This is the second article about the tramroad and railways which served Penrhyn Quarries. The first provided a short history of the line and then followed the tramroad which was first used to replaced pack horses carrying slate and other goods between the quarries and Porth Penrhyn. That article can be found at:
The featured image at the top of this second article about the Penrhyn Quarry railways comes from the camera of K.H. Cribb and is included here with the kind permission of his son Russ Cribb.
The first picture is an embedded link to a photograph on Ernie’s Railway Archive on Flickr and is general view of Porth Penrhyn looking South towards the port headquarters.
The second image shows the port headquarters in 1961, a few years before final closure of the line. The photograph appears to have been taken from the bridge over the line and looks North into the port area.
The headquarters building at Port Penrhyn, Bangor, and part of the quay photographed in August 1961. The last narrow gauge train to carry slates ran on 28th June 1964. The Penrhyn quarry route is now a public path. [41]
The Penrhyn Quarry Railway (PQR) left Porth Penrhyn running alongside a standard-gauge LNWR branch which also served the port and linked it with the national rail network.
The older tramroad occupied the same formation area as the two later lines of the PQR. The standard-gauge line was built while the horse-drawn tramroad was operating.
The PQR and the standard-gauge line ran in close proximity for some distance after leaving the port. Both used the same bridges over the Afon Cegin.
The two railways ran on different gradients after a second crossing of the Cegin. The next photograph shows the two lines passing under the old A5. As illustrated, the Shrewsbury to Holyhead road (A5) crossed the PQR and the standard-gauge line. Each line had its own bore in a tall stone embankment. “The Penrhyn bore being 36ft long and of its basic loading gauge Viz. 15ft wide and 11ft 10in. height from rail to top of arch with 7ft horizontal clearance at the foot of the walls.” [29: p60]
The old structure shown above was later replaced by a more modern structure spanning only the PQR, as shown below. The structure now carries the A5 over the Lon Las Ogwen cycle-route.
After passing under the A5, the LNWR line rose to join the main Chester to Holyhead line west of Llandygai tunnel. The PQR ran on its own course as it travelled on from the A5 at Maesgierchen.
The Penrhyn Quarry Railway opened in 1879. Its route is shown as a red line, this map is rendered with Maperitive, text and integration: Pechristener Wales in United Kingdom.svg: TUBS United Kingdom location map.svg: NordNordWest • CC BY 3.0. [4]The routes of three railways can be seen on this extract from the 6″ OS Maps from around the turn of the 20th century. It shows the area South of the A5 road bridge referred to above. On the right of the image, running South from the Incline Cottage at the top of the extract, field boundaries define the alignment of the old Tramroad. To the West of the A5, which runs down the centre of the extract, are two lines which were in use when the survey was undertaken. Running closest to the A5 is the be LNWR standard-gauge branch. The narrow-gauge Penrhyn Quarry Railway is to the West of the standard-gauge line and follows the East bank of the Afon Cegin. [5]The same area as shown on the OS 6″ Map above. The alignment of the old tramroad is illustrated by the red line. The newer narrow-gauge railway is shown light-blue. Parallel and immediately adjacent to the East of the Penrhyn Quarry Railway was the standard-gauge LNWR line. The two lines began to separate to the Southwest of the A5 road. The approximate alignment of the standard-gauge line is shown in purple. The A5 runs down the centre of the image. [5]
The old tramroad is covered in the first article in this short series:
This article follows the Penrhyn Quarry Railway which was operational from the 1870s. Motive power was given some consideration in the earlier article.
In this extract from the 6″ Ordnance Survey from the turn of the 20th century we see the two routes diverging on their way South. [6]Approximately the same area as appears in the 6″ Ordnance Survey above but focussing on the PQR. Shown, this time, on the RailMapOnline satellite imagery. The route of the Penrhyn Quarry Railway is shown in pink. [7]
At a gradient of 1 in 209 the PQR left the Nant Maes-y-Geirchen gorge crossed the occupation crossing to Felin-Esgob and approached the fine spectacle of the Chester & Holyhead Railway’s Cegin Viaduct.
The Cegin Viaduct “has seven semi-circular arches each of 35ft span – it has masonry piers but the stone arches are faced in brick (Ref: Public Record Office, M.T. 27/49.).” [29: p60]
As an aside, The Bethesda Branch which runs along a similar route to the PQR was a 4.25mile (6.8 km) line between Bangor and Bethesda in Gwynedd, North Wales. Its primary purpose was to bring quarried slate down to the main line for onward transport. It existed in competition with the private PQR. It opened in July 1884, and a local passenger service was run as well as trains for the mineral traffic.
Competition with the PQR was healthy and the two lines managed to co-exist until increasing road competition led to the cessation of ordinary passenger services on the branch in 1951; goods traffic and occasional passenger excursion journeys kept the line going until its complete closure in October 1963. [19]
Wikipedia tells us that the line climbed all the way from the main line, rising for much of the way at 1 in 40. Major features on the branch included the Ogwen Viaduct and the Tregarth Tunnel which was 279yards (255metres) long. Apart from the terminus at Bethesda, there were two intermediate stations on the route – at Felin Hen and at Tregarth. [19]
The Bethesda Branch formation now provides a cycle and walking route to Bethesda from Porth Penrhyn – known as the Ogwen Trail, part of the Sustrans 82 cycle-route.
Continuing to look at the Penrhyn Quarry Railway …. we head South from the Cegin Viaduct.
At about 70ft above sea-level, there was a halt for the Workmen’s Train adjacent to Lon Cefn Ty. The bridge here (once just a footbridge) carried the road over the PQR. To the West of the bridge, the Lon Cefn Ty crossed the Afon Cegin by means of a ford (with a footbridge for pedestrians) and then passed under the Bethesda Branch which was on a steep falling grade from its junction with the mainline just to the East of Bangor Tunnel.
The PQR left the East side of the Afon Cegin and crossed the Glas-yn-Fryn embankment, passing Coed-Hywel-Uchaf Farm on its left then passed 15ft below the LNWR Bethesda Branch by means of an acutely-skewed bridge. Boyd tells us that the LNWR retrieved this bridge from another site and cut it down “to a 31ft span for re-use here; it formed a ‘tunnel’ almost 43 ft long for the narrow gauge and gave generous vertical clearance of 14 ft and 14 ft horizontal!” [29: p59]
As the satellite image above shows, to the South of the A55, the alignments of the PQR and the LNWR Bethesda branch converged and ran parallel to each other at different levels. Immediately South of the A55, the PQR formation ran across what is now an open field. before passing under the Bethesda branch. On the adjacent map extract, to the East of Glasinfryn. The Bethesda Branch is highlighted in purple and the PQR in pink.
The Bethesda branch Felin-hen station was Immediately to the South of this point. It appears at the top of the 6″ Ordnance Survey map extract below. The PQR can be seen drifting away to the Southwest alongside the A4244 (Felin Hen Road).
The PQR runs in a large arc round to the East passed a Gravel Pit which had its own connection to the line. [13]This satellite image covers the same area as the map extract above. [7]
The line curved to the right and then to the left left and crossed the Felin-Hen Road on a 17ft lattice ironwork span and the Felin-Hen stopping point before passing through a heavily wooded area in cutting.
The view along Felin Hen Road from the Northeast. The Bethesda Branch was carried over the Felin Hen Road on a girder bridge. The PQR ran alongside the road in a Southwesterly direction for a short distance before crossing the road at its junction with the B4409. [Google Streetview]The route of the PQR crosses the Felin Hen Road at its junction with the B4409. [Google Streetview]
Continuing to curve to the left, trains passed a short siding alongside on the left which did not have a permanent connection to the PQR. This siding served “a small gravel pit and connection was made as required – and probably since 1881 – by a set of portable Spoon Points which were lifted off after use. On Mondays a wagon was manhandled down to here from Coed-y-Parc, pushed through the narrow curved cutting into the working and loaded up as required; output was small being only about 150 tons a year, with 1912-14 being the best period. An embarrassing accident occurred to the Up Workmen’s Train here one Monday morning, when, the Spoon Points having been inadvertently left in position, the train engine tried to enter the gravel pit and was derailed. The Engineer’s diary records the date, 3rd February, 1941, that the engine was CEGIN – an unusual choice – and that the train ‘Arrived Mill 10.30 a.m’.” [29: p59]
The PQR then continued to sweep round in a wide arc towards the East, gaining height as it travelled. Completing the curve to the left the PQR was then running West-northwest and to the North of Moel-y-ci Farm which is now, in the 21st century, the site of a Farm Shop (Blas Lon Las). The route of the PQR crosses the access road to the Farm Shop and gradually converges with the line of the Bethesda branch. There was an overbridge carrying the Moel-y-ci Farm lane.
James Boyd says that along this section of the PQR there was a long (250 yard) loop together with a long siding on the North side. “trains passed each other on the right. Unusually, iron railings fenced the route here, whereas elsewhere the ubiquitous estate fence made of slabs stuck into the ground on edge and wired together near the top, was (and is) a feature of the district.“[42][36: p58]
Clicking here will take you to an image of ‘Linda’ on a PQR main line up train a few years before closure in 1961 which includes the slate slab and wire fencing mentioned by Boyd. [40]
“Until the reduction in trade made the running of but one train (from 4th May, 1928) sufficient to move stocks, trains passed here regularly. There was a water tank used by Up trains which stopped if required. … There was no signalling. The loop, Pandy (or sometimes Tyn-y-Lon) was an original stopping point for the Workmen’s Train and boasted one of the four Waiting Huts, but a stone throwing incident during the Great strike so displeased His Lordship that the stop was removed.” [36: p58-59]
The two railways may be running very close together on the map or satellite image but the vertical separation was significant with the LNWR line in deep cutting.
Boyd comments that the Workmen’s Train Halt in Tregarth was behind Shiloh Chapel, it was “linked with the nearby road by footpath and wicket gate. No trains ever seemed actually to stand there, for it was sufficient for the Workmen’s rake to run slowly past as the men jumped on or off!” [36: p58]
It appears from the annotated map extract sent to me by Robin Willis, that the Workmen’s Halt was on the East side of the main road rather than behind Shiloh Chapel. Nonetheless the quote from Boyd remains apposite.
Looking from the South along the B4409 in Tregarth: the approximate line of the PQR is shown by the pink line. It passed under the road at this point. There is a footpath/cycleway at the right side of this image running away to the East which appears to be on the line of the old PQR. This is the Lon Las Ogwen and is shown on the next Streetview image below. [Google Streetview]The Lon Las Ogwen again at the point where the PQR crossed under the main street in Tregarth. At the rear of the gardens of the adjoining properties, the Lon Las Ogwen bears left, heading back to the old Bethesda Branch, while the line of the PQR continues in an East-northeast direction. The land level dropped down to the level of the PQR and then the line was on embankment for a short distance as the map extract below shows. [Google Streetview]Tregarth Station on the Bethesda Branch of the LNWR is shown on this extract from the 6″Ordnance Survey. The PQR can be seen crossing the map extract to the South of the LNWR line. [16]The next length of the PQR crosses open ground in a East-northeast direction. the satellite image is once again provided by RailMapOnline. [7]
The PQR passed under the main road in Tregarth through what James Boyd describes as “the ‘standard’ form of road overbridge, stone with brick facings.” [36: p58]
After crossing over the Bethesda Branch the route of the PQR is shown on the 6″ Ordnance Survey looping tightly round following the contours to run due South. It is high enough to cross the metalled lane to the East of Tregarth. The Bethesda line is shown in tunnel on this map extract with the PQR crossing it’s line once again above the southeastern end of the tunnel. [17]This small extract from satellite imagery shows an area one-third down the left side of the extract above from the 6″ Ordnance Survey. The lane to the East of Tregarth was crossed by the PQR after the PQR ( pink line) crossed the LNWR branch at high-level. [Google Maps]
The bridge was a skew single arch structure in brick and was funded by the LNWR.. the Bethesda Branch was 31ft below the PQR at this point. [36: p58] Details of the bridge over the lane can be found below. Immediately below are two pictures taken from road level of the 21st century remains of the bridge over the lane.
Facing Southeast along the lane referred to above. The abutments of the girder bridge which used to carry the PQR are clearly visible. [Google Streetview, November 2022]Facing Northwest along the same lane. [Google Streetview, November 2022]The satellite imagery provided by RailMapOnline covering the same area as the 6″Ordnance Survey above shows the significant loop in the line of the PQR and its relation to both the older tramroad route (red line) and the LNWR branch (purple line). The Tramroad alignment meets the newer PQR at the top of the Ddinas Incline and then follows the same route South. [7]
After crossing the LNWR, which was in deep cutting, the PQR ran along a very short embankment before bridging the Tal-y-Cae to Hen-Durnpike road which climbed steeply beneath it. The bridge was originally a 25ft timber span (which was replaced in steel) on stone abutments. Just beyond the bridge was the Corrig-Llwydion Workmen’s Train halt, then a shallow cutting followed by an equally shallow causeway. The line was now climbing at 1 in 93 and at approximately 400ft above sea level.
As both the 6″ OS map extract and the satellite image above show, the line turned very sharply to the right round the flanks of Pen-Dinas. Apparently, the tightest radius on the line was at this location (85ft) and the Baldwin locomotives purchased by the PQR were known to derail here on occasions. The line here was supported on low walls. Boyd tells us that the right of way of the PQR widens out at the head of the old Incline. There used to be stabling loops for the Incline at this point. [36: p58]
Between the old tramroad incline and Hen-Durnpike in Bron-Ogwen the newer PQR followed the line of the old Tramroad. Boyd describes this section: “the line was carried on a stone shelf. … Parallel and below, the old road to the Quarry kept company.” [36: p57]
Boyd describes this road crossing as: “a close-walled road and rail intersection with protective tall semaphore signal (its signal hut perched on the walling, the enceinte of successive Mrs. Parry – gatekeepers) and twin road gates, made all the more risky as several roads met hereabouts. The hut, wooden walled and slate roofed, survived the closure. Here the line was 420 ft above sea level, and there were ‘Whistle’ boards on each side of the gates; this was a most dangerous and narrow place, more especially for the road-user! The position of the approaching train could be determined quite exactly by long forewarning of its steam hooter, each main line engine having an individual tone.” [36: p57]
Behind the road crossing and running along the backs of the properties in Bron-Ogwen on the B4409, initially on a shallow grade, then climbing at a gradient of 1 in 36 the PQR reached open land. Here, at first, it ran on a causeway spanning a footpath, and then it passed through a series of rock cuttings, one being only 8ft wide at formation level. [36: p57]
As we noted above the route of the PQR and the earlier Tramroad diverge close to the top of this extract from the 6″ Ordnance Survey. The PQR was still in use at the turn of the 20th century and it appears as an active line. The route of the old tramroad passed through the bottom of the garden of the properties to the East of the PQR and then followed the route first delineated by the dotted lines. The route is shown on the following satellite image. [28]The same area shown on satellite imagery which includes the two routes as plotted on RailMapOnline. [7]
Over open land to the West of the modern B4409 the PQR ran on a high embankment/causeway, 18ft high and 10ft wide. The outer walls of which were formed of stone slabs which were then back filled with earth/arisings from the Quarry.
The two separate routes continue onto this next map extract and cross to the bottom right of the image. The later PQR was carried through this area on a slate-slab embankment crossing the footpath at high level by means of a 5ft span bridge. [36: p56] [29]The same area as above as it appears on the satellite imagery from RailMapOnline with the two routes plotted. [7]For a short distance the old tramway route runs to the West of the PQR, as the lines drawn on the satellite image below demonstrate. [30]This satellite image brings the PQR to the industrial complex at the North end of the Quarry site. [7]The view West from the B4409 along St. Ann’s Hl. The pink line shows tha approximate alignment of the PQR which crossed St Ann’s Hl on a bridge. The red line marks the route of the old tramway. Both the lines were at high level over the road which was in a deep cutting, as over the years the spoil heaps either side of the road had built gradually built up to levels that required high retaining walls. Once the rails had gone the bridges could be removed and road levels raised on St. Ann’s Hl and the main road. Boyd tell us that the bridge carrying the PQR “was formed in the ‘standard’ method used elsewhere viz. a square-section timber beam supported on slab piers, 4-hole chairs being used thereon to carry each rail. And this was not all, as an adjacent tip line also had its own bridge over the road until the site was full and the tip abandoned. Here too a junction in the tipping system had once thrown off a spur line which passed off the top of the ‘fortress walling’ and crossed the old turnpike road by a wooden span; it led on to further spoil banks on the east side of this road, which at a later date were linked by an incline which dropped a tramway into the Ogwen Tile Works.” [36: p56] On the North and South sides of St. Ann’s Hl the PQR was carried on a slate-slab embankment which held it above the growing spoil heaps. [Google Streetview]Looking North, back along the line of the old tramroad towards Porth Penrhyn. [Google Streetview]Looking South along the line of the old tramroad towards Penrhyn Quarry. [Google Streetview]
After crossing St. Ann’s Hl the old Tramroad continued on to the South towards the Felin-Fawr Slate Works and the Quarry. The later PQR route and the Tramroad route meet once again just before a footbridge. Felin-Fawr House was just beyond the footbridge to the left and Mill Cottage was on the right. James Boyd notes that the footbridge was constructed by John Foulkes in 1823 and framed wooden gates to close off access along the line to the Slate Works.[36: p55]
A short distance beyond the footbridge the trains reach the summit of the line. At that point they had climbed 550ft from Porth Penrhyn. [36: p56]
The summit was close to a point where a standpipe was on the retaining wall which ran down the West side of the Slate Works site, to the right of the line. It was along this length of the line that loaded slate trains were prepared for their journey down to the port.
The mainline stayed close to the wall which can still be seen on site in 21st century. The photograph below shows a port-bound slate train being prepared to for the journey North with ‘Linda’ in charge.
To the East of the mainline there were three sidings between it and the original slate-slab mill. One of these sidings was increasingly used for locomotives which had been taken out of service. The mainline continued South beyond the slab mill and then, once it has been built in 1900, under an overbridge which, like the footbridge’ was gated to control access to the site of the Quarry. Beyond the overbridge were the main sidings where slate wagons were marshalled either for their journey to the coast (if they were full).
We finish this portion of our journey with a look at some of the locomotives which were stored at Felin-Fawr and some of the rolling stock in the immediate area.
Terry Dorrity writes of the photograph above: “This was the bitter-sweet sight that met visitors to the Coed y Parc Penrhyn Works at Bethesda in Snowdonia. The sad line of withdrawn locomotives resting and rusting, apparently beyond saving, in a sort of mini Barry scrapyard must have encouraged many a daydream but fortunately every one of them, except SKINNER, has been preserved.” [47]
The Locomotives are: “EIGIAU; STANHOPE; the de Winton, KATHLEEN; JUBILEE 1847; frames wheels and part of the cab of SKINNER; LILLA, and SGT MURPHY await their fate with LILLIAN, which was next in line but out of sight.” [47]
Terry Dorrity continues: “EIGIAU is an Orenstein and Koppel 0-4-0 well tank built in 1912 (works number 5668) which was originally supplied to C L Warren contractors in Cheshire and named SUNLIGHT. In 1916 it was sold to the Aluminium Corporation of Dolgarrog for use in building Cowlyd reservoir and renamed EIGIAU after a lake in Snowdonia. It became a Penrhyn locomotive in 1928. It was taken out of service in 1949 and was bought for preservation by Mr G J Mullis and removed in pieces to Droitwich in January and February 1963 and restored to working order. It ran at Bressingham Gardens for some time but it is now part of the Bredgar and Wormshill Light Railway collection.” [47]
A number of photos taken by Barry Fitzpatrick, Ron Fisher and Ken Cribb, included here follow, all of locos on the line at Felin-Fawr. All pictures used by permission of the photographers or, in Ken’s case, with permission from his son Russ.
I have recently undertaken a detailed review of a book by R.F. Savage and L.D.W. Smith entitled, The Waggon-ways and Plate-ways of East Shropshire. [1] This was a research paper produced in 1965. The original document is held in the Archive Office of the Ironbridge Gorge Museum Trust. It was a timely document. Large parts of the area surveyed by the authors were changed almost beyond recognition as the Development Corporation got to work on creating what became the new town of Telford, where (in 2023) I now live. Their work included a detailed series of drawing produced by hand, tracing as best they could the lines of tramroads from smaller scaled plans onto 6″ to the mile and 1″ to the mile drawings. There are two examples of their 6″ to the mile plans below.
Savage & Smith’s 6″ to the mile plan of the Madeley Wood and Bedlam Furnace Area on the North side of the River Severn Gorge. [1] Savage & Smith’s 6″ to the mile plan of the Madeley Court Area to the North of the River Severn Gorge. [1]
Savage & Smith were diligent in their research and careful in their documenting of the historic sources and information gleaned on site. The resulting document is wonderful and I have enjoyed engaging with it. This document alone would justify a research visit to the Ironbridge Gorge Museum Trust Archive. My thanks to the Archive for the welcome offered to me and their generous agreement to my using the material from this resource.
As a result of undertaking this and other research at the Archive, I was asked to give a talk at one of the meetings of the Friends of the Ironbridge Gorge Museum Trust. The detailed notes associated with the talk and a PowerPoint presentation can be downloaded using the links below.
The PowerPoint presentation used on 18th October 2023.
I hope that these notes and slides are of interest to some. It is possible that you may read them and find things in the notes that are incorrect. If so, please do let me know. I will be using this material for future talks. I would really appreciate any comments that you might have.
References
R.F. Savage & L.D.W. Smith; The Waggon-ways and Plate-ways of East Shropshire, Birmingham School of Architecture, 1965. An original document is held by the Archive Office of the Ironbridge Gorge Museum Trust.
A great Christmas purchase from Rossiter Books in Leominster! (£12.99, ISBN 978-1-910839-60-7, Paperback, 176 pages, 242 x 171mm).NB: The images in this article are sourced from the internet.
Horse-Drawn Tramways of the Wye Valley [1] by Heather Hurley, published by the Logaston Press in Novber 2022, is an excellent introduction to the early tramways in the Wye Valley. A short-lived transport system of horse-drawn waggons on rails, operating from the late eighteenth century to the introduction of steam locomotives in the middle of the nineteenth century, primarily used for transporting goods such as coal and wood.
Heather Hurley explores all of the tramways known to have existed in and around the Wye Valley from Kington, through Brecon and Hay to Abergavenny, Monmouth, the Forest of Dean and Hereford; the routes taken, the companies that built and ran them, and the people who used them. She draws on extensive research of Tramway Company archives, Acts and ledgers, maps and plans, newspapers and journals, archaeological reports, books and illustrations, as well as detailed fieldwork.
As the back cover states, Hurley’s book is richly illustrated and offers captivating insights into early nineteenth-century transport history, trade routes and the beginnings of the steam railways on the Welsh border.
Heather Hurley has a keen interest in local history. She has written several books, including ‘The Scudamores of Kentchurch and Holme Lacy’, ‘The Story of Ross’ and ‘Landscape Origins of the Wye Valley’. She is planning to produce a parallel volume about the railways of the Wye Valley in due course.
Horse-Drawn Tramways of the Wye Valley is an easy to read but well-researched introduction to tramways in the Southern Marches. Evidence of Hurley’s detailed research can be found in the extensive notes which support each chapter. Solid research does not, however, mean that this is primarily a dry academic book. It is accessibly produced with appropriate illustrations and a confident narrative.
The first chapter gives an overview of transport systems which predated the introduction of tramways. A chapter is devoted to the development of the horse-drawn tramways which includes an important section focussing on the horses used, before the more usual engineering matters of waggons, rails and stone ‘sleepers’ are covered.
Two further chapters cover some local tramways of interest and the coming of steam-power.
The history of each of the major lines is recounted is some detail, each route is surveyed and details of goods carried are provided. For each line, some notes are provided on remains visible in the 21st century and on where documents recording its life can be found.
The extent of the coverage in a paperback book of 176 pages is to be commended. No doubt some readers will want to look at one or more of the routes portrayed in more detail than is possible in a book of this nature. The book might have benefitted from the addition of maps to support the detailed route descriptions provided towards the end of each of the major chapters. The book is, however, a wonderful introduction to its subject and has been an excellent post-Christmas read!
I wholeheartedly recommend this book to anyone interested in the industrial history of the Welsh Marches and the Forest of Dean. Anyone interested in the history of tramways/tramroads in the UK would do well to purchase a copy, not only for the informative narrative and illustrations but also for the detailed endnotes.
The Logaston Press takes its name from the hamlet of Logaston, in the beautiful countryside of rural north-west Herefordshire. It was here that Logaston Press was set up by Andy Johnson in 1983, and later run by Andy together with his wife Karen.
In 2018 Andy and Karen handed over the reins to Richard and Su Wheeler, who now run Logaston Press from the nearby village of Eardisley.
Logaston Press publishes books on local history, landscape, archaeology, architecture, and a range of walks guides – all focussed on the ‘Logaston heartlands’ of the Southern Marches: Herefordshire, Shropshire, Worcestershire and Gloucestershire, Radnorshire, Breconshire and Montgomeryshire.
In almost four decades, Logaston Press has published more than 350 titles, with more than 100 books currently in print. Its books are beautifully produced, ethically printed and reasonably priced. They are are a pleasure to own.
Logaston Press is rooted in the people and places of the Southern Marches and is dedicated to publishing books that explore and illuminate this extraordinary part of the world.
References
Heather Hurley; Horse-Drawn Tramways of the Wye Valley; Logaston Press, Eardisley, 2022.
A short history of the line is followed by some information about the locomotives used on the line. This first article then focusses primarily on the horse-powered tramroad which preceded the later Penrhyn Quarry Railway.
Penrhyn is the Welsh word for ‘promontory’.
“The history of Port Penrhyn can be traced back as early as 1713 when it was recorded that 14 shipments totalling 415,000 slates had been sent to Dublin. In 1720, another 8 shipments totalling 155,000 slates were sent to Dublin, two to Drogheda (20,000) and one to Belfast (35,000). Two years later, a shipment of 80,000 slates were sent to Dunkirk. After these few shipments only coastal traffic left from Aber-Cegin (Port Penrhyn) until Richard Pennant took over the ownership of Penrhyn Estates and appointed Benjamin Wyatt in 1786 as agent.” [23]
Porth Penrhyn in the mid- to late- 19th century. [23]
The Penrhyn Railway opened as a tramroad in 1801 which ran from quarries a few miles inland from Bangor in North Wales to the coast at Port Penrhyn. The gauge of the tramroad was 2ft 0.5in. It was constructed by Lord Penrhyn at a cost of around £175,000. [1][2] The alignment was as shown on the map immediately below.
The Penrhyn Railway 1801 to 1878: rendered with Maperitive, text and integration: Pechristener Wales in United Kingdom.svg: TUBS United Kingdom location map.svg: NordNordWest • CC BY 3.0. [1]
It was thought that there was an earlier line which ran between Port Penrhyn and Llandegai. That tramway, if it existed, was constructed in 1798. Its route paralleled that of the northern end of Lord Penrhyn’s tramroad. One theory is that this earlier tramway was operational until 1831. [1] There appear to have been two inclines on the Llandegai Tramway, one close to the port and the other directly adjacent to Llandegai Penlan Mill at Llandegai at the Southern end of that line. Both are shown on the image below.
The Llandegai Tramway: rendered with Maperitive, text and integration: Pechristener Wales in United Kingdom.svg: TUBS United Kingdom location map.svg: NordNordWest • CC BY 3.0. [1]
Research in 2021 suggests that the earlier tramway did not exist. [2]. If it did, it is likely that it was subsumed into the tramroad built by Lord Penrhyn. There is also research, undertaken in 2019, which suggests that a tramway was probably constructed in 1798 in connection with the Penrhyn Mills on the lower Ogwen. [35] My thanks to David Elis-Williams for providing a link to this research by Barrie Lill.
Lill comments that the Penrhyn Mills at Llandegai had a part in the development of the tramway/tramroad which eventually served the Penhryn Quarry: “The mill had what David Gwyn believes to be part of the first iron-railed overland edge railway of any length in the world, and the first iron edge railway built for the mass movement of stone. However, whereas James Boyd conjectures that originally the Penlan railway only extended from Port Penrhyn to the mill at Llandegai, pre-dated the Penrhyn Quarry Railway by three years, and was only later extended to the Quarry, [36] Gwyn does not agree. Instead he believes that the Penlan line merely was an off-shoot from the Quarry Railway. [37] At present there is no available evidence to confirm either theory, although there is a belief that prior to publishing his book on the Penrhyn Quarry Railways, Boyd had obtained supporting documents which no longer are publicly available. Irrespective of the above it seems unlikely that the mill would have opened without an adequate transportation system such as some simple form of tramway being in place, and in this scenario it is likely that the problems encountered with the working of this system are what prompted Wyatt to adapt the system and introduce the iron-railed edge railway to which David Gwyn refers.” [35]
Lord Penrhyn was persuaded by William Jessop to build the tramroad. “Jessop and his partner Benjamin Outram were then constructing the Little Eaton Gangway in Derbyshire. Samuel Wyatt was also involved in the construction of the gangway, and his brother Benjamin was the Penrhyn estate manager.” [1][2]
“Benjamin Wyatt was put in charge of building the tramway. Construction started on 2 September 1800, with the first slate train travelling on 25 June 1801. … The track used oval rails designed by Benjamin Wyatt, and their quoted gauge of 2 ft 1⁄2 in (622 mm) was measured between the centres of the rails. The railroad was operated by horse power along with gravity and three balanced inclines – “Port” (sometimes called “Marchogion”), “Dinas” north east of Tregarth and “Cilgeraint” a short distance north of Coed-y-Parc workshops in Bethesda. The longest was 220 yards (200 m).” [1]
Before the tramroad was constructed, slate was transported to the port by horses along mountain paths. After the tramroad was brought into service the local costs of transport fell from 4 shillings/ton to 1 shilling/ton. [1][4: p42-43]
In 1832, “Wyatt’s oval rails were replaced with more conventional … rails. The gauge of this new track was 1ft 10.3⁄4in (578 mm), measured between the inner edges of the rails – the conventional way of measuring track gauge.” [1][3]
In 1876 the tramroad was “rebuilt on a new course with steel rails laid on wooden sleepers. Steam locomotives were introduced, supplied by De Winton & Co. Engineers of Caernarvon.” [5]
Thomas Middlemass tells us that De Winton supplied ten locomotives to the line. “Seven were to be used at the quarries, three were to work the ‘main line’ to the coast, and all* were vertical-boilered 0-4-0 tanks.” [6: p16] They had two cylinders secured below the running plate with direct drive to one axle. The total weight varied between 4 and 5 tons. [7]
* … It appears that Middlemass has overlooked the fact that 3 of the 10 locomotives were fitted with horizontal boilers and were 0-4-0ST locos. They were named ‘Edward Sholto’, ‘Hilda’ and ‘Violet’, and were supplied in 1876, 1878 and 1879 respectively. [34]
Between 1882 and 1909 the Hunslet Engine Company of Leeds supplied sixteen four-wheeled locomotives for use in the quarry and on the line to Port Penrhyn.” [5]
One surviving Penrhyn locomotive is 0-4-0 vertical-boiler tank engine “George Henry,” which was built in 1877 and still looks good 140 years later at the Narrow Gauge Railway Museum in Tywyn, Wales.
The new route to suit steam-power obviated the need for the inclined planes, maintaining the easiest possible gradients. “Between coast and quarry it rose 550 feet, and, allowing for a stretch of 1/4 mile at 1 in 37 and 3 miles at 1 in 40, the average gradient emerged as 1 in 91. Flat bottomed rails were laid at first, but these were replaced in 1894 by the 50 lb bullhead variety.” [6: p15-16]
The new route of the Penrhyn Railway which opened in 1879: rendered with Maperitive, text and integration: Pechristener Wales in United Kingdom.svg: TUBS United Kingdom location map.svg: NordNordWest • CC BY 3.0. [1]
“The first locomotives used on the new railway were three De Winton’s. … Although successful, these locomotives were not powerful enough for the substantial traffic that passed down the line.” [1]
In 1882 the railway ordered ‘Charles’, a large 0-4-0ST from Hunslet. Charles proved very successful and was followed by ‘Blanche’ and ‘Linda’ in 1893 to the same basic design. These locomotives were the mainstay of the railway for the rest of its life.
In 1882 Penrhyn switched to more conventional locomotion, ordering “‘Charles’, a large 0-4-0ST from Hunslet. Charles proved very successful and was followed by ‘Blanche’ and ‘Linda’ in 1893 to the same basic design. These locomotives were the mainstay of the railway for the rest of its life.” [1]
“Between then and 1909 a positive spate of tank locos flowed, new, from Hunslet Engine Co. All were 0-4-0 saddle tanks, with weight and power variations introduced to meet specific Penrhyn requirements. Three were designed to work the ‘main line’, three were employed shunting at Port Penrhyn. Four of the smallest were confined to quarry work, and these were supplemented a few years later when six larger tanks arrived. As it happened, the latter were the last new purchases by Penrhyn.” [6: p16]
Among the Hunslet locomotives were the Penrhyn Port Class of three locomotives “built for the Penrhyn Quarry Railway (PQR). These locomotives were built by the Hunslet Engine Company between 1883 and 1885 and supplied specifically to work at Port Penrhyn near Bangor, North Wales. They were a variant of the standard Dinorwic Alice Class design.” [8]
“The Penrhyn Main Line class was a class of three narrow gauge steam locomotives built for the Penrhyn Quarry Railway (PQR). These locomotives were built by the Hunslet Engine Company between 1882 and 1893 and supplied specifically to work the railway that connected the Penrhyn Quarry near Bethesda in north Wales to Port Penrhyn on the Menai Strait.” [9]
“All three locomotives were preserved after the closure of the PQR. Charles was donated to the Penrhyn Castle Railway Museum. Linda was loaned to the nearby Ffestiniog Railway in July 1962. For the 1963 season the locomotive was re-gauged to the Ffestiniog’s 1 ft 11.5 in (597 mm) and purchased, along with Blanche at the end of the year. Both have since received extensive modifications including tenders, pony trucks and superheating.” [9]
The post-First World War years brought such economic instability that second-hand locos were not hard to find. Penrhyn bought 15 such from 1922 onwards. [5]
In 1923, three ex-US Army Baldwin 2-6-2Ts were also imported for ‘main line’ use, but, as happened elsewhere in Britain, they were never popular, and their working life was short.
The railway was private, providing no public service for either goods or passengers. Quarrymen’s trains were run, paid for by the quarrymen themselves.” [5]
“Today Porth Penrhyn in Bangor still serves the Penrhyn Quarry at Bethesda. Although today slate production and exports are not at 19th century levels it continues to be a key part of the business of slate. Exports of crushed slate (aggregate) by Penrhyn Quarry, through Porth Penrhyn currently to Rotterdam, or ports along the south coast of England, have grown to become a significant proportion of Welsh Slate sales in addition to several containers of roofing slates being shipped every month to Australia alone (taking approximately 45 days).” [23]
“Welsh slate is now covering the roofs of buildings as prestigious as the New South Wales Supreme Court and historic as Unwin’s Stores, both in Sydney Australia, as well as the Arts Centre in earthquake-hit Christchurch, New Zealand 2012. Europe also is a prime destination for Welsh slate with shipments of slate and decorative aggregate within Europe continuing to grow and evolve in particular.” [23]
All rail connections to the quarry disappeared in the mid-20th century under competition from road transport
The Post-1879 Route of the Railway
We start at the North end of the old railway at Porth Penrhyn. Porth Penrhyn) is a harbour located just east of Bangor in north Wales at the confluence of the River Cegin with the Menai Strait.
We follow the route on the Ordnance Survey 6″ Maps from around the turn of the 20th century as supplied by the National Library of Scotland (NLS). [10]
Before the future A5 was developed as a turnpike in 1820, the tramroad ran within the width of the old highway from this point for a few hundred yards. When the turnpike was created, the road level was lifted and the tramroad crossed beneath the renewed highway and ran along the Southwestern side. The sketch below shows this.
The old tramroad which was operational until 1879 was diverted to accommodate the construction of the turnpike. We start following the route of that old Tramroad. This sketch is based on a drawing in James Boyd’s book. [36: p11] He refers to the diversion in the text of the book as well.[36:p22]In this extract from the 6″ Ordnance Survey from around the turn of the 20th century, the short standard-gauge branch meets the mainline. The route of the old tramroad has now crossed the A5. The Penrhyn Quarry Railway only appears fleetingly in the top left corner if the map extract. [24]The same area as shown in the 6″ OS map above, as recorded on the ESRI satellite imagery provided by the NLS. The colour coding remains the same as in previous satellite images. [24]
A. The old tramroad
Beyond this point, we first follow the line of the old Tramroad to Penrhyn Quarries. …..
This next extract from the 6″ Ordnance Survey shows the route of the old tramway flanked by walls and passing in front of the Grand Lodge of Penrhyn Castle at Llandegai. [25]The same area now shown on the ESRI satellite imagery provided by the NLS. The lodge can be made out just to the Northeast of the red line which shows the approximate route of the old tramway crossing the roundabout on the A5 at Llandegai. [25]The approximate route of the old tramway is marked on this picture, as before, with a red line. The photograph is taken from the roundabout on the A5 at the entrance to Llandegai Industrial Estate which is in the top left of the satellite image above. The line ran just a few metres to the Southwest of what is now the A5. [Google Streetview]The approximate line of the old tramway runs across the next roundabout on the A5 before curving round to the South. [Google Streetview]Looking along the line of the old Tramroad from the modern roundabout, with the A5 heading South on the right. [Google Streetview]This is a repeat of the sketch shown earlier which is based on a drawing from James Boyd’s book. [36: p11] After being diverted from its original route, the tramroad ran on the Southern side of the highway before turning away to the South. The Smithy shown in the sketch appears on the 6″ map extract below. Just to the North of the Smithy there was a branch from the old tramroad which served the bottom of the Llandegai Incline which connected the Upper Penrhyn Mill to the tramroad. There were two level crossings at this location, one of which became an over ridge when the turnpike was built in 1820.The route of the old tramway continues on this next extract from the 6″ Ordnance Survey. At the top of the extract it is just to the left (West) of the Smithy. It crosses the standard-gauge line which is in tunnel at this point the Llandegai Tunnel). Further the south the formation, at the time of the survey was being used as an accommodation road to access ‘Bryn’ and then even further South, it was being used as a footpath. [26]This is an extract from ‘RailMapOnline’ which shows the route of the old railway plotted on modern satellite imagery. The purple line close to the top of the image is the line of the Llandegai Tunnel on the standard-gauge mainline. [27]Just to the South of the underground route of the standard-gauge mainline (Llandegai Tunnel), the old tramroad alignment crosses the access road to the A5 and runs South along the accommodation road visible to the left of the road in this image. [Google Streetview]The old tramroad route followed this lane South. [Google Streetview]At the end of the lane, a footpath can be seen running South. The hedge ahead in this image partially blocks the route but allows pedestrian access. [Google Streetview]The route of the old tramroad and the later footpath remain on the same alignment as far as the top corner of the woods shown in this map extract. From that point southwards the Tramroad route crossed the fields in a Southeasterly direction. [28]The same area as shown on the 6″ Ordnance Survey extract above. The North Wales Expressway is the notable modern addition to the image [27]The obvious features on this next extract from the 6″ Ordnance Survey which mark the line of the tramroad are the walls to the rear (West) of the cottages at Tyddyn-Iolyn. South of these properties the tramroad ran alongside the road for a very short distance. After which it curved away to the Southwest before curving back towards the Southeast to a point to the South of Llan-isaf Cottage. [29]The route described in the notes to the 6″ map extract immediately above are illustrated on this satellite image. [27]Facing South along the lane to the South of Tyddyn-Iolyn, showing the approximate line of the old tramroad in red. [Google Streetview]Looking back to the North along the lane to Tyddyn-Iolyn showing the point at which the old tramroad crossed the line of the lane. To the East of this point the Tramroad turned to the South and then to the West. [Google Streetview]The walled route of the Tramroad can still easily be picked out on the 6″ Ordnance Survey. After a short distance travelling in an West to East direction and before reaching the banks of the Afon Ogwen at a point to the North of Tyddyn-Dicwn it turned once again towards the South. [30]On the modern satellite imagery from RailMapOnline, the tramroad route appears to be within the width of the modern A5. There are signs that the actual formation of the old tramroad runs through the woodland to the South of the A5. Boyd shows this diversion on his map of the route. [36: p11] Its route can be picked out some metres to the South of the A5 but then rather than following a curving hedge line to the North and the East of Tyddyn-Dicwn at the bottom right of this satellite image. It continued towards the road junction, crossing the Southbound road just to the South of the junction. [27]The probable route of the old tramroad at the point where it crossed the road South towards Tregarth. From this point it travelled South between the road and the Afon Ogwen for a few hundred yards. [Google Streetview]The route of the old tramroad can again be picked out easily on the West Bank of the Ogwen passing an old quarry and then running immediately adjacent to Pen-isa’r-allt and on to meet Lon Ddinas. [31]RailMapOnline shows the tramroad crossing fields to the South of Lon Ddinas to join the route of the later Penrhyn Quarry Railway. This extract shows that route. Looking at the gradients involved and the 6″Ordnance Survey, it seems possible that this was the case only if an incline was used. There is no evidence of this on the ground. It seems more likely that Lon Ddinas runs along the line of the old Tramroad and may well, in times past have shared the same formation. The gradient along Lon Ddinas would have been much more suitable. However, records indicate that there was an incline at this location – known as the Ddinas Incline. [27]The lane which can easily be confused with the route of the old tramway is clearer on the 6″ Ordnance Survey. However, the Ddinas Incline followed the present field boundaries from close to Ddinas Farm up the relatively steep escarpment to meet the later Penrhyn Quarry Railway route. [32]
“The Ddinas Incline was one of three gravity-worked inclines on the original line of the Penrhyn Railway, built 1800-1801 to transport slate from the Penrhyn quarries to Port Penrhyn. … About half-way up the incline was an overbridge carrying a minor road, now widened and straightened at this point. To the north a cutting can still be seen, but the lower part of the incline has been destroyed by construction of a sewage works. To the south the line is visible as a terrace in the field. A ruined wall constructed of large roughly squared stone blocks near the top of the incline may be a surviving fragment of the winding house.” [33] W J Crompton, RCAHMW, 5 November 2009.
From this point on, the old Tramroad and Penrhyn Quarry Railway followed approximately the same route. The second article about these lines will follow the Penrhyn Quarry Railway to this point at Tregarth.
Dan Quine; The development of Port Penrhyn, Part One: 1760-1879; Archive. No. 110. Lightmoor Press, June 2021.
James I.C. Boyd; Narrow Gauge Railways in North Caernarvonshire, Volume 2 The Penrhyn Quarry Railways; The Oakwood Press, Usk, 1985. (The British Narrow Gauge Railway No. 5.)
Susan Turner; The Padarn and Penrhyn Railways; David & Charles; Newton Abbot, 1975.
This post is a short addendum to my post about the pre-railway age and the tramways of Pembrokeshire. In that post there was a section about the Porthgain to Abereiddi Tramway. In writing about that tramway, I failed to include details of the 3ft-gauge clifftop tramway which linked the slate quarry at Pen Clegyr Point with Porthgain.
I also failed to note the detail of the tramway tunnel between St. Bride’s Quarry and Porthgain Harbour. The original post can be found here:
Much of this current post about the Clifftop Tramway is summarised from a book by R.C. Jermy – “The Railways of Porthgain and Abereiddi,” which is an excellent study of the location. [2]
The 1906 6″ OS Map shows the clifftop tramway. [1]By the time the 1906 survey was undertaken the tramway tunnel and St. Bride’s Quarry were abandoned and the tramway rails through the tunnel had been lifted. The two short branches of the clifftop tramway can be seen to good effect on this map extract. [1]
By 1906, lines which linked St. Bride’s Quarry with the harbour via two inclines had been removed. The later tramway tunnel was also redundant and the tramway rails had been lifted. “Traces of the earthworks and inclines, including the lines to the spoil tips, are the only remains on the 1906 map. There remained on the clifftop just the lines of the horse-drawn tramway fetching stone from the quarries at Pen Clegyr Point. From loading sidings in the quarry the line entered a shallow cutting passing a small smithy on the right, after which maps indicate a short passing loop. The line then climbed upwards towards the summit close to Pentop Gate at which point it curved right, passing the weighing machine which measured the wagon weights. The line then forked into two, one track leading to each of the stone crushers located above the storage hoppers. Small passing loops were located on each of these tracks.” [2: p17]
There is, for me, an interesting connection between this area and the Forest of Dean. In 1900, the Forest of Dean Stone Firms were registered in Bristol.”This concern took over the harbour and mining interest at Porthgain but after November 1909, and until it was finally wound up in 1922, its interests were managed by United Stone Firms, another Bristol-registered Company. This firm raised a mortgage of £200,000 on the Dean Forest and Porthgain interests in 1910 and indeed this was the time when the crushed stone demand was reaching its peak. Sailing ships and powered vessels called regularly, the quarry and harbour railway systems were well developed and the Company ran its own fleet of steam coasters, each of about 350 tons.” [2: p10]
However, by 1913, despite the success of its Porthgain operations the parent company passed into the hands of the receiver. It remained so until 1926 “when it was reorganised and taken out of receivership by Walter Bryant of Coleford, Gloucestershire, who formed United Stone Forms (1926) Limited.” [2: p10]
However,by July 1931, that company became insolvent and was closed by 31st August 1931.
The 1948 revision of the 6″ Ordnance Survey was published in 1953. As far as the map extract is concerned all remnants of the clifftop railway have disappeared. This seems to be an over simplification of the situation as a number of remnants were still present even if not recorded. [5] The line of the track can still be traced as a levelled strip on the clifftop, adjacent to the path to Porthgain harbour. [4] R. C. Jermy includes a number of photographs, taken in 1951 by H. Townley, which show the engine shed (with ‘Newport’ gently rotting away on one of the roads) and the remains of two traction engines, ‘Daisy’ and ‘Dinah’. Dinah was sited at Pen Clegyr and was used as a winding engine. Daisy sat on the clifftop. [2: centre-pages]
Jermy notes that “by 1908 the demand for roadstone had increased and the Forest of Dean Stone Firms made the decision to invest in a steam locomotive for operating the clifftop system. … It was realised that with the arrival of a heavy locomotive complete relaying with heavier track would become a necessity. Accordingly 200 sleepers were ordered … and … between 20th and 22nd January, 1909 the tramway was [re-laid] with heavy rails and sleepers from Pentop Gate by the water tank to the winding engine house at the top of the incline leading from the lowest quarry levels. A new engine shed was constructed, the roof over the single road being completed just six days after the arrival of the first locomotive! An inspection pit was located between the rails in the shed. Later, in November 1909 a ten ton weighbridge was installed in a brick building close to the water tower.” [2: p18]
Later, two further locomotives arrived at Porthgain necessitating the addition of a second road to the engine shed.
Records appear to show that one of these locomotives, Singapore, was too heavy for the tramway rails in place when they arrived and as a result in some expenditure was necessary to upgrade the tramway. In fact, the prevailing weather conditions and the weight of the locomotives seem to have resulted in a significant regular maintenance programme being implemented.
Jermy shows two plans of the railway – the first shows it much as on the 1906 6″ Ordnance Survey. He dates his sketch plan to 1905. [2: p20]. The second is the result of a survey of the line by Jermy in the 1980s which seems to show the small network at its fullest extent in around 1925. [2: p21] This sketch plan shows the engine shed in its position on the Northeast side of the St. Bride’s Quarry, three roads serving the crushers and hoppers, a small Yard on the North side of St. Bride’s Quarry, a weighbridge and water tank to the Northwest of the Yard, a long straight length of line with two tracks, one known as ‘The Cutting’, the other as ‘Jerusalem Road’. These two line led to the Upper Level of Pen Clegyr Quarry and, via a cable-worked incline to the lower level of the quarry. [2: p21]
Locomotives
The first locomotive was named ‘Portgain‘. It was built in 1909 by Andrew Barclay in Kilmarnock. It was Works No. 1185. … No. 1185 was an 0-6-0T with 7″ x 13″ outside cylinders, 2ft 2½in wheels 3ft gauge. … Despatch Date: 26th July 1909. [2: p23][3] This locomotive was out of use by 1929 and was scrapped on site shortly after 1931. [4]
The second, ‘Charger‘ was built in 1891 by W.J. Bagnall in Stafford and had the Works No. 1381. It had a copper firebox, brass tubes and two 5½in x 10in outside cylinders. It passed through a number of ownerships before, in September 1912, it was moved to Porthgain. [2: p29-30] This locomotive was scrapped shortly after 1931. [4]
The third, ‘Singapore‘, was a 0-4-2 saddle tank built at the Kerr-Stuart works in Stoke-on-Trent and had Works No. 659. It had 9½in x 15in outside cylinders. It was built in 1899. It was first bought by the contractor G. Pauling and Co. It was shipped to Ireland and was used on the Burtonport Extension contract which Pauling’s were undertaking for the Londonderry and Lough Swilly Railway. Sold in 1903, it went to Scotland and remained there until 1912 when it was transferred to Porthgain. [2: p31-33] This locomotive was out of use by 1929 and was scrapped on site shortly after 1931. [4]
The fourth locomotive was ‘Newport‘, a 0-4-0T loco. It was built by Hudswell, Clarke and Company of Leeds. It was originally built as a 2ft 10in gauge loco with Works No. 311 in 1889. In 1900 it was owned by Kellett & Sons who worked on the Hagley to Frankley section of the Elan Valley Aqueduct. It went through a number of ownerships after this before entering service at Porthgain in May 1929 after an overhaul. [2: p33-36] This locomotive remained in the Porthgain Railway Locomotive Shed after closure until scrapped in 1953. [4]
A holiday in West Wales in the early Autumn of 2022 led to a little research on the railways in the area.
This is the sixth article about Pembrokeshire’s Railways. The first focussed on the pre-railway age, the second focussed on the mainline railways of the county. The third article focussed on the industrial railways in the vicinity of Milford Haven. The fourth and fifth on the Saundersfoot Railway in Pembrokeshire. The links to these posts are provided below. This article concentrates on the railways associated with RNAD Trecwn (the Royal Navy Armaments Depot at Trecwn).
TheRoyal Navy Armaments Depot at Trecwn (RNAD Trecwn)
RNAD Trecwn is, in the 21st century, a decommissioned Royal Navy Armaments Depot, south of Fishguard in the village of Trecwn, Pembrokeshire, West Wales.
It was built in 1938 to store and supply naval mines and munitions ordnance to the Royal Navy. The depot apparently came into its own during the cold war. During those times 400 permanent workers were employed at the site, housed in an MoD built small town. The site had an on-site, 2ft 6in (762mm) narrow gauge railway, built using copper to reduce sparks. Weapons were both delivered to the site and then distributed using standard gauge rail to Fishguard, Neyland for Milford Haven, and latterly Pembroke Dock. [56]
Trecwn as shown on the 1948 revision of the 6″ Ordnance Survey published in 1953. A series of three sidings are shown to the South of the main RNAD site. [57]
The Standard-gauge Branch Line and Sidings – Just south of the main entrance to RNAD Trecwm and the main security fence to the site was a single railway platform, for workers access to the depot. Within the security fence, a marshalling yard of 8 parallel loops existed, shunted by a dedicated MoD diesel hydraulic shunting locomotive. The line then extended on down the valley, through a gauge exchange shed for access to the narrow gauge network, and then provided direct access to the 58 cavern storage chambers via a series of herring-bone shaped sidings. [59]
Supply trains would run along the dedicated branch-line from the site: to Fishguard Harbour; to Neyland for Milford Haven; and Pembroke Dock. At Fishguard the line extended beyond the ferry terminal at Fishguard Harbour railway station, continuing along the breakwater to a single line spur, allowing for transfer of munitions to Royal Navy ships. [59]
These next few images show the Trecwn branch-line. The first shows its junction with what was the GWR line to Fishguard from which the branch runs Northeast towards Trecwn …
The Trecwn branch-line junction with the old GWR as shown on the 1951 1:25,000 Ordnance Survey. [60]The ESRI satellite image from the National Library of Scotland has the route of the Trecwn Branch-line imposed on it. [80]The view at the junction from a train window in 9th August 2007, (c) Ceridwen, authorised for use under a Creative Commons Licence (CC BY-SA 2.0). [238]A little to the South of the junction, a lane crosses the branch. This photograph looks along the line to the accommodation crossing on 5th May 2010, (c) Ceridwen, authorised for use under a Creative Commons Licence (CC BY-SA 2.0). [239]The view East along the line on 23rd July 2006. (c) Stephen McKay, authorised for use under a Creative Commons Licence (CC BY-SA 2.0). Stephen comments: “Taken from an accommodation level crossing looking along what was once a meandering branch to Clunderwen. [241] That route was abandoned in the 1940s, but a stub was retained to give access to the Royal Naval Armaments Depot at Trecwn.” [240]The view from the North along the A40 of the bridge carrying the branch over the road. [Google Streetview, March 2022]The view of the same bridge from the South [Google Streetview, March 2022]After a short distance running Northeast, the standard-gauge line runs adjacent to the main gates of Trecwm on an East-West axis before turning South and the East again. [60]
The depot was decommissioned in 1992. All 58 cavern storage bunkers and the extensive above ground network of storage sheds and other military buildings remain in place. Ownership of the site was transferred from the Ministry of Defence to Anglo-Irish consortium Omega Pacific in 1998, and then by court order to the Manhattan Loft Corporation in 2002. The site is being redeveloped as an industrial park. [56]
Dashed-red lines show the approximate route of the old standard-gauge line which was lifted in the early 21st century. [82]The remaining length of the Trecwm branch-line as shown on the 1951 1:25,000 Ordnance Survey. [60]The same area as shown in the OS Map above[230]Coflein provides this map of the main site in 2021. Careful inspection will show that the standard-gauge branch-line has been lifted by the date of this Ordnance Survey edition. [61]The 1906 6″ Ordnance Survey shows no sign of either the standard-gauge branch nor the infrastructure that made up RNAD Trecwn. [231]The same area on modern satellite imagery shows much of the infrastructure of the Depot remaining after closure. The standard-gauge sidings remain at the date this image was produced. [231]Just before reaching Trecwm, the line passed under the lane which can be seen at the left side of the satellite image above. The bridge parapets have been extended upwards for safety reasons using galvanised metal fencing. [Google Streetview, October 2021]The concrete bridge carrying the standard-gauge branch-line over a local road just prior to its entry into the Depot. [Google Streetview, March 2022]The same structure viewed from the North. [Google Streetview, October 2021]Google Maps in 2022 still shows the sidings in place in RNAD Trecwn. No doubt this will get updated in due course. [Google Maps, 29th September 2022]The site extends across the join between two OS Maps. This 1948 revision of the 6″ OS Mapping shows the West end of the Depot. The map was published in 1953. [232]At approximately the same scale, the next OS Sheet shows only the standard-gauge line and not the internal narrow-gauge lines. It is shown terminating at the same location as the mapping further above. [233]The fan of standard-gauge sidings just inside the Depot fencing, (c) Dave Mansell, taken in 2003. This image is used with the kind permission of the Subterranea Britannica website. [234]
Three aerial photographs are provided by the Fishguard and Goodwick Local History Society. Posted by Ian Evans, they are used here by kind permission.
The first one shows the main entrance to the depot at it’s southern end. It can be dated to the mid-1950’s. “At the bottom right of the image can be seen the main railway line into the valley, leading to the railway sidings. The buildings to both sides of the railway sidings included a number of specialist workshops and storage facilities, there were no live explosives handled in this area.” [247]
This aerial photograph looks from the West along the valley of the Afon Aer. To the right of centre, the fan of standard-gauge sidings can be made out. An enlarged image taken from this picture follows below. The picture was taken in 1955 and is used with the kind permission of Ian Evans and the Fishguard & Goodwick Local History Society. [247]An enlarged section of the photograph above which shows the bridge which carries the line over a minor road close to the Depot gates, in the bottom-right. The fan of sidings feature prominently towards the top of this extract. The branch beyond the sidings first curves away to the South [247]
The second “shows the workshops and stores buildings in more detail. The building at the bottom right with the tall chimneys was the southern boiler house which supplied steam to most of the buildings seen here. It was in this area that the narrow gauge railway system started, it extended right up the north end of the site.” [247]
Of interest, to me at least, is that when I load Google Earth onto my desktop I automatically get the railway tracks at Trecwn added. I am not sure how that happened, but it is useful for this article. ….
A Google Earth extract with the network of lines in the valley of the Aer shown in black. This is the first length inside the Depot. [Google Earth, 29th September 2022.The remaining length of the Depot in the Aer Valley. [Google Earth, 29th September 2022]
The third of three aerial images from the mid-1950s appears below. It “shows the red area where live explosives were handled and stored, everything from .303 Rifle bullets to 1 Thousand pound bombs were processed here and stored in 58 Magazines built into each side of the valley, If you zoom in you can see a number of the tunnel entrances quite clearly. A lot of the smaller buildings have blast walls surrounding them. The complex extended further north from this photo to the north end Boiler House and security gates.” [247]
The remaining length of the Depot taken from the air looking North along the valley of the Aer. Again, the picture was taken in 1955 and is used with the kind permission of Ian Evans and the Fishguard & Goodwick Local History Society. These images can be found at http://www.hanesabergwaun.org.uk/ [247]These two images are enlarged extracts from the last of the three aerial images above. It is possible to see something of the network of lines which existed in the valley. [247]
The OpenRailwayMap [235] is also of great help in establishing what railways existed inside the Depot. It is clear that the standard-gauge line extended much further to the Northeast along the valley of the Afon Aer than the Ordnance Survey mapping records.
To complete this section on the Standard-gauge line, I have included a series of screen-dumps from the OpenRailwayMap [235][236]. Having them at this point in the article should hopefully minimise scrolling when we look at the Narrow-Gauge network at the depot. The sequence of the map extracts runs from the Depot gates in the West, closest to the hamlet of Trecwn, eastwards to the point where the valley turns to the North and then follows the valley northwards.
This final image is the key/legend provided by the OpenRailwayMap [235][236] editors. The Trecwn branch as far as the depot gates is shown in yellow above. The standard-gauge lines within the Depot are deemed industrial lines and are therefore shown as thin brown lines. The length of these line inside the Depot is significantly longer that that shown on the Ordnance Survey maps. Abandoned standard gauge lines are shown as thick dashed brown lines (not grey as in the key).
The narrow gauge lines are shown as thin dashed brown lines. It is possible that by the time the mapping was undertaken these had been abandoned and are hence shown dashed. There are a very few lengths of narrow-gauge track shown solid brown.
The extent of the network of these lines is, for me, the most engaging element of this mapping. RNAD Trecwn had a very significant internal narrow-gauge network. …
The Narrow Gauge (2ft 6in) Lines – A 2ft 6in (762 mm) gauge network traverses the entire site, with direct access to the 58 cavern storage chambers. All rail infrastructure was built in copper to reduce the risk of sparks. Serviced via its own on-site locomotive shed and works, the line was equipped with a series of specially provided wooden enclosed wagons, with sliding roof covers. This allowed sea mines and other munitions to be directly placed within the wagons from overhead gantries, and transported over the entire site without access via any form of side door, hence enhancing safety. The narrow gauge line therefore became the main method of on-site distribution, with standard gauge rail or road the off site access method. [56]
The next few aerial images can be found on the Coflein website and show elements of the narrow-gauge system running along the site. In places the standard-gauge and narrow -gauge sit side-by-side.
This next aerial image comes from before the narrow-gauge tracks were lifted. The most obvious lines are standard-gauge lines but careful inspection will show the narrow-gauge network as well. This photograph was taken in 2006. [61]Turning through 180° this next aerial image from 2009 comes from the time when large parts of the narrow-gauge system had been lifted but before the narrow-gauge tracks at locations crossing site roads or standard-gauge lines were lifted. Careful inspection will identify a number of such locations. [61]View from the North in 2006 looking down on the upper area of the Depot with both standard-gauge and narrow-gauge lines visible. [61]Also taken in 2006 from the North, this view shows a number of the storage bunkers on site and the rail system. [61]Again taken in 2006, this photograph looks from the Southeast showing more of the bunkers in the northern length of the Depot. [61]
In 2003, David Mansell, writing about the site commented: “About a mile into the site the narrow gauge railway facilities commence with maintenance sheds and a covered transfer building. There are a total of 58 storage chambers, each extending into the hillside for 200 feet, arranged in a herringbone formation along both sides of the valley. Each one has alarmed steel doors with its own siding off the narrow gauge railway.” [234] … His opinion at the time, was that RNAD Trecwn was “a railway enthusiasts dream with both standard and narrow (2ft 6in) gauge lines. The depot has its own branch off the Fishguard to Carmarthen line and after a small platform area outside the depot for staff the line enters the site via lockable steel gates into the main marshalling yard where the line splits into 8 parallel loops. The standard gauge line then travels the entire length of the valley alongside the narrow-gauge line which has points for the siding to each storage chamber.” [234] …
The narrow gauge rolling stock then consisted of the “well known ‘Trecwn’ wooden wagons with sliding roofs to enable mines to be lowered in and flatbed trucks for other munitions. Some of the stock can now be seen on the Welsh Highland and [Welshpool and] Llanfair light railways.” [234]
At the time Dave Mansell was writing, there was still a substantial amount on site. Locomotives included small diesel shunters and battery units; some derelict examples of which were still on the site in 2003. Points on both gauges were manually operated and still well greased. [234]
The next few photographs were all taken early in 2003 by Dave Mansell and are shared with his kind permission and that of Subterranea Britannica…..
Locomotives – a series of narrow-gauge locomotives were employed at the site. These are surviving examples:
Ruston & Hornsby 187069 – was a Class 25/30hp locomotive with a Ruston 3VSO engine and weighing 3.25 tons. It left the works on 28th October 1937. “It was one of forty of that type working on the Nuttall-Pauling Consortium contract to build the … Depot at Trecwn. … Construction was complete by 1941 but this locomotive was evidently still in the West of Wales in 1950, because a spares order was placed by Pauling on 26th May 1950 to be sent to Geo Bros Ltd., East Burrows Yard, Swansea, which may have been repairing it. In 1951 it was noted at Pauling’s Park Royal plant depot, Middlesex, numbered P250 in the Pauling list. It was later sold or scrapped at an unknown date. [229: p1-2]
Baguley-Drewry Locomotives – Baguley-Drewry of Burton-on-Trent built a number of locomotives for this narrow gauge network.
The Talyllyn railway purchased two of Trecwn’s narrow-gauge locomotives …. Diesel No.11 “Trecwn” & No.12 “St Cadfan” were purchased by Talyllyn volunteers from RNAD Trecwn in 2008. The names were decided by ballot in 2014 by the group that originally purchased the locomotives for the Talyllyn. Both Locomotives were re-gauged from 2ft 6in to the Talyllyn’s 2ft 3in Gauge. Talyllyn members also purchased over a mile of track from RNAD Trecwn complete with rail, sleepers, spikes and fishplates in June 2008. [251]
The Talyllyn’s Facebook Page provided photographs of these locomotives. These two images were included. [251]
32. D S M Barrie, revised Peter Baughan; A Regional History of the Railways of Great Britain: volume 12: South Wales; David St John Thomas, Nairn, 1994.
36. Wing Commander Ken McKay; A Vision of Greatness: The History of Milford 1790-1990; Brace Harvatt Associates, 1989.
236. OpenRailwayMap (previously called “Bahnkarte”) is a detailed online map of the world’s railway infrastructure, built on OpenStreetMap data. It has been available since mid-2013 at openrailwaymap.org. This project was founded in December 2011 in order to create a world-wide, open, up-to-date and detailed map of the railway network, based on OpenStreetMap. The domain was registered on April 27th, 2013 and the corresponding website was launched in mid 2013. Since then it has received constant improvement. In February 2014 the project moved to a new server. In April 2014 a dedicated map for mobile phones was launched. [237]
The OpenRailwayMap includes all rail-mounted and automotive vehicles, e.g. railways, subways, trams, miniature railways and funiculars. The map does not include aerialways, monorails, and maglevs. The name OpenRailwayMap mostly refers to the online map, but the project also aims to support railroad-related data in OpenStreetMap. By developing a consistent data model, providing a mailing list for discussions, developing editor plugins, etc. the collection of these data is boosted and the data are made usable for other applications and developers. [237]
241. This statement needs a minot clarification. The Trecwn Branch used to leave the line between Fishguard and Clynderwen just South of where that line diverged from the route from Fishguard tthrough Clarbeston Road. The North Pembrokeshire line was lost many years before the Trecwn branch closed. The tracks visible in the image above led only to Trecwn.
This plan appears at the head of the article on the Disused Stations website about the Fishguard to Clynderwen route – a.k.a the North Pembroke shire and Fishguard Railway. it shows the Trecwn branch leaving this railway just South if its junction with the line through Clarbeston Road. [242]
The featured image above shows the Locomotive Bulldog which was used on the length of the line between the Inclined Plane and Reynalton Colliery.
This is a follow-up to the first article about the Saundersfoot Railway. The first article covered the history of the Railway and then went on to look at the route of the line from Saundersfoot Harbour via Wiseman’s Bridge to Stepaside. That is the arm of the Railway shown on the right-hand side of the image below.
The first article can be found by following this link:
These articles are part of a series looking at the railways of Pembrokeshire. Full details of that series can be found in the first article about the Saundersfoot Railway.
This map of the Saundersfoot Railway was shared on the Tenby and Saundersfoot Through Time Facebook Group by Mark Davies on 26th November 2015. [148]
This article follows the line running West from Saundersfoot Harbour under Saundersfoot Railway Station to Reynalton at the left side of the map above.
Saudersfoot Harbour to Reynalton Via Saundersfoot Tunnel (Kingsmoor Tunnel)
We start this journey with some of the pictures from the first article of Saundersfoot Harbour. We begin with two very early views of the harbour and its tramroad.
This picture showing coal being loaded onto a vessel at Saundersfoot Harbour was shared on the Saundersfoot & District Historical Society’s Facebook Group on 25th May 2020 by Gillian Hibberd.[141]
This picture showing Saundersfoot Harbour was shared on the Saundersfoot & District Historical Society’s Facebook Group by Gillian Hibberd on 24th May 2020. Note the railway tracks leading onto the North Harbour Wall. [225]A 1936 image of Saundersfoot Harbour looking Southeast from the North wall with the railway in the foreground. This image was shared by Gary Davies on 15th September 2019 on the Tenby and Saundersfoot Through Time Facebook Group. Gary Davies writes that there appears to only be “one coal wharf operating to fill the hold of this steamer the industrial era of the Harbour is coming to an end. As Bonvilles Court Colliery had closed in 1929 and the screens there were washing coal from Broom and Kilgetty Collieries. It wasn’t to long before the coal was sent out on the mainline branch of the GWR via the siding at Bonvilles Court Colliery. This would have been one of the last few coal steamers to come into the Harbour to load coal as by 1939/40 the export of coal from the Harbour had ceased.” [159]This image shows Rosalind heading away from the South quay at Saundersfoot Harbour. She is heading for Railway Street (The Strand) with the Miner’s Express. If she were to be travelling on Milford Street she would be turning left just behind where we are standing. [187]1906 6″ Ordnance Survey [199]Modern satellite imagery of the same area with the railway alignment shown as a red line. [199]Looking West along Milford Street, Saundersfoot in the 21st century. [Google Streetview, March 2022]Looking West along Milford Street, Saundersfoot in the 21st century. The railway ran approximately on the red line, heading off Milford Street (which turns to the right) down what is now called Brookland Place. [Google Streetview, March 2022]Looking back East along Milford Street from Brooklands Place. The railway ran approximately on the red line. [Google Streetview, August 2021]Looking West along Brookland Place. The road has been laid over the line of the old railway. [Google Streetview, August 2021]The view West from the end of Brookland Place looking along what is in the 21st century known as ‘The Incline’. The footpath follows the line of the old railway. [Google Streetview, August 2021]Looking back East along ‘The Incline’ towards Saudersfoot Harbour. [Google Earth, August 2021]Looking West along ‘The Incline’. The footpath continues to follow the line of the Saundersfoot Railway. [Google Streetview, August 2021]The route of the old railway crosses Westfield Road. [Google Streetview, August 2021]This enlarged view of the 6″ OS Map of 1906 shows the area around the bottom of the Inclined Plane. [199]The key buildings on the map above are highlighted on this NLS supplied satellite image of the same area. All of the buildings have been adapted for modern living. One, Incline Villa, is identified as a holiday let in the 21st century. [199]Incline Villa as advertised as a holiday let. The two storey element of the building has been expanded by the single storey extension. [205]The photograph was taken at approximately the point where the railway crossed what is now Westfield Road. It was shared on the Tenby and Saundersfoot Through Time Facebook Group by Mark Davies on 26th November 2015. [151]Beyond Westfield Road the footpath follows the line of the old railway. [Google Streetview, August 2021]Looking back towards Saundersfoot Harbour towards the line of the old railway from the East end of Incline Way. This footpath links to the line of the old railway. [Google Streetview, March 2022]The east end of Incline Way almost meets the line of the old railway which is shown in red and which continues to be a footpath in 21st century. At this point the incline is carrying the railway up onto the escarpment behind Saunderfoot. [199]Two pictures taken at different points along the Incline in November 2021 by Jonathan Kedward and shared by him on the Ancient Monuments UK’s website. [204]
This small extract from the 1906 6″ Ordnance Survey shows the same are as appears in the satellite imagery immediately above. As can be seen, very close to this location the three rails of the incline separated into four to allow wagons to pass. [199]
This extract from the 6″ Ordnance Survey shows the full length of the Incline. As can be seen there was a passing loop at half-height, referred to above, and a passing loop at the head of the incline. The building at the head of the incline shown below does not appear on the 1906 Survey, but does appear on the 1887 Map. [199]
The 1887 6″ Ordnance Survey shows the building at the head of the incline and a second loop closer to the highway which does not appear on the 1906 Survey. The existence of remains of the winding house in 2021 (see below) suggests that the building was missed off the 1906 survey. [201]
The photograph was shared on the Tenby and Saundersfoot Through Time Facebook Group by Mark Davies on 26th November 2015. It shows the passing loop at the head of the Incline. The photograph was taken facing Southeast towards Saundersfoot Harbour. [151]The remains of the winding house in November 2021. This photograph was taken by Jonathan Kedward and shared by him on the Ancient Monuments UK website. [204]The excellent information board at the Winding House pictured above. [206]The photograph was shared on the Tenby and Saundersfoot Through Time Facebook Group by Mark Davies on 26th November 2015. It shows the top of the Incline, facing Southeast, after closure and was probably taken from the location of the winding house shown in the picture above. [151]
Coflein records the Inclined Plane as follows: “The main line of the Saundersfoot Railway … opened in 1832 between Saundersfoot Harbour … and Thomas Chapel. It was built to a gauge of 4ft 0 3/8in and originally worked by horses. A self-acting incline, some 300m long and on a gradient of 1 in 5, lay about 800m west of the harbour. At the foot was a siding and hut whilst at the summit was a winding house. The track on the incline was double with a shared inner rail, widening to a loop midway allowing wagons to pass.” [203]
The incline was 363 metres long. Ancient Monuments UK’s website records the site as follows: “The monument consists of the remains of a complete tramroad incline formation from an important horse-drawn tramroad built in 1832, including a former counterbalance drum housing and marshalling areas at top and bottom. The monument is of national importance for its potential to enhance our knowledge of 18th and 19th century industrial and transportation practices. It retains significant archaeological potential, with a strong probability of the presence of associated archaeological features and deposits. The structure itself may be expected to contain archaeological information concerning chronology and building techniques. A drumhouse may be part of a larger cluster of monuments and their importance can further enhanced by their group value.” [204]
Looking back Southeast towards the Incline from ‘The Fan Road’, the modern road which follows the line of the old railway. Valley Road enters from the right in this image. [Google Streetview, March 2022]Looking Northwest, The Fan Road follows the line of the Saundersfoot Railway. [Google Streetview, March 2022]The Saundersfoot Railway’s branch into the Bonville’s Court Colliery. [Google Streetview, August 2018][201]The 1906 Ordnance Survey shows the branch-line from the Great Western Railway which was installed around the turn of the 20th century after a long campaign by Boneville’s Court Colliery’s owner. It finally superseded the Saundersfoot Railway and its access to the mainline at Saundersfoot Railway Station, see below. [202]The modern satellite image has the key features mark in red and ochre. [202]The Locomotive Bulldog sits taking water close to the entrance to the colliery. This image was shared by Gary Davies on the Saundersfoot and District Historical Society Facebook Group on 10th November 2018. [180]Bonvilles Court Colliery, which was active between 1842 and 1930; it was served first by the Saundersfoot Railway (and then from 1896 by a branch from the Pembroke & Tenby Railway (GWR). Following closure, part of the site was converted into a screening plant and storage yard. This picture was shared on the Tenby and Saundersfoot Through Time Facebook Group by Kenneth Townsend on 12th July 2019. [156]Two more photographs of the Colliery. [209][208]The photograph was shared on the Tenby and Saundersfoot Through Time Facebook Group by Mark Davies on 26th November 2015. [151]Looking North-northwest along The Fan Road, beyond Bonville’s Court Colliery, which follows the line of the old railway. [Google Streetview, March 2022]The 1906 6″ Survey shows the Saunders foot Railway snaking across the fields towards Saundersfoot Station. [200]Modern satellite imagery confirms that The Fan Road follows the alignment of the old railway to reach the B4316. The trees on the North side of the B-road hide the alignment of the old railway as it approached Saundersfoot Station along an alignment separate from but parallel to the B4316. [200]Saundersfoot Railway Station as shown on the 1906 6″ Ordnance Survey provided by the NLS. Both the transshipment siding and the line down to the tunnel have been added as red-lines. [210]The same area on the modern ESRI satellite imagery provided by the NLS. The area of the siding as theaccess to the tunnel are shown heavily wooded. In around 2018 the undergrowth was cutback to reveal the man-made embankment and rail routes. Please see the photograph below. [210]The same location on the 1887 6″ Ordnance Survey. By this time, the tunnel already appears dis-used. However, at a later date, 1915 or so, the line was opened up again and the locomotive Bulldog was purchased to supply the colliery at Reynalton. Sadly that period of operation is not picked up by the Ordnance Survey as the next revision took place in 1948 after closure of the line. [211]from the site of Saundersfoot Railway Station in 2018, this view shows the alignment of the Saundersfoot Railway. The B4316 is on the right of the image. This photograph was shared on the Tenby and Saundersfoot Through Time Facebook Group by Gary Davies on 15th April 2018. He commented at the time: “Now the trees have been cut its … possible to see the route of the Saundersfoot railway. On the left side is the route to the Kingsmoor tunnel and on the right is the embankment siding for discharging coal from the Saundersfoot railway onto coal wagons of the Main Pembroke Dock to Whitland Railway via the exchange siding which came in behind Saundersfoot Station.” [164]Saudersfoot Railway Station. This picture was shared on the Tenby and Saundersfoot Through Time Facebook Group by John Stoot on 16th December 2017. [162]Saundersfoot Railway Station in 1914. This photograph was shared on the Tenby and Saundersfoot Through Time Facebook Group by Penny Brace on 13th February 2020. [163]Saundersfoot Railway Station. This photograph was share by Sarah Whiddett on the Saundersfoot & District Historical Society’s Facebook Group on 3rd March 2020. [207]Saundersfoot Station Bridge. Mark Davies shared this image on the Tenby and Saundersfoot Through Time Facebook Group on 26th November 2015. [165]
The tunnel under Saundersfoot Railway Station was constricted in size and as a result dictated the size of any locomotive which could be used. Bulldog was purchased in 1915. Full details of the loco can be found on the first post about the Saundersfoot Railway. There is a picture of it above at the entrance to Bonville’s Court Colliery. [213]
Coflein records the tunnel as follows: “The main line of the Saundersfoot Railway opened in 1832 between Saundersfoot Harbour and Thomas Chapel. It was built to a gauge of 4ft 0 3/8in and originally worked by horses. King’s Moor Tunnel carried the line under rising ground below the hamlet of Hill and the site of the 1866 Saundersfoot Station on the Whitland extension of the former Pembroke & Tenby Railway. The tunnel is 450m long, 2.44m wide and approximately 2.6m high with a semi-circular arch.” [214] The route of the tunnel appears most clearly on the 1948 revision of the 6″ Ordnance Survey. …
28dayslater comments that the tunnel “is very wet and very muddy in places due to the years of neglect and non-use but is a very important part of Welsh industrial history.” [167]
To the North of the tunnel the line was in cutting for 200metres or so. It then traversed open country until passing on an embankment and bridge over New Road (it’s present name).
The 6″ 1906 Ordnance Survey shows the line continuing in a generally northwesterly direction [215]A thind red line shows the route of the old railway on this ESRI satellite image. Modern roads seem to make the most impact on the landscape although there is a caravan site sitting over the line of the railway in the bottom right quadrant of the satellite image (Kingsmoor Caravan Site). [215]Looking East along the A477 at the approximate location where the old railway route crosses the main road. It appears that it enters the caravan site (on the left) just at the Eastern edge of the entrance road. [Google Streetview, March 2022]As we have just noted, it appears that the route of the old railway enters the caravan site just at the Eastern edge of the entrance road and then runs roughly parallel to the road through the site but perhaps 50 to 100 metres to the Northeast. [Google Streetview, March 2022][215]The point at which the Saundersfoot railway crossed New Road, Begelly. Note the relatively large bungalow with its wall running parallel to the old railway. It would seem that the property boundary followed the line of the embankment![215]The location of the old railway in relation to New Road can be fixed by the bungalow shown to the left of this image, of which part seems to straddle the route of the old railway. [Google Streetview, March 2022]Begelly Railway Bridge over what is now New Road. This picture looks through the bridge to the West. The photograph was share on the Tenby and Saundersfoot Through Time Facebook Group by Ron Powell on 24th January 2017. [166]North of New Road a public footpath follows the old railway line as far as the West end of Parsonage Lane. [Google Streetview, March 2022]The route of the Miner’s Walk Path is shown here in mauve. It follows the old railway which is now a bridleway. [218]The path as it approaches Parsonage Lane, (c0 Two Dogs and an Awning. [217]The view West from the end of Parsonage Lane. The gated track is met by the old railway route coming in from the left and the track then follows the Saundersfoot Railway formation. [Google Streetview, March 2022]Bulldog at the head of a train of wagons North of Kingsmoor Tunnel. This picture was shared by Gavin Thomas on the Saundersfoot & District Historical Society Facebook Group on 17th October 2018. I am not sure of the location of this photograph but it is possible that is in the length that we are currently looking at. If so, Parsonage Lane runs just to the left and the buildings visible beyond the train are at Parsonage Green. [140]This extract from the 6″ OS Map published in 1889 is of what I consider to be the likely location of the photograph above. The rectangle shows the suggested location, with the train facing East towards the bridge at what is now called New Road. If I am right, the original building in the photograph no longer exists, it has been replaced by a bungalow. [219]
The line continued across the fields before it approached Thomas Chapel. We do know that there was a short branch to Broom Colliery. Its existence is recorded by Coflein: “An earthwork linear feature, probably a relict tramway, runs for c.400m NE-SW from SN11220814, at Broom Pit, … to SN10900788, where it effects an apparent junction with the Saundersfoot Railway . … It is not depicted as a railway on Ordnance Survey County series 25inch mapping of 1889 as it was disused by this time. … Broom Colliery was re-constructed and re-opened in 1933 and improvements included a 600-yard electrically-hauled narrow-gauge tramway to carry coal to the Saunderfoot Railway.” [228]
That statement from Coflein is supported on their website by an Ordnance Survey extract which is reproduced here and annotated with the key features. [228]
Thomas Chapel on the 62 Ordnance Survey of 1906. The Saundersfoot Railway can be seen approaching from the South. [220]Approximately the same are as on the map extract above. The red line on the satellite image shows the route of the old railway. [220]
The lane serving Honeywood Cottage and other deellings runs across the top-half of the map and satellite image above. Just left of, and above the centre of, the image it is crossed by the old railway. The location is marked with a red arrow. It is of interest because there appears to be a remnant of the Saudersfoot Railway just at this point. I am not entirely sure that this is the case. However, if it is then is fixes the route of the line beyond here to Reynalton. I’d be interested to know whether anyone can provide details of what it ia that appears in the photograph below.
The location of the Reynalton Cooliery and the New Reynalton Colliery as indicated by Coflein. [221]
Urbex tells us that the railway “was extended for about one and a half miles beyond Thomas Chapel to serve a new colliery at Reynalton. To avoid heavy expenditure on earthworks and bridges, the line followed a somewhat circuitous course through open country. The existing railway from Thomas Chapel to Saundersfoot was relaid.” Horse traction was finally abandoned, and all traffic between Reynalton and the head of the incline was worked by 0-4-0ST Bulldog. Bulldog was slightly larger than than Rosalind which worked the line between Stepaside and the harbour. “It had 9inch by 15inch outside cylinders, 2feet 6inch wheels, and weighed 12 and a half tons in working order. To enable it to pass through the tunnel under the Great Western Railway to Saundersfoot, the maximum height and width had to be restricted to six feet nine inches respectively.” [227]
Coflein comments that the colliery site at Reynalton was a former anthracite drift mine. “Reynalton Colliery was opened by 1906. It was rebuilt in 1914 under the New Reynolton Anthracite Colliery Co., and served by an extension of the Saundersfoot Railway. … The mine closed in 1921 and the site was cleared, the only survivors being a brick-built winding house, six houses in the village and some railway embankment. There are various shafts and pits shown on the 1948 OS 6inch map. A cinder and slag heap near the church was removed during the Second World War to assist with the construction of Templeton airfield, … 2km to the north. [217]
Reynalton Bridge Abutments. This photograph was taken and shared by Dewi H. Davies on 7th October 2015 (c) People’s Collection Wales and used here under the Creative Archive Licence. [222]View from the SouthView form the North[223]We know that the Reynalton extension was constructed with frugality in mind, that it sought to follow the contours as much as possible and avoided building embankments, cuttings or structures as much as possible. With these factors in mind the red line shown on this satellite image is an estimation of the likely route which roughly follows the contours of the land and picks up on features that exit in the 21st century. A solid red line has been used where I have reasonable confidence over the alignment of the railway, the red-dotted line where I have a greater uncertainty but feel that showing the probable line is warranted.
We have already identified the two bridge abutments alongside the road South of Reynalton and it is possible (see below) to pick out the line of the railway either side of that for a couple of hundred yards at most. Closer to the line to Thomas Chapel there is a linear section of woodland which is in the shape of an upturned ‘U’ which closely follows the contours of the land. Between these two lengths the presumed route does approximately follow the contours and existing features, specifically, a lane to the East of the modern tarmacked road running North-South at the centre of the picture and an obvious lane running to the West of that road which does not appear on any of the revisions of the OS mapping carried by the NLS.
This leaves us with a question about the line’s approach to Reynalton colliery. The blue flag on the Coflein map above locates the colliery with reasonable accuracy. That position is shown again below and is marked on this satellite image as an ochre-coloured circle. At the moment the line approaching the colliery is shown in ochre as well and dashed because I have little certainty over its exact line. I hope to be able to clarify this further as time goes by. [223]Coflein provides two aerial photographs looking from the North across Reynalton to the most visible remains of the Saundersfoot Railway extension to Reynalton Colliery. The remains can be picked out towards the top of this image. A tree-lined curve runs from the West to two bridge abutments and the line can then be seen as a straight line running East through the first two fields East of the highway. The photograph was taken taken on 11 January 2006 by Toby Driver. [224]The location of Reynalton Colliery. An enlarged version of the map as shown by Coflein. [221]
This last satellite image taken from Google Earth shows that my presumptions about the line of the railway close to the colliery may be right. The field which is centre-right on this image has an area of curved land which appears to have retained water differently to the rest of the field and which is as a result greener. [Google Maps, September 2022]
Writing about the Reynalton extension to the Saundersfoot Railway, Coflein says: “The main line was extended to serve Reynalton Colliery … in 1915. The colliery closed in 1921 and the extension was abandoned, the whole Saundersfoot Railway closing finally in 1939.” [226] Some detailed reasoning for my proposed alignment for the extension is given in the comments under the satellite image above. I am hoping that at some time I may be able to find further information on the alignments that I have shown and would be very happy for someone to correct my assumptions.
Making the assumption that I have the correct alignment a few more photos on the line of the old railway can be offered. …
A telephoto image looking along the line of the railway to the East from the lane at the centre of the satellite image above. [Google Streetview, August 2021]A wider view of the probable line of the old railway taken from the same lane, looking East. [Google Streetview, August 2021]This time looking ahead along the probable line of the Saundersfoot Railway Extension. [Google Streetview]
It goes without saying that if anyone has photographs from along the routes shown, and is prepared to share them, I would be delighted to include them properly referenced in this article.
One final note: OpenRailwayMap [235] is usually an excellent source for following rail lines throughout the UK and abroad. Sadly the only length of the Saundersfoot Railway covered is a short length either side of Saundersfoot Railway Station. That length include the tunnel under that station. [235]
A holiday in West Wales in the early Autumn of 2022 led to a little research on the railways in the area.
This is the third article about Pembrokeshire’s Railways. The first focussed on the pre-railway age, the second focussed on the mainline railways of the county. The links to these two posts are provided below. This article looks specifically at some of the industrial railways in Pembrokeshire, particularly those in the vicinity of Milford Haven.
The Saundersfoot Railway (covered in a later article)
The Milford Haven Docks Railways
The Milford & St. Bride’s Bay Light Railway and proposals for expansion of the Docks at Milford Haven
The Royal Navy Armaments Depot at Newton Noyes (RNMD Milford Haven)
The Royal Navy Armaments Depot at Trecwn (RNAD Trecwn) (covered in a later article)
Milford Haven Oil Refineries
The Freystrop Colliery Railway.
The Hook Colliery Railway.
1. Milford Haven Docks Railways
In 1790 an Act of Parliament granted William Hamilton permission to: ‘make and provide Quays, Docks, Piers and other erections and establish a Market with proper Roads and Avenues’. Several plans were proposed for the construction of quays, piers and all weather docks in the first half of the 19th century, but nothing was done. In an attempt of kick start the town to life the Milford Improvement Bill of 1857 led to the construction of a pier and two wooden bridges: Black Bridge and Hakin Bridge, both now replaced by modern structures. [51]
Once construction of the Milford Junction Railway was completed in 1863, further work became essential to the docks. This was completed in the early 1870s and more railway track was laid towards the docks complex in 1875. A spur to Newton Noyes, known as the ‘Estate Line’, was completed in 1882. It connected with a cast-iron pier, which was reached via a lifting bridge at Castle Pill; the junction with the Milford line was opposite the station. [53]
The docks were finally opened in 1888, with dry-dock facilities in Castle Pill. The docks were intended for the transatlantic passenger trade, but were only very sparsely used for this purpose. [51]
The port development highlighted Milford station’s less than favorable location, although equidistant between the two major populations of Milford and Hakin, it was at a distance from the quayside and with no discernible pedestrian access. To rectify the issue, the short-lived Hakin Dock Station was constructed in 1889. [52][53]
Hakin Dock Station was ideally placed to be the alighting point for passengers embarking to North America. Wing Commander Ken McKay notes particularly the Gaspesia. [36] Hakin Station also welcomed passengers disembarking from New York, the inaugural voyage being the City of Rome in 1889. [54]
Train waiting to depart Hakin Dock Station with passengers arrived from New York on the City of Rome, 1889. Public Domain. [54]
Ultimately, Hakin Dock Railway Station’s proximity to Milford Haven railway station, and the fact that transatlantic trade did not develop at the port, meant that the station was quickly dismantled and absorbed into the Milford Haven Docks complex. [53] The track was later used for freight traffic servicing the fishing industry. [52]
As the 20th century dawned, Milford Haven Docks became a significant fishing port and maintained this role throughout the first half of the 20th century. Sharp decline in the fishing industry occurred in the 1950s. [51]
Hakin Dock in 1907 with HMS Aurora berthed alongside the quay. Public Domain. [53]This photograph was taken in 1911 from a similar location, photographer unknown sourced from martinshaven.com. [78]A view across Hakin Wharf in the 1950s, photographer unknown sourced from martinshaven.com. [78]
The railway lines and facilities at Milford Haven are shown in a series of map extracts below. …
The images on the link are all protected by copyright and so cannot be reproduced. They show the following Milford Haven locomotives:
AJAX (2 photographs) – Fletcher NER Class 124 LNER Class J76 0-6-0T – built 1882 by Darlington Works as NER No.598 – 1926 sold to MDC and named AJAX – 1944 scrapped – seen at Milford Haven, 04/39.
NEPTUNE – Fletcher NER Class 964 0-6-0T – built 1875 by Robert Stephenson & Co. as NER No.973 – 1914 sold to Milford Dock Co. as NEPTUNE – seen at Milford Haven, 07/38.
A number of Peckett locomotives were based at Milford Haven. [76]:
PARIS – 0-4-0ST Peckett Locomotive, built June 1938 under works number 1949 was sent to Milford Docks Company. [77]
Swansea Harbours’ 0-4-0ST Peckett No. 929 was loaned to Milford Haven Dock Co. It was recorded as present at the GWR engine shed to the North of the railway Station on 5th April 1947. [79]
Other locomotives are referred to in the sections below which relate to specific branch-lines.
2. The Milford & St. Bride’s Bay Light Railway and proposals for expansion of the Docks at Milford Haven
This railway was a proposed industrial line which would have brought coal from the St. Bride’s Bay area to Milford Haven Docks. Correspondence dated between 1911 and 1926 can be found in the Milford Docks Company Records and Correspondence which were deposited in the Pembrokeshire Records Office and are held by Pembrokeshire Archives and Local Studies. [84]
As early as 1865 proposals had been put forward for a link between pits on St. Bride’s Bay and the port of Milford Haven. The possibility was raised again in 1911 when colliery owners put forward a plan for a pontoon in the middle of Nolton Haven with an aerial ropeway carrying the coal to the pontoon for onward distribution by ships. [1: p141][85]
The Port Authority at Milford Haven saw the potential competition as a problem and put forward a railway of 11 miles in length and some significant improvements to the port facilities at Milford Haven. Connop-Price provides plans of the the proposed railway and the enlargement of the Docks. [1: p139-141][86]
Apparently, the Order for the Light Railway was obtained in 1916. Attention during the war years, was focussed on the operation of the existing docks. After the War ongoing objections from local landowners seem to have prevented further work on the proposal. [1: p141][87]
3. The Royal Navy Armaments Depot at Newton Noyes (RNMD Milford Haven)
RNMD Milford Haven is a decommissioned Royal Naval Armaments Depot located on the North shore of Milford Haven between Milford Haven and Llanstadwel in the County of Pembrokeshire, Wales. The area is known as Newton Noyes. [88]
The Newton Noyes area was previously occupied as a ship breakers yard. Known locally as Wards Yard, it was connected to the mainline railway via a spur from Milford Haven which crossed Castle Pill via a swing bridge. A cast iron pier was built in 1872 with the intention of encouraging transatlantic traffic to unload, allowed a rail / marine interchange.[88][36]
With developing tensions in Europe in the 1930s, the Admiralty began preparations for possible conflict. In 1934, Thomas Ward’s ship breaking yard was purchased. Construction work began the following year and by the outbreak of war in 1939 the Depot was ready for action.[88]
Wikipedia tells us that, “The site consisted of an extensive storage facility of six armament sheds, comprising tunnels built into the neighbouring valley. A reservoir was constructed on higher ground to the north in case of explosion or fire. All of the tunnels were connected by rail, which also extended to the pier. Housing for the naval officers was located near the former mansion of Castle Hall. At the height of World War II, it employed 1,000 people, and thereafter hundreds of people from the local area. By the 1970s its future was identified as being at risk.” [88][89]
“The tunnels that ran beneath the site were about 100 meters (328 feet) long and provided access to the underground storage. The mines were stored on a raised platform at the height of a railroad car. There was also an overhead crane with a lifting capacity of 10 tons that was used to load and unload the mines.” [92]
The site was closed in the 1980s. It was subsequently purchased by Gulf Oil, then considered as a potential large scale development site for a retail and residential complex. It was sold again in 2015 and then again in 2017. The most recent purchase was by the Port of Milford Haven. [88]
Some excellent pictures inside the depot and underground can be found on Flickr, taken by Newage, (Flickr @newage2). The following pictures are used by kind permission. [96]
There were a series of tunnels stretching back into the land behind the shore, each one secured against accidental ingress. In the 21st century the metal doors are not all secure and the site itself has been fenced off but not before a number of different people were able to make a photographic and video record of the site.
Two pictures of the tunnel entrances, (c) Newage on Flickr (Flickr @newage2) [96]The tunnels curved back into the hill side. The narrow-gauge tracks can clearly be seen in the tunnels (c) Newage on Flickr (Flickr @newage2)The tunnels were around 100ft in length, (c) Newage on Flickr (Flickr @newage2)Each tunnel led to an arched vault with a platform level to match the height of the wagon floors. In this image the narrow-gauge tracks can be seen at a lower level on the right-side of the picture, (c) Newage on Flickr (Flickr @newage2)Turning round this image shows the end wall of the vault and the travelling crane which was installed in each vault to aid in movement of armaments stored there, (c) Newage on Flickr (Flickr @newage2)A close-up photograph of the travelling crane/telpher in one of the vaults, (c) Newage on Flickr (Flickr @newage2)
Coflein’s Maritime Officer (RCAHMW) described the site in May 2012. The previous use as a shipyard is recognised and their webpage continues: “The depot utilised the site of the Newton Noyes farmstead (NPRN 4176748) and the former Oil and Manure Works (NPRN 416749). It was served by the railway line and steamer pier built in 1872. Incoming deactivated mines were transferred from the standard gauge railway to a narrow gauge system linking the massive armament sheds and the six underground magazines (see NPRNs 270769-771). Each of these magazines was sealed off by ventilated blast door and thick concrete walls. The tunnels providing access to the underground magazine are some 100m in length which opens into a large storage bay with a raised platform to allow mines to be stored at the height of the railway wagon. An overhead 10 ton crane faciliated loading and unloading. A large reservoir (NPRN 416750) was constructed by damming the stream to provide a water supply in case of fire. During World War II, the depot was used to arm minefields in the Western Approaches. After 1943, when the U-boat threat diminished, the depot’s role change from activating mines to preparing them for shipping to the North Africa for use by the Mediterranean Fleet.” [93]
After decommissioning, the above-ground facilities which remained were recorded in a baseline aerial reconnaissance survey for the CHERISH Project. (Crown: CHERISH PROJECT 2017). Produced with EU funds through the Ireland Wales Co-operation Programme 2014-2020. All material made freely available through the Open Government Licence. [93]
Royal Naval armaments depot. Baseline aerial reconnaissance survey for the CHERISH Project. (Crown: CHERISH PROJECT 2017). Produced with EU funds through the Ireland Wales Co-operation Programme 2014-2020. All material made freely available through the Open Government Licence. [93]
28dayslater.co.uk paid a visit to the site in 2011 when access was relatively easy. Their site provides photographs of these buildings from ground-level and some internal photographs. [94]
The first of a series of photographs published by 54Strat on 28DaysLater.co.uk. The full series of photographs can be accessed here. [94]
A video of the site can be seen below. … [95]
4. Milford Haven Oil Refineries
Milford Haven Refinery(Robeston) began operating in 1973 under Amoco’s ownership, but in its final days it was owned by Murco Petroleum. It was on a 1200 acre site close to Milford Haven. [97]
The closure of the refinery was announced in November 2014. The site was sold to Puma Energy in 2015 for use as a petroleum storage and distribution terminal. [97] The branch-line which served the refinery remains open as of 2022. Regular movements along the branch continue.
The branch-line from Herbrandston Junction to the refinery at Robeston. [103]Herbranston Junction with the line to Robeston Refinery heading off the image to the West. [Google Earth]Two bridges – an accommodation bridge to the right of this satellite image and Lower Thornton Road Bridge at the centre of the image. [Google Maps]Lower Thornton Rail-over-Road bridge from the North in September 2021. [Google Streetview]Lower Thornton Rail-over-Road bridge from the South in September 2021. [Google Streetview]Two more bridges – another accommodation bridge to the right and Upper Thornton Bridge close to centre of this satellite image. [Google Maps]Looking East along the branch-line from Upper Thornton Bridge [Google Streetview, September 2021]Looking West along the branch-line from Upper Thornton Bridge [Google Streetview, September 2021]The Junction between the Robeston Line and that which used to serve the Esso Refinery to the South. [Google Maps]The rail-over-road bridge shown on the Google satellite image above, from the South [Google Streetview, October 2021]The rail-over-road bridge shown on the Google satellite image above, from the North [Google Streetview, October 2021]The sidings at the Western end of the branch-line appear at the centre of this satellite image. [Google Maps, October 2021]The sidings at the Robeston Refinery site. Some of the tank wagons still bear the Murco logo. [Google Streetview, October 2021]
The Gulf Refinery, Waterston was opened in August 1968 by Queen Elizabeth II. The plant, constructed at a cost of approximately £35 million, produced a range of petroleum products and occupied an area of 300 acres (121.4 ha).[2] Up to 119,000 barrels (18,900 m3) of oil could be processed a day at the facility. [98]
Gulf Oil’s crude oil was principally obtained from Nigeria and Kuwait through joint ventures with BP. Crude was shipped to Bantry Bay in Ireland in 312,000 DWT (deadweight ton) ships. From there it was shipped in 100,000 DWT ships to Gulf’s refineries in Milford Haven, Denmark and Rotterdam. The Milford Haven refinery was integrated with a petro-chemical plant, using oil products from the refinery as feed-stock for the chemical plant. It employed about 280 people. About 23% of the refinery output was exported by train via a rail link to the national rail network. About 75% was exported by ship. [98]
The line ran roughly North-South from to the refinery which was sited to the East of Milford Haven just a short distance beyond the RNMD Milford Haven site referred to above.
The Gulf Oil Refinery close to Milford Haven. This small extract from the Ordnance Survey Landranger map shows the site and particularly the rail link entering the site from the North.
The line ran roughly North-South from to the refinery which was sited to the East of Milford Haven just a short distance beyond the RNMD Milford Haven site referred to above. The pier and rail connection to that site at Newton Noyes can be seen on the left of the image above.
The video below comprehensively covers the design and construction of the 4 km long branch serving the oil refinery. [99] The refinery closed, eventually, in 1997.
The construction of the Gulf Refinery Branch in 1967/1968. [99]
The route of the old branch leaves the national network to the West of the A477 as can be seen on the satellite image below.
The Gulf Refinery Branch left the national network to the West of the A447. [Google Maps]Curving to the South, it passed under Neyland Road (A477) to the East of the junction between the A477 and the A4076. [Google Maps]The view North along the route of the closed branch-line from the bridge at Neyland Road. The cutting is becoming overgrown but its route can still be made out. [Google Streetview, March 2022]The view South from the road bridge. Again, the cutting can be made out relatively easily, although the parapet height is increased on this side of the bridge. [Google Streetview, March 2022]The route of the line turns back towards the East before again turning Southwards and approaching Waterston and the Refinery site. [Google Maps]The view North from Main Road, Waterston (B4325), the old line is in cutting. [Google Streetview, March 2022]Looking South from the same bridge, the route of the line is marked by the parallel lines of trees heading into the distance. [Google Streetview, March 2022]The fan of sidings at the southern end of the branch still appear on the satellite imagery of the 2020s. [Google Maps]A view into the old refinery site in August 2010. The photographer comments: “The former Gulf oil refinery at Waterston closed in 1997 and the site is now used for oil storage and the import of liquid natural gas (LNG). The railway that served the plant is evidently no longer in use.” (c) Stephen McKay, authorised for use under a Creative Commons Licence (CC BY-SA 2.0), [104]
The Esso Refinery was opened in 1960 by the Duke of Edinburgh. Construction cost £18 million and the refinery had the initial capacity to process 4.5 million tons of crude oil a year. As originally conceived the refinery worked in conjunction with Esso’s older, larger refinery at Fawley on Southampton water. Milford Haven refinery supplied the west coast and Fawley the rest of the country. Milford Haven also supplemented Fawley’s fuel oil deliveries to the London area. The refinery shipped semi-refined heavy gas oil to Fawley for further refining. There were also shipments to Ireland and northern Europe. Most of the refinery’s crude came from the Persian Gulf shipped in tankers such as the Esso Scotia of 249,952 deadweight tons. [101]
Wikipedia tells us that most of the product from the refinery, about 95%, was sent out by ship. However, the refinery was connected to the national rail network. Trains carrying liquefied gas were sent to the Midlands and Scotland. The refinery closed down in March 1983. [101]
This extract from streetmap.co.uk shows the line of the railway access to the old refinery as a dotted line extending from the remaining branch-line to Robeston Refinery. [103]
The rail link ran from the national network at Herbrandston Junction via the refinery at Robeston to the Esso Refinery. The picture below, at first sight (and in the light of the notes reproduced beneath the image), suggests that it is a picture of that link, but actually shows sidings at Milford Haven Station. The line to the Esso Oil Refinery was build much later than 1910!
Postcard titled “Glam. R.E.(T) en route for South Hook Fort 23/07/10”. Shows the Glamorganshire Royal Engineers marching from Milford Haven railway station en route for South Hook Fort, 23 July 1910. Line of private owner railway wagons including “J.W.Paton” in the background. The Esso Oil Refinery later occupied the site. Unused. [102]The junction with the Robeston Branch is just off the top-right of this satellite image. The route of the branch to the Esso refinery appears as a light sand coloured line through the scenery to the East of the road which follows the East boundary of the Robeston plant and sidings. [Google Maps, October 2021]Looking North along the branch-line from the track shown close to the bottom of the satellite image above. The view South was obscured by bushes across the line.[Google Streetview, April 2011]This next satellite image shows the line entering at the top-right before passing under Dale Road and curving to the West and to the South, leaving the image at the bottom-left. [Google Maps]The line ran in cutting and then under Dale Road. This view looks back to the North from Dale Road bridge. [Google Streetview, November 2021]Looking South from the same location. The bridge visible beyond the parapet of Dale Road bridge appears to be a pipe-bridge. [Google Streetview, November 2021]The final length of the old branch line is shown on this satellite image as it approaches the site of the refinery. [Google Maps]
The Pembroke Refinery is to be found at Rhoscrowther in the community of Hundleton on the South side of the Milford Haven opposite the town of Milford Haven. It first came on stream in 1964 and was Regent/Texaco’s only British refinery. The refinery occupies a prominent position on the south bank of the Milford Haven Waterway and can be seen for many miles. Around a quarter of the site is within the Pembrokeshire Coast National Park which was created in 1952. [100]
The refinery came on stream in 1964. It was initially owned by the Regent Oil Company, a large domestic marketer of Trinidad-produced oils. Regent was fully acquired by Texaco in 1956 (although the brand name was only phased out in the UK in favour of Texaco in the late 1960s). When it first came on-stream, most of the crude oil for the refinery came from the Middle East with some from Libya, Venezuela and Trinidad. Products were shipped to all parts of Britain 96 per cent going by ship as there was no rail link to the national rail network. [100] Valero, who currently own the site say: “The refinery receives all of its feedstocks and delivers some of its products by ship and barge via deepwater docking facilities along the Milford Haven Waterway, with its remaining products being delivered through our Mainline pipeline system and by trucks.” [105]
Pembroke refinery also supplied fuel oil to the nearby oil-fired 2,000 MW Pembroke power station (commissioned in 1968). Chevron acquired Texaco in 2000. Valero Energy Corporation bought the refinery from Chevron in 2011. [100]
5. The Freystrop Colliery Railway
The Freystrop Colliery Company was formed in July 1900 to take over and redevelop the site of the former Cardmakers’ Pool at Freystrop. [1: p134, 136][107]
On 10th July 1901, the Haverfordwest and Milford Haven Telegraph and General Weekly Reporter for the Counties of Pembroke Cardigan Carmarthen Glamorgan and the Rest of South Wales reported That works at Freystrop Colliery were in an advanced state and that prospects for the coal industry were promising. At the beginning of their article they wrote:
“The works at the newly-opened colliery at Freystrop are now in a very satisfactory state of progress. The company have laid down the latest machinery and have spared neither trouble nor expense in providing the best possible plant available. The main shaft, which has been sunk in the centre of their taking (extending from the Freystrop road to the railway line at Johnston) has now been brought down to a depth of over 50 yards. For 35 yards of this distance an excellent brick lining, with occasional patches of concrete where extra strengthening was required, has been laid on the sides, but, as the rock has now been reached, there is no necessity for continuing it further.” [106]
At that time, the Company still had a great deal of work to do before all the preliminaries were finished. The prospects were seen as very promising, and, as around £100 was already being expended on weekly wages, locally hopes were high for a great future. [106]
The reconstruction of the mine took time, “but it became obvious that the anticipated output would make the previous practice of carting coal and culm either to the quays on the river or to Johnston station quite impractical. As the colliery was only one and a half miles east of Johnston, the natural solution was the construction of a rail link.” [1: p136]
Much of the land between the colliery and the railway station was a marsh. Nevertheless the Pembroke Herald reported in the Autumn of 1901 that work would begin on the branch-line. [108]
Connop-Price tells us that the construction of the railway and ancillary works took the best part of two years. He tells us that the Pembrokeshire Herald reported that, ” now it is possible for the wagons belonging to the company to be filled under the huge screen, five at a time, with different qualities of coal.” At the time of this report the company output was around 400 tons of coal and culm per week and expected to rise significantly. [1: p136][109]
Connop-Price notes that directors of the Milford Docks Company were on the board of this venture and that as a result the connection to the mainline was laid facing south to Milford Haven. The venture encountered geological problems and output was intermittent. Eventually it was decided to abandon the enterprise and the branch-line was closed officially in 1911. Connop-Price goes on to state that, “In its brief career it had been worked at different times by two tank locomotives. The first cannot be identified now., but the second was an 0-4-0 saddle tank built in 1905 by Andrew Barclay and Co. of Kilmarnock. [110] The locomotive shed was situated about 300 yards from the junction at Johnston, facing towards Freystrop.” [1: p136]
The Freystrop Colliery Line as shown on the 6″ Ordnance Survey of 1906 and which was published in 1908. Enlarged extracts at Johnston Station and at the Colliery are shown below. [110]St. Johnston StationFreystrop CollieryThe thin red line shows the approximate route of the branch line leaving Johnston Railway Station as it appears on modern satellite imagery. [111]
Coflein describes the site of Johnston station as, “formerly Milford Road Station on the South Wales Railway, now merely site of a halt, with all buildings demolished.” Their site carries two photographs of the original station, these are shown below. [113]
Johnston Railway Station before its demolition and the singling of the line through the station. [113]Johnston Railway Station looking North from the South end of the platform. This picture was taken in 2018, (c) Stehen McKay and made available under a Creative Commons Licence (CC BY-SA 2.0). [112]The modern satellite image at the location of Freystrop Colliery has the approximate line of the railway and the colliery and screens locations highlighted. [111]Looking West at the point which the old branch line crossed Vine Road (A4076). [Google Streetview, March 2022]Looking East at the point which the old branch line crossed Vine Road (A4076). [Google Streetview, March 2022]
6. The Hook Colliery Railway
The National Library of Wales holds the papers associated with Hook colliery. They tell us that “Hook Colliery, Llangwm, Pembrokshire, was opened in 1850, and operated until 1947. An attempt was made in the 1950s to re-open it as a private mine by Hook Colliery Co., under T. W. Harcourt Roberts., geologist and mining engineer, and General Manager and Managing Director of Hook Colliery, Pembrokeshire.” [115]
This photograph was shared by Mark Lewis on the Pembrokeshire – I LOVE IT! Facebook Group on 30th May 2018. It shows Hook Colliery but is not dated. [119]This photograph was shared by Stephen Hughes on the Pembrokeshire – I LOVE IT! Facebook Group on 31st May 2018. It shows Hook Colliery again but is dated 1912-1928. [120]
At its peak, over 40,000 tons of anthracite was mined at Hook colliery each year and employment provided for well over 100. Until the rail link was built in the early 1900’s to link the village with the main line at Johnston the vast majority of coal left by sea from Hook Quay. [114]
Connop-Price tells us that the “Margaret Pit was sunk at Hook in 1910, and initially coal was moved to Hook quay in small trams over the narrow-gauge railway built in 1888 to serve the older West Park colliery. This was an endless rope-worked tramway, driven by a stationary engine at the colliery. The side-tipping trams … were not grouped together as a train, but spaced out about thirty yards apart along the line. This space was needed to give time for the loaded trams to be knocked off when they reached the incline, and the empties hooked on. .. At the quay the coal had to be transferred to barges which were then worked down to Llangwm Pool for loading onto sea-going vessels. Later the river was dredged in the vicinity of Hook quay to allow small coasters to come alongside for loading, but this system of transport was still slow and labour-intensive, and a handicap to the colliery.” [1: p136]
This photograph was shared by Mark Lewis on the Pembrokeshire – I LOVE IT! Facebook Group on 30th May 2018. It shows one of the trams used by Hook Colliery in the years before the railway was constructed. [118]Hook Colliery again, this time one of the trams is visible on the right side of the image. This photograph was shared by Stephen Hughes on the Pembrokeshire – I LOVE IT! Facebook Group on 25th May 2017. [120]
The Colliery Company owned several sea-going vessels most of which traded to the French and London markets. The coal was in great demand for smelting and also heating the sophisticated homes of the capital city. It has been recorded that Queen Victoria had a distinct preference for the practically smokeless Hook anthracite and it was used extensively in the Royal palaces. [114]
Some detail of the operations of the various sea-going ships owned and used by the colliery can be found here. [114]
The Pembrokeshire Virtual Museum entry for Hook Colliery tells us that, “Hook Colliery Railway operated as a standard gauge mineral line and ran from Johnston station on the G.W.R. to Hook Colliery some 4 miles away. During the late 1920s the Pembrokeshire coal industry appeared to be on the verge of collapse with only the collieries at Hook and Bonvilles Court (closed in 1930) still in operation. It was clear that if Hook Colliery was to survive then new investment was necessary especially in moving coal to its markets. … It was decided in 1929 to build a railway line to move the coal instead.” [116]
Despite the need for a railway being recognised as early as 1919, nothing, however, was done until 1929 when the decision was taken to construct a railway. [1: p136/137] “The railway was built in 1930 and was completed by November of that year. It ran for part of its length along the route of a disused railway line to Freystrop Colliery (please see the section on this line above), which saved considerable engineering work.” [116]
Connop-Price tells us that the cost of the work was around £40,000, and “this time the junction at Johnston was laid facing North to allow direct running towards Haverfordwest and Carmarthen. … Pembrokeshire Council raised an objection to the level crossing over the main road near Johnston (one of five such crossings on the line0 but eventually the problem was resolved. A siding for the use of the nearby Johnston brickworks was also provided. a permanent connection with the GWR mainline was made on 13th November 1930, and the railway opened to traffic.” [1: p137]
Hook Colliery Railway sometime in the 1930s or 1940s. This photograph was shared by Stephen Hughes on the Pembrokeshire – I LOVE IT! Facebook Group on 31st May 2018. [121]
“Once completed the railway enabled easy export of coal and production then rose until it peaked in 1934 when 40,000 tons were produced, the largest ever annual total from a Pembrokeshire colliery and some 35,000 tons were moved by the railway. From that point on, however, output declined and in 1945 only 20,000 tons were produced. The colliery and its railway were nationalised in January 1947 (Hook was the only Pembrokeshire colliery to be nationalised) but the pit flooded in that year and it was considered uneconomic to put it back into operation. In early 1948, the railway closed after moving the last of the stored coal.” [116]
“The railway operated two of its own 0-6-0 saddle tank locomotives, neither of which appear to have carried names. It also had its own private owner wagons which moved the coal on the railway and then via the G.W.R. to its markets. At Johnston station exchange sidings were built from where Hook wagons would be collected and deposited by G.W.R. freight trains.” [116]
Connop-Price mentions the two locomotives: “The contractors’ locomotive, D.M.D.Ltd No.10, an 0-6-0 saddle tank built by Peckett of Bristol, was retained, but another engine said to have been at Hook, an 0-4-0 saddle tank built by Hawthorne Leslie, was transferred to Davies, Middleton and Davies at Caerphilly.” [1: p137]
Later, by 1934, “the colliery railway had acquired an engine from the Mersey Docks and Harbour Board, an 0-6-0 saddle tank built by Avonside of Bristol in 1910.” [1: p137/138]
The company owned a modest number of open wagons.
This photograph was shared by Mark Lewis on the Pembrokeshire – I LOVE IT! Facebook Group on 30th May 2018. It shows one of the fleet of wagons owned by Hook Colliery. [117]The first length of the new branch to Hook Colliery, as shown on the 6″ Ordnance Survey of1948, published 1953. Note the North facing junction with the GWR mainline. The remnants of the old branch are still visible curving to the south to the railway station. [124]The north facing connection to the mainline is illustrated in this modern satellite image. The newer alignment rejoins the older alignment to the West of Vine Road. The newer line followed the earthworks of the older line as far as the Freystrop Colliery location where the old line terminated. The route can be seen under the section about Freystrop Colliery Railway above and then picked up again in the satellite image below. [126]Two level crossings feature in this next length of the line. Freystrop Colliery was in the woodland North of the line on the left-side of this image. The line curved sinuously through the landscape crossing first a lane which ran North/South between Targate Road and Cardmakers’ Pool Colliery then Targate Road itself (at the bottom-right of this image). [127]The location of the Targate Road level crossing the red line shows the approximate line of the old railway which ran in front of what is now a white-painted wall on the left across into the bushes and undergrowth on the right, just behind the first car travellign towards the photographer. [Google Streetview, March 2022]The of the branch South of Freystrop village and running through to the western edge of the Hook Colliery site, as shown on the 6″ Ordnance Survey of1948, published 1953. [124]The left-hand half of the area shown on the map above shows the line crossing to the North of Puddleduck Bridge. [128]Looking West towards Johnston. The old railway followed the dirt track before crossing Troopers Inn/ Freystrop Cross at level. [Google Streetview, July 2021]From the same location looking East towards the Colliery. The old line followed the line of the dirt track after crossing the road. [Google Streetview, July 2021]The terminus of the branch at the Hook Colliery site, as shown on the 6″ Ordnance Survey of 1948, published 1953. [125]The approximate lines of the standard gauge railway and the tramroads at the Hook Colliery Site. [129]Hook Colliery again, this time showing the terminus of the standard-gauge branch-line. This photograph was shared by Stephen Hughes on the Pembrokeshire – I LOVE IT! Facebook Group on 25th May 2017. [123]
76. “I confess that, since the age of four, I have had a passion for steam locomotives, especially those of the former GWR. It all started when my mother took me to see one of the Milford Docks Company Peckett locomotives, which would have been driven by the late Mr Billy Pugsley. I was lifted onto the footplate and given a ride, and I was hooked!” … words from Gordon Vyne Adams quoted by Jack Riley; That reminds me of… railways, locomotives and their crews; in the Western Telegraph, 19th September 2021.
A holiday in West Wales in the early Autumn of 2022 led to a little research on the railways in the area.
This is the fourth article about Pembrokeshire’s Railways. The first focussed on the pre-railway age, the second focussed on the mainline railways of the county. The third article focussed on the industrial railways in the vicinity of Milford Haven. The links to these three posts are provided below. This article looks specifically at the Saundersfoot Railway in Pembrokeshire.
The Saundersfoot Railway (covered in this article and a follow-up article).
The Milford Haven Docks Railways (covered in a previous article).
The Milford & St. Bride’s Bay Light Railway and proposals for expansion of the Docks at Milford Haven (covered in a previous article).
The Royal Navy Armaments Depot at Newton Noyes (RNMD Milford Haven) (covered in a previous article).
The Royal Navy Armaments Depot at Trecwn (RNAD Trecwn) (covered in a future article).
Milford Haven Oil Refineries (covered in a previous article).
The Freystrop Colliery Railway (covered in a previous article).
The Hook Colliery Railway (covered in a previous article).
The Saundersfoot Railway
“Saundersfoot began life as a few medieval cottages in a forest clearing in Coedrath, a hunting ground of the Norman Earls of Pembroke. Five hundred years later it had grown into thriving coal port with its abundance of anthracite coal, and exported 30,000 tons annually from its harbour.” 150 years on when the coal industry vanished Saundersfoot evolved into a seaside resort. [132]
“‘Saundersfoote’ was first referred to by the Elizabethan Historian George Owen when describing the coal measures of Pembrokeshire, however on county maps from the 16th century it was referred to the village as St. Issells, the name of the parish. A water course paid rent for by Walter Elisaunder in 1332, Elisaunder’s Ford may originally have given the hamlet its name, being shortened to Saundersford.” [132]
Wikipedia tells us that the Saundersfoot Railway was an industrial narrow-gauge railway in Pembrokeshire, Wales, built between 1830–1834, to connect Saundersfoot harbour to the local coal mines. Trading began on 1st March 1834 and within a few years it comprised a small network of over 4 miles (6.4 km) along the coast from Saundersfoot to Wisemans Bridge and on to the collieries at Stepaside and Kilgetty, and later, running inland to Thomas Chapel near Begelly. [1: p131][49]
The Saundersfoot Railway provides the first example in Pembrokeshire of the joint construction of a harbour and tramway, and remained independent until it closed in 1939.[1: p128][49] The first image below comes from the very early 19th century and shows Saundersfoot before the construction of the harbour and railway. …
The 1809/1811 Ordnance Survey shows Tenby (at the bottom of this extract) and Saundersfoot village before the construction of the harbour and railway [130]This enlarged extract from the 1906 6″ Ordnance Survey which was published in 1908 focusses on the harbour at Saundersfoot and shows the two main tramroad lines. One heads immediately West along Milford Street and off the map extract centre-left. The other heads along what was then called Railway Street and leave the map extract centre-top. [131]
I guess that it is appropriate to ask whether it is a tramway/tramroad or a railway. I have chosen to treat it as a ‘railway’ because of its longevity, it’s own claim to be a ‘railway’ and because, ultimately it’s tracks were re-laid with flat bottom edge-rails on wooden sleepers which made it as much of a railway as any other line. Indeed Connop-Price says that “the Saundersfoot Railway and Harbour Company was an important undertaking in the context of Pembrokeshire. As it developed it metamorphosed from early tramroad to true railway (my emphasis), and by so doing was, in transport terms, a pivotal enterprise.Futhermore it was the earliest example in Pembrokeshire of an idea pioneered in South Wales – the planning of a railway and harbour as a single combined undertaking.” [1: p128]
High quality anthracite was found in the Saundersfoot area which was part of what became known as the Pembrokeshire Coalfield. The likely quantities involved were large and it quickly became essential to create a tramroad to move the extracted coal to the coast for onward shipping. “The Saundersfoot Railway and Harbour Company was formed in 1828 to build a harbour at Saundersfoot and a tramway to connect it to the collieries around Begelly and Stepaside. In 1829, Parliamentary authorisation was given for the Saundersfoot Railway and Harbour Company. This was to be a four-feet gauge horse operated tramroad, connecting collieries with a new harbour at Saundersfoot.” [49]
This map of the Saundersfoot Railway was shared on the Tenby and Saundersfoot Through Time Facebook Group by Mark Davies on 26th November 2015. [148]
The Act authorised a length of tramroad from the new harbour to pits in the hamlet of Thomas Chapel, Northwest of Begelly – close to 5 miles inland. “Two branches were also approved – the first from Ridgeway near Saundersfoot due West to Morton, … a distance of about a mile, and the second running North along the coast from the harbour to Wiseman’s bridge.” [1: p128 &131]
It is interesting to note that prior to the coming of the tramroad through Wiseman’s Bridge to Stepaside and Kilgetty a canal, the Kilgetty Canal, was built about 1792 to link collieries in Kilgetty/Stepaside to Wiseman’s Bridge, where high quality anthracite was carted onto beached schooners for dispatch to UK and European customers. The canal was only 10’-12’ wide and without locks, only tub boats would have operated along it. Being poorly designed, the canal was not successful and a horse-drawn tramway to Wiseman’s Bridge replaced it. Little remains of the canal today, except for the canal basin and the sluice at Wiseman’s Bridge, which controlled the level of water in the canal. [144]
Coflein tells us that “the harbour was built in 1829-30 … for the exportation of anthracite. By 1837, the harbour had five jetties handling coal, iron ore, pig iron and firebricks from local companies and mines. In 1884, Sailing Directions noted that the southern pier … ‘has a spur for checking the in-run of the sea, the entrance faces east, and is 35 yards wide; off which is a warping buoy. The bottom on the west side of the harbour is hard, but the rest consists of mud and sand, with a shelving beach in the northeast corner. At the south pier end, a yellow ball is hoisted while there is a depth of 8 feet water within the entrance; at night a red light is shown during the same time, which is elevated 15 feet above the highwater. Vessels of 16 feet draught can enter the harbour on spring tides, and those of 9 feet on neaps; two qualified pilots attend every tide, and whose charge is by agreement. In entering, it is necesssary to luff short round the south pier head and check the vessel’s way in time?’ Those Directions also note: ‘Tramroads connect the western side of the harbour with the collieries, which are situated about 3 miles within.’ [133]
Coflein comments: “The Saundersfoot railway was built to link Bonville Court mine and others to the Stepaside Ironworks (NPRN 43501, 43052).” [133] It seems, however, that Boneville Court Colliery and the Ironworks were built a little later than some of the other collieries opened, [134] so it seems fairer to say that a component of traffic on the line was generated by the existence of the Stepaside Ironworks until its closure in the mid- to late-1870s.
In its original form the Saundersfoot Railway was an edge-railway but it was like a tramroad in that the Company provided a transport facility for which it charged tolls to users of the line. Connop-Price says that “such a line was an entirely logical development from the era of canals and turnpike trusts, but it was only adequate when traffic was not continuous, and haulage was by horse or oxen.” [1: p131] As we have already noted, the original cast Iron rails supported on stone-blocks had to be replaced and the line developed into a railway, albeit of 4ft gauge (perhaps 0.75in wider?), rather than standard-gauge and, as we will see, a very reduced headroom.
This photograph shows one of the original cat-iron fish-bellied rails of 4ft length used on the Saundersfoot Railway. They spanned bewteen stone blocks laid in the ground. The rails were made locally. The image was shared on the Tenby and Saundersfoot Through Time Facebook Group by Mark Davies on 26th November 2015. [151]
The authoritative text is ‘The Saundersfoot Railway’ written by M.R. Connop-Price which is No. 28 in the Oakwood Press series of Locomotion Papers. [136] Oakwood Press is now owned by Stenlake Publishing but existed independently from its founding in 1931 until 2016. The early editions of this book were all published from Usk in Monmouthshire. Connop-Price has also written ‘Pembrokeshire: the Forgotten Coalfield, publihed in 2004 by Landmark Publishing, Ashbourne Derbyshire which contains a significant chapter on Mining Transport. [1: p120-144]
The Saundersfoot Railway had two main mineral lines which were fed by a number of branches. Horse-power was used at first with horses pulling up to three laden trams (wagons). Wikipedia tells us that the two main lines were:
A line connecting the collieries and the later ironworks close to Stepaside which ran along the coast to the harbour in Saundersfoot. [32][49]
A line from Thomas Chapel colliery near Begelly to the harbour in Saundersfoot. This line passed beneath the GWR station in a tunnel at King’s Moor and had an incline around half-a-mile from the harbour which had a gradient of 1 in 5. [49]
This, while true, somewhat simplifies the development of the line. We noted above that the 1829 Act authorised two branches, one of which was the nascent form of first line mentioned immediately above, although it limited the line running North to a terminus at Wiseman’s bridge until the harbour was operational at Saundersfoot. [1: p131]
The mainline running towards Begelly and Thomas Chapel was substantially complete between Begelly and the harbour by the time the Company officially began trading on 1st March 1834. The branch to Moreton, however, was not constructed immediately. The line to Wiseman’s Brdige was substantially complete by June 1834. Connop-Price tells us that the line suffered a number of rock falls and, as a result, broken rails and it seems highly unlikely that the line saw any significant use. [1: p131]
Both the branch along the coast and the harbour suffered storm damage. An extension to the North pier of the harbour narrowed the harbour entrance and gave much greater protection to vessels within. [1: p131]
It was decided to realign the tramroad to Wiseman’s Bridge and, when another Act of Parliament was needed to renew powers to build the Moreton branch (1842), the realignment of the coastal line was included as well as an extension to Lower Level Colliery at Kilgetty. “The line to Wiseman’s Bridge was rebuilt on a slightly altered alignment, and at a slightly higher level beneath the cliffs North of Coppet Hall; the extension to Kilgetty gradually steepened over its final mile until it reached a gradient of 1 in 32 on the approaches to Lower Level Colliery.” [1: p132] That 1842 Act also authorised another branch from Kingsmoor to Broadmoor and Masterlands, although a decision not to contract that line was made before the middle of the 1840s. {1: p132]
On the line West from the harbour after about a half-mile journey there was a self-acting incline which worked well for those exporting goods from the harbour bringing it down the line. The loaded trams lifting the empty trams up the incline. It did not work well for those importing freight such as pit-props or stone. Eventually a winch was provided so as to avoid damage to the land alongside the incline. [1: p132]
On learning of the South Wales Railway’s plan to build a branch from its mainline to Pembroke, the Saundersfoot Railway’s board of directors decided to construct a line to meet the GWR at Reynalton. Their scheme was authorised in 1846. However, the South Wales Railway failed to provide the branch to Pembroke. The Saundersfoot Railway’s proposed Tenby, Saundersfoot & South Wales Railway and Pier Company line was not built. [49] Another Company built a standard-gauge line between Pembroke and Tenby -The Pembroke and Tenby Railway (in 1863), and then extended that line to meet the South Wales Railway at Whitland. (in around 1865). Moreton Colliery got its own siding on that line but Boneville Court Colliery did not. Coal drops were provided at the point where the Saundersfoot Railway passed under the standard-gauge line. [1: p133] Eventually Saundersfoot Station was built at this site.
As part of a modernisation project, the whole line was upgraded to a narrow gauge railway in 1874. The tramway along the coast was re-laid with flat bottom rails on wooden sleepers allowing a locomotive to be used on the line to Stepaside. [49]
In April 1874 an 0-4-0ST built by Manning Wardle of Leeds (Rosalind) was purchased and worked the line between the harbour and Lower Level Colliery. “Horses were retained to work the portion of the line from the harbour to the incline, and also from the top of the incline to to the exchange siding at Saundersfoot Station. The failure of collieries at Thomas Chapel, and the decline in mining at Begelly, meant that by this date traffic worked through Kingsmoor Tunnel was negligible.”[1: p133]
The track north of the standard-gauge line was lifted in 1887, however, in 1914 it was re-laid and a new 1.5 mile branch line built to support the opening of a short-lived colliery at Reynalton. A new engine was purchased for this purpose. [49]
In 1889/1890 the track between the harbour and the incline was re-laid to allow it to be worked by Rosalind. In 1893, Bonevilles Court colliery was provided a siding from the standard-gauge line and the exchange sidings at Saundersfoot Station fell into disuse as did the line between the incline and the station. By this time harbour traffic was limited to coal and culm from two collieries, Bonevilles Court and Lower Level. [1: p133]
By the late 1920s coal mining was in recession and the line closed. In 1932 a brief resurgence in local mining led to the lines being briefly reopened. [49]
However, only seven years later, due to financial considerations and the workings becoming exhausted, the railway finally closed on the eve of the Second World War. Subsequently, the rolling stock along with the tracks were scrapped for use in the war effort. [49]
Locomotives – Both engines used on the line had low profiles so they could work the tunnels. Although Rosalind was scrapped, Bulldog continued to work at Llanelli steel works until 1951. [49]
Name
Builder
Wheel arrangement
Date
Works number
Notes
Rosalind
Manning Wardle
0-4-0ST
1874
476
Bulldog
Kerr Stuart
0-4-0ST
1915
2040
Purchased from the New Reynalton Anthracite Coal Company in 1921
This table comes directly from the Wikipedia article about the Saundersfoot Railway [49]
We have already noted that there were two main lines which met at Saundersfoot Harbour. It seems to be a good idea to start at the harbour and to look at each line in turn. This article covers the line to Stepaside via Wiseman’s Bridge. A second article will cover the line which heads West from the Harbour.
Saudersfoot Harbour to Stepaside via Wiseman’s Bridge
We start this journey at Saudersfoot Harbour with two very early views of the harbour and its tramroad.
From the harbour we head out along what was Railway Street (now called ‘The Strand’). First we have a series of views of Railway Street and its railway from the late 19th century and the early 20th century.
Before Saundersfoot Harbour’s development, coal was loaded into boats at Swallow Tree Bay (South of Saundersfoot) and Coppet Hall, (thought to derive from ‘coal pit haul’). [169]
The 1906 6″ Ordnance Survey of Coppet Hall showing the old tramroad curving from the tunnel under Craig-y-Mor to then pass through a very short tunnel while traveling to the East on the North side of the beach. The following tunnel entrance can just be made out to the top-right of the image. [170]The line of the old railway through Coppet Hall follows the line of the Coastal Path highlighted by the red line, dashed through tunnels. [Google Maps, June 2022]An information board at Coppet Hall giving some details about the Saundersfoot Railway, (c) Gareth James, 20th May 2010, authorised for us under a Creative Commons Licence [CC BY-SA 2.0) [183]This view from the tunnel mouth of the coastal line to Wiseman’s Bridge faces back towards Saundersfoot with Coppet Hall Beach visible in the centre of the image beyond the railway tracks. The image was shared by Stephen Hughes on the Pembrokeshire – I LOVE IT! Facebook Group on 12th January 2018. [138]A view back to Saundersfoot along the Coastal Path from approximately the same location as the monochrome image above. Around the curve ahead is a short tunnel before Coppet Hall and its beach which can be seen beyond the railings. [Google Streetview, June 2016]Turning through a half-circle the view looks along the tunnel from the position of the last image. [Google Streetview, June 2016]The 1906 6″ Ordnance Survey shows the tramroad/railway heading North after leaving the tunnel at the bottom of the map extract, closely following the sea wall. [171]the coastal path continues to follow the route of the old railway [171]The North portal of the railway tunnel which appears at the bottom of the last two images and carries the modern coastal path, looking back South towards Saundersfoot. [Google Streetview, June 2016]Turning 180 degrees, this photograph shows the coastal path and hence the old railway’s route heading North towards Wiseman’s Bridge. [Google Streetview, June 2016]The 1096 6″ OS Map shows the railway continuing North through an S-bend along the sea wall and then running along the highway yo Wiseman’s Bridge. The Iron Foundry was Woodside Iron Foundry. Coflein says that it was serves by a siding from the Saundersfoot Railway, (although the siding does not appear on this edition of the Ordnance Survey) It is shown on OS 1st edition mapping of 1889. The tramway siding terminated in the yard of a disused brickworks – comprising a large building and four kilns. Opened in 1849/50, Hean Castle Brickworks produced firebricks from black clay underlying the coal seams and were reputedly the best in the country. [172][173][174]The 1887 6″ Ordnance Survey published a year or so later shows the Iron Foundry and Brickworks together with the tramroad branch which ran from the Saundersfoot Railway in-between the two curves of the S-bend in the line. It then ran along the South side of the Foundry before turning to the North, close to the Brickworks. [175]This modern image shows the location at which the short siding referred to above diverged from the Saundersfoot Railway. [Google Streetview, June 2016]The same area as shown on the 1906 6″ OS map extract above which the line of both the coastal path and railway marked by the red line. The Ironworks discussed above were sited in the grass area to the West of the railway to the North of the woodland. The brickworks were to their West. [172]This photograph shows the point at which the old railway joined the verge of the road to Wiseman’s Bridge. It is takenlooking back towards Saundersfoot with the old railway’s route on the left adjacent to the sea-wall. [Google Streetview, June 2016]The old railway crossed the coast road and followed Back Lane northwards. [Google Streetview, June 2016]Wiseman’s Bridge. The old railway ran off the left of this image at the top of the steps which can be seen on the left. Ahead between the steps and the bridge Kilgetty Canal can be glimpsed. The railway and Canal followed each other up the valley. The canal passed under the nearest arch of Wiseman’s Bridge. [Google Streetview, March 2022]Wiseman’s Bridge and Step Cottage on 28th January 2010. The Saundersfoot Railway ran on top of the wall in front of the cottage along what is now called Back Lane. There was a passing loop on the railway which ran from the front of the cottage to the right of the image. It can be seen at the top of the 1906 6″ OS map extract above and at the bottom of the 6″ extract below, (c) Humphrey Bolton, authorised for use under a Creative Commons Licence (CC BY-SA 2.0). [176]The Kilgetty Canal and towpath seen from the road crossing Wiseman’s Bridge. [Google Streetview, March 2022]The Kilgetty Canal Basin between the sea and the coastal road/path. The Saudersfoot Railway ran at the top of the wall visible to the right of the picture. [Google Streetview, March 2022]The old railway heads North up the valley from Wiseman’s Bridge. We have already noted the passing loop which features at the bottom of this map extract. [The old railway route runs North from Wiseman’s Bridge along Back Lane. Immediately South of what is called Wiseman’s Bridge Cottage on the OS Map extract. Back lane turns away to the left and the route of the old railway continues up the valley. [177]The Saundersfoot Railway followed Back lane heading North from Wiseman’s Bridge. The canal can be seen on the right of the image. [Google Streetview, July 2021]The point at which Back Lane and the Railway diverged as it was in July 2021. A footpath now follows the old railway. [Google Streetview]The old railway turned gradually towards the West as it ran North. The 1906 6″ Ordnance Survey again. [178]The same area as on th emap extract. There is no need to mark the route of the old railway as the public-right-of-way which follows it can be clearly seen on this 21st century satellite image as provided by the National Library of Scotland (NLS). [178]This next extract from the 1906 6″ Ordnance Survey covers the remaining length(s) of the line to Stepaside. The line served a number of industrial sites. Low Level Colliery, Kilgetty Colliery and the Saw Mill are all shown as having connections to the railway. [185]The modern satellite image supplied by the NLS covers the same area as the 6″ OS Map extract above but it shows a dramatically different transport situation! The old railway and sidings have gone and the most prominent feature is the A477 running North-South across the image. [185]This extract from the 1887 Ordnance Survey shows, in addition to the Saw Mill appearing on the 1906 revision, the Ironworks and Grove Colliery which were at that time alongside the Railway branch to the South of Stepaside. The Ironworks and the Saw Mill (in 1887) had their own connection from the mainline of the Railway in the valley to the East of Stepaside, having a bridge across the canal adjacent to the Ironworks. The truncated network in the vicinity of the Ironworks appears on the 1906 survey, the full extent appears on this extract. Elsewhere in the immediate area, there is little difference between the 1887 and 1906 OS Maps. [186]
The satellite image above shows how significant the industry in the area of Stepaside was. Only a little remains. Amroth and District Community Association say that Stepaside was “a heavily industrialised site during the latter end of the nineteenth century with a thriving iron works using iron ore and limestone from local quarries. Today, this site is privately owned and features a chalet style complex. At one time, the village offered a school, post office, shop, garage and petrol station, a cobbler, a tailor and numerous public houses. Today, the only industry is the very busy coachworks, with several small housing estates.” [188]
Stepaside Ironworks as they appear in the 21st century. [188]
The remains of Stepaside’s Ironworks are pictured above. Grove Colliery’s Engine House remains as a substantial ruin and is shown below.
Grove colliery had a deep shaft which extend 182 metres down into the ground and it’s workings extended over a large area as it followed the anthracite-bearing strata to extract the coal. The owners aim was to find the Kilgetty vein, which took until 1858, a period of some 5 years after opening and at a cost of £30,000. Eventually, the Grove Colliery was linked underground to the Kilgetty Colliery, a distance of some 795 metres.
Coal from the Grove Colliery was carried both on the Saundersfoot Railway via Stepaside and on a self-acting incline to the Ironworks in the valley below. The colliery had its own stables, stores, carpenter’s shop and smithy.
Lower Level Colliery, according to Coflein, appears on the early OS mapping (1887/1889) but on the second edition of 1906/1907 it is marked as disused, having closed in 1900. According to OS mapping of 2013, the site has been cleared and landscaped. [190]
Coflein also notes that Kilgetty Colliery was an anthracite colliery dating from around 1843. It closed in 1873 but was re-developed and re-opened in 1935, with a weighbridge house, ventilation drift and winding engine house. Another winding engine house (now converted) stood nearby. The colliery closed finally in 1939 by 2003 the site was largely built over. [191]
On the approach to Stepaside village the railway ran adjacent to the road. In 22st century the railway route remains protected as a footpath running just below the the level of the road. It is highlighted on this image by the red line. [Google Streetview, March 2022]This Google Streetview image shows that the remains of the Ironwork sit at the entrance to a caravan park. [Google Streetview, March 2022]The Kigetty Ironworks (or the Stepaside Ironworks) drawn as they were in 1866. The tramroads serving the site feature prominently. This is the picture on the information board at the site of the Ironworks in the 21st century. THe picture is an extract from an image shared by David Holland on the Tenby and Saundersfoot Through Time Facebook Group on 20th April 2020. [198]Closer in to the village the railway ran immediately on the verge. [Google Streetview, March 2022]The old railway with the lane beside it used to pass under the road above. There is a modern bridge in place of the double-arched masonry structure that once stood at this location. The read line entering the image from the left was the Saundersfoot Railway branch to Grove Colliery [Google Streetview, March 2022]A distant view of Stepaside from the Southwest. The arch bridge is visible at the centre of the image. This photograph was shared by Paul Wyatt on 28th January 2020 on the Kilgetty, Begelly, Stepaside and Pentlepoir Community Voice Facebook Group. [194]Looking East across the old arch bridge in Stepaside. This picture was shared on the Kilgetty, Begelly, Stepaside and Pentlepoir Community Voice Facebook Group by Paul Wyatt on 27th April 2018. [193]The old bridge at the centre of Stepaside. [192]Gary Davies shared this image from May 1970 of the old bridge. He notes that it was built by Thomas Telford. The image was shared on the Tenby and Saundersfoot Through Time Facebook Group on 9th May 2020. [197]This close up image of the 6″ OS Map shows the railway and lane running under the double-arched masonry structure supporting the road. It also highlights the two railway junctions either side the the bridge. [185]
Before passing under the bridge we take a quick look back down the branch to Grove Colliery.
Looking south from the modern bridge over the old railway route the Saundersfoot Railway ran along the verge of the highway. A branch-line ran off to the West to Grove Colliery. The old line has been built over by a small housing estate. That branch climbed the hill behind the estate in this picture. [Google Streetview, March 2022]
Beyond the housing visible in the picture above the railway crossed the old Kilgetty Canal before climbing the hill beyond. The tramway bridge now carries a footpath as shown on the OpenStreetmap extract below. British Listed Buildings website tells us that the bridge carried the “private branch of the tramway known as the Saundersfoot Railway to the high level of Kilgetty Ironworks of the Pembrokeshire Coal and Iron Company (which commenced production in 1849) and on to Grove Colliery of the same Company. As it is likely to have been one of the first things constructed, its date is probably c.1846. It probably remained in tramway use until the closure of the colliery in c.1900.” [196]
The bridge is a single-arch skew bridge of local sandstone, with an arch span of about 4 m. and a width of about 6 m. Low parapet on the SW side, restored, with modern railings.
The location of the bridge on the line to Grove Colliery (c) Openstreetmap. [196]
On the other side of the bridge the old railway has another junction. The longer arm to the left heads for Lower Level Colliery. The route ahead served Kilgetty Colliery. I have not as yet been able to find photographs of these two collieries.
The Railway ran on to Lower Level Colliery along the track to the left. Kilgetty Colliery was ahead on what is now called Kilgetty Lane. [Google Streetview, March 2022]The site of Kilgetty Colliery in the 21st century. [Google Streetview, March 2022]
We noted above how the route of line to Lower Level Colliery crosses the line of the A477. The composite image below brings together the 6″ OS Map of 1906 and modern satellite imagery to show how close Lower Level Colliery was to the line of the new road.
A translucent combined image of Lower Level Colliery and the modern A477. [185]
This is the point at which we leave the arm of the Saundersfoot Railway which ran North from the Harbour.
This picture of the ……. portal of the tunnel was taken and shared by Steve Briers on the Kilgetty, Begelly Stepaside & Pentlepoir Community Voice on 2nd February 2019. [184]
32. D S M Barrie, revised Peter Baughan; A Regional History of the Railways of Great Britain: volume 12: South Wales; David St John Thomas, Nairn, 1994.
36. Wing Commander Ken McKay; A Vision of Greatness: The History of Milford 1790-1990; Brace Harvatt Associates, 1989.
134. The tramroad was built between 1839 and1834, [1: p131][49] the harbour, between 1829 and 1830. [133] Boneville Court Colliery was not established until 1842 [1: p132] and the Ironworks were established in 1848/1849. The Ironworks were active intermittently until 1868 when the complex was sold to Bonville’s Court Coal and Iron Company around 1873. The ironworks finally closed in 1877 and were dismantled in 1887-89. The chimney stack above the furnaces was eventually demolished in 1909. [135]
144. These comments were made by Mike Roch and he indicates that he picked up the information from a book by M.R. Connop-Price, ‘Industrial Saundersfoot’. The comments are made alongside a series of photographs of the remailing lengths of the canal taken and shared by Mike Roch on 23rd November 2021 on the Saundersfoot & District Historical Society Facebook Group. The pictures can be found by following this link: https://www.facebook.com/groups/1806381086087895/search/?q=tramway, accessed on 23rd September 2022.
187. I found this image while searching on Facebook and cannot now find the dull link back to it. This is the record of the image that I kept … facebook_1664055146584_6979553157540841155.jpg … if anyone is better at following these things through on Facebook, please feel free to do so.
Since posting about the Town Section of the Welshpool & Llanfair Light Railway I have received some pictures from people who visited the railway in the 1950s, 1960s and 1970s and I have identified a few other items worth including in this addendum.
The featured image above is one taken by K.H. Cribb and used by kind permission of his son Russ.
The original article about the W&LLR Town Section can be found here:
Most of the images included in this article are shared with the kind permission of the photographers. My thanks to all who have been willing to let me share their photographs. The author of an image is credited in the text under that image and, as appropriate, the source is provided in the ‘References’ at the end of the article. There are a number of images for which it has not been possible to determine or to contact the original photographer to seek permission to share the image. Any help in identifying a copyright holder, if one exists, would be appreciated.
1. A set of three photographs sent to me by Tony Jervis are included in the photographs below. All were taken in 1977. One shows the remaining dual-gauge track as it existed in 1977. Another shows the location of the Seven Stars Halt, the third shows the Bron-y-Buckley length of the line after the lifting of the track.
2. Three pictures were sent to me by Malcolm Peakman.
The first to mention was from the abandoned section of the narrow-gauge line in the town and particularly the dual-gauge track alongside the Smithfield livestock market and mirrors Tony Jervis’ photograph of the same location. This photo is included in the series of pictures following the route of the town section of the line below.
The other two are from further along the line and show some of the stock purchased by the preservation society when it took over the line. I have included these here for their historical interest, even though they do not relate directly to the Town Section of the line.
Malcolm Peakman also shared some memories of the early preservation period:
“As a volunteer on the W&L between 1962 to 1964 I travelled the town section many times, despite the failure to obtain long term permission we were allowed to use the line to recover spent ballast from BR to spread further up the line, so a typical weekend would see 2 or 3 trips with empty wagons down and loaded back up and then off loaded. As I was a teenage apprentice in a Locomotive Works I was a lot fitter than I am now and this part of the job certainly helped keep me in shape!
The worst part of the run was at Raven Square where we perforce ran wrong direction in the road due to the island. This caused several near misses where motorists ignored the red flags and tried to proceed in the face a steam loco. I only saw one collision, that was outside the Seven Stars where an irate local who had parked on the tracks despite knowing it would be used at the week end, chose to deliberately drive into the locomotive, he burst his radiator and scratched the paint on the loco. The police were not very sympathetic towards him.
I was there when the pannier tank and The Earl stood side by side.”
3. An image of the W&LLR is used by the Lightmoor Press on their website to advertise one of their publications, Michael Whitehouse’s, ‘Narrow Gauge Album 1950-1965 In Colour’. [1] The photograph was taken by Patrick Whitehouse and is covered by copyright so cannot be reproduced in this article. It can be seen by clicking here. [2]
The picture shows the view from the main W&LLR yard adjacent to Welshpool Railway Station towards the town centre. It shows No. 822 idling gently in the yard whilst the day’s goods train awaits its journey to Llanfair Caereinion having already been assembled. The passenger platform was behind the photographer to the left, behind the waiting goods train. Although no regular passenger services were offered at the time that Patrick Whitehouse took the photograph, having been withdrawn by the GER in the early 1930s. Beyond the engine to the right a second goods brake van can be seen. Behind that is the dual-gauge Smithfield Siding and the Smithfield livestock market. [2]
(On its webpage, Lightmoor Press writes: “Patrick Whitehouse (PBW)… travelled far and wide to photograph many … narrow gauge lines and systems before they were lost. In 1957, he compiled his seminal Narrow Gauge Album, which brought many of these wonderful but obscure railways to the attention of thousands of other enthusiasts, some of whom followed in his footsteps with their cameras. Now, PBW’s son Michael has delved in to the family and other archives to compile a similar album for the 21st century, accompanied by essays from a variety of well known names and sources.”) [2]
4. Then and Now Images. Tim Abbot has posted two images on Flickr with permission to use under a Creative Commons Licence. These are included in the series of photographs following the route of the line. Both appear early in that series of pictures as they show the length close to the mainline railway station.
5. Ken Cribb(K.H. Cribb) took around 1000 photographs of a series of different railways. All his photos come from the 1950s and 1960s. These photographs are very recently uncovered and mostly unseen by others. His son Russ is at present cataloguing those photographs and hopes one day that publication may be possible. Russ has very kindly allowed me to include a number of his dad’s photographs in this article.
Russ has been sharing a few of the photos on a number of Facebook Groups “to gain a bit more knowledge from people or railway groups that could help. This has been a bit of an eye opener as to some of the photos, not realising what historical importance some of them are.” [22]
He writes: “Dad was great friends with Richard Blenkinsop and many photographic locations were done together, Dick taking loads of notes and then publishing so many fantastic books over the years, with Dad showing up in a few. Sadly we lost dad in 1995 after Alzheimer’s set in very early at the age of 56, passing away at 64. There was never enough time to go through all the photos with him at the time as I had just started my own family and time was centred around the children. Then it was sadly too late and the recollection were very mixed and distorted so now left with the enormous task of trying to make as good a job as I can with the information available.” [22]
Russ would be delighted if there are people who might want to assist in understanding the pictures he has. He has kindly watermarked the photographs included here and would love to hear from anyone who can add to his knowledge. For the purposes of this blog, I have to remember to keep photograph file sizes relatively small, so please don’t judge the quality of the photographs on the basis of what appears here. In my view Ken Cribb’s photos are a great asset and they need to be shared more widely, If you have something significant to offer, please get in touch with me and I will pass your details on to Russ.
Ken Cribb took 26 photographs of the W&LLR, many on the last SLS special. Russ again: “His friend Pat Webber was with him that day, (who he cycled with for two weeks around Ireland and at Letterkenny) also sent one of his photos as a Christmas card. The photos are along the route, so he didn’t travel on the train on this occasion.” [22]
Russ continues: “Any publication is miles away yet, have to get the spreadsheet finished first and proper inventory of what photos there are before proper scanning. … [Dad] spent most of his spare weekends and holidays helping out on the Ffestiniog Railway and photographing Welsh narrow gauge along with the 1950’s steam on standard gauge across the UK and Ireland.” [22]
9 of Ken’s photographs are included below.
Photographs taken along the Town Section of the W&LLR
The photos which follow illustrate the Town Section of the line throughout its history. They begin close to the mainline station in Welshpool and end at Raven Square.
Welshpool now has a town trail which follows the line of the Town Section of the W&LLR. This is one of the information boards along the route. Each has a map which fills the centre of the board with illustrations and photographs surrounding the map. Text is in both Welsh and English. This is Board No. 2 which can be found the wall at the southwestern edge of the Tesco car park. The board explains: “Having crossed Smithfield Road the line entered the narrow gauge yard with the running line passing between a loop and warehouse siding. The warehouse, again a timber framed building, had a double pitch roof clad in corrugated iron sheets. Supported on pillars a canopy protected the rail-side entrance of the warehouse, whilst the yard-side entrance was protected by a canopy cantilevered out from the roof. … This area was an extremely busy one as not only did the standard and narrow gauge lines run side by side but also a busy cattle market was held adjacent. After the railway had closed the town section and the track removed the area was taken over and incorporated into the Smithfield until it moved to its present location on the outskirts of town in 2009.” [My photograph, 2nd September 2022]A plan of the yard at Welshpool which was shared by Rob Bishop on the Narrow Gauge Railway Enthusiast’s Facebook Group on 20th January 2017. It shows: the triangle formed by the dual-gauge length of line on the East side of the triangle, adjacent to the Smithfield market; the transshipment line extended across the bottom of the triangle; and the curving sidings of the goods yard. This image was shared by Rob Bishop on the Narrow Gauge Enthusiasts Facebook Group on 20th January 2017. [21]
The following photographs are, as far as possible, shown in sequence along the line through Welshpool starting at the mainline station and the W&LLR yard.
The first is a ‘then and now’ photograph created by Tim Abbot.
Tim Abbott comments: “The first train on the newly opened Welshpool & Llanfair Light Railway stands in the Smithfield Road outside the Cambrian Railway station in Welshpool on 4th April 1903. Where once stood the proud directors of the company, road improvements and a mini roundabout now lead intending passengers through Welshpool to the preserved railway’s new station on the western edge of the town.” (c) Tim Abbott, licenced for use under a Creative Commons Licence, Attribution-NonCommercial-NoDerivs 2.0 Generic (CC BY-NC-ND 2.0). [3]
The second shows the view from Smithfield Road in front of the mainline station car park in the year s after the W&LLR rails had been lifted.
The site of the terminus of the W&LLR on in front of Welshpool Railway Station on 14th July 1978. Smithfield Road is in the foreground and extends down the left side of this photograph. The passenger terminus was to the right of this image, the goods yard was off to the left. The transshipment facilities were through the gateway at the centre of the photograph. The image was taken by Keith Spencer and shared by him on the Disused Railway Lines of Britain Facebook Group on 30th December 2019. [17]
Tim Abbott comments: “Smithfield Road, then and now: The Welshpool and Llanfair Light Railway started from a siding beside the road outside the main line station. Trains, passenger up to 1931 and freight until closure in 1956, were made up here before departure for Llanfair. Road improvements have since wiped out all memory of the original line and the main line goods yard adjacent to it. (c) Tim Abbott, licenced for use under a Creative Commons Licence, Attribution-NonCommercial-NoDerivs 2.0 Generic (CC BY-NC-ND 2.0). [4]This is the first of 9 photographs taken by Ken Cribb which are included in this article. Chronologically, it is not the first, but it is correctly placed geographically for the purposes of this article. This is a SLS Special being readied for a trip on the W&LLR in November 1956. The headboard has yet to be put in place. The locomotive is No. 822, The Earl. The train is made up of brake vans and open wagons for what will inevitably be a steady run along the line to Llanfair, (c) Ken Cribb. [23]No. *22 The Earl again, just a little later in the morning. The Locomotive’s headboard has now been fixed and the crowd of enthusiats have arrived of the train in Welshpool Railway Station. It looks as though it will be quite a tight fit to get everyone on board, (c) Ken Cribb. [23]This is a photograph from an earlier visit to the W&LLR. Ken Cribbs visited the W&LLR twice in the 1950s. This is from the first visit in 1955 and shows No 823 Countess leaving the W&LLR platform on the forecourt of Welshpool Mainline Railway Station and taking the curve through the W&LLR goods yard in July 1955. The route appears on the picture below curving round to the left, (c) Copyright Ken Cribb. All of Ken’s photographs are used by kind permission of his son, Russ Cribb. [23]An extract from an aerial image showing a train of horseboxes sitting in the Smithfield siding in 1939. The cattle market is beyond and the W&LLR good yard is in front of the horseboxes, (c) Historic England and sources from the Britain from Above website, Image No. WPW061716, authorised for non-commercial use. [8]The third side of the triangle looking Northeast the narrow-gauge would have crossed the standard-gauge approximately where the cattle wagons stand in the distance beyond the shed. There was apparently a length of narrow gauge track which was placed across the standard-gauge when it was needed. The length of track concerned is shown dotted on the plan above. Again, the photographer is not known. The image was shared by Rob Bishop on the Narrow Gauge Enthusiasts Facebook Group on 20th January 2017. [21]This photograph shows the point close to the Cambrian Mainline where the narrow-gauge separated from the standard-gauge. The timber yard which it served was off to the left of the picture. The photographer’s identity is not known. The image was shared on the Narrow Gauge Enthusiasts Facebook Group on 20th January 2017 by Rob Bishop. [21]
The Smithfield Siding ran alongside the Smithfield livestock market and over part of its length was dual-gauge.
It is worth noting that the provision of the narrow gauge as part of this dual-gauge track was not to allow loading and unloading at the cattle dock but to provide access for W&LLR wagons to a sawmill farther down next to the standard gauge lines. The goods and cattle were unloaded from the narrow gauge in a different part of the yard. [11]
In 2003, Clwyd-Powys Archaeological Trust recorded the site of the dual-gauge siding on its website [5] in 2003 as follows: “PRN 85212 – Welshpool, Smithfield Road, railway transfer dock (multiple site) Scheduled Ancient Monument MG254(POW): NGR:- SJ22980734 (SJ20NW); Unitary authority:- Powys; Community:- Welshpool; Preferred site type:- 20th Century – Cattle docks (Multiple – Intact) … A rare surviving interchange facility between narrow and broad gauge railways. Built 1903 to provide a connection between the Welshpool and Llanfair Railway (narrow gauge) and the Cambrian Railways (later Great Western) (standard gauge), it remained in use until 1956. Three parallel rails in the transfer dock allowed access for both standard and narrow gauge rolling stock to the same platforms. The site is well documented in the papers of the Welshpool and Llanfair Railway in the National Library of Wales. A triangular island platform of stone, brick and concrete survives with mixed gauge track on both sides, laid into concrete without sleepers. The island platform has two rows of cattle pens with concrete and iron fencing and timber gates, and a single-storey brick office. Of national importance as a rare surviving railway transfer dock, believed to be the last surviving example in Wales, and possibly Britain (Cadw, 2003).” [5]
An interesting aside to the photograph above is the content of a short discussion on the Narrow Gauge Railways Facebook group. This discussion started with a comment from the photographer about the fact that the locomotive was facing towards Llanfair and a recollection that on another visit it was seen in the loco shed with its bunker facing towards Llanfair.
In response to Alfred Fisher, Tim Abbott commented that “Countess worked bunker first towards Llanfair in the 1920s. But your experience suggests this might not have been the only time. Until 1937 it was theoretically possible to turn locos on a triangle at Welshpool, but the connecting sidings were removed after this date.” [12]
The triangle Tim Abbot refers to was probably formed from the narrow gauge line which was part of the dual-gauge Smithfield Siding and a line which connected to the transshipment siding in the mainline goods yard at Welshpool.
A 21st century view along the route of the old railway looking towards the canal bridge and Welshpool town centre from the old W&LLR goods yard. This image was taken and then shared on the Narrow Gauge Railways Facebook group by David Knott on 28th May 2018. [13]The climb to the Canal bridge, also taken and shared by David Knott on 28th May 2018. [13]
These quotes come from private messages which Russ has sent me. He has kindly given permission for these to be shared here along with some of his father’s photographs.
All Ken Cribb’s photographs are included with permission from his son Russ. Rus would be interested in hearing from anyone with information to share about his father’s photographs. Please get in touch with me, if this is the case, and I will pass your details on to Russ.


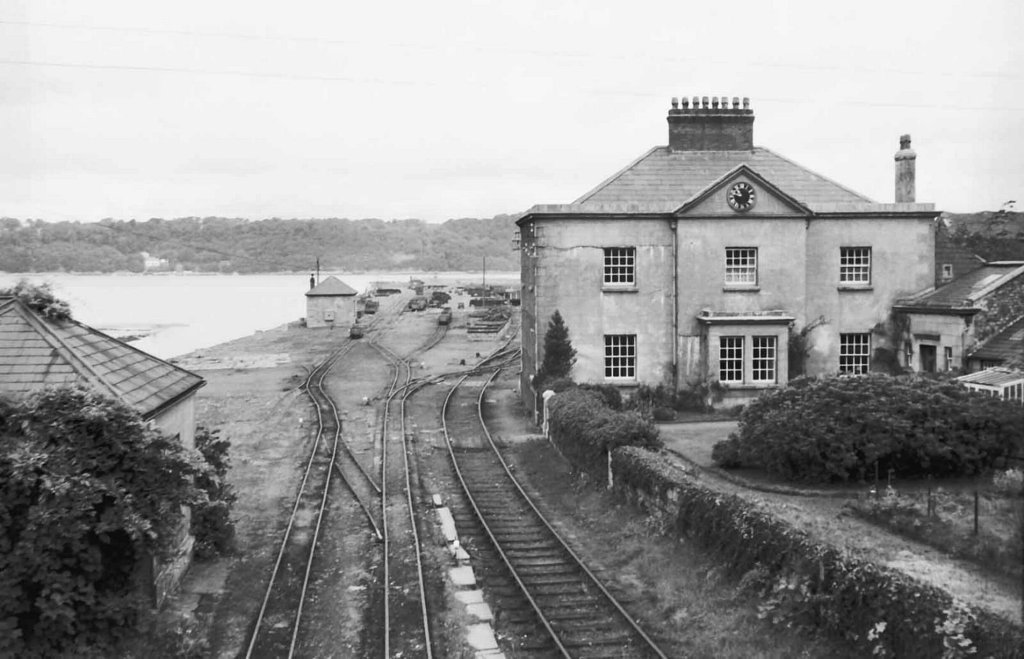

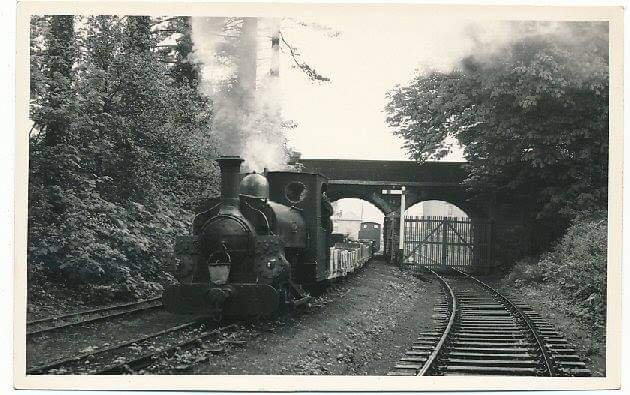
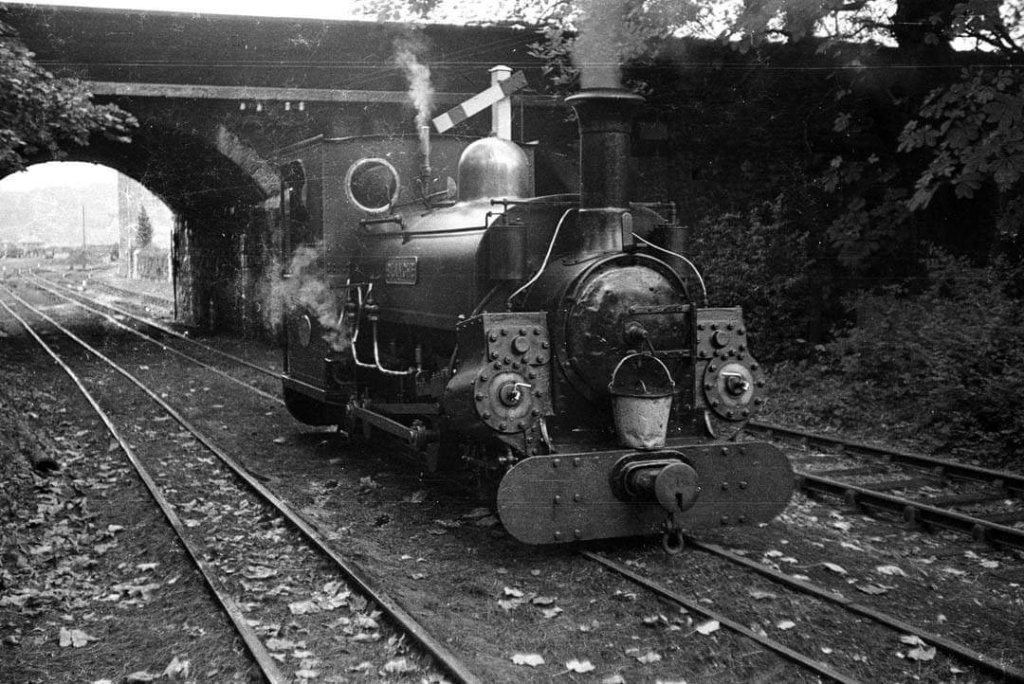
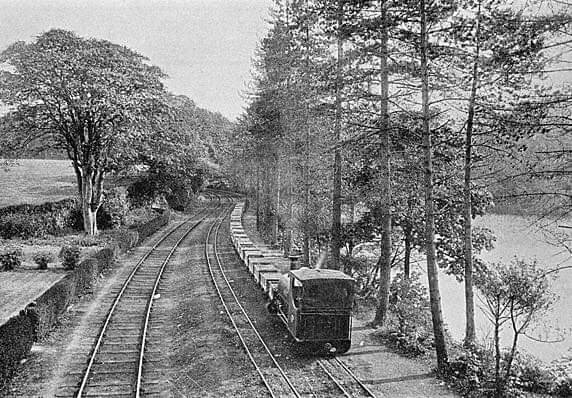
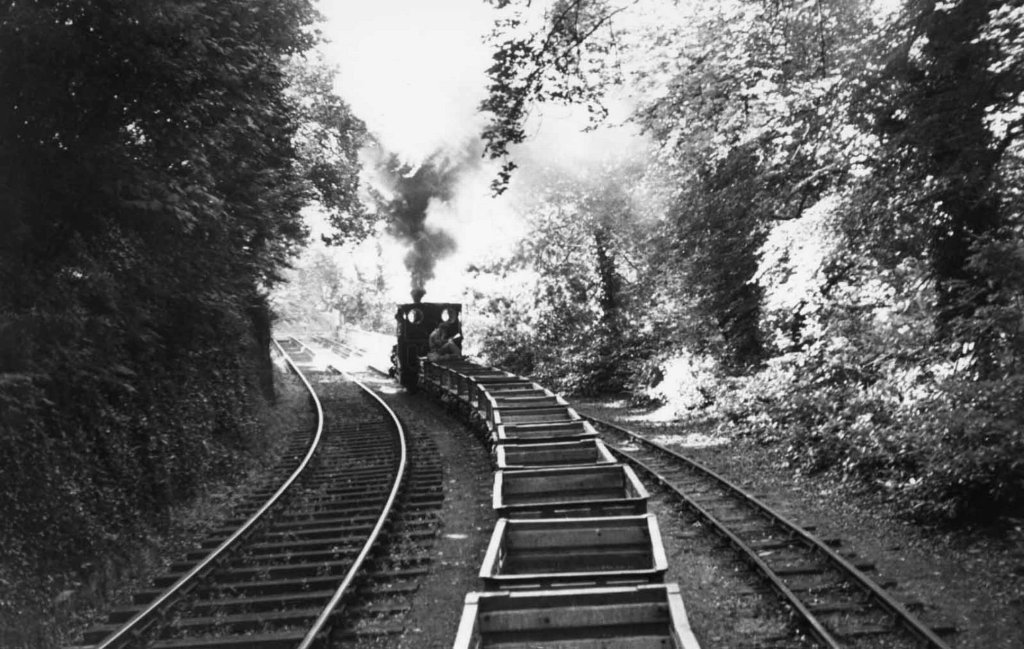
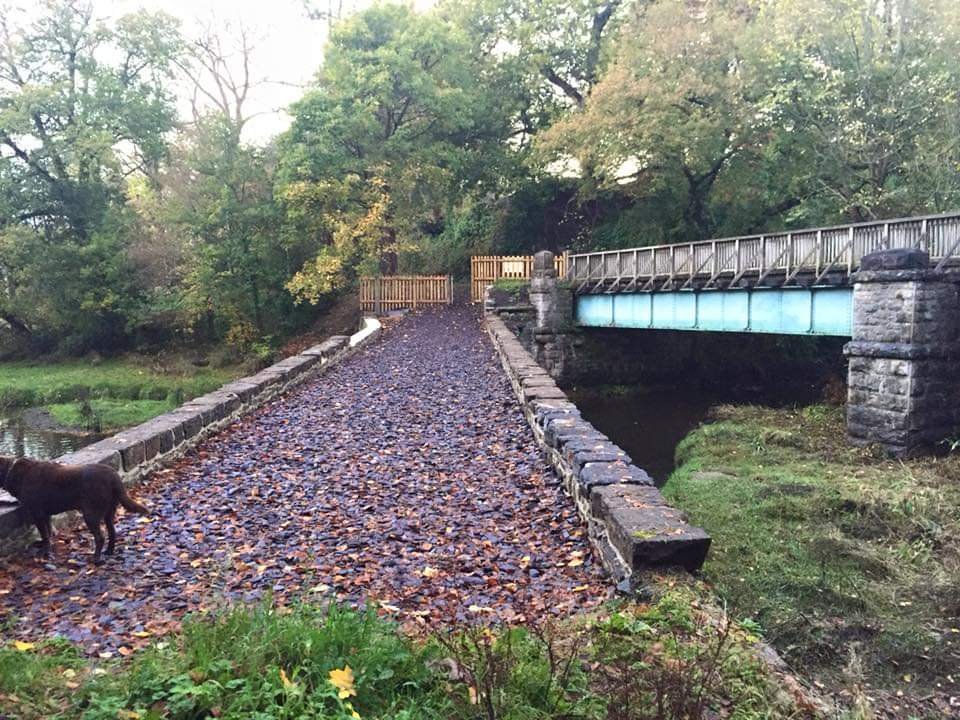
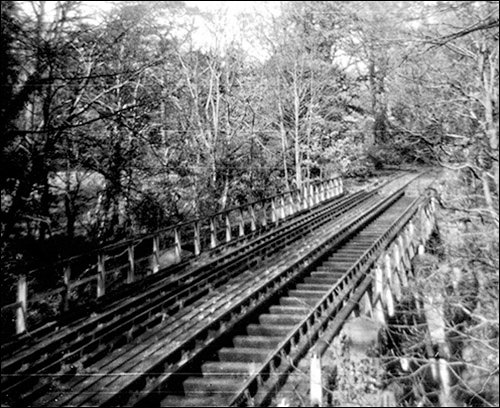

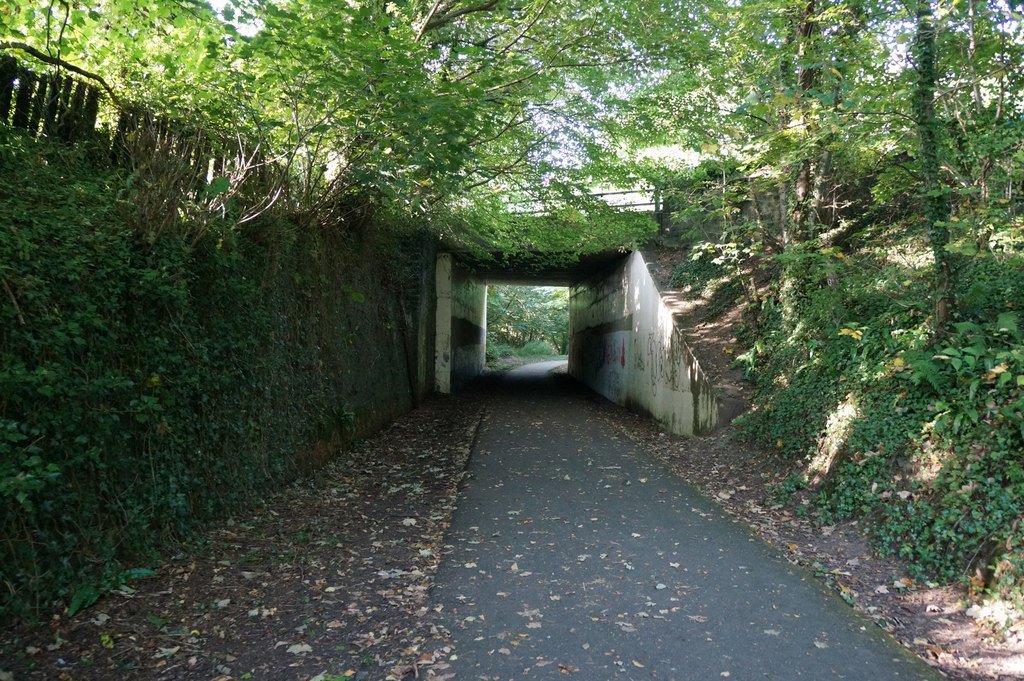
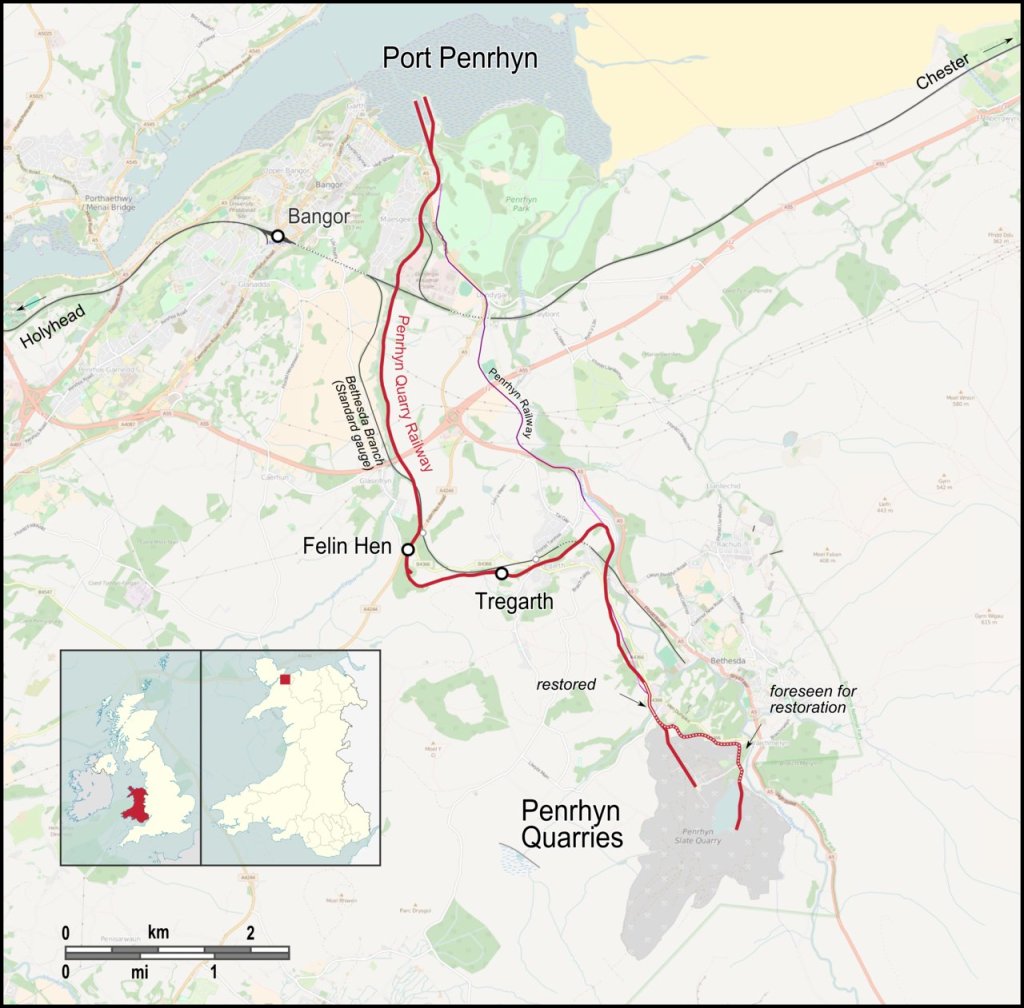
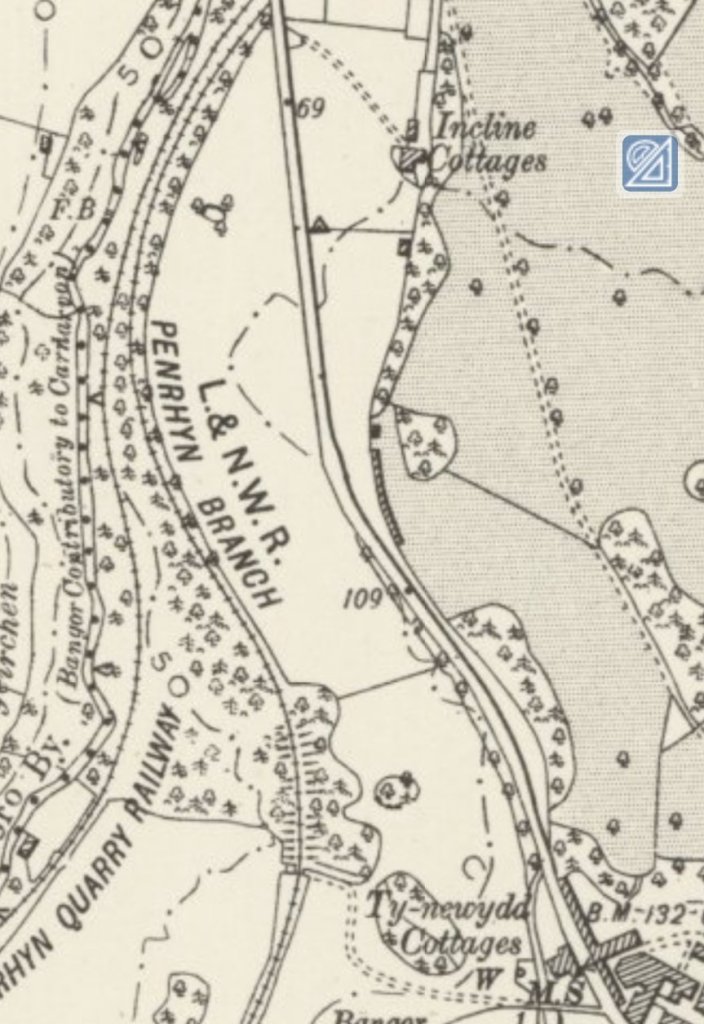

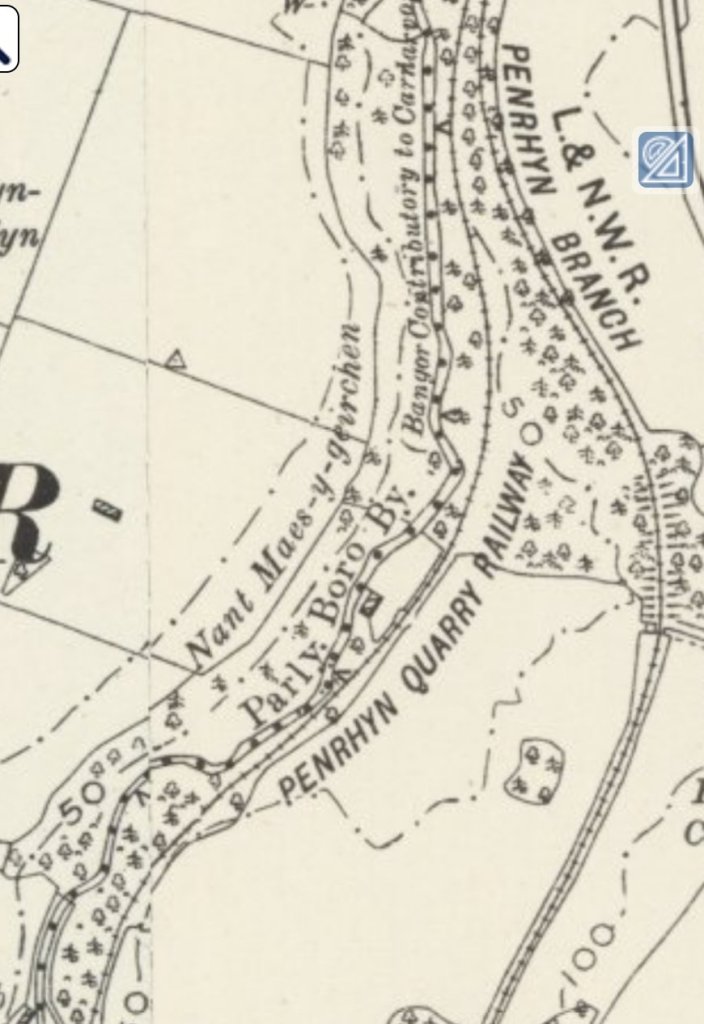
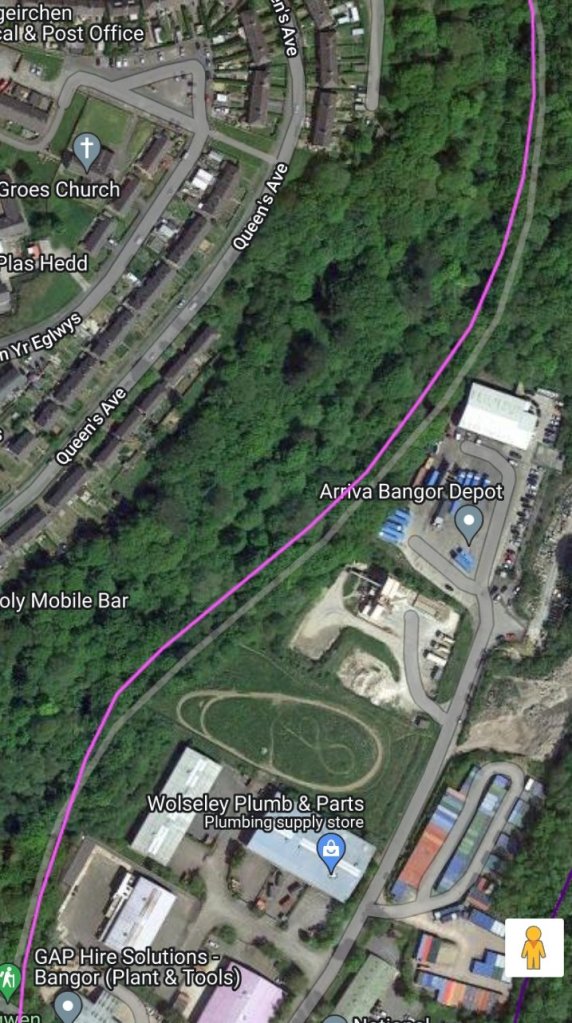
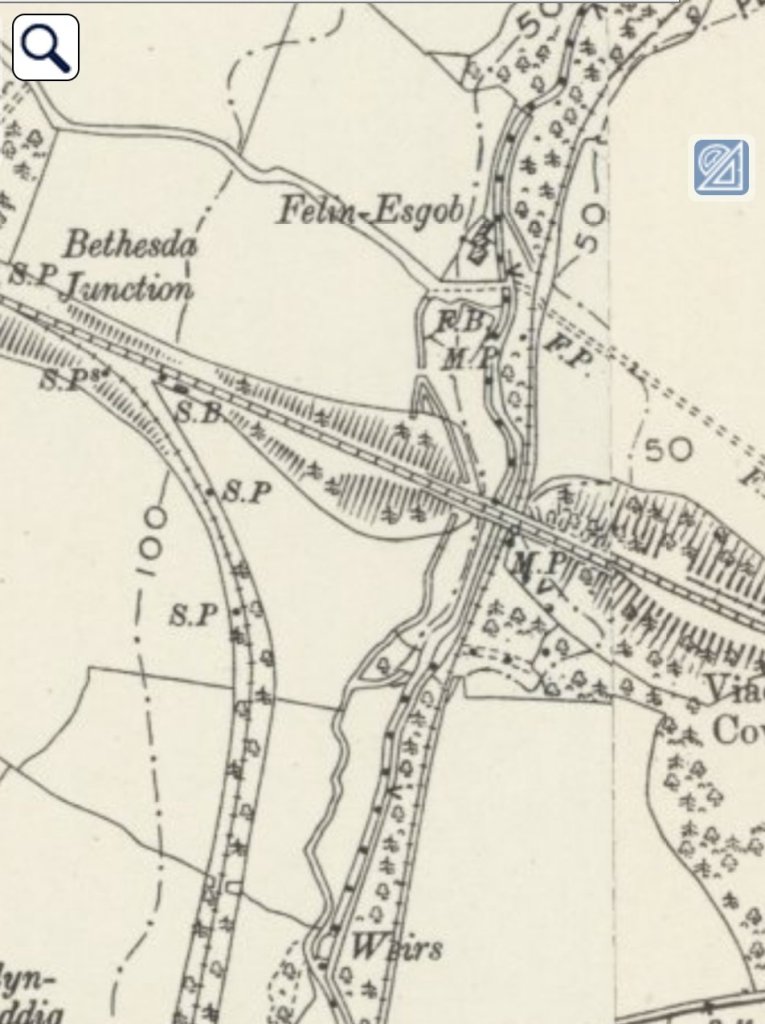

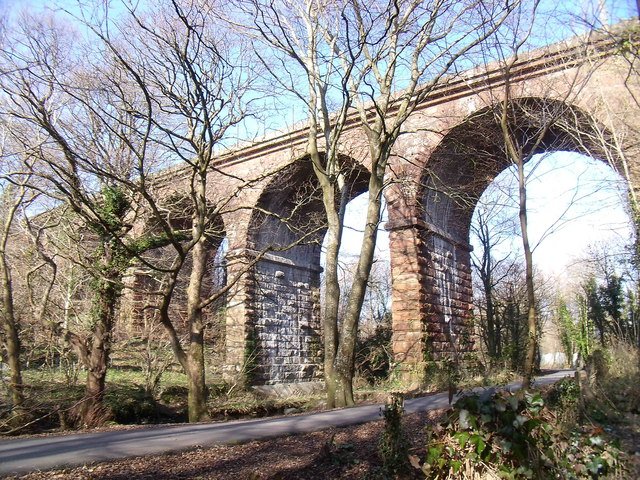
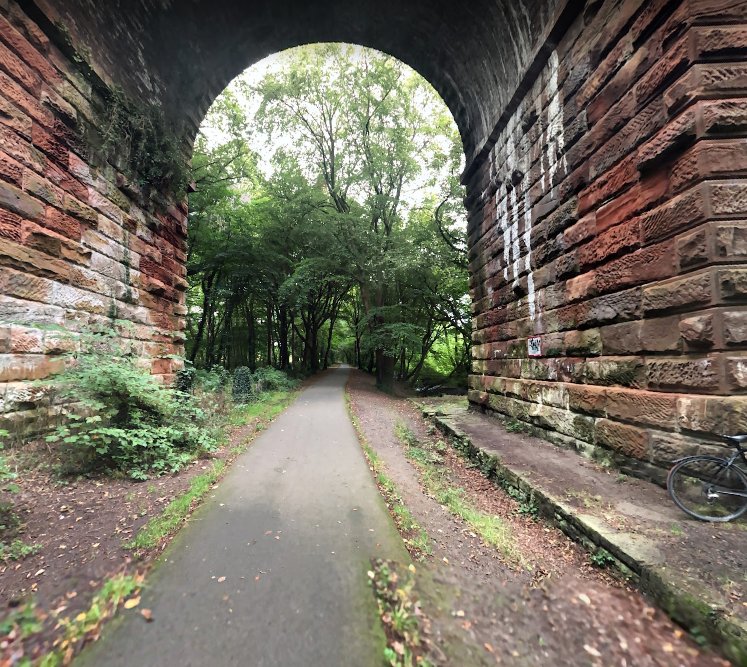
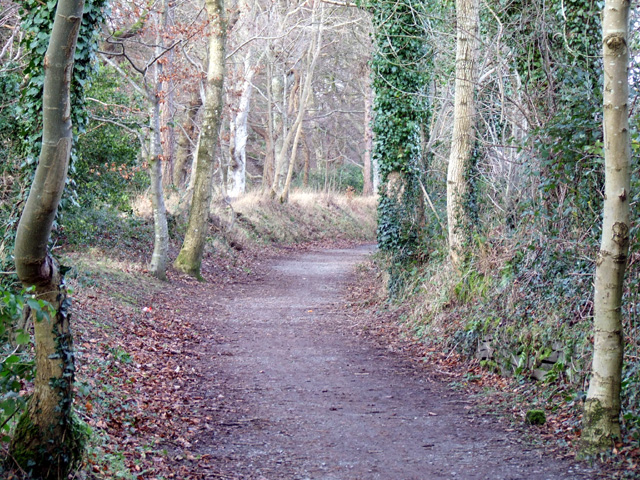
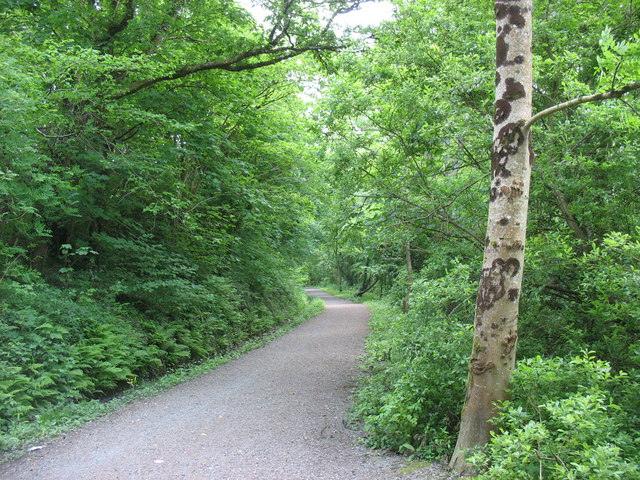
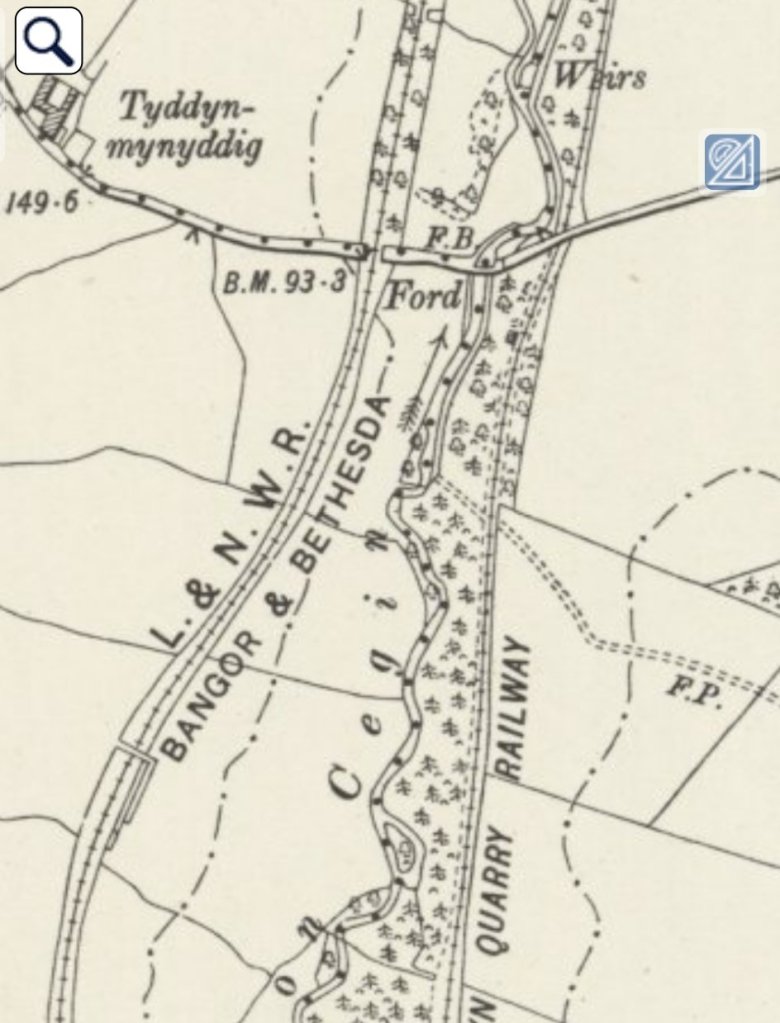
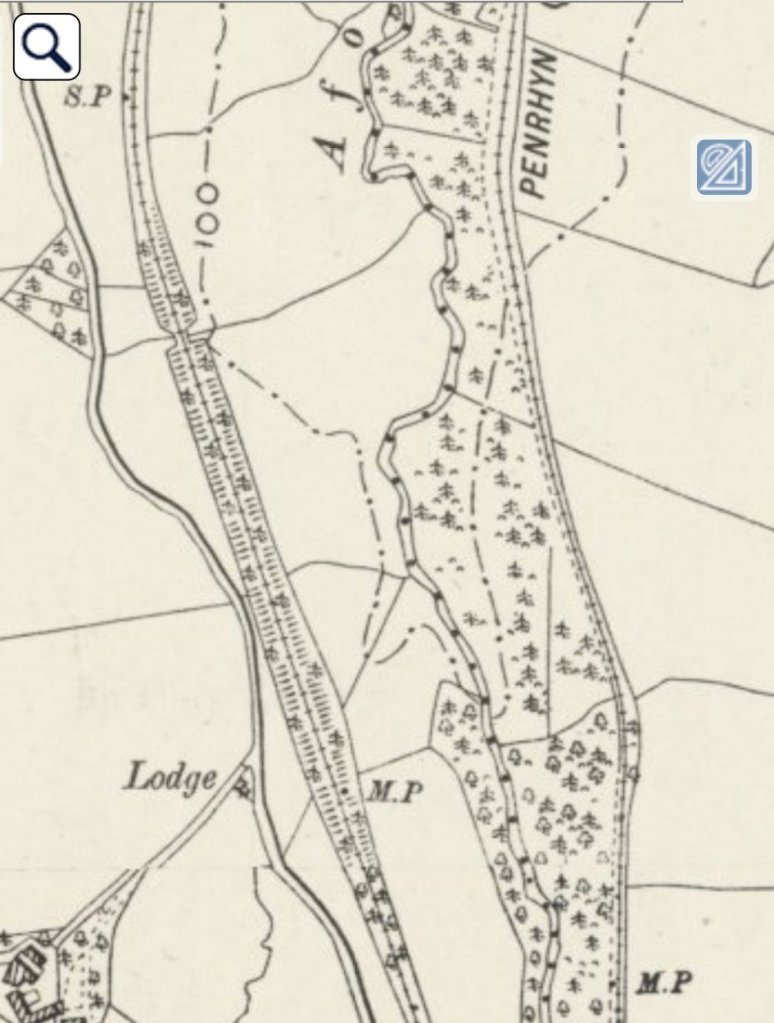
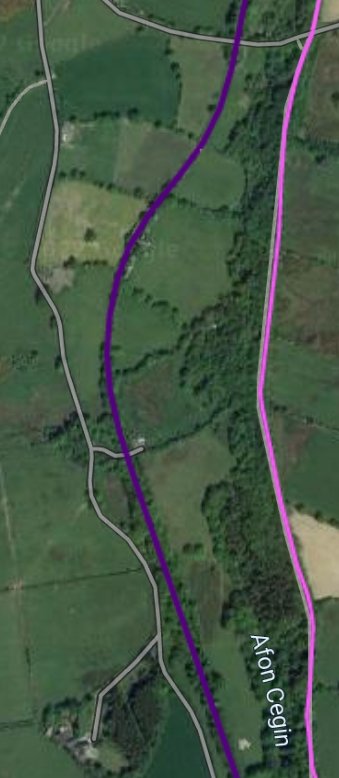
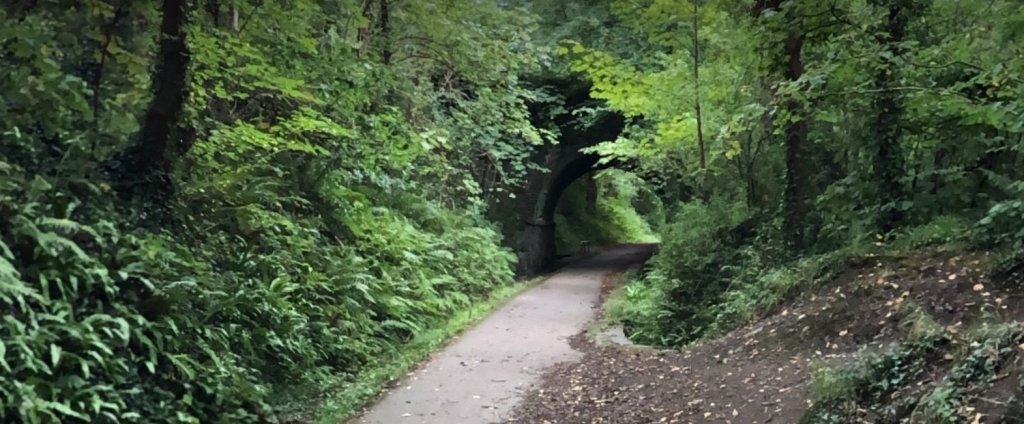
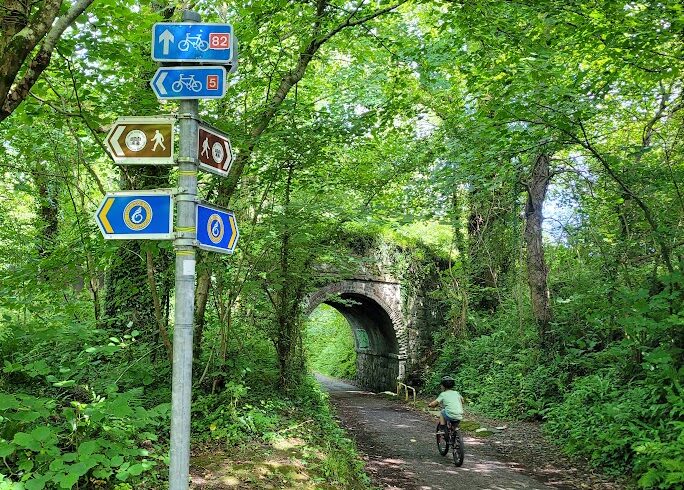
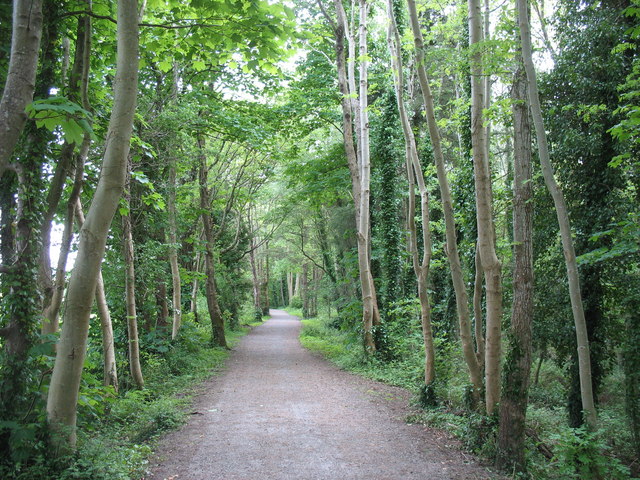
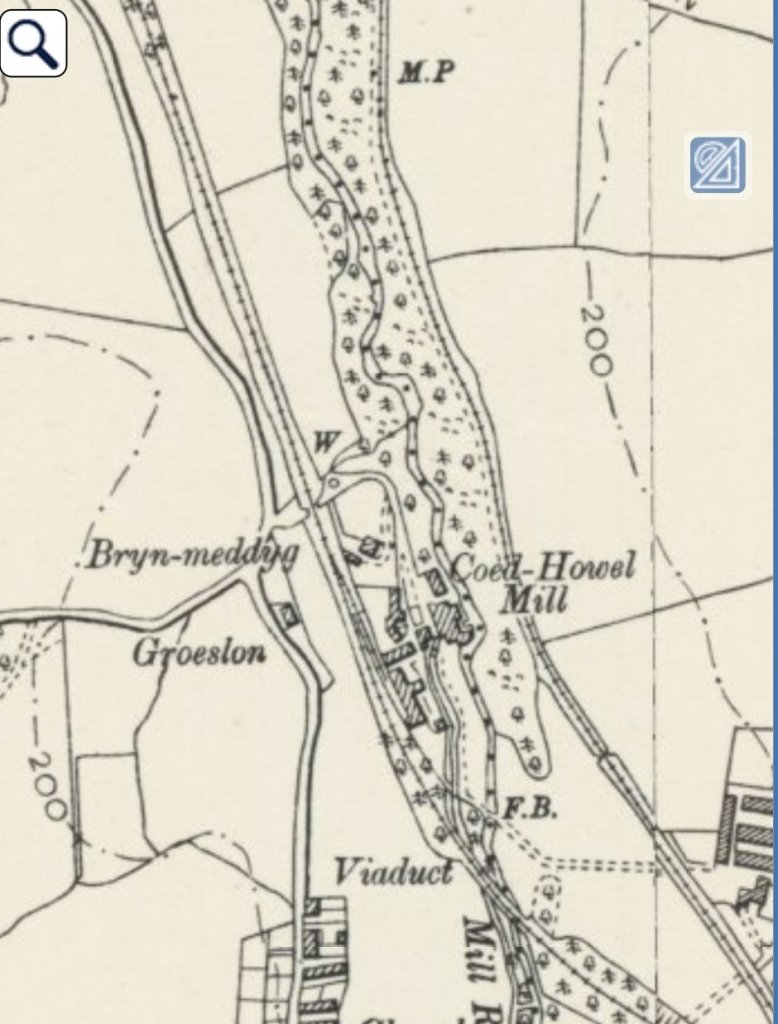
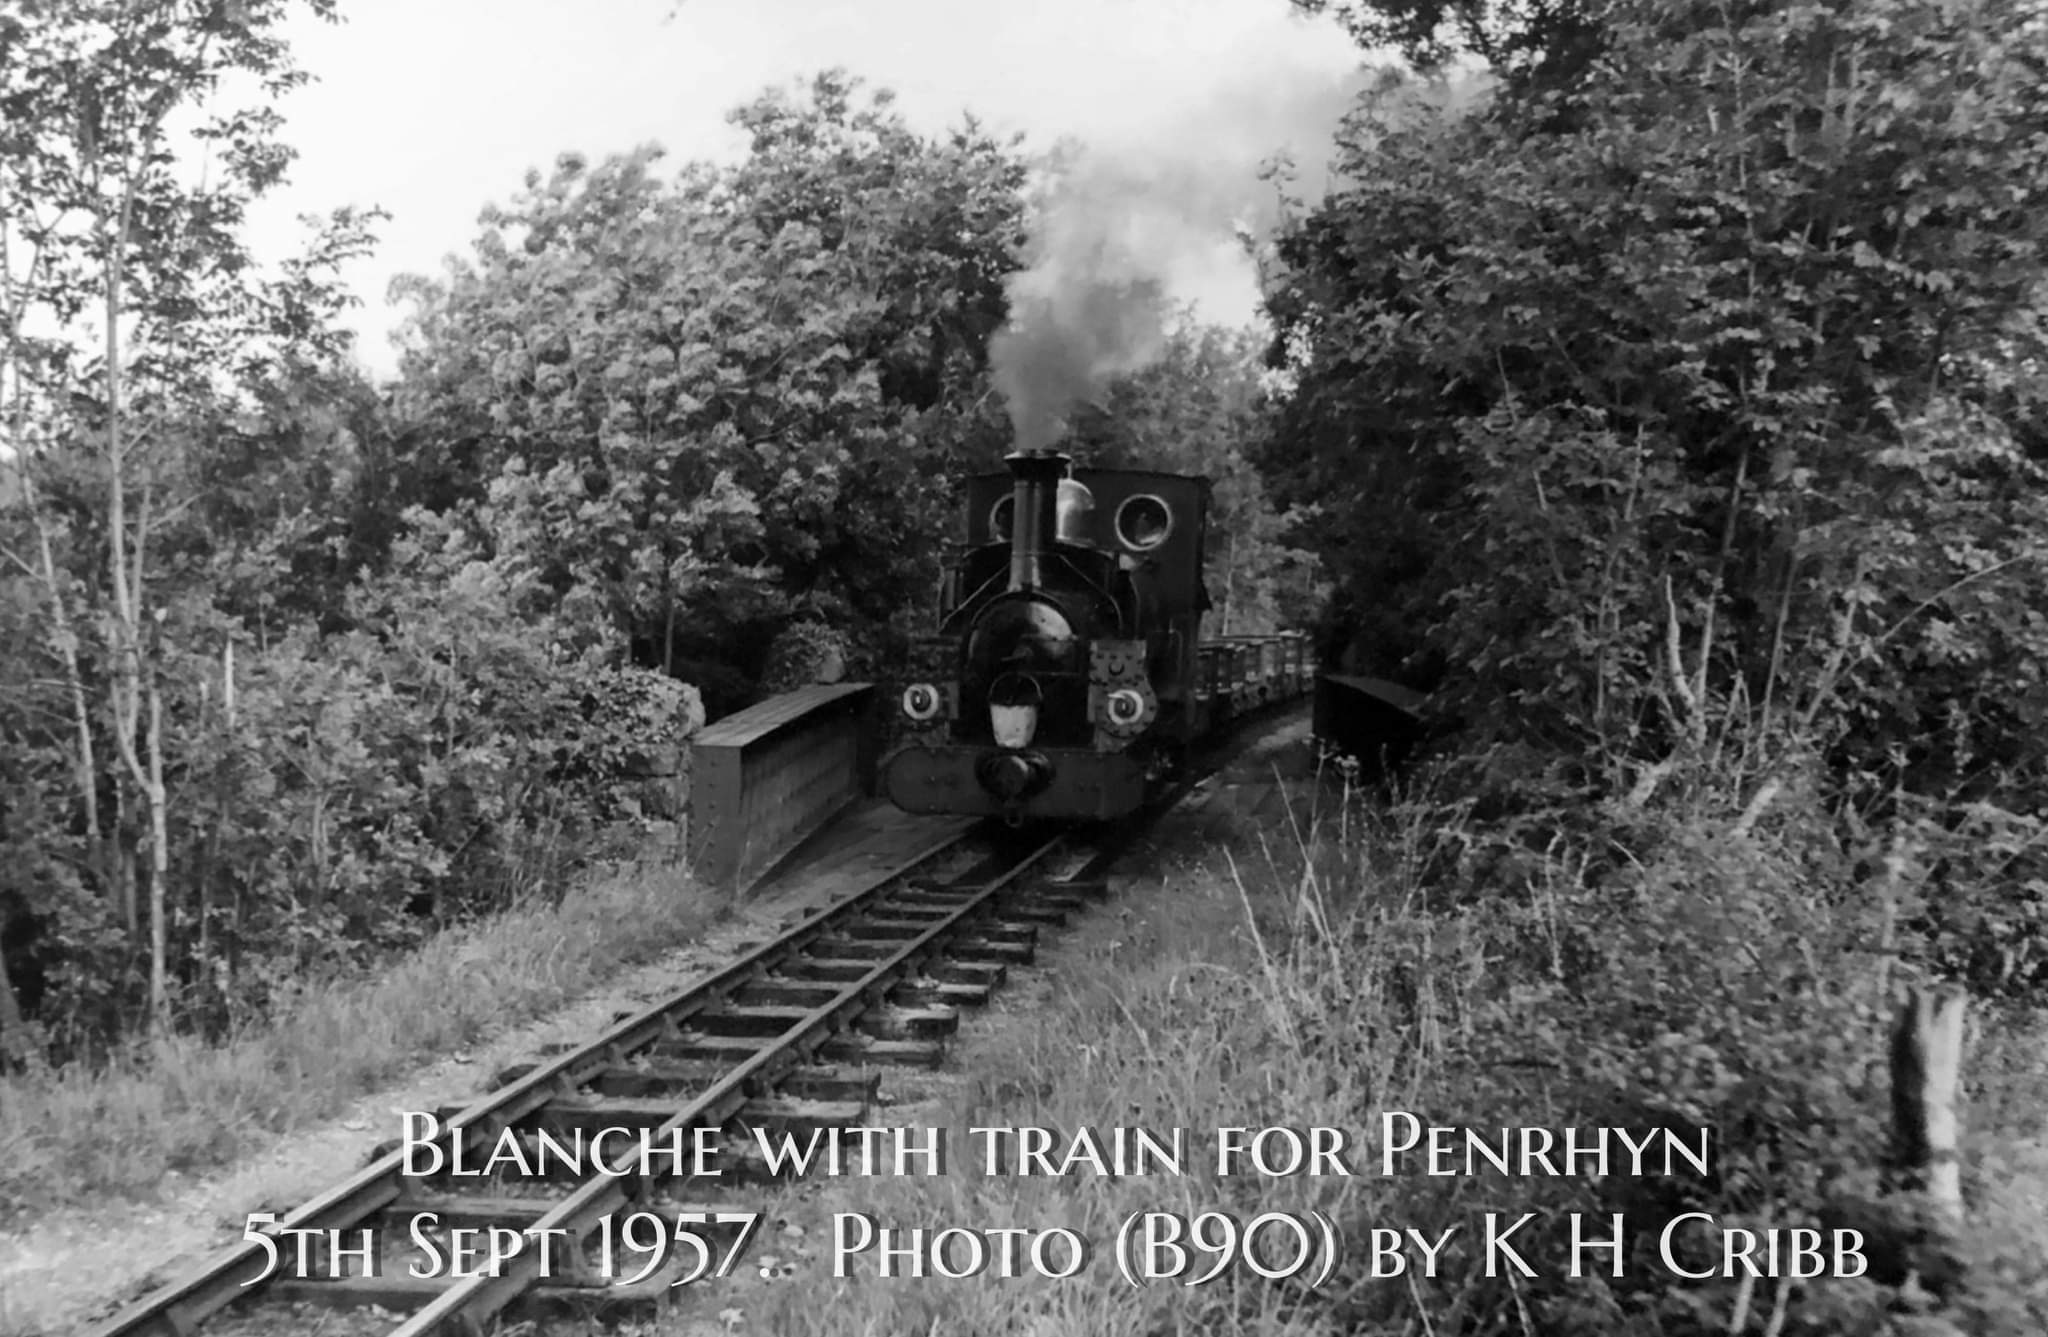
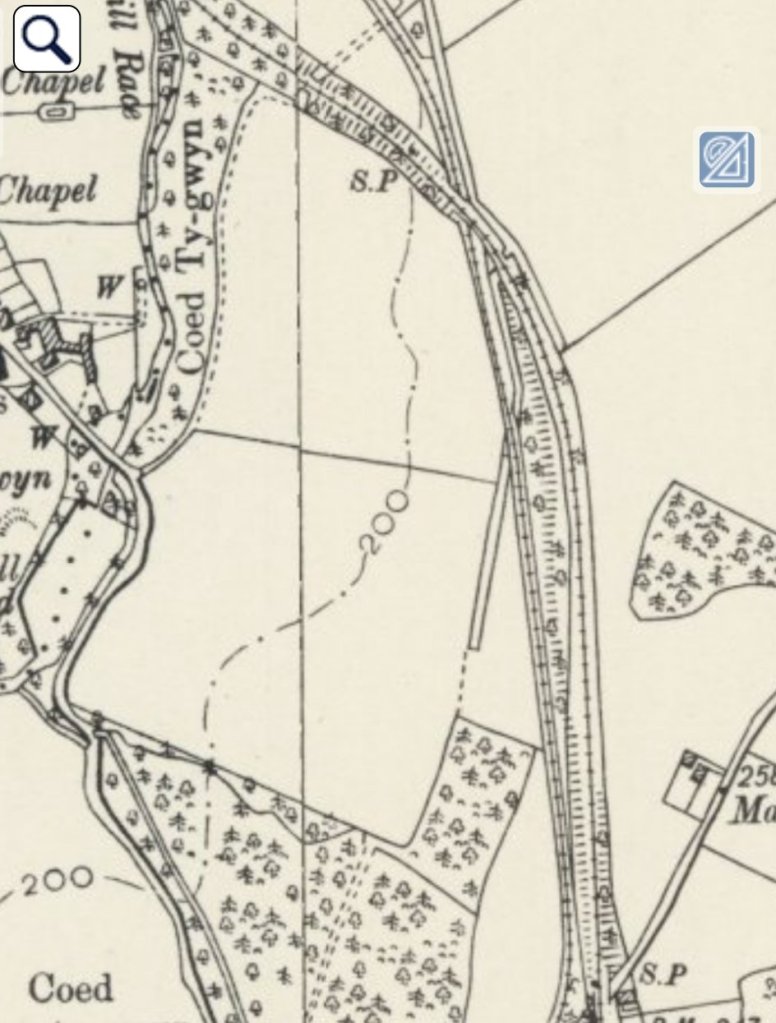
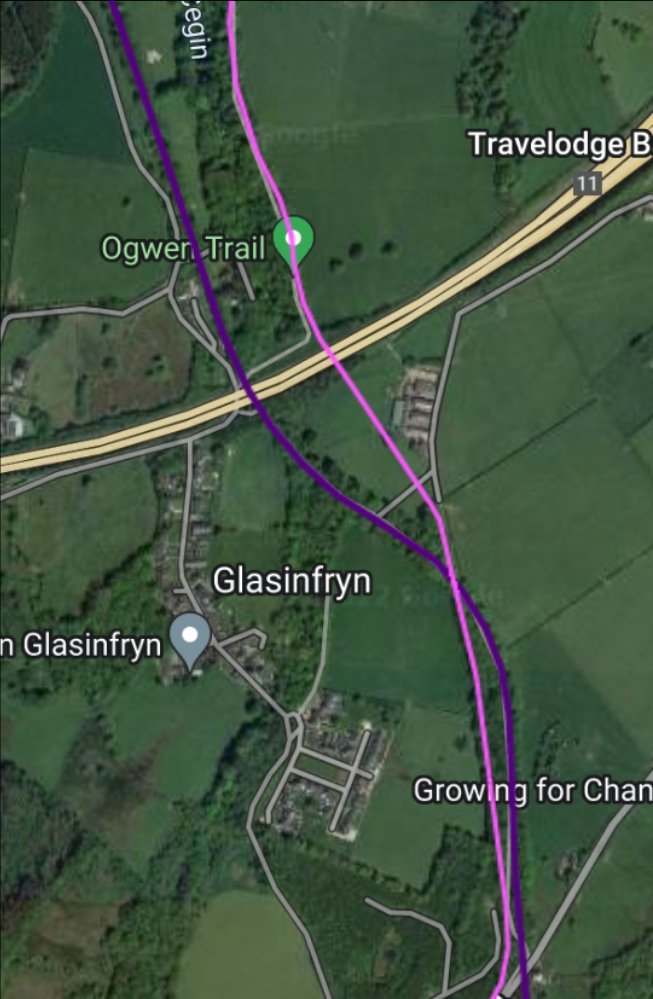
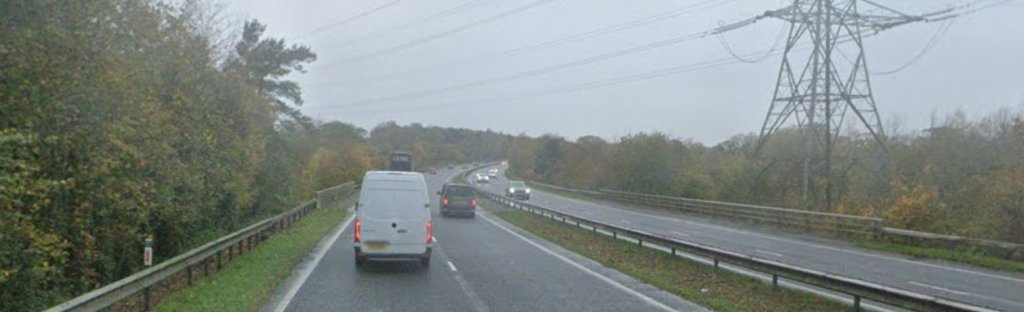

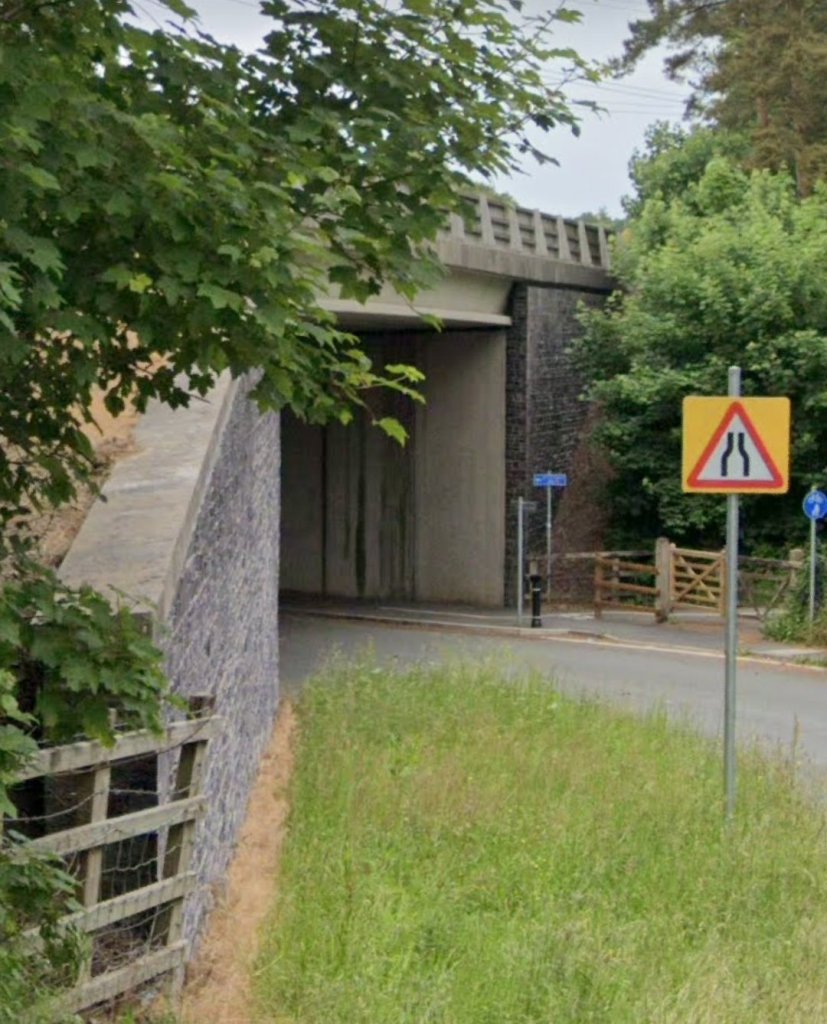
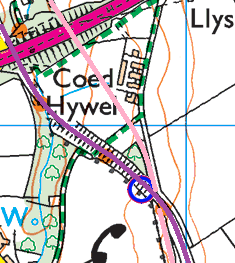
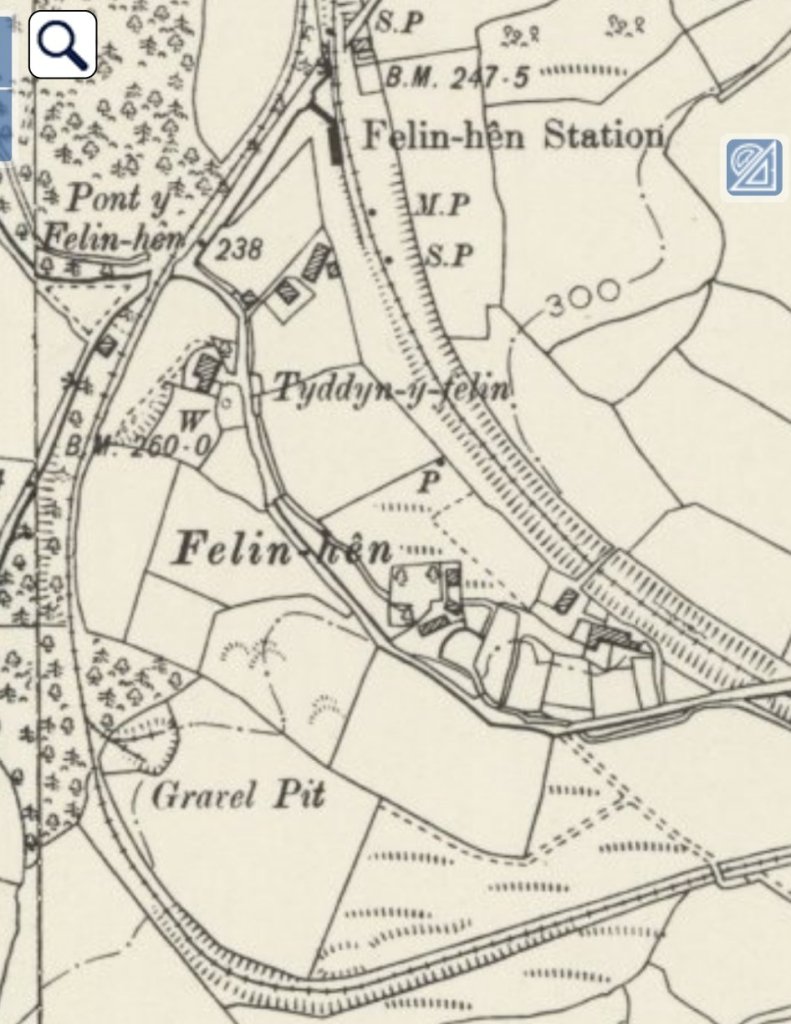
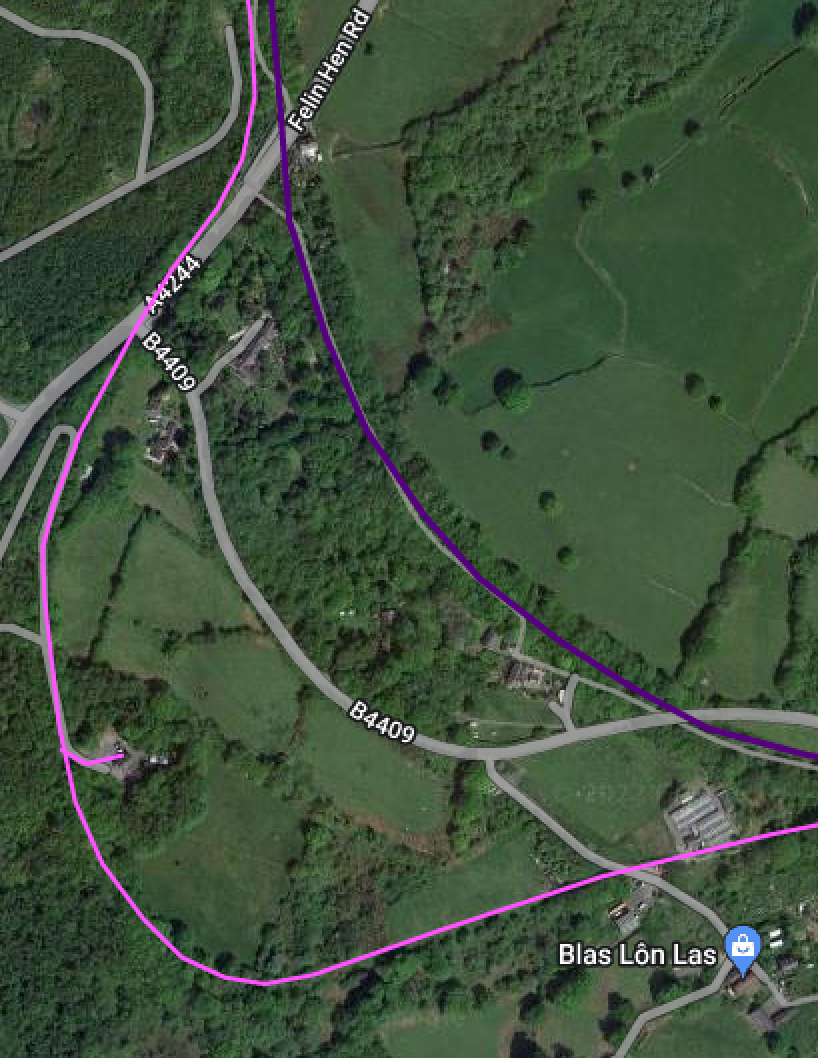
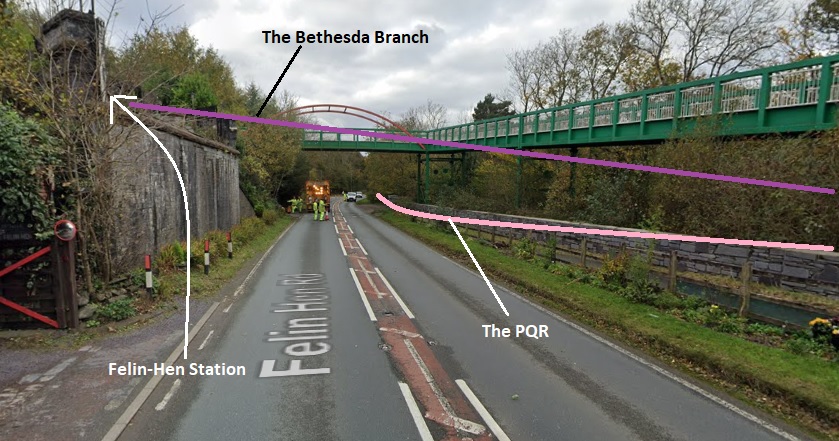
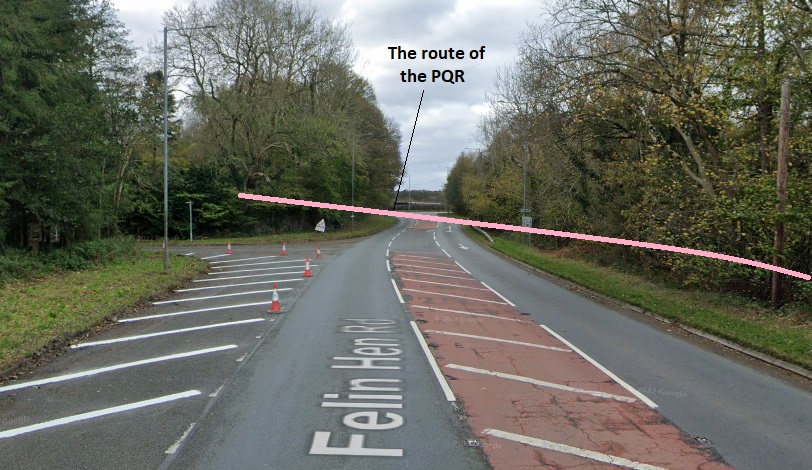
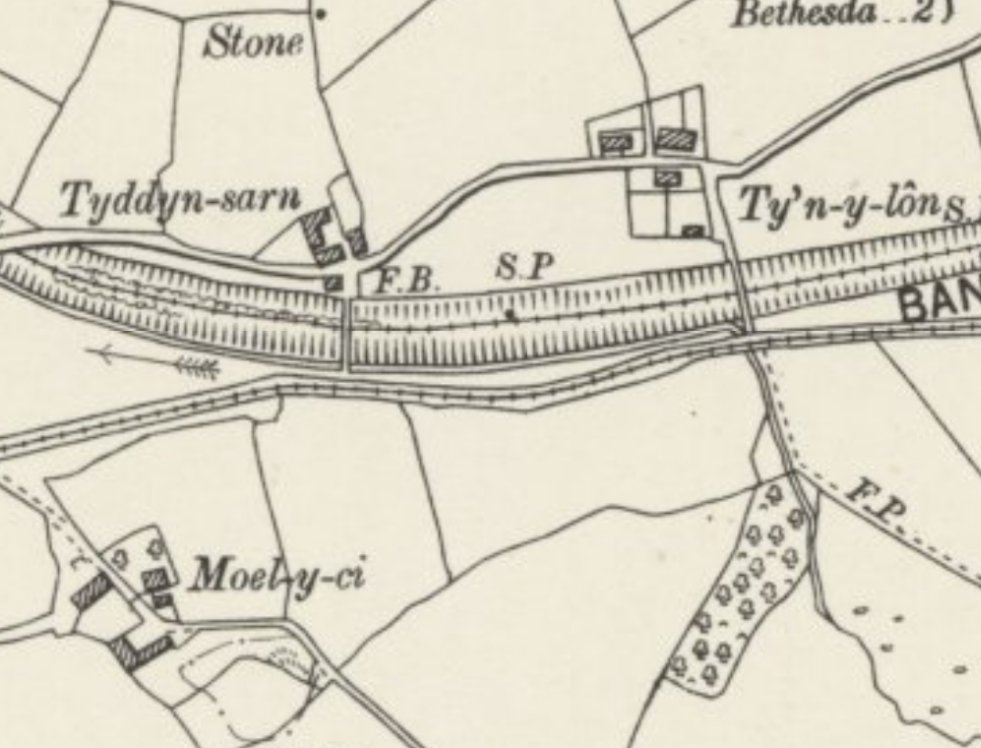
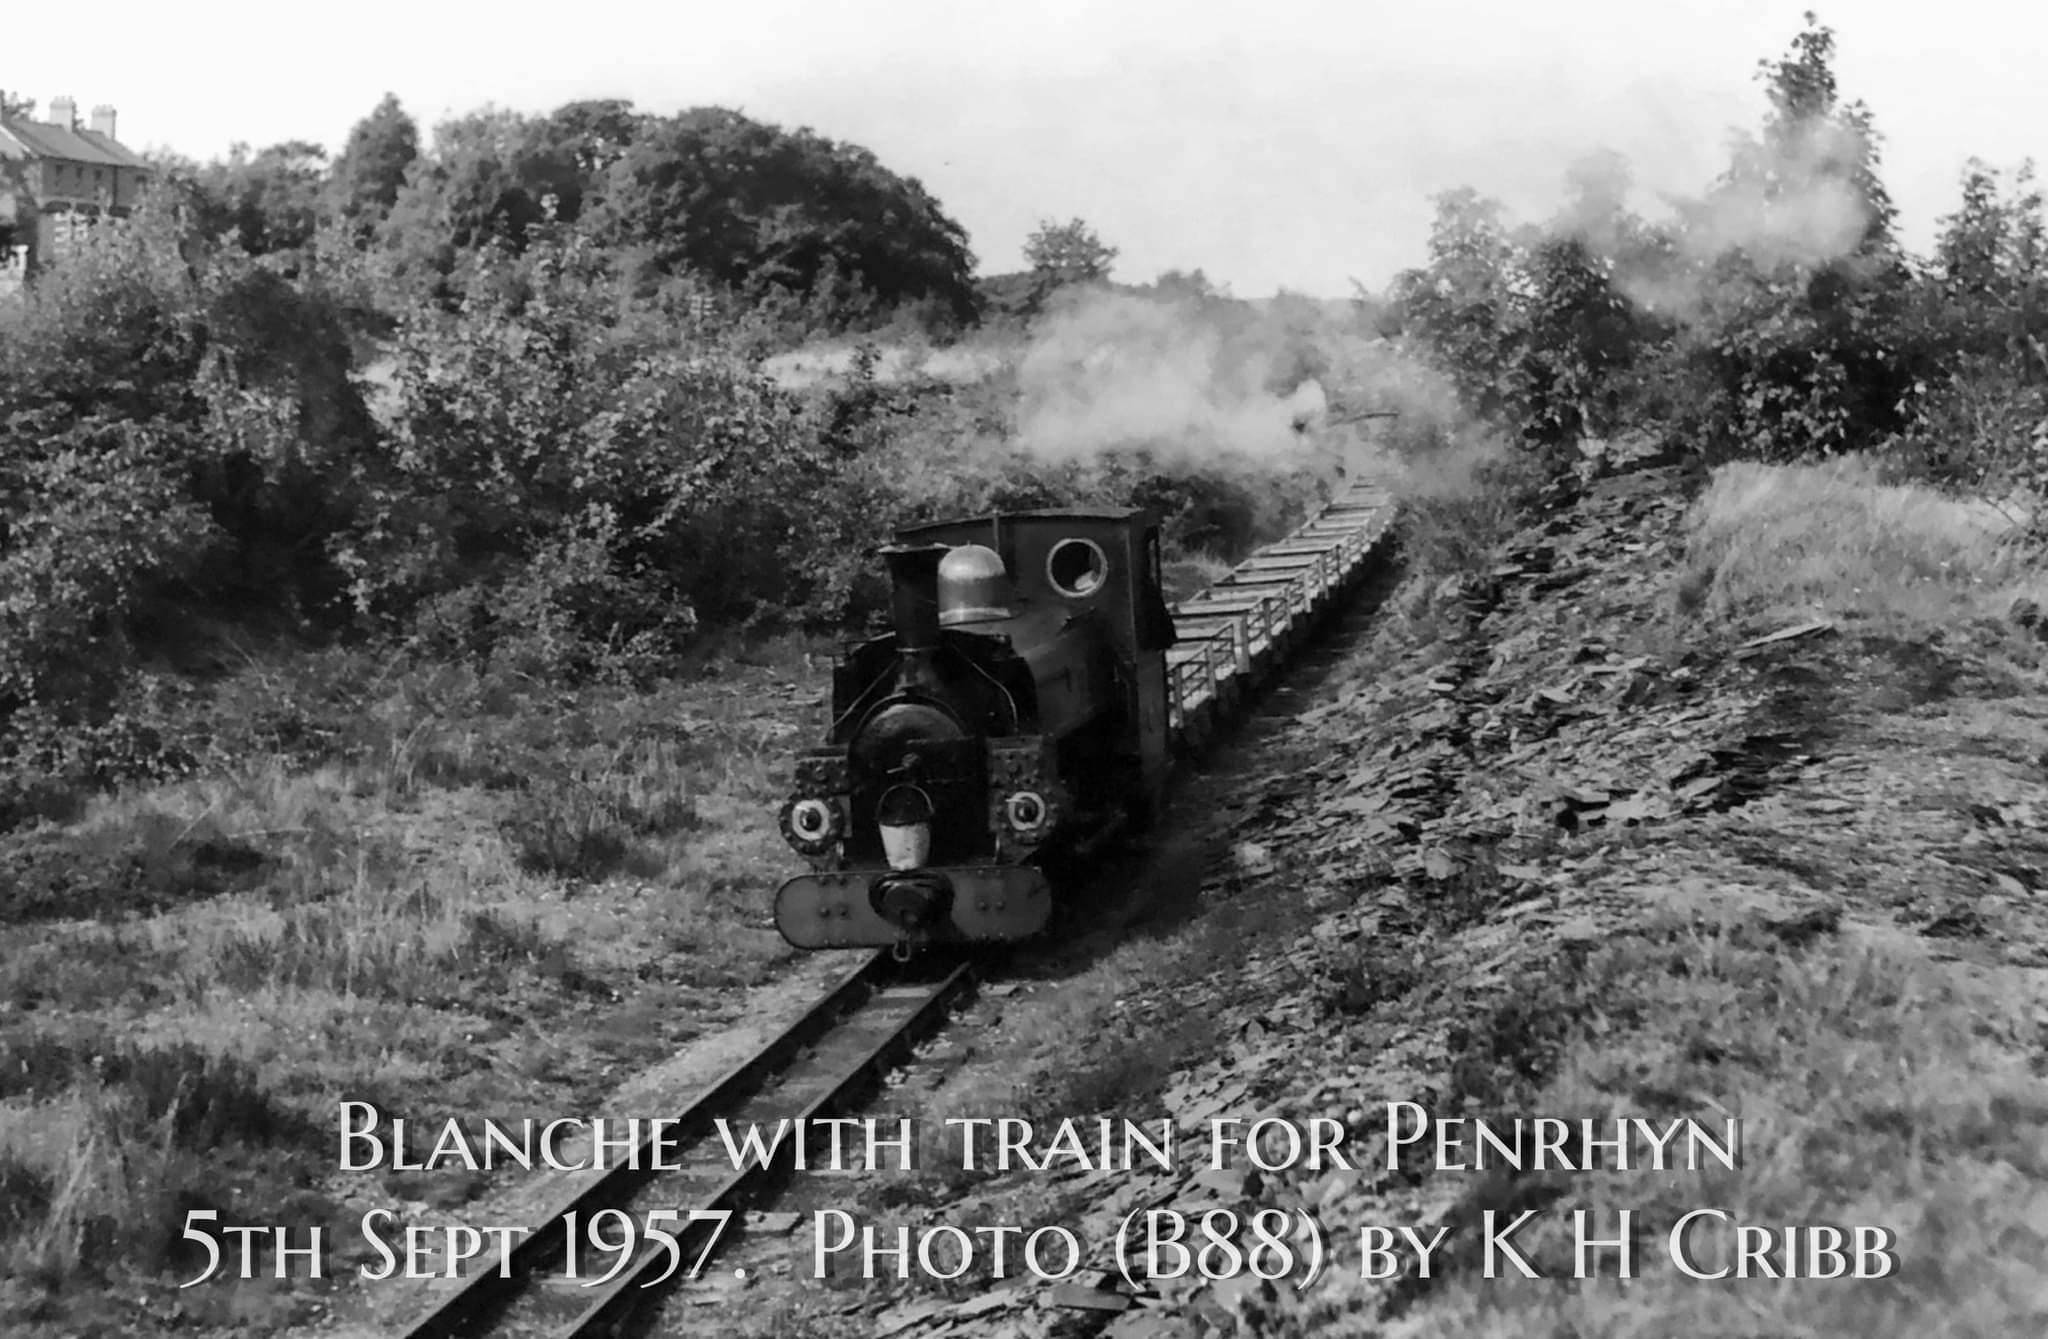
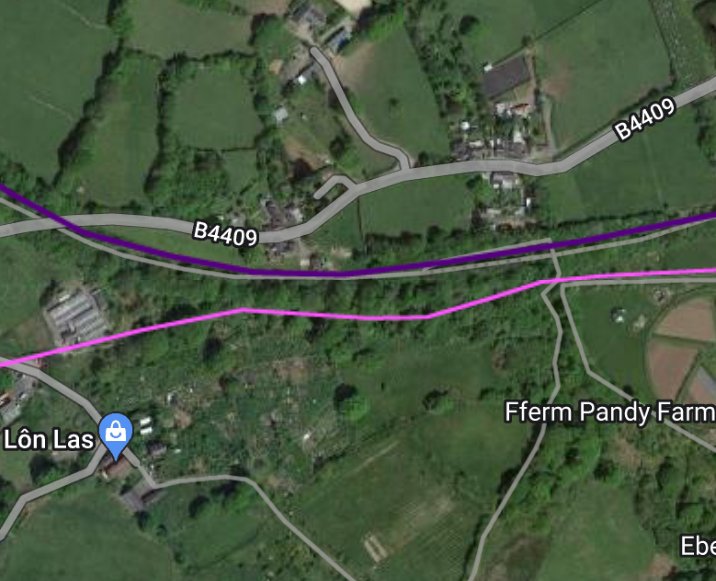
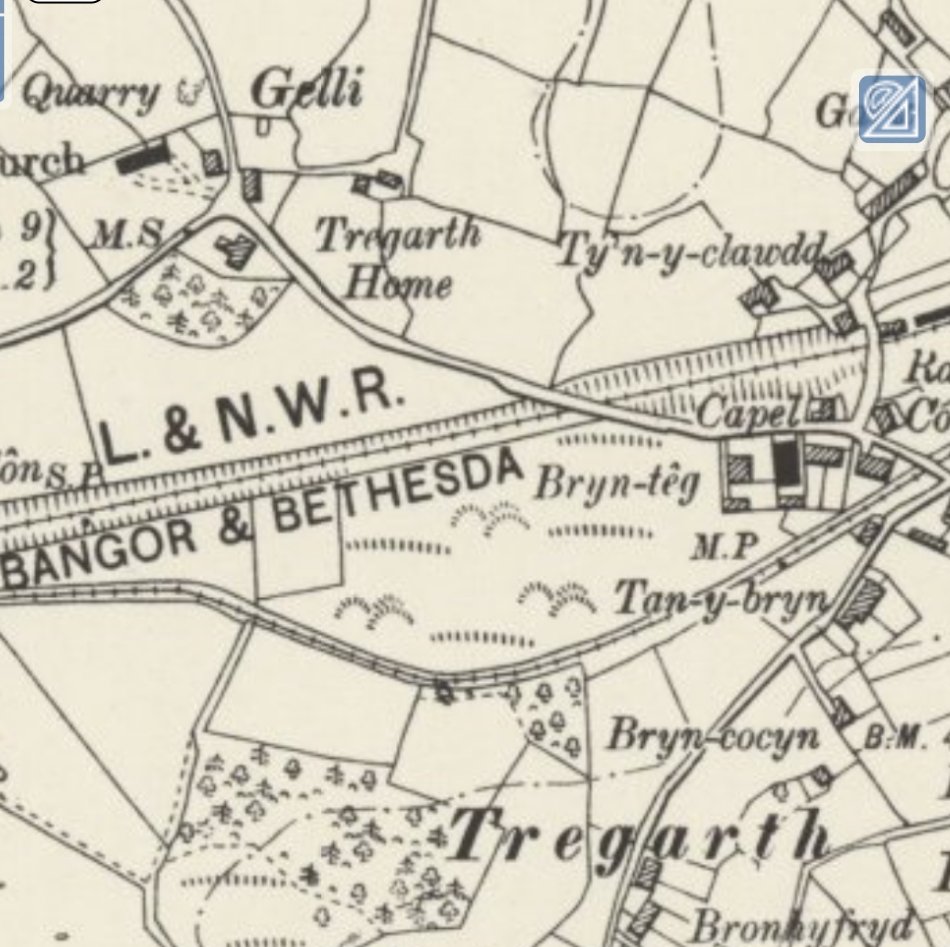
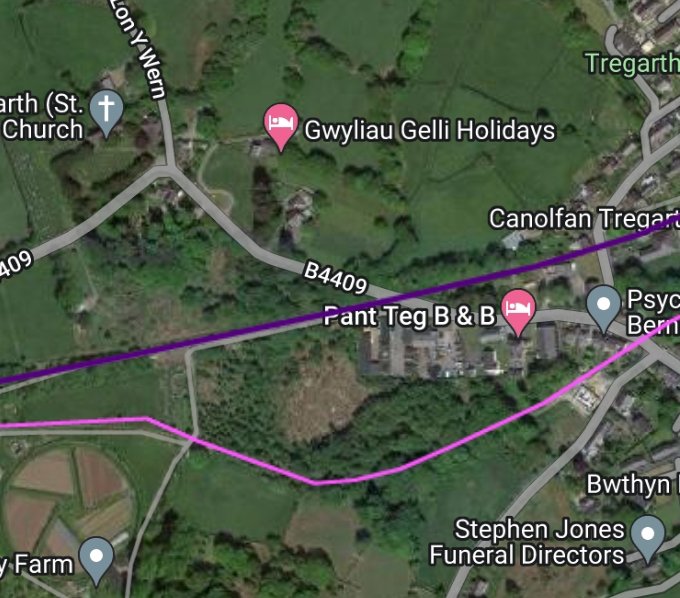
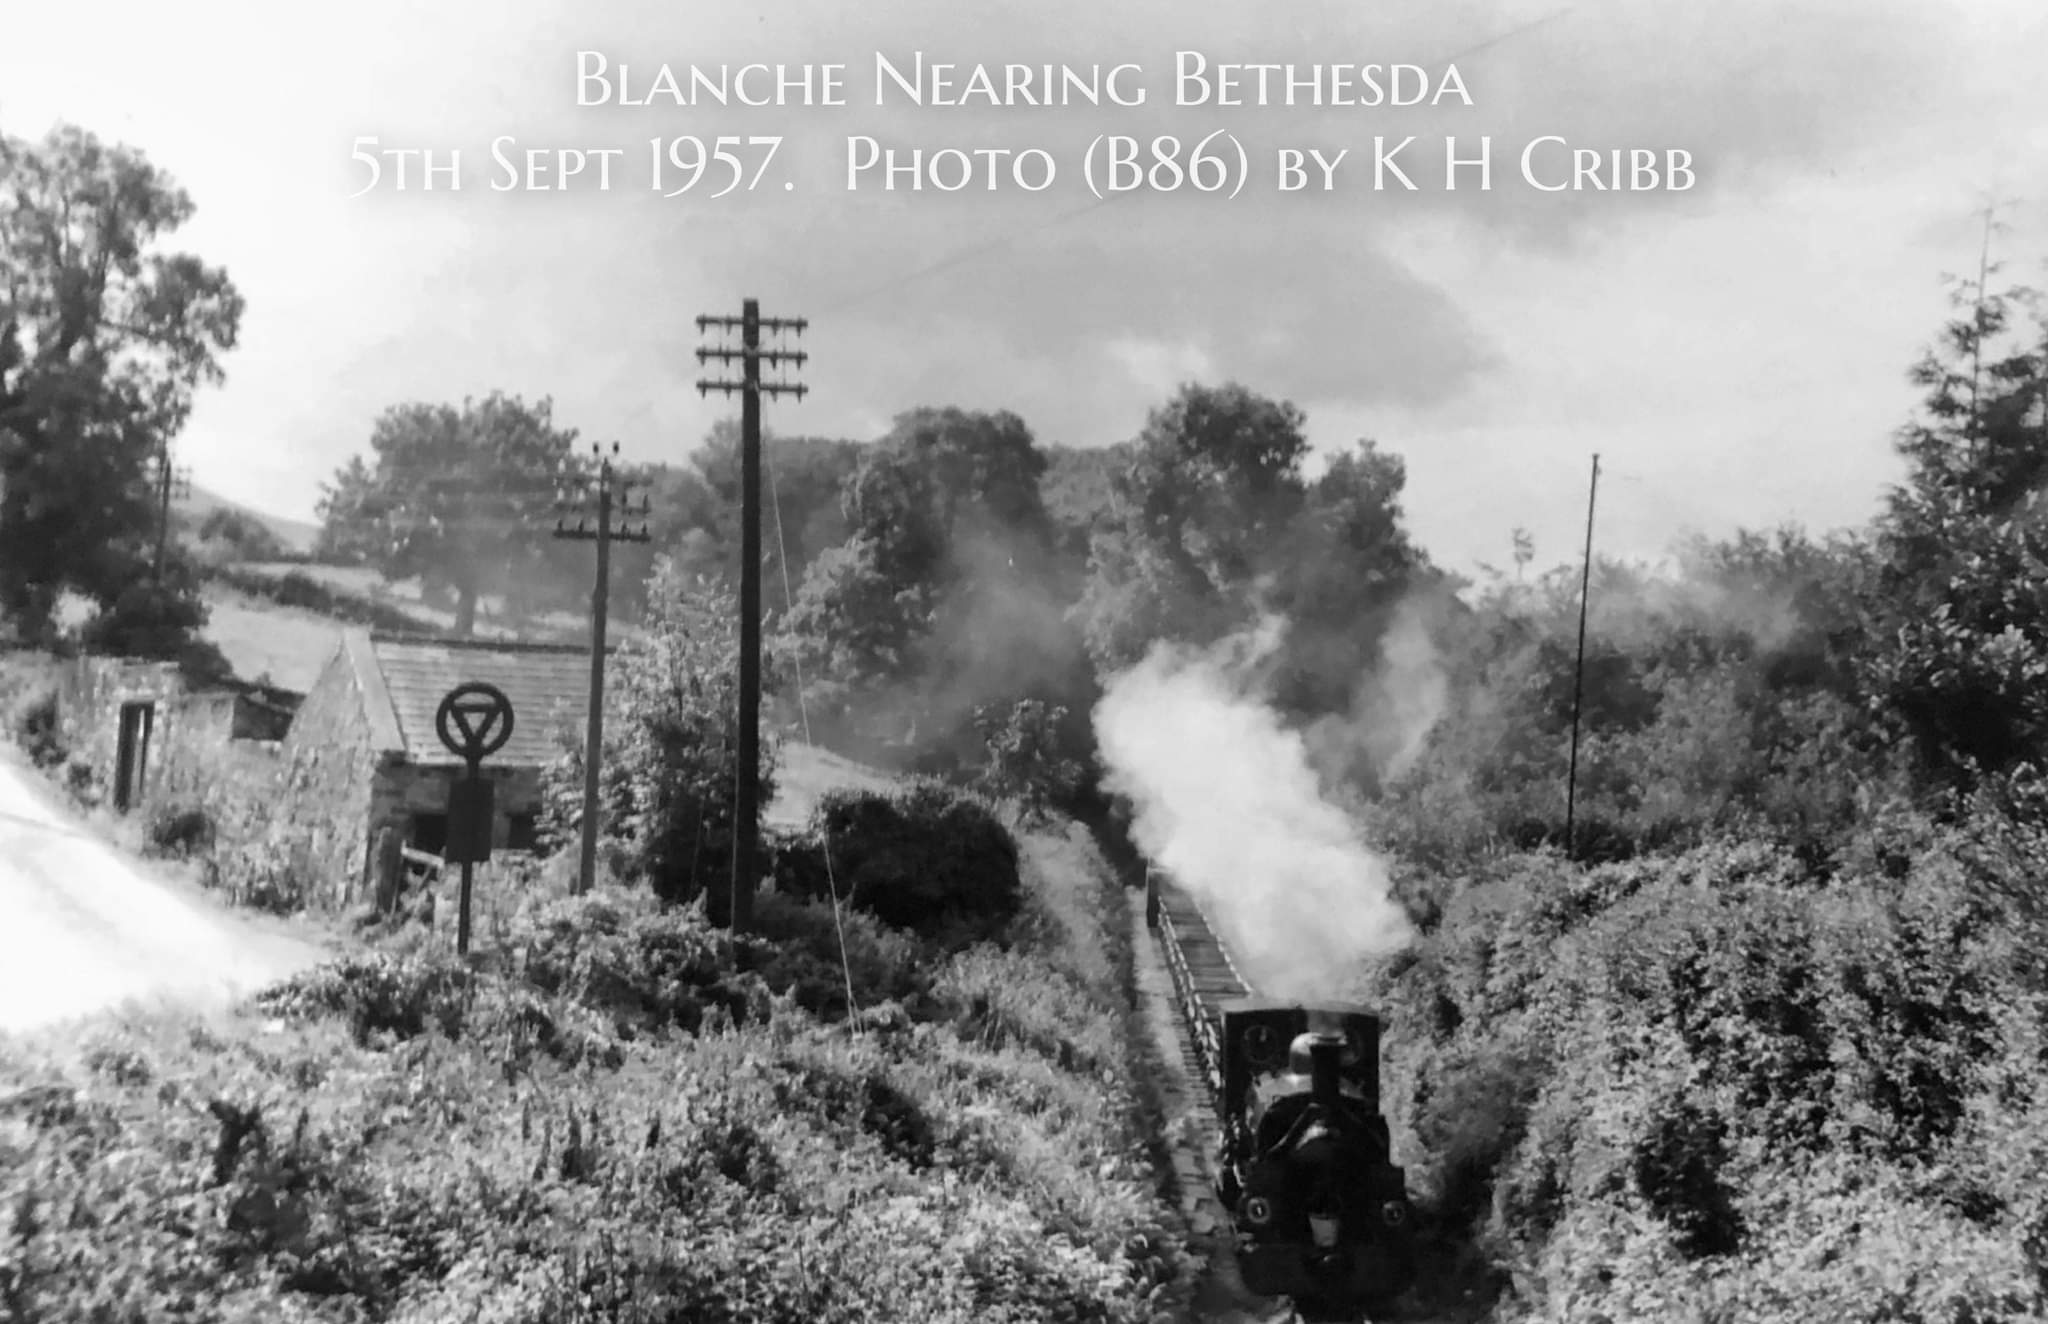
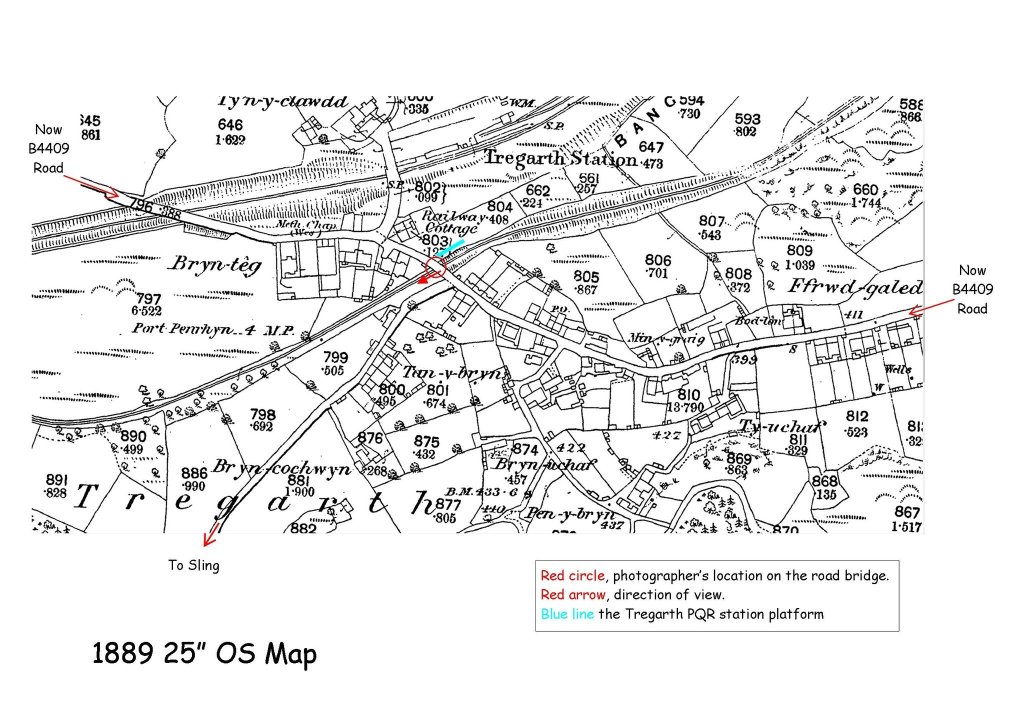
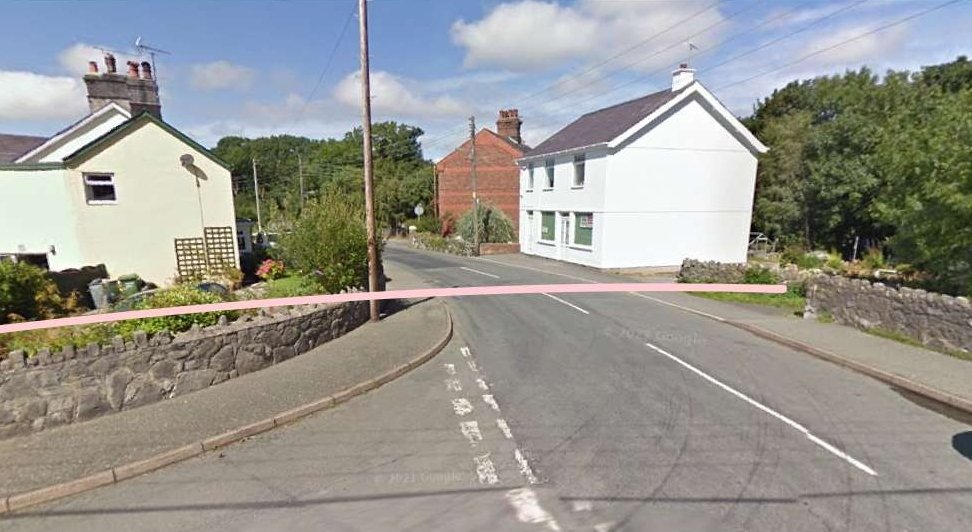
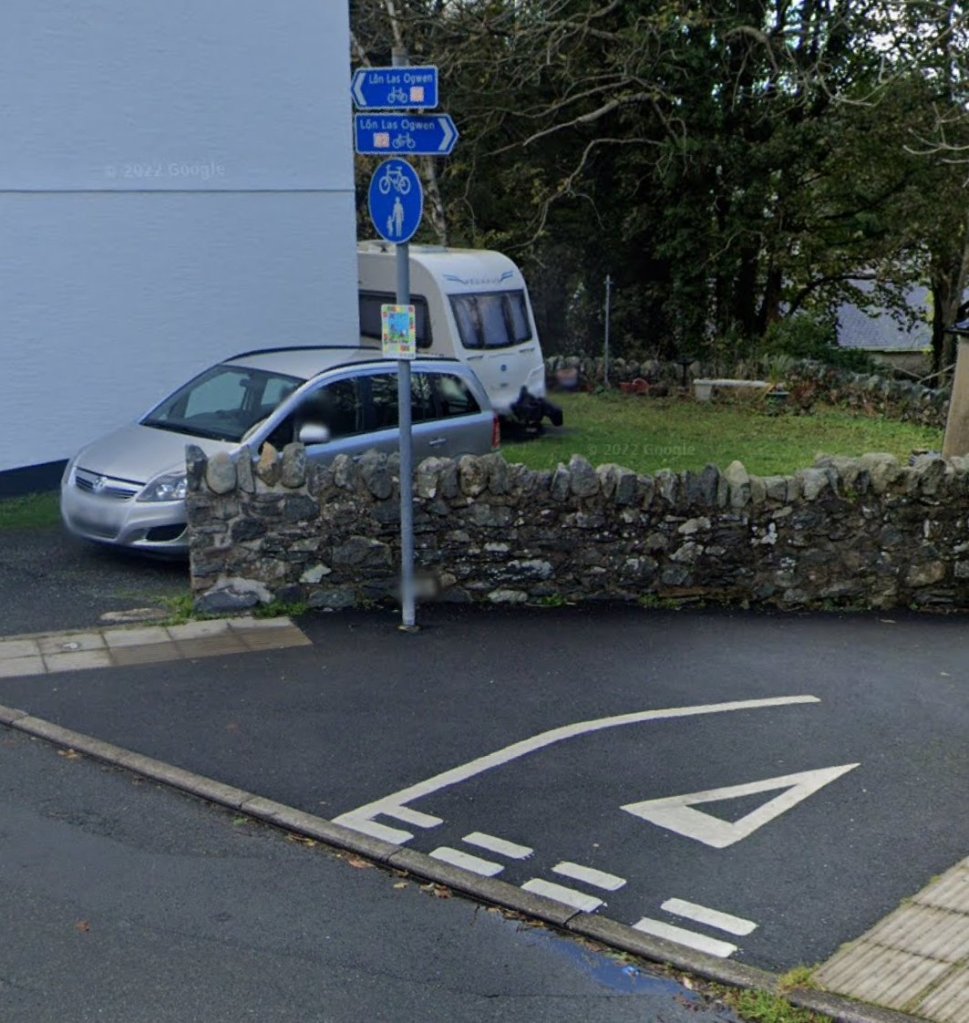
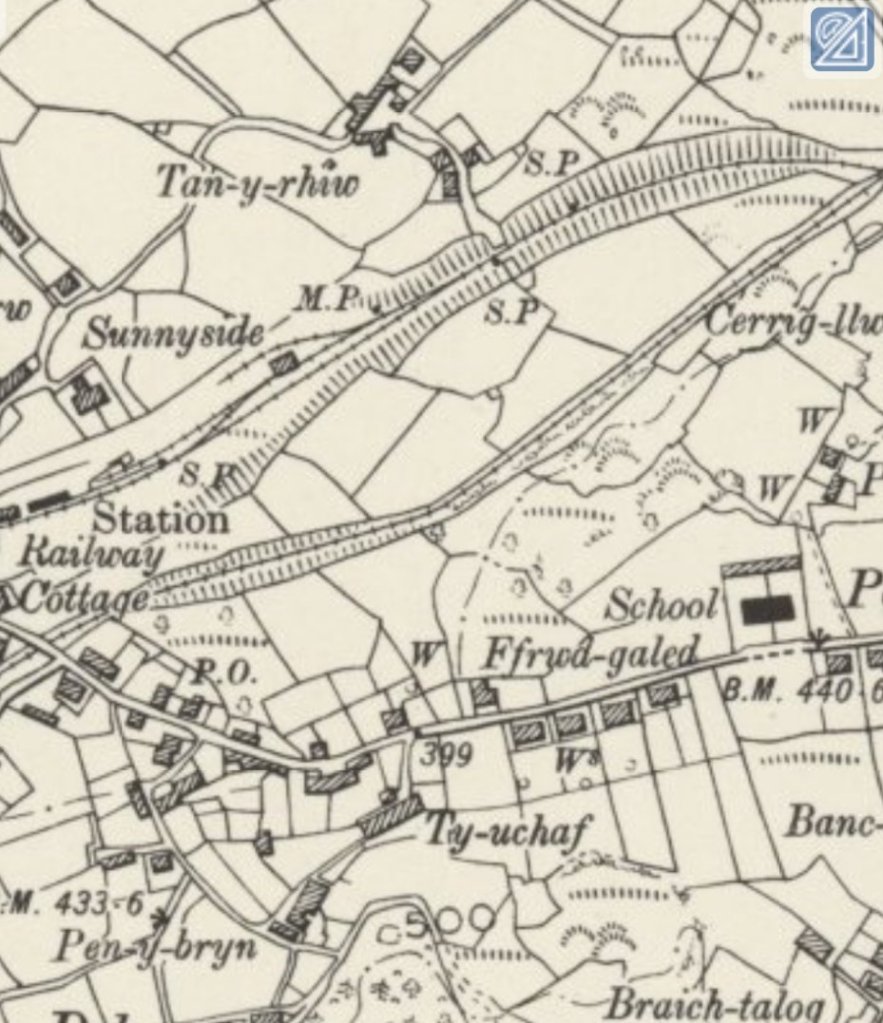
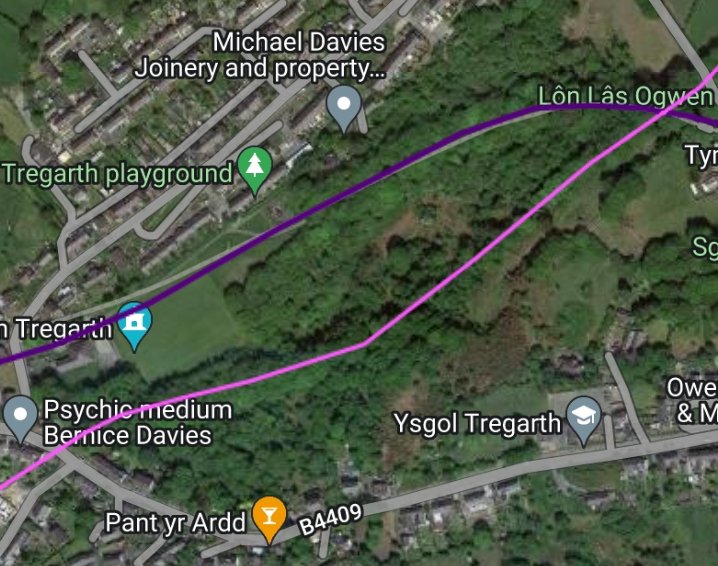
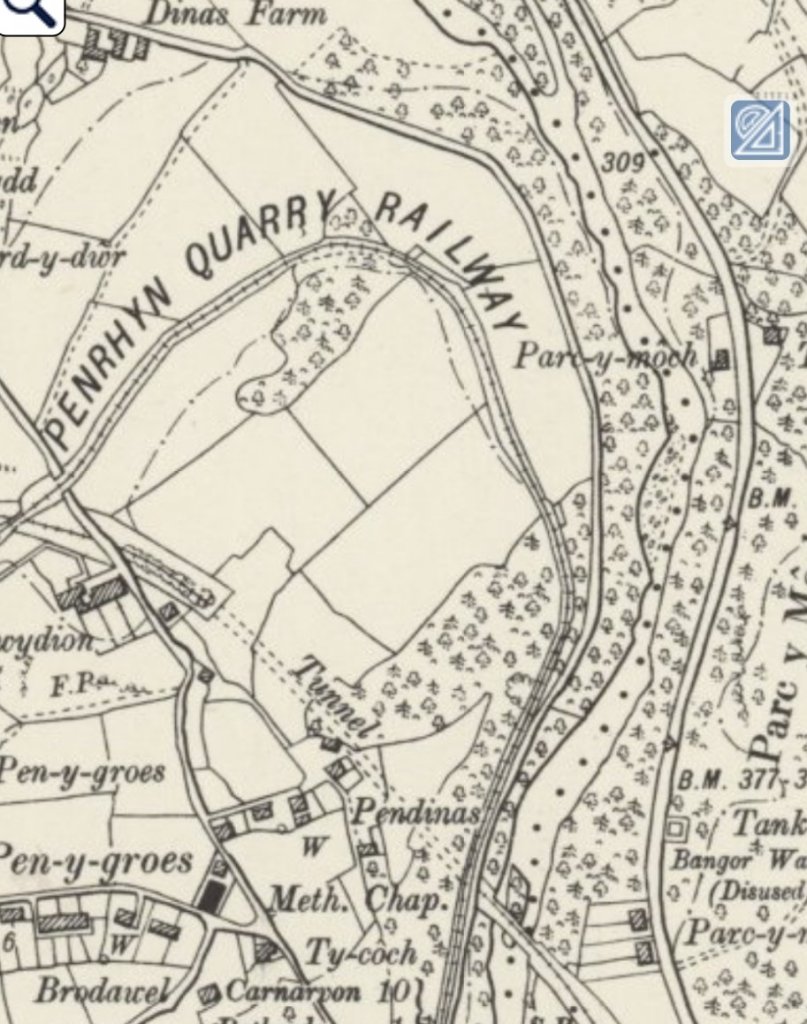
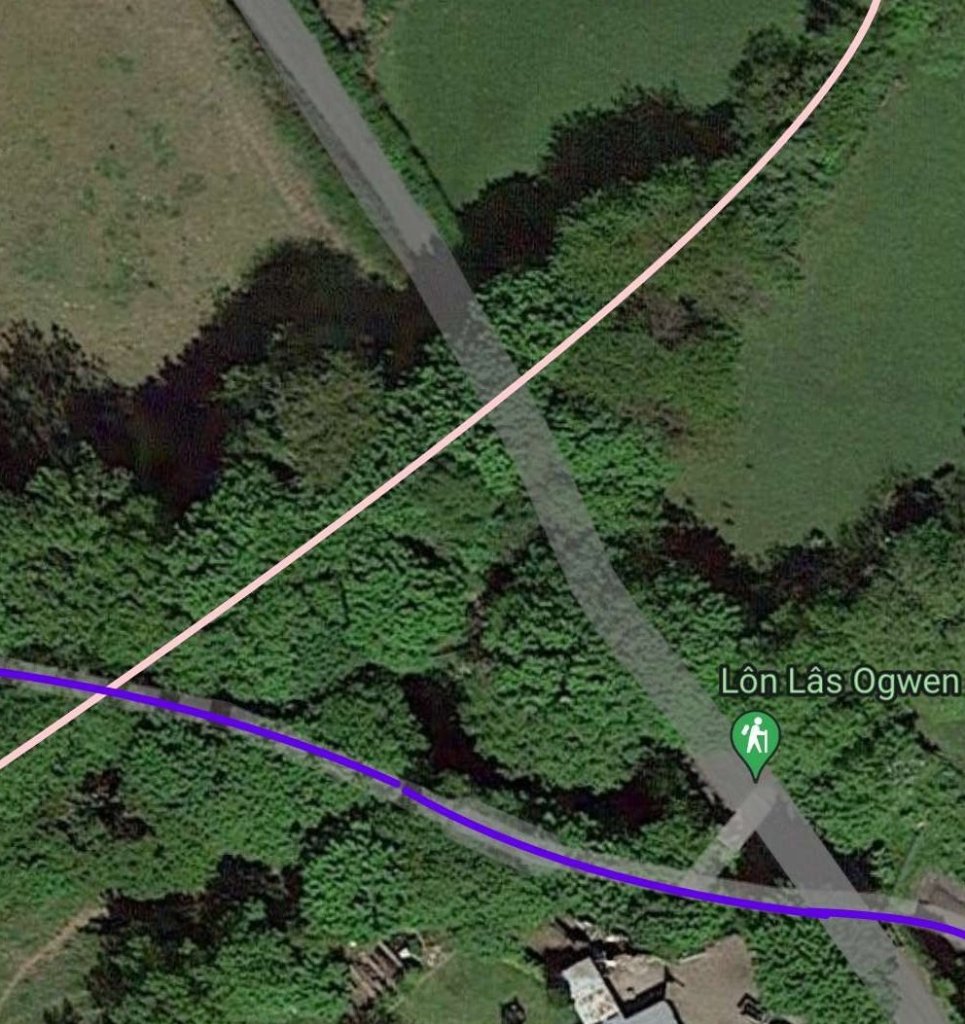
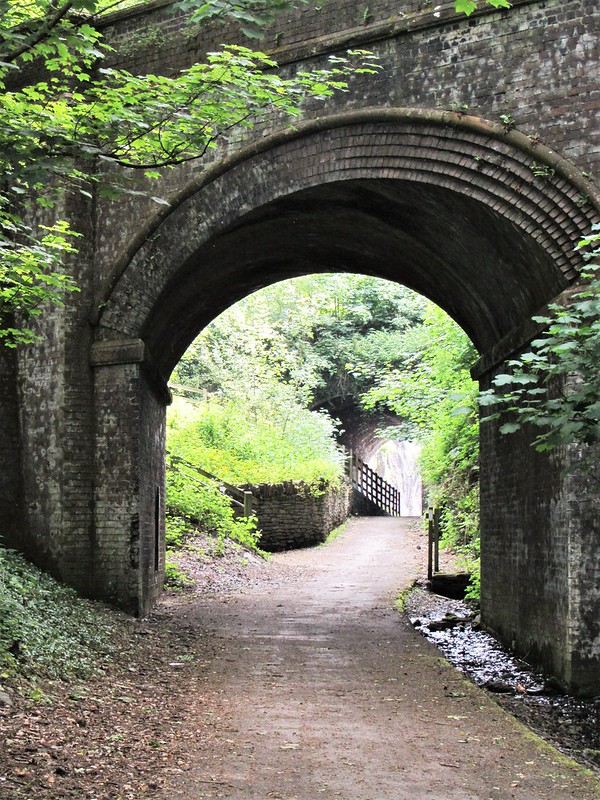
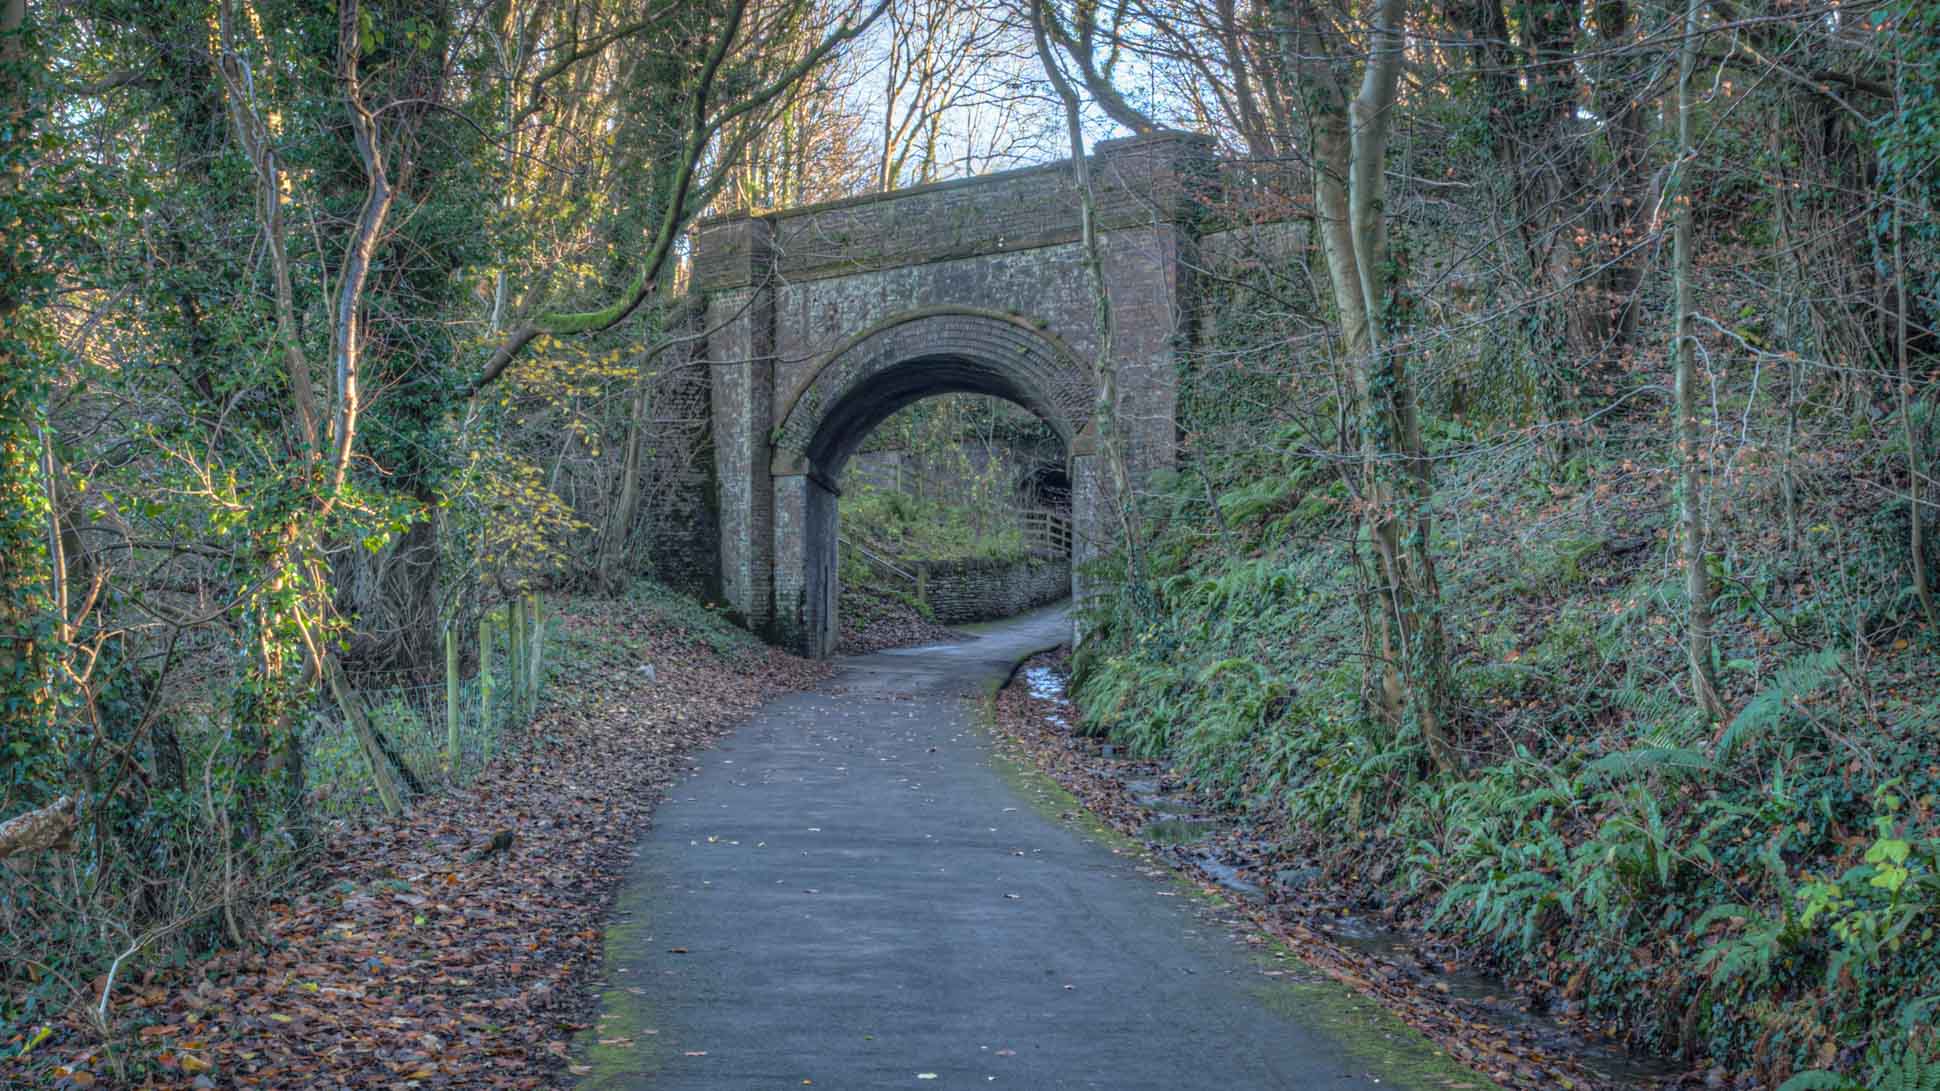
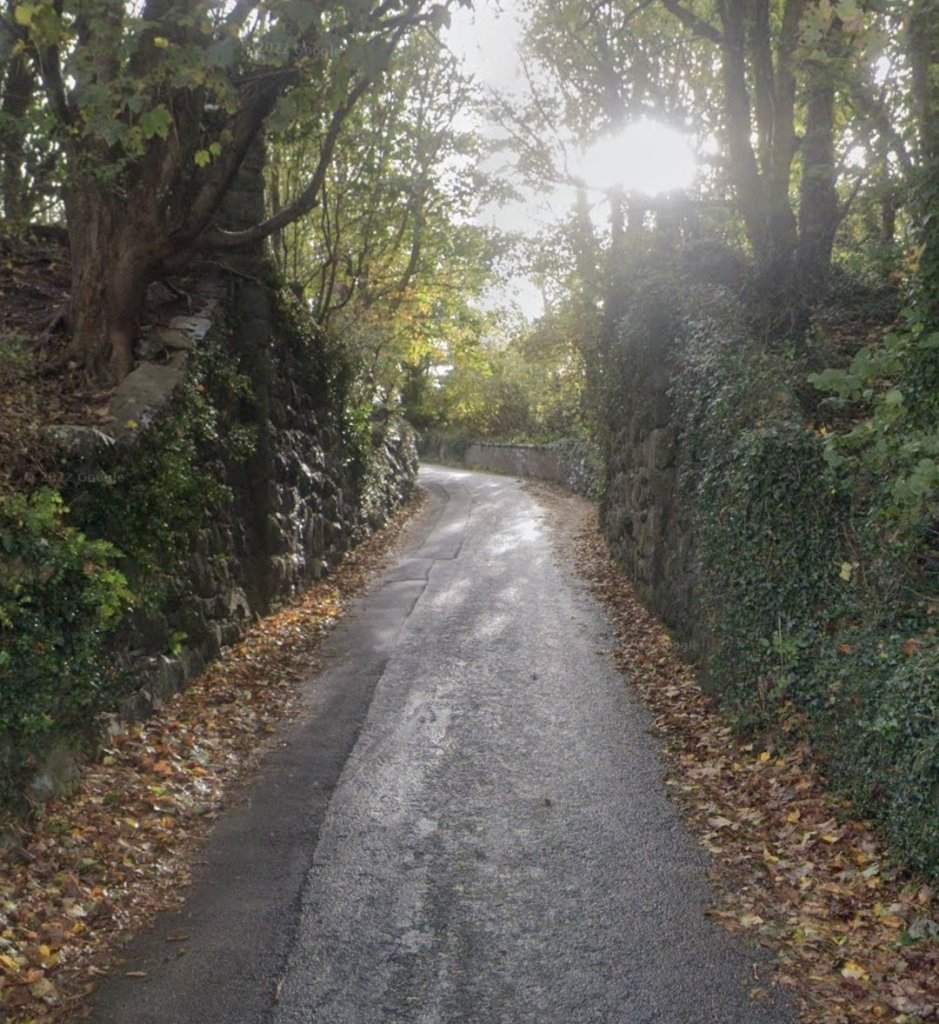
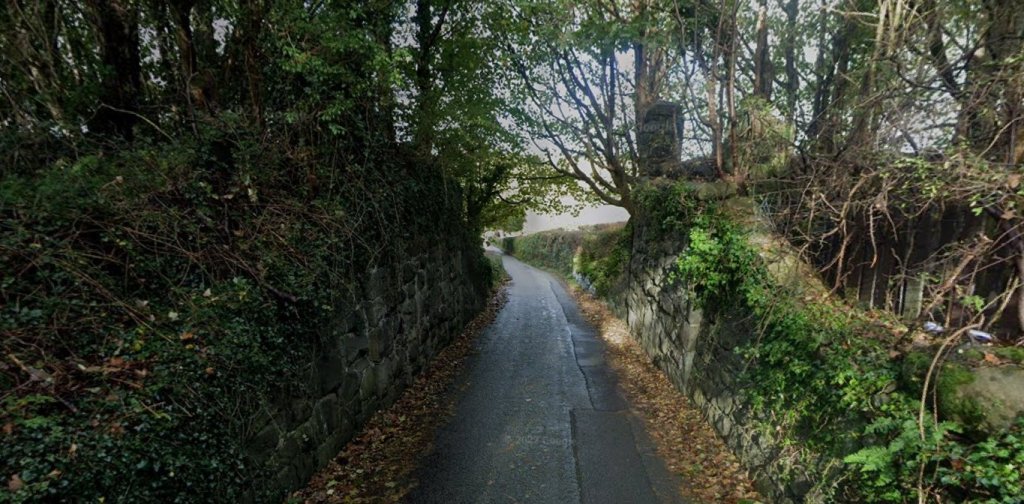

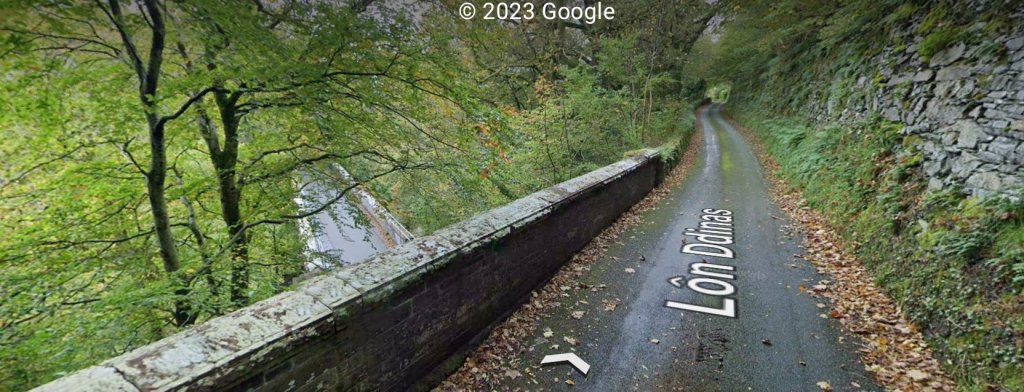
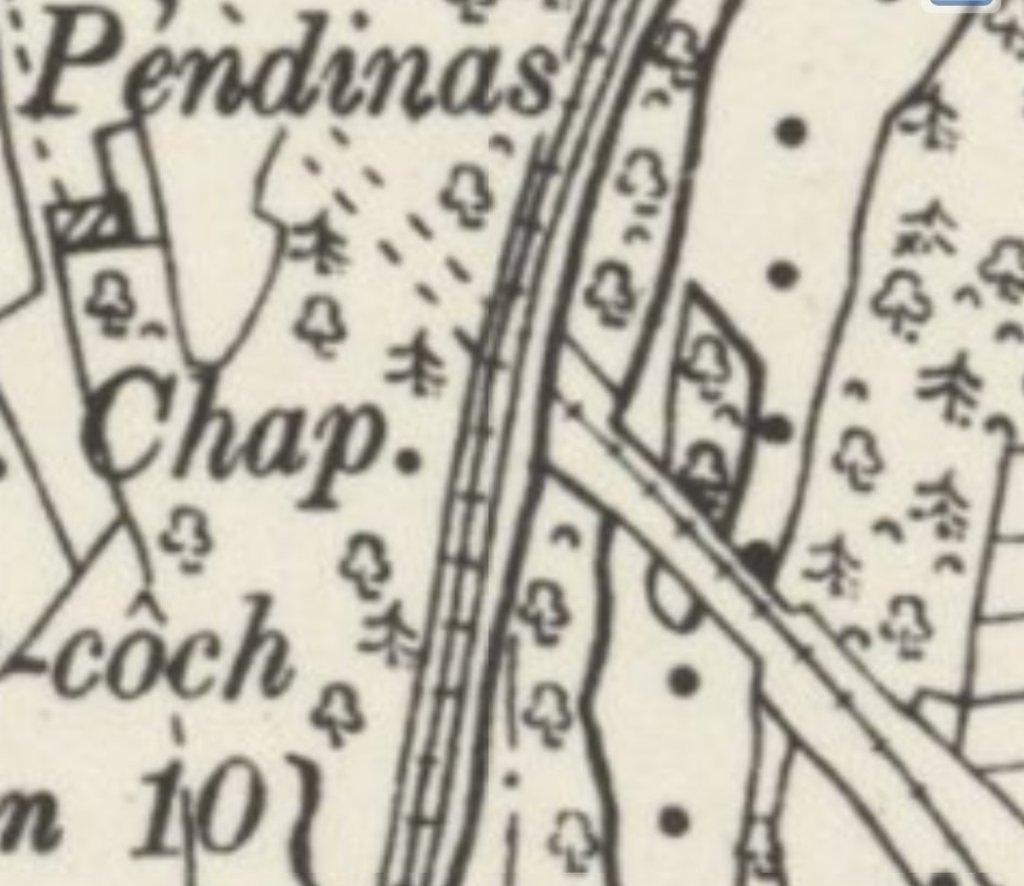
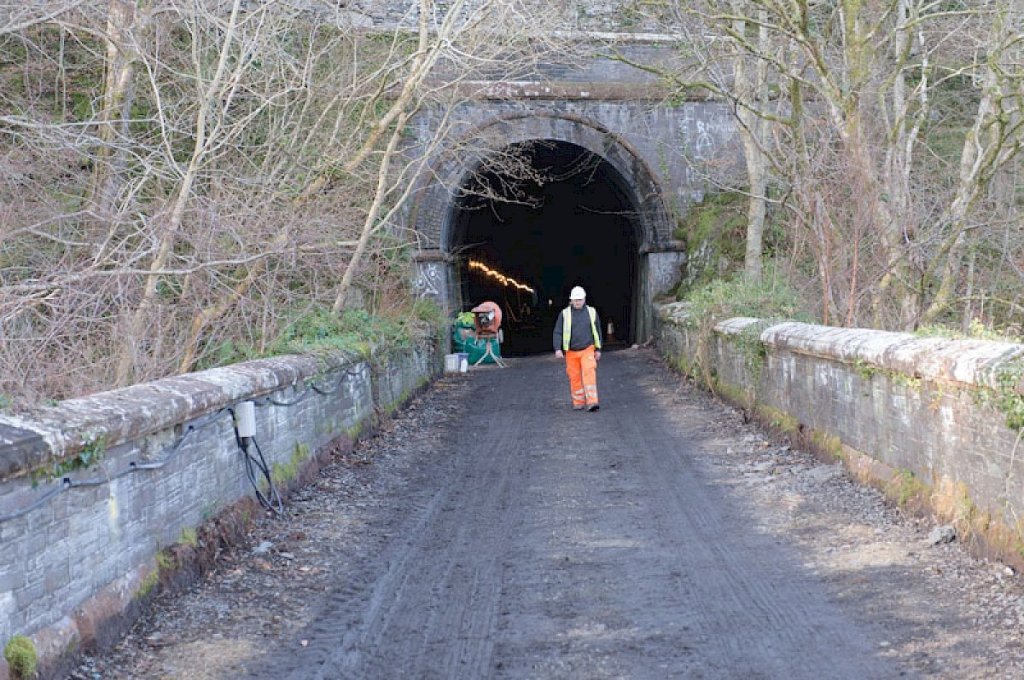
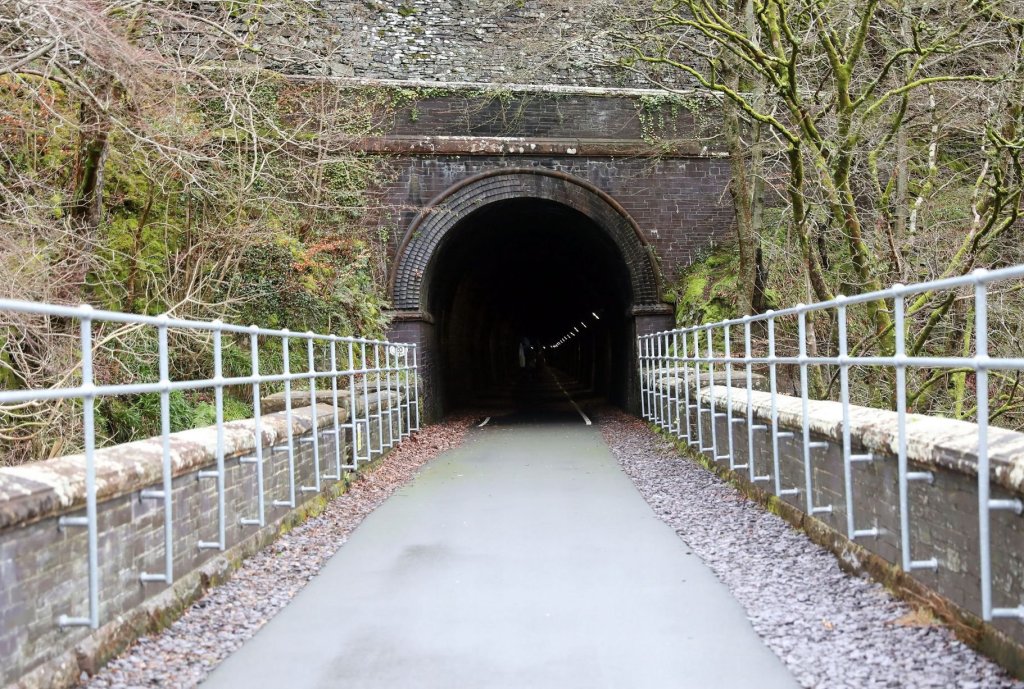

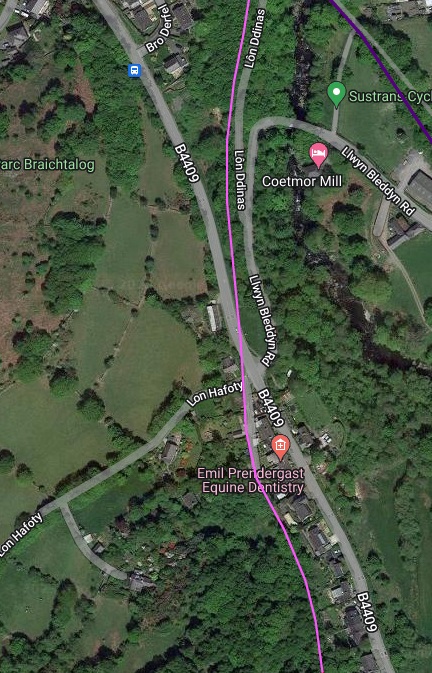
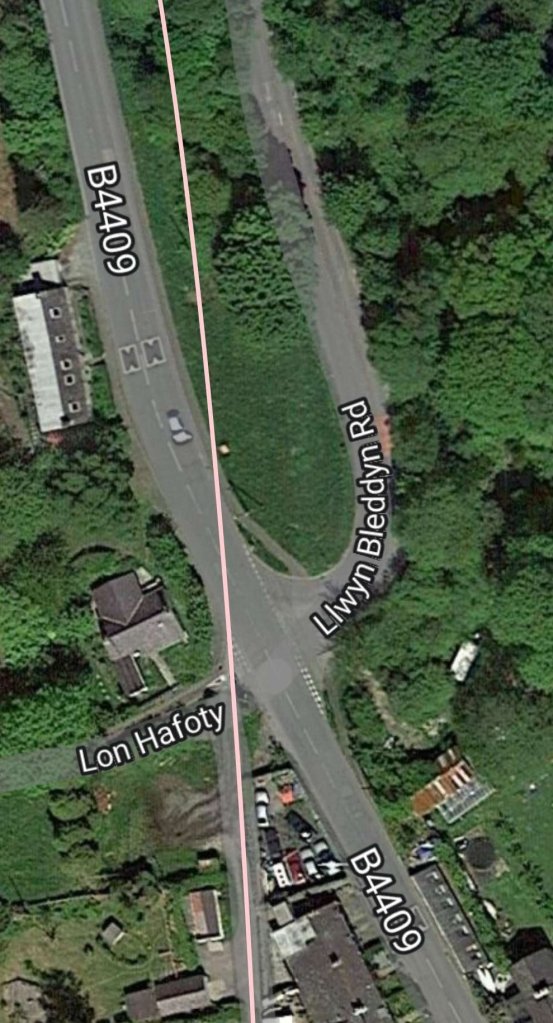

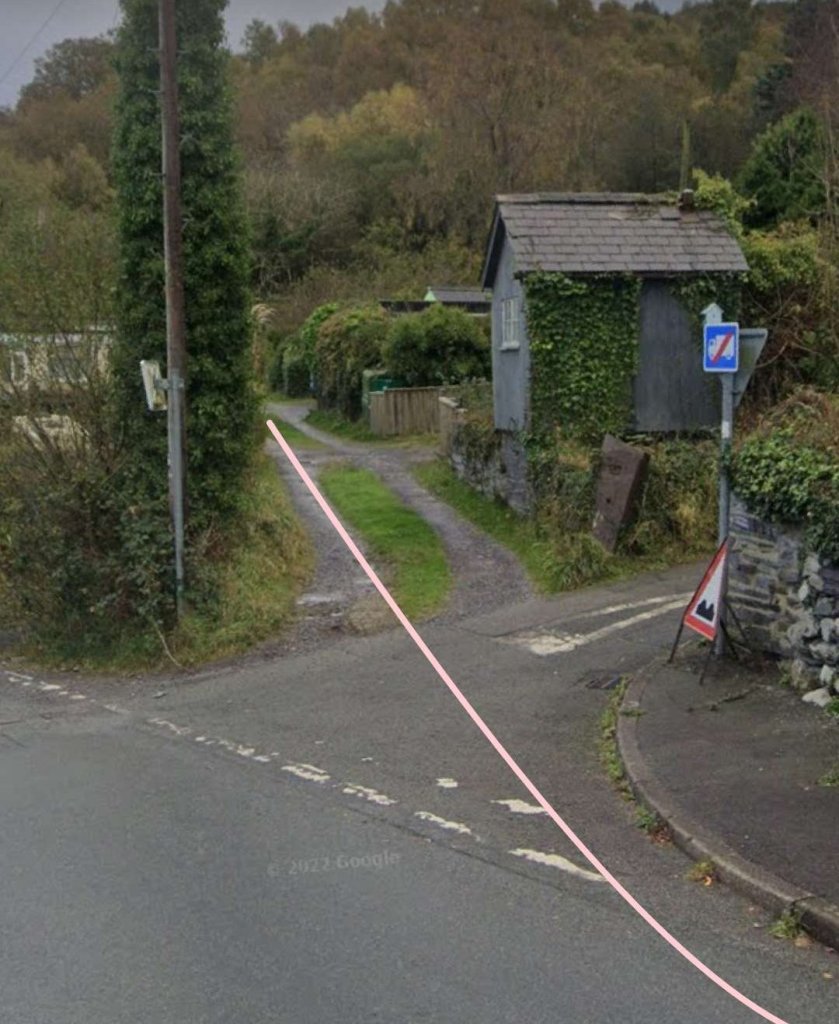
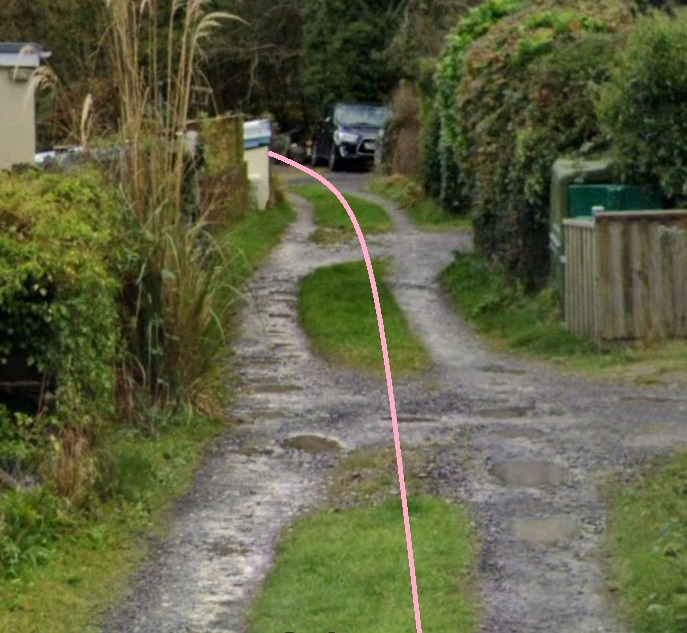
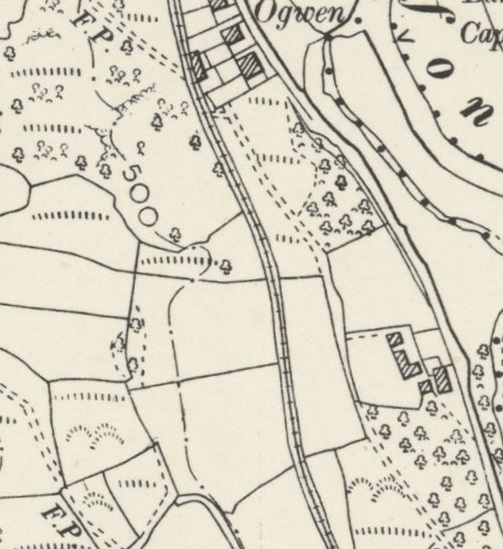
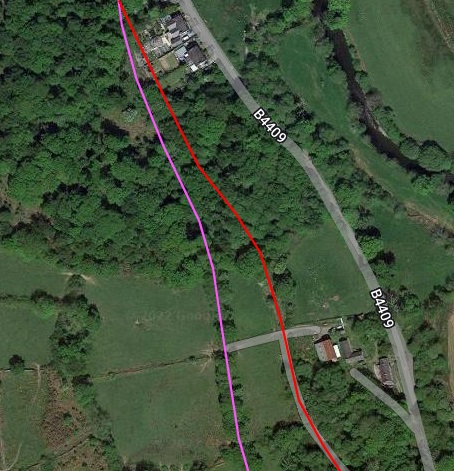
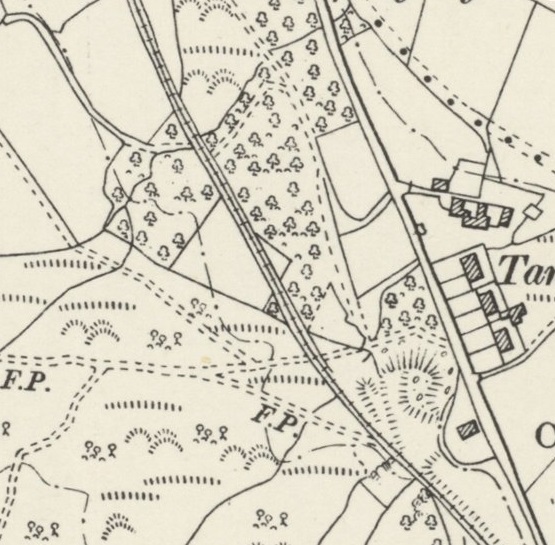

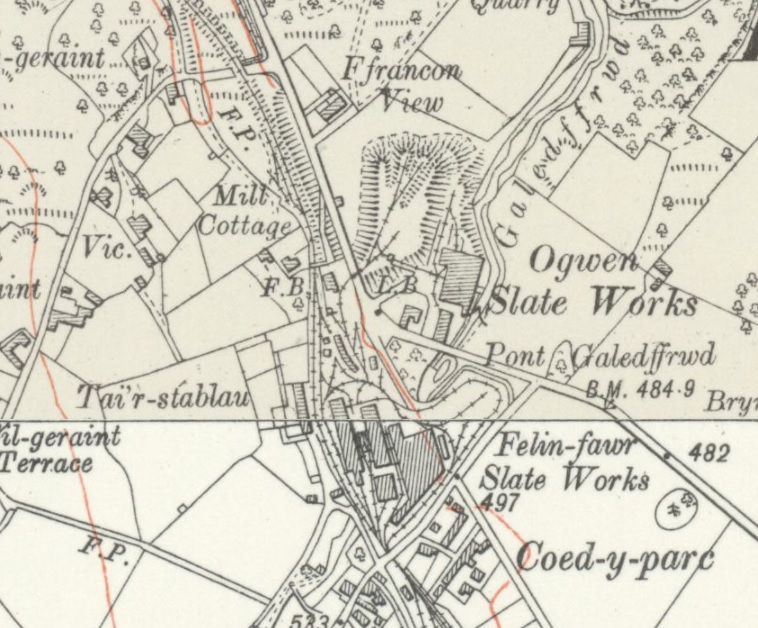
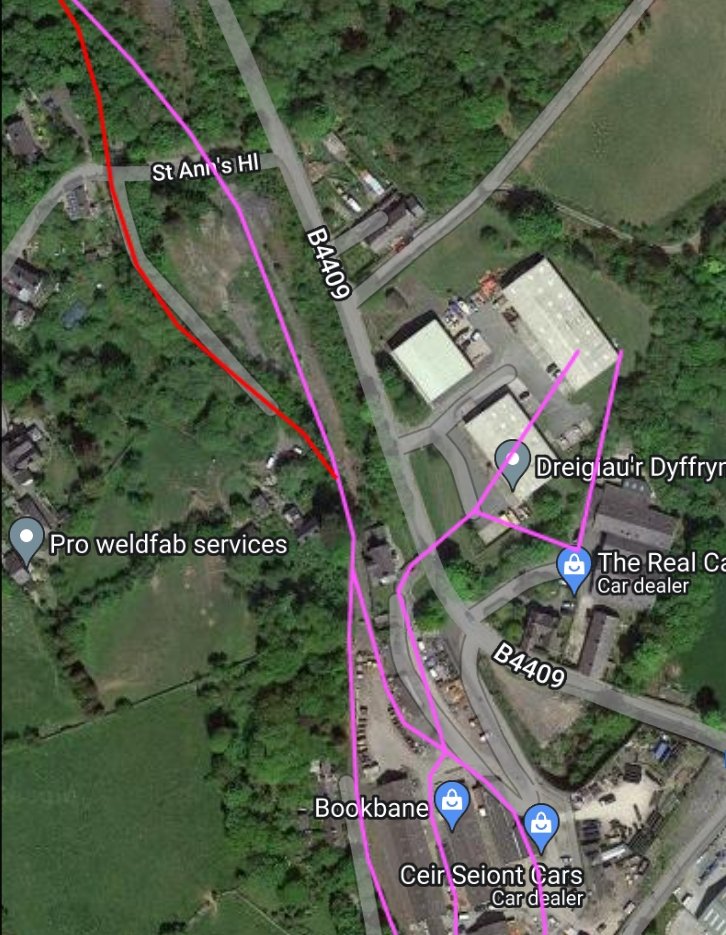
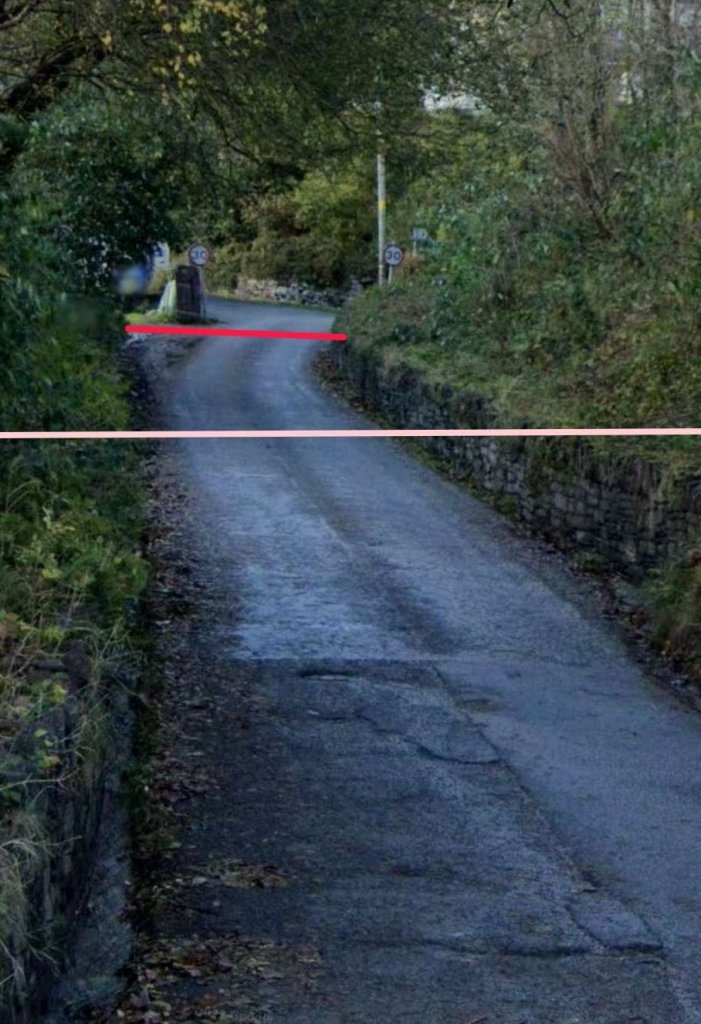
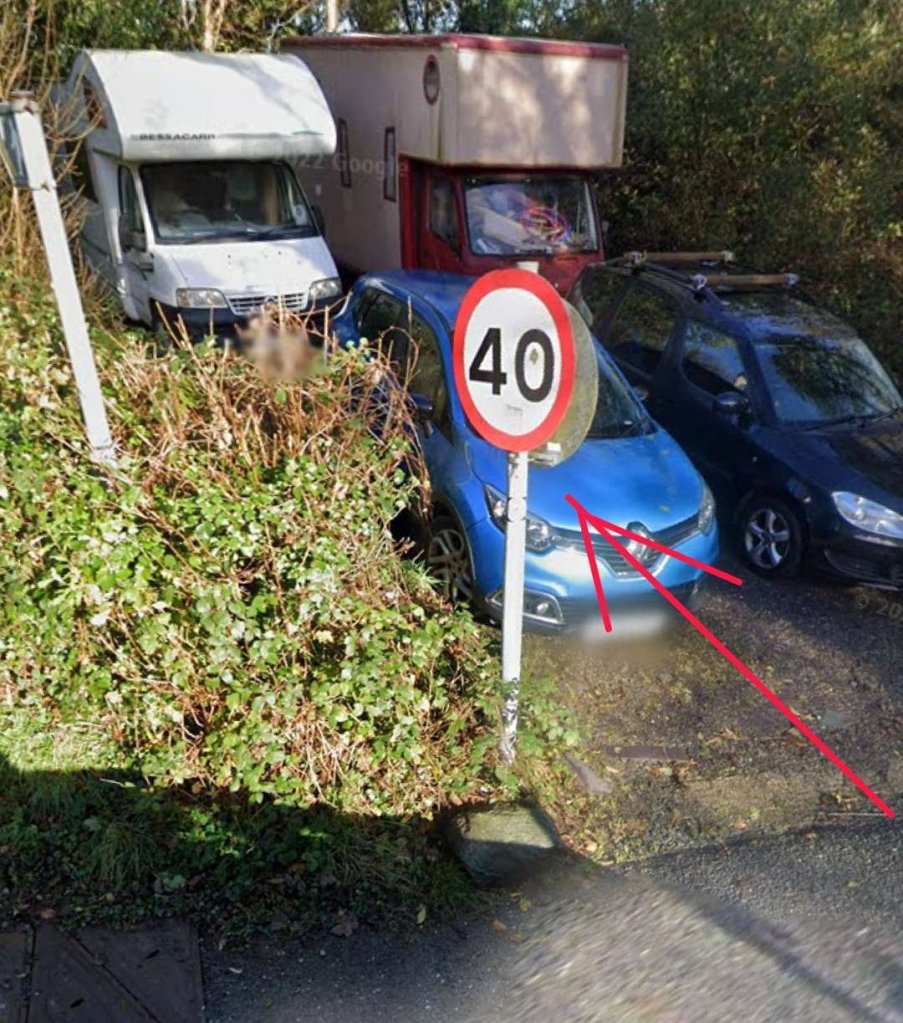
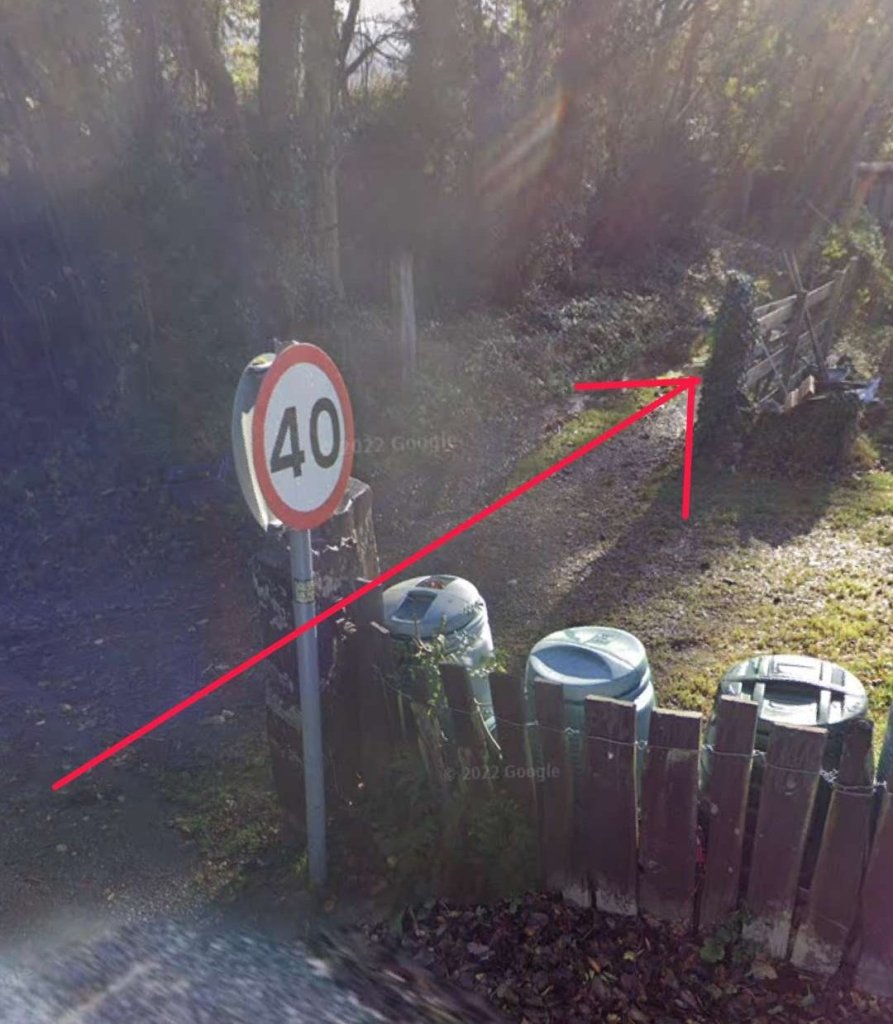
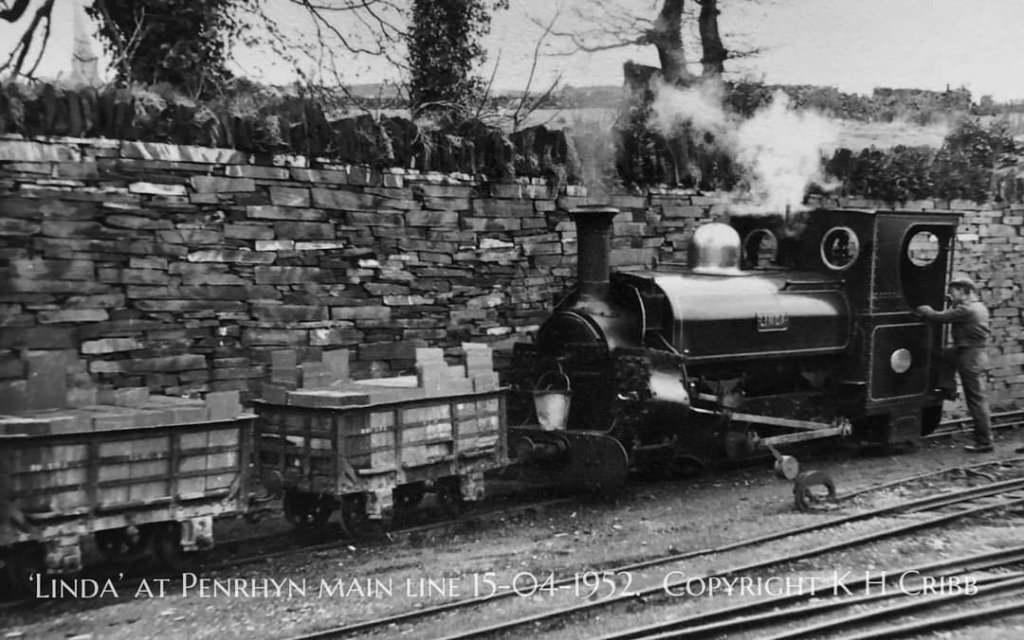
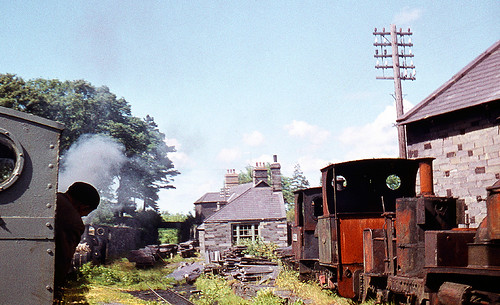
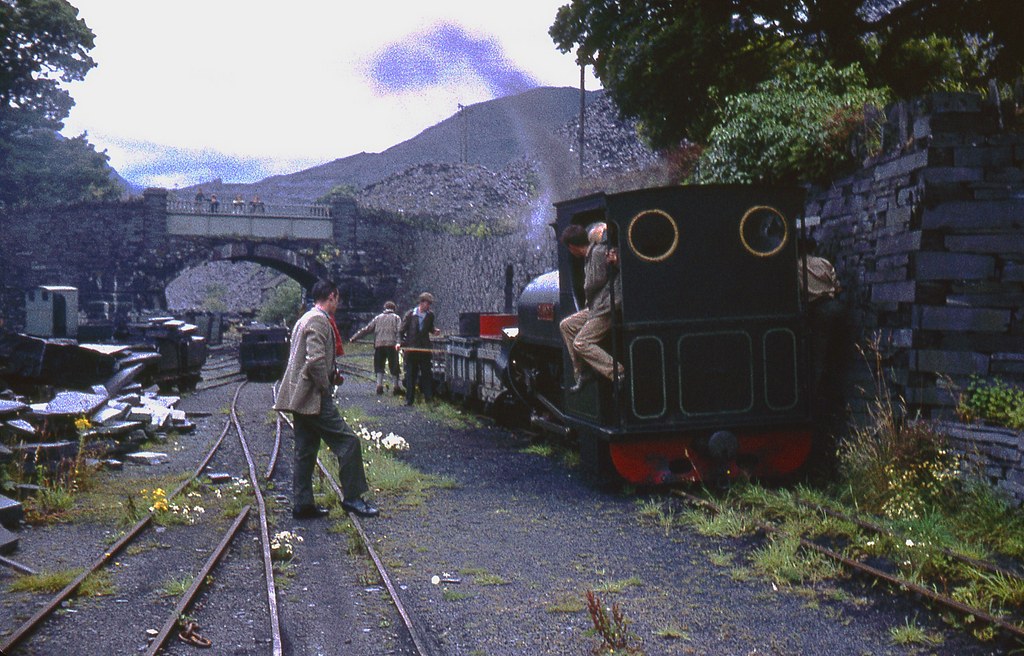
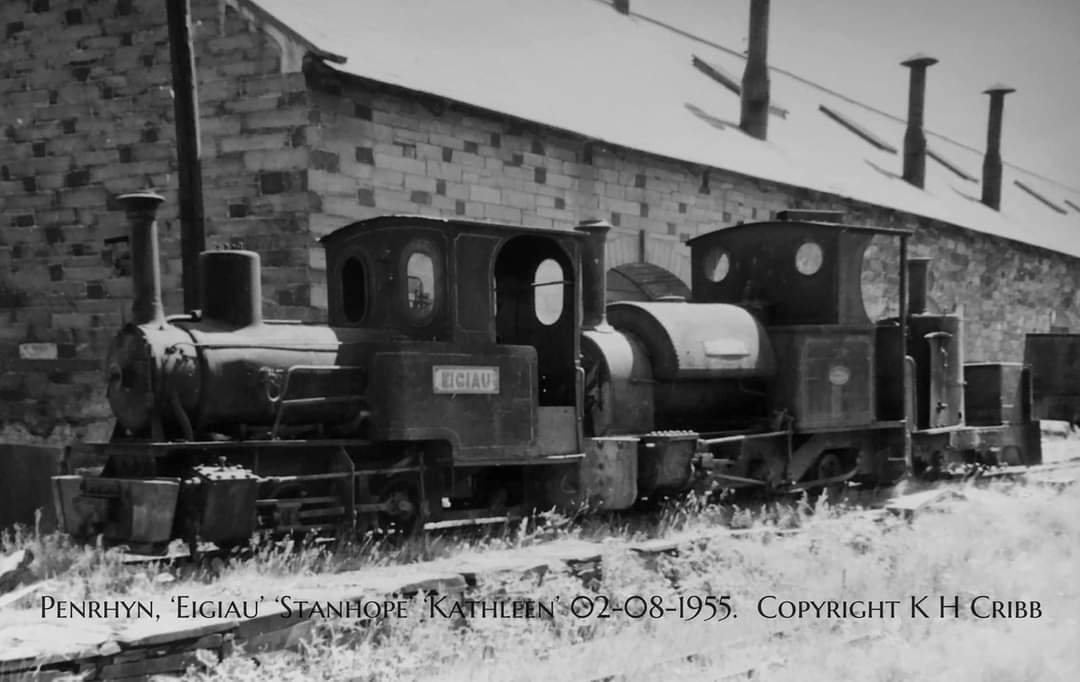
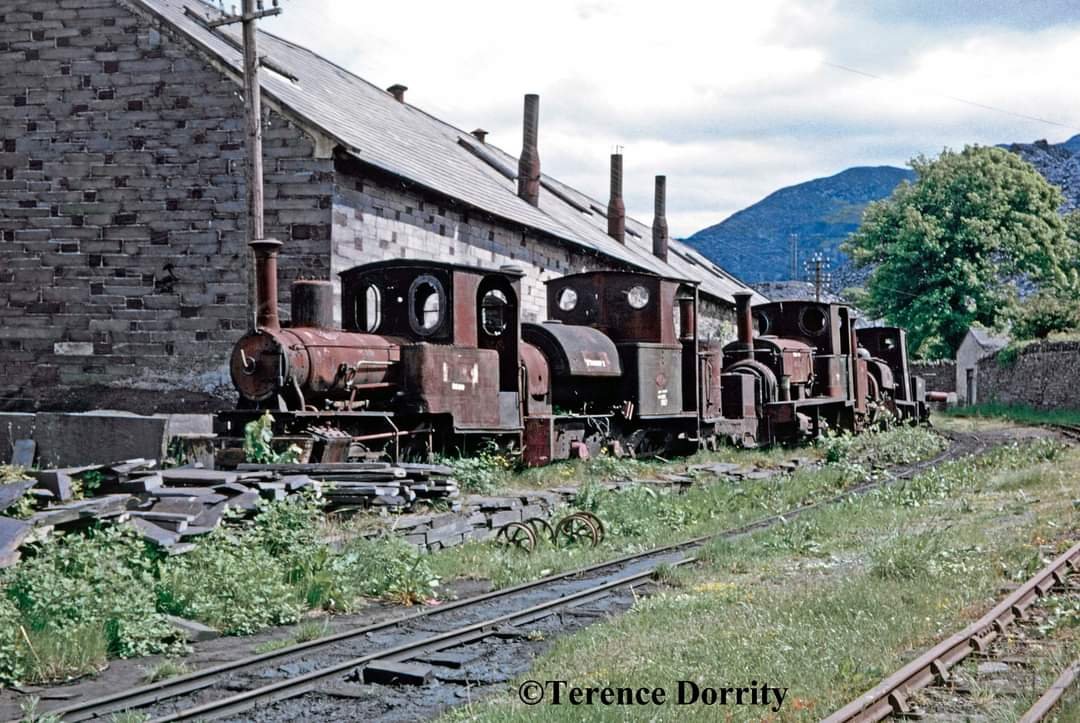
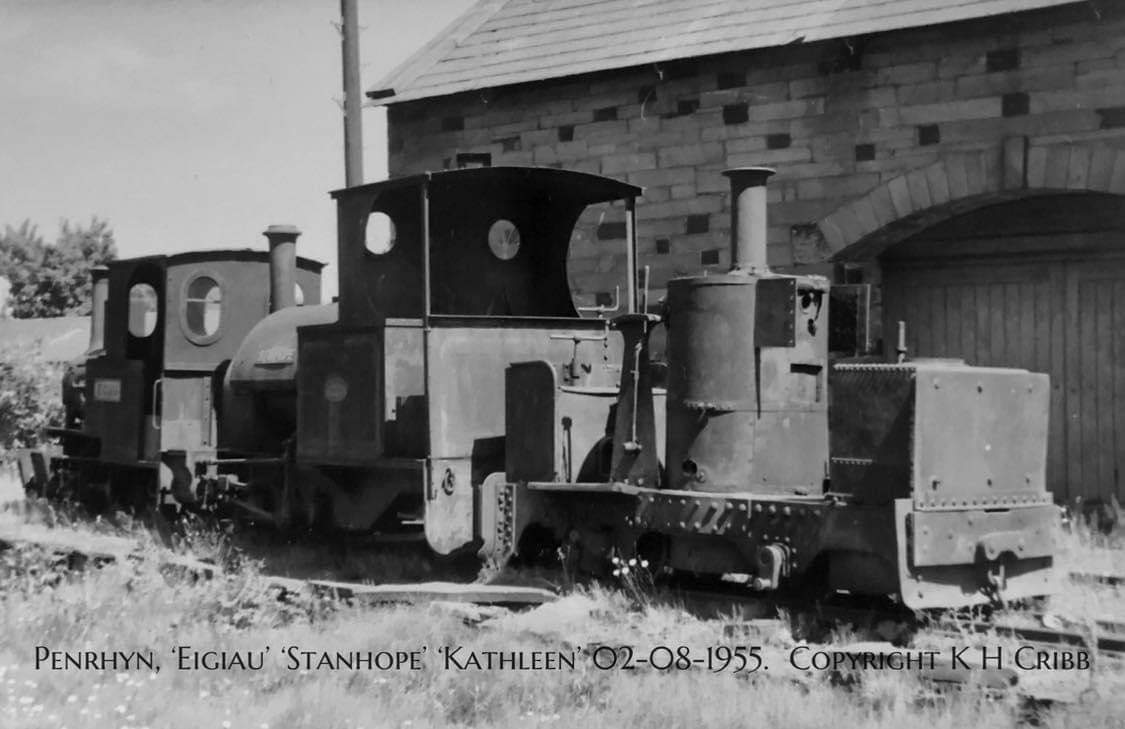
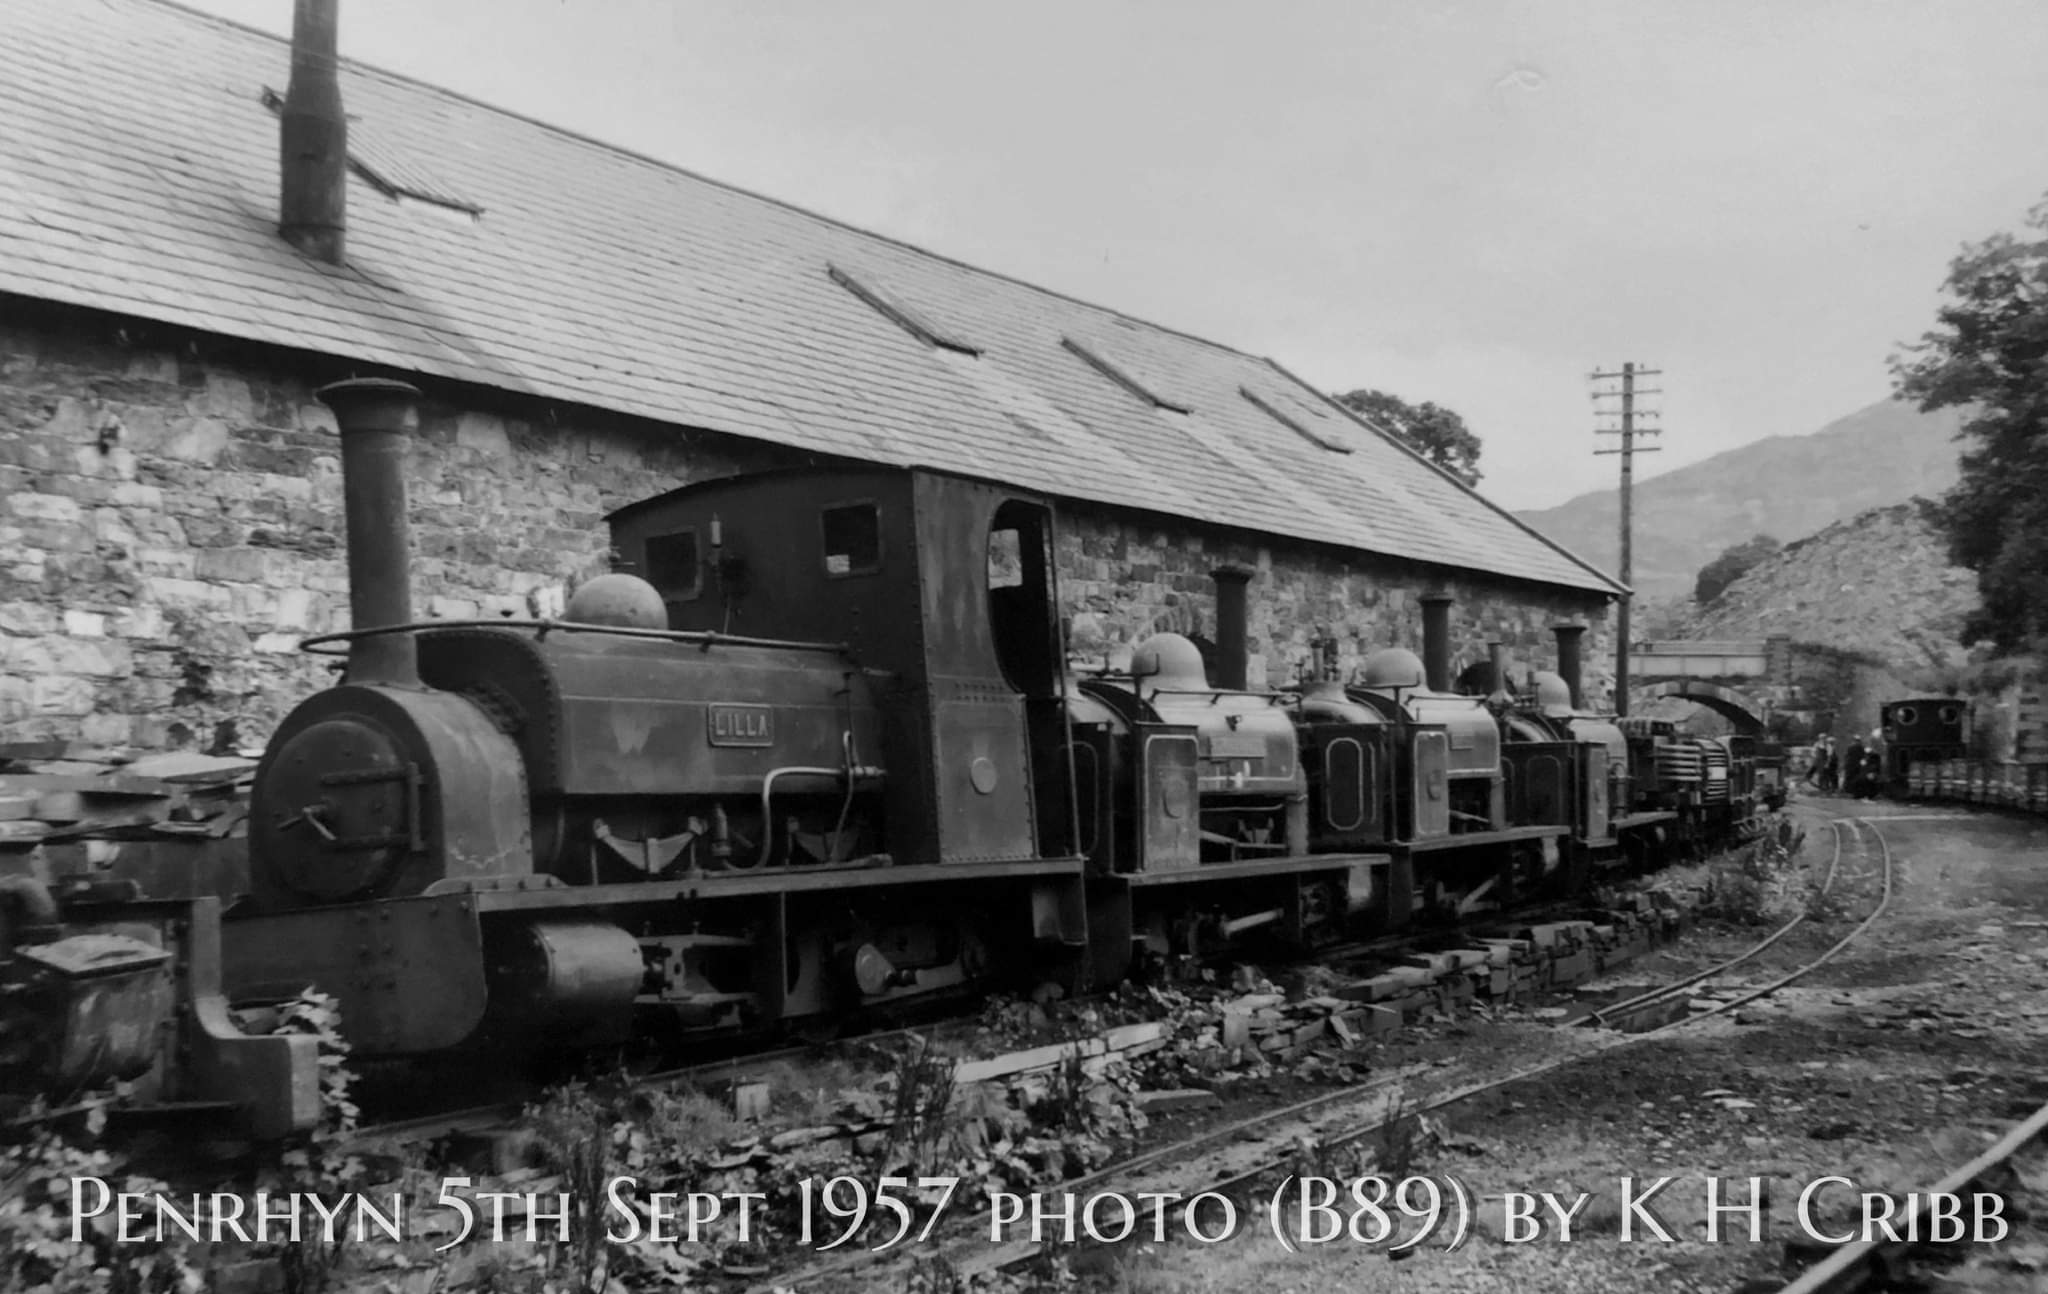
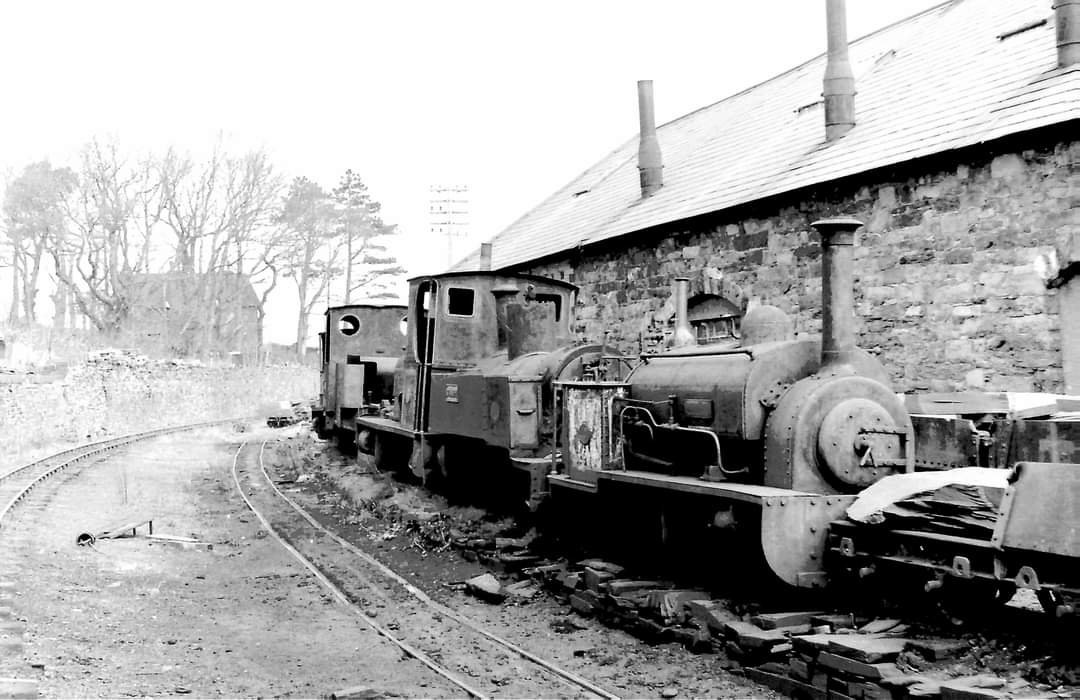
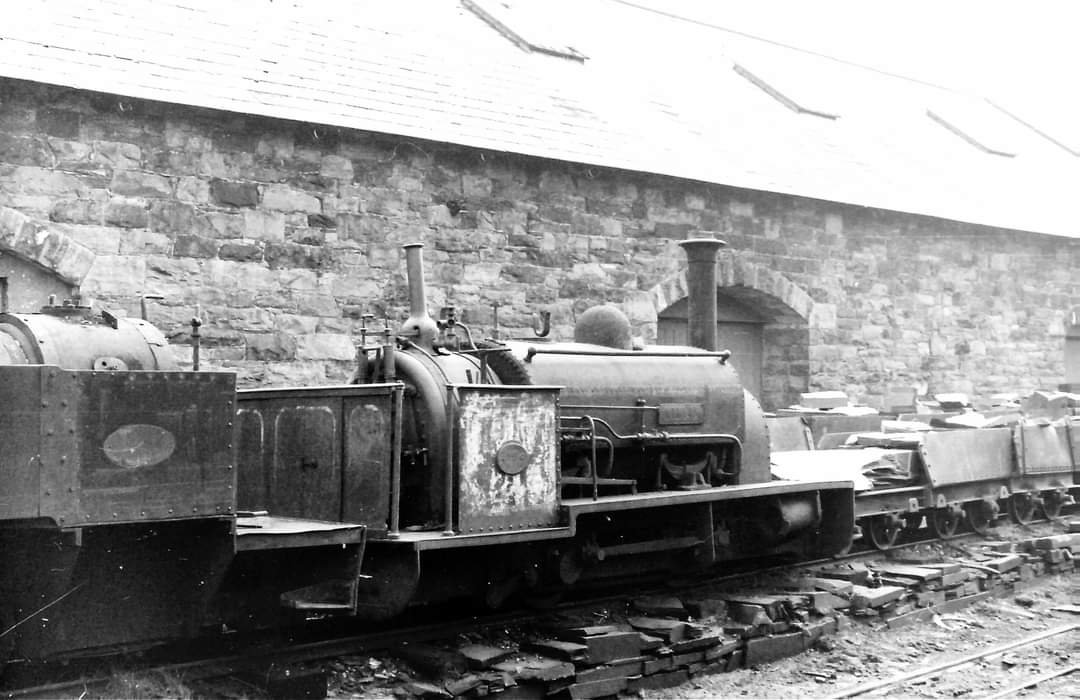
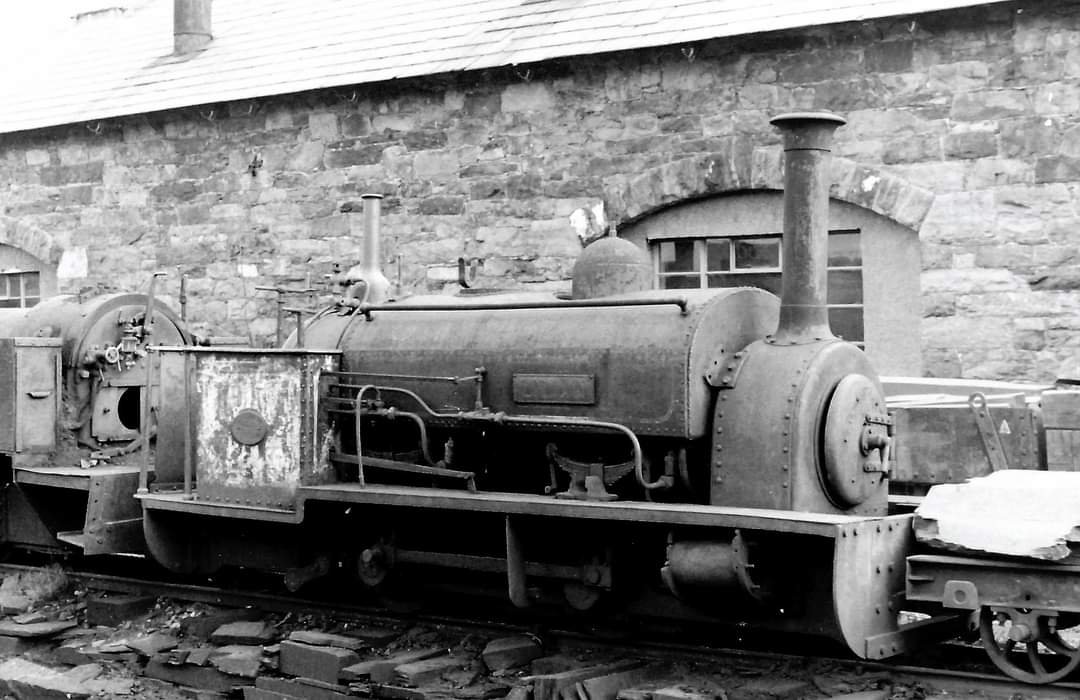
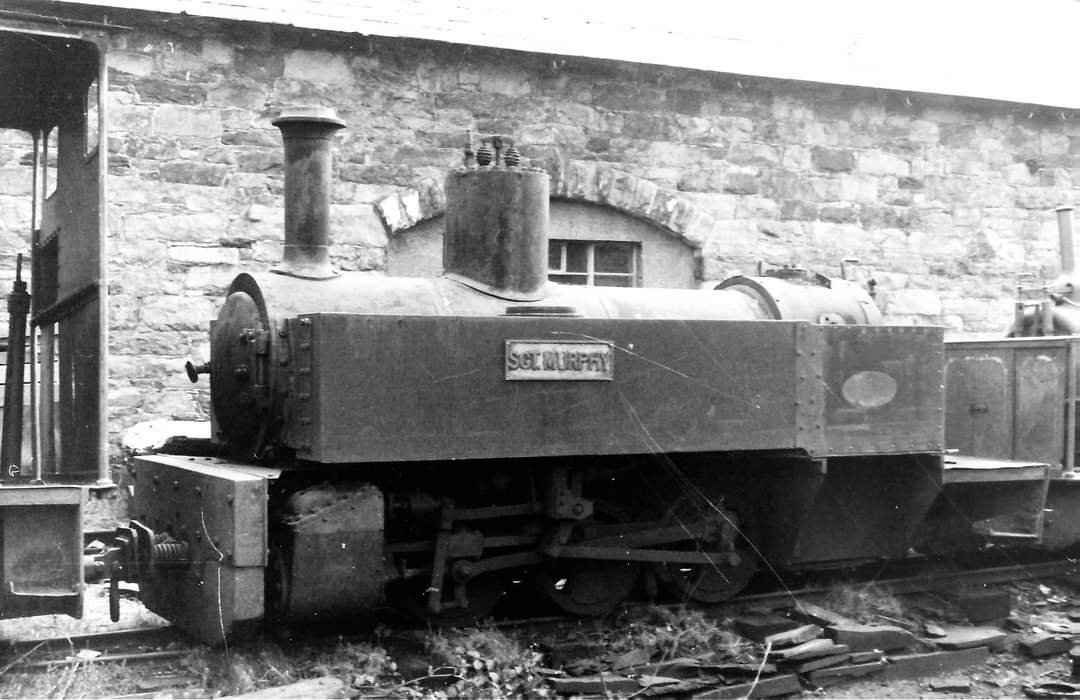


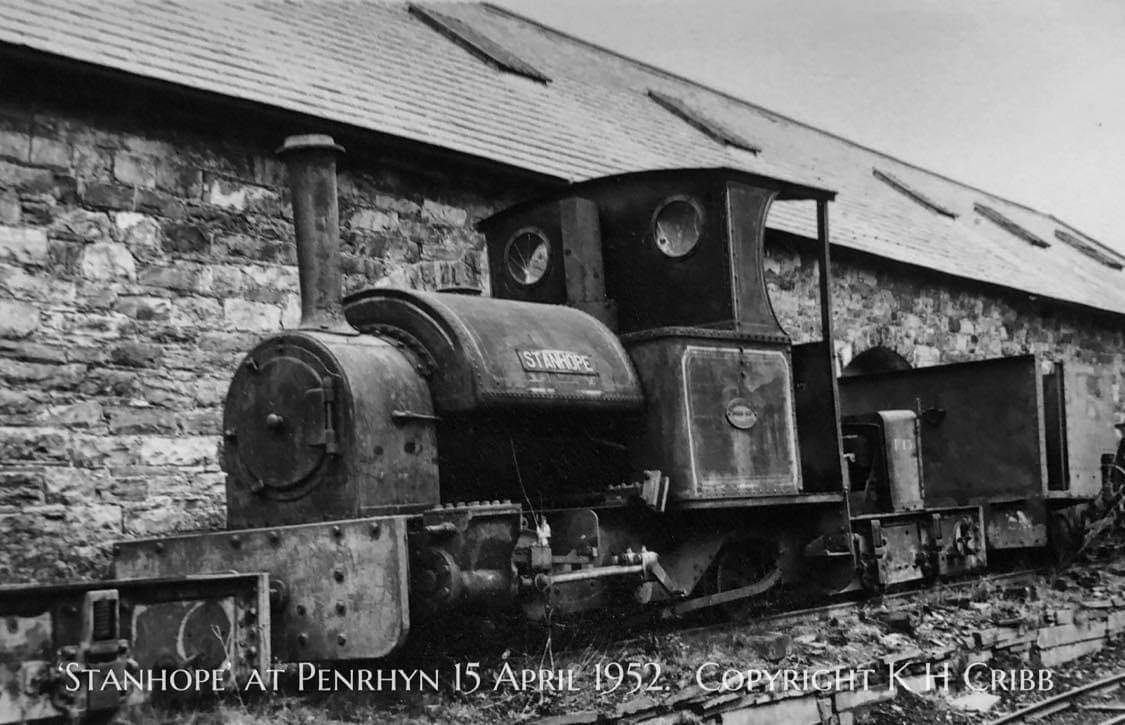
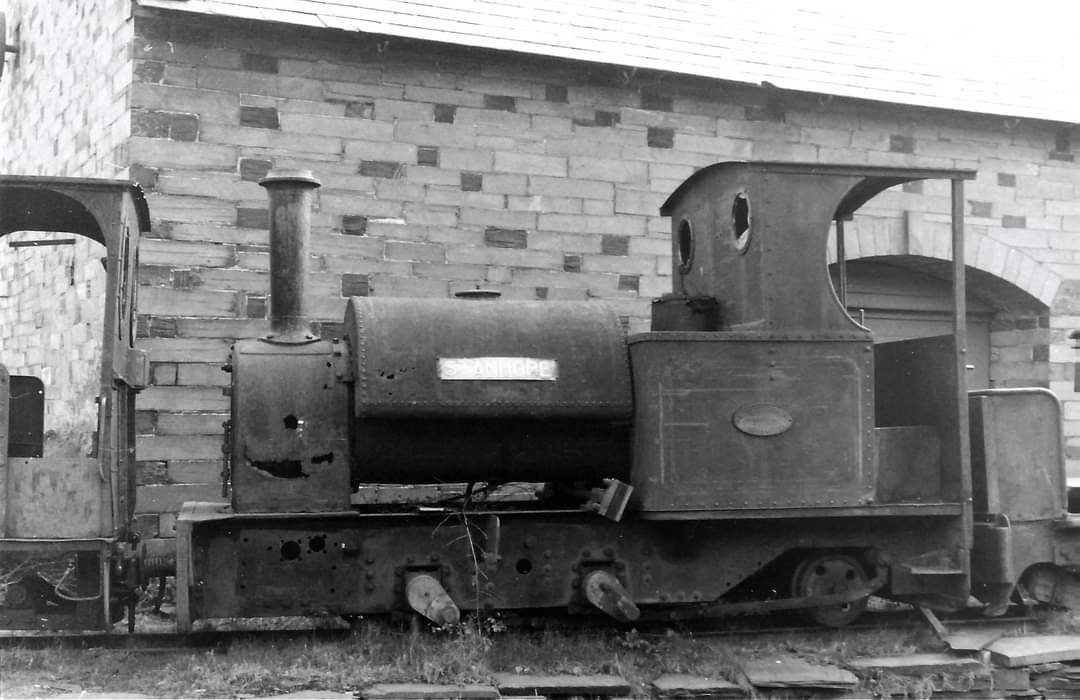
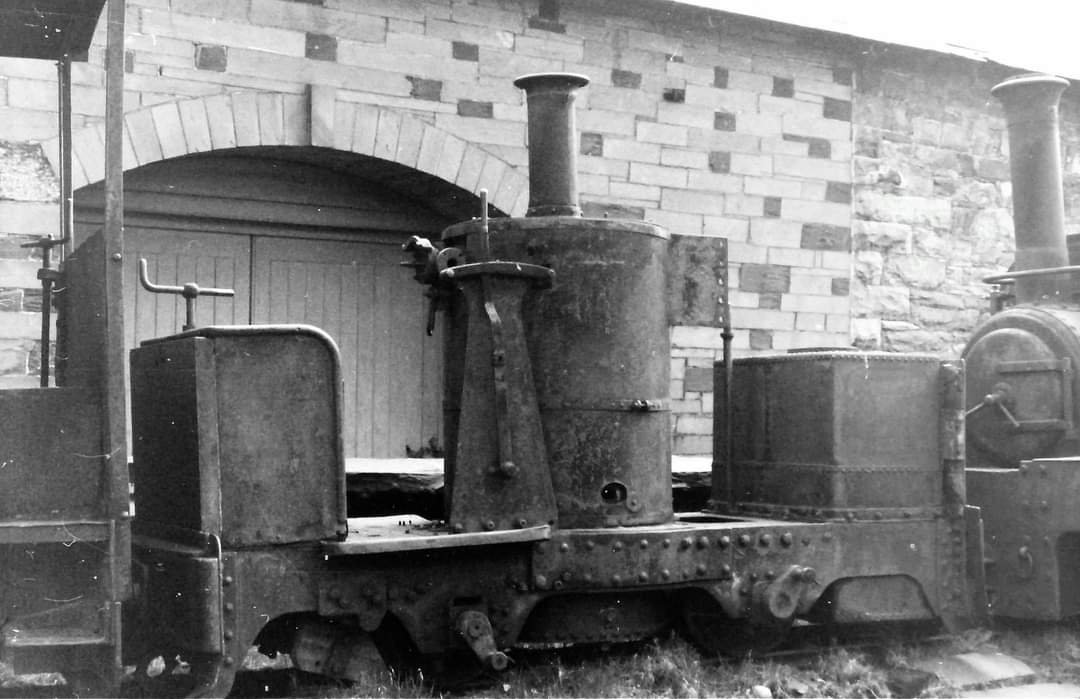
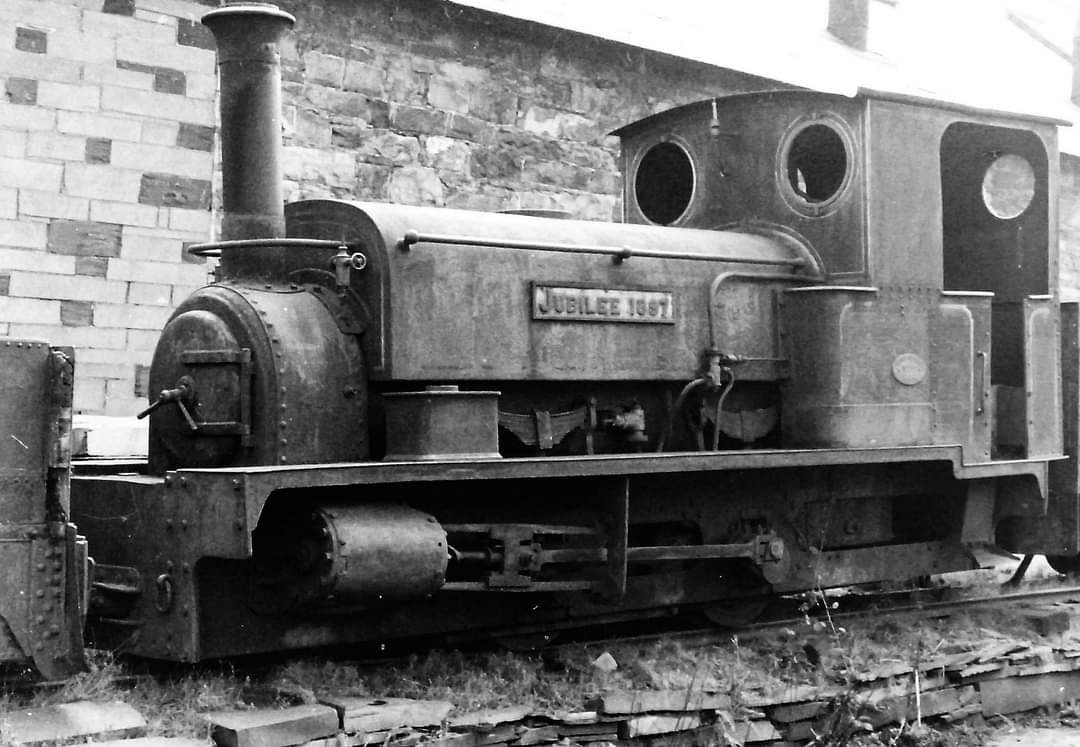
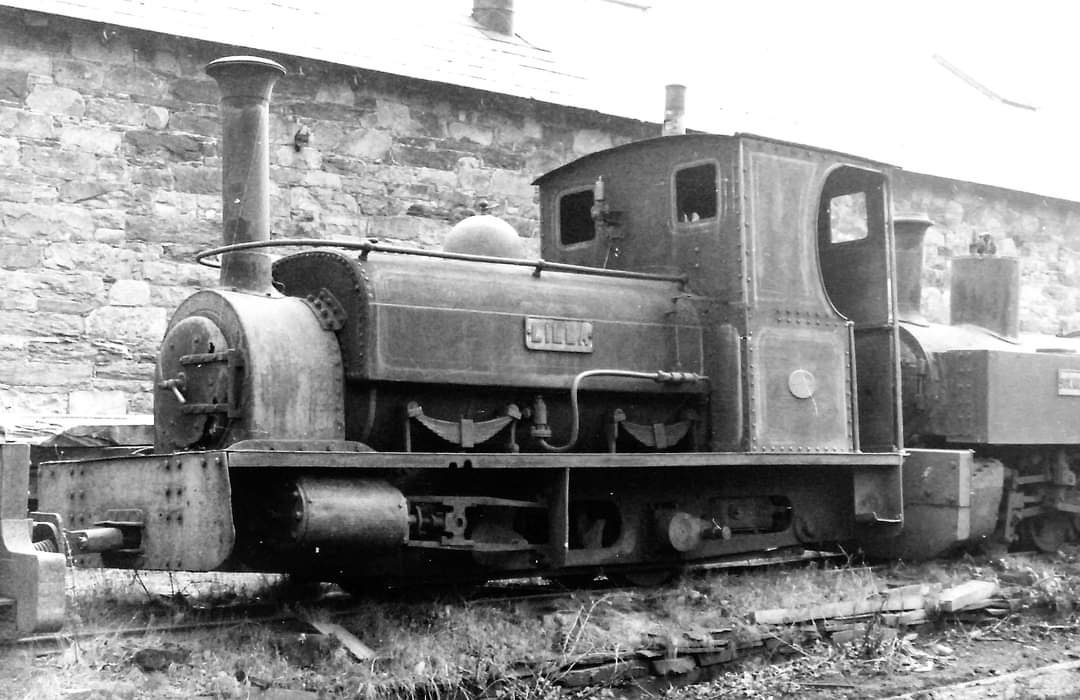
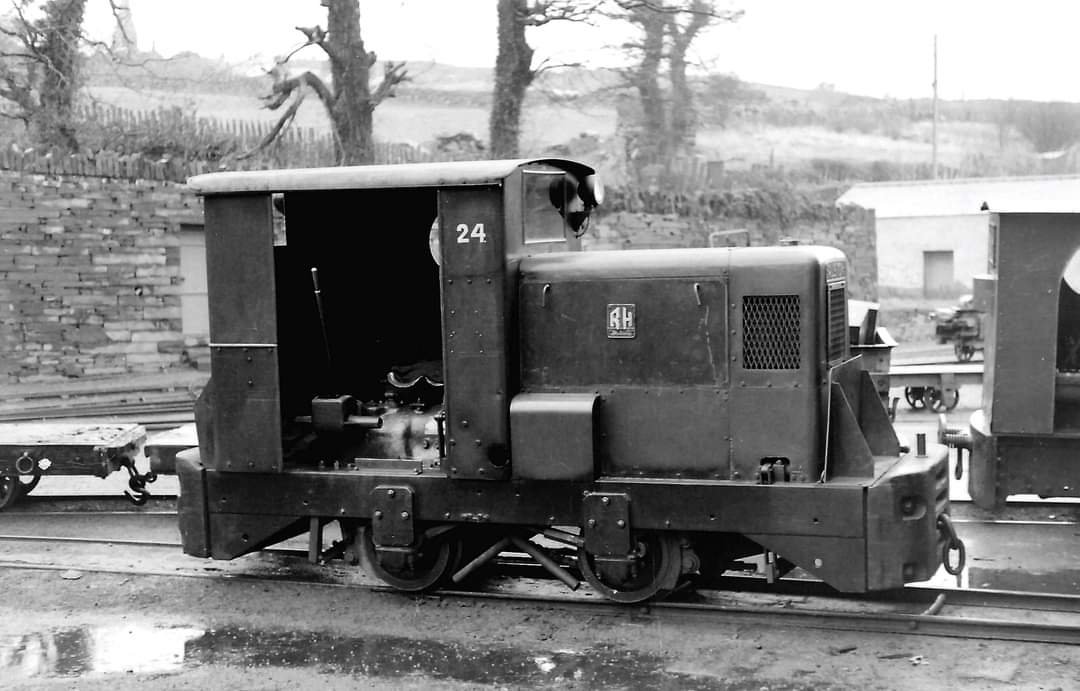
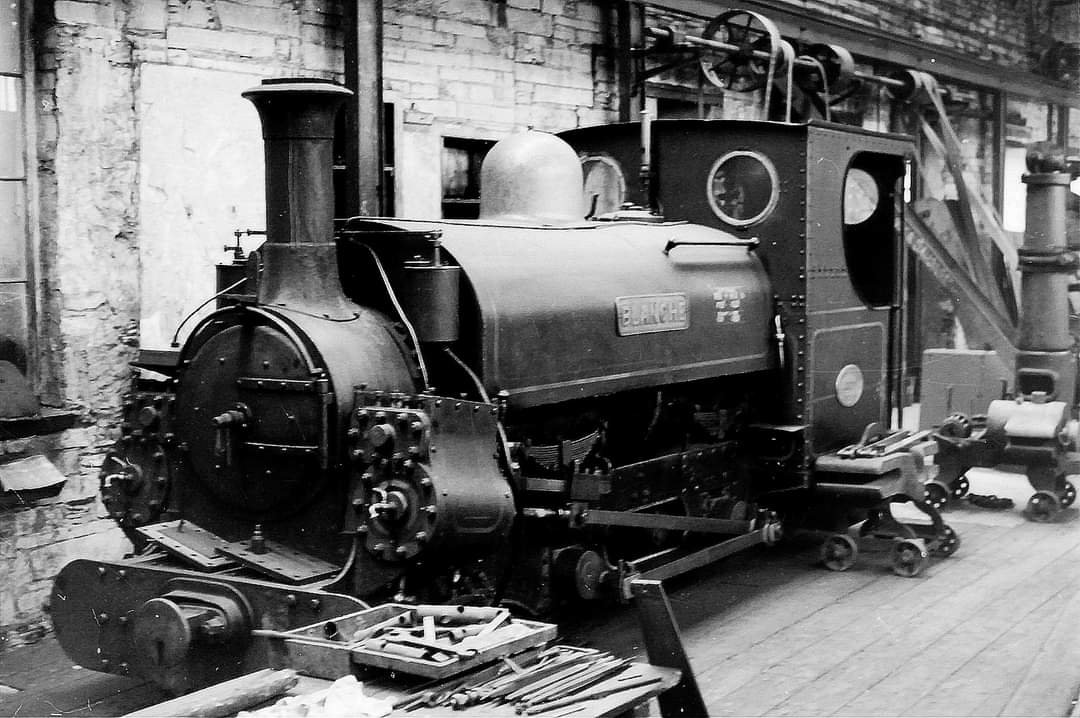
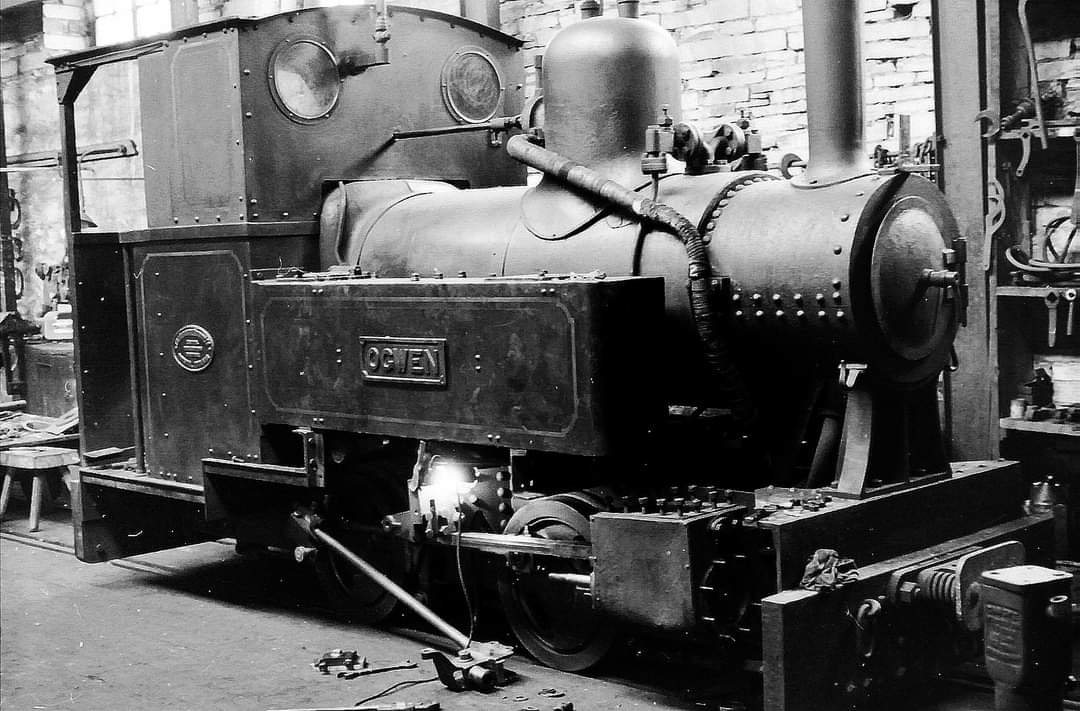
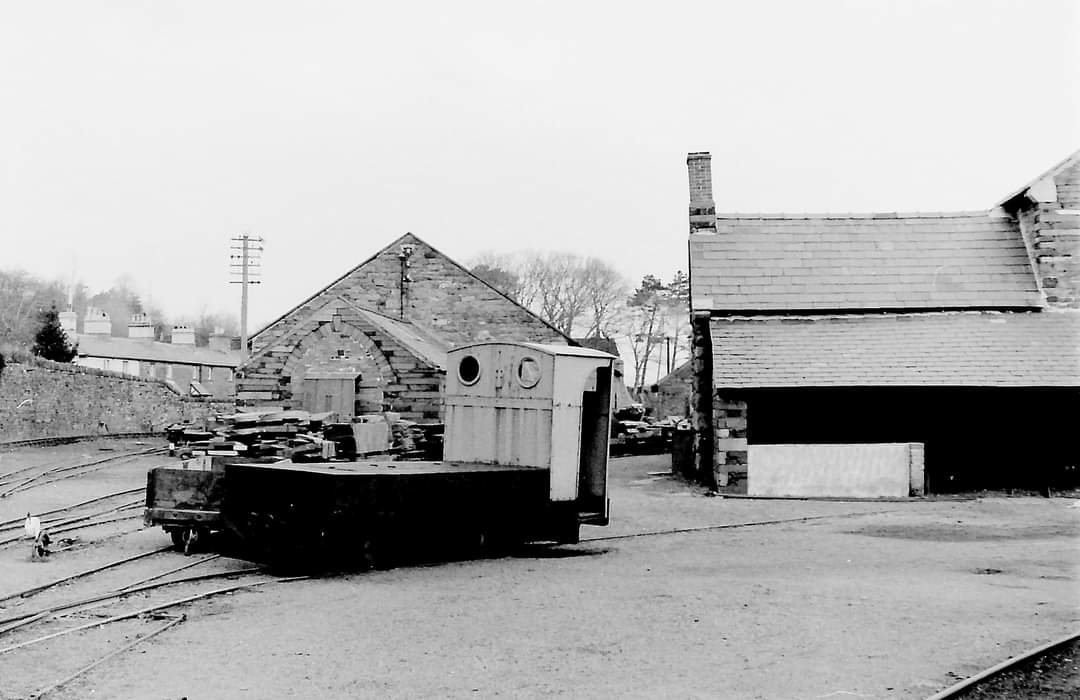

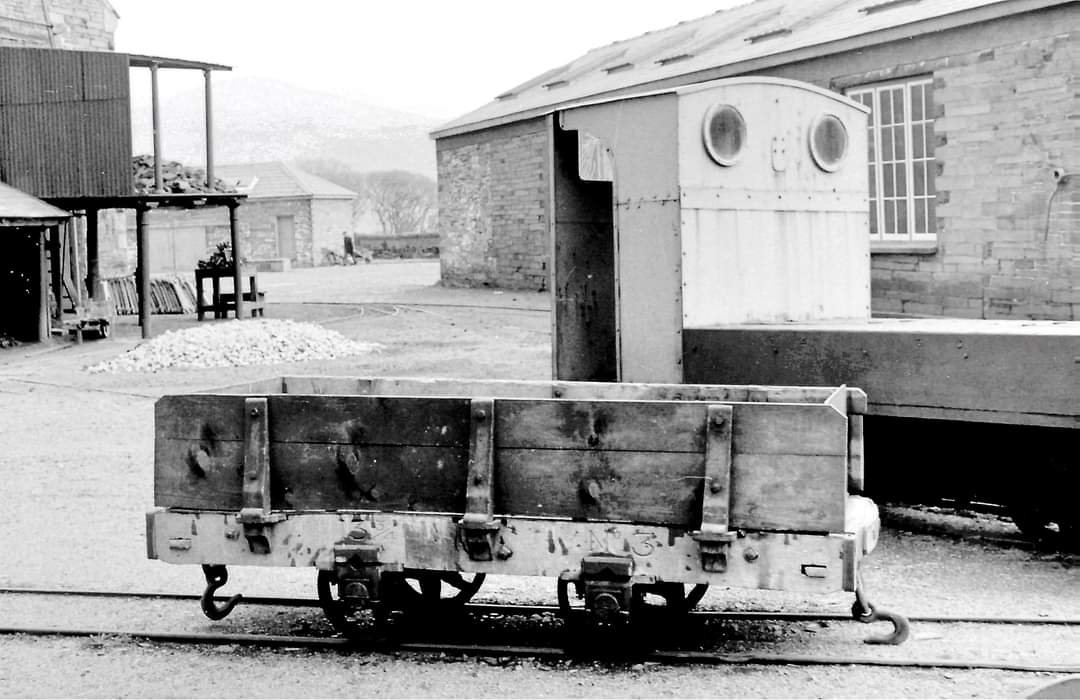
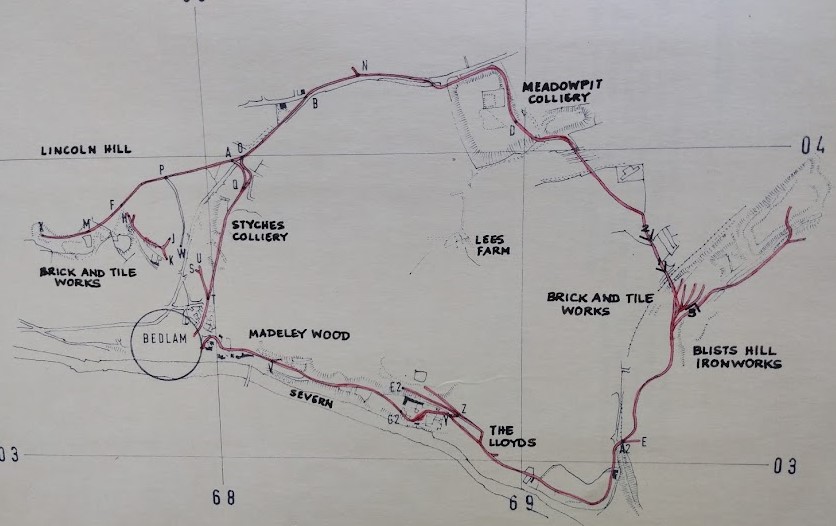
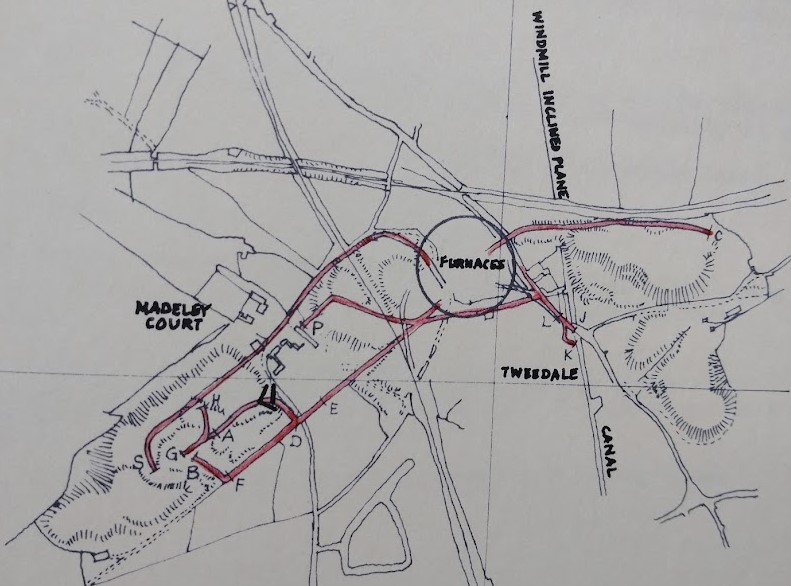

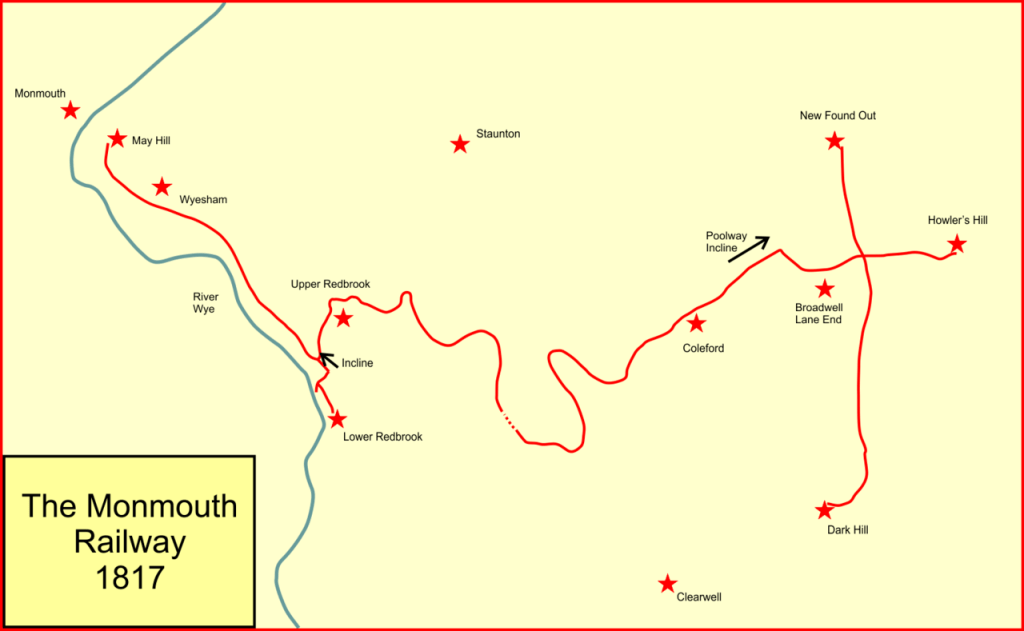
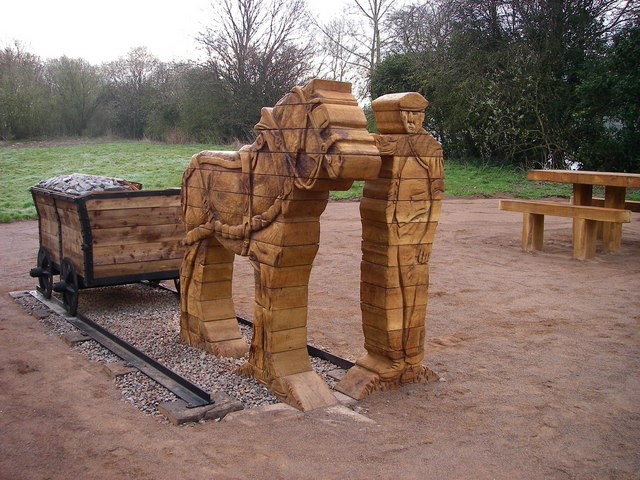
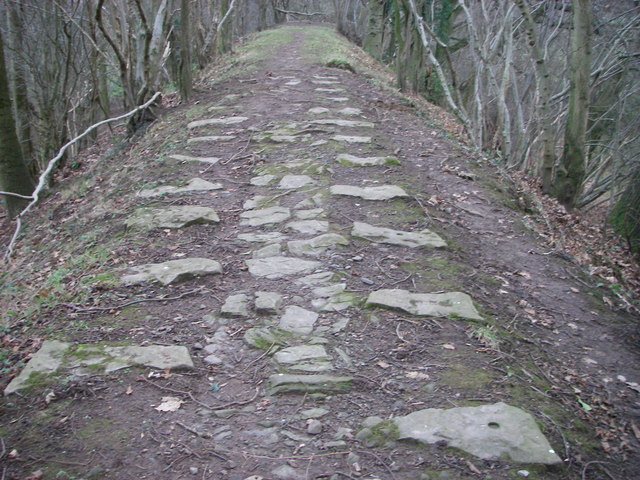

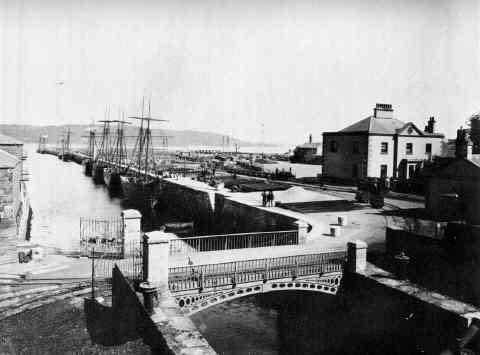


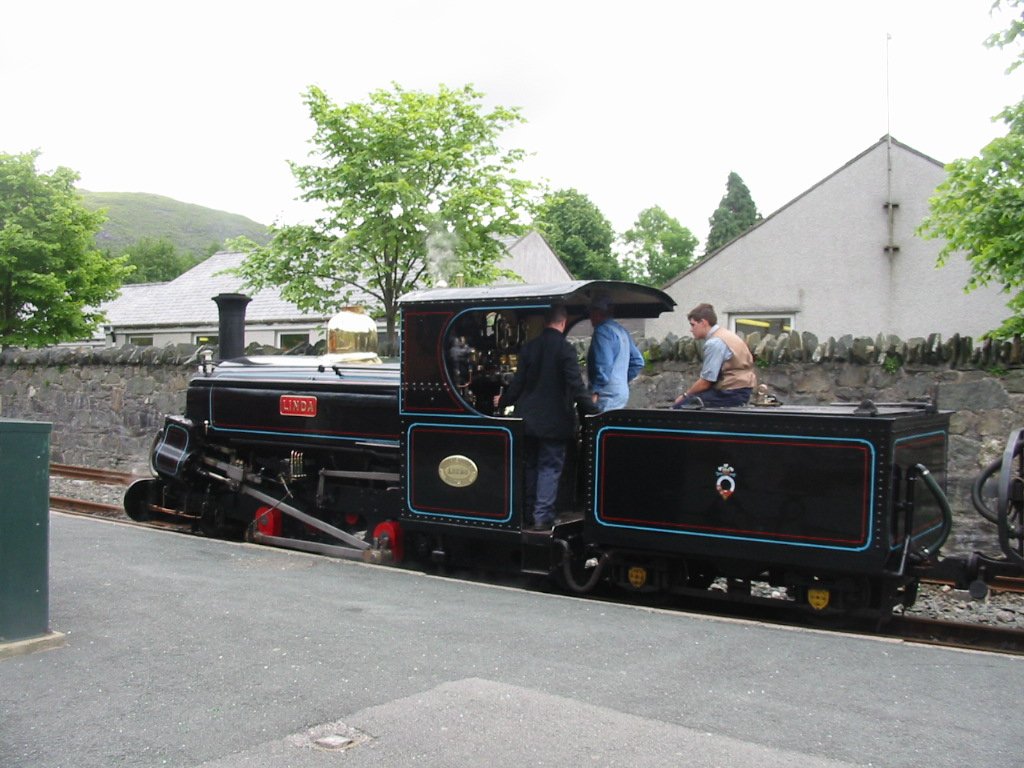

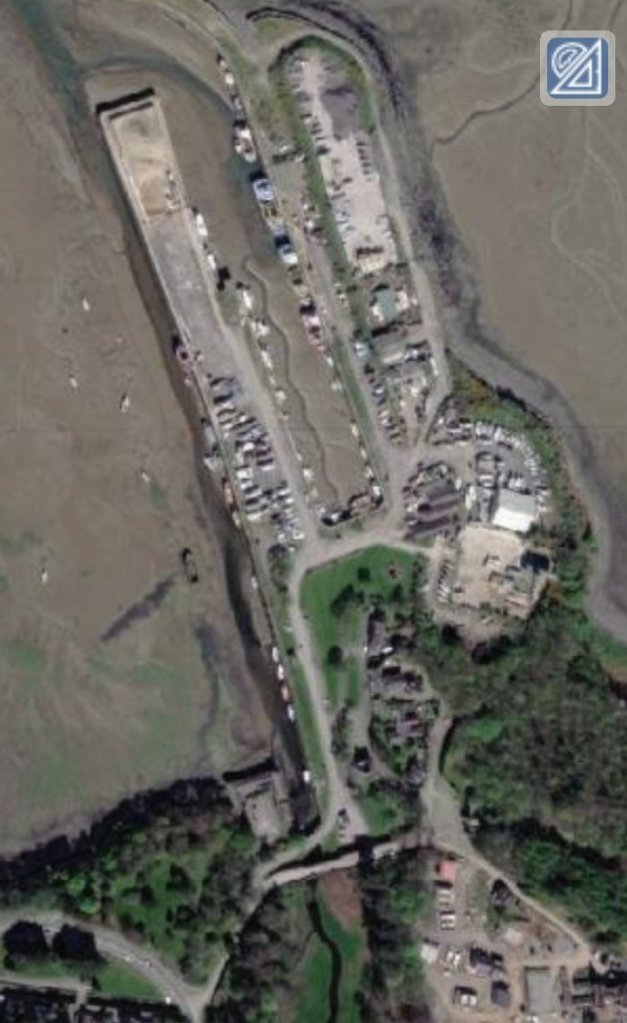


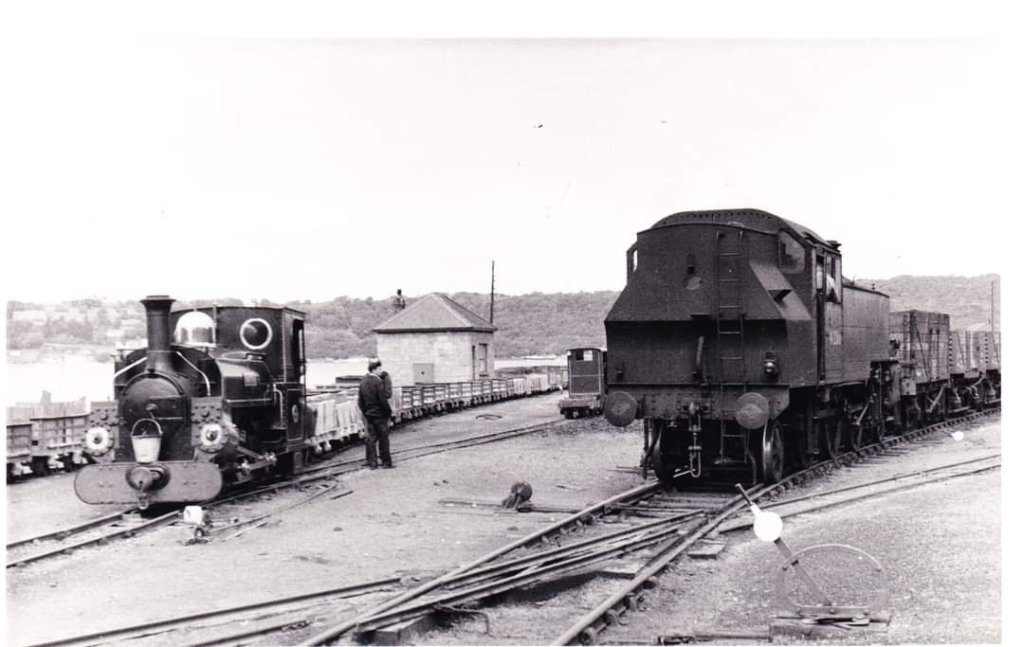
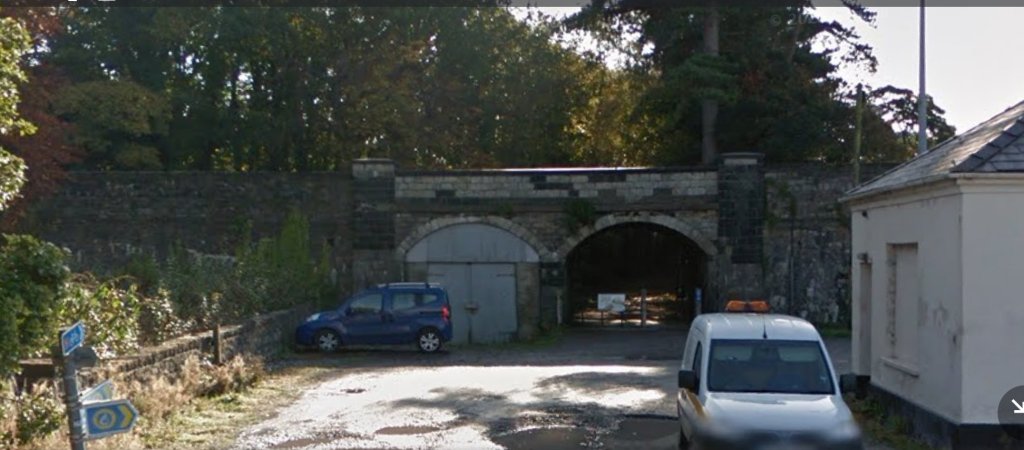
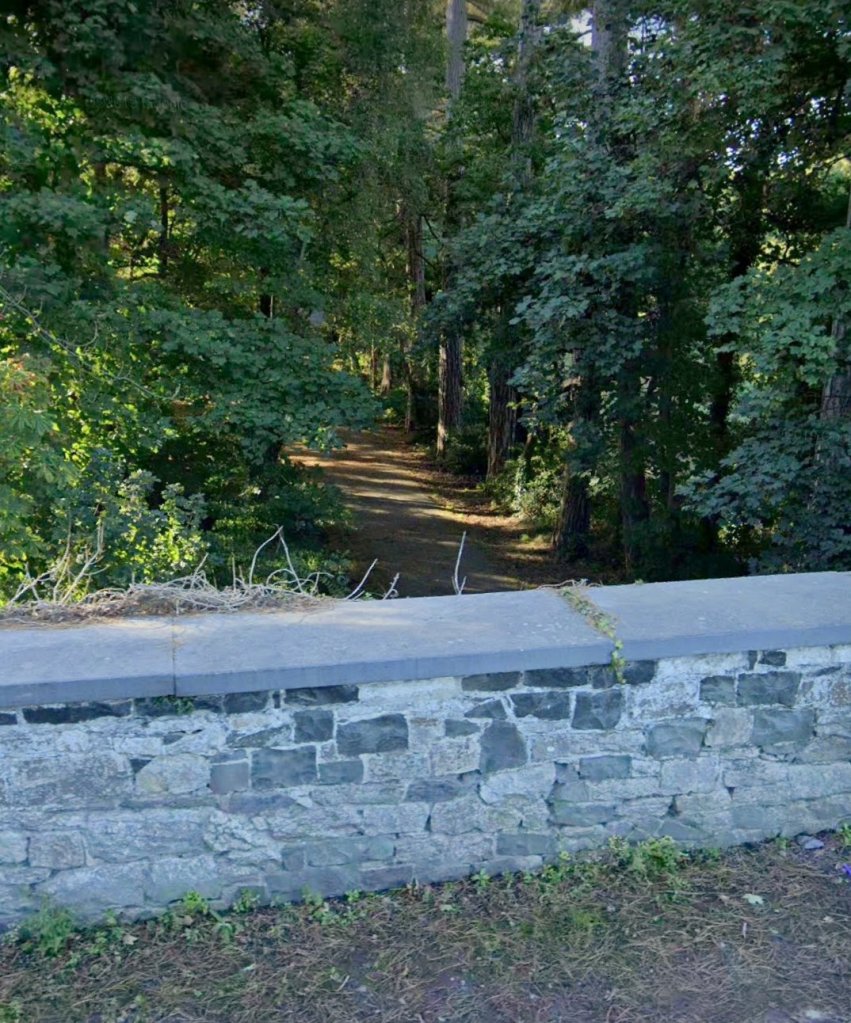

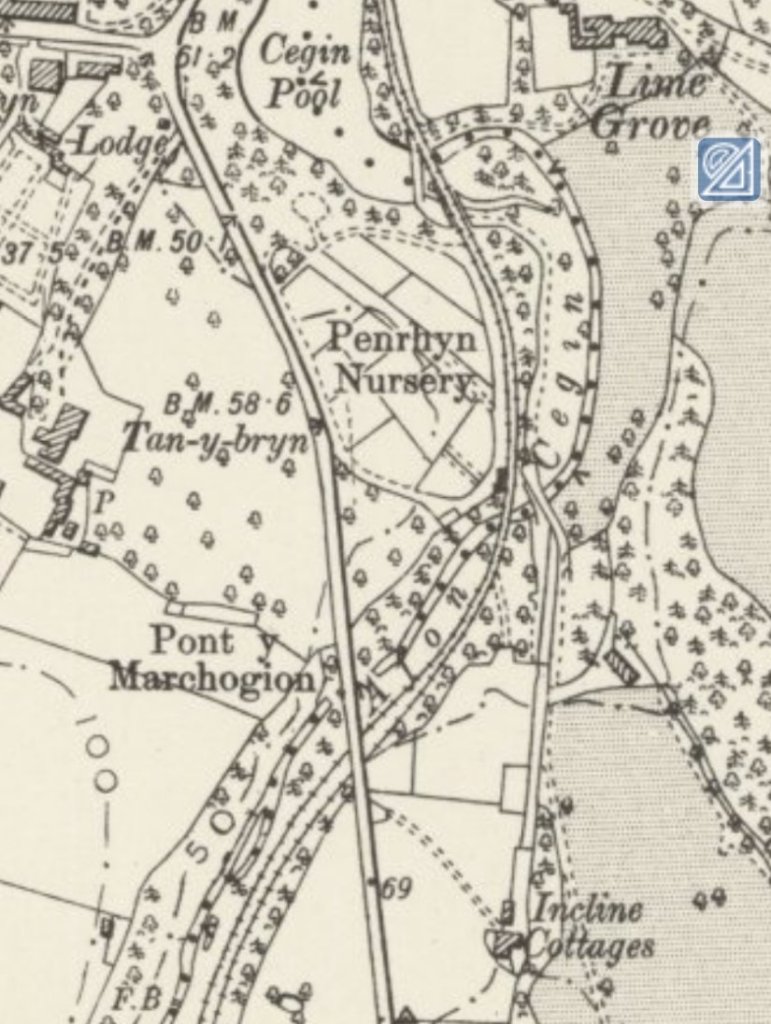


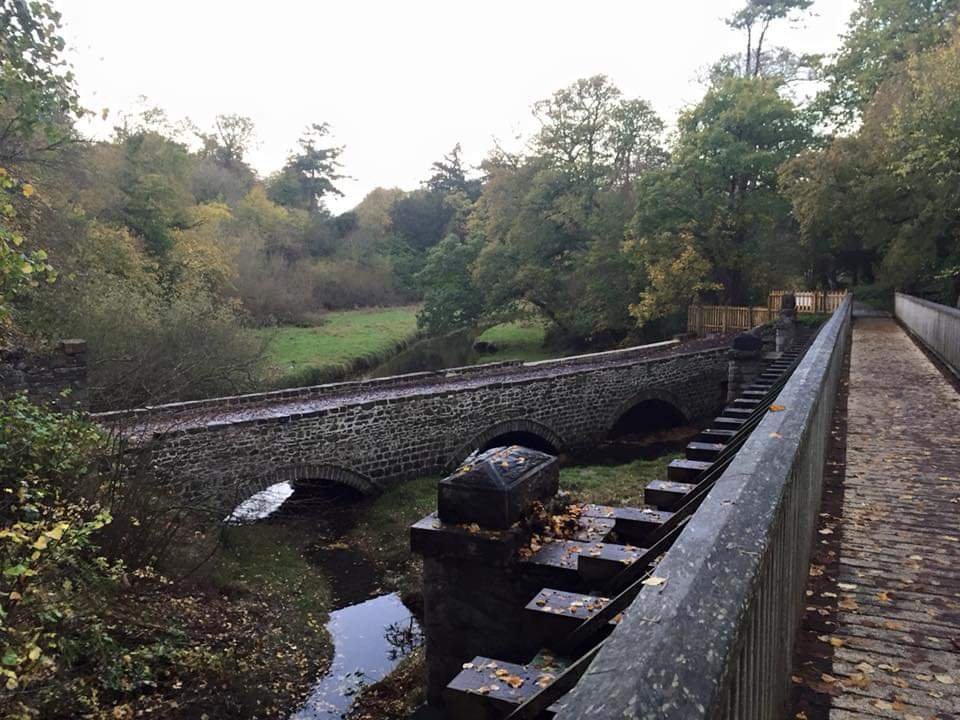
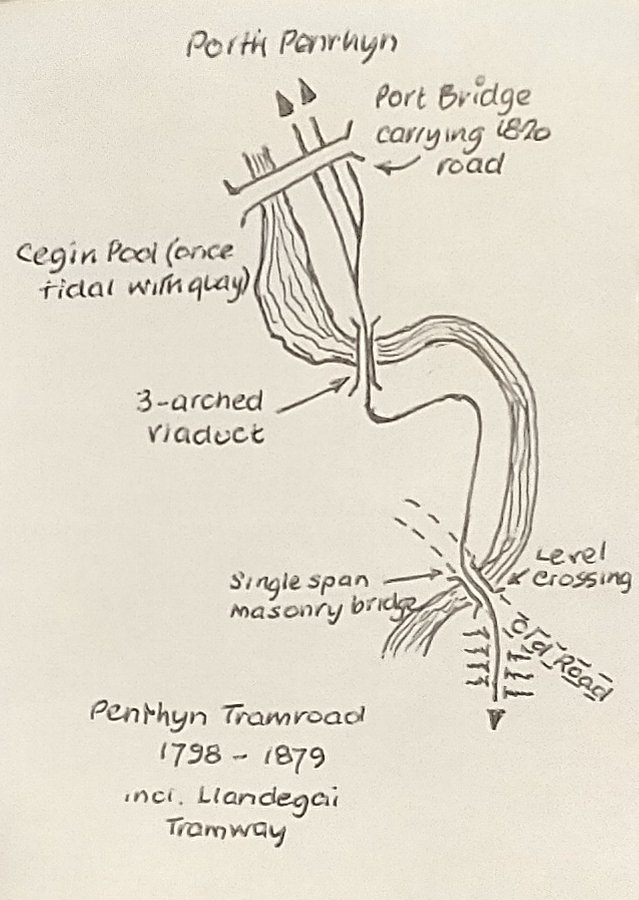
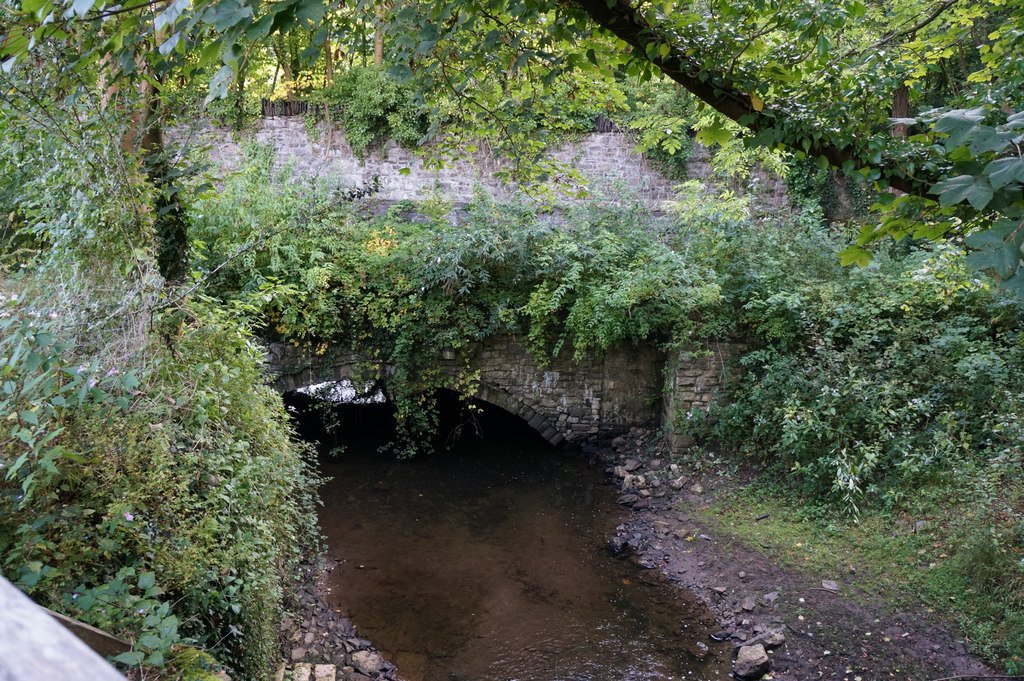

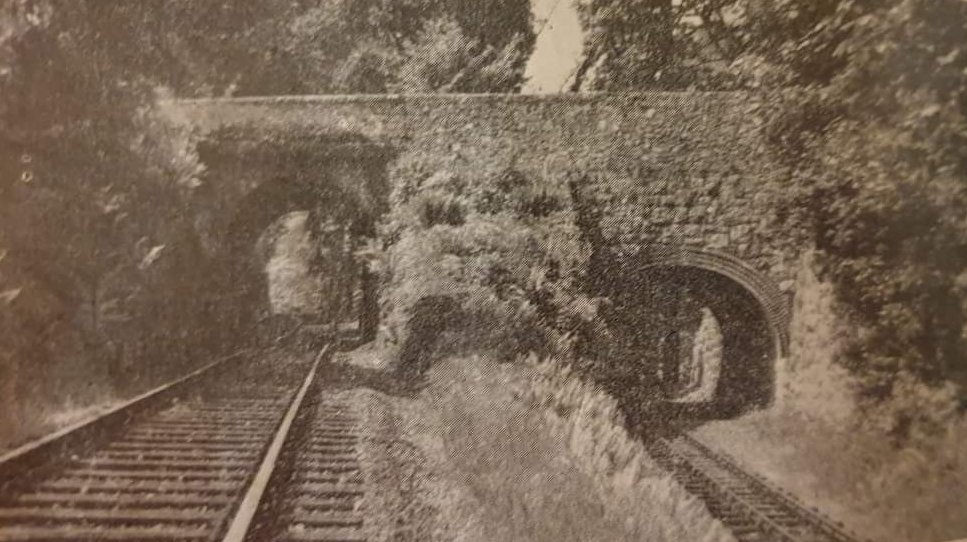
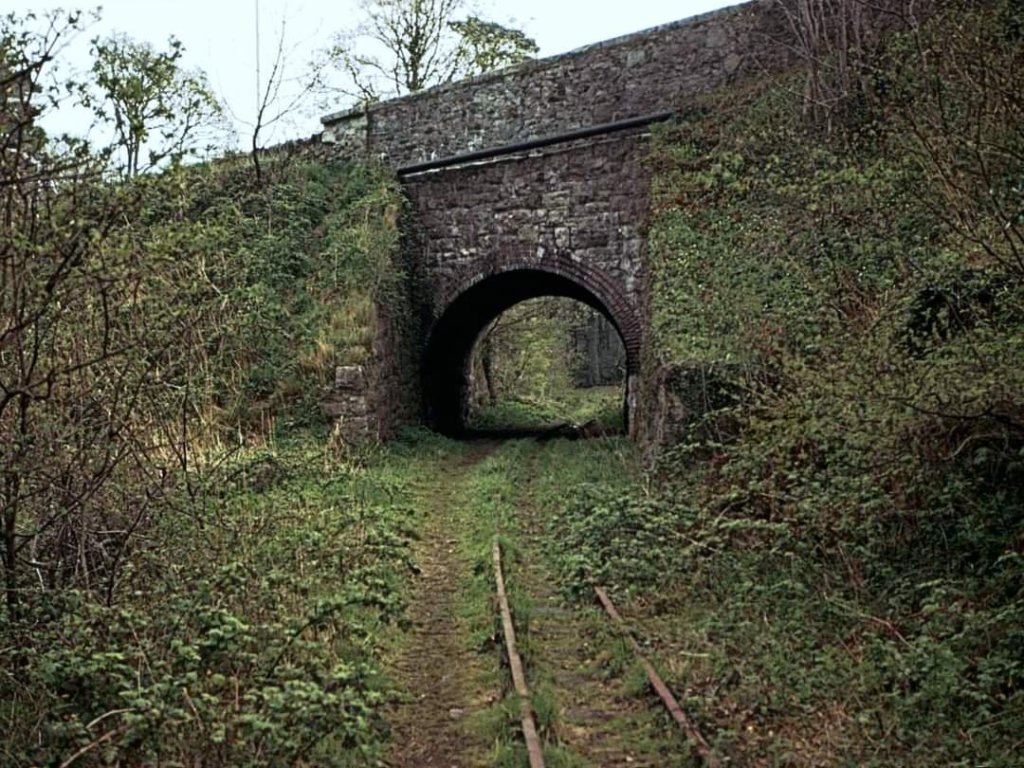


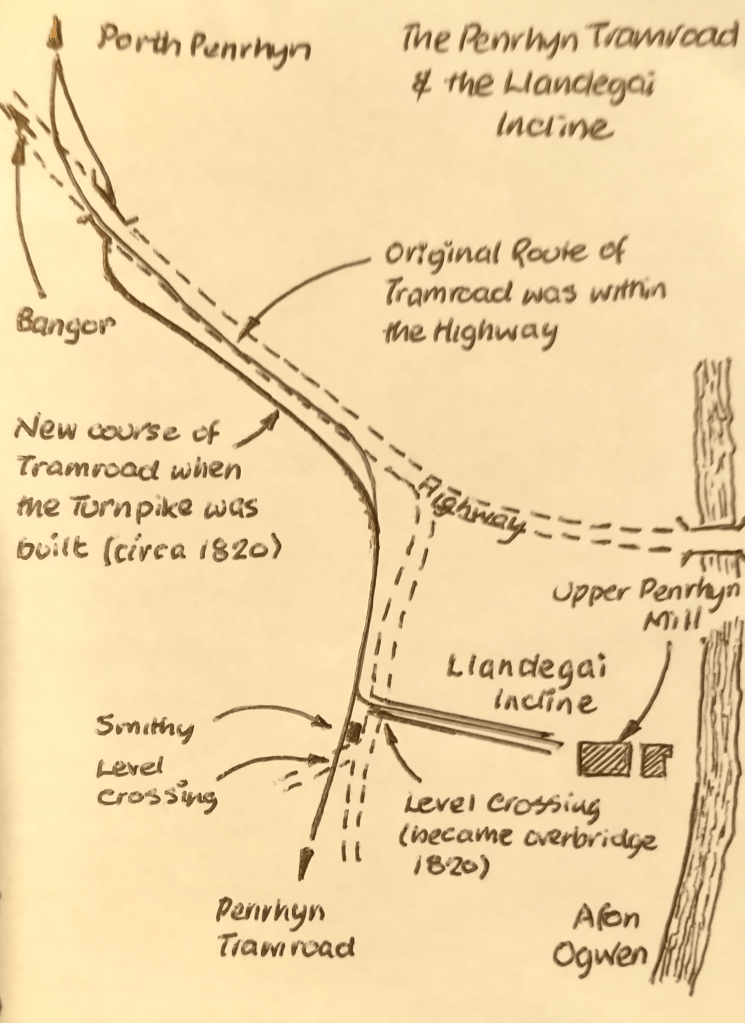
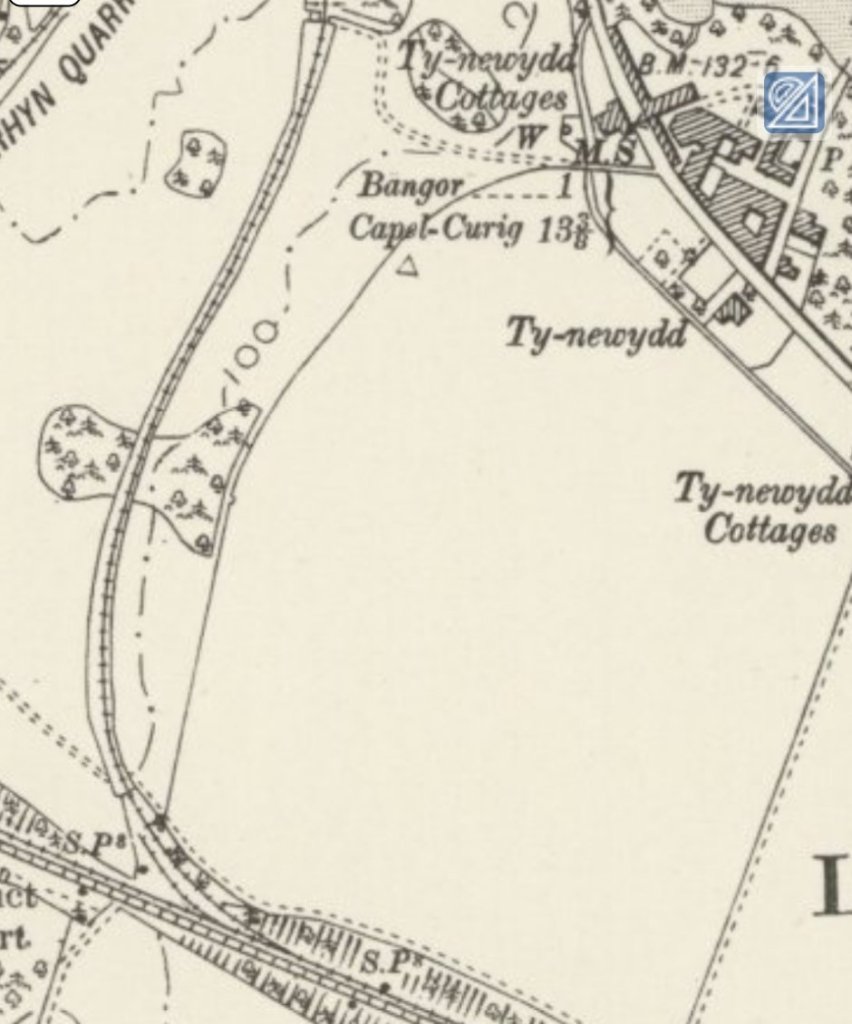
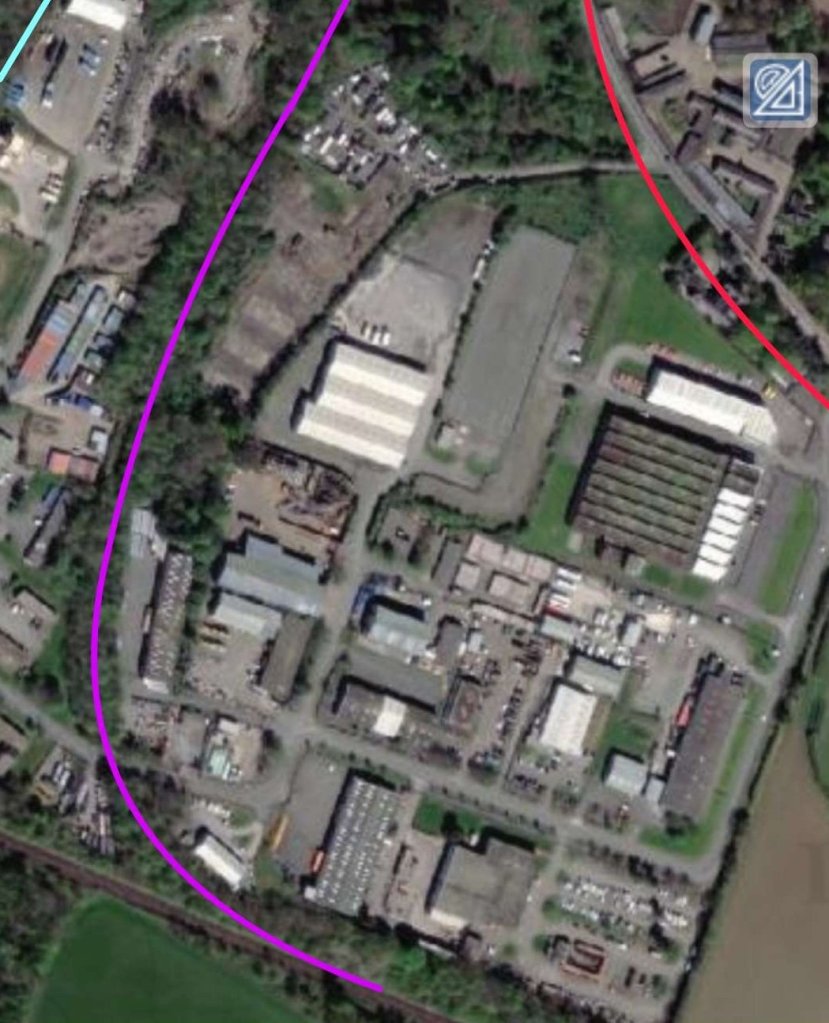
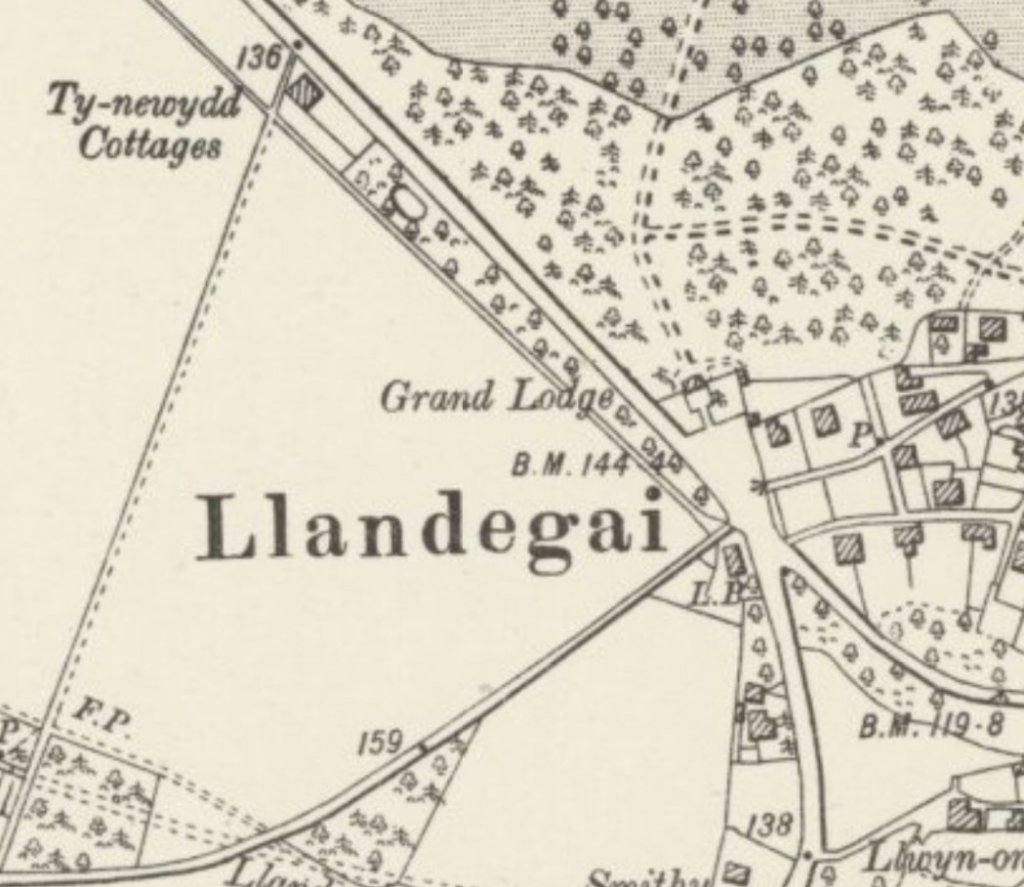

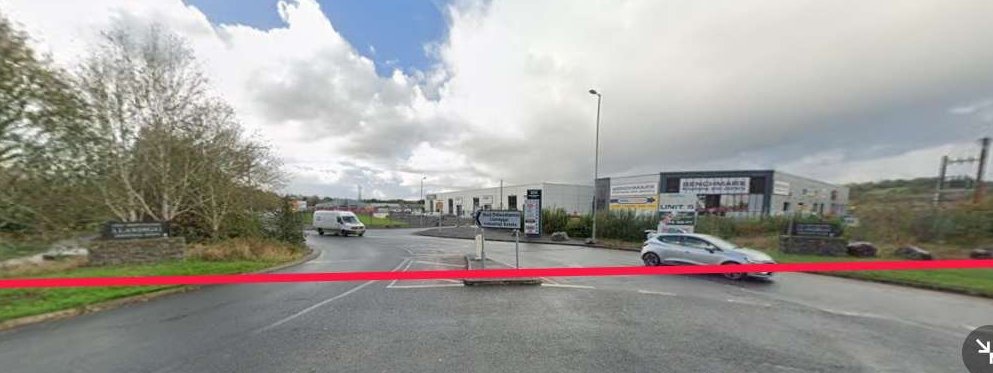

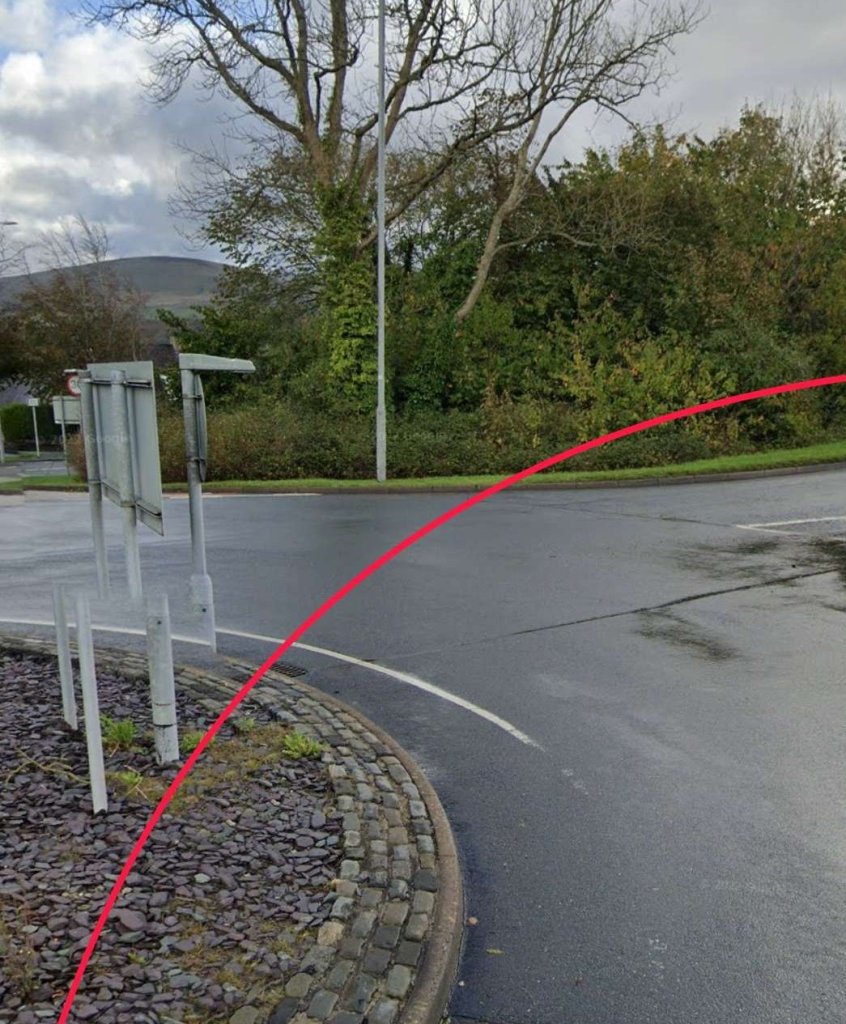

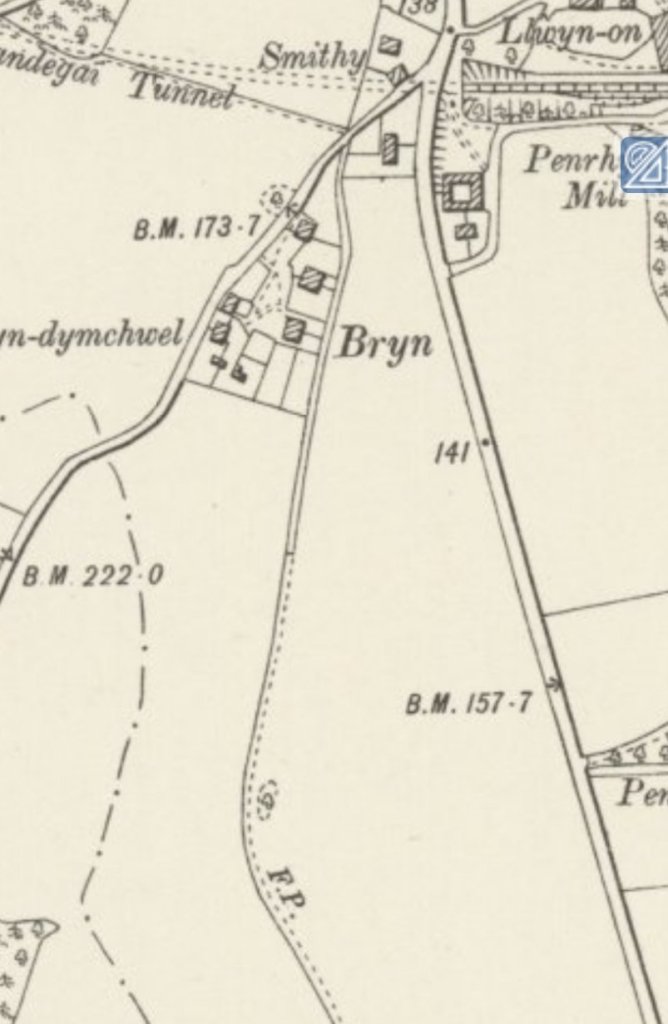
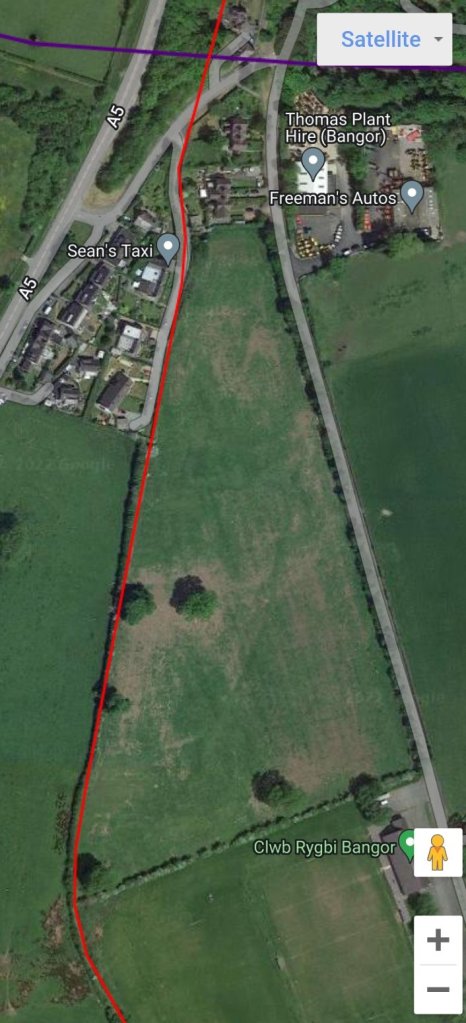

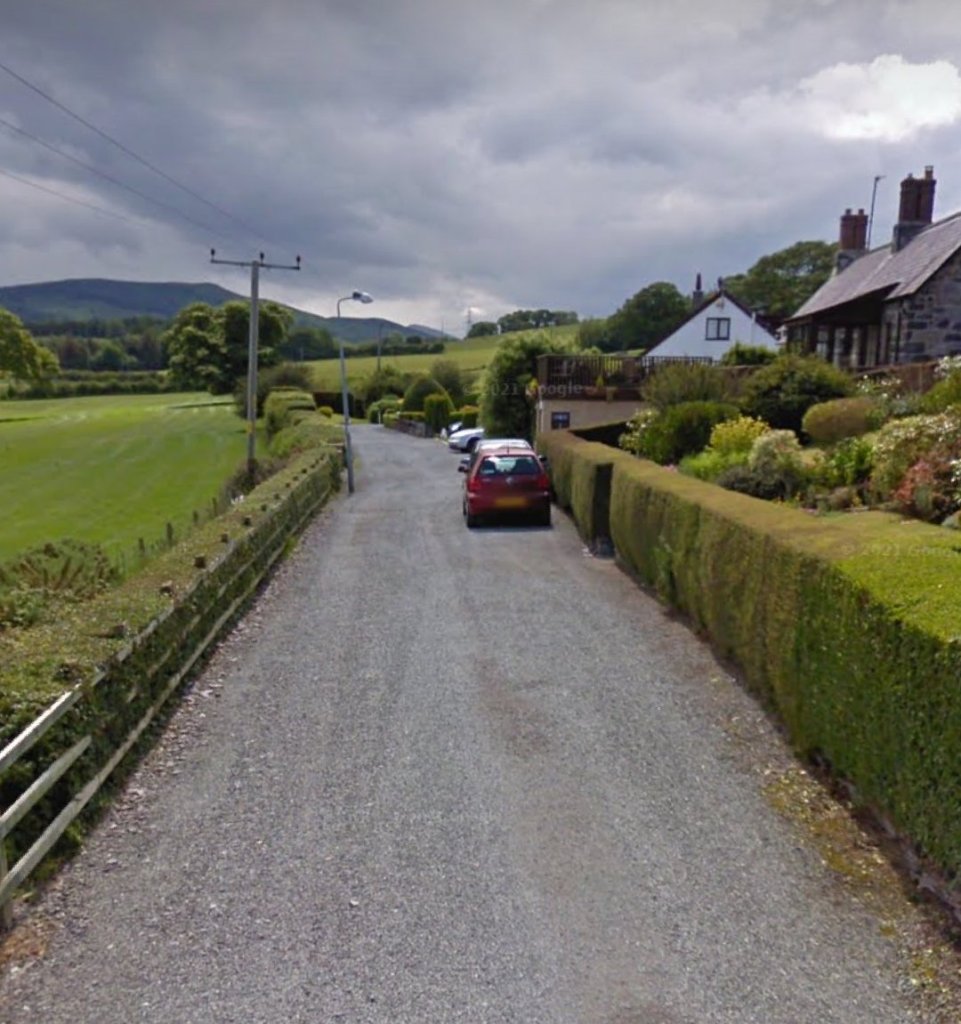

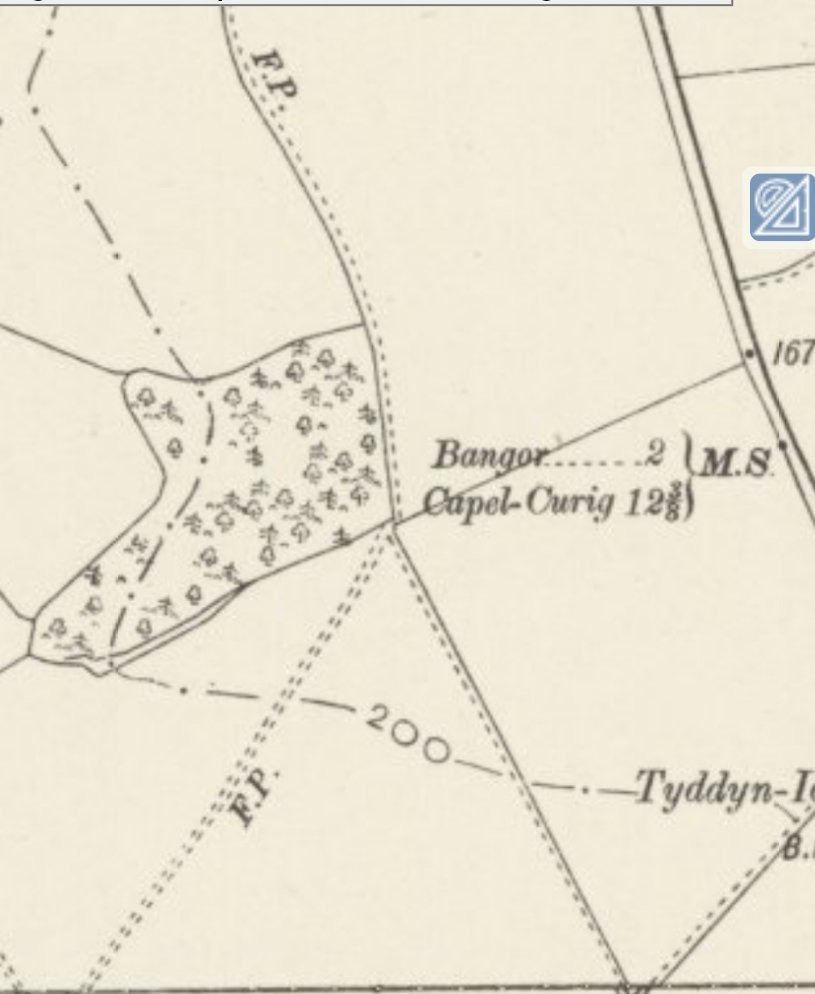
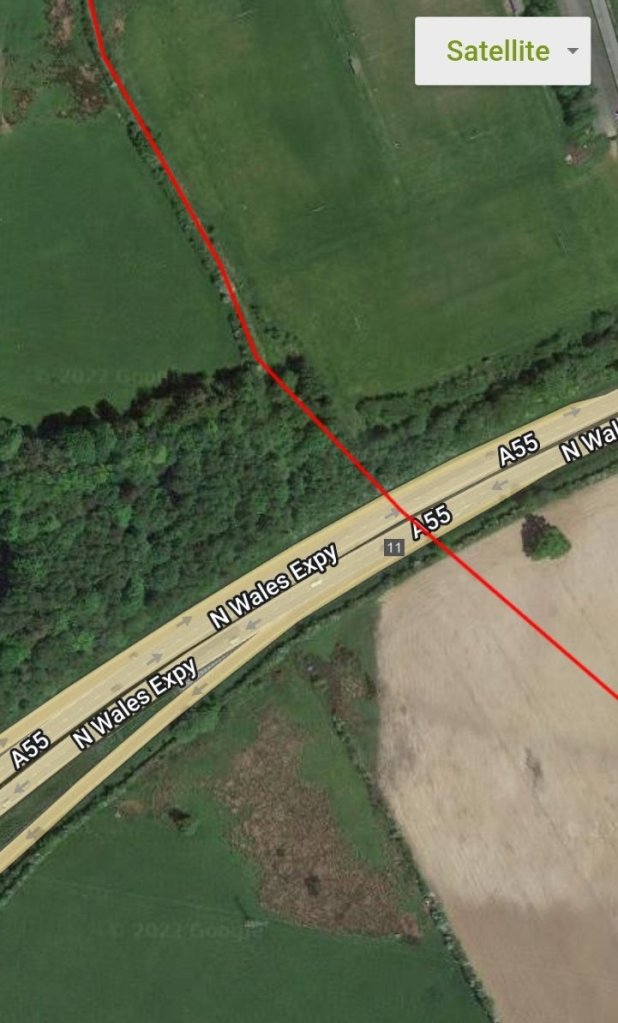
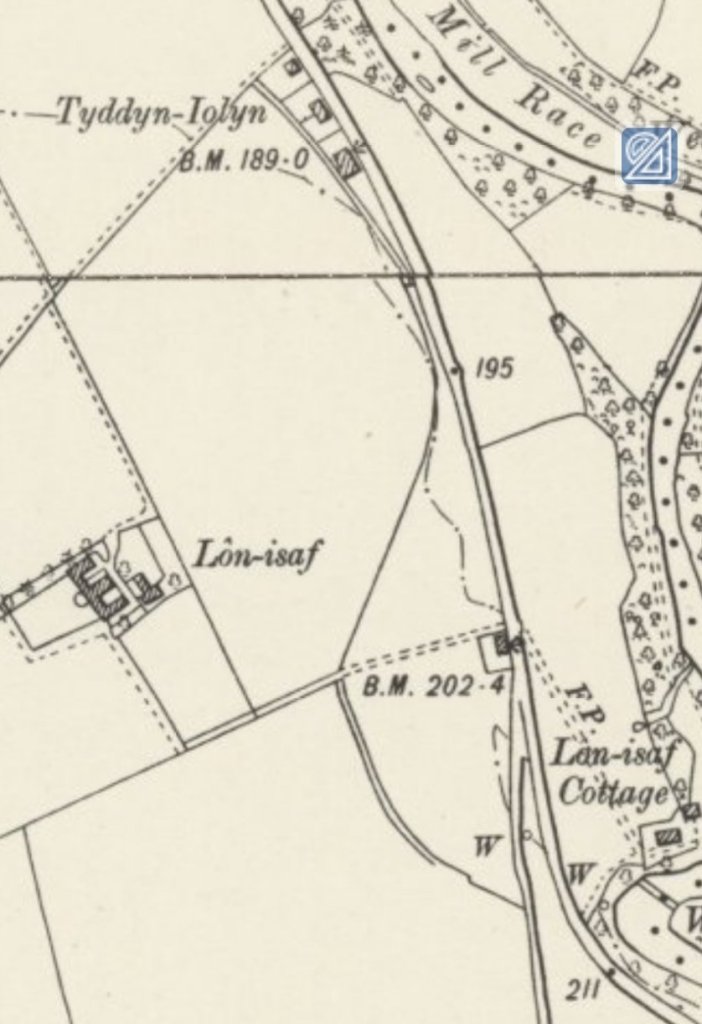


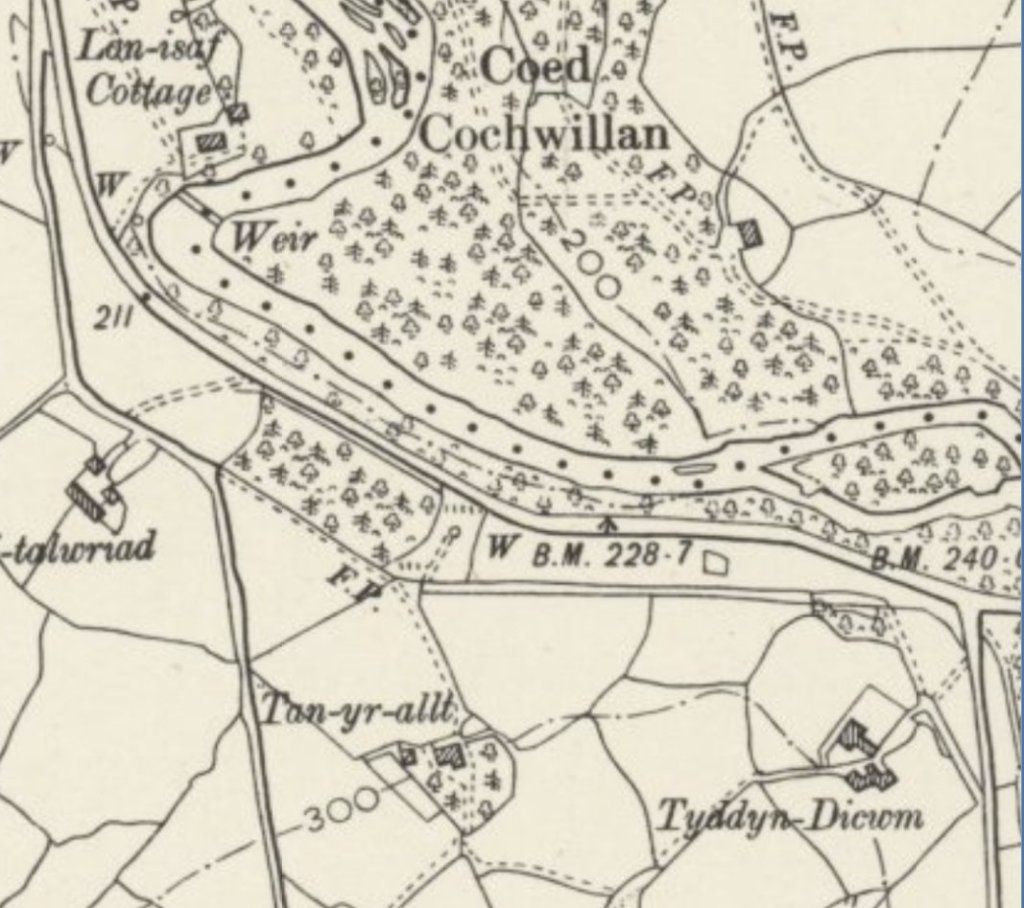
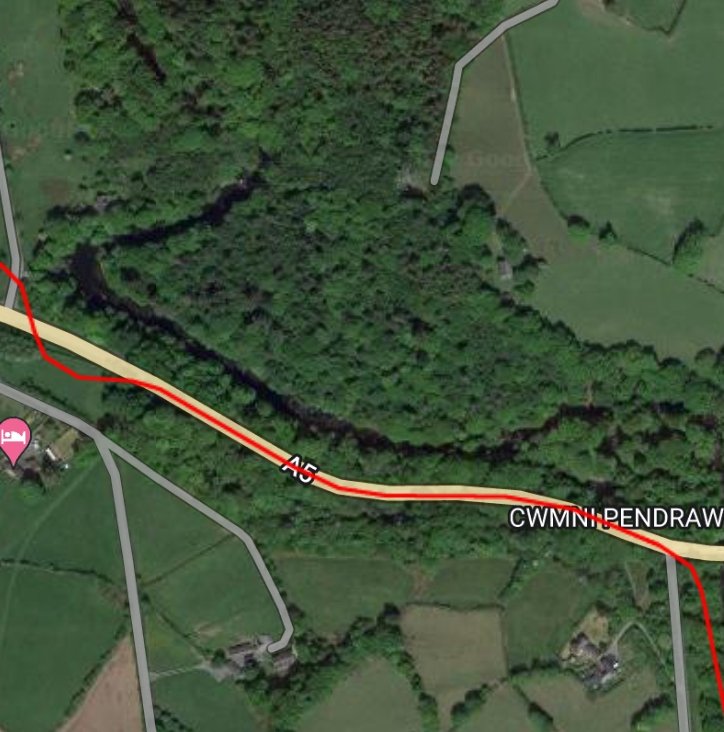
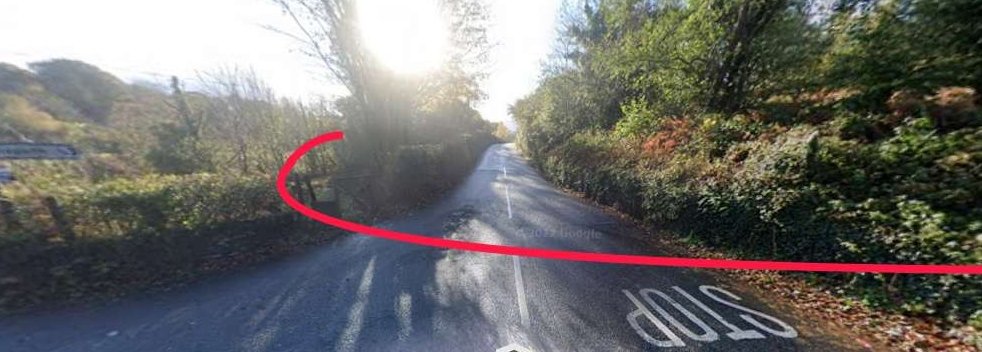
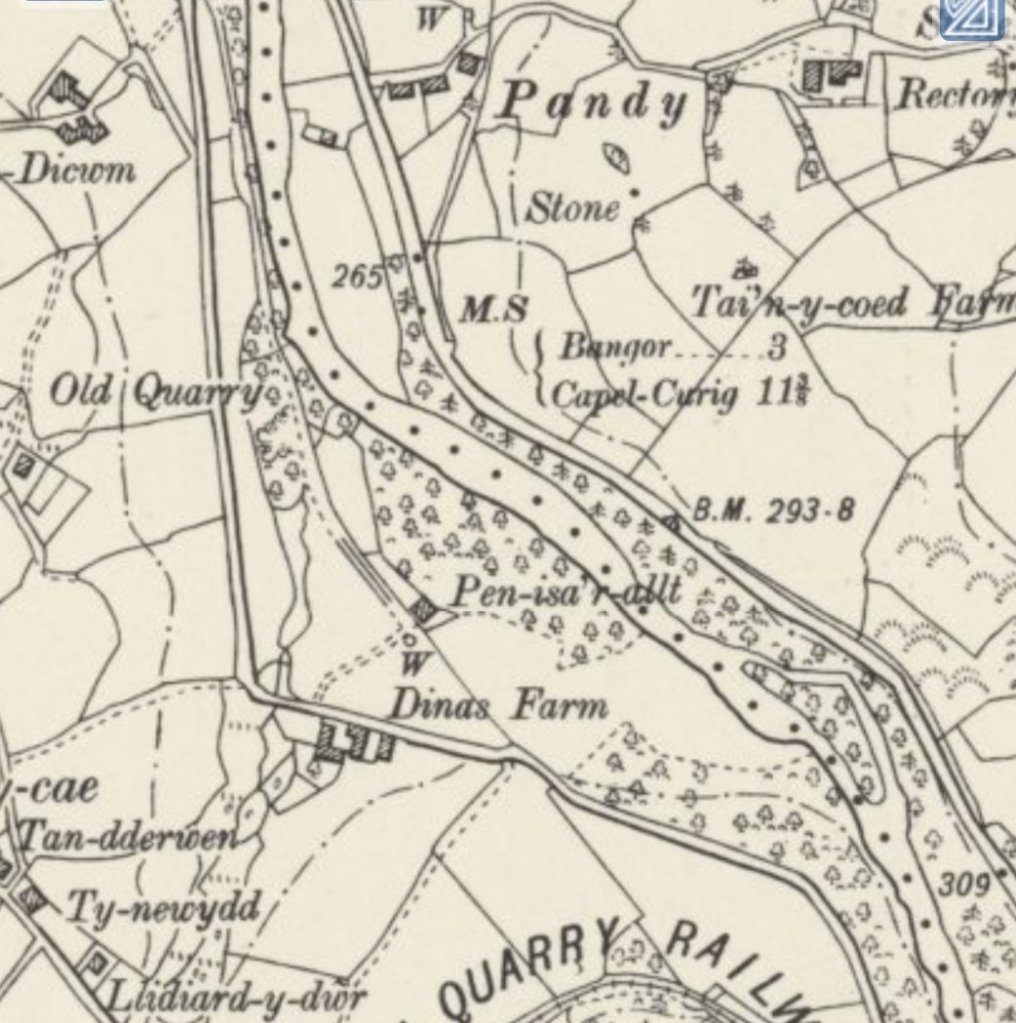
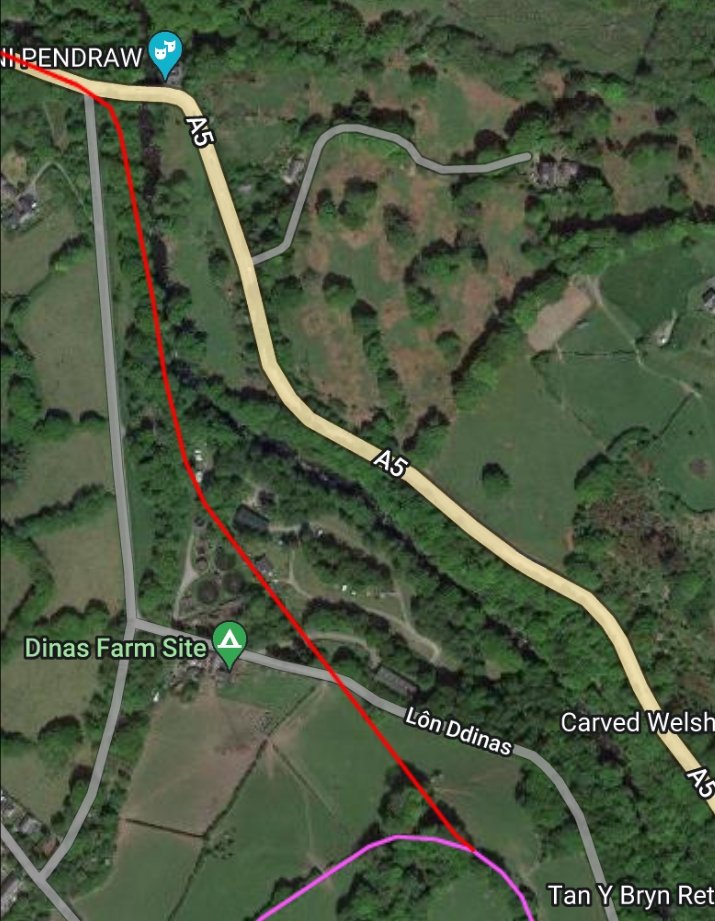

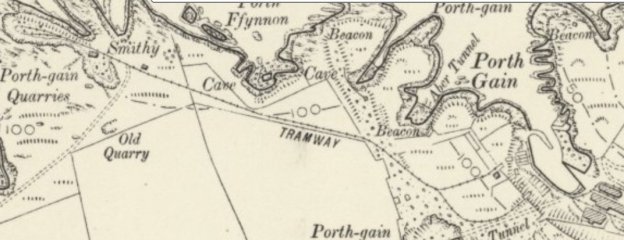
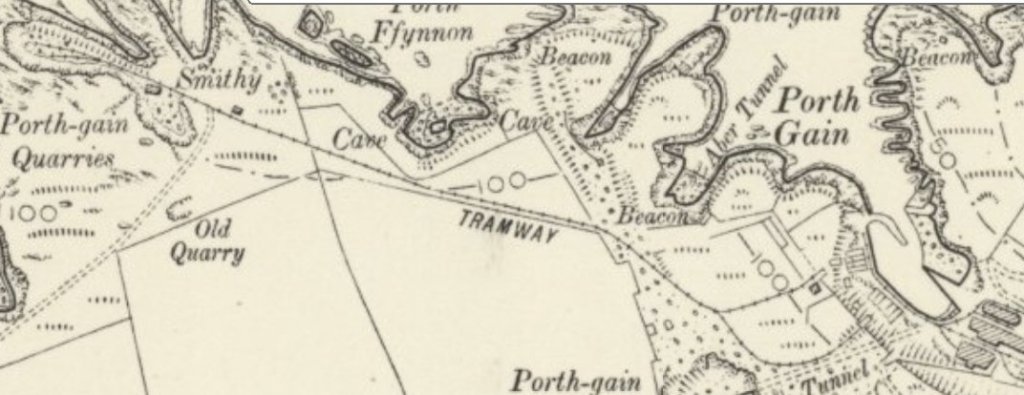

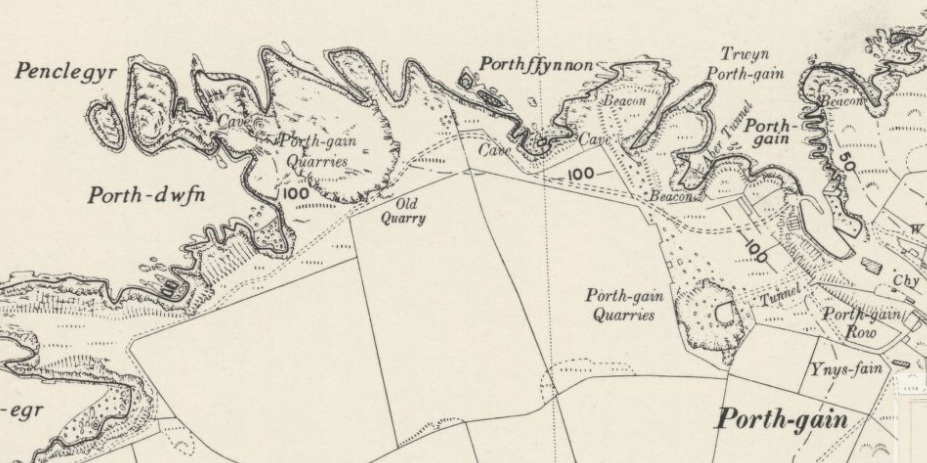
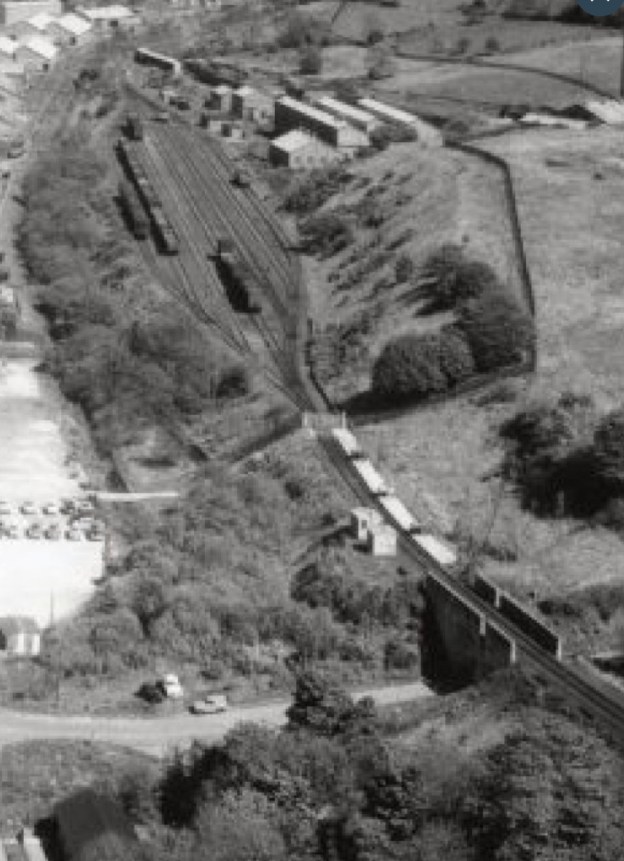
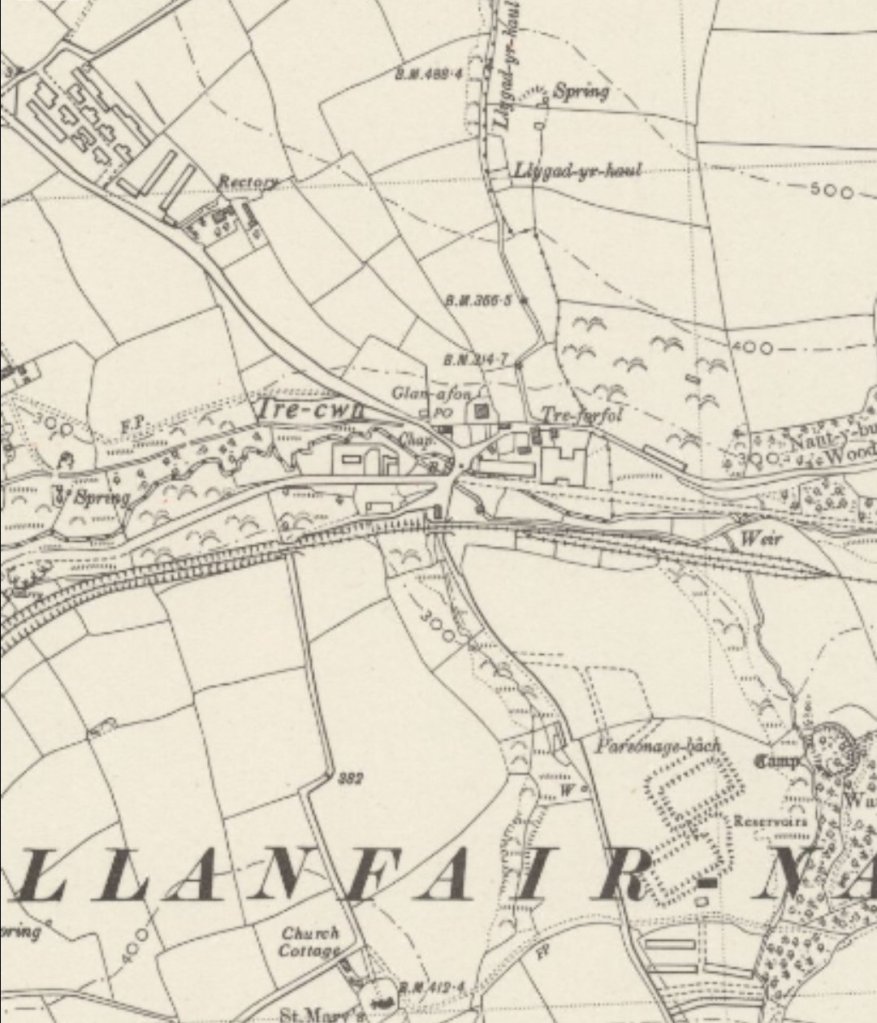
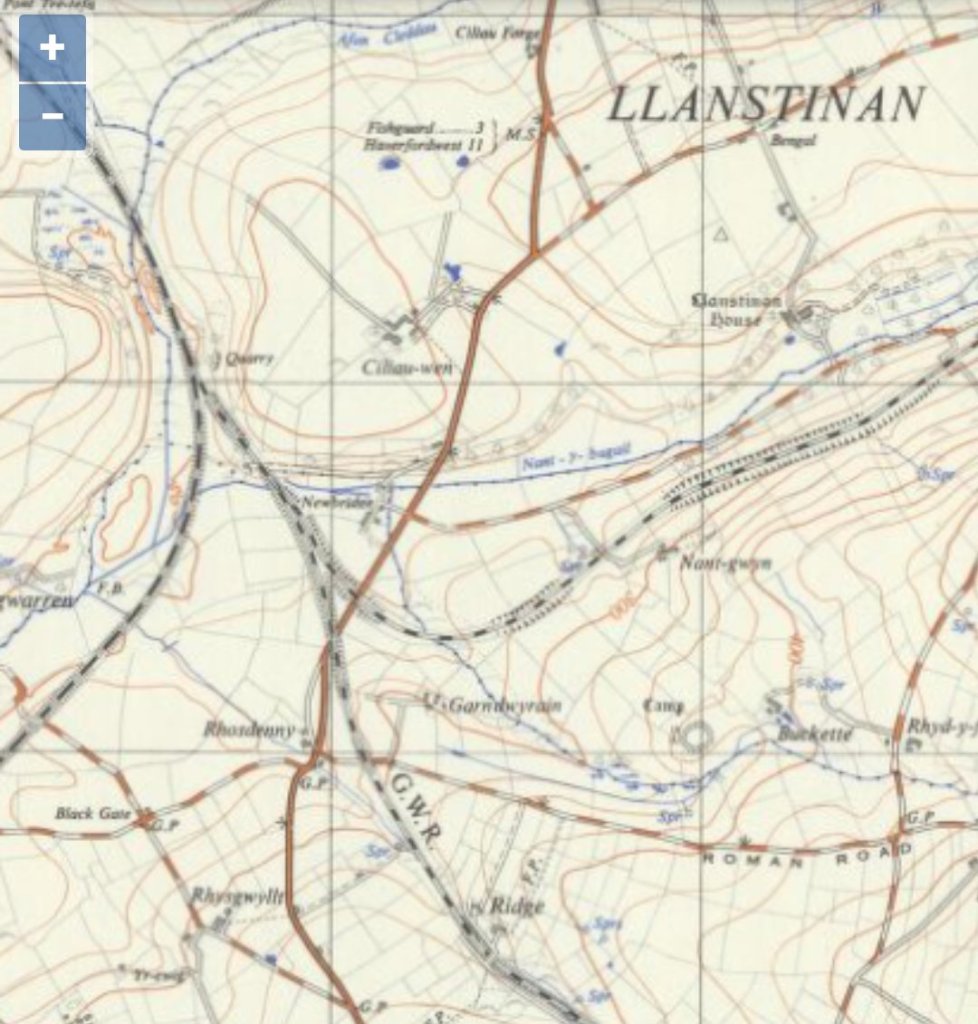


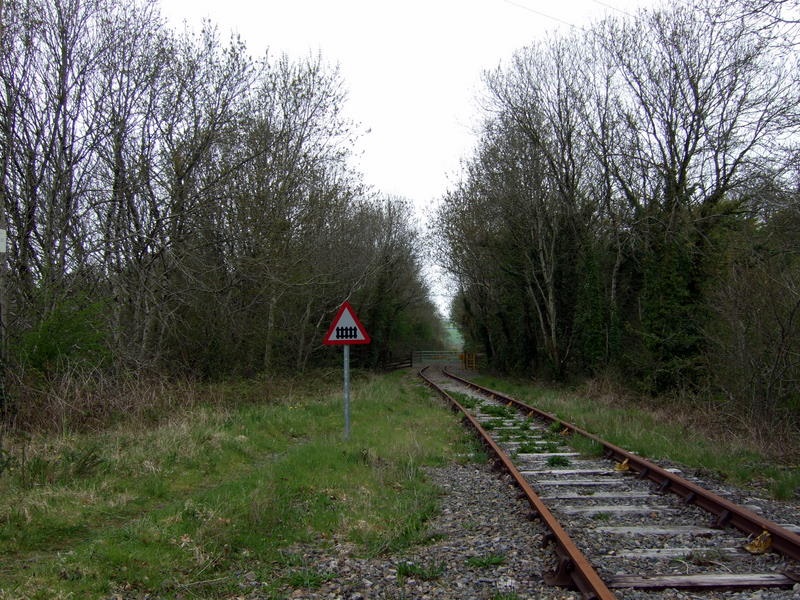
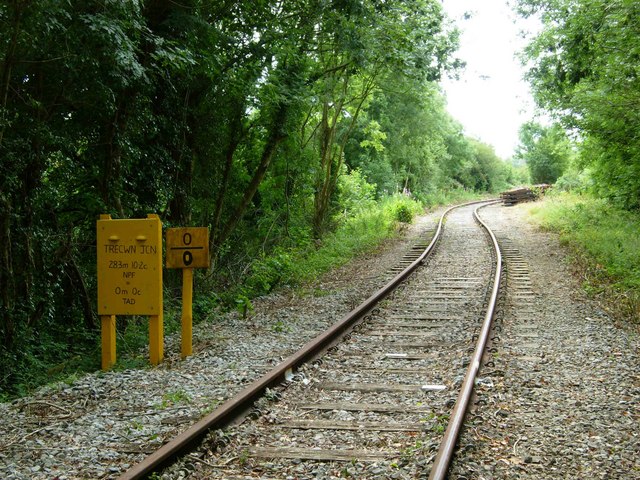
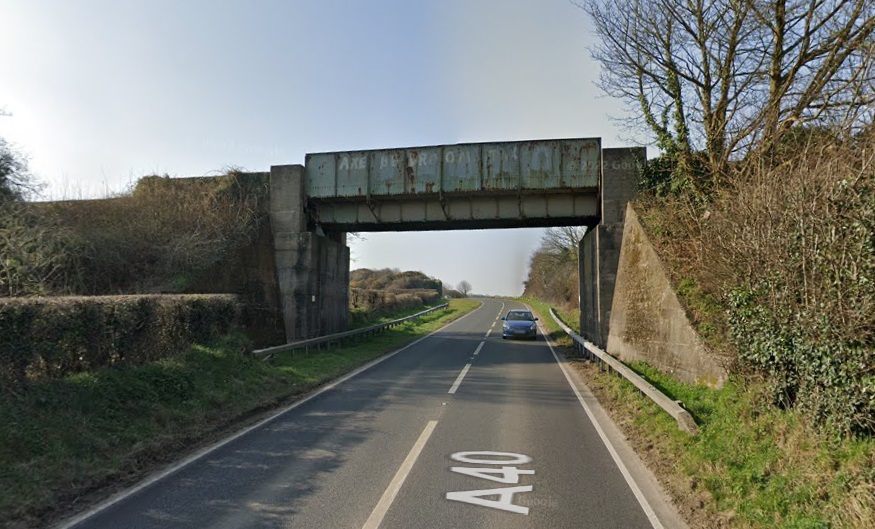

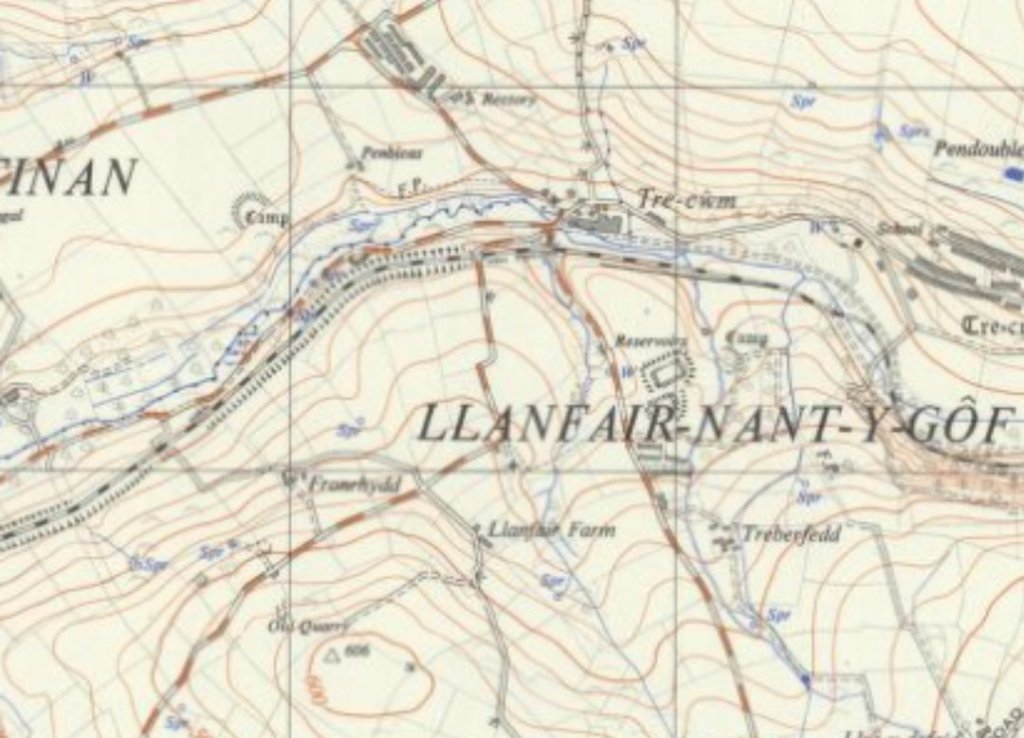

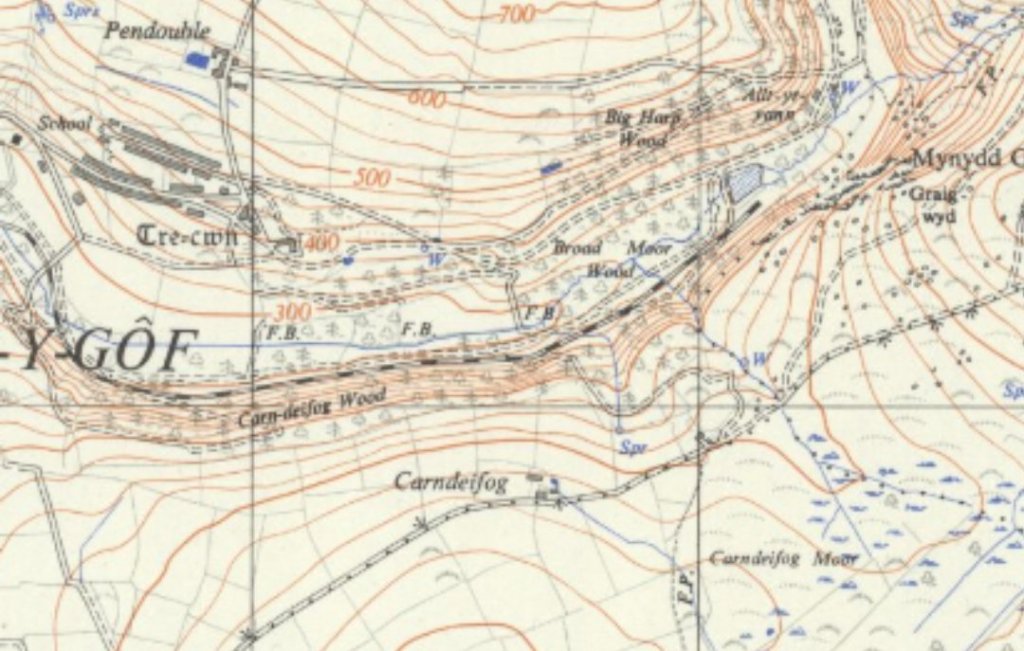
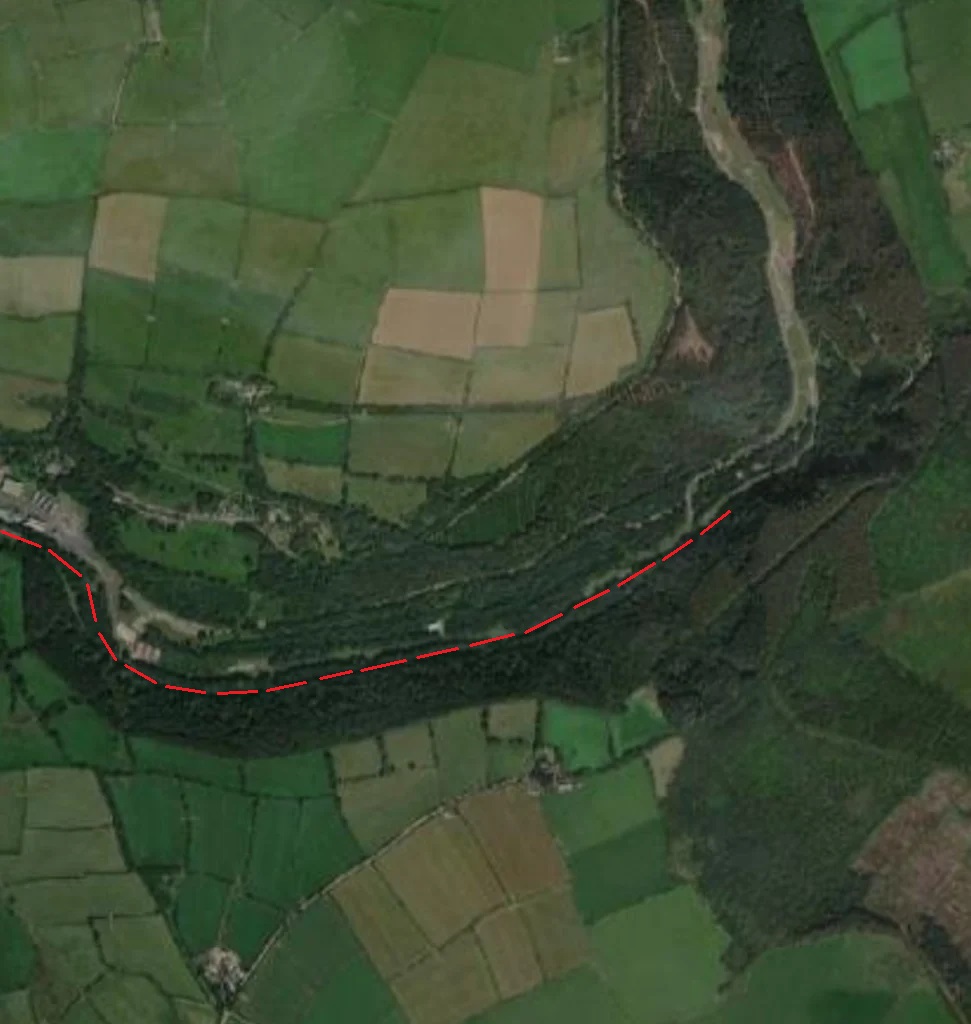
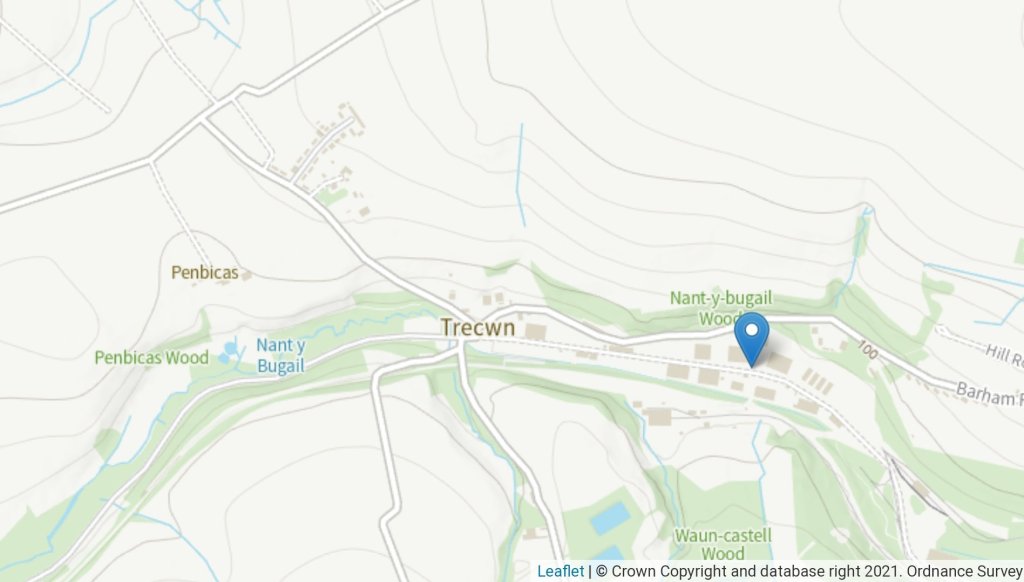


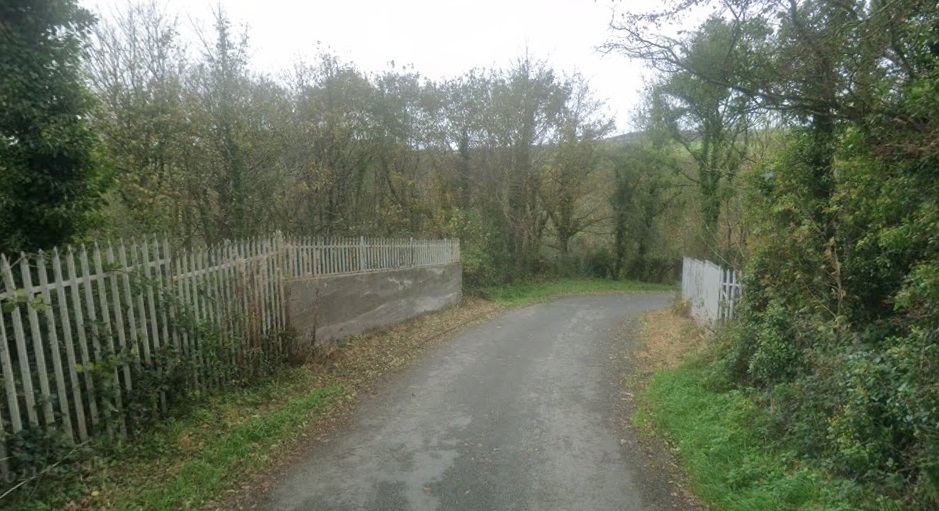
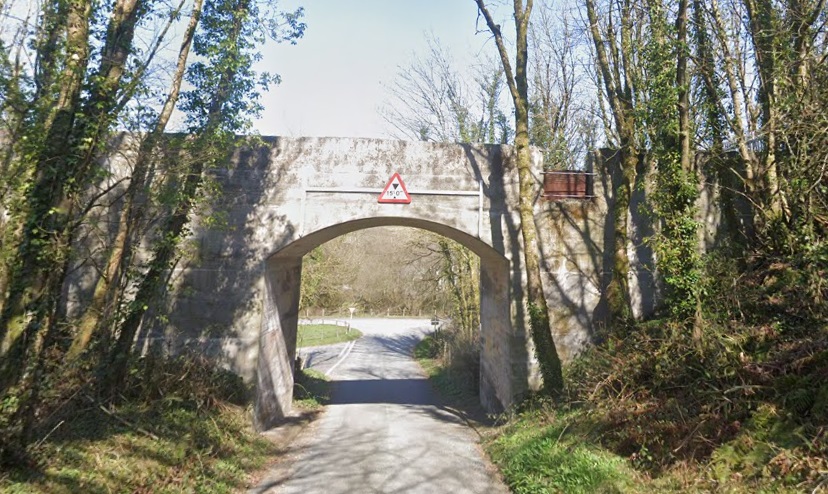
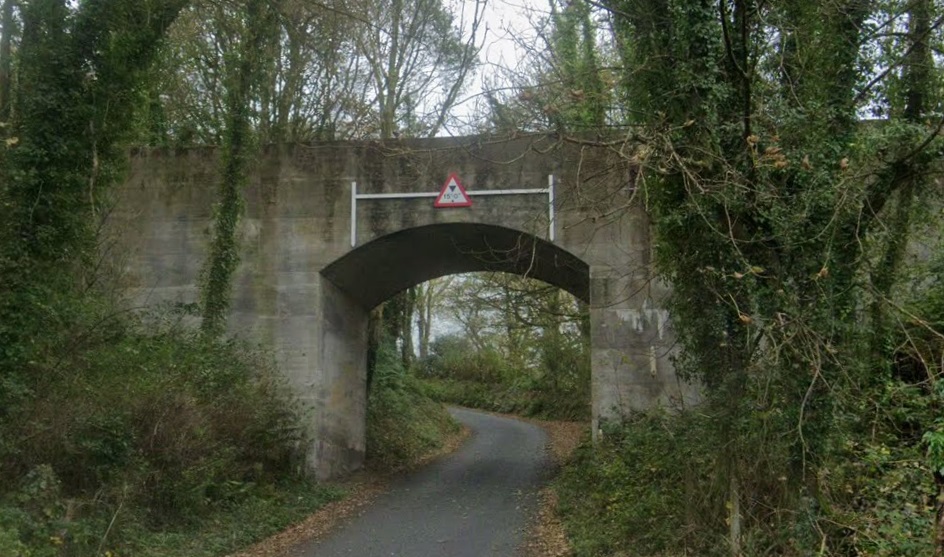


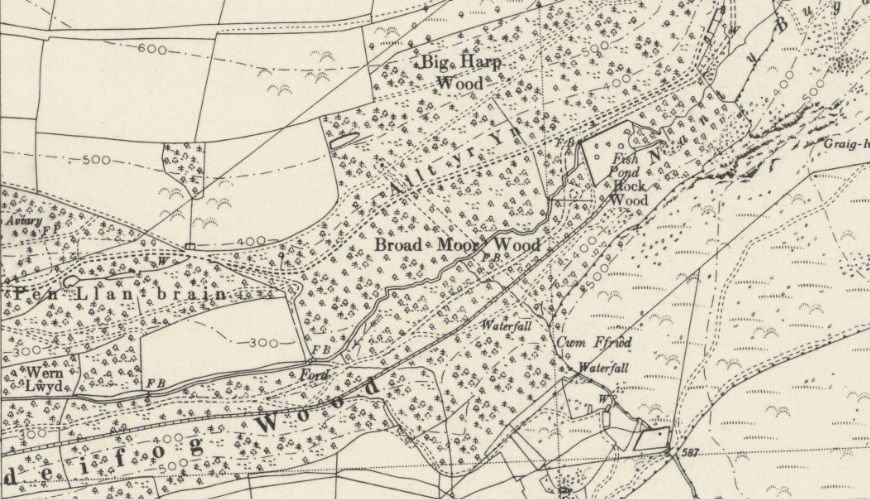
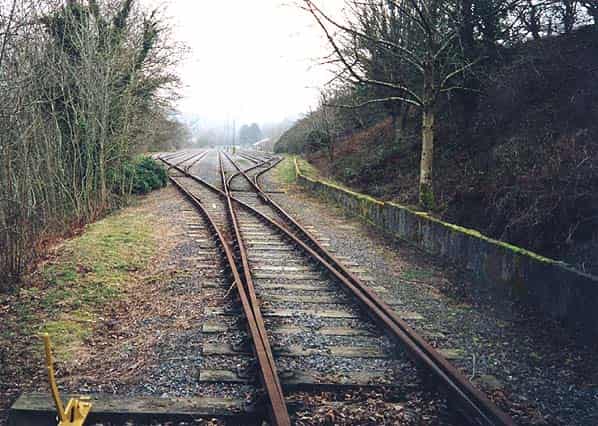
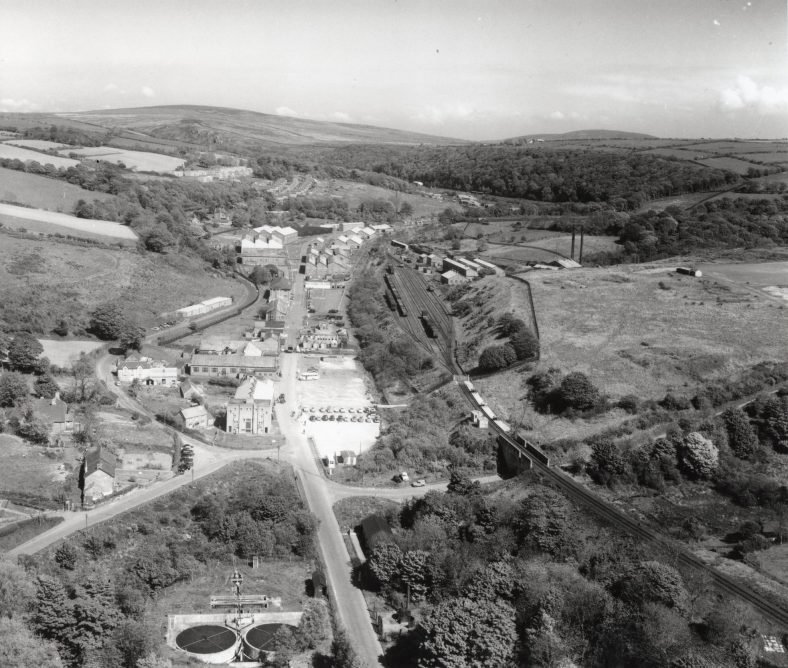


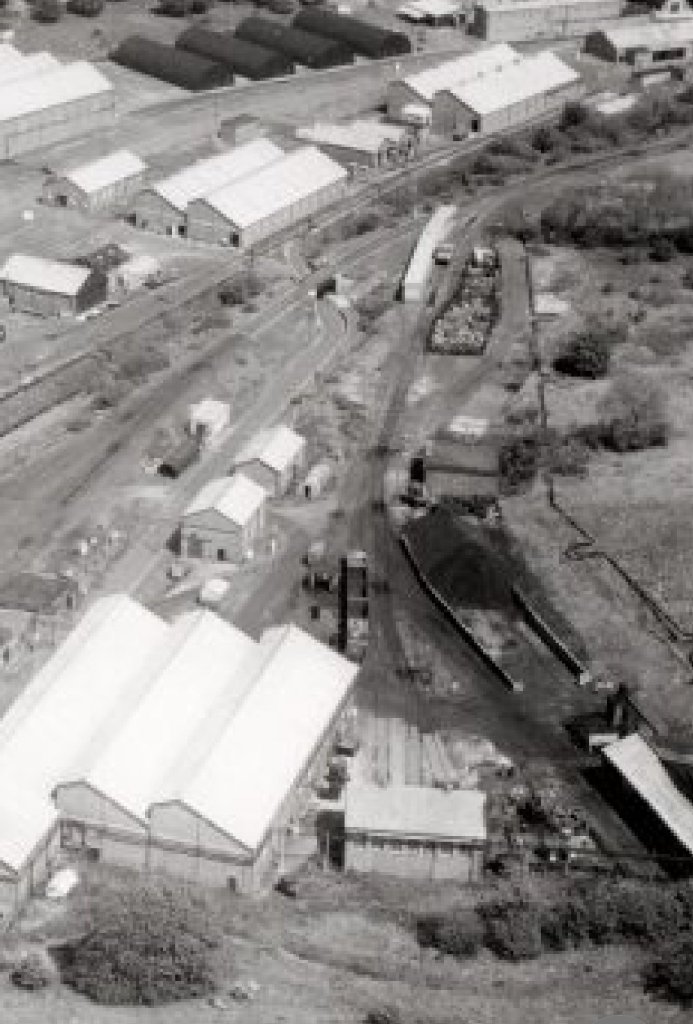
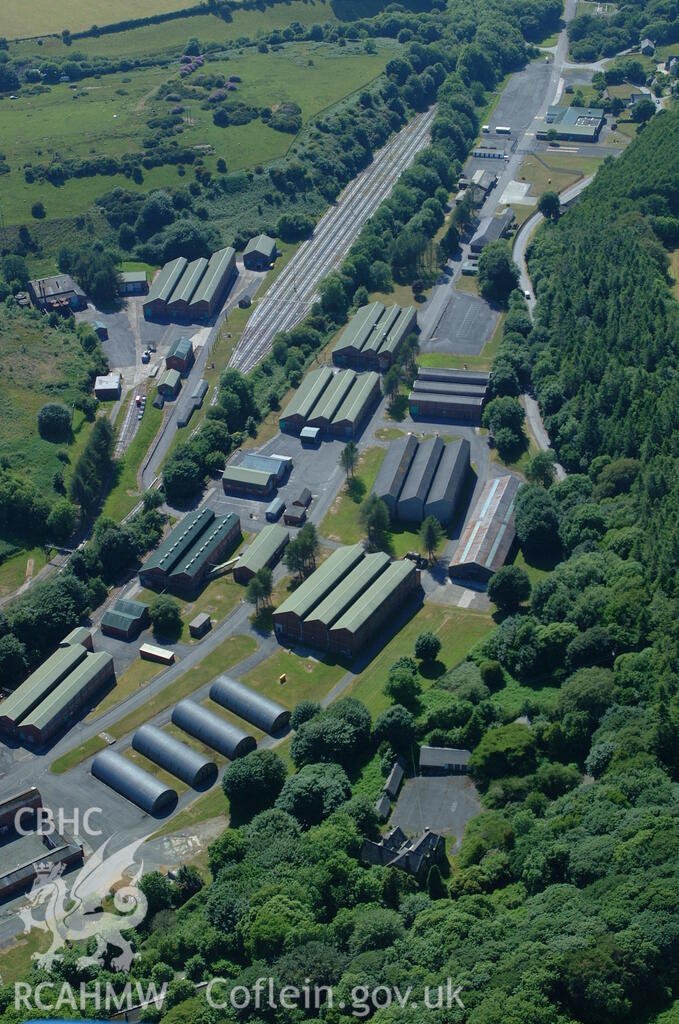


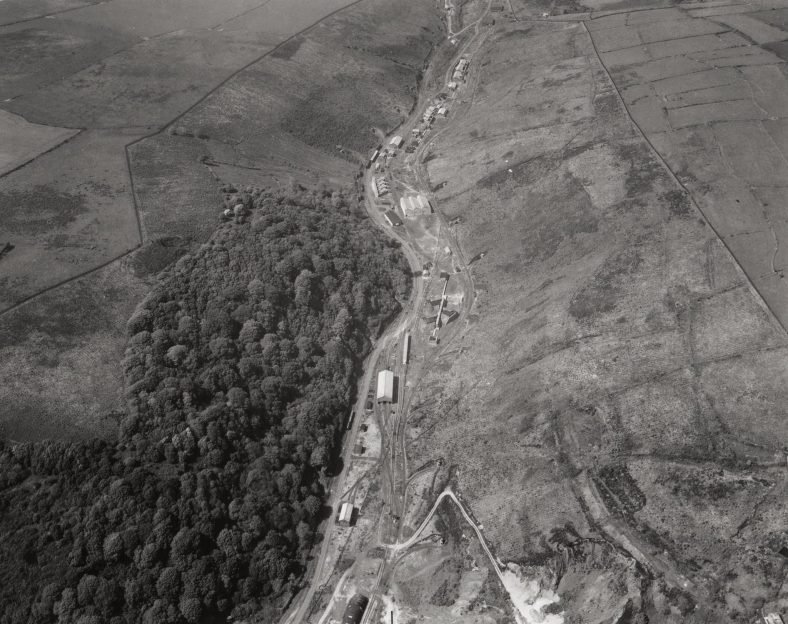

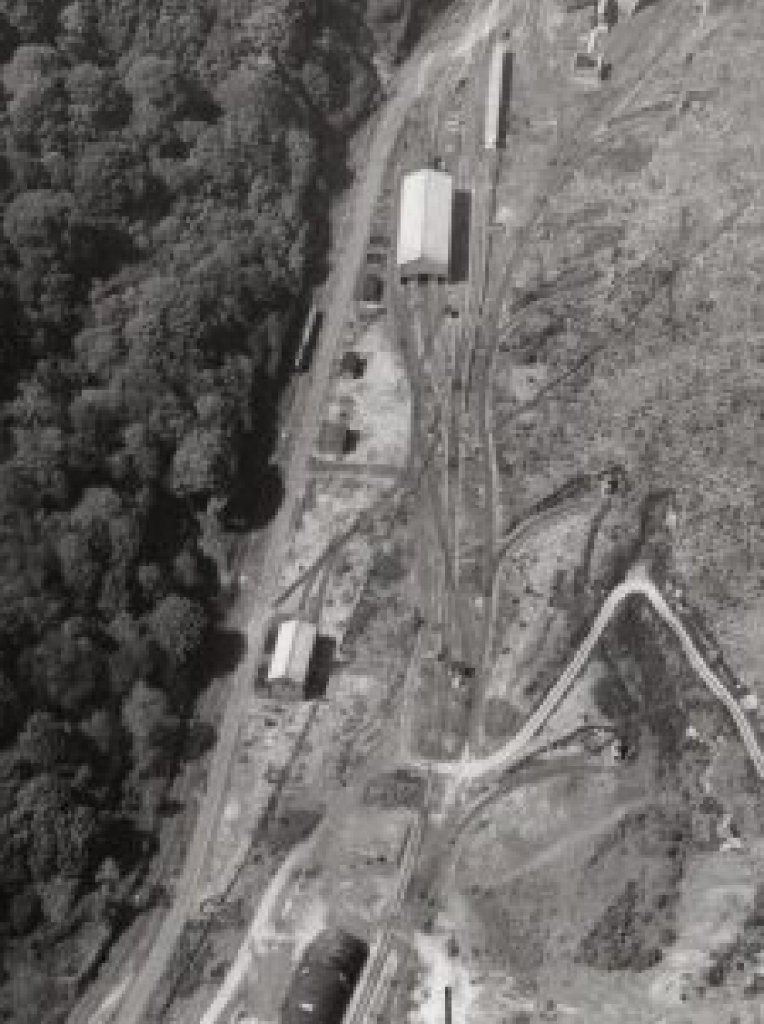
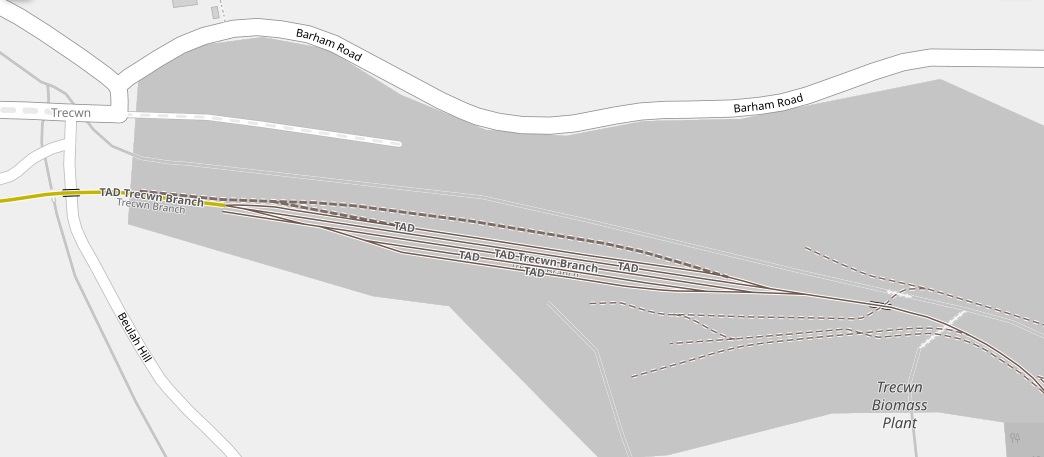

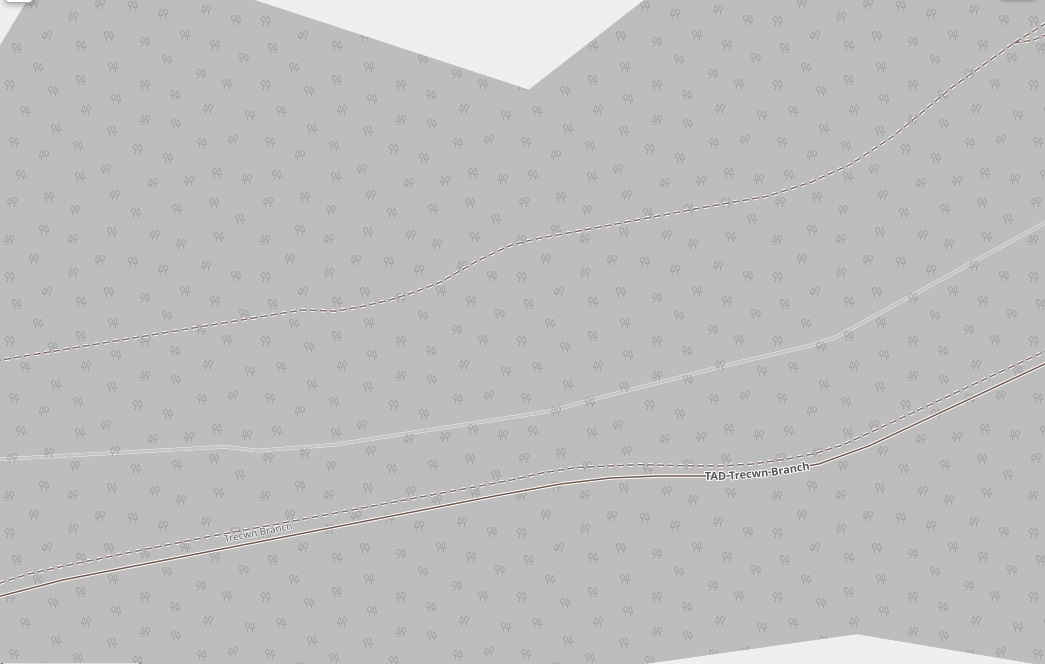


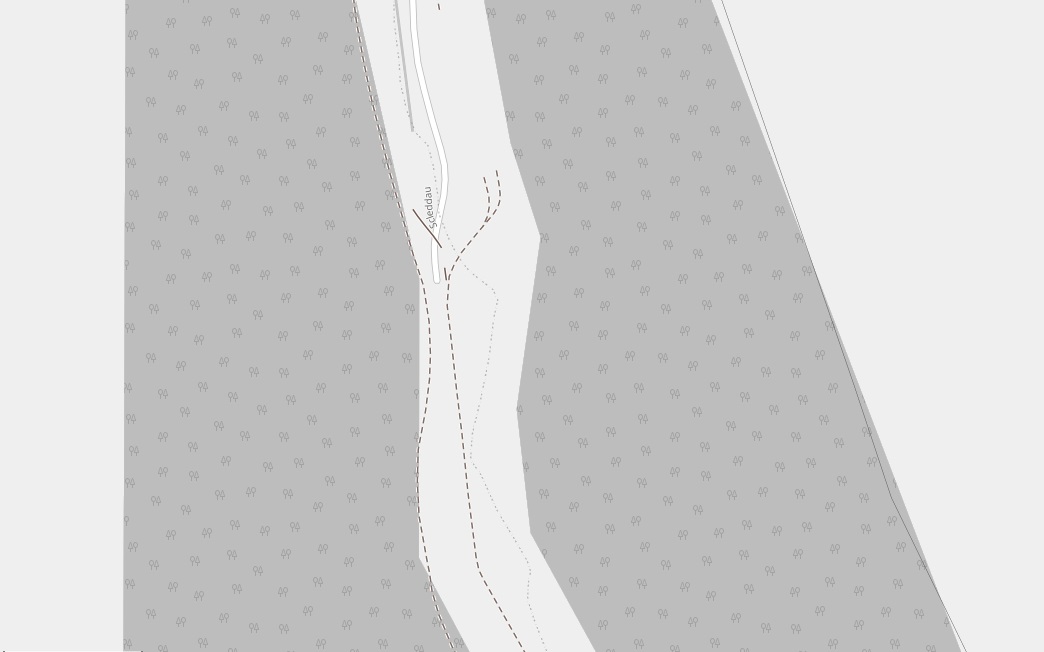
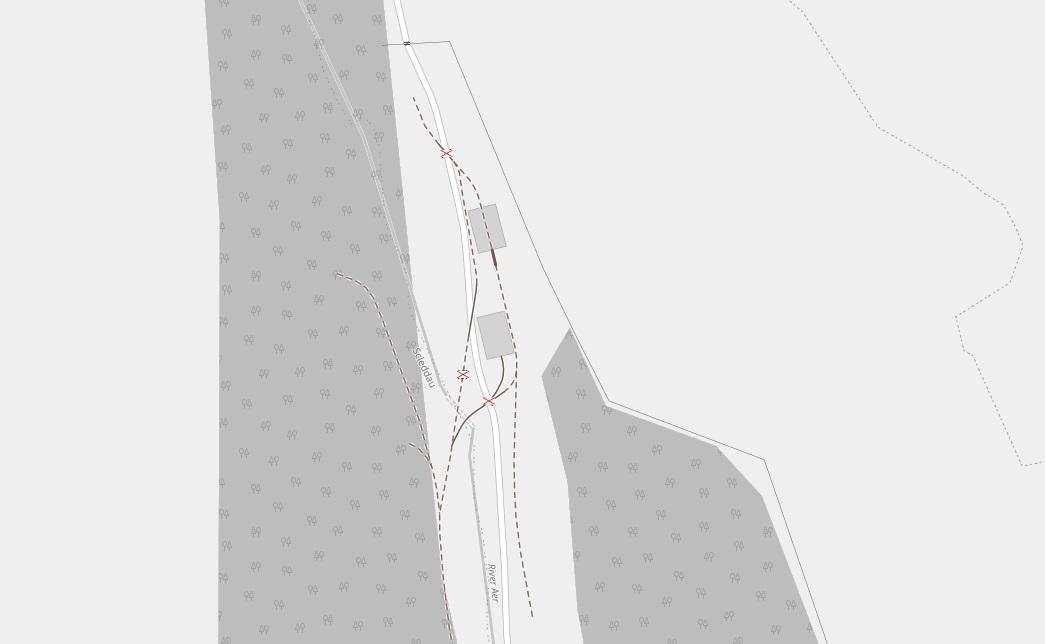
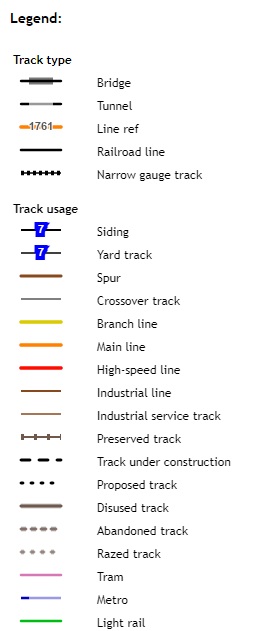
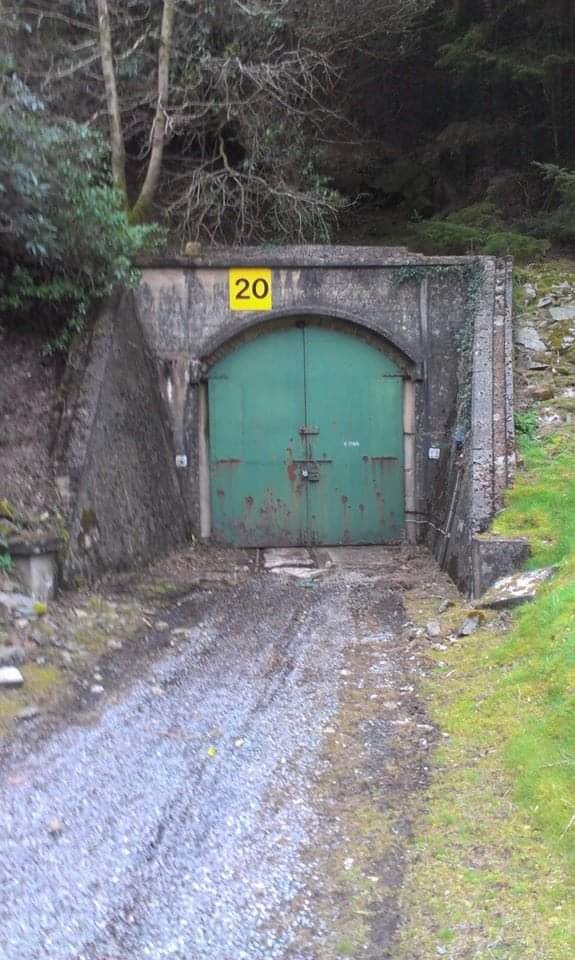
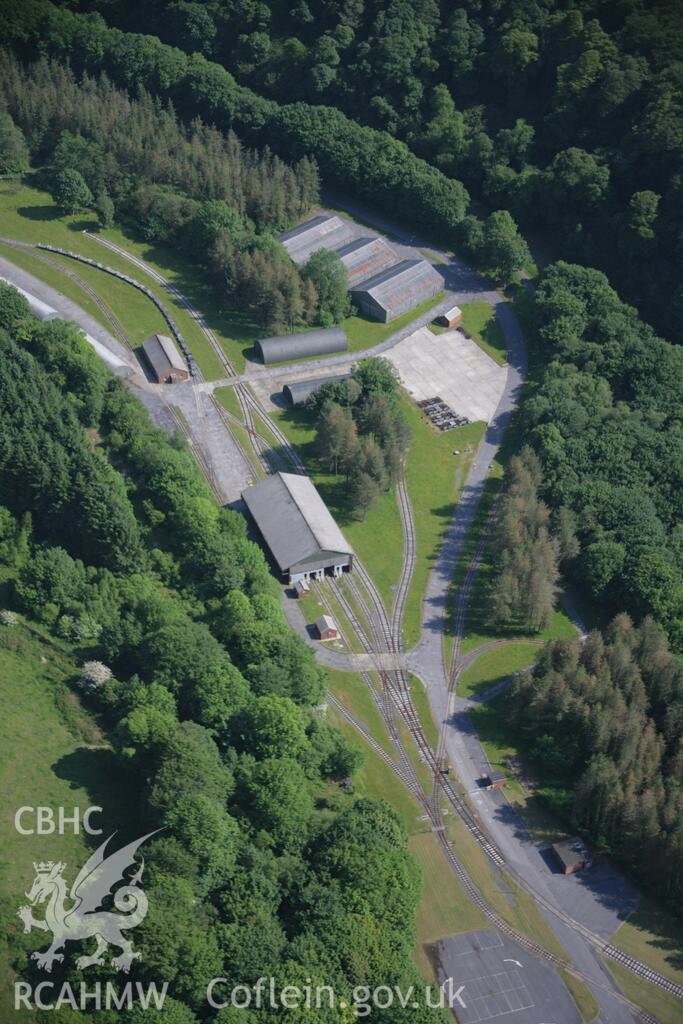

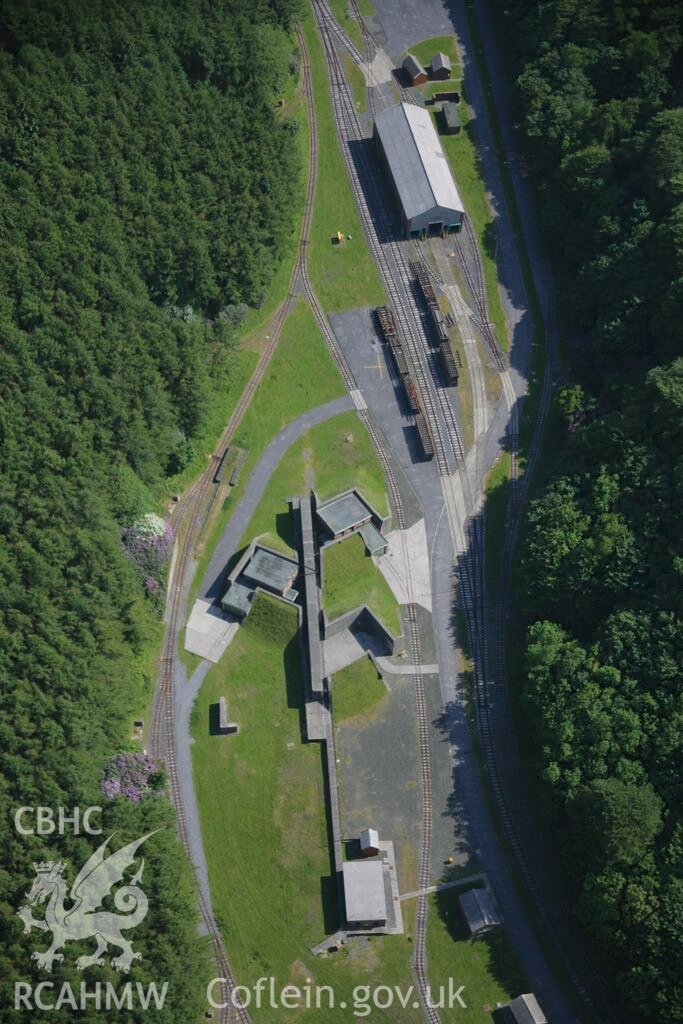
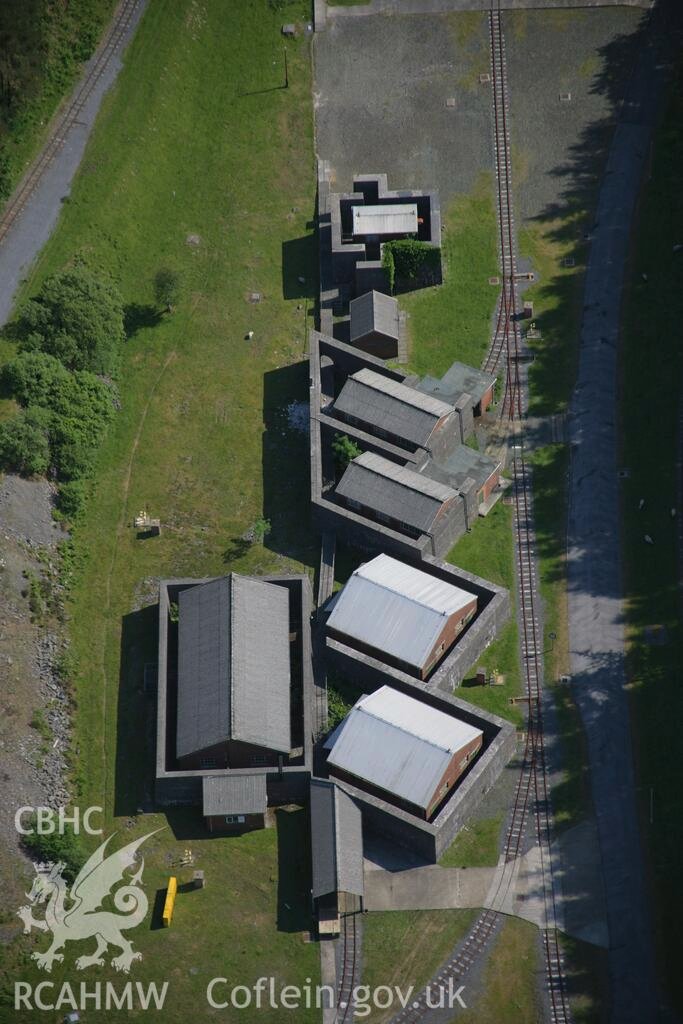

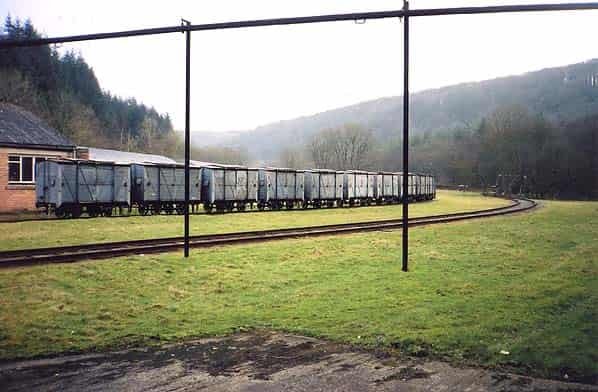
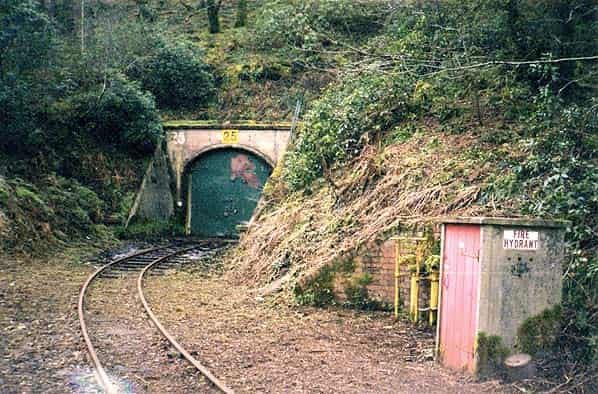
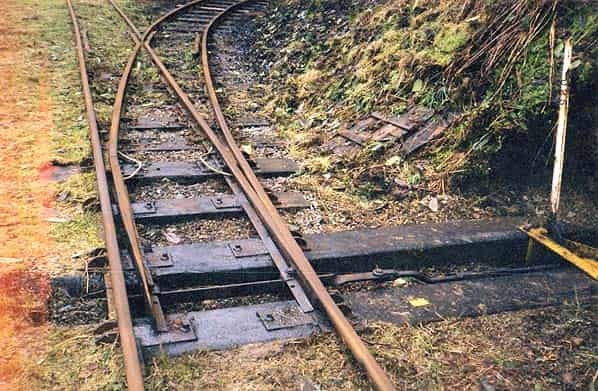
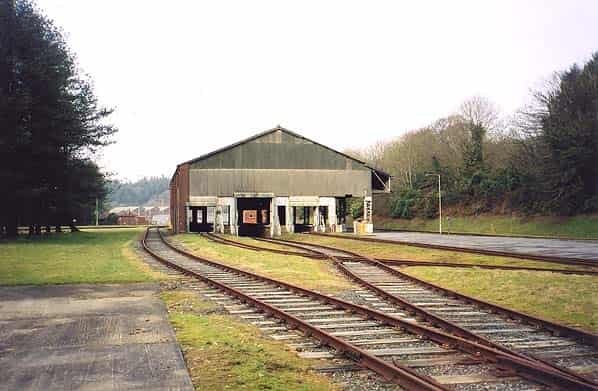
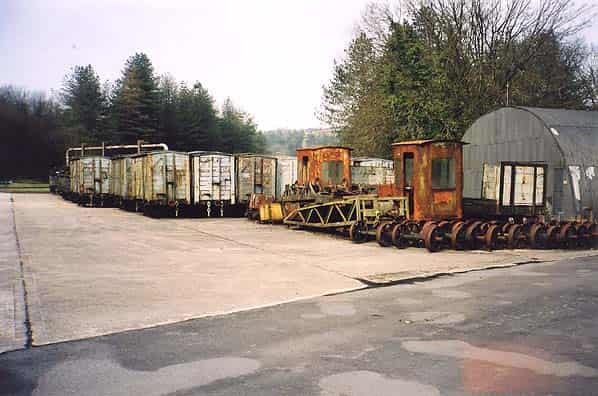

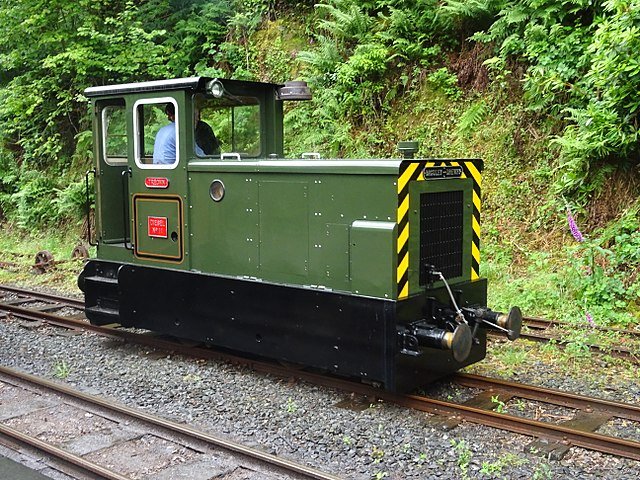

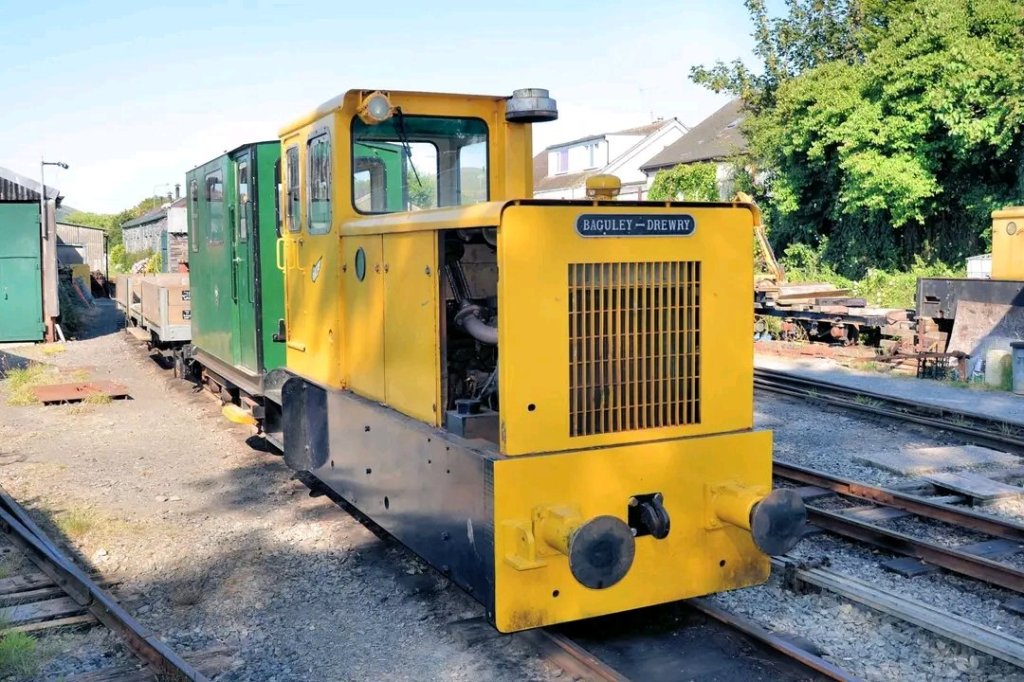


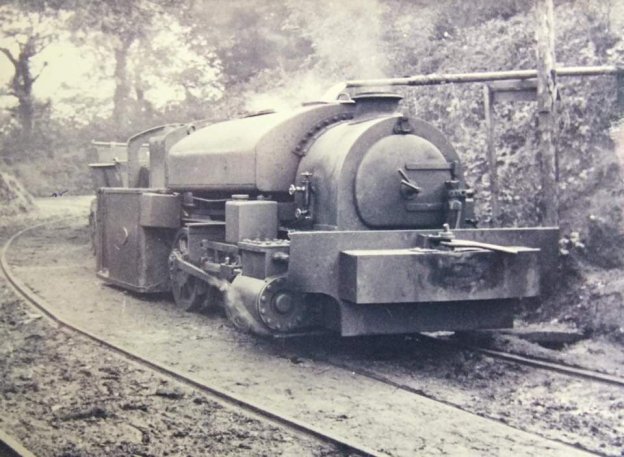


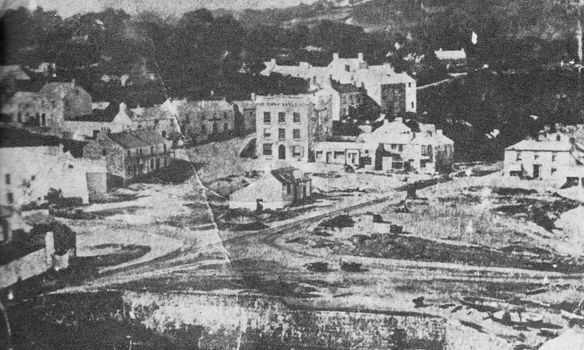
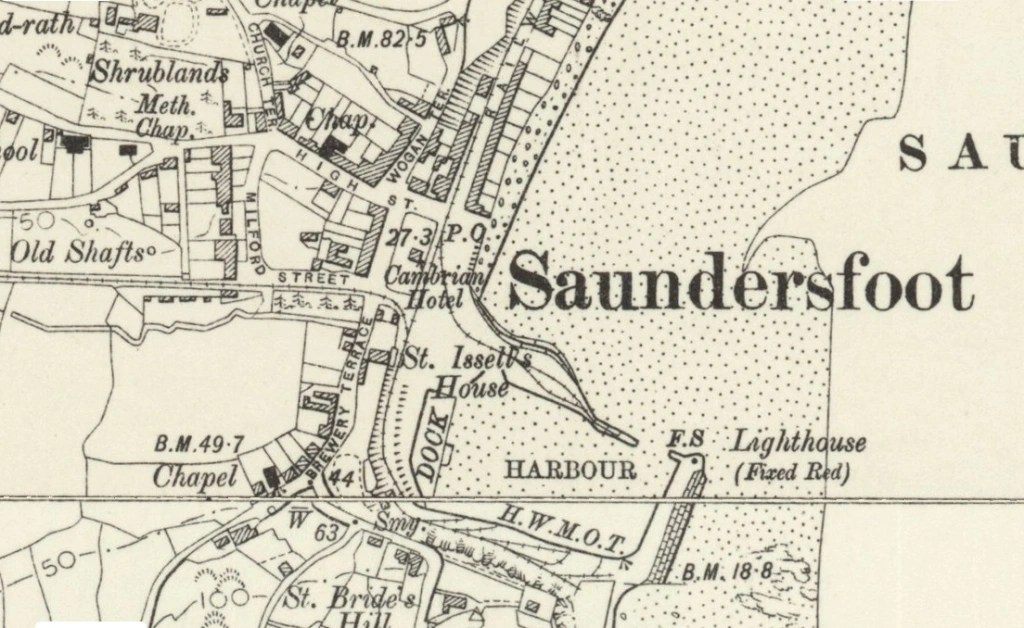
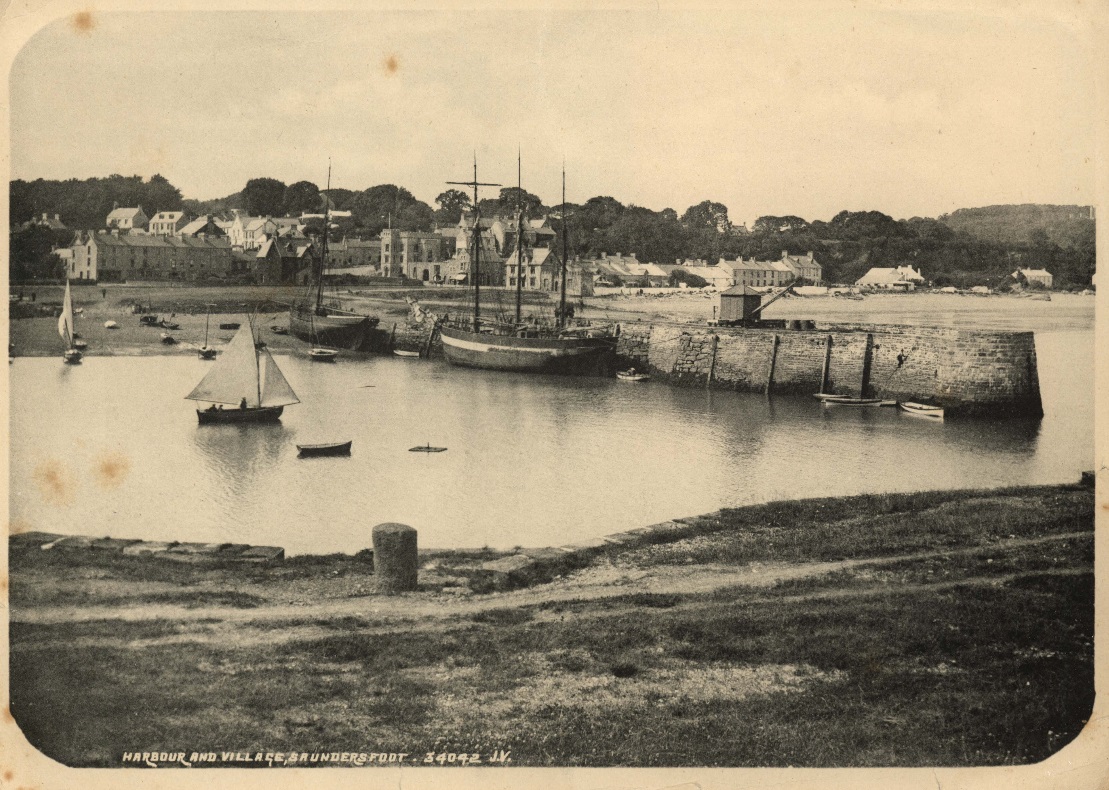

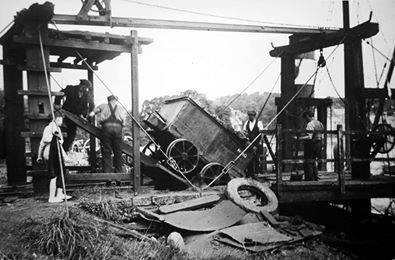
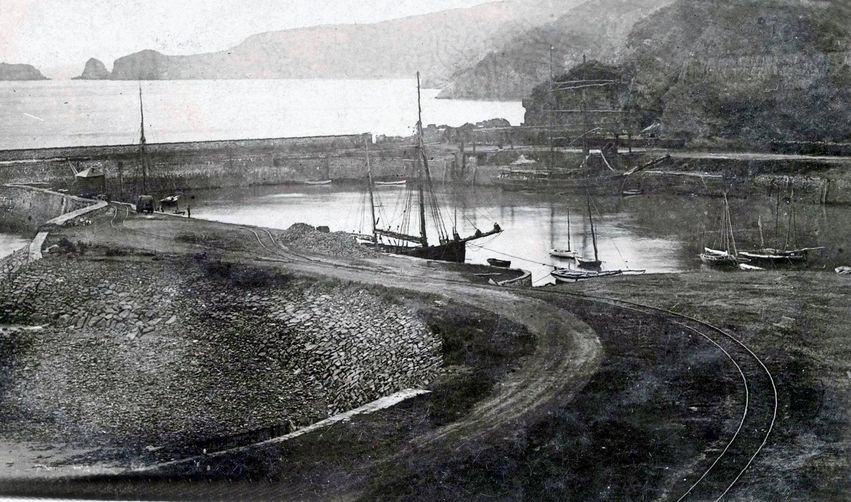

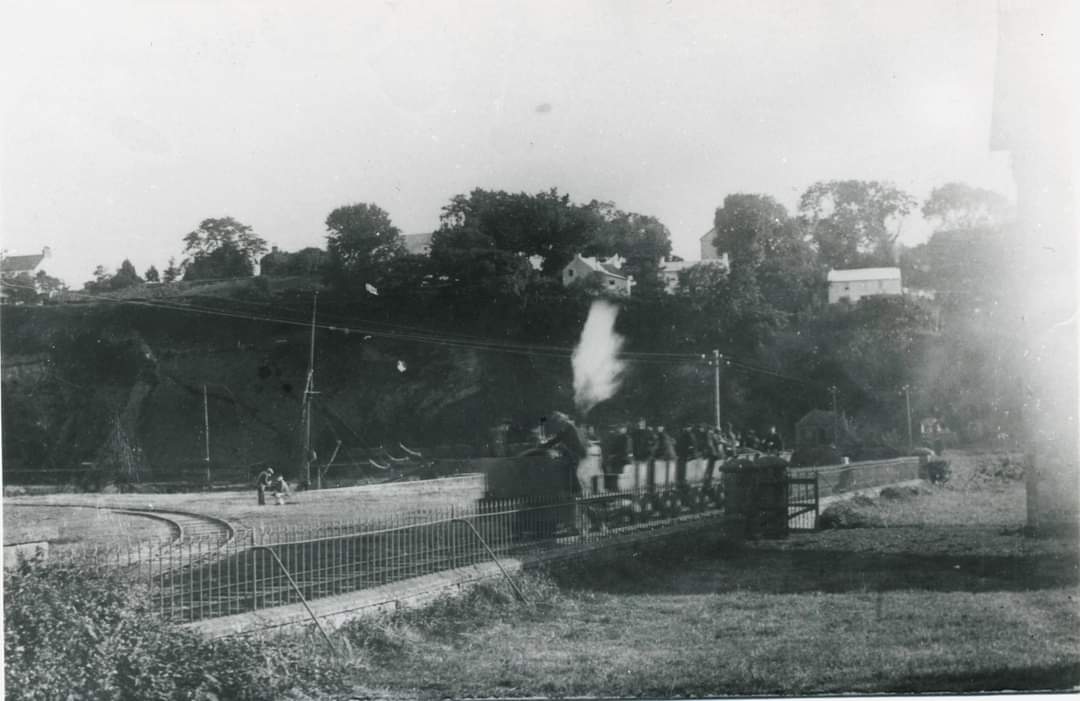

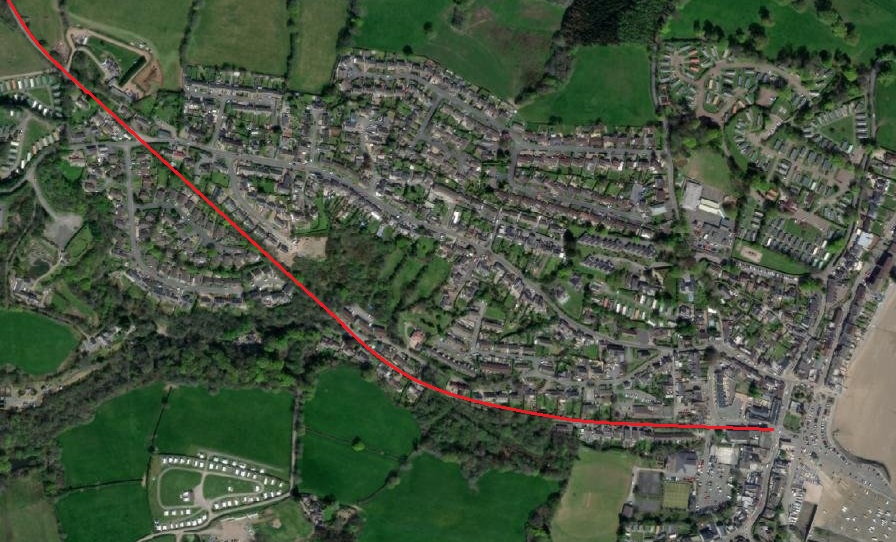


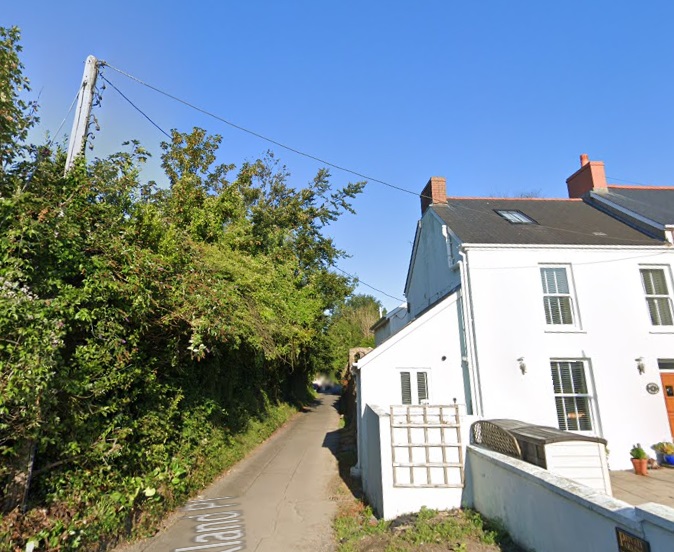
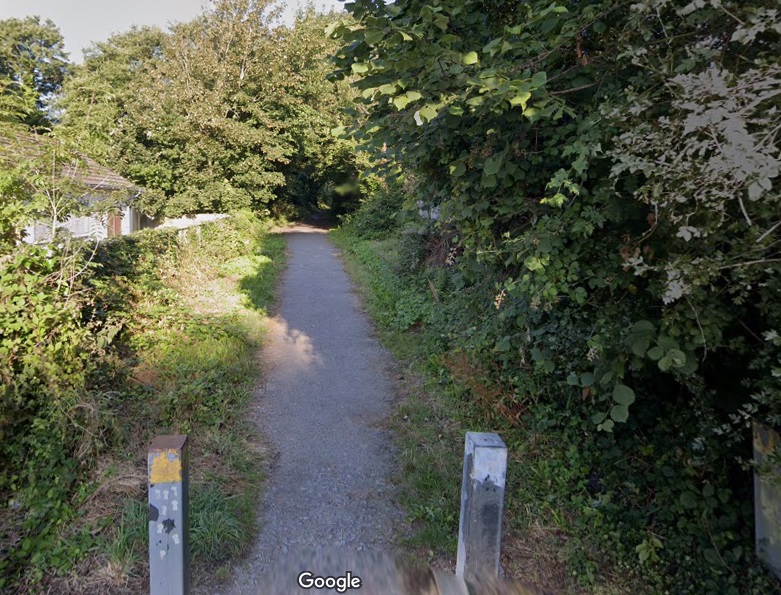

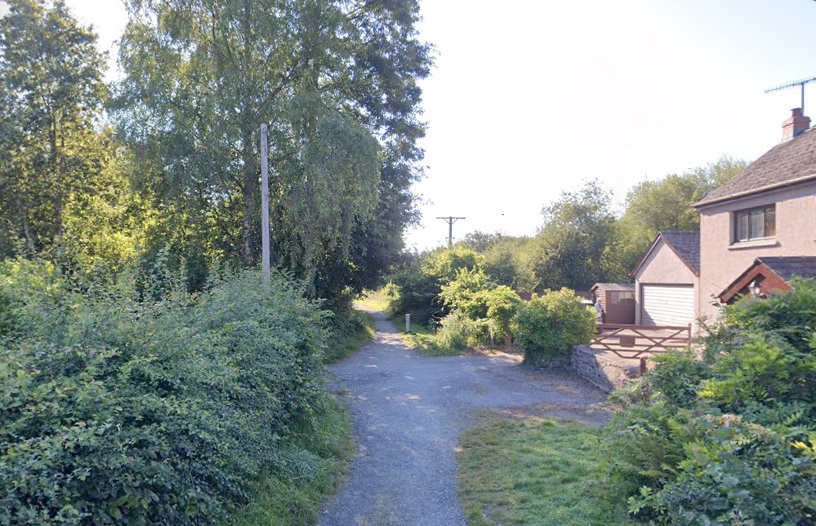
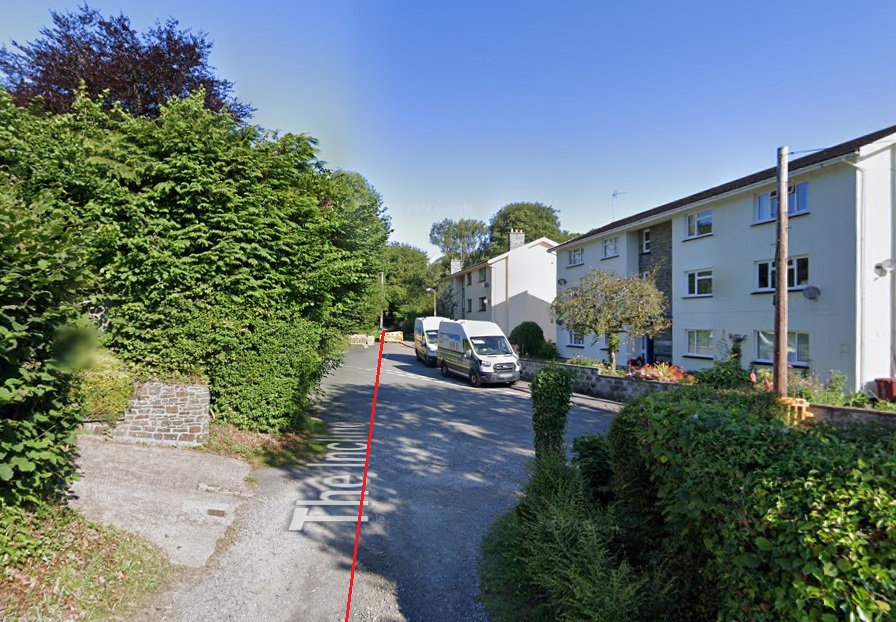

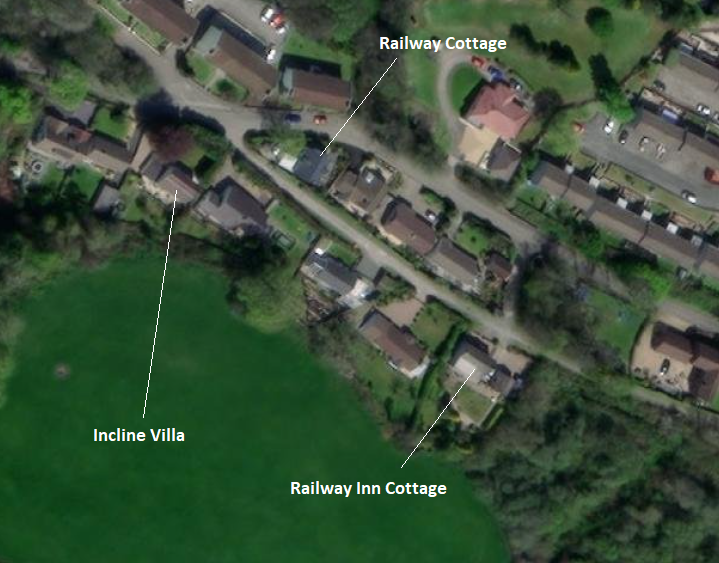
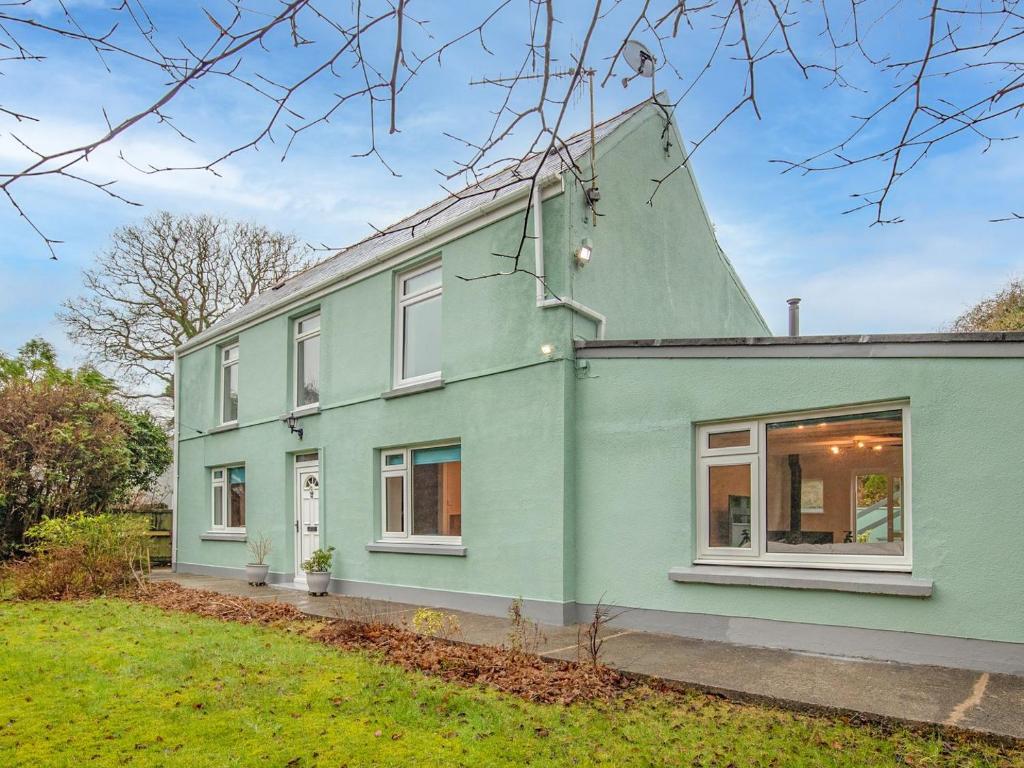

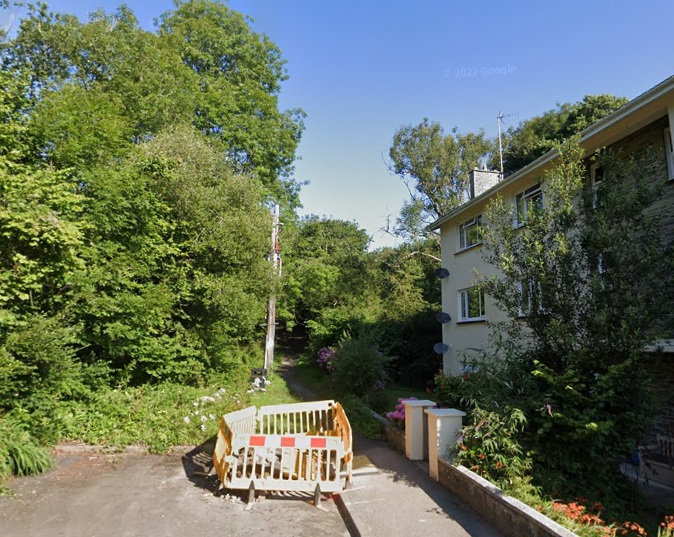


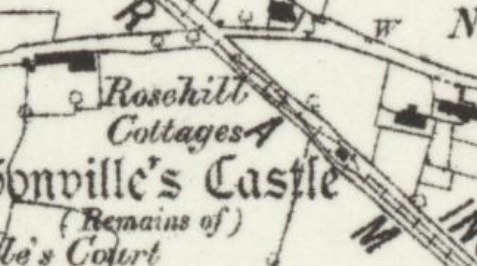
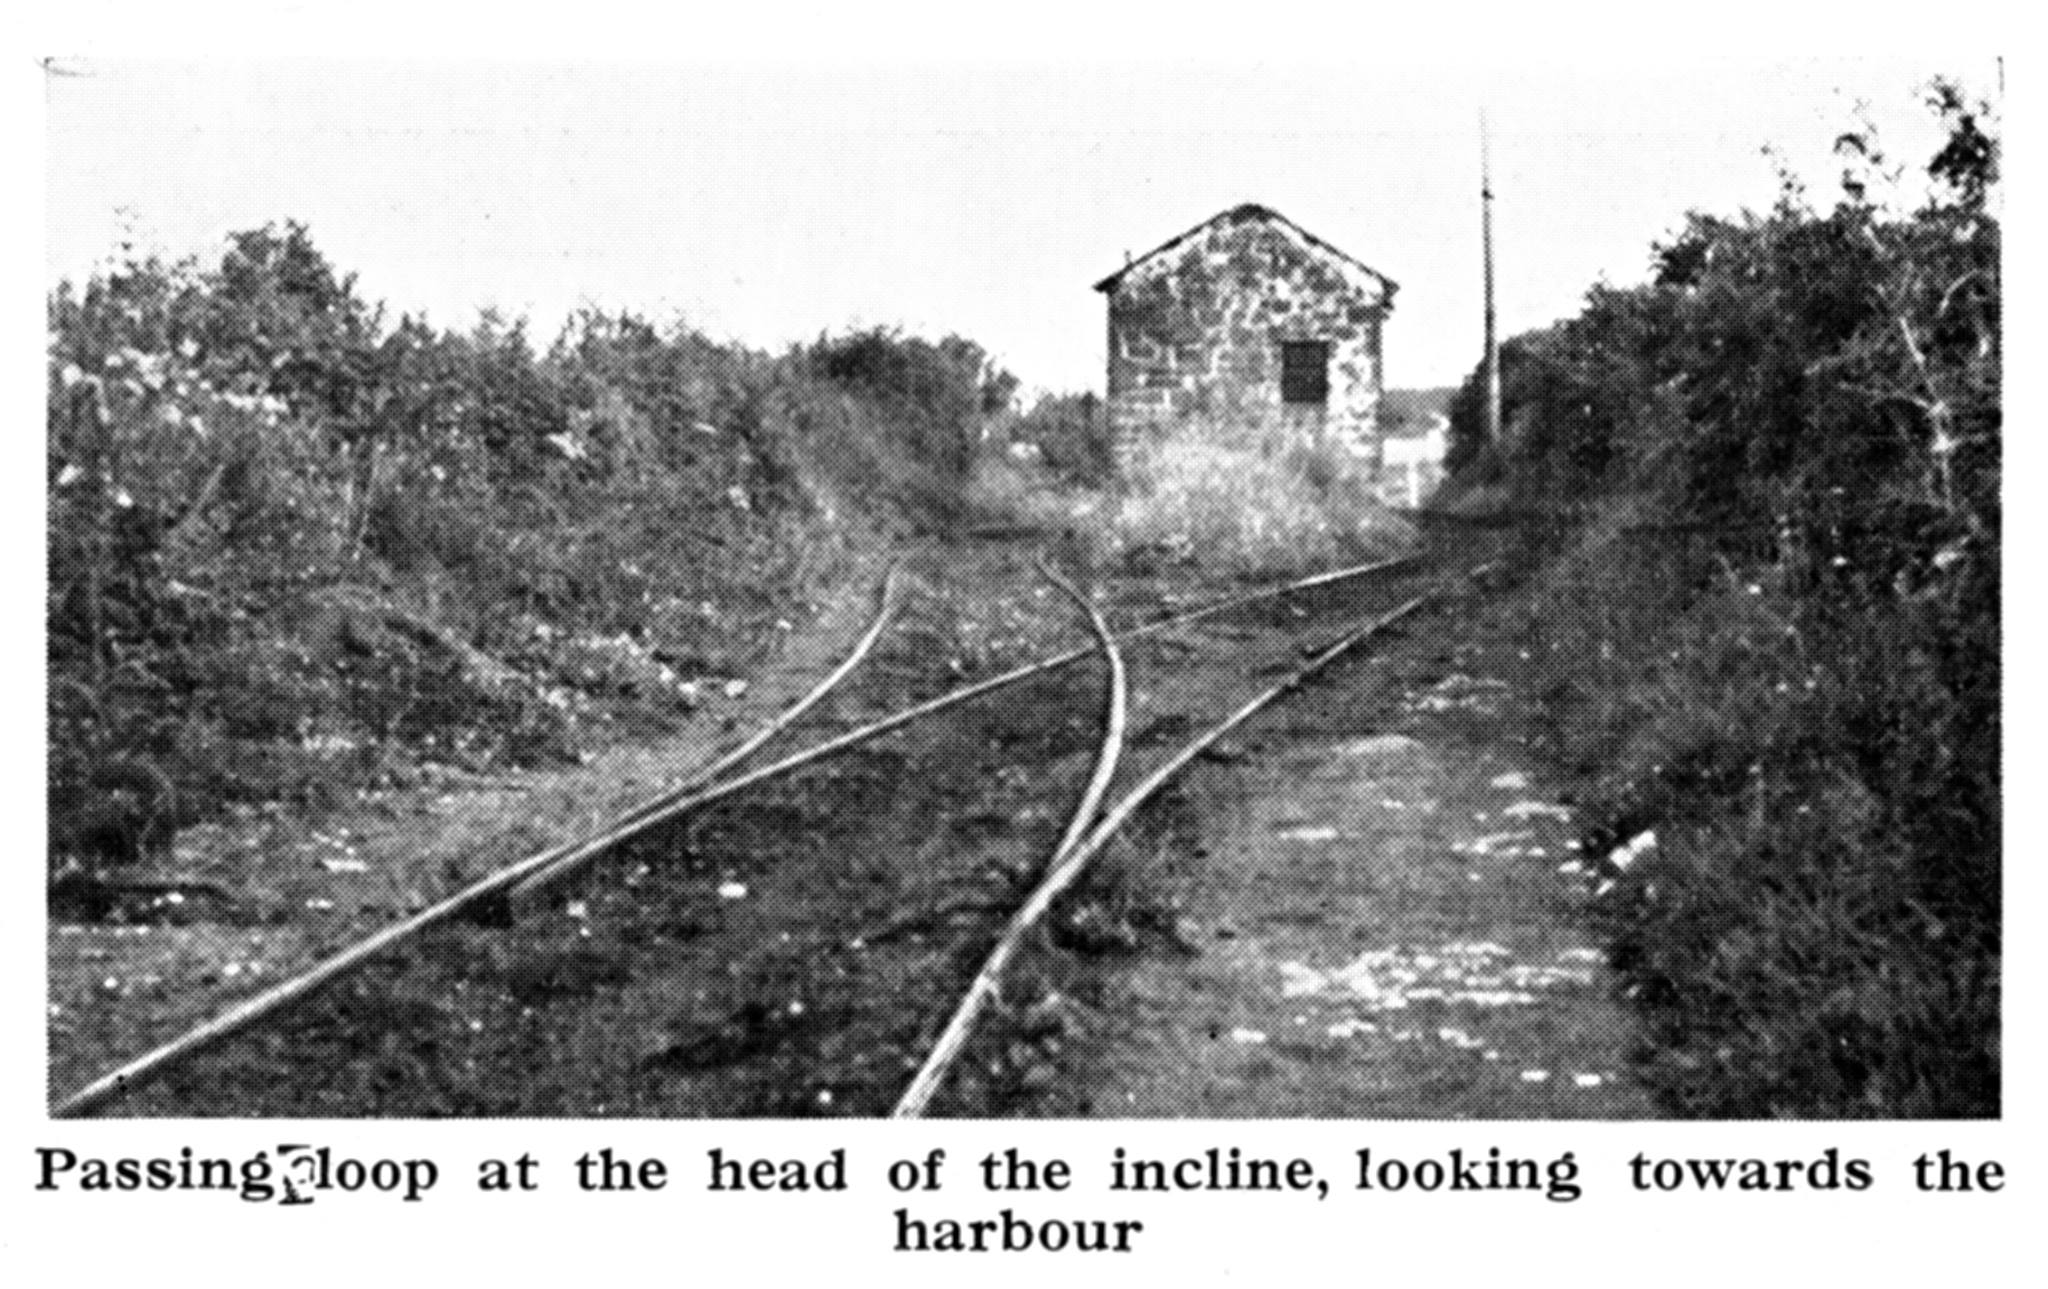
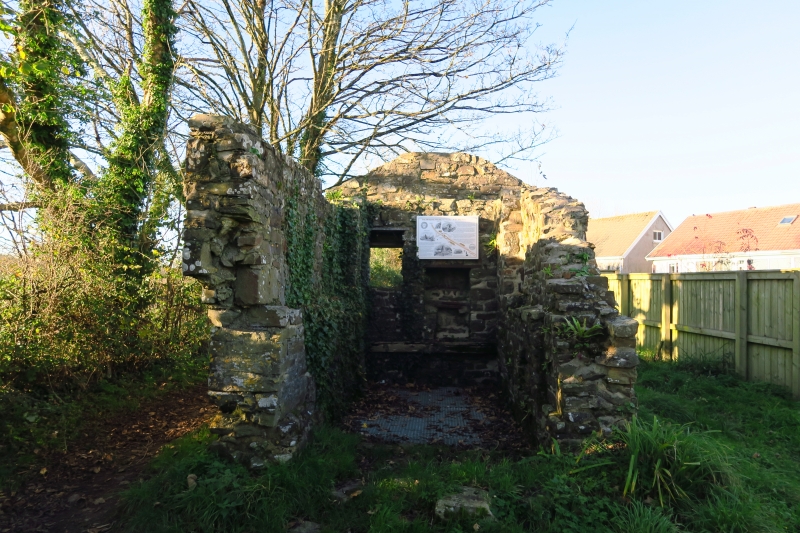
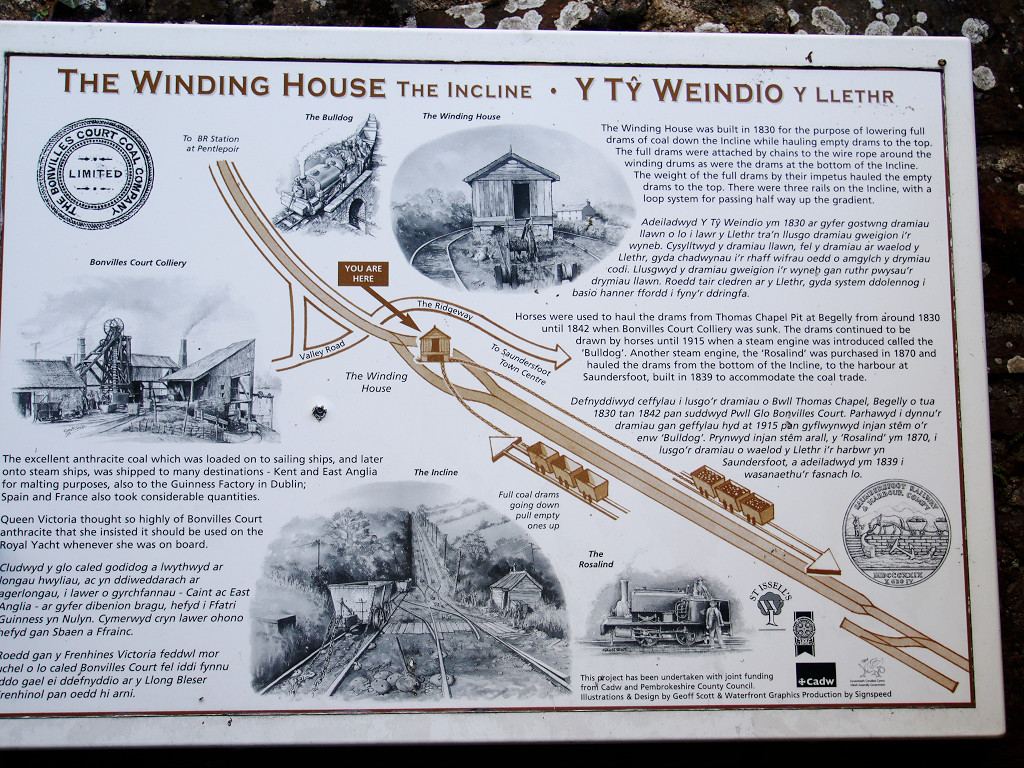

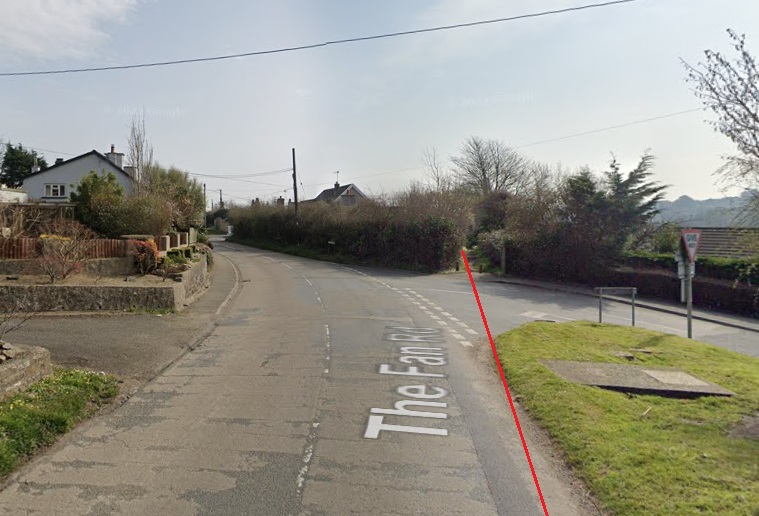

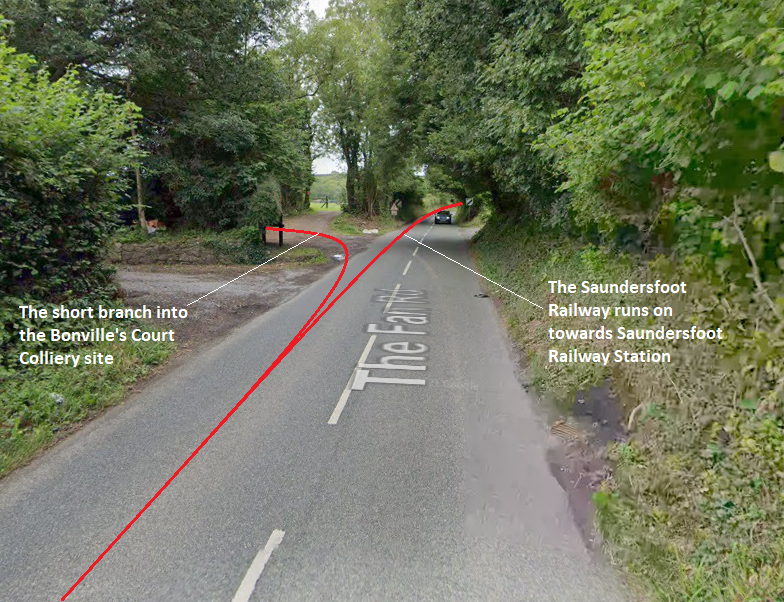

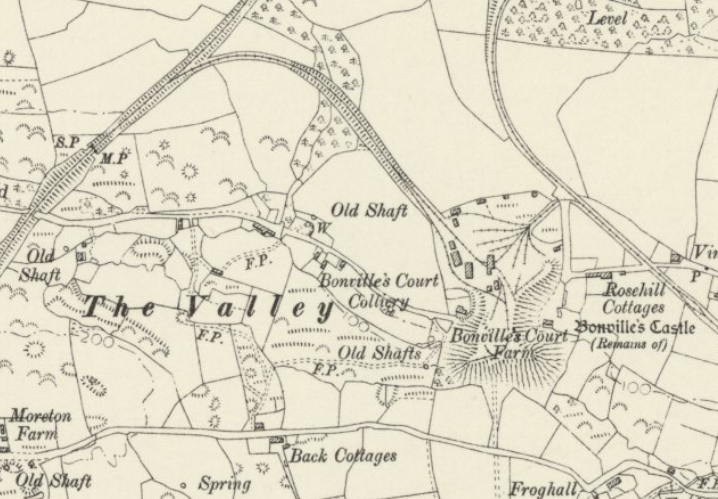
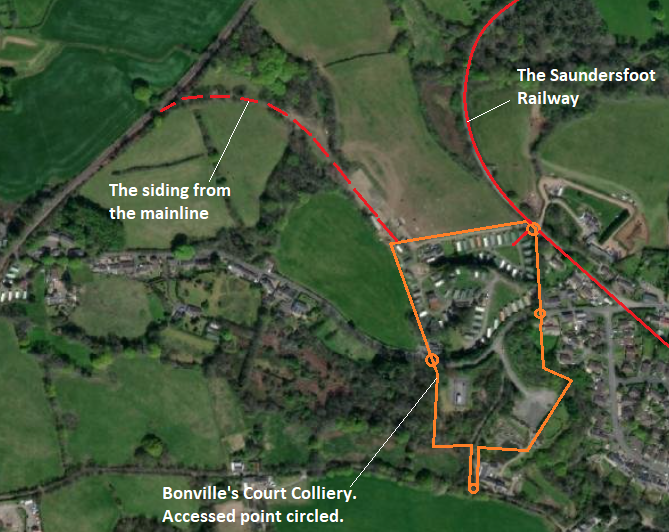
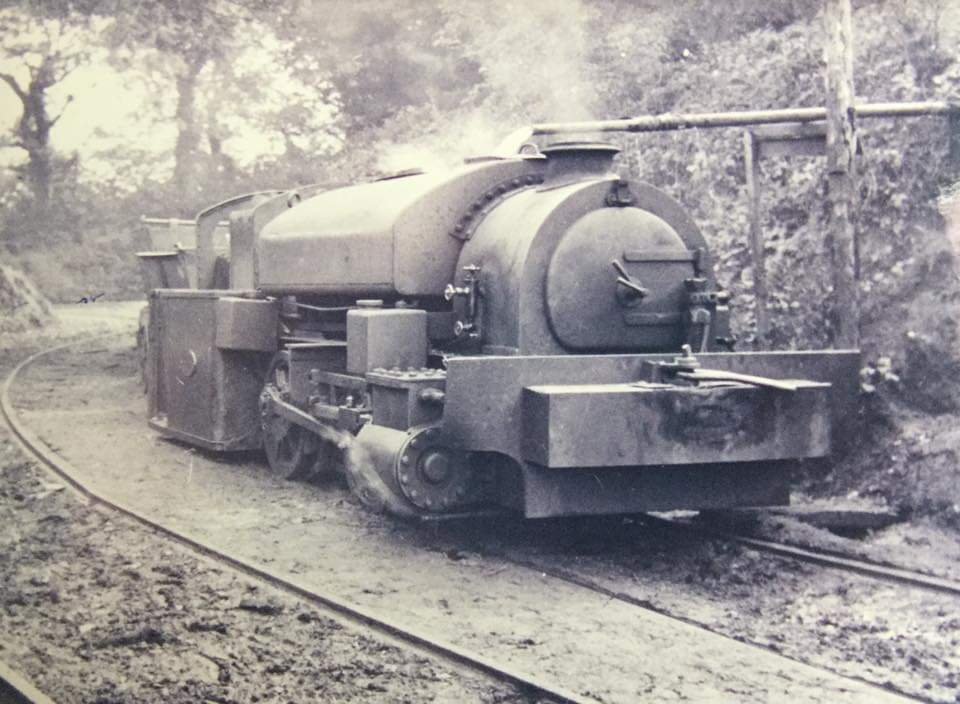


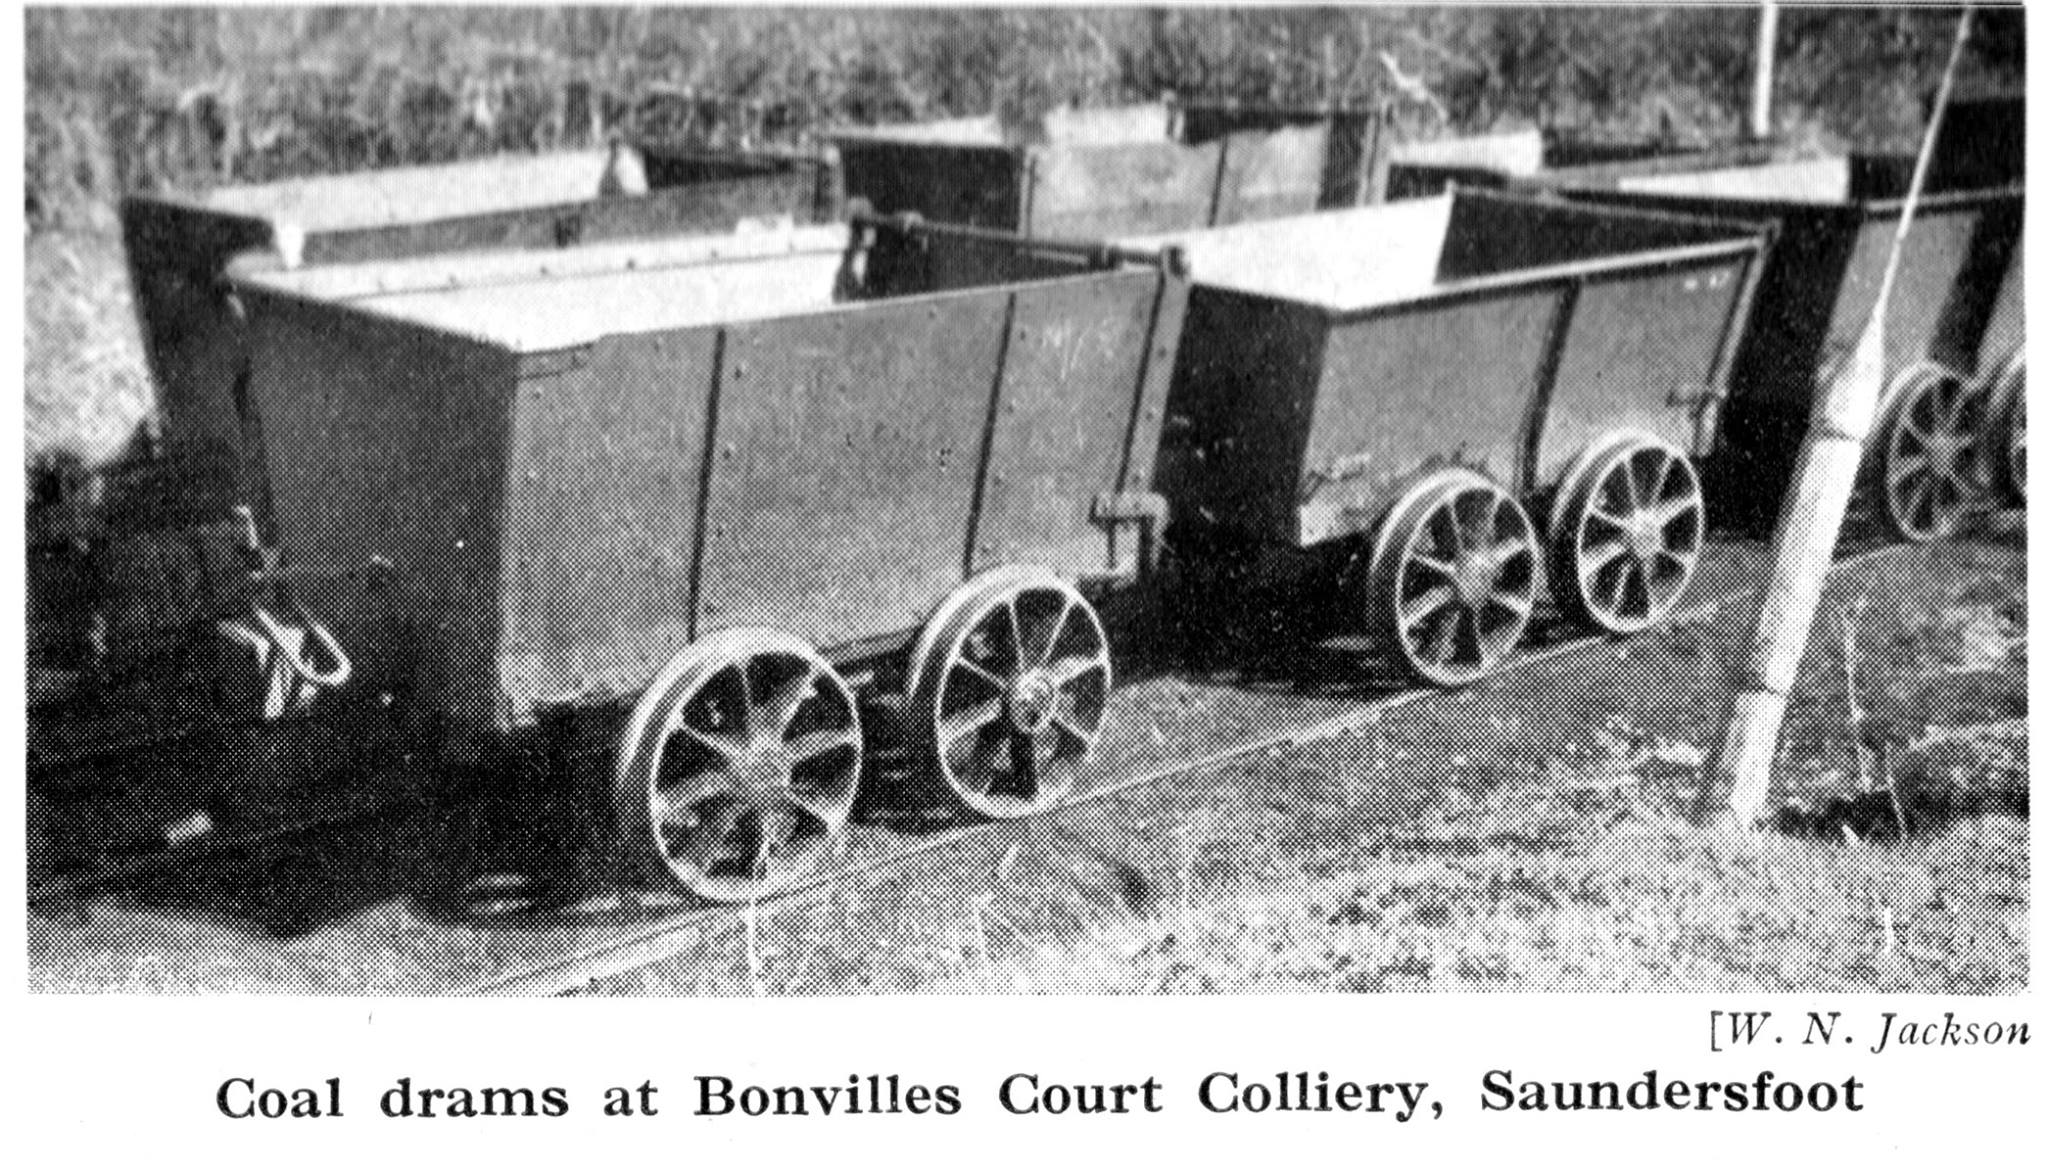


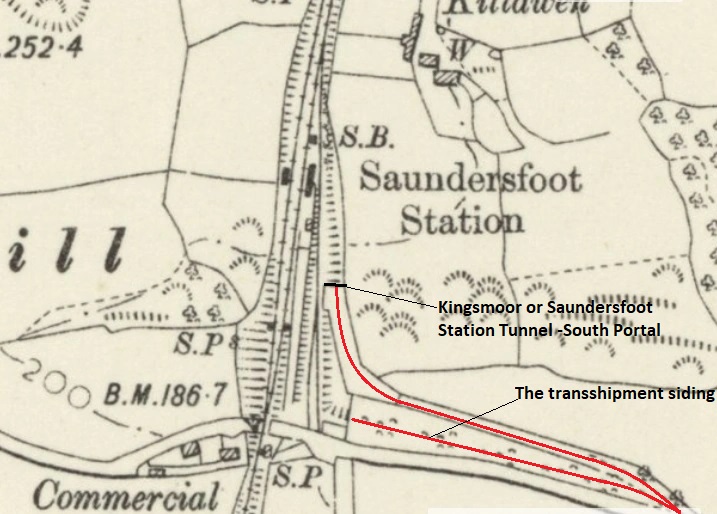


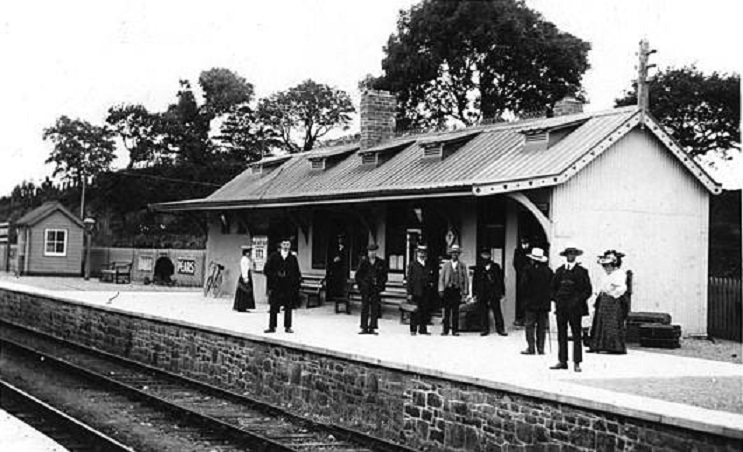
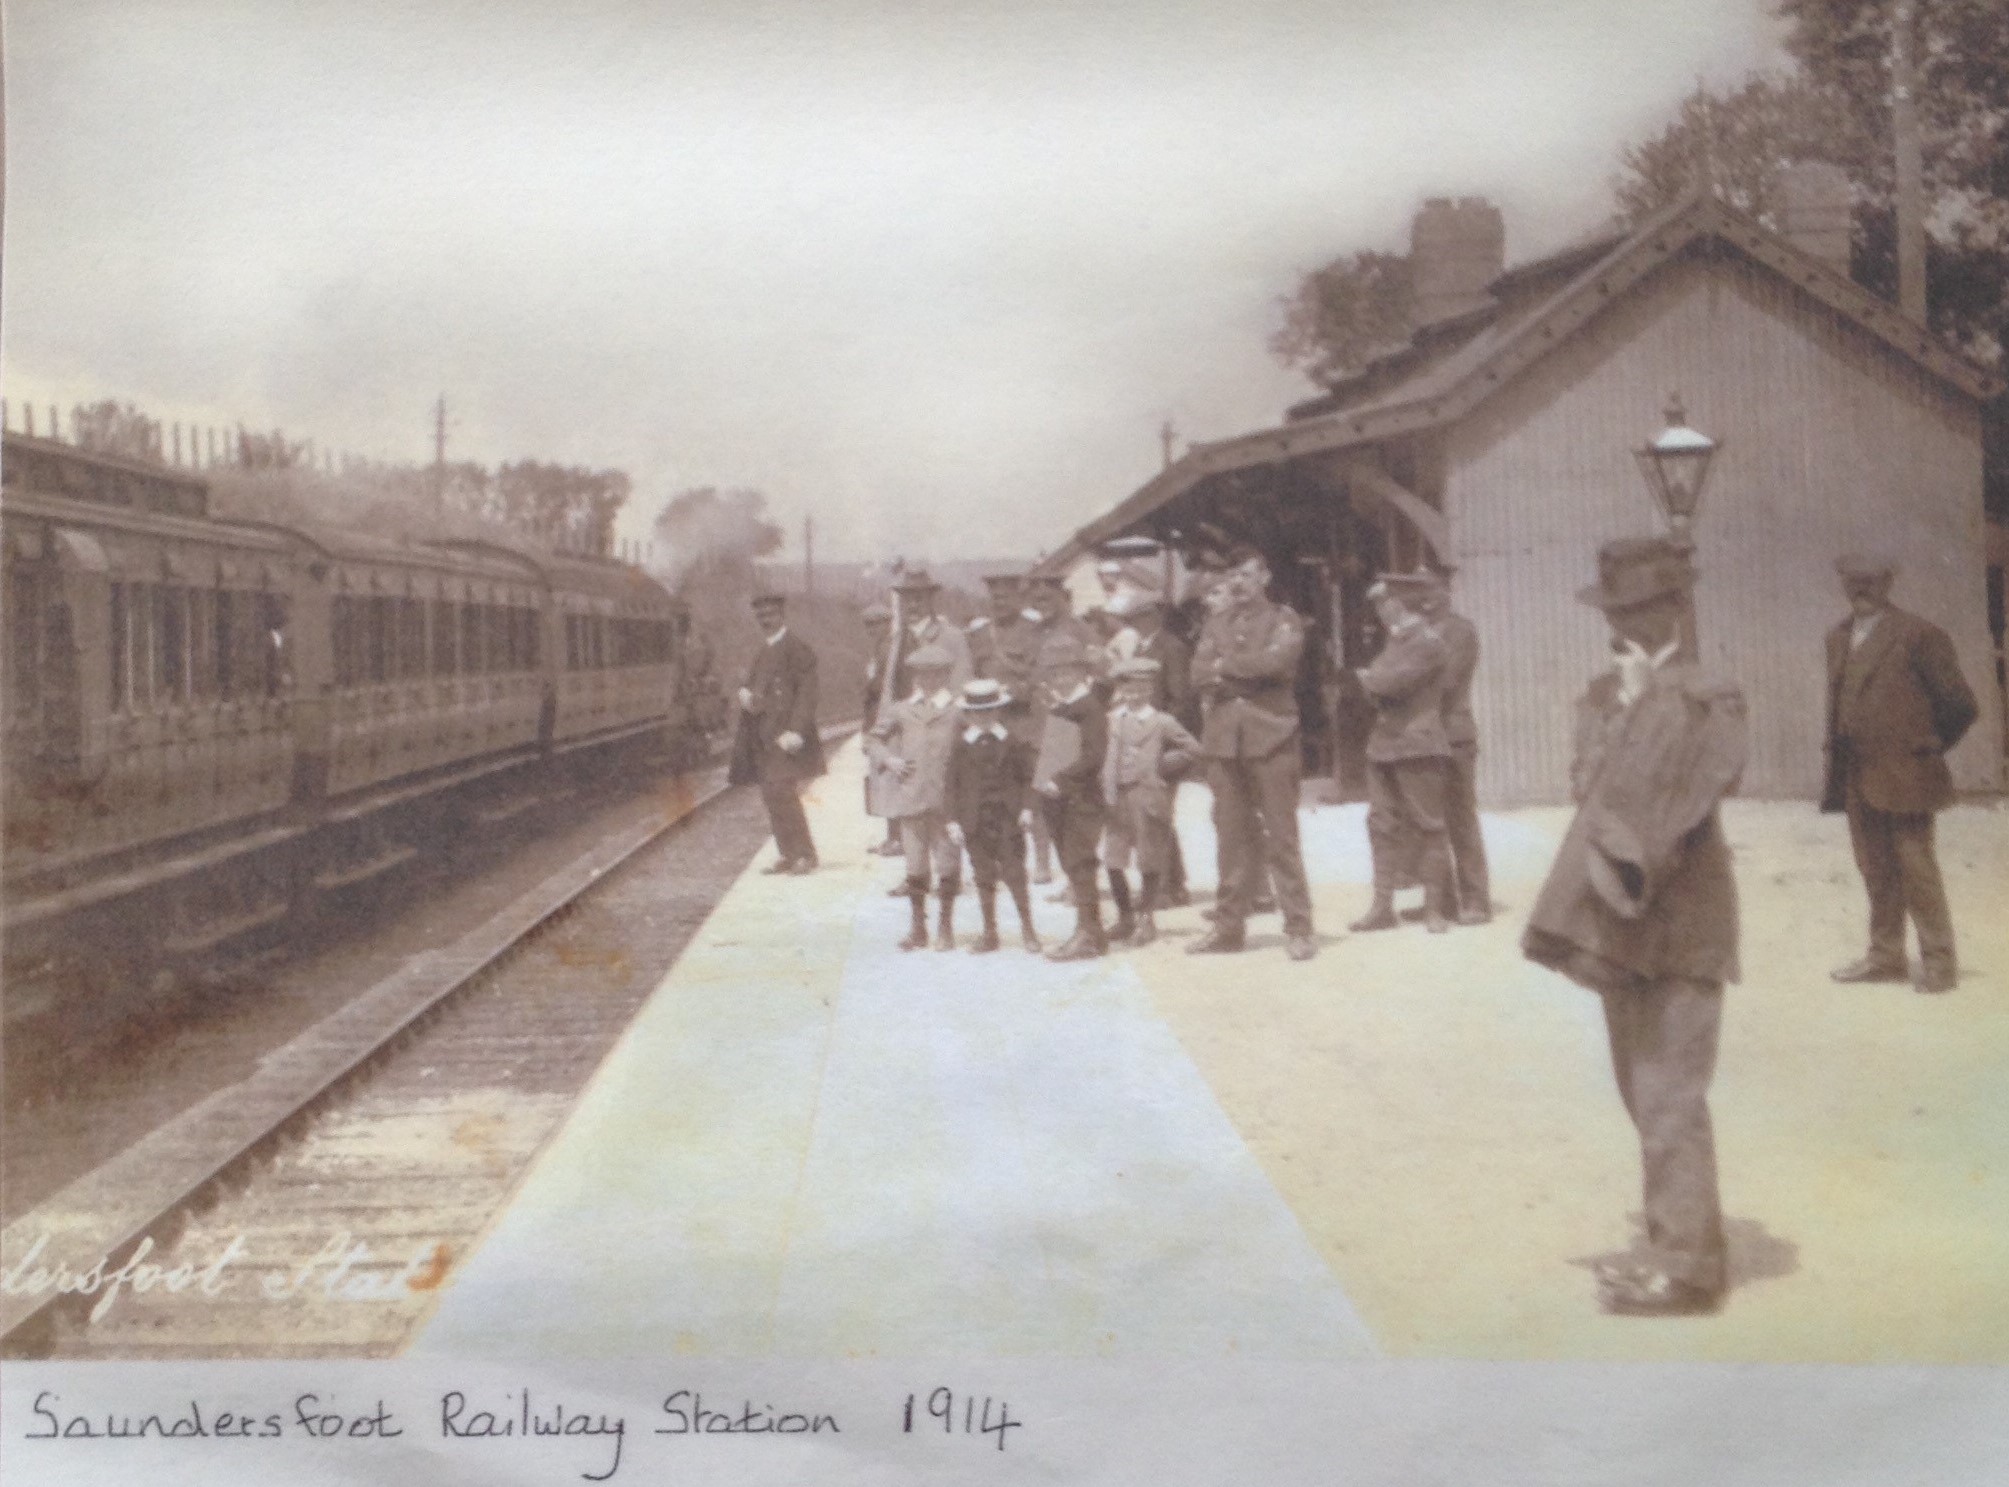
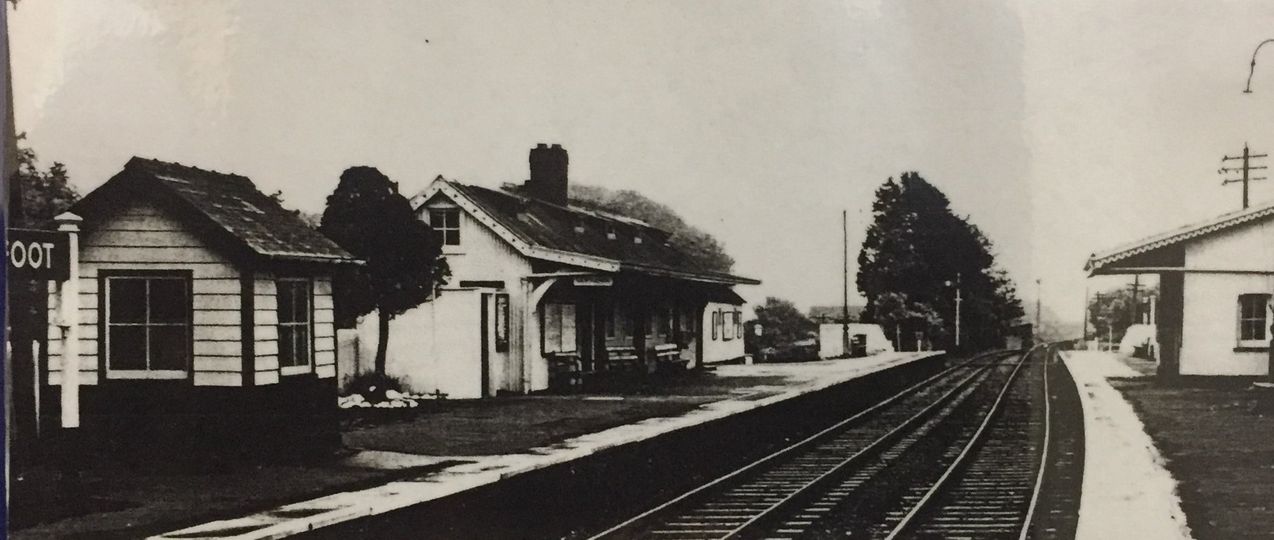
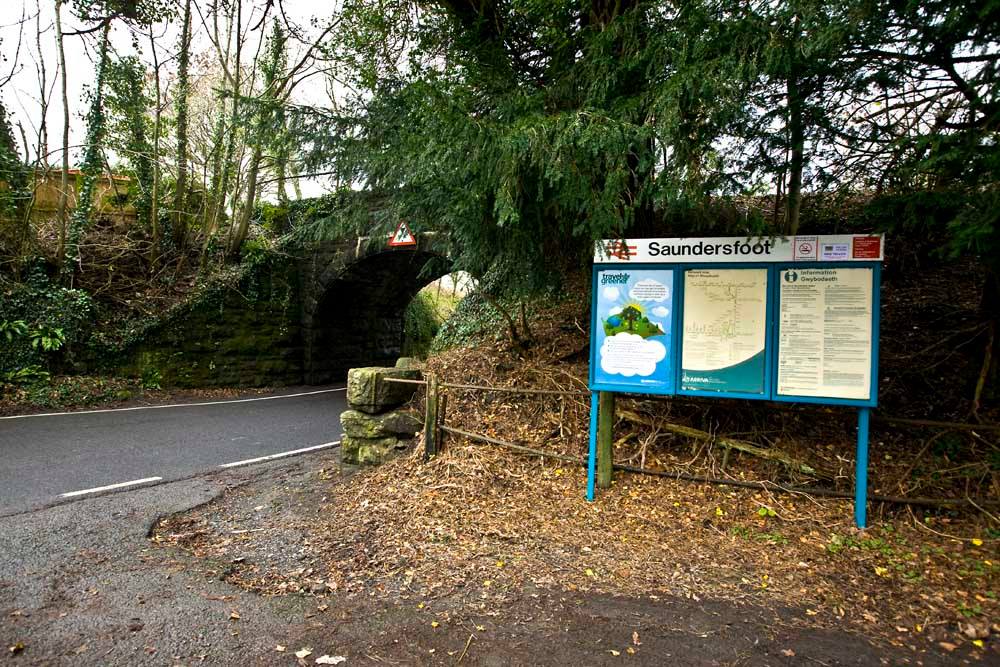
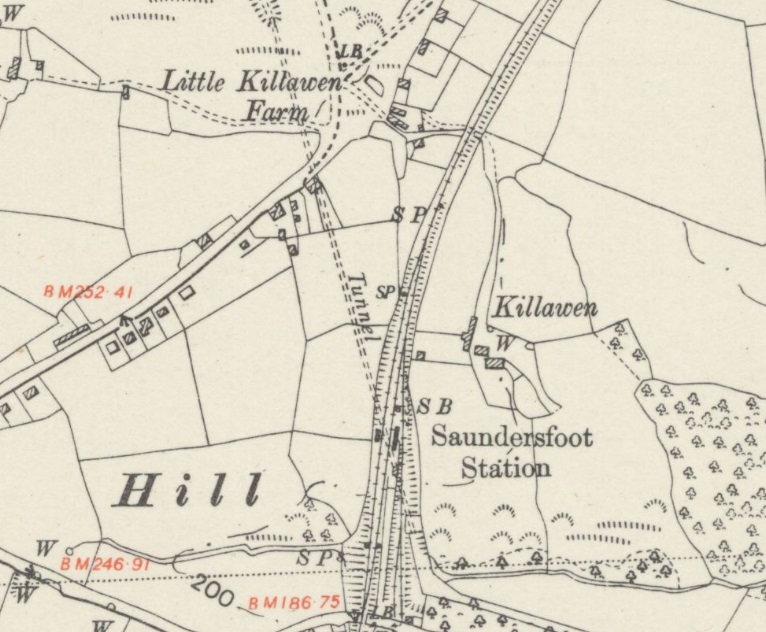
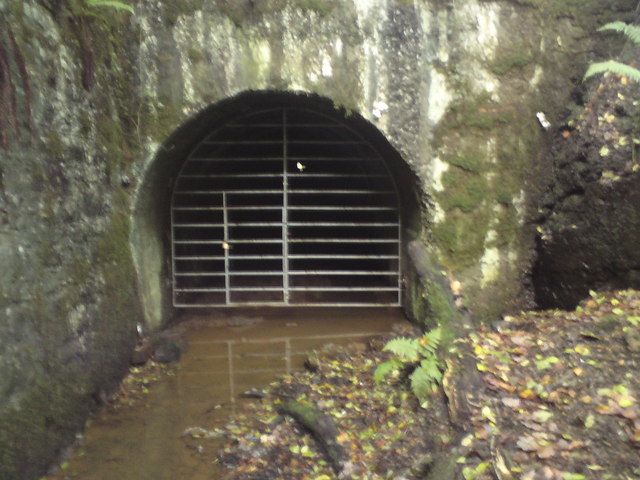

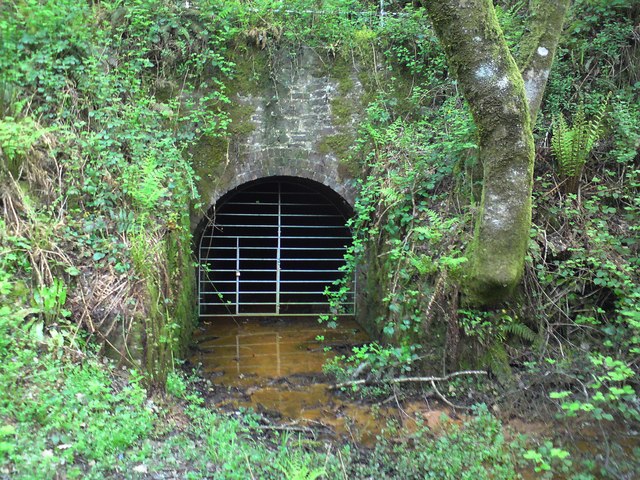

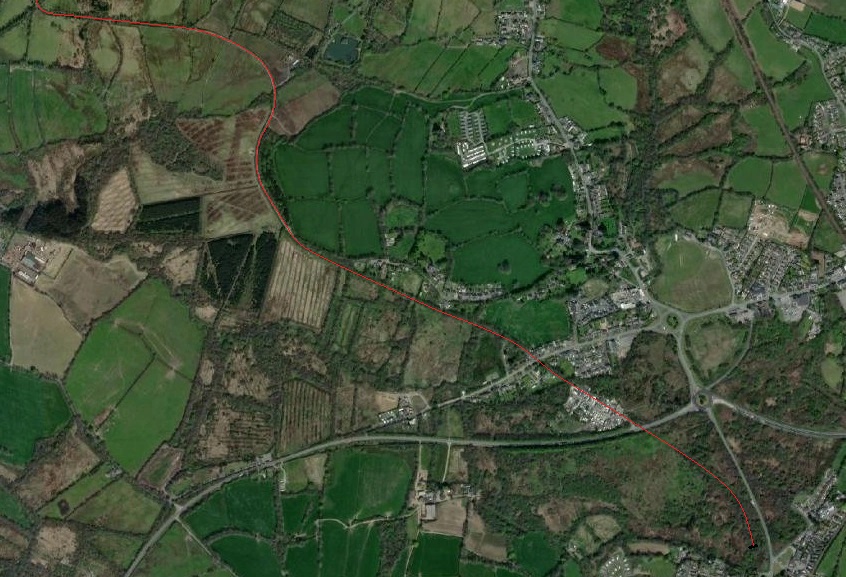


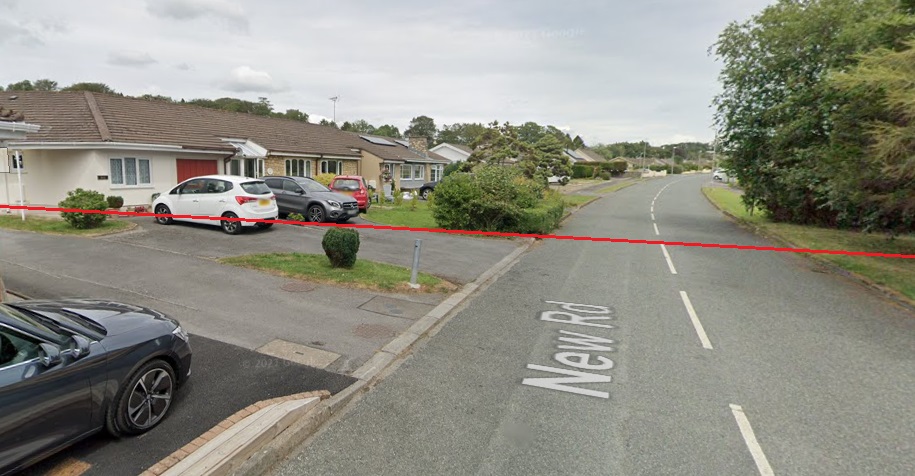

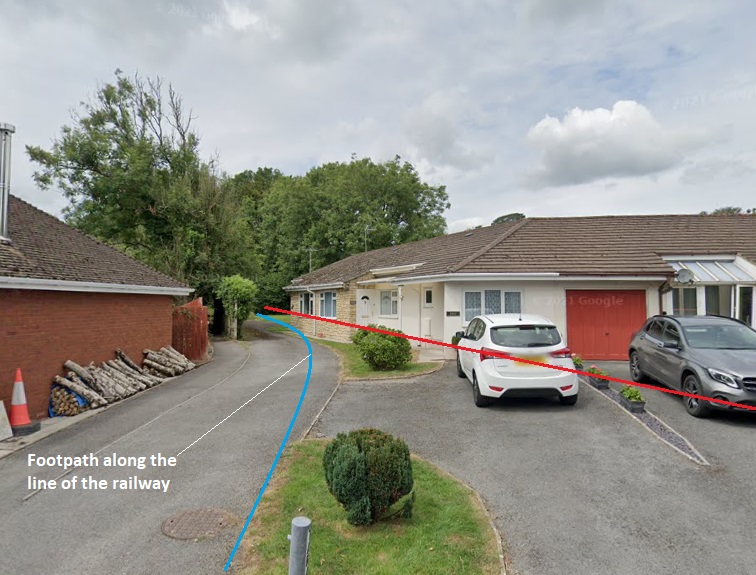

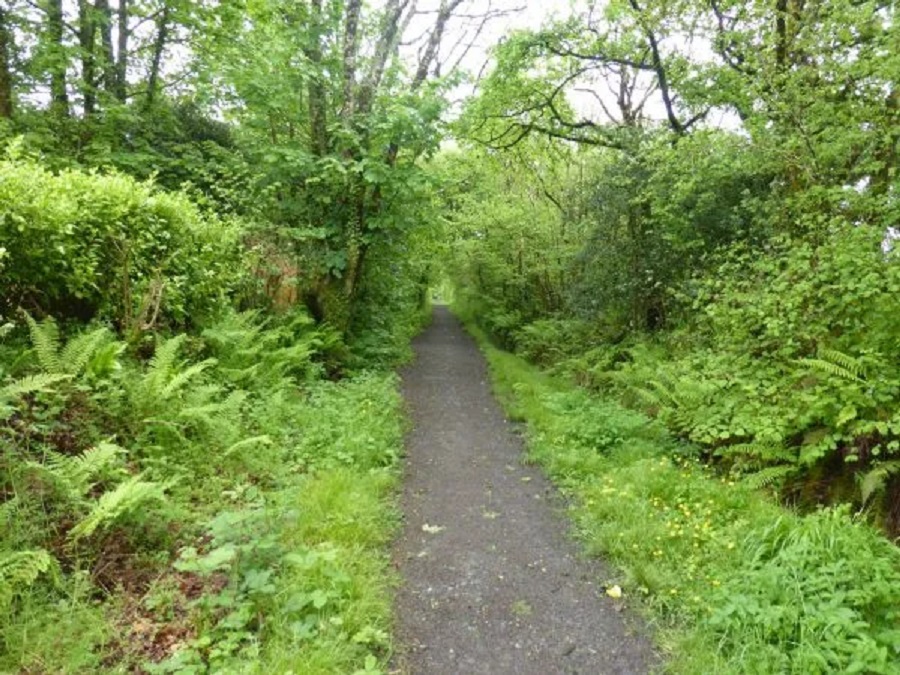

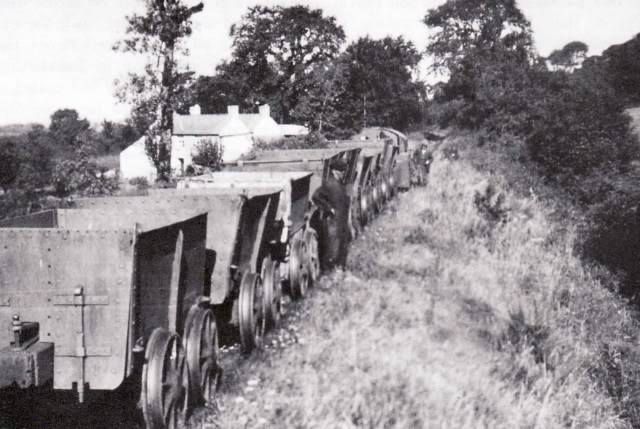
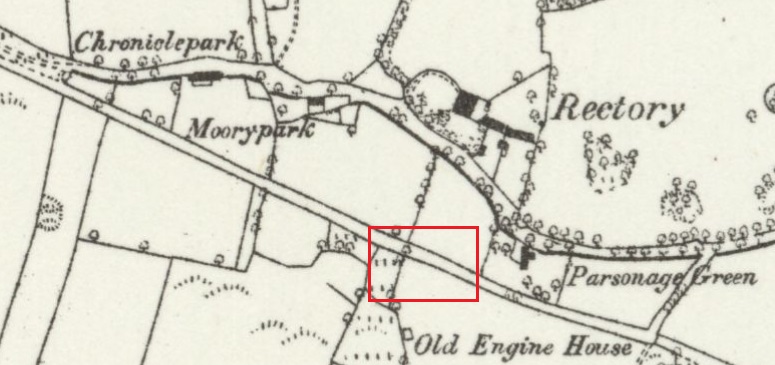


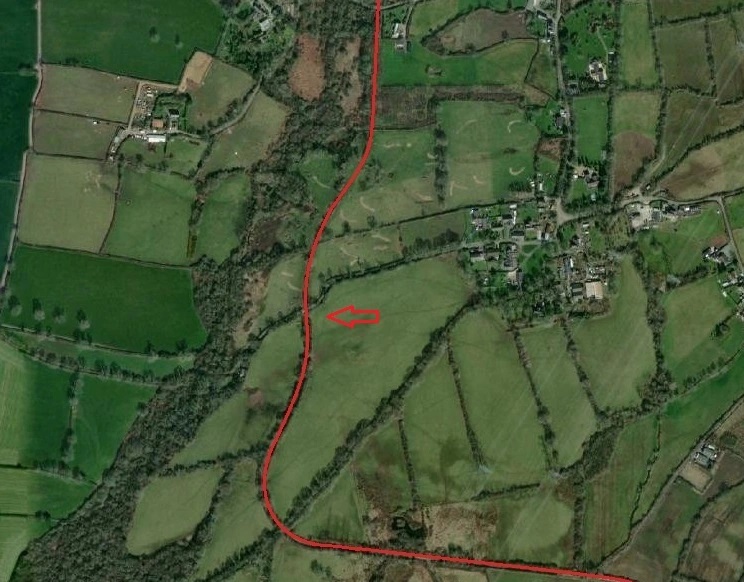
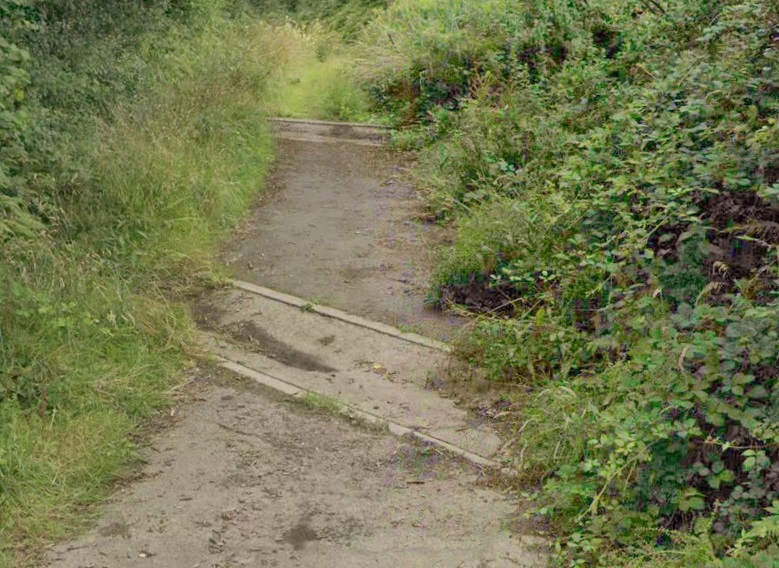


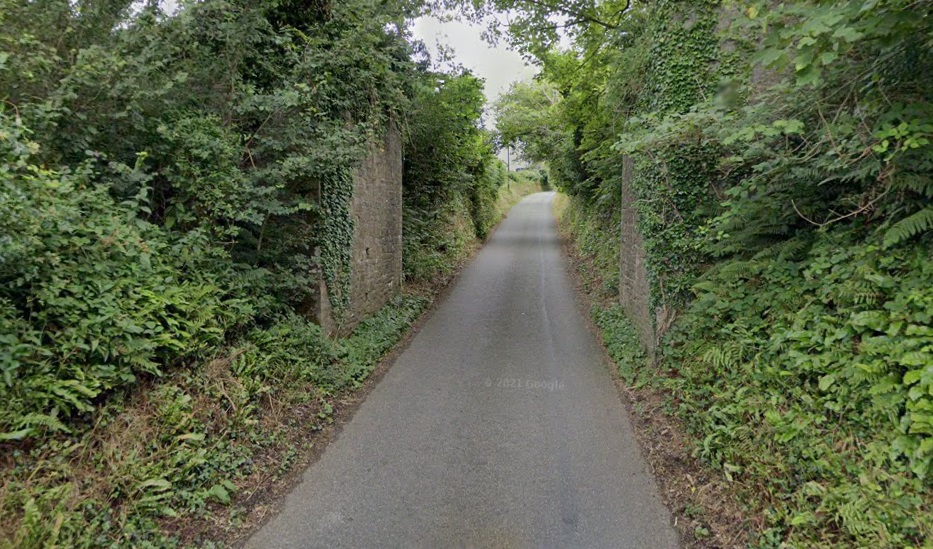
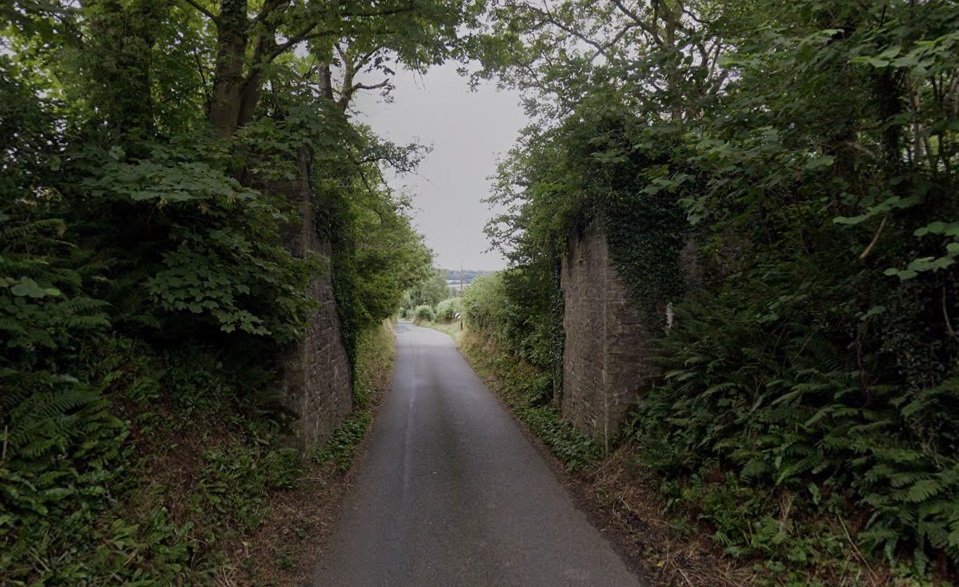


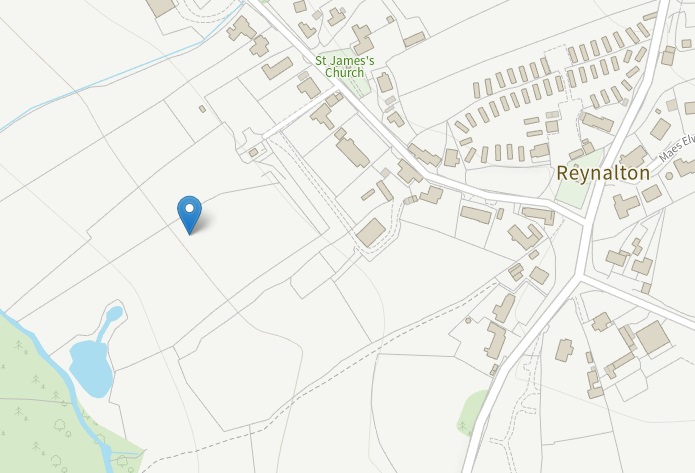
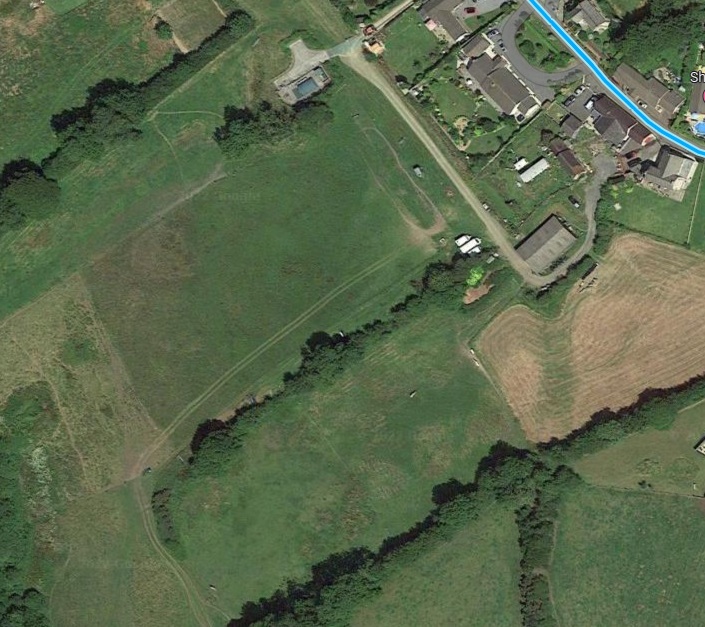
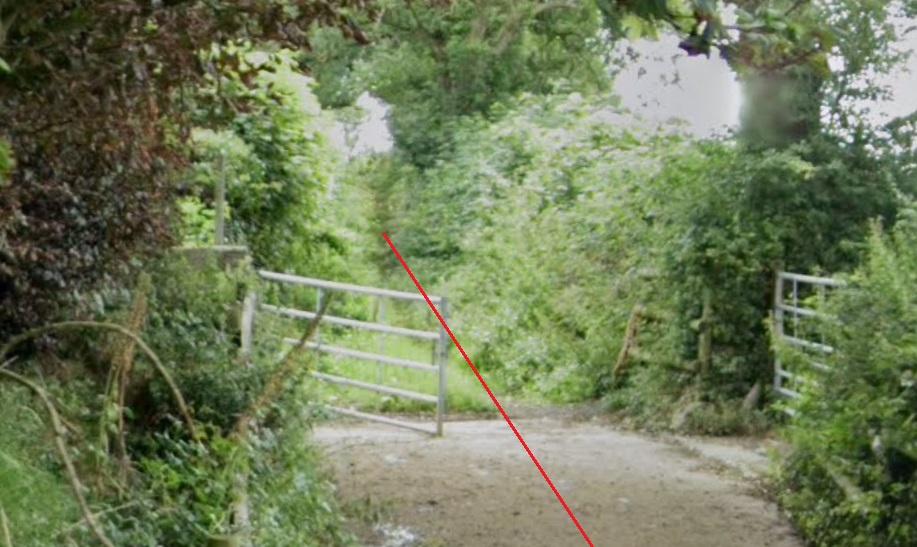


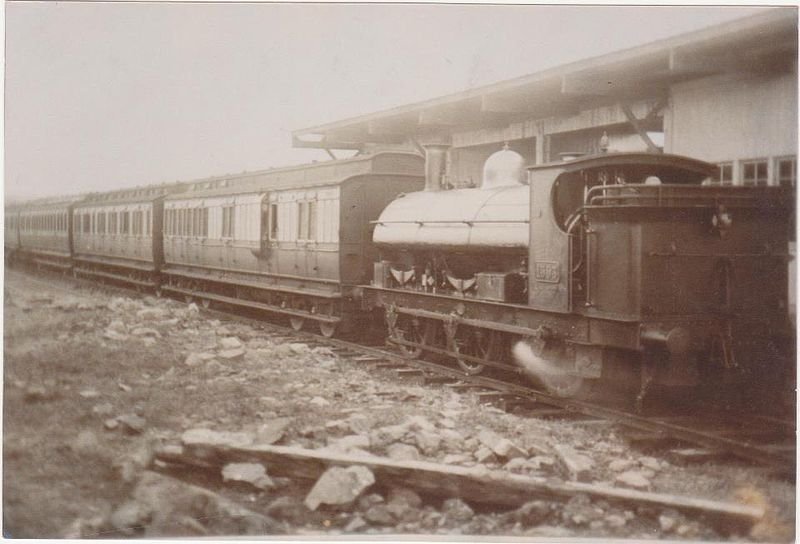
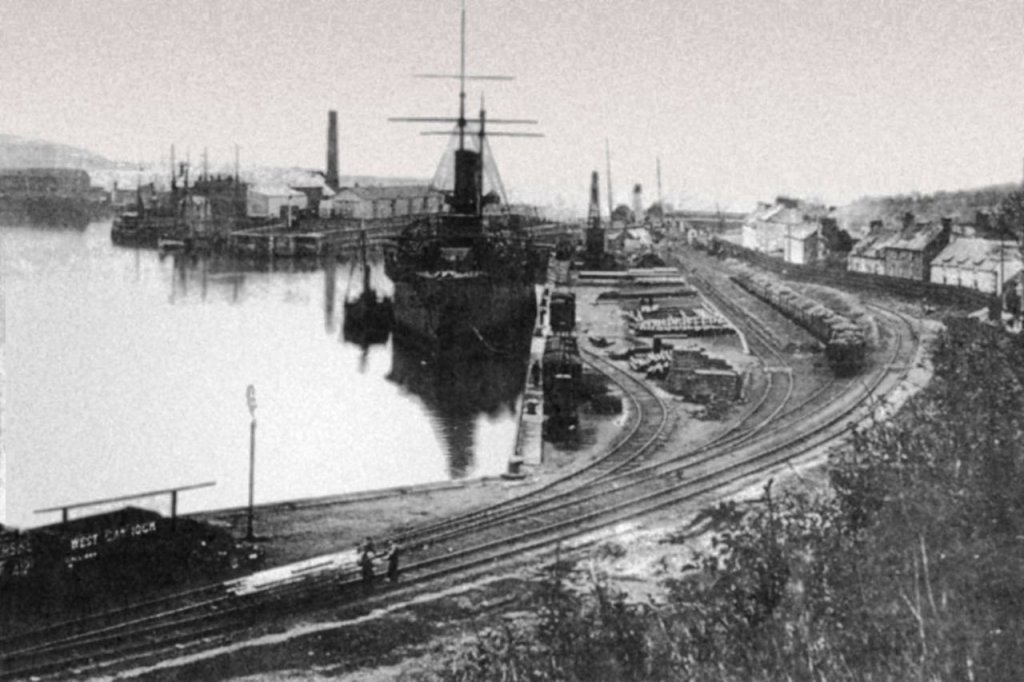
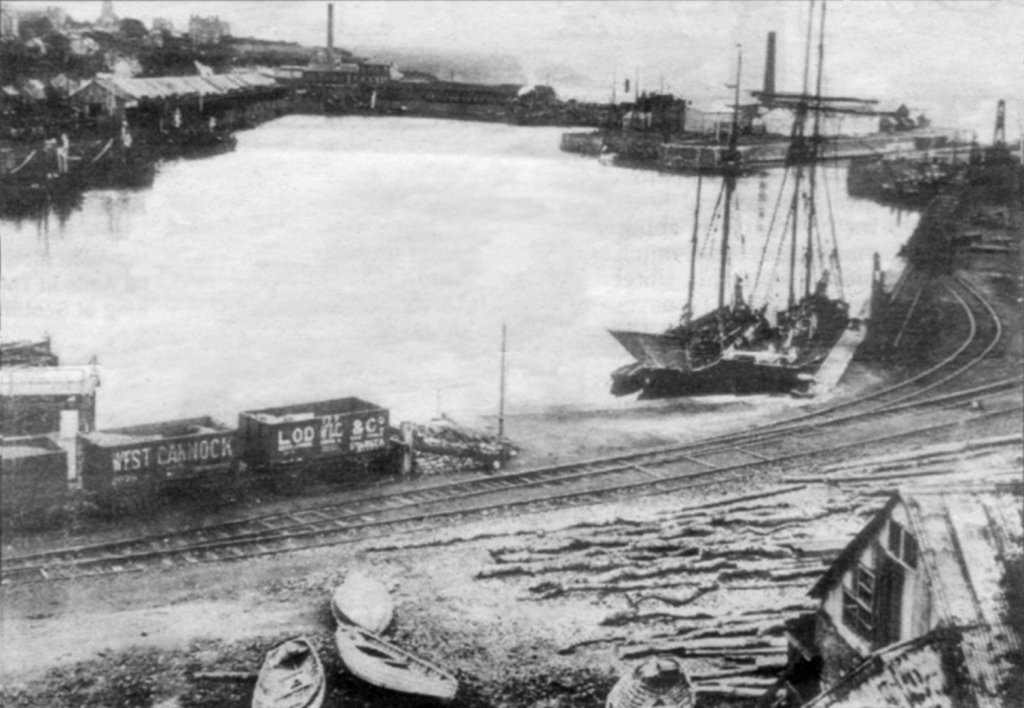

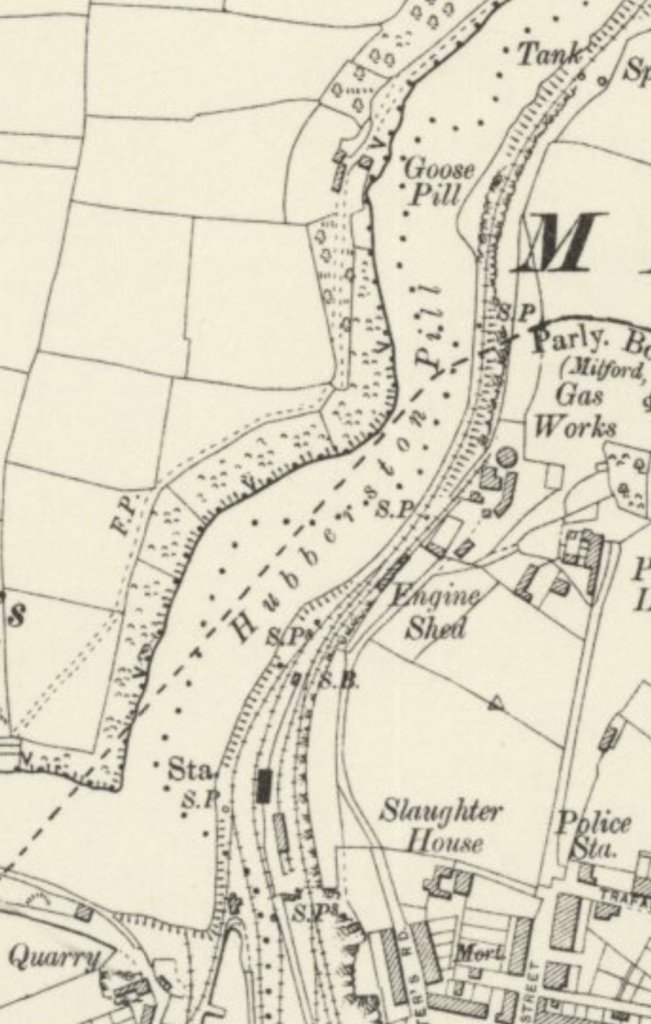
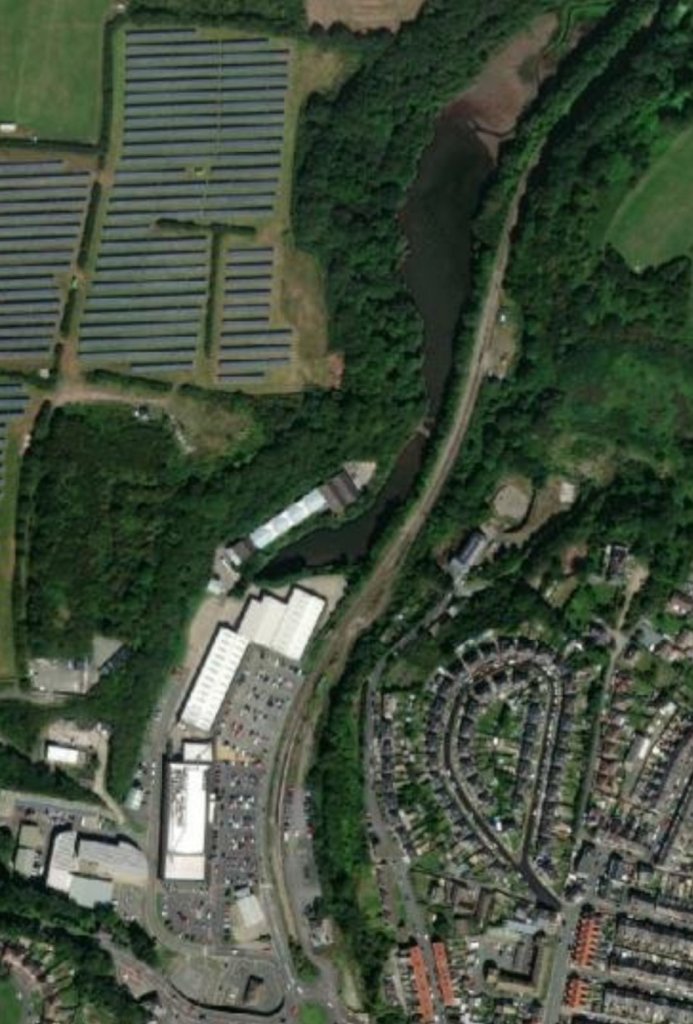

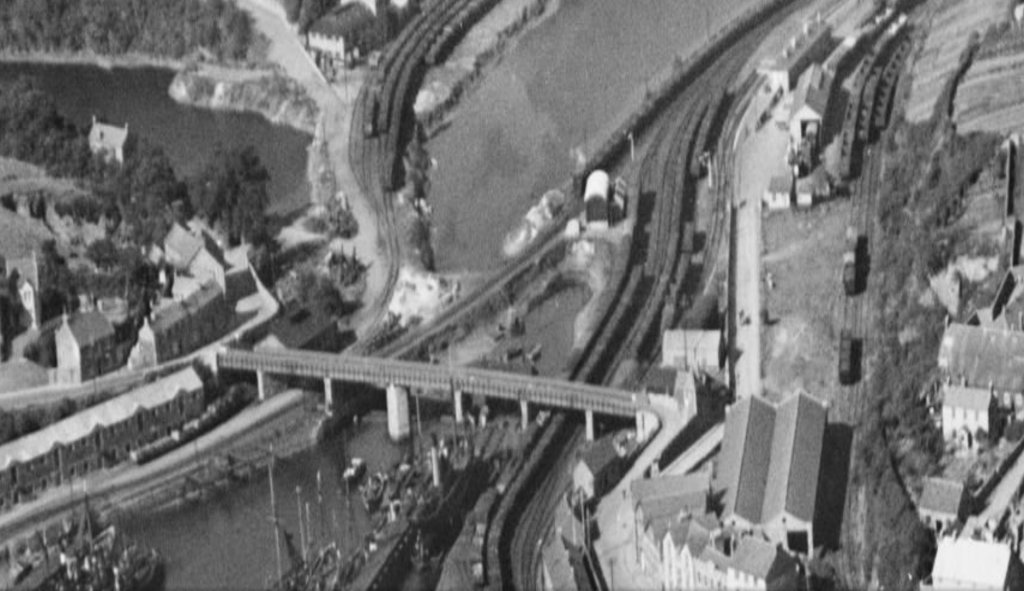
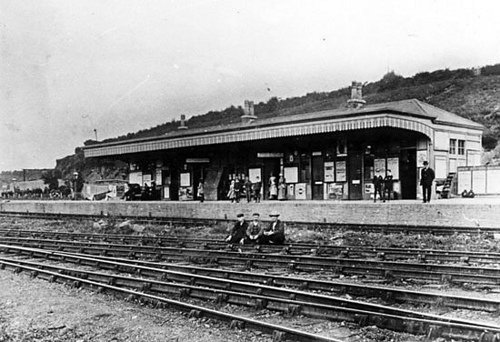
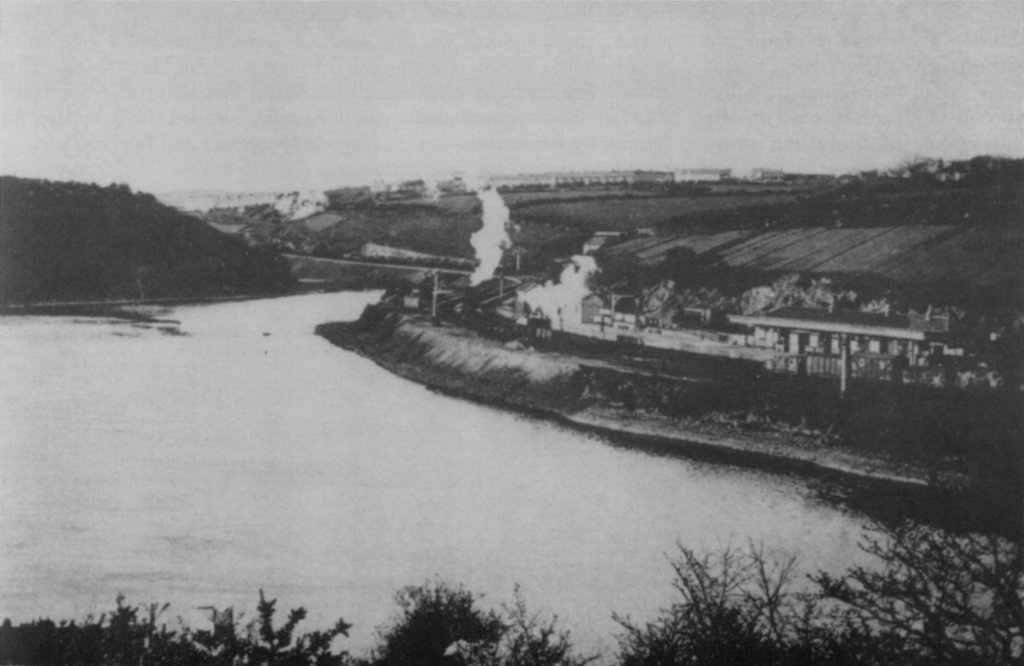
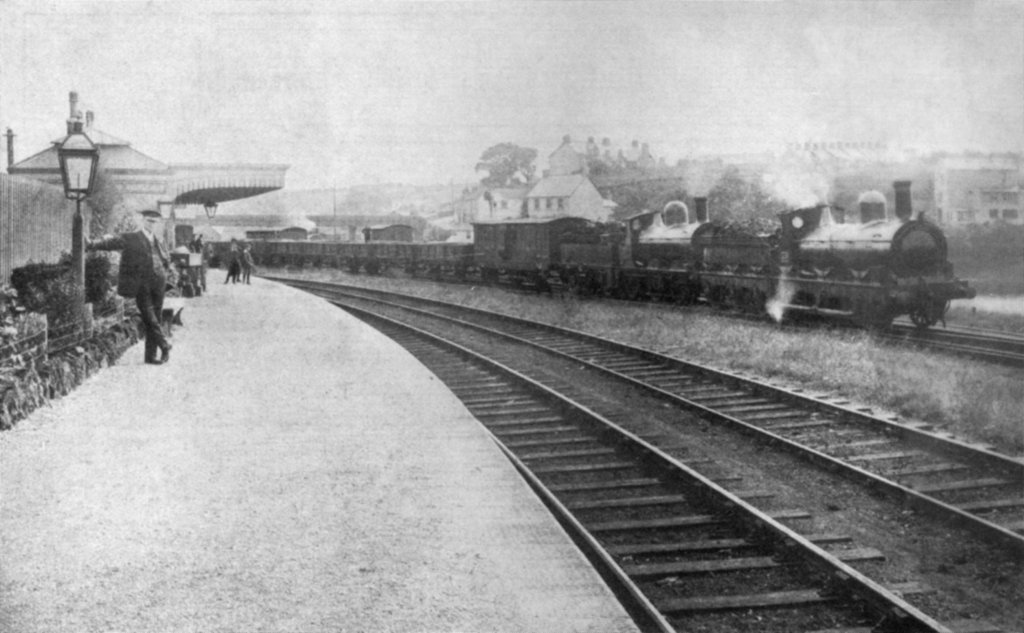


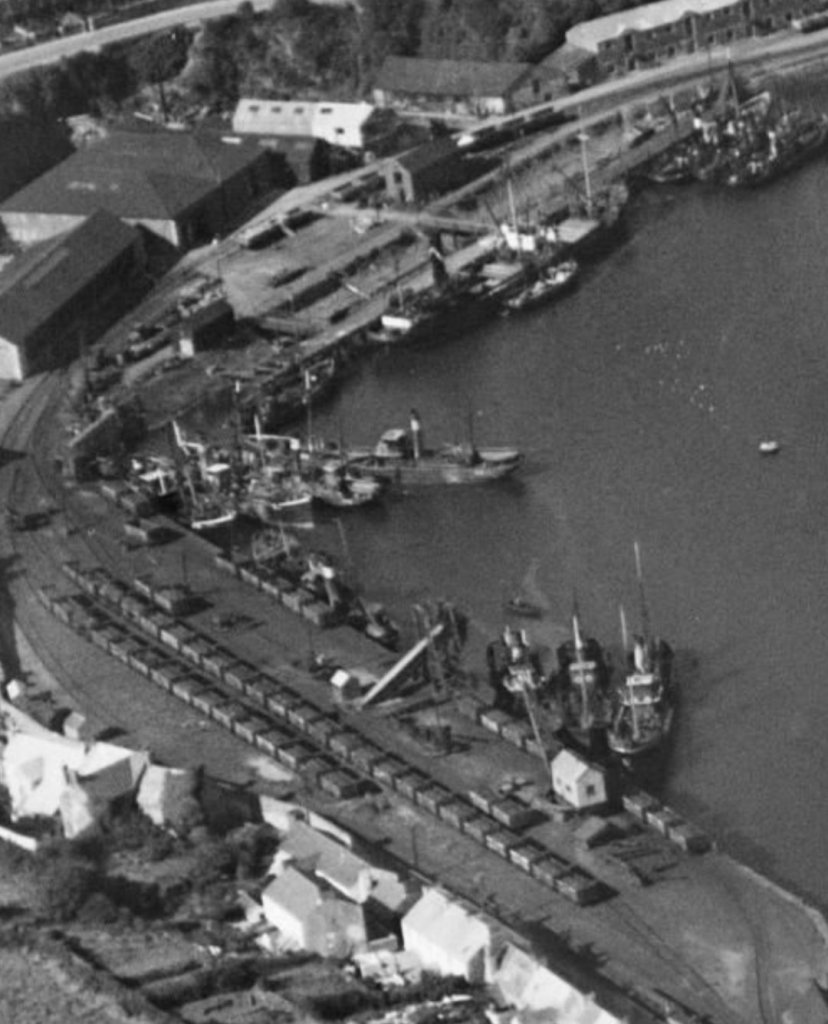
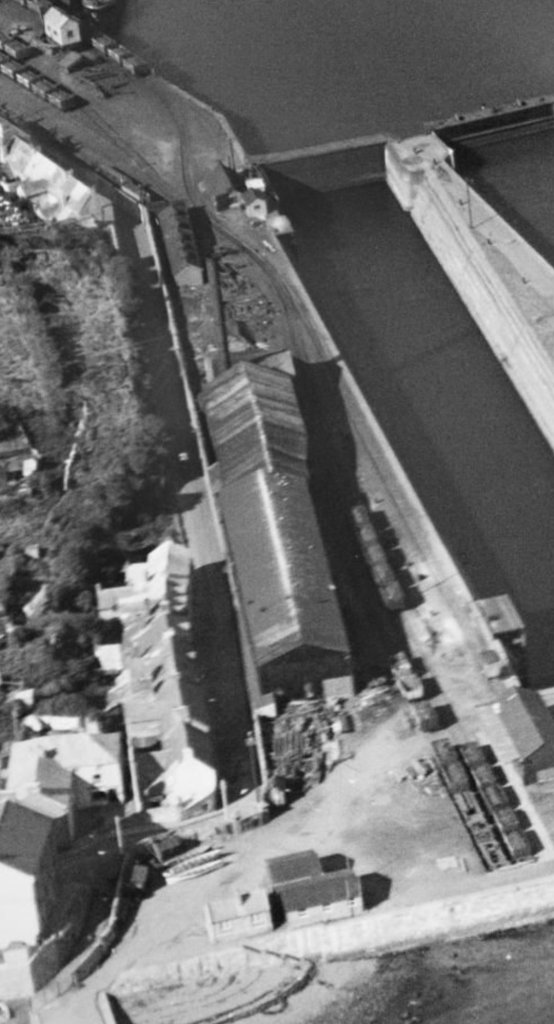
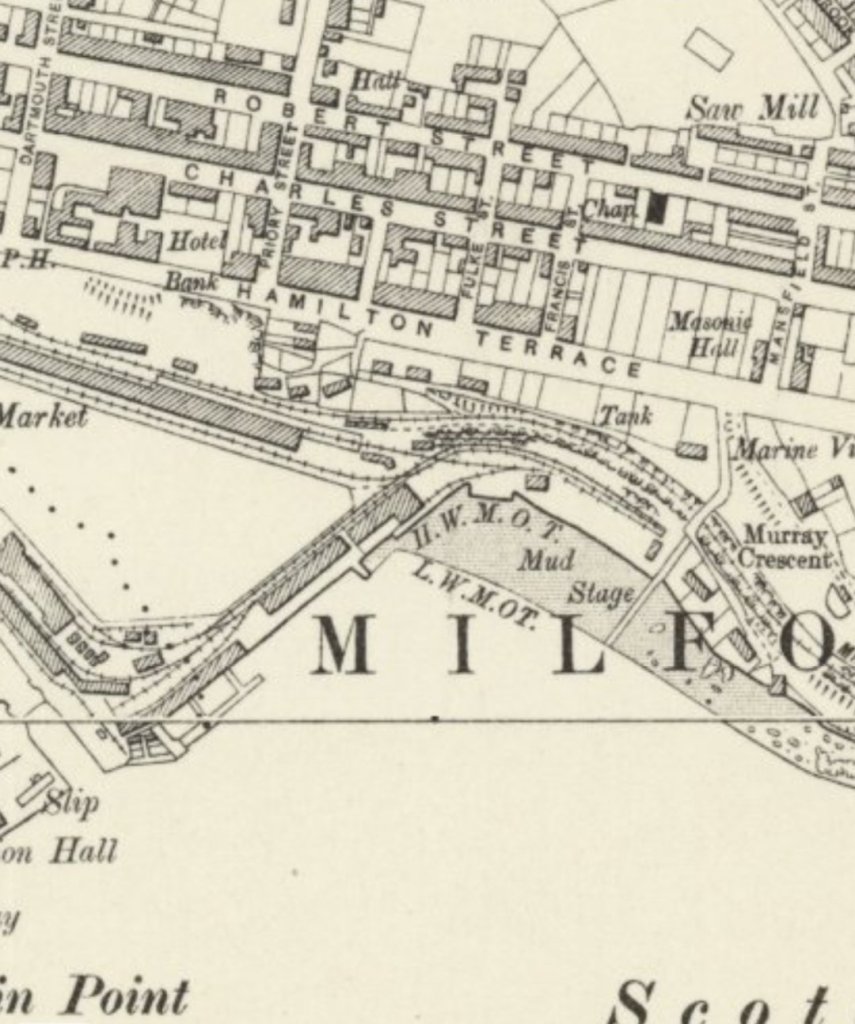
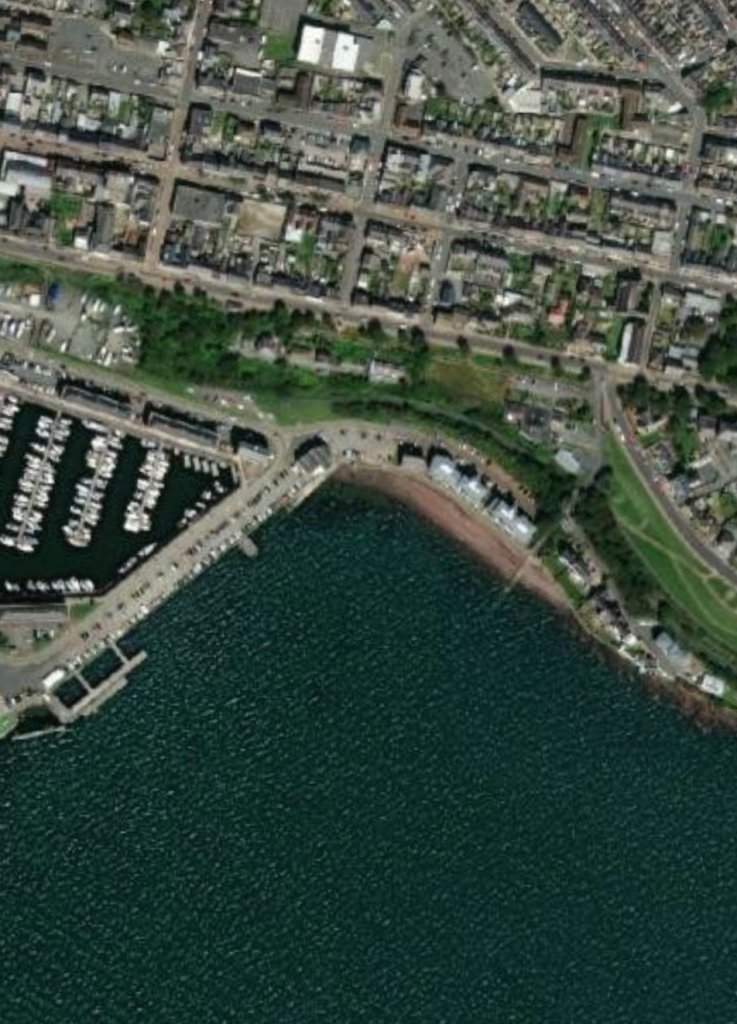


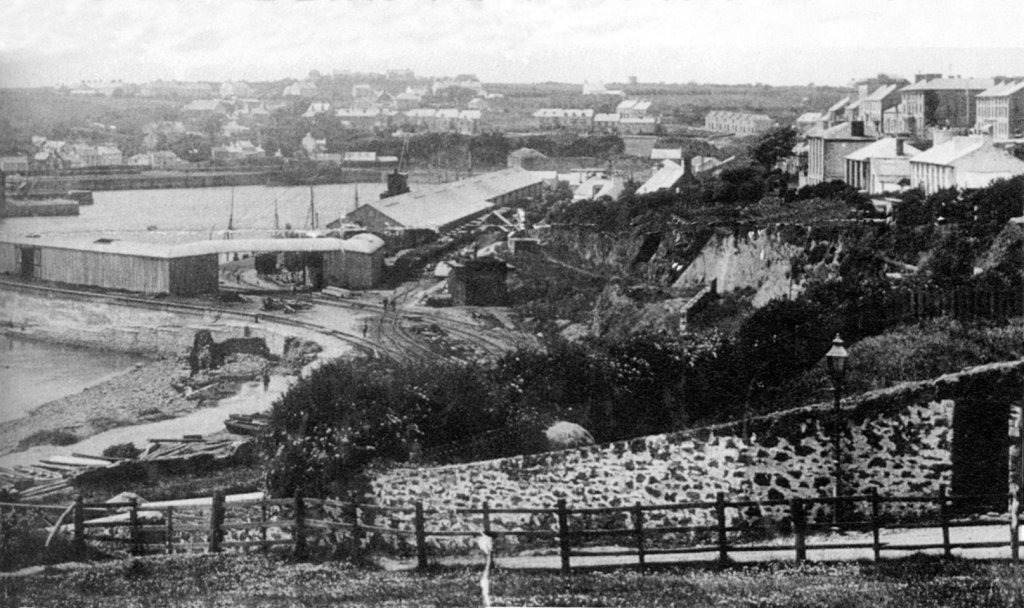


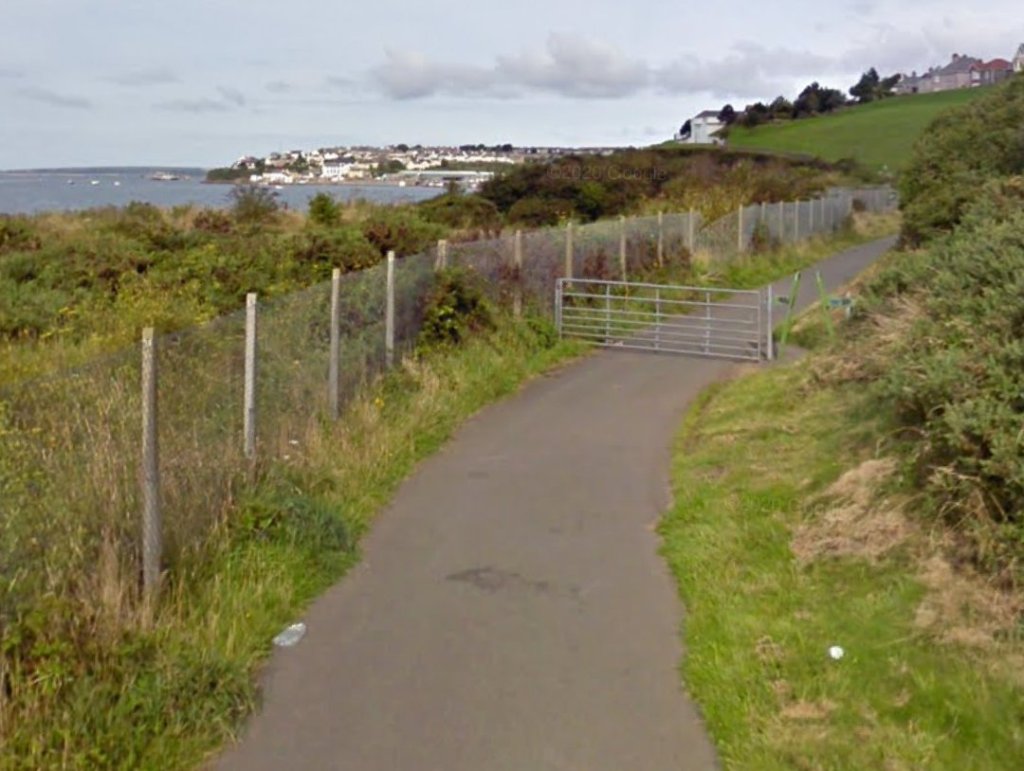
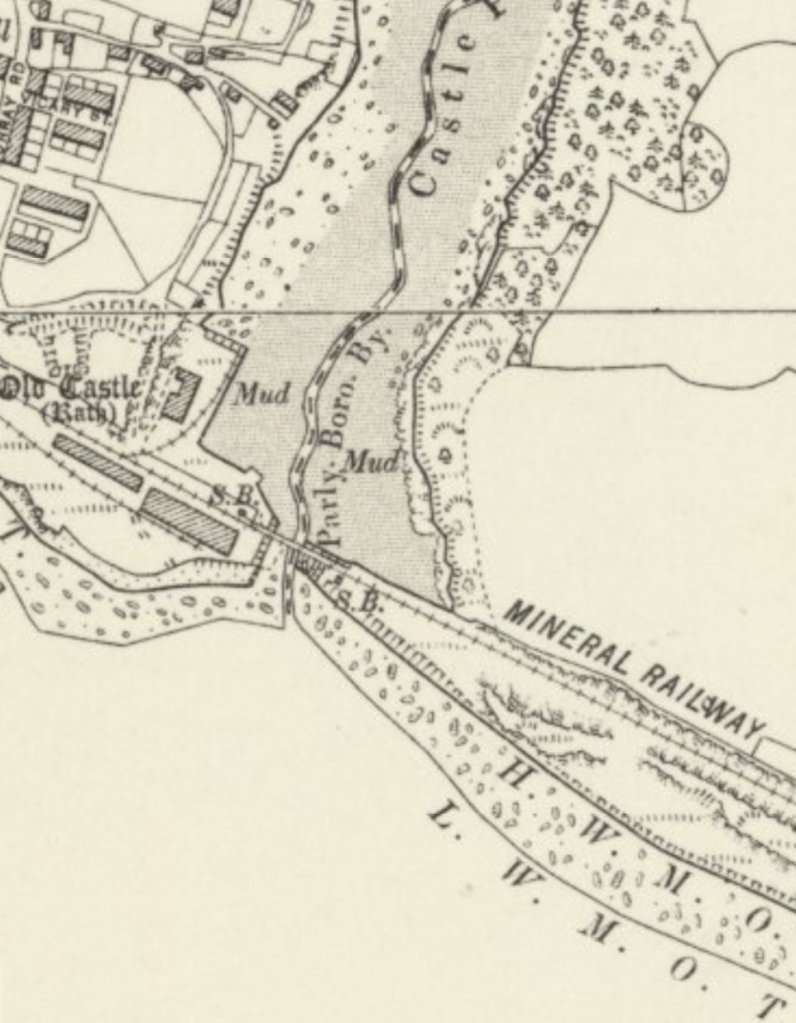
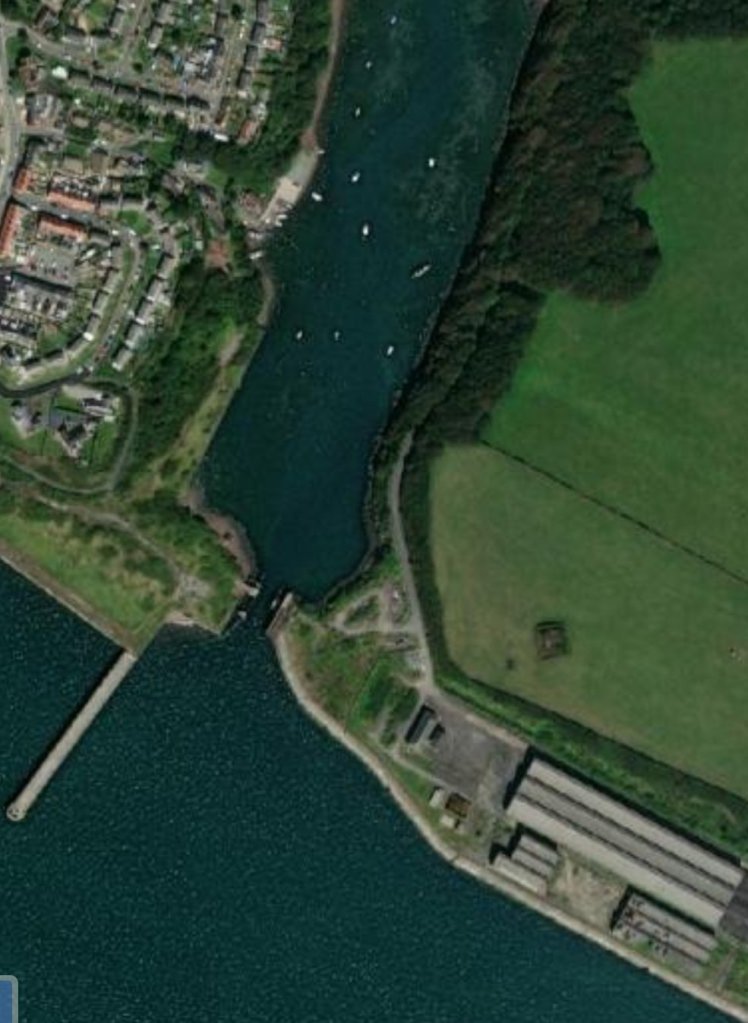
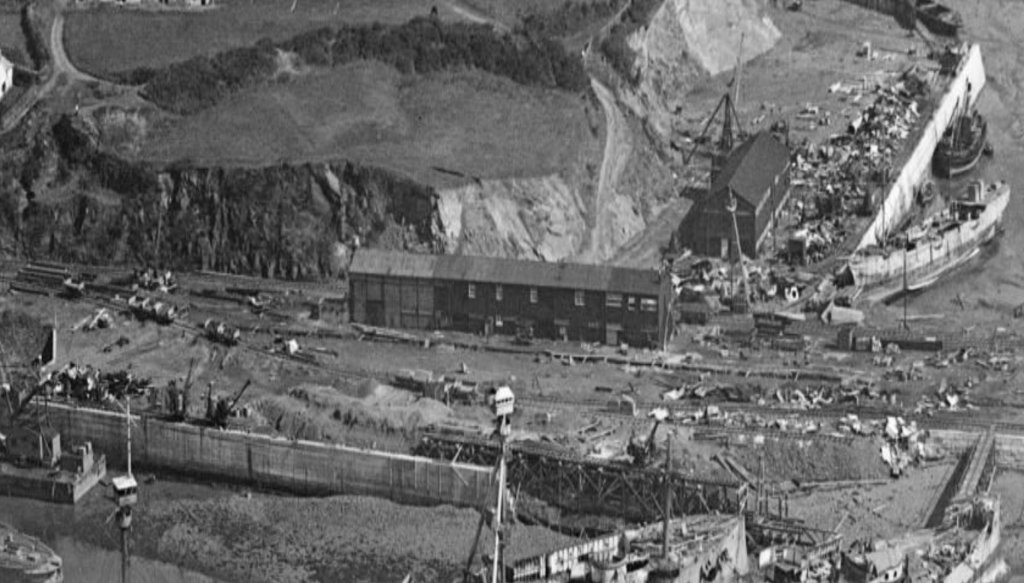

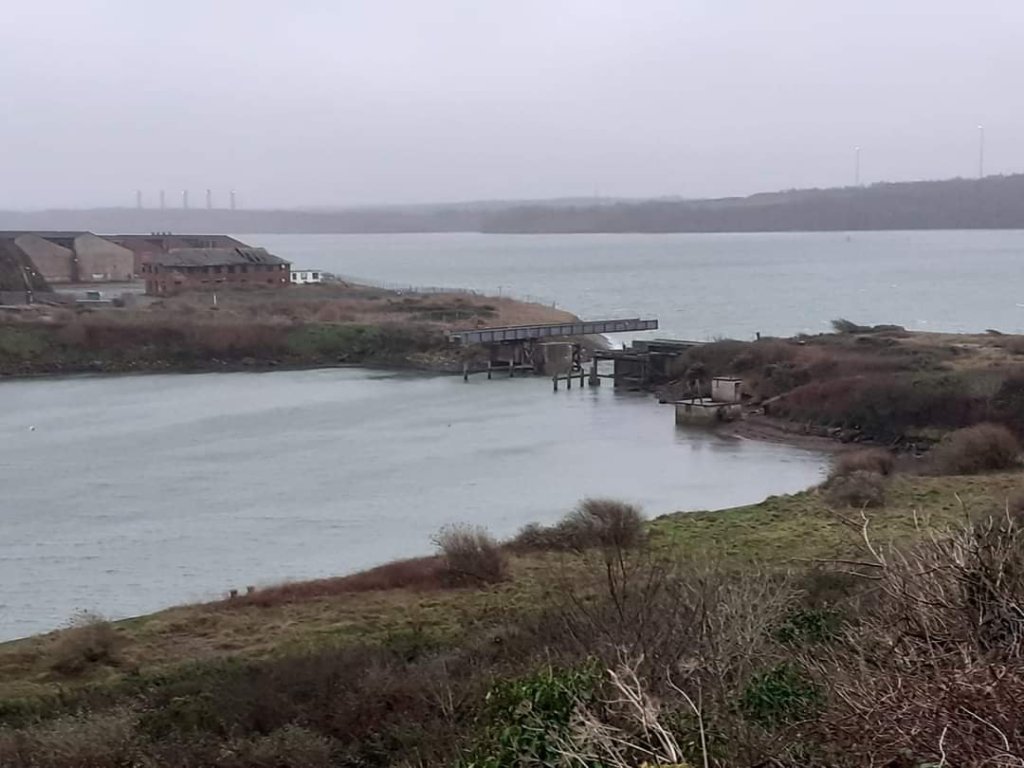


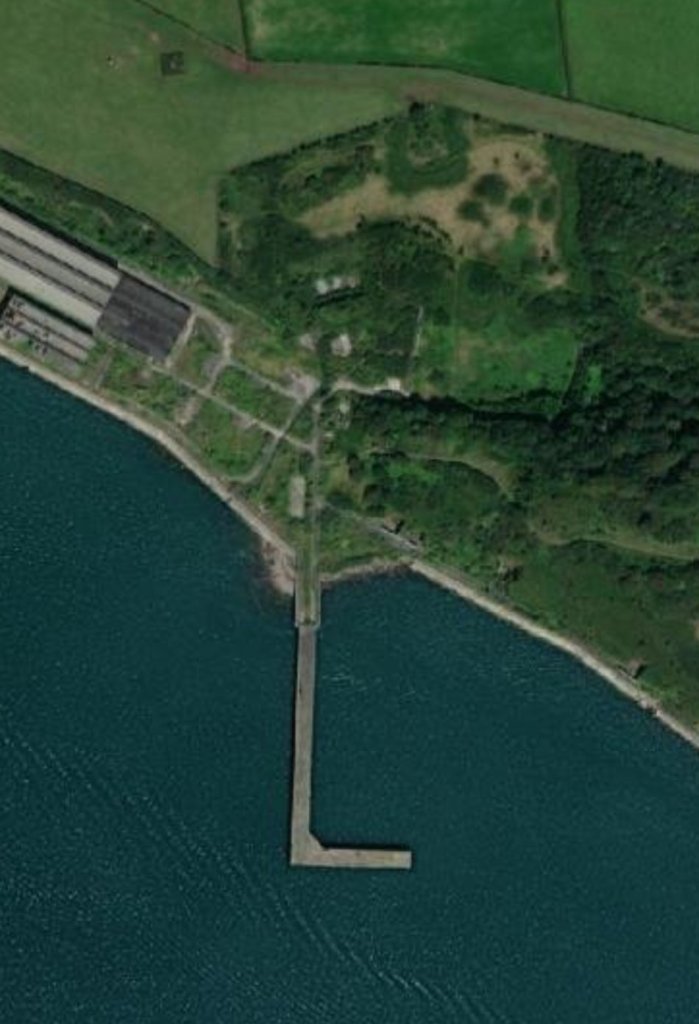
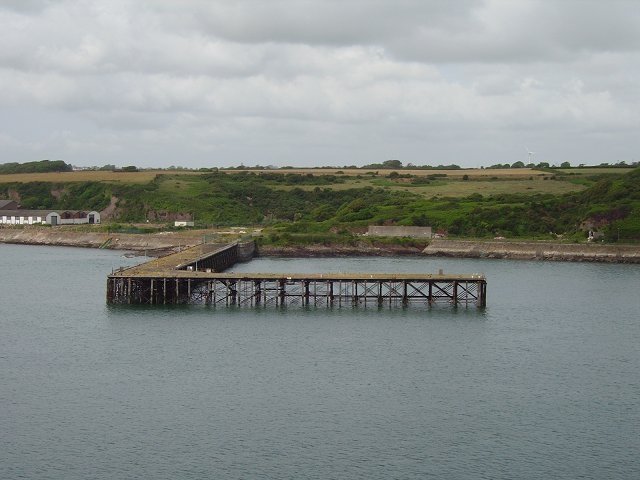
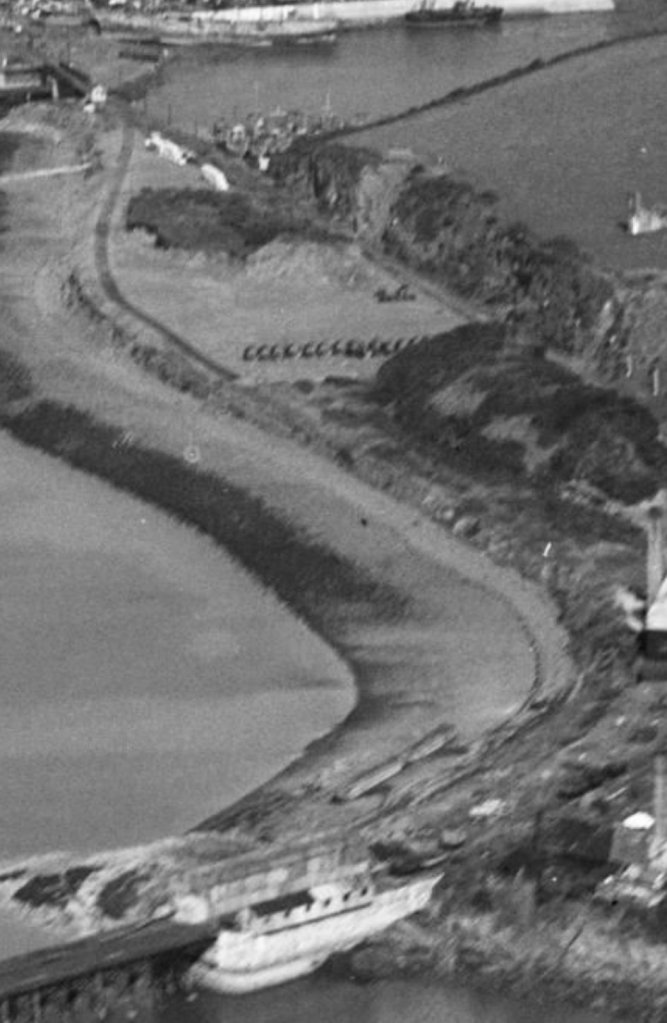

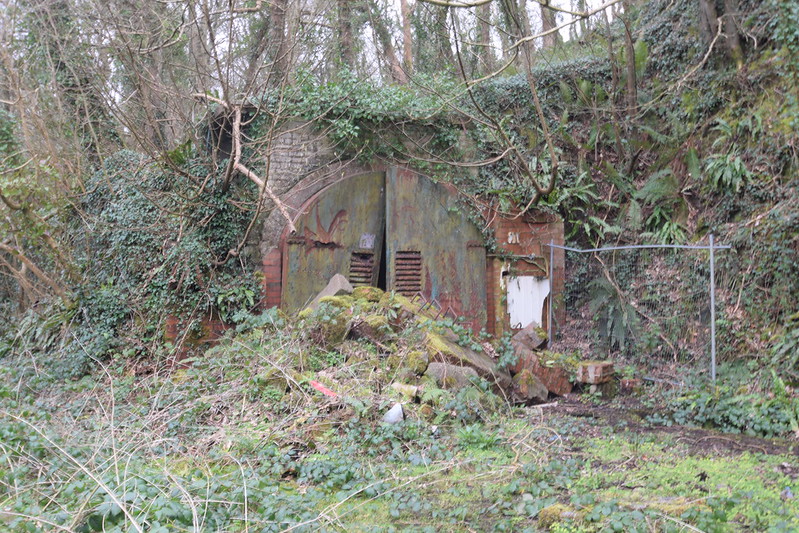
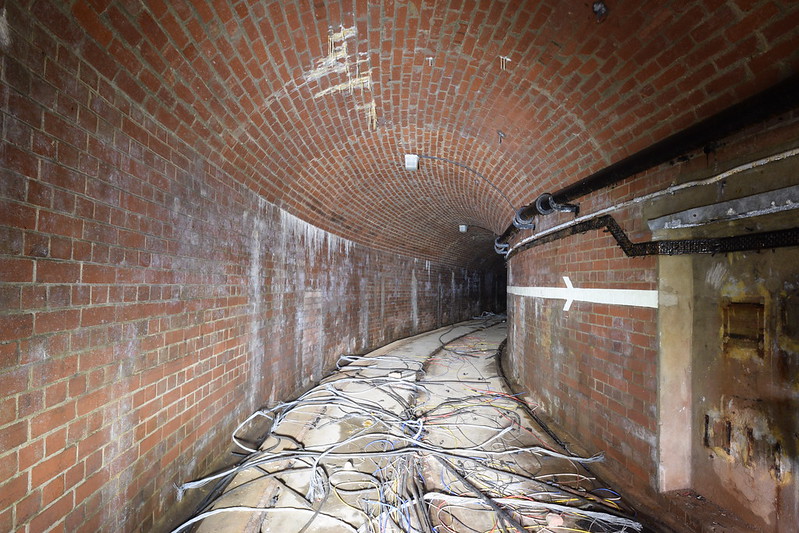
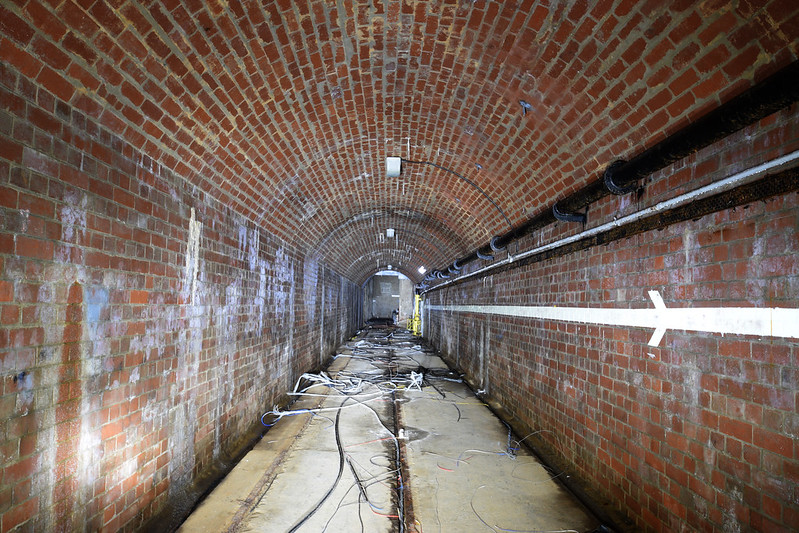
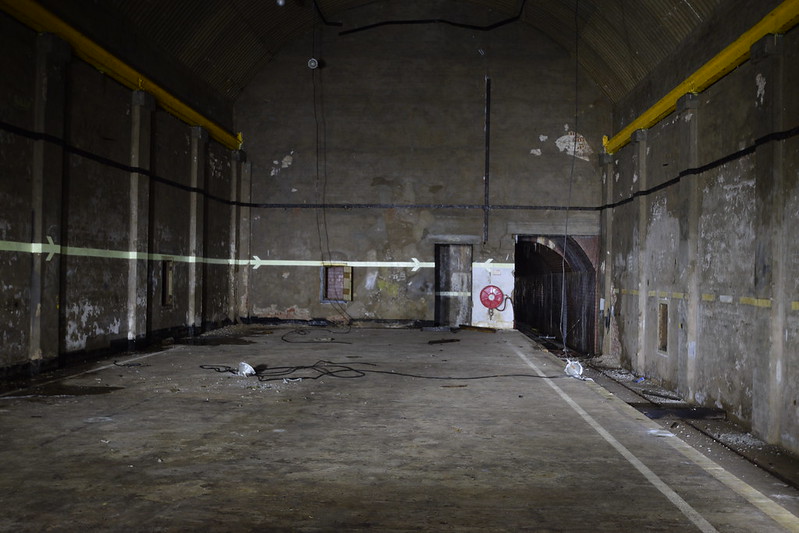
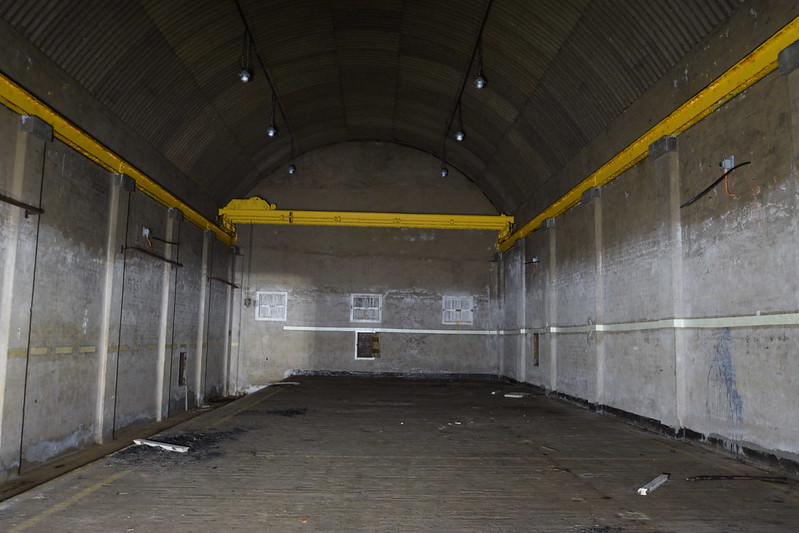
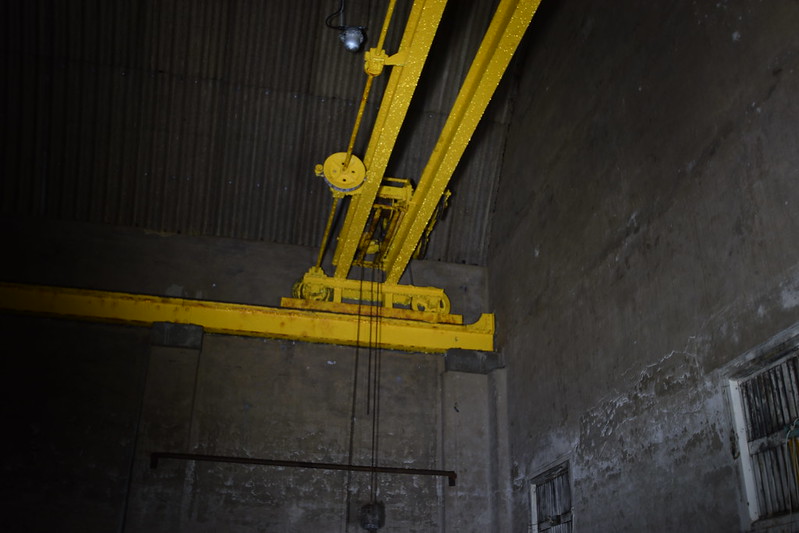

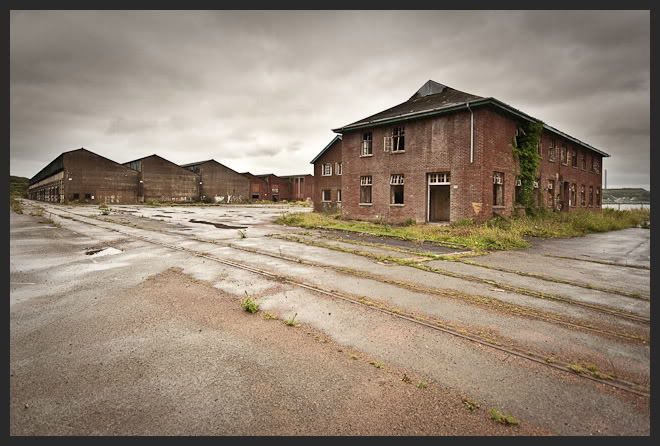
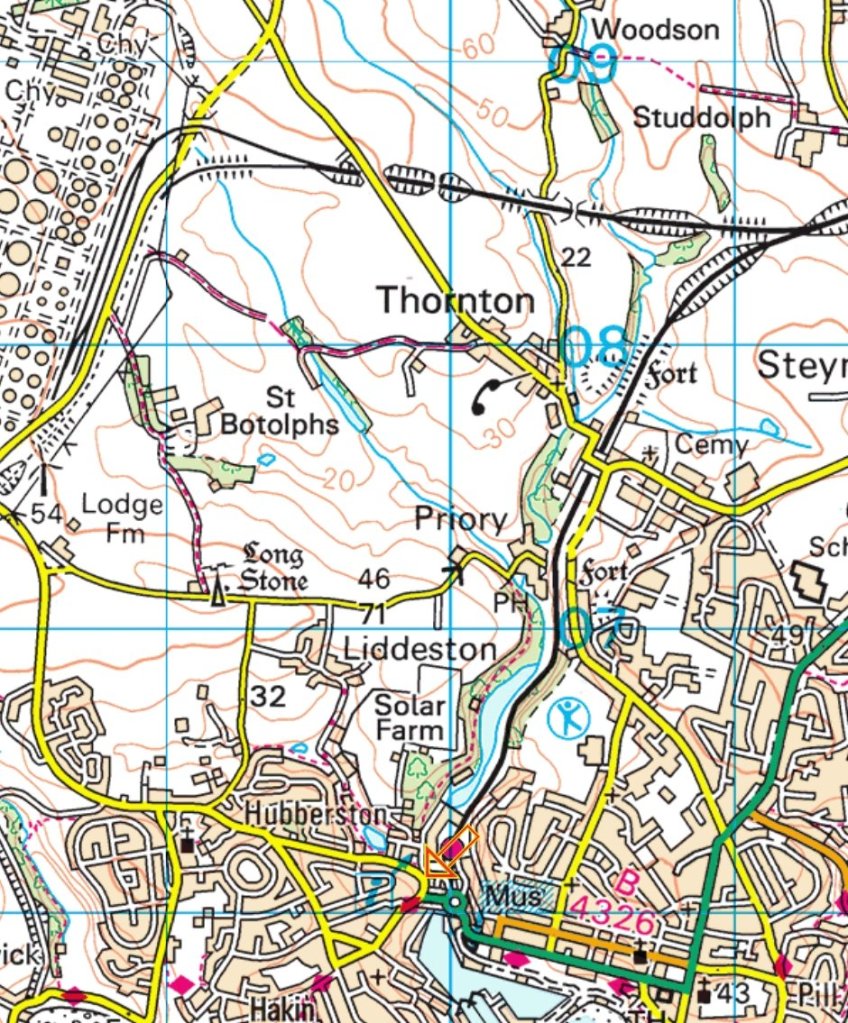

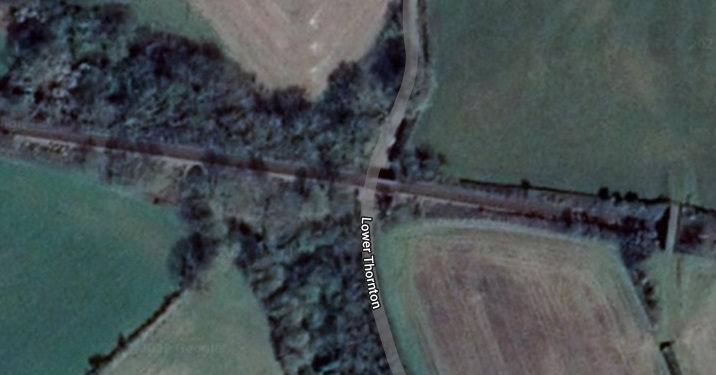
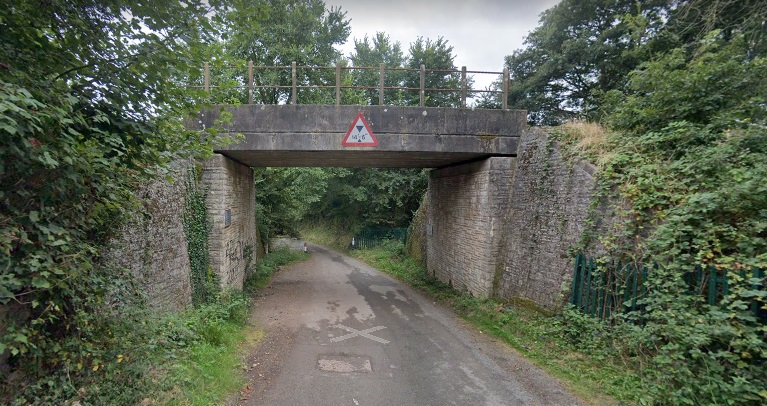


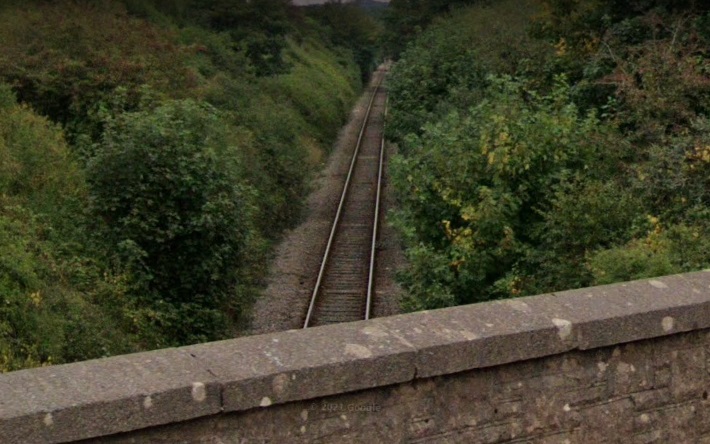

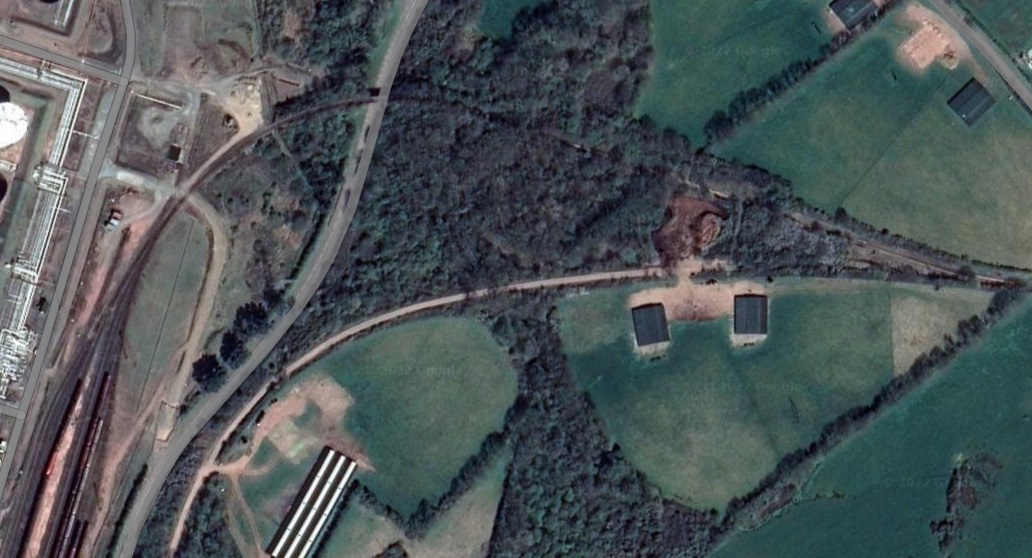
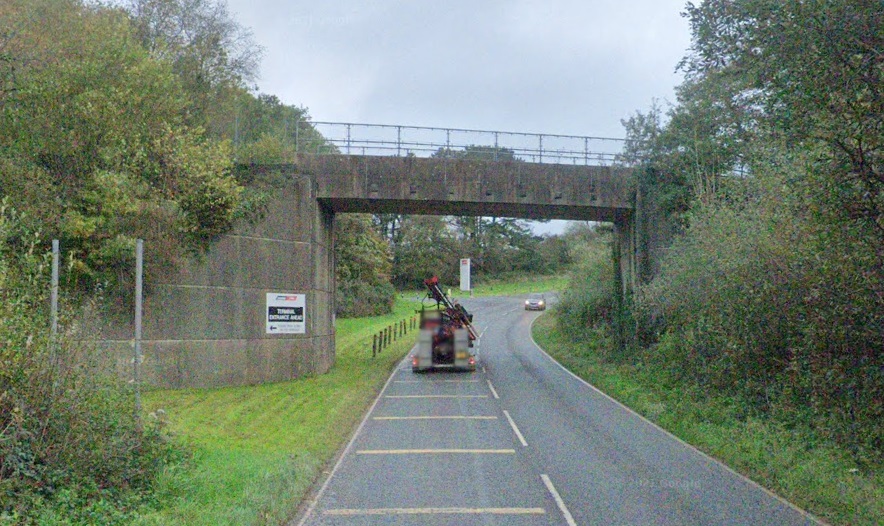

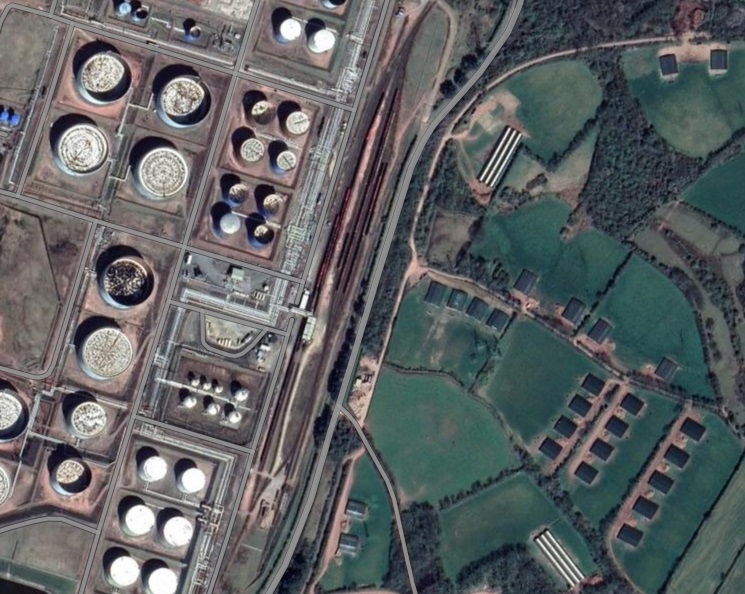


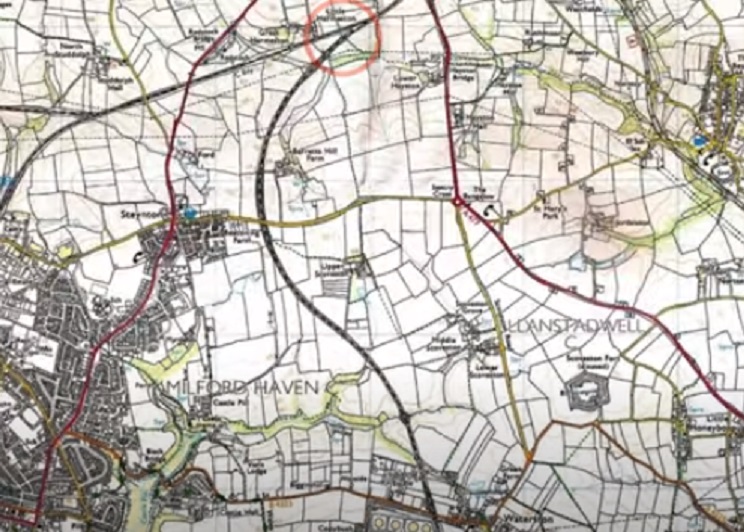


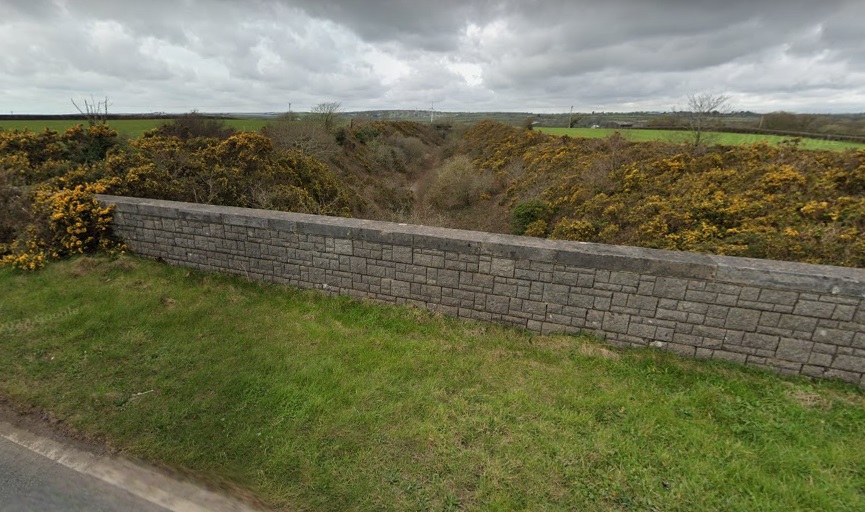
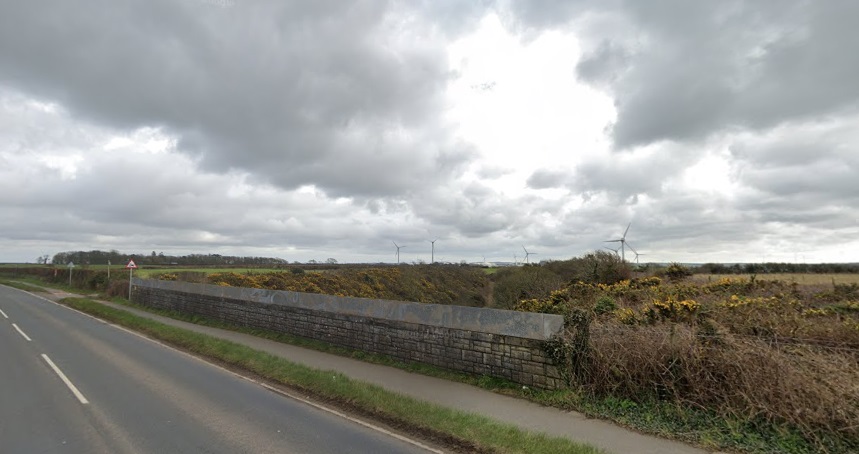
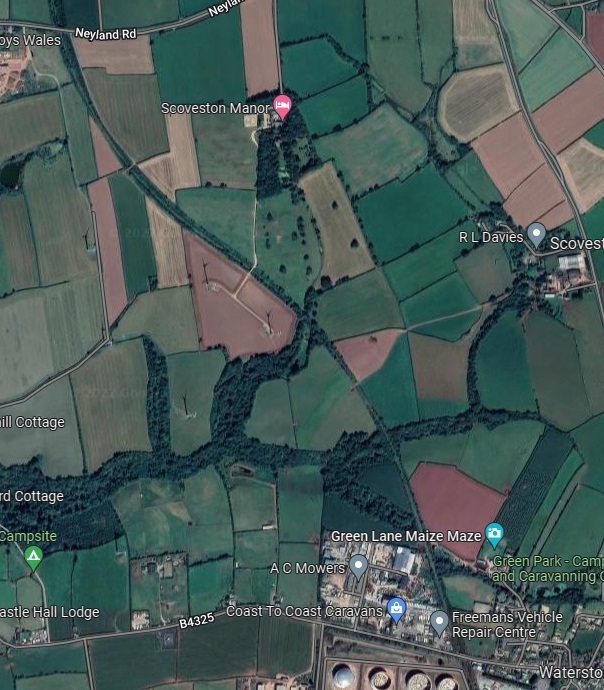


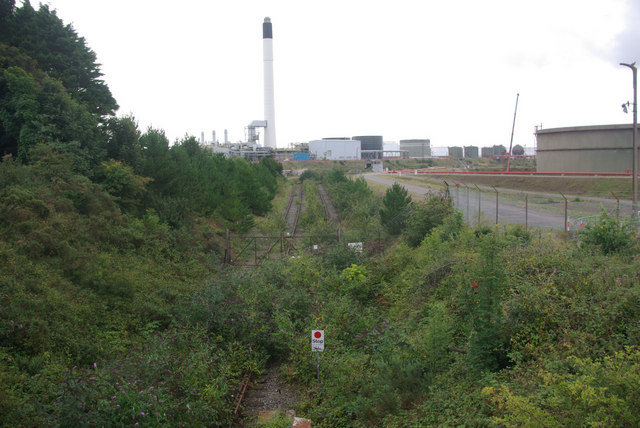


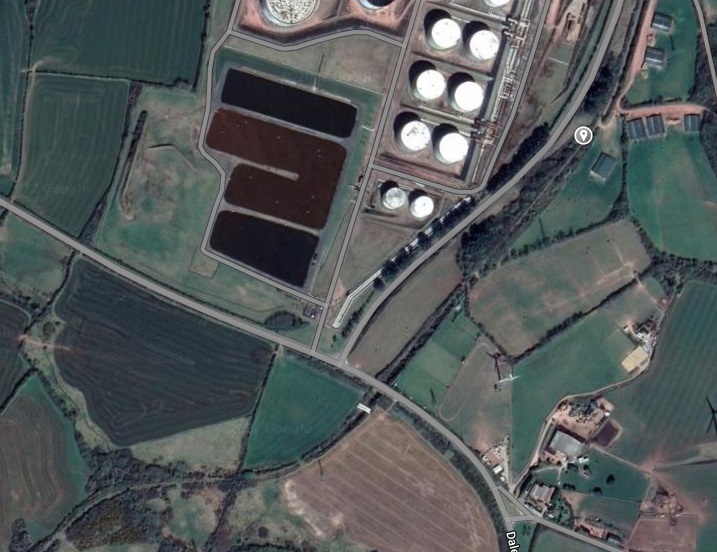
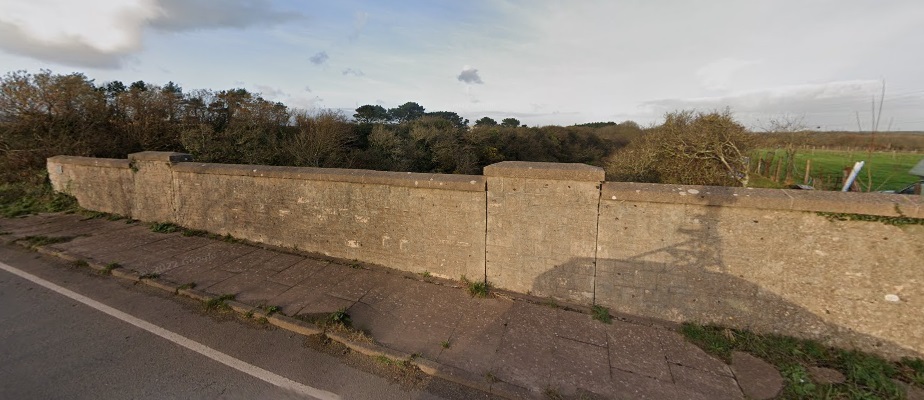

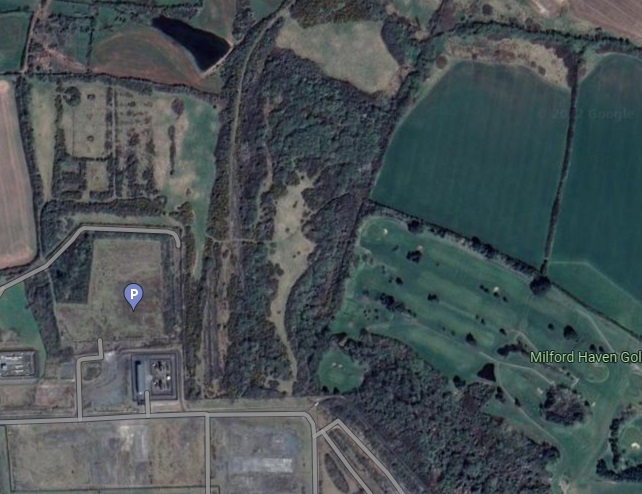
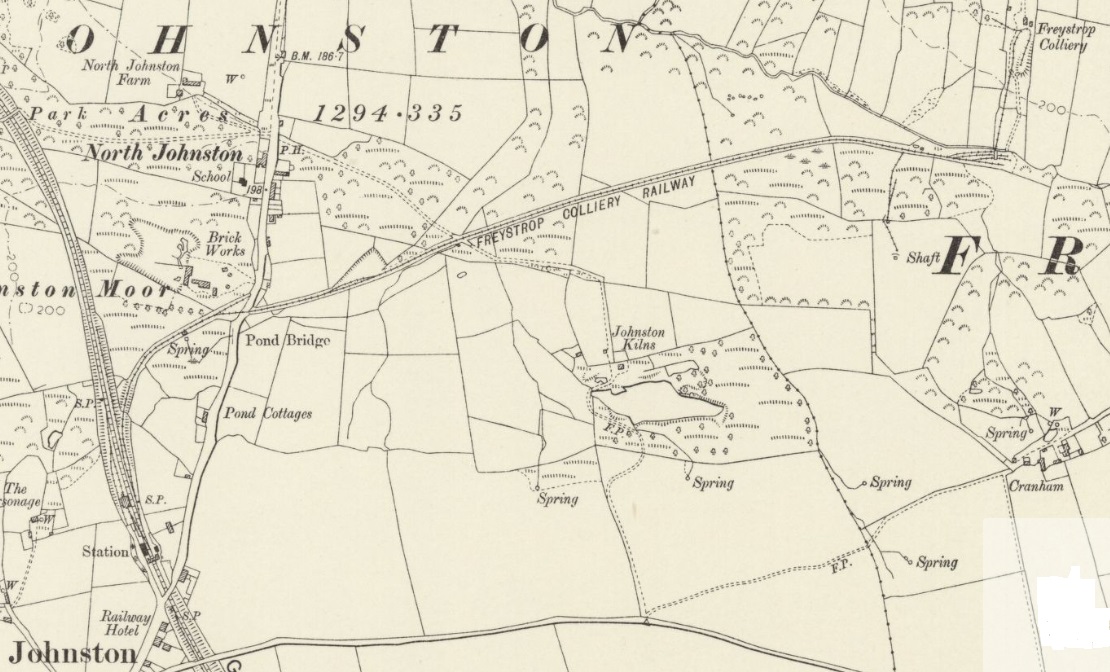
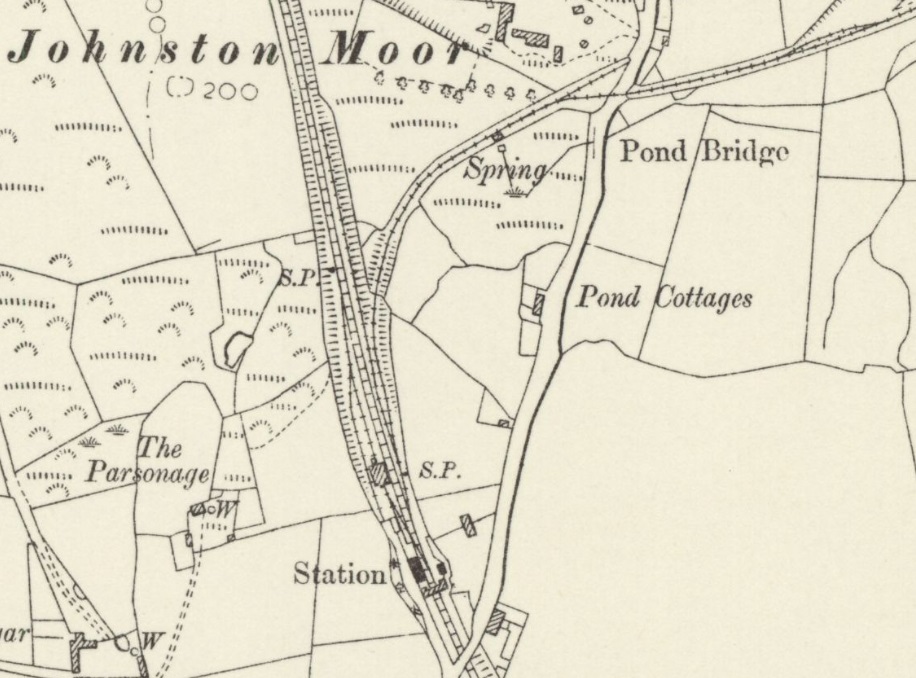
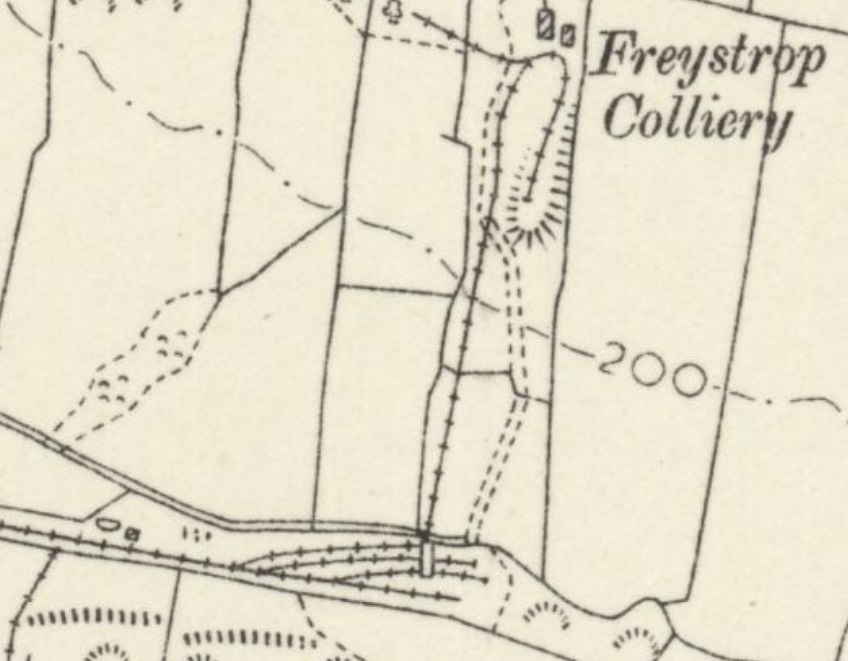
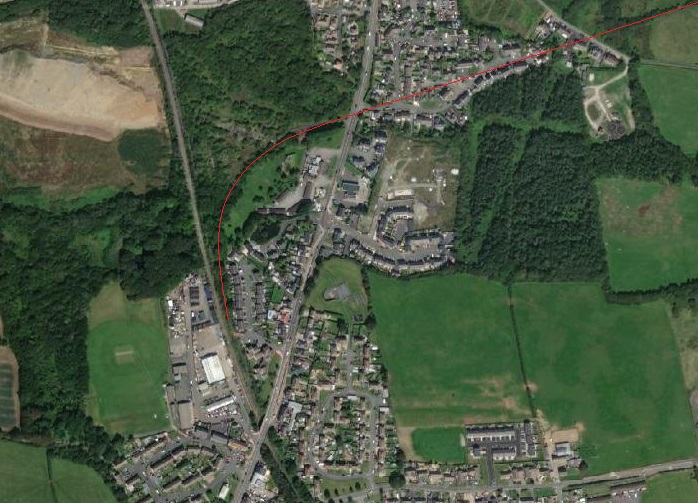
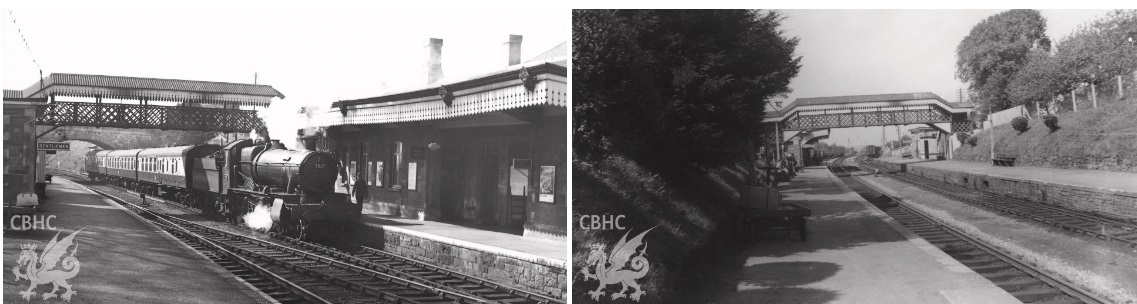
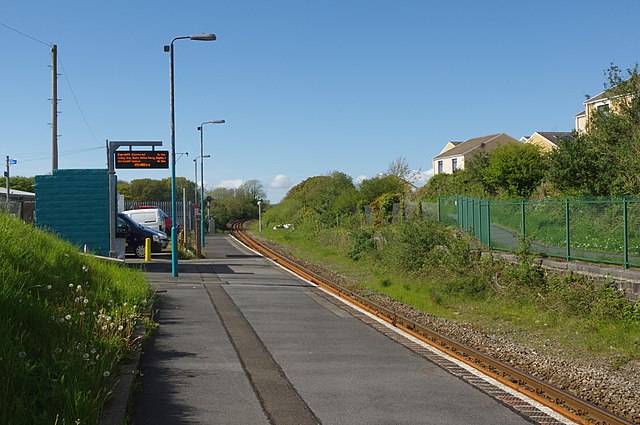

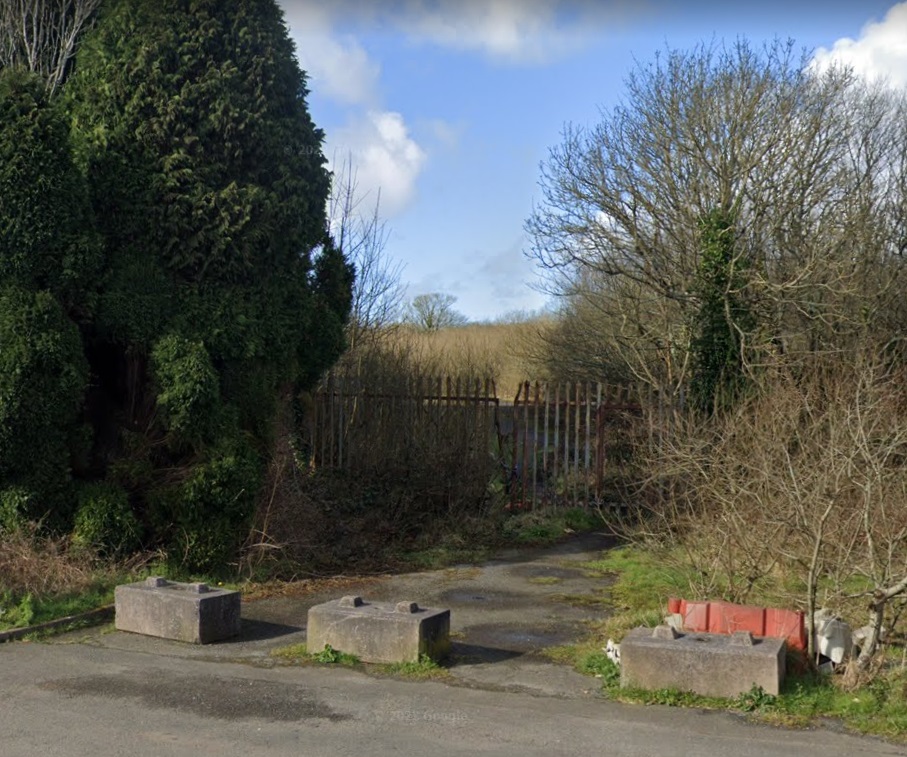

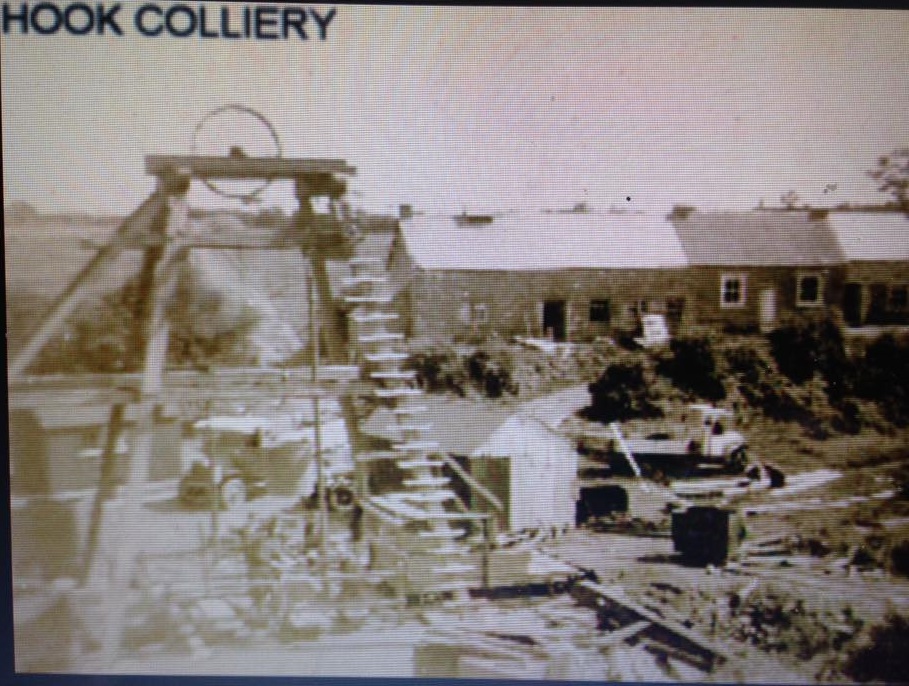


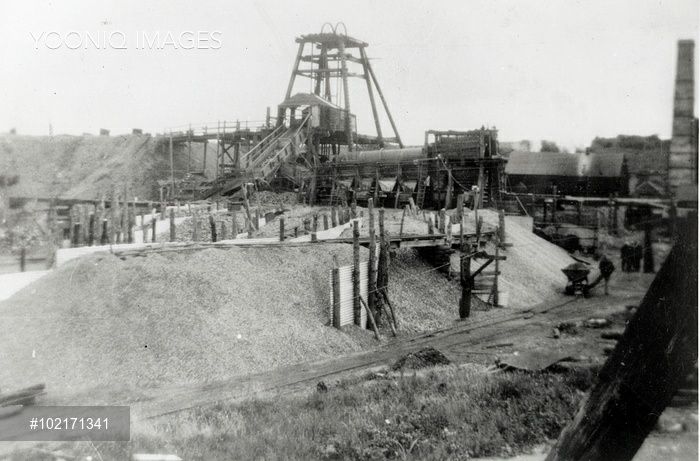
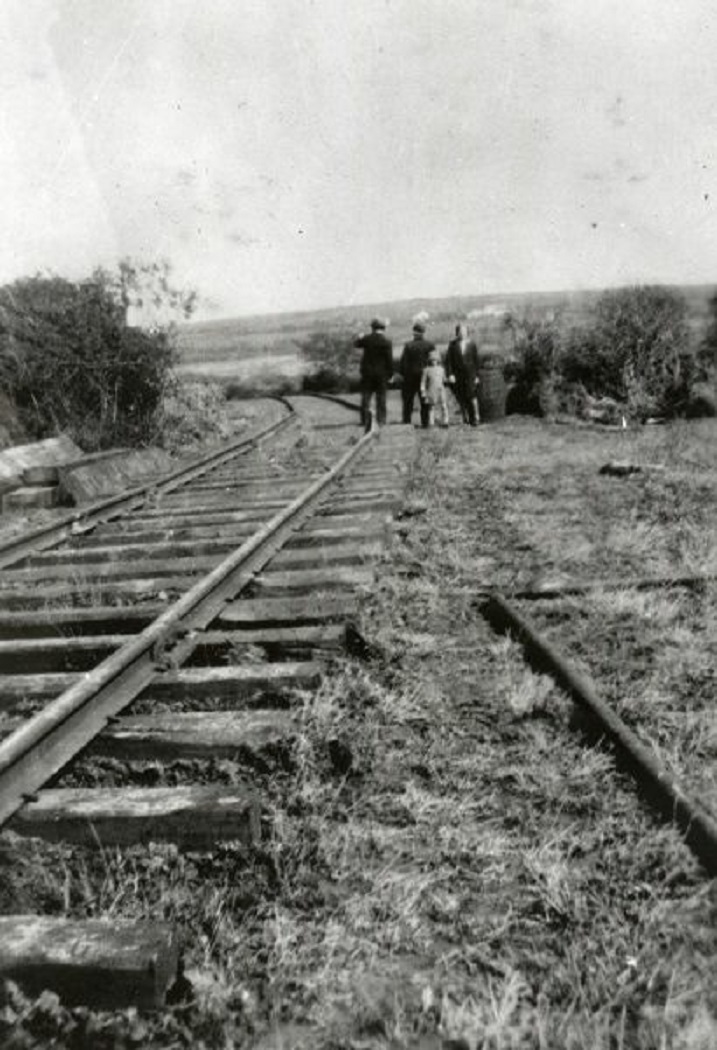
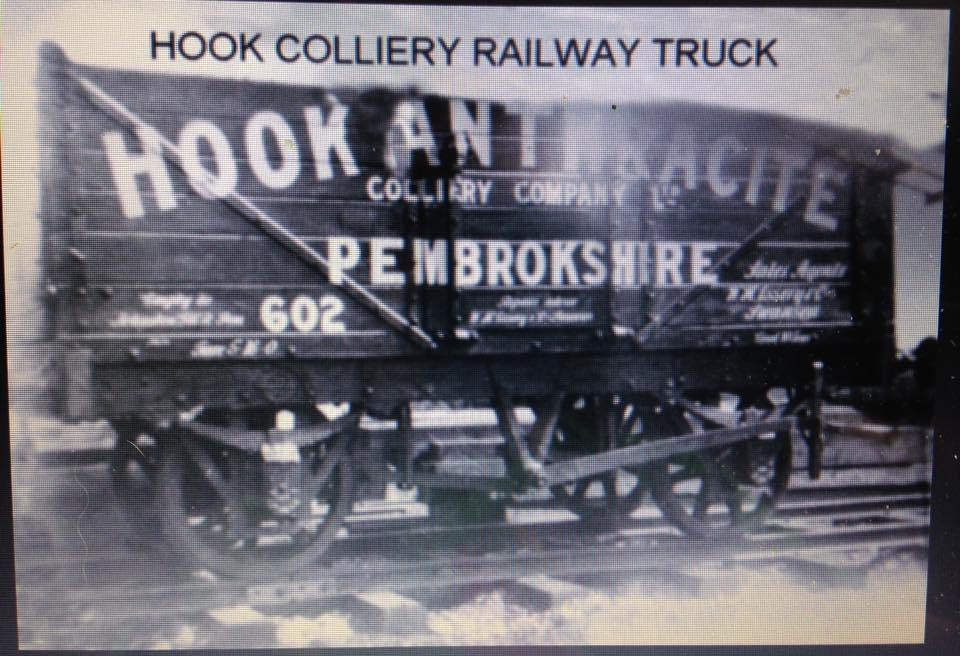
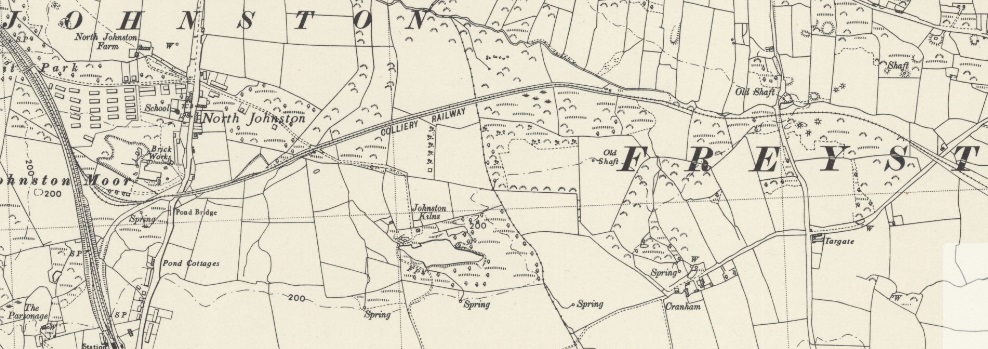


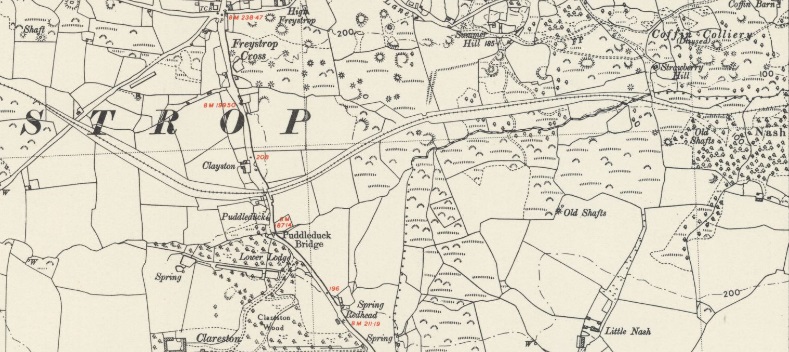
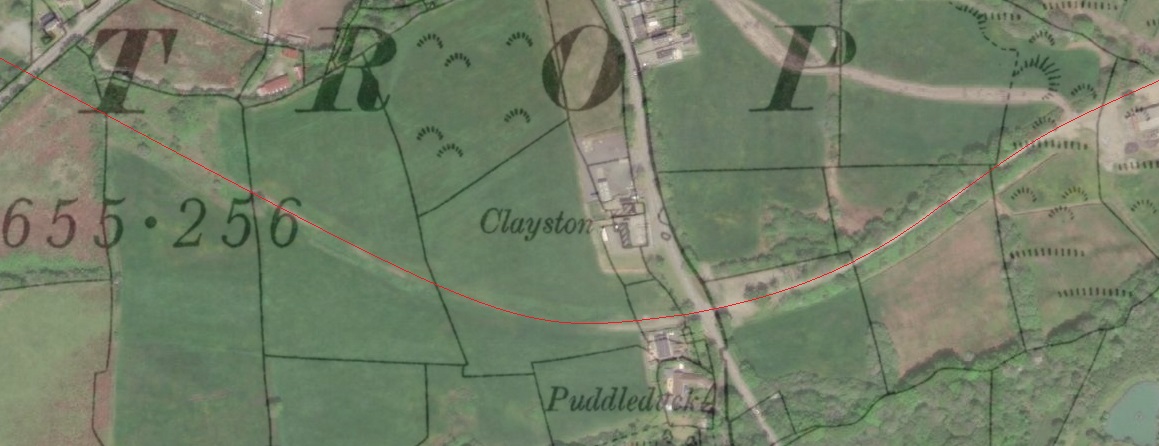
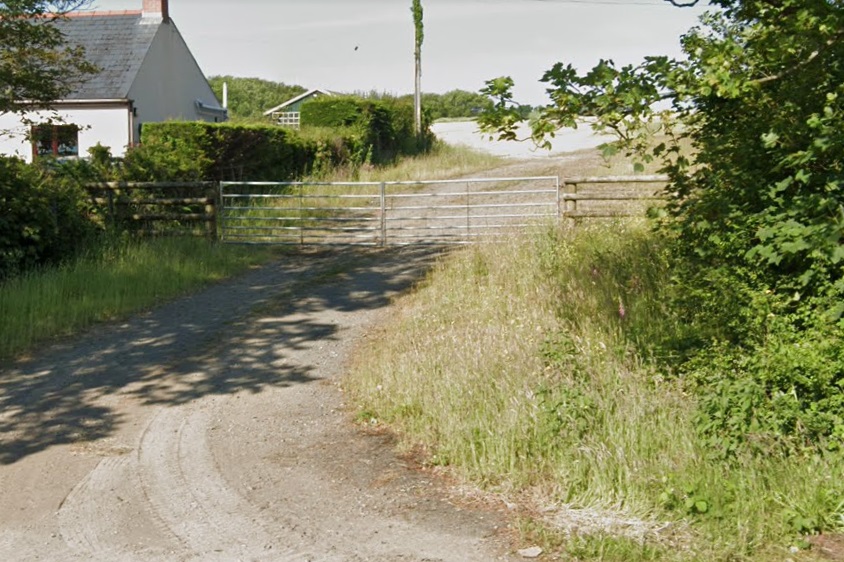

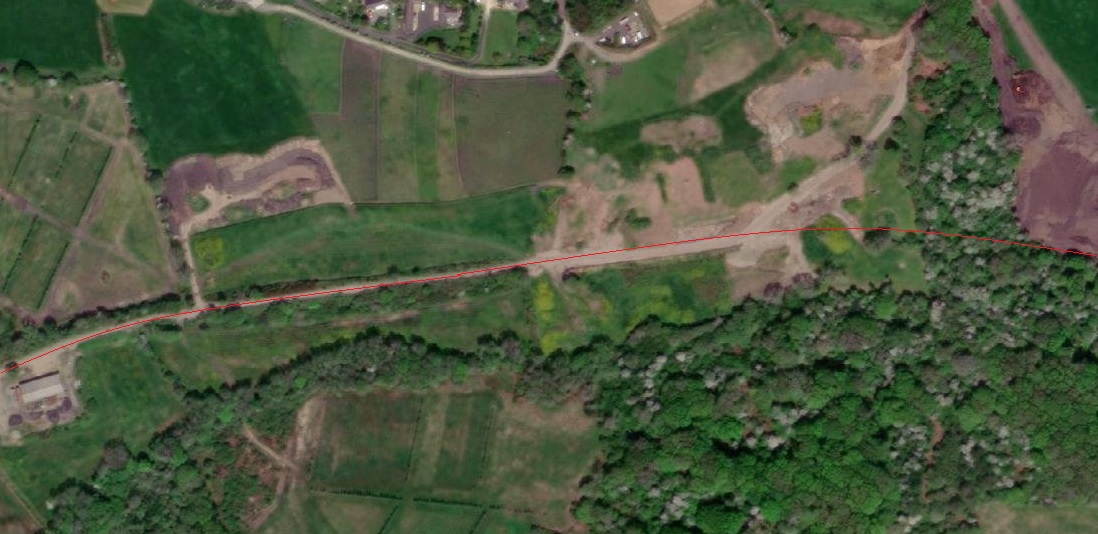
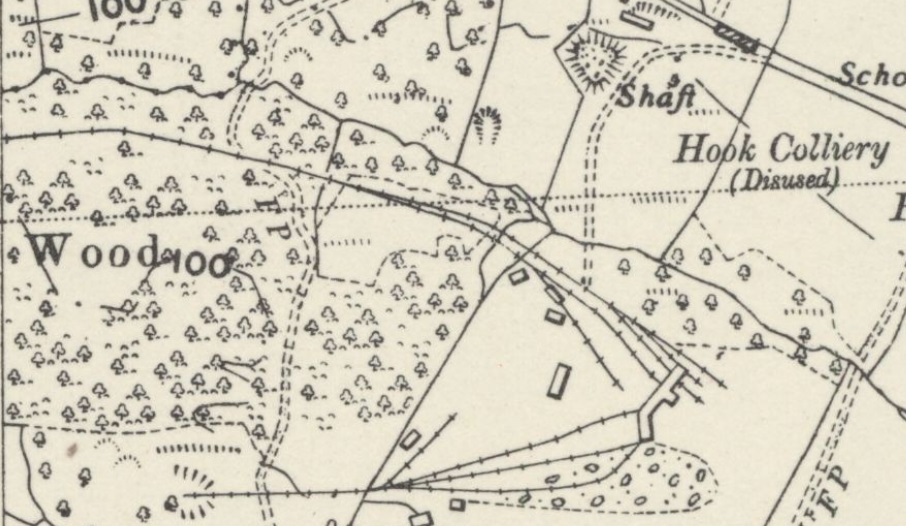
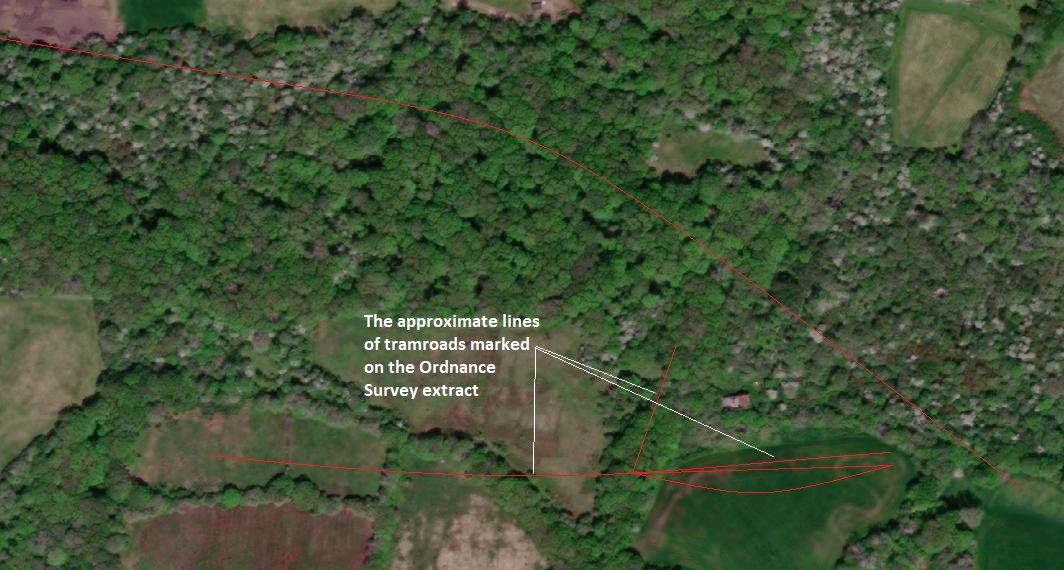

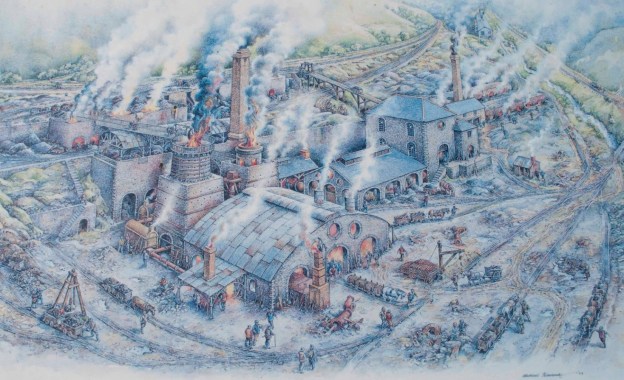
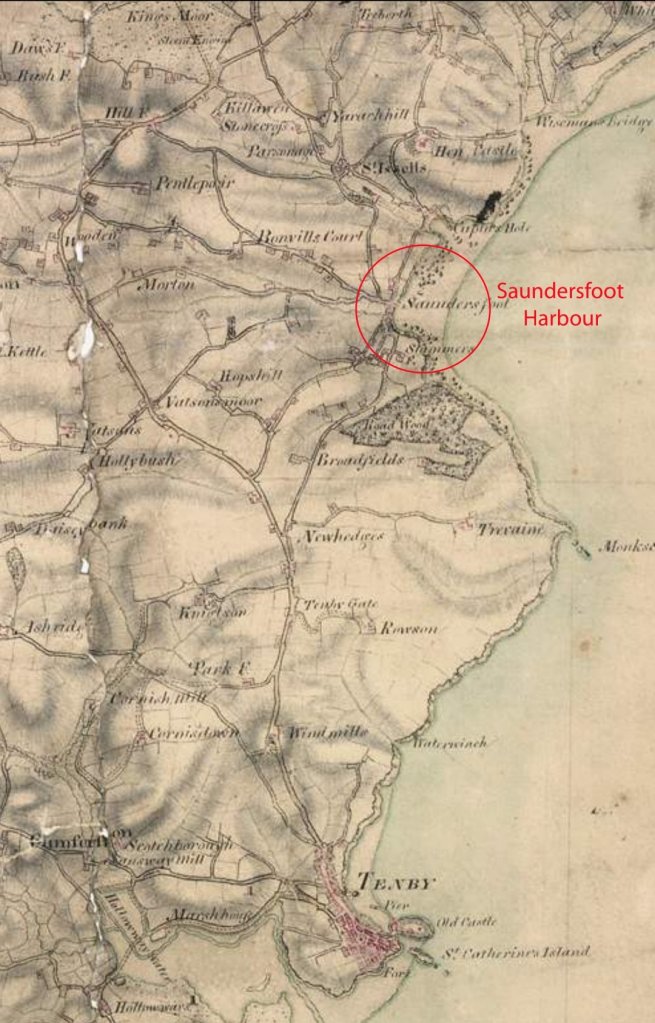
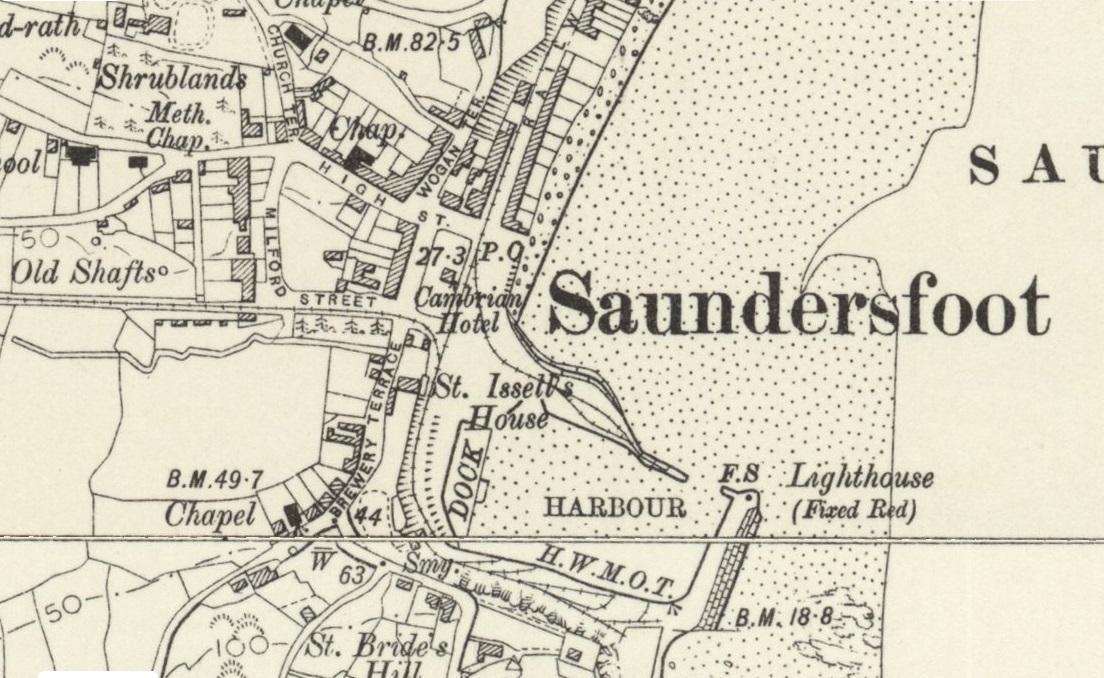

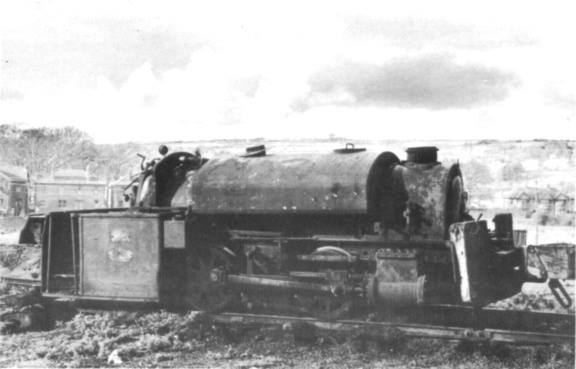


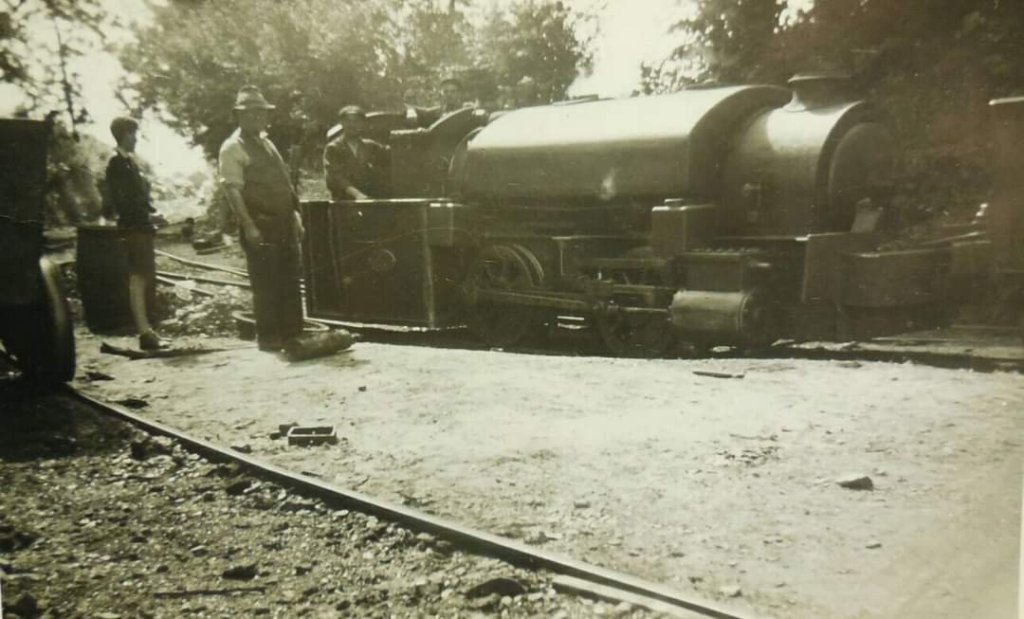

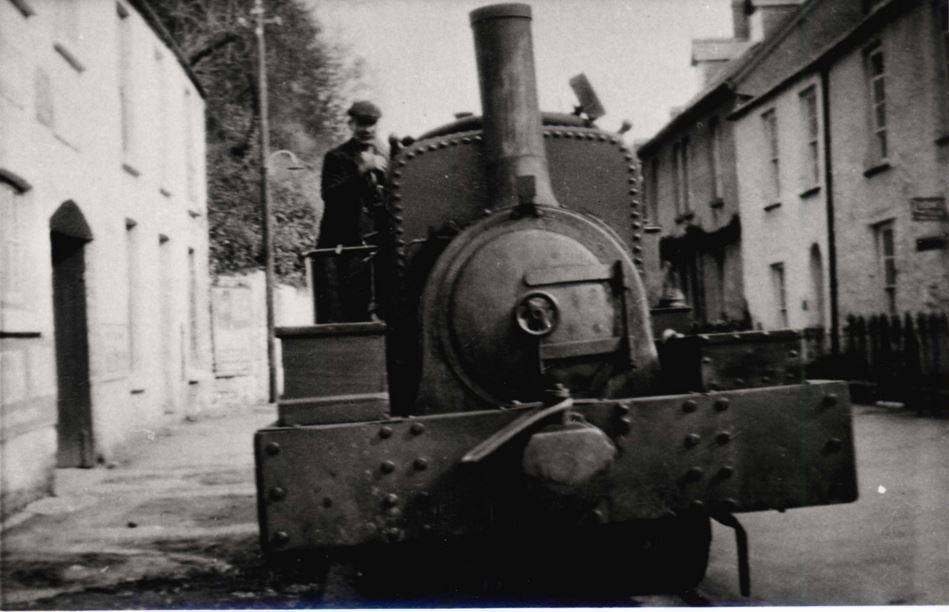
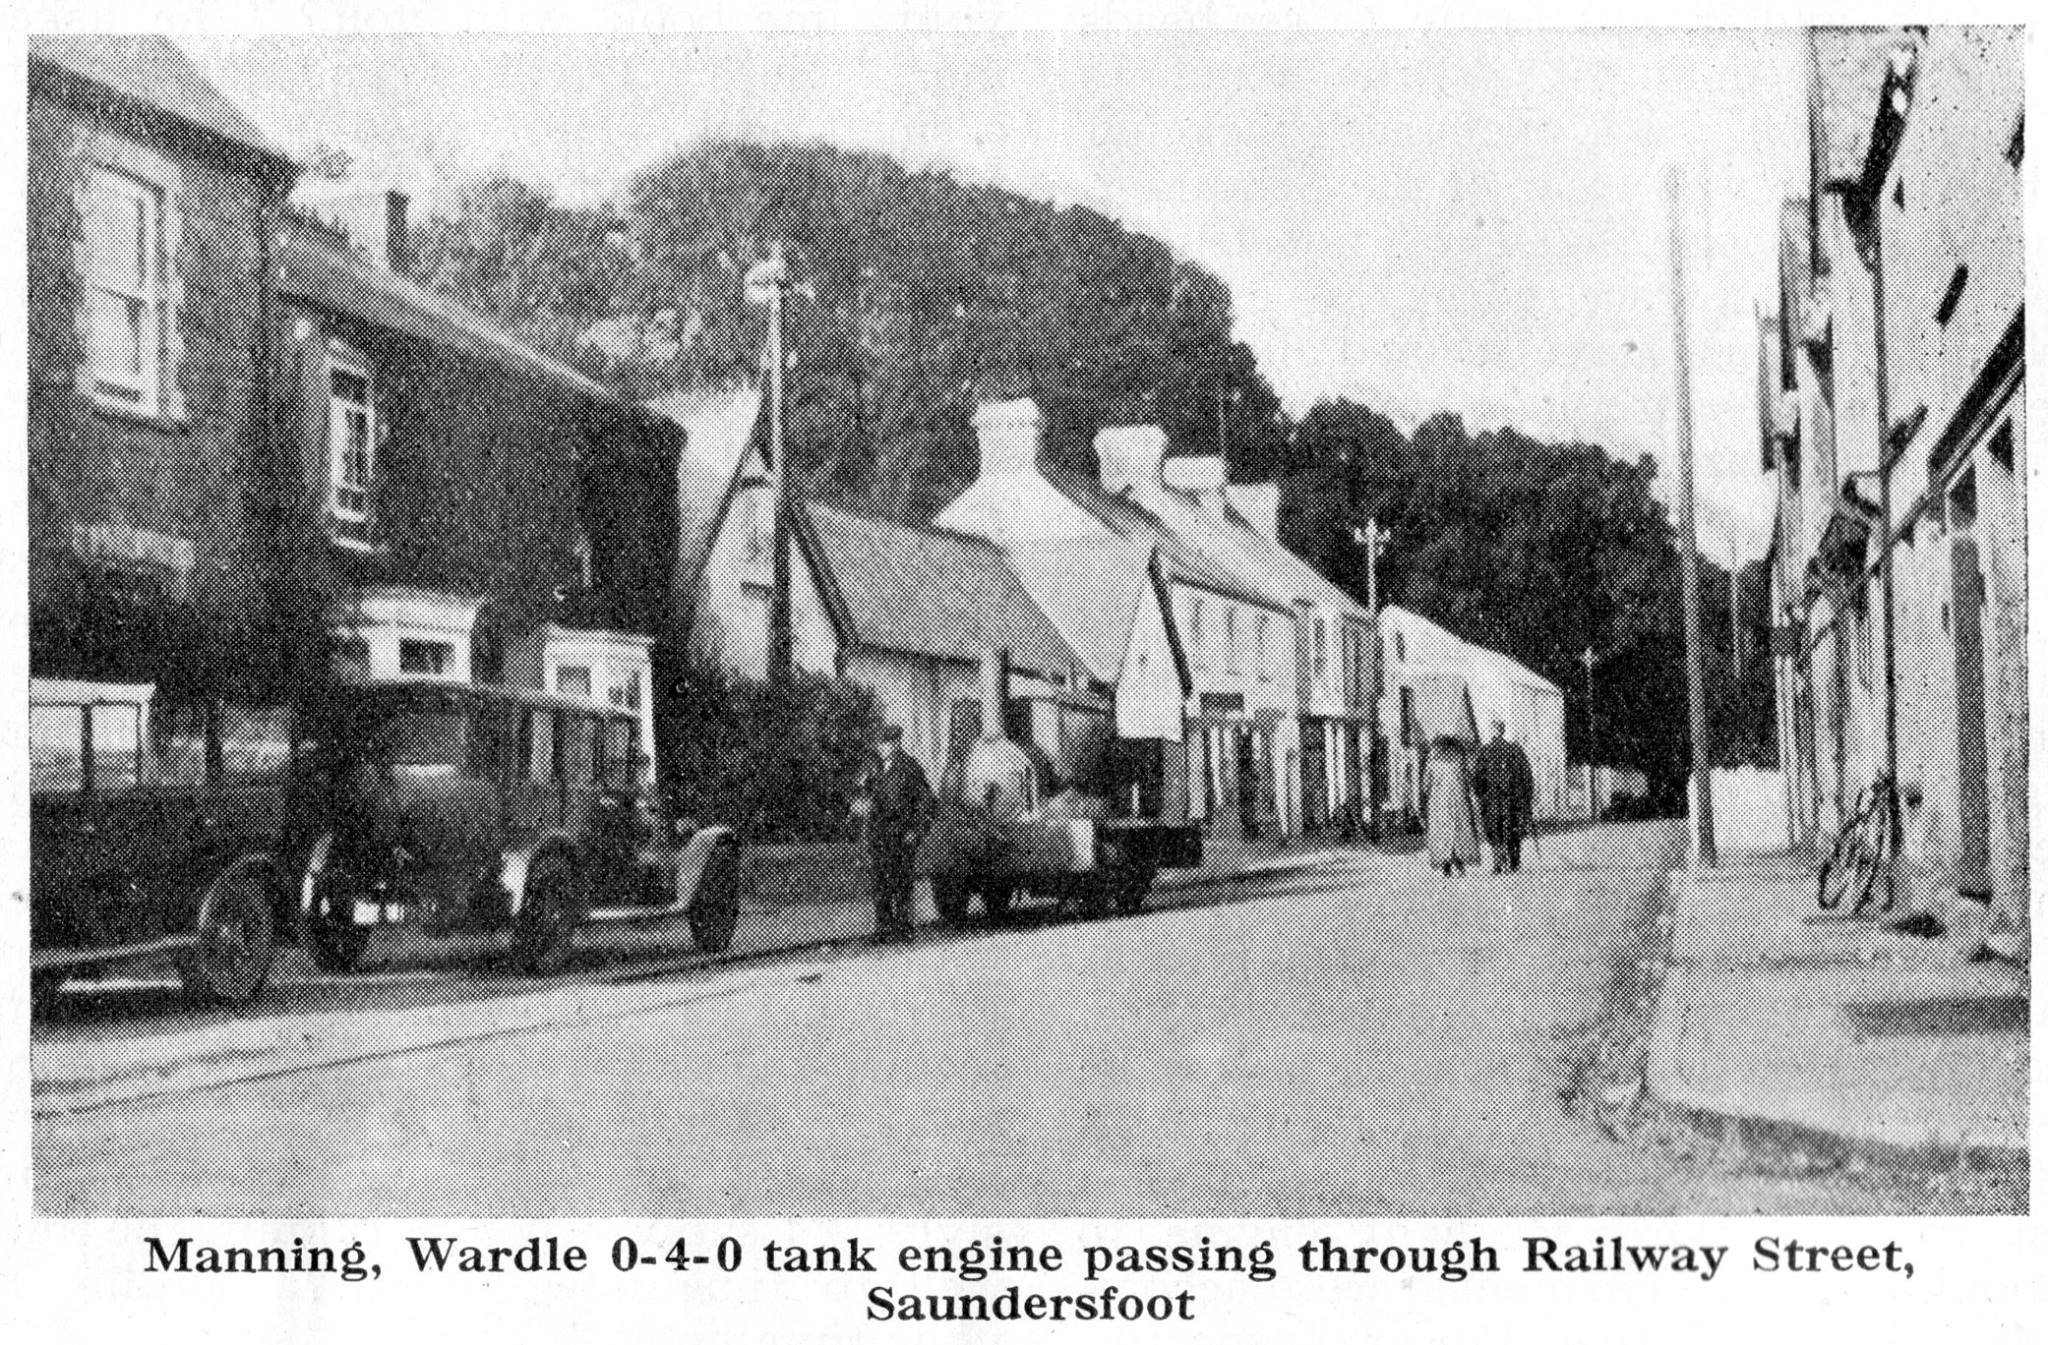


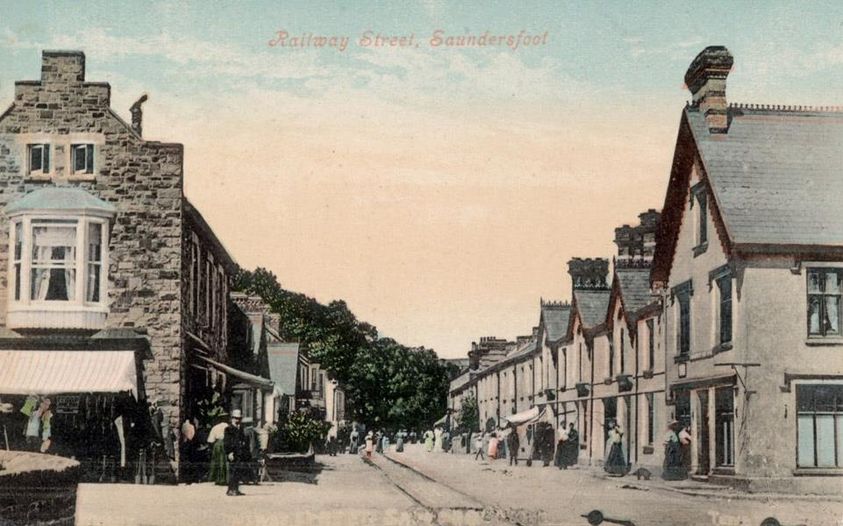

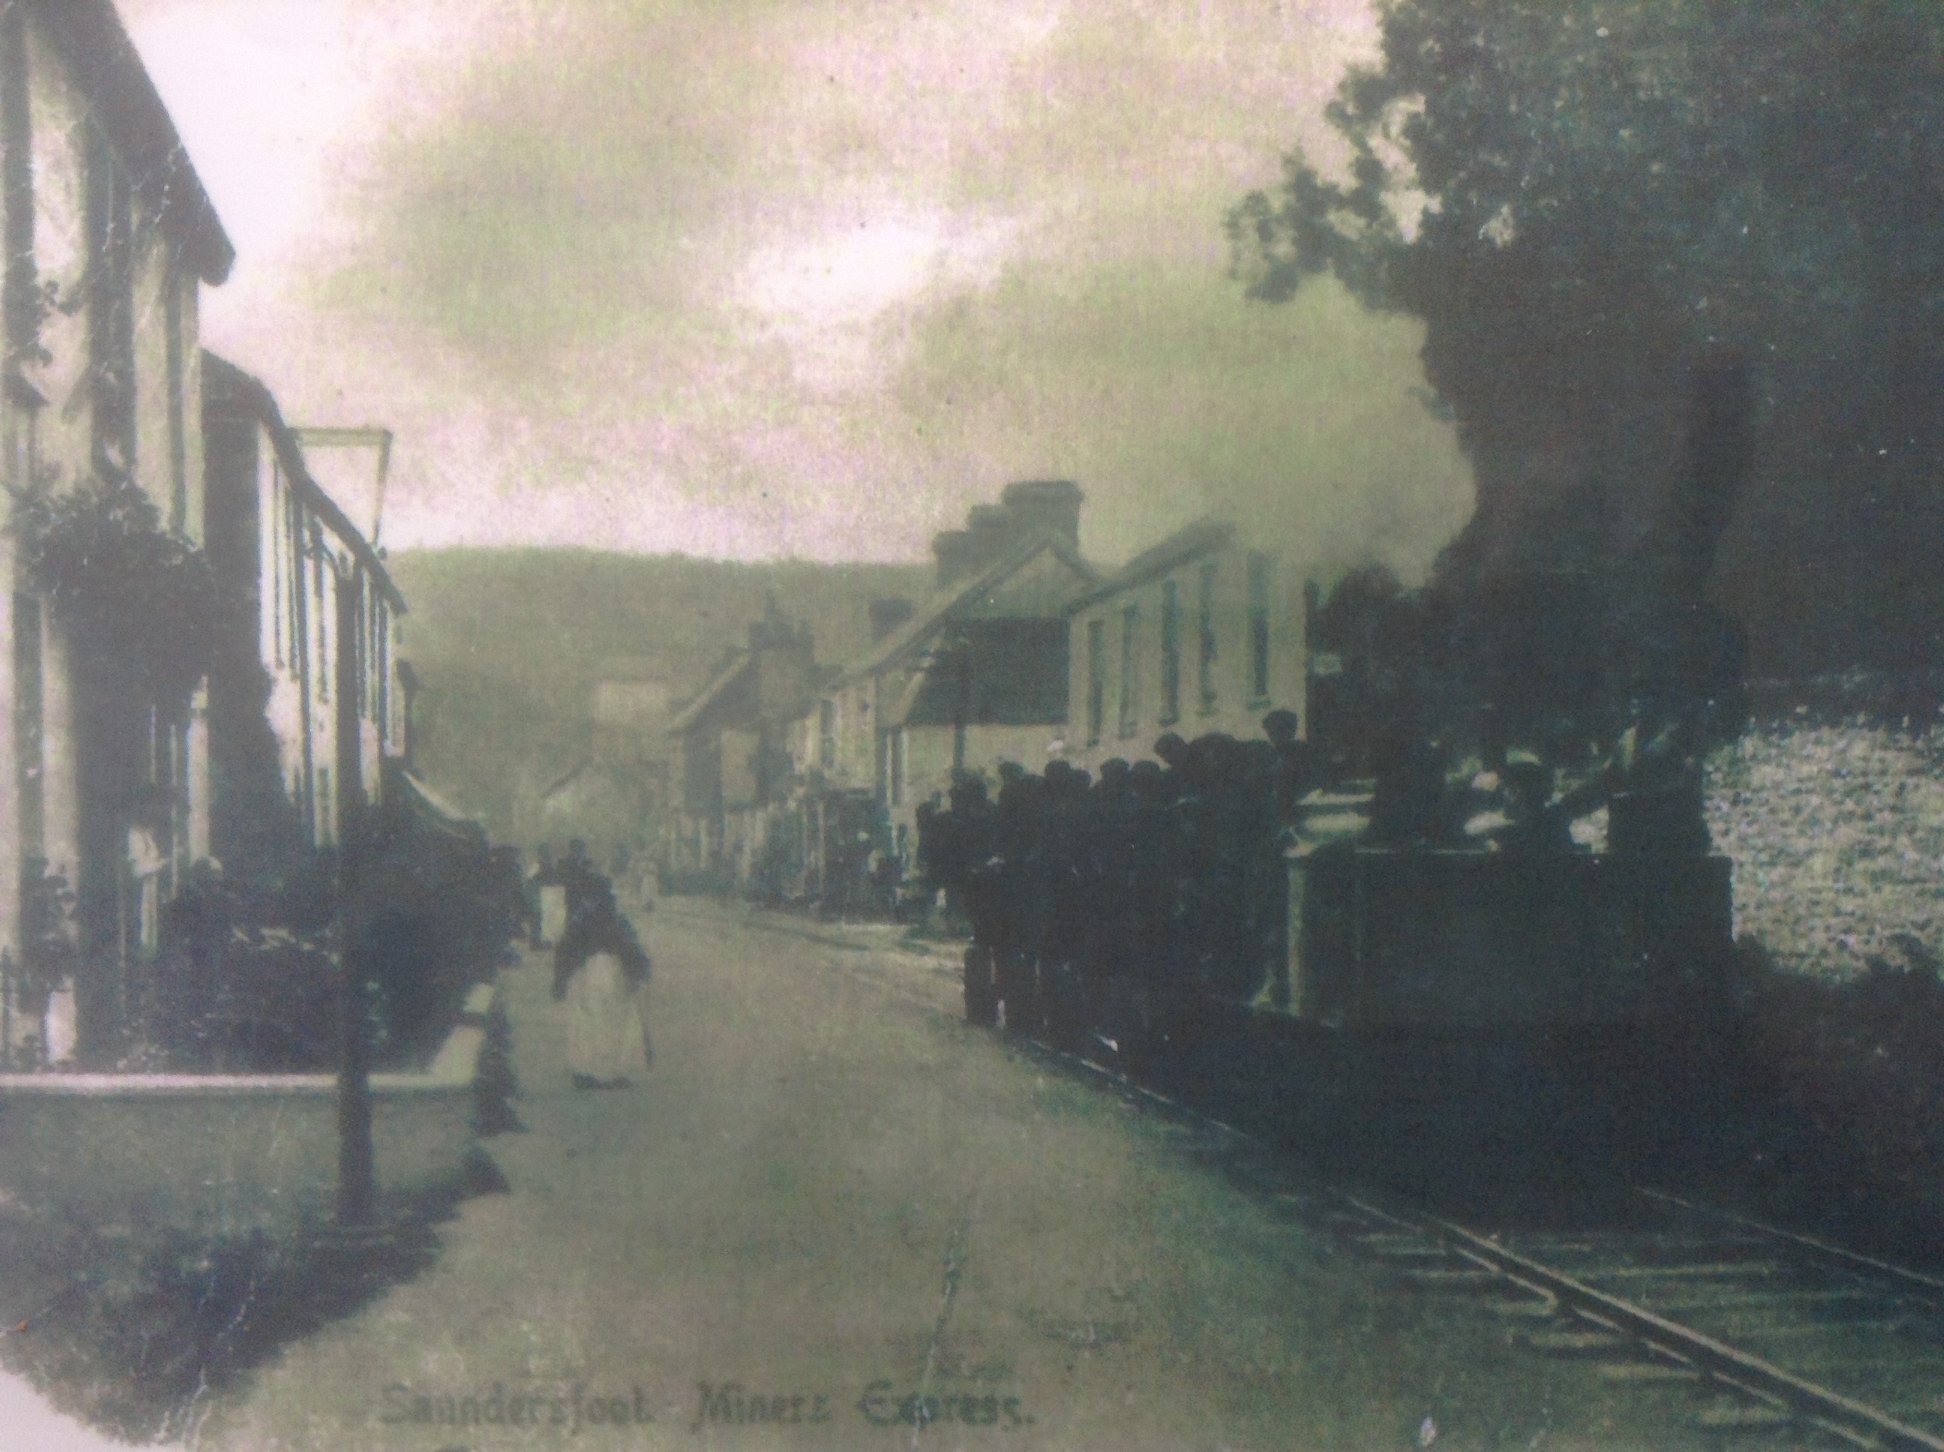
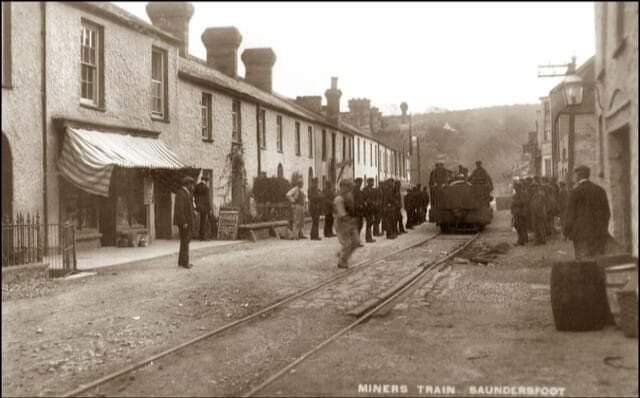
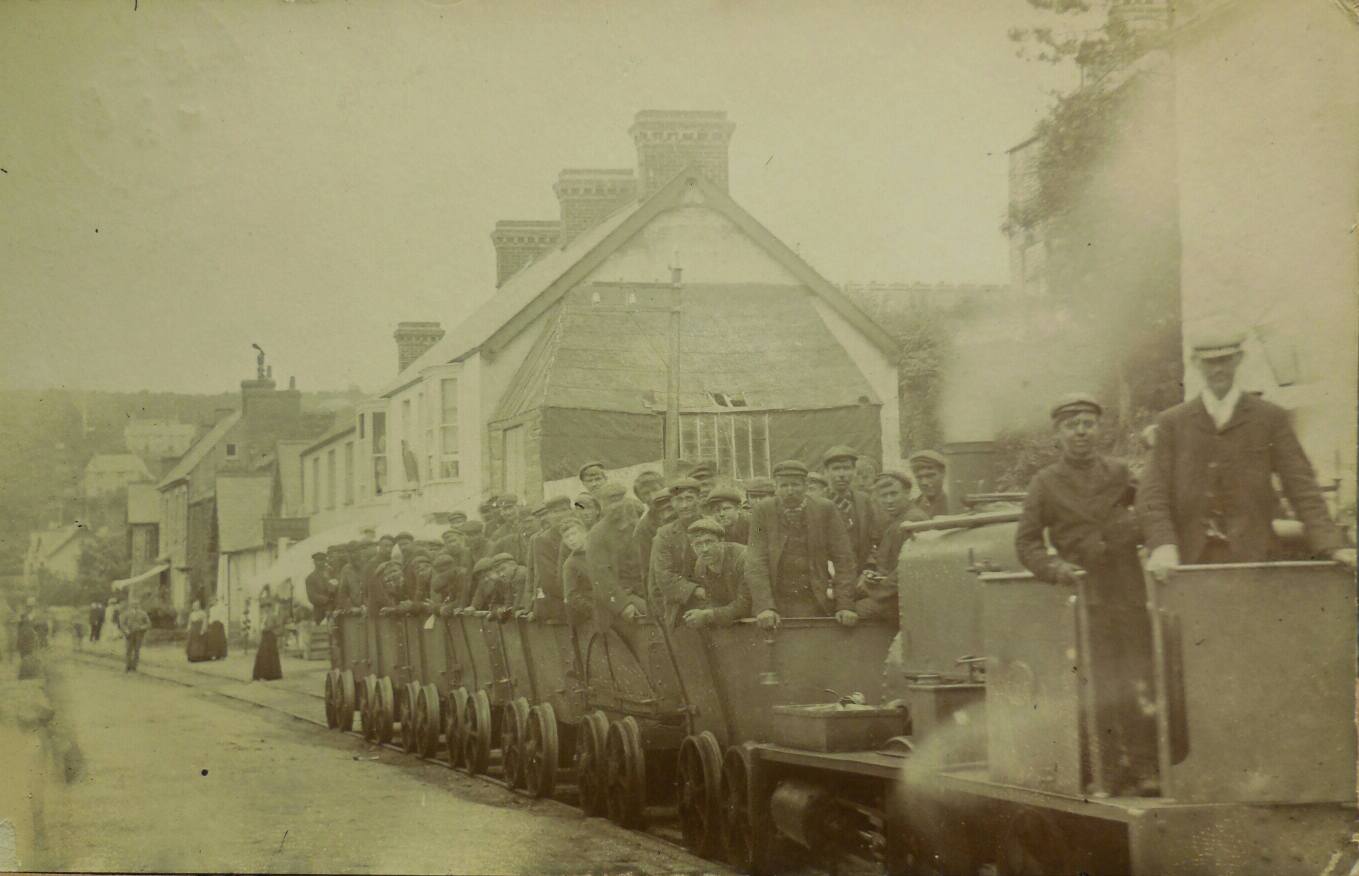
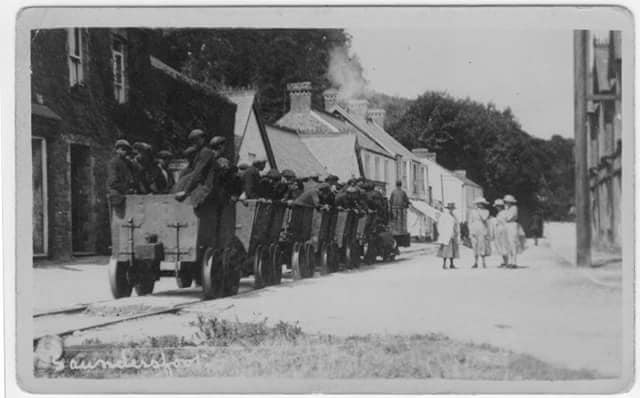
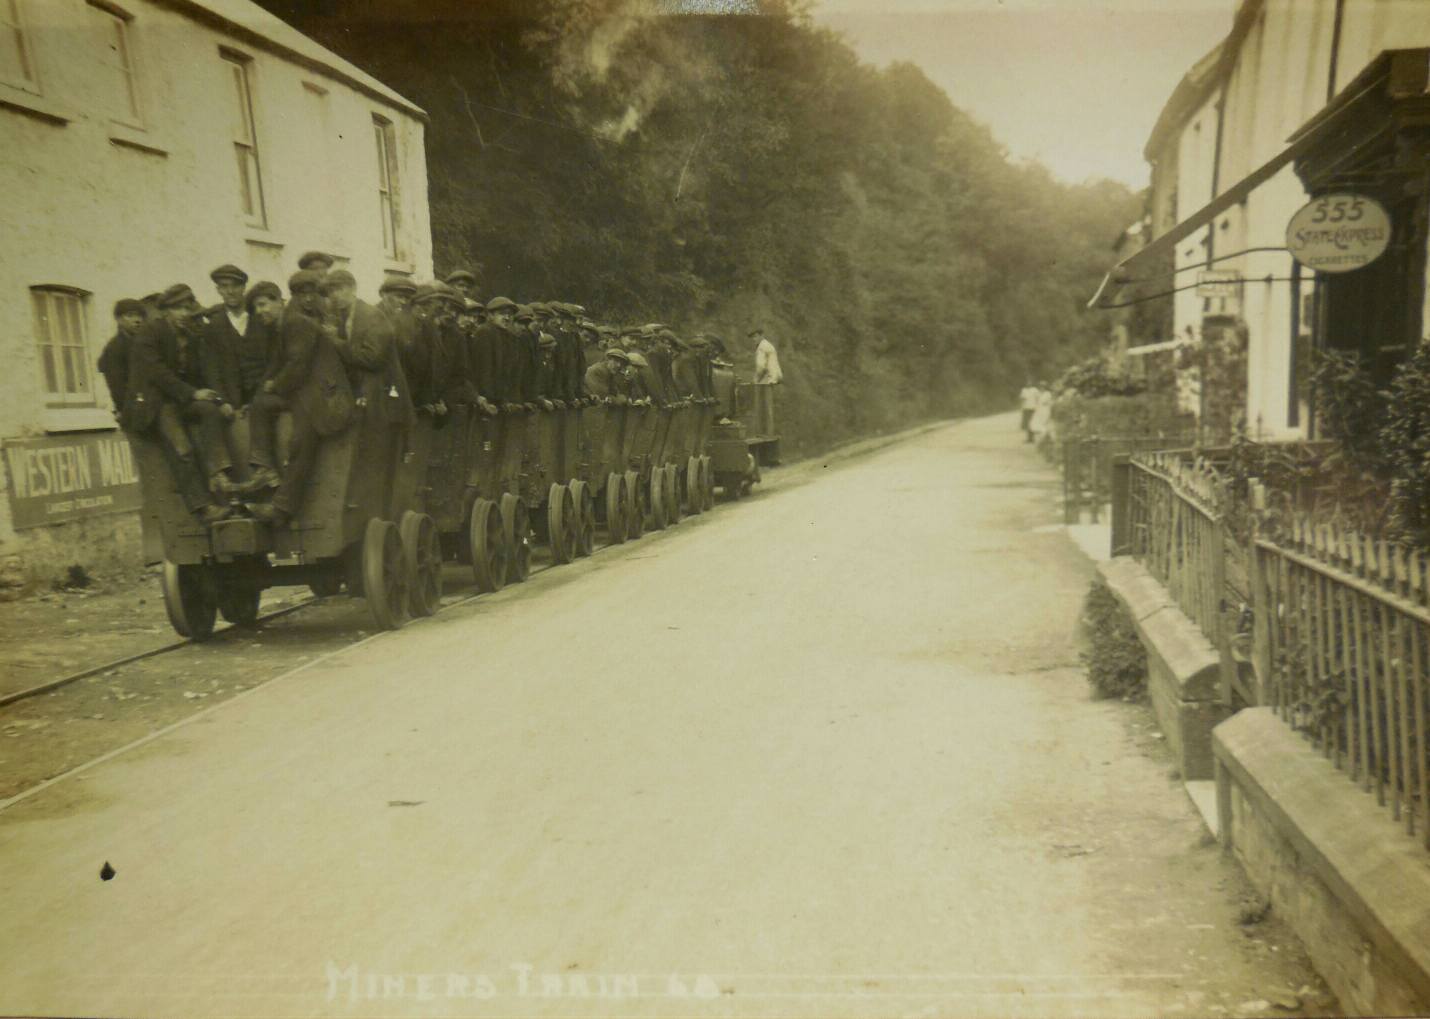


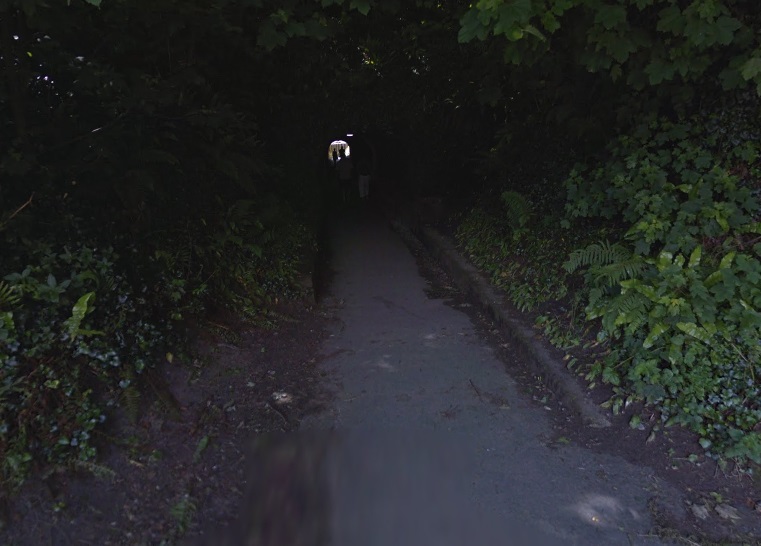
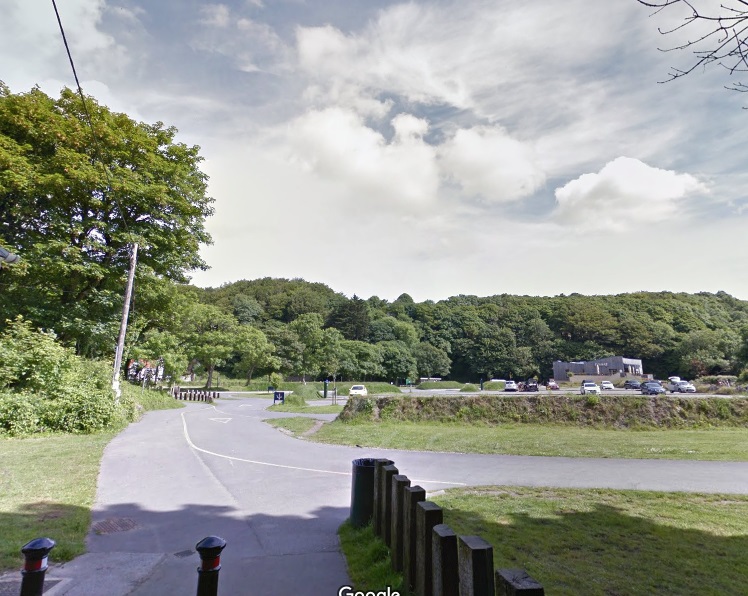

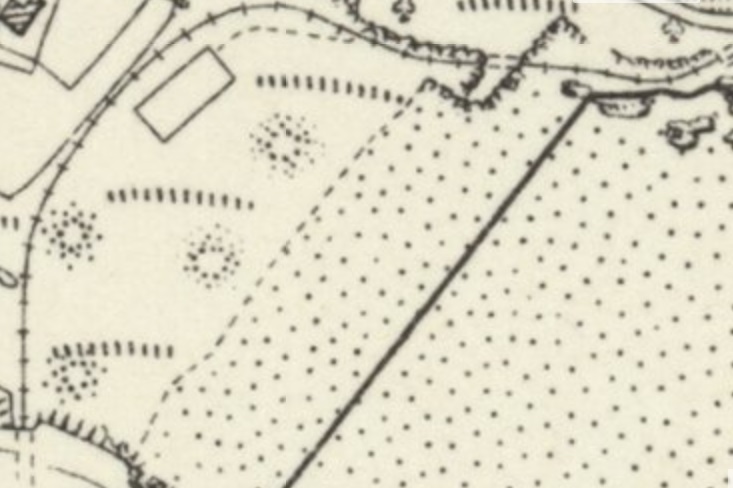
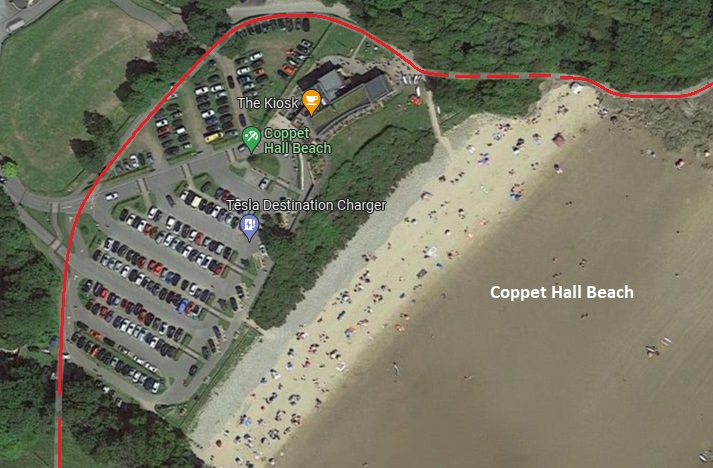


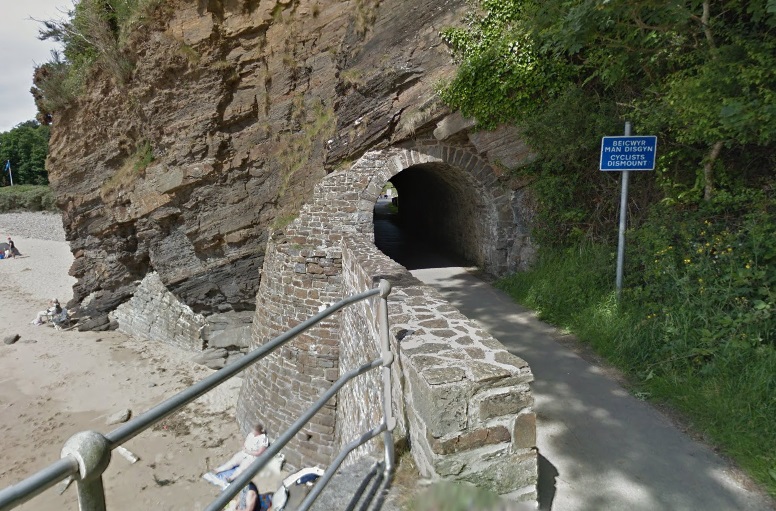
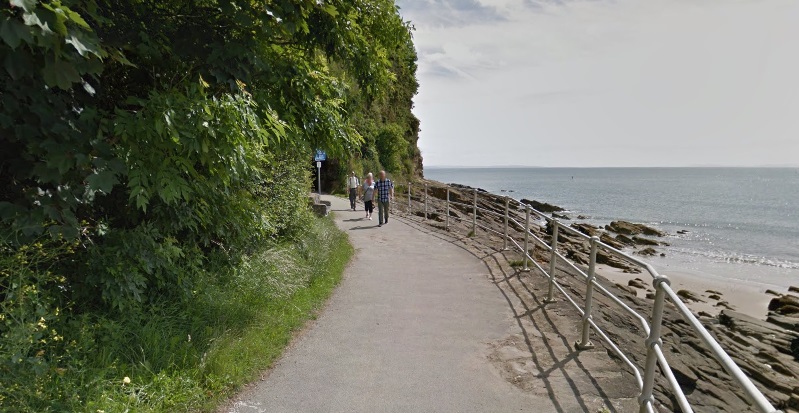


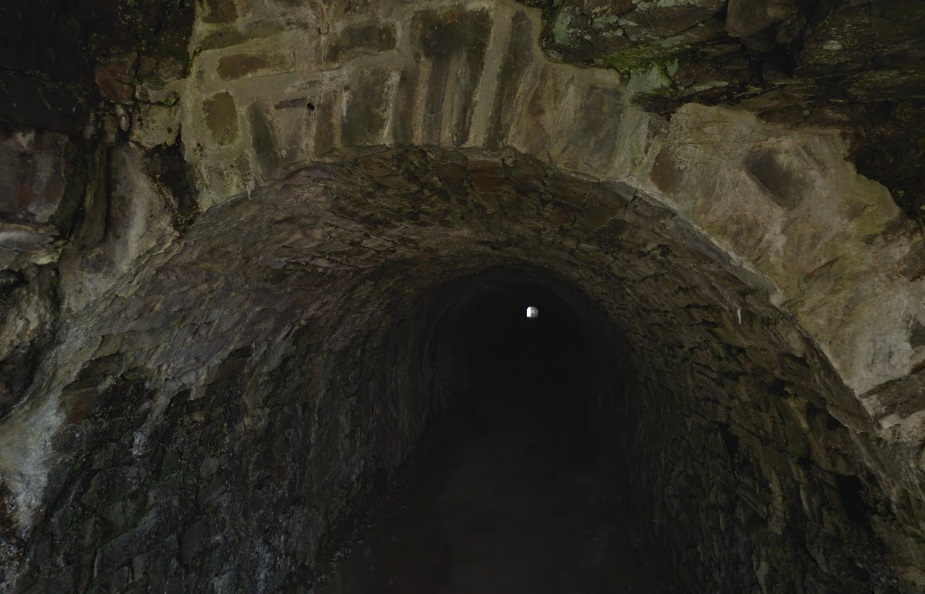


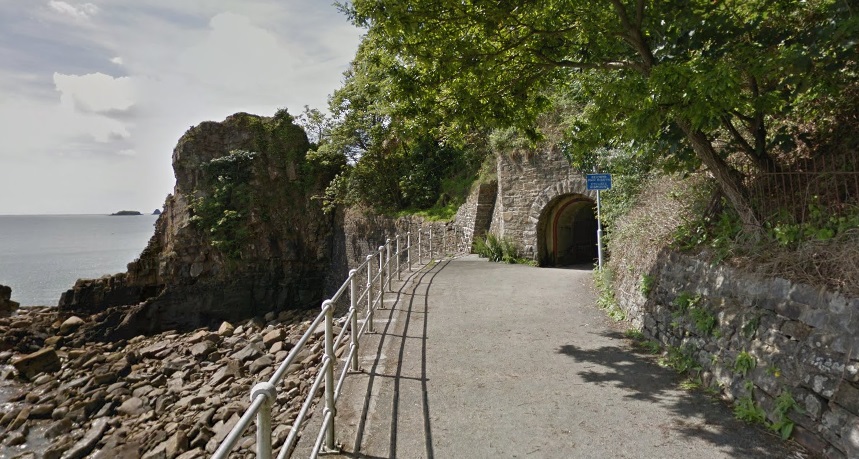

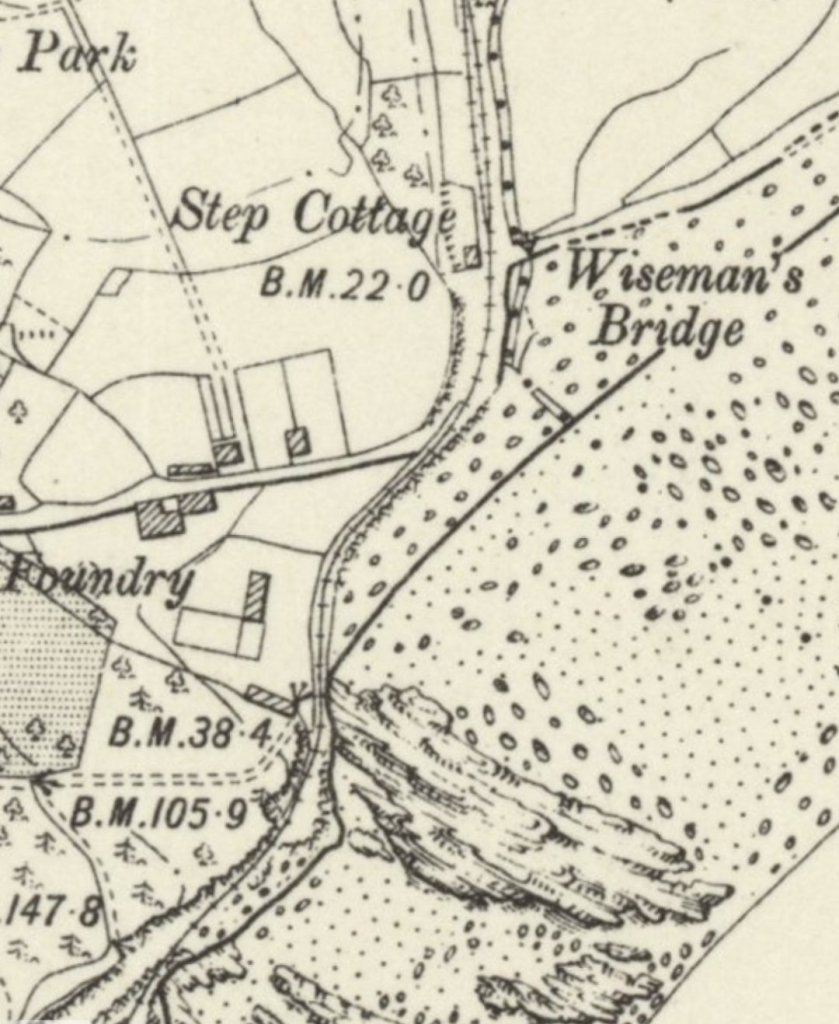

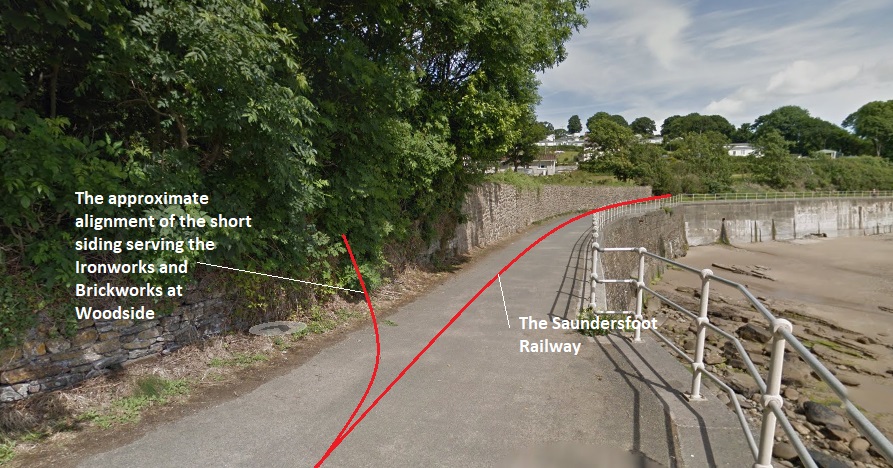
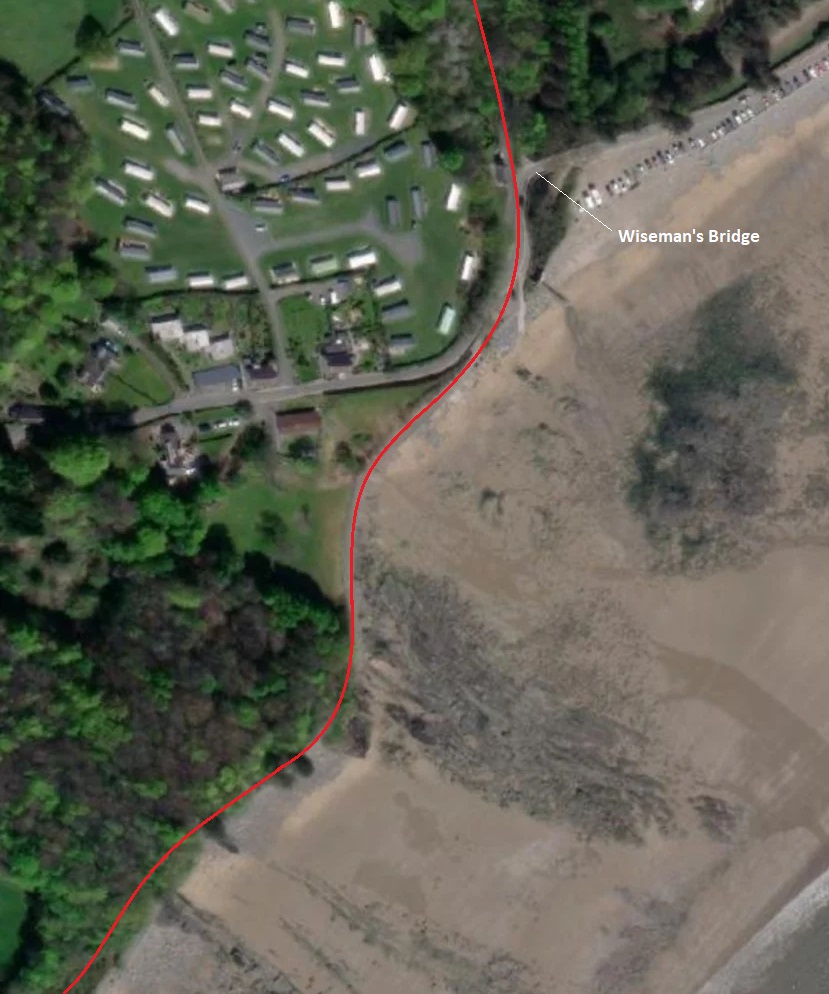


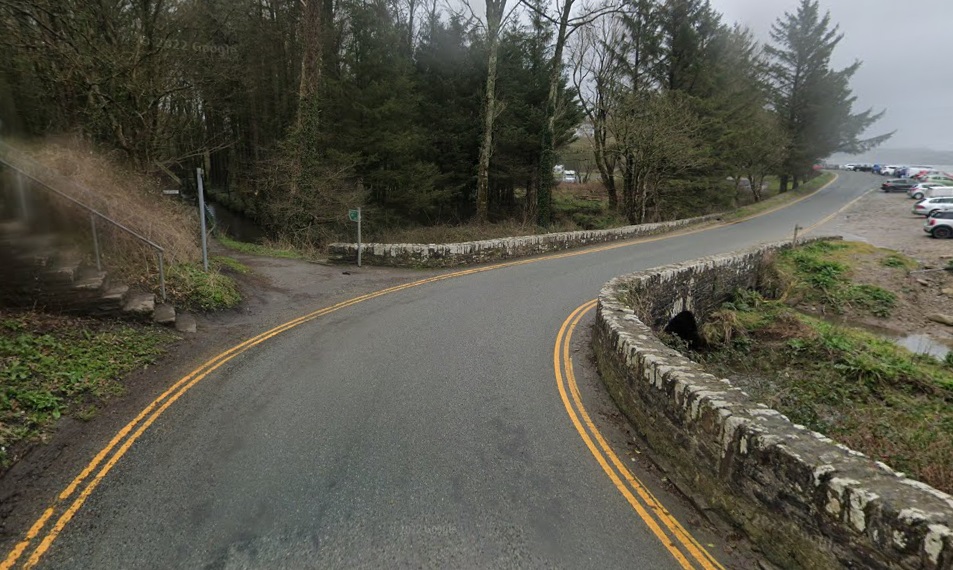


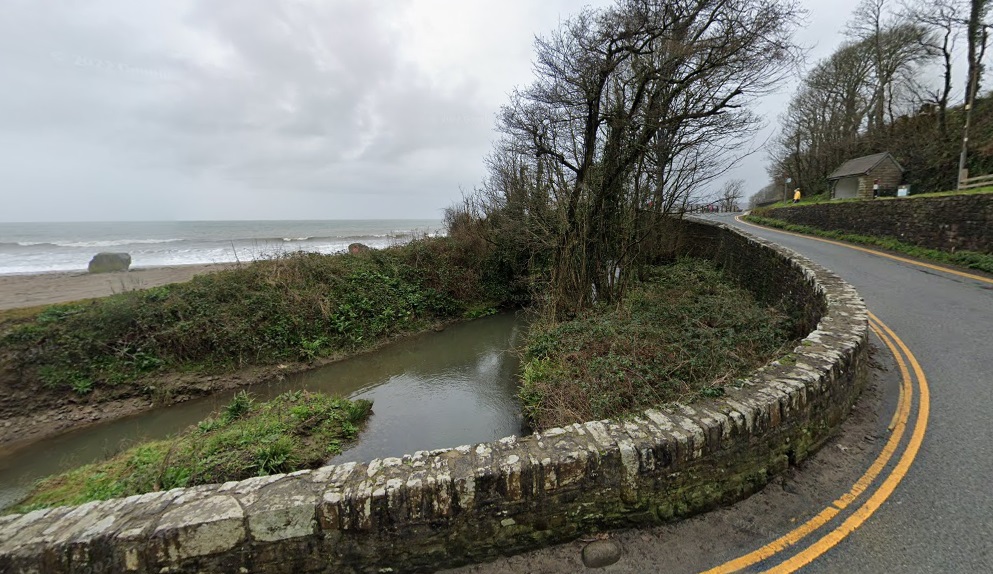

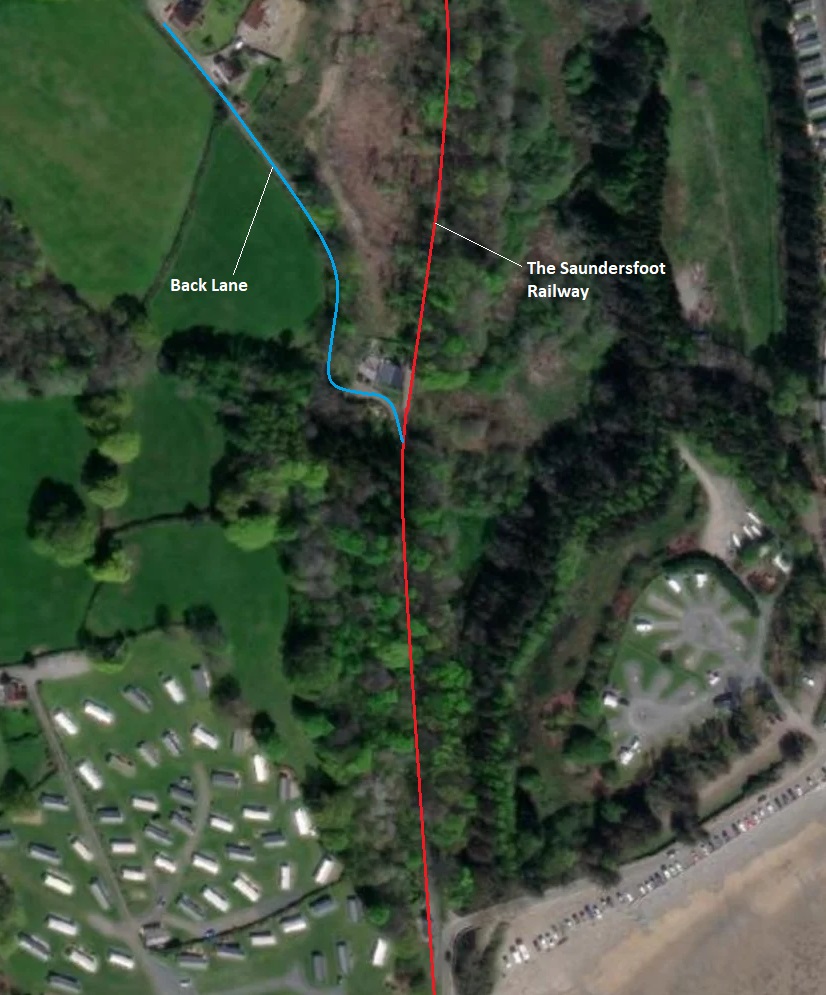
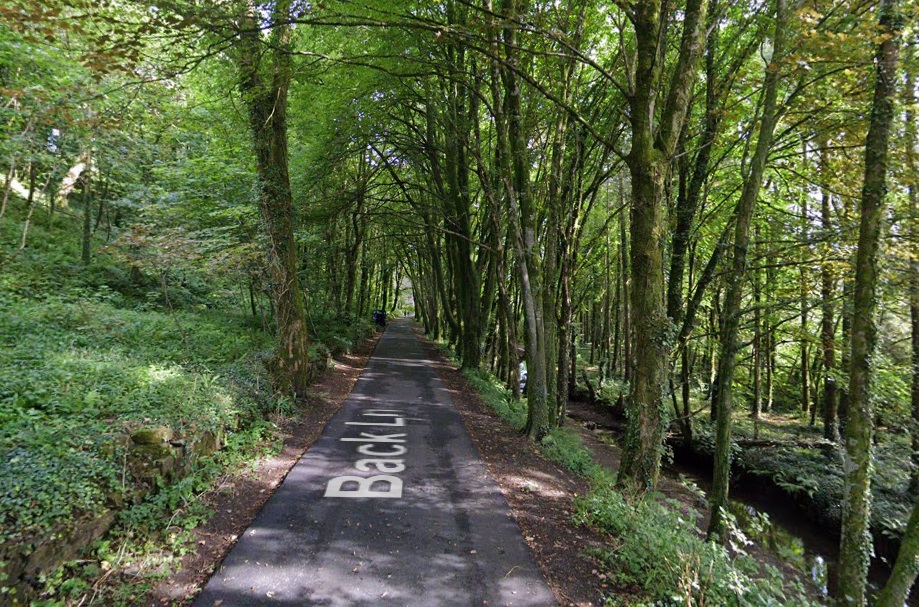

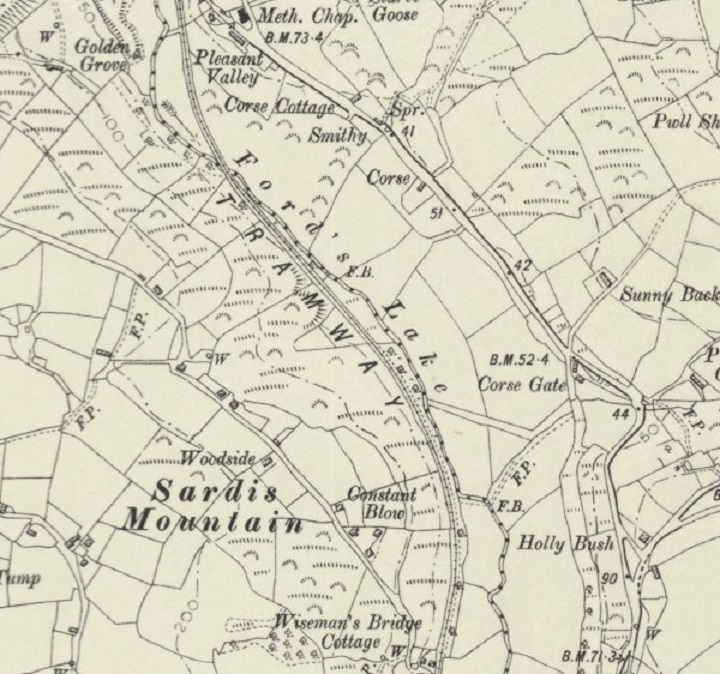

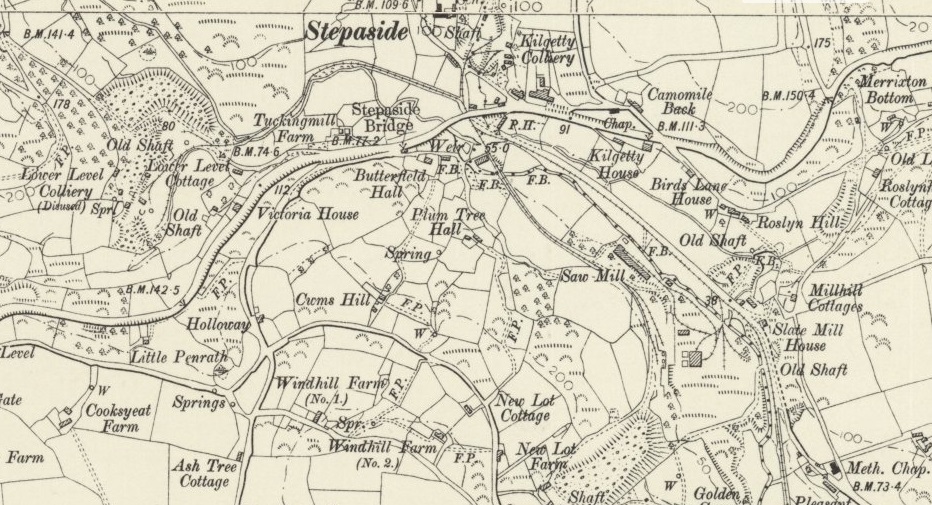
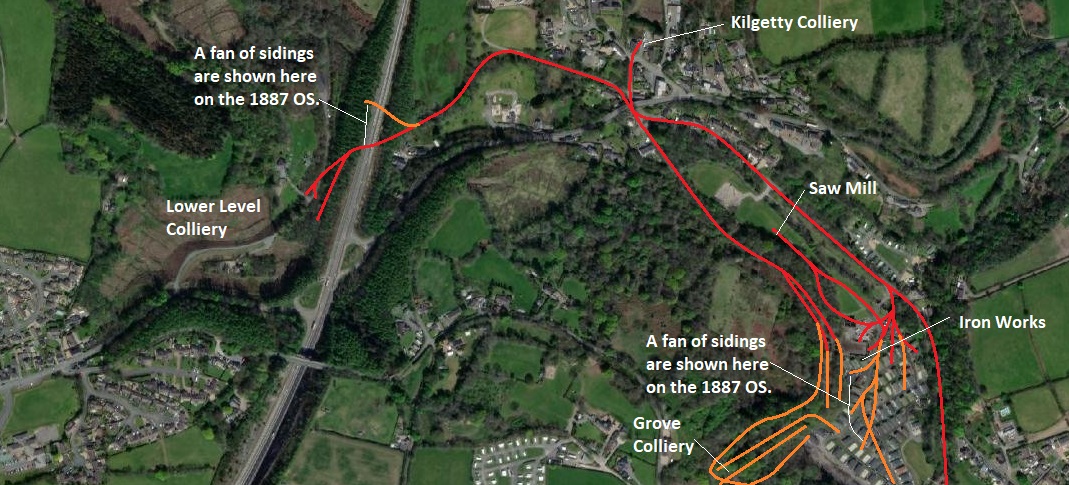
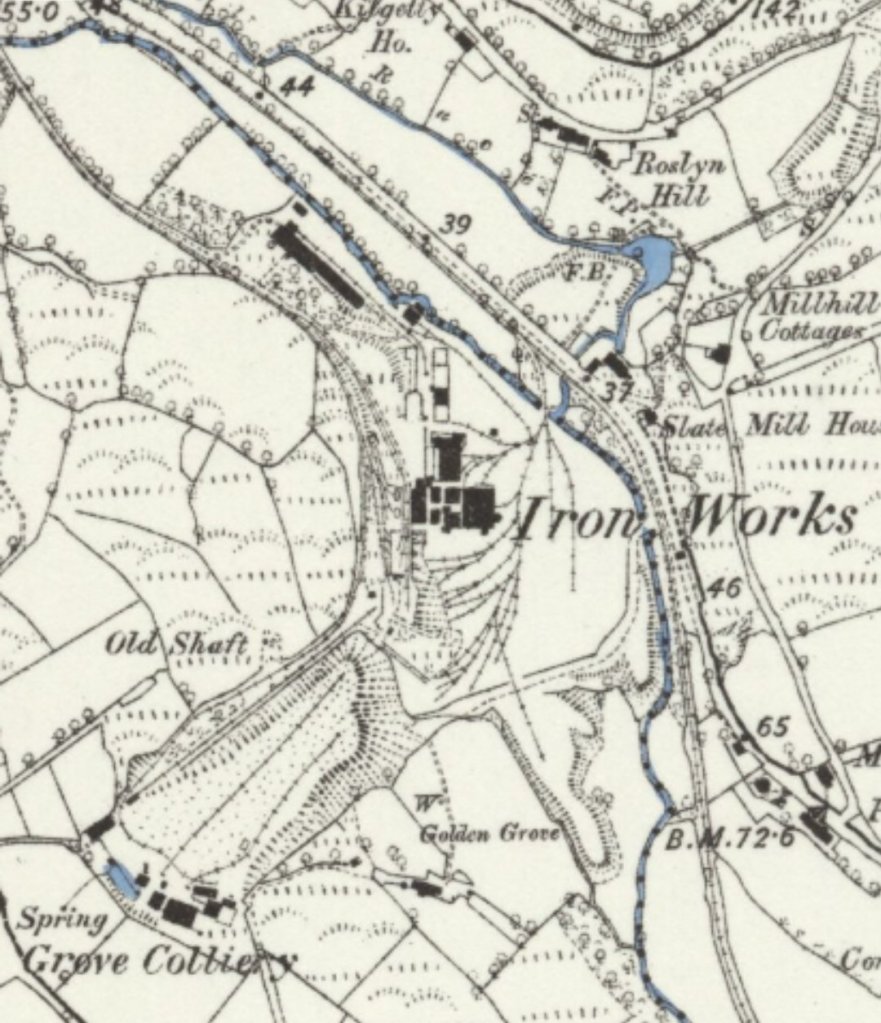
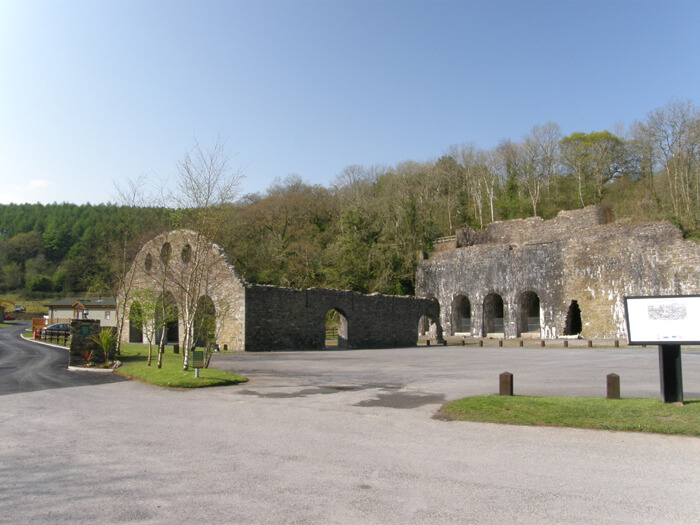
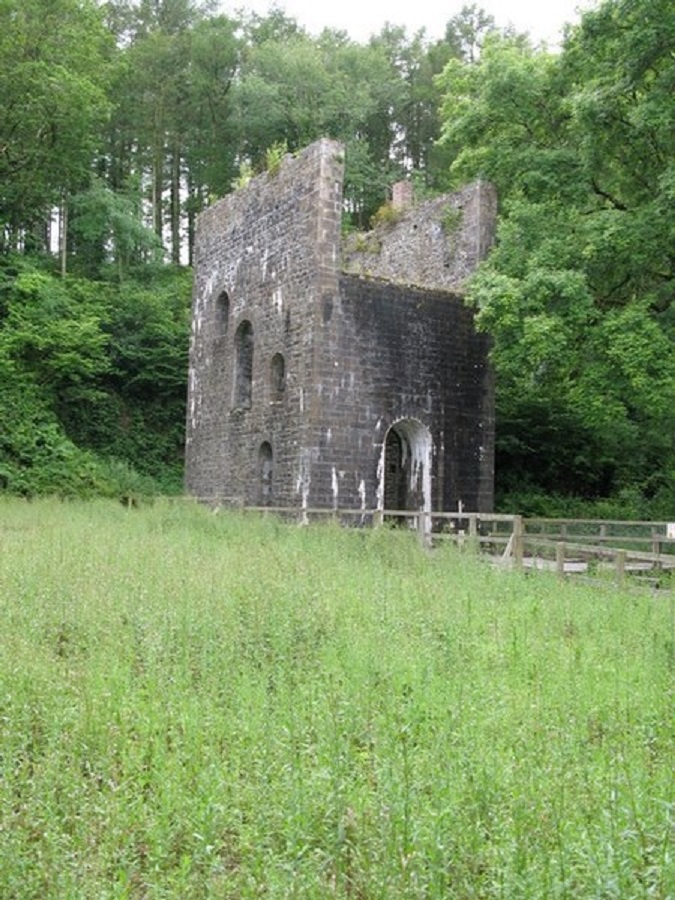


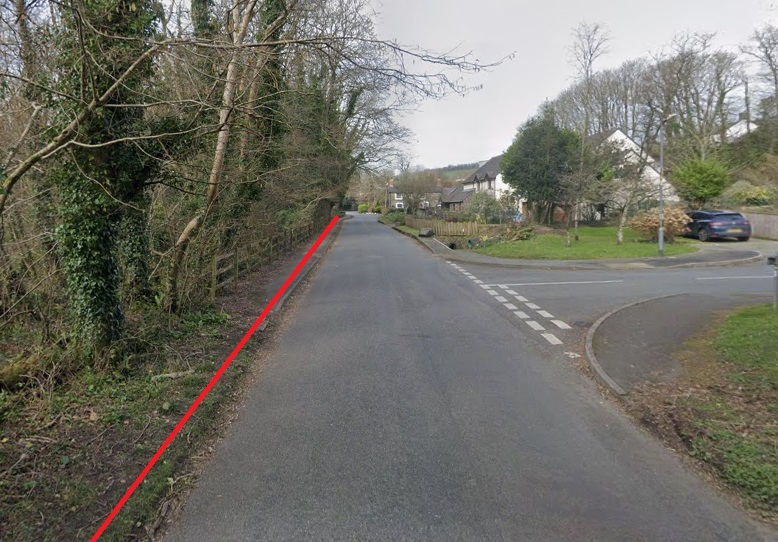
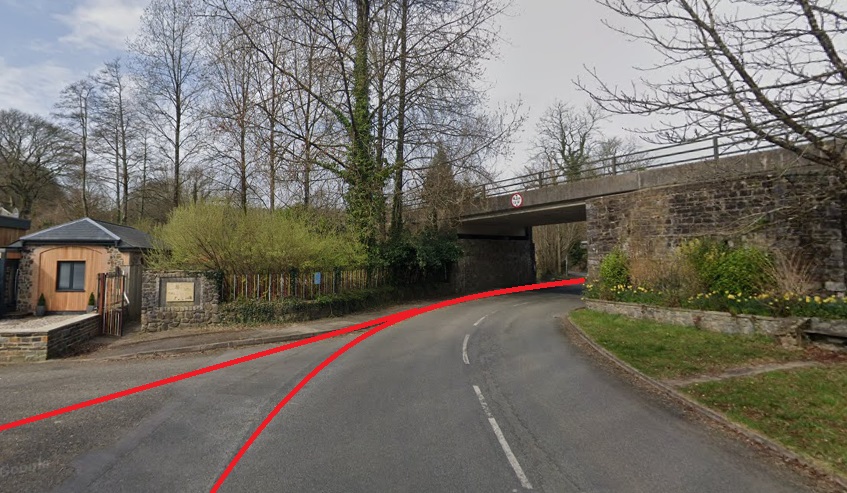

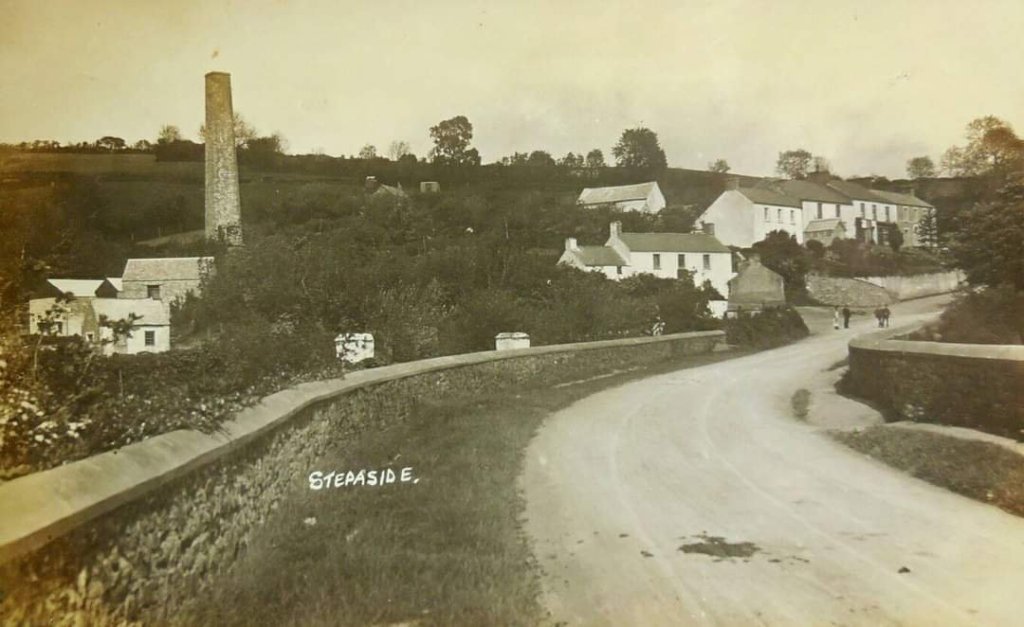
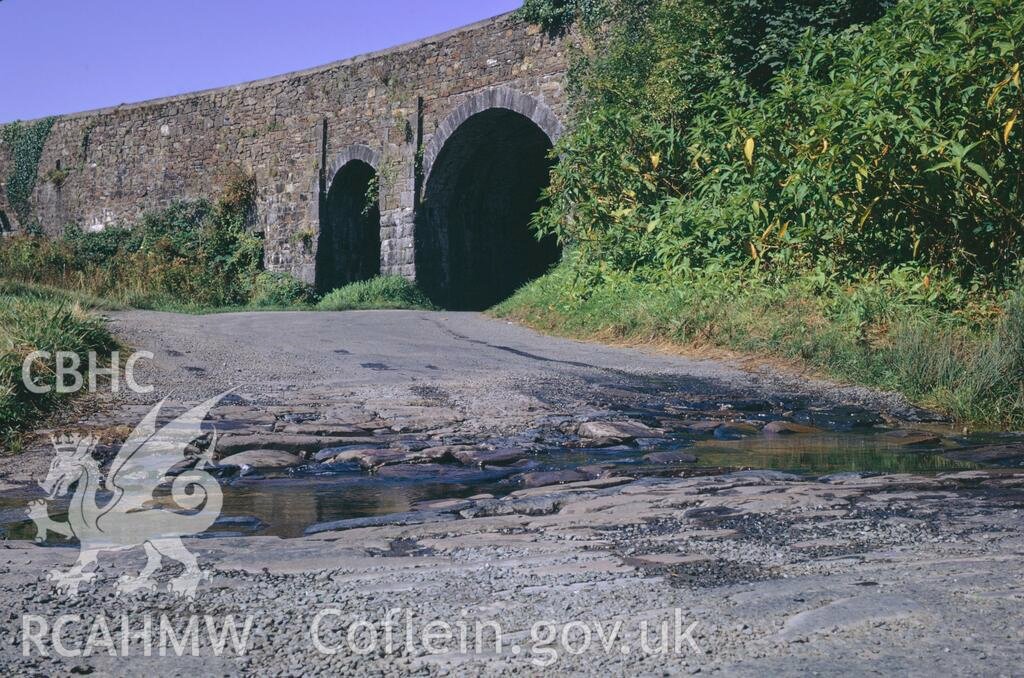

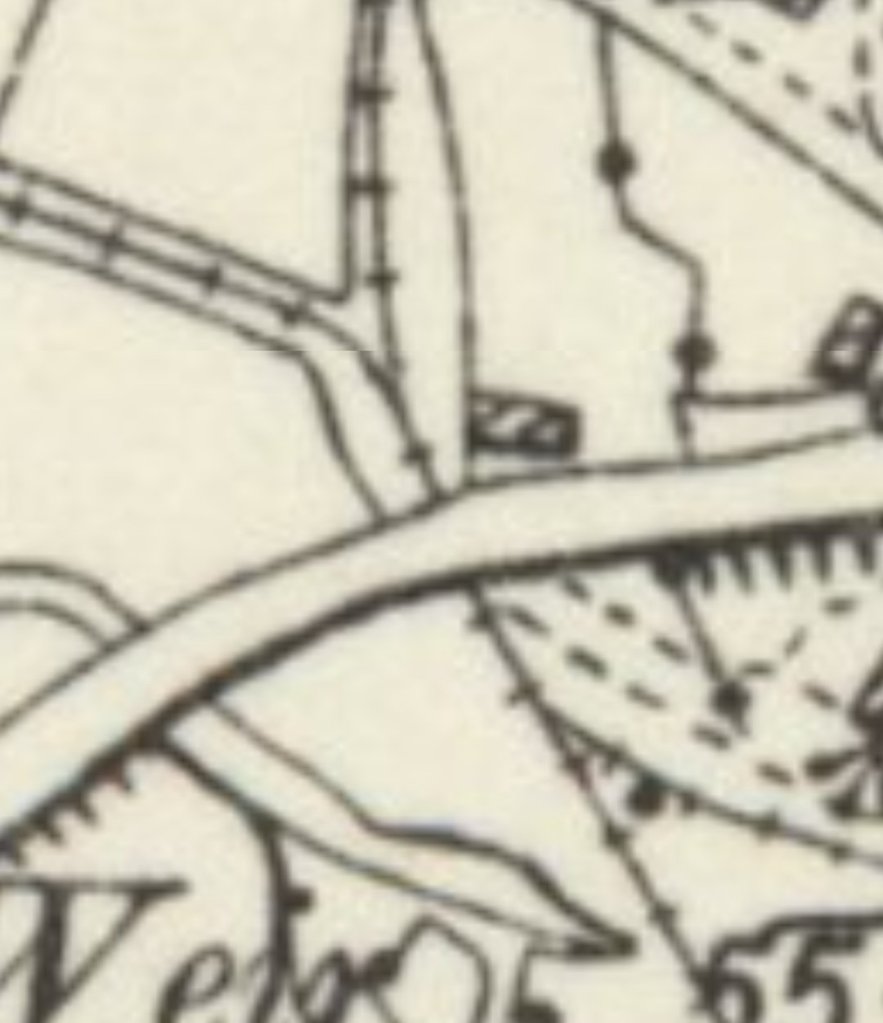
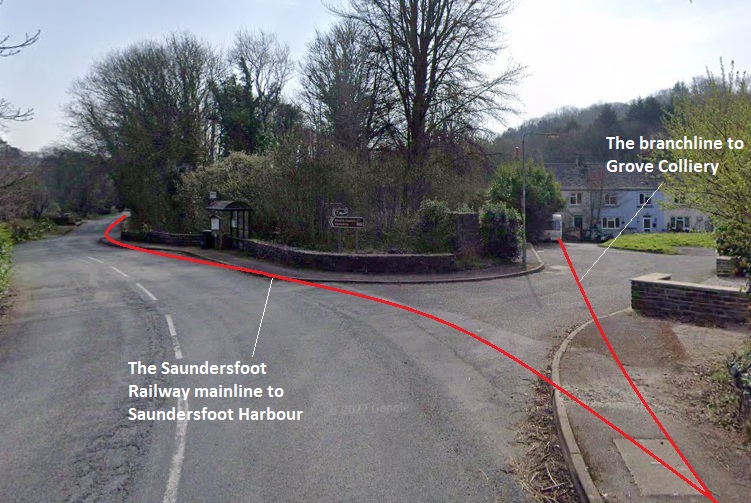
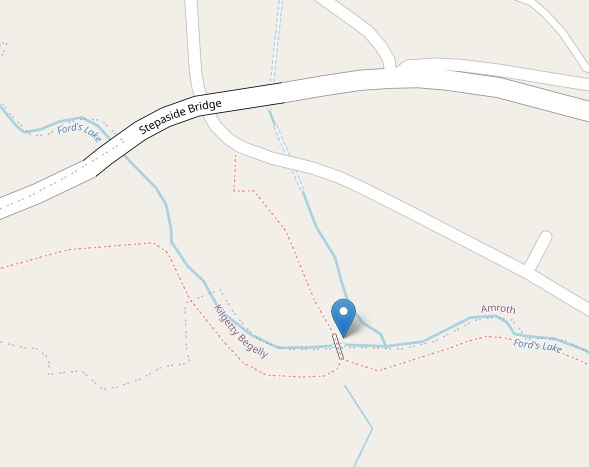
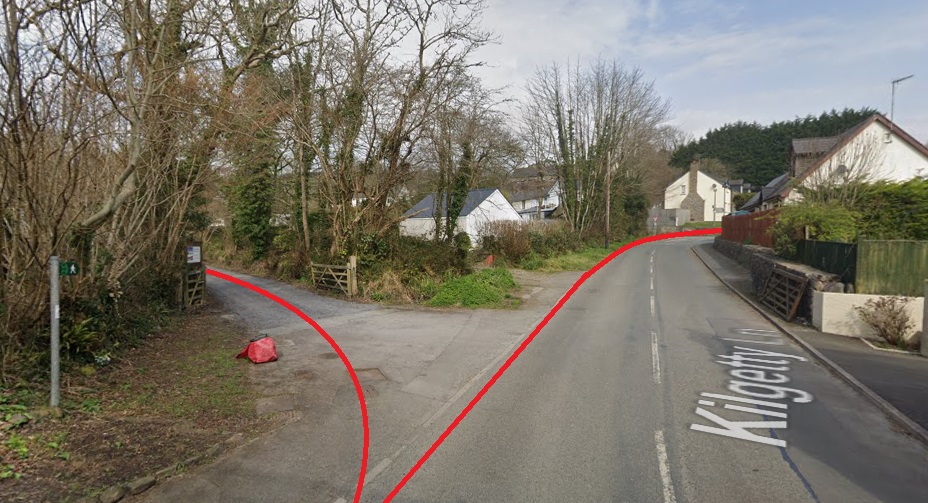
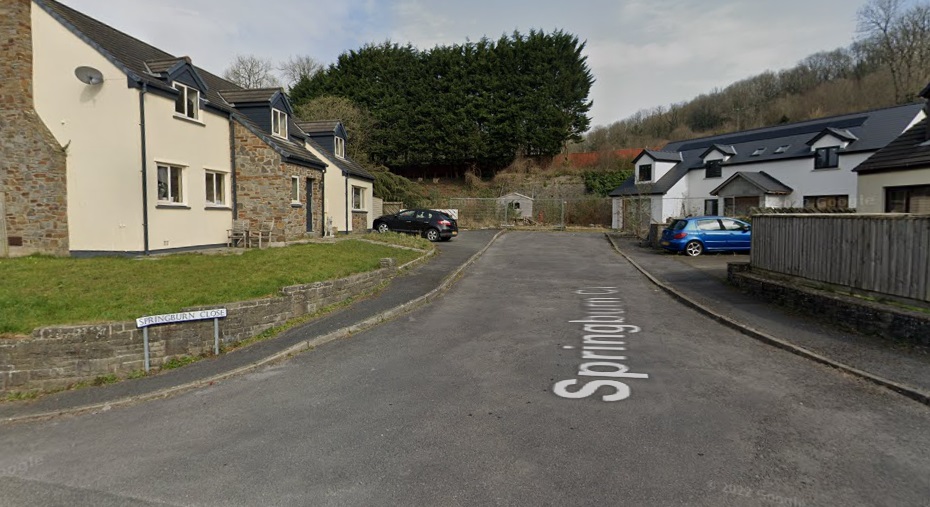
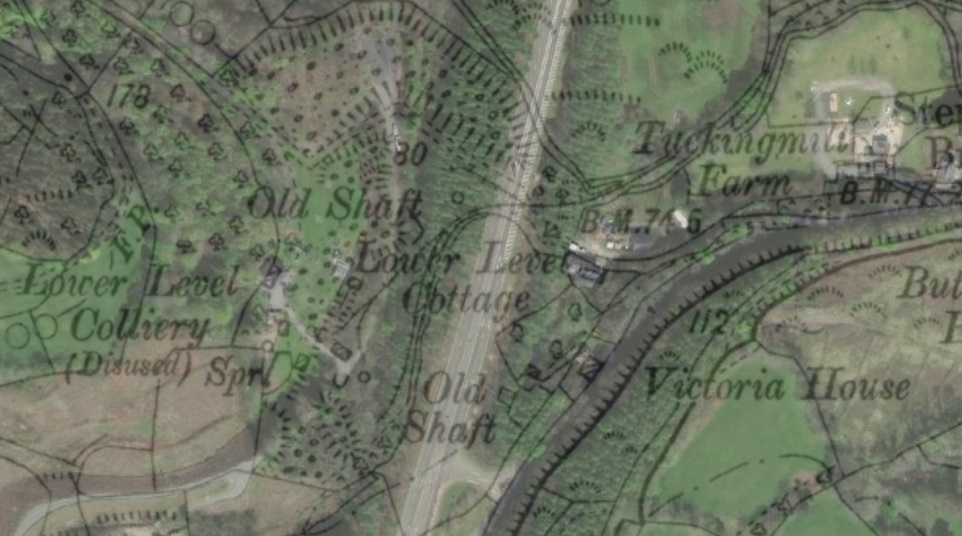

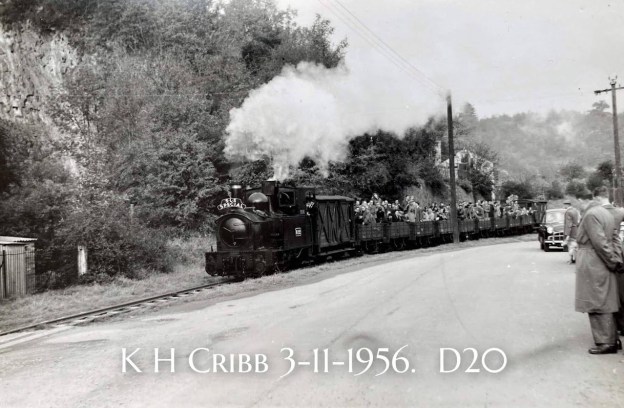
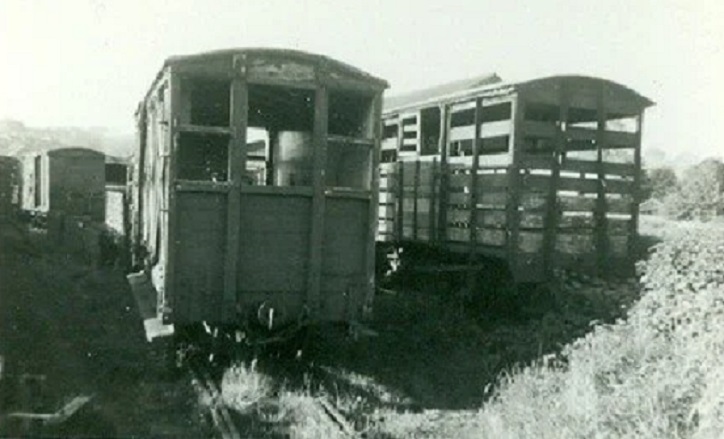


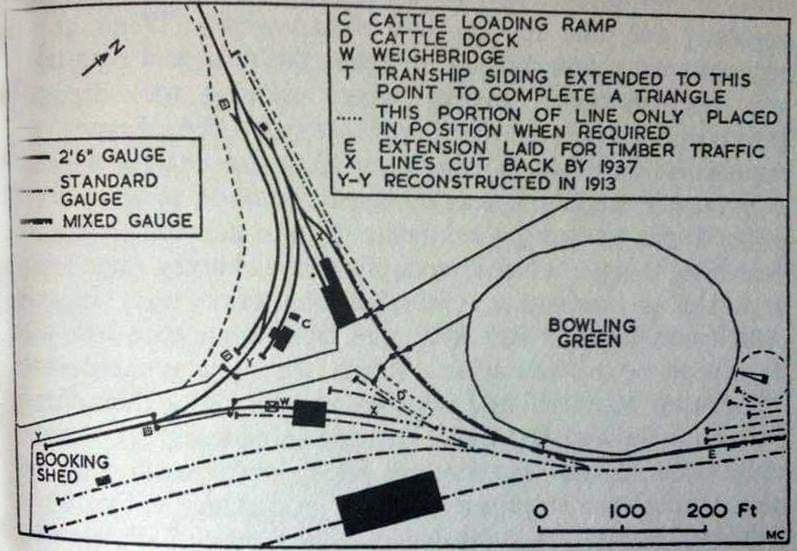


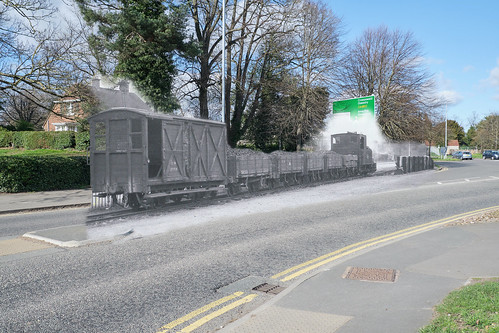

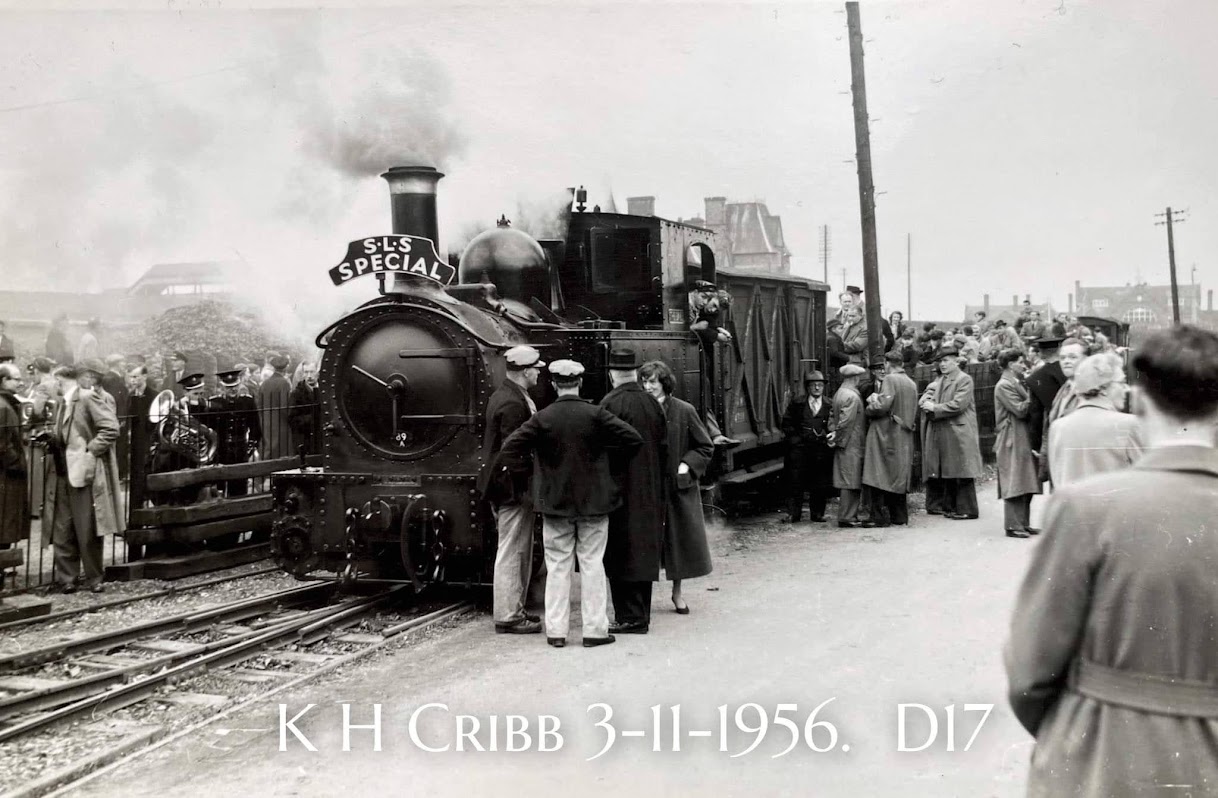
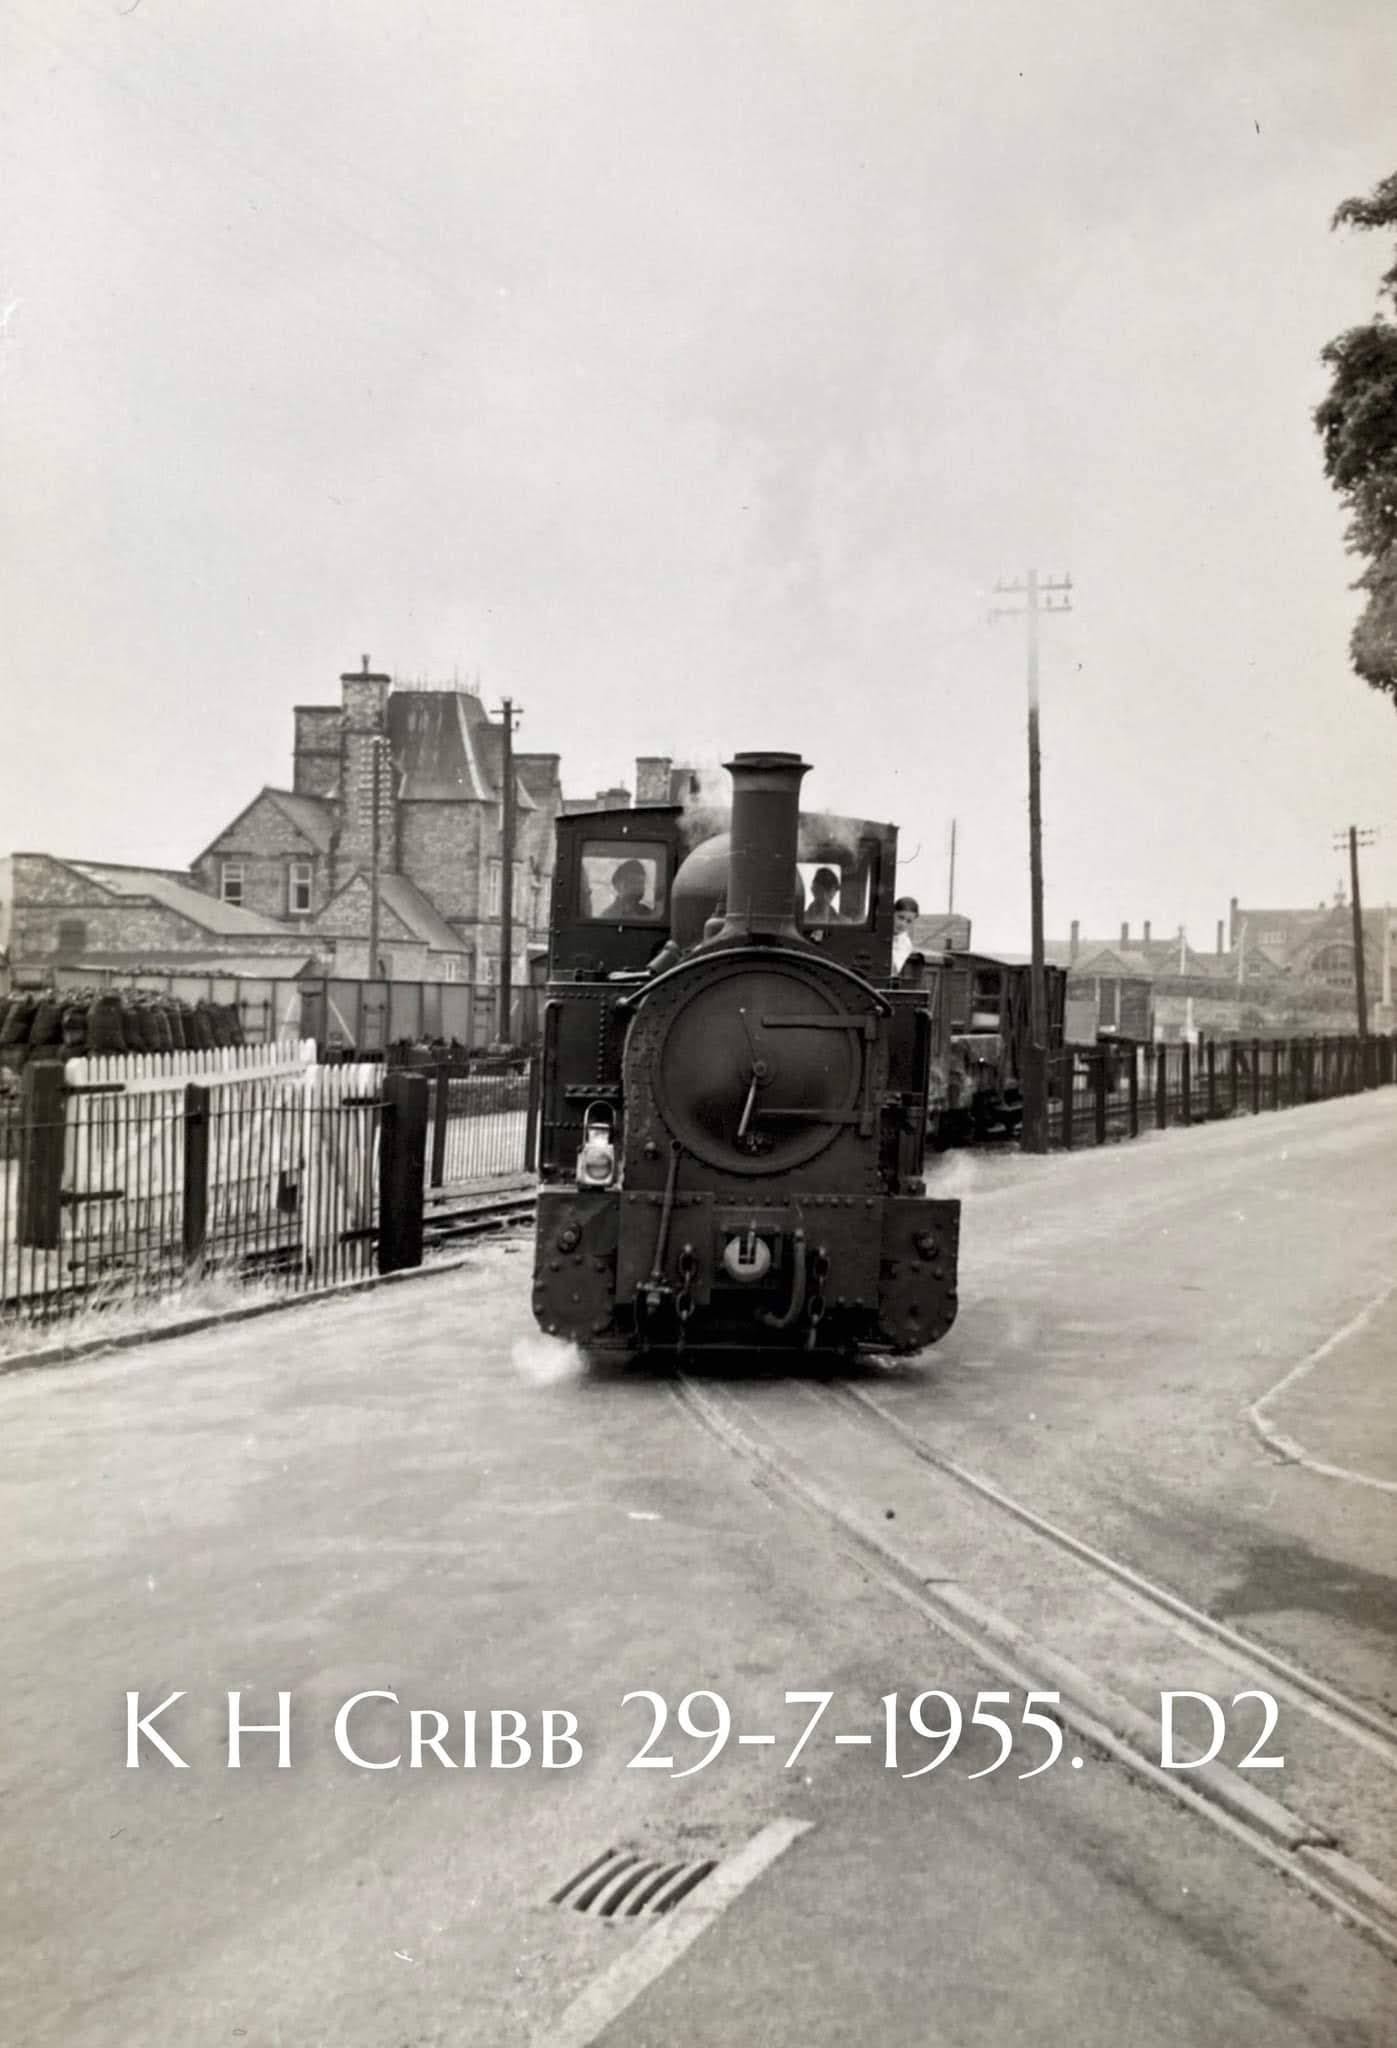
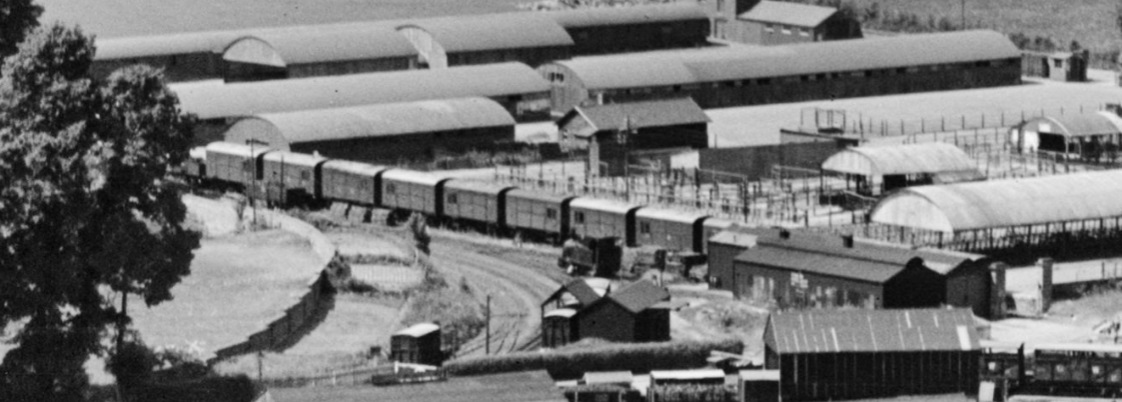


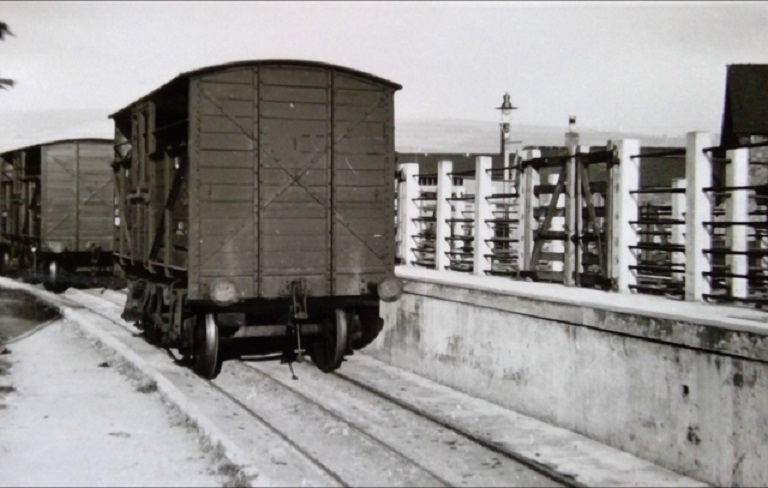
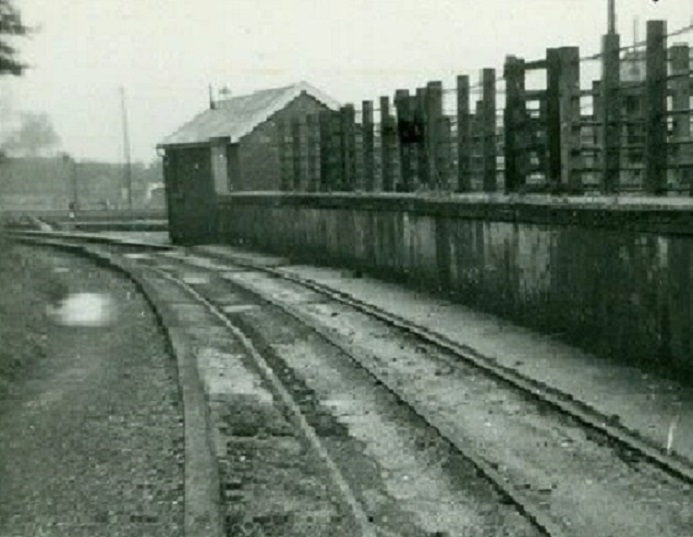
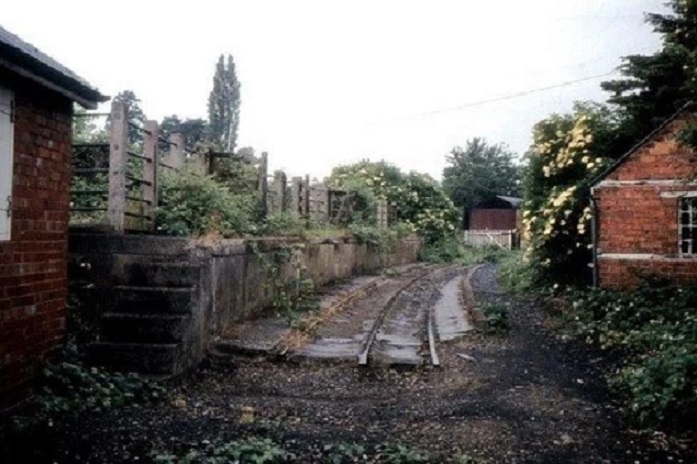

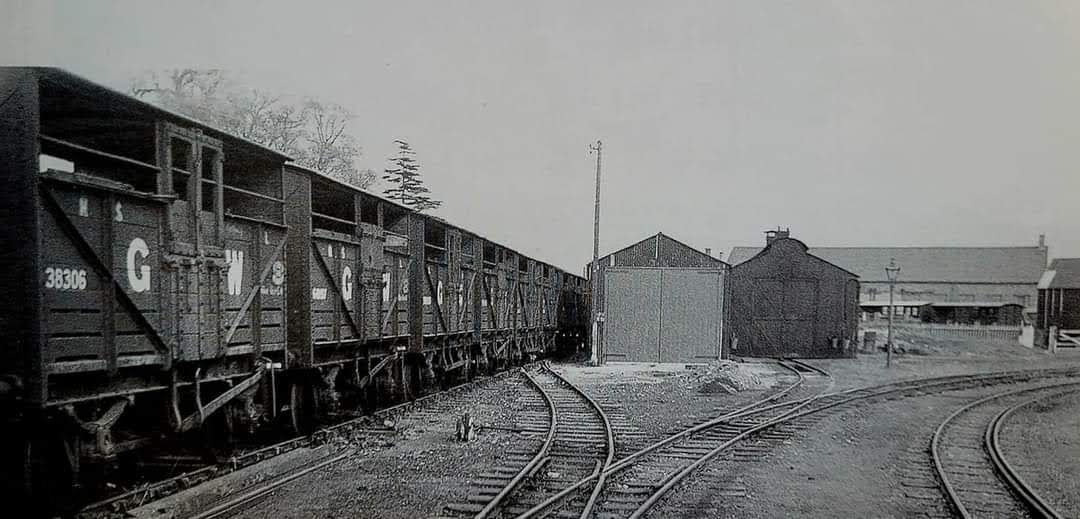

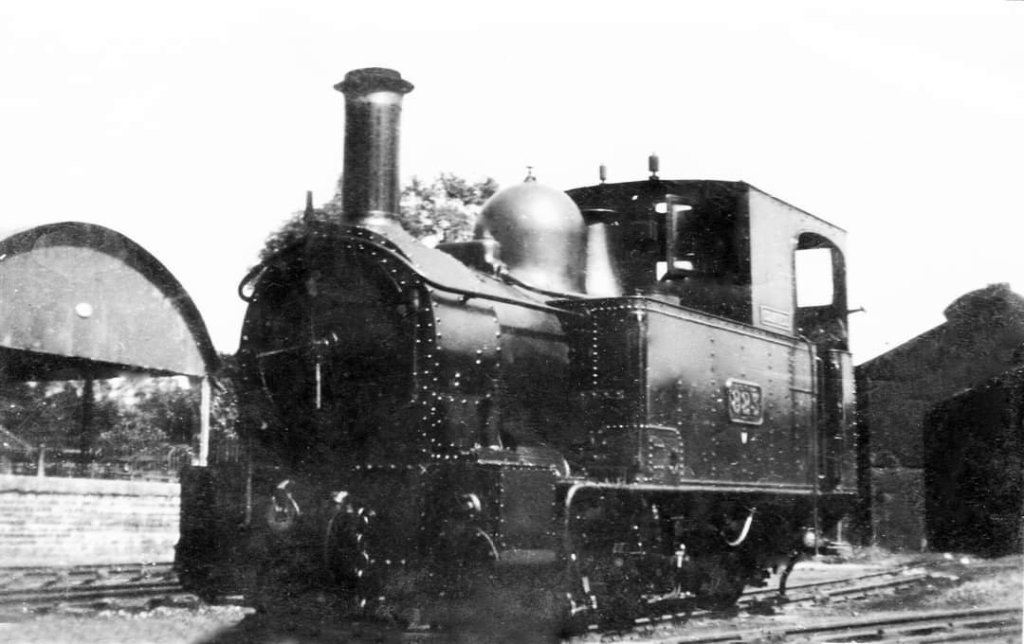

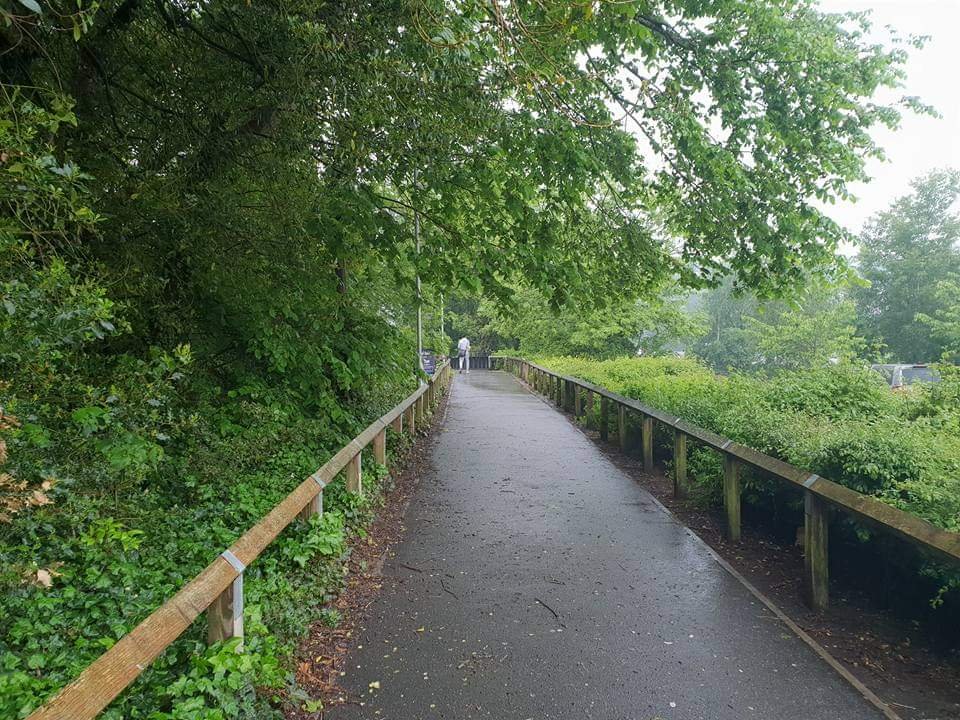
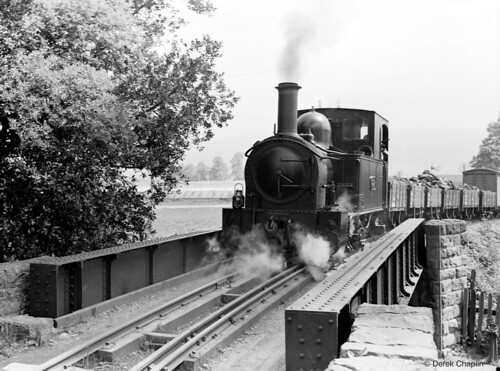
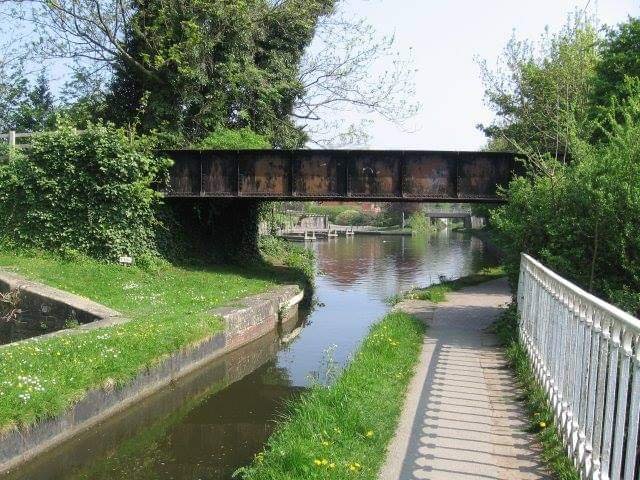

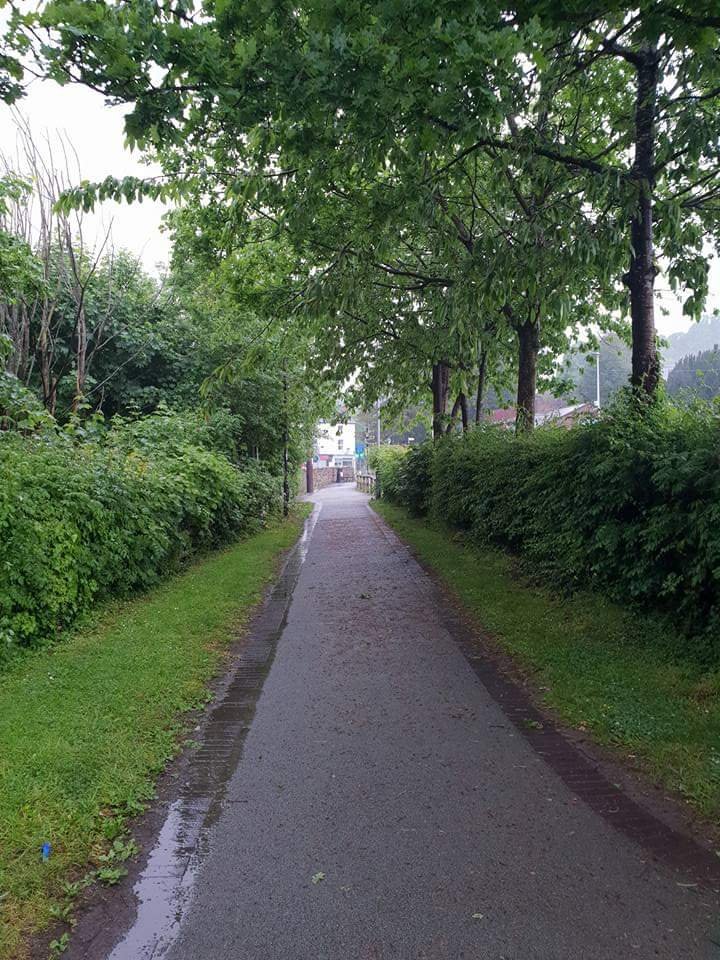
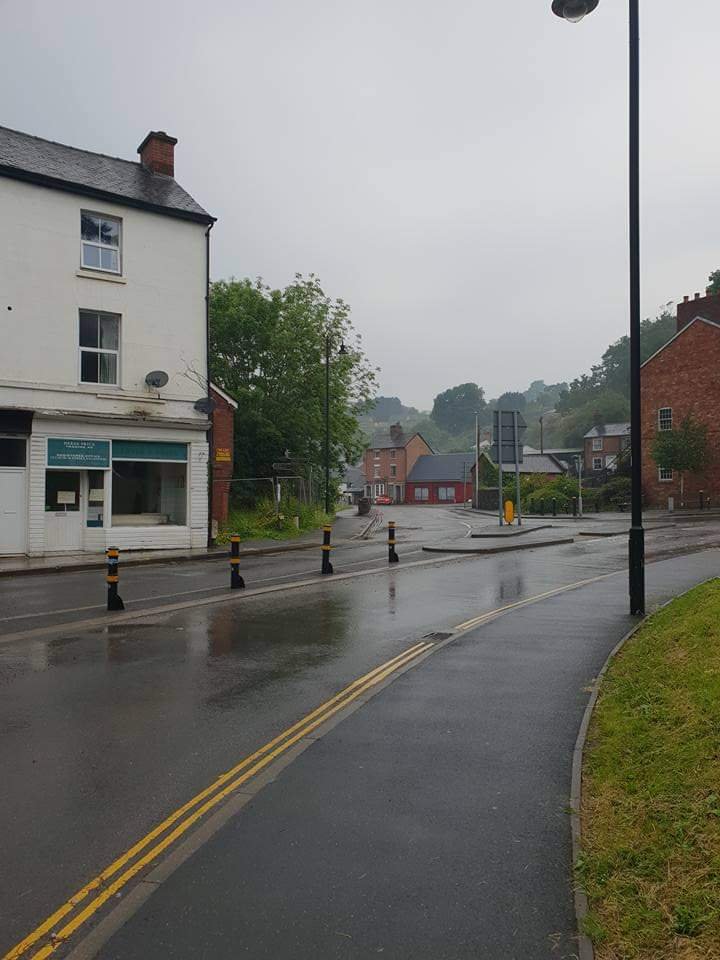
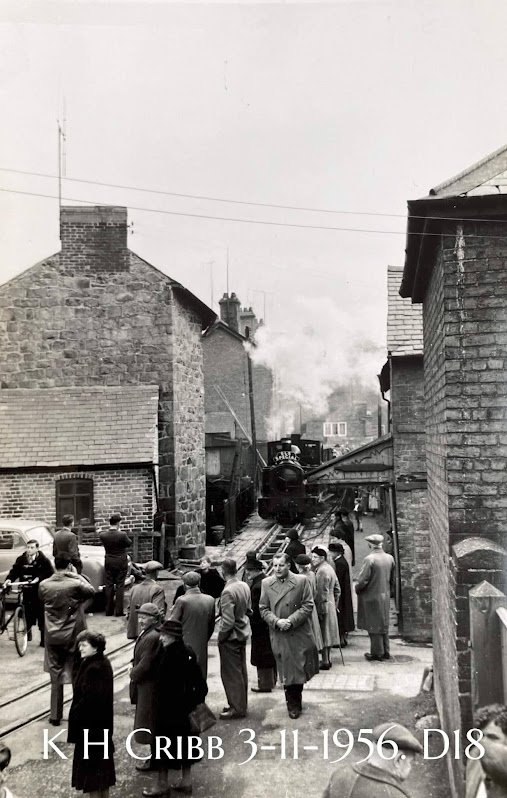
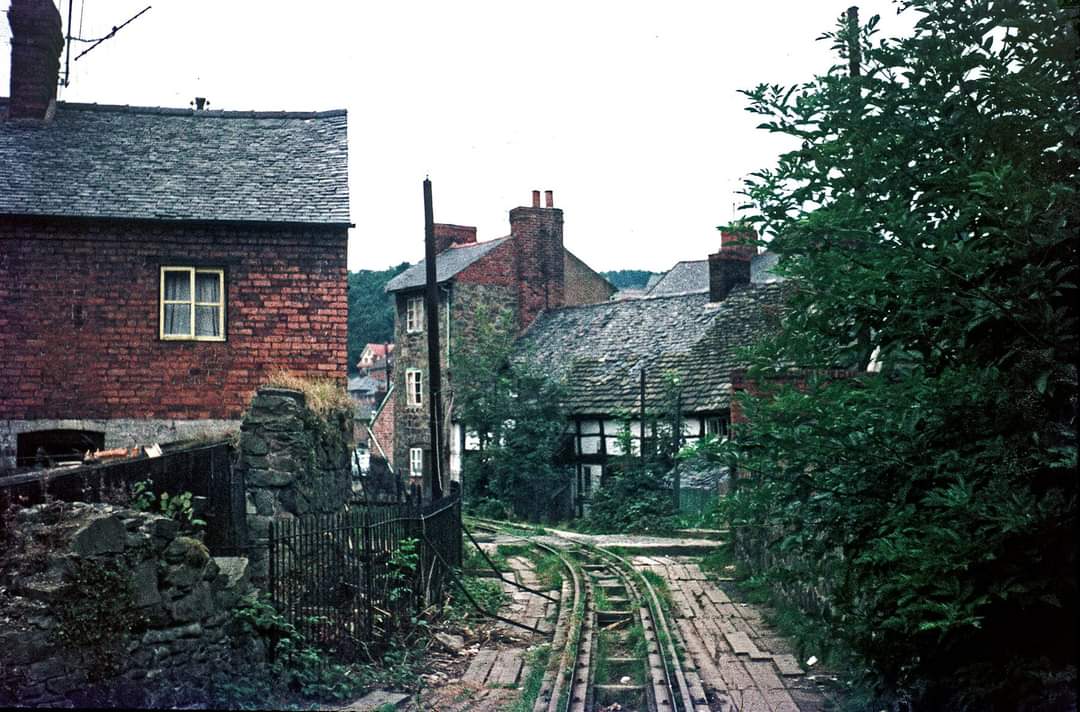


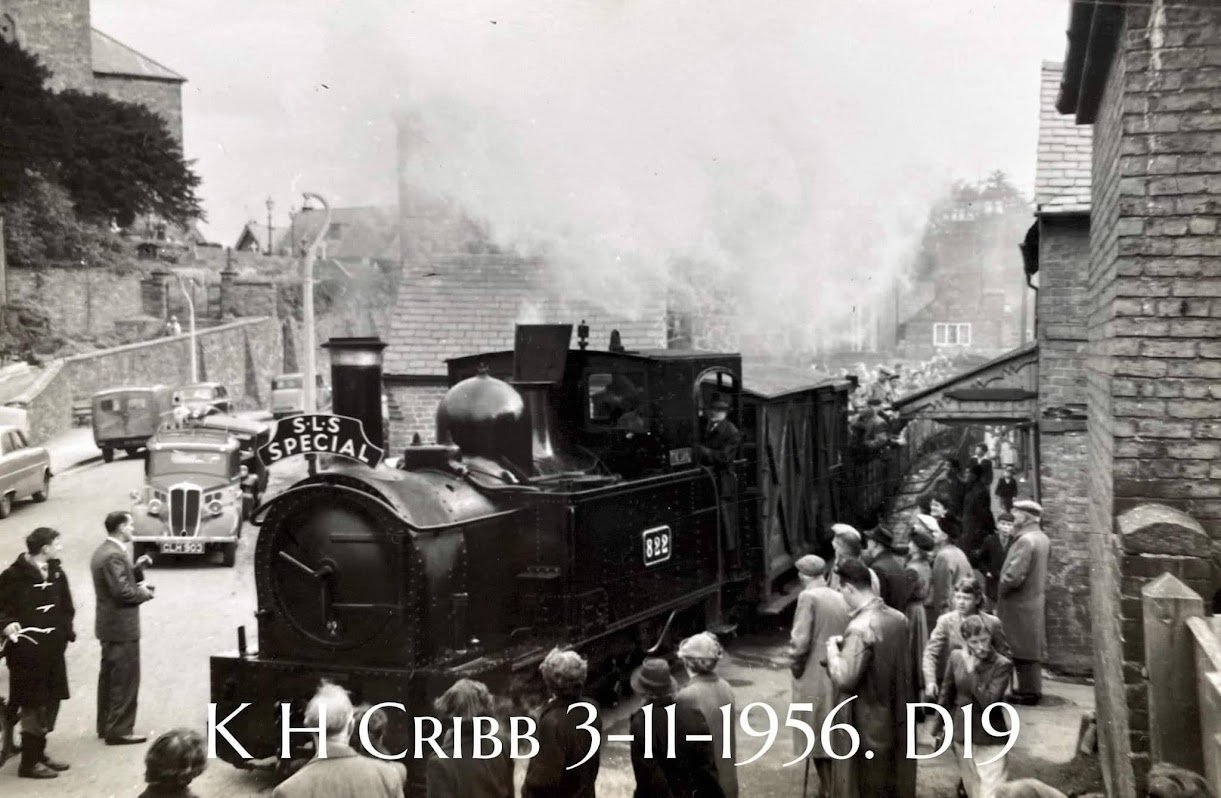


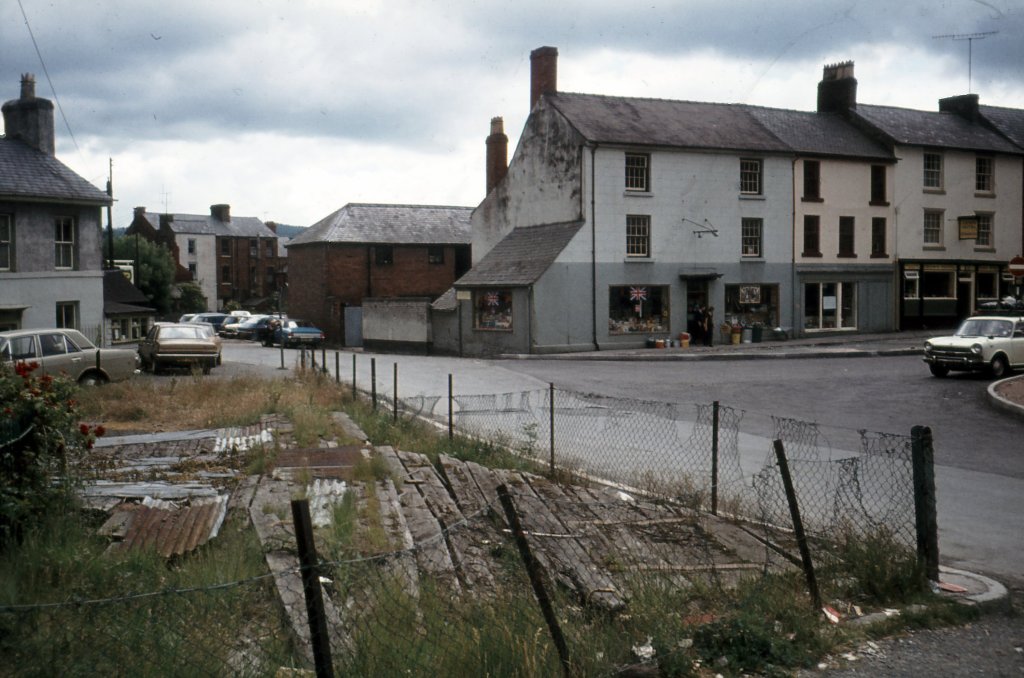
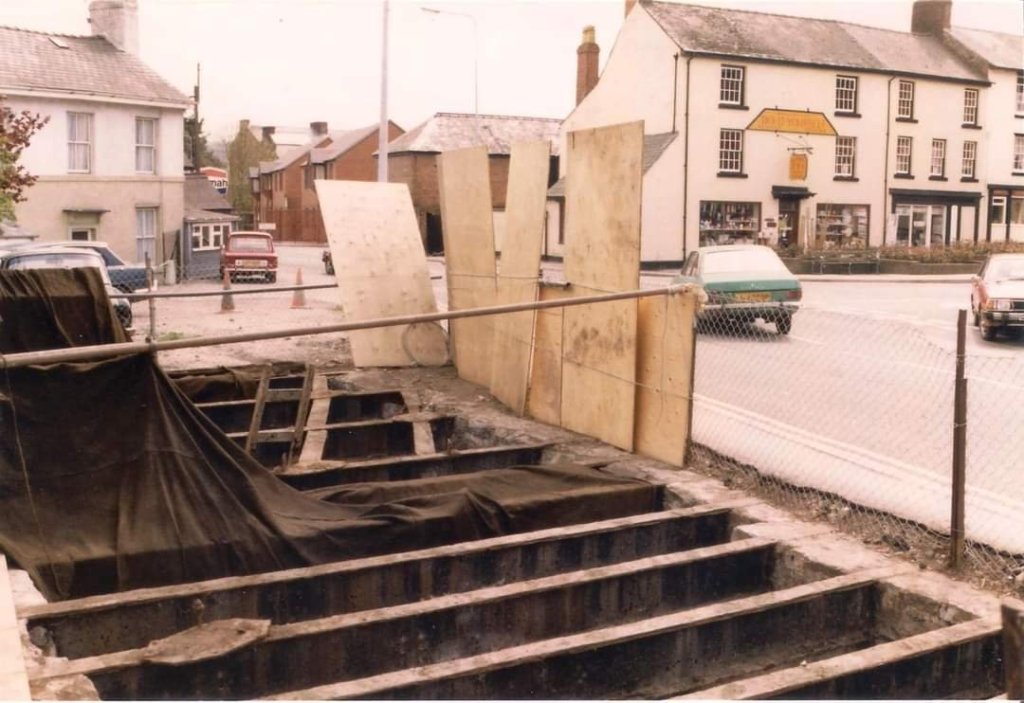


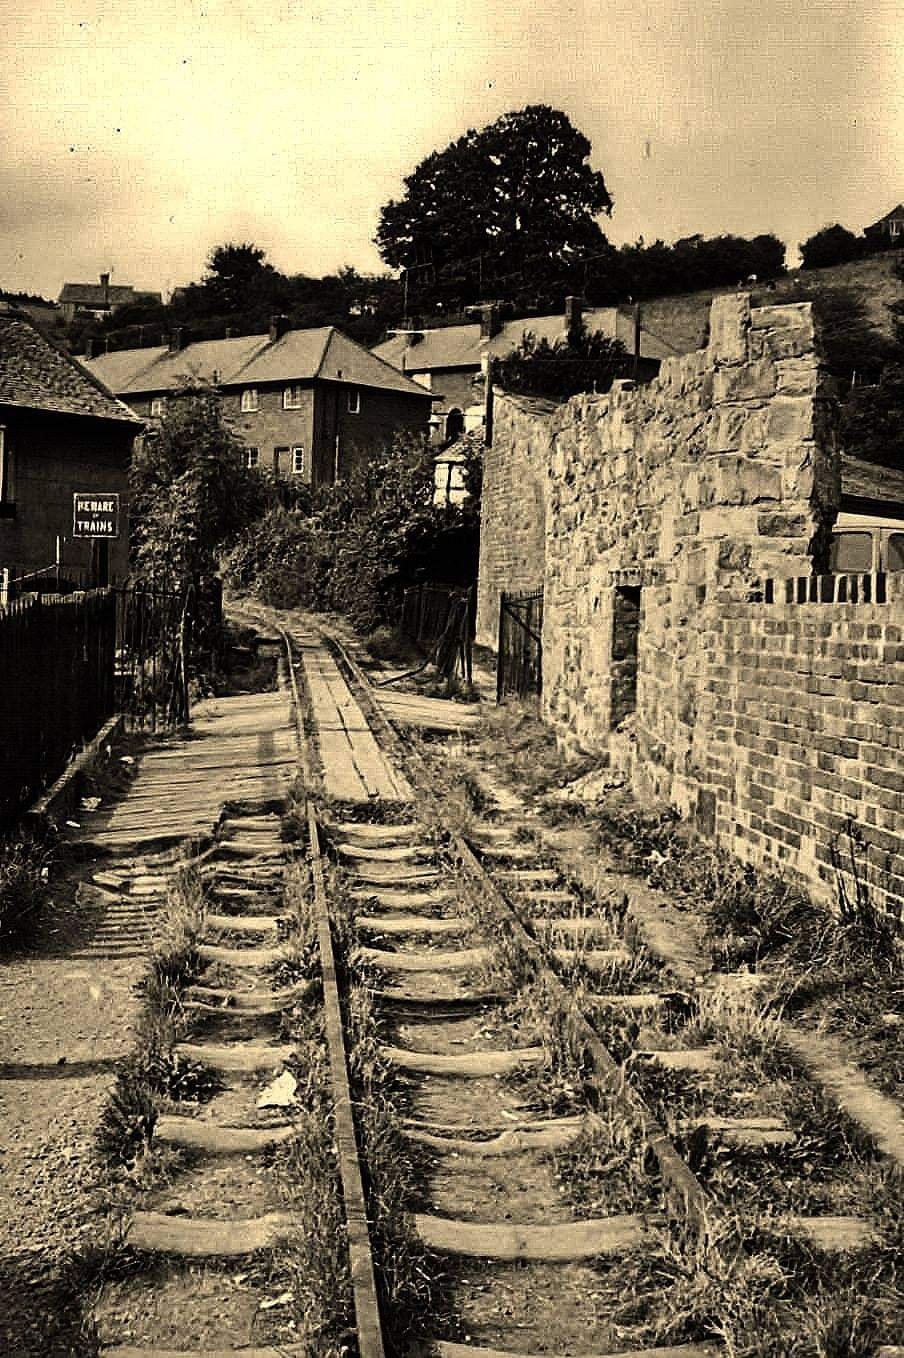
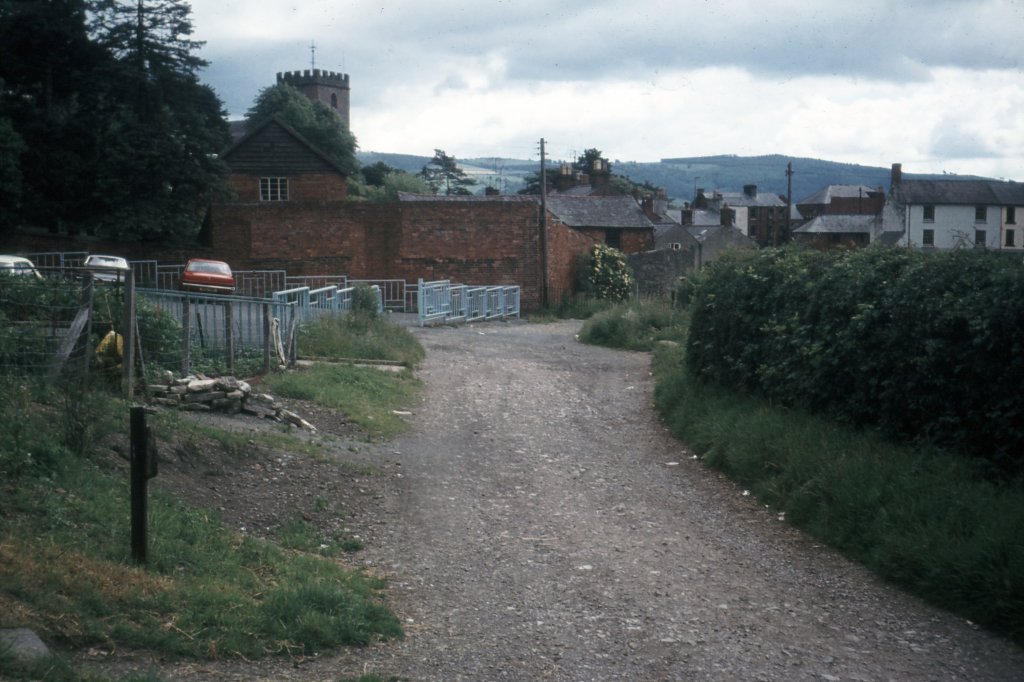
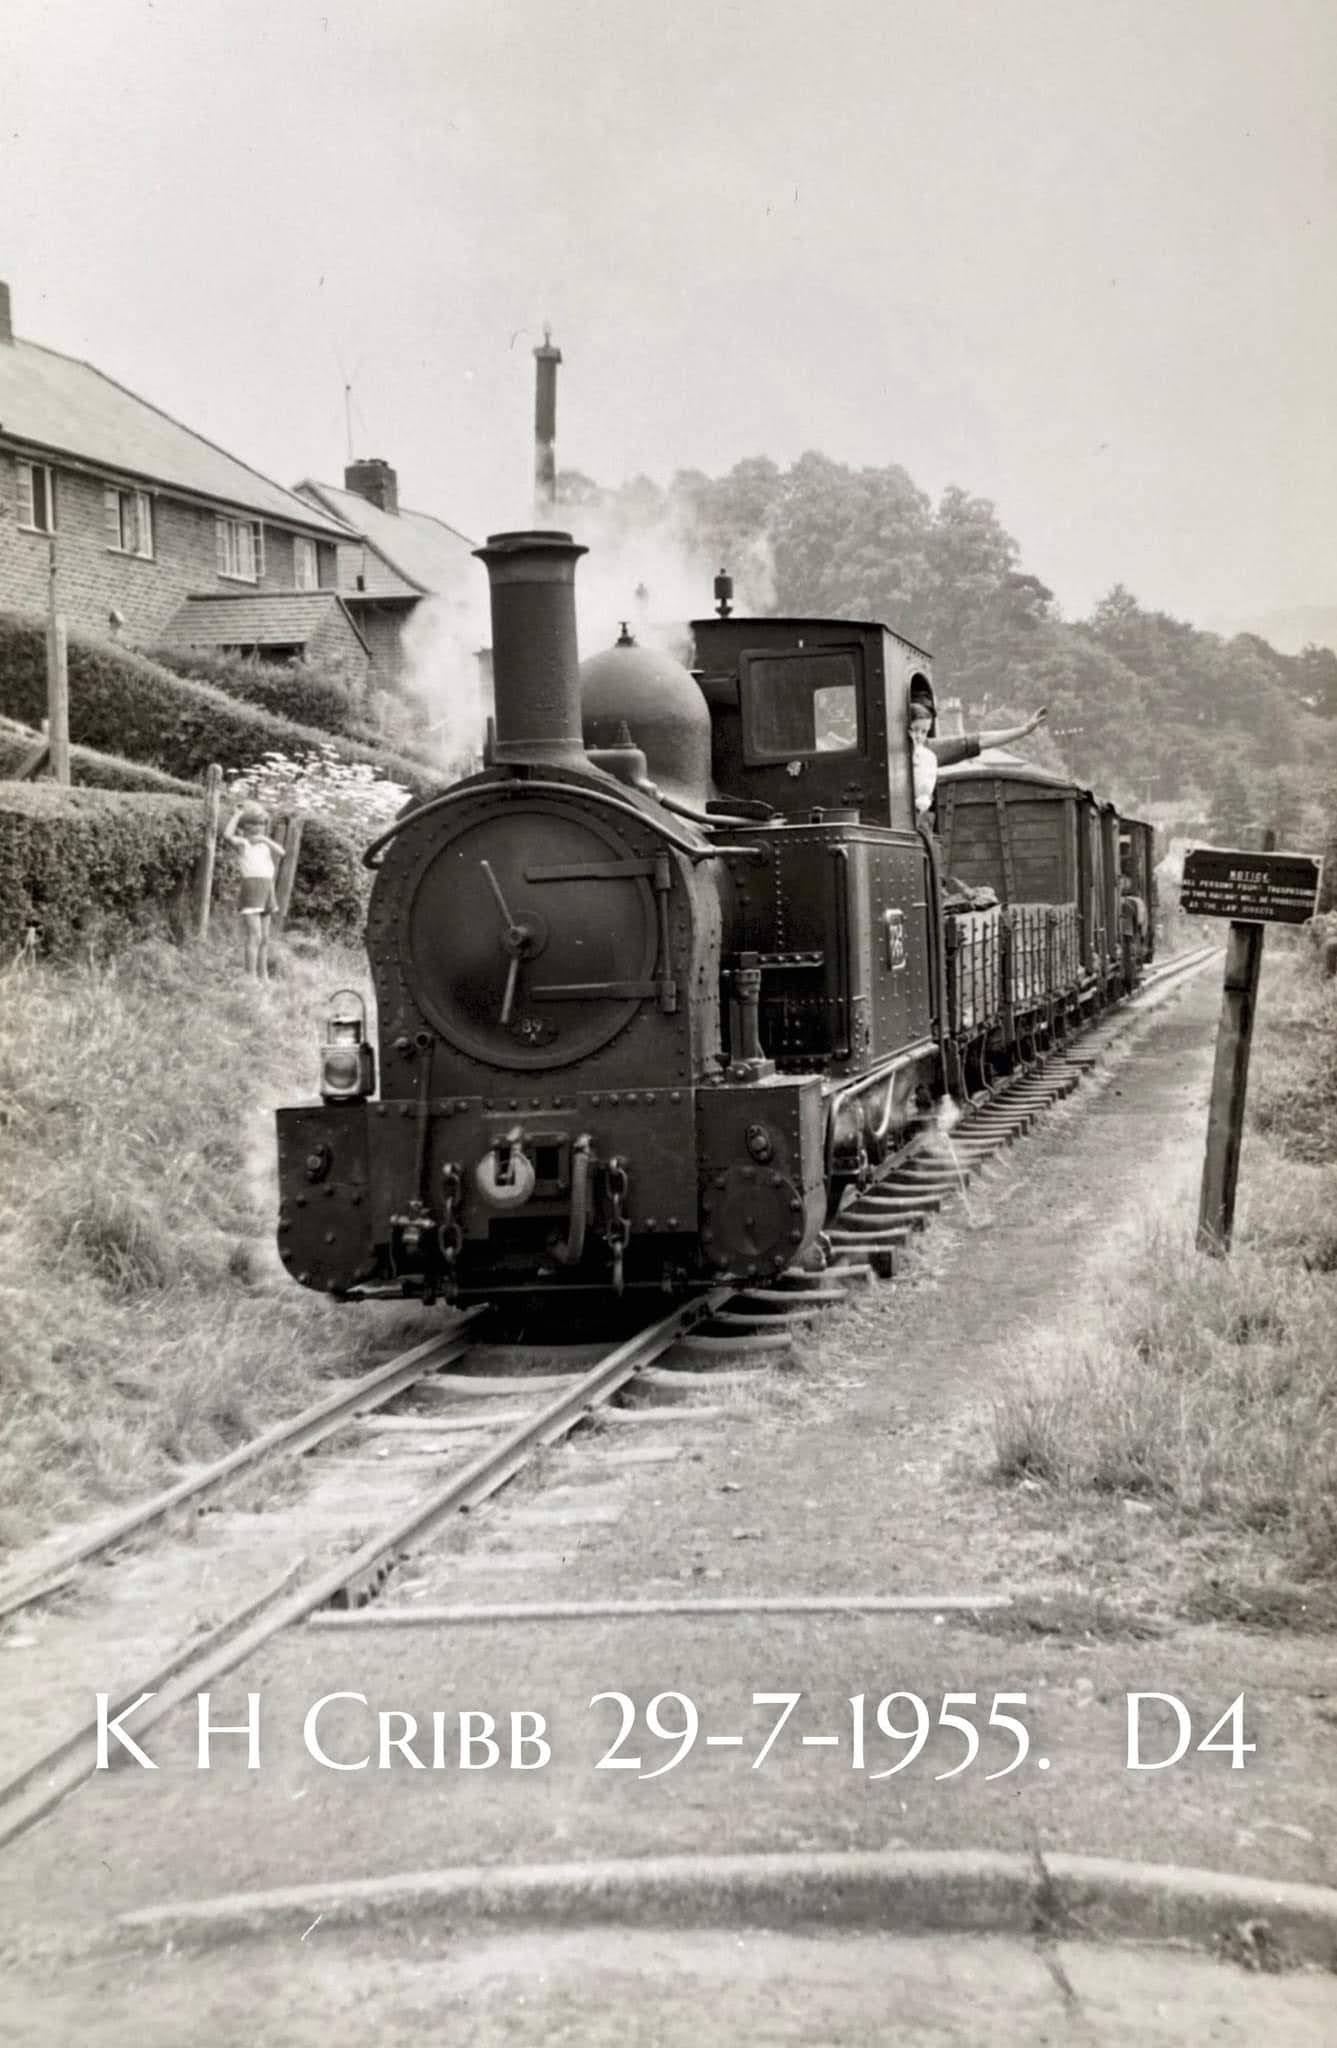


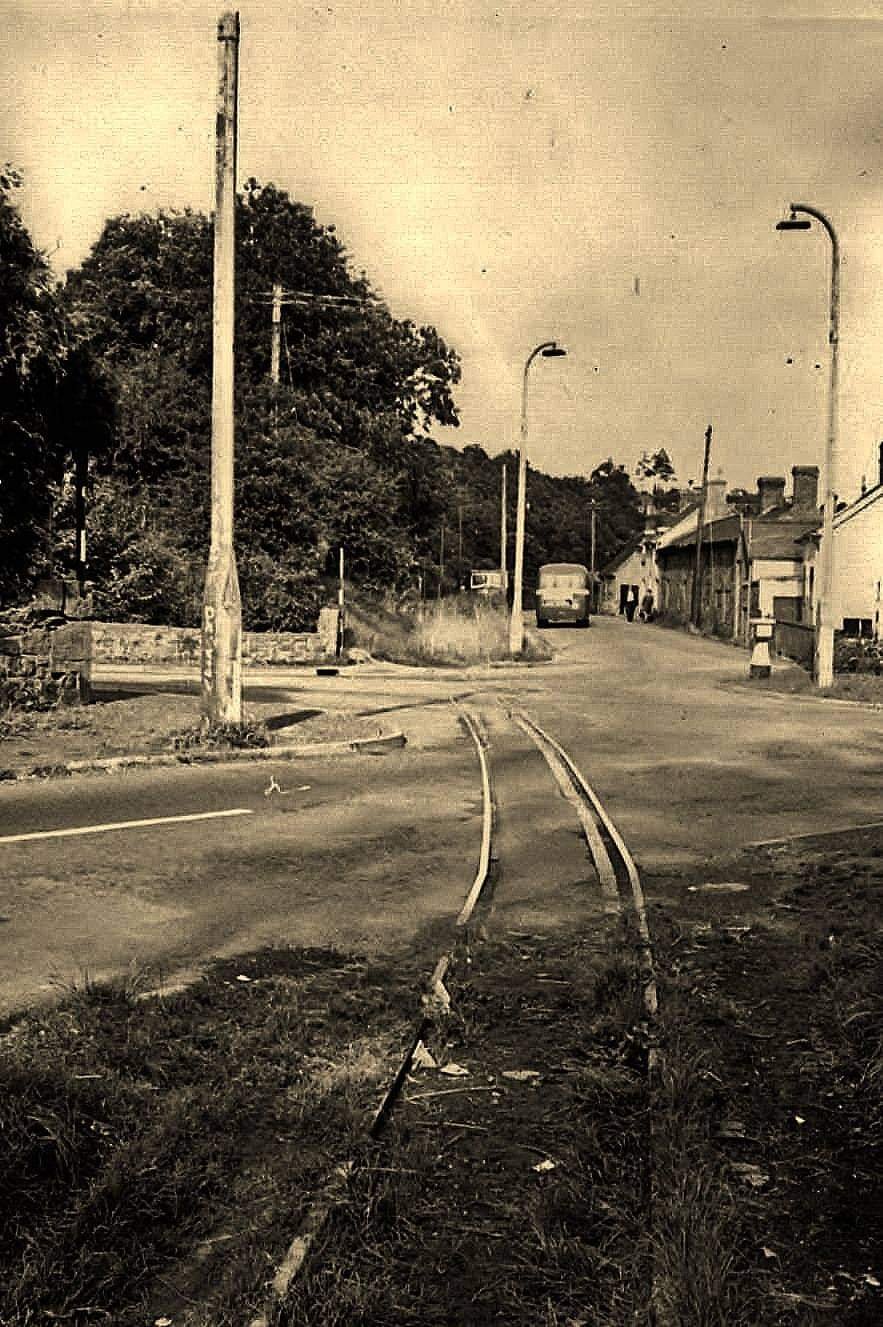


.jpg)
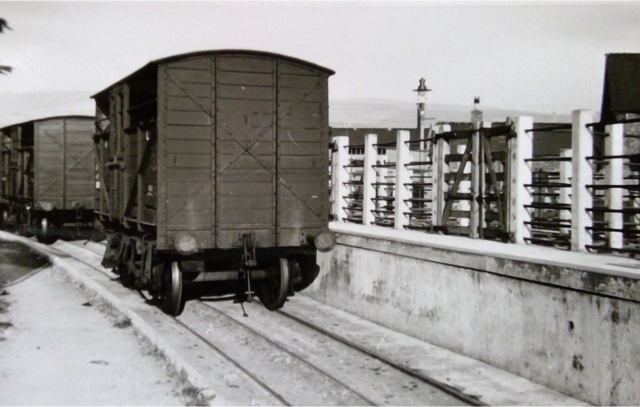