Ballinamore to Arigna
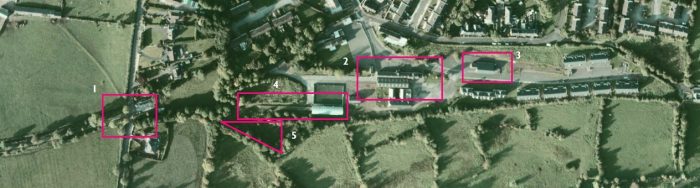
 We re-start our journey back at Ballinamore Railway Station again. The plan below is a repeat of one provided in an earlier post. It is helpful in orienting ourselves once again. [1: p132]
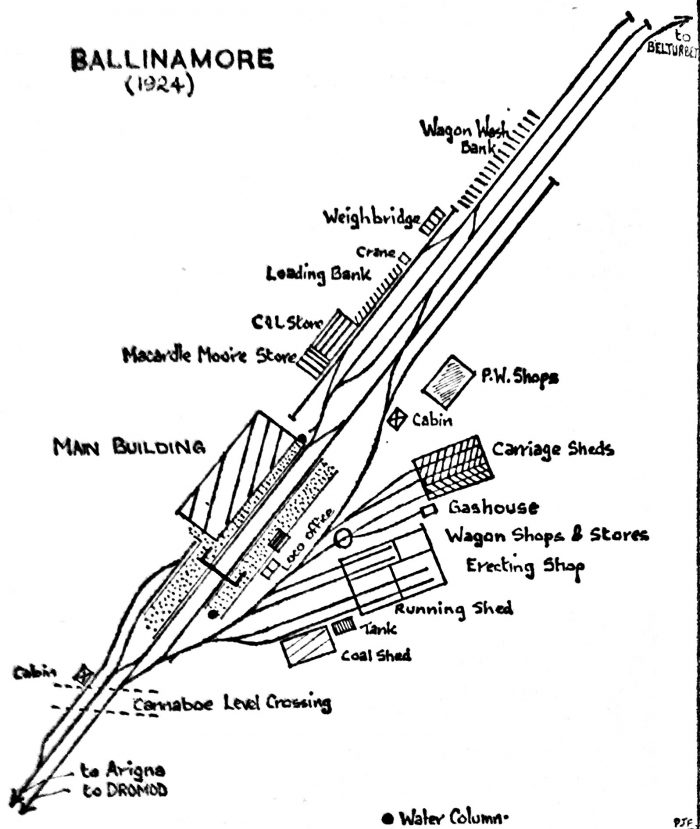
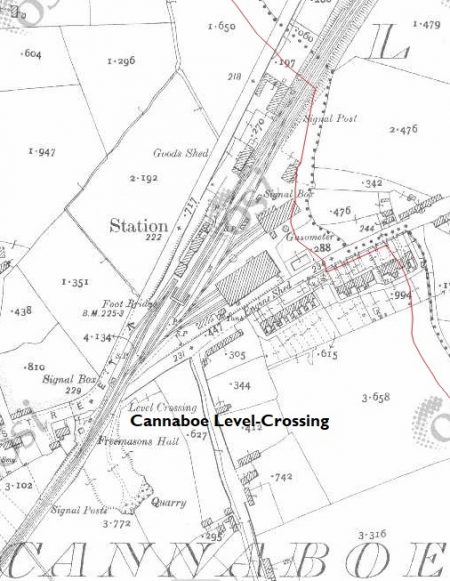
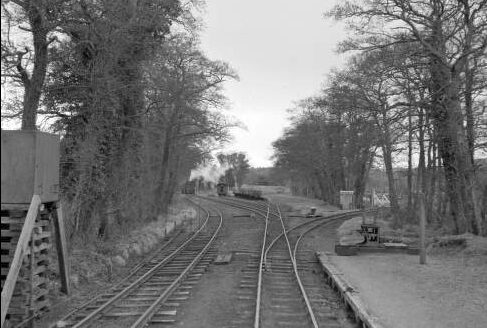
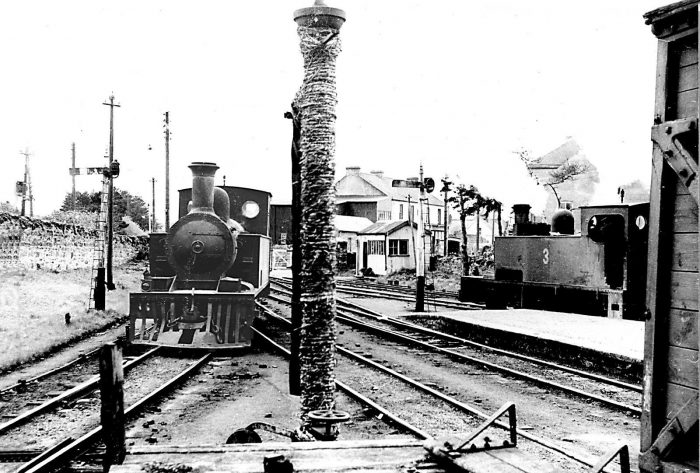 This first picture looks southwest from the throat of the motive power depot towards Cannaboe level-crossing. [4]
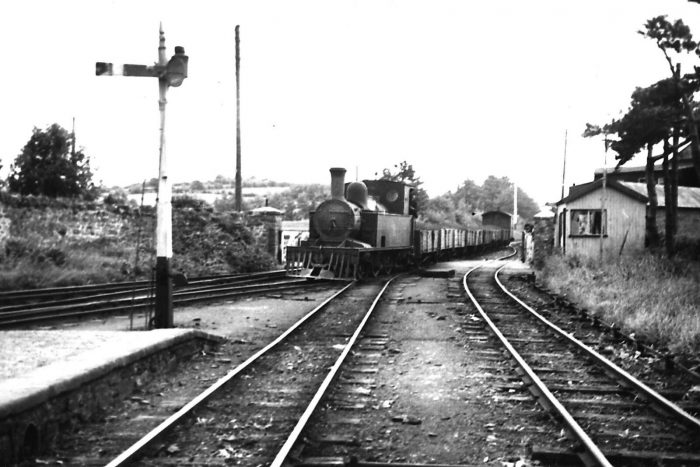 The photographer has stepped out into the permanent way to take this picture, it also looks towards Cannaboe level-crossing. [4]
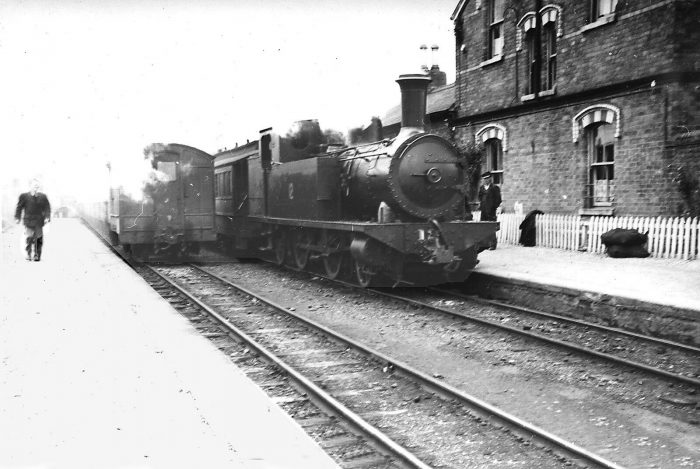 Walking Northeast, someway along the platform opposite the station building brings us to this somewhat overexposed view. The footbridge is missing from the image because it is overexposed. [4]
 This view looks northeast from the footbridge. [4]
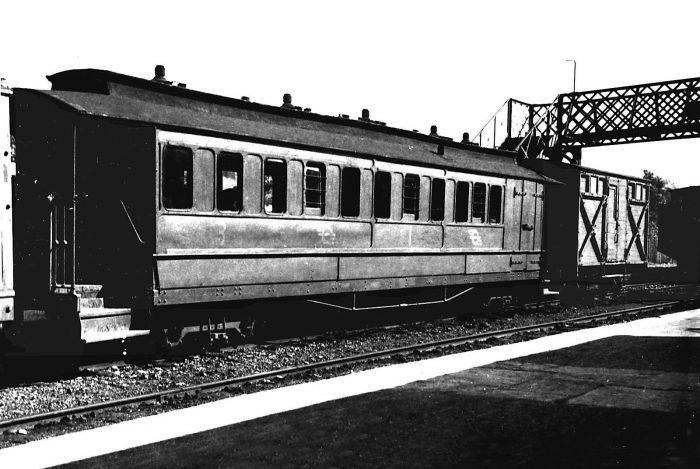
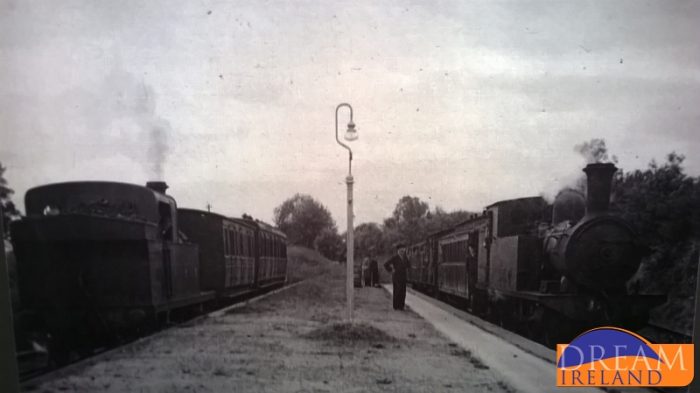
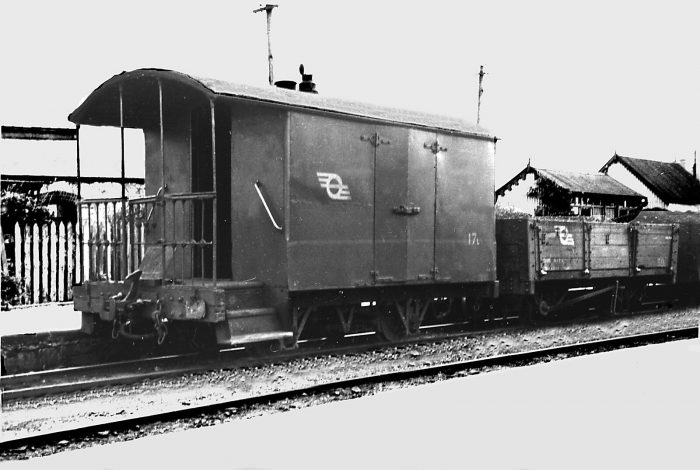 Two photographs taken at platform level. [4]
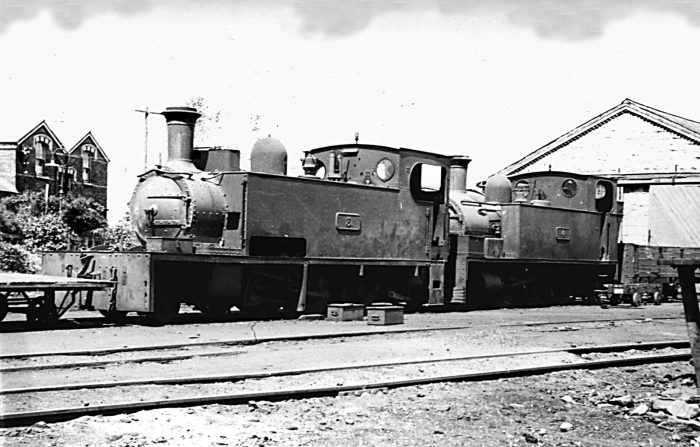
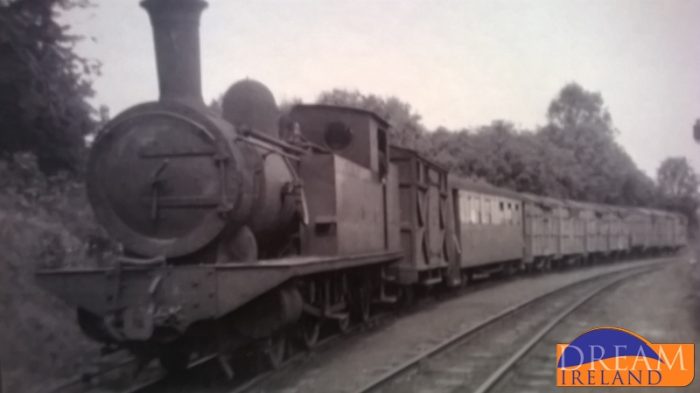
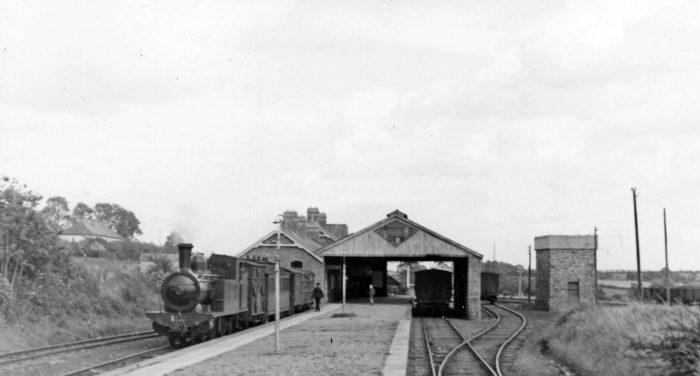
 Three images taken in the MPD at Ballinamore. [4]
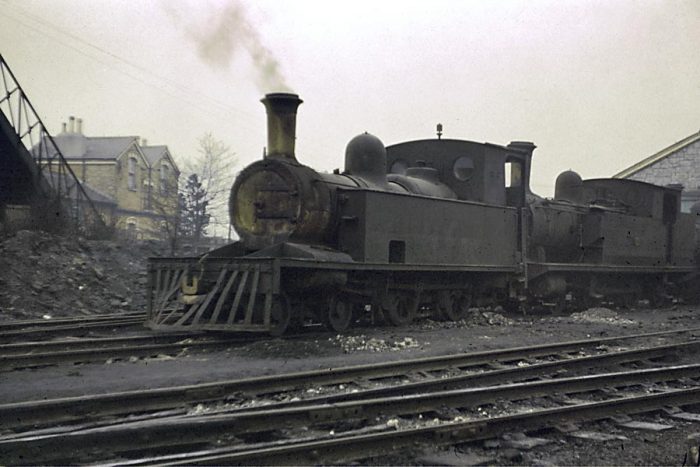 Cavan & Leitrim 4-4-0T 4L in front of the pair of Cork Blackrock 2-4-2Ts 21st March 1959, (c) Martin Cowgill. [5]
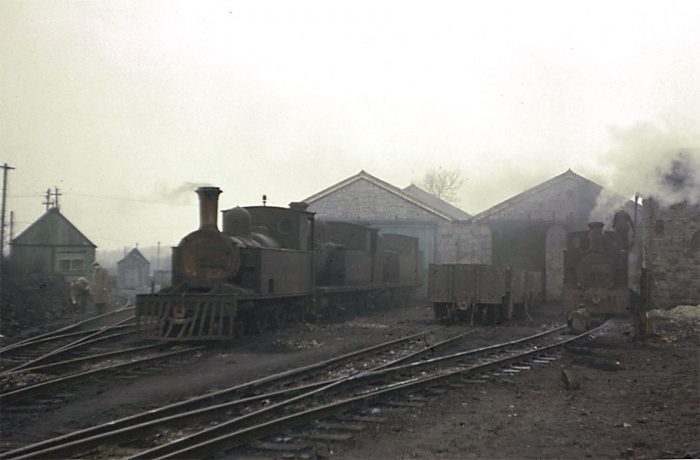 An array of filthy motive power on shed at Ballinamore. From left to right: C&L 4-4-0T 4L in front of the pair of Cork Blackrock 2-4-2Ts, 10L & 12L, and Kerr Stuart 2-6-0T 4T by the water tower on 21st March 1959, (c) Martin Cowgill. [5]
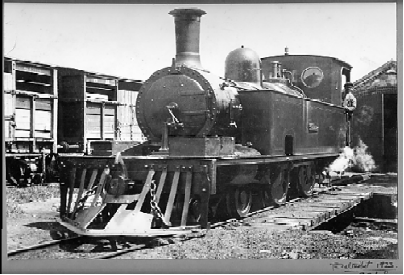
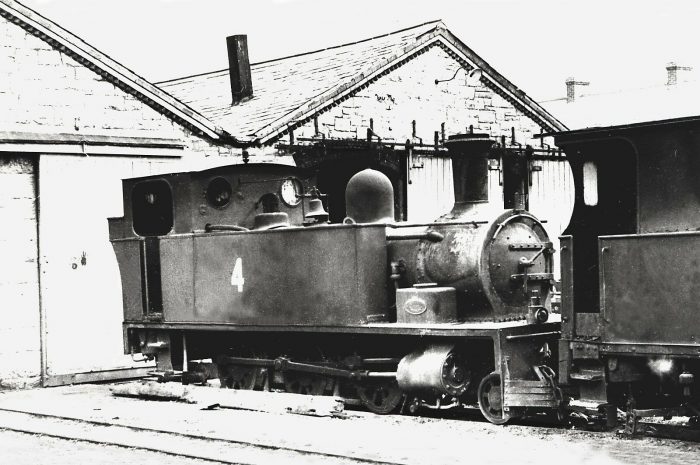
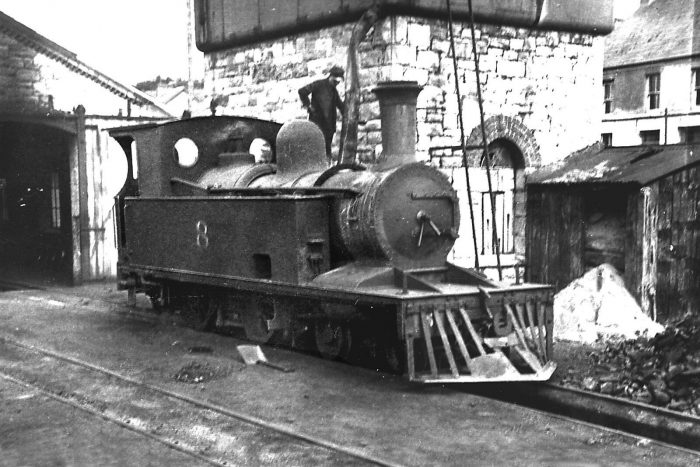
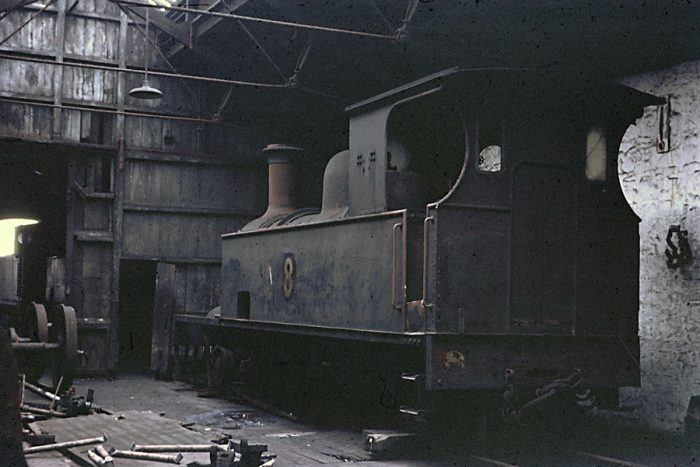 One of the line’s original locomotives, No 8 in the shed at Ballinamore on 21st March 1959
Formerly named Queen Victoria, No 8 retained it’s original chimney and dome cover. The cutaway cab sheet dates from the locomotive’s time as an Arigna Tramway locomotive, (c) Martin Cowgill. [5]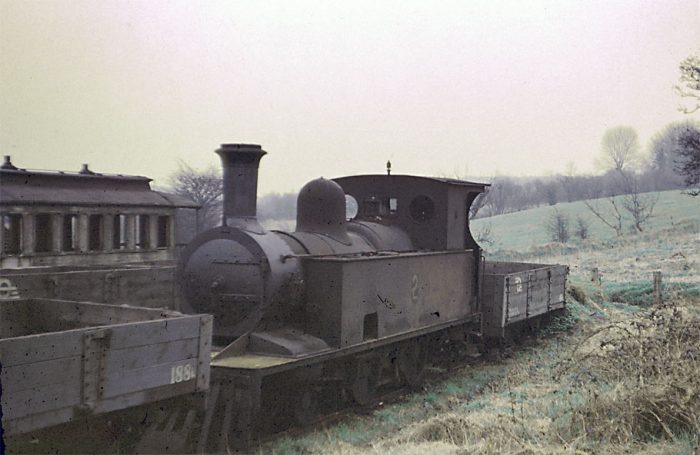 Tucked away out of use was C&L No 2, the former Kathleen, No 2 is the sole survivor of the line’s locomotives in Ireland, being preserved at the Ulster Folk & Transport Museum. Tralee & Dingle No 5 spent time on the line and also survives in working order on it’s original line, 21st March 1959, (c) Martin Cowgill. [5]
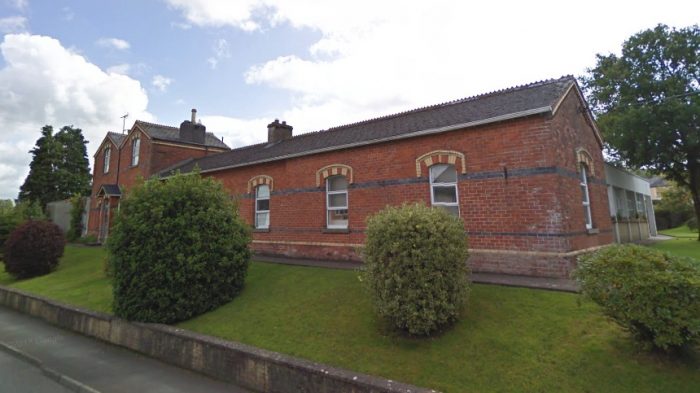 Ballinamore Station building pictured from Railway Road in 2009 on Google Streetview.
 Looking Northwest from the approximate location of the station footbridge, also from 2009.
 Looking Southeast from the location of the station footbridge, again in 2009.
 The tramway line to Arigna ran alongside the main line as far as Tully gates and then turned to the right on a five-chain curve and a downgrade of 1:33 to pass the Lower Town gates.
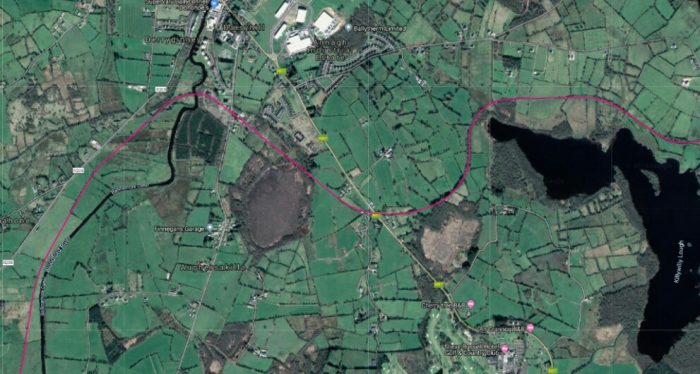
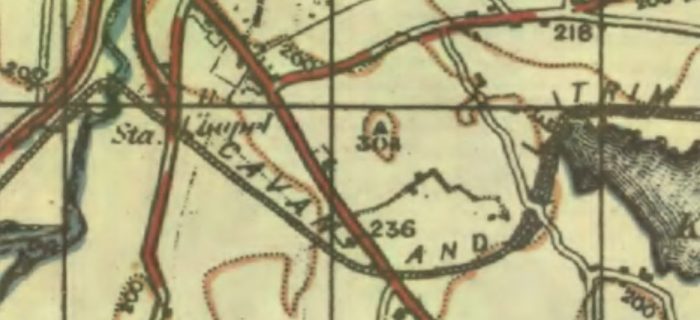
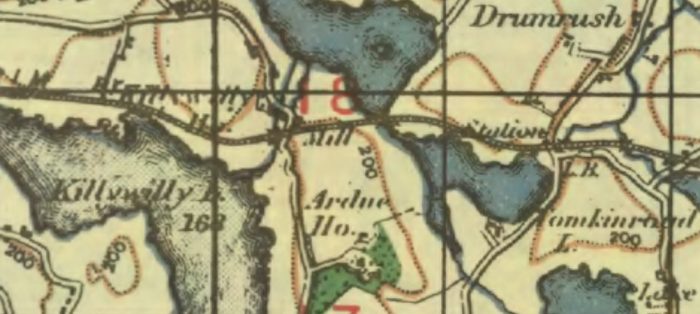
These three images are provided by two different mapping services. The first two are extracts from historical maps held by the OS of Ireland which can be accessed via ‘GeoHive’ [6]
The third is provided by RailMap On-line [7] and is based on the Google satellite mapping service.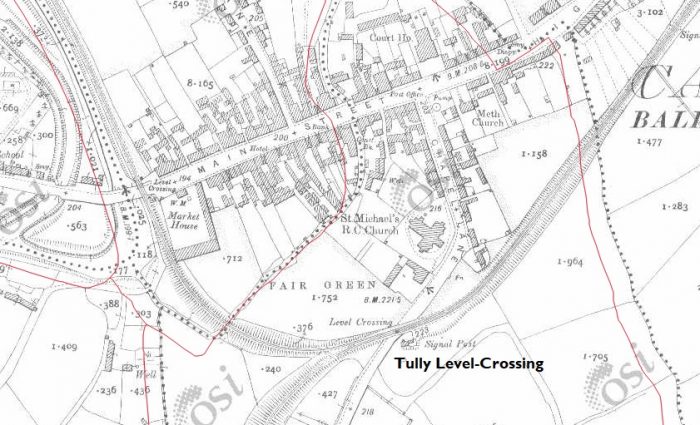
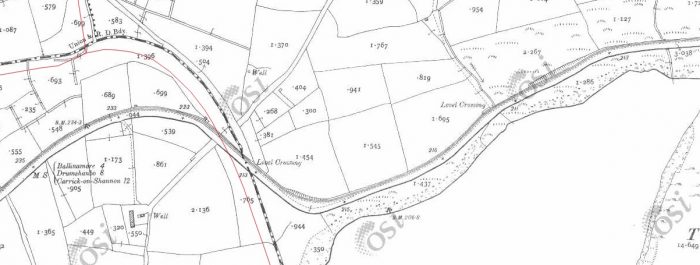
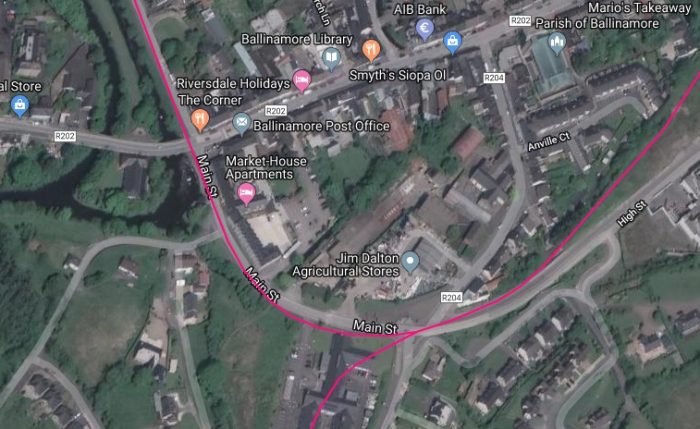 Lower Main Street level Crossing was adjacent to the Canal and from that point the Tramway levelled and ran alongside the old canal.
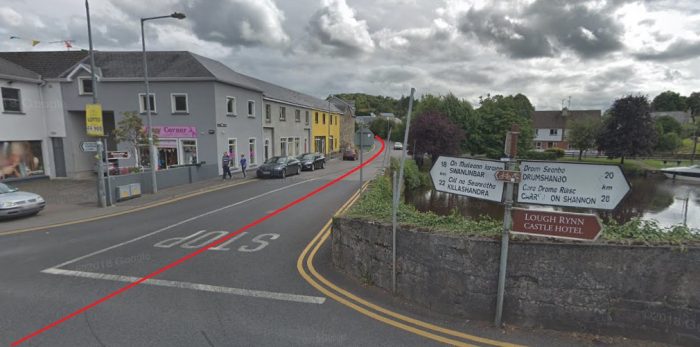
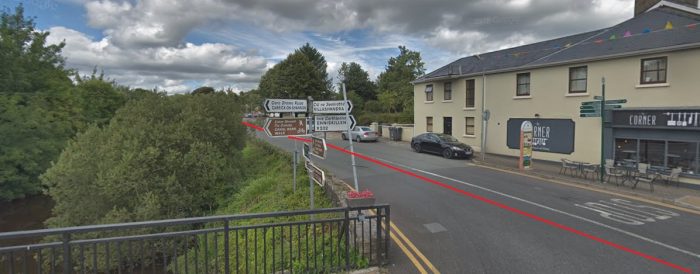 Two images of the location of Lower Main Street Level-Crossing taken in 2018. Both views are adapted from Google Streetview. The first looks East back towards the Station the second looks Northwest along the line heading for Arigna. The canal can be seen in both pictures.
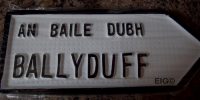
Flanagan says: “About a quarter of a mile past the gates of Lower Main Street Crossing, on the right, was the site of Stradermot Quarry siding. From here on the line wound tortuously right and left through low-lying ground often flooded by the canal and sometimes made impassable to trains. After a fairly level run, the halt at Ballyduff (3 miles) was reached. The cottage and gravelled passenger space were on the left, past the gates which were protected by one of the few signals on the tramway. There was a water tank at the halt up to about 1893 and a replacement, filled by a ram, was erected in 1901, although the site chosen was actually on the Ballinamore side, not far from Lock 7 on the canal. However, the tank’s capacity was insufficient and a second one on the same base was added in 1904. Both were out of use by 1919 and at least one was loaned to the Board of Works for the construction of the extension. No water facilities were provided after 1919. The halt had a telephone and was used as a temporary block post..” [1: p141-142]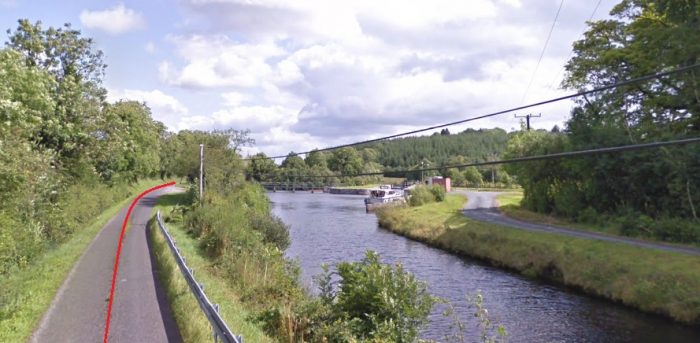 Looking back along the line of the tramway towards Ballinamore from a point close to Ballyduff.
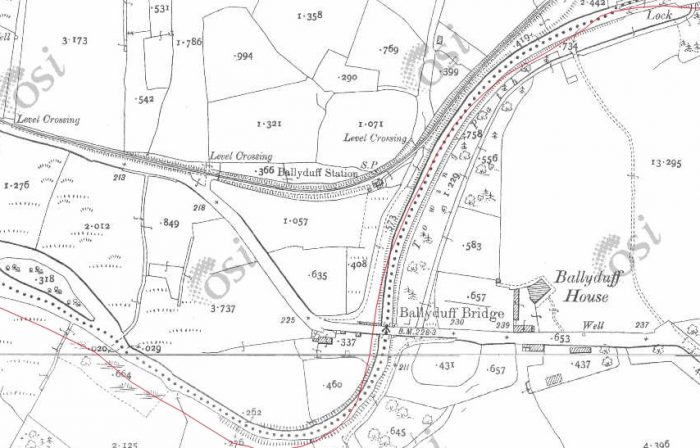
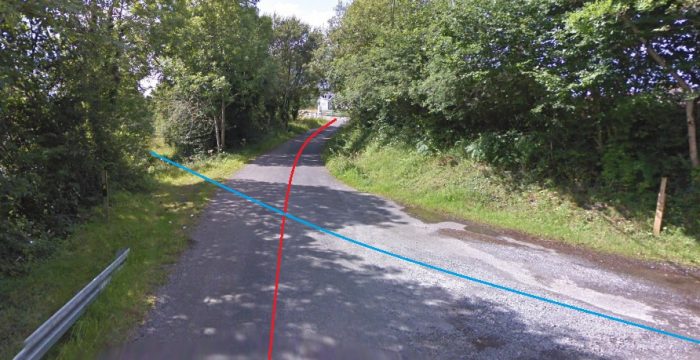
 The old road at the level-crossing immediately before Ballyduff Halt used to follow the line shown in blue, as can be seen on the OS Map extract above. That road has now been diverted along the line of the railway in red. Ballyduff Halt was encountered straight after the crossing.
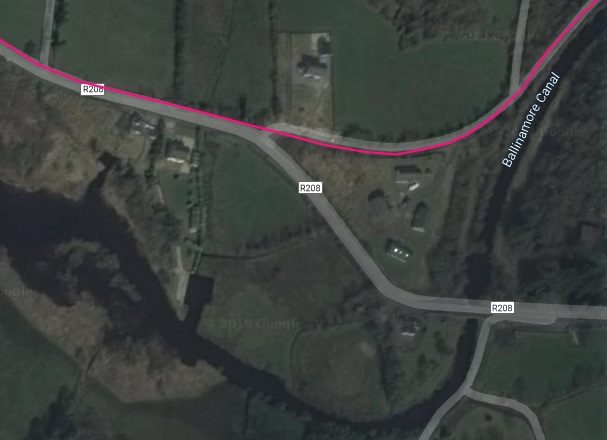 Almost immediately beyond Ballyduff there was a four-chain right-hand curve, and then the line met a road coming in on the left. That road is now the R208 on the above satellite image.
  The tramway followed the north shoulder of what is now the R208. It’s route is shown on the OSI Map extracts below. [6]
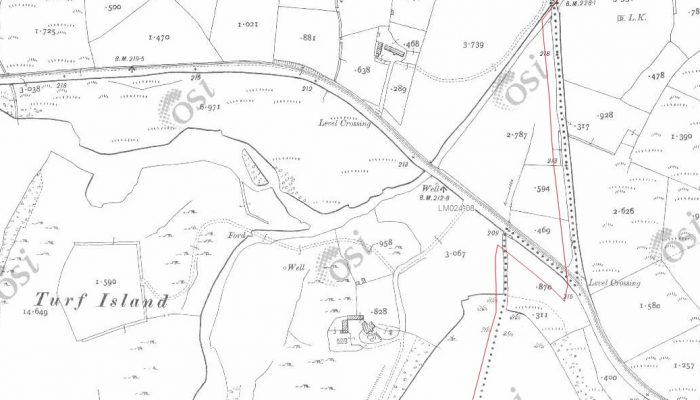
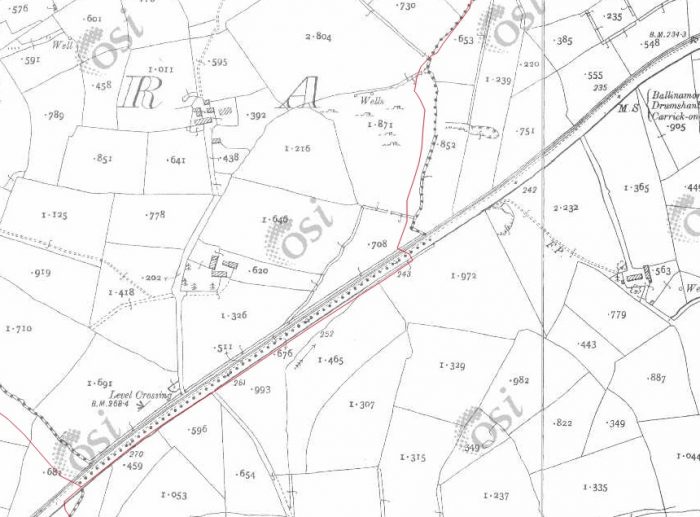 Flanagan asserts: “The cheap construction of the line was obvious from here on, as it faithfully reflected every hump and dip in the county road. Short, steep gradients followed one another in quick succession, the steepest yet encountered being a drop at 1:28 to the ‘4’ milepost. Just beyond, the road veered briefly to the left and the intervening space was the site of the down, facing Dromkeen Wood siding, at the bottom of the ‘Long Bank’. The siding was the standard six wagon-lengths and lasted from March 1918 to January 1919, being installed for the removal of timber for sleepers.” [1: p142]
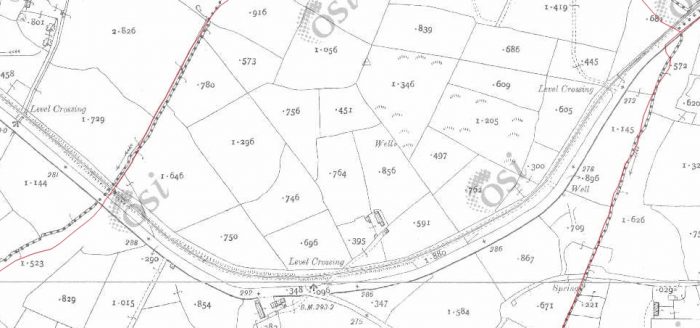 I believe that this is the place referred to above by Flanagan where the road and tramway separated to allow room for a siding. [6]
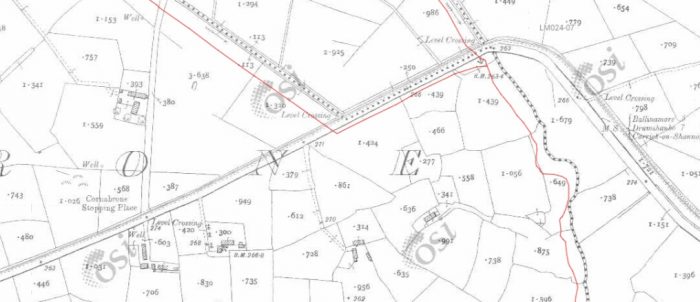 Within a short distance and a few ungated crossings Cornabrone Halt was reached, it appears towards the left of the map extract above. [6]
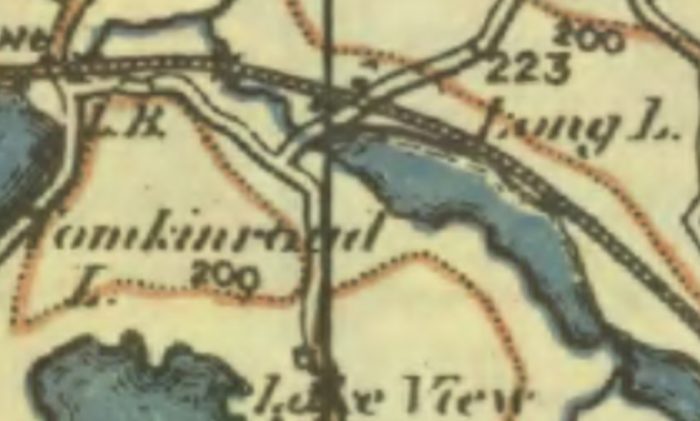
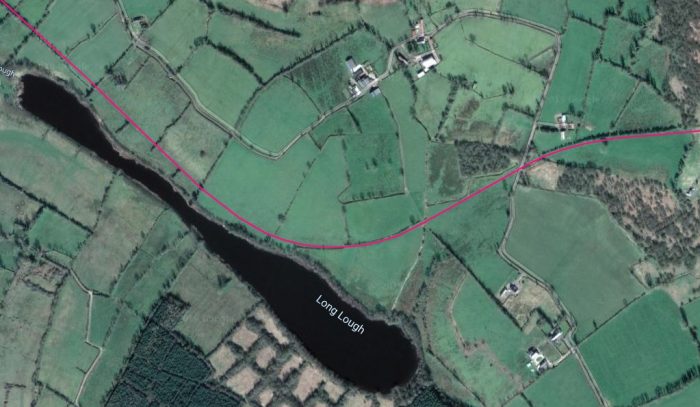
Going on towards Cornabrone, the line continued to meander and passed the ‘4.25’ milepost before, Flanagan says, it encountered a grade of “1:29 on a four-chain left-hand curve. It rose steadily to the ‘5’ mile-post and then descended with another four-chain twist to 5.5 miles, after which it rose slightly to Cornabrone Halt (5.75 miles).” [1: p142]

Cornaborne Halt is shown in the adjacent colour image from the 1950s. Cavan & Leitrim 3T (HE479/1889) is at Cornabrone halt with an Arigna-bound mixed train. [8]
The halt was the first of the three well-known roadside stopping-places and, like the others, consisted solely of an enamelled nameboard which nestled in the hedge on the far side of the county road. There were requests for a siding here in 1901 but they were refused, as was an earlier one in 1898. There were never any facilities whatsoever at these halts.” [1: p142]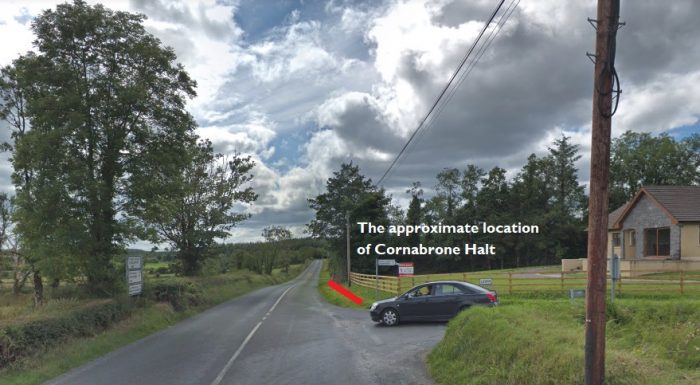 The location of Cornabrone Halt in 2018 (Google Streetview).
Once past Cornabrone, “the line descended sharply at 1:29 and continued to fall until, after a brief downgrade of 1:32, it crossed the Aughacashlaun River and reached Aughacashlaun ballast siding (6.5 miles). It was an up, trailing siding which had the points in the middle and extended east almost to the river bridge. Although the contractor had a siding here, the C&L one dated from 1896, when the Board of Trade ceased to object, and lasted till 1952. The siding points gave the C&L men a lot of headaches as, although they were protected by an Annett’s lock, the local people had found a way of opening them by interfering with the rodding. In 1926, drivers were warned to proceed with caution and later the points were officially immobilized though the siding was left. It was again brought into use about 1936, when repairs were being carried out to the bridge, and was afterwards left intact; it was infrequently used up to 1946 for sand traffic.” [1: p142-143]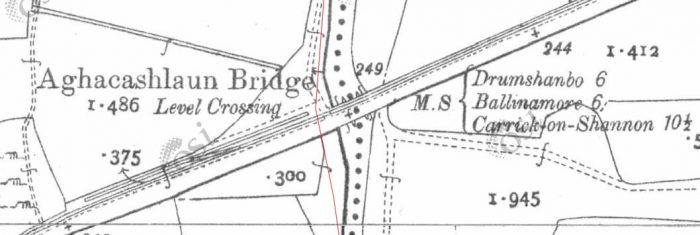 Aghacashlaun Siding and Bridge. [6]
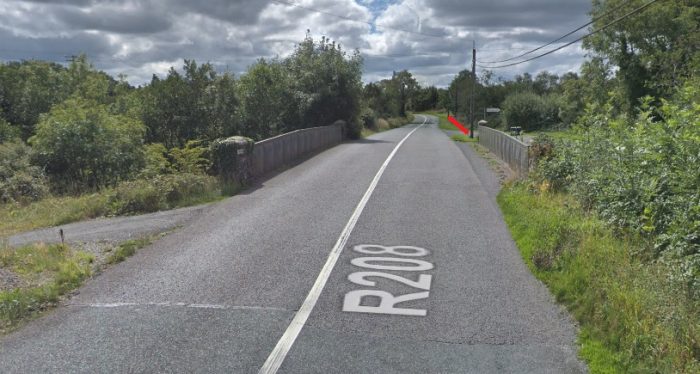 Looking West this view of the R208 in 2018, shows the location of the siding marked in red just beyond the Aghacahlaun Bridge (Google Streetview).
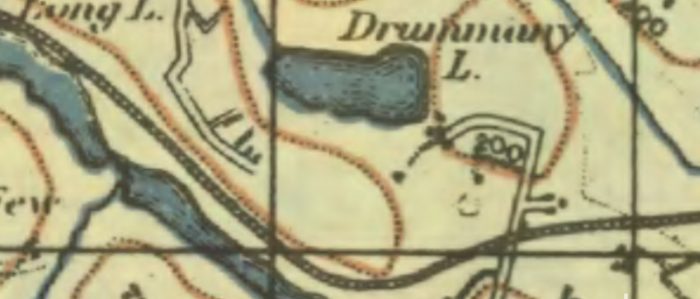
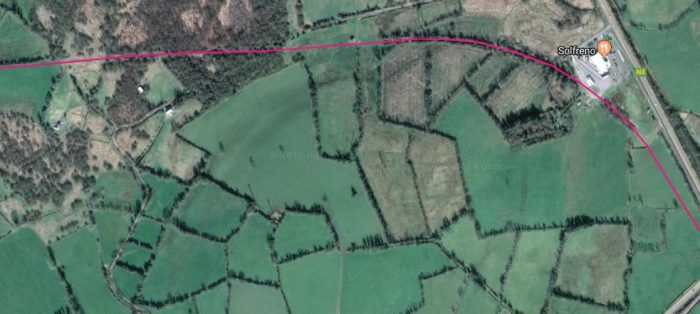
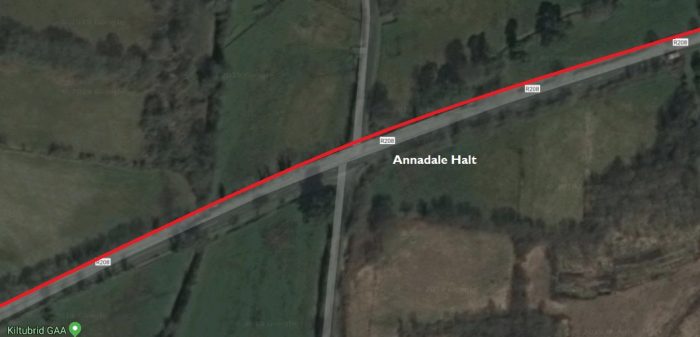
Flanagan continues: “After more humps and curves, though not so sharp as before, the line fell at 1:32 to Annadale (7.5 miles), another roadside halt. A full station was proposed in 1889 and there was also a plan for a refuge siding for heavy trains in 1896. A final idea was for the transfer of Kiltubrid siding to here in 1903 to make the place a crossing point. Annadale was the stop for the historic Lough Scur and for Driney, though special excursionists for the latter place alighted at Driney Curve itself, half a mile farther on.” [1: p143]
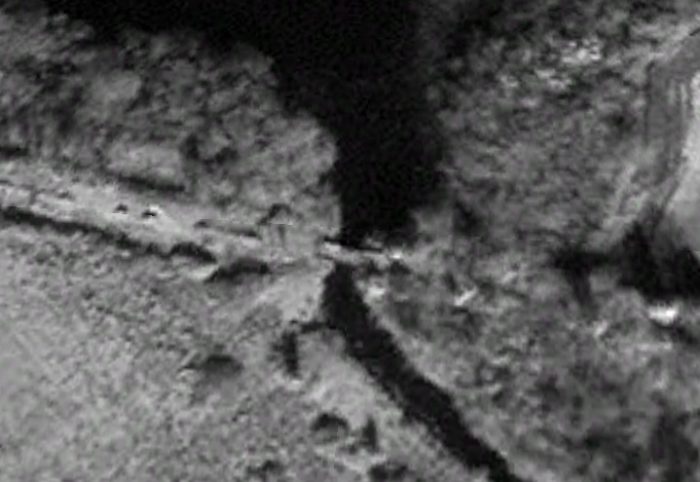
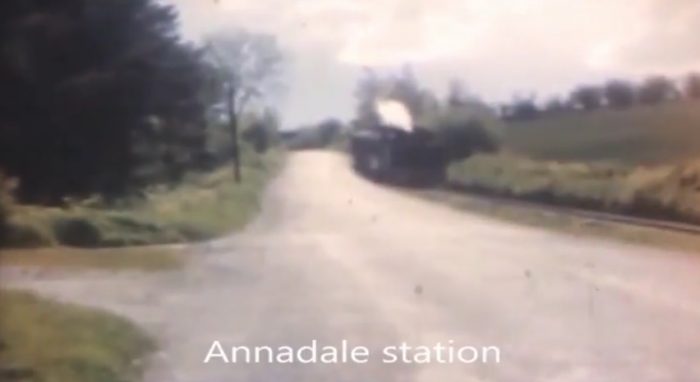 This indistinct image is a still from a video taken int he late 1950s and shows the location of Annadale Halt. [13]
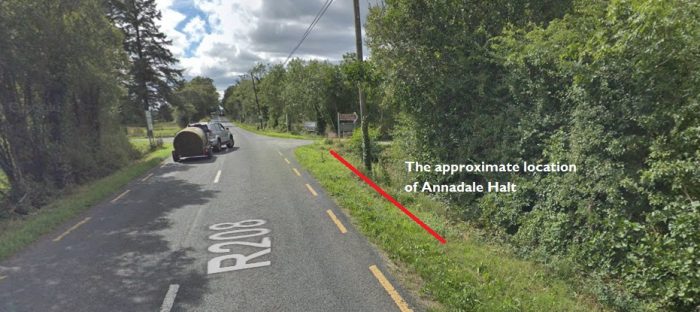 The location of Annadale Halt in 2018.
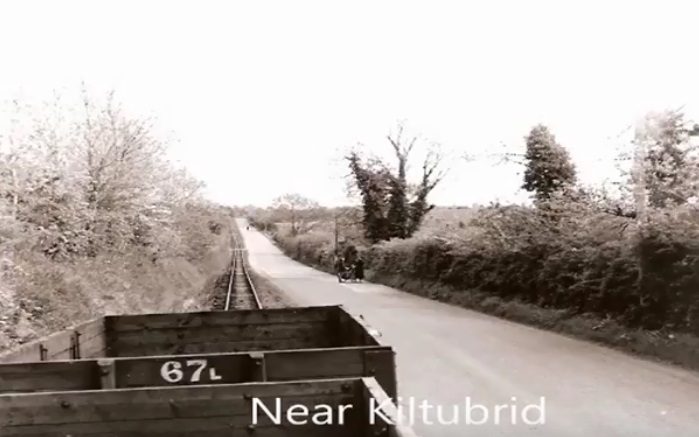
 The image above shows the length of tramway between Annadale Halt and Kiltubrid. [13]
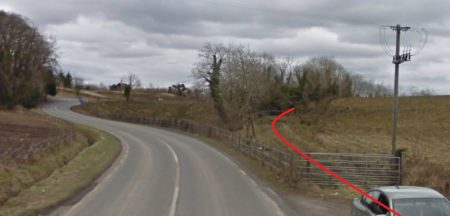
Just beyond the ‘8.5’ milepost, the line curved right at 1:37 and made an oblique crossing of a river and the Drumshanbo road as shown in the adjacent image which looks back towards Ballinamore. [9]

The combination of road junction, bridge and level crossing made this place, which was right beside Kiltubrid halt (8.75 miles), very dangerous.
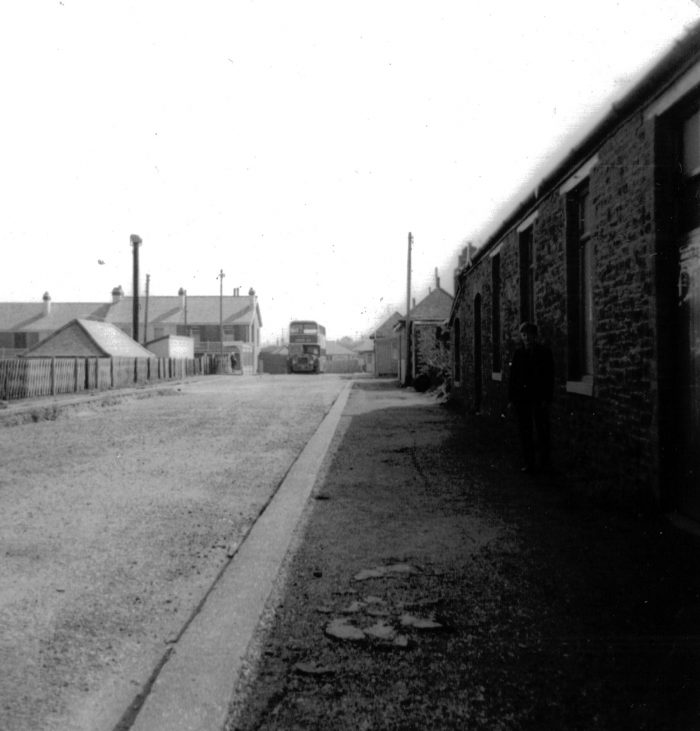
The next image shows a locomotive heading into Kiltubrid Halt from Ballinamore. [3]
The halt consisted of a house, shelter, and platform on the right-hand side, nicely situated on a four-chain curve. Behind the station-house, and entered from the Drumshanbo end, was the goods siding which dated from the opening of the line. It had its own disc signal, erected in April 1888. As there had been no crossing place on the tramway so far, it was proposed in 1897 that a loop be installed here and some land was bought. However, in December 1901 the engineer stated he was unable to buy all the land he required and put forward a plan for the more economic use of the existing space. This was agreed to in February 1902, but in May of the following year it was decided that Annadale be the crossing point; in the event, no change was made to either place. Kiltubrid also boasted a telephone, being a temporary block post.” [1:p143]
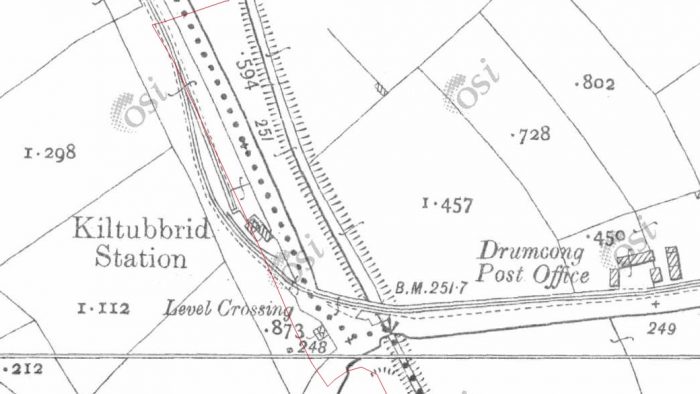 Kiltubrid Halt. [6]
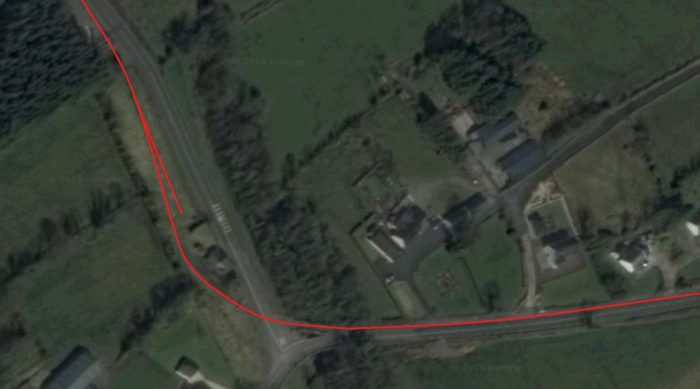 Google Earth shows that the alignment of the tramway can still be picked out.
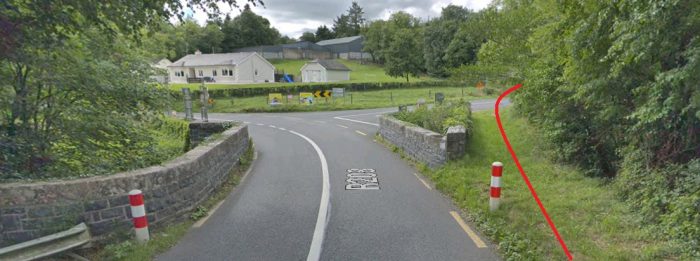 The approach from Ballinamore (Google Streetview).
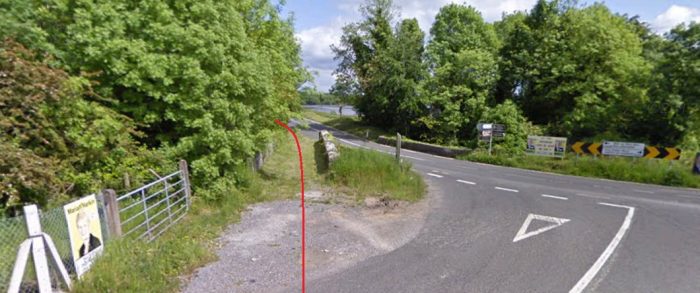 Looking back towards Ballinamore – the old tramway bridge is still standing! (Google Streetview)
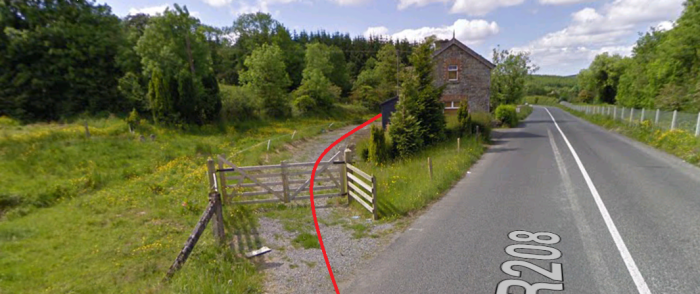 Looking forward from the crossing into the small station site (Google Streetview).
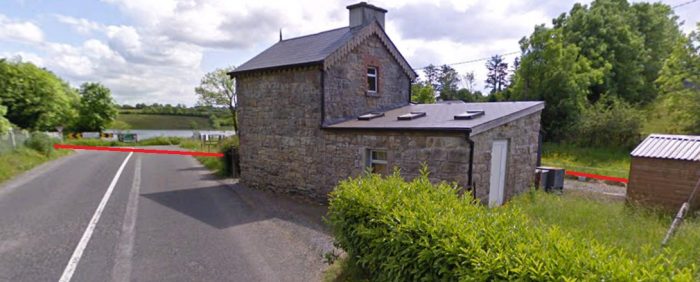 In 2018, the small station building still exists and is in use as a private dwelling (Google Streetview).
 This still from a video shows Kiltubrid Station from an Arigna-bound train. The short siding is visble of the right side of the image. [13]
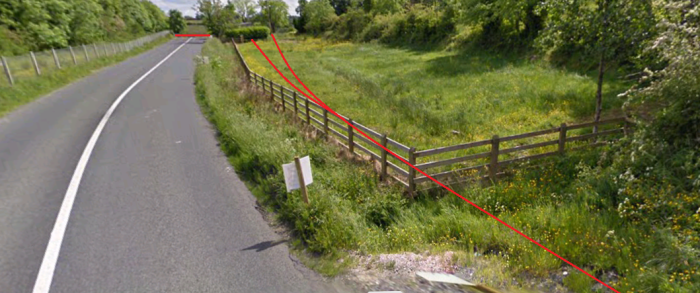 Leaving the Halt at Kiltubrid the line drifted back to run along the verge of the road. The left-hand red line is the siding alignment.
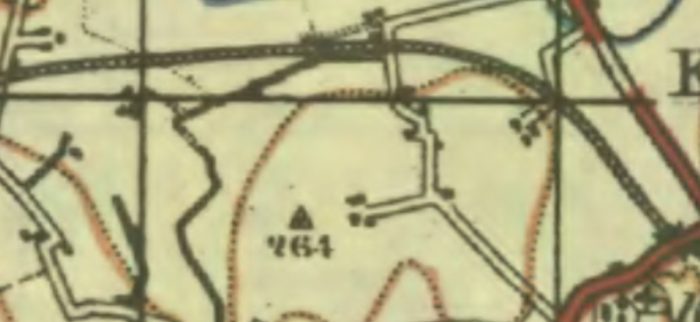
A little past the halt, the line began to climb for a quarter-mile at 1:28. “Then,” says Flanagan, “it swung sharply across the road by an un-gated crossing and remained to the right of the road for the rest of the way to Drumshanbo. The worst banks of all were in this section, though the steepest were mercifully short. At 9.25 miles there was a short fall and a little farther on a climb at 1:26. The line then undulated until it finally rose at 1:25 to reach the roadside stop at Creagh (10.25 miles).” [1: p143]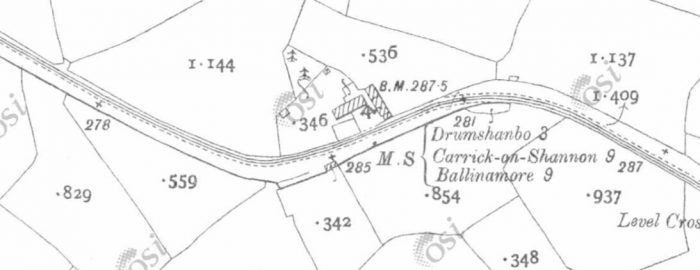 Cornaleck Crossing was the point at which the tramway crossed back over the Drumshanbo Road. [6]
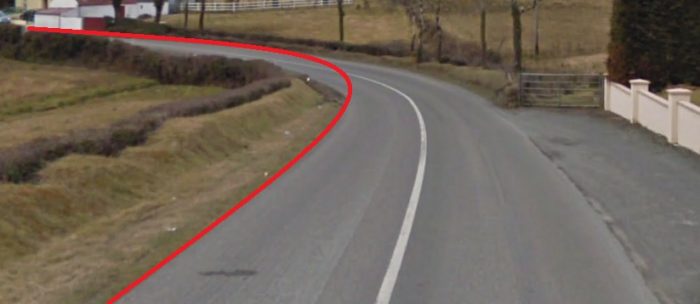 The tramway swung across the road on a curve at an un-gated crossing (Google Streetview). The tramway continued from this point on the north side of the road towards Drumshanbo.
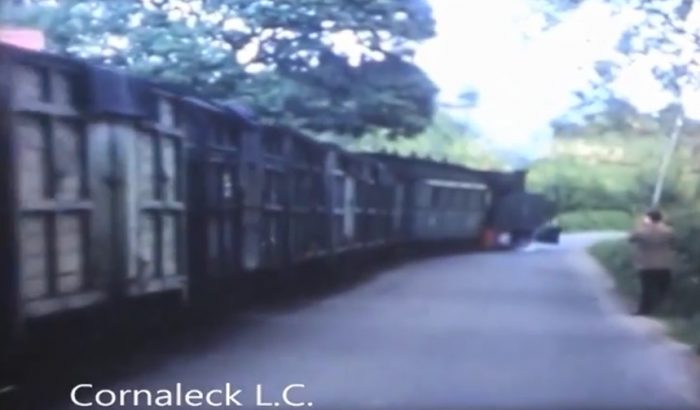 This video still is taken looking towards Ballinamore at Cornaleck Crossing. [13]
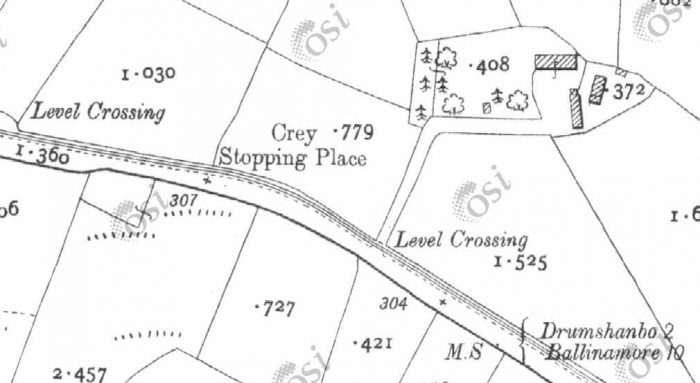 Creagh (Crey) Halt. [6]
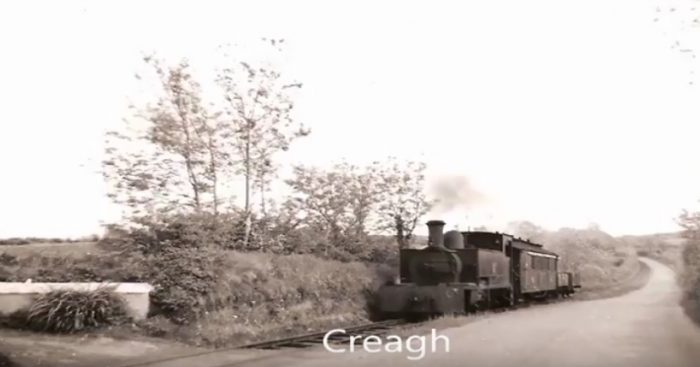 Approaching Creagh from Ballinamore. [13]
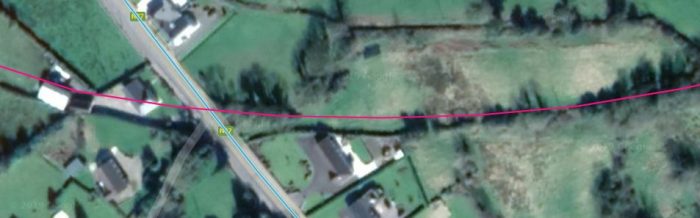
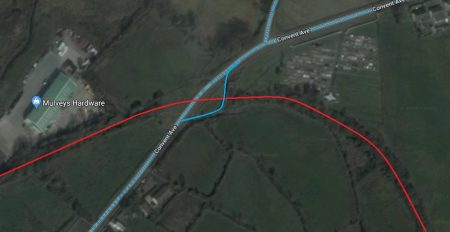
There was a short section of tramway where, in order to make the curvature manageable for trains the road and tramway separated for a few tens of metres as shown below. [6]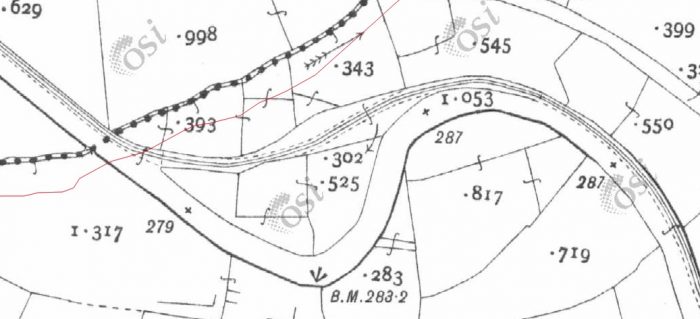
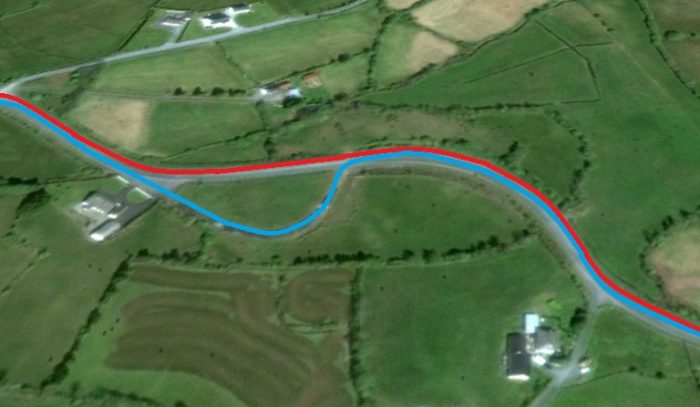 This 2011 satellite image shows the route of the old road highlighted in blue with the route of the C&L in red. The modern R208 follows the red line and the sharp meander of the old road has been abandoned.
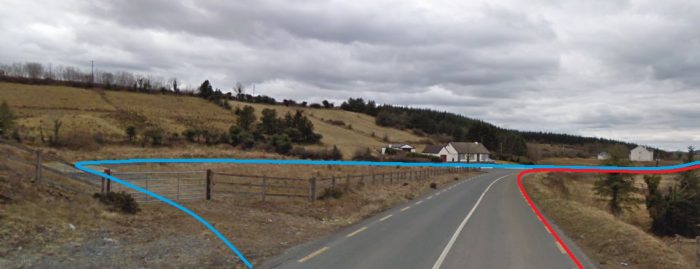 The same location looking towards Drumshanbo along the R208 in 2010.
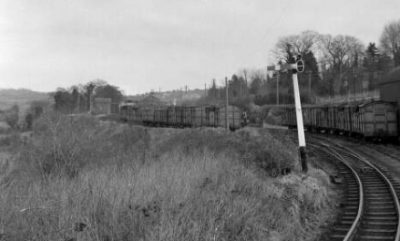
Flanagan says that, “from there to Drumshanbo the run was mostly downhill, the chief point being a hump (1:33) at the ‘11.25’ post. At this point the road veered away to the left and the line had its own right of way through Fallon’s Cutting, over the Priest’s Bog, past the Three Arch Bridge and down the 1:32/1:41 Drumshanbo bank.2 [1: p143-144]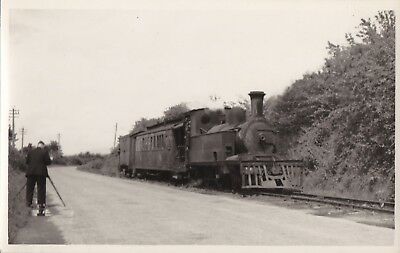 To the east of Drumshanbo a train heads for Ballinamore. [10]
 Fallon’s Cutting. [6]
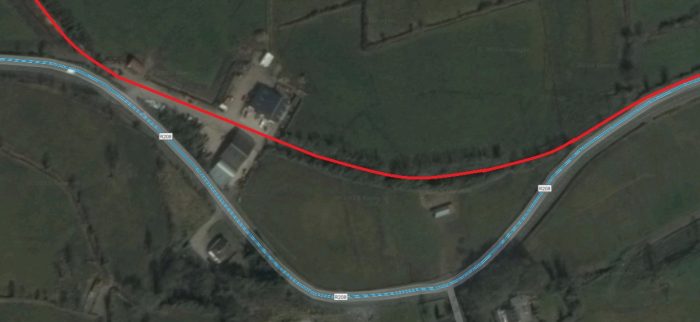
 The old railway leaves the line of the new road (above) and heads north, running across the North side of Drumshanbo to the Station. After Fallon’s cutting road and rail converge and then diverge as shown above.
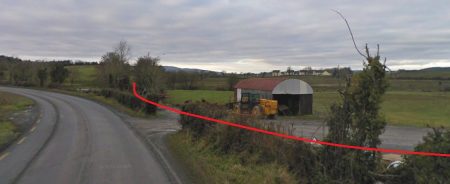
As the two transport modes diverged, the railway began to cross a bog.
The route across the bog is shown on the next OSI map extract. As the railway curved round from a northerly to a westerly direction it was in cutting once again [6]
The road from Drunsanbo (Convent Avenue) to the East doglegged in order to cross the cutting roughly on the square.
The line ran under ‘Three Arch Bridge’ which is still in place in the early part of the 21st century. The route of the old road can still be picked out as it swings to cross the bridge, both on the satellite image and in the Streetview picture below.
The railway cutting has been infilled to allow the new road (Covent Avenue) to cross its line. This can also be seen easily in the picture of the bridge below.
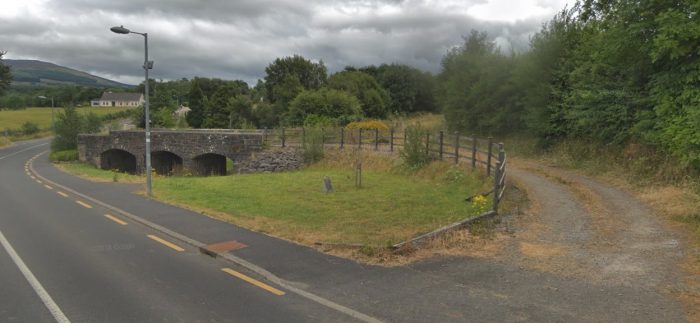
 Beyond Three Arch Bridge the C&L descended Drumshanbo Bank and entered the Station which can just be picked out on the left side of the OSI Map extract above. [6]
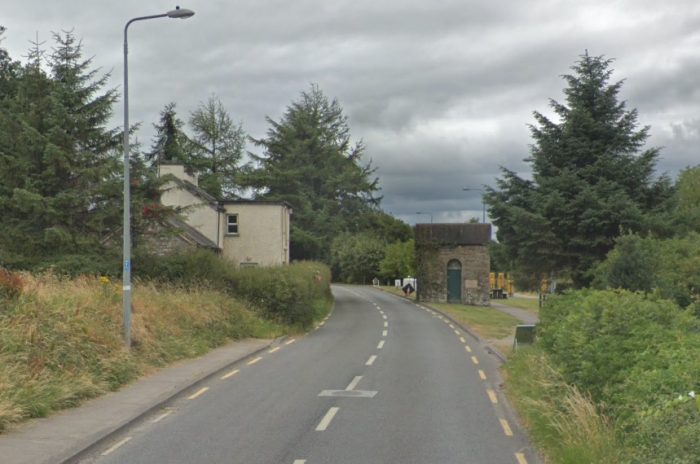
 The approach to the site of Drumshanbo Station in 2018. This road is numbered R208.
“Drumshanho was yet another place where the C&L got its names wrong and the GSR did not improve matters by introducing an Irish error in the bilingual nameboard. The station (12.25 miles; Class 20 had one platform on the down side. The main buildings originally had one storey but the agent’s house was enlarged in 1914 when another floor was added at a cost of £70 2s 9d. A ground frame at the Arigna end of the platform controlled the yard. Behind the frame was the very short engine shed road. A temporary shed was built in 1888, and lasted until the 1900s. A new one was erected in 1908 at a cost of £77 10s and was a wooden structure which, surprisingly, was not burnt down till about 1923, after which engines were left out overnight, as at Belturbet. For some odd reason no shed ever existed at Arigna and no engine was regularly stabled there, apart from No 6 during the making of the extension.” [1: p144]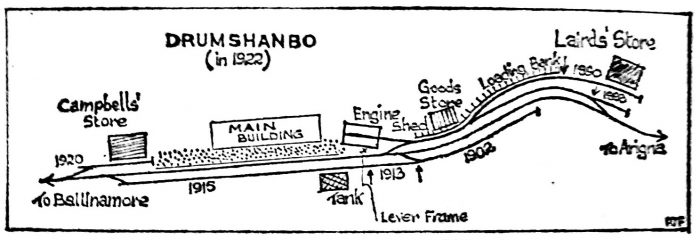 Flanagan’s sketch map of Drumshanbo Station. I am not too sure why he has chosen to invert the usual practice of the North point being at the top of the image. [1: p144]
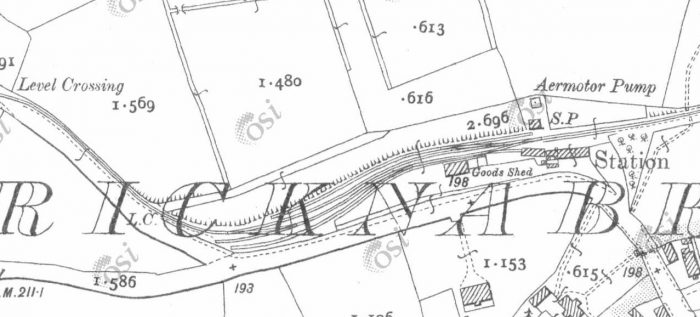
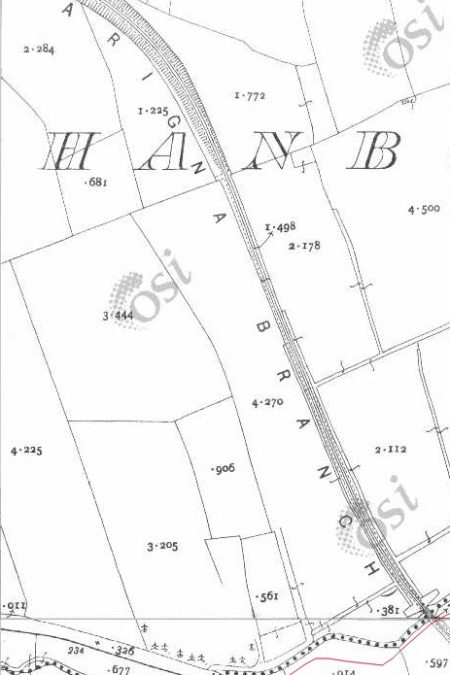
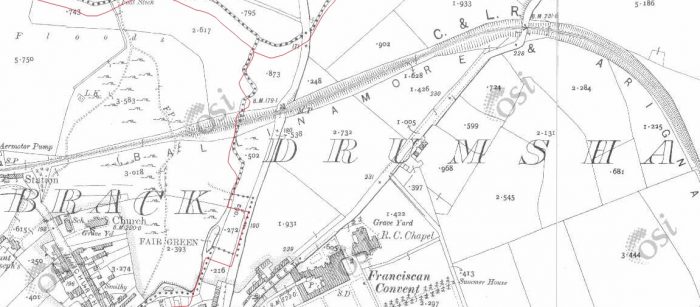
 The OSI Map extract above has north to the north! Sadly the word Carricknabrack sits over the plan of the station area. [6]
The photo above shows the route of the line through the old station.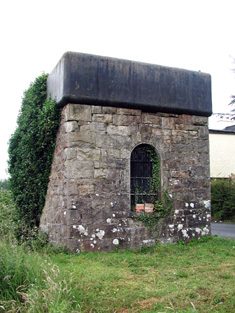
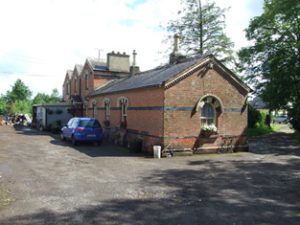
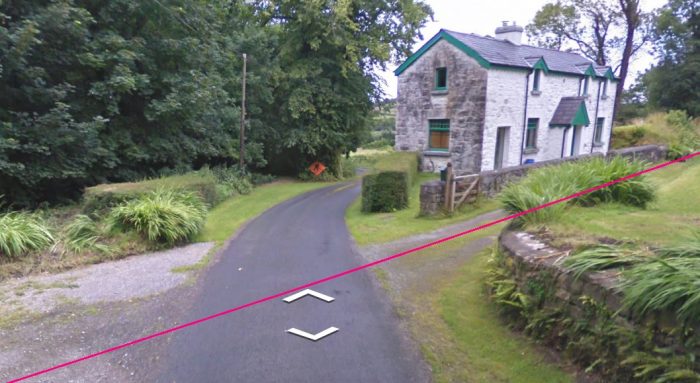
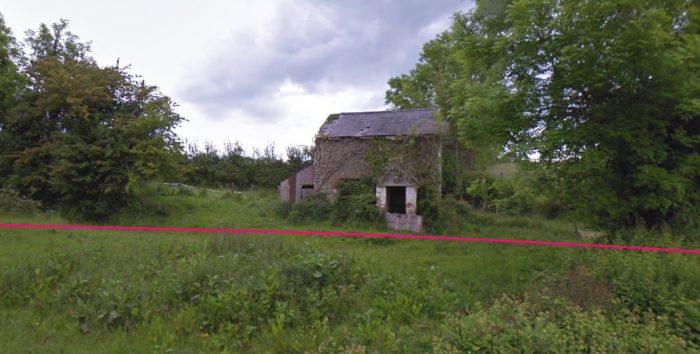
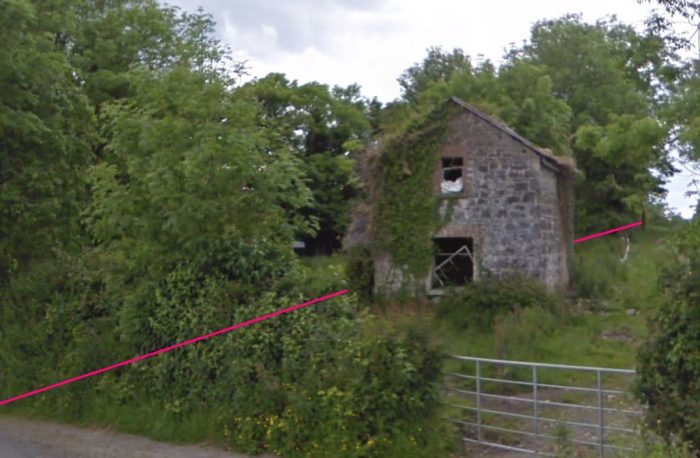
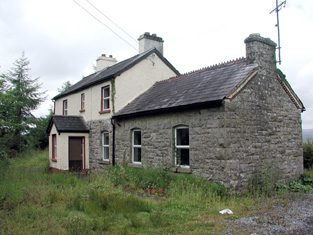
The station building is shown on the adjacent image as it was in the early 21st century. It is a detached five-bay one- and two-storey former railway station, built c.1885. It is now used as a house. Set in its own grounds. Pitched slate and tiled roofs with stone and rendered chimney-stacks. Terracotta ridge cresting and cast-iron rainwater goods. Roughly dressed random coursed limestone and pebble-dashed walls with gable-fronted porch with slated roof. Brick dressings to gable eaves. Replacement uPVC windows with segmental heads and stone sills. Timber door to projecting porch. [12]
This former station building is one of a few structures associated with the railway at Drumshanbo that remain. Its fine stonework and brick detailing are typical of Victorian architecture. Today this house stands as a reminder of the Ballinamore, Arigna and Aughabehy Line, which served the area until 1959. [12]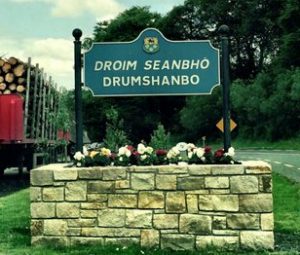
The water tower also remains. It is now disused. Its construction is of random coursed limestone walls with round-arched openings and surmounted by cast-iron water tank. It has a timber battened door with overlight and window with cast-iron frame. It was built as part of a well-designed complex of structures and is of architectural and technical merit. [14]
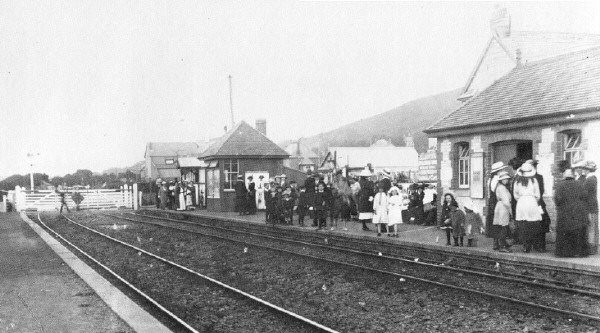
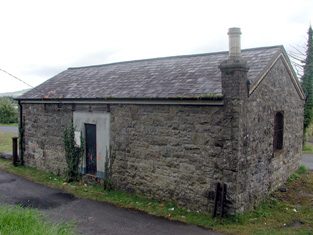
The Goods shed still stands in the early 21st century. It is a detached single-bay single-storey former goods shed, in use for storage. It has a pitched slate roof with brick chimney-stack. It is of roughly dressed random coursed limestone walls with brick dressings to gable eaves. There is a fixed window with stone sill to segmental-headed window opening. A modern opening has been provided to the south gable and blocked square-headed opening to west elevation. There is a limestone former station platform to north with a section of railway track. It has been altered to meet modern day needs. However it has retained much of its original fabric. Brick dressings to the gables enhance the coursed stone elevations, resulting in a structure of architectural merit. The surviving railway platform contributes to the setting of the shed. [15]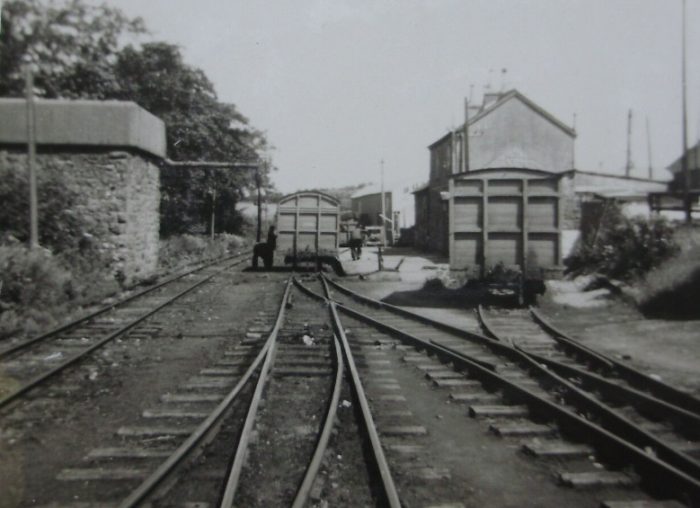 Drumshanbo Station seen from the West in the 1950s. [21]
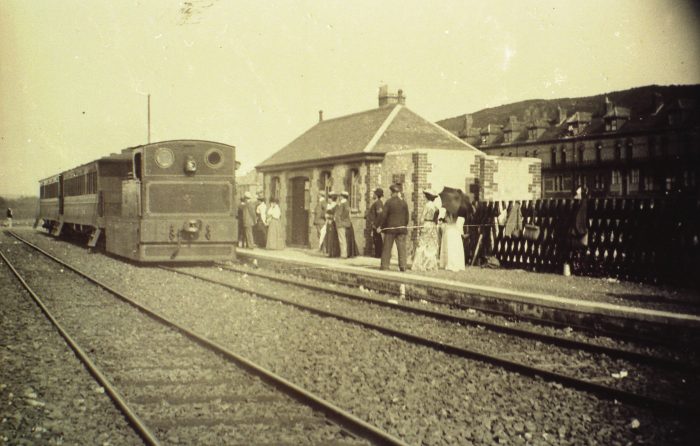
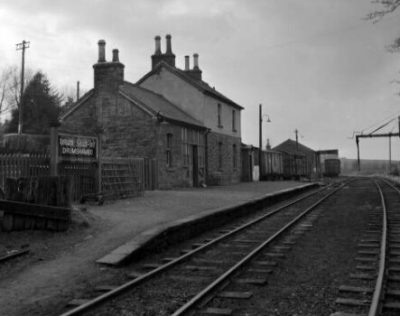
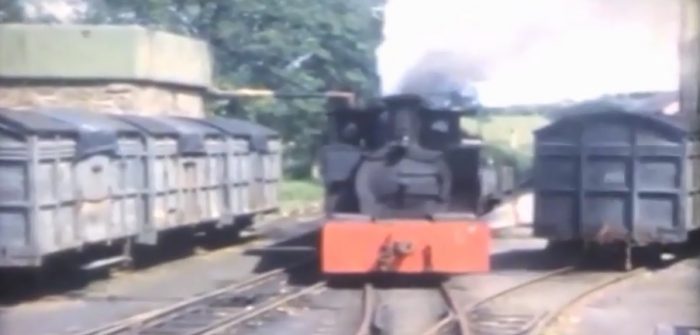 Another picture at almost exactly the same location. This is a video still from the late 1950s. [13]
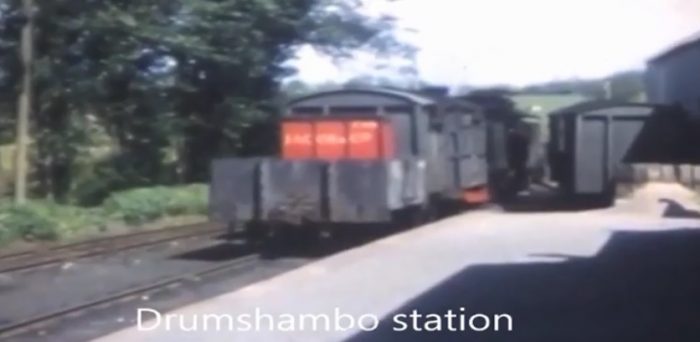 A video still showing shunting in Drumshanbo Station with the Station building in shadow on the right. [13]
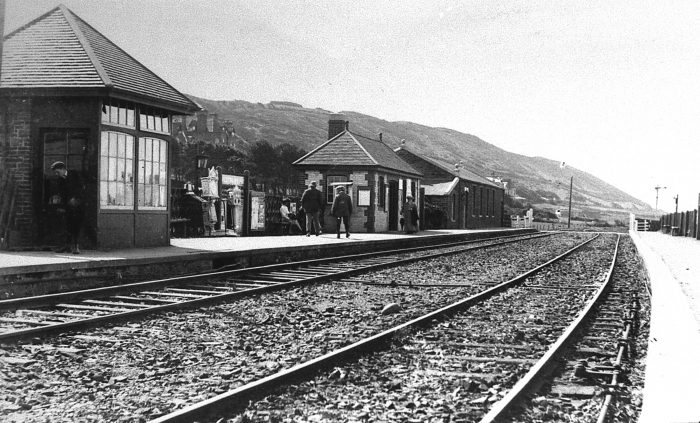
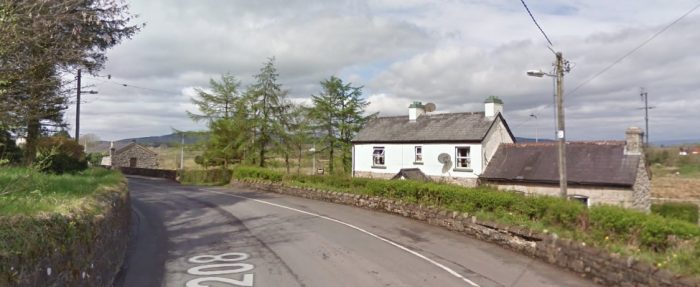 Drumshanbo Stationhouse to the right and the goods shed, to the left, taken from another arm of the R208. [7]
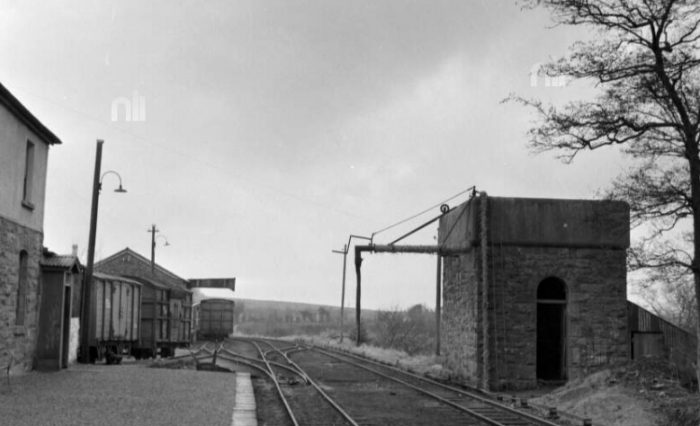
 Two 1950s image looking West along the line towards Arigna for the National Library of Ireland. [16]
Flanagan says: “Opposite the station-house, two road-widths from the platform, stood the 5,000-gallon water tank. For many years it was filled by a windmill just to the west of it but the mill was very troublesome and it was often necessary to call on the permanent-way gang to hand-pump the water. To remedy the situation an arrangement was made with Mr Laird, a mill-owner from the town, whereby he supplied the water from his mill. This reputedly cost the company £80 a year and in 1918 it was decided to reduce costs by installing an oil-engined pump. Unfortunately, the pump, which cost £197, was a failure, and the old arrangements were reverted to in 1922. In January 1923 it was ordered that the pump be removed and the hand-pumping gang reduced in number. About this time, too, the windmill was taken down. Later, the town supply was used.” [1: p144-145] The water tower is shown behind the station ground frame in the image adjacent/immediately above. [16]
Originally, Drumshanbo was neither a staff nor a crossing station but from 1892 it became both, although the loop used was near the goods store and not opposite the platform. The line at the latter point was merely a goods loop (being protected by traps) and was not laid till 1915. At the Ballinamore end of the station a short line diverged on the left to serve Campbells’ hardware store; the line was built in 1920 and was worked by hand points before being connected to the ground frame in later years. Other sidings were laid in 1890, 1902 and 1913. The goods store and loading bank were on the left on a curve and the private Lairds’ Store was at the end of the store road. The goods sidings, and the running line in between, curved both left and right in turn, within the station boundaries, and working could be quite complicated, especially if it was necessary to run round via one of the sidings.” [1: p145] 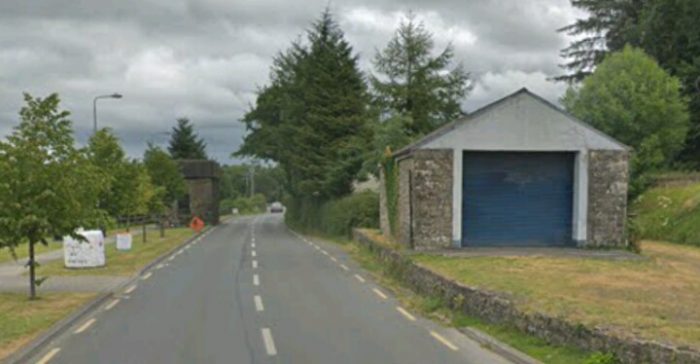 Looking East through Drumshanbo Station site in 2018 towards Ballinamore.
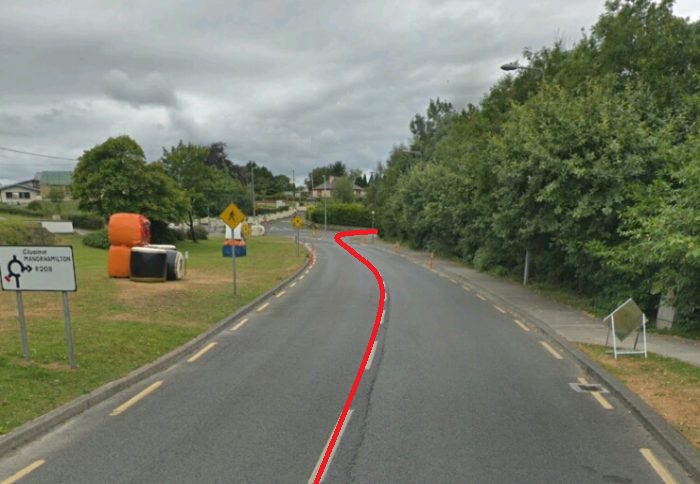
 Looking West from beside the goods shed (Google Streetview).
The adjacent monochrome image shows a view looking back to the station from alongside the sidings shown on the OSI Map extract above. [16]
Flanagan continues: “Outside the station, the line met the un-gated road-crossing at Carrignabrack. It was on a four-chain reverse curve and a few yards beyond it was a second similar crossing. Once more on the right of the road the line crossed the Lough Allen Canal and then passed through a pleasantly-wooded section on a low stone embankment.” [1: p145]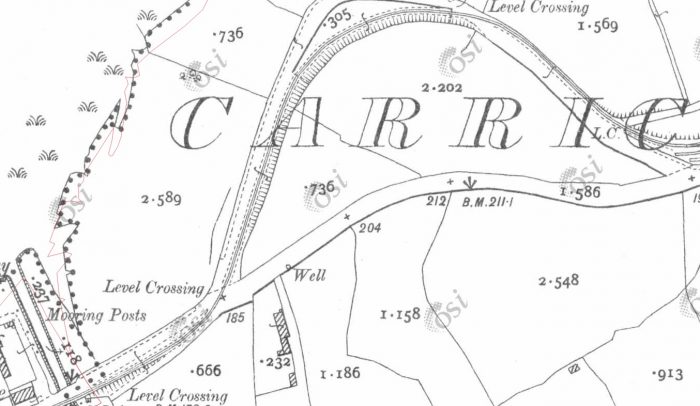
 This OSI Map extract shows the tramway crossing the road on two occasions, leaving the tramway on the left of the road when it crossed the canal. [6]
The adjacent image shows the level-crossing just prior to the Lough Allen Canal Bridge. [16]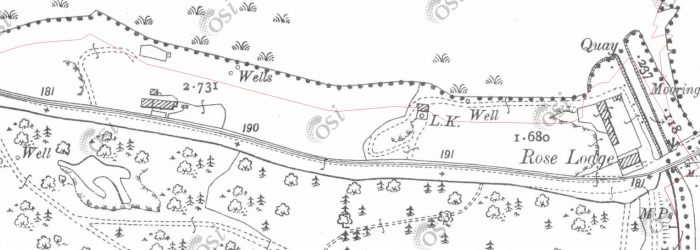 Immediately after crossing the canal the tramway crossed the road again and continued on the north side – the right side of the road heading for Arigna. [6]
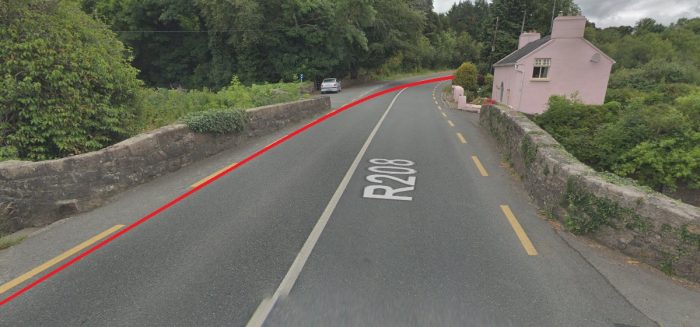 The route to the West (Google Streetview) 2018.
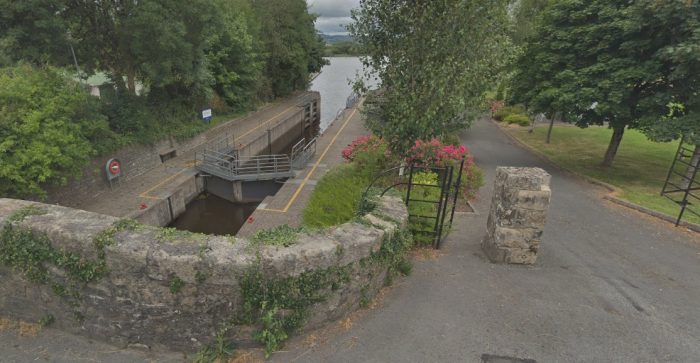 The Lough Allen Canal as it appears on the North side of the R208 (Google Streetview) 2018.
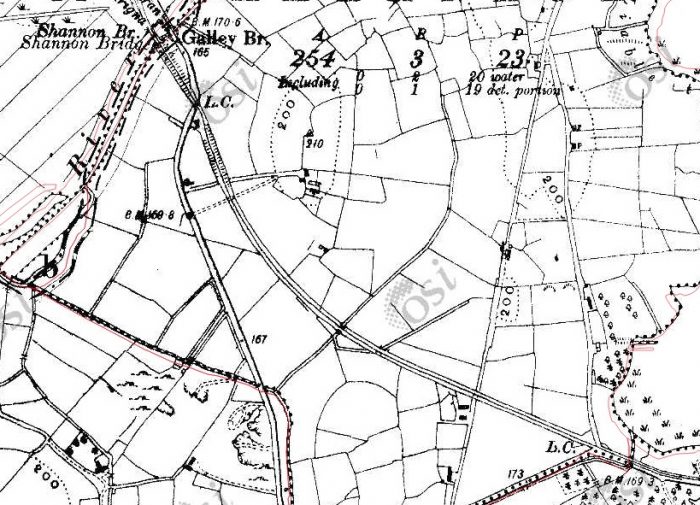 The OSI Map Extract shows the line curving gradual towards the Northwest and the road (in the bottom right corner heading Southwest. The Mahanagh Crossing and the Shannon Bridge are near the top left of the extract. [6]
 This satellite image shows the old railway alignment which was on its own right of way and the modern R208 which follows the same alignment until it curves away to give room for a junction with the R280. [7]
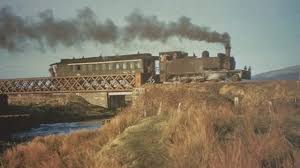
“There was a short fall at 1:28 at the ‘12.75’ milepost, where the road swung to the left and made a U-turn to recross the line again at Mahanagh gates (13.25 miles). A little beyond the crossing the line rose slightly to cross the single-span girder Shannon Bridge.” [1: p145]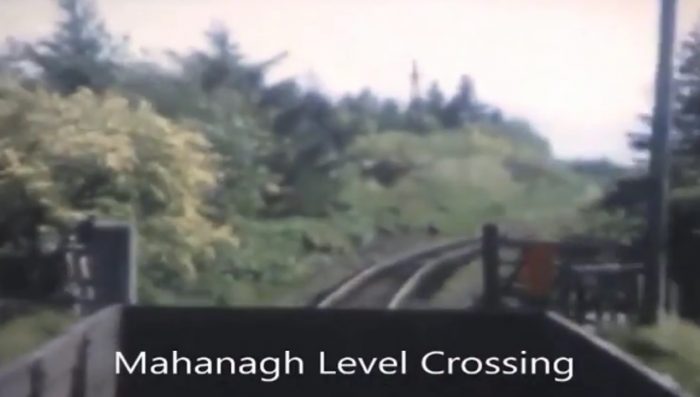 Mahanagh Level Crossing looking back from a train of empty coal wagons towards Drumshanbo. [13]
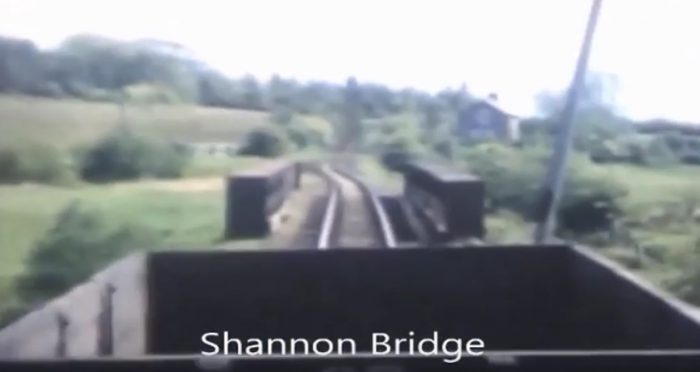 Shannon Bridge looking back from the same train of empty coal wagons towards Drumshanbo. [13]
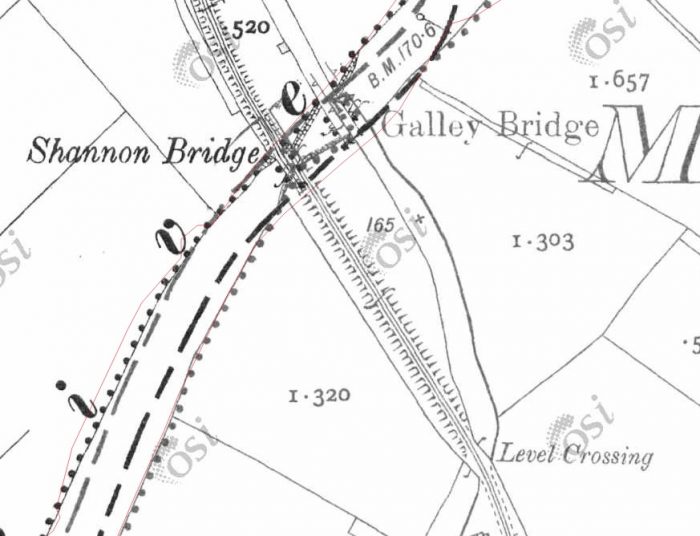 The Map extract shows Mahanagh Crossing to the bottom right. The crossing cottage only just edges into the extract. Shannon bridge is towards the top of the extract with the road bridge (Galley Bridge) alongside. [6]
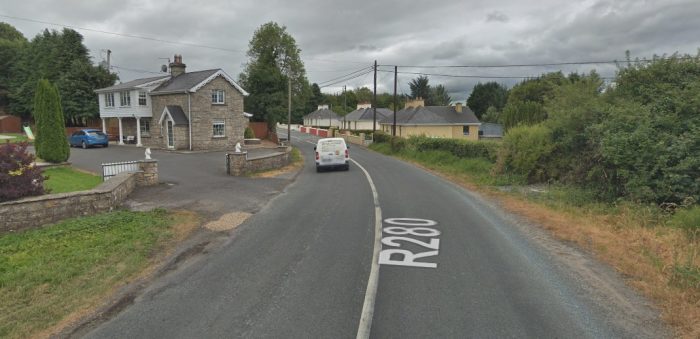 The Crossing keeper’s cottage at Mahanagh has been extended significantly. The line passed on the near side of the cottage not far from the location of the access gates to the cottage in 2018 (Google Streetview).
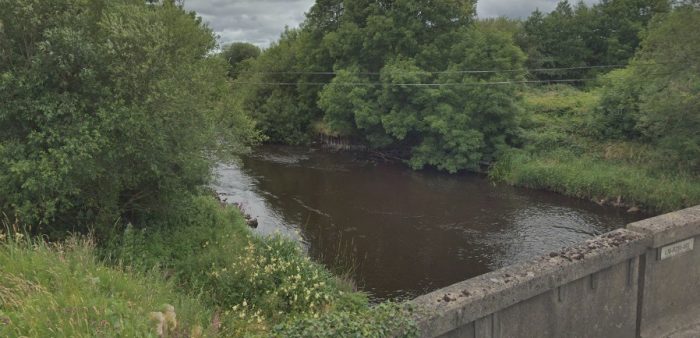
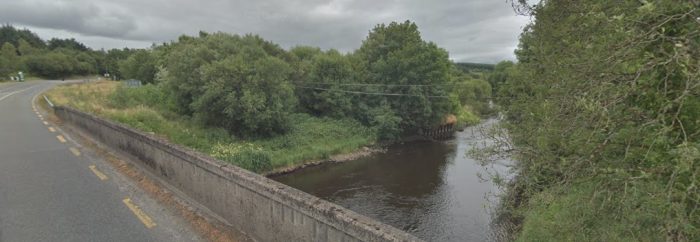
 Two images above of the River Shannon looking to the south side of the R208. The location of the railway bridge abutments on each bank can just be seen, (Google Streetview). The adjacent image shows the railway bridge from the southwest with the road bridge behind. [11]
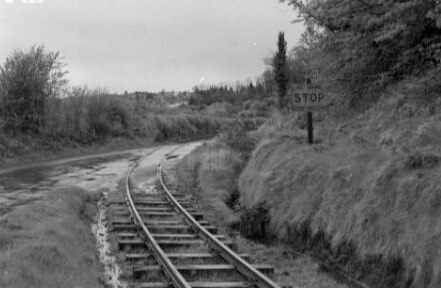
“The tramway was now in Co. Roscommon and just past the river it rejoined the road, remaining on the left of it for most of the run to Arigna. The section rose slightly at 1:193 and was dead straight for over half a mile before leaving the road for good and curving left to run into Arigna station (14.75 miles).” [1: p145]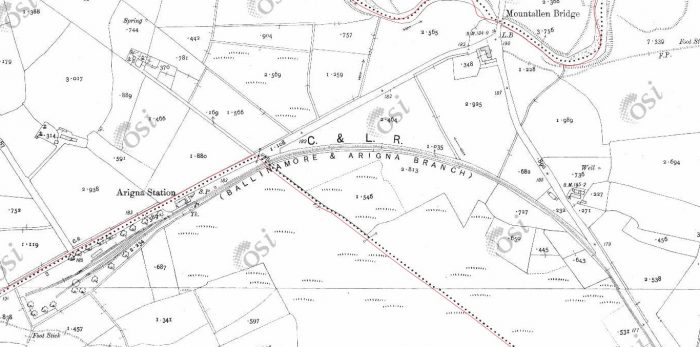 The end of the line at Arigna before the construction of the extension. [6]
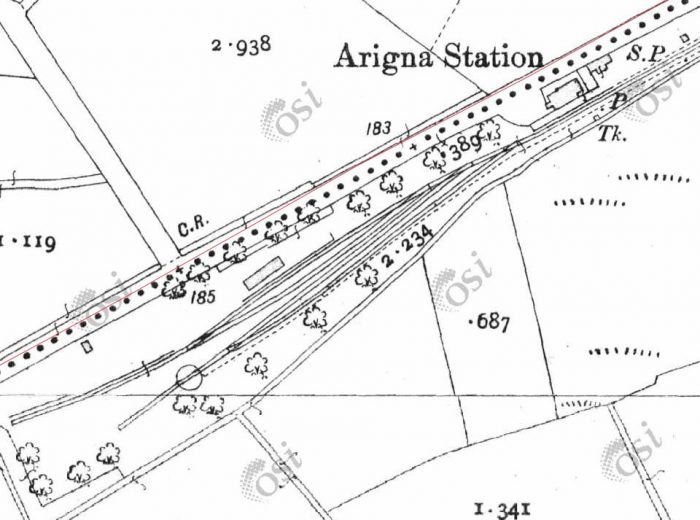 A closer image. The layout is not the same as below as re-modelling took place as the extension was built. [6]
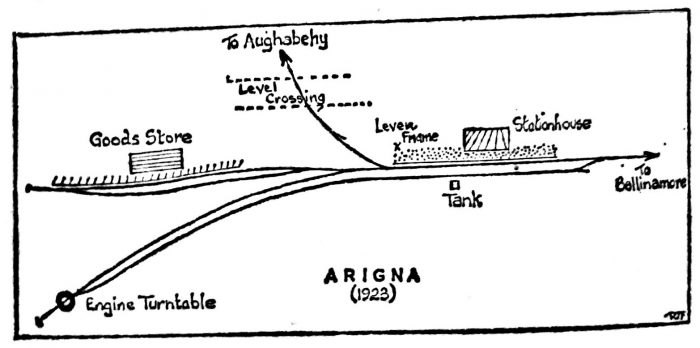 Flanagan’s sketch plan of Arigna Station. [1: p146]
For details of the Extension, please follow this link: https://rogerfarnworth.com/2019/04/26/the-cavan-leitrim-railway-arigna-valley-railway.
 The Arigna station, as shown in the adjacent National Library of Ireland image, [18] “was delightfully situated in a glade of tall alder trees, and had a very elongated layout. The station-house was on the one platform on the right, with the ground frame at the west end. The Arigna station-house was always the odd man out on the C&L. In latter days it was of concrete block construction, [adjacent, [19]] the building dating from 1923-4. The original was also non-standard, being a single-storey, red, corrugated-iron structure. A more solid building was not possible as a firm foundation could not be obtained. Light as the original was, there were reports of it sinking in December 1890, though the engineer managed to cure this trouble. The new house was much more solid, and had as foundation 100 wagon-loads of material from the pit at Ballyheady.” [1: p146]
The run-round loop was at first beyond the platform and it curved left, ending some little distance from the station at the 24ft turntable. Off it, to the right, a goods loop diverged, upon which were a loading bank and store. Past the latter, the loop closed into a single line which served another loading bank, authorized in November 1888.” [1: p146]
 The Arigna yard seen from close to the passenger station building. the line curving away to the right is the Extension. [20]
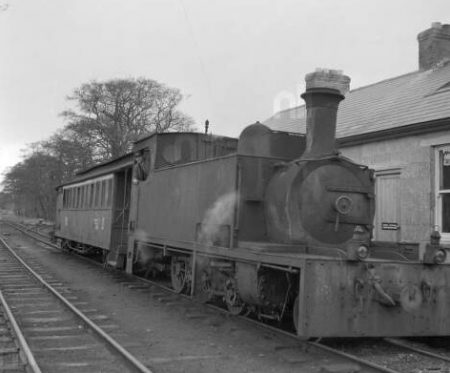
“After the opening of the extension, the layout was changed and the run-round loop was ex-tended to the Ballinamore end of the platform. The first line then to diverge right was the extension itself, the other being the lengthened goods loop. The goods store was of corrugated iron with a high gabled roof, and it survived until about 1940.” [1: p146-147]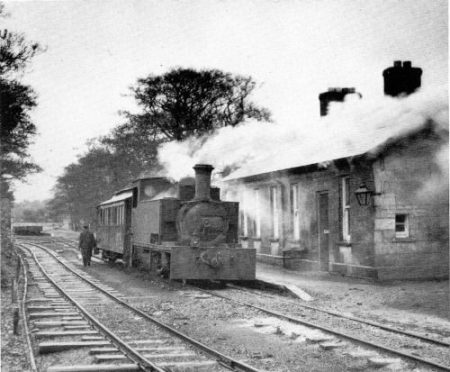 Arigna Station viewed from the East – 2-6-0T locomotive No.3T sits at the platform. [17]
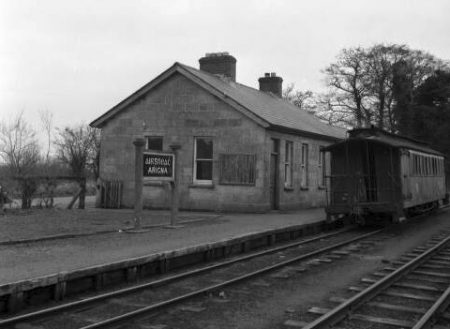
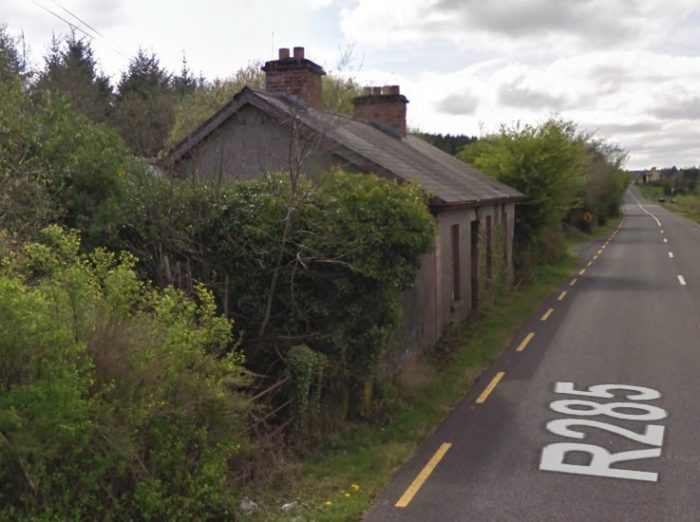 The station building in the early 21st century, also taken from the East, (Google Streetview).
“Arigna station was the only Class 4 one on the C&L but the £45 allowance was augmented by the Arigna Mining Company, which also paid for the 1892 ballasting of the station-yard and used to share the other general expenses of the station. There was a stable for cart-horses in the yard and, for some six years after its opening, a carriage shed, situated opposite the goods store. This was another Rogers building but the smallest on the line, its dimensions of 60ft X 12ft X 10ft being only just enough for the single branch coach; it was transferred to Ballinamore in 1894. A water tank, erected in 1889 and replaced in 1892, was built on a crate of sleepers opposite the station-house. The second tank was also positioned there and, although officially unrecognized, Arigna had water till the end. It was pumped by hand and was used only when drivers were trying to coax leaky engines. A cart weighbridge, for the coal traffic, was provided early on and replacements were installed on two occasions though none survived to the closure. [1:p147]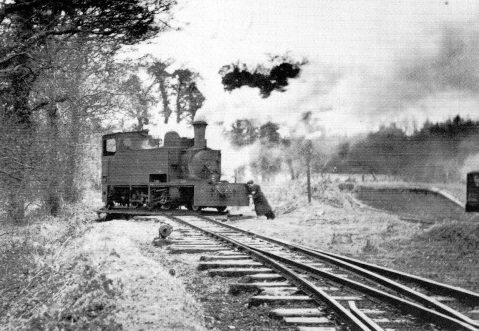 Turning the locomotive at Arigna was a very exacting task as the locomotive turntable was short for the Tralee and Dingle engines. The locomotive had to be properly balanced on the pivot otherwise the fireman would not be able to move the engine. The driver is pushing from the rear. [17]
References
- Patrick J. Flanagan; The Cavan & Leitrim Railway; Pan Books, London, 1972.
- https://maps.nls.uk, accessed on 22nd May 2019.
- http://railthing.blogspot.com/2015/10/?m=1, accessed on 25th May 2019.
- https://www.ebay.co.uk/itm/Cavan-Leitrim-NG-Railway-3-different-Sets-of-10-6×4-Black-White-photo-prints-/292954701892, accessed on 11th June 2019
- http://www.cowgill.org.uk/CLR/index0001.html
- http://geohive.maps.arcgis.com/apps/webappviewer/index.html?id=9def898f708b47f19a8d8b7088a100c4, accessed on 11th June 2019.
- http://www.railmaponline.com/UKIEMap.php, accessed on 11th June 2019.
- https://picclick.co.uk/Cavan-Leitrim-NG-Railway-3-different-292954701892.html, accessed on 11th June 2019.
- https://www.pinterest.co.uk/53Stapleton/ireland-co-leitrim, accessed on 11th June 2019.
- https://picclick.co.uk/fg-irish-plain-back-postcard-ireland-leitrim-railway-401505238559.html, accessed on 24th May 2019.
- https://www.northernsound.ie/podcast-off-beaten-track-narrow-gauge-railway-belturbet-dromod, accessed on 14th June 2019.
- http://www.buildingsofireland.ie/niah/search.jsp?type=record&county=LE®no=30808003, accessed on 13th June 2019.
- https://www.youtube.com/watch?v=Uvg1qAQ9THQ, accessed on 13th June 2019.
- http://www.buildingsofireland.ie/niah/search.jsp?type=record&county=LE®no=30808002, accessed on 13th June 2019.
- http://www.buildingsofireland.ie/niah/search.jsp?type=record&county=LE®no=30808001, accessed on 13th June 2019.
- http://catalogue.nli.ie/Search/Results?lookfor=Drumshanbo&type=AllFields&submit=FIND, accessed on 13th June 2019.
- https://chasewaterstuff.wordpress.com/2014/06/12/some-early-lines-ireland-arigna-cavan-and-leitrim-railway, accessed on 15th June 2019.
- http://catalogue.nli.ie/Record/vtls000304124 ((c) James P. O’Dea), accessed on 15th June 2019.
- http://catalogue.nli.ie/Record/vtls000304126 ((c) James P. O’Dea), accessed on 15th June 2019.
- http://catalogue.nli.ie/Record/vtls000304127 ((c) James P. O’Dea), accessed on 15th June 2019.
- https://www.ebay.ie/itm/EIRE29-1950s-ARIGNA-STEAM-RAILWAY-TRAIN-CARRIAGE-at-STATION-Photo-IRELAND-/122769139155?hash=item1c959c65d3, accessed on 15th June 2019