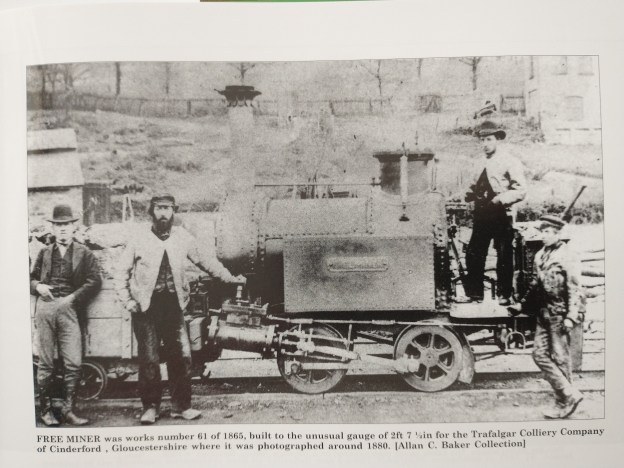
The featured image above shows the locomotive ‘Free Miner’ which was Works No. 61, at the Lilleshall Company Works, it was delivered to Trafalgar Colliery in February 1865 for use on the Tramway. The picture comes from Bob Yate’s book about the Lilleshall Company locomotives and railways, (c) Alan C. Baker Collection. [5: p55]
A little while ago, I wrote an article about the Trafalgar Colliery in the Forest of Dean and as part of that article started to cover Brain’s Tramway. That article can be found at:
In that article, I noted that Brain’s Tramway was built soon after the opening of the colliery to connect to the Great Western Railway’s Forest of Dean Branch at Bilson [1] The single line of 2ft 7.5in gauge utilised edge rails laid on wooden sleepers and ran east from the colliery, turning south-east at Laymoor, and terminated 1.5 miles away at interchange sidings at Bilson. It would appear that the authorisation for its construction was a Crown licence for ‘a road or tramway 15 feet broad’ dated May 1862. The date the line was opened for traffic is unknown as, although the first of three locomotives used on the tramway was built in 1869, it is possible that it may have been horse worked before this date. [2]
I noted that the colliery appeared to have owned three locomotives: ‘Trafalgar’ and ‘The Brothers’ were 0-4-2 side-tank locos. The third locomotive was ‘Free Miner’, an 0-4-0 side-tank. The locomotive ‘Trafalgar’ continued in use until 1906, working on the northern extension of the tramway, built in 1869, to the Golden Valley Iron Mine at Drybrook. [2] we will return to these three locomotives later in this article.
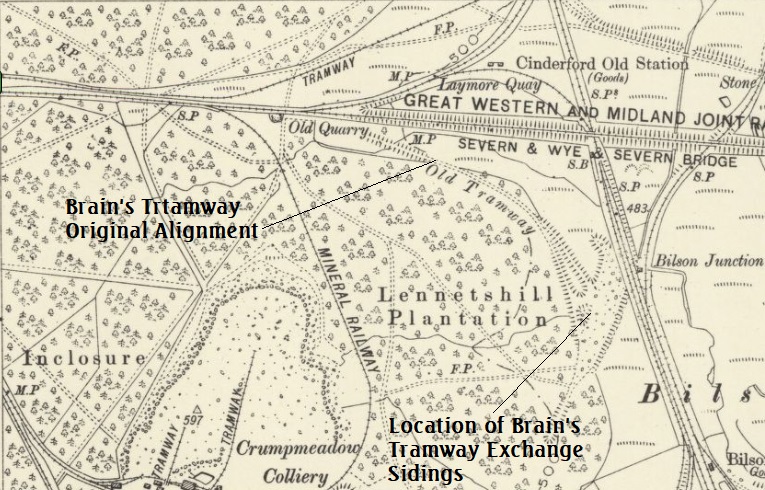
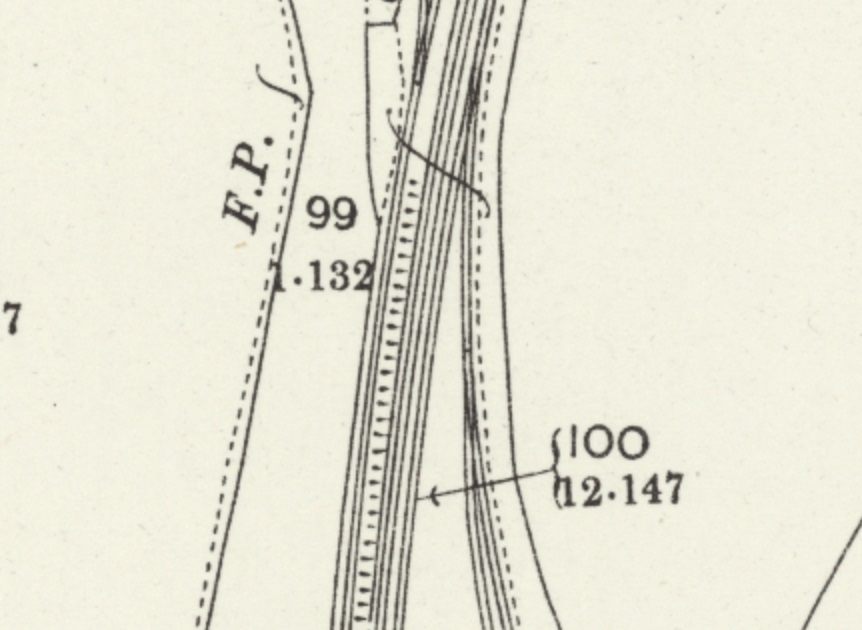
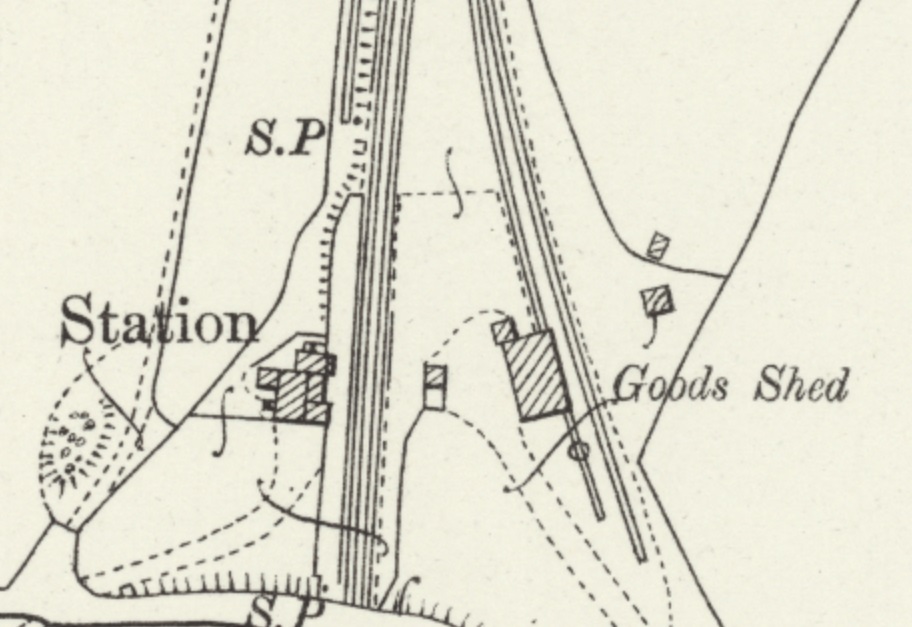
6″ OS Map from 1901 showing both Mr Brain’s Tramway and the standard-gauge sidings of the Colliery and their connection to the Severn & Wye Railway close to Drybrook Road Station. [16]The extent of Mr Brain’s Tramway when first built to the Bilson Exchange Sidings. The point of conflict with the Severn and Wye near Laymoor (as mentioned below) can easily be picked out on the map extract. [3]
Tramway locomotives hauled trains of 20-25 trams of coal on each trip along Brain’s Tramway to Bilson, until 1872 when the Severn & Wye built their branch to Bilson. This crossed the tramway on the level near Laymoor and resulted in the need for the two companies to negotiate an acceptable coexistence. This became more urgent once the Servern and Wye extended beyond Drybrook Road an when, in 1878, passenger trains began running over the crossing.
Although a connection had been made to the Severn and Wye Railway in 1872 [1] at a point between Serridge Junction and Drybrook Road station, a large element of Trafalgar’s output still travelled along the tramway to Bilson. [2]
In my article about the colliery, I noted that in 1872, agreement was reached between the Severn and Wye and Trafalgar Colliery for sidings to be put in to serve the colliery screens. Soon after the Mineral Loop of the Severn and Wye was completed, a loop off the main line was installed and sidings were laid. However, the Severn and Wye was dismayed to note at a later date that Trafalgar Colliery was still making heavy use of the tramway.
The Lightmoor Press website comments that:
“Finally, in December 1889, an agreement was entered into between the Severn & Wye and the Trafalgar Colliery Company who, it was said, ‘are desirous of obtaining railway communication to Bilson Junction in lieu of their existing trolley road.’ It was agreed that on or before 31st March 1890 the colliery company would construct new sidings and the railway company would lay in a new junction at Drybrook Road. Although the new junction was a quarter of a mile closer to Drybrook Road than the old sidings, the mileage charge was to remain the same. The accommodation, on approximately the same level as Drybrook Road station, was to be constructed so that traffic to and from the Great Western would be placed on a different siding to that which was to pass over the Severn & Wye system. For taking traffic to Bilson Junction for transfer to the Great Western the colliery was to be charged 7d per loaded wagon, although empties were to pass free. The transfer traffic also had to be conveyed ‘at reasonable times and in fair quantities so as to fit in with the ordinary workings of the Railway Company trains’. The new sidings were brought into use on 1st October 1890.” [2]
The Lightmoor Press article notes that this “agreement finally resulted in the abandonment of the length of the tramway from Laymoor to Bilson Junction. Two of the colliery’s narrow gauge locomotives were put up for sale, neither sold.” [2]
A couple of things:
1. More about the locomotives in use on Brain’s Tramway
Further research has resulted in a bit more information about the locomotives that worked on the Tramway. ….
These locomotives were built by the Lilleshall Iron Co. The first, ‘Free Miner’ was built in 1865. I came across the locomotive in a book by Bob Yate, “The Railways and Locomotives of the Lilleshall Company.” [5] I have recently (2022) moved to Telford and I have been reading a number of publications about the industry, canals, tramways and railways of the area. The Lilleshall Company was the major player in the industrial scene in the Telford (East Shropshire) area throughout the 19th century and much of the 20th century. It had its own system of canals, tramways and railways. Ultimately it had a large roster of industrial locomotives. In the mid-19th century, the Lilleshall Iron Co. built locomotive for others. Bob Yates features ‘Free Miner’ in his list of locomotives built by the Lilleshall Company.
‘Free Miner‘ was Order No. 61 at the Lilleshall Works. It was built in 1865 to a 2ft 7.5 in gauge. It was an 0-4-0T locomotive which the Industrial Railway Society Handbook records as having 8″ x 14″ outside cylinders. It was delivered new in February 1865 to Cornelius Brain, Colliery, Cinderford, Gloucestershire. It was possibly scrapped in 1906. [5: p52]
The date of delivery calls into question the comments above about the date of opening of the line as we now know that a single locomotive was available early in 1865, rather than in 1869. Given that approval for the construction of the Tramway was only given in 1862, it may well be that it was only operated under horsepower for a very short period.
‘Free Miner’ was Works No. 61, at the Lilleshall Company Works, it was delivered to Trafalgar Colliery in February 1965, (c) Alan C. Baker Collection. [5: p55]
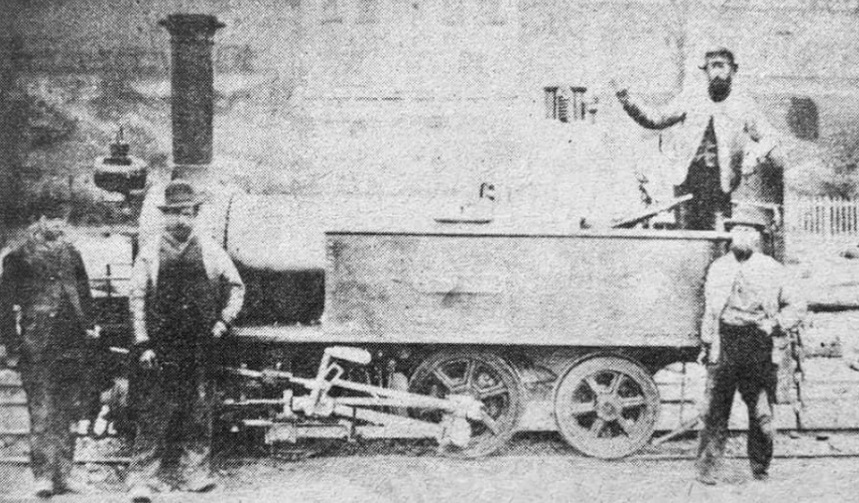
Bob Yate also provides information about the other two locomotives ‘Trafalgar’ and ‘The Brothers’. ‘Trafalgar‘ was supplied to the colliery in 1869. Bob Yates provides the following information: Gauge 2ft 7.5in; Works No. 140; 0-4-2T with 8″ x14″ outside cylinders. It was delivered new in April 1869. Yate comments that an early photograph of this locomotive reveals that it was supplied without a cab, and that the trailing wheels were only about 6″ diameter less than the driving wheels. The safety valves were mounted on a ‘haystack’ firebox. Scrapped c 1906. [5: p56] Both Yate [5: p56] and Lightmoor [2] say the the locomotive was of an 0-4-2T wheel arrangement. What seems not to have been noted is the very short wheel-base of the locomotive as can be seen in the image below. Also evident is the minimal difference in size between the driving wheels and the trailing wheels that Yate refers to.
‘Trafalgar’ which was delivered to the colliery in April 1869. [4]
‘The Brothers‘ was delivered new by the Lilleshall Company in August 1870. It was Order No. 159 on the Lilleshall Company books. Yate records this as a sister locomotive to ‘Trafalgar’ with the same details/dimensions. He notes, however that the Register of Drawings in the archives of the Ironbridge Gorge Museum Trust has the cylinder bore being 8.5in diameter. [5]
2. The Northern Extension
A brief mention, on the Lightmoor Press website, of ‘Trafalgar’ being used on the tramway’s northern extension, [2] encouraged a look at that section of the tramway.
When I was writing about the Trafalgar Colliery, [6] I did not have access to the 1878/79 Ordnance Survey of the Forest which was published in 1883. That shows the transshipment sidings at Bilson junction, the Laymoor crossing and the erstwhile Bilson Road Station. It also shows the northern extension of the tramway diverging from the line to the transshipment sidings just to the North of Bilson Road Station.
The tramway branch was built in 1869/70. It “ran north to the Golden Valley Iron Mine near Drybrook. … The earthwork remains of embankments, cuttings and the interchange embankment are visible on aerial photographs.” [8]
“The tramway earthworks divide in two at its eastern end, the northern branch heading towards Drybrook, the southern heading towards Bilson Interchange.” [8]
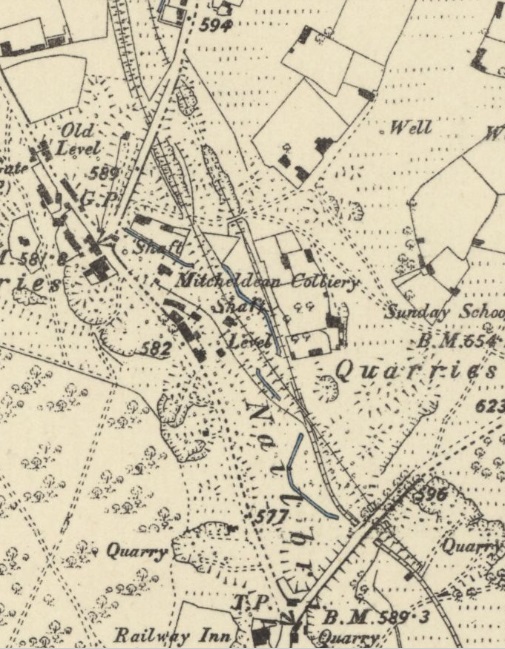
“The Brain family used clay from Trafalgar colliery at brickworks at Steam Mills.”[12][13] The tramway “ran northwards by way of Steam Mills and Nailbridge to iron-ore workings near Drybrook. In 1890 the Severn & Wye provided Trafalgar with a line to Bilson but the narrow-gauge railway continued to carry coal to Steam Mills and Nailbridge.” [13][14]
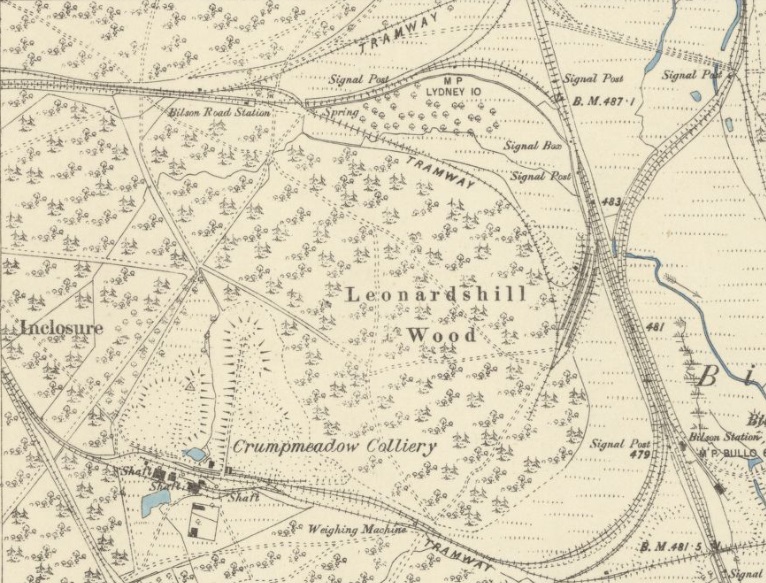
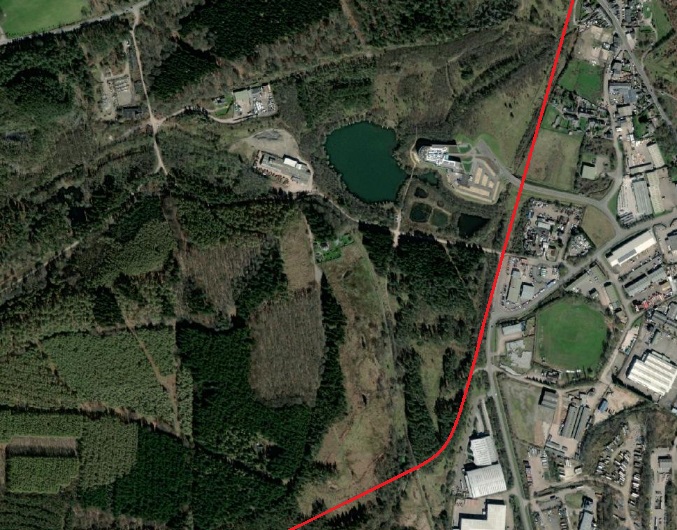
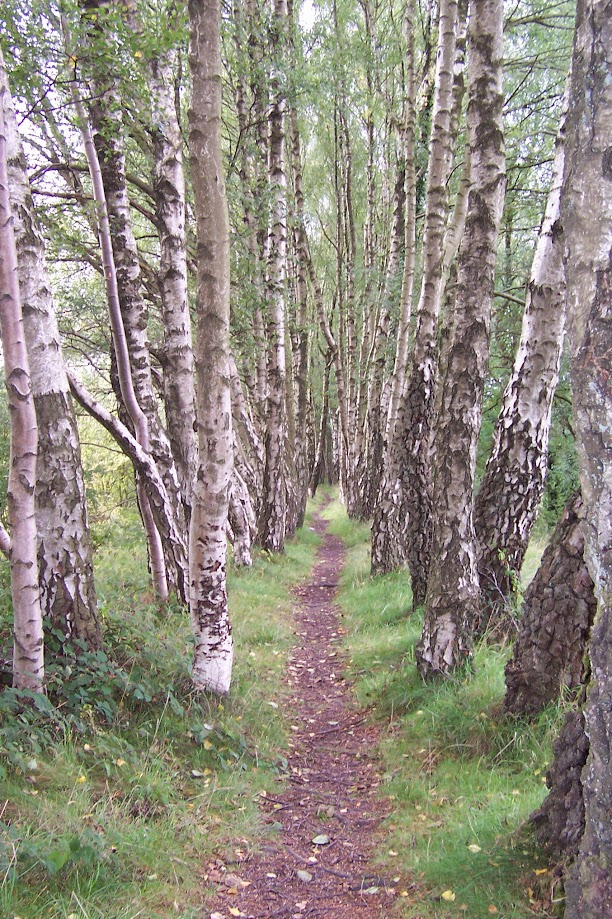
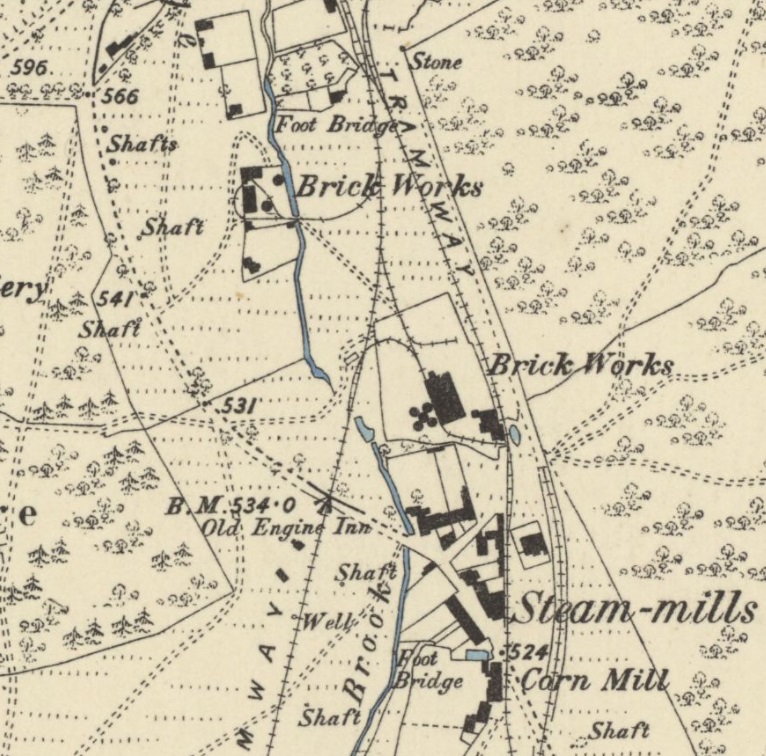
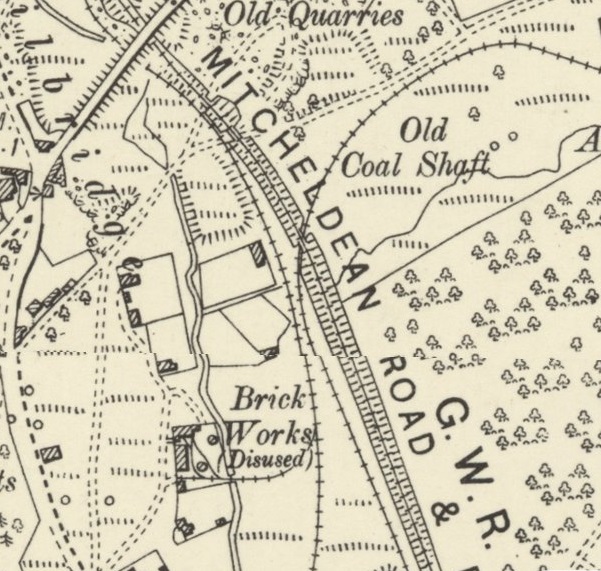
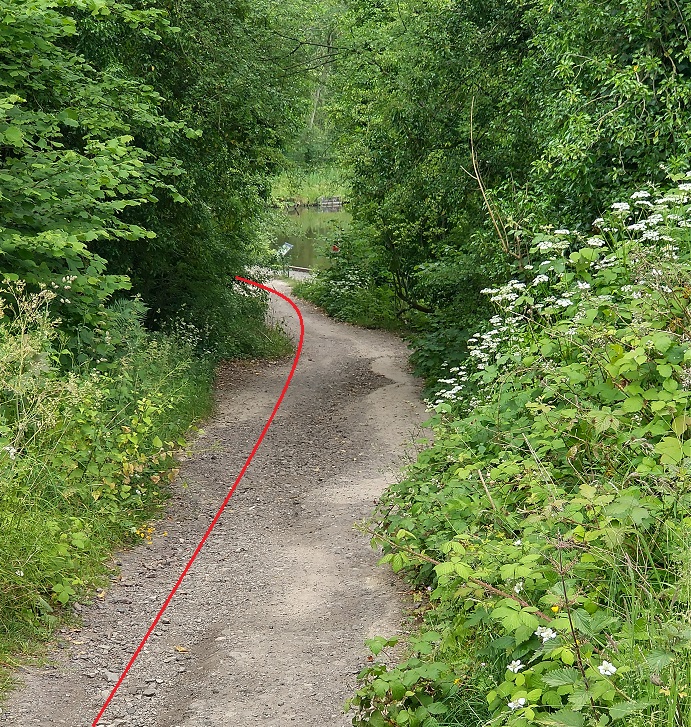
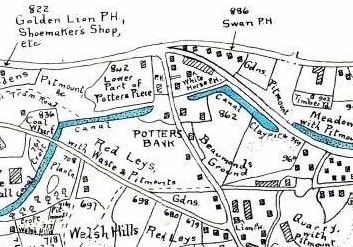
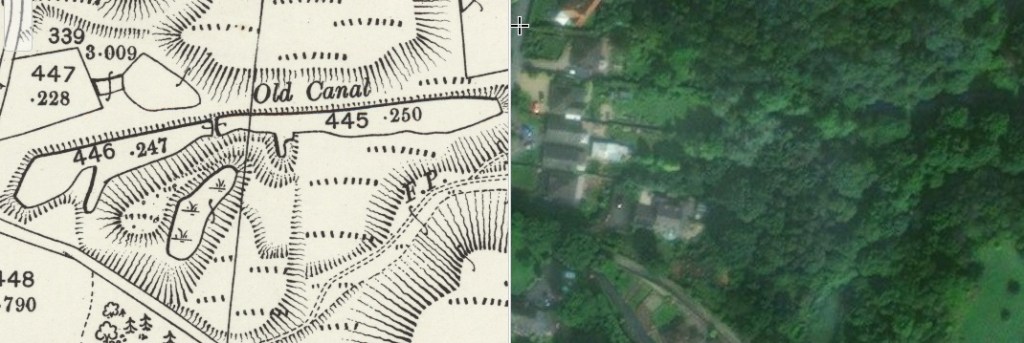
The 6″ OS Mapping published in 1883 showing the Bilson end of Brain’s Tramway and, at the very bottom of the extract, the tramway serving the Crumpmeadow Colliery. [6]The Northern Extension of Brain’s Tramway can be seen crossing the Forest of Dean Branch of the GWR/Severn & Wye & Severn Bridge Railway and then turning to head North passing to the East of Winning and New Bowson Collieries. It continues North-northeast passing off the map extract close to ‘Steam Mills’ [7]A similar area to that shown in the map extract above. a red line marks the approximate alignment of the tramway on the modern satellite image. The location of the surviving embankment is highlighted. [11]Looking Southwest along the line of the embankment which used to support the Northern extension of Brain’s Tramway. [My photograph, 15th September 2010]Brain’s Steam-mills on an enlarged extract from the 6″ 1878/79 OS Maps. The tramway connections to the industrial premises can easily be picked out. [7]This is an extract from a later edition of the 6″ OS Maps (from 1901, published in 1903). On the last map extract a complicated tramway junction appears at the top-centre. That junction had been rationalised by 1901. It is much easier to see on this plan that Brain’s Tramway continued North alongside The GWR branch-line which does not itself appear clearly on the following mapping from 1881/82. [9]Back with the 1881/82 mapping, Brain’s Tramway can be seen in a short tunnel before passing under the road at the top of the plan. [7]These two 6″ 1878/79 OS Survey plans should be taken together. They show the final length of the Tramway as it served Drybrook Iron Mine. [7]This satellite image shows the location of Brain’s Drybrook Mine. [15]
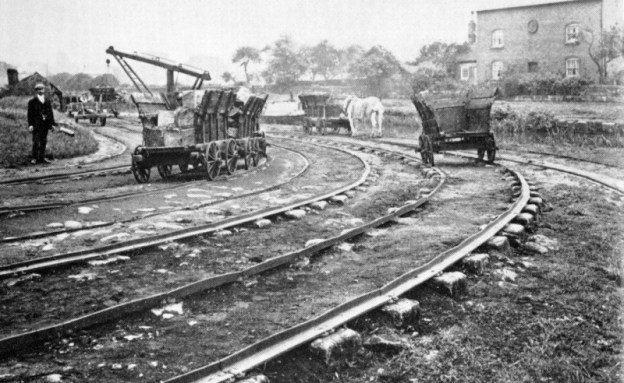
The featured image shows a typical Tramroad, it is not from the Telford area but from the Little Eaton Plateway in Derbyshire. The rails and waggons will be very much like those in use on the tramroads in and around Malinslee.
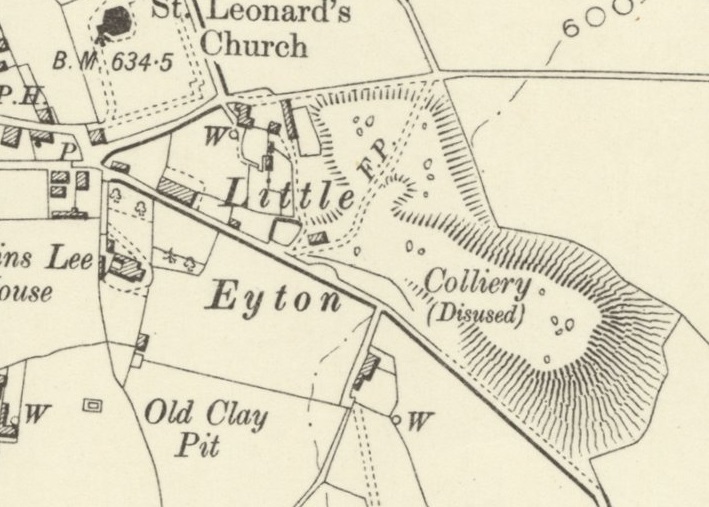
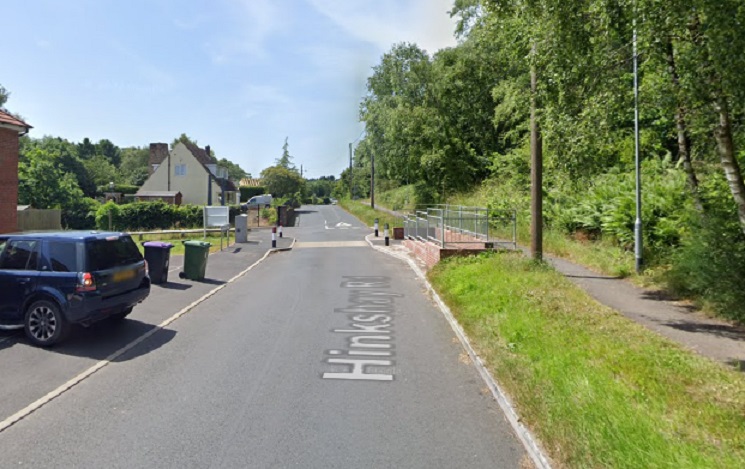
Just South of our home in Malinslee are the Hinkshay and Strichley areas. I have already posted about a walk from our home down the line of the erstwhile tramway which served Little Eyton Colliery which was not more than a couple of hundred yards from St. Leonard’s Church, Malinslee. That tramway crossed the Hinkshay Road close to the location of what was the White Hart Inn. There was a significant network of tramways in that immediate area.
Those linking directly to the tramway from Little Eyton Colliery to the Coalport Branch of the Shropshire Canal and later to the Coalport Branch of the LNWR were covered in that previous post:
The rails in this vicinity were know locally as Jerry Rails, probably because the White Hart was known locally as the ‘Jerry’. In the 1861 census the White Hart was called the ‘Tom and Jerry’
The White Hart Inn at Hinkshay was previously known as the ‘Tom and Jerry’. The highly informative Dawley History website tells us that “this photograph was taken of the White Hart from off the “Jerry Mount” at Hinkshay. The road that ran between, and which crossed the Hinkshay Road, was called the “Jerry Rails” and the pub was knick-named the “Jerry”. Also, a furnace near Stirchley Pools was called the “Jerry Furnace”. … It can clearly be seen in the 1861 census, that the pub was originally called the “Tom and Jerry” and so we can safely assume that the name stems from this, and that the other places, and road, were named after the pub and not the other way round. … ‘Tom and Jerry” was a name formerly used for roistering young men about town. … ‘Tom and Jerry’ is also the name of a hot mixed drink containing rum, brandy, egg, nutmeg and sometimes milk. … The pub is mentioned in the 1896 Licensing returns, when John Breeze was landlord, and is listed in the 1841 census, where Thomas Summers was landlord. In Bagshaw’s 1851 directory we find Thomas Summers listed as a Maltsters, Farmer and Victualler at Hinkshay. The 1861 census clearly names the pub as Tom & Jerry, but in 1871 it is called the White Hart. In Kelly’s 1913 and 1926 directories, Walter Harper was the landlord.” [2] Incidentally, the long brick building is a row of cottages built for the workers at the nearby Ironworks. Futher similar housing can be seen to the left of the image, behind the goalposts. [2]This image shows the ‘White Hart’ in its earlier guise. It would have appeared like this when known as the ‘Tom and Jerry’ [18]
This article follows a tramway route which ran from the Dawley and Stirchley Railway Station on the LNWR Coalport Branch around the Hinkshay Pools across the back of the White Hart Inn (behind the row of cottages in the above picture) and then into the Stirchley Ironworks site.
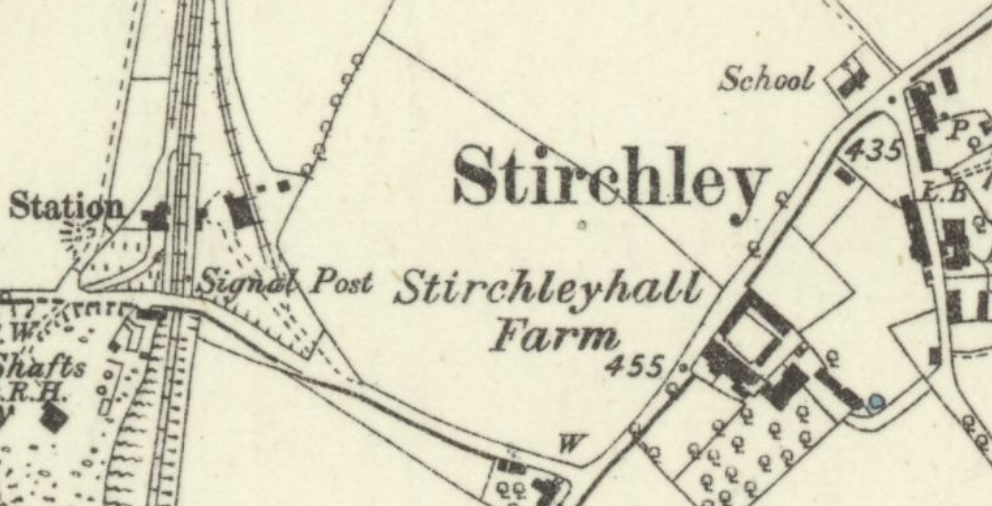
Dawley and Stirchley Railway Station
Dawley and Stirchley railway station was opened in 1861 and closed to passengers in 1952. [3] When it was opened, it was given the name ‘Stirchley’. The station was renamed Dawley & Stirchley in 1923, although closed to passengers as early as 1952 the line was not closed to freight until 1964. Although the goods service which originally served Coalport was restricted to only travelling to Dawley and Stirchley Station in 1960.[4][5]
The London and North Western Railway Society comments on the standard-gauge Coalport Branch as follows: “The first half of the route was originally part of the Shropshire Canal which the LNWR bought in 1857 and filled in, the line opening four years later. The passenger service, referred to locally as the Dawley Dodger, consisted of four trains on weekdays, the journey taking 30 minutes. It was withdrawn in 1952 but a string of private sidings between Wellington and Stirchley helped to keep that section open a further twelve years.” [5]
Through Telford Town Park and on through Dawley and Stirchley Station, the old railway line is now part of The Silkin Way. [6][7]
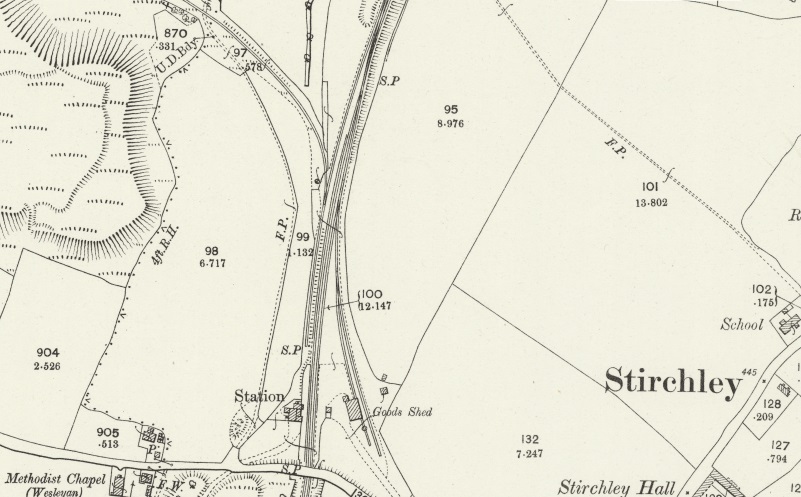
In the first half of the 19th century, before the LNWR branch line was built the tramway had a wharf on the Western bank of the Coalport Branch of the Shropshire Canal which was sited a little to the Northwest of the location of the point at the bottom of the map extract above. When the Coalport Branch of the LNWR was built the tramway was extended a little to run alongside the standard-gauge railway.
This map of the Stirchley area in 1838 was developed to show the relative arrangement of different land-holdings in the Stirchley area. Its value to us is that it clearly shows (at the left of the image) the wharf where tramway/waggonway loads could be transshipped onto canal barges or tub-boats. This location approximates to the railway point on the map extract directly above this map, (c) British History Online. [14]
From, what was, the canal wharf, the tramway turned away West of the Canal to skirt the western flanks of the Hinkshay (Stirchley) ponds.
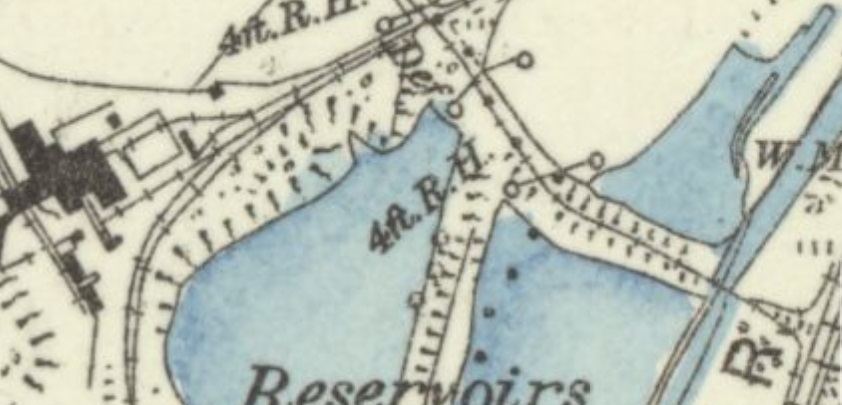
The 6″ 1881/82 Ordnance Survey, published in 1888, shows the tramway running Northwest alongside the Pools and then turning through North to Northeast adjacent to the Jerry Furnaces. [8]The same area on the 25″ 1902/02 Ordnance Survey. The Ironworks to the Northwest of the Pools has now been demolished and the tramway sidings associated with it have been removed. [16]The same area in the 21st century on the ESRI World Topo images provided by the National Library of Scotland. Re-wilding has taken place a very little of the topography can be made out. Two of the Pools are easy to pick out. The Coalport Branch of the Shropshire canal ran along the East side of the larger, more Eastern Pool and the railway alignment was a little further to the East. [16]Looking North along the Silkin Way. The tramway turned away to the left having run parallel to the old railway at a higher level for a short distance. The land to left of the line can be seen in this image to be a little higher than the old Coalport Branch formation. [My photograph, 15th June 2022]The difference in level is more obvious in this image. [My photograph, 15th June 2022]The footpath which follows the old tramway route leaves the Silkin Way towards the right of this picture just to the left of the modern waste-bin. [My photograph, 15th June 2022]Almost immediately the tramway crossed the disused Canal. This picture looks North along the Canal. It seems as though some minimal provision was made for drainage as the water does not seem to be stangnant. [My photograph, 15th June 2022]
David Clarke, in his survey of the railways of the Telford area says that the GWR’s Stirchley Branch was “a freight only line of 1.5 miles (2.4km) and was formally known as the Old Park branch. The branch had no signal box and was operated by one engine in steam, with the train crew holding a token to give them possession of the line. The line … served Randlay Brickworks and the large complex that was Old Park Ironworks as well as Grange Colliery. The branch was initially worked by the Haybridge Iron Company. On the Ordnance Survey plan for 1902 it is described as a mineral line, and by then Grange Colliery was closed and disused. From 1908, the Great Western Railway took over the maintenance and workings of the branch.” [58: p37] “The branch closed on 2nd February 1959, prompted by bricks no longer being sent out by rail from Randlay Brickworks. The sidings specifically for the Stirchley branch had been removed by November 1962.” [58: p38]
Looking South towards Dawly and Stirchley Station along what was the line of the Canal. [My photograph, 15th June 2022]Looking across the line of the Canal towards the Silkin Way. [My photograph, 15th June 2022]Looking Northwest along the line of the old tramway with Hinkshay Pools on the right. [My photograph, 15th June 2022]
Immediately to the Northwest of the Pools was and Ironworks, shown on the map extracts above. It was already disused in the 1880s and does not feature on the 1901/02 OS map of the area. A relatively complex trackwork layout was still present in the 1880s, by 1901/02 just a single line curves round to the North east and runs along the Northern side of the Pools.
The next map below shows the continuation of the tramway as it crosses the tramway route covered in my earlier post [1] and then heads towards Stirchley Ironworks.
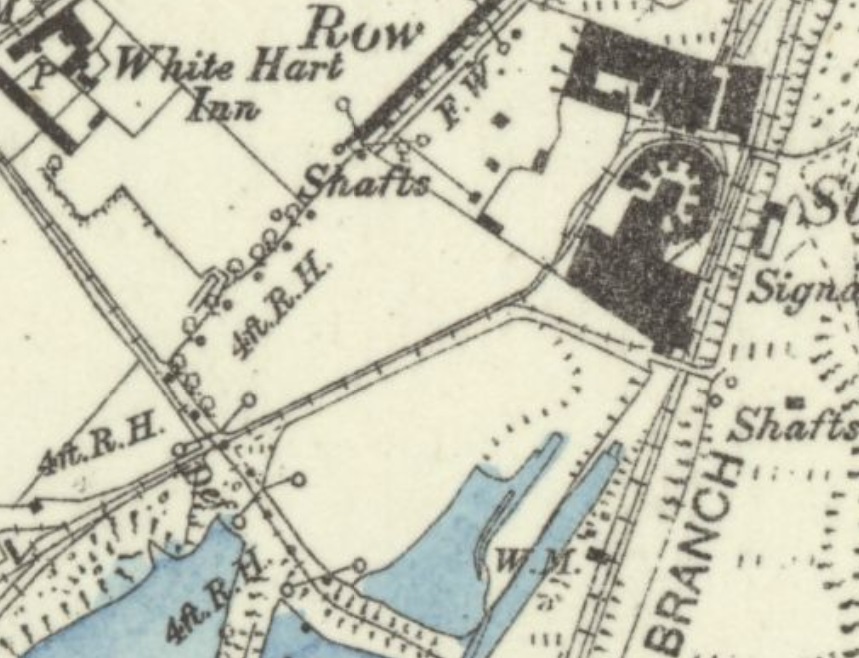
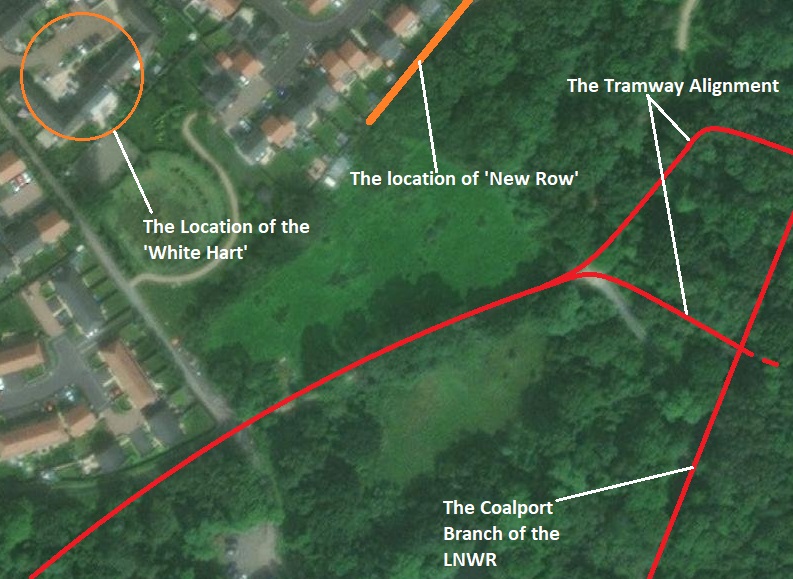
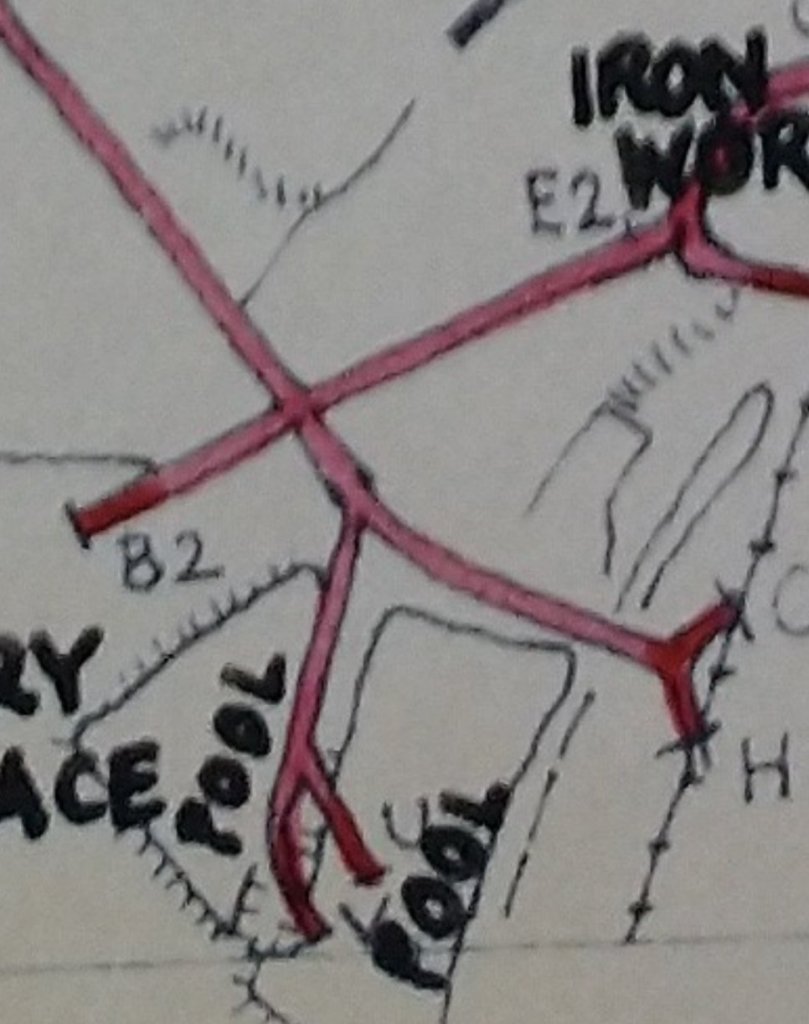
This next map extract from the 6″ 1881/82 Survey shows the Tramway we are following running across the North side of Hinkshay Pools and crossing the tramway covered in my earlier post. [1] The White Hart Inn, which in a previous guise resulted in these tramways becoming know as Jerry Rails, is at the top left of the map extract. The ‘row’ of properties at top-centre of the extract were know as ‘New Row’. The complex in the top right of the extract is Stirchley Ironworks. [8]Approximately the same area as it appears on the 25″ Survey of 1901/02. [17]The main features of earlier times are marked on the modern satellite image of the same area. Stirchley Ironworks are not marked but as the older maps show, the building were both above and below the more northerly tramway route. [17]Looking back to the West from the location of the tramway junction, the approximate alignment of the old tramway is marked by a red line. The erstwhile Ironworks were directly ahead of the camera. [My photograph, 15th June 2022]Turning through 180°, this image shows the tramway route heading towards Stirchley Ironworks. [My picture, 15th June 2022]An extract from the plans drawn up by Savage & Smith which shows the route of the tramway from the Jerry Furnace to the Stirchley Ironworks. [60: p164]
Before we look in detail at the Stirchley Ironworks site and the area immediately around it – some background information will probably be helpful. …
Telford Town Park’s website provides a preliminary introduction to the area as part of its walking trails:
Stirchley Forge and Rolling Mills – The Hinkshay Works, Stirchley Forge and Rolling Mills are all Archaeological remains of buildings that can be found in the park today. They were all sold off to the Haybridge Iron Co. In 1873. The works were rebuilt in 1876 and a nail factory was established on the site in 1874/5 until 1885. The forge and rolling mill continued in use until it closure in approximately 1900.
Stirchley Chimney and Furnaces:The Iron Works were established in 1790 by Thomas Botfield, originally with two blast furnaces, a forge and a mill. The Chimney was constructed of Randlay brick and is approximately 209 feet high and is still standing. This is a permanent reminder of the industry that used to occupy the Town Park. There is a small opening on the western side of the Chimney and it was connected to the furnaces by a tunnel. The ironworks were blown out in 1885, however the forge and rolling mill continued in use until its closure in 1900.” [19]
“Shropshire Canal:The Silkin Way, running north to south through the centre of the park, was formerly the Shropshire Canal and the Wellington and Coalport railway. In 1788/9 the Coalport branch of the Shropshire Canal was built along the western edge of Stirchley, through the centre of the Park. It was designed to link the key industrial centres of the area with the River Severn.” [19]
Stirchley was an agricultural community until the beginning of the 19th century when coal and ironstone mining, iron founding, and brick making were started close to the Coalport Branch of the Shropshire Canal. for much of what follows, I have replied on the comprehensive notes provided by British History Online which in turn took the notes from ‘A History of the County of Shropshire: Volume 11, Telford. Originally published by Victoria County History, London, 1985.’ [20]
“Industry came to Stirchley as a result of a partnership between I. H. Browne, owner of most of the parish, and the Botfield family, the Dawley ironmasters who had established collieries and ironworks on Browne’s Old Park estate in Dawley in the late 18th century.” [20]
Between 1811 and around 1843, “they established collieries, ironworks, and a brickworks on their Stirchley royalties. … In 1856, … the land, mineral rights, and plant were leased to the Old Park Iron Co., [21] which continued the industrial operations in Stirchley until it was wound up in 1871. [22] By 1900 mining and ironworking had ceased. A chemical works, occupying one of the former ironworks, flourished until 1932 and brick making and the crushing of furnace slag for road metal continued until the 1960s.” [20]
British History Online tells us that by 1822, Coal was being mined at four collieries, [23] “and by 1840 [24] there were five collieries in the parish [of Stirchley]: Randlay pits, sunk in 1820; [25] Cuxey’s Wood pits, sunk 1834-5; [26] Forge pits, sunk 1825-6; [27] Grange colliery, probably opened by 1833; [28] and the original shaft at Stirchley pits. The extent of seams that could be worked was restricted by the Limestone fault, east of which the coal lay deeper. … After the Old Park Iron Co. was wound up in 1871 the mines were leased to the Wellington Iron & Coal Co. Ltd. in 1874 [29] but by 1879 had reverted to the landowners, the Cheney family. [30] By 1881 all the pits except Grange colliery had been closed. [31] Despite the lease of mineral rights to Alfred Seymour Jones of Wrexham in 1893, Grange colliery was closed in 1894.” [32][20]
British History Online notes that Ironworking “was started in the parish c. 1826 by the Botfield brothers. Blast furnaces were built at the south end of Randlay reservoir (or Randay pool) [33] and a forge and rolling mill were opened probably c. 1828, west of the Shropshire Canal on land purchased from Lord Darlington in 1826. [34] The blast furnaces were leased with the mining royalties to the Old Park Iron Co. after Botfield’s lease expired in 1856. [35] After the company was wound up in 1871 the furnaces were leased in 1874 to the Wellington Iron & Coal Co., which failed in 1877. [36] The furnaces passed back to the owner of the site, Edward Cheney, who kept them in blast for a few years, but they were shut down by 1885. [37] The forge and rolling mills, which were Botfield’s freehold property, were sold by Beriah Botfield’s trustees in 1873 to the Haybridge Iron Co., [38] which rebuilt the works in 1876 and established a nail factory on the site in 1874 or 1875. [39] The nail factory was sold to John Maddock in 1876; he moved his operations to Oakengates two years later but nails continued to be made at Stirchley for a few years under different proprietors. [40][41][42] The factory had closed by 1885 [43] but the adjacent forge and rolling mills continued to be operated by the Haybridge Co., the rolling mill closing finally c. 1900.” [44][20]
Brick working and Clay working ran in parallel with the mining of Coal and Iron ore as those mineral deposits were found primarily in boulder clay and marls. “The Botfields were manufacturing bricks in Stirchley in 1808-9, [45] … Randlay brickworks … which continued to manufacture bricks until 1964 or later, had been established by the Botfields by 1838. [46] … Clay was obtained on site from an extensive pit, which was enlarged after the purchase of more land in 1905 and used until 1969. [47] In 1964 the brickworks employed 91 [48] (fn. 79)and the three kilns produced c. 300,000 bricks a week.” [49][20]
In 1886, Thomas Groom leased the site of the former furnaces and “transferred his Wrekin Chemical Works to Stirchley … The chemical works extracted wood naphtha and tar from timber supplied by the Grooms’ yard at Wellington and converted the residue into charcoal. Acetate of lime and sulphur were also manufactured. Groom’s successor, George Wilkinson, bought the site in 1904 and the works closed in 1932.” [50][51][52][20]
The arisings from the former furnaces were deposited in slag heaps and were “exploited as a source of aggregate for road building and concrete manufacture from the 1890s. The mounds south-west of the Wrekin Chemical Works were leased in 1893, and purchased in 1907, by H. C. Johnson, a Wrexham quarry owner, who had built a slag crusher on the site by 1901. [53] The industry expanded during the 1920s when most of the slag mounds in the parish were acquired by Tarslag (1923) Ltd. and the Bilston Slag Co. (1924) Ltd.” [54]
The British History Online notes continue: “By 1925 there were four slag-crushing plants in the parish, [55] the largest being Tarslag’s works, employing up to c. 130 men, which both crushed the slag and coated it with tar and bitumen. Tarmac Ltd., which succeeded the Bilston company, also manufactured ‘Vinculum’ concrete walling blocks at Stirchley from c. 1925 to c. 1935, and Tarslag operated a short-lived concrete plant there as well. Impurities and the variable quality of the slag led to the closure of the works. [56] By the Second World War most of the slag mounds had been exhausted and Tarslag’s crushing and coating plant closed in 1941. Tarmac continued to remove slag from Stirchley for processing elsewhere until c. 1964.” [57]
That is more than enough general industrial history for our present purposes. It illustrates the diversity of activity in the immediate area between Hinkshay Pools and Randlay Pool which is just a little further to the Northeast. The plan below illustrates, schematically, the industry in the immediate area.
Significant sites in the immediate area of the Hinkshay/Stirchley and Randlay/Blue Pools have been superimposed on this enlarged extract from Google Maps. Detail has been omitted for clarity. [Google Maps]
The history of the tramways and railways is relatively complicated. Tramways, predated the standard-gauge railway but in this area, rather then just becoming feeders to the railway network, a number were converted into standard-gauge Mineral Railways which could remain in private hands or, as in the case of the tramway/railway route to the West of the Coalport Branch and running to the West of Randlay Pool, they were taken over by the larger rail companies and in some cases, therefore became a part of British Rail!
The Coalport Branch was an LNWR branch line and then became a part of the LMS. The Mineral Railway was taken over by the GWR and worked in direct competition with the LNWR line.
David Clarke, in his survey of the railways of the Telford area says that the GWR’s Stirchley Branch was “a freight only line of 1.5 miles (2.4km) and was formally known as the Old Park branch. The branch had no signal box and was operated by one engine in steam, with the train crew holding a token to give them possession of the line. The line … served Randlay Brickworks and the large complex that was Old Park Ironworks as well as Grange Colliery. The branch was initially worked by the Haybridge Iron Company. On the Ordnance Survey plan for 1902 it is described as a mineral line, and by then Grange Colliery was closed and disused. From 1908, the Great Western Railway took over the maintenance and workings of the branch.” [58: p37] “The branch closed on 2nd February 1959, prompted by bricks no longer being sent out by rail from Randlay Brickworks. The sidings specifically for the Stirchley branch had been removed by November 1962.” [58: p38]
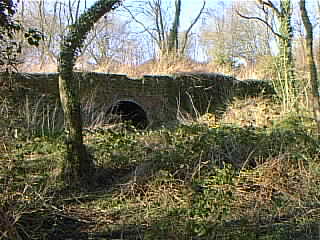
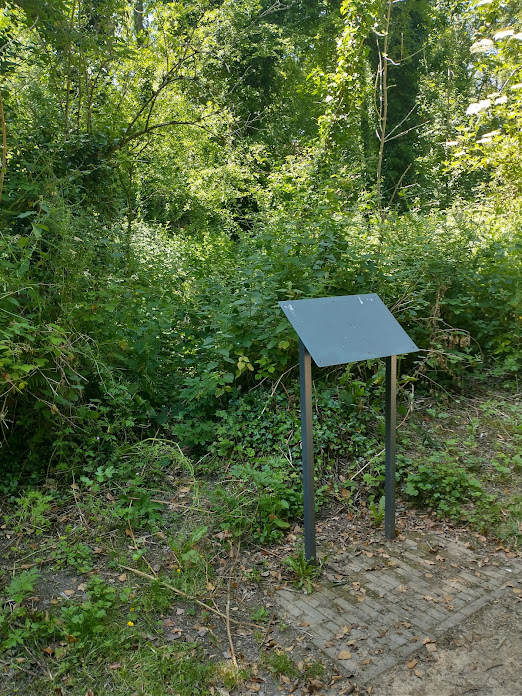
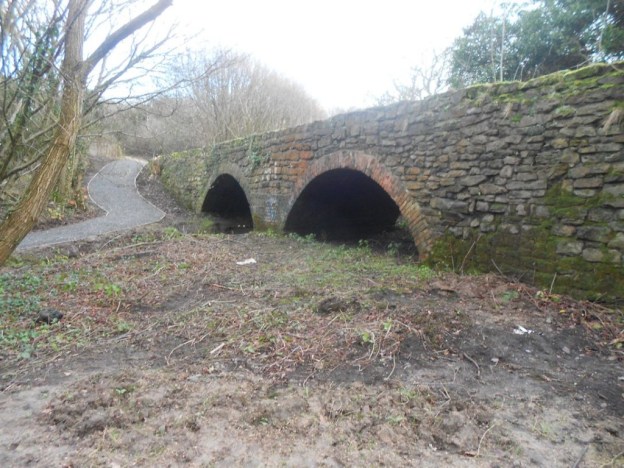
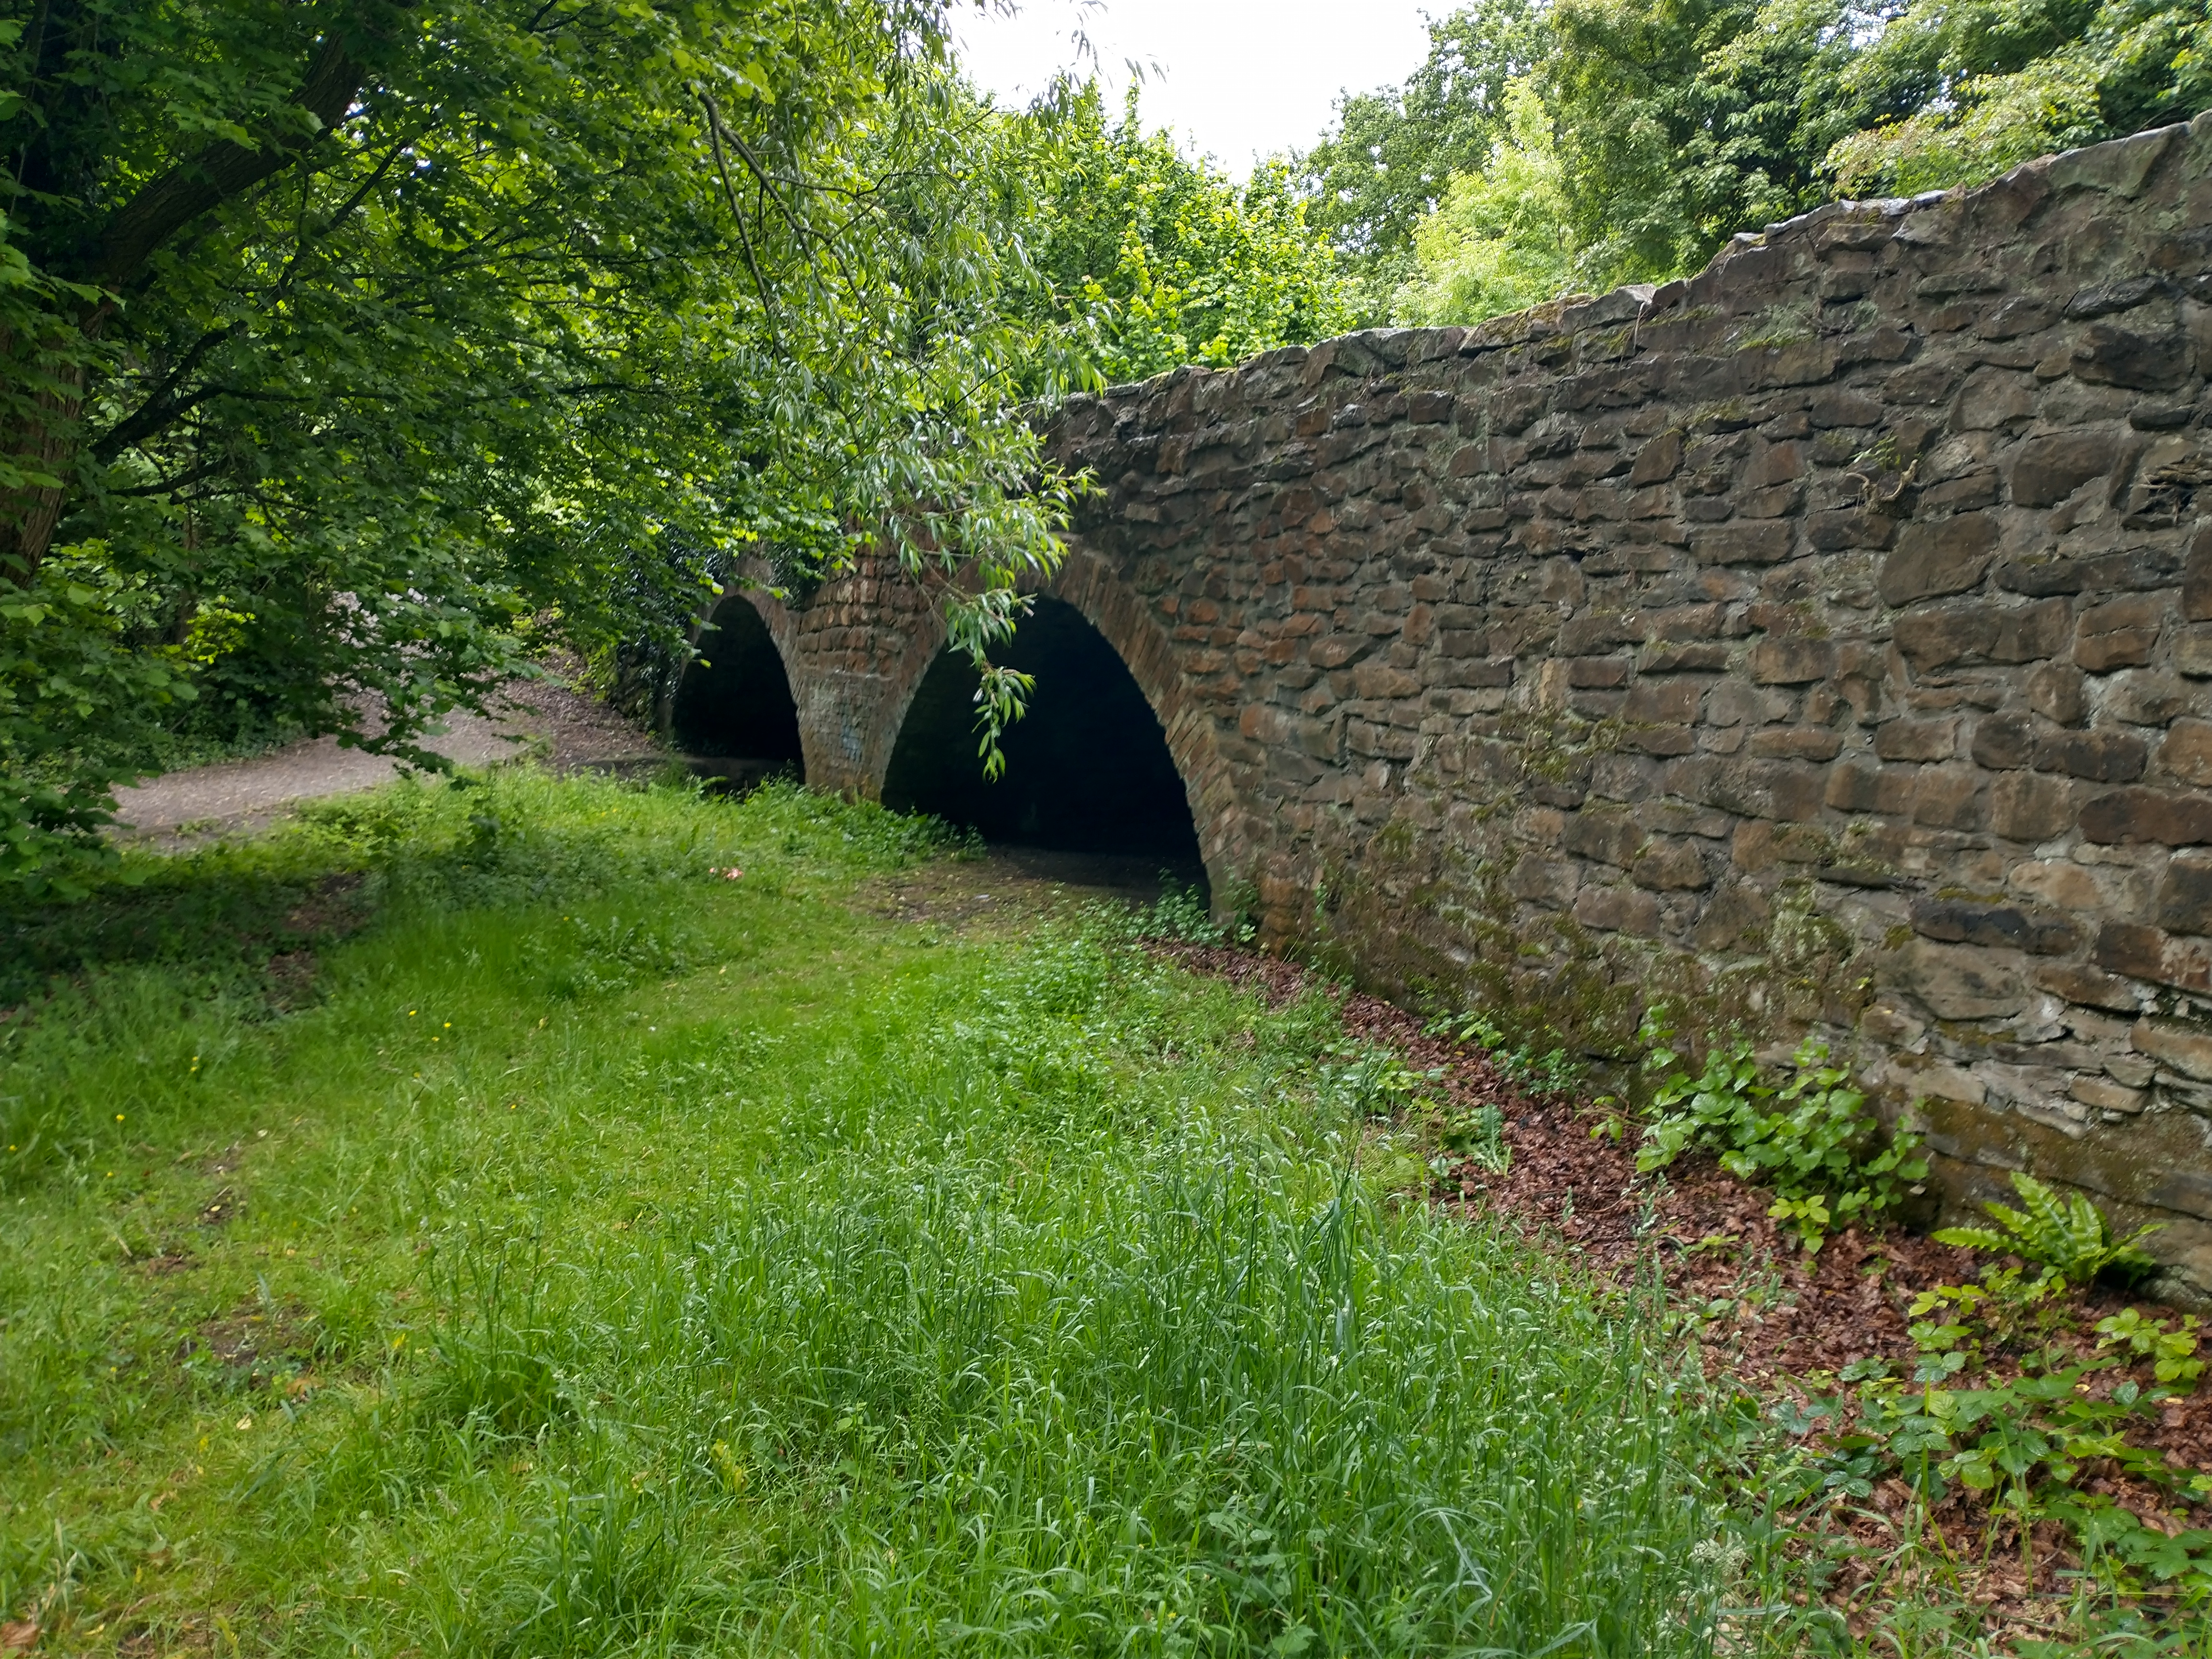
The Exploring Telford website contains a lot of speculation about what this tunnel was originally used for. [59] The undergrowth has had plenty time to establish itself by the time the next two pictures were taken in 2022.
Looking North towards the tunnels/arches in June 2022. The information board is missing in this image. [My photograph, 21st June 2022]Pushing trough the undergrowth it was possible to find the tunnel, now properly protected for safety reasons. In the past (2007) it was explored by ‘cat_bones’ who posted pictures of the interior on the 28DL Urban Exploration website. [60]
Returnign to the tramway that we are following, it branches in two as it enters the immediate site of Stirchley Ironworks. This can clearly be picked out on the 1881/82 6″ OS Map extract above. There is a stub branch running East from the junction which approaches a cast iron bridge which would have spanned both the old Canal and the later railway. On the 1881/82 map, the tramway stops short of the bridge.
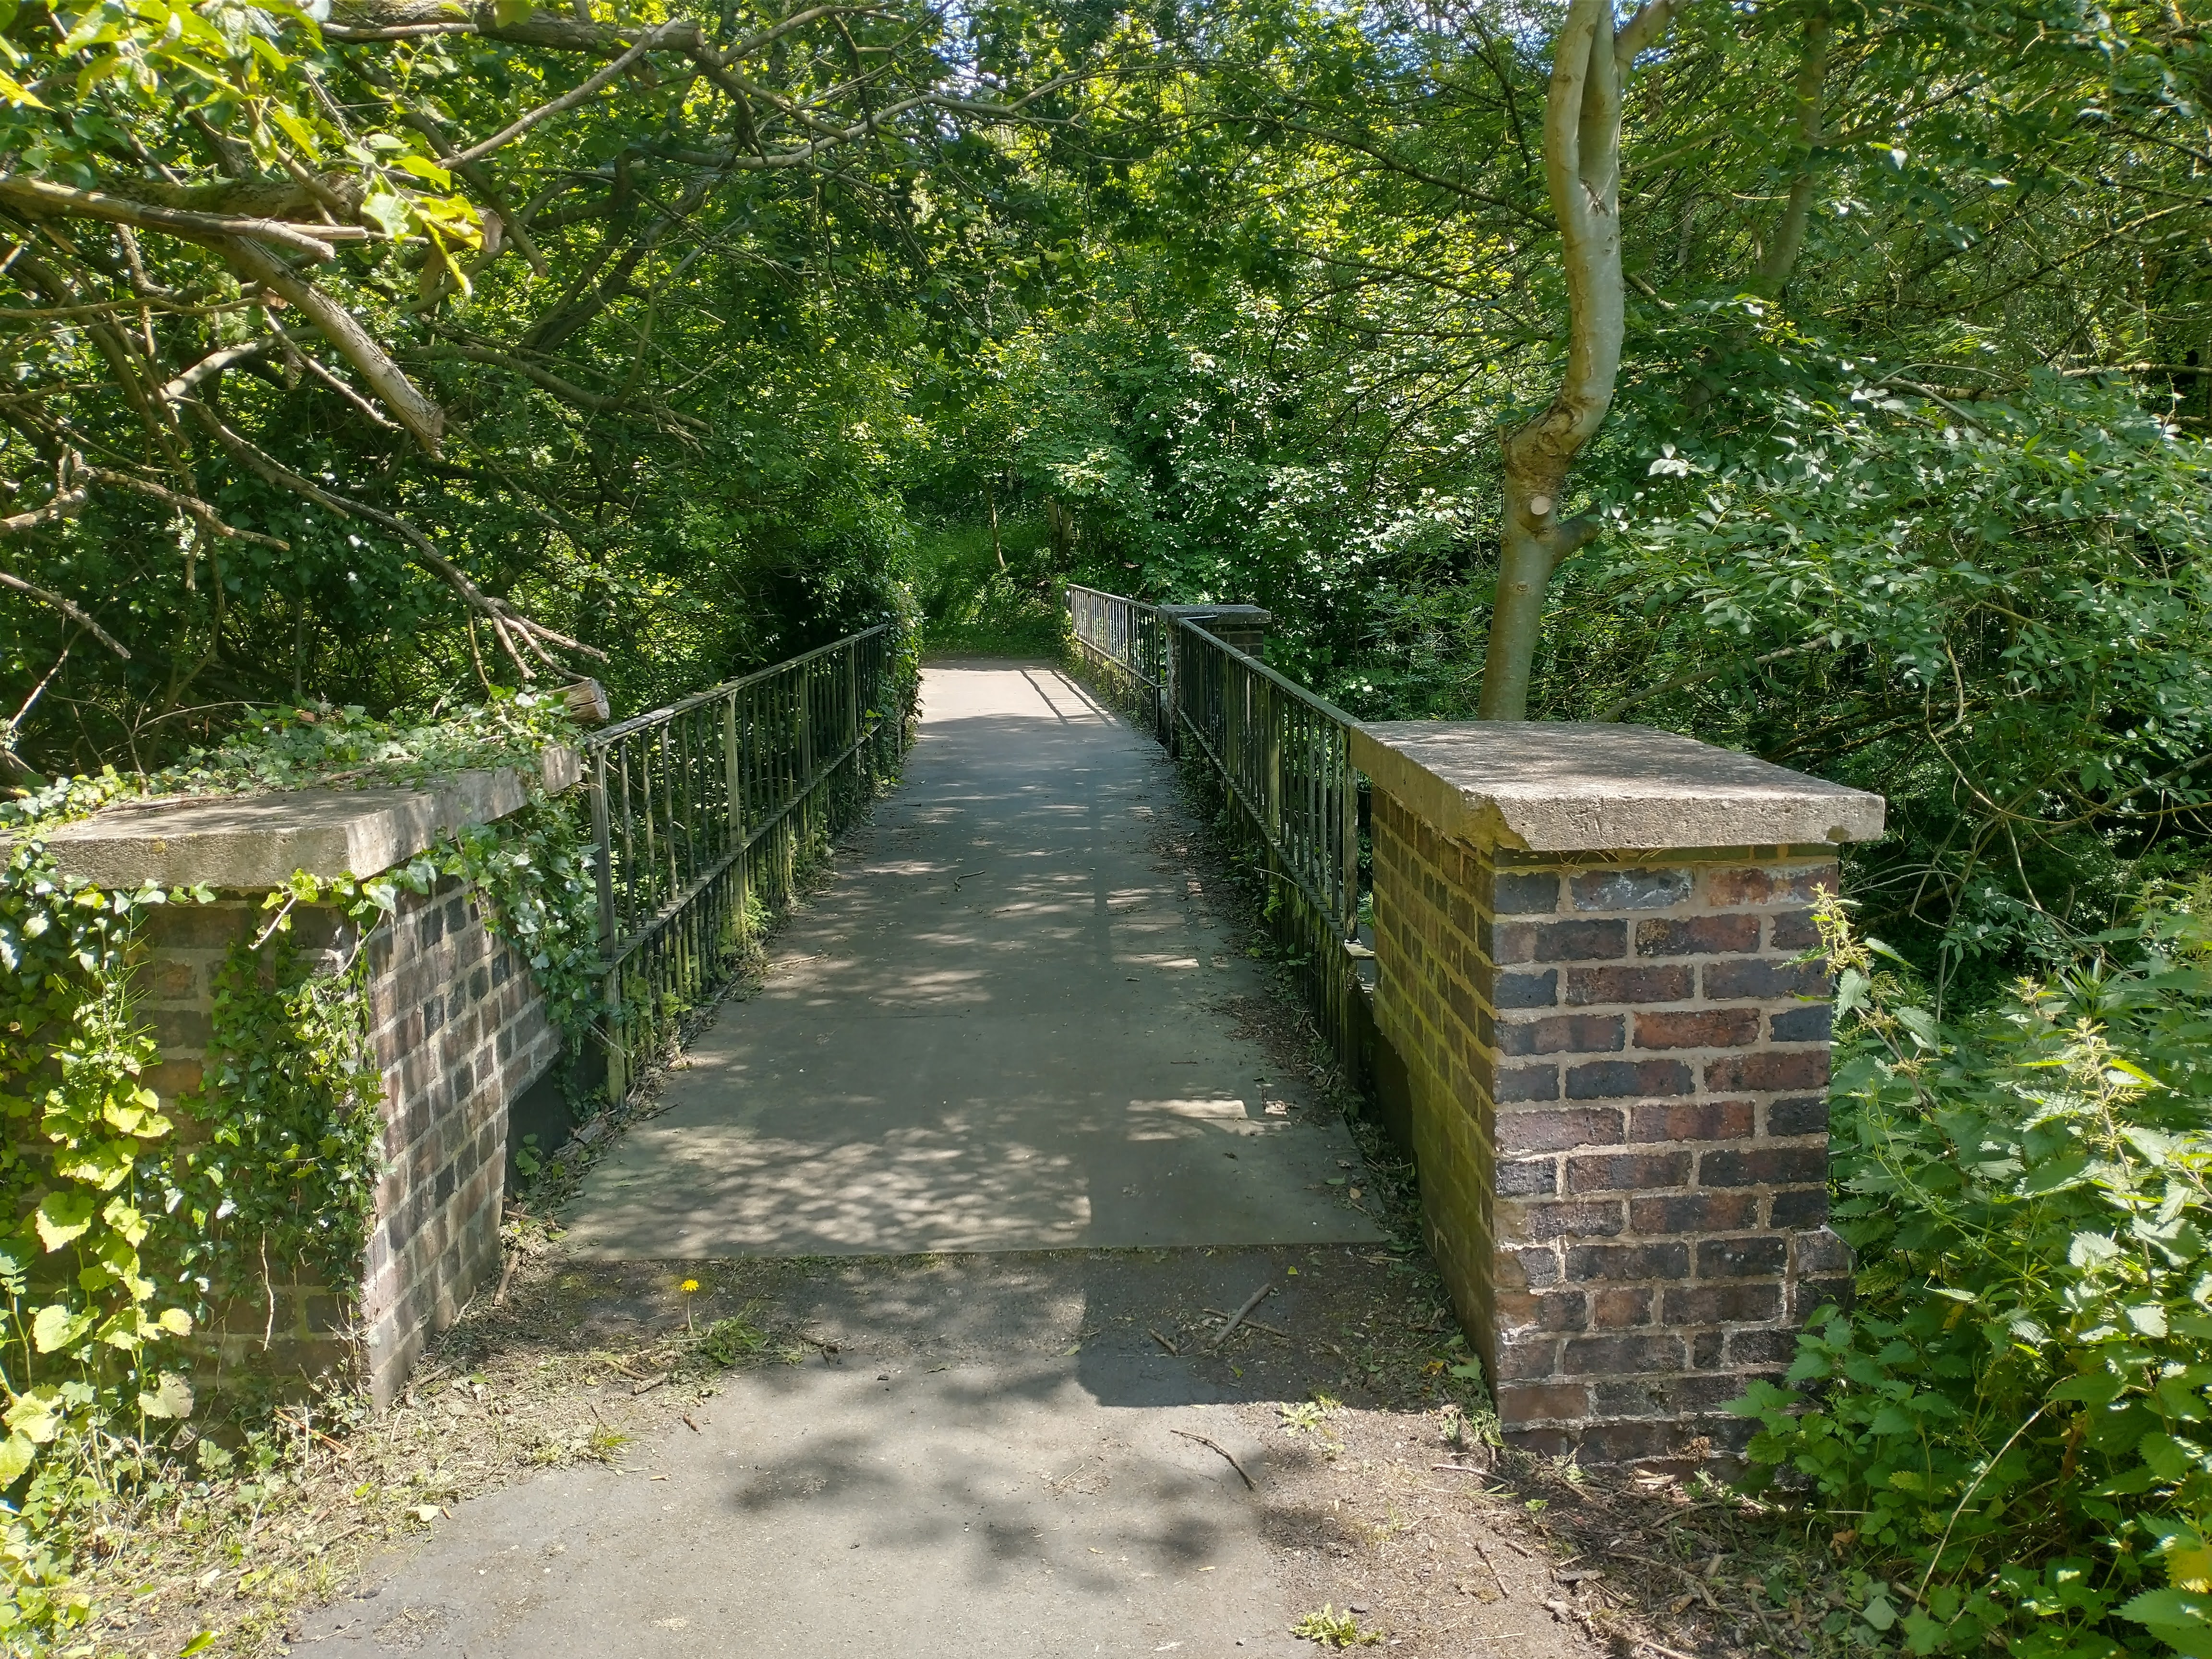
The truncated tramway branch on the South side of Stirchley Ironworks led towards a Cast Iron Bridge supported on brick piers. The bridge remains in place in the 21st century. It is not immediately obvious where the tramway might once have gone on the East side of the bridge. [8]The Stirchley Ironworks Bridge, this image shows the bridge in the 21st century from approximately the end of the tramway as surveyed in 1881. [My photograph, 21st June 2022]The Stirchley Ironworks Bridge, this image shows the bridge in the 21st century from the North on the Silkin Way. The Ironworks buildings sat off the right of this image, nearside of the bridge. [My photograph, 21st June 2022]The Stirchley Ironworks Bridge, this image shows the bridge in the 21st century from the South on the Silkin Way. The Ironworks Buildings sat beyond the bridge on the left. [My photograph, 21st June 2022]
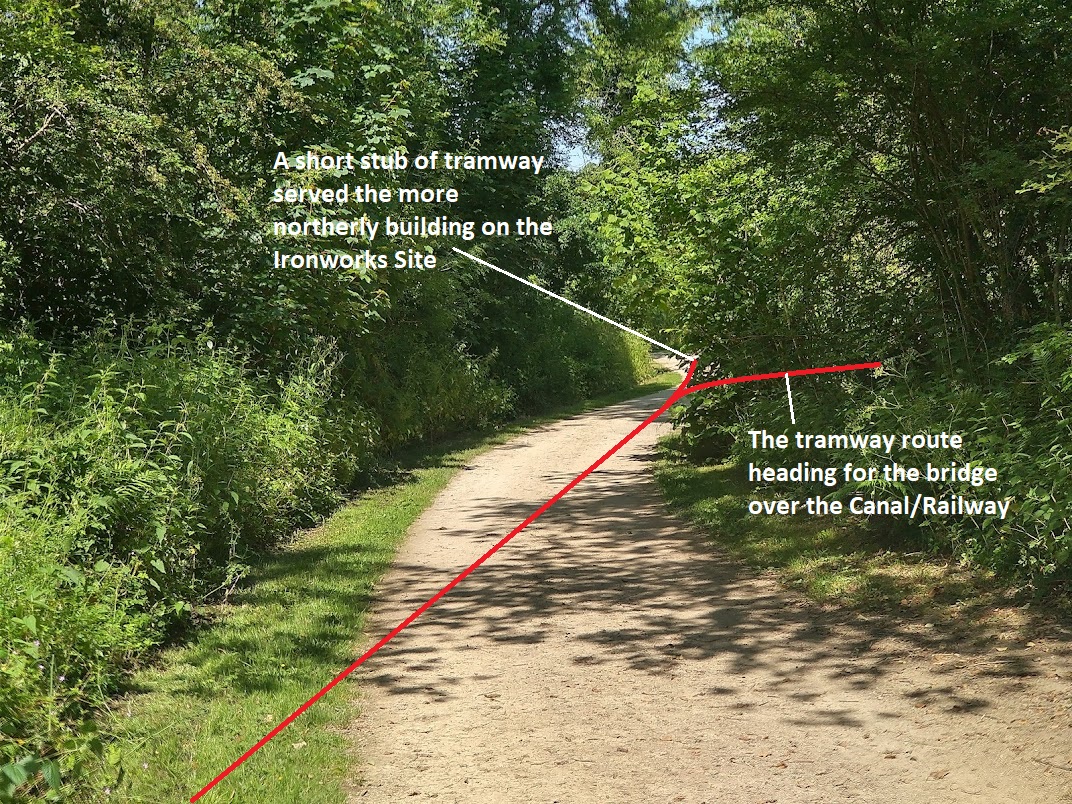
The Northern arm of the tramway passed between the two main buildings on the site before crossing the Canal/railway on another bridge (which has not survived into the 21st century) as shown below. …
Enlarged extract from the 6″ survey of 1881/82. [8]The modern footpath in this image drifts round to the right through what would have been an Ironworks building. the tramway bore right between the furnaces and another ironworks building. [My photograph, 21st June 2022]The approximate line of the tramway heading East. The whole site of the Stirchley Ironworks has been re-wilded, the buildings long-gone. Only foundations to the wall facing the Silkin Way can be seen. [My photograph, 21st June 2022]Foundations of part of the Stirchley Ironworks. The building elevation stood immediately alongside the Coalport Branch of the Shropshire Canal and hence directly next to the later railway. [My photograph, 21st June 2022]
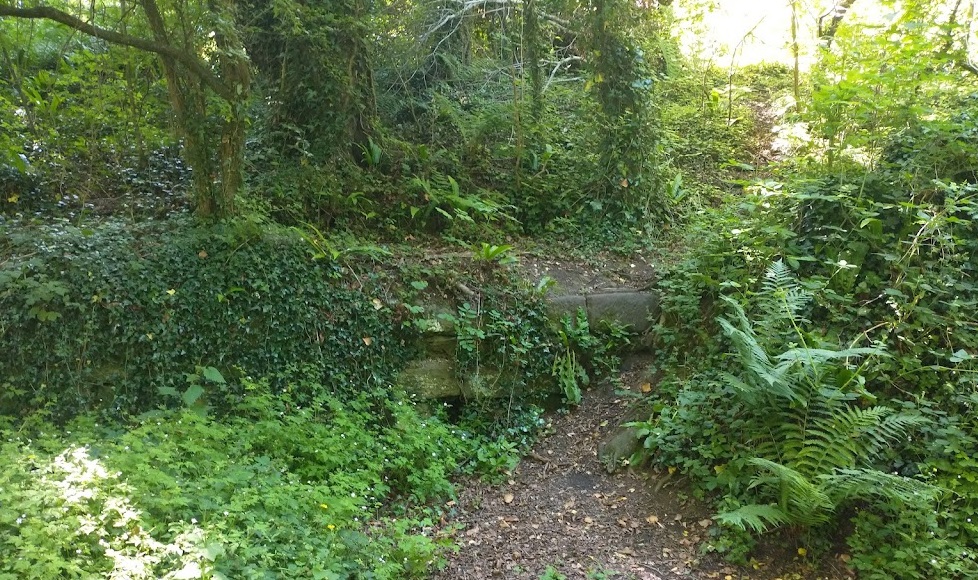
Using the maps and satellite images provided by the National Library of Scotlad it is possible to identify the location of the old bridge over the Canal/Railway but all that can be seen from the Silkin Way is thick undergrowth. I was unable to find any remnants of the old structure.
On the East side of the Canal/Railway the tramway line drifted round to the Northeast before entering what was the site of Old Park Ironworks. By 1881/2 there was a significant network of rails on the Old Park Ironworks Site. …
The Old Park Ironworks site in 1881/82 as shown on the 6″ Ordnance Survey published in 1888. [8]
At this time, the site of the Old Park Ironworks was still active as an Ironworks. But by the time of the next survey, after the turn of the century, it had closed. At the time of that next survey the site was a chemical works. The network of tramways had been significantly rationalised as can be seen below.
6″ OS Map surveyed in 1901/02. The tramway lines around the Old Park Works have been severely rationalised. The Works is now Wrekin Chemical Works. The line that served Grange Colliery has been removed. Some very limited tramway lines remain on the slag heaps South of the Works. [61]6″ OS Map surveyed in 1925. Further rationalisation has occurred. The lines have been extended where necessary to serve the various slag works which are now present on the site. All are served by the GWR’s Stirchley Branch which replaced the tramways to the North of the site. [62]
In Parts 3 and 4 of our look at the tramways around Malinslee, we will look, in more detail, at the tramways North of Stirchley. There is still a lot to look at both to the West and towards Oakengates.
At SJ 701 077: W. Howard Williams, ‘Dawley New Town Hist. Survey: Industries’ (TS. 1964), addns. and corr. (1965), p. 6 (copy in S.P.L., accession 5202); https://www.british-history.ac.uk/vch/salop/vol11/pp189-192, accessed on 21st June 2022.
At O.S. Nat. Grid SJ 700 074: Trinder, Ind. Rev. Salop. 241; O.S. Map 1″, sheet 61 NE. (1833 edn.). Called ‘Old Park Iron Works’ on O.S. Map 6″, Salop. XLIII. NE. (1889 edn.); https://www.british-history.ac.uk/vch/salop/vol11/pp189-192, accessed on 21st June 2022.
At SJ 696 072: S.R.O. 1265/261; O.S. Map 1″, sheet 61 NE. (1833 edn.); S.R.O. 1011, box 425, W. Botfield to E. Browne, 14 Aug. 1827. Chain making at Old Park (above, Dawley, Econ. Hist.) is wrongly located in V.C.H. Salop. i. 479 at Stirchley furnaces; https://www.british-history.ac.uk/vch/salop/vol11/pp189-192, accessed on 21st June 2022.
Telford Development Corporation, (T.D.C.), Randlay brickworks deeds; and O.S. Map 6″, Salop. XLIII. NE. (1889, 1903, and 1929 edns.); inf. from Dr. Brown; https://www.british-history.ac.uk/vch/salop/vol11/pp189-192, accessed on 21st June 2022.
R.F. Savage & L.D.W. Smith; The Waggon-ways and Plateways of East Shropshire; Birmingham School of Architecture, 1965. Original document is held by the Archive Office of the Ironbridge Gorge Museum Trust.
The featured image above shows Newdale Bridge after some path work improvements were undertaken. [1]
The location of Newdale Bridge on Google Maps.
Newdale Bridge is one extant remnant of the old tramway which probably ran between Ketley and Horsehay. The images below show its location. The bridge is recorded by Historic England as a Grade II listed structure (No. 1025096). It was listed on 8th April 1983. [5]
The Wrekin Local Studies Forum records this bridge in these words: “An extensive network of tramways was built, with horses pulling small waggons laden with coal, firclay and other minerals, connecting various mines to foundry sites. Pioneered by Abraham Darby II, Newdale Tram Bridge, crossing over Ketley Dingle, was built in 1759 around the same time [as] Darby’s revolutionary idea for the first purpose-built workers’ village, New Dale, with a small foundry, various cottages and the impressive long row consisting of 17 back-to-back dwellings.” [6]
Newdale Village has long-gone but the tramway bridge has been retained.
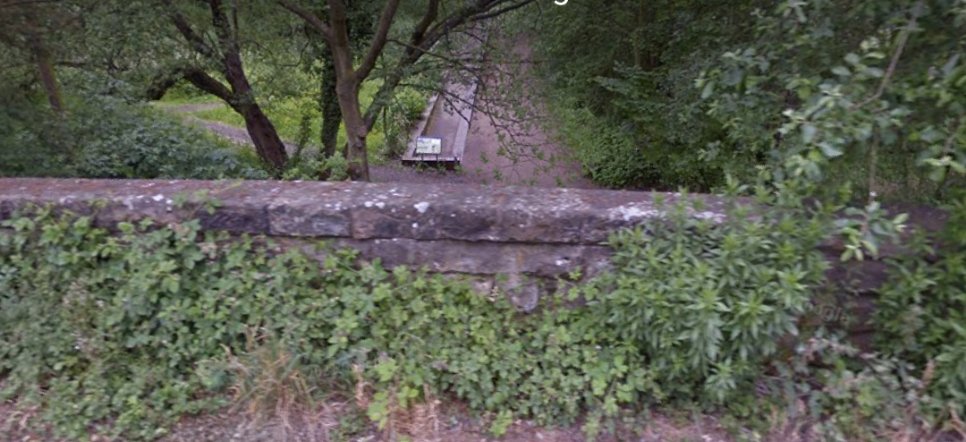
This first image shows the immediate vicinity of the Bridge in the 21st century. The blue line represents the line of the tramway. The redline represents the Wellington to Severn Junction Branch of the GWR which is now a part of the Ironbridge Way public footpath. Newdale Bridge is sited just to the West of the route of the old railway. It is clear that the tramway ran across the line of the old railway, perhaps going under a low bridge, although it did predate the railway and may have been cut by the construction work for the standard-gauge line. [2] An extract from the 6″ OS Mapping of 1882 which was published in 1887. Newdale Bridge crossed the stream just to the West of the standard-gauge line and to the East of Newdale. Without further research it is difficult to be sure of the tramway alignment away from the immediate vicinity of the Bridge. The mapping suggests that the tramway and the road on the East side of Newdale was cut by the building of the railway. In all probability the tramway used to run North-South alongside what was to be the route of the new railway as shown below. However, by the time of the 1882 survey the tramway rails had been lifted. [3]21st century housing to the West of Newdale Bridge. [My photograph, 9th June 2022]Ironbridge Way, the old Wellington to Severn Junction Railway, looking North from close to Newdale Bridge towards the M54. [My photograph, 9th June 2022]Ironbridge Way, the old Wellington to Severn Junction Railway, looking South from close to Newdale Bridge towards Morrison’s Supermarket which has been built over the line of the old railway. [My photograph, 9th June 2022]Looking West from the Ironbridge Way over Newdale Bridge. [My photograph, 9th June 2022]Looking East along the spandrel walls of the two arched Newdale Bridge. [My photographs, 9th June 2022]Looking West at low level along the spandrel walls of Newdale Bridge. [My photograph, 9th June 2022]Looking South towards Newdale Bridge from the adjacent footpath. [My photograph, 9th June 2022]Looking East at low level along the spandrel walls of Newdale Bridge. You will note that all the low level pictures of the bridge are taken from the North side. The southern side is inaccessible because of thick undergrowth. [My photograph, 9th June 2022]
Around 100 yards from our home in Telford there was once, many years ago, a colliery that was served by a tramway/waggonway.
Little Eyton Colliery was already disused by the time the survey was undertaken in 1881/1882 for the 6″ OS Maps published in 1888. The tramway had not yet been lifted, so it appears on the map extract below.
The Mindat.org website tells us that the colliery was owned in 1890 by the Haybridge Iron Co. It was in the ownership of the Stirchley Coal & Iron Co. from 1895 to 1896 and was back in the hands of the Haybridge Iron Co. by 1900. [3]
The Dawley History Website tells us that the Chartermaster in 1869 was Edward Bailey. [4]
There was a mining accident in 1869 at the Little Eyton Pit. … The Wellington Journal on Saturday 17th April 1869 carried this report:
The Late Fatal Accident. – On Saturday last an inquest was held at the Bull’s Head Inn, Lawley-bank, before J. Bidlake, Esq., on the body of Joseph Oliver, aged 37 years, whose death we recorded in last week’s Journal, when the following evidence was adduced:– John Oliver, son of deceased, deposed : My father worked at the Little Eyton Pit. Edward Bailey is chartermaster. It was a coal pit. I have worked at the pit a month. I have been driving. On Thursday morning, about nine o’clock, I was taking a draught of coal to the bottom of the shaft. I saw my father lying at the bottom with the basket on him. There was a lid on the basket, and another lid lying by the side of him. I ran off and told James Poole. I had seen my father about ten minutes before at the bottom. There was no one with him. He did not speak to me when I found him under the basket. I saw that his head was cut on the top, and also behind. He was lying on his back. One end of the basket was sticking up against the shaft, the other end on his stomach. The lids are about 2 ft. long. The lids on being sent down are tied under the tackler. – James Poole said : I work at the Little Eyton Pit. The last witness came and told me that his father was under the basket at the bottom of the shaft. I went there and found him. The deceased was lying at the bottom, with his head in the shaft, and not in the road. There was one lid in the basket not fastened, and one by him. He was about a yard from the side of the shaft. Three or four lids are generally sent down at a time. They are not usually lashed. There was no lasher round the basket when I saw the deceased. The lids are about three quarters of a yard. The pit is 200 yards. The hooker-on generally calls for lids. He had called for some that morning. I told him to do so, and he told me that he had done so. This was about half an hour before I found him. – John Perks said : I am banksman at the Little Eyton Pit. On Thursday morning deceased shouted for some trees and lids. I sent some down. I remember sending the last two lids down. It would be about half-past eight. I shouted “Joe” when I sent them down, but I got no answer. They were put under the tackler between the squares. We lash the trees. I have known of lids falling out before. I did not hear this drop or the skip catch. The Jury returned a verdict of “Accidentally killed.” [4]
Little Eyton Colliery as surveyed in 1881/82 for the 6″ OS Maps of 1888. The tramway leaving the map extract at the bottom right runs from the colliery towards the Wellington to Coalport Branch of the LNWR (later LMS). Before the coming of the railway, the tramway will have had wharves on the Coalport Branch of the Shropshire Canal. The railway company made use of the route of the Canal but as we will see, the horizontal.alignment of the canal was not always suitable for the railway. There is also a length of tramway running from the pit head out onto the slag heap. It leaves the map extract to the North of the other line. [1]
By the time of the next OS survey of Malinslee, just after the turn of the 20th century, all traces of the tramways at the colliery site have disappeared.
Little Eyton Colliery site at the turn of the 20th century. No tramway infrastructure remains at the site. The colliery slag heap remains and will continue to be a feature of the local landscape into the 21st century. [2]The same area in the 21st century as it appears on the ESRI World Image, Background map as provided by the National Library of Scotland. The large green sward of land surrounded by mature trees is the old colliery site and slag heap. The land remains significantly higher than the immediate locality and has been ‘rewilded’ to provide s pleasant meadowland and wooded area. [2]
The next few photographs show the Little Eyton Colliery site in the 21st century.
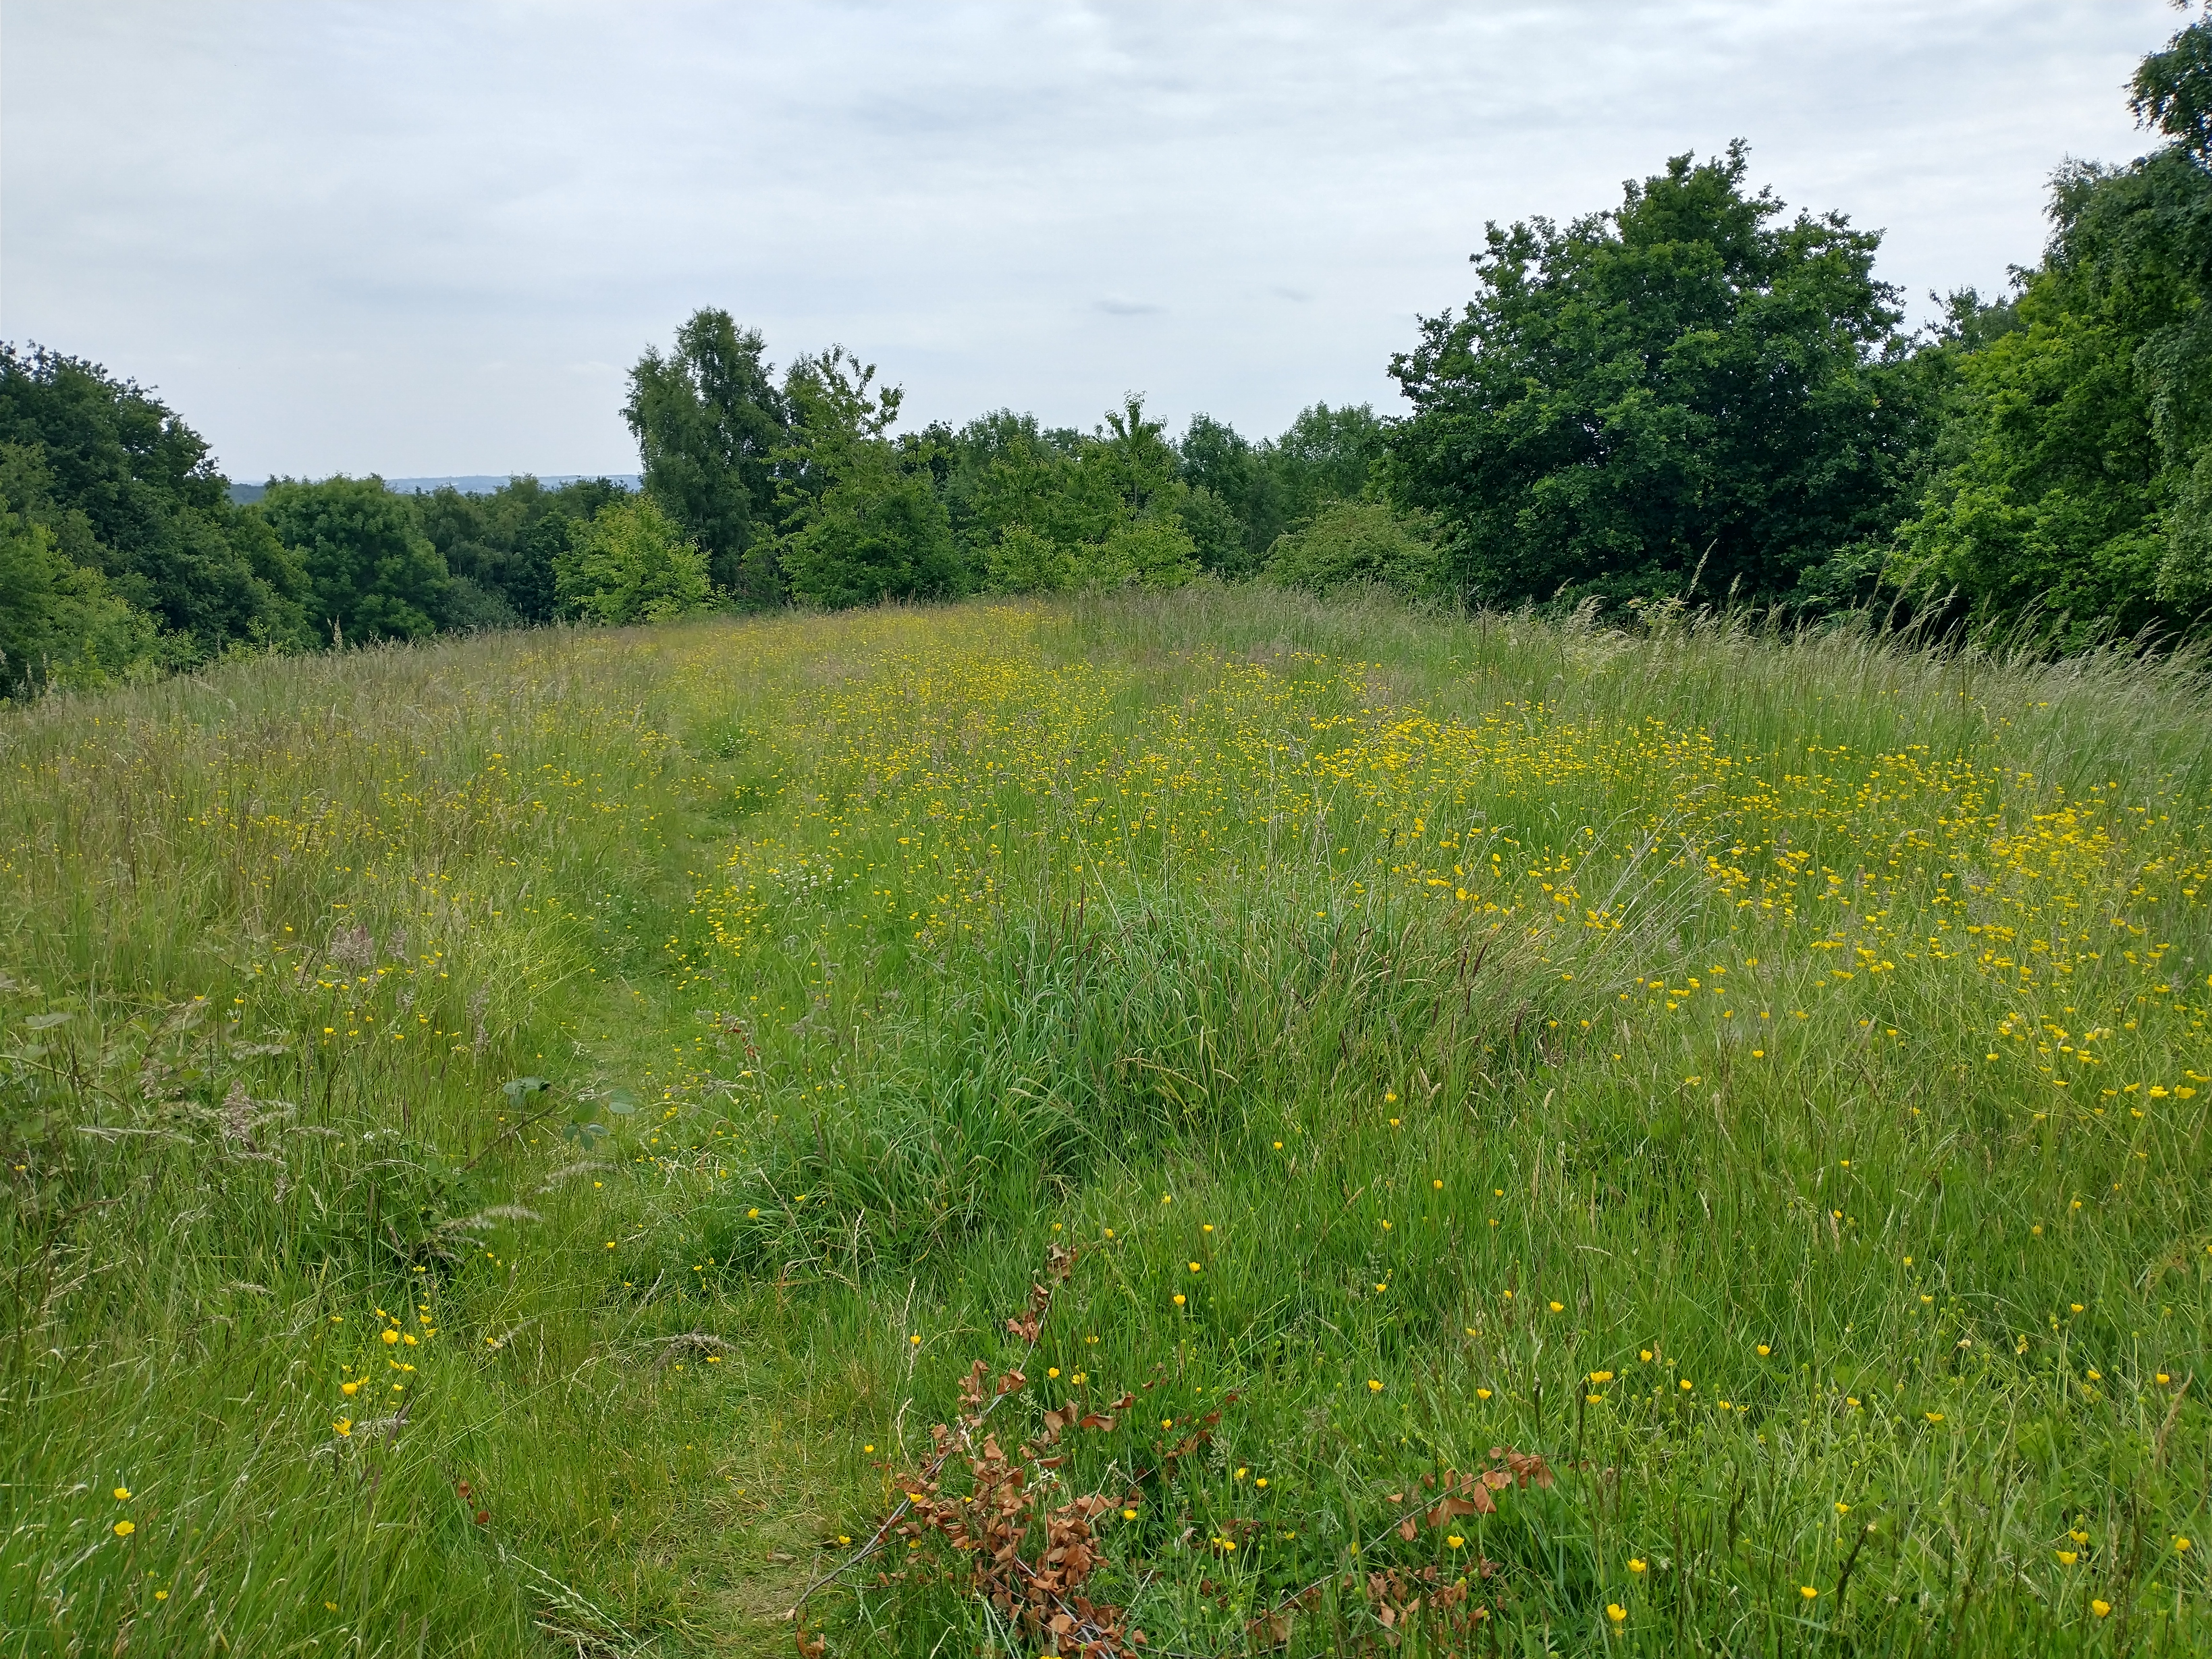
Three photographs of the Little Eyton Colliery and Slag Heap site in the 21st century. [My photographs, 15th June 2022]
Leaving the colliery, the tramway followed the route of what is now Matlock Avenue.
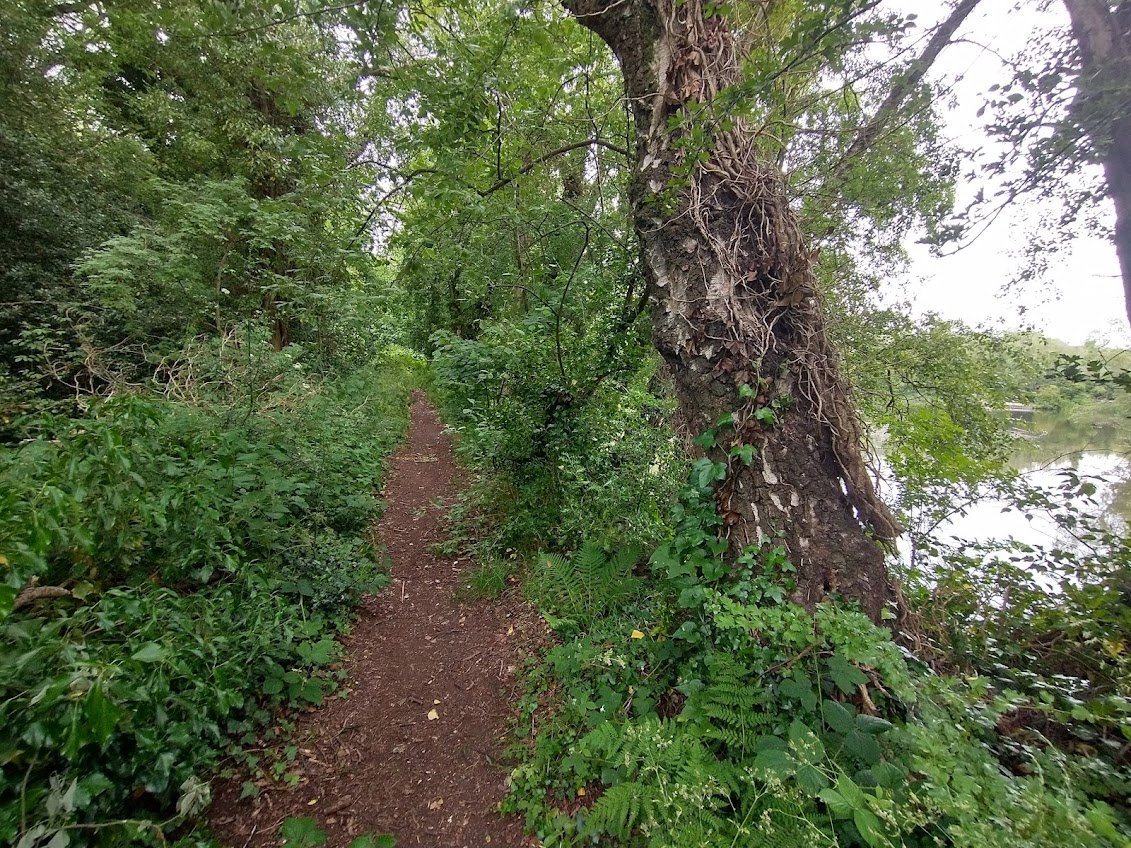
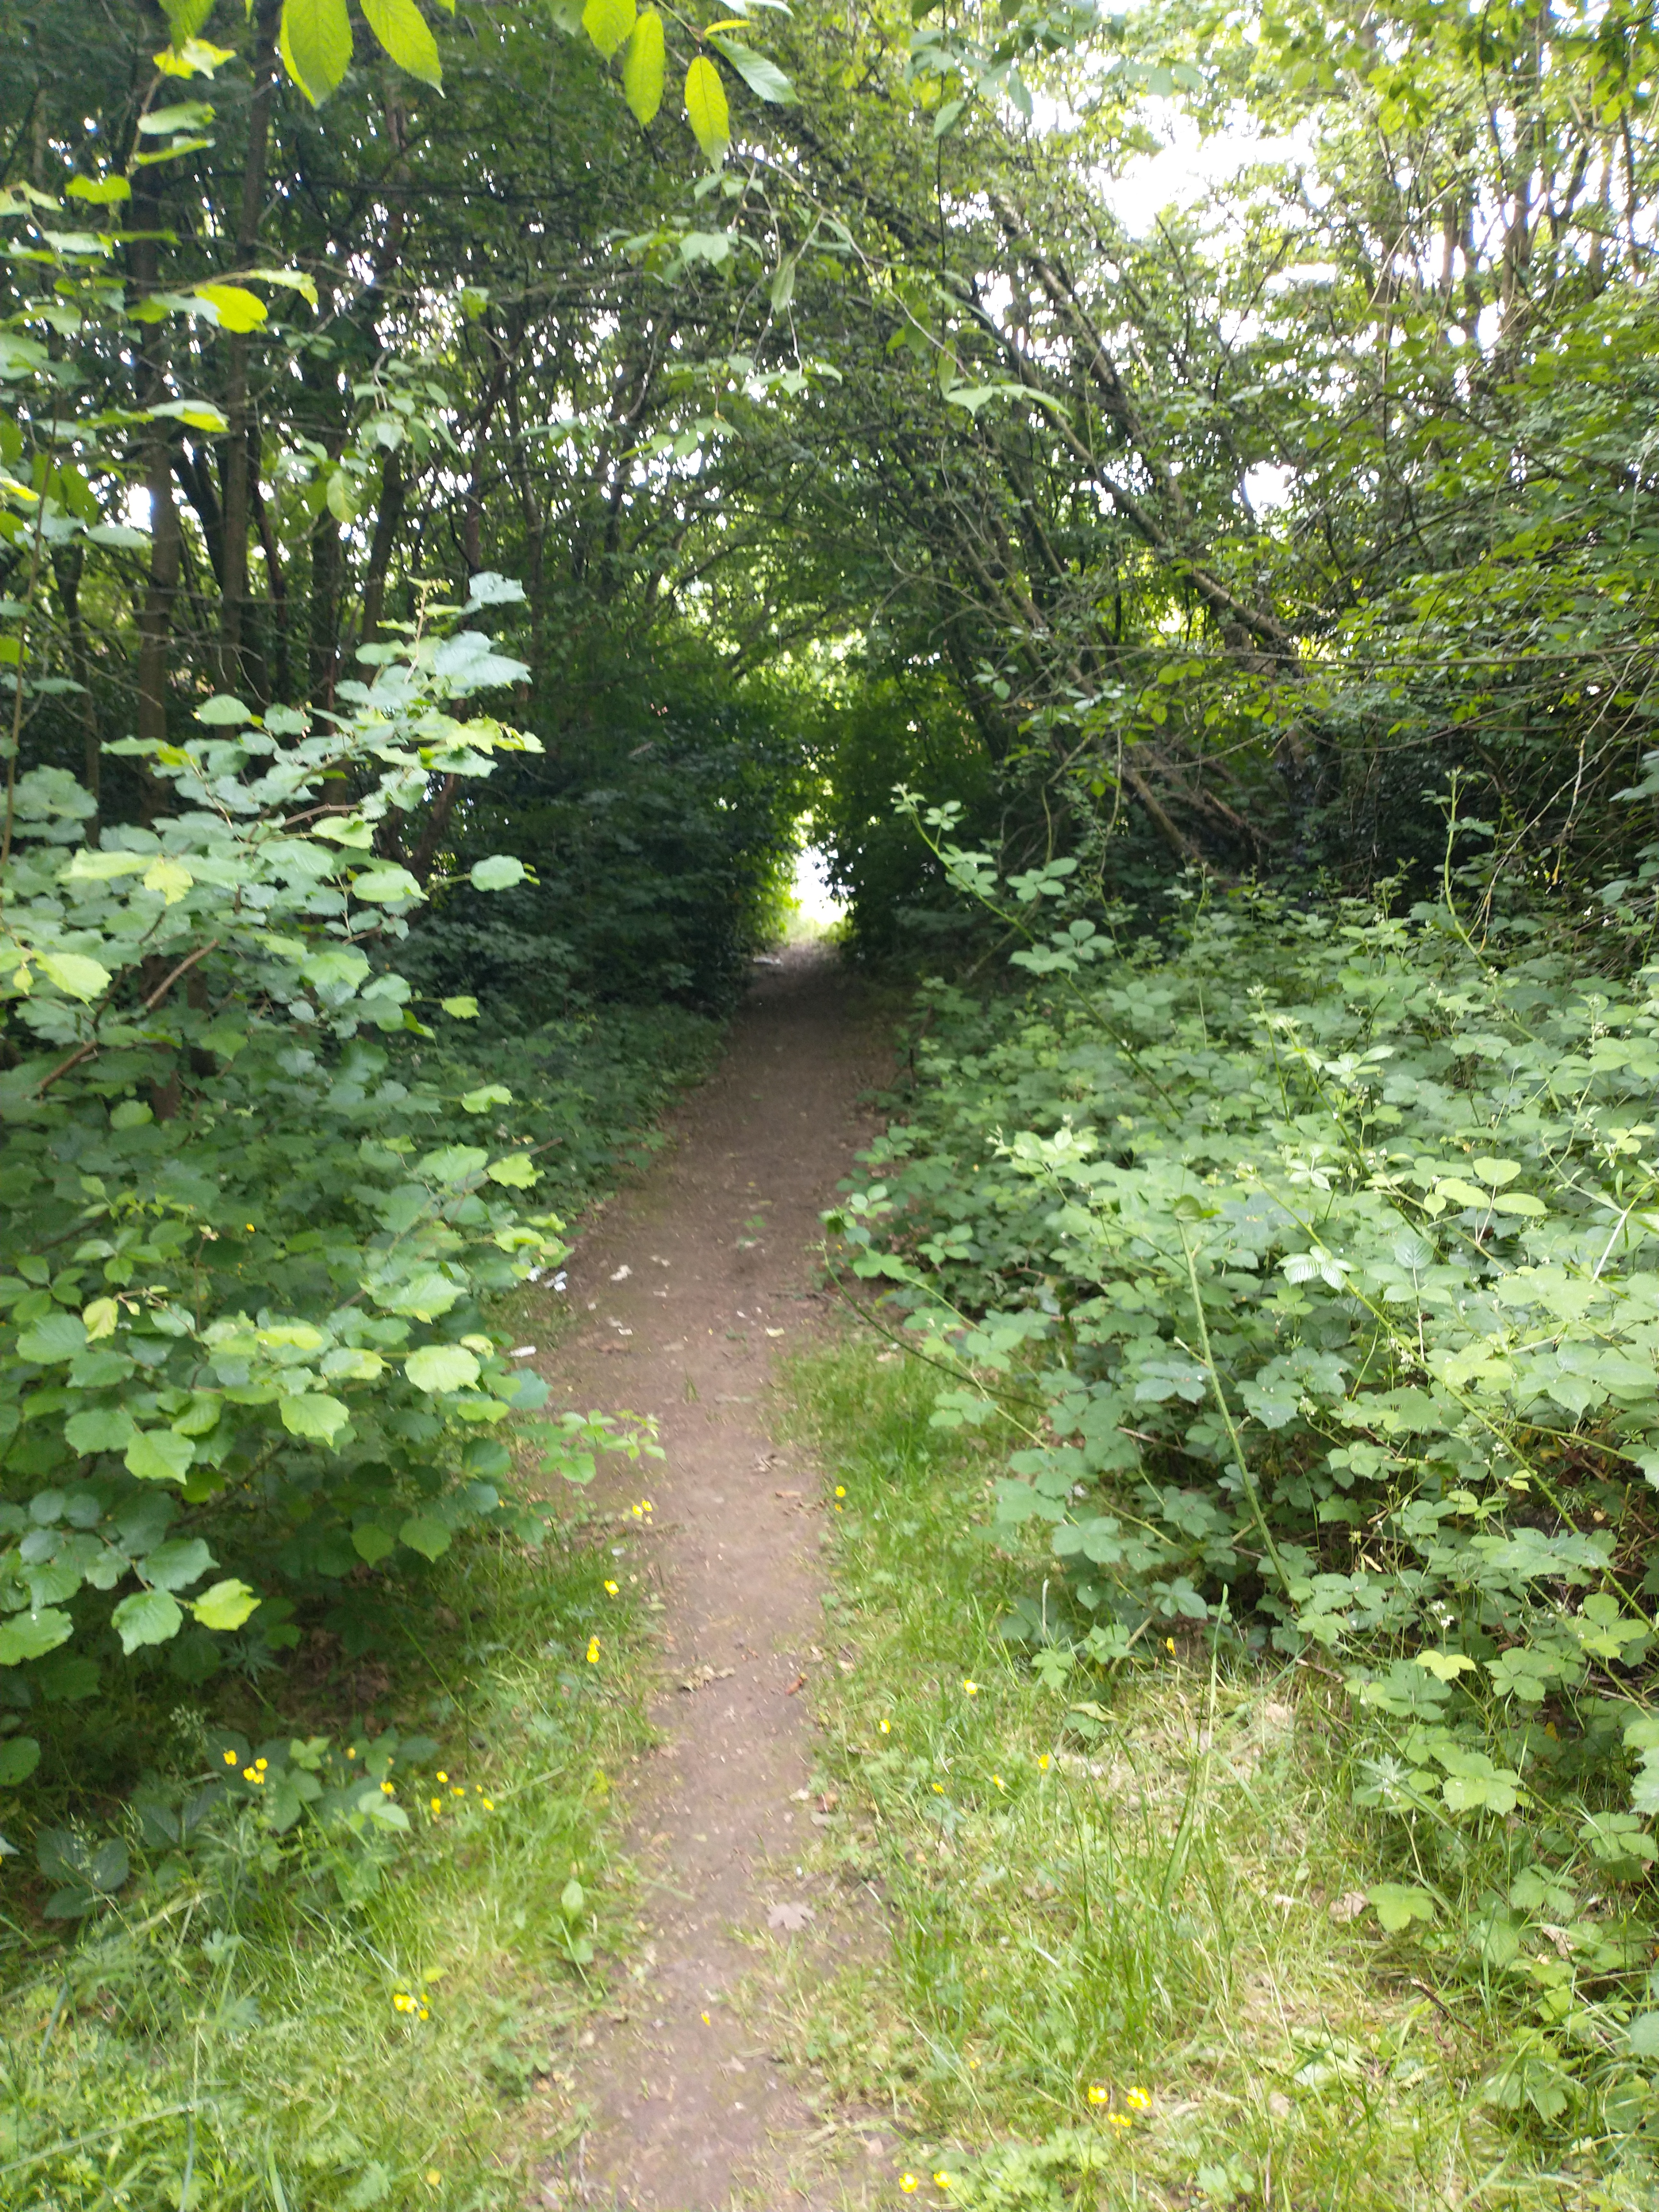
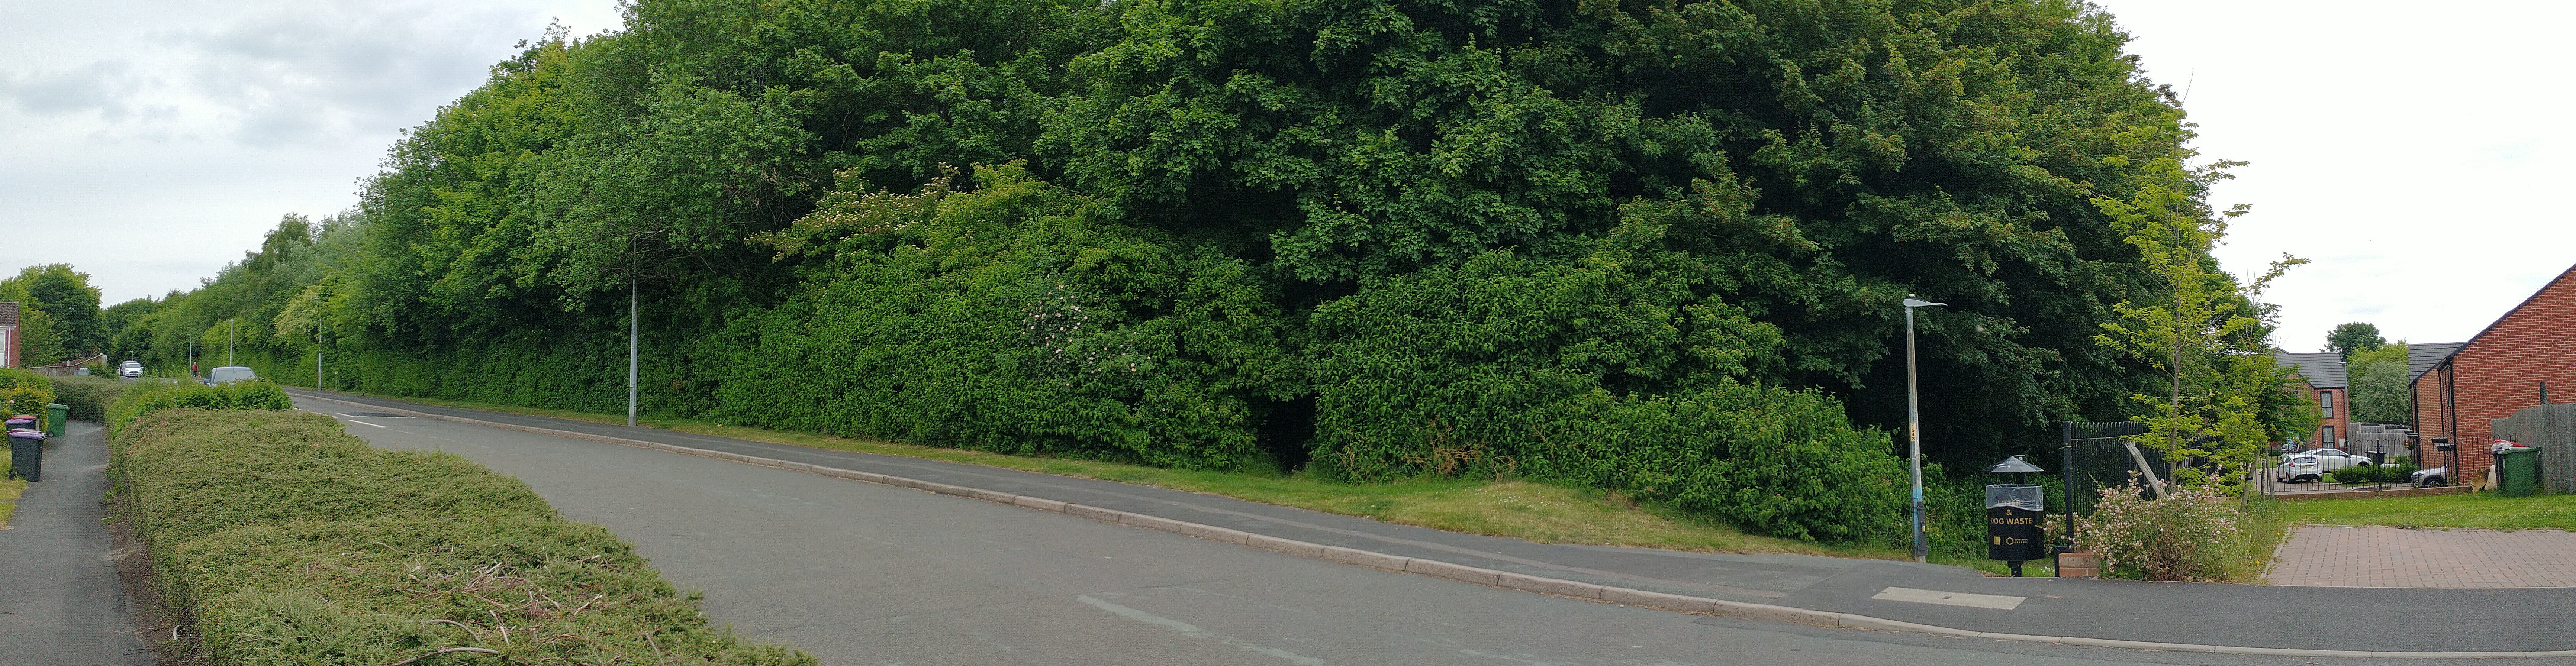
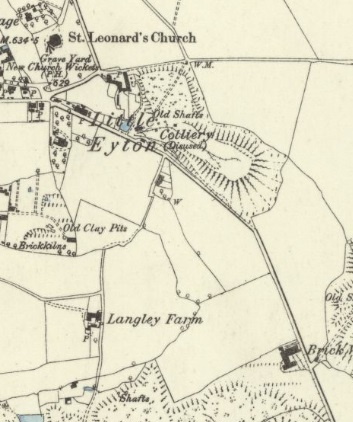
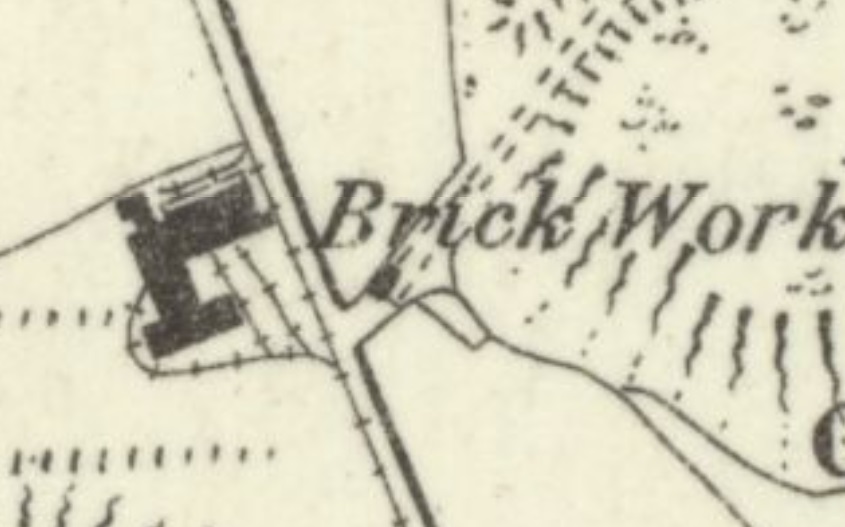
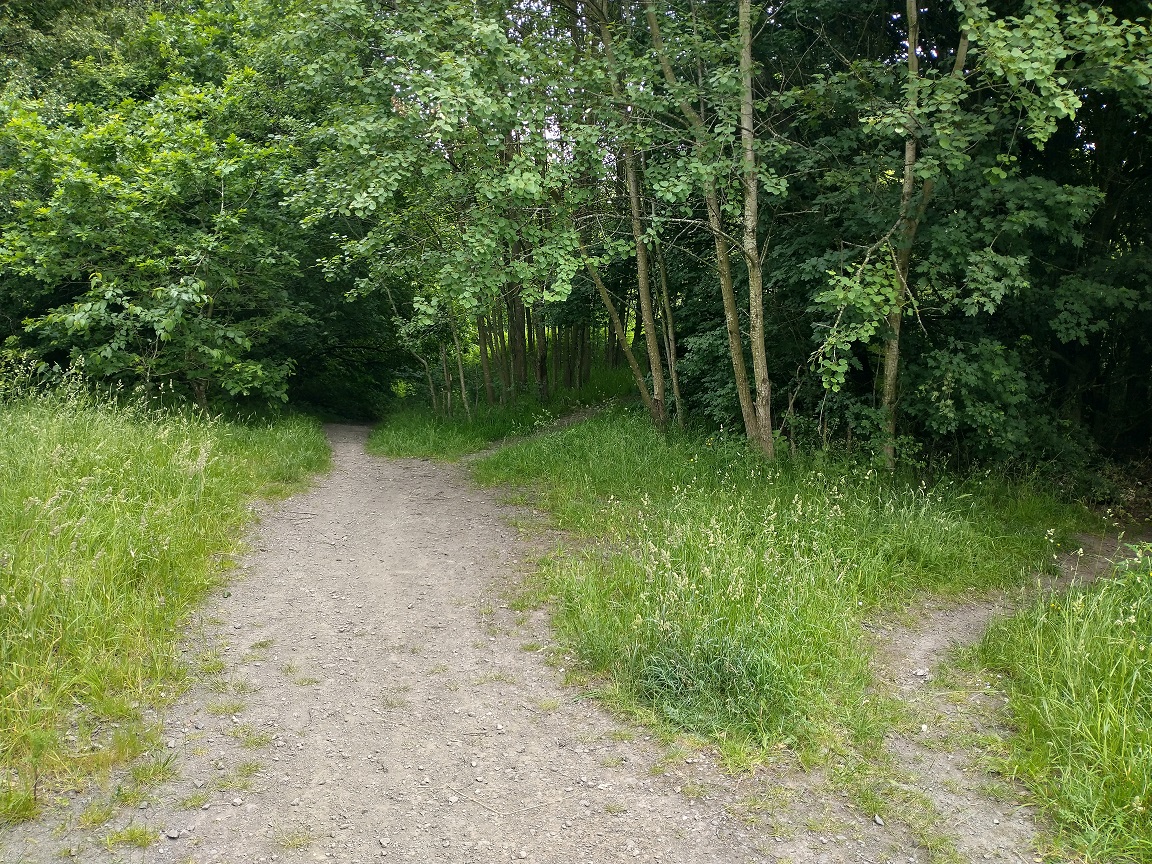
Matlock Avenue alongside the old Little Eyton Colliery. The old tramroad followed the line of the road. [My photograph, 15th June 2022]The 6″ OS Map shows the area before anyone conceived of the housing developments of the mid-to-late 20th century which swallowed up Langley Farm. [6]As the tramway ran Southeast it served Langley Brickworks and Langleyfield Colliery. Both sites had private sidings, those for the Pit were more extensive than those at the brickworks. It was followed, on the journey, by the road linking Little Eyton with the White Hart Inn which was known locally as the ‘Jerry Inn’. [6]Looking Southeast along Matlock Avenue. The route of the old tramway ran approximately under the car in the foreground before passing to the left of the lamppost and litter bin Under the tree in the centre-top of the image and heading down a ginnel between two different housing developments ahead. [My photograph, 15th June 2022]Looking South east along the line of the old tramway. The footpath runs between two housing estates and provides access to Telford Town Park. [My photograph, 15th June 2022]The area around Matlock Avenue and the route of the old tramway as it appears on Satellite images from April 2021. [Google Earth]Looking Southwest at the corner of the Brickworks site. [My photograph, 15th June 2022]The Brickworks Site looking Southwest onto the site from the line of the old tramway. The trees ahead have been allowed to grow across the site of Lawley field Colliery and its Slag Heap. The old tramway ran down the line of a modern footpath off to the left of this image. [My photograph, 15th June 2022]Details of the surveyed tram tracks at the Brickworks. The extract comes from the 6″ OS Map above. [6]Two images from the site of Langleyfield Colliery which has been allowed to revert to nature. [My photographs, 15th June 2022]The tramways serving the Langleyfield Colliery site. The extract comes from the 6″ OS Map above. [6]Looking Northwest along the line of the old tramway towards Matlock Avenue. The route continues to be a surfaced footpath running along the western edge of Telford Town Park. [My photograph, 15th June 2022]The same footpath, this time looking to the Southeast. The railings ahead are at Hinkshay Road. [My photograph, 15th June 2022]
The Dawley History website provides the following information about the Langleyfield site:
Langleyfield Collieries Ownership:
Coalbrookdale Company 1803 – 1826 Langley Field Company 1826 – 1856 Beriah Botfield 1856 – 1872 Haybridge Company 1872 – 1885 The site records the pit(s) having been sunk in ca. 1803 and closed ca. 1885. [7]
The website quotes Malcolm Peel, in his book, ‘The Pit Mounds of Dawley’ says that at Langleyfield: “There were at least ten shafts working at various times between 1803 and 1885, and they produced coal and ironstone. This large colliery was originally owned by the Coalbrookdale Company and in 1826 was sold to the Langley Field Company in which George Bishton and Adam Wright were partners. The colliery, ironworks and brick yard established here by Bishton and Wright were bought by Beriah Botfield in 1856, and after the breakup of the Botfield Empire the colliery was owned by the Haybridge Company.[7][8]
In addition the Dawley History site highlights a short article in the Shrewsbury Chronicle on Friday 25th March 1836 advertising an auction of property at the Jerningham Arms Inn, Shiffnal, on Tuesday, 12th April, 1836, “at four o’clock in the afternoon, in one or more lots, or shares, and subject to such conditions as shall be determined on at the time of sale.” [7]
The sale included, freehold, around 30 acres of land and “two dwelling houses, with nine Cottages for workmen, Warehouses, Shops, Stables, Outbuildings, Yards, and Gardens, and several pieces or parcels of Land thereto belonging, situate at Langley Field, in the parish of Dawley Magna, in the county of Salop, … with the Mining works thereon erected, and the valuable Mines of coal, and iron-stone, clay, and other minerals under the same.” [7]
Also for sale were “two blast furnaces, one bridge house, two casting houses, one blast engine sixty horse power with four boilers complete, three cupolas (one at work as a foundry, and has a good casting house and stove, and the fires are blown from the blast engine), one steam engine to wind materials to the top of the furnaces, a blacksmith’s shop, an air furnace for heating boiler plates, and a punching engine, three machines for weighing coals and stone, three field winding engines, several shafts down to the mine, two stoves, one oven, one kiln for making bricks, and a mill for grinding fire clay, and every other possible convenience for carrying on the mines and works in full vigour.” [7]
According to Eddowes’s Journal, and General Advertiser for Shropshire, and the Principality of Wales – Wednesday 21st August 1844, the site was up for sale once again.
Of interest to us, in addition to a glowing and detailed description of the site and items for sale, is the following paragraph:
“The property is intersected with tram roads in every requisite direction, and is admirably arranged for carrying on the works at as little expense as possible, and contains within itself every convenience required for making superior iron, and the whole of the works may be put into full operation in a very short space of time, at a comparatively trifling outlay.” [7]
Elsewhere, the Dawley History site notes that the tramway was in use in the early 19th century. It was “known locally as the Jerry Rails. The now demolished nearby public house, The White Hart, was referred to in the 1861 census as the ‘Tom & Jerry’, called locally the ‘Jerry’. The name was obviously associated with the tramway and other features in the area.” [5]
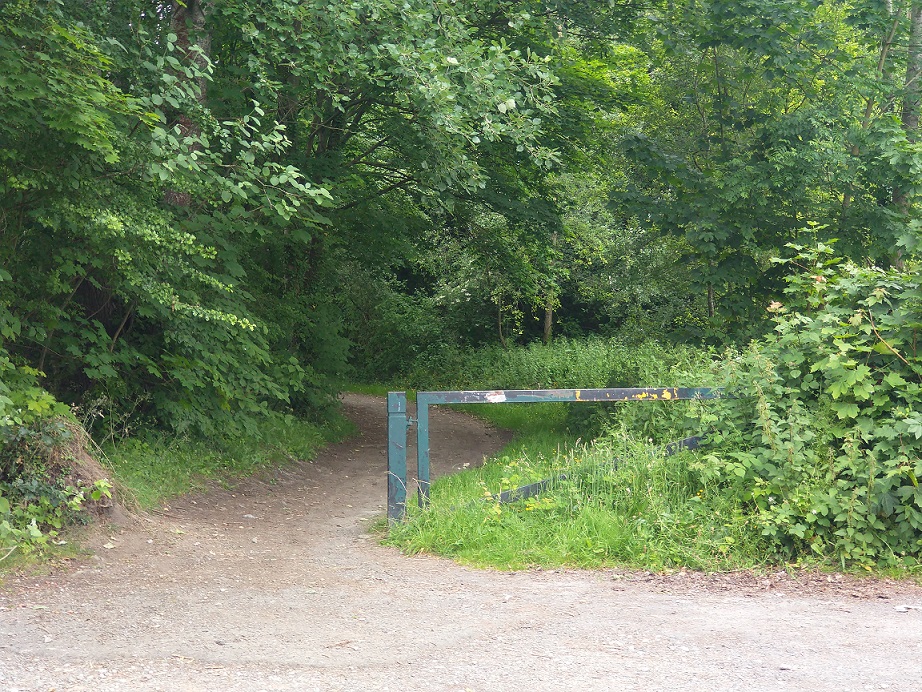
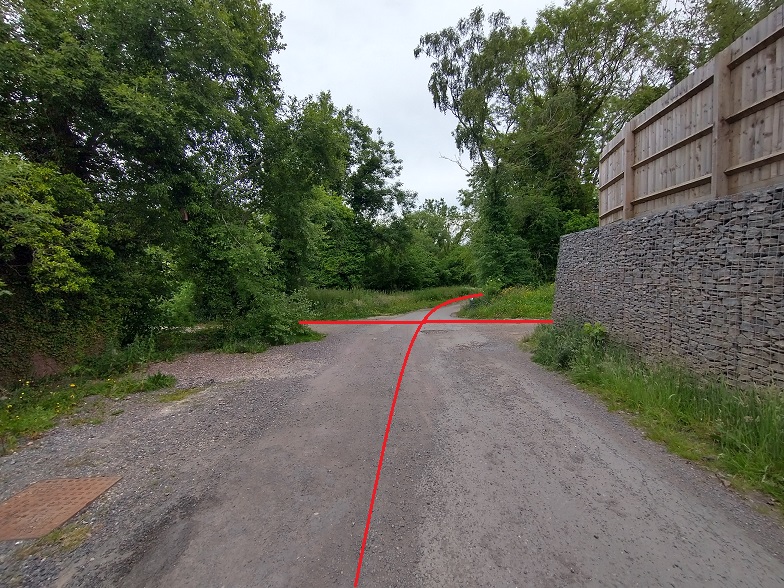
The junction of Hinkshay Road and the public road from Little Eyton. The now demolished White Hart In dominates the junction which was also a significant tramway junction. The line we have been following enters the extract from the top left and encounters a trailing connection with the lines serving Langleyfield Colliery. Two lines leave our tramway route at the road junction. One of these, runs Northeast towards what is now Telford Town Park. Another runs Southwest for a short distance. A passing loop can be seen on this line just before it exits the map extract. Our line continues in a Southeast direction. [6]Approximately the same area as in the map extract above but this time from April 2021 rather than the 19th centuryThe view across Hinkshay Road from the North. The ginnel ahead is the route of the tramway that we are following. Tramways branched right and left from this location along Hinkshay Road. [My photograph, 15th June 2022]Looking back across Hinkshay Road from the South. The footpath following the line of the old tramway is protected by metal gates. [My photograph, 15th June 2022]Looking along Hinkshay Road from the West across the location of the tramway junction. [My photograph, 15th June 2022]Looking West along Hinkshay Road. One of the tramway branches ran on the North (left) side of the road for a short distance. [My photograph, 15th June 2022]Looking West a little further along Hinkshay Road. The tramway once ran directly in front of these cottages before running off to the left. [My photograph, 15th June 2022]On the 6″ OS Maps the tramway can be seen curving away to the North of Hinkshay Road at this point. It seems to terminate in the vicinity of a church but probably served the collieries which stood on the North side of Hinkshay Road at this point. [My photograph, 15th June 2022]
We have explored the branch tramway which ran to the East on Hinkshay Road, we return no to look at the branch which runs to the West.
Looking to the West, towards Dawley on Hinkshay Road. The branch tramway ran, as far as I can ascertain, on the North (right) side of the road as far as the most distant houses that can be seen in this picture. [Google Streetview, May 2019]The tramway remained on the North side of Hinkshay road until taking a sharp left to run South towards an Ironworks. The route South is just beyond the low wooden rails on the grass area to the left of the road in this view. [Google Streetview, May 2019]Looking back North across Hinkshay Road from the route of the old tramway. [My photograph, 15th June 2022]Another extract from the 6″ OS Map. Hinkshay Road runs across the top left corner of the extract. The old tramway branch terminated at what was, in the 1880s, a disused Ironworks (Jerry Furnaces). It appears that the works were served, probably at two different levels from the North and the East. We will look at the tramway from the East a little later in this article. [6]
Returning to the junction on Hinkshay Road we continue our journey along the route of the tramway from Little Eyton Colliery.
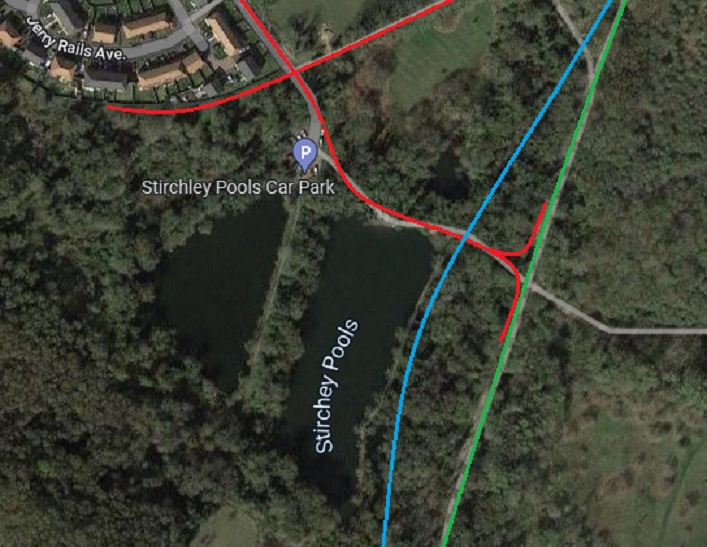
The old tramway route from Hinkshay Road runs along the metalled access to the modern car park at Hinkshay Pools. This view looks along the route from a point just South of Hinkshay Road. [My photograph, 15th June 2022]Close to the modern carpark we reach the point of another tramway junction. [My photograph, 15th June 2022]This extract from the 6″ OS Map surveyed in the early 1880s Shows the tramway crossing. The Ironworks that we have just encountered above (Jerry Furnaces) appear on the left of this image. South of those Works a tramroad runs Southeast past Hinkshay Pools which are given a blue wash on the map. In the bottom right of the extract, the line of the Coalport Branch of the Shropshire Canal is just visible. Our tramway route crossed the Canal on a bridge. The tramway running from the Ironworks on the left of the extract and crossing our route is a tramway which served Stirchley Ironworks. We will come back to this tramway in another article. [6]Looking West towards the location of the Ironworks. [My photograph, 15th June 2022]Looking East along the line of the tramway towards Stirchley Ironworks. [My photograph, 15th June 2022]This satellite image from early 2022 shows the approximate alignment of tramways in the vicinity of Hinkshay Pools as they are known locally (despite Google Maps calling them Stirchley Pools). Worthy of note is the green line which represents the standard-gauge Coalport Branch of what was the LNWR. The wharves alongside that railway were the terminus of the tramway that we have been following. Wharves were provided at a level above the Coalport Branch to allow easy loading of materials. The blue line shows the alignment of the Coalport Branch of the Shropshire Canal. The canal, at this location, can still be picked out as an elongated pool running close to the Hinkshay Pools. Also of interest is the name given to the estate road in the top left of this image. As we have already noted, the tramways in this vicinity were know as ‘Jerry rails’. [Google Maps]
We continue heading Southeast from the tramway ‘crossroad’ in the 6″ extract following the line between the Hinkshay Pools.
The access road swings to the right to enter the car park. The tramway ran ahead probably just to the left of the road as it disappears around the vegetation. [My photograph, 15th June 2022]Looking North from the Southern edge of the car park at Hinkshay Pools. The approximate line of the tramway is marked by the red line on the right side of the image. [My photograph, 15th June 2022]In this image we are facing Southeast at the same location as the image immediately above. The tramway followed the unsurfaced path round to the left. One of the Hinkshay pools is visible on the right of the image. [My photograph, 15th June 2022]The display board at Hinkshay Pools. [My photograph, 15th June 2022]The reference on the top right of the display board to the Coalport Branch of the Shropshire Canal is important as the canal ran along the East side of the Pools. [My photograph, 15th June 2022]One of the Hinkshay Pools. [My photograph, 15th June 2022]A remnant of the Coalport Branch of the Shropshire Canal. [My photograph, 15th June 2022]The tramway was carried over the line of the canal on an arched culvert which at least permitted ongoing drainage. Originally wharves would have existed along the side of the canal but once the railway was built the canal and its wharves would no longer have been required. [My photograph, 15th June 2022]This is the location of the Hinkshay Pools as drawn on a map of tramways taken from research undertaken by R.F. Savage & L.D.W. Smith and kindly made available by the Ironbridge Gorge Museum Trust Archive Office. It suggests that there was an additional tramway branch which ran out between two of the Pools. [9: p164] Savage and Smith say that the Lawleyfield Colliery had a wharf at this location in the early 1800s and that the lower pool was originally a canal wharf. [9: p166]Looking South-southwest along the line of the Canal. [My photograph, 15th June 2022]The remnant of the Canal on the North-northeast side of the tramway/footpath. [My photograph, 15th June 2022]
Immediately to the West of the Canal the tramway we have been following divided in two to access a wharf/wharves alongside the Coalport Branch of the LNWR.
A siding, accessible from both ends, was provided along side the Coalport Branch as can be seen in this extract from the 6″ OS Maps of 18888 (surveyed in 1881/82). The rail-side tramway track would have been at a height above the railway siding which allowed easy offloading of the waggons, probably by hand. [6]Looking back to the West from the line of the Coalport branch along the tramway alignment. [My photograph, 15th June 2022]
In Part 2 of this review of tramways in the Malinslee area, after wandering South down the Coalport Branch to the site of Stirchley and Dawley Railway Station we will return along the ‘Jerry Rails’ past the Hinkshay Pools on their Southern side, past the Hinkshay Ironworks and then on round to the Stirchley Ironworks site and then follow where they lead.
Malcolm Peel; The Pit Mounds of Dawley; Dawley Heritage.
R.F. Savage & L.D.W. Smith; The Waggon-ways and Plateways of East Shropshire; Birmingham School of Architecture, 1965. Original document is held by the Archive Office of the Ironbridge Gorge Museum Trust.
Moving the layout of Hereford from Ashton-under-Lyne to Telford required some careful planning. I was particularly concerned about the safe transport of locomotive and rolling-stock. I decided that I would move the layout and stock myself rather than ask the removal company to transport them. This proved to be a wise decision and I managed to get my employers to cover the cost of a few journeys between Ashton-under-Lyne and Telford as this was cheaper than using a removal company.
Some research resulted in the purchase of one stock box from Ten Commandments. [1]
Ten Commandments’ stock storage boxes for N Gauge are based on two boxes from the ‘Really Useful Box Company‘ [2] – a 4-litre box (£22.00) and a 9-litre box (£37.00).
I purchased the smaller of the two. It came with two foam inserts with pre-cut storage slots. The top layer had 9 crossways slots, each 195mm long. The lower layer had 5 length-wise slots each 310mm long. The slots were 25mm wide and 25mm deep. Each foam tray also had a cover layer/lid of foam.
I have a large amount of stock and would have needed to buy a significant number of the stock boxes. At £22.00 or £37.00 per box. I was going to be spending a lot of money.
The 9-litre Really Useful Boxes cost around £6.00 each (depending on where they were bought this varied from £4.50 to £10.00, with a manufacturer’s retail price of £7.55 plus postage. With a significant amount of stock it made sense to buy in bulk – 9 No. 9-litre boxes cost a total of £45 at Rymans (£5 each) and I found a few for a little less than this in sales at various retailers.
I researched available plastic packing-foam and realised that I could purchase reasonably large sheets on-line. I ordered two different thicknesses of foam in nominal 25mm and 10 mm sizes. The actual thickness of each sheet was marginally below the nominal sizes.
I tried using a variety of different glues before decided that strong double-sided tape would be the best for the job. This was purchased on-line at reasonable prices.
Each tray was made up of a bottom sheet of 10mm foam with cut pieces of 25mm foam stuck to it. The construction of the trays is illustrated by a series of pictures below. Please bear in mind that perfection was not required, just trays that would protect stock in the move to Telford.
The trays varied in thickness depending on what stock I intended to place in them. …
Base layer of nominal 10mm foam.The base layer of foam with two end-pieces 25mm deep.Double-sided tape in place at one end of the base sheet of foam.Two end-pieces of foam stuck in place and double-sided tape almost ready to accept the side-pieces of foam.The process continues.A finished tray – definitely not perfect but perfectly serviceable!A couple of examples of my finished trays followed by the two foam trays which came with the original purchase from Ten Commandments.Stock being placed in storage boxes in the loft layout-room
As this process seemed to have gone well. Rather than buying a lot more ‘Really Useful Boxes’ I decided to try an alternative system for a significant amount of my stock. This system made use of the 25mm thick foam as well as the 10 mm foam.
At the time, I purchased a set of storage drawers as shown below for, I think £12.00. The prices as I write in June 2022 is now £18.00. I imagined that these drawers wolw hold a significant amount of stock and that I would also be able to accommodate some larger items which I had on display in the Vicarage.
The process followed was the same with the exception of a need to provide some reinforcement for the trays as they were larger and the foam was not fully rigid. Trays were shaped to fit the drawers as can be seen below. …
The first layer of foam in one of the plastic drawers.The first tray in this drawer was used for road vehicles.
I had some very large items – O-Gauge models made by my father-in-law and some buidlings from the layout which needed larger boxes. The method used was the same but the thicker foam was more suitable for these boxes. …
Midland/LMS Steam Railmotor in O-Gauge together with a brake van and a mineral wagon.One of Hereford’s large goods sheds being packed away carefullyHereford Station Building also being stored away carefully. Both these models were made for me by my father-in-law from card. Superb!
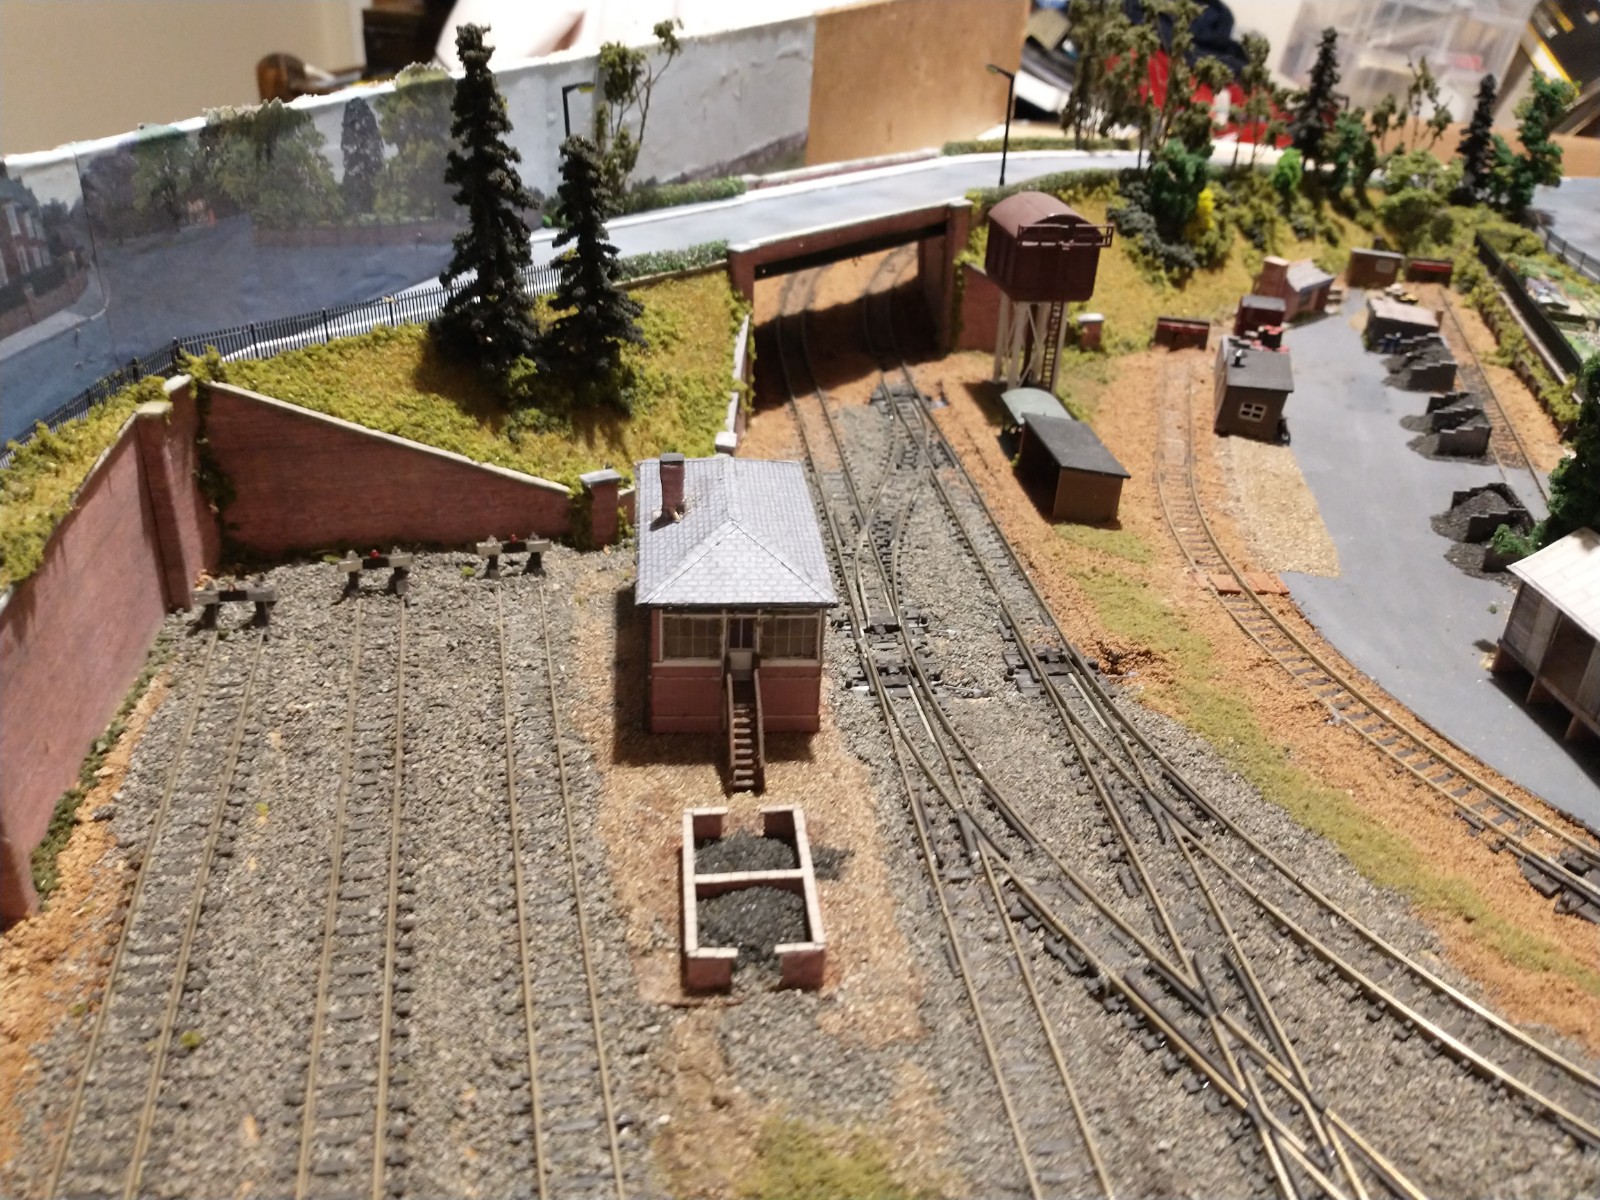
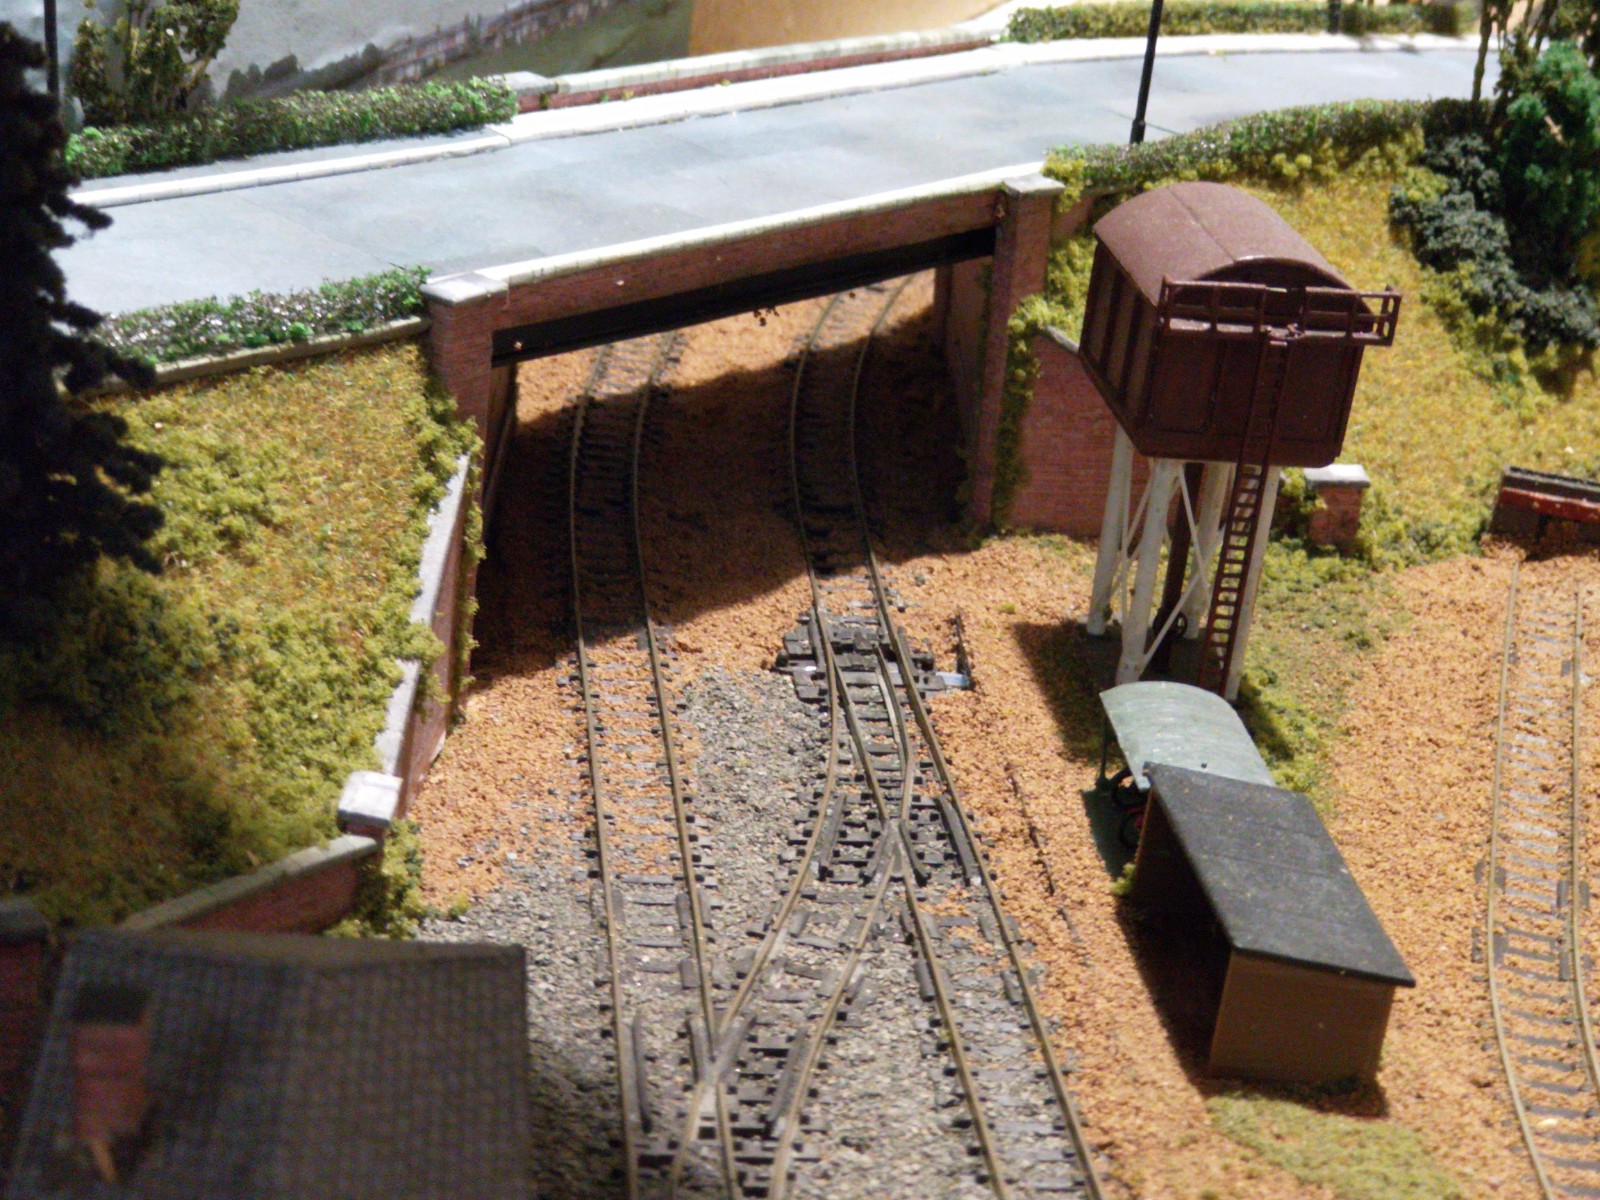
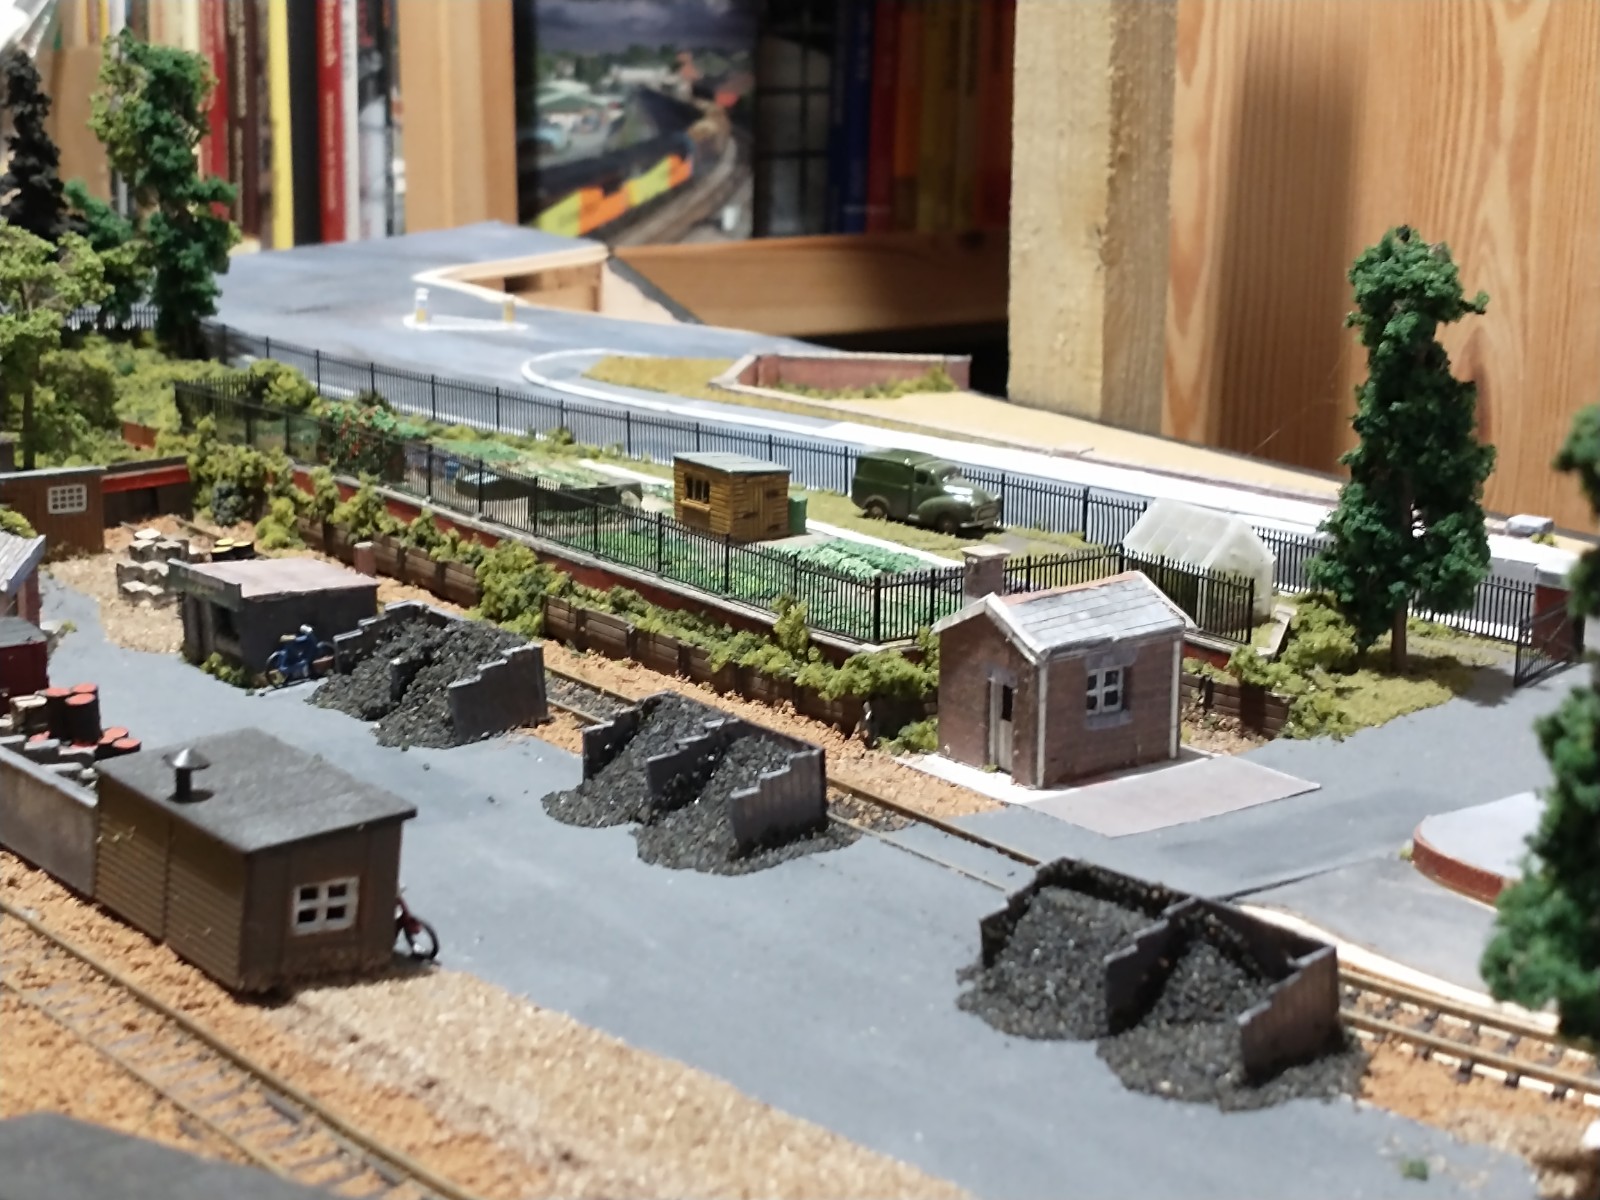
I mentioned in my last post that the staging in my layout room had been built and my library was close to being sorted out.
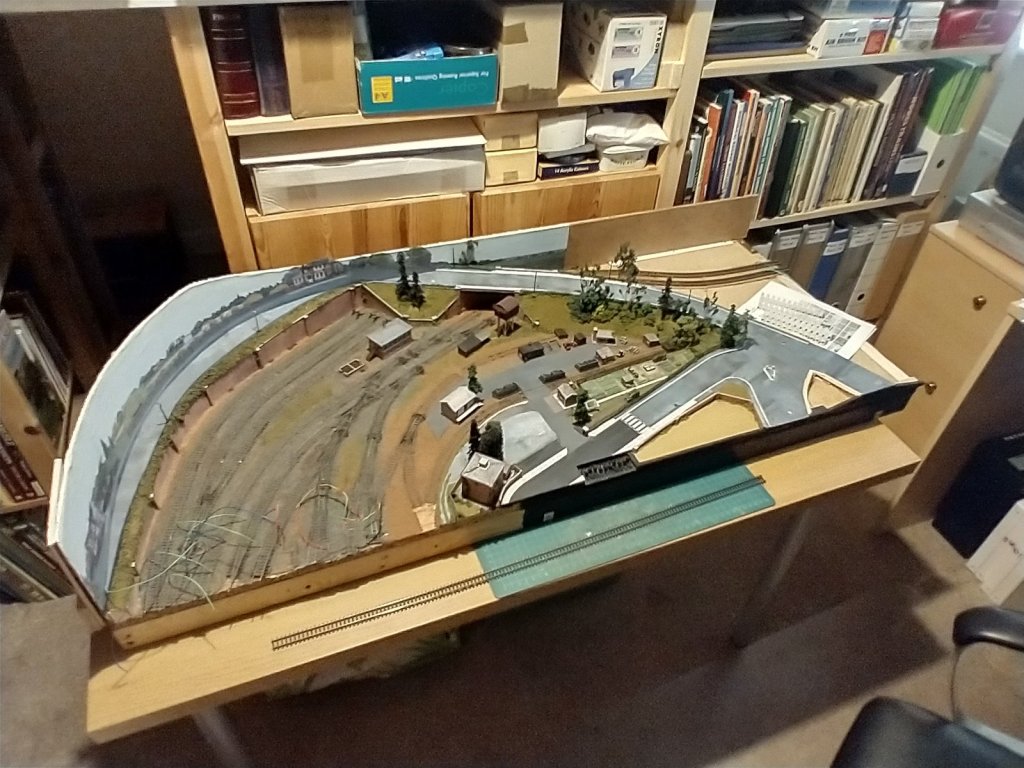
Just a few more pictures. These show the layout room with the completed staging and one layout board being worked on…..
The staging uses IKEA “Ivar” to create bookcases on which the layout sits/will sit. The uprights are 1.2 metres high which means that there is good shelving space beneath, and room for a desk and computer.
It has been a while since I posted about my layout.
We have now moved to Telford and the powers that be have generously allocated a relatively large bedroom for the layout. Some compromises are inevitable as the space is smaller than the loft in the Vicarage in Ashton-under-Lyne.
Staging has been built and my library is close to being sorted out. I will need one new fiddle yard, the electrics will need connecting board to board for the layout and some damage will need to be rectified.
Completing the staging is a good step forward!
Just a few pictures …..
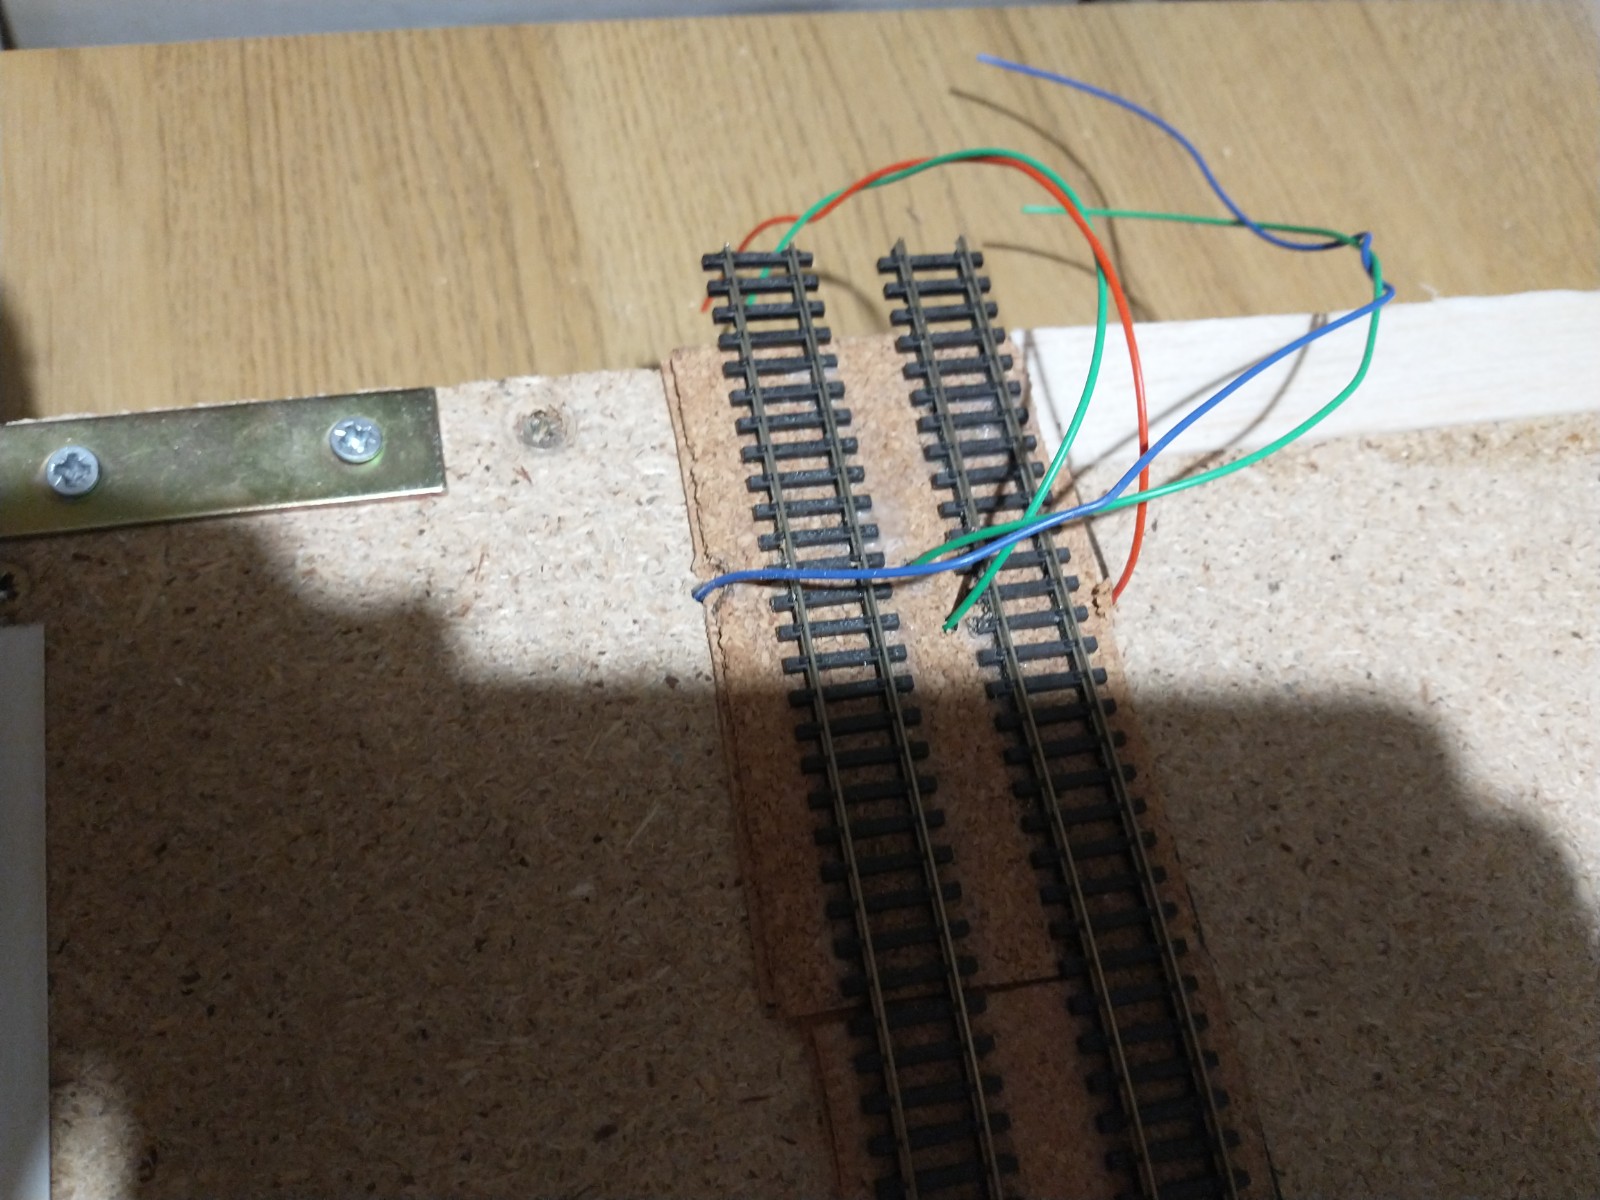
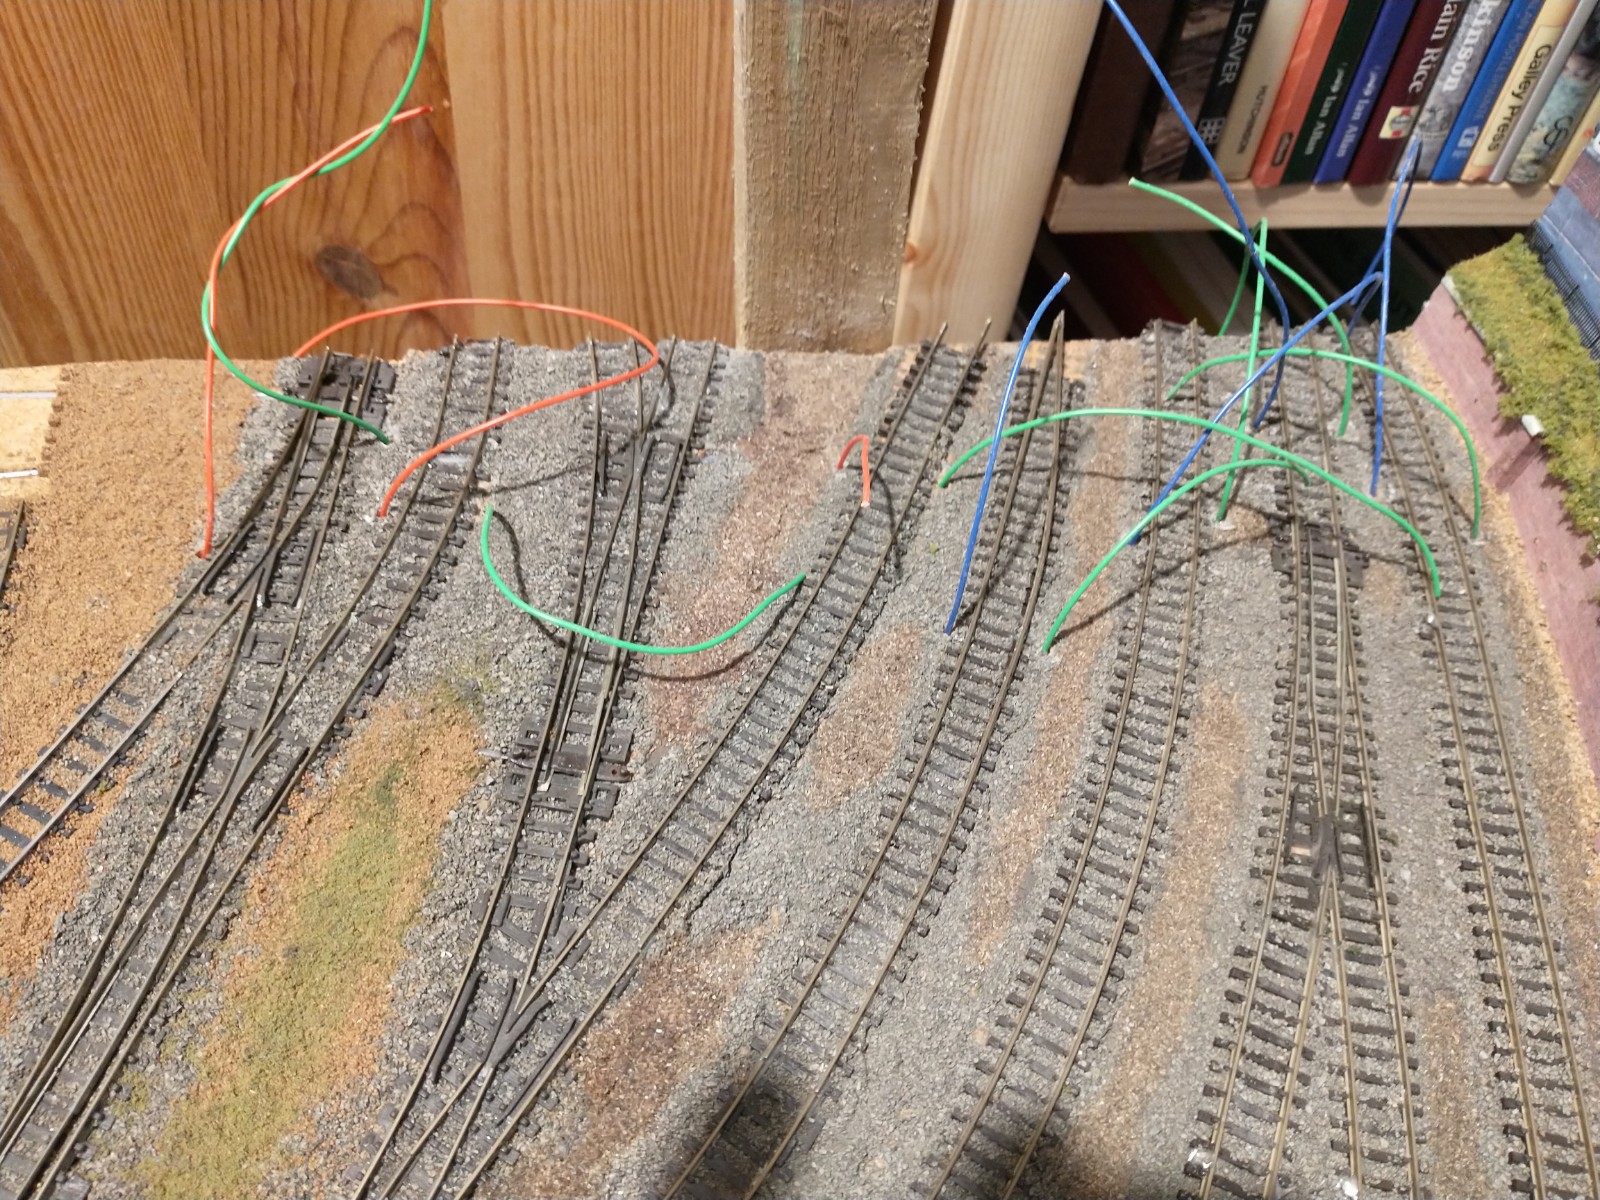
The wiring above is new connections from the board I am supposed to be working on which will connect sections which originally relied only on the track connection across the board joints!
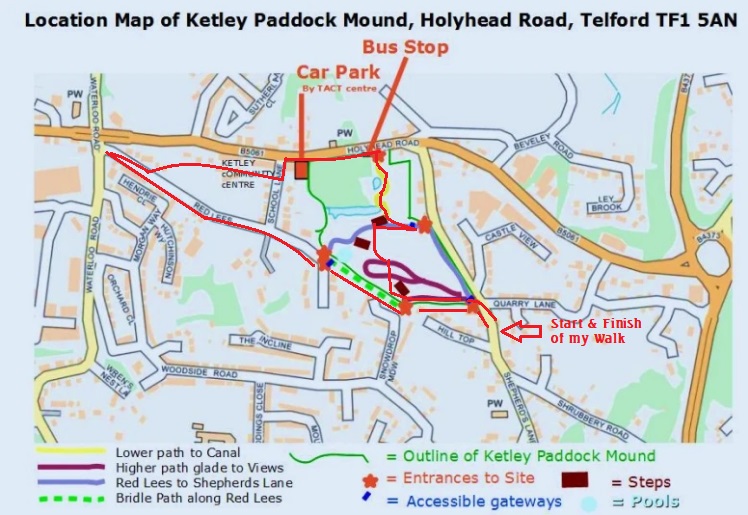
This is a first look at the Ketley area just a few miles from where we live in Malinslee.
This was a short walk which encompassed a variety of industrial remains. The route taken is shown by the red line on the image below which comes from the Ketley Paddock Mound website. ……
Ketley Paddock Mound. [26]
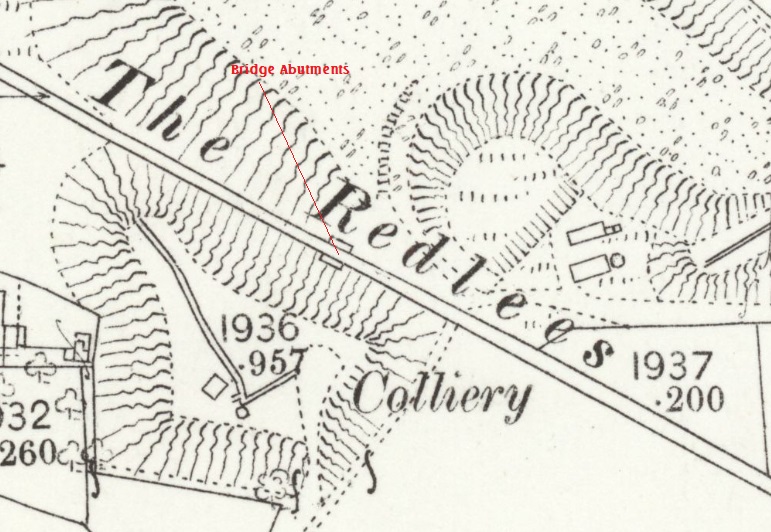
I parked close to the church of St. Mary the Virgin in Red Lake and walked North up Shepherd’s Lane, turning left into Hill Top. Hill Top becomes Red Lees. The route of Red Lees was crossed by a high-level tramway which probably linked a colliery to what is now called Ketley Paddock Mound and was a colliery slag heap. the extract from the 1882 25″ OS Map below shows the location.
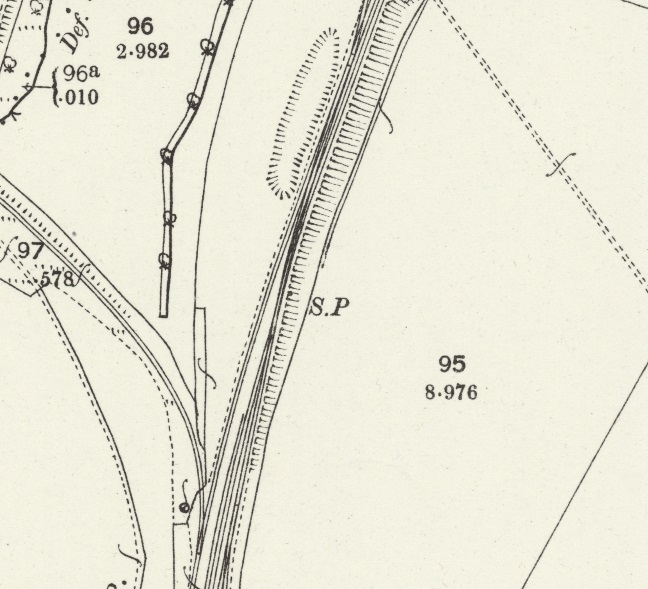
Tramway Bridge abutments or piers shown on the 1882 25″ OS Map. [1]
It seems to me to be unlikely that the tramway which used this bridge was directly associated with a larger network of tramways in the area. The map extract shows other short sections of tramway immediately at the colliery location and is seems highly likely that there was a need to cross Red Lees at high-level to reach the large slag heap to the North of the lane.
The view Northwest on Red Lees on 2nd June 2022. The shaping of the stonework to the right of this image suggests that it was a pier and that the bridge was therefore a two span structure. [My Photograph]The view Southeast along Red Lees on 2nd June 2022. [My photograph]
Recently, reading ‘A Ketley Mon’ by Terry Low, I came across an older photograph at this location. It was taken in 1906 and shows the pier probably at its fullest height. It seems as though it was originally built in masonry and, at a later date, extended upwards in brick. Whilst it is impossible to be sure what this means, it suggests that there was a need at some stage to lift the line of the tramway. An obvious explanation for this would be the growth of the slag heap which is to the right of the picture below.
Red Lees in 1906, looking Northwest. The old colliery was to the left of this image, the slag heap to the right. In all probability a timber deack was used to carry the tramway rails. Each span would have been made up of a horizontal deck supported at third points by raking timber props. [Photographer not known – Alan Harper collection][2: p27] The image also appears on the Historic Ketley website. [5]
Walking Northwest from the location of the tramway bridge, it was apparent that this section of Red Lees followed a straight course. Possible explanations for this include:
the development of the colliery and the slag heap required an established right of way to be redrawn to accommodate the work. I cannot find maps early enough to look at what predated the industry at this location; or
Red Lees itself, may have been part of the route of a tramway.
It would be interesting to be able to test these ‘theories’, if earlier detailed maps were available.
Red Lees to the Northwest of the tramway bridge remains looking to the Northwest on 2nd June 2022. [My photograph]
We know from early maps that the Ketley Canal once crossed Red Lees to the East of Ketley Hall.
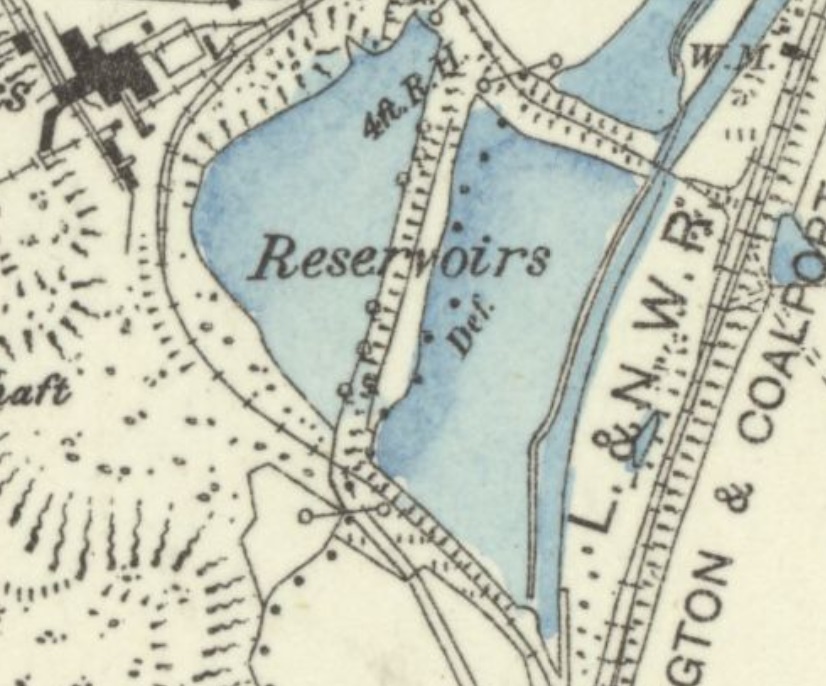
A extract from a hand drawn map which was posted on The Ketley History Group on Facebook. The Ketley Canal is shown in blue on the sketch map and crosses Red Lees immediately adjacent to Ketley Hall which appears far-left on this extract.[3]This image appeaars on the website of the Friends of Ketley Paddock Mound. It also shows the canal route passing under Red Lees just East of Ketley Hall. [4]In this image taken from the National Library of Scotland’s website the 25″ OS Map, published in 1902, is placed immediately alongside precisely the same area on modern satellite imagery. The canal arm is central to the image. The wider area at the western end of the remaining canal (in 1902) was a wharf. [6]This image shows the two images above superimposed on each other. The old wharf can be seen to be under the site of modern housing on the North side of Red Lees. The Hall was to the South. According to the earlier images, the canal continued down the East side of the Hall. It then probably ran West on the South side of the Hall. [7]This picture shows a map of Ketley Paddock Mound which is on display on the South side of the nature reserve. The blue dotted line, superimposed on the image, shows the approximate line of the canal as it passes under Red Lees. The present length of the canal arm is shown in light blue on the original sign board. The Friends of Ketley Paddock Mound’s website can be found here. [My photograph, 2nd June 2022]A view from Red Lees footpath looking Northwest to where it widens out to become a road. There is a slight rise in the road surface just in front of where the pedestrian is walking. This is the most likely location for what would have been an arched bridge, now buried and inaccessible. [My photograph, 2nd June 2022]
I followed Red Lees down to the junction with the B5061, before walking back along Red Lees following what probably was a tramway route which then drifted away from Red Lees to the Northeast as shown on tthe sketch map at the head of this article. The Ketley History website says the following: “Behind the Victorian school building that is now Ketley Community Centre, there is a footpath that leads down to Red Lees and this is also the line of a tramway, probably to serve the coal wharf that was situated on Ketley Canal where School Lane meets Red Lees now.” [5]
The view Northwest towards the junction with the B5061. [My photograph]The view from Red Lees along the line of the probable tramway. [My photograph]The view Northeast along the line of the tramway. [My photograph]Further along the tramway route with what was Ketley primary school in sight. [My photograph]Looking along the route of the tramway to what was the Canal Wharf area. The old school buildings are on the left. [My photograph]
I turned to the left and walked along School Lane to the B5061, which, incidentally was the A5 and so was Thomas Telford’s trunk road to North Wales, and so it carries the name ‘Holyhead Road’.
The Ketley Canal
TheKetley Canal was about 1.5 miles (2.4km) long. It linked the Shropshire Canal, in the small town of Oakengates, with Ketley Iron Works. It was built in the late 18th century (around 1788) and required the construction of an inclined plane to lower and raise tub-boats a little over 70ft between the level of the Works and the higher ground that it travelled over from Oakengates. [8]
The inclined plane was the first effective inclined plane in the UK. [9]
The canal predominantly carried coal and ironstone in horse-drawn tub-boats. These tub-boats where in use across Shropshire and beyond. They “were rectangular in plan, 19 feet 9 inches long x 6 feet 2 inches wide made of wrought-iron plates rivetted together. An inclined plane consisted of two rails laid parallel to each other, on each of which ran a cradle raised or lowered by a wire rope and capable of carrying one tub boat at a time. The descending cradle assisted in balancing the weight of the ascending one and the extra power required was supplied by a stationary winding engine. A boat descending an inclined plane entered a chamber where it was manoeuvred over a submerged cradle. Once in place, the boat was secured to the cradle in readiness for its journey down the plane. The cradle was then hauled up over a sill and onto the plane, at which point it was still inside the chamber. When everything was ready it commenced its descent, which required just a few minutes, and a small number of workmen were able to complete the whole operation.” [12]
The inclined plane lasted in service until 1816, closing with Ketley Iron Works. The length of canal between Ketley and Oakengates remained open for more than 60 more years until the 1880s.
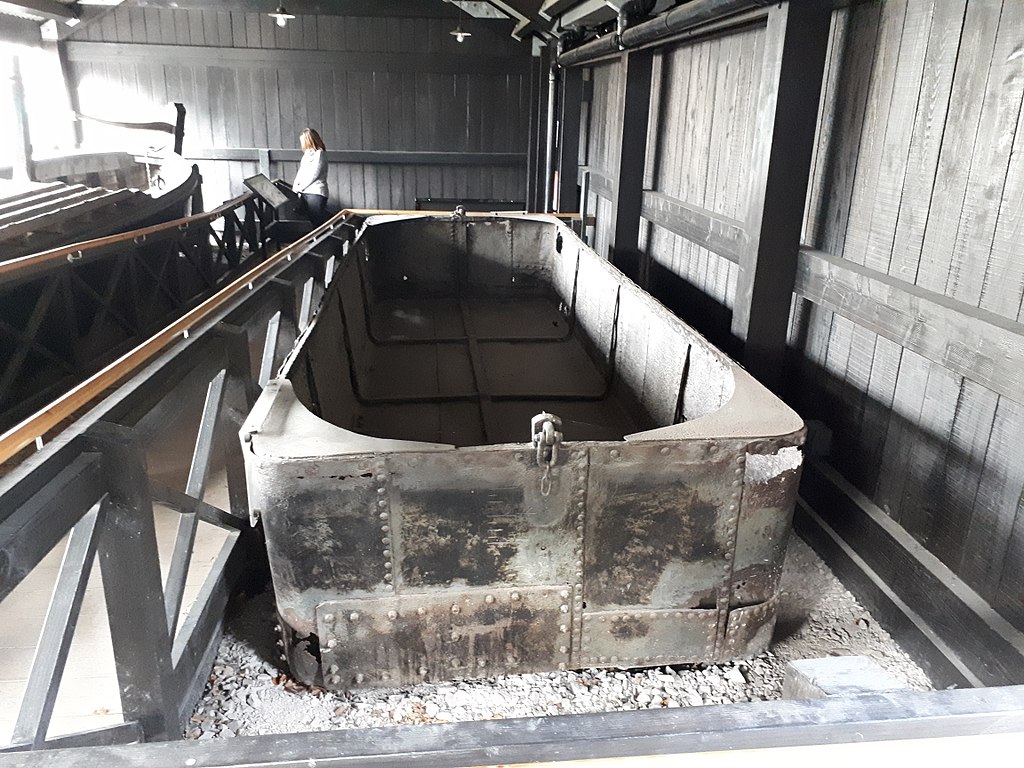
“One tub-boat is preserved in the Blists Hill Victorian Town museum. It was rescued from a farm in 1972, where it was in use as a water tank. Before its discovery, it was thought that all tub boats on the Shropshire Canal were made of wood.” [13]
This tub-boat is on display at Blists Hill Museum near Ironbridge in Shropshire.
The canal ran on the north side of Holyhead Road. A few hundred yards to the West of Shepherd’s Lane the canal passed under the Holyhead Road. It “clung to the southern side of the main road for a few hundred yards … but then it moved away from the road, heading westward at the backs of what are now gardens on Holyhead Road until it reached Shepherd’s Lane.” [9]
The Eastern portal of Shepherd’s Lane Tunnel is still visible in a private garden. [4]
The canal entered a short tunnel under Shepherd’s Lane and emerged into Ketley Paddock Mound (as it is now called). The length of canal which is preserved in the nature reserve can be reached from a number of directions.
The route I took was to walk East along Holyhead Road to the bus stop adjacent to one entrance to Ketley Paddock Mound. The bus stop is a delight! It was painted in 2018 by Fran O’Boyle and funded by the Ketley Parish Council and the Friends of Ketley Paddock Mound. [10][11]
The bus stop which is owned by Ketley Parish Council is outside Ketley Paddock Mound was decorated in 2018. It was created by Fran O’Boyle and funded by the Parish and the Friends of Ketley Paddock Mound. [10][11]
And I then entered the nature reserve through the gate visible in the photograph above. Immediately inside the gate is another public information board. The image below is an extract from my photograph of the board. …
Entering the nature reserve from adjacent to the Bus Stop on Holyhead Road, the path climbs through open meadow and paddock. It curves round a small pond before the remaining section of the Ketley Canal is reached. [15]
This next sequence of photos shows the walk up to the remaining section of the Ketley Canal as highlighted on the map extract immediately above.
The path from Holyhead Raod. [My photograph]Buttercups in flower in the paddock to the East of the footpath. [My photograph]The footpath winds gently up hill to the old canal. [My photograph]The Ketley Canal. This remaining section of the tub-boat canal is now given over to nature. Just before taking this picture I watched a Kingfisher fly along the length of the water. Behind the camera is the cutting which led to the tunnel under Shepherd’s Lane. [My photograph, 2nd June 2022]
The walk back to my car took me over the top of the Paddock Mound which was the slag-heap made up of arisings from local pits and mines.
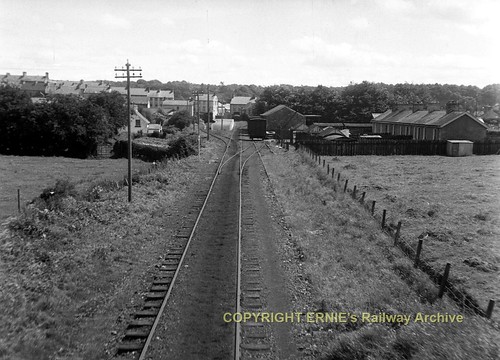
The featured image above shows Fintona Railway Station from Main Street, Fintona in June 1957, (c) Wilson Adams. The image is used here under the Creative Commons Attribution-Share Alike 2.0 Generic license (CC BY-SA 2.0). [7]
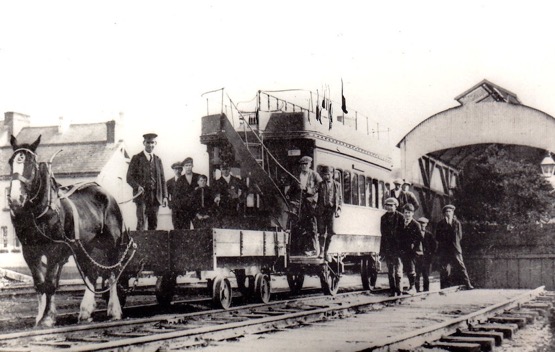
The Londonderry and Enniskillen Railway [2] opened the railway station in Fintona on 5th June 1853. A short time after the Londonderry to Enniskillen Railway completed its mainline to Enniskillen (in 1854 [2]). mainline services were withdrawn from Fintona (in 1856 [1]), and the link to Fintona became a branch from the mainline at Fintona Junction railway station. [3] Most passenger services on this branch line were then provided by a horse-drawn tram car. [1] Since the line’s closure, the tram has been preserved at the Ulster Folk and Transport Museum at Cultra, County Down. [2]
Wikipedia notes that the branch line to Fintona was taken over by the Great Northern Railway (Ireland) in 1883 when it took control of the Londonderry and Enniskillen Railway. [1]
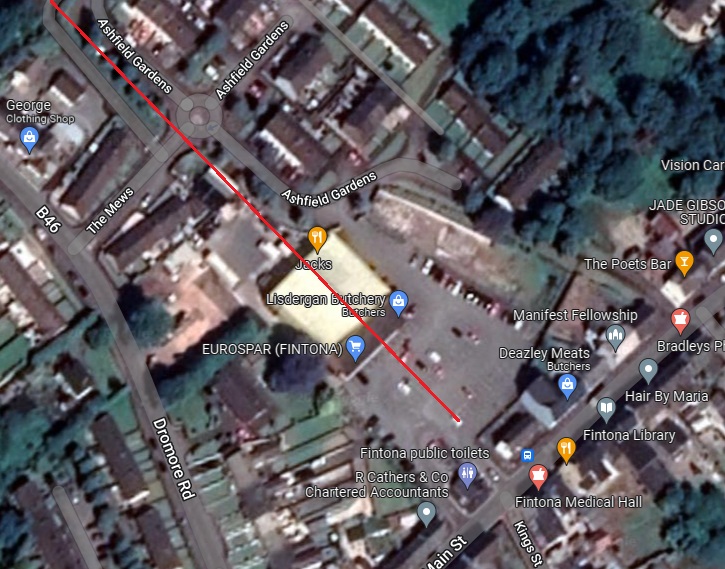
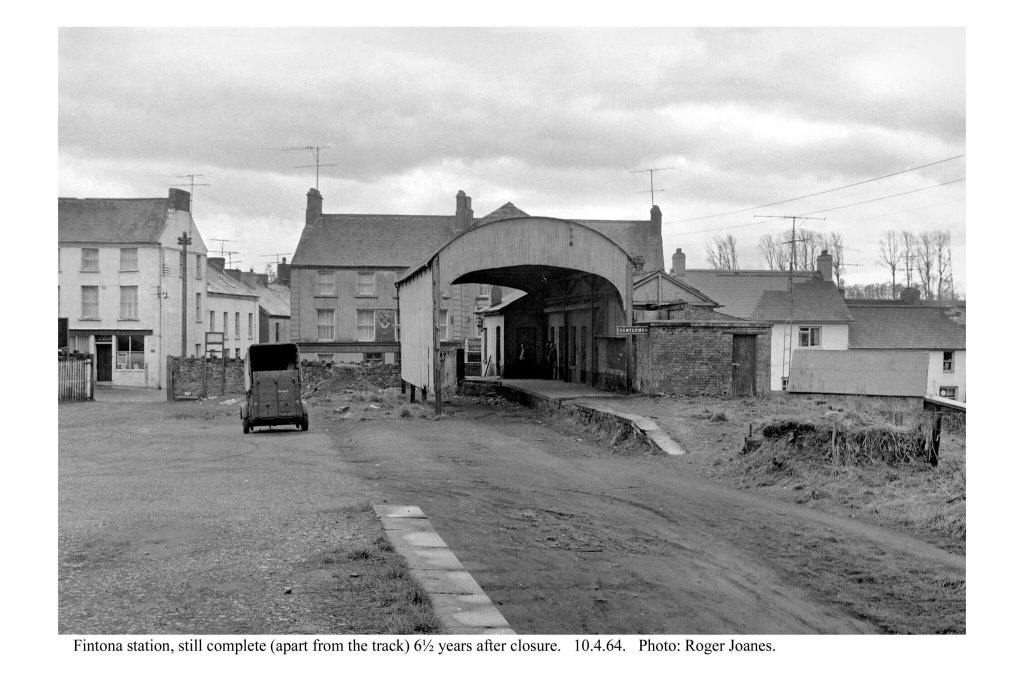
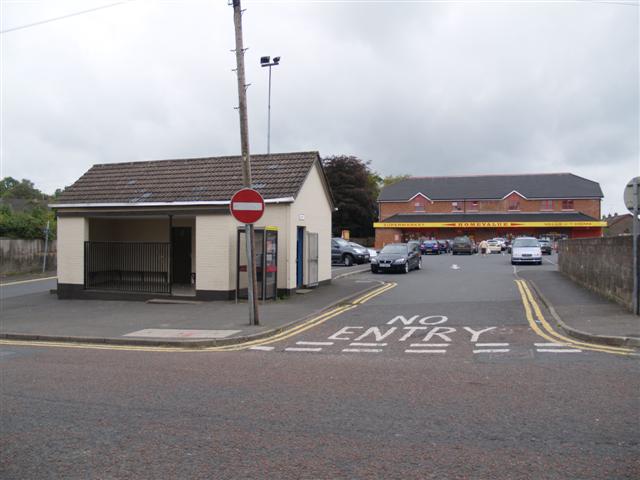
The branch-line and the station at Fintona were closed on 1 October 1957. [1] The whole area comprising the Fintona Train station is now a car park and public toilet. [4]
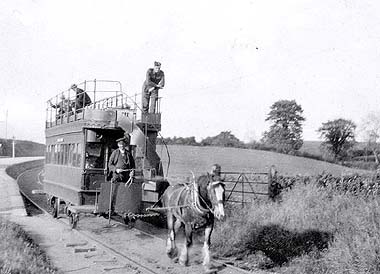
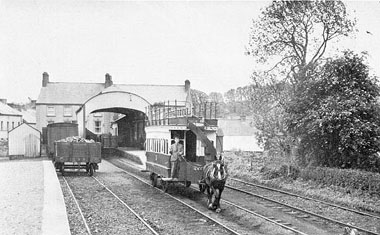
As we have noted, “Passenger services on the half mile Fintona branch were worked by horse traction throughout the 104 years of its existence up to closure in 1957.” [4]
Timetables were worked out on what a horse could reasonably be expected to achieve. This meant that rail authorities “allowed 10 minutes for the slightly downhill trip to Fintona, and 15 minutes for the return working. Seven trips per day were scheduled in summer 1951.” [5]
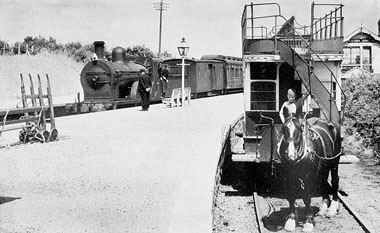
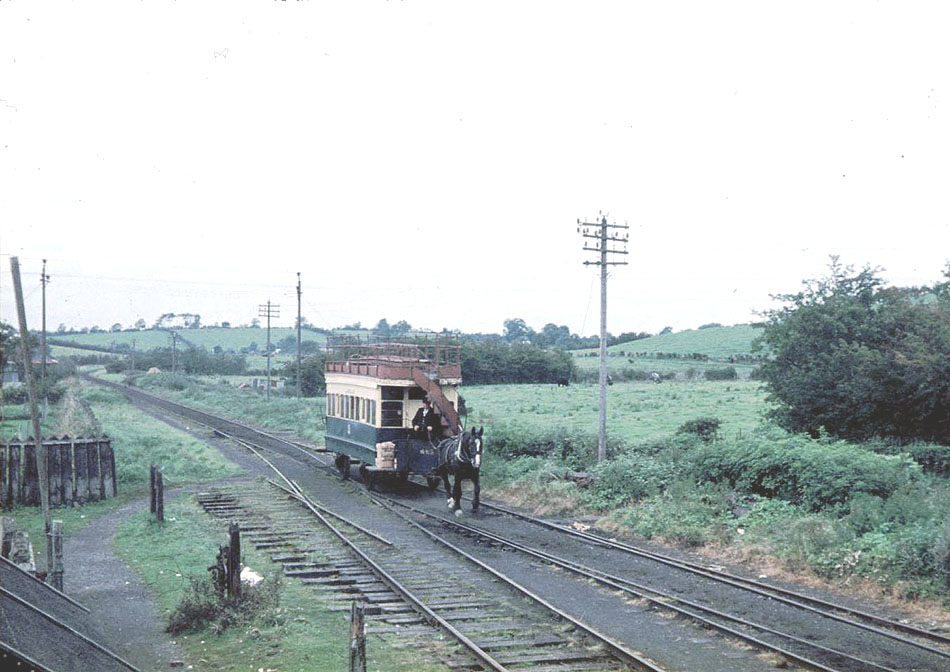
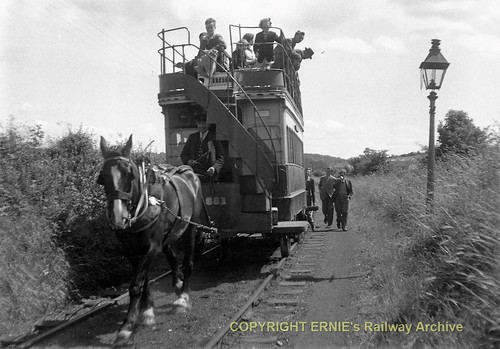
The tramcar which was used for the majority of the life of the service, “entered service in 1883, had longitudinal seating, back to back on the upper deck and with seats facing each other on the lower deck. Originally the latter was divided into 1st and 2nd class, and the top deck was 3rd class. The car is estimated to have covered 125,000 miles in its ambulation’s on the branch.” [5]
“Goods wagons for Fintona were worked by a steam engine which, in later years at least, made a return trip in the morning before passenger services started.” [5]
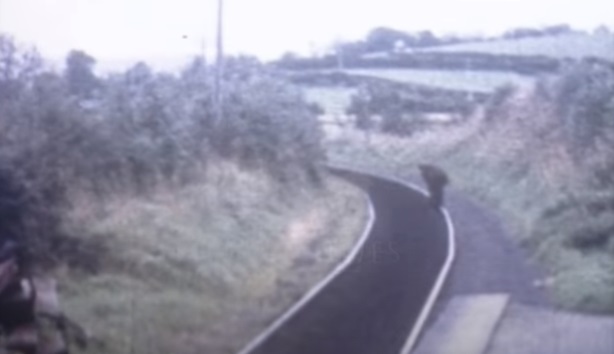
The Line between Fintona and Fintona Junction
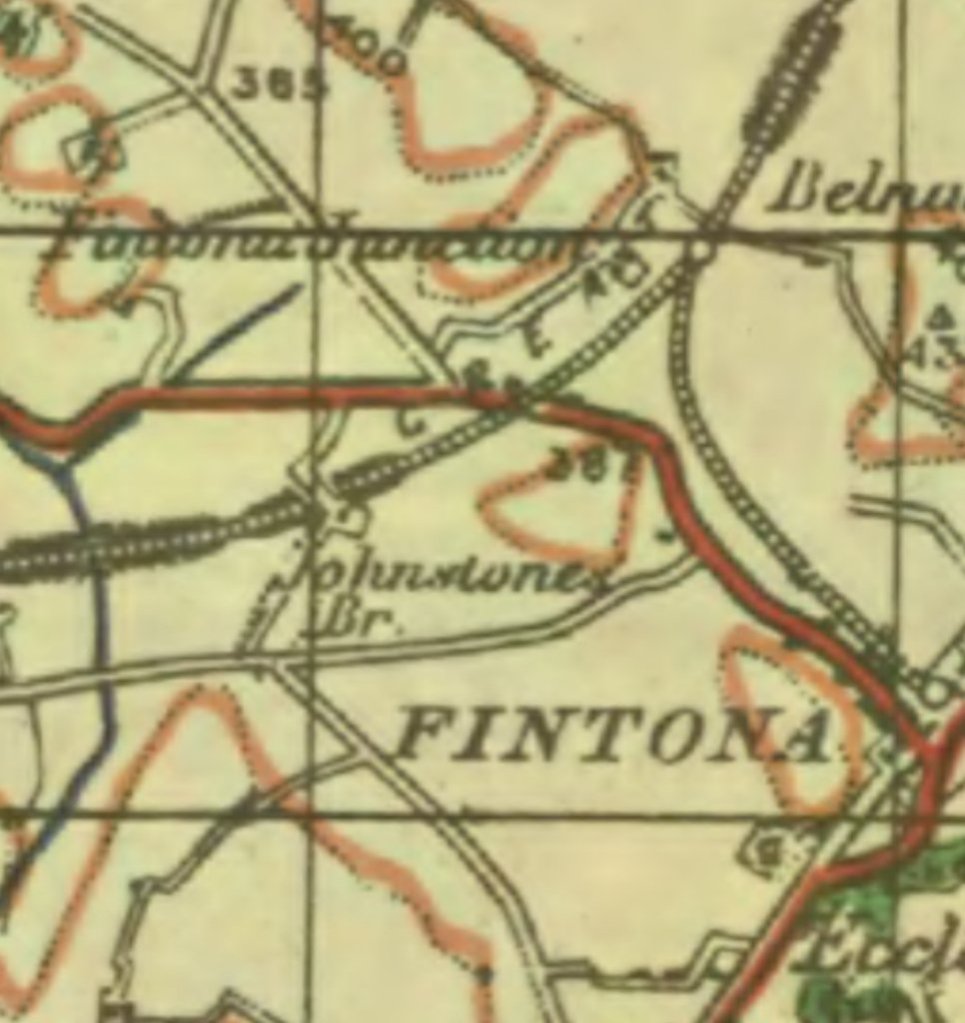
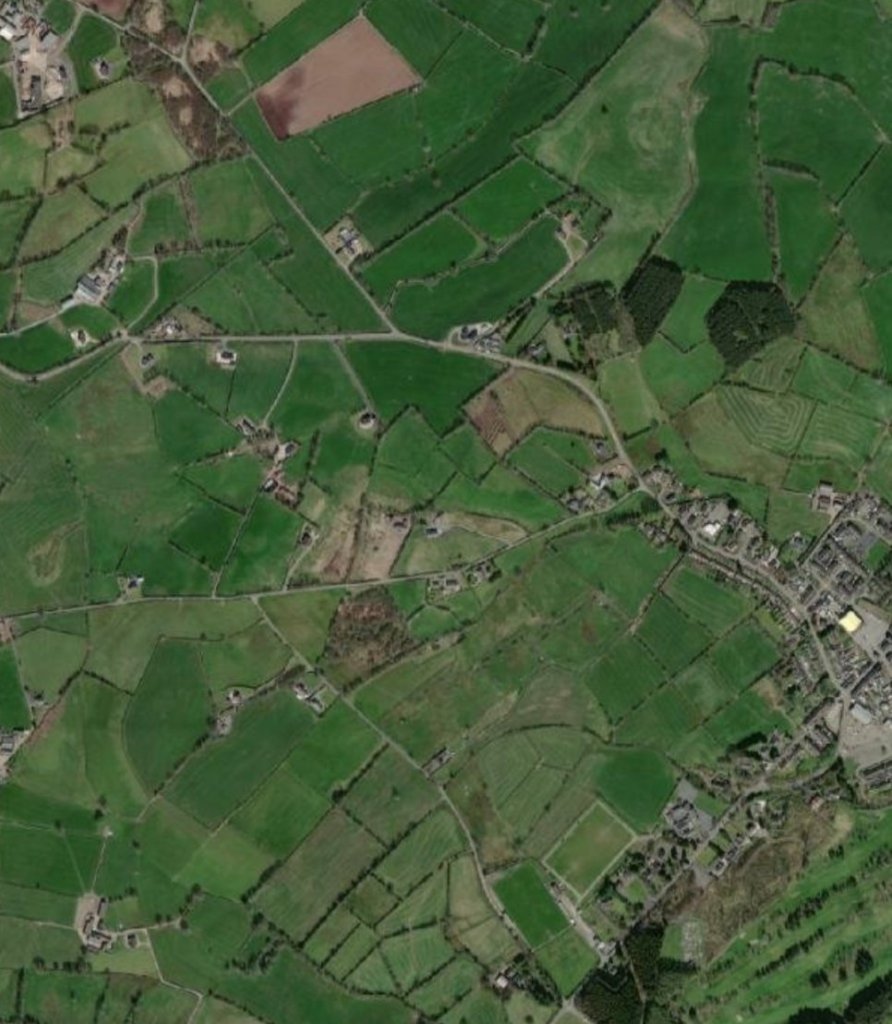
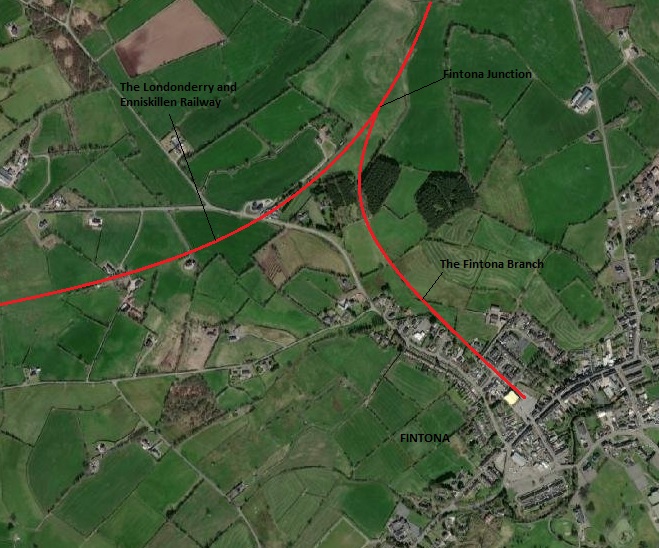
The first image below shows the route of the line on an extract from the GSGS maps of 1941-1943 produced by the British War Office at a scale of 1″ to 1 mile. [6] The second picture is a matching 21st century satellite image which shows how little of both the mainline and the branch remain in the 21st century.
The Fintona Branch: a map extract from the British War Office (G.S.G.S 4136) 1″ to the mile survey published 1941-1943. [6]The location of the Fintona Branch on modern satellite imagery. [6]A similar area on the Satellite imagery with the route of the mainline (The Londonderry and Enniskillen Railway) and the alignment of the Fintona Branch illustrated by redlines. [6])
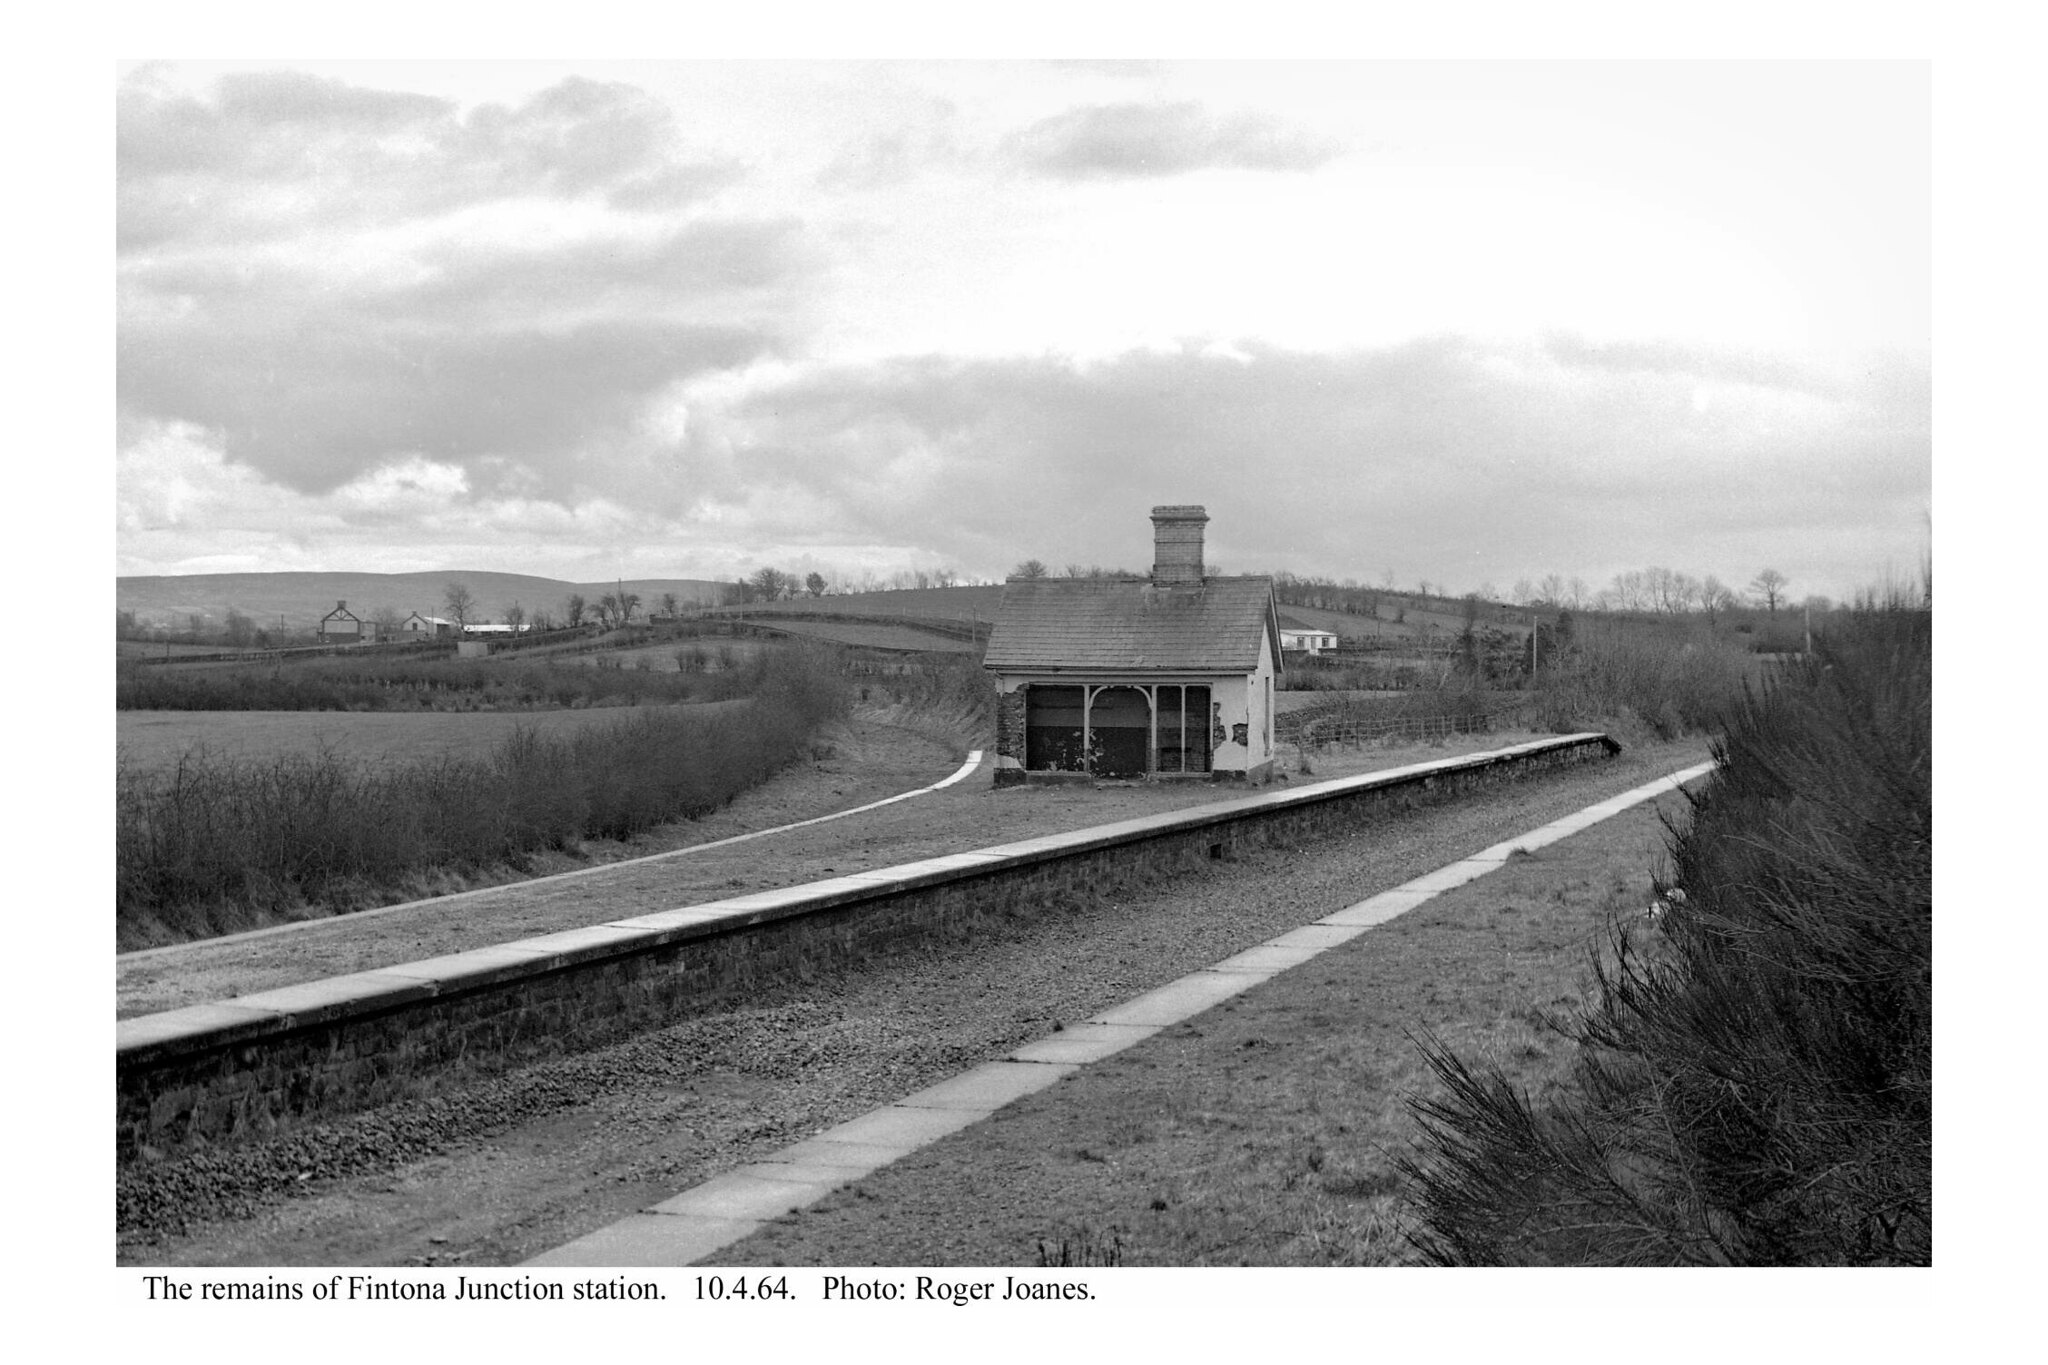
Fintona Junction
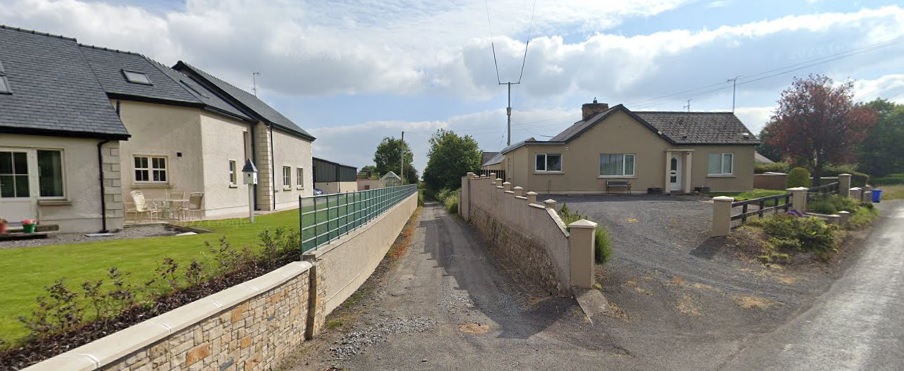
The next image below shows the approach road to what was Fintona Junction Railway Station from the B46. Immediately to the right of this road was a level-crossing which took the mainline across the B46. The Londonderry and Enniskillen Railway ran under the location of the bungalow on the right, parallel to the station approach road.
The access road shown above now only provides access to a farm. At one time it was the public access to the junction station.
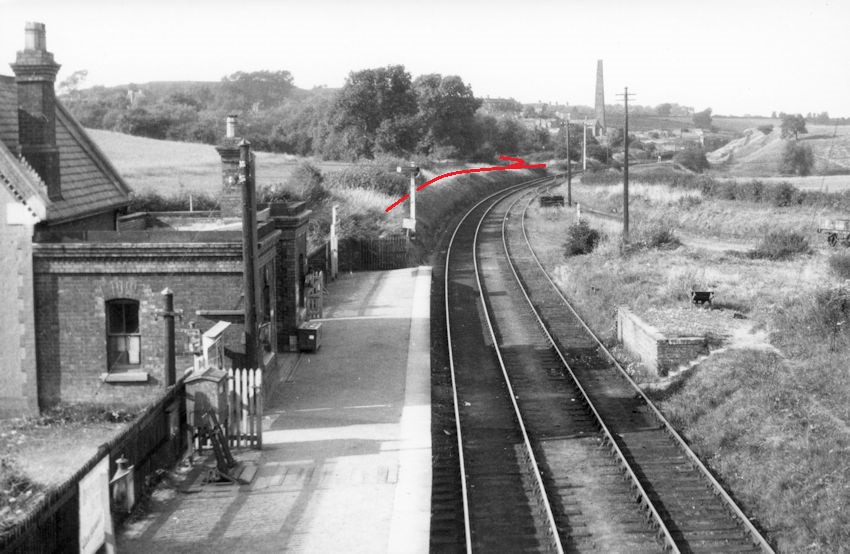
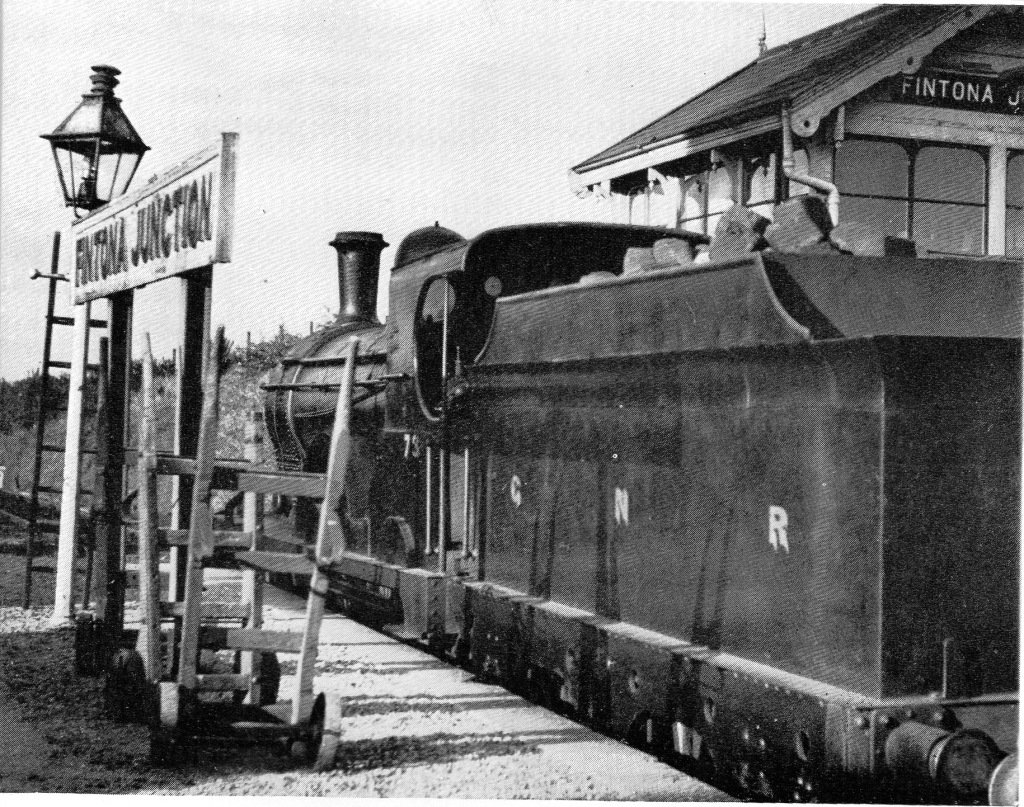
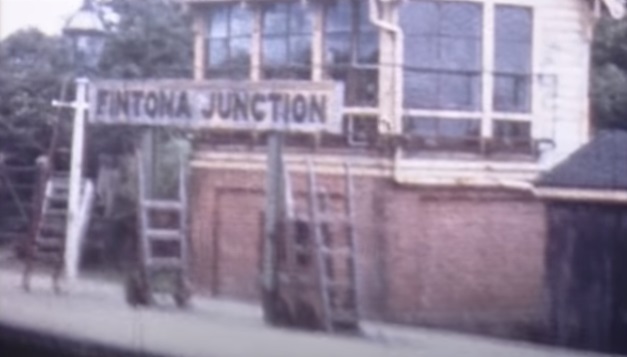
Fintona Junction Station site. The line of the railway to Enniskillin can be seen crossing the B46, Dromore Road in the bottom left of this satellite image. The line to Fintona is indicative rather then accurate. [Google Maps]Fintona Junction: GNR 4-4-0 goods engine No.73 of Class ‘P’ stands in the bay, having shunted its train to await the passing of the two passenger trains of the evening of August Bank Holiday Saturday, 1954. [12]A Still image from a 1950s cinefilm which shows the signal box, station sign and porters trolleys at Fintona Junction, (c) The Huntley Archives, Film No.96367. [13]
The line
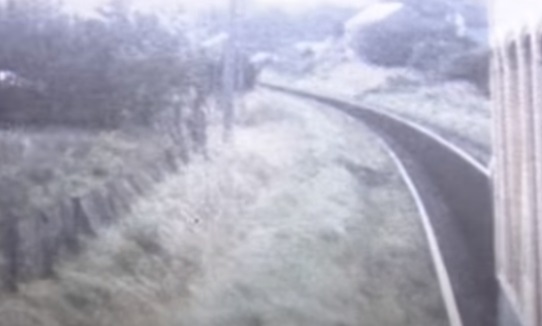
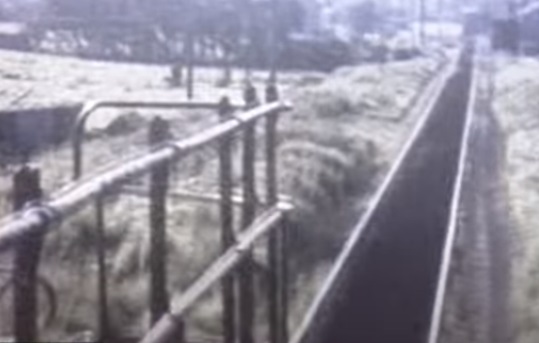
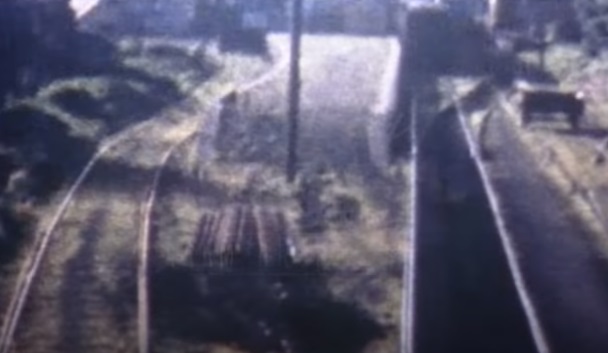
AS we have already noted, the journey from Fintona Junction to Fintona Railway Station was timetabled as just a 10 minute journey. The tram was usually waiting for connections at Fintona Junction as in the first picture below.
The view from the mainline of Fintona Junction Station. The tram is waiting to offer a connection for the train arriving from Londonderry, (c) J.W. Armstrong/ARPT – this link is to the image as held on Ernie’s Railway Archive on Flickr. [8]The tram for Fintona with horse”Dick” (apparently all the horses used on the service were called ‘Dick’) waiting with the branch connection at Fintona Junction, while PPs class 4-4-0 No.44 arrives with 1.45pm Omagh – Enniskillen local train (c) L.King,5th July 1955. [4]Fintona Junction Railway Station in April 1964 (c) Roger Joanes. The image is included here under a creative Commons Licence, Attribution-NonCommercial-NoDerivs 2.0 Generic (CC BY-NC-ND 2.0). [9]
In the picture above the line can be seen to be in a shallow cutting soon after leaving the railway station. As can be seen below, this was a very shallow and short cutting.
Lookin ahead down the line from Fintona Junction in the 1950s, (c) The Huntley Film Archive Film No. 96367. [13]The tram transporting military personnel leaves Fintona Junction and runs along the section of track being inspected in the image above, (c) Mr Gallagher c1941-45. [4]Now just beyond the cutting mentioned above. The line continues to curve towards Fintona, (c) The Huntley Film Archive Film No. 96367. [13]Leaning out of the tram window, we can see the line continuing to curve westwards, just ahead, shrubs are beginning to encroach on the line, (c) The Huntley Film Archive Film No. 96367. [13]This satellite image shows the current landscape around the next section of the old railway linejust south of the junction station. [Google Maps]A hazy view from the top deck of the tram looking back along the line towards Fintona junction, (c) The Huntley Film Archive Film No. 96367. [13]Postcard View circa 1930 which shows the tram rounding the curve after leaving Fintona Junction Station on the way to Fintona. It is in the midst of the shrubs mentioned above, (c) Public Domain. [1]A little further ahead along the line is again in a shallow cutting, (c) The Huntley Film Archive Film No. 96367. [13]The next length of the line sees the old railway leave the curve and straighten up heading for Fintona in a southeasterly direction. [Google Maps]Over this next length of the old railway it is much more difficult to determine the precise alignment of the line. The redline cannot be taken as accurate in anyway. The vast majority of the buildings shown to the southwest of the line all postdate the removal of the old railway. [Google Maps]The north end of Sherwood Close. The old railway probably ran approximately on the line of the green fence between the two properties shown here. [Google Streetview]A view from the north on Ashfield Gardens. The farm access track referred to on the image appears in the bottom right of the satellite image above. It can also be seen at the top left of the satellite image below. [Google Streetview]This final satellite image shows the approximate line of the railway as it enters the station throat and runs through to the terminus buffer stops. The station used to front onto Main Street. The area is now the premises of Lisdergan Butchery (https://lisderganbutchery.com), Eurospar and the town car park. The building which fronts onto Main Street being Fintona’s public toilets. [Google Maps]A short distance further along the line, the land has dropped away once again and the station at Fintona is in sight, (c) The Huntley Film Archive Film No. 96367. [13]
The view Southeast towards Fintona Station from along the line. The permanent way between the two rails is filled with earth up to sleeper level or just above to create a suitable surface for the horse. Notice how, at the point ahead, hoof marks show that the horse has avoided crossing the switch rail until the last possible moment, (c) Ernie’s Railway Archive – this link is to the image as held on Ernie’s Railway Archive on Flickr. [8]Arriving at Fintona. The tram is a few yards closer to the station than it was in the image above, (c) David Bradley, September 1957. [4]Closer again to the station platform now. Do not be deceived by the platform visible close to the camera, this was a goods loading point which is described on the plan below as ‘The Beach’, (c) The Huntley Film Archive Film No. 96367. [13]We are now close-in to the covered station platform at Fintona. This a picture of the Railway Station in April 1964 a good few years after the closure of the line, (c) Roger Joanes. The image is included here under a creative Commons Licence, Attribution-NonCommercial-NoDerivs 2.0 Generic (CC BY-NC-ND 2.0). [9]A similar image to the Roger Joanes’ photograph above, this time in colour. As the vegetation encroachment is greater on this image it is probably a summer-time image. [Public Domain] [11] A plan of Fintona Railway Station as shown on the Irish Railway Modellers Forum. It is taken from from Norman Johnston’s book on the Tram, “The Fintona Horse Tram.” [10]Fintona Railway Station as shown at the head of this article, (c) Wlison Adams. The image is included here under The image is included here under a creative Commons Licence (CC BY-SA 2.0). [14]This is approximately the same view but taken in 2007. (c) Kenneth Allen. The image is included here under The image is included here under a creative Commons Licence (CC BY-SA 2.0). [15]Approximately the same location but this time in June 2021. The toilet block has been replaced with something which looks a little more as though it belongs in the heart of Fintona. [Google Streetview]
The Return Journey to Fintona Junction
Just a few photographs now which show the return journey to Fintona Junction.
The line’s horse stands in Fintona station ready to depat with a baggage truck and the tramcar in 1926. This consist does not appear in any other images but it is how the tram is displayed in the Museum at Cultra, (c )the Tramway and Light Railway Society. The image was seen on the Tramway Badges and Buttons website. [16]“Dick” leaving Fintona with the 4.14pm to Fintona Junction, (c) N.W.Sprinks taken on 25th June 1952. [4]
The journey back from Fintona to Fintona Junction on 26th June 1952 (c) Ernie’s Railway Archive. This link is to the image as held on Ernie’s Railway Archive on Flickr. [8]
And finally. …
After closure of the line, Fintona’s tram was preserved and now sits in Ulster Transport Museum, Cultra.
Fintona’s tram on display in Ulster Transport Museum, Cultra. [11]