The featured image above has a sense of both the wind and flames of Pentecost, and the call to move out into the world as God’s ambassadors and servants. [1]
Today is Pentecost or Whit Sunday the birthday of the Christian Church and a time for celebration and gifts.
Gift, what does that word conjure up? Something given to us, something special that the person who is giving has taken the time to pick, or that one thing we were born with and able to excel at without trying, a talent.
On the very first Pentecost the Holy Spirit descended on the disciples and gave them the gift to be able to go out into the world and spread the Gospel. It says in Acts 2, ‘suddenly there was a noise from the sky which spread like a strong wind blowing, and it filled the whole house where they were sitting. Then they saw what looked like tongues of fire which spread out and touched each person there’. (Flames of fire just like candles on a birthday cake!) The Holy Spirit being the ultimate gift from Jesus.
Jesus told them at The Ascension, “I am going so I can send the Spirit to you”. (The Holy Spirit is another name of comforter, which is very apt). They were able to speak and be understood in different languages, what must that have felt like?
Just before the lockdown, the Parish of the Good Shepherd in Ashton-under-Lyne started a group to learn to speak Spanish, we were given simple phrases and words to learn, it certainly wasn’t something that happened straight away! So, it must have felt pretty frightening to the disciples, that they were able to understand and speak a language that was not their own.
Do we all have this gift, to be able to go out and spread the love that God has for us all? Yes, I think we do, because it not just about speaking, it’s what we do and how we conduct ourselves. We all know that person who has the knack of being able to say the right thing when someone needs a helping hand with a problem, it might not be the answer, but sometimes it is a pointer in the right direction. Or that person who sees that something needs doing and organises a group to do it or just gets on with it without a big show.
The past few weeks have brought out the gifts in people. Simple things like shopping for those who are self-isolating, or making contact by phone or text to check that people are OK. We are reflecting the love of God with what we do in our daily lives.
The way we ‘do’ church has changed during the pandemic, many of us have followed services online, radio, television, from many different sources, and we have received each week, by post or email the service and prayer sheet. And although we have not been able to meet up with our friends from our own church, we are able to worship God with others who we may never meet but have so much in common with. But we are still in touch with other because we pray together, sing together. The fact that we haven’t physically seen each other doesn’t necessarily mean we are apart, God has given us the gift of being part of the his greater family.
Some ‘gifts’ are waiting to be recognised. It takes a nudge, a word, an email or a post on social media to start the ball rolling. We question ourselves, could I do that? Do I have the time? Am I qualified enough? Am I doing this for the right reason? But if we put our trust in God, he will show us the way. God will help us fit things into our daily lives. God will show us where to find the time. God will point us in the right direction.
No matter what our gift is, it is a mission given by God, and all we need to do is trust in him.
I love superheroes. I love reading graphic novels (comic books), watching the films and wondering which power I would like to have. Having a 7-month old child means early mornings but a surprise benefit of these early starts is that together Stanley and I have been working our way through the classic (in my opinion) Michael Keaton Batman films. Batman is one of my favourites. But whether the hero is bitten by a radio-active spider (Spider-Man), crashing to Earth from the planet Krypton (Superman) or even caught in Gamma rays and can’t control their temper (The Incredible Hulk) I love them all.
So, if you could have a super-power, what would it be? Speed, so you could complete lots of work in a short period of time? Invisibility, so you can have some undisturbed alone time? Flight, so you can really save on those flights during the summer holidays? Super strength, so you may be able to beat Mick from St Gabriel’s at boxing?
Personally, I find all of these worthy of countless hours of daydreaming.
However, two problems tend to arise. Firstly, I always seem to focus on how they would benefit ME.
Secondly, I’m pretty sure they are never going to happen and only appear in daydreams.
The Church celebrates Pentecost on Sunday 31st May this year. This is when we remember the gift of the Holy Spirit coming on to the disciples “like tongues of fire” (Acts 2:3). I find this image very dramatic.
Once in a school assembly, I heard someone say “The Holy Spirit came as fire onto all their heads!” Quite rightly, this received gasps of horror from the children. In some Christian icons, the Holy Spirit is depicted like a candle flame above the disciples’ heads. This holy anointing is so powerful, it calls to my mind the verse that speaks about “Children of Light” (1 Thessalonians 5:5). … Now comes the challenge, because this applies to us too, now. …. To carry this light into our homes, work and communities. But what does this look like?
We are told about the fruit of the Spirit. This is what we are to bear out with the Spirit within us. Galatians 5:22-23 tells us “the fruit of the Spirit is love, joy, peace, patience, kindness, generosity, faithfulness, gentleness and self-control.”
It is important to note that it says “fruit” not ‘fruits”. This is a real game changer. It means that unlike choosing whether you would rather fly OR have super strength, we get both. We don’t have to choose between having more patience or faith. We can pray for all the fruit of Spirit. I don’t know about you, but I definitely need at least a few of them daily!
God in his love for us sent us the Holy Spirit so that, just like planting a seed, we can bear this fruit. However, like tending a plant, we need to tend to ourselves. When I was in Uganda, I led a session on the Holy Spirit. I openly shared how personally I have experienced great senses of being loved and a deep sense of peace. We used the metaphor of a sponge saturated in water. Then over time the sponge dries out. There is no need to panic, just put the sponge into some water again. Over time, we may feel like we have dried out of patience, kindness or self-control. But Jesus says he is the “Living Water” (John 4:10) and we just have to ask to be filled again.
So I encourage you to nurture the Holy Spirit within you. Bear the fruit and pray to be refreshed whenever you need. In doing so, we can all bless and reflect the love of God onto all those with who we come into contact.
The featured image above is a 1951 Plan of Gloucester Docks which was produced by the Docks and Inland Waterways Executive South Western Division in 1951 which was found on the Llanthony Secunda Website. [14]
Railways on the East Side of the Docks
The railways on the East side of the docks replaced the older tramroad/plateway which served the dockside. They were sidings from the Midland Railway in Gloucester, whereas the railways to the west of the docks were sidings from the Great Western Railway.
It had initially been intended to follow the alignment of the Gloucester and Cheltenham Tramroad into the docks from the East. This was always going to be impracticable as the tramroad operated with tight curves through the streets of Gloucester. In the end, these Eastern sidings had to be served from elsewhere. Within the main docks area they took over the role of the tramroad in two separate phases. The first phase came about as a result of the tramroad route along the east side of the Main Basin between it and what became the Victoria dock, was cut as part of the construction of the Victoria Dock and was not re-instated.
In this phase, the Midland railway sidings took over the whole of the area North of the Barge Arm. A new Midland Railway Branch was built to make this possible – The High Orchard Branch.
In a second phase the Midland Railway took an effective monopoly over the area immediately to the South of the Barge Arm. It was at this time (1861) that the tramroad closed completely. These additional sidings were also served from the High Orchard Branch.
Steam was used on the main sidings of the new system but horse were still gainfully employed on some of the wharves, warehouse sidings and quays of the docks, specifically where these were accessed by wagon turntable rather than points.
The High Orchard Branch
I first came across the branch when reading one of the volumes of ‘British Railway History in Colour’ published by Lightmoor Press and compiled by Neil Parkhouse. [1]
In this volume of what is a magnificent series of books there is a section dedicated to the High Orchard Branch and the Sidings on the East side of the Docks. [1: p51-80]
Parkhouse notes that the Midland Railway opened its High Orchard Branch in 1848 which was 6 years before the Great Western Railway opened its Llanthony Branch. [1: p52] He notes that as the 19th century progressed the network, in and around the Docks, developed significantly. Many of the sidings were owned by the Docks Company and leased jointly to the two railway companies to operate. This did not work effectively and from 1880 it was agreed that the Midland (MR) would operate on the East side of the Canal and Docks and that the Great Western (GWR) would operate on the west side of the site. [1: p52]. This arrangement held, with the exception of some disputes over a new branch built by the Midland as the end of the 19th century approached.
The 1843 map of Gloucester does not show the Midland Railway line which curved through the eastern area of the City of Gloucester. It clearly shows the route of the old tramroad and Gloucester Railway Station which sat on the East side of the old city on roughly the same latitude as the cathedral. The MR took over the Bristol and Gloucester Railway and the Birmingham and Gloucester Railway in 1845 and the original station became the MR Station in the City. This is shown on the extract from the map drawn 1843 below.
The Midland Railway Station in Gloucester – the image is an extract from Causton’s 1843 Map of Gloucester. [2]
The Midland Railway Station in Gloucester – the image is another extract from Causton’s 1843 Map of Gloucester and shows the planned railways close to the station. [2]
In 1848 the High Orchard Branch was completed it ran from the mainline access to the MR railway station down across Barton Street and then curved to the west through the bottom corner of the Park. Its route is shown in red below.
In 1851 the GWR built its South Wales line across the North of the city and built its own station to the North of the MR station. The approximate line of the GWR South Wales Route near the MR Station is shown on the plan above. The two stations shared the same throat although they were still operating on different track gauges.
In 1854 the MR built its Tuffley Loop because the rapid expansion of the rail network had left their station difficult to work. The Loop followed the first part of the original High Orchard Branch and then headed away t the Southeast to meet the MR mainline which ran to the East of Gloucester. Parkhouse notes that the issues surrounding the MR station were only partially resolved by the construction of the Tuffley Loop. It did however allow the MR to “dispence with the operation of broad gauge trains. The line was effectively and extension of the High Orchard Branch to the docks, with the twin tracks of the loop curving away from the docks branch between Barton Street and what was to be the site of California Crossing.” [1: p82]
The 1852 Map drawn for the Local Board of Health can be found in an interactive form on the ‘Know Your Place’ Website [3] This Map predated the construction of the Tuffley Loop. It shows the original form of the High Orchard Branch and its route through into the docks There is a short section of the route which falls outside the mapping area. The name ‘High Orchard’ acknowledges the early use of the land as an Orchard for Llanthony Priory.
In the 1852 map the developments in the station area are visible – the GWR line is shown as was, at the time, only recently open to traffic. The station ‘yard’ and sidings of the MR station are by this time more complex.[3]
The Branch crossed Barton Street close to the old Tramroad and curved to the West around the bottom of Gloucester’s Park. On the curve, it became double-track for a short distance which, I guess, gave trains room to pass and may also have been used as storage space when trains arrived before they could be taken down into the docks. This can be seen on the third of the map extracts on the bottom side of the Park. [3]
As it left the Park area, the Branch once again became single track. This can be seen at the left-hand side of the third extract from the 1852 map. It was then just a matter of a few 10s of yards before the dock complex was reached and the fourth map extract shows this area. [3]
The fourth map extract shows three main areas to the South of the Barge Arm which can be seen centre-top of the map extract.
First, there are sidings around the High Orchard Dock at the bottom left of the extract. (1)
Second there is a single long siding giving limited access to the rail network for canal frontages between High Orchard Dock and the more northerly Barge Arm. (2)
Third, a series of sidings (3)accessed from the main branch which curved round to the north to serve properties North of the Barge Arm.
The fifth extract from the 1852 Map (adjacent) highlights the sidings which served the Northern part of the docks at this early stage. It is worth noting that the Tramroad sidings on the North side of the Barge Arm have now been removed and replaced by standard-gauge lines. On the map, the Gaol can be picked out centre-top (4) next to the River Severn (5). The two main basin are central to the extract – The Basin (or Main Basin) (6) and Victoria Dock (7). These two docks are linked by a short canal which severed the tramroad access and which has not by the time of the map been bridged by the MR sidings. [3]
The next series of maps of Gloucester which we have access to are those prepared between 1880 and 1925. Three series of 25″ OS Maps appeared in relative quick succession – Series 1 (1886), Series 2 (1901) and Series 3 (1923).
Firstly, Series One. In the first extract below we see what was the northern end of the High Orchard Branch in the East of the City. By the time this map was drafted, the railway network had expanded considerably. The pattern of railway lines close to Gloucester Station had begun to look much like it would be in later years. The two Gloucester Stations (A & B) were at this time still adjacent to each other. The Midland Loco Shed is in a position (C) which would soon eb seen to be preventing expansion. The lines of the Tuffley Loop follow what was the older High Orchard Branch across Barton Street (D).
Very little else on the High Orchard Branch differs from what can be seen on the Series 2 Map extracts below. However, one area which was still under used at this time, was that South of the early buildings of the Wagon Works shown on the adjacent extract. Railway sidings hugged the canal bank to provide access to timber yards further south along the canal. These appear in the bottom left of the map extract.
The area alongside the Canal at that location was known as Canada Wharf.
Secondly, Series Two, The first extract below shows that the Midland Station had been moved to the Southeast when this map was drafted. This meant that it was possible for the New Midland Station (Eastgate) to be a through station, making the handling of trains significantly easier. The Loco Shed to the east side of the map is the GWR Shed at Horton Road. A footbridge now links the two stations. The MR Loco Shed was just off the east side of the map extract.EPW041489 – Britain From Above – Great Western Road, the railway stations and city centre Gloucester, from the east, 1933. [4]EPW024156 – Britain From Above. Central Station, Eastgate Station and railway sidings, Gloucester, 1928. [5]
Heading to the Southwest across the Barton Street level crossing the map shows the Tuffley Loop leaving Eastgate Station (the MR Station).
The second extract shows the High Orchard Branch leaving the Tuffley Loop at a very shallow angle and crossing Parkend Road, again on a very shallow angle and curving round to the West.
EPW024171 – Britain From Above. The area between Park Road and the railway station, Gloucester, 1928. This shows the route of the Tuffley Loop down the East side of Gloucester and the point at which the High Orchard Branch left that route. [6]An extract from EPW050780 – Britain From Above. The photograph was taken in 1936 and the extract shows the junction between the High Orchard Branch and the Tuffley Loop. California Crossing can be seen in the bottom-centre of the image. [50]
An extract from EAW012211 – Britain From Above. Gloucester Docks and the surrounding industrial area, Gloucester, 1947. This shows the High Orchard Branch and its sidings on the far side of the Canal. The photograph is taken from the West. [7]
The third extract, which appears above at a slightly smaller scale, shows the Branch crossing Lower Southgate Street and providing access to enhanced siding approaching the canal. Space has been created for these sidings by infilling the High Orchard Dock which was visible on the 1852 Map. Gloucester Carriage and Wagon Works had grown significantly since they first opened in the 1860s and had a complex of lines serving its site.
As shown by the fourth map extract, the two lines running north from the sidings had changed little until they reached Lanthony Road. An East-West line crossed Lanthony Bridge linking the West and East Sidings. and which met the ongoing Midland lines at a trailing crossing. This map also shows that new sidings had been developed on the South side of the Barge Arm to serve premises which in 1852 were still being served by the Gloucester and Cheltenham Tramroad.
The fifth extract shows the most northerly end of the docks complex. Things to note here include: the line crossing the bridge across the canal between the Main Basin and Victoria Dock; the two link bridges across the locks leading to the River Severn, North of the Main Basin which allowed access to the West side of the Main Basin; the fact that no attempt has been made to serve the quays on the river to the North of these Locks.
An extract from EAW012204 – Britain From Above. Gloucester Docks and the surrounding warehouses, Gloucester, 1947. [8]
Finally, above, on the Series 2 mapping, we have zoomed out to get an idea of the railway system South of the Railway Carriage and Wagon Works alongside the Gloucester and Berkeley Canal, which were referred to in the notes about the Series 1 mapping. The Carriage and Wagon Works had expanded and new timber yards were now served by the railway.
An extract from EPW016965 – Britain From Above. This shows the Baltic Wharf and timber yards on the Gloucester and Sharpness Canal, Gloucester in 1926. Very soon after the Series 3 OS Maps were produced. The map extract below covers this area. [9]
The most significant overall difference between the Series 2 maps and the Series 3 OS Maps is the mapping style. However, there is one area of the map which has changed – the area shown below, This is the area south of the Carriage and Wagon Works. Madleiz Road, just to the South of the main site of the Wagon Works, has been shortened significantly to allow the Wagon Works to expand southwards. The track-work has been expanded in this area to serve new works building(s).By the 1950s, the Carriage and Wagon Works was redeveloped and modernised. External track-work seems to be only marginally changed from the 1920s.1950s 25″ OS Map of the Carriage and Wagon Works. [10]
An extract from EAW032295 – Britain From Above. The Gloucester Railway Carriage and Wagon Company Works and environs, Gloucester, 1950. The main sigins of the High Orchard Branch seem tightly hemmed in between the industrial buildings. [11]An extract from EAW032296 – Britain From Above. The High Orchard Branch sidings are shown to good advantage, 1950. [12]
A final set of maps [13] show the area to the east of the Docks as it is in the early 21st century after significant redevelopment has occurred.
The modern Trier Way (A430) follows the line of the old High Orchard Branch as far as Southgate Street. This is mapped on the adjacent image and on the one below. [13] The next map extract shows the approximate relation of old lines to the modern High Orchard Area, Shopping Centre and St. Ann Way (A430).
The final map in this sequence shows the Northern end of the docks. These maps do not always appear at the same scale in this blog. They are schematic illustrations rather than accurate plans. The lines shown for the dock railways and sidings are only approximate. Detail can be gleaned from the earlier maps above. However, these plans illustrate that modern development has generally respected the alignment of the old dock buildings. This clearly has not bee possible in the case of the new shopping development at High Orchard.
The High Orchard Branch
We have already noted that this Branch left the Tuffley Loop just to the south of the Barton Street Level Crossing. Up to now, we have primarily concentrated on mapping and aerial images to give an idea of the Branch and its sidings. We now look at the route of the Branch and its sidings from ‘street’ or ‘rail level’ wherever that detail is available to us.
This view was taken in 1975 looking North towards Barton Street Crossing. The High Orchard Branch has not yet been lifted and is the railway track to the left of the mainline, leaving the mainline to the left of the DMU, (c) David Stowell / Towards Barton Street / CC BY-SA 2.0 [16]California Crossing looking North towards the Barton Street Crossing. The Park can be seen to the left of the image. The High Orchard Branch has left the Tuffley Loop and runs across Parkend Road at a very shallow angle behind the crossing gate in this picture, (c) David Stowell / California Crossing / CC BY-SA 2.0. [17]
The picture above is taken, as shown by the red arrow, on the adjacent map extract.The next picture shows the California Crossing at an earlier date and is taken from within the park. The tracks of the High Orchard Branch cannot easily be picked out on this picture, but they run under where the Ford Anglia is waiting to turn across the Level Crossing. [18]
There are some excellent pictures of the eastern end of the High Orchard Branch in Neil Parkhouse’s book [1: p53-58], in Ben Ashworth’s pictorial essay on the railways of Gloucestershire in the steam era [21: p6-8], and in Colin Maggs’ book, ‘The Branch Lines of Gloucestershire’ [22: p66] but not many that I can find across the web. There are also photographs available in the Gloucestershire Archives. [23]
Colin Maggs’ book includes a picture of the gated entrance to the High Orchard Branch which was taken on 9th March 1968 by Derrick Payne. Ben Ashworth’s book includes a series of great photographs of steam at work in the docks area and a couple of excellent shots of the eastern end of the branch: one of ex S&DJR 2-8-0 53806 crossing Parkend Road heading away from the docks on 12th May 1961; and one, taken on 4th June 1962, showing MR class 0F 41535 hauling a timber load away from the docks and passing under the footbridge which gave access to the South side of the park from Weston Road.
Early 21st century view looking South across the location of California Crossing (Google Streetview).
There are a few photographs of the area around California crossing in Ben Ashworth’s first book, “The Last Days of Steam in Gloucestershire.” [51: p59-60] These include: a shot of Locomotive No. 41537 crossing Parkend Road on its way onto the branch, travelling cab first; S&DJR travelling tender first onto the branch; and Wigmore Castle on the Tuffley Loop heading south across California Crossing.
As we have already seen, the branch curved to the West on the South side of Gloucester Park. Neil Parkhouse’s book should to be consulted if you wish to see images along the length of the line as it runs towards Southgate Street. [1: p53-58] Ben Ashworth’s book also includes a picture of 41535 on 17th December 1962, shunting the yard at High Orchard which took it East along the branch before setting back across the Crossing at Southgate Street.
Southgate Street Level Crossing on the High Orchard Branch (c) A Rigby. [19]
The adjacent picture shows the level crossing at Southgate Street and is taken looking West into the docks complex. The factory buildings on the right are part of the former Fielding & Platt engineering works. [19]
The ‘Fielding and Platt History’ website [20] has a number of pictures which show the High Orchard Yard.
The same Junction in 2002 after the building of St. Ann Way, but before the demolition of Fielding and Platt’s site to make way for the High Orchard Shopping Centre (https://www.gloucestershirelive.co.uk). [24]To the West of Southgate Street the line divided to form High Orchard Yard. Most of that Yard is now under the buildings of the High Orchard Shopping Centre (Google Streetview).
The High Orchard Yard ran along the South side of the Fielding and Platt site and on the North side of Gloucester Railway Carriage and Wagon Works site. As noted above, in searching the internet, I have discovered some pictures of the Yard on the The ‘Fielding and Platt History’ website [20] I have very kindly been given permission by them to share these pictures here. A night-time shot of the level crossing on Southgate Street/Bristol Road. The crossing provided access from the Branch into High Orchard Yard (c) Henry Jenner. [20]High Orchard Yard with the tracks in the process of being lifted. (c) Paul Regester. [20]High Orchard Yard again, this time prior to dismantling of the track-work but further into the site. (c) Paul Regester. The image shows the rear of No. 1 Hydraulic shop, the Boiler Yard and the Former Iron Foundry. The tracks curving away ahead of the photographer are the lines which provide access the the main dock basins. [20]This picture is taken from the South looking towards No. 1 Hydraulic Shop (c) Ralph Tucker. [20]
Paul Regester notes this picture as showing the unloading of an F&P Press for modification in the plant (c) Paul Regester. [20]
The last three pictures show the unloading of wagons supplying Fielding and Platt in High Orchard Yard. The first looks from the South across the Yard towards Fielding and Platt’s factory. The remaining two pictures seem to have been taken of the same operation but from different angles. The first from the East, the second from the West.
High Orchard Yard – Crane at work, probably taken looking West towards the Canal (c) Paul Regester. [20]This final shot in the sequence appears to have been taken from the West looking back towards the Level Crossing and shows No. 1 Hydraulic shop behind the locomotive and crane, (c) Paul Regester. [20]
Turning North from High Orchard Yard there were three different lines. One was little more than a quay-side siding which ran up the East side of the canal and served a number of the properties very close to the Yard. Another ran up Merchants’ Road towards Lanthony Road but stopped short of making a junction with the tracks in Lanthony Road. The remaining line was the most significant of the three. It appears in one of the pictures credited to Paul Regester above and appears in a couple of excellent images in Ben Ashworth’s book. One image shows No. 41537 on a short covered freight running between the high walls of Fielding and Platt’s site. The other image shows the same engine leaving the narrow channel between those high walls, crossing Baker Street and entering High Orchard Yard. [21: p14]
High Orchard Street looking North towards Gloucester Cathedral, showing the original Fielding and Platt buildings, (https://www.gloucestershirelive.co.uk). The railway to the main basin and the Victoria Dock runs to the right of the building in the centre of this image. Llanthony Road is just out of sight between the buildings two-thirds of the way up the image. [24]Looking North along High Orchard Street in July 2018 (Google Streetview).Turning to the left from the image above we get a glimpse of the Canal at Bakers Quay. Merchants’ Road runs into the shot from the bottom-left (https://www.gloucestershirelive.co.uk). [24]Street level view north along Merchants’ Road in 2019 (Google Streetview).
Llanthony Road looking West towards Llanthony Bridge in 2002. There was a line running East-West across Llanthony Bridge which connected the Docks sidings either side of the Canal, (https://www.gloucestershirelive.co.uk). [24]Llanthony Raod looking West in 2019 from roughly the same position as the image above (google Streetview). There has been major redevelopment of this area.
Llanthony Road Bridge – April 2011 (Google Streetview)
Looking North using a long telephoto lens along what was the line of the Old Docks Railway. The older building which is coloured white, and which is only just visible below the tower of the Cathedral and above the parked cars, is Albion Cottages which can be seen on the images below. The photograph was taken from Llanthony Road. (Google Streetview). There is a photograph in Ben Ashworth’s collection from a similar position but taken in April 1962 which shows No. 41537 advancin towards the crossing at Llanthony Road and the line diverginf to run along Llanthony Road to the swing bridge. [21: p13] The old docks railway alignment (Google Streetview).
The same location adjacent to Albion Cottage (c) Roger Marks. He comments: The track-bed of one of the former Midland Railway lines at Gloucester Docks, looking towards Llanthony Road from the Southgate Street docks entrance in 1991 and 2015. The building on the right is known as Albion Cottages. If you look carefully at the wall on the left on the left hand picture, you can make out two gate pillars. This was the entrance where the Gloucester & Cheltenham Tramroad once entered the docks. The gateway was bricked up for many years but has recently been restored. [26]
The Docks Sidings and Quays on the East Side of the Canal and Main Basin
Tank Engine LMS 41537 (0-4-0T) close to the entrance to the docks off Southgate Street. Albion Cottages can be seen behind the locomotive. [15] The following monochrome image is taken looking East along the front of Albion Cottages. [27]
A pair of replica Gloucester & Cheltenham Tramroad wagons on display at Gloucester Docks on a section of original track. They stand on the original route of the Tramway, which entered the Docks through the gateway in the background. 21st May 2015 (c) Roger Marks. [27]
No. 41537 again. This picture is taken from almost the same position as the preious one featuring this locomotive, only the photographer is now facing West rather than facing South on 13th April 1959 (c) Ben Brooksbank (Creative Commons Attribution Share-alike license 2.0) [35]
Wikipedia provides some details of this small class of locomotives – Midland Railway 1528 Class. [34] Ten were built in two batches; all at the Midland Railway’s Derby Works: the first five, Nos 1528–1533, in 1907 on Derby order number 3031, and the second five, 1534–1537, in 1921–1922, with only minor detail differences between the batches. When they were given BR numbers a ‘4’ was placed in front of the original locomotive numbers – so ‘1537’ became ‘41537’. No. 41537 was withdrawn from service in 1963. As the picture above shows, these locomotives were unusual in not having a coal bunker and so carried spare coal on top of the side-tanks. The last locomotives of the Class were withdrawn in 1966 (41528, 41533).
Ben Ashworth’s first photographic collection includes a shot of 41537 travelling North away from the Southgate Street entrance to the docks in 1962. It was waiting for some road vehicles to be moved out of its way before propelling its train of four covered wagons towards the Commercial Road entrance to the docks. [51: p59] The colour image below mimics the same movement but a little further to the North.This photograph of No. 41537 is taken from the East side of Victoria Dock looking North. The building at the North end of the dock are still recognizable in the 21st century. Permission to use this image was kindly given by the Tewkesbury Direct website. [36]A view from a similar location in the 21st century (Google Streetview).A five-plank open goods wagon displayed outside the National Waterways Museum, Gloucester. 29th March 2009 (c) Roger Marks. Immediately behind the wagon, just beyond the roofed area to the left, is the Barge Arm. The short length of track on which the wagon sits is on the line of one of the old docks railways which surrounded the Barge Arm. Turning 90 degrees to the left would bring the main building of the Museum into the picture.[28]Close to the same location in 2012 (Google Streetview).
Severn & Canal Carrying Company motor narrowboat “Oak” in the Barge Arm, Gloucester Docks. 21st May 2015 (c) Roger Marks. Biddle & Shipton’s Warehouse is on the North side of the Barge Arm, in the centre of this image. At one time, railway sidings ran down each side of the Barge Arm. [33]The Biddle & Shipton Warehouses in 1989 (c) Roger Marks. These warehouses are that the Western end of the Barge Arm. A railway siding ran around the dock wall at this location. [31]Biddle & Shipton Warehouses (c) Roger Marks.He writes: “The Biddle & Shipton warehouses, Gloucester Docks. 21st May 2015. Now rebuilt as residential apartments.” In this image, the Barge Arm is to the right. To the left, the Canal opens out into the Main Dock Basin and warehouse continue down its eastern edge. [30]Warehouses on Gloucester Docks, 21st May 2015 (c) Roger Marks. These warehouses are alongside the Main Dock Basin to the North of the Biddle & Shipton Warehouses. The dockside railway ran in front of these buildings before turning sharply by means of a wagon turntable to the right just beyond the far wall of the warehouses. Access to these sidings required the use of horese-power. [32]The City Flour Mills (c) Roger Marks. He writes: “The former City Flour Mills, Gloucester Docks, 21st May 2015. Anyone with an ounce of railway knowledge will immediately see that the railway track foreground is what is technically known as ‘utter bollocks’. Although it links two sections of authentic old docks railway, the physically impossible set of points is a figment of the mind of the developer who rebuilt this section of the docks in the late 1980s.” The Priday Flour Mills (these buildings) formed the northern backdrop to the Main Basin and the Victoria Dock. Behind the photographer is the old steam crane which has been placed on the North end of the docks and which was the first image in Part 1 of these notes about the Docks Railways. [29]Turning round to look to the West from the same position as the immediately preceding photograph, we look along the North end of the Docks Main Basin in the 21st century (Google Streetview)..
There is an excellent view of the East side of Victoria Dock on 5th July 1965 in Ben Ashworth’s photo collection. [21: p12]. The photograph shows the three lines on the East side of the Dock.
We have reached the northern end of the Docks complex. In order to finish our survey of the railways on the East Side of the Docks and Canal, we need to go back to the High Orchard Yard and turn to the South. A single line ran down the East bank of the Gloucester and Berkeley Canal and served a number of industrial concerns. The first, was the Gloucester Railway Carriage and Wagon Works and then there were a series of timber yards and Saw Mills along Baker’s Quay and Canada Wharf as far as the other Midland Railway Branch which for a time served the Docks. This branch was known as the Hempsted or New Docks Branch.
Baker’s Quay, Baltic Wharf and Canada Wharf
There was a single-track line serving the various industries which fronted onto Baker’s Quay. The Quay ran southwards from the High Orchard Yard down to the point where the Hempsted Branch was to cross the Canal just before the turn of the 20th century, The next three map extracts show the full length of Baker’s Quay, Baltic Wharf and Canada Wharf in the late 1940s and early 1950s. [3]
Gloucester Railway Carriage and Wagon Works were a significant employer in Gloucester> Their engineering products travelled all over the world. The business was formed in 1860 and lasted until 1986 when it was acquired by Powell Duffryn Rail, all operations ceased in 1993/1994. [39] The factory site was accessed by rail directly from High Orchard Yard and from Baker’s Quay.
The Timber Yards were used by a number of different traders during their lifetime. Once such was Nicks & Co. [40]
Nicks & Co. are still trading in 2020 from their site on Canada Wharf. The adjacent image shows their first offices, the picture was taken in 1863. [41] Hugh Conway-Jones has written a short history of this company which appeared in the GSIA Journal in 2007. [40]
Typical view of the timber yards alongside the Canal. The view is taken looking North from Baltic Wharf towards the Docks. This is not a view of Nicks Timber Yard but shows the length of canal about 500 yards North. The access railway siding can easily be seen in the picture running from the bottom-left towards the top-right. Typical timer wagons stand on the siding [42]
This smaller image comes from the 1880s and is included in an article by Hugh Conway-Jones published in the GSIA Journal, (c) Nicks& Co. Archive [40]. It shows Nicks & Co.’s frontage onto the Canal at Canada Wharf.
Nicks & Co.’s yard was rail served, initially along the canal-side, as can be seen by the first image below. The image shows the unloading of timber at the canal-side from one of the 1940 shipments. [43]
There were also internal sidings and the next picture shows. The main feature of the image is the construction of a new chimney in 1916. The internal sidings of the yard a visible towards the bottom of the image. [44]
Griggs’ Timber yard was at the South end of the wharves close to the Bristol Road. It started operating in 1875 and is still in operation in 2020. [48]
Saw Mills were an integral part of the industrial development of Baltic Wharf and Canada Wharf. Two large concerns are marked on the OS Maps at the Southern end of the site.
Rail access to all of these concerns was along the canal-side from High Orchard Yard, no connection seems to have been made to the Hempsted Branch when it was installed. All of the OS Map Series show a dis-connect (as in the adjacent extract) between the Canal-side lines and the Hempsted Branch,
The Hempsted Branch
The Hempsted Branch was a Midland Railway incursion into GWR territory. The two companies has reached a competitive truce which saw the Midland managing traffic on the East side of the Docks and the GWR operating on the West side of the Docks. Visit-Gloucestershire reports that the Hempsted Branch opened on 5th September 1898. [15] Colin Maggs says that, “The variously named New Docks, Tuffley, or Hempsted branch ran from Tuffley Junction (where the hitherto parallel MR and GWR divided to make their separate ways to Gloucester) to Hempsted Wharf. The branch opened to goods on 24 May 1900; a sub-branch, opened in 1913, served the gasworks. Another line crossed Monk Meadow where, until 1938, it linked with the GWR’s docks line. At Monk Meadow a dock and large pond for floating timber had been constructed west of the canal in 1891 and 1896 respectively. In 1969, the branch closed west of the gasworks siding and was shut completely two years later.” [22] Wikipedia supports the date Maggs has indicated for the opening of the line. [37]The Railway Clearing House Map of 1910 shows the Hempstead Branch on the bottom-left (Wikiwand) [38]25″ OS Map – the Hempsted Branch leaves the main line. [3] Its primary purpose was to proved the Midland Railway with access to the West side of the Gloucester and Berkeley Canal. The next few 25″ maps show its route up to the Canal Bridge.The ‘Know Your Place’ 2019 digitized maps [3] show the modern Podsmead Road at the hear of residential development. The old accommodation bridge which carried the Hempsted Branch over the road shown in the top-left of the 25″ OS Map above is long gone. Earlier OS Maps show the bridge in place supporting the line long before Podsmead Road was extended South under the line. The old branch was carried on an embankment which is also long-gone.
Looking Northwest along the line of the old branch (Google Streetview). A little to the Northwest of Podsmead Road the branch broadened out into a series of sidings and at that point a ‘sub-branch’ turned away to the Southwest. [3]
A ‘sub-branch’ turned away to the Southwest at the beginning of the branch sidings. It does not appear on the 25″ 2nd Edition OS Maps. It first appears on the 25″ 3rd Edition OS Maps. It served the Bristol Road Gas Works. The Gasworks was not rail-served until 1920. A regular ‘4F’ 0-6-0 working saw coal delivered twice a day to Gloucester Gas Works Siding. Locomotive 4F 0-6-0 No. 44269 was photographed at the Gasworks in August 1965 by its fireman Dick Courtney. The photograph can be found on the Gloucestershire Railway memories Website. [45]
An extract from EPW037842 – Britain From Above. The picture was taken in 1932 and shows the Gasworks at the centre of the image. The canal can be seen in the bottom-left of the image with Bristol Road (A38) running parallel to it and almost empty of traffic! The Gasworks sidings can be seen heading away North towards the Hempsted Branch which runs across the top of the picture [46]
There are also two photographs of this working in Ben Ashworth’s first collection [51: p64]. the first shows 4F 0-6-0 No. 44264 leaving the sub-branch with a train of empties. The second shows the same engine propelling a train of coal onto the sub-branch.
Two further images appear in his second collection [21: p18-19]. The first shows 4F 0-6-0 No. 44264 in charge of a train of coal wagons heading along the Hempsted branch towards the Gasworks sidings in September 1965. [21: p18] The second is a view across the allotments which are centre-bottom of the first of the two map extracts above. [21: p19] The picture shows the 44264 returning, tender first, from the Gasworks with empties on the same day.
The gasworks were decommissioned in the early 1970s but it took around 40 years for the site to fully made safe. [46]
At the Northwest end of the sidings before the Branch passed under the Bristol Road ther was a further siding bearing away to the Southwest and a short stub-siding on the Northeast side of the running line. The first of these served Hempsted Wharf although it was divided from the Canal by Bristol Road (A38). The stub-siding served a chemical works.
And finally ……….
In order to build the Hempstead Branch the Midland Railway had to realign the A38 Bristol Road and build a substantial 3-arch bridge. This is the last significant feature before the branch crossed the Canal on a sing bridge.
The parapets of the bridge over the Hempsted Branch, still in place in 2019 (Google Streetview).Looking to the East from the A38 bridge over what was the Hempsted Branch. This picture was taken in 2019 (Google Streetview).Looking West along what was the Hempsted Branch towards the Canal. Joseph Griggs’ Timber yard is beyond the bridge parapet.A grainy extract from EPW037841 – Britain From Above (1932). The bridge carrying the A38 Bristol Road is highlighted. The Hempsted Wharf Sub-Branch and the Hempsted Branch are indicated. Both have wagons sitting on them. It is impossible to make out the Canal Bridge on this image. [49]Bristol Road Bridge in 2019 looking along the old Hempsted Branch to the Canal (Google Earth 3D).Looking East across the A38 from above Griggs’ Timber Yard in 2019. The three-arch bridge is hidden in the shadows created by the trees (Google Earth 3D)
The A38 bridge also appears in Ben Ashworth’s collection. A view taken from the West bank of the Canal in 1970 shows the structre to good advantage looking along what was the old railway but by then was part of Griggs’ Timber Yard. [21: p16]
The route of the Hemsted Branch as it crosses the Canal is shown by the red line on this image. The swing bridge has long been removed. The route on the far side of the canal is now a footpath (2020 – Google Earth -3D).
Ben Ashworth; The Last Days of Steam in Gloucestershire A Second Selection; Amberley Publishing, 2013.
Colin Maggs; The Branch Lines of Gloucestershire; Amberley Publishing, 2013.
Gloucestershire Archives, Clarence Row, Alvin Street, Gloucester. GL1 3DW, at the time of writing the Archives are closed to public access because of COVID-19.
Hugh Conway-Jones; Nicks & Co. Long Established Timber merchants of Gloucester; Gloucestershire Society for Industrial Archaeology (GSIA) Journal for 2007, p3-13. Found online at https://www.gsia.org.uk/reprints/2007/gi200703.pdf, accessed on 25th May 2020.
My wife and I were due to take our annual holidays in 2020 in April and May. We would have been staying in Co. Donegal in Ireland and would, among other things, have explored some parts of the old 3ft gauge railways which served Co. Donegal.
Map of the Co. Donegal 3ft-gauge railway network. [25]
I have been reading through the 1948 editions of The Railway Magazine and on 16th May 2020, I found this short paragraph in the ‘Notes and News’ section of the May and June 1948 edition. Volume 94 No. 575. …
Closing of the Glenties Branch, County Donegal Railways Joint Committee
Passenger services were withdrawn on 13th December 1947, from the Stranorlar-Glenties branch of the County Donegal Railways Joint Committee in Ireland. The stations affected were Glenmore, Cloghan, Ballinamore, Fintown, Shallogans and Glenties. The branch of 3ft-gauge and 24.5 miles in length was constructed under the Light Railways (Ireland) Act of 1889, and opened on 23rd June 1894.
This seems to be far too short an obituary to the Glenties Branch. So, it seemed to me that I should start looking at the Co. Donegal Railways by looking at the Glenties Branch.
As part of my holiday reading, I had set aside the updated version of E.M. Patterson’s book about the Co. Donegal railways (which I first read as a teenager). That 2014 book has been a companion over a couple of weeks of lockdown in 2020. [3]
The Glenties Branch ran through a very rural part of Co. Donegal and seemingly stopped short of what could be considered a ‘sensible’ destination – the Atlantic Coast. Indeed it seems as though there were quite a few people in Ardara on the coast who thought that way. There was a concerted campaign over many years to get a short extension built between Glenties and Ardara. [3] But more of that later!
Grace’s Guide tells us that the line between Stranorlar and Glenties was 24 miles (38 km) long and that It opened in 1895. [2] Stranorlar and Ballybofey (located on the other side of the River Finn) together, form the “Twin Towns.” [5] It might interest you to know that there are no schools or churches in the town of Ballybofey itself, all these amenities were governed by laws during plantation times when certain Catholic buildings were not allowed within a specified range of Protestant towns. Times have changed a little now as Stranorlar has both a Roman Catholic and a Church of Ireland church. Both of the Twin Towns have their own railway station.
Stranorlar Railway Station was a junction Station with the line to Glenties branching off the Donegal to Strabane line. Ballybofey Railway Station was on the other side of the River Finn. Ballybofey Railway Station opened on 3rd June 1895 and closed on 15th December 1947 along with the rest of the Glenties branch.
Wikipedia tells us that Stranorlar Railway Station was built by the Finn Valley Railway and opened on 7th September 1863 and finally closed on 6th February 1960. “The old railway station was demolished to make way for a new bus garage owned and run by Bus Éireann. To celebrate the millennium, the old clock from the railway station was restored and installed in a new clock tower which sits at the old pedestrian entrance to the railway station yard. The town remains the main depot for Bus Éireann within County Donegal.” [5]
When first built, the station was the terminus of an Irish standard-gauge (5ft 3in – 1600mm) line which ran from Strabane to Stranorlar. It served in this form for a number of years.In 1880 work commenced on the West Donegal Railway which was built to 3ft-gauge and for a time Stranolar served in this new mixed-gauge era.In 1892, the Finn Valley Railway merged with the West Donegal Railway to form a new company, the Donegal Railway Company. The line from Stranorlar to Strabane was then reconstructed to (3 ft – 914mm) gauge. [6] Conversion took very little time as it only required the moving of a single rail and respiking of the railchairs on the smae sleepers that had been used for the 5ft 3in gauge line. As we have already noted the branch to Glenties opened in 1895.
The story of all machinations which eventually brought all these lines into the same fold is told well by Patterson, Begley and Flanders and does not need repeating here. [3]
An extract from the Ireland GSGS one inch OS Map Series of the early 1940s [4]
The station building in Stranorlar taken from the station forecourt. This image is shared with the kind permission of David Parks. It appears on his blog: Irish Postcards: irishpostcards.wordpress.com. [8]
Stranorlar Railway Station in 1948 (c) Wlater Dendy CC BY-SA 2.0. [7]
There are a number of excellent monochrome photographs of Stranorlar Railway Station available on Flickr on the Photostream “Ernies Railway Archive” [9] You might want to check out the links to a sample of the different images available which are included in the notes. [10-24]
The image above looks into the site of Stranorlar Railway Station from the direction of Strabane. I found it on the Irish Railway Modeller’s Forum. [27] The contributor had found it on Facebook.Railcar No 8 arrives at Stanorlar from Glenties sometime in the 1930’s. These railcars had a single front axle and a chain-driven rear bogie, and did not provide the most comfortable rides, (c) John Langford. This image was found on the Donegal Railway Heritage Centre’s Facebook page and is used by kind permission. [40]
I have recently been given access to some station plans from the Co. Donegal Railways produced by Chris Amundson. The link immediately below shows what is known about the layout of Stranorlar Railway Station in different eras.
Stranorlar, based on Ordnance Survey and numerous photographs, (c) Chris Amundson (CC BY-SA 2.0), included by kind permission . [41]
The next two images show Stranorlar in the mid-1950s and come from the blog, “Hyde Park Now!” and are, in turn, sourced by that site from elsewhere. [25] In giving permission to use these two images, londonblogger expresses concern that it is easy for the historic content of blogs to be lost or dissipated in the sharing of images. The two blogs from ” Hyde Park Now! are very much worth a visit and give a great overall context to this post which focuses on one part of the whole network. These are the relevant links:
Stranolar was effectively the headquarters of the Co. Donegal Railways. ‘londonblogger’ on the blog ‘Hyde Park Now!’ notes thatit had “an extensive works for the maintenance of rolling stock.” [25] In the first of the two pictures above the maintenance facility is shown to really good advantage. Railcars were serviced in the buildings to the left of the image and steam locomotives to the right.The site of Stranorlar Railway Station as it appeared in 2009 – it functions as Bus Eireann’s Stranorlar Depot. None of the railway infrastructure and buildings remain. (Google Streetview).
Stranorlar to Clohan, GSGS Map of the early 1940s. [30]
The Glenties Branch set off West from Stranorlar Station with the line to Donegal bearing away to the Southwest. In a very short distance the branch crossed the River Finn.This image shows just how short the distance was from the end of the station platform, used by the Glenties Branch trains, to the bridge over the River Finn at Stanorlar. The village of Ballybofey can be seen at the top of this image. It had its own station. The image is used by kind permission from of David Parks. It appears on his blog: Irish Postcards: irishpostcards.wordpress.com. It was first published by ‘Aero-Views’, Dublin. [28]
The Glenties branch can be seen crossing the bridge over the River Finn and then cuvidn around the North side of Ballybofey after having been crossed by the main road (N15) on a single-span stone-arch bridge. [28]
The Glenties Brach crossed the River Finn on a large-span truss girder bridge which sat on stone abutments.
Those abutments remain in the 21st century and can be glimpsed from the N15 as it approaches and then crosses the River Finn on its stone-arch viaduct. On the Stranorlar bank of the river, the line first passed over a narrow lane serving the river side on a girder-bridge before crossing the river. The remains of that bridge and the East abutment of the bridge can be seen on the first colour image below. You can just pick out the River Finn in the greenery to the right of the image. The stonework to the bottom right is a length of coping from the road-bridge parapet.
The Glenties Branch Bridge over the River Finn, east abutment. The picture was taken in June 2018 (Google Streetview).It is impossible to pick out the stone abutment to the West of the River Finn among the greenery on the river banks. This picture was also taken in June 2018. (Google Streetview).The view back into Stranorlar across the River Finn from Ballyfoley. The Glenties Branch Railway Bridge over the River Finn can be seen on the right of this picture [33]A postcard view of the Bridge over the River Finn (The Linen Hall Library Collection – available for sharing) [35]
The River Finn Railway bridge at Stranorlar/Ballybofey during construction of the line. The superstructure sits alongside the railway awaiting being moved into position across the river. The image is from the geocache webpage for this location. [36]
A postcard view looking back across the River Finn from Ballybofey towards Stranorlar Railway Station. Both of the river bridges are in the photograph, as is the bridge wingwall of the stone arch bridge which carried the road over the Glenties Branch. [37]
The adjacent small image shows the two River Finn Bridges (road and rail) in use. Sadly the rail bridge is only partially visible on the right of the photograph. The image is from the Facebook page ‘Ballybofey Stranorlar’. [34]
The route of the old branch-line to the Northwest of the N15 is now hidden by redevelopment. The early 1940s GSGS One-inch Map shows the railway crossing Back Road on an overbridge and then running alongside the river into Ballybofey Railway Station. [29]The approximate line of the old railway which ran across the North side of the village of Ballybofey, lifted from the GSGS Map of the early 1940s. [29]The site of Ballybofey Railway Station. This picture was taken in 2010 (Google Streetview)
At the West end of Ballybofey Station the line crossed what is now Railway Road/Beechwood Avenue on the level and then ran between Beechwood Avenue and Glenfin Street/Road (R252) parallel to the River Finn. The first length is now buried under domestic dwellings.
After a short distance the R252 (Glenfin Road) crossed the old line on an over-bridge. With the closure of the line, it became possible for a small road improvement scheme to straighten out the line of the roadas shown below.
The Glenties Branch West of Ballybofey. [31]After passing under an accommodation bridge the line continued in a westerly direction with the R252 once agin dog-legging to cross it close to the River Finn (Google Earth).
Glenmore Railway Station opened on 3rd June 1895. [32] There is no evidence of its existence in the early 21st century. The church which is marked on the GSGS Map of the early 1940s is still standing to the West of the old road junction. The railway passed to the South of the Church between it and the R253. I have shown the location ringed in red on the satellite image immediately above. The R252 curves through what would have been the station site. there would have been a level-crossing and the point above where the line crossed the old road (marked with a break in the red line).Looking East from the R253 adjacent to the churchyard at Glenmore in July 2011 (Google Streetview).The line of the old railway is so much easier to determine when the boundary walls still remain in place. This view looks to the West from the old road junction, again in July 2011. Glenmore Church can be seen on the right (Google Streetview).Cloghan Railway Station was a couple of kilometres South of the Village with the same name. The old railway turned gradually to the Northwest as it approached the station, still following the River Finn. The old station building retains the designation Station House although it is in the Townland of Gortiness. It has been extended along the line of the old platform tp the Southeast.This postcard view of Cloghan Station is a colourised monochrome image. It is taken from the Southeast. The station building can be seen on the left of the image and the road bridge can be seen beyond the platform. Permission to include this image was very kindly given by David Parks. It appears on his blog: Irish Postcards: irishpostcards.wordpress.com. [8]This view shows the old Station House which is in cream at the centre of the picture. It is taken from the road bridge shown in the postcard view, looking Southeast along the route of the old railway line. The line is marked by the line of bushes running towards the Station House (Google Streetview).The old Station House at Cloghan Railway Station. The image comes from June 2011. The first three windows from the left on the 1st floor were part of the original building. The extension is on the right (Google Streetview).
From Cloghan Railway Station the Glenties Branch turned North, crossing the River Finn twice as shown on the adjacent extract from the GSGS 1940s Map and continued up the Finn Valley. The next three photographs show the route of the line at the road bridge marked at the top of the map extract which was about a kilometre South of the village of Cloghan.
The first is a view on Google Streetview which is taken from just to the West of the the River Finn road bridge at the top of the adjacent map extract. The road alignment on the extract needs verifying. It seems as though the position of the railway was a little closer to the river.
The second image is a close up satellite view from Google Maps which has had the old railway route at its centre.The old road alignment is marked by the cartographers who have provided the road overlay to the satellite images associated with Google Maps. Teh road used to turn sharply to the South after crossing the river to a point where crossing the line was possible. It is not clear whether this was a bridge or a level-crossing.
I have been unable to find photographs of the two bridges over the River Finn. Nor are there any photos of the road crossing point near the top of the satellite image.
The next image shows the Glenties Branch alignment through this area. The red line, again, show the route of the railway.
The next map extract is at a smaller scale and shows the route of the old line to Ballinamore. The valley of the River Finn turns once again to the West after passing Cloghan village and the railway remained on the West and then South side of the river.
These next two satellite images follow the old railway route along the West side of the River Finn before it turns to the West again.
The first runs across open fields alongside the River Finn. The second continues in the same vein. At around the half-point of the satellite image extract a farm access track now uses the old railway formation as it travels North.
The first landscape image below is another satellite image which shows the gradual change of direction of the old line as it swung round towards the West. The next, illustrates the condition of the railway formation in 2009, At that time the gravel surface had newly been relaid. Further to the North the track shows up as having been tarmacked in 2009.
A sequence of photographs from Google Streetview covers the next few kilometres of the old railway. Various dwellings have been built since the closure of the line which have the old railway formation as their only access route.
A good number of these homes appear to have been constructed since the turn of the 21st century.
Eventually the tarmacked length of the old formation ends where the old railway crossed another road. A satellite image follows the Google Streetview photographs and again picks up the line close to that road crossing.The last Streetview photograph above shows the point at which the old railway formation meets what is now a local road. If the road had been present during the life of the Glenties Branch, this would have been a level crossing probably without gates. However the GSGS map (see below) does not show a road at this location in the early 1940s. The Glenties Branch continued westward on the South side of the River Finn. There was a need for a significant number of culverts to allow land drainage to reach the river. They show up particularly well of the extract from the GSGS map above.Ballinamore Station Building in 2010 seen from the R252. It is difficult to imagine a more remote location for a Station Halt nor a more run-down, but still standing, corrugated iron building. As we can see in the last picture of this article, the platform face still remains! (Google Streetview)Ballinamore Station Building! It was still standing in 2020 as can be seen on the Satellite image above. This picture was taken in 2009 (Google Streetview).
Ballinamore Railway Station opened in June 1895 and closed in December 1947. [38]
Former Ballinamore County Donegal Railway Station, June 1990 – The photographer says, “Miles from anywhere, not a house or tree in sight. Once the haunt of snub-nosed diesel railbuses. Ballinamore station, opened in 1895 was about half way between Glenties and Stranorlar on the CDR County Donegal Railway.” (Scanned slide) (c) G Sludge (Attribution-ShareAlike 2.0 Generic (CC BY-SA 2.0)). [39]
We have reached the end of this first part of the journey from Stranorlar to Glenties. It is hard to think of a worse place to stop and we only do so because it is roughly at the half-way point on the journey to Glenties.
References
The Railway Magazine: ‘Notes and News’; May & June 1948 edition. Volume 94 No. 575, p202.
Edward M Patterson (original author), Joe Begley & Steve Flanders (authors of additional material in the Revised Edition); The County Donegal Railways; Colourpoint Books, Newtownards, Co. Down 2014.
http://ballybofeyandstranorlar.com, accessed on 26th May 2020. (A subsequent internet search to find this image only produced a similar but watermarked version of the photograph.)
Chris Amundson has been working on a series of large scale map plans of the Co. Donegal Railway Stations. He has very kindly allowed me to link to that work. (https://www.flickr.com/gp/spw45/y49162)
Father, the hour has come; glorify your Son so that the Son may glorify you (NRSV)
I wonder what Jesus means when he says these words? …
If we are to discover answers to this question, we need to look at the context.
In our Gospel reading, time seems to have stood still. The first 12 chapters of the Gospel cover the first 33 years of Jesus’ life. Then, from the beginning of Chapter 13 right through to the end of Chapter 17, we are in the Upper Room at a Passover Meal with Jesus and his disciples, his friends. This is last evening of Jesus’ time with his disciples before the Crucifixion.
We have watched Jesus washing his disciples’ feet. We have heard him talking of the Holy Spirit who will walk alongside them, live within them, help them to be witnesses to the love of God as they live their lives. We know that these actions and these words were spoken as much for us as for the disciples’ benefit.
In what Jesus says and does, he is encouraging us to share in his priorities for our lives: serving others; receiving their service to us with grace and love; witnessing to the love of God; listening to the inner voice of the Holy Spirit; and later in Chapter 17, placing a priority on working together as one, respecting each other, knowing that without our shared fellowship and witness, we are so much poorer.
And in the middle of all this, come those words of Jesus:
Father, the hour has come; glorify your Son so that the Son may glorify you.
I guess that there are two ways that we can think about those words.
First, there is the wider context of all that Jesus has been saying and doing in the Upper Room and the wider context of the whole prayer in John 17. He could be praying that God will be glorified through the lives of his friends. Jesus has commissioned them to serve him and they will, from now on, be the ones through whom God is glorified. This means that we are the ones to be God’s visible presence in the world. Our actions, good or bad speak about the Lord that we claim to follow and serve. Our choices and actions speak loudly about the God we say we serve. We are the ones who will glorify God. Or our behaviour and actions could bring shame on the God we say we serve. So, Jesus prays that God will be glorified by the choices we make and by our actions.
Secondly, and in line with the immediate context of John 17: 1-6, Jesus could be talking about something very different. …
When Jesus talks about himself being glorified and so bringing glory to God, it seems that he has in mind the days which immediately follow this prayer. He sees the events of the crucifixion and resurrection as being about glory! And particularly, the events of Good Friday. For Jesus, the glory of God will be revealed in him at the cross and in his resurrection. As Jesus is lifted-up in the eyes of everyone, so he gives glory to God.
Glory is to be found, not in power and influence, but in obedient submission to God’s will.
Jesus’ throne is the Cross. God’s glory is revealed in suffering. God is revealed most clearly at the place of suffering.“Father, use these next hours,” prays Jesus in John 17, “to glorify me and to glorify you.” And Jesus re-emphasises this as he says to God the Father, in John 17:4: “I glorified you on earth by finishing the work that you gave me to do.”
Jesus’ example to us is one which centres on the Cross. It is at the Cross, the place of suffering, that God’s redeeming work is done. The place of weakness is the place of glory! This is the place where we discover who God really is, and God’s glory is revealed.
We are safe in the love of God, in some mysterious way, because of the Cross.
And because of the Cross, we too can serve others without counting the cost. And if we suffer, we can be sure that, in Christ, God has walked the same journey that we walk. God is not surprised or shocked by our struggles, but there alongside us each step of the way.
Prayers for Sunday 24th May 2020 from Jesuit communities in the USA.
Jesus Christ, you travelled through towns and villages “curing every disease and illness.” At your command, the sick were made well. Come to our aid now, in the midst of the global spread of the coronavirus, that we may experience your healing love.
Heal those who are sick with the virus. May they regain their strength and health through quality medical care.
Heal us from our fear, which prevents nations from working together and neighbours from helping one another.
Heal us from our pride, which can make us claim invulnerability to a disease that knows no borders.
Jesus Christ, healer of all, stay by our side in this time of uncertainty and sorrow.
Be with those who have died from the virus. May they be at rest with you in your eternal peace.
Be with the families of those who are sick or have died. As they worry and grieve, defend them from illness and despair. May they know your peace.
Be with the doctors, nurses, researchers and all medical professionals who seek to heal and help those affected and who put themselves at risk in the process. May they know your protection and peace.
Be with the leaders of all nations. Give them the foresight to act with charity and true concern for the well-being of the people they are meant to serve. Give them the wisdom to invest in long-term solutions that will help prepare for or prevent future outbreaks. May they know your peace, as they work together to achieve it on earth.
Whether we are home or abroad, surrounded by many people suffering from this illness or only a few, Jesus Christ, stay with us as we endure and mourn, persist and prepare. In place of our anxiety, give us your peace. …… Jesus Christ, heal us. Amen.
The Ascension begs a question: … What exactly is happening as Jesus goes into heaven?
Is this the triumphant finale, the final victory parade? When at last Jesus goes home to the Father, to be paraded through the streets of heaven in victory – much like the Liverpool football team had hoped to be driving around the streets of the city in an open-top bus at about this time. Is it the time when Jesus is welcomed back into that indescribable unity which is the Trinity of the Godhead – back home at last?
Or is it a moment of desertion. The disciples have only just received Christ back among them after his death and now cruelly he is taken from them into heaven. A renewed relationship is abruptly ended!! A commission is given and then the bombshell is dropped.
“Listen!” says Jesus, “I have a job for you to do – to be my witnesses throughout the known world.”
“Great, Lord, when do we get down to business, when do we work out the strategy, when to do you provide the corporate plan of action, when do we do our Mission Action Planning?”
“Not us. … Not me!” says Jesus, “You! …… I’m going away and you’ll never see me again this side of heaven!”
Or is this, actually, rather than desertion, the point at which followers become leaders, children become adults. Is this primarily the point where Jesus followers can no longer hide behind a leader and have to begin to make important choices themselves.
For all the participants in this story, this must have been a confusing moment. A time which carried so much emotion – parting from friends, losing a friend and leader, going home …
All sorts of mixed emotions.
In the end all of these scenarios have more than a grain of truth to them.
Christ is going home in victory. A job well done.
Christ is leaving behind a ragged group of followers who must have felt deserted. Yes, he did promise the Holy Spirit as helper and guide. But what’s a Spirit when you’ve had real flesh & blood to relate to?
And perhaps most crucially for us, Jesus is asking this ragged group to stand up for themselves. To be what he knows that they can be with the Spirit’s strength – a missionary band that will turn the world upside down within a century.
St. Teresa of Avila’s prayer sums it up well …..
Christ has no body now but yours. No hands, no feet on earth but yours. Yours are the eyes through which He looks compassion on this world. Christ has no body now on earth but yours.
As we mark the Ascension today, of course we celebrate a job well done, the earthly part of Christ’s mission over. But, most critcally, the Ascension reminds us that we are the ones that count – between now and eternity God has left his concerns, his mission in our hands. And on Ascension Day, it behoves us to commit ourselves again to serving to God – to discovering his way and walking in it, to being his hands, eyes and feet here in the places that God has put us.
Midland Railway Crane, Gloucester Docks, (c) Robert Powell, 2011, reproduced under a Creative Commons Licence. [24]
Gloucester Docks is an historic area of the city of Gloucester. It is important for its Victorian warehouses which are listed buildings. [2] Within the old Dock’s site are the Gloucester Waterways Museum [3] and the Soldiers of Gloucestershire Museum. [4] The docks are located at the northern junction of the River Severn with the Gloucester and Sharpness Canal. [7]
The docks were rail-served by both the Great Western Railway and the Midland Railway, later by the GWR and the LMS and ultimately by British Railways (BR).
Steam Crane, Gloucester Docks (c) Crispin Purdye, 2006, reproduced under a Creative Commons Licence [26]
Neil Parkhouse, in one of his fantastic collections of colour photographs from the last decades of steam in Gloucestershire (British Railway History in Colour) focusses on the Midland lines serving the docks, specifically three lines in the area – the Tuffley Loop; the High Orchard Branch; and the Hempsted or New Docks Branch. [9] He covered the Western approaches to the docks in the first volume in his series. [41]
Wikipedia offers us the following volumes for researching the docks and the associated railways in Gloucester, although it is unable to provide links to the relevant texts: [10]
Hugh Conway-Jones; Gloucester Docks: An illustrated history; Sutton & Gloucestershire County Library. 1984. [35]
A Guide to Gloucester Docks; Sutton, 1988
Michael Stimpson; The History of Gloucester Docks and its Associated Canals and Railways; West London Industrial Archaeological Society, Potters Bar, 1980.
Further research on the internet produces a number of sites which focus on the railways of the Docks in Gloucester:
Gloucester Docks and the Sharpness Canal, Past and Present. [11]
Gloucester Transport History: Railways in Gloucester and Churchdown After 1845. [20]
Gloucester Transport History: Railways in Gloucester [34]
The Tramroad
However, the first rail link to the docks was not a standard-gauge edge railway, but rather a plateway – The Gloucester and Cheltenham Tramroad. Its primary economic purpose was the transport of coal from Gloucester’s docks to the rapidly developing spa town of Cheltenham and the transport of building stone from quarries on nearby Leckhampton Hill to Cheltenham and Gloucester. [16][33]
”The tramroad was opened for mineral traffic on 2 July 1810. The line was a 3ft 6 in (1,067mm) gauge plateway, with cast iron plates on stone blocks. Wagons with plain wheels could run on the plates and were guided by an upstand on the plates. The route was single track, but passing places were provided at four to the mile, or more frequently. It appears that more passing places were added later, no doubt in response to higher traffic densities.” [16][33]
The picture below is a sketch map of the route of the tramroad produced by the GSIA (Gloucestershire Society for Industrial Archaeology) of which I am a member. (Membership of the society costs £9 per annum.) [40]
The route of the tramroad between Cheltenham and Gloucester. [32]
I have read through some of the internet links to the Cheltenham & Gloucester Tramroad and I have undertaken further research into the history of the line. That research has resulted in the drafting of a number of articles about the Tramroad:
The tramroad/plateway was horse-powered and only briefly flirted with the use of steam-power. [39] But the use of horses did not stop with the construction of what we today would see as more conventional railways. After the Midland Railway had built its lines into the Dock complex, horses were still vital to the operation of the railways in the docks. Hugh Conway-Jones explains:
“Horses were used on the dock railways to distribute incoming wagons, marshall outgoing wagons and make short transfers between quay and warehouse etc. These movements could be quite time consuming as many of the lines along the quays were only linked to the main system by small turn-tables that could only take one wagon at a time. The horses knew exactly where to stop to position a wagon correctly on a turntable, which was then rotated by pushing on an extending arm. Sometimes a horse was hitched up to the arm to get the turntable moving, but care was required not to exert too much force or the wagon could swing round out of control. The horses also knew that it was worth stopping outside the black shed beside the Great Western Warehouse, as this was where the lump sugar was stored and some body would usually give them a lump or two. Locomotives were used for transfers between the different parts of the docks, and as some of the bends were rather sharp, the Midland Railway had a special type of tank locomotive with a very short wheelbase.” [35: p123]
The tramroad made, in its time, a dramatic contribution to the economic life of Cheltenham, Gloucester and its Docks. It was unable, however, to compete with the more modern railways and gradually became less and less significant in the life of the Docks and nearby conurbations. Eventually it closed in 1861. Much of the line has disappeared under development in Cheltenham and Gloucester. There are things to find which relate to the old tramway and details can be found in the series of articles above. Information on some of the remains can also be found at http://www.gsia.org.uk. [32]
The Railways
It was the middle of the 19th century when branches from the Midland Railway were laid to serve to docks in Gloucester. The GWR also laid tracks to serve the docks. These became a better option than the waterways for carrying imports into the Midlands and they eclipsed the tramroad for local supplies to Cheltenham. The Midland sidings cut the tramroad access to the northern part of the docks and to the quay further north along the River Severn
The Midland Railway completed their branch to Bakers Quay and the east side of the docks in 1848. That branch also served the timber yards established along the canal banks to the south. “Locomotives moved wagons to and from the main line, but most movements around the docks area, as we have already noted, were done by horses, particularly as there were a number of turntables needed to negotiate sharp corners around existing buildings.” [11]
The Great Western Railway completed their branch to Llanthony Quay and the west side of the docks just a few years later – around 1853. Broad gauge lines were laid at this time but soon these were converted to mixed-gauge. Hugh Conway-Jones says that, “it had been hoped that the GWR line would provide a ready supply of coal from the Forest of Dean for export, but most masters preferred to load coal at one of the South Wales ports.” [11]
The different railway routes at the docks will be covered in subsequent articles. It is interesting to note that because of the differing access arrangements, the sidings on each side of the docks had very different characteristics. The sidings from the Midland Railway had to find their way through relatively built up areas to reach the dockside. Those from the Great Western Railway crossed open fields and the River Severn before they formed a fan of sidings close to the docks with some extensions southwards down the west side of the docks.
Aerial Images of Gloucester Docks
These aerial images of the docks are available on the Historic England website, ‘Britain From Above’. They show the docks at work in the period between about 1920 and 1950.
Image No. EPW024154 – Gloucester prison and the docks, Gloucester, 1928. The River Severn can be seen curving away to the right of the image. The Canal to Sharpness heads away to the South at the top of the image. [27]Image No. EPW024161 – Gloucester Docks, 1928. It is interesting to note the presence of open fields on the far side of the River Severn!The Main Basin is shown in the centre of the image and the canal running from it to the bottom of the image was the access for shipping into the Victoria Dock. [28]Image No. EPW024164 – Victoria Dock, Southgate Street and environs, Gloucester, 1928. The Main Basin is just off the photograph to the right. The railway sidings in the foreground were originally Midland Railway Sidings and those in the top right corner of the picture were GWR sidings. [29]Image No. EPW024166 – The Docks and environs, Gloucester, 1928. Both Victoria Dock and the Main Basin are centre stage in this image. The River Severn can be seen in the top right with green fields beyond. Top-centre are the GWR sidings with a bridge access across the River Severn, top right. [30]Image No. EPW037837 – GWR Railway sidings next to Llanthony Priory and surroundings, Gloucester, 1932. The River Severn and one of its locks are in the foreground. [31]
References
The Docks Conservation Area (Conservation Area No. 3) Appraisal & Management Proposals. Gloucester City Council, Gloucester, 2007, accessed on 9th April 2020, quoted in reference [2] below.
One of several museums and attractions operated by the Canal & River Trust, the successor to The Waterways Trust, the Gloucester Waterways Museum is housed in the old Llanthony Warehouse in the heart of what once was the bustling Gloucester Docks. [5]
The Soldiers of Gloucestershire Museum is also located in Gloucester’s Historic Docks. It reopened in April 2014 after a significant Heritage Lottery funded refurbishment. It is a place to discover the lives of Gloucestershire soldiers over the last 300 years. The story begins in 1694, travels through the Napoleonic Wars, the Age of Empire, Worlds Wars, Korea and right up to modern day conflicts. [6]
The Gloucester & Sharpness Canal was once the broadest and deepest in the world. Even today, it stands out from other navigations because of its sheer scale and impressive engineering. [8]
Neil Parkhouse; British Railway History in Colour: Volume 4A – Gloucester Midland Lines Part 2 : South, Eastgate to Stroud & Nailsworth; Lightmoor Press, Lydney, Gloucestershire, 2019; cf. http://lightmoor.co.uk/books/gloucester-midland-lines-part-2-south/L8665, accessed on 18th April 2020.
Hugh Conway-Jones; Gloucester Docks: An Illustrated History; in the County Library Series, Allan Sutton, Gloucester and Gloucestershire County Libraries, 1984.
Neil Parkhouse; British Railway History in Colour: Volume 1 – West Gloucester and Wye Valley Lines, 2nd Edition, Lightmoor Press, Lydney, Gloucestershire.
The Cornwall Minerals Railway is mentioned in an article in the journal “Railway Archive.” about the first locomotives purchased for the Cornwall Minerals Railway. [1]
The Cornwall Minerals Railway developed out of a series of older Tramroads which served the Cornish Mining Industry. It owned and operated a network of 45 miles (72 km) of standard standard gauge railway lines in central Cornwall. It started by taking over an obsolescent horse-operated tramway in 1862, and it improved and extended it, connecting Newquay and Par Harbours and Fowey.
Wikipedia tells us that the Cornwall Minerals Railway had a chequered history having been hurt by a collapse in mineral extraction due to a slump in prices. But after a period in bankruptcy it recovered enough to take over a defunct route between Fowey and Lostwithiel – theLostwithiel and Fowey line.
In 1896 it finally sold its line to the Great Western Railway which had been leasing it for some time.
Its main passenger line from Par to Newquay is still in use as the Atlantic Coast Line, and also carries some mineral traffic, but the Par to Fowey line has been converted to a private road. [2]
CMR No. 1, Treffrey was built, along with all of the CMR locomotives, by Sharp, Stewart & Co. Ltd of Manchester. It was named for Joseph Austin Treffrey but the name plates were mis-spelt. These locos were intended to work in pairs, back to back and it is likely that the lack of rear bunker and the open cab were intended to facilitate this way of working. There is no evidence to suggest that the traffic on the railway was ever large enough to justify this intention. [1][2]
The Cornwall Minerals Railway was adventurous in its intentions and purchases. It anticipated far more traffic from the mines than was to materialise and bought 18 (yes, eighteen) 0-6-0T steam engines to serve the anticipated high demand. [1] When the line was leased to the GWR in 1877, the new lease-holders quickly realised that the over provision of motive power was a financial drain on the Line. The GWR returned 9 of the engines to their makers, leaving 9 to serve the needs of the Line. [1:p30]
Of the 9 remains locos, a further one was sold by 1883 to the Sharpness New Docks Company and based on the opposite side of the River Severn from the Forest of Dean. [1:p31]
Of the 9 locos returned to Sharp, Stewart, 8 were purchased by the Lynn & Fakenham Railway and ended their days in various guises on the Midland & Great Northern Joint Railway (M&GNJR) which was the ultimate successor to the Lynn & Fakenham Railway. [1:p30] A first batch of three were sold to the Lynn & Fakenham in 1880, a further five were sent to the Lynn & Fakenham in 1881. [1: p36]
The last of the 9 locos returned to Sharp, Stewart was sold to the Colne Valley & Halstead Railway before ending up at a colliery in Northumberland. [1: p30]
This is the first article of what I hope will be a series about the Cornwall Minerals Railway.
References
1. Peter Treloar; A Scattered Family: The Cornwall Minerals Railway’s 0-6-0Ts; Railway Archive Issue 30, Black Dwarf Lightmoor Press, 2011, p27-40.
My wife Jo and I studied together at St. John’s College, Nottingham when we were training to become priests in the Church of England. We both had overseas placements in the Summer of 1998. I went to Sri Lanka for 8 weeks and Jo went to South Africa. My placement was at Lanka Bible College on Christopher Road in Peradeniya, near Kandy which can be picked out on the map below in the centre of the island country. The main building of the college features in the image above! [1]
Sri Lanka, formerly Ceylon, is an island country lying in the Indian Ocean and separated from the Indian peninsula by the Palk Strait. It is located between latitudes 5°55′ and 9°51′ N and longitudes 79°41′ and 81°53′ E and has a maximum length of 268 miles (432 km) and a maximum width of 139 miles (224 km), (c) Encyclopedia Britannica, 1998.
Sri Lanka is primarily a Buddhist and Hindu country. Christians are very much in the minority – perhaps less than 5% of the population. The church is growing quite quickly, particularly in rural areas. … I want to introduce you to two of the people I met while I was staying there. … A woman called Lalani and a man called Anargith.
Anargith gave up work in the capital city, Colombo, to be a missionary in one of the driest and poorest parts of Sri Lanka. He exchanged a comfortable flat for a small grass-roofed mud house with no running water or sanitation. The nearest church was around 50 km away. He started sharing his faith with people in the villages around where he lived and, when I met him, he had a small group of people meeting in his home. In the months after I returned from Sri Lanka they began to build a church. When I last heard from Anargith, which must over 15 years ago now, none of the people in his church had yet been baptised.
Anargith explained that it would only be when they got baptised they would be marked out as converts from Buddhism. It was important that their faith was strong enough to cope with the persecution they most probably would face. They would be threatened and, if experience elsewhere in Sri Lanka was to be matched, the church building and their houses could be burnt down.
Lalani’s story is a little different. When I met her, she was Pastor of an Assemblies of God church in southern Sri Lanka. In the mid to late 1990s, her husband Lionel had a successful ministry in their village – a lot of people were becoming Christians. He received threats from local Buddhist community leaders, but he continued to work, and the church continued to grow.
A contract was taken out on his life and he was shot and killed.
Lalani had trained with her husband and after he died took over the role of Pastor to the Church in their village. When I met her she was still working in that same village – witnessing to people that she knows were involved in her husband’s death.
These are stories that have touched me personally. But throughout the world today there are many Christians suffering and dying for the faith that they hold so dear:
Many of the Saints who fill our Anglican calendar were martyred.
In Pakistan, Christians have regularly been accused under strict blasphemy laws and imprisoned without trial.
Some time ago I was told an astounding fact: There were more Christians tortured and killed in the 20th century than throughout the whole of the history of the church before that.
One example of persecution in the 20th century is the deaths of seven bishops in Romania. Pictured are six of those seven bishops of the Eastern-rite Romanian Catholic Church who died during a fierce anti-religious campaign waged under the communist regime in Romania. Pope Francis recognized their martyrdom and beatified them in Romania on 2nd June 2019. Clockwise: Auxiliary Bishop Vasile Aftenie of Fagaras and Alba Iulia; Bishop Ioan Balan of Lugoj, Auxiliary Bishop Tit Liviu Chinezu of Fagaras and Alba Iulia; Bishop Valeriu Traian Frentiu of Oradea Mare; Bishop Ioan Suciu, apostolic administrator of Fagaras and Alba Iulia; and Bishop Alexandru Rusu of Maramures. Not pictured is Bishop Iuliu Hossu of Gherla. (CNS photo/courtesy Romanian Catholic bishops’ conference). [2]
Since the time of the early church, when the gospel has been proclaimed persecution and suffering have been close at hand. Sacrifices have been made, both by those sharing the good news of God’s kingdom and those accepting God’s rule. And Peter’s epistle reflects that. The passage set for today is about suffering for being a Christian.
But what do stories of persecution in Sri Lanka, or words of comfort from an apostle to Christians in the early church have to do with us in our communities?
Peter wants to stress that being a Christian will not be an easy ride. We can’t take our status as children of God for granted and then sit back with our feet up. Peter warns us what to expect, so as to enable us to be prepared. He then makes it clear what we are called to do:
First, says Peter: “Do what is just and right even if there is a personal cost. … For it is better to suffer for doing what is right than what is wrong.” When you see injustice in your local community do something about it, even if it is inconvenient, even if there is a real cost to you. Be the difference that makes the difference in your community.
Secondly, says Peter: “Be a witness to what God has done in Christ.” Share the faith that is in you. “For Christ suffered for sins in order to bring you to God.” What God does in history is consistent – right from the time of Noah, God has been active saving and transforming his world. Christ’s death and resurrection is part of that plan of salvation which is brought right up to date in our own generation in our own baptism. God’s work of salvation made real for us in our own baptism. God’s work of salvation made real for other’s as we share our hope with them.
And thirdly, let’s remember that in our own country we belong to the majority, there are others who experience being in the minority in our culture. How will we behave towards them? Will we ostracise them? Or will we welcome and support them? Will we push them away? Or will we recognise that although they are different from us, although they may worship in a different way to us, they too are God’s children.
Sadly, the Church, of whatever denomination, over the centuries, has not been good at accepting difference and has justified all sorts of atrocities in the pursuit of purity of doctrine. In our generation we are just as capable of bigotry. We can so easily slip into a pattern of thought which makes the other person less valuable than we are and that makes it seem OK to ridicule and hurt those different from ourselves. Our faith as Christians calls us to love and not to hatred. It calls those of us with the privilege of being in the majority to give space to other views, to recognise those different from ourselves and children of God and fellow human beings. Our faith calls on us to be those who create the space for good dialogue and who always see the good in our neighbours.
So let me remind you of Anargith and Lalani who testify that God is with them in the midst of persecution.
Let me remind you of Peter, who is convinced that we will not find life easy as we give ourselves to God. But who is just as convinced that we will know we are ‘saved’: that we sit in the heart of God’s will, safe and secure in God’s love. Sure too, that as we seek to serve Jesus and to live lives that honour our Lord, we are doing something worthwhile even if we suffer for doing so.
A reflection for Sunday 10th May 2020 – The Fifth Sunday of Easter
Revd. Pat Lodge
This week’s reflection comes from my colleague in the Parish of the Good Shepherd, Ashton-under-Lyne – Revd Pat Lodge.
Oh, my goodness, what an appropriate reading for the current times that we’re living in!
This is a Gospel reading that we may well be very familiar, partly because it often used in the funeral service, and the reason for that is that it is such a comforting reading. It reminds us that Jesus is with us on the journey of life, that he loves us and cares for us particularly when we are sad, lonely, confused and troubled, and that he prepares the way ahead for us.
Before the disciples heard Jesus speak these words to them they knew that there were dark days ahead for them. There they were, closeted in an upper room. It had all been going so well. They would have been planning for a future following Jesus, and helping him in his work. And then, suddenly, their world fell apart. Judas betrayed Jesus to Caiaphas. Jesus was arrested and crucified. Peter had denied even knowing Jesus three times, just as Jesus had said he would, and they had no idea what was ahead of them. For their own safety, they had locked themselves away in fear, in sadness and in apprehension about the future. Ring any bells?
I think that situation chimes with all of us at the moment. Our world was chugging along quite happily. We were making plans for the rest of the year ahead and all was well till, suddenly, this dreadful virus sweeps through our world and stops us all in our tracks. Don’t we feel that fear and apprehension for the future that the disciples felt as we keep our distance from family, friends and neighbours, closeted away as we are in our homes as much as possible? I know I have.
And then Jesus comes to comfort them and to show them the way forward, just as he does with us. He lets them know that he’s with them, and asks them to trust in God the Father and in himself, just as he does us. He tells them to hang on by putting their faith in him, just as he tells us. He assures his disciples that he will be going ahead of them to prepare the way for them, just as he does us.
Thomas, perhaps harshly nicknamed Doubting – for wasn’t he in exactly the same boat that we’re in now in wanting to know more – wants some detail about what’s going to happen in the future? What does Jesus mean by telling them that they know the way they must go? And where is Jesus going? He needs to know so that he knows where to follow him. And then we hear, as the disciples did, those words of infinite comfort, strength, support and healing, “I am the way and the truth and the life.”
No matter what we have to face in these dark and difficult days, no matter how long this uncertainty goes on for, we have Jesus’s assurance that he will be with us always, that he is there to help us on the onward journey from here, and that by following him will we have God’s promise of eternal life – and I think that’s a tremendous comfort right now.
And I said to the man who stood at the gate of the year: Give me a light that I may tread safely into the unknown. And he replied: Go out into the darkness And put your hand in the Hand of God That shall be to you better than a light And safer than a known way.


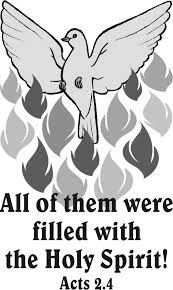 On the very first Pentecost the Holy Spirit descended on the disciples and gave them the gift to be able to go out into the world and spread the Gospel. It says in Acts 2, ‘suddenly there was a noise from the sky which spread like a strong wind blowing, and it filled the whole house where they were sitting. Then they saw what looked like tongues of fire which spread out and touched each person there’. (Flames of fire just like candles on a birthday cake!) The Holy Spirit being the ultimate gift from Jesus.


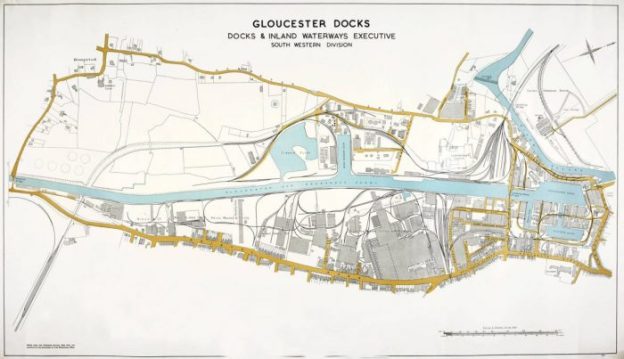

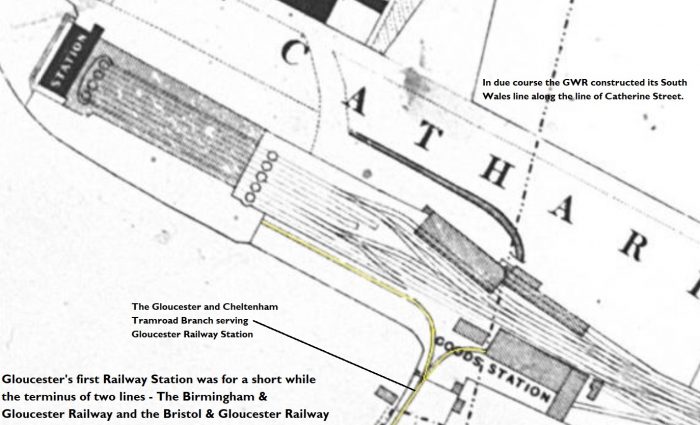
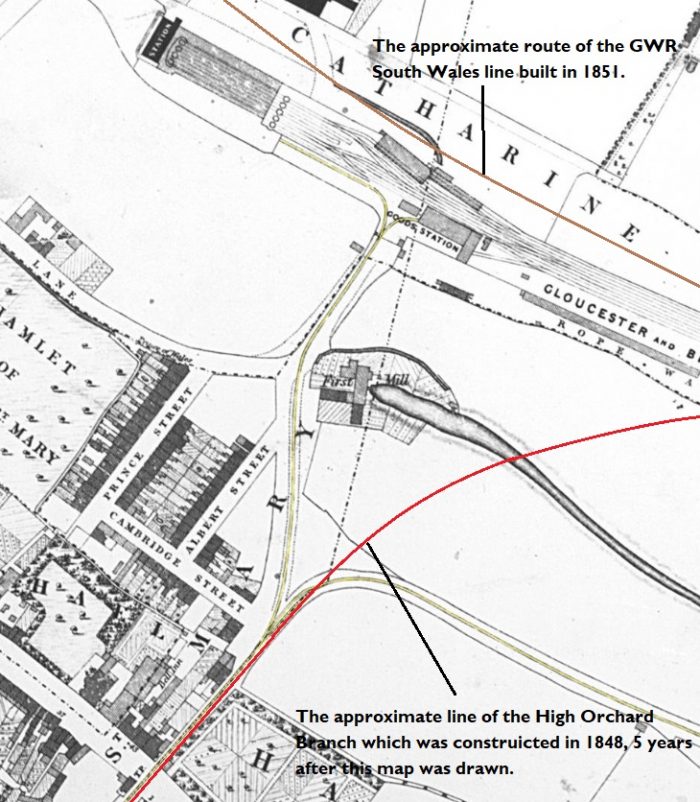
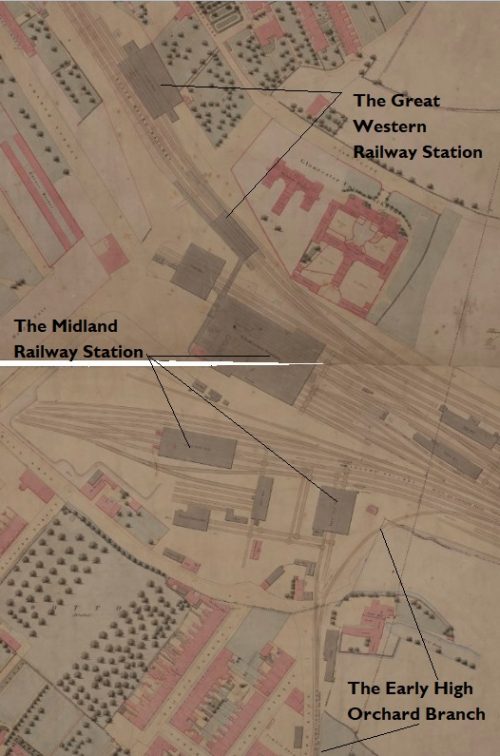
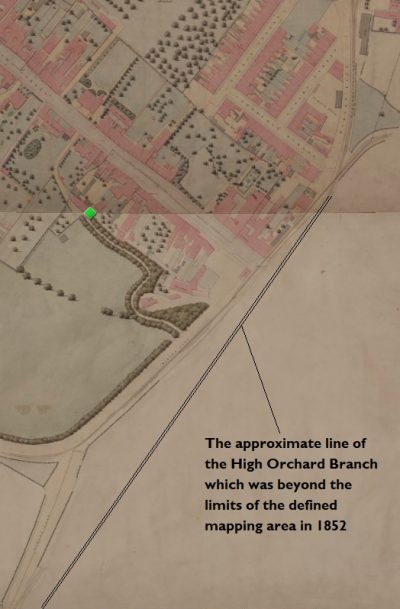
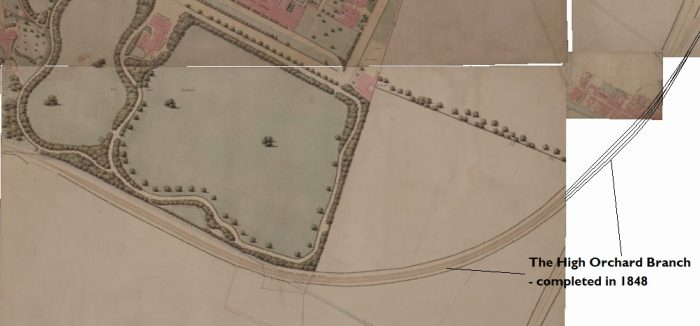
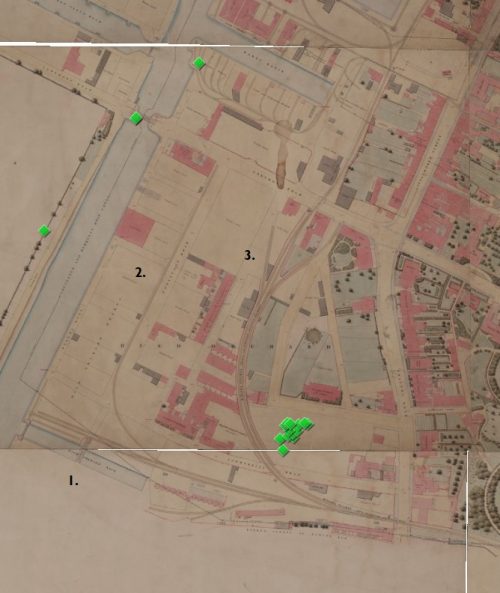

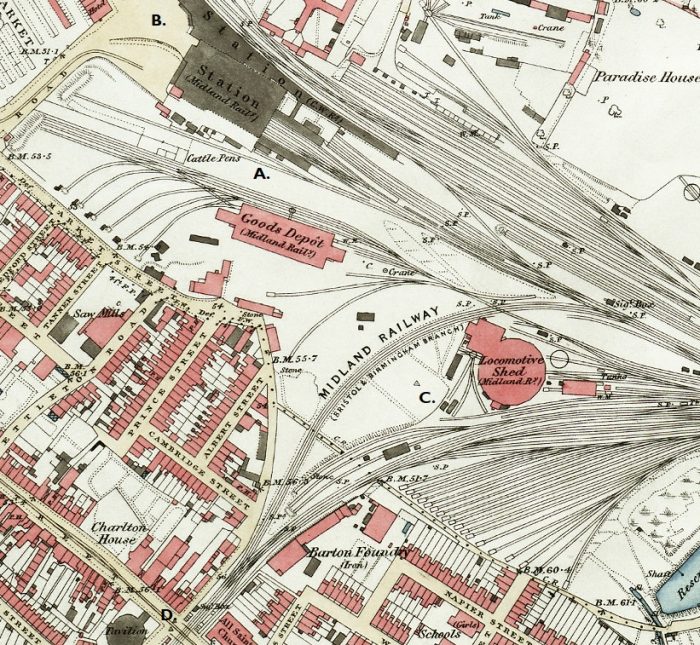
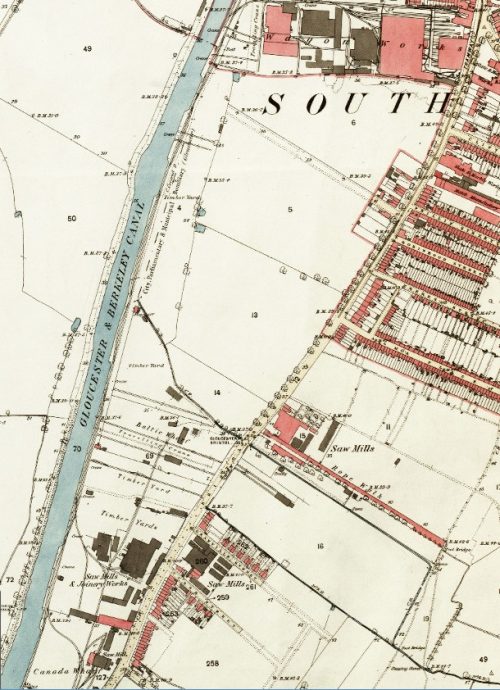
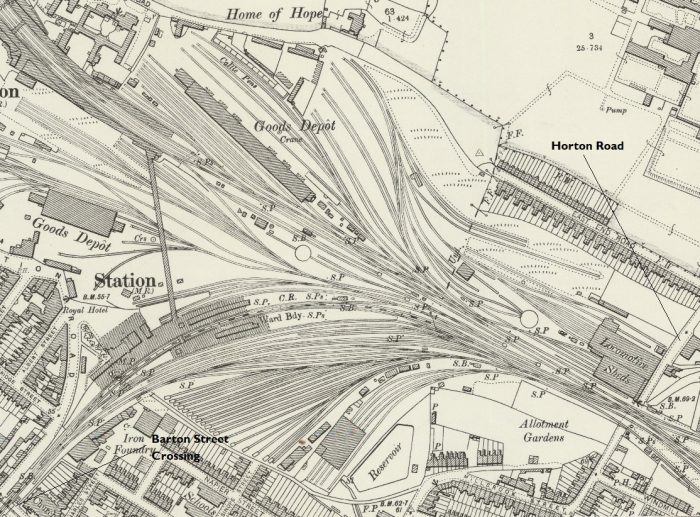

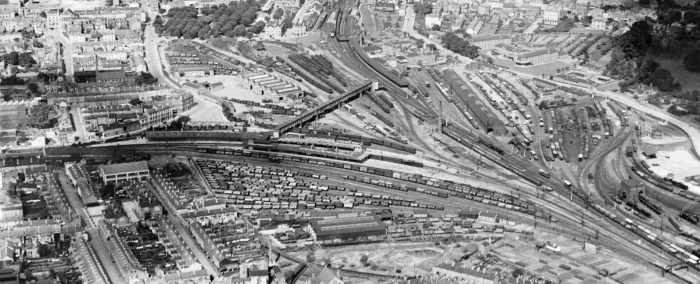
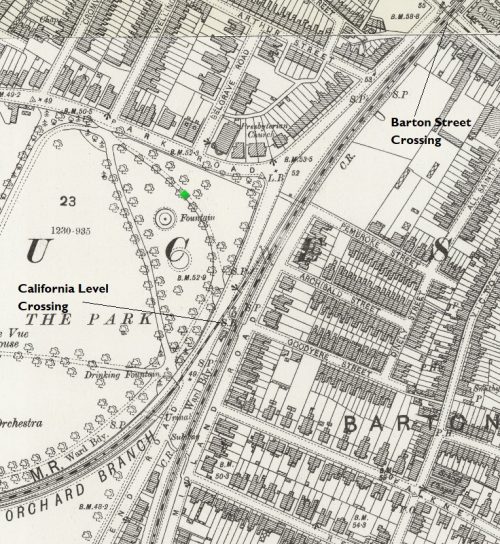

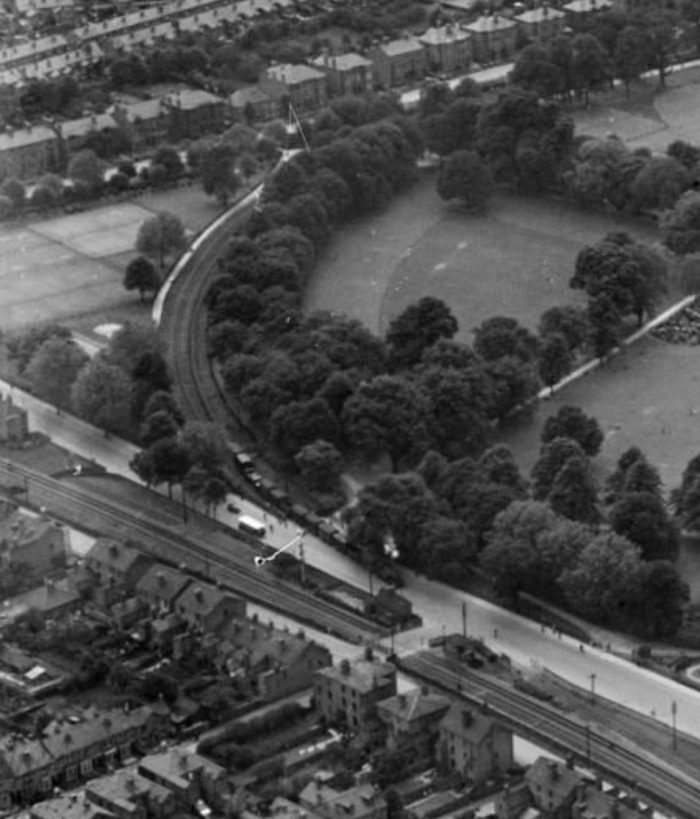
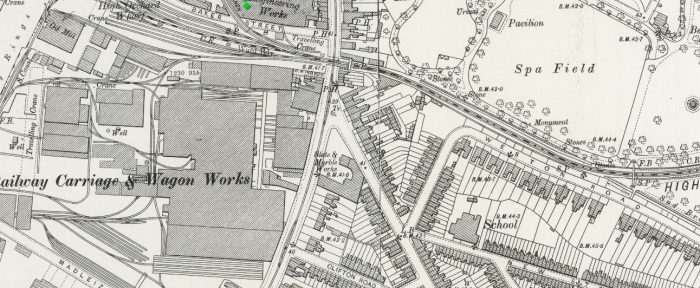
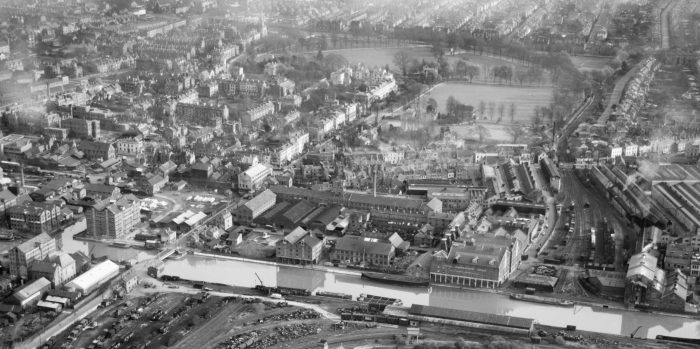
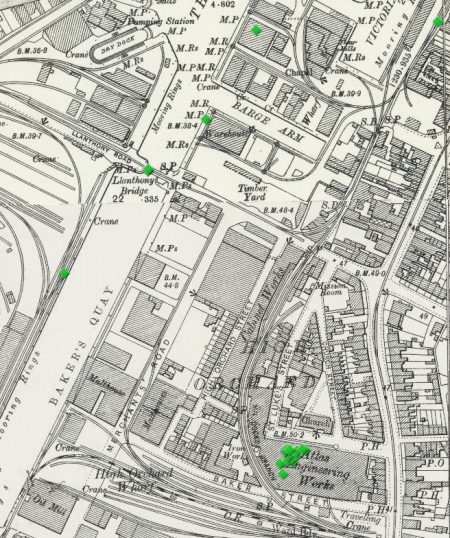
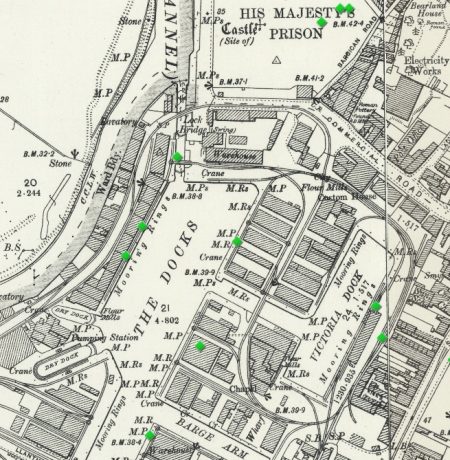

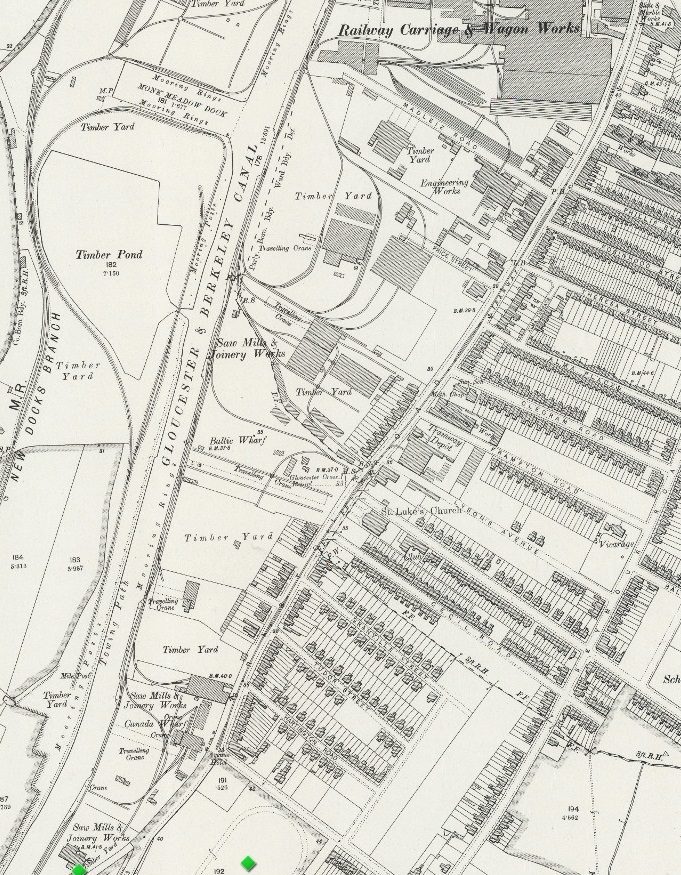
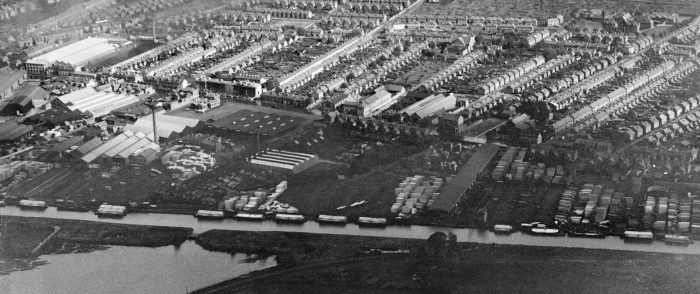
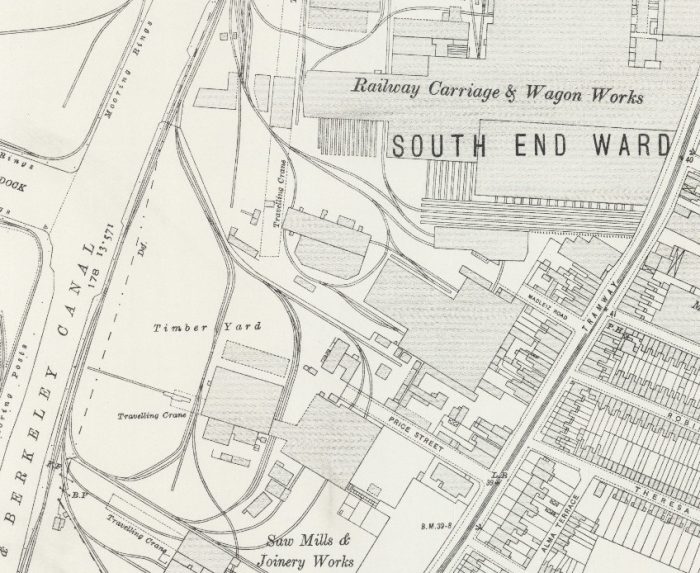
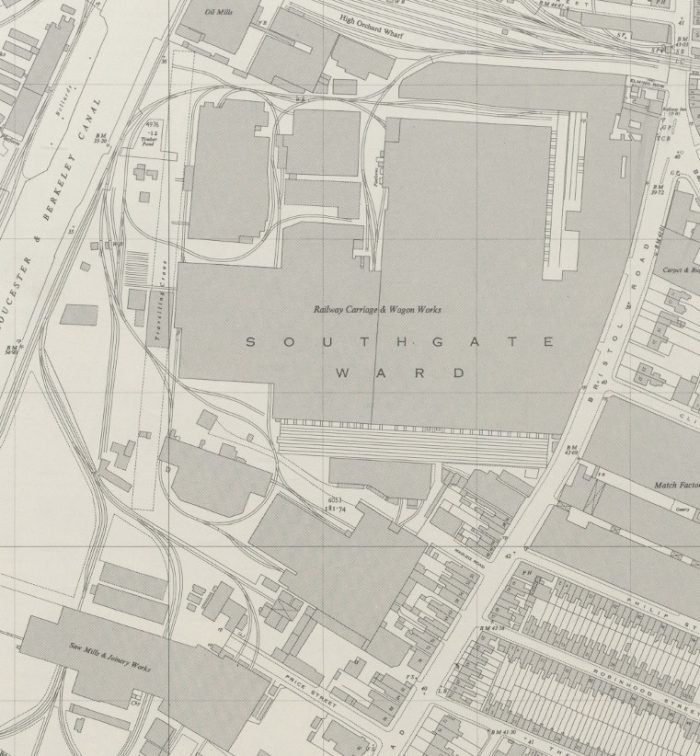
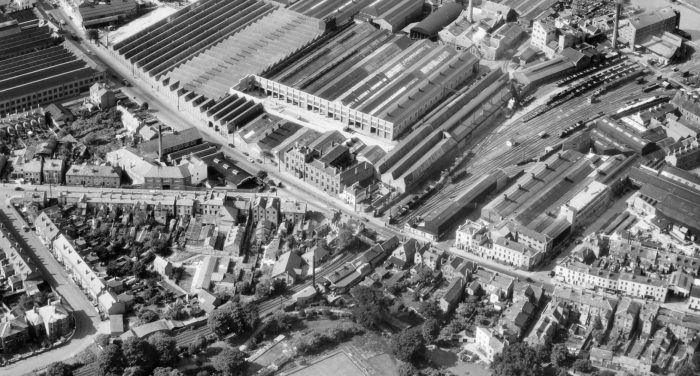
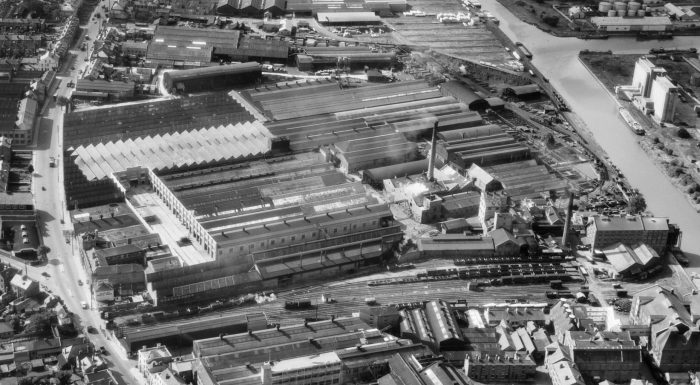
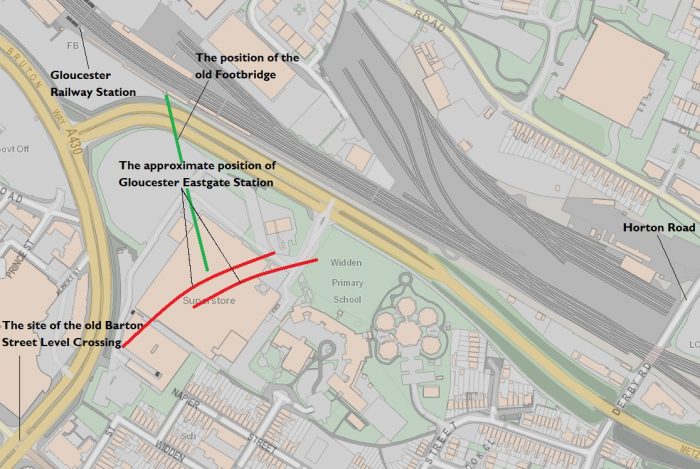
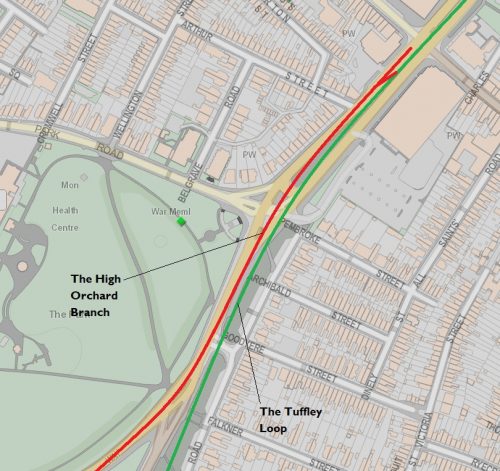
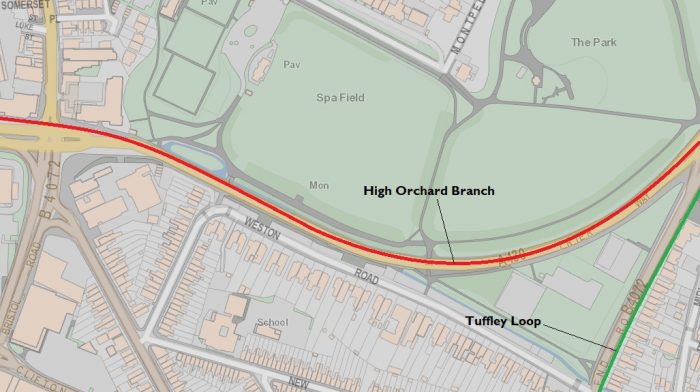
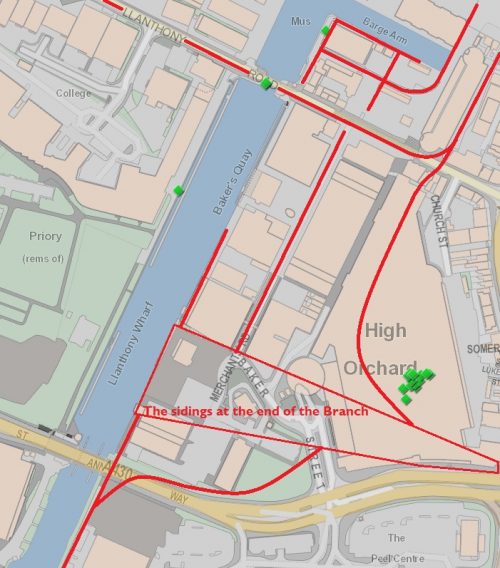
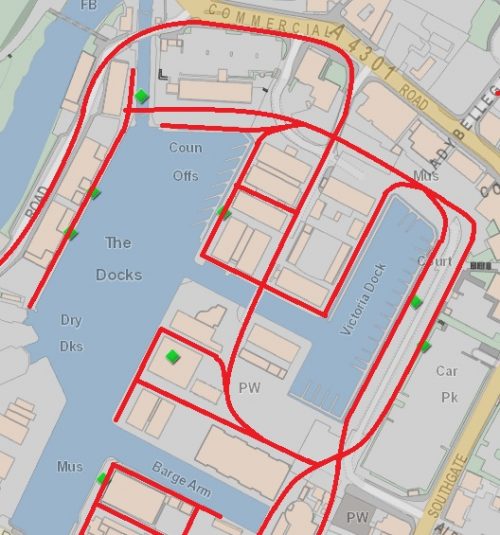
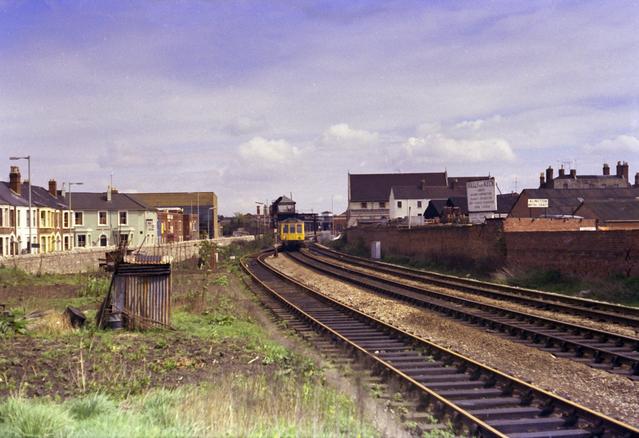
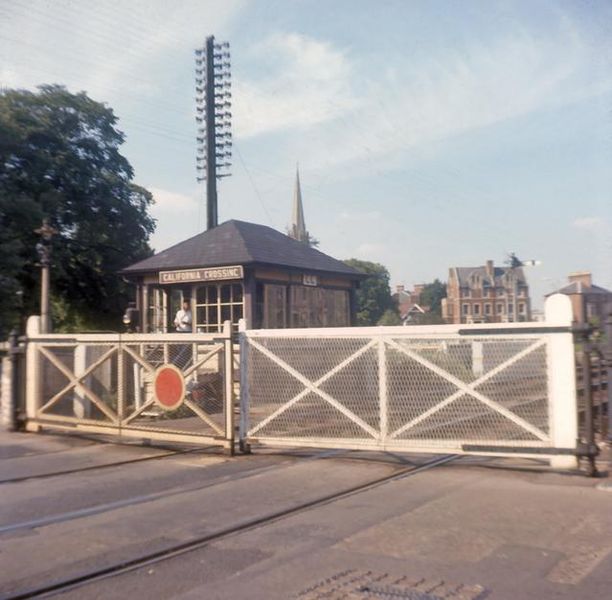
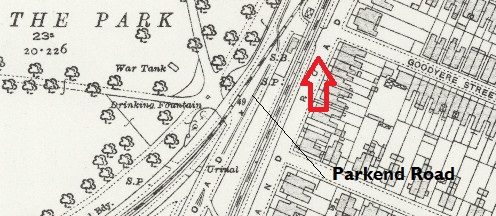
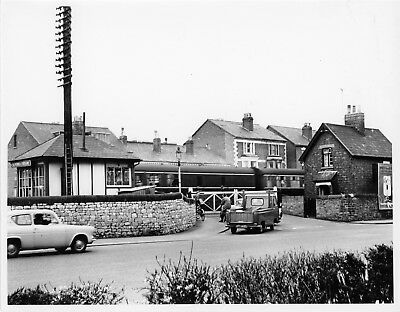
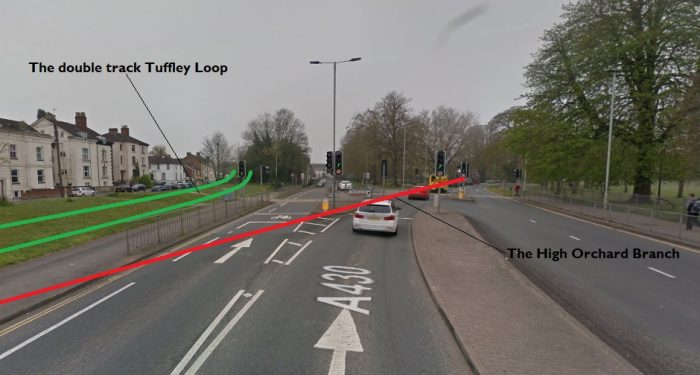
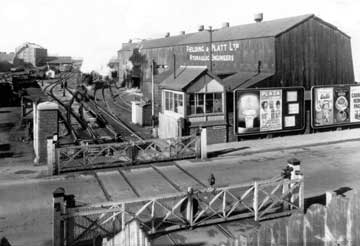
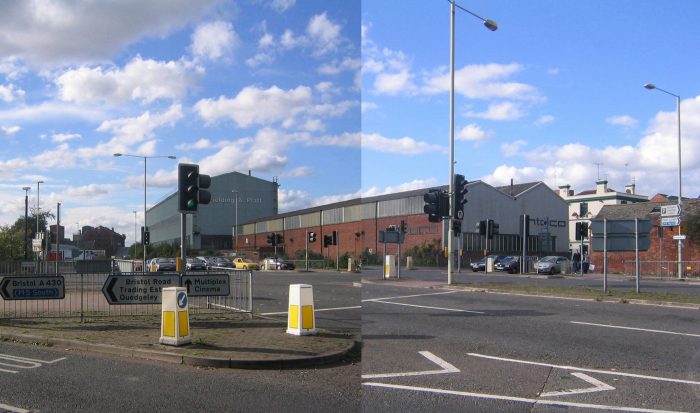
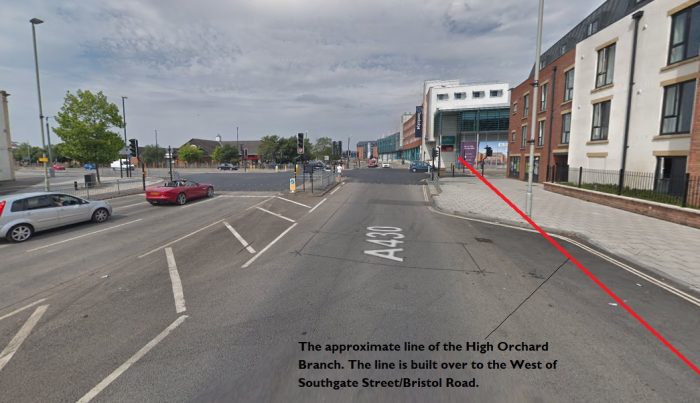
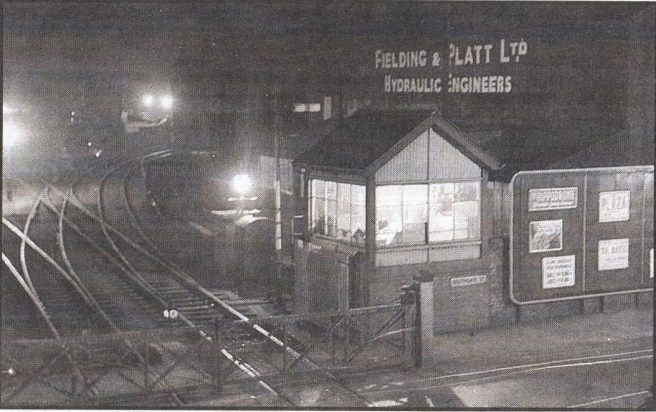
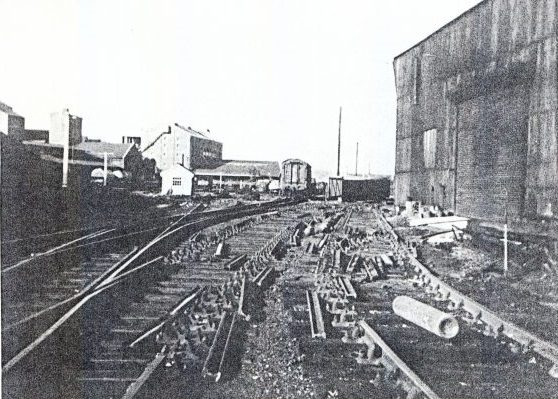

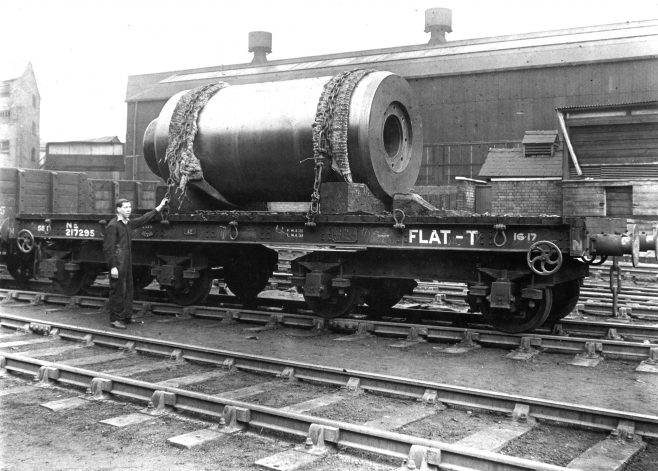
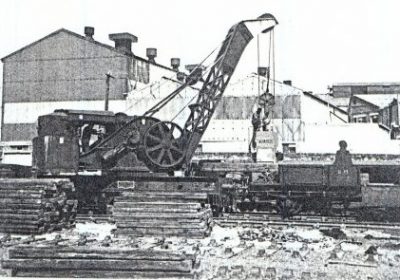
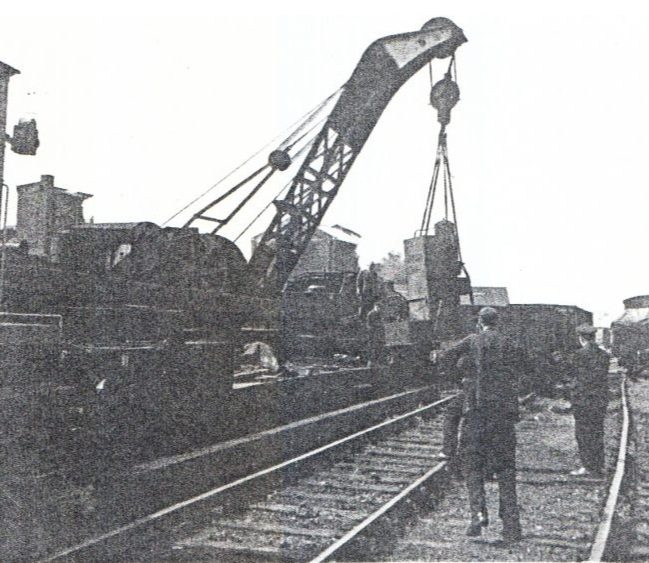
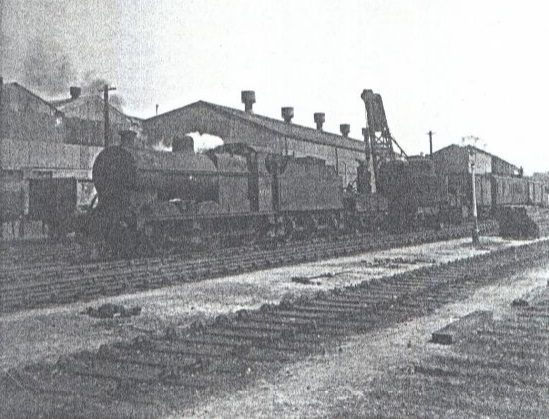
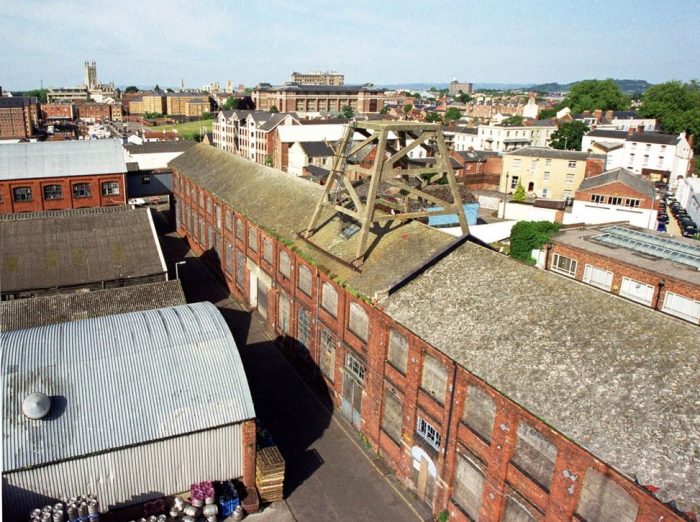
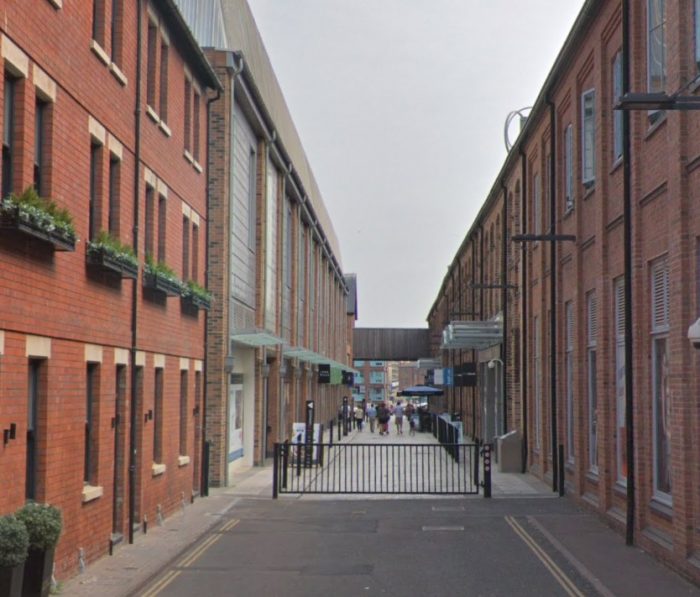
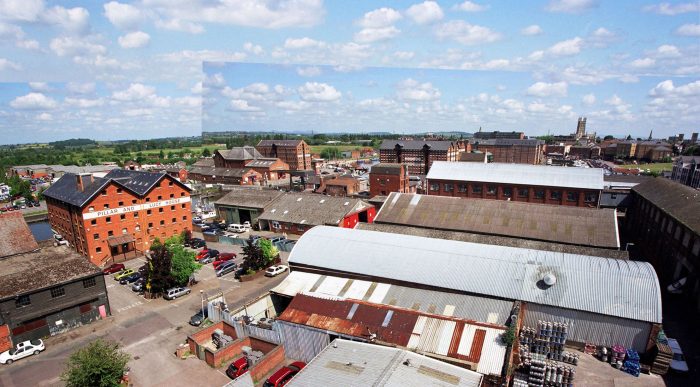
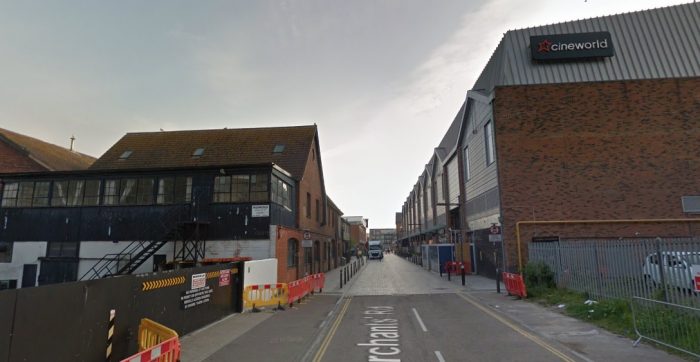
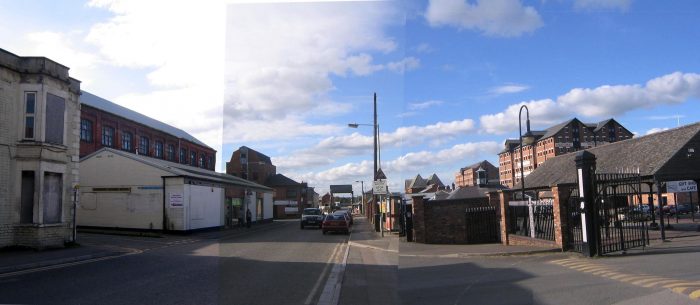
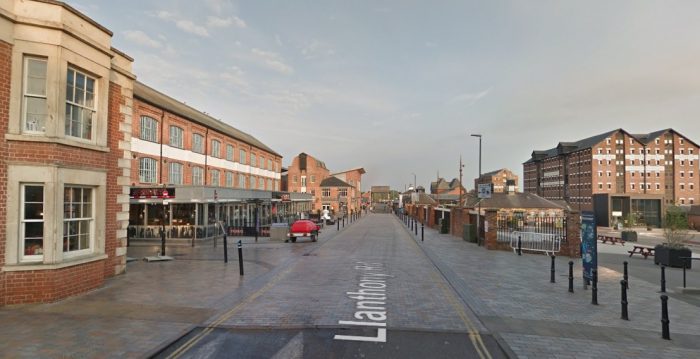
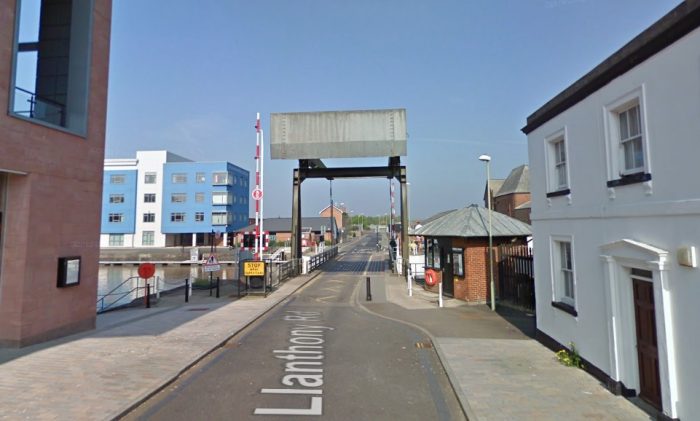
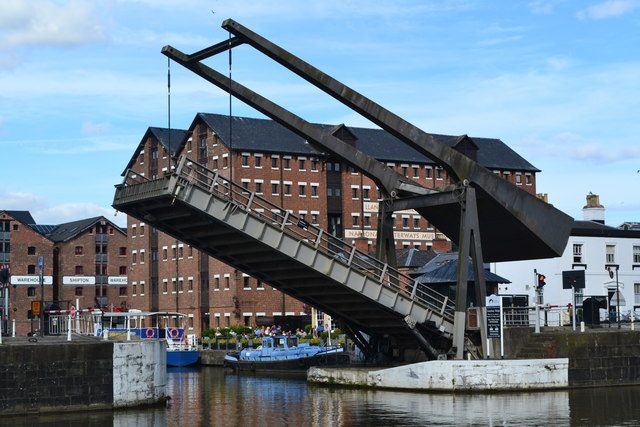
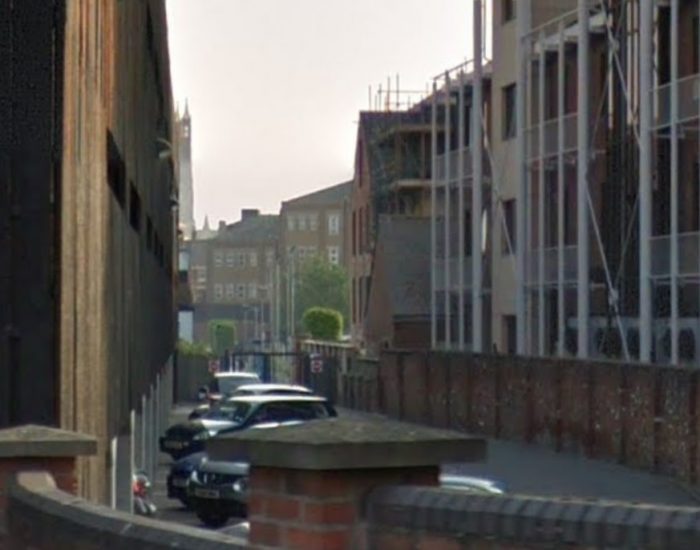
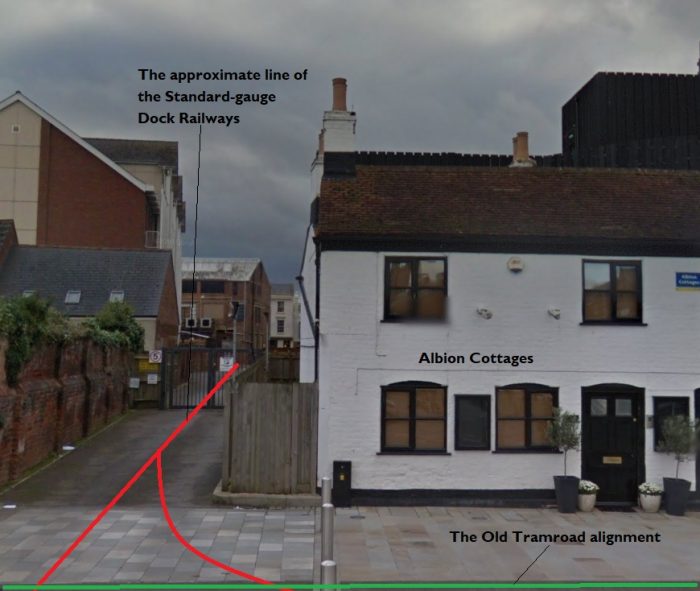
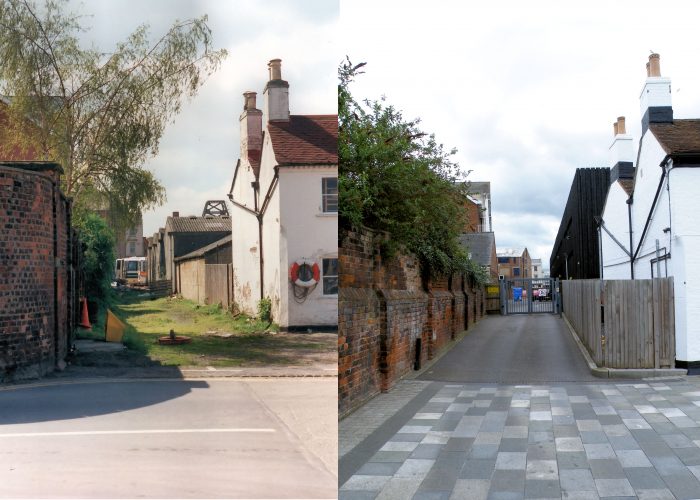
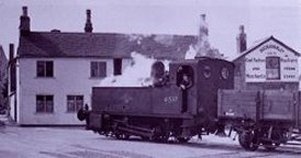
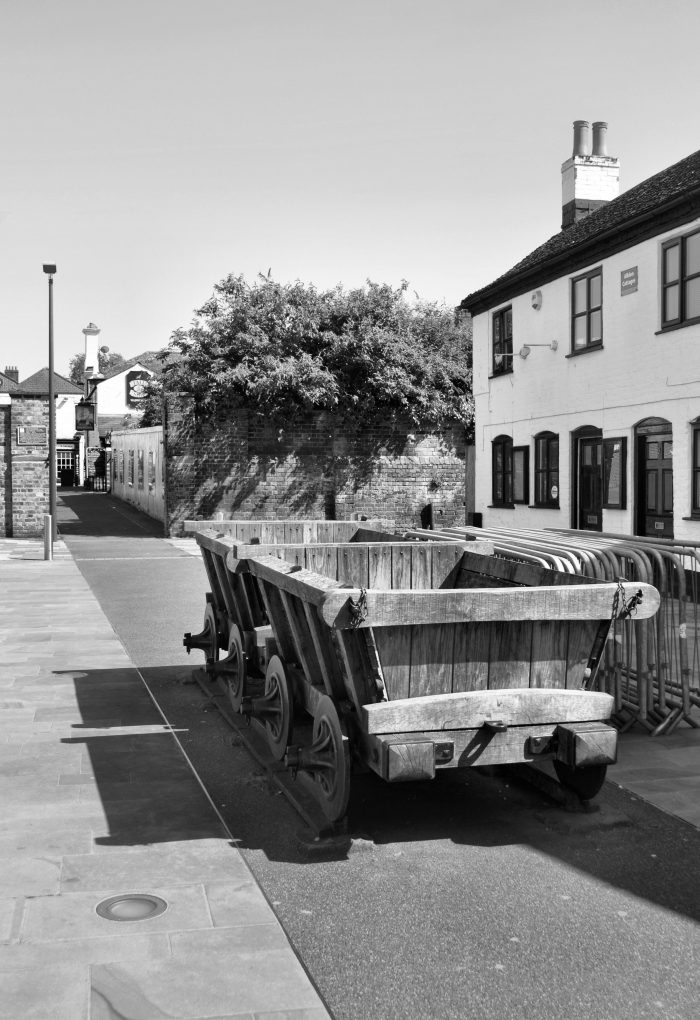
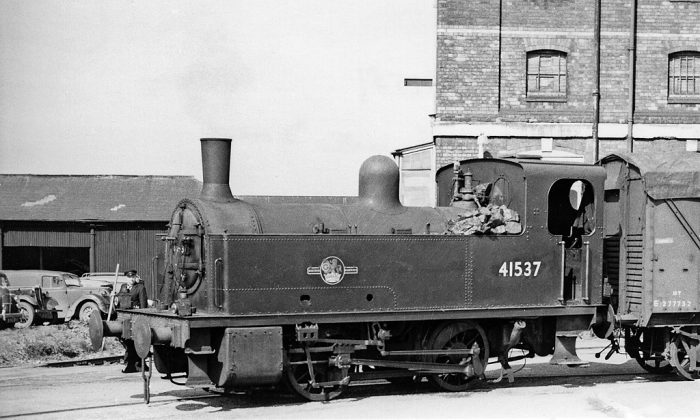
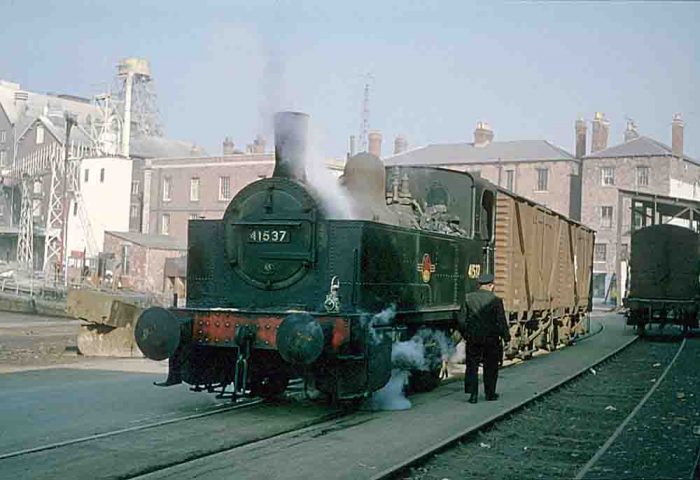
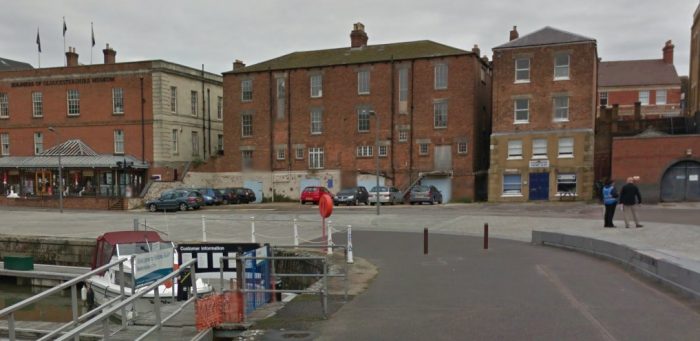
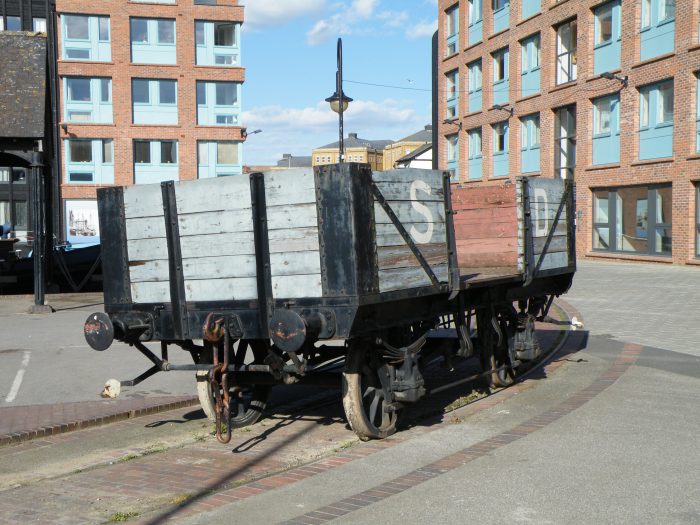
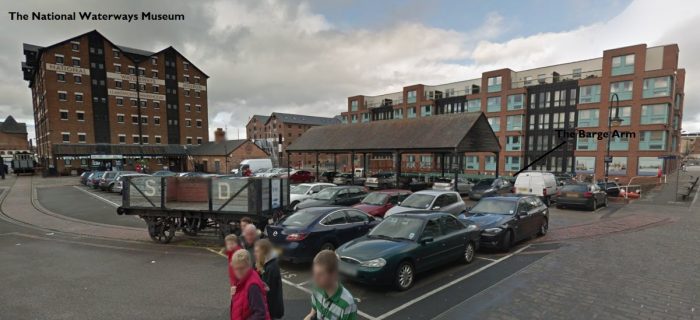
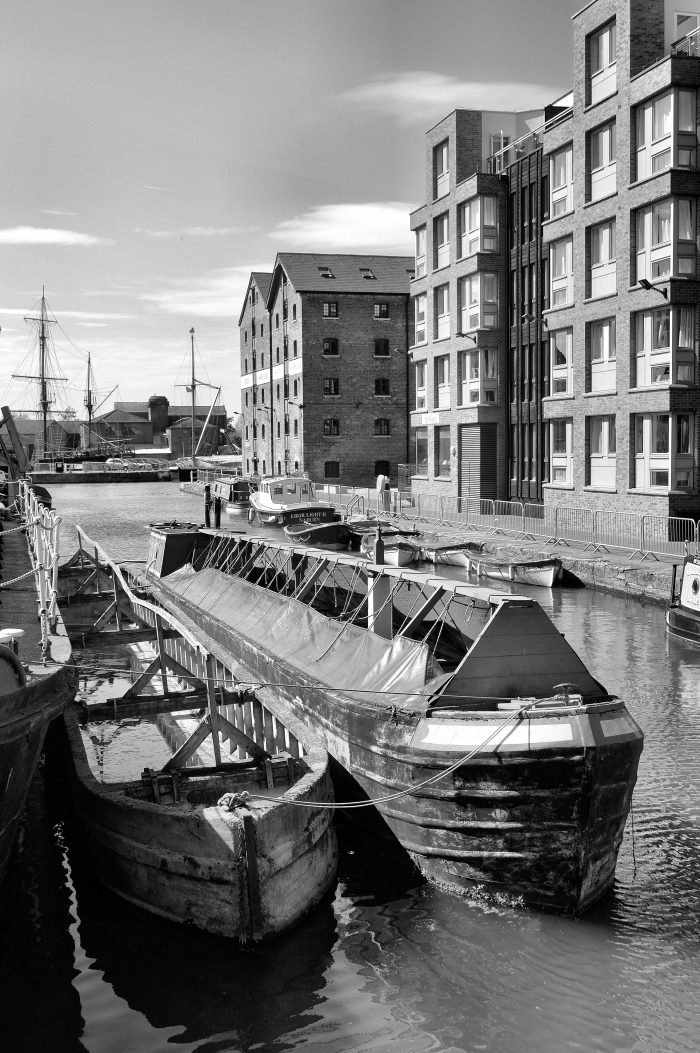
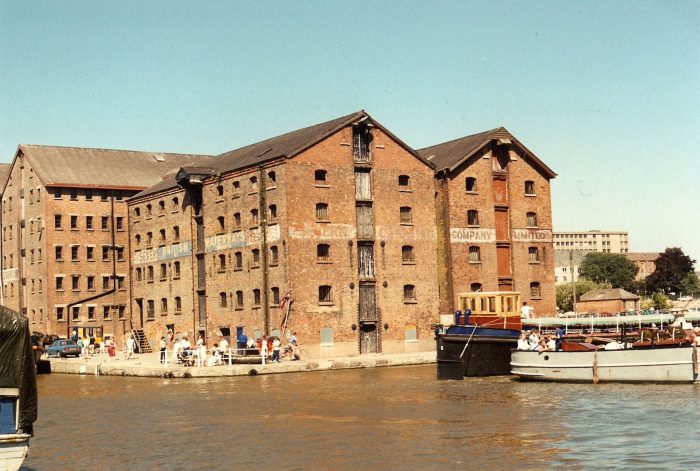
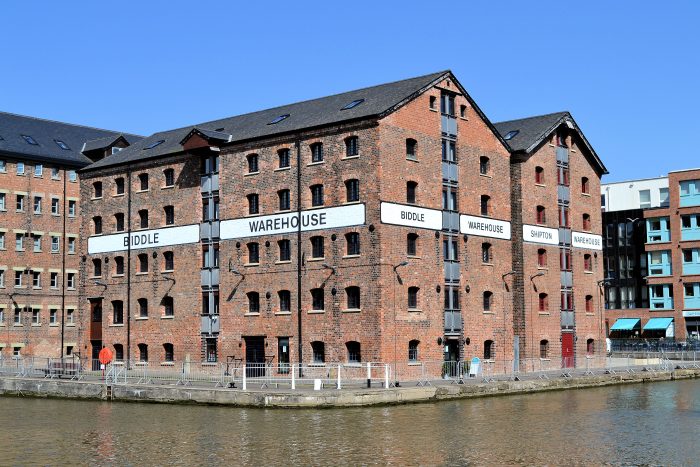
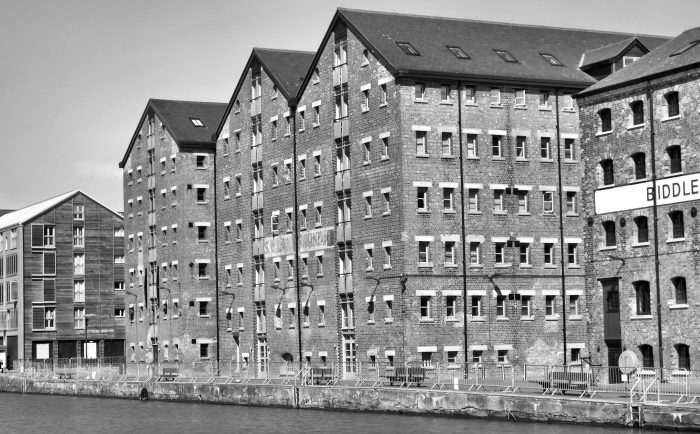
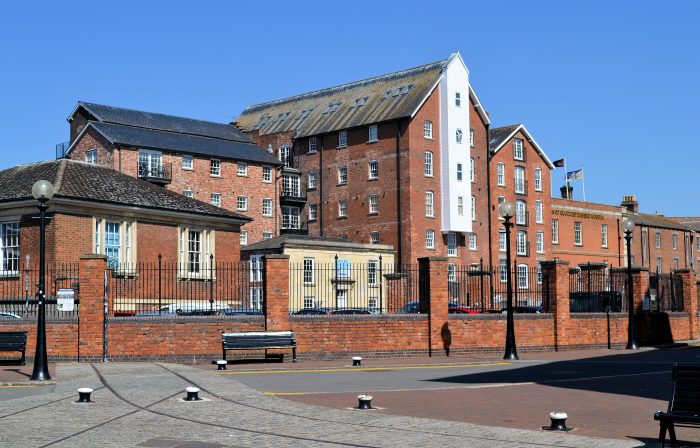
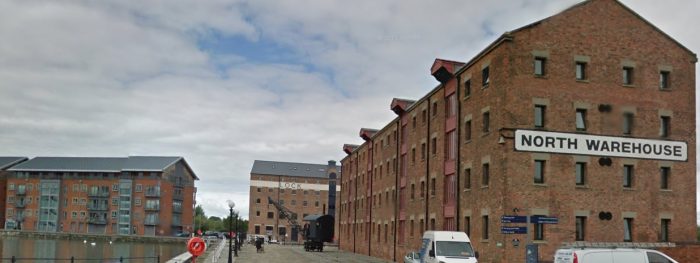
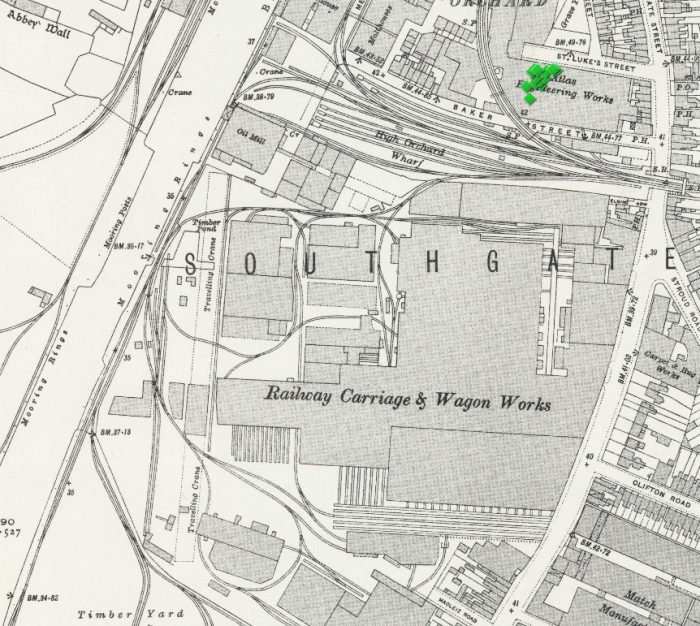
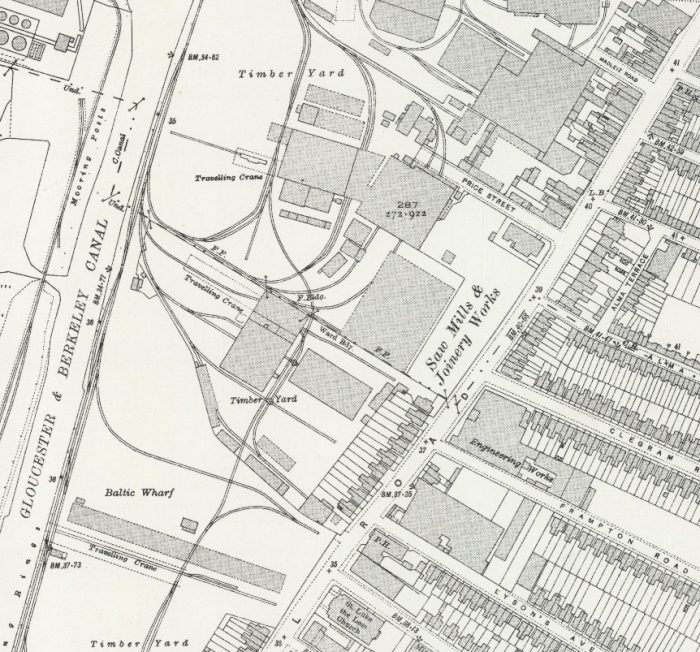
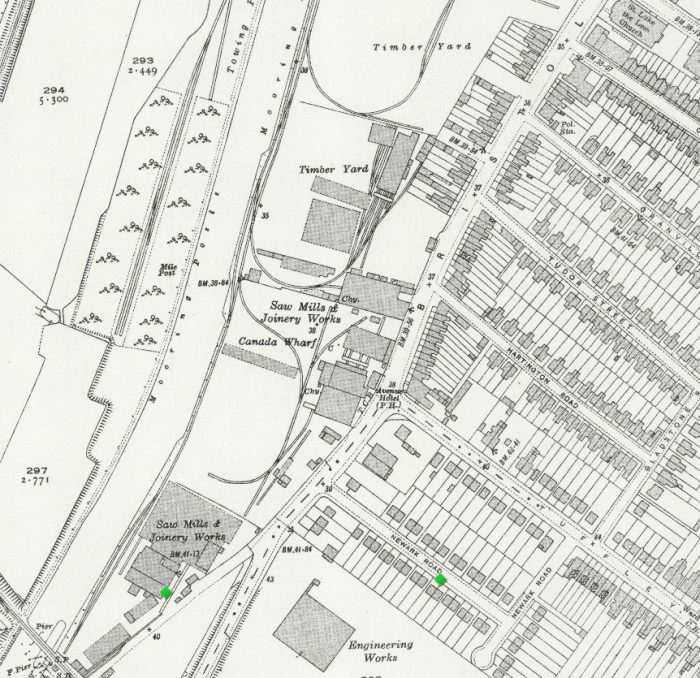
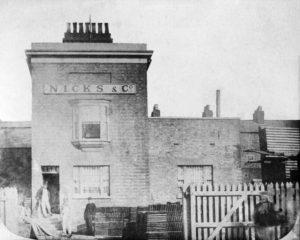
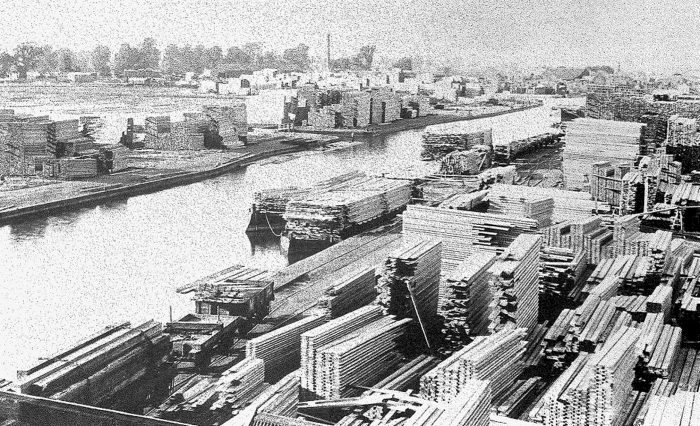
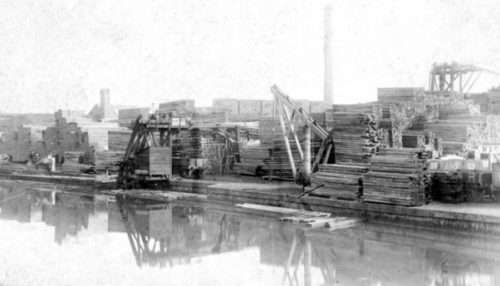
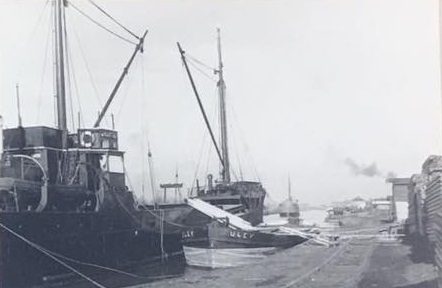
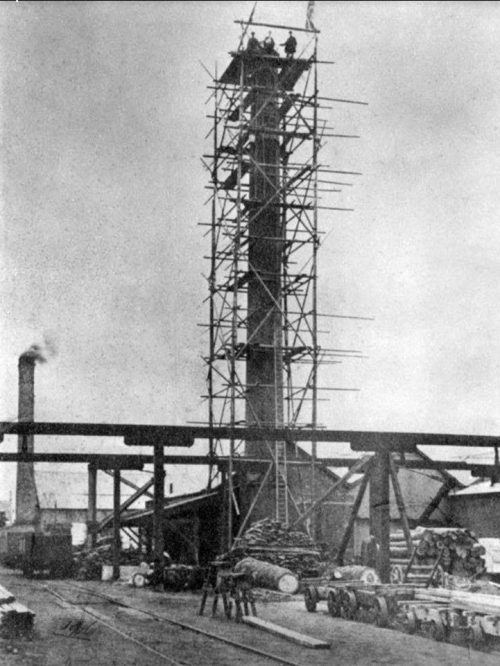
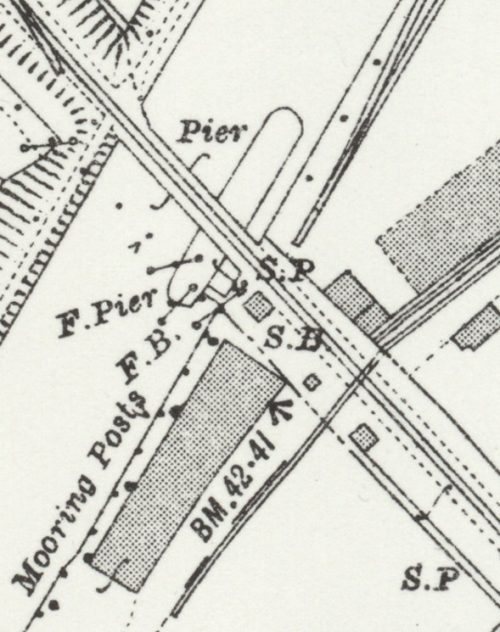
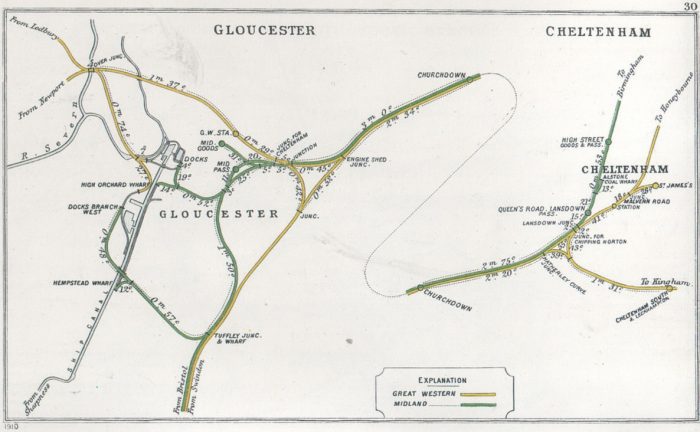
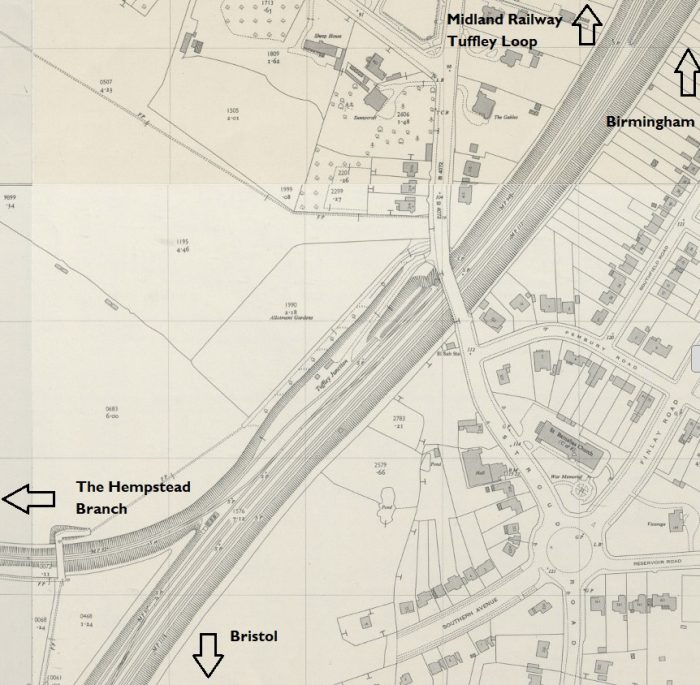
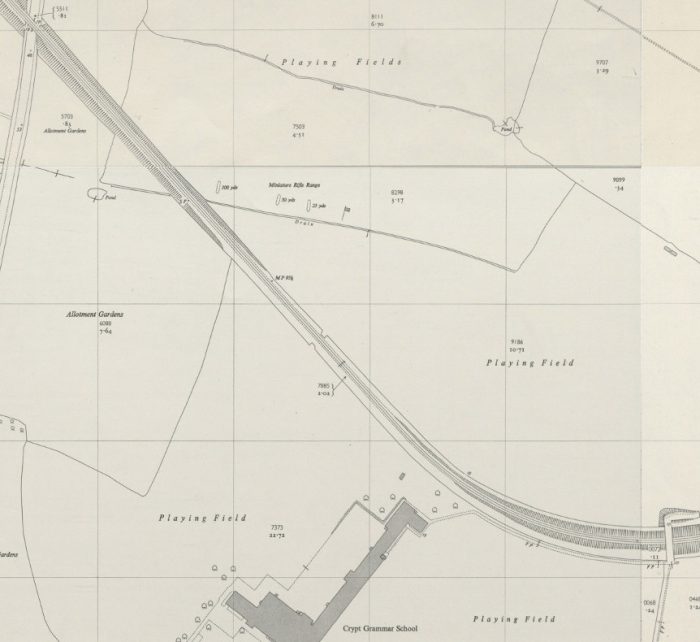

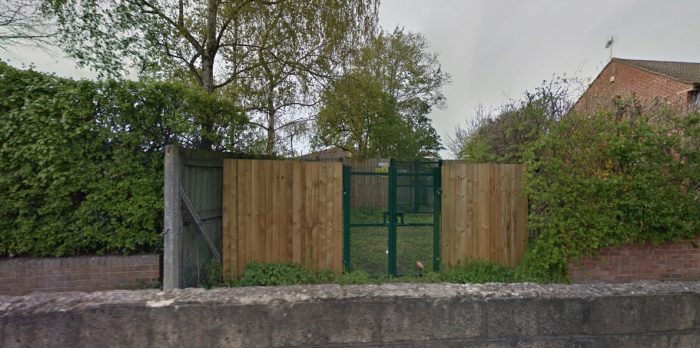
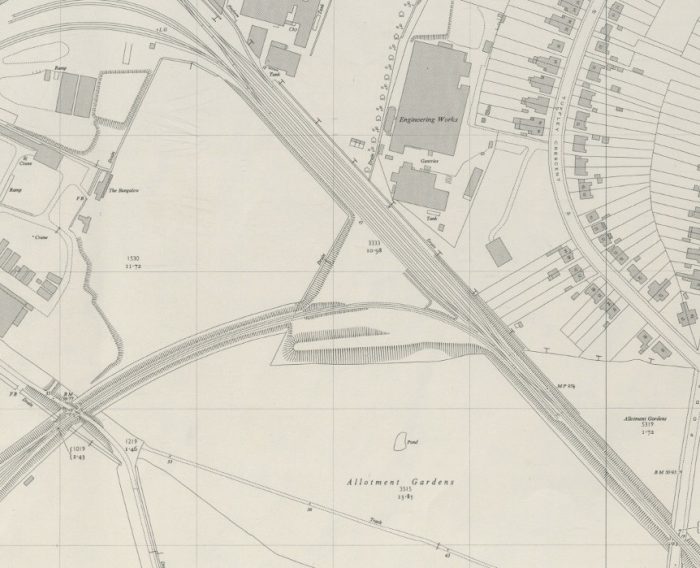
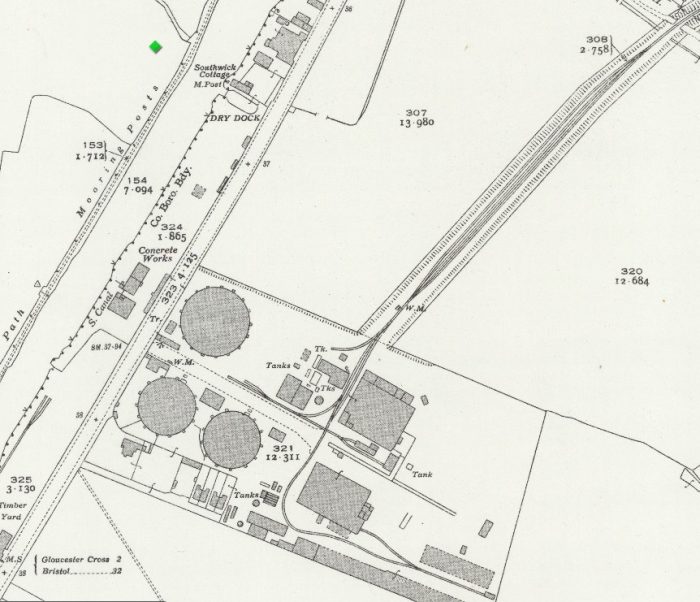
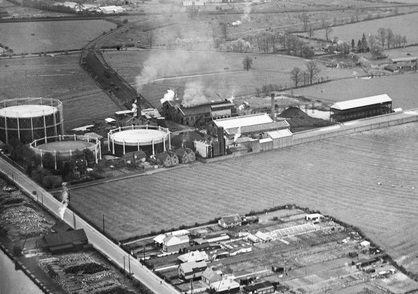
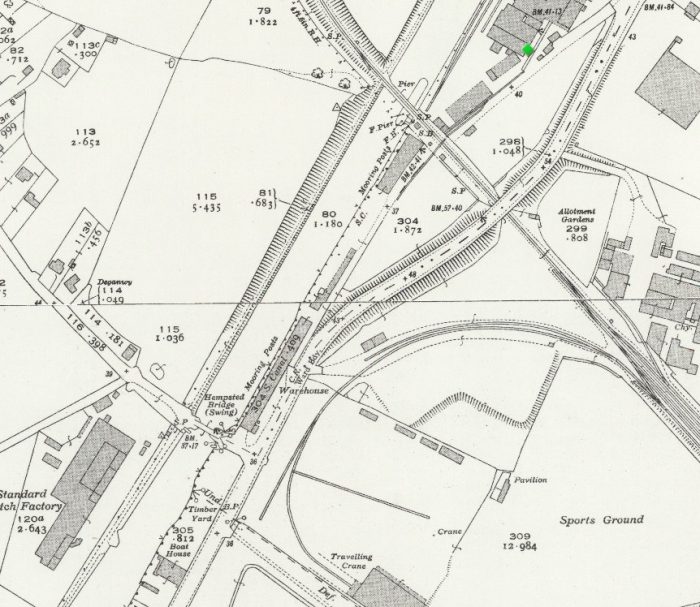
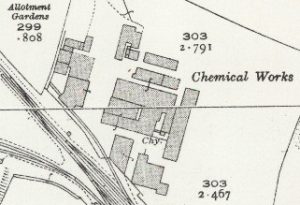
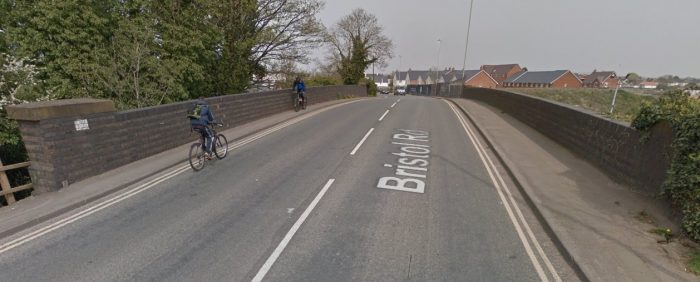
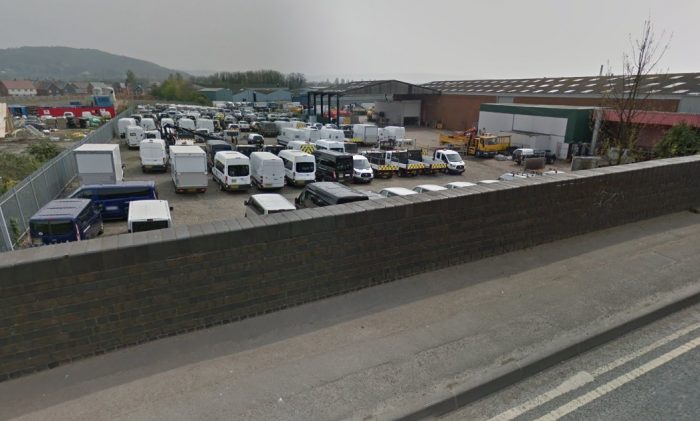
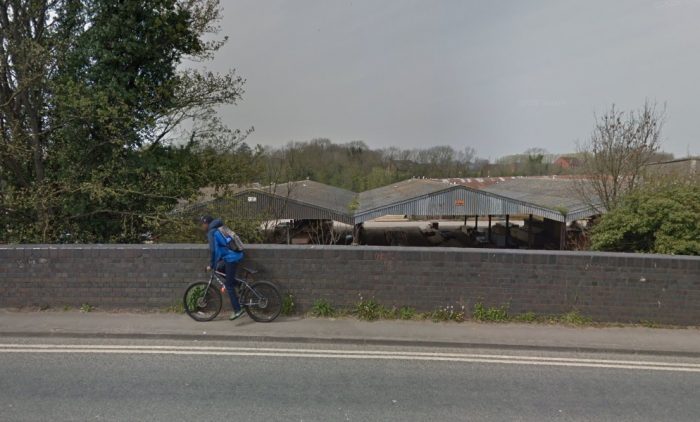
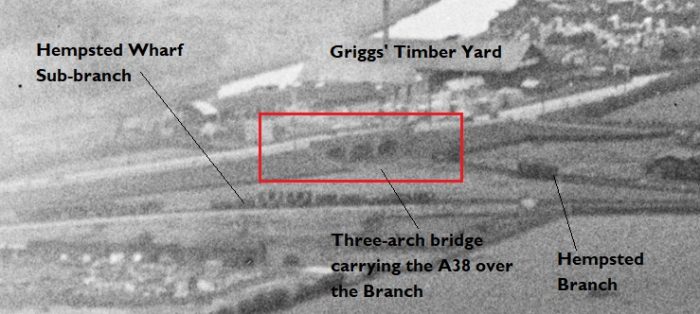
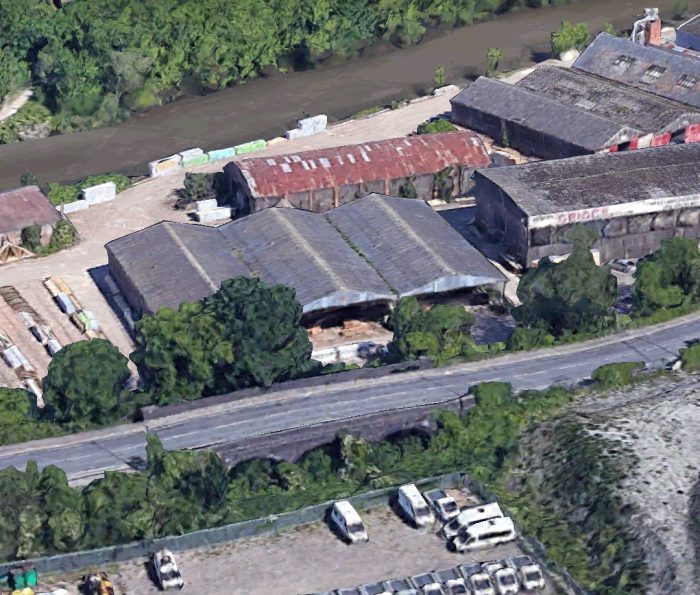
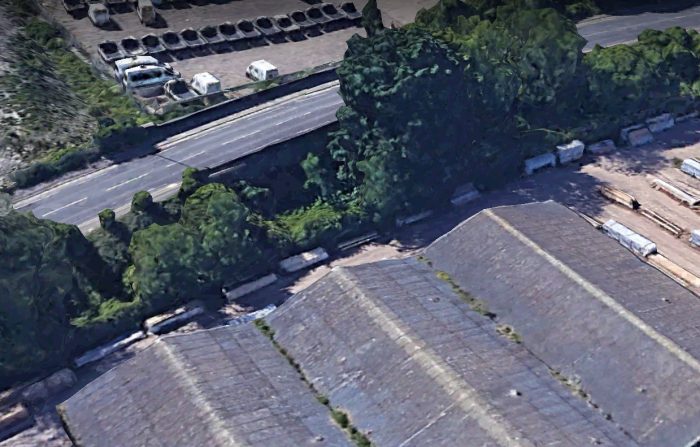
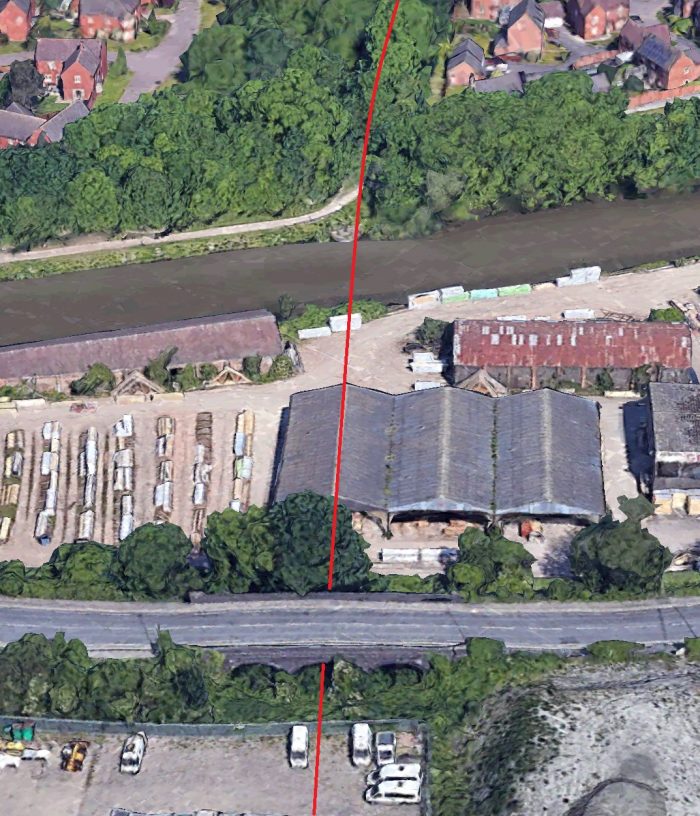
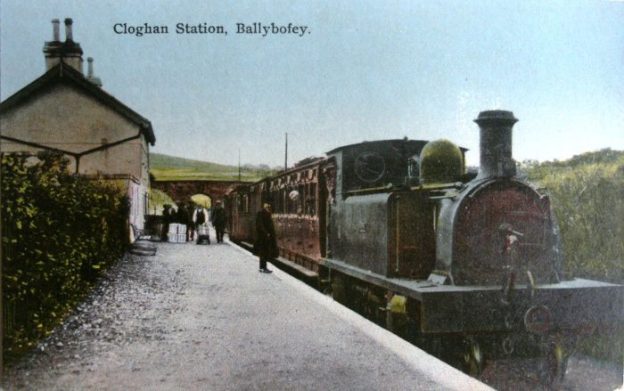
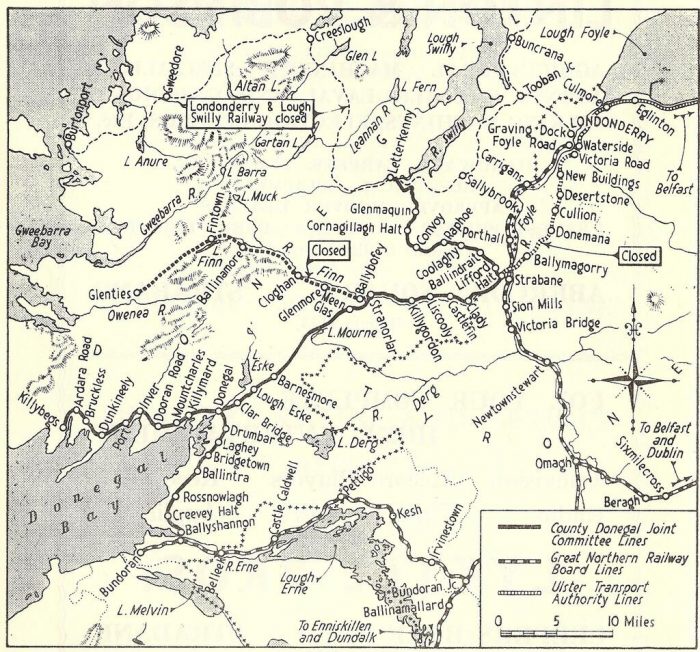
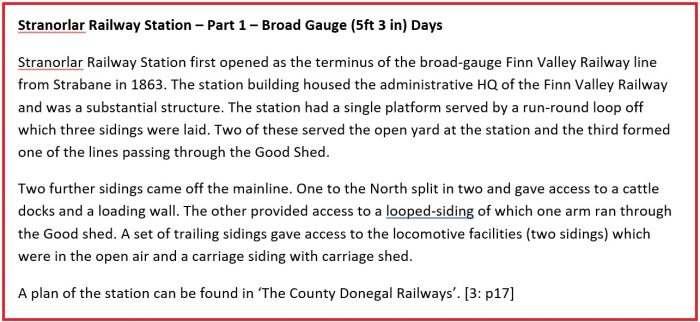
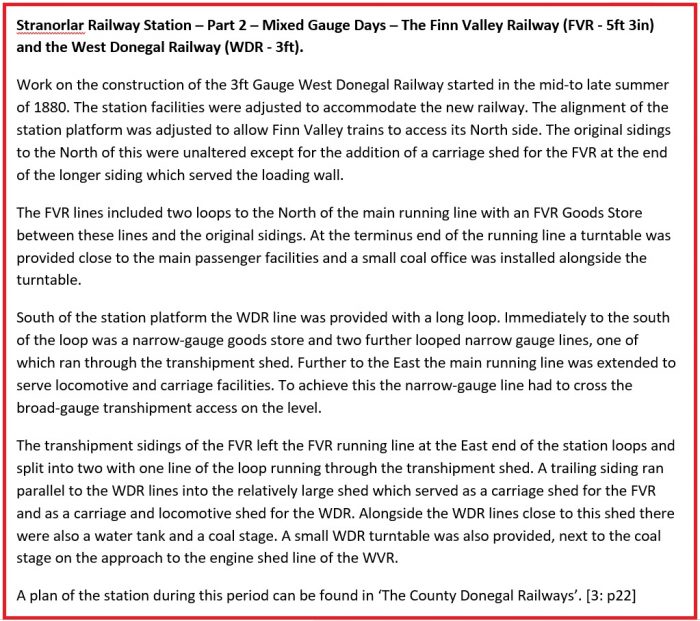
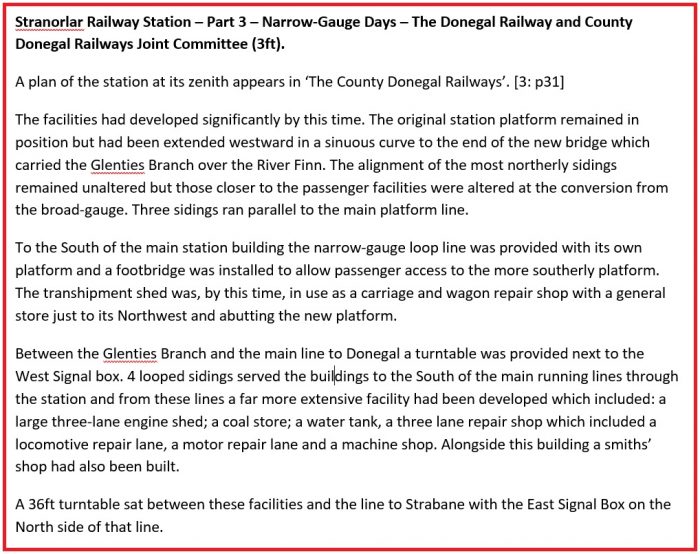
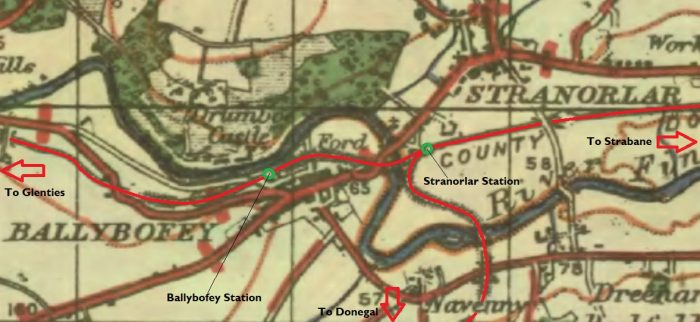
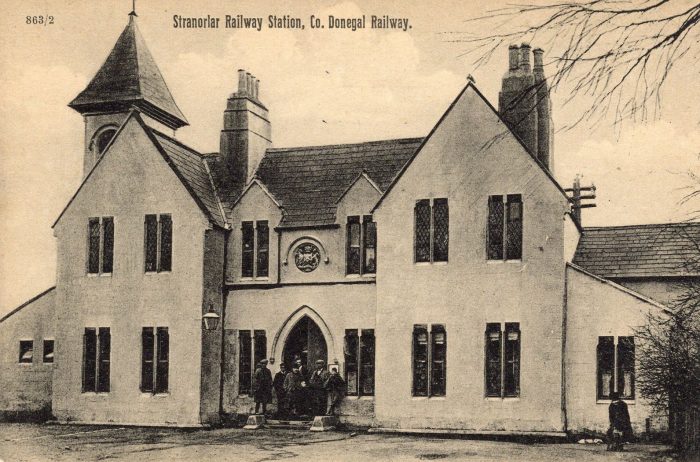
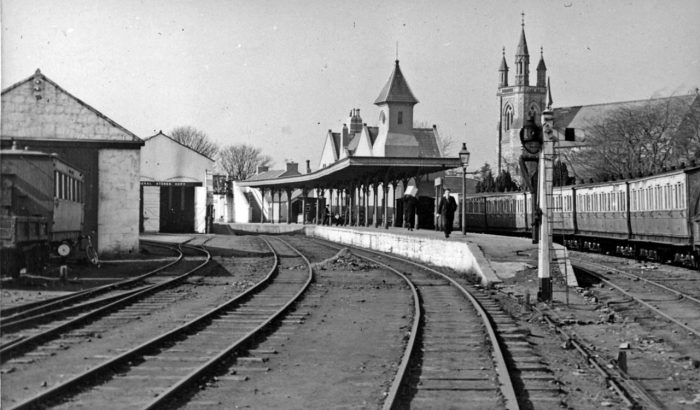
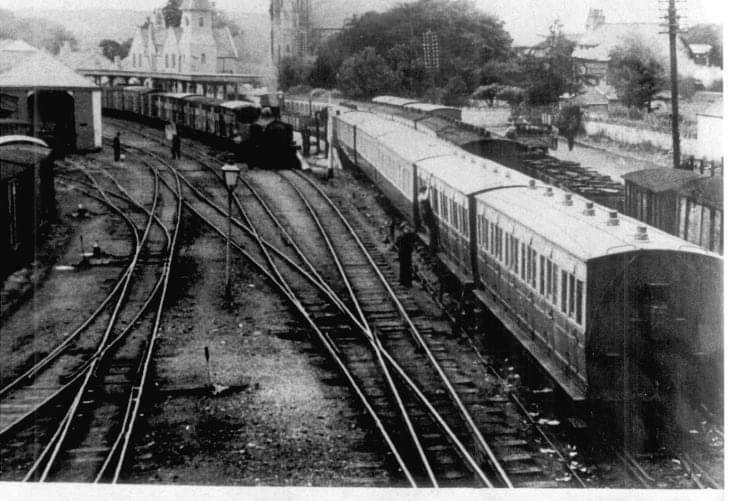 The image above looks into the site of Stranorlar Railway Station from the direction of Strabane. I found it on the Irish Railway Modeller’s Forum. [27] The contributor had found it on Facebook.
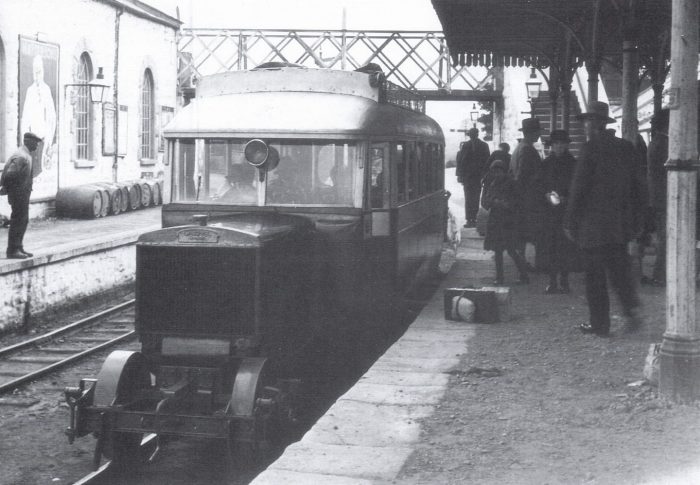


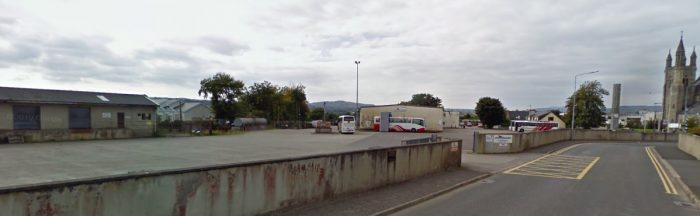

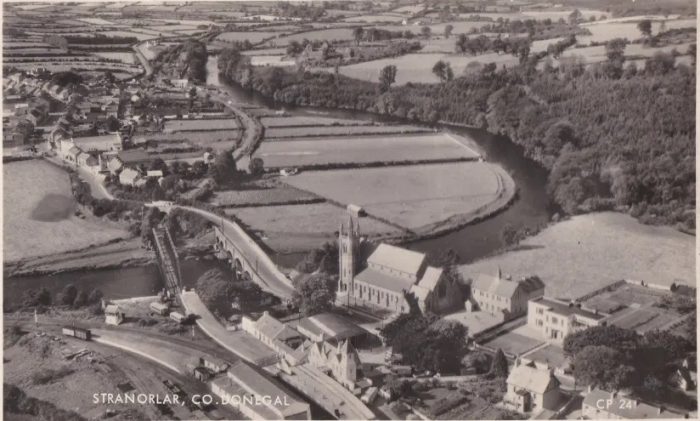
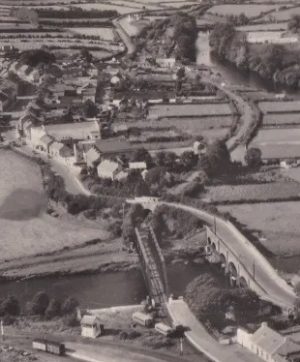
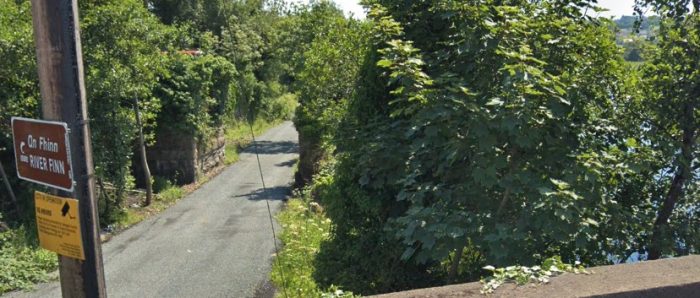
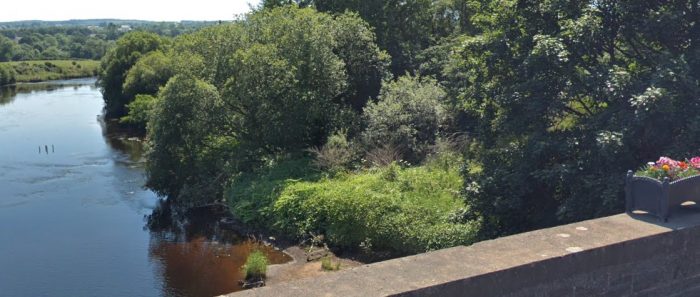
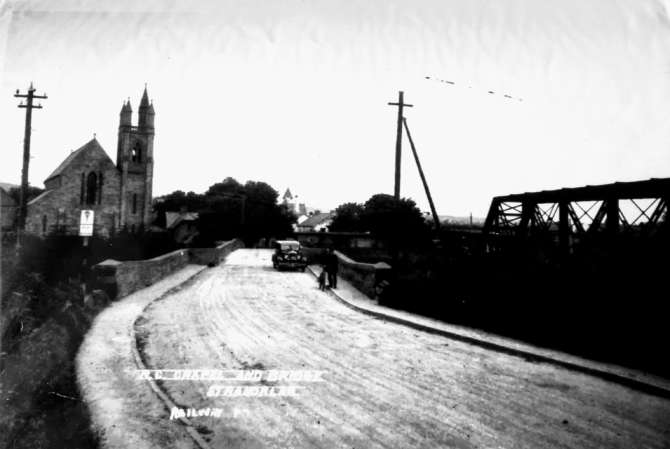
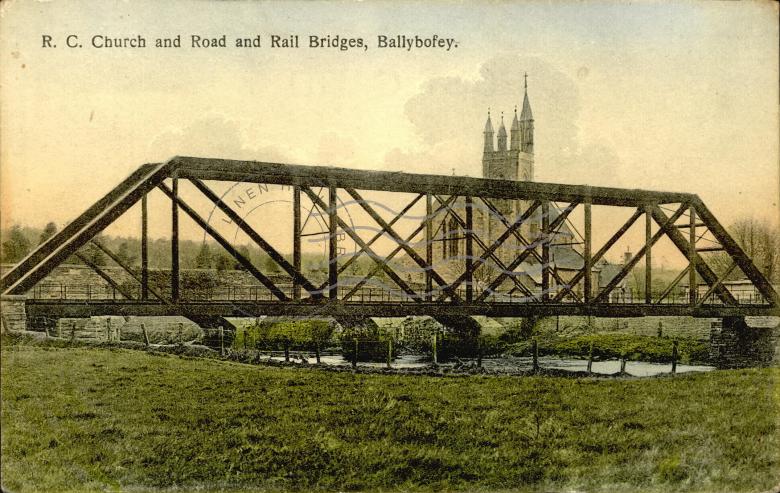
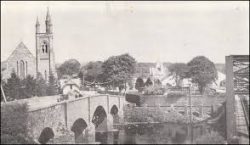
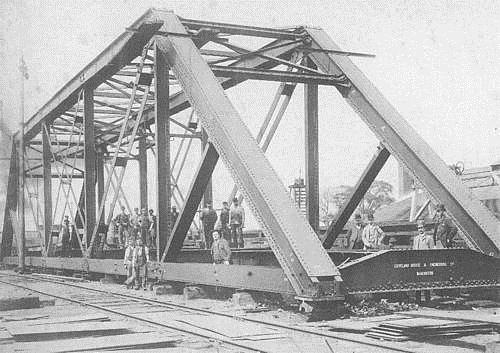
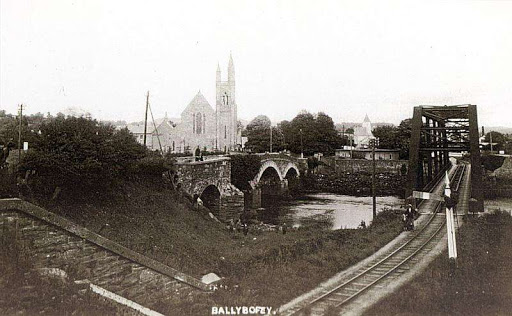
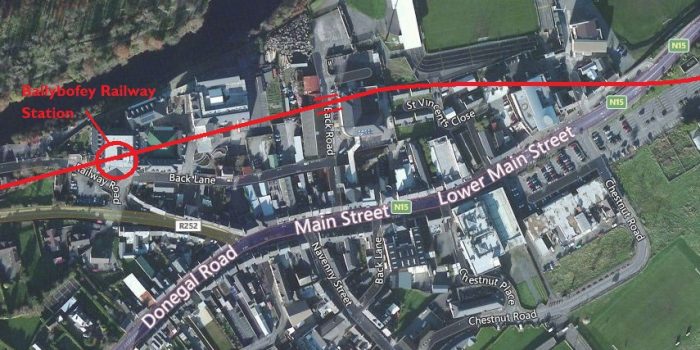
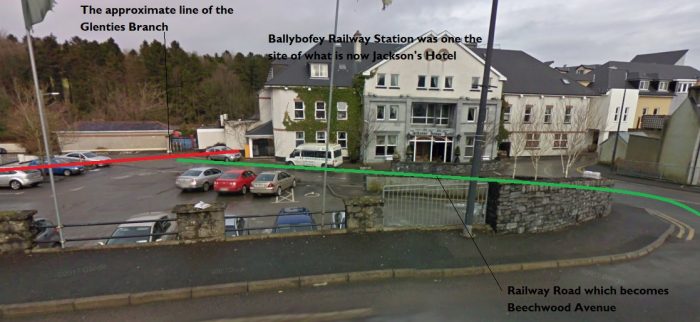
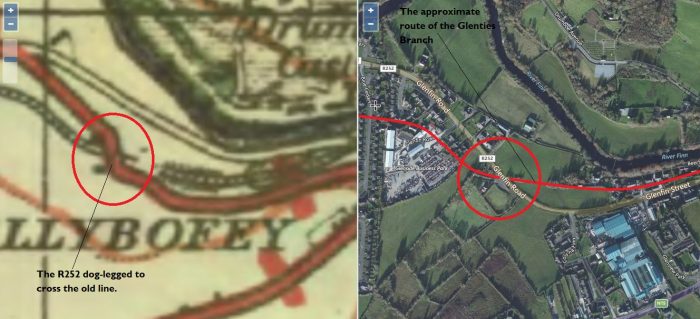
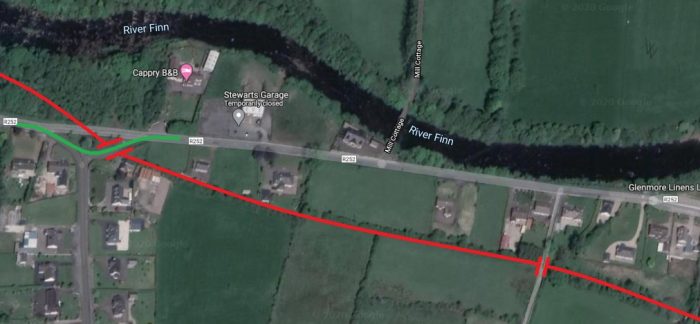
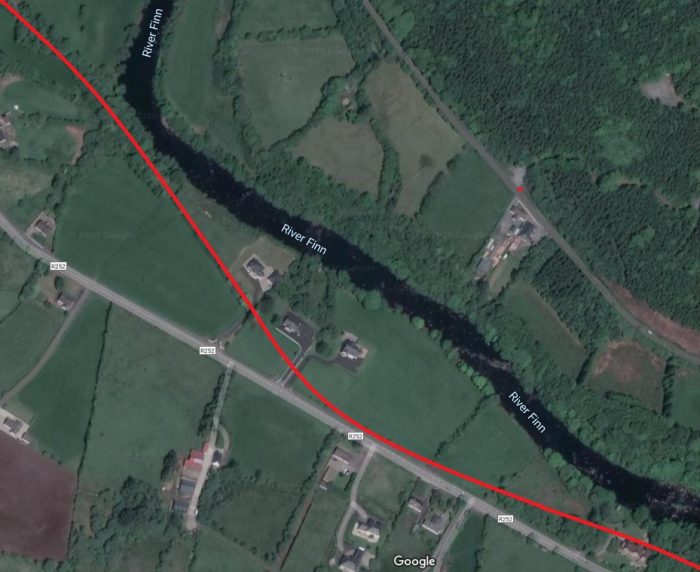
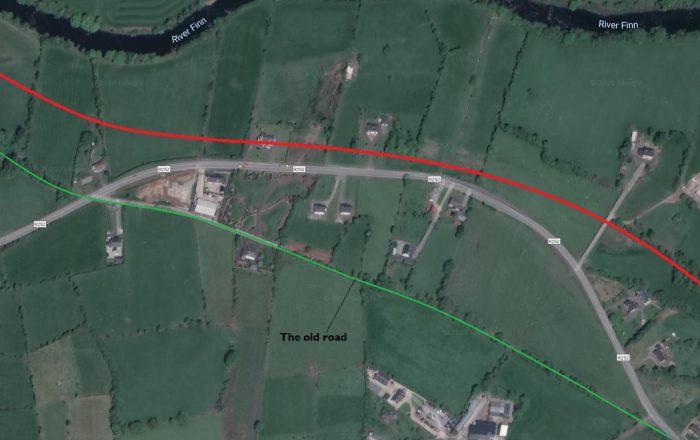
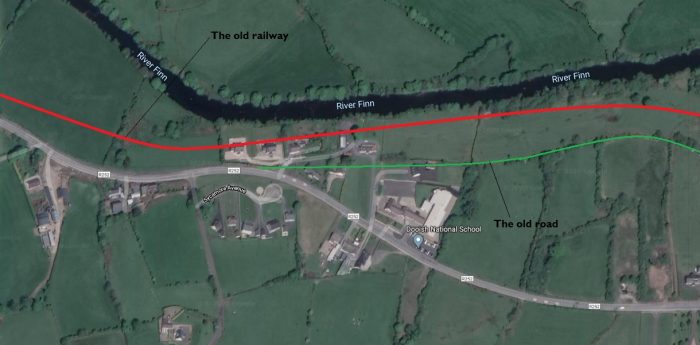
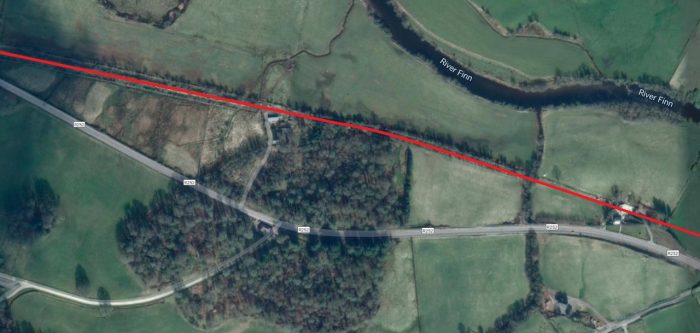
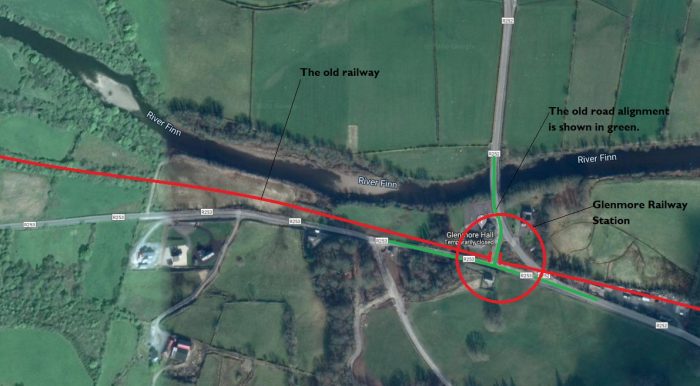
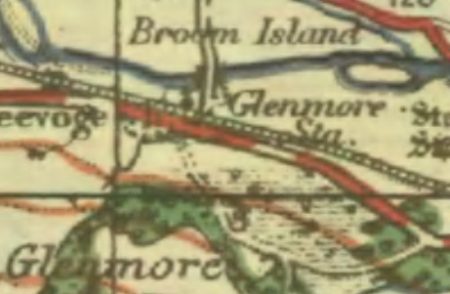
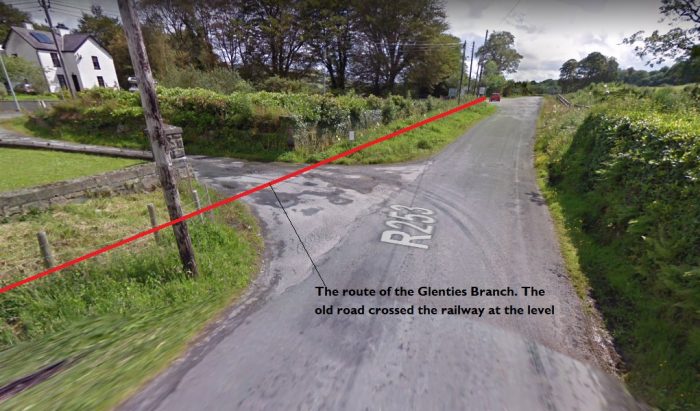
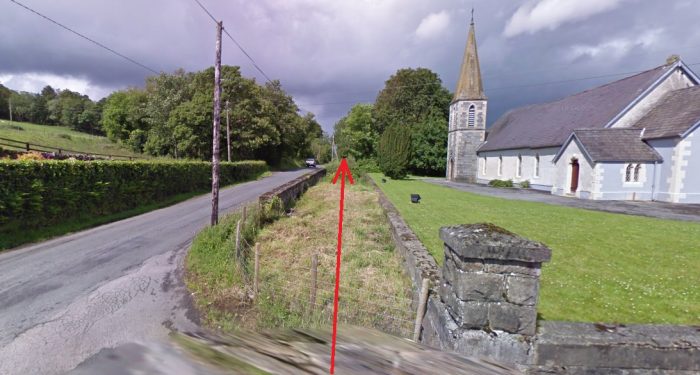
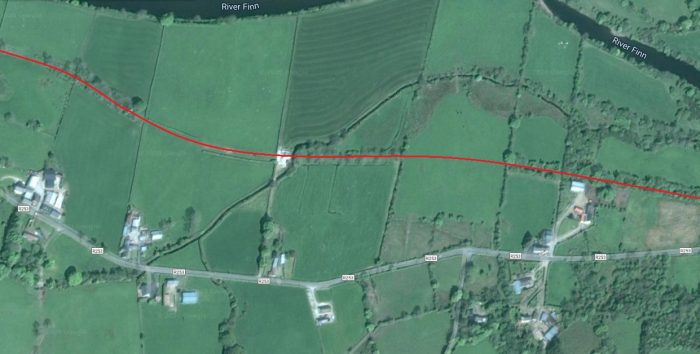
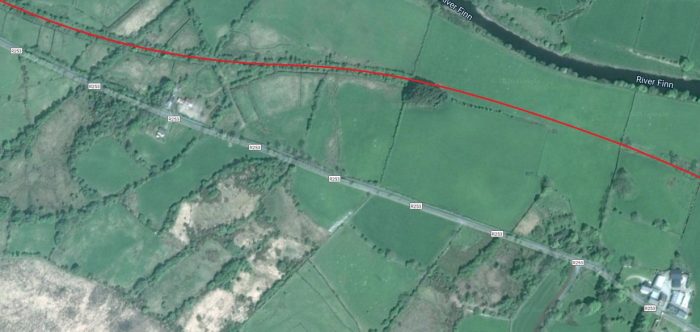
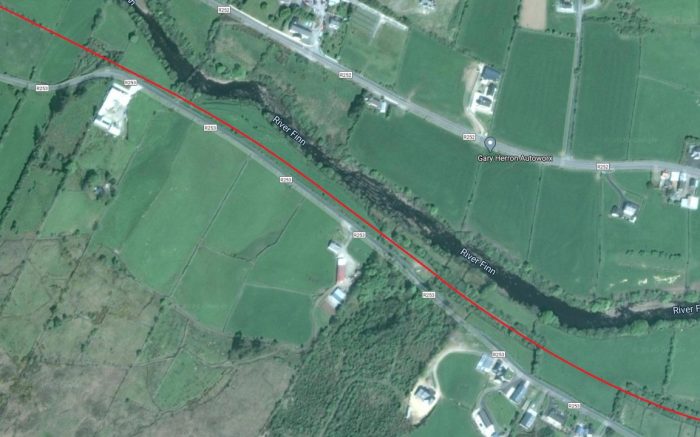

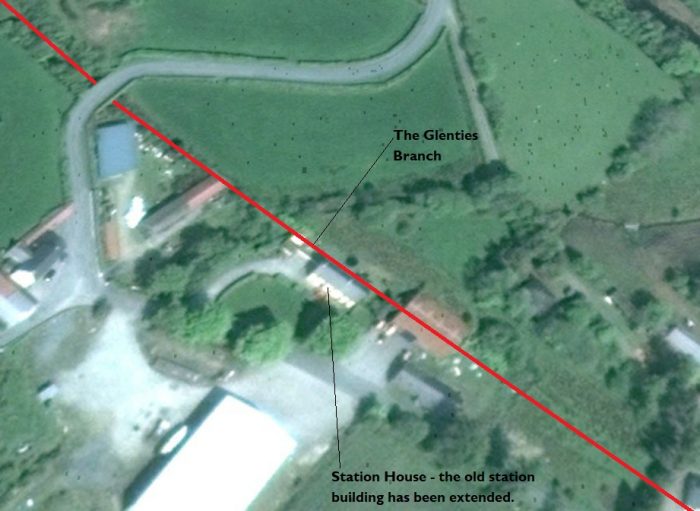

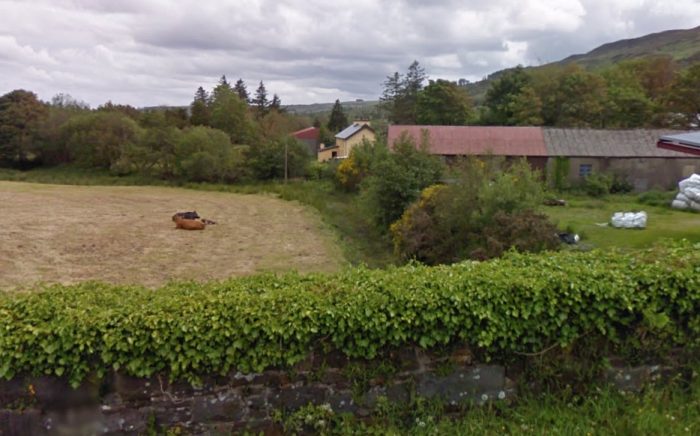
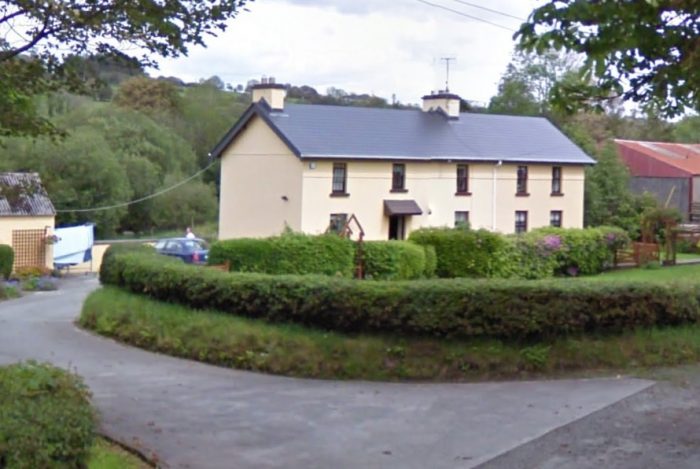
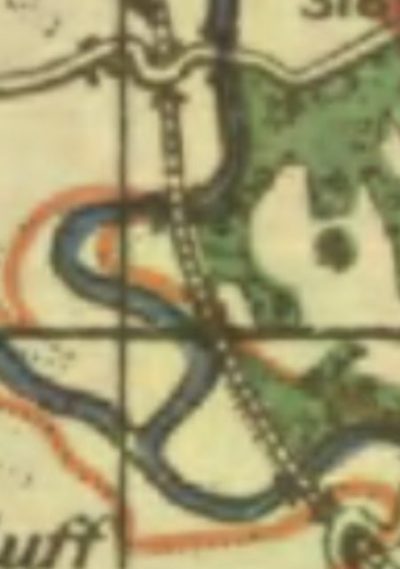
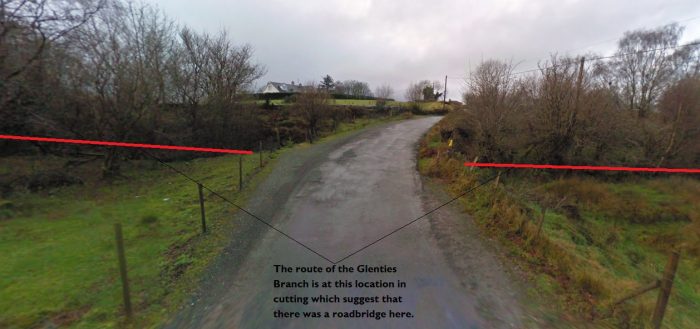
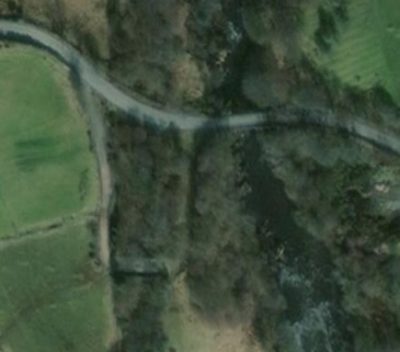
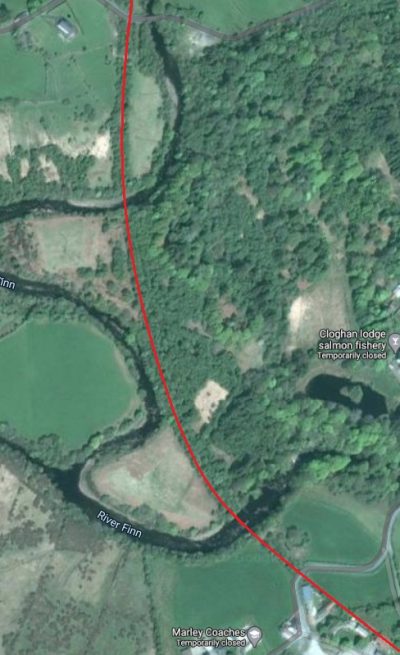
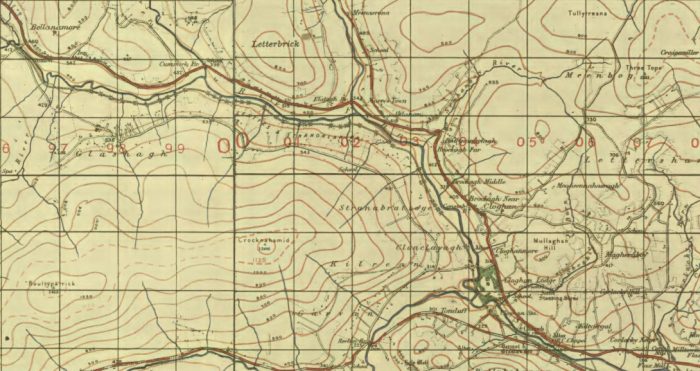
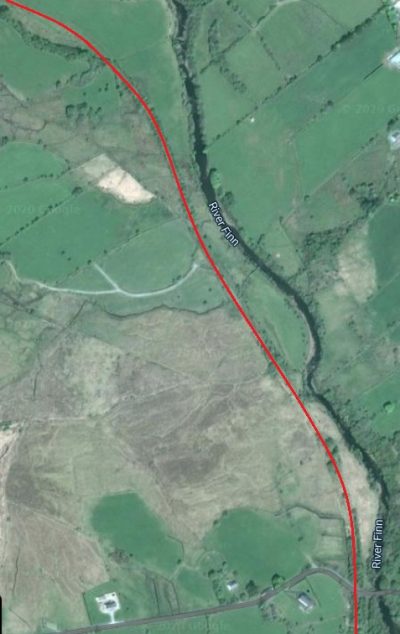
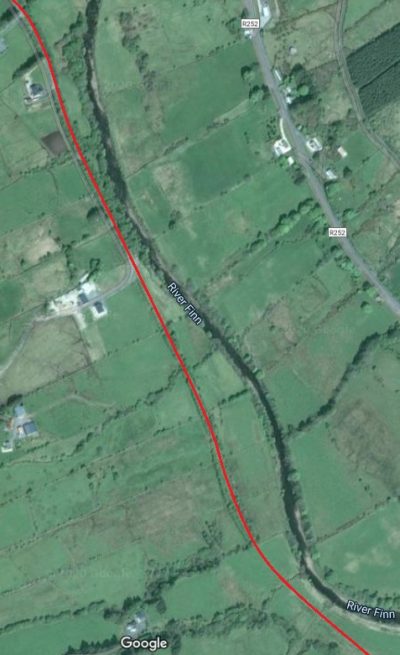
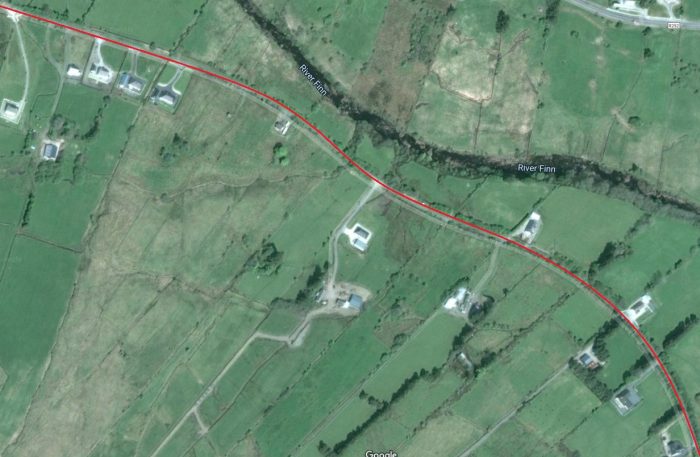
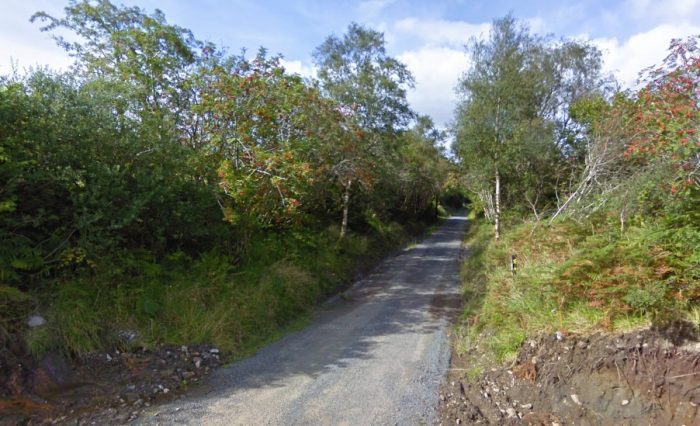
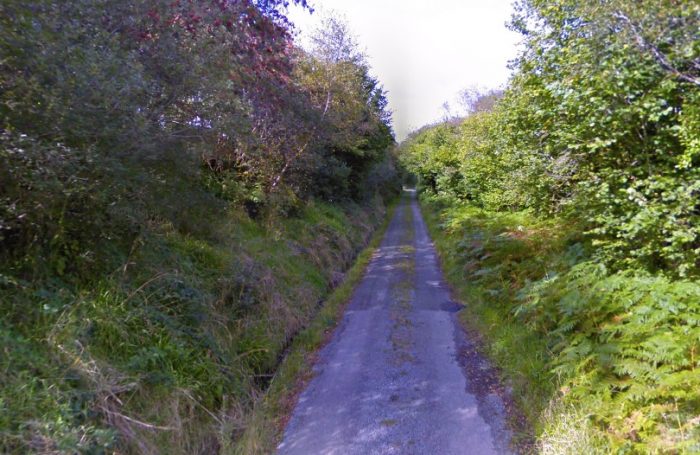
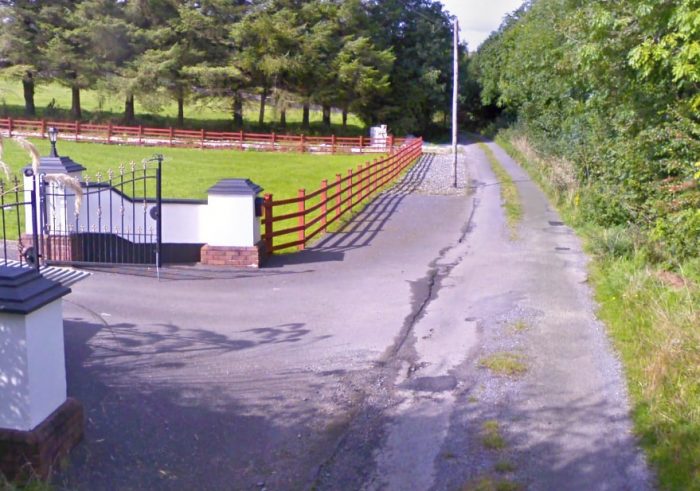
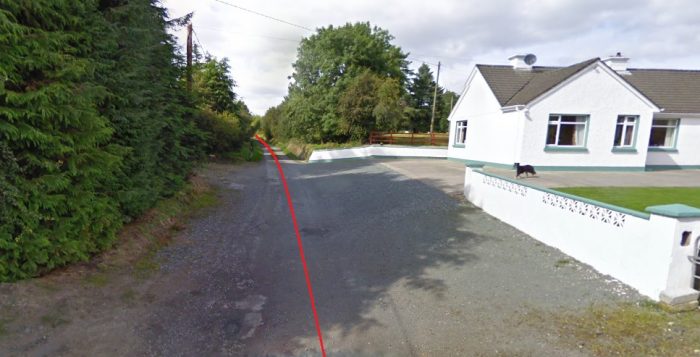
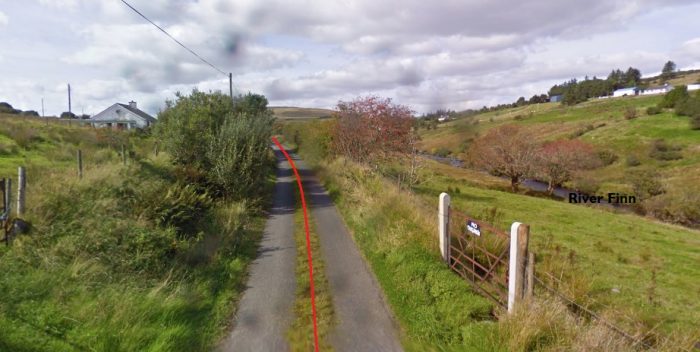
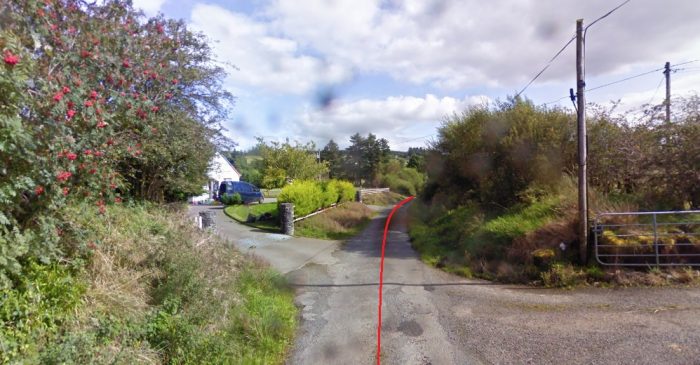
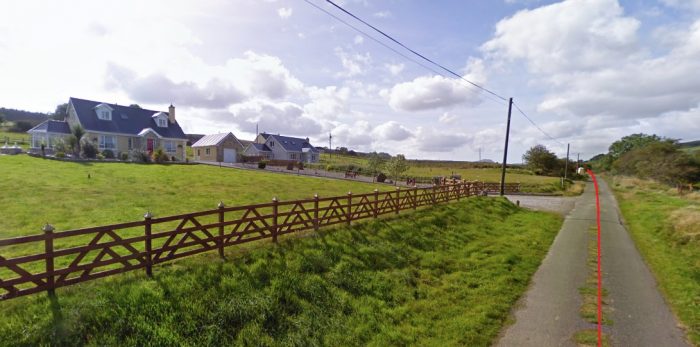
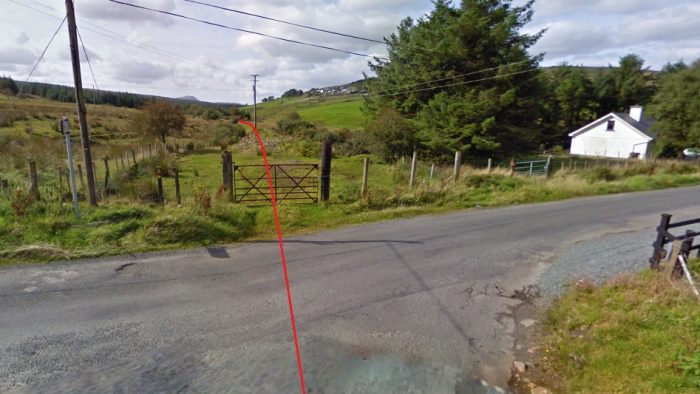

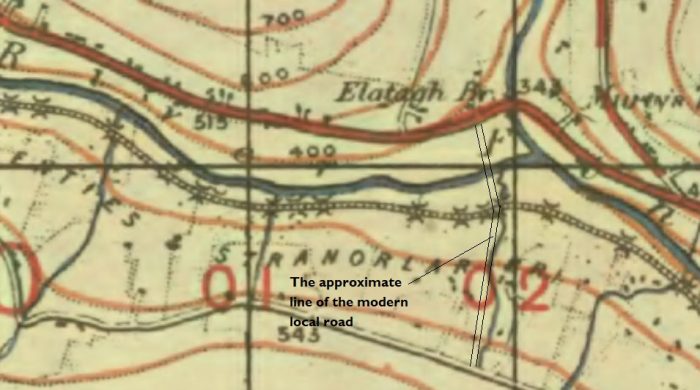
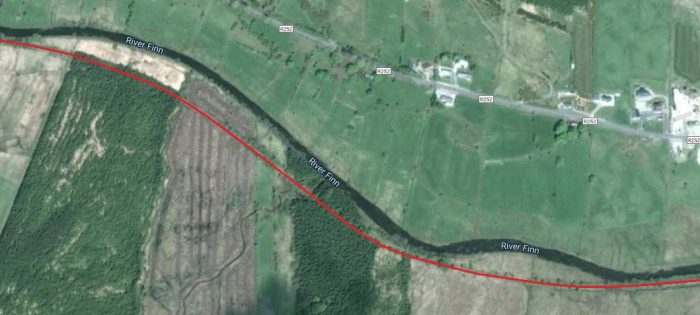
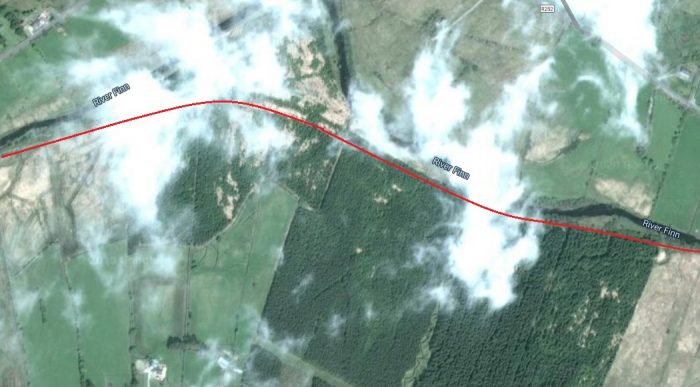
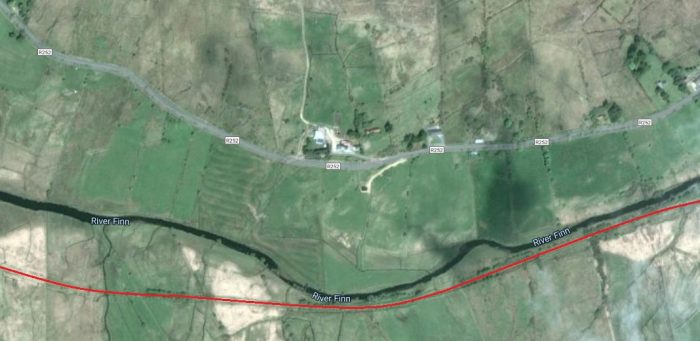
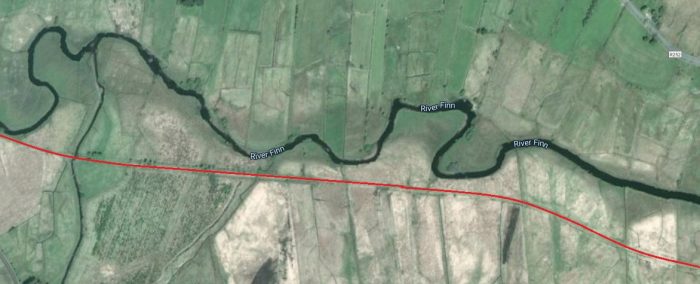
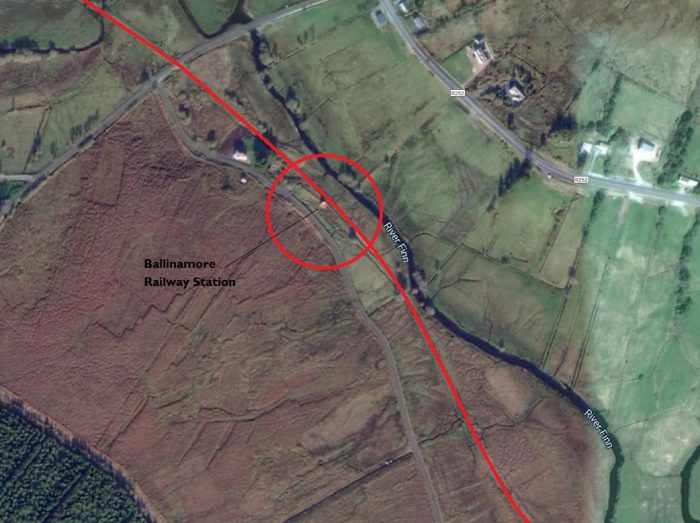
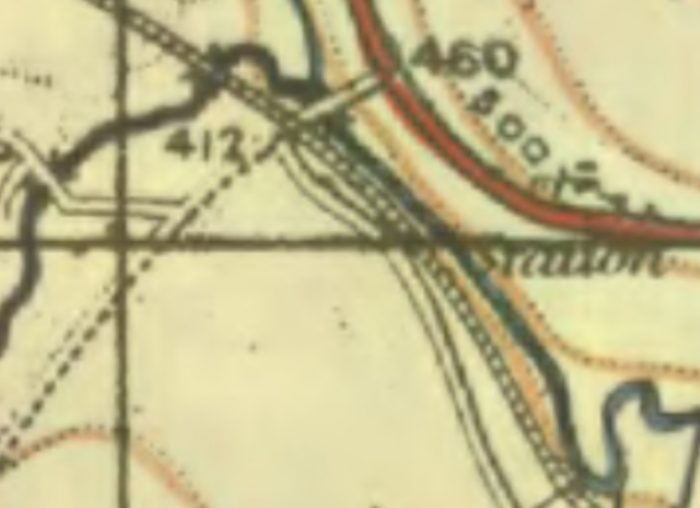
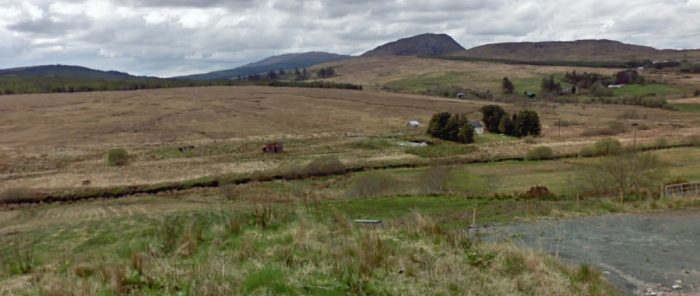

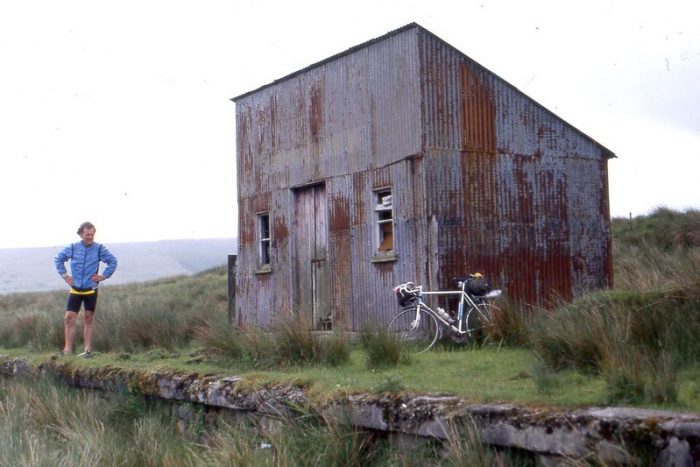


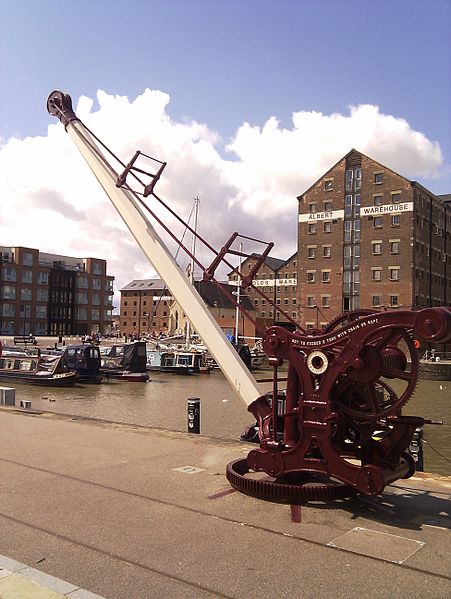
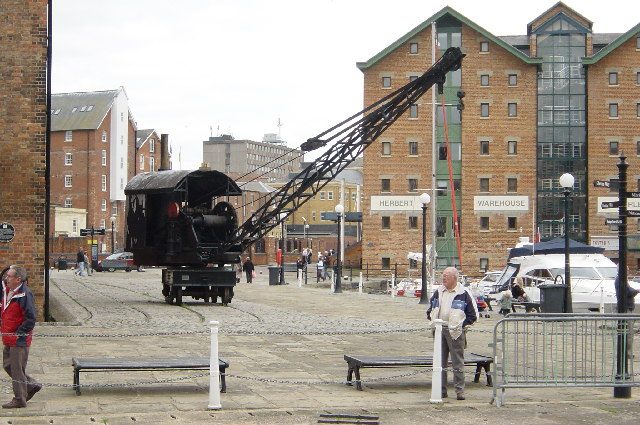

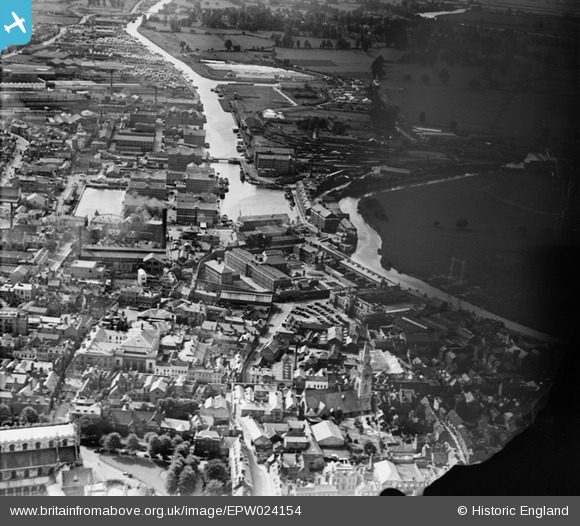
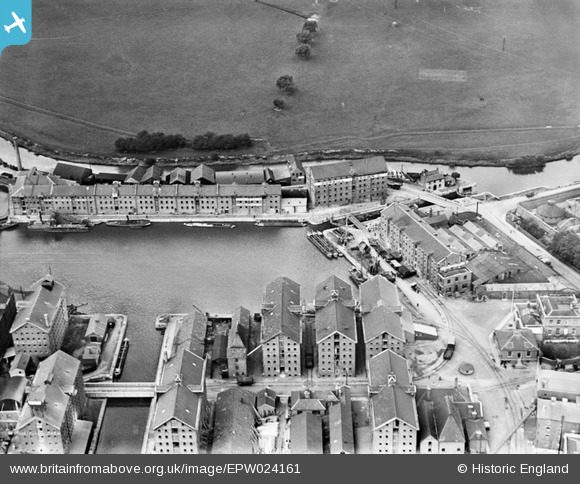
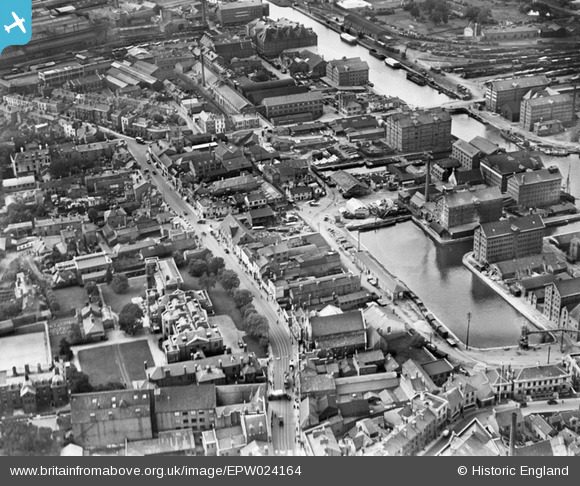

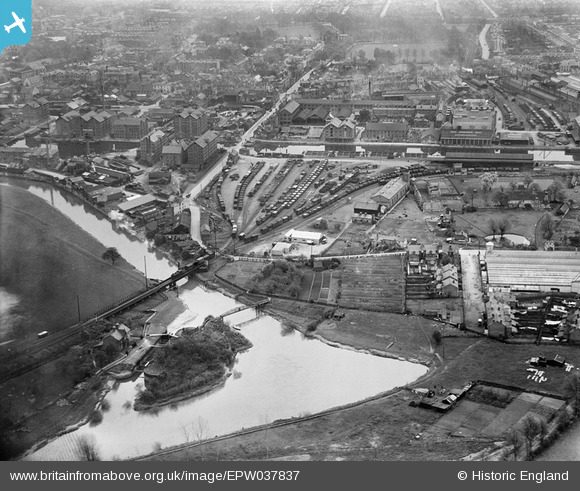

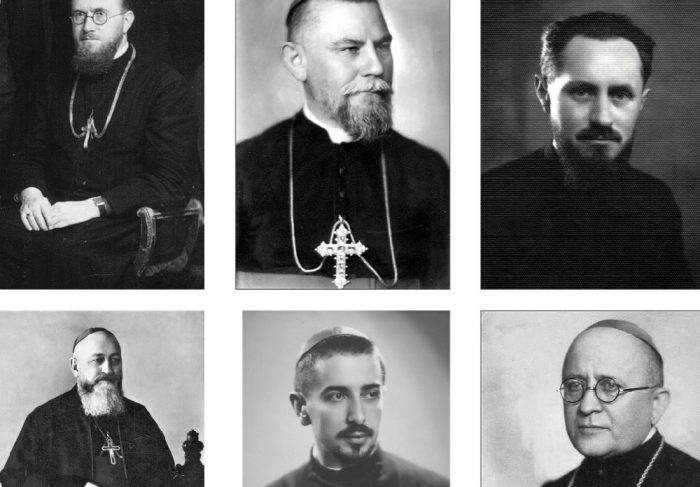


.jpg)