
I am indebted to Alan Young for a number of the images in these articles about the Micklehurst Loop. This is his drawing of the Loop which appears at the head of his article about the Loop on the Disused Stations website. It is used with his kind permission, (c) Alan Young. [7]
During January 2021, my wife and I walked the majority of the length of the Micklehurst Loop from Stalybridge to Diggle. This was the goods relieving line for the main Stalybridge to Huddersfield railway line. It had been hoped to alleviate congestion by making the mainline into a 4-track railway but the geography mitigated against this and a route on the other side of the Tame Valley was chosen instead.
The maps used in this sequence of articles are predominantly 25″ OS Maps from 1896 through to 1922 and have been sourced from the National Library of Scotland. [1] There are a number of websites which focus on the Loop which are excellent. The sites concerned are noted immediately below and the relevant link can be found in the references section of this page or by clicking on the highlighted text here:
- The most detailed treatment of the line and its stations can be found on the Disused Stations – Site Records website. The particular pages on that site which cover the Loop were provided by Alan Young. One page covers the route and pages covering each of the stations can be accessed from that page. [7]
- Particularly good for old photographs of the Loop is the Table 38 webpage about the railway. [9]
The first articles about the Micklehurst Loop can be found at:
The Micklehurst Loop – Part 1
The Micklehurst Loop – Part 2
The Micklehurst Loop – Part 3
There is a series of addenda to these articles which include additional material found or shared with me after the drafting of the relevant article. These can be found on the following links:
The Micklehurst Loop – Part 1A
The Micklehurst Loop – Part 1B
The Micklehurst Loop – Part 1C – Including Hartshead Power Station
The Micklehurst Loop – Part 1D – Some Miscellaneous Items relating to the area around the Staley and Millbrook Goods Yard.
The Micklehurst Loop – Part 3A
In my perambulations around the internet, I have also encountered a series of videos (on YouTube) which start from the Northern end of the line. 5 videos cover the length of the line in 2020 and a separate video covers some of the structures on the line. These videos are easily available on YouTube. This is the first [3] in the series:
Part 4 – Chew Valley Road, Greenfield to Diggle
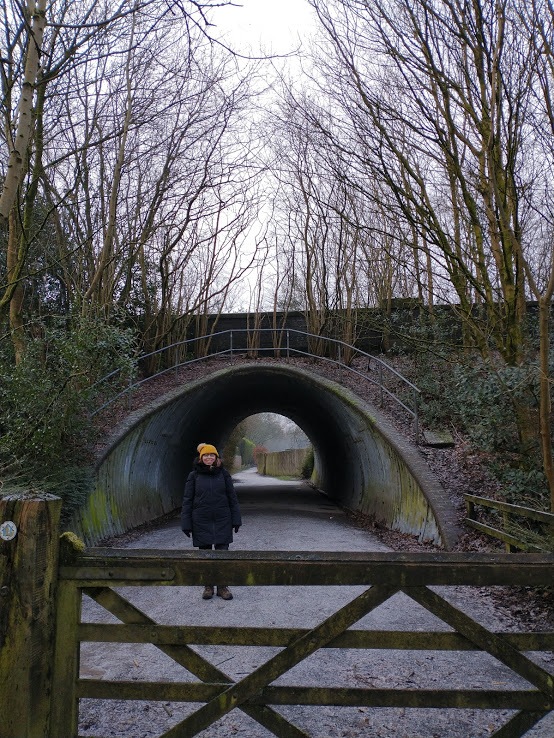
We continue our journey travelling North from Chew Valley Road. The images immediately below appear at the end of the last article about the line which finished at Chew Valley Road. …………..
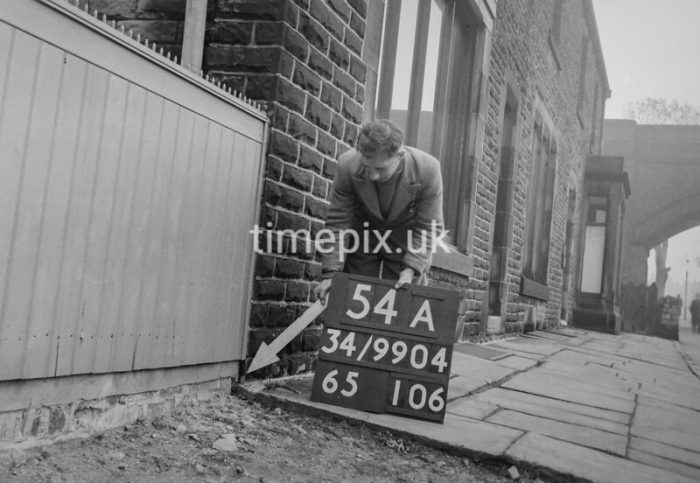
Man marking Ordnance Survey minor control revision point with an arrow on Chew Valley Road in Greenfield. The photograph looks Southeast along the Northern pavement of the road with the arch-bridge which carried the Micklehurst Loop visible in the background, (c) Manchester Libraries. [2]
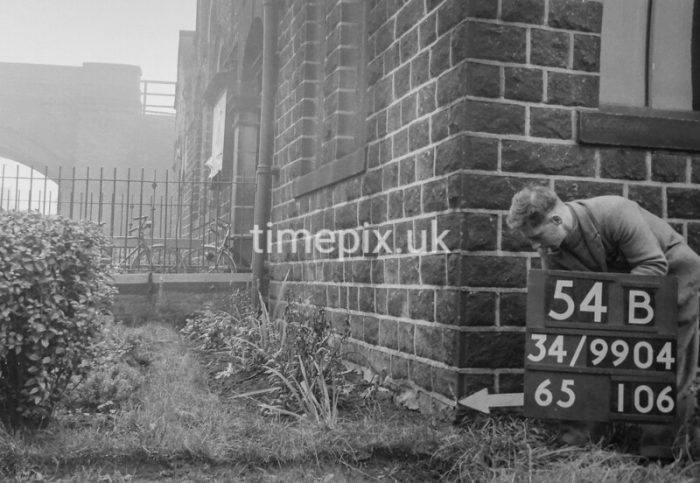
Corner of Greenfield Conservative Club, converted to housing in 2019. The bridge visible carries the Micklehurst Loop line over Chew Valley Road. This view is also looking to the South east but on the opposite side of Chew Valley Road, (c) Manchester Libraries. [3]
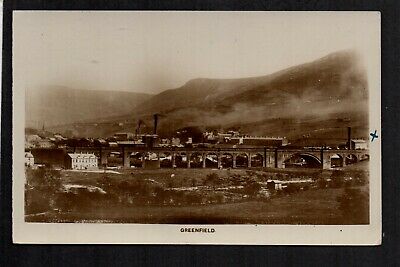
Greenfield Viaduct. [4]
We finished the last length of the Micklehurst Loop at Chew Valley Road in Greenfield.
In concluding, we saw a couple of older postcard images of Greenfield Viaduct, the second of which looks along Chew Valley Road towards the Southeast, and a 21st century Google Streetview image of the point at which the Loop crossed Chew Valley Road.
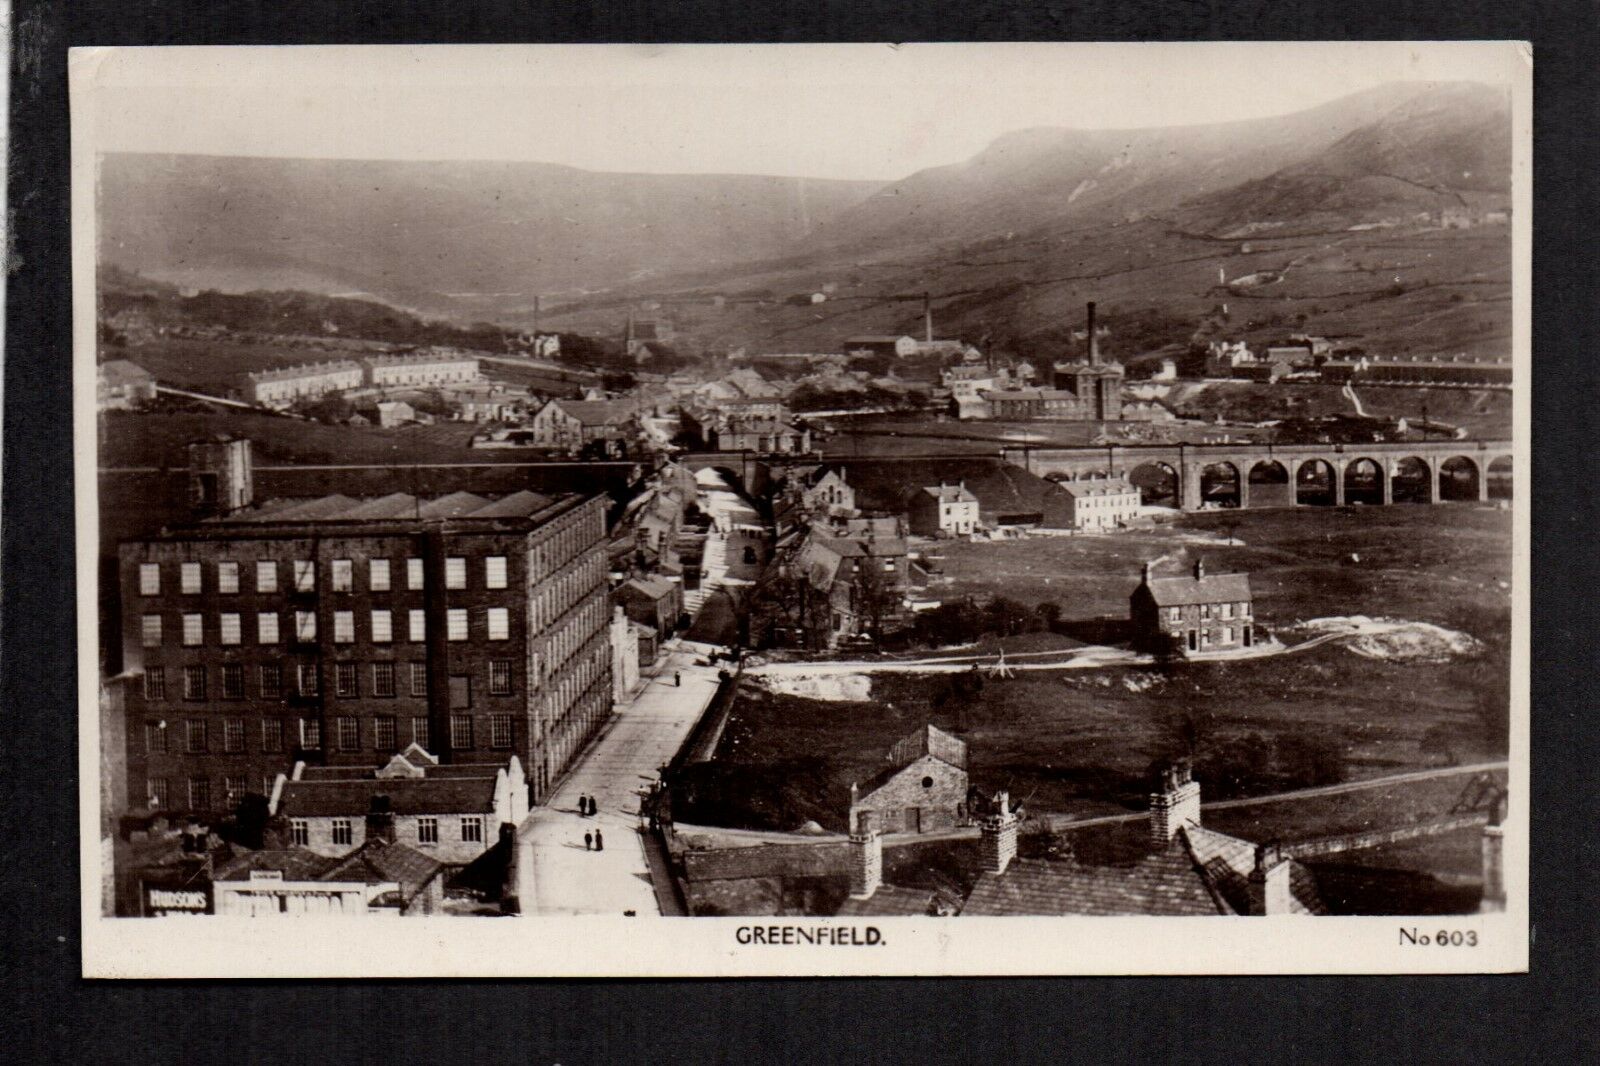
Old Postcard Image looking past Wellington Mills and along Chew Valley Road to the Southeast. Greenfield Viaduct appears on the right side of the image, there is then a short section of embankment before the arched bridge over Chew Valley Road. Bentfield Mill sits behind the Viaduct. The line was on embankment to the Northeast of Chew Valley Road, to the left of this image. [5]
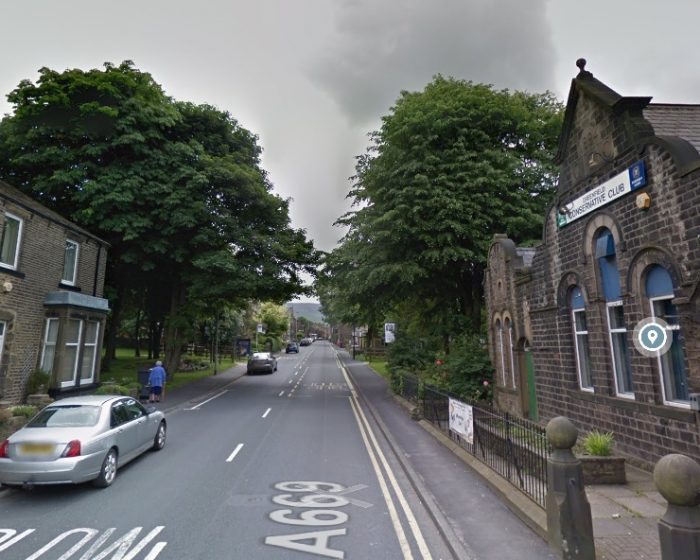
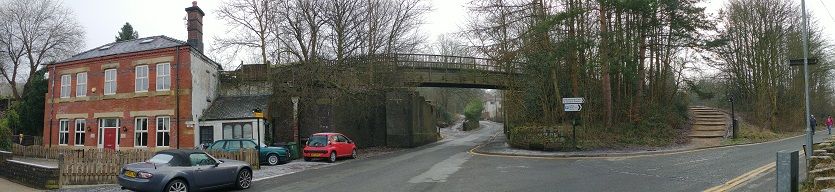
Chew Valley Road at the point where the Micklehurst Loop crossed the road by means of an arched bridge. The trees sit where the bridge abutments once sat! (Google Streetview.)
We get ready to set off on this last length of the Loop by looking at a few images of Chew Valley Road Bridge which I found on the “Greenfieldgoneby” Facebook group. [15]
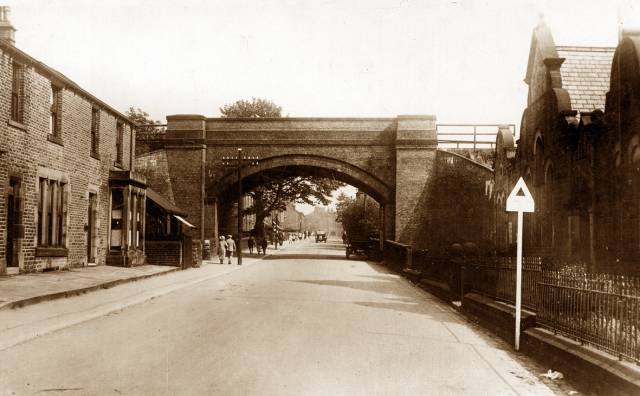
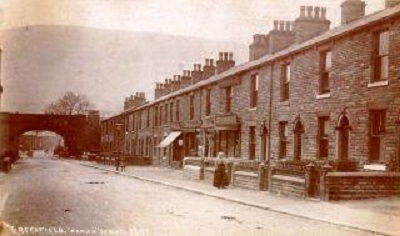 The adjacent image looks from the Southeast along Chew Valley Road. [16]
The second image is taken from the same direction and a little closer to the bridge. The first was a winter-time shot, the second was taken in the summer. [17]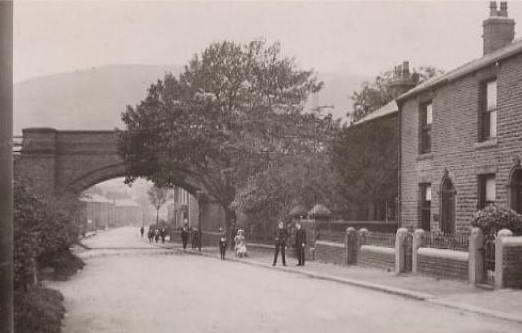
 The third, below, is taken from the Northwest and shows the Conservative Club on the right side. [18]
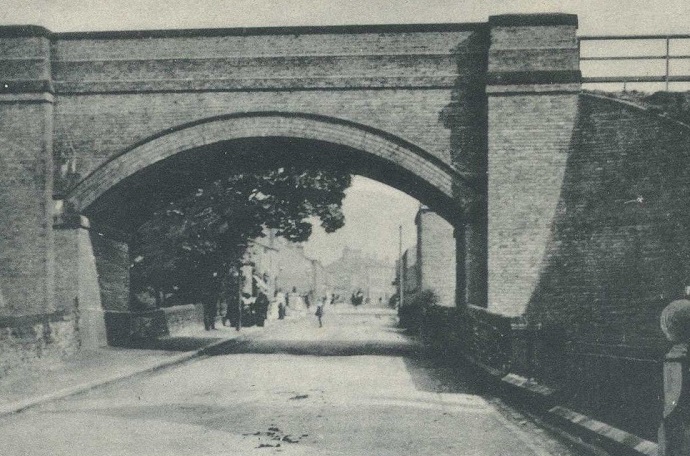
This final image of the bridge before we begin our journey, is also taken from the Northwest, but from much closer to the bridge. [19]
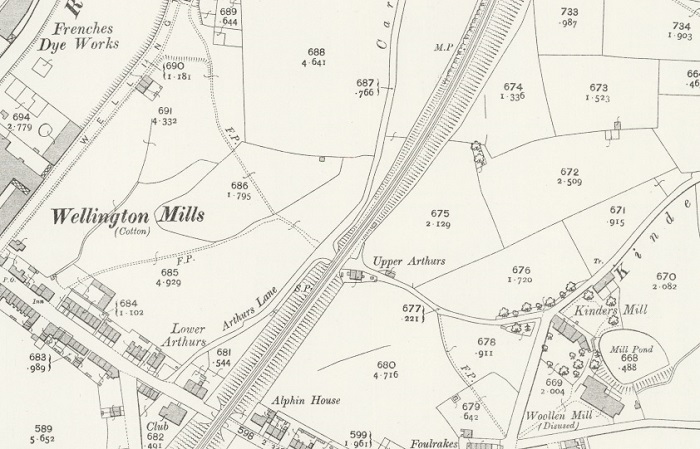
An extract from the 25″ OS Maps from the early 20th Century. Chew Valley Road appears in the bottom left of the extract. [1]
Satellite image of approximately the same area in the 21st century (Google Maps).
Looking Northeast from Chew Valley Road in the 21st century along what would have been the line of the Micklehurst Loop (My Photograph – 25th January 2021)
Wellington Mills – the postcard above and the extract from the OS Mapping show Wellington Mills to the West of the railway in Greenfield. The mills were built in 1852 for Shaw, Son and Lees cotton Spinners who traded until 1858 and were succeeded by N. Broadbent and Sons. When Broadbent ceased trading the mills were left unused for 6 years (from 1932 to 1938). 1938 saw part of the buildings used as a general engineering works and in 1941 the rest of the premises were opened up with the installation of 362 looms by the fabric weaver B. Kershaw. [6]
The railway embankment between Chew Valley Road and Higher Arthurs has been regraded to tie in with surrounding land. (My photograph – 25th January 2021).
In the years up to 1946 the engineering section of the mill produced engine parts for bombers. It was then used for storage, first by the Navy and then by the British Wool Board. In 1946 the buildings and land were purchased by William Oddy. He transferred his woolen carding and mule spinning operations form Shipley to Greenfield. The Knoll Spinning Company was formed at this time. It seems that 362 looms were installed at this time. The company ceased trading in the 1990s and the mill again became vacant. [8]
The approach to Higher Arthurs in the 21st century – the original bridge has been removed. The railway embankment can be see rising ahead (My Photograph – January 2021).
Huddersfield Narrow Canal – along this stretch of the Loop the Canal is conspicuous by its absence. Having followed the Eastern valley side and hence having been very close to the Loop at times on the way up from Stalybridge, the Canal crossed both the Tame valley and the River Tame in the Friezland area. Through Greenfield and Uppermill it followed the line of the older mainline railway on the West side of the valley. The River Tame can just be made out in the Northwest corner of the map extract above running on the Southeast side of Frenches Dye Works. The Canal was on the northwest side of the Works.
Frenches Dye Works – Owen Ashmore, in The Industrial Archaeology of Northwest England, notes the existence of this Dye Works but as having been closed at the time of his survey – “At Frenches … is [the] site of [a] former Dye Works built on [the] site of [an] early 18C fulling mill.” [10: p130]
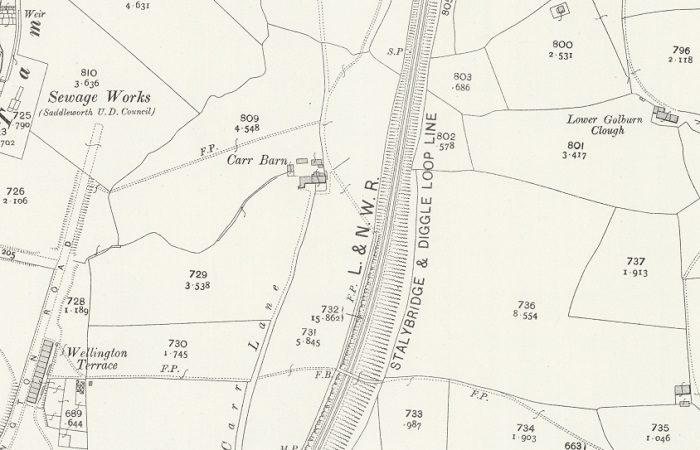
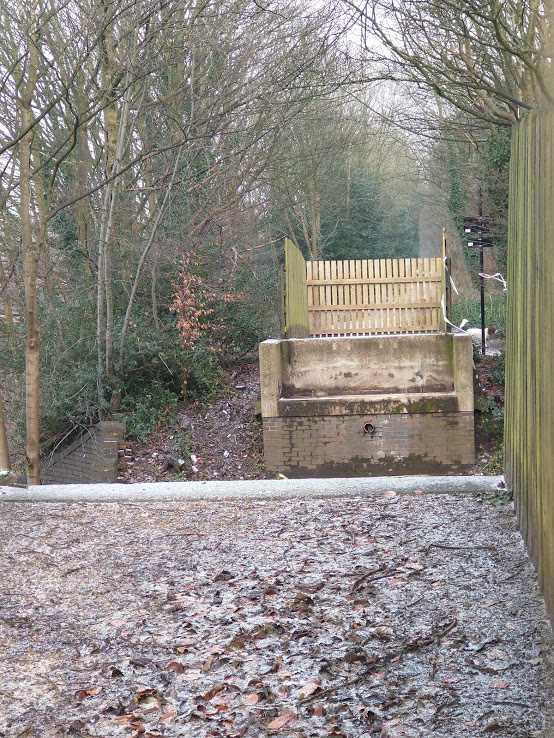
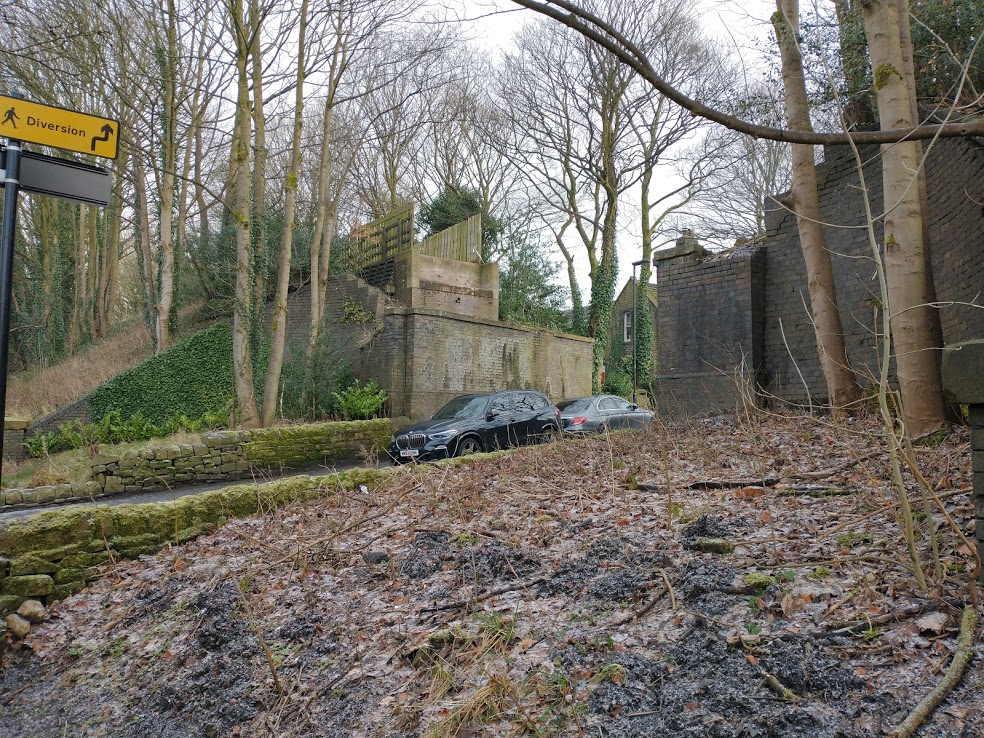
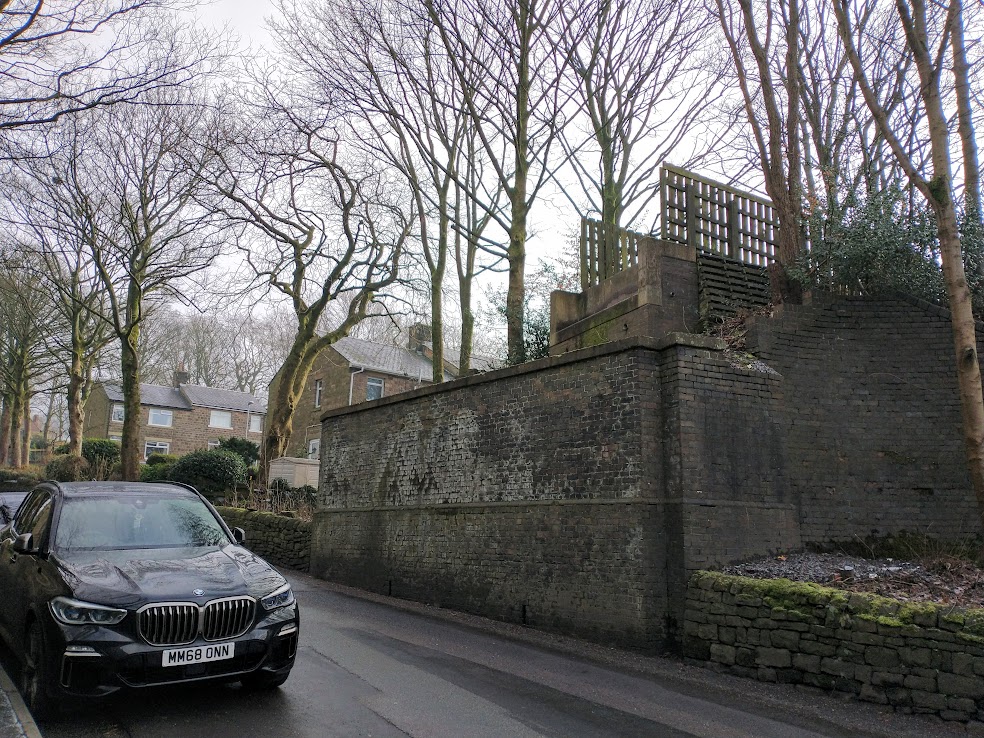
Our walk along the line of the Micklehurst Loop took us across Chew Valley Road and Higher Arthurs on 25th January 2021. Just to the north of Higher Arthurs, we had to choose between scrambling up the embankment face seen just beyond the dwarf wall which is all that is left of the abutment of the bridge which carried the Loop over the lane, or a short walk along Carr Lane to access the track-bed along the approved walking route. We chose the latter and joined the route of the old line a few tens of metres ahead of the steep track shown in the picture.
This slightly blurred image from the Saddleworthgoneby Facebook Group shows the bridge which carried the Loop over High Arthurs. A double-headed mineral train is travelling North on the Loop. The road in the foreground is Carr Lane. The photographer is not known. [60]
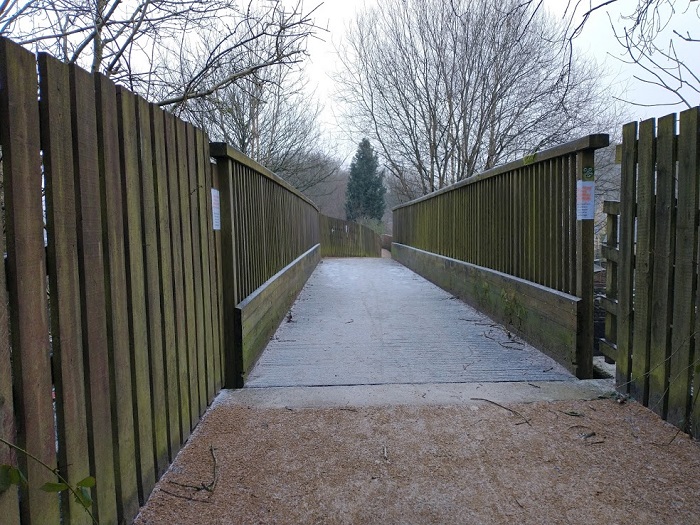
The old railway continued Northeast from Higher Arthurs curving gradually round towards a Northerly direction. At the time the map below was drawn, there was a footbridge carrying a footpath from Wellington Terrace across to Kinders Lane and Fur Lane Farm. This footbridge was a narrow blue-brick arched bridge. It remains in place in the 21st century. These next two pictures show it from track-bed level.
The footbridge is a two span blue-brick arch bridge. This picture is taken looking North toward Uppermill Station, (My photograph – 25th January 2021).
The footbridge again, this time looking South towards Greenfield, (Photograph taken by Jo Farnworth – 25th January 2021).
The track-bed continues to curve round towards the North.
The Micklehurst Loop track-bed approaching Uppermill Goods Yard, (My photograph – 25th January 2021).
An extract from the 25″ OS Mapping of the early 20th century. [1]
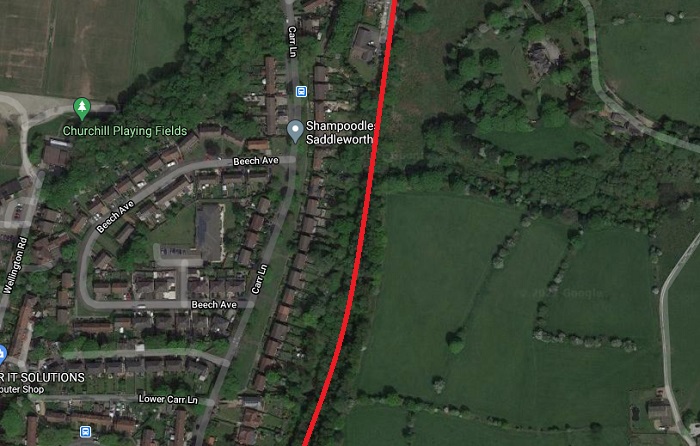
The same area on modern satellite imagery, (Google Maps). The encroachment of modern housing in significant.
The next map extract shows the immediate approach to what was Uppermill Goods Yard. The goods yard was protected on it southern boundary by another accommodation bridge which provided access to Ballgrove from Uppermill. On Google maps this bridge can be seen to carry Rush Hill Road.
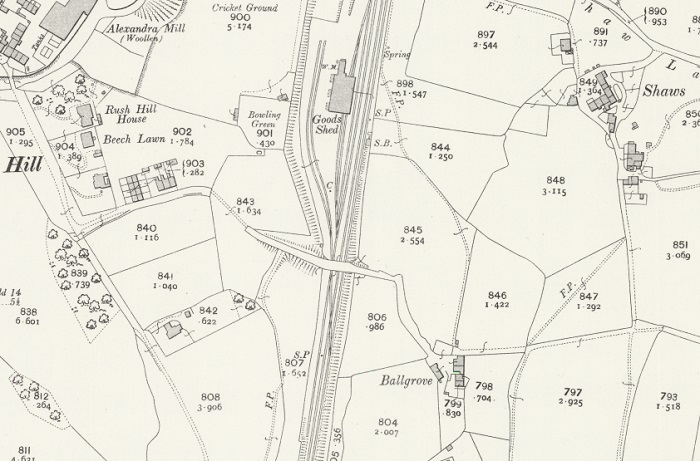
This next extract from the 25″ OS Mapping shows the approach to Uppermill Goods Yard from the South. [1]

The same area as the map above, shown on modern satellite imagery. The site of the Goods Yard has been replaced by Uppermill Sports Club.
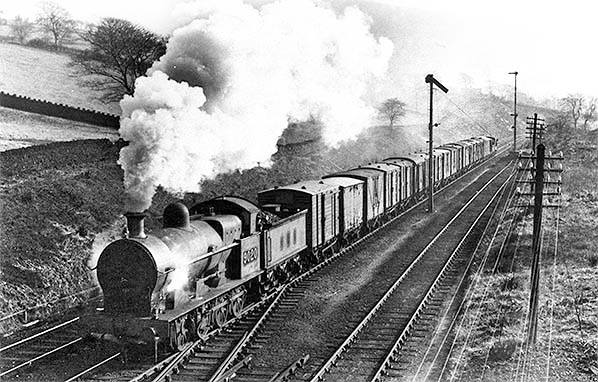
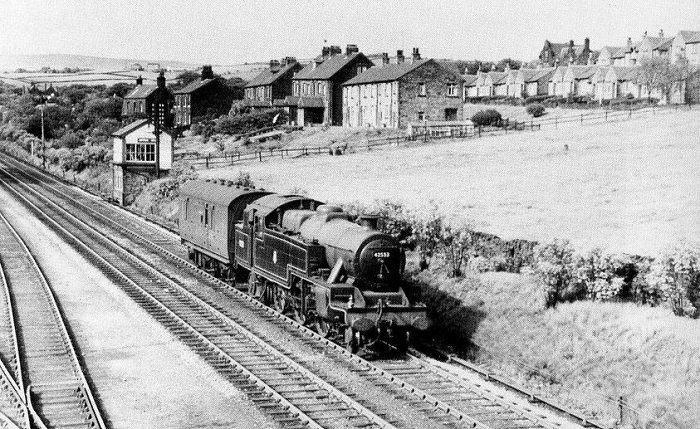
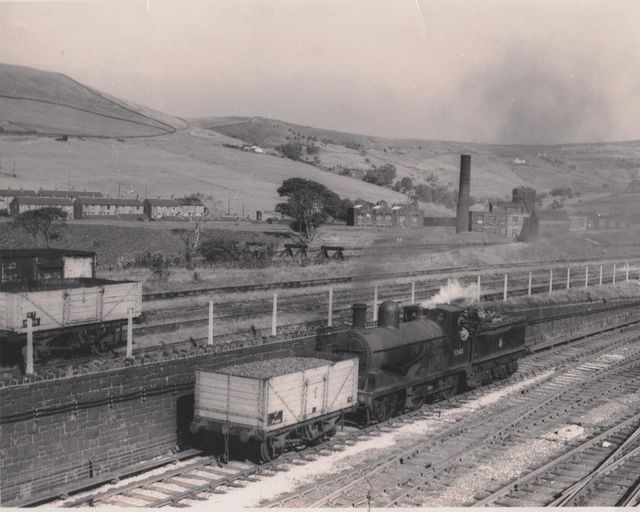
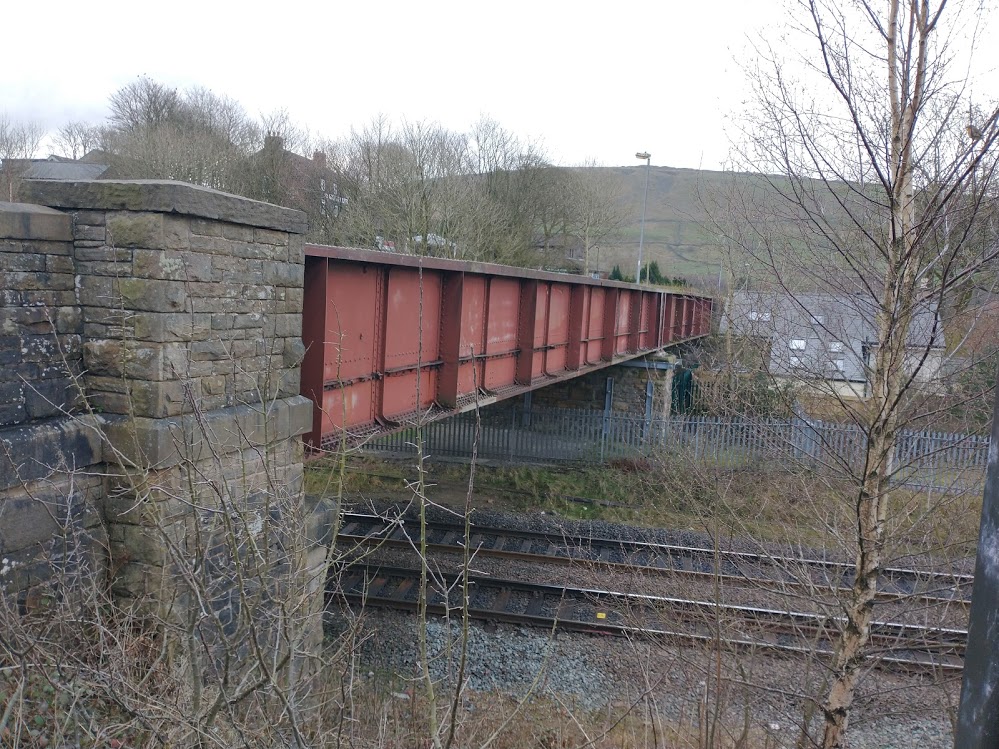
Northbound Goods approaching Rush Hill Road Bridge to the South of Uppermill Goods Yard. [25]
This image also appears on the ‘Disused Stations’ website, where Alan Young comments: “In the late 1940s a Leeds-bound goods train is seen from Rush Hill Road bridge approaching the goods station at Uppermill. The locomotive is Bowen-Cooke-designed ex-LNWR 7F 0-8-0, built at Crewe works in August 1896. Numbered 9020 by the LMS, and previously 2540 in LNWR ownership, she continued to work as British Railways No.49020 until October 1961 when she was withdrawn from 10A, Wigan Springs Branch shed, and cut up the same month at Crewe works – Photo by Jim Davenport.” [26]
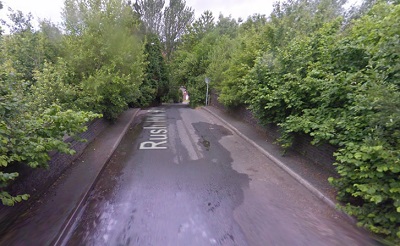
A view from the East of Rush Hill Road as it crosses the line of the Micklehurst Loop – the blue brick parapets are almost hidden by summer vegetation, (Google Streetview).
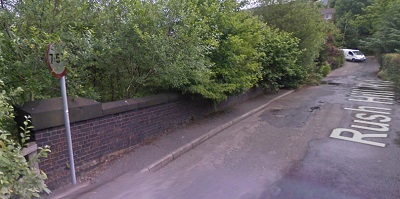
Rush Hill Road Bridge Northern parapet taken from the Western end of the bridge, (Google Streetview).
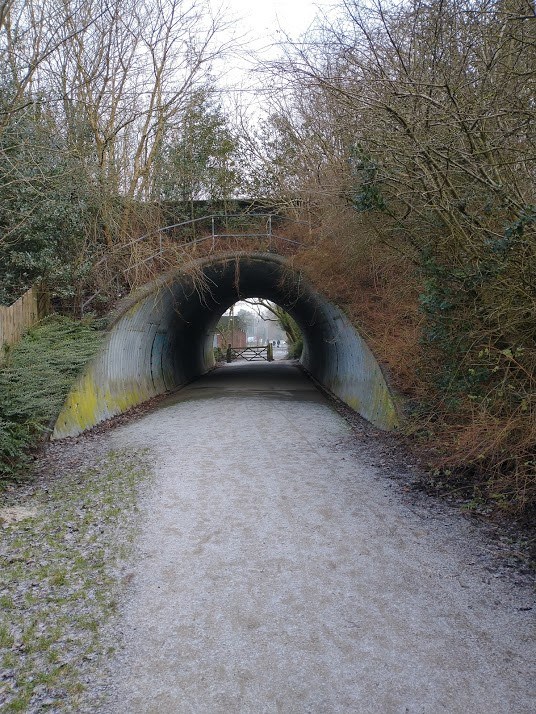
Rush Hill Road Bridge was strengthened using and Armco Arch with stone backfill when the route of the line was turned into a linear walkway, This view looks forward into the former Uppermill Goods Yard, (My photograph – 25th January 2021).
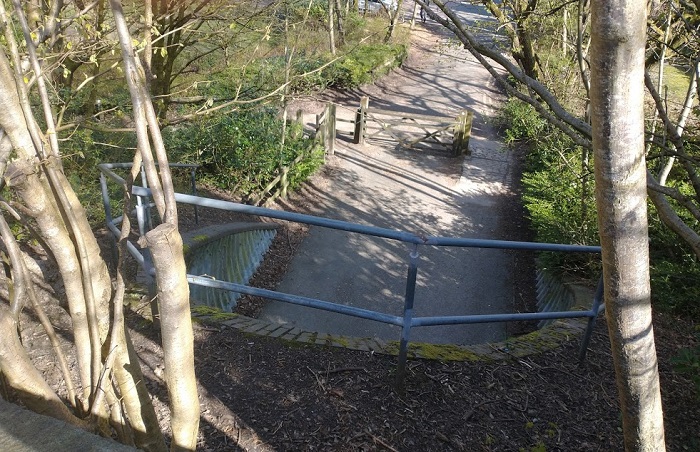
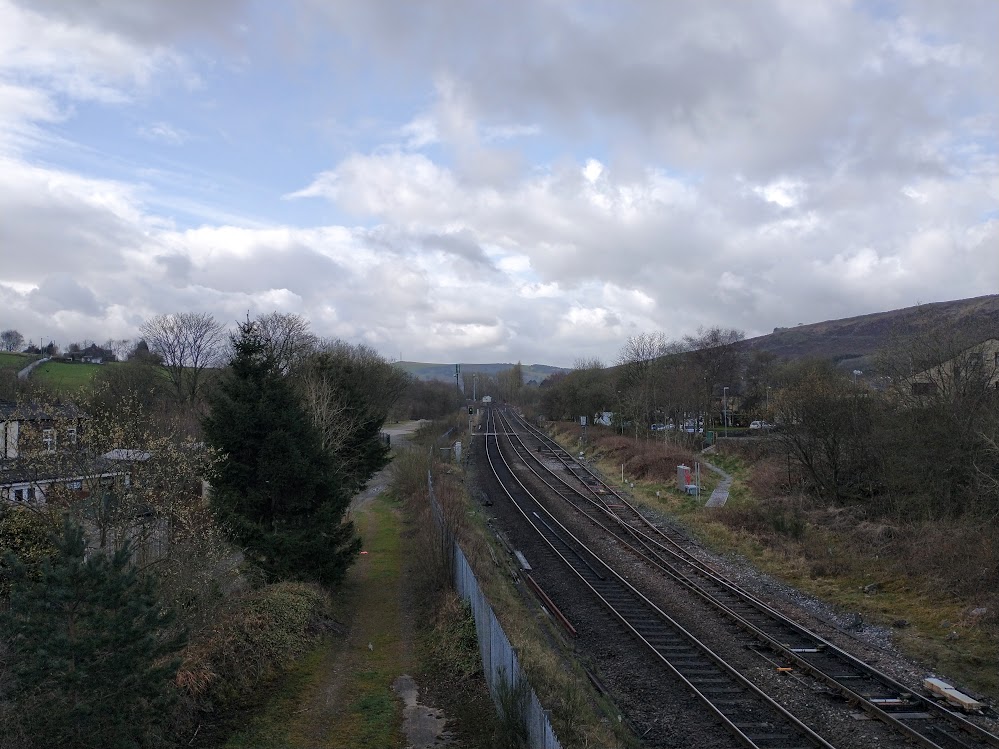
Looking north along the route of the Micklehurst Loop from Rush Hill Road Bridge, (My photograph – 6th April 2021).
Looking back to the South along the line of the Micklehurst Loop through Rush Hill Road Bridge, (My photograph – 25th January 2021).
Once closed, Uppermill Goods Shed was demolished and the tracks were lifted. In the 21st century, the site is used for a variety of sporting interests. The route of the old line crosses the carpark facilities of the sports centre and continues to the North. Before following it, we take a look at some images of the goods facilities on the Loop at Uppermill.
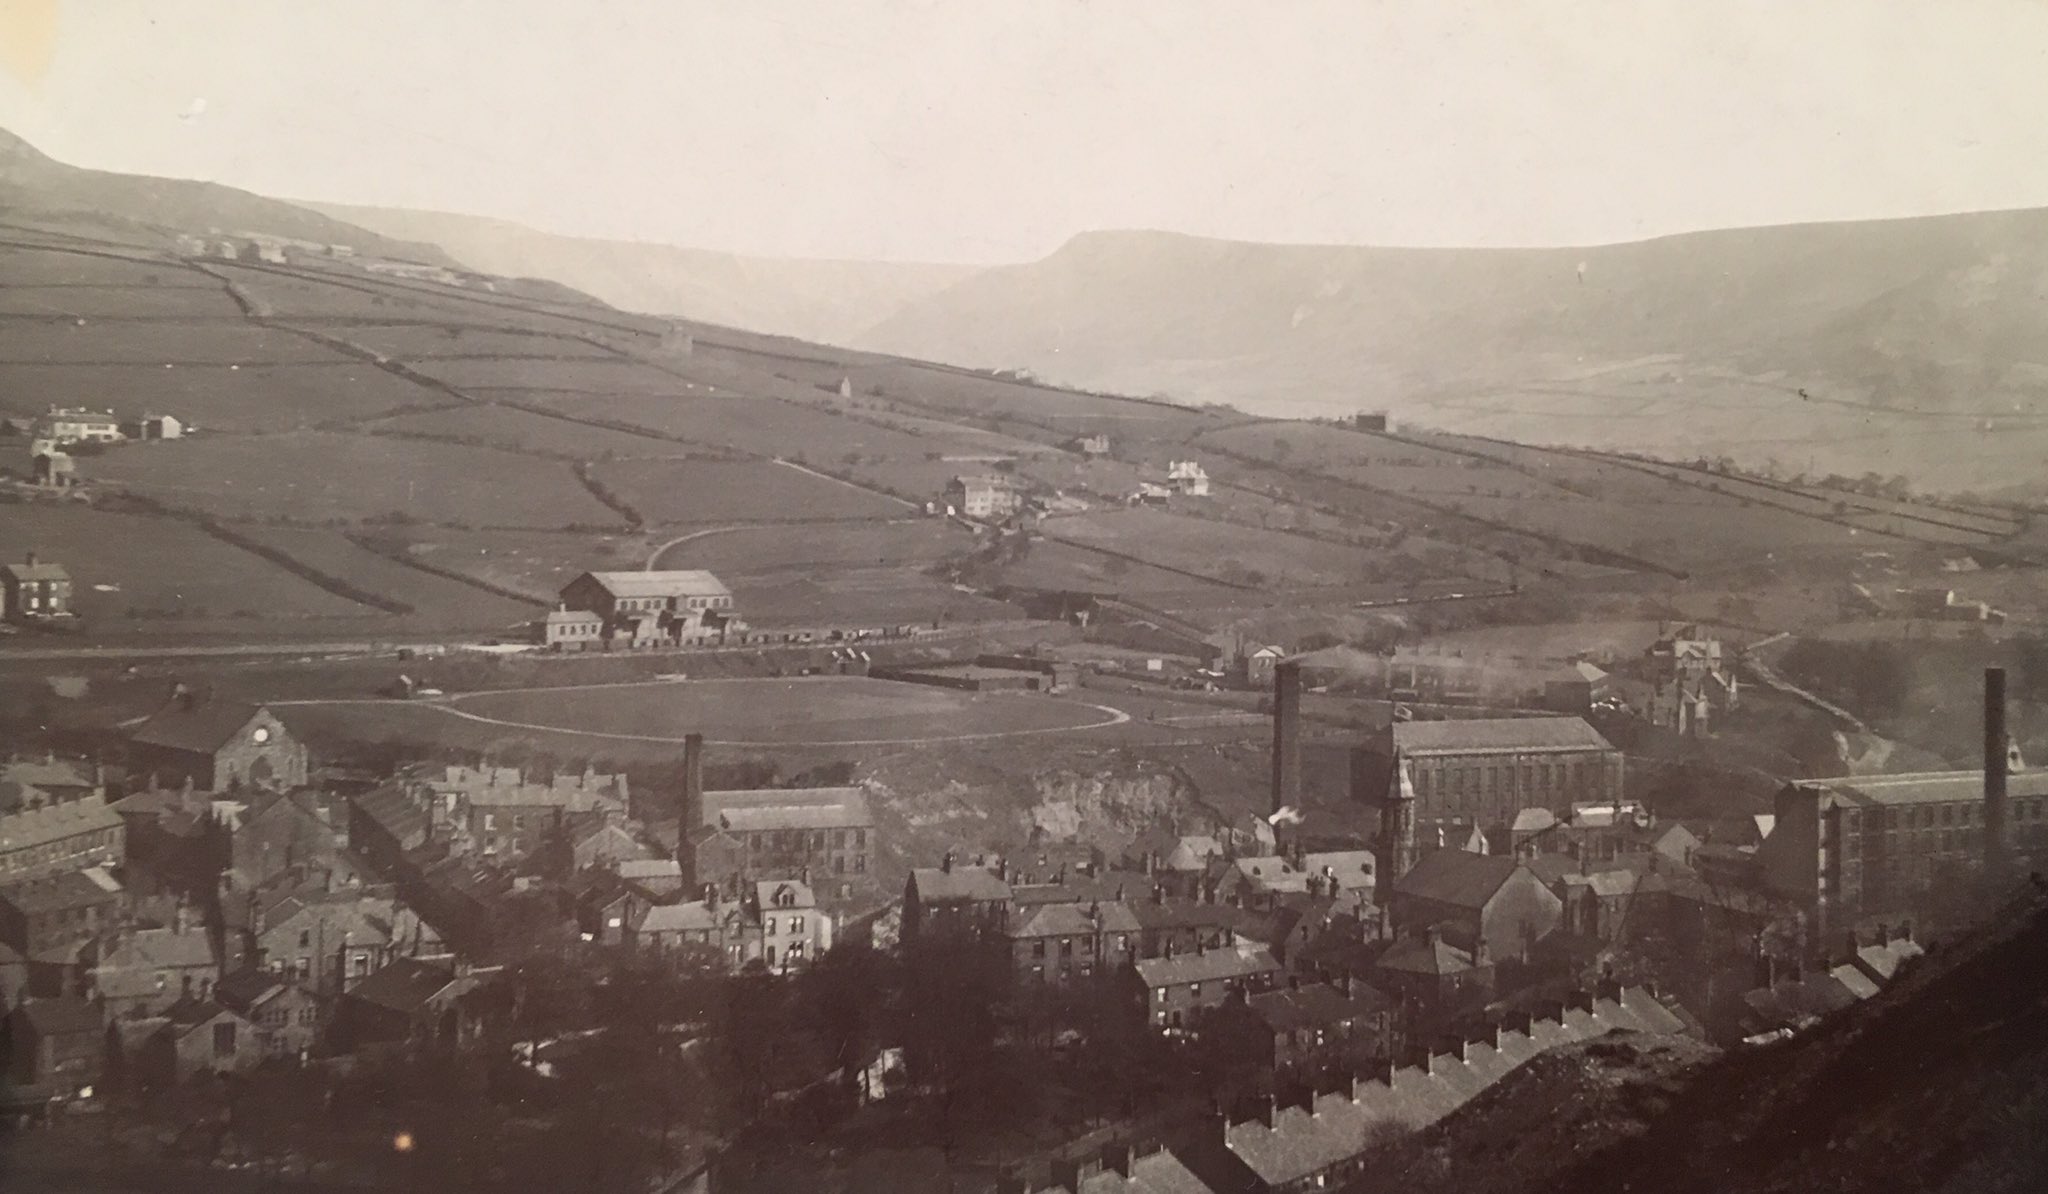
Uppermill Goods Shed from across the Tame Valley [11]
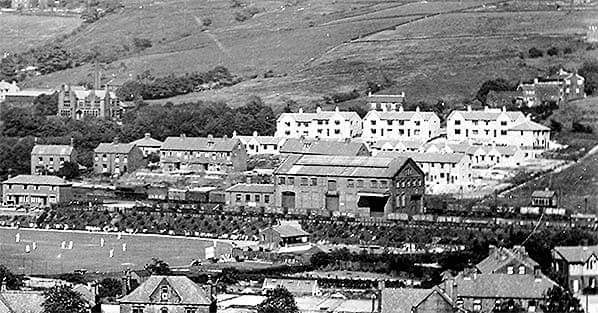
The Uppermill Goods Yard from the West. In front of it there is a game of cricket taking place – from the “Saddleworthgoneby” Facebook group. [20]
This image also appears on the ‘Disused Stations’ website, where Alan Young comments: A view of “Uppermill goods station looking east c1937. A cricket match appears to be in progress on the ground to the left. The goods warehouse dominates the scene, built on a generous scale, as were those at the other Micklehurst Loop stations. The single storey section of the warehouse contains offices and toilet facilities. The sidings are occupied by numerous wagons. New houses can be seen beyond the railway, on Bankside Avenue – Photo from Peter Fox ‘Old Saddleworth’ collection.” [26]
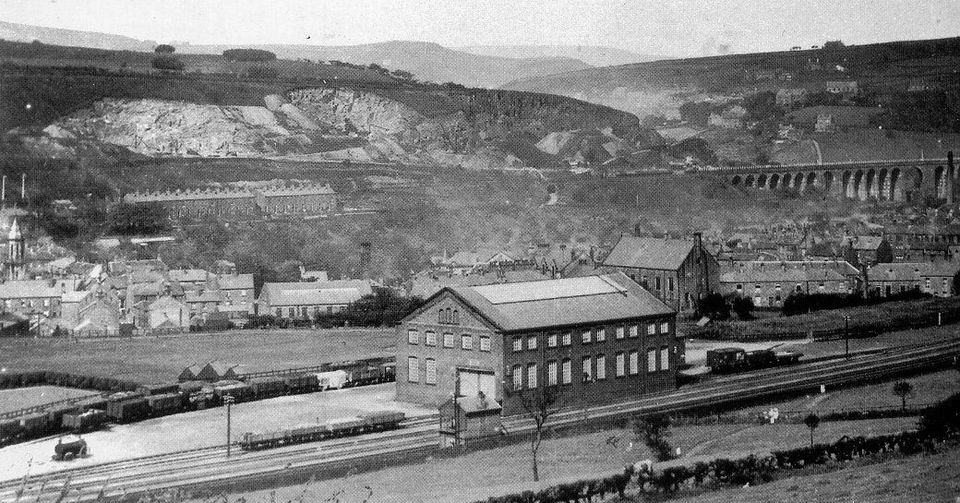
The Uppermill Goods Yard taken from the Southeast. Saddleworth Viaduct can be seen to the right side of the image. This picture was also sourced from the “Saddleworthgoneby” Facebook group. [21]
The above image also appears on the ‘Disused Stations’ website. On that site Alan Young comments: This is “Uppermill goods station, looking north-west from near Ballgrove. This view (circa 1905) highlights the goods warehouse, a commodious structure in engineering brick. Some rakes of goods and mineral wagons occupy the sidings. A traction engine is standing in the yard (left). Uppermill (or Saddleworth) Viaduct is seen on the original Huddersfield-Manchester route which runs parallel to the Micklehurst Loop. Den and Ladcastle quarries, both in operation at this time, are excavated into the distant hill – Photo from Peter Fox ‘Old Saddleworth’ collection.” [26]
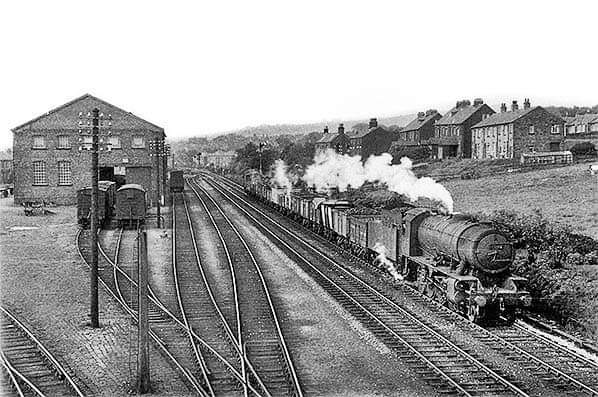
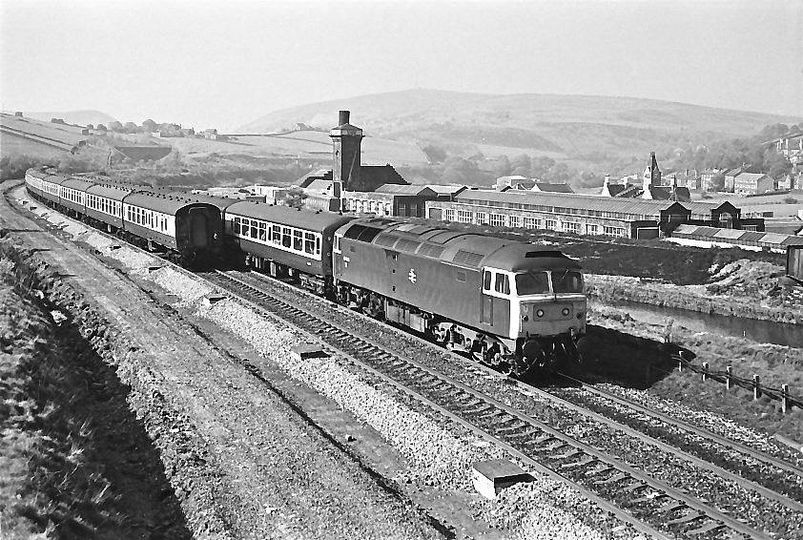
The Micklehurst Loop was designed to take pressure of the original line in the Tame Valley by separating Goods from Passenger traffic. This relatively shorts goods train is travelling South past Uppermill Goods Yard and Shed. Another image from the “Saddleworthgoneby” Facebook Group. [22]
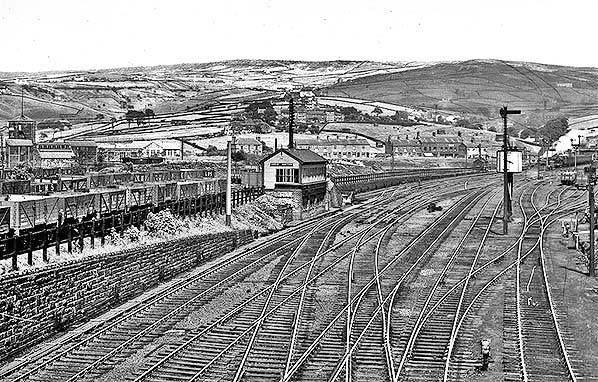
The above image also appears on the ‘Disused Stations’ website. On that site Alan Young comments: “At all four stations on the Micklehurst Loop the passenger and goods facilities were some distance apart. This northward view from Rush Hill Road bridge is of the goods yard at Uppermill, and the passenger station is ahead but out of sight. The tall, brick-built warehouse on the left was a standard feature of these goods stations. On 5 June 1958 ex-WD 2-8-0 No.90671 is hauling loaded coal wagons southbound from Diggle (dep 5.55pm) to Heaton Norris (Stockport). The Riddles-designed locomotive was produced from 1943 for the War Department and entered British Railways service in 1948, based initially at 73C, Hither Green shed in Kent. She was withdrawn from 26F, Lees Oldham shed, on 30 September 1963 and cut up at Crewe works the following December – Photo by B Hilton.” [26]
A short parcel working passes Uppermill Goods Yard travelling South. The photograph includes an excellent shot of the Yard Signal Box. Another image from the “Saddleworthgoneby” Facebook group. [23]
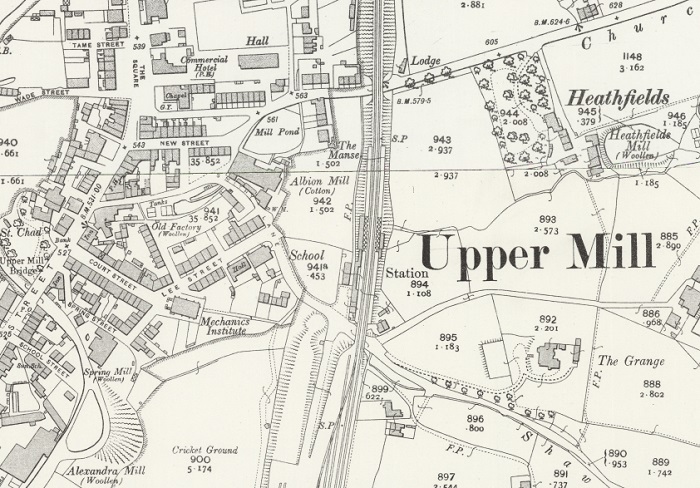
An OS 25″ Series Map extract from the turn of the 20th century which centres on the Station building at Uppermill. [1]
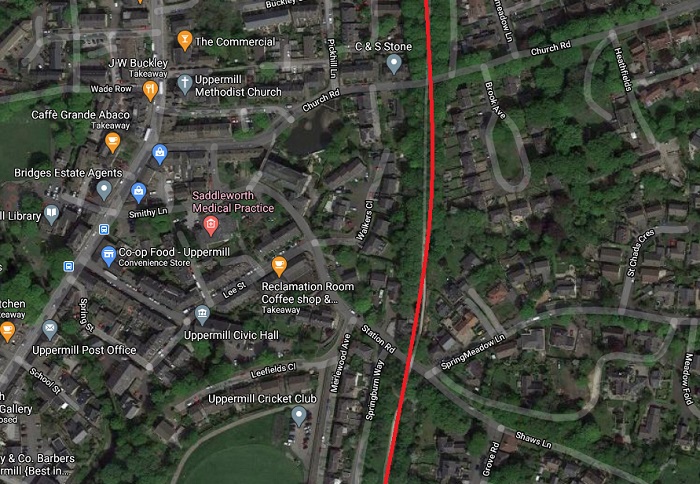
Approximately the same area from satellite imagery in the 21st century, (Google Maps).
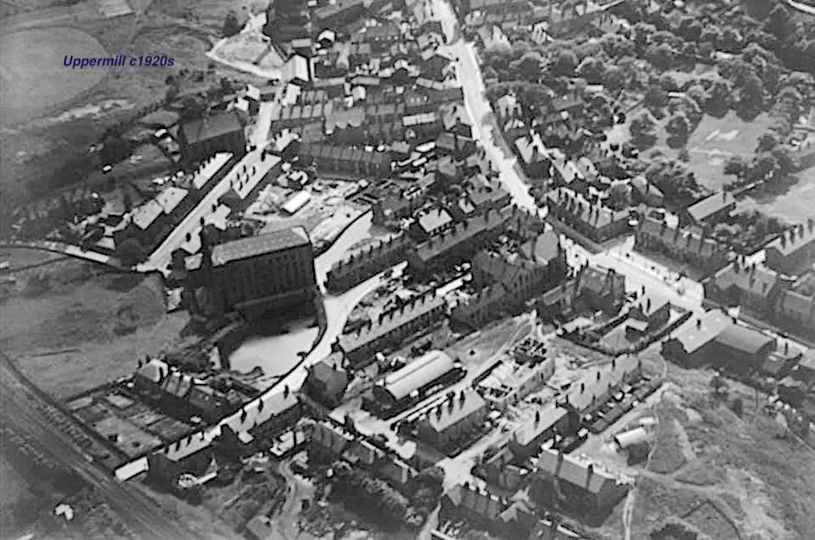
Uppermill in the 1920s. The Loop Line intrudes onto the photograph in the bottom left. The Passenger Station was just off the image to the left The Mill in the foreground adjacent to the Mill Pond is Albion Cotton Mill which appears on the 25″ OS Map extract above. Station Road leave the left side of the image beyond Albion Mill. Church Road runs under the bridge in the bottom left of the picture. [13]
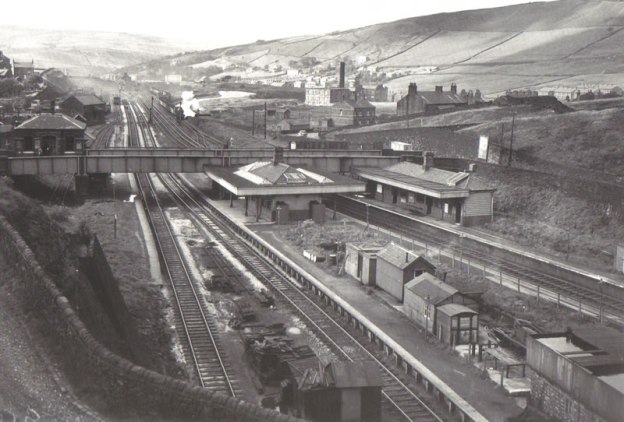
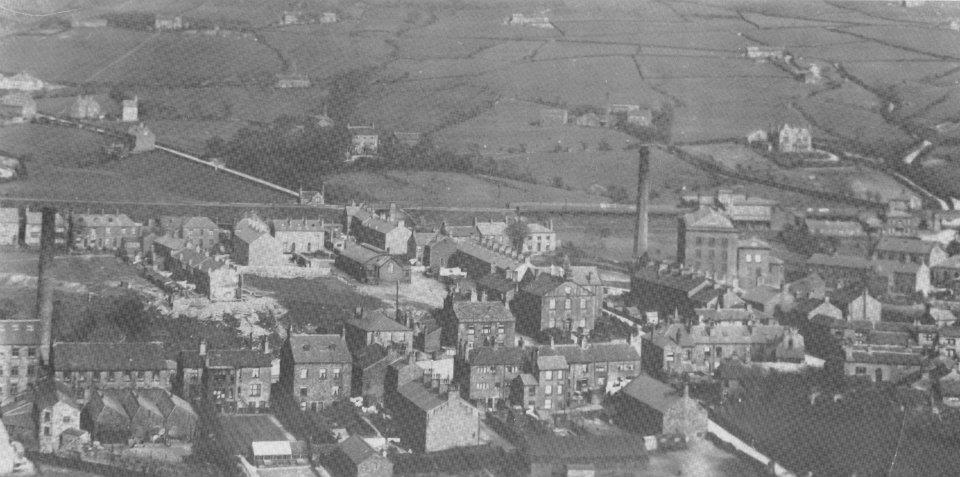
Looking East across the Tame Valley from above the main line with the Loop Line visible in the distance. Uppermill Station and platforms can be made out just to the right of centre and just above mid-height in the image. [14]

Uppermill Railway Station building in the late 20th century. Another image from the “Saddleworthgoneby” Facebook group. [24]
Uppermill Passenger Station sat adjacent to the Station Road Bridge but at low level. Steps led up to wooden platforms which were sited to the North of the brick-built Passenger facilities. That arrangement can be picked out on the large image immediately above. The solid wooden area which looks a little out of place is the rear of the platform shelter on the Northbound side of the Loop.
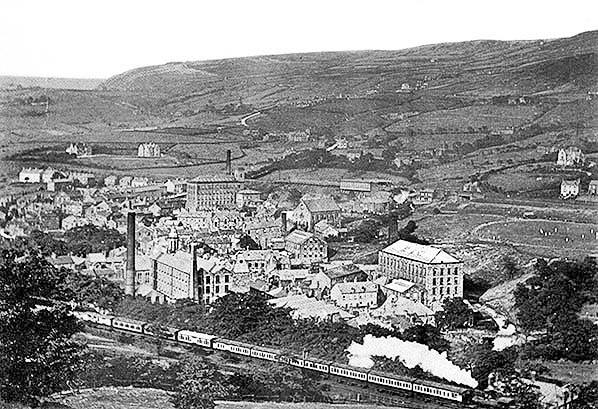
The larger image above also appears on the ‘Disused Stations’ website. Alan Young, on that site comments: This is “a panoramic view eastwards across the old Diggle-Stalybridge line (with train) towards Uppermill c1910. In the village are Victoria Mill (cotton), lower left, with Alexandra Mill (cotton) on its right and Dam Head Mill (cotton spinning) in its dominant position beside Church Road. A little right of centre in the distance the platforms and waiting sheds of Uppermill station on the Micklehurst Loop can be seen, with the station building to the right, at a lower level close to the railway bridge. … Photo from Peter Fox ‘Old Saddleworth’ collection.” [26]
In this view from the West across Uppermill, Buckley Mill and Damhead Mill can be seen on the left and right of the image respectively. Behind Damhead Mill, the platform structures of Uppermill Station can be picked out. [31]
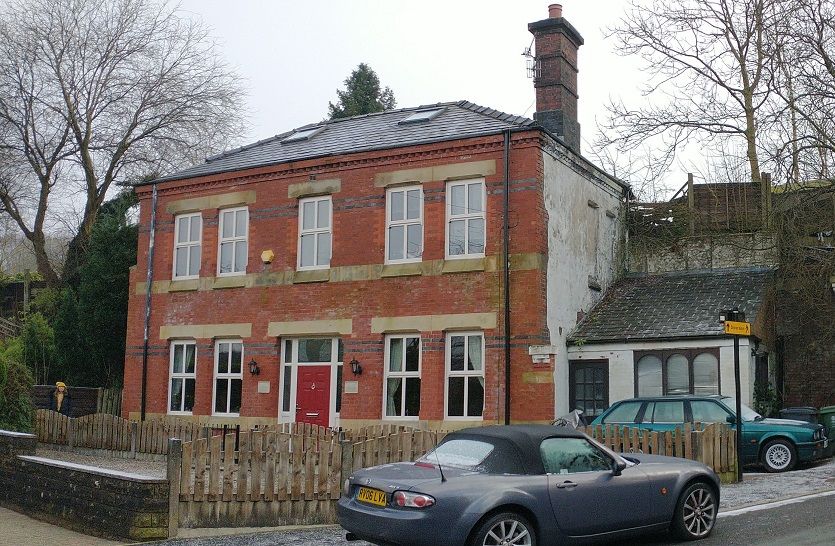
Uppermill Passenger Station Building, Station Road, Uppermill in the 21st century, (My photograph – 25th January 2021)
The Passenger Station Building was of the same design as others on the Loop Line. The front faces of these buildings were built in red-brick the side and rear walls in blue engineering brick. The building is in private hands. Station Road passed under the Loop Line immediately adjacent to the Station building as shown on the panorama below.
Uppermill Passenger Station building sat immediately next to Station Road in Uppermill. The line was originally carried across Station Road on a girder bridge. In this view in 2021 the modern footpath/cycleway is carried across Station Road on a laminated hardwood timber structure, (My photograph – 25th January 2021).
An extract from EPW016500, an image held by ‘Britain From Above’ on their website. The Loop Line and Uppermill Station can be seen at the top of the image. The remains of the ramp structures leading to the platforms can be made out on this photograph. The building at the bottom centre of the image is Albion Mill, (c) Britain From Above. [27]
Station Road Bridge in the 21st century, (My photograph – 25th January 2021).
In the text above a number of mills are mentioned:
Church Road Bridge in the 21st century. By January 2021, the footbridge crossing Church Road was removed because of defects, (My photograph).
Albion Mill – was a cotton mill, built circa 1854 [28] which is listed in the ‘1891 Worrall’s Cotton Spinners Directory’ along with Spring Hill Mill, Waterhead as belonging to John Lees. [29] The Mill has been converted to apartments.
Alexandra Mill – was a cotton mill “built in 1860 by flannel manufacturers J.Bradbury & Co. This four-storey stone built mill has had many uses over the years. In the mid 1980s it was a craft centre which was divided into small units. Today the mill, on the banks of the River Tame, has been converted into stylish living apartments. For reference, a 2-bedroom fourth floor flat was on the market for £199,950 in March 2009.” [28]
Church Road Bridge North abutment, (My photograph – 25th January 2021).
Dam Head Mill – was also known as Willow Bank Mill. [28] Neither this mill nor Alexandra Mill seem to be listed in the ‘1891 Worrall’s Cotton Spinners Directory’. [29]
Victoria Mill – was a cotton mill and housed Ellis Meanock, cotton spinners and manufacturers. [29] The mill has been demolished but what were outbuildings remain and house the Saddleworth Museum and Art Gallery. [28][30]
Church Road Bridge – South abutment, (My photograph – 25th January 2021).
Continuing North from Uppermill Station, the Line passed two further Mills and two relatively large houses.
Buckley Mill and Buckley New Mill sat either side of Uppermill High Street, neither is mentioned by Wikipedia [28] or Grace’s Guide [29]. They were owned by the Kenworthy family and produced flannels and shawls.
Two larger private dwellings stand out on the 25″ Map below and are relatively typical of a number of properties around Uppermill.
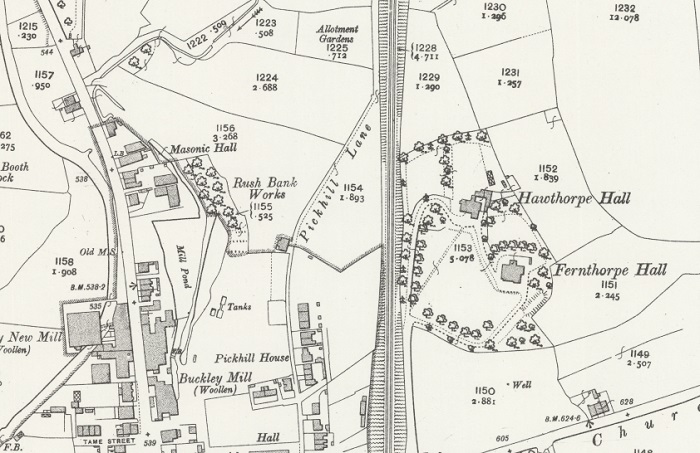
Another extract from the 25″ OS Survey maps from around the turn of the 20th century. Buckley Woollen Mill and Buckley New Mill (with buildings straddling the River Tame) can be seen to the West of the Loop Line. Fernthorpe and Hawthorpe Halls can be picked out to the East of the line. [1]
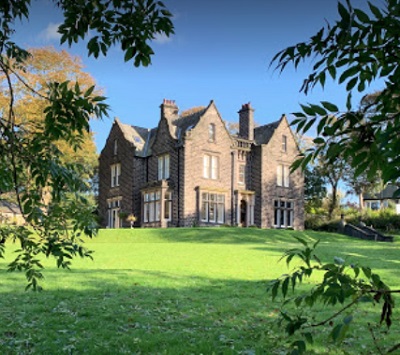
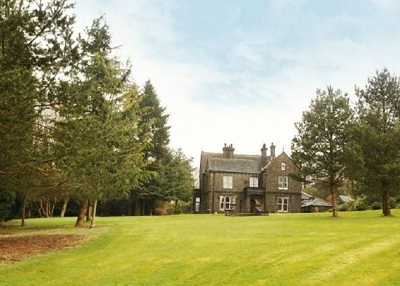
Fernthorpe Hall, Uppermill
Fernthorpe Hall – is now a series of luxury apartments.
Hawthorpe Hall, Uppermill
Hawthorpe Hall – is now two separate semi-detached family homes.
They both can be made out on the satellite image below.
It is now only a short distance to what was the mouth of Butterhouse Tunnel, named after Butter House which sat almost directly over the tunnel.
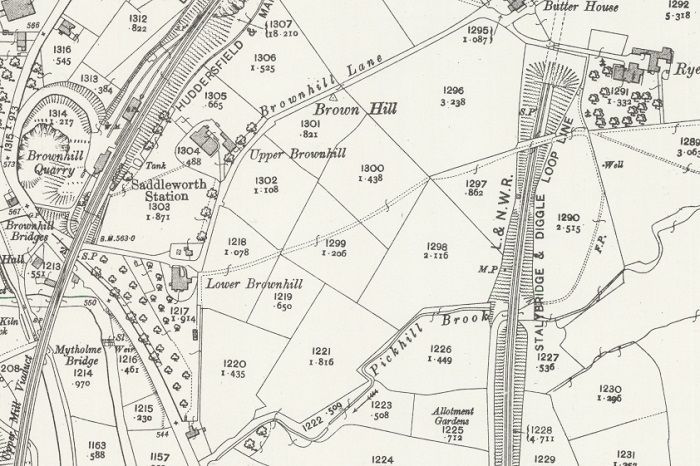
The next 25″ Map extract shows the tunnel mouth and also shows how the mainline and the Loop are now gradually moving towards each other as they travel North by Northeast. Brownhill Quarry and Saddleworth Station can be seen on the left side of the extract.
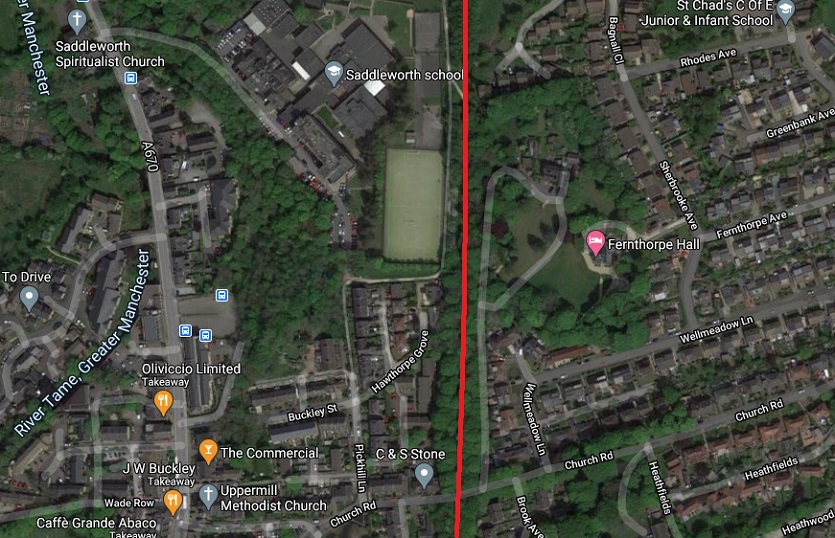
The Northern part of Uppermill which includes Saddleworth School. Both Fernthorpe and Hawthorpe Halls can be seen among trees and lawns to the East of the Loop Line, (Google Maps).
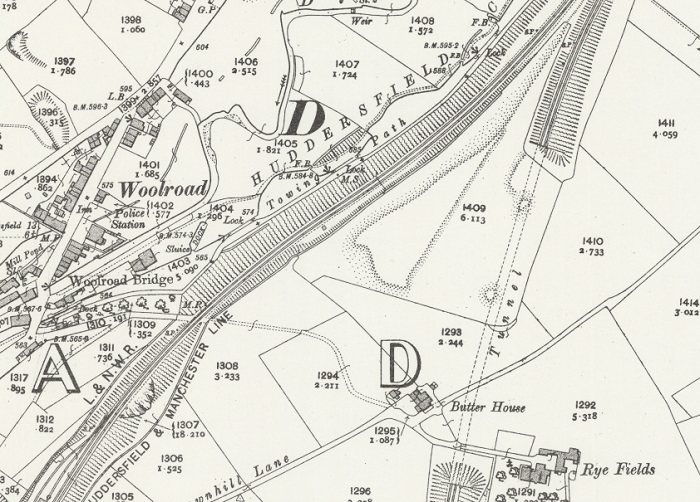
Another 25″ OS Map extract shows the last section of the Loop to the South of Butterhouse Tunnel. Saddleworth Station on the Mainline can also be seen on the left of the extract. [1]
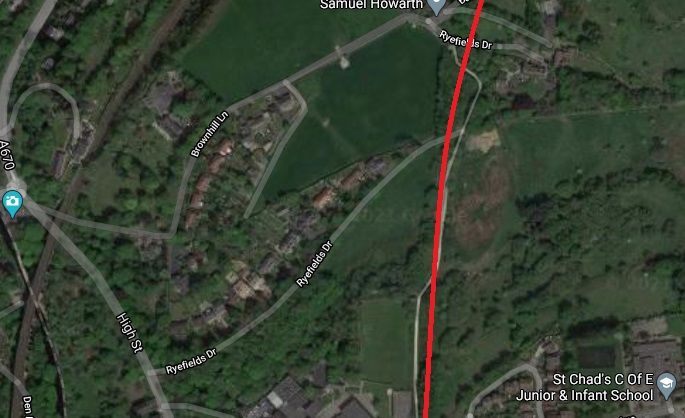
North of Uppermill the Loop line began to curve round towards the Northeast and entered Butterhouse Tunnel. The most southerly portal of the tunnel has been infilled, (Google Maps).
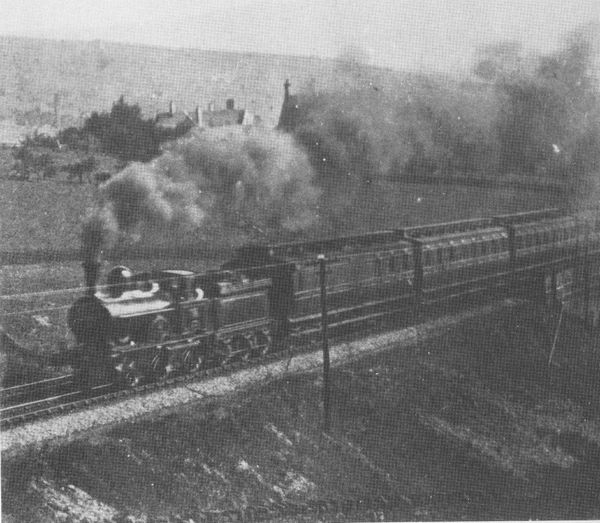
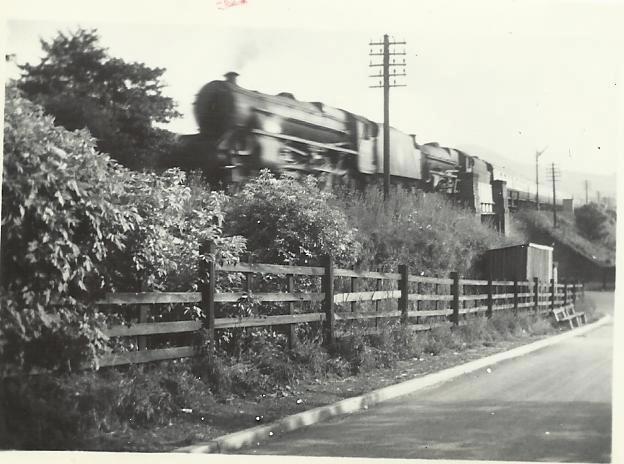
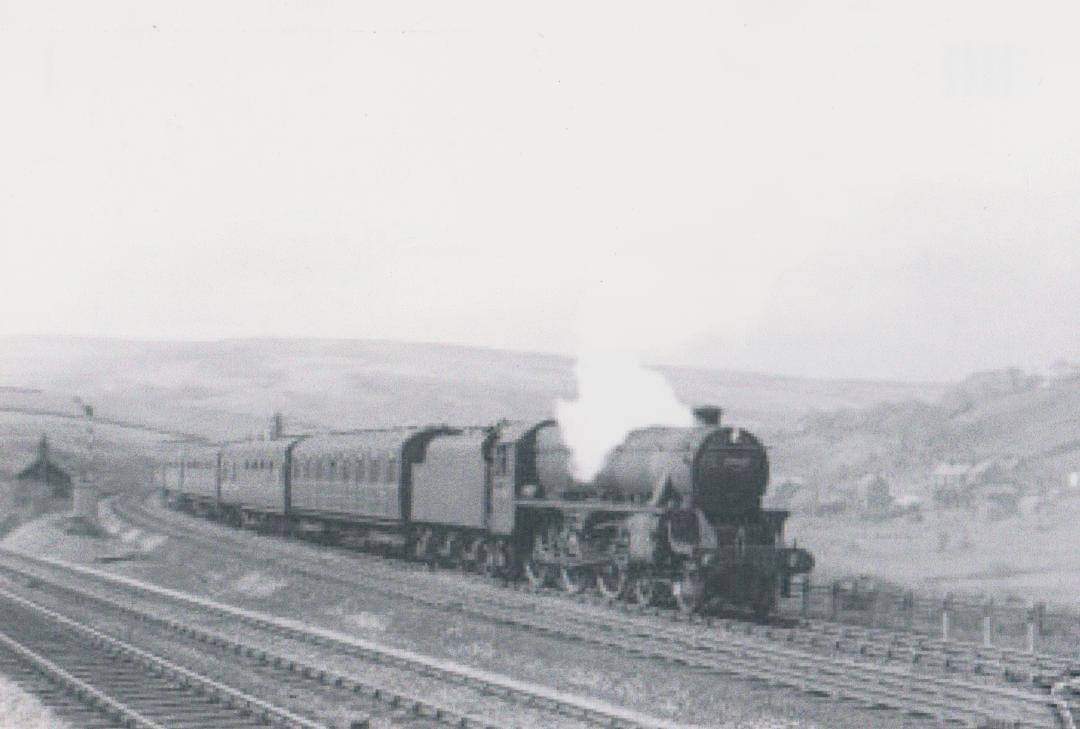
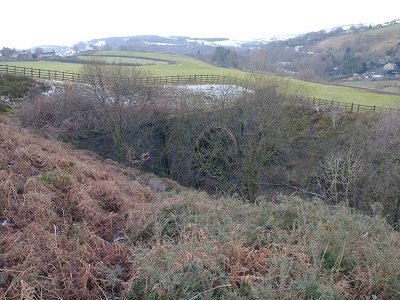
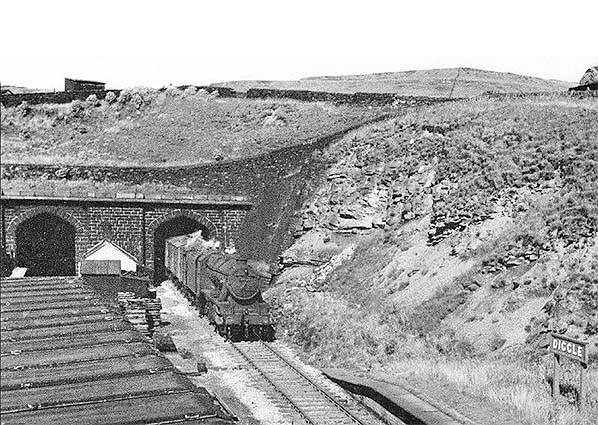
The Micklehurst Loop Line in 1900 – this picture shows the line just before it entered Butterhouse Tunnel. In the background is Pickhill Clough. Photographer not known. [12]
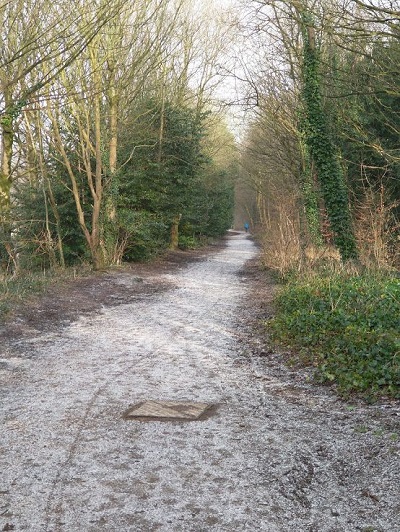
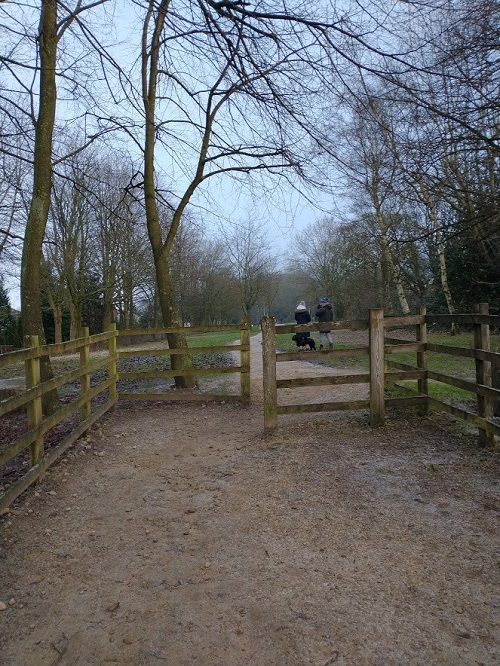
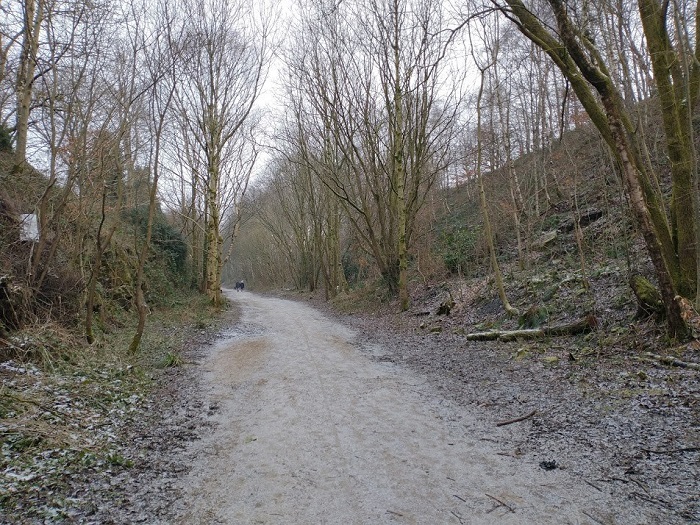
The formation of the Micklehurst Loop North of Church Road, (My Photograph – 25th January 2021)
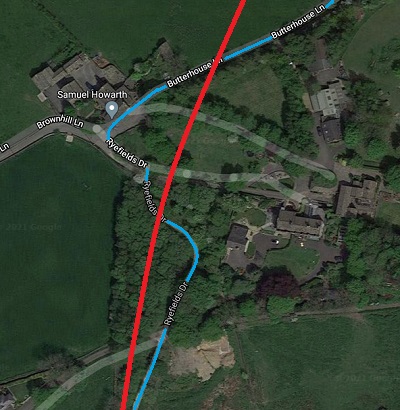
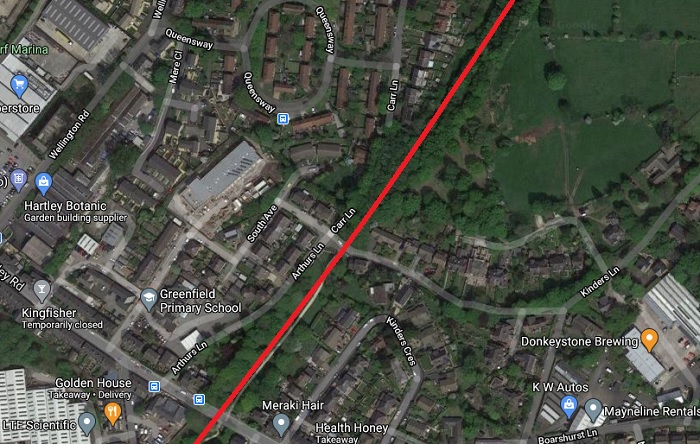
Google Maps satellite image in the vicinity of the South Portal of Butterhouse Tunnel. The line of the Micklehurst Loop through the tunnel is marked in red, the footpath/bridleway route in light blue.
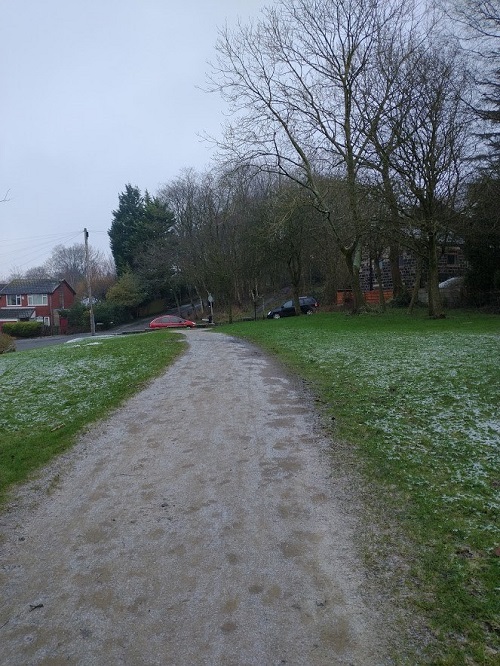
North of Church Road we regained the old railway formation and walked North past Saddleworth School.
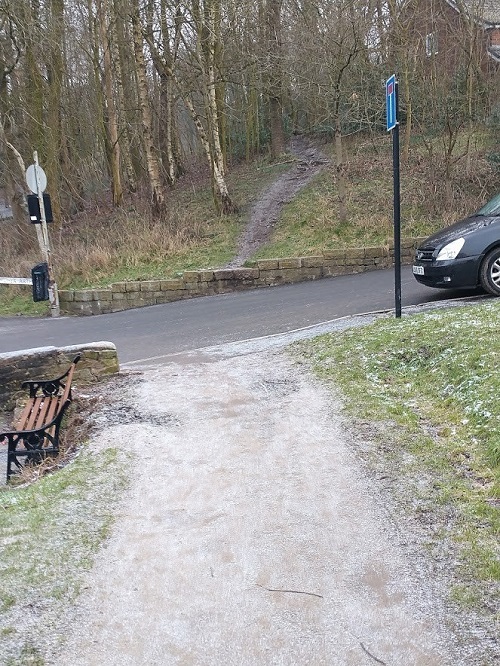
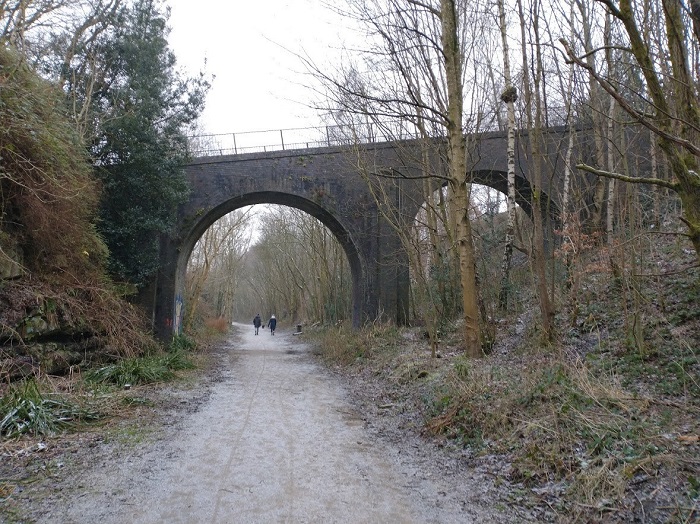
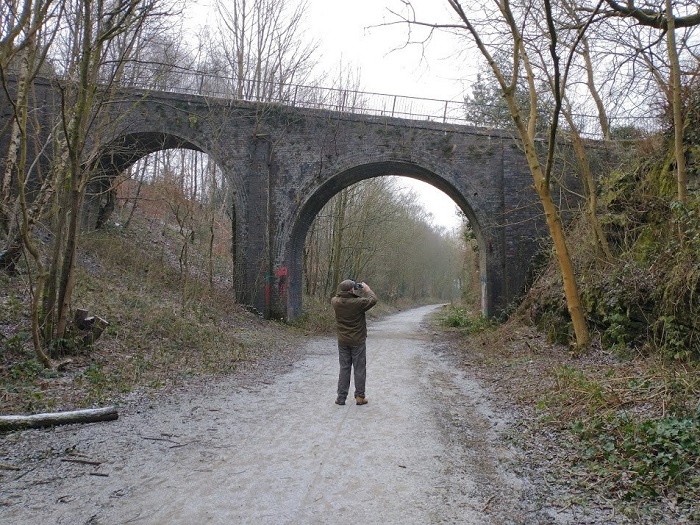
A short trek beyond Saddleworth School along the gentle gradient of the old Loop and approaching Ryefields Drive the public bridleway is forced away from the Line of the Micklehurst Loop as first the cutting and bridge under Ryefields Drive and then the tunnel portal have been infilled.
Once the footpath/bridleway separated from the old line and our walking route took us across Ryefields Drive at road level and then on towards Brownhill Lane. A left turn before reaching the junction of Brownhill Lane and Butterhouse Lane and Butter House.
It can be seen on the adjacent satellite image that two roadway lengths bear the name Ryefields Drive, both of which provide access to Rye Fields and that these are linked by the bridleway which also bears the name Ryefields Drive.
Rye Fields which sat above the Old Loop to the East is still occupied today. It is a Grade II listed 18th century structure. [32]
Butter House is similarly a Grade II 18th century property. [33]
But we are getting ahead of ourselves. …. The lower arm of Ryefields Drive crossed the Loop on a girder bridge, very soon after this the old railway entered Butterhouse Tunnel. I have so far only found one image relating to either of these structures. It is not reproduced hear for copyright reasons. It can be found in a short article carried on the Saddleworth Independent website in an article by Peter Fox entitled “History: Saddleworth by Rail – Part 2.” [43] The second image in the article on that webpage is a view taken from inside the South Portal of Butterhouse Tunnel looking towards the bridge which carried Ryefields Drive.
We then walked along Butterhouse Lane before following a footpath which led off the the left which brought us out close to the Northeastern portal of Butterhouse Tunnel. That portal is still open and the tunnel can be accessed from the track-bed if desired. [34]
Butterhouse Tunnel appears on this next extract from the 25″ OS Map series from the turn of the 20th century. [1]
Roughly the same area as in the map extract above, (Google Maps).
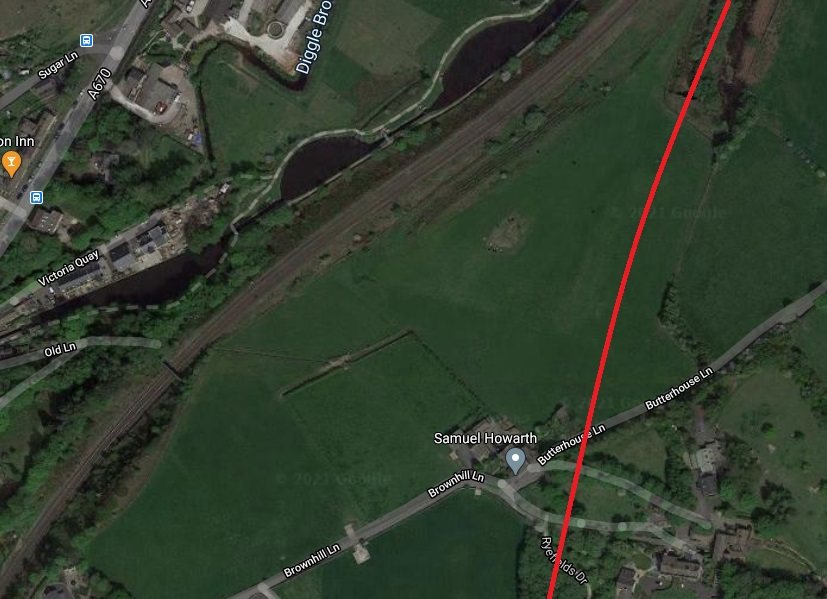
25″ OS Map extract from the turn of the 20th century, the main Huddersfield Line and the Loop run side by side towards Diggle. The point at which the footpath crossed under the rail lines appears just to the Soputh of the Works [1]
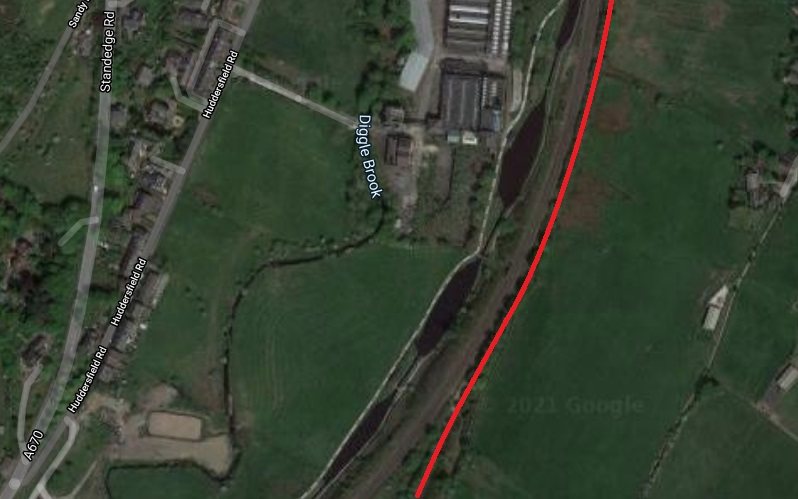
The Micklehurst Loop ran alongside the mainline towards Diggle Junction, (Google Maps)
This image comes from the Saddleworthgoneby Facebook Group and shows the point at which the Micklehurst Loop (on the left) meets the Mainline. Photographer not known. [47]
Butterhouse Tunnel North Portal, (My photograph – 25th January 2021).
The footpath that we used can be seen entering the above map extract from the bottom right and then turning North-northeast to run parallel to the railway. We left the footpath at the point where it turns North and wandered South toward the Tunnel portal.
North of the tunnel portal, the Loop left its cutting behind and ran alongside the main Huddersfield Line towards Diggle.
What was a 4-track line was (and is) closely followed by the Huddersfield Narrow Canal over this next length.
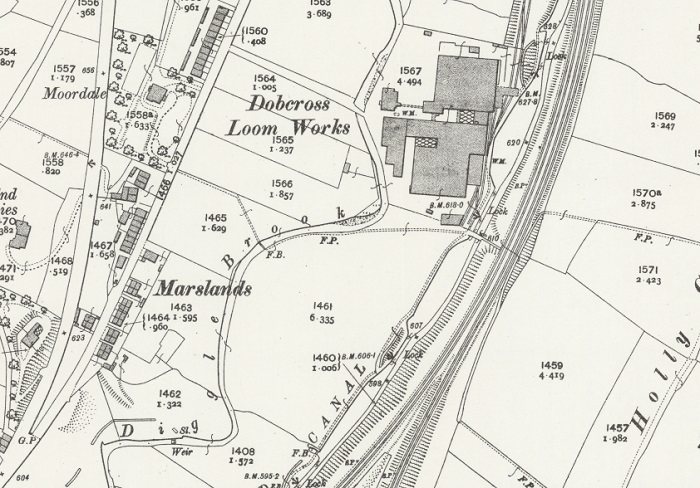
The 25″ OS Map extract above shows that at the time of its drafting the Dobcross Loom Works were rail served. The Dobcross Loom Works was built in 1860 and was set over a 22-acre site. [40] It still features a Grade II Listed building known locally as ‘The Cathedral’ which houses a Gothic clock tower. [35]
During the Great War, the factory doubled up as a munitions factory to assist with the war effort. Later, during the Second World War it helped create parts for Russian submarines to help counter the U-boat threat. [35]
The Loom Works closed in 1967 [35] and was then (in 1969) used for 37 years until 2006, as the home of Shaw’s Pallet Works, reputedly one of the largest pallet works in Europe. [40]
The Daily Mail [35] reported on the site just before it was demolished to make way for a new secondary school – Saddleworth School. Their report is online and includes some excellent picture of the works and its interior prior to demolition. Further excellent pictures can be found on the www.28dayslater.co.uk website. [36]
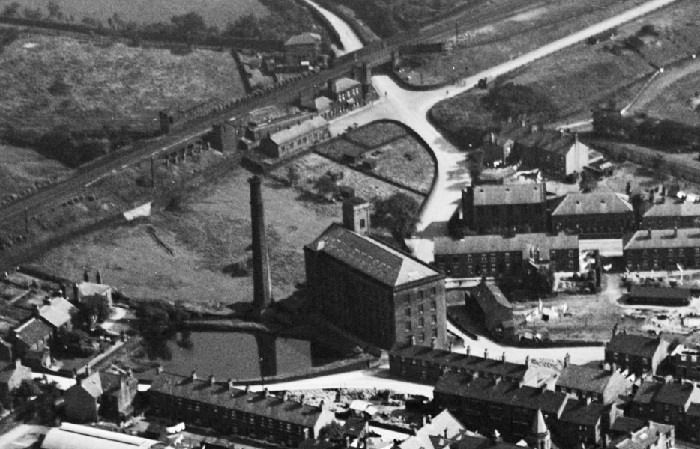
The works are shown from the air on the monochrome aerial photograph below in 1926. They have been significantly extended compared to the buildings on the 25″ OS Mapping.
The Micklehurst Loop, the mainline to Huddersfield and the Huddersfield Narrow Canal can all be seen behind the Works and careful inspection also reveals the Works sidings. There is an added bonus of a goods train on the Northbound Loop line. Diggle Brook meanders in front of the Works.
There are a sequence of extracts from that image which focus on specific elements: The mainline railway; the canal and sidings and finally a grainy picture of private owner wagons in the Works sidings.
rail-online.co.uk carries an excellent photograph of the 4-track railway line to the North of the Loom Works in around 1964. It shows the siding drifting away to the west of the mainline and on the right side of the image the bridge over the Huddersfield Narrow Canal which gave access to the Works can also be seen. [39]
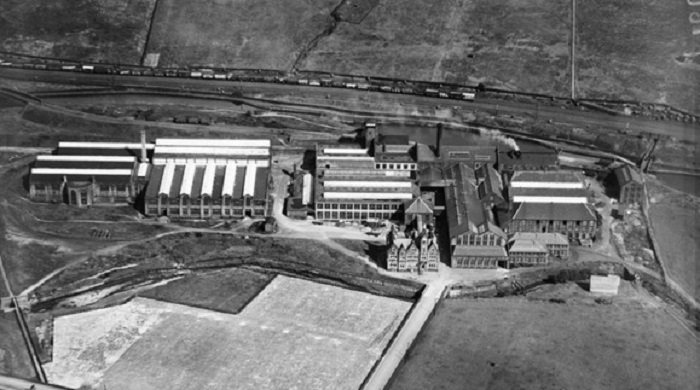
An extract from photograph EPW016481 held by Historic England – Dobcross Loom Works in 1926 looking across the site from the West. The Micklehurst Loop, the mainline to Huddersfield and the Huddersfield Narrow Canal can be seen behind the Works and careful inspection also reveals the Works sidings. There is a goods train on the Northbound Loop line, (c) Britain from Above. [38]
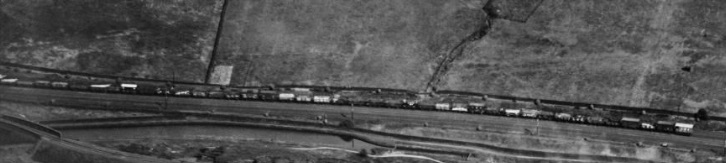
An extract from the image above which focusses on the Goods train on the Loop. It must have been a colourful sight with a significant range of different wagon liveries. Sadly the locomotive is not visible, (c) Britain from Above. [38]
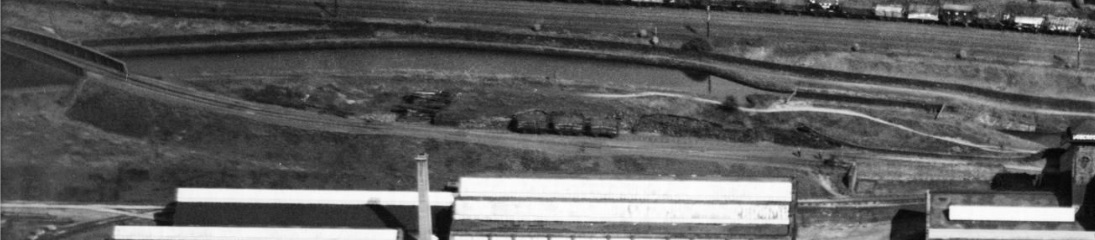
Another extract from EPW016481, this time focussing on the Works sidings and the Canal. The bridge to the sidings from the mainline can be seen on the left of the extract. Three private owner wagons sit centre stage on the apparently sloping siding, (c) Britian from Above. [38]

Sadly, the photo-definition is not good enough to make out the livery on the wagons, (c) Britain from Above. [38]
There is an excellent short illustrated article about the small locomotive employed at the Loom Works. It is written by Peter Fox and appears in the Saddleworth Historical Society Bulleting Volume 49 No. 4 p128-129. The locomotive was nicknamed the Dobcross Donkey and arrived at the Works in 1931 to replace horse-drawn shunting operations. Parts of the locomotive seem to have been in use in the years prior to the purchase on 3ft gauge lines in Ireland (the Clogher Valley Railway and the Donegal Railways). [49]
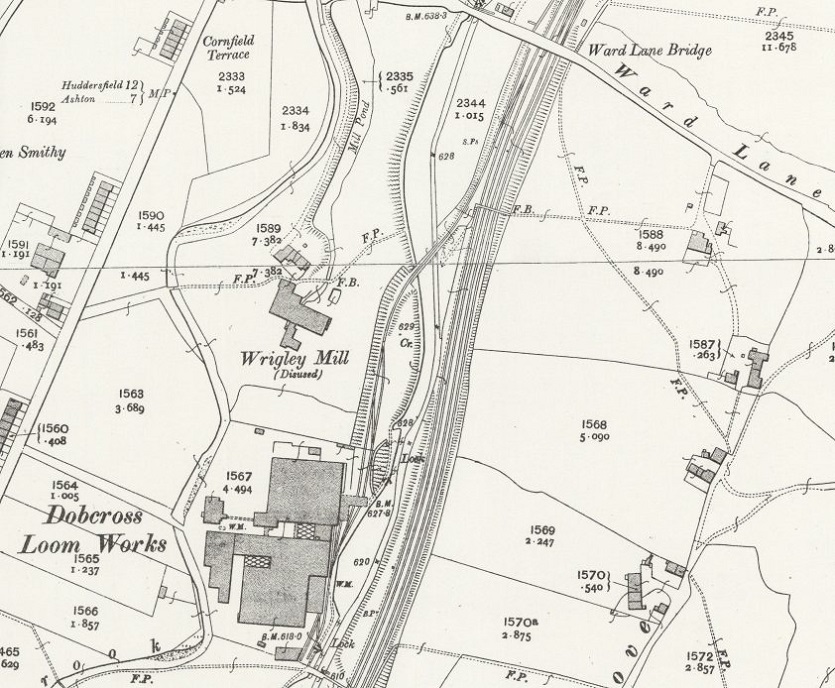
Dobcross Loom Works and the Works sidings as shown on the 25″ OS Map from the run of the 20th century. [1]
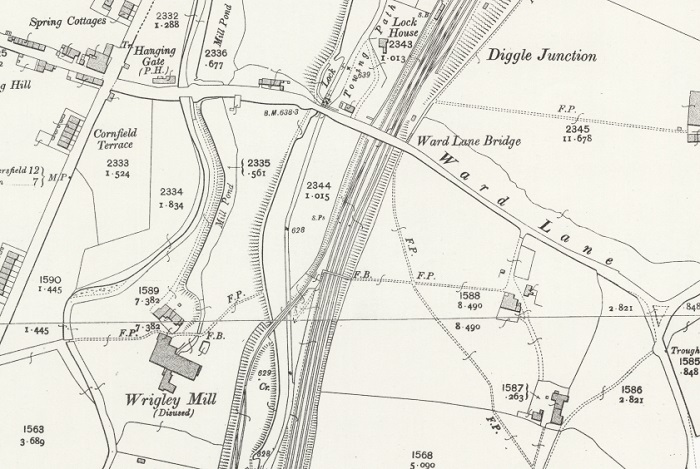
Ward Lane and Diggle Junction on the 25″ OS Maps from the turn of the 20th century. There was a footbridge crossing the main line a little to the south of Ward Lane. It carried a footpath access from the East to the Canal towpath, immediately to the South of the bridge for the Works sidings. [1]
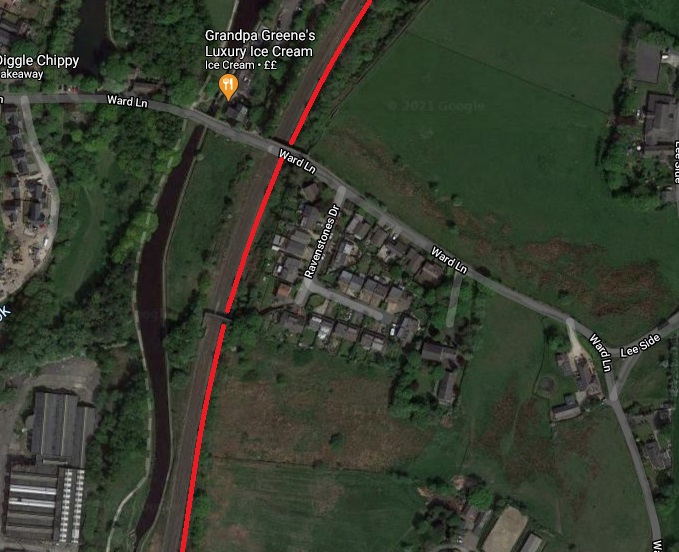
A similar area to that shown on the 25″ map extract above. The footbridge can still be made out to the southwest of Ravenstones Drive. Grandpa Green’s is a very popular destination which can create significant car traffic, (Google Maps).
There is an excellent monochrome image in the Brian Hilton collection which looks North from the footbridge on the 25″ OS map extract above and visible in the image below and shows the junction between the Works siding and the mainline and provides an excellent view of Ward Lane Bridge and has a hint of the pointwork of Diggle Junction beyond. Not included here for copyright reasons. [48]
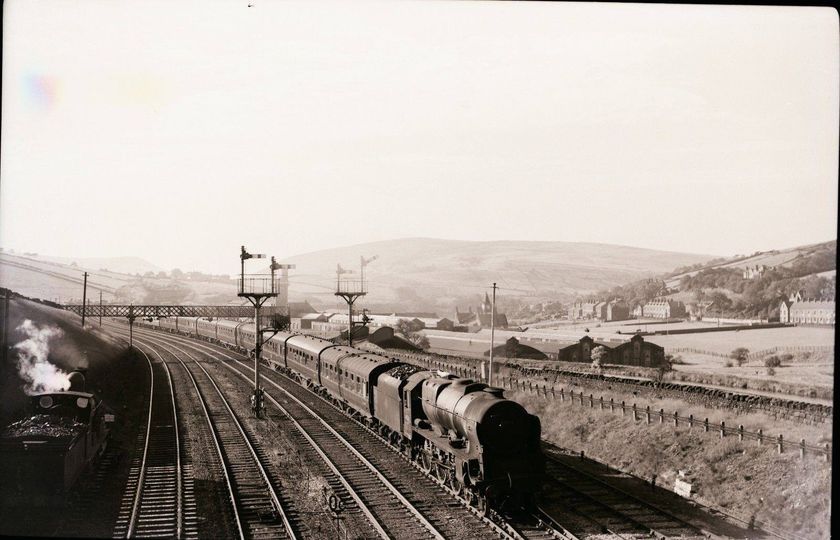
This image comes from the Saddleworthgoneby Facebook Group. [46] Rebuilt Patriot approaches Diggle Junction on the mainline passing a L&Y ‘A’ Class idling in a siding adjacent to the Loop lines. The footbridge visible on both the 25″ OS map and the satellite image can be seen clearly against the haze. The bridge carrying the Works siding over the Huddersfield Narrow canal can be made out in the middle distance above the train. The photographer is standing on Ward Lane Bridge. Photographer not known. [44]
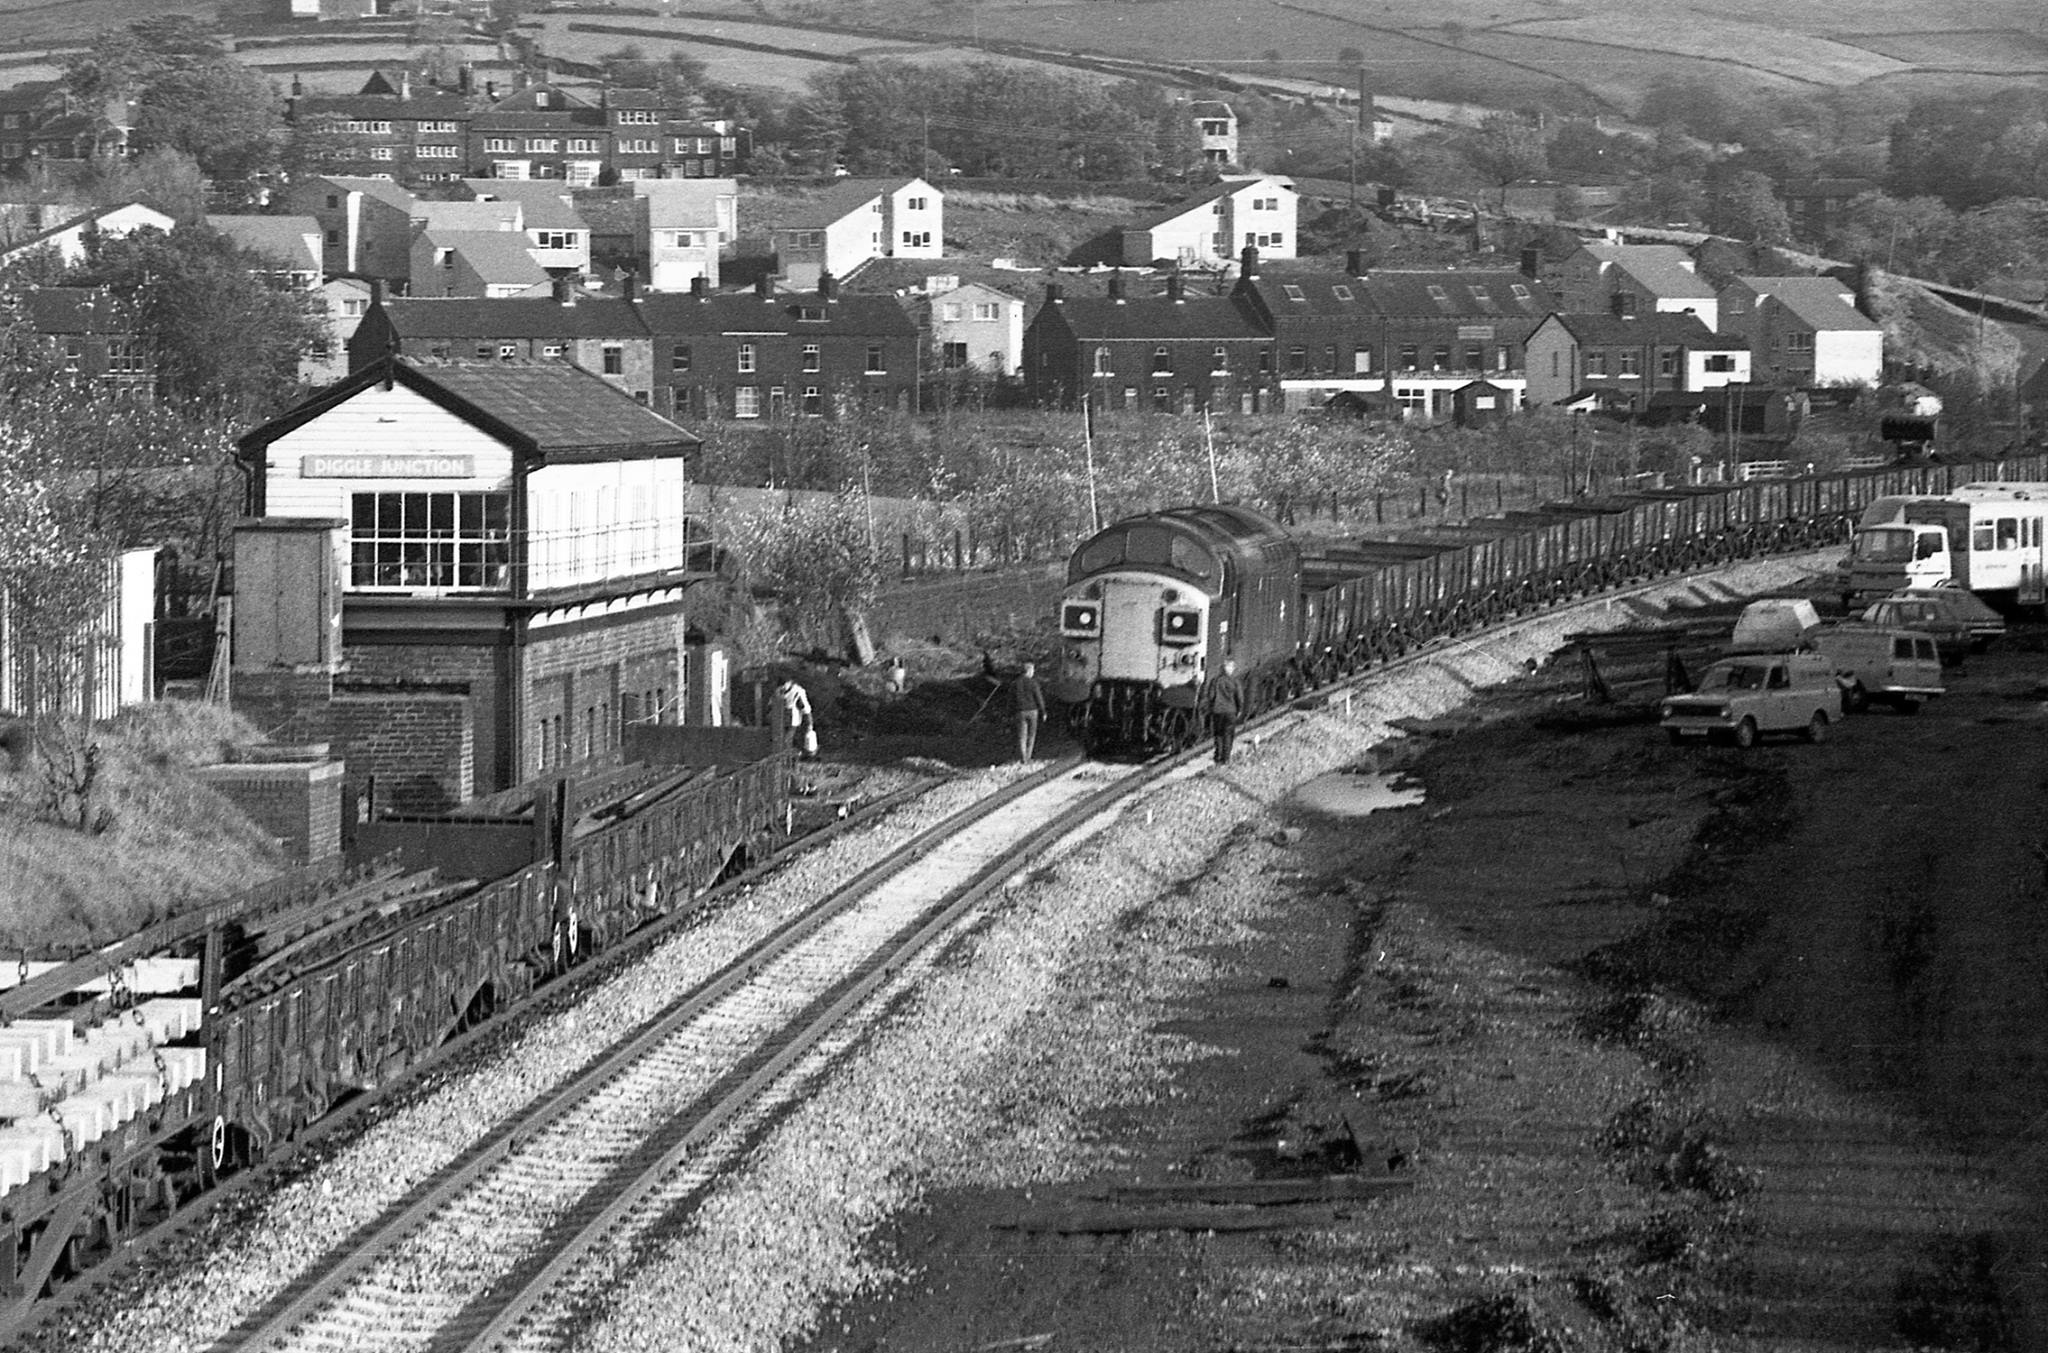
Also from the Saddleworthgoneby Facebook Group but now in the blue-grey livery era and with the Loop line lifted this view is taken from the footbridge in the image above. Photographer not known. [45]
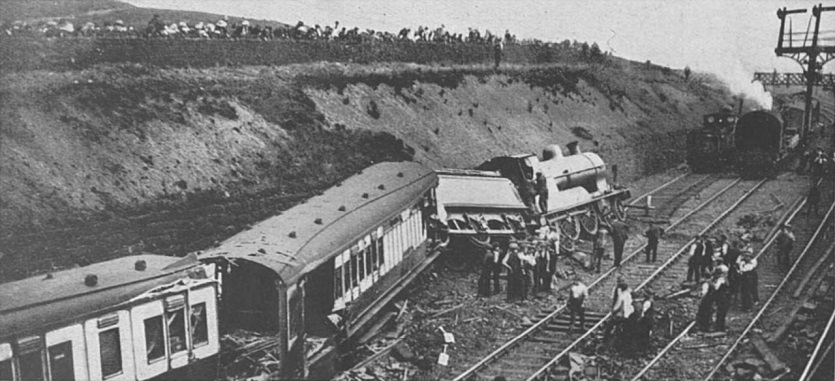
Diggle Junction was the site of a significant accident in 1923. This photograph is taken from Ward Lane Bridge. There seem to be a lot of people watching the recovery operation! The footbridge South of Ward Lane can be seen on the right of the image. The photographer not known. [64]
Diggle Junction was the point at which the Loop joined the main Huddersfield line before passing through Diggle Station and on into Standedge Tunnels. There was a relatively complex series of points which allowed access to the different lines to the North, and into the Works sidings to the South. Ward Lane spanned the tracks at this point. Diggle Junction was the scene of a significant rail accident in 1923, one picture of the aftermath of the accident is shown above. Full details of the accident can be found in an article by Alan Schofield in the Saddleworth Historical Society Bulletin Volume 43 No. 1 of Spring 2013. [41]
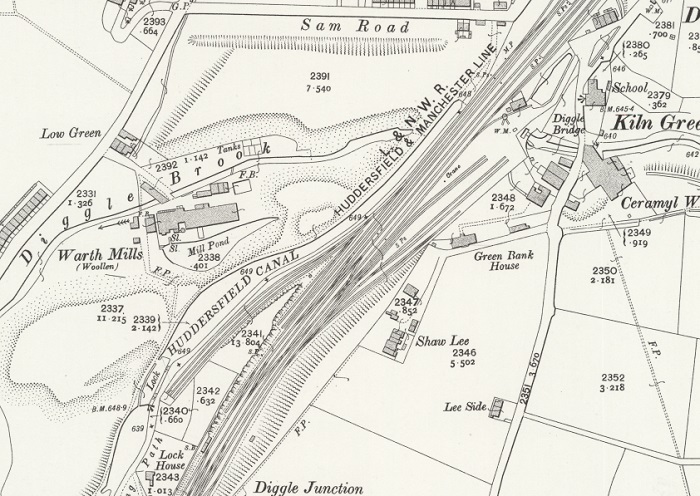
The complexity of Diggle Junction can be seen on this 25″ OS Map extract from the turn of the 20th Century. [1]
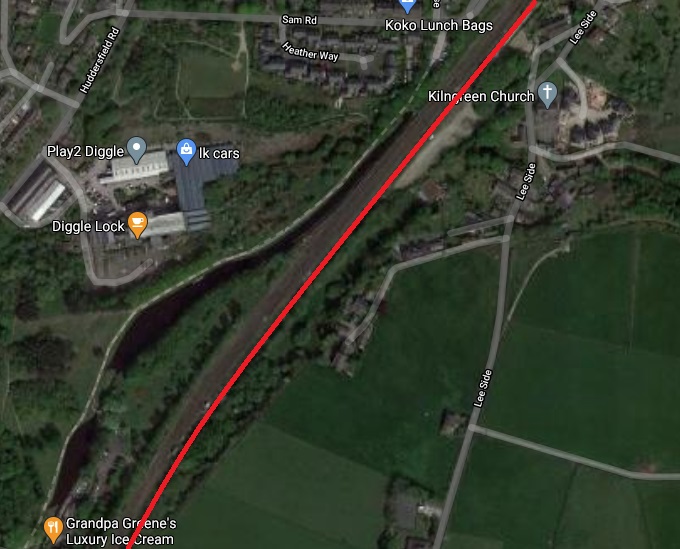
As far as the railway layout is concerned, things are far less complex in the 21st century, (Google Maps).
Another photograph from Saddleworthgoneby Facebook Group. A view Northwest from Ward Lane Bridge. The chimney is that of Warth Mills which appear on both the 25″ and 1:2,500 OS map extracts (above and below). The buildings are still standing in 21st century. Photographer not known. [50]
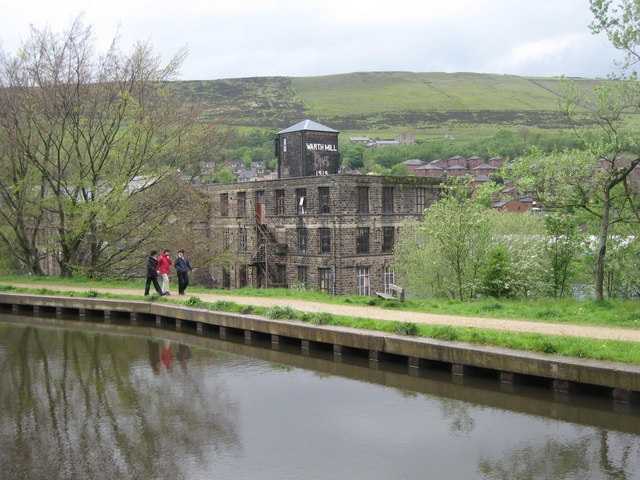
Warth Mill in the 21st century, (c) Paul Anderson (Warth Mill Diggle – . [52]
An early image, also from Saddleworthgoneby. Warth Mill is centre stage and the railway can be seen running right to left Southwest to Northeast roughly halfway up the image. Sadly the resolution is not good enough to focus in on the railway. Photographer not known. [56]
Warth Mill was constructed in 1919 in its present form, although there was an earlier, smaller mill on the site beforehand. It was acquired by the Tanner family in 1928 and in its prime was producing 50 tons of tyre fabric for the automotive industry every week. The building is now in use by a range of small industrial concerns – a café and a catering school are of most interest to me! Until recently Wooly Knits had a factory shop int he building, [61]
This 1:2,500 OS Map extract from 1932 shows that between the turn of the 20th century and the 1930s the number of sidings provided at Diggle increased significantly on both sides of the running lines. This map comes from the Disused Stations Website and is used with the kind permission of Alan Young. [51]
Another image from Saddleworthgoneby. A short distance along the line from the last monochrome image was Diggle Junction Signal Box. [53]
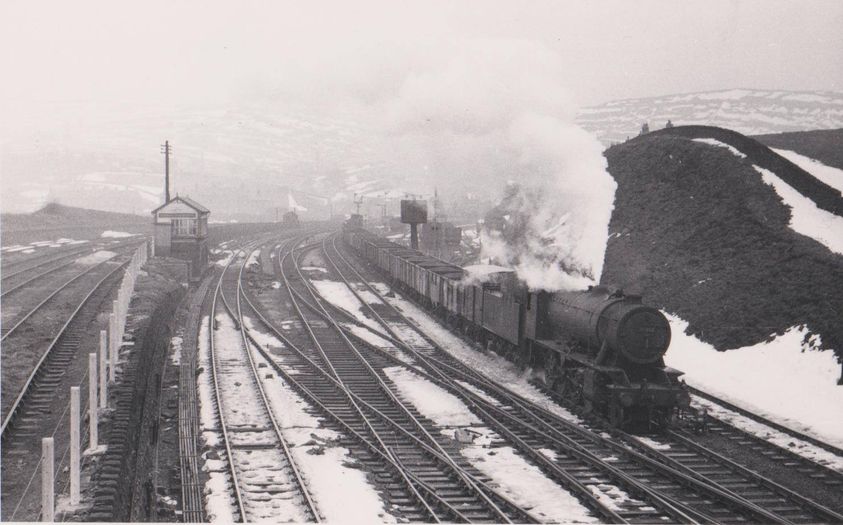
Another image from Saddleworthgoneby. An Austerity 2-8-0 in charge of a train of mineral wagons comes out of the gloom adjacent to Diggle Junction Signal Box. Photographer not known. [54]
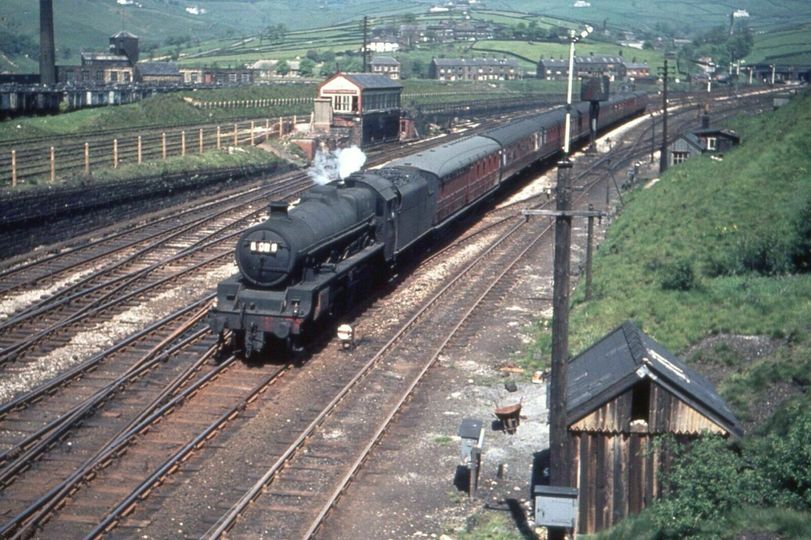
Also from Saddleworthgoneby. The same location again, this time in colour in the mid- to late1960s with a Jubliee in charge of a rake of marron stock. The first coach appears to be LNER Gresley stock. The others appear to be Mark 1 stock. Photographer not known. [55]
Saddleworthgoneby again – although monochrome this is a much later image. The Sidings on both sides of the main line and the Micklehurst Loop lines have seemingly recently been removed. Photographer not known. [57]
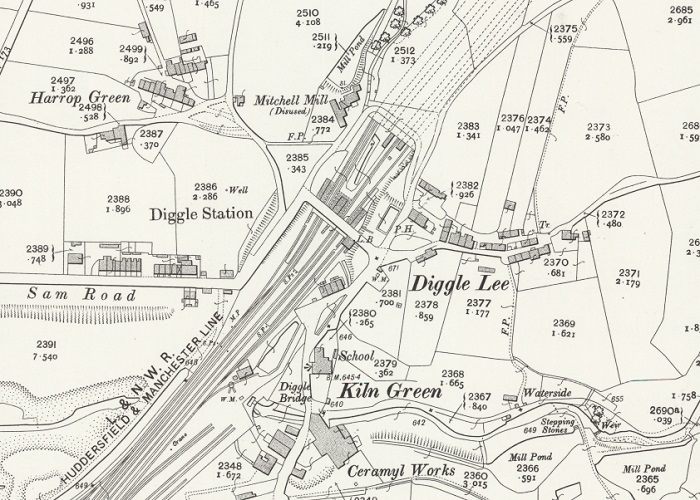
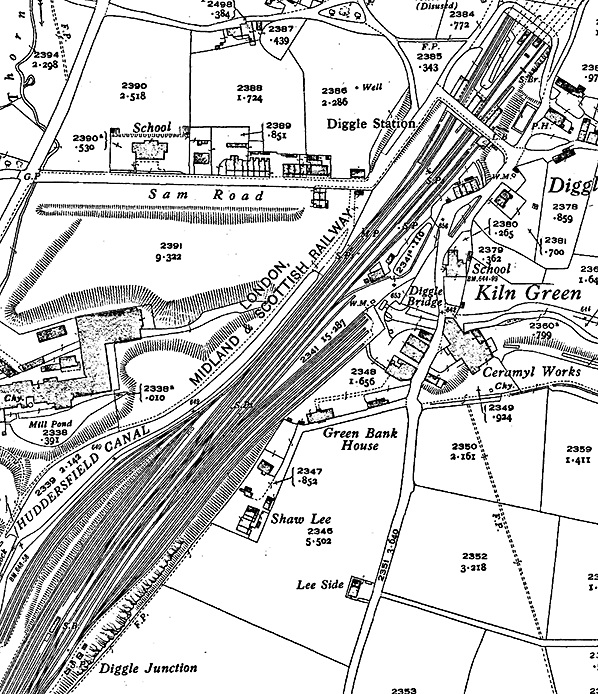
A final 25″ OS Map extract shows Diggle Station and the Tunnel mouths of Standedge Tunnels – a double bore carries the modern mainline and two single bores used to carry two other lines under the Pennines. [1]
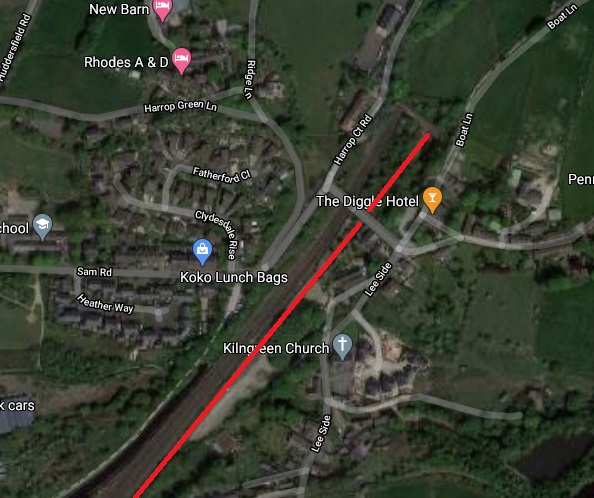
And in the 21st century, (Google Maps)
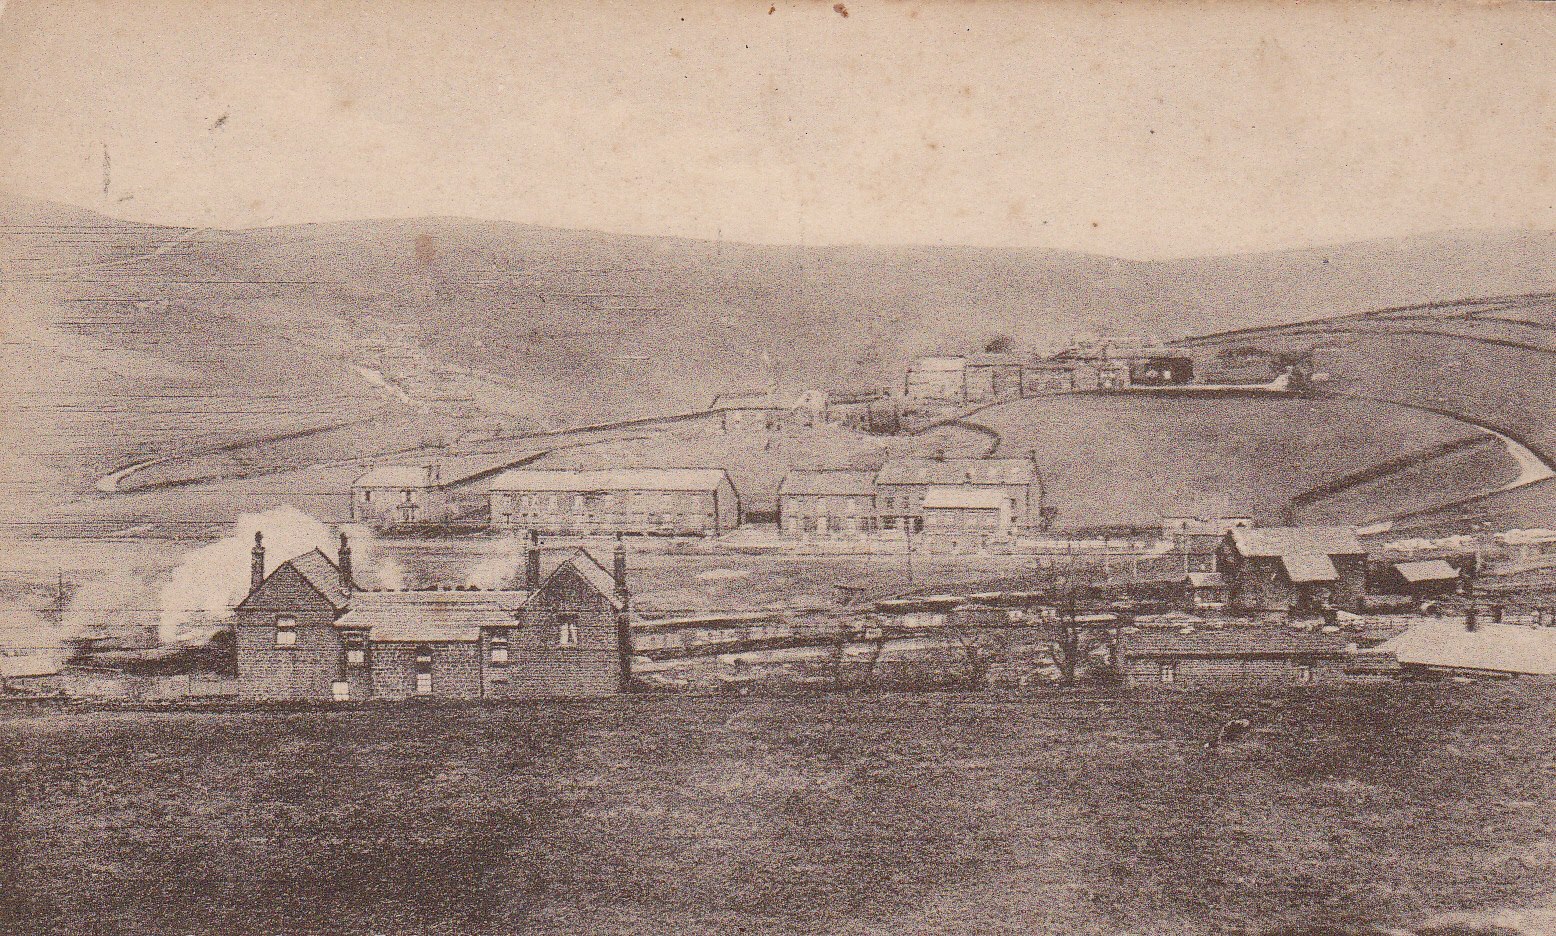
Saddleworthgoneby again, a very early image looking across the railway towards Sam Road with Harrop Green behind. The photograph was taken from the South. The photographer is not known. There appears to be a goods shed in the sidings on the near side of the mainline which does not appear on either of the OS Map extracts of the location. [58]
Another early image also from Saddleworthgoneby. It is a view from Station Road across the throat of Diggle station from the North. The shows the good shed to better advantage. The buildings beyond the railway make up the hamlet of Kiln Green. The mill chimney is on the left of the image. The photographer is not known. [59]
Kiln Green Mill was a Works that produced Ceramyl. It is marked as such on the 25″ OS Map from the turn of the 20th century. Ceramyl appears to be a hard synthetic product used in bathroom fittings – mainly basins and baths. Most modern references to the product on the internet are from Europe or North America. The word does not appear in the majority of on-line English dictionaries, but it was clearly being produced in Kiln Green early in the 20th century.
Diggle Station sat at the mouth of the Standedge Tunnels. 4 tracks ran through the Pennine Hills in Tunnel between Diggle and Marsden in West Yorkshire. The first tunnel was completed in 1848 and was large enough for just one railway track. The second was completed in 1871 and was also single-bore. The third tunnel was large enough for two tracks and was completed in 1894. It is the double-track tunnel which remains open in the early 21st century. [62]
Diggle Station was “opened in 1849 along with the first rail tunnel and closed to passenger traffic in 1968. The station features on the Diggle Community Association Website. [65]

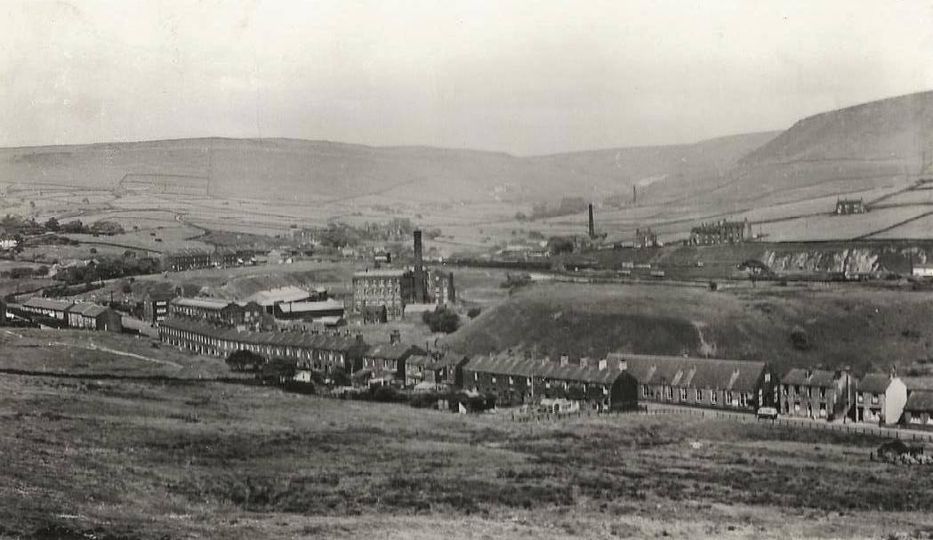
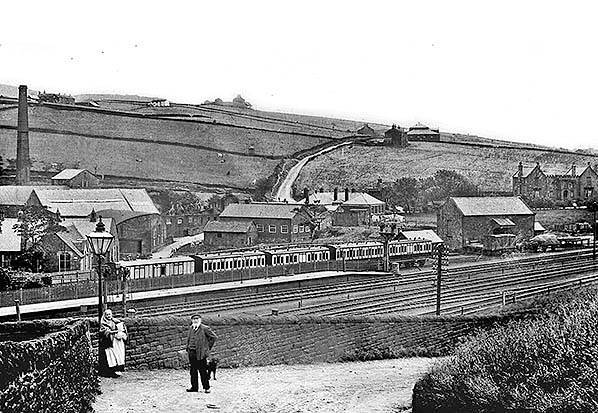
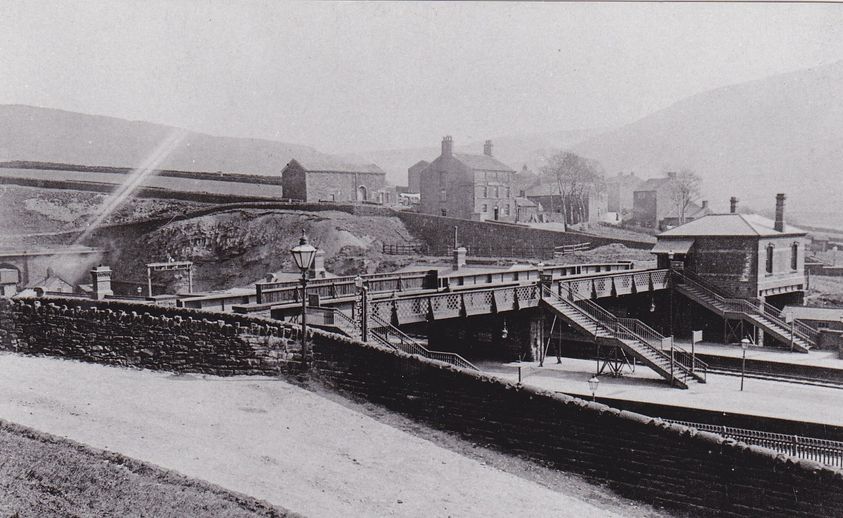
This photograph is carried by the Diggle Community Association Website. In addition to facts about the station, their comments include the following: “There is an indication of how small Diggle used to be. In the background, the fields below Harrop Edge are obviously used for farming. Today there are houses along Devon Close and Dorset Avenue. Note also the chimney at Wharf mill. The bridge crossing the railway is still in use today and a car has just turned round the corner at the top of Sam Road. The fields to the right of the car are now occupied by houses on Clydesdale Rise. Just to the right of the steam train is an expanse of water, which is the canal lagoon used for turning barges around.” [65]
In its heyday, the station had platforms serving all four lines but little trace remains of it today—all of the buildings and much of platforms having been demolished.” [63]
The next two monochrome photographs were carried by the Saddleworthgoneby Facebook group. They show trains leaving two of the different tunnel bores, with the third bore visible in the first of the two images.
An image rom the Saddleworthgoneby Facebook Group. It shows a goods train emerging from one of the two single-bore tunnels and immediately into Diggle Station. The photographer is not known. [66]
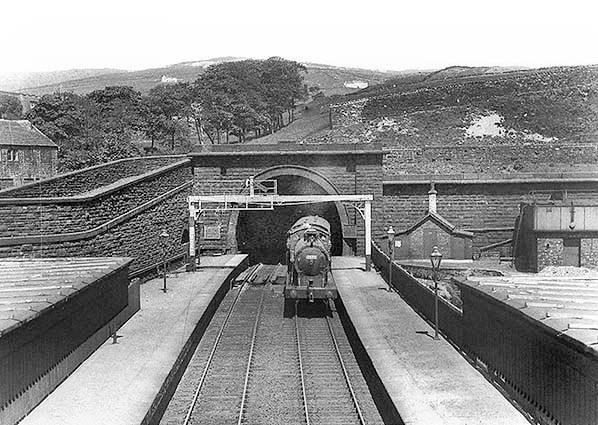
Another Saddleworthgoneby Facebook Group photograph. This one shows a passenger train breaking out into the summer light from the double-bore tunnel which is still in use in the 21st century. The platforms of Diggle station begin at the tunnel portal. Again, the photographer is not known. [67]

And another Saddleworthgoneby Facebook Group image which shows the southwest end of the platforms. The picture was taken from a point just to the Southwest of the station footbridge which was, in turn, just to the the Southwest of the road bridge. On the left of the image the goods shed can be seen behind a row of mineral wagons. The photographer is not known. [68]
Saddleworthgonebay Facebook Group also provided this photograph taken from the station approach road (Station Road/Sam Road) which shows the footbridge and road bridge and also shows the small station building at high level next to the road and carried on girders over the most easterly of the tracks at the station which was a terminus line. The photographer is again not known. [69]
The next sequence of photographs were taken in April 2021 and show the condition of the station site in the 21st century. The first three pictures are from Google Streetview. The subsequent images are my own photographs.
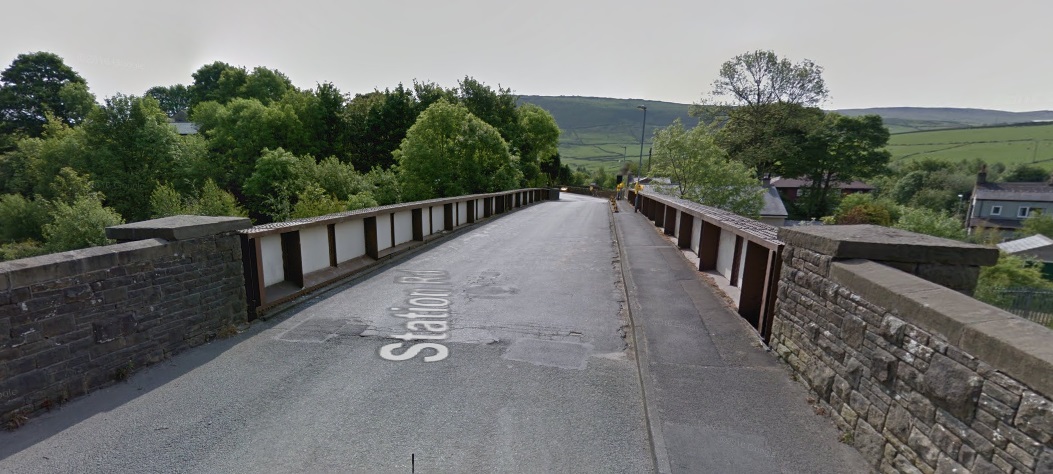
Looking Southeast across Station Road bridge in Diggle, (Google Streetview).
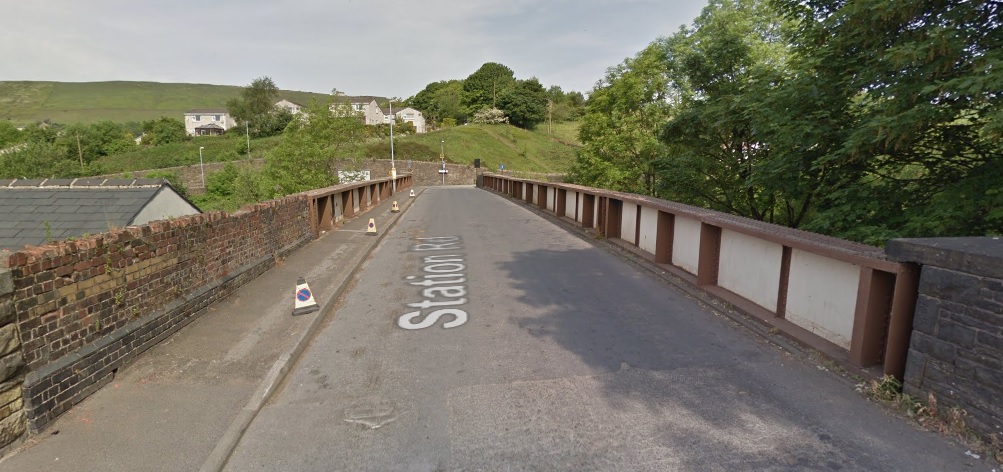
Looking Northwest along Station Road Bridge in Diggle, (Google Streetview).
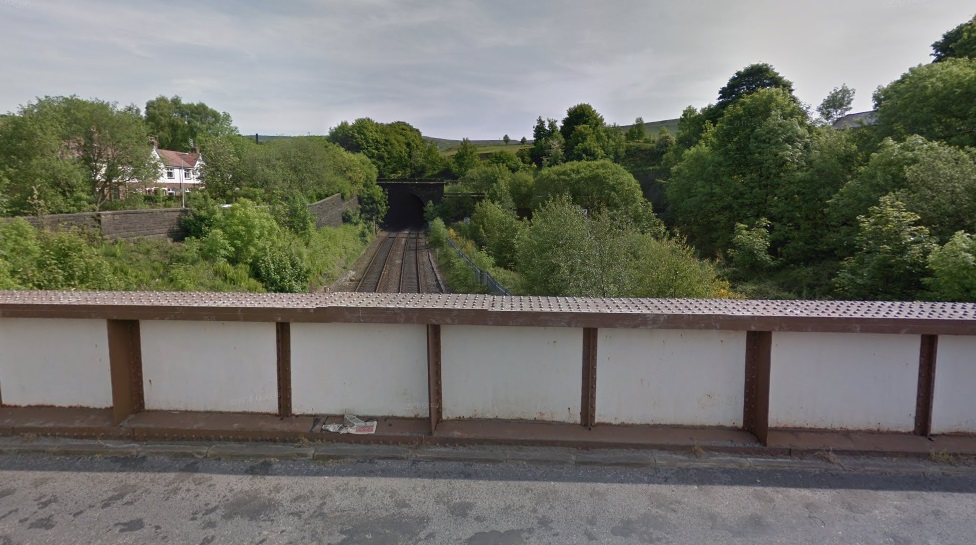
Looking Northeast towards the double-bore tunnel still in use, (Google Streetview).
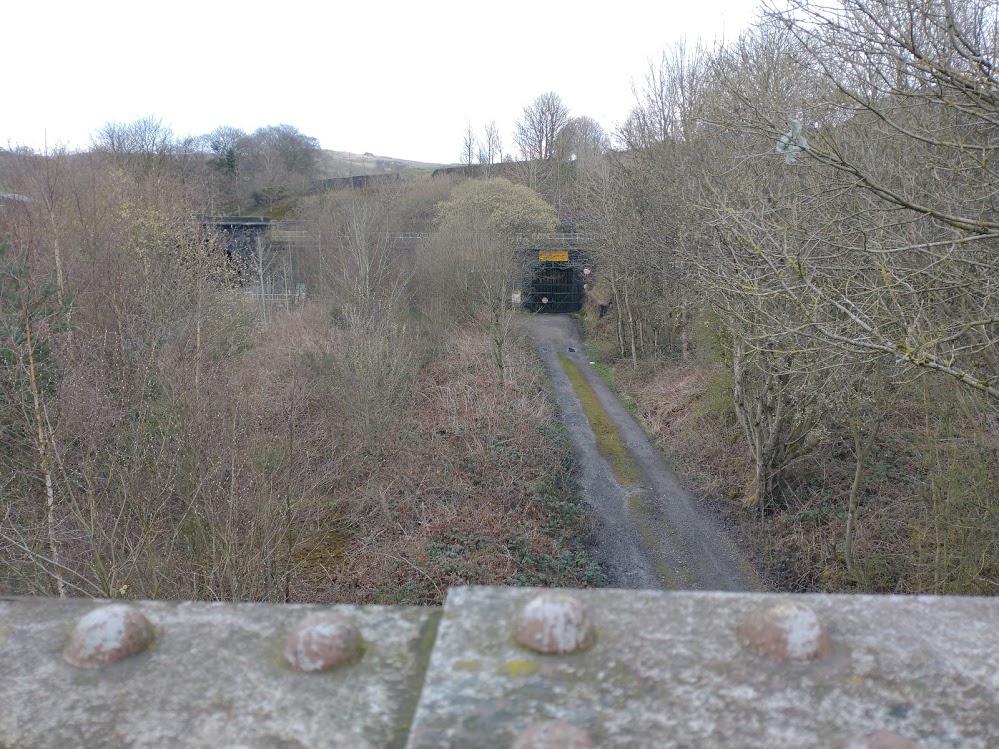
A similar view of the single-bore tunnel but this time taken in the 21st century, (My photograph – 9th April 2021).
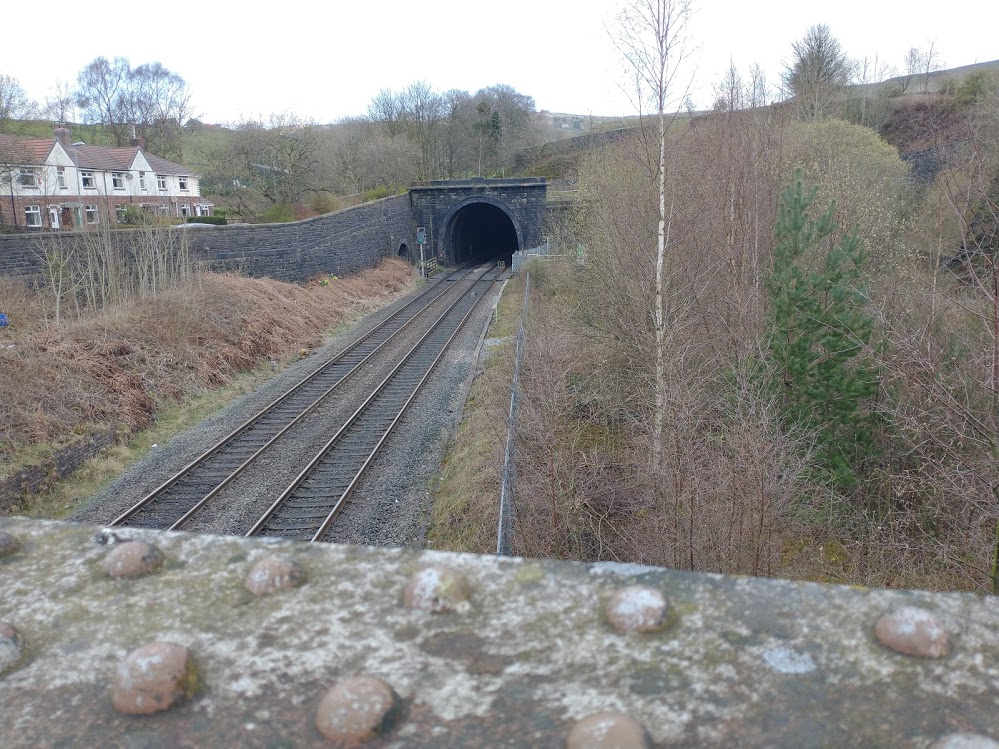
The double-bore tunnel on 9th April 2021, (My photograph).

A panorama which shows the relative positions of the three tunnel bores. The two single-bore tunnels are marked by the yellow panels, (My photograph – 9th April 2021).
A 21st century view along the line of the old station footbridge, (My photograph – 9th April 2021).
The view Southwest along the railway on 9th April 2021, (My photograph).
References
- https://maps.nls.uk, accessed on 4th April 2021.
- https://www.timepix.uk/Collection-galleries/OS-Revision-Points-in-Greater-Manchester/1940s-1950s-Middleton-Oldham-and-Rochdale/Lees-Grasscroft-and-Greenfield/i-sqpQVTp, accessed on 28th February 2021.
- https://www.timepix.uk/Collection-galleries/OS-Revision-Points-in-Greater-Manchester/1940s-1950s-Middleton-Oldham-and-Rochdale/Lees-Grasscroft-and-Greenfield/i-GB6pX6v, accessed on 28th February 2021.
- https://picclick.co.uk/Greenfield-near-Uppermill-Oldham-Ashway-Gap-352652407476.html, 28th February 2021.
- https://www.ebay.co.uk/itm/313086782469?mkevt=1&mkcid=1&mkrid=710-53481-19255-0&campid=5338722076&toolid=10001
- https://www.28dayslater.co.uk/threads/knoll-mill-wellington-mill-greenfield-july-2019.122608, accessed on 5th April 2021.
- http://disused-stations.org.uk/features/micklehurst_loop/index.shtml, accessed on 25th January 2021.
- https://www.derelictplaces.co.uk/threads/wellington-mill-greenfield-oldham.14646, accessed on 5th April 2021.
- http://www.table38.steamrailways.com/rail/Micklehurst/micklehurst.htm, accessed on 24th January 2021.
- Owen Ashmore; The Industrial Archaeology of North-west England; Manchester University Press, 1982.
- https://twitter.com/saddleworthlife/status/805505076685078528/photo/1, accessed on 5th April 2021.
- https://www.facebook.com/414417905268685/photos/a.425457050831437/425457284164747, accessed on 6th April 2021.
- https://www.facebook.com/photo?fbid=1618346588372481&set=gm.1320088341664545, accessed on 6th April 2021.
- https://www.facebook.com/photo.php?fbid=843332152540599&set=p.843332152540599&type=3, accessed on 6th April 2021.
- https://www.facebook.com/Greenfieldgoneby.co.uk, accessed on 7th April 2021. There are four images of Chew Valley Road Bridge taken directly from that group. They are:
- https://www.facebook.com/124389994363907/posts/2149890145147205/?sfnsn=scwspmo, accessed on 7th April 2021.
- https://www.facebook.com/124389994363907/posts/2170281923108027/?sfnsn=scwspmo, accessed on 7th April 2021.
- https://www.facebook.com/124389994363907/posts/2149889381813948/?sfnsn=scwspmo, accessed on 7th April 2021.
- https://www.facebook.com/124389994363907/posts/2182892861846933/?sfnsn=scwspmo, accessed on 7th April 2021.
- https://www.facebook.com/permalink.php?story_fbid=1741606352549827&id=414417905268685, accessed on 6th April 2021.
- https://www.facebook.com/permalink.php?story_fbid=3978593725517734&id=414417905268685, accessed on 7th April 2021.
- https://www.facebook.com/414417905268685/photos/a.414418885268587/674477962596010, accessed on 6th April 2021.
- https://www.facebook.com/permalink.php?story_fbid=3093554747354974&id=414417905268685, accessed on 6th April 2021.
- https://www.facebook.com/414417905268685/posts/3690399224337187/?sfnsn=scwspmo, accessed on 7th April 2021.
- https://www.facebook.com/414417905268685/posts/3826630547380720/?sfnsn=scwspmo, accessed on 8th April 2021.
- http://www.disused-stations.org.uk/u/uppermill, accessed on 9th April 2021.
- https://www.britainfromabove.org.uk/en/image/EPW016500, accessed on 9th April 2021.
- https://en.wikipedia.org/wiki/List_of_mills_in_Saddleworth, accessed on 9th April 2021.
- https://www.gracesguide.co.uk/1891_Cotton_Mills_in_Uppermill_and_Greenfield, accessed on 9th April 2021.
- https://www.saddleworthmuseum.co.uk, accessed on 9th April 2021.
- https://www.facebook.com/414417905268685/photos/a.422158627827946/424481954262280, accessed on 9th April 2021.
- https://britishlistedbuildings.co.uk/101068129-ryefields-and-ryefields-cottage-saddleworth#.YHLlquhKiUk, accessed on 11th April 2021.
- https://britishlistedbuildings.co.uk/101067465-butterhouselindum-cottage-saddleworth#.YHLngehKiUk, accessed on 11th April 2021.
- See, for example, https://www.28dayslater.co.uk/threads/butterhouse-railway-tunnel-saddleworth-28-04-2015.96108, accessed on 11th April 2021.
- https://www.dailymail.co.uk/news/article-7836803/Inside-crumbing-British-factory-built-Russian-submarine-parts-Second-World-War.html, accessed on 12th April 2021.
- https://www.28dayslater.co.uk/threads/w-h-shaws-diggle-pallet-works-dobcross-loom-works-a-final-stroll-february-2020.122128, accessed on 12th April 2021.
- https://www.questmedianetwork.co.uk/news/oldham-reporter/demolition-begins-on-pallet-site-for-new-saddleworth-school, accessed on 12th April 2021.
- https://www.britainfromabove.org.uk/en/image/EPW016481, accessed on 12th April 2021.
- https://www.rail-online.co.uk/p353285794/hCFD64DE8#hcfd64de8, accessed on 12th April 2021.
- https://www.oldham-chronicle.co.uk/news-features/139/main-news/132920/demolition-begins-on-pallet-site-for-new-saddleworth-school, accessed on 12th April 2021.
- https://www.saddleworth-historical-society.org.uk/wp-content/uploads/2016/04/vol43no1-2.pdf, accessed 1st April 2021.
- https://www.facebook.com/414417905268685/photos/a.414418885268587/1316060985104368/?type=3&eid=ARClyhRwU12hrUBtg6O_q4-T3Q72SGshvBOmwsj911j8ug7lZolKEy3ADe8mqoFdE7VXZ4COlOSRZg_5, accessed on 12th April 2021.
- https://saddind.co.uk/history-saddleworth-by-rail-part-2, accessed on 13th April 2021.
- https://www.facebook.com/permalink.php?story_fbid=1695331200510676&id=414417905268685, accessed on 14th April 2021.
- https://www.facebook.com/permalink.php?story_fbid=4044441378932968&id=414417905268685, accessed on 14th April 2021.
- https://www.facebook.com/Saddleworthgonebycouk-414417905268685, accessed on 14th April 2021.
- https://www.facebook.com/Saddleworthgonebycouk-414417905268685/photos/2102305609813231, accessed on 14th April 2021.
- https://hmrs.org.uk/home, accessed on 14th April 2021. Search under Photographs- Collections.
- https://www.saddleworth-historical-society.org.uk/wp-content/uploads/2020/01/SHS-2019-Bulletin-Vol-49-No4i.pdf, accessed on 14th April 2021.
- https://www.facebook.com/permalink.php?story_fbid=3826628260714282&id=414417905268685, accessed on 14th April 2021.
- http://disused-stations.org.uk/d/diggle/index.shtml, accessed on 14th April 2021.
- Provided under a Creative Commons Licence (CC BY-SA 2.0) https://commons.wikimedia.org/wiki/File:Warth_Mill_Diggle_-_geograph.org.uk_-_433985.jpg, accessed on 14th May 2021.
- https://www.facebook.com/414417905268685/photos/a.414418885268587/1392923360751463, accessed on 15th April 2021.
- https://www.facebook.com/permalink.php?story_fbid=2102305019813290&id=414417905268685, accessed on 15th April 2021.
- https://www.facebook.com/permalink.php?story_fbid=3074436342600148&id=414417905268685, accessed on 15th April 2021.
- https://www.facebook.com/permalink.php?story_fbid=2458599980850457&id=414417905268685, accessed on 15th April 2021.
- https://www.facebook.com/414417905268685/photos/a.414418885268587/1032433433467126, accessed on 15th April 2021.
- I know that this image came from the Saddleworthgoneby Facebook Group but I did not record the link.
- https://www.facebook.com/permalink.php?story_fbid=1313967991980334&id=414417905268685, accessed on 15th April 2021.
- https://www.facebook.com/414417905268685/photos/a.425457050831437/425457124164763, accessed on 15th April 2021.
- https://saddind.co.uk/diggle-a-brief-history-including-the-wheel, accessed on 15th April 2021.
- https://en.wikipedia.org/wiki/Standedge_Tunnels#Railway_tunnels, accessed on 15th April 2021.
- https://en.wikipedia.org/wiki/Diggle_railway_station, accessed on 16th April 2021.
- https://en.wikipedia.org/wiki/Diggle_railway_station#/media/File:Railway_accident_at_Diggle,_Yorkshire_in_1923.png, accessed on 16th April 2021.
- http://www.digglevillage.org.uk/diggle-village/village/canal, accessed on 16th April 2021.
- I know that this image came from the Saddleworthgoneby Facebook Group but I did not record the link.
- https://www.facebook.com/414417905268685/photos/a.414418885268587/1374937455883387, accessed on 14th April 2021.
- https://www.facebook.com/permalink.php?story_fbid=2648325101877943&id=414417905268685, accessed on 14th April 2021.
- https://www.facebook.com/permalink.php?story_fbid=3569493929761051&id=414417905268685, accessed on 14th April 2021.
 I first came across this ‘railway’ completely by accident.

 The Route of the Line ……
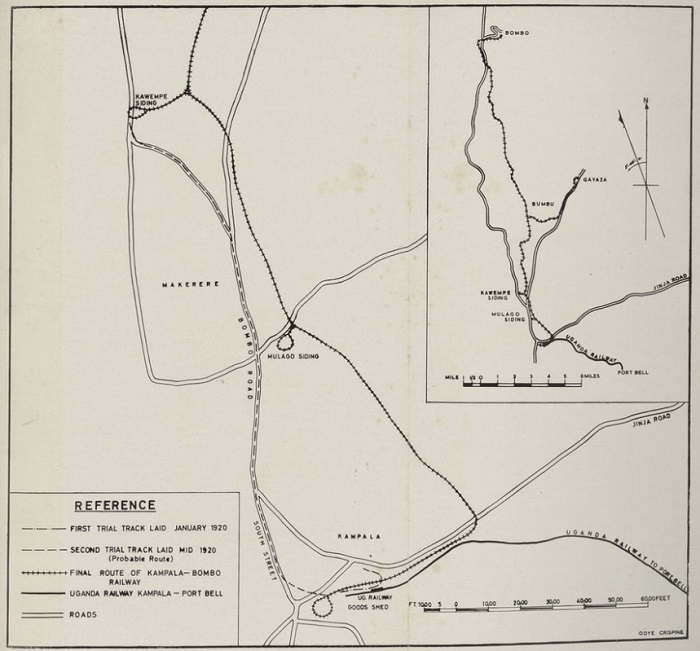
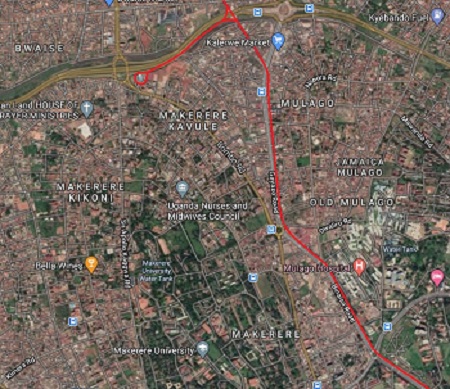 I have been unable to find much in the way of records of the route of the line. However, based on Peal’s sketch map above, The line appears to have run Northeast along the modern Station Approach and Station Rd in Kampala to the junction between Station Road and what is now Yusuf Lule Road. The line seems to have followed the verge of Yussuf Lule Road, crossed the modern Kira Road at what is now Mulago Roundabout. There was a short branch at this location noted on Peal’s sketch plan as Mulago siding. At the end of the siding closest to the Bombo Road, there was a turning loop. That siding is not shown on the adjacent satellite images as its location is at the junction of the first two images.
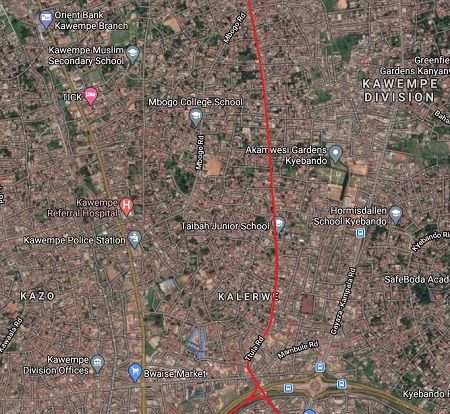 In other locations, the route of the is shown with red dashes. At these points on the line, I cannot be sure of the route taken by the line, only that the line traveled through the area. At these locations the line shown should be considered as possible rather than probable. Again, I should be delighted if others with greater knowledge can correct my assumptions.
 It is worth noting that in Kampala and its suburbs, even if any remnant of the line existed as long as the middle of the 20th century, the modern intensive use of tarmac on main roads in the city and its suburbs will have completely covered any possible remnants of the narrow gauge line.
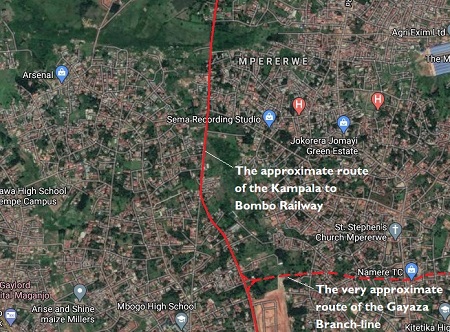 The line then followed the verge of what is now the Binaisa Road, passing Mulago Hospital and on towards the junction with the Bombo Road. There is now a roundabout at that point. The line did not, however, follow the Bombo Road, it seems to have more closely followed what is now the Gayaza Road on the East side of the Kalelwe River. It seems to have crossed the Gayaza Road in the vicinity of Kalerwe Market.
 A short siding ran close to what is now the line of the Kampala Northern Bypass Highway, west towards the Bombo Road. This branch was known as the Kawempe Siding. It terminated in a loop adjacent to the Bombo Road. From this point Northwards the Bombo Road is marked on current maps as the Kampala-Gulu Highway or the Kampala-Masindi Highway.
 On the fifth image, a longer branch can be see diverging from the mainline to Bombo. As noted earlier, I have shown the first length of this branch-line in red dashes because it is impossible to tell what the alignment may have been over the first few hundreds of yards until the branch reached the Kampala-Gayaza Road.
 The next few satellite images follow the assumed route of the branch-line alongside the Gayaza Road. On his sketch map (above), Peal shows the line following the road through to Gayaza.
 Wikipedia tells us that in the early 20th century, Gayaza started as a road junction, where the road to Gayaza High School branched off the main road from Kampala to Kalagi.
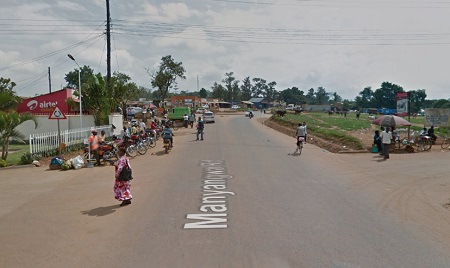 Today, the township continues to grow and is continuous with Kasangati, a short distance to the south-east. [8] included in the run of satellite images is a typical Google Streetview image of the main road approaching Gayaza. The old narrow gauge branch line was alongside the old road which would have been much narrower.
 That the alignment of the railway shown on the satellite images is at best tentative is perhaps best illustrated by a further Streetview image of what I think was the route of the line back in the 1920s. The image was captured in 2015. It shows the North-South road on the satellite image just to the north of the probable location of the junction between the Bombo and Gayaza lines.
 The mainline probably continued in a generally Northerly direction through Kiteezi, which had a large landfill site to its Southeast. The Uganda Observer carried a short article about the landfill site in 2013, written by one of the site managers. [10]
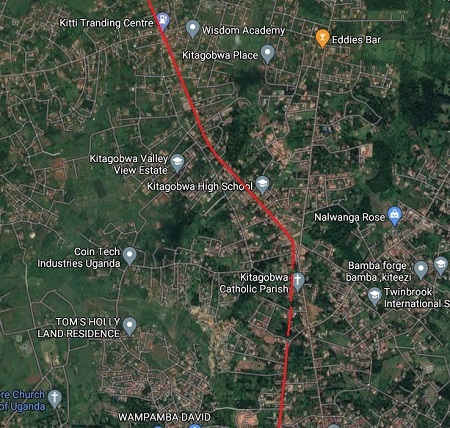 It then turned more to the Northwest beginning to drift towards the Bombo road from Kitagobwa.
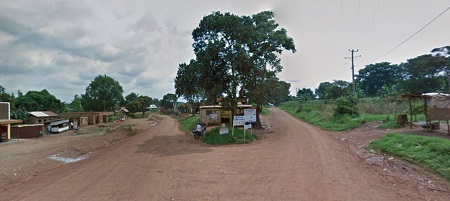 These areas seem quite built-up on the Satellite images but much development is single storey and dispersed.
 The next Google Streetview image shows the location of the junction between the Kigaga Road and the road to Kiti in the village of Kitagobwa. If I have the line of the railway correct, it followed the left fork in the Streetview image – to the left of the large tree in the centre of the picture.
 The line passed to the Southwest of Kiti. The village/town is off to the right of what appears to be the alignment of the old narrow gauge railway. The railway followed the right fork in the Streetview photograph – essentially straight-on from the camera.
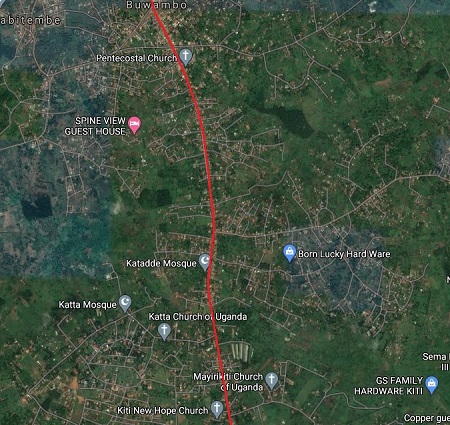 The next district along the presumed route of the old railway is Buwambo which appears at the top of the next segment of the satellite imagery.
 North of Buwambo, running through Migadde, there is much more uncertainty over the line followed by the old Railway, There are no roads following the approximate route shown in Peal’s sketch map above.
 The old railway route is represented by red dashes through this area as it approaches the main Bombo Road – the Kampala – Gulu Highway.
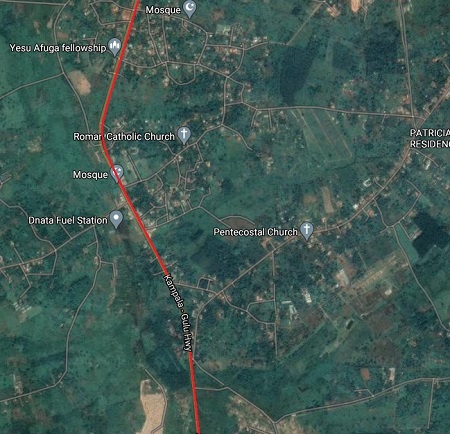 North of Migadde, which straddled the Kampala-Gulu Highway, the narrow gauge Road-Rail line followed the verge of the old main road. Before branching away to the East-Northeast towards Bombo Town.
 Bombo was the ultimate destination of the line. It has been a relatively significant centre since the formation of the Uganda protectorate.
