Monthly Archives: Oct 2018

Tramways de l’Aude – Ripaud to Port La Nouvelle via Portel

The previous two posts in this series about Les Tramways de l’Aude both finished their journeys at Ripaud. These posts can be found at:

https://rogerfarnworth.com/2018/10/19/tramways-de-laude-les-palais-to-ripaud, and

https://rogerfarnworth.com/2018/10/25/tramways-de-laude-tuchan-to-ripaud-via-durban.

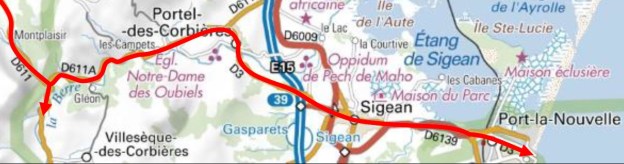
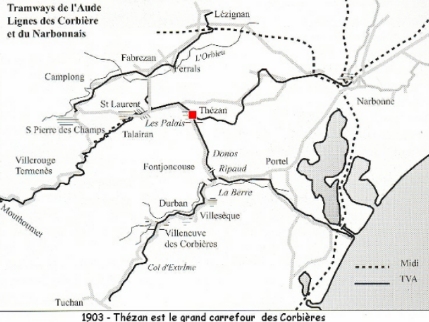
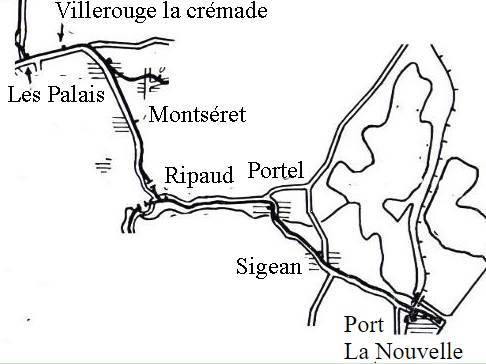
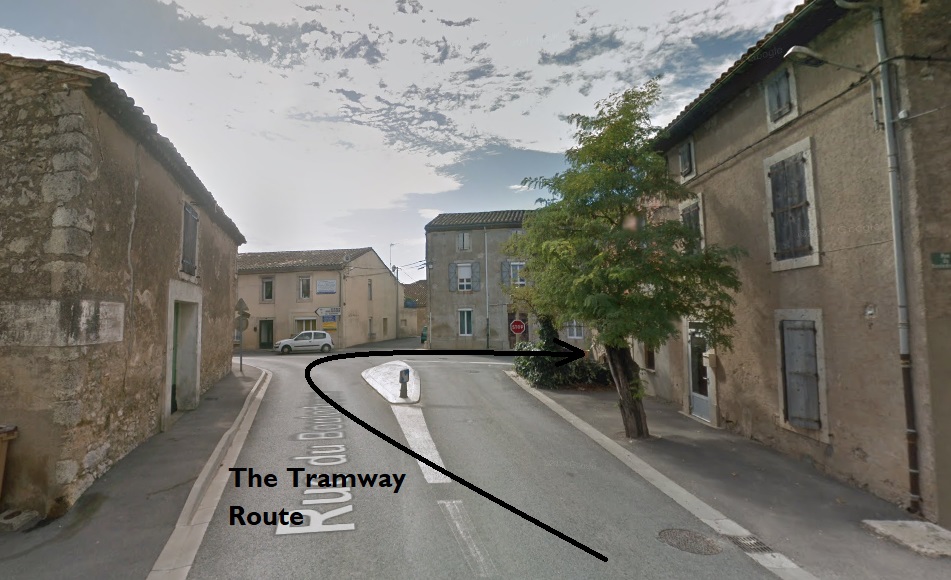
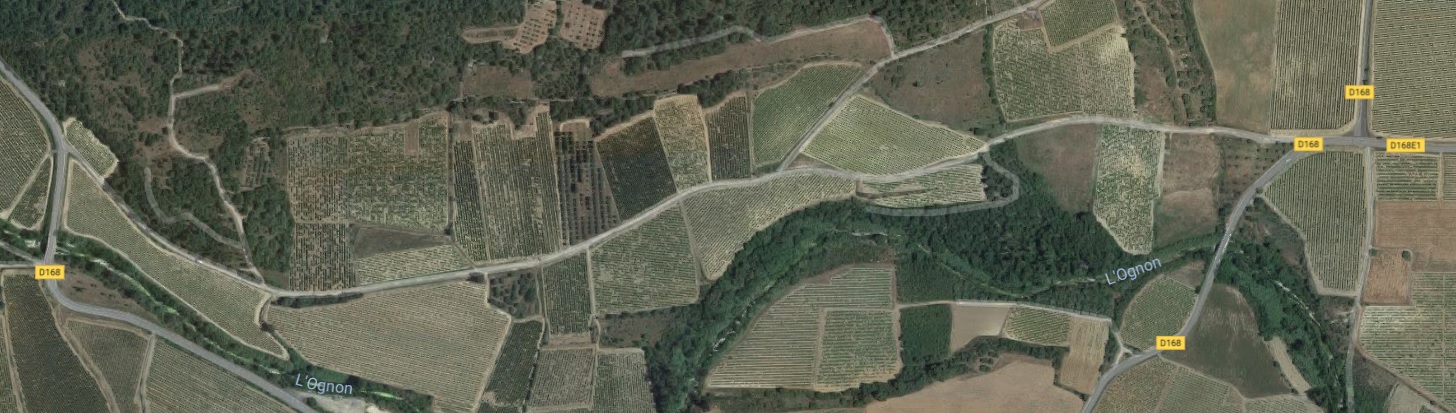
This post continues the journey to the coast from Ripaud, via Portel-des-Corbieres, Sigean and La Nouvelle. The route is shown in the featured image above.

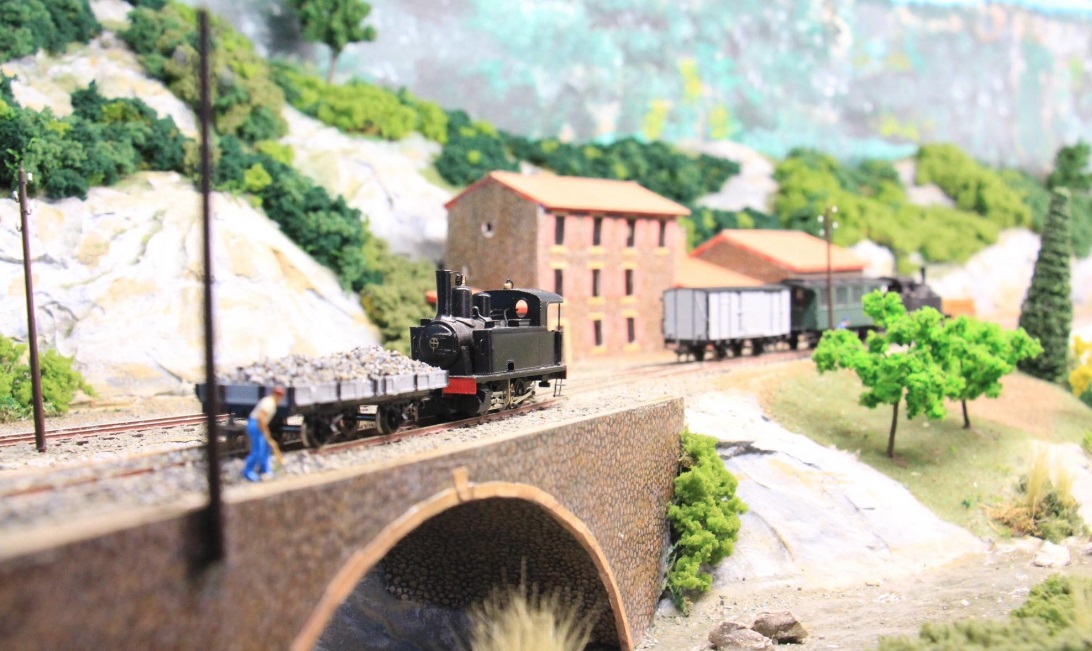
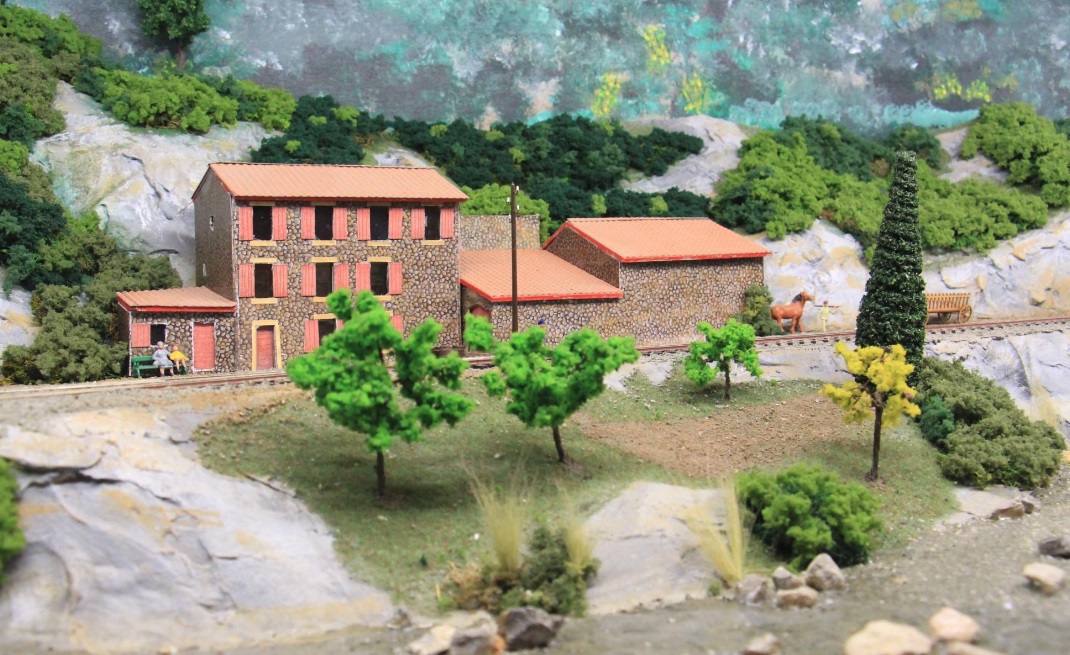
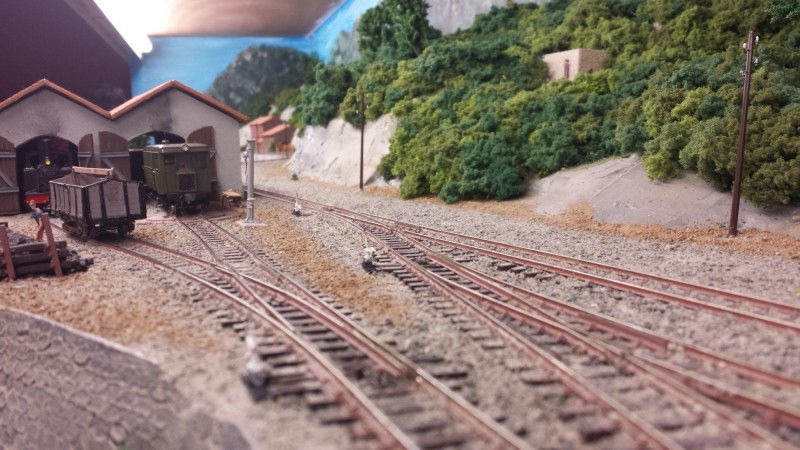
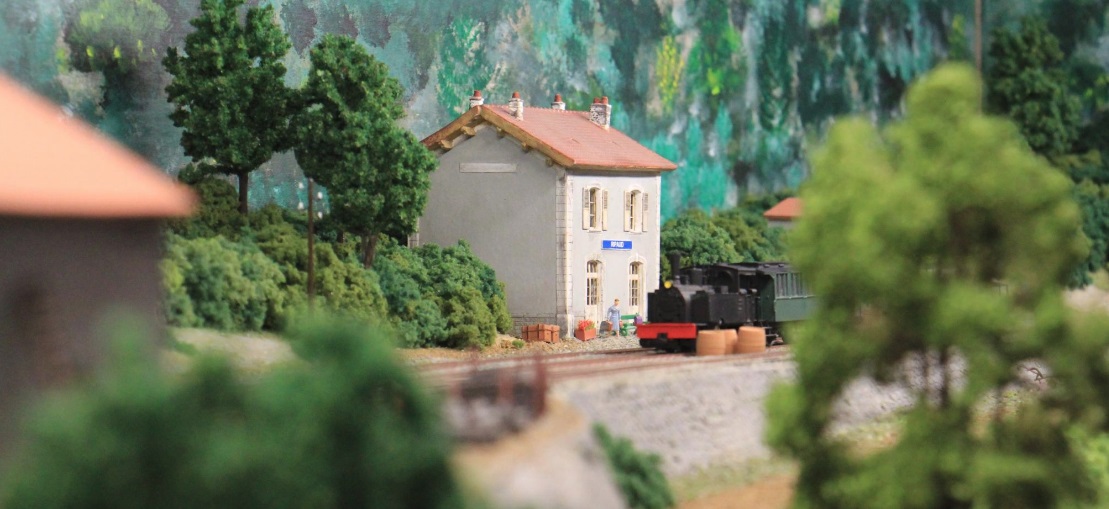
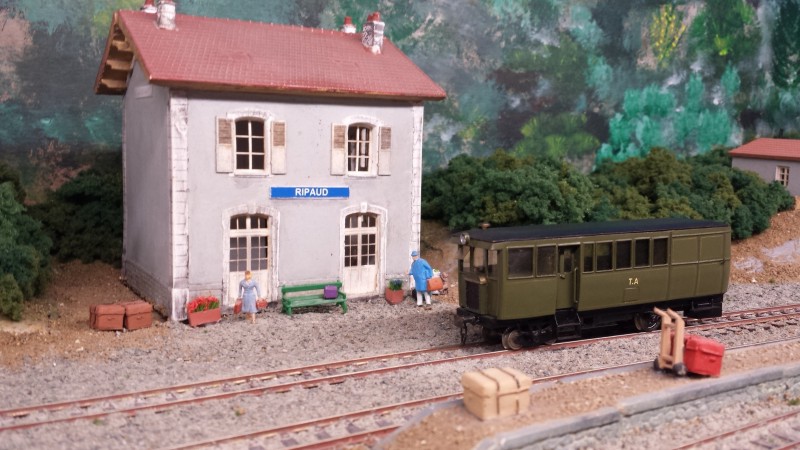
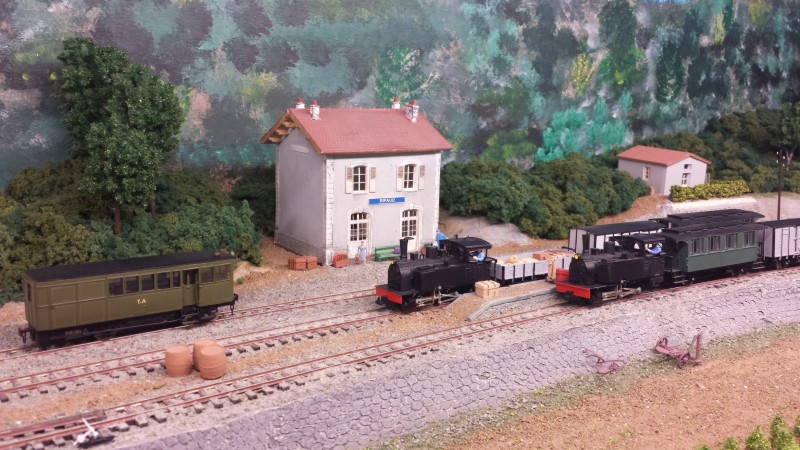
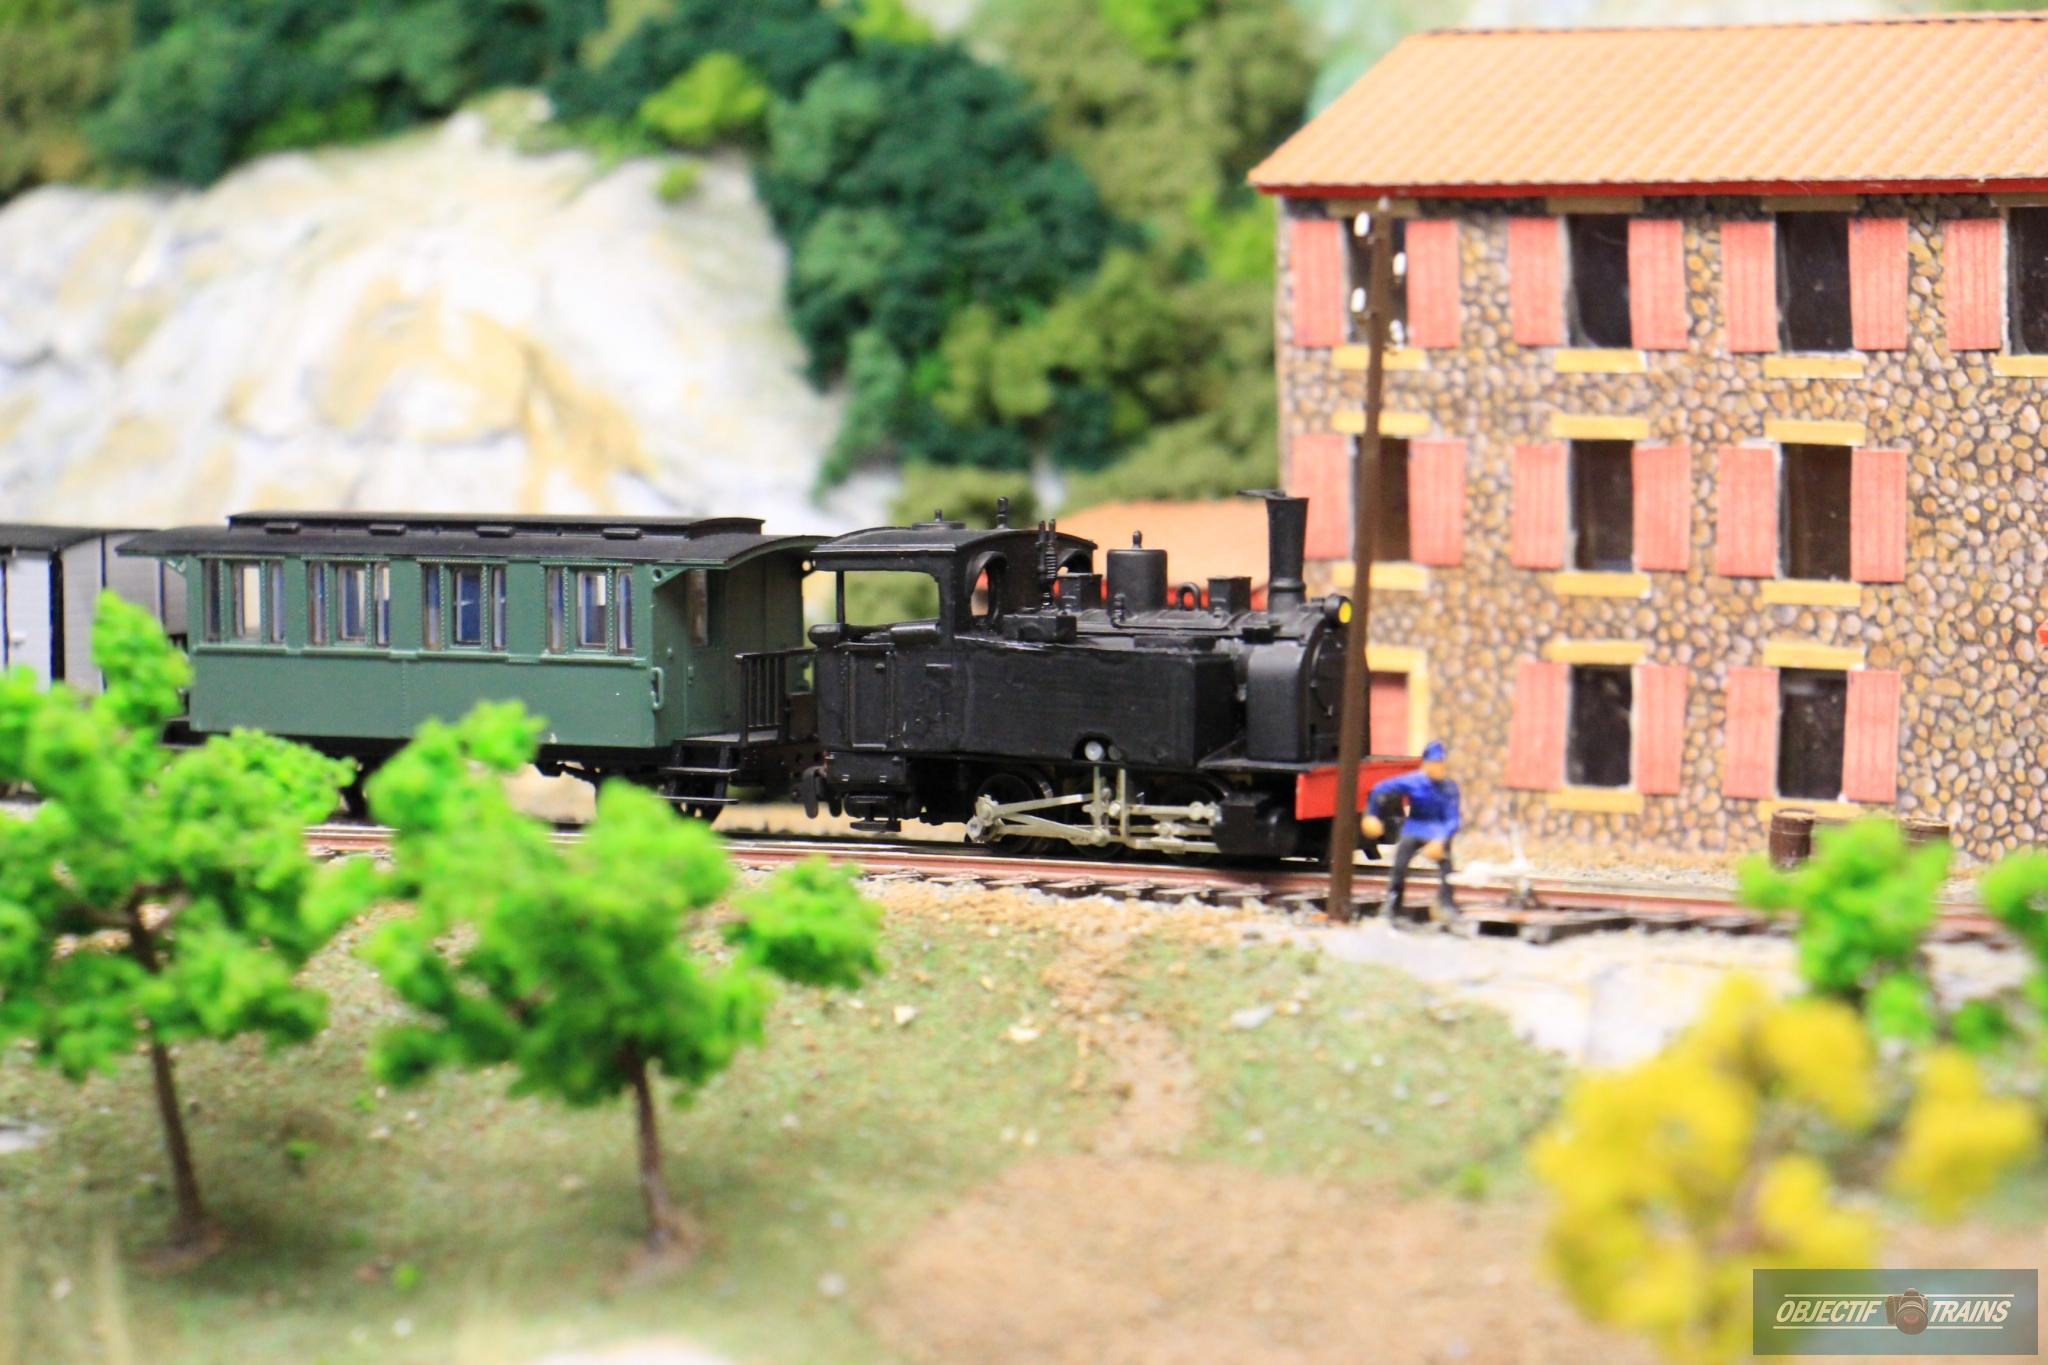
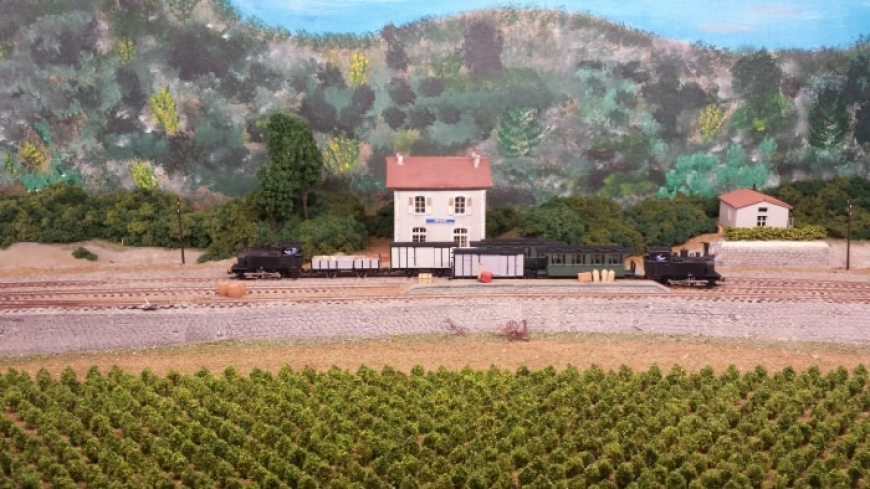
In the last two posts we have seen glimpses of a model made of Ripaud station and its environs by Pascal Deschamps and Christophe Salle. The images which follow are taken from three different websites. The model gives a really good impression of what the Tramways de l’Aude were like in their later years. [1][2][3] The model is in HOm Scale. 
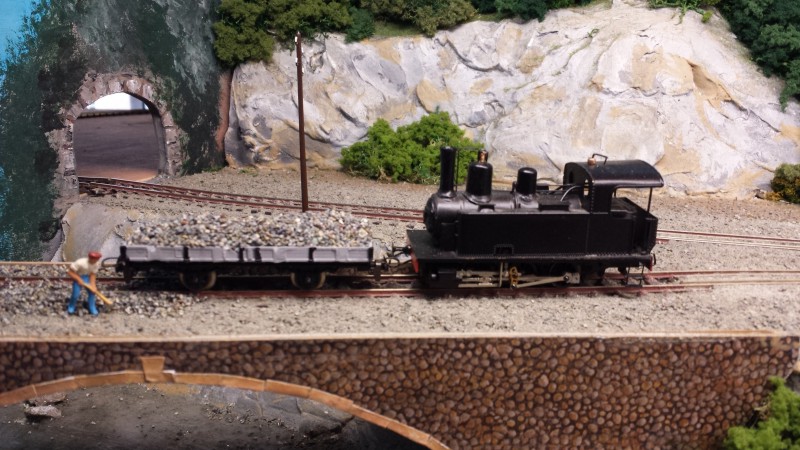
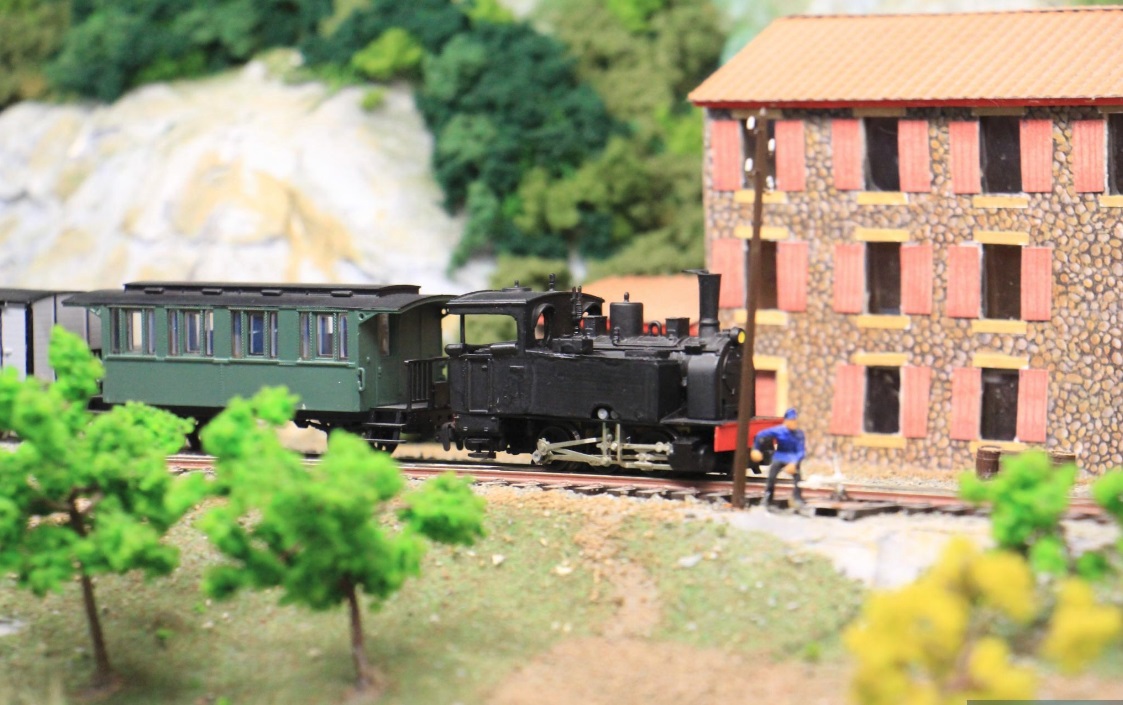
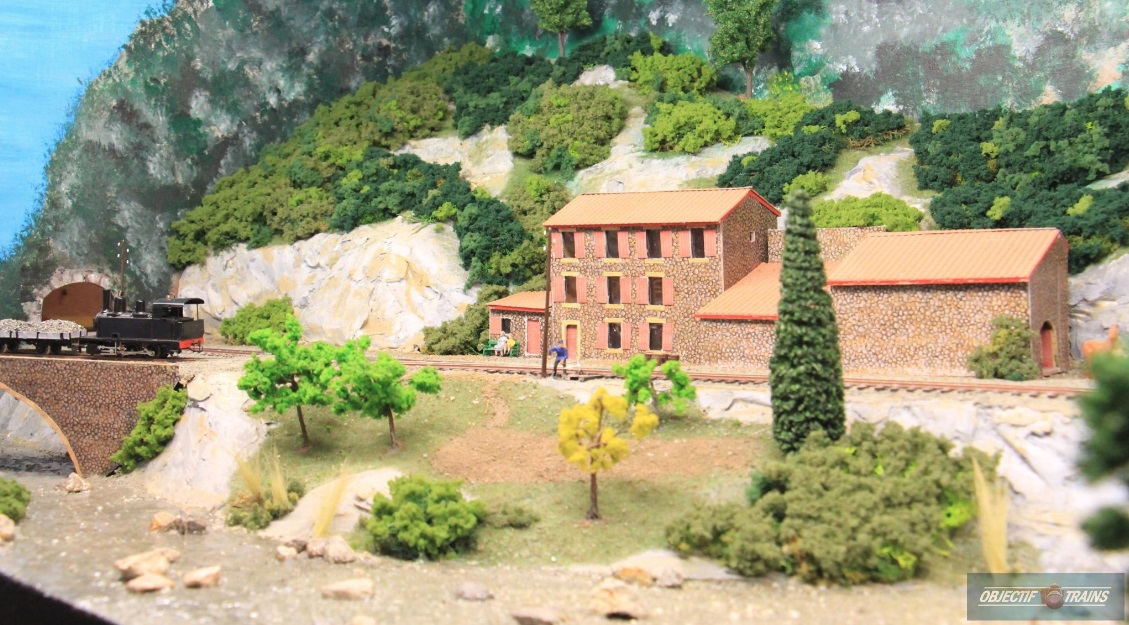
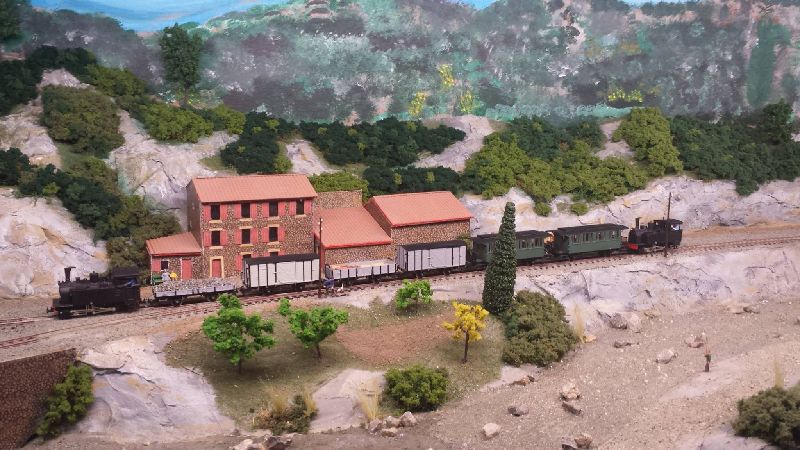
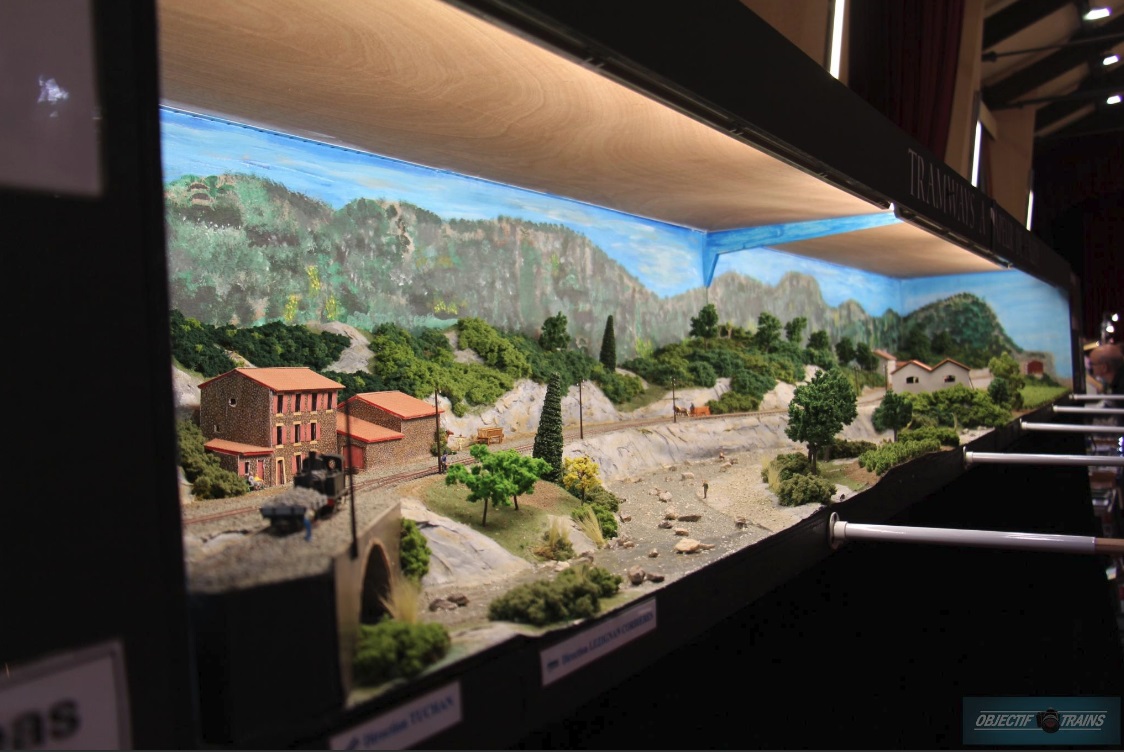
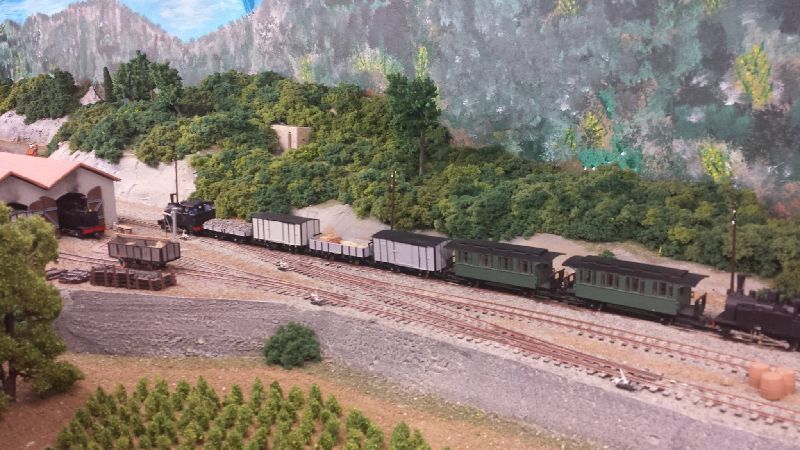
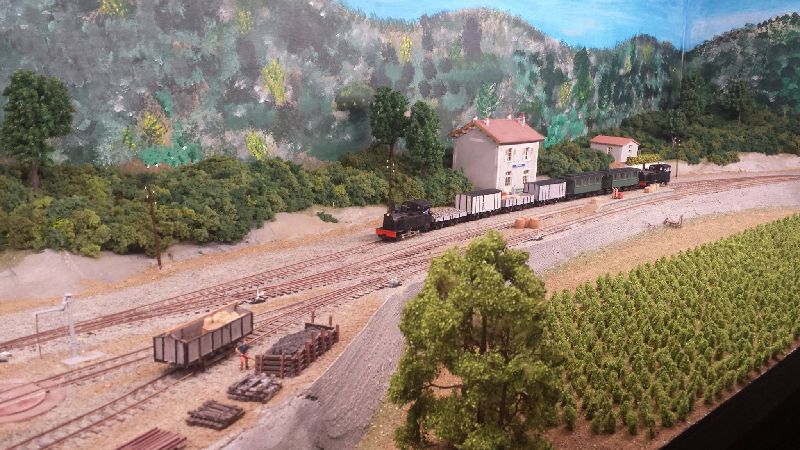
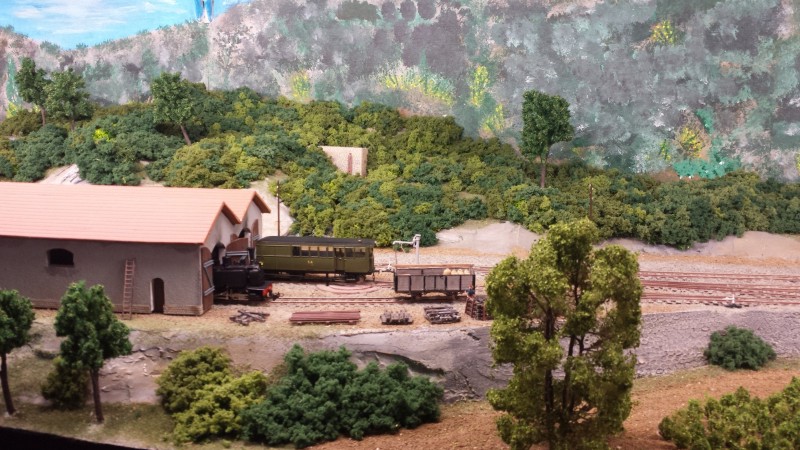
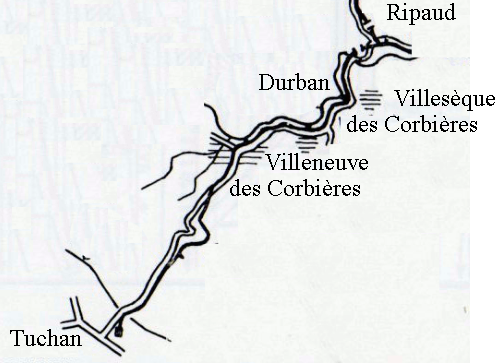
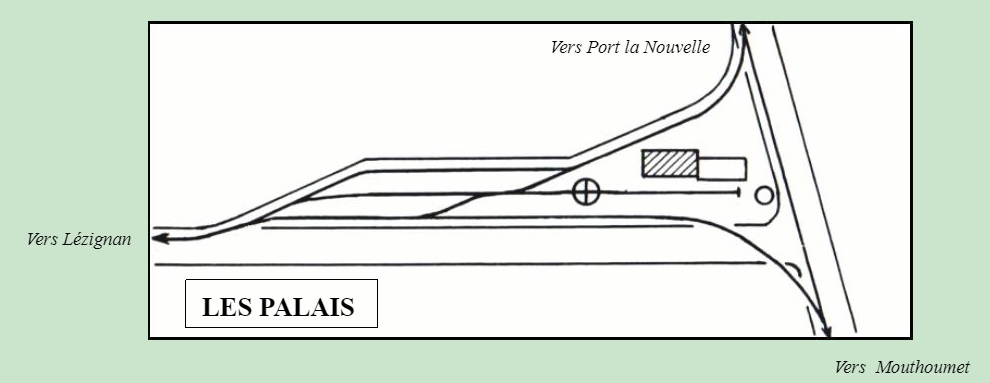
Ripaud Station  was a junction station. The two lines seen entering the sketch below from the left come from Les Palais and Durban. The line leaving the sketch on the right heads for La Nouvelle.
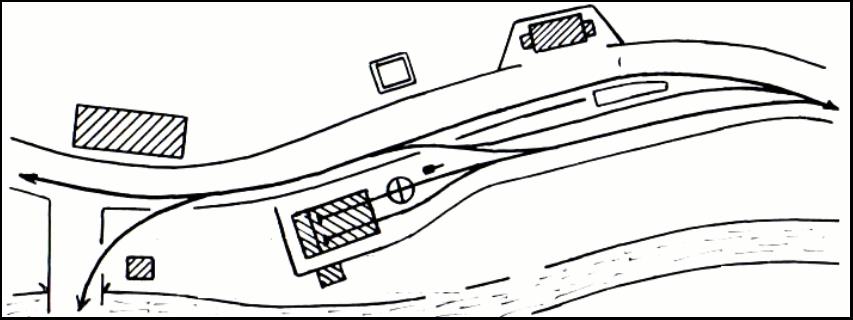
We have already seen, in other posts, some images of the station and its environs in the early 20th century, but these bear repeating here alongside some matching modern images taken at the location.
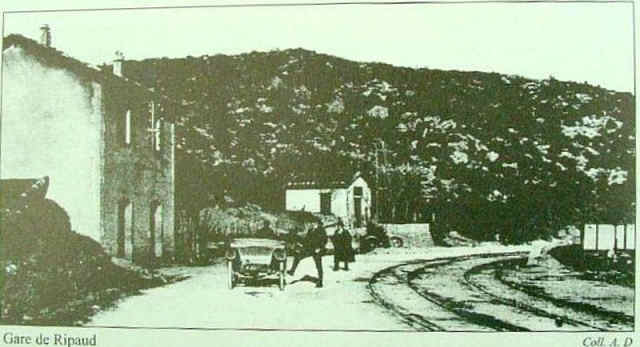
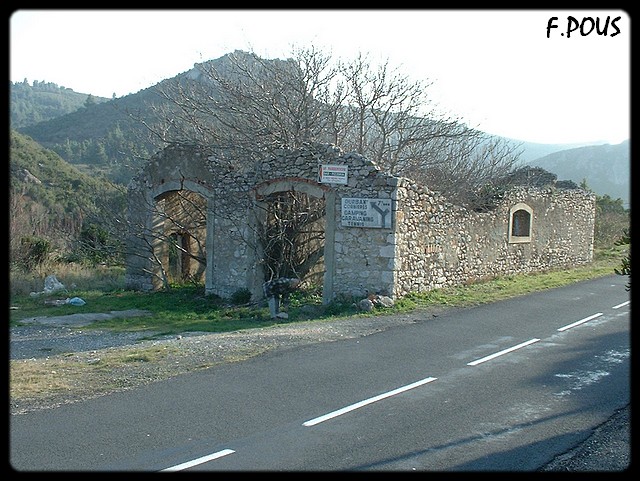
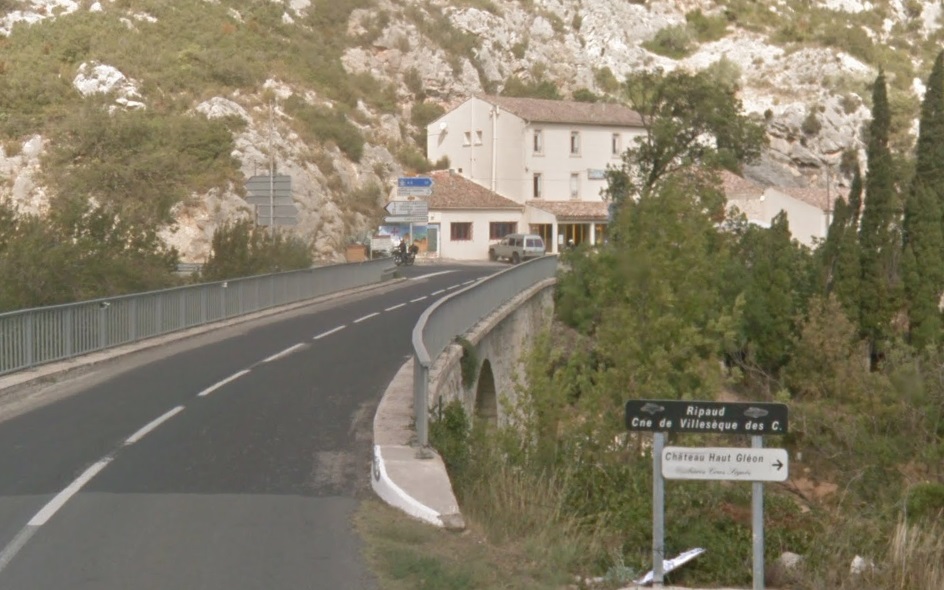
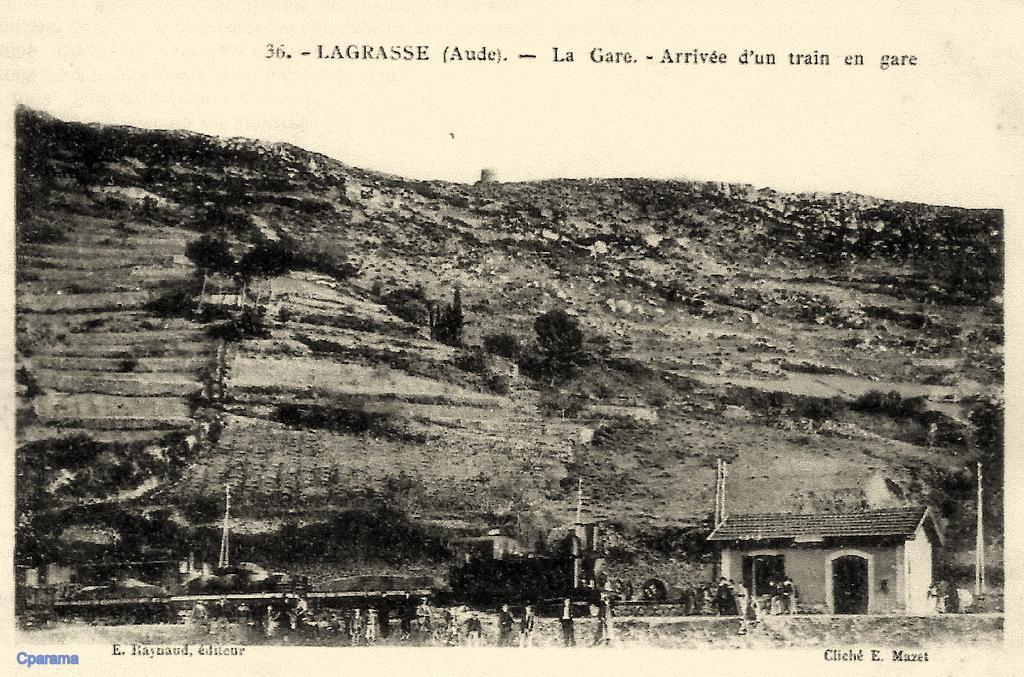
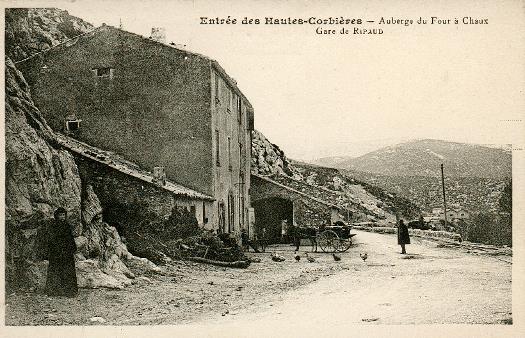
The inn at Ripaud. [4]
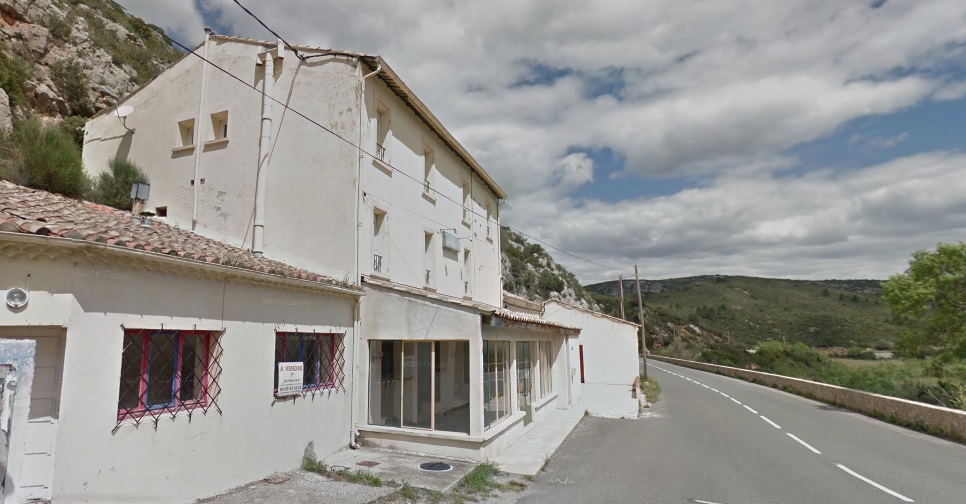
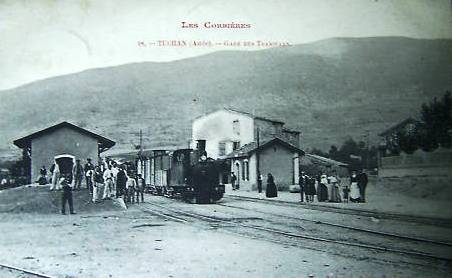
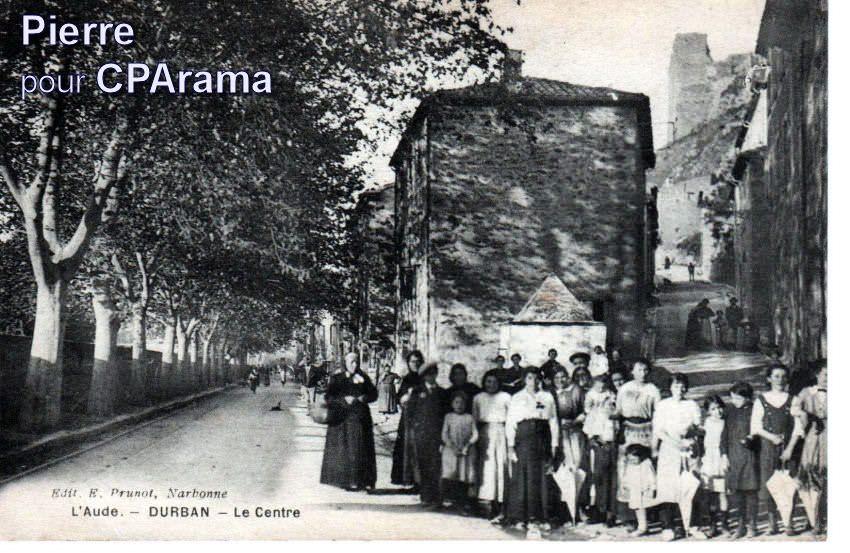
The inn at Ripaud. The tramway from Durban enters from the bottom right, the tramway from Les Palais enters from the bottom left. [4]
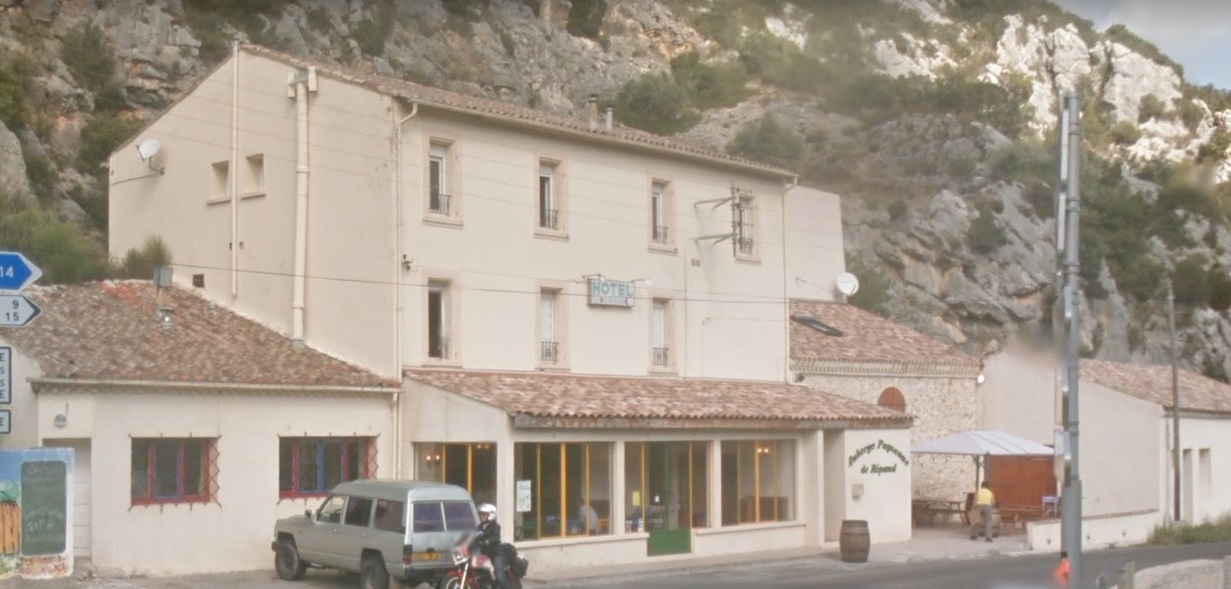
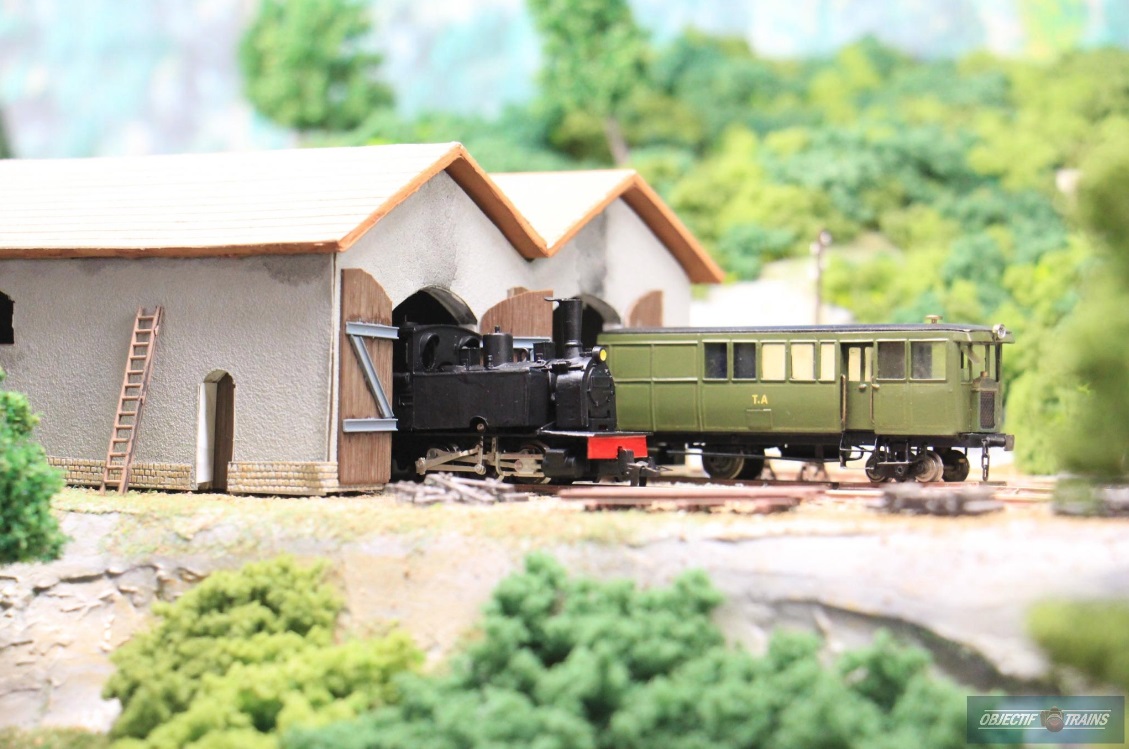
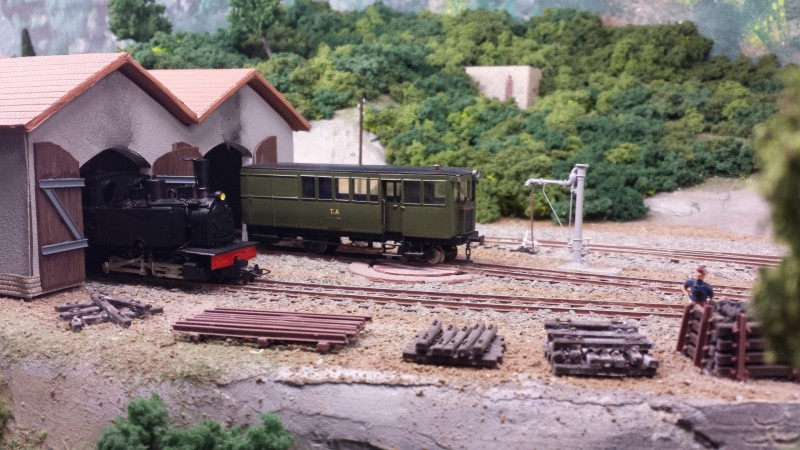
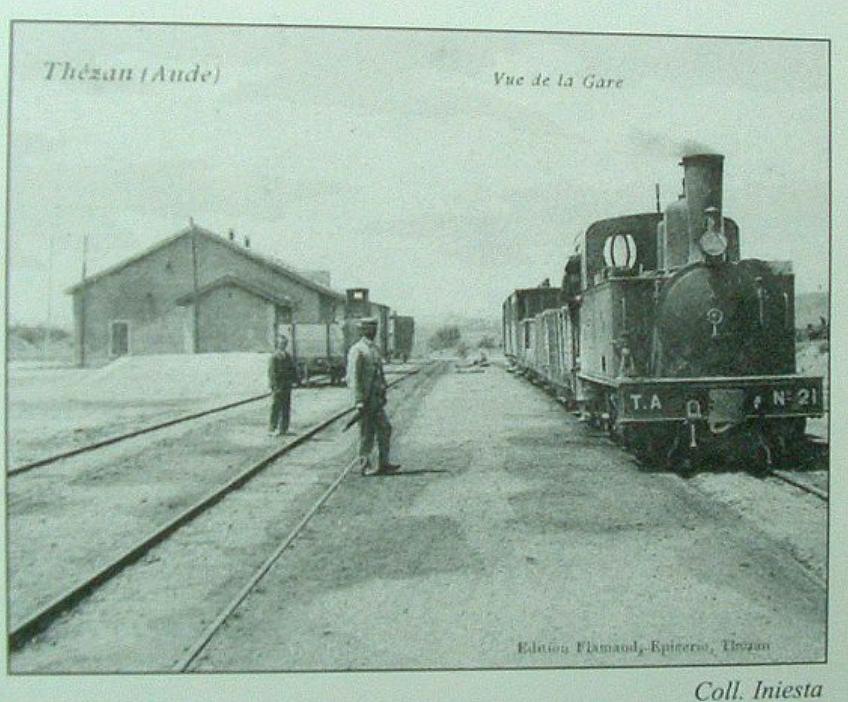
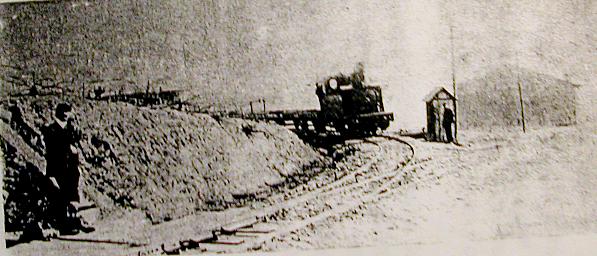
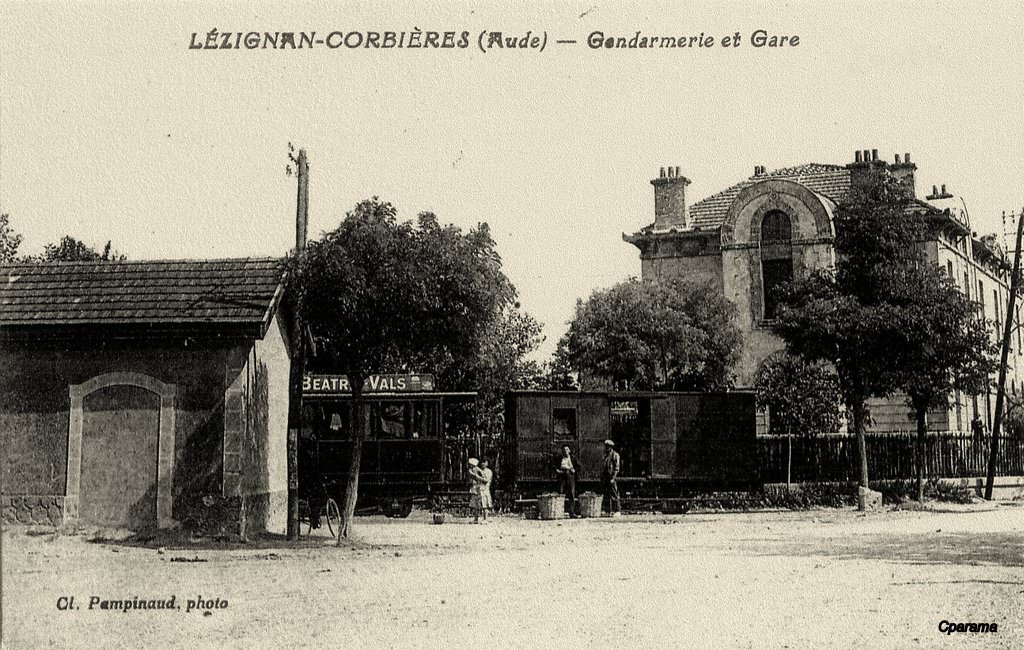
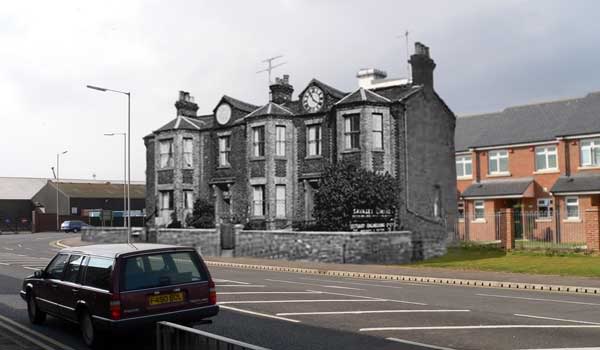
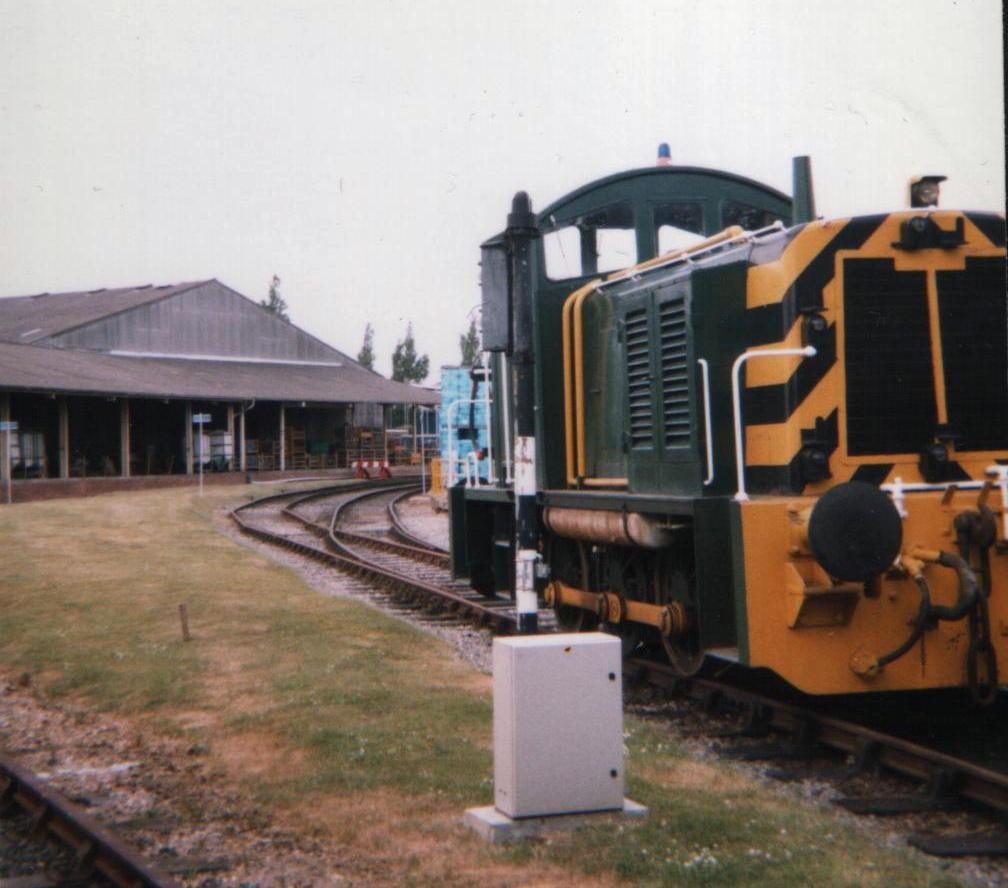
The Engine Shed with the station building just in shot on the right and a tram in the station. [5]
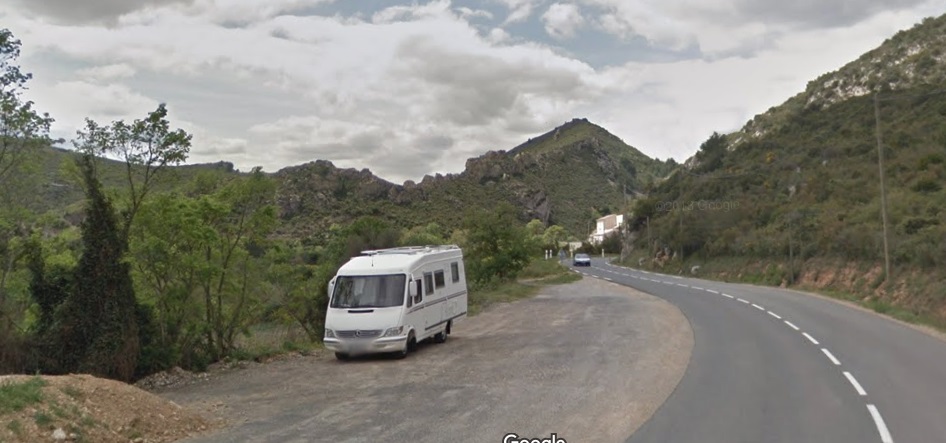
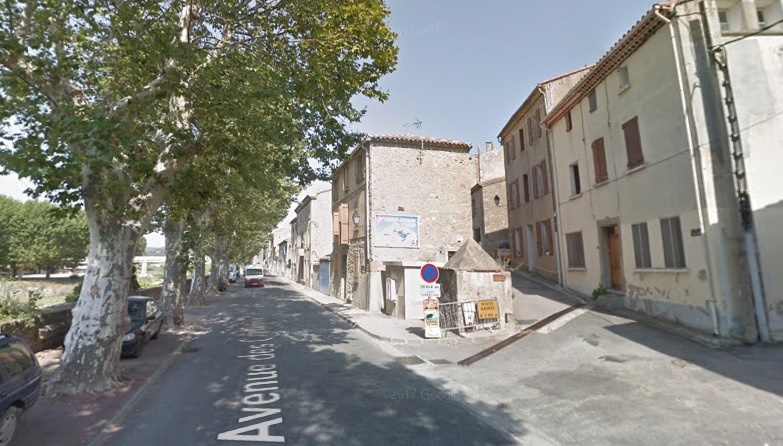
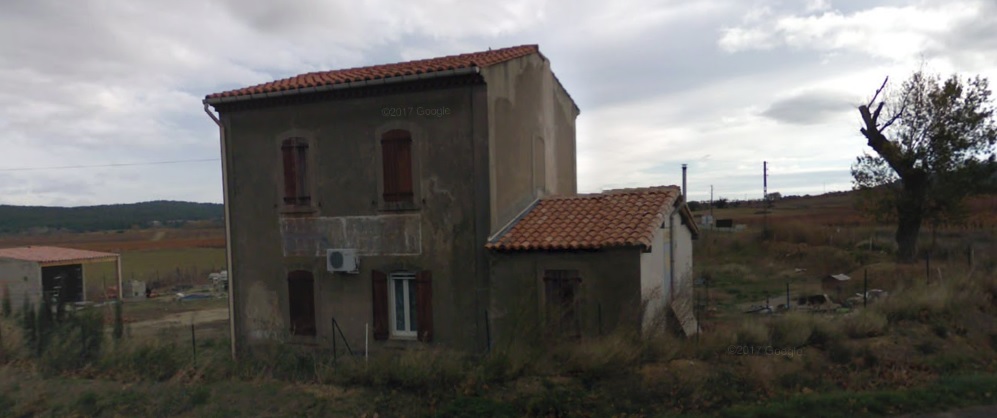
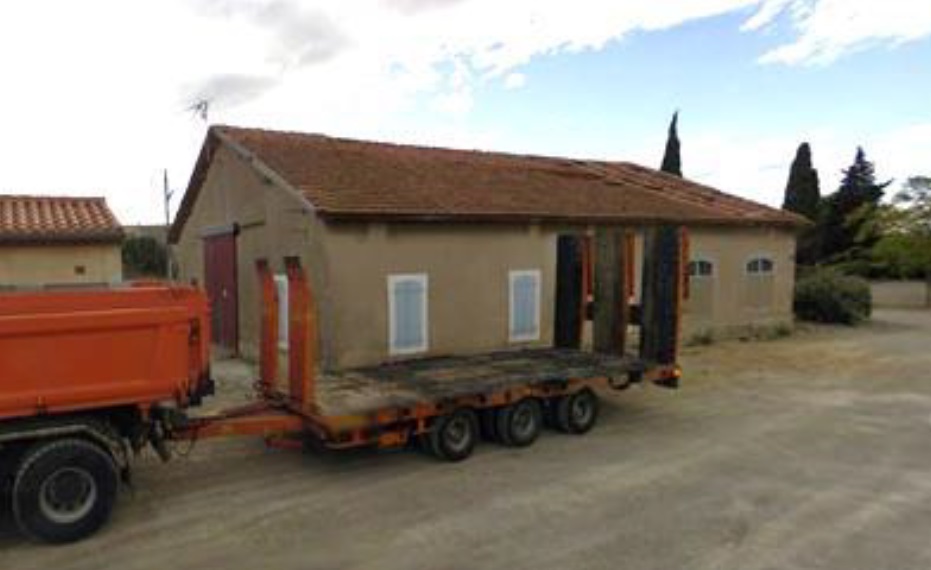
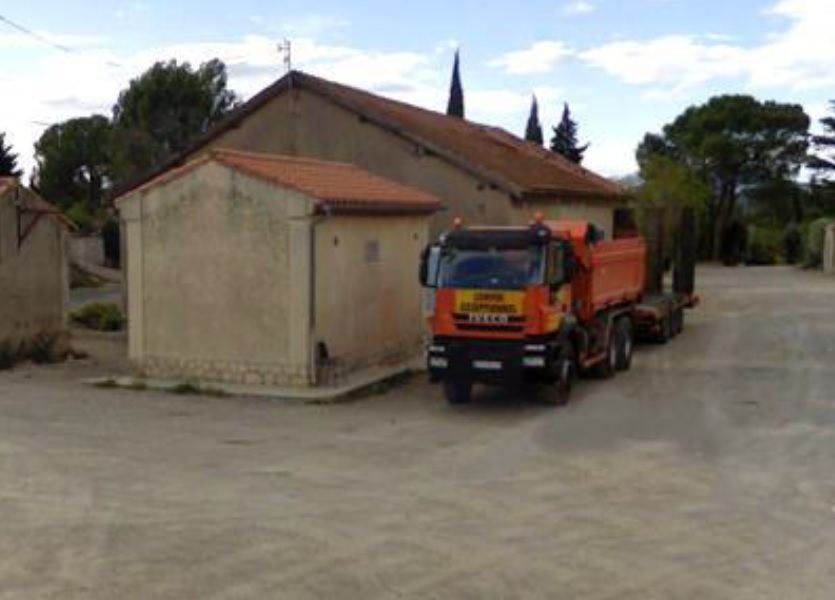
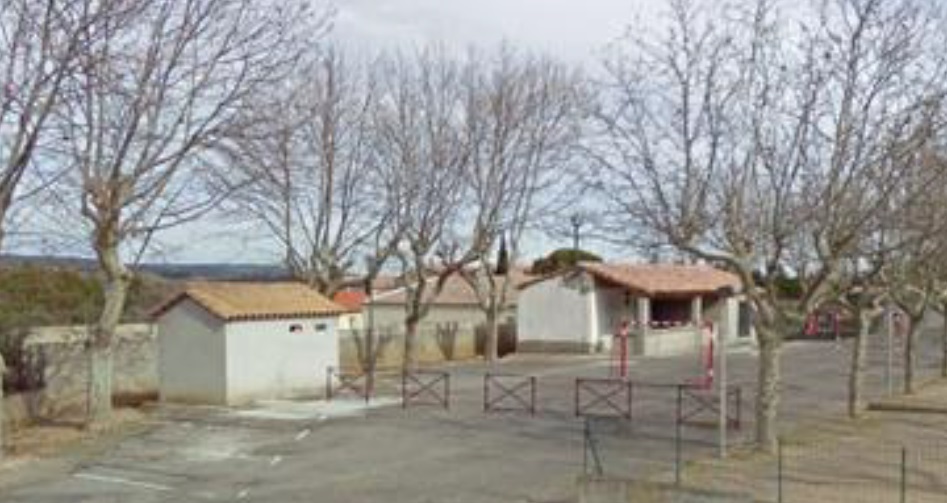
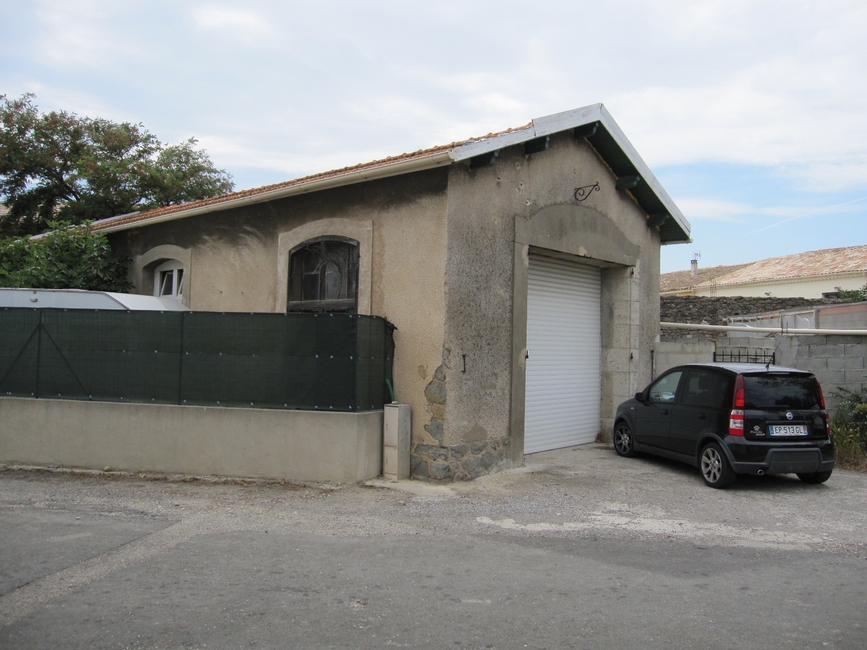
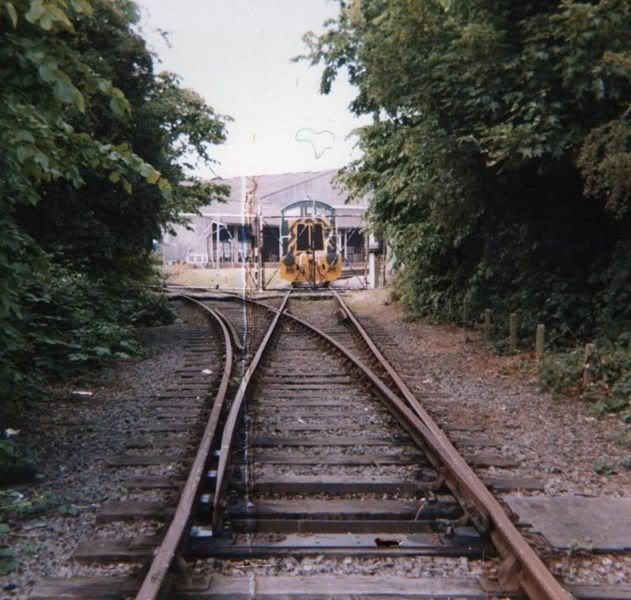
The engine shed in 2003. [6]
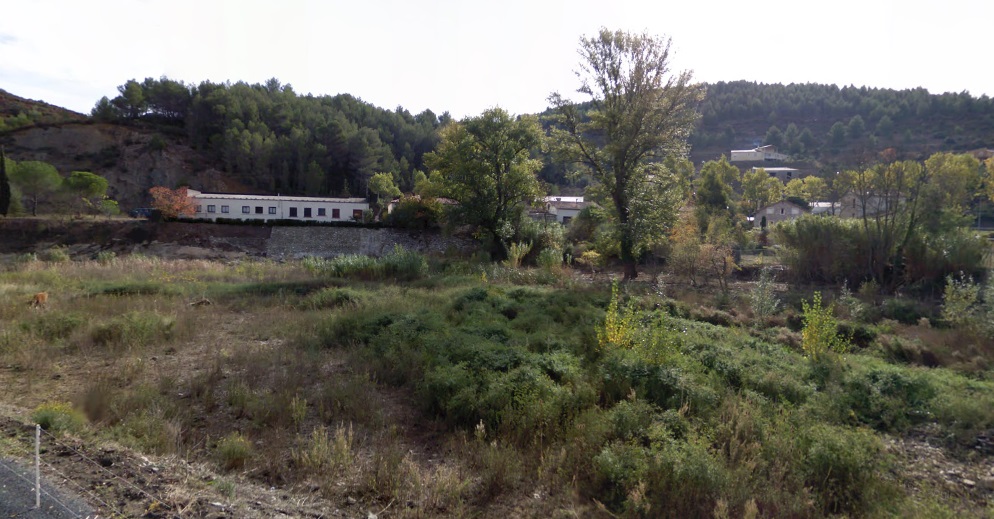
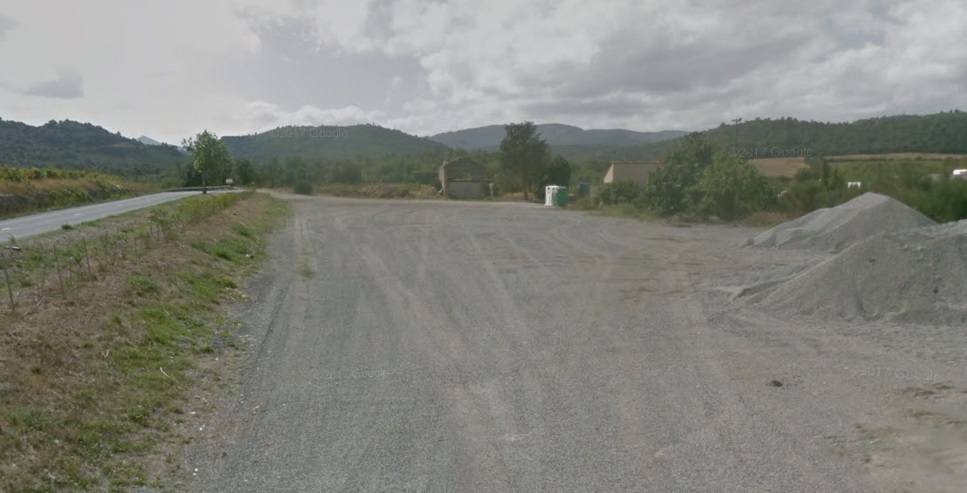
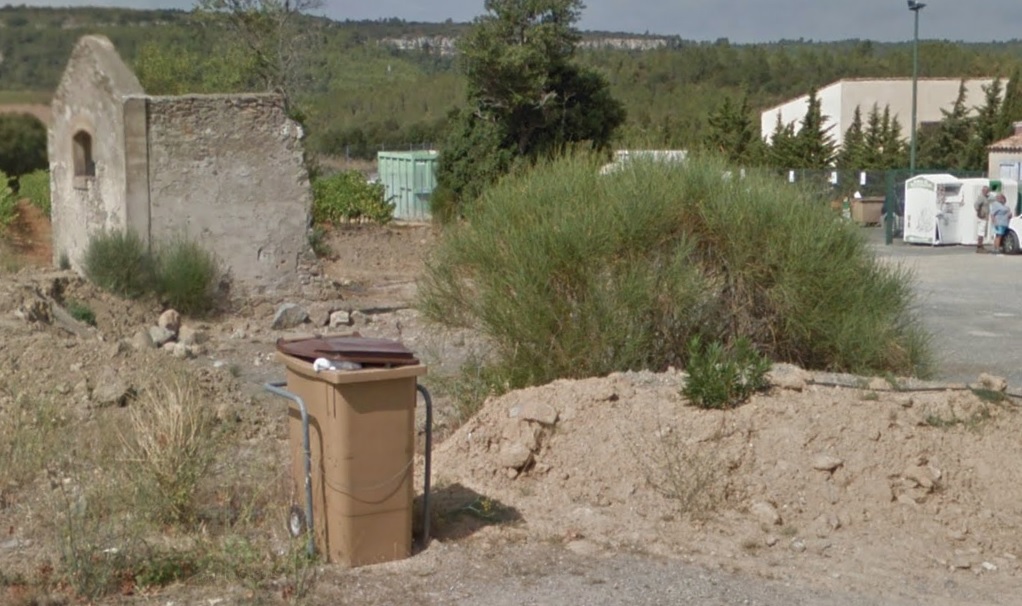
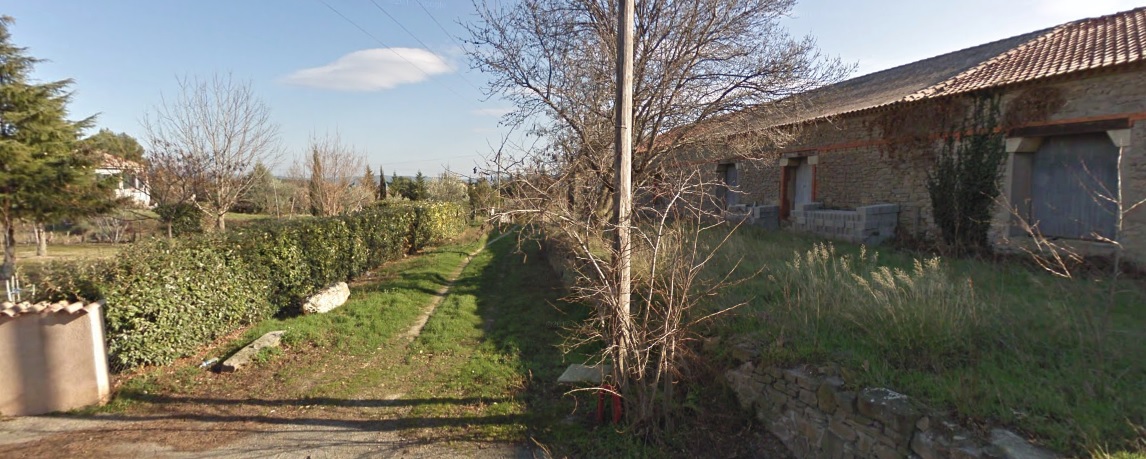
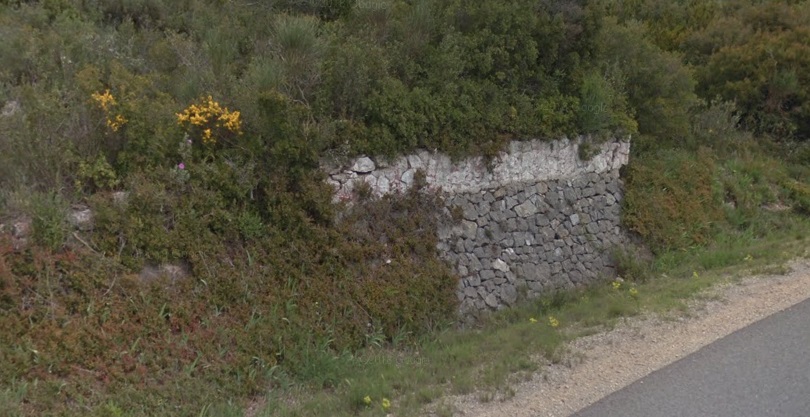
The last remaining vestige of the station appears to be this short section of retaining wall which appears in a number of the pictures above!

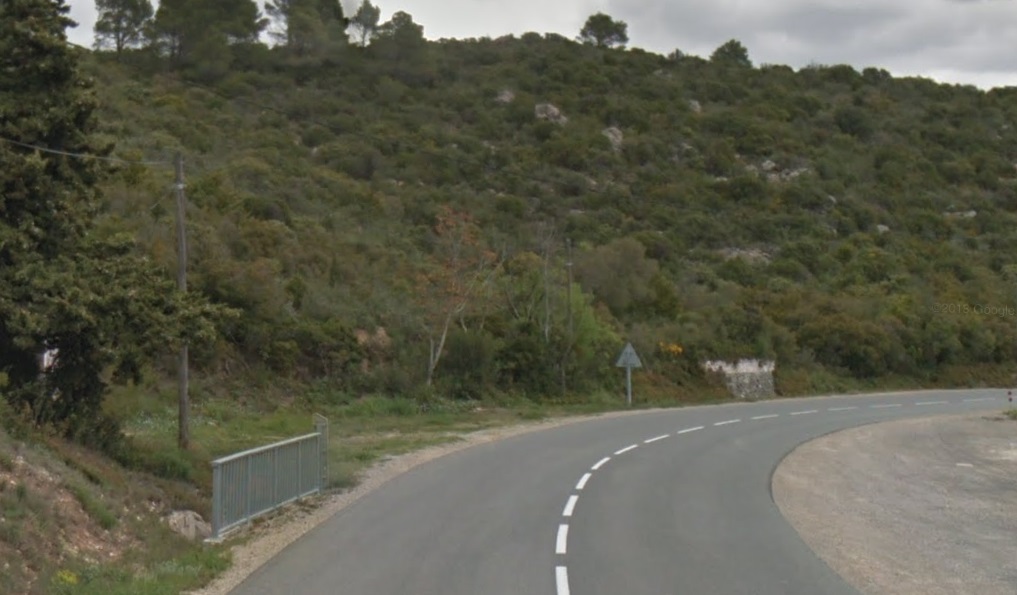
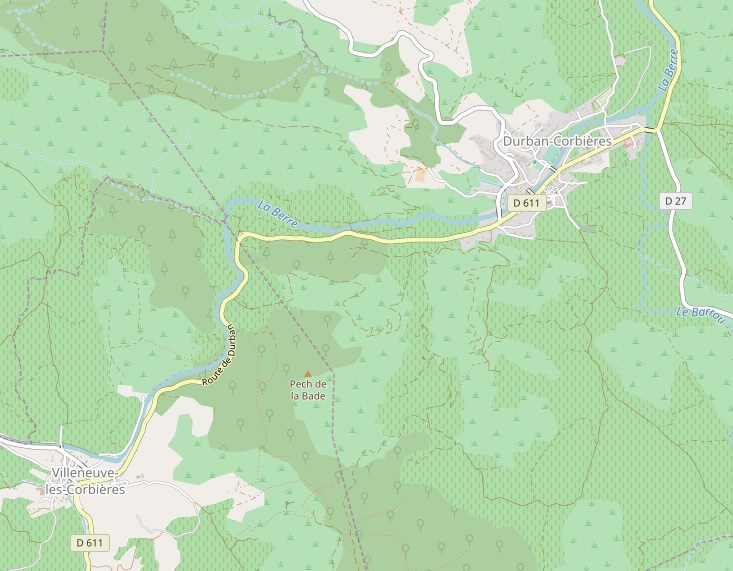
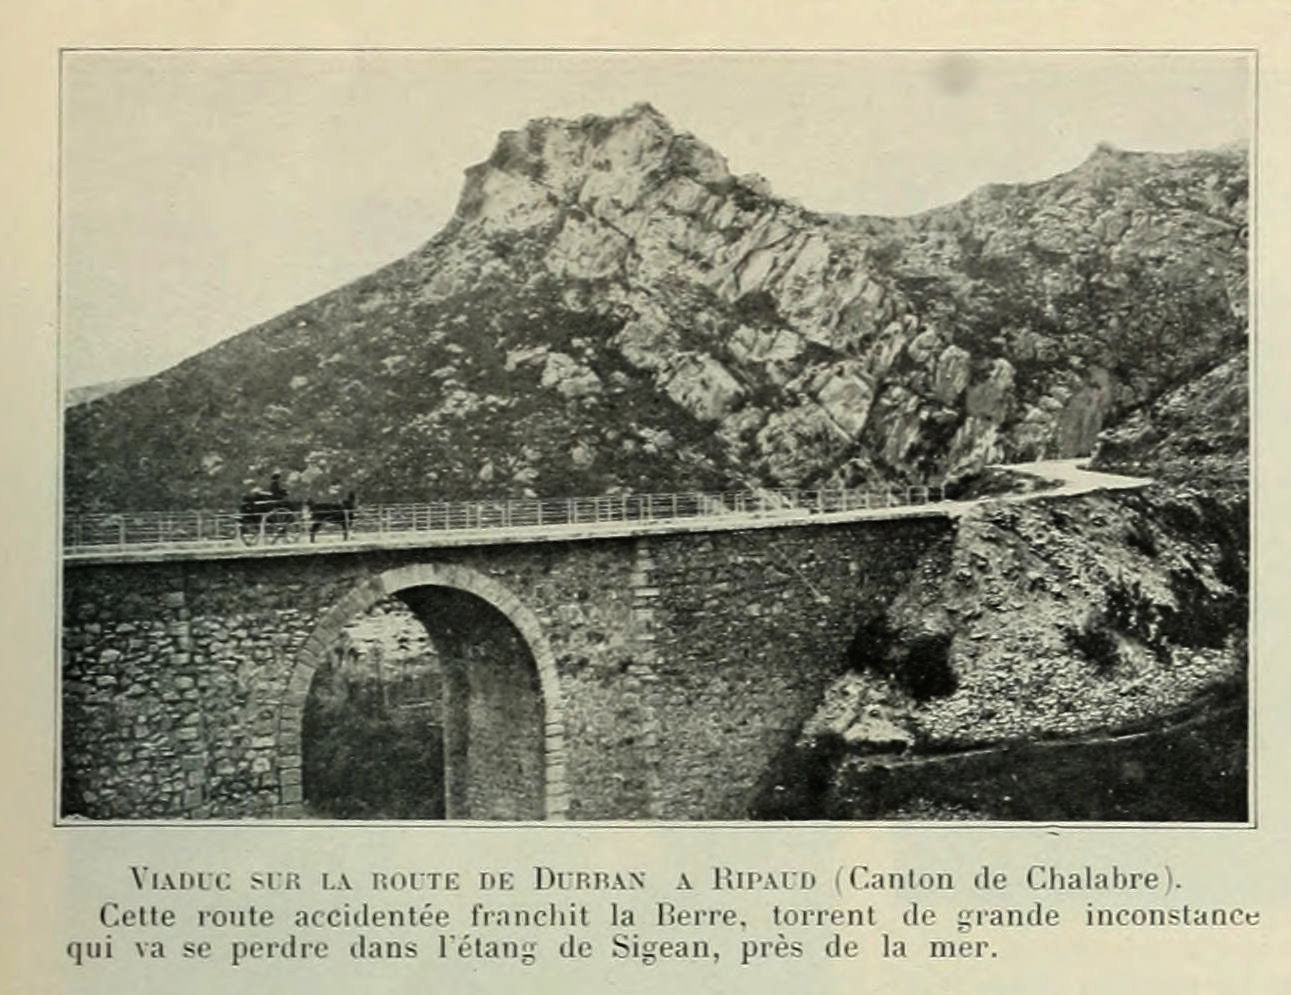
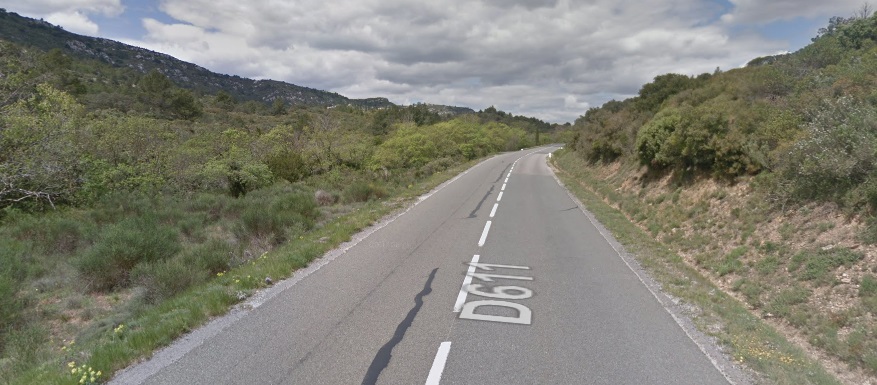
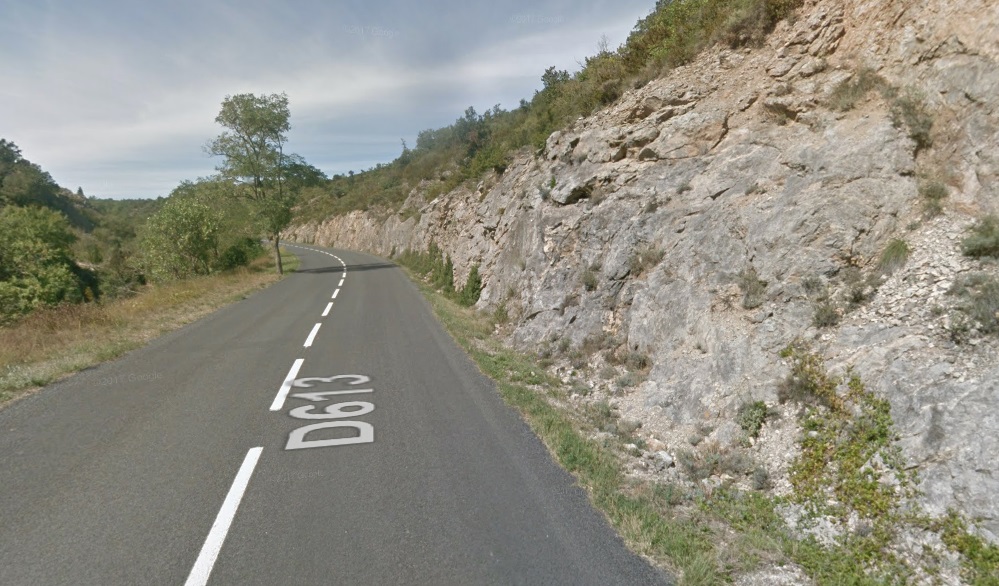
After quite an intense focus on Ripaud we head on along the tramway towards the coast. The route follows the valley of La Berre and the GC3 (D611A) past the small village of Gleon and on towards Portel-des-Corbieres.
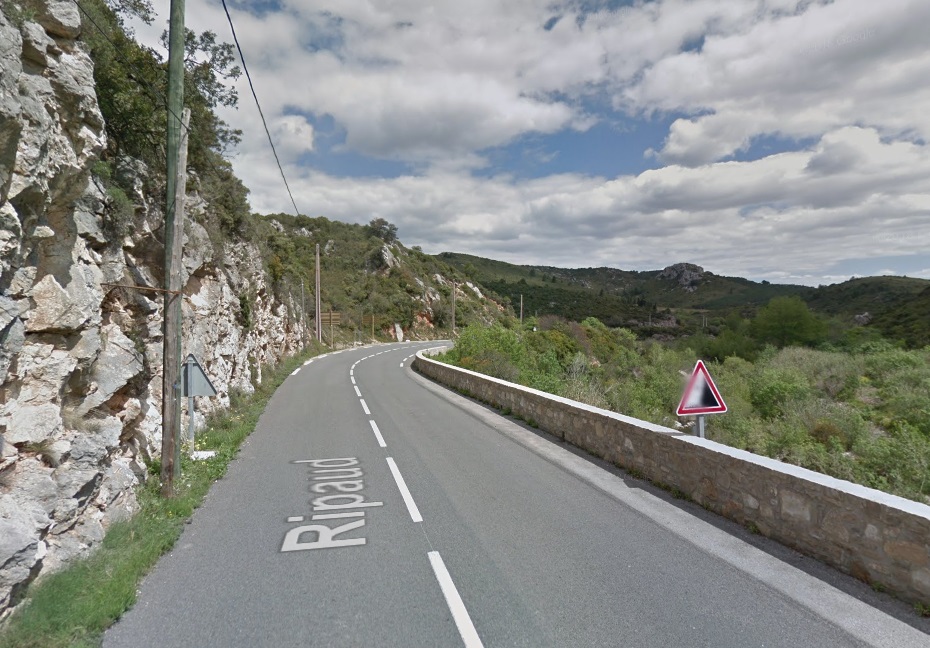
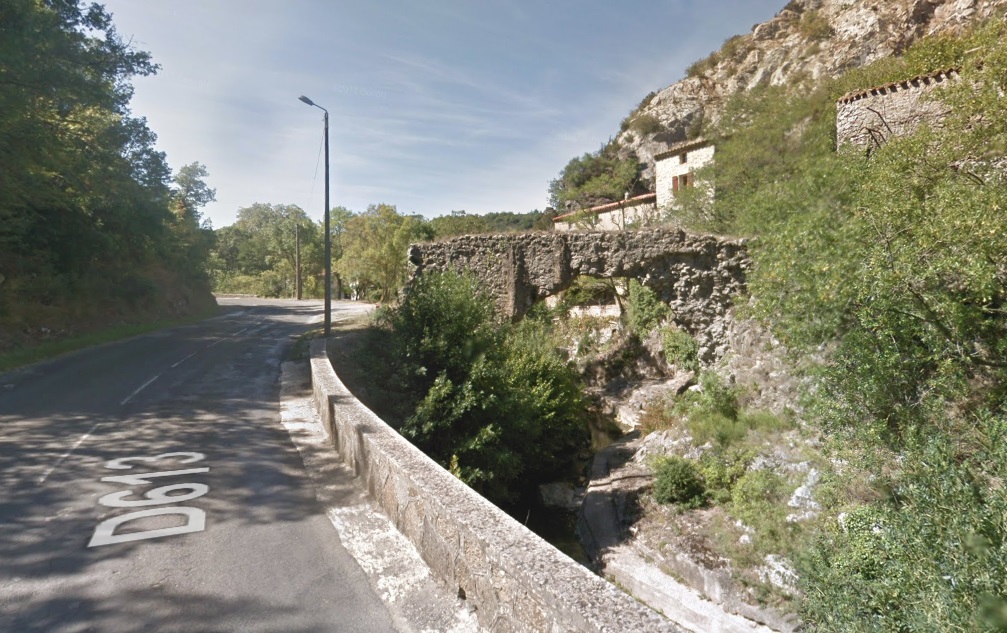
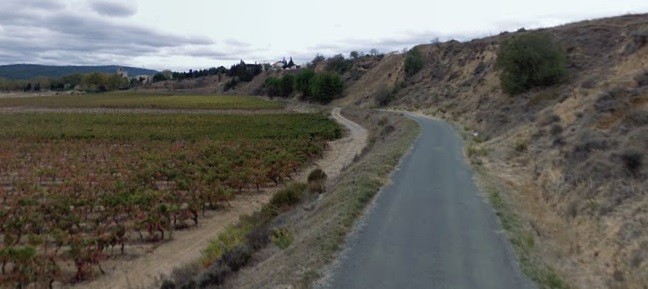
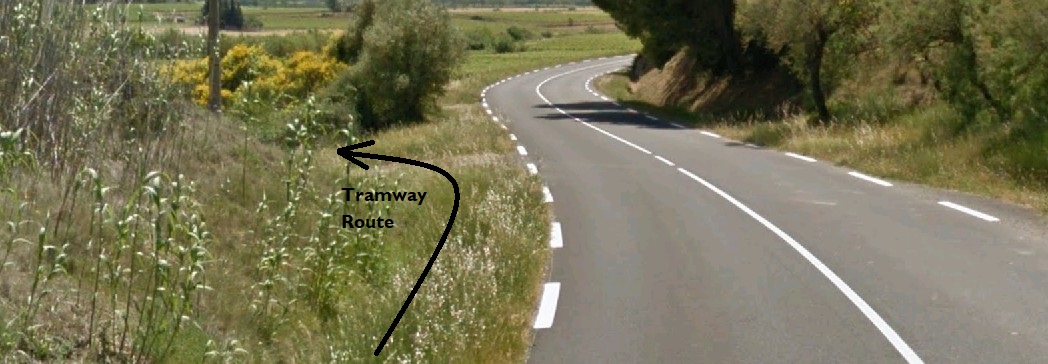
The GC3 (D611A) and the old tramway route follow the valley side towards Portel. Trams travelled on the shoulder of the road adjacent to the drop to the River Berre.

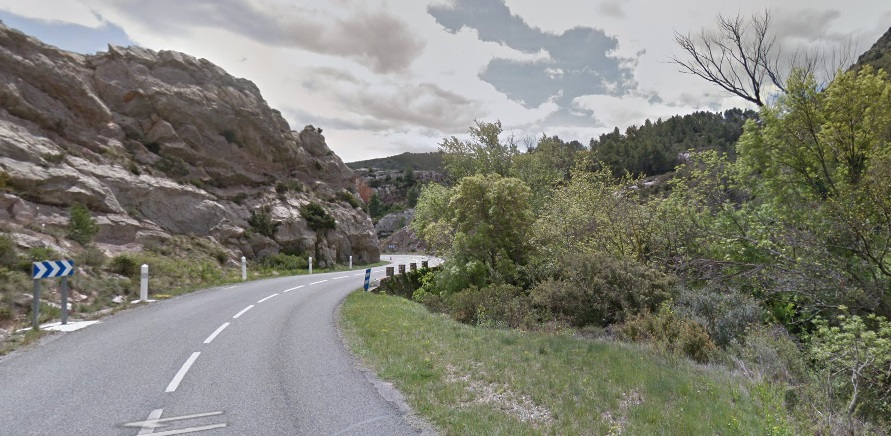
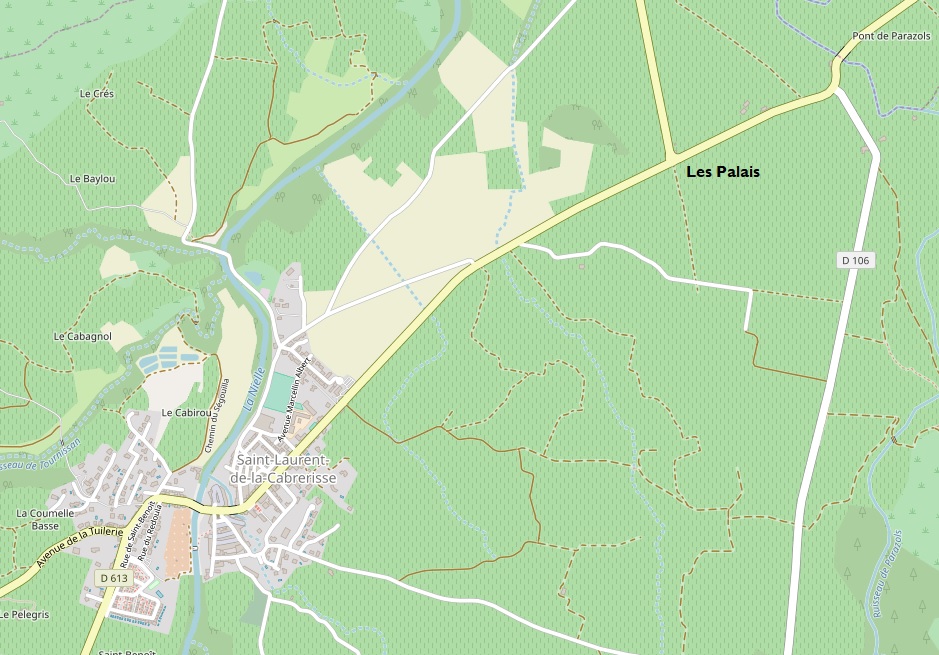
After Les Campettes (today, Les Campets) the GC3 (D611A) left the riverside to follow a more direct route to Portel.
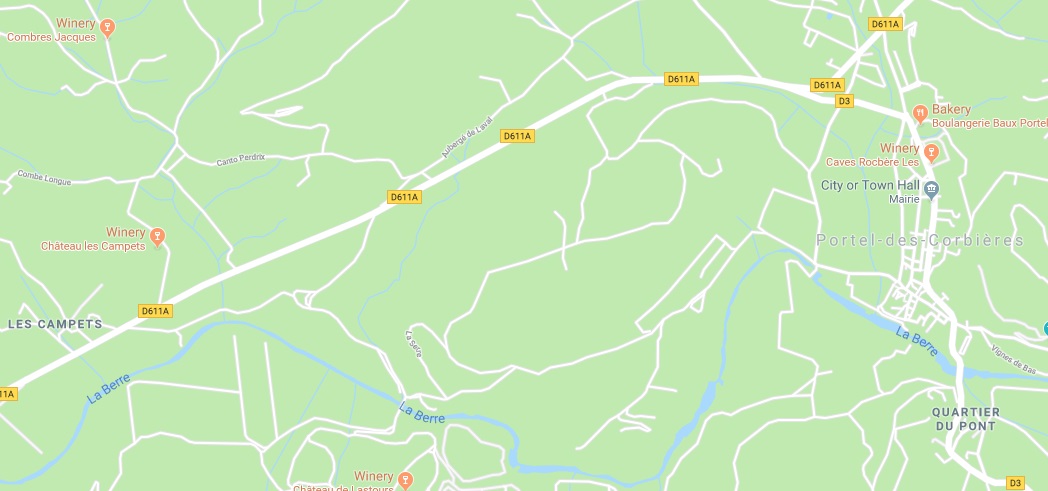
Along the full length of this journey the tramway remained on the South Side of the GC3. Just before arriving at Portel, the GC105 (D611A) separated from the tramway route which continued to follow the GC3 (D3) into the centre of the old village.

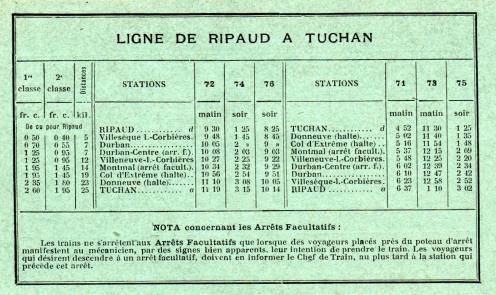
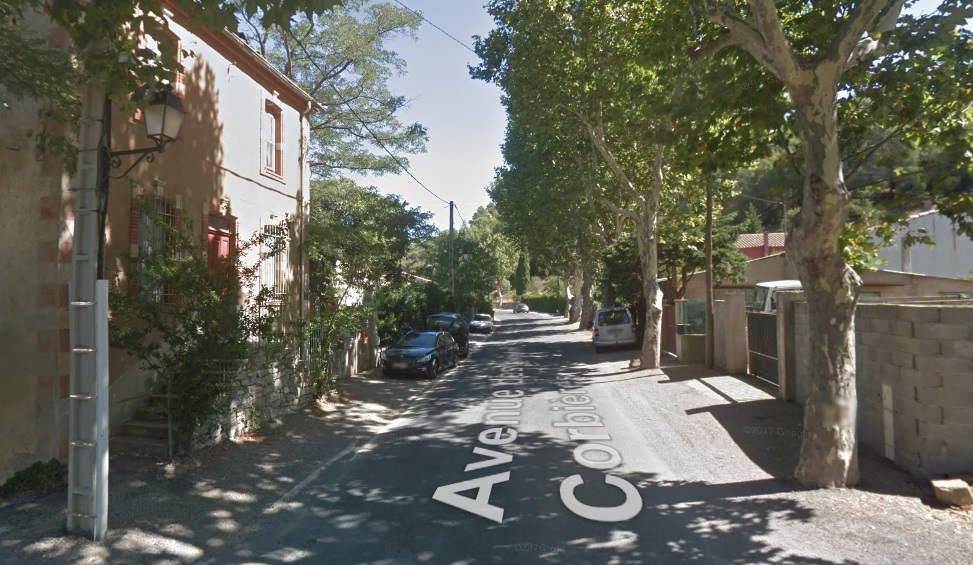
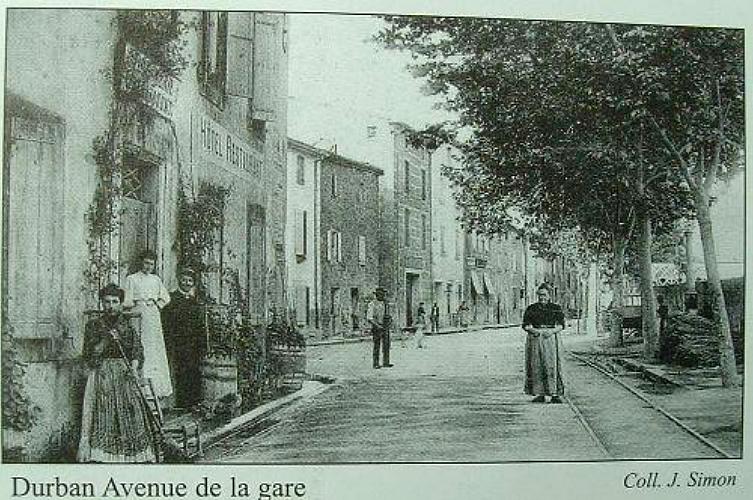
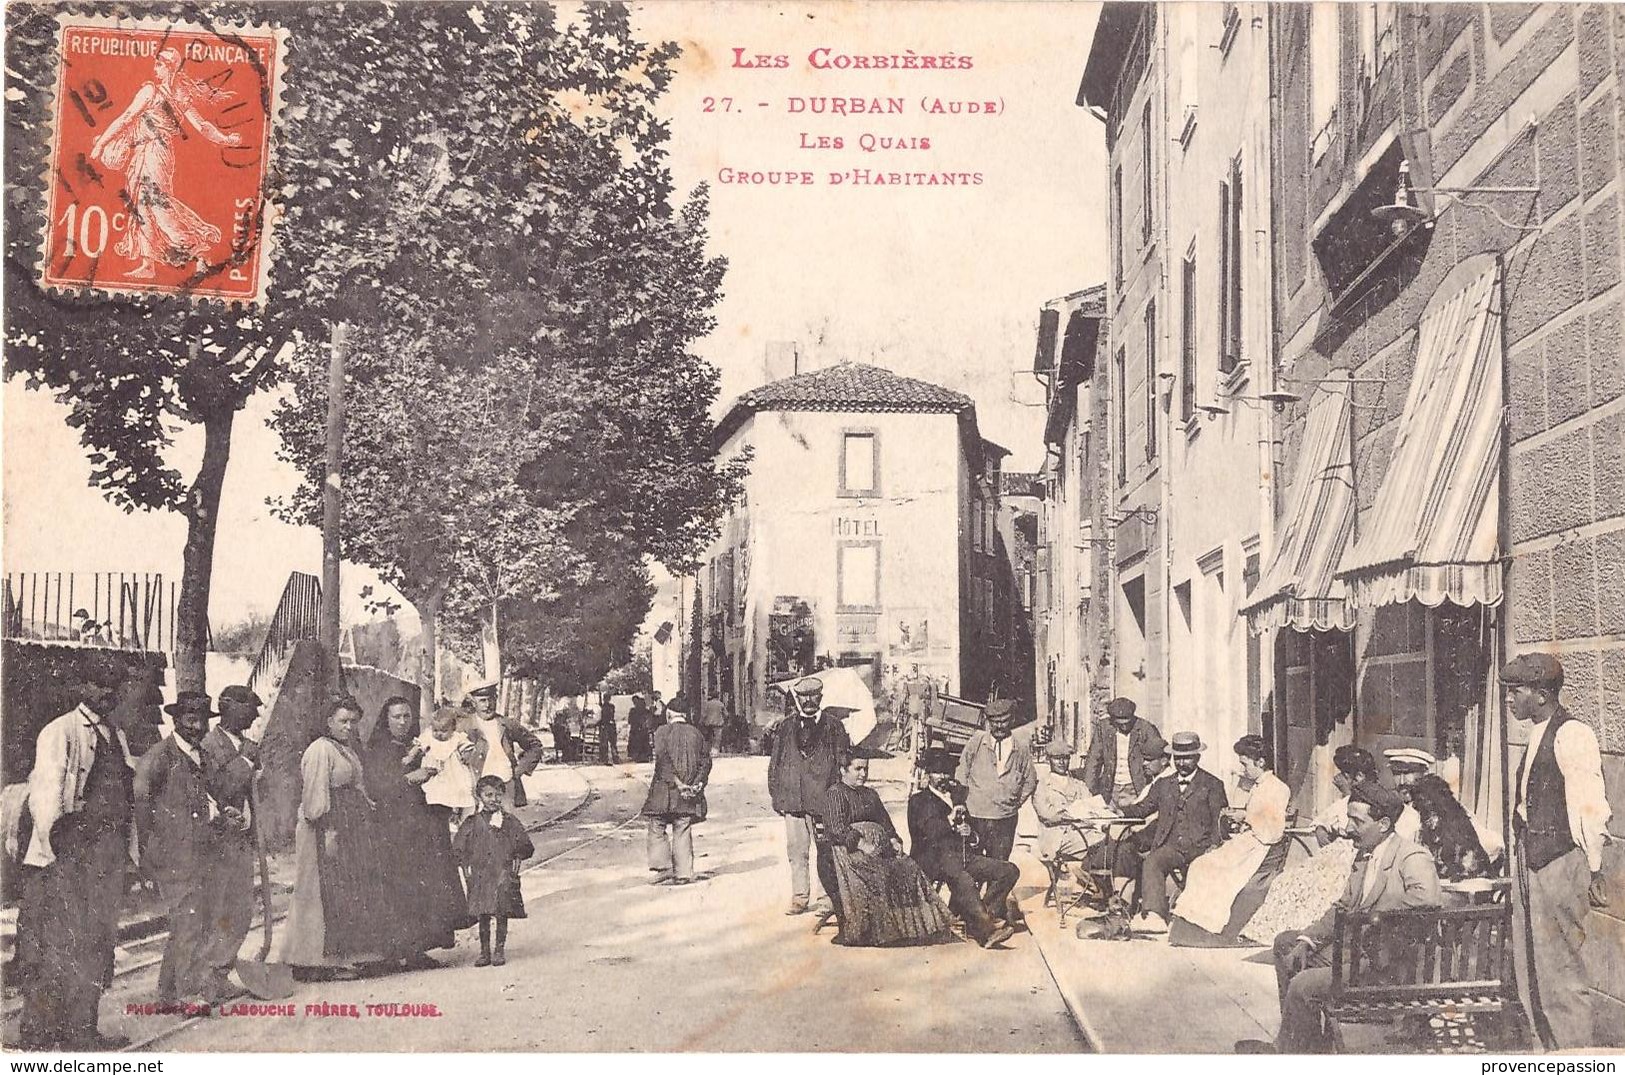
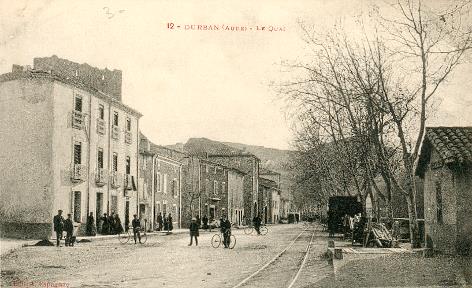
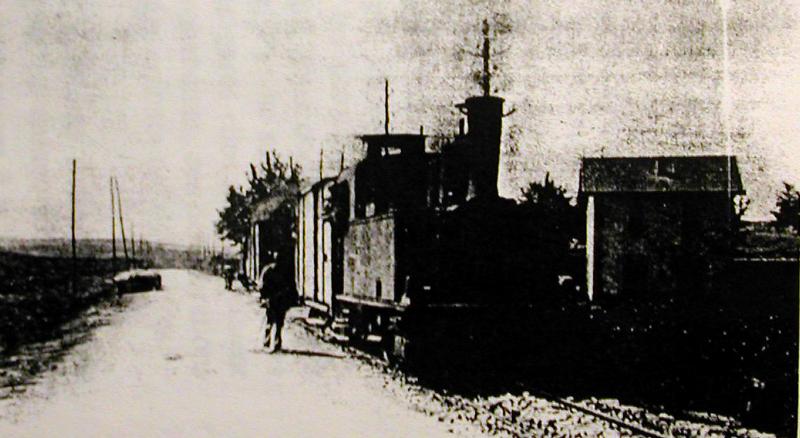
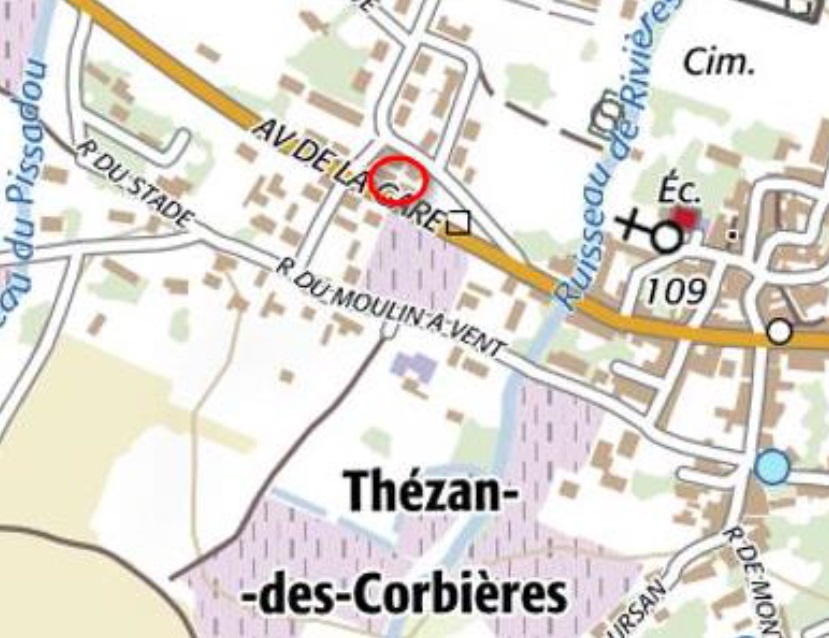
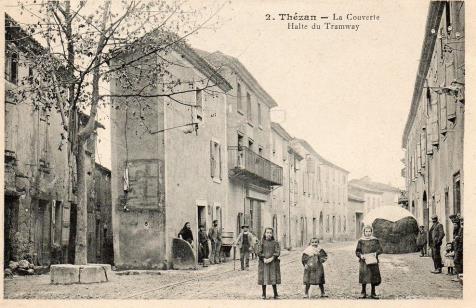
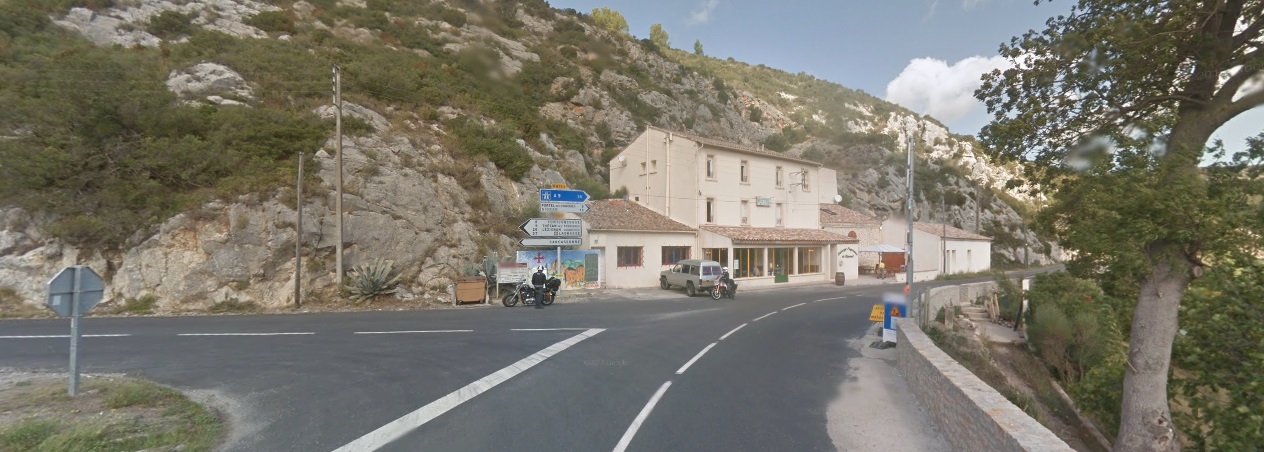
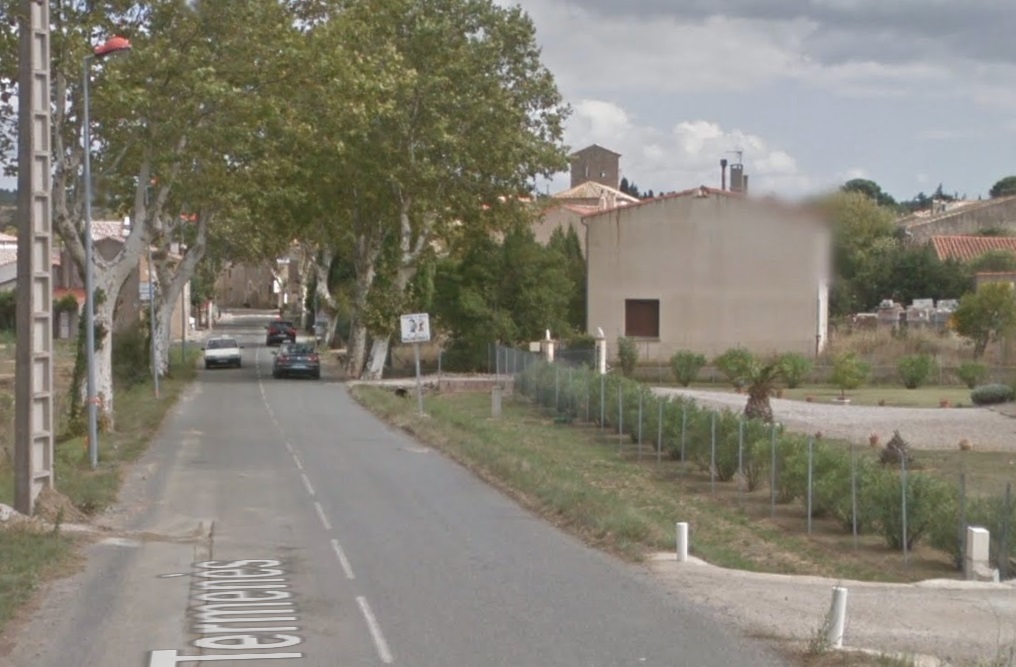
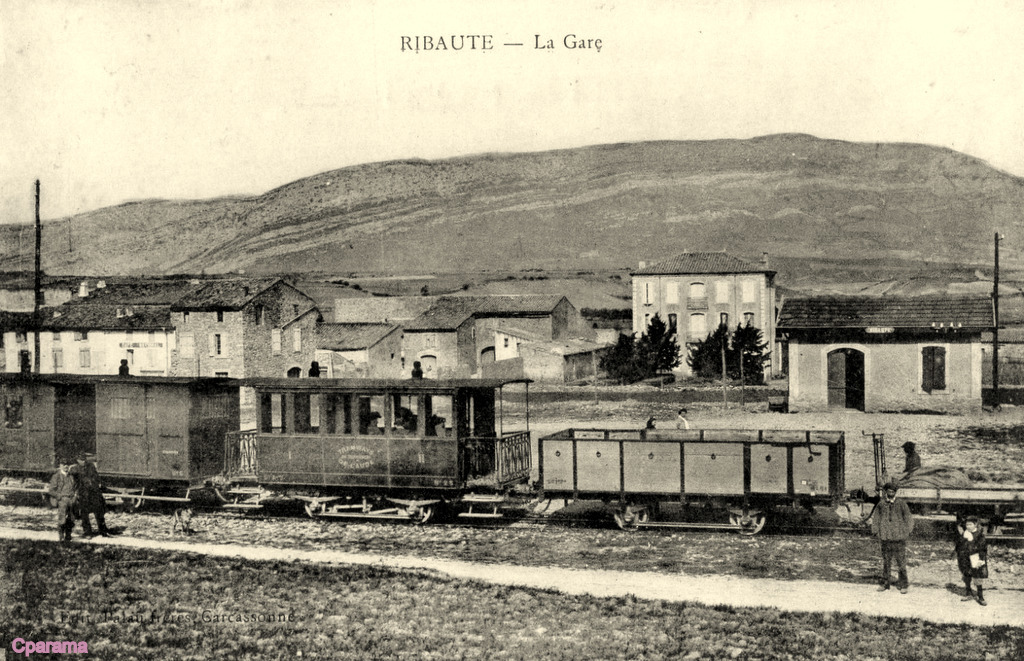
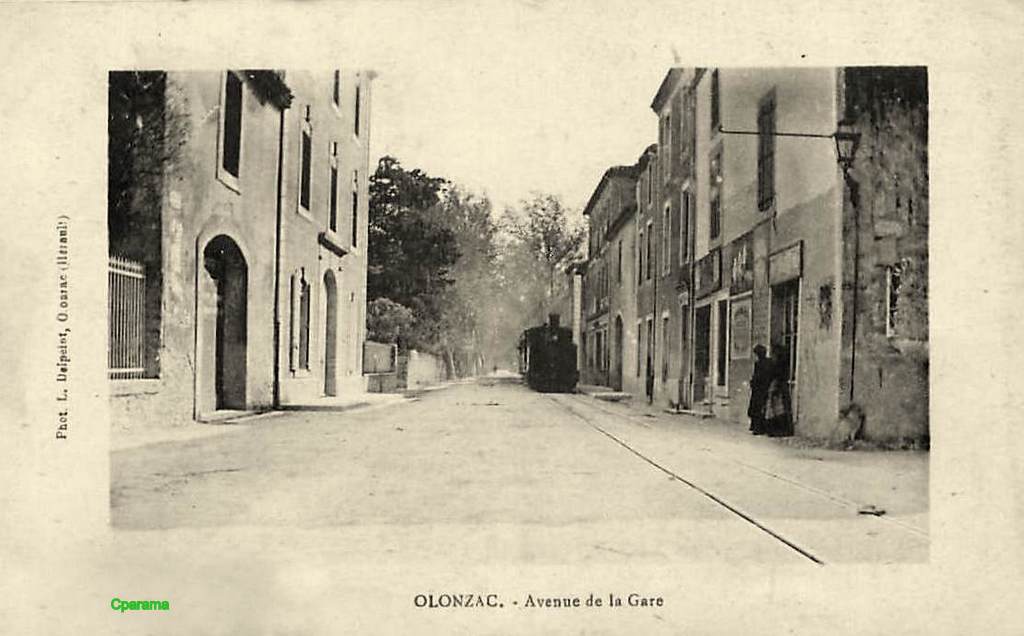
The station was located in front of the Rocbère cooperative cellar. A sign indicating a speed limit of 8km/hr still remained in 1947 at the entrance to the village at the crossroads.  Single track rails were laid directly in the cobbled roads because it was not until 1920 that the first asphalting was seen. Portel station allowed for trains to pass. There was only a relatively sparce service on the line. The winter 1928-1929 passenger schedules were as follows: from Ripaud to La Nouvelle, the trams passed through Portel at 6:32 am and 3:18 pm; the return journey saw trams at 8:29 am and 5:59 pm. [7] 
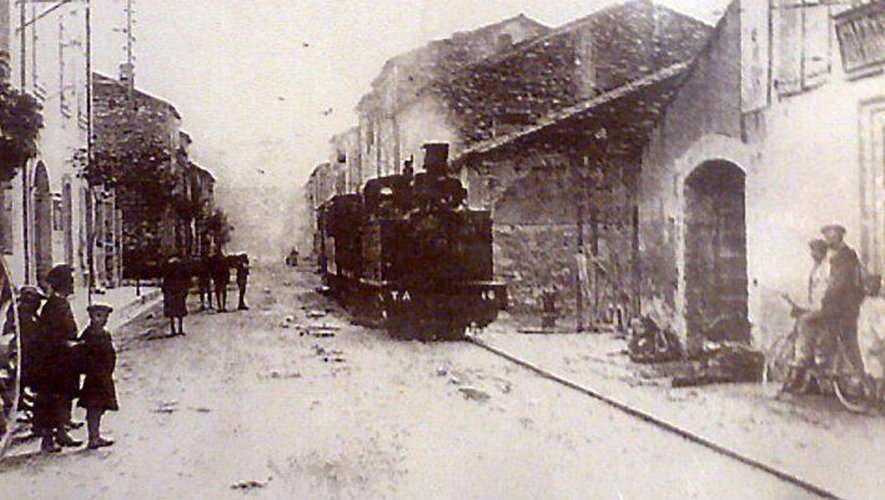
A tram trundles through Portel on Avenue de la Gare. [7]
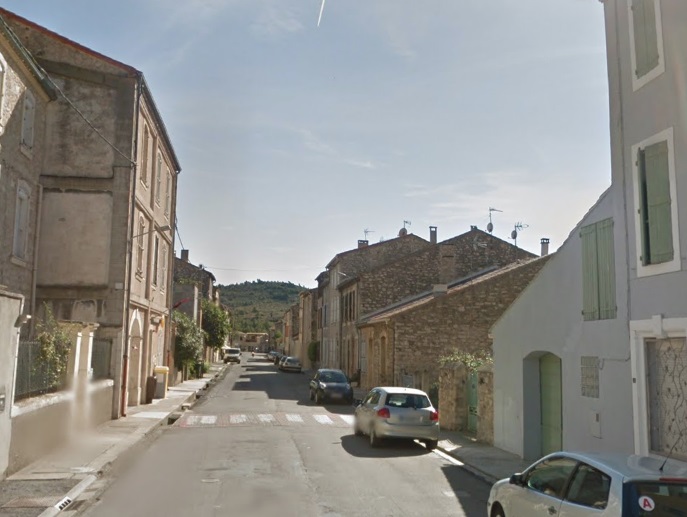
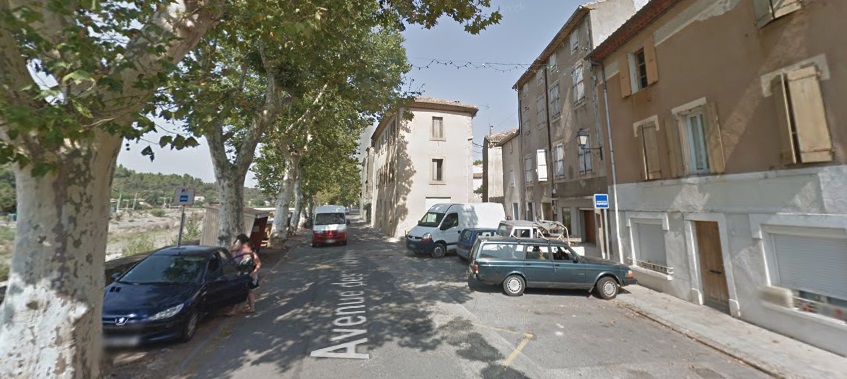
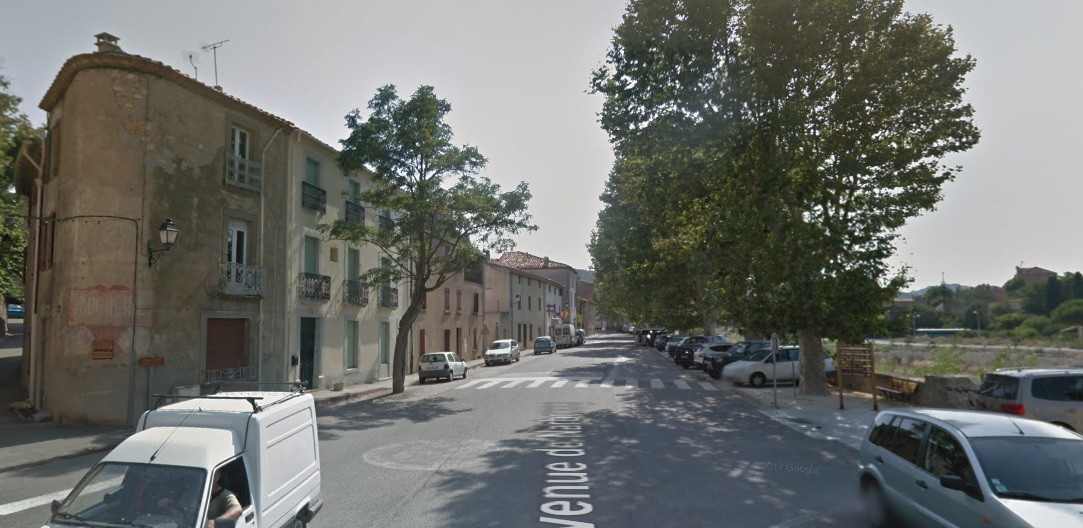
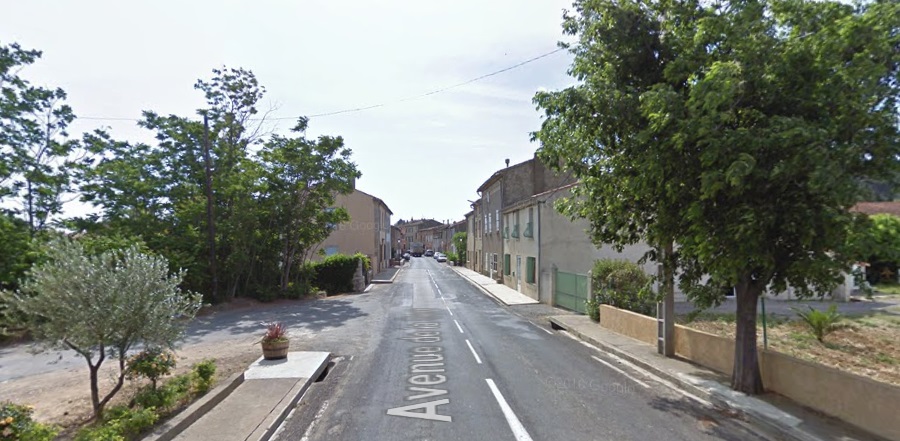
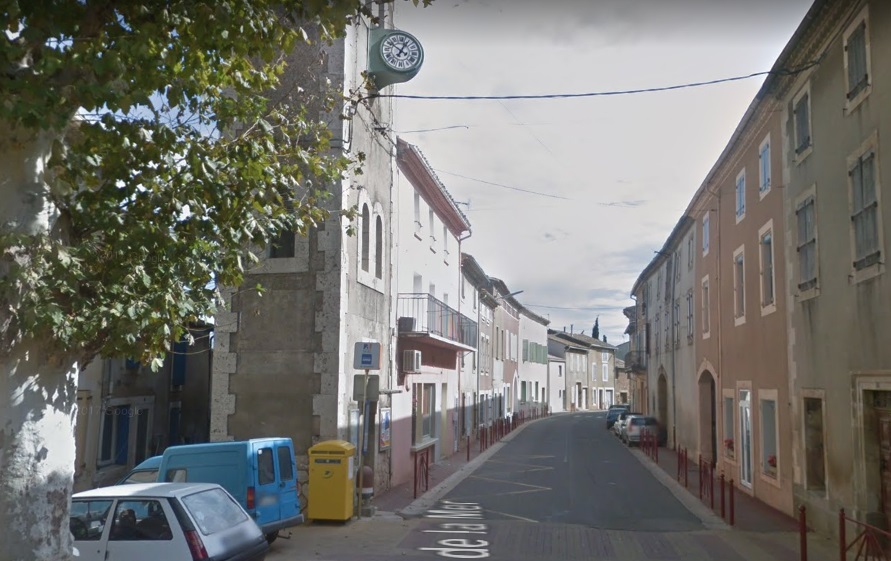
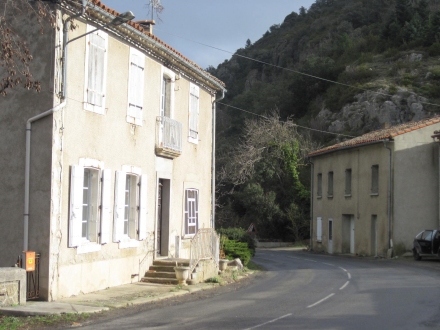
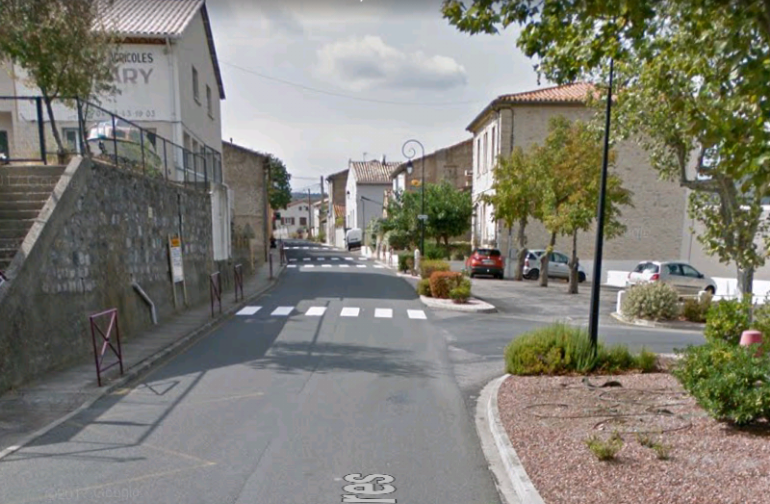
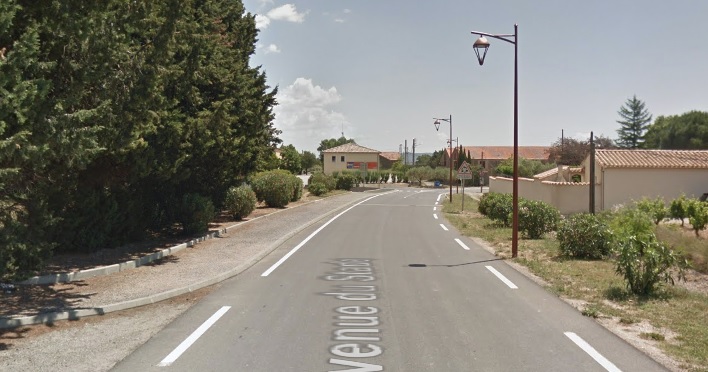
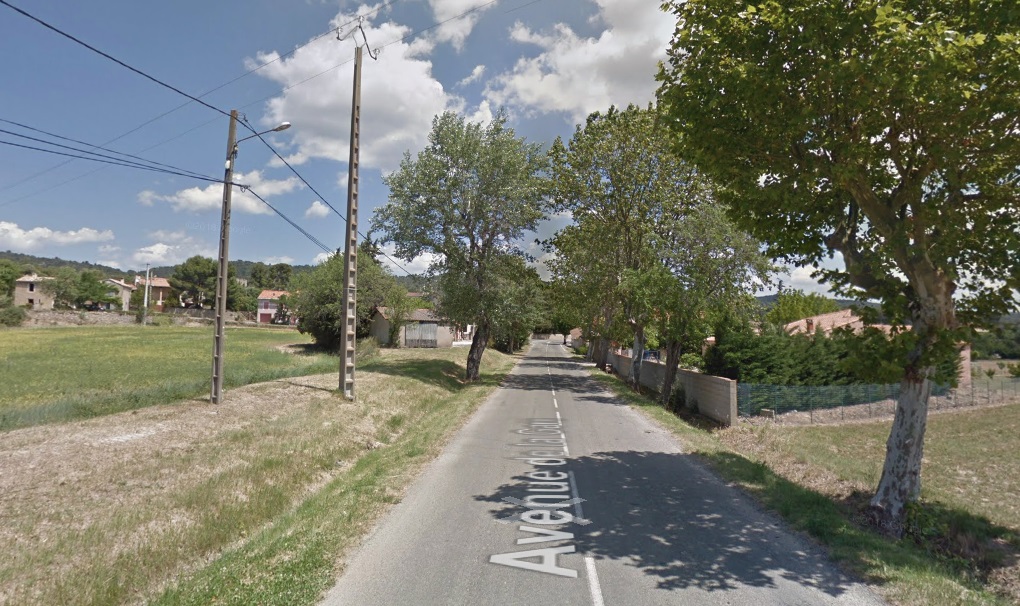
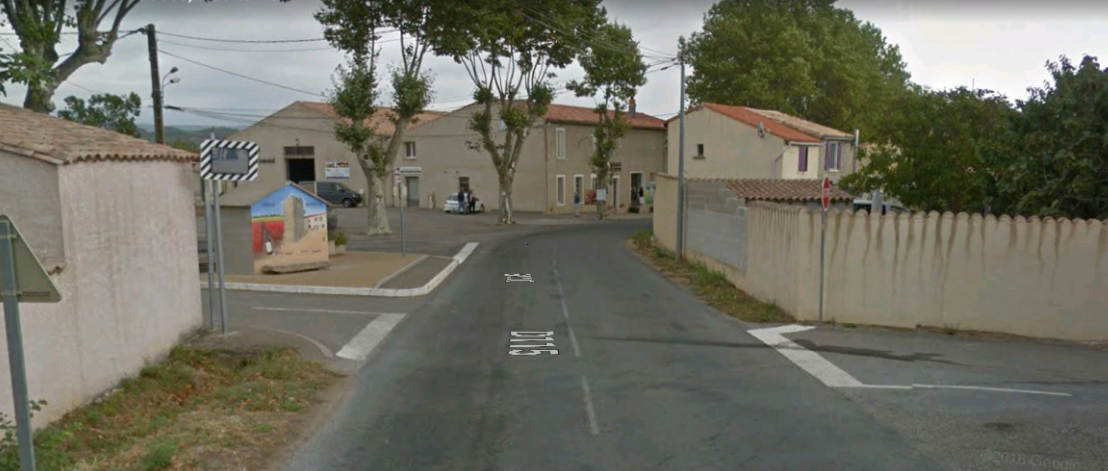
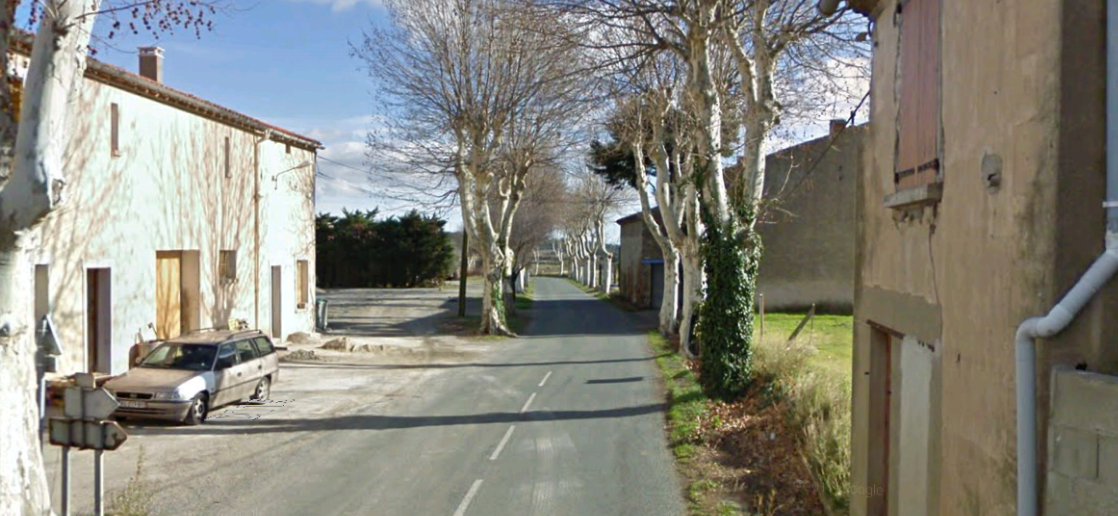
The same view in 21st Century. The building on the left is the post office.

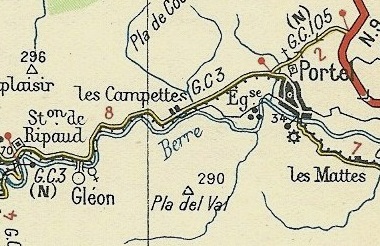
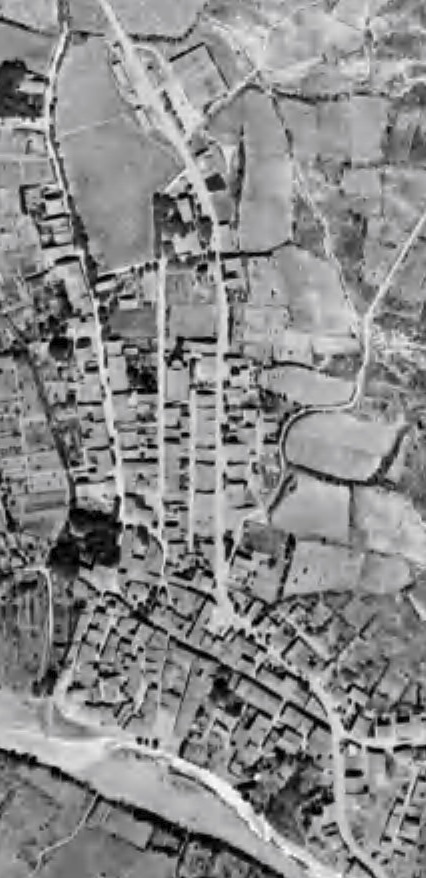
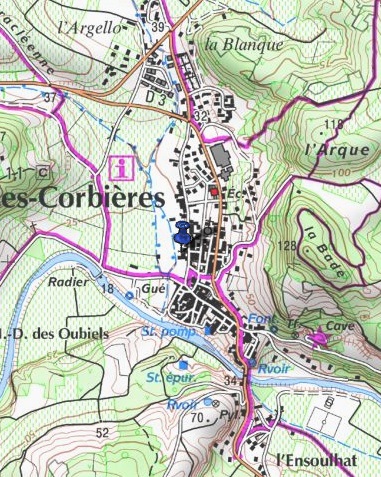
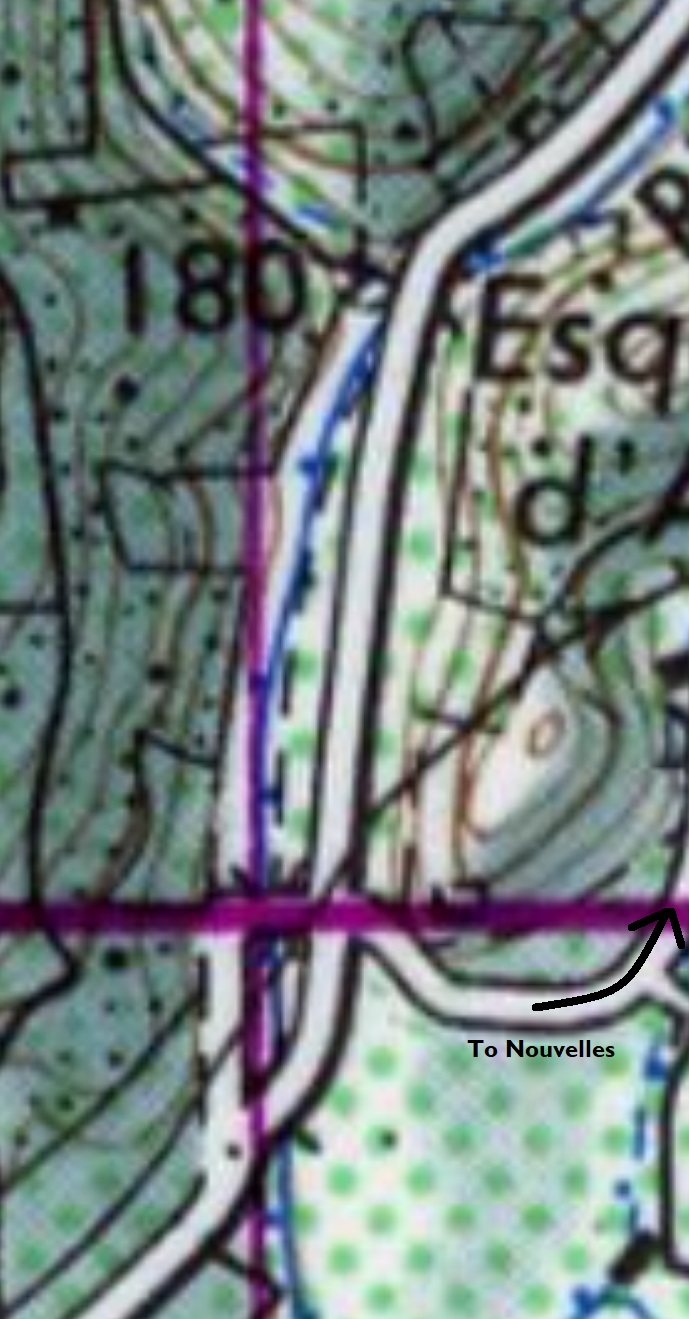
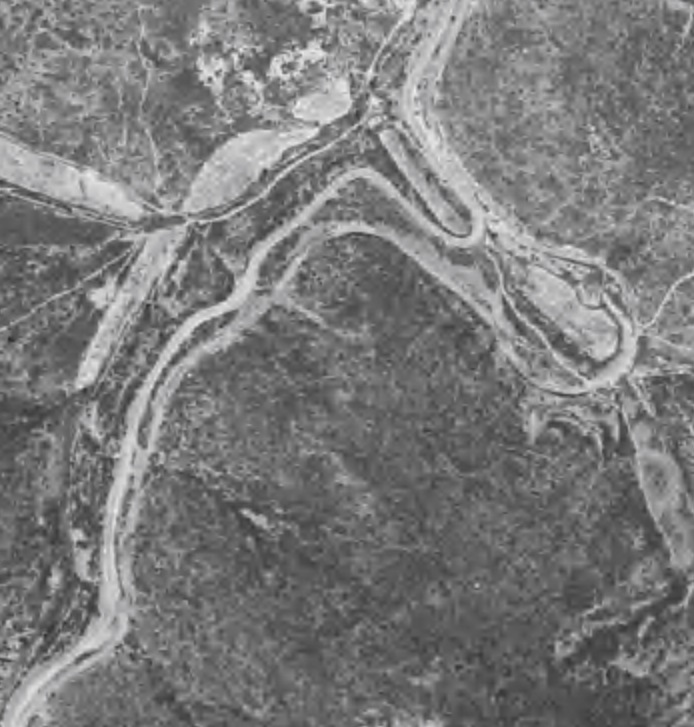
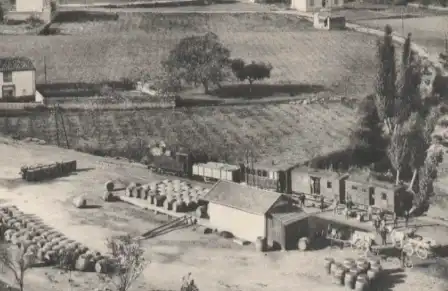
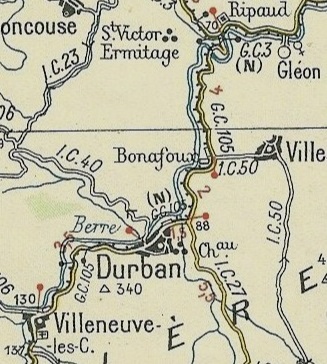
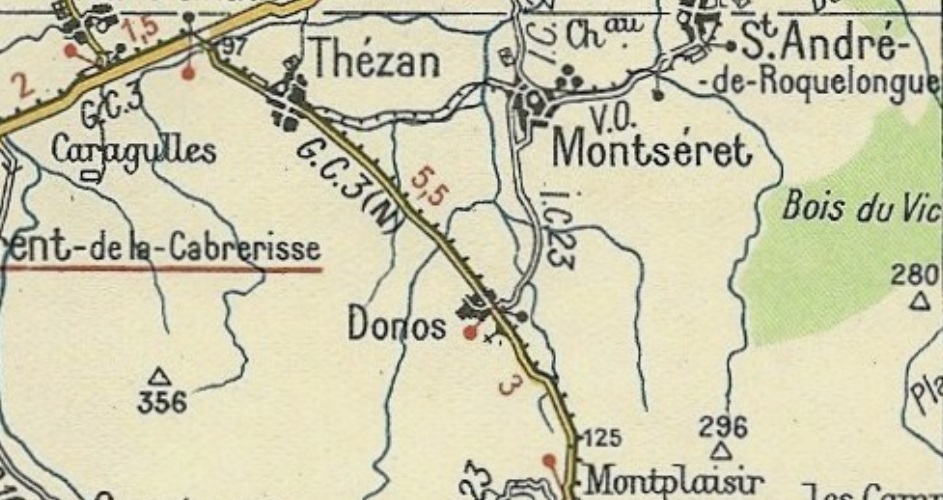
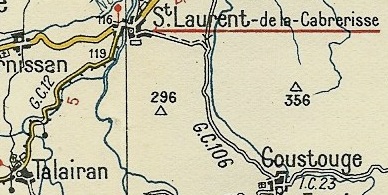
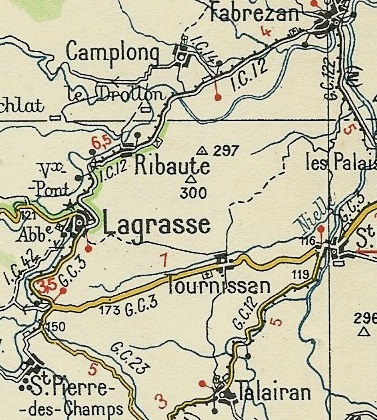
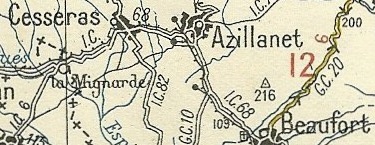
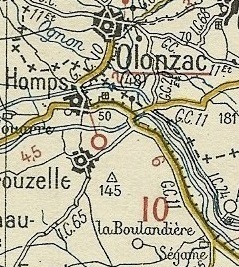
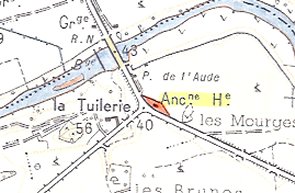
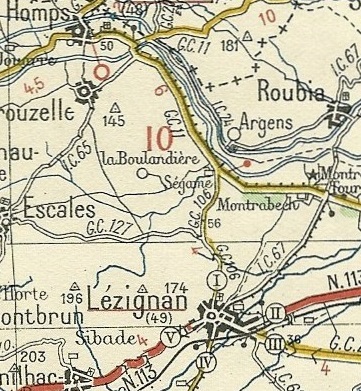
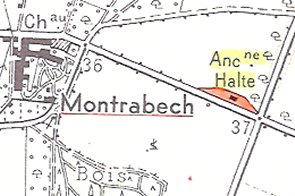
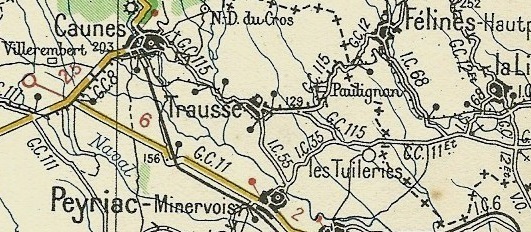
The tramway passed through Portel on the GC3 on an approximately North-South axis. The station location is not obvious on the 1930s Michelin map above, nor on the adjacent 1946 aerial photograph. I understand that it was North of the village and so may well have been at the location at the top of the aerial photograph where the road opens out.

If anyone has better information, I would really appreciate hearing from them!


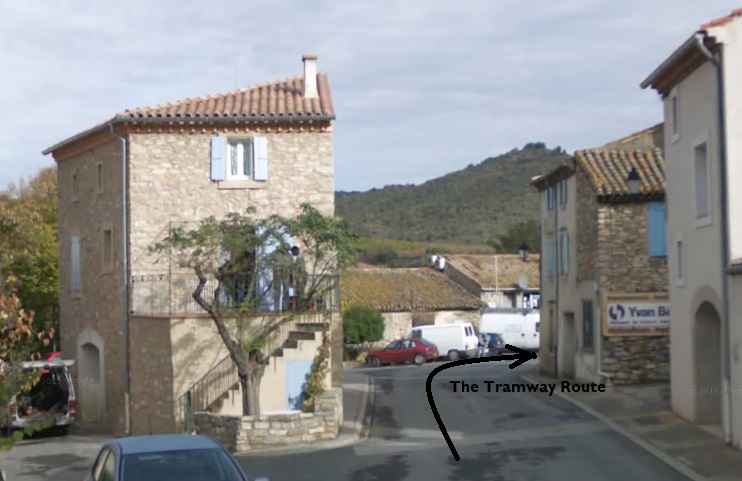
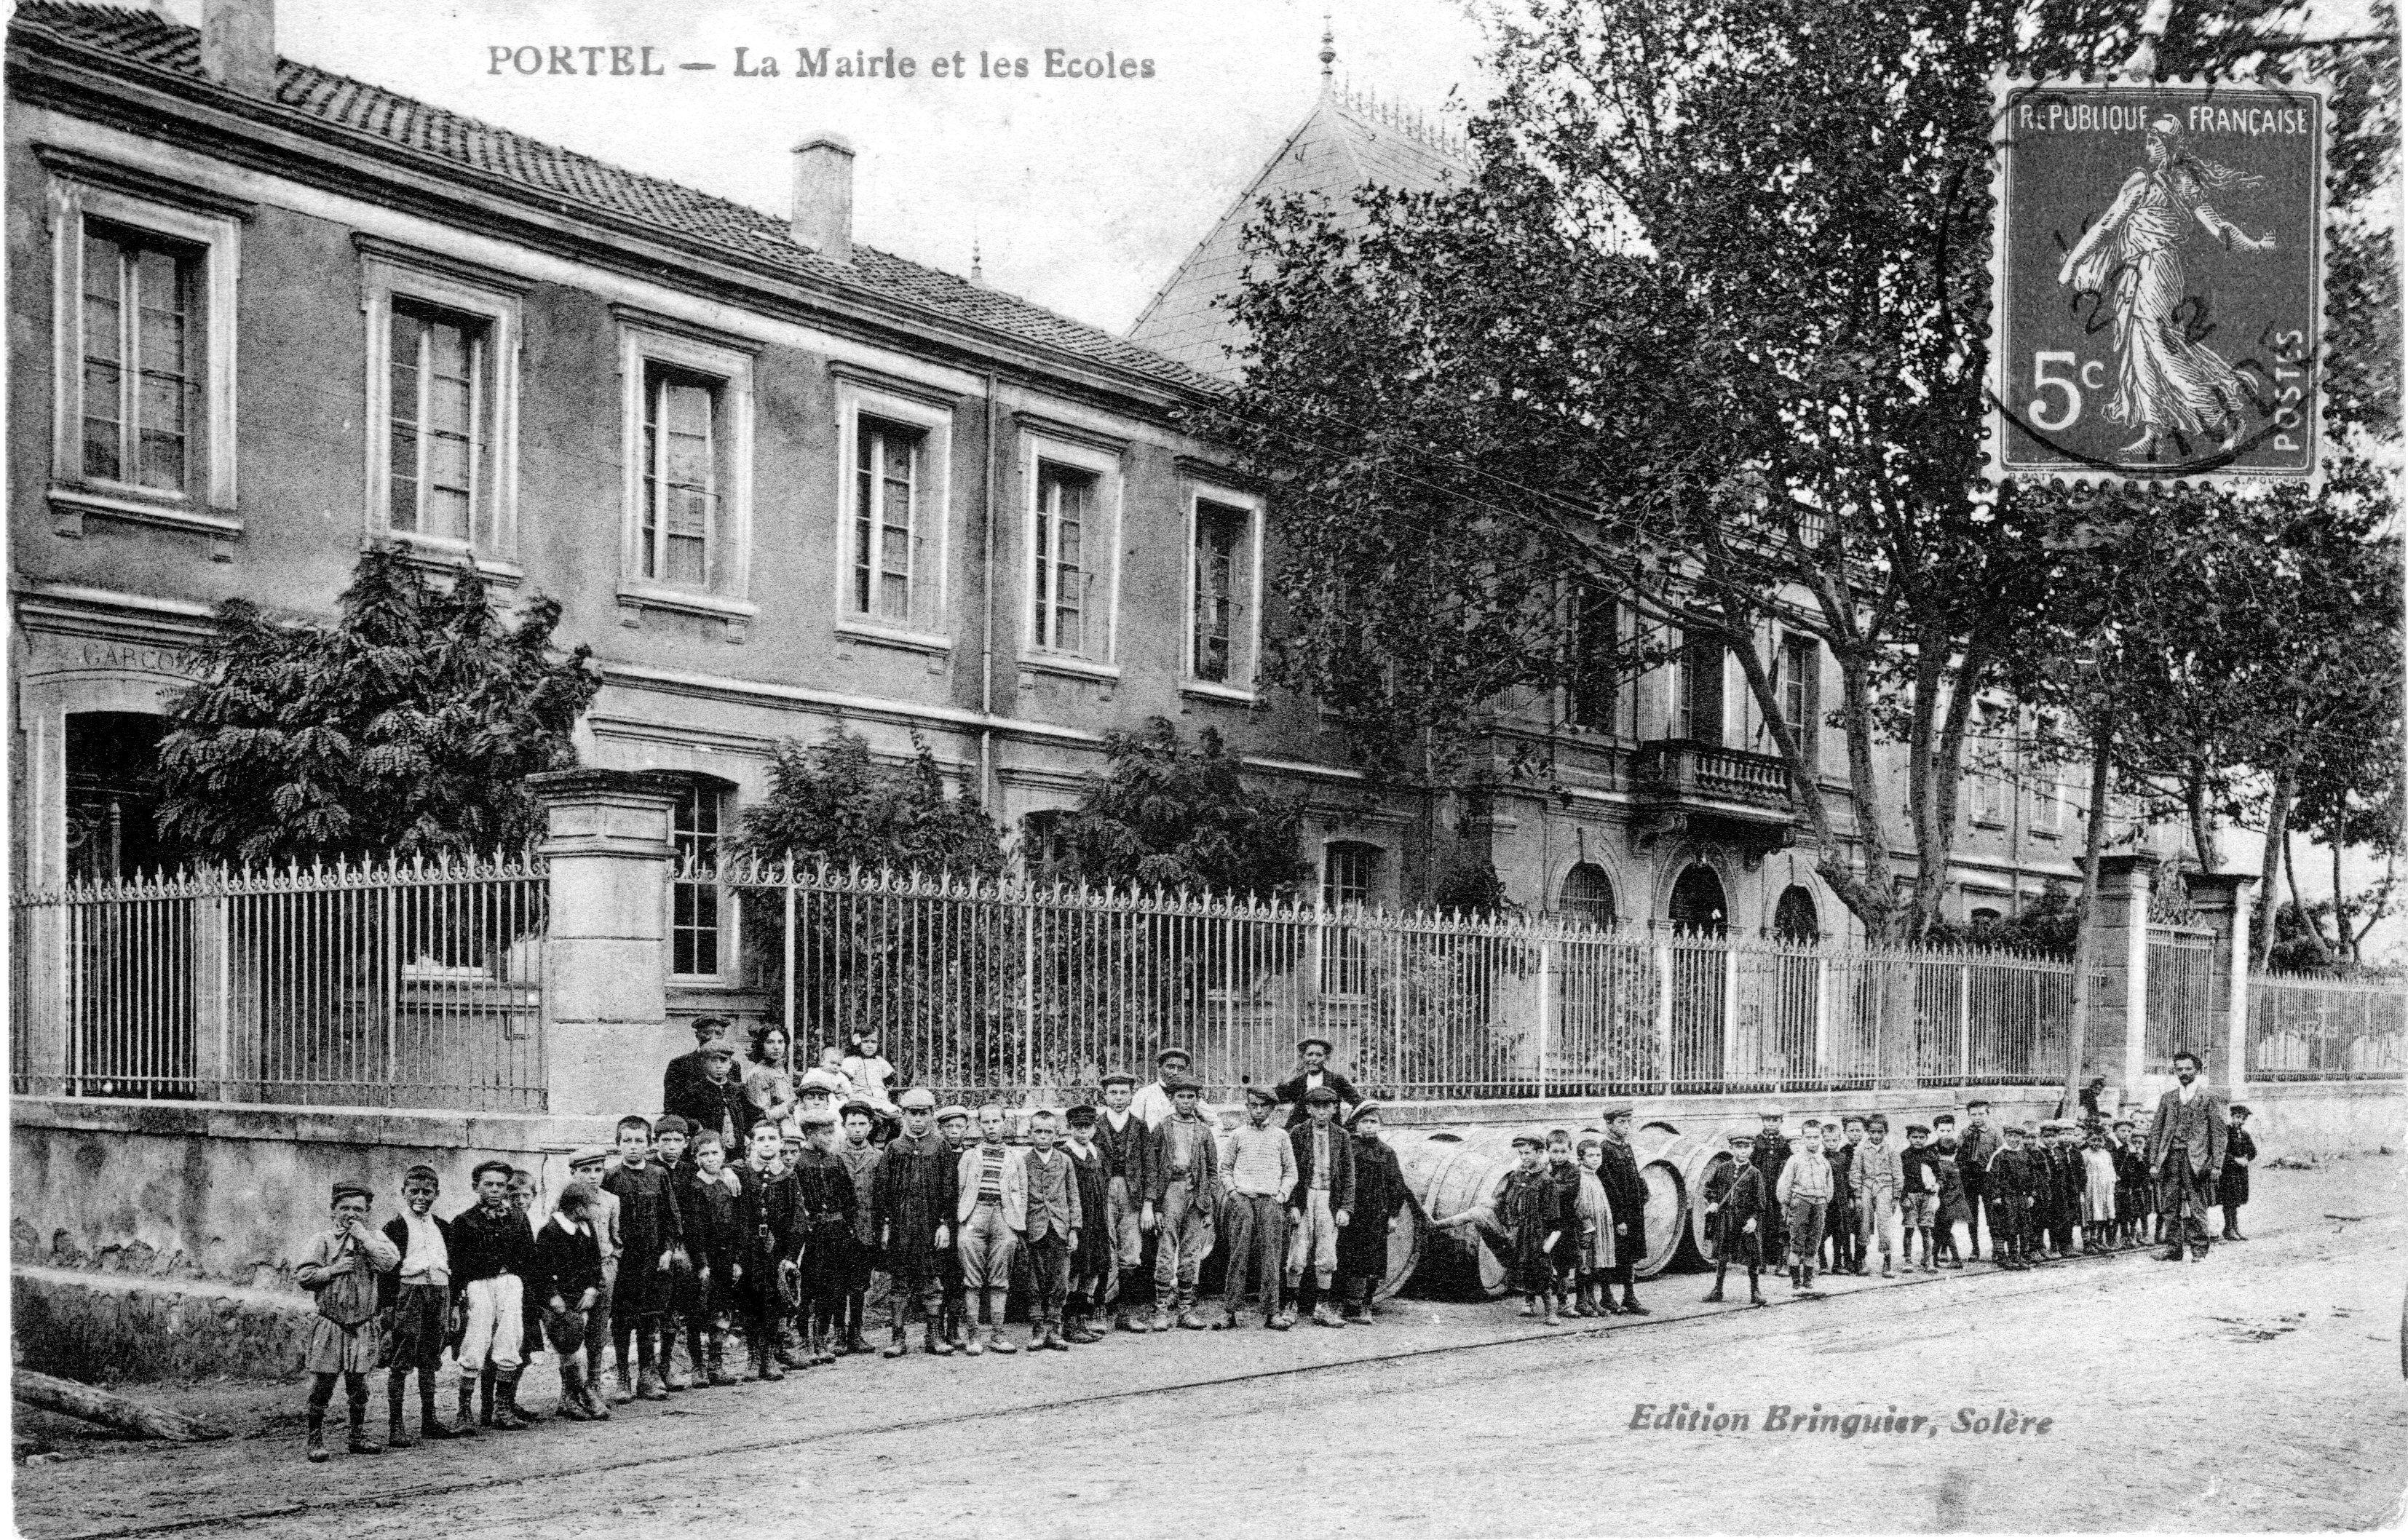
The tramway in front of the Town Hall. [8]
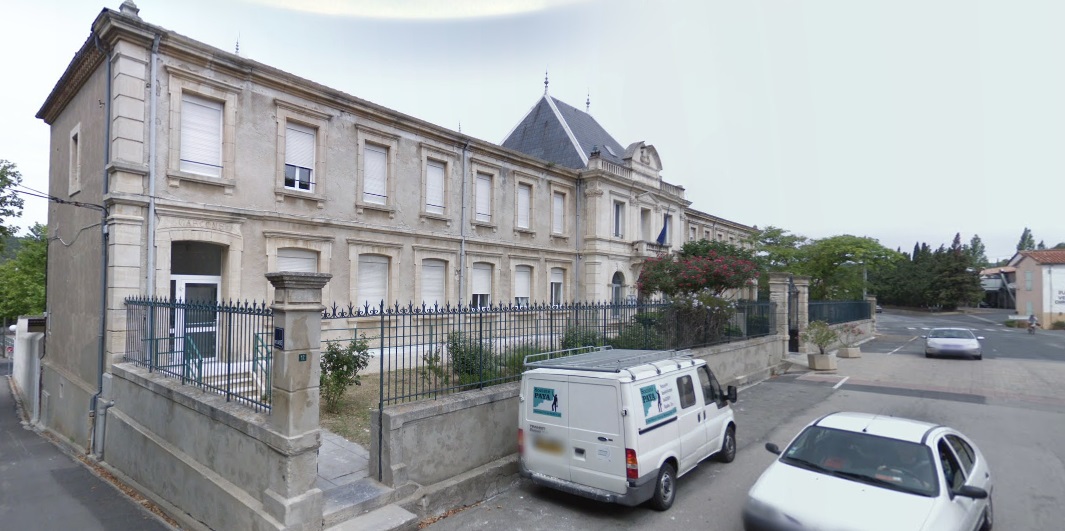
The same location in the early 21st Century.

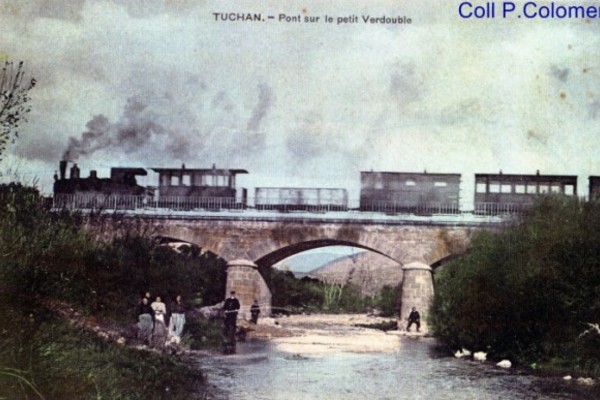
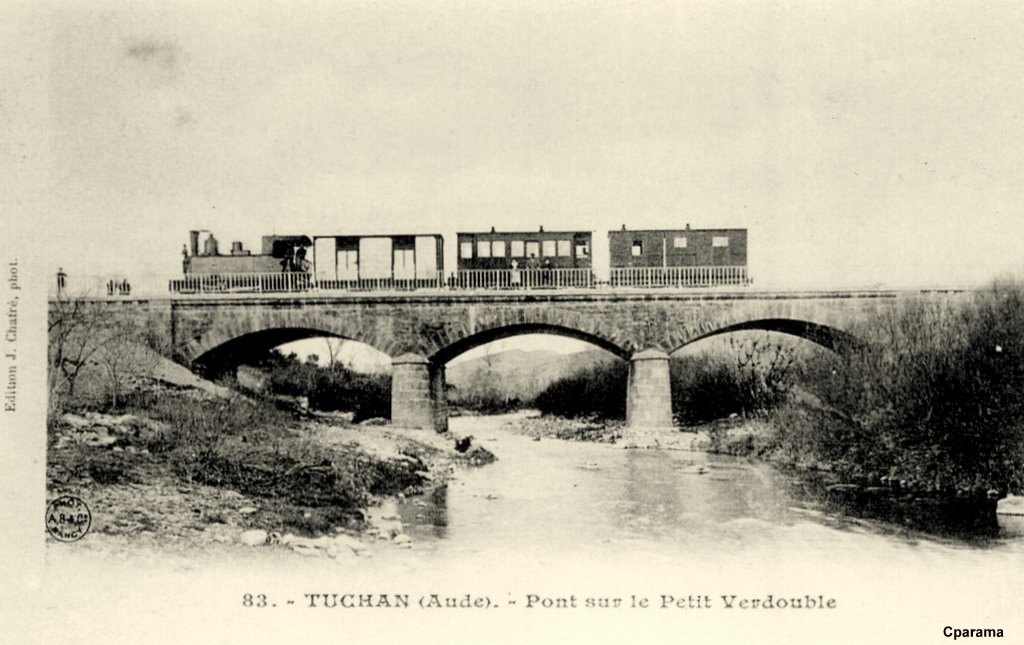
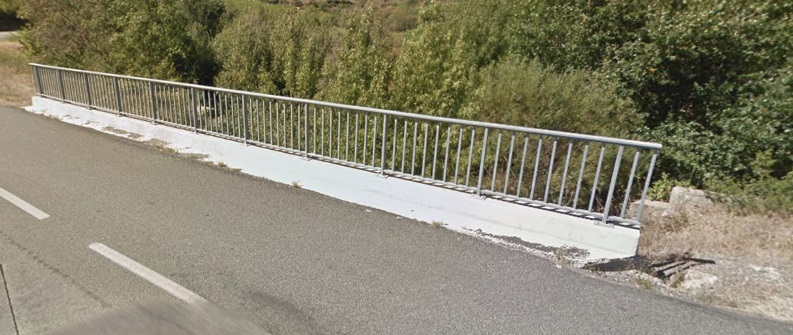
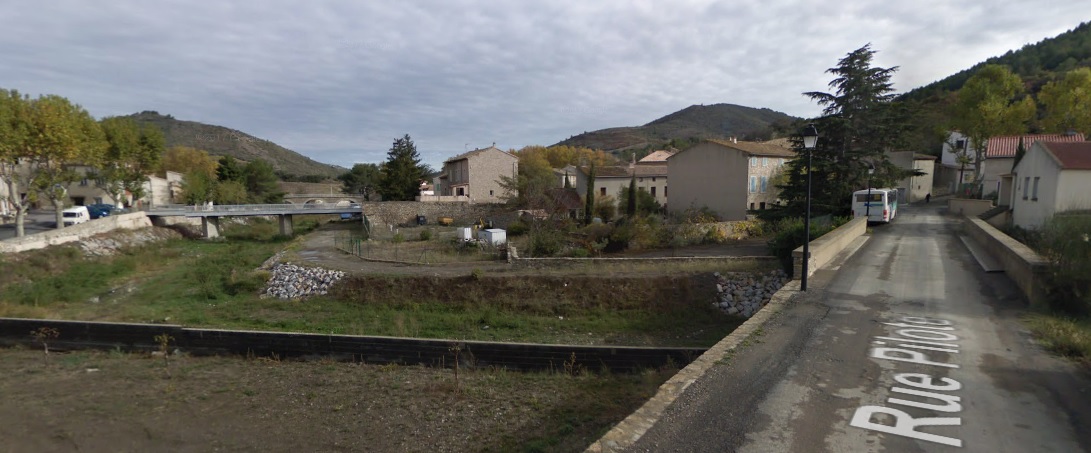
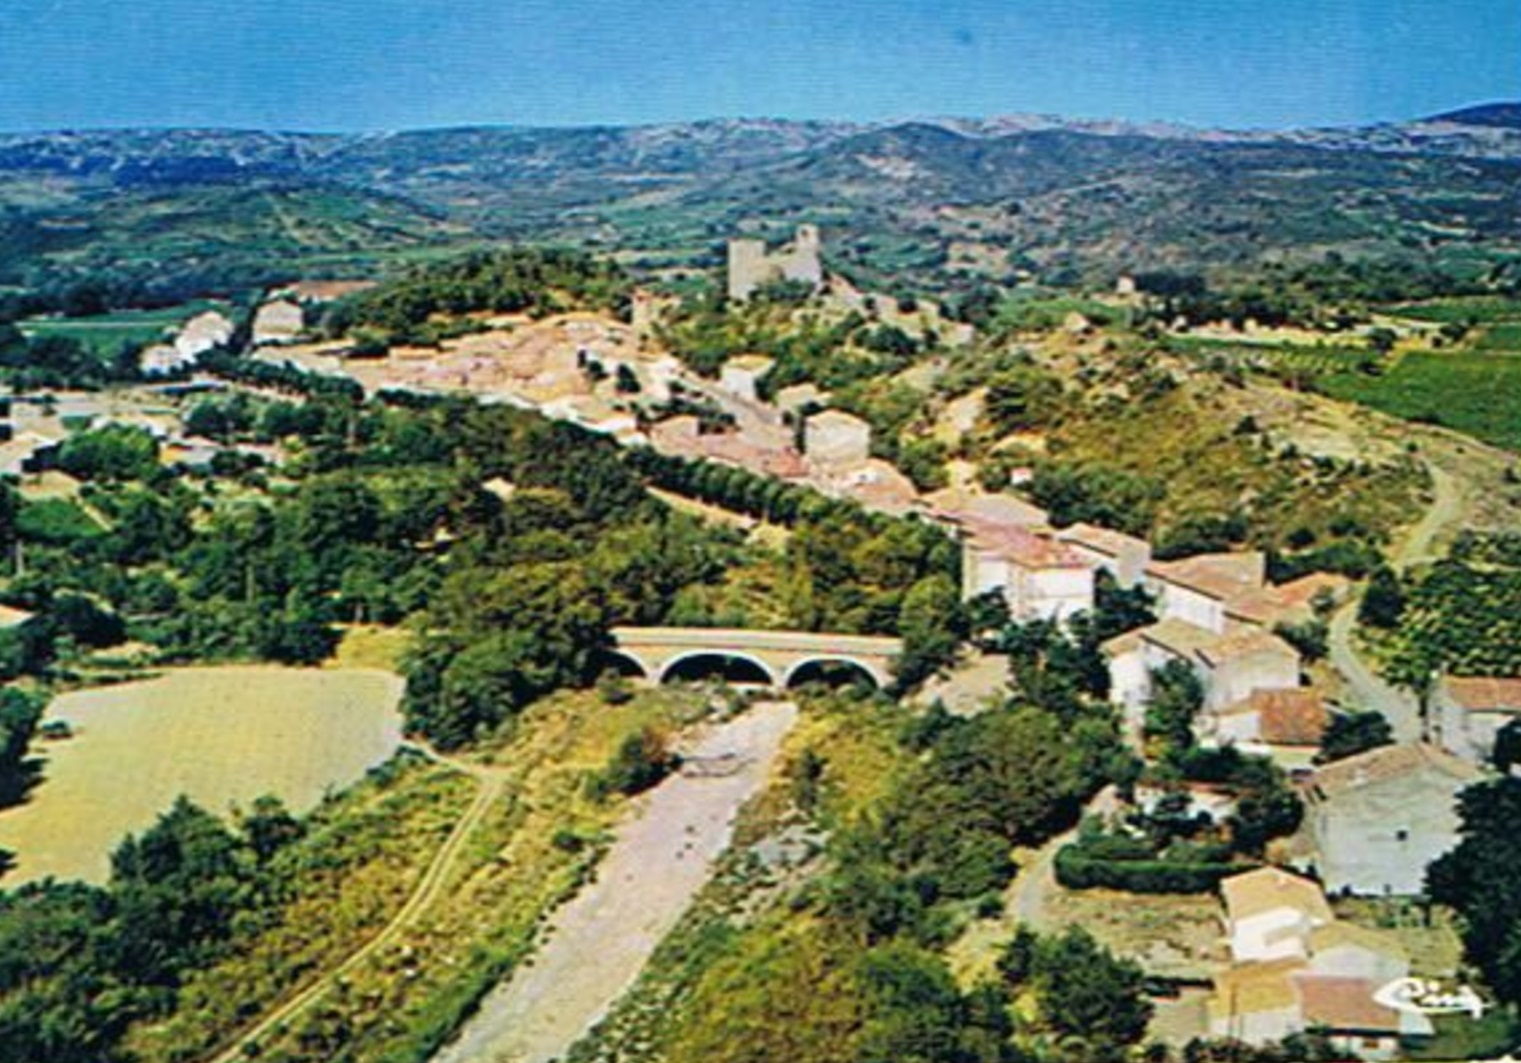
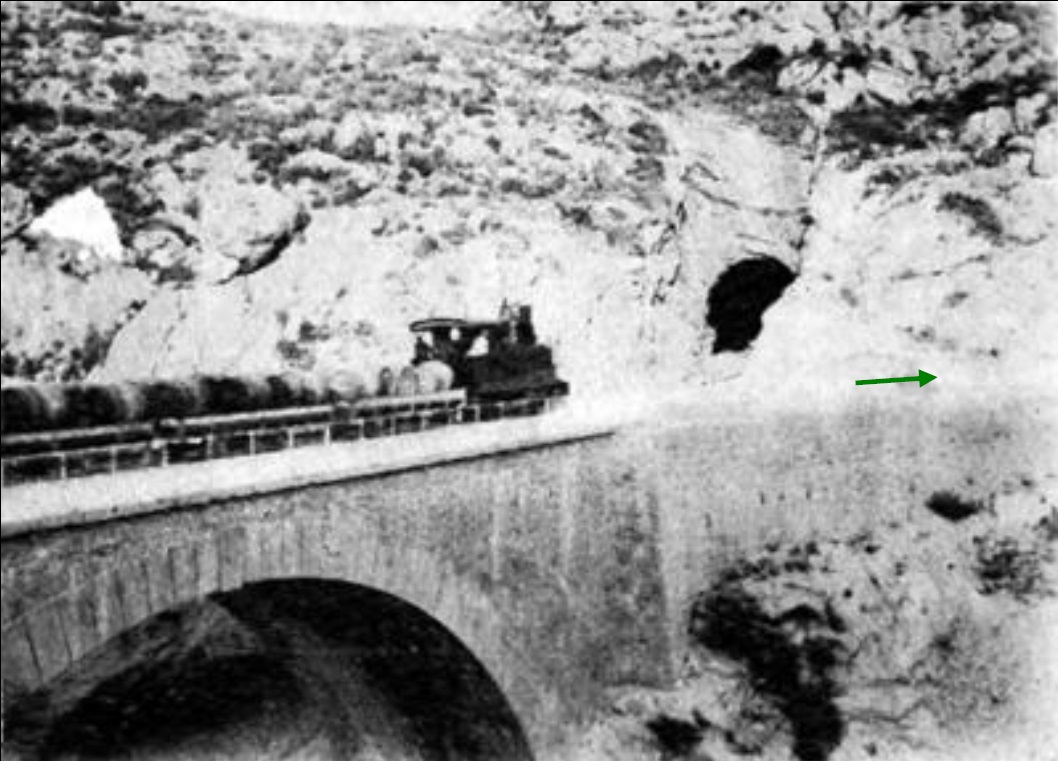
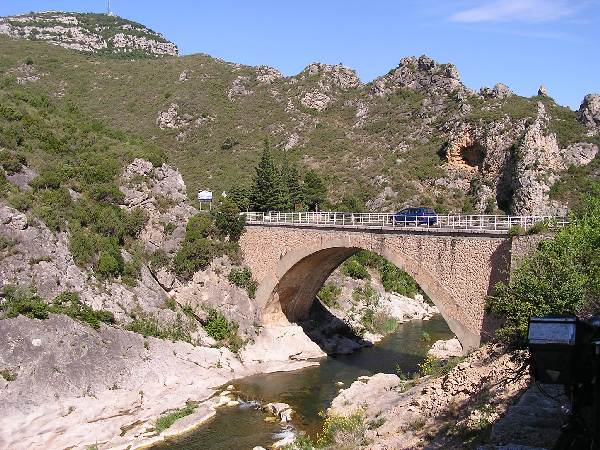
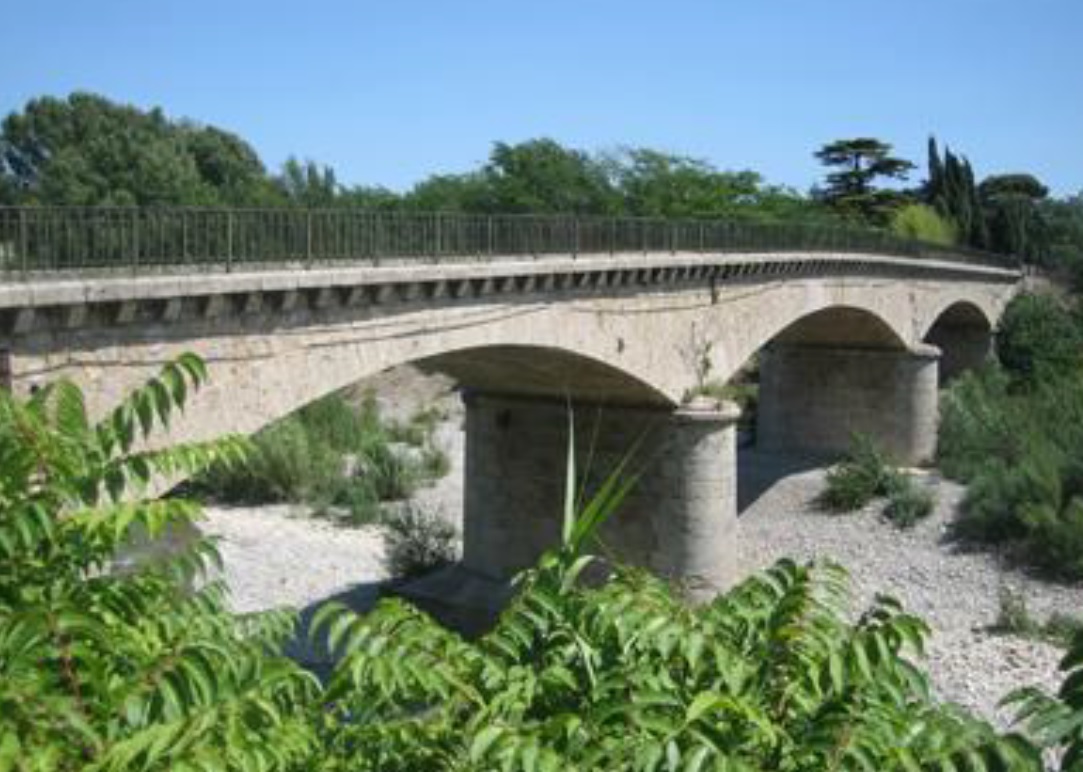
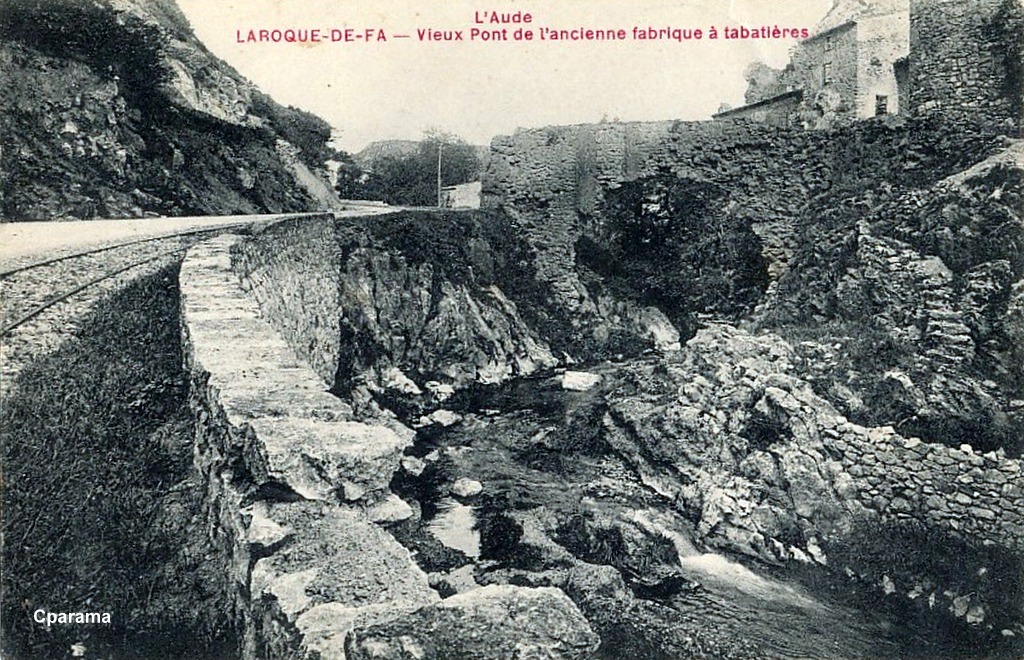
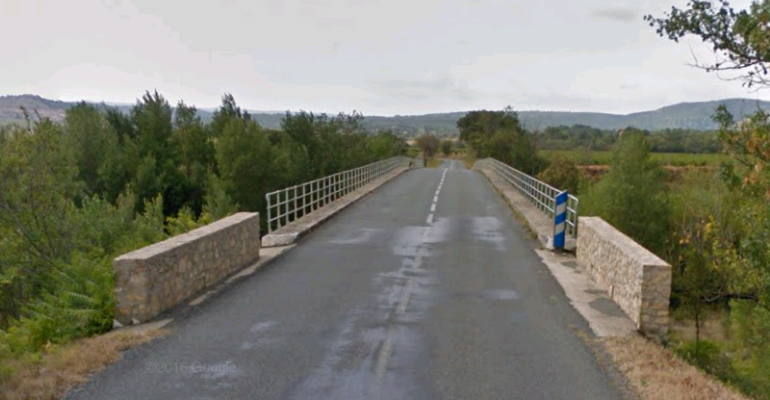
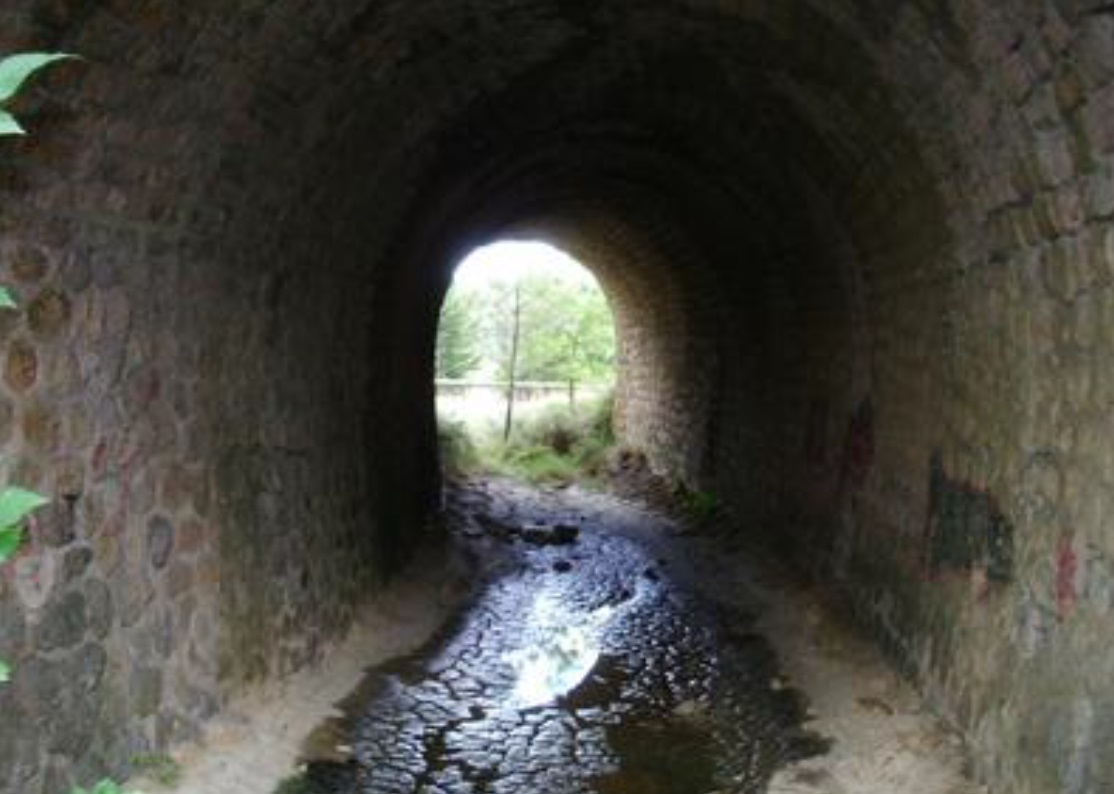
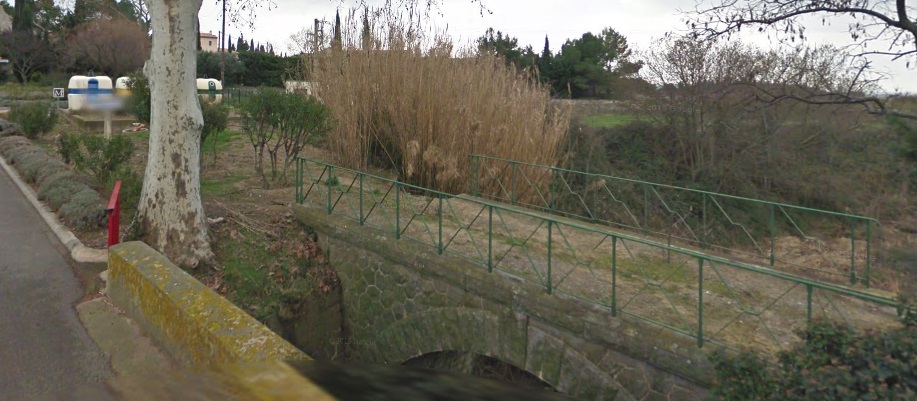
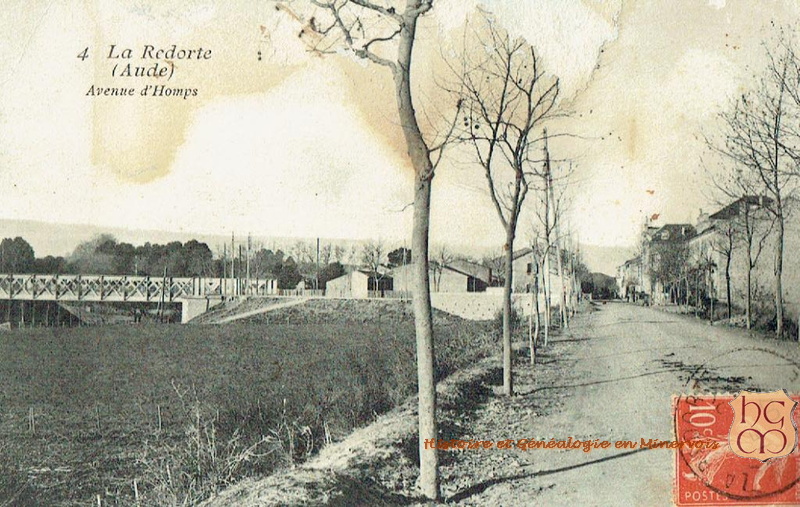
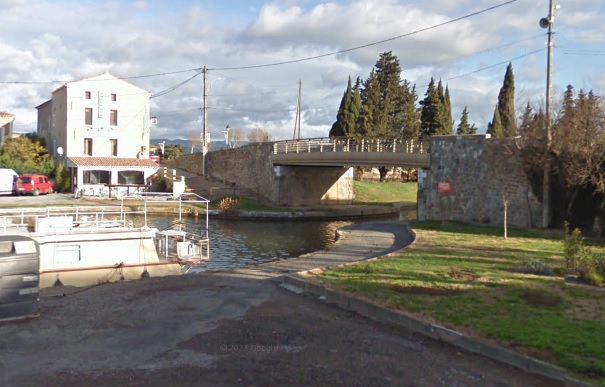
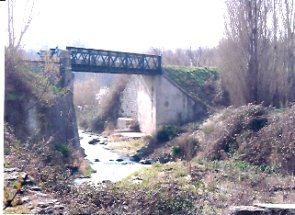
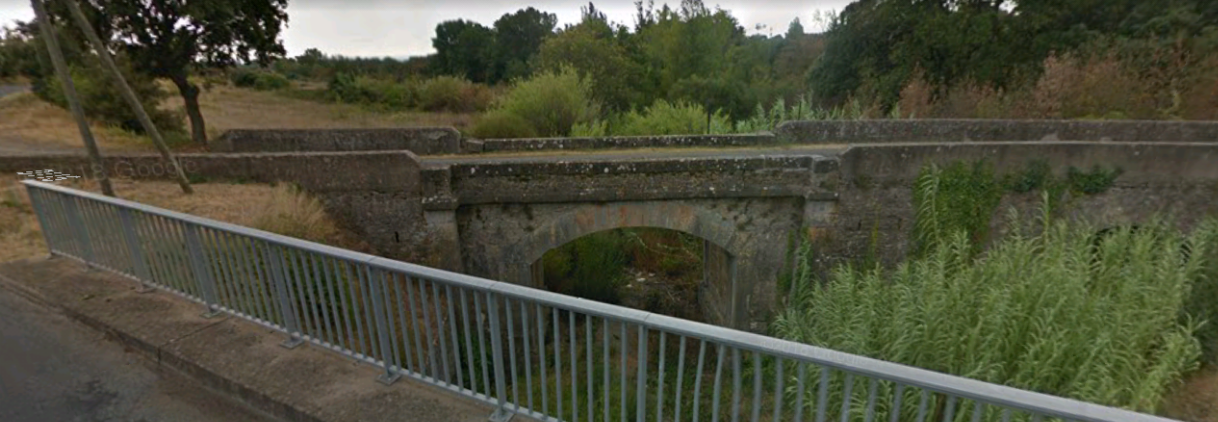
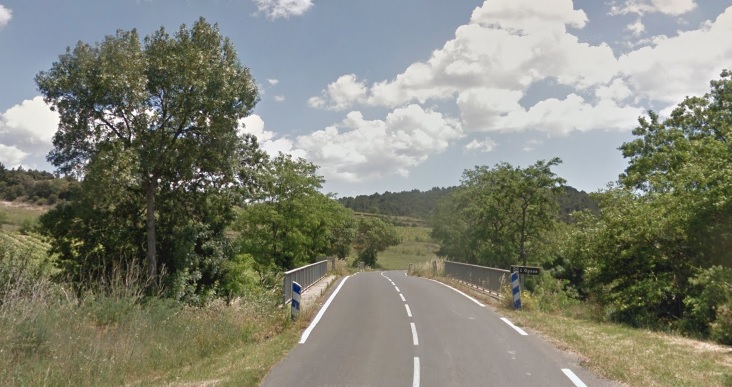
As the tramway left Portel it crossed La Berre on a single-span arch bridge.
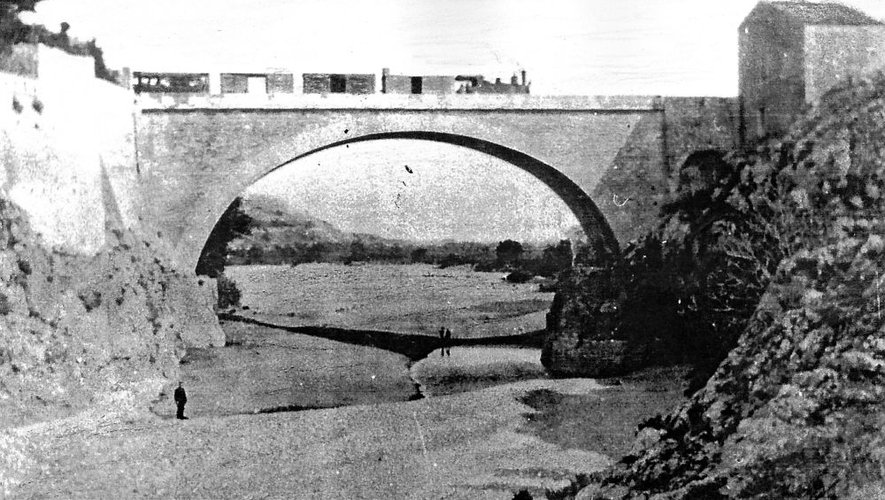
A tram crosses the bridge at Portel travelling towards La Nouvelle. [12]A similar view of the bridge at Portel. [9]
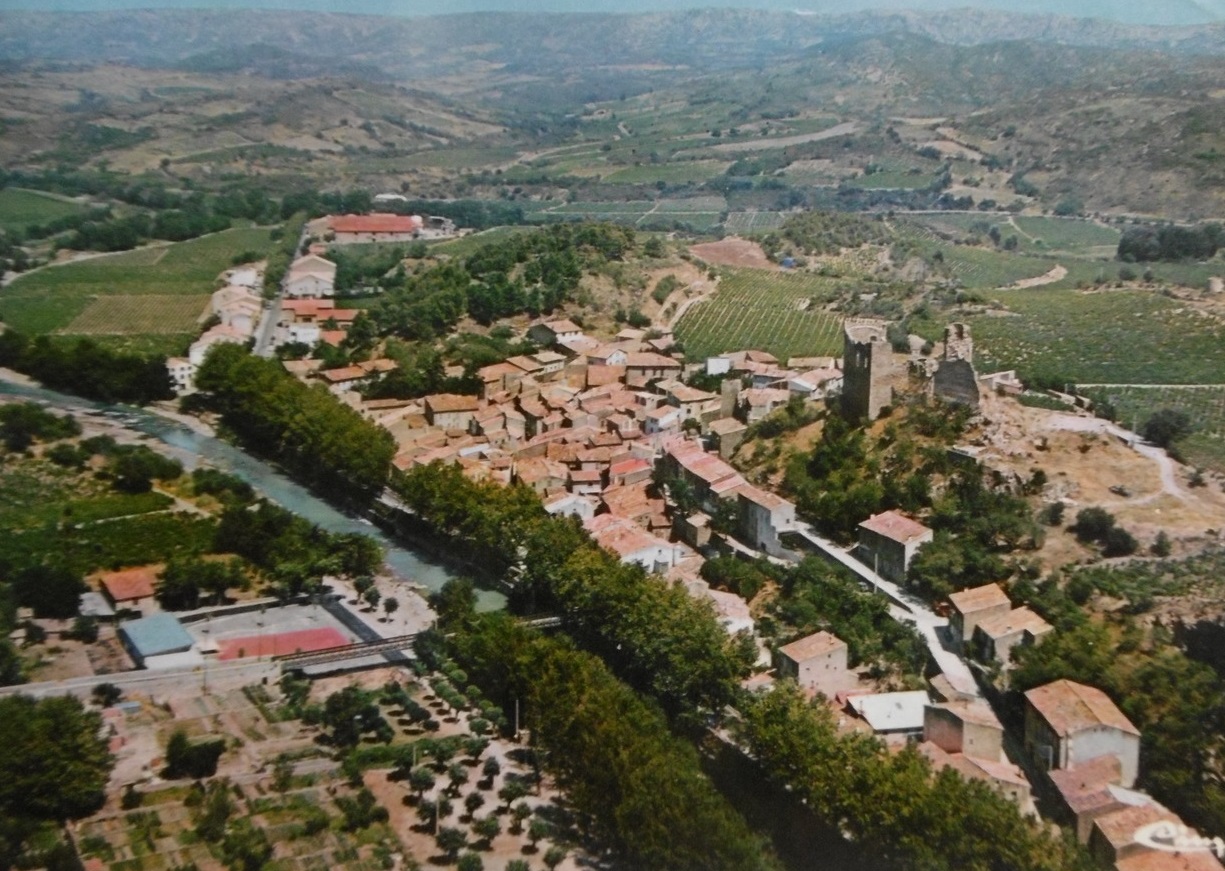
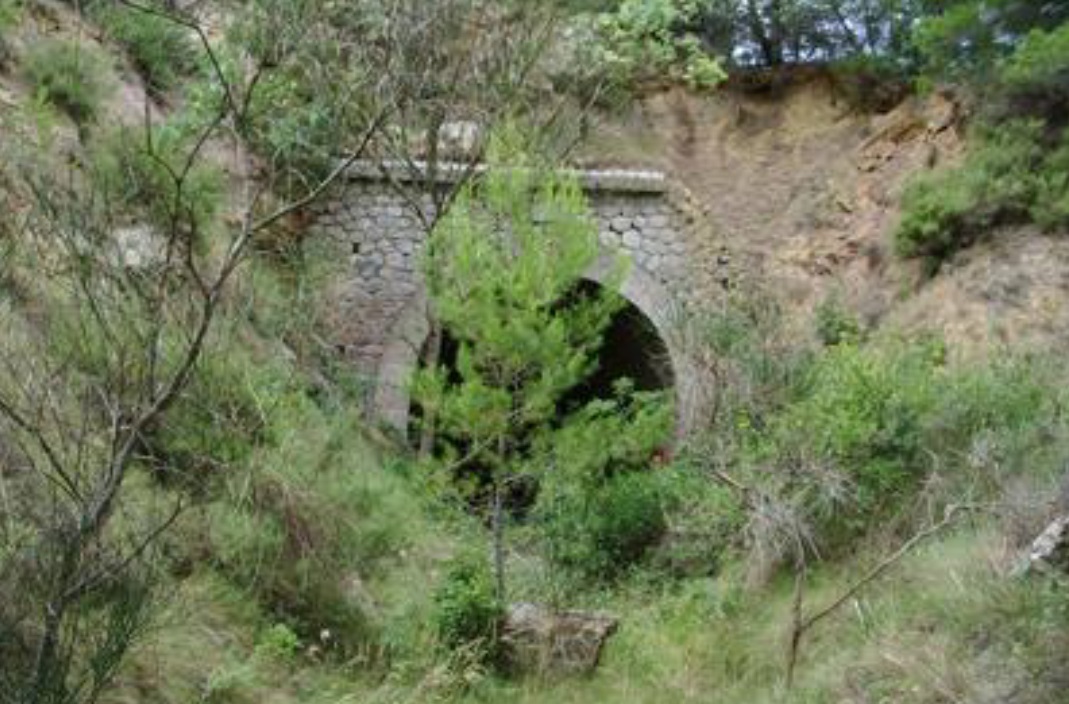
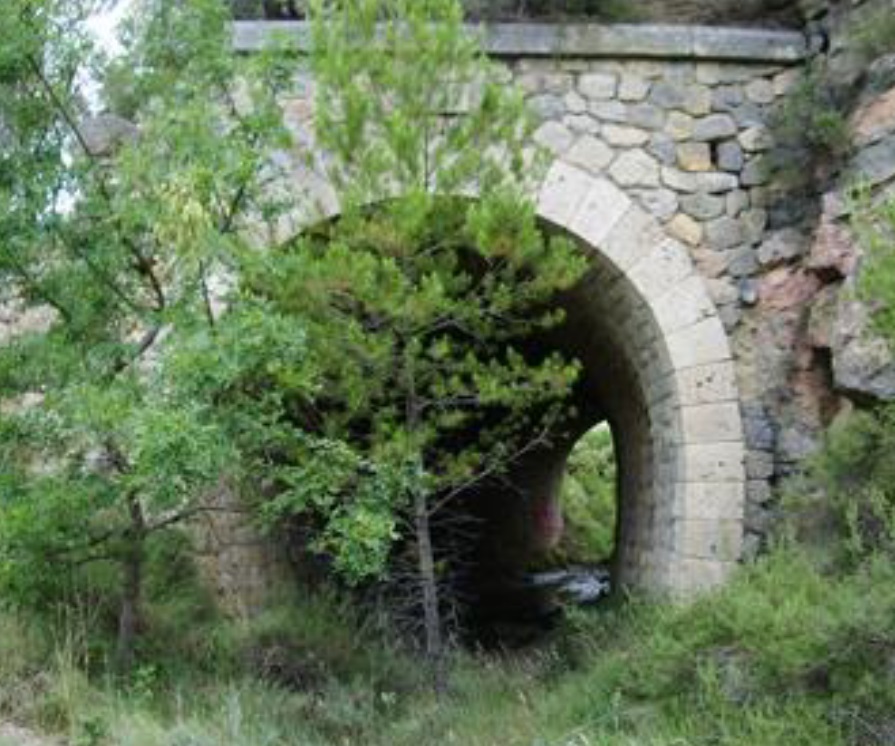
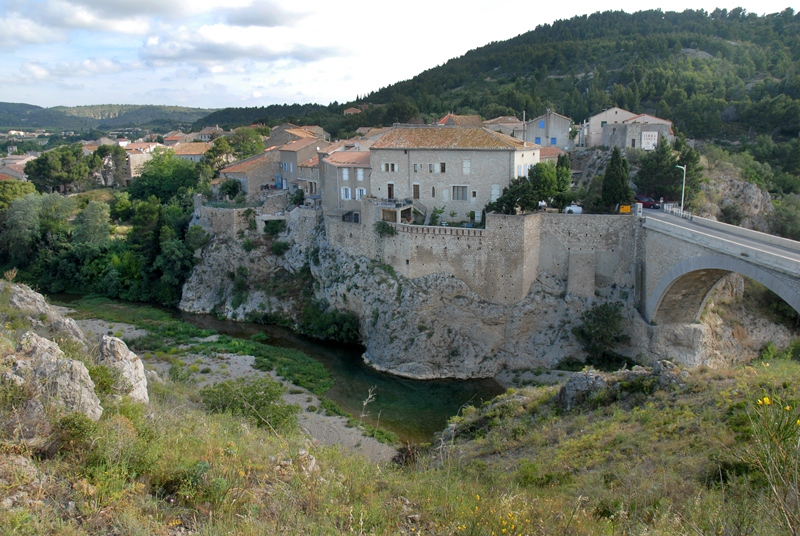
A view of Portel and its bridge from the South bank of La Berre. [10]
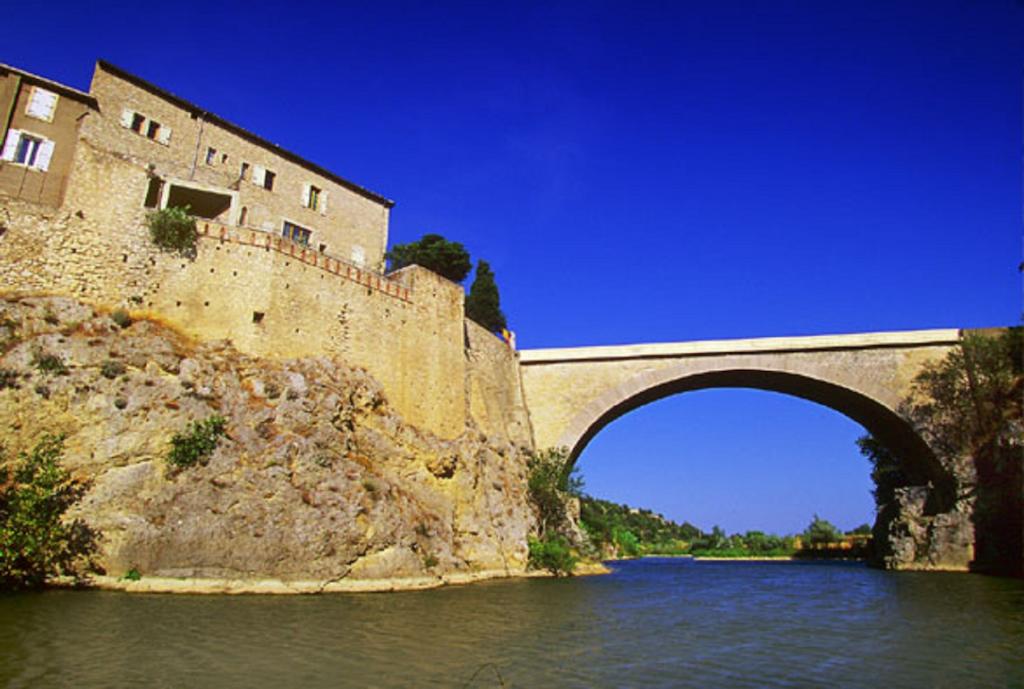
The kind of blue sky (above) that we expect from the South of France. [11]

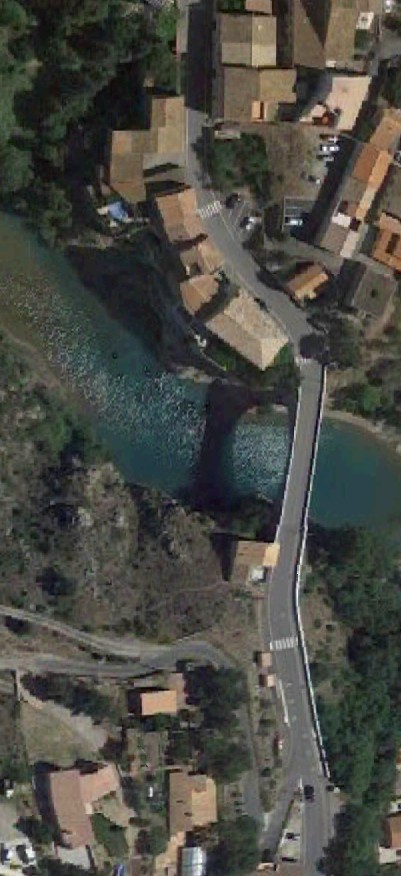
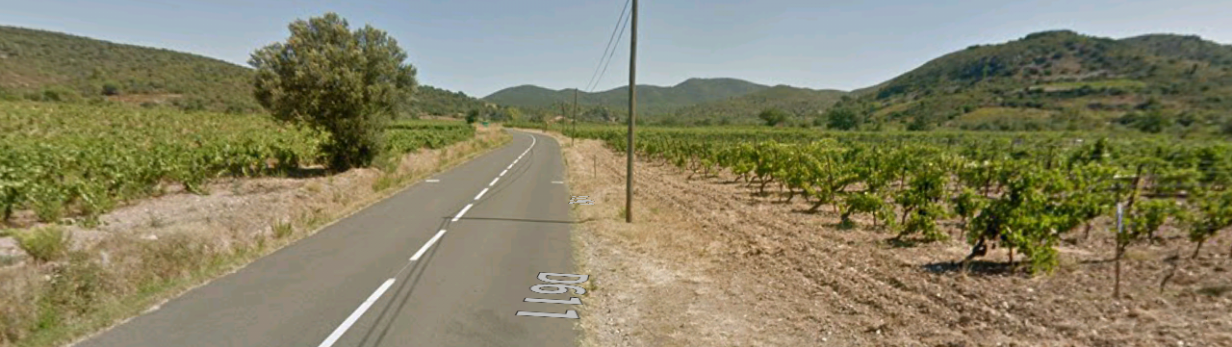
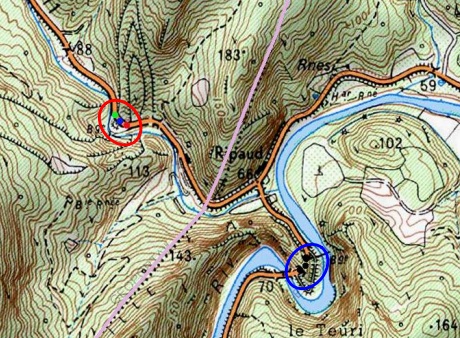
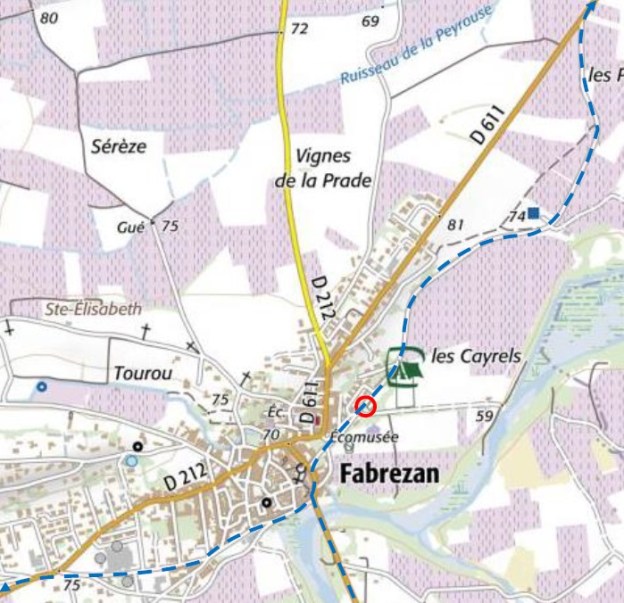
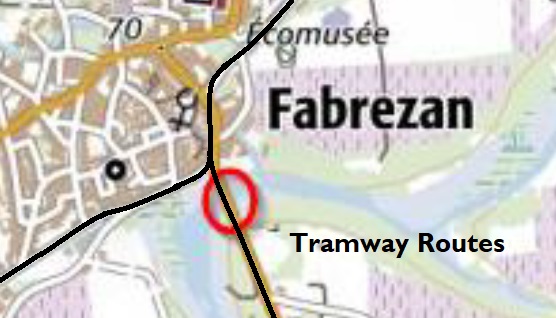
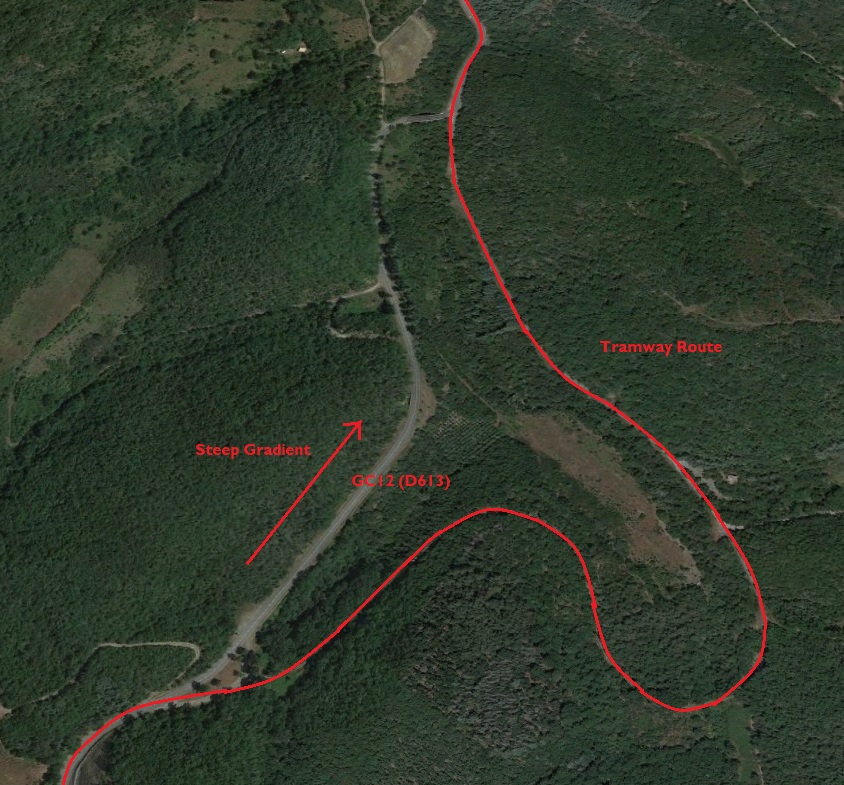
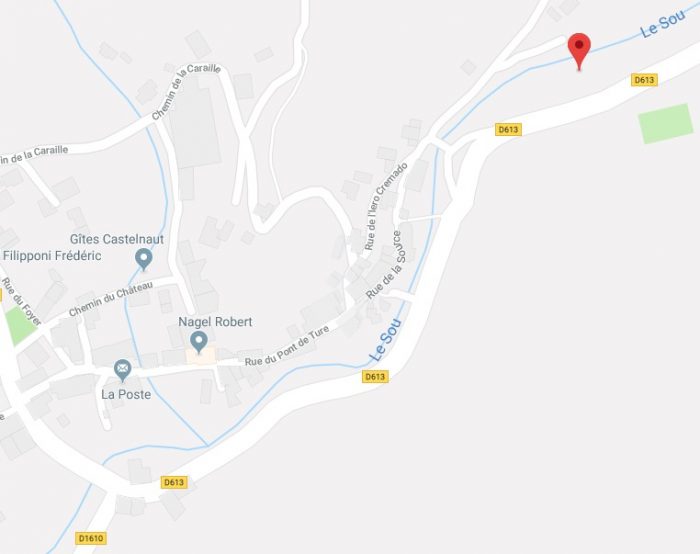
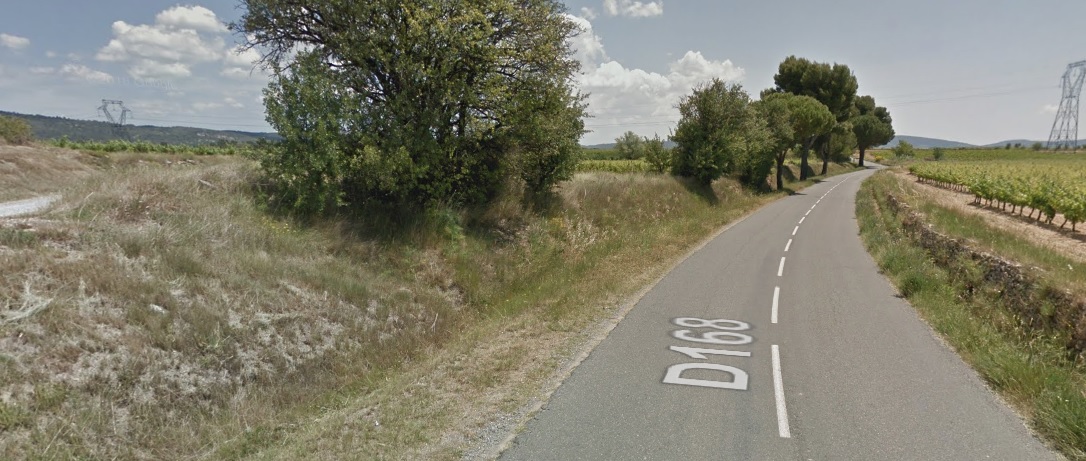
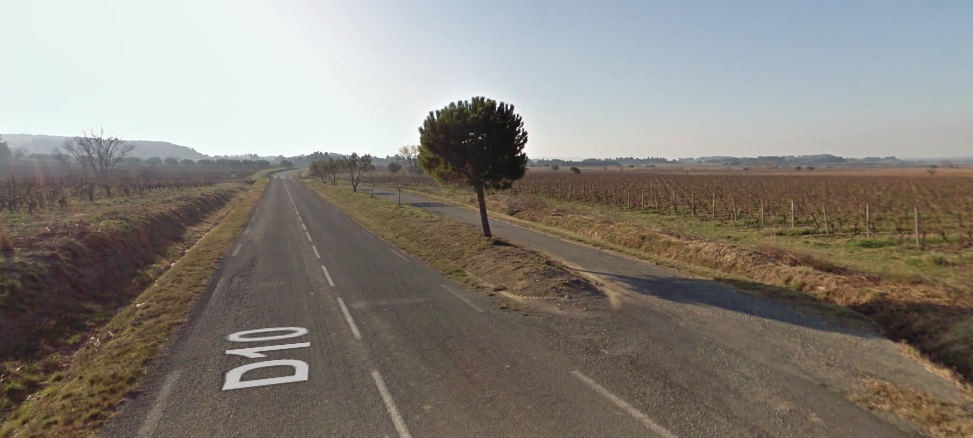
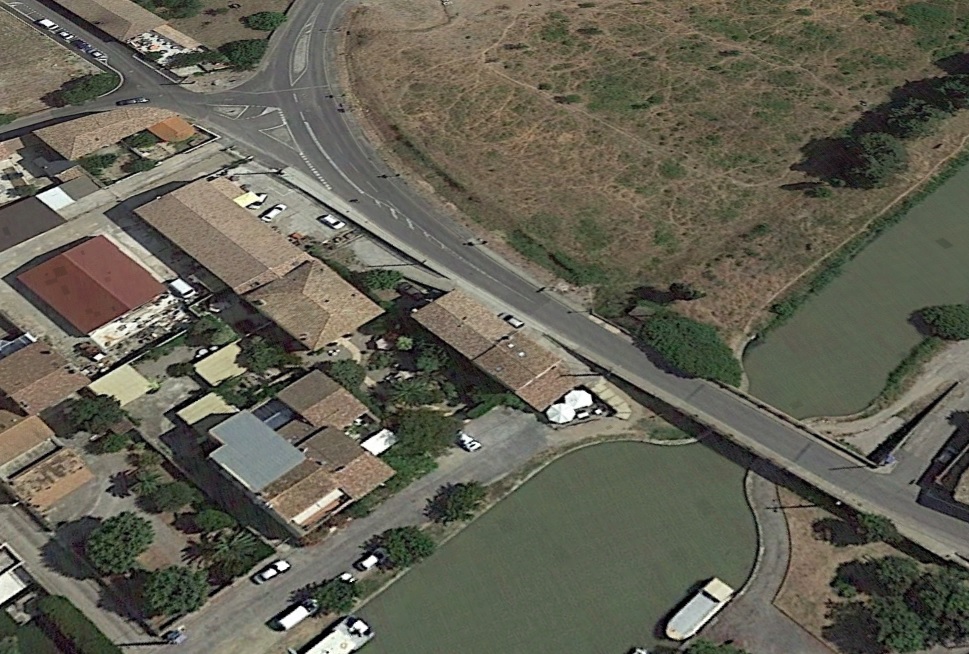
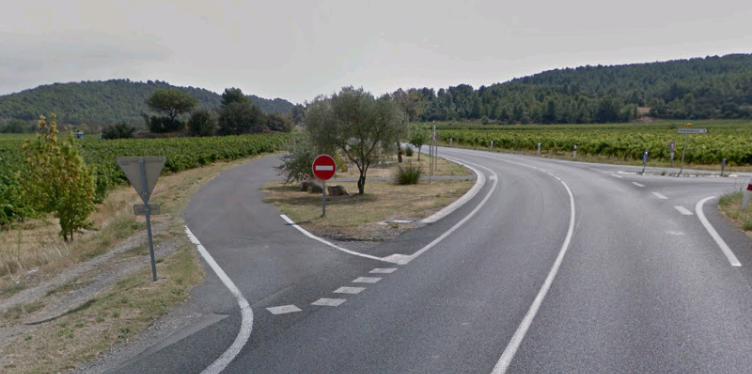
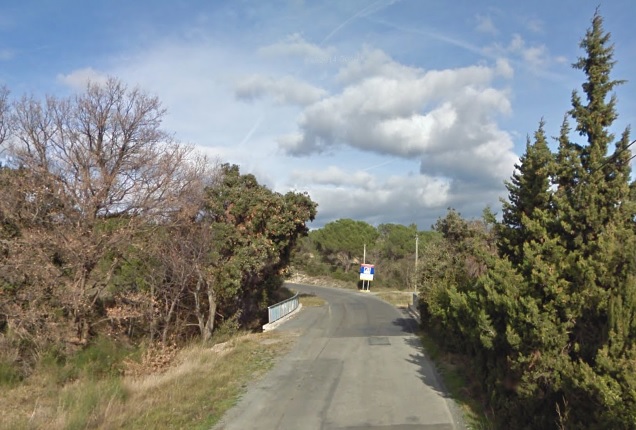
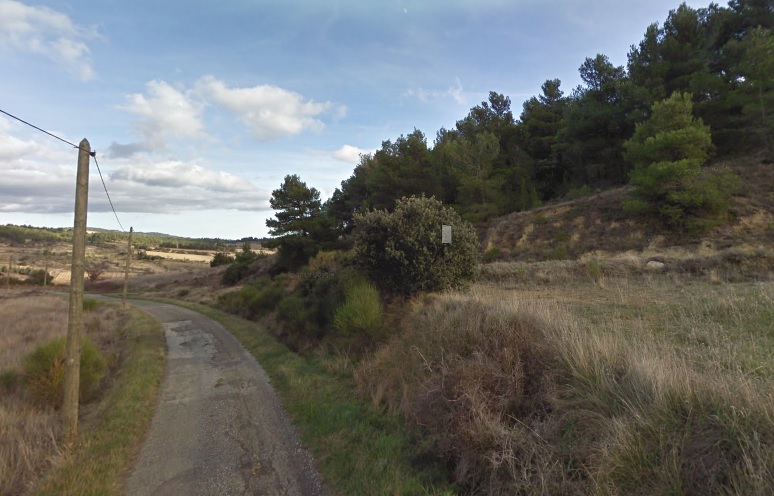
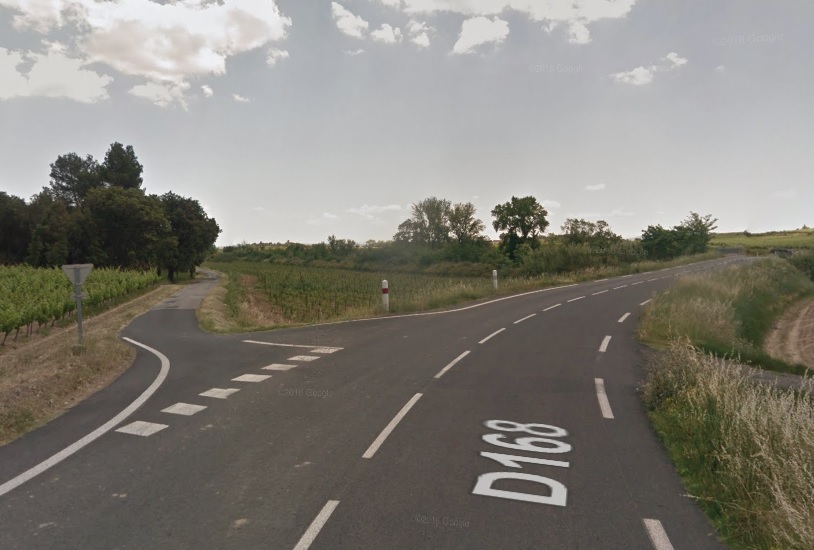
After crossing the bridge  across La Berre (shown in plan in the adjacent satellite image), the tramway and the GC3 (D3) headed southeast.

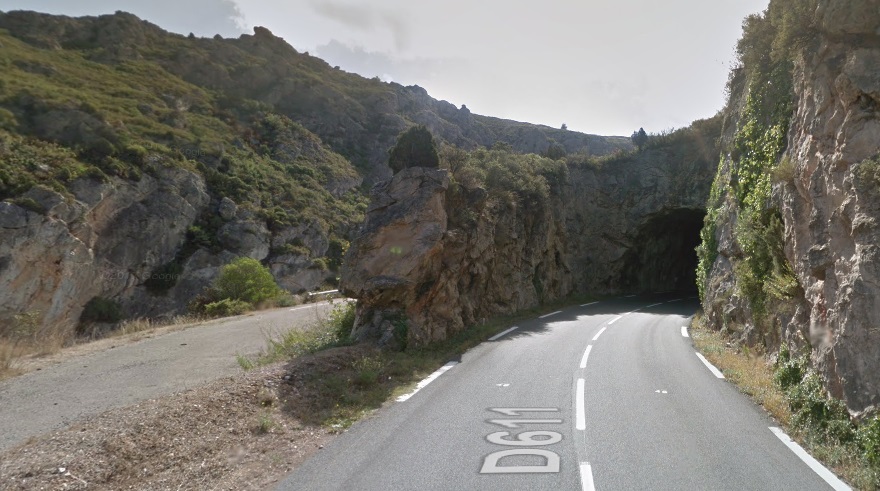
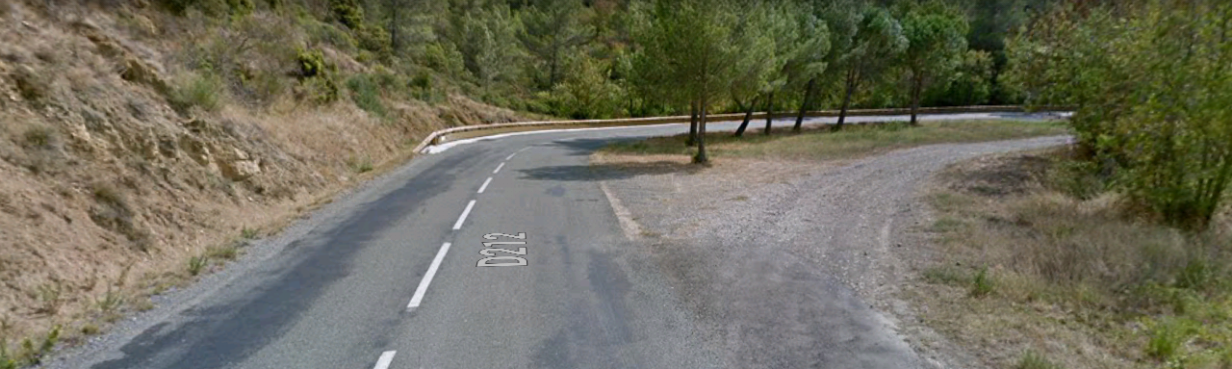
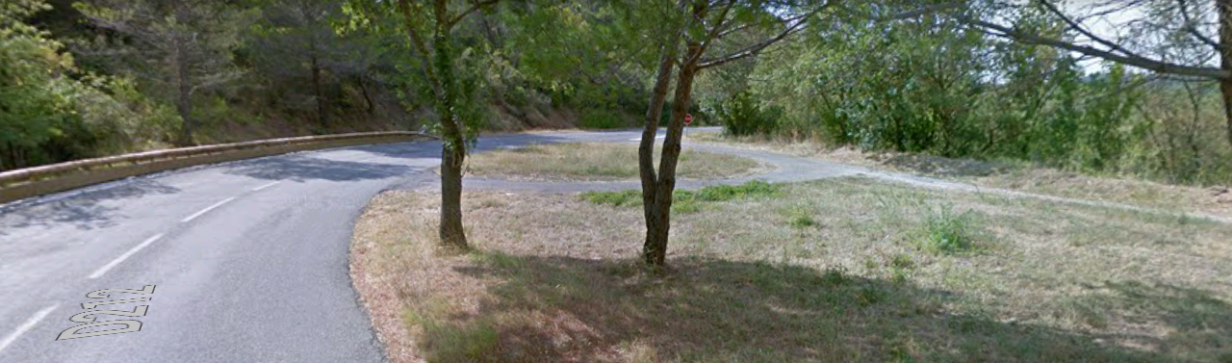
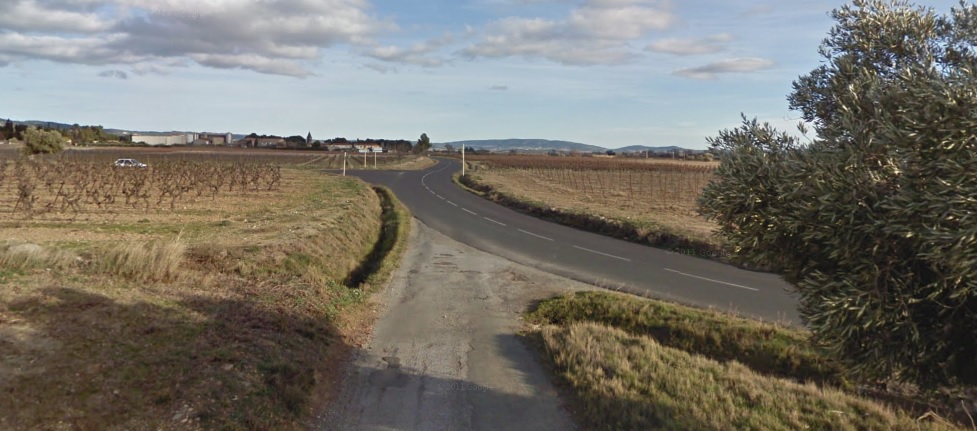
The modern road at times smooths out the tighter bends on the old GC3.

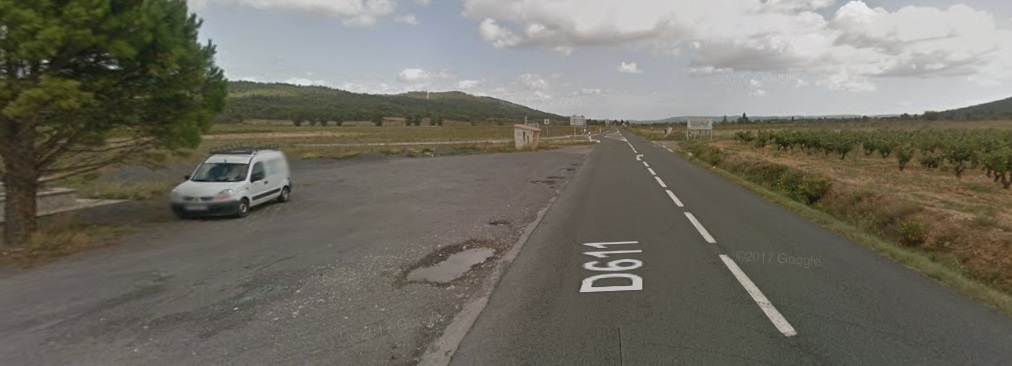
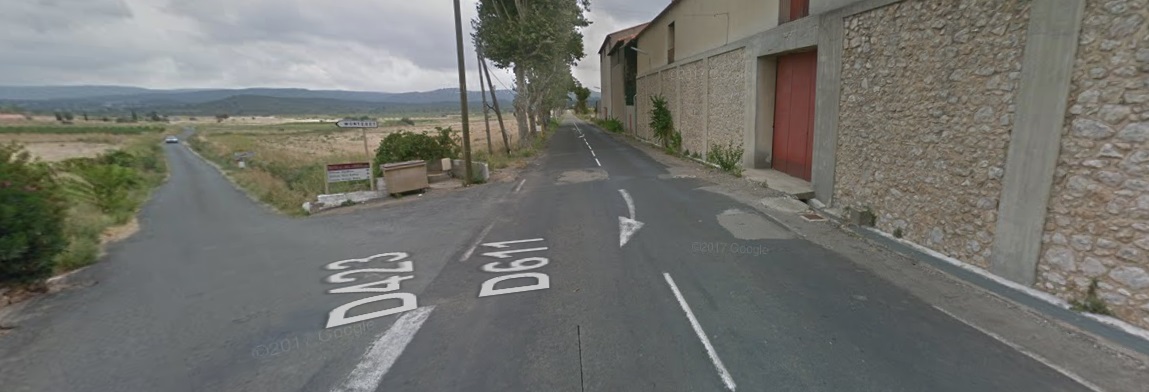
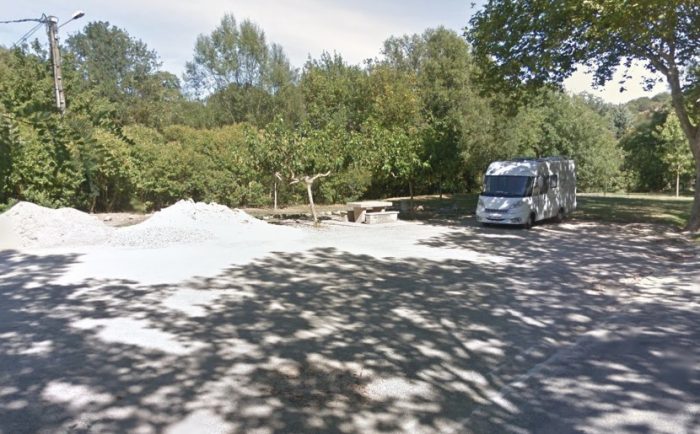
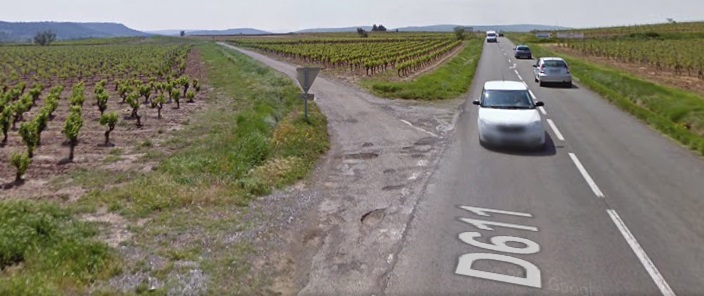
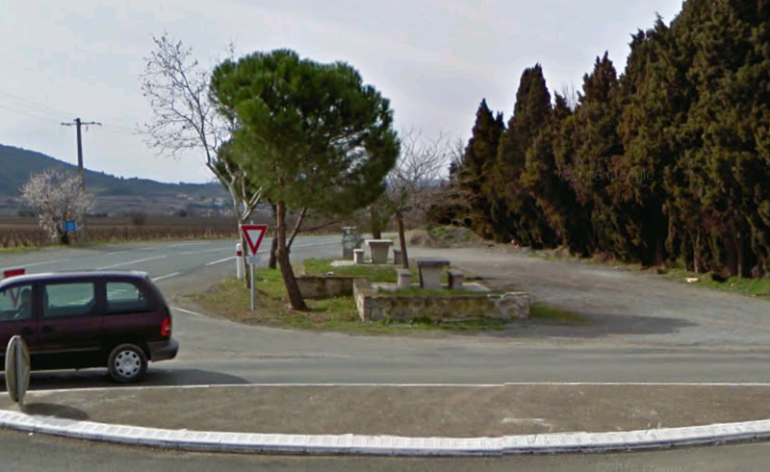
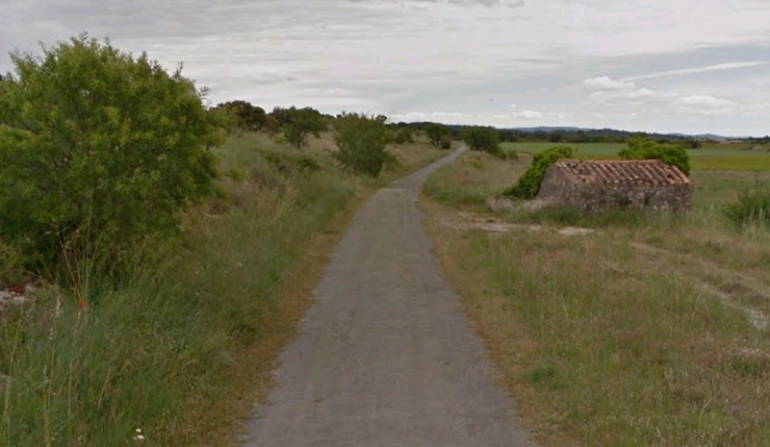
The first image below is typical of very minor deviations with the old road (and tramway route) now being used as a lay-by and picnic site.

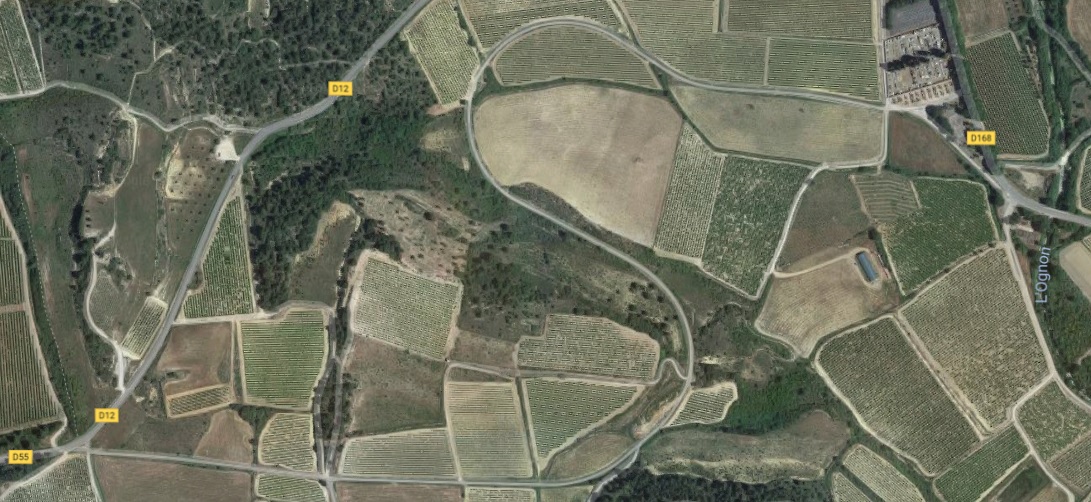
However, just a little further to the Southeast the deviations from the modern road are more pronounced as the maps below show.
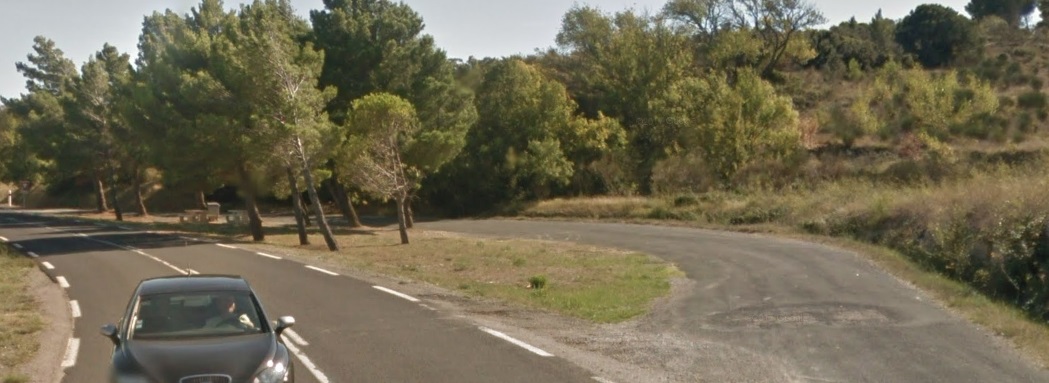
The old road and the tramway route deviate from the modern D3 to the Southeast of Portel.
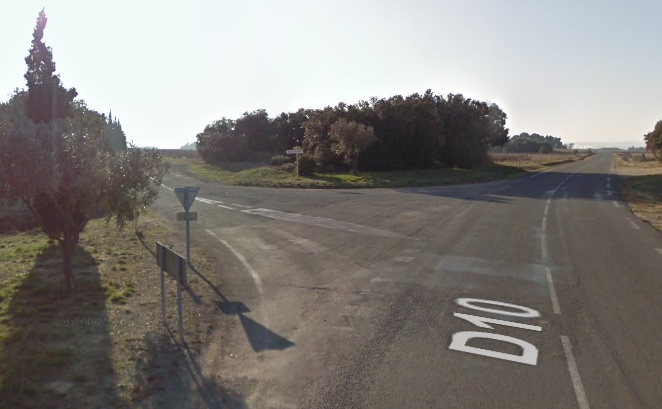
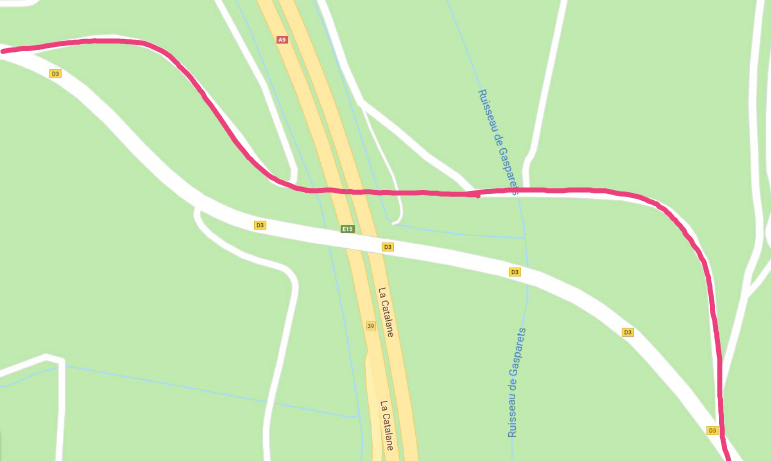
The route of the old GC3 and the associated tramway deviate again from the modern D3. Not surprising, as the old route is now blocked by the line of the A9/E15 Autoroute – Le Catalane.

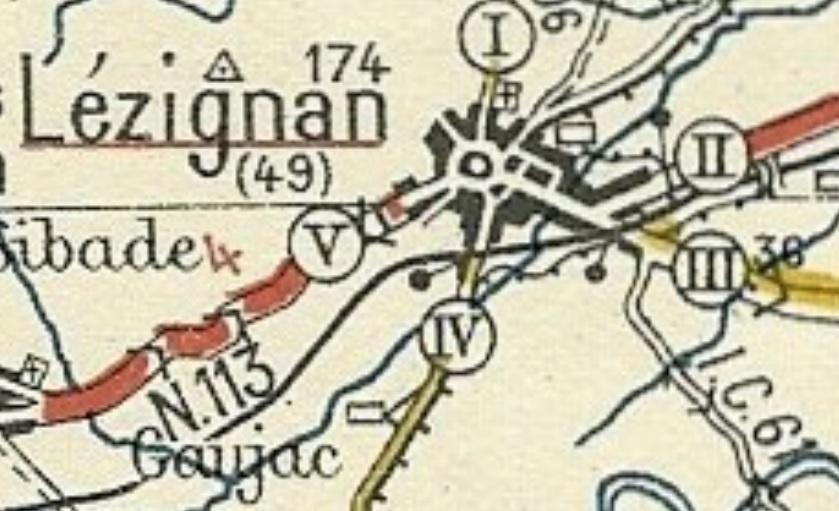
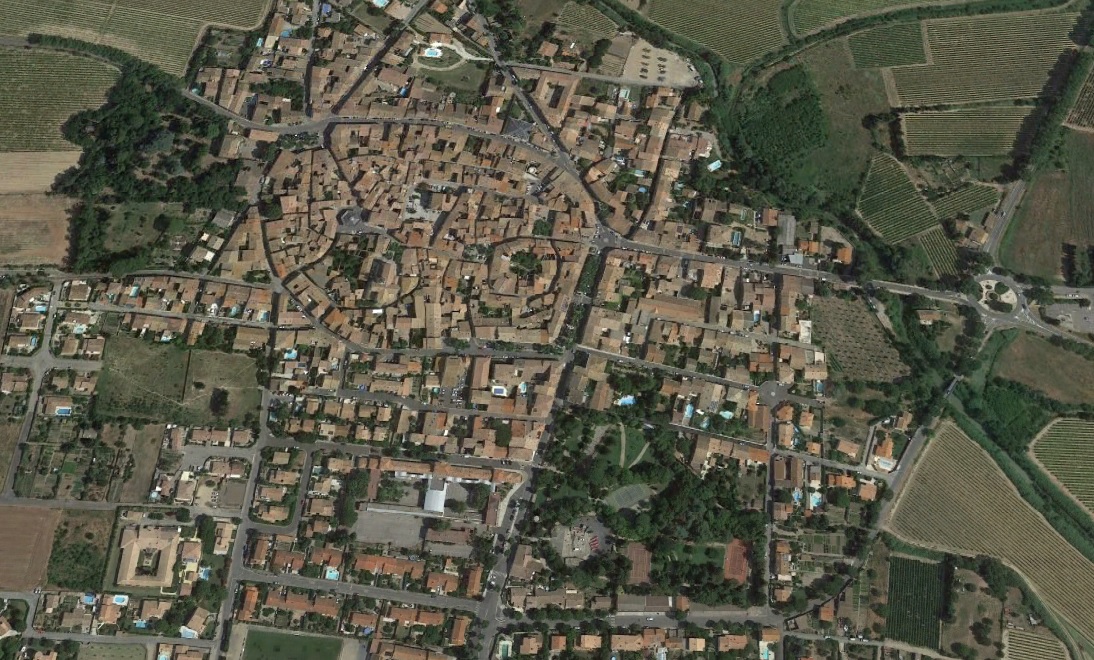
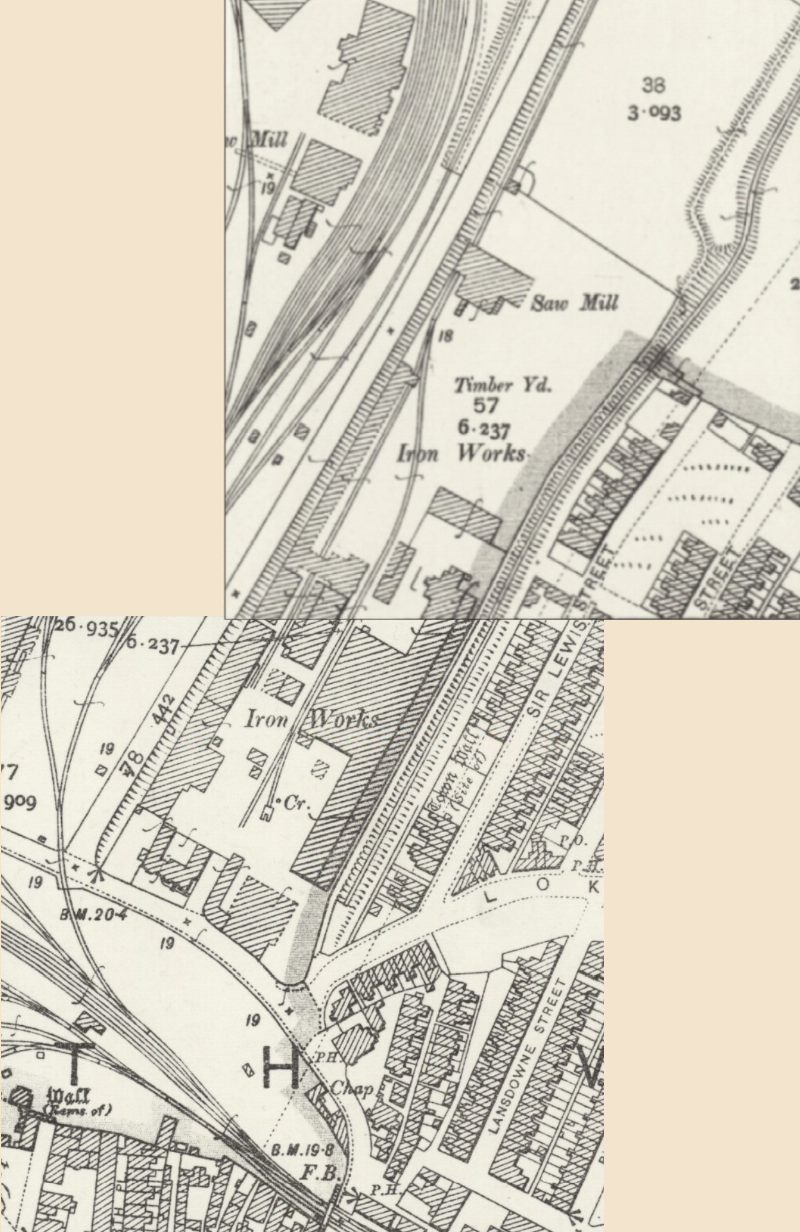
Along the length of the GC3 to Sigean the tramway followed the North shoulder of the road. The town is so much larger than when the tramway was in use. The route through the countryside to the West of Sigean has been overwhelmed by the town’s suburbs.

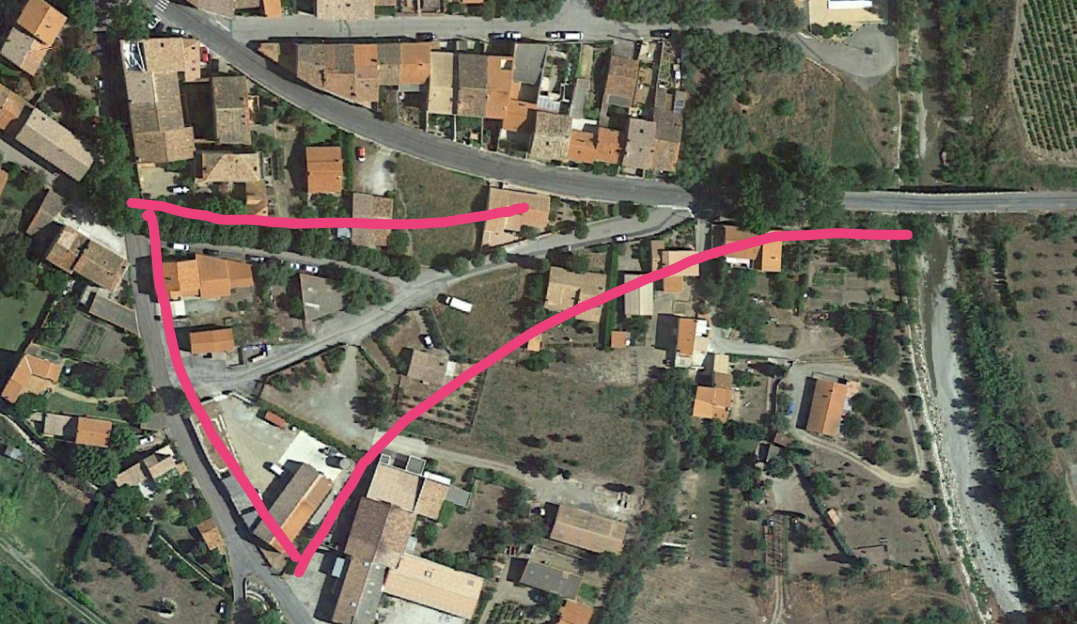
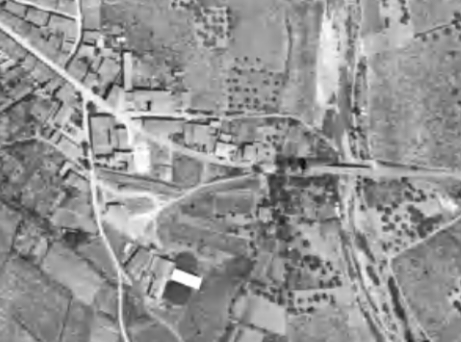
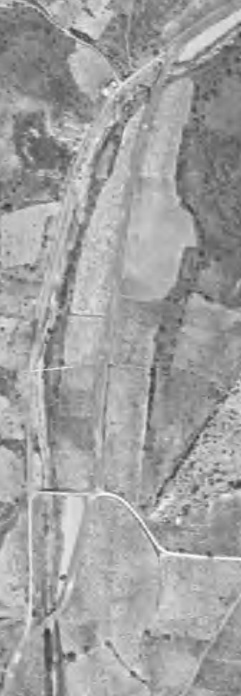
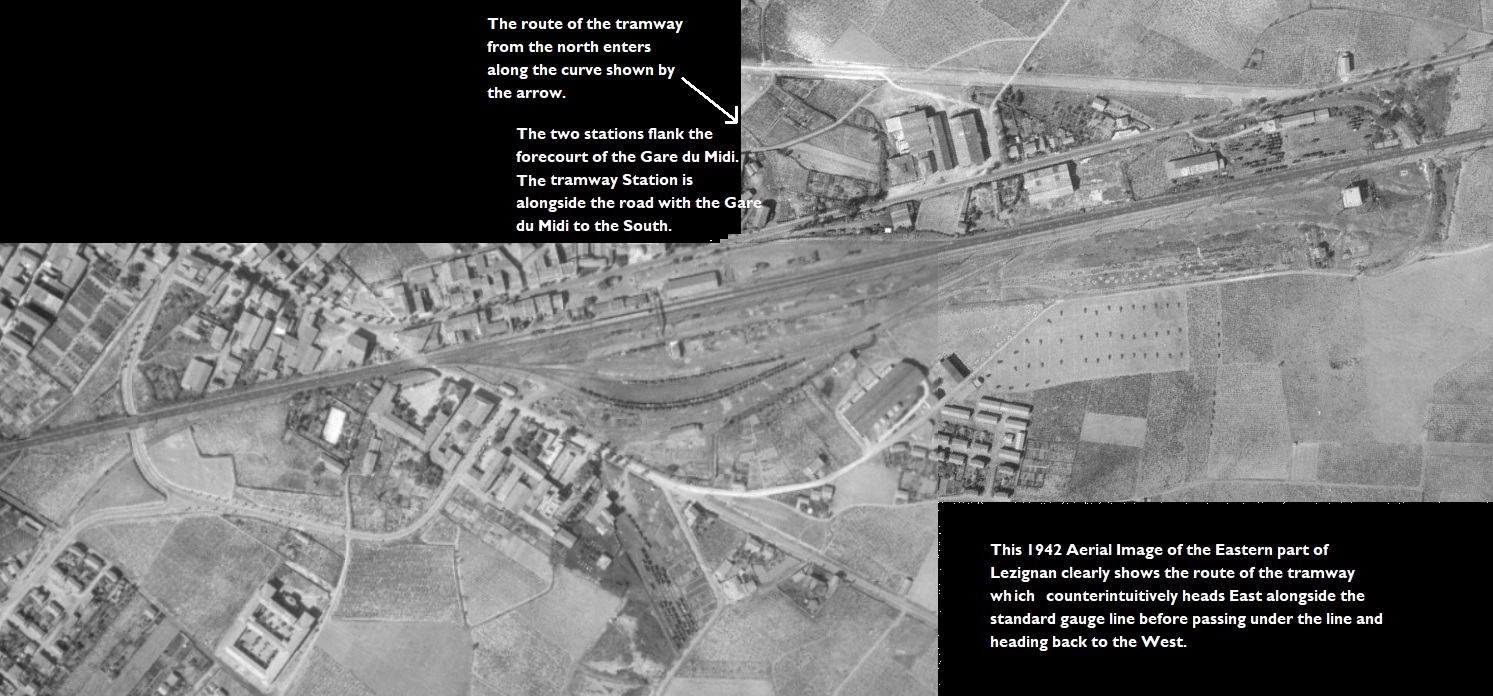
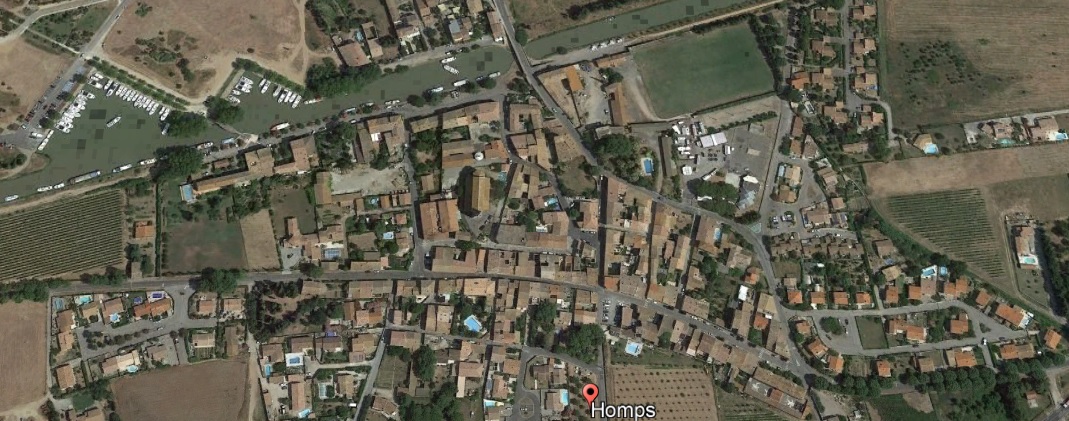
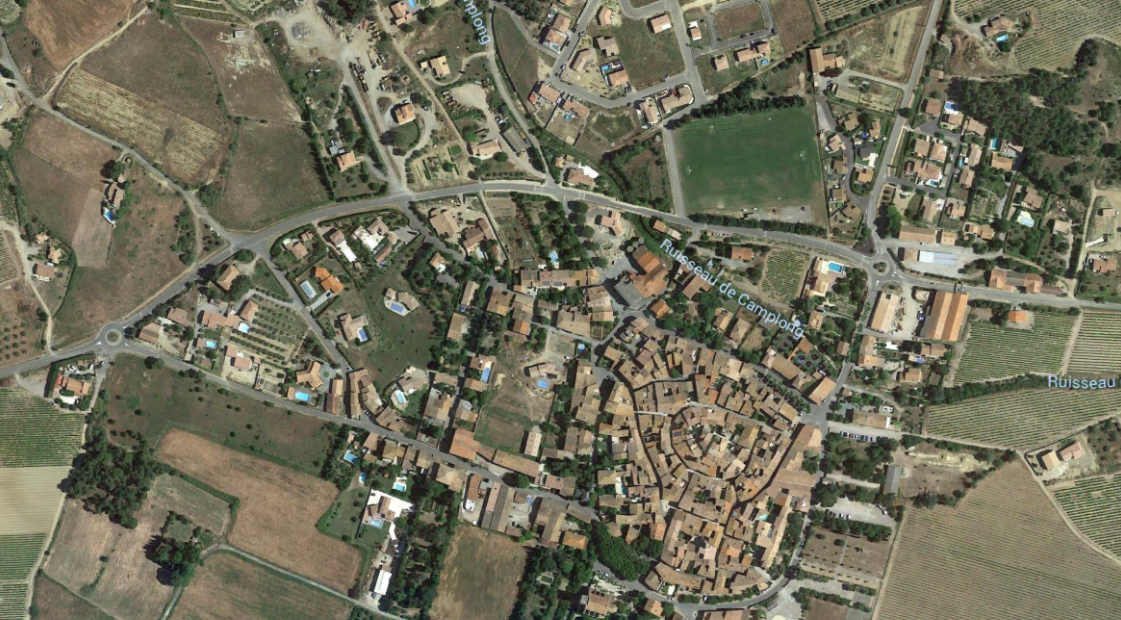
On entering the town, the tramway followed the route indicated on the satellite image below. The pink line is sketched onto the image by hand and is therefore only approximate.
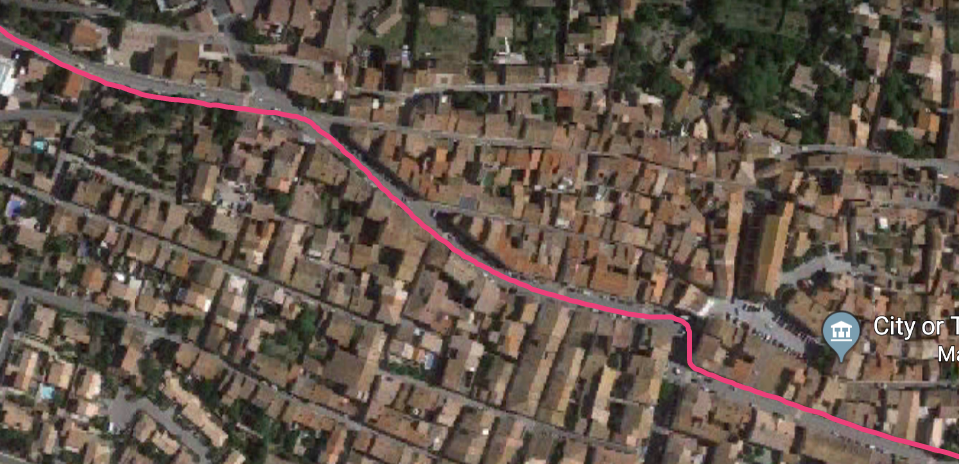
The aerial image below was taken in 1942 sometime after the closure of the tramway. The dogleg inntye tramway route can easily be picked out.
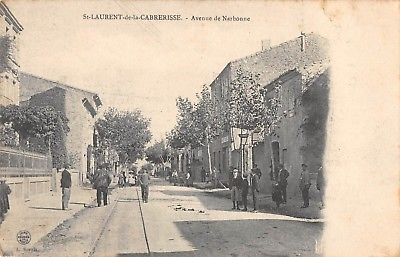
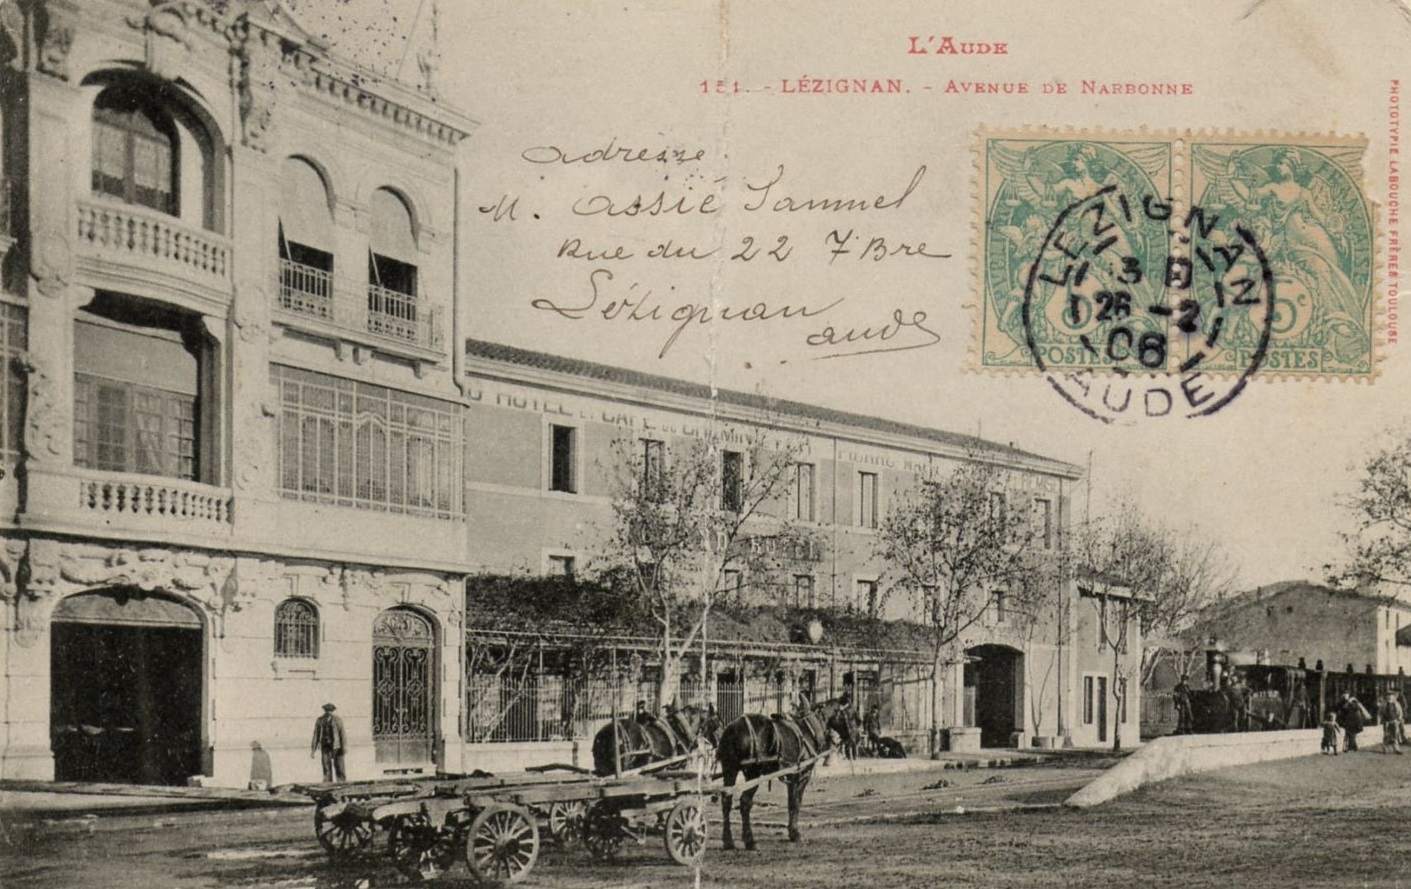
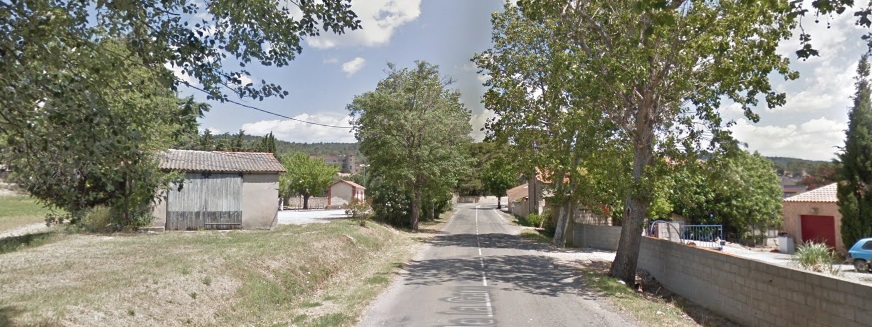
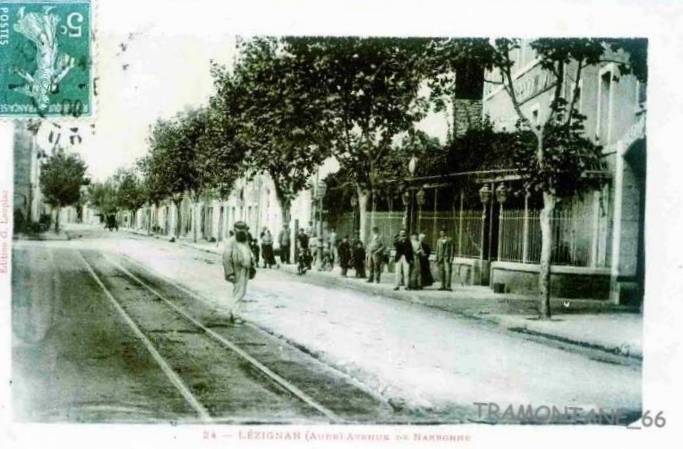
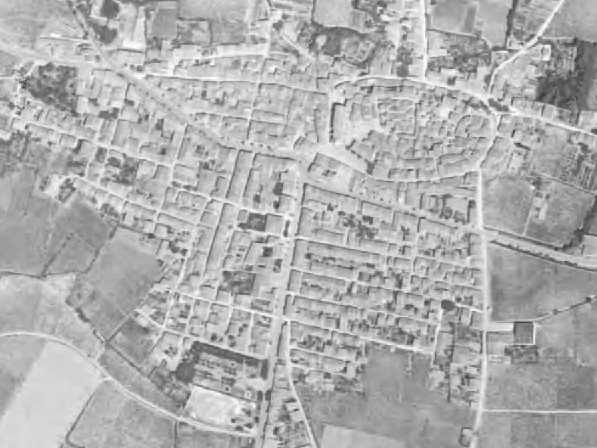
The tramway ran across the South side of the old village of Sigean along the Avenue de Narbonne and the Route de La Nouvelle.
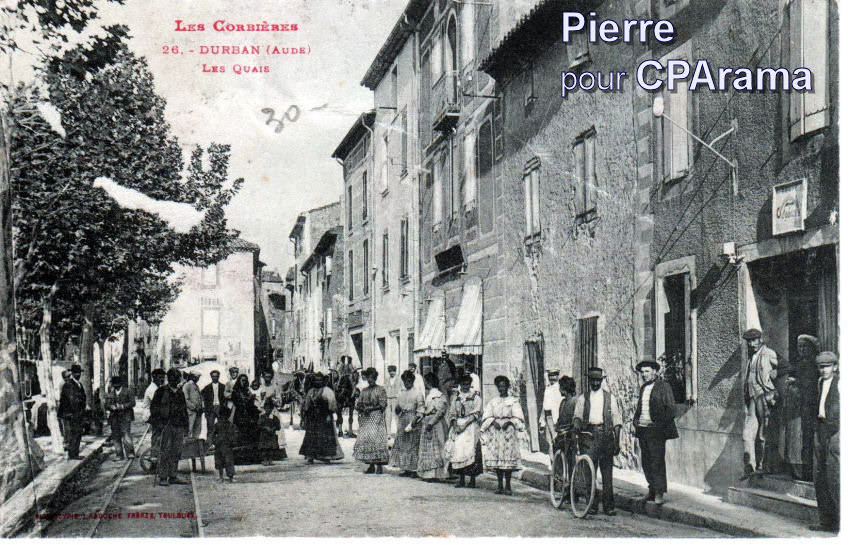
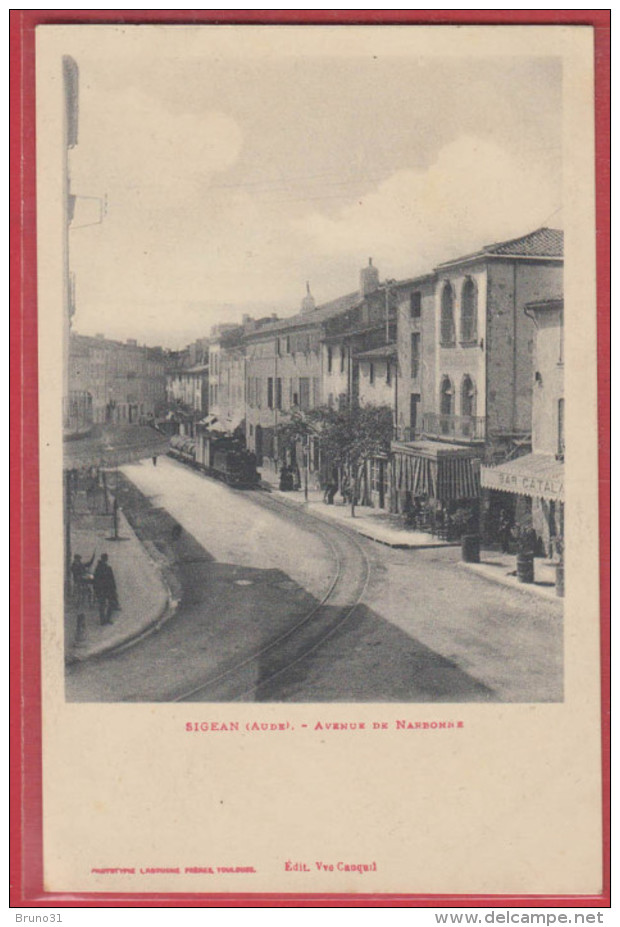
The first of a few images of the line through Sigean. [13]
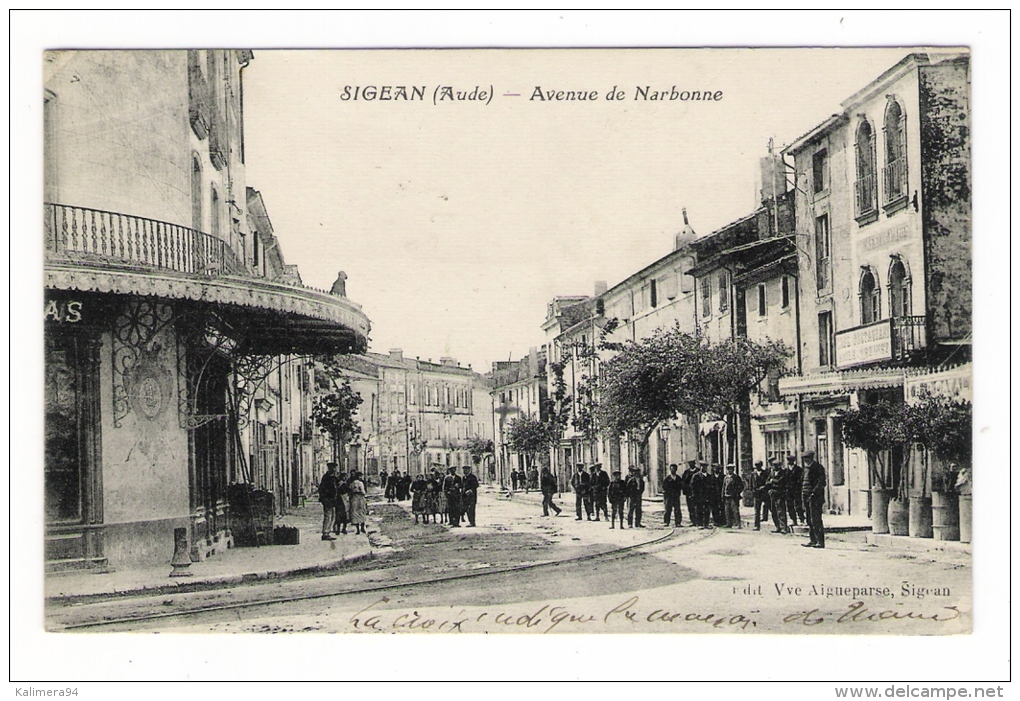
From a similar location close to the station. [13]
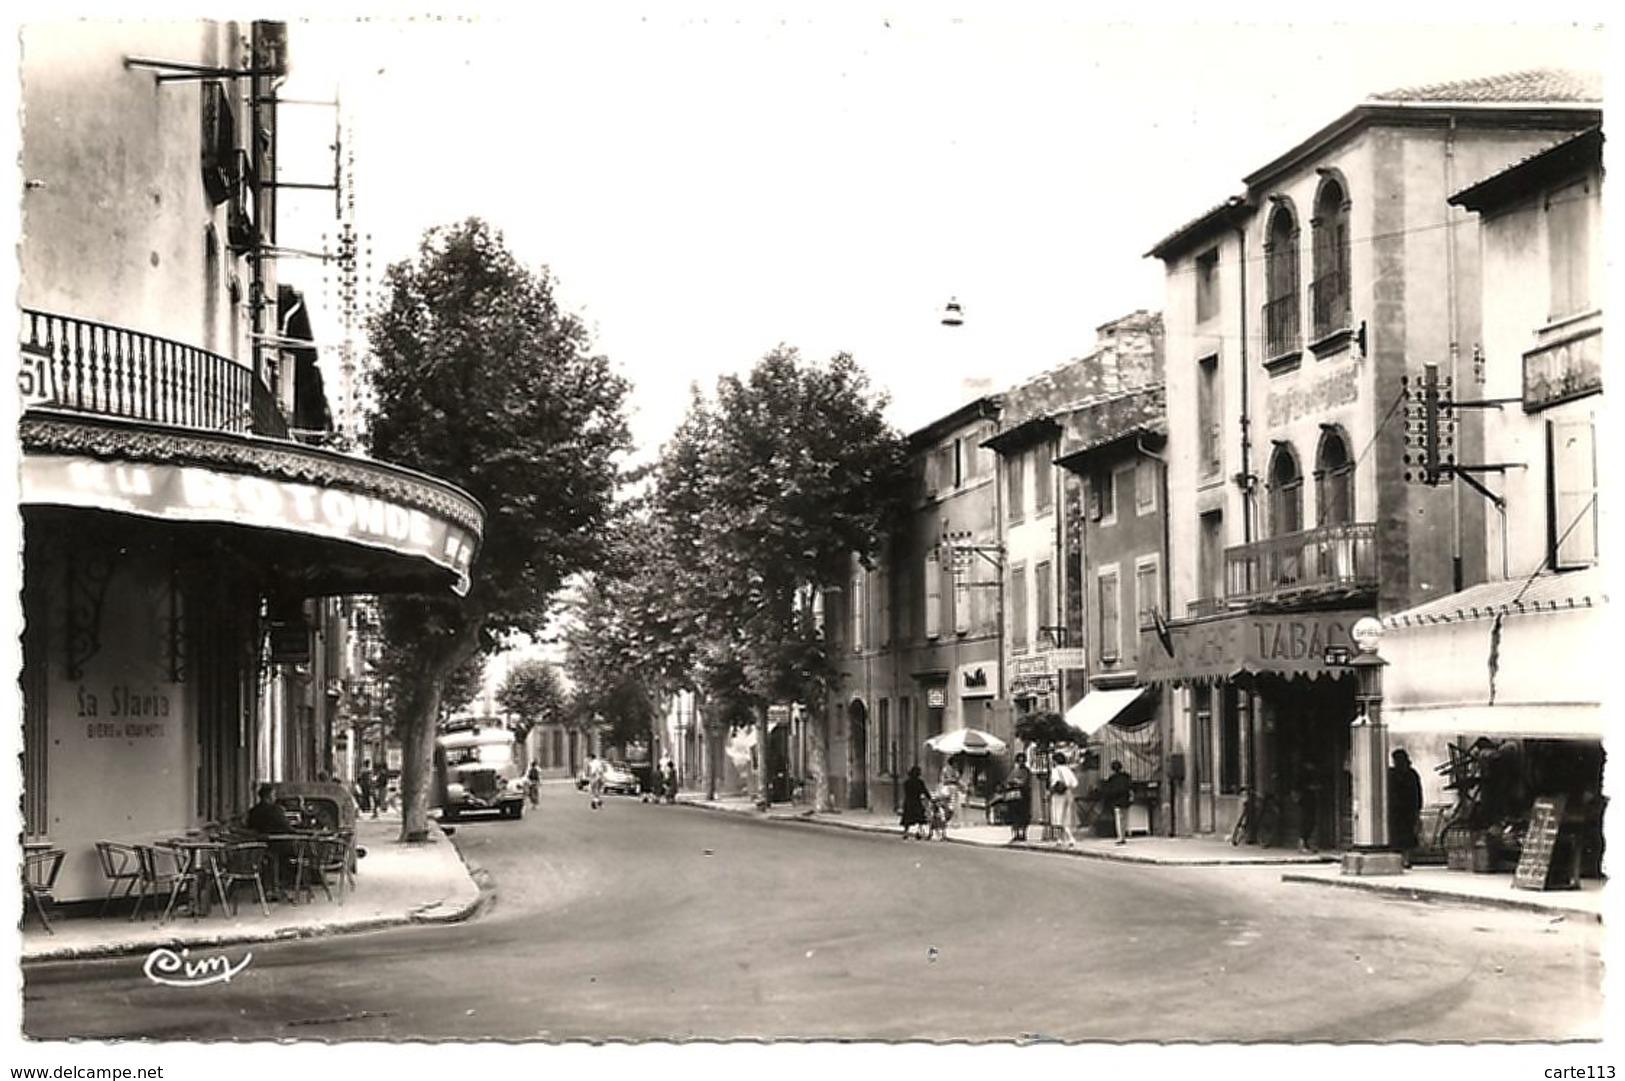
A later monochrome image after the closure of the tramway also looking West along Avenue de Narbonne. [13]
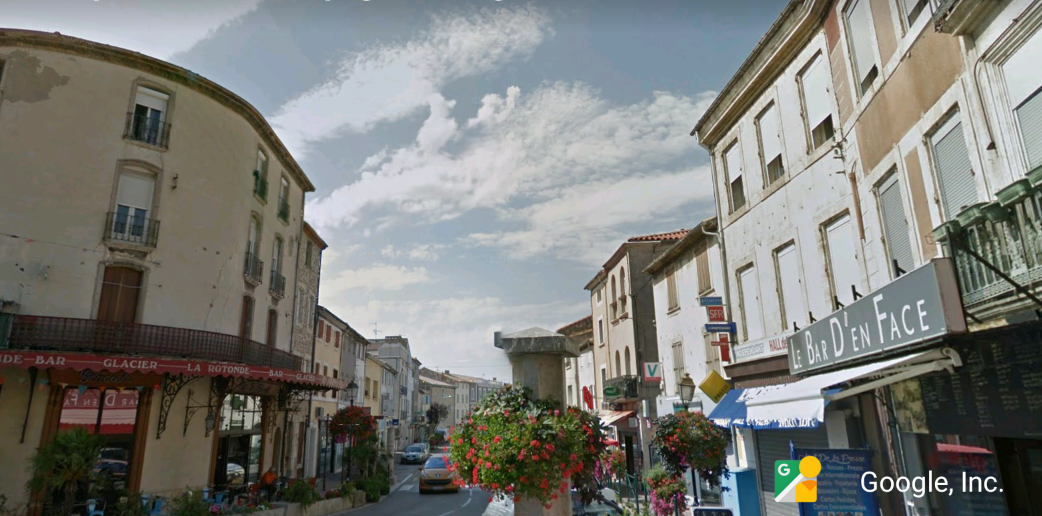
An image from roughly the same location but in the 21st century.
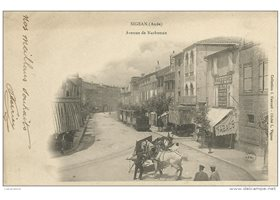
An early image from approximately the same location [13]
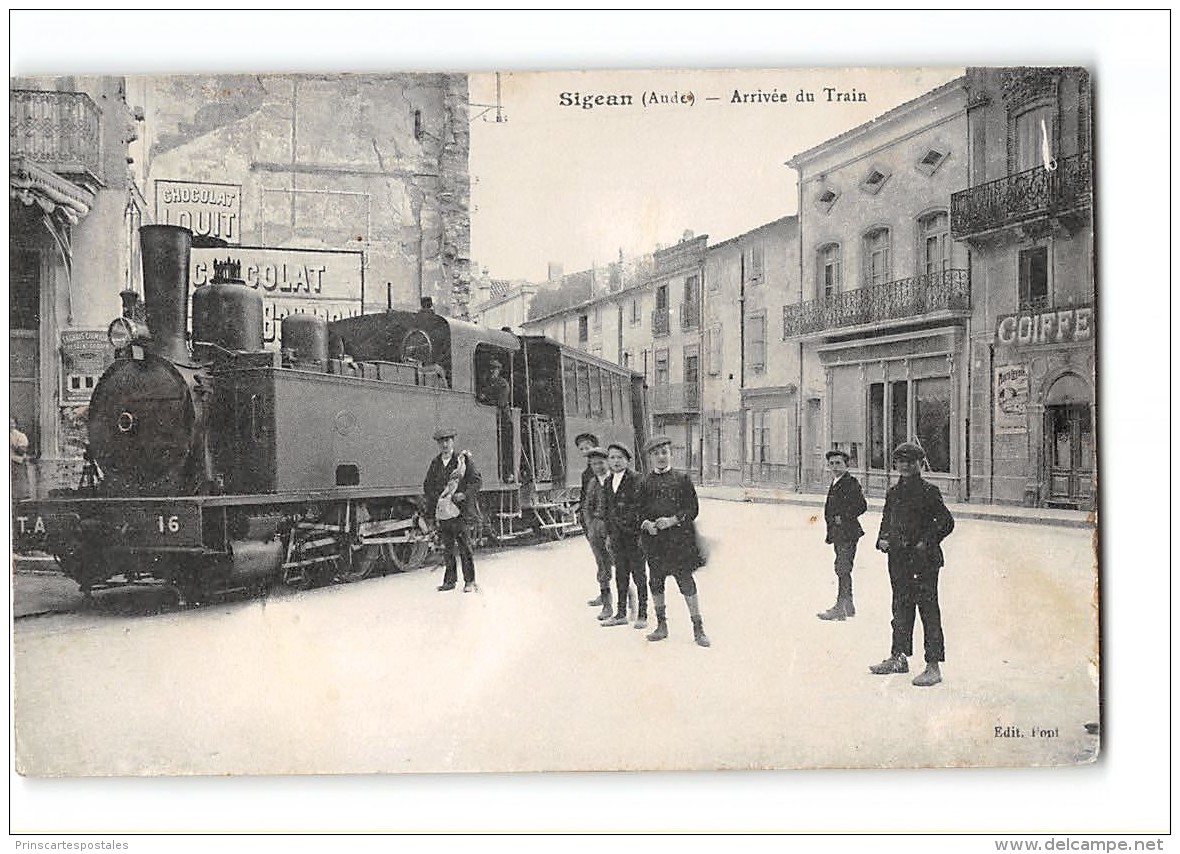
The tram arriving from Portel. [13]
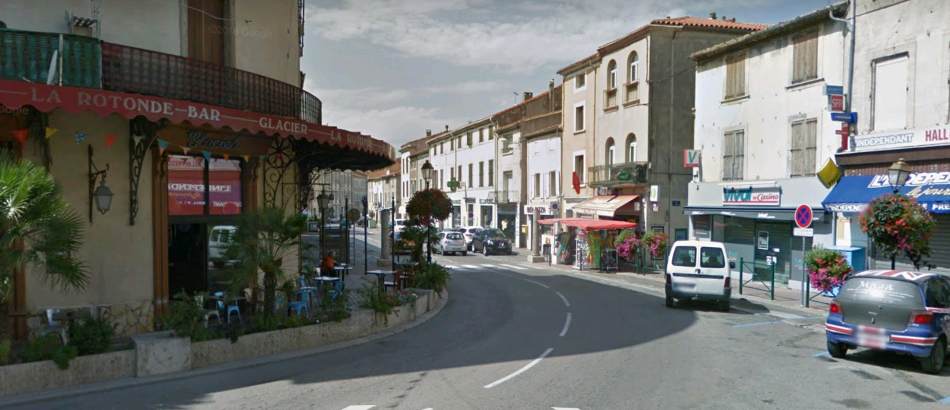
The same location in the 21st Century.
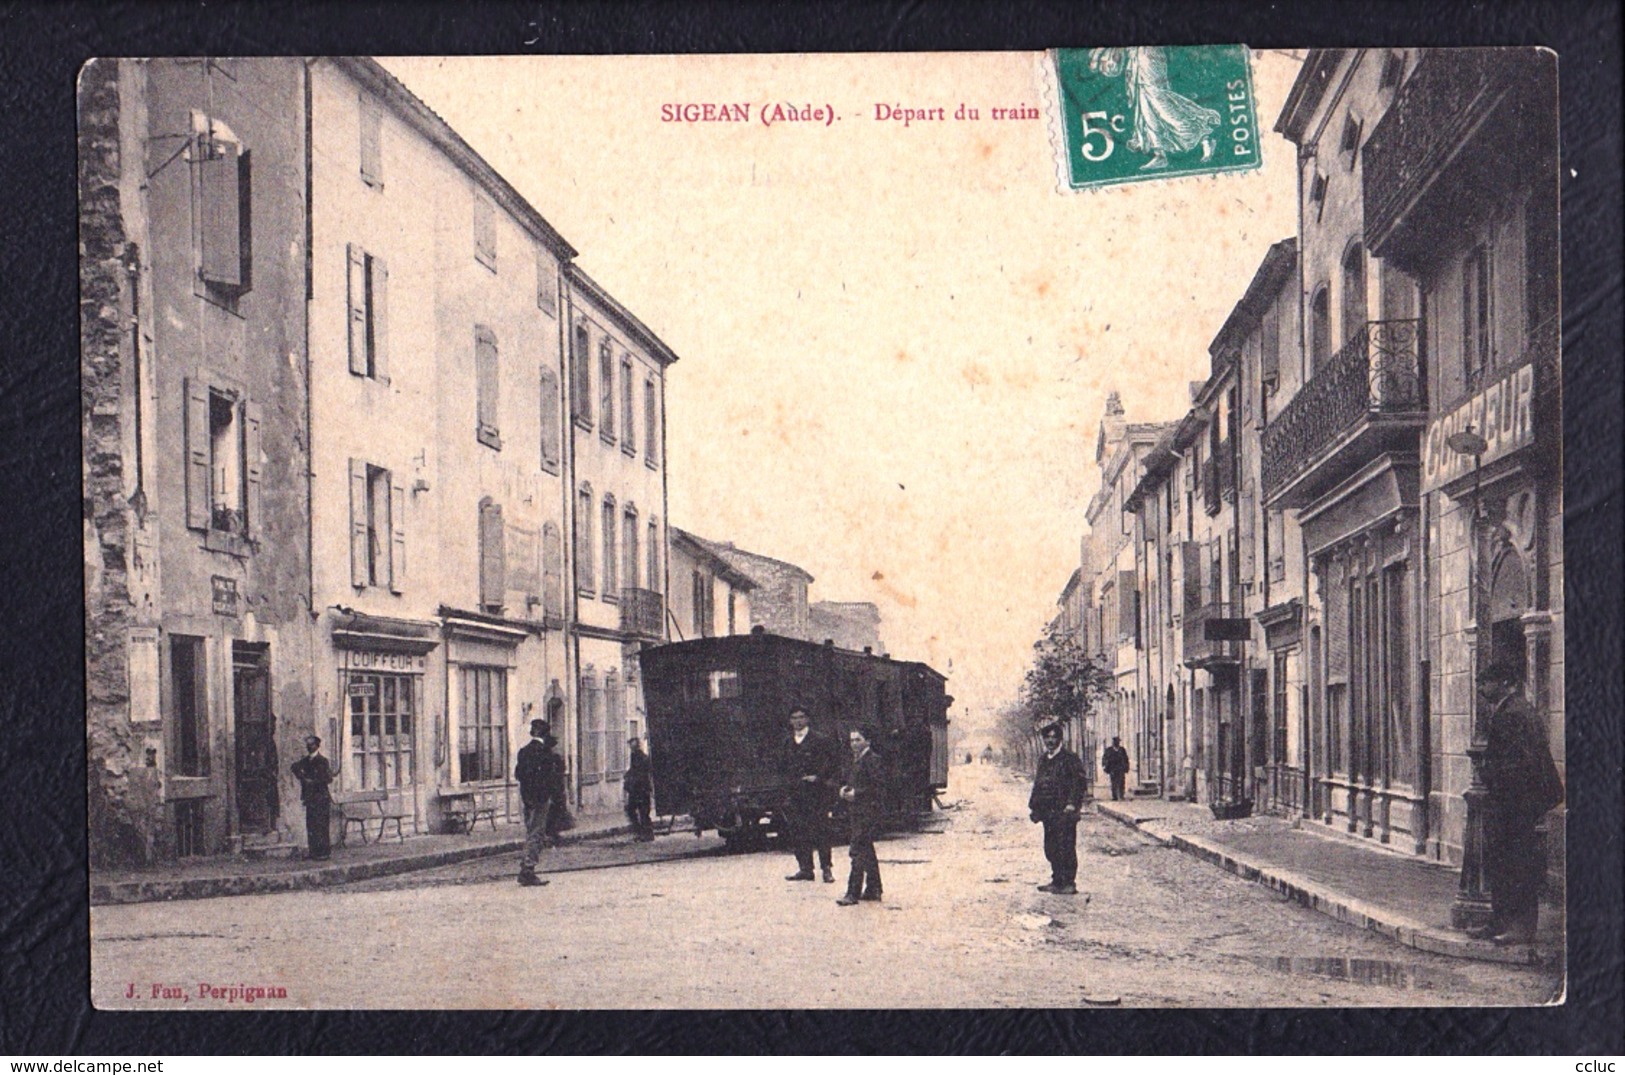
A tram leaving in the direction of Portel. [14]
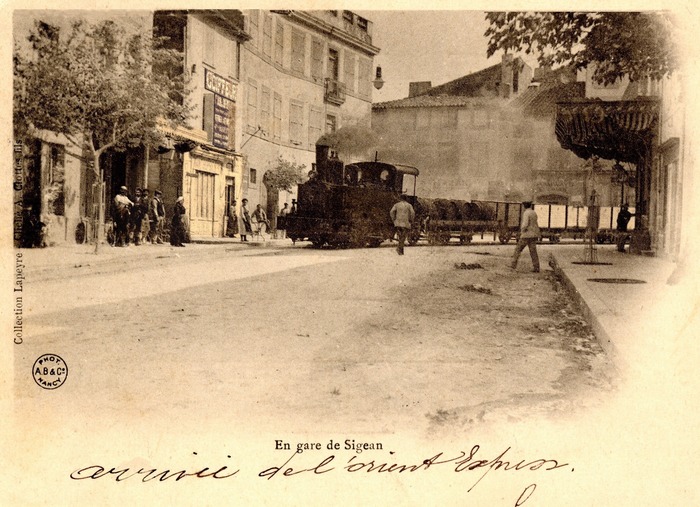
Another tram leaving for Portel. The view is taken, this time, from the West. [13]
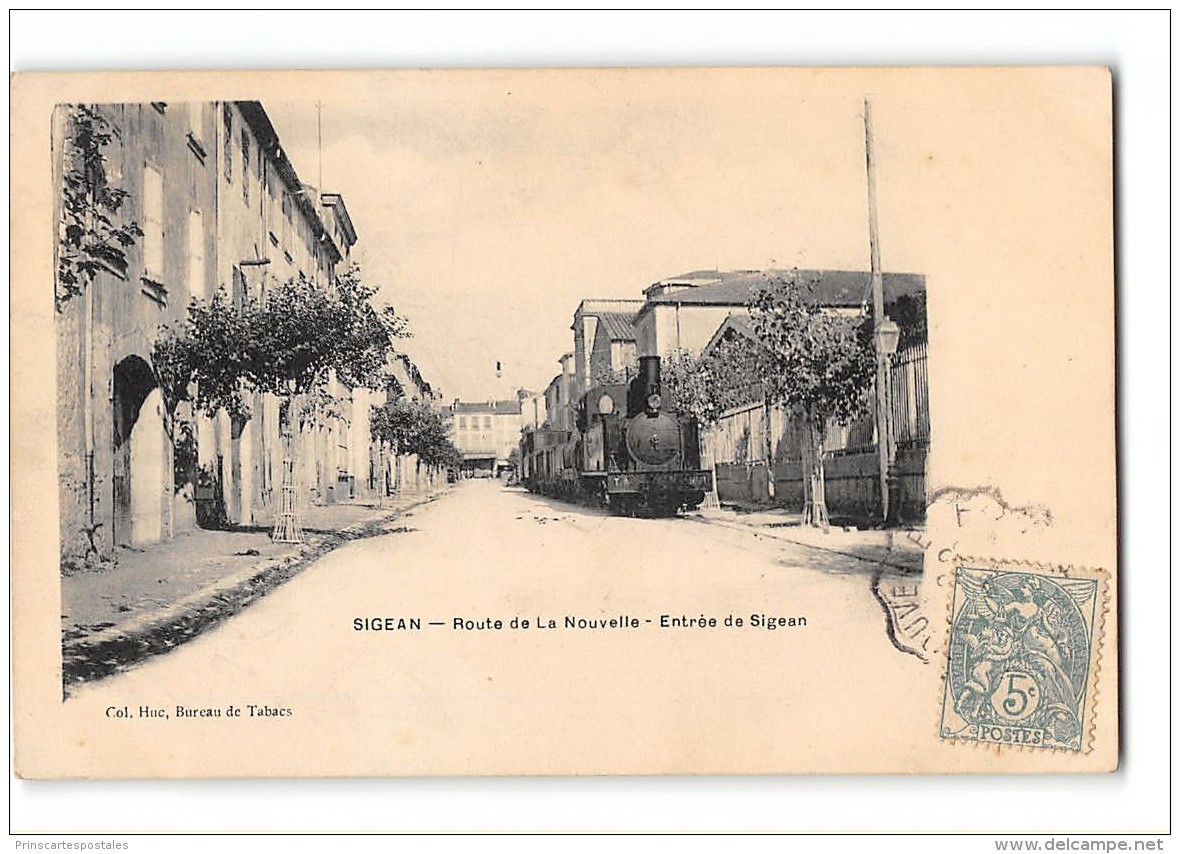
This view shows a tram heading the other way – towards La Nouvelle. [13]
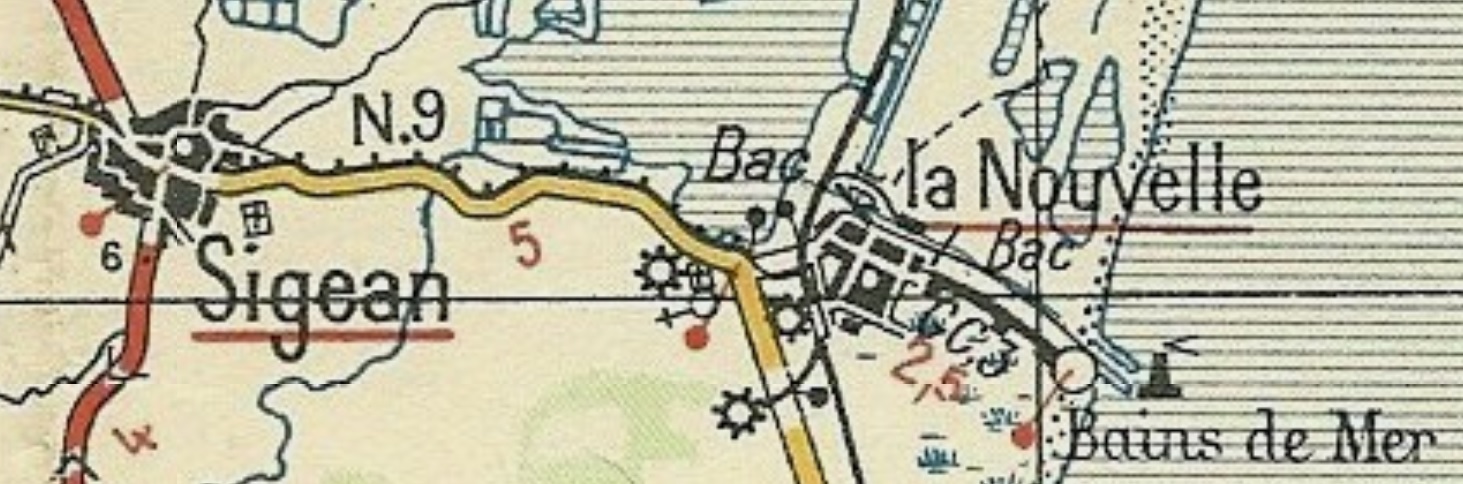
The route East of Sigean crosses the main standard gauge line near La Nouvelle and then passes through La Nouvelle before reaching Port La Nouvelle.

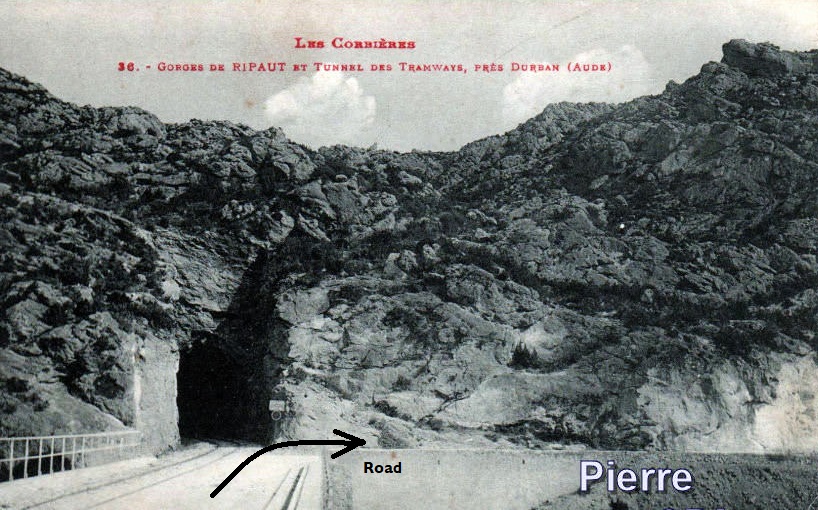
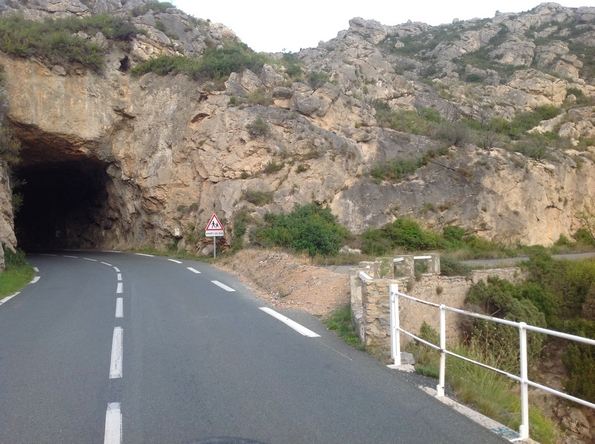
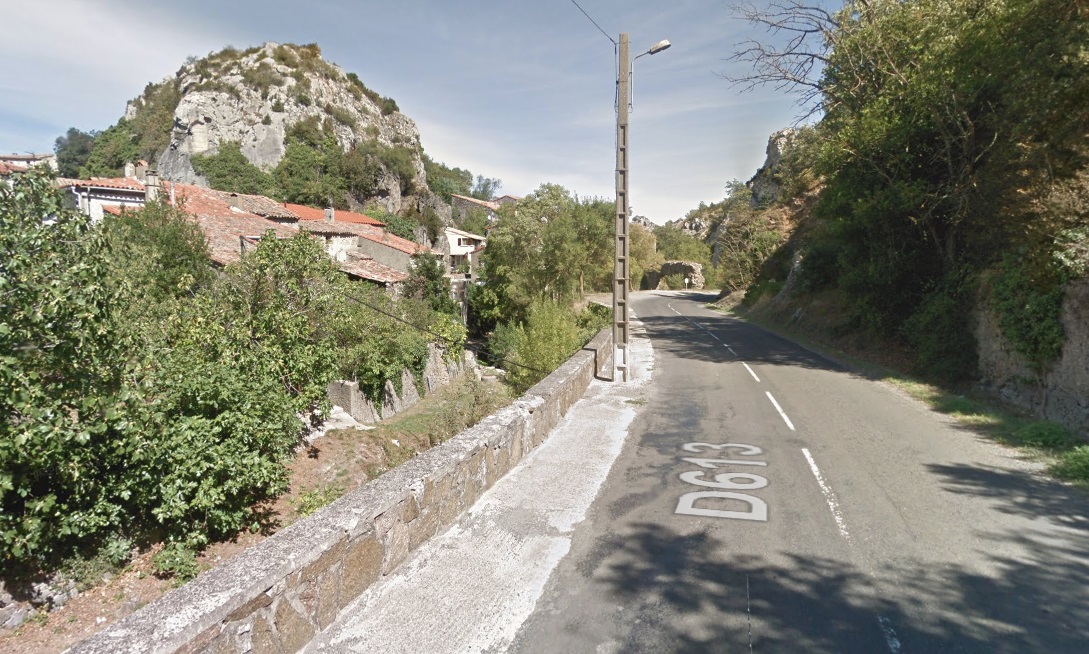
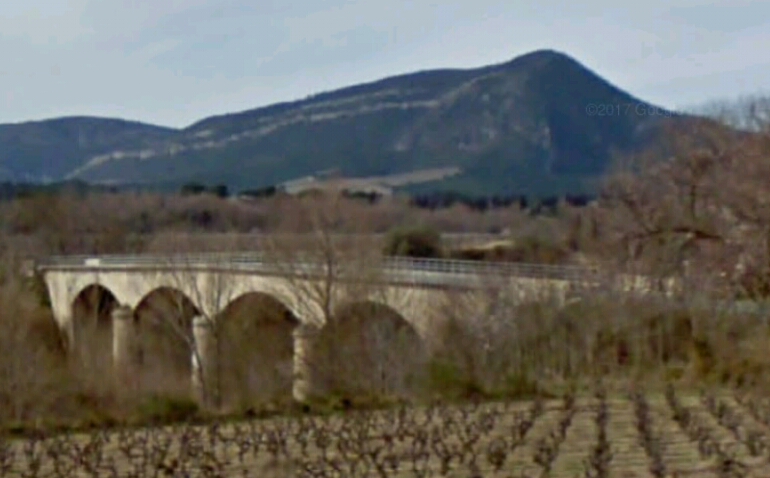
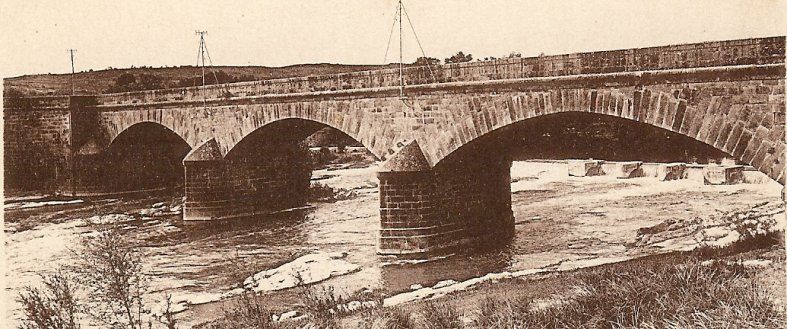
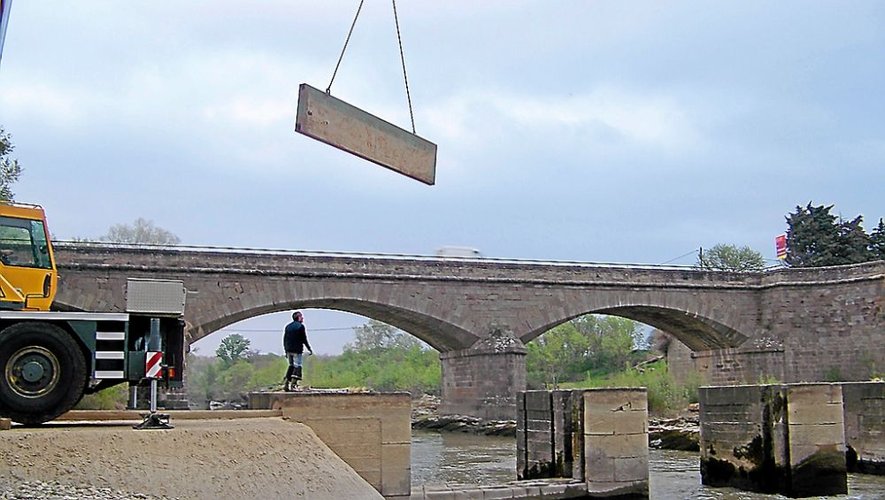
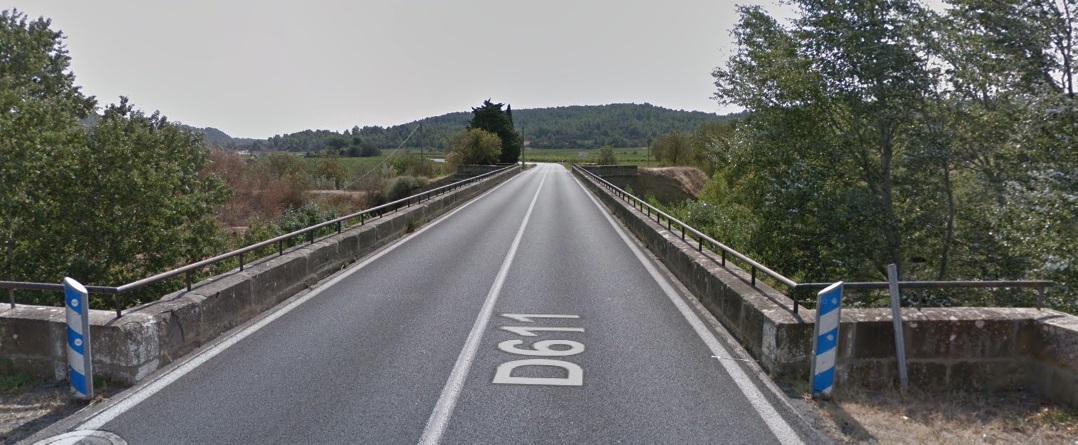
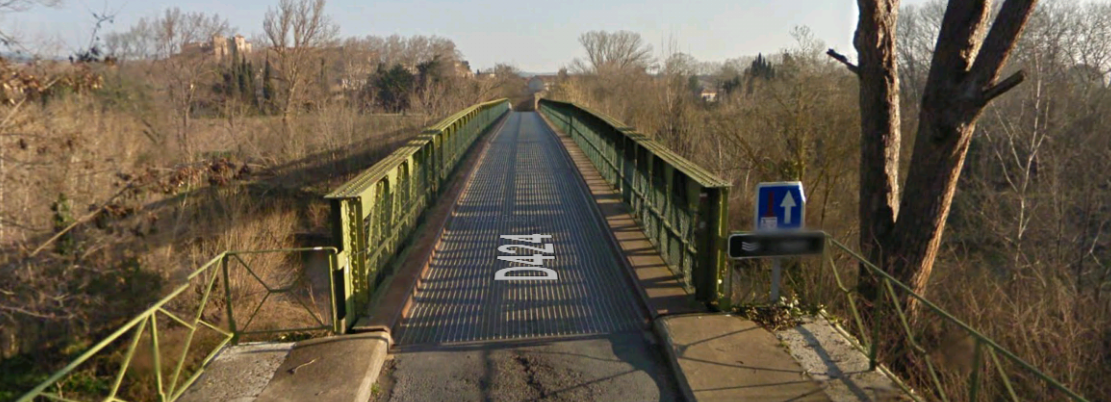
A few kilometres to the East of Sigean, the tramway and road crossed the River Rieu on a three-arch stone viaduct. The road between Sigean and La Nouvelle was the N9, today it is the D6139. The modern road splits as it approaches Le Rieu. East-bound traffic crosses the old bridge and West-bound traffic uses a new concrete structure to the North of the old bridge.
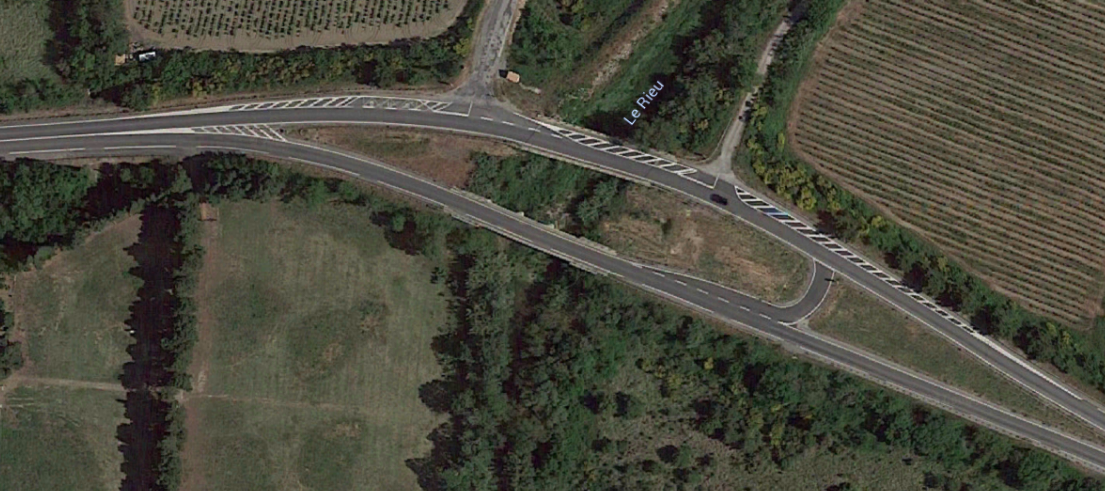
The old bridge is under the traffic lane to the right in the above picture.
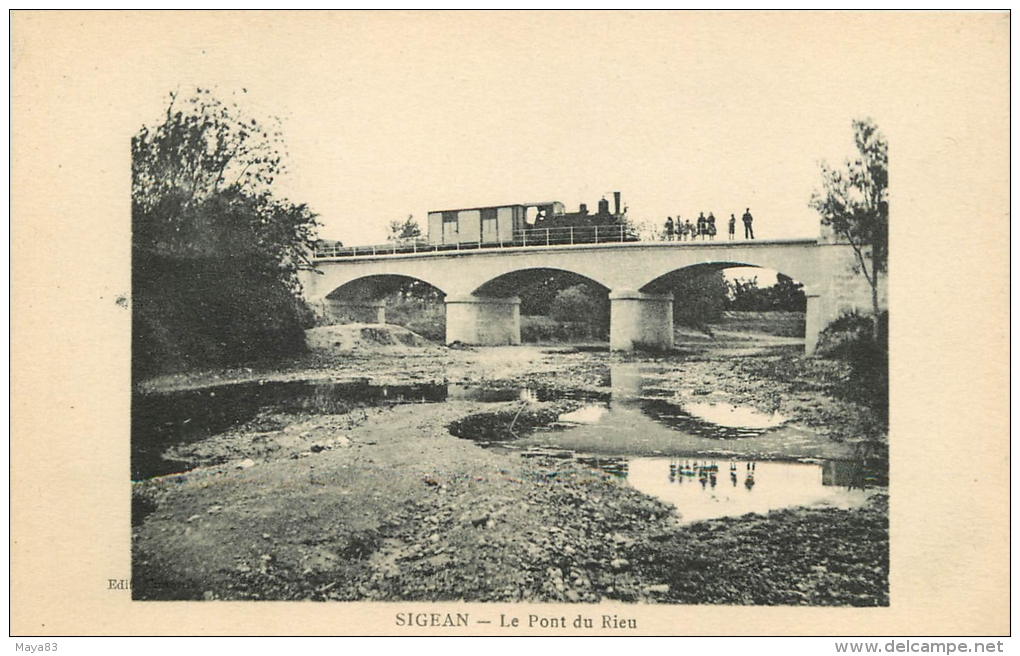
The ‘Pont du Rieu’ which is to the East of Sigean. The picture is taken from the North. [13]
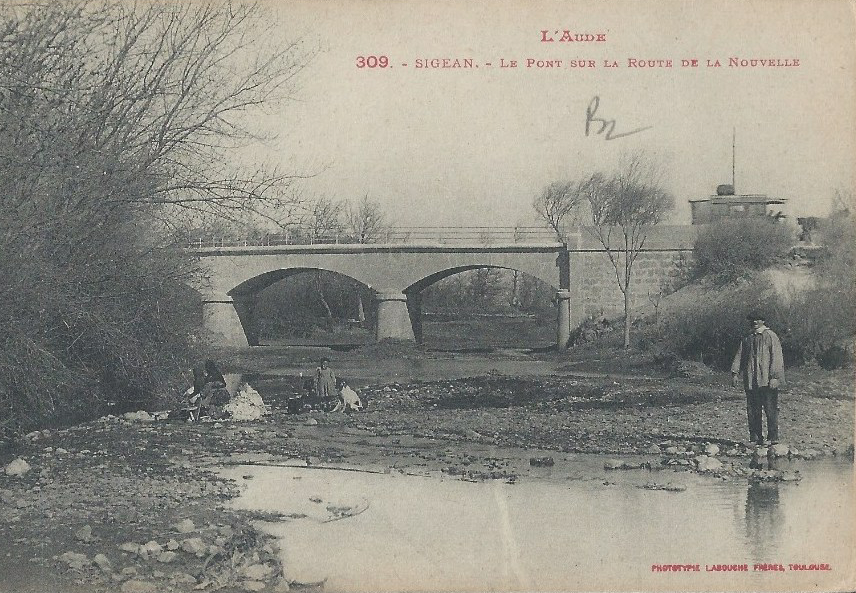
The same bridge from the South. [15]
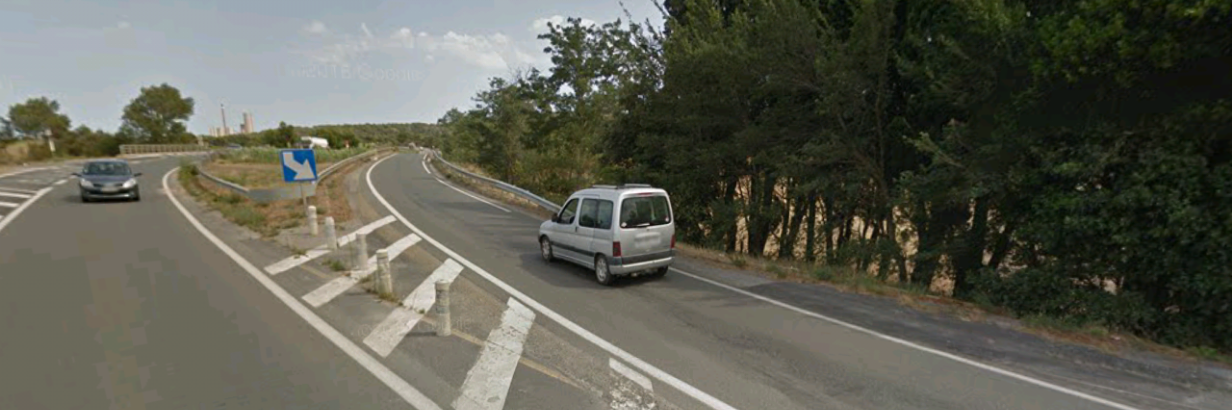
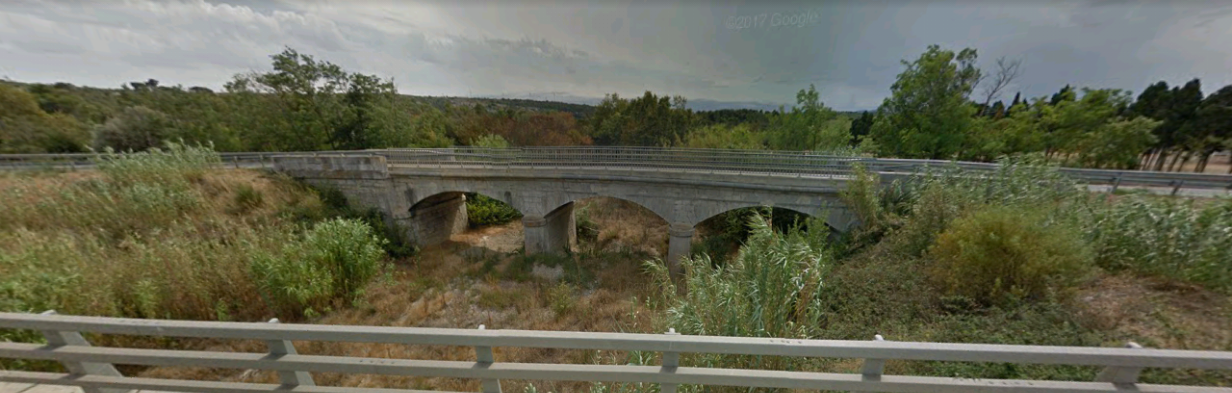
The old bridge taken from a vehicle travelling over the Northern bridge which carries Westbound traffic.

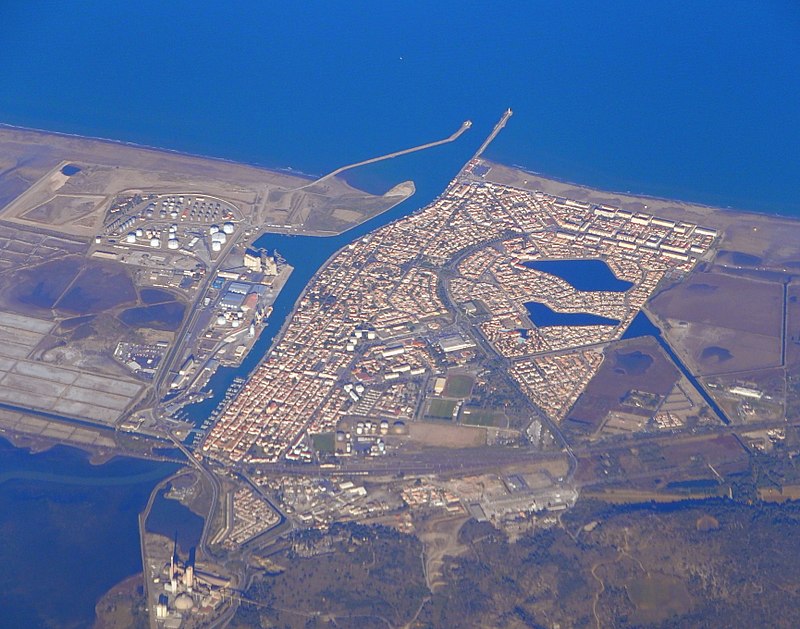
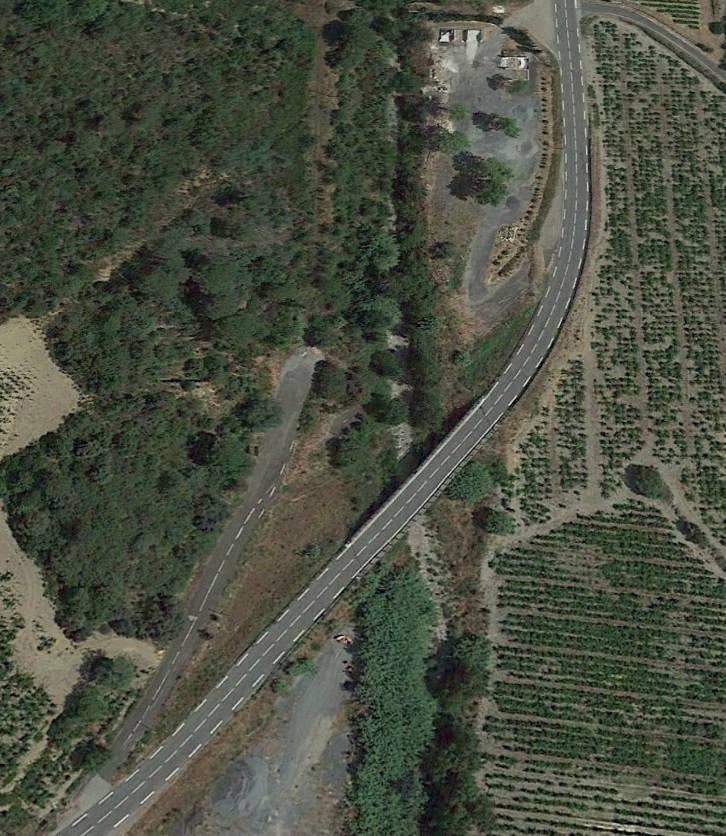
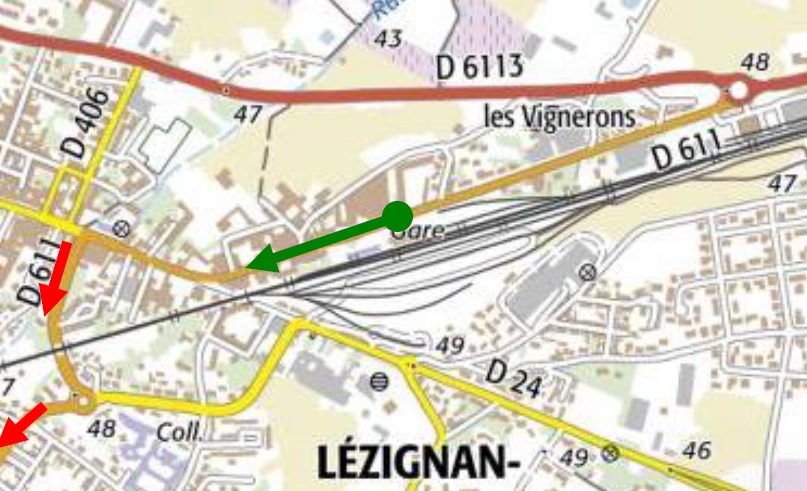
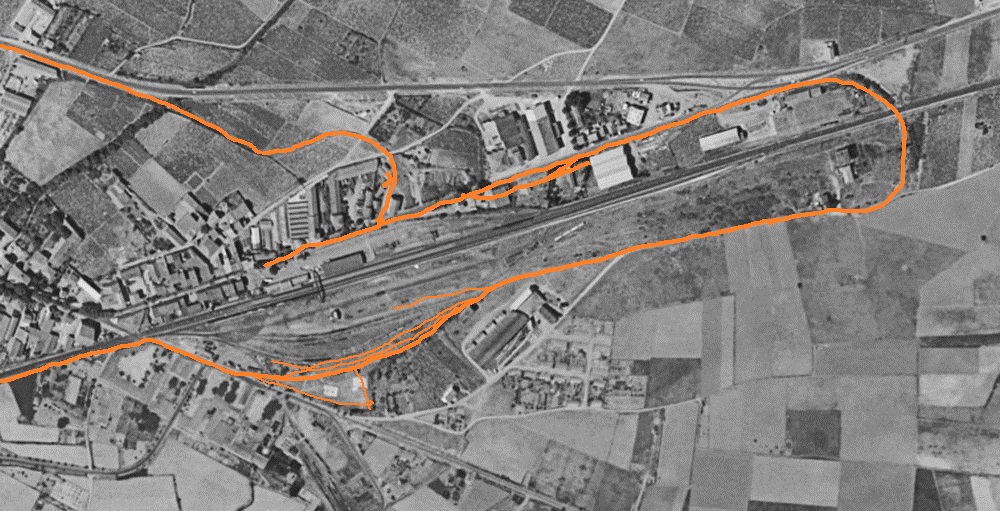
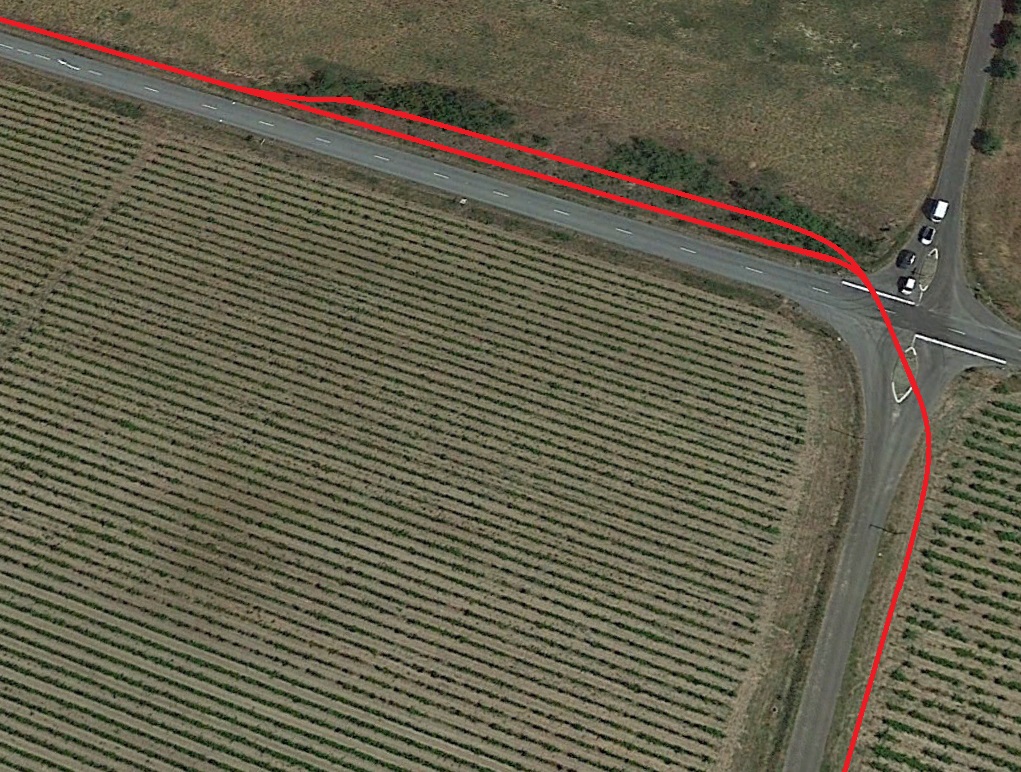
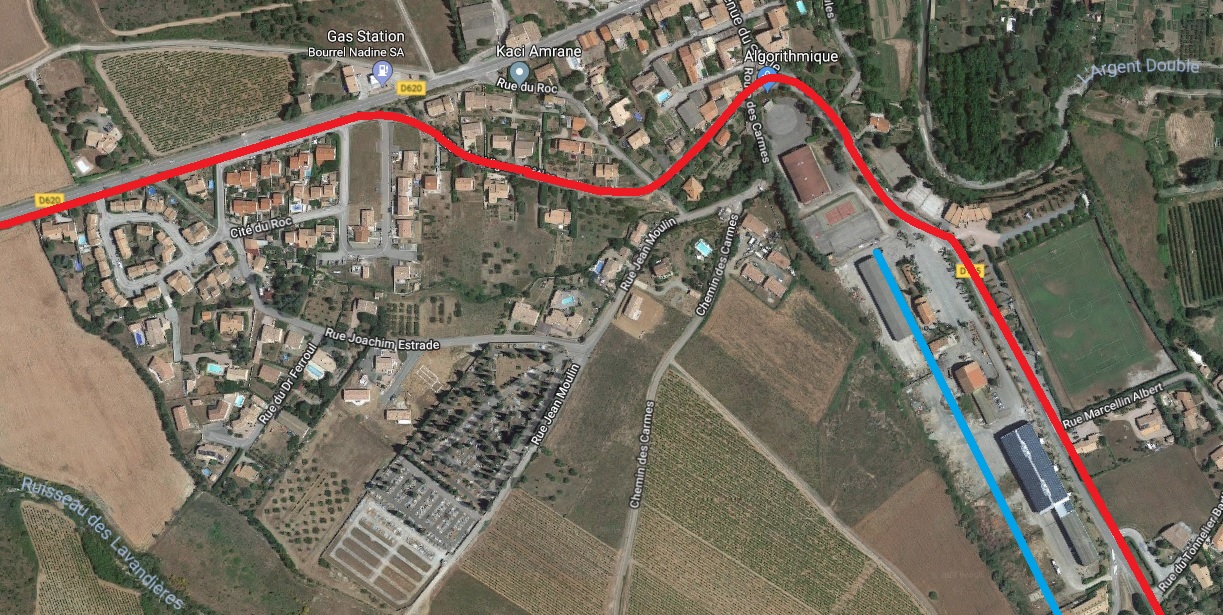
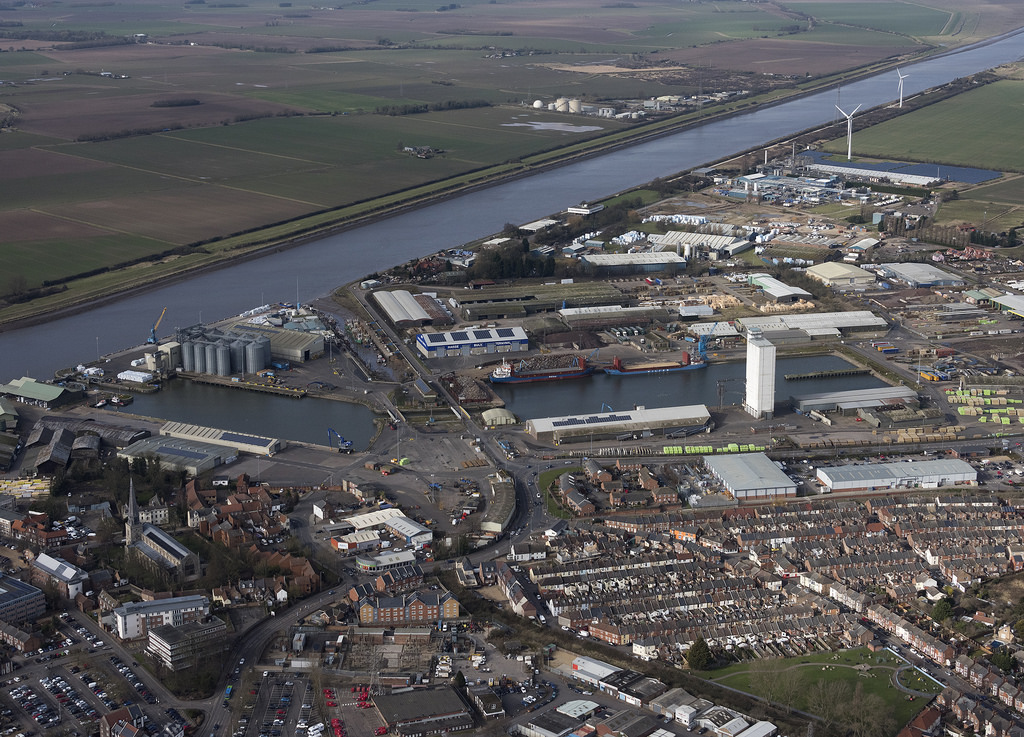
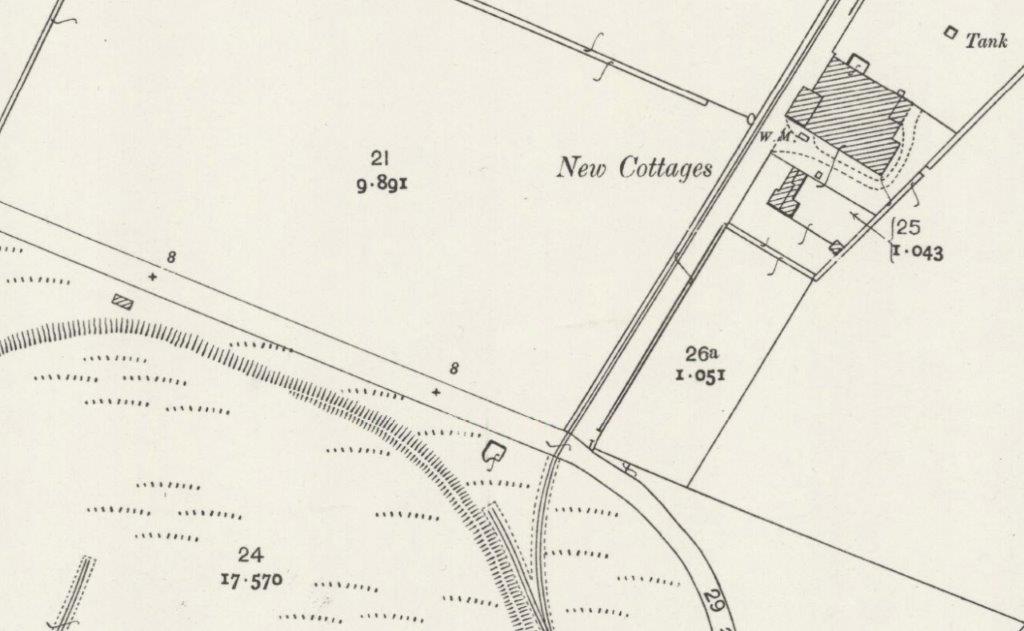
From Le Rieu, which links into the series of lakes close to the coast through which the waters of La Berre flow, the tramway and the N9 (D6139) head for La Nouvelle and its port.  It appears that the tramway followed the N9 almost all the way to the station entrance. Jut before crossing the Standard Gauge line the N( turned south and the tramway followed the road which accessed the port, village and beach at La Nouvelle. The photo below shows the route of the tramway which was under the modern D6139.
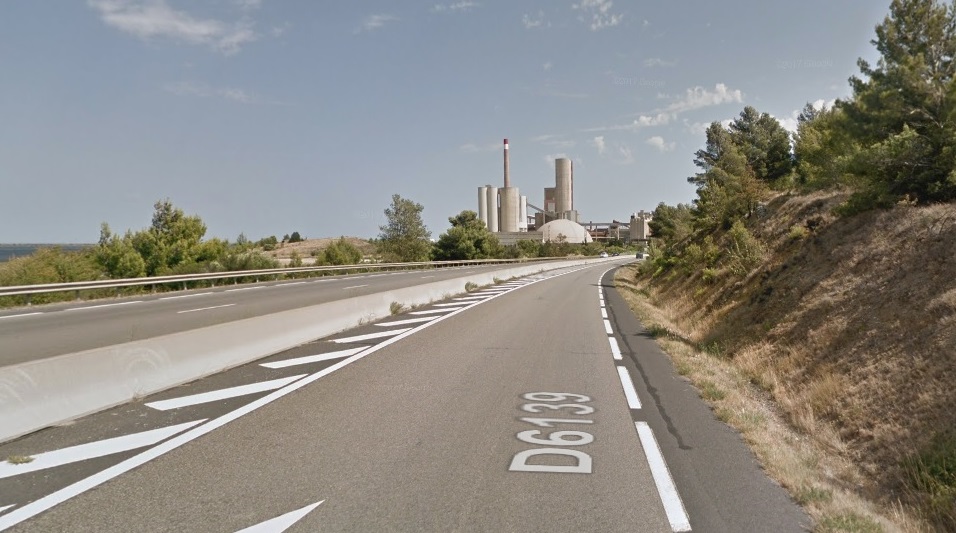
The N9 is the road shown on the image below entering top left and turning sharply to the south.
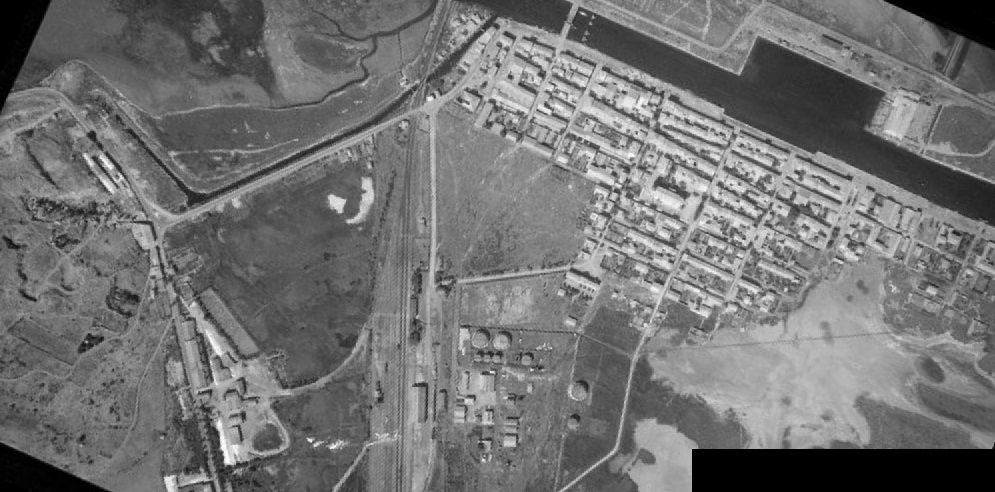
An aerial image from 1946. [15]
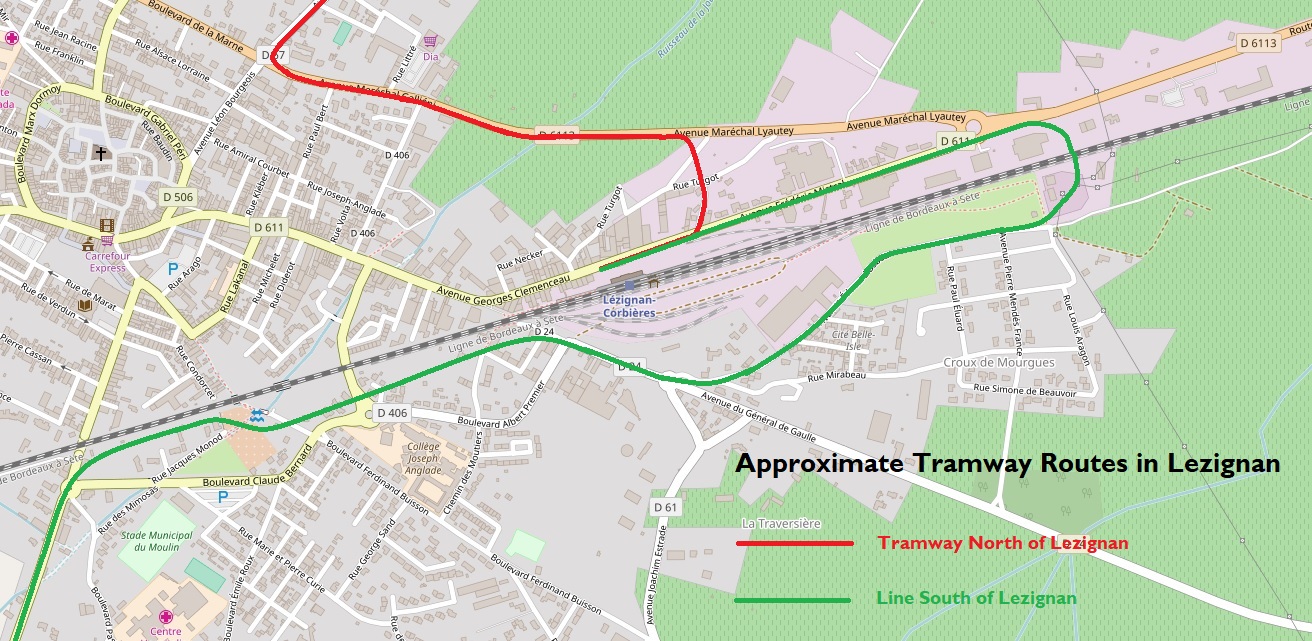
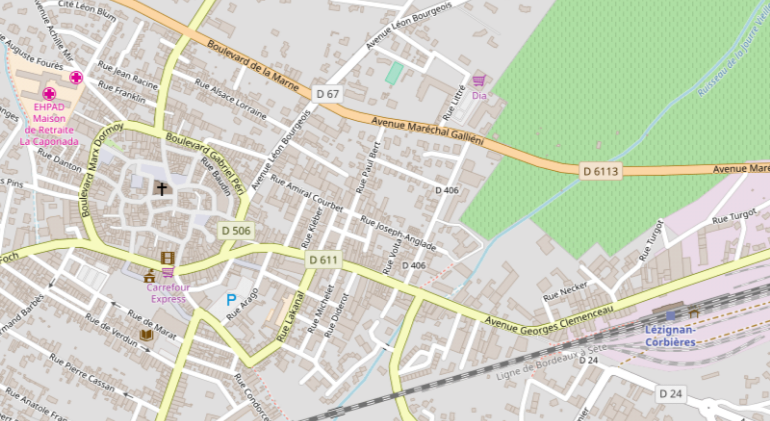
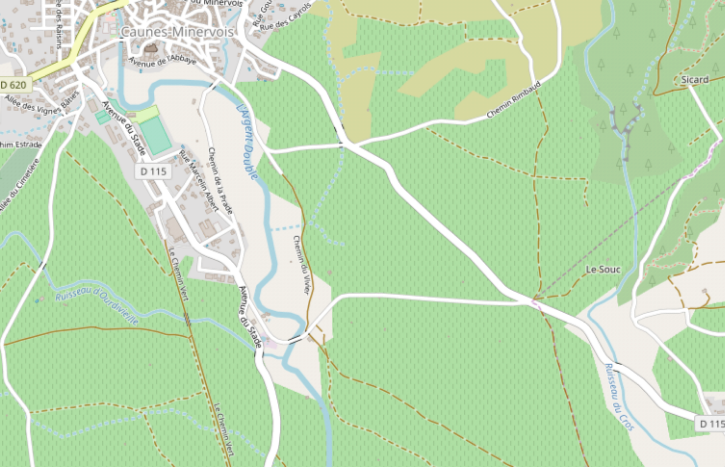
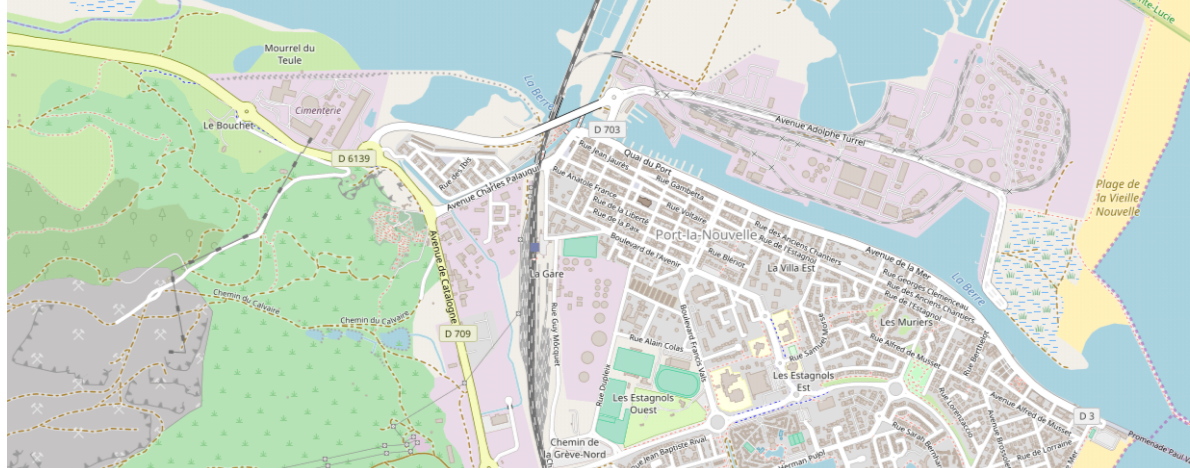
OpenStreetMap shows that quite a bit has changed in the road layout In La Nouvelle and to its Northwest. The tramway followed what is now known as Avenue Charles Palauqui. [18]

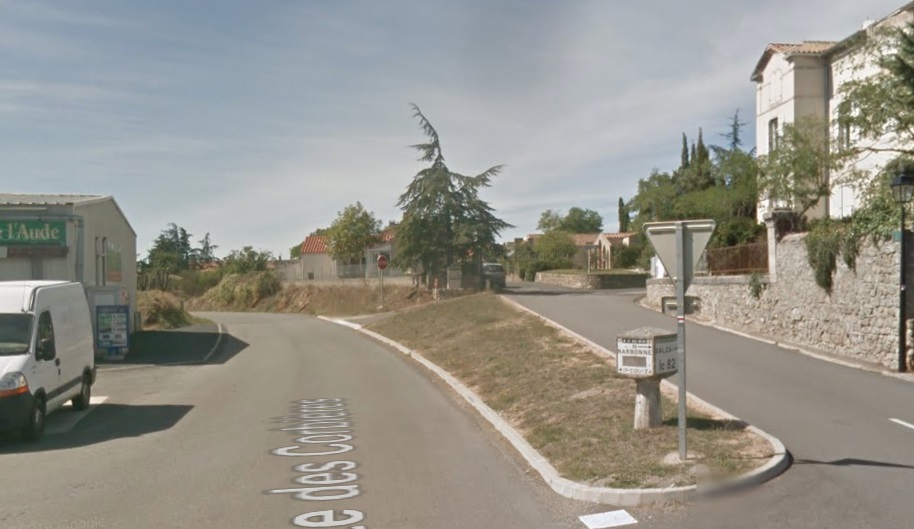
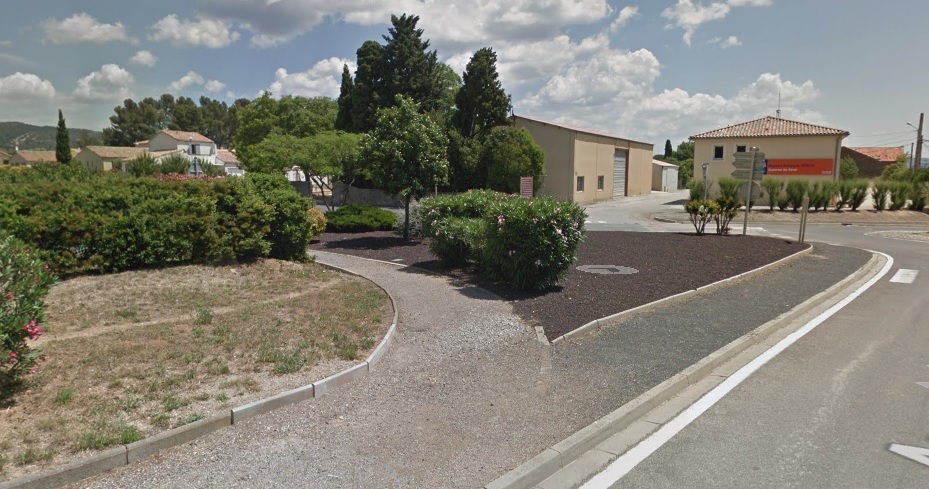
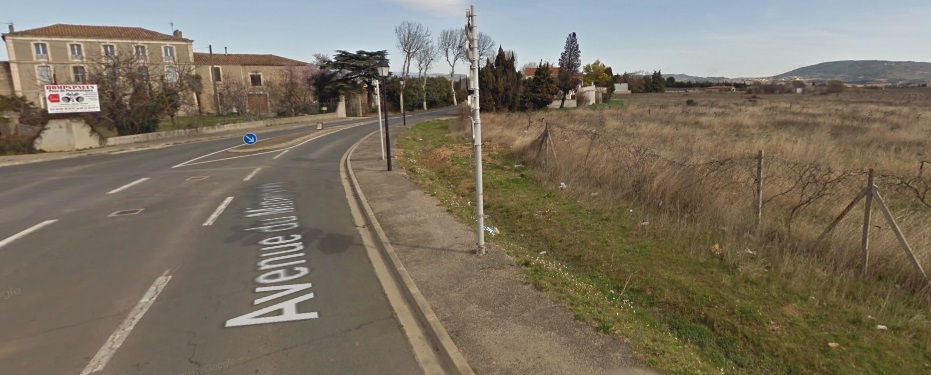
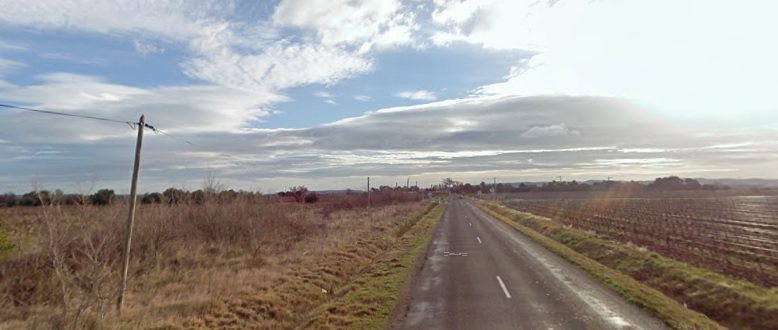
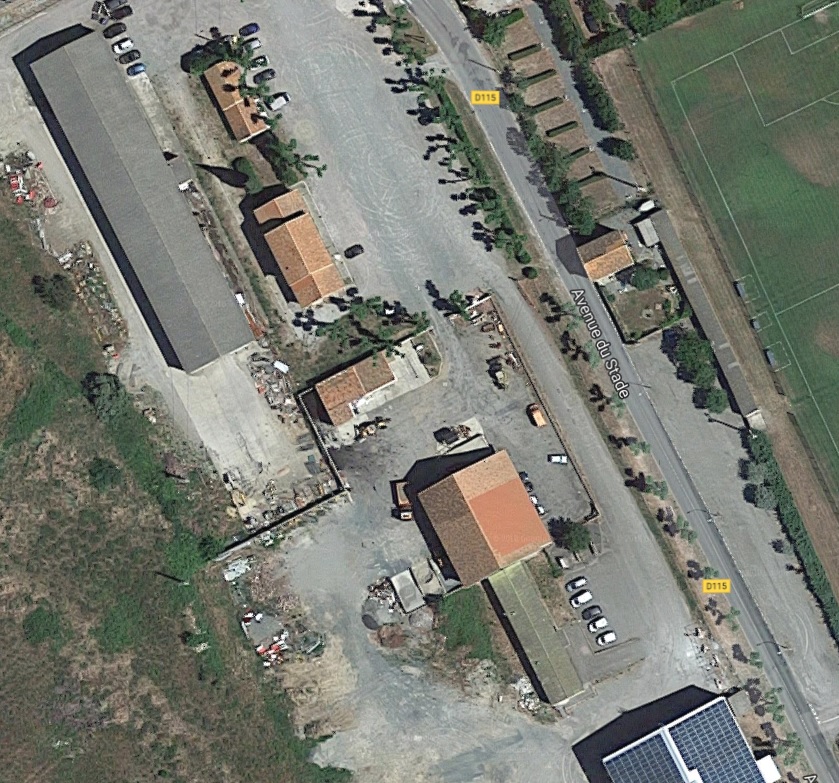
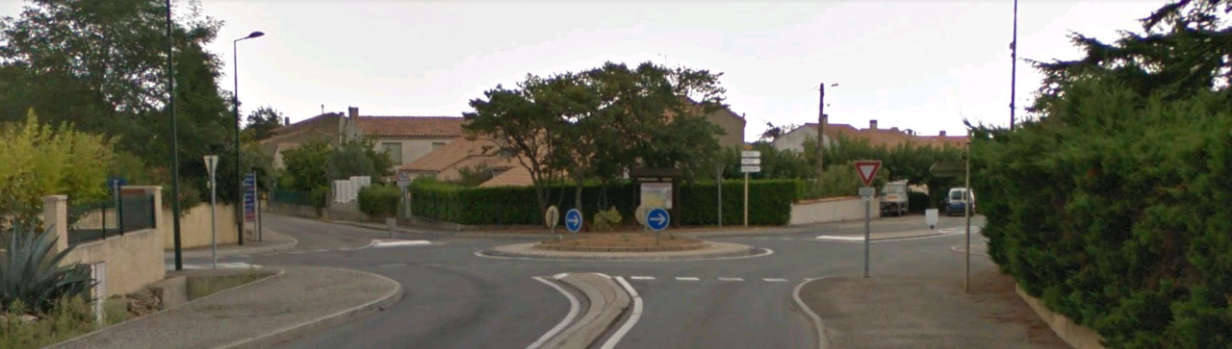
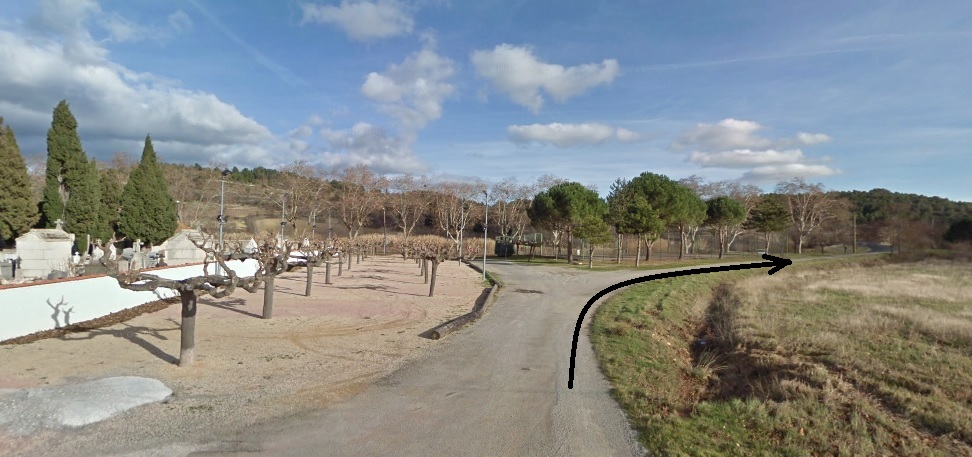
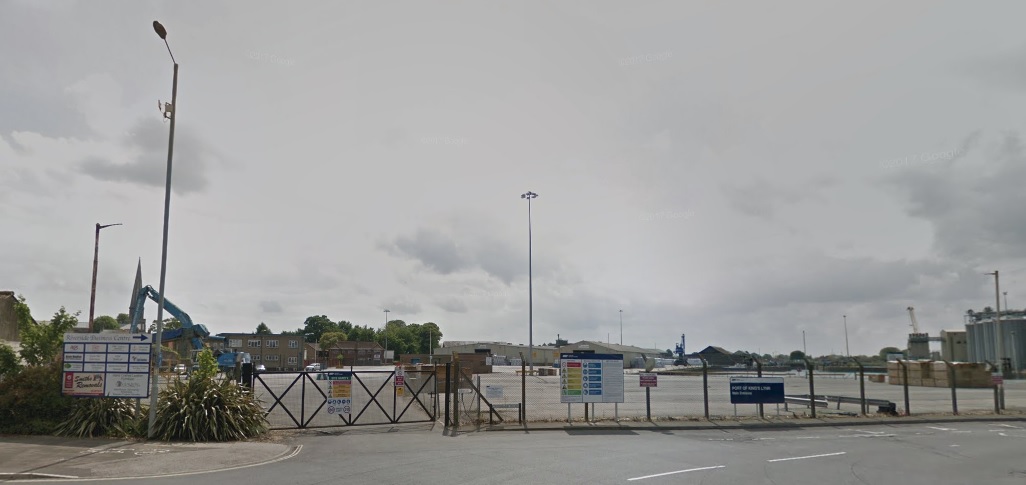
The old NP has become the D709 and the image immediately below shows that modern road on its approach to the point where the tramway turned into the village of La Nouvelle.
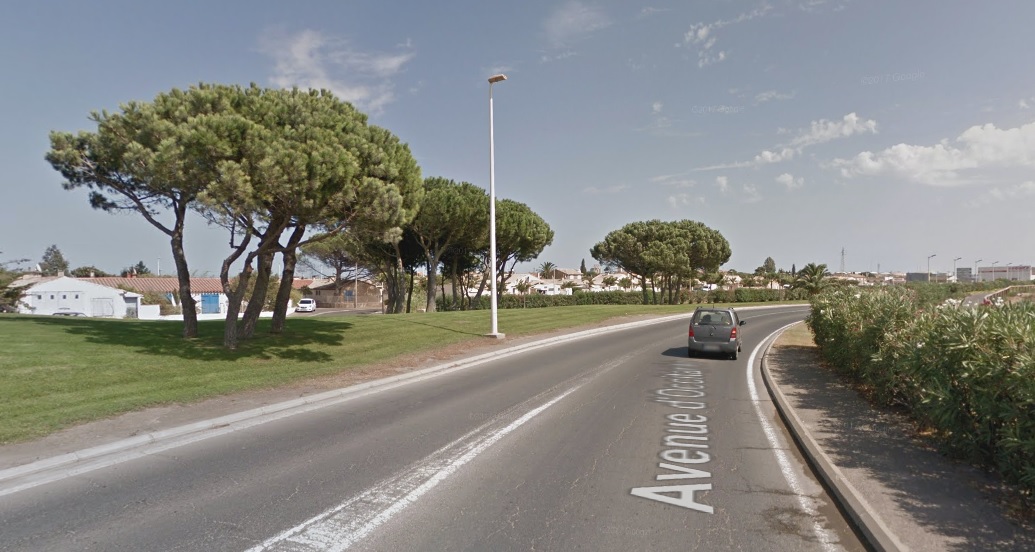
The picture below shows the road (D3) crossing the Standard-Gauge line in 21st century. The tramway curved away to the right to make its approach to the terminus station before reaching this rail crossing. It crossed the standard-gauge line at level off to the right of the picture.
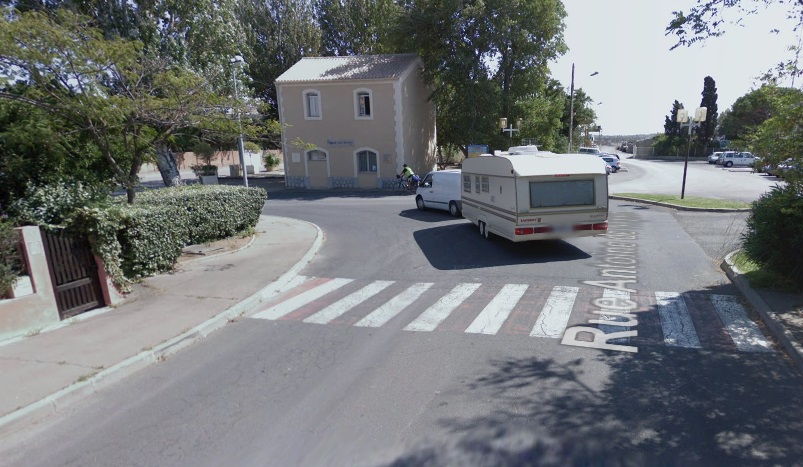
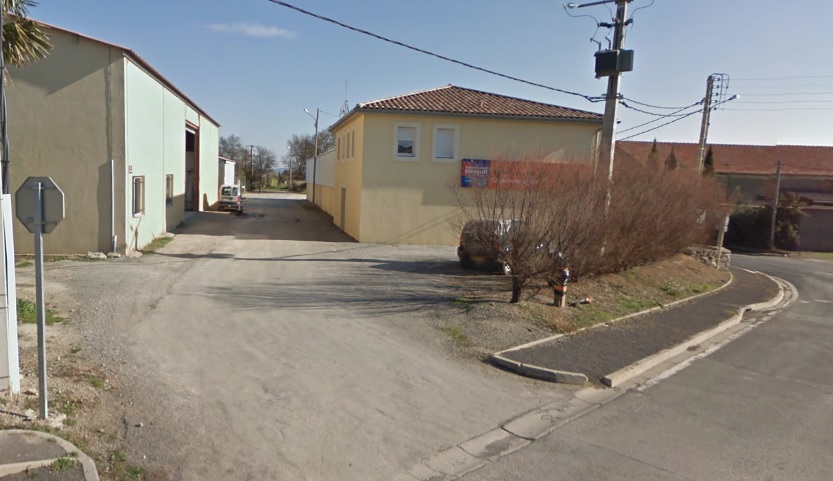
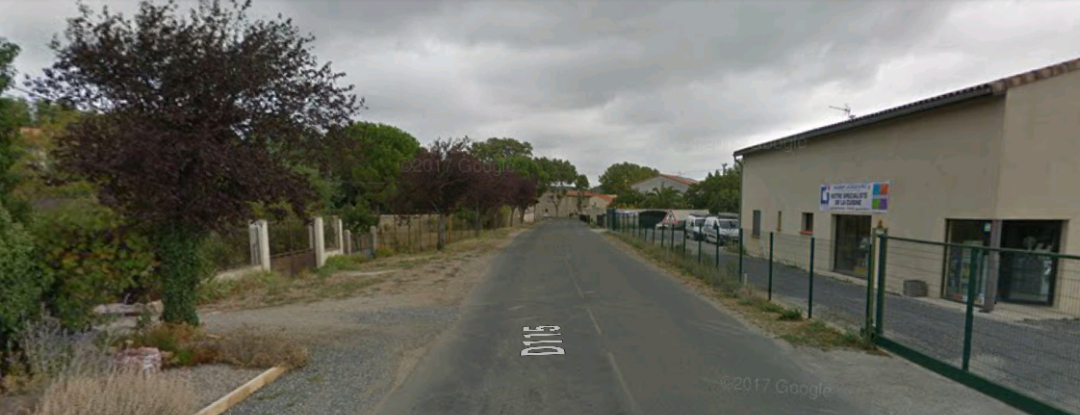
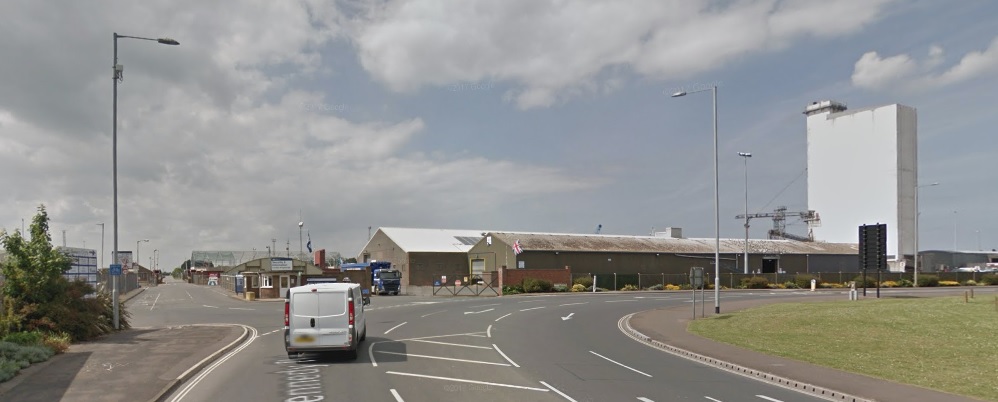
The next picture shows the point at which the Gare du Midi (and the tramway station) access road left the road running down to the beach. The station access is to the right in the photo. The branch of the tramway leadign to the beach crossed the picture in front of the curved wall of the building close to the centre of the image and then headed off the top left of the picture.
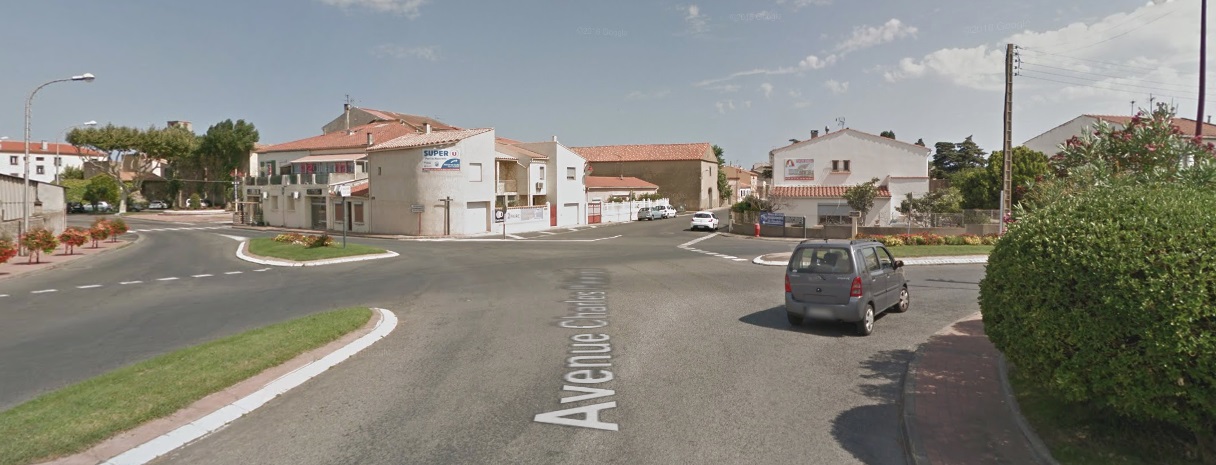
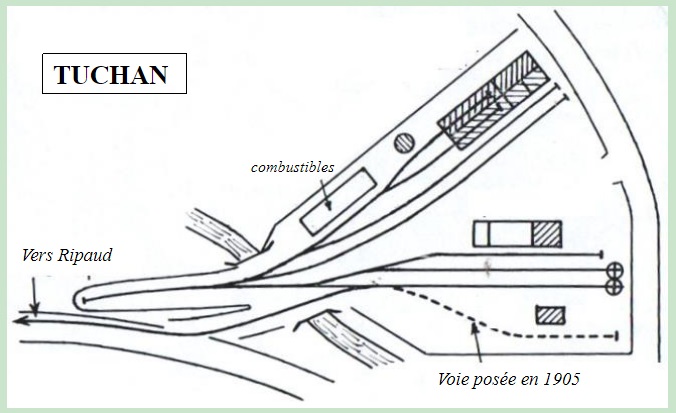
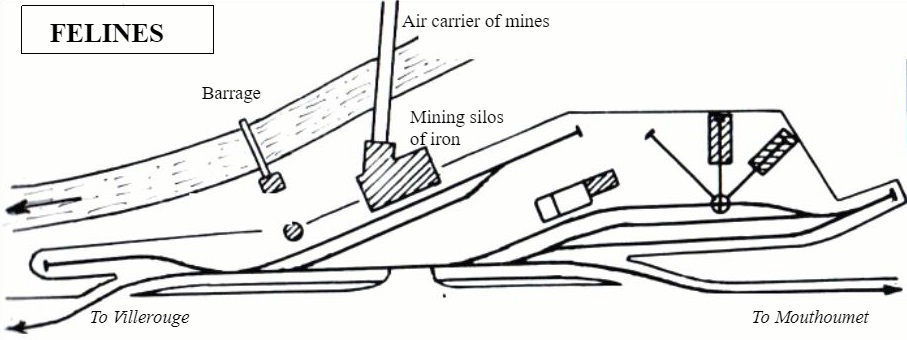
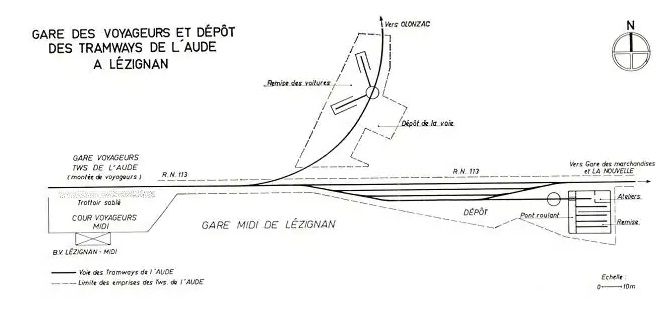
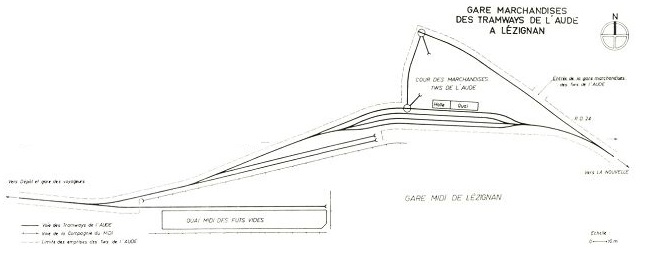
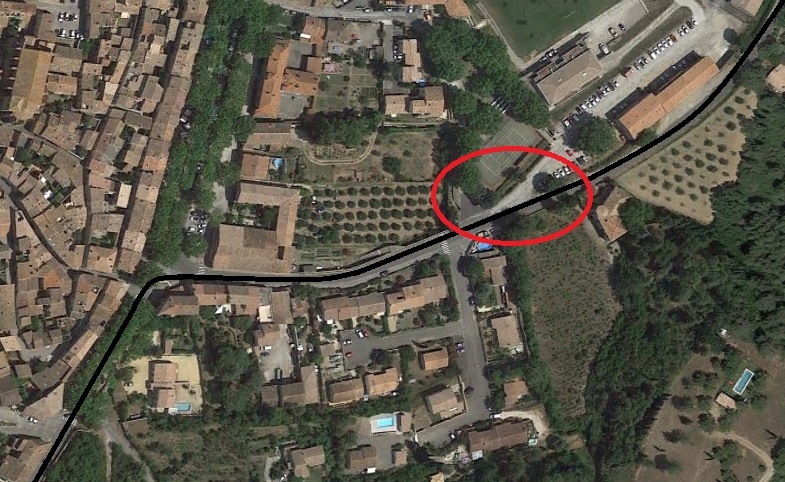
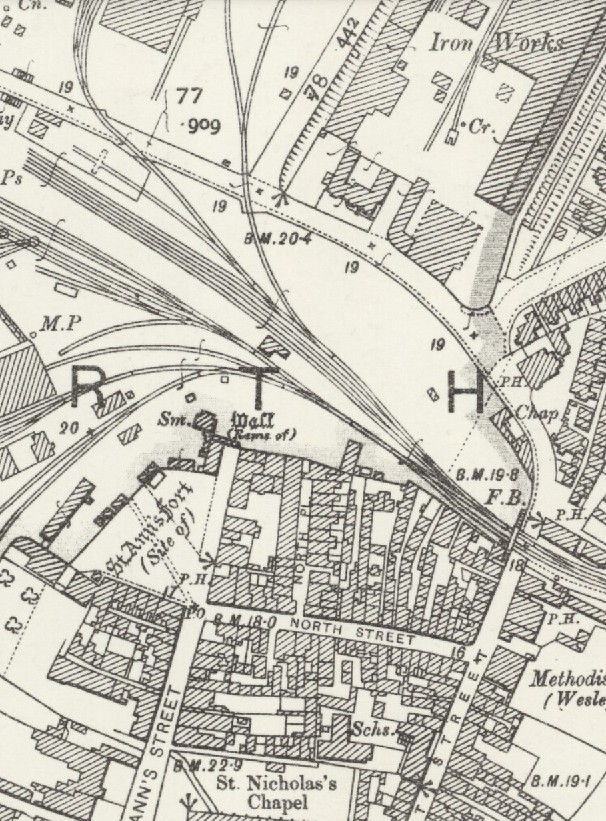
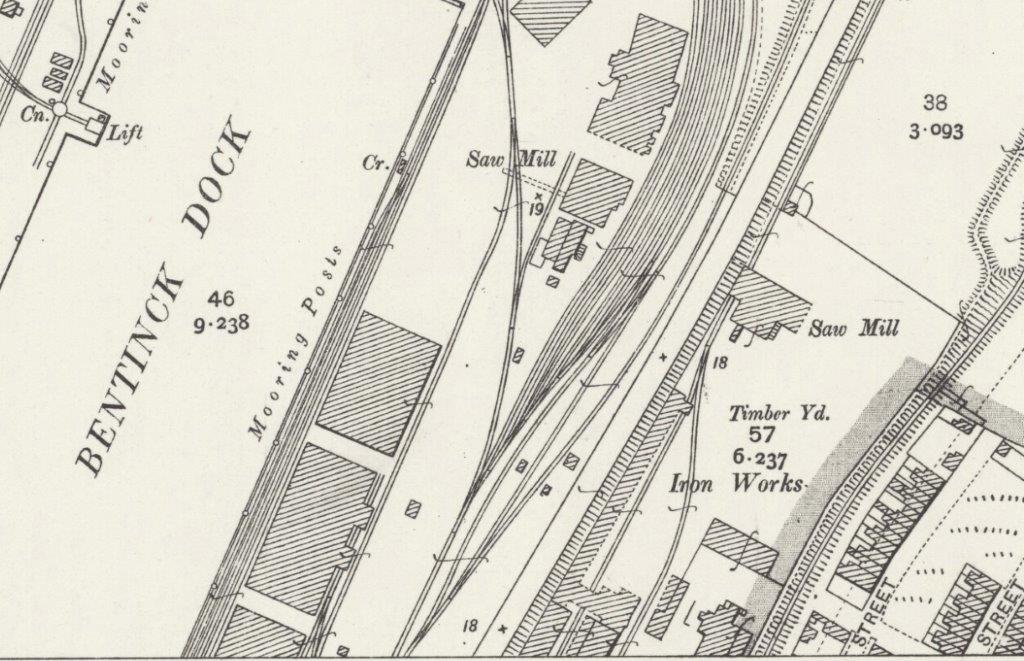
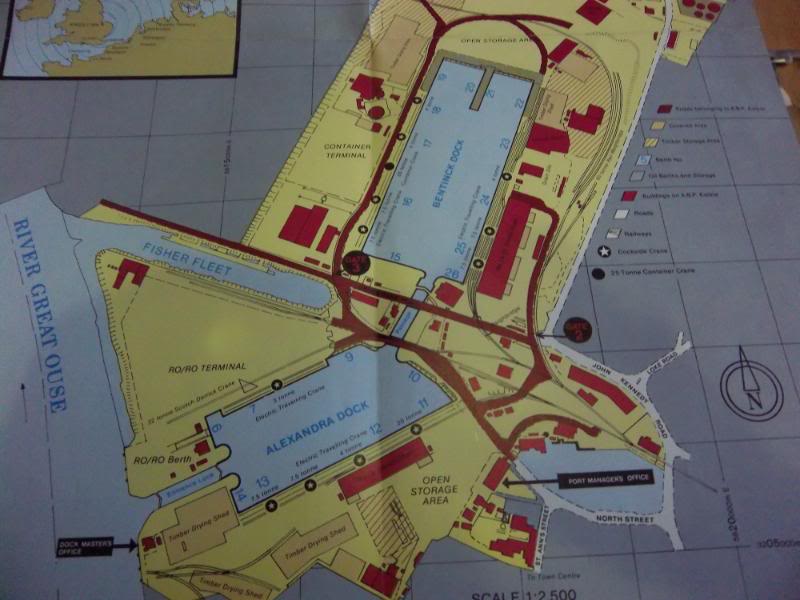
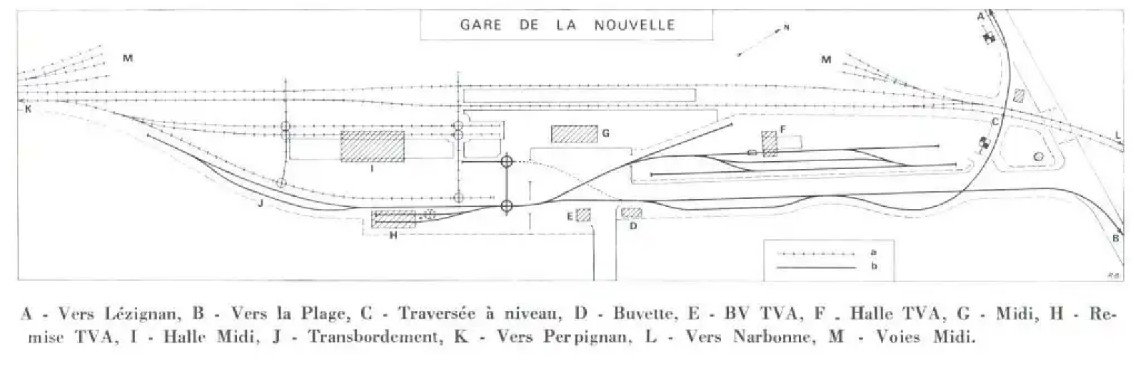
The terminus station adjacent to the Gare du Midi, it seems clear to me, from the sketch plan that passenger services took a secondary place in the life of the tramway. Goods were more important. The road junction at the right-hand end of the sketch-plan is the one shown in the Google Streetview image directly above the plan. [17]
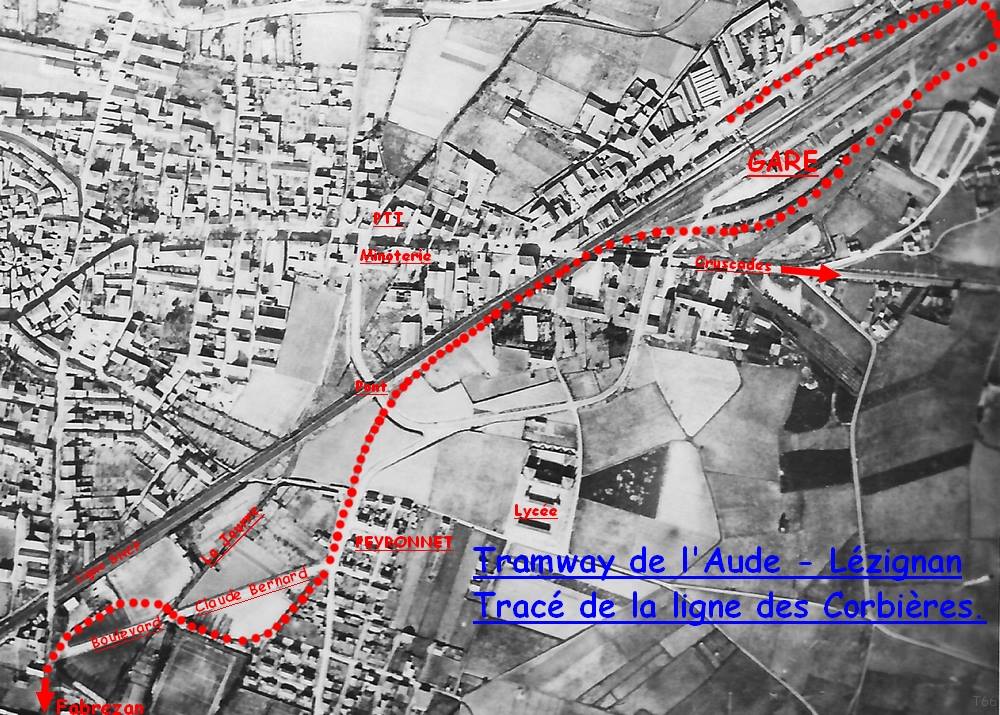
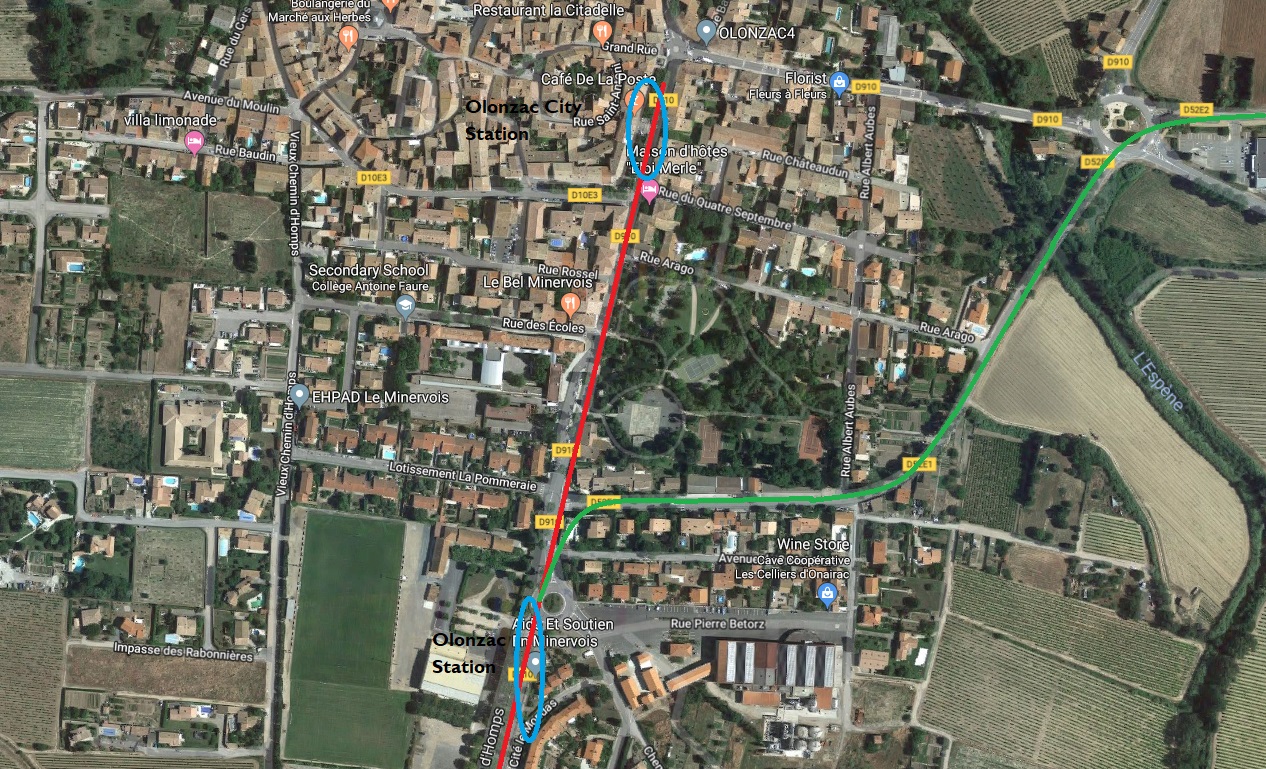
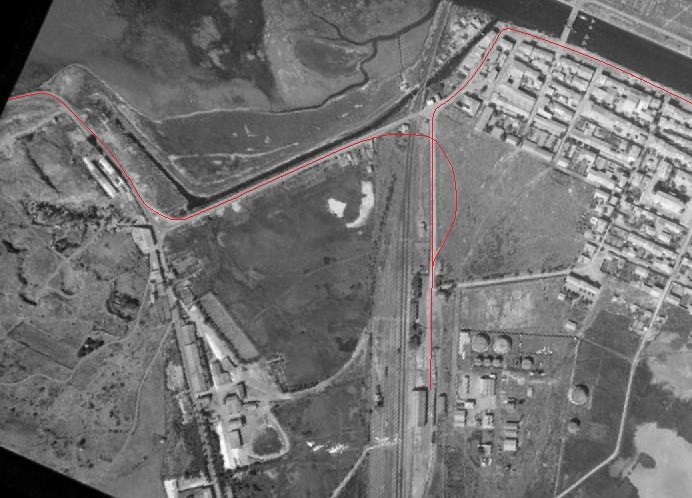
The very approximate line of the tramway is shown by a thin red line on the above image. The station was adjacent to the Gare du Midi and formed a terminus for the tramway with a branch heading back out of the station to the beach. This short branch saw the greatest passenger use across the whole network! [15]

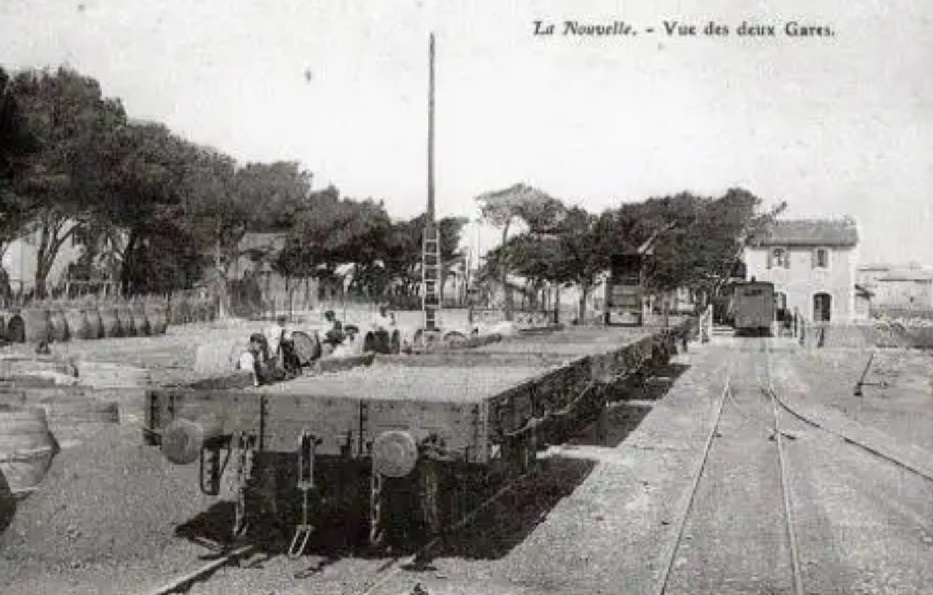
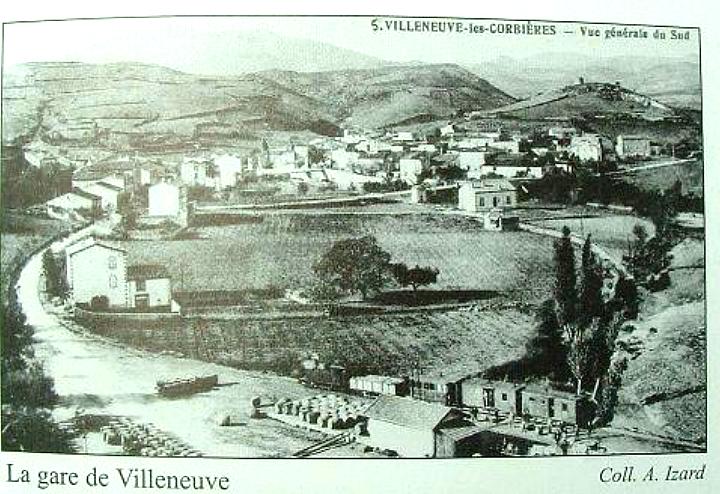
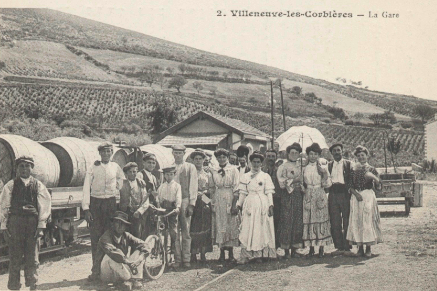
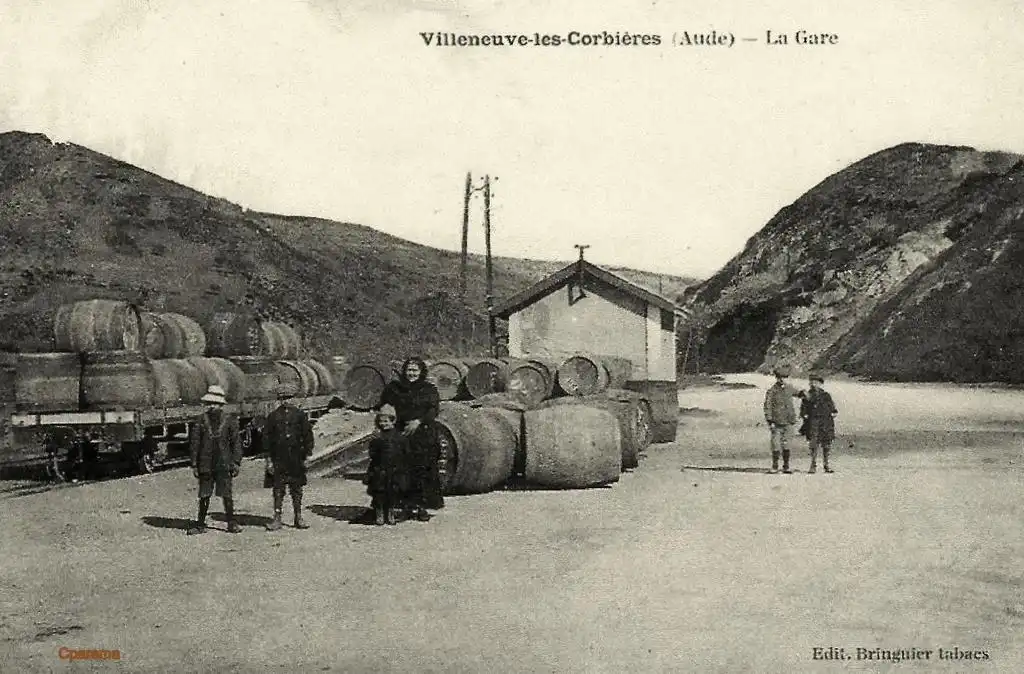
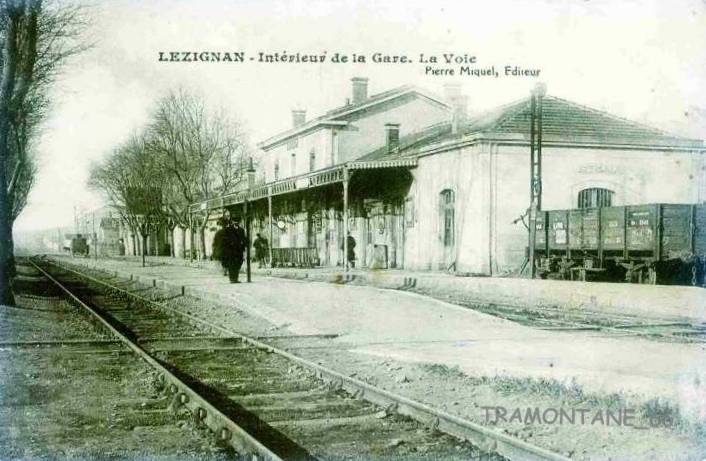
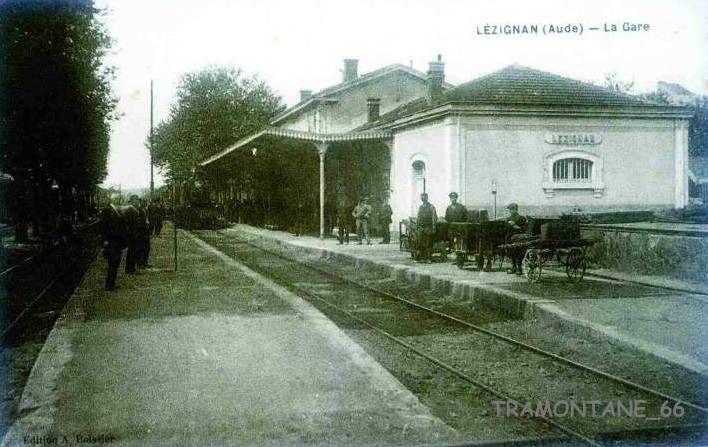
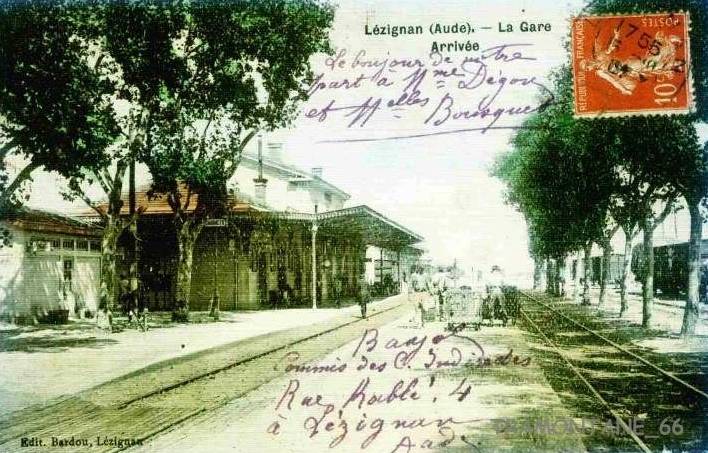
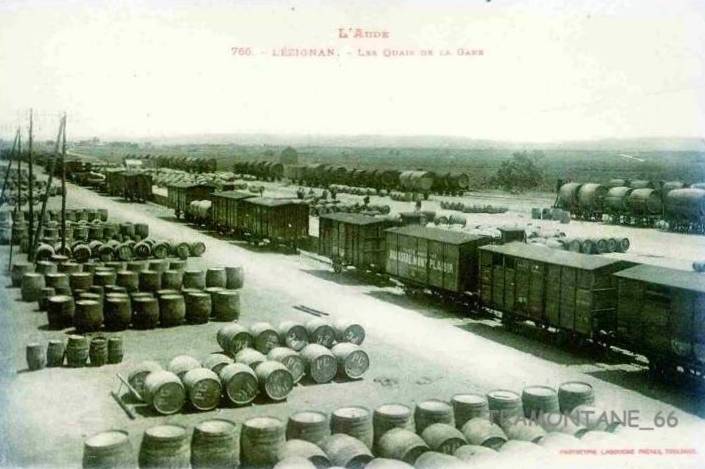
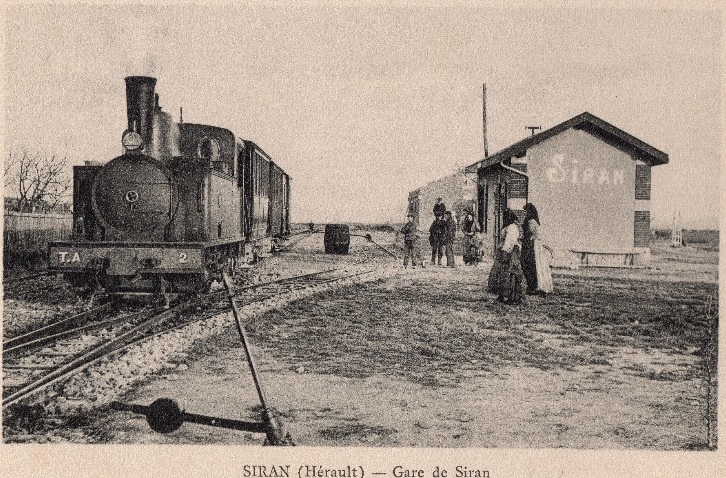
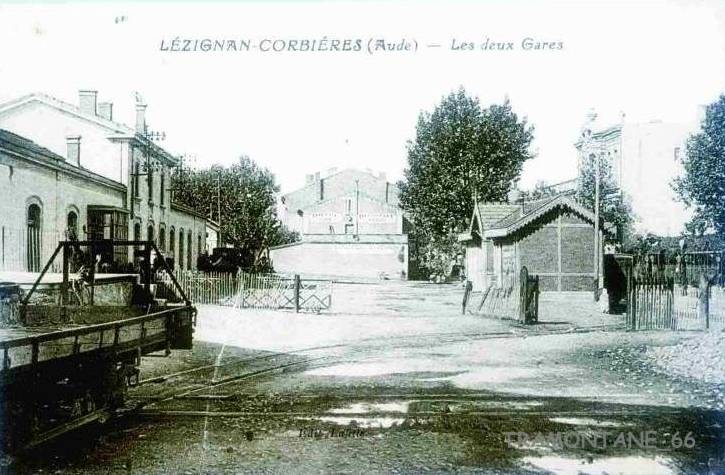
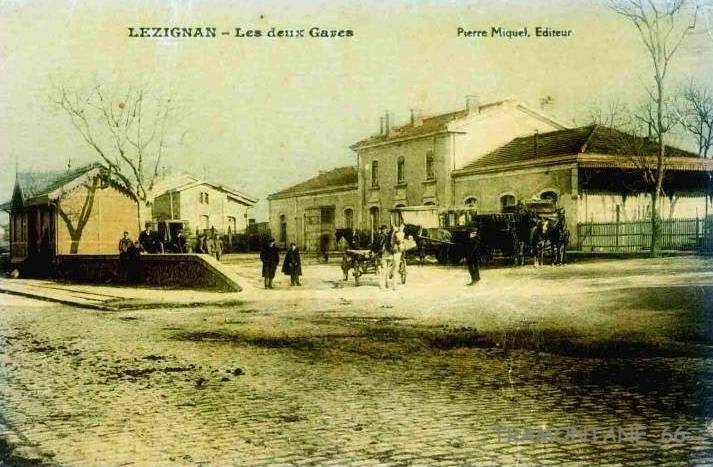
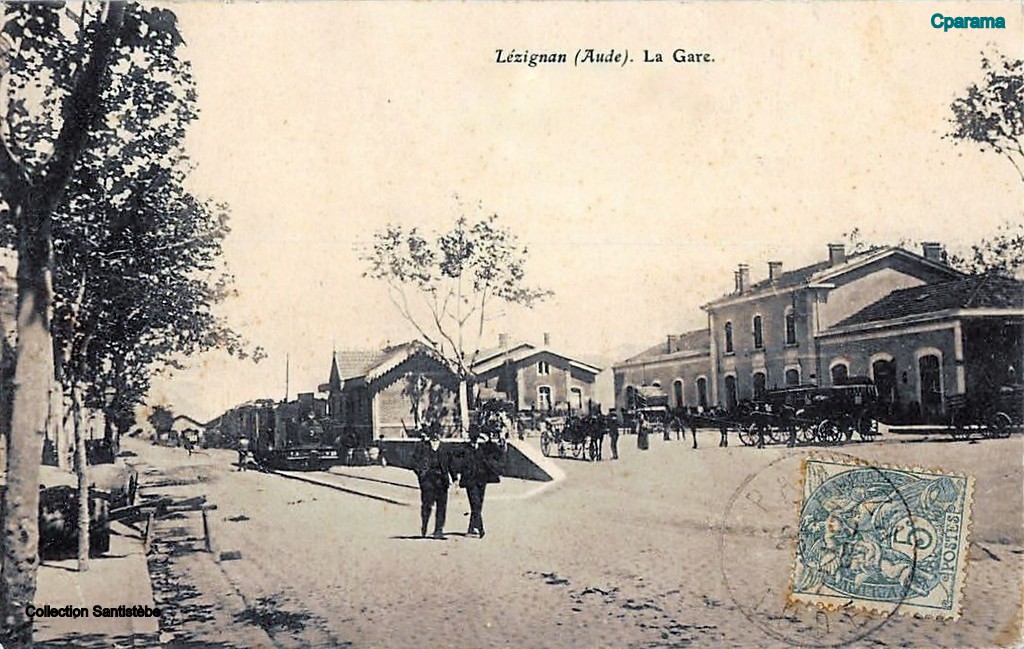
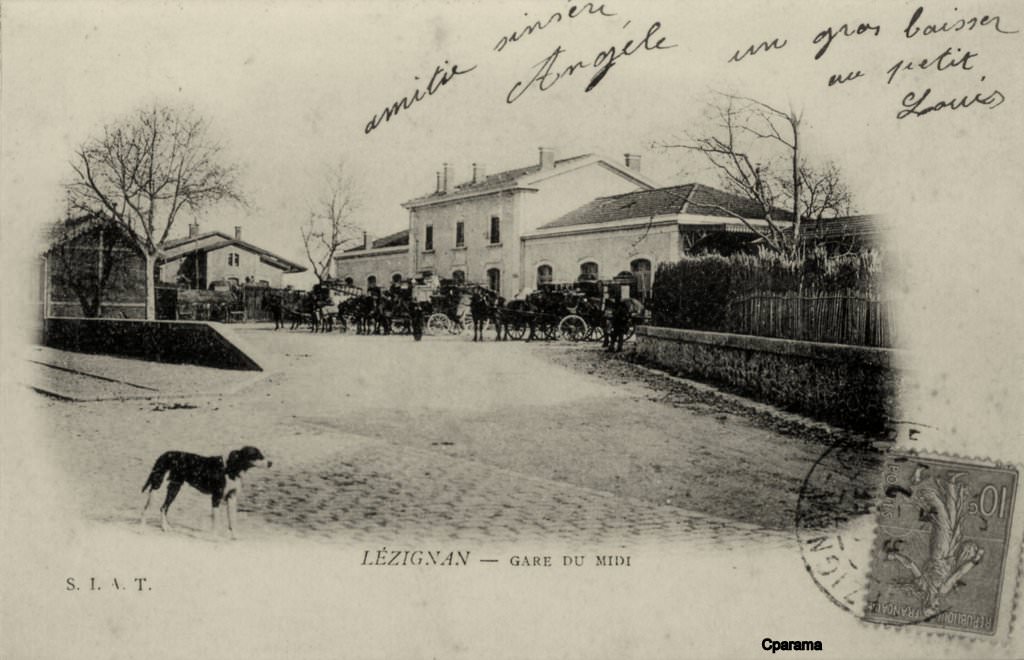
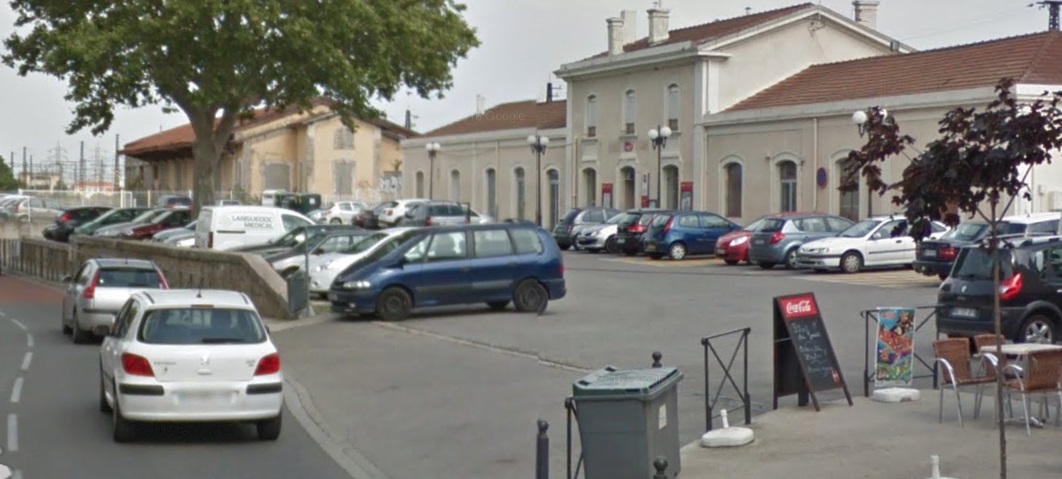
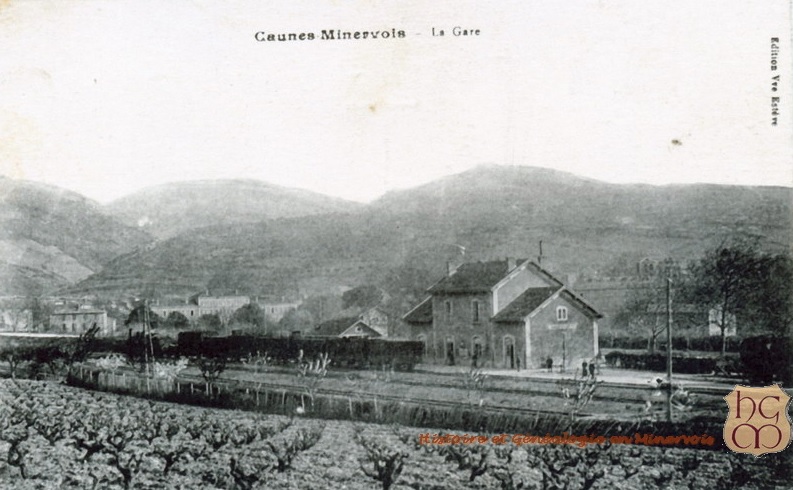
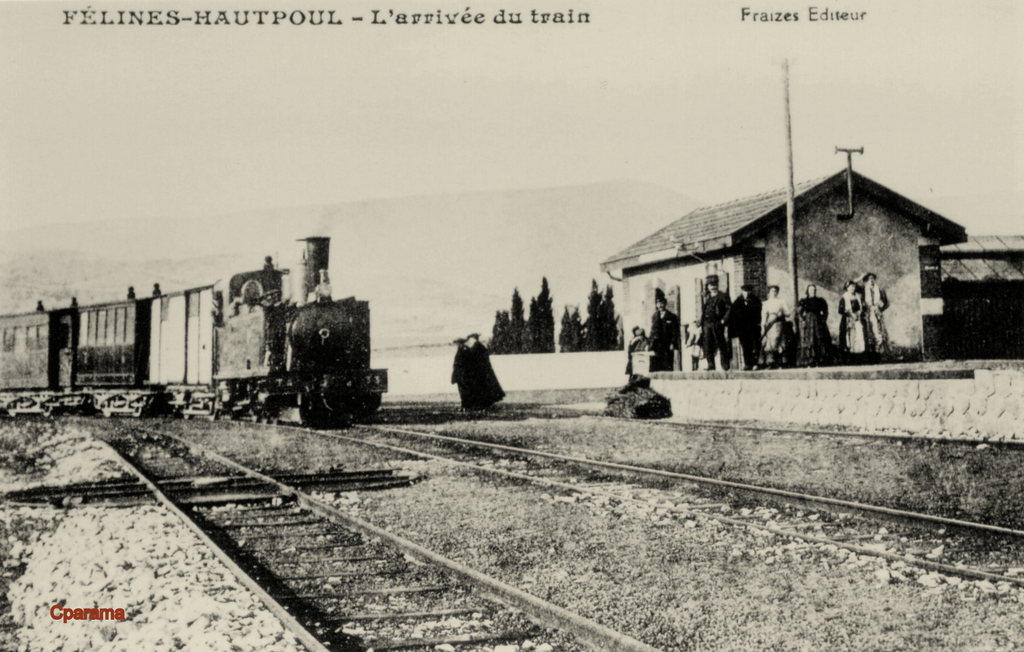
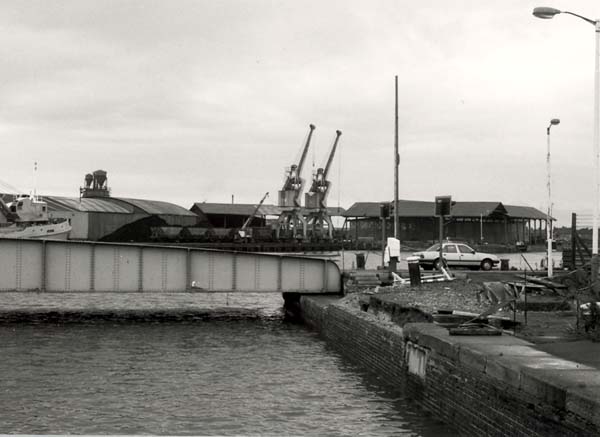
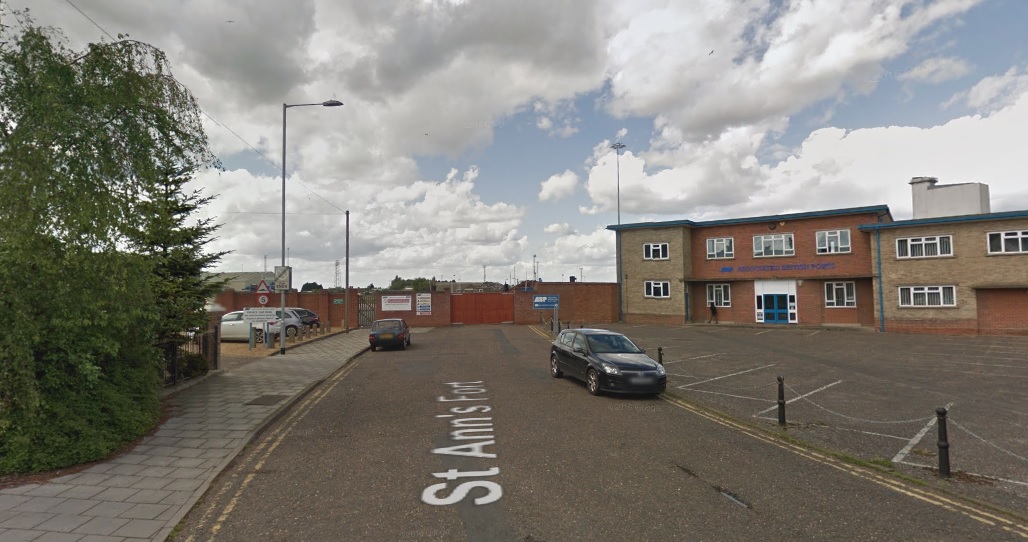
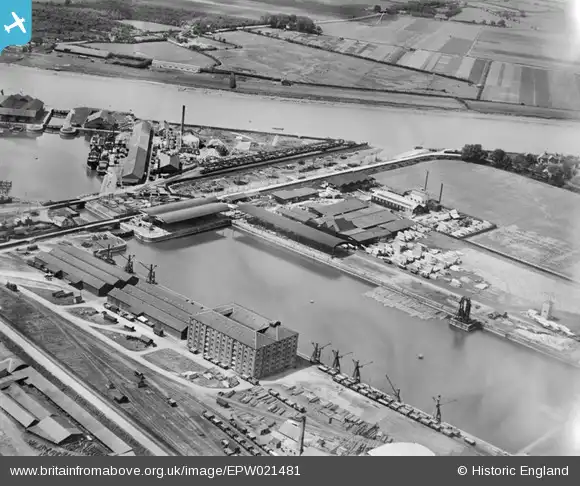
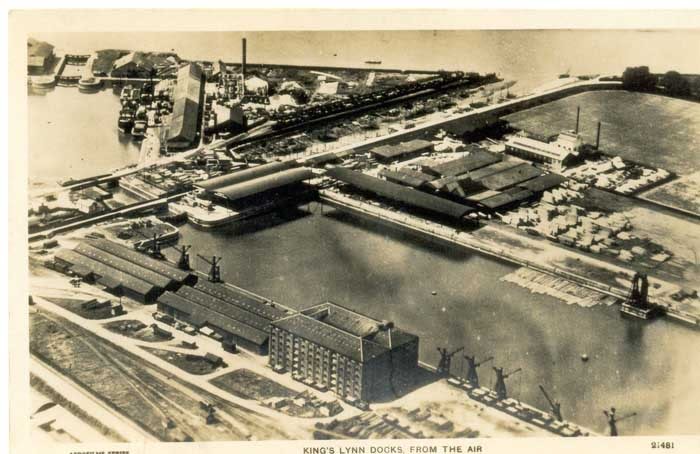
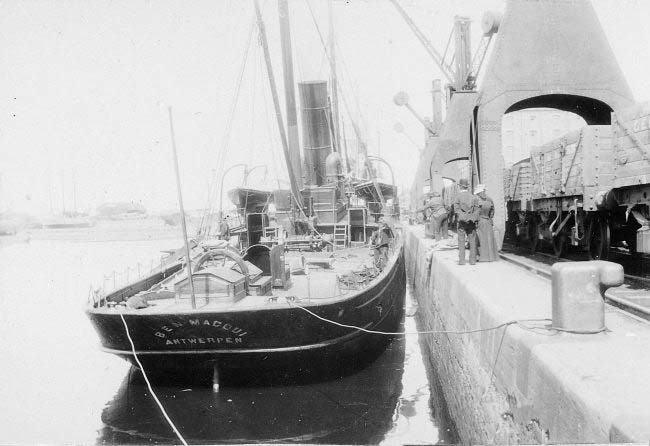
These next images are from the area around the Gare du Midi and the tramway station.
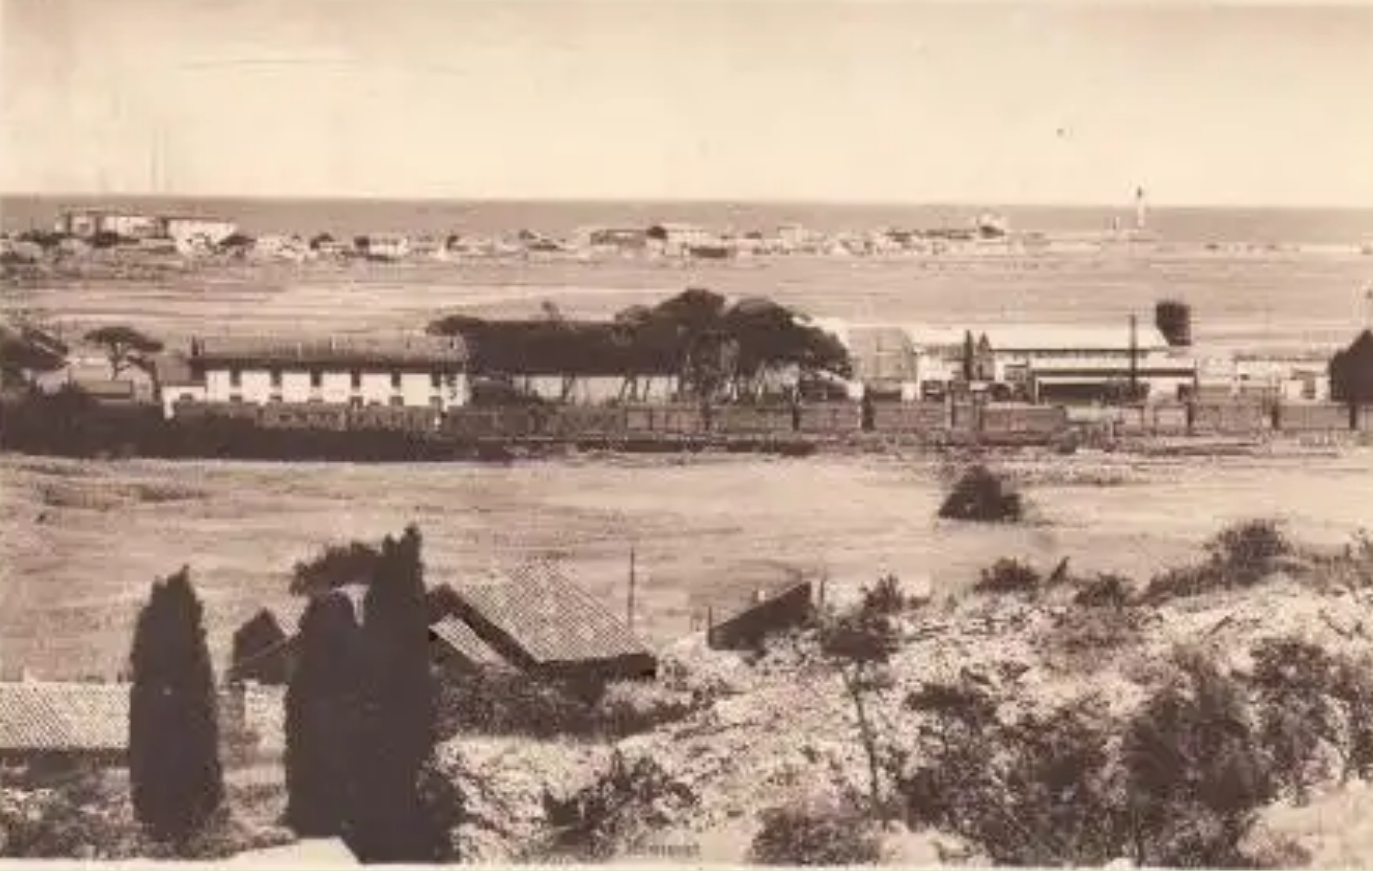
A view of the station site from the West.  The Gare du Midi is visible with a standard-gauge train nearer the camera. The narrow-gauge tramway station was behind. [17]
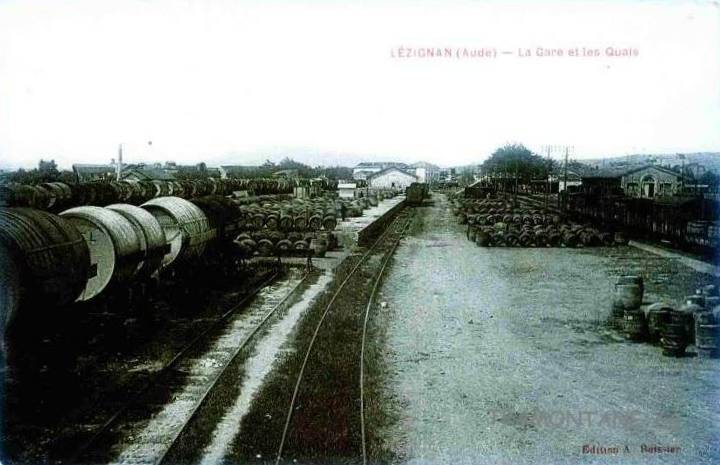
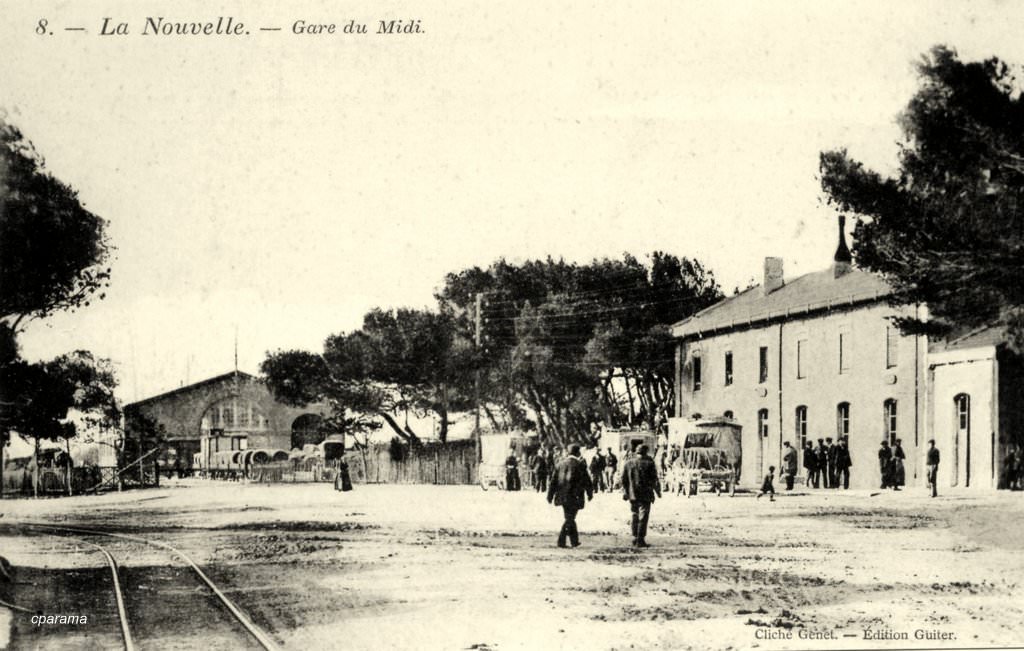
The Gare du Midi passenger facilities are shown on the right of this picture the building ahead is part of the goods handling facilities for the standard-gauge line. The track shown in the front-left of the image is one of the sidings of the Tramways de l’Aude. [19]
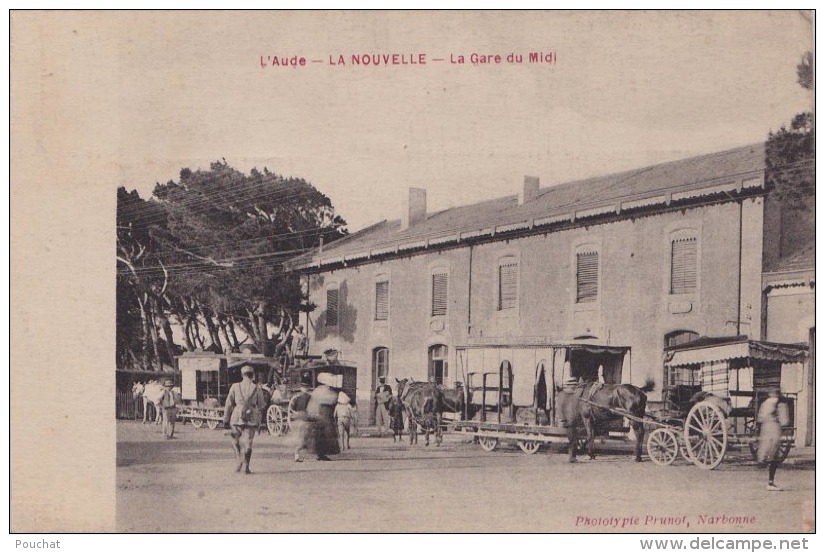
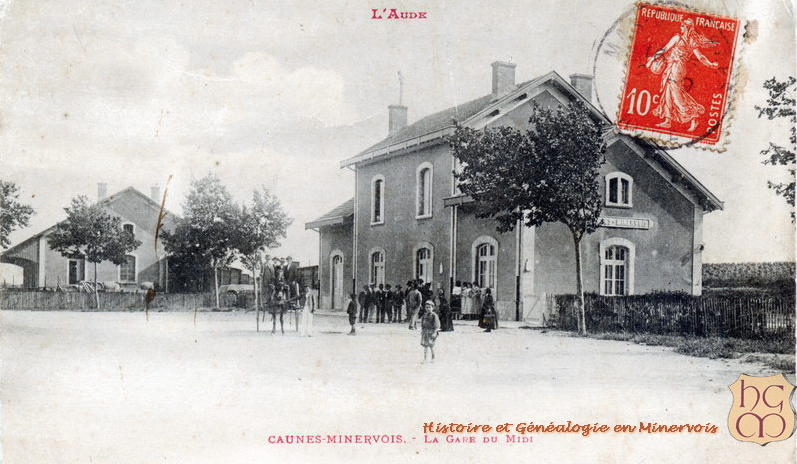
The three images directly above show the Gare du Midi. [20][21]

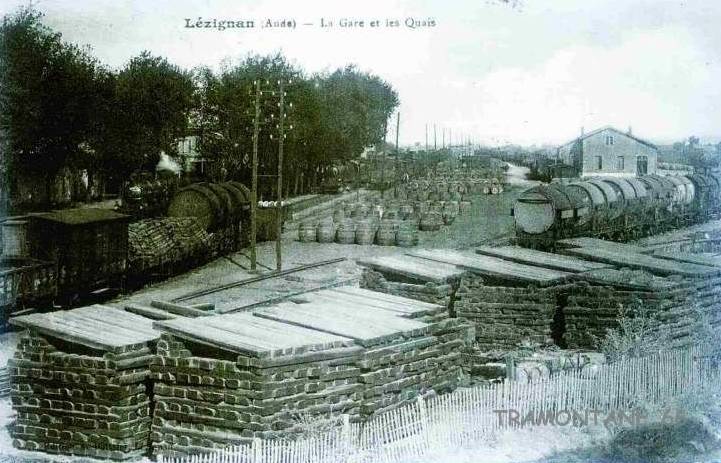
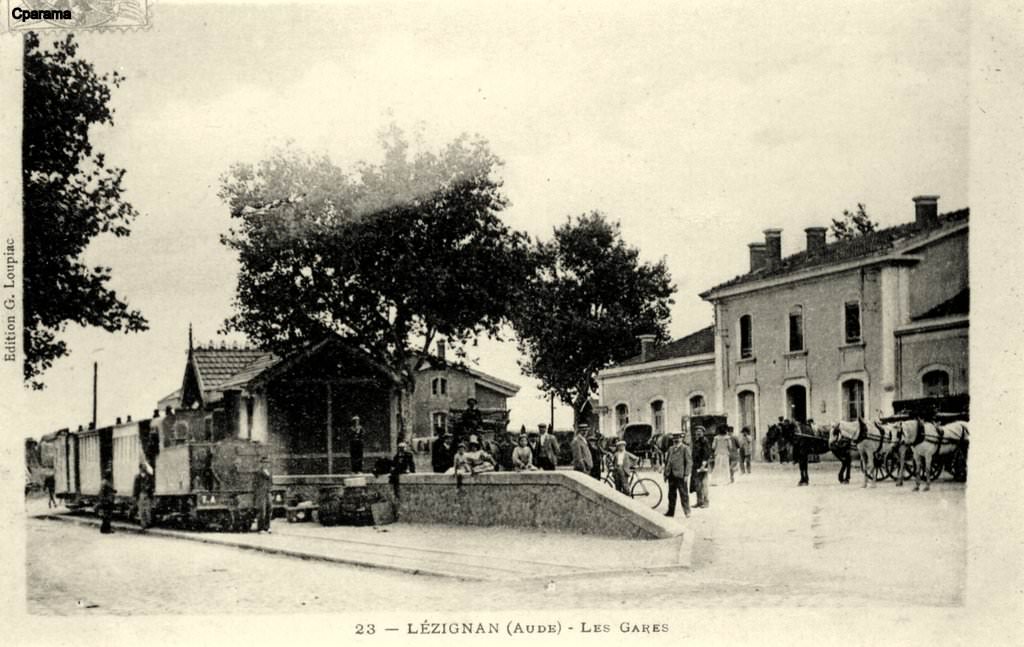
The following images focus more one the Tramways de l’Aude, its station buildings and traffic.
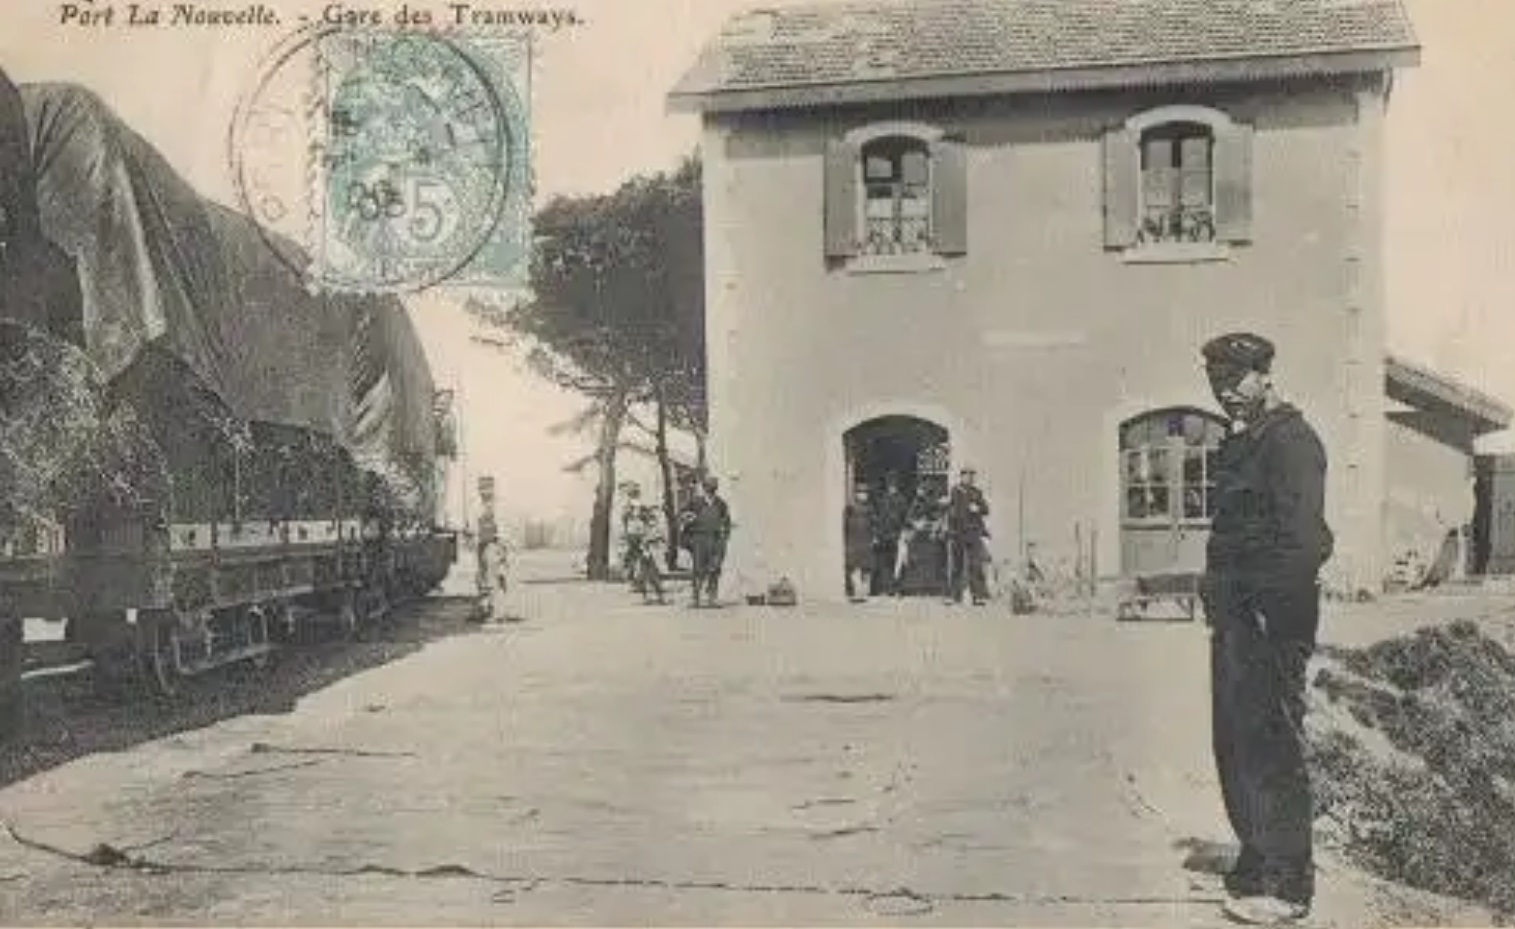
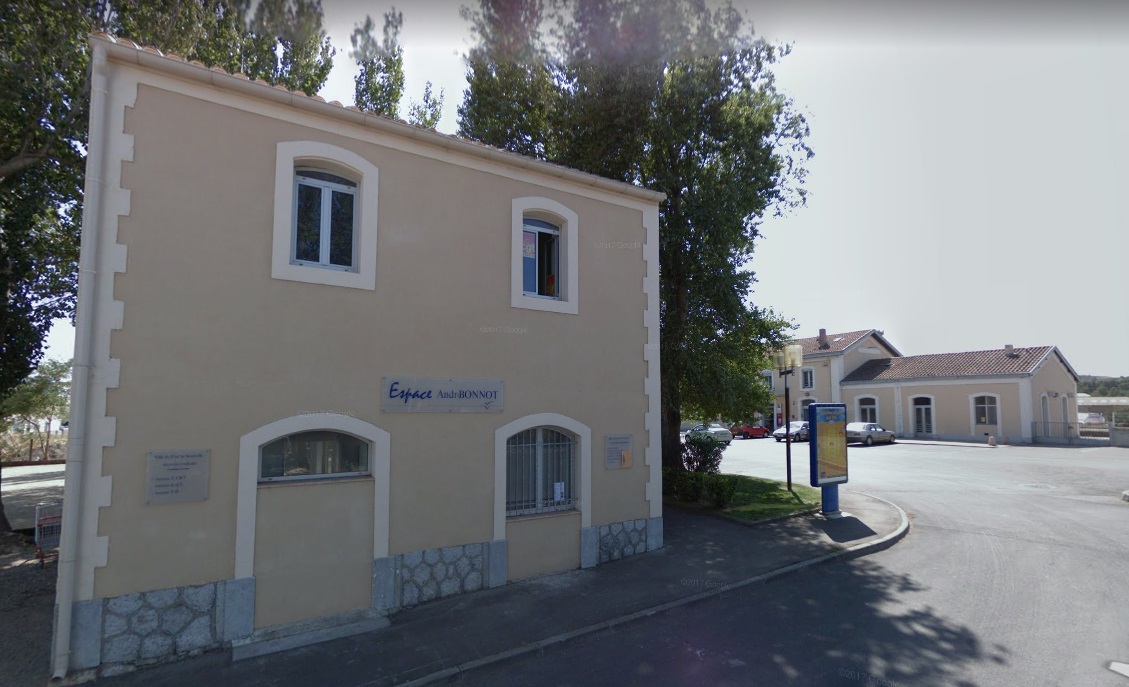
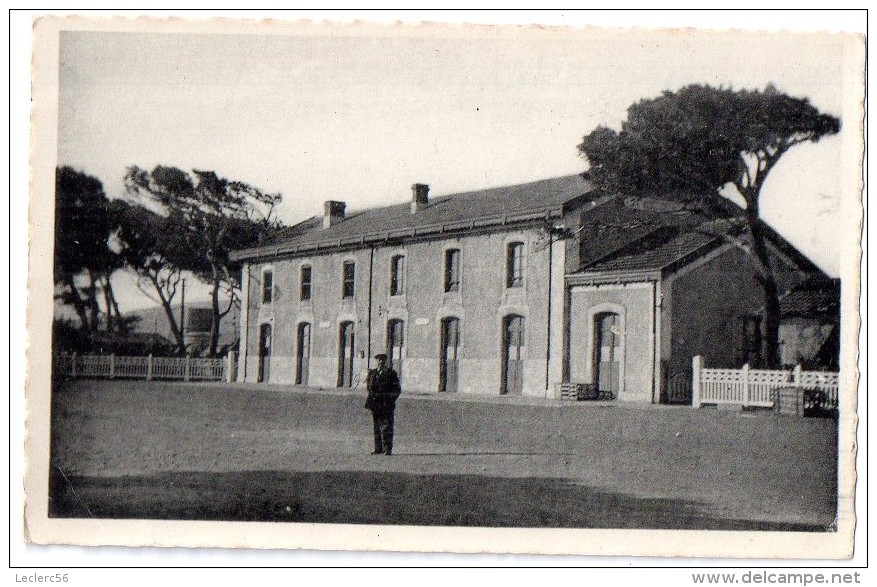
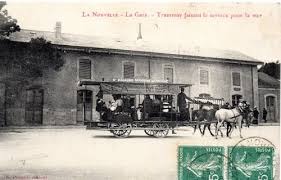
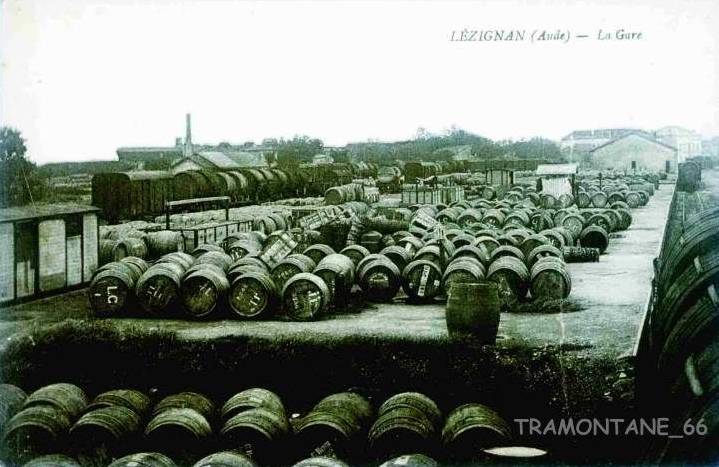
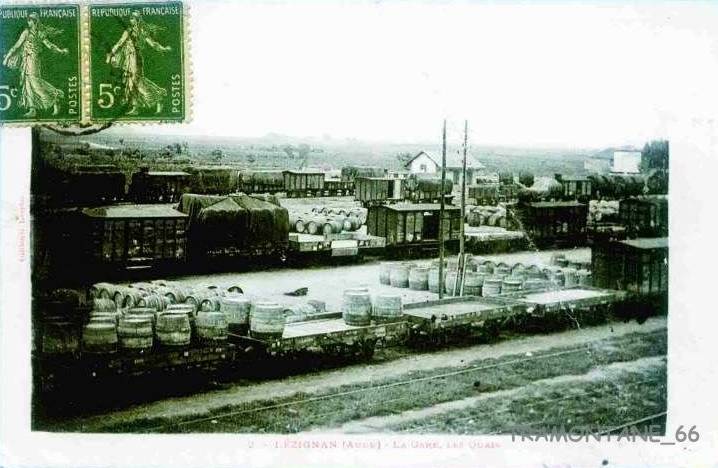
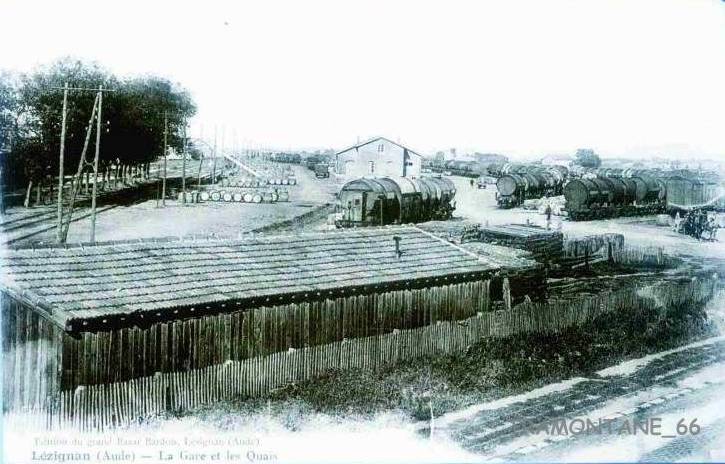
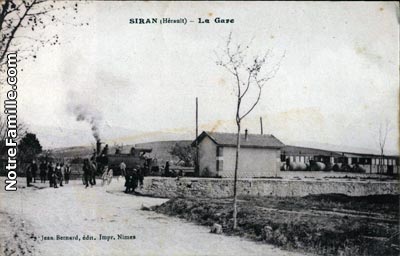
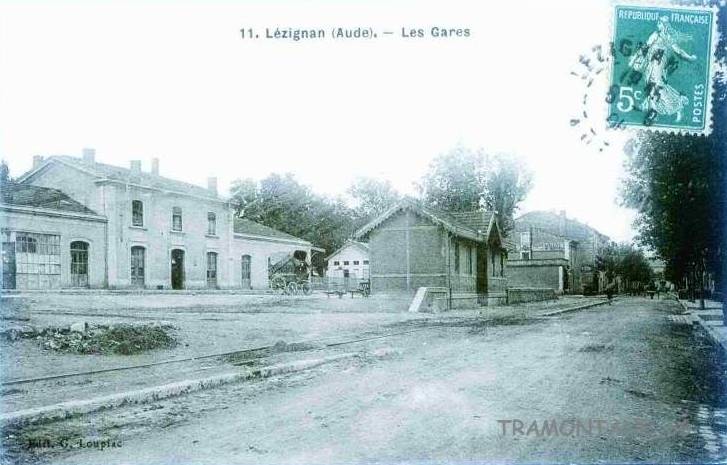
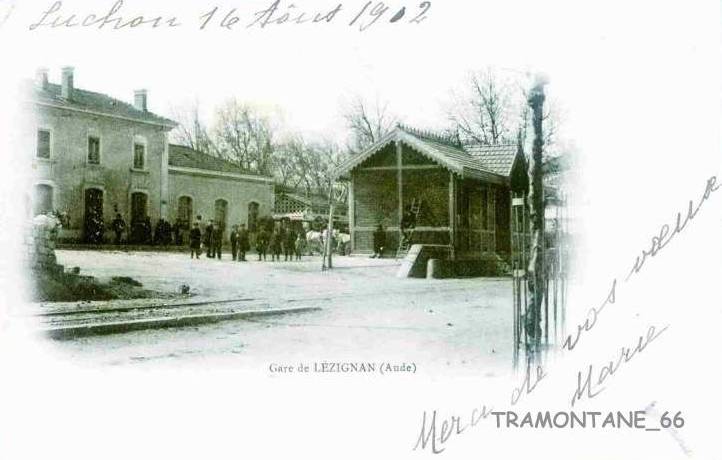
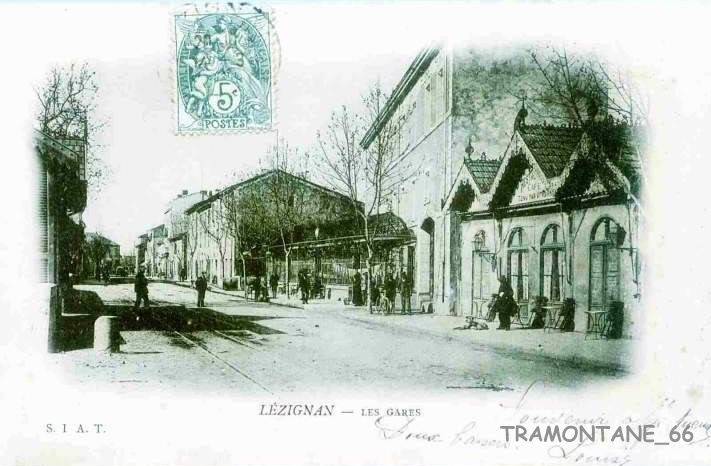
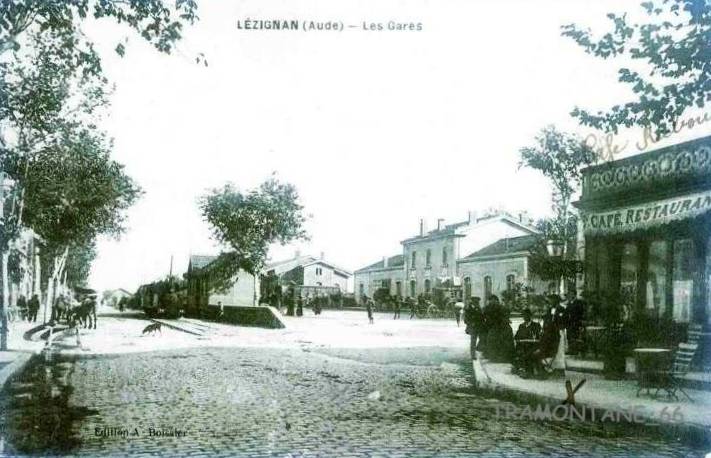
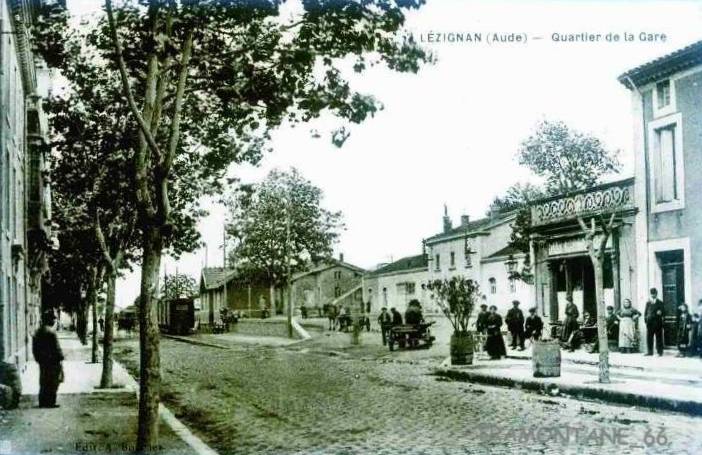
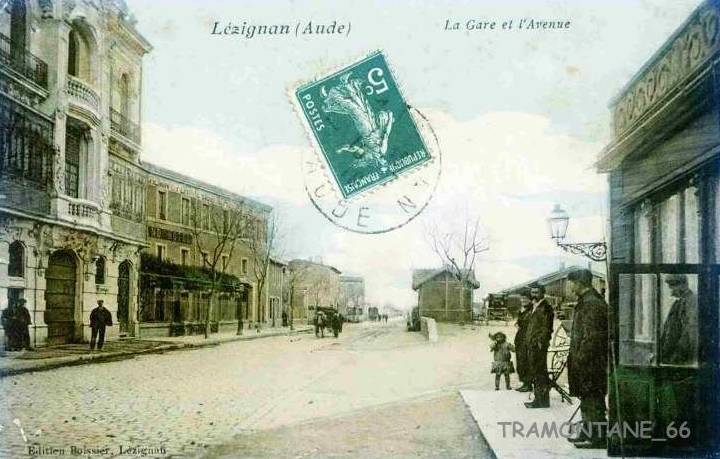
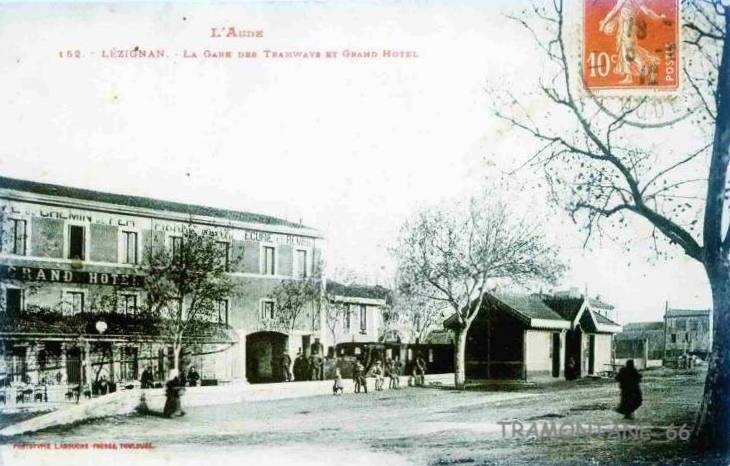
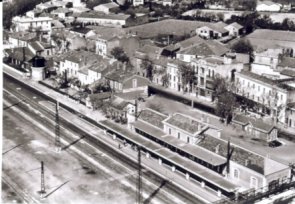
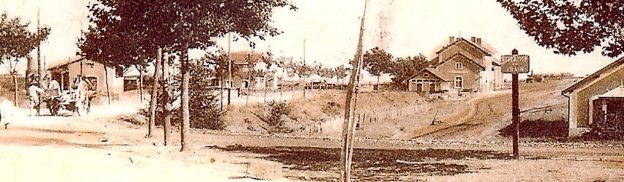
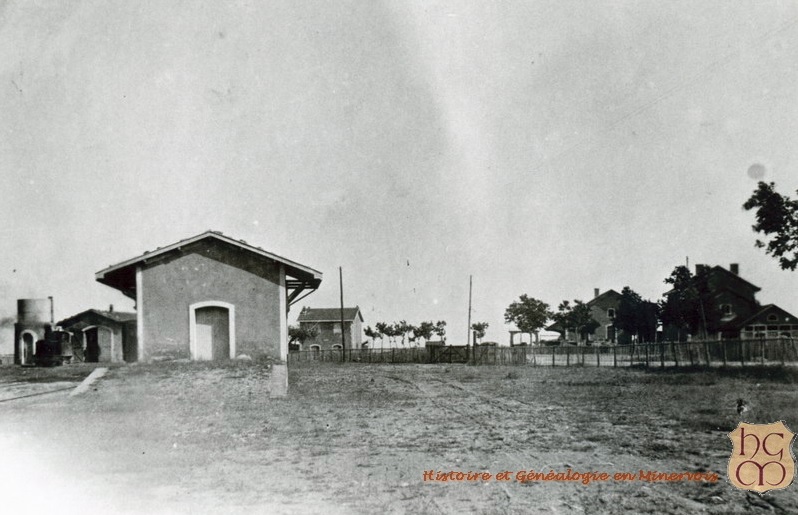
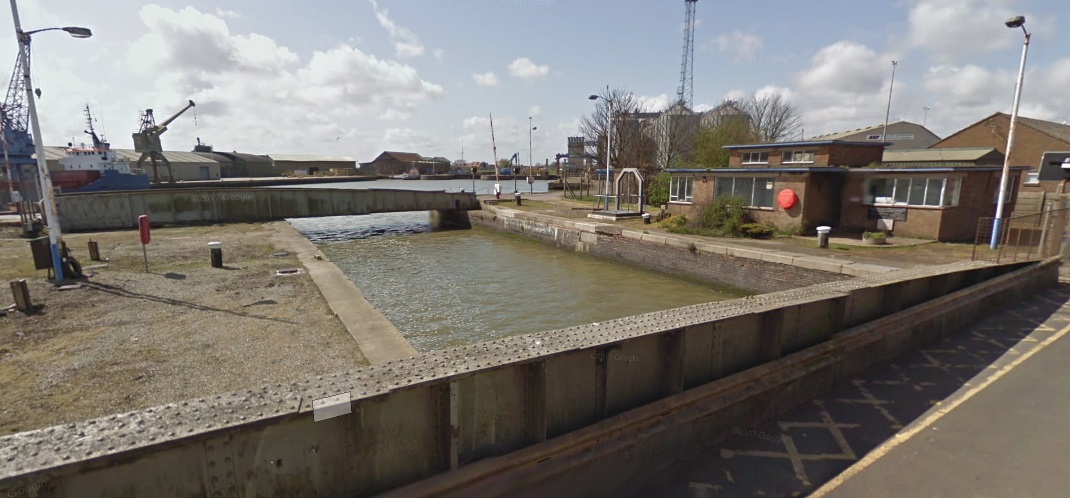
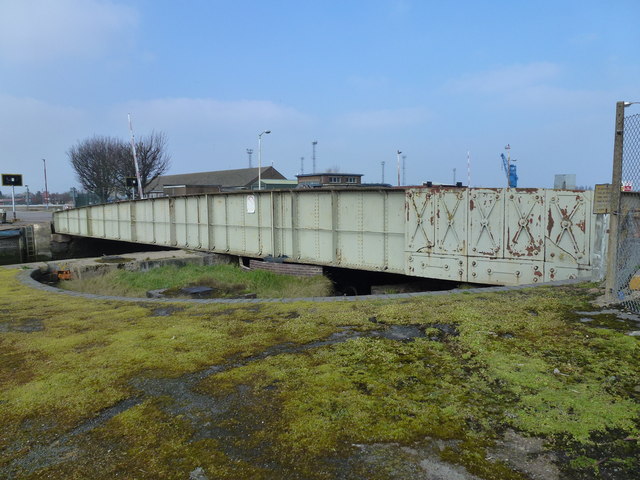
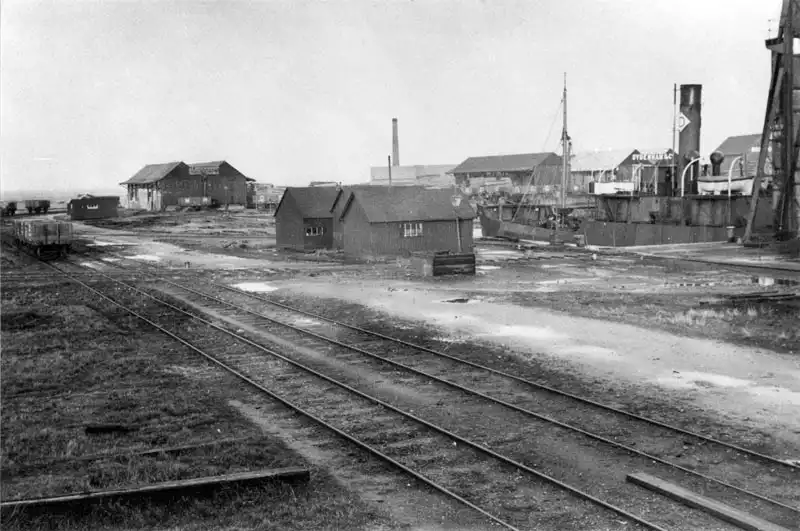
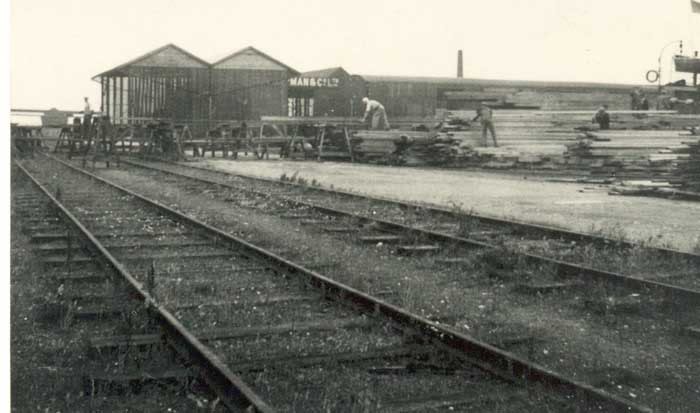
The three monochrome images immediately above show the Tramways de l’Aude facilities at La Nouvelle. The first two are taken from the North the last is taken looking from the South with the Gare du Midi just off shot to the left. Interspersed with these images are two modern pictures taken to illustrate the present condition of the site and to show that the tramway passenger building still remains. [17]

A short branch ran from the terminus out along the Quai du Port and the Avenue de la Mer to the lighthouse at the end of the harbour wall.
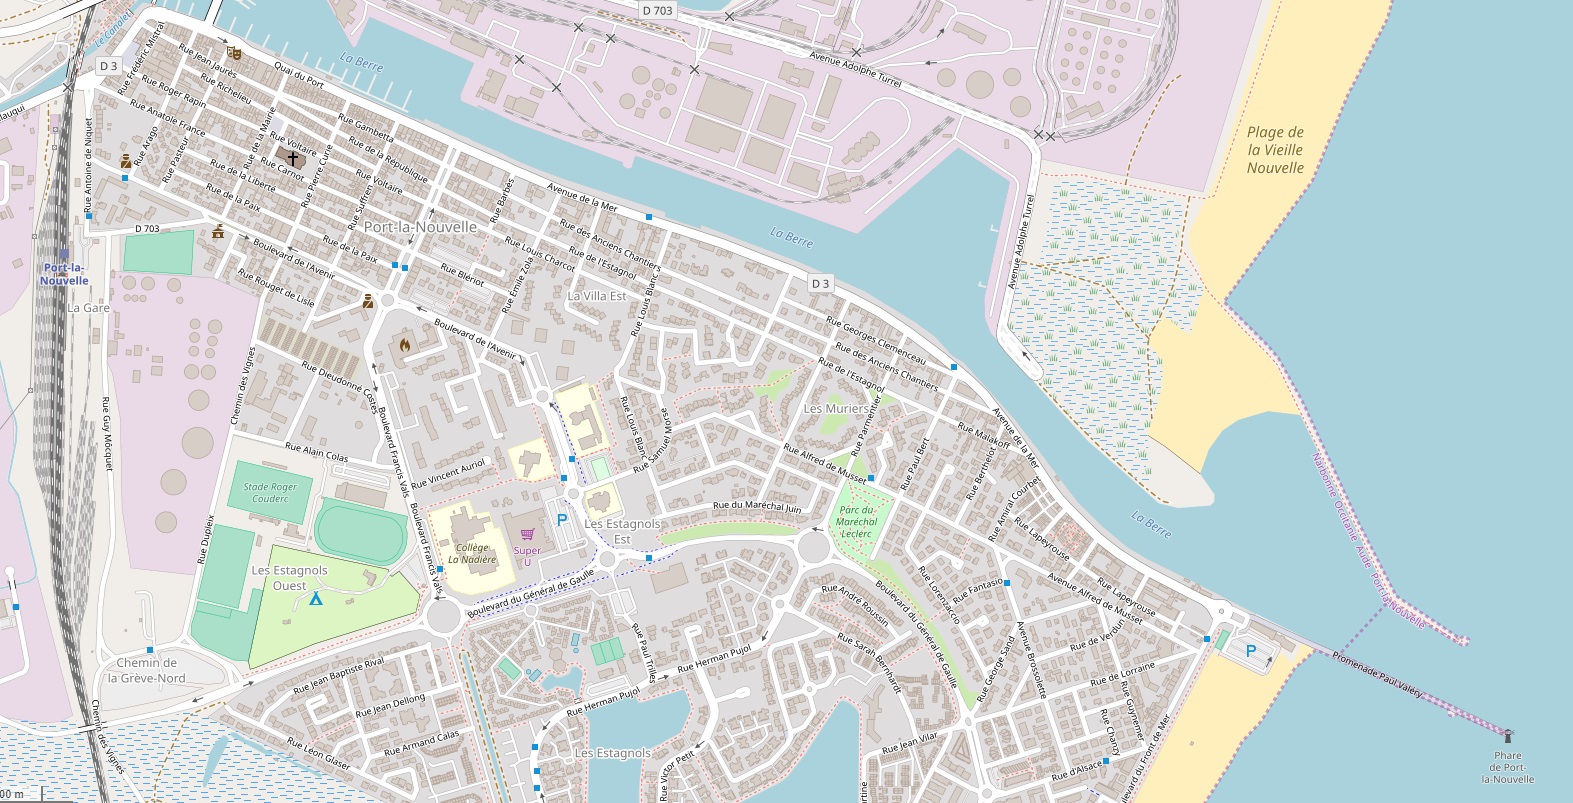
The two images immediately above are taken from roughly the same position on Avenue de la Mer!
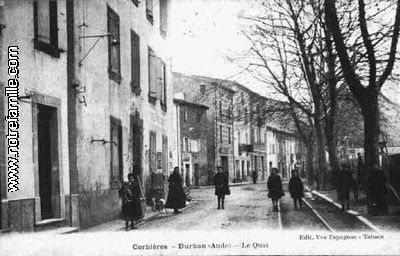
The Tramway can be seen in the forefront of this image of the Quai. [23]A tram trundles along the branch heading for the Gare du Midi. [16]
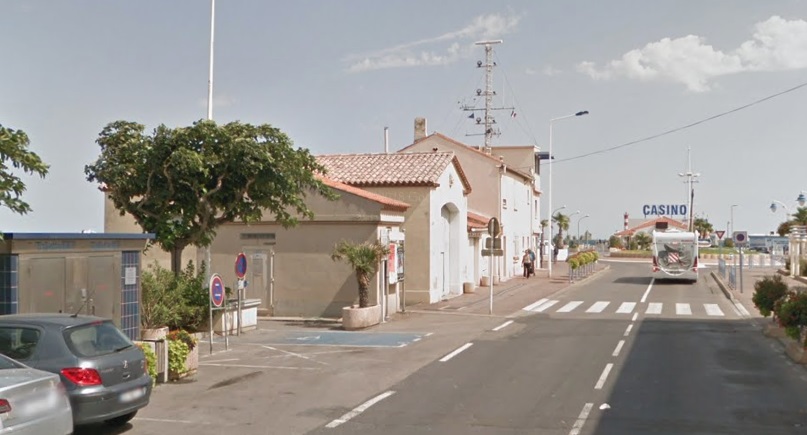
The same buildings but taken from the road rather than the Quai.
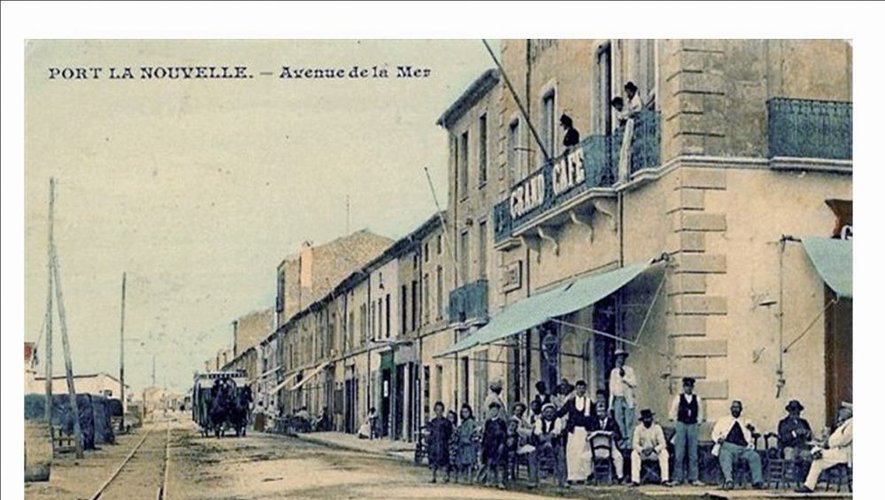
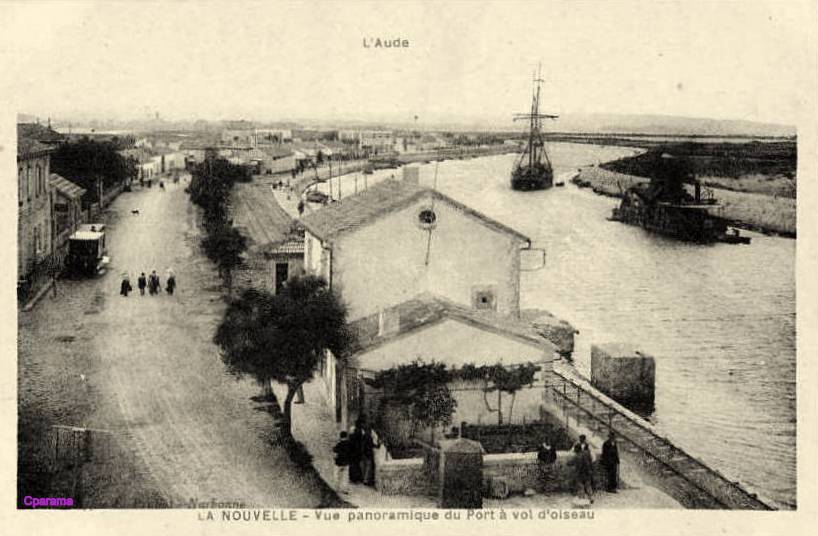
A view looking West along Avenue de la Mer. [19]
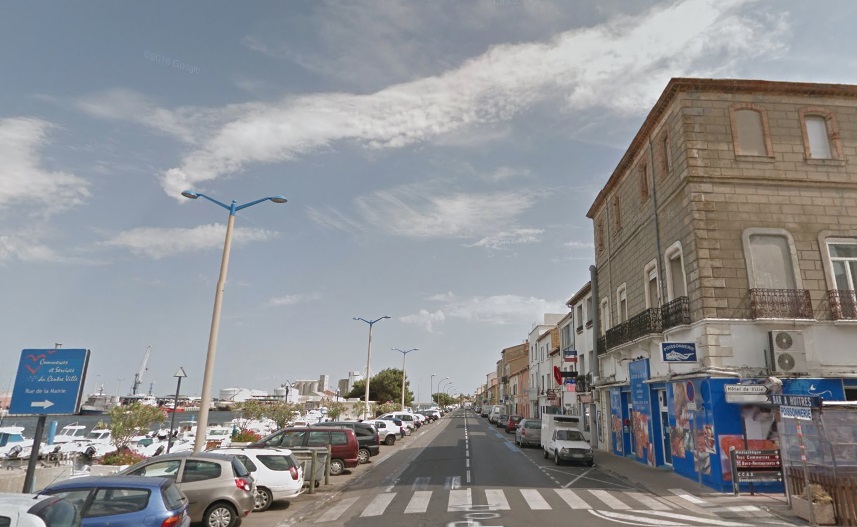
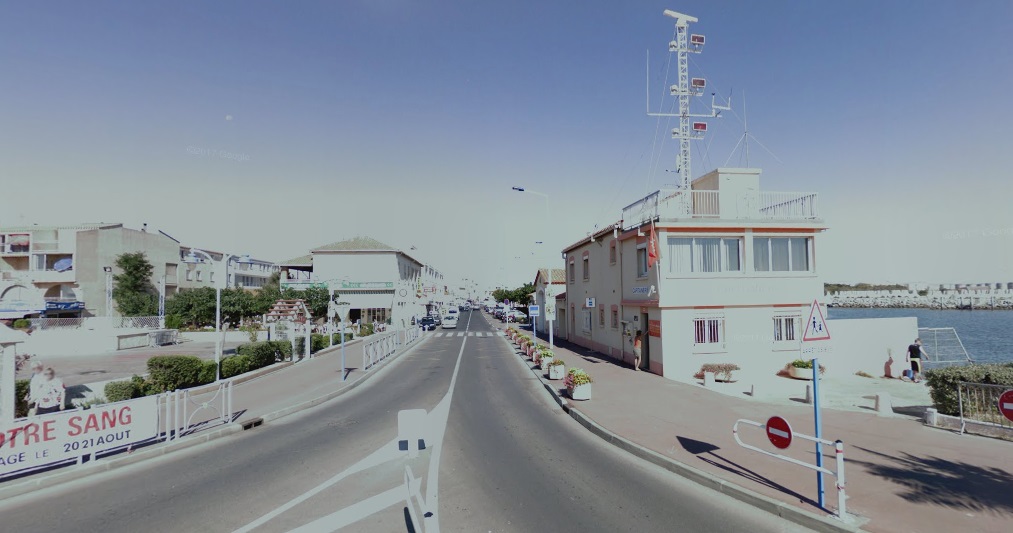
This is the nearest Google Streetview can get to showing the same image!
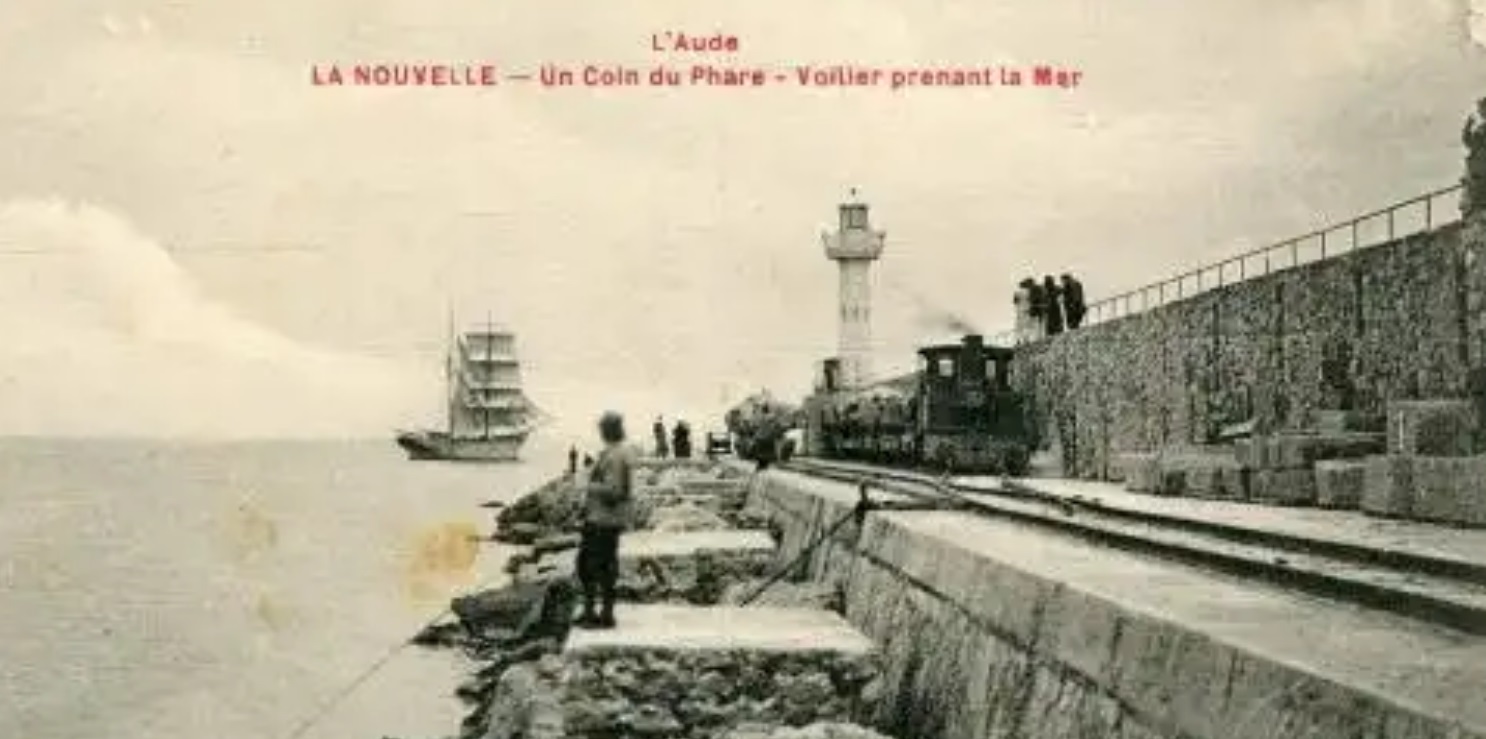
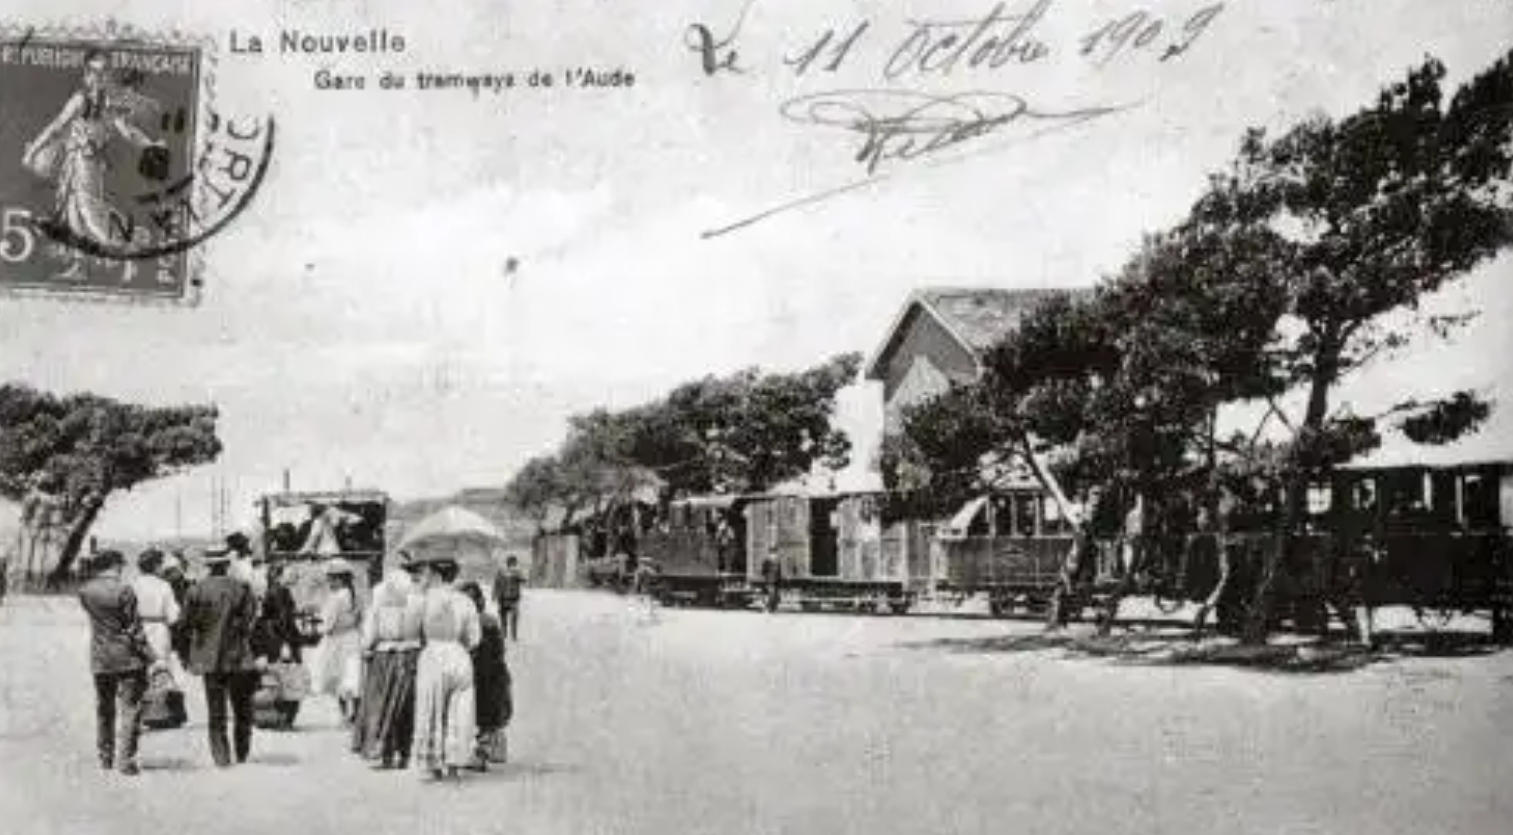
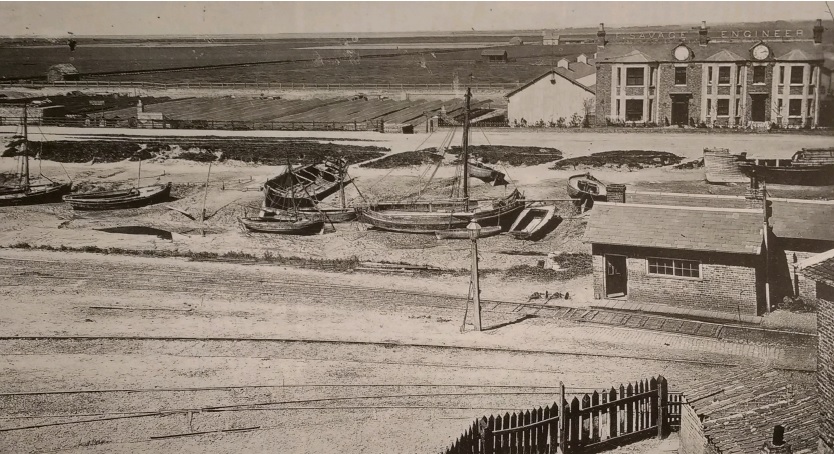
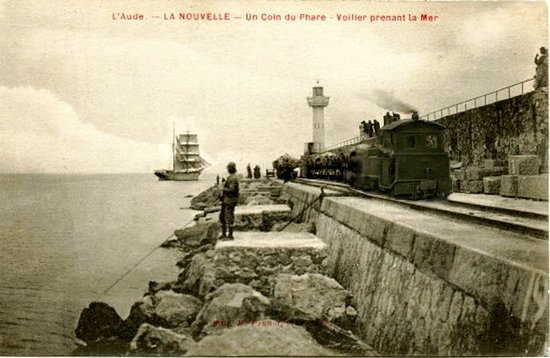
The lighthouse at the end of the harbour wall. The tramway travelled right out to the end of the wall. The two images above are very similar but they are not the same! [16]

The images below show the light-house today. The first is the cloest I have been able to find to the angle of the pictures above.
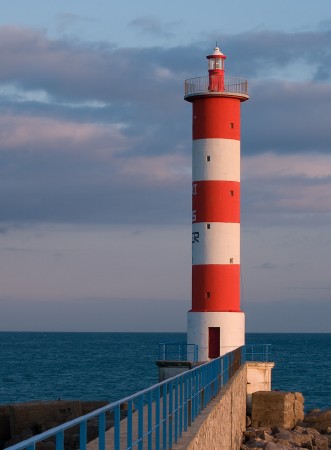
This image (above) is the one used as the record image on the internet listing of France’s lighthouses! [24]

The adjacent image is taken from on top of the sea wall. [25]

The image below is the last image in this post and shows an aerial view of the old tramway route from the lighthouse and then curving back along the Avenue de la Mer, before reaching the Quai du Port and the tramway station close to the image horizon! The beaches at La Nouvelle were and are partciularly popular. Fr the short period of the existence of the Tramways de l’Aude income from this short branch was significant. If only that had been true for the rest of the network! [26]
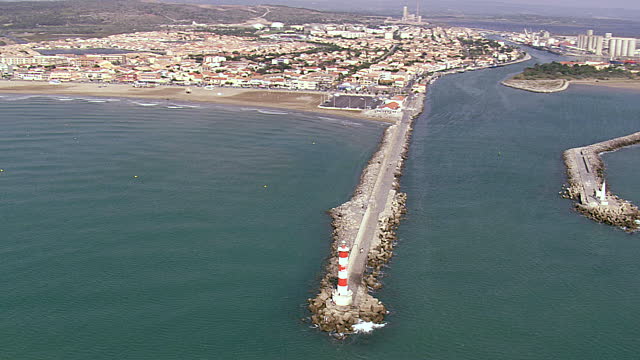
 

References

  1. http://objectif-trains.com/tramways-de-laude, accessed on 25th October 2018.
  2. https://tramways-aude-miniature.webnode.fr/ripaud, accessed on 20th October 2018.
  3. http://www.montelirail.fr/Tous-les-Reseaux-2018-M2_1.68.html, accessed on 25th October 2018.
  4. http://www.cpaaude.fr/THEMES/TRAMWAYS/index_fichiers/Page2764.htm, accessed on 20th October 2018.
  5. http://www.cpaaude.fr/THEMES/TRAMWAYS/index_fichiers/Page2764.htm, accessed on 20th October 2018.
  6. http://forum.e-train.fr/viewtopic.php?f=4&t=40082&start=60, accessed 20th October 2018.
  7. https://www.lindependant.fr/2014/09/14/quand-le-tramway-circulait-sur-l-avenue-des-corbieres,1929254.php, accessed on 26th October 2018.
  8. https://www.geneanet.org/cartes-postales/view/1489269#0, accessed on 26th October 2018.
  9. https://www.tripadvisor.co.uk/LocationPhotoDirectLink-g1221593-d1532261-i209014308-Relais_De_Tamaroque-Portel_des_Corbieres_Aude_Occitanie.html, accessed on 26th October 2018.
  10. http://renovhabitat.legrandnarbonne.com/1048-photos/3881-portel-des-corbieres-credit-photo-jean-belondrade.html, accessed on 26th October 2018.
  11. https://www.booking.com/hotel/fr/relais-de-tamaroque.fr.html?aid=356983;label=gog235jc-hotel-XX-fr-relaisNdeNtamaroque-unspec-gb-tab-L%3Afr-O%3Aandroid-B%3AandroidSwebkit-N%3AXX-S%3Abo-U%3AXX-H%3As;sid=b0566469f8863f77cde47733a9d9380a;dist=0&keep_landing=1&sb_price_type=total&type=total&, accessed on 26th October 2018.
  12. https://www.midilibre.fr/2011/08/04/le-pont-de-tamaroque-a-desenclave-la-commune,366144.php, accessed on 26th October 2018.
  13. https://www.delcampe.net/fr/cartes-postales/europe/france/11-aude/sigean?f=moyens-de-transport:tramway, accessed on 27th October 2018.
  14. https://openagenda.com/jep-2017-occitanie/events/la-tramway-de-l-aude, accessed on 26th October 2018.
  15. https://remonterletemps.ign.fr, accessed on 28th October 2018.
  16. https://cascastelchateau.fr/les-tramways-de-laude, accessed on 28th October 2018.
  17. http://www.cpaaude.fr/THEMES/TRAMWAYS/index_fichiers/Page3478.htm, accessed on 29th October 2018.
  18. https://www.openstreetmap.org/search?query=La%20Nouvelle%20aude#map=16/43.0183/3.0423, accessed on 28th October 2018.
  19. https://www.cparama.com/forum/la-nouvelle-t84-20.html, accessed on 27th October 2018.
  20. https://www.delcampe.net/fr/cartes-postales/europe/france/11-aude/port-la-nouvelle?f=lieux:gare, accessed on 29th October 2018.
  21. https://www.google.co.uk/search?sa=G&hl=en-GB&q=JPEG&tbm=isch&tbs=simg:CAQSlwEJENL1BiSNLbMaiwELEKjU2AQaBAgVCAMMCxCwjKcIGmIKYAgDEij-A9cKlg3gAtkKigO2DbgN2grlHuI50CvjOM8r6znkOMorzSvqOMwrGjA2bms8w4xONqNoGh_1spsaQdLb8Z1Oq0rqFfrLFGDo8dtaWxhKqI0H2WnQKaWo-NjUgBAwLEI6u_1ggaCgoICAESBEm_1nq8M,isz:m&ved=0ahUKEwjHg7bry6veAhWCESwKHaKBAxgQ2A4ILSgC&biw=1345&bih=865#imgrc=Cf7MJPy4Kj0SXM:, accessed on 29th October 2018.
  22. https://www.tripadvisor.com/LocationPhotoDirectLink-g1025646-d12318071-i345268003-Le_Phare_de_Port_la_Nouvelle-Port_La_Nouvelle_Aude_Occitanie.html, accessed on 29th October 2018.
  23. https://www.geneanet.org/connexion/?from=view_limit_redirect&url=https%3A//www.geneanet.org/cartes-postales/view/6259095, accessed on 25th October 2018.
  24. http://www.lighthousesrus.org/showSql.php?page=Med/FranceS, accessed on 29th October 2018.
  25. https://www.ibiblio.org/lighthouse/fras.htm, accessed on 29th October 2018.
  26. https://www.gettyimages.co.uk/videos/la-nouvelle?sort=mostpopular&offlinecontent=include&phrase=la%20nouvelle, accessed on 29th October 2018.

Tramways de l’Aude – Tuchan to Ripaud via Durban

This next journey along Les Tramway de l’Aude begins in the town of Tuchan in the Southeast of the Departement of Aude.The small town of Tuchan – the tramway station was off to the bottom right of this satellite image.A schematic drawing of the station site. The watercourse shown on the sketch will not be the River Petit Verdouble. There was a mill close to the station site and it is possible that the watercourse shown would have been a mill-race! The sketch has the North point to the bottom of the image. [3]The old tramway station site is outlined in pink. In the bottom corner, the old engine shed is still standing.

Joseph Pestel on the RMweb forum (26th October 2018) comments: “There are three buildings left on the old station site still if you include the water tower. The river on the station map is a figment of the cartographers imagination. All there is in reality is a deep drainage channel alongside the road.” [22]This 1942 aerial image shows the station site at that time. The original buildings can be picked out – the engine shed, the passenger building and the goods office. There appears to be no sign of a mill-race. This suggests that the sketch plan of the station may erroneously include the river passing under the station. [4]The route of the line from Tuchan as far as Ripaud. [3]The tramway timetable for Tuchan to Ripaud. [3]The 7 images immediately above show the station site and surrounding buildings. [1][2][3]

Immediately on leaving the station the tramway and the GC105 (D611) crossed the river to the East of Tuchan. I have seen that river given two different names – Le Petit Verdouble and Riviere du Mas de Segure. The images below show trams crossing the bridge over the river.The two images above show trams on Le Pont sur Le Petit Verdouble close to Tuchan. [1][2].

Joseph Pestell comments: “In all these years (40+!), I had never noticed that the caption on that photo of the bridge is wrong. The Petit Verdouble (usually a dry bed) is somewhat further east and does not intersect with the tramway until about a km further east at the junction for Nouvelles. That bridge is indeed over the watercourse (usually dry but a torrent in the 1999 floods) that takes you up past the Mas de Segur towards Palairac.” [22]

The 1930s map adjacent to these notes shows the tramway route from Tuchan to Durban via Villeneuve-les-Corbieres.

The tramway climbed about 100 metres from Tuchan to the Col d’Extreme before dropping down about 120 metres into Villeneuve. The distance to Villeneuve tramway station was about 14 kilometres.

The first few kilometres Northest from Tuchan followed a gentle grade through vineyards with the trams running on the eastern shoulder of the GC105.After just over 2km the road and tramway crossed the Riviere du Col d’Extreme.The modern D611 has its own new bridge. The old GC105 and the tramway route can be seen on the image on the North side of the modern road in the image above. The hills around the road begin to close in and the valley begins to narrow from this point although the gradient of the road remained relatively shallow for a few more kilometres. The tramway continued to follow its eastern shoulder.

The image above, together with the adjacent satellite image [4] leave some significant questions about the actual alignment of the tramway. The 1930s Michelinn Map above suggests that the tramway followed the route of the modern road to the East of the River. However, the 1942 aerial image shows two alternative possible routes for the tramway, one on each side of the Riviere du Col d’Extreme. Reviewing the 1950s 1:50,000 IGN Map leaves the question open.

It is not clear whether the GC105 and/or the tramway were on the West or East side of the river. It is clear on the adjacent aerial image that the road from Nouvelles crossed the River in an East-West direction and then turned south to meet the modern road alignment to the Southwest of the modern bridge at the location shown in the image above. In the image below, the purple horizontal line on the map masks the location of the bridge on the line of the road to/from Nouvelles. [4]

It is not clear what route the tramway followed, but I should be inclined to accept the route given by the 1930s Michelin Map. which would match the thicker roadside line on the 1950s map above. Perhaps the road in the period before the 1930s was aligned to the West of the river and the tramway to the East. The road may then have been realigned to follow the tramway in the period prior to the making of the Michelin Map. I can find no conclusive evidence.

A counter argument is put by Joseph Pestel (26th October 2018), which given his residence close to the line is likely to be most reliable: “At Nouvelles (or rather at the road junction for Nouvelles), one can still see clearly (on the ground rather than with aerial photos) that the road used to stay on the right-hand (west) bank of the Petit Verdouble. There was a single bridge across to the road to Nouvelles. I don’t know at what date the road was widened and taken over two bridges (both washed away in 1999) to run for about 250M on the left-hand bank of the river. But I am sure that I have seen a pic of a halt at Nouvelles for the tramway on that side of the river. So my guess is that the road was diverted at the time the tramway was built. But not impossible that the road was moved after the tramway was built or even after closure which would explain the confusion on the Michelin map.” [22]

North of this location the road and tramway approached the Col d’Extreme. The modern road has been cut through the high point of the Col. As a result the old road alignment seems to have been lost and it is also difficult top pick out the tramway alignment. The 1942 Aerial image below shows that the road and tramway diverged close to the summit of the Col.The Col d’Extreme. The GC105 and tramway rose realtively steeply to the summit. Beyond the summit the topography dictated that the GC105 needed to fall way relatively quickly and a single hairpin bend was required to allow this to happen. The tramway needed a more gentle route to the North of the summit and diverged to the East of the road and followed a wider arc. [4]

The tramway and the GC105 remained distinct from each other for around a kilometre North of the Col. Both dropped quickly away from the summit but the tramway needed a gentler decent than the road. The earthworks associated with the modern D611 seem to have obliterated the old tramway and GC105 road.

On the decent to Villeneuve-les-Corbieres the tramway switched to the western shoulder of the GC105. I could find little or no evidence of the tramway along this stretch of the modern D611, except perhaps some old bridge abutments! I guess the evidence is tenuous at best, but we do know that this was the route followed by the tram and that the tracks ran on the West side of the GC105 (D611), so it is just possible that the concrete blocks visible beyond the  modern bridge railings below are remnants of the tramway?When the road and tramway reached Villeneuve-les-Corbieres they curved to the East through the old village centre. The Michelin map from the 1930s shows a small village on the South side of the River Berre. The village has extended across the river and the two banks of the river are linked by a series of bridges.A Google Streetview image which shows the three bridges crossing the river bed in Villeneuve-les-Corbieres – this is taken from the far bank. The old village is ahead across the river and the tramway and GC105 were beyond.The tramway route through Villeneuve-les-Corbieres.

After passing through thenheart of the old village, trams encountered the tramway station close to the River Berre and to the East of the village.The GC105 (D611) left the village  heading East and the tramway station was encountered on the first significant piece of open ground alongside the road. The first house on the left of the picture appears in one of the 21st Century images below. [5]The two images immediately above take us much closer in on the station! The first is an exceprt from the earlier image. [6]Wine was clearly a major commodity carried by the tramway! [7]Looking from the village towards the station site in the 21st Century. The house on the left is the one noted in the monochrome image of the village taken from the South and shown above.Still travelling in the same direction, this is the approximate location of the tramway station at Villeneuve-les-Corbieres. There is nothing of the station left to see and in the 21st Century there has been significant development on and around the site.This view of the old station site is taken from a minor road on the North side of the River Berre. The single storey buildings are built on what seems to have been the station site.

The tramway and GC105 followed the valley of La Berre from Villeneuve-les-Corbieres to Durban. It approached Durban Corbieres from the West and remained on the line of what is now the D611 through the village.The route is confirmed on the adjacent 1930s Michelin Map which shows the line on the North shoulder of the ols GC105 between Villeneuve and Durban. The location of the station can also be picked out to the East of the village of Durban and on the North side of the GC105.

Worthy of note is that in the 1930s the village is shown on the map as being completly to the south of the river Berre with one bridge crossing the river and carrying the IC40. on the OpenStreetMap image above there are two further bridges shown to the East of the IC40 bridge and the village has expanded significantly to the North of the river.

Durban is a town that has experienced its fair share of natural disasters. There have been significant floods over many centuries. The historic postcards below show a range of different locations along the Avenue de la Gare which later became the Avenue des Corbieres and the D611. In the pictures the flood defences vary from something quite elaborate, with steps to allow access to the top of the wall, to plain walls.

The more modern images culminate in pictures of present day arrangements which appear to have widened out the valley and so reduced the height of the flood defences. Before looking at the postcards it is worth noting the debilitating nature of the November 1999 floods. The picture immediately below shows the extent of the floods overlain on a map of the village. [12]The tramway entered the village from the Southwest. The original route across the River Berre could be seen on the left as the trams entered the town passed the Gendarmerie.The river bridge, the tramway passed behind the Gendarmerie. [10]

The first series of pictures below centre around the junction between the modern Avenue des Corbieres and the Rue du Fort.In this image there is a plain flood-defence wall on the left. The road to the right is Rue du Fort and the Fort can be seen at the top of the hill. The tramway can just be picked out in the carriageway on the left of the picture [8]The same location on a different location. [9]The tramway is more obvious in this image. The picture was taken from a point slightly further to the West along the flood-defence wall. [10]The same location in the 21st century. The flood protection now appears almost non-existent.A little further East and looking back to the West. the steps to the level of the top of the flood defences are on the right of the picture and there is evidence about halfway up the right-hand side of the image of the lattice girder bridge across the river. [10]A similar image in the 21st century. These are now the only steps to a higher level and provide access to the lattice girder bridge over the River Berre.

These next pictures are centred on the junction between the modern Avenue des Corbieres and Rue du Centre.Rue du Centre is the road off to the left in this image. We are looking West along the Avenue des Corbieres [5] This image is taken from a point a few metres further to the East than the one above it. [8]We have turned round to face East. The building at the centre of the image seems very similar to that on earlier images. The difference is that this one has windows facing West. Note the stone steps which are not evident in the two images above this one. [9][11]This image is taken from a point slightly further to the West. [9]Approximately the same location in the 21st Century. As above, there is now only a dwarf wall to provide a parapet to the river wall rather than the earlier high flood-defences.Two aerial images of the village showing two different river levels. The first shows very little water in the channel. [11]As the tramway approached the station at the west end of the narrower road alongside the river, the road widened out for a short distance. [13]A similar view in the 21st century. Both views are taken looking West. The modern image shows just how accessible the watercourse now appears!We have already noted that the station at Durban Corbieres was to the East of the village centre. [9]The tram sets off down the road from the station back into Durban – today it is the D611, Avenue de Narbonne. [13]Just a few yards further down the road, but this time without the tram. [13]

From Durban the tram passed through one more station before reaching the junction at Ripaud. The stop for Villeseque des Corbieres was on the main road a distance West from the village. The site of the station was just to the North of the junction between the GC105 and the IC50 to Villeseque.After the station for Villeseque the tramway and the GC105 headed North towards Ripaud. Both road and tramway followed the eastern bank of La Berre with the cream way on the western shoulder of the GC105. 

Within a kilometre of Ripaud the river alignment was such that the road and tramway could not continue to follow its East bank. The GC105 and the tramway crossed to the West bank and the tramway then entered a short tunnel.

The old road eventually was closed and the new D611 now runs through the old tramway tunnel. The satellite aerial image below is that the highest resolution possible, The image was taken in 1962 prior to the diversion of the road. [4]

The road and tramway crossed the River Berre on a single span bridge.

The adjacent map, centred on Ripaud, shows the location of two short tunnels. That circled in blue is the tunnel on the line between Durban and Ripaud. [15]

This is the only image I have found which shows a tram, the tunnel, the bridge and the road all in one picture. The green arrow shows the route of the road which is highlighted below with a black arrow. [20]This view is taken from the West across the bridge over the Berre and shows the tramway tunnel portal. The GC105 turned to the right and followed the river. [16]A much later view showing the D611 now running through the widened tramway tunnel. [17]The single-span arch bridge over the River Berre south of Ripaud. [18]The North portal of the old tramway tunnel now takes the D611, the old GC105 is to the left of the rock curtain and is no longer used for traffic. The river flows below and to the left.The approach to the road junction at Ripaud in the 21st Century. The arch bridge crosses the Ruisseau de Ripaud immediately adjacent to it confluence with La Berre. The inn ahead is in Ripaud. The tramway cross the bridge in the foreground and then formed a junction with the tramway from the North.An early view of the bridge. [21]

We noted in the last post that there is an excellent model of the tramways of Ripaud and we will see more images of that model in the next post. Here is one to finish this length of our journey, (c) http://objectif-trains.com/tramways-de-laude. [19]This picture of the model railway shows the model of the inn which can be seen in the Goggle Streetview image above! [19]

References

  1. https://www.cparama.com/forum/tuchan-t246-60.html, accessed on 21st October 2018.
  2. http://association-amis-aguilar.eklablog.com/cartes-postales-anciennes-gallery16764, accessed on 21st October 2018.
  3. http://www.cpaaude.fr/THEMES/TRAMWAYS/index_fichiers/Page3035.htm, accessed on 21st October 2018.
  4. https://remonterletemps.ign.fr, accessed on 22nd October 2018.
  5. http://www.thezandescorbieres.com, accessed on 15th October 2018.
  6. http://www.cpaaude.fr/THEMES/TRAMWAYS/index_fichiers/Page2790.htm, accessed on 23rd October 2018.
  7. https://www.cparama.com/forum/villeneuve-les-corbieres-t1029.html, accessed on 23rd October 2018.
  8. https://www.communes.com/cartes-postales-anciennes-durban-corbieres, accessed on 24th October 2018.
  9. https://www.cparama.com/forum/durban-t251.html, accessed on 24th October 2018.
  10. http://noriadurbanaise.id.st/durban-hier-c356269, accessed on 24th October 2018.
  11. https://www.delcampe.net/fr/collections/search?term=durban%20corbieres, accessed on 24th October 2018.
  12. https://www.researchgate.net/figure/Reconstruction-and-development-of-Durban-Corbieres-following-the-November-1999-floods_fig2_309345160, accessed on 24th October 2018.
  13. http://www.cpaaude.fr/THEMES/TRAMWAYS/index_fichiers/Page3036.htm, accessed on 24th October 2018.
  14. http://www.cpaaude.fr/THEMES/TRAMWAYS/index_fichiers/Page2855.htm, accessed on 24th October 2018.
  15. http://www.tunnels-ferroviaires.org/tu11/11152.1.pdf, accessed on 25th October 2018.
  16. https://www.cparama.com/forum/ripaud-t1058.html, accessed on 25th October 2018.
  17. http://www.gite-corbieres.fr/2014/09/se-baigner-en-riviere, accessed on 25th October 2018.
  18. https://randoslondres.wordpress.com/2010/09/24/etape-1-corbieres, accessed on 25th October 2018.
  19. https://tramways-aude-miniature.webnode.fr/ripaud, accessed on 20th October 2018.
  20. http://www.inventaires-ferroviaires.fr/hd11/11203.a.pdf, accessed on 15th October 2018.
  21. http://informations-documents.com/environnement/coppermine15x/displayimage.php?pid=32231, accessed on 25th October 2018.
  22. http://www.rmweb.co.uk/community/index.php?/topic/136974-tramways-de-laude/page-2, accessed on 29th October 2018.

Tramways de l’Aude – Les Palais to Ripaud

For this next post, we have travelled back on the line from Mouthoumet to Les Palais and are ready to explore more of the Tramways de l’Aude closer to the Mediterranean coast.

Les Palais station is in the middle of a triangle of tracks which allows trains to be directed between Fabrezan, the terminus at Mouthoumet and Thezan, This is not in an urban area, it is isolated and only a short distance from Saint-Laurent-de-la Cabrerisse, hence the legend of the postcard below. [1]The station building at Les Palais in the very early 21st Century!A schematic plan of the station. [2]This is not the best quality of image but it shows the station at Les Palais. [5]

Continuing eastward towards Thezan and La Nouvelle, the train passes in front of the Pech Maurel farm, through the junction with the minor road to Coustouge, Aude, not to be confused with Coustouges, Pyrenees Orientales, which runs via Parazols along the GC106 (D106) [1]

The tramway remains on the GC3 (D611), traversing wide open vineyards to a halt close to Villerouge-la-Cremade. I have not been able to find any information about this halt other than the fact that it existed and was close to the road to Villerouge-la-Cremade.The probable location of the tramway halt for Villerouge-la-Cremade.

Beyond Villerouge-la-Cremade, the trams would pootle along at a steady pace on the North side of the straight GC3 (D611) to the junction with the GC12 (D613) where the tramway and the main road turned to the Southeast. The present D611 bears the name Avenue de la Gare as it enters Thezan-des-Corbieres. The station location was just to the Northwest of the town, roughly where the picture below is taken.The location is clearly marked by the red circle on the map above. As will be noted later in this post, the location can be fixed exactly by the remaining station buildings. [3]The four pictures above all show the main station building at Thezan. [4][5] Thezan was a junction station receiving trains from a number of different routes. It was one of the busier stations on the network. The two images immediately above show that the main station buildings are still in evidence in the early 21st century, in use as a road maintenance depot. [3]

The junction was to the South east of the town. Trains to Narbonne would bear off to the left.Here a train approaches from Narbonne. The picture shows the telephone booth for the pointman. Given the heavy traffic of passengers and goods, the role of the pointman in Thézan was a position of high responsibility. With the arrival of a train from Narbonne, he had to make sure that no train was due on the common stretch Durban – Port La Nouvelle, then telephone to the train station of Thézan to obtain the authorization to switch the points. [5] There is an excellent page written in fench on the site www.thezandescorbieres.com which tells the story of the station. Auto translate in Chrome is a real boon! [5]

There was a small halt in the centre of Thezan at the beginning of Avenue de la Mer. The pictures below show the location early in the 20th and 21st centuries. [4]

The tramway junction was to the Southeast of the town. This is the location in 2017. The large buildings on the right of the picture are the Wine Co-operative buildings. When the tramway was in use the D423 did not exist. The 1930s Michelin map show the tramway heading off across the fields towards Montseret and Saint-Andre as below. We will return to the route towards Narbonne in a future post. For now, we continue Southeast towards Donos and Mont plaisir. As can be seen on the map above, the tramway follows the Northeastern shoulder of the GC3 (D611) all the way to Donos which is the location of a vinyard an little else in the 21st Century.

The tramway continues along the left-hand shoulder of the GC3 to Monplaisir. Over much of this length the tramway ran in a straight line and at a level grade. Monplaisir was another small hamlet and slipped quickly by as trams trundled on to the next junction/station at Ripaud.

The route to Ripaud was not initially demanding on trams, the terrain was flat and grades were shallow. The GC3 (D611) and the tramway followed the line of the Ruisseau du Ripaud towards the hills. As the hills began to close in around the river, road and tramway gradients still remained reasonable, as can be seen in the Google Streetview images below.At one location the road curvature was a little tight for the tramway and the bend was eased.The location in the Google image above is shown at the time of the tramway in this image. The tramway tunnel has been removed and a cutting provided for the modern D611. [7]

he image below shows the location of Ripaud Station in 2017. Our route from Thezan comes in along the D611 from the left. The route from Durban and the South comes in from behind the camera and the route to Portel heads of into the distance on the right side of the picture The station itself was a little way up the route to Portel as can be seen in the sketch plan below. [8]  A series of postcard images of the station follow below. The first two show the inn in the picture above. [8]The two tramway lines are evident in the image immediately above. [8]This image shows the station building on the North side of the road with the tramway tracks to the South side of the road. [7]

We are finishing this section of our journey at Ripaud because it is a junction station. We will return to it in the next post as we travel to it along the line from Durban. It is worthy of note that Ripaud is the subject of an excellent model of the Tramways de l ‘Aude made and operated by a team that take it around exhibitions in France, (Marie, Pascal and Christophe). [6]

Their website is really worth a visit – https://tramways-aude-miniature.webnode.fr. [6] They say: “The model of the Ripaud station is composed of two modules, 2 metres long and 60 cm deep. In order to respect the original layout, HOm scale was required. The left side, made by Christophe, represents the inn at Ripaud located in front of the River Berre, the way going left towards Tuchan and crossing a bridge and the one to the right to Lézignan. Pascal made the other module, the passenger building and the Ripaud depot overlook a large vineyard. Further on, towards Portel, a small house served as a dormitory for the staff. Marie created the backdrop of the two modules.”

References

  1. Michel Vieux; Tramways a Vapeur de l’Aude; R. Latour Editions 14 rue Sébile 09300 Lavelanet, 2011.
  2. http://www.cpaaude.fr/THEMES/TRAMWAYS/index_fichiers/Page3648.htm, accessed on 18th October 2018.
  3. http://www.inventaires-ferroviaires.fr/hd11/11203.a.pdf, accessed on 15th October 2018.
  4. http://www.cpaaude.fr/THEMES/TRAMWAYS/index_fichiers/Page4306.htm, accessed on 19th October 2018.
  5. http://www.thezandescorbieres.com/train.htm, accessed on 19th October 2018.
  6. https://tramways-aude-miniature.webnode.fr/ripaud, accessed on 20th October 2018.
  7. https://cascastelchateau.fr/les-tramways-de-laude, accessed on 20th October 2018.
  8. http://www.cpaaude.fr/THEMES/TRAMWAYS/index_fichiers/Page2764.htm, accessed on 20th October 2018.

Tramways de l’Aude – Fabrezan to Mouthoumet

We return to Fabrezan in order to continue our journey on Les Tramways de l’Aude. The tramway routes in the village of Fabrezan are shown as black lines on this map. The bridge over the River Orbieu is circled in red. The village station was on the northern edge of this map. [1]The two images above show the bridge at Fabrezan. The first, at the time the tramway was in use, the second, in the early 21st century. [1]This postcard shows a view of the village and bridge and is taken in the early 20th Century from the East. [2]This view is taken from the West. [3]

After crossing L’Orbieu the tramway followed the GC112 (D611) as far as Les Palais. In the course of this short journey, it first followed the wetsern shoulder of the GC112 and then swung away from the old road to the West, to loop round to join the road crossing the River Nielle a  tributary of L’Orbieu. It appears that the modern D611 now follows the tramway alignment. The tramway then swung southwards through the hamlet of Les Palais and then entering the village station. 

Les Palais station is in the middle of a triangle of tracks which allows trains to be directed between Fabrezan, the terminus at Mouthoumet and Thezan, This is not in an urban area, it is isolated and only a short distance from Saint-Laurent-de-la Cabrerisse, hence the legend of the postcard below.The two-storey building is used as a residence by the station manager and his family, the ground floor is reserved for the administration. The stationmaster’s wife is also at her window,  there is also a group of young girls among whom there are probably two twins, if we can trust their identical clothes. … Barrels lie on the ground, and we can decipher the names of their owners: A. Bouyssiere, Paris;  Monsieure Fabre; Monsieur Monge; Monsieur Boussieux. Behind, the water pump seems to be in action feeding the locomotive, the water comes from the River Nielle. The goods train, of which we can see two wagons, comes from Mouthoumet and is bound for Thézan. The rails we can see in the foreground are the siding serving the loading platform. [4]The station building at Les Palais in the very early 21st Century!A schematic plan of the station. [13]

Continuing eastward towards Thezan and La Nouvelle, the train passes in front of the Pech Maurel farm, crosses the road to Coustouge, in the Aude, not to be confused with Coustouges in the Pyrenees Orientales, and approaches the Parazols stopover at KP 17,502, named after a stream. However, we will leave that arm of the tramway and focus on the westerly route to Mouthoumet.

Heading West from Les Palais, the tramway first encounters Saint-Laurent-de-la-Cabrerisse.

As the adjacent Michelin map from the 1930s shows the tramway followed the northern shoulder of the GC3 (D613) to Saint-Laurent-de-la-Cabrerisse and the station can be picked out on the North side of the road close to the village.

The tramway continued from there through Talarain, Villerouge Termenes, Felines Termaines, Laroque de fa and on to Mouthoumet.


The images immediately above show the station at Saint-Laurent-de-la-Cabrerisse. The second image shows the GC3 road (on the right) with a train approaching from Les Palais. The first image shows an altogether much busier scene taken from the approximate location of the train in the second image. [5] The smaller adjacent image is taken at a similarly busy time to the first image above. [7]Saint-Laurent-de-la-Cabrerisse, Avenue de Narbonne. the location is probably a few hundred meters closer to the village centre than the station. [6]The picture above possibly sows the same location in 2017.

The adjacent image is taken in the opposite direction on the Avenue de Narbonne.Close to the centre of the village. [12]The tramway – looking back into the village of Saint-Laurant-de-la-Cabrerisse. [10]Looking back along the line of the tramway/road into the village of Saint-Laurent-de-la-Cabrerisse in the early 21st Century. The picture is taken from almost the same position as the monochrome image above. It is interesting to note that the church tower has been rebuilt but that the design is different!The bridge at Saint-Laurent-de-la-Cabrerisse at the time of the tramway. [8]The bridge was destroyed during WW2. This was the temporary structure built to replace it. [8]

After Saint-Laurent-de-la-Cabrerisse, the tramway headed southwest, along the eastern shoulder of the GC12 (D613) towards Talairan. At first the road and tramway travelled across open vineyards but as Talairan came closer the tramway and road found themselves within the increasingly narrow valley of the Ruisseau de Remouly a tributary of the River Nielle. The tramway had to negotiate a more tortuous course alongside the river.The station at Talairan appears in the three postcard images immediately above. [9][10]A schematic plan of the station at Talairan which was alongside the road approaching the village of Talairan from Les Palais. [11]After passing through the centre of Talairan the tramway followed the southern shoulder of the GC12. [10]A similar view in 2017.

Then next village along the line was Villerouge-Termenes, an intersting historical village with a large castle. The tramway stayed above the village on what is now the D613.An excellent schematic plan of the village. [17]The Cathar Castle of Villerouge-Termenes. [14]The tramway route was about 100 metres behind the church in this image. [15]

I have been unable to identify the actual location of the station in the village – it seems as though the most likely location is an area of open ground to the south of the church and on the south side of the GC12 (D613) The area laaid out for parking at the bottom of the adjacent image. The church can be seen at the top of the picture and the village is just off the north edge of the photograph.

A short distance after Villerouge the tramway entered Felines-Termenes. On the way there it was necessary for the tramway route to separate from the road as the GC12 encountered a steep gradient. The two routes are highlighted on the satellite image below.The tramway came down the hill into Felines-Termenes following the Ruisseau du Gazel and after crossing the Ruisseau de Saint-Jean it crossed the River Libre. The station was 100 metres or so beyond the bridge over Le Libre. Its layout is shown immediately below. [16]The three images immediately above show the site of the station at Felines. I is impossible to finally confirm the exact location of the station but the barrage in the plan above appears to be visible in the river on Google satellite images of the village as shown below. [16]The red flag denotes the station location, the  barrage referred to above is in the River to the Northeast of the station. Philip Morand says: the station was at 42.987159, 2.612986, where there’s another stone water tower and the remains of a building (south east of the co-ords I’ve given) which I think is the ‘mining silos of iron’ shown in the plan of the station” above. [24]The water tower mentioned by Philip Morand can be seen in this Google Streetview image.

Beyond Felines-Termenes  the tramway and road meandered through the forested hills to Laroque de Fa.Once again the tramway and main road remained outside the village of Laroque and on this occasion, travelling round three sides of the village.The tram approaching Laroque on the GC12 (D613). The road can be seen to the right of the tram. It is difficult to locate the station in the village but the 1930s Michelin map shows the tramway on the left side of the road travelling round the village and then just to the North of the village on the GC12 switching to the other shoulder of the road to complete the journey to the terminus at Mouthoumet [18] Approximately the same location as the above monochrome photograph in the early 21st century.

Philip Morand who lives in Laroque de Fa says: “I think the station in Laroque de Fa was at 42.958147, 2.568130, where there’s also a short stone tower which I’m told was used for water for the steam locomotive. Nowadays the space is used as an unofficial aire for camper-vans and the Marché nocturne in the Summer.” The location, to the Northeast of the village, is shown on the map and in the photo below (September 2012). [24] A crumbling bridge in Laroque! [23]Almost the same location in 2017.This image shows the tramway curving around the village and the picture below shows the same location in the early 21st century. [21]The remaining journey to Mouthoumet was completed on the South side of the GC12.

Before leaving Laroque it is worth noting that there was a tramway accident in the village in 1912. [19]

The accident is noted on Les Forums de Passions Métrique et Etroite!! [19]

This note is provided on that forum in French. It has been translated using “Google translate”:

“This Monday, June 24, 1912, it is 1 pm, from Monthoumet, the machine No. 11 driven by the mechanic Mr. Olive, enters the village, pulling behind a wagon of forage which may have been badly loaded or the load may have shifted. The locomotive and wagon derailed and, in its fall, disemboweled the wall of Dr. Lautier’s shed. Jets of vapours escaped from the exploding boiler burning to the third degree. The unfortunate Mr. Olive, according to the witnesses of the scene, did not die quickly,  but his sufferings were atrocious. He absorbs into his lungs the steam that escapes. Despite all the care that will be lavished on him, he will die the next day at Lézignan hospital. ”

The source of this short story is Mr. Fabre, quoted by Michel Vieux, Steam Tramway of the Aude, p. 102. [4]

Having noted this accident and particularly having commiserated with those affected by it, we move on towards the terminus of the line at Mouthoumet. The tramway followed the lefthand shoulder of the GC12.Gradients along this final length of this branch of the tramway were not steep and the final few kilometres of the tramway were straight as a die. The station was set to the north of the main road. North is at the bottom of the plan below.The road on the right of the photograph above is Rue de la Gare. The engine shed would have been at about the location of the young Cyprus Tree, perhaps just beyond it on the line of the side road. The main road turns away to the south in the image, just as it does on the sketch plan above.The tramway station was immediately in front of the Gendarmerie in Mouthoumet! [22]The station at Mouthoumet. [20]

Another journey is over. …. In the next post we will return to Les Palais and start to explore the remainder of the Tramways de i’Aude system.

References

  1. http://www.inventaires-ferroviaires.fr/hd11/11203.a.pdf, accessed on 15th October 2018.
  2. https://www.geneanet.org/cartes-postales/view/4728335#0, accessed on 18th October 2018.
  3. https://www.geneanet.org/cartes-postales/view/4728343#0, accessed on 18th October 2018.
  4. Michel Vieux; Tramways a Vapeur de l’Aude; R. Latour Editions 14 rue Sébile 09300 Lavelanet, 2011.
  5. https://www.cparama.com/forum/saint-laurent-de-la-cabrerisse-t29081.html, accessed on 18th October 2018.
  6. http://www.thezandescorbieres.com/train.htm, accessed  on 18th  October 2018.
  7. https://www.communes.com/cartes-postales-anciennes-saint-laurent-de-la-cabrerisse, accessed on 18th October 2018.
  8. https://www.geneanet.org/cartes-postales/search/?country=FRA&go=1&place=saint-laurent-de-la-cabrerisse&sort=date_depot, accessed on 18th October 2018.
  9. https://www.geneanet.org/cartes-postales/view/5928362#0, accessed on 18th October 2018.
  10. https://www.delcampe.net/fr/cartes-postales/europe/france/11-aude/autres-communes?f=keyword:talairan, accessed on 18th October 2018.
  11. http://www.cpaaude.fr/THEMES/TRAMWAYS/index_fichiers/Page3929.htm, accessed on 18th October 2018.
  12. http://www.cpaaude.fr/THEMES/TRAMWAYS/index_fichiers/Page3875.htm, accessed on 18th October 2018.
  13. http://www.cpaaude.fr/THEMES/TRAMWAYS/index_fichiers/Page3648.htm, accessed on 18th October 2018.
  14. http://www.beyond.fr/villages/villerouge-termenes.html, ,accessed on 19th October 2018.
  15. http://chateauvillerouge.wix.com/termenes#!, accessed on 19th October 2018.
  16. http://www.cpaaude.fr/THEMES/TRAMWAYS/index_fichiers/Page4163.htm, accessed on 19th October 2018.
  17. http://www.belcaire-pyrenees.com/article-le-chateau-de-villerouge-termenes-2eme-partie-50304313.html, accessed on 19th October 2018.
  18. http://www.cpaaude.fr/THEMES/TRAMWAYS/index_fichiers/Page4005.htm, accessed on 19th October 2018.
  19. http://www.passion-metrique.net/forums/viewtopic.php?f=2&t=9326&start=90, accessed on 19th October 2018.
  20. http://www.cpaaude.fr/THEMES/TRAMWAYS/index_fichiers/Page4066.htm, accessed on 19th October 2018.
  21. http://www.laroquedefa.fr/village/photos1900.htm, accessed on 19th October 2018.
  22. http://www.audecathare.fr/villages/mouthoumet.htm, accessed on 19th October 2018.
  23. https://www.cparama.com/forum/laroque-de-fa-t249.html, accessed on 19th October 2018.
  24. Email from Philip Morand on 14th July 2019.

Tramways de l’Aude – Lezignan-Corbieres to St. Pierre-des-Champs

We continue our journey on the Tramways de l’Aude. This time we are travelling South of Lezignan. We start our journey with a dispute about the line of the tramway leaving Lezinan-Corbieres. The 1930s MIchelin Map is likely to the be the most reliable source. This suggests that the tramway terminated opposite the Gare du Midi. It shows two lines approaching the Station – one from Carcassonne and one from Narbonne, both being circuitous routes.

The Map, below, shows the routes. That running south for Lezignan is first shown running East to find a bridging point over the Chemin de Fer du Midi and then running West before heading off to the South.An alternative route is suggested by Randonnees Ferroviaires [1] It shows the line running West along what was the Avenue de Narbonnes and then South down the D611. As I have already mentioned, I believe that the Michelin Map is the most reliable source.Some work would be required to establish the actual route of the tramway! Whichever route is correct, the alignment has been lost under roads and various developments. My assessment of the most likely route follows approximately that shown on the 1930s Michelin Map. The exact location of the bridge under the standard-gauge line is not clear. Both red and green routes on the OpenStreetMap below are approximate.A number of people have been in touch with me in the past few days to point to the IGN site called ‘Remonter le Temps’ and as a result I have been able to find 1942 aerial images of the East end of Lezignan. The green line above can be seen to be approximately correct on the image below. [10] The large loop below the Midi line is probably misplaced on the map above. The tramway on the aerial image appears to run North of the route of the road and much closer to the standard gauge sidings (as below). [10]On the North side of the standard gauge line the rea and green lines are indicative only. I have found two plans in a copy of the Loco Revue magazine from 1961 which show the track layout at two locations on the green route north of the standard-gauge railway. The updated edition of the last post now has one of these maps which shows the approach from the north into the tramway station and the route out heading towards the East. [11][12]The resolution of the second map, below, leaves something to be desired but it shows the tramway on the North side of the standard-gauge line almost at its most eastern extent. [13]This aerial image shows the location of the sketch map above.

As a result of posting on a number of French language forums. I have been contacted by Pascal_pmidi on the LRPresse ForumForum who has provided two images showing the route of the tramway. In the first aerial image, the orange line shows the approximate line of the tramway after leaving Lezignan station. The second provides greater detail in the section before the line heads South away from the town. top left. [14]

In the searching the internet for information and pictures of the tramways I have encountered a number of photographs of the standard gauge railway. Before setting off on our journey southwards it is worth reviewing the photographs of the Gare du Midi and its goods yards.Looking West along the Standard-gauge line. [3]Looking West along the Standard-gauge line. [4]Looking East along the Standard-gauge line. [3]Looking West across the Standard-gauge goods yard. [3]Looking East along the Standard-gauge line, this image shows the station to the left and the sidings to the South of the mainline in the middle and right of the image. [3]The Standard-gauge sidings make it abundantly clear that the main goods traffic on the Chemin de Fer du Midi in this area was wine! It seems that this is a view looking east with the unloading wharf just visible between wagons. [3]Looking West towards the station (in the top right corner of the image). [2]The mixed traffic on the standard gauge line is highlighted in this image and the one below. [2]The South side of the mainline looking East. [2]And finally we get on our train on the tramway. This train has just arrived on the tortuous Route from Carcassonne and the locomotive is about to run round its train to set off East before crossing the standard gauge line.

We pick up the tramway as it heads out of Lezignan to the South along the GC106 (D611) towards Ferrals and Fabrezan. The first image below shows the tram en-route out of Lezignan towards Ferrals on the GC106 (Route de Fabrezan). The road and tramway run in a straight line heading South-southeast. The plane trees mean that the scene feels quite cramped. [5] The image below is taken at a similar location in the 21st century, the road is now know as the Avenue de Corbieres.The plane trees now only follow one shoulder of the road as doom had to be made for cars and lorries to pass. The tramway is long-gone!

When the D611 sweeps to the right to head for Fabrezan, the tramway route follows the modern D106 into Ferrals les Corbieres.On modern maps Ferrals appears to be known as Le Faubourg. (Joseph Pestells on RMWeb points out that ‘Faubourg’ is a French term for suburb and that the village name of ‘Ferrels’ will appear elsewhere on the map.) The tramway route is schematically marked on the map below as a blue dotted line with the Station location at Ferrals circled in red.The tramway turns right in the village to follow the line of the modern D111. It is highly likely that the house on the corner (on the right side of the junction) was built after the tramway was removed as the turn would have been too tight for the tramway. (My thanks to Joseph Pestell on RMWeb for this observation.)A few hundred metres to the West of the centre of the village we encounter what remains of the tramway station at Ferrals.This postcard shows the view looking east from the Station into Ferrals. [5]The view above looks West through the Station site and shows both the main-line and the sidings with the station building also in view. It appears that trains were permitted to pass at this location by taking the West bound train into the sidings. [5] The adjacent view looks East into Ferrals and shThe location of the Station shown in the early 21st Century.ows a significant mixed train. [5]

After the station at Ferrals trams headed westwards to the next major road junction with the IC12 (D611) and then travelled South-southwest to Fabrezan.Before reaching Fabrezan the old tramway route leaves the line of the IC12 (the modern D611). It followed its own route through the fields. That route has now become a minor road.On this map the tramway route is marked by blue dashes, the station location by a red circle. As can be seen there is a tramway junction in then village. We will follow the western route which heads for St. Pierre. [1]North of Fabrezan, the tramway route bears off to the left of the modern D611. Both routes run through the vineyards of Corbieres.The location of the Station shown in the early 21st century. Two earlier postcard images which show a similar view. [6][7]The station viewed from the opposite direction. [6]In this early coloured image, the station site is shown to great effect. The gradient on the road to the centre of the village and the church can also be seen. This explains the tramway route, it followed the contours around the village which was built on a ridge and was at a higher level than the surrounding countryside. [1]

From Fabrezan Station, the tramway continued to flank the South-eastern side of the village and then joined GC122 (the modern D611). Along this length of road the two tramway routes divided with our chosen route heading first along Quai d’Orbieu, then Rue de l’Egalite before running along the shoulder of the IC12 (D212) towards Lagrasse and St. Pierre-des-Champs. The other route will be covered elsewhere. It follows the GC122 (D611) South to Les Palais and beyond.

The tramway route along the IC12 (D212) followed the northern shoulder. At the cross-roads between the IC12 and IC14 there was a Station for Camplong. In 2018, the Station site is now a picnic area. Travelling westward the tramway and road crossed the River Orbieu on a large viaduct.The view westward in the 21st century, from the vineyards South of the D212.A view along the modern viaduct on the D212.

The next station on the Tramway was at Ribaute, the tramway continued to Ribaute on the North side of the IC12.A view of the Station and village at Ribaute, taken from the South. [8]The tramway followed the line of what is now the Avenue des Corbieres in Ribaute and this picture is taken looking along the line of the tramway from what was the station. The road to the right is still called Rue de la Gare. The station building shown in the monochrome image above still exists but it has been heavily modified! Two pictures of the old station building which has been modified and extended. [1]

Beyond Ribaute, the tramway remained on the right-hand side of the road travelling towards Lagrasse apart from one location which was around 1 kilometre West of Ribaute at a tight left-hand hairpin bend, where the tram needed to tunnel trough the rock to provide a suitable curvature for the track. The tunnel route is shown on the map above and the tunnel is pictured in the direction we have been travelling – towards Lagrasse. [1]The North Portal of the Tunnel. [1]The South Portal of the Tunnel. [1]

Subsequently, a right-hand hairpin required that the tightness of the road curvature was lessened by the tramway finding a less sharp route around the bend.The road and tramway eventually entered Lagrasse from the East along Route de Ribaute.As far as I can ascertain the location of the tramway station in Lagrasse was in the area circled in red above. It is just before the Route de Ribaute meets the D3, Boulevard de la Promenade where the tramway turned south to head for St. Pierre. Two images on postcards which show the station at Lagrasse. [9]

The tramway followed the western shoulder of the GC3 (D3) out of Lagrasse and followed that road to its junction with the GC23 (D23). The line then followed the GC23 until it reached the side road which led to St. Pierre-des-Champs which today is number D212. Only a short distance along the D212 the tramway reached its terminus. The D212 approaching the terminus station for St. Pierre-des-Champs.The site of the terminus. The remains of the station building can be seen in the distance. The station site was alongside the road (now the D212).The terminus building at St. Pierre-des-Champs was over a kilometre from the village. All that remains of the building in the early 21st century can be seen in this picture which comes, as do the other images immediately above, from Google Streetview.

We complete this leg of our journey on Les Tramways de l’Aude at St. Pierre-des-Champs having been unable to find any images from the time of operation of the tramway.

References

  1. http://www.inventaires-ferroviaires.fr/hd11/11203.a.pdf, accessed on 15th October 2018.
  2. https://www.cparama.com/forum/lezignan-corbieres-gare-t28257-20.html, accessed on 15th October 2018.
  3. https://www.cparama.com/forum/lezignan-corbieres-gare-t28257.html, accessed on 15th October 2018.
  4. https://www.geneanet.org/cartes-postales/view/5928361#0, accessed on 15th October 2018.
  5. https://www.delcampe.net/fr/cartes-postales/europe/france/11-aude/autres-communes?f=moyens-de-transport:tramway, accessed on 16th October 2018.
  6. https://www.delcampe.net/fr/cartes-postales/europe/france/11-aude/autres-communes?f=keyword:fabrezan, accessed on 16th October 2018.
  7. https://www.pinterest.co.uk/pin/594615957024942068, accessed on 16th October 2018.
  8. https://www.cparama.com/forum/ribaute-t313.html, accessed on 16th October 2018.
  9. https://www.cparama.com/forum/lagrasse-t170.html, accessed on 17th October 2018.
  10. https://remonterletemps.ign.fr, 25th October 2018.
  11. https://rogerfarnworth.com/2018/10/13/tramways-de-laude-siran-to-lezignan-corbieres, accessed on 8th November 2018.
  12. Loco Revue Volume No. 212 November 1961, p385.
  13. Loco Revue Volume No. 212 November 1961, p384.

Tramways de l’Aude – Siran to Lezignan-Corbieres

The Tramway Station at Siran was Northeast of the old town centre on the site of what is now a fire-station. The location can be picked out on the Google Earth Satellite image below to the northeast of the roundabout in the top right of the image. The line ran to the rear of the white roofed building and the station building was located under the same building. The line ran behind the ‘Cave’ which can just be seen at the top right of the image.Approaching the Station from the West.The tramway ran to the North side of the road along a line just in front of the bushes at the left of this picture and crossed the accommodation road to pass between the two buildings evident to the right of centre in the picture.The tramway passed between these two buildings. This picture is taken from roughly the same position as the older image below. [1]This image is taken from the approximate location of the modern roundabout on the D168E4 and looks to the North. [2]

In the image below, the tramway continues behind the ‘Cave’ which ids the low long building on the right. the Tramway alignment is running parallel to the IC68 (D168) which can be found on the south side of the ‘Cave’ and is shown in the second image below.From Siran, the Tramway travelled on the Northside of the IC68 (D168) to Cesseras. As far as I can ascertain, the tramway ran on a raised embankment on the North side of the road, as shown below.This image shows the remains of a tramway bridge over a stream. Old abutments and one beam are visible.The approach to Cesseras. The tramway is still on the north side of the D168 (IC68). The slight embankment to the left of the road shows the tramway alignment. The station at Cesseras is just beyond the building ahead on the left of the road.A hundred metres or so closer to the village the old station building can still be seen in the early 21st century.The Tramway Station building in Cesseras was encountered just before the trams entered the village. The image above attempts to produce a similar view to the adjacent earlier image. [3] The platform has been removed and a bench provided.This view looks back from Cesseras towards Siran. [4]A similar view of the station building in the early 21st century.

The village of Cesseras retains vestiges of its ramparts (towers and curtain walls). It also has some old houses (mullioned windows) and elements of the old castle, dismantled from the Revolution: two round towers, one crowned with a glazed tile roof. The station building can just be picked out on the bottom edge of the satellite image below to the left of the D168.The tramway continued in an easterly direction through the village on the IC68 (D168). The route is easily seen in the satellite images above and below.Beyond the village of Cesseras, the tramway followed a generally easterly path through vineyards towards Azillanet, still running on the North shoulder of the IC68 (D168). The main  road by-passed Azillanet to the South and the tramway followed it, crossing the road into the village and then running on the southwest side of what became the D168. The old tramway crossed the River Tay on the right side of the bridge in the foreground of the picture below. And when the road turned East, the tramway continued in a southeasterly direction into the tramway station site. The old station building can still be seen beyond the central bridge railings.The station building at Azillanet.Azillanet station looking back towards Cesseras. [5]

After Azillanet the GC10 (nowadays the D10) followed a southerly path, wandering through vineyards towards Beaufort. The tramway shadowed the GC10 on its western shoulder until the GC68 (D168) branched off towards Beaufort. The tramway then followed the southwestern shoulder of the GC68 to Beaufort.The lay-by to the right of the road is on the approximate line of the tramway.The D168 is the left-hand road. The tramway followed its right-hand shoulder as can be seen below. Again, vineyards are very much in evidence.The satellite image above shows the tramway alignment as it approached Beaufort. The green (grass) to the west of the road at the top of the image is the tramway route. On reaching the village cemetery, the tramway moved into the centre of the GS68 (D1680 and shared space with road traffic for a short distance and then slipped back to the southwestern shoulder. Vineyards still dominate the landscape.At the village boundary sign the road (on the left above) and the tramway crossed the Ruisseau de Beaufort on small independent bridges. The tramway bridge is in an excellent state of repair as can be seen below. [6]
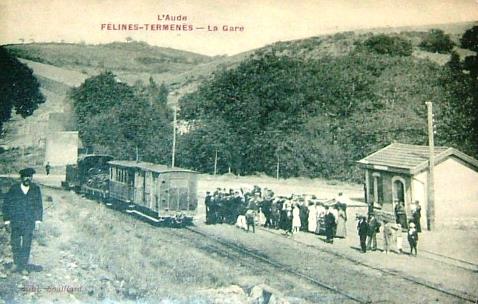
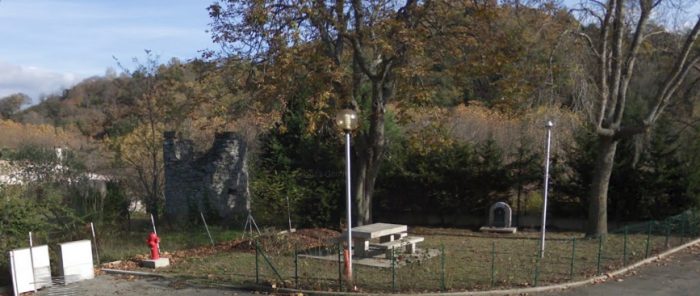
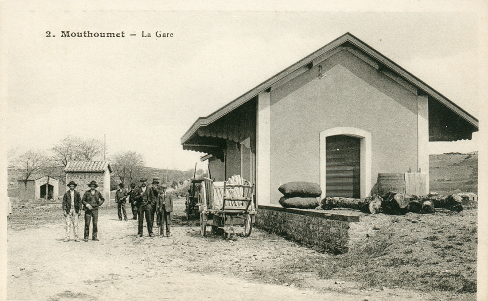
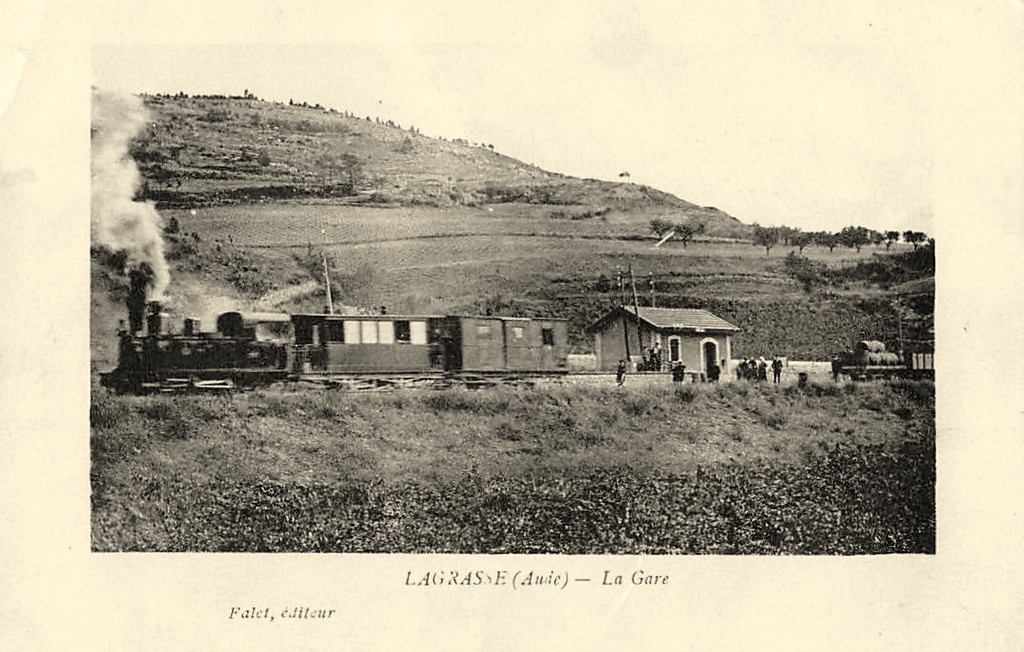
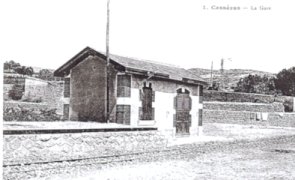
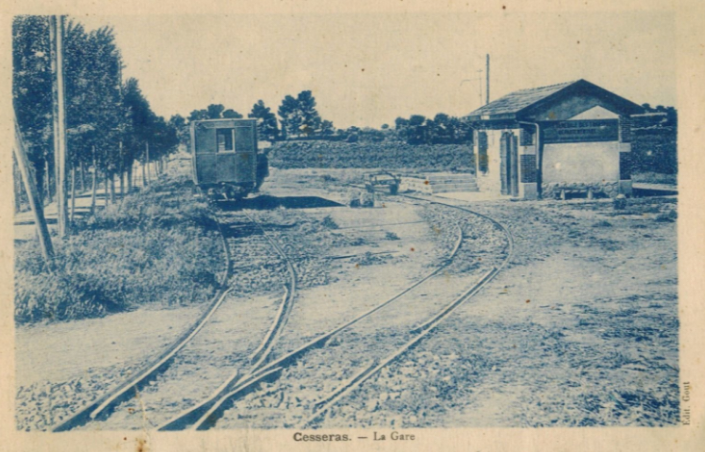
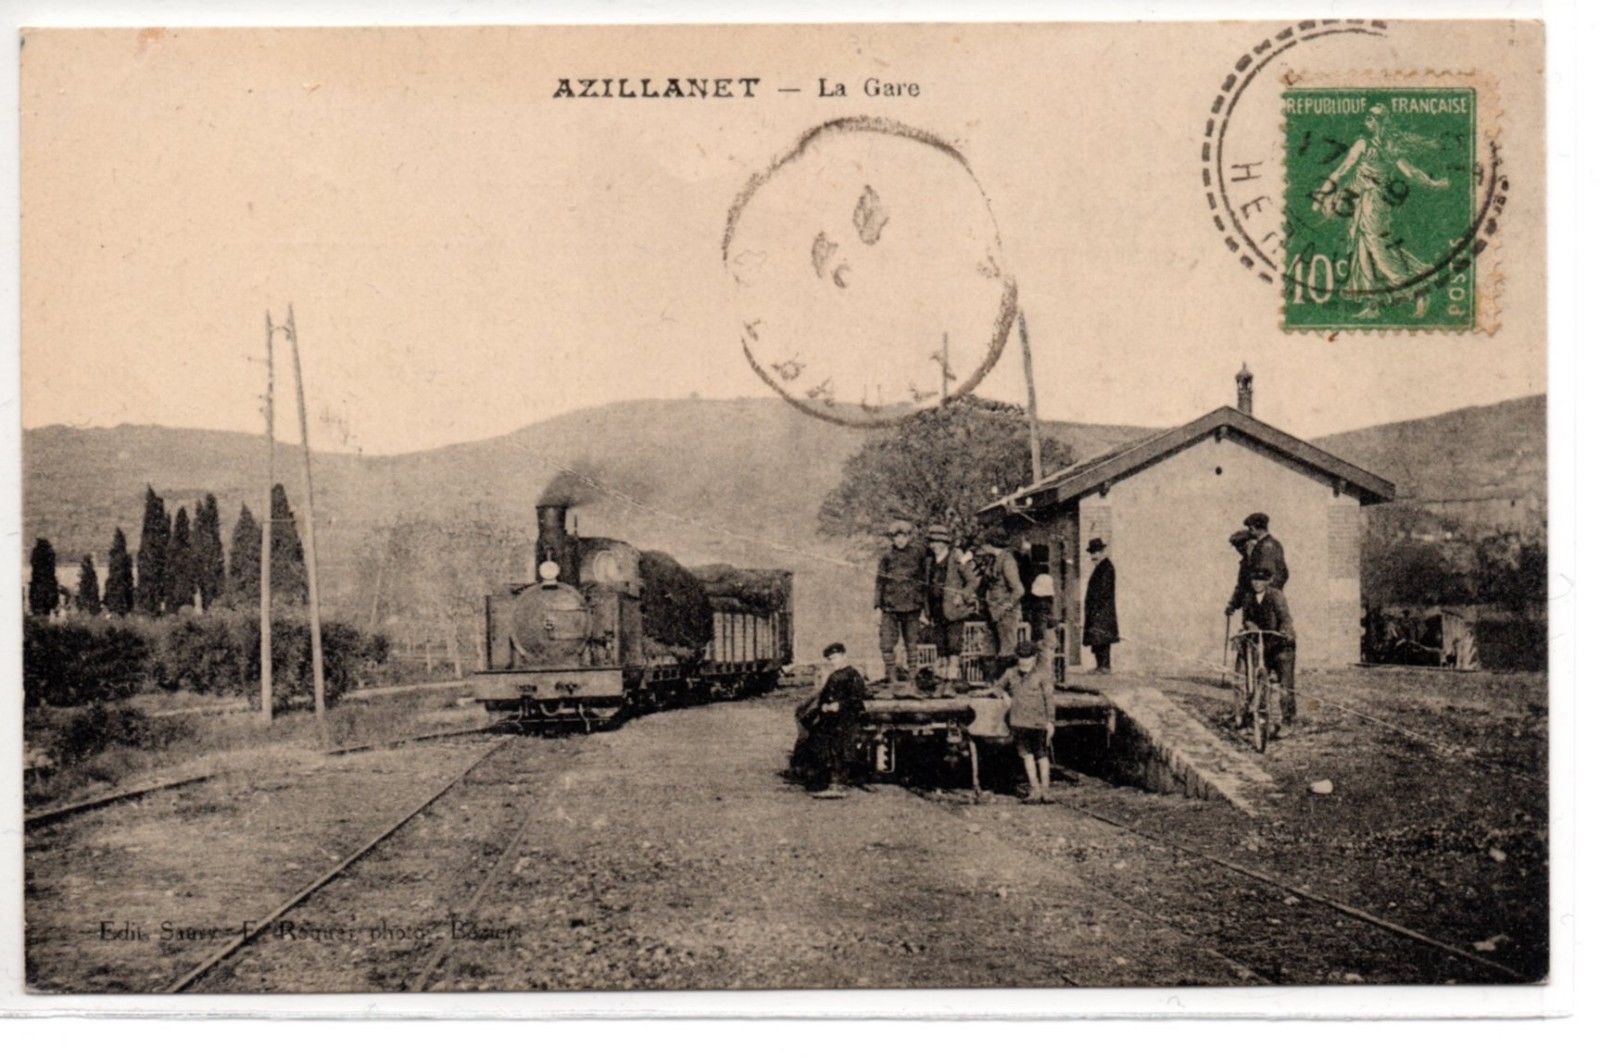
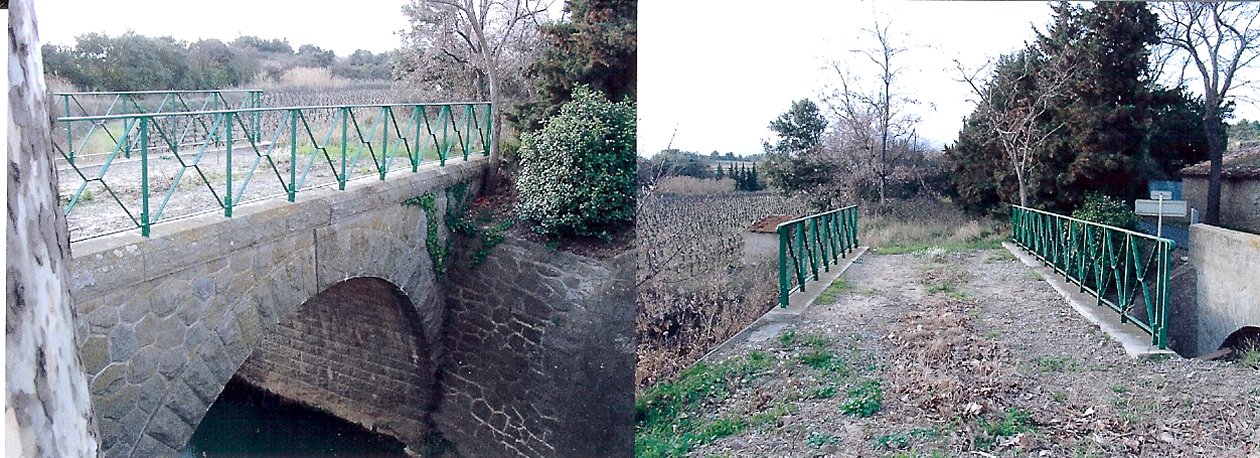
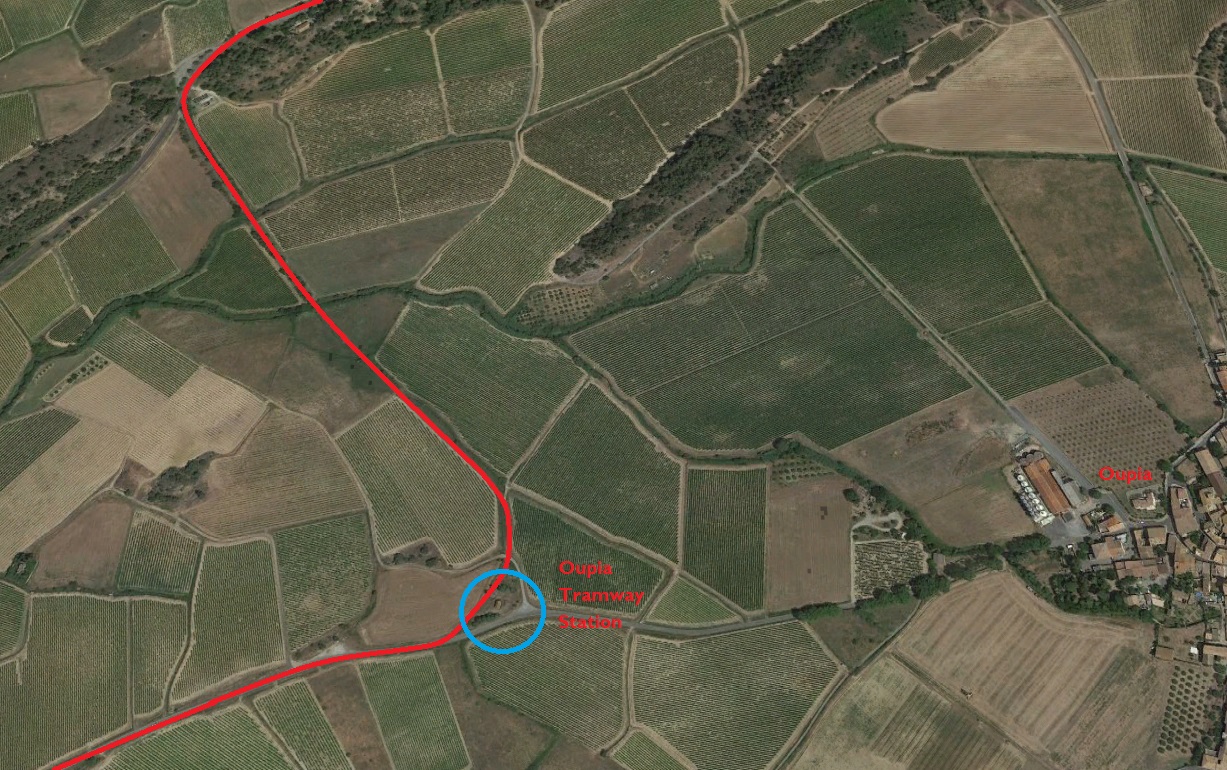
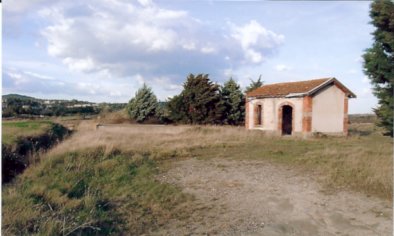
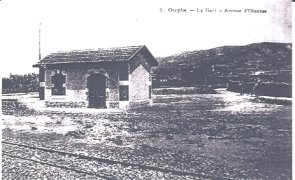
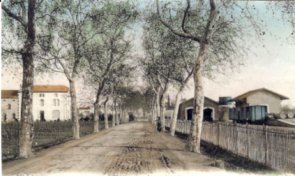
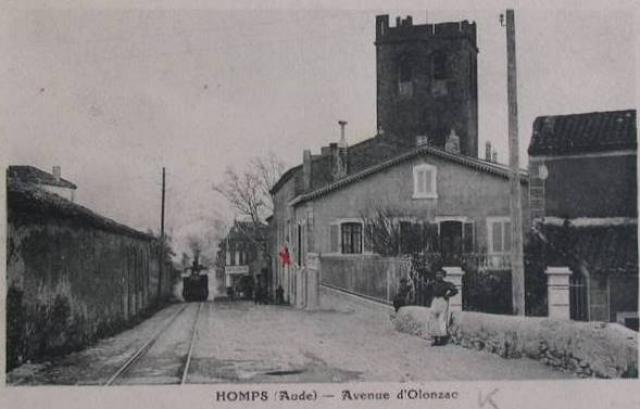
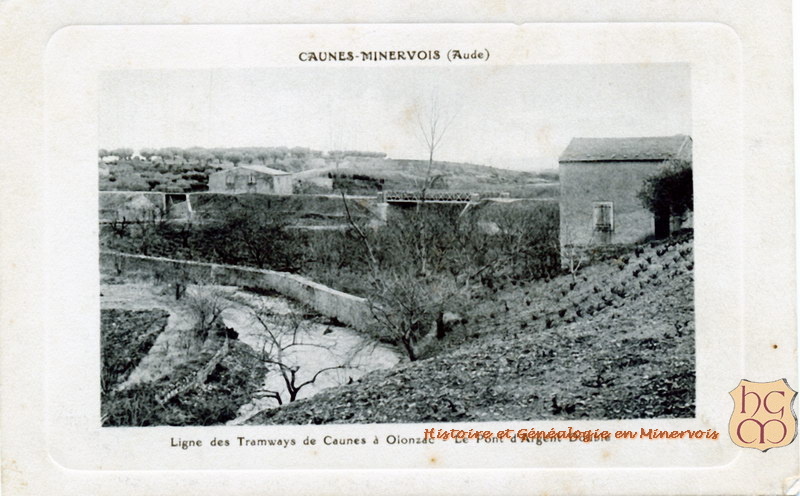
The tramway then left the road to cross on the south side of the village of Beaufort before crossing the road to Olonzac – the GC 20 (D910). The route of the tramway has been converted into a minor road – Rue de l’Ancienne Gare.  The monochrome postcard view below shows the old station in its heyday. A passing loop was provided along with a small station building. The old station site is now an area for playing boules/petanque. Beyond the station the line crossed followed the route to Olonzac (the GC20 (D910)) for a few hundred metres before heading across the fields towards Oupia.
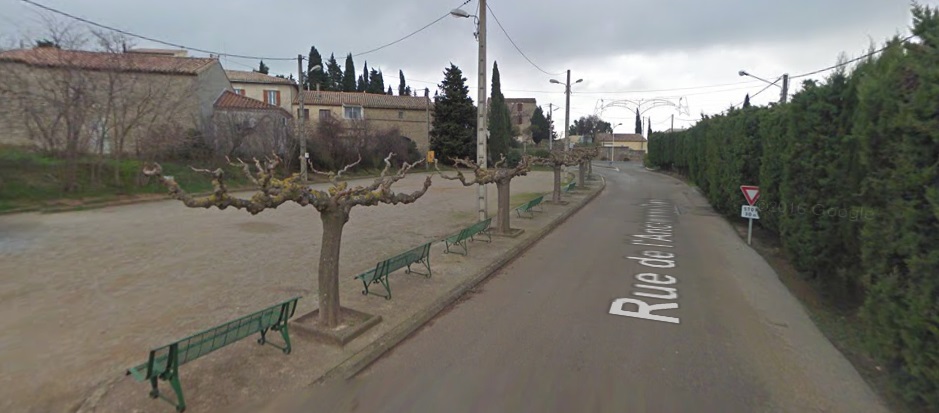
The satellite image and the picture above show the point of deviation of the tramway from the GC20 (D910). The photograph is taken at a point on the red line in the satellite image close to the top of that picture. The satellite image then shows the tramway route to Oupia Station which was some way from the village of Oupia (of which a portion is visible on the right-hand side of the satellite image. The adjacent photos show first, the state of the station of Oupia in the early 21st Century and second, the station in use. [7]

On the way to the station of Oupia, trams crossed two girder bridges with 15 metre spans over the streams of Oupia and Escut. These bridges were demolished and sold in around 1948. The abutments remain [7]. After the station the tramway followed the route of the modern D52E2 towards Olonzac. Nowadays there is a roundabout at the point where the tramway encountered the GC20 (D910) at its junction with the GC70 (D52).

The tramway route round Olonzac is now covered by the D52E1 which forms a by-pass on the southeastern side of Olonzac. From the poisiton of the present roundabout the tramway headed southwest and crossed the River Espene almost immediately. The satellite image below shows the whole town of Olonzac.The next image focusses in on the South side of the town. The tramway arrangement in the town are shown schematically. The town was for a time the terminus of the line. After crossing the River Ognon to the South of the town trams first encountered the main Olonzac Station highlighted by the first blue oval. The line continued into the town to a point just South of the War Memorial where there was a small wooden platform which formed the terminus station of Olonzac City. The main tramway facilities were to be found at the station in the suburbs. It included a passenger building, a large hall with dock, a shed for equipment, a water intake and a dormitory for staff. [7]
The green line on the satellite image above approximates to the route of the tramway arriving from Beaufort, Cesseras and Siran.

The adjacent image shows the station which was at the bottom of the satellite image above. [7]

The next image is of Olonzac City Station close to the War Memorial in the centre of the town. [7] And it is followed by a postcard showing that town centre line in operation. [8]


The adjacent image shows the same length of line, this time with a maintenance train in view. [7]

The next three historic images show the more southerly station in use. [8] After leaving the main Station in Olonzac, trams soon crossed the River Ognon on a masonry Arch Viaduct as below. The viaduct was close to the town distillery, it was a three-arched road and tramway bridge, each arch was of 8 metres span. [7]The line has now turned southwards and as it leaves Olonzac soon exits Herault and returns to the Aude. It follows the GC10 (D910) to the departement boundary, and then the D2560 into Homps.

Just before reaching Homps the tramway and the road which is now the D2560 crossed the Canal du Midi.

Like Olonzac, Homps has grown since the days of the tramway. It stretches along the South side of the Canal.

The picture below is a satellite image of the village and Canal.The Station at Homps was on the North side of the Canal du Midi. It was a three-track station alongside the GC10. The location was at the top of the image below and to the right of the main road. The route from Olonzac enters the satellite image at the top and then curves round to pass over the Canal.This image is taken from the end of the retaining walls on the North side of the Canal. It shows Avenue de Minervois, looking towards Olonzac. It shows the location of the Station at Homps.

The earliest bridge over the Canal du Midi was a lattice girder bridge of the type seen in La Redorte, on the left of the postcard below.The later replacement Canal bridge was a substantial structure as can be seen in the adjacent old postcard image. It was a 15 metre span which carried both road and tramway. Its approach retaining walls remain, but the superstructure has been replaced by a modern open- parapeted bridge of a slightly longer span.

As an interesting aside, I came across this postcard while searching the internet. It is a complete flight of fancy as no standard gauge railway line ever served Homps!

The image on the postcard also seems to exaggerate the size of the village. A further search on the internet resulted in a series of postcards for different towns and villages all bearing the same image!This image was taken from close to the Canal bridge looking into Homps.

On leaving the old village of Homps the tramway followed the original GC5 (D611, which now-a-days joins the D610), before turning right down the GC11 (D611) and then crossing the River Aude on  a masonry viaduct of three 20 metre-span arches. [7]The bridge over the River Aude taken in 2012 during the construction of the wier which improved the water supply to Tourouzelle. [10]The viaduct in 2016.

Immediately after crossing the bridge over the River Aude the trams encountered another Halt. The Halt/Station was close to the hamlet of La Tuilerie to the Northeast of Tourouzelle, and served Tourouzelle. [7][9]The image above shows the location of the Station for Tourouzelle. It is, in the 21st century, a kind of lay-by alongside the D611.

After the station at Tuilerie the  tramway follows the northeast shoulder of the GC11 (D611) to Segame (Serame) and on to Montrabech on the GC11 (D11).Segame (Serame) was close to Argens-Minervois and Argens was connected to the tramway by a bridge over the River Aude.

The Halt at Montrabech was  known as Lezignan-Montrabech. It was to the East of the hamlet of Montrabech. The area of the Station is still visible on the satellite image below. The approximate rail alignment is also shown in red.The area of scrub land to the left of the D11, in between the vineyard and the road, is the location of the old station.

The tramway followed the eastern shoulder of the IC67 (D67 – Avenue Leon Bourgeois) into the northeastern outskirts of the town of Lezignan-Corbieres, usually known as Lezignan. It then drifted away from the road, following a line that approximates to the modern D6113 (Avenue Marechal Gallieni, which then becomes Avenue Marechal Lyautey.The image above shows the tramway’s tight turn from the IC67 to travel East. The buildings to the left of the tramway alignment were the site of the old Gendarmerie which appears in a couple of postcard images because a tramway halt could also be found at this location. [13]

As we have already noted, after the station at the Gendarmerie the tramway took an easterly course along the line of the modern D6113 before turning southwards across some waste ground and then following the line of the present day Rue des Glycines and then to the West Southwest on Avenue Frederic Mistral before travelling to the South of that route and swinging round into Lezignan station. The orange line on the aerial image below shows that route entering from the top left. I am indebted to by Pascal_pmidi on the LRPresse Forum for this image. [16]This sketch plan was made for the Magazine Loco Revue and shows the two lines approaching Lezignan Station. Comparing the two maps/plans it can be seen that one of the buildings accessed by turntable remains to be seen in the 21st Century. [15]One building remains from the loco depot shown on the plan above. This picture was taken in July 2017. [16]

The following pictures all show the terminus line of the tramway which ran parallel to the standard gauge line/sidings to the Gare du Midi aliong what was originally known as the Avenue de Narbonne.The line to the right runs immediately alongside the tramway. [14]The low level building on the right is the station building for the tramway. [14]The building appears again in earlier days in this image with a track leading to what must have been interchange sidings behind the camera. [14]Both the Gare du Midi and the tramway station building appear in this image and the image below. [14]The Avenue de Narbonne appears in the two images above. [11][13]The seven images above are all taken looking East along the Avenue de Narbonne and show the tramway station with the Gare du Midi behind. [13][14]This modern image shows the Gare du Midi forecourt as it is in the early 21st Century.The Gare du Midi forecourt above with the tramway station building in the middle right and the Grand Hotel across the Avenue de Narbonne. [14]

The adjacent image shows the two station buildings and the station forecourt. [7]

We finish this particular journey in Lezignan!

References

  1. https://www.delcampe.net/fr/cartes-postales/europe/france/34-herault/autres-communes?f=keyword:siran, accessed on 9th October 2018.
  2. https://www.communes.com/ville-siran-34, accessed on 9th October 2018.
  3. http://cahiers.de.minerve.pagesperso-orange.fr/HTML/cdf_lezignancaunes.html, accessed on 25th September 2018.
  4. https://www.delcampe.net/fr/cartes-postales/europe/france/34-herault/autres-communes?f=moyens-de-transport:transports, accessed on 12th October 2018.
  5. https://picclick.fr/Rare-Cpa-34-Herault-Azillanet-la-Gare-183374972512.html
  6. https://cahiers.de.minerve.pagesperso-orange.fr/HTML/cdf_hompsminerve.html, accessed on 13th October 2018.
  7. http://cahiers.de.minerve.pagesperso-orange.fr/HTML/cdf_lezignancarcassonne.html, accessed on 25th September 2018.
  8. https://www.cparama.com/forum/olonzac-t197.html, accessed on 13th October 2018.
  9. https://www.cparama.com/forum/tourouzelle-t266.html, accessed on 14th October 2018.
  10. https://www.lindependant.fr/2012/04/11/de-l-eau-de-l-aude-pour-alimenter-le-village,130415.php, accessed on 14th October 2018.
  11. https://www.cparama.com/forum/tourouzelle-t266.html, accessed on 15th October 2018.
  12. https://www.geneanet.org/cartes-postales/view/5928361#0, accessed on 15th October 2018.
  13. https://www.cparama.com/forum/lezignan-corbieres-gare-t28257-20.html, accessed on 15th October 2018.
  14. https://www.cparama.com/forum/lezignan-corbieres-gare-t28257.html, accessed on 15th October 2018.
  15. Loco Revue Volume No. 212 November 1961, p385.
  16. Aerial image provided with the line sketched by Pascal_pmidi on the LRPresse Forum on 1st December 2018.

Tramways de l’Aude – Caunes-Minervois to Siran

Our journey on the metre-gauge lines of the Tramways de l’Aude continues from the station at Caunes-Minervois. As the plan above shows, the route was tortuous, it certainly wasn’t the quickest route to Lezignan. It ran through a good number of the villages in the Occitanie region, including the canton of Les Haut-Minervois, in Hérault and in the Corbières wine region of i’Aude.

The shorter and faster route would have been to travel from Caunes-Minervois down the standard gauge line to Moux and then along the mainline to Lezignan.

Nonetheless we are going to enjoy the bucolic journey by the slower metre-gauge tramway through the French countryside!

The Featured Image at the top of this post shows the buildings of both stations in Caunes-Minervois. The tramway buildings are to the left of the image, the standard-gauge terminal is featured int he centre-right of the image.

Wikipedia describes the village’s railways in a section about the marble quarries which brought some prosperity to the village:

“The marble quarry brought prosperity and kudos to Caunes and a railway spur was run across the plain from Moux in 1887 to transport passengers, quarried marble and the region’s wine. The station was finally closed to passengers in 1939 and to goods in 1965. Some station buildings still retain a link with the past as a marble carving workshop.”

“During the first part of the 20th century, and operating via a second station almost opposite the first, there was a 1-metre gauge tram line from Caunes connecting the town to Lezignan and Carcassonne. This tramway was closed down in 1932. This additional station may be seen in old postcards but is still in use as a private home today.” [1]

The tramway arrived at Caunes-Minervois on the southern shoulder of the GC8 (today’s D620) and then, just before the centre of the village dropped down towards the standard gauge station, before turning to run parallel to the standard gauge railway for a few hundred metres on its eastern side. The postcard immediately below the map shows the two stations. It is taken from the village and shows the Gare du Midi with the Tramways de l’Aude station behind. [2] The large building on the right of the photograph is the goods shed for the standard-gauge line.The two pictures above are taken of the Gare du Midi from a similar vantage point to the southwest of the station buildings. [2][3]An early view of the Gare du Midi from the same angle but from a greater distance. [2]This view shows the same building but from the station yard rather than trackside. [2]This view is taken from the village looking towards both stations. The Gare du Midi and its goods-shed are almost hidden by the trees but the facilities at the Tramways de l’Aude station and much more in evidence. The goods-shed is in the foreground with the passenger station building to the right and the engine shed and water tower to the left. [2]This modern image from Google Streetview is taken from the North and shows the two station buildings still in use. On the right is the Gare du Midi used now as a marble workshop. On the left is the Tramways de l’Aude station building in use as a private home.Here we have an approximate alignment for the route of the Tramways de l’Aude line through Caunes-Minervois (in red) and the standard-gauge Ligne du Midi which terminated in the village (in blue).The satellite image above shows the proximity of the two station buildings. The present D115 follows the line of the old tramway.

The tramway route can easily be picked out on the 1930s Michelin map above.  After finding its own way through the countryside, it joined the GC115 about halfway between Caunes and Trausse. On the modern OpenStreetMap image below its formation is under the D115, Avenue due Stade heading south of the village before it follows what is now a minor road and bridges the River Argent Double travelling East to join another arm of the D115.The tramway left the shoulder of the western arm of the modern D115 and turned down the minor road in the image above.This is as far down the minor road that that has replaced the tramway that Google Streetview will take us. The bridge over l’Argent Double can just be glimpsed ahead. The sign is a weight restriction sign.The pink line approximates to the tramway alignment.The bridge which used to carry the tramway has gone – it appears that this has been due to neglect and flooding. Historic satellite images on Google Earth show that the route was eroded to the East of the bridge before the bridge itself failed! The view above is from the tramway route to the East. The adjacent image shows the bridge before it was lost and appears to have been taken from the South. [4] The image below shows the two bridges at this location from the North. [2]The tramway formation has been used to create a minor road which runs from the bridge to the eastern arm of the D115. The old formation is only lightly tarmacked.At the junction with the D115 the modern road forms a right-angled junction but the tramway route curves to the right. and follows the D115.There is one deviation from the modern D115 before we reach Trausse. It is shown below. The old rad/tramway cross the Ruisseau du Cros almost at right-angles on an old arch bridge. The newer road has its own bridge.In this image the road bearing to the left is the route into the village and that bearing right is the modern D115 and the route of the old tramway. The tramway ran round the south side of Trausse.

The village of Trausse is pleasantly set in the middle of vineyards close to the boundaries of the Aude and Herault, in the foothills of the Cevennes. The village was once fortified. There are still many vestiges of the 9th century ramparts.

The tramway ran round the outskirts of the village and the station was on the southeast of the village. There is no evidence of the station nowadays. It was on the length of the D115 shown in the pictures below.The tramway left town East along the D115. Of the pictures below, the first looks back toward the village centre with the tramway entering stage left. The second shows the route ahead.Travelling East from Trausse the tramway headed for Felines-Hautpoul in Herault. The tramway followed the old GC115 to the departement boundary where the road number changed to the GC12. Modern raod numbers are different. The GC115 is numbered D115 for the first few kiloemetres fraom Trausse. It then becomes the D55 as far as the departement boundary. En-route the raod/tramway crosses the Ruisseau du Canet and then passes to the Southwest of Le Chateau de Paulignan.At the departement boundary, as the D55 becomes the D12, the tramway left the route of the old road. In our direction of travel there is a significant climb and the tramway needed to find its own route as road gradients were too steep. Its route is now a minor road linking the D55/D12 with the D168 and running across vineyards to the South of Felines-Hautpoul.Felines-Hautpoul station was adjacent to the Cemetery where the tramway curved away to the South and joined the D168.As the tramway travelled southwards is crossed L’Ognon. The modern D168 was once the IC68. The tramway ran along the western shoulder of the IC68.The station at Felines-Hautpoul no vestiges remain. [5]

The tramway left the IC68 (D168) along the route of what is now another minor road and headed for La Liviniere. The route is shown turning of the D168 to the left and then can be followed on the satellite image below for a couple of kilometres. It then meets the D168(D168E1) once again.La Liviniere was, and is, a small village alongside the main-road. There was a small halt to the South of the village, its station building is shown in the adjacent image. [4]

The halt was close to the Notre-Dame du Spasm church which was protected from the tramway by a large masonry retaining wall. [4]

The tramway continues along the IC68 until the road approaches Siran. Siran has grown since the days of the tramway and its route is now underneath the modern D168E4.The image above shows the passing loop at Siran Station. [6] The adjacent image shows the station at Siran taken from the South. [7]


References

  1. https://en.m.wikipedia.org/wiki/Caunes-Minervois, accessed on 7th October 2018.
  2. http://album.minervois-gen.org/index.php?/categories/posted-weekly-list-any-35-6/start-120, accessed on 8th October 2018.
  3. https://www.cparama.com/forum/caunes-minervois-aude-t24644.html, accessed on 8th October 2018.
  4. http://cahiers.de.minerve.pagesperso-orange.fr/HTML/cdf_lezignancarcassonne.html, accessed on 24th September 2018.
  5. https://www.cparama.com/forum/felines-hautpoul-ou-olonzac-t26747.html, accessed on 9th October 2018.
  6. https://www.delcampe.net/fr/collections/cartes-postales/france/autres-communes-34/siran-gare-de-siran-tres-rare-train-locomotive-animation-minervois-minerve-olonzac-pepieux-azille-386933772.html, accessed on 9th October 2018
  7. https://www.communes.com/cartes-postales-anciennes-siran-34, accessed on 9th October 2018.

King’s Lynn Docks Branch – Part 3

The Featured image at the start of this post shows the Bentinck Dock and its surroundings in a satellite image from Google Earth.

The Dock Branch from King’s Lynn Station to John Kennedy Road and the area around the Alexandra Dock were covered in previous posts:

https://rogerfarnworth.com/2018/09/24/kings-lynn-docks-branch-part-1

https://rogerfarnworth.com/2018/09/24/kings-lynn-docks-branch-part-2

The Bentinck Passage – the channel between Alexandra and Bentinck Docks

We concluded the last post with an image from Google Earth showing the Alexandra Dock and the channel between it and the Bentinck Dock, and a short series of pictures of the channel. This post starts with that the Google Earth satellite image from the last post and a few of the photographs of the channel and bridges which introduce us to the Bentinck Dock and ts surroundings.

The Dock from above on Google Earth in 2016 the two swing bridges over the channel are easily picked out. The one closest to the top of the image was reserved purely for road traffic and has become a public highway. The other bridge allowed for rail and road access and remains within the limits of the Dock fences.

This Google Streetview Image shows both of the swing bridges, the internal docks bridge can be picked out to the left of the control signals for the bridge on Cross Bank Road.

This image gets us the closest to the Alexandra Dock that we can using Google Streetview. It shows both swing bridges and the dock beyond.

A similar but older view of the Alexandra Dock with the railway/road swing bridge in the foreground.

A closer shot of the internal docks bridge which once carried the dock railway. [16]

The channel in use in the early years of the 21st century. [21]

Bentinck Dock

In the last post we noted that traffic volumes resulted in the need for an expansion of the docks. The measure put to parliament was strenuously resisted by the Norfolk Estuary Company whose land was required for the new dock. The company was not opposed to the extension in principle but implied that then development would block access to its own land.

The development of the new dock required the Cross Bank Road to be cut by the access channel. This channel would have prevented the Duke of Portland accessing the eastern half of his farm. [10: p51]

“In order to offset the inconvenience to road users, the dock company proposed to cross the breach by men’s of a swing bridge and to construct a diversionary road (now known as Estuary Road) from the Cross Bank which could be used as an alternative route by the Duke of Portland when the swing bridge was open for shipping.” [10: p51]

The reference in the quote above to Estuary Road refers to the road which is now know as Edward Benefer Way, and already was known as this in the time I lived in King’s Lynn in the 1970s. On the 1893 plan below, this road is marked ‘ROAD’.


The Estuary Company argued that the diversionary road should be continued into the town across the fan of sidings that served Alexandra Dock to join up with St. Ann’s Street. They hoped that this would avoid the awkward route via North Street and Pilot Street. The route proposed was from the junction between Cross Bank Road and the modern Edward Benefer Way (to the left of the Iron Works on the plan below) almost directly South to St. Ann’s Street and would have resulted in the demolition of a small section of the old town walls next to the site of St. Ann’s Fort. As can be seen below, on plan, this seemed to make a great deal of sense.

The junction between Edward Benefer Way and Cross Bank Road in the 21st Century.

The view South from the above junction across the docks at the location where the fan of points/sidings would have been crossed by the proposed road.
However, there were real problems with this proposal. The Dock Company showed that the average time that the crossing gates on Pilot Street were closed to road traffic each day was 33 minutes but, on an average day, locomotives on shunting duty crossed the fan of sidings 156 times and any road across that location would be closed for very large parts of the day. [10: p53]

The view North from St. Ann’s Street in the 21st Century.

The ‘Engineering Works’ on the 1893 plan just below Estuary Road were the same works as those marked on the OS Map as ‘Iron Works’.

These were the works of F. Savage. His house is seen in the image below. The house was placed adjacent to the works entrance and faced onto Cross Bank Road. The image comes from Mike G. Fell’s book [10] and shows the fan of sidings close to Alexandra Dock before Bentinck Dock and Estuary Road had been constructed. Fisher Fleet is in evidence across the middle of the picture. Savage’s Works were known as St. NIcholas’ Works and stretched along the Southeast side of the site of Bentinck Dock.


Savage’s was a local engineering firm with a national, if not international, reputation and is worth a detour from our survey of the Dock railways. Throughout much it their life the Works were rail-served.
F. Savage Engineering Ltd: The company was founded by Frederick Savage in 1853. He worked from several locations, including a forge in the “Mermaid and Fountain” Yard in Tower Street, a forge in Railway Road, and the former premises of St James’ Workhouse on London Road before moving to this site on St Nicholas Street, known as St Nicholas’ Works. In 1873, eight years before construction started on the Bentinck Dock, four acres were purchased for the Ironworks, and a further five acres were added later. The site included a foundry, boiler and fitting shops, warehouse, and drying sheds and a railway access was eventually added. “Estuary House” was constructed adjacent to the yard as the residence of Mr. Savage. The firm became well known for its agricultural machinery, particularly steam engines and steam roundabouts, and gained an international reputation for steam-powered fairground rides. Savage himself became Mayor of King’s Lynn in 1889. [11]

Until recent years, no fairground was complete without its share of Savage-built merry-go-rounds, switchbacks and showmen’s engines. Each machine was a masterpiece, not only of engineering ingenuity, but also of flamboyant art and craftsmanship. Savages’ fairground machinery was exported all over the world, but the root of this success lay in agricultural implements originally made for local farmers. [12]

The mid-nineteenth century drainage of the Fens by steam power opened up new agricultural opportunities. Savage was quick to exploit these and built and developed carts, hoes and steam threshing machines. From these, the manufacture of traction, or self-moving, engines was a logical development. His Juggernaut, c.1856, was an extremely advanced model. At a time when most engines were driven by an endless chain, the Juggernaut had its rear wheels gear-driven from the crank-shaft which could be disengaged on sharp bends and was therefore easy to manoeuvre. In spite of a warm reception at the Long Sutton Show in 1858, it was never developed and Savage returned to more orthodox chain-engines. [12]

Expansion led to the firm’s move to St. Nicholas Street in 1860, where Savage is described as a machine maker involved in the ‘noisome trade or business of making and repairing steam engines’. In 1873 he was able to purchase reclaimed land off Estuary Road for the St. Nicholas Ironworks site. His biographer, William Sparkes, stated that ‘the securing of the first four acres well nigh exhausted all his money, of which there only remained some £10 or £12 in the bank’. This financial problem was short-lived, however, for Savages was now about to enter its most prosperous era in which it was to receive international acclaim. All activity was now focused at St. Nicholas Ironworks which was equipped with the most modern machinery and staffed by up to 400 employees. [12]

It was in the sphere of fairground machinery that Savages reigned supreme. In the words of their 1902 Catalogue for Roundabouts ‘we have patented and placed upon the market all the principal novelties that have delighted the many thousands of pleasure seekers at home and abroad’. As the expanding railway network made goods cheaply and nationally available, the ancient trading fairs turned to showmanship and public amusement for their survival. Prior to the mid 1860s, roundabouts were driven by young boys or horses pulling round the spinning frame. Similar technology had been applied to horse-driven threshing machines, which Savage was manufacturing at the time. Frederick Savage did not invent the steam-driven roundabout; that privilege probably belongs to Sidney George Soame of Marsham, Norfolk, who exhibited his steam organ engine and roundabout in the 1860s. Nevertheless, Savage was a major pioneer whose engineering skill and commercial flair rapidly outstripped any potential rivals. His Velocipedes and Dobby Horses which proved so popular at the Lynn Mart quickly received nationwide admiration. [12]

As showmen jostled with each other for trade, they required larger, faster and more opulent rides to attract the punters’ attention. Savage responded not only with Racing Peacocks, Jumping Cats and Flying Pigs as variations on the Gallopers theme, but also with the Switchback, the forerunner of most modern rides. Patented in 1888, eight cars ran on an undulating track to which a third compensating rail was added. The undulations of this rail, on which only the front wheel of each car ran, were out of sequence with the inner and outer rails and thereby corrected the proneness of the cars to overbalance. Switchbacks were the most lavish machines ever produced, their cars taking the form of Baroque-style gondalas, gilt-encrusted dragon carriages and the newly invented motor-cars. When steam centre engines were replaced by electric drive, rides became known as Scenics. [12]

Further thrill and amusement was provided by Steam Yachts, Sea-on-Land, Tunnel Railway (incorporating a model locomotive), Razzle Dazzle, Wheely Whirly, Cakewalk and Aeroflyte, to name but a few. These machines could transport people to new realms of ecstasy with their faster speed and sickening dips, all accompanied by the noise, smoke and smell of steam centre engines, the strident music of steam organs and glittering lights provided by Savage Sparklers – new steam-powered electric light engines. It was the golden age of the showman. According to William Sparkes ‘immense sums of money have been paid for the purchase of these respective sets, and as much as £100 to £150 has been received by their proprietors in one day in penny and two penny fares’. [12]

The interior of the Works Yard at Savages in the middle years of the 20th Century. [13]

From 1914 to 1918 the factory was used to manufacture Voisin biplanes (patents acquired from Bleriot in 1914). A field was also acquired to use as a landing strip for testing the aircraft. This airfield may have been location to the north of the factory, but the exact location is uncertain. The aircraft factory itself is said to have been constructed from the buildings of a brick-works at Sedgeford. [11]

The company struggled in the middle 20th century and, although it managed to survive beyond the life of almost all of its competitors, by the late 1960s it was in real trouble and it eventually closed in the early 1970s after a number of rescue bids/attempts. The site was cleared by 1974 and many of the original buildings have been demolished.

Savage’s own house dominated the area around Fisher Fleet. A member of King’s Lynn Forums (‘old-git’) cleverly provided in 2004 a superimposed image showing the house in relation to the modern 21st century layout of the area. [13]

The site of the old Savage’s Works is on the near side of the modern grain silo next to Bentinck Dock. Edward Benefer Way is between the Silo and the Savage’s site, (c) John Fielding. [23]

Bentinck Dock, its Railways and Buildings

The Act authorising the construction of the Bentinck Dock received Royal Assent on 23rd July 1877 but construction work was delayed by problems raising capital. It was not until 1881 that the directors were able to report that all the obstructions thrown in their way had been overcome. The Dock was completed in October 1883 and it was named after William John Arthur Charles James Cavendish-Bentinck (1857-1943), the Sixth Duke of Portland, who officiated at the opening ceremony. [10: p55]

The Dock had vertical walls rather than the originally battered walls of the Alexandra Dock. It was over 10 acres in area. Its opening coincided with an economic downturn which lasted until 1890, when began to pick up once again. [10: p56]

Trade figures show the downturn which followed the opening of the Dock. … In 1883, the total traffic in tons was 280,605. The figure dropped to a low of 155,250 tons on 1888 and gradually increased again, only surpassing the 1883 figure in 1891. After this date, traffic increased to as much as 780,587 tons in 1907 before dropping back to a more steady figure of round 450,000 tons before the First World War. [10: p56]

After the grouping, the LNER became responsible for working the Docks branch and the shunting of dock traffic under an agreement with the docks company. In 1925 the Anglo-American Oil Company constructed five storage tanks with a capacity of over 1.25 million gallons on Estuary Road. These tanks were linked by a pipeline to a berth on the Dock. [10: p61]

The first seaborne oil cargo arrived in September 1925. Soon after this a whole series of different oil companies were using the docks and their logos could be seen on tank wagons using the docks branch.

Molasses were also stored in tanks alongside the docks. They were a by-product of the processing of sugar beet. A large storage tank was erected on the West side of Bentinck Dock with a capacity of 2,500 tons. It was connected to another berth by pipeline. [10: p62]

A 1935 Development Plan shows the layout of the railways around Bentinck Dock. Estuary Roadbis marked to the Southeast side of the dock and although Savage’s Works are not shown, the spur into the Works is shown crossing Estuary Road. It the ran down the Southeast shoulder of the road and entered the northern corner of the Works.

This aerial image shows Bentinck Dock in 1928. The coal lift can be seen on the Northwest side of the dock. The large warehouse was known as No. 3. While the dock is empty of shipping the railway sidings appear to be busy and wagons wait close to the dockside cranes for loading or unloading. [24] The same image appears below as a postcard of the docks.

This later aerial image shows further development of the buildings around Bentinck Dock. In the bottom left we can see Savage’s Works. The sidings alongside the dock warehouses are particularly busy. The coal lift is still visible to the Northwest side of the dock. Development around the Dock now stretches alongside Fisher Fleet all the way to the River Ouse.

The large warehouse known as No. 3 Warehouse is shown in a series of pictures below from different eras in the life of the docks. In most of the images the rail sidngs which ran along the quay are visible and frequently the travelling cranes which served the dockside can be seen as well.

This image is taken after 1960 when the old hydraulic cranes were replaced by more modern cranes.

In this image 4 hydraulic cranes were being used to transfer goods from the steamship Moidart into No. 3 Warehouse. “This was the first time that four cranes had been used simultaneously on the same ship to discharge cargo into the warehouse. There are about 15 bags in each sling, all of which had to be individually man-handled in the holds and again in the warehouse.” [10: p82] Careful inspection of the image will show that the furthest crane of the four from the camera is discharging these bags to a makeshift stage supported by two wooden-bodied railway wagons. At a higher level there are two other stages jutting out from the side of the warehouse upon which the bags were landed. They are supported by packing placed on the more solid platforms below. Dockworkers lives were at risk throughout these operations! [10: p83]

This aerial image is taken from the South. St. Nicholas’ Chapel is prominent in the foreground. Bentinck Dock is close to the top centre of the image. Savage’s can be seen to the right of the Dock with the owner’s house prominent to the right of Estuary Road facing Cross Bank Road. The fan of sidings to the West of Pilot Street are centre-stage. [25]

There were 8 hydraulic cranes along the east side of Bentinck Dock. They are evident in a number of pictures above. They had capacities from 30 cwt to 5 tons and were often used to transfer goods directly from ships into No. 3 Warehouse.

The two images immediately above are taken on the Northwest side on Bentinck Dock in 1911 looking North towards the buildings of Sydenham & Co Ltd. In the first image the hydraulic coal lift just sneaks in on the right-hand side of the picture. There were a number of timber merchants with premises aroun Bentinck Dock in the early and middle 20th century. These included: Bristow & Coply; F. E. Chapman; J. T. Stanton; and a little later, Travis & Arnold.

The two images above show the hydraulic coal lift which was sited on the Northwest side of Bentinck Dock at different times in its life. [26]

These three excerpts from the OS Map of 1928 show the railway layout around the east side of Bentinck Dock at the time.

This map shows the much later layout of the Docks with a considerably reduced rail network (1970s and later). The extension which served Dow Chemicals can be seen north of Bentinck Dock.

Dow Chemical Company arrived in King’s Lynn in the 1950s establishing a large site to the Northwest of Bentinck Dock. Dow Chemicals Plant stretched from Cross Bank Road in the south to Estuary Road in the North – the Grey area north of Fisher Fleet on the plan above.

This picture shows the Dow Chemicals site in the mid-1970s just before the major incident in 1976 during the very hot summer of that year. [27] The Fisher Fleet can be made out just below the top of the picture. The River Ouse crosses the top right of the image. The fact that the site was rail served is also evident – rail tracks can be made out on the laft of the image.

The plant was served by rail until the closure of the docks branch. The track layout at the time of the explosion in 1976 is drawn on the plan immediately below. [27] The plan is not aligned north-south but uses the River Ouse to define its alignment. The main site railway travels in an approximately northwesterly direction from the site gates.

Details of the explosion, its aftermath and the learning which followed are contained in a report promulgated on-line by the Institution of Chemical Engineers – http://www.icheme.org. [27] The report was first published by the Health and Safety Executive in March 1977.

This image in the 1977 Health and Safety report was taken to show steel flooring embedded in the roof of the boiler house, 99 metres from the area of the explosion, but for the purposes of this post, it shows another view of the rail sidings in the plant. [27]

The next three pictures show the rail approach to the Dow Chemicals site from the lines on the East and North of the Bentinck Dock. The third image is taken inside the gates of the site.