Monthly Archives: Jan 2019

Japanese Narrow Gauge -762mm Lines – Part 1 – The Kurobe Gorge Railway

I hope this will be the first of a short series of posts looking at some of the 762mm lines in Japan. …….

1. The Kurobe Gorge Railway

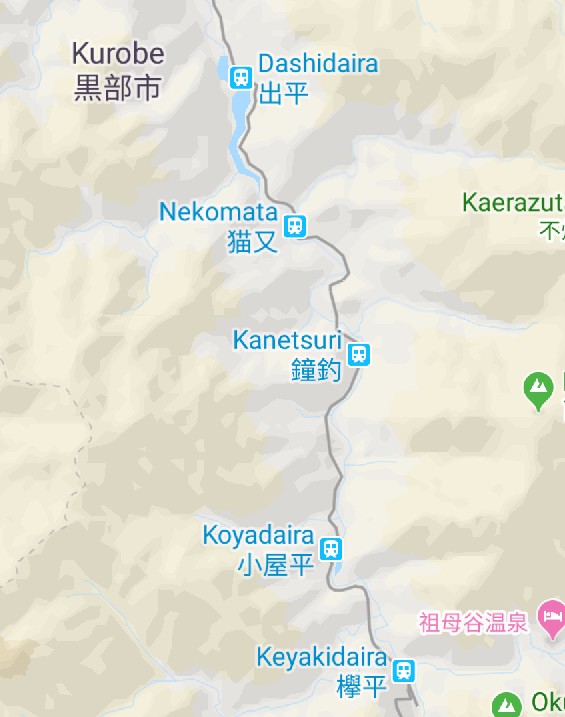
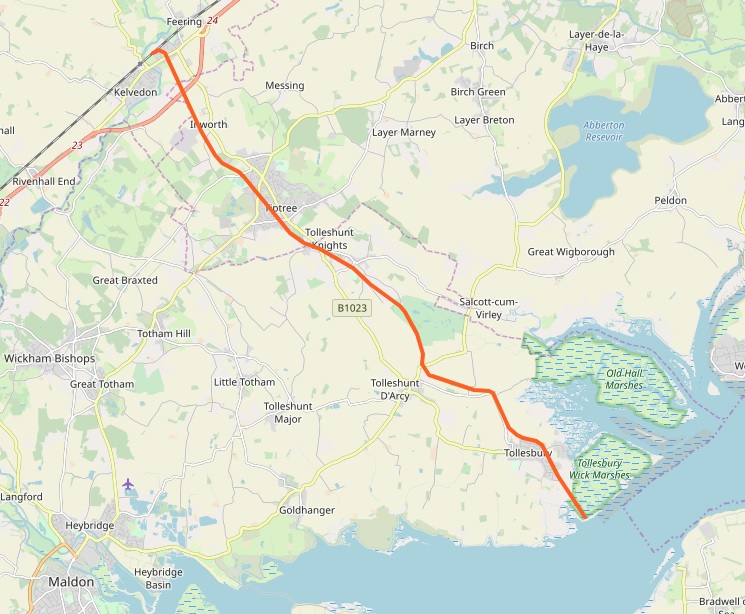
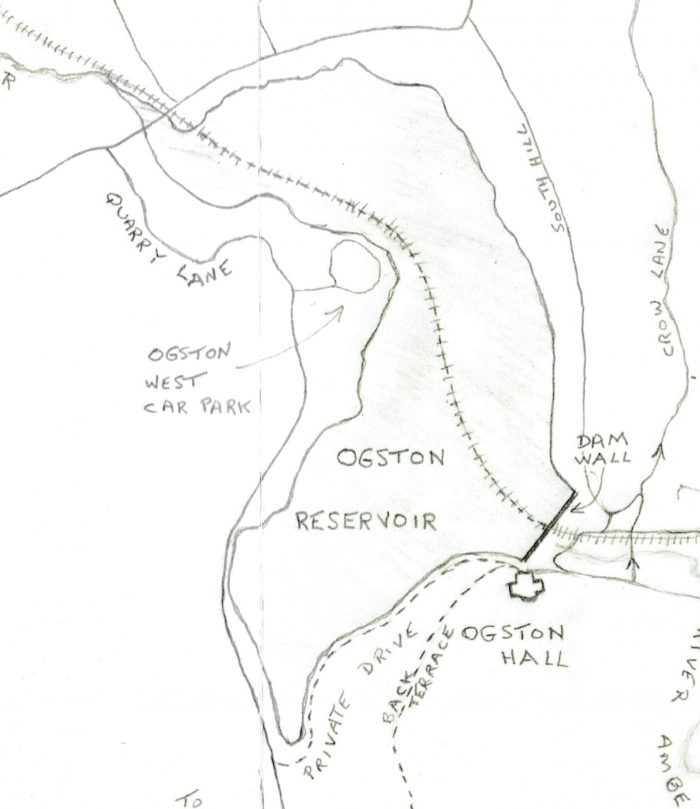
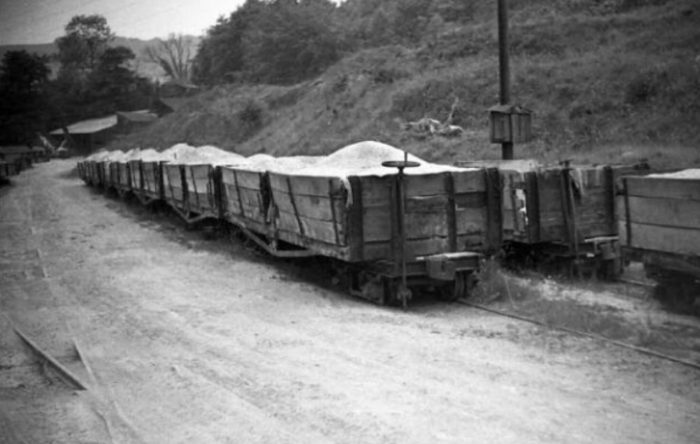
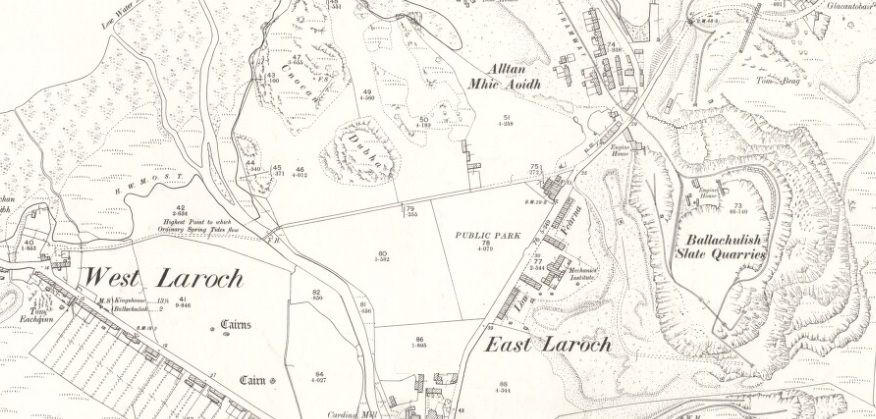
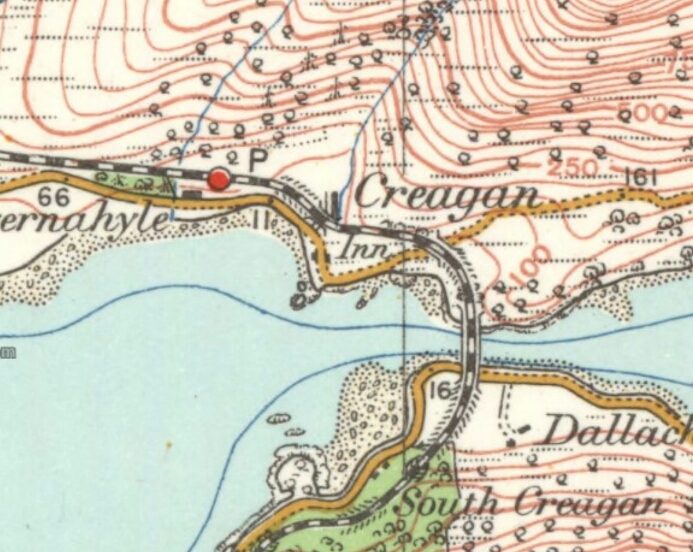
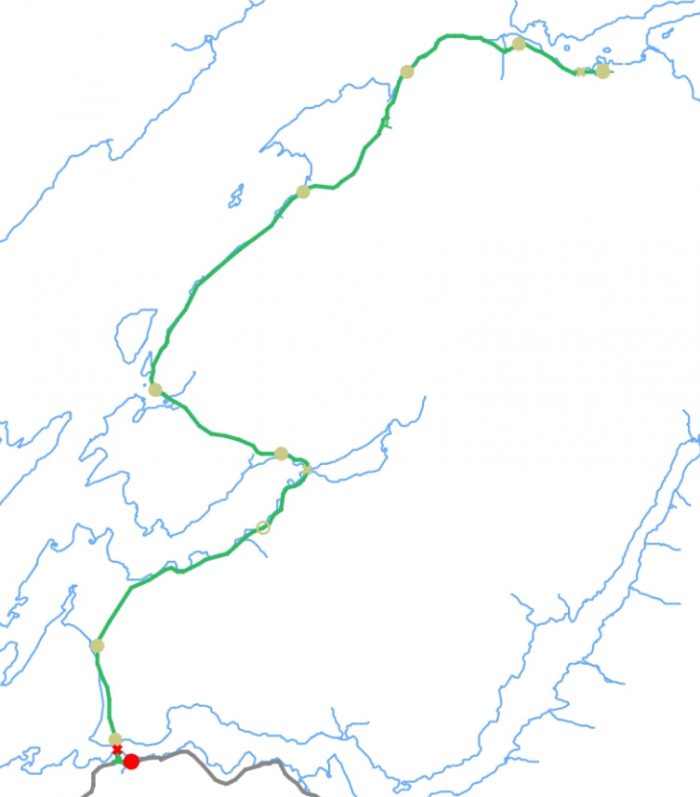
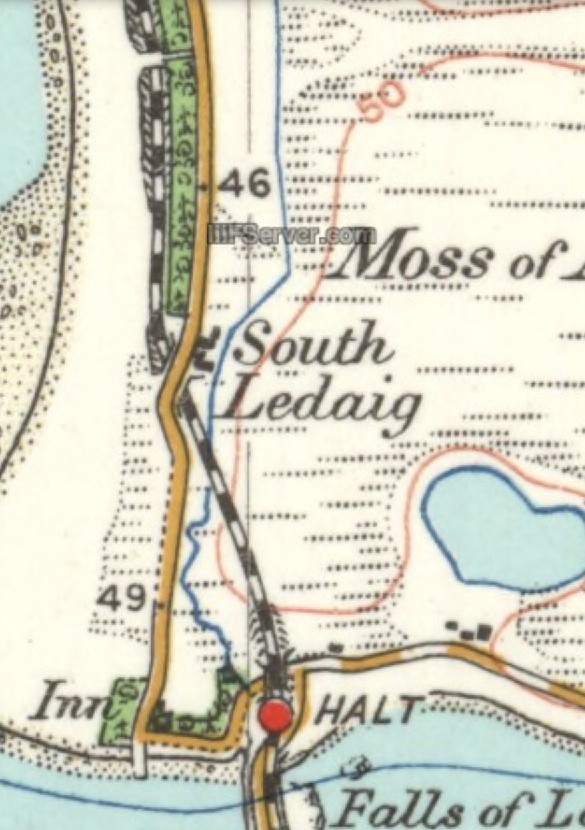
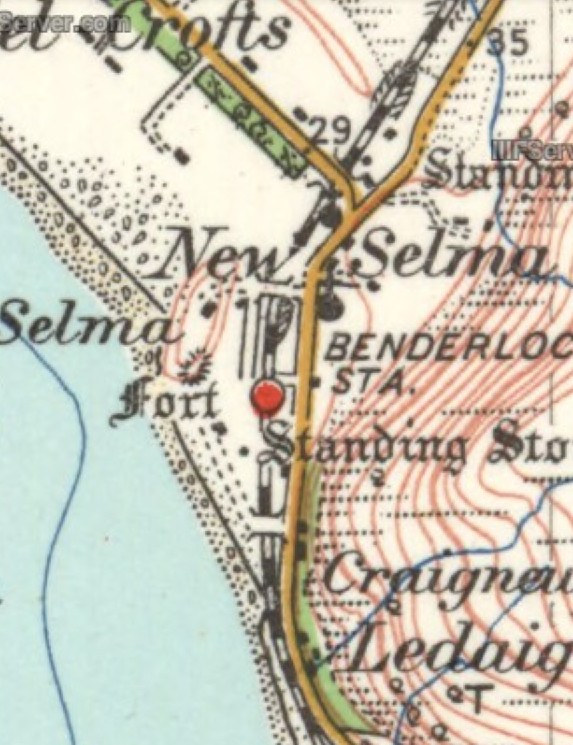
The Kurobe Gorge Railway (Kurobe Kyōkoku Tetsudō Kabushiki Kaisha), or Kurotetsu  for short, is a private, 762 mm (2 ft 6 innarrow gauge railway company operating the Kurobe Gorge Main Line along the Kurobe River in the Kurobe gorge area of Toyama Prefecture, Japan. The adjacent maps show the  location on the Gorge. It is marked with the red flags which actually pin-point Unazuki Station.To fulfil domestic electricity demand, the Japanese government began surveying the Kurobe River in 1909 for the Kurobe HEP Plant Project. In 1923, the Japanese government began building a 762mm narrow-gauged railway in Unazuki to transport equipment and personnel to the site. Later on by 1926, the 11.8km long “Kurobe Gorge Railway” reached Nekomata. It was extended to develop the HEP plant. Finally in 1937, the railway reached a length of over 20km and reached Keyakidaira. The line to Nekomata operated on a 600V DC supply. The full route from Unazuki to Keyakidaira is shown in the two map excerpts below. [5]

The present railway was used for the construction of the Kurobe dam for the Kansai Electric Power Company, which was completed in 1963; Kurotetsu was spun off from the power company in June 1971, but remains a wholly owned subsidiary. At its remote terminus, the Main Line links to Kurobe Senyō Railway, which is not open to the general public. [6]

In 1951, the Kansai Electric Power Company was formed to provide electric power for the Kansai region of Japan. Shortly after their formation, the area suffered from drought which caused power rationing. The drought, along with the rapid growth of post–World War II Japan, pushed the company to increase their generating capacity. After a series of geological and hydrological studies of the Kurobe River and Gorge, it was announced in late 1955 that the Kurobe Dam would be constructed. [2][4] Construction began in July 1956 but problems quickly arose while transporting material to the construction site as only one small railway existed through the narrow gorge. [3][4]

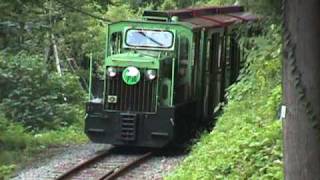
Although the railway was built to transport construction materials and personnel, it passed through amazing scenery and a passenger service started in 1953 primarily as a tourism venture. Initially, the journey was considered to be dangerous and various warnings were printed on passenger tickets. [5] As we have already noted, in 1971 a new company was formed by Kansi Electric Power Co., Inc which it named as the “Kurobe Railway Co., Ltd.” This new subsidiary invested, gradually, in better passenger rolling stock. In 2008, the company operated 27 locomotives, 138 passenger carriages and 322 freight wagons. [6]

En-route from Unazuki to Keyakidiara trains first cross a large red steel truss arch bridge which is shown in the adjacent picture. [1] The Shin-Yamabiko (Mountain Echo Tree Spirit) Bridge. The name (yamabiko) was earned by the fact that the sound of the train passing by echoes in the town. Immediately after crossing the bridge the railway enters a short tunnel before  following down the eastern side of the Gorge towards Unazuki Dam.

The Dam is the most recent to be built in the Gorge. It was complete in 2001. Before reaching the location of the Dam, trains plunge once again into a tunnel.

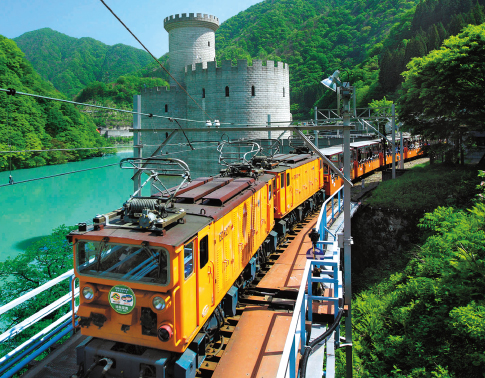
Trains do not emerge from that tunnel until well south of the Dam alongside Lake Unazuki and close to one of the power stations in the Gorge – Shin-Yanagawara Power Plant. This hydroelectric power station resembles an ancient European castle and is located on the shores of Lake Unazuki. [1]
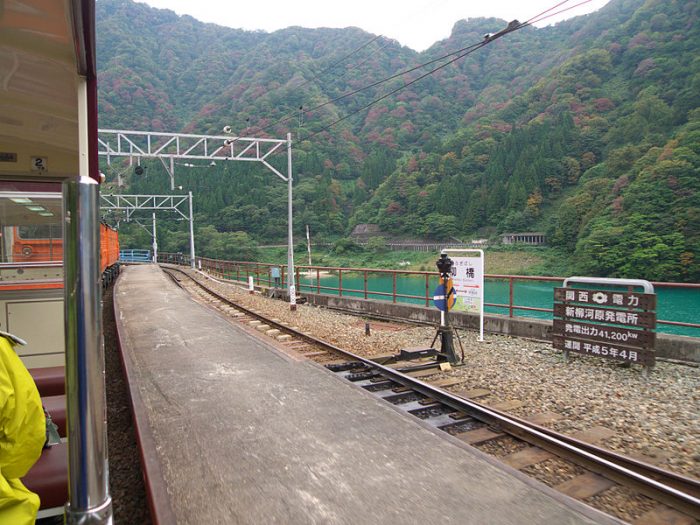
Yanagibashi Station alongside Lake Unazuki. [7]

Travelling South down the East side of the Gorge, trains pass through Yanagibashi Station before turning East and passing through Moriishi Station. 
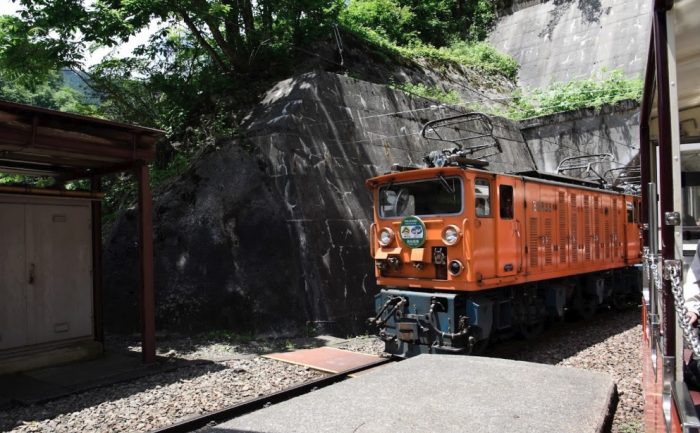
A train heads east out of the tunnel into Moriishi Station, (c) Ryota23. [8]

Travelling East from Moriisi, the line drifts away form the River Kurobe. The next station is at Kuronagi and is on the Northside of and above one of the tributaries of the Kurobe, the River Kuronagi. Here there is a footpath which leads east along that River to some hot springs. Trains leave Kuronagi Station and immediately cross the River Kuronagi over the Atobiki Bridge.
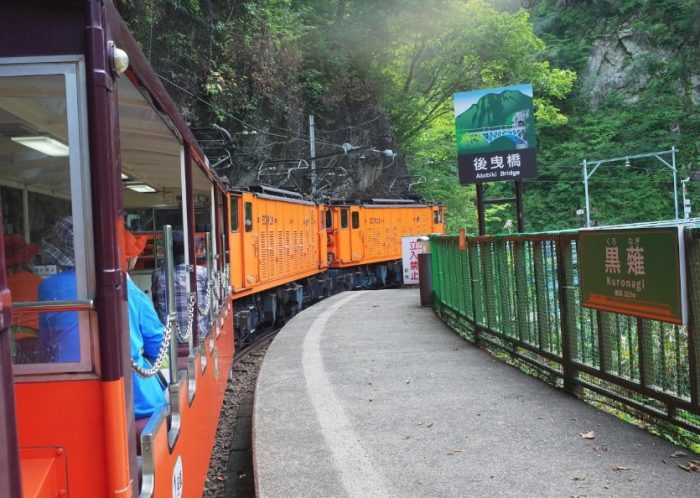
Kuronagi Station [9] and the Atobiki Bridge beyond. [10]At a height of 60 meters and a length of 64 meters, this bridge spans the steepest and deepest valley along the rail line. The name is derived from the belief that previously mountain climbers would inch backwards away (atobiki) when they came face-to-face with such a seemingly bottomless valley. [1]

After crossing the River Kuronagi, trains head back towards the East side of the Kurobe Gorge, for a short while traveling southwestwards in tunnel and then reverting to a south-easterly course alongside the Gorge of the Kurobe River. At the point where the railway turns south-eastwards it passes through Sasadaira Station.
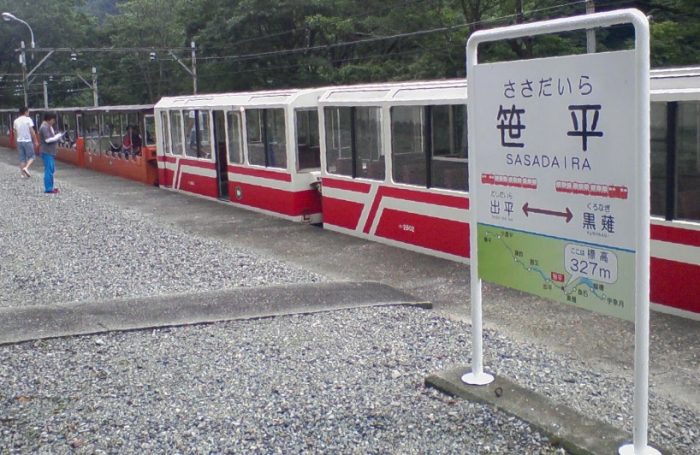
A train at Sasadaira Station. [11]

The south-easterly course of the Gorge and the railway continues as far as the next Dam at Dashidaira with a station of the same name a little beyond the Dam alongside the lake formed by the Dam.
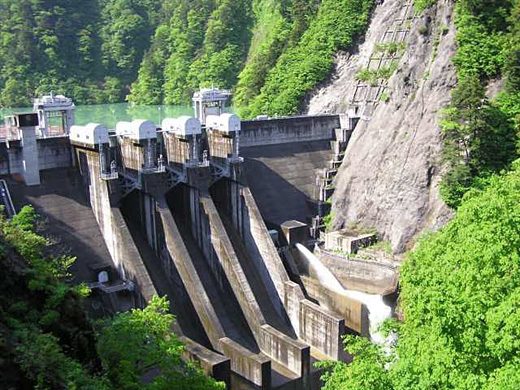
Dashidaira Dam. [12]
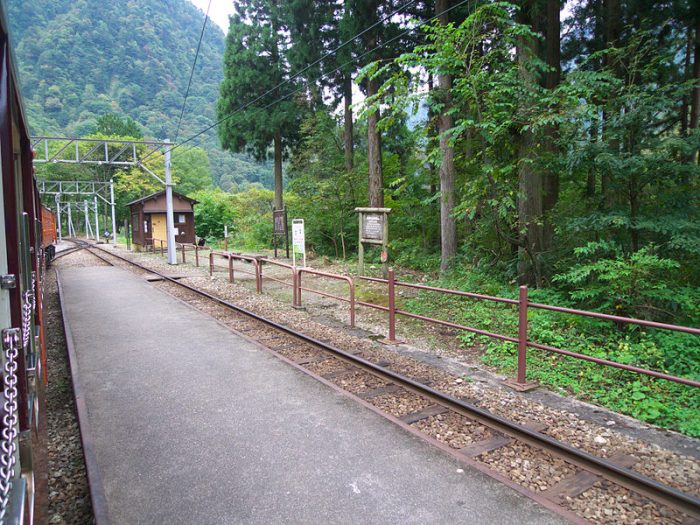
Dashidaira Station. [13]

The next significant location on the route is that of the Kurobegawa Daini Power Station. This can be seen below on the West side of the River Kuobe.
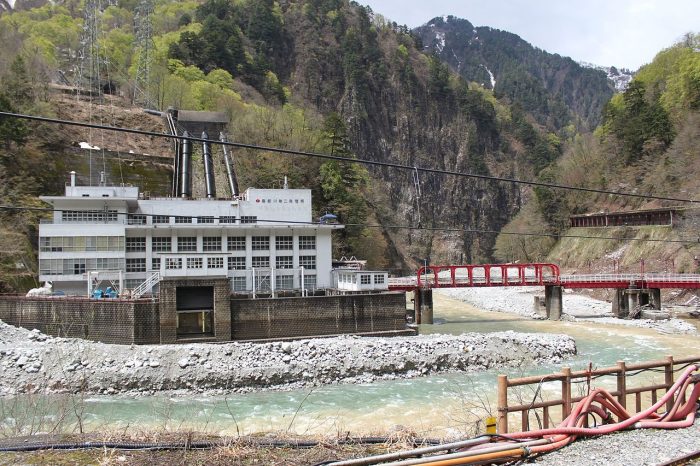
The Kurobegawa Daini Power Station, the railway can be seen under a protective snow roof  on the right side of this picture. [14]

Immediately after the power station is passed the railway enters Nekomata Station which was at one time the terminus of the railway.
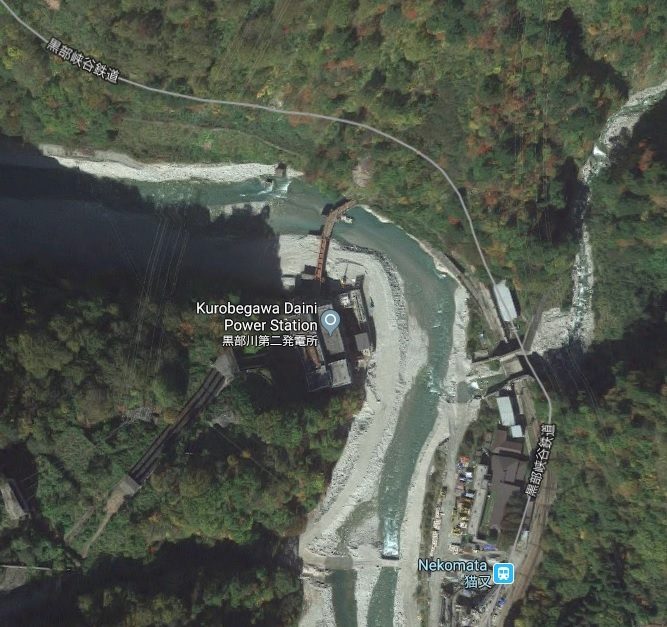
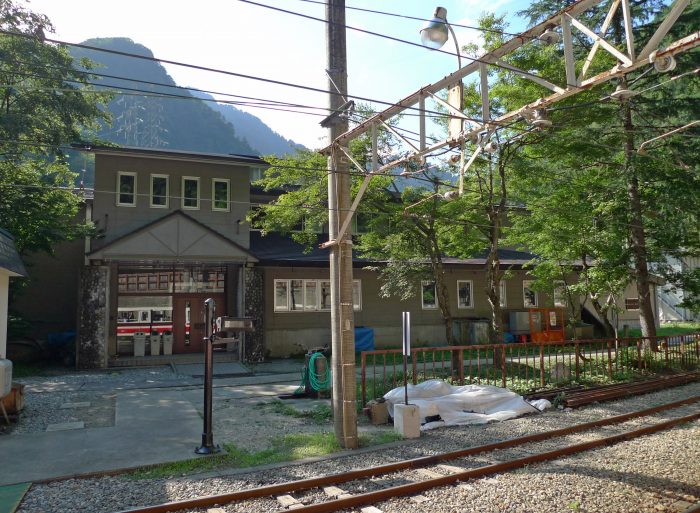
Nekomata Railway Station. [15]

South of Nekomata, the railway continued down the East side of the Gorge. It passed in tunnel under  Higashikanetsuriyama and then crossed to the West side of the Gorge. It then passed along the North flank of Nishikanetsuriyama into Kanetsuri Station which is shown in the adjacent picture.

The line continues South on the West side of the Gorge passed the Kanetsuri Hot Springs, through a series of tunnels, and over a series of bridges before reaching the next station at Koyadaira close to the Dam of the same name.
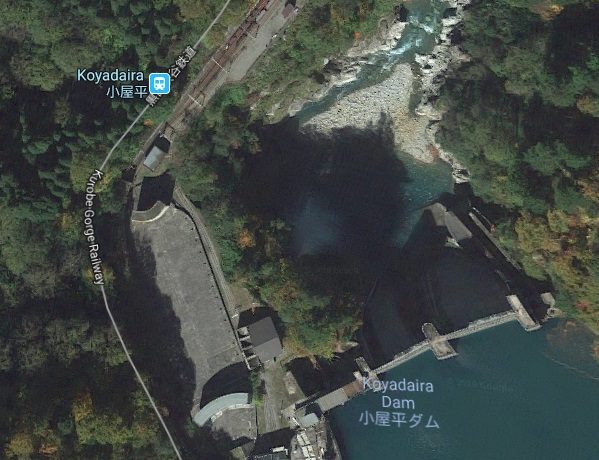
Koyadaira Dam and Railway Station.
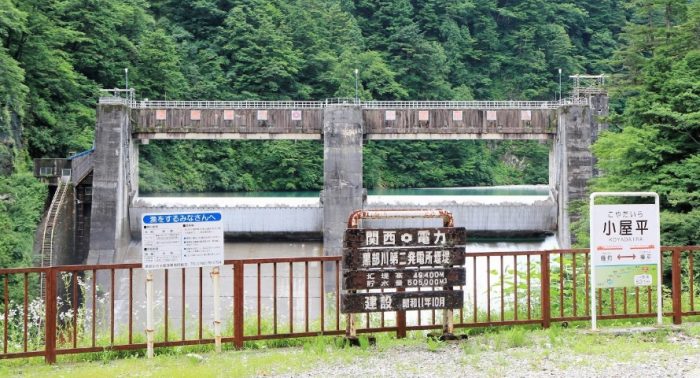
Koyadaira Dam and Railway Station, (c) Laxic Hsiao . [17]

Tunnels and bridges follow, a Power Station is passed and trains eventually arrive at Keyakidaira Station, beyond which lies the Kurobegawa Daisan Power Station, the Shinkurobegawa Daisan Power Station and the Kurobe Senyō Railway which is in private hands. [18] Both of the branches of the private railway provide access to power stations further along the Gorge.

Close to the railway station lies the Keyakidaira Visitor Centre and walks up the valley of the River Babadani are possible across two significant pedestrian bridges.

The first of these is the Okukane Bridge , a vermillion-lacquered bridge spanning the main course of the Kurobe River. The view enjoyed from this 34-meter-high bridge is breathtaking. The second is the Meiken Bridge.


References

  1. http://www.kurotetu.co.jp/en/railway, accessed on 29th January 2019.
  2. “Milestones:Kurobe River No. 4 Hydropower Plant, 1956-63”. IEEE., https://ethw.org/Milestones:Kurobe_River_No._4_Hydropower_Plant,_1956-63#cite_note-refnum3-2, accessed 30th January 2019.
  3. Takashi Oka; The New Japan; The Rotarian, November 1960, p. 22. https://books.google.com/books?id=ajcEAAAAMBAJ&pg=PA22&lpg=PA22&dq=Kurobe+Dam+1956#v=onepage&q=Kurobe%20Dam%201956&f=false,  accessed on 30th January 2019.
  4. https://en.wikipedia.org/wiki/Kurobe_Dam, accessed on 30th January 2019.
  5. https://www.railway.gov.tw/Luodong/CP.aspx?SN=18164, accessed on 30th January 2019.
  6. https://en.m.wikipedia.org/wiki/Kurobe_Gorge_Railway, accessed on 29th January 2019.
  7. https://commons.wikimedia.org/wiki/File:Kurobe_Gorge_Railway_Yanagibashi_Station.jpg, accessed on 30th January 2019.
  8. https://www.google.co.uk/maps/place/Moriishi+Station/@36.791973,137.613129,3a,75y,90t/data=!3m8!1e2!3m6!1sAF1QipMJgsDwRl9TskatlLFOQ5Al7t0kegupNW_ugvFC!2e10!3e12!6shttps:%2F%2Flh5.googleusercontent.com%2Fp%2FAF1QipMJgsDwRl9TskatlLFOQ5Al7t0kegupNW_ugvFC%3Dw203-h135-k-no!7i2047!8i1366!4m8!1m2!2m1!1skuronagi!3m4!1s0x5ff7b6dda3e99cc3:0xd84e8ce32d74153d!8m2!3d36.7919741!4d137.6131314, accessed on 30th January 2019.
  9. https://www.google.co.uk/maps/place/Kuronagi+Station/@36.786557,137.625156,3a,75y,90t/data=!3m8!1e2!3m6!1sAF1QipOkkn0hQVlRu64xFzMzEiJ2FSYHND0zrvZMGgjn!2e10!3e12!6shttps:%2F%2Flh5.googleusercontent.com%2Fp%2FAF1QipOkkn0hQVlRu64xFzMzEiJ2FSYHND0zrvZMGgjn%3Dw203-h134-k-no!7i3936!8i2608!4m8!1m2!2m1!1skuronagi!3m4!1s0x0:0x22e23d0be2f09cf!8m2!3d36.7865571!4d137.6251561, accessed on 30th January 2019.
  10. https://www.google.co.uk/maps/place/Kuronagi+Station/@36.786557,137.625156,3a,75y,90t/data=!3m8!1e2!3m6!1sAF1QipPhBsL6Awc5Diy7EsnivlU7dhhzcsFtlW_Z9_ci!2e10!3e12!6shttps:%2F%2Flh5.googleusercontent.com%2Fp%2FAF1QipPhBsL6Awc5Diy7EsnivlU7dhhzcsFtlW_Z9_ci%3Dw203-h152-k-no!7i2048!8i1536!4m5!3m4!1s0x5ff7b6fad2bee879:0x22e23d0be2f09cf!8m2!3d36.786557!4d137.625156, accessed on 30th January 2019.
  11. https://www.google.co.uk/maps/place/Sasadaira+Station/@36.7831127,137.6237955,3a,75y/data=!3m11!1e2!3m9!1sAF1QipPMp8uldhHdgCqSUW8xn9oSxO69LrzNuiwB9zJH!2e10!3e12!6shttps:%2F%2Flh5.googleusercontent.com%2Fp%2FAF1QipPMp8uldhHdgCqSUW8xn9oSxO69LrzNuiwB9zJH%3Dw203-h152-k-no!7i1600!8i1200!9m2!1b1!2i24!4m12!1m6!3m5!1s0x5ff7b6fad2bee879:0x22e23d0be2f09cf!2sKuronagi+Station!8m2!3d36.786557!4d137.625156!3m4!1s0x5ff7b6fc6e533587:0x9b7570646a30b80!8m2!3d36.7831128!4d137.6237952, accessed on 30th January 2019.
  12. http://damnet.or.jp/cgi-bin/binranA/enAll.cgi?db4=0881, accessed on 30th January 2019.
  13. https://commons.wikimedia.org/wiki/File:Kurobe_Gorge_Railway_Dashidaira_Station.jpg, accessed on 30th January 2019.
  14. https://commons.wikimedia.org/wiki/Category:Kurobegawa_No.2_Power_Station, accessed on 30th January 2019.
  15. https://commons.wikimedia.org/wiki/File:Nekomata_Station_20100904-4.jpg, accessed on 30th January 2019.
  16. https://www.google.co.uk/maps/place/Kanetsuri+Station/@36.7344716,137.6514835,3a,75y,90t/data=!3m8!1e2!3m6!1sAF1QipOTEI4j0pOu3Y6nOxp-Xz1hd5goGjlBBtd4sGBO!2e10!3e12!6shttps:%2F%2Flh5.googleusercontent.com%2Fp%2FAF1QipOTEI4j0pOu3Y6nOxp-Xz1hd5goGjlBBtd4sGBO%3Dw203-h360-k-no!7i720!8i1280!4m5!3m4!1s0x5ff7c872db9dfdd3:0xdddc79f34e2a53f7!8m2!3d36.7342025!4d137.6511564, accessed on 30th January 2019.
  17. https://www.google.co.uk/maps/place/Koyadaira+Station/@36.7110379,137.6469909,3a,75y,90t/data=!3m11!1e2!3m9!1sAF1QipOCrQC47H9YO-fpqq_DzKa1X32a6OYC1C7Ma_1Y!2e10!3e12!6shttps:%2F%2Flh5.googleusercontent.com%2Fp%2FAF1QipOCrQC47H9YO-fpqq_DzKa1X32a6OYC1C7Ma_1Y%3Dw129-h86-k-no!7i2592!8i1728!9m2!1b1!2i20!4m5!3m4!1s0x5ff7c635e0932073:0xb92346a137017734!8m2!3d36.7110379!4d137.6469909, accessed on 30th January 2019.
  18. https://en.m.wikipedia.org/wiki/Kurobe_Seny%C5%8D_Railway, accessed on 30th January 2019.


The Kelvedon and Tollesbury Light Railway

I am continuing to read through old copies of ‘The Railway Magazine’. This time it is the December 1950 edition. It contains a short article about the Kelvedon and Tollesbury Light Railway in Essex. This article held my interest because it relates to a line not too far from Braintree in Essex where we lived between 1970 and 1972. A scan of the article in the Railway Magazine is reproduced at the end of this post below the References …

The Kelvedon and Tollesbury Light Railway was an 8-mile-42-chain (13.72 km) standard-gauge light railway in Essex, England. It was authorised under the Light Railways Act 1896 and operated between the two villages of Kelvedon (on the Great Eastern Main Line) and Tollesbury to the south of Colchester on the coast. The line, which was part of the Great Eastern Railway (GER), was authorised on 29 January 1901, although its opening was delayed until 1 October 1904. [1][2][3]The approximate route of the line shown on OpenStreetMap.

The area served by the railway lay between the GER main line and the coast, mostly agricultural land, with fruit being a main crop. At Tiptree, Wilkin & Sons, the jam-making firm, founded in 1885,[4] provided a large amount of the freight traffic; it had also been hoped that a tourist trade would ensue from the yachts moored near Tollesbury. The line became known locally as The Crab and Winkle Line, although the original railway to bear that name was the Canterbury and Whitstable Railway, which used a play on the initial letters of the line.

Arthur Wilkin, the proprietor of the jam making family firm, was intent on having the railway built because Tiptree was only a farmstead in a large heathland. Fruit had to be taken to Kelvedon, the nearest village, by horse and cart, which took time. There were no made roads, just rugged tracks. For the company, it was imperative that they had a railway. In fact, Arthur Wilkin threatened to move his jam company to Dagenham if the railway was not built. [2]

Tiptree, Tollesbury and Tolleshunt D’Arcy had substantial buildings; the otherintermediate stations had an old passenger coach for accommodation. [1] All the platforms were at a low level; there was no signalling, since only one locomotive worked the line; and only local tickets were issued on the trains; there were no through tickets to mainline stations. [4]

The 1.75 miles (2.8 km) extension to Tollesbury Pier never brought the expected traffic. During World War I it was used for troop training on the river and was subsequently closed to passengers in 1921.The government took it over during World War II and erected defences along it.[2] Final closure to passenger traffic took place on 5th May 1951, just 6 months or so after the article in The Railway Magazine was written. Freight traffic continued between Tollesbury Pier and Tiptree until 29th October of the same year. The section between Tiptree and Kelvedon continued in use for freight traffic until 28th September 1962. [1]

The total construction cost of the line from Kelvedon to the River Blackwater was estimated at £45,000 or £4,667 a mile. The maximum speed allowed was 25mph and 10mph through villages and ungated level crossings. Fares on the first journeys were only offered as third class. For the full excursion from Kelvedon to Tollesbury, you would have been charged 9d (about 4p), and the journey would have taken 40 minutes if there were no accidents or animals on the line. [2]

On the last day of the passenger service: “On the engine’s firebox were chalked ‘Born 1904. Died 1951’, and on the bunker was the solemn warning, ‘There be many a poor soul have to walk’. This last train to Tollesbury arrived on time at 6.25pm, and on departure for the last time to Kelvedon was accompanied by as much noise as the departure on the outward journey.” [1] Following the last passenger train from Kelvedon, a black coffin from Kelvedon with wreaths, one of which was shaped in the letters of BR, was laid along Tiptree platform. On the side of the train, someone had chalked: “Crab and Winkle, sorry to say, you died because you did not pay.” [2]

Access at the Kelvedon terminus was by a footway running across the road bridge and descent to the Low Level Station. The Low level station is shown in the two images above. [5]Passengers waited here for their train in a wooden shed. A mixed train behind a GER 0-6-0 tank near Kelvedon on the Kelvedon & Tollesbury Light Railway in around 1910. [6]

The stations/halts served by the line were, Feering, Inworth, Tiptree, Tolleshunt Knights and Tolleshunt D’Arcy, before reaching Tollesbury and finally Tollesbury Pier. [1]

The route meandered through the Essex countryside, the maximum gradient being 1 in 50. The tightest curves occurred on the final section between Tolleshunt D’Arcy and Tollesbury and included an agricultural siding at Old Hall. The stations at Tiptree and Tollesbury were the most attractive on the line. The latter consisted of a small goods yard, complete with loading gauge and cart road and wooden buildings. Tiptree Station. [6]Tollesbury Station. [5]Tolleshunt Knights Halt. [1]

The line then crossed the road, Station Road, by an open crossing on the other side of which was a run-round loop. [1]

The extension to Tollesbury Pier was completed on 15th May 1907 about two years after the rest of the line. It remained open for less than 20 years and skirted the village before dropping steadily to the River Blackwater. Two roads, Woodrolfe Road and Woodrolfe Farm Lane were crossed by this final section of the line. The terminus facilities included an old coach body and a red brick hut about 40 yards from where the pier began. [1]The Tollesbury Pier Station. [7]

In 1939, the pier extension, which had only remained open until 1921, was taken over by the then War Department. Part of the structure was blown up in 1940 as an anti-invasion precaution. The overgrown track was terminated in a sand-drag and used by four locomotives to service the mobile guns that were stationed along the estuary. Part of the extension had been used previously for the storage of rolling stock, but the wooden pier had been allowed to fall into disrepair after closure nineteen years earlier. [1]

During war-time, a pill-box of thick reinforced concrete was built on the land end of the pier, and a control tower for the many electrically controlled mines, which effectively blockaded the estuary against enemy attack, was built about mile inland on the seaward side of the line. The old pier was finally demolished when the line was taken up in 1951, and any traces that might have been left were washed away when the great floods of February 1953 inundated the north bank of the Blackwater for about mile inland. Even the few rotting stumps of timber which stood above the mud at low tide have now disappeared. [1]

“Services were neither rapid nor very frequent. A majority of the trains were mixed and the time allowed for the journey was between 30 and 40 minutes. No trains ran on Sundays.” [1]

“By 1937 branch traffic was in steady decline. Ten years later passenger journeys had reached their lowest ebb – averaging only 33 return journeys along the entire route each day.” [1]

Searching the internet, I have found a number of texts relating to the line which I have not yet been able to read:

  • N.J. Stapleton; The Kelvedon and Tollesbury Light Railway; Forge Books; 2nd Revised edition edition, December 1975.
  • M. House; The Kelvedon to Tollesbury Railway: A Pictoral History;
  • Vic Mitchell; Branch Lines Around Witham and Kelvedon: Bishop’s Stortford, Maldon, Tollesbury; Middleton Press, 2010.
  • Peter Paye; The Tollesbury Branch; Oxford Pub Co, 1985.

I have also had this link to a video pointed out to me:

References

  1. Keith Lovell; The Crab and Winkle Line; http://www.tollesbury.org/history/crab_winkle.html, accessed on 29th January 2019.
  2. http://www.tiptreeturner.co.uk/crabandwinkle.html, accessed on 29th January 2019.
  3. https://en.wikipedia.org/wiki/Kelvedon_and_Tollesbury_Light_Railway, accessed on 29th January 2019.
  4. R.C.J. Day and R.K. Kirkland; The Kelvedon & Tollesbury Light Railway; The Railway Magazine Tothill Press Ltd, Volume 96 No. 496, December 1950, p838-842, p847.
  5. http://railthing.blogspot.com/2015/11/tollesbury-kelvedon-low-level-top-two.html, accessed on 29th January 2019.
  6. https://spellerweb.net/rhindex/UKRH/OtherRailways/Tollesbury.html, accessed on 29th January 2019.
  7. https://en.wikipedia.org/wiki/Tollesbury_Pier_railway_station, accessed on 29th January 2019.
  8. The Railway Magazine article on which this post is based can be found in the Railway Magazine archives on line if you do not have access to the original edition of the magazine. A subsequent note in The Railway Magazine of June 1951 (p422) says that all passenger services were withdrawn from the line in May 1951. The last passenger train ran, it notes, on the evening of 5th May.


The Ashover Light Railway – Part 3

The Route of the Ashover Light Railway – Stretton to Ashover Butts

Baldwin 4-6-0T ‘Joan’ at Stretton in 1930. [5] Joan heading South from Stretton, (c) M. W. Earley [6]

South of the Halt at Stretton, the railway travelled for well over a kilometre alongside the main standard-gauge line before it began to bear away from the Midland line towards the west, soon entering the valley of the River Amber. The next halt was at Hurst Lane, but there was an intermediate passing loop for stabling purposes at Ford.

Ford Loop was “the lowest point on the railway. In the early days a steam locomotive would wait here ready to pilot heavy stone trains to Clay Cross, but objection was made to the weight on the bridges and subsequently the engine was attached to the rear of the train as a banker. Years later the morning stone from Ashover would drop half its load here and collect it in the afternoon.” [4]

Beyond Ford Loop, wagons of coal for nearby Ogston Hall could be accommodated in a siding alongside Ford Lane.Ogston Hall. [15]

The line climbed steadily at a grade of 1 in 220 on its journey to Hurst Lane which was provided with facilities for trains in both directions to take water simultaneously.[2] It had a wooden shelter and telephone box, together with a water tank on wooden trestles. There were points for a siding near the shelter, but this was never laid. The water tank was gone by the late 1940s. [1][7]

Beyond Hurst Lane, the gradient of the line steepened to 1 in 99, wooded slopes which surround the line in the lowest part of the valley gave way to open country as the railway ran on towards Woolley. Along the route of the line, bridges were used to allow the line to remain on an acceptable alignment despite to meanderings of the River Amber. Just before reaching Woolley and after crossing the river on a bridge, the line passed what could have been the location of its main junction. Within the original authorisation for the construction of the line was a route to Alton Colliery. Although authorised, this line was never built. [8]

Alton Colliery was not re-opened. K.P. Plant notes: “Examination of the Deposited Plans shows that the branch would have had a continuous climb to the colliery from its junction … west of Hurst Lane. Traffic would have been worked on the endless rope principle and, as level crossings were vetoed, extra expense would have been incurred in providing 5 road bridges. The order restricted the gradient on the branch to 1 in 10, the minimum radius of curves to 5 chains, and not surprisingly prohibited it to passenger traffic.” [9]

By this time, the surrounding countryside was more hilly.

At Woolley, the next halt, a public road was crossed, and goods facilities were provided. This halt, and those at Dalebank and Milltown, took their names from hamlets on the hillside. In most cases passengers were also picked up and set down wherever public roads were crossed.

Woolley Halt comprised  “the usual shelter, together with a telephone box, plate-layers cabin and Clay Cross Company coal office (closed about 1934) and a siding to hold four or five wagons.” [7] The Halt served the village of Woolley Moor. Some time before its closure, the telephone was moved from the box into the office, as coal sales were initially good, but soon deteriorated. The section of track where the station once stood has now been flooded by the Ogston Reservoir. [1] The sketch plan above [14] shows the line of the Light Railway and the extent of the reservoir. The railway route only appears out of the water just to the southeast of what is now the B6014 and had it survived, the line would have followed the lake shore to the right of the image below. This northwestern tip of Ogston Reservoir is cut off from the main reservoir by the B6014. This is where the River Amber joins the reservoir, its course can be seen when water levels are low. [13]

Beyond Woolley trees encroached on the line again and the railway crossed the Amber two times as it continued to climb up the valley. The next halt was Dale Bank Halt, which had a wooden shelter. The halt was always very underused, despite being just half a mile from Stubben Edge Hall. [7]Stubben Edge Hall. [16]

A further 500 metres or so up the line the railway crossed a small bridge and arrived at Milltown Halt. Provision was originally made here for a siding but one was not built. The points were removed at the beginning of the 1930s. [7] The halt was reach via a short roadway from Oakstedge Lane. [1]

Before leaving the lower end of the Amber Valley, it is worth a note about the reservoir which now floods much of the area. Ogston Reservoir was completed in 1958 and dramatically altered the appearance of the Amber Valley. Today (2019) it is regarded positively and has become a magnate for birds. [12] The reservoir was originally created to supply the National Coal Board’s Carbonisation Plant at Wingerworth but is now run by Severn Trent Water and supplies water for the local area and is used as a holding ground for water for nearby Carsington Reservoir. It has an area of 220 acres of open water, holds 1300 million gallons of water and gets its water from the River Amber. [10]

The flooding of the valley in 1958, completely submerged farmland, roads and part of the Ashover Light Railway. The reservoir also destroyed most of the village of Woolley. The villagers were relocated into council houses built in another local hamlet, Badger Lane, which eventually became known as the village of Woolley on the Moor, which subsequently became the present village of Woolley Moor. [10]

Local feelings in the late 1950s are highlighted in an article written at the time by Mrs Annie Fox. [11] she draws attention to the changing scene after the building of the dam. Her words are in italics:

In days gone by, Woolley House a large Country house was run as a Hydro and took in visitors all the year round. Attached to it was a small village store where you could buy anything from a box of matches to a cwt: of corn. In the yard at the back was the old Joiners shop, which was used by the local undertaker.

Later the house was sold and divided up into 6 small cottages made out of the big house, the shop 11 other cottages and the old public house Napoleon’s Home, all will soon be destroyed by the New Ogston Reservoir built to supply industry with millions of gallons of water.

The Napoleon’s Home has been in the family of the Fox’s for generations past, and is still bother owned and run by Mr Fox today. In its grounds the village football team used to play, also the cricket team had their pitch. Here the Flower and Vegetable Show has been held every year for the past 48 years. Now they are told it cannot stay. The villagers have to leave homes in which some were born, and lived for a life, time, to make way for the flooding of the valley. At present only the Public House remains occupied. When the bulldozers have finished their work, one cottage on the other side of the road will remain, standing out like a landmark with the past. Its occupant an old gentleman who has seen many changes in his life time, now spends a lot of time directing many and various people up the hill, to where the villagers have been re-housed in Council houses, almost making a new village on top of the hill. Before, only a few cottages and small holdings stood there.

The old sheep wash too, has been destroyed where local farmers used to bring their sheep for washing. The bridge across the river is being raised; cranes, concrete mixers and bulldozers spoil the quiet countryside.

At one side of the river at this point stood the laundry where washing from both Woolley Hydro and Stubbin Edge Hall was done.

On the other side of the river stood a house built by a local man named Beresford, also his Blacksmiths shop, where both he and his man worked regularly.

Across the river set out among spacious lawns was Amber Valley Camp School. Built in 1939 to give 250 children from urban areas the benefit of having a month’s education in rural surroundings. During the war, it was used to re-house a Public School evacuated from Derby. This too will soon be swept away by bulldozers to make way for the rising waters.

At the other side of the valley stand the Pumping Station, and the Purifying plant.

On top of the spur stood a large Georgian house know as The Ford House. In its lovely grounds also stood the Gardeners and Butlers cottages, these too have been swept away, to make way for the modern dwellings to house reservoir officials. On the other side of the road, in a large meadow, stands another group of new houses built for reservoir staff.

At the bottom of the valley by the side of the river used to run a footpath. Over 30 years ago a then young school mistress took a class of infants on a picnic into a field which the footpath ran through by the river, that day has never been forgotten. They fished they played cricket, and drank milk and tea carried from a Farm House up on top of the hill 4 steep fields away. What a day they had – no more will do it. Now the same field lies 30 feet under water, only memories are left. But to those who took part in it, it stands out as one of the most wonderful days of childhood.

The old Mill too has gone. It used to be driven by a water wheel and was well known for miles around. No more will carts take rough stone in at one side of the yard and sawn blocks out at the other.

In the past the valley was one of Derbyshire’s beauty spots, a lovely place in summer, but forgotten in winter. What will it be now?

In the early 21st Century, Ogston Reservoir provides many leisure activities including sailing, windsurfing and trout fishing. There have been 200 species of bird life recorded at Ogston including Wilson’s phalarope, Sabine’s gull and long-tailed skuas. There are two observation hides used by local bird watchers.

The present sailing club building which can be viewed from the field was originally the Amber Valley Camp School. It was built in 1939 to give 250 children from urban areas the benefit of have a months education in rural surroundings. [10] It seems, with the benefit of hindsight, that Mrs Fox’s fears have not been borne out, despite what has been lost.

We are now some distance up the line from the northwestern end of the reservoir.One of the most picturesque stretches of the line was in the vicinity of the halt at Dale Bank where the wooden shelter formerly stood on the left of the above photograph beyond the road. The pit in the foreground replaced the original wooden cattle guards, © K.P. Plant (4th March 1951). [6]

The gradient eased beyond Dale Bank. The line passed the Miners Arms on the left and turned northwards into a deep cutting and then passed a fluorspar washing plant and sidings. One of those sidings climbed to the Clay Cross limestone quarry. Although close to Fallgate station the quarry was known as the Milltown Quarry. [17]

The next stop on the line was Fallgate. Fallgate was an important mineral traffic centre, with short branches to quarries and their associated electric power station, and extensive siding accommodation (as we have already noted). Here, also, were additional locomotive and carriage sheds. [2] The station/halt served the hamlet of Fallgate. It had a wooden shelter, a telephone box and a water tank. The station stood at the north end of a 100-yard loop adjacent to a level crossing. There was also a coal sales depot, and in 1927, a limestone dust grinding plant was built. However, due to repeated complaints by local residents, the plant was dismantled and moved to the Clay Cross Works. A tarmacadam plant was also built, operating from 1936 to 1948. [1][17]This excellent drawing (badly scanned) is taken from the 1965 edition of K.P. Plant’s book on the Ashover Light Railway. In interpreting the plan it is important to remember that North is to the righthand-side of the plan. [18]

On the above plan, the Fluorspar washing plant is to the left, and the line from Clay Cross enters from the left just below the plant. The route to the quarry runs north and the line onwards to Ashover heads off to the right side of the plan. The power station is close to the River Amber on the right side of the image, it can just be seen to the right of the (1/1).

The location has been the subject of a superb 009 model which, while foreshortening some distances has been as faithful as possible to the location. The layout is called: “Fallgate: Ashover Light Railway.” It was created by Brian Love, a member of the 009 Society, and since 1998 it has been extensively exhibited throughout Southern and Eastern England. It is now owned by Stephen Little and Matthew Barrett and is based in Manchester. [19]The track plan of the 009 layout – Fallgate. The Fluorspar Washer is on the top-left of the track plan with the tarmac plant in the middle-right opposite the station building. The two lines to the right of the track plan represent the line into the quarry and the line on to Ashover repectively. [19]The model of the Fluorspar Washer, (c) Stephen Little. [19]The model of the Tarmas plant with the timber station building in the foreground, (c) Stephen Little. [19]The model of the cottages at Fallgate, (c) Stephen Little. [19]Fallgate Station before the construction of the Tarmacadam plant which sat beyond the timber station shelter on the left of the image. [23]

The tracks in the immediate vicinity of Fallgate station were not lifted at the same time as the rest of the Ashover Light Railway. They remained in place late into the 1960s serving the quarrying operation at the site. Indeed, as can be seen in the photograph below, some sections of track have survived into the 21st Century.Railway lines in the track leading to Milltown/Fallgate/Felbrigg Quarry, (c) Graham Hogg. [21]The formation of the Ashover Light Railway remained in use at Fallgate into the late 1960s as a works railway operating in the immediate vicinity of the Washing Plant and the old station as is shown in this drawing from Plant’s book about the Ashover Light Railway. [28]Fluorspar Crushing Mill at Fallgate, recently refurbished. [20]

The adjacent Google Earth satellite image shows the approximate route of the railway through Fallgate and the location of the small station building.

The railway formation ran on the West side of the River Amber through the halt and then followed what is now a lane called Jetting Street.

At the North side of the station a horse-worked branch line ran up a 1 in 13 gradient to a set of the screens and loading hoppers which were fed from a high level line out of the adjacent quarry.  [17]

Along that length of the valley, the railway passed the Fallgate power house which was sited on the opposite bank of the River Amber. It had stone walls and a red asbestos roof. The power house supplied electricity to the Clay Cross Company quarries. [24]

Milltown/Felbrigg/Fallgate Quarry. [22]

Along this length of the line, trains also passed an old mill and water wheel. That mill is shown in a refurbished condition above. It was a water-powered corn mill. Dated 1781, but with earlier work incorporated within the present structure. It was restored in 1987-8. A restored overshot wheel with metal sideplates and timber buckets was set into the  wheelpit. A metal pentrough delivers water to the wheel head. The interior of the mill and the machinery have been fully restored. [25]

Salter Lane, the next halt, was the nearest to the main part of Ashover town, but the line continued to a triangular junction, used for turning purposes, with the spur leading to the passenger terminus at Ashover (Butts), near the old and historic parish church. [2]

Salter Lane (for Ashover) was just half a mile from Overton Hall. It consisted of a low platform with a wooden shelter and a nameboard. The shelter is no longer present, but the edge of the platform is still visible. [1]Overton Hall was once the home of the naturalist Sir Joseph Banks. [27]Overton Hall was, from 1942, certified to operate as an approved school for boys. It served in this capacity until 1948, not long before the Ashover Light Railway closed. From 1950 to 1956, it operated as a youth hostel. Later it served as an old people’s home. In the early 21st Century, it is now a private residence. [26]Salter Lane can be made out on the above map at the point where it crosses the route of the ALR South of Ashover. It was the closest stop to the village.The proximity of the Salter Lane Halt (right of middle in the image) to the village of Ashover is illustrated above. [34]The end of the line.

Ashover Butts had a single platform with a wooden building, which comprised an open-fronted shelter with an office on either side, one of which was for ticket sales. The other office briefly sold confectionery, but then stood unused for many years. Latterly, it was used to store moulds from the Butts concrete plant.[29] In the last couple of years before passenger services ended, the building was painted grey. [1][30] The station building is shown in the first image below.Ashover Butts railway Station. [31]An overview of Ashover Butts Station. [33]Ashover Butts Satation was on the lineheading off to the top right of this image. The train, in the capable of 4-6-0 Baldwin, ‘Joan’, is using the triangle to turn ready for a trip back to Clay Cross Works via Stretton. The round peaked building to the top left of the image was a cafe built for tourists travelling on the ALR – the ‘Where the Rainbow Ends’ Cafe [32]Another view of the Cafe. [34]A view back down the line towards Stretton taken from close to the ‘Where the Rainbow Ends’ Cafe. [34]

The base of the triangle was extended to Butts Quarry further up the valley. The Google Earth satellite image above shows the approximate line of that extension. The Quarry is now the site of a MotoX track. [35]

The triangle at Ashover Butts was replicated at Clay Cross. These triangles meant that trains could be maintained intact with the locomotives running chimney first, in which conditions the type in use performed most efficiently. Also, as they were 4-6-0 tank engines, it was advantageous for negotiating the sharp curves on the line to have the bogie leading. [2]

To complete our journey along the line, it is worth noting that Wild Swan published a book about the Ashover Light Railway. The book was written by Stewart R. Band and Robert Gratton and published in 1989. [36]

BackTrack Magazine carried an article written by Tim Warner on the Ashover Light Railway in its May/June 1992 issue. A copy of the article is produced below the references section. [37]

Julian Holland has a chapter about the line in his book, “Discovering Britain’s Little Trains. [38]

References

  1. https://en.m.wikipedia.org/wiki/Ashover_Light_Railway, accessed on 13th January 2018.
  2. The Ashover Light Railway; The Railway Magazine, Volume 96, No. 593, September 1950.
  3. http://www.alrs.org.uk/site/?page_id=31, accessed on 14th January 2019.
  4. K.P. Plant; The Ashover Light Railway. The Oakwood Press, 1965, p44.
  5. https://www.pinterest.com/pin/374221050282986254, accessed on 23rd January 2019.
  6. K.P. Plant; The Ashover Light Railway. The Oakwood Press, 1965, pictures between p44 and p45.
  7. K.P. Plant; The Ashover Light Railway. The Oakwood Press, 1965, p45.
  8. Ibid., p4 & p10.
  9. Ibid., p11-12.
  10. http://www.derbyshireuk.net/ogston_reservoir.html, accessed on 26th January 2019.
  11. http://www.strettonhandley.derbyshire.sch.uk/oldwebsite/areservoirtakesitstoll.html, accessed on 26th January 2019.
  12. http://www.ogstonbirdclub.co.uk, accessed on 26th January 2019.
  13. https://en.wikipedia.org/wiki/Ogston_Reservoir, accessed on 26th January 2019.
  14. The Ashover Light Railway Society, Short Walks on a Railway Theme – Walk Number 3, Country Estates and Waterworks, Stretton to Ogston.
  15. https://www.brackenfield.org/ogston-hall-visit-picnic-at-the-hall#&gid=347&pid=1, accessed on 26th January 2019.
  16. http://m.ipernity.com/#/doc/buildings/25566191, accessed on 26th January 2019.
  17. K.P. Plant, op. cit., p46.
  18. Ibid., p37.
  19. http://www.stephenelittle.com/fallgate/#layout, accessed on 27th January 2019.
  20. http://m.ipernity.com/#/doc/302581/45025008, accessed on 27th January 2019.
  21. https://www.geograph.org.uk/photo/3861366, accessed on 27th January 2019.
  22. https://www.geograph.org.uk/photo/1855664, accessed on 27th January 2019.
  23. http://www.ashover.org/photo107.htm, accessed on 27th January 2019.
  24. K.P. Plant, op. cit., p47.
  25. https://historicengland.org.uk/listing/the-list/list-entry/1241794, accessed on 27th January 2019.
  26. http://www.childrenshomes.org.uk/AshoverAS, accessed on 27th January 2019.
  27. http://www.ashover.org/photo130.htm, accessed on 27th January 2019.
  28. K.P. Plant, op. cit., p47.
  29. Ibid., p48.
  30. https://en.m.wikipedia.org/wiki/Ashover_Butts_railway_station, accessed on 28th January 2019.
  31. http://railthing.blogspot.com/2014/01/ashover-light-railway.html, accessed on 28th January 2019.
  32. https://www.pinterest.co.uk/pin/131871095323434925/?lp=true, accessed on 28th January 2019.
  33. https://www.ebay.co.uk/bhp/ashover-light-railway, accessed on 28th January 2019.
  34. https://picclick.co.uk/Set-of-12-Ashover-Light-Railway-Postcards-original-273663372391.html, accessed on 28th January 2019.
  35. https://www.facebook.com/pages/Butts-Quarry-MotoX-Track/119689744810650, accessed on 28th January 2019.
  36. Stewart R. Band and Robert Gratton; The Ashover Light Railway; Wild Swan, Didcot, 1989.
  37. Tim Warner; BackTrack Magazine, Volume 6, No.3, May/June 1992, p127-129.
  38. Julian Holland; Discovering Britain’s Little Trains; AA Publishing, Basingstoke, 2008, p56-69.

The Ashover Light Railway – Part 2

The Route of the Ashover Light Railway – Clay Cross Works to Stretton

The main Clay Cross Company Works were adjacent to the LMS main line from Sheffield to Derby, just  south of Clay Cross Junction. The main facilities (locomotive and carriage sheds) for the Light Railway were at the site of the Works. The Clay Cross Company had standard-gauge sidings connected to the LMS mainline. There was an inclined siding alongside one of these sidings which permitted the narrow gauge line’s wagons to be propelled to a height where they could be tipped into standard gauge wagons. An electrical mechanism was used for this work. [2] In order to permit narrow-gauge access into the works standard-gauge track was crossed by means of hinged rail sections. [2]The ramped siding alongside the standard-gauge works line and the hinged rail sections also show up well in this image. They could be turned through 90°. The picture shows the transshipment tippler in early 1925, looking North. Ashover Light Railway wagons were hauled up the ramp using an electric winch and their contents tipped, by way of a moveable shute into standard gauge wagons on the siding below. (c) Topical Press Agency. [5]

As the map above shows, the line left Clay Cross Works in a Westerly direction before first turning Northwest and then round to the South. [4] The works themselves were on the East side of the standard-gauge line as it emerged from the North portal of Clay Cross tunnel. The Clay Cross and Egstow Station was in the location shown on the map below at the south side of the Works site. Clay Cross Works in 1929. [7]

Clay Cross & Egstow passenger terminus – a single low platform with a wooden shelter – was on a short spur line, and was about half a mile from Clay Cross Station on the LMS. These pictures give a good impression of the station. [2][3][6][10]The station and yard. [6]Clay Cross and Egstow Station. [10]The track plan of the Clay Cross Works showing both standard and narrow gauge lines. [24]

The Wikipedia article about the line states: “Clay Cross and Egstow [Station] had an unusually large name-board (10 ft by 3 ft) which stood on the single low platform. [12]  There was a wooden station building consisting of an open-fronted wooden shelter, which had the manager’s office on one side, and on the other what was intended as a parcels office, but was actually used as a general storeroom. The station was the only one on the line to enjoy electric lighting.” [1]

The spur line from the station joined the line from the Works. After the junction with the Station spur, the main line climbed a fairly steep gradient, down which wagons attached to the rear of trains coming from the Ashover direction were allowed to run by gravity into reception sidings after the coaches had been hauled into the passenger station. [1] The relatively steep gradient allowed the narrow-gauge line to climb up an embankment to cross the main road north of Clay Cross (now the A61). That climb is shown in the first picture below.The route from Clay Cross & Egstow, with the Pirelli Bridge visible in the background. It is just possible to make out Chesterfield Road station, with the wooden walkway leading up from road level. [3]

The bridge over the main road was known locally as the Pirelli Bridge. It was a steel girder bridge spanning 45 feet. The height had to be 16 feet above road level, which required a half-mile long approach embankment to be built. The bridge and embankment and one cutting were the only major pieces of engineering on the entire route between Clay Cross and Ashover. [1] The nickname was the result of the Pirelli Tyre Company at Burton-upon-Trent having a large advertisement painted on the bridge. [2]The Pirelli Bridge over the A61. [8]The same location painted by David Charlesworth. [9]

The first stopping place was Chesterfield Road Halt, immediately beyond the bridge. As a frequent service of buses passed the halt, [13] this was the usual point at which Chesterfield passengers joined and left the trains during the period that passenger traffic was maintained. In 1940, the wooden shelter was destroyed in a gale, and the pieces were used to construct a small store-shed at the back of the Clay Cross locomotive shed. [1]

Immediately beyond Chesterfield Road was Hilltop passing loop, but no platform was provided there. [2] Up to this point, the railway was on embankment. It now travelled through a series of cuttings and three different halts.Hilltop Cutting, North of Holmgate Halt and Holmgate Lane. This view looks South towards Holmgate and was taken in 1934. (c) I.M. Purdy. [14]

The first cutting was Hilltop Cutting and this was the most significant cutting on the route. Travelling South trains reached Holmgate Road with its halt just beyond. Holmgate Halt had a siding capable of holding around six wagons. It was provided with a small wooden shelter and a telephone box. [1] Evidence suggests [15] that the siding was located on the North side of Holmgate Road and the Halt on the South side. [14] The route of the line at this point is illustrated on the adjacent sketch which is contained in one of the walks leaflets produced by the Ashover Light Railway Society. [17]

The three images immediately below are taken at the approximate location of the road crossing for Holmgate Road. The first image looks North along the line of the old railway. The second looks south through bollards along the line of the track bed of the old railway. The third looks down an adjacent modern footpath towards the line of the railway heading South. The crossing at Holmgate Road was un-gated.

At the point where the tramac path turns to the left, the railway formation follows on its right side. Pushing aside the foliage at this point, it is possible to access the remains of the old railway bridge over a small tributary of the River Amber which left the Amber at near Ogston Hall. [17]Holmgate Road looking North along the line of the old railway.Holmgate Road looking South along the line of the old railway. The halt was immediately to the South of the road and its small building was on the left of this image. There is a grainy image of the halt in the Ashover Light Railway Society’s recent booklet. [14] This may be the only image of the halt is existence.Holmgate Road looking South. At the point where this footpath turns to the left ahead, it is immediately alongside what was the route of the Ashover Light Railway. That point is adjacent to the old stream bridge. [17]

We have noted that immediately South of Holmgate Halt, the railway crossed a small tributary of the River Amber (Smithy Brook) which left the Amber at near Ogston Hall.

Following the modern-day tarmacked path takes one immediately alongside the old railway formation which runs through the copse area to the West of the path. The fishing pond encountered to the left of the modern path was not present when the railway was still in use. The car park for the fishing pond is at the location of Springfield Halt. The Halt consisted of nothing more than a name-board at a point where the line was crossed by a footpath/track. The location can be seen at the top of the adjacent map. [13][16]

After a short trip across the fields, Clay Lane was reached. Clay Lane Halt had a wooden shelter and a telephone box. It was located about a quarter of a mile from the main street in Clay Cross, near the Royal Oak public house. The points were laid for a siding, but this was never built, due to meagre goods traffic. Despite this, passenger traffic was initially good. [1]The Royal Oak shown on the map above on Clay Lane is now a private home. [18]

The railway line met Clay Lane a little to the West of the Royal Oak Pub. The location is shown on the adjacent sketch map. [19] The pictures below are taken from Clay Lane. The first looks North along the line of the railway which was roughly on the line of the driveway. The second looks South along the line.

The Halt was on the North side of Clay Lane and is shown in a photograph in the 2016 book by Trevor Gosling. [16]

From Clay Lane, the line followed the ex-LMS standard-gauge Sheffield-Derby line, to Stretton. Close to the location of Stretton Halt, the railway crossed Horsescar Brook. Both this brook and Smithy Brook ran parallel to the two railway lines, either side of the standard-gauge railway cutting.

The mainline station was in deep cutting and pictures of the Ashover Light Railway Halt and railway taken from Ashover Road (B6014) often include sight of one of the coping stones at the end of the railway bridge wingwall.

The proximity of the Halt and the mainline station at Stretton meant that Stretton was the ideal interchange with the LMS. It had a wooden shelter, with a goods office and a telephone box. The loop-line at Stretton was used as accommodation for connecting trains. The timetables with the main line did not always coincide, and ALR trains sometimes had to wait for nearly half an hour. The loop line was removed in the 1940s. [1][20]Looking North along the line from Clay Lane.Looking South along the line from the same point on Clay Lane.The railway formation North of Ashover Road (B6014) followed the gravel track beyond the metal field gate. The coping stone and bridge wingwall are to the right side of the picture. The halt was on the North side of the road.Stretton Halt is in the middle distance. [23]

Ashover Light Railway Locomotive Joan at Stretton, entering the loop. [21] Joan at Stretton Level Crossing with a railway society tour in open mineral wagons. The coping stone to the right of the picture is still in place at the crossing location. [22]

The adjacent images show the coping stone in the above picture in the early 21st Century and the condition of the formation some years ago now. [2]

The crossing at Ashover Road, Stretton was the only protected crossing on the line. Stretton was the most important intermediate stopping place on the line, 2.5 miles from Clay Cross. [2] “For most of the distance from Clay Cross to Stretton the light railway ran parallel with the main Sheffield-Derby LMS line. The scenery to here was scarcely attractive, the influence of the nearby collieries being somewhat persistent, but, after leaving Stretton, the surroundings soon became very pretty.” [2]

We will explore the remainder of the line in the next post.

References

  1. https://en.m.wikipedia.org/wiki/Ashover_Light_Railway, accessed on 13th January 2018.
  2. The Ashover Light Railway; The Railway Magazine, Volume 96, No. 593, September 1950.
  3. http://www.alrs.org.uk/site/?page_id=31, accessed on 14th January 2019.
  4. https://maps.nls.uk/os/25k-gb-1937-61/index.html, accessed on 14th January 2019.
  5. Trevor L. Gosling; The Ashover Light Railway 1925-1950, An Illustrated Presentation; The Ashover Light Railway Society, Winger worth, Chesterfield, 2016; p15.
  6. https://picclick.co.uk/Clay-Cross-railway-station-and-yard-Ashover-Light-273368783149.html, accessed on 15th January 2019.
  7. https://municipaldreams.wordpress.com/2015/page/4, accessed on 14th January 2019.
  8. http://www.claycrosstoday.co.uk/Ashover-Light-Railway, accessed on 14th January 2019.
  9. http://davidcharlesworthart.com/railway.htm, accessed on 14th January 2019.
  10. http://colonelstephenssociety.co.uk/the%20colonels%20railways/ashover%20light%20railway/ashover%20light%20railway%20photo%20gallery.html, accessed on 15th January 2019.
  11. https://mapio.net/pic/p-75953053, accessed on 15th January 2019.
  12. K.P. Plant; The Ashover Light Railway. The Oakwood Press, 1987, p33.
  13. Ibid., p35.
  14. Trevor L. Gosling; The Ashover Light Railway 1925-1950, An Illustrated Presentation; The Ashover Light Railway Society, Winger worth, Chesterfield, 2016; p17.
  15. Ibid., p11.
  16. Ibid., p18.
  17. The Ashover Light Railway Society, Short Walks on a Railway Theme – Walk Number 1, Over the Hill – Clay Cross Works to Holmgate.
  18. http://www.claycrosstoday.co.uk/Pubs-Of-The-Past, accessed on 20th January 2019.
  19. The Ashover Light Railway Society, Short Walks on a Railway Theme – Walk Number 2, Across Green Pastures, Clay Cross to Stretton.
  20. K.P. Plant; op. cit; p44.
  21. https://www.pinterest.com/pin/374221050282986254/?lp=true, accessed on 19th January 2019.
  22. http://colonelstephenssociety.co.uk/the%20colonels%20railways/ashover%20light%20railway/ashover%20light%20railway%20members%20weekend/ashover%20light%20railway%20members%20weekend%20route.html, accessed on 14th January 2019. … RLinkinS on the forum national-preservation.com says: “I think this is the Birmingham Locomotive Club’s trip on 24/08/1948. There is a colour picture in Michael Whitehouse’s new album and the stains on the front of the smokebox are identical.” (https://www.national-preservation.com/threads/the-ashover-light-railway.1302307/#post-2352339, accessed on 16th January 2019).
  23. https://picclick.co.uk/Stretton-Ashover-Light-Railway-View-of-Stretton-390729127429.html, accessed on 19th January 2019.
  24. K.P. Plant; The Ashover Light Railway. The Oakwood Press, 1965, p36.

The Ashover Light Railway – Part 1

The September 1950 edition of “The Railway Magazine” includes a short article on the Ashover Light Railway in the Peak District to the south of Chesterfield. In the spring of that year, the railway was finally closed to traffic.

The featured image above comes from the front page of the Ashover Light Railway Society’s website. That Society is working to recreate the atmosphere of the Ashover Butts terminus of this railway in its heyday. [3] The website can be found at:  http://www.alrs.org.uk

The featured image in this blog was painted by Eric Leslie. You can find out more about him, and his art, on the FB page drawnbysteam. He donates his work free of charge to several NG railways, helping them to raise funds.

NB: I always seek to ensure that no copyright is infringed in my blogs. Any infringement is unintentional. I will immediately take down any image when asked to do so by that image’s copyright owner.

The article states: “Although one of the most recently built light railways in Great Britain, the Ashover Light Railway, which was closed to all traffic on 31st March last (1950), had its roots in the very earliest days of British railway enterprise, for its owner, the Clay Cross Co. Ltd., was founded in 1837 by George Stephenson himself. The Clay Cross undertaking was, in effect, a by-product of railway construction, for it was while George Stephenson was superintending the building of a tunnel at Clay Cross for the North Midland Railway that he saw the vast mineral wealth revealed by the excavations of the workmen, and conceived the idea of forming a company to exploit these valuable natural resources.” [2]

The Clay Cross Company was formed by George and Robert Stephenson and the board included a number of railway worthies. Among them were George Hudson, S. Morton Peto and William Claxton. For a time, the Clay Cross Company was the largest independent employer in the UK. [1]

The Ashover Light Railway was a 1′ 11.5″ (597 mm) narrow gauge railway in the Peak District in the UK. It connected Clay Cross and Ashover. It was built to transport minerals such as limestone, fluorite, barytes and gritstone to the works at Clay Cross and further afield. [1] Its primary function related to minerals which are used in steel manufacture and which, ultimately, were exported to the USA and Canada. It was “primarily an adjunct to the undertaking of the Clay Cross Company, it also carried public traffic.” [2]

In 1918, the Clay Cross Company expanded its interests by purchasing the Overton Estate at Fallgate with the aim of extracting minerals. This required the development of a means of transportation for the minerals mentioned above. [1] Loads were anticipated to be relatively light and Light Railway Orders were used to gain permission for the construction of a narrow gauge line, “which coupled with the facts that, for much of its course, it was built on land belonging to the Clay Cross Company and that no very heavy engineering works were involved, kept construction costs low.” [2]

The first Light Railway Order was granted on 4th December 1919, which incorporated the Ashover Light Railway Company. Subsequent powers were contained in Orders of 1920, [1] 1922 and 1924. [2][3] “The Order was passed … on condition that the railway provided a passenger service. This was agreed and construction of the Ashover Light Railway began.” [3] 

In 1920 H. F. Stephens, the consulting engineer for the line, had proposed building the entire railway to 2 ft gauge. Prior thinking had been to establish a standard-gauge rope worked line. Stephens proposal considerably reduced the costs of construction and the plan was approved. [1] Construction started in 1922.

“As the construction of the line progressed, it was realised that a passenger station at Hollow Lane would be a little tight for space, and therefore in May 1924, another Light Railway Order was applied for. This was for yet another extension, this time going from Hollow Lane to Ashover Butts where there was more room to build a station. The Order went through in August that year.” [3] The railway opened to goods traffic in 1924. The formal opening to passenger traffic took place in 1925. The line was built using surplus equipment from the War Department Light Railways. [3] The Wilipedia article about thw line states: “The line was laid throughout with 30-lb. flat-bottom rails on timber sleepers. Traffic control was by Wise’s patent train staff, and there were no semaphore signals. Telephone boxes were provided along the route to enable train movements to be reported to headquarters and controlled if necessary.” [2]

Ashover was already a tourist attraction and the route of the railway up the Amber valley was itself beautiful. The line opened from the Clay Cross works to Ashover on Monday 6th April 1925. Public traffic began on 7th April and the line was immediately popular. [2]

“The inaugural service consisted of five trains daily from Clay Cross to Ashover, a sixth starting from Hill Top loop but not picking up passengers until Holmgate, and extra late trains on Wednesday (one) and Saturday (two) nights. There were eight trains daily from Ashover to Clay Cross, and a ninth from Ashover to Holmgate. Five passenger trains each way were run on Sundays. Cheap tickets available for 12 single journeys were issued to workmen, and day returns for the general public on Wednesdays, Saturdays, and Sundays. Fares were low; cheap day returns being issued for 6d, — Clay Cross to Ashover, and it is not surprising that the trains were well patronised. Five thousand passengers were carried in the opening week, which included the Easter holiday.” [2]  Except for Chesterfield Road, Stretton, Woolley and Fallgate, trains called at the other halts only when requested. [2]

“At holiday times such as Easter and Whitsun, the Clay Cross Company laid on special outings for its employees. These involved a trip to Ashover where the day was spent picnicking on the banks of the River Amber. The popularity of the line encouraged General Jackson to provide more facilities at Ashover Butts, resulting in the construction of the ˜Where the Rainbow Ends” cafe.” Holidays were busy and extra carriages often had to be found to cope with demand. [3]

The passenger service continued to prove successful in the 1920s, but competition from buses saw numbers decline and Winter services ceased in the early 1930s. Ultimately, all passenger services were withdrawn by 1936. [3] For the last years of the life of the passenger service, the Summer timetable saw only one formal intermediate stop, at Stretton. Other stops were by request. Passenger trains ran only on Wednesdays, Saturdays and Sundays, with a frequency reduced to six trains each way on Wednesdays and Saturdays and three on Sundays, The time taken on the journey varied from 45 to 55 minutes. The regular passenger service was finally withdrawn in September, 1936. [2]

From that time, only occasional passenger trips were made. The railway continued to be used for mineral traffic, until 31st March 1950 when the line was finally closed. An Order for the winding up of the Company was issued by the Ministry of Transport on 20th May 1950. [2]

The goods service sustained the railway for its remaining years. Although at a much reduced scale that in the early years of the line. [3]

Most of this traffic came “from the Clay Cross Company’s own quarries at Ashover, Fallgate and Milltown. The extracted minerals were then used in the Clay Cross Works, or sold off around the country. Coal for the surrounding villages was carried on the railway in the early days, but this died down as the roads improved. In fact, the railway’s success led to cheaper and quicker competition from road transport.” [3]

“On September 9, 1946, General Jackson died aged 77. His son, Humphrey (Hummy), took control of the Clay Cross Company, but could not change the declining fortunes of the railway. The following year, Harold Skinner, who was a long standing driver on the railway, resigned, leaving only Charlie Maycock as sole employee of the Ashover Light Railway. By the end of 1947 the railway had made a loss of £2,000 and the Clay Cross Company made it known that they intended to close the line.” [3]

“In 1949 the railway’s last remaining contract with Butts quarry was terminated and the quarry closed in 1950.” [3] The railway closed on 31 March 1950. Most of the rail remained in place through October of that year when a last inspection trip was made. After that the majority of the railway was lifted. “The scrap dealers, Marple & Gillott, moved in that same day and commenced the lifting of the track. In September 1951 the Pirelli Bridge over Chesterfield Road was removed, marking the final stage in the dismantling of the railway. However, a short section of railway was retained at Fallgate as fluorspar was still being excavated there. This continued until early 1969 when the wagons and track work were scrapped in favour of road transport.” [3][1]

Locomotives and Rolling Stock


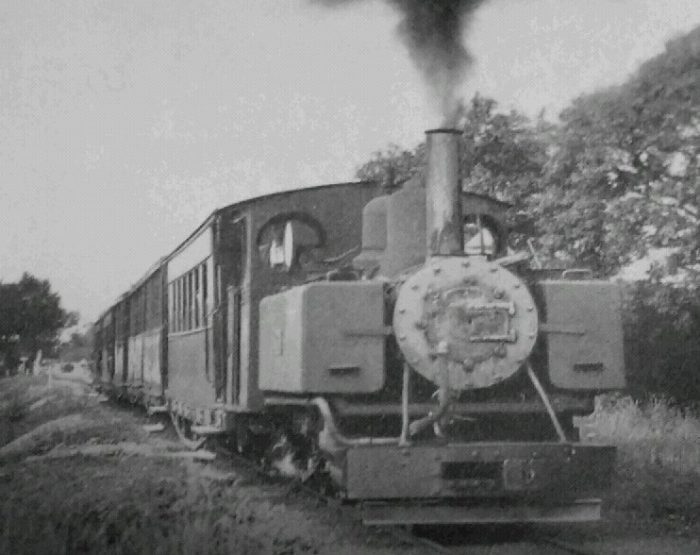
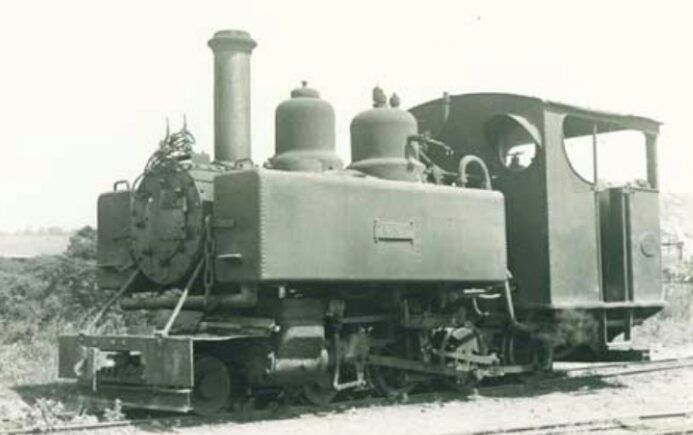
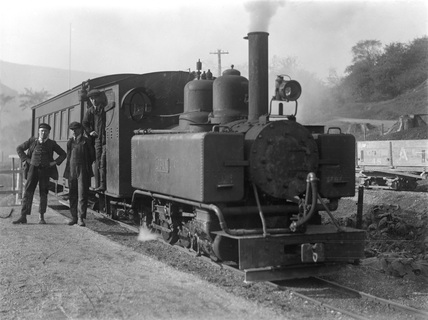
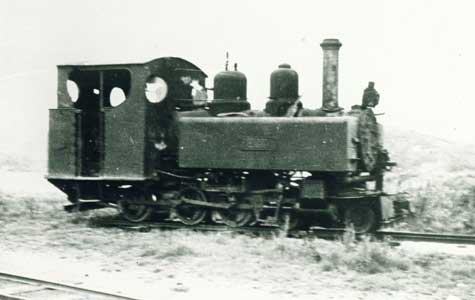
BRIDGET was built by Baldwin in 1917
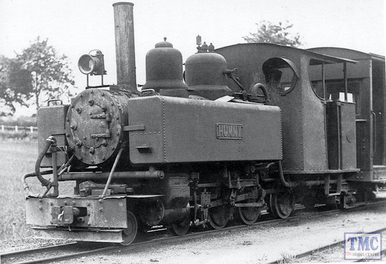
. [3]

PEGGY, also built by Baldwin in 1917. PEGGY was scrapped in June

1951. [3]

HUMMY work on the line. [11]

“Almost all of the equipment provided for the building and running of the railway was acquired second-hand from the War Stores Disposals Board. Four American-built, Baldwin 4-6-0 tank locomotives arrived and were named PEGGY, HUMMY, JOAN, and GUY; the names given to General Jackson’s children. Shortly afterwards, a fifth similar locomotive was purchased and was given the name BRIDGET.” [3] The locomotive stock was latter augmented by a further example of the class which was name GEORGIE.

As we have noted, these locos were built by the Baldwin Locomotive Works, Philadelphia, U.S.A., “for use on light railways on the French and other fronts during the war of 1914-1918. The locomotives were of typically American appearance, having sand domes, an American type of chimney, and central buffers, with outside cylinders (9 in. by 12 in.), Walschaerts valve motion, and coupled wheels measuring 1 ft. 11.5 in. dia. They had vacuum brake equipment for working passenger trains. At first they were painted Midland red to match the coaches, but this was later changed to black. By 1939, some of these steam locomotives had finished their useful life, and Guy and Georgie were scrapped.” [2]

Two further powered purchases were made. The Railway Magazine article states: “A small 0-4-0 diesel locomotive was secured, and a petrol tractor constructed with Muir-Hill Fordson equipment. There was also a small petrol-electric tractor named Amos used at Fallgate gravel pits which was illustrated and briefly described in our July-August, 1944, issue, when it was stated that this appeared to have been put together in 1939 largely from the remains of an ex-W.D. gauge locomotive. Joan appears to have been scrapped about 1944, but, with the remaining three, there is some uncertainty as to what may be regarded as ‘scrapped’ or ‘under repair’.” [2]Joan, pictured in 1926, appears to be in charge of one of the bogie coaches. [4]Joan at Stretton Level Crossing with what looks like a railway society tour in open mineral wagons. The coping stone to the right of the picture is still in place at the crossing location. [5]

The Railway Magazine article also states: “Four passenger coaches were provided when the line opened. The Gloucester Railway Carriage & Wagon Co. Ltd. constructed the underframes and bodies, but acquired the bogies from surplus war material. They were of the open, tramway type, and fares were collected on the trains. Later, some open-sided bogie coaches were acquired for use in summer, when passenger demands were extra heavy. The saloons were divided into two compartments, and electrically lighted. They were painted a dark red, lettered in gold, and were quite attractive looking vehicles. Riding was fairly steady, but somewhat noisy, due, probably, to the very small wheels, together with the light rails.” [2] An Ashover Light Railway passenger train. [9]

As the general condition of the railway deteriorated, only 4 of the original 12 passenger coaches were kept in running order. These were the four large bogie carriages  supplied by The Gloucester Railway Carriage & Wagon Co. Ltd. They “all ended up as stands on the Works bowling green. One was scrapped in 1960, two were moved to the Lincolnshire Coast Light Railway, [8] and are numbered Nos 1 and 2. No 4 was moved to the Golden Valley Light Railway. By default, … carriage No 3 was the one that was scrapped in 1960. [3]No. 2 at the Lincolnshire Coast Light Railway having been recently restored, © Nick Holliday (RMWeb) [10]

More recently, No. 4 has been resting at the Midland Railway Centre at Butterley. It is now in a fully restored condition. Ashover Light Railway Coach No. 4. [6] 

Mineral traffic was conveyed in open bogie wagons purchased from war surplus stocks, in the years immediately prior to closure a stock of 59 wagons was maintained. [2]The two images immediately above show examples of these open bogie wagons at Fallgate quarry. [7]

Part 2 of the story will follow the route of this line from Clay Cross/Egstow to Ashover.

References

  1. https://en.m.wikipedia.org/wiki/Ashover_Light_Railway, accessed on 13th January 2018.
  2. The Ashover Light Railway; The Railway Magazine, Volume 96, No. 593, September 1950.
  3. http://www.alrs.org.uk/site/?page_id=31, accessed on 14th January 2019.
  4. https://www.pinterest.co.uk/pin/374221050282985511, accessed on 14th January 2019.
  5. http://colonelstephenssociety.co.uk/the%20colonels%20railways/ashover%20light%20railway/ashover%20light%20railway%20members%20weekend/ashover%20light%20railway%20members%20weekend%20route.html, accessed on 14th January 2019. … RLinkinS on the forum national-preservation.com says: “I think this is the Birmingham Locomotive Club’s trip on 24/08/1948. There is a colour picture in Michael Whitehouse’s new album and the stains on the front of the smokebox are identical.” (https://www.national-preservation.com/threads/the-ashover-light-railway.1302307/#post-2352339, accessed on 16th January 2019).
  6. http://museumofthinobjects.com/2014/08/23/derbyshire-dales-tales-4-midland-railway-centre-butterley, accessed on 15th January 2019.
  7. http://colonelstephenssociety.co.uk/the%20colonels%20railways/ashover%20light%20railway/ashover%20light%20railway%20photo%20gallery.html, accessed on 15th January 2019.
  8. http://www.lclr.co.uk, accessed on 15th January 2019.
  9. https://www.deviantart.com/ffdp-neko/journal/Remembering-the-Ashover-light-railway-565004075, accessed on 16th January 2019.
  10. http://www.rmweb.co.uk/community/index.php?/topic/115061-hollidays-lincolnshire-holiday-modelling-inspirations-hopefully/page-2, accessed on 16th January 2019.
  11. https://www.themodelcentre.com/391-028, accessed on 18th January 2019.

Japanese Railway History – Cape Gauge

I have been researching the history of railways in Japan. My interest has been drawn by the use of Cape Gauge as the early standard gauge in Japan.

Cape Gauge is very close to the Metre-Gauge that many of the secondary lines in France. It is the same track gauge that was used in a number of different British colonies.The photographers notes say: JNR 3′ 6″ Gauge Class C10-8 on a turntable in Oikawa Railways Senzu station in July 2001. It was built by the Kawasaki Heavy Industries Rolling Stock Company, Kisha Seizō in 1930, (c) D. Bellwood. [27]

Railways with a track gauge of 3′ 6″ (1,067 mm) were first constructed as horse-drawn wagonways. From the mid-nineteenth century, the 3’6″ gauge became widespread in the British Empire (although it was not used in East Africa or India) and was adopted as a standard in Japan and Taiwan.

There are approximately 112,000 kilometres (70,000 miles) of 1,067 mm gauge track in the world.The photographer’s note says: Class C11 is a type of 2-6-4T 3′ 6″ Gauge steam locomotive built by the Japanese Government Railways and the Japanese National Railways from 1932 to 1947. A total of 381 Class C11 locomotives were built. This is JR Hokkaido C11 207 hauling a Niseko tourist service in September 2014, (c) ウツダー, Japan. [28]

The article on this subject on Wikipedia [1] says that one of the first railways to use 3′ 6″ (1,067 mm) gauge was the Little Eaton Gangway in England, constructed as a horse-drawn wagonway in 1795. Other 3′ 6″ gauge wagonways in England and Wales were also built in the early nineteenth century.

In 1862 the Norwegian engineer Carl Abraham Pihl constructed the first 3′ 6″ gauge railway in Norway, the Røros Line. Japan Railway and Transport Review carried an article about Norwegian Railways in 2002. [35]

In 1865 Queensland Railways were constructed. Its 3′ 6″ gauge was promoted by the Irish engineer Abraham Fitzgibbon and consulting engineer Charles Fox.

In 1867, the construction of the railway from the Castillo de Buitrón mine to the pier of San Juan del Puerto, Huelva, Spain, began. The width was 3′ 6″ (1,067 mm).

In 1868 Charles Fox asks civil engineer Edmund Wragge to survey a 3′ 6″ railway in Costa Rica.

In 1871 the Canadian Toronto, Grey and Bruce Railway and the Toronto and Nipissing Railway were opened, promoted by Pihl and Fitzgibbon and surveyed by Wragge as an engineer of Fox.

In January 1872, Robert Fairlie advocated the use of 3 ft 6 in gauge in his book Railways Or No Railways: Narrow Gauge, Economy with Efficiency v. Broad Gauge, Costliness with Extravagance. [4]

1872 also saw the opening of the first 3′ 6″ gauge railway in Japan, proposed by the British civil engineer Edmund Morel based on his experience of building railways in New Zealand. [5].

On 1 January 1873, the first 3′ 6″ gauge railway was opened in New Zealand, constructed by the British firm John Brogden and Sons. Earlier built 4 ft 8 12 in (1,435 mm) and broad gauge railways were soon converted to the narrower gauge.

Also in 1873, the Cape Colony adopted the 3′ 6″ gauge. [6][7]. After conducting several studies in southern Europe, the Molteno Government selected the gauge as being the most economically suited for traversing steep mountain ranges.[8] Beginning in 1873, under supervision of Railway engineer of the Colony William Brounger, [9], the Cape Government Railways rapidly expanded and the gauge became the standard for southern Africa. [10][11] 

In 1876, Natal also converted its short 10 kilometres (6.2 miles) long Durban network from 4 ft 8 12 in (1,435 mm) standard gauge prior to commencing with construction of a network across the entire colony in 1876. [12] 

Other new railways in Southern Africa, notably Mozambique, Bechuanaland, the Rhodesias, Nyasaland and Angola, were also constructed in 3′ 6″ gauge during that time.After 1876In the late nineteenth and early twentieth century numerous 3′ 6″ gauge tram systems were built in the United Kingdom and the Netherlands.

The precise reason why a track gauge of 3′ 6″ in (1,067 mm) (also known as “Cape gauge”) came to be selected as the early standard gauge in Japan remains uncertain. It could be because 3’6″ was supposedly cheaper to build than the international standard “Stephenson gauge” of 4 ft 8 12 in (1,435 mm), or because the first British agent, whose contract was later cancelled, ordered iron sleepers made for the narrower gauge. It seems most likely, however, that Morel’s previous experience building Cape gauge railways in similar New Zealand terrain was a significant influence, and Cape gauge became the de facto standard.

As a further commentary on the 3′ 6″ gauge, readers might want to consult Japan Railway and Transport Review which carried an article about the 3′ 6″ gauge in 2002. [36]

Japan’s Shinkansen lines are all built to Standard Gauge, because trains are more stable, and can go faster, on wider track. Some other lines in Japan use 1,372 mm (4′ 6″), 762 mm (30″) gauge or 610 mm (24″) gauge. But the majority, over 83% in terms of distance, of Japan’s railways are built to Cape Gauge, 1,067 mm (3′ 6″). The name comes from its adoption in 1873 by the Cape Colony (later part of the Union of South Africa). But by then it had been around for nearly a century, originally for horse-drawn railways in England and Wales, and later steam railways around the world, including Australia, Canada and other locations. And, as of 1872, Japan, where it is known as KyOki (OM, literally “narrow path” or “narrow track”). But compared to Standard Gauge, it’s never been all that heavily used outside of Japan. [2]

Currently there are 5 track gauges in common use in Japan. The most common gauge is 1067mm/3′ 6″, which forms the bulk of the JR Group network and connecting private railways. The others, already referred to above, were very kindly listed by Mark Newton in response to a query from me on the website http://www.jnsforum.com. [3] His notes are in italics below. There is also an article in the archives of the magazine, Japan Railway & Transport Review from January 1997 which reflects on the activities of railway companies in the private sector [37]:

610mm – Tateyama Sabo railway (shown adjacent) in Toyama prefecture. [21] I think this would be the last non-museum/preserved line using 610mm gauge, which was once common for local and industrial railway operations, known as “keiben“, [22] throughout Japan.

762mm – the three former Kintetsu lines [18] … and the Kurobe Gorge railway (shown adjacent). [19] This gauge was also once very commonly used by keibenlines throughout Japan, but in many cases the lines were converted to 1067mm gauge and electrified as traffic increased, such as Kintetsu’s Yunoyama line. The famous Kiso Forest Railway was 762mm gauge. [20]

1067mm – JR Hokkaido, JR East, JR Tokai, JR West, JR Shikoku, JR Kyushu, all JR Freight operations on these lines, and many private railways and tramway, big and small. The reasons for choosing 3’6″ gauge for the original Tokyo-Yokohama line in 1872 are not apparent these days, but that choice greatly influenced subsequent government and private railway construction.

1372mm – Toei Shinjuku line, [29] Tokyu Setagaya line, [30] Toden Arakawa line, [31] Keio Teito Corporation lines, [32] and the Hakodate city tramway. [33] The once-huge Tokyo municipal tramway system was built to this gauge, plus some private railways and tramway in the Tokyo area. Some of these lines have been re-gauged twice, going from 1067mm to 1372mm, then 1372mm to 1435mm!Hakodate Haikara-gō is a vintage 1372mm gauage tramcar first operated in the city in 1918 and now restored for use on tourist runs in the summer, (c) 湯の川. [34]

1435mm – Shin Keisei railway, Hokuso Railway, Keihin Express Railway, Keisei Electric Railway, Eidan Ginza and Marunouchi lines, Toei Asakusa line, Yokohama metro, Hakone Tozan Railway, Nagoya metro, Kinki Nippon Railway/Kintetsu main lines, Keifuku Electric Railway, Eizan Electric Railway, Keihan Electric Railway, Kyoto metro, Osaka metro, Hankai Electric Tramway, Hankyu Electric Railway, Nose Electric Railway, Hanshin Electric Railway, Kobe metro, San-Yo Electric Railway, Hiroshima Electric Railway, Takamatsu-Kotohira Electric Railway, Chikuho Electric Railway, Nishi Nippon Railway main lines, Nagasaki Electric Tramway, Kumamoto city tramway, Kagoshima city tramway, and of course the JR Shinkansen network. So there’s more standard gauge trackage in Japan than you might think at first.

Historically there were a number of other gauges used. There were once a number of man-powered tramways, known as “jinsha kido”, some of which used 737mm gauge. Kaimaishi Iron Works and the Hankai Railway used 838mm. In northern Kyushu there were a number of local lines that used 914mm/3′ gauge. In total there have been 16 different track gauges used in Japan in the railway era. I’ve not gone into the various monorails and guideway lines there, as I’m not sure how you’d even measure their gauges! [3]

Edmund Morel (1840-1871) was a British civil engineer who was engaged in railway construction in many countries, including New Zealand, Australia, and Japan. He was the first foreign Engineer-in-Chief appointed by the Japanese government, for guiding and supervising railway construction.

A graduate of King’s College in London where he studied civil engineering, he was highly sought after to work with countries seeking to construct railroad systems, such as in New Zealand, Australia and North Borneo, which is now part of Malaysia.

Edmund Morel was clearly not one to shy away from a challenge. It was while he was working in North Borneo that he was asked to come to Japan by British envoy Sir Harry Parkes and help create Japan’s first railroad system. Edmund arrived in Japan on April 9, 1870. He had only 18 months to live. [13] On arriving at Yokohama, he at once proceeded to set out a line of railway between Tokei and Yokohama, 20 miles in length; the works on this, and on another length of 20 miles, between Kobe and Otaka, were commenced under him, but he did not live to see their completion. [14]

He assumed the role of Japan’s first chief engineer for railway and telegraph construction. His involvement in Japan was quite eclectic. Along with railway design he made proposals about the country’s education system and about engineering administration. It was as a result of his advice that Japan set up its Ministry of Public Works in December of 1870. It’s role was to find ways to bring in and utilize foreign technologies. [13]

The locomotives and rails for Morel’s railways were imported from England. Through discussions with senior government officials, Japan’s standard gauge of 1,067 mm (3′ 6″) was established. [15] Morel’s experiences in other countries predisposed him to the narrow gauge of 3′ 6″, in New Zealand contractors began laying track to the 5′ 3″ gauge from 1863 but all of it had been reduced to 3′ 6″ by 1870. Similarly, standard-gauge track laid in Indonesia from 1867 was gradually changed to 3′ 6″. (That gauge-change took time and was only completed during Japan’s wartime occupation.) [16]

As we have already noted, survey work for the 3′ 6″ line between Tokyo and Yokohama were begun in the spring of 1870 and the line was completed in May, 1872. The formal opening of the railway took place in the presence of the Emperor. “A general holiday,” says one account, “was declared for all government offices, and His Majesty the Emperor proceeded to the station dressed in ancient court costume, Naosbi, in a four-horse state carriage, accompanied by his suite in similar dress and wearing their swords.” [17]A Cape Gauge (3′ 6″) Express train ‘Niseko’ bound for Otaru, Hokkaido, Japan. An steam locomotive type C62 (C623) and five old type passenger cars. The C62 type locomotive was the biggest and largest steam locomotive for passenger train in Japan, (c) Neko Ja Neko Ja. [25]

“During the first year from May 7, 1872 to December 31, the railway carried 495,000 passengers, and about 500 tons of freight. In this period the operating income came to 174,930 yen and operating expenses amounted to 113,464 yen, producing a profit of 61,466 yen.” [17]

Other government sponsored lines were started after the opening of the first railroad. In December of 1873 work was begun on a 27-mile line between Kyoto and Osaka, and entwined in 1877. A short line between Osaka and Kobe was opened to traffic in 1874. Long range plans called for the laying of trunk lines, but owing to the shortage of funds and internal disturbances culminating in the Satsuma Rebellion, the government was unable to launch large scale railway projects in the early years. [17]

Hudson built for the Limited Expresses of the old Cape-gauge (3′ 6″) Tokaido line, class C62, Hiroshima 1966, (c) Dr. Stephan Stoeckl. [24]


Although the government didn’t nationalize the railways until 1906, it took a strong central role in standardization, and apparently chose to continue with the gauge it had started with, causing most later railways to be built to that gauge. Some private railways chose other gauges, including standard gauge, and in particular a number of small regional railways used and still use 762 mm (30”) gauge. But most were built to Cape Gauge. [2]

In subsequent years, particularly from 1909 to 1920, the Japanese would try, repeatedly, to switch to standard gauge out of a desire for higher speed, heavier tonnage, or simply for ease of purchasing equipment overseas. Several of these attempts were put off by the government on military grounds, as the existence of an odd gauge made use of railway lines by a potential invader more difficult. By 1927, the nationalized Japanese Government Railways operated 12,864 km (7,993 mi) of track and it would have been very expensive to convert. And by then, the technology was entirely locally-made, and imports were no longer a concern. A preserved Japanese 3′ 6″ gauge JNR Class D51 2-8-2 locomotive in main line service in 2014 (c) C.C. Lerk. [23]Cape Gauge (3′ 6″) EF62 1 at the Usui Pass Railway Heritage Park, April 2007, (c) RSA. This is a a Co′Co′ wheel arrangement DC electric locomotive type built between 1962 and 1969  [26]

It wasn’t until the first high speed Shinkansen line was built in the 1960’s that Japan would finally get a large-scale standard gauge line. [2]

References

  1. https://en.m.wikipedia.org/wiki/3_ft_6_in_gauge_railways, accessed on 2nd January 2019.
  2. http://www.sumidacrossing.org/Prototype/StandardNarrowGauge, accessed on 4th January 2019.
  3. Mark Newton; http://www.jnsforum.com/community/topic/15147-understanding-japans-track-and-loading-gauges, accessed on 4th January 2019.
  4. https://archive.org/stream/railwaysornorai01fairgoog#page/n8/mode/2up, accessed on 2nd January 2019.
  5. Peter Semmens; High Speed in Japan: Shinkansen – The World’s Busiest High-speed Railway. Sheffield, UK: Platform 5 Publishing, 1997. p1.
  6. P.J.G. Ransom; Narrow Gauge Steam; Oxford Publishing Co., 1996, p107.
  7. I. L. Griffiths; Susan Rowland; (1994). The Atlas of African Affairs. Routledge, 1994, p168.
  8. John Bond; “Chapter 19, The Makers of Railways: John Molteno”. They were South Africans. Oxford University Press, 1956, p170.
  9. “Cultural, historical assessment of the Hex Pass Railway, Worcester to de Doorns”(PDF), accessed on 2nd January 2019.
  10. Jose Burman; Early Railways at the Cape, Cape Town: Human & Rousseau, 1984.
  11. D.E. Davenport; A Railway Sketch of South Africa. 1882. Cape Town.
  12. T.V. Bulpin; Natal and the Zulu Country (3rd ed.). Cape Town: T.V. Bulpin Publications Ltd., 1977. p224–227.
  13. https://wonderfulrife.blogspot.com/2013/10/gaijin-father-of-japans-railways.html?m=1, accessed on 5th January 2019.
  14. https://www.gracesguide.co.uk/Edmund_Morel, accessed on 7th January 2019.
  15. https://en.wikipedia.org/wiki/Edmund_Morel_(railway_engineer), accessed on 7th January 2019.
  16. Akira Saito; Why Did Japan Choose the 3’6″ Narrow Gauge?  Japan Railway & Transport Review No. 31 (p33–38); http://www.ejrcf.or.jp/jrtr/jrtr31/f33_sai.html, accessed on 7th January 2019.
  17. Nobutaka Ike; The Pattern of Railway Development in Japan; in The Far Eastern Quarterly, Vol. 14, No. 2, February 1955; p222-223, sourced via https://www.jstor.org/stable/2941732?read-now=1&seq=6#page_scan_tab_contents, accessed on 8th January 2019.
  18. https://en.wikipedia.org/wiki/Yokkaichi_Asunarou_Railway_Utsube_Line, accessed on 8th January 2019; “The Yokkaichi Asunarou Railway Utsube Line (四日市あすなろう鉄道内部線 Yokkaichi Asunarō Tetsudō Utsube-sen) is a 762 mm (2 ft 6 in) narrow gauge railway line operated by the Japanese private railway company Yokkaichi Asunarou Railway, connecting Asunarou Yokkaichi Station and Utsube Station, both in the city of Yokkaichi, Mie, Japan.The line connects with the Kintetsu Nagoya Line and the Yunoyama Line at Asunarou Yokkaichi Station; these other lines use an elevated platform called Kintetsu Yokkaichi Station whereas the Utsube Line uses a low-level platform. At Hinaga Station, the line connects with the Yokkaichi Asunarou Railway Hachiōji Line, a one-station branch line. Because all trains on the Hachiōji Line offer direct service to Asunarou Yokkaichi via the Utsube Line, the two lines are collectively called the Utsube-Hachiōji Line (内部・八王子線 Utsube-Hachiōji-sen). … Until March 2015, the line was under control of Kintetsu, a major railway company.”
  19. http://www.kurotetu.co.jp/en/railway, accessed on 8th January 2019 and https://en.wikipedia.org/wiki/Kurobe_Gorge_Railway, accessed on 8th January 2019: “The Kurobe Gorge Railway (黒部峡谷鉄道株式会社 Kurobe Kyōkoku Tetsudō Kabushiki Kaisha), or Kurotetsu (黒鉄) for short, is a private, 762 mm (2 ft 6 in) narrow gauge railway company operating the Kurobe Gorge Main Line along the Kurobe River in the Kurobe gorge area of Toyama Prefecture, Japan. The railway was built to serve the construction of the Kurobe dam for the Kansai Electric Power Company, which was completed in 1963; Kurotetsu was spun off from the power company in June 1971, but remains a wholly owned subsidiary. At its terminus, the Main Line links to Kurobe Senyō Railway, which is not open to general public. … In 2008 the company operated 27 locomotives, 138 passenger carriages and 322 freight wagons.
  20. https://en.wikipedia.org/wiki/Kiso_Forest_Railway, accessed on 8th January 2019: “The Kiso Forest Railway (木曽森林鉄道 Kiso-shinrin-tetsudō) was a network of 400 km of 762 mm (2 ft 6 in) narrow gauge light (keiben (軽便)) railway lines that operated in the Kiso Valley in Nagano Prefecture, Japan. … The railway was used to support the logging of cedar forests in the region. The Kiso Forest had historically been the possession of a local lord, but at the time of the Meiji Restoration had become the property of the Imperial family. In 1901, a railway was laid into the forests and was initially worked by hand or animals. The first 0-4-2T locomotives built by Baldwin Locomotive Works were introduced in 1907. Further locomotives were obtained from Baldwin, as well as a Shay locomotive that was transferred to the Alishan Forest Railway in Taiwan when that line opened. The railway was extensively rebuilt in 1920, with steel bridges and 24 tunnels. … The railway was abolished in stages between 1966 and 1976.
  21. http://www.hrr.mlit.go.jp/tateyama/english/service/history.html, accessed on 8th Januaty 2019: “Tateyama Sabo’s service railway opened in 1926, and in 1929 11.7 km of track from Senjugahara to Kanbadaira went into operation. In 1965 the 18 km of railway to Mizutanidaira were completed. This section includes an 18-lebel switchback. At first the point switches were manually controlled, but between 1980 and 1986 they became entirely automated. However, for the sake of safety, an assistant driver checks that everything is running smoothly. The train has changed with the times up to the present day. This train, still today active in erosion control work, is one of the symbols of Tateyama Sabo.”
  22. Dan Free; Early Japanese Railways 1853-1914: Engineering Triumphs That Transformed Meiji-Era Japan; sourced via https://books.google.co.uk/books?id=MwbQAgAAQBAJ&pg=PT586&lpg=PT586&dq=Keiben+Railways+Japan&source=bl&ots=vp0hACPS5X&sig=CV5WU8ubrKhWLp3NAlgPuYyo454&hl=en&sa=X&ved=2ahUKEwiagIjig97fAhXTtXEKHTLhCv8Q6AEwC3oECAIQAQ#v=onepage&q=Keiben%20Railways%20Japan&f=false, accessed on 8th January 2019: “By 1910, when the desire to construct more railways [in Japan] was close to its peak, the cost of developing a railway to main line standards was likewise becoming more costly. As the framework of a national railway system was well underway, with most of the major trunk lines built and the few still needed under construction, most of the new lines projected were short local lines with modest traffic potential. In order to stimulate such lines, the government passed a Light Railway Law, which brought many keiben tetsud “light railways” into being. Within three years, the effect was notable. By 1913 the number of keiben tetsud had greatly increased, thanks to the simplified organizational procedures authorized by the new law and other governmental encouragements. As of that year, there were 38 keiben tetsud with 574 route miles in operation, an additional 44 with a route mileage of 800 miles under construction, and some 126 companies with a combined mileage of 1,953 miles which had received a preliminary charter, but which had not commenced construction. The law would be augmented in 1924 with the addition of a Tramway Law. In all, by the close of the Meiji period, there were approximately 208 such keiben tetsud contemplated to add some 3,328 route miles to the Japanese railway system. Many of the keiben tetsud were short, local affairs that acted as branch line extensions from the “main-line” grade shitetsu or IJGR, meandering along old cart tracts or the banks of local streams to bring rail transportation to small towns, remote locations, and otherwise un-served villages and hamlets of the hinterlands. They were often times on the shakiest of financial grounds, operating as it were “on a shoe-string” with second-hand, obsolete equipment purchased used from their more established “main-line” brethren if they happened to be of a matching gauge. Thus they often retained a quaint, nostalgic flavor, often all the more charming due to the hodgepodge of dated and mismatched equipment with which they were furnished.
  23. By LERK, CC BY-SA 3.0, https://commons.wikimedia.org/w/index.php?curid=32955115
  24. https://www.trains-worldexpresses.com/500/519.htm, accessed om 8th January 2019.
  25. https://en.wikipedia.org/wiki/JNR_Class_C62#/media/File:C623_Express_Niseko.JPG, accessed on 8th January 2019.
  26. https://en.wikipedia.org/wiki/JNR_Class_EF62, accessed on 8th January 2019.
  27. https://en.wikipedia.org/wiki/JNR_Class_C10, accessed on 8th January 2019. NB: I have been informed that the note provided with this photograph is slightly misleading. The loco was built by Kawasaki. Kisha Seizo was a separate manufacturer.
  28. https://en.wikipedia.org/wiki/JNR_Class_C11, accessed on 8th January 2019. NB: Again the note provided with this photograph is slightly misleading. The loco C11 207 was built by Hitachi in 1941.
  29. https://en.wikipedia.org/wiki/Toei_Shinjuku_Line, accessed on 8th January 2019.
  30. https://en.wikipedia.org/wiki/T%C5%8Dky%C5%AB_Setagaya_Line, accessed on 9th January 2019.
  31. https://en.wikipedia.org/wiki/Toden_Arakawa_Line, accessed on 9th January 2019.
  32. https://en.wikipedia.org/wiki/Keio_Corporation, accessed on 9th January 2019.
  33. https://en.wikipedia.org/wiki/Hakodate_Transportation_Bureau, accessed on 9th January 2019.
  34. https://en.wikipedia.org/wiki/Hakodate_Transportation_Bureau#/media/File:Hakodateshiden30kei.JPG, accessed on 9th January 2019.
  35. Roar Stenersen; Development of Norwegian Railways, 1854-2002; Japan Railway and Transport TReview, June 2002, Volume No. 31, p39-41; http://www.ejrcf.or.jp/jrtr/jrtr31/pdf/f39_ste.pdf
  36. Akira Sato; Why did Japan Choose the 3′ 6″ Narrow Gauge; Japan Railway and Transport Review, June 2002, Volume No. 31, p33-38; http://www.ejrcf.or.jp/jrtr/jrtr31/pdf/f33_sai.pdf, accessed on 17th February 2019
  37. Takahiko Saito; Japanese Private Railway Companies and Their Business Diversification;  Japan Railway and Transport Review, January 1997, Volume No. 10, p2-9;  http://www.ejrcf.or.jp/jrtr/jrtr10/pdf/f02_sai.pdf, accessed on 17th February 2019.


The Ballachulish Railway Line – Part 3

Part 3 of our study of the Ballachulish line will include material from some present day pictures from along the National Cycleway which follows the line together with parts of a description of that journey from another website, the completion of the journey along the line from Kentallen to Ballachulish Station, and a study of the slate mining at Ballachuish which probably was the main justification for the construction of the branch-line.

The Railway Magazine November 1950

My spare time over Christmas 2018 has been spent looking at a few older magazines which have been waiting my attention for some time. I have discovered an article in “The Railway Magazine” November 1950 edition. The article was written by H.A. Vallance and entitled ‘From Connel Ferry to Ballachulish’.

A copy of that article can be found in the Railway Magazine Archive which grants access on payment of an additional sum over and above the annual subscription to the magazine. [26]

Kentallen to Ballachuish

We finish our journey along the line from Kentallen to Ballachuish ……

Initially we continue our look around the station at Kentallen.This image provides an overview of the station site. The footbridge, station buildings, signal box and water tank are all visible as well as the siding on the northeast corner of the site. [8]Ex-Caledonian Railway ‘439’ Class (LMSR Class 2P) 0-4-4T 55230 enters Kentallen Station from the South during July 1959 with an Oban – Ballachulish train. [9]

The following images were all taken in the mid-1970s by J.R. Hume, after closure of the railway but before re-development. A Mk 3 Cortina is visible in two images which for the officionados may well date the pictures more definitively. They are all available on the Canmore website. [8]The station from the road-side. [8]The railway cottages and water tank on the southeast side of the A828. [8]The station buildings from the Northeast. [8]The waiting shelter on the west side of the station with Loch Linnhe behind. [8]Unidentified ex-Caledonian Railway (LMSR Class 2P) 0-4-4T, the morning Ballachulish to Oban train crosses a Ballachulish-bound train at Kentallen Station during July 1959, (c) Kelvin Hertz. [11]The water tank at Kentallen, still standing in May 2015. [10]

The water tank in 2014. [13]

Moving on from Kentallen, the next two images are taken just to the north-east of the station.Local passenger train approaching Kentallen in 1961 from Ballachulish, (c) H.B. Priestly. [7]Local pick-up goods approaching Kentallen from Ballachulish in the mid-1960s . [6]

The next station along the line was Ballachulish Ferry, it was reached after a the line had travelled East along the south side of Loch Leven. Close to Ballachulish Pier the A828 crossed the railway on a bridge and then hugged the shoreline as far as the ferry and the hotel.In 2014, we stayed in a bed and breakfast  along this length of the A828 and walked a distance along the track-bed on the old railway line. These next few images show the B&B and the cycleway/path. As you will see below the cycleway/path is marked characteristically along its full length by ornate ironwork.Part 1 of this short series of posts carried a video of the ferry. Please follow this link:

https://rogerfarnworth.com/2019/01/01/the-ballachulish-railway-line-part-1

Some pictures will suffice here, three images in total, of which the third shows the Ballachulish Bridge under construction.

Ballachulish Ferry, before the bridge was started. Looking from the north side, towards Sgorr Dhonuill, © Copyright Ian Taylor. [14] Argyll postcard of Ballachulish Ferry. [15]

Ballachulish Ferry and Bridge, © Copyright N T Stobbs. [16]

Finally at this location, Ballachulish Hotel and Ferry Slipway [17]

Ballachulish Ferry Railway Station is hidden away inland south of the ferry behind the hotel. It had one platform on the North side of the railway line.Ballachulish Ferry Railway Station, looking towards the terminus at Ballachulish.[18]Ballachulish Ferry Railway Station facing West, (c) H.B. Priestley. [19]

The railway continues in an easterly direction towards Ballachulish Station, crossing the A828 and running along the shore. Close to Ballachulish, the A828 turns inland to find a good bridging point across the River Laroch. The railway continued along the shore on embankment so as to have the most convenient approach to Ballachulish.The station opened as Ballachulish on 20 August 1903 [2] with two platforms. There was a goods yard on the north side of the station. [1] Within two years it was renamed as Ballachulish & Glencoe [2] and renamed again following the opening of the ‘new’ road between Glencoe village and Kinlochleven in 1908 as Ballachulish (Glencoe) for Kinlochleven. Apart for a short closure in 1953, this latter name remained until closure in 1966. [2] In the railway timetables the name was shortened to simply Ballachulish with a note stating “Ballachulish is the Station for Glencoe and Kinlochleven”. [3]

The Callander and Oban Railway were responsible for the construction of the branch-line and for the opening of the station. That company was absorbed into the London, Midland and Scottish Railway during the Grouping of 1923. The station then passed to the Scottish Region of British Railways on nationalisation in 1948, and was closed by the British Railways Board in 1966 [2] when the entire length of the Ballachulish Branch closed.

In the early 1990s the station buildings were converted into a medical centre. Houses have been built in the station yard. The engine shed remained, being used by a local garage until 2015, when it was demolished to make way for more private housing.
Ballachulish Railway Station. [1]A close up of the station buildings. [20]Ballachulish Station in the 1950s, (c) Marcel Gommers. A google search produced this picture, but the link failed to operate and the website appears not to exist.An eye-level view into the station from West along the line. [20]Ballachulish Engine Shed, used as a garage for sometime before its demolition recently. [20]

The adjacent picture shows the shed acting as a local garage in 2012. [21]A track plan of the station. [20]The three pictures above show the old station building in use as a medical centre in 2011, (c) J.M. Briscoe. [22]

We have travelled the full length of the branch-line and done our best to get an impression of it operating as a railway. As we have done so, we have noted on a few occasions that the railway line is now in use as part of the National Cycle Network Route 78.

National Cycle Network Route No. 78

We have already seen some of the ornate ironwork which has been used to give this particular part of Route 78 an identity. These next few images highlight other locations along the route where the ironwork has been used.The cycle-way which follows much of the branch-line is marked by ornate ‘gateways’ and sculpture work as in this image and that below. Details of the cycle-way (Sustrans No. 78) can be found at the end of this post. [5]The National Cycle Network gateway close to Kentallen. [12]Similar ironwork closer to Oban. [23]

The description of the cycle route on the Sustrans website, which is an excellent way of following the route of the branch-line, follows in italics [4]:

Connel Bridge to Benderloch – two miles

Follow the Route 78 signs over the bridge and then through housing and past Connel Airfield. There is a currently a short gap in National Route 78 here. It is possible to join the main trunk road for just under a mile – but please note that this is narrow high-speed road, and it is not recommended for children or inexperienced cyclists. A footpath heads off to the left through the trees before you reach the trunk road, but in addition to being a bit muddy and overgrown this is not part of the National Cycle Network route. This joins with the beginning of the tarmac path to the south of Benderloch. This area (but not the additional path) is shown in this map link.

Benderloch to the Sea Life Sanctuary – four miles

A traffic-free path follows the line of the old railway into Benderloch village. From near the primary school, it runs alongside the A828 trunk road to the Sea Life Sanctuary, which has interesting marine displays, other wildlife such as otters, a nature trail and an adventure play area, plus a cafe.  

Sea Life Sanctuary to Appin and Dalnatrat (the Highland boundary) – 13 miles

This is a glorious, almost entirely traffic-free section that starts from the east side of the Sea Life Sanctuary car park. There are several crossings of the trunk road on this section, where you should exercise care. The route runs through woodland and then joins minor roads through the settlement of Barcaldine and the forest of Sutherland’s Grove, and along railway path to above Creagan road bridge. Here you will see signs for the Loch Creran Loop, a six mile route on quiet road. Route 78 continues over the bridge. A traffic-free path runs alongside the road to Inverfolla and then the route rejoins the line of the old railway past Appin and Castle Stalker. Look out for the signs for the Port Appin Loop, which takes you down to Port Appin where you can catch the passenger ferry to the Isle of Lismore. After passing Castle Stalker, there’s a bit under a mile where the route shares a quiet access road with road traffic and skirts a layby, followed by more traffic-free path and less than a mile on very quiet minor road. A further two miles of entirely traffic-free path ends at Dalnatrat, near the foot of Salachan Glen.

Dalnatrat to Duror – two miles

Between Dalnatrat and Duror is currently a gap of almost two miles in the National Route 78. It has not yet been possible to build a path here and to continue a northbound journey temporarily using the busy trunk road is unavoidable. Please note that this is narrow high-speed road, and it is not recommended for children or inexperienced cyclists, or those on foot. Look out for the cycle route signs to the right as you enter Duror village to take you back onto the National Cycle Network.

This area is shown here on Sustran’s mapping.  There are some rough paths and tracks in nearby woodland to the southeast of the road – but these are not part of the National Cycle Network, they don’t bridge the gap entirely, and the loose surfaces and steep inclines make them relatively challenging even if on an unladen mountain bike or on foot. Please note that current Google based mapping shows a bridge which no longer exists. Openstreetmap currently (Sept 2017) shows the correct details.

Duror to Ballachullish – six miles

Traffic-free path runs from the south of Duror village and loops round on minor road to rejoin the line of the old railway. The path over the hill to Kentallen takes you to the highest point on the route where you get a seat and a wonderful view over Loch Linnhe. The path then heads down to Kentallen, across the road and onto one of the most scenic sections as the railway path hugs the coastline for a couple of miles, before heading inland and emerging just to the south of Ballachulish Bridge. At this junction, you can continue right for another three miles on a traffic-free link path to the village of Glencoe, or turn left to continue on Route 78 over Ballachulish Bridge to North Ballachulish.

Ballachulish Quarries

Ballachulish Slate Quarries before the arrival of the Railway (1897 OS Map).

Just to the south of the A82 and at the east end of the village of Ballachulish are the fascinating  remains of the Ballachulish slate quarries, which employed up to 300 men at any given time for over two and a half centuries until 1955. Today the quarries have been opened up as a scenic attraction in their own right, and are well worth a visit. [24]

The story of slate quarrying in what was originally known as East Laroch began in 1693, just the year after the Glen Coe massacre took place, a little over a mile and a half to the east. The quarries grew dramatically during the 1700s and slate from here was shipped out to provide roofing for Scotland’s rapidly growing cities. It is recorded that in one year alone, 1845, some 26 million Ballachulish slates were produced.

The arrival of a branch railway from Oban in 1903 gave the quarries a further boost, as it made overland transport of the slates both possible and cheap. The Railway’s arrival was, however, unfortunate timing in one sense, as a major industrial dispute was under way in the quarries at the time over the provision of medical care, which involved the workforce being locked out for a year. Further trouble flared up in 1905, but the quarries remained in business until finally closing in 1955.

Ballachulish slate had one major drawback compared with some of its competitors. The presence of iron pyrite crystals within the slate meant that rust spots and holes were prone to appear in slates exposed to the weather, which of course is a drawback on a roof. Because of this, only about a quarter of the slate actually extracted could be used for roofing, with the remainder finding less lucrative uses or being wasted.

The adjacent images come from the Undiscovered Scotland Website as does the text above, although it has been edited slightly. [24]

Some further images of the quarries have been provided below. They have been sourced from the Canmore Website. [25] Canmore contains more than 320,000 records and 1.3 million catalogue entries for archaeological sites, buildings, industry and maritime heritage across Scotland. Compiled and managed by Historic Environment Scotland, It also contains information and collections from all its survey and recording work, as well as from a wide range of other organisations, communities and individuals who are helping to enhance this national resource. The old road used to pass under the incline. [25] An aerial image of the quarries. The route of the railway line is clearly visible. [25]The quarrying operation was of a significant size and lasted for well over two centuries employing around 300 men. [25]

And finally … a video of travel along the branch-line in the 1960s.

References

  1. https://en.m.wikipedia.org/wiki/Ballachulish_railway_station, accessed on 1st January 2019
  2. R. V. J. Butt; The Directory of Railway Stations: details every public and private passenger station, halt, platform and stopping place, past and present (1st ed.). Sparkford: Patrick Stephens Ltd., 1995, p23.
  3. Table 33, British Railways, Passenger Services Scotland summer 1962, quoted in https://en.m.wikipedia.org/wiki/Ballachulish_railway_station, accessed on 1st January 2019.
  4. https://www.sustrans.org.uk/ncn/map/route/oban-to-fort-william, accessed on 3rd January 2019.
  5. https://cuilbay.com/2014/07, accessed on 1st January 2019.
  6. https://hollytreehotel.co.uk/facilities/history, accessed on 5th January 2019.
  7. https://www.highlandtitles.com/blog/highland-reserve-interviews-lord-douglas-lady-penelope, accessed on 4th January 2019.
  8. https://canmore.org.uk/site/107540/kentallen-station?display=image, accessed on 5th January 2019.
  9. https://www.pinterest.co.uk/amp/pin/382031980881862868, accessed on 5th January 2019.
  10. https://wildaboutscotland.com/2015/05/28/lejog-day-11-connel-to-fort-augustus/amp, accessed on 5th January 2019.
  11. https://www.pinterest.nz/pin/382031980881872965/?lp=true, accessed on 4th January 2019.
  12. http://www.scottishanchorages.co.uk/kentallen-bay/4532986587, accessed on 5th January 2019.
  13. http://www.boydharris.co.uk/w_bh14/140818.htm, accessed on 5th January 2019.
  14. http://www.geograph.org.uk/photo/362353, accessed on 5th January 2019.
  15. https://www.ebay.co.uk/itm/BALLACHULISH-FERRY-Argyll-postcard-C31111-/253269532962, accessed on 5th January 2019.
  16. https://www.geograph.org.uk/photo/753925, accessed on 5th January 2019.
  17. https://www.undiscoveredscotland.co.uk/ballachulish/ballachulish/index.html, accessed on 5th January 2019.
  18. https://en.wikipedia.org/wiki/Ballachulish_Ferry_railway_station, accessed on 5th January 2019.
  19. http://myrailwaystation.com/FORMER%20LOCATIONS/index.htm, accessed on 5th January 2019.
  20. http://www.rmweb.co.uk/community/index.php?/topic/122717-kentra-bay-a-what-might-have-been-caley-west-coast-terminus, accessed on 5th January 2019.
  21. http://www.petesy.co.uk/2012/09/28, accessed on 5th January 2019.
  22. https://her.highland.gov.uk/Monument/MHG346, accessed on 5th January 2019.
  23. https://www.glencoescotland.com/see-do/mountain-biking/sustrans-to-oban, accessed on 5th January 2019.
  24. https://www.undiscoveredscotland.co.uk/ballachulish/slatequarries/index.html, accessed on 5th January 2019.
  25. https://canmore.org.uk/site/23552/ballachulish-slate-quarries, accessed on 5th January 2019.
  26. H.A. Valance; From Connel Ferry to Ballachulish; The Railway Magazine, November 1950.

Jesus in the Temple (Luke 2: 41-52 & 1 Samuel 2: 18-20, 26)

I’ve discovered that as I’ve got older it has become easier to forget where I’ve put things. It’s actually quite worring.

Keys – losing my house keys would be a nightmare. But some of you will know that I have left church keys in all sorts of places in the last few years, fortunately without dire consequences as yet.

Notes for my sermon – imagine getting to church just before the service and discovering you’ve left your notes at home. I have managed it at least once recently and had to adlib the sermon. Some might say, why, couldn’t we have just got on with the service without a sermon?

Jo – I do know my wife’s name, I promise you but I have caught myself calling her Gill on a number of occasions recently. Gill is my sister’s name.

I hope you can sympathise with me!

I wonder, have you ever searched for something only to find that it wasn’t really lost? You ransack the house looking for spectacles, only to find that they’re on your head. You turn out the drawer looking for the tin-opener, only to find that it was already on the work-top. You search down the sides of the cushions on the sofa for your car-keys, only to find them in your pocket.

Embarrassing, isn’t it! You want to hide! If you’re like me you’re tempted to make up a good story about how you found them, especially if you’ve involved other people in an unnecessary search!

Mary and Joseph search Jerusalem for three days thinking that Jesus is lost. When they finally track him down in the temple they find that he isn=t lost at all. Jesus says very calmly, “Why were you searching for me?”

Jesus has recognised his identity as God’s son: “Did you not know that I must be in my Father’s house?” Just like Samuel in the Old Testament reading above, Jesus was at home, most at home in God’s house. He was not lost at all.

This visit of Jesus to the temple at twelve years of age – perhaps his bar-mitzfer – is like a homecoming. He’s in his Father’s house. For him, a theological principle has become an intimate, personal experience. The Jews believed in the divine fatherhood of God. For Jesus this was not just theory, it was a lived out experience – time and again throughout the Gospels we are reminded that he knew God as his Father. In the Temple, Jesus was at home.

You might know this quotation from a prayer of St. Augustine: “Lord, you have made us and our hearts are restless until they find their resting place in you.”

Jesus experienced a homecoming in his visit to the temple. We can similarly experience a homecoming – finding our resting place in Christ. Jesus says: “Come to me, all you that are weary and are carrying heavy burdens, and I will give you rest. Take my yoke upon you and learn from me; for I am gentle and humble in heart, and you will find rest for your souls.”

Many people spend their lives searching for something – not sure exactly what it is they’re looking for. It is the Bible’s claim, not just St. Augustine’s, that we find ourselves when we find God – that our searching ceases when we find our rest in God.

For Christians that sense of belonging, of being at home, is embodied in the Eucharist. At God’s table, we are welcomed without condemnation, without question. As we take the bread and as we take the wine, we are at home, sharing in fellowship with the God who made us, is with us, and thinks the world of us. We’re not lost – we’re at home.

The Ballachulish Railway Line – Part 2

In Part 1 we covered much about the history of the line between Connel Ferry and Ballachulish. We start Part 2 with a few reminders of what was covered in Part 1 and provide some additional material from various sources before continuing our journey North along the branch.

Several sea lochs made road travel between Oban and Fort William difficult, and Argyll County Council had indicated that it would co-operate with the Callandar & Oban Railway (C&OR) if the railway were to build dual-use bridges; the C&OR was considering an ambitious railway from Oban to Inverness by way of Fort William. The C&OR decided to decline the idea, and to make the railway on its own, and to undertake the work it itself. The C&OR had difficulty in raising enough money for a survey of the proposed line, but undaunted, it presented a Parliamentary Bill for the line in September 1894, for the following year’s session. [1]

The C&OR made this move without consulting with its parent company, the Caledonian Railway (CR). When the CR heard of the plan, they announced that they would oppose the Bill in Parliament. The Bill was swiftly withdrawn. [1]

The C&OR converted their proposal into a branch line to Ballachulish from Connel Ferry. Ballachulish had a population of 1,800 at the time, and its industry was chiefly quarrying. The branch was authorised by Act of Parliament on 7 August 1896. [3] The C&OR line was to have a triangular junction a Connel Ferry, and to cross Loch Etive by Connel Bridge which was second in Britain only to the Forth Bridge in the length of the main span, and it was the largest single-span steel bridge in Britain. [5] The route approved north of the bridge was later changed substantially, a hotel had been built at Loch Creran to serve a proposed station there; the hotel was never opened as the railway as built did not go there. The capital was to be £210,000 of which the Caledonian Railway agreed to fund £15,000. [5]

The Route North from Benderloch

In Part 1 of this survey we travelled as far North as Benderloch. We saw at Benderloch a station very typical of the branch line with buildings (now long-gone) which matched those at other stations on the line.

Leaving Benderloch the railway and the A828 ran closely parallel to each other with the railway running closest to the loch shore. This continued until the railway approached the location of Barcaldine House.

The extract from the OS Map above shows the road turning inland at this point and crossing two rivers. The first is Death Abhainn, the second is Abhainn Teithil. The two rivers have over time created a small area of open land at the loch-side which the road avoided. The railway maintained a straighter route and was carried over each of the rivers on bridges.

Barcaldine Halt opened to passengers in 1914. It comprised a single platform on the east side of the line. A siding was installed at the same time, to the south of the platform. [9]

Barcaldine Halt in 1950. [8]

Incidentally, a search for Barcaldine on the internet produces some very interesting information about railways and tramways in Queensland, Australia. Something for another time!

I have recently received the next two images from Tony Jervis -the first is taken from a train passing through Barcaldine Halt. The second is a ticket for the journey from the Halt to Connel Ferry.

Tony comments: “The railway ticket was probably sold at Connel Ferry Station; if someone has list of station Audit numbers, 4777N against that station should confirm it. The train had just deposited the man and his bicycle.” [22]

Travelling on from Barcaldine, the A828 and the railway swapped places and the railway too a very slightly more inland trajectory and began to rise to a height which would allow it to cross the next loch – Loch Creran. The A828 was forced to take a detour to the East to follow the shore of the loch. The railway took the more direct route.

It crossed the loch at the narrowest point on a high level, Howe Truss Girder bridge. When the railway closed, the bridge remained as a pedestrian/cycle route until its foundations were used to divert the A828.

Creagan Bridge from the East, taken after closure of the railway line. [10]

The new bridge. The picture was taken in 2008 by Jack Russell from a very similar location to the one above. As can be seen, the new bridge made use of the foundations and lower piers of the previous railway structure. [11]

Creagan Station was then approached from the EastEast, as the railway turned westward along the loch-side. The railway ran on the north side of the A828. Creagan Station was the only station on the Ballachulish branch that had an island platform. There was a siding to the east of the platform, on the north side of the railway.

One platform was taken out of use on 1 April 1927. [12]

The station at Creagan when still in use. [8]

An earlier image of the station, taken when both lines were in use. [8]

The island platform building at Creagan in the 21st century. [12]

The line continued West from Creagan through the Strath of Appin to Appin Station, by which time the railway was beginning to turn to the North.

Appin Station was once again typical of the stations on the route. The station building was a substantial two story structure of the same design as elsewhere. The station was laid out with two platforms, one on either side of a crossing loop. There were sidings on both sides of the line. A camping coach was sited here for a number of years.

Appin Station building. [8]

Branch goods at Appin. [8]

Two passenger trains pass at Appin. The camping coach is just visible on the right of the picture. [8]

1920s view of Appin Station. [8]

A similar view in the 1950s. [8]

Appin Station Signal Box. [8]

The service from Ballachulish in the later years of the line. [8]

Heading out of Appin Station towards Ballachulish, the line travels Northeast along the coastline. The A828 runs alongside the railway on the landward side all the way to Duror Station.

The next two images below show Duror Station while it was still in use for its intended purpose. The signal box can be seen beyond the main station building.

Duror Railway Station. [15]

Duror Station after the closure of the loop. [16]
The station was laid out with two platforms, one on either side of a crossing loop. There was a siding to the north of the station, on the east side of the line. One platform was taken out of use on 8th April 1927 along with the crossing loop.

The station building at Duror is still standing and is a well-maintained private house. The pictures immediately below show the property taken from its access road. The station building remains almost intact, as do the platforms which lie within the garden of the private property. These are also shown below.

Google Streetview Image.

Another view of the station (c) Nigel Thompson. [17]

The station platforms in the 21st century. [16]
The line turned East for a short distance beyond Duror Station, and then turned to the Northeast. Its route is shown on the 1940s OS Map below and as a dismantled railway on the later OS Map below. On that map, Duror Station site is marked with a yellow flag.

The route North-east from Duoro took trains through a narrow valley hidden away from Loch Linnhe which brought the line and the A828 down to Kentallen and Kentallen Bay. The village was at the head of the bay, its station some distance to the North-east. By the time the station was reached the railway was on the seaward side of the A828.

The station was laid out with two platforms, one on either side of a crossing loop. Alongside the station was a pier from which interconnecting steamers operated. The main station building was on the southbound platform and still stands in much extended form. There was a goods yard at the north end, on the east side of the line. There was a smaller shelter on the northbound platform. The pier survives, in cut back form.

To the south of the station site, and across the road, are railway cottages and the former water tank.

Following closure in 1966, the station buildings were enlarged and converted into a hotel and restaurant.

Holly Tree Hotel and Restaurant on the site of Kentallen Station in 2005. [18]

The Hotel from above on the hillside. [19]

July, 1959. Ex-Caledonian Railway 439 Class (LMSR Class 2P) 0-4-4T No. 55200 stands at Kentallen Station with an Oban to Ballachulish train, (c) Keith R. Pirt. [21]

A steam train at Kentallen shortly before the line closed in 1966. [20]

Kentallen Station and Pier. [8]

Kentallen Pier. [13]

We have noted that train times and ferry times were designed to allow connections to be made between the station and the pier at Kentallen. The two pictures above show the pier in use by ferries. The ferry timetable is shown below:

The Oban to Fort William Ferry timetable. [13]

The ferry made travel between Oban and Fort William manageable with a significant road journey. The stop at Kentallen allowed a combined train and ferry journey to be made.

To finish this post and before moving on towards Ballachulish we look at a few period images of Kentallen Station.

The station immediately after closure and before conversion to a hotel commenced. [13]

Pick-up goods heading south through Kentallen. [13]

The local passenger service heading south through Kentallen. [14]

I had originally expect that there would be just one post relating to the Ballachulish line but the material has been mounting up and I have now (January 2018) discovered an article from November 1950 in “The Railway Magazine” which means that a third post is warranted. We finish this part of the journey at Kentallen and will commence again from here to complete the journey to Ballachulish in part three of the story of the line.

References

  1. https://en.m.wikipedia.org/wiki/Callander_and_Oban_Railway, accessed on 1st January 2019.
  2. https://en.m.wikipedia.org/wiki/Ballachulish_railway_station, accessed on 1st January 2019
  3. E F Carter, An Historical Geography of the Railways of the British Isles, Cassell, London, 1959
  4. http://www.rmweb.co.uk/community/index.php?/topic/126169-appin-station, accessed on 2nd January 2019.
  5. David Ross, The Caledonian: Scotland’s Imperial Railway: A History, Stenlake Publishing Limited, Catrine, 2014.
  6. R. V. J. Butt; The Directory of Railway Stations: details every public and private passenger station, halt, platform and stopping place, past and present (1st ed.). Sparkford: Patrick Stephens Ltd., 1995, p23.
  7. Table 33, British Railways, Passenger Services Scotland summer 1962, quoted in https://en.m.wikipedia.org/wiki/Ballachulish_railway_station, accessed on 1st January 2019.
  8. http://oldappin.com/ballachulish-railway-line, accessed on 26th December 2018.
  9. https://en.m.wikipedia.org/wiki/Barcaldine_railway_station, accessed on 2nd January 2019.
  10. https://www.geograph.org.uk/photo/3213543, accessed on 2nd January 2019.
  11. https://www.sabre-roads.org.uk/wiki/index.php?title=File:A828_Creagan_Bridge_-_Coppermine_-_18816.jpg, accessed on 2nd January 2019.
  12. https://en.m.wikipedia.org/wiki/Creagan_railway_station, accessed on 2nd January 2019.
  13. https://hollytreehotel.co.uk/facilities/history, accessed on 5th January 2019.
  14. https://www.pinterest.at/amp/pin/510666045218505803, accessed on 5th January 2019.
  15. https://canmore.org.uk/site/106021/duror-station, accessed on 3rd January 2019.
  16. https://railscot.co.uk/img/9/766, accessed on 3rd January 2019.
  17. https://www.geograph.org.uk/photo/5394443, accessed on 3rd January 2019.
  18. https://en.wikipedia.org/wiki/Kentallen_railway_station#/media/File:Kentallen_railway_station_in_2005.jpg, accessed on 4th January 2019.
  19. https://hollytreehotel.co.uk/about-area/station, accessed on 4th January 2019.
  20. https://www.geograph.org.uk/photo/3027899, accessed on 4th January 2019.
  21. https://www.facebook.com/groups/ScottishRailways/search/?query=galloway&epa=SEARCH_BOX, accessed on 6th June 2019.
  22. Email from Tony Jervis on 15th May 2021.

The Ballachulish Railway Line – Part 1

An old copy of Hornby Magazine fell open at a modelling idea – the creation of a model representing the Ballachulish line in Western Scotland. Having walked a length of this line in the past, the article grabbed my attention and prompted some research. [1]

Ballachulish Railway Station.[4]

Ballachulish is a village at the foot of Glencoe in the Scottish Highlands. Glencoe is a deep valley which forms the natural road route into this remote part of Scotland. During the Victorian era it’s transport links centred around a steamer connection with Fort William, about 15 miles North, and Oban, a little further in a southerly direction.

Despite its remote location, Ballachulish had extensive slate quarries and during the 1880s it was hoped that local interest would be served by a railway line from Crianlarich up Glencoe and on to Fort William. This was not to be. The Rannoch Moor route was chosen instead. Other lines, such as an Oban to Fort William Railway failed to materialise.

Instead, rather late in the day in 1896, a branch line was authorised from the Oban-Crainlarich line at Connel Ferry. It was hoped that this would meet a similar line from Fort William but, although powers were obtained, it was never built because of problems gaining permission for bridges across sea lochs. [1]

Ballachulish

Ballachulish is a slightly confusing place. It’s not unusual to find places that come in two halves. But Ballachulish comes in two halves plus another, larger, settlement two miles along the road towards Glencoe.

The name comes from the Gaelic for village of the narrows, and the first settlement to bear the name lay where North Ballachulish is today. Its twin, on the south side of the loch, rapidly followed. Loch Leven narrows dramatically here and North and South Ballachulish grew up around the slipways used by ferries crossing the loch from a very early date. A vehicle ferry started to cross the narrows in 1912, but the service finally disappeared in 1975 when the bridge opened. With it disappeared the choice facing drivers of the sometimes long ferry queues at busy periods or the nineteen mile detour via Kinlochleven.

While the ferry has long gone, the slipways that served the ferry remain: though they are by no means opposite one another. The steel truss bridge that opened here in 1975 fits nicely into its environment. Indeed, it comes as something of a surprise to find it is such a relatively recent addition to this part of the Western Highlands.

South Ballachulish largely comprises the slipway and the nearby Ballachulish Hotel. Close to the steps leading down from the bridge to the Oban road near the hotel is a memorial to James Stewart, hanged here in 1752 for the Appin Murder. This was the killing of Colin Campbell, an event used as the basis for Robert Louis Stevenson’s novel Kidnapped. Stewart’s execution was a result of the greatest miscarriage of justice in Scottish legal history. A number of the sites associated with the Appin Murder have been linked by the Last Clansman Trail.[2]

Ballachulish Bridge should not be confused with the Connel Ferry bridge closer to Oban.

North Ballachulish is a little more developed and is home to an art gallery, lochside hotel and the slipway for the old ferry.

The largest settlement carrying the name of Ballachulish lies on the south side of Loch Leven, a mile or so west of the village of Glencoe. This started life as the hamlets of East and West Laroch in the 1500s, names still attaching to parts of the village on detailed Ordnance Survey maps. In 1693, slate was first quarried here in the Ballachulish Slate Quarries (only a year after the Glencoe massacre took place nearby). By the early 1700s, this had developed into a major slate quarrying operation which continued for over 250 years until 1955, when the quarries closed. The name of Ballachulish simply seems to have attached itself to the larger village that grew out of the earlier settlements to house the 300 workers and their families.

The Ballachulish Medical Practice today stands on the site of the railway station that formed the terminus of a branch line railway running from Connel via Ballachulish Ferry. This opened in 1903 and closed in 1966. Ballachulish now has its own Visitor Centre, which comes complete with ample parking and public conveniences. Just across the road from the visitor centre are the old Ballachulish slate quarries, which now provide scenic walks. There’s no mistaking what they are, but in the half century since they closed, nature has made a start on the task of reclaiming what was once taken from it. The main settlement of Ballachulish is now largely bypassed by the A82, which passes along the Loch Leven side of the village. [2]

The Railway

Construction work on the line started in 1898 and was completed in 1903. This was one of the last branch lines to be built in the UK. [1] The following notes in italics are taken from an on-line article published on the website “Unseen Steam” on the 50th Anniversary of the closure of the line in March 2016. [5] Images used are credited where possible and taken from a variety of sources.

The authorised capital of the new line was £210,000, of which the Caledonian Railway agreed to fund £15,000. There were two major engineering structures required: the viaducts over Loch Etive and Loch Creran at Creagan. The former, constructed by the Arrol Bridge & Roofing Co, was started in 1898. The cantilever bridge that resulted was the second only in length to the Forth Bridge and was the longest steel single-span bridge in Britain.Construction Drawing – Connel Bridge. [8]

Connel Bridge under construction. [4] Connel Bridge under construction. [4]Connel Bridge. [7] Creagan Railway Bridge, Loch Creran. [6]

The Connel Ferry Bridge, the world’s 2nd largest steel cantilever bridge, Argyllshire, Scotland, opened in 1903. [9]

Although a triangular junction was authorised at Connel Ferry to permit direct Oban-Ballachulish services, in the event the north-west curve was never constructed. Originally both the viaducts had footpaths alongside; however, in order to counter a proposal by MacAlpine Downie to operate a ferry across Loch Etive in 1913, the Callendar &Oban Railway decided to make the railway bridge capable of handling road traffic. This was completed in June 1914 and saw the railway charge tolls for road users crossing the bridge; special signalling ensure the safety of the arrangement.

The 27½-mile long branch opened throughout to passenger services on 28 March 1903. There were intermediate stations at North Connel, Benderloch, Creagan, Appin, Duror, Kentallan and Ballachulish Ferry that opened with the line. Barcaldine Siding (Halt from 1960) followed in 1914; this station was closed during World War 2 and was used for summer services only for a period after reopening postwar. Ballachulish Ferry was to be closed between 1 January 1917 and 1 March 1919 as an economy measure during World War 1. The population of Ballachulish when the line opened was less than 2,000 but quarried stone represented a useful source of freight traffic.

During the summer of 1910 there were three return workings over the branch each day, making a connection with the ferry to and from Kinlochleven. Services ran to and from Oban, with reversal at Connel Ferry. Down services departed from Oban at 8.20am, 11am, 5pm (Mondays, Wednesdays and Fridays only) and 8.30pm (Tuesdays, Thursdays and Saturdays only; this was the only working that did not connect with the Kinlochleven ferry). Up workings departed at 7.15am, 11.15am and 3.45pm. A single journey from Connel Ferry to Ballachulish took about 70 minutes. There was no service on Sundays.

By the summer of 1947, the final year of the line’s operation by the LMS before Nationalisation in January 1948, there were still only three return workings per weekdays. Departures from Oban were at 8.10am, 12.5pm, 4.pm (except Saturdays) and 8.50pm (Saturdays only). Services departed from Ballachulish at 7.30am, 10.50am, 3.50pm (Saturdays only) and 4pm (except Saturdays). There was no Sunday service. A revised pattern of service was operated by British Railways (Scottish Region) during the period from September 1964 through to June 1965. There were two down departures from Oban, departing at 8.15am and 5pm with a third service starting at Connel Ferry at 12.30pm. The station at North Connel was a request halt for both the 8.15am and 12.30pm services. In the up direction there were departures from Ballachulish at 7.14am (to Oban), 10.40am (to Connel Ferry), 4.20pm (to Oban) and a Saturdays only 6.57pm (to Oban). For all, apart from the 7.14am, the station at North Connel was a request halt.

In terms of motive power over the line, the early years witnessed the operation of three generation of 4-4-0s specifically designed for the C&OR — the ‘Oban bogies’. During the war Class 5 4-6-0s are known to have operated troop trains to Benderloch. In the later years, steam passenger services were dominated by Macintosh-designed ‘19’ class 0-4-4Ts. By the end of 1961, three of the class were based at Oban — Nos 55204/217/260 — but before the final demise of steam over the branch, these were replaced by ex-LMS or BR 2-6-0s. With the dieselisation of the C&OR main line and its branches to Killin and Ballachulish, 45 steam locomotives were replaced by 23 Type 2 diesel-electrics plus four diesel shunters. It was the diesel-electrics that operated the final passenger services over the line to Ballachulish.

Whilst both the Crianlarich-Oban and Crianlarich-Fort William-Mallaig lines were not listed for closure under the Beeching Report of March 1963 — albeit a number of intermediate stations on the former were — the line to Ballachulish was not so fortunate. Passenger traffic ceased over the on 28 March 1966; with freight having ceased in June the previous year, the line was closed completely from that date.

Today many of the structures that once served the line are still extant or have been reused for new purposes. The station at Ballachulish remains, having been converted into a medical centre. Platforms remain extant at Ballachulish Ferry with a section of the line westward having been converted by Sustrans into a cycleway. At Kentallen, the platforms of the station have been incorporated into a new hotel. At Duror, the station has been converted into a private house. The station at Creagan, which was overgrown for many years, has now been restored. The piers of the bridge across Loch Creran at Creagan remain, having been used in the late 1990s for a new bridge for the A828. The bridge at Connel Ferry also survives; following the closure of the line it was converted to take road traffic exclusively. [5]

The Route of the Ballachuliush Branch. [3]

The Connel Bridge

The red ‘x’ on the plan above marks the Connel Bridge which sits just to the north of the Calendar to Oban line. The bridge was the largest cantilever span in Great Britain aside from the Forth Bridge when completed. A truly unique bridge, it features several members positioned in unusual angles and inclines, resulting in a striking appearance that looks ahead of its time and may even call to mind images of modern cable-stayed and steel rigid-frame bridges.

The bridge was originally built as a single-track railway bridge to carry the Callander and Oban Railway. In 1909, a special railway service was added that carried motor vehicles across the bridge, albeit only one car at a time. This unusual arrangement did not last long, however. By 1914, the bridge was reconfigured with a roadway along the western side of the deck and the railway on the east side of the deck. Despite this arrangement, the relatively narrow width of the bridge prevented cars and trains from crossing the bridge at the same time. When a train needed to cross the bridge, the crossing was treated like a grade crossing, with gates to keep cars off the bridge. In 1966, the railway line was closed and bridge was reconfigured as a highway-only bridge, with the rails being removed. The narrow bridge operates as a one-lane bridge, with traffic signals controlling the flow of traffic over the bridge. [8]

The distinctive design of the cantilever truss is due to the configuration of the trusses over the piers. Typically, cantilever trusses have a vertical post, sometimes called the “main post,” located directly over the pier that is also at the deepest section of the truss web. For the Connel Bridge, these posts are instead inclined, not only inward toward the center of the span, but also inward toward the centre of the roadway. As such, the inclined main posts extend out beyond the truss lines to the pier below, giving the bridge a bowed out appearance when viewed from certain angles. The inclined posts also mean that the deepest “tower” section of the truss is located not over the pier, but partway into the central span of the truss. [8]

The inclined main post is countered by what engineering periodicals described as a “back strut” extending from the bearing on the piers back to the abutment at the roadway level. The back struts angle out to meet the main post locations outside of the truss lines, adding to the bowed out appearance of the bridge. The end post of the truss, also inclined, extends all the way to the main post of the truss, meaning there is no upper chord for this entire length, an unusual design that gives the bridge a striking appearance when approached on the road. If the end post, the main post, and the back strut at each end of the bridge are looked at as a single shape, the bridge has the appearance of two giant triangles resting on their apex at the piers. Another unusual detail of the truss is found at the deck level, where a beam that may look like a lower chord of the truss to casual viewers also angles out to meet the inclined main post at the roadway level, and was described as an “outer boom” in engineering periodicals. [8]

This bridge used steel from a large variety of companies and mills. Numerous names can be found on the steel and are documented in the enormous detail in the photo gallery available for this bridge.[8]

The bridge crosses the Falls of Lora, turbulent rapids that are strongly affected by tidal flows. This is one of the reasons a cantilever truss bridge was constructed at this location. it could be erected over the waterway without the use of falsework in the fast-flowing rapids.

The Transactions of the Institution of Engineers and Shipbuilders in Scotland, 1903 had an obituary for Thomas Arthur Arrol the builder of this bridge. Thomas Arthur Arrol should not be confused with the more famous Sir William Arrol, who also built bridges.

Thomas Arthur Arrol was born in Glasgow on the 24th August, 1852, and was educated at the Collegiate and High Schools of Glasgow, and at the Glasgow University. He served his time as an engineer with Messrs P. & W. MacLellan and remained in their service till he became general manager. After spending a few months in the United States he returned to his native city and entered into partnership with his brother, the late Mr James Cameron Arrol. Together they founded the Germiston Works, at which roof and bridge building and general engineering were carried on until 1892.

The concern was subsequently converted into a Limited Company under the designation of Arrol’s Bridge & Roof Co., Ltd., with Mr T. Arthur Arrol as managing director. Under his supervision many important contracts were successfully carried out, and among others in hand at the time of his death were those for the Connel Ferry Bridge, which is the second largest cantilever bridge in Europe; the Larkhall and Stonehouse viaducts for the Caledonian Railway; and the transporter bridge across the Mersey at Runcorn, which is the first of its kind in Britain. He died suddenly at Aberdeen on 29th October, 1902. Mr. Arrol joined the Institution as a Member in 1875, and took an active interest in its affairs. He was a Member of Council for Sessions 1882-84, and a Vice-President for Sessions 1884-86. He was again elected a Member of Council in April, 1901. [8]A striking overhead image from Google Earth showing the bridge and the Falls of Lora.

Immediately north of the bridge the railway entered the first railway station on the Branch. Road and rail first had to separate and the railway then entered North Connel railway station which was adjacent to Oban Airport.  A train approaches the bridge from the north. [10]A train leaves the bridge and heads towards North Connel Station. [4]

This video was sent tome in January 2020 by Chris Deuchar with permission to share it in this article. It shows both the area around Connel Bridge and a car journey over the bridge. [12]

1955: North Connel. (Photo by Raymond Kleboe/Picture Post/Getty Images)

Further North the line followed the line of what is now the A828. The original road north ius now an access road for Oban Airport.

The roads crossed the line just south of North Connel Station and dropped down to meet the roads on the north side of Loch Etive before passing under the line in a westerly direction. The road then turned sharply to the north and passed over the line on a bridge at South Ledaig.

The old road and the railway ran parallel to each other heading north through North Ledaig and on to the next station at Benderloch.

Approaching Benderloch the two ran immediately next to each other as can be seen on the adjacent OS Map.

The station at Benderloch was laid out with two platforms, one on either side of a crossing loop. There were sidings on both sides of the line. There was a large two story station house in the style typical of the line, one of which still remains at Duror. There was also a standard design signal box.

The south bound track was the faster line with the north bound track forming the loop. Goods facilities/sidings were to the south of the station. The station was attractive and appears to have been cared for well.Benderloch Station. [11]Benderloch Station taken from a north bound train. [4]Benderloch Station taken from the south with a branch goods heading towards Connel Ferry. [4]

References

1. Evan Green-Hughes; Ballachulish; Hornby Magazine Issue 61, July 2012, p44-46

2. https://www.undiscoveredscotland.co.uk/ballachulish/ballachulish/index.html, accessed on 1st January 2019.

3. https://www.railscot.co.uk/companies/B/Ballachulish_Branch_Callander_and_Oban_Railway, accessed on 1st January 2019.

4. http://oldappin.com/ballachulish-railway-line, accessed on 1st January 2019.

5. http://www.unseensteam.co.uk/News-spotlight/Ballachulish-closure, accessed on 1st January 2019.

6. https://www.geograph.org.uk/photo/1589044, accessed on 1st January 2019.

7. https://www.westcoasttours.co.uk/blog/2016/connel-bridge-and-the-falls-of-lora, accessed on 1st January 2019.

8. https://historicbridges.org/bridges/browser/?bridgebrowser=unitedkingdom/connelbridgeconnelbridge, accessed on 1st January 2019.

9. https://www.amazon.co.uk/Media-Storehouse-Poster-Connel-4331400/dp/B07BB5HMYH, accessed on 1st January 2019.

10. http://www.myrailwaystation.co.uk/FORMER%20LOCATIONS/pages/NORTH%20CONNEL%20STATION_%20With%20the%20station%20behind,%20the%20train%20crosses%20the%20road%20before%20moving%20on%20to%20the%20bridge_jpg.htm, accessed on 1st January 2019.

11. http://ardchattan.wikidot.com/benderloch-station, accessed on 1st January 2019.

12. https://vimeo.com/324830517, accessed on 15th January 2019.