A note in the August 1905 edition of The Railway Magazine mentions a 1904 report from the Light Railway Commissioners and comments from the Board of Trade in 1905. [1: p170]
The Regulation of Railways Act 1868 permitted the construction of light railways subject to ‘…such conditions and regulations as the Board of Trade may from time to time impose or make’; for such railways it specified a maximum permitted axle weight and stated that ‘…the regulations respecting the speed of trains shall not authorize a speed exceeding at any time twenty-five miles an hour’. [2]
“The Light Railways Act 1896 did not specify any exceptions or limitations that should apply to light railways; it did not even attempt to define a ‘light railway’. However, it gave powers to a panel of three Light Railway Commissioners to include ‘provisions for the safety of the public… as they think necessary for the proper construction and working of the railway’ in any light railway order (LRO) granted under the act. These could limit vehicle axle weights and speeds: the maximum speed of 25 miles per hour (mph) often associated with the Light Railways Act 1896 is not specified in the act but was a product of the earlier Regulation of Railways Act 1868. … However, limits were particularly needed when lightly laid track and relatively modest bridges were used in order to keep costs down.” [2]
Sir Francis Hopwood’s report to the Board of Trade on the proceedings of the Light Railways Commission during 1902, indicated “a growing tendency to embark on private and municipal light railway schemes all over the country. Thirty-one fresh orders, of which only two for steam traction, were submitted, eighteen being confirmed, making a total of thirty-five for the year. No order was rejected. Since 1896, 420 applications [had] been made, more than half being confirmed. They represented 3,900 miles of line, with a capital expenditure of £30,371,193. The total mileage sanctioned during 1902 amount[ed] to 1,500 miles, with a capital expenditure of £10,148,900, or over a third of the aggregate for five years.” [10]
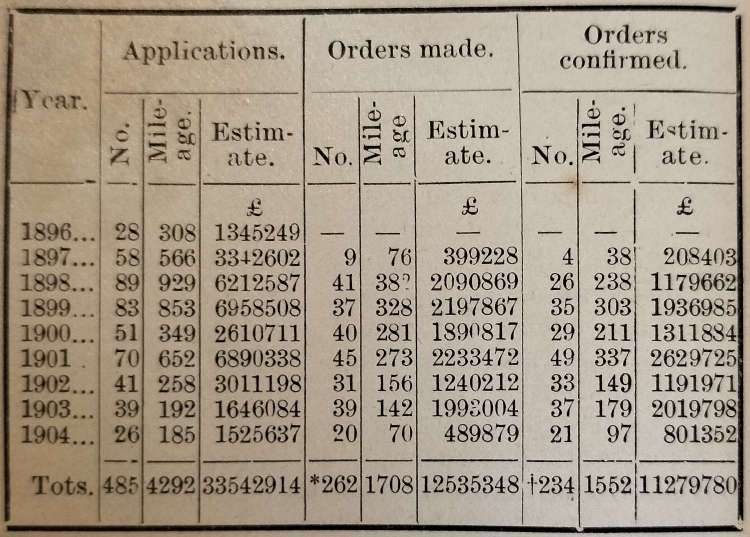
The short report in the August 1905 Railway Magazine highlighted the “number of applications made to the Commissioners in each year since the commencement of the Act, the number of orders made by the Commissioners, and the number confirmed by the Board of Trade, with mileage and estimates.” [1: p170]
Applications for Light Railway Orders (*From 278 applications. + From 237 Orders submitted). [1: p170]
Railways built under the Light Railways Act 1896 struggled financially and by the 1920s the use of road transport had put paid to the majority. Some survived thanks to clever management and tight financial control.
“The Light Railways Act was repealed in 1993 for England and Wales by the Transport and Works Act 1992 and no new light railway orders were allowed to be issued for Scotland after 2007. … Until the Transport and Works Act 1992 introduced transport works orders, heritage railways in the UK were operated under light railway orders.” [2]
Among many others, Light Railways which were built under the Act include these examples:
Welshpool and Llanfair Light Railway, opened in 1903, closed in 1956, reconstructed and reopened between 1963 and 1981 on the entire route except Welshpool town section. Articles about this line can be found here, here and here. [3]
Tanat Valley Light Railway, articles about the line can be found here and here. [4]
Shropshire & Montgomery Light Railway, five articles about this line and its rolling stock can be found here, here, here, here and here. [5]
Kelvedon & Tollesbury Light Railway, an article about this line can be found here. [6]
Campbeltown and Machrihanish Light Railway is referred to in this article. [7]
Bere Alston and Calstock Light Railway, the East Cornwall Mineral Railway and this line are covered in three articles which can be found here, here and here. [8]
Ashover Light Railway, is covered in three articles which can be found here, here and here. [9]
A parallel Act governed light railways built in Ireland.
A holiday in West Wales in the early Autumn of 2022 led to a little research on the railways in the area.
This is the third article about Pembrokeshire’s Railways. The first focussed on the pre-railway age, the second focussed on the mainline railways of the county. The links to these two posts are provided below. This article looks specifically at some of the industrial railways in Pembrokeshire, particularly those in the vicinity of Milford Haven.
The Saundersfoot Railway (covered in a later article)
The Milford Haven Docks Railways
The Milford & St. Bride’s Bay Light Railway and proposals for expansion of the Docks at Milford Haven
The Royal Navy Armaments Depot at Newton Noyes (RNMD Milford Haven)
The Royal Navy Armaments Depot at Trecwn (RNAD Trecwn) (covered in a later article)
Milford Haven Oil Refineries
The Freystrop Colliery Railway.
The Hook Colliery Railway.
1. Milford Haven Docks Railways
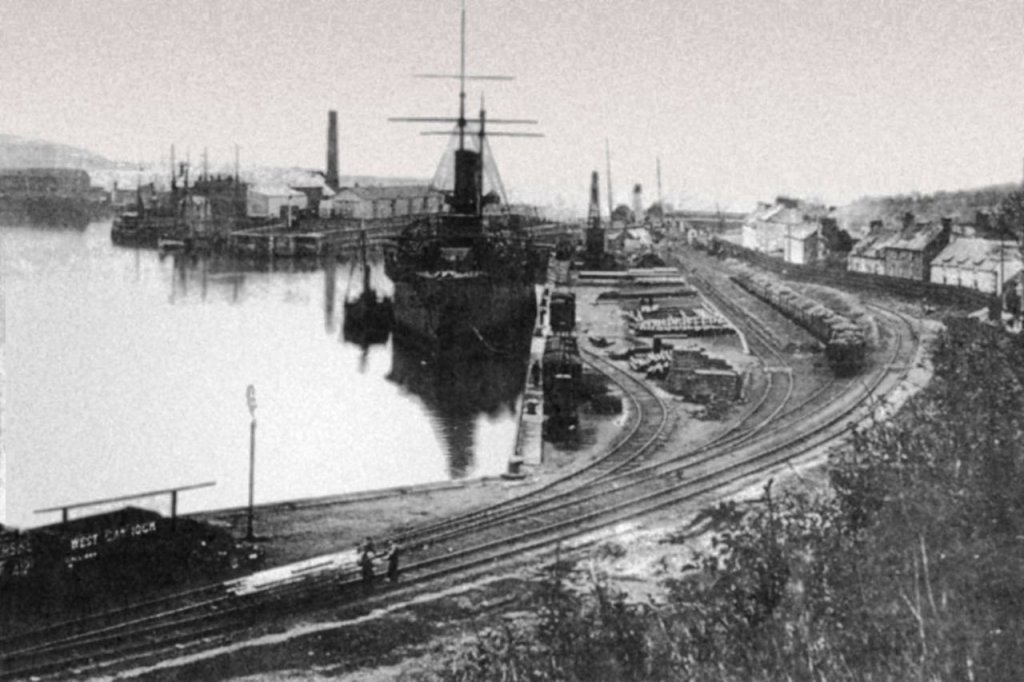
In 1790 an Act of Parliament granted William Hamilton permission to: ‘make and provide Quays, Docks, Piers and other erections and establish a Market with proper Roads and Avenues’. Several plans were proposed for the construction of quays, piers and all weather docks in the first half of the 19th century, but nothing was done. In an attempt of kick start the town to life the Milford Improvement Bill of 1857 led to the construction of a pier and two wooden bridges: Black Bridge and Hakin Bridge, both now replaced by modern structures. [51]
Once construction of the Milford Junction Railway was completed in 1863, further work became essential to the docks. This was completed in the early 1870s and more railway track was laid towards the docks complex in 1875. A spur to Newton Noyes, known as the ‘Estate Line’, was completed in 1882. It connected with a cast-iron pier, which was reached via a lifting bridge at Castle Pill; the junction with the Milford line was opposite the station. [53]
The docks were finally opened in 1888, with dry-dock facilities in Castle Pill. The docks were intended for the transatlantic passenger trade, but were only very sparsely used for this purpose. [51]
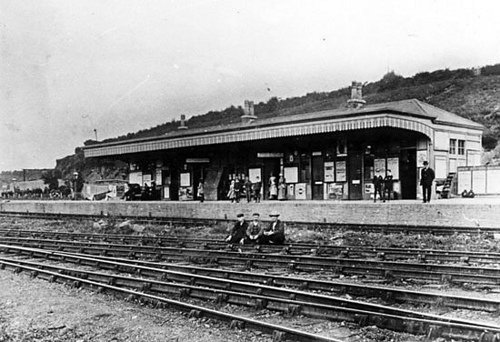
The port development highlighted Milford station’s less than favorable location, although equidistant between the two major populations of Milford and Hakin, it was at a distance from the quayside and with no discernible pedestrian access. To rectify the issue, the short-lived Hakin Dock Station was constructed in 1889. [52][53]
Hakin Dock Station was ideally placed to be the alighting point for passengers embarking to North America. Wing Commander Ken McKay notes particularly the Gaspesia. [36] Hakin Station also welcomed passengers disembarking from New York, the inaugural voyage being the City of Rome in 1889. [54]
Train waiting to depart Hakin Dock Station with passengers arrived from New York on the City of Rome, 1889. Public Domain. [54]
Ultimately, Hakin Dock Railway Station’s proximity to Milford Haven railway station, and the fact that transatlantic trade did not develop at the port, meant that the station was quickly dismantled and absorbed into the Milford Haven Docks complex. [53] The track was later used for freight traffic servicing the fishing industry. [52]
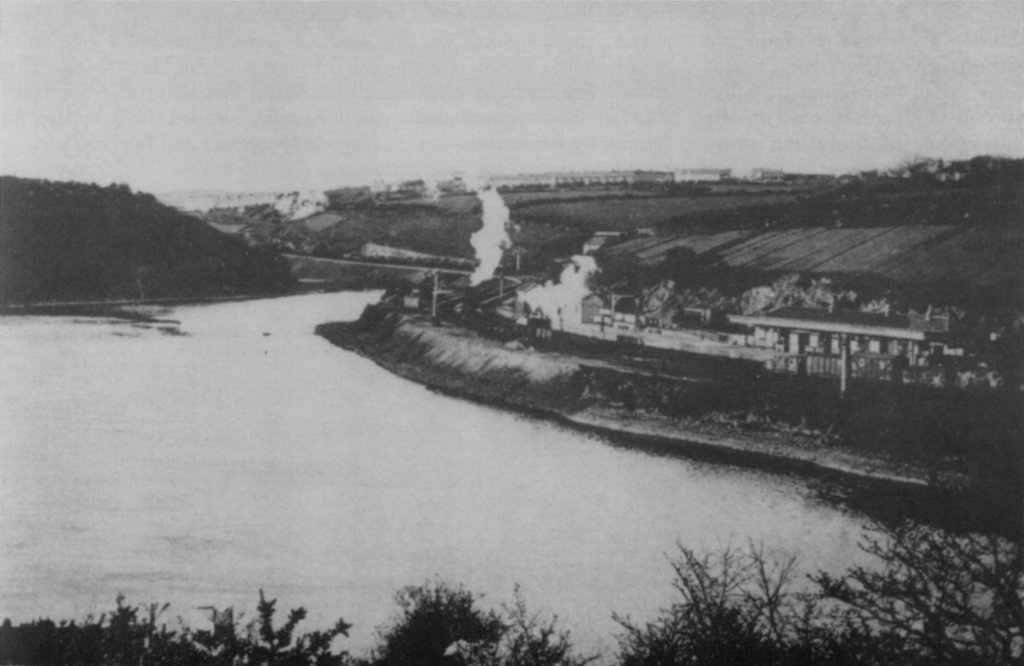
As the 20th century dawned, Milford Haven Docks became a significant fishing port and maintained this role throughout the first half of the 20th century. Sharp decline in the fishing industry occurred in the 1950s. [51]
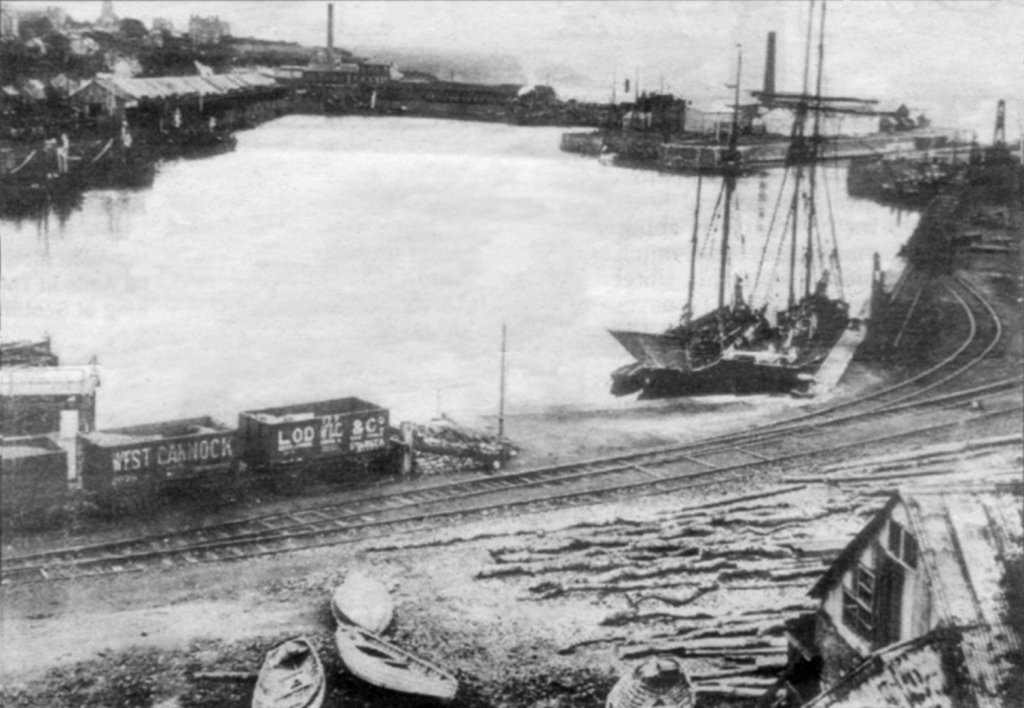
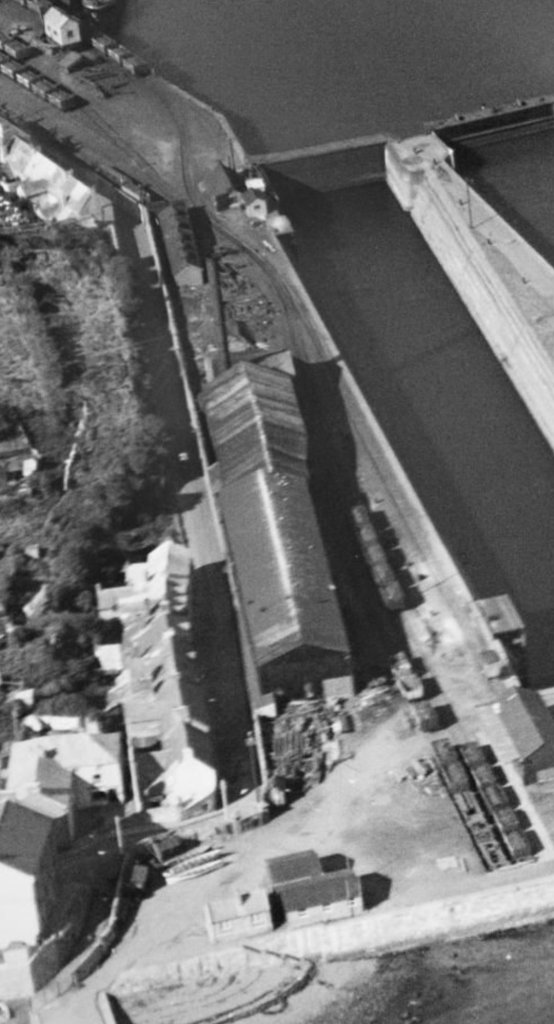
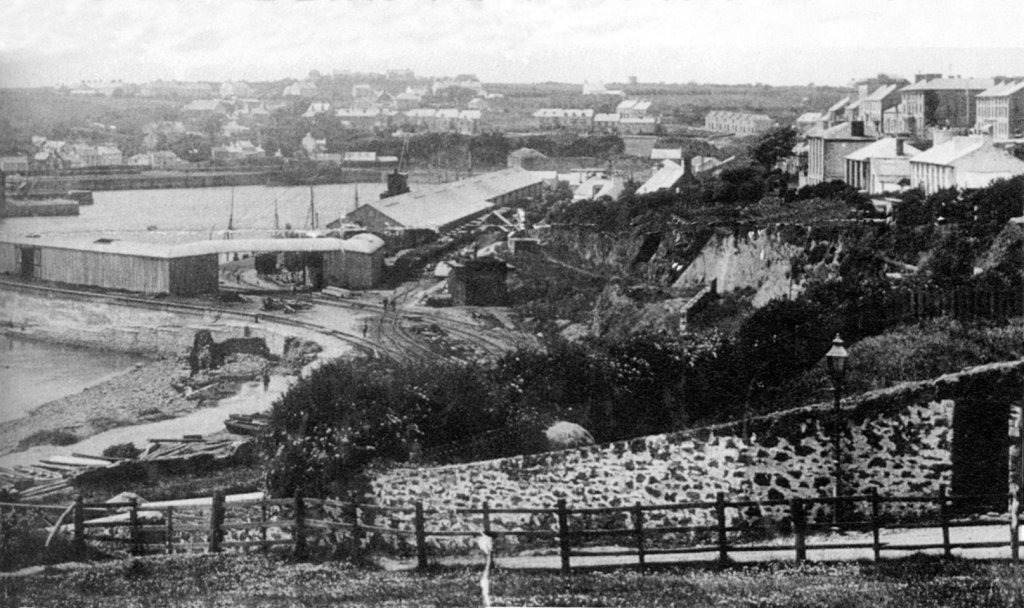
Hakin Dock in 1907 with HMS Aurora berthed alongside the quay. Public Domain. [53]This photograph was taken in 1911 from a similar location, photographer unknown sourced from martinshaven.com. [78]A view across Hakin Wharf in the 1950s, photographer unknown sourced from martinshaven.com. [78]
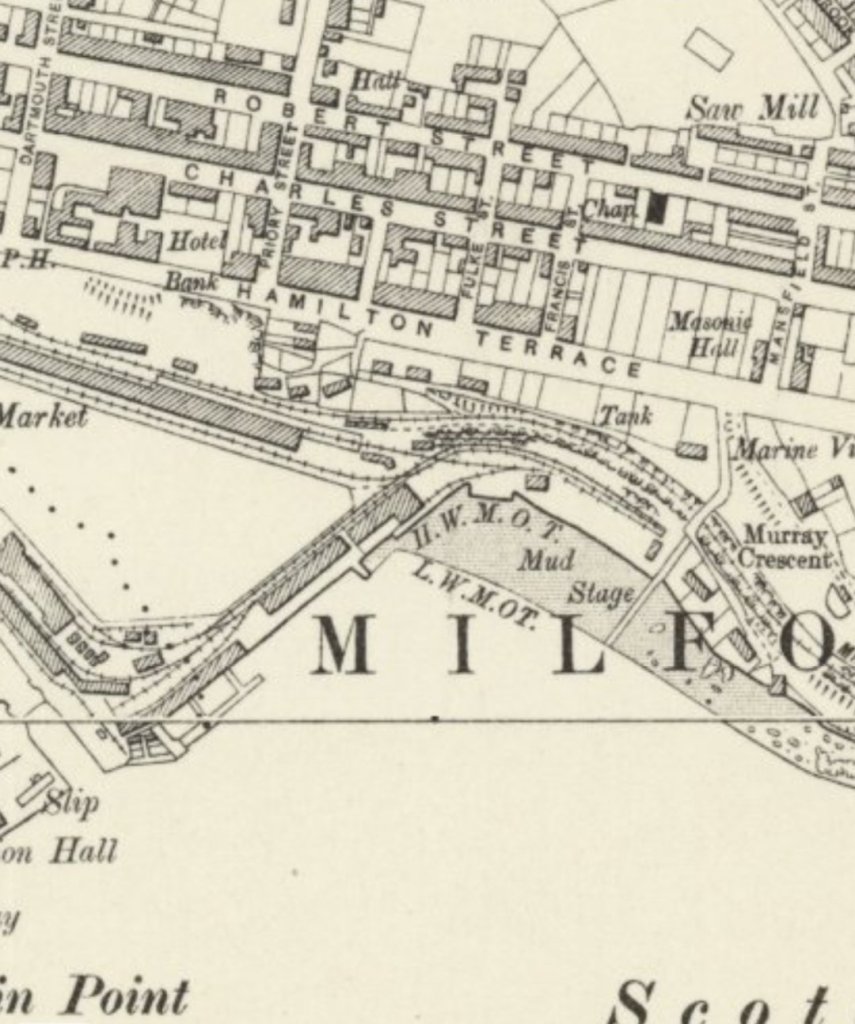
The railway lines and facilities at Milford Haven are shown in a series of map extracts below. …
The images on the link are all protected by copyright and so cannot be reproduced. They show the following Milford Haven locomotives:
AJAX (2 photographs) – Fletcher NER Class 124 LNER Class J76 0-6-0T – built 1882 by Darlington Works as NER No.598 – 1926 sold to MDC and named AJAX – 1944 scrapped – seen at Milford Haven, 04/39.
NEPTUNE – Fletcher NER Class 964 0-6-0T – built 1875 by Robert Stephenson & Co. as NER No.973 – 1914 sold to Milford Dock Co. as NEPTUNE – seen at Milford Haven, 07/38.
A number of Peckett locomotives were based at Milford Haven. [76]:
PARIS – 0-4-0ST Peckett Locomotive, built June 1938 under works number 1949 was sent to Milford Docks Company. [77]
Swansea Harbours’ 0-4-0ST Peckett No. 929 was loaned to Milford Haven Dock Co. It was recorded as present at the GWR engine shed to the North of the railway Station on 5th April 1947. [79]
Other locomotives are referred to in the sections below which relate to specific branch-lines.
2. The Milford & St. Bride’s Bay Light Railway and proposals for expansion of the Docks at Milford Haven
This railway was a proposed industrial line which would have brought coal from the St. Bride’s Bay area to Milford Haven Docks. Correspondence dated between 1911 and 1926 can be found in the Milford Docks Company Records and Correspondence which were deposited in the Pembrokeshire Records Office and are held by Pembrokeshire Archives and Local Studies. [84]
As early as 1865 proposals had been put forward for a link between pits on St. Bride’s Bay and the port of Milford Haven. The possibility was raised again in 1911 when colliery owners put forward a plan for a pontoon in the middle of Nolton Haven with an aerial ropeway carrying the coal to the pontoon for onward distribution by ships. [1: p141][85]
The Port Authority at Milford Haven saw the potential competition as a problem and put forward a railway of 11 miles in length and some significant improvements to the port facilities at Milford Haven. Connop-Price provides plans of the the proposed railway and the enlargement of the Docks. [1: p139-141][86]
Apparently, the Order for the Light Railway was obtained in 1916. Attention during the war years, was focussed on the operation of the existing docks. After the War ongoing objections from local landowners seem to have prevented further work on the proposal. [1: p141][87]
3. The Royal Navy Armaments Depot at Newton Noyes (RNMD Milford Haven)
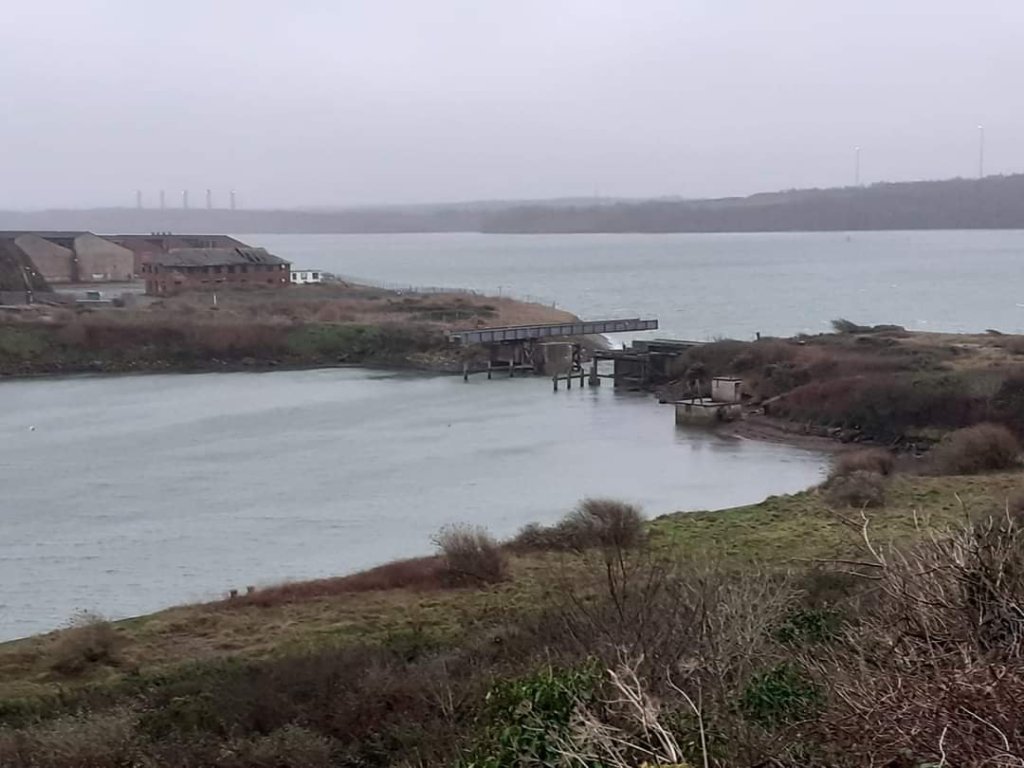
RNMD Milford Haven is a decommissioned Royal Naval Armaments Depot located on the North shore of Milford Haven between Milford Haven and Llanstadwel in the County of Pembrokeshire, Wales. The area is known as Newton Noyes. [88]
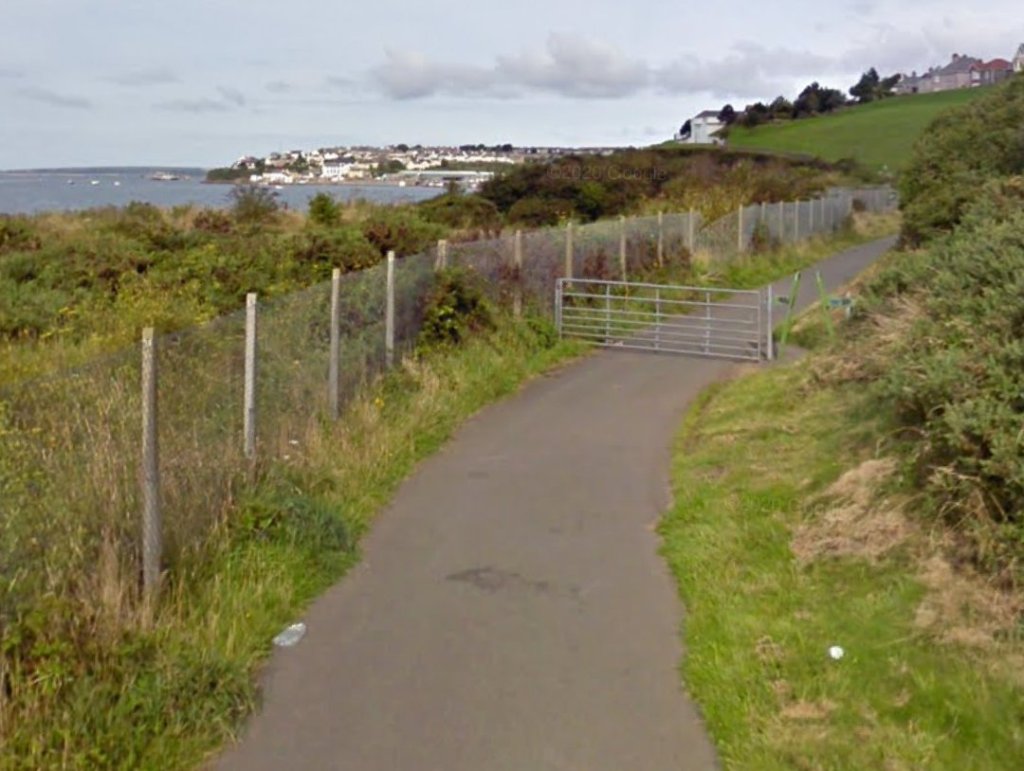
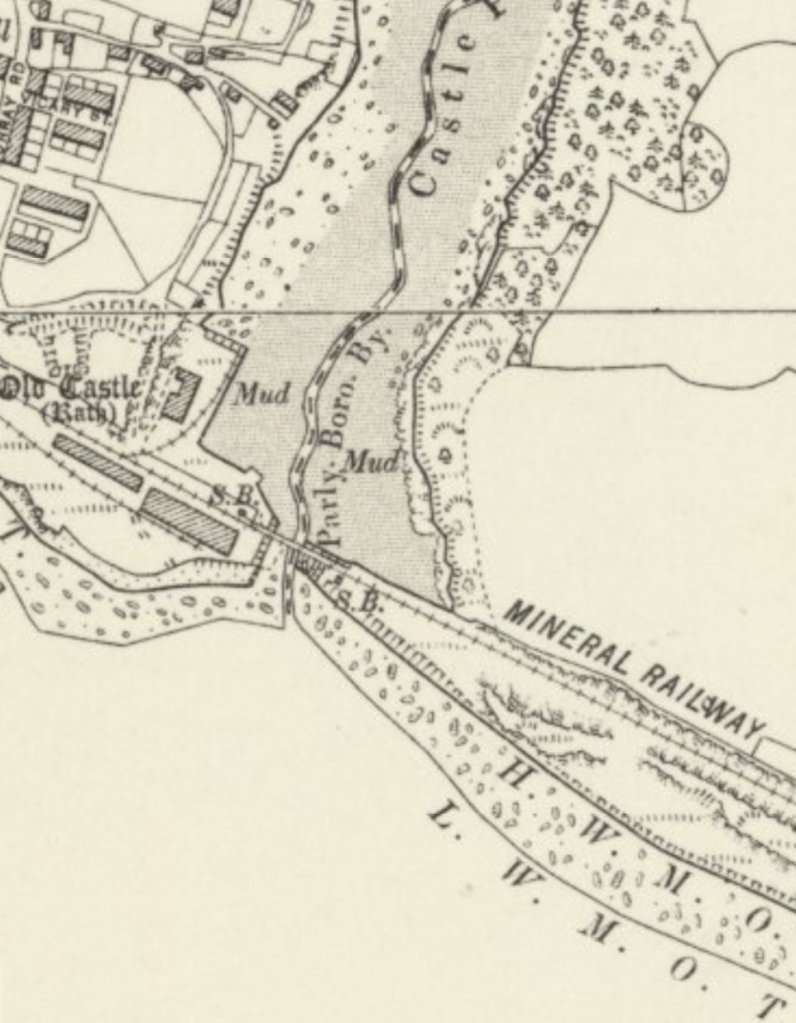
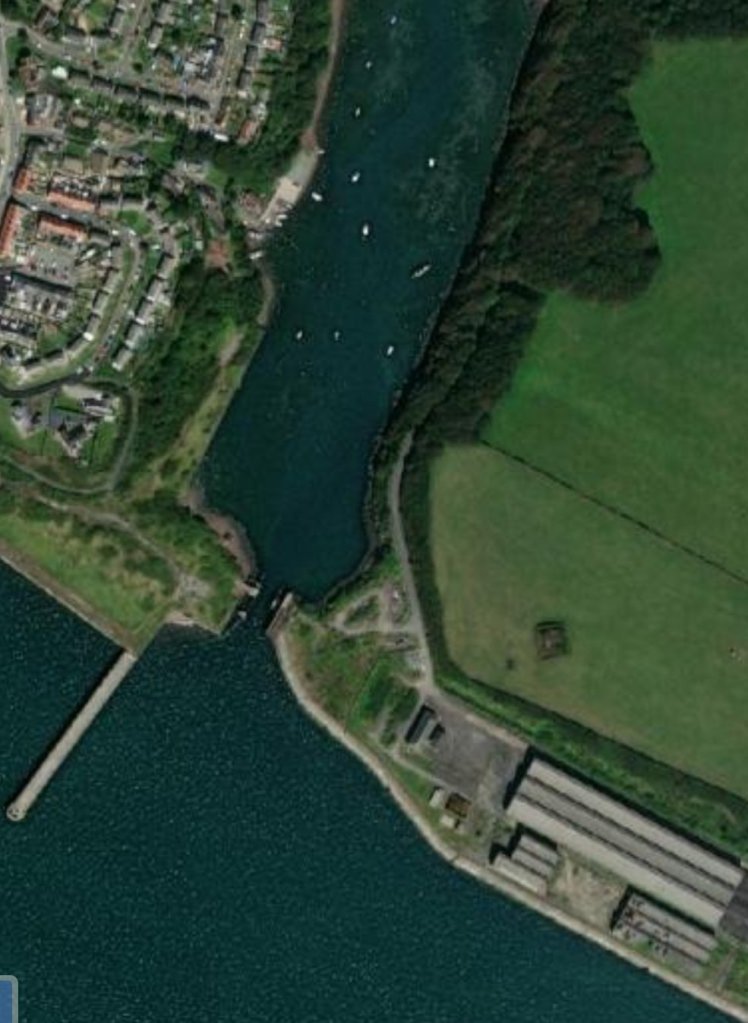
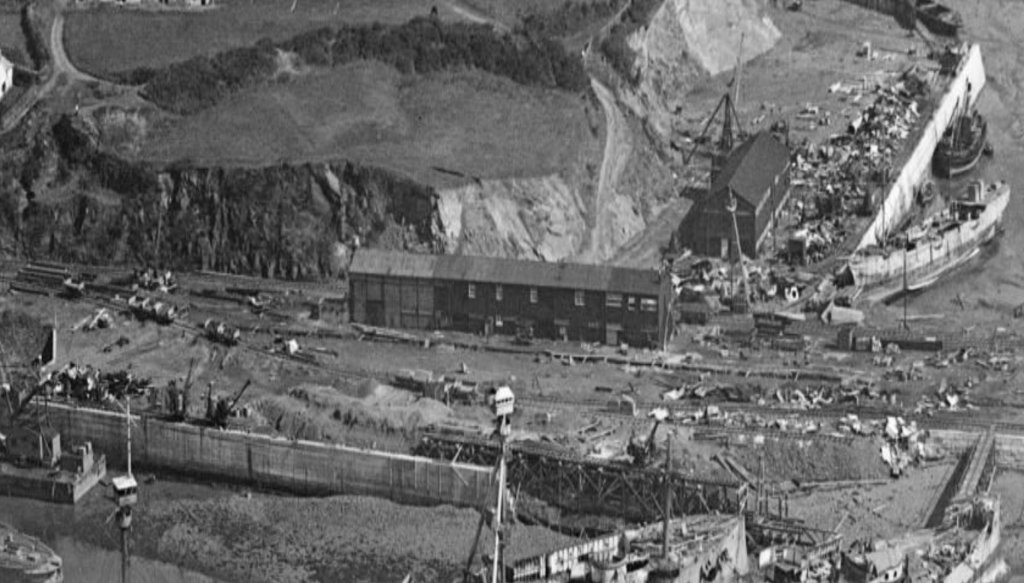
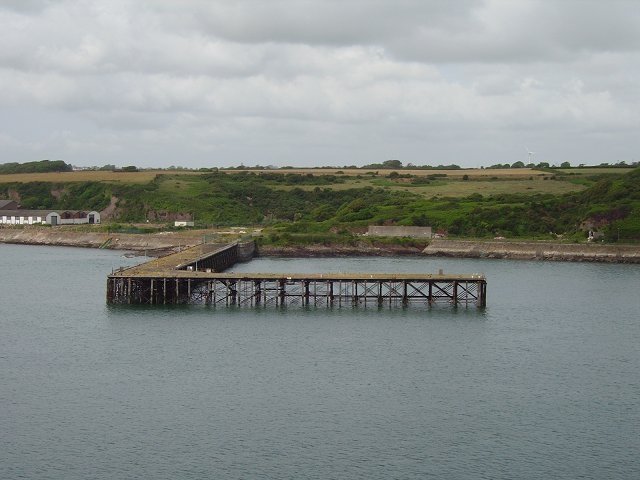
The Newton Noyes area was previously occupied as a ship breakers yard. Known locally as Wards Yard, it was connected to the mainline railway via a spur from Milford Haven which crossed Castle Pill via a swing bridge. A cast iron pier was built in 1872 with the intention of encouraging transatlantic traffic to unload, allowed a rail / marine interchange.[88][36]
With developing tensions in Europe in the 1930s, the Admiralty began preparations for possible conflict. In 1934, Thomas Ward’s ship breaking yard was purchased. Construction work began the following year and by the outbreak of war in 1939 the Depot was ready for action.[88]
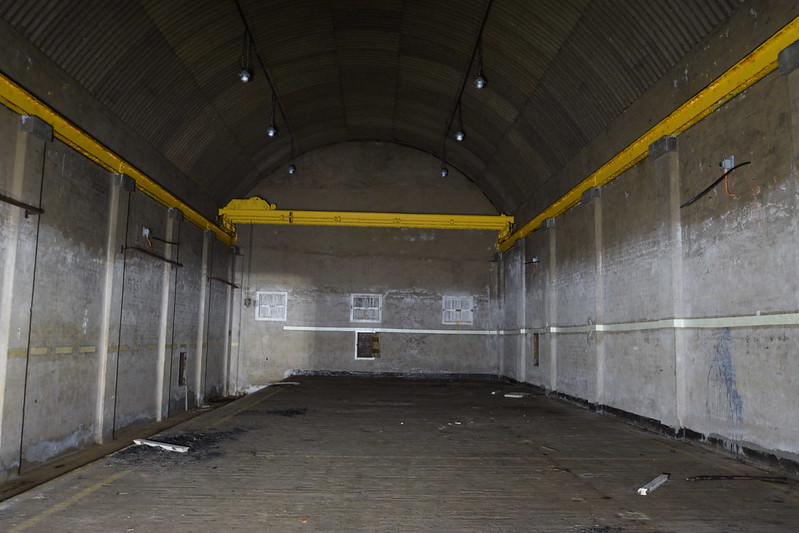
Wikipedia tells us that, “The site consisted of an extensive storage facility of six armament sheds, comprising tunnels built into the neighbouring valley. A reservoir was constructed on higher ground to the north in case of explosion or fire. All of the tunnels were connected by rail, which also extended to the pier. Housing for the naval officers was located near the former mansion of Castle Hall. At the height of World War II, it employed 1,000 people, and thereafter hundreds of people from the local area. By the 1970s its future was identified as being at risk.” [88][89]
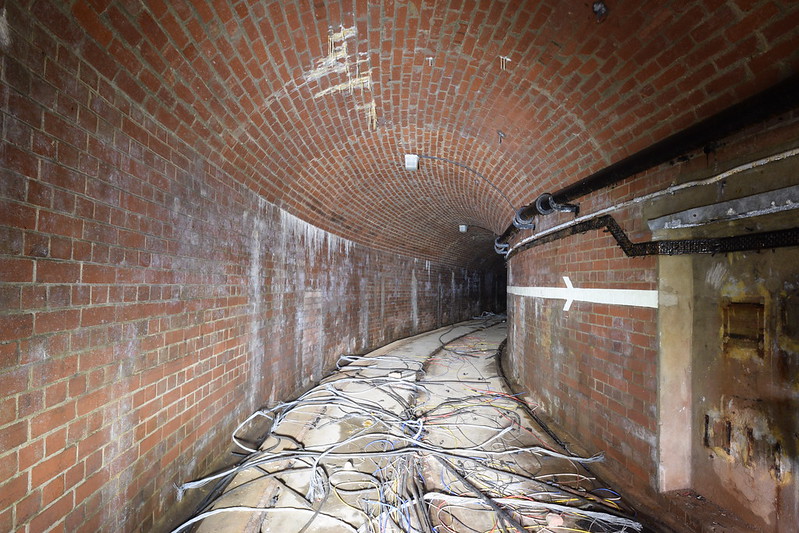
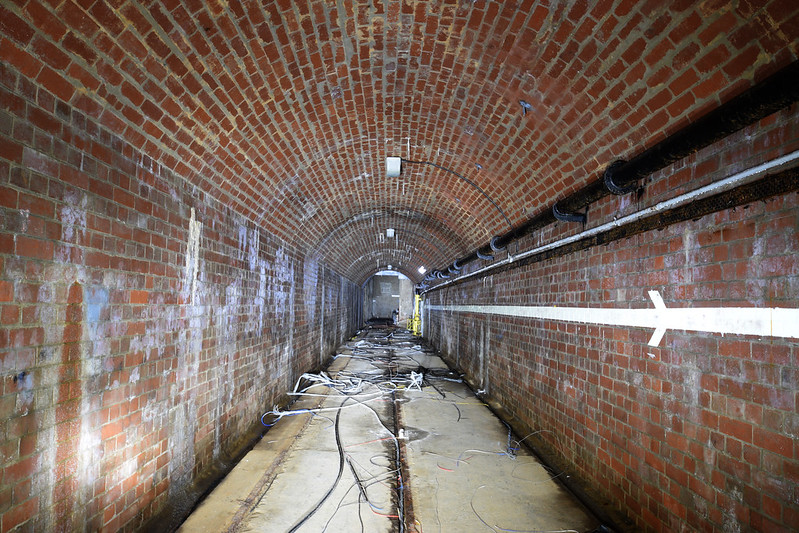
“The tunnels that ran beneath the site were about 100 meters (328 feet) long and provided access to the underground storage. The mines were stored on a raised platform at the height of a railroad car. There was also an overhead crane with a lifting capacity of 10 tons that was used to load and unload the mines.” [92]
The site was closed in the 1980s. It was subsequently purchased by Gulf Oil, then considered as a potential large scale development site for a retail and residential complex. It was sold again in 2015 and then again in 2017. The most recent purchase was by the Port of Milford Haven. [88]
Some excellent pictures inside the depot and underground can be found on Flickr, taken by Newage, (Flickr @newage2). The following pictures are used by kind permission. [96]
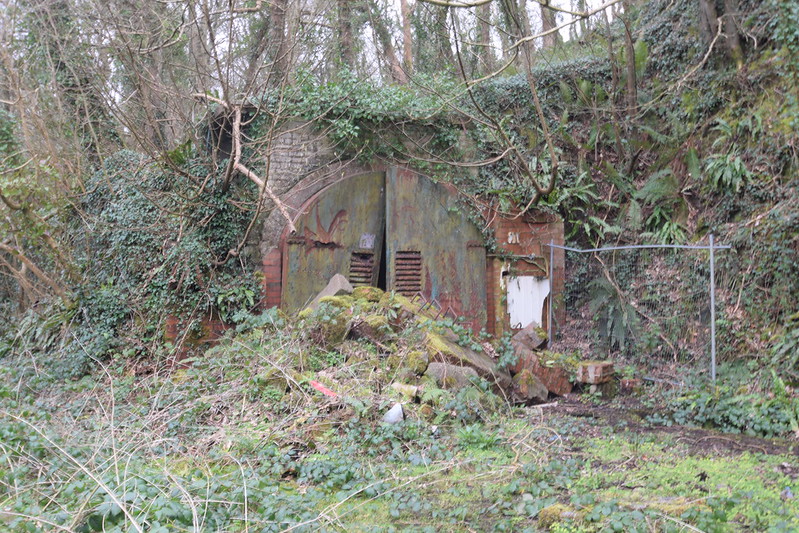
There were a series of tunnels stretching back into the land behind the shore, each one secured against accidental ingress. In the 21st century the metal doors are not all secure and the site itself has been fenced off but not before a number of different people were able to make a photographic and video record of the site.
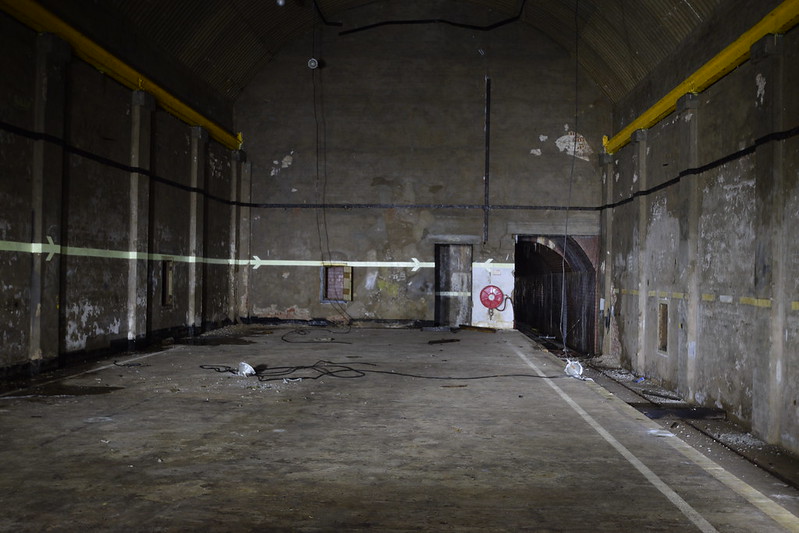
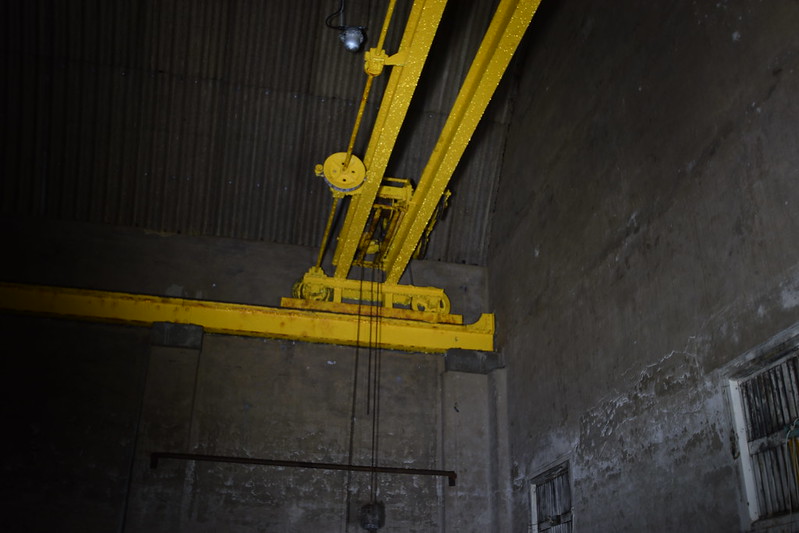
Two pictures of the tunnel entrances, (c) Newage on Flickr (Flickr @newage2) [96]The tunnels curved back into the hill side. The narrow-gauge tracks can clearly be seen in the tunnels (c) Newage on Flickr (Flickr @newage2)The tunnels were around 100ft in length, (c) Newage on Flickr (Flickr @newage2)Each tunnel led to an arched vault with a platform level to match the height of the wagon floors. In this image the narrow-gauge tracks can be seen at a lower level on the right-side of the picture, (c) Newage on Flickr (Flickr @newage2)Turning round this image shows the end wall of the vault and the travelling crane which was installed in each vault to aid in movement of armaments stored there, (c) Newage on Flickr (Flickr @newage2)A close-up photograph of the travelling crane/telpher in one of the vaults, (c) Newage on Flickr (Flickr @newage2)
Coflein’s Maritime Officer (RCAHMW) described the site in May 2012. The previous use as a shipyard is recognised and their webpage continues: “The depot utilised the site of the Newton Noyes farmstead (NPRN 4176748) and the former Oil and Manure Works (NPRN 416749). It was served by the railway line and steamer pier built in 1872. Incoming deactivated mines were transferred from the standard gauge railway to a narrow gauge system linking the massive armament sheds and the six underground magazines (see NPRNs 270769-771). Each of these magazines was sealed off by ventilated blast door and thick concrete walls. The tunnels providing access to the underground magazine are some 100m in length which opens into a large storage bay with a raised platform to allow mines to be stored at the height of the railway wagon. An overhead 10 ton crane faciliated loading and unloading. A large reservoir (NPRN 416750) was constructed by damming the stream to provide a water supply in case of fire. During World War II, the depot was used to arm minefields in the Western Approaches. After 1943, when the U-boat threat diminished, the depot’s role change from activating mines to preparing them for shipping to the North Africa for use by the Mediterranean Fleet.” [93]
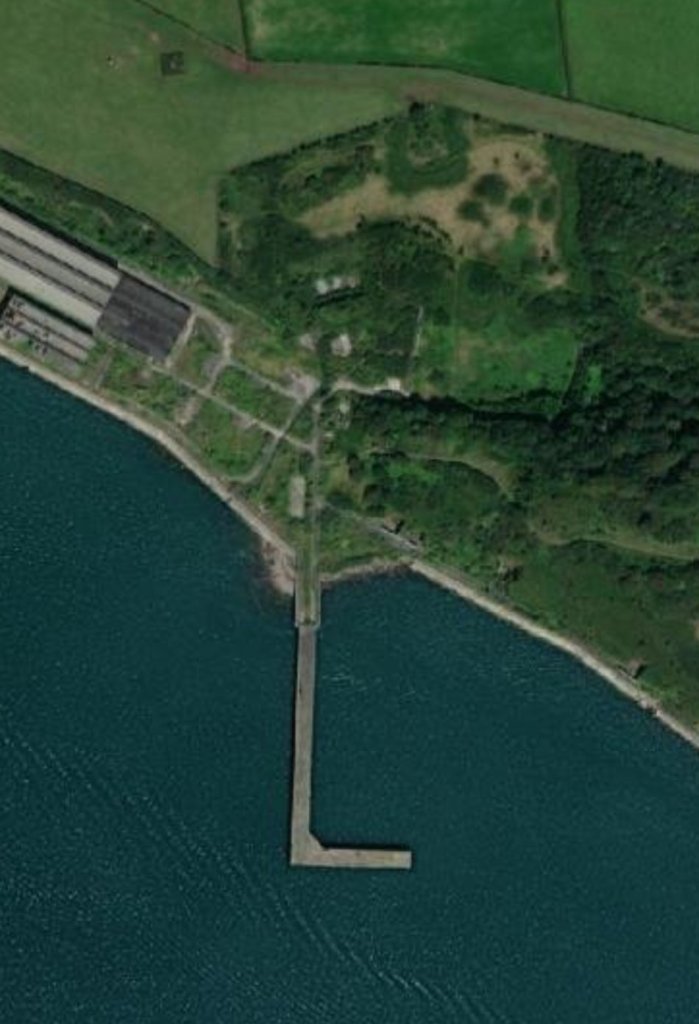
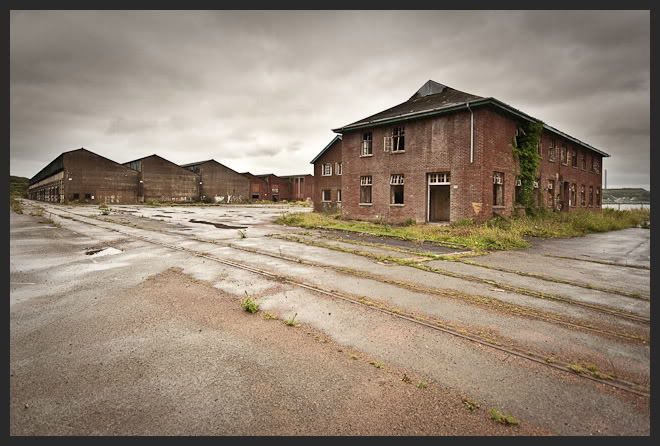
After decommissioning, the above-ground facilities which remained were recorded in a baseline aerial reconnaissance survey for the CHERISH Project. (Crown: CHERISH PROJECT 2017). Produced with EU funds through the Ireland Wales Co-operation Programme 2014-2020. All material made freely available through the Open Government Licence. [93]
Royal Naval armaments depot. Baseline aerial reconnaissance survey for the CHERISH Project. (Crown: CHERISH PROJECT 2017). Produced with EU funds through the Ireland Wales Co-operation Programme 2014-2020. All material made freely available through the Open Government Licence. [93]
28dayslater.co.uk paid a visit to the site in 2011 when access was relatively easy. Their site provides photographs of these buildings from ground-level and some internal photographs. [94]
The first of a series of photographs published by 54Strat on 28DaysLater.co.uk. The full series of photographs can be accessed here. [94]
A video of the site can be seen below. … [95]
4. Milford Haven Oil Refineries
Milford Haven Refinery(Robeston) began operating in 1973 under Amoco’s ownership, but in its final days it was owned by Murco Petroleum. It was on a 1200 acre site close to Milford Haven. [97]
The closure of the refinery was announced in November 2014. The site was sold to Puma Energy in 2015 for use as a petroleum storage and distribution terminal. [97] The branch-line which served the refinery remains open as of 2022. Regular movements along the branch continue.
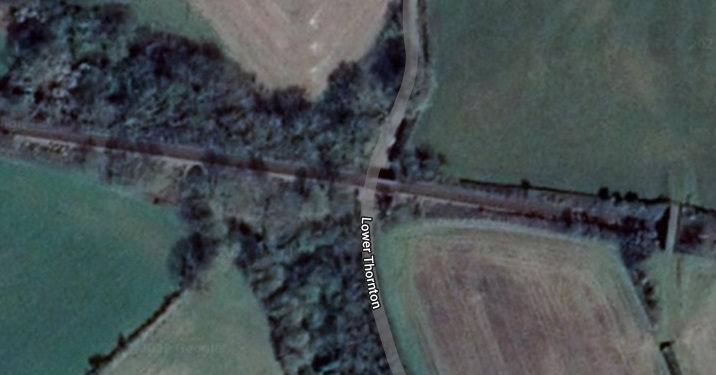
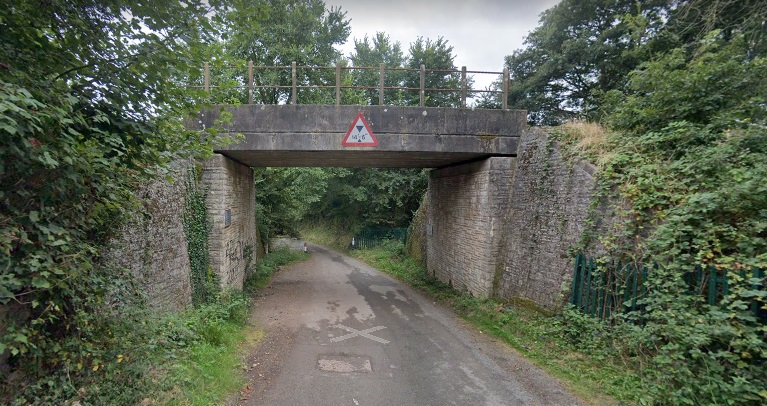
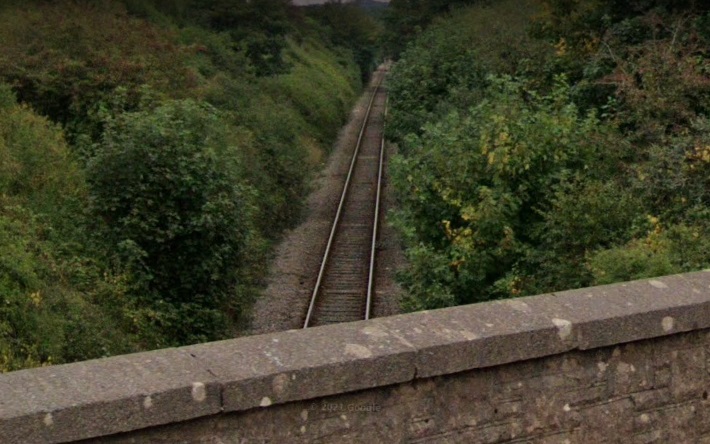
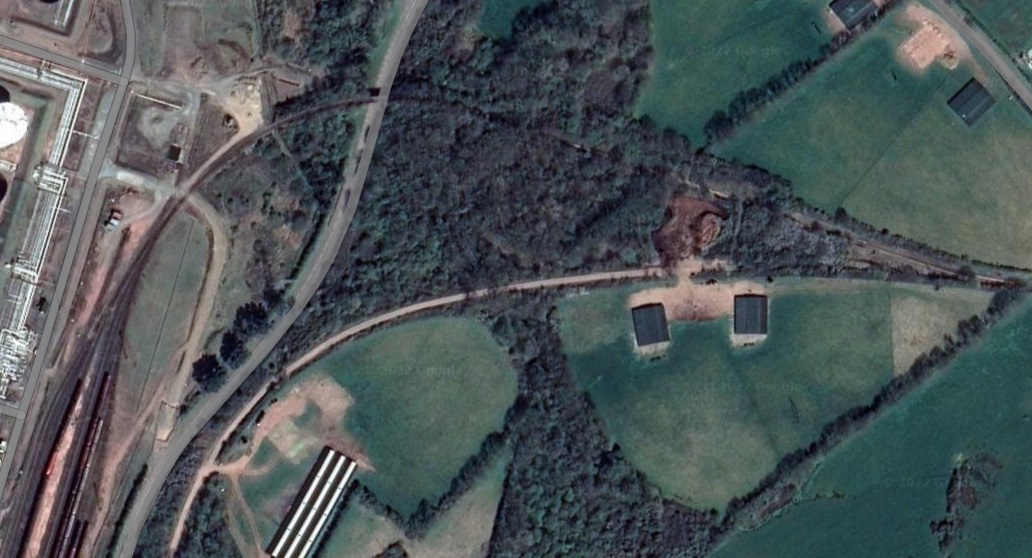
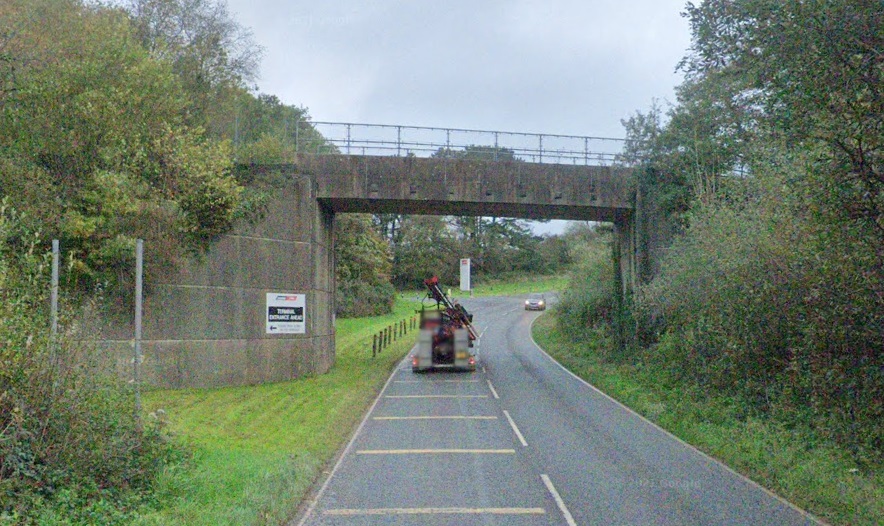
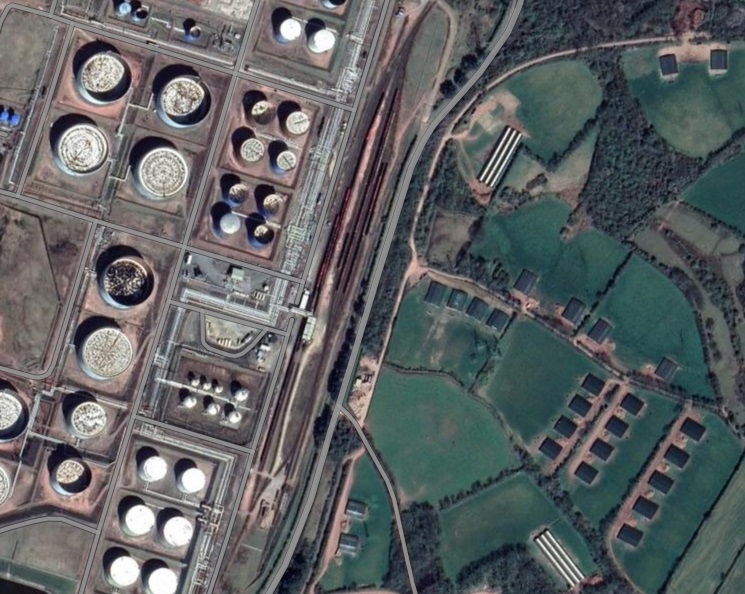
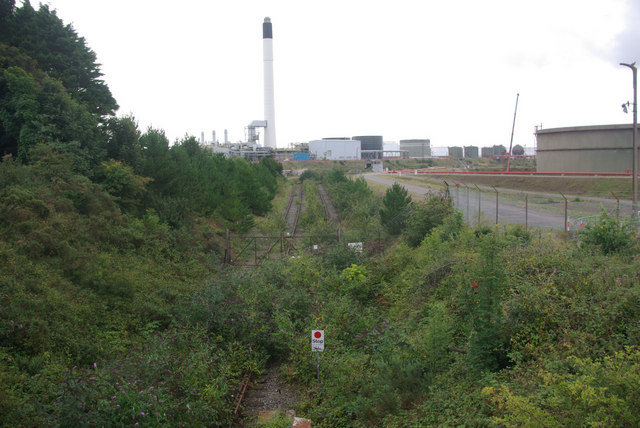
The branch-line from Herbrandston Junction to the refinery at Robeston. [103]Herbranston Junction with the line to Robeston Refinery heading off the image to the West. [Google Earth]Two bridges – an accommodation bridge to the right of this satellite image and Lower Thornton Road Bridge at the centre of the image. [Google Maps]Lower Thornton Rail-over-Road bridge from the North in September 2021. [Google Streetview]Lower Thornton Rail-over-Road bridge from the South in September 2021. [Google Streetview]Two more bridges – another accommodation bridge to the right and Upper Thornton Bridge close to centre of this satellite image. [Google Maps]Looking East along the branch-line from Upper Thornton Bridge [Google Streetview, September 2021]Looking West along the branch-line from Upper Thornton Bridge [Google Streetview, September 2021]The Junction between the Robeston Line and that which used to serve the Esso Refinery to the South. [Google Maps]The rail-over-road bridge shown on the Google satellite image above, from the South [Google Streetview, October 2021]The rail-over-road bridge shown on the Google satellite image above, from the North [Google Streetview, October 2021]The sidings at the Western end of the branch-line appear at the centre of this satellite image. [Google Maps, October 2021]The sidings at the Robeston Refinery site. Some of the tank wagons still bear the Murco logo. [Google Streetview, October 2021]
The Gulf Refinery, Waterston was opened in August 1968 by Queen Elizabeth II. The plant, constructed at a cost of approximately £35 million, produced a range of petroleum products and occupied an area of 300 acres (121.4 ha).[2] Up to 119,000 barrels (18,900 m3) of oil could be processed a day at the facility. [98]
Gulf Oil’s crude oil was principally obtained from Nigeria and Kuwait through joint ventures with BP. Crude was shipped to Bantry Bay in Ireland in 312,000 DWT (deadweight ton) ships. From there it was shipped in 100,000 DWT ships to Gulf’s refineries in Milford Haven, Denmark and Rotterdam. The Milford Haven refinery was integrated with a petro-chemical plant, using oil products from the refinery as feed-stock for the chemical plant. It employed about 280 people. About 23% of the refinery output was exported by train via a rail link to the national rail network. About 75% was exported by ship. [98]
The line ran roughly North-South from to the refinery which was sited to the East of Milford Haven just a short distance beyond the RNMD Milford Haven site referred to above.
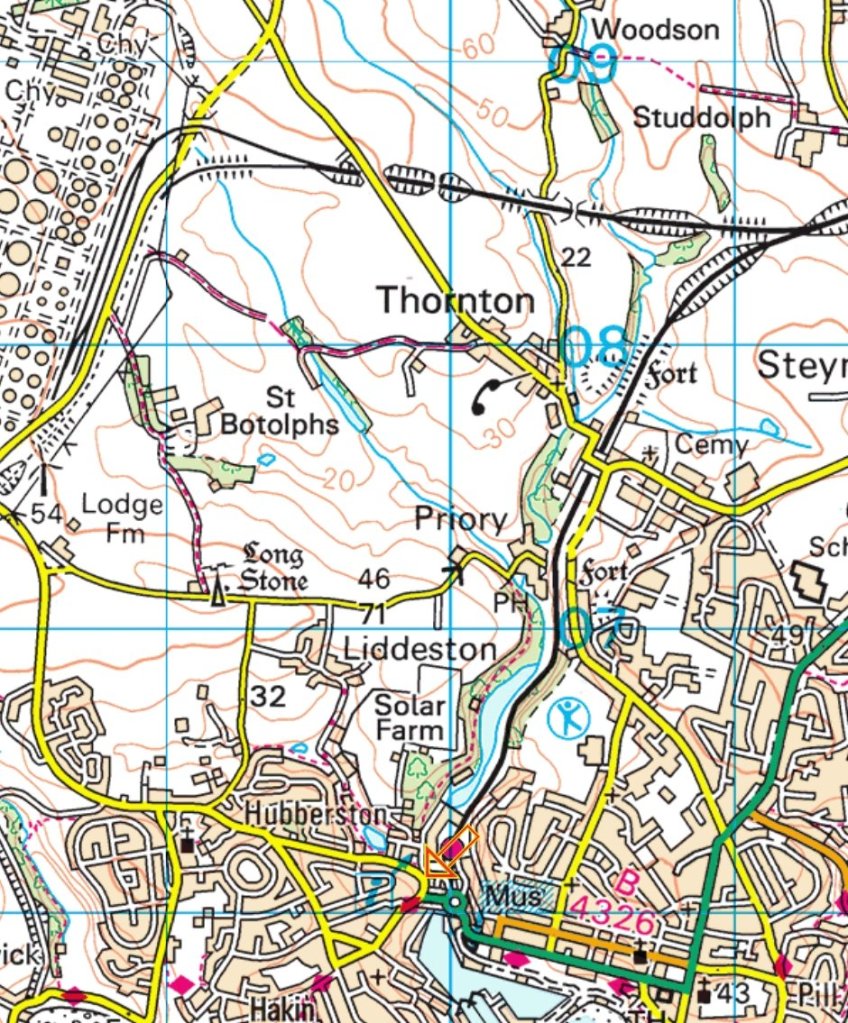
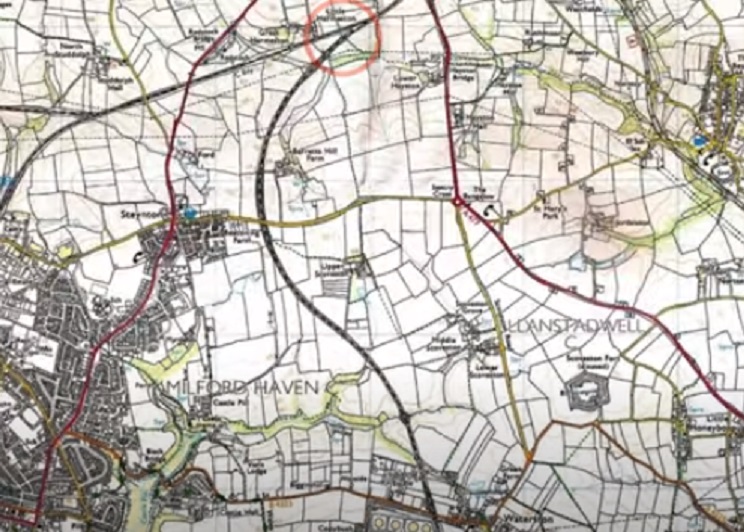
The Gulf Oil Refinery close to Milford Haven. This small extract from the Ordnance Survey Landranger map shows the site and particularly the rail link entering the site from the North.
The line ran roughly North-South from to the refinery which was sited to the East of Milford Haven just a short distance beyond the RNMD Milford Haven site referred to above. The pier and rail connection to that site at Newton Noyes can be seen on the left of the image above.
The video below comprehensively covers the design and construction of the 4 km long branch serving the oil refinery. [99] The refinery closed, eventually, in 1997.
The construction of the Gulf Refinery Branch in 1967/1968. [99]
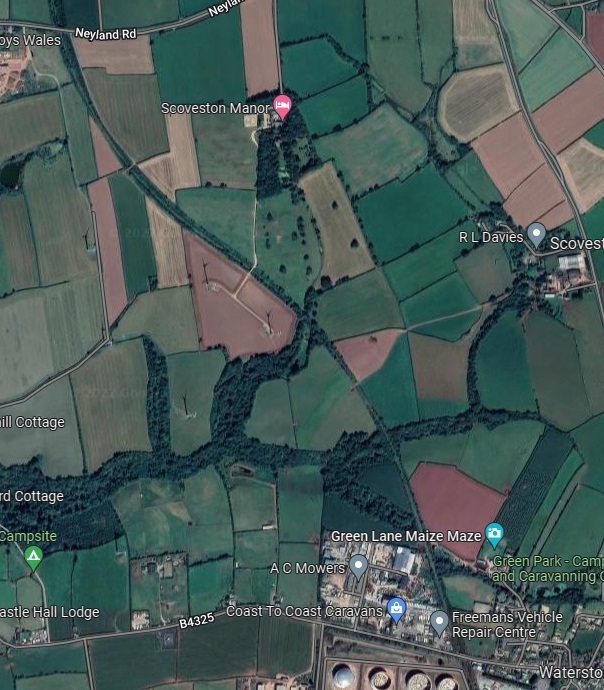
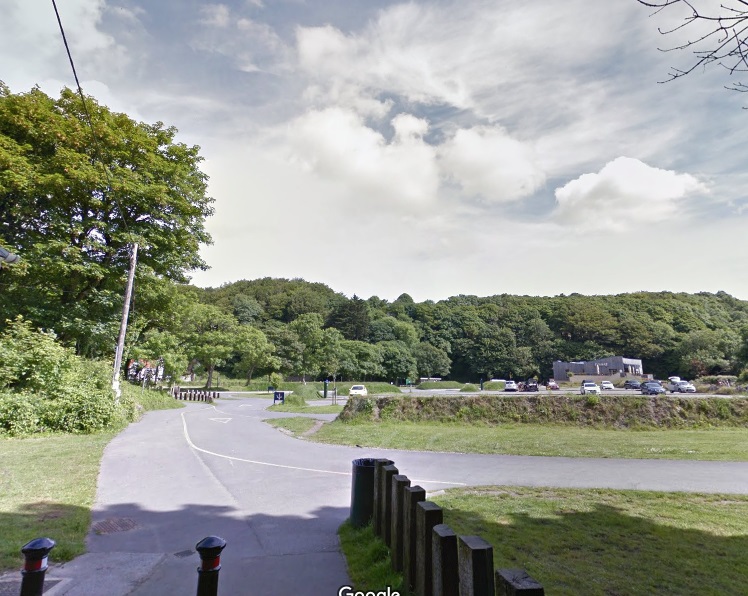
The route of the old branch leaves the national network to the West of the A477 as can be seen on the satellite image below.
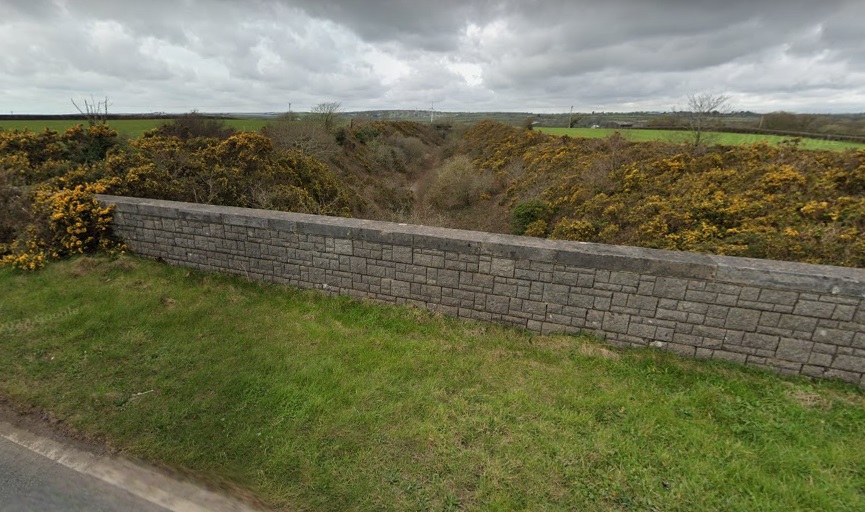
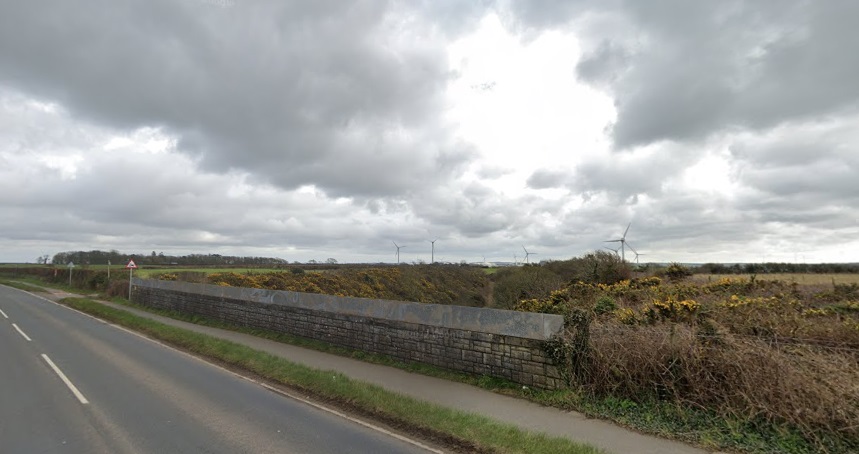
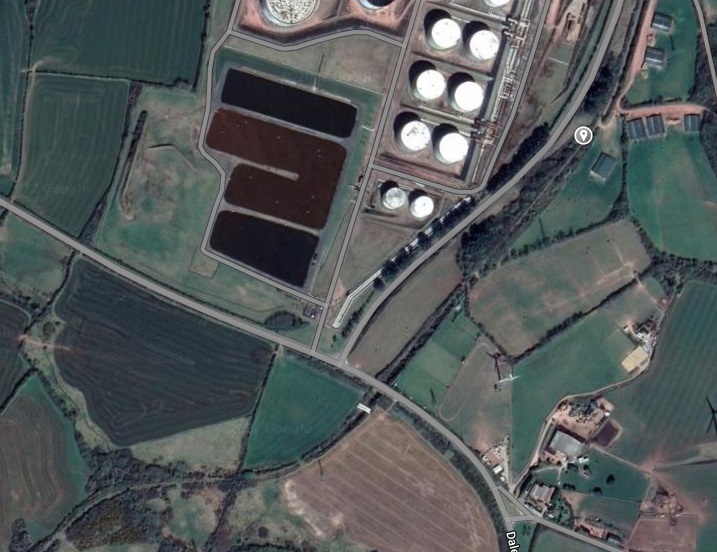
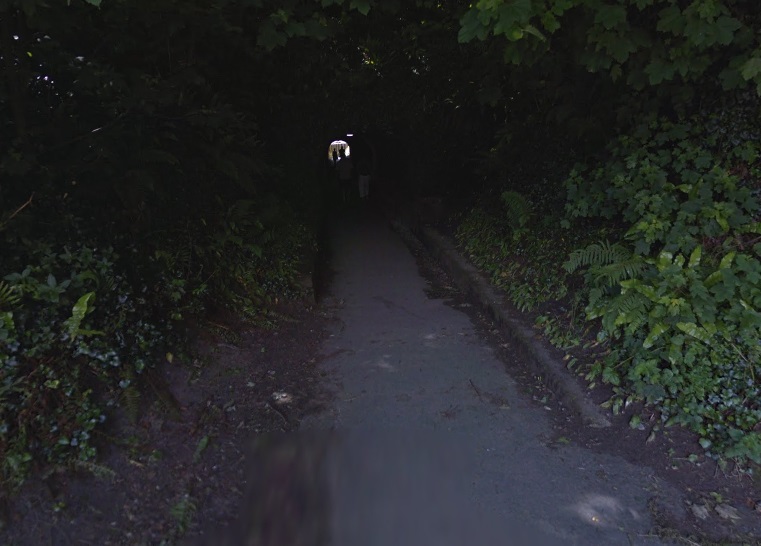
The Gulf Refinery Branch left the national network to the West of the A447. [Google Maps]Curving to the South, it passed under Neyland Road (A477) to the East of the junction between the A477 and the A4076. [Google Maps]The view North along the route of the closed branch-line from the bridge at Neyland Road. The cutting is becoming overgrown but its route can still be made out. [Google Streetview, March 2022]The view South from the road bridge. Again, the cutting can be made out relatively easily, although the parapet height is increased on this side of the bridge. [Google Streetview, March 2022]The route of the line turns back towards the East before again turning Southwards and approaching Waterston and the Refinery site. [Google Maps]The view North from Main Road, Waterston (B4325), the old line is in cutting. [Google Streetview, March 2022]Looking South from the same bridge, the route of the line is marked by the parallel lines of trees heading into the distance. [Google Streetview, March 2022]The fan of sidings at the southern end of the branch still appear on the satellite imagery of the 2020s. [Google Maps]A view into the old refinery site in August 2010. The photographer comments: “The former Gulf oil refinery at Waterston closed in 1997 and the site is now used for oil storage and the import of liquid natural gas (LNG). The railway that served the plant is evidently no longer in use.” (c) Stephen McKay, authorised for use under a Creative Commons Licence (CC BY-SA 2.0), [104]
The Esso Refinery was opened in 1960 by the Duke of Edinburgh. Construction cost £18 million and the refinery had the initial capacity to process 4.5 million tons of crude oil a year. As originally conceived the refinery worked in conjunction with Esso’s older, larger refinery at Fawley on Southampton water. Milford Haven refinery supplied the west coast and Fawley the rest of the country. Milford Haven also supplemented Fawley’s fuel oil deliveries to the London area. The refinery shipped semi-refined heavy gas oil to Fawley for further refining. There were also shipments to Ireland and northern Europe. Most of the refinery’s crude came from the Persian Gulf shipped in tankers such as the Esso Scotia of 249,952 deadweight tons. [101]
Wikipedia tells us that most of the product from the refinery, about 95%, was sent out by ship. However, the refinery was connected to the national rail network. Trains carrying liquefied gas were sent to the Midlands and Scotland. The refinery closed down in March 1983. [101]
This extract from streetmap.co.uk shows the line of the railway access to the old refinery as a dotted line extending from the remaining branch-line to Robeston Refinery. [103]
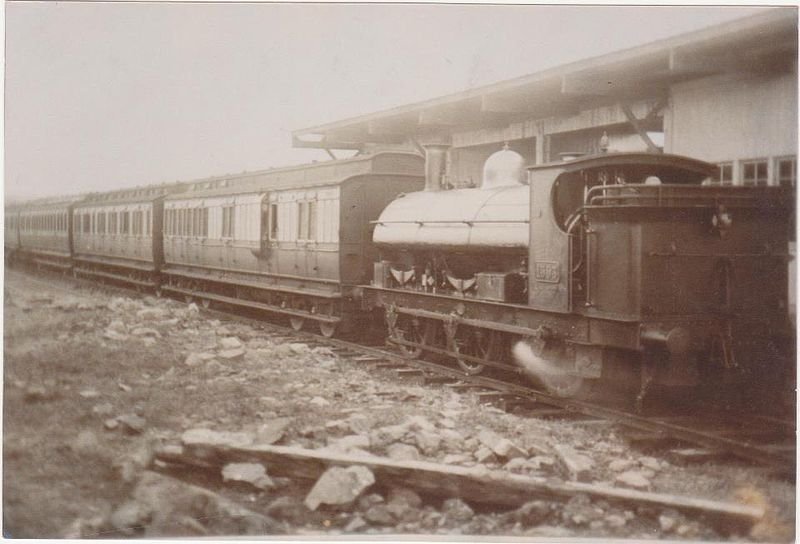
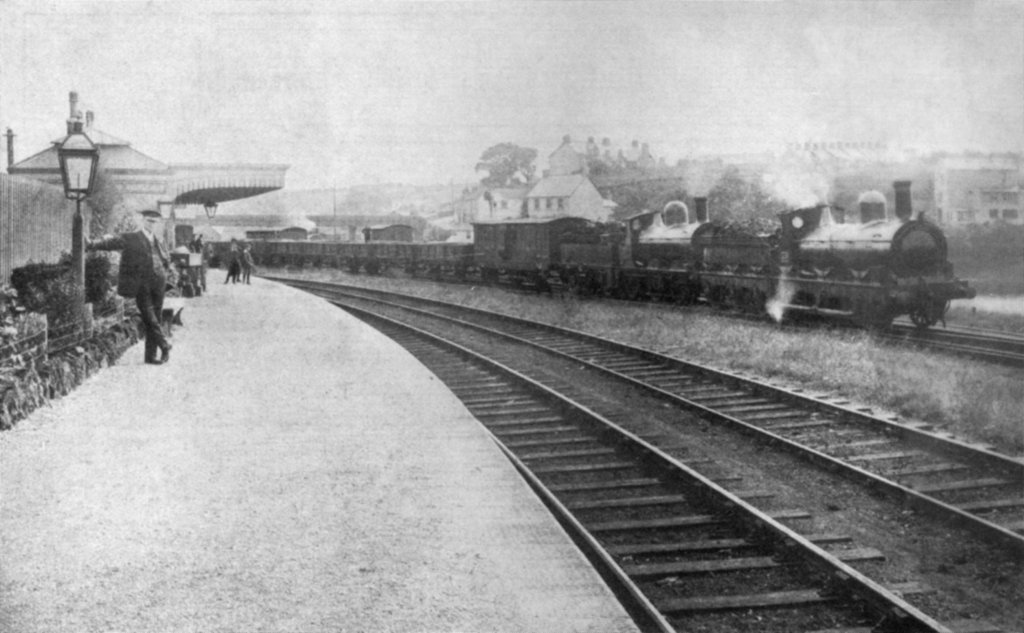
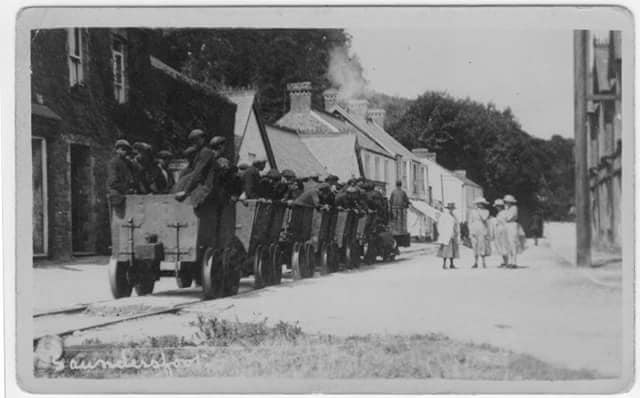
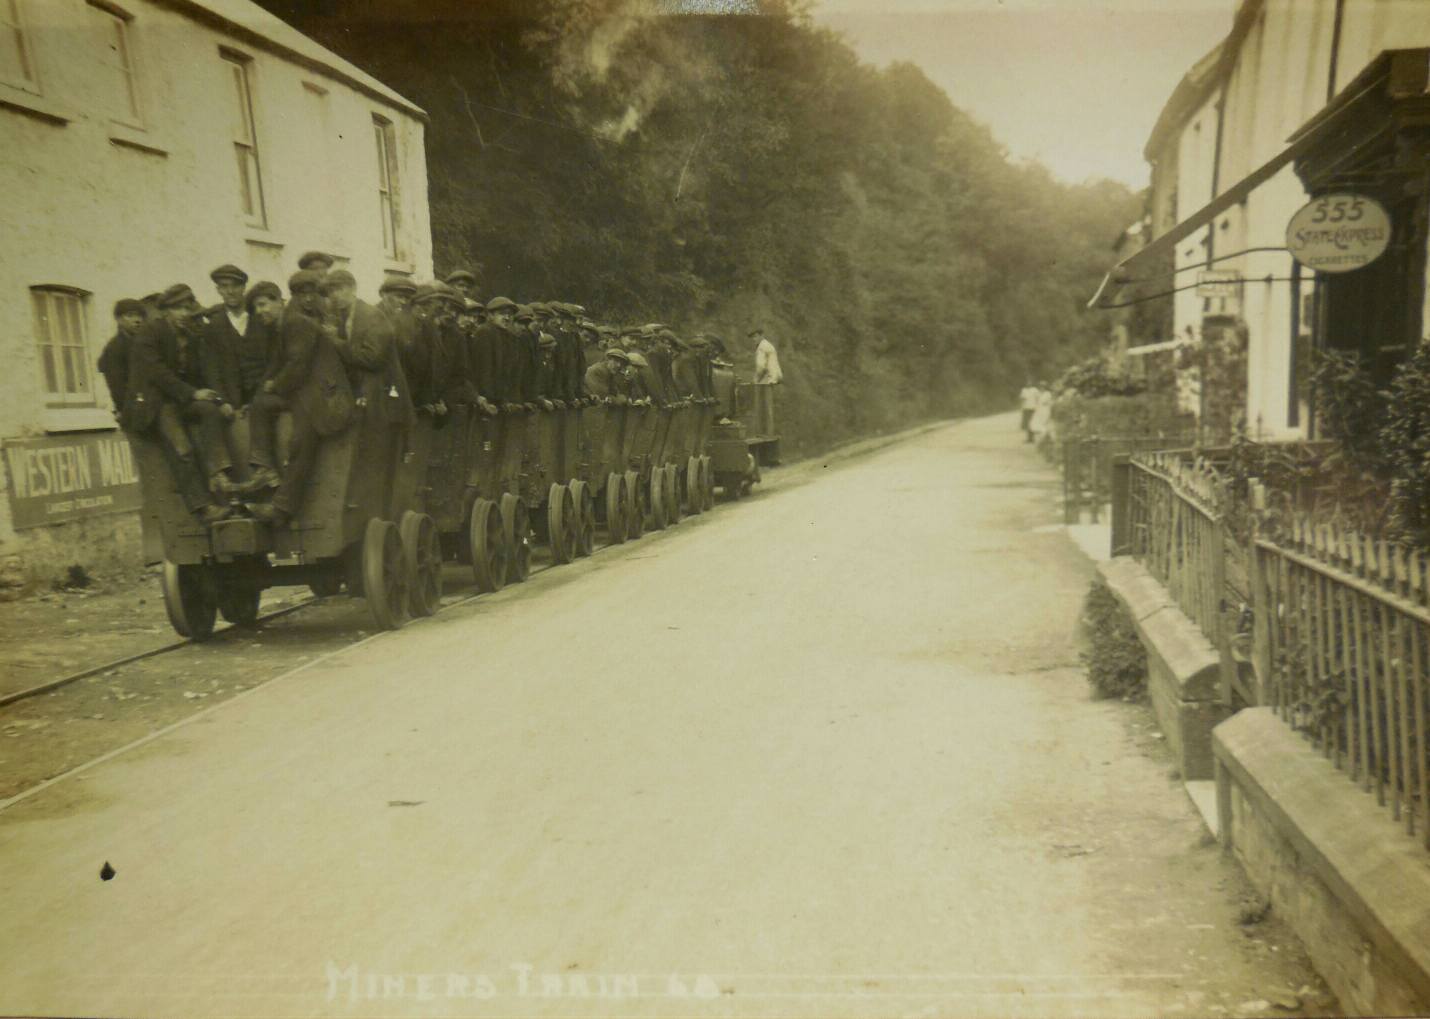
The rail link ran from the national network at Herbrandston Junction via the refinery at Robeston to the Esso Refinery. The picture below, at first sight (and in the light of the notes reproduced beneath the image), suggests that it is a picture of that link, but actually shows sidings at Milford Haven Station. The line to the Esso Oil Refinery was build much later than 1910!
Postcard titled “Glam. R.E.(T) en route for South Hook Fort 23/07/10”. Shows the Glamorganshire Royal Engineers marching from Milford Haven railway station en route for South Hook Fort, 23 July 1910. Line of private owner railway wagons including “J.W.Paton” in the background. The Esso Oil Refinery later occupied the site. Unused. [102]The junction with the Robeston Branch is just off the top-right of this satellite image. The route of the branch to the Esso refinery appears as a light sand coloured line through the scenery to the East of the road which follows the East boundary of the Robeston plant and sidings. [Google Maps, October 2021]Looking North along the branch-line from the track shown close to the bottom of the satellite image above. The view South was obscured by bushes across the line.[Google Streetview, April 2011]This next satellite image shows the line entering at the top-right before passing under Dale Road and curving to the West and to the South, leaving the image at the bottom-left. [Google Maps]The line ran in cutting and then under Dale Road. This view looks back to the North from Dale Road bridge. [Google Streetview, November 2021]Looking South from the same location. The bridge visible beyond the parapet of Dale Road bridge appears to be a pipe-bridge. [Google Streetview, November 2021]The final length of the old branch line is shown on this satellite image as it approaches the site of the refinery. [Google Maps]
The Pembroke Refinery is to be found at Rhoscrowther in the community of Hundleton on the South side of the Milford Haven opposite the town of Milford Haven. It first came on stream in 1964 and was Regent/Texaco’s only British refinery. The refinery occupies a prominent position on the south bank of the Milford Haven Waterway and can be seen for many miles. Around a quarter of the site is within the Pembrokeshire Coast National Park which was created in 1952. [100]
The refinery came on stream in 1964. It was initially owned by the Regent Oil Company, a large domestic marketer of Trinidad-produced oils. Regent was fully acquired by Texaco in 1956 (although the brand name was only phased out in the UK in favour of Texaco in the late 1960s). When it first came on-stream, most of the crude oil for the refinery came from the Middle East with some from Libya, Venezuela and Trinidad. Products were shipped to all parts of Britain 96 per cent going by ship as there was no rail link to the national rail network. [100] Valero, who currently own the site say: “The refinery receives all of its feedstocks and delivers some of its products by ship and barge via deepwater docking facilities along the Milford Haven Waterway, with its remaining products being delivered through our Mainline pipeline system and by trucks.” [105]
Pembroke refinery also supplied fuel oil to the nearby oil-fired 2,000 MW Pembroke power station (commissioned in 1968). Chevron acquired Texaco in 2000. Valero Energy Corporation bought the refinery from Chevron in 2011. [100]
5. The Freystrop Colliery Railway
The Freystrop Colliery Company was formed in July 1900 to take over and redevelop the site of the former Cardmakers’ Pool at Freystrop. [1: p134, 136][107]
On 10th July 1901, the Haverfordwest and Milford Haven Telegraph and General Weekly Reporter for the Counties of Pembroke Cardigan Carmarthen Glamorgan and the Rest of South Wales reported That works at Freystrop Colliery were in an advanced state and that prospects for the coal industry were promising. At the beginning of their article they wrote:
“The works at the newly-opened colliery at Freystrop are now in a very satisfactory state of progress. The company have laid down the latest machinery and have spared neither trouble nor expense in providing the best possible plant available. The main shaft, which has been sunk in the centre of their taking (extending from the Freystrop road to the railway line at Johnston) has now been brought down to a depth of over 50 yards. For 35 yards of this distance an excellent brick lining, with occasional patches of concrete where extra strengthening was required, has been laid on the sides, but, as the rock has now been reached, there is no necessity for continuing it further.” [106]
At that time, the Company still had a great deal of work to do before all the preliminaries were finished. The prospects were seen as very promising, and, as around £100 was already being expended on weekly wages, locally hopes were high for a great future. [106]
The reconstruction of the mine took time, “but it became obvious that the anticipated output would make the previous practice of carting coal and culm either to the quays on the river or to Johnston station quite impractical. As the colliery was only one and a half miles east of Johnston, the natural solution was the construction of a rail link.” [1: p136]
Much of the land between the colliery and the railway station was a marsh. Nevertheless the Pembroke Herald reported in the Autumn of 1901 that work would begin on the branch-line. [108]
Connop-Price tells us that the construction of the railway and ancillary works took the best part of two years. He tells us that the Pembrokeshire Herald reported that, ” now it is possible for the wagons belonging to the company to be filled under the huge screen, five at a time, with different qualities of coal.” At the time of this report the company output was around 400 tons of coal and culm per week and expected to rise significantly. [1: p136][109]
Connop-Price notes that directors of the Milford Docks Company were on the board of this venture and that as a result the connection to the mainline was laid facing south to Milford Haven. The venture encountered geological problems and output was intermittent. Eventually it was decided to abandon the enterprise and the branch-line was closed officially in 1911. Connop-Price goes on to state that, “In its brief career it had been worked at different times by two tank locomotives. The first cannot be identified now., but the second was an 0-4-0 saddle tank built in 1905 by Andrew Barclay and Co. of Kilmarnock. [110] The locomotive shed was situated about 300 yards from the junction at Johnston, facing towards Freystrop.” [1: p136]
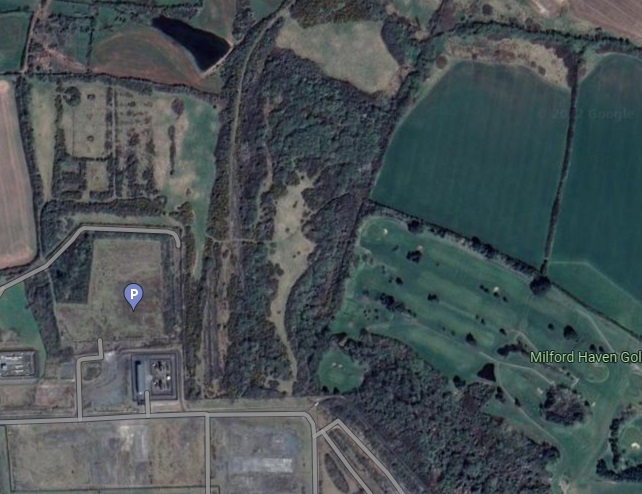
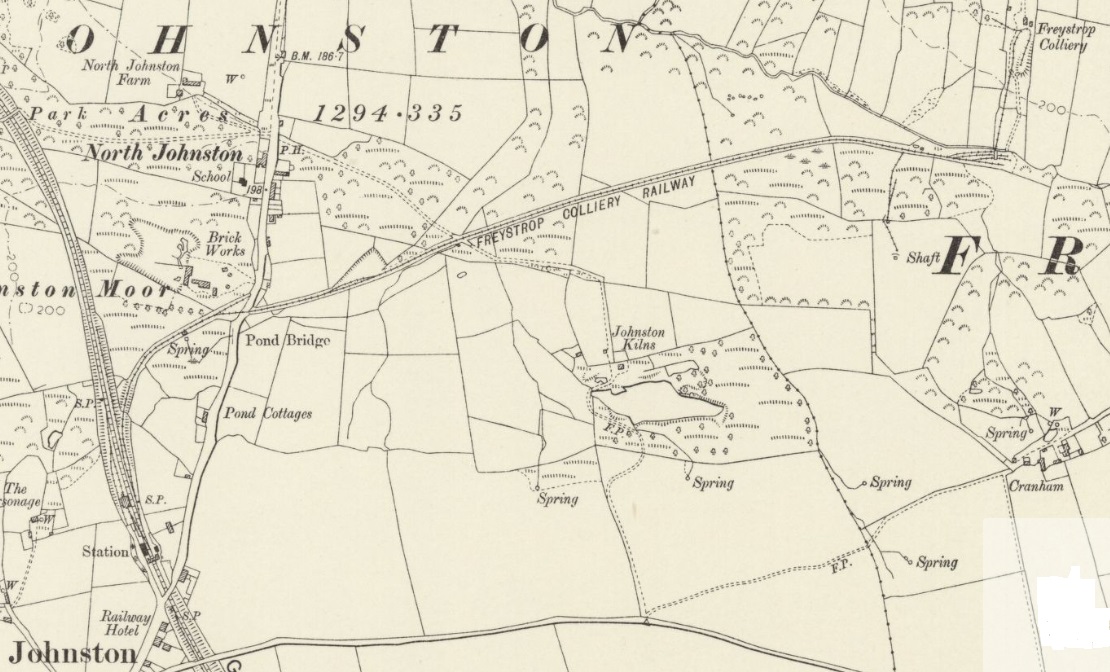
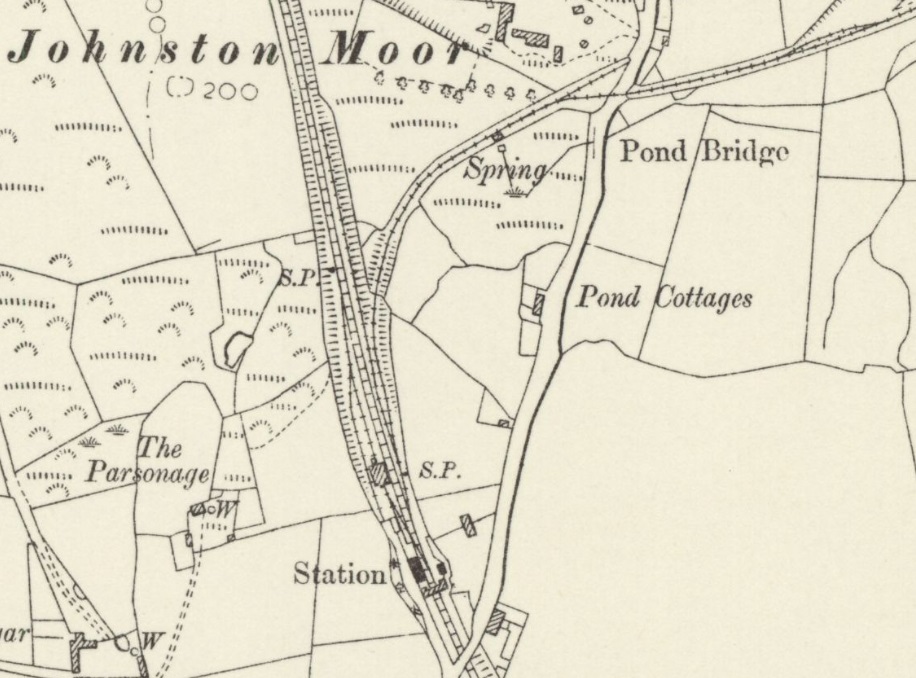
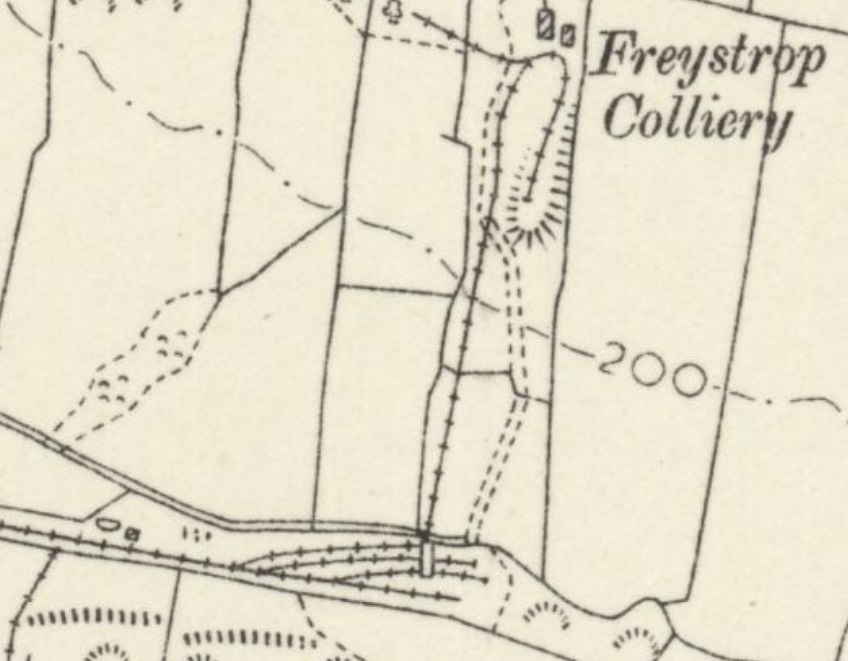
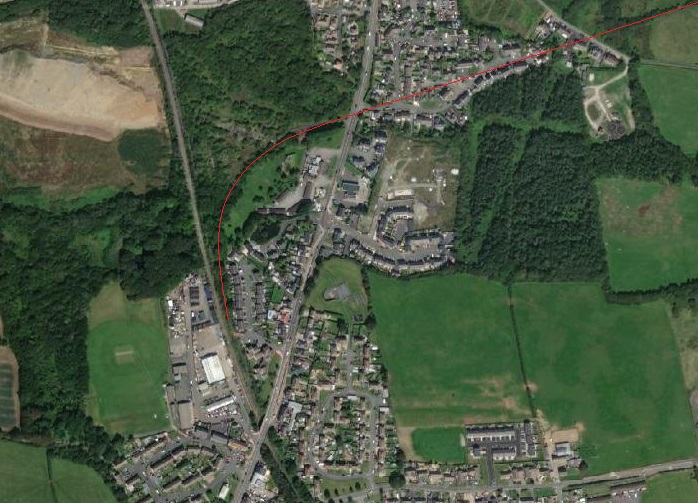
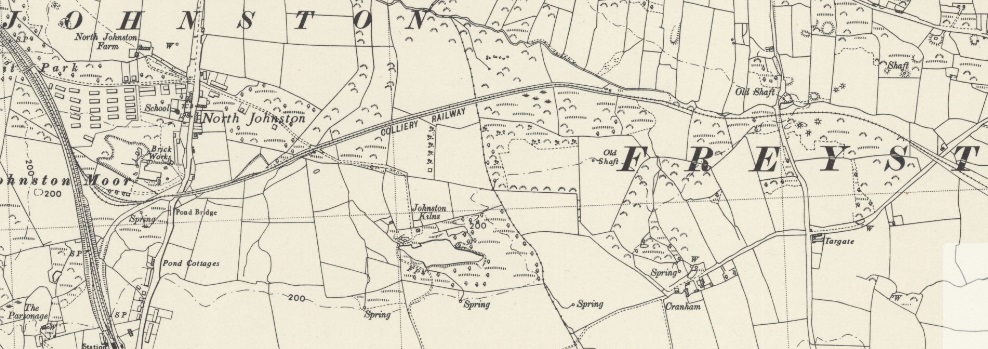
The Freystrop Colliery Line as shown on the 6″ Ordnance Survey of 1906 and which was published in 1908. Enlarged extracts at Johnston Station and at the Colliery are shown below. [110]St. Johnston StationFreystrop CollieryThe thin red line shows the approximate route of the branch line leaving Johnston Railway Station as it appears on modern satellite imagery. [111]
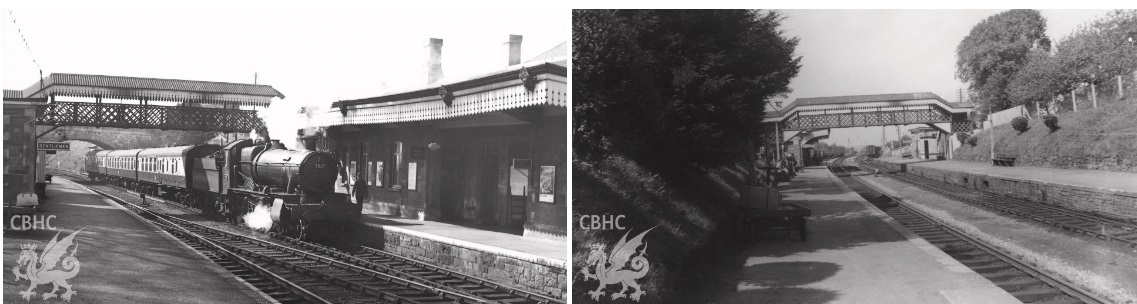
Coflein describes the site of Johnston station as, “formerly Milford Road Station on the South Wales Railway, now merely site of a halt, with all buildings demolished.” Their site carries two photographs of the original station, these are shown below. [113]
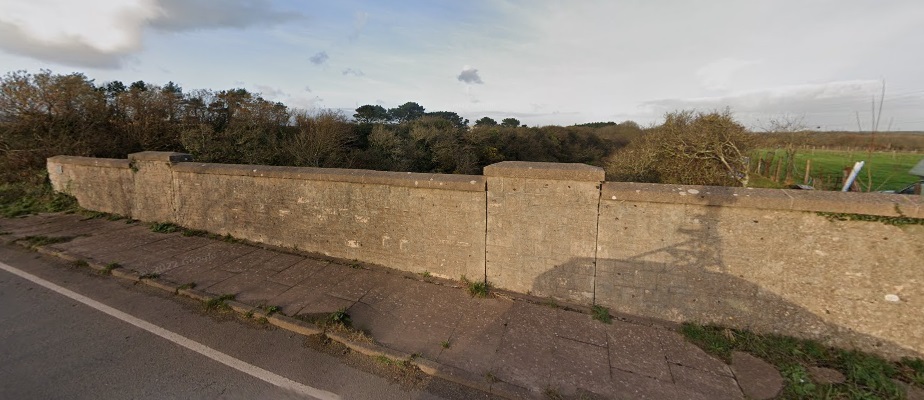
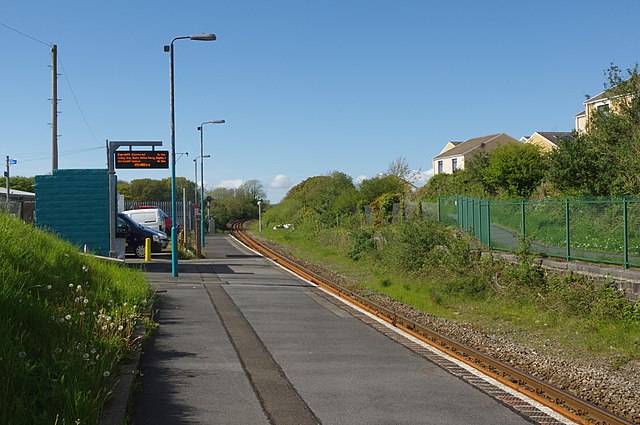
Johnston Railway Station before its demolition and the singling of the line through the station. [113]Johnston Railway Station looking North from the South end of the platform. This picture was taken in 2018, (c) Stehen McKay and made available under a Creative Commons Licence (CC BY-SA 2.0). [112]The modern satellite image at the location of Freystrop Colliery has the approximate line of the railway and the colliery and screens locations highlighted. [111]Looking West at the point which the old branch line crossed Vine Road (A4076). [Google Streetview, March 2022]Looking East at the point which the old branch line crossed Vine Road (A4076). [Google Streetview, March 2022]
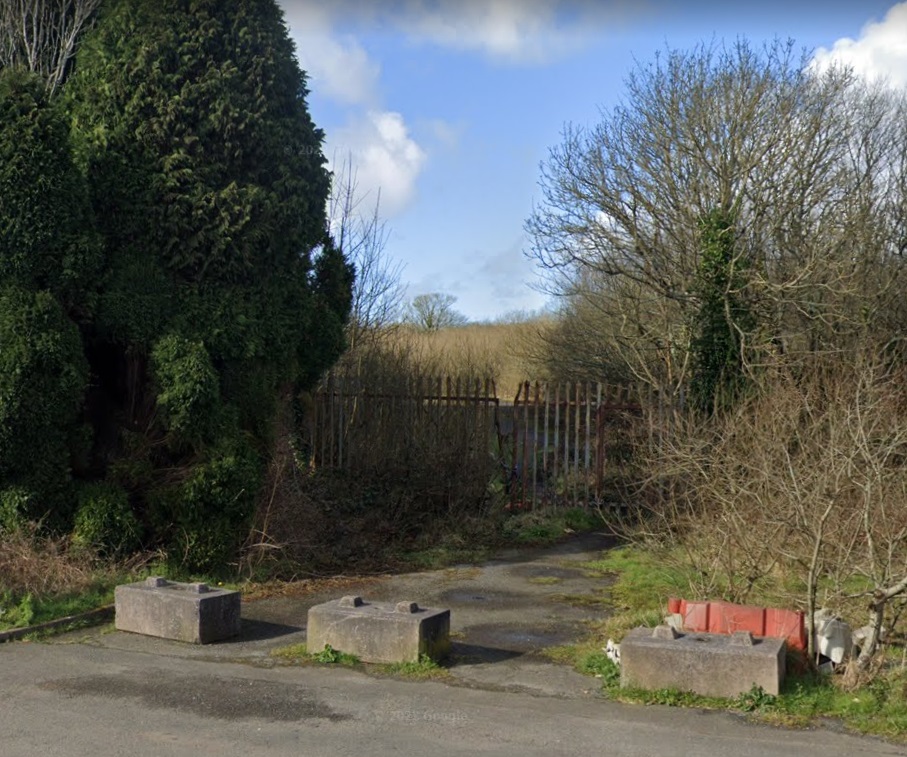
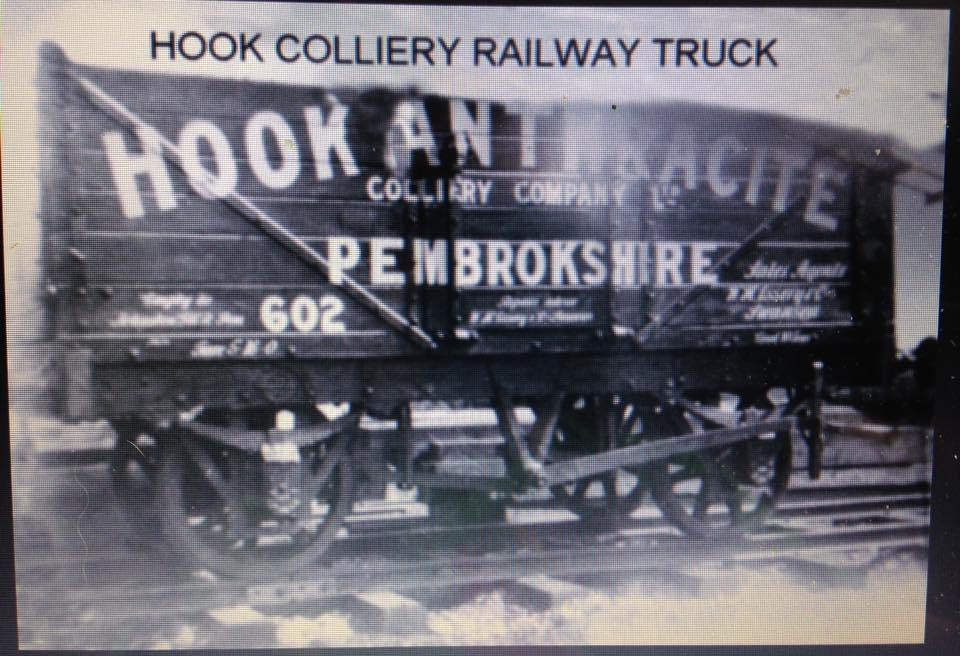
6. The Hook Colliery Railway
The National Library of Wales holds the papers associated with Hook colliery. They tell us that “Hook Colliery, Llangwm, Pembrokshire, was opened in 1850, and operated until 1947. An attempt was made in the 1950s to re-open it as a private mine by Hook Colliery Co., under T. W. Harcourt Roberts., geologist and mining engineer, and General Manager and Managing Director of Hook Colliery, Pembrokeshire.” [115]
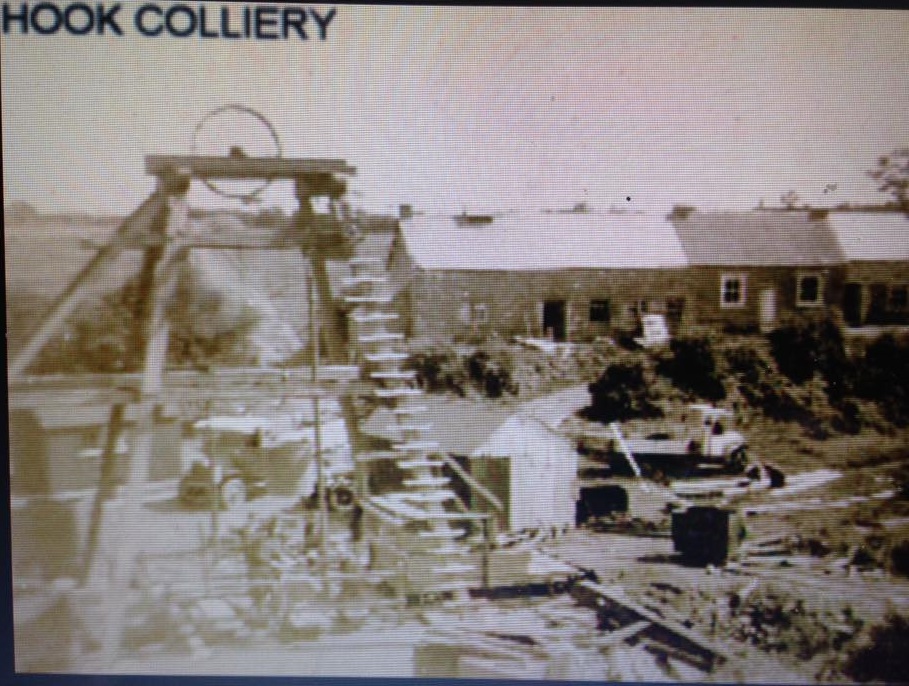
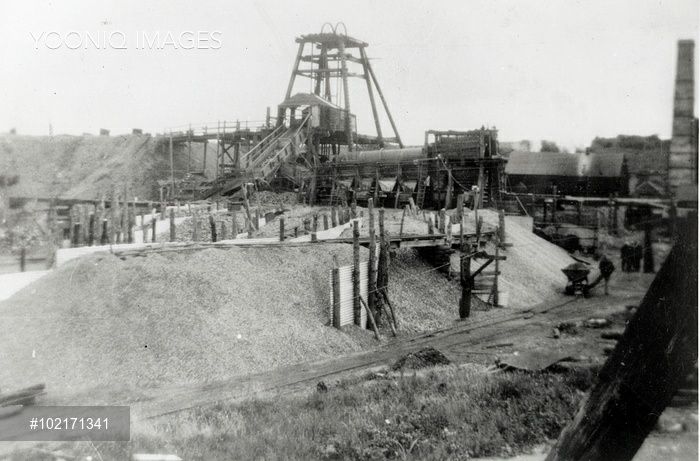
This photograph was shared by Mark Lewis on the Pembrokeshire – I LOVE IT! Facebook Group on 30th May 2018. It shows Hook Colliery but is not dated. [119]This photograph was shared by Stephen Hughes on the Pembrokeshire – I LOVE IT! Facebook Group on 31st May 2018. It shows Hook Colliery again but is dated 1912-1928. [120]
At its peak, over 40,000 tons of anthracite was mined at Hook colliery each year and employment provided for well over 100. Until the rail link was built in the early 1900’s to link the village with the main line at Johnston the vast majority of coal left by sea from Hook Quay. [114]
Connop-Price tells us that the “Margaret Pit was sunk at Hook in 1910, and initially coal was moved to Hook quay in small trams over the narrow-gauge railway built in 1888 to serve the older West Park colliery. This was an endless rope-worked tramway, driven by a stationary engine at the colliery. The side-tipping trams … were not grouped together as a train, but spaced out about thirty yards apart along the line. This space was needed to give time for the loaded trams to be knocked off when they reached the incline, and the empties hooked on. .. At the quay the coal had to be transferred to barges which were then worked down to Llangwm Pool for loading onto sea-going vessels. Later the river was dredged in the vicinity of Hook quay to allow small coasters to come alongside for loading, but this system of transport was still slow and labour-intensive, and a handicap to the colliery.” [1: p136]
This photograph was shared by Mark Lewis on the Pembrokeshire – I LOVE IT! Facebook Group on 30th May 2018. It shows one of the trams used by Hook Colliery in the years before the railway was constructed. [118]Hook Colliery again, this time one of the trams is visible on the right side of the image. This photograph was shared by Stephen Hughes on the Pembrokeshire – I LOVE IT! Facebook Group on 25th May 2017. [120]
The Colliery Company owned several sea-going vessels most of which traded to the French and London markets. The coal was in great demand for smelting and also heating the sophisticated homes of the capital city. It has been recorded that Queen Victoria had a distinct preference for the practically smokeless Hook anthracite and it was used extensively in the Royal palaces. [114]
Some detail of the operations of the various sea-going ships owned and used by the colliery can be found here. [114]
The Pembrokeshire Virtual Museum entry for Hook Colliery tells us that, “Hook Colliery Railway operated as a standard gauge mineral line and ran from Johnston station on the G.W.R. to Hook Colliery some 4 miles away. During the late 1920s the Pembrokeshire coal industry appeared to be on the verge of collapse with only the collieries at Hook and Bonvilles Court (closed in 1930) still in operation. It was clear that if Hook Colliery was to survive then new investment was necessary especially in moving coal to its markets. … It was decided in 1929 to build a railway line to move the coal instead.” [116]
Despite the need for a railway being recognised as early as 1919, nothing, however, was done until 1929 when the decision was taken to construct a railway. [1: p136/137] “The railway was built in 1930 and was completed by November of that year. It ran for part of its length along the route of a disused railway line to Freystrop Colliery (please see the section on this line above), which saved considerable engineering work.” [116]
Connop-Price tells us that the cost of the work was around £40,000, and “this time the junction at Johnston was laid facing North to allow direct running towards Haverfordwest and Carmarthen. … Pembrokeshire Council raised an objection to the level crossing over the main road near Johnston (one of five such crossings on the line0 but eventually the problem was resolved. A siding for the use of the nearby Johnston brickworks was also provided. a permanent connection with the GWR mainline was made on 13th November 1930, and the railway opened to traffic.” [1: p137]
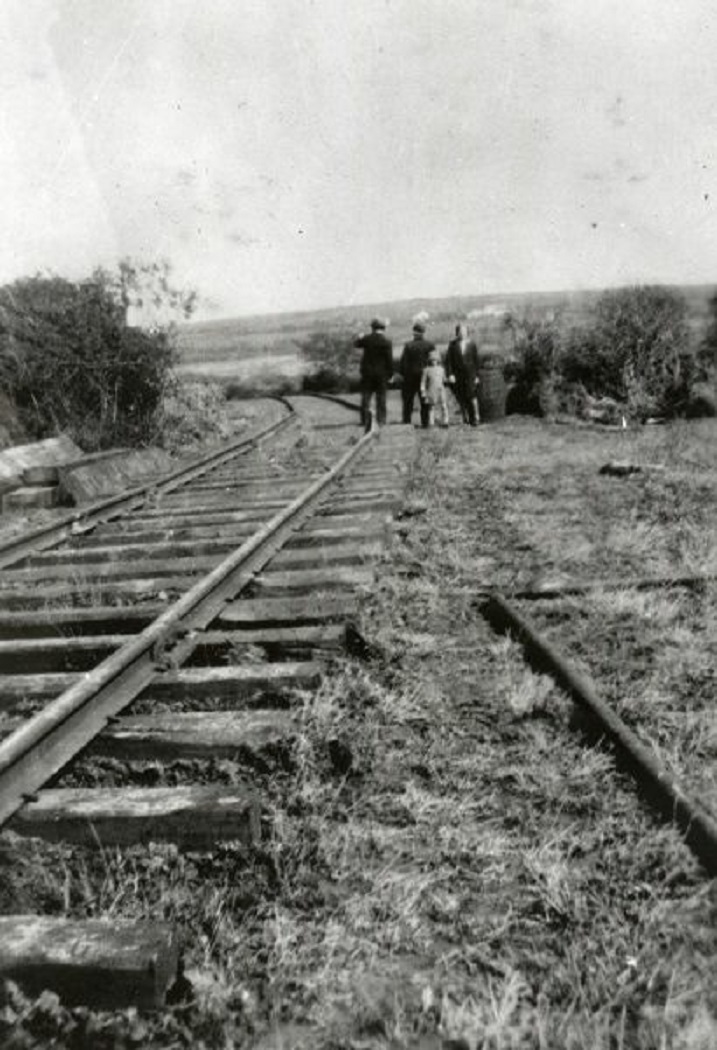
Hook Colliery Railway sometime in the 1930s or 1940s. This photograph was shared by Stephen Hughes on the Pembrokeshire – I LOVE IT! Facebook Group on 31st May 2018. [121]
“Once completed the railway enabled easy export of coal and production then rose until it peaked in 1934 when 40,000 tons were produced, the largest ever annual total from a Pembrokeshire colliery and some 35,000 tons were moved by the railway. From that point on, however, output declined and in 1945 only 20,000 tons were produced. The colliery and its railway were nationalised in January 1947 (Hook was the only Pembrokeshire colliery to be nationalised) but the pit flooded in that year and it was considered uneconomic to put it back into operation. In early 1948, the railway closed after moving the last of the stored coal.” [116]
“The railway operated two of its own 0-6-0 saddle tank locomotives, neither of which appear to have carried names. It also had its own private owner wagons which moved the coal on the railway and then via the G.W.R. to its markets. At Johnston station exchange sidings were built from where Hook wagons would be collected and deposited by G.W.R. freight trains.” [116]
Connop-Price mentions the two locomotives: “The contractors’ locomotive, D.M.D.Ltd No.10, an 0-6-0 saddle tank built by Peckett of Bristol, was retained, but another engine said to have been at Hook, an 0-4-0 saddle tank built by Hawthorne Leslie, was transferred to Davies, Middleton and Davies at Caerphilly.” [1: p137]
Later, by 1934, “the colliery railway had acquired an engine from the Mersey Docks and Harbour Board, an 0-6-0 saddle tank built by Avonside of Bristol in 1910.” [1: p137/138]
The company owned a modest number of open wagons.
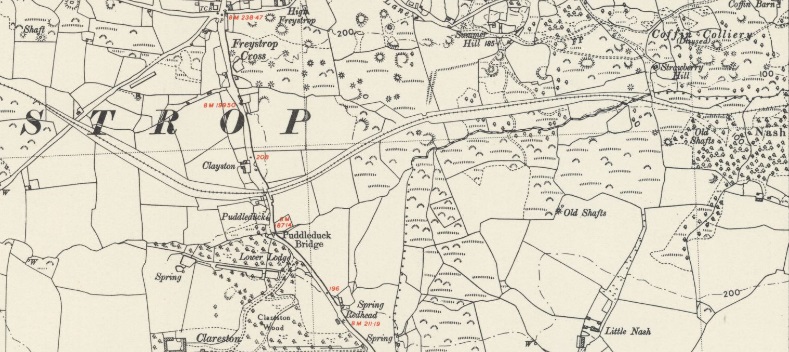
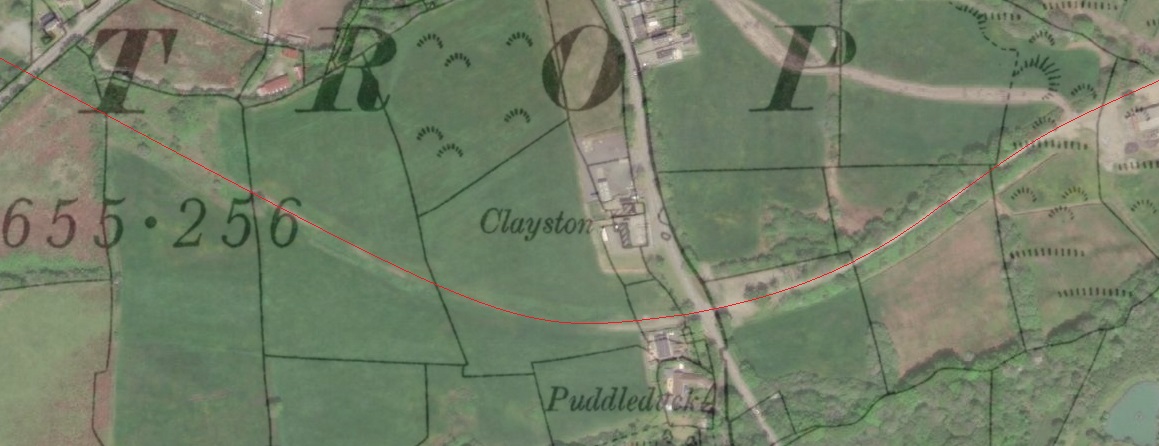
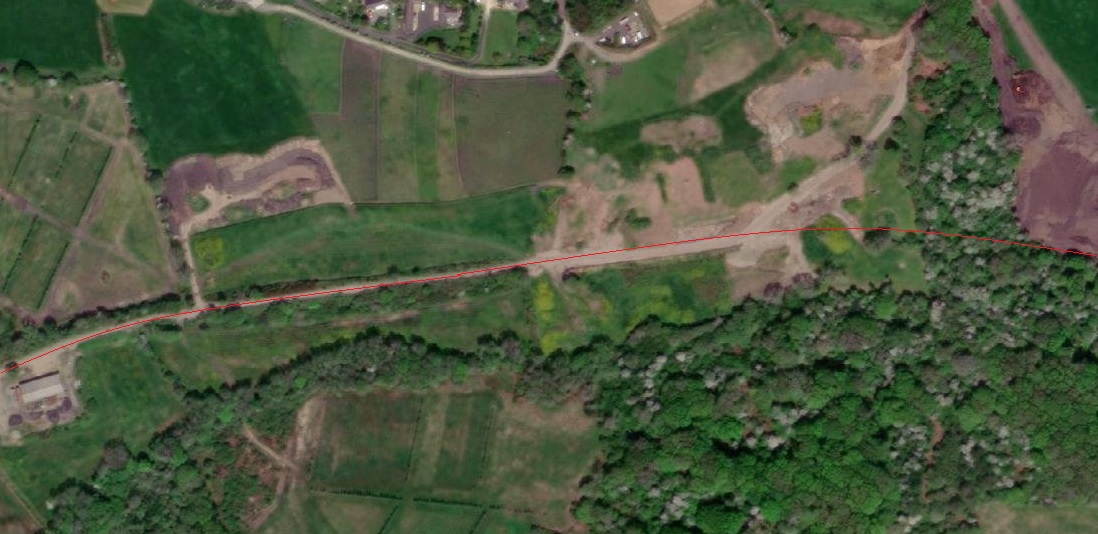
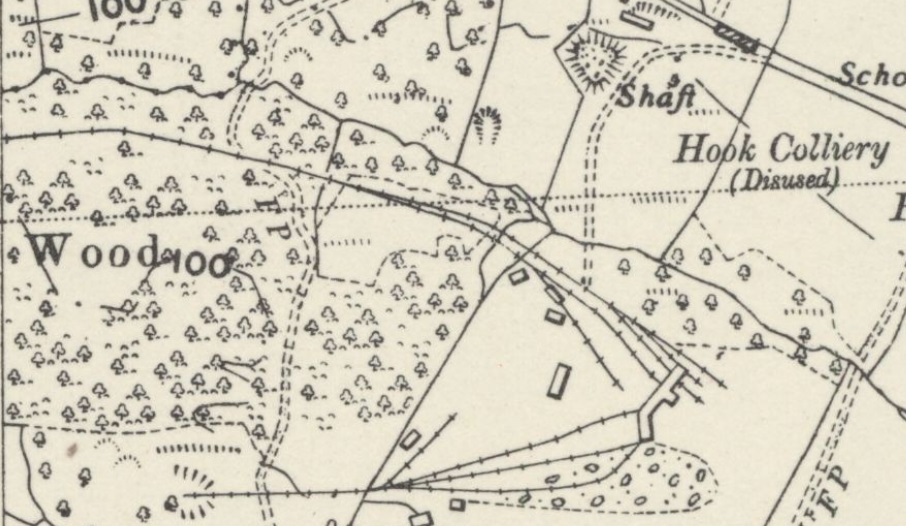
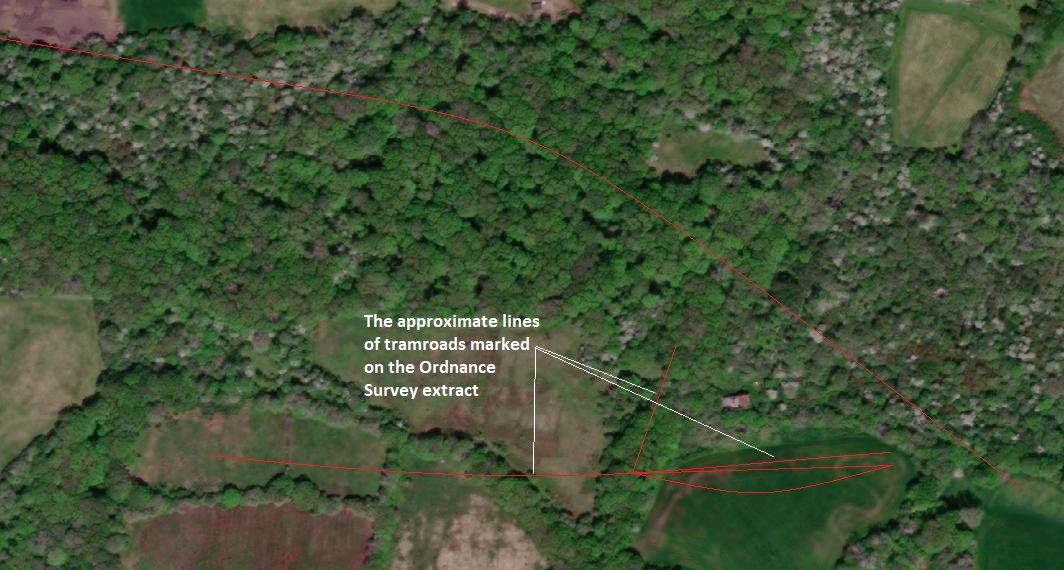
This photograph was shared by Mark Lewis on the Pembrokeshire – I LOVE IT! Facebook Group on 30th May 2018. It shows one of the fleet of wagons owned by Hook Colliery. [117]The first length of the new branch to Hook Colliery, as shown on the 6″ Ordnance Survey of1948, published 1953. Note the North facing junction with the GWR mainline. The remnants of the old branch are still visible curving to the south to the railway station. [124]The north facing connection to the mainline is illustrated in this modern satellite image. The newer alignment rejoins the older alignment to the West of Vine Road. The newer line followed the earthworks of the older line as far as the Freystrop Colliery location where the old line terminated. The route can be seen under the section about Freystrop Colliery Railway above and then picked up again in the satellite image below. [126]Two level crossings feature in this next length of the line. Freystrop Colliery was in the woodland North of the line on the left-side of this image. The line curved sinuously through the landscape crossing first a lane which ran North/South between Targate Road and Cardmakers’ Pool Colliery then Targate Road itself (at the bottom-right of this image). [127]The location of the Targate Road level crossing the red line shows the approximate line of the old railway which ran in front of what is now a white-painted wall on the left across into the bushes and undergrowth on the right, just behind the first car travellign towards the photographer. [Google Streetview, March 2022]The of the branch South of Freystrop village and running through to the western edge of the Hook Colliery site, as shown on the 6″ Ordnance Survey of1948, published 1953. [124]The left-hand half of the area shown on the map above shows the line crossing to the North of Puddleduck Bridge. [128]Looking West towards Johnston. The old railway followed the dirt track before crossing Troopers Inn/ Freystrop Cross at level. [Google Streetview, July 2021]From the same location looking East towards the Colliery. The old line followed the line of the dirt track after crossing the road. [Google Streetview, July 2021]The terminus of the branch at the Hook Colliery site, as shown on the 6″ Ordnance Survey of 1948, published 1953. [125]The approximate lines of the standard gauge railway and the tramroads at the Hook Colliery Site. [129]Hook Colliery again, this time showing the terminus of the standard-gauge branch-line. This photograph was shared by Stephen Hughes on the Pembrokeshire – I LOVE IT! Facebook Group on 25th May 2017. [123]
76. “I confess that, since the age of four, I have had a passion for steam locomotives, especially those of the former GWR. It all started when my mother took me to see one of the Milford Docks Company Peckett locomotives, which would have been driven by the late Mr Billy Pugsley. I was lifted onto the footplate and given a ride, and I was hooked!” … words from Gordon Vyne Adams quoted by Jack Riley; That reminds me of… railways, locomotives and their crews; in the Western Telegraph, 19th September 2021.
A holiday in West Wales in the early Autumn of 2022 led to a little research on the railways in the area.
This is the fourth article about Pembrokeshire’s Railways. The first focussed on the pre-railway age, the second focussed on the mainline railways of the county. The third article focussed on the industrial railways in the vicinity of Milford Haven. The links to these three posts are provided below. This article looks specifically at the Saundersfoot Railway in Pembrokeshire.
The Saundersfoot Railway (covered in this article and a follow-up article).
The Milford Haven Docks Railways (covered in a previous article).
The Milford & St. Bride’s Bay Light Railway and proposals for expansion of the Docks at Milford Haven (covered in a previous article).
The Royal Navy Armaments Depot at Newton Noyes (RNMD Milford Haven) (covered in a previous article).
The Royal Navy Armaments Depot at Trecwn (RNAD Trecwn) (covered in a future article).
Milford Haven Oil Refineries (covered in a previous article).
The Freystrop Colliery Railway (covered in a previous article).
The Hook Colliery Railway (covered in a previous article).
The Saundersfoot Railway
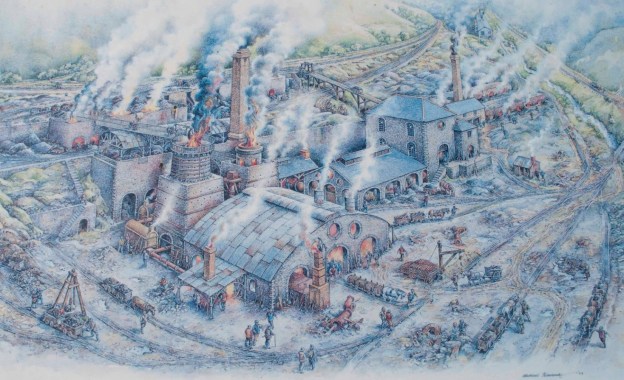
“Saundersfoot began life as a few medieval cottages in a forest clearing in Coedrath, a hunting ground of the Norman Earls of Pembroke. Five hundred years later it had grown into thriving coal port with its abundance of anthracite coal, and exported 30,000 tons annually from its harbour.” 150 years on when the coal industry vanished Saundersfoot evolved into a seaside resort. [132]
“‘Saundersfoote’ was first referred to by the Elizabethan Historian George Owen when describing the coal measures of Pembrokeshire, however on county maps from the 16th century it was referred to the village as St. Issells, the name of the parish. A water course paid rent for by Walter Elisaunder in 1332, Elisaunder’s Ford may originally have given the hamlet its name, being shortened to Saundersford.” [132]
Wikipedia tells us that the Saundersfoot Railway was an industrial narrow-gauge railway in Pembrokeshire, Wales, built between 1830–1834, to connect Saundersfoot harbour to the local coal mines. Trading began on 1st March 1834 and within a few years it comprised a small network of over 4 miles (6.4 km) along the coast from Saundersfoot to Wisemans Bridge and on to the collieries at Stepaside and Kilgetty, and later, running inland to Thomas Chapel near Begelly. [1: p131][49]
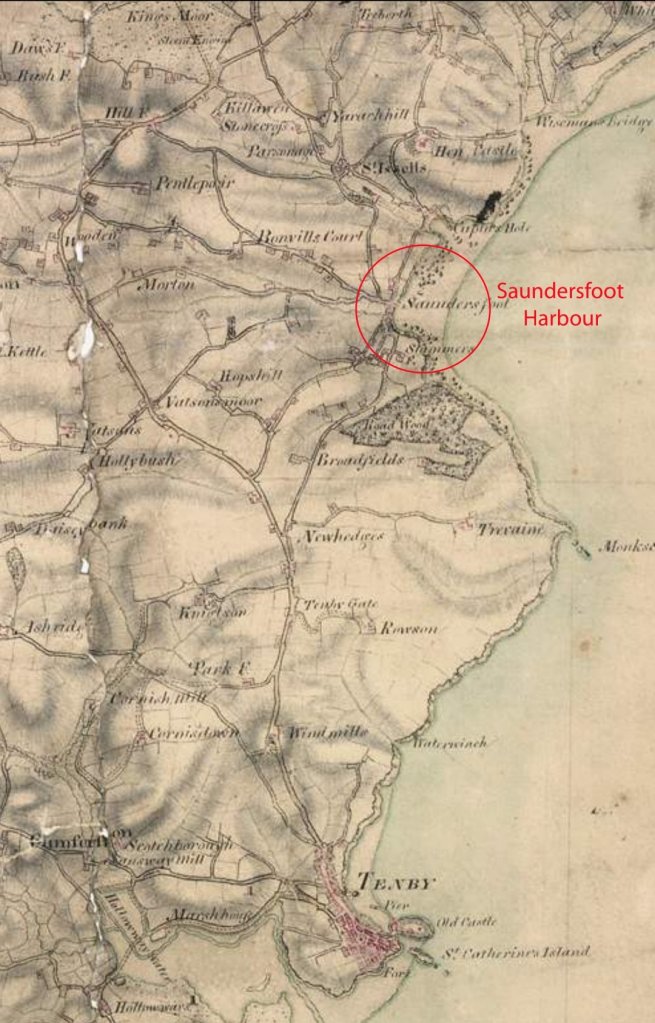
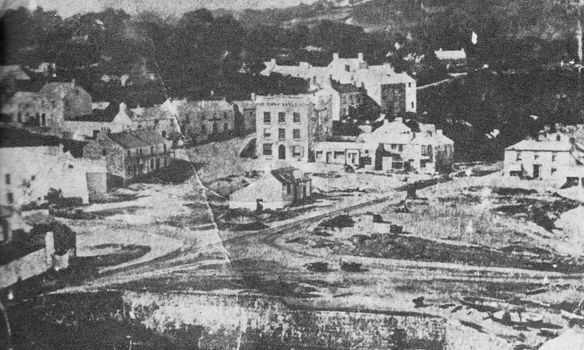
The Saundersfoot Railway provides the first example in Pembrokeshire of the joint construction of a harbour and tramway, and remained independent until it closed in 1939.[1: p128][49] The first image below comes from the very early 19th century and shows Saundersfoot before the construction of the harbour and railway. …
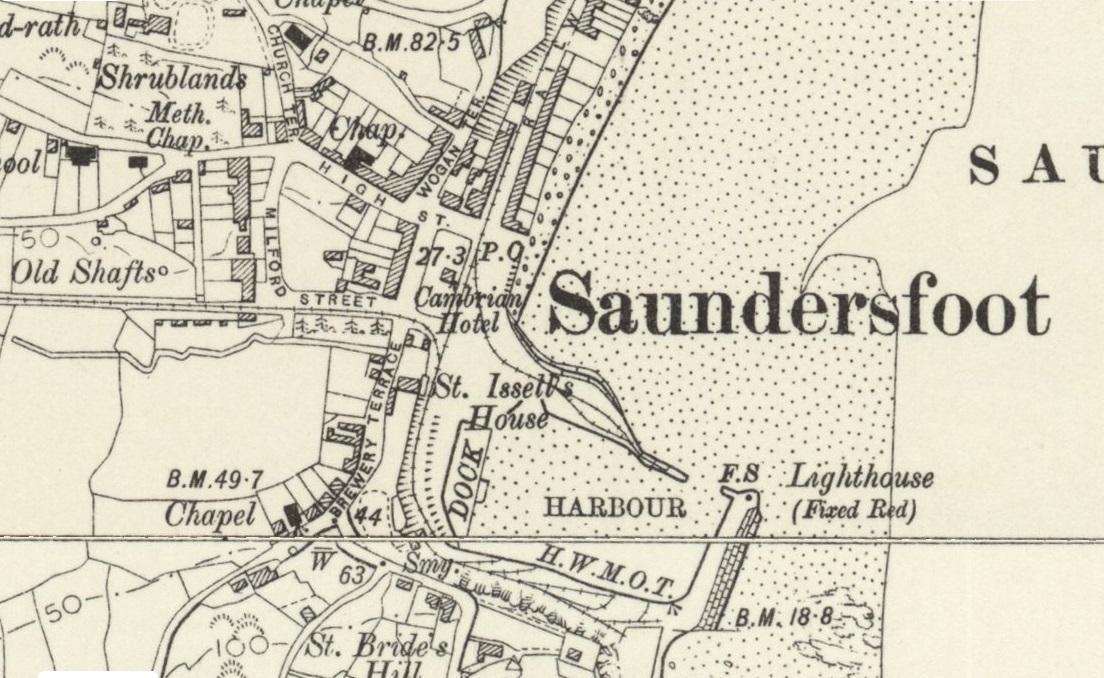
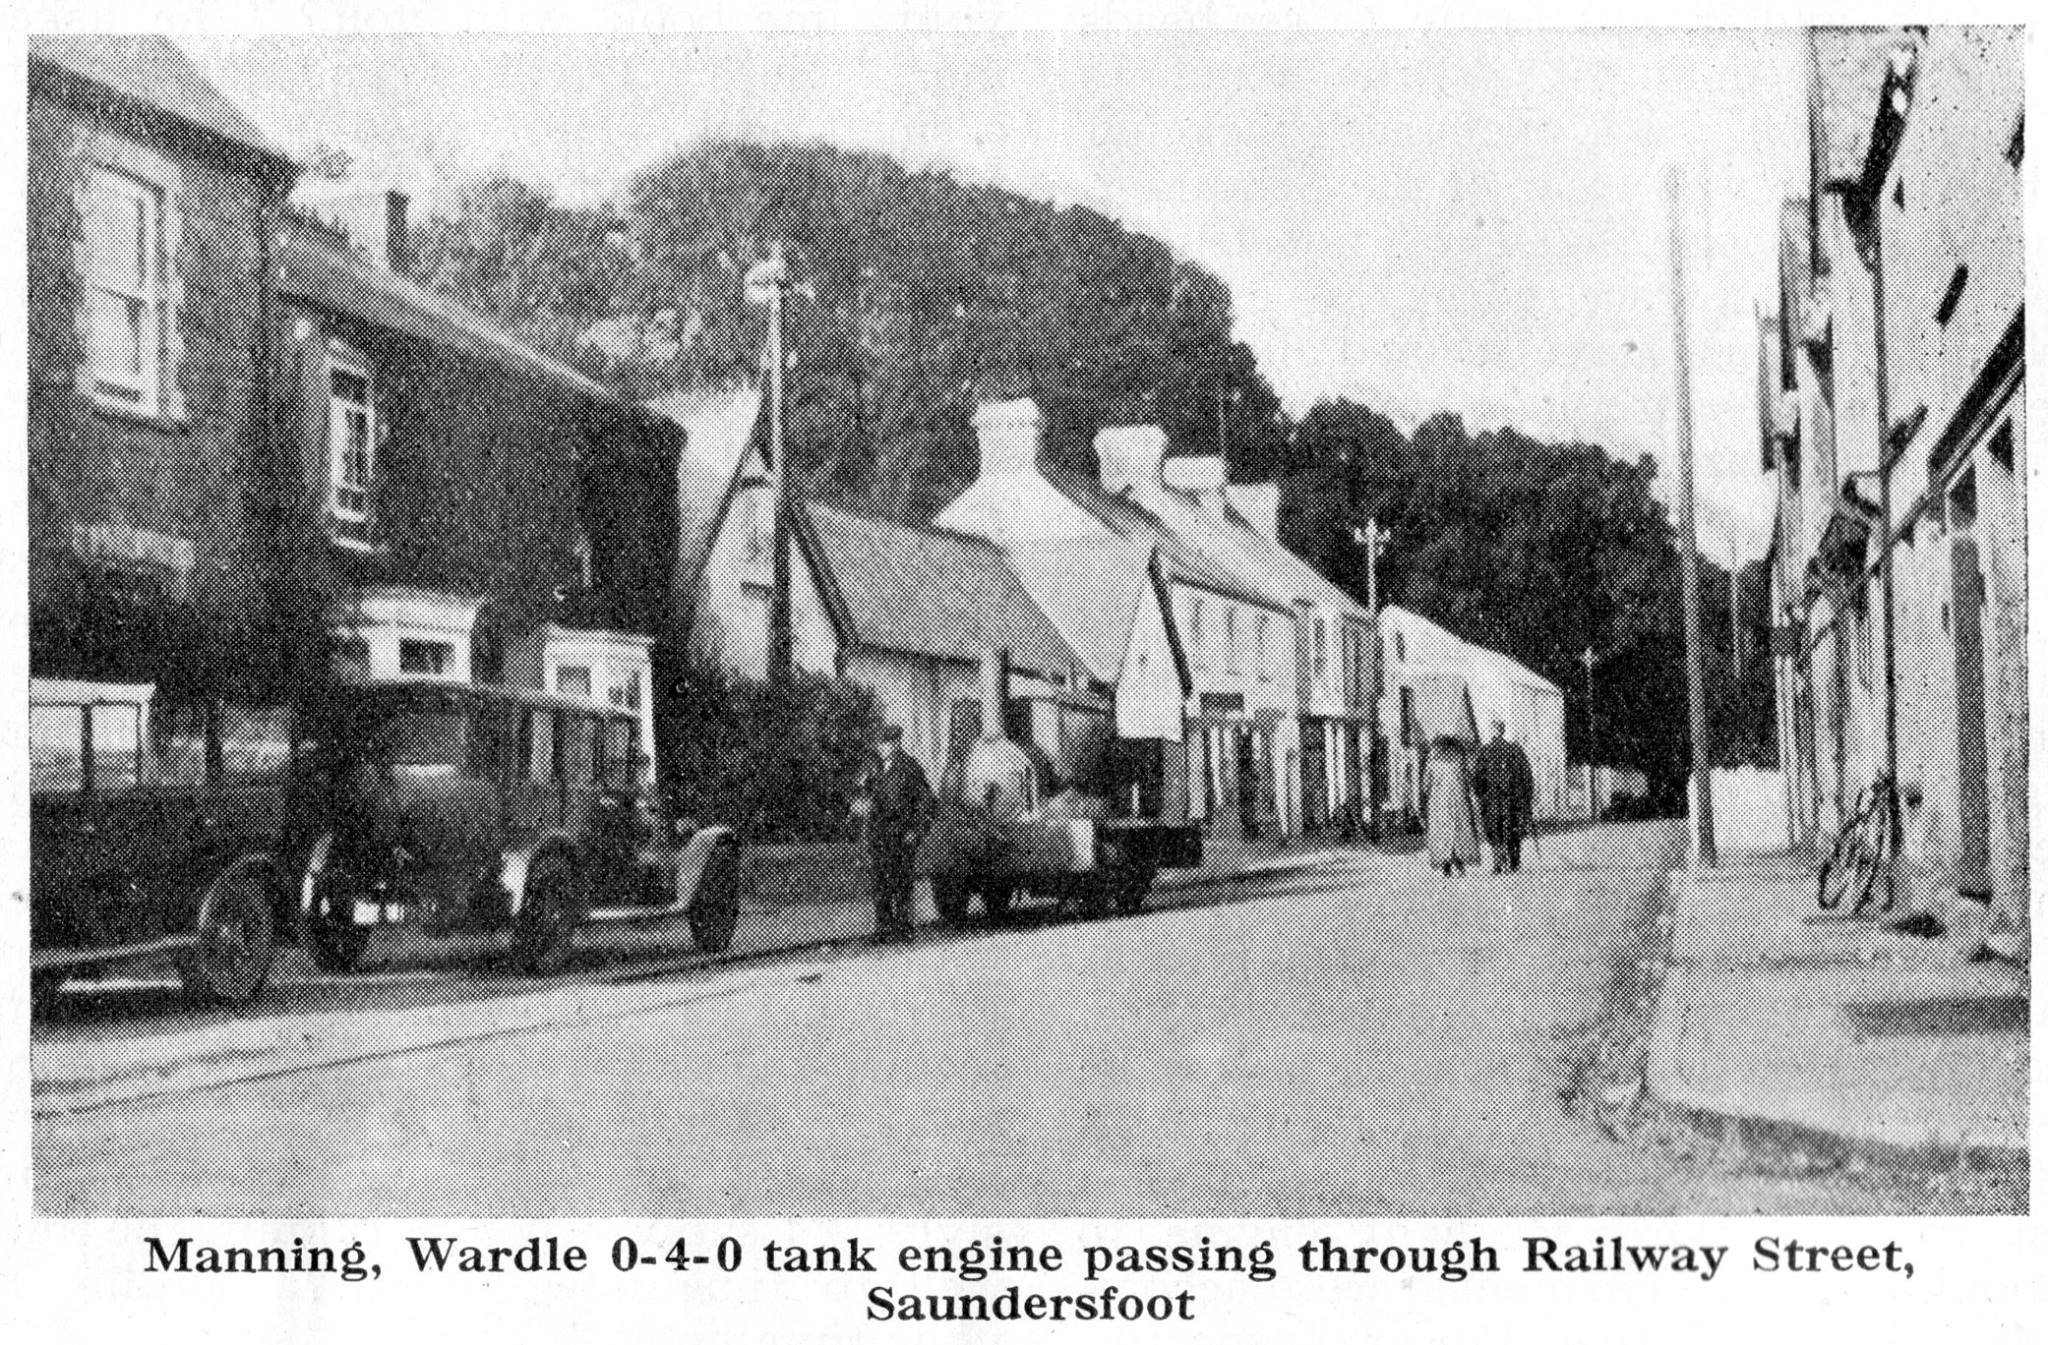
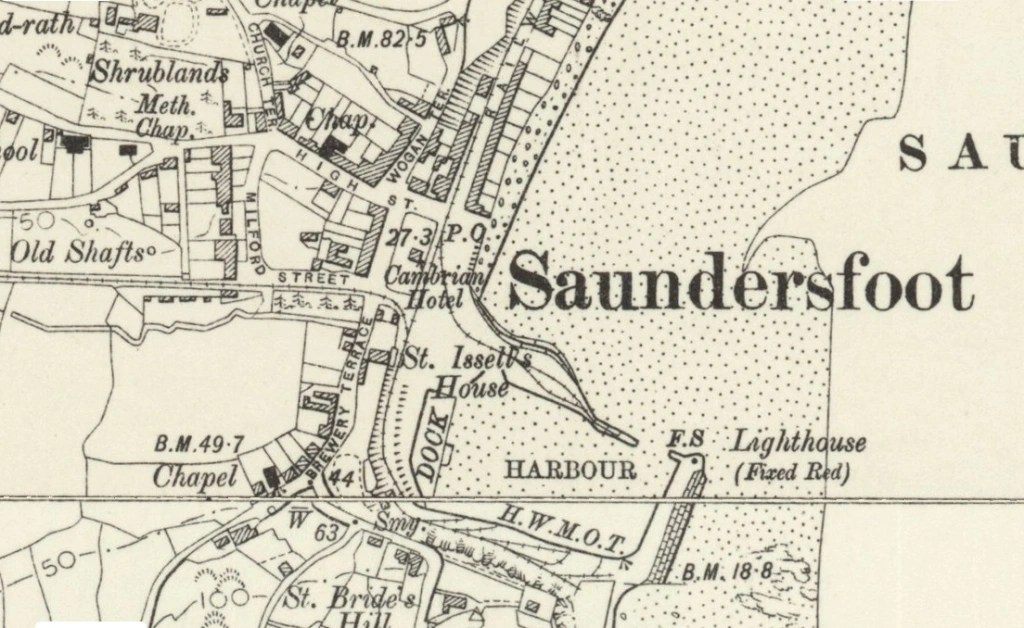
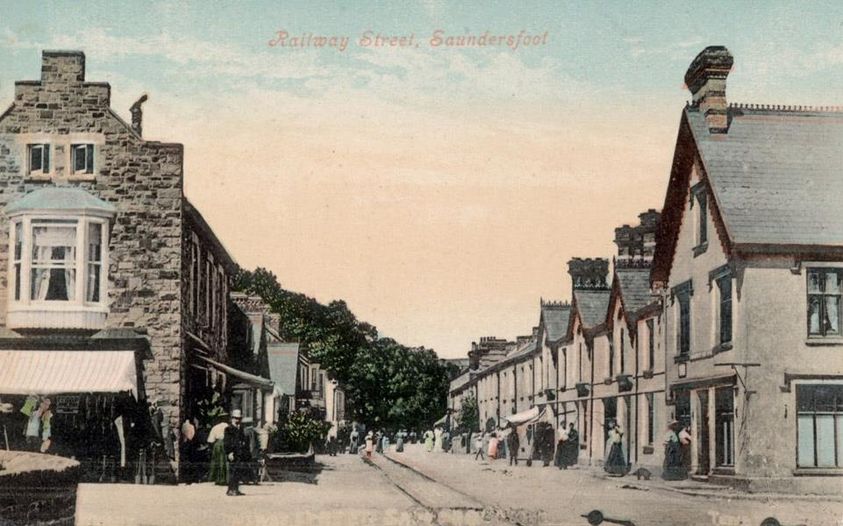
The 1809/1811 Ordnance Survey shows Tenby (at the bottom of this extract) and Saundersfoot village before the construction of the harbour and railway [130]This enlarged extract from the 1906 6″ Ordnance Survey which was published in 1908 focusses on the harbour at Saundersfoot and shows the two main tramroad lines. One heads immediately West along Milford Street and off the map extract centre-left. The other heads along what was then called Railway Street and leave the map extract centre-top. [131]
I guess that it is appropriate to ask whether it is a tramway/tramroad or a railway. I have chosen to treat it as a ‘railway’ because of its longevity, it’s own claim to be a ‘railway’ and because, ultimately it’s tracks were re-laid with flat bottom edge-rails on wooden sleepers which made it as much of a railway as any other line. Indeed Connop-Price says that “the Saundersfoot Railway and Harbour Company was an important undertaking in the context of Pembrokeshire. As it developed it metamorphosed from early tramroad to true railway (my emphasis), and by so doing was, in transport terms, a pivotal enterprise.Futhermore it was the earliest example in Pembrokeshire of an idea pioneered in South Wales – the planning of a railway and harbour as a single combined undertaking.” [1: p128]
High quality anthracite was found in the Saundersfoot area which was part of what became known as the Pembrokeshire Coalfield. The likely quantities involved were large and it quickly became essential to create a tramroad to move the extracted coal to the coast for onward shipping. “The Saundersfoot Railway and Harbour Company was formed in 1828 to build a harbour at Saundersfoot and a tramway to connect it to the collieries around Begelly and Stepaside. In 1829, Parliamentary authorisation was given for the Saundersfoot Railway and Harbour Company. This was to be a four-feet gauge horse operated tramroad, connecting collieries with a new harbour at Saundersfoot.” [49]
This map of the Saundersfoot Railway was shared on the Tenby and Saundersfoot Through Time Facebook Group by Mark Davies on 26th November 2015. [148]
The Act authorised a length of tramroad from the new harbour to pits in the hamlet of Thomas Chapel, Northwest of Begelly – close to 5 miles inland. “Two branches were also approved – the first from Ridgeway near Saundersfoot due West to Morton, … a distance of about a mile, and the second running North along the coast from the harbour to Wiseman’s bridge.” [1: p128 &131]
It is interesting to note that prior to the coming of the tramroad through Wiseman’s Bridge to Stepaside and Kilgetty a canal, the Kilgetty Canal, was built about 1792 to link collieries in Kilgetty/Stepaside to Wiseman’s Bridge, where high quality anthracite was carted onto beached schooners for dispatch to UK and European customers. The canal was only 10’-12’ wide and without locks, only tub boats would have operated along it. Being poorly designed, the canal was not successful and a horse-drawn tramway to Wiseman’s Bridge replaced it. Little remains of the canal today, except for the canal basin and the sluice at Wiseman’s Bridge, which controlled the level of water in the canal. [144]
Coflein tells us that “the harbour was built in 1829-30 … for the exportation of anthracite. By 1837, the harbour had five jetties handling coal, iron ore, pig iron and firebricks from local companies and mines. In 1884, Sailing Directions noted that the southern pier … ‘has a spur for checking the in-run of the sea, the entrance faces east, and is 35 yards wide; off which is a warping buoy. The bottom on the west side of the harbour is hard, but the rest consists of mud and sand, with a shelving beach in the northeast corner. At the south pier end, a yellow ball is hoisted while there is a depth of 8 feet water within the entrance; at night a red light is shown during the same time, which is elevated 15 feet above the highwater. Vessels of 16 feet draught can enter the harbour on spring tides, and those of 9 feet on neaps; two qualified pilots attend every tide, and whose charge is by agreement. In entering, it is necesssary to luff short round the south pier head and check the vessel’s way in time?’ Those Directions also note: ‘Tramroads connect the western side of the harbour with the collieries, which are situated about 3 miles within.’ [133]
Coflein comments: “The Saundersfoot railway was built to link Bonville Court mine and others to the Stepaside Ironworks (NPRN 43501, 43052).” [133] It seems, however, that Boneville Court Colliery and the Ironworks were built a little later than some of the other collieries opened, [134] so it seems fairer to say that a component of traffic on the line was generated by the existence of the Stepaside Ironworks until its closure in the mid- to late-1870s.
In its original form the Saundersfoot Railway was an edge-railway but it was like a tramroad in that the Company provided a transport facility for which it charged tolls to users of the line. Connop-Price says that “such a line was an entirely logical development from the era of canals and turnpike trusts, but it was only adequate when traffic was not continuous, and haulage was by horse or oxen.” [1: p131] As we have already noted, the original cast Iron rails supported on stone-blocks had to be replaced and the line developed into a railway, albeit of 4ft gauge (perhaps 0.75in wider?), rather than standard-gauge and, as we will see, a very reduced headroom.
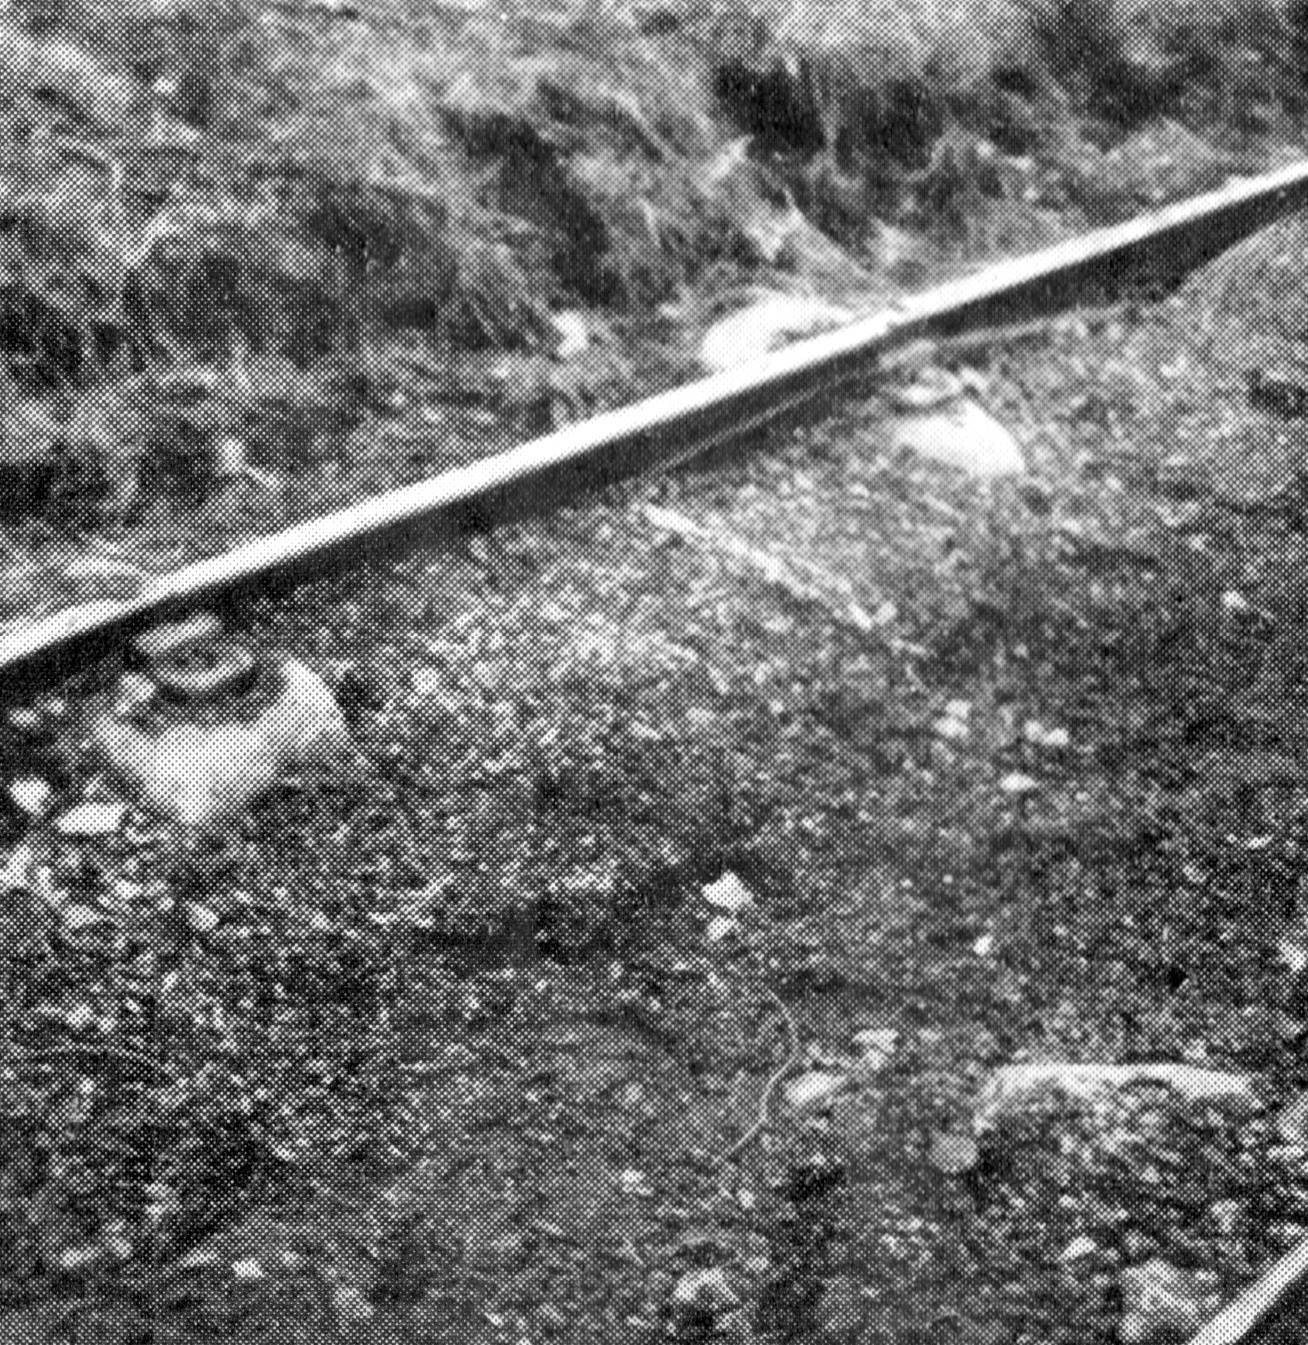
This photograph shows one of the original cat-iron fish-bellied rails of 4ft length used on the Saundersfoot Railway. They spanned bewteen stone blocks laid in the ground. The rails were made locally. The image was shared on the Tenby and Saundersfoot Through Time Facebook Group by Mark Davies on 26th November 2015. [151]
The authoritative text is ‘The Saundersfoot Railway’ written by M.R. Connop-Price which is No. 28 in the Oakwood Press series of Locomotion Papers. [136] Oakwood Press is now owned by Stenlake Publishing but existed independently from its founding in 1931 until 2016. The early editions of this book were all published from Usk in Monmouthshire. Connop-Price has also written ‘Pembrokeshire: the Forgotten Coalfield, publihed in 2004 by Landmark Publishing, Ashbourne Derbyshire which contains a significant chapter on Mining Transport. [1: p120-144]
The Saundersfoot Railway had two main mineral lines which were fed by a number of branches. Horse-power was used at first with horses pulling up to three laden trams (wagons). Wikipedia tells us that the two main lines were:
A line connecting the collieries and the later ironworks close to Stepaside which ran along the coast to the harbour in Saundersfoot. [32][49]
A line from Thomas Chapel colliery near Begelly to the harbour in Saundersfoot. This line passed beneath the GWR station in a tunnel at King’s Moor and had an incline around half-a-mile from the harbour which had a gradient of 1 in 5. [49]
This, while true, somewhat simplifies the development of the line. We noted above that the 1829 Act authorised two branches, one of which was the nascent form of first line mentioned immediately above, although it limited the line running North to a terminus at Wiseman’s bridge until the harbour was operational at Saundersfoot. [1: p131]
The mainline running towards Begelly and Thomas Chapel was substantially complete between Begelly and the harbour by the time the Company officially began trading on 1st March 1834. The branch to Moreton, however, was not constructed immediately. The line to Wiseman’s Brdige was substantially complete by June 1834. Connop-Price tells us that the line suffered a number of rock falls and, as a result, broken rails and it seems highly unlikely that the line saw any significant use. [1: p131]
Both the branch along the coast and the harbour suffered storm damage. An extension to the North pier of the harbour narrowed the harbour entrance and gave much greater protection to vessels within. [1: p131]
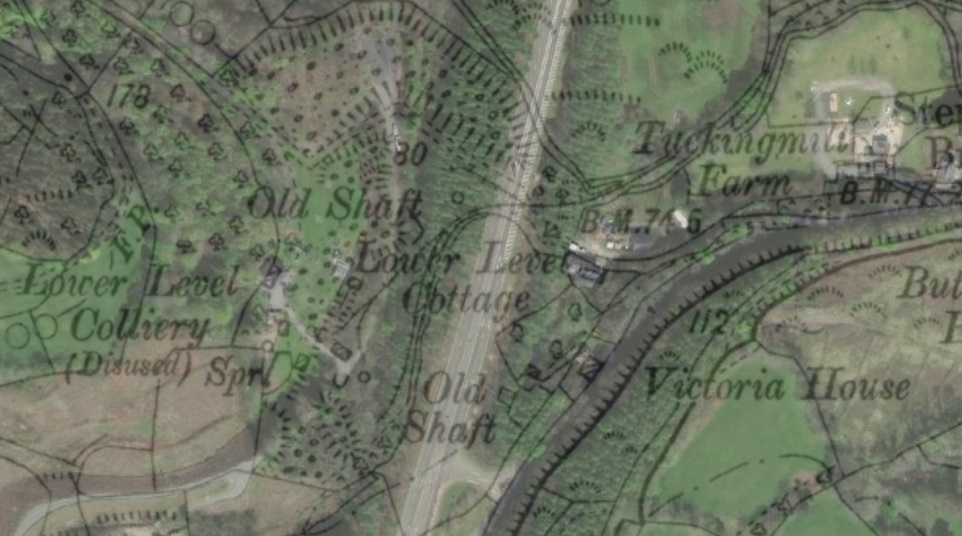
It was decided to realign the tramroad to Wiseman’s Bridge and, when another Act of Parliament was needed to renew powers to build the Moreton branch (1842), the realignment of the coastal line was included as well as an extension to Lower Level Colliery at Kilgetty. “The line to Wiseman’s Bridge was rebuilt on a slightly altered alignment, and at a slightly higher level beneath the cliffs North of Coppet Hall; the extension to Kilgetty gradually steepened over its final mile until it reached a gradient of 1 in 32 on the approaches to Lower Level Colliery.” [1: p132] That 1842 Act also authorised another branch from Kingsmoor to Broadmoor and Masterlands, although a decision not to contract that line was made before the middle of the 1840s. {1: p132]
On the line West from the harbour after about a half-mile journey there was a self-acting incline which worked well for those exporting goods from the harbour bringing it down the line. The loaded trams lifting the empty trams up the incline. It did not work well for those importing freight such as pit-props or stone. Eventually a winch was provided so as to avoid damage to the land alongside the incline. [1: p132]
On learning of the South Wales Railway’s plan to build a branch from its mainline to Pembroke, the Saundersfoot Railway’s board of directors decided to construct a line to meet the GWR at Reynalton. Their scheme was authorised in 1846. However, the South Wales Railway failed to provide the branch to Pembroke. The Saundersfoot Railway’s proposed Tenby, Saundersfoot & South Wales Railway and Pier Company line was not built. [49] Another Company built a standard-gauge line between Pembroke and Tenby -The Pembroke and Tenby Railway (in 1863), and then extended that line to meet the South Wales Railway at Whitland. (in around 1865). Moreton Colliery got its own siding on that line but Boneville Court Colliery did not. Coal drops were provided at the point where the Saundersfoot Railway passed under the standard-gauge line. [1: p133] Eventually Saundersfoot Station was built at this site.
As part of a modernisation project, the whole line was upgraded to a narrow gauge railway in 1874. The tramway along the coast was re-laid with flat bottom rails on wooden sleepers allowing a locomotive to be used on the line to Stepaside. [49]
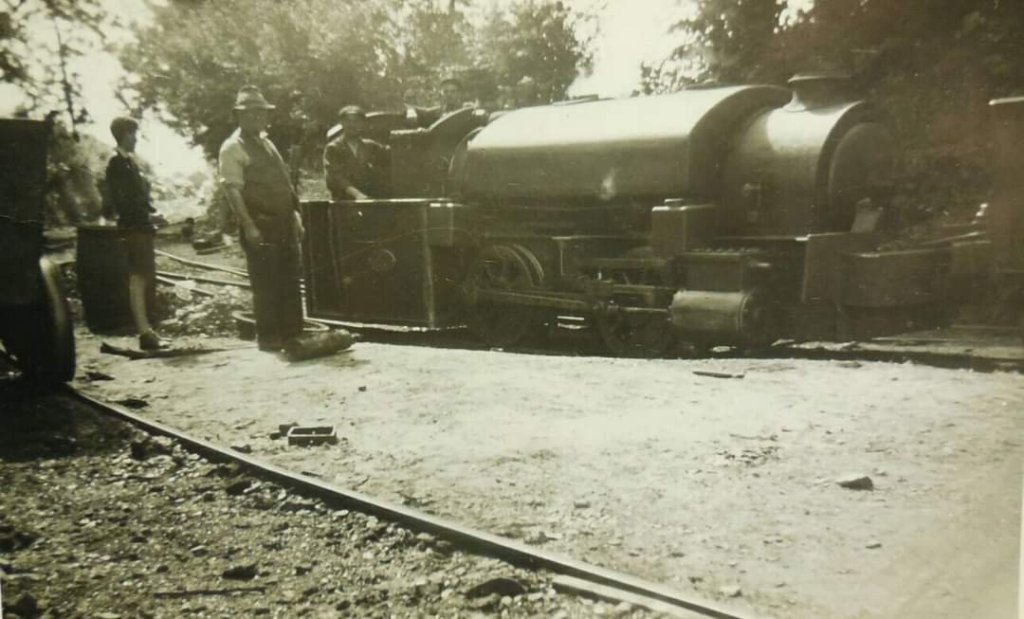
In April 1874 an 0-4-0ST built by Manning Wardle of Leeds (Rosalind) was purchased and worked the line between the harbour and Lower Level Colliery. “Horses were retained to work the portion of the line from the harbour to the incline, and also from the top of the incline to to the exchange siding at Saundersfoot Station. The failure of collieries at Thomas Chapel, and the decline in mining at Begelly, meant that by this date traffic worked through Kingsmoor Tunnel was negligible.”[1: p133]
The track north of the standard-gauge line was lifted in 1887, however, in 1914 it was re-laid and a new 1.5 mile branch line built to support the opening of a short-lived colliery at Reynalton. A new engine was purchased for this purpose. [49]
In 1889/1890 the track between the harbour and the incline was re-laid to allow it to be worked by Rosalind. In 1893, Bonevilles Court colliery was provided a siding from the standard-gauge line and the exchange sidings at Saundersfoot Station fell into disuse as did the line between the incline and the station. By this time harbour traffic was limited to coal and culm from two collieries, Bonevilles Court and Lower Level. [1: p133]
By the late 1920s coal mining was in recession and the line closed. In 1932 a brief resurgence in local mining led to the lines being briefly reopened. [49]
However, only seven years later, due to financial considerations and the workings becoming exhausted, the railway finally closed on the eve of the Second World War. Subsequently, the rolling stock along with the tracks were scrapped for use in the war effort. [49]
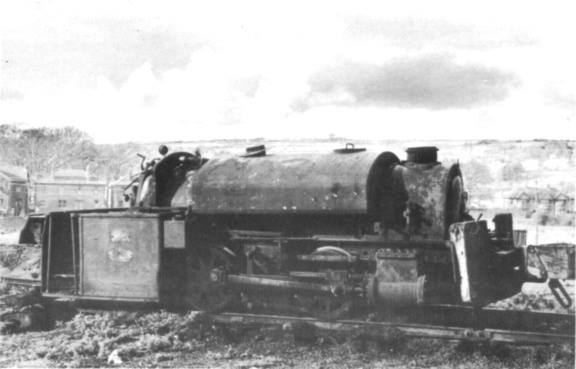
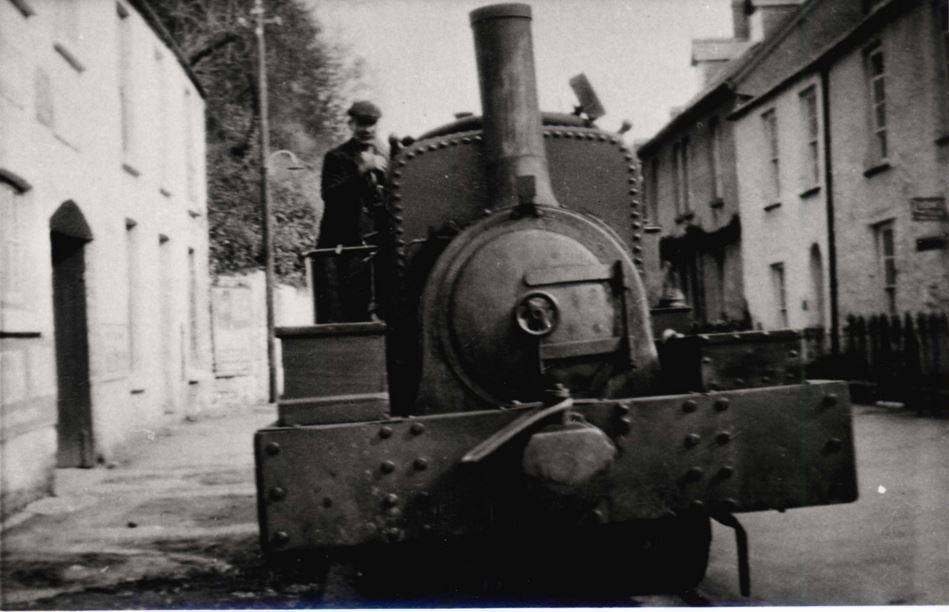
Locomotives – Both engines used on the line had low profiles so they could work the tunnels. Although Rosalind was scrapped, Bulldog continued to work at Llanelli steel works until 1951. [49]
Name
Builder
Wheel arrangement
Date
Works number
Notes
Rosalind
Manning Wardle
0-4-0ST
1874
476
Bulldog
Kerr Stuart
0-4-0ST
1915
2040
Purchased from the New Reynalton Anthracite Coal Company in 1921
This table comes directly from the Wikipedia article about the Saundersfoot Railway [49]
We have already noted that there were two main lines which met at Saundersfoot Harbour. It seems to be a good idea to start at the harbour and to look at each line in turn. This article covers the line to Stepaside via Wiseman’s Bridge. A second article will cover the line which heads West from the Harbour.
Saudersfoot Harbour to Stepaside via Wiseman’s Bridge
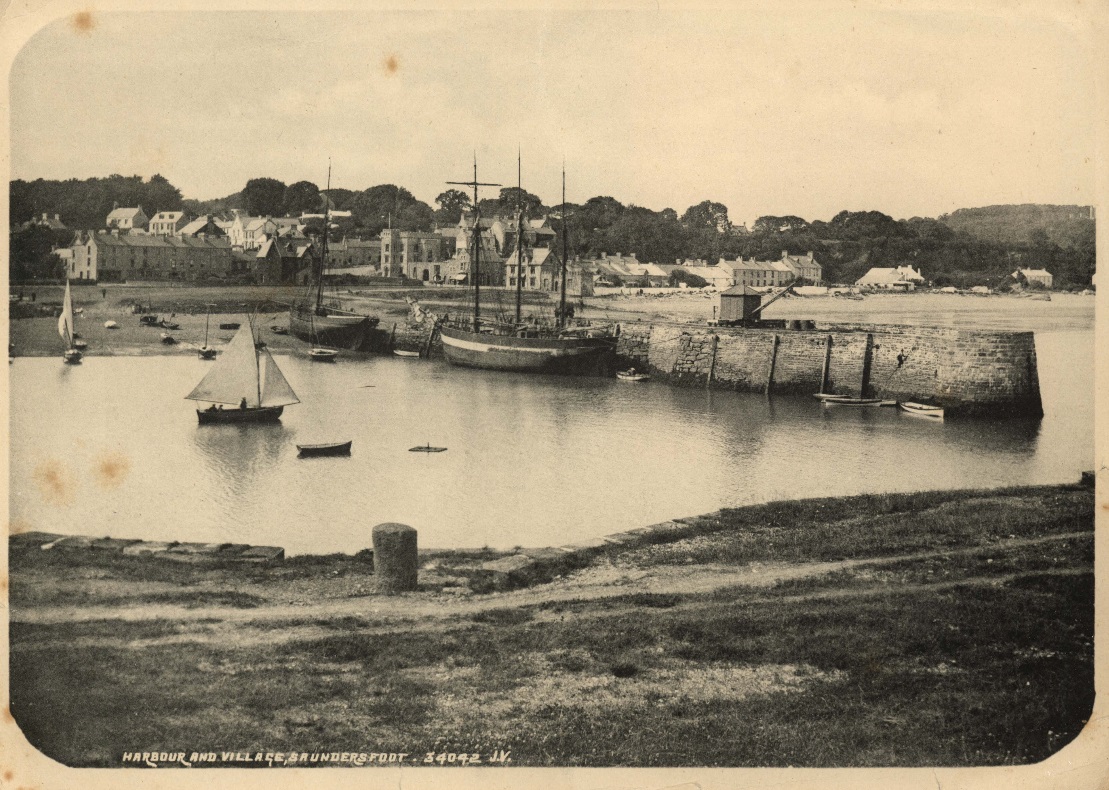
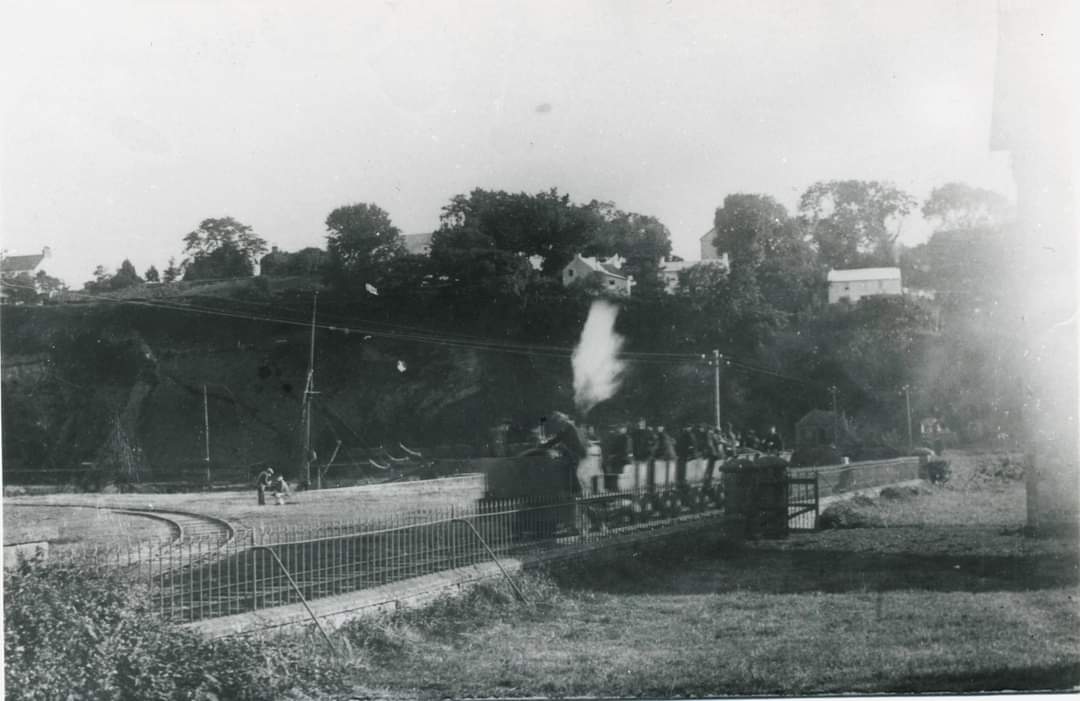
We start this journey at Saudersfoot Harbour with two very early views of the harbour and its tramroad.
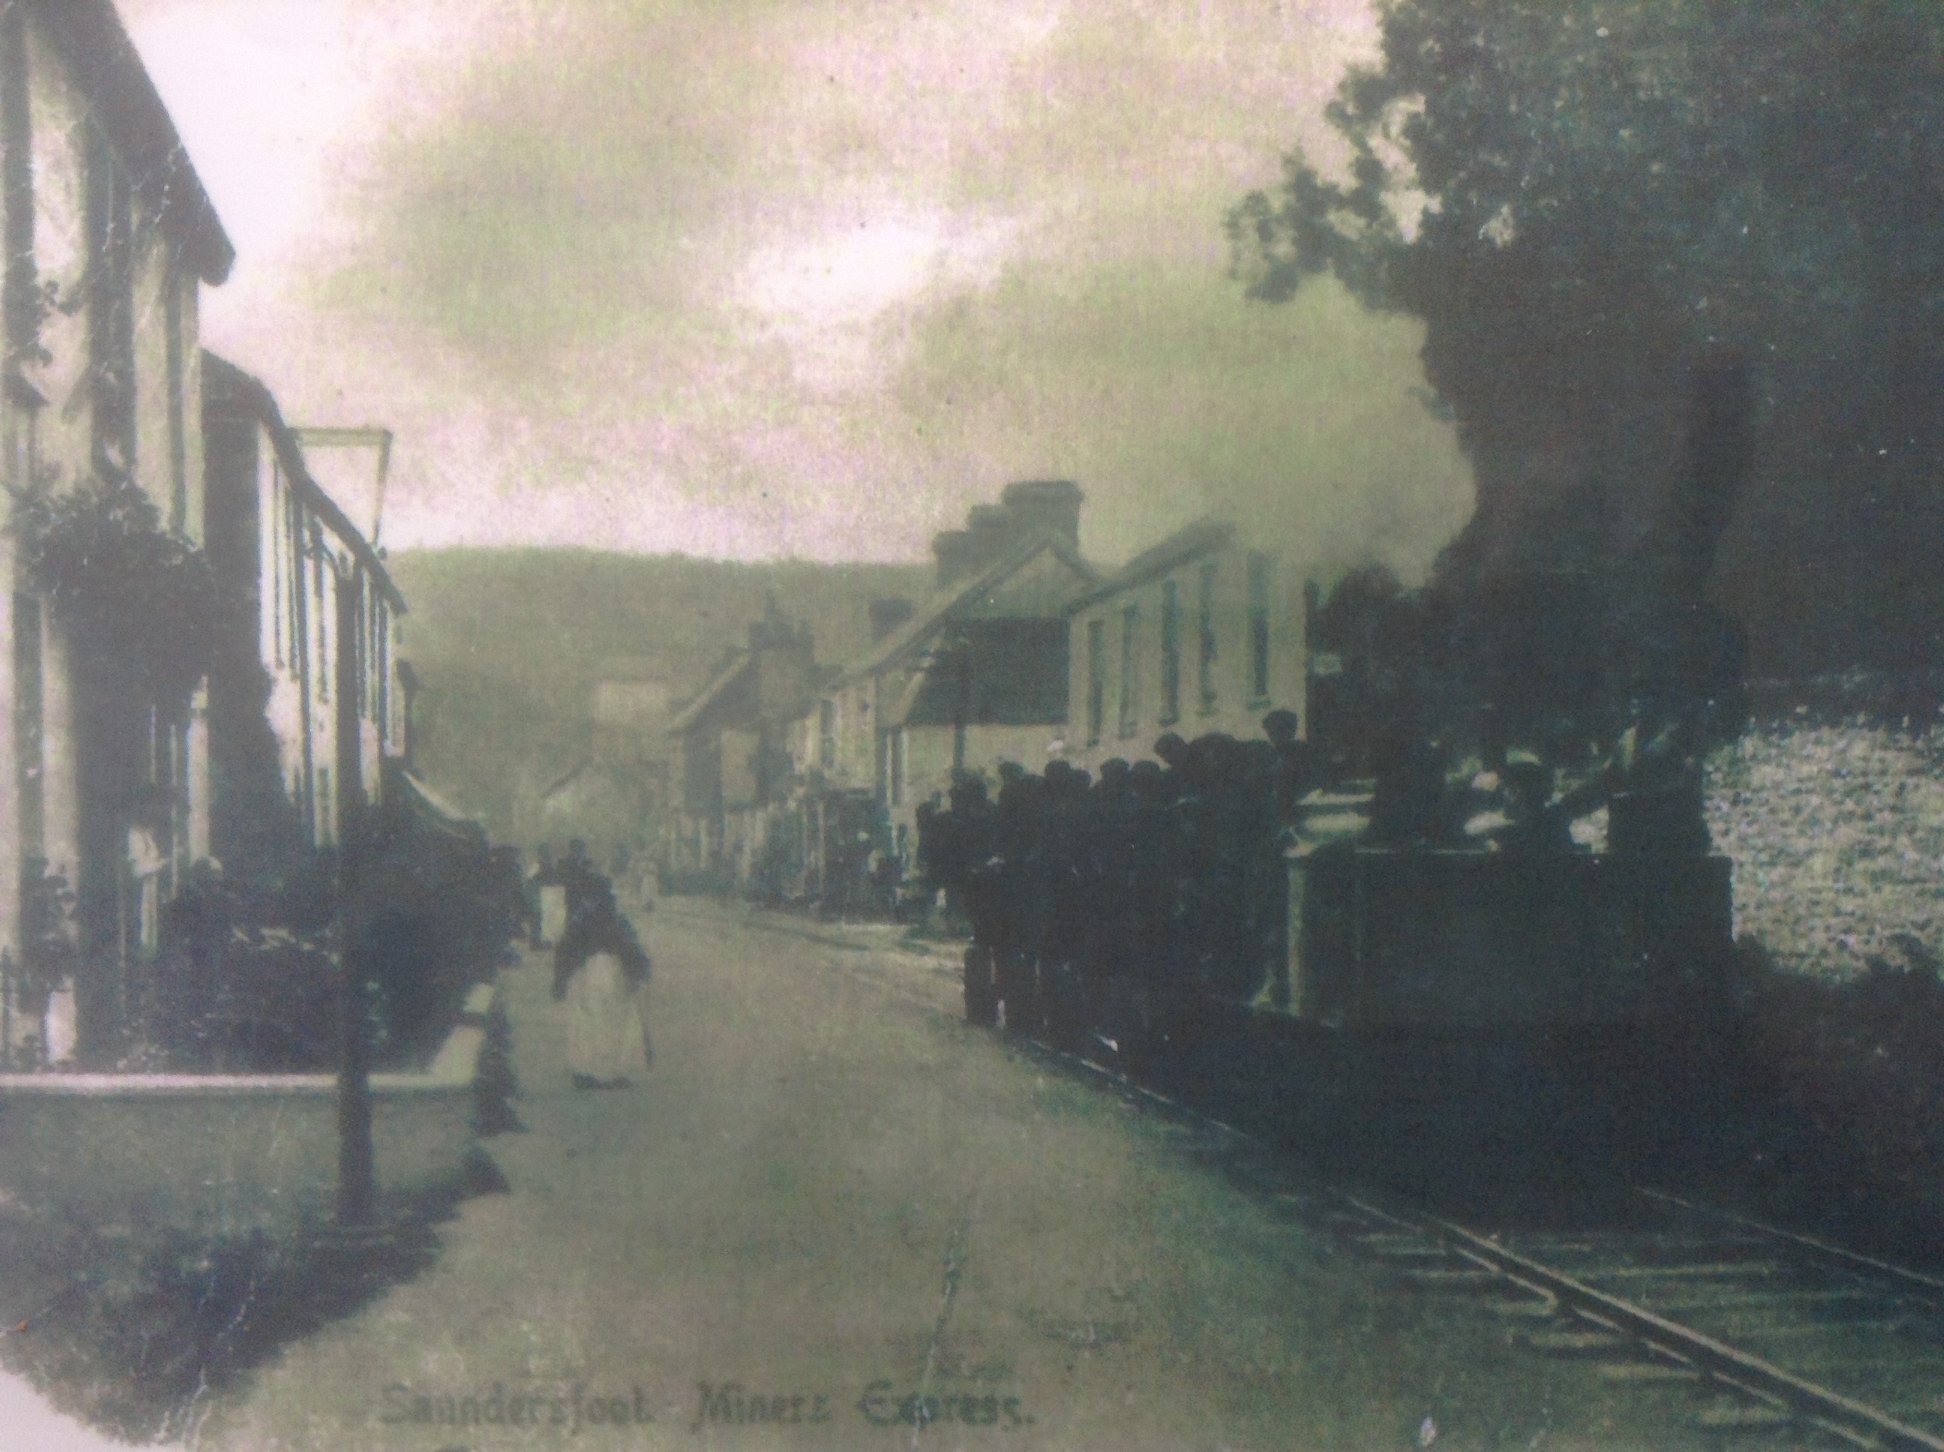
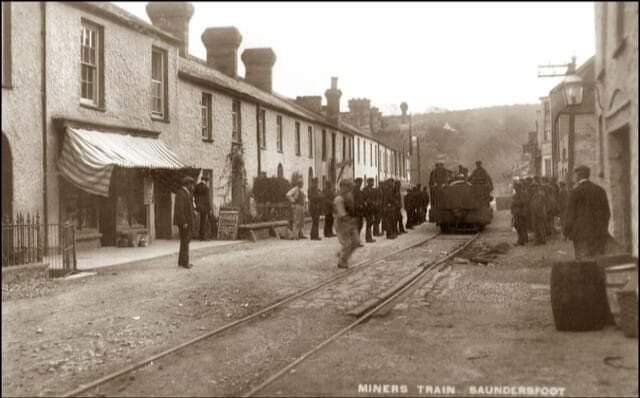
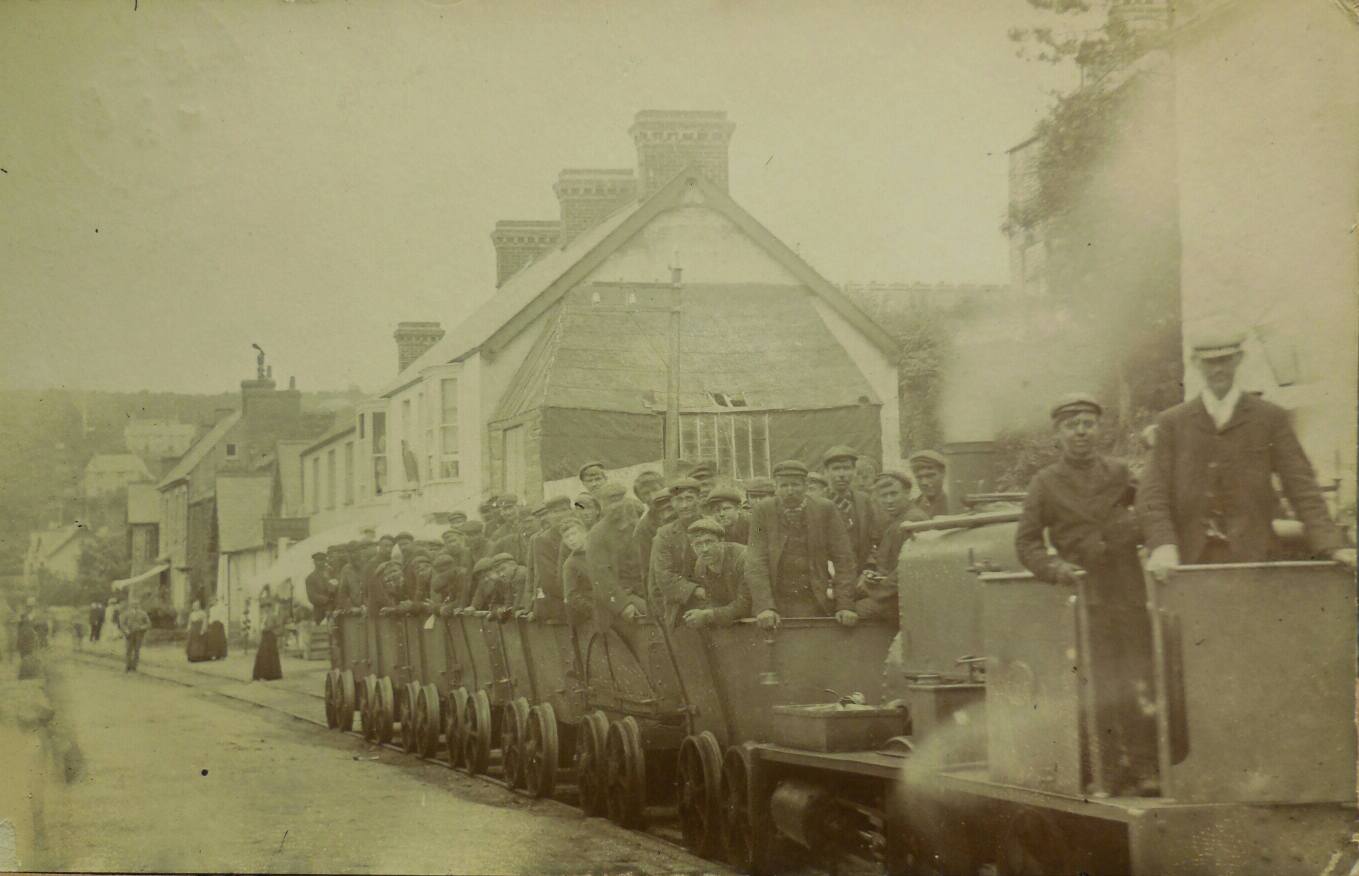
From the harbour we head out along what was Railway Street (now called ‘The Strand’). First we have a series of views of Railway Street and its railway from the late 19th century and the early 20th century.
Before Saundersfoot Harbour’s development, coal was loaded into boats at Swallow Tree Bay (South of Saundersfoot) and Coppet Hall, (thought to derive from ‘coal pit haul’). [169]
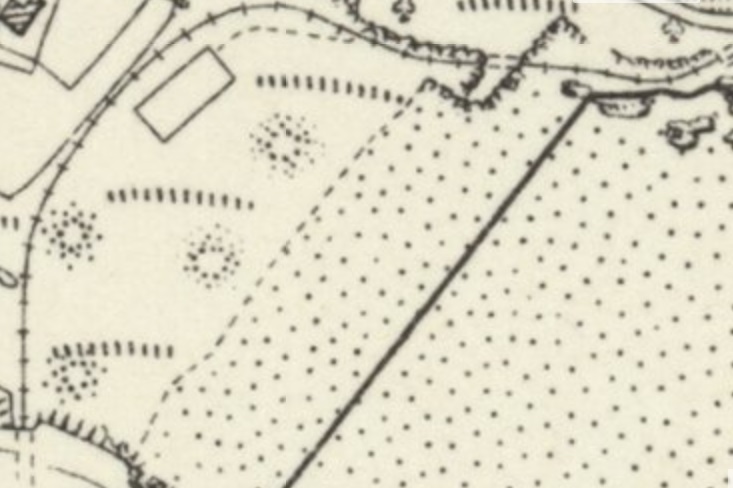
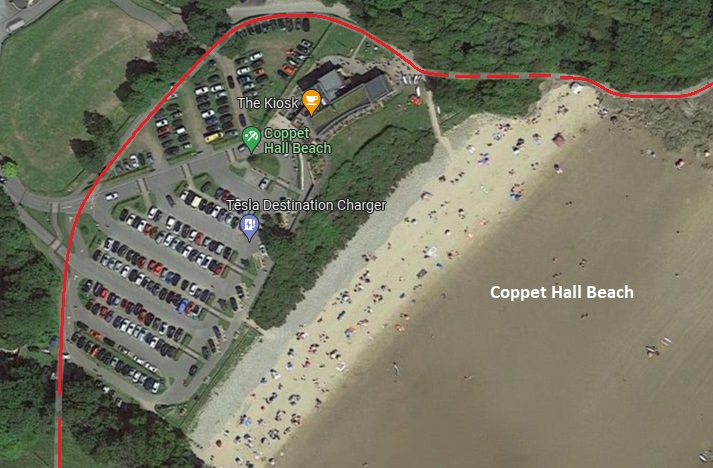
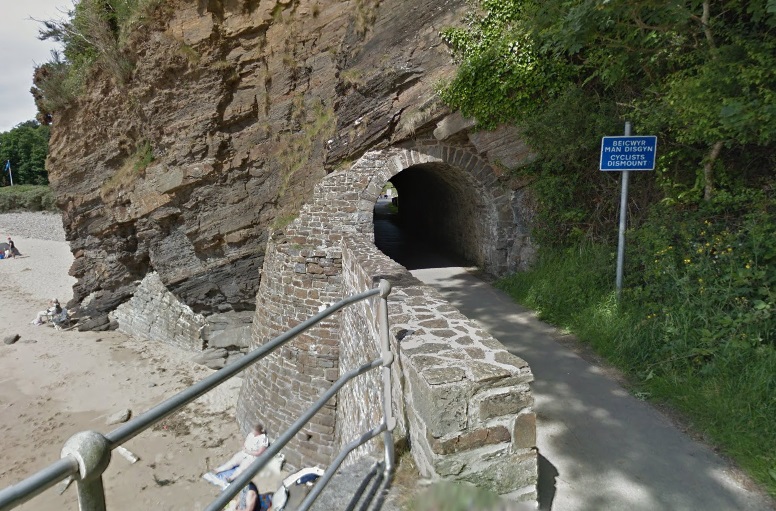
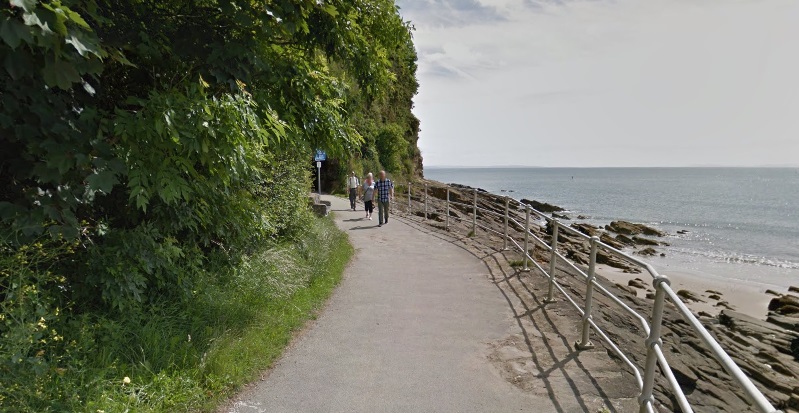
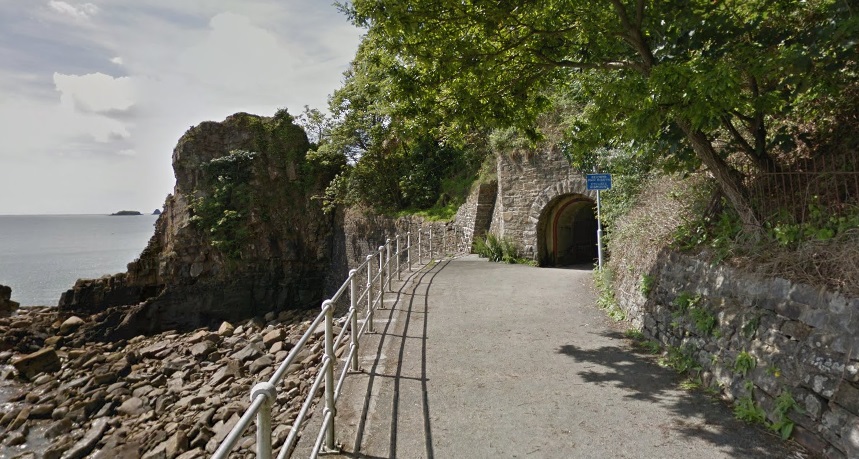
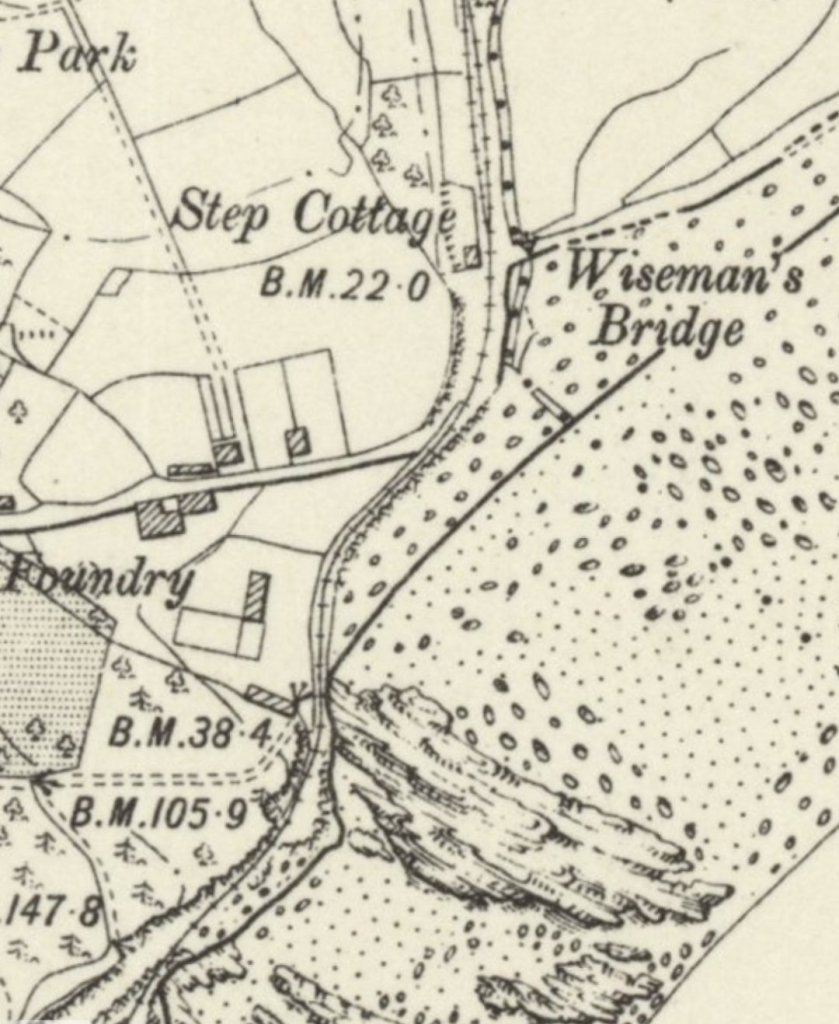
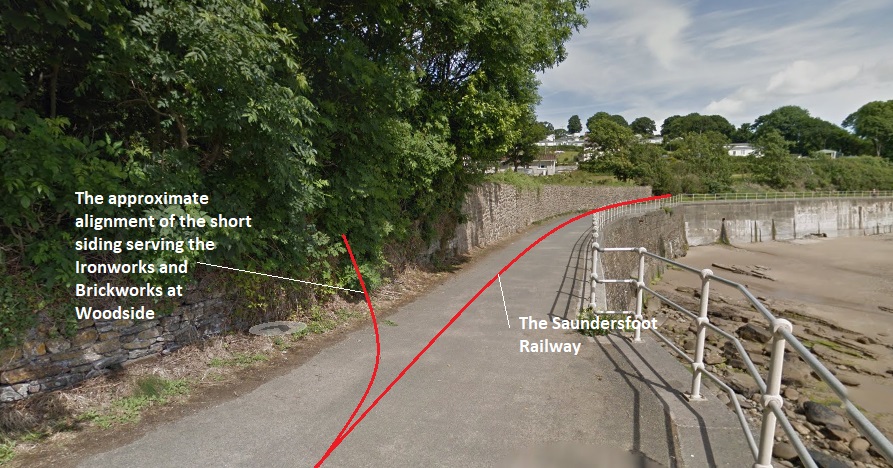
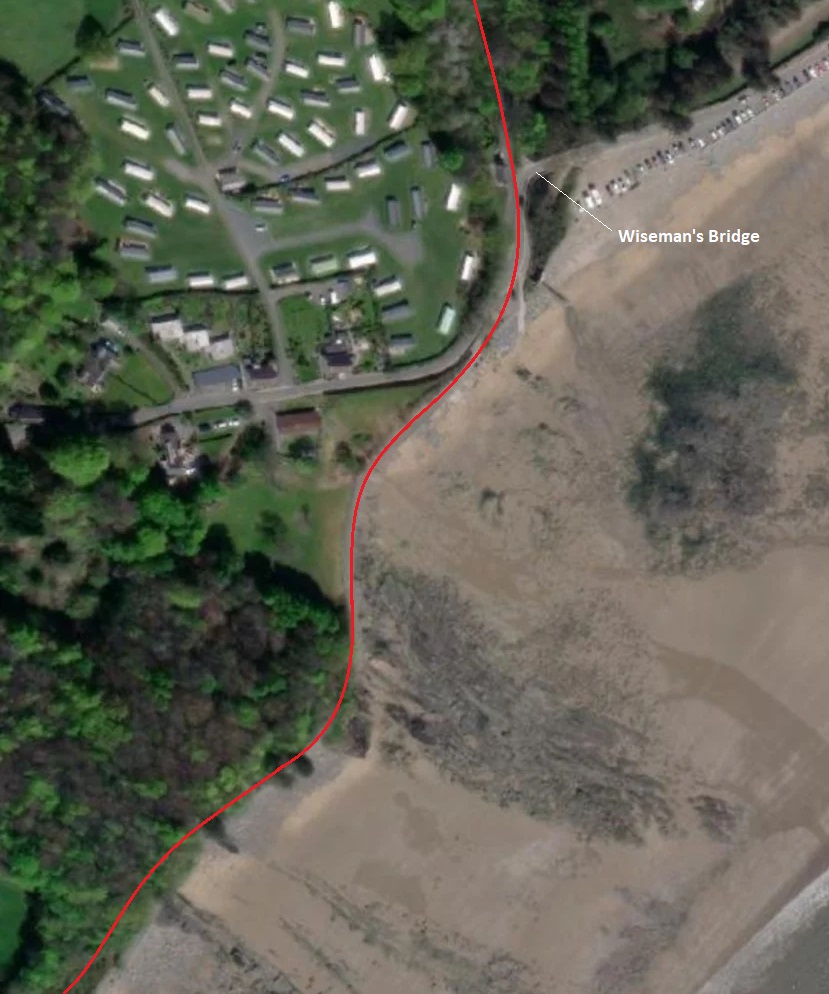
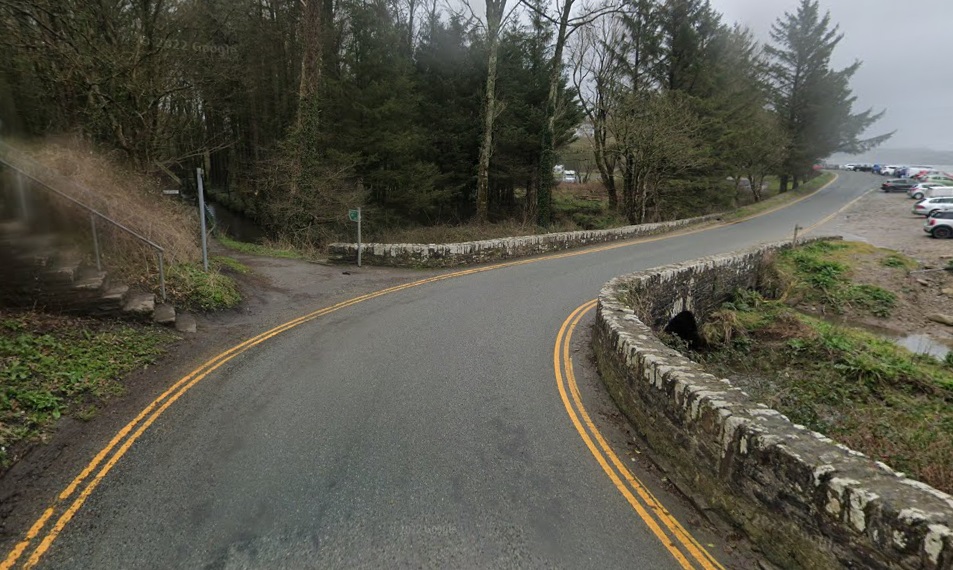
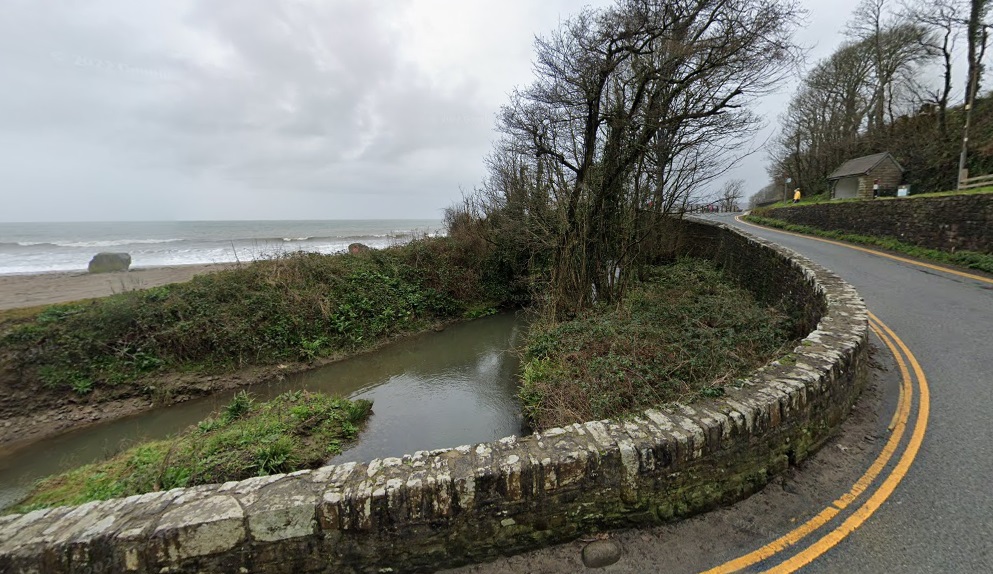
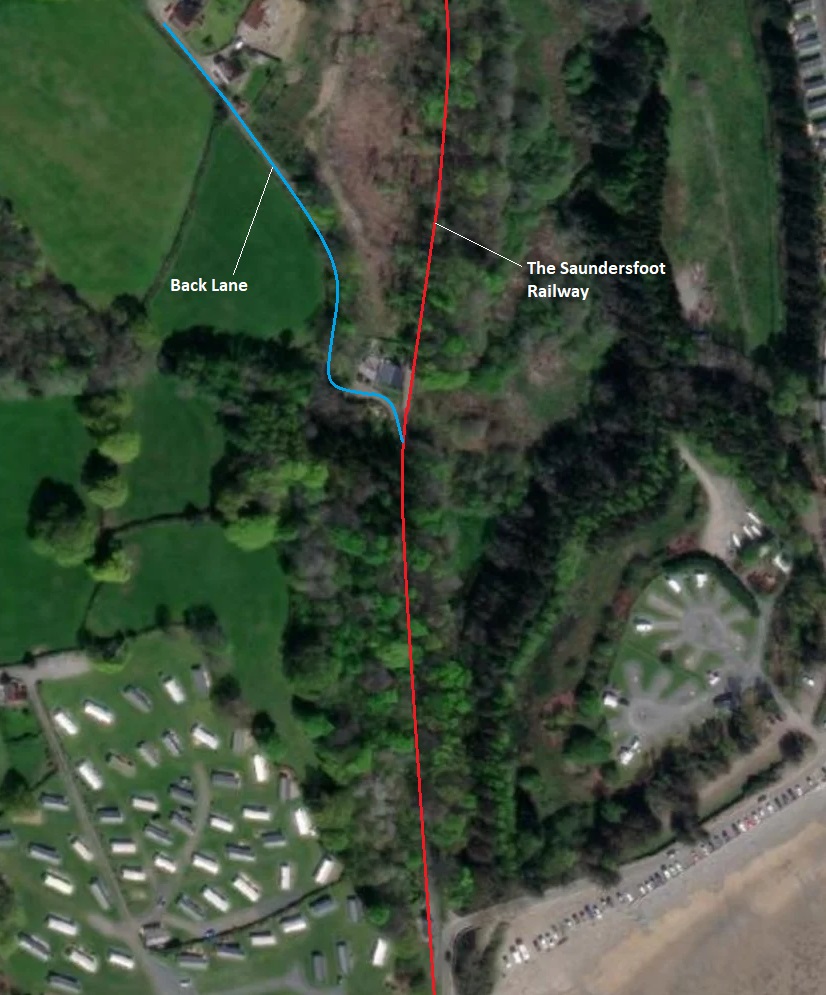
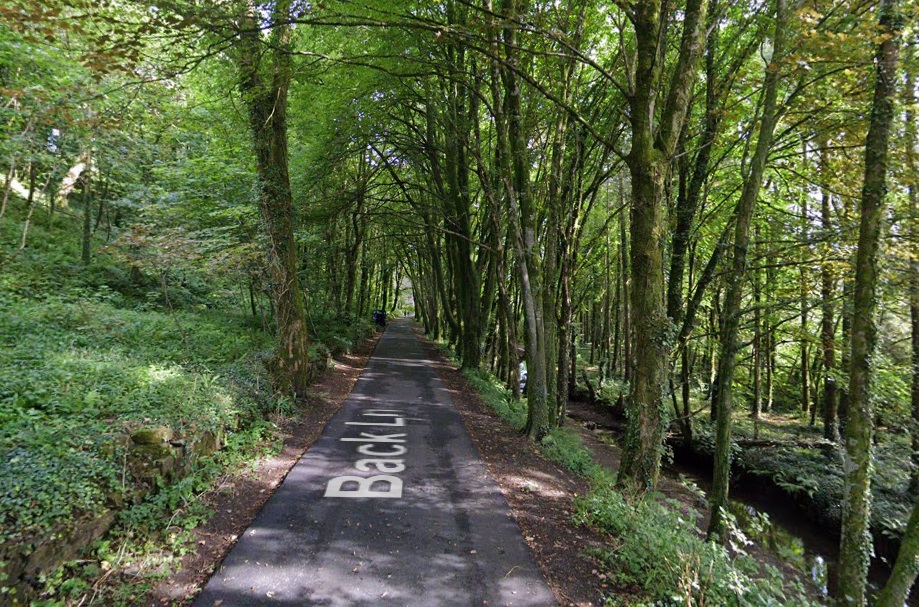
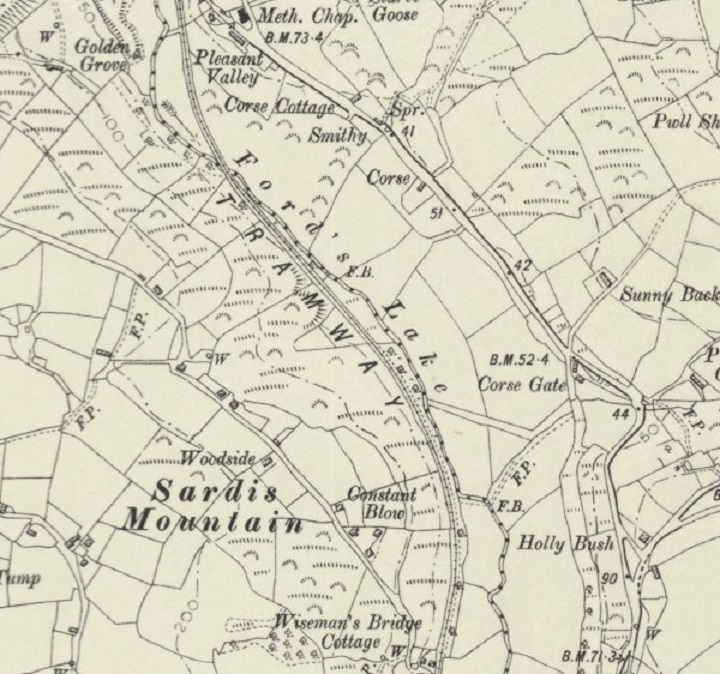
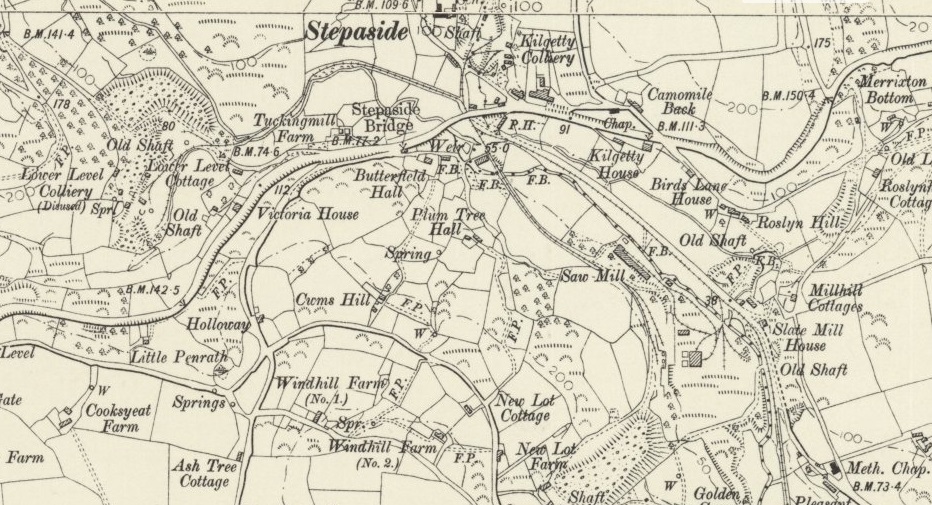
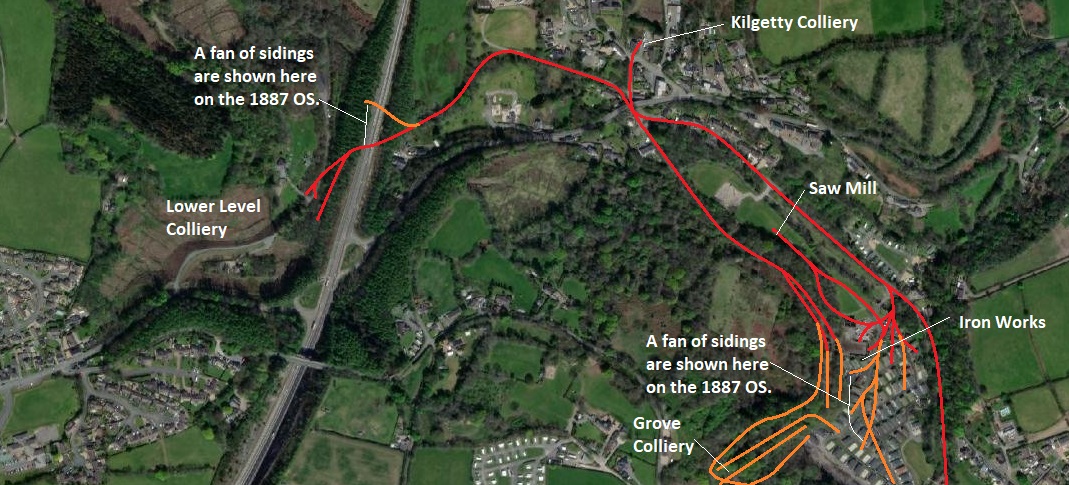
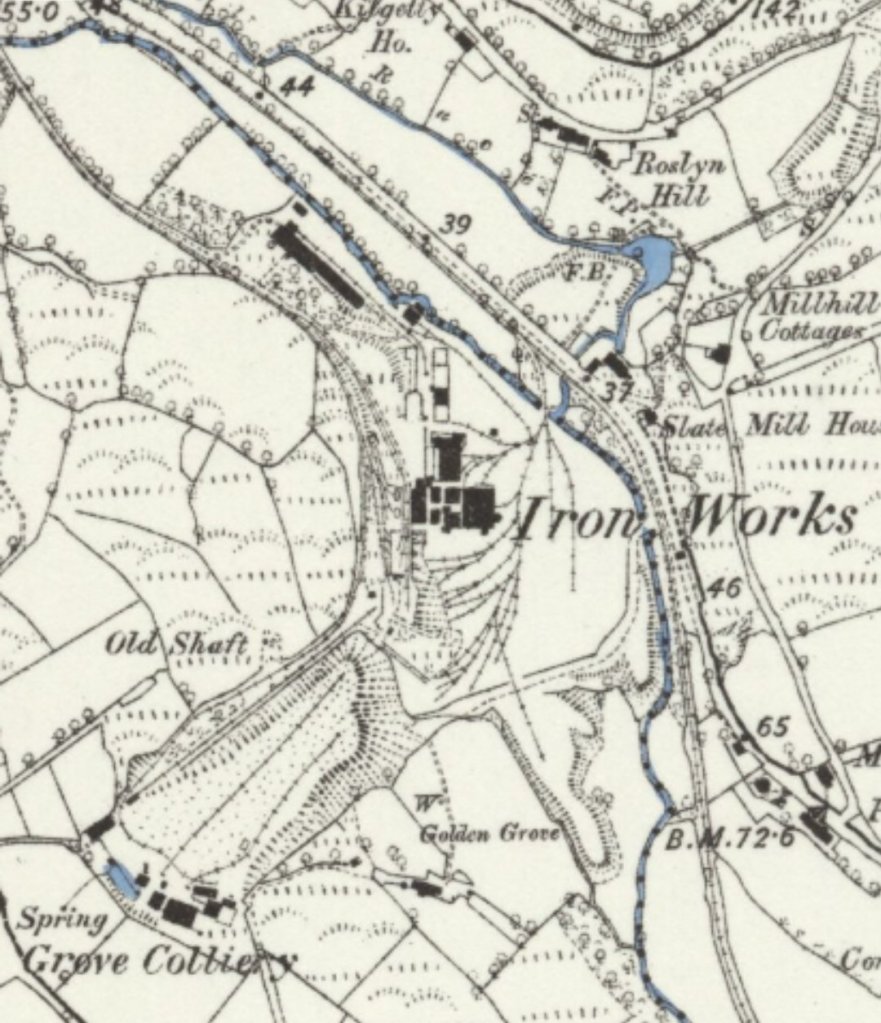
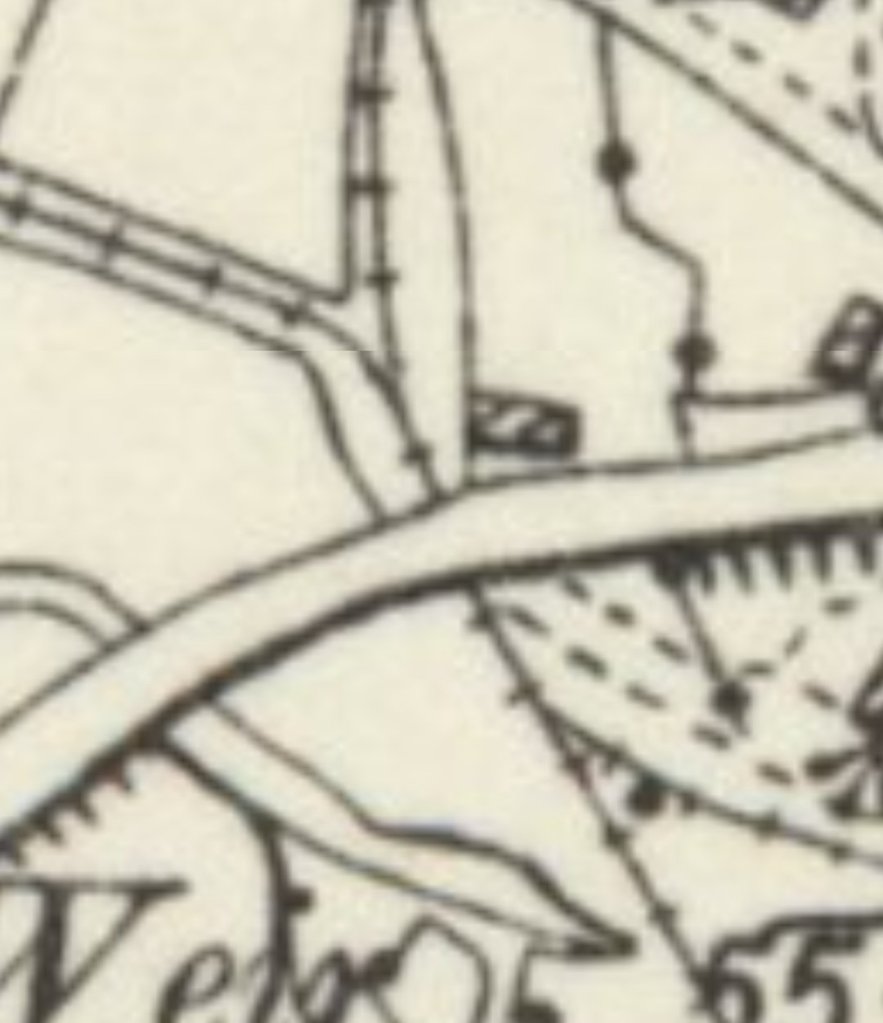
The 1906 6″ Ordnance Survey of Coppet Hall showing the old tramroad curving from the tunnel under Craig-y-Mor to then pass through a very short tunnel while traveling to the East on the North side of the beach. The following tunnel entrance can just be made out to the top-right of the image. [170]The line of the old railway through Coppet Hall follows the line of the Coastal Path highlighted by the red line, dashed through tunnels. [Google Maps, June 2022]An information board at Coppet Hall giving some details about the Saundersfoot Railway, (c) Gareth James, 20th May 2010, authorised for us under a Creative Commons Licence [CC BY-SA 2.0) [183]This view from the tunnel mouth of the coastal line to Wiseman’s Bridge faces back towards Saundersfoot with Coppet Hall Beach visible in the centre of the image beyond the railway tracks. The image was shared by Stephen Hughes on the Pembrokeshire – I LOVE IT! Facebook Group on 12th January 2018. [138]A view back to Saundersfoot along the Coastal Path from approximately the same location as the monochrome image above. Around the curve ahead is a short tunnel before Coppet Hall and its beach which can be seen beyond the railings. [Google Streetview, June 2016]Turning through a half-circle the view looks along the tunnel from the position of the last image. [Google Streetview, June 2016]The 1906 6″ Ordnance Survey shows the tramroad/railway heading North after leaving the tunnel at the bottom of the map extract, closely following the sea wall. [171]the coastal path continues to follow the route of the old railway [171]The North portal of the railway tunnel which appears at the bottom of the last two images and carries the modern coastal path, looking back South towards Saundersfoot. [Google Streetview, June 2016]Turning 180 degrees, this photograph shows the coastal path and hence the old railway’s route heading North towards Wiseman’s Bridge. [Google Streetview, June 2016]The 1096 6″ OS Map shows the railway continuing North through an S-bend along the sea wall and then running along the highway yo Wiseman’s Bridge. The Iron Foundry was Woodside Iron Foundry. Coflein says that it was serves by a siding from the Saundersfoot Railway, (although the siding does not appear on this edition of the Ordnance Survey) It is shown on OS 1st edition mapping of 1889. The tramway siding terminated in the yard of a disused brickworks – comprising a large building and four kilns. Opened in 1849/50, Hean Castle Brickworks produced firebricks from black clay underlying the coal seams and were reputedly the best in the country. [172][173][174]The 1887 6″ Ordnance Survey published a year or so later shows the Iron Foundry and Brickworks together with the tramroad branch which ran from the Saundersfoot Railway in-between the two curves of the S-bend in the line. It then ran along the South side of the Foundry before turning to the North, close to the Brickworks. [175]This modern image shows the location at which the short siding referred to above diverged from the Saundersfoot Railway. [Google Streetview, June 2016]The same area as shown on the 1906 6″ OS map extract above which the line of both the coastal path and railway marked by the red line. The Ironworks discussed above were sited in the grass area to the West of the railway to the North of the woodland. The brickworks were to their West. [172]This photograph shows the point at which the old railway joined the verge of the road to Wiseman’s Bridge. It is takenlooking back towards Saundersfoot with the old railway’s route on the left adjacent to the sea-wall. [Google Streetview, June 2016]The old railway crossed the coast road and followed Back Lane northwards. [Google Streetview, June 2016]Wiseman’s Bridge. The old railway ran off the left of this image at the top of the steps which can be seen on the left. Ahead between the steps and the bridge Kilgetty Canal can be glimpsed. The railway and Canal followed each other up the valley. The canal passed under the nearest arch of Wiseman’s Bridge. [Google Streetview, March 2022]Wiseman’s Bridge and Step Cottage on 28th January 2010. The Saundersfoot Railway ran on top of the wall in front of the cottage along what is now called Back Lane. There was a passing loop on the railway which ran from the front of the cottage to the right of the image. It can be seen at the top of the 1906 6″ OS map extract above and at the bottom of the 6″ extract below, (c) Humphrey Bolton, authorised for use under a Creative Commons Licence (CC BY-SA 2.0). [176]The Kilgetty Canal and towpath seen from the road crossing Wiseman’s Bridge. [Google Streetview, March 2022]The Kilgetty Canal Basin between the sea and the coastal road/path. The Saudersfoot Railway ran at the top of the wall visible to the right of the picture. [Google Streetview, March 2022]The old railway heads North up the valley from Wiseman’s Bridge. We have already noted the passing loop which features at the bottom of this map extract. [The old railway route runs North from Wiseman’s Bridge along Back Lane. Immediately South of what is called Wiseman’s Bridge Cottage on the OS Map extract. Back lane turns away to the left and the route of the old railway continues up the valley. [177]The Saundersfoot Railway followed Back lane heading North from Wiseman’s Bridge. The canal can be seen on the right of the image. [Google Streetview, July 2021]The point at which Back Lane and the Railway diverged as it was in July 2021. A footpath now follows the old railway. [Google Streetview]The old railway turned gradually towards the West as it ran North. The 1906 6″ Ordnance Survey again. [178]The same area as on th emap extract. There is no need to mark the route of the old railway as the public-right-of-way which follows it can be clearly seen on this 21st century satellite image as provided by the National Library of Scotland (NLS). [178]This next extract from the 1906 6″ Ordnance Survey covers the remaining length(s) of the line to Stepaside. The line served a number of industrial sites. Low Level Colliery, Kilgetty Colliery and the Saw Mill are all shown as having connections to the railway. [185]The modern satellite image supplied by the NLS covers the same area as the 6″ OS Map extract above but it shows a dramatically different transport situation! The old railway and sidings have gone and the most prominent feature is the A477 running North-South across the image. [185]This extract from the 1887 Ordnance Survey shows, in addition to the Saw Mill appearing on the 1906 revision, the Ironworks and Grove Colliery which were at that time alongside the Railway branch to the South of Stepaside. The Ironworks and the Saw Mill (in 1887) had their own connection from the mainline of the Railway in the valley to the East of Stepaside, having a bridge across the canal adjacent to the Ironworks. The truncated network in the vicinity of the Ironworks appears on the 1906 survey, the full extent appears on this extract. Elsewhere in the immediate area, there is little difference between the 1887 and 1906 OS Maps. [186]
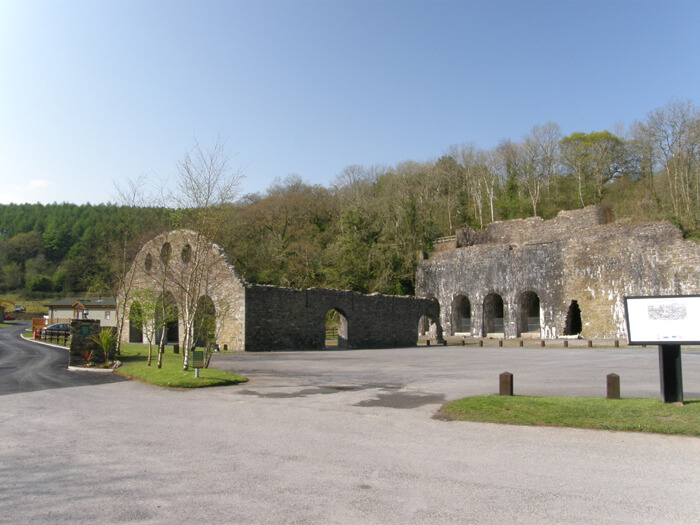
The satellite image above shows how significant the industry in the area of Stepaside was. Only a little remains. Amroth and District Community Association say that Stepaside was “a heavily industrialised site during the latter end of the nineteenth century with a thriving iron works using iron ore and limestone from local quarries. Today, this site is privately owned and features a chalet style complex. At one time, the village offered a school, post office, shop, garage and petrol station, a cobbler, a tailor and numerous public houses. Today, the only industry is the very busy coachworks, with several small housing estates.” [188]
Stepaside Ironworks as they appear in the 21st century. [188]
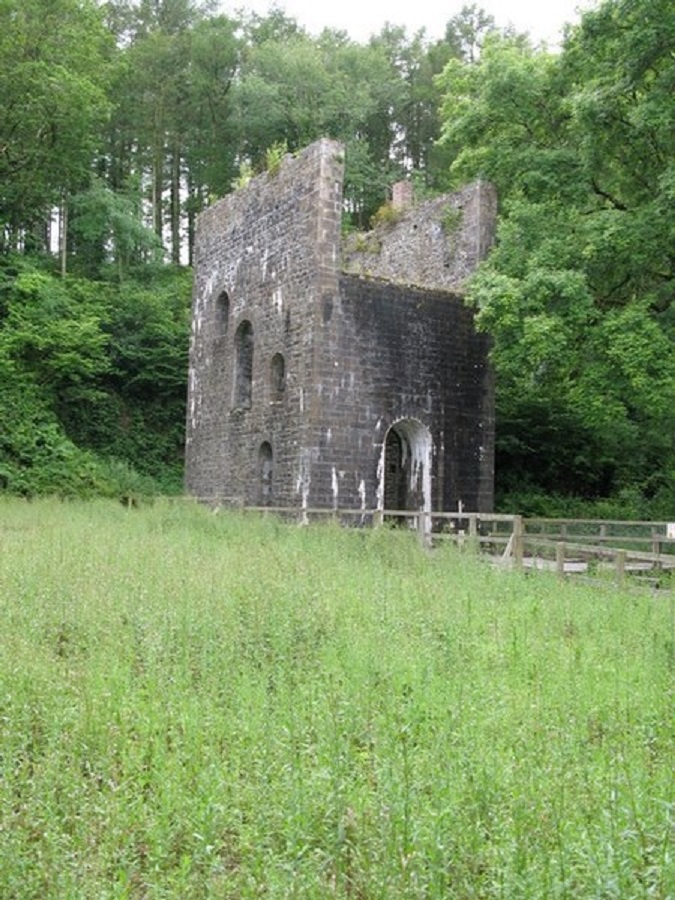
The remains of Stepaside’s Ironworks are pictured above. Grove Colliery’s Engine House remains as a substantial ruin and is shown below.
Grove colliery had a deep shaft which extend 182 metres down into the ground and it’s workings extended over a large area as it followed the anthracite-bearing strata to extract the coal. The owners aim was to find the Kilgetty vein, which took until 1858, a period of some 5 years after opening and at a cost of £30,000. Eventually, the Grove Colliery was linked underground to the Kilgetty Colliery, a distance of some 795 metres.
Coal from the Grove Colliery was carried both on the Saundersfoot Railway via Stepaside and on a self-acting incline to the Ironworks in the valley below. The colliery had its own stables, stores, carpenter’s shop and smithy.
Lower Level Colliery, according to Coflein, appears on the early OS mapping (1887/1889) but on the second edition of 1906/1907 it is marked as disused, having closed in 1900. According to OS mapping of 2013, the site has been cleared and landscaped. [190]
Coflein also notes that Kilgetty Colliery was an anthracite colliery dating from around 1843. It closed in 1873 but was re-developed and re-opened in 1935, with a weighbridge house, ventilation drift and winding engine house. Another winding engine house (now converted) stood nearby. The colliery closed finally in 1939 by 2003 the site was largely built over. [191]
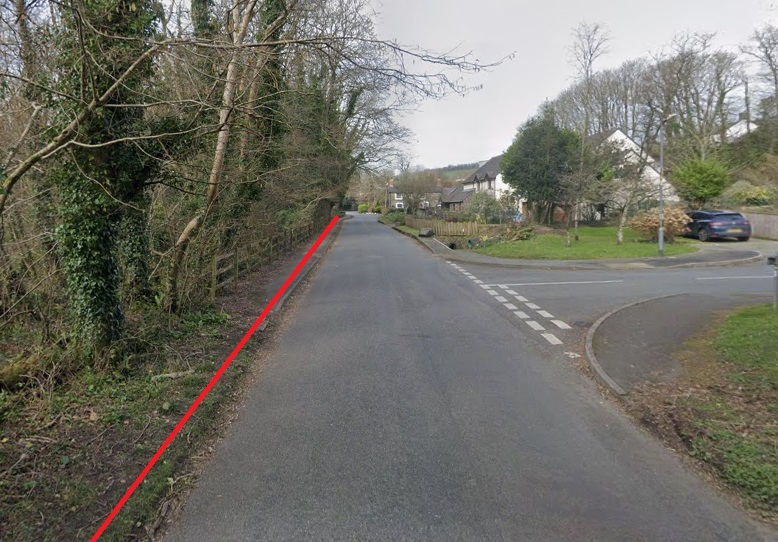
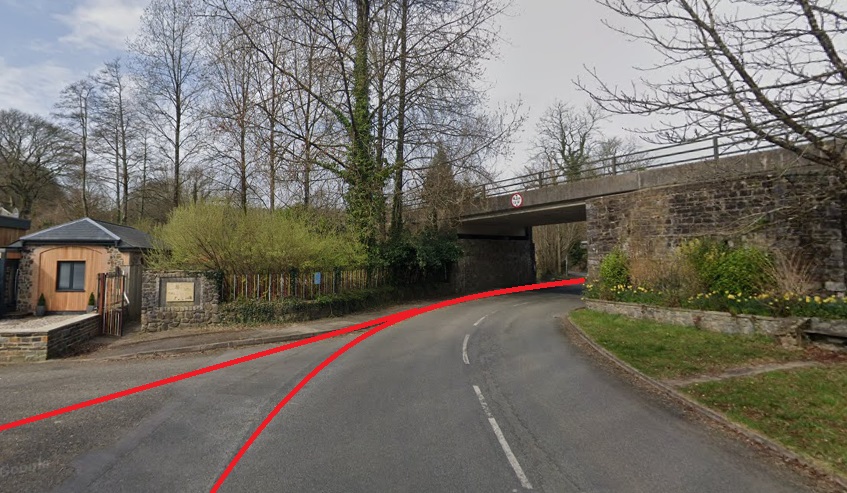
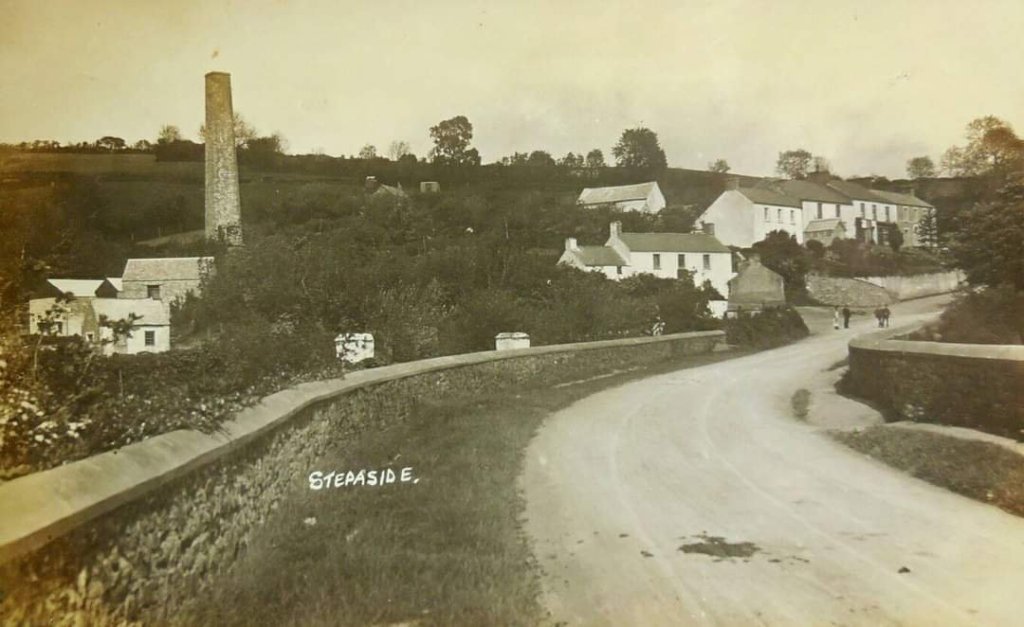
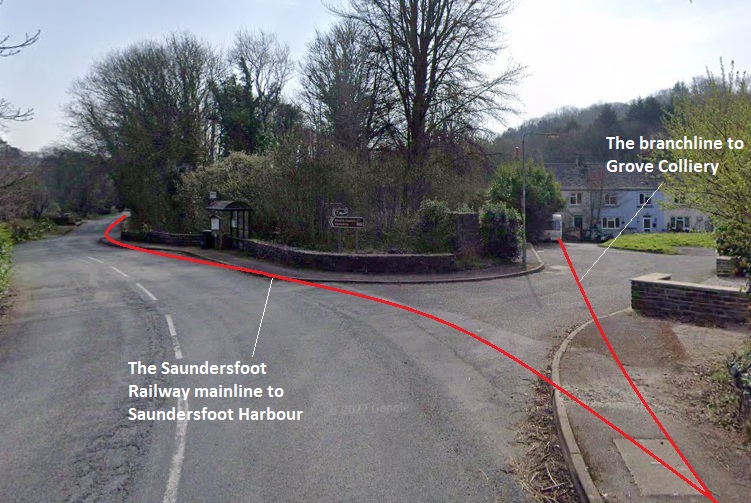
On the approach to Stepaside village the railway ran adjacent to the road. In 22st century the railway route remains protected as a footpath running just below the the level of the road. It is highlighted on this image by the red line. [Google Streetview, March 2022]This Google Streetview image shows that the remains of the Ironwork sit at the entrance to a caravan park. [Google Streetview, March 2022]The Kigetty Ironworks (or the Stepaside Ironworks) drawn as they were in 1866. The tramroads serving the site feature prominently. This is the picture on the information board at the site of the Ironworks in the 21st century. THe picture is an extract from an image shared by David Holland on the Tenby and Saundersfoot Through Time Facebook Group on 20th April 2020. [198]Closer in to the village the railway ran immediately on the verge. [Google Streetview, March 2022]The old railway with the lane beside it used to pass under the road above. There is a modern bridge in place of the double-arched masonry structure that once stood at this location. The read line entering the image from the left was the Saundersfoot Railway branch to Grove Colliery [Google Streetview, March 2022]A distant view of Stepaside from the Southwest. The arch bridge is visible at the centre of the image. This photograph was shared by Paul Wyatt on 28th January 2020 on the Kilgetty, Begelly, Stepaside and Pentlepoir Community Voice Facebook Group. [194]Looking East across the old arch bridge in Stepaside. This picture was shared on the Kilgetty, Begelly, Stepaside and Pentlepoir Community Voice Facebook Group by Paul Wyatt on 27th April 2018. [193]The old bridge at the centre of Stepaside. [192]Gary Davies shared this image from May 1970 of the old bridge. He notes that it was built by Thomas Telford. The image was shared on the Tenby and Saundersfoot Through Time Facebook Group on 9th May 2020. [197]This close up image of the 6″ OS Map shows the railway and lane running under the double-arched masonry structure supporting the road. It also highlights the two railway junctions either side the the bridge. [185]
Before passing under the bridge we take a quick look back down the branch to Grove Colliery.
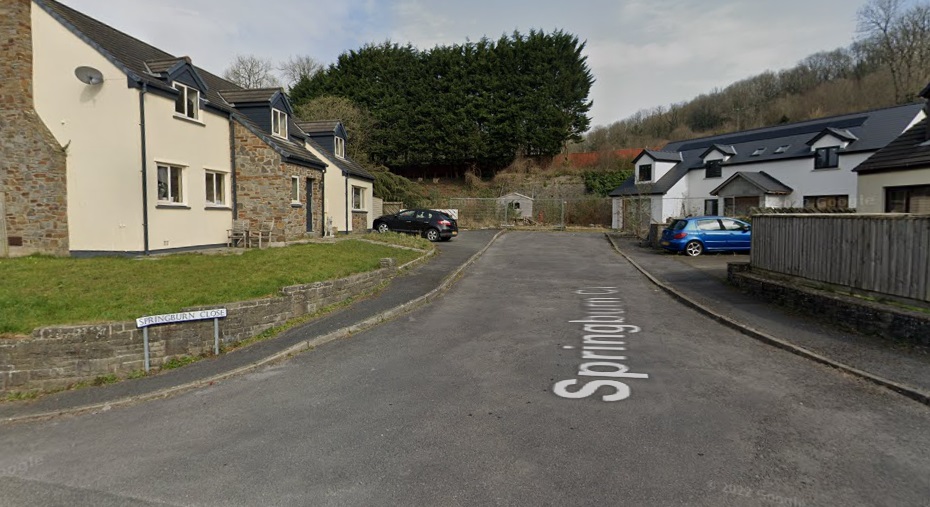
Looking south from the modern bridge over the old railway route the Saundersfoot Railway ran along the verge of the highway. A branch-line ran off to the West to Grove Colliery. The old line has been built over by a small housing estate. That branch climbed the hill behind the estate in this picture. [Google Streetview, March 2022]
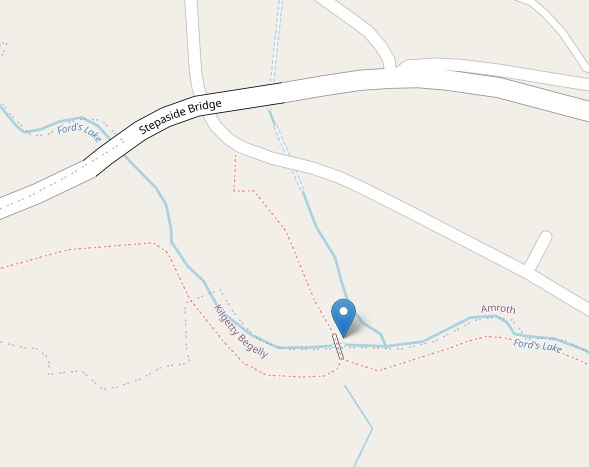
Beyond the housing visible in the picture above the railway crossed the old Kilgetty Canal before climbing the hill beyond. The tramway bridge now carries a footpath as shown on the OpenStreetmap extract below. British Listed Buildings website tells us that the bridge carried the “private branch of the tramway known as the Saundersfoot Railway to the high level of Kilgetty Ironworks of the Pembrokeshire Coal and Iron Company (which commenced production in 1849) and on to Grove Colliery of the same Company. As it is likely to have been one of the first things constructed, its date is probably c.1846. It probably remained in tramway use until the closure of the colliery in c.1900.” [196]
The bridge is a single-arch skew bridge of local sandstone, with an arch span of about 4 m. and a width of about 6 m. Low parapet on the SW side, restored, with modern railings.
The location of the bridge on the line to Grove Colliery (c) Openstreetmap. [196]
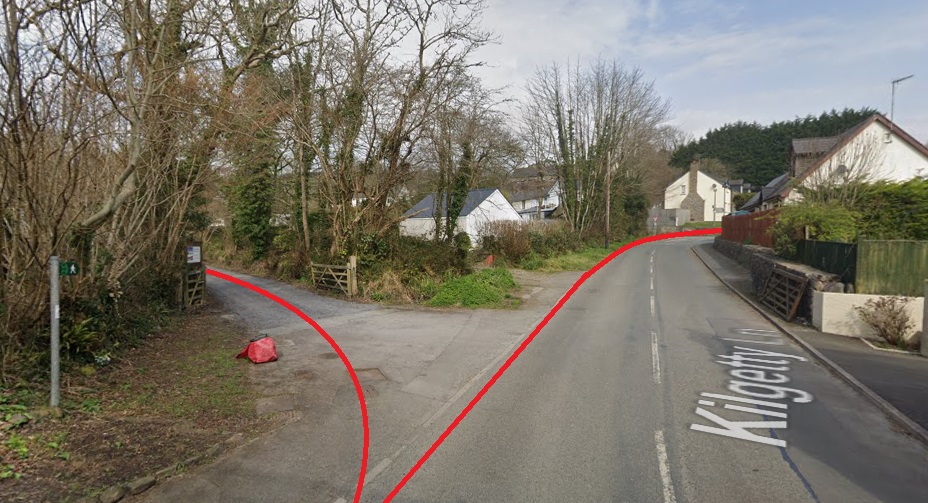
On the other side of the bridge the old railway has another junction. The longer arm to the left heads for Lower Level Colliery. The route ahead served Kilgetty Colliery. I have not as yet been able to find photographs of these two collieries.
The Railway ran on to Lower Level Colliery along the track to the left. Kilgetty Colliery was ahead on what is now called Kilgetty Lane. [Google Streetview, March 2022]The site of Kilgetty Colliery in the 21st century. [Google Streetview, March 2022]
We noted above how the route of line to Lower Level Colliery crosses the line of the A477. The composite image below brings together the 6″ OS Map of 1906 and modern satellite imagery to show how close Lower Level Colliery was to the line of the new road.
A translucent combined image of Lower Level Colliery and the modern A477. [185]
This is the point at which we leave the arm of the Saundersfoot Railway which ran North from the Harbour.
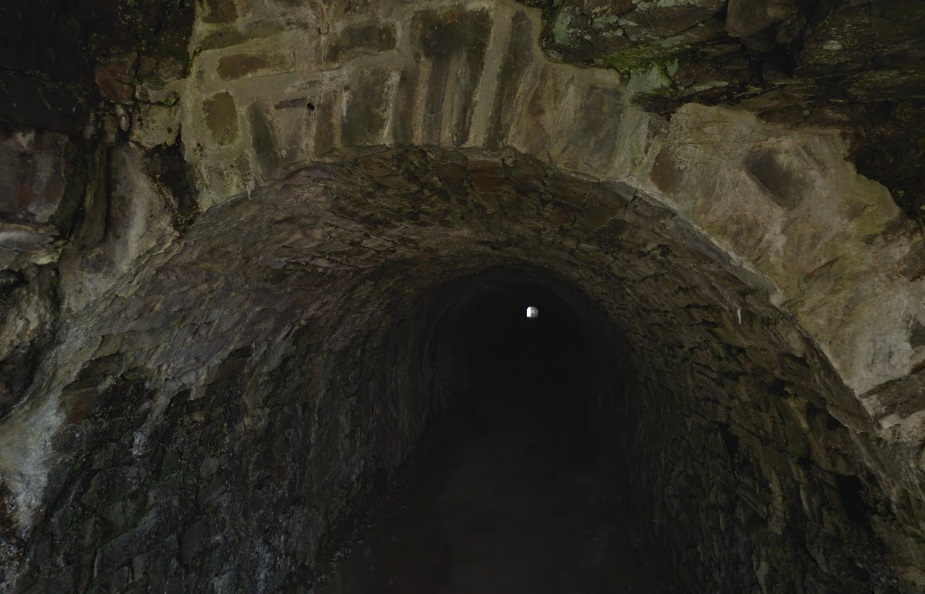
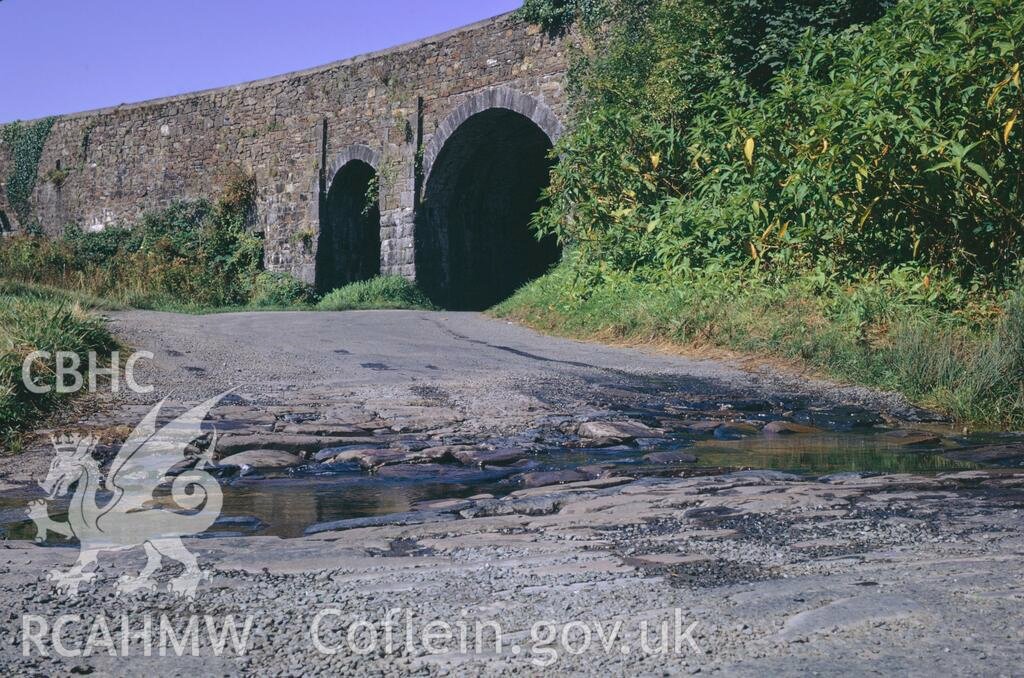
This picture of the ……. portal of the tunnel was taken and shared by Steve Briers on the Kilgetty, Begelly Stepaside & Pentlepoir Community Voice on 2nd February 2019. [184]
32. D S M Barrie, revised Peter Baughan; A Regional History of the Railways of Great Britain: volume 12: South Wales; David St John Thomas, Nairn, 1994.
36. Wing Commander Ken McKay; A Vision of Greatness: The History of Milford 1790-1990; Brace Harvatt Associates, 1989.
134. The tramroad was built between 1839 and1834, [1: p131][49] the harbour, between 1829 and 1830. [133] Boneville Court Colliery was not established until 1842 [1: p132] and the Ironworks were established in 1848/1849. The Ironworks were active intermittently until 1868 when the complex was sold to Bonville’s Court Coal and Iron Company around 1873. The ironworks finally closed in 1877 and were dismantled in 1887-89. The chimney stack above the furnaces was eventually demolished in 1909. [135]
144. These comments were made by Mike Roch and he indicates that he picked up the information from a book by M.R. Connop-Price, ‘Industrial Saundersfoot’. The comments are made alongside a series of photographs of the remailing lengths of the canal taken and shared by Mike Roch on 23rd November 2021 on the Saundersfoot & District Historical Society Facebook Group. The pictures can be found by following this link: https://www.facebook.com/groups/1806381086087895/search/?q=tramway, accessed on 23rd September 2022.
187. I found this image while searching on Facebook and cannot now find the dull link back to it. This is the record of the image that I kept … facebook_1664055146584_6979553157540841155.jpg … if anyone is better at following these things through on Facebook, please feel free to do so.


.jpg)