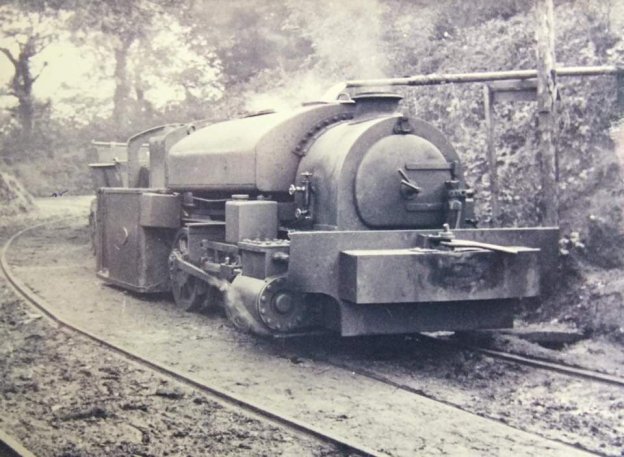
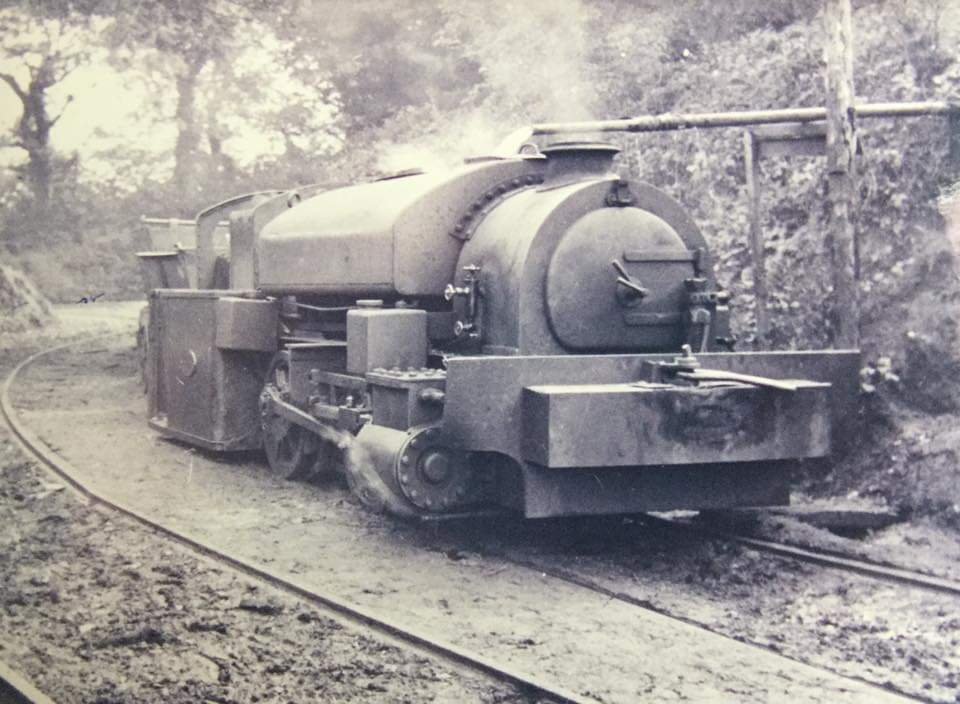
The featured image above shows the Locomotive Bulldog which was used on the length of the line between the Inclined Plane and Reynalton Colliery.
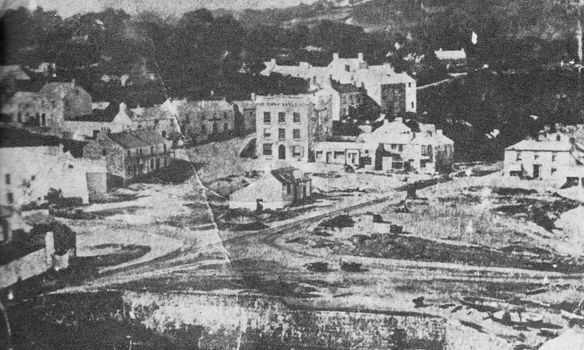
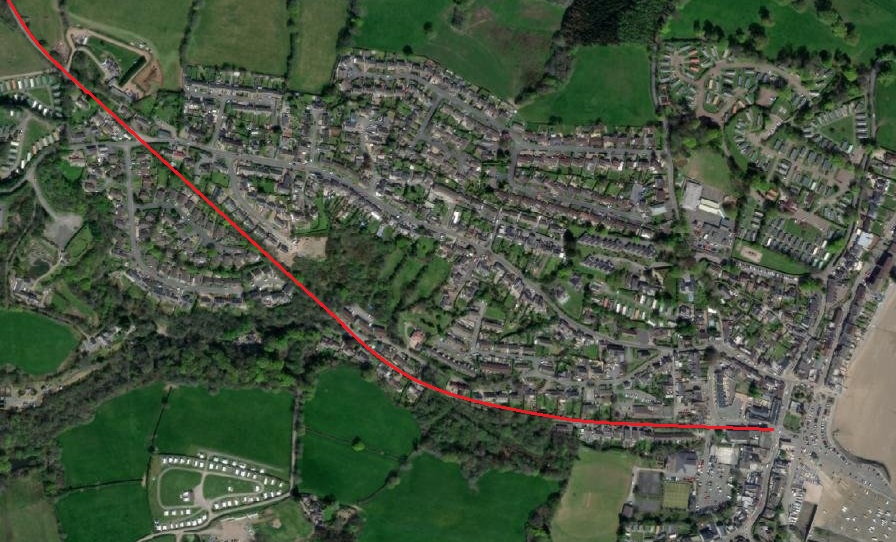
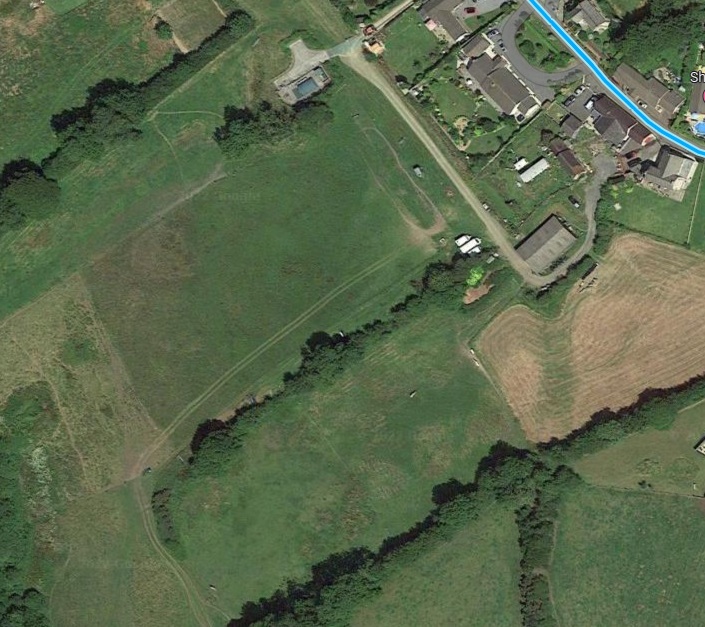
This is a follow-up to the first article about the Saundersfoot Railway. The first article covered the history of the Railway and then went on to look at the route of the line from Saundersfoot Harbour via Wiseman’s Bridge to Stepaside. That is the arm of the Railway shown on the right-hand side of the image below.
The first article can be found by following this link:
These articles are part of a series looking at the railways of Pembrokeshire. Full details of that series can be found in the first article about the Saundersfoot Railway.
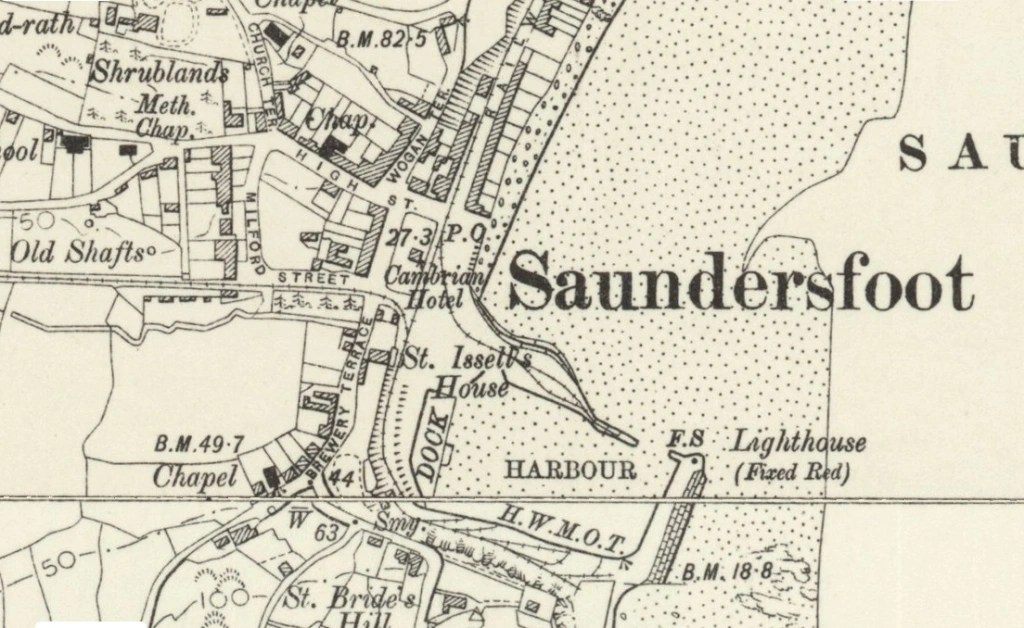
This map of the Saundersfoot Railway was shared on the Tenby and Saundersfoot Through Time Facebook Group by Mark Davies on 26th November 2015. [148]
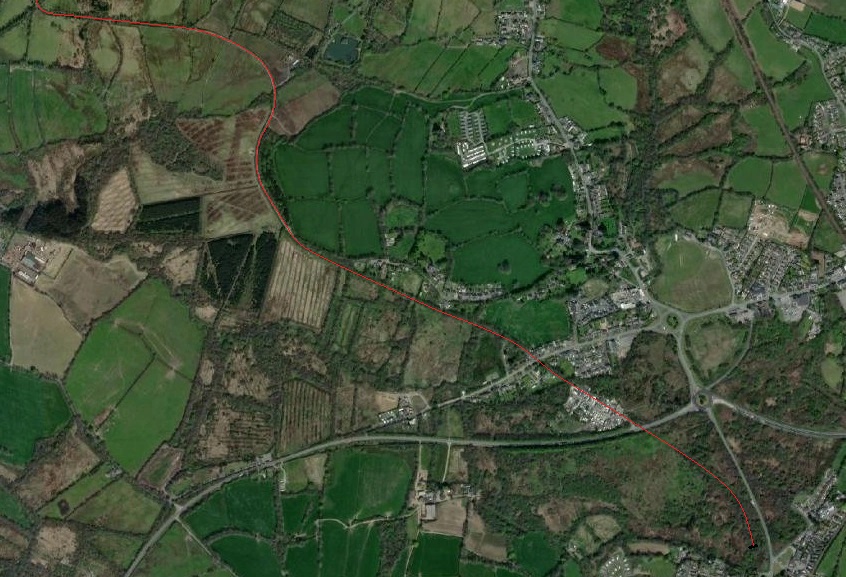
This article follows the line running West from Saundersfoot Harbour under Saundersfoot Railway Station to Reynalton at the left side of the map above.
Saudersfoot Harbour to Reynalton Via Saundersfoot Tunnel (Kingsmoor Tunnel)
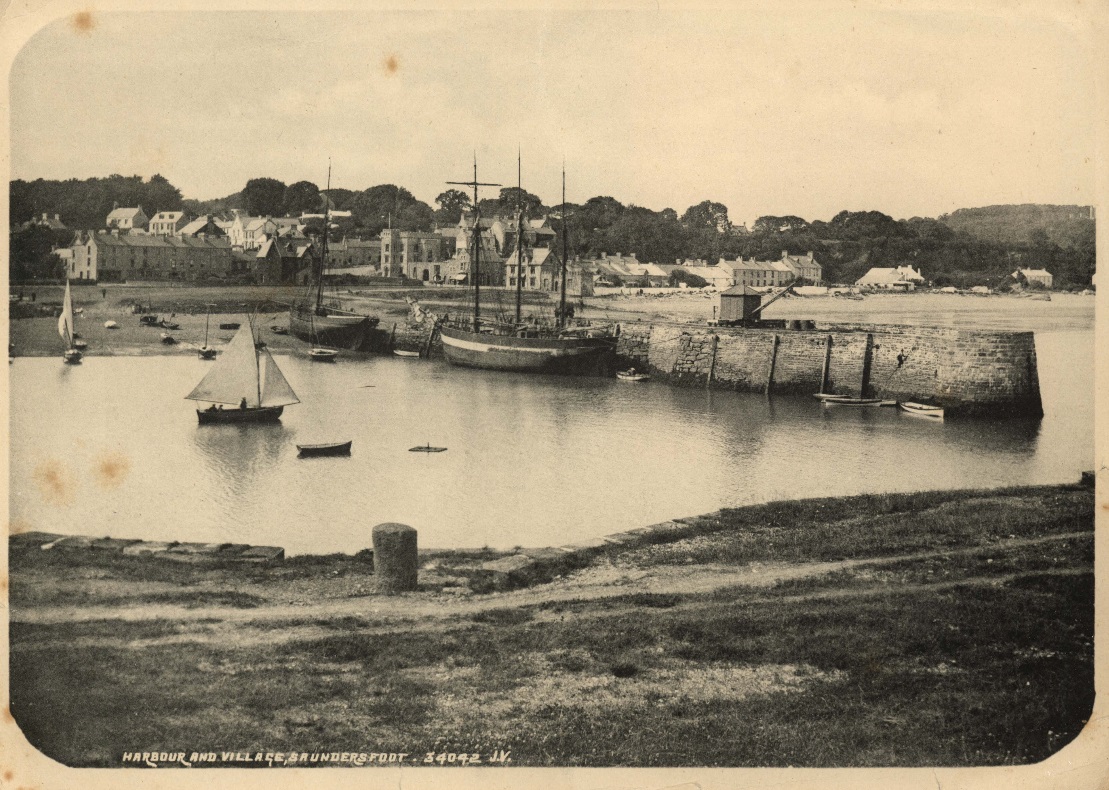
We start this journey with some of the pictures from the first article of Saundersfoot Harbour. We begin with two very early views of the harbour and its tramroad.
This picture showing coal being loaded onto a vessel at Saundersfoot Harbour was shared on the Saundersfoot & District Historical Society’s Facebook Group on 25th May 2020 by Gillian Hibberd.[141]
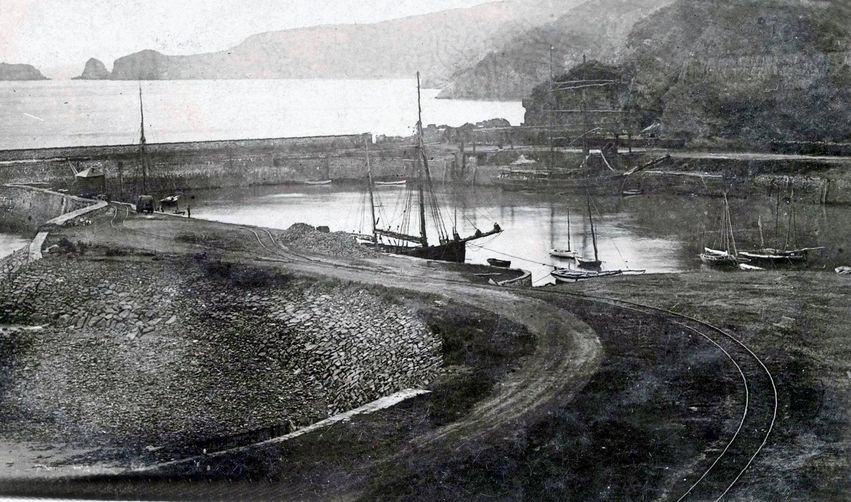
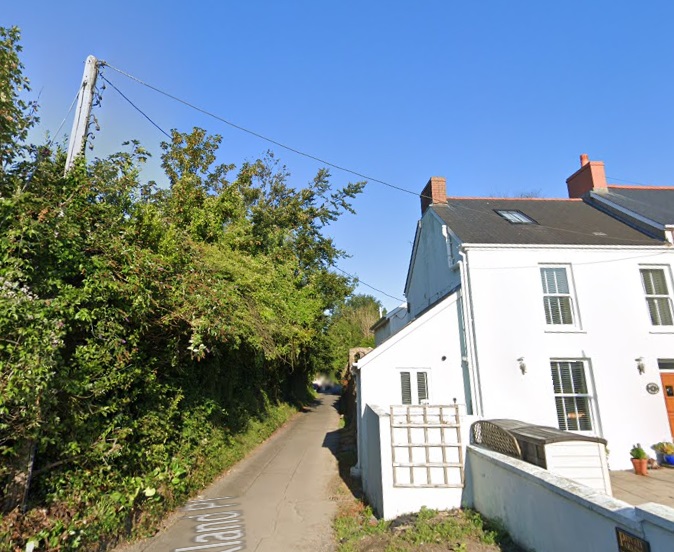
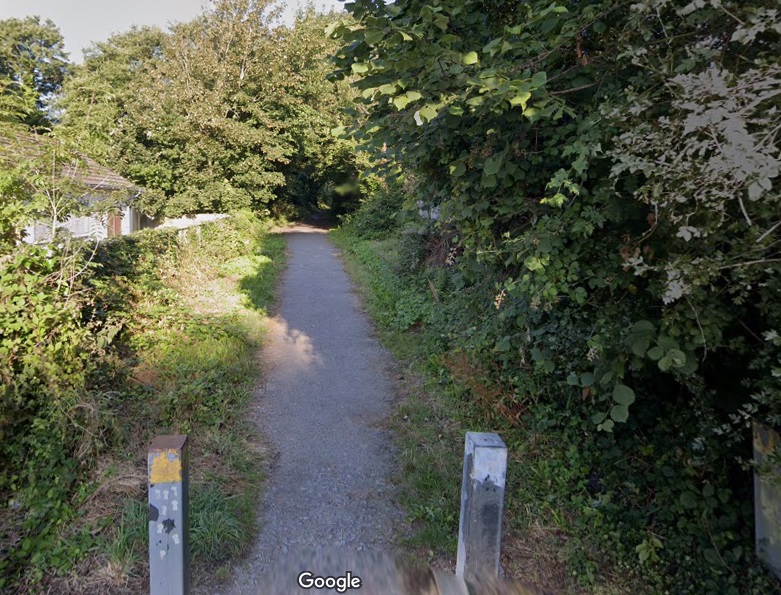
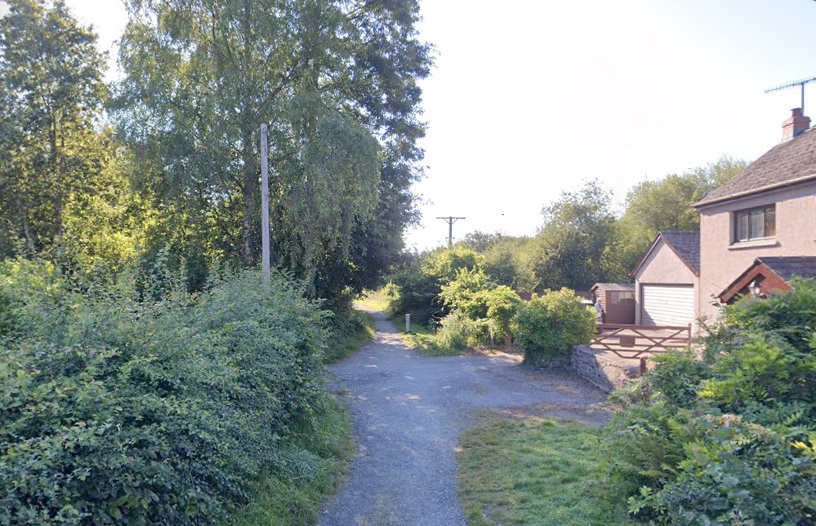
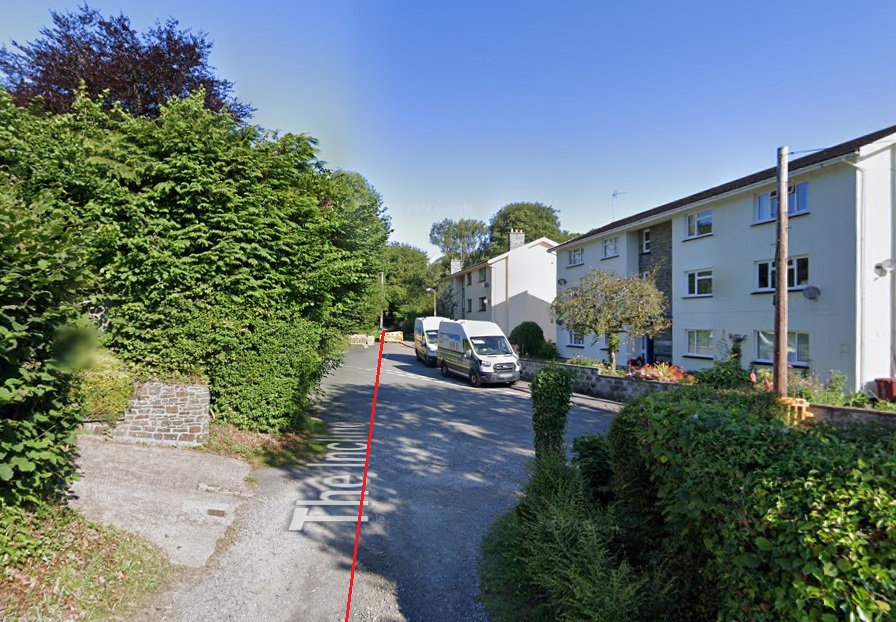
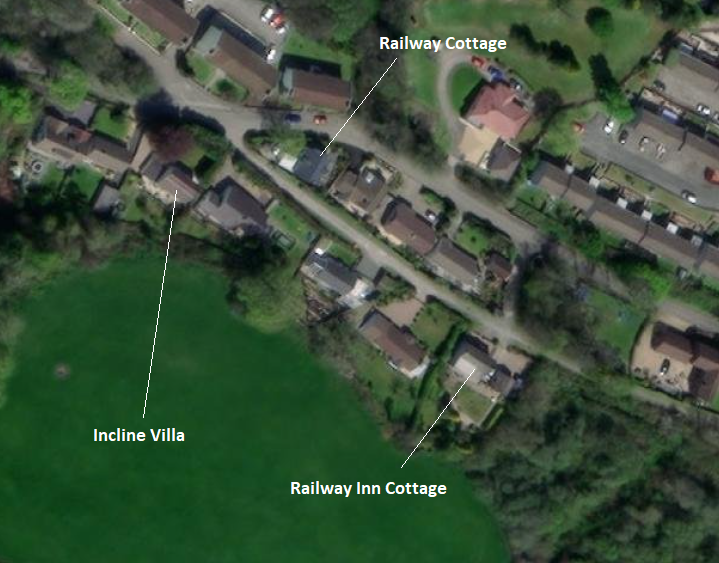
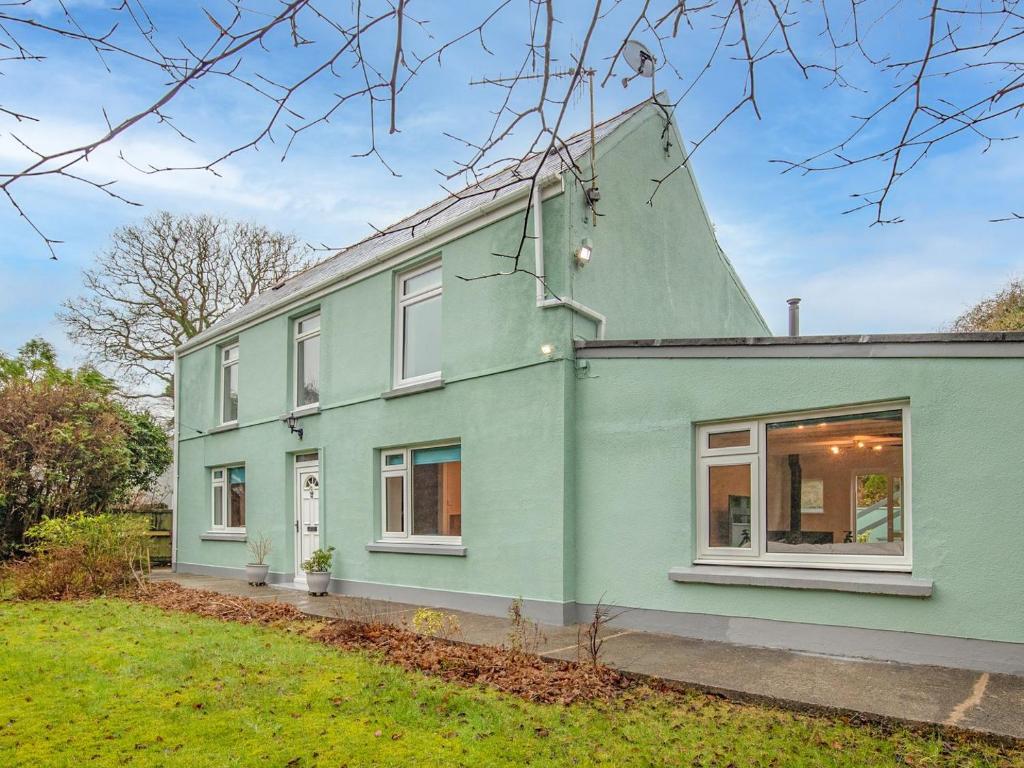
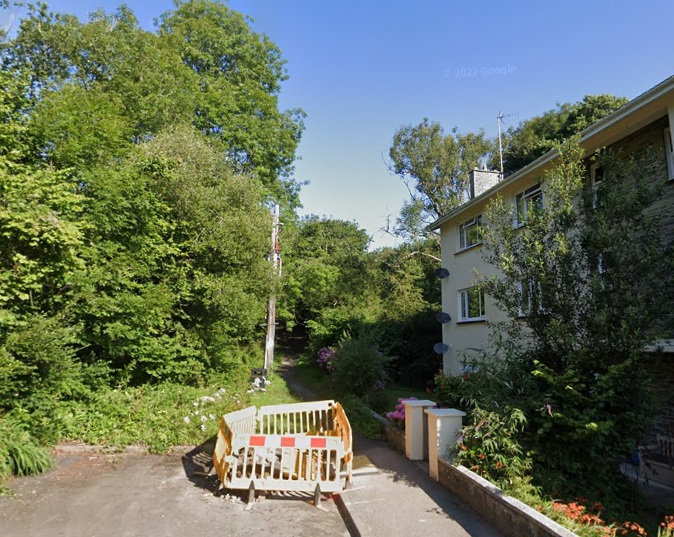
This picture showing Saundersfoot Harbour was shared on the Saundersfoot & District Historical Society’s Facebook Group by Gillian Hibberd on 24th May 2020. Note the railway tracks leading onto the North Harbour Wall. [225]A 1936 image of Saundersfoot Harbour looking Southeast from the North wall with the railway in the foreground. This image was shared by Gary Davies on 15th September 2019 on the Tenby and Saundersfoot Through Time Facebook Group. Gary Davies writes that there appears to only be “one coal wharf operating to fill the hold of this steamer the industrial era of the Harbour is coming to an end. As Bonvilles Court Colliery had closed in 1929 and the screens there were washing coal from Broom and Kilgetty Collieries. It wasn’t to long before the coal was sent out on the mainline branch of the GWR via the siding at Bonvilles Court Colliery. This would have been one of the last few coal steamers to come into the Harbour to load coal as by 1939/40 the export of coal from the Harbour had ceased.” [159]This image shows Rosalind heading away from the South quay at Saundersfoot Harbour. She is heading for Railway Street (The Strand) with the Miner’s Express. If she were to be travelling on Milford Street she would be turning left just behind where we are standing. [187]1906 6″ Ordnance Survey [199]Modern satellite imagery of the same area with the railway alignment shown as a red line. [199]Looking West along Milford Street, Saundersfoot in the 21st century. [Google Streetview, March 2022]Looking West along Milford Street, Saundersfoot in the 21st century. The railway ran approximately on the red line, heading off Milford Street (which turns to the right) down what is now called Brookland Place. [Google Streetview, March 2022]Looking back East along Milford Street from Brooklands Place. The railway ran approximately on the red line. [Google Streetview, August 2021]Looking West along Brookland Place. The road has been laid over the line of the old railway. [Google Streetview, August 2021]The view West from the end of Brookland Place looking along what is in the 21st century known as ‘The Incline’. The footpath follows the line of the old railway. [Google Streetview, August 2021]Looking back East along ‘The Incline’ towards Saudersfoot Harbour. [Google Earth, August 2021]Looking West along ‘The Incline’. The footpath continues to follow the line of the Saundersfoot Railway. [Google Streetview, August 2021]The route of the old railway crosses Westfield Road. [Google Streetview, August 2021]This enlarged view of the 6″ OS Map of 1906 shows the area around the bottom of the Inclined Plane. [199]The key buildings on the map above are highlighted on this NLS supplied satellite image of the same area. All of the buildings have been adapted for modern living. One, Incline Villa, is identified as a holiday let in the 21st century. [199]Incline Villa as advertised as a holiday let. The two storey element of the building has been expanded by the single storey extension. [205]The photograph was taken at approximately the point where the railway crossed what is now Westfield Road. It was shared on the Tenby and Saundersfoot Through Time Facebook Group by Mark Davies on 26th November 2015. [151]Beyond Westfield Road the footpath follows the line of the old railway. [Google Streetview, August 2021]Looking back towards Saundersfoot Harbour towards the line of the old railway from the East end of Incline Way. This footpath links to the line of the old railway. [Google Streetview, March 2022]The east end of Incline Way almost meets the line of the old railway which is shown in red and which continues to be a footpath in 21st century. At this point the incline is carrying the railway up onto the escarpment behind Saunderfoot. [199]Two pictures taken at different points along the Incline in November 2021 by Jonathan Kedward and shared by him on the Ancient Monuments UK’s website. [204]
This small extract from the 1906 6″ Ordnance Survey shows the same are as appears in the satellite imagery immediately above. As can be seen, very close to this location the three rails of the incline separated into four to allow wagons to pass. [199]
This extract from the 6″ Ordnance Survey shows the full length of the Incline. As can be seen there was a passing loop at half-height, referred to above, and a passing loop at the head of the incline. The building at the head of the incline shown below does not appear on the 1906 Survey, but does appear on the 1887 Map. [199]
The 1887 6″ Ordnance Survey shows the building at the head of the incline and a second loop closer to the highway which does not appear on the 1906 Survey. The existence of remains of the winding house in 2021 (see below) suggests that the building was missed off the 1906 survey. [201]
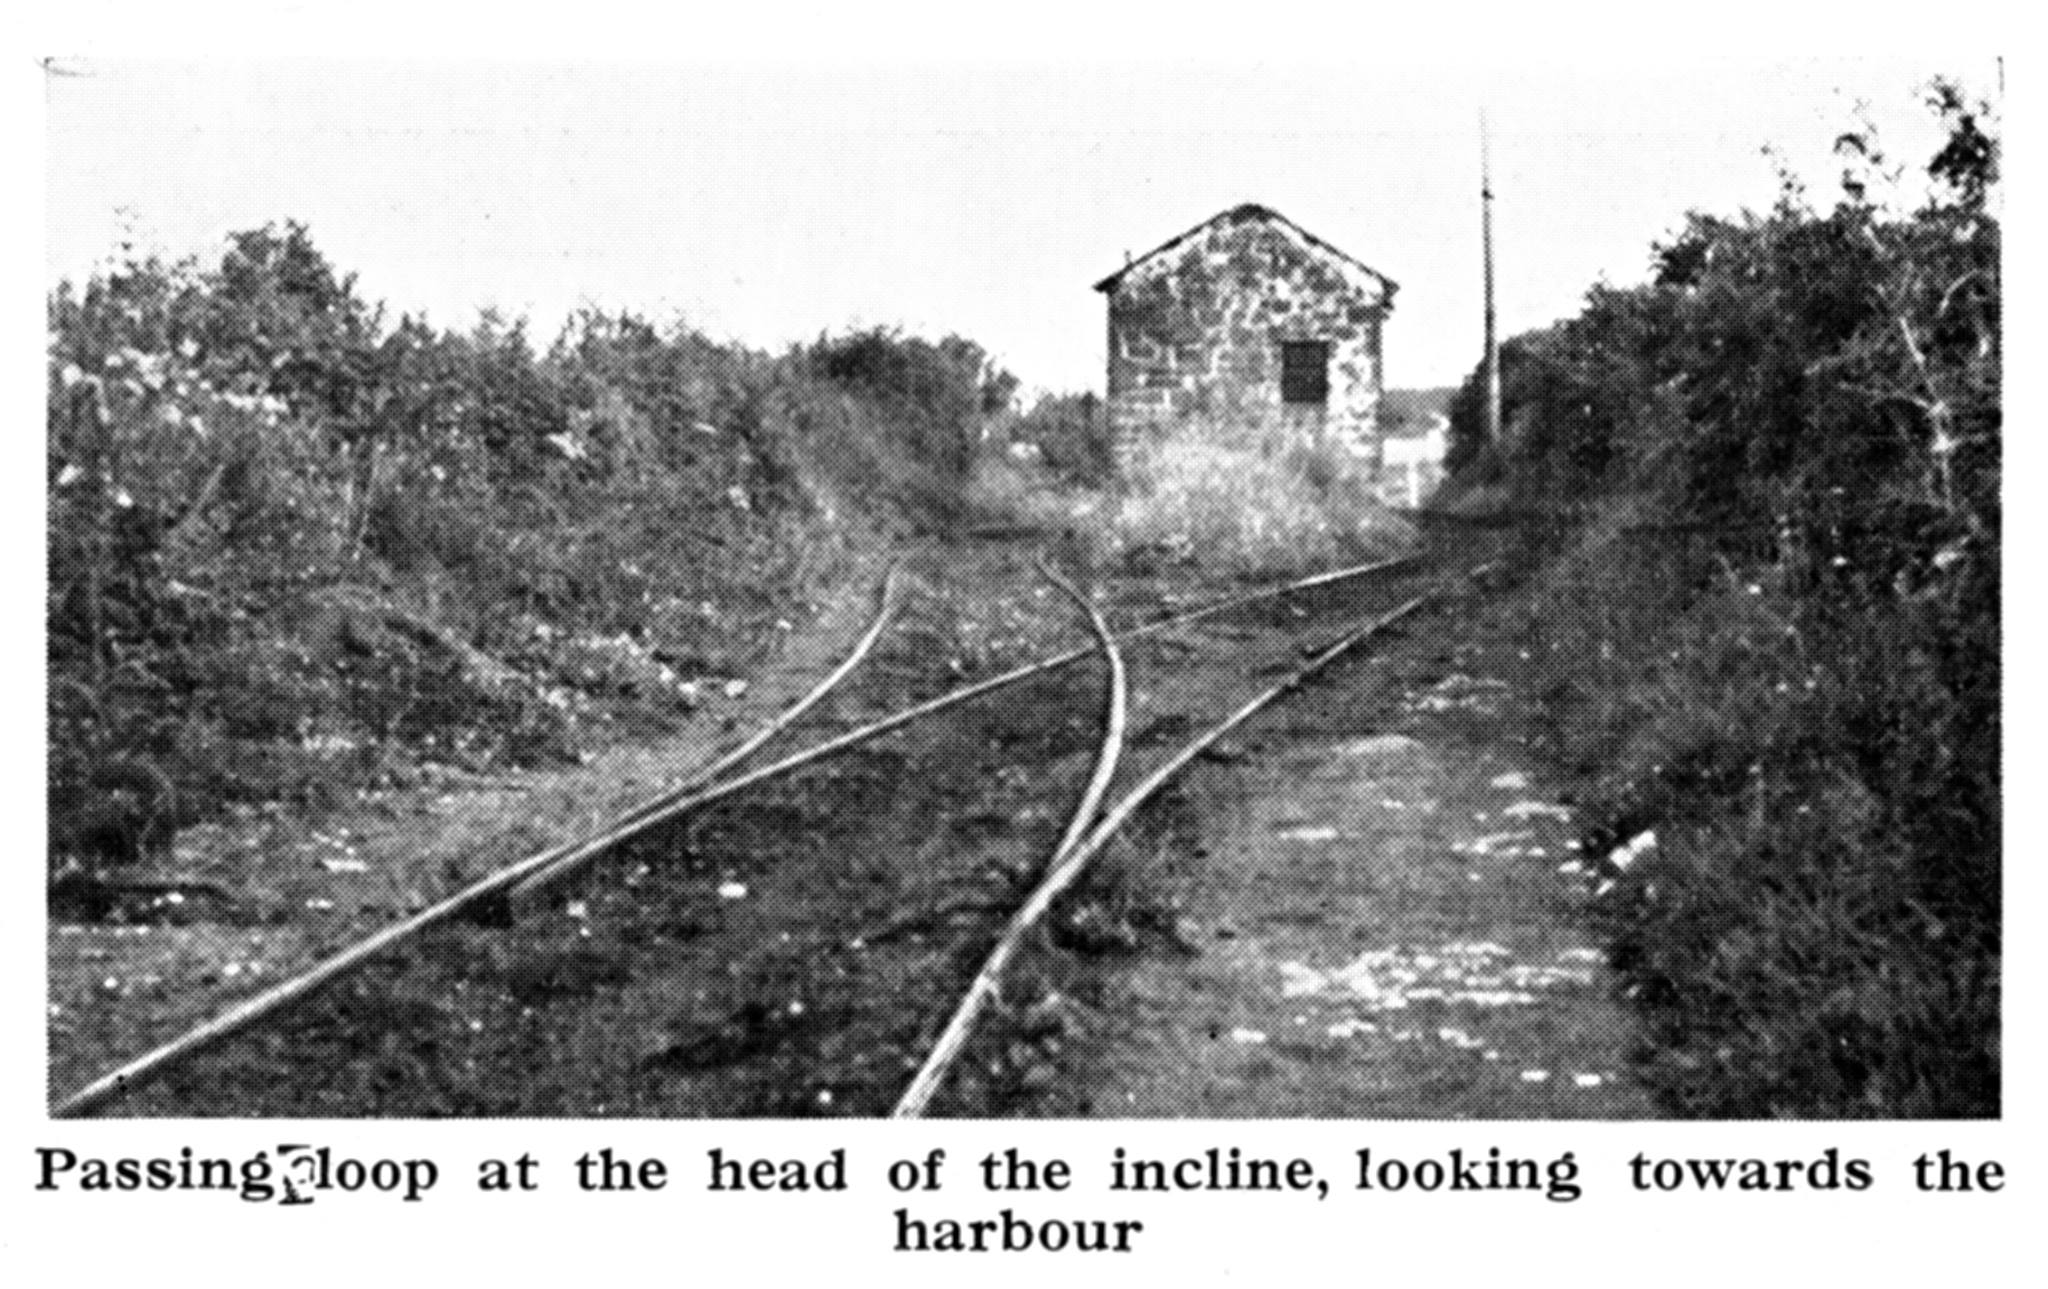
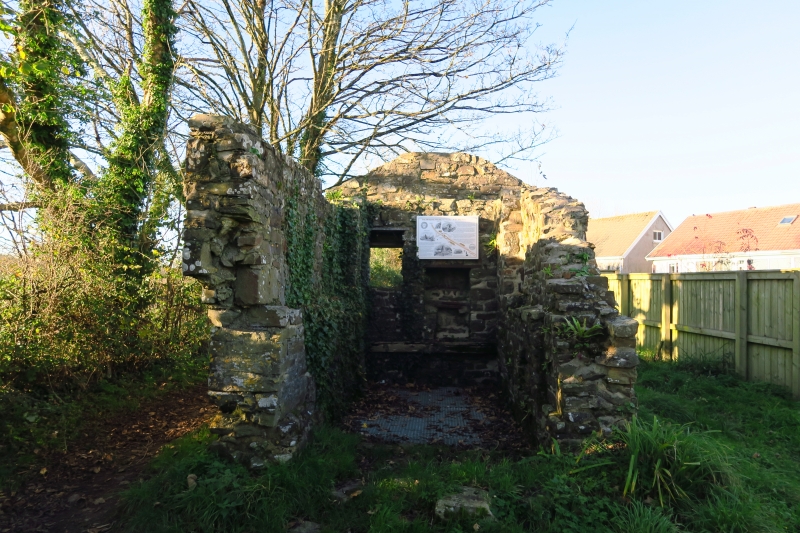
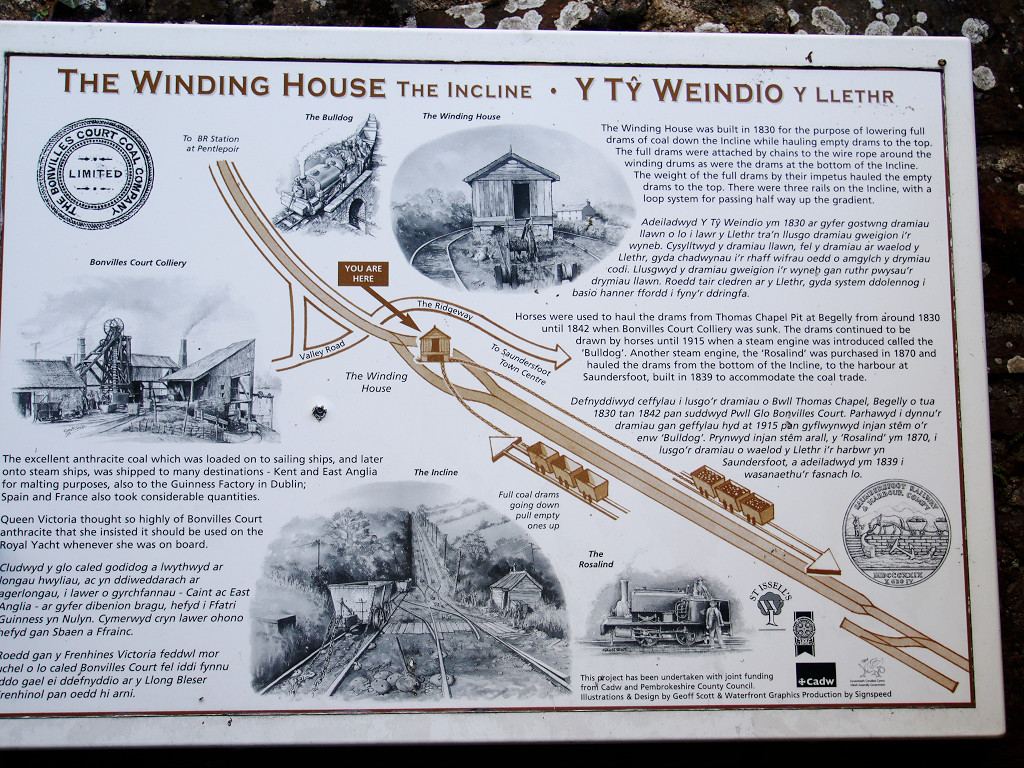
The photograph was shared on the Tenby and Saundersfoot Through Time Facebook Group by Mark Davies on 26th November 2015. It shows the passing loop at the head of the Incline. The photograph was taken facing Southeast towards Saundersfoot Harbour. [151]The remains of the winding house in November 2021. This photograph was taken by Jonathan Kedward and shared by him on the Ancient Monuments UK website. [204]The excellent information board at the Winding House pictured above. [206]The photograph was shared on the Tenby and Saundersfoot Through Time Facebook Group by Mark Davies on 26th November 2015. It shows the top of the Incline, facing Southeast, after closure and was probably taken from the location of the winding house shown in the picture above. [151]
Coflein records the Inclined Plane as follows: “The main line of the Saundersfoot Railway … opened in 1832 between Saundersfoot Harbour … and Thomas Chapel. It was built to a gauge of 4ft 0 3/8in and originally worked by horses. A self-acting incline, some 300m long and on a gradient of 1 in 5, lay about 800m west of the harbour. At the foot was a siding and hut whilst at the summit was a winding house. The track on the incline was double with a shared inner rail, widening to a loop midway allowing wagons to pass.” [203]
The incline was 363 metres long. Ancient Monuments UK’s website records the site as follows: “The monument consists of the remains of a complete tramroad incline formation from an important horse-drawn tramroad built in 1832, including a former counterbalance drum housing and marshalling areas at top and bottom. The monument is of national importance for its potential to enhance our knowledge of 18th and 19th century industrial and transportation practices. It retains significant archaeological potential, with a strong probability of the presence of associated archaeological features and deposits. The structure itself may be expected to contain archaeological information concerning chronology and building techniques. A drumhouse may be part of a larger cluster of monuments and their importance can further enhanced by their group value.” [204]
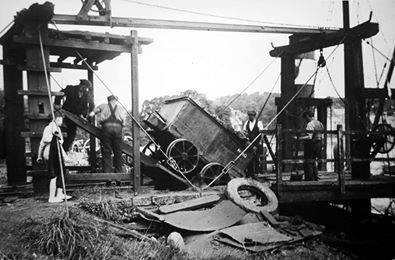
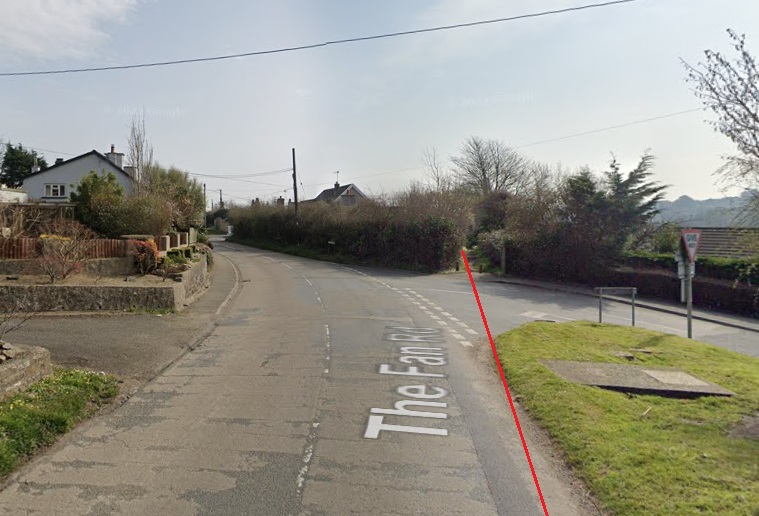
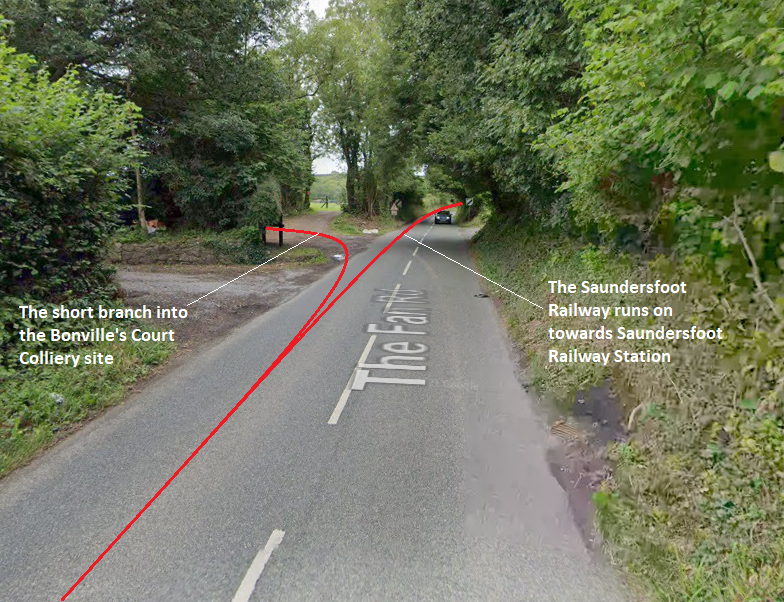
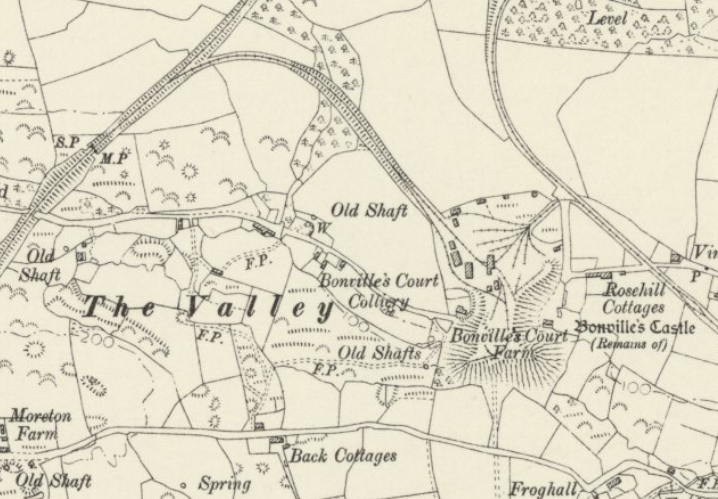
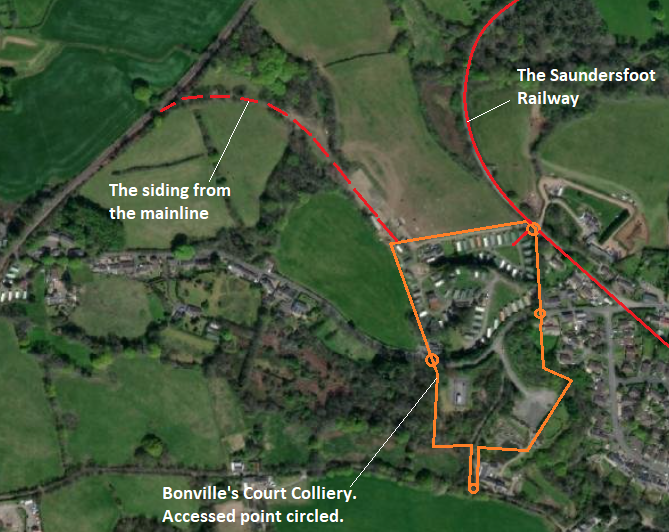
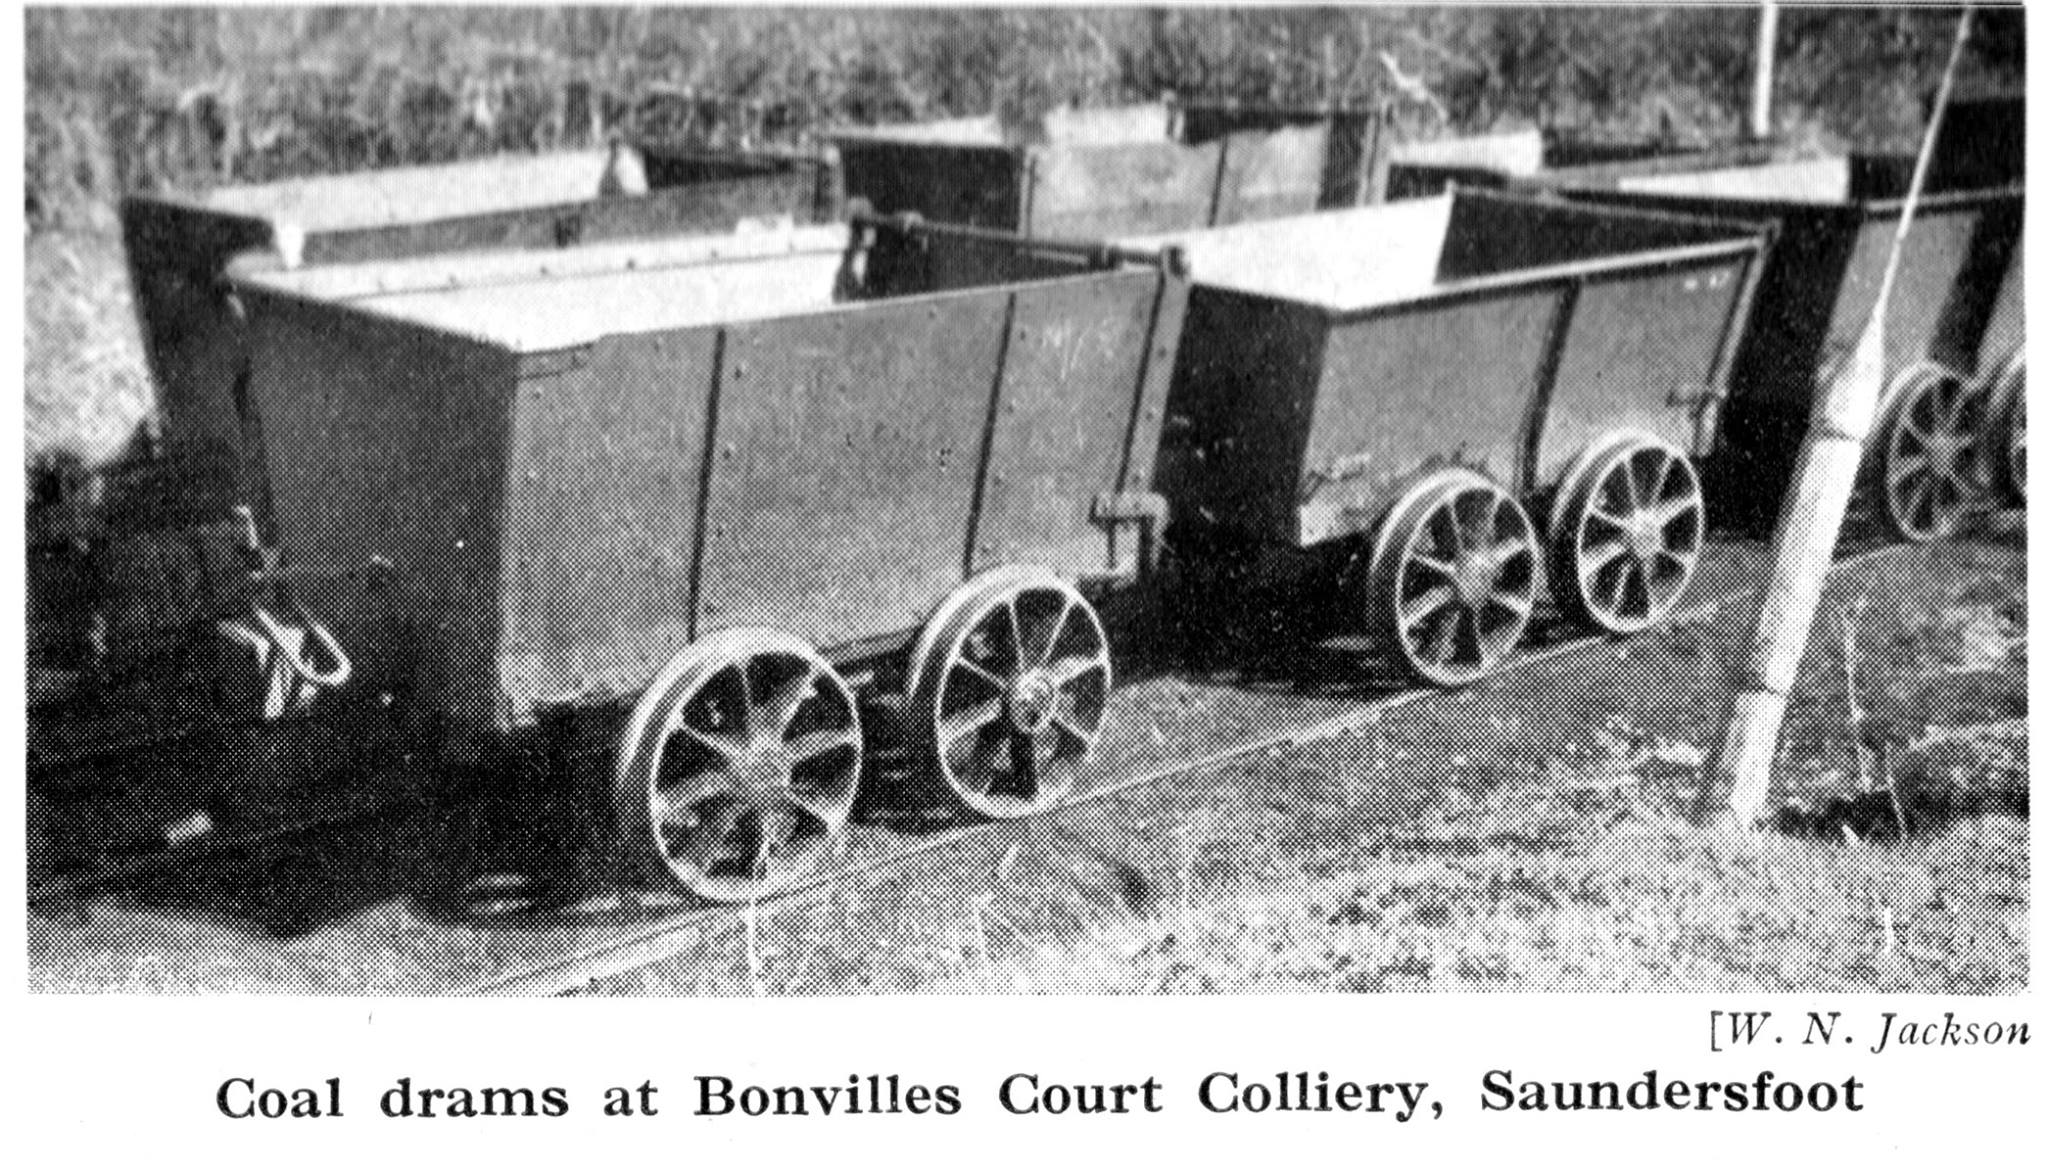
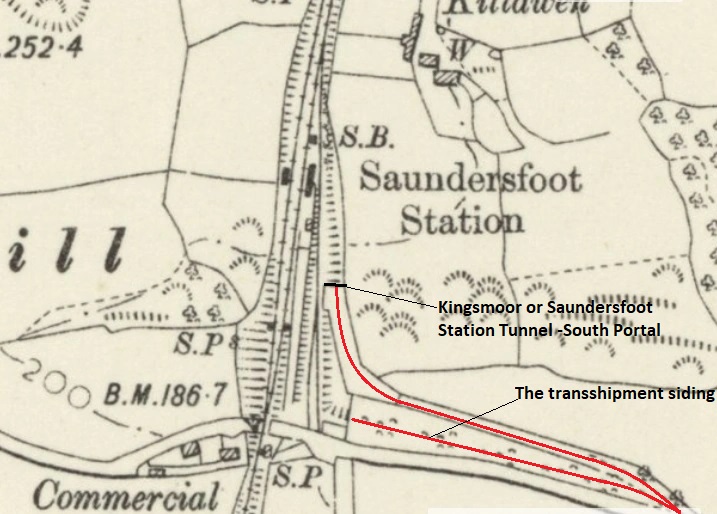
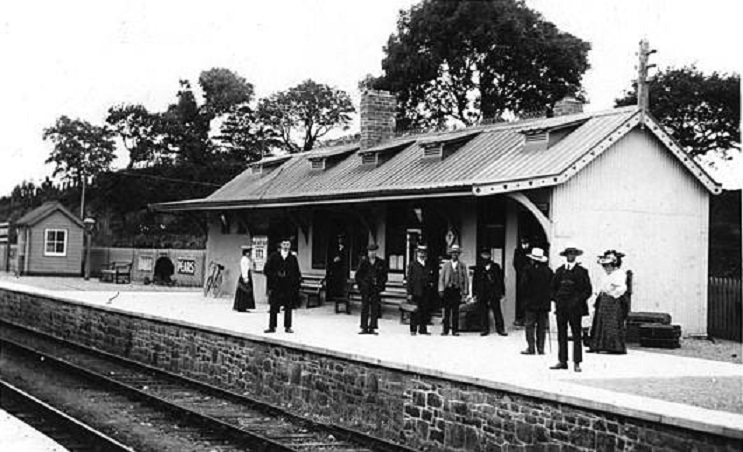
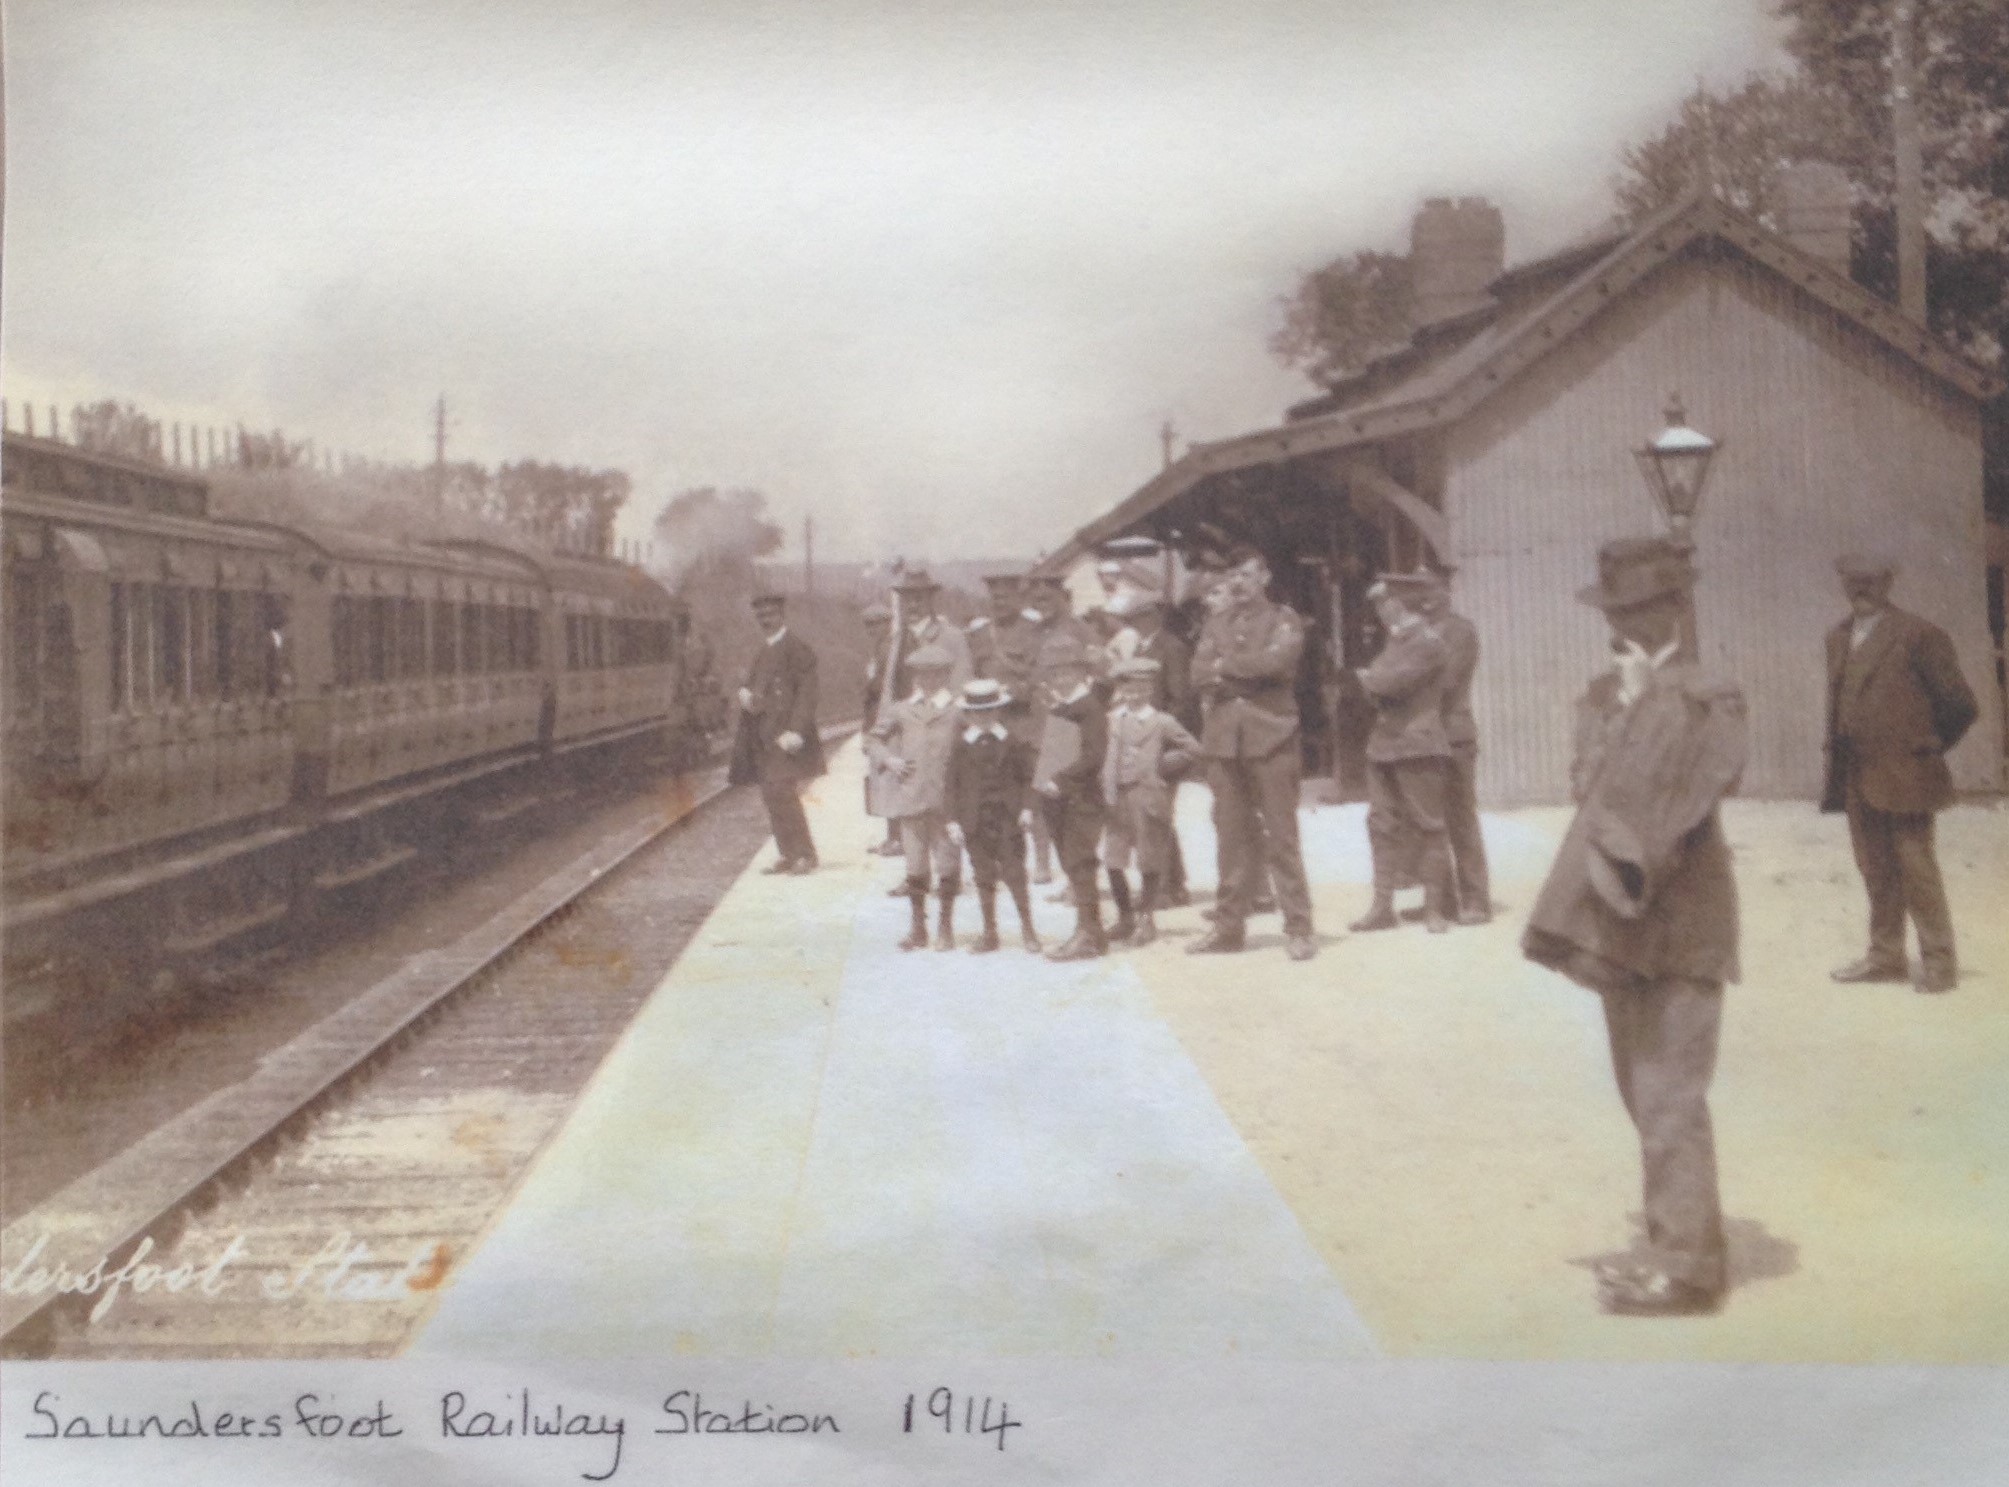
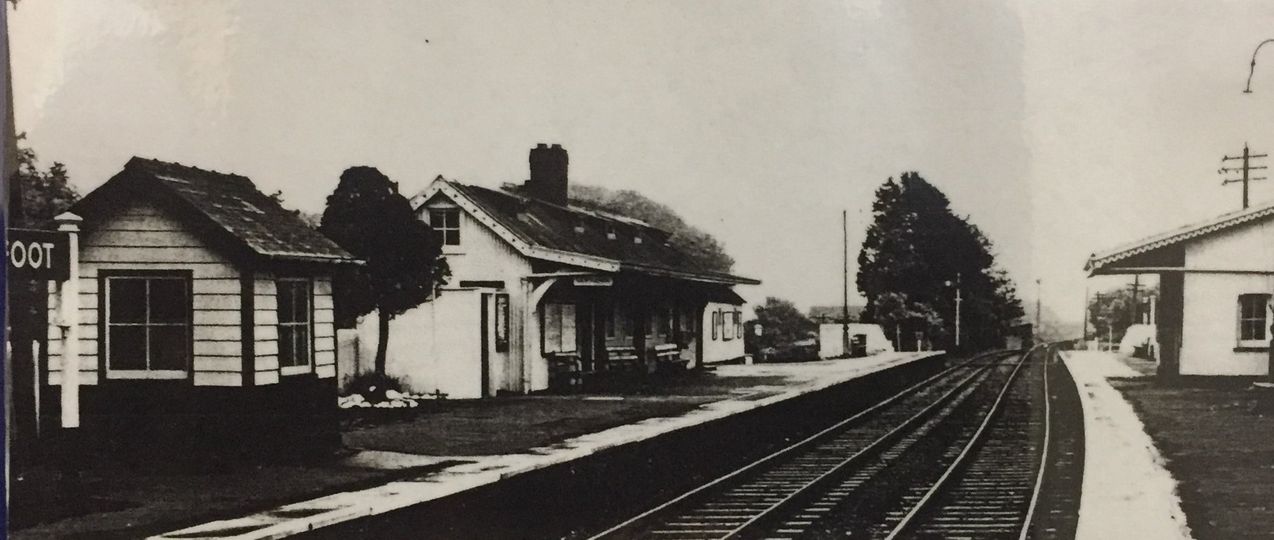
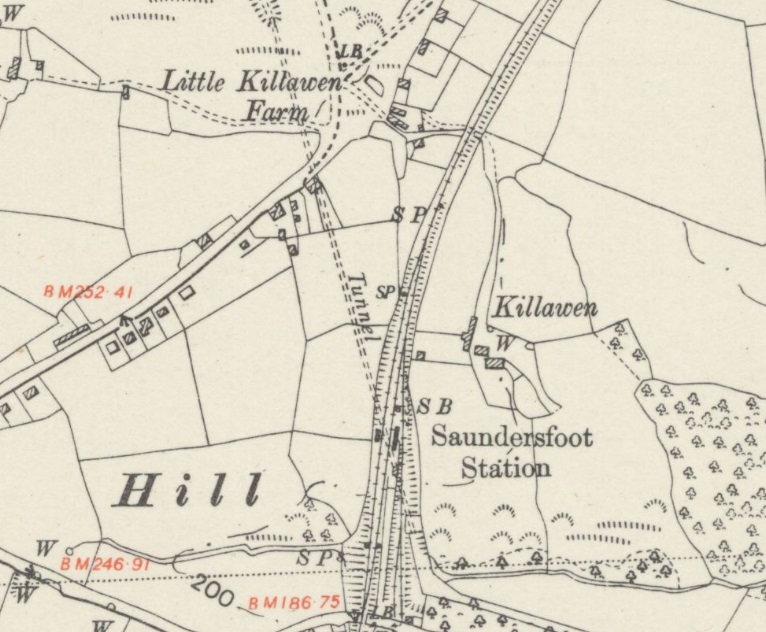
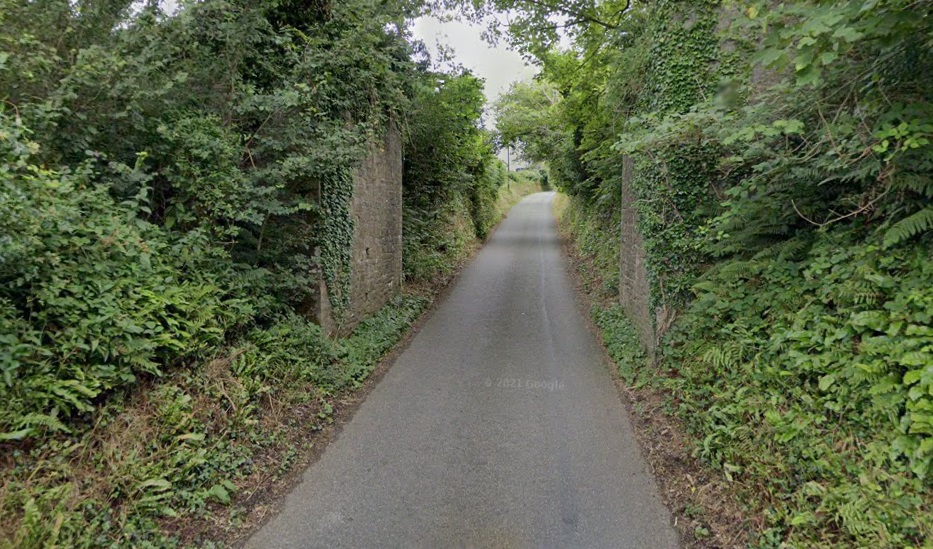
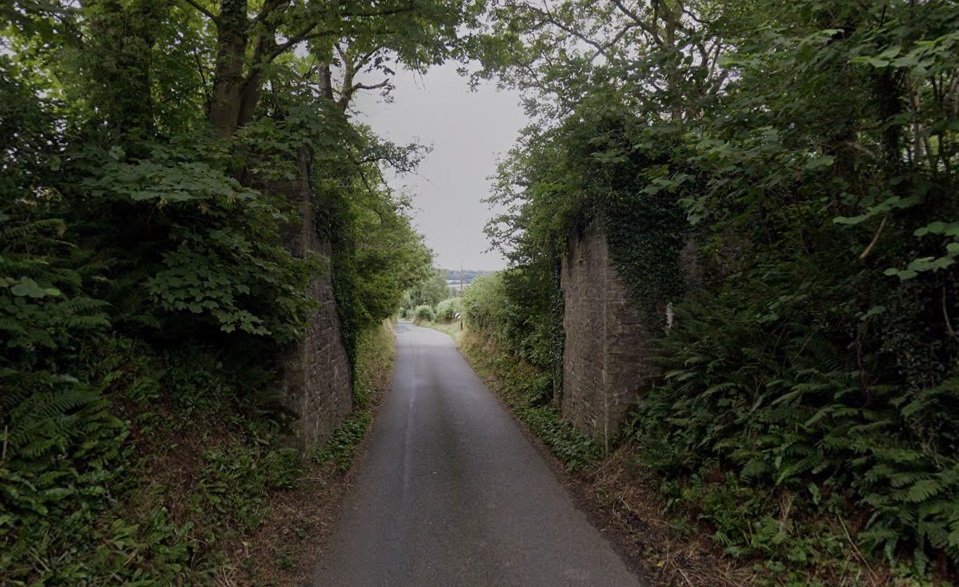
Looking back Southeast towards the Incline from ‘The Fan Road’, the modern road which follows the line of the old railway. Valley Road enters from the right in this image. [Google Streetview, March 2022]Looking Northwest, The Fan Road follows the line of the Saundersfoot Railway. [Google Streetview, March 2022]The Saundersfoot Railway’s branch into the Bonville’s Court Colliery. [Google Streetview, August 2018][201]The 1906 Ordnance Survey shows the branch-line from the Great Western Railway which was installed around the turn of the 20th century after a long campaign by Boneville’s Court Colliery’s owner. It finally superseded the Saundersfoot Railway and its access to the mainline at Saundersfoot Railway Station, see below. [202]The modern satellite image has the key features mark in red and ochre. [202]The Locomotive Bulldog sits taking water close to the entrance to the colliery. This image was shared by Gary Davies on the Saundersfoot and District Historical Society Facebook Group on 10th November 2018. [180]Bonvilles Court Colliery, which was active between 1842 and 1930; it was served first by the Saundersfoot Railway (and then from 1896 by a branch from the Pembroke & Tenby Railway (GWR). Following closure, part of the site was converted into a screening plant and storage yard. This picture was shared on the Tenby and Saundersfoot Through Time Facebook Group by Kenneth Townsend on 12th July 2019. [156]Two more photographs of the Colliery. [209][208]The photograph was shared on the Tenby and Saundersfoot Through Time Facebook Group by Mark Davies on 26th November 2015. [151]Looking North-northwest along The Fan Road, beyond Bonville’s Court Colliery, which follows the line of the old railway. [Google Streetview, March 2022]The 1906 6″ Survey shows the Saunders foot Railway snaking across the fields towards Saundersfoot Station. [200]Modern satellite imagery confirms that The Fan Road follows the alignment of the old railway to reach the B4316. The trees on the North side of the B-road hide the alignment of the old railway as it approached Saundersfoot Station along an alignment separate from but parallel to the B4316. [200]Saundersfoot Railway Station as shown on the 1906 6″ Ordnance Survey provided by the NLS. Both the transshipment siding and the line down to the tunnel have been added as red-lines. [210]The same area on the modern ESRI satellite imagery provided by the NLS. The area of the siding as theaccess to the tunnel are shown heavily wooded. In around 2018 the undergrowth was cutback to reveal the man-made embankment and rail routes. Please see the photograph below. [210]The same location on the 1887 6″ Ordnance Survey. By this time, the tunnel already appears dis-used. However, at a later date, 1915 or so, the line was opened up again and the locomotive Bulldog was purchased to supply the colliery at Reynalton. Sadly that period of operation is not picked up by the Ordnance Survey as the next revision took place in 1948 after closure of the line. [211]from the site of Saundersfoot Railway Station in 2018, this view shows the alignment of the Saundersfoot Railway. The B4316 is on the right of the image. This photograph was shared on the Tenby and Saundersfoot Through Time Facebook Group by Gary Davies on 15th April 2018. He commented at the time: “Now the trees have been cut its … possible to see the route of the Saundersfoot railway. On the left side is the route to the Kingsmoor tunnel and on the right is the embankment siding for discharging coal from the Saundersfoot railway onto coal wagons of the Main Pembroke Dock to Whitland Railway via the exchange siding which came in behind Saundersfoot Station.” [164]Saudersfoot Railway Station. This picture was shared on the Tenby and Saundersfoot Through Time Facebook Group by John Stoot on 16th December 2017. [162]Saundersfoot Railway Station in 1914. This photograph was shared on the Tenby and Saundersfoot Through Time Facebook Group by Penny Brace on 13th February 2020. [163]Saundersfoot Railway Station. This photograph was share by Sarah Whiddett on the Saundersfoot & District Historical Society’s Facebook Group on 3rd March 2020. [207]Saundersfoot Station Bridge. Mark Davies shared this image on the Tenby and Saundersfoot Through Time Facebook Group on 26th November 2015. [165]
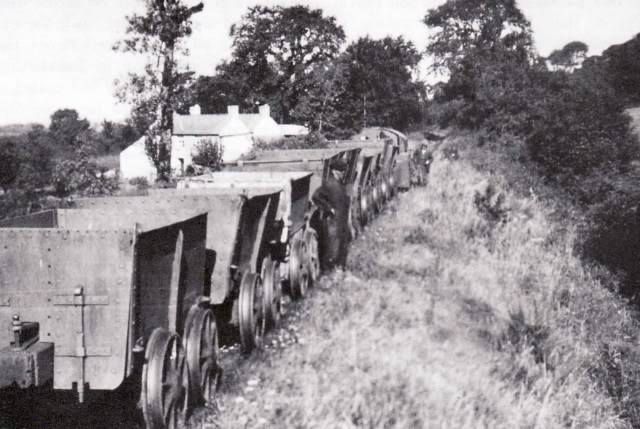
The tunnel under Saundersfoot Railway Station was constricted in size and as a result dictated the size of any locomotive which could be used. Bulldog was purchased in 1915. Full details of the loco can be found on the first post about the Saundersfoot Railway. There is a picture of it above at the entrance to Bonville’s Court Colliery. [213]
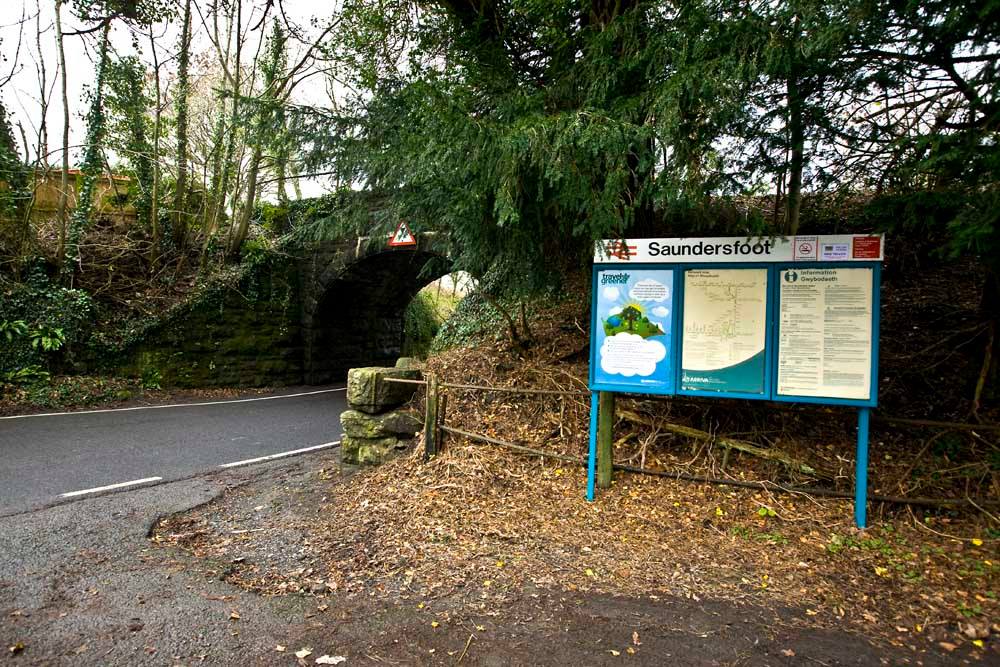
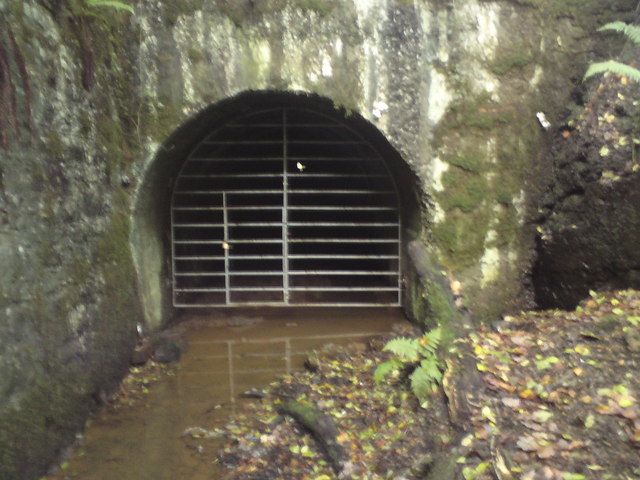
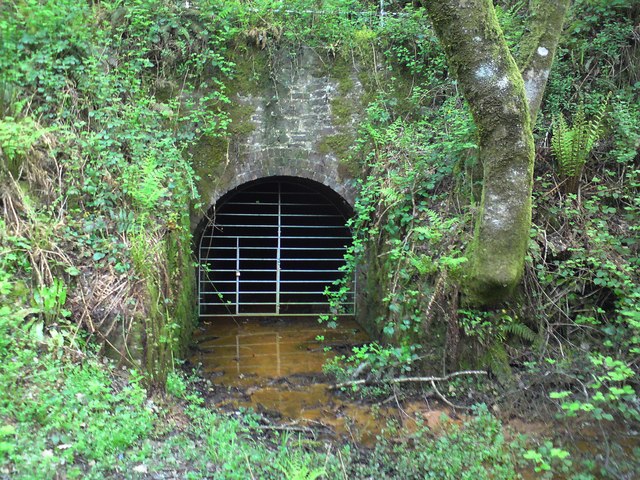
Coflein records the tunnel as follows: “The main line of the Saundersfoot Railway opened in 1832 between Saundersfoot Harbour and Thomas Chapel. It was built to a gauge of 4ft 0 3/8in and originally worked by horses. King’s Moor Tunnel carried the line under rising ground below the hamlet of Hill and the site of the 1866 Saundersfoot Station on the Whitland extension of the former Pembroke & Tenby Railway. The tunnel is 450m long, 2.44m wide and approximately 2.6m high with a semi-circular arch.” [214] The route of the tunnel appears most clearly on the 1948 revision of the 6″ Ordnance Survey. …
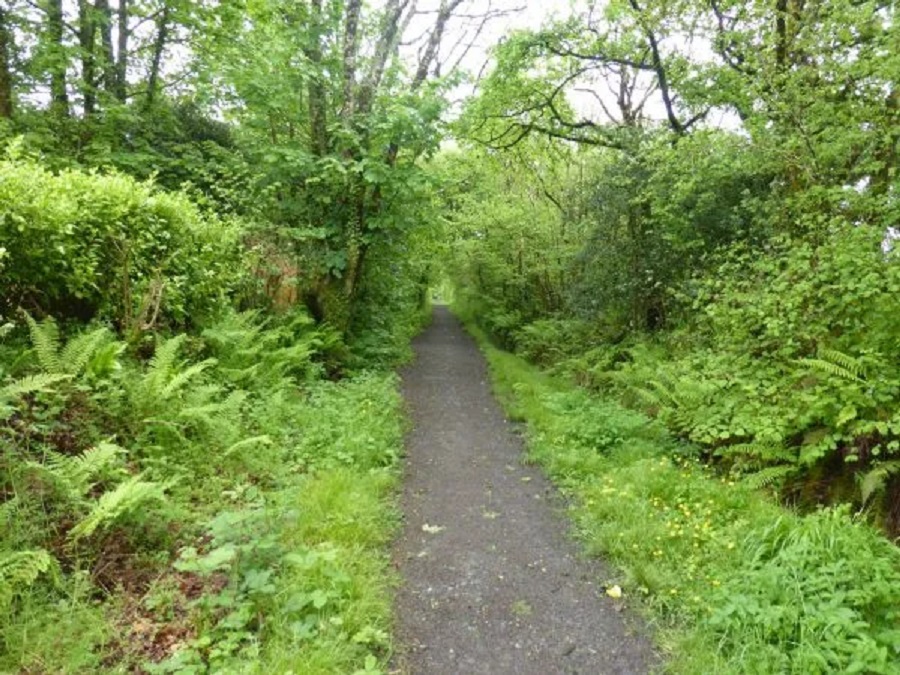
28dayslater comments that the tunnel “is very wet and very muddy in places due to the years of neglect and non-use but is a very important part of Welsh industrial history.” [167]
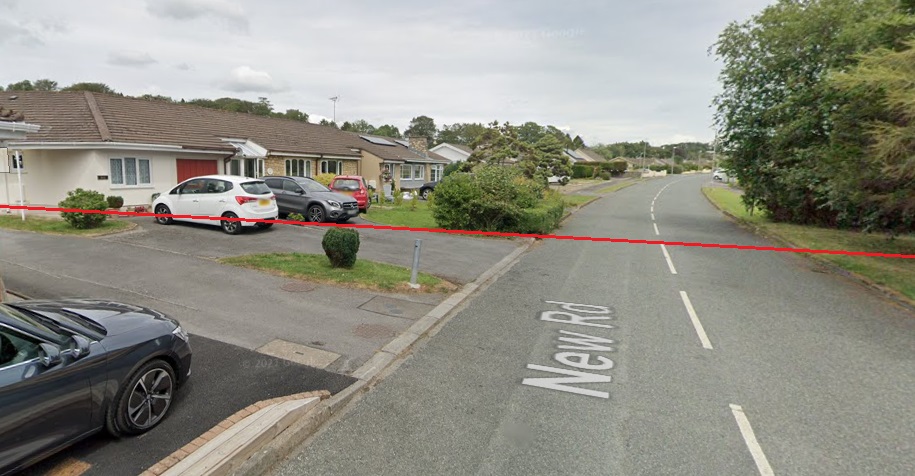
To the North of the tunnel the line was in cutting for 200metres or so. It then traversed open country until passing on an embankment and bridge over New Road (it’s present name).
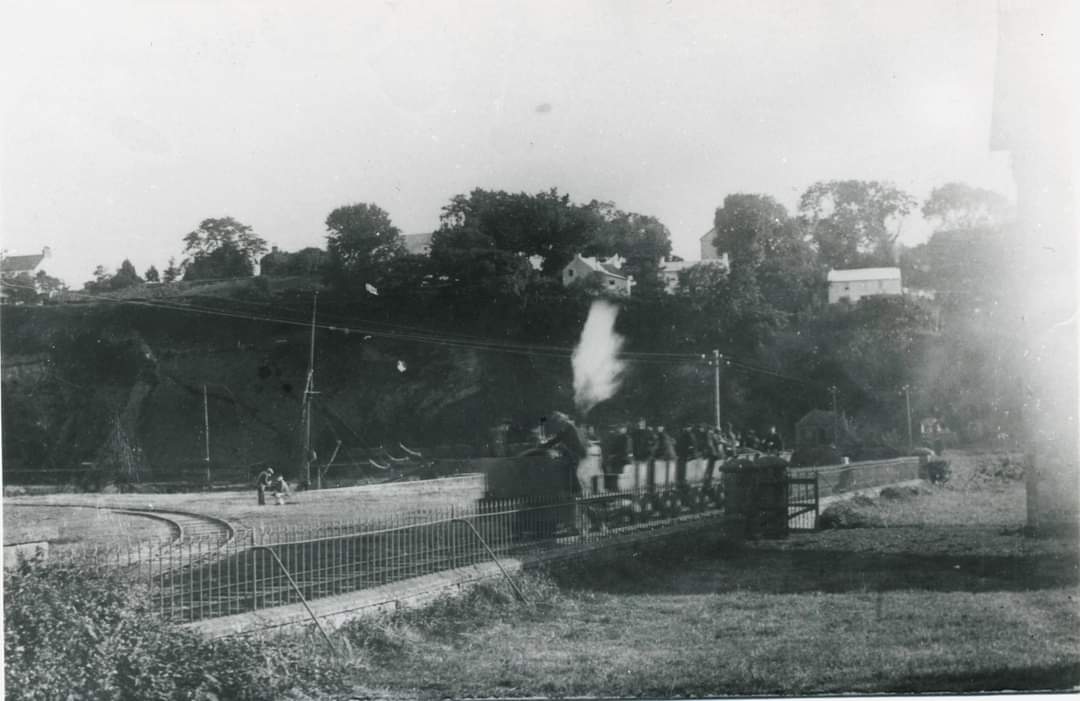
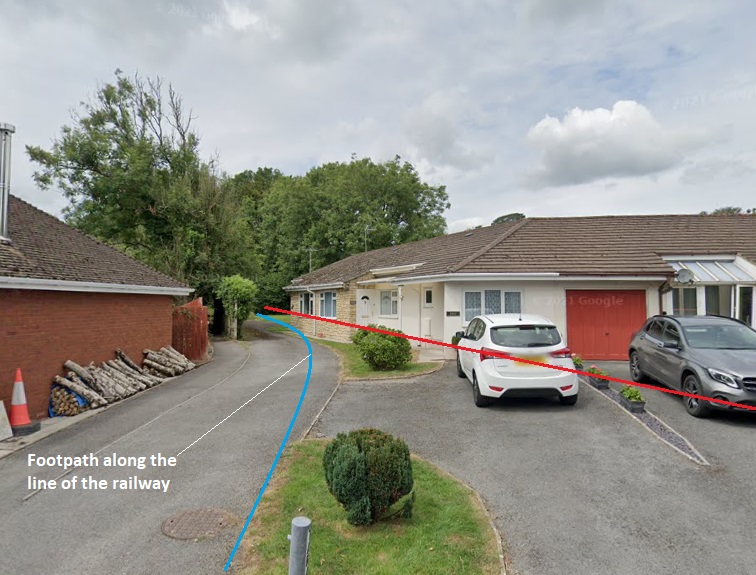
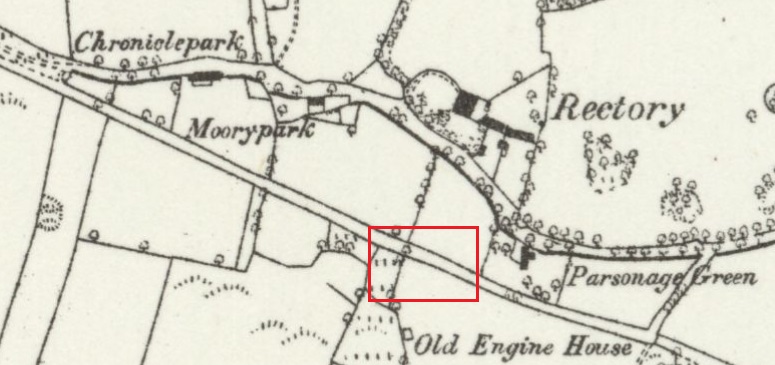
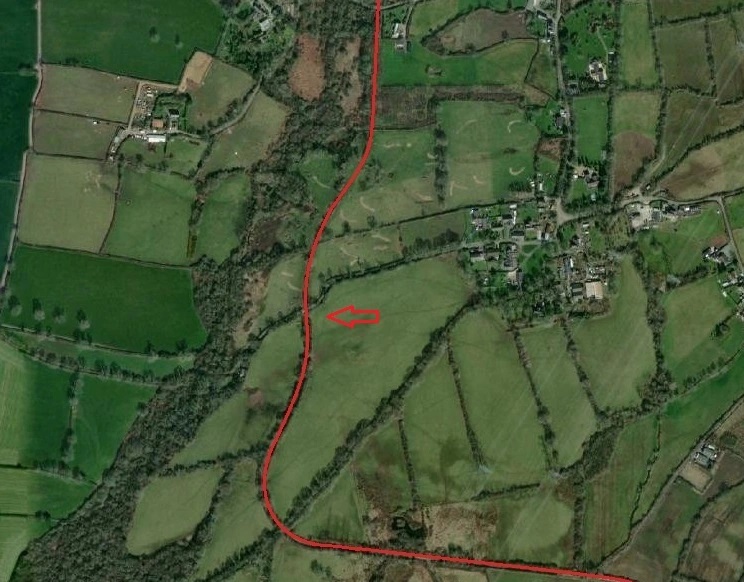
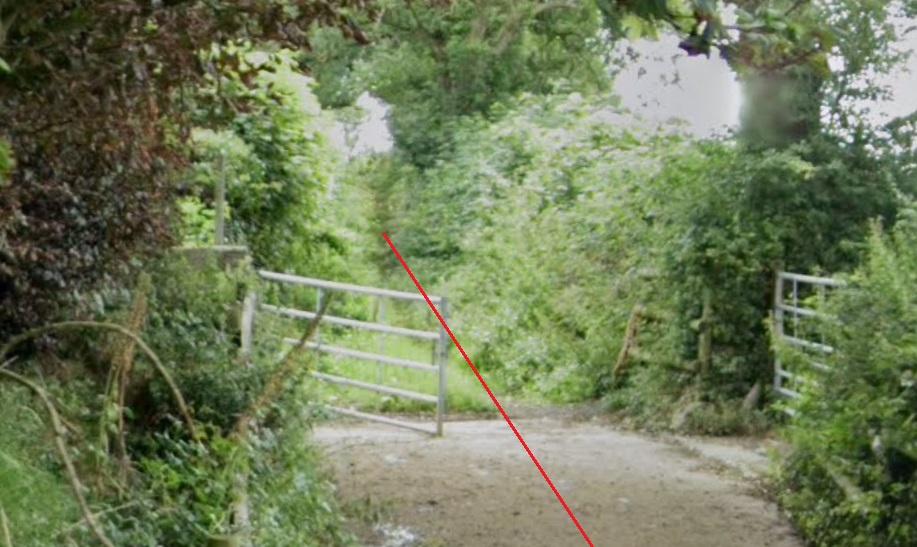
The 6″ 1906 Ordnance Survey shows the line continuing in a generally northwesterly direction [215]A thind red line shows the route of the old railway on this ESRI satellite image. Modern roads seem to make the most impact on the landscape although there is a caravan site sitting over the line of the railway in the bottom right quadrant of the satellite image (Kingsmoor Caravan Site). [215]Looking East along the A477 at the approximate location where the old railway route crosses the main road. It appears that it enters the caravan site (on the left) just at the Eastern edge of the entrance road. [Google Streetview, March 2022]As we have just noted, it appears that the route of the old railway enters the caravan site just at the Eastern edge of the entrance road and then runs roughly parallel to the road through the site but perhaps 50 to 100 metres to the Northeast. [Google Streetview, March 2022][215]The point at which the Saundersfoot railway crossed New Road, Begelly. Note the relatively large bungalow with its wall running parallel to the old railway. It would seem that the property boundary followed the line of the embankment![215]The location of the old railway in relation to New Road can be fixed by the bungalow shown to the left of this image, of which part seems to straddle the route of the old railway. [Google Streetview, March 2022]Begelly Railway Bridge over what is now New Road. This picture looks through the bridge to the West. The photograph was share on the Tenby and Saundersfoot Through Time Facebook Group by Ron Powell on 24th January 2017. [166]North of New Road a public footpath follows the old railway line as far as the West end of Parsonage Lane. [Google Streetview, March 2022]The route of the Miner’s Walk Path is shown here in mauve. It follows the old railway which is now a bridleway. [218]The path as it approaches Parsonage Lane, (c0 Two Dogs and an Awning. [217]The view West from the end of Parsonage Lane. The gated track is met by the old railway route coming in from the left and the track then follows the Saundersfoot Railway formation. [Google Streetview, March 2022]Bulldog at the head of a train of wagons North of Kingsmoor Tunnel. This picture was shared by Gavin Thomas on the Saundersfoot & District Historical Society Facebook Group on 17th October 2018. I am not sure of the location of this photograph but it is possible that is in the length that we are currently looking at. If so, Parsonage Lane runs just to the left and the buildings visible beyond the train are at Parsonage Green. [140]This extract from the 6″ OS Map published in 1889 is of what I consider to be the likely location of the photograph above. The rectangle shows the suggested location, with the train facing East towards the bridge at what is now called New Road. If I am right, the original building in the photograph no longer exists, it has been replaced by a bungalow. [219]
The line continued across the fields before it approached Thomas Chapel. We do know that there was a short branch to Broom Colliery. Its existence is recorded by Coflein: “An earthwork linear feature, probably a relict tramway, runs for c.400m NE-SW from SN11220814, at Broom Pit, … to SN10900788, where it effects an apparent junction with the Saundersfoot Railway . … It is not depicted as a railway on Ordnance Survey County series 25inch mapping of 1889 as it was disused by this time. … Broom Colliery was re-constructed and re-opened in 1933 and improvements included a 600-yard electrically-hauled narrow-gauge tramway to carry coal to the Saunderfoot Railway.” [228]
That statement from Coflein is supported on their website by an Ordnance Survey extract which is reproduced here and annotated with the key features. [228]
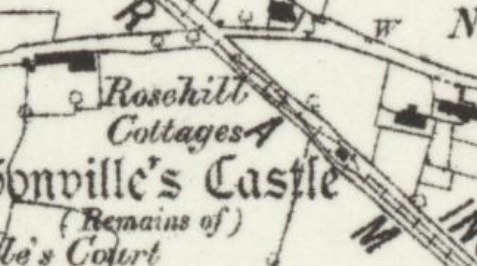
Thomas Chapel on the 62 Ordnance Survey of 1906. The Saundersfoot Railway can be seen approaching from the South. [220]Approximately the same are as on the map extract above. The red line on the satellite image shows the route of the old railway. [220]
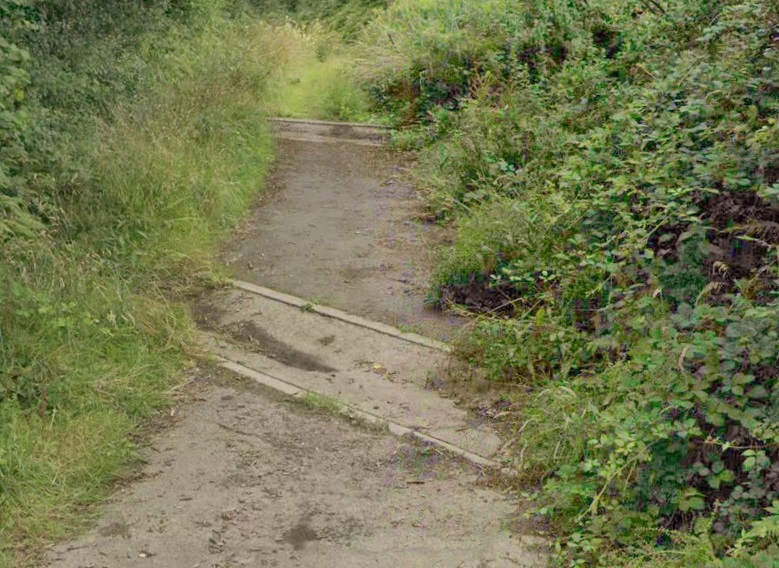
The lane serving Honeywood Cottage and other deellings runs across the top-half of the map and satellite image above. Just left of, and above the centre of, the image it is crossed by the old railway. The location is marked with a red arrow. It is of interest because there appears to be a remnant of the Saudersfoot Railway just at this point. I am not entirely sure that this is the case. However, if it is then is fixes the route of the line beyond here to Reynalton. I’d be interested to know whether anyone can provide details of what it ia that appears in the photograph below.
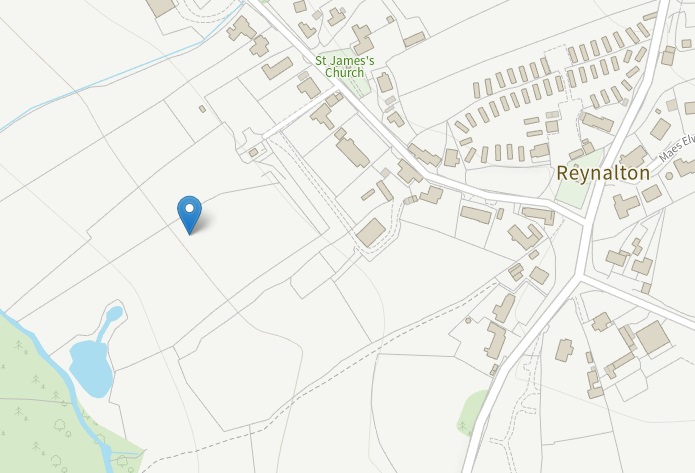
The location of the Reynalton Cooliery and the New Reynalton Colliery as indicated by Coflein. [221]
Urbex tells us that the railway “was extended for about one and a half miles beyond Thomas Chapel to serve a new colliery at Reynalton. To avoid heavy expenditure on earthworks and bridges, the line followed a somewhat circuitous course through open country. The existing railway from Thomas Chapel to Saundersfoot was relaid.” Horse traction was finally abandoned, and all traffic between Reynalton and the head of the incline was worked by 0-4-0ST Bulldog. Bulldog was slightly larger than than Rosalind which worked the line between Stepaside and the harbour. “It had 9inch by 15inch outside cylinders, 2feet 6inch wheels, and weighed 12 and a half tons in working order. To enable it to pass through the tunnel under the Great Western Railway to Saundersfoot, the maximum height and width had to be restricted to six feet nine inches respectively.” [227]
Coflein comments that the colliery site at Reynalton was a former anthracite drift mine. “Reynalton Colliery was opened by 1906. It was rebuilt in 1914 under the New Reynolton Anthracite Colliery Co., and served by an extension of the Saundersfoot Railway. … The mine closed in 1921 and the site was cleared, the only survivors being a brick-built winding house, six houses in the village and some railway embankment. There are various shafts and pits shown on the 1948 OS 6inch map. A cinder and slag heap near the church was removed during the Second World War to assist with the construction of Templeton airfield, … 2km to the north. [217]
Reynalton Bridge Abutments. This photograph was taken and shared by Dewi H. Davies on 7th October 2015 (c) People’s Collection Wales and used here under the Creative Archive Licence. [222]View from the SouthView form the North[223]We know that the Reynalton extension was constructed with frugality in mind, that it sought to follow the contours as much as possible and avoided building embankments, cuttings or structures as much as possible. With these factors in mind the red line shown on this satellite image is an estimation of the likely route which roughly follows the contours of the land and picks up on features that exit in the 21st century. A solid red line has been used where I have reasonable confidence over the alignment of the railway, the red-dotted line where I have a greater uncertainty but feel that showing the probable line is warranted.
We have already identified the two bridge abutments alongside the road South of Reynalton and it is possible (see below) to pick out the line of the railway either side of that for a couple of hundred yards at most. Closer to the line to Thomas Chapel there is a linear section of woodland which is in the shape of an upturned ‘U’ which closely follows the contours of the land. Between these two lengths the presumed route does approximately follow the contours and existing features, specifically, a lane to the East of the modern tarmacked road running North-South at the centre of the picture and an obvious lane running to the West of that road which does not appear on any of the revisions of the OS mapping carried by the NLS.
This leaves us with a question about the line’s approach to Reynalton colliery. The blue flag on the Coflein map above locates the colliery with reasonable accuracy. That position is shown again below and is marked on this satellite image as an ochre-coloured circle. At the moment the line approaching the colliery is shown in ochre as well and dashed because I have little certainty over its exact line. I hope to be able to clarify this further as time goes by. [223]Coflein provides two aerial photographs looking from the North across Reynalton to the most visible remains of the Saundersfoot Railway extension to Reynalton Colliery. The remains can be picked out towards the top of this image. A tree-lined curve runs from the West to two bridge abutments and the line can then be seen as a straight line running East through the first two fields East of the highway. The photograph was taken taken on 11 January 2006 by Toby Driver. [224]The location of Reynalton Colliery. An enlarged version of the map as shown by Coflein. [221]
This last satellite image taken from Google Earth shows that my presumptions about the line of the railway close to the colliery may be right. The field which is centre-right on this image has an area of curved land which appears to have retained water differently to the rest of the field and which is as a result greener. [Google Maps, September 2022]
Writing about the Reynalton extension to the Saundersfoot Railway, Coflein says: “The main line was extended to serve Reynalton Colliery … in 1915. The colliery closed in 1921 and the extension was abandoned, the whole Saundersfoot Railway closing finally in 1939.” [226] Some detailed reasoning for my proposed alignment for the extension is given in the comments under the satellite image above. I am hoping that at some time I may be able to find further information on the alignments that I have shown and would be very happy for someone to correct my assumptions.
Making the assumption that I have the correct alignment a few more photos on the line of the old railway can be offered. …
A telephoto image looking along the line of the railway to the East from the lane at the centre of the satellite image above. [Google Streetview, August 2021]A wider view of the probable line of the old railway taken from the same lane, looking East. [Google Streetview, August 2021]This time looking ahead along the probable line of the Saundersfoot Railway Extension. [Google Streetview]
It goes without saying that if anyone has photographs from along the routes shown, and is prepared to share them, I would be delighted to include them properly referenced in this article.
One final note: OpenRailwayMap [235] is usually an excellent source for following rail lines throughout the UK and abroad. Sadly the only length of the Saundersfoot Railway covered is a short length either side of Saundersfoot Railway Station. That length include the tunnel under that station. [235]
Hi Roger, a fantastic up to date source of information on the Saundersfoot to Reynalton railway. I live in Reynalton and I can help you out with a few bits as the railway (used) to approach Reynalton. Also I can help you locate where the photograph is on the line in Begelly with the house in the background. It’s such a shame more photographs don’t exist of the line. My email is sam@sdgb.co.uk if you’d like me to help out with these bits!
Hi Sam. Thank you for the positive comments. There are two options. If you want, I will use what you send me to adapt my article, or, if you prefer, you could put your comments here. If you send stuff to me, I will attribute it to you and make changes to my article. My email address is rogerfarnworth@aol.com.
Having just spent a few days on holiday in Saundersfoot and walking the coastal path through the tunnels, this article pulls everything together. An excellent read, many thanks.


Pingback: Railways in West Wales Part 1C – Pembrokeshire Industrial Railways – Section C – RNAD Trecwn | Roger Farnworth
Hi Roger, a fantastic up to date source of information on the Saundersfoot to Reynalton railway. I live in Reynalton and I can help you out with a few bits as the railway (used) to approach Reynalton. Also I can help you locate where the photograph is on the line in Begelly with the house in the background. It’s such a shame more photographs don’t exist of the line. My email is sam@sdgb.co.uk if you’d like me to help out with these bits!
Hi Sam. Thank you for the positive comments. There are two options. If you want, I will use what you send me to adapt my article, or, if you prefer, you could put your comments here. If you send stuff to me, I will attribute it to you and make changes to my article. My email address is rogerfarnworth@aol.com.
Having just spent a few days on holiday in Saundersfoot and walking the coastal path through the tunnels, this article pulls everything together. An excellent read, many thanks.
You are Welcome!🙂
Pingback: The Railway Magazine March 1959 | Roger Farnworth