
A significant proportion of the August 1925 edition of The Railway Magazine [1] was dedicated to coverage of the Centenary celebrations at Darlington. Given the short timescale between the event and the publication date of the August issue of the magazine (?late July?), and given that modern digital techniques were in no way available, the achievement of publication in such a short time is to be admired.
Writing at the end of 2024, in just a few months the 200th anniversary will occur, it will be interesting to see what celebrations will be taking place in the Summer of 2025. See, for example, the National Railway Museum‘s plans for 2025. [42]
G.A. Sekon offered The Railway Magazine’s congratulations to the organisers of the 1925 exhibition on their organisational achievements and on the “comprehensiveness and interest of the exhibits brought together.” [1: p101] He also notes that the opportunity was taken by the King to appoint many different leading railway officers to the Order of the British Empire these included: four CBEs (Mr. R. C. Irwin, Secretary, L.M.S.R., Mr. E. A. Bolter, Secretary, G.W.R., Mr. G. Davidson, Divisional General Manager, North Eastern Area, L.N.E.R., and Mr. G. S. Szlumper, Assistant General Manager, Southern Railway), eight OBEs and fourteen MBEs.
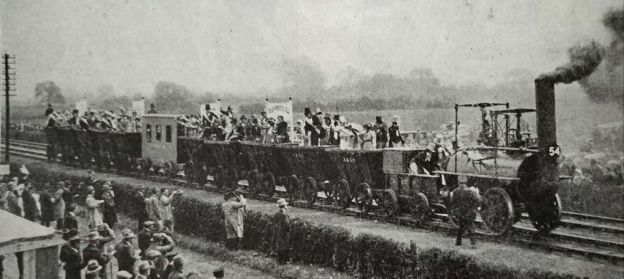
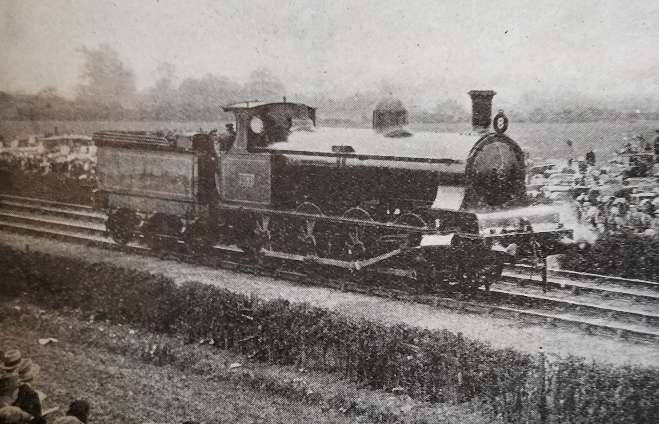
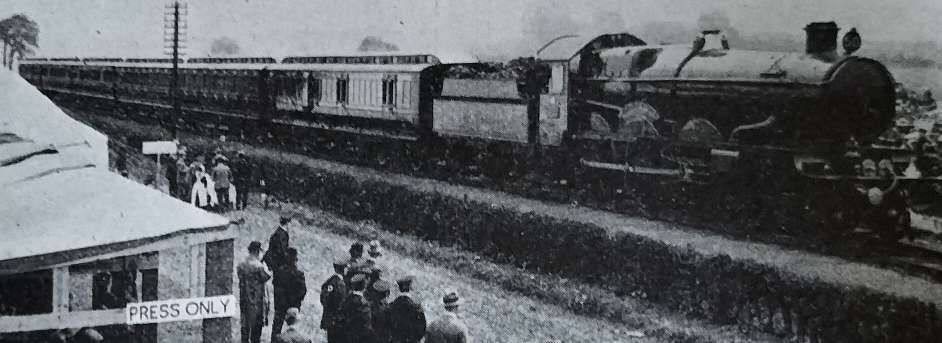
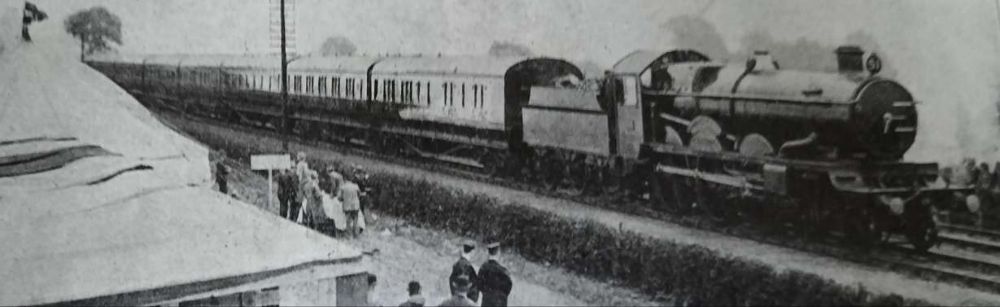
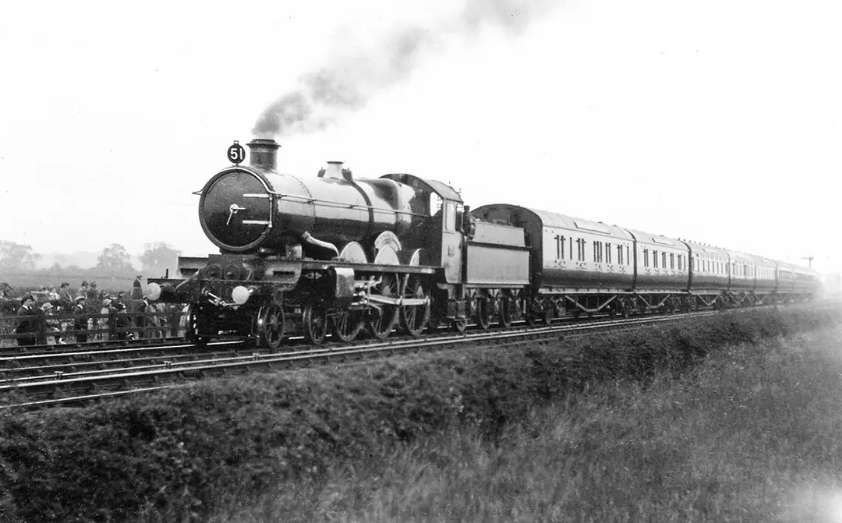
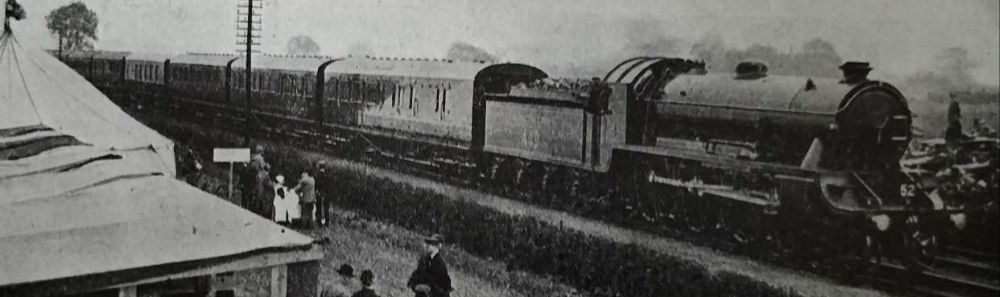
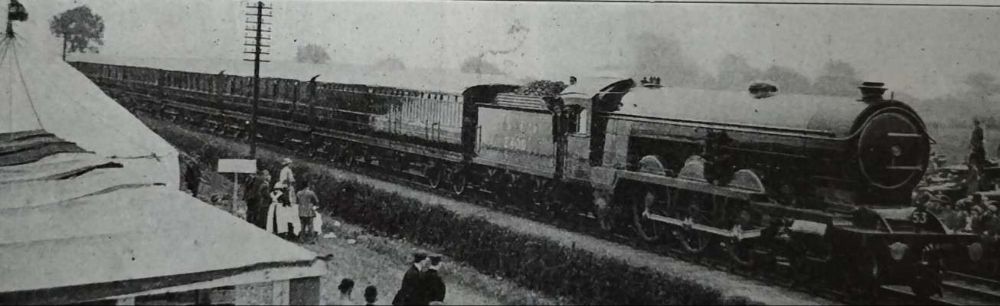
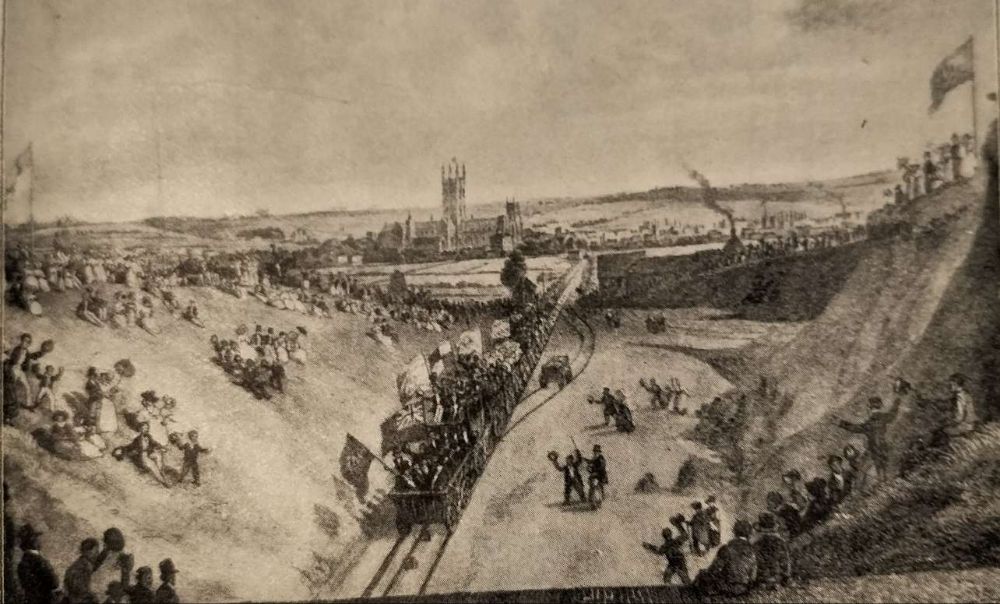
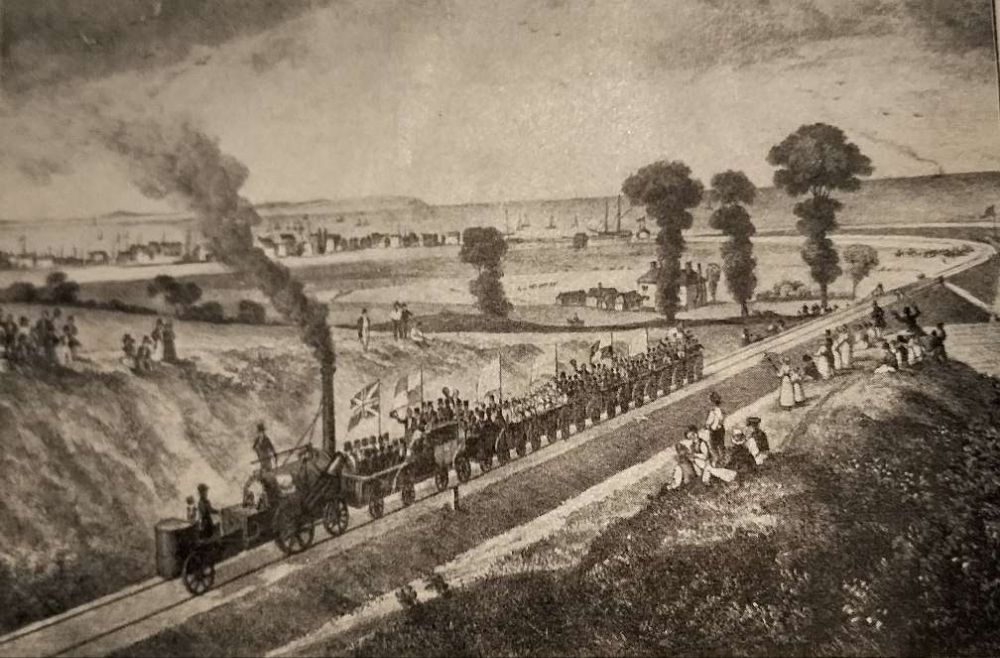
The ‘main event’ was the procession which was “witnessed at ease and in comfort by many hundreds of thousands in view of the accessibility of the route practically from end to end and the arrangements whereby landowners generously allowed access to fields adjoining the line.” [1: p103]
The event was opened by HRH. the Duke of York, accompanied by the Duchess of York. (The Duke of York being the future George VI who became King unexpectedly following the abdication of his brother, King Edward VIII, in December 1936.)
In his opening address Mr. W. Whitelaw made it clear that, “The Exhibition was the result of the co-operation of five great railway companies, assisted by many friends from all parts of the country, who possessed interesting relics of the first passenger railway in the kingdom. It seemed very fitting that the commencement of the celebration of what took place on 27th September 1825, should be in that great railway town of Darlington. If Darlington did not own all the credit for the science of railways, at any rate no one could deny or challenge the statement that Darlington was the home of the first great railway statesman, Edward Pease.”
The Procession
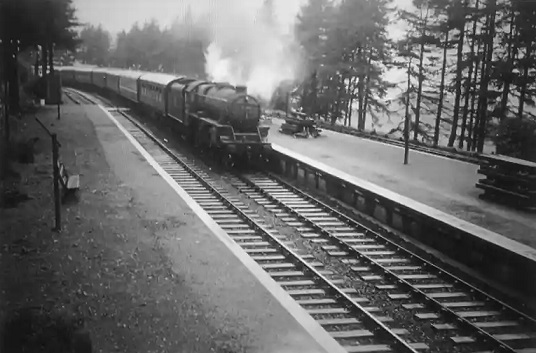
A short (20 minute) film of the procession/cavalcade can be viewed here. [35]
“The centenary celebrations were held in July to allow guests from foreign countries visiting the International Railway Congress to take part. An exhibition of rolling stock at the new Faverdale Wagon Works in Darlington was opened by the Duke and Duchess of York (later King George VI and the Queen Mother). The following day the royal couple watched as procession of locomotives passed between Stockton and Oak Tree Junction, starting with a Hetton Colliery locomotive that had been built in 1822 and finishing with a replica train of ten chaldron waggons and ‘the company’s coach’ hauled by Locomotive No.1 propelled by a petrol engine in a specially built tender.” [45] A copy of the original programme for the procession can be found here. [46]
The procession was due to have 54 items, one of which had to be withdrawn (the North British Locomotive Company’s geared turbine condensing locomotive). [1: p123] The final list was: [8]
- 1. Hetton Colliery locomotive – 1822.
- 2. S. & D.R. “Derwent” – 1845.
- 3. NBR 0-6-0 No. 381 (LNER J31 10114) – 1867.
- 4. NER 0-6-0 No. 1275 – 1874.
- 5. LNER J26 0-6-0 No. 517 (ex NER) – 1905.
- 6. LNER B16 4-6-0 No. 934 (ex NER) – 1921.
- 7. LNER K3 2-6-0 No. 203 – 1925.
- 8. LNWR 0-8-0 No. 1881 (LMS 8900) – 1901.
- 9. LMS 0-8-0 No. 9446 (ex LNWR) – 1922.
- 10. LNER 02 2-8-0 No. 3501 – 1924.
- 11. GWR 2-8-0 No. 4700 – 1919
- 12. LNER P1 2-8-2 No. 2393 – 1925.
- 13. LNER electric loco No. 9 (hauled by J71 0-6-0T 317) (ex NER) – 1914.
- 14. GWR 2-2-2 “North Star”(replica), (on wagon, hauled by J71 0-6-0T No. 181) – 1837.
- 15. LNWR 2-2-2 No. 3020 “Cornwall” – 1847.
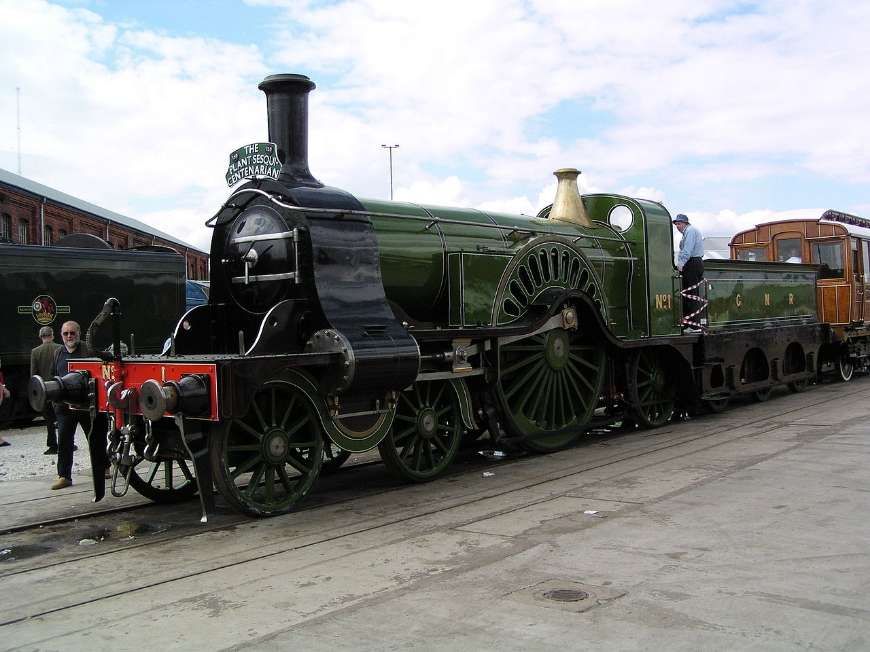
- 16. GNR 4-2-2 No. 1 – 1870.
- 17. MR 4-2-2 No. 679 – 1899.
- 18. LNER X4 4-2-2 No. 5972 (exGCR) – 1900.
- 19. NER Class 901 2-4-0 No. 910 – 1875.
- 20. LNER E5 2-4-0 No. 1463 (ex NER) – 1885.
- 21. LNER D17/1 4-4-0 No. 1620 (ex NER) – 1892.
- 22. LNER D15 4-4-0 No. 8900 “Claud Hamilton” (ex GER) – 1900.
- 23. LNER C2 4-4-2 No. 3990 “Henry Oakley” (ex GNR) – 1898.
- 24. LNER C1 4-4-2 No. 3251 (ex GNR) – 1902.
- 25. LNER C11 4-4-2 No. 9902 “Highland Chief” (ex NBR) – 1911.
- 26. LNER C7 4-4-2 No. 2207 (ex NER) – 1917.
- 27. LNER B13 4-6-0 No. 2006 (ex NER) – 1900.
- 28. LNER B3 4-6-0 No. 6169 “Lord Faringdon” (ex GCR) – 1917.
- 29. LMS 4-6-0 No. 5900 “Sir Gilbert Claughton” (ex LNWR) – 1913.
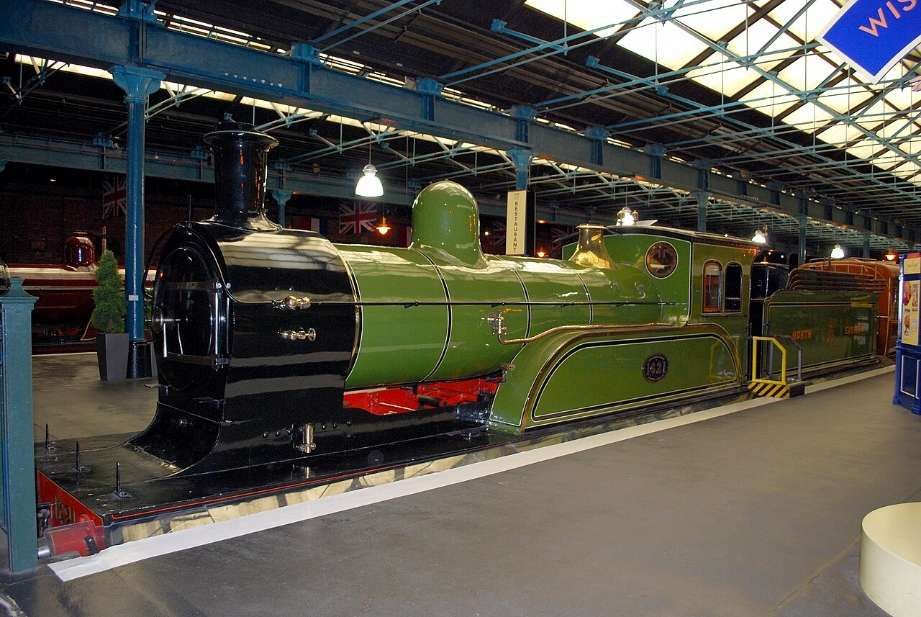
- 30. LNER A1 4-6-2 No. 2563 “William Whitelaw” – 1924
- 31. Withdrawn
- 32. LNER electric loco No. 13 (hauled by J71 0-6-0T No. 1163) – 1922.
- 33. LNER X1 2-2-4T No. 66 “Aerolite” (ex NER) – 1851.
- 34. LNER J61 0-6-0ST No. 6469 (ex GCR) – 1873.
- 35. LNER Y6 0-4-0T No. 7133 (ex GER) – 1897.
- 36. LNER G6 0-4-4T No. 949 (ex NER) – 1874.
- 37. LNER G5 0-4-4T No. 1334 (ex NER) – 1901.
- 38. LNER H1 4-4-4T No. 2152 (ex NER) – 1913.
- 39. LNER A5 4-6-2T No. 5088 (ex GCR) – 1923.
- 40. LMS 4-6-4T No. 11112 – 1924.
- 41. GWR 2-8-0T No. 5225 – 1924.
- 42. LNER U1 2-8-8-2 No. 2395 – 1925.
- 43. LNER Railbus 130Y (ex NER) – 1922.
- 44. LNER petrol autocar No. 2105Y – 1923.
- 45. Sentinel steam railcar – 1925.
- 46. LNER Q7 0-8-0 No. 904 (ex NER) on mineral train. – 1919.
- 47. LNER Q5 0-8-0 No. 130 (ex NER) hauling tableaux train.
- 48. GNSR 4-4-0 No. 45A and train of old 4-wheel coaches – 1865.
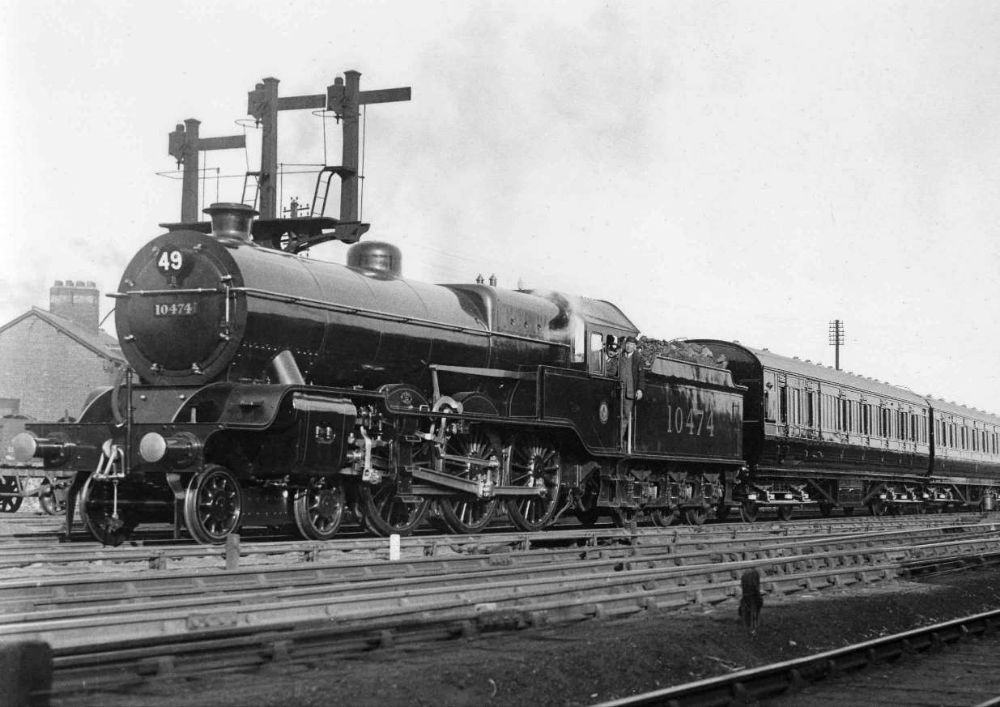
- 49. LMS 4-6-0 No. 10474 with vestibule coaches. – 1925.
- 50. GWR 4-6-0 No. 4082 “Windsor Castle” with GWR royal train – 1924.
- 51. GWR 4-6-0 No. 111 “Viscount Churchill” with coaches.
- 52. SR 4-6-0 No. 449 “Sir Torre” with coaches. – 1925.
- 53. LNER A2 4-6-2 No. 2400 “City of Newcastle” with coaches. – 1922.
- 54. “Locomotion” – 1825
This list can be found on the Stockton & Darlington Rail Centre website. [8]
Of these items, The Railway Magazine chose to highlight a number of these including:
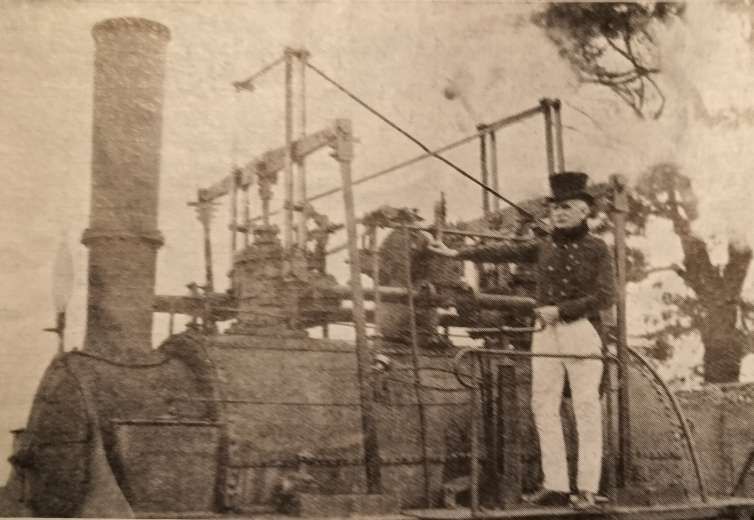
- 1. The Hetton Colliery Locomotive
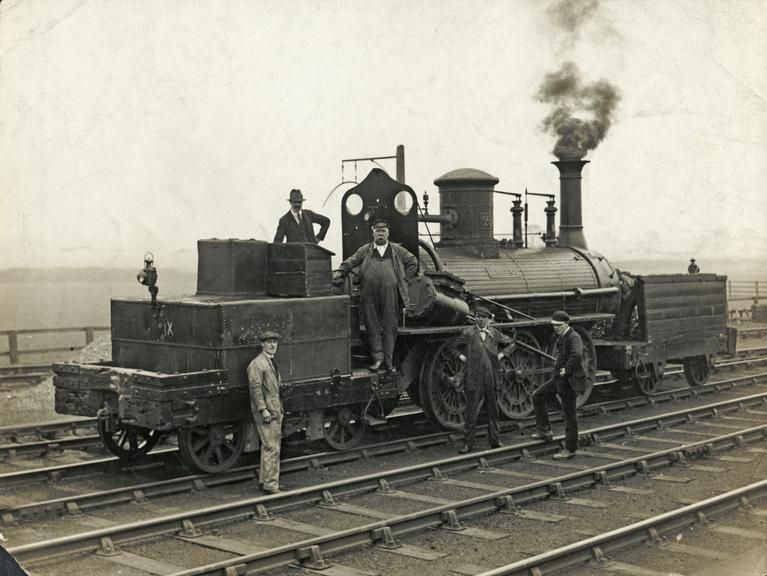
“The procession was headed by the old Hetton Colliery engine, built in 1822 by George Stephenson and Nicholas Wood, previous to the establishment of Stephenson’s works at Newcastle-on-Tyne. The engine, by the way, was rebuilt in 1857, and again in 1882, when the link motion, at present fitted, was added.” [1: p109]

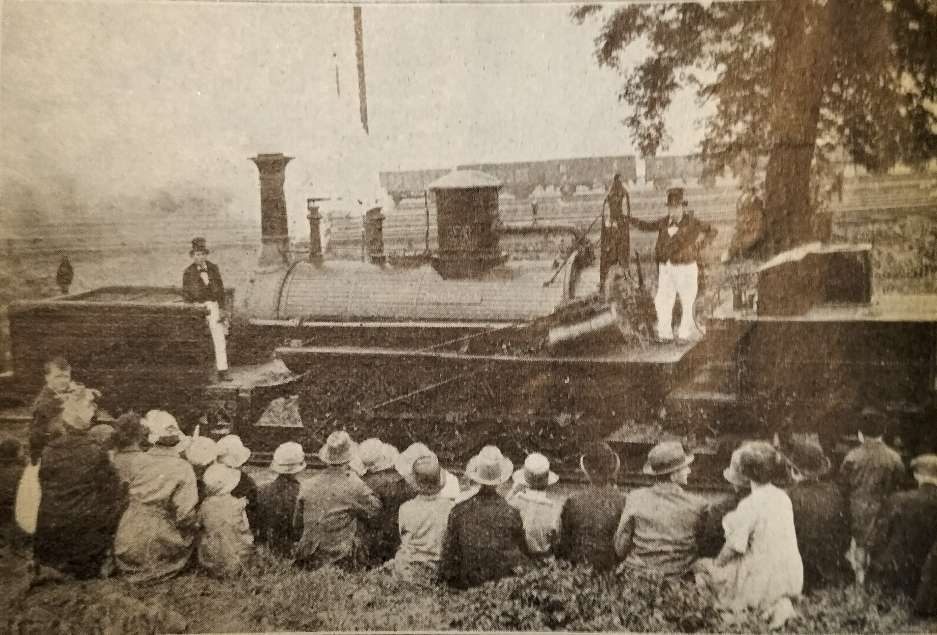
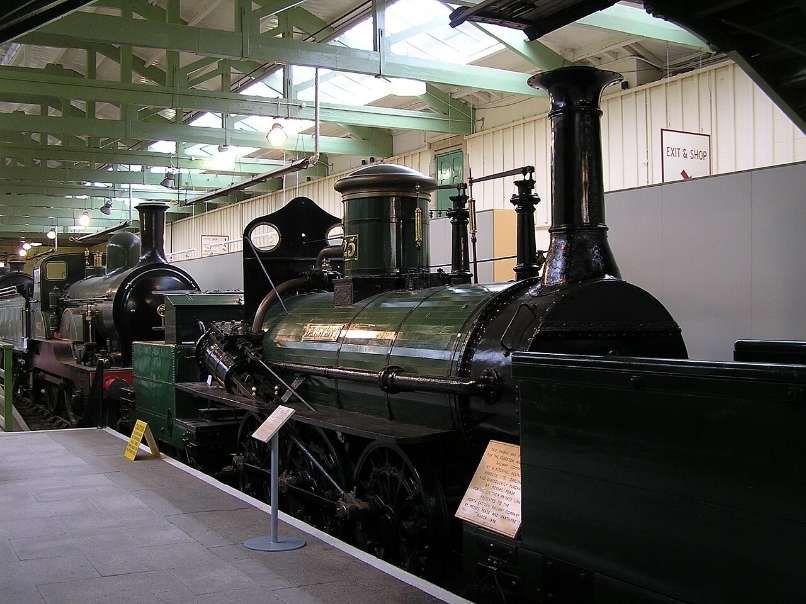
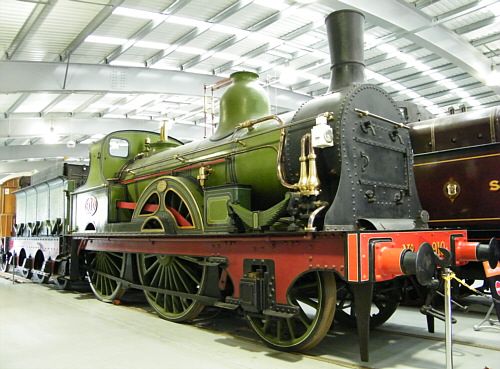
- 2. The ‘Derwent’
“Next in order came the old ‘Derwent’, a mineral engine of Timothy Hackworth’s design, which was built in 1845 by William and Alf Kitching, of the Hopetown Foundry, Darlington, for the Stockton and Darlington Railway. The ‘Derwent’ also ran under its own steam.” [1: p109]
“Then followed a number of engines more or less familiar to the present generation [1925], although two of them were built over 50 years ago. A 1925 modern goods express 2-6-0, with special valve gear, and a mineral engine 2-8-0 with three cylinders, were a great contrast to the veterans that had passed earlier. Then followed a “Mikado” type of locomotive built at the Doncaster works of the L.N.E.R., for fast mineral work, but even greater interest was shown in a model of the old North Star, built in 1837 by Robert Stephenson and Co., which was mounted on a Great Western ‘crocodile’, drawn by a locomotive. Several specimens of the single-driver expresses popular in the latter half of the [19th century] were in the procession, including the Cornwall, which has a driving wheel of 8 ft. 6 in. in diameter the largest locomotive driving wheel still in service in the world.” [1: p109]
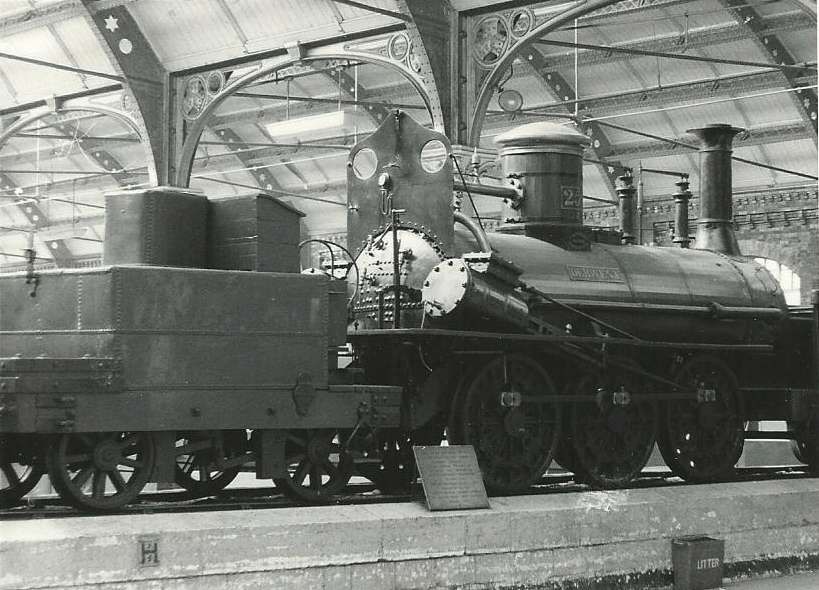
- 4. 0-6-0 Stockton & Darlington Goods
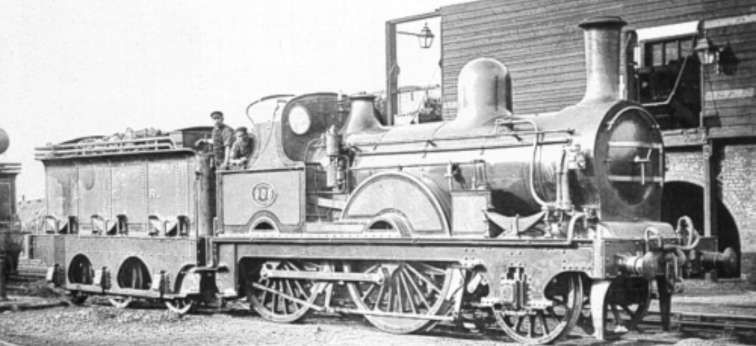
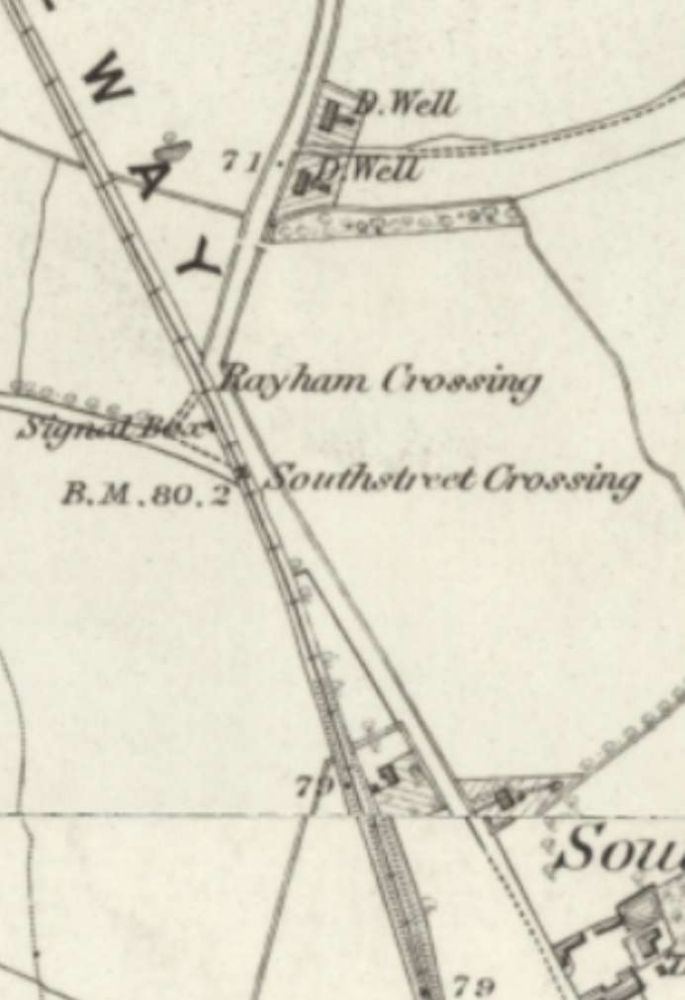
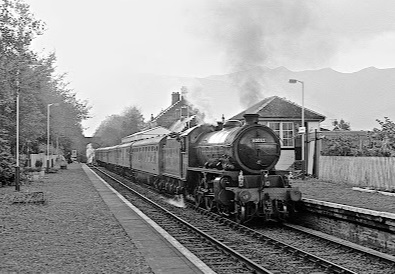
Fourth in the procession was a typical 0-6-0 locomotive from the Stockton and Darlington (S&D) Railway. This was probably NER No. 1275 which was the only NER 1001 Class locomotive to survive into LNER ownership. It was built by Dübs & Co., Glasgow, and was delivered to the S&D in May 1874. 1275 entered into LNER ownership with an official mileage of 908,984 miles. Still in its NER livery, it was quickly withdrawn on 16th February 1923. [6]
More details can be found on the Preserved British Steam Locomotives website. [6]
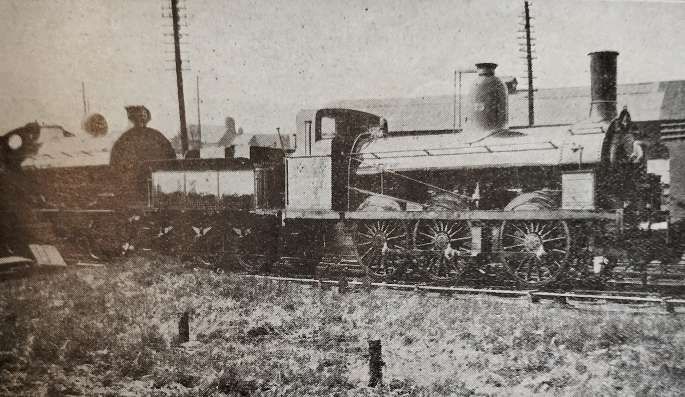
This locomotive is preserved as part of the National Collection and is on static display at the National Railway Museum at York. [6]

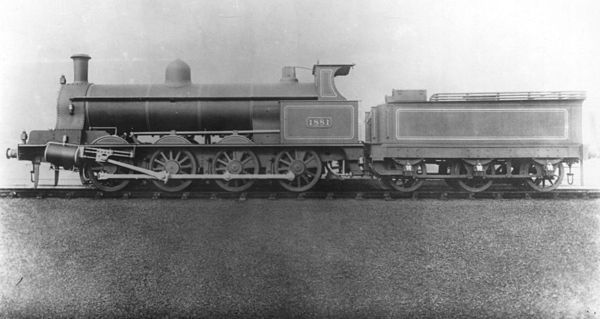
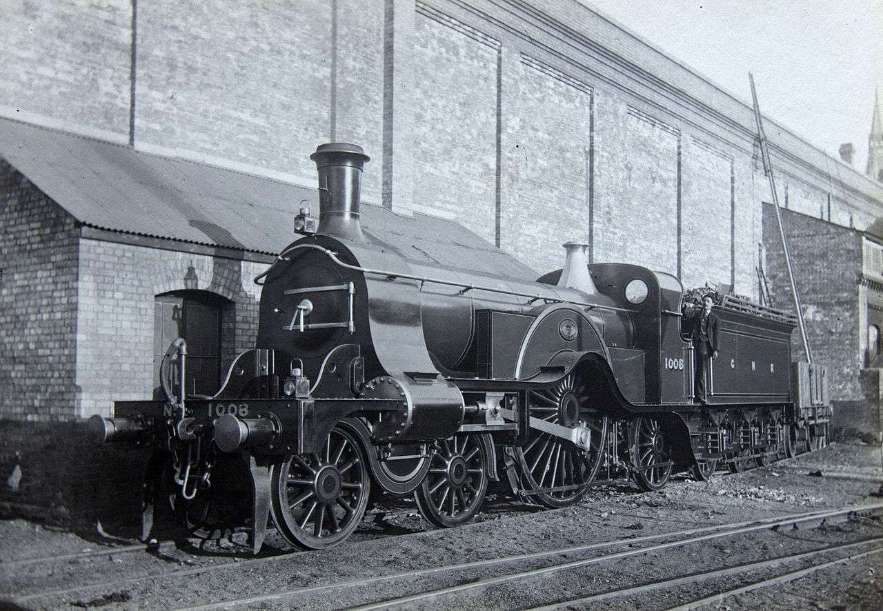
- 8. LNWR No. 1881, 0-8-0 Webb Compound Locomotive (LMS No. 8900 of 1901)
The LNWR Class B was a class of 0-8-0 steam locomotives introduced in 1901. These locomotives were a development of the three-cylinder compound Class A (though this letter classification was not introduced until 1911), they had a 4-cylinder compound arrangement. 170 were built between 1901 and 1904. [9]
- 12. LNER P1 2-8-2 No. 2393 ‘Mikado’
“The London and North Eastern Railway Class P1 Mineral 2-8-2 Mikado was a class of two steam locomotives designed by Nigel Gresley. They were two of the most powerful freight locomotives ever designed for a British railway. It was initially intended they be a more powerful 2-10-0 version of the earlier Class O2 2-8-0s. The design was submitted in August 1923, for use between Peterborough and London, and also between Immingham and Wath marshalling yard. The power was quoted as being 25% more than the O2.” [21]
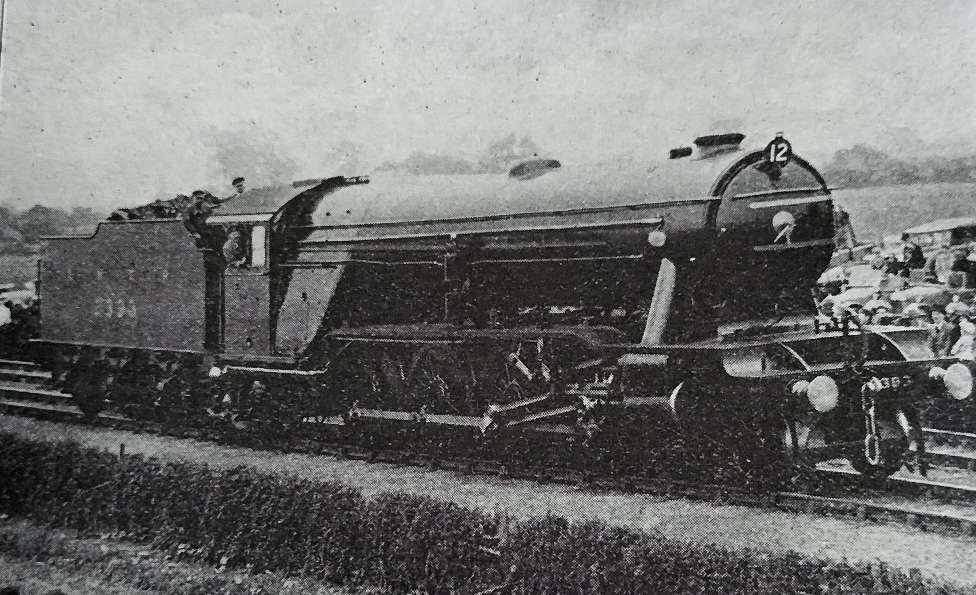
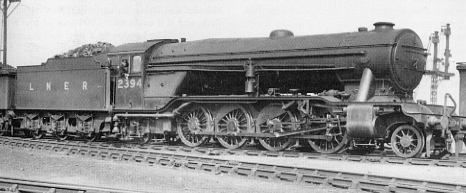
“No. 2393 was completed in June 1925, just in time for the Stockton & Darlington Centenary celebrations in July. It was fitted with a Robinson superheater, whilst No. 2394 (completed in November) had the “E Double” superheater recommended by The Superheater Co.” [22]
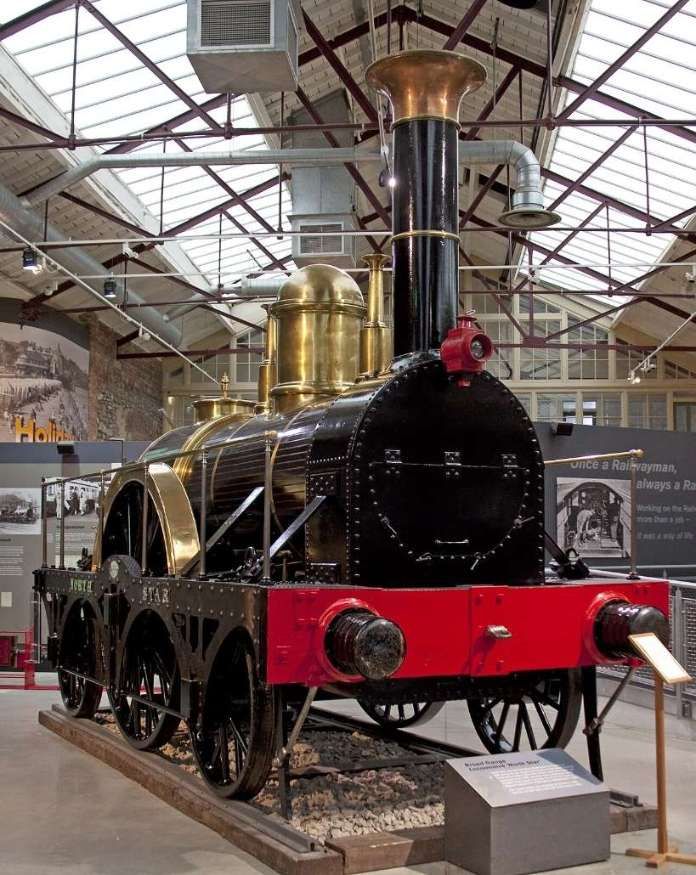
- 14. GWR 2-2-2 ‘North Star’ (replica)
North Star was the first GWR locomotive, it on 31st May 1838 it worked the inaugural train for the company’s directors. More details can be found on the Preserved British Steam Locomotives website. [10]
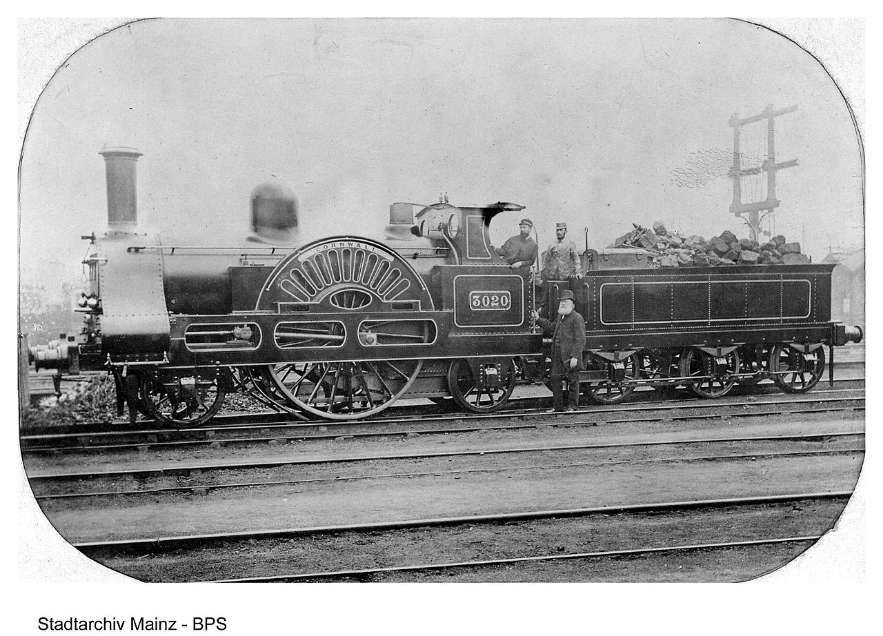
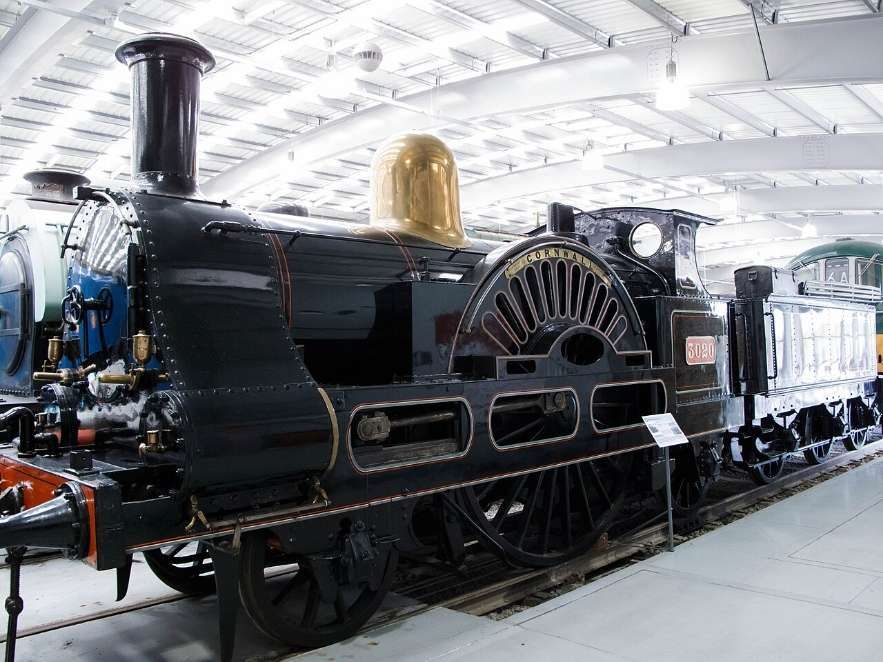
- 15. LNWR 2-2-2 No. 3020 ‘Cornwall – 1847
Built in 1847, ‘Cornwall’ is a preserved steam locomotive. She was built as a 4-2-2 at Crewe Works in 1847, but was extensively rebuilt and converted into her current form in 1858. [12]
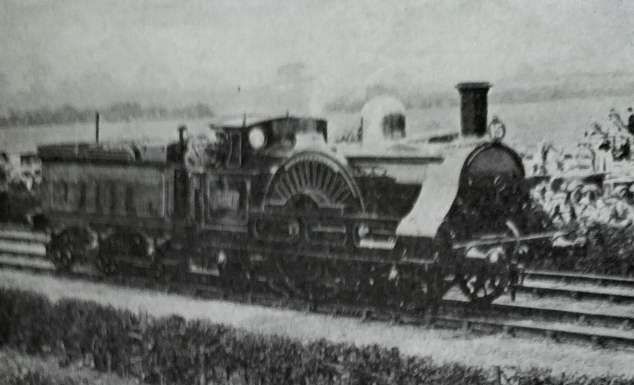
Wikipedia tells us that, “In 1858, Ramsbottom redesigned Cornwall almost completely. Little survived unchanged, other than the outside frames and the centres of the drivers. The boiler was … moved entirely above the driving axle, without any notches, channels or tubes. … New cylinders and valve gear were provided. … The wheel arrangement was [changed to] 2-2-2. … Ramsbottom also included his newly designed tamper-proof safety valves.” [12]
There was another minor rebuild in the 1870s providing a typical LNWR style of cab, with a short roof and semi-open sides. It was renumbered 3020 in June 1886. [12]

- 16. GNR 8ft Single No. 1
The Great Northern Railway (GNR) No. 1 Class Stirling Single was a class of steam locomotive designed for express passenger work. Designed by Patrick Stirling, they were characterised by a single pair of large (8 ft 1 in) driving wheels which led to the nickname ‘eight-footer’. Originally the locomotive was designed to haul up to 26 passenger carriages at an average speed of 47 miles per hour (76 km/h). It could reach speeds of up to 85 mph (137 km/h). [14]
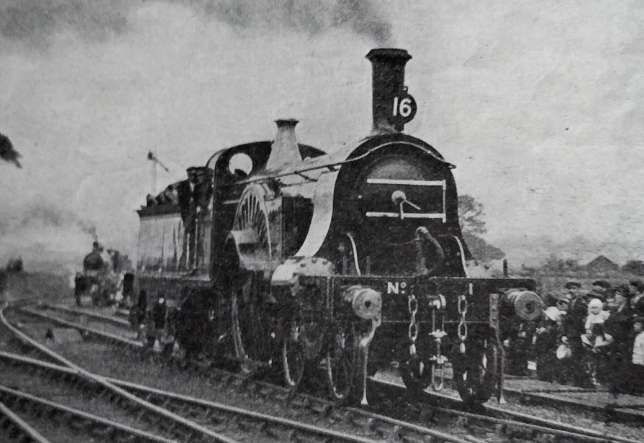
“The first of the class, No. 1 is the only engine to be preserved. It is exhibited at the National Railway Museum, York. It was restored to running order during the 1930s for the fiftieth anniversary of the Race to the North and steamed again during the 1980s.” [14]
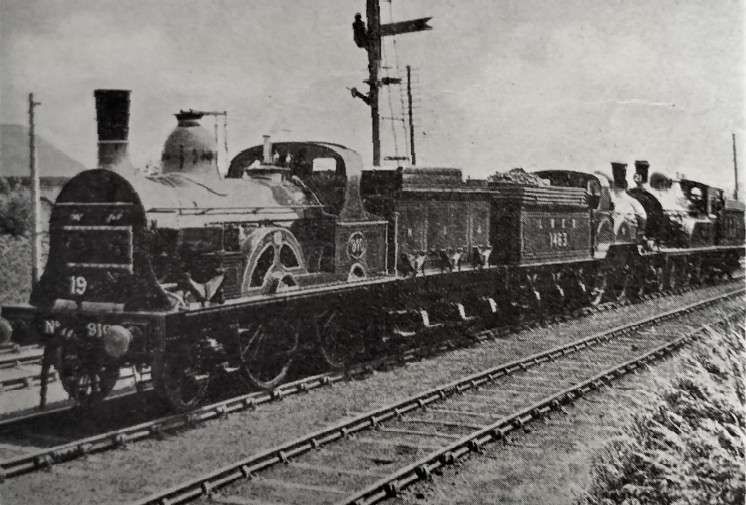
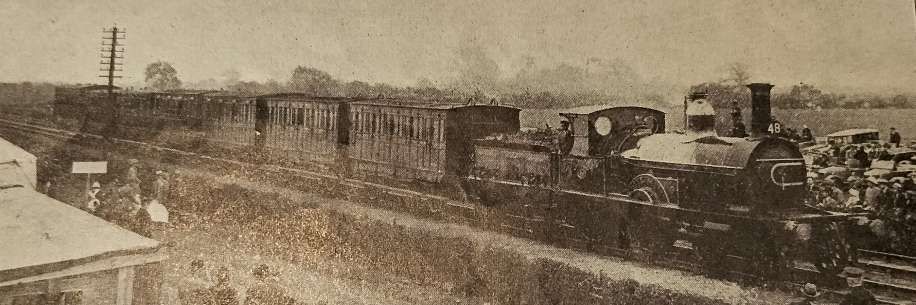
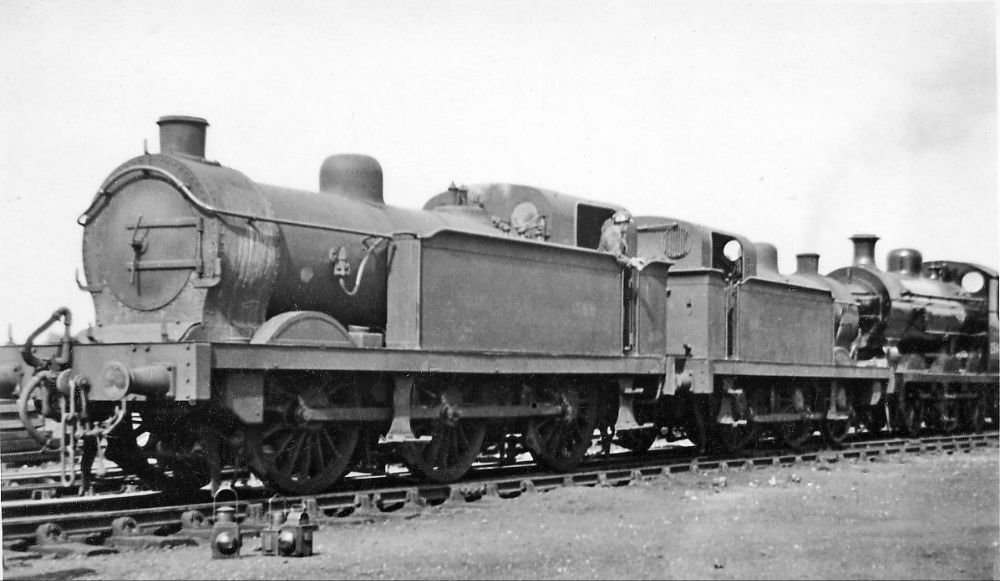
The three locomotives shown in the image above are:
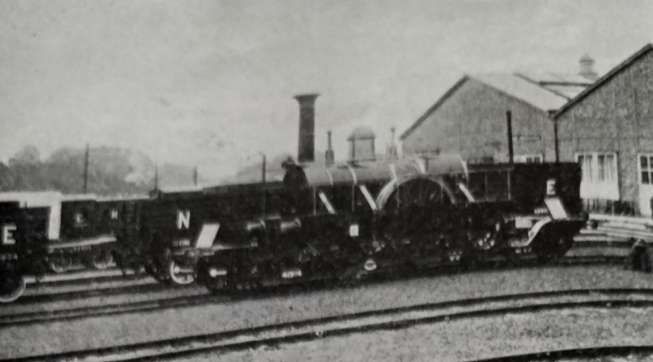
- 19. 1875 built NER Class 901 2-4-0 No. 910;
- 20. 1885 built LNER E5 2-4-0 No. 1463 (ex NER);
- 21. 1892 built LNER D17/1 4-4-0 No. 1620 (ex NER)
The LNER Encyclopedia says that “Fletcher’s ‘901’ class was his final express passenger design for the … NER. The ‘901’ Class was created in 1872 to provide new more powerful express locomotives to replace the 16in cylinder locomotives still being used by the NER for express work. The first two locomotives, Nos. 901/2, were built at Gateshead in 1872. Whilst these were being built, two batches of ten each were ordered from Beyer, Peacock & Co and Neilson & Co. These twenty engines were built and delivered in 1873. A further 33 were built at Gateshead between 1873 and 1882 in four batches.” [17]
The LNER Encyclopedia says that the “new E5 locomotives were direct descendents of Fletcher’s ‘901’s. The cab design was changed, and a completely new tender design was used. A total of twenty E5s were built in 1885, with Darlington and Gateshead building ten each.” [18]
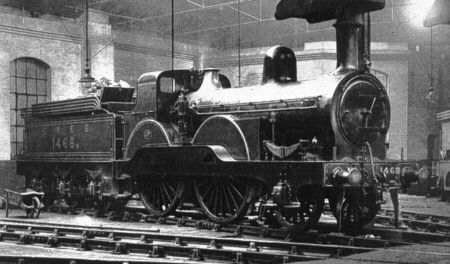
The LNER Encyclopedia also notes that the NER Class M1 (later Class M) locomotives were Wilson Worsdell’s first express passenger locomotives for the North Eastern Railway (NER). … Twenty Class M1 locomotives were built at Gateshead between 1892 and 1894. More information can be found on the LNER Encyclopedia website. [19] These NER M1 locomotives became the LNER D17/1 Class at the grouping. [20]
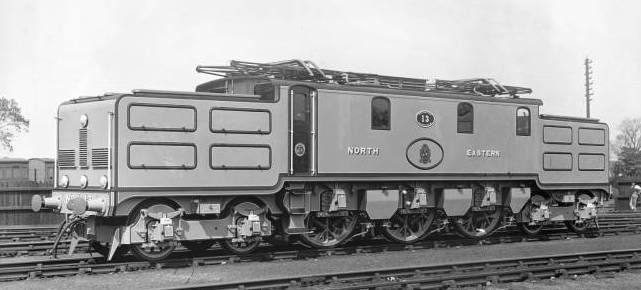
- 32. LNER electric loco No. 13 (hauled by J71 0-6-0T No. 1163) – 1922

The LNER operated a surprising variety of electric locomotives and multiple units. Although its electric operations were eclipsed by the Southern, the LNER had the largest electric locomotive stud of the Big Four companies. More about the various electric locks and multiple units can be found on the LNER Encyclopedia website. [27]
“Sir Vincent Raven was a great believer in the electrification of main lines. After the success of the Shildon-Newport electrification, he planned to electrify the North Eastern Railway’s (NER) stretch of the East Coast main line from York to Newcastle. As a part of this plan, authorisation was granted in March 1920 to build the prototype electric passenger locomotive No. 13. This had a 2-Co-2 (4-6-4) wheel arrangement, and was built at Darlington with electrical equipment provided by Metropolitan-Vickers.” [28] The loco was completed in 1922 just before the NER became part of the LNER in 1923.
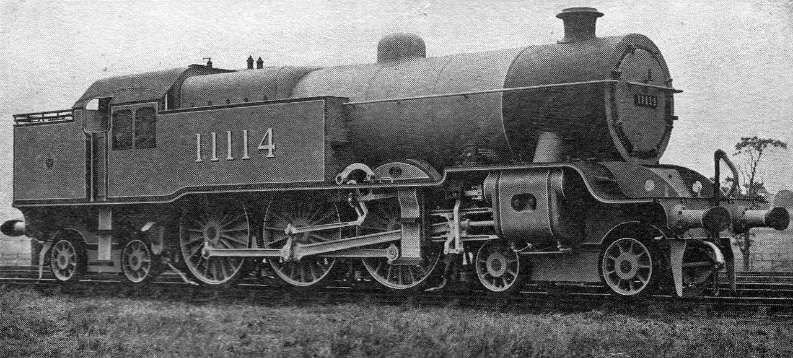
- 40. LMS 4-6-4T No. 11112 – 1924.
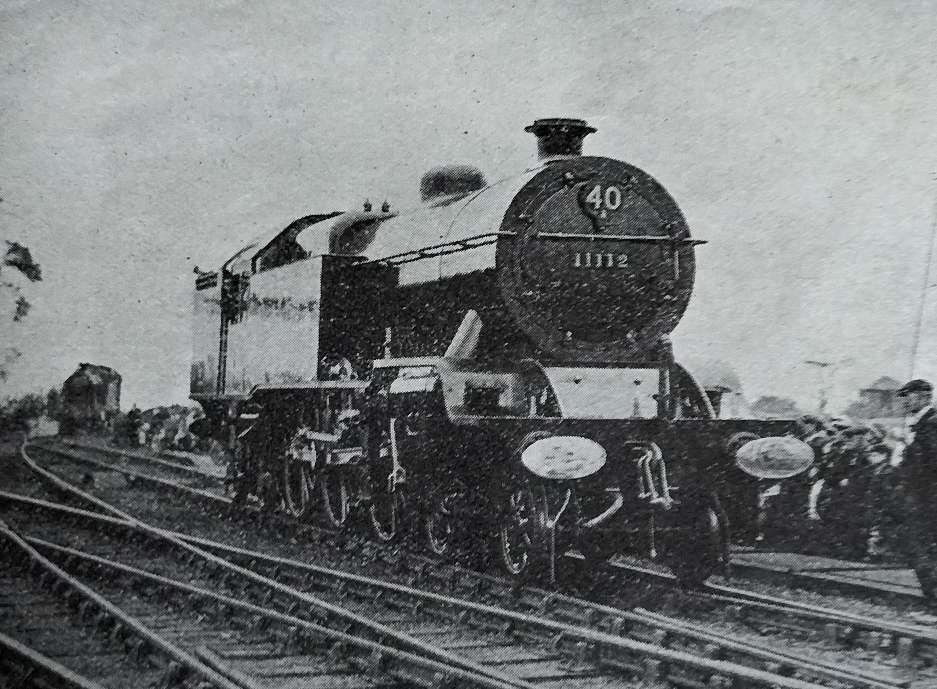
The Lancashire and Yorkshire Railway (L&YR) Hughes 4-6-4T class of steam locomotives were a 4-6-4T version of the L&YR Class 8 (‘Dreadnought’ Class 4-6-0), hence they were known as ‘Dreadnought tanks’. All were actually built by the LMS in 1924 after the grouping, albeit at the L&YR’s Horwich Works. Withdrawals started in 1938, with three engines (11112, 11115, 11116), one each in 1939 and 1940 (11113 and 11111 respectively), four in 1941 (11114, 11117–11119) and the last (11110) in January 1942. No examples were preserved. [23]
- 41. GWR 2-8-0T Locomotive No. 5225
The 4200 class of 2-8-0T engines was designed to work the heavy short-haul coal and mineral trains in South Wales. They were designed using standard GWR parts as used in the 2800 class. A total of 205 locomotives were built (including the 5205 class) between 1910 and 1940. They were the only 2-8-0T to run in Britain. [24]
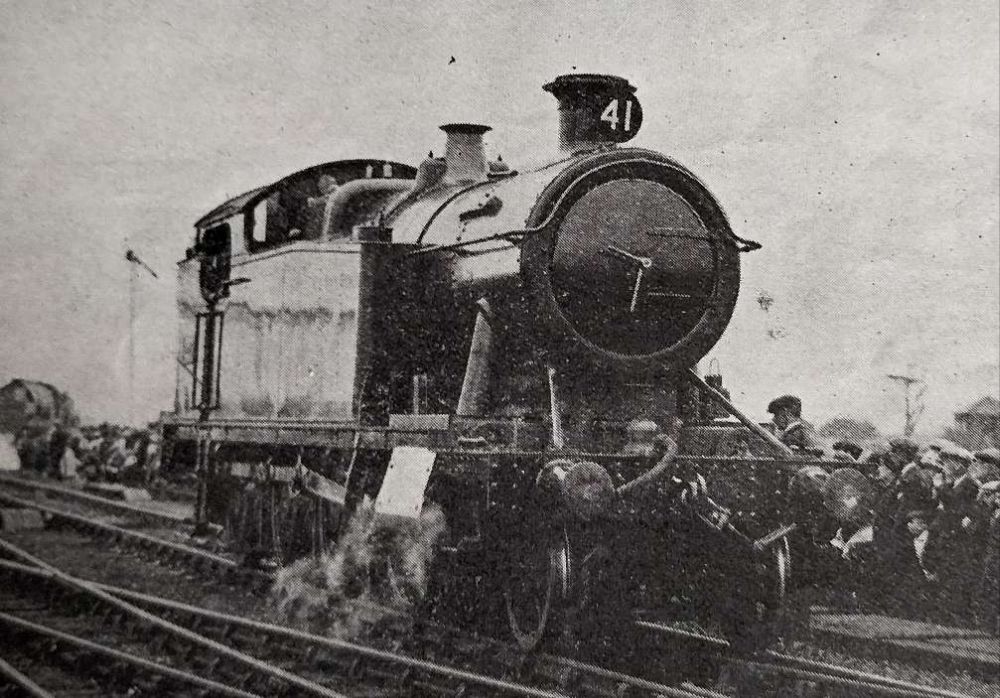
“The first engine to be built was 4201 in 1910 (4200 was a later engine built in 1923). Between 1910 and 1930 195 were built numbered 4200-4299 and 5200-5294. 5205 onwards had larger cylinders and other minor alterations and were known as the 5205 class.” [24]
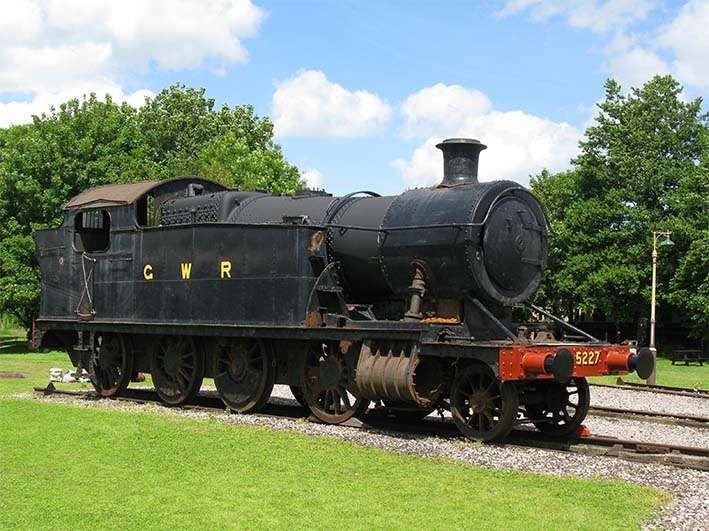
“Five examples of the 4200 class and three members of the 5205 class have been preserved (4247, 4248, 4253, 4270, 4277, 5224, 5229 and 5239). There are also three locomotives preserved from the 7200 class which were rebuilds of the 5205 series 5264 rebuilt as 7229, 5275 rebuilt as 7202 and 5277 rebuilt as 7200).” [24]
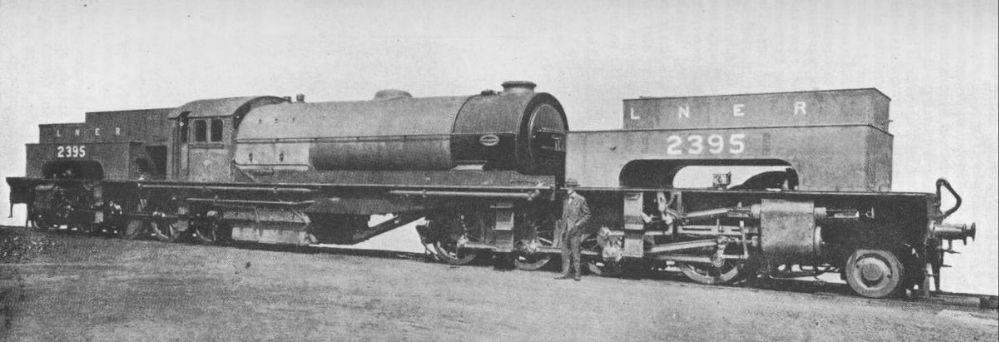
- 42. LNER ‘Garratt’ Locomotive No. 2395
“The London and North Eastern Railway Class U1 was a solitary 2-8-0+0-8-2 Garratt locomotive designed for banking coal trains over the Worsborough Bank,[i] a steeply graded line in South Yorkshire and part of the Woodhead Route. It was both the longest and the most powerful steam locomotive ever to run in Britain. It was built in 1925 with the motion at each end being based on an existing 2-8-0 design. The original number was 2395, and it was renumbered 9999 in March 1946, and then 69999 after nationalisation in 1948, although it retained its cab-side plate bearing its original number throughout its life. The locomotive ran for some time as an oil burner, and was tried out on the Lickey Incline in 1949–1950 and again, after the electrification of its home line, in 1955. These trials were unsuccessful, and so the locomotive was withdrawn in 1955 and scrapped.” [26]
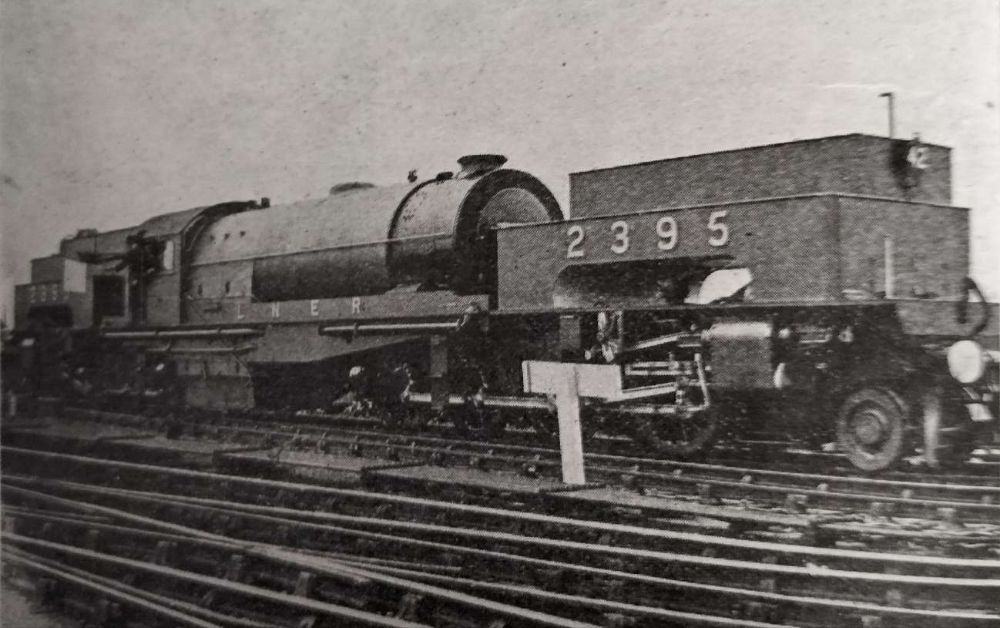
The locomotive was constructed in just 3 weeks in 1925, perhaps with the Stockton & Darlington centenary celebrations in mind. It was ready just in time and sent in the standard outshopped grey livery before being painted black. [26]
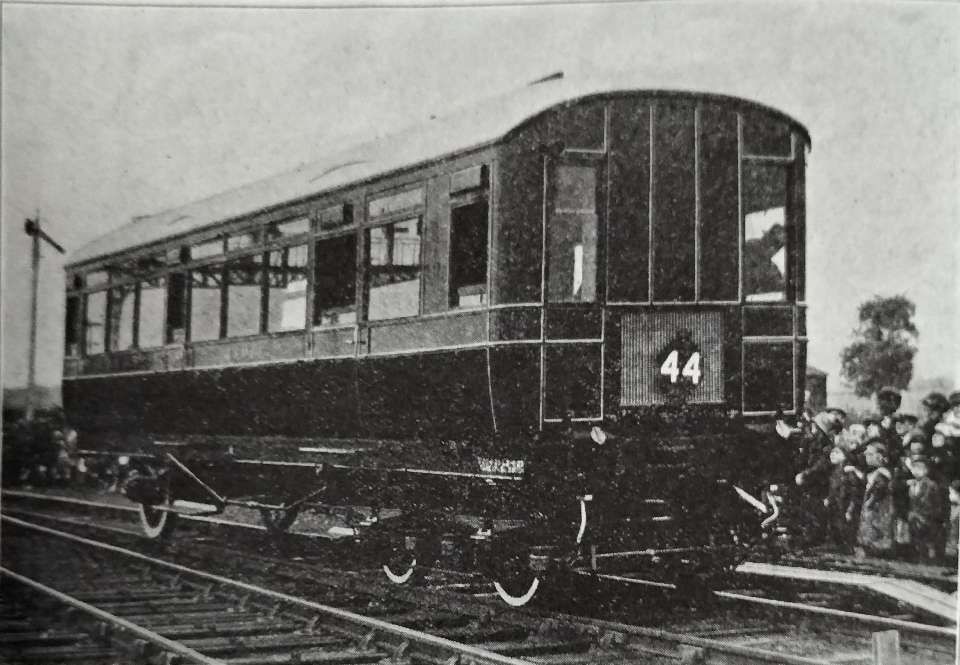
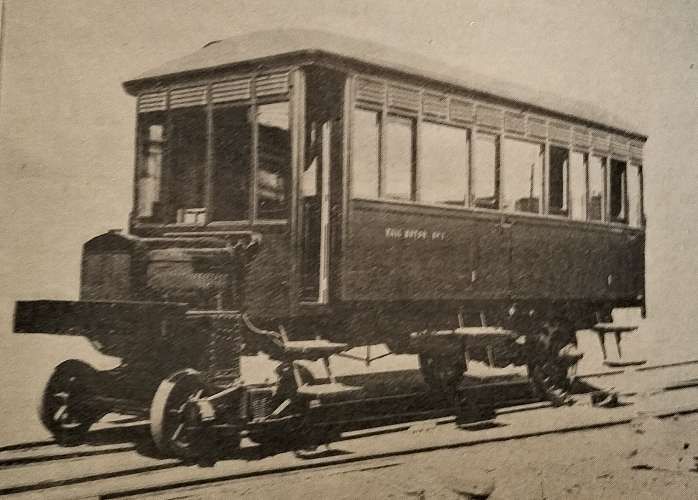
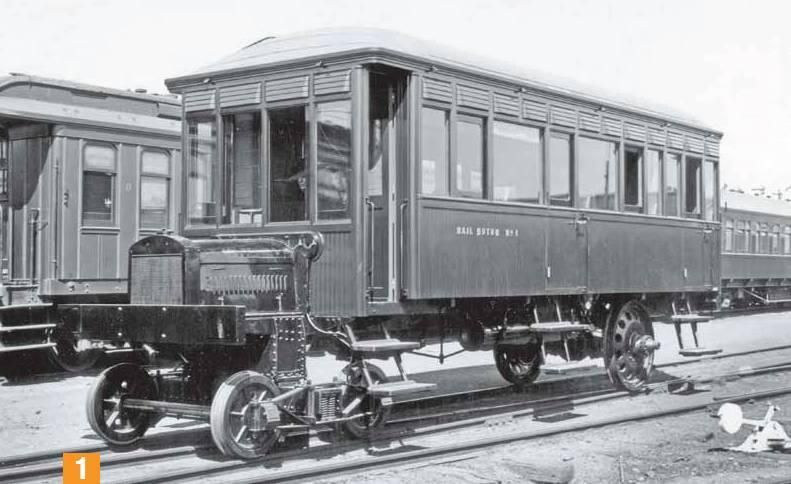
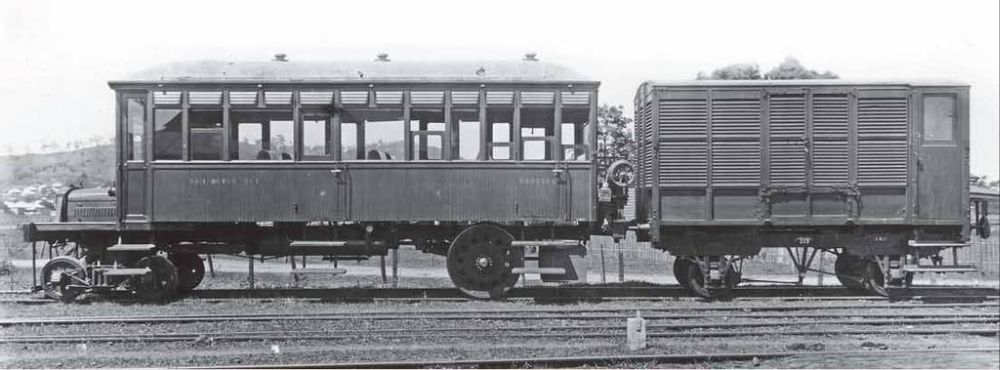
- 43. LNER Petrol Railcar/Railmotor No. 130Y, later 2105Y
The 1920s were quite an era for experimentation on the railways of the UK. This Railcar/Railmotor is included in a number looked at elsewhere on this blog. The relevant article can be found here. [30]
The North Eastern Railway (NER) “authorised the construction of the experimental Petrol Autocar No. 2105 on 21st September 1922. On 19th October, Raven reported the purchase of a 6-cylinder 105hp Daimler engine from the Slough Trading Estate Co. Ltd. The remainder of the vehicle was built at York Carriage Works and was completed in July 1923. By this time, Grouping had occurred, and the autocar was given the LNER number 2105Y. It was later renumbered as No. 22105 in August 1926.” [31]
- 45. Sentinel-Cammel Steam Railmotor of 1925
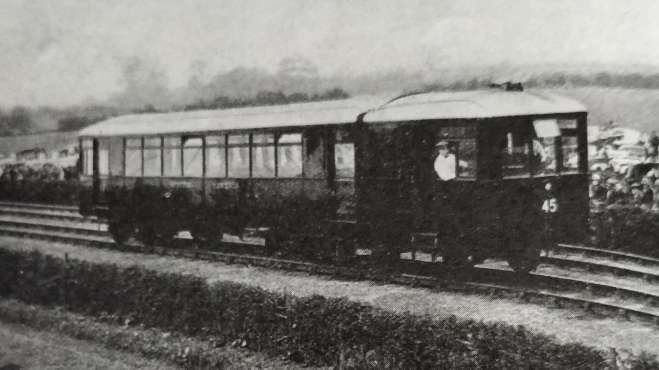
Sentinel produced a significant number of steam railcars/railmotors. They are covered elsewhere on this blog. Please click here. [33]
The LNER arranged for trials of two Sentinel railmotors in 1924. After those trials, adaptations were made including providing larger boilers. The result was ideal for LNER uses and a series of 80 units were purchased. The first two large boiler railcars were ordered on 11th December 1924. These railcars used the bodies from the trial railcars and the cost was discounted accordingly. Numbered Nos. 12E & 13E, the railcars entered service with the LNER in May 1925 and were classified as Diagram 14600-614E. [34] They were ‘state of art’ units available just in time for the Stockton & Darlington celebrations.
- 46. LNER 0-8-0 Q7 (formerly NER T3) with mineral wagons.
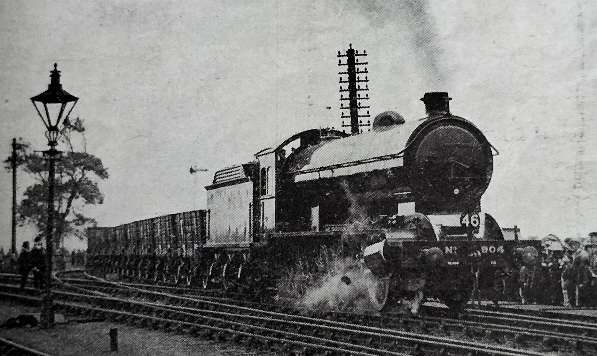
The North Eastern Railway Class T3, classified as Class Q7 by the LNER, was a class of 0-8-0 steam locomotive designed for heavy freight. Five were built by the NER in 1919 and a further 10 by the LNER in 1924. No. 904 was put in charge of a rake of mineral wagons for the procession. [32]
No. 901 is preserved at Darlington. …

- 47. LNER Q5 0-8-0 No. 130 (ex NER) hauling tableaux train
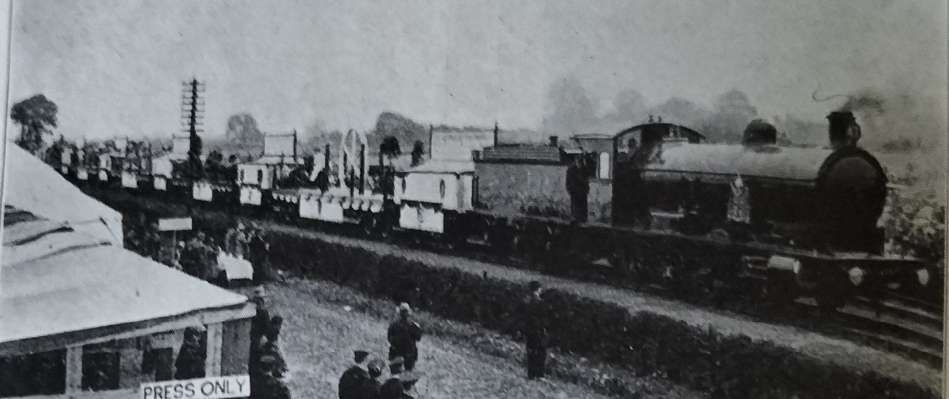
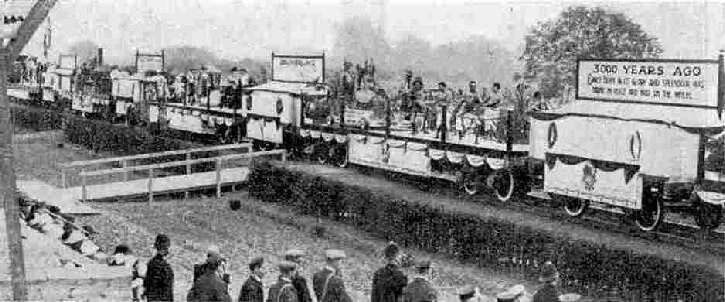

This train consisted of a series of tableaux depicting the history of the wheel. It was described in the publication ‘Railway Wonders of the World’ like this: “The tableaux consisted of six wagons each carrying a separate ‘picture’. The first was allegorical and depicted a number of astrologers grouped at one side of a symbolic wheel, with a scene showing modern engineering practice on the other. The two scenes were joined through the spokes of the wheel by a huge chain, representing the links of time. The second tableau showed a tribe of prehistoric men, who, having felled a tree with their flint axes, were shown transporting the trunk on logs used as rollers – the earliest form of the wheel. Then came an Egyptian scene in which one of the royal Pharaohs was being drawn on a wheeled platform by slaves, showing how the Egyptians started the wheel in its manifold forms so that, through the ages that followed, progress successively moved on the wheels of chariot, wain, and coach. This was followed by the fourth tableaux showing how the wheel was discarded for a time when Sedan chairs were used, and the fifth depicting the story of the wheel in transport opening its most famous chapter when Stephenson mounted an engine on wheels and steam locomotion began. On one side of this wagon Stephenson was explaining the working of a model of “Locomotion No. 1” to a group of friends and workmen, whilst on the other side modem mechanics were working with present-day materials and tools. The final tableau showed how the railways of the world have grown from the few miles of permanent way uniting Stockton and Darlington.” [37]
- 48. GNSR 4-4-0 No. 45A and train of old 4-wheel coaches
The locomotive was one of a Class which transferred to the LNER. More details can be found here. [38]
No. 45A was repainted in GNSR green to take part in the Stockton & Darlington Centenary celebrations. It was withdrawn on 31st July 1925 shortly after its return. There was some talk of preservation, and it was temporarily employed as a shunter at the Inverurie Works. However, preservation was not to be, and No. 45A was scrapped soon afterwards. [38]
- 49. LMS Train of Vestibule Stock behind LMS 4-6-0 No. 10474
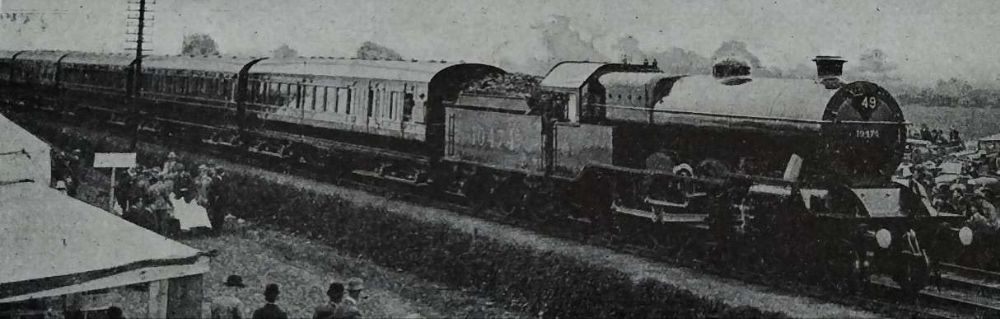
LMS 4-6-0 No. 10474 was a Class 8 4-6-0 steam locomotive to a Lancashire & Yorkshire Railway design that was built for the LMS by Horwich Works in 1925. 10474 and its siblings were used on express passenger trains for the LMS. [36]
Its train is made up of nine vestibule carriages built at Derby and used on the West Coast route to Scotland. [1: p124]
- 50. GWR Royal Train behind GWR 4-6-0 No. 4082 ‘Windsor Castle’
No. 4082 ‘Windsor Castle’, “was chosen as the Royal engine from the time that it was driven from Swindon works to Swindon station by King George V accompanied by Queen Mary on 28th April 1924. Plaques were mounted on the side of the cab to commemorate the occasion.” [39]
- 51. GWR Train of Articulated Vehicles behind GWR 4-6-0 No. 111 ‘Viscount Churchill’
No 111 ‘Viscount Churchill’ (converted into a Castle class 4-6-0 from ‘The Great Bear’) took charge of a train of express passenger articulated coaches. Didcot Railway Centre says that the new GWR articulated coaches “came as a surprise to many as the railway press was unaware they had been developed. The train had one two-coach unit and two three-coach units. The formation was one brake first, one first, one first restaurant car, one kitchen car, one third restaurant car, two third-class coaches and a brake third. The first-class coach interiors were finished in walnut and the third-class in mahogany.” [40]
- 52. SR Train of New Stock behind SR 4-6-0 No. 449 ‘Sir Torre’
The LSWR N15 class was a British 2–cylinder 4-6-0 express passenger steam locomotive designed by Robert Urie. The class had “a complex build history spanning three sub-classes and ten years of construction from 1918 to 1927. The first batch of the class was constructed for the London and South Western Railway (LSWR), where they hauled heavy express passenger trains to the south coast ports and further west to Exeter. After the Lord Nelsons, they were the second biggest 4-6-0 passenger locomotives on the Southern Railway. They could reach speeds of up to 90 mph (145 km/h).” [41] The Southern Railway (SR) publicity department gave the N15 locomotives names associated with Arthurian legend; the class hence becoming known as King Arthurs.
- 53. LNER Train of Articulated Stock behind LNER A2 4-6-2 No. 2400 ‘City of Newcastle’
The LNER Class A2 4-6-2 steam locomotive was designed by Vincent Raven for the North Eastern Railway (as NER class 4.6.2). Two were built by the NER in 1922 before the grouping and another three by the LNER in 1924. Their LNER numbers were 2400–2404. All five locomotives were named by the LNER. ‘City of Newcastle’ was the first of the class. [43]
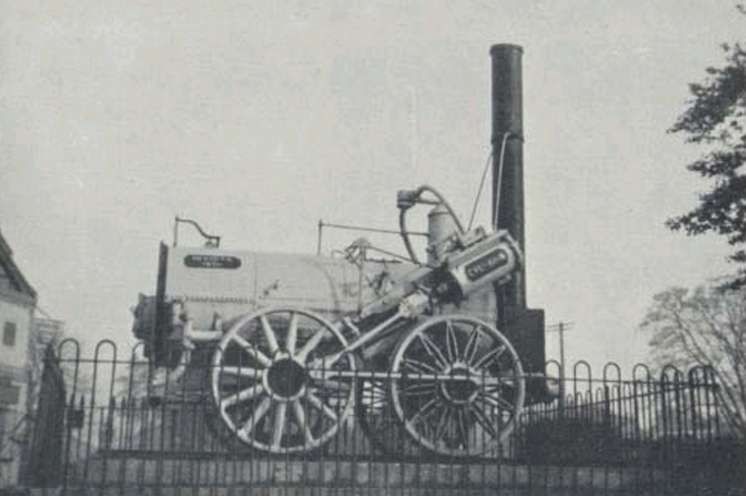
- 54. Locomotion No. 1 and a replica train

The replica train pulled by a modern incarnation of ‘Locomotion No.1’ was the last element of the procession/cavalcade. It was somewhat shorter than the original train of September 1825. ..
On 27th September 1825, Locomotion No. 1 hauled the first train on the Stockton and Darlington Railway, driven by George Stephenson. The train consisted of Locomotion No.1, eleven wagons of coal, the carriage ‘Experiment’, and a further 20 wagons of passengers, guests, and workmen. Around 300 tickets had been sold, but about twice as many people were believed to have been aboard. The train, which had an estimated weight of 80 metric tons and was 400 feet long, reached a maximum speed of 12 mph, and took two hours to complete the first 8.7 miles of the journey to Darlington, slowed by a derailed wagon and a blocked feed pump valve for an average speed of 8 mph. [44]
“Locomotion No. 1 (originally named Active) … was built in 1825 by … George and Robert Stephenson at their manufacturing firm, Robert Stephenson and Company. It became the first steam locomotive to haul a passenger-carrying train on a public railway … [It] was ordered by the Stockton and Darlington Railway Company in September 1824; its design benefitted from George Stephenson’s experience building his series of Killingworth locomotives. It is believed that Locomotion No. 1 was the first locomotive to make use of coupling rods to link together its driving wheels, reducing the chance of the wheels slipping on the iron rails. However, the centre-flue boiler proved to be a weakness, providing a poorer heating surface than later multi-flue boilers. … Locomotion hauled the first train on the Stockton and Darlington Railway, the first locomotive to run on a public railway. On 1st July 1828, it was heavily damaged when its boiler exploded at Aycliffe Lane station, killing its driver, John Cree. It was rebuilt, but as a consequence of the rapid advances in locomotive design, [it] became obsolete within a decade. It was used on the railway until 1850, after which it was converted into a stationary engine. In 1857, as a consequence of its historical importance, Locomotion was preserved and put on display. Between 1892 and 1975, it was on static display at one of the platforms at Darlington Bank Top railway station, and was then on display at the Head of Steam museum based at Darlington North Road railway station between 1975 and 2021. It was then moved to the Locomotion museum in Shildon. A working replica of Locomotion was built, and following years of operation at Beamish Museum was put on display at the Head of Steam museum.” [44]
The Exhibition
At the Railway Centenary Exhibition held in the LΝΕR’s Faverdale Wagon Works and Sidings at Darlington “was gathered together the biggest and most interesting collection of railway appliances, locomotives, rolling stock and other material ever exhibited in this country. The locomotives and rolling stock on rails at the exhibition sidings numbered 99, whilst in the building were three locomotives and about 650 other items. … The railways were naturally the chief exhibitors, but many extremely interesting items were loaned from private collections.” [1: p127]
The Railway Magazine went on to list all the major exhibits, some of which were in the cavalcade/procession covered above.
The details given in The Railway Magazine are reproduced in the Appendix below.
The exhibition was comprehensive, giving an outstanding insight into the world of railways in Great Britain.
Appendix – Exhibition Items
The Railway Magazine … [1: p127-130]
In the outdoor catalogue were: the model of North Star, constructed for the exhibition, utilising the original driving wheels. Nearby was the Invicta, Canterbury and Whitstable Railway, built by R. Stephenson & Co., in 1830, and a 2-2-2 engine constructed by Bury, Curtis & Kennedy in 1846 for the Great Southern Railway. Two locomotives came from Belgium, one a 2-2-2 saddle tank, with tender built for the 3-ft. 7-in. gauge Anvers-Gand Railway in 1844, the other a full-size model of a 2-2-2 engine built in 1835 for the Belgian State Railways. Other old locomotives included the Derwent, Cornwall and the Hetton Colliery locomotive, which led the van in the Centenary procession. There was also the historic Locomotion, and a full size model of the Rocket. The remaining locomotives are tabulated according to groups, subdivided on the basis of original ownership.
Of these, the sections of the LNER were responsible for 33 locomotives.
The NER‘s total was 14:
No. 949 0-4-4 5-ft. passenger tank built by Neilson & Co. in 1874, designed by E. Fletcher;
No. 1334, 0-4-4 5-ft. 11-in. passenger tank built at Darlington in 1901, designed by Wilson Worsdell;
No. 2151, 4-4-4 5-ft. 9-in. passenger tank, 3 cylinders, built at Darlington in 1913, designed by Sir Vincent Raven;
No. 1275, 0-6-0 5-ft. mineral engine, built in 1874 by Dubs & Co., designed by W. Bouch;
No. 517, 0-6-0 4-ft. 74-in. mineral engine built at Gateshead in 1905, designed by W. Worsdell;
No. 934, 4-6-0 5-ft. 8-in. express goods engine, 3 cylinders, built at Gateshead in 1921, designed by Sir Vincent Raven;
No. 902, 0-8-0, 4-ft. 71-in. 3-cylinder mineral engine, built at Darlington in 1919, designed by Sir Vincent Raven;
No. 910, 2-4-0, 7-ft. express passenger engine, built at Gateshead in 1875, designed by E. Fletcher;
No. 1463, 2-4-0 7-ft. express passenger engine, built at Darlington in 1885, “Tennant” type;
No. 1620 4-4-0 7-ft. 1.25-in. express passenger engine, built at Gateshead, 1892, by W. Worsdell;
No. 2207, 4-4-2, 6-ft. 10-in. express passenger engine, 3 cylinders, built at Darlington, 1911, designed by Sir Vincent Raven;
No. 2006, 4-6-0 6-ft. 11-in. express passenger engine, built at Gateshead, 1900, designed by W. Worsdell, Gold Medal, Paris, 1900;
No. 9, 0-4-4-0 4-ft. electric freight engine, built at Darlington, 1914, designed by Sir Vincent Raven;
No. 13, 4-6-4, 6-ft. 8-in. electric express engine, built at Darlington, 1922, designed by Sir Vincent Raven.
The Great Central section was represented by four engines:
No. 6499, 0-6-0, 3-ft. 9-in, saddle tank shunting engine, built by Manning Wardle & Co., 1876, for the Manchester, Sheffield and Lincolnshire Railway;
No. 5088, 4-6-2 5-ft. 7-in. passenger side tank engine, built at Gorton, 1923, designed by J. G. Robinson;
No. 5972, 4-2-2 7-ft. 9-in. inside cylinder express passenger engine, built at Gorton, 1900, designed by H. Pollitt;
No. 6169, Lord Faringdon, 4-6-0 6-ft. 9-in. 4-cylinder express passenger engine, built at Gorton, designed by J. G. Robinson.
Two locomotives represented the GE section
No. 7133 was a 0-4-0 3-ft. 1-in. enclosed tramway engine built at Stratford in 1897;
No. 8900 (1900), Claud Hamilton, 4-4-0 7-ft. express passenger engine, built at Stratford, 1900, designed by J. Holden. Gold Medal Paris Exhibi- tion, 1900.
The GN section showed three engines:
The celebrated No. 1, 4-2-2 8-ft. 2-in. express engine, with outside cylinders, built at Doncaster, 1872, designed by P. Stirling:
No. 3990 (No. 990), 4-4-2 6-ft. 8-in. express engine, built at Doncaster, 1898, designed by H. A. Ivatt, the first “Atlantic” engine constructed in Great Britain;
No. 3251 (No. 251), 4-4-2 6-ft. 8-in. express engine, built at Doncaster, 1902, designed by H. A. Ivatt, the first engine on a British railway with a wide firebox.
The NBR section was represented by two engines:
No. 10114, 0-6-0 5-ft. 13-in. goods engine, built by Neilson & Co. in 1868, designed by T. Wheatley;
No. 9902, Highland Chief, 4-4-2 6-ft. 9-in, express engine, built by R. Stephenson & Co., 1911, designed by W. P. Reid.
The GNSR section was represented by No. 45A, 4-4-0 5-ft. 61-in. mixed traffic engine, built in 1866 by Neilson & Co., designed by W. Cowan.
The remaining seven locomotives exhibited by the LNER. were built since the grouping of the railways:
“Garratt” type 2-8-0+0-8-2, built by Beyer Peacock & Co., 1825, fitted with H. N. Gresley’s valve gear, driving wheels, 4-ft. 8-in. diameter, 6 cylinders (three to each truck), the first 6-cylinder “Garratt” locomotive, weight in working order, 176tons;
No. 203, 2-6-0 3-cylinder 5-ft. 8-in. express goods engine, built an Darlington, 1925, designed by H. N. Gresley (No. 202, a similar engine, was shown in the Exhibition building);
No 3499, 2-8-0 3-cylinder 4-ft. 8-in. mineral engine, built at Doncaster, 1924, designed by H. N. Gresley;
No. 2393, “Mikado” type (2-8-2) 3-cylinder 5-ft. 2-in. mineral engine, fitted with “booster” to drive trailing wheels, built at Doncaster, 1925, designed by H. N. Gresley;
No. 2563, William Whitelaw, 4-6-2 3-cylinder 6-ft. 8-in. express engine, designed by H. N. Gresley;
No. 2400, City of Newcastle, 4-6-2 3-cylinder 6-ft. 8-in. express engine, built at Darlington, 1922, designed by Sir Vincent Raven.
The LMS exhibit of modern locomotives comprised six engines: …
Three LNWR engines: …
No. 1881, 4-cylinder compound 4-ft. 3-in. mineral engine, built at Crewe, 1901, designed by F. W. Webb;
No. 9446, 0-8-0 4-ft. 2-in. goods engine, built at Crewe, 1922, designed by C. J. B. Cooke;
No. 5900, Sir Gilbert Claughton, 4-cylinder, 6-ft. 3-in. express engine, built at Crewe, 1913, designed by C. J. B. Cooke.
The Midland section exhibit was No. 679, 4-2-2 7-ft. 91-in. express engine, built at Derby, 1899, designed by S. W. Johnson.
The L&YR section showed No. 10474, 4-6-0 4-cylinder 6-ft. 3-in. express, built at Horwich, designed by G. Hughes.
The LMS specimen was No. 11112, 4-cylinder 6-ft. 3-in. passenger tank, built at Horwich, 1924, designed by G. Hughes.
The Somerset & Dorset Joint Railway No. 86 2-8-0 4-ft. 71-in. mineral engine, built by R. Stephenson & Co., 1825, designed by Sir H. Fowler (LMS)
The GWR was represented by three modern locomotives:
No. 5225, 2-8-0 4-ft. 7-in. mineral tank engine, built at Swindon, designed by G. J. Churchward;
No. 4700, 2-8-0 5-ft. 8-in. express goods engine, built at Swindon in 1919, designed by G. J. Churchward;
No. 4082, Windsor Castle, 4-6-0 4-cylinder 6-ft. 8-in. express, built at Swindon, designed by C. B. Collett. This is the locomotive the King and Queen drove at Swindon.
The SR was represented by No 449, Sir Torre, at the head of the train of modern coaches.
In addition there were: the City and South London Railway‘s old electric engine supplied for the opening of the railway in 1890. The LNER showed a petrol bus for rail service, a petrol autocar, and a Sentinel-Cammell steam coach.
Modern rolling-stock-passenger and freight was represented in profusion: …
A complete train by each of the four groups: …
GWR – showed an articulated rake of coaches and a 10-compartment third-class corridor coach, 70ft long;
LNER – showed a similar articulated rake and an electric coach, a Post Office van, a sleeper with first-class berths and third-class compartments, a twin (articulated) sleeper, a ‘triplet’ dining set, corridor third etc.;
SR – sent Pullman Car ‘Lydia’, whilst the Pullman Car Company exhibited ‘Niobe’;
LMS – showed a first-class corridor coach, Queen Victoria’s saloon (and indoors – Queen Adelaide’s carriage);
London Electric Railways by one of the latest tube coaches.
Also in view were:
The “Dandy” coach from the Port Carlisle Railway;
A Stockton & Darlington carriage built circa 1850;
A GNSR coach from circa 1865.
The wide range of modern freight vehicles was well shown by the 18 wagons, etc, of different types exhibited by the LNER, varying from a four-wheeled horse-box to a set of three 60-ton flat wagons tight coupled for conveying 160-ton guns. The GWR showed a 20-ton mineral wagon, a 35-ton well trolley, a 30-ton articulated gun wagon, and a 70-ft. rail or timber truck. There were a few items of old goods rolling-stock, including a ‘Chaldron’ coal wagon built in 1826.
Within the building the fine display of signalling appliances from the earliest days, through the crude interlocking of some sixty years ago to the present perfect locking apparatus, electrical and mechanical, attracted much attention. So did the many specimens representing all periods during the past 100 years of the rails, chairs, and sleepers that go to make up the permanent way. Chief interest was taken in the numerous models, many on a large scale, and as regards locomotives chiefly working models, actuated by compressed air. Of the 46 locomotive models there were two of the Locomotion, while several GWR. broad-gauge engines made a fine display. The Metropolitan Railway was a big exhibitor in this section, showing seven or eight models of locomotives of various railways. A quarter-size model of the GNR’s 8-ft. 1-in. single (Stirling’s famous 4-2-2 type) was prominent, as, too, was the Dandy Cart, with horse aboard, as attached to the rear of horse-hauled mineral trains. Here also were models in plenty of railway bridges and viaducts, railway coaches, steamers, &c. Early railway tickets, bills, time-tables, passes, medals, &c., were to be seen in profusion, with specimens of Edmondson’s ticket-dating presses and ticket-printing machines invented in 1840, and taken from actual work to be shown at Faverdale. Railway-station bells, besides early signal and hand lamps of various types, were represented, whilst the many loan collections of literature and maps relative to early railways provided information of rare value to those interested in the development of the railway system.
References
- G.A. Sekon, ed.; 1825-1925: The Railway Centenary Celebrations at Darlington, 1st to 3rd July 1925; in The Railway Magazine, London, No. 338, August 1925, p101-142.
- https://commons.m.wikimedia.org/wiki/File:Hetton_Colliery_0-4-0_(1822_or_1851)_Locomotion_Shildon_29.06.2009_P6290048_(9989613283).jpg, accessed on 27th December 2024.
- https://commons.m.wikimedia.org/wiki/File:S%26DR_Derwent_(Hugh_Llewelyn).jpg, accessed on 27th December 2024.
- https://commons.m.wikimedia.org/wiki/File:Stockton_%26_Darlington_0-6-0_25_%27Derwent%27_Head_of_Steam,_Darlington_30.06.2009_P6300113_(10192716434).jpg, accessed on 27th December 2024.
- https://collection.sciencemuseumgroup.org.uk/objects/co205769/steam-locomotive-no-25-derwent-stockton-darlington-railway, accessed on 27th December 2024.
- https://preservedbritishsteamlocomotives.com/sd-class-1001-0-6-0-stockton-darlington-railway-1275, accessed on 28th December 2024.
- https://collection.sciencemuseumgroup.org.uk/objects/co205734/ner-0-6-0-1001-class-steam-locomotive-and-tender-no-1275-1874, accessed on 28th December 2024.
- http://www.railcentre.co.uk/RailHistory/Stockton/Pages/StocktonPage6.html, accessed on 28th December 2024.
- https://en.m.wikipedia.org/wiki/LNWR_Class_B, accessed on 28th December 2024.
- https://preservedbritishsteamlocomotives.com/north-star-2-2-2-gwr-broad-gauge, accessed on 28th December 2024.
- https://commons.m.wikimedia.org/wiki/File:North_Star_Steam_museum_Swindon.jpg, accessed on 28th December 2024.
- https://en.m.wikipedia.org/wiki/LNWR_2-2-2_3020_Cornwall, accessed on 28th December 2024.
- https://commons.m.wikimedia.org/wiki/File:LNWR_locomotive,_%22Cornwall%22.jpg, accessed on 28th December 2024.
- https://en.m.wikipedia.org/wiki/GNR_Stirling_4-2-2, accessed on 29th December 2024.
- https://en.m.wikipedia.org/wiki/GNR_Stirling_4-2-2#/media/File%3A4-2-2_GNR_1008.jpg, accessed on 28th December 2024.
- https://en.m.wikipedia.org/wiki/GNR_Stirling_4-2-2#/media/File%3AGNR_Stirling_1_at_Doncaster_Works.jpg, accessed on 29th December 2024.
- https://www.lner.info/locos/E/ner_901.php, accessed on 29th December 2024.
- https://www.lner.info/locos/E/e5.php, accessed on 29th December 2024.
- https://www.lner.info/locos/D/d17.php, accessed on 29th December 2024.
- https://en.m.wikipedia.org/wiki/NER_Class_M1, accessed on 29th December 2024.
- https://en.m.wikipedia.org/wiki/LNER_Class_P1, accessed on 30th December 2024.
- https://www.lner.info/locos/P/p1.php, accessed on 30th December 2024.
- https://en.m.wikipedia.org/wiki/L%26YR_Hughes_4-6-4T, accessed on 30th December 2024.
- https://preservedbritishsteamlocomotives.com/4200-2-8-2t-gwr-churchward-4200-4299-5200-5204https://preservedbritishsteamlocomotives.com/4200-2-8-2t-gwr-churchward-4200-429, accessed on 30th December 2024.
- https://didcotrailwaycentre.org.uk/article.php/71/5227-5205-class, accessed on 30th December 2024.
- https://en.m.wikipedia.org/wiki/LNER_Class_U1, accessed on 30th December 2024.
- https://www.lner.info/locos/Electric/electric.php, accessed on 30th December 2024.
- https://www.lner.info/locos/Electric/ee1.php, accessed on 30th December 2024.
- https://en.m.wikipedia.org/wiki/LNER_Class_EE1#/media/File%3ANorth_Eastern_Railway_electric_locomotive_No_13.jpg, accessed on 30th December 2024.
- https://rogerfarnworth.com/2024/08/08/petrol-railmotors-the-railway-magazine-september-1922
- https://www.lner.info/locos/IC/ner_petrol_autocar.php, accessed on 30th December 2024.
- https://en.m.wikipedia.org/wiki/NER_Class_T3, accessed on 30th December 2024.
- https://rogerfarnworth.com/2024/06/26/steam-railmotors-part-6-after-the-grouping
- https://www.lner.info/locos/Railcar/sentinel.php, accessed on 30th December 2024.
- https://player.bfi.org.uk/free/film/watch-the-official-film-of-the-railway-centenary-1925-online, accessed on 31st December 2024.
- https://locomotive.fandom.com/wiki/L%26YR_Class_8_No._10474, accessed on 31st December 2024.
- https://www.railwaywondersoftheworld.com/railway_centenary.html, accessed on 31st December 2024.
- https://www.lner.info/locos/D/d47.php, accessed on 31st December 2024.
- http://www.greatwestern.org.uk/m_in_cas_40827013.htm, accessed on 31st December 2024.
- https://www.facebook.com/161421647218065/posts/pfbid0otP6Sxuamk1BURpmy2cZ6opNaZmjVDnwY8AcomKmaoE3YioDGEtK8jZmsRQ2yAZAl/?app=fbl, accessed on 31st December 2024.
- https://en.m.wikipedia.org/wiki/LSWR_N15_class, accessed on 31st December 2024.
- https://blog.railwaymuseum.org.uk/2025-celebrating-200-years-of-the-stockton-darlington-railway, accessed on 31st December 2024.
- https://en.m.wikipedia.org/wiki/LNER_Class_A2, accessed on 31st December 2024.
- https://en.m.wikipedia.org/wiki/Locomotion_No._1, accessed on 31st December 2024.
- https://en.m.wikipedia.org/wiki/Stockton_and_Darlington_Railway, accessed on 31st December 2024.
- https://wp.me/p9H29O-Ao, accessed on 31st December 2024.


_Locomotion_Shildon_29.06.2009_P6290048_(9989613283).jpg)
.jpg)
.jpg)
.jpg)