
In July 1923, The Railway Magazine carried an article about the Callander & Oban Railway (C&O) written by G.F. Gairns. [1]
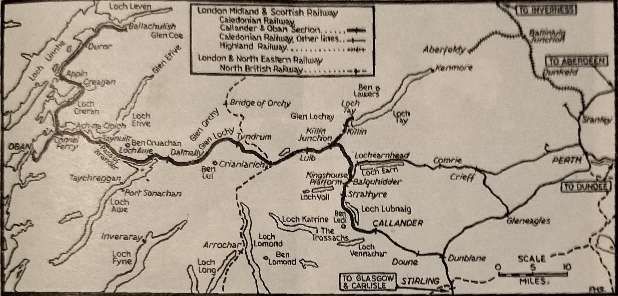
Gairns commented that the C&O constituted the third of the three great mountain lines: the Perth-Inverness line of the Highland Railway; the West Highland Line of the North British Railway; and the Callander & Oban Railway (including the Ballachulish Extension).
A short series of four articles about the Ballachulish line can be found here, [2] here, [3] here, [4] and here. [5]
The C&O had previously been written about in the Railway Magazine, specifically in the issues of September 1903, August 1904, and August and September 1912. Gairns leaves the detailed history to those previous articles, apart from a brief introduction, and focusses in 1923 on a journey along the line from Stirling to Oban and to Ballachulish.
An excellent presentation of the various scenes which preceded the Callander & Oban Railway can be found in the early pages of John Thomas’, ‘The Callander & Oban Railway‘. [62: p1-26]
Ultimately, an agreement was signed between the Scottish Central Railway (SCR) and the Callander & Oban (C&O) was signed on 17th December 1864 which affirmed that the SCR would subscribe £200,000 to the scheme. “The C&O was to have nine directors, five appointed by the Scottish Central and four by the promoters. The line was to be ‘made, constructed and completed in a good, substantial sufficient and workmanlike manner, and without the adoption of timber bridges and culverts’. … The rails were to weigh 75 lb per yard and were to be laid in 24 ft lengths on larch sleepers placed at an average distance of 3 ft.” [62: p26-27]
As part of the agreement, once at least 20 miles of line directly connected to the Dunblane, Doune & Callander Railway had been constructed and passed by the Board of Trade, the Scottish Central Railway undertook work it in perpetuity, on the basis that it would receive half of the gross revenue.
The Callander & Oban Railway bill was drawn up and presented in Parliament in January 1865. … The bill sought:
“First, a Railway commencing about Five Furlongs South-westwards from the Schoolhouse in the Town of Oban called the Oban Industrial School, and terminating by a Junction with the Dunblane, Doune and Callander Railway, about One and a Half Furlongs Eastward from the Booking Office of the Callander Station of the Railway.
Secondly, a Tramway commencing by a Junction with the Railway above described about One Furlong South-westwards from the said Schoolhouse, and terminating on the Pier on the East Side of the Harbour of Oban about Two Chains Eastward from the South-western end of the said Pier.” [62: p27]
148 railway bills were passed in a two-day session of Parliament on January 1865. These included the C&O and the Dingwall & Skye Railway. Both these schemes had a similar primary purpose – to reach ports on the West Coast of Scotland to give the fishing trade access to markets in the rest of Scotland and further South.
Thomas comments: “The Callander & Oban Railway Act was passed on 8th July 1865. The first sod was not cut for over fourteen months. Five years were to pass before a revenue-earning wheel was to turn on the line (and on only 17½ miles at that), and it would be fifteen years before a train entered Oban. … But even before the Act was passed sweeping changes had transformed the railway political scene. Ten days earlier, on 29th June, the Scottish Central had won permission to take over the Dunblane, Doune & Callander as from 31st July 1865; and the Central had enjoyed its new-found gains for one day. On 1st August 1865 the Central itself had been absorbed by the Caledonian, which acquired all its assets and liabilities including the obligation to finance and operate the Callander & Oban. At the outset the C & O directors found themselves with formidable new masters.” [62: p28]
As much as the Callander & Oban had looked attractive to the Scottish Central. “It was not at all attractive to the Caledonian, whose shareholders, had no stomach for squandering cash among the Perthshire hills. … The 1861 census had shown that Oban and Callander between them possessed fewer than 3,000 inhabitants, and the scattered hamlets between the two could produce barely a thousand more. The certain dividends lying in the coal and iron traffic of the Clyde Valley were infinitely preferable to the nebulous rewards from the fish and sheep of the West Highlands.” [62: p29]
From the beginning there was a faction on that Caledonian board which wished to drop expansion towards Oban at the earliest opportunity, “but the terms of the SCR-Caledonian amalgamation agreement forbade such a course. And there was another reason, if a negative one, why the Caledonian should use caution. The amalgamations of 1865 had given the Edinburgh & Glasgow to the North British, which as the result had now penetrated deep into traditional Caledonian territory – Glasgow and the Clyde coast; and the North British already possessed and exercised running powers into Callander. If the Caledonian abandoned its awkward foster-child on the Callander doorstep, it was reasonable to suppose that the North British would attempt to pick it up.” [62: p29]
The Callander & Oban directors had undertaken to find £400,000 along the route of the railway. This proved to be a monumental task. Their first attempts brought in 201 individual shareholders who subscribed for a total of £56,360 worth of shares! The C&O may well have been stillborn had it not been for the appointment of John Anderson as the Secretary to the C&O.
Given palpable hostility between the directors, Anderson “was left to conduct the line’s affairs single-handed.” [62: p32] Thomas goes on to describe in some detail the different methods he used to achieve progress. The machinations involved need not, however, detain us here
Gairns writes:
“The Callander and Oban Railway Company was constituted in 1865. The Dunblane, Doune and Callander Railway was already in existence, having been opened in 1858. The Callander and Oban line was opened: Callander to Killin Junction, 1870; Killin Junction to Tyndrum, August, 1873; thence to Dalmally, May, 1877; and to Oban, July, 1880. At Balquhidder, at first known as Lochearnhead, the line from Crieff makes connection. This route, with connecting lines, was opened, Perth to Methven, 1838; Methven Junction to Crieff, 1866; Gleneagles (previously Crieff Junction, 1856; Crieff to Comrie, 1893; Comrie to St. Fillans, 1901; St. Fillans to Balquhidder (Lochearnhead), 1905. The Callander and Oban line has always been worked by the Caledonian Company, and is now [1923] included in the London Midland and Scottish Railway.
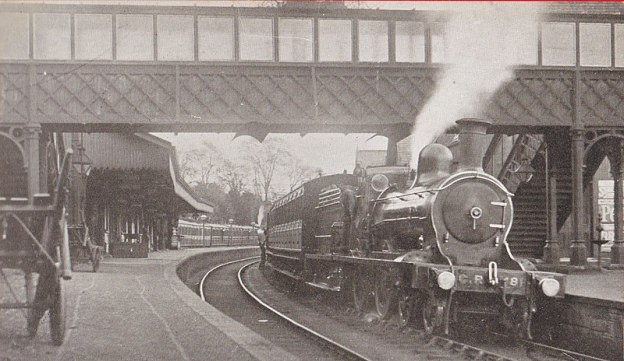
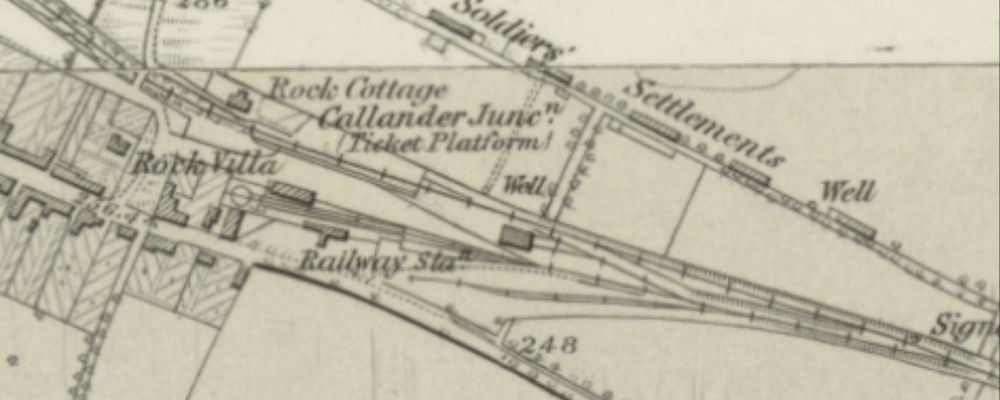
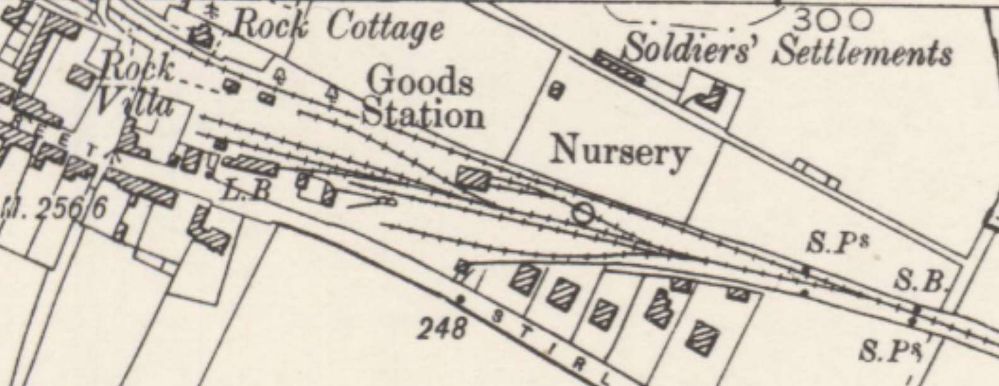
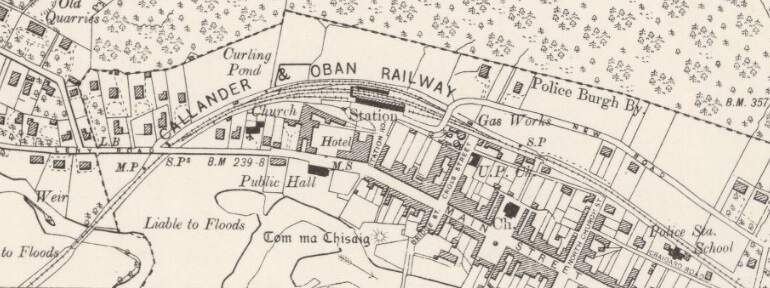
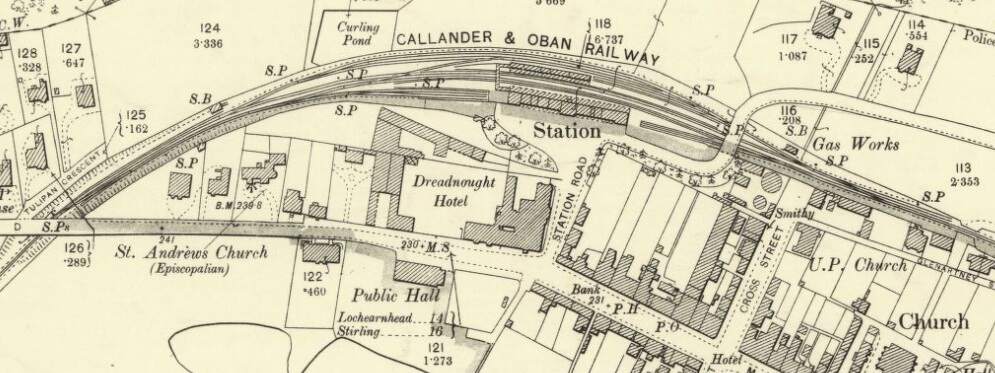
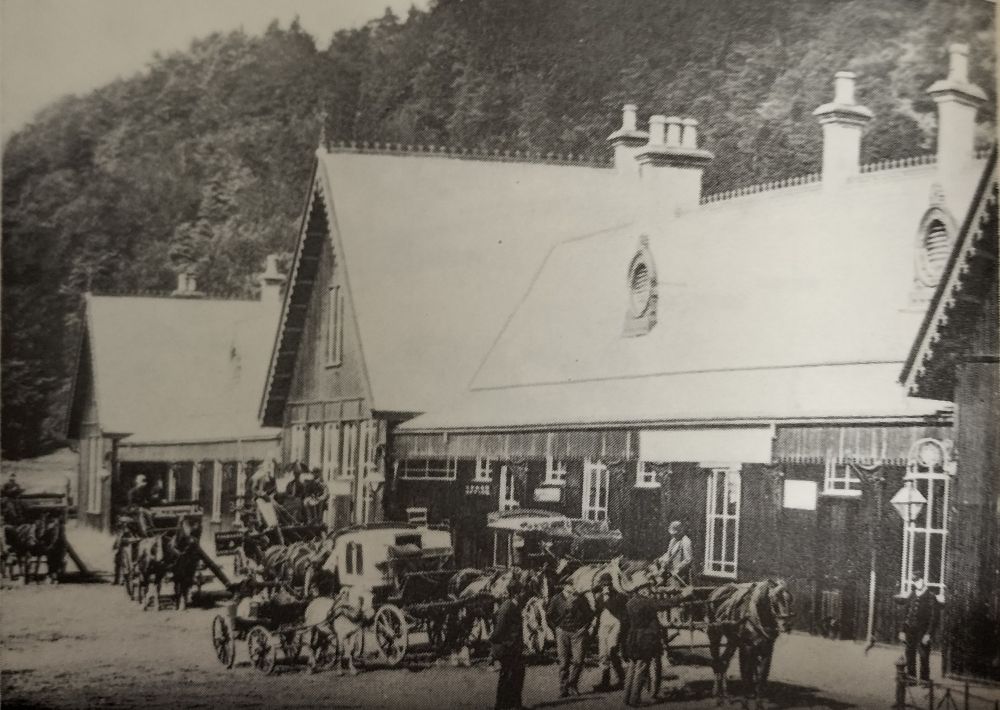
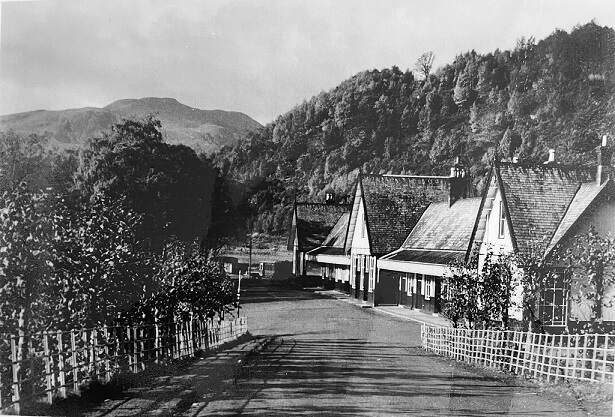
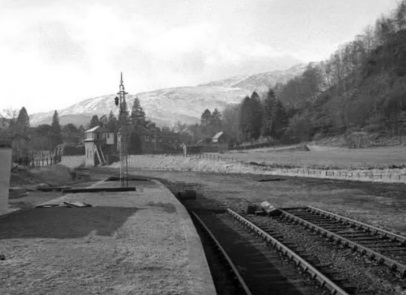
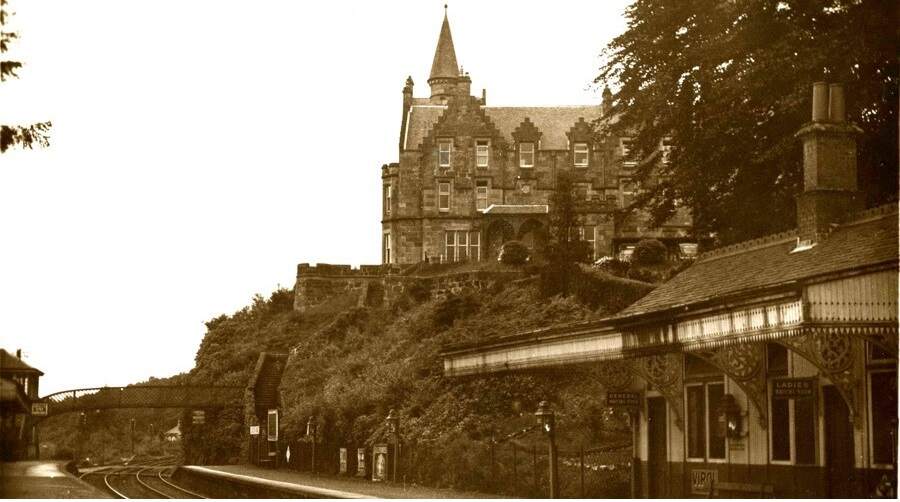
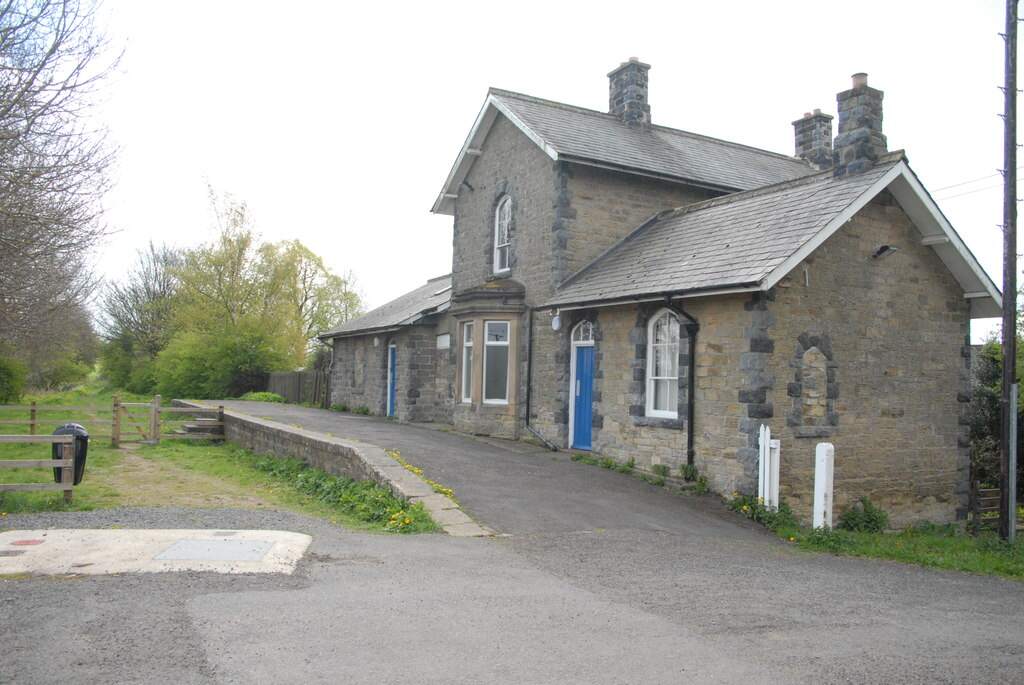
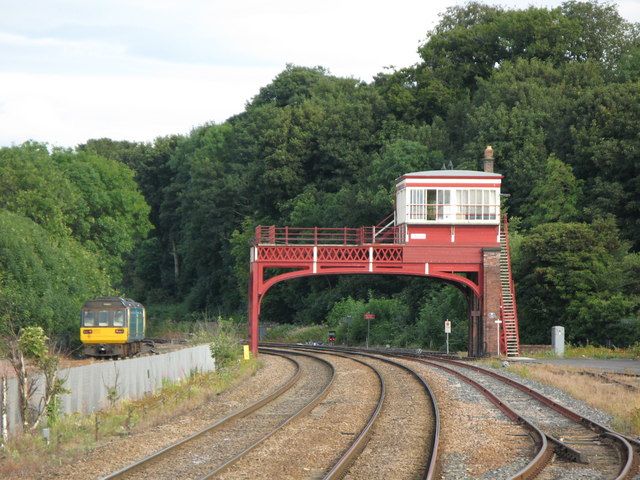
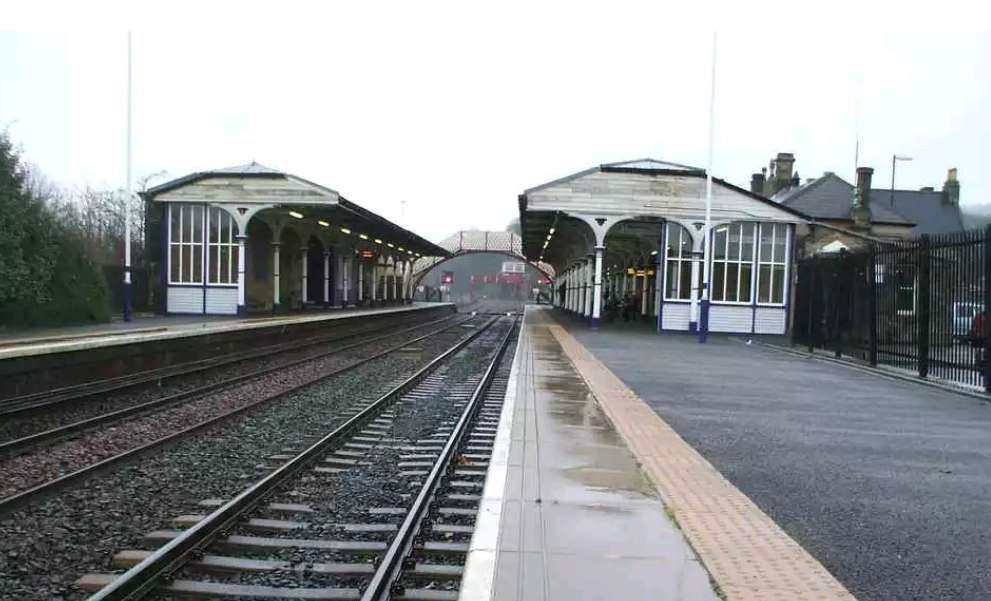
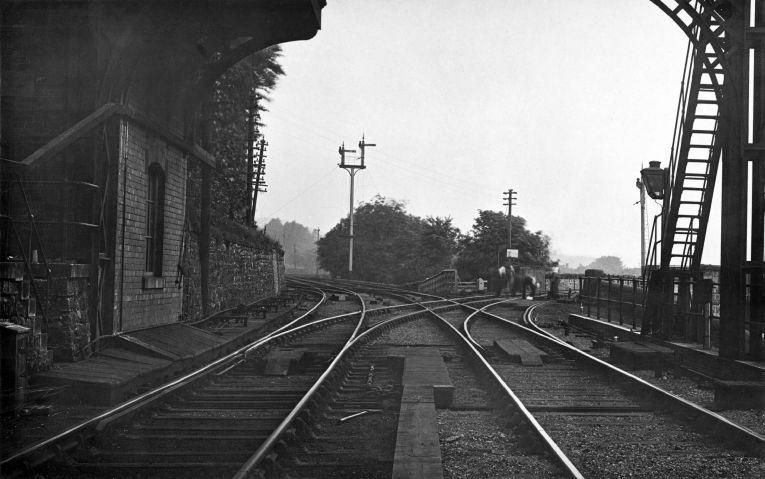
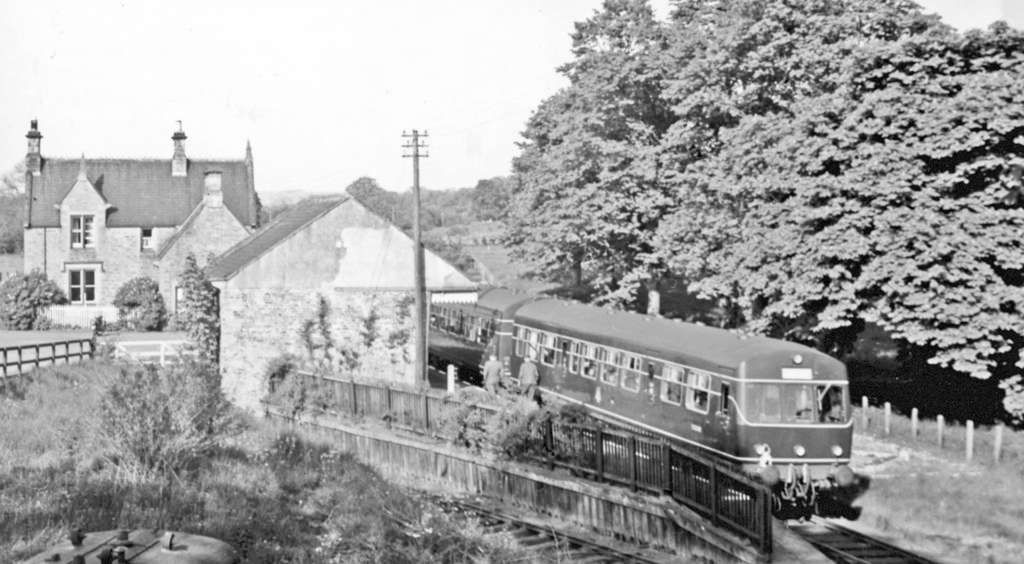
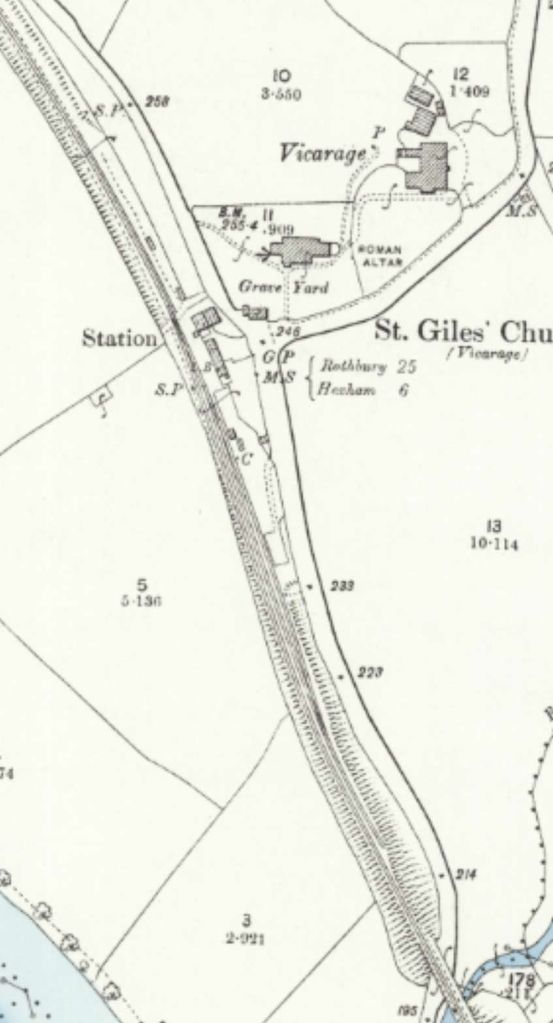
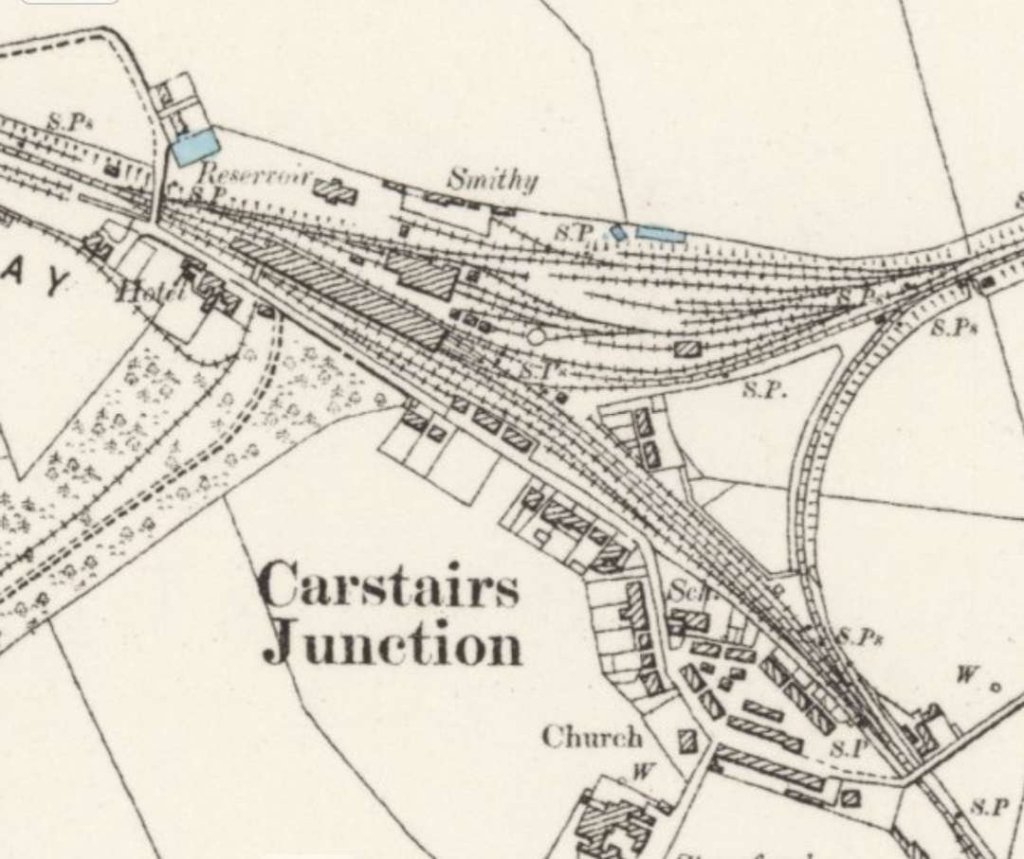
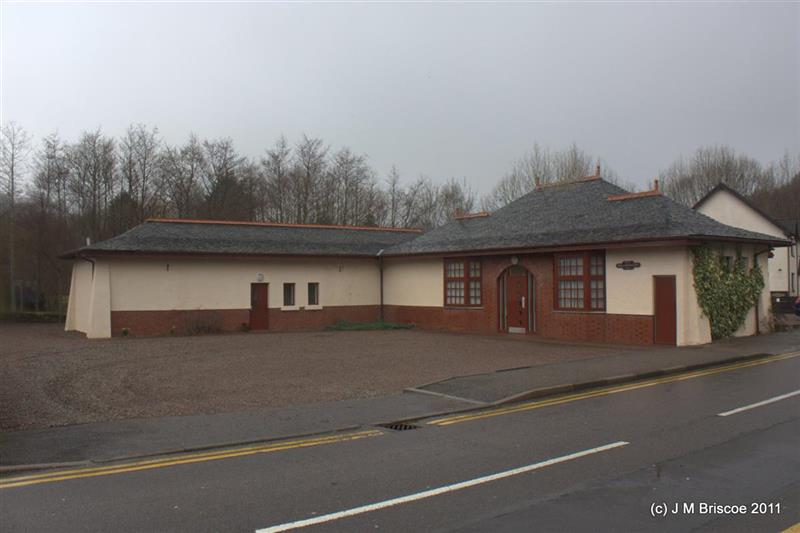
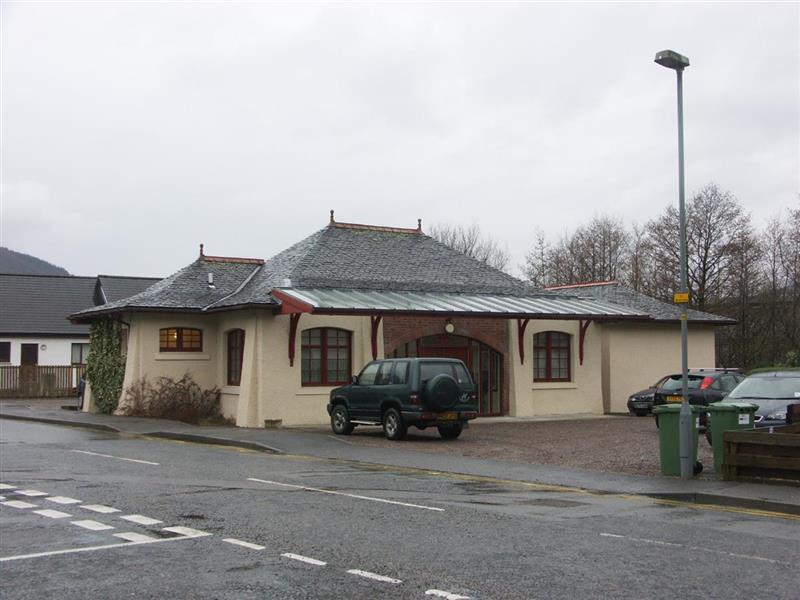
Dunblane is the ordinary junction for the Callander and Oban line, but trains which are not through to or from Glasgow use Stirling as their southern terminus. In some instances, ordinary Caledonian main line engines work the trains to and from Callander, the special C. and O, engines being attached or detached there, though this is mainly a traffic arrangement, convenient in the case of certain trains. At Dunblane there is an island platform on the down side, thus enabling branch trains to wait on the outer side to make connections. To Doune is double track, and the country mainly pastoral. Thence to Callander is single line, controlled by electric train tablet, as is the whole of the Callander and Oban line. The scenery continues to be of lowland character, though picturesque, but signs of the mountain country beyond show themselves. Between Doune and Callander is an intermediate crossing place – Drumvaich Crossing – to break up the long section of nearly 7 miles between stations. The original line diverged into what is now the goods station at Callander, the present station having been built when the Oban line was made. Callander station is distinctly picturesque, an ornamental clock tower surmounting the footbridge, and the station buildings being neat and attractive, while the platforms are decorated florally. It also has refreshment rooms on the platforms. On the up and down sides there are short bay lines from which locals can start as required. For down trains there is also a ticket platform, half a mile or so short of the station, but this is now used only by a few trains.” [1: p10]
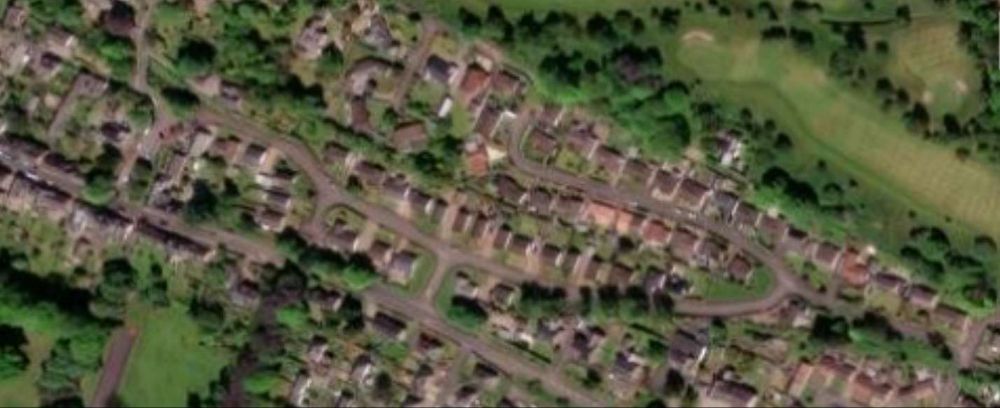
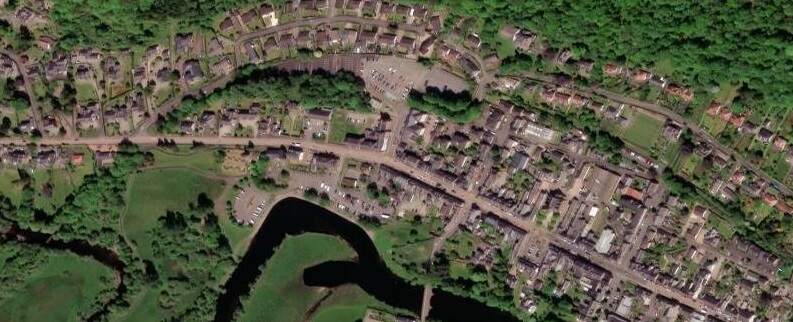
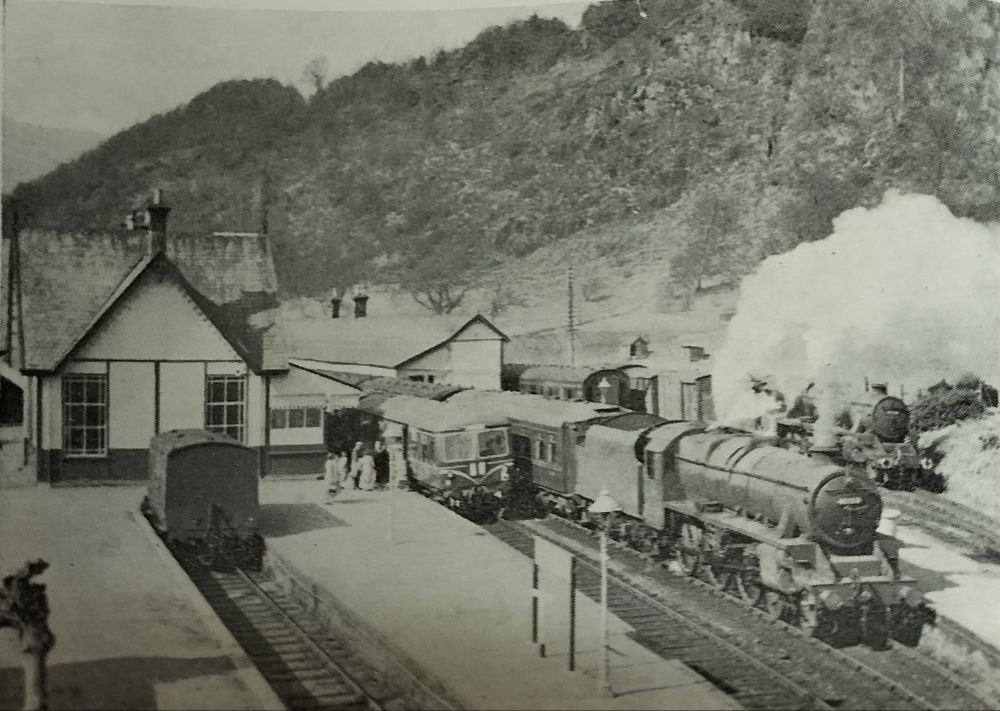
Wikipedia tells us that “closure [for Callander Station] came on 1st November 1965, when the service between Callander and Dunblane ended as part of the Beeching Axe. The section between Callander and Crianlarich (lower) was closed on 27th September that year following a landslide at Glen Ogle.” [8]

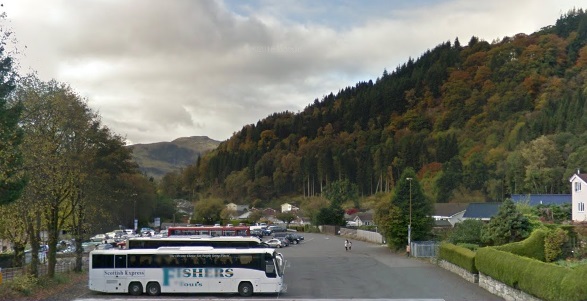
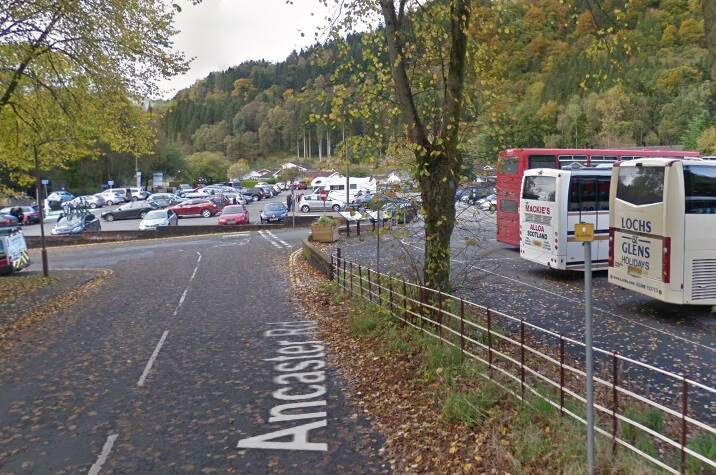
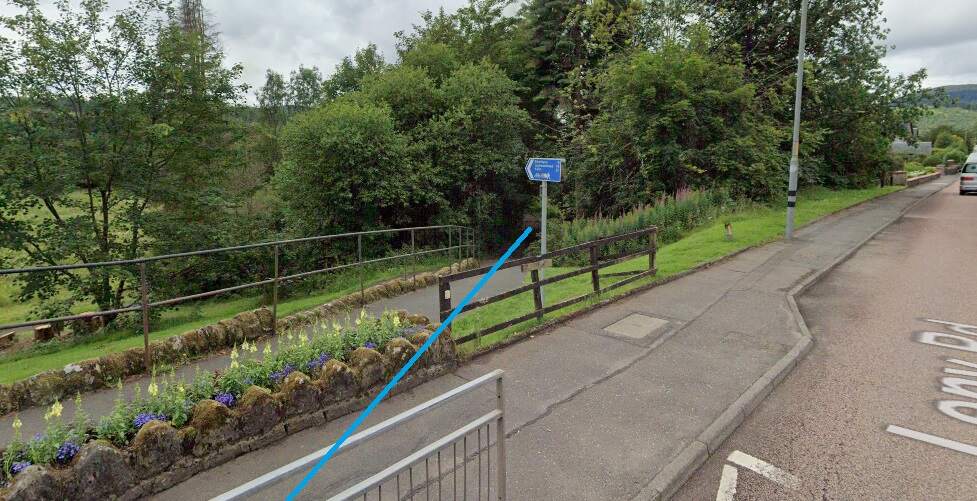
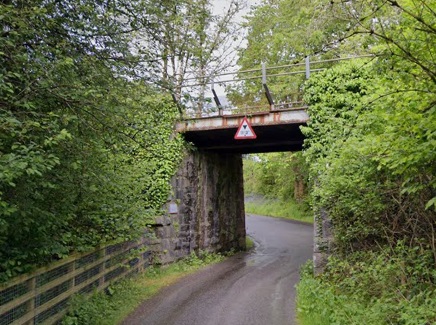
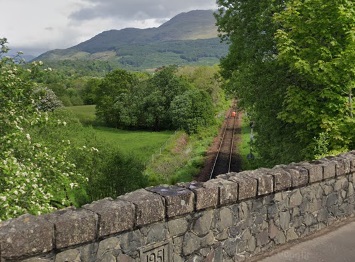
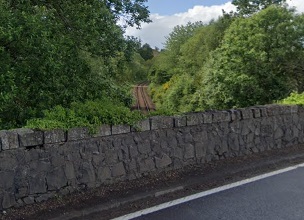
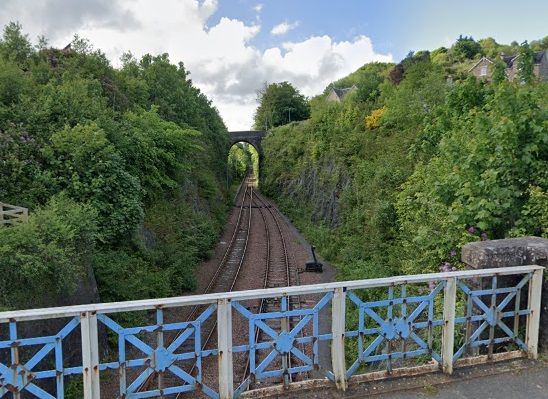
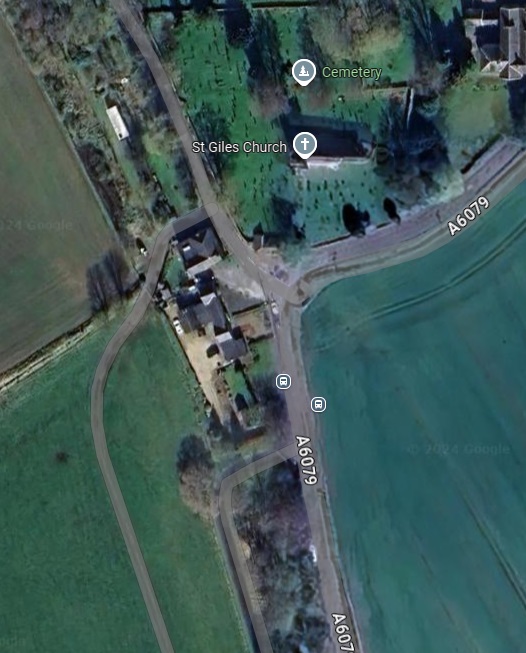
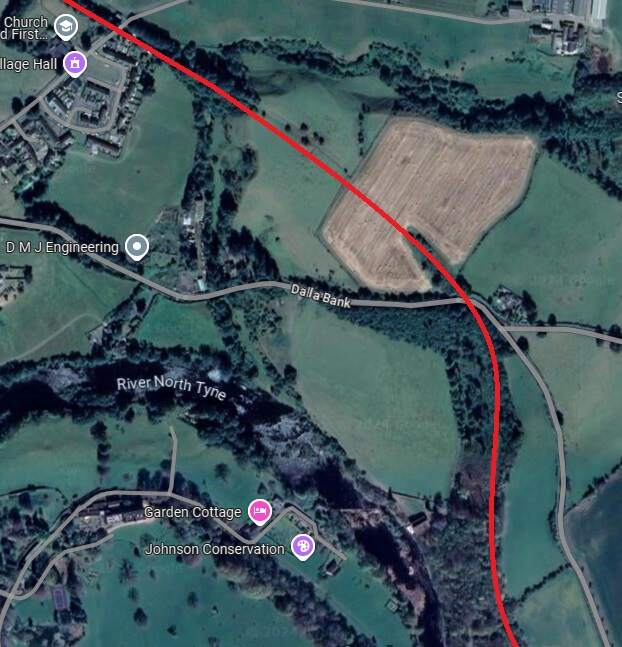
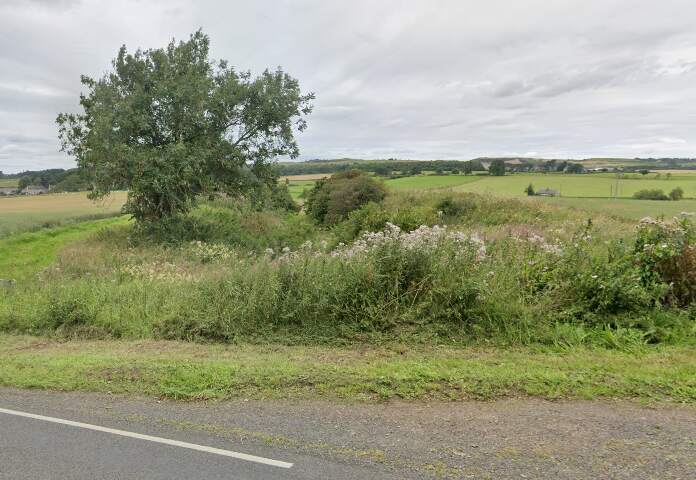
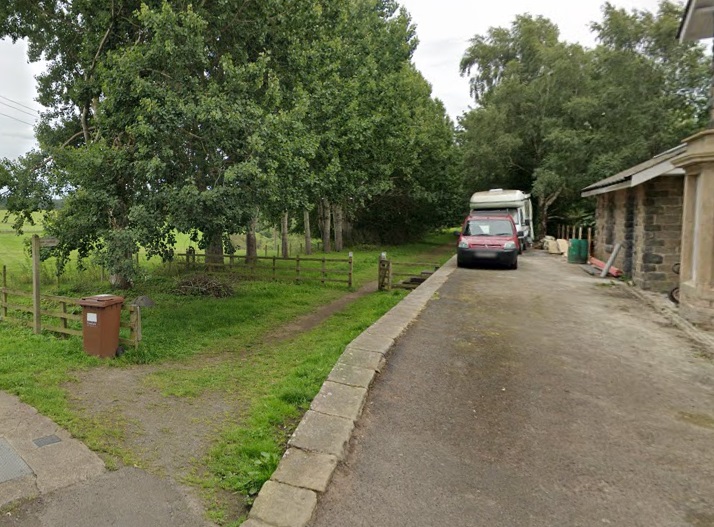
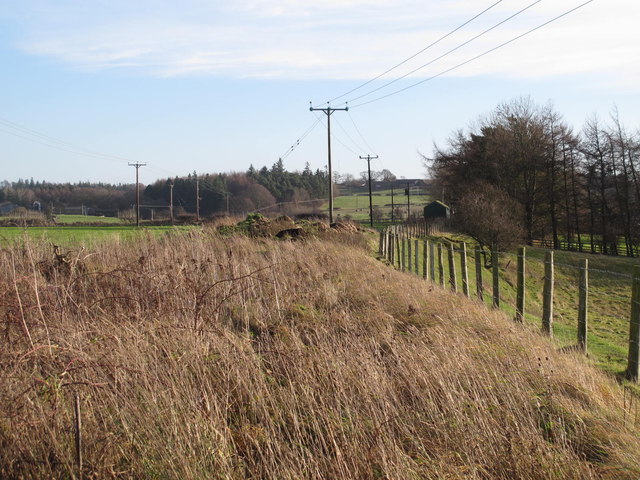
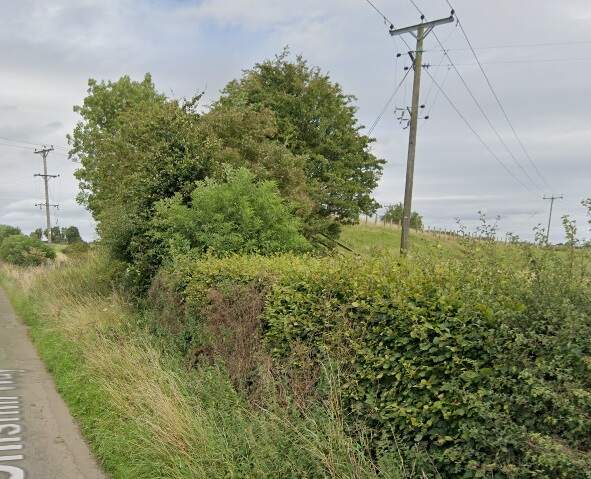
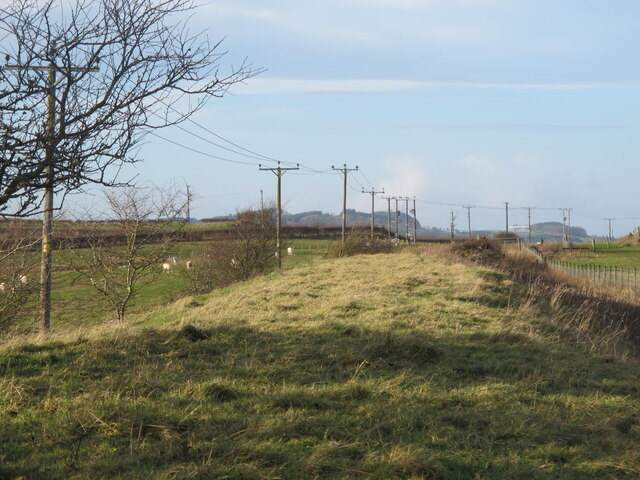
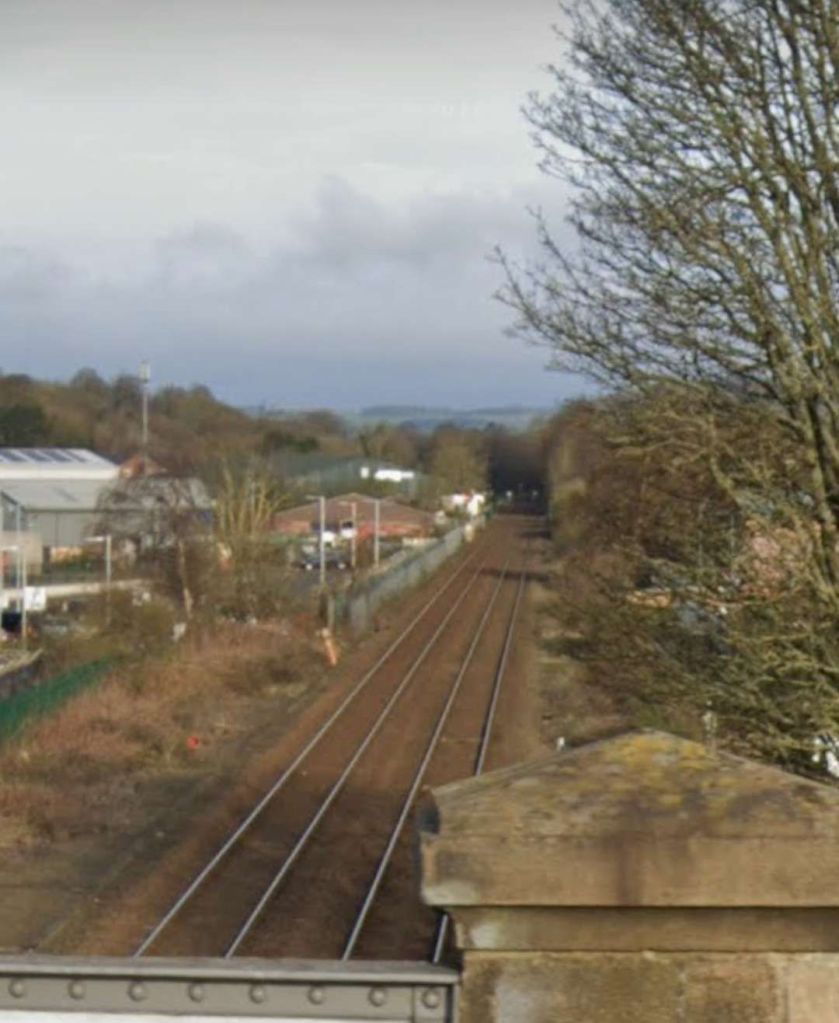
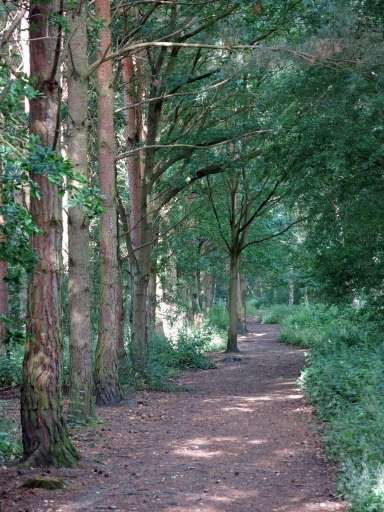
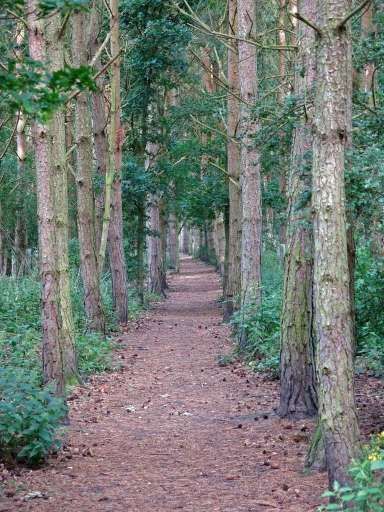
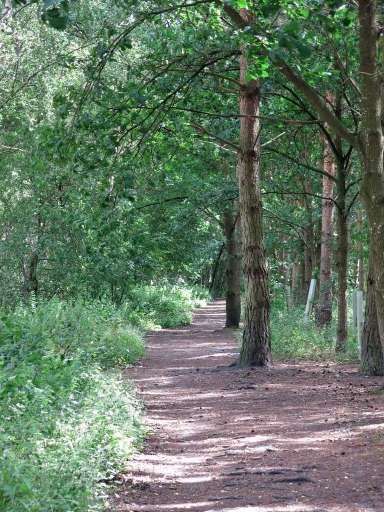
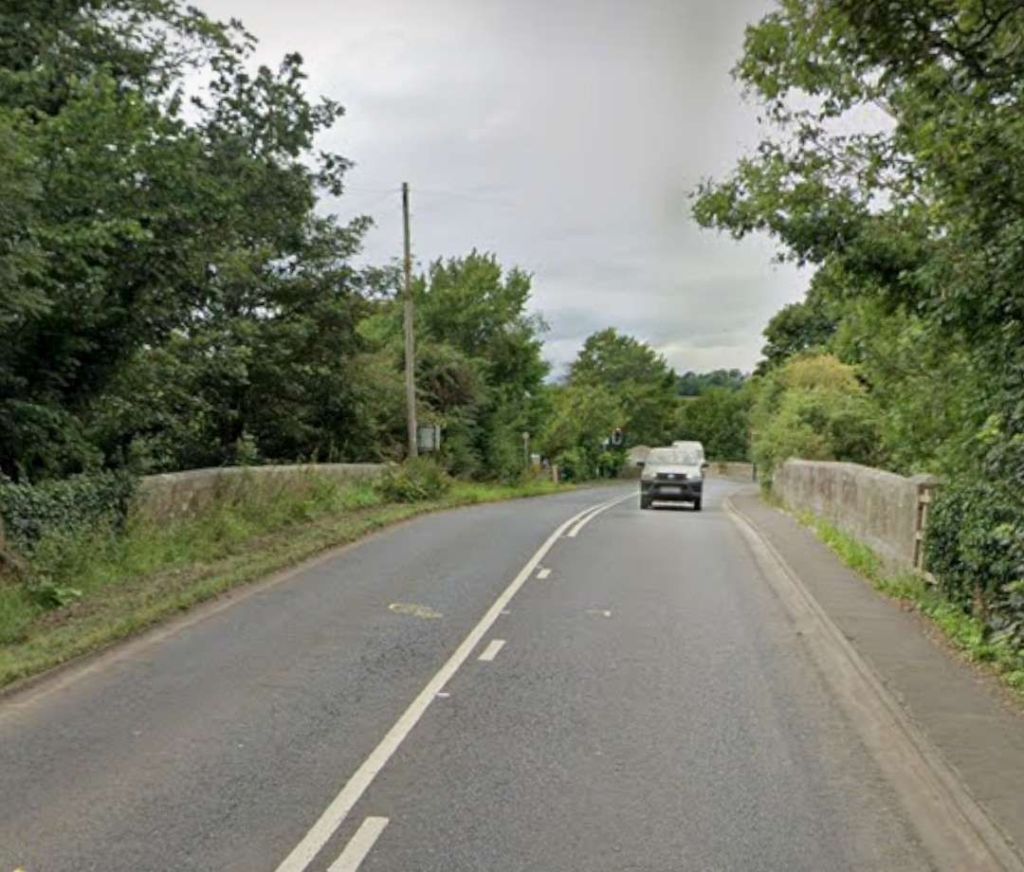
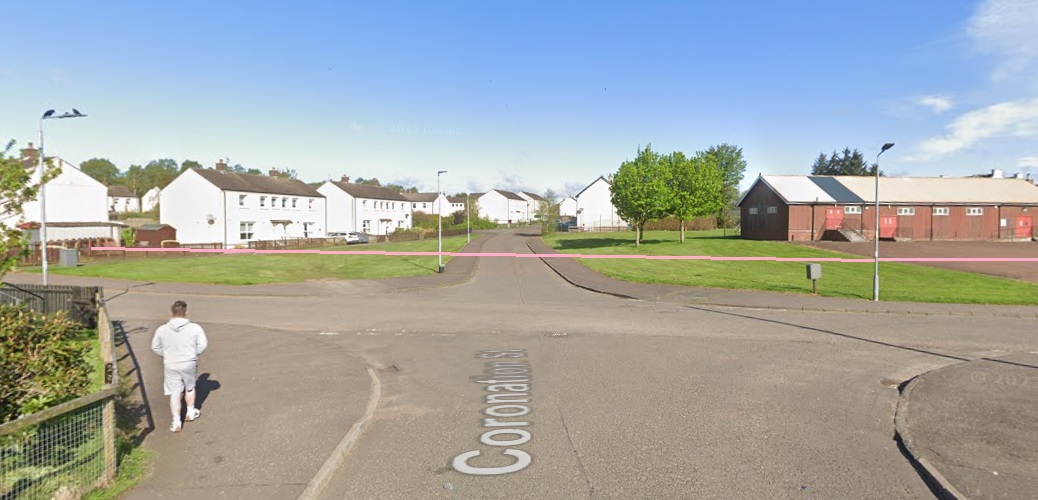
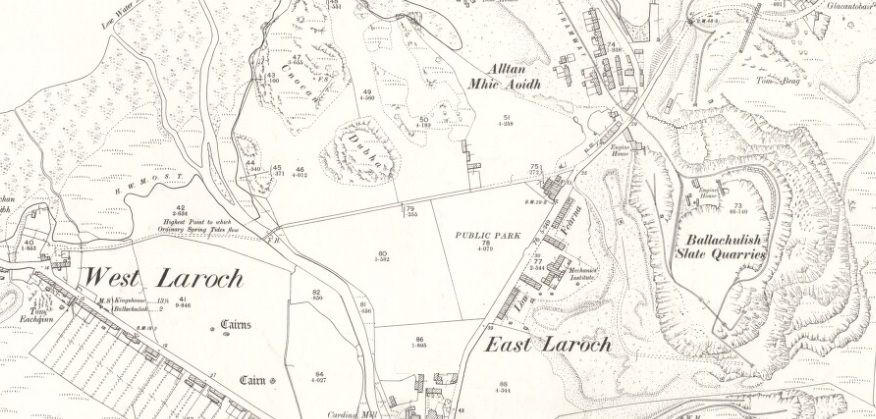
The old railway passed under Leny Road, Callander at the western end of the station site. The first image below shows the alignment of the railway looking Northeast from Leny Road. The pelican crossing marks the location of the old bridge. The second image shows the public footpath which follows the old railway to the South side of Leny Road.
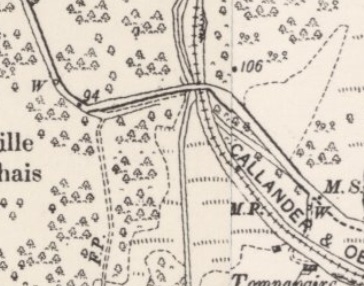
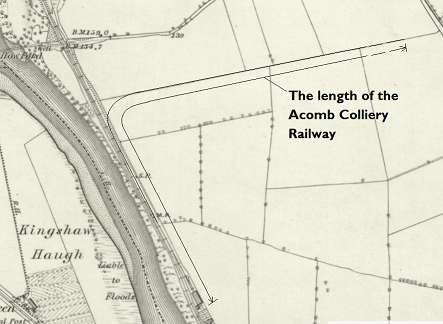
The first length of the railway to the West of Callander is shown on the RailMapOnline.com image below.


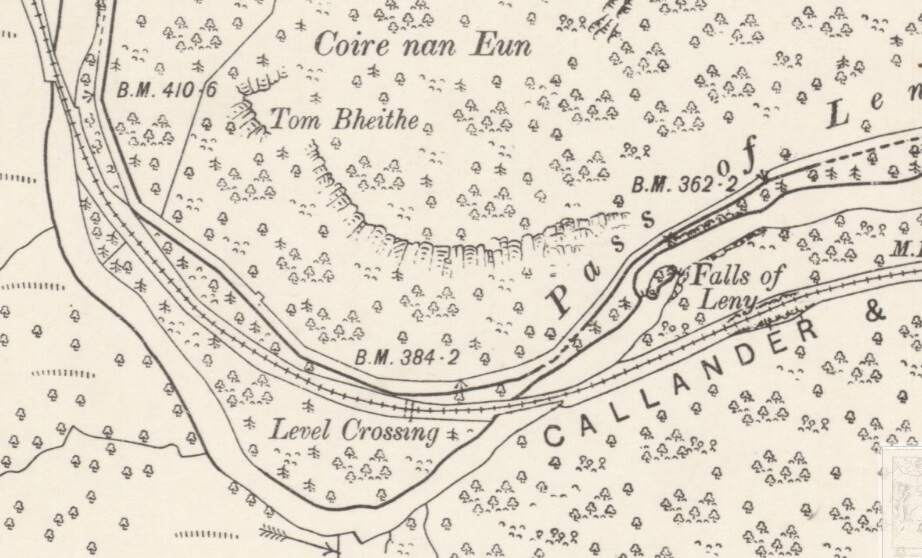
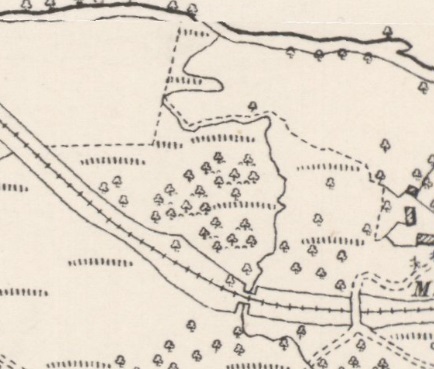
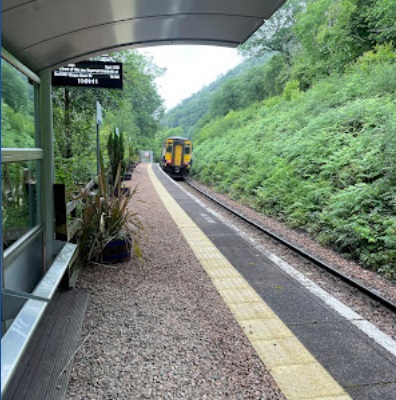
Gairns mentions the Pass of Leny and the Falls of Leny, below. The falls are shown on the map extract immediately below. The Falls can be seen in the right half of the extract.

Gairns continues:
“Crossing the River Leny [Garbh Uisge] by a bowstring girder bridge, mountain country is entered in the Pass of Leny, and Ben Ledi and Ben Vane on the one side (the former skirted by the line), Ben Each, and, in the distance, Ben Vorlich, on the other, give evidence of the nature of the country traversed. The Falls of Leny can be seen on the right providing the intervening foliage is not too full. St. Bride’s Crossing, at the head of the Pass of Leny, is now only used as a crossing place at periods of special pressure. For nearly two miles the line then proceeds along the western shore, and almost at the water’s edge of Loch Lubnaig ‘the crooked lake’. A short distance beyond St. Bride’s Crossing is Craignacailleach Platform, used by children of railway servants going to school in Callander the 5.40 a.m. from Oban and the 6.45 pm from Callander, daily except Saturdays. At the picturesque little station of Strathyre, both platforms are adorned by ornamental shrubs, and on the up side there is a fountain, rockeries, rustic gate ways, etc.. lending further interest to this pretty station among its beautiful natural surroundings.
Before reaching Strathyre station the River Balvag is crossed. It keeps close company with the railway until near Kingshouse Platform, where a glimpse is had of the hills encircling Loch Val. Kingshouse Platform is used as a halt, trains calling as required, for the convenience of visitors to the Braes o’ Balquhidder.” [1: p10-11]
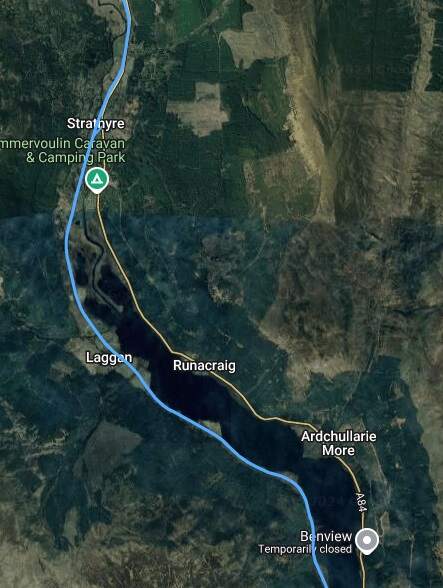
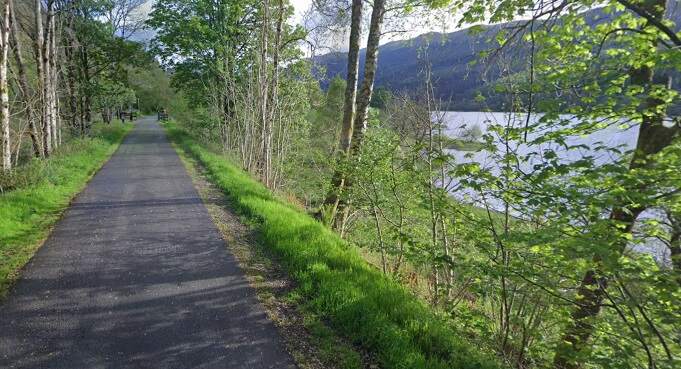
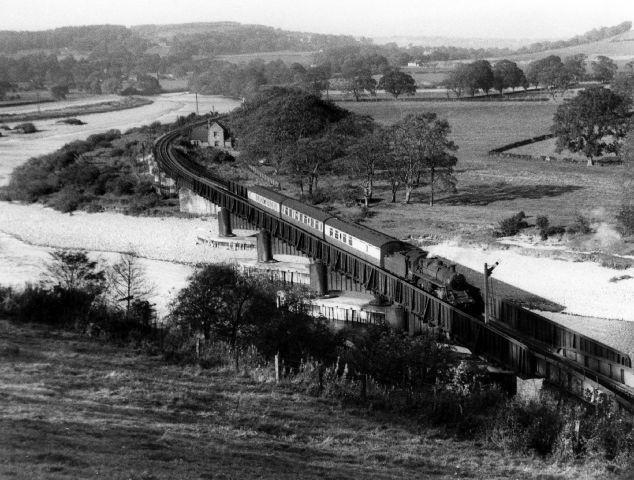
The adjacent RailMapOnline.com satellite image shows the railway running up the West side of Loch Lubnaig. Strathyre, mentioned by Gairns above, can be seen to the North of the Loch.
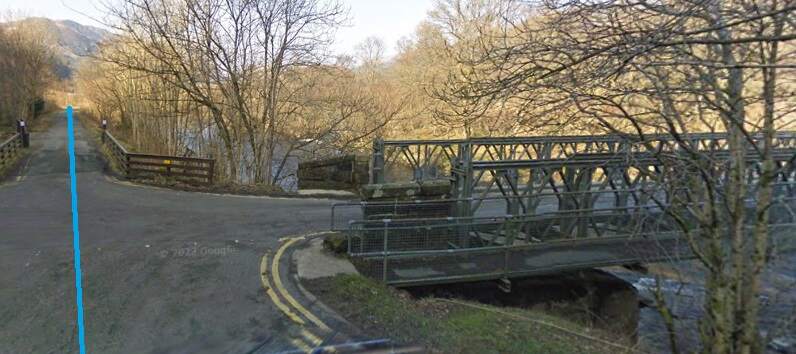
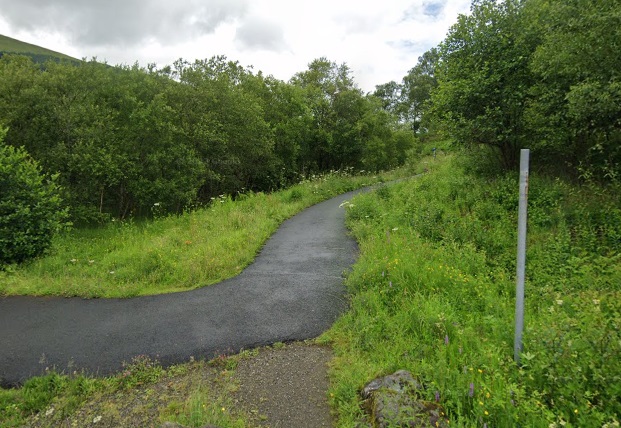
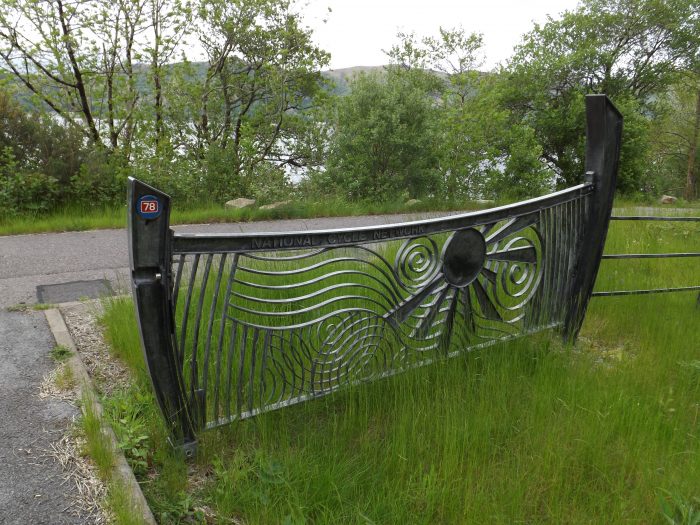
This portion of the old railway has been metalled to support its use as National Cycleway No. 7. South of the Loch, there is now a car park close to the upstream of the two bridges noted above.
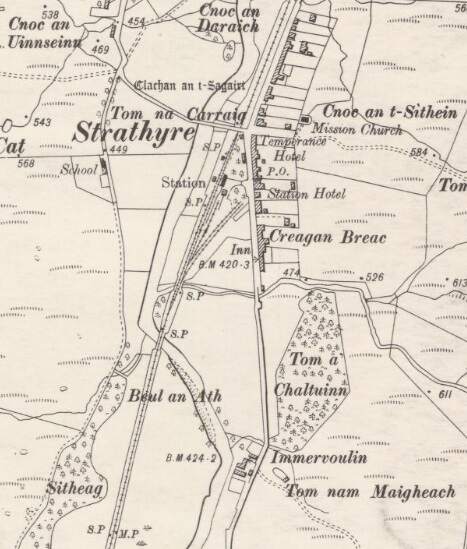
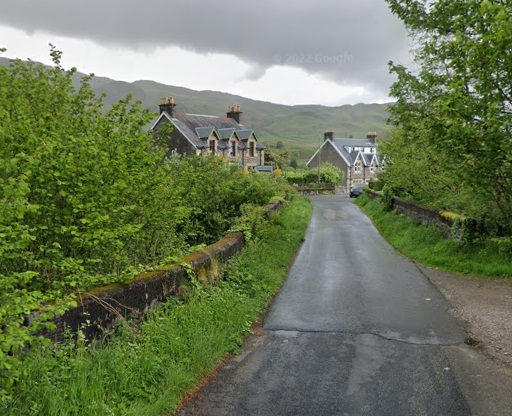
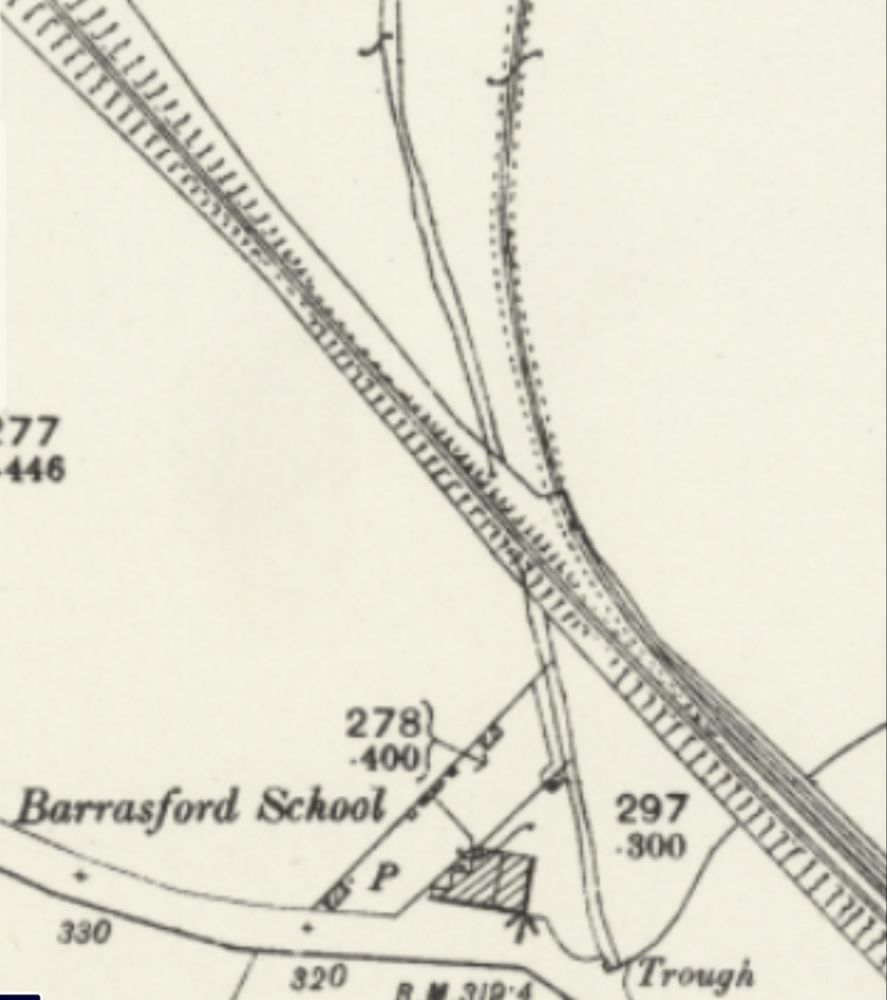
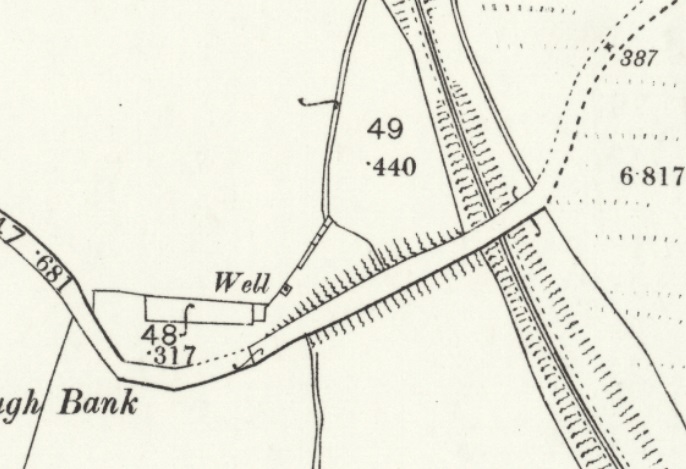
North of Loch Lubnaig, the old railway ran North through Strathyre, first crossing the river to the East bank and few hundred metres short of the Railway Station.
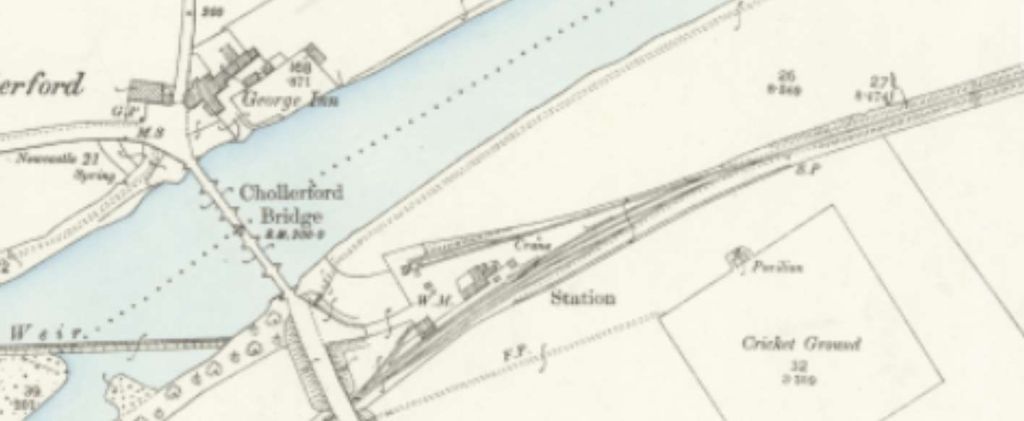
This extract from the 6″ Ordnance Survey of 1898, published in 1901 [19] shows the small village of Strathyre, its railway station and the bridge over the River Leny [Garbh Uisge].

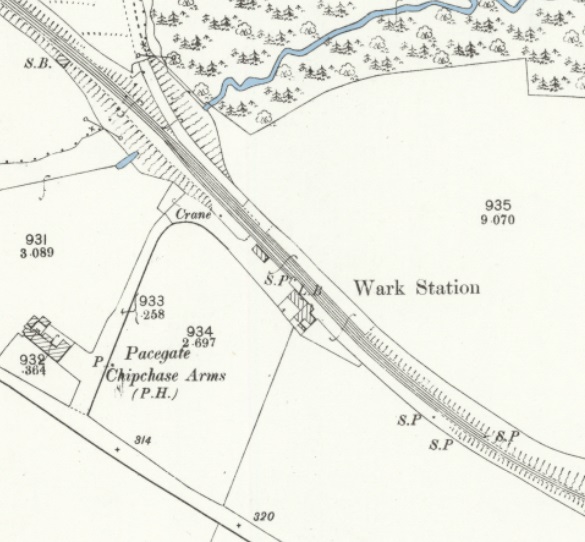
North of Strathyre the line continued North-northeast towards Balquhidder.
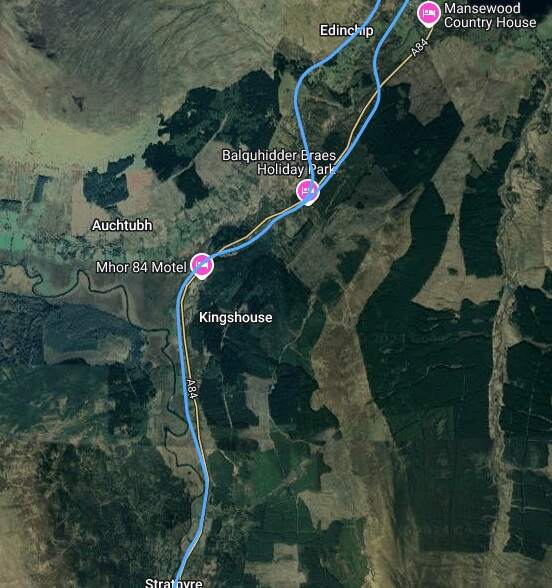
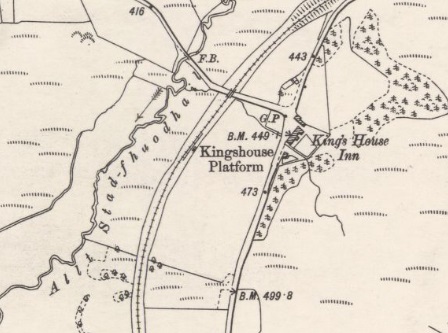
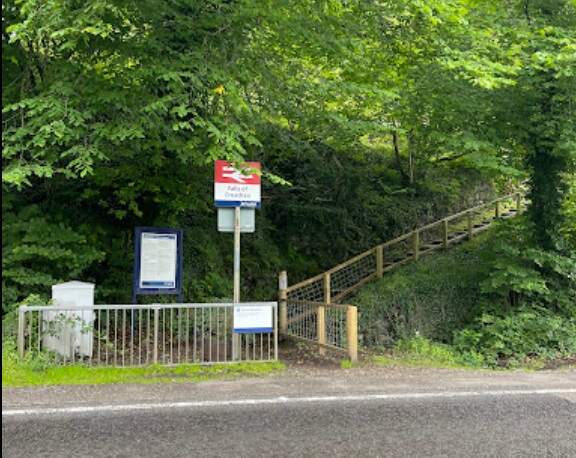
King’s House Inn on the modern A84 had its own Halt – Kingshouse Platform. This was a request halt serving both King’s House Inn (just to the east of the line) and the road to Balquhidder Glen (to the west). The halt was built at the expense of the King’s House Inn. It was a single platform, on the east side of the line, with a waiting shelter. Both platform and building were built in timber. Traffic handled included passengers, children using the school train and milk churns. As can be seen below, the halt was located south of the road to the glen.
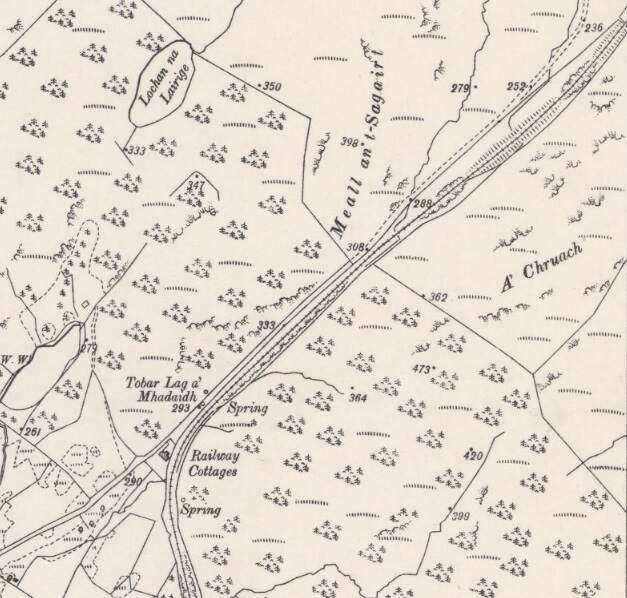
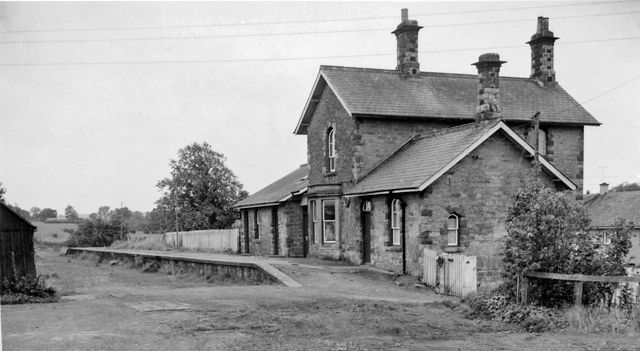
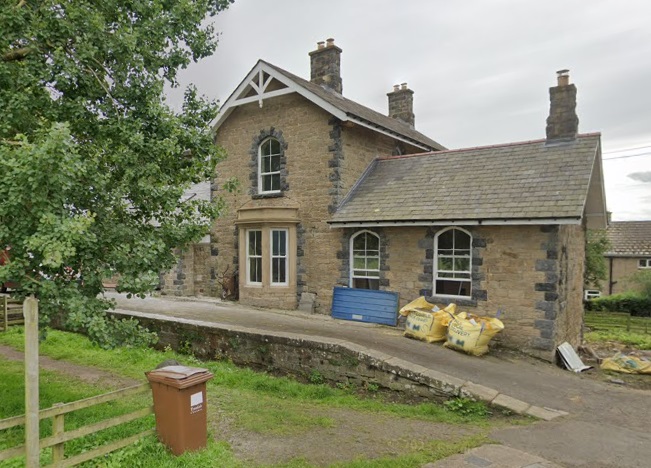
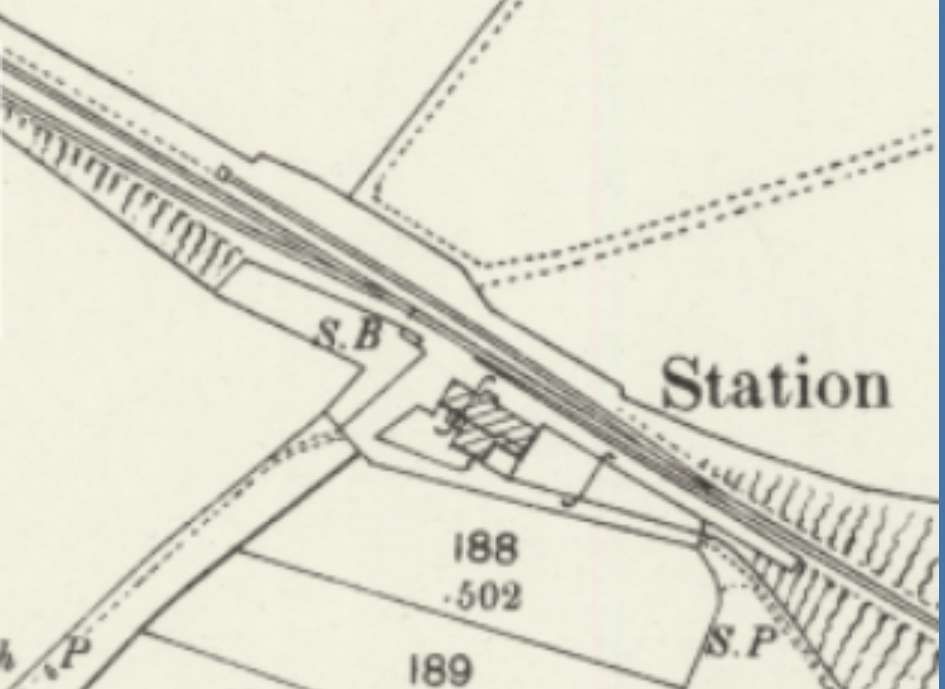
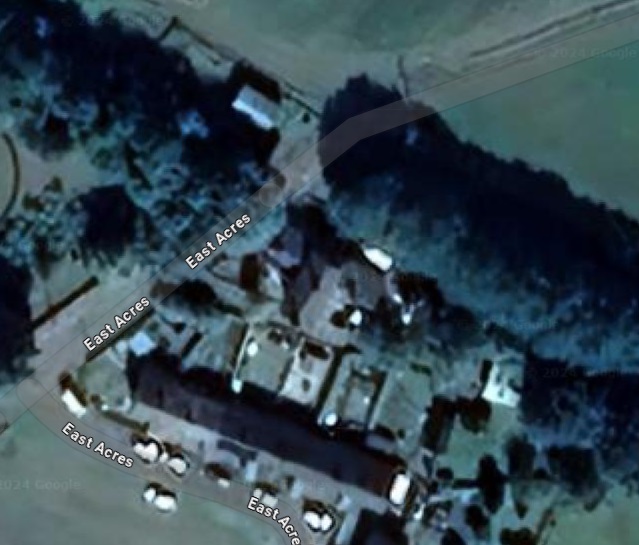
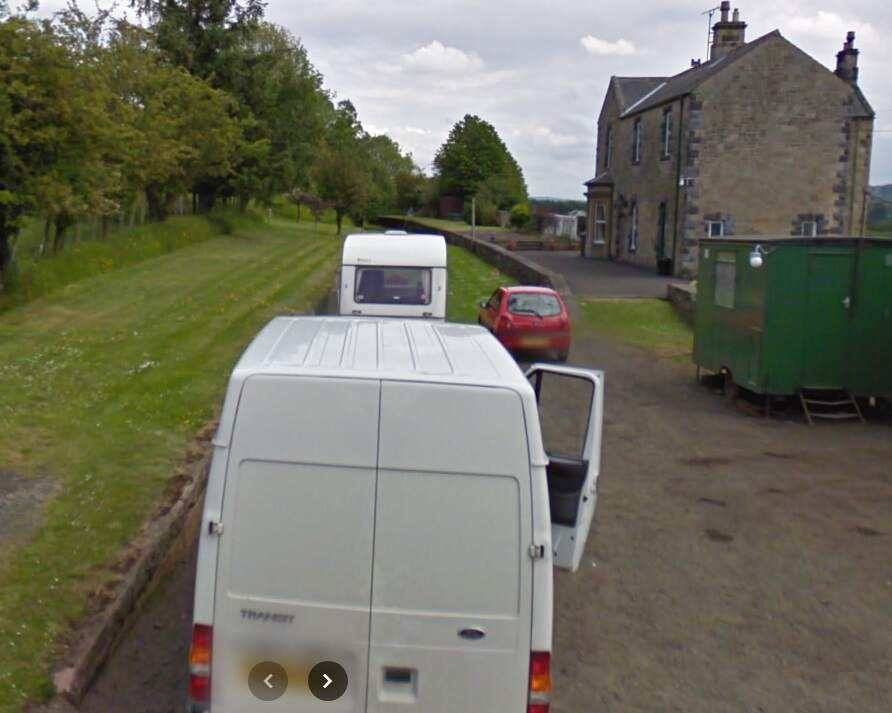
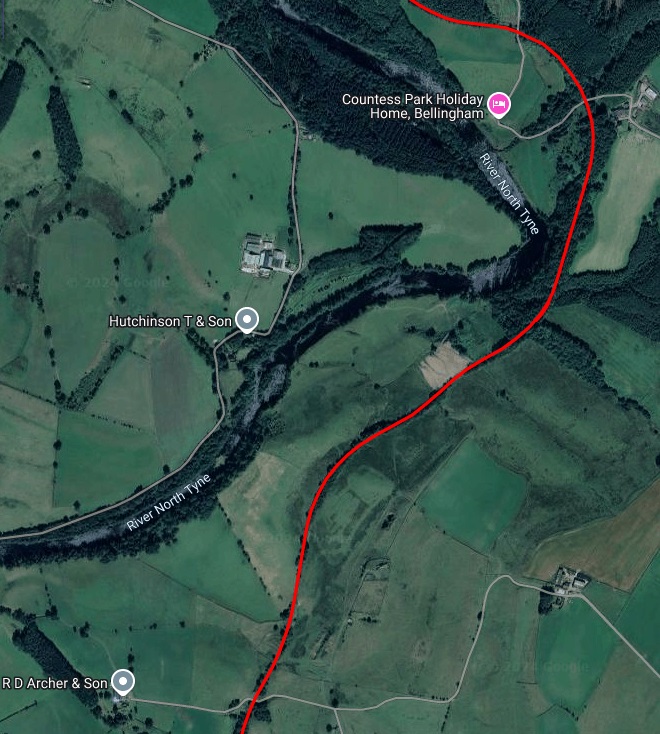
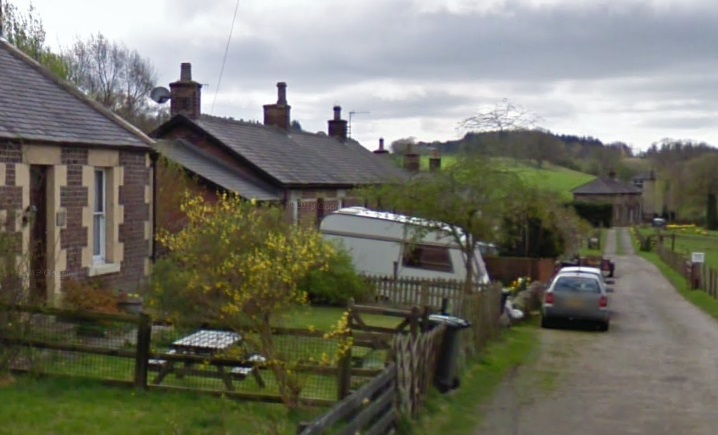
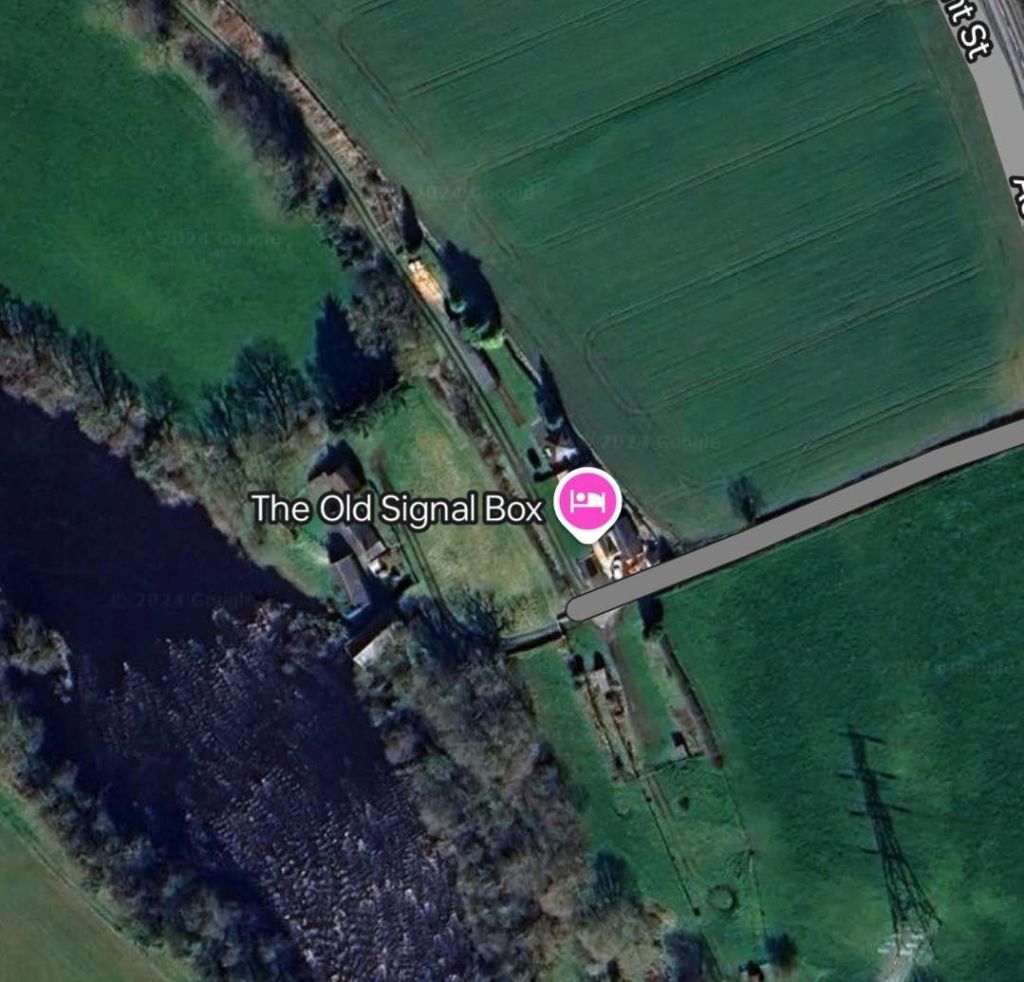
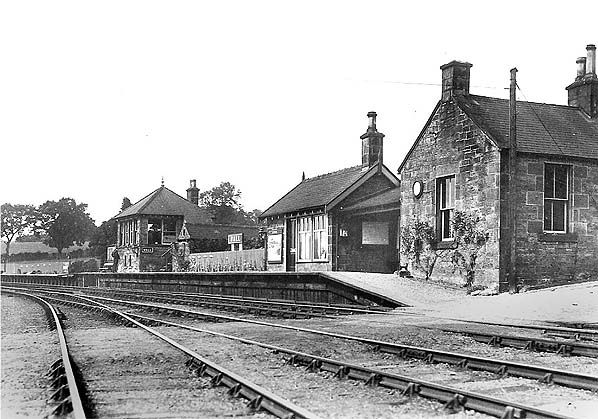
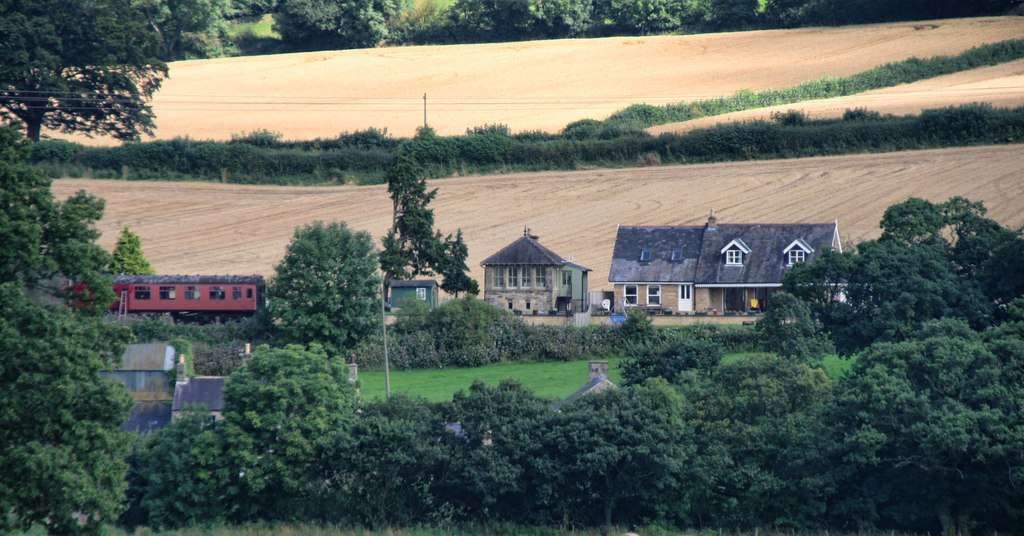
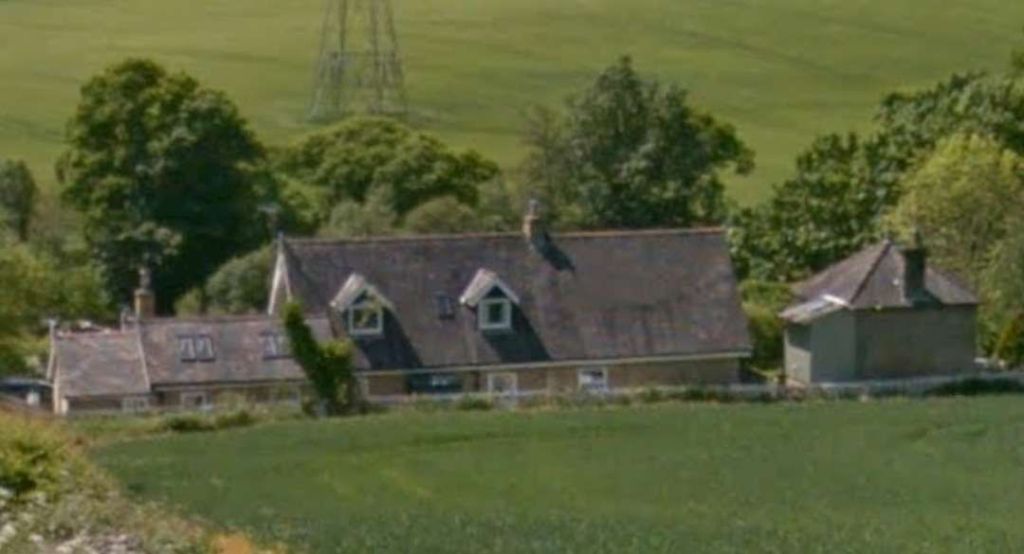
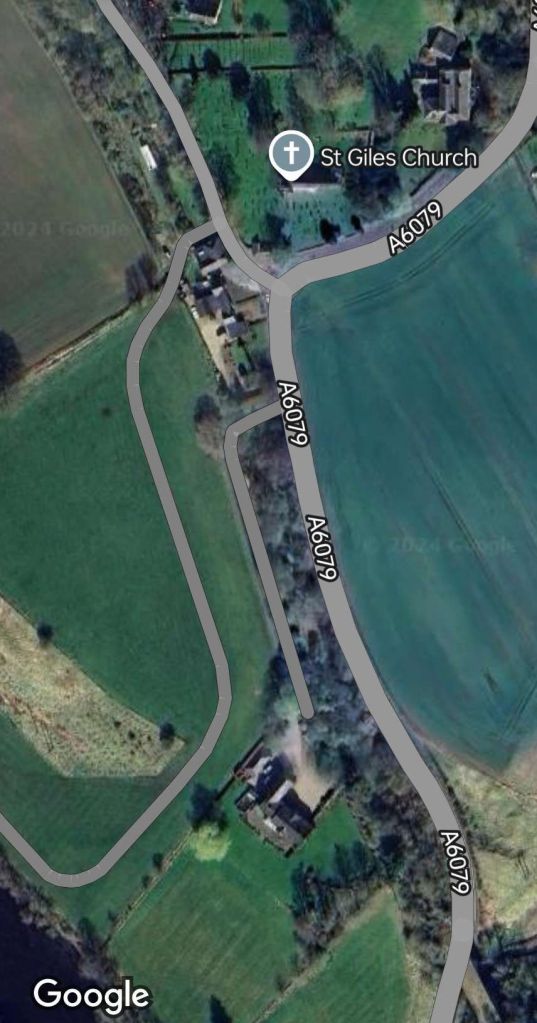
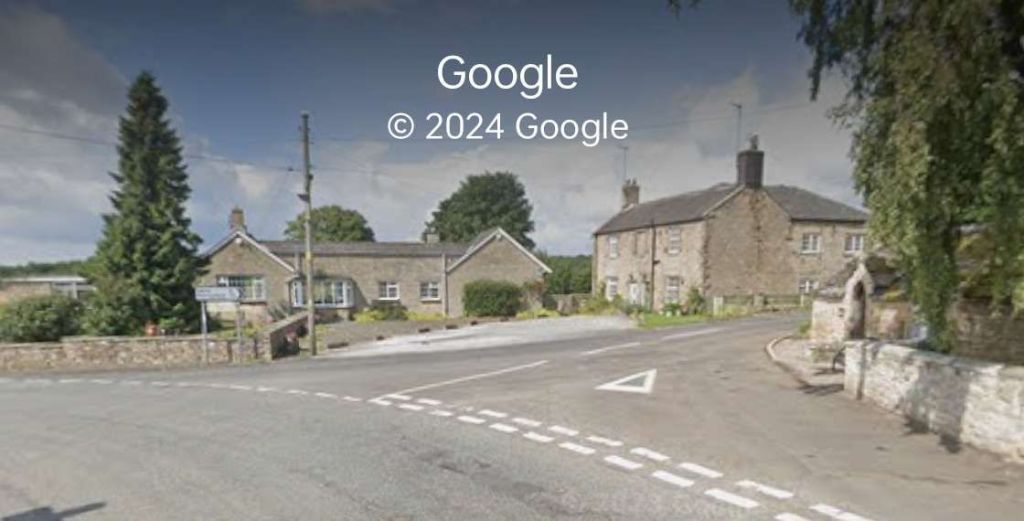
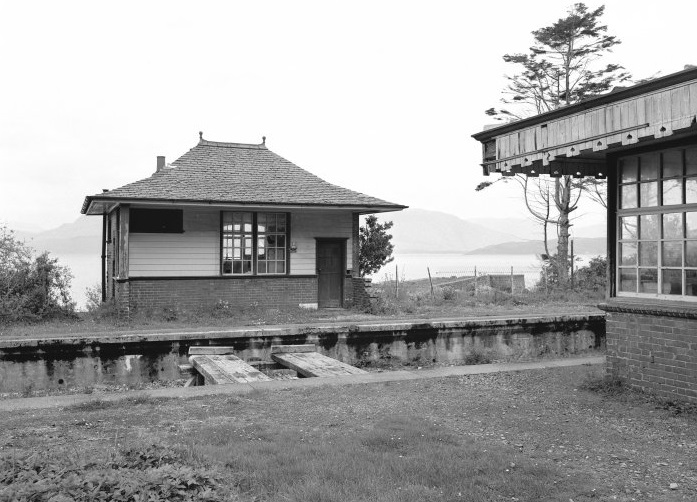
A short distance Northeast of Kingshouse Platform was Lochearnhead Railway Station sited some distance South of the community of the same name.
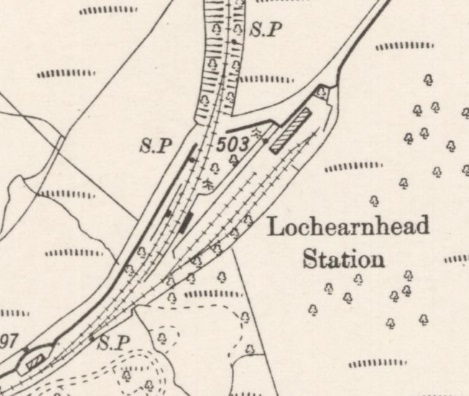
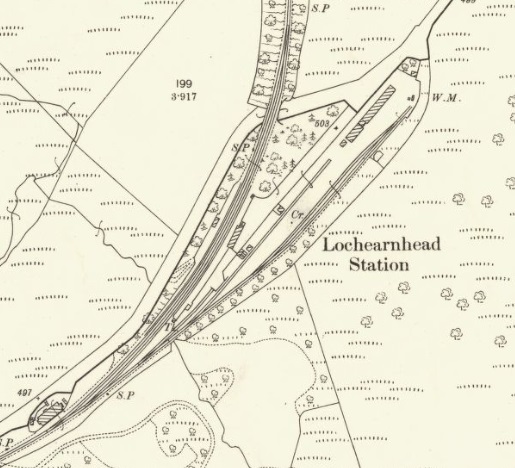
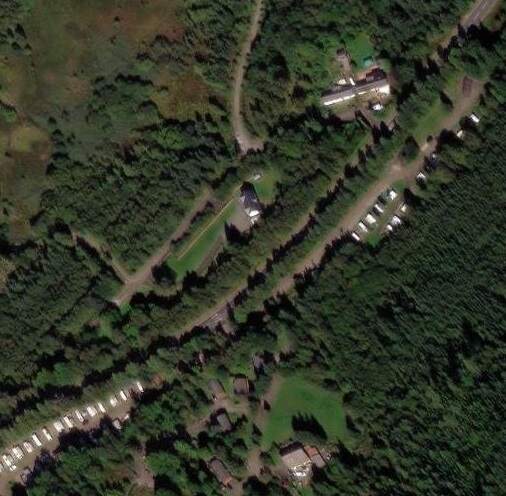
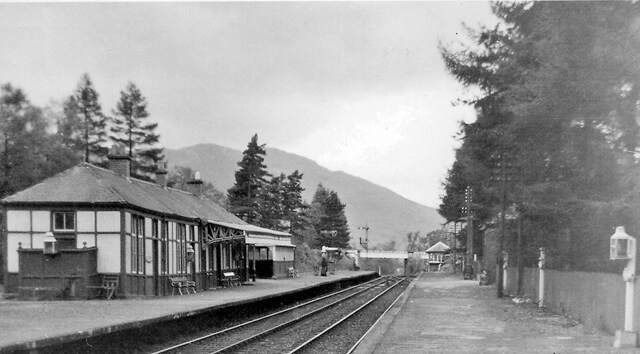
The station was renamed Balquhidder Station on 1st July 1904, when the line to Crieff, Gleneagles and Perth was completed. The station then became the junction station. The branch came in from the North, paralleled by the Oban line for some distance, from the head of Loch Earn. Balquhidder station had an island platform on the up side to provide for connecting trains. A new station was built on the branch to serve Lochearnhead village. [25]
Gairns continues:
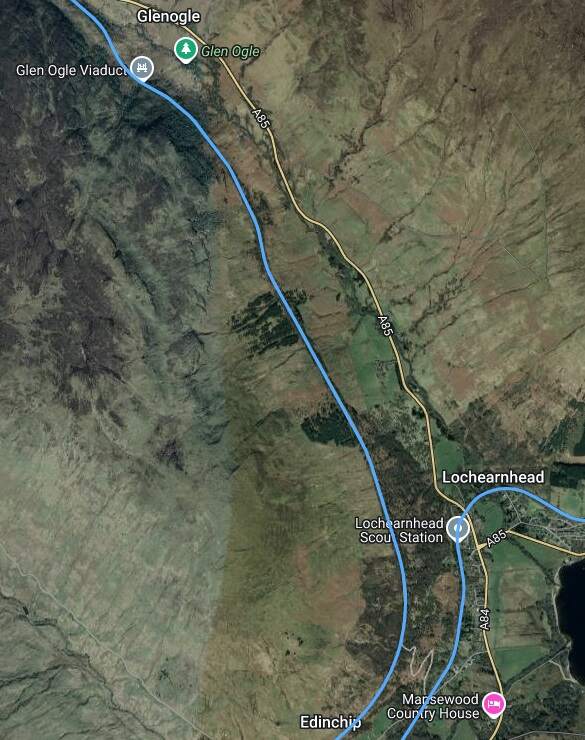
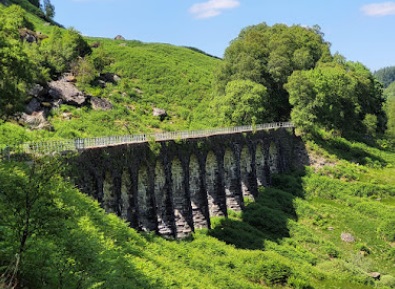
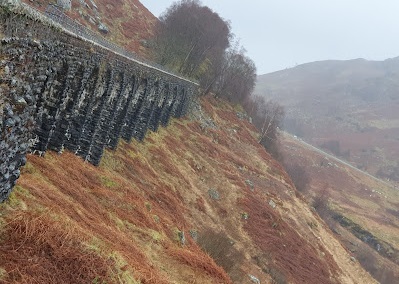
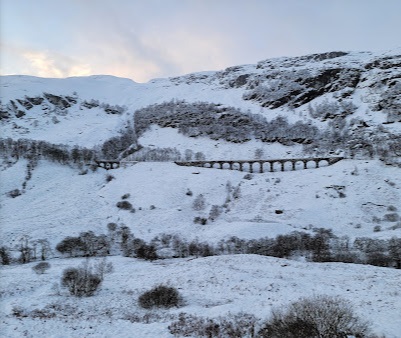
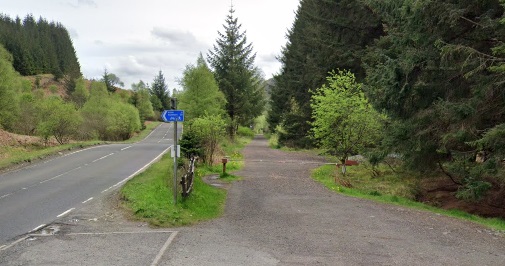
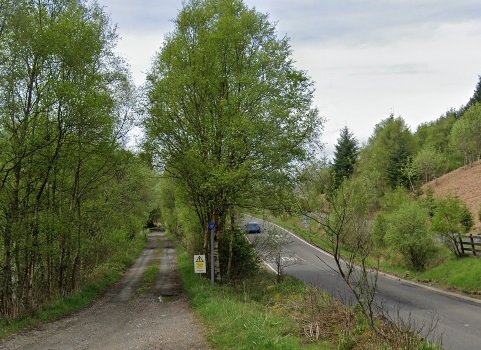
“Leaving Balquhidder the Oban line climbs steeply along the hillside as it finds its way up Glen Ogle, overlooking, in the ascent, the Crieff line as it follows the shores of Loch Earn eastward, and giving views over the waters of the Loch, amidst their mountain setting, which are said to be the finest in the British Isles. … Nearly 8 miles separate Balquhidder and Killin Junction stations, though there is an intermediate crossing – Glenoglehead. This was the site of the original Killin station, before the opening of the Killin Branch Railway. The whole length of ‘gloomy’ Glen Ogle – a wild rocky valley, four miles in length, described as the Khyber Pass of Scotland – is traversed, with its rocky boulder-strewn slopes, the railway being carried in places on brick or masonry viaducts around the face of the rock where the cutting of a ledge was well-nigh impossible. For most of the ascent the view from the train is down almost precipitous slopes, continued upwards on the other side.” [1: p11]

Gairns continues:
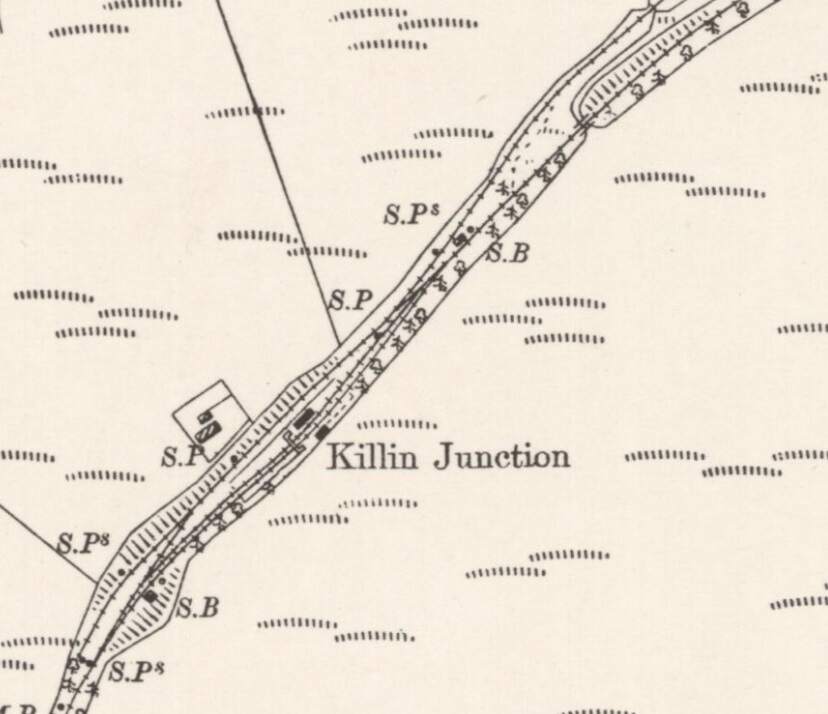
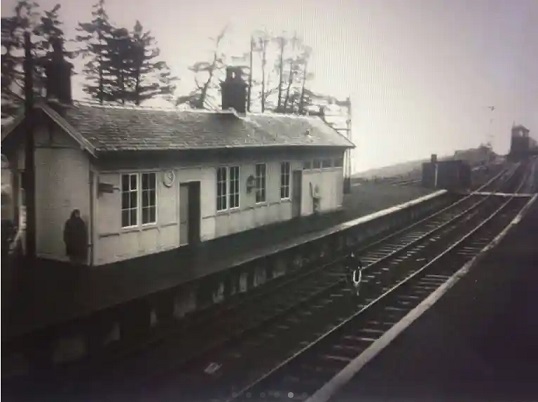
“At the northern end of the Pass the line curves westward, overlooking the Loch Tay branch which runs from Killin Junction to the little town of Killin, with an extension of about a mile to a pier on Loch Tay to connect with the railway steamers which serve the whole length of the Loch, glimpses of which are had from the Oban train. The branch is on a lower level and its track can be seen for a long distance from the main line. The branch railway is one of very heavy gradients. At Killin Junction it makes connection with the main line which has descended from Glenoglehead to meet it. The station here has the usual island platform on the up side, to accommodate the branch trains clear of the main line.” [1: p11-12]
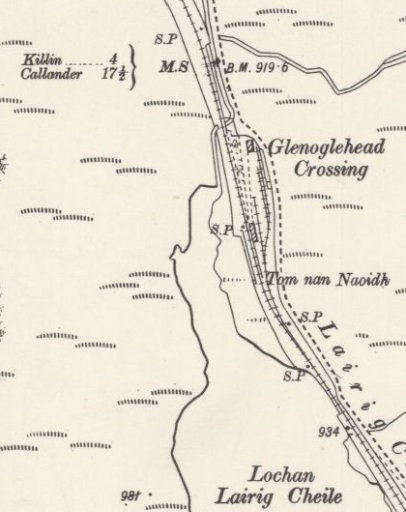
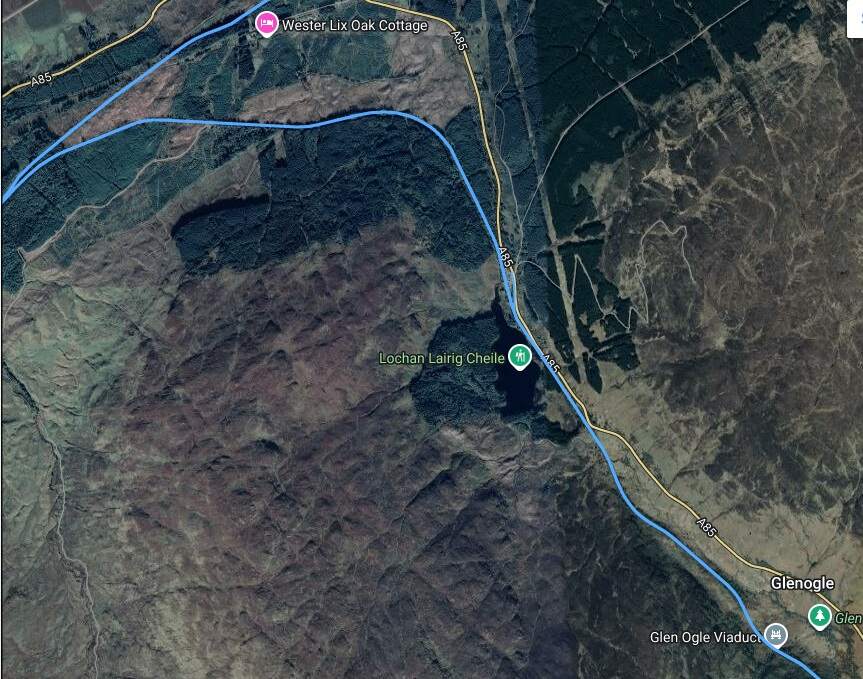
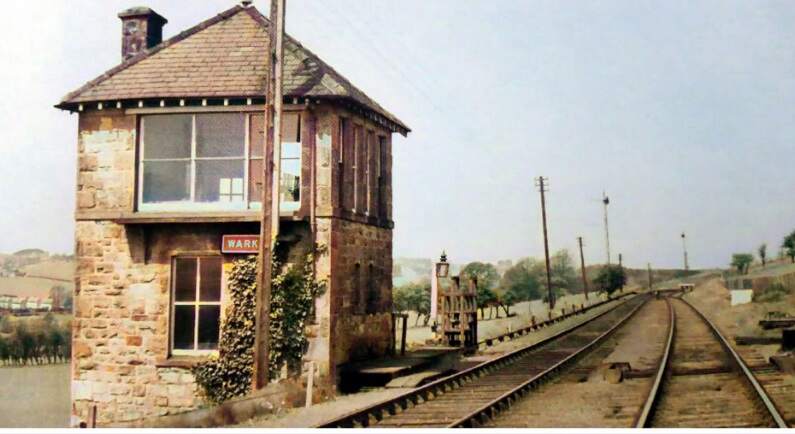
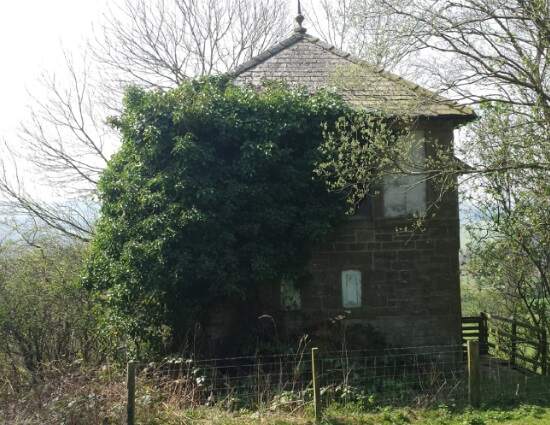
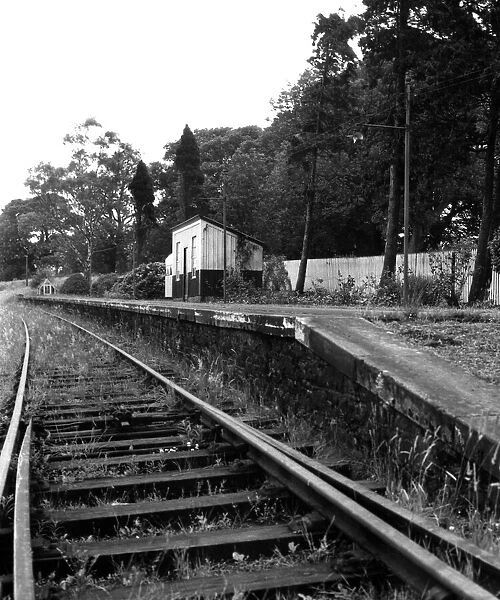
Glenoglehead Crossing permitted two trains on the line to pass each other.
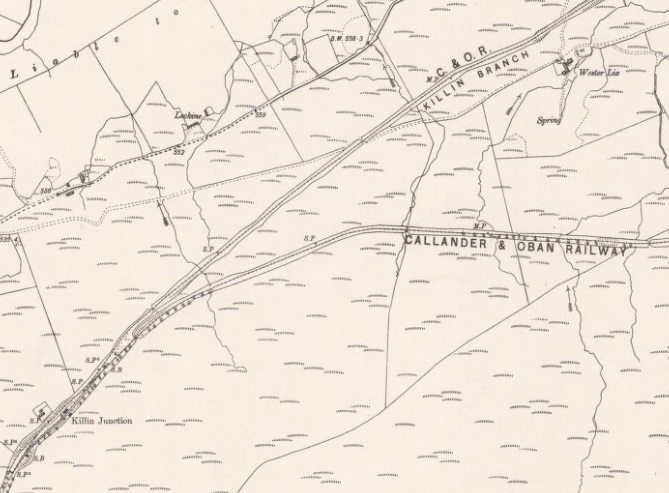
A Google Maps satellite image extract showing the location of Glenoglehead Crossing in the 21st century. It was once known as Killian Railway Station (even though over 3 miles from Killin) and was at that time the northern terminus of the Callander & Oban Railway. [Google Maps, November 2024]
From Glenoglehead the line dropped down to Killin Junction. The two map extracts above come from the same 6″ Ordnance Survey sheet surveyed in 1899 and printed in 1901. [27]
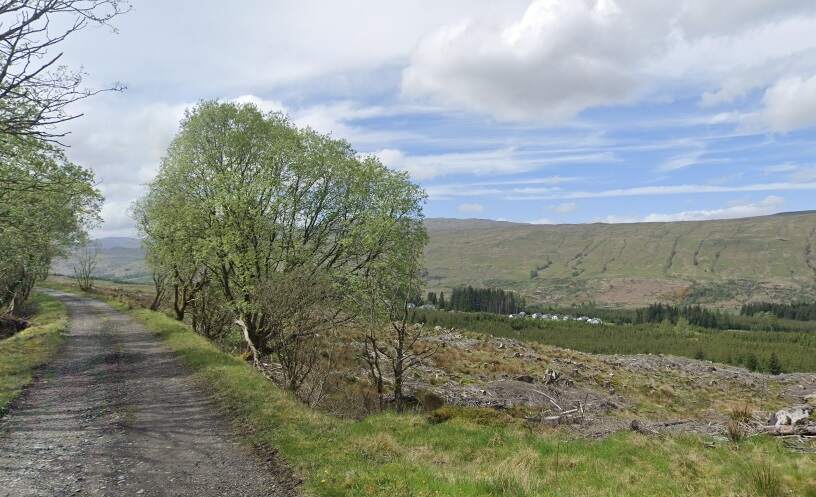
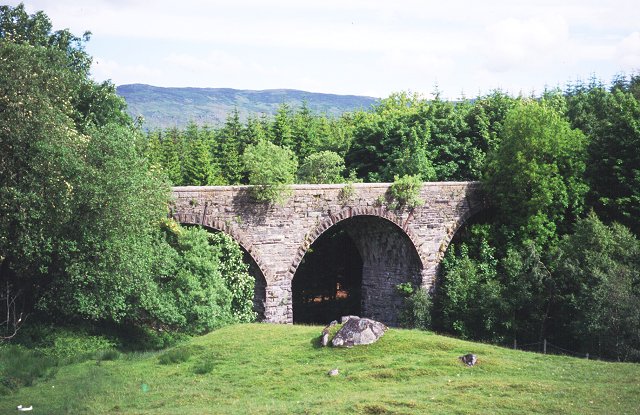
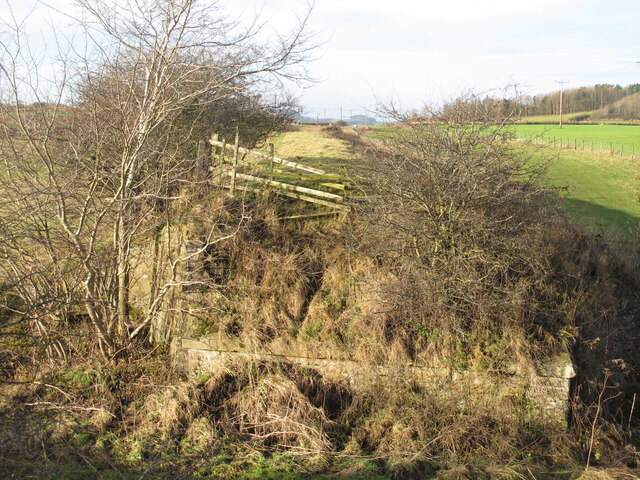
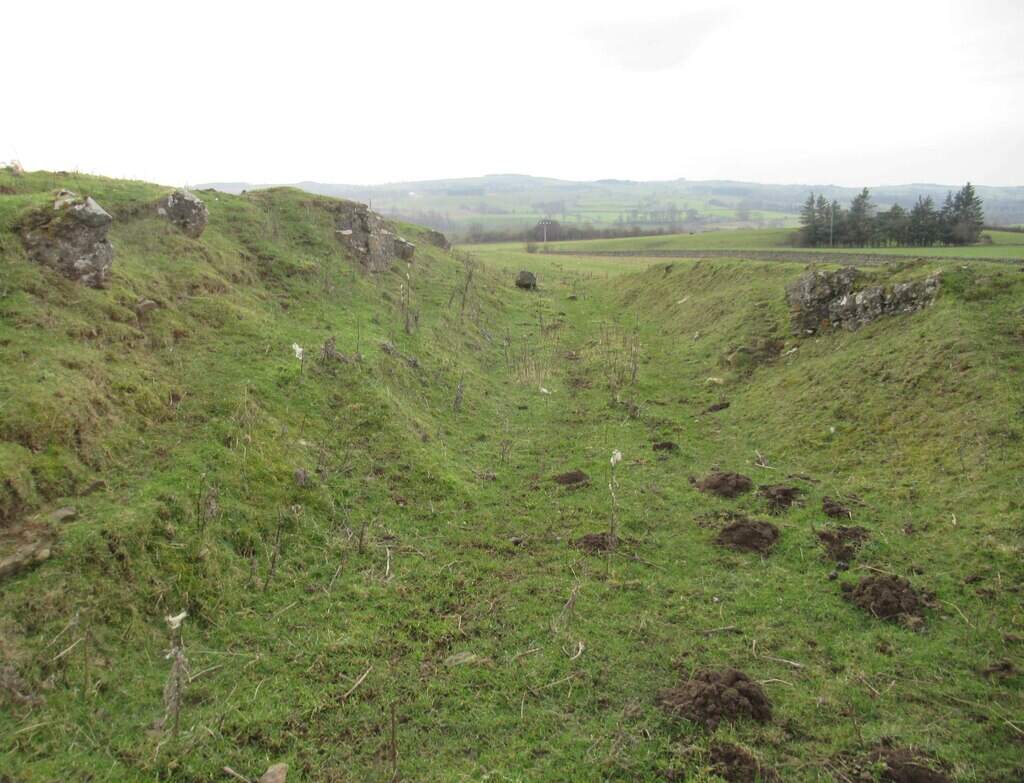
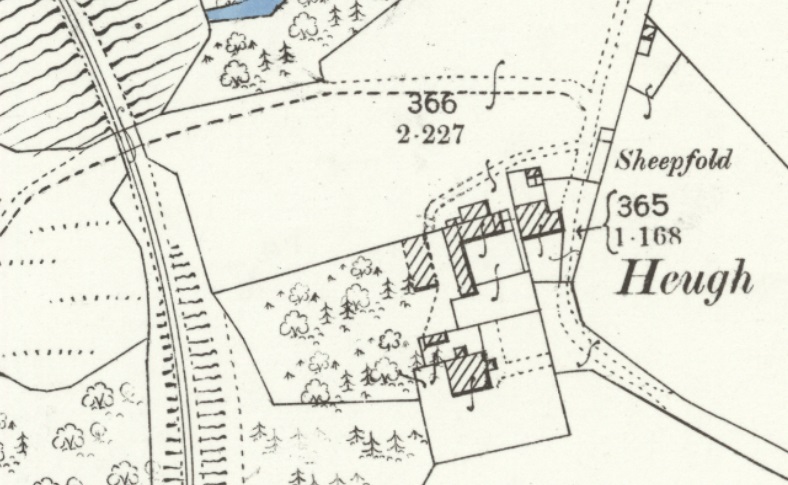
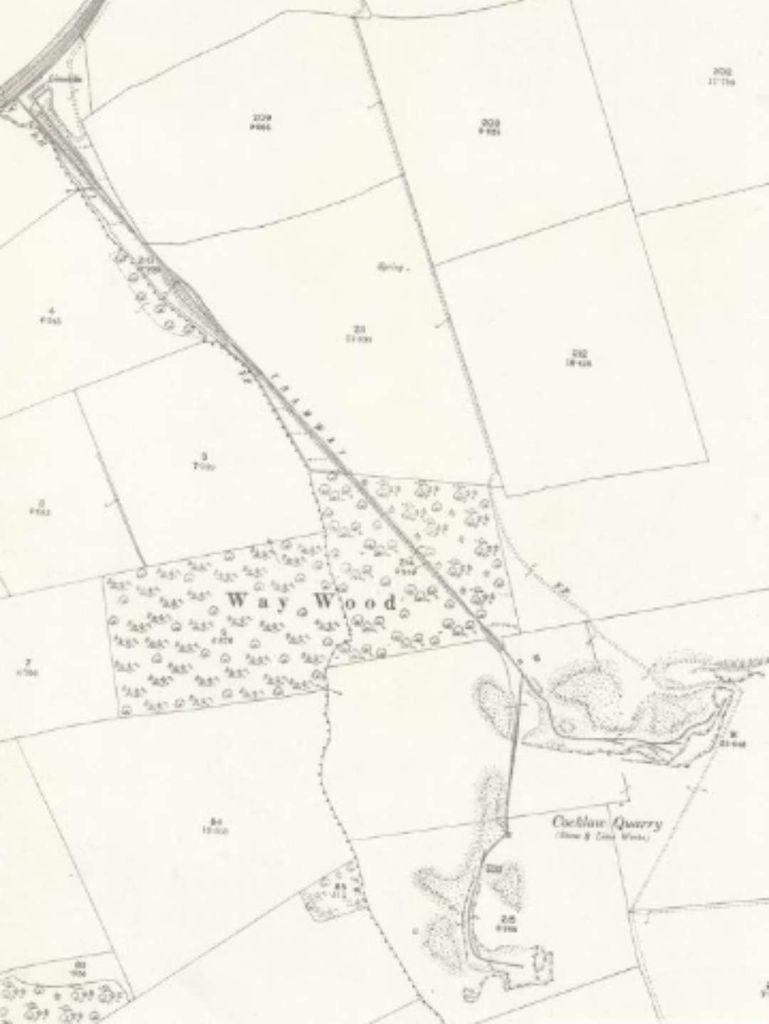
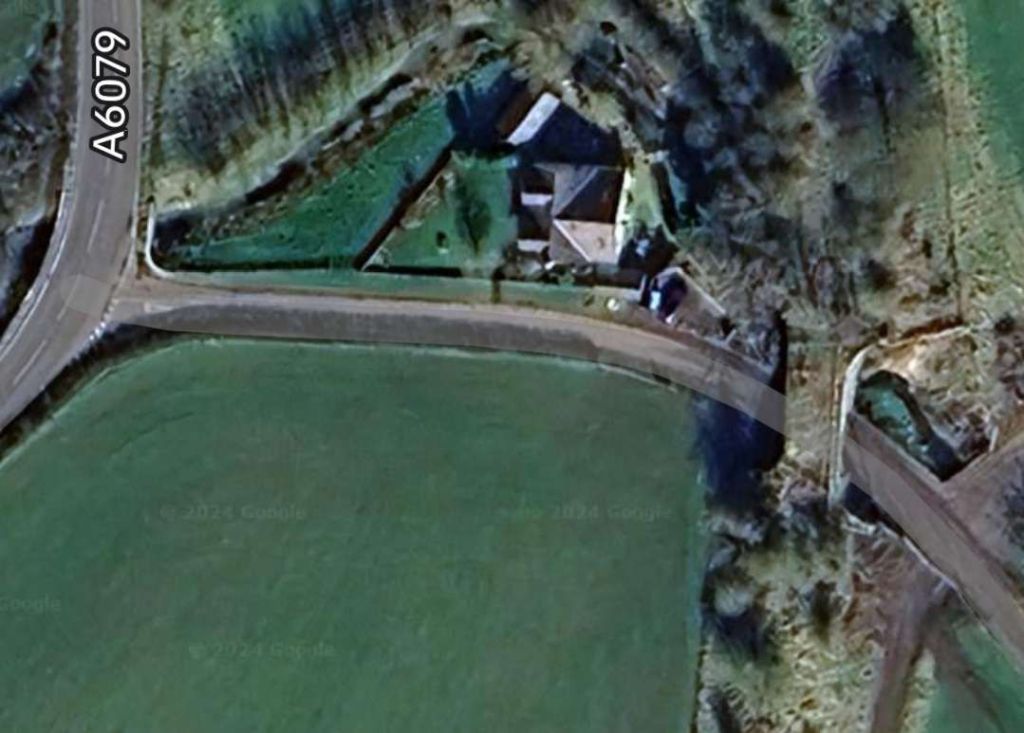
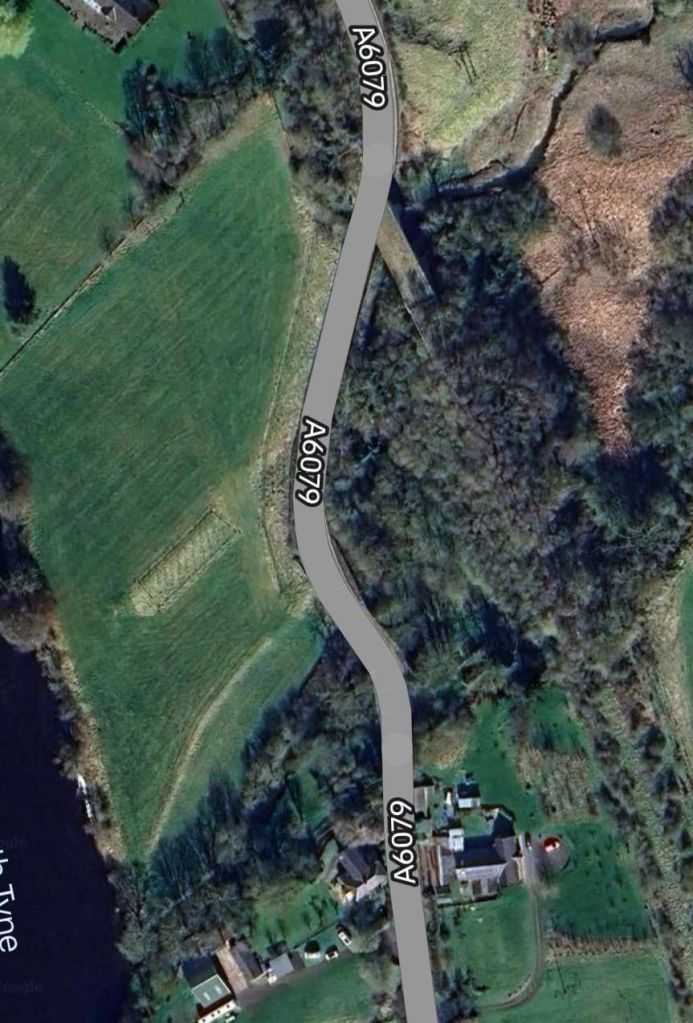
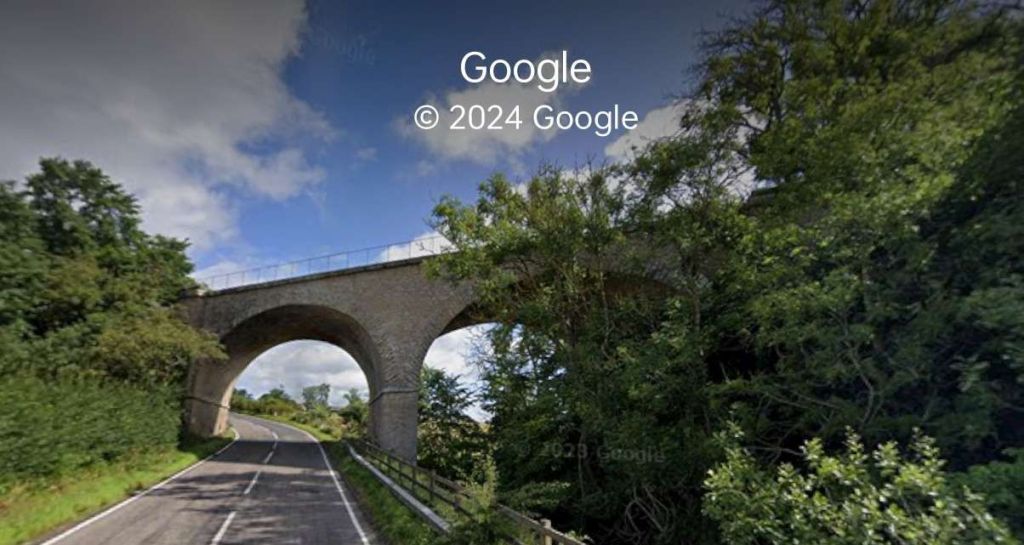
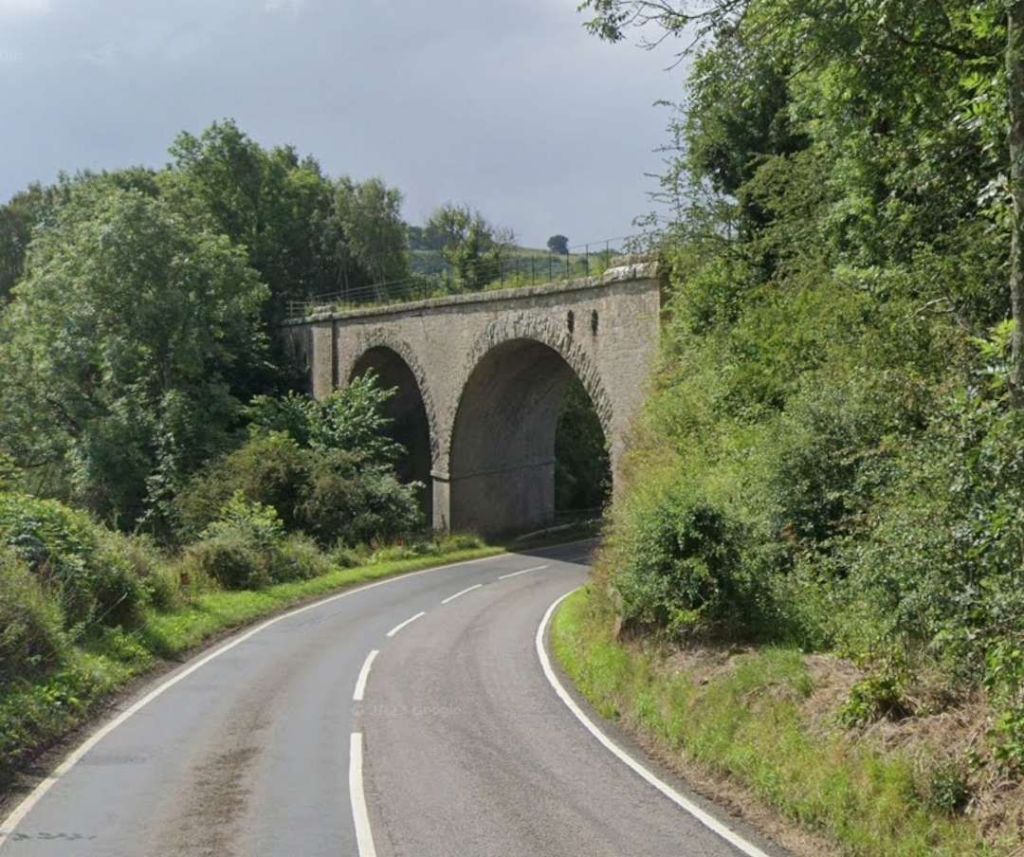
Just to the Southwest of Killin Junction the line was carried over the Ardchyle Burn on a stone viaduct – Glendhu Viaduct.
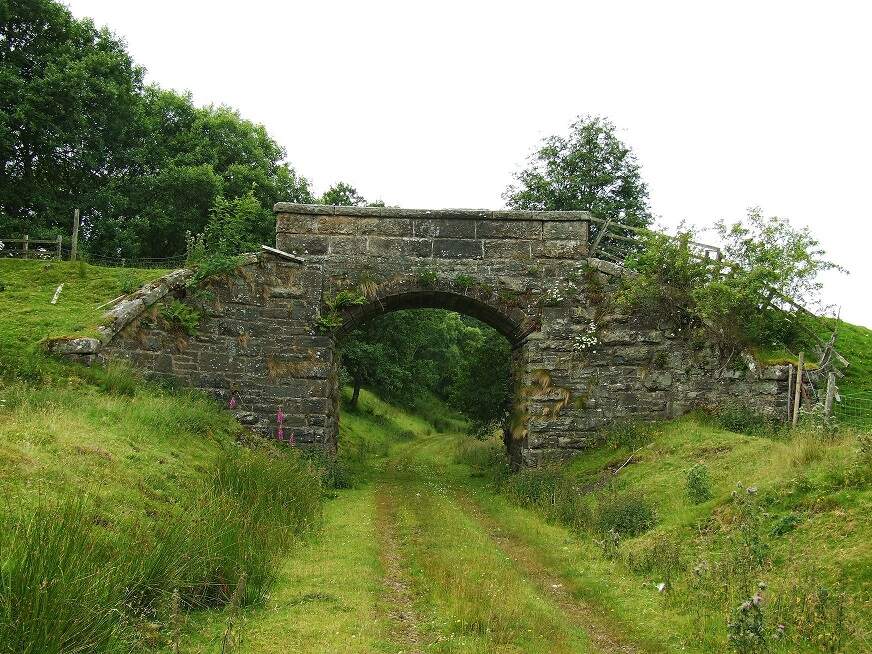
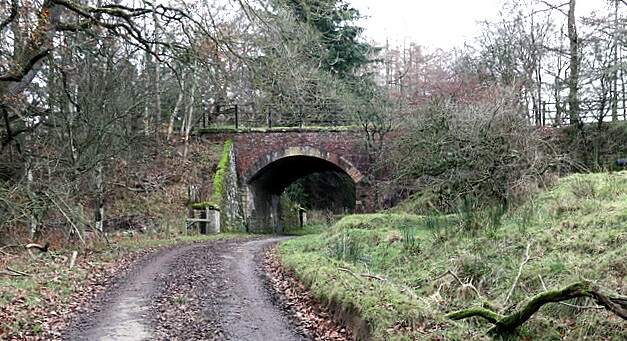
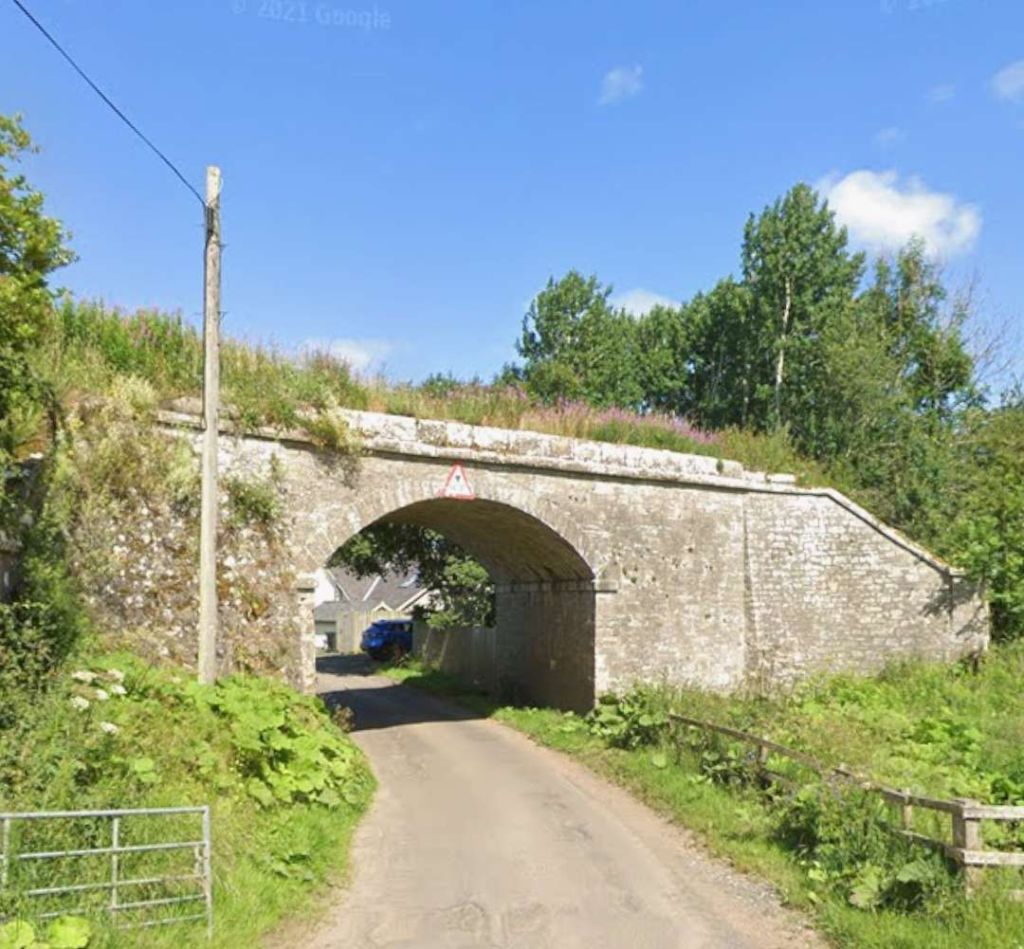
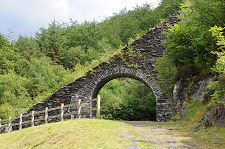
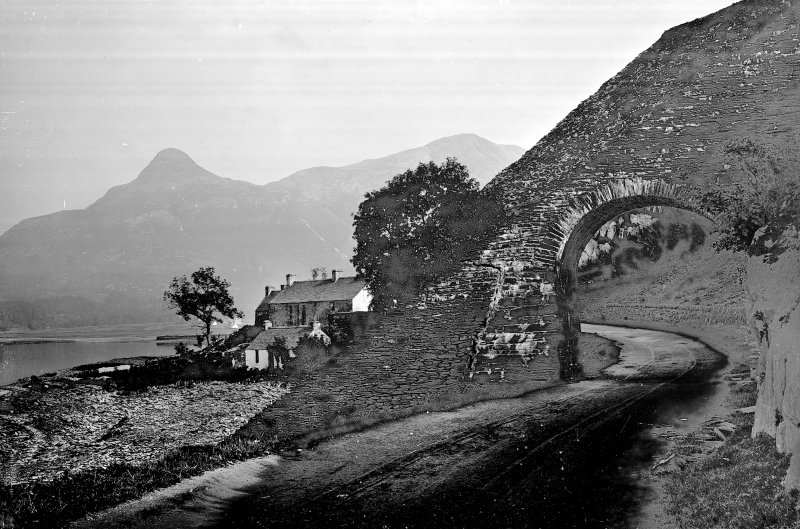
A short distance to the West of the viaduct, a farm acess track was carried over the railway on a stone arched bridge.
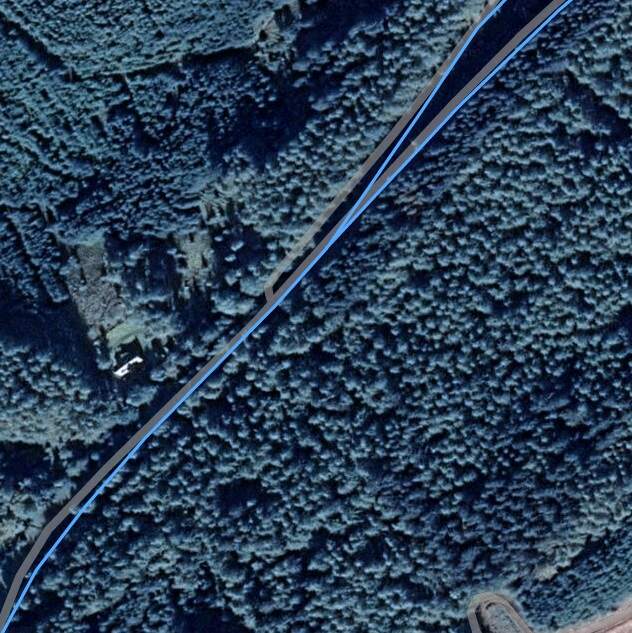
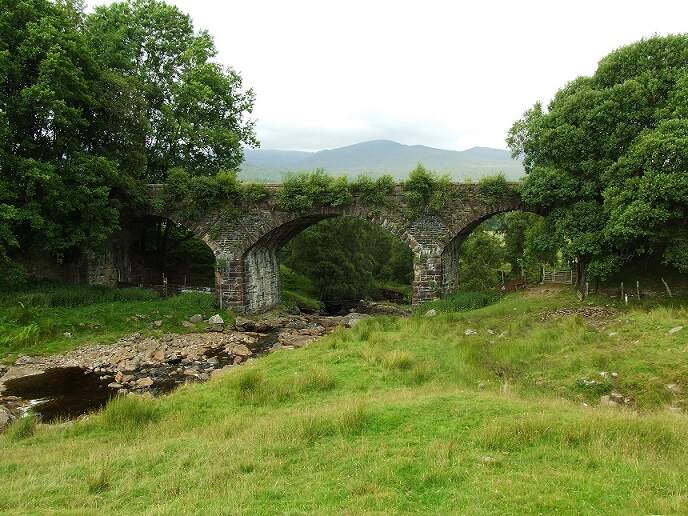
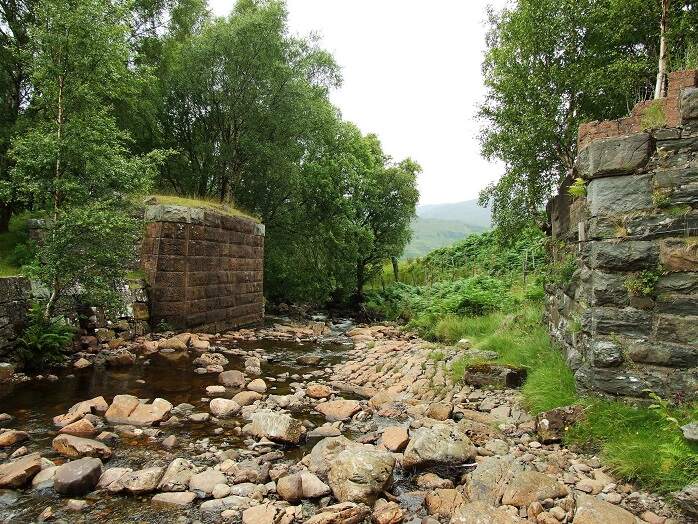
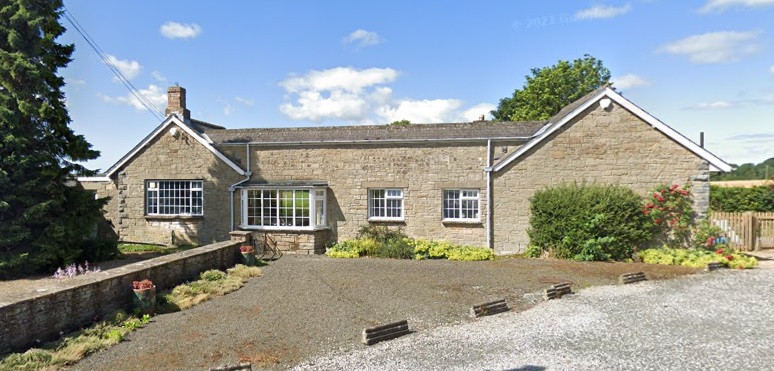
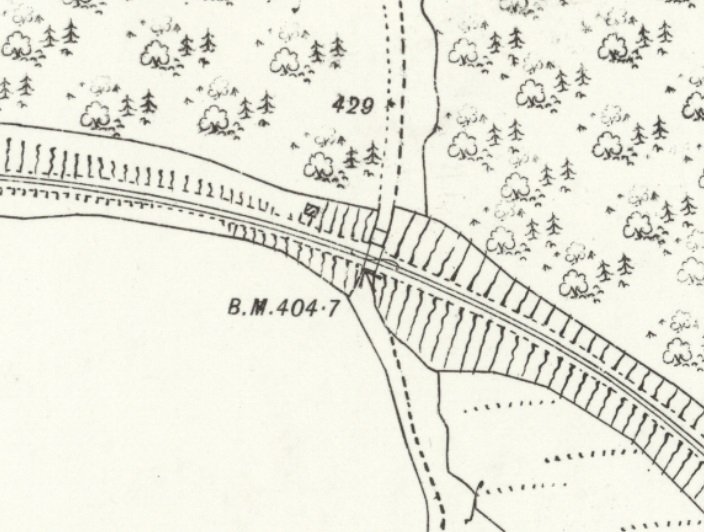
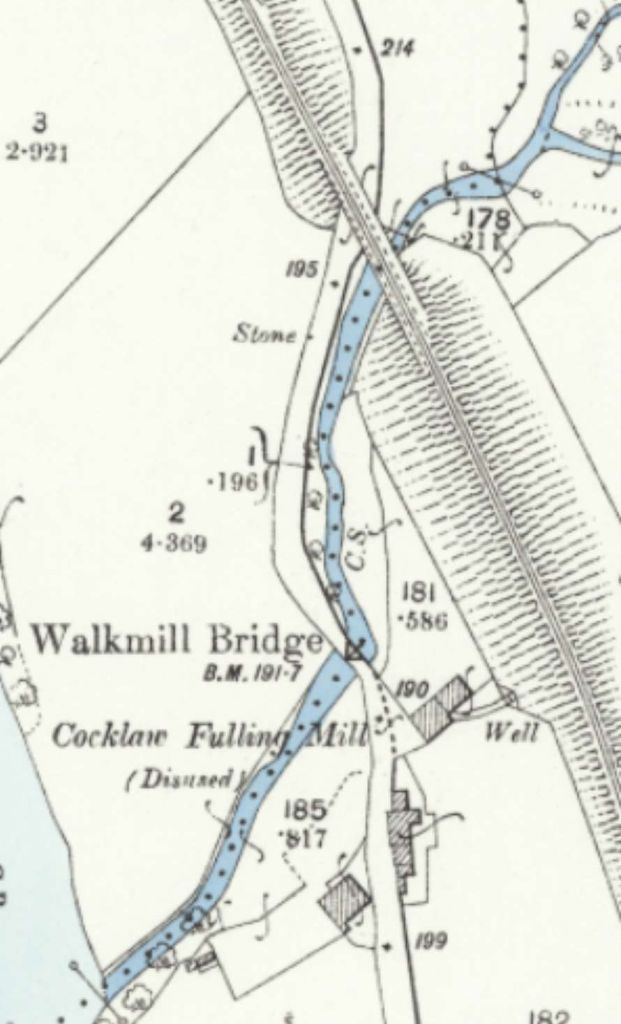
Along the length of the old railway between Killin Junction and Luib Railway Sation two more structures are worthy of note. First, Ledcharrie Viaduct at around the half-way point between Killin Junction and Luib spans the Ledcharrie Burn. [33] The second is Edravinoch Bridge which was a girder bridge which once spanned the Luib Burn. The aboutments remain but the girders were removed for scrap on closure of the line. [34] Bothe the pictures below were taken by John Gray and shared by him on the Re-Appreciate the Callander & Oban Line Facebook Group on 4th October 2018. John Gray’s photographs are reproduced here with his kind permission.
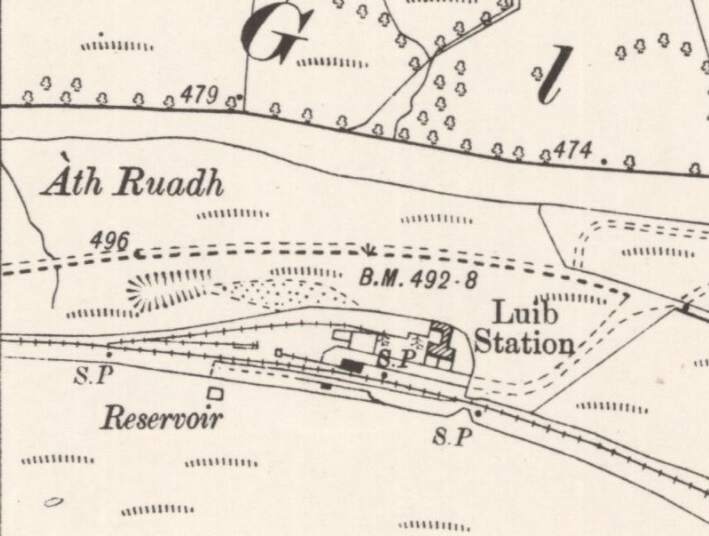
The next station on the old railway was Luib Railway Station in Glen Dochart.
Gairns continues:
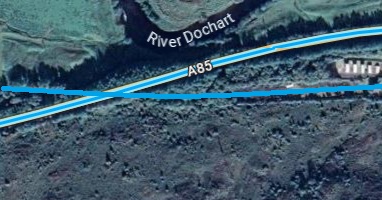
“Westward past Luib to Crianlarich, Glen Dochart is traversed, with the River Dochart, until it merges into Loch Iubhair, succeeded in turn by Loch Dochart, and the public road, for company close alongside. Here splendid views are hard on both sides, bare mountain slopes being relieved by wooded areas, while rushing burns and streamlets add further interest. On both sides are peaks of considerable height, notably Ben Dheiceach (3,074 ft.) to the North, Ben More (3,843 ft.) immediately ahead, and Stobinian (3,821 ft.) to the South, with many others in the distance.
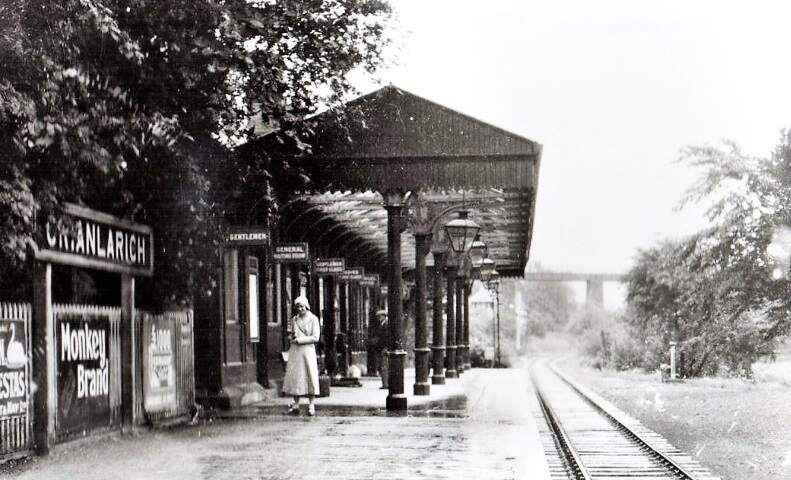
Crianlarich is important as it provides for interchange traffic with the West Highland line to Fort William and Mallaig, which here crosses. The stations are within a short distance, and there is siding connection for interchange goods traffic. The Callander and Oban station is a neat double-platformed station with rather attractive buildings on the down side, Just beyond the station the North British Railway crosses by an overbridge, and Crianlarich Junction is then reached, this controlling the connection with the West Highland line.” [1: p12-13]
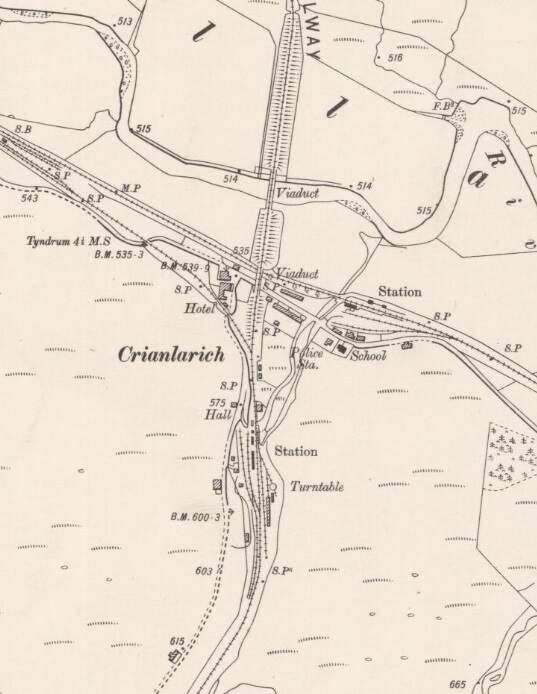
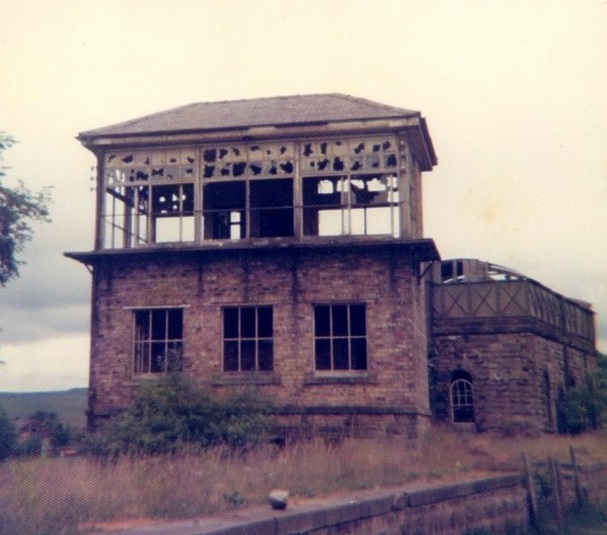
Crianlarich Junction was situated half a mile west of Crianlarich Lower station. Opened on 20th December 1897, the junction was located at one end of a short link line that ran to Crianlarich station on the West Highland Railway. There were two signal boxes: “Crianlarich Junction East” (32 levers) and “Crianlarich Junction West” (18 levers). Following closure of the line east from Crianlarich Lower, the line between there and Crianlarich Junction was retained as a siding, with the link line becoming the main line for trains to and from Oban. [37]
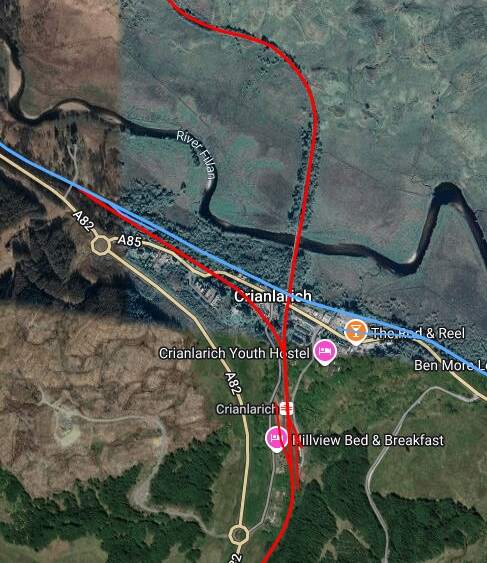
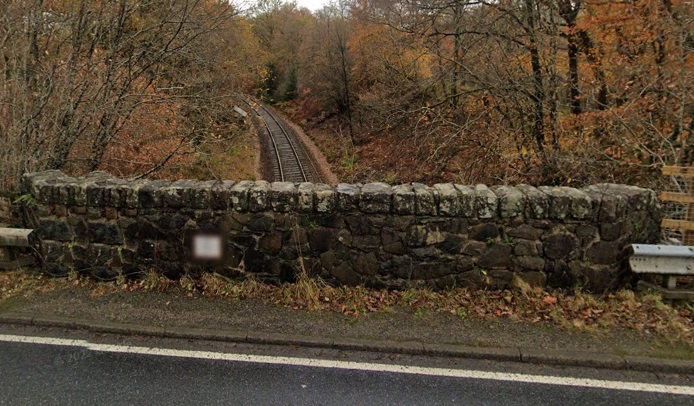
The line to the West of Crianlarich Junction remains in use in the 21st century.
Gairns continues his description of the line:
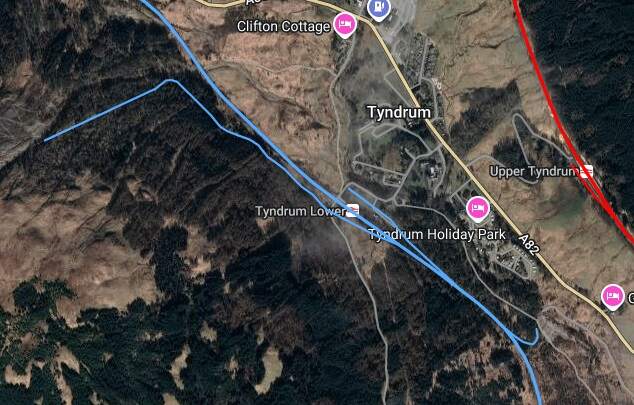
“Onwards through Strath Fillan magnificent views are had, and for some miles the West Highland line runs parallel, but on the opposite side of the valley, climbing up the hillside, after crossing the viaduct over the River Fillan until both lines are almost on the same level, with the valley between. Both lines have stations at Tyndrum (a favourite mountain resort), though these are some half-a-mile apart. The Callander and Oban station is a neat tree-shaded [location], with the goods yard at a lower level.” [1: p13]
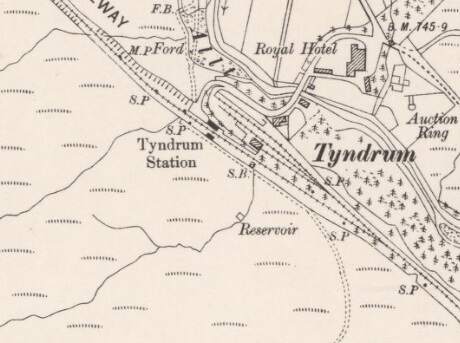
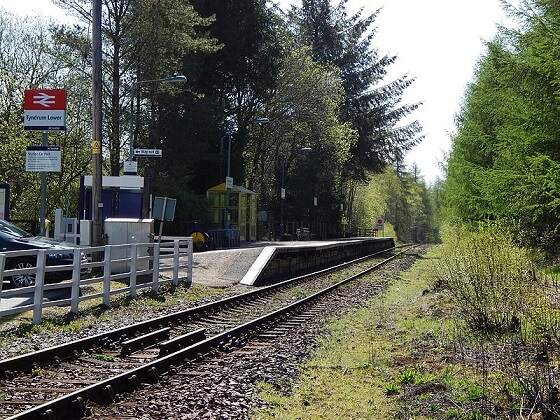
Wikipedia tells us that Tyndrum Lower Station “opened on 1st August 1873 as a terminal station. This was the first railway station in the village of Tyndrum. Until 1877, it was the western extremity of the Callander and Oban Railway. In 1877, the Callander and Oban Railway was extended from Tyndrum to Dalmally. Concurrently, the station was relocated 301 yards (275 m) west, onto the new through alignment. The new station was on a higher level, as the line had to climb steeply to reach the summit about 0.6 miles (1 km) to the west. The old terminus then became the goods yard. The through station was originally laid out with two platforms, one on each side of a passing loop.” [40]
Gairns’ description of the line continues:
“Passing Tyndrum station a final view is had of the West Highland line [before] it turns its course northwards, while the Callander and Oban line makes a long sweep southwesterly through Glen Lochy, wild and bare. An intermediate crossing, Glenlochy breaks the 12-mile run from Tyndrum to Dalmally. Approaching the rather pretty station at the latter place, Glen Orchy is joined, fine views being had along it. Dalmally, at the foot of Glen Orchy, has been described as ‘the loveliest spot in all that lovely glen’. A short run of less than 3 miles crossing the Orchy and rounding a bay on Loch Awe, and incidentally giving beautiful views up the Loch, and Loch Awe station is reached, right on the water side, and with a pier alongside for the steamers which ply along the Loch. For four miles or so the line runs high on the base at Ben Cruachan and follows the shores of the Loch through the gloomy Pass of Brander in which the waters of the loch merge into the brawling River Awe most turbulent of Highland salmon streams, Three miles beyond Loch Awe station the Falls of Cruachan Platform is a convenience for visitors to the celebrated Falls, a glimpse of which is had from the train in passing. The crossing place is, however, Awe Crossing, a mile or so beyond. A further run of 41 miles and Taynuilt is reached, beyond which the shores of Loch Etive are followed to Connel Ferry, a run of 64 miles, with one intermediate station – Ach-na-Cloich – and providing lovely views over the loch and the hills and mountains. beyond.” [1: p13]
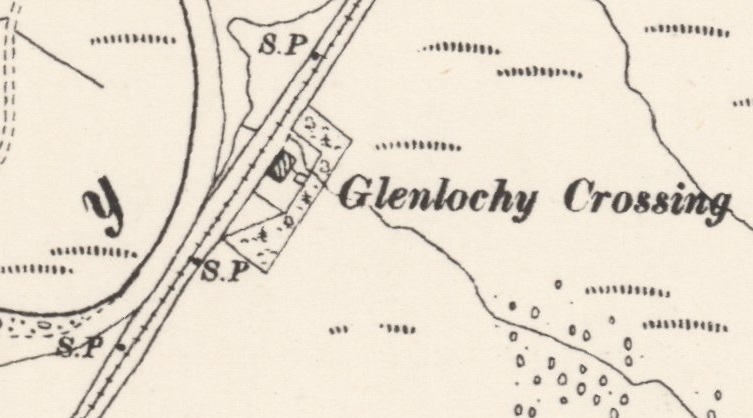
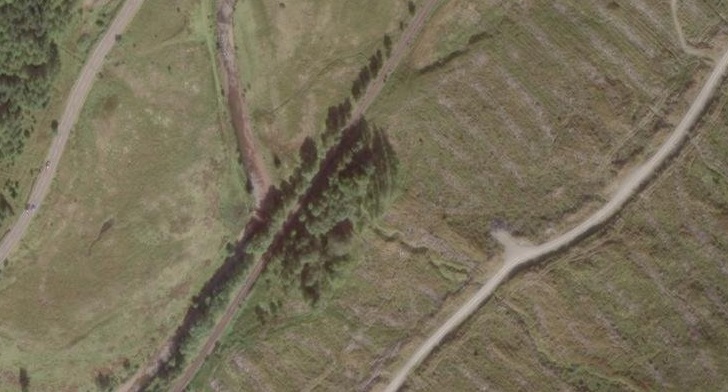
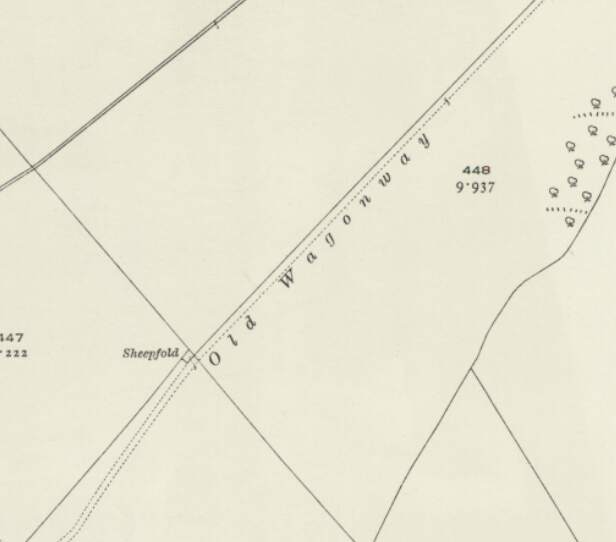
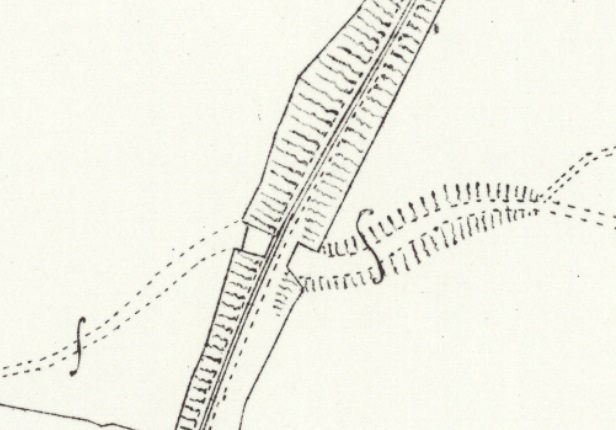
Glenlochy Crossing was a passing loop opened in 1882 to increase the capacity of the line. It broke the singl-track section between Tyndrum Lower and Dalmally. The building shown just to the East of the line was similar to that found at other crossings (such as Drumvaich Crossing and Awe Crossing0. It combined a railway cottage with a signal cabin. When first built the loop had two trailing sidings one at each end of the loop. We know that the loop was lifted in 1966 when the building was also demolished. There is still a footbridge across the River Lochy which gave access to the Crossing but that is now locked against public access. [42]
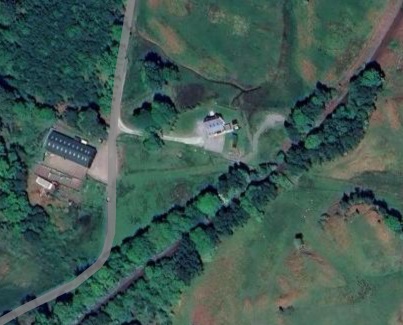
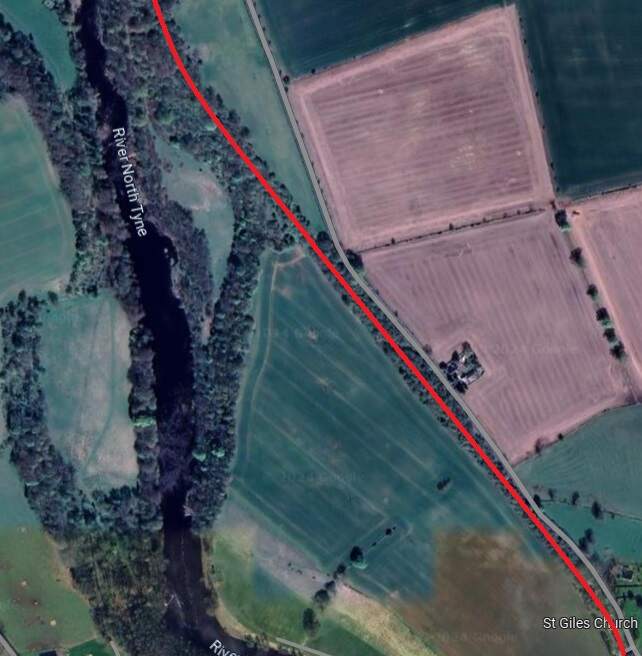
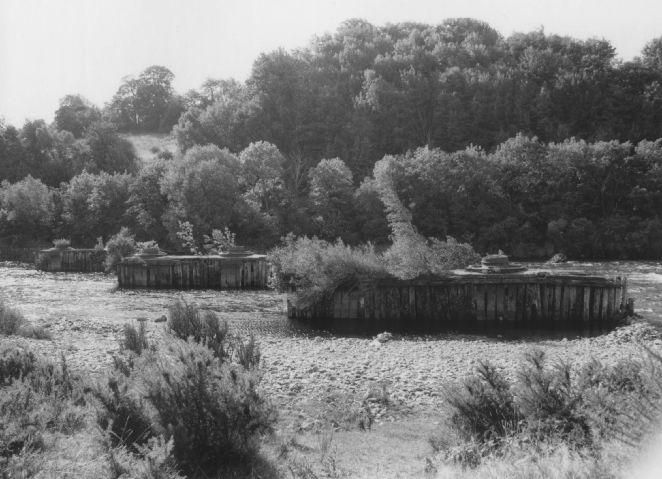
The Callander & Oban Railway closely followed the South bank Of the River Lochy, only turning away to the South to cross Eas a Ghaill (a tributary which approached the River Lochy from the South) by means of Succoth Viaduct.

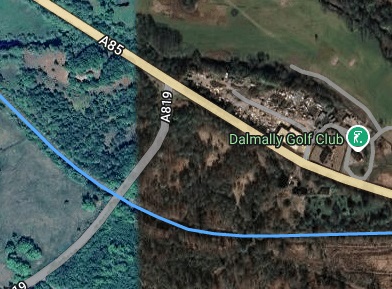
The line runs almost due West from Succoth Viaduct at a distance from the River Lochy until it reaches Dalmally Railway Station.
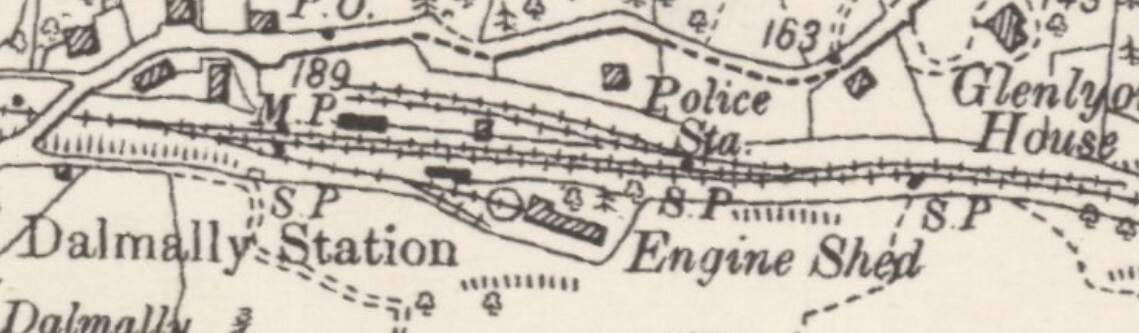
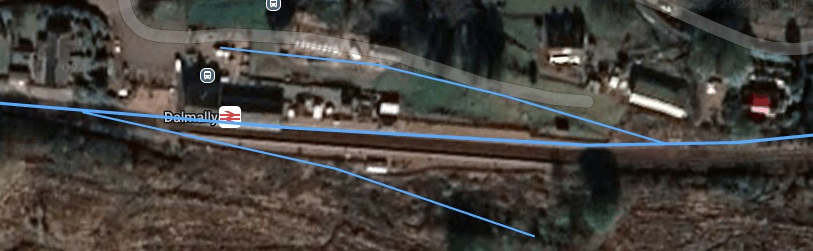
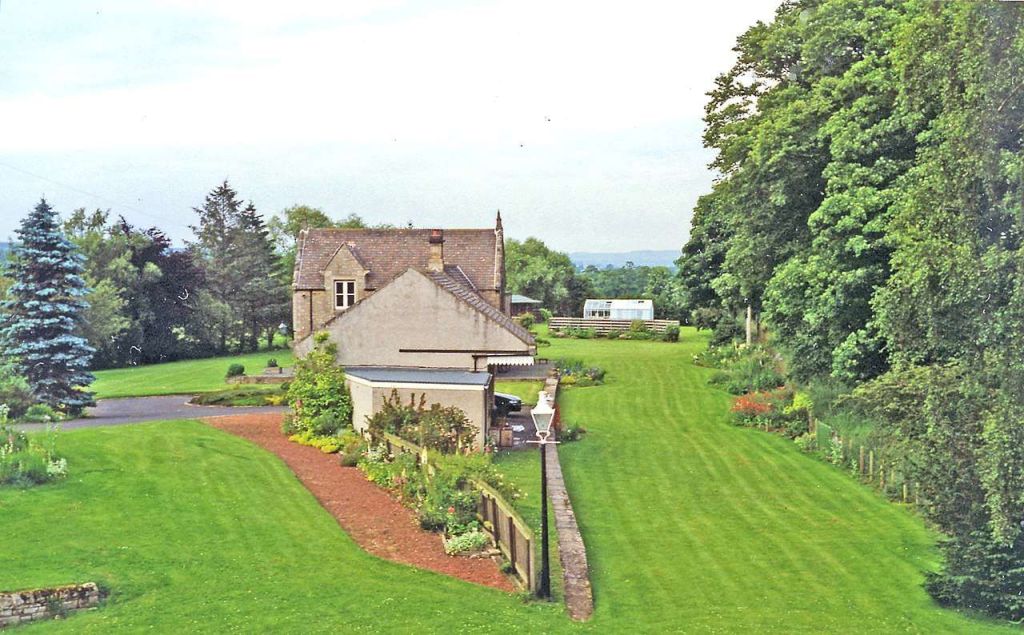
This photograph was taken from the Road overbridge at the West end of Dalmally Railway Station site, (c) inett (November 2017) and shared on Google Maps.

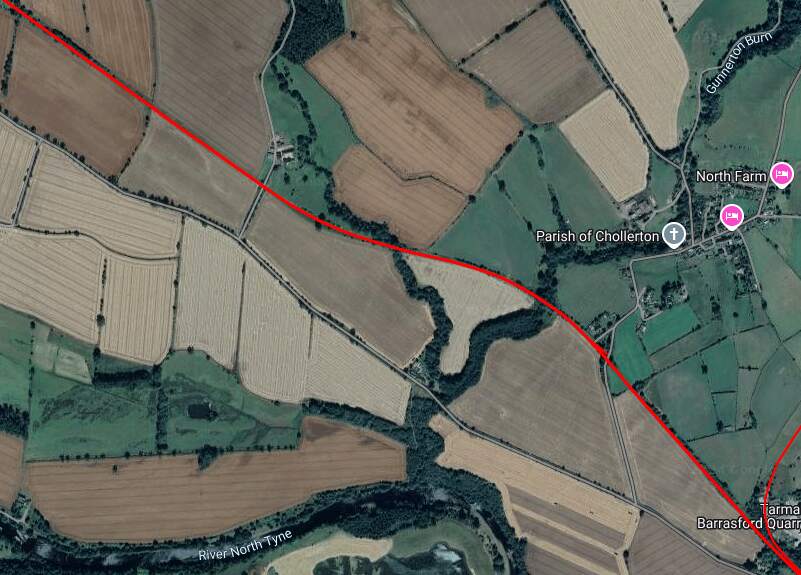
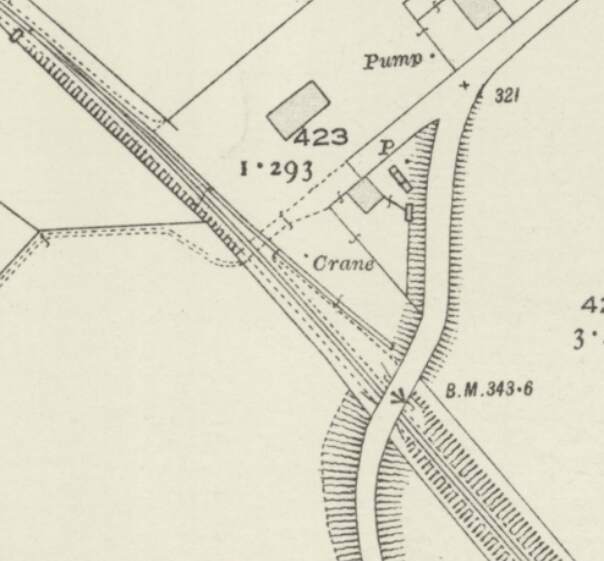
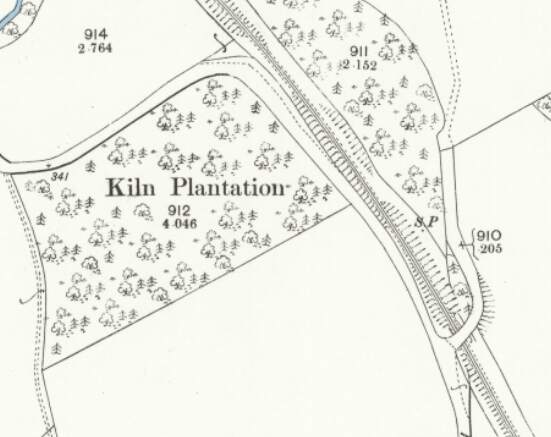
West of Dalmally the line ran on towards a viaduct which crossed the River Lochy at Drishaig. However, we need to note that the road layout in this immediate area is considerably different to what was present at the turn of the 20th century.

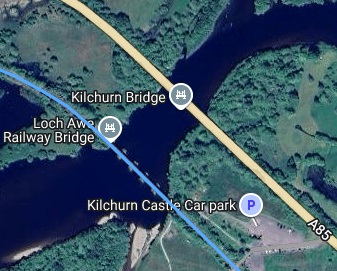
Just a short distance to the West, the line crossed the River Orchy at the East end of Loch Awe.
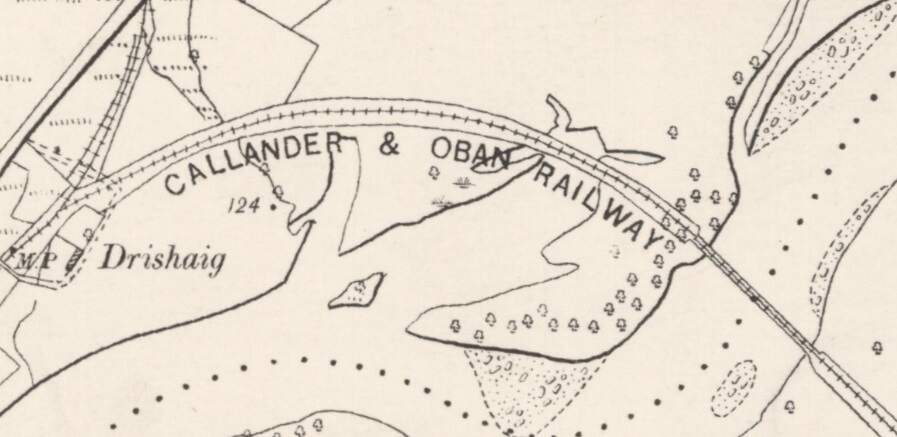
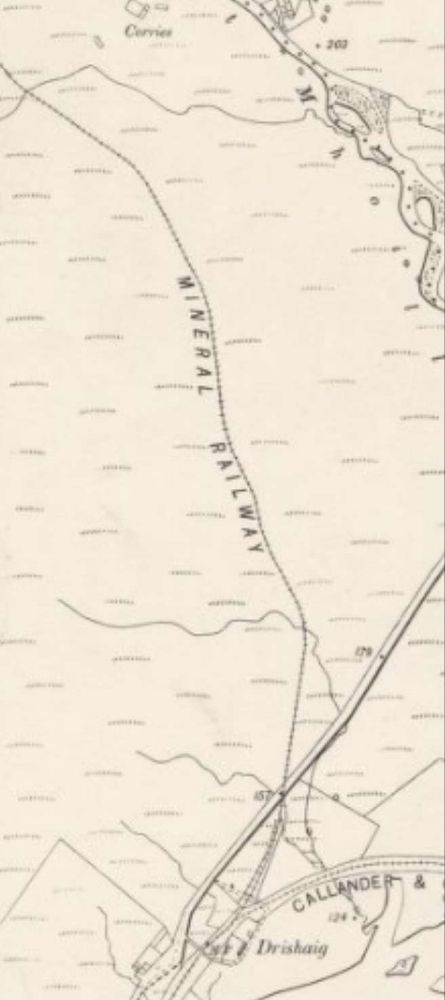
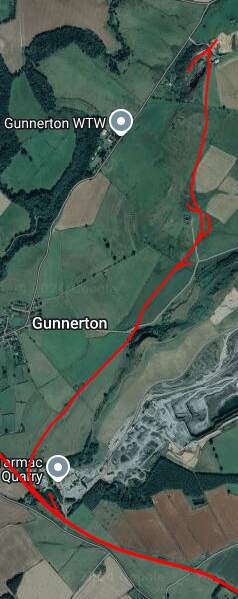
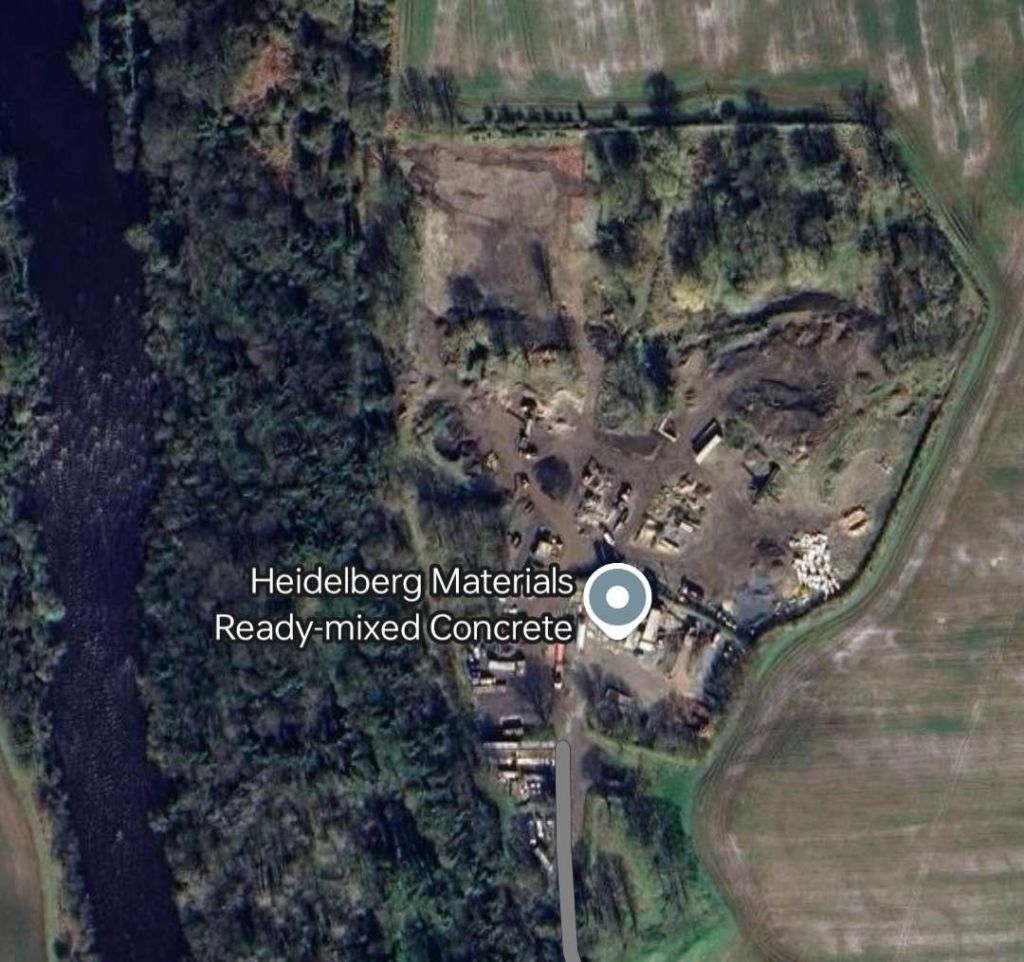
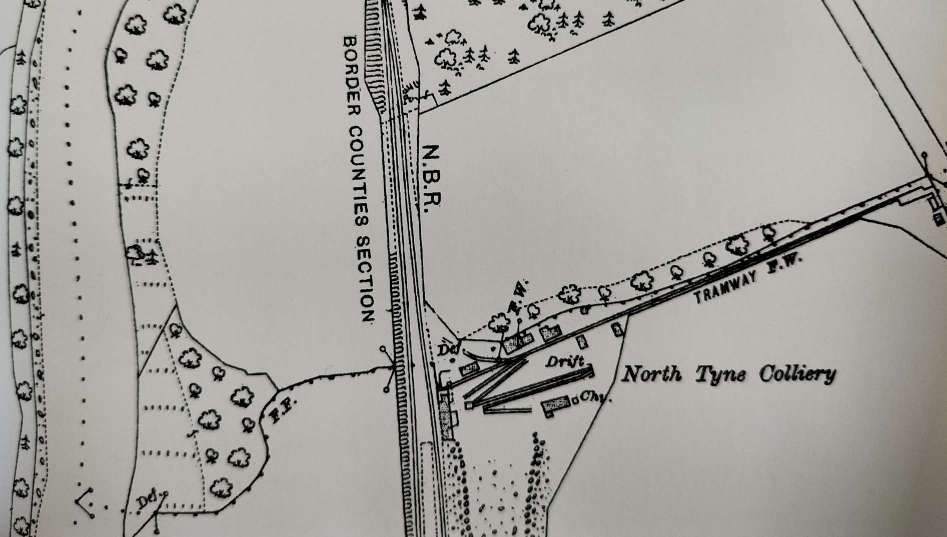
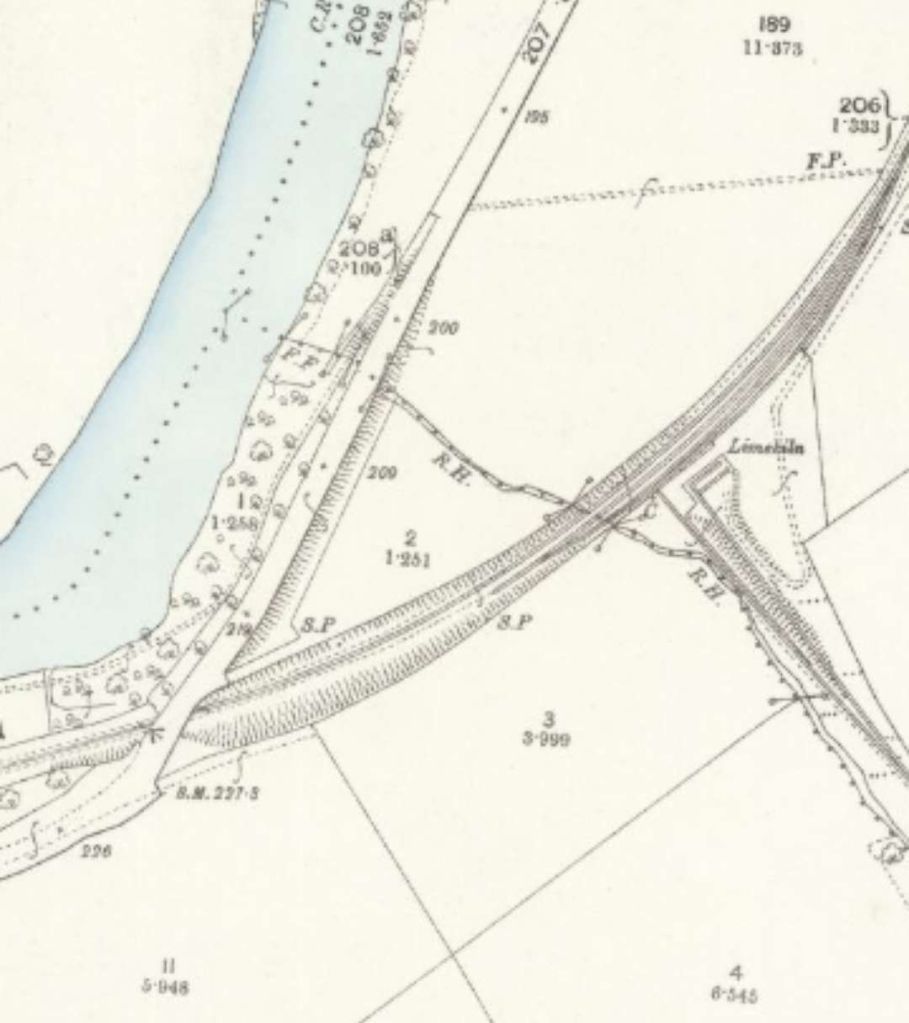
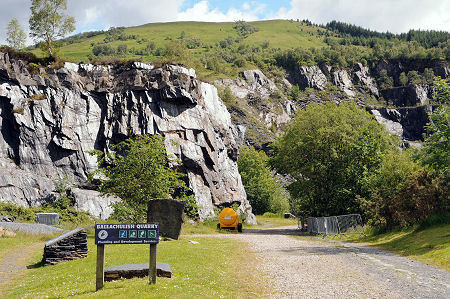
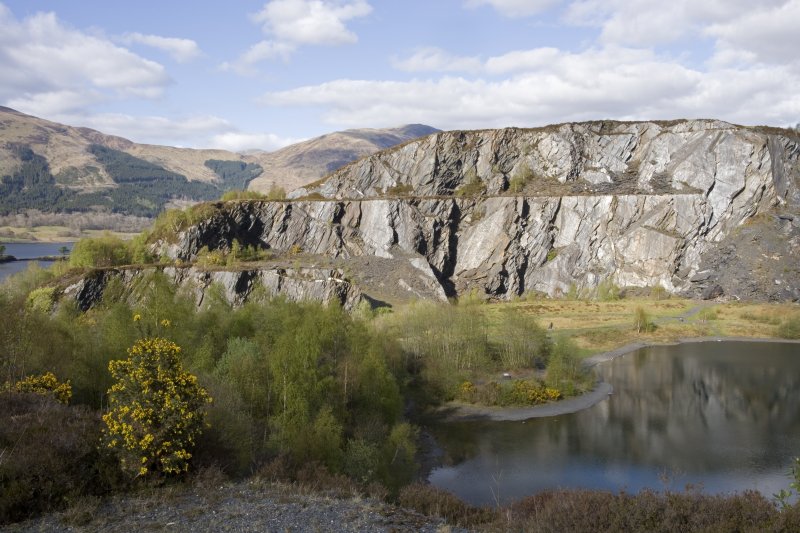
The Ben Cruachan Quarry Branch was standard-gauge and ran North from Drishaig. It is shown here as it appears on the 6″ Ordnance Survey of 1897, published in 1900. The line North from Drishaig appears on the map extract on the left. [47]
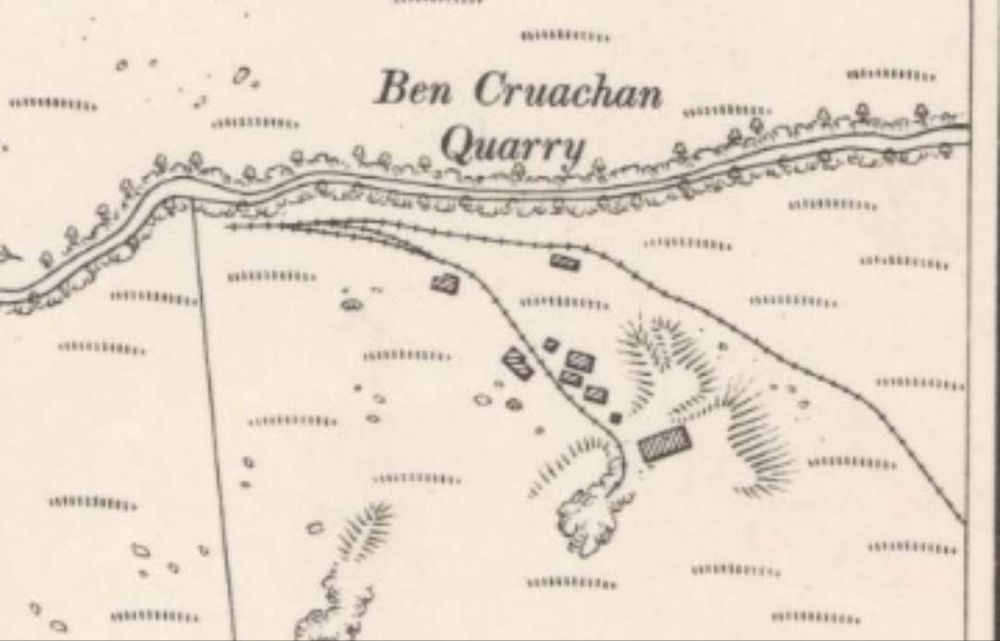
Ben Cruachan Quarry was multi-levelled and was accessed by the railway which zig-zagged to gain height. The RailScot website rells us that”The ground frame for this short Ben Cruachan Quarries Branch (Callander and Oban Railway) was released by a tablet from Loch Awe station for the section to Dalmally. The quarry had its own pair of 0-4-0ST locomotives.” [49]
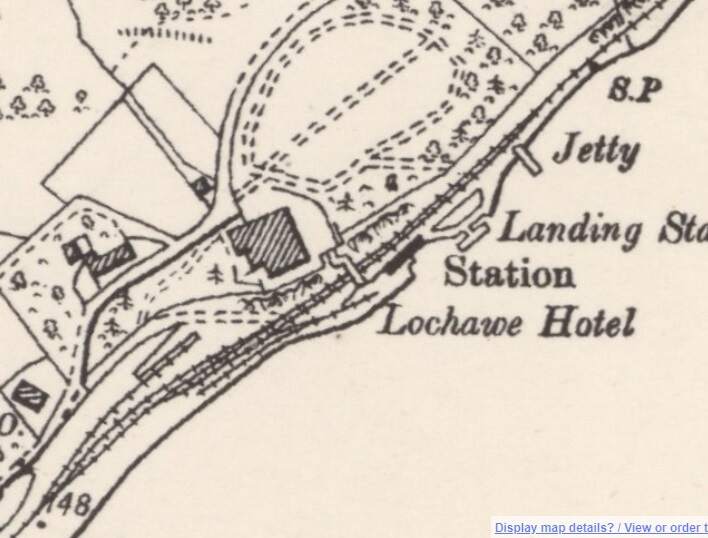
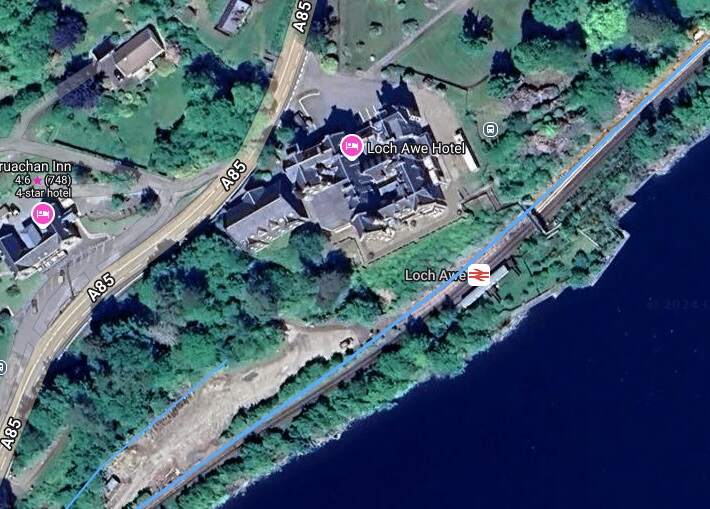
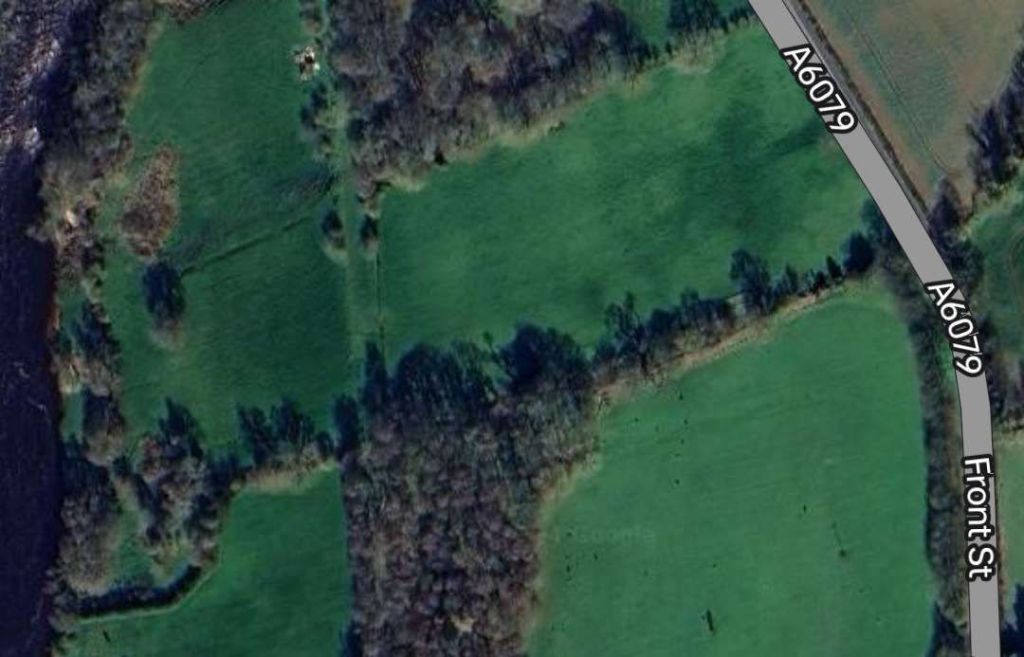
Just a short distance Southwest of Drishaig was the Lochawe Hotel which had its own railway station alongside the Loch.
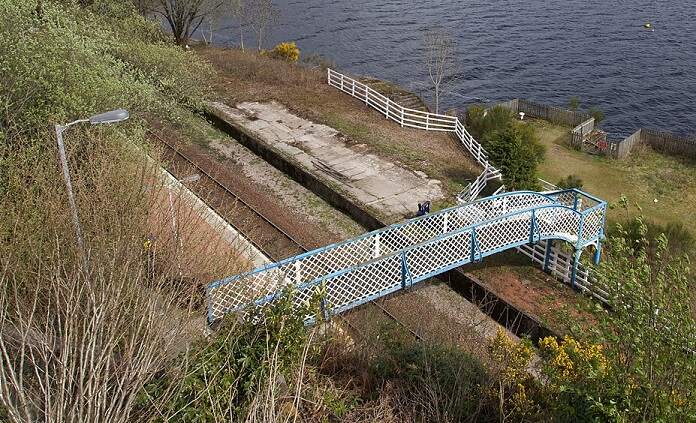
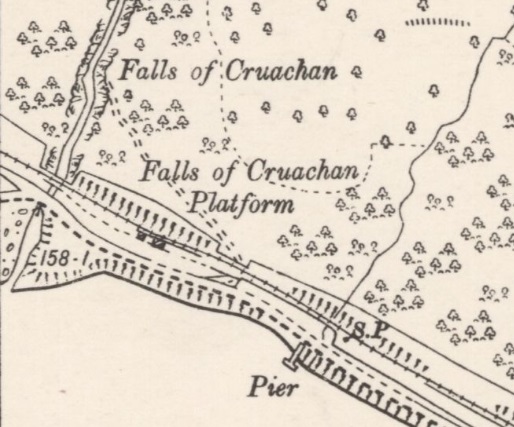
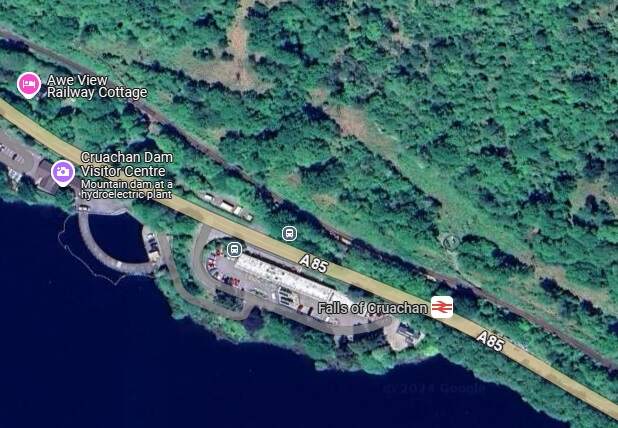
The line ran across the North shore of Loch Awe to a Halt named for the Falls of Cruachan – Falls of Churachan Platform.
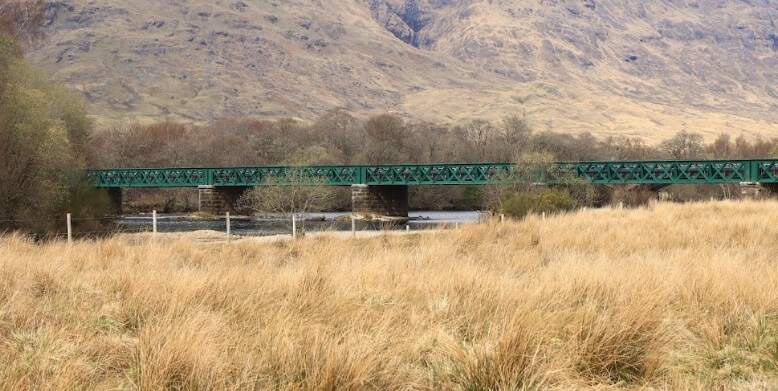
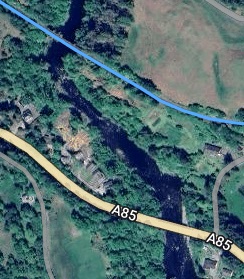
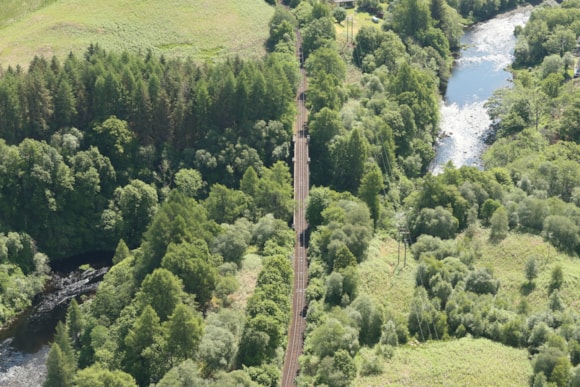
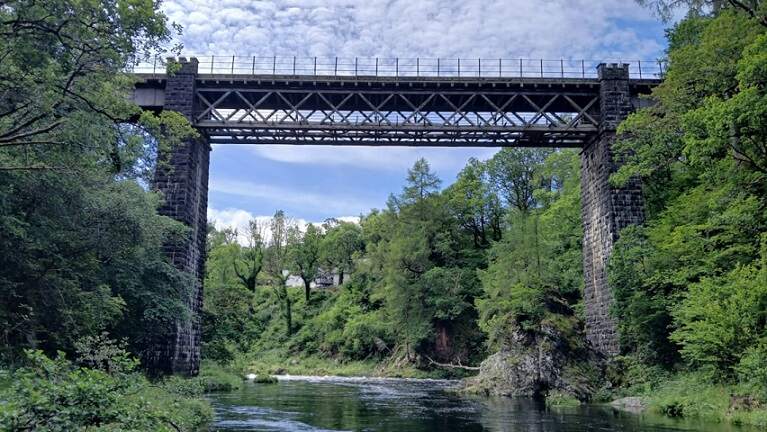
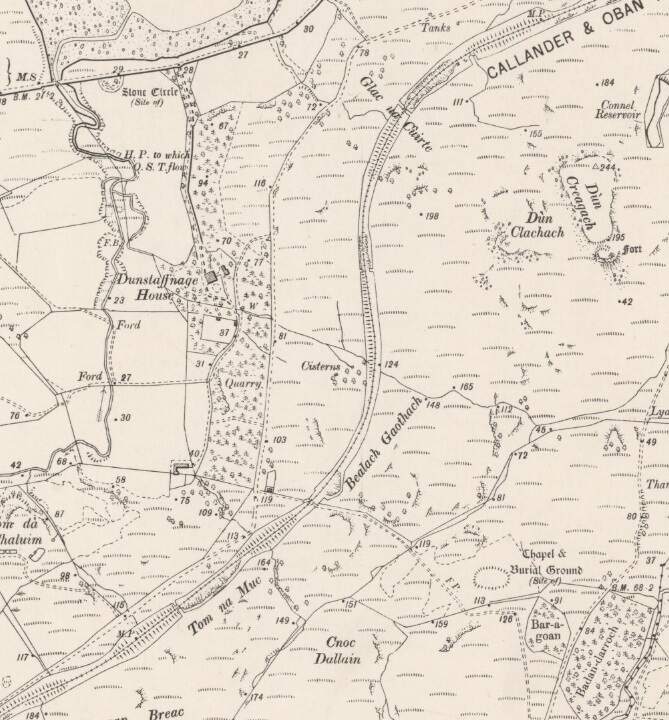
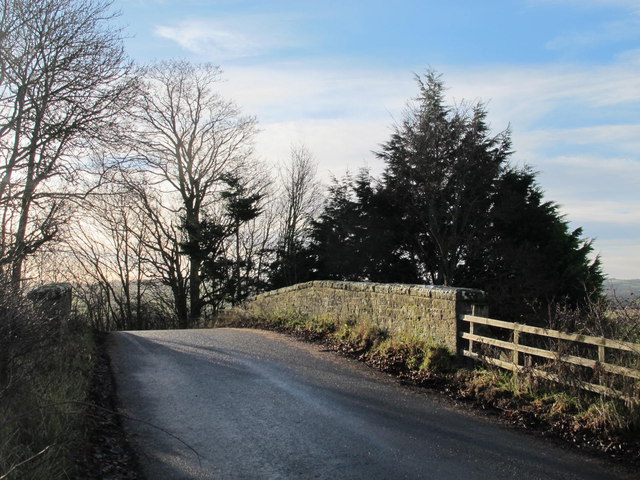
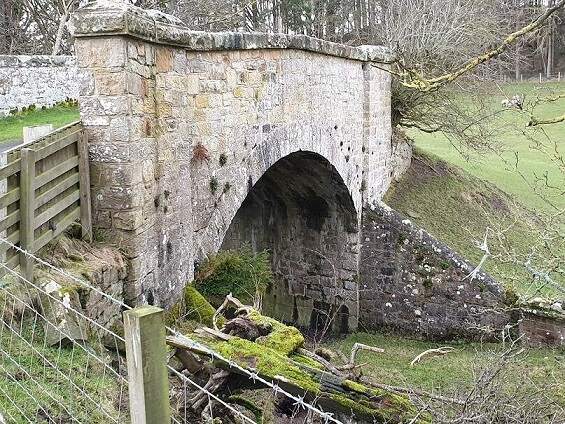
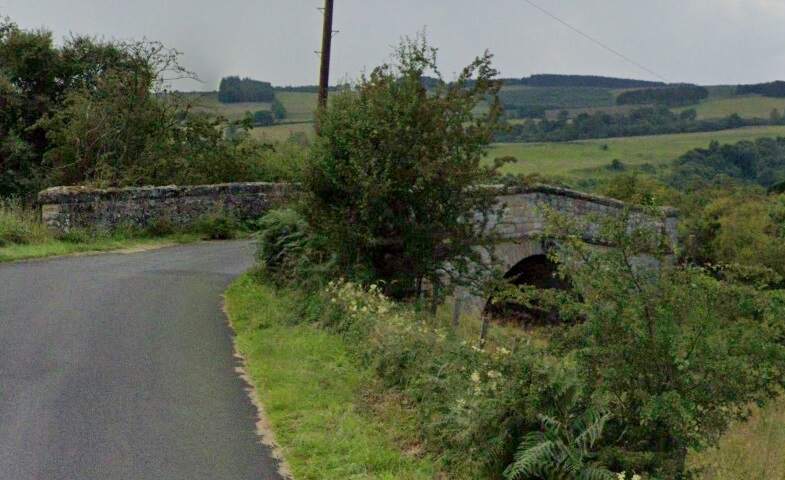
The line continues West/Northwest along the Northside of the River Awe. It crosses the river just North of The Bridge of Awe. Just prior to reaching the Viaduct the line bridged the minor road which served properties on the North side of the River Awe.
A matter of not much more than a couple of hundred metres to the West of the minor road, the line bridges the River Awe.
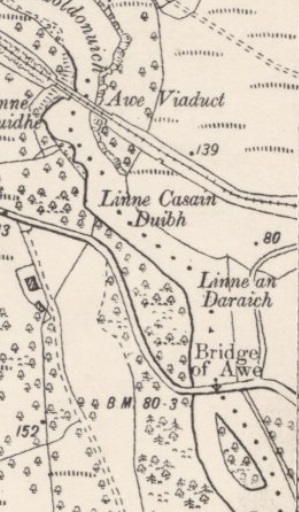
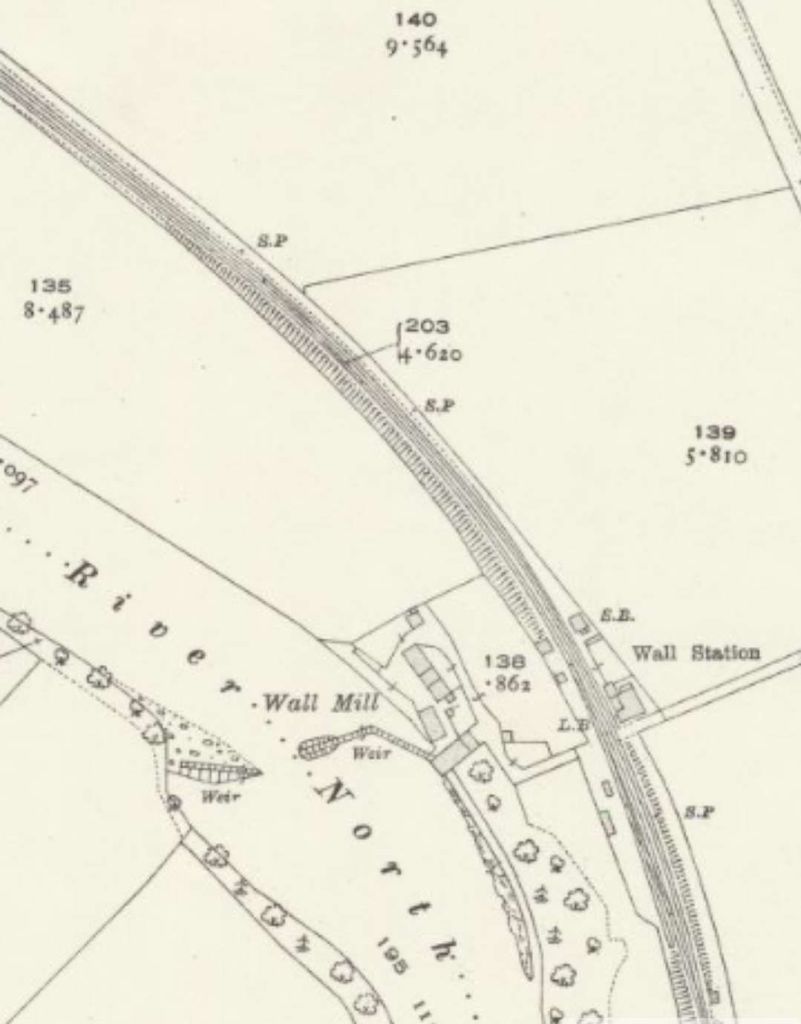
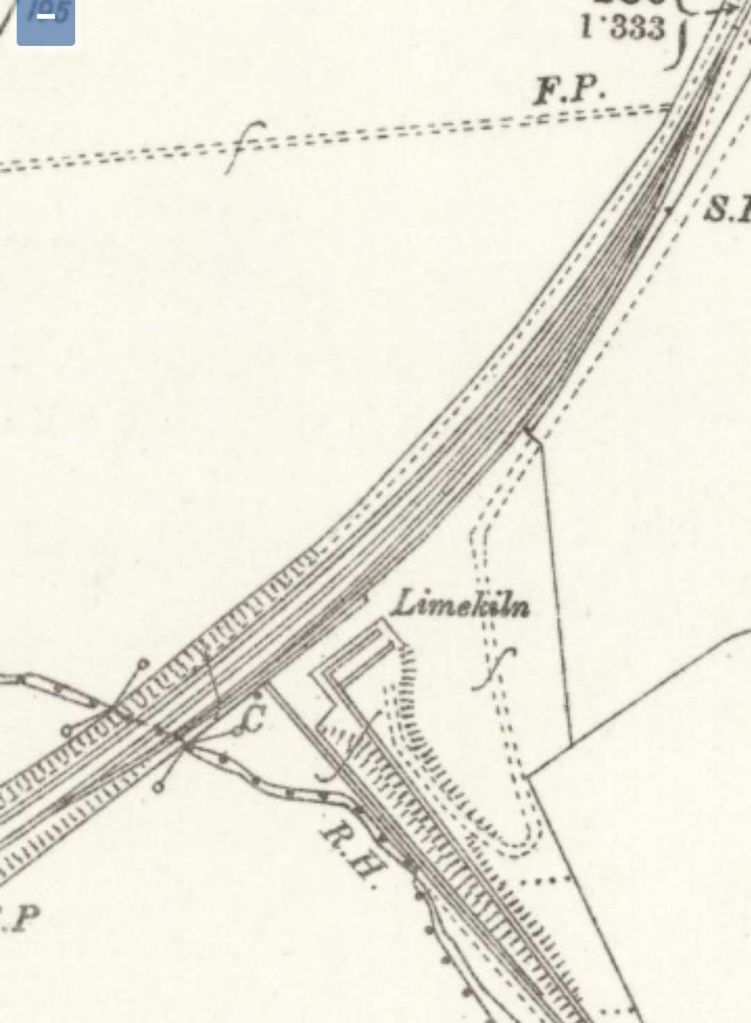
The Bridge of Awe with the Railway Viaduct just to the North, as they appear on the 6″ Ordnance Survey of 1897, published in 1900. [53]
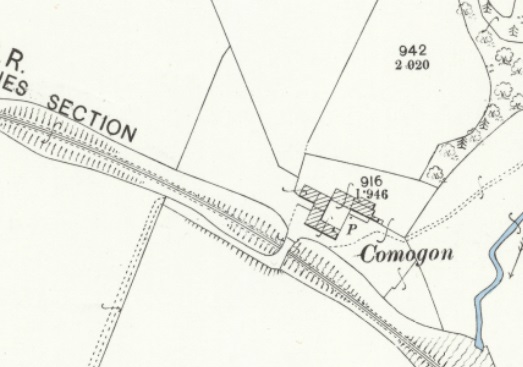
Over the river, the line heads for Taynuilt.
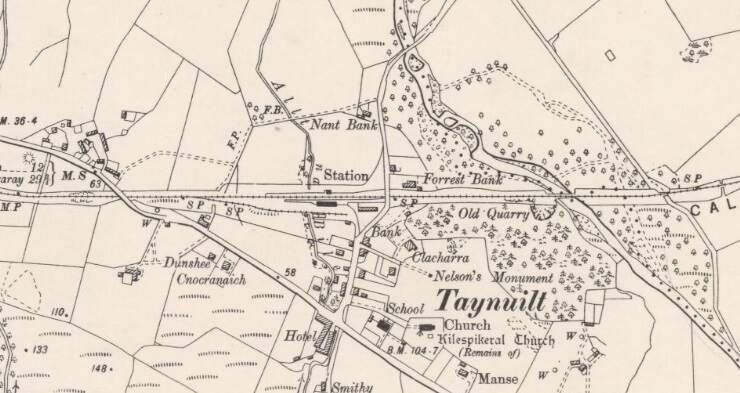
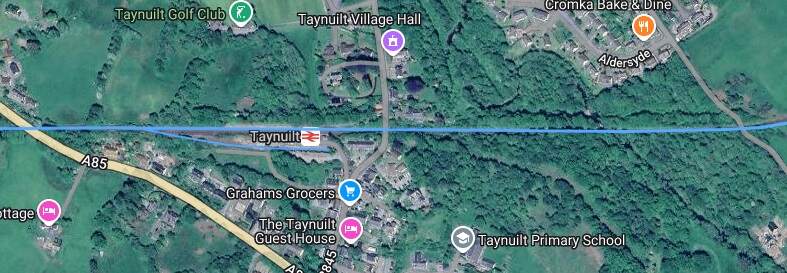
On the way into Taynuilt the line crosses a minor road which serves the East end of the village. That road can be seen at the righthand side of the satellite image and the map extract above.
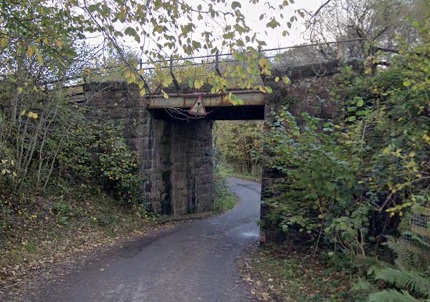
The next bridge spans the railway adjacent to Taynuilt Railway Station it carries the B845.

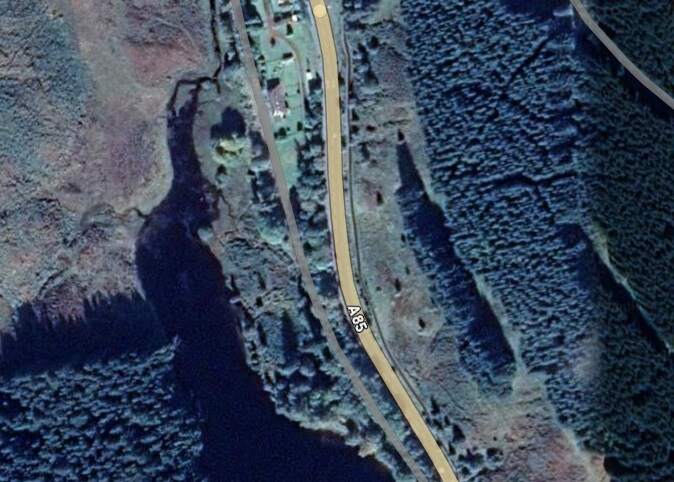
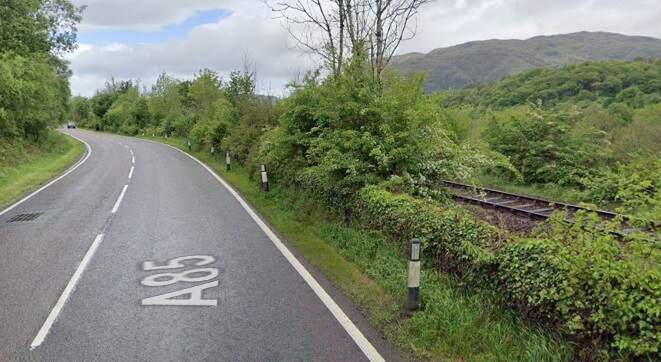
A little further to the West the railway passes under the A85 again.
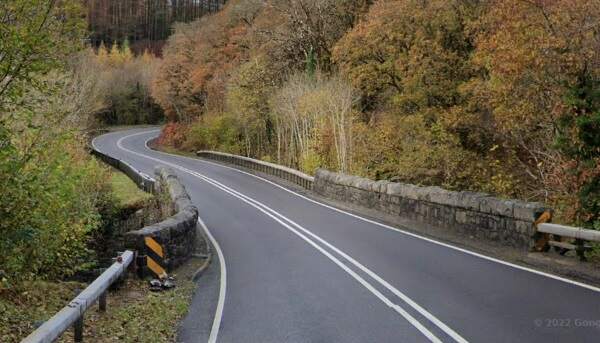
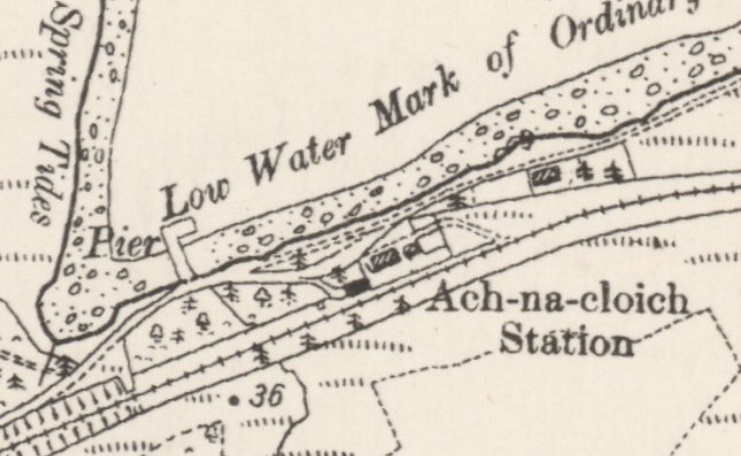
The line now drops down to the shores of Loch Etive and in due course arrives at Auch-na-Cloich.

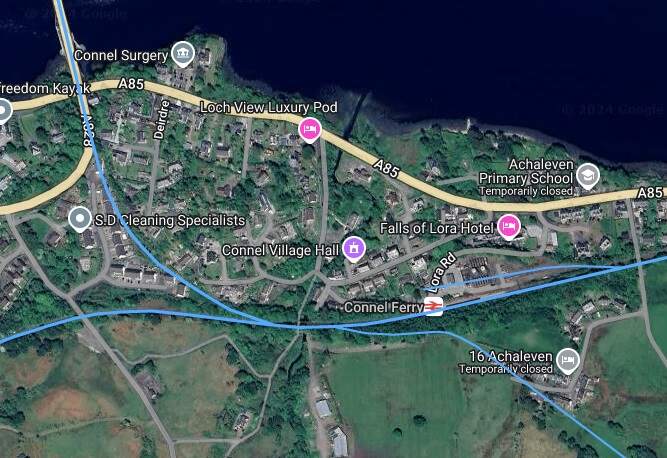
The line continues to hug the shore of Loch Etive passing over the A85 a couple of local roads on its way to Connel Ferry Railway Station.
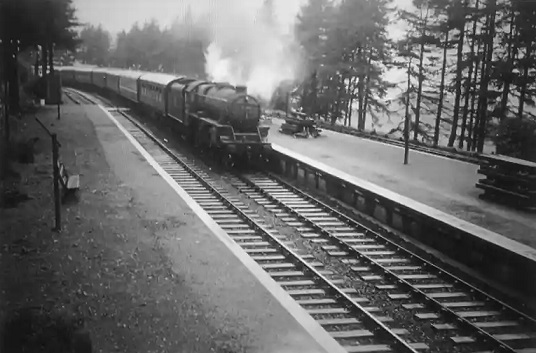
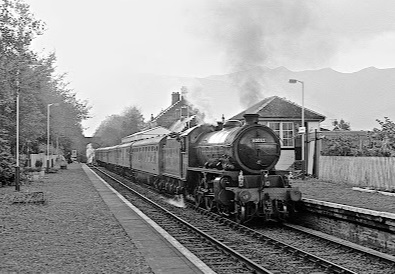
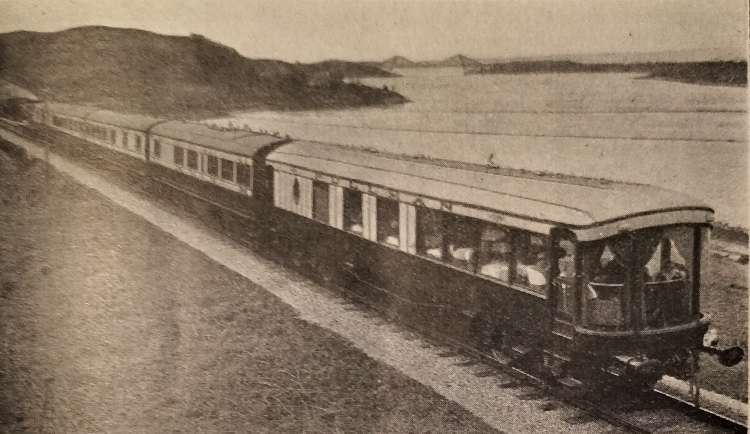
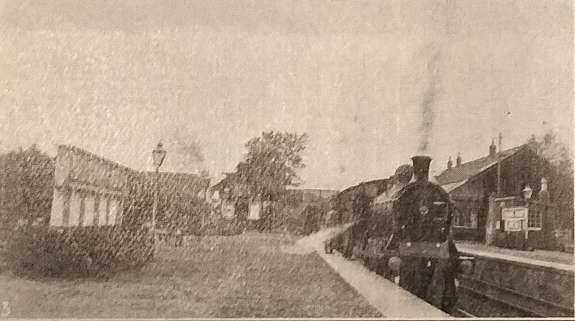
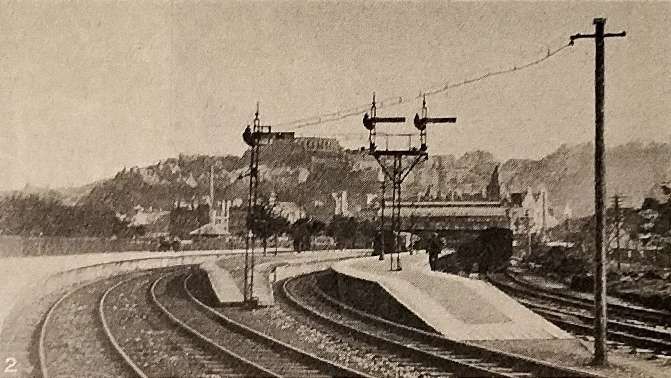
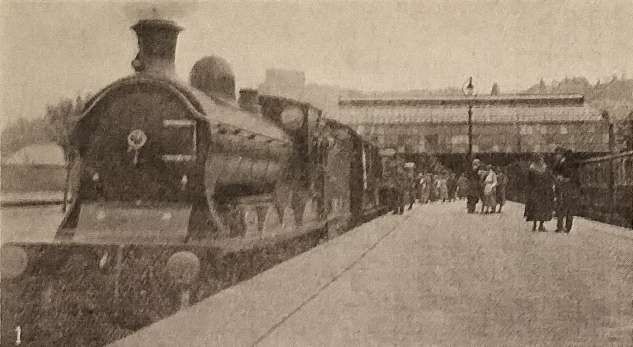
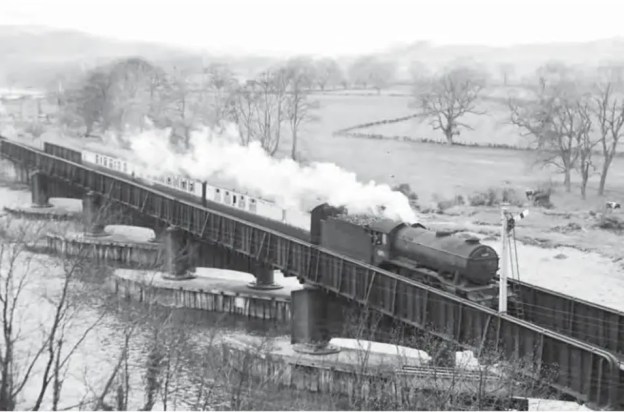
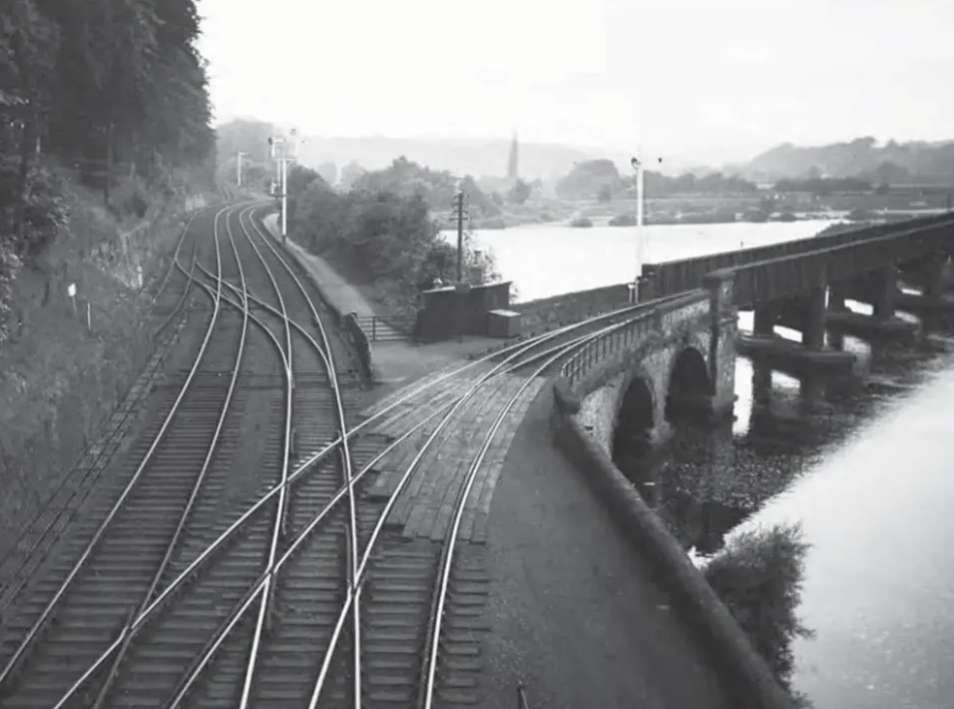
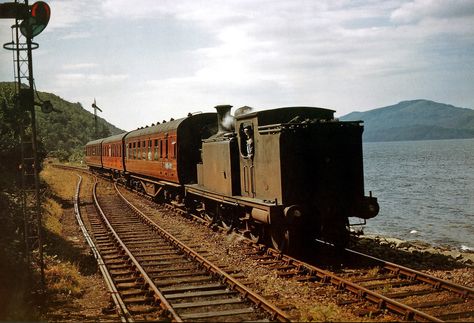
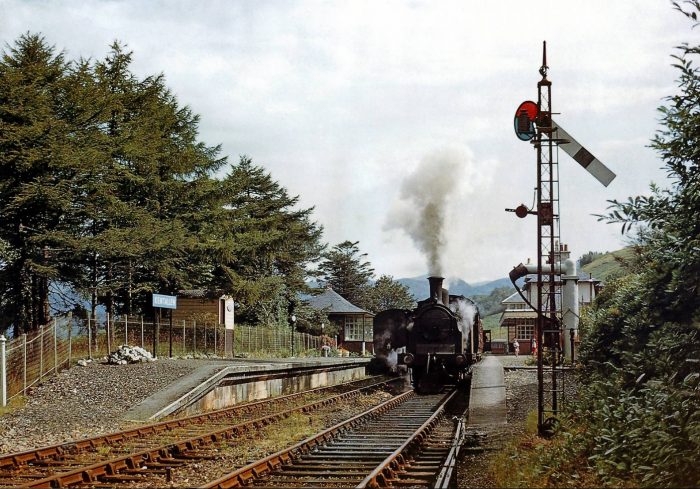
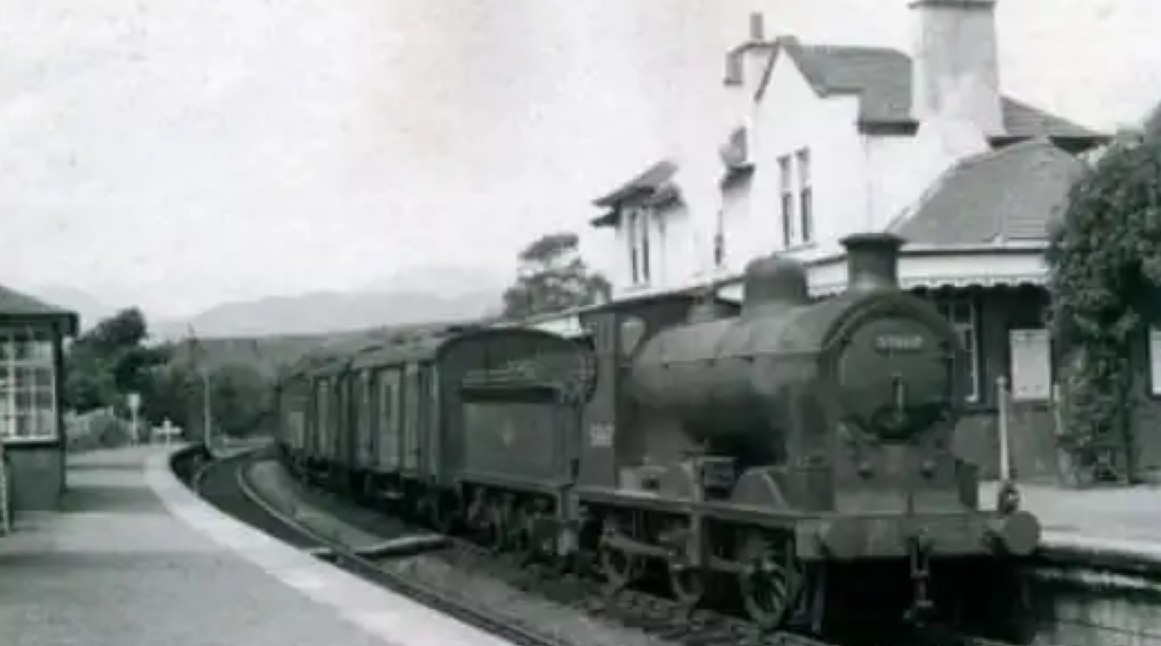
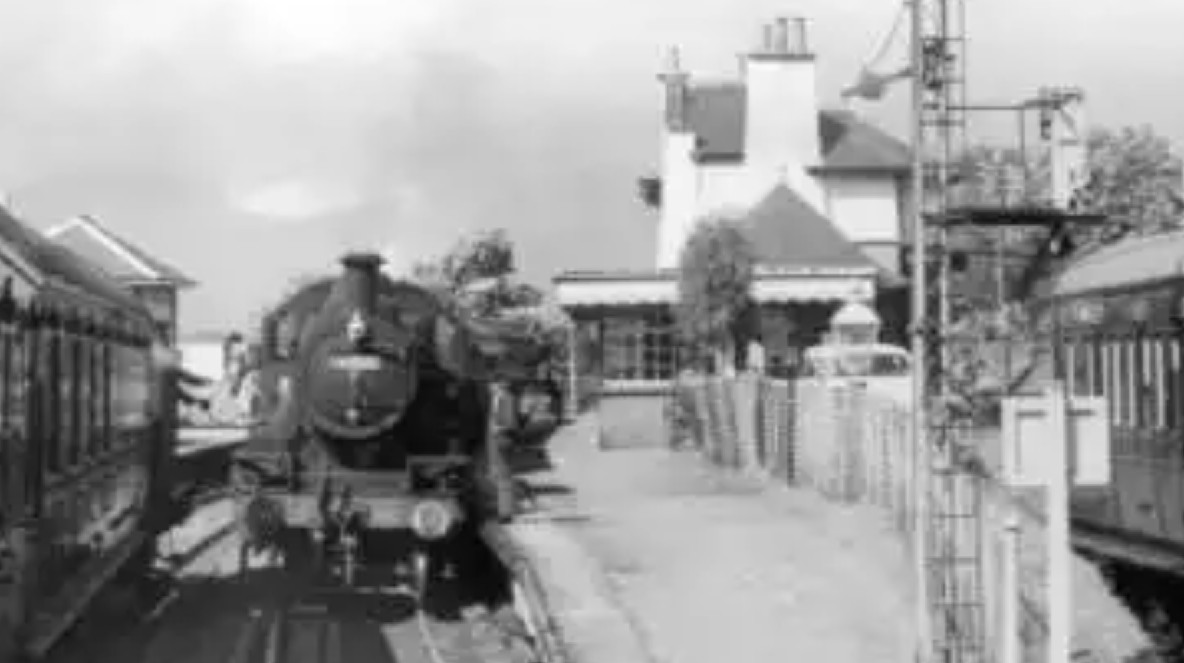
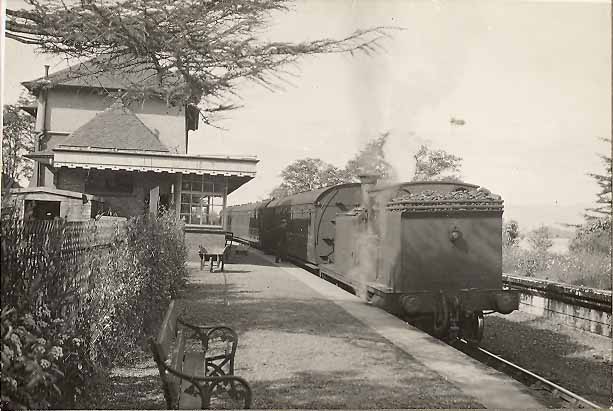
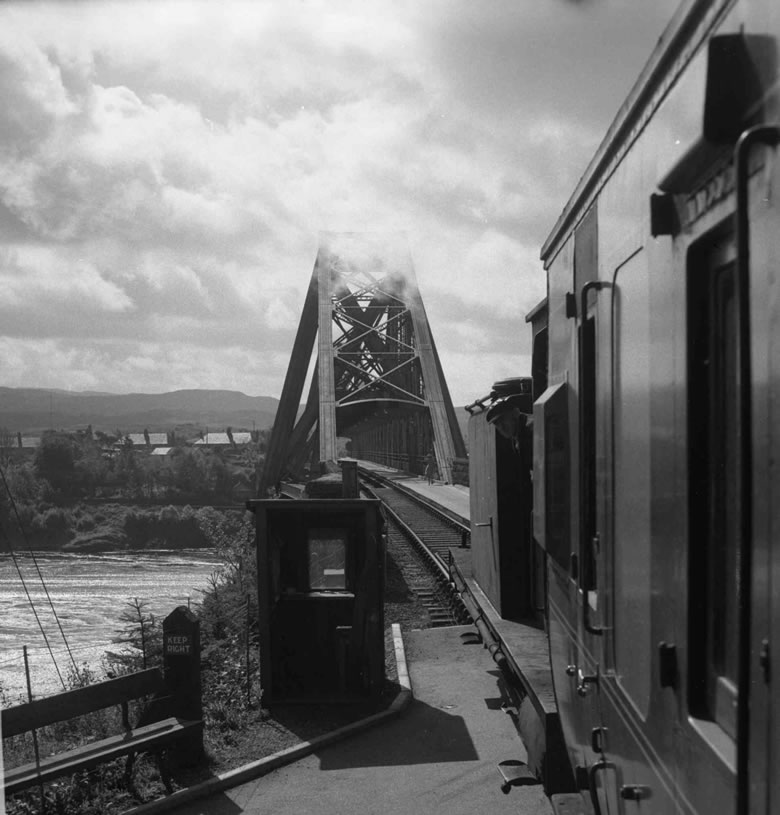
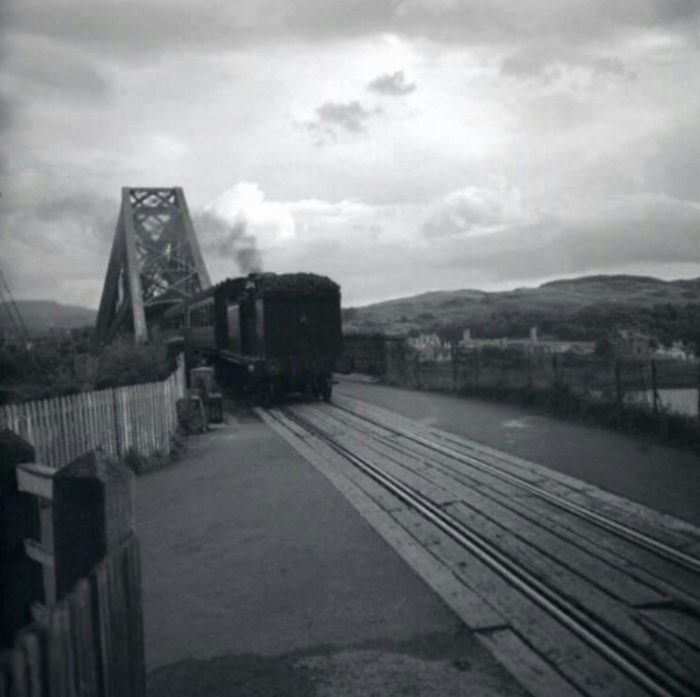
The next image comes form Gairns’ article in The Railway Magazine and shows a train approaching Connel Ferry from the East.
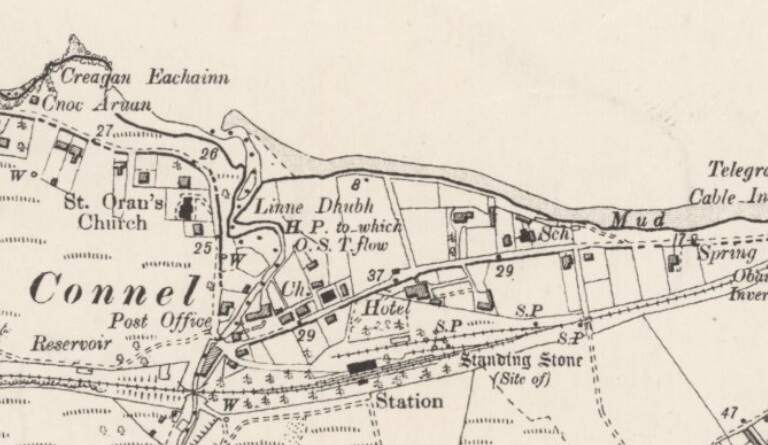


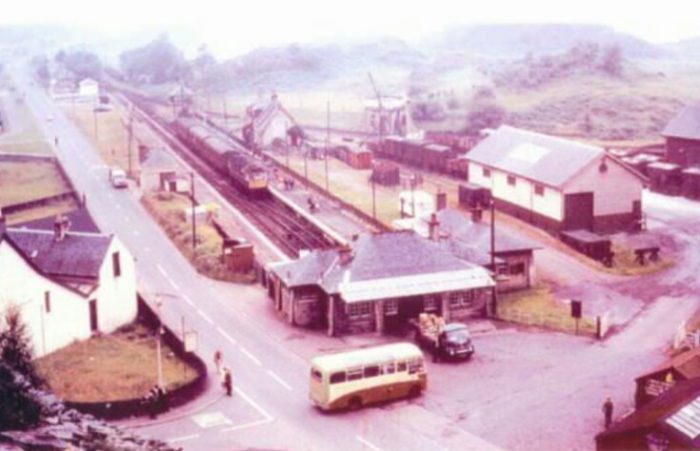
In its heyday when it served a branch to Ballachulish, Connel Ferry Railway Station had three platforms, a goods yard and a turntable. Later this was reduced to just the single platform, after the branch closed in 1966, [64] as it remains today. [63][65]
As we have already noted, the journey along the branch can be followed by reading articles elsewhere on this blog. We will continue our journey with Gairns along the main line to Oban. ….
Gairns continues
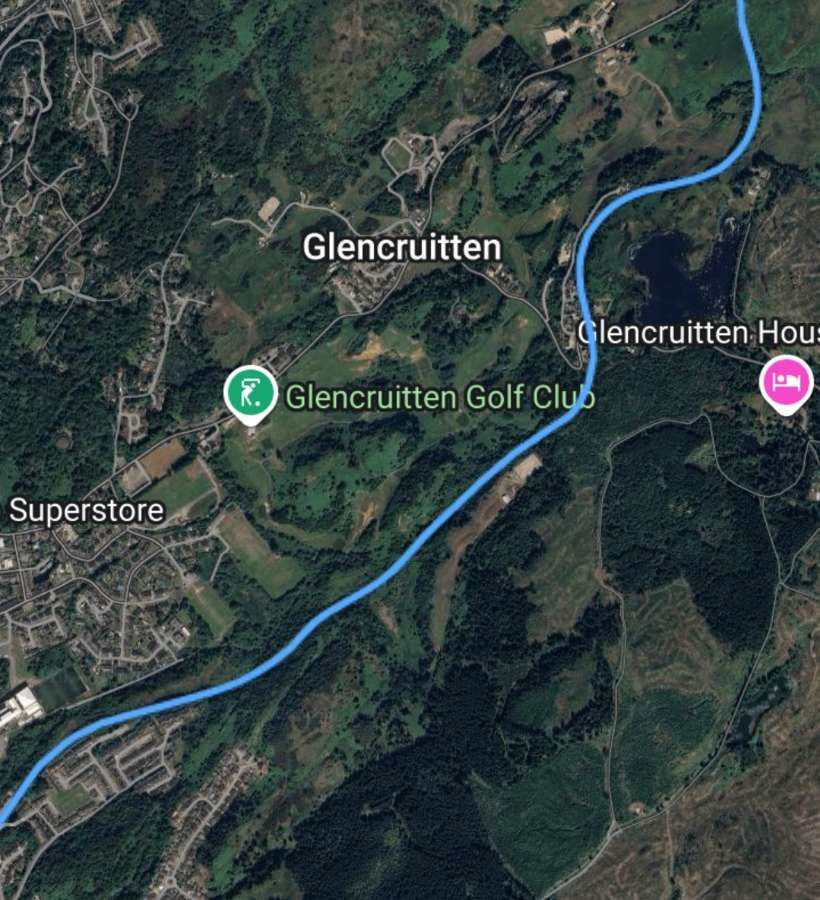
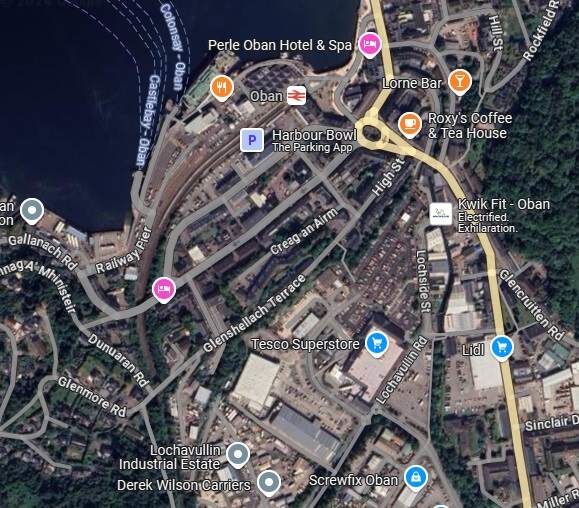
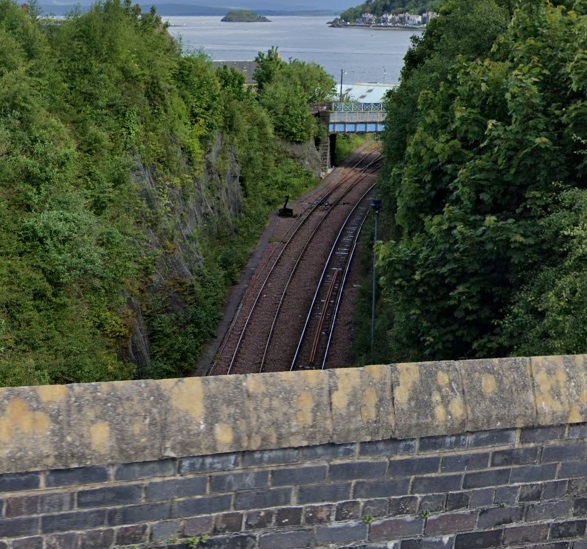
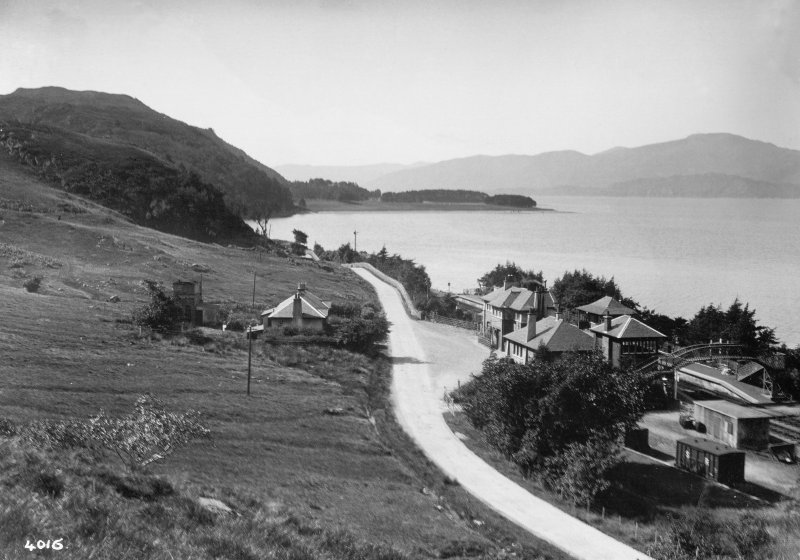
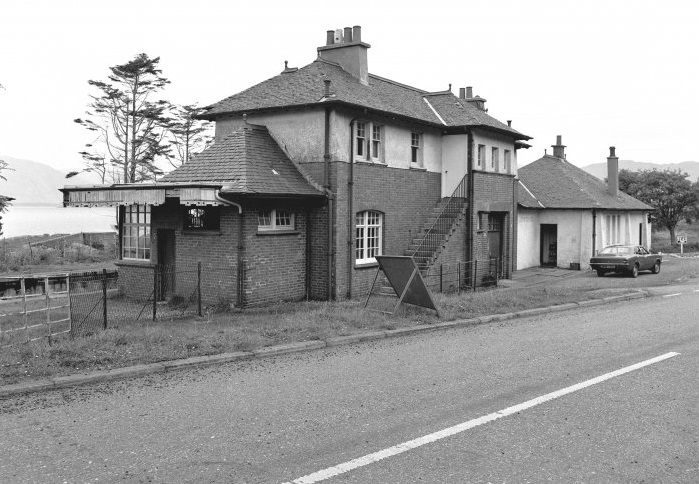
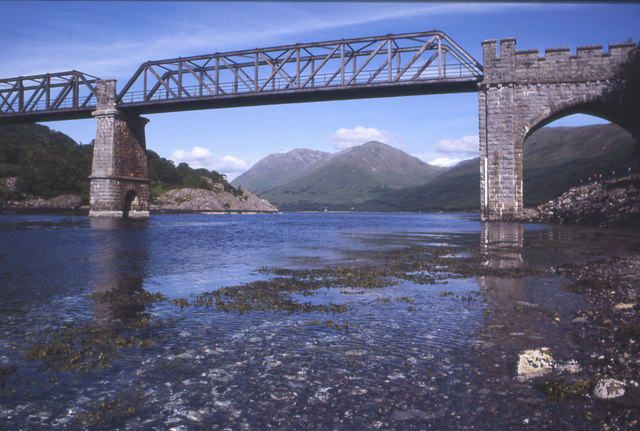
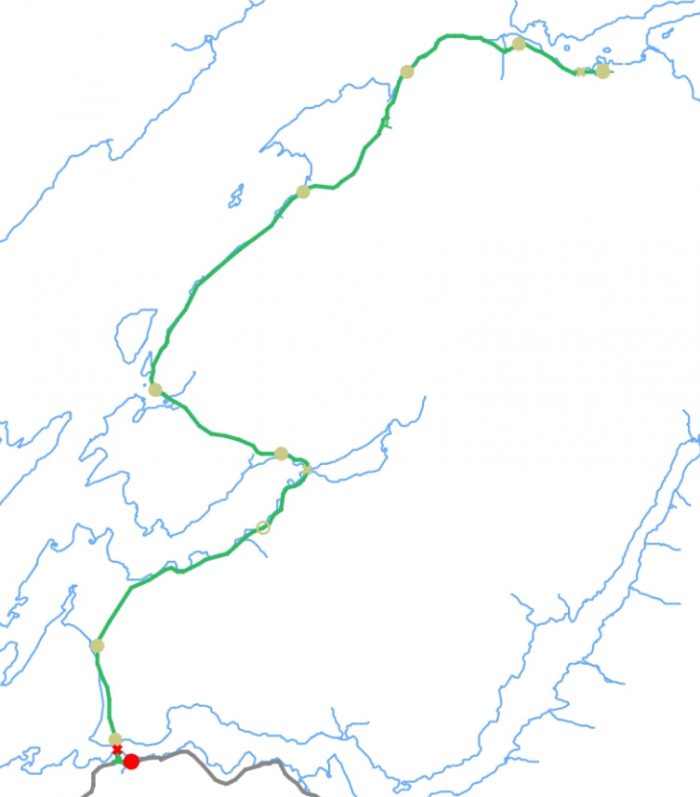
“At Connel Ferry, junction for the Ballachulish line, there is a wide island platform serving the up and down main lines, and a single platform on the up side designed for branch trains, though generally these use the main platform to facilitate passenger and luggage transfer. The station has sidings and [a] goods yard. Its height above the village entails high viaducts both on the Oban line and on the approach to the famous Connel Ferry bridge, crossed by Ballachulish trains. Fine views are had of the bridge from the Oban line as it pursues its course high up on the hillside until it cuts inland to attain the summit of Glencruitten. This is at the top of the 3-mile incline at 1 in 50 by which the line zig-zags down to reach the shore at Oban, giving views now over Oban and the landward hills above it, and then, with final sweep round, over the Kerrera Sound and Kerrera Island, to the mountains of Mull and the Firth of Lorne.
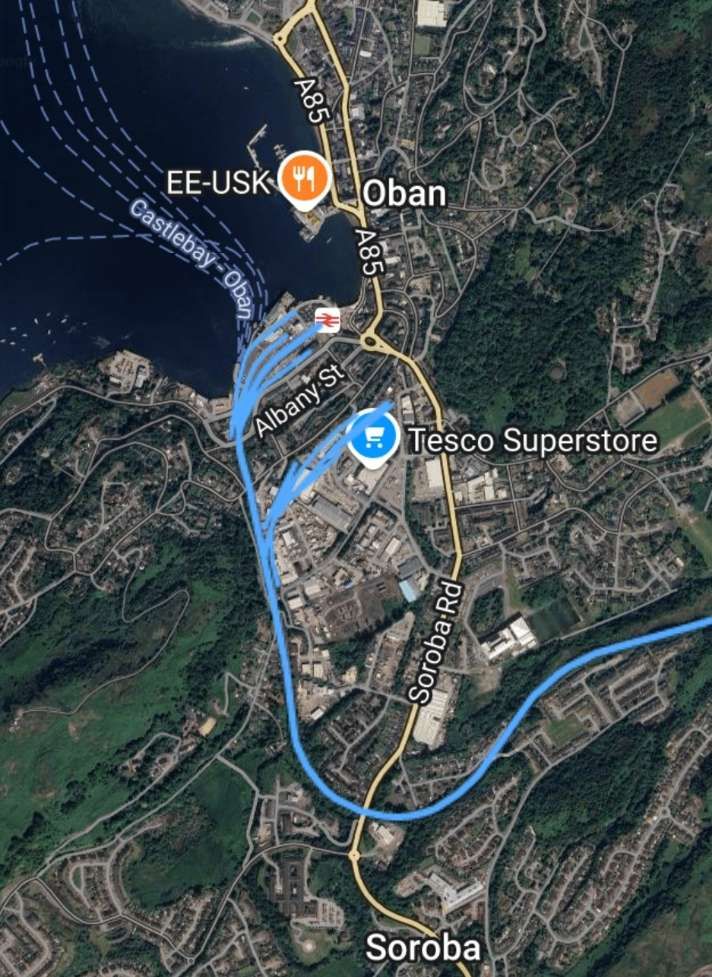
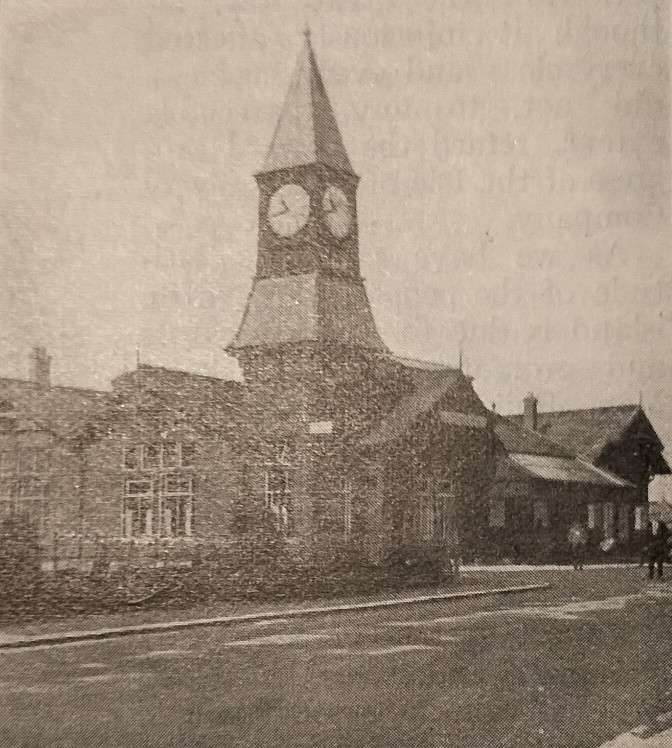
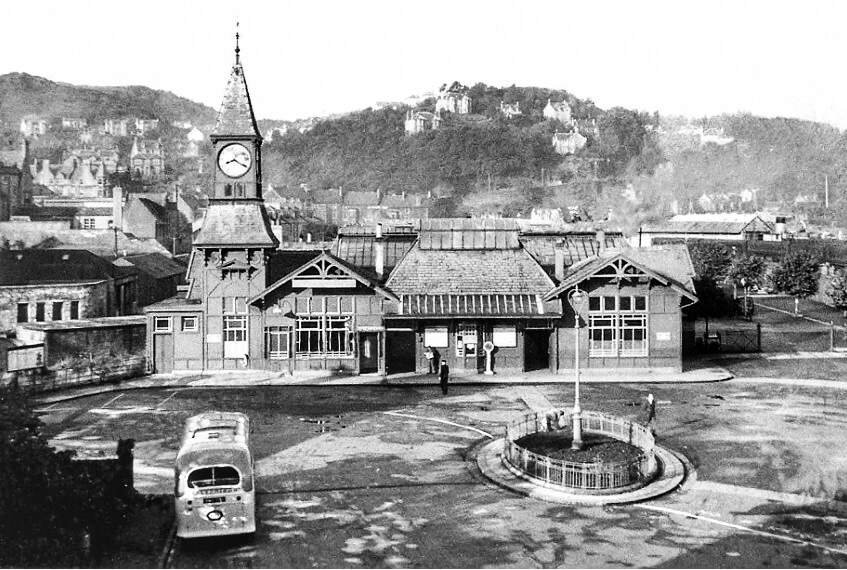
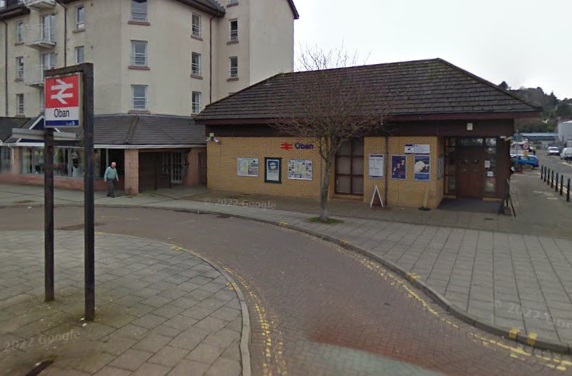
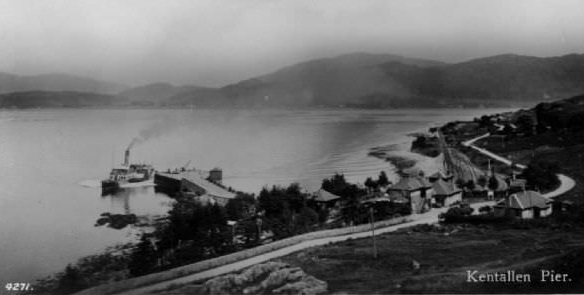
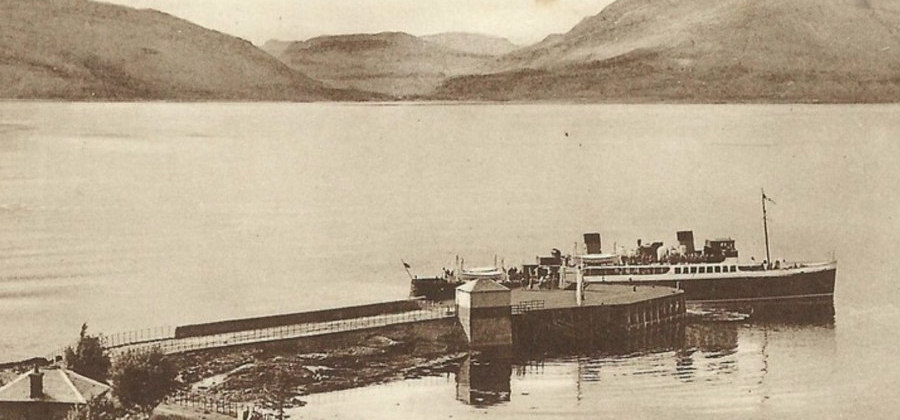
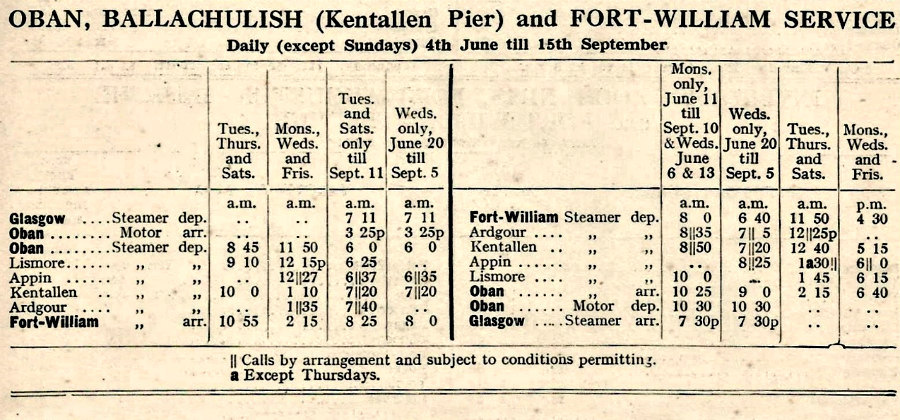
Before reaching the terminus a stop is usually made at Oban ticket platform, adjacent to the goods yard and engine shed. Oban station has picturesque build ings surmounted by a clock tower, and the circulating area is adorned with hanging flower baskets. Refreshment and dining rooms are provided. The three main platforms are partly covered by a glazed all-over roof, though their outer curved portions are open. Alongside are two open arrival platforms permitting cabs, &c., to come directly alongside the trains, The station is immediately alongside the steamer pier and harbour premises, the location being peculiarly convenient to the principal hotels, the sea front, and the Corran Esplanade.Oban – ‘a little bay’ – so widely favoured as a holiday resort, as a boating and yachting centre, and as headquarters for touring the Highlands and the Hebrides in all directions, has been described as the ‘Charing Cross of the Highlands’. Whether readers will agree with this as a happy choice or not, it certainly justifies it as a great steamer traffic and touring centre. Messrs. David MacBrayne, Ltd., operate steamers between Oban, the Sound of Mull and Tobermory to Castlebay and Lochboisdale (‘Inner Island Service’), Ardrishaig via the Crinan Canal, to Staffa and Iona, to Ballachulish, Kentallen and Fort William, and thence via the Caledonian Canal to Inverness, besides many local trips and excursions.” [1: p13-15]
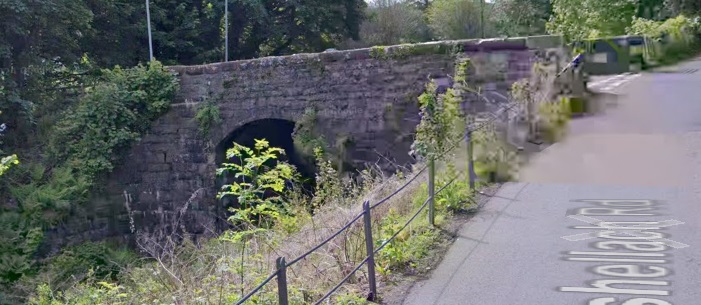
Connel Ferry is the last station before Oban. The railway line runs behind (South of) Connel and then turns away from the coast and the A85.

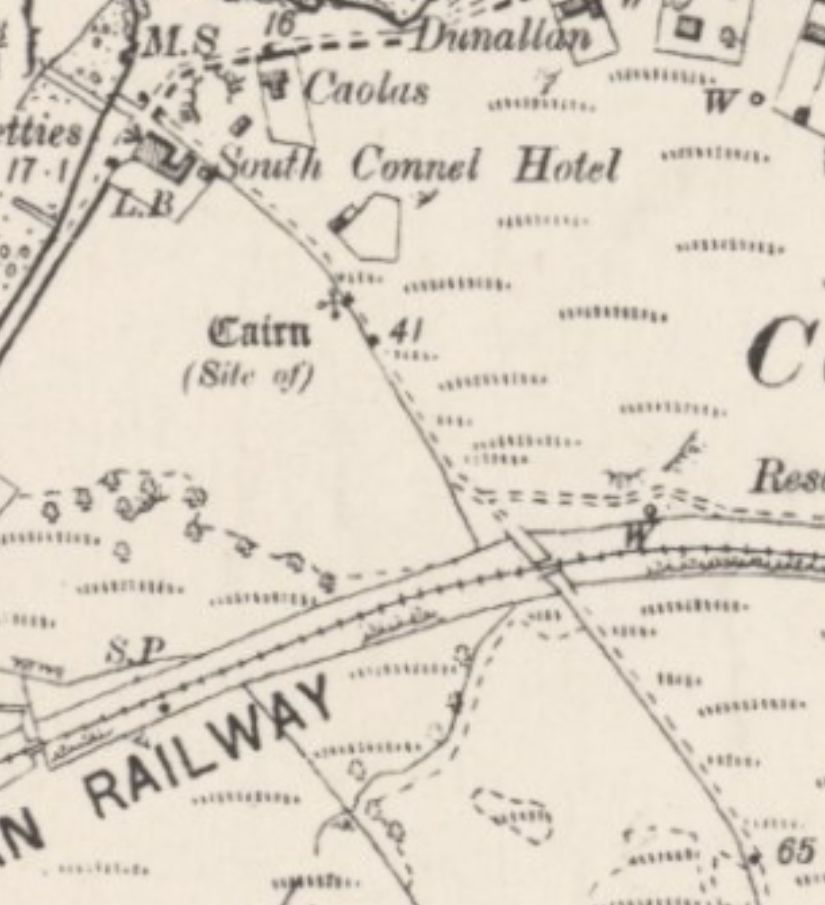

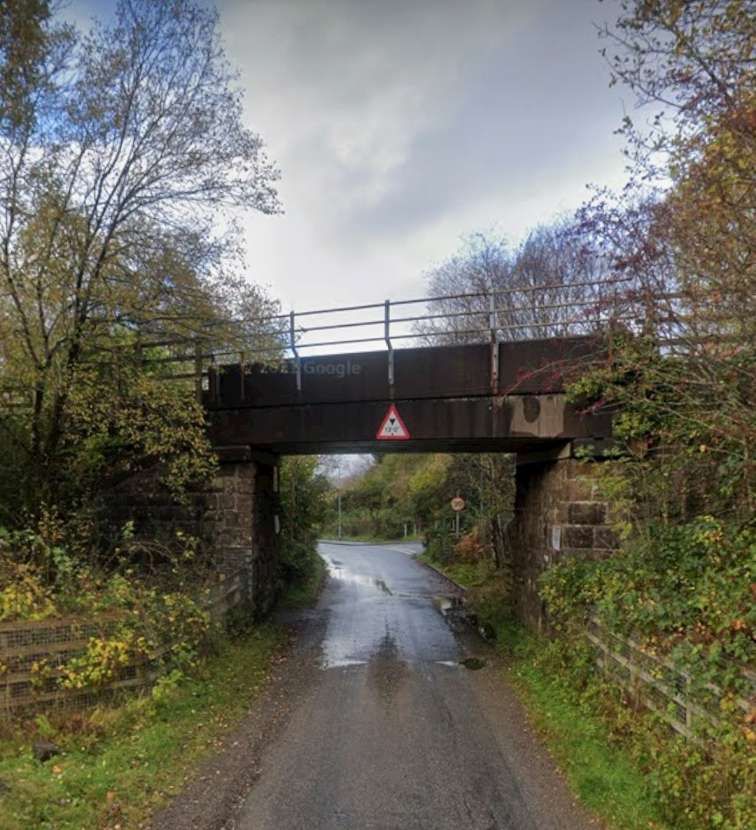
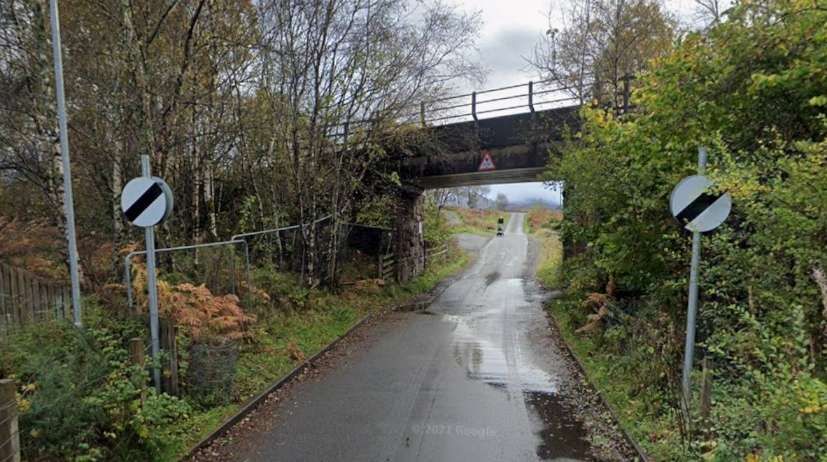
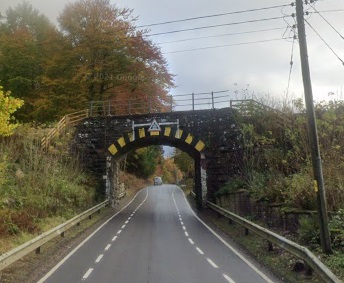
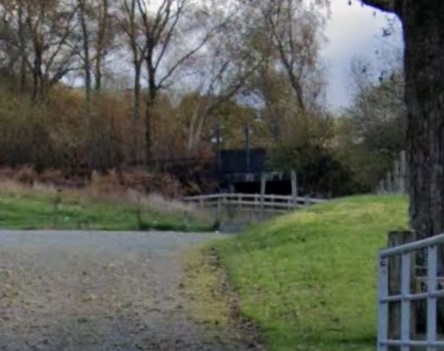
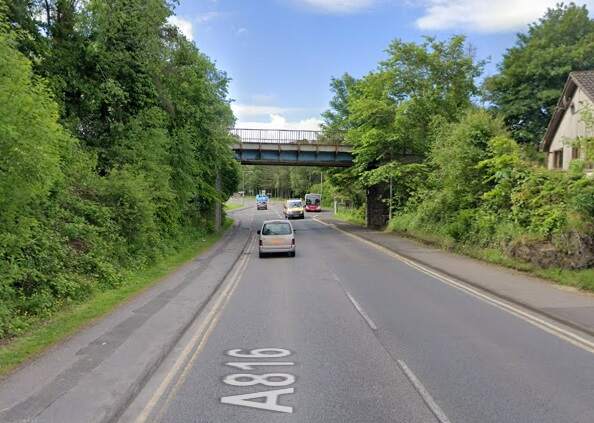
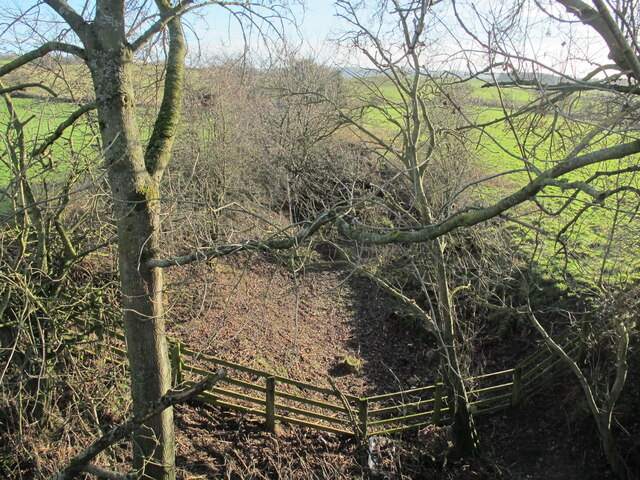
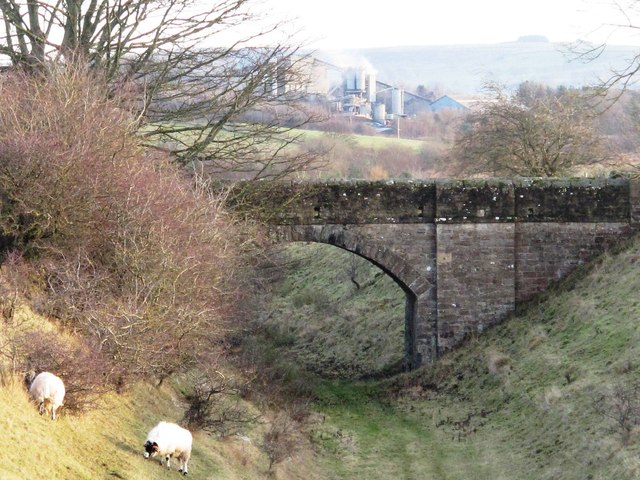
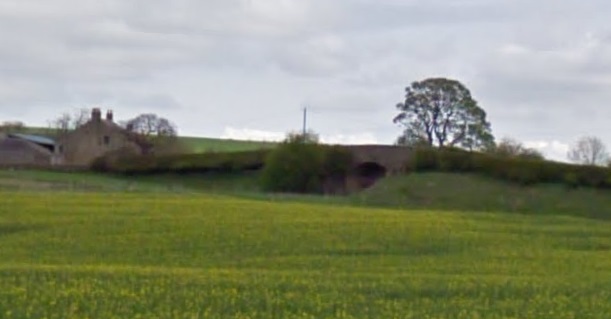
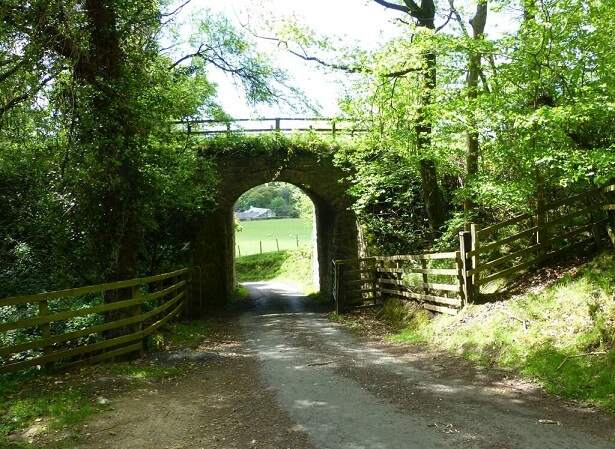
Trains encounter a number of accommodation bridges/underpasses which allow field access under the line of the railway. The one shown below, at the highest magnification possible from the public highway, is typical of one type of culvert.
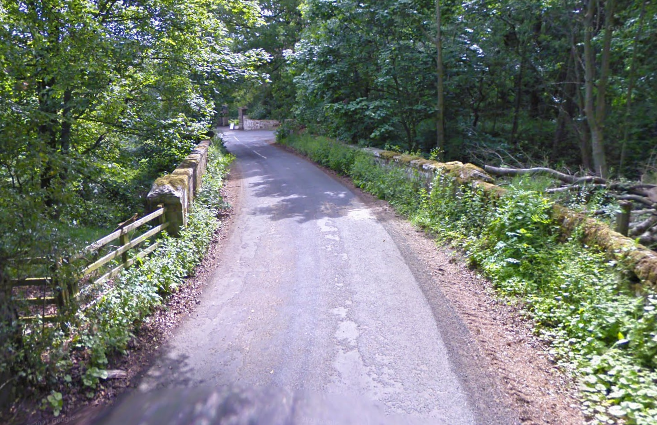
Just a short distance Southwest is another underpass, this time of stone arch construction.
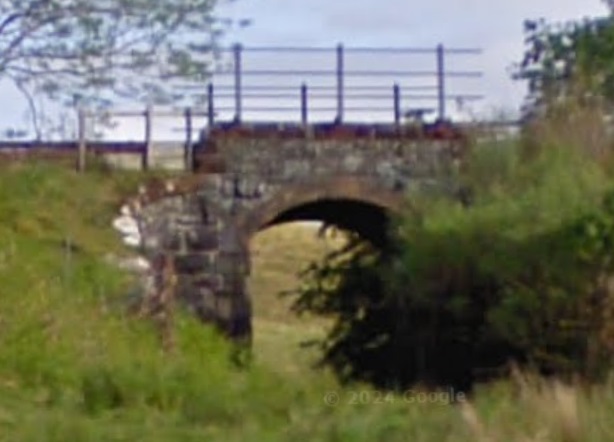
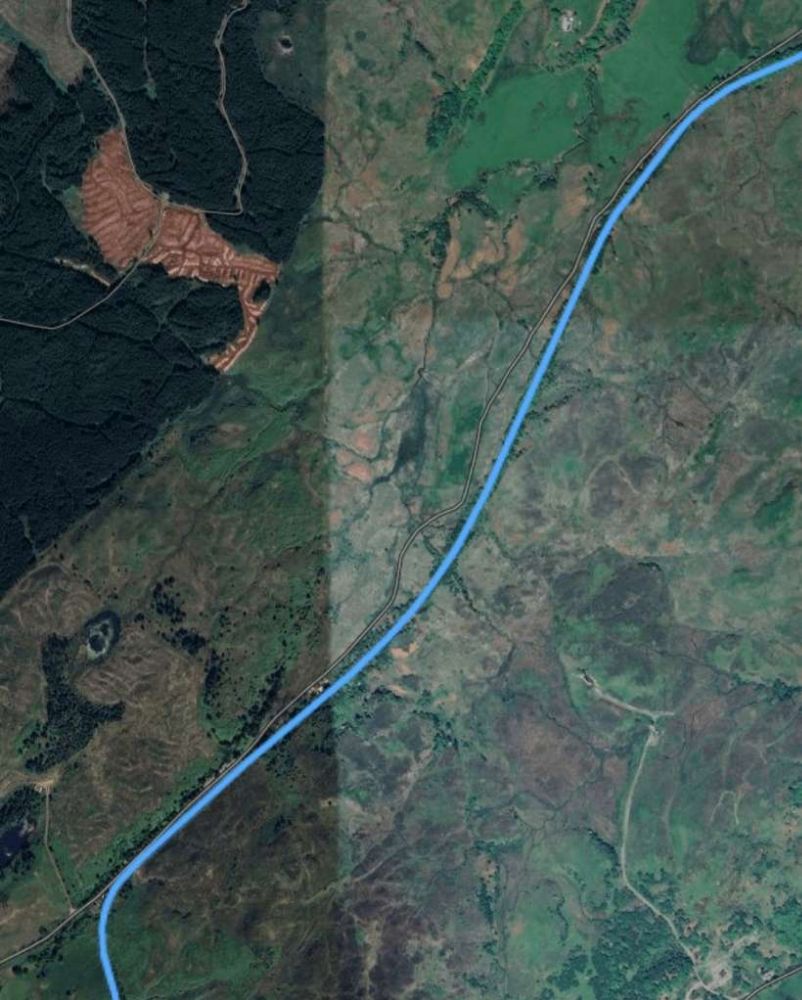
Another few hundred metres to the Southwest a further underpass is a girder bridge.

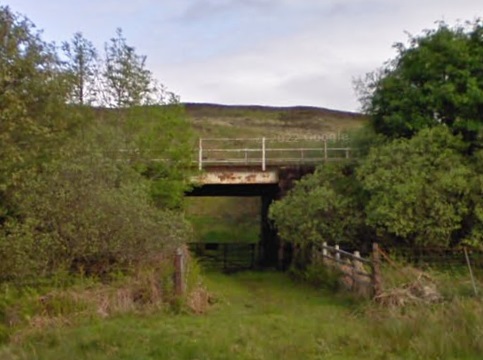
The next underpass is a stone arched structure.
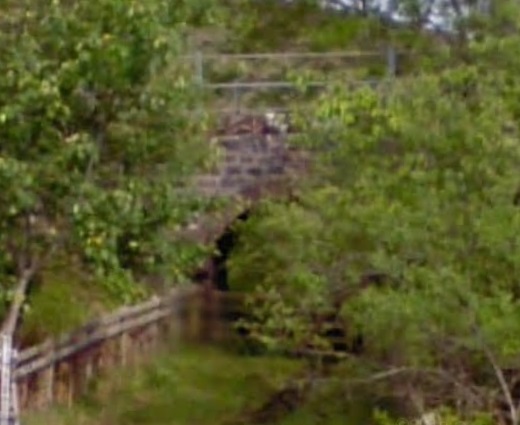
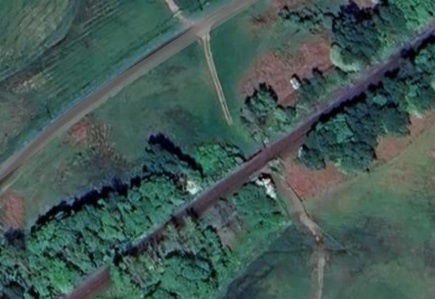
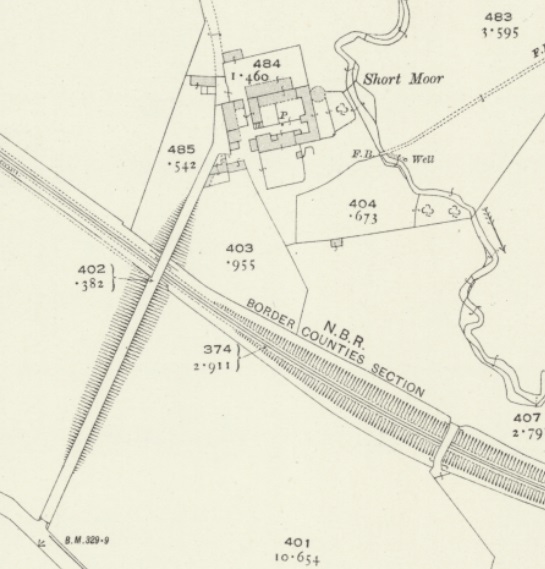
These two locations appear on the 6″ Ordnance Survey of 1897. …


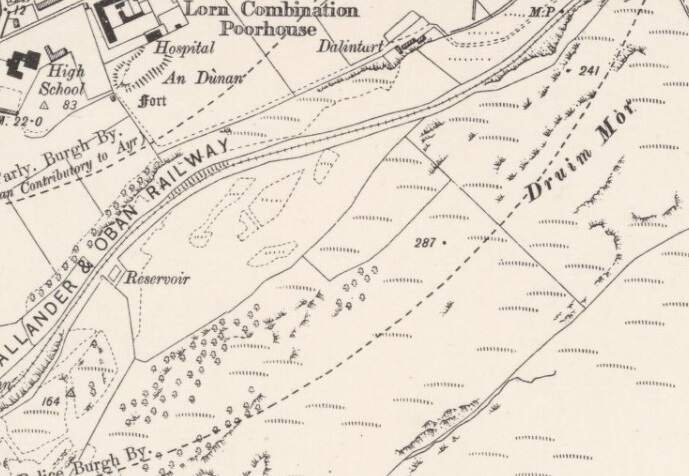
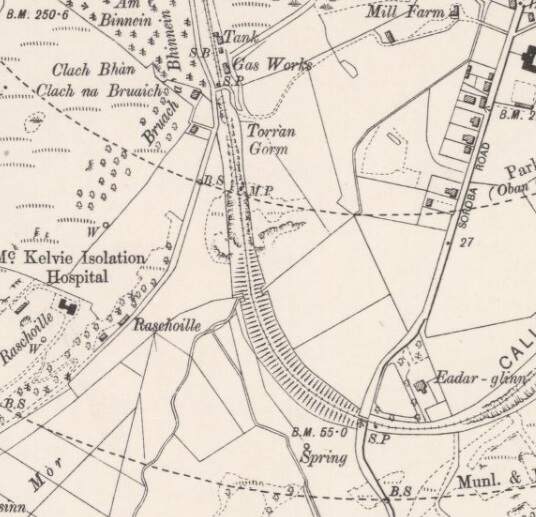
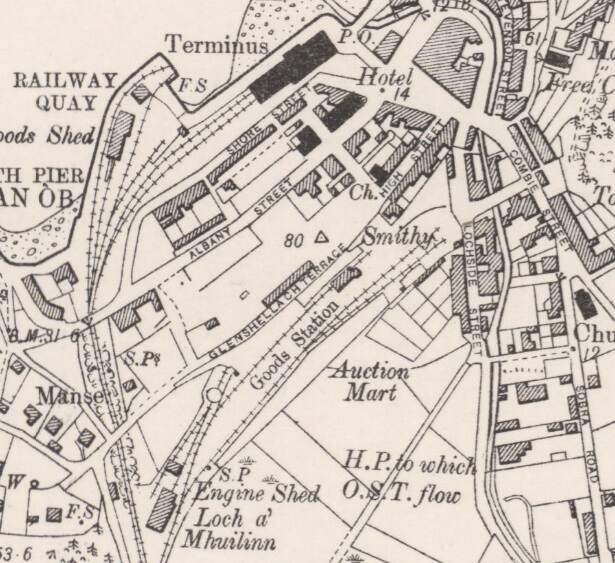
Running into Oban the line is crossed by three road bridges:
For the sake of completeness, we note that Gairns’ narrative returns to Connel Ferry for commentary on the Ballachulish Branch.
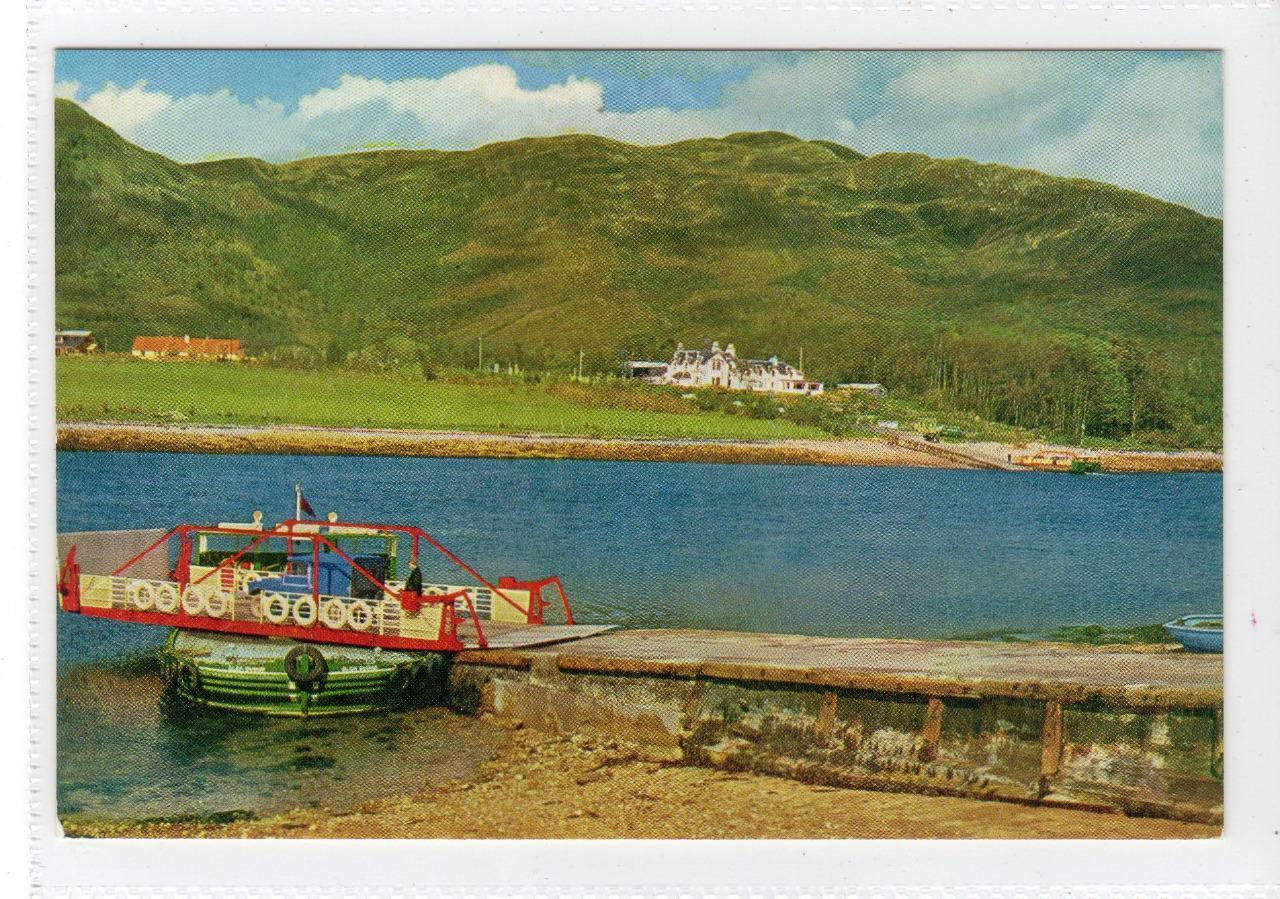
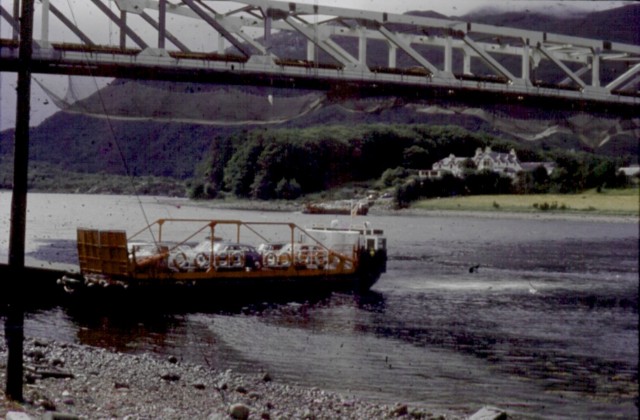
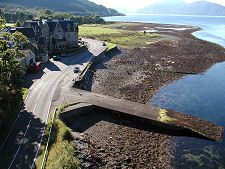
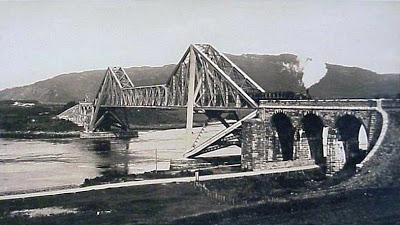
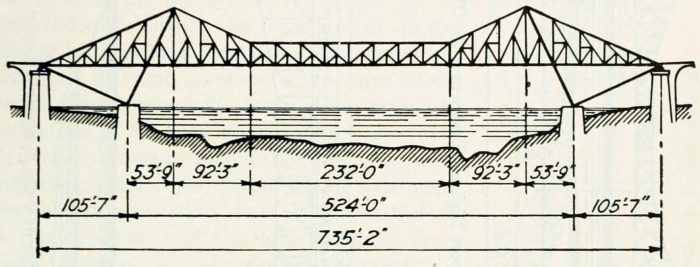
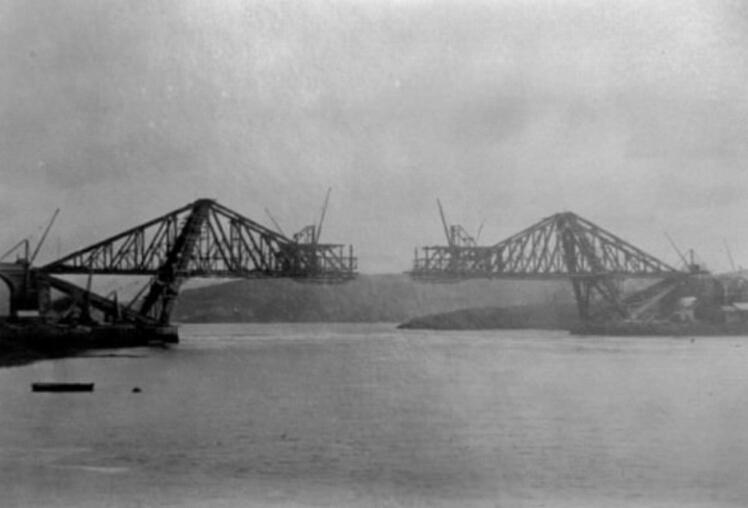
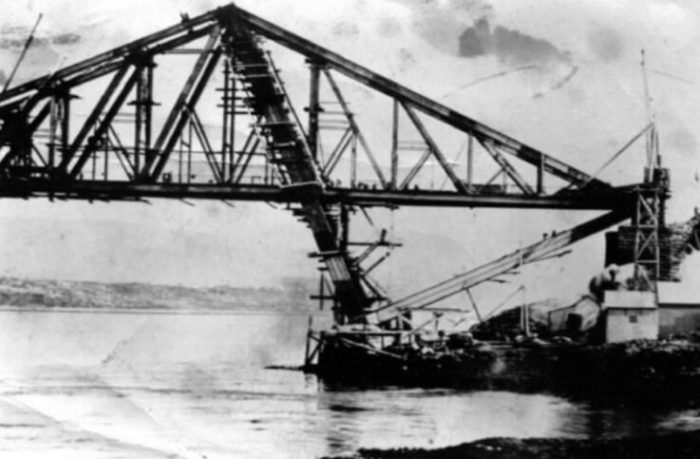
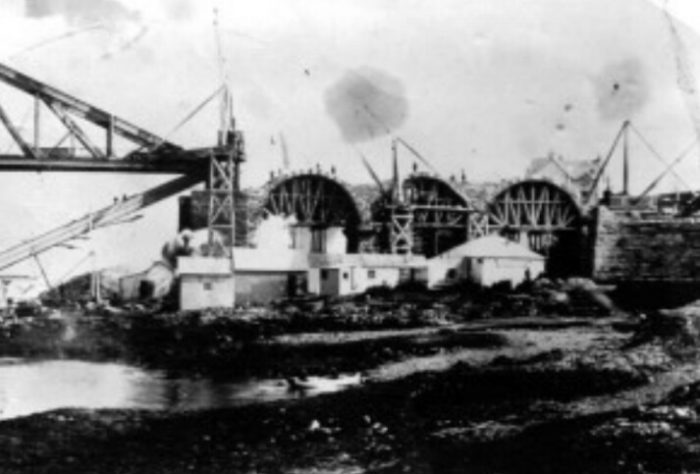
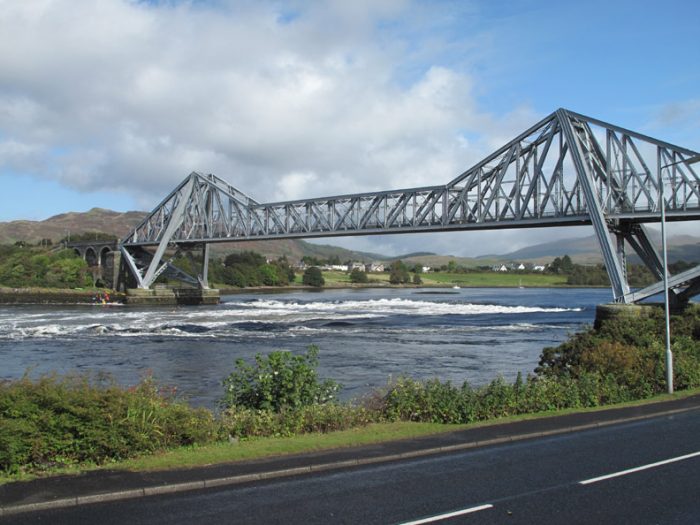
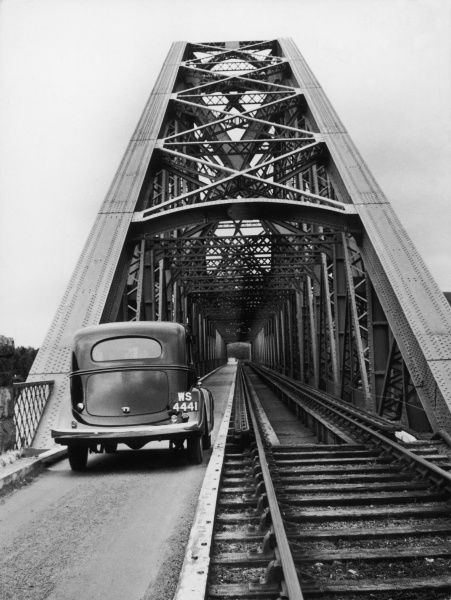
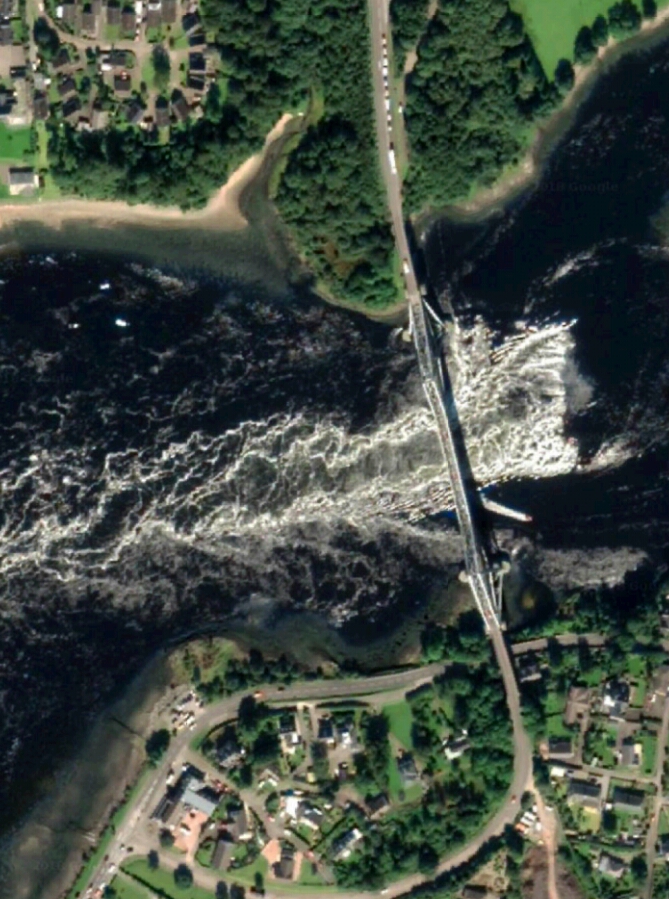
“Commencing at Connel Ferry station, the branch train reaches the famous bridge by a viaduct approach over the village of Connel Ferry. The Connel Ferry bridge, claimed to be the Forth Bridge’s ‘biggest British rival’, was opened for traffic on 21st August 1903. The bridge, which is of cantilever type (hence the analogy suggested with the Forth Bridge), has a length of 524 ft. between the two piers, the clear span being 500 ft., and the headway above high-water level, 50 ft. Extreme height from high water to the topmost point of the bridge is 125 ft., while the middle span, carried by the two cantilever spans, has a length of 232 ft. This bridge not only enabled a district hitherto most inconveniently situated in regard to rail traffic to be placed in communication with the Callander and Oban Railway at Connel Ferry, but provided a means of crossing Loch Etive, where previously a very lengthy detour had to be made to get from one side to the other, the only alternative being a very uncertain ferry service,
The difficulty having been solved from the railway point of view, there still remained the problem of providing for the transit of motor-cars and other road vehicles across the Loch, and for several years after the opening of the bridge the Caledonian Railway Company conveyed private motor-cars across the bridge by placing them on flat trucks and hauling them, passengers included, by road motor vehicles adapted to run on rails across the bridge.
This … was continued for a considerable time, but, several years ago, the Caledonian Railway Company adopted the alternative method of adapting the bridge also for the passage of motor vehicles, cycles, etc., under their own power. There is not, however, sufficient room for a roadway clear of the railway track, so that it is necessary to restrict the passage of road vehicles to periods when no train is signalled. At each end of the bridge, therefore gates under the control of the bridge keeper, are provided to close the bridge to road traffic when a train is due, and the tablet instruments are controlled by electric circuits in connection with the road gates, to ensure that unless the gates are properly closed, a tablet cannot be used. The roadway over the bridge comes close up to the rails, there being just sufficient room for a vehicle to pass between the rails and the side of bridge, and the bridgekeeper has to see that vehicles from both directions are not allowed on the bridge at the same time. These facilities apply only to private motor-cars and horse-drawn vehicles, and not trade vehicles, of either class. Cyclists and pedestrians also use the bridge. In each case the crossing of the bridge is subject to toll, the men in charge at the Connel Ferry and Benderloch ends acting as toll-keepers. … In August [1922], the bridge was used by 6,009 foot passengers, by 852 motor-cars, and by 290 cycles. [1: p15-16]
Gairns continues:
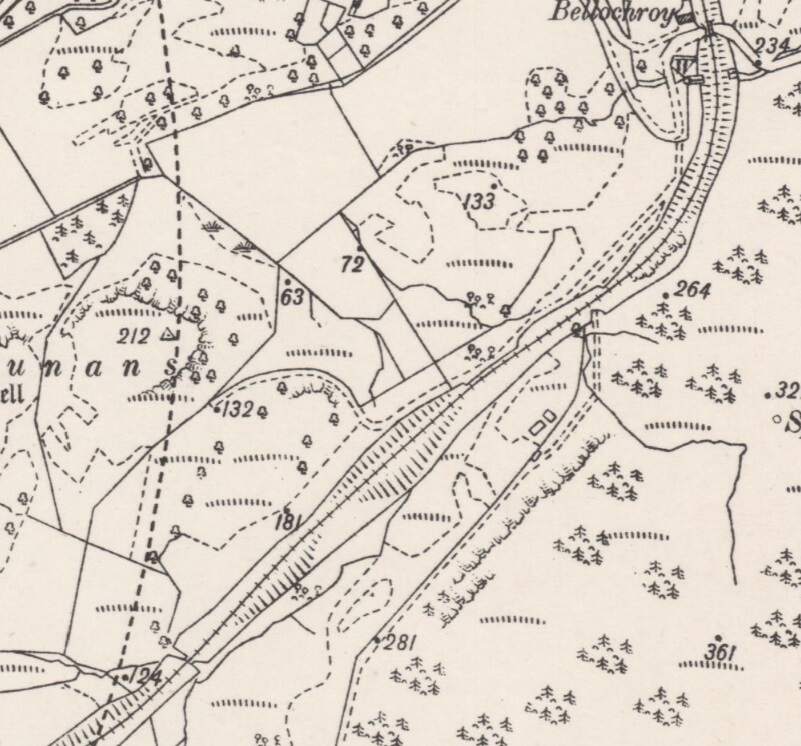
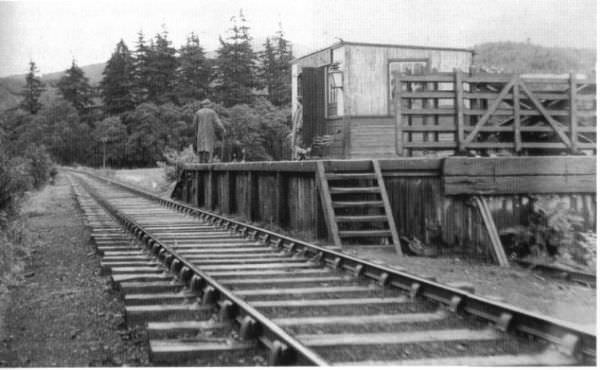
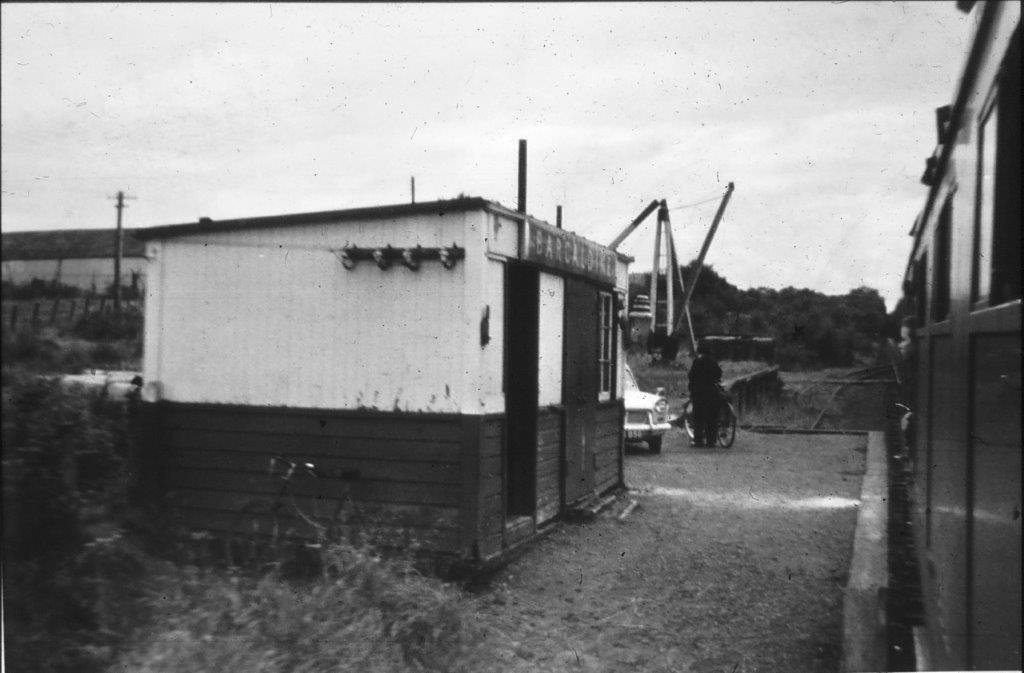
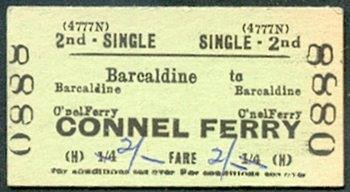
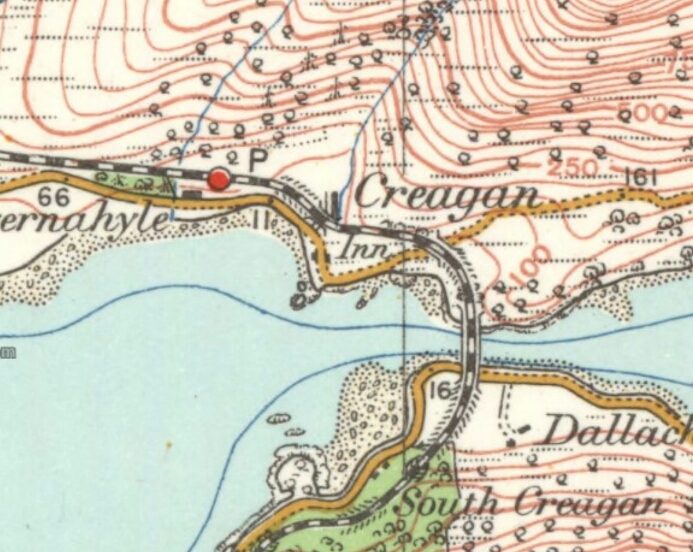
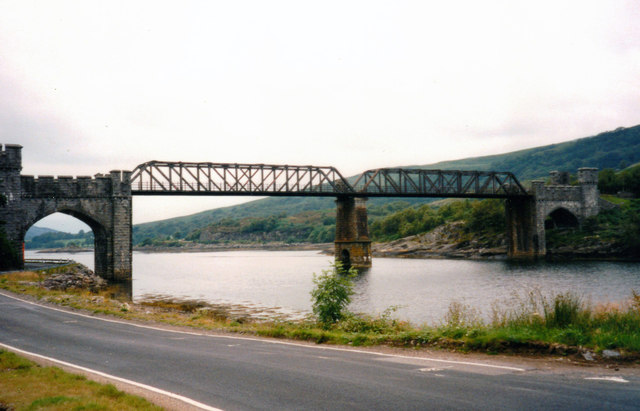
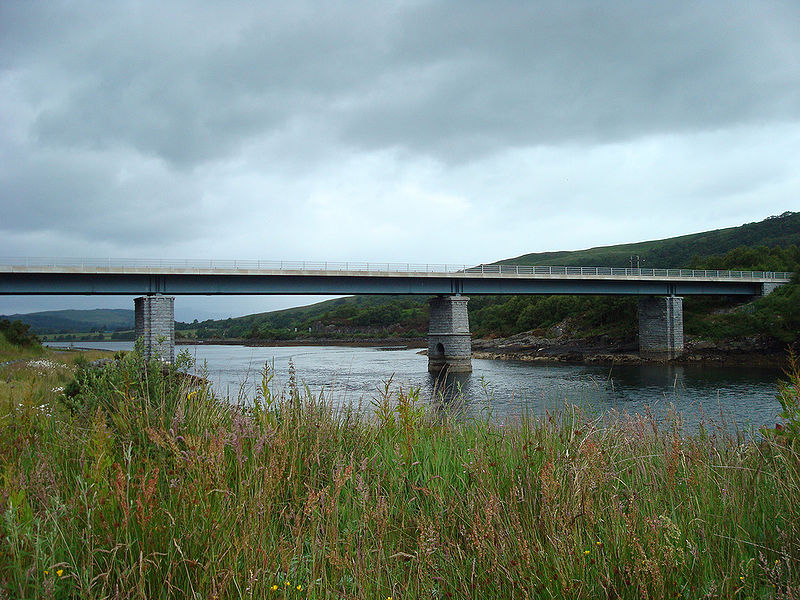
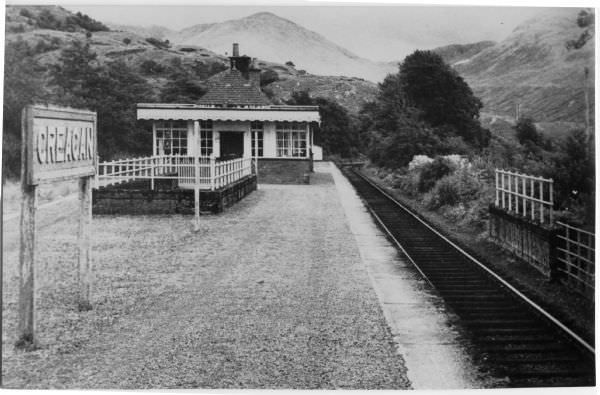
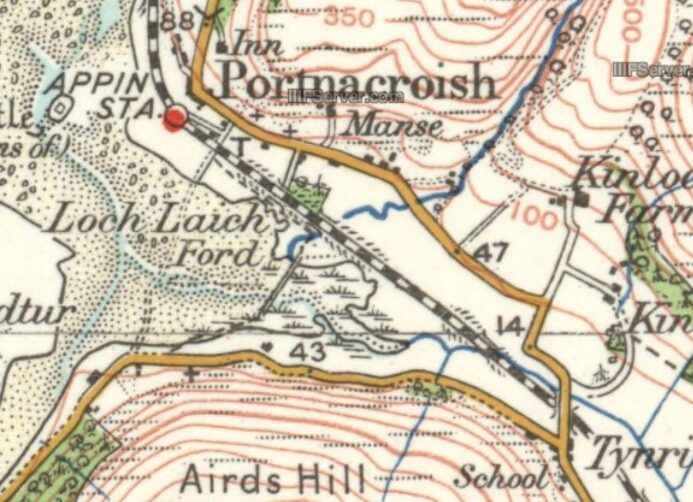
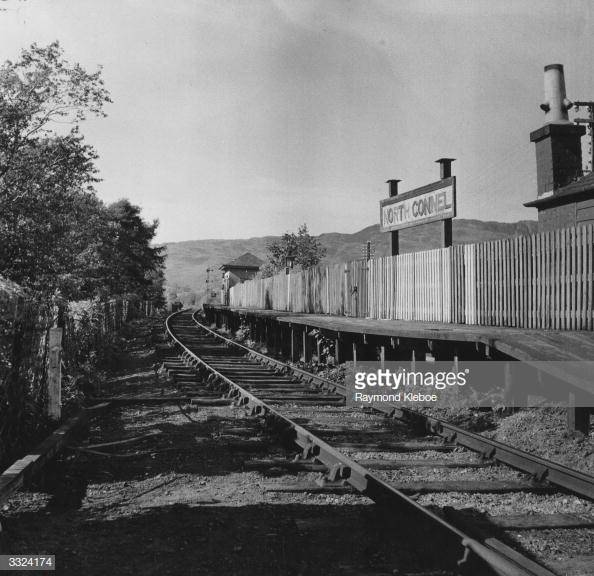
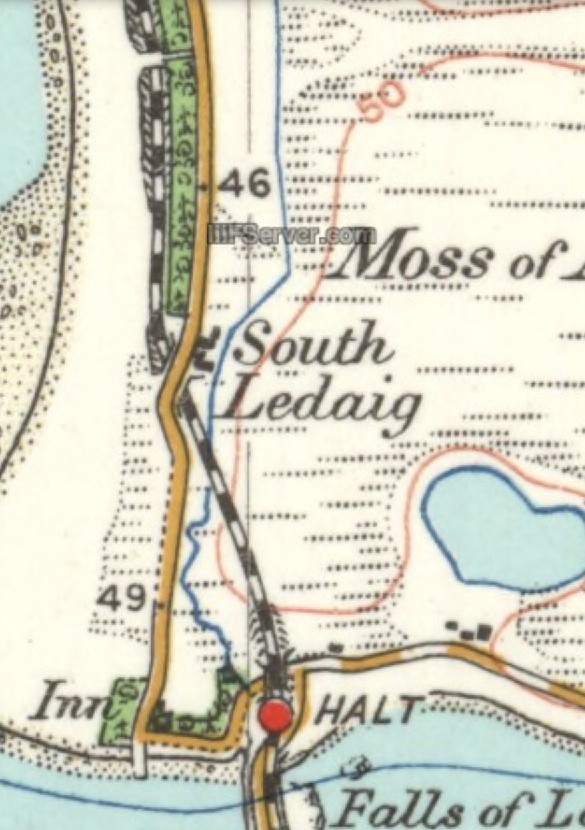
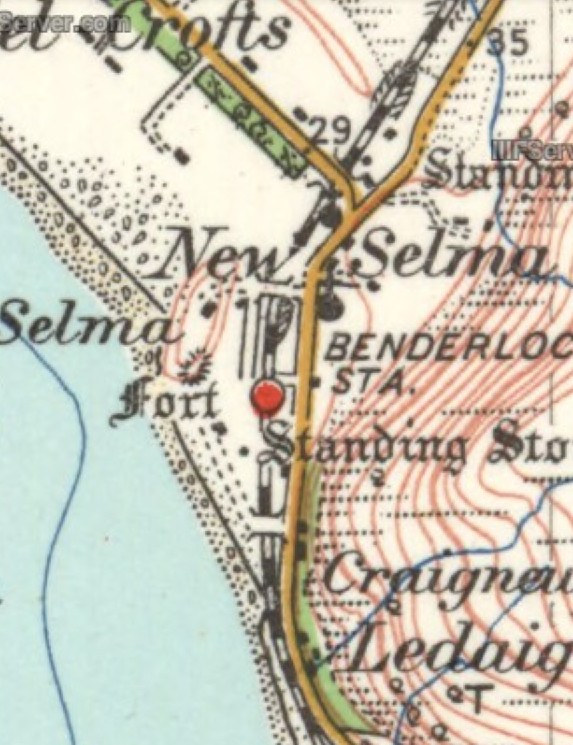
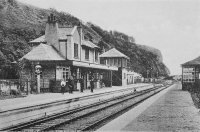
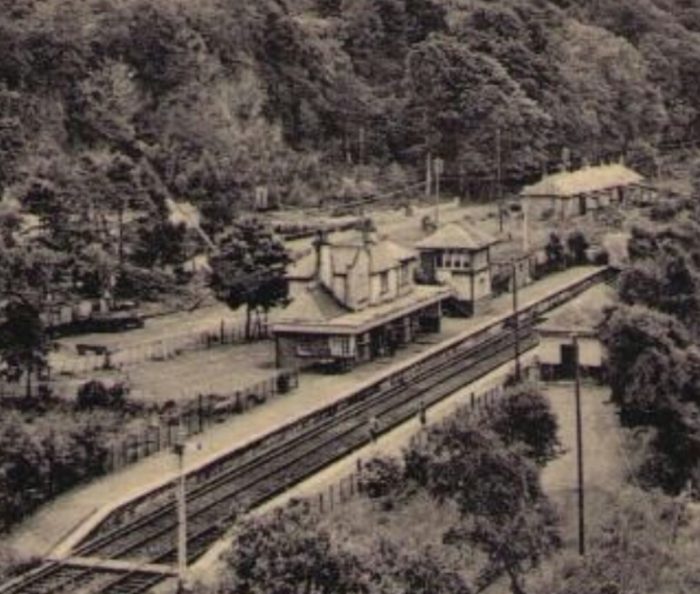
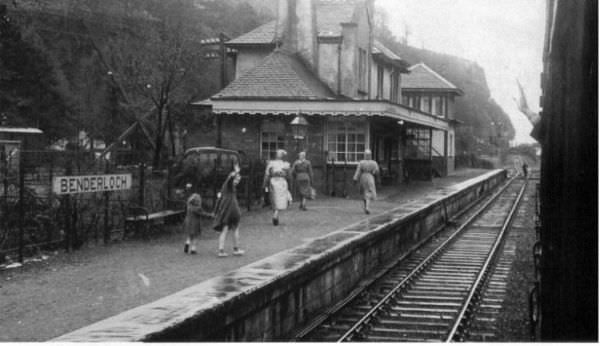
“Passing North Connel halt, at the North end of the bridge, the line follows the shore to Benderloch station. At Barcaldine Crossing a platform is provided, where trains call as required. So far, the country traversed has been ‘comparatively’ flat and uninteresting, but as it crosses a peninsula to reach the shores of Loch Creran, mountain vistas again open up. Short of Creagan station the line crosses the Narrows to the Loch by a two-span girder bridge with approach viaducts, fine views being had on both sides.
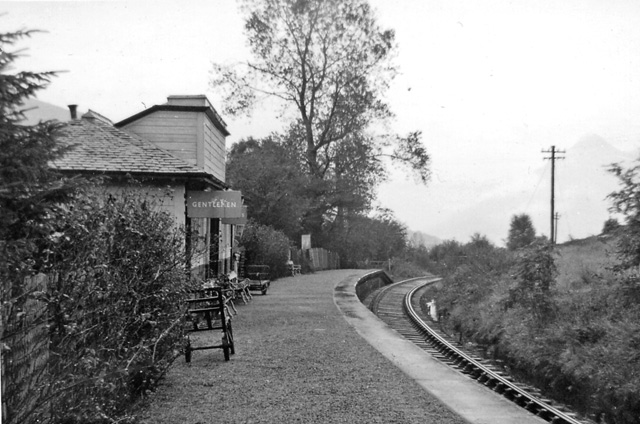
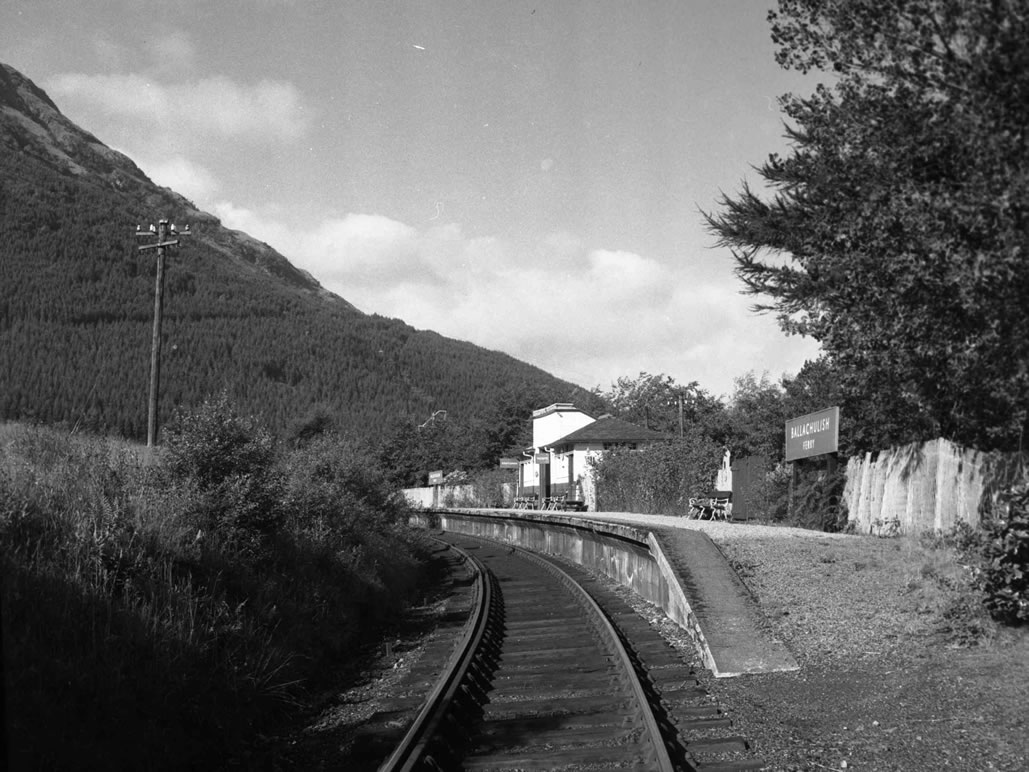
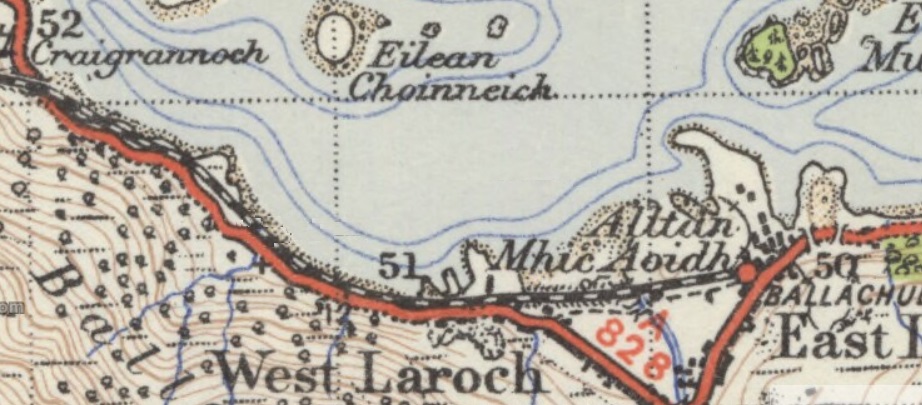
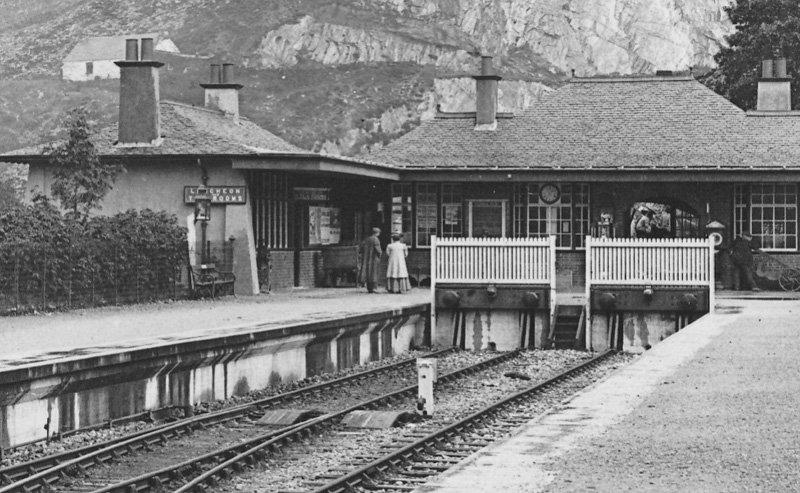
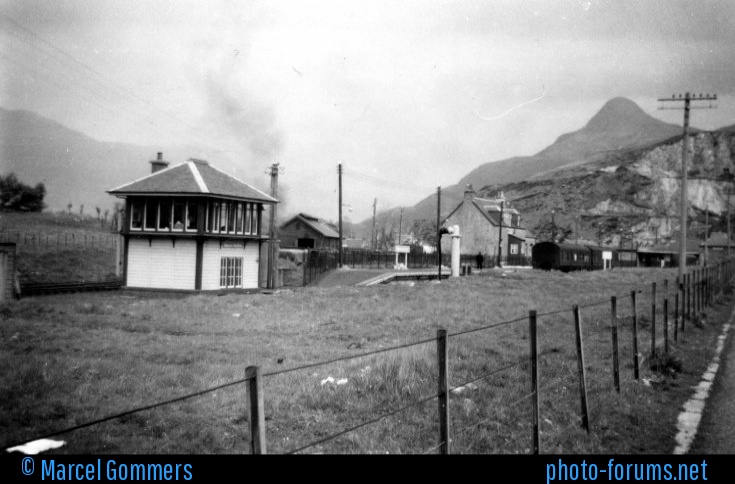
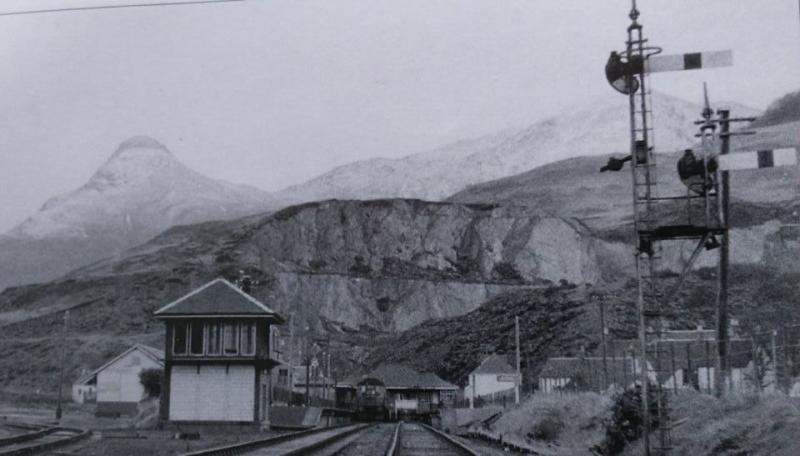
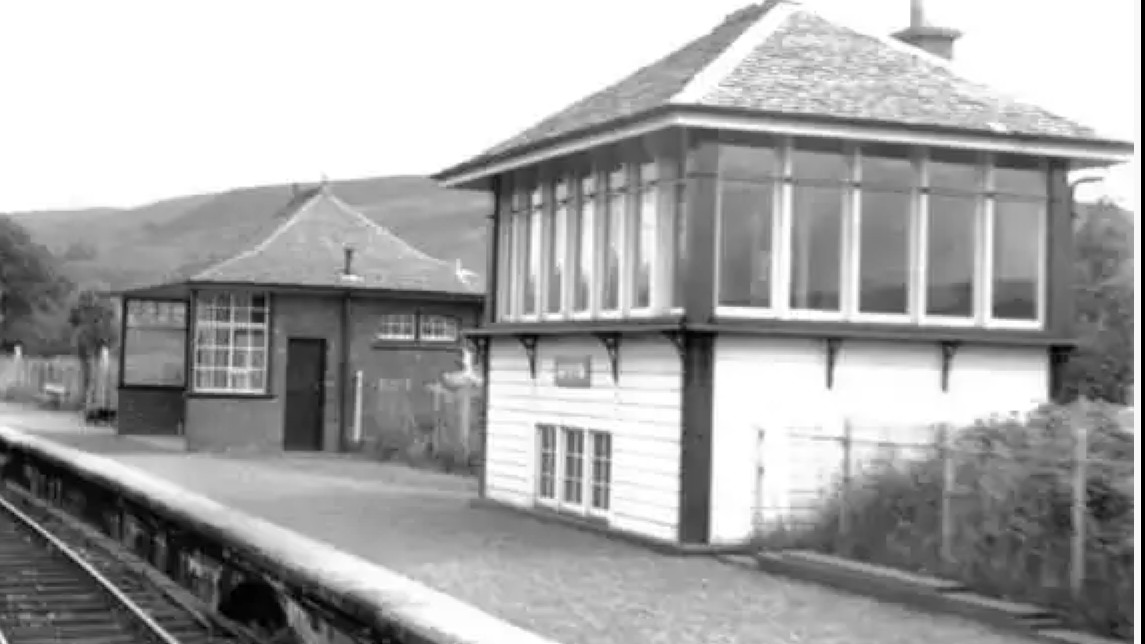
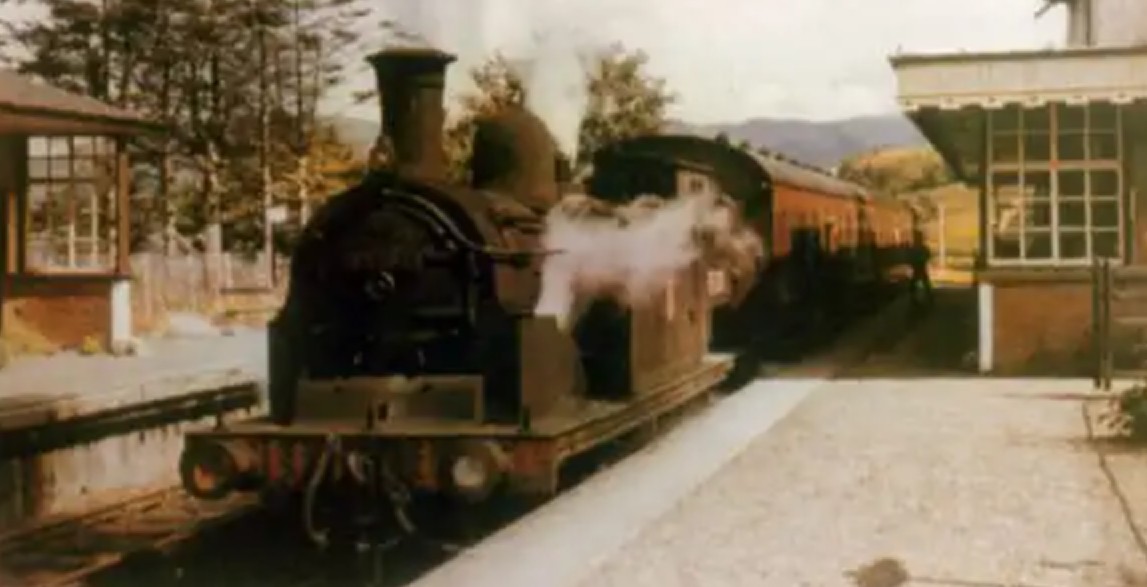
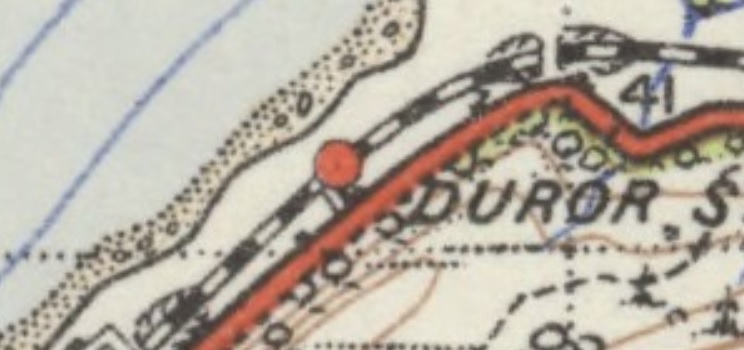
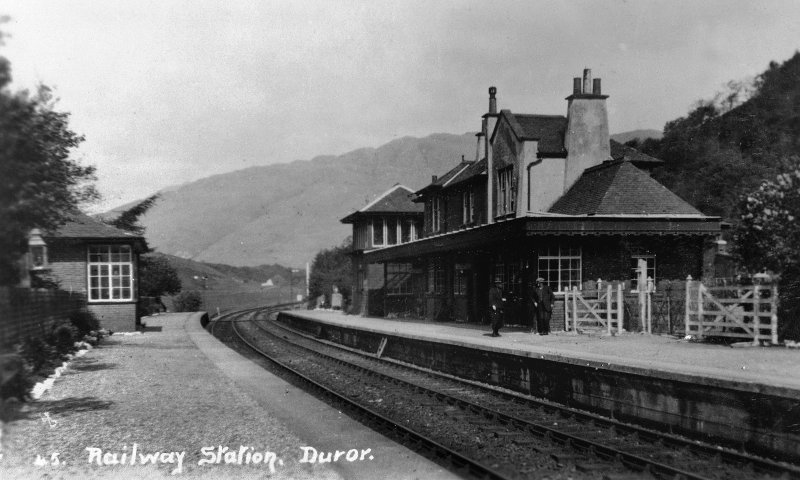
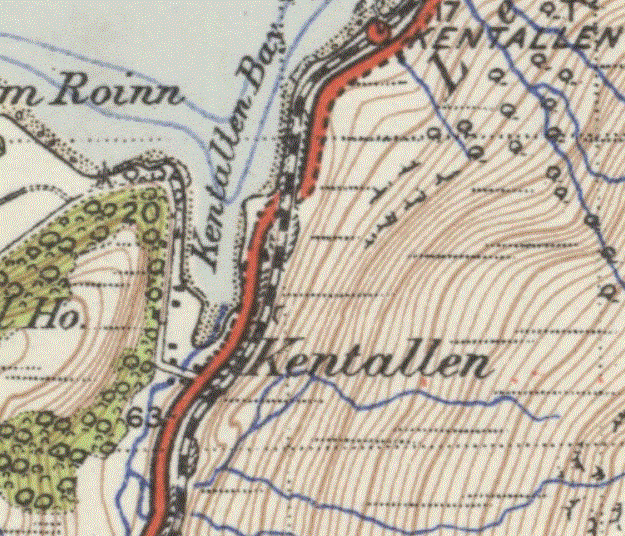
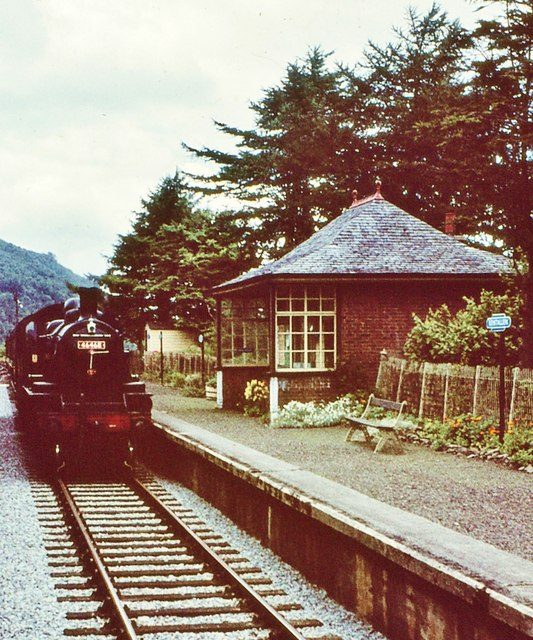
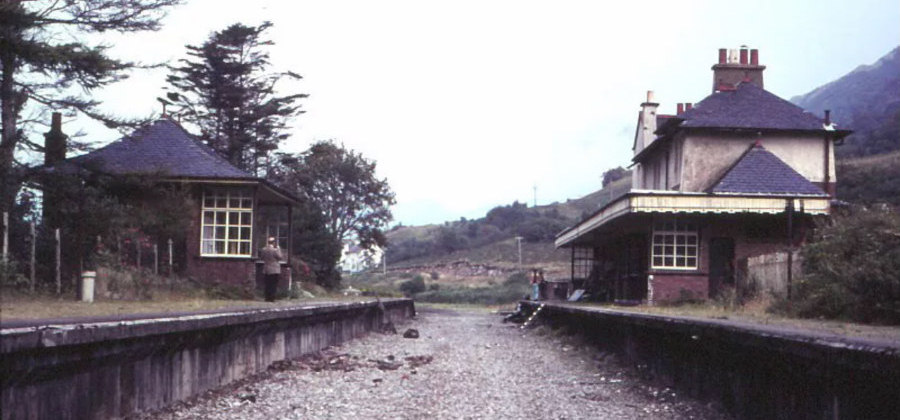
Again crossing a peninsula. Appin is reached, and for the remainder of the journey the line follows closely the shores of Loch Linnhe. As it curves round after leaving Appin station, a good view is had of the ruins of Castle Stalker. Alongside the Loch splendid views are had, and Duror and Kentallen stations are sufficiently picturesque to harmonise with the general character of the scenery. At Ballachulish Ferry station tickets are collected, and the line then curves round to follow the shores of Loch Leven to the terminus at Ballachulish. This is a neat two-platformed station, with dining and refreshment rooms, and the district is impressively mountainous. A short distance from the station is a small harbour, whence a David MacBrayne steamer used to ply three times daily to and from the Kinlochleven wharf of the British Aluminium Company, for goods, passenger and mail traffic. This steamer service has now been withdrawn, a road having been built by German prisoners during the [First World War] and opened for traffic at the end of [1922].” [1: p16]
As noted close to the start of this article, the Ballachulish Branch has been covered extensively in an earlier series of articles which can be found here, [2] here, [3] here, [4] and here. [5]
Gairns goes on to reflect on the use of the Callander and Oban line. He says that its use is “complicated by the fact that its gradients are systematically so severe.” [1: p16] Indeed 1 in 50 gradients occurred:
“several times for considerable distances, curves are numerous, and in several places reduced speed is necessary owing to the danger of tumbling rocks, notably alongside Loch Lubnaig in Glen Ogle and the Pass of Brander, and automatic alarm wires are erected on some stretches, a fall of rock encountering them causing warnings to be given in adjacent signal cabins and watchmen’s huts, and putting the special signals to danger. On the steep grades both goods and passenger trains are operated under special restrictions, stops being made at the summits and brakes tested, or, on goods trains, a proportion pinned down before descending. Mountain mists and fogs, occasional torrential rainstorms or cloudbursts and other ‘episodes’ peculiar to mountain lines, also complicate the working at times. But even in winter there is a steady traffic in meeting the transport needs of the wide areas rendered accessible by this line, of the various townships and villages (many are centres for other places within a considerable radius), country houses, castles and large estates, and in carrying mails, supplying coal and, in due season, conveying cattle and other live stock.
The winter train services are, naturally, much reduced as compared with those of the summer, but even the winter service provides four through trains each way daily, a local each way between Oban and Dalmally, and several additional trains between Callander and Glasgow. Sleeping cars and through carriages are provided between Euston and Oban in winter on Fridays only from London, returning on Mondays. The down vehicles are conveyed on the 8.25 a.m. from Stirling, due in Oban at 12.15 p.m. It is also possible to reach Oban at 4.45 p.m. from London by the 11 p.m. from Euston the night before, and by the 5 a.m. from Euston at 9.50 p.m., the same night, though not, of course, with through carriages.” [1: p16-17]
Gairns goes on to cover train movements on the line in some detail. While the copious detail he provided need not detain us here, it is worth noting the care with which connections to the various railway branches, steamer and motor-coach services associated with the main line were arranged. There were also a significant number of excursions and tours to suit passenger’s differing budgets.
Gairns’ final paragraph concentrated on the motive power in use on the line in the early 1920s and is worth recording here:
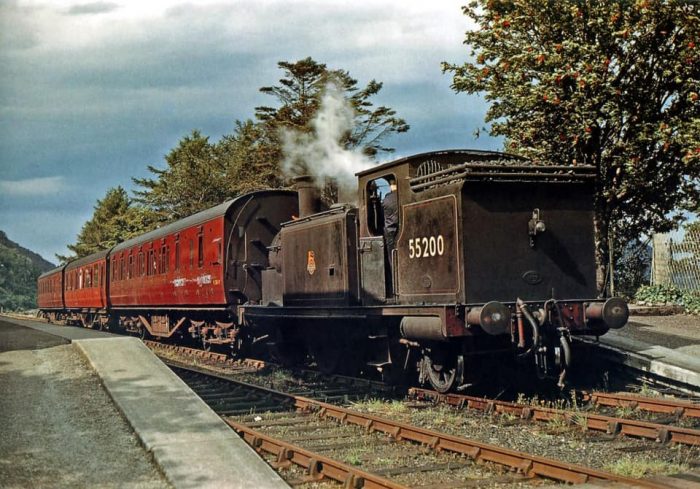
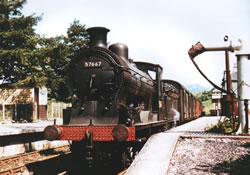
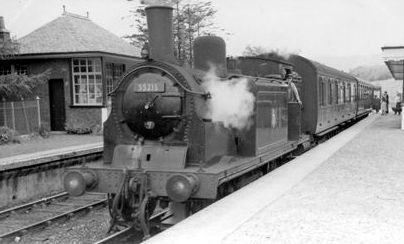
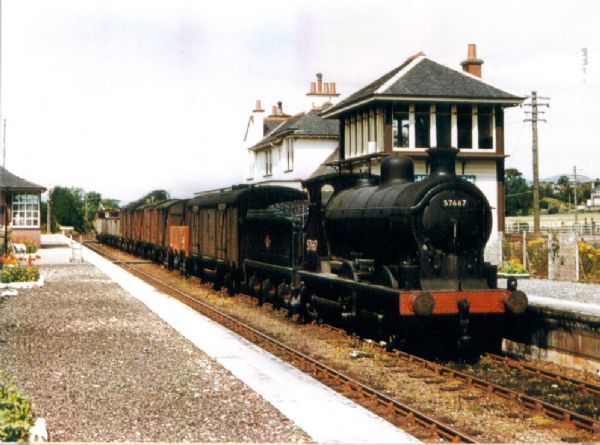
“The locomotives generally employed are the well-known ‘Oban’ 4-6-0s, with 5-ft. coupled wheels, together with Mr. Pickersgill’s new ‘Oban’ class recently introduced, though odd trips are taken by 0-6-0 goods engines, which also render assistance on the steep grades. On the Killin branch and the Ballachulish extension 0-4-4 tank engines of the 4 ft. 6 in. class are used. Between Dunblane and Callander main line 4-4-0 locomotives from Glasgow or Stirling and 0-6-0 goods engines are used, as well as the Oban 4-6-0s on the through trains, a change being sometimes made at Callander. The Callander and Oban line and the Ballachulish extension are controlled by electric train tablet apparatus. Ordinary train staff is used on the Killin branch.” [1: p18]
References
- G.F. Gairns; The Callandar and Oban Railway; in The Railway Magazine, London, July 1923, p10-17
- https://rogerfarnworth.com/2019/01/01/the-ballachulish-railway-line-part-1
- https://rogerfarnworth.com/2019/01/02/the-ballachulish-railway-line-part-2
- https://rogerfarnworth.com/2019/01/05/the-ballachulish-railway-line-part-3
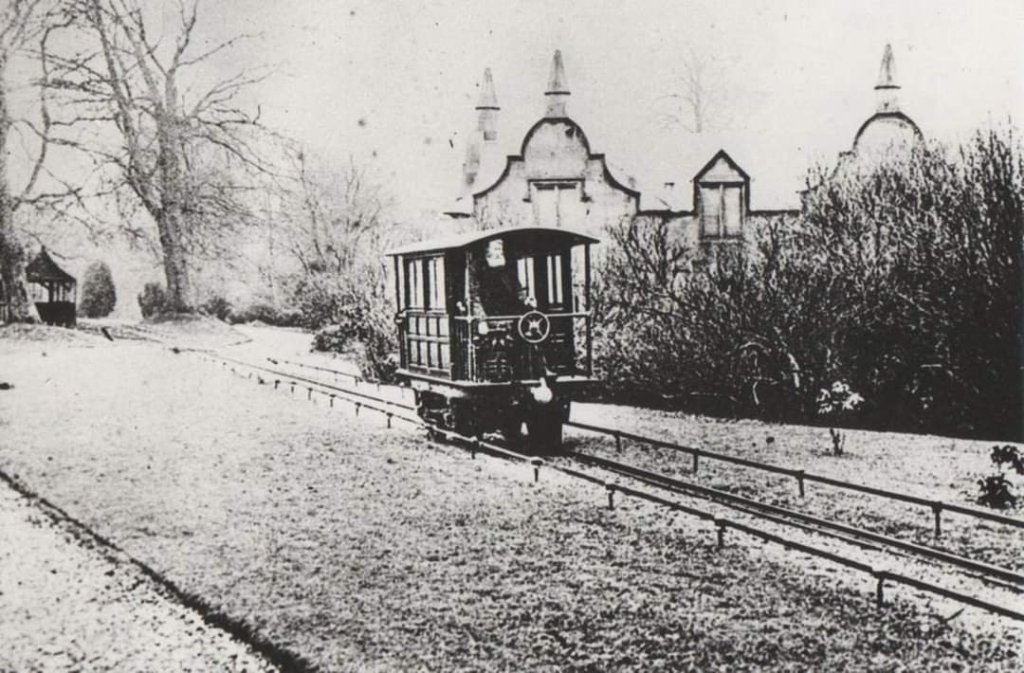
- https://rogerfarnworth.com/2024/07/16/the-caledonian-railway-rail-motor-car
- https://maps.nls.uk/geo/explore/#zoom=15.9&lat=56.24212&lon=-4.20521&layers=257&b=ESRIWorld&o=100, accessed on 2nd November 2024.
- https://maps.nls.uk/view/75656127, accessed on 2nd November 2024.
- https://en.m.wikipedia.org/wiki/Callander_railway_station, accessed on 2nd November 2024.
- https://maps.nls.uk/view/75656013, accessed on 3rd November 2024.
- https://www.flickr.com/photos/david_christie/5764782485, accessed on 3rd November 2023.
- https://canmore.org.uk/collection/682143, accessed on 3rd November 2024.
- https://www.facebook.com/callanderheritage/photos/callander-railway-station-looking-west-no-date-around-1940s/760225246144844, accessed on 3rd November 2024.
- https://maps.nls.uk/view/82899621, accessed on 3rd November 2024.
- https://www.facebook.com/reel/655973169967306, accessed on 4th November 2024.
- https://railmaponline.com/UKIEMap.php, accessed on 4th November 2024.
- https://i.rcahms.gov.uk/canmore/l/SC00682139.jpg, accessed on 4th November 2024.
- https://maps.nls.uk/view/75655998, accessed on 4th November 2024.
- https://www.flickr.com/photos/96915808@N03/53340427048, accessed on 4th November 2024.
- https://maps.nls.uk/view/75655856, accessed on 4th November 2024.
- https://www.geograph.org.uk/photo/6564414, accessed on 4th November 2024.
- https://maps.nls.uk/view/75655850, accessed on 4th November 2024.
- https://maps.nls.uk/view/75655673, accessed on 4th November 2024.
- https://maps.nls.uk/view/82899030, accessed on 4th November 2024.
- https://maps.nls.uk/geo/explore/#zoom=17.0&lat=56.36156&lon=-4.30648&layers=168&b=ESRIWorld&o=0, accessed on 4th November 2024.
- https://en.wikipedia.org/wiki/Balquhidder_railway_station, accessed on 4th November 2024.
- https://www.geograph.org.uk/photo/1749724, accessed on 4th November 2024.
- https://maps.nls.uk/view/75655499, accessed on 4th November 2024.
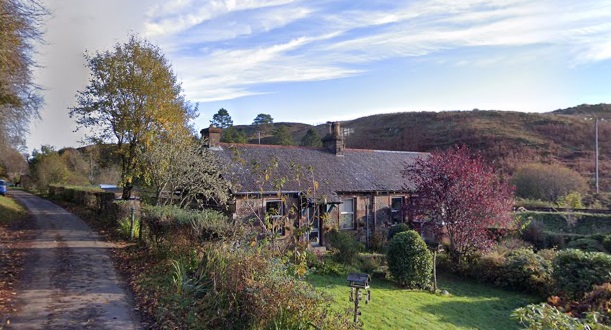
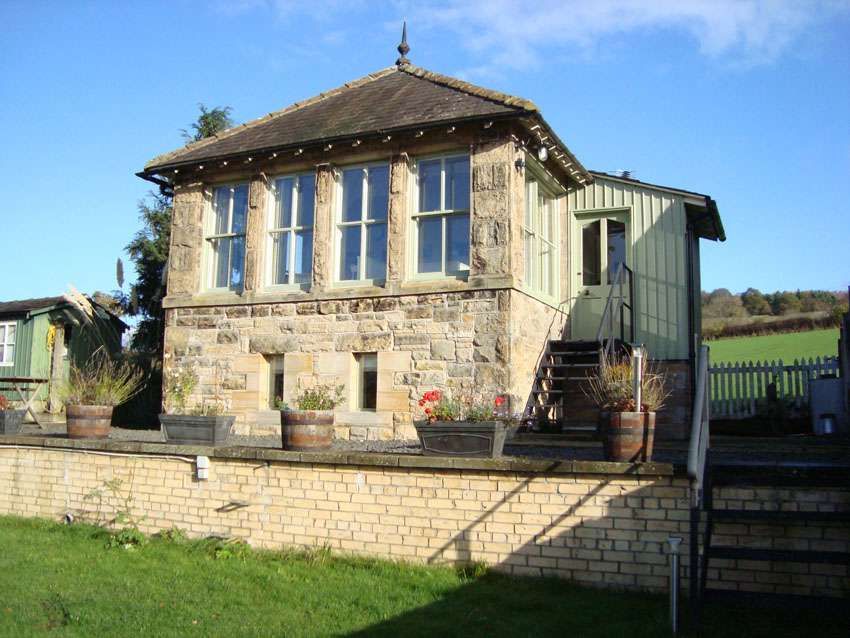
- https://railwaycottagekillin.co.uk/history, accessed on 4th November 2024.
- https://www.wikidata.org/wiki/Q116203468#/media/File:Glendhu_Viaduct.jpg, accessed on 6th November 2024.
- https://maps.nls.uk/view/75655490, accessed on 6th November 2024.
- https://www.flickr.com/photos/irishswissernie/36542360150, accessed on 6th November 2024.
- https://www.facebook.com/photo/?fbid=980038522183226&set=pcb.800198413666581, accessed on 6th November 2024.
- https://www.facebook.com/photo?fbid=978725508981194&set=pcb.799156517104104, accessed on 6th November 2024.
- https://www.facebook.com/photo?fbid=978725332314545&set=pcb.799156517104104, accessed on 6th November 2024.
- https://maps.nls.uk/view/75655487, accessed on 6th November 2024.
- https://maps.nls.uk/view/75655649, accessed on 6th November 2024.
- https://en.wikipedia.org/wiki/Crianlarich_Lower_railway_station, accessed on 6th November 2024.
- https://www.facebook.com/photo/?fbid=10160616125076909&set=gm.28307289845525004&idorvanity=1730959503584733, accessed on 6th November 2024.
- https://maps.nls.uk/view/75655466, accessed on 6th November 2024.
- https://en.wikipedia.org/wiki/Tyndrum_Lower_railway_station, accessed on 6th November 2024.
- https://maps.nls.uk/geo/explore/#zoom=17.0&lat=56.42498&lon=-4.83030&layers=6&b=ESRIWorld&o=100, accessed on 7th November 2024.
- https://www.railscot.co.uk/locations/G/Glenlochy_Crossing, accessed on 7th November 2024.
- https://getlostmountaineering.co.uk/walks.php?id=1253, accessed on 7th November 2024.
- https://maps.nls.uk/geo/explore/#zoom=17.6&lat=56.40080&lon=-4.98135&layers=6&b=ESRIWorld&o=100, accessed on 7th November 2024.
- https://maps.nls.uk/geo/explore/#zoom=16.6&lat=56.40862&lon=-5.02492&layers=6&b=ESRIWorld&o=100, accessed on 7th November 2024.
- https://maps.nls.uk/geo/explore/#zoom=16.6&lat=56.40455&lon=-5.01399&layers=6&b=ESRIWorld&o=100, accessed on 7th November 2024.
- https://maps.nls.uk/view/75483093, accessed on 7th November 2024.
- https://maps.nls.uk/view/75483090, accessed on 7th November 2024.
- https://www.railscot.co.uk/locations/B/Ben_Cruachan_Quarry, accessed on 7th November 2024.
- https://maps.nls.uk/view/75483096, accessed on 7th November 2024.
- https://commons.wikimedia.org/wiki/File:Loch_Awe_Railway_Station_(22837896929).jpg, accessed on 7th November 2024.
- https://www.forgottengreens.com/forgotten-greens/argyllshire-acharacle/loch-awe-dalmally, accessed on 7th November 2024.
- https://maps.nls.uk/view/75483078, accessed on 7th November 2024.
- https://www.networkrailmediacentre.co.uk/news/awe-inspiring-works-taking-place-to-restore-200-year-old-viaduct-in-the-highlands, accessed on 7th November 2024.
- https://maps.nls.uk/view/75482830, accessed on 7th November 2024.
- https://en.wikipedia.org/wiki/Ach-na-Cloich_railway_station, accessed on 7th November 2024.
- https://maps.nls.uk/view/75482821, accessed on 7th November 2024.
- https://www.ebay.co.uk/itm/204060151459, accessed on 7th November 2024.
- https://www.railscot.co.uk/locations/A/Achaleven_Sidings, accessed on 7th November 2024.
- https://canmore.org.uk/site/299480/connel-ferry-station-sidings, accessed on 7th November 2024.
- https://www.britainfromabove.org.uk/image/SAW039391, accessed on 7th November 2024.
- John Thomas; The Callander &Oban Railway: The History of the Railways of the Scottish Highlands – Vol. 4; David St. John Thomas Publisher, Nairn, Scotland, 1966, 1990 and 1991.
- https://en.m.wikipedia.org/wiki/Connel_Ferry_railway_station, accessed on 1st December 2024.
- https://www.undiscoveredscotland.co.uk/connel/connel/index.html, accessed on 1st December 2024.
- https://www.scottish-places.info/features/featurefirst91901.html, accessed on 1st December 2024.
- https://maps.nls.uk/view/75482821, accessed on 21st December 2024.
- https://maps.nls.uk/view/75483058, accessed on 22nd December 2024.
- https://maps.nls.uk/view/75483043, accessed on 22nd December 2024.
- https://maps.nls.uk/view/75483055, accessed on 22nd December 2024.
- https://thisisoban.com/24-incredible-images-of-the-old-oban-railway-station, accessed on 22nd December 2024.


.jpg)