I have a few older copies of Modern Tramway which I had not yet read. The first of these is the January 1951 issue.
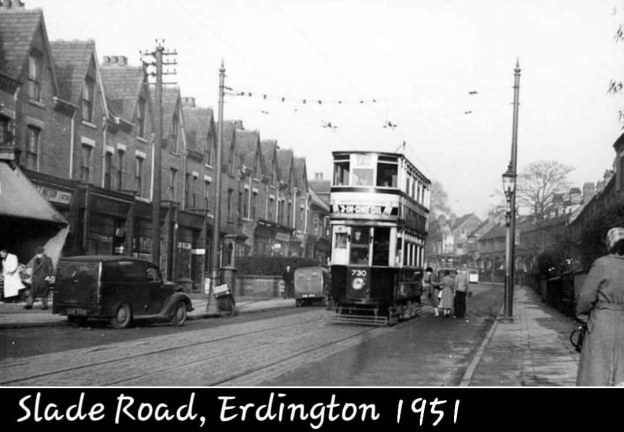
The editorial for this issue of Modern Tramway was a long update on Birmingham’s tram-scrapping programme. An update that railed against the dominance of the bus! It was clearly written by someone who knew the centre of Birmingham at the start of the 1950s very well.
“Birmingham Corporation Tramways operated a network of tramways in Birmingham from 1904 until 1953. It was the largest narrow-gauge tramway network in the UK, and was built to a gauge of 3 ft 6 in (1,067 mm). It was the fourth largest tramway network in the UK behind London, Glasgow and Manchester.” [2]
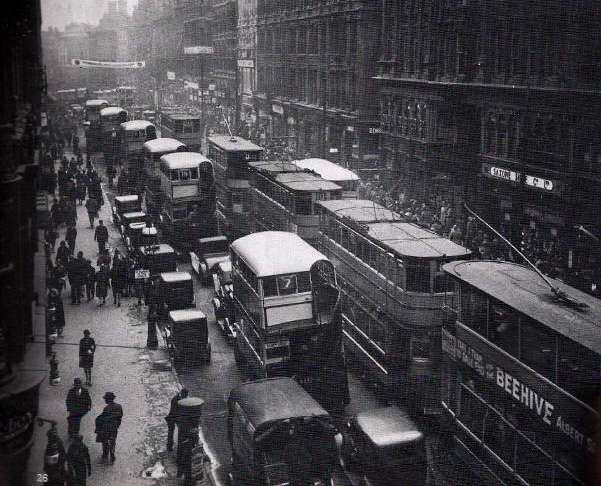
“As Birmingham’s tram-scrapping programme continues it becomes increasingly clear how great a part has hitherto been played by the tramways in keeping city centre congestion within bounds. Birmingham has an awkward arrangement of central streets, and for many years now a large number of bus services, some of them cross-city, have followed a loop route through the central streets (Victoria Square, New Street, Corporation Street, Bull Street and Colmore Row). This is an admittedly convenient arrangement for cross-city passengers, but the very large number of buses traversing these streets adds considerably to the congestion; it could just be done, however, with the existing number of bus services and aided by the desperate expedient of the world’s most complicated one-way scheme, formulated in 1933.
In 1933, however, most of the traffic to the city was catered for by tramways terminating on the fringe of the central loop area; their terminal arrangements were far from ideal in many cases, but the quick turn-round possible with trams at such places as Hill Street and Steelhouse Lane did materially aid matters, as did the arrangement by which the Martineau Street trams (services 3, 3X, 6, 8 and 10) followed the one-way routing by a single track in Corporation Street from Martineau Street, then passing through a central island at the Corporation Street – Bull Street corner (where other traffic turned left and right) and across what may be described as a ‘one-way watershed’ alongside Lewis’s building, to rejoin the Corporation Street traffic where two-way traffic commences at Old Square. This arrangement was severely criticised on the ground that it involved the running of trams against the one-way traffic for one block alongside Lewis’s, but this feature could very easily have been rectified by extending the already rather complicated island at Bull Street corner up to Old Square, so as to keep the tramway traffic on a reservation throughout the very short stretch where it conflicted in direction. with the road traffic. This would not have caused any additional congestion, for traffic along Corporation Street from Old Square towards Bull Street has in any case to be split into two streams (right and left) at the Lewis’s island, and to do this in advance of the corner would probably have assisted traffic flow rather than otherwise, while the single track is no wider than other islands in Corporation Street erected as traffic aids, including a long one opposite Cherry and Union Streets which directly continues the line of the track.
There need therefore have been no difficulty in running trams along Corporation Street, whilst doing so did have the immense advantage of directing the traffic from Martineau Street terminus into a path which short-circuited the very congested détour via Bull Street and Steelhouse Lane which was the only alternative.
The tramway abandonments which have occurred since 1933, however, have in most cases had the effect of upsetting these arrangements and causing further invasions of the already congested central ‘loop’. Thus the Ladywood changeover brought an additional bus service into Victoria Square and Paradise Street, and the Moseley Road changeover two more, owing to the lack of flexibility of buses, whereby they must have central streets to loop round, instead of simple reversal as was possible with the trams in Hill Street. The Transport Department was evidently anxious to keep the additional buses to a minimum, for the former Cannon Hill service was eliminated altogether, and many thickly populated streets in the Balsall Heath area left for the first time in fifty years without service, in a desperate attempt to eliminate one service at all costs and thus limit the mischief. As it is, Paradise Street is now a solid mass of bus loading stations (incidentally without weather protection, which the tram termini had), and scenes at rush hours beggar description.
The next step was the abandonment of the Witton and Perry Barr routes operating from Martineau Street. As the replacing buses could not, of course, use the ‘watershed’ at Lewis’s, these two services (33a and 39) were compelled to go via the Bull Street and Steelhouse Lane detour, bringing additional buses to this very congested area; a recent traffic census showed this part of Bull Street to carry the heaviest volume of traffic in Birmingham.
Then, in October last, the remaining Martineau Street tram routes were scrapped. It had evidently been decided on this occasion that no further traffic could possibly be added to upper Bull Street, for some very awkward expedients were adopted to avoid this. The buses (55b) replacing the service 8 trams were brought into the city by the former outward route and terminated by reversal in Old Square (short of Bull Street); this, besides depositing passengers some distance short of the former central terminus, has meant additional vehicles turning right out of Corporation Street into Old Square, causing considerably more obstruction than the former tramway arrangement at this point, for the trams merely separated the two streams of traffic, while the buses intersect them. The Washwood Heath service (56) replacing tram 10 has been routed still more awkwardly; it comes into Martineau Street by the former route, and turns into Corporation Street, but at the Lewis’s island turns right down lower Bull Street, and rejoins the outward route at an extremely awkward narrow hairpin bend at the foot of Bull Street, where a double line of buses has to be squeezed between the blind corner and a central lavatory island. The change from one-way to two-way traffic, in fact, occurs at the narrowest peak (STET) of the whole loop! Local tramway students prophesied trouble at this point as soon as the plans were known; a single traffic bollard was planted in this narrow ‘throat’ to separate the two lines of traffic, but a Belisha Beacon on the corner became a casualty on the first day of operation, and a day or two afterwards an elevated kerb and guard rails were very hastily erected to protect the blind corner. Notwithstanding these precautions a skidding bus tore through the guard rails and caused a fatal accident on the morning of 10th November, less than six weeks after the changeover. At the inquest on the victim of this accident, the jury added a rider saying: (a) that the wood block paving was dangerous and (b) that they did not agree with the route followed by bus service 56 (round the Bull Street Dale End hairpin bend). When asked if they would be satisfied if a non-skid surface were laid, they replied in the negative and said they still thought the route was wrong. A non-skid surface has since been laid very hastily, but the route of the 56 bus remains unchanged.
On Wednesday, 1st November [1950], the Chairman of the Traffic Advisory Com mittee stated that ‘removal of trams in Corporation Street had greatly eased the stress there and in Lancaster Place’. Statements to this effect are regularly made in Birmingham, but few now believe them, and unfortunately for the Chairman, the very worst traffic jam ever experienced in Birmingham occurred on the afternoon following his self-congratulatory speech, and had Lancaster Place for its centre! The subsequent highly-embarrassed official explanations blamed everything which could be thought of (including a collision near Five Ways, over two miles away on the other side of the city!) but there is little doubt that the trouble was directly caused by the new bus arrangements, for any hitch at the foot of Bull Street quickly dams traffic back along the short length of lower Bull Street to Lewis’s corner, and this in turn blocks Corporation Street both ways, with inevitable trouble at Lancaster Place.
There was a much better case for anticipating an improvement at Perry Barr terminus after the changeover, for the tram terminus at Perry Barr was admittedly in an awkward place, and with the replacing 33A buses extended to Boar’s Head, no vehicles of any sort now terminate at Perry Barr. Nevertheless, queues of traffic extending nearly a mile from Perry Barr to Heathfield Road can be seen any evening and it is the considered opinion of many that the chaos there is much worse than before.
Such are the results of tram-scrapping so far in Birmingham. It may be said that besides the points already mentioned, there are many other traffic plague-spots, all tramless, such as the notorious instance of Digbeth and Deritend. Remaining to be ‘converted’ are the two groups of services following the Bristol and Lichfield Roads (36, 70, 71; 2, 78, 79), which at present are among the busiest, though least congested, thoroughfares in Birmingham. Abandonment of the Bristol Road tramway will involve removing an exceptionally heavy traffic load (including Austin Motor Works industrial, and Lickey Hills holiday traffic) from the present reservations, and the consequent invasion of the adjoining carriageways by hundreds of additional vehicles, with results which may be imagined (or seen, at Kingsway, Manchester). Abandonment of the Lichfield Road services will mean the loss of a good deal more reservation (especially in Tyburn Road) and perhaps more important in this particular case, will involve finding turning circles and loading places in the city for three extremely heavily-trafficked routes. It is difficult to see, in fact, how this can possibly be done. Looping via Corporation Street, Bull Street and Steelhouse Lane would put an intolerable extra burden on the busiest section of Bull Street and add more turning traffic to the Snow Hill corner; there is certainly no more room in the Old Square, and though Martineau Street is not now fully utilised, any more buses there mean Bull Street again, either to the left (already chock-a-block) or to the right (where the recent fatality occurred). The authorities have so far kept very quiet as to what is proposed for these routes, and one suspects that they are to be quietly cut back to Lancaster Place, with a nice half-mile walk to the city centre for all passengers. But as these are scheduled as the last routes to go, it will then be too late for anyone to protest!” [1: p2-3 & 5]
There is no doubting that these are the partisan words of a lobbying group opposed to the removal of Birmingham’s trams. But the increased congestion which would inevitably occur with the introduction of a significant number of additional buses should have been foreseen and have been better planned.
In more modern times the retention and refurbishment of the tram network would perhaps have been seen as the better option along with the pedestrianisation of much of the central area of the city.
But the early 1950s were not the 2020s. The internal combustion engine was seen as the future for transport and the electric trams were seen as leftovers from another era.
References
Birmingham’s Bustigestion; in Modern Tramway Volume 14 No. 157; The Light Railway Transport League, London, January 1951.
An article by Seymour Glendenning in the July 1906 issue of The Railway Magazine focussed on the newly opened Burton & Ashby Light Railway. [1]
The light railway was a 3ft 6in gauge electric tram line supplied with electricity from a diesel generator plant near Swadlincote. [3] The power plant sat alongside the tram depot. [1: p56]
The first article about the line covered the length from Burton, through Newhall and Sawdlincote to Castle Gresley. It can be found here. [4]
Glendenning notes that the construction cost for the whole network was £150,000. [1: p57] He says that it served a population of about 100,000 inhabitants in the towns and villages through which it passed.
This second article about the line completes the journey, covering the length from Sawdlincote to Ashby-de-la-Zouch.
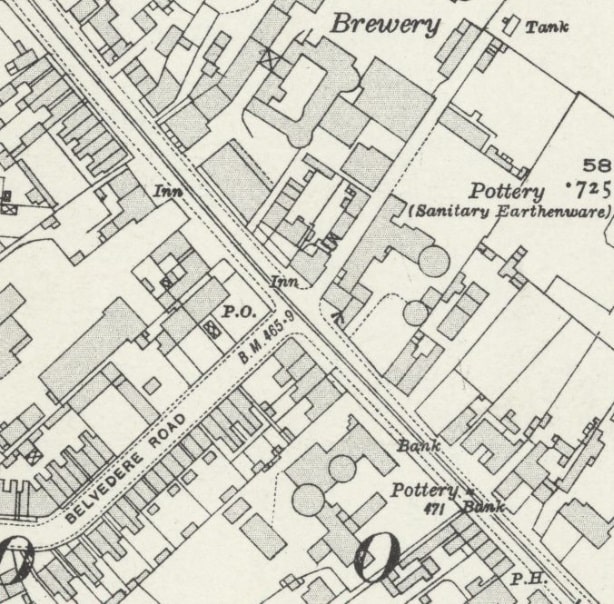
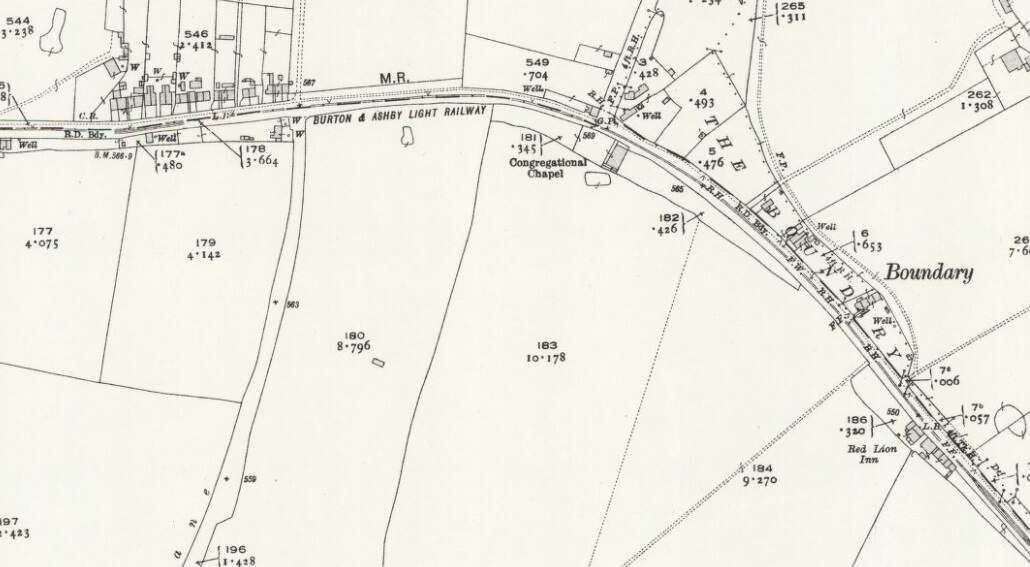
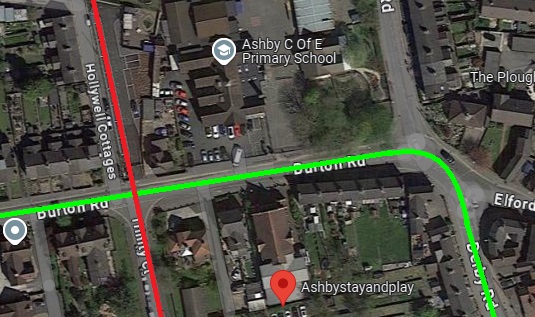
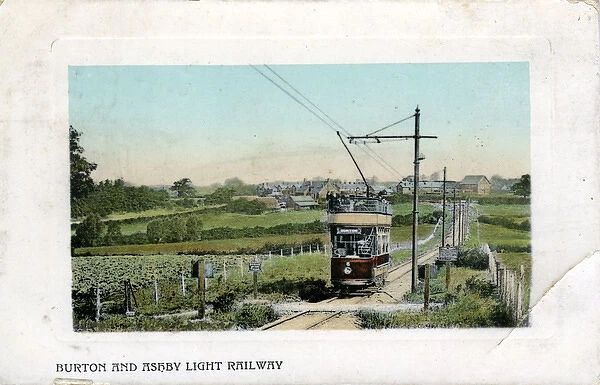
The route of the line(s) is shown in black on the map extract below.
The Burton and Ashby Light Railway. [2]
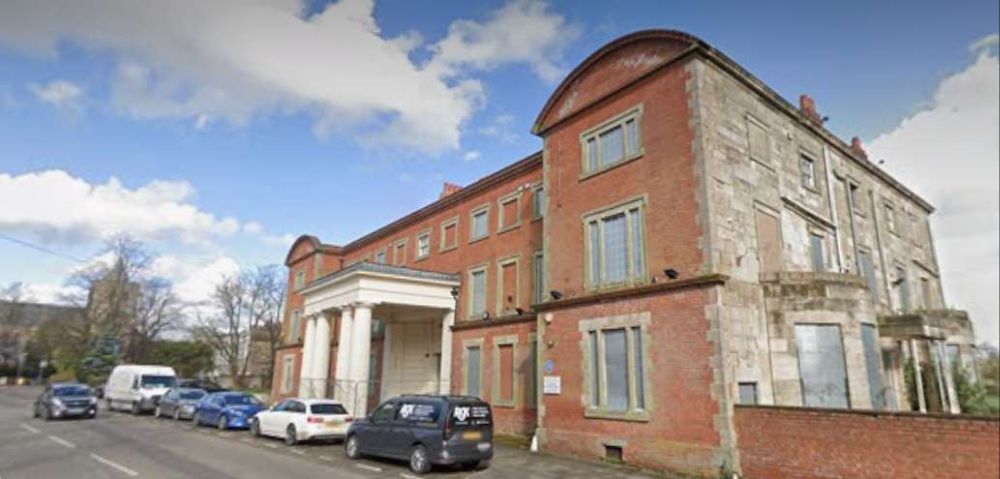
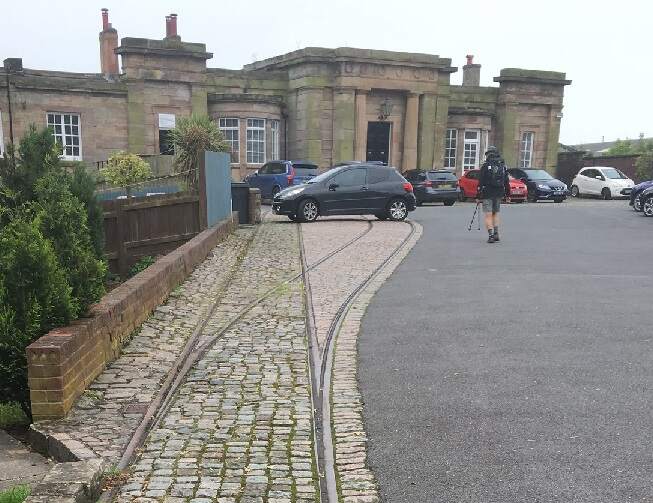
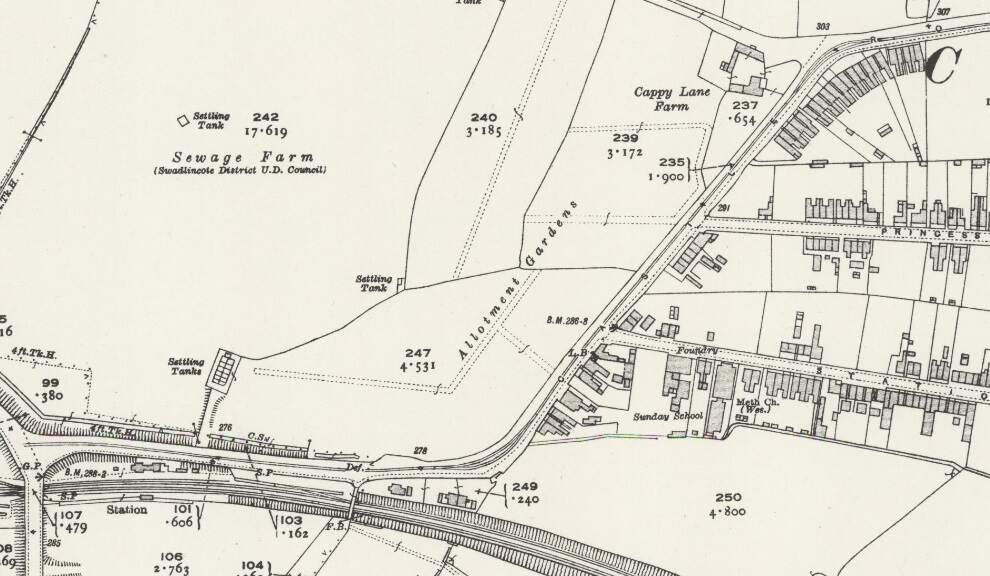
We start this second part of the journey at the tram depot which sat in Swadlincote on the North side of the Swadlincote and Woodville Branch of the Midland Railway and to the East of the Burton and Ashby Light Railway
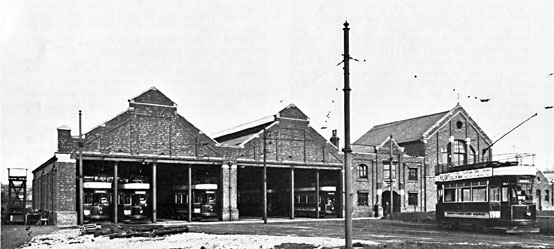
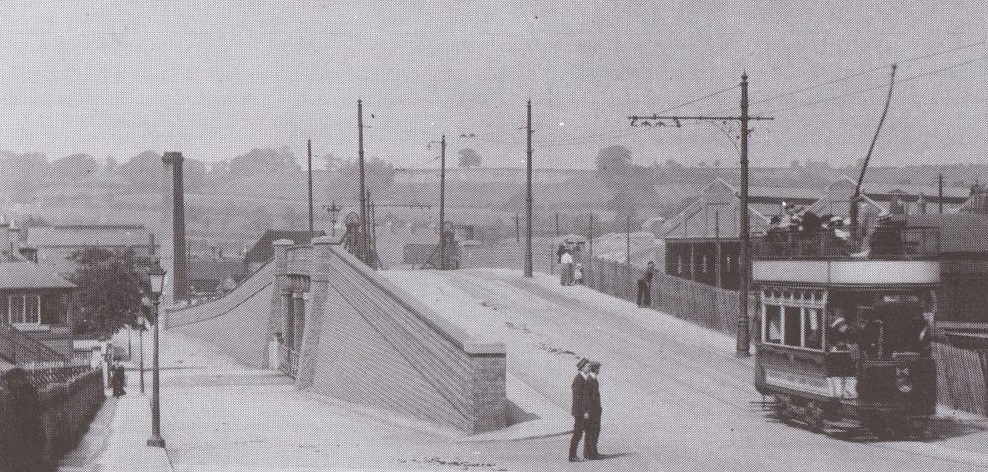
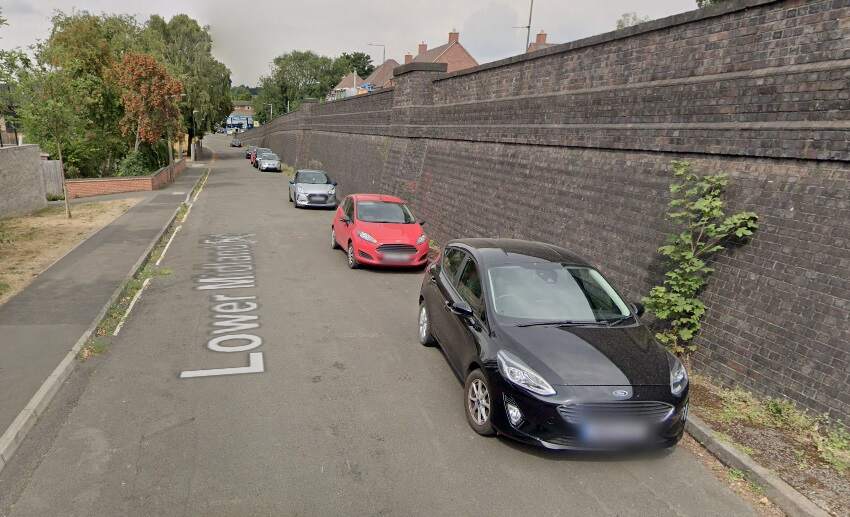
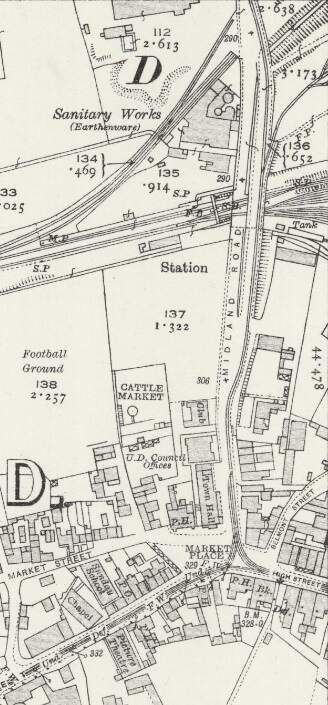
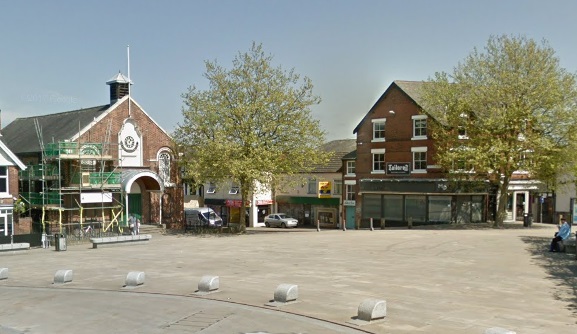
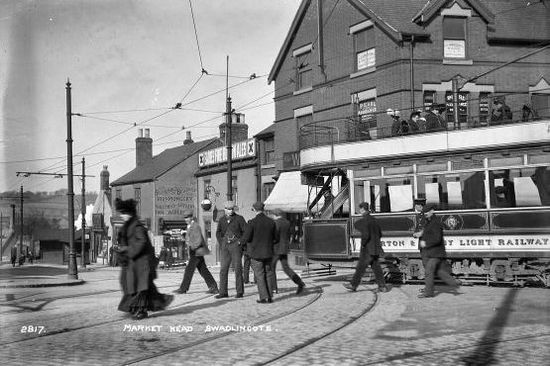
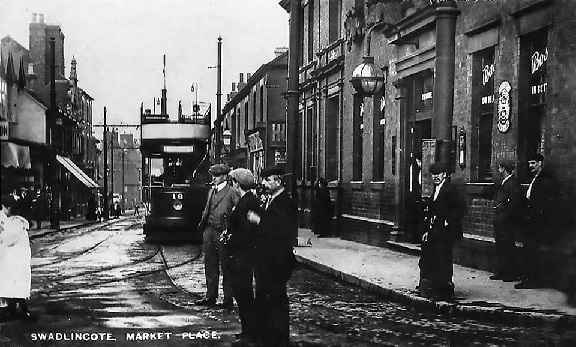
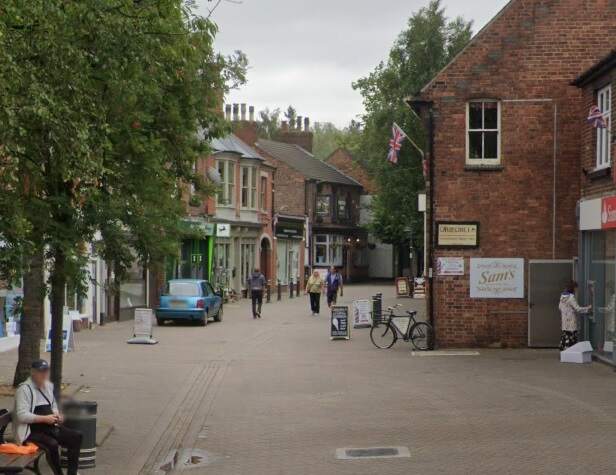
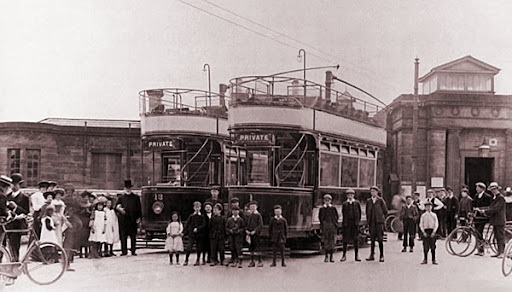
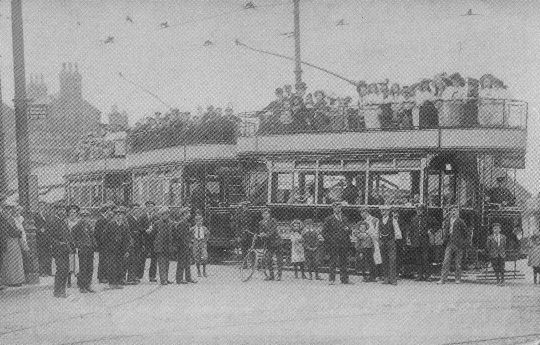
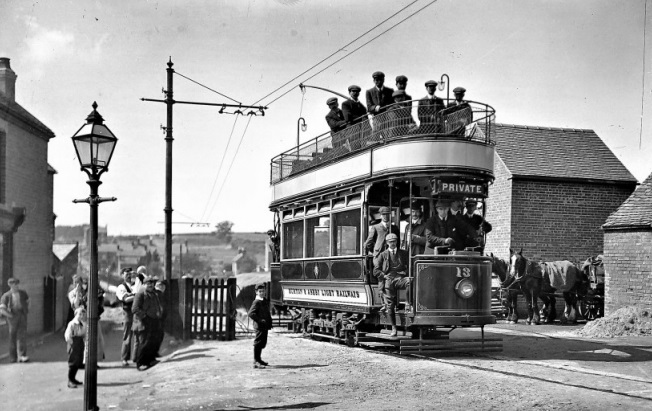
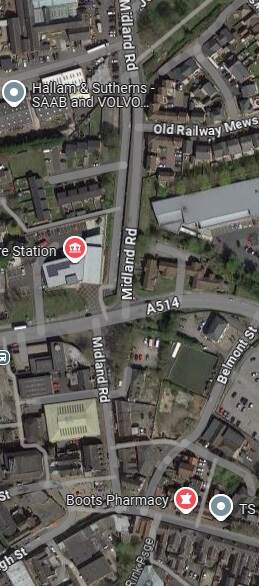
The tram depot off Midland Road, Swadlincote, seen from the West. The trams on the depot are (left to right) Nos. 18, 5, 14, 9 and 10. On the left of the depot is the horse-drawn trolley tower. The map extract immediately below shows the depot (top-left). [3]Glendenning provided a photograph of the bridge in this photograph under construction (see above). The bridge appears on the map extract immediately above and is seen here in use by the Burton and Ashby Light Tramway, (c) Public Domain. [13]A similar view in the 21st century. [Google Streetview, August 2022]The tram depot sat to the East of the Burton and Ashby Light Railway and on the North side of the Swadlincote and Woodville Branch of the Midland Railway, just off the top-right of this extract from the 1920 25″ Ordnance Survey. As can be seen here, the branch into the tram depot left the mainline at high level adjacent to the North abutment of the bridge over the standard-gauge line. The Burton and Ashby Light Railway is shown heading South towards Swadlincote Market Place along Midland Road. Sitting to the West of the Light Railway Bridge and at a lower level was Swadlincote Railway Station. To its North were some Sanitary Earthenware Works. [5]This extract from the 21st century Google Maps satellite imagery shows much the same area as the map extract above. The light railway ran down the full length of Midland Road as far as its junction with the High Street in Sawdlincote. [Google Maps, October 2024]A tram sits on the South side of Market Place and is about to set off for Burton (turning left and running beyond the Town Hall which is at the left rear of the photograph), or Ashby (bearing to the right off the right side of the photograph), (c) Public Domain. [14]A very similar view looking from West Street East into Market Place in the 21st century. [Google Streetview, May 2017]
At Swadlincote Market Place a branch left the main line to Ashby-de-la-Zouch. That branch ran South from Swadlincote to serve Castle Gresley. We followed that branch in the first article about the Burton and Ashby Light Railway.
In this article we follow the route of the line from Swadlincote to Ashby-de-la-Zouch which heads East from the Market Place.
“The road towards Ashby rises continuously until it reaches a height of 569 ft. above sea level. It passes through the heart of the Derbyshire Potteries, where a great industry is carried on in the manufacture of furnace bricks, sanitary pipes, and common earthenware. Furnaces and kilns abound in Swadlincote, and the subsidiary industry of crate-making is also much in evidence.
There are numerous stacks arranged in the form of a lofty cone, of the long tapering branches of timber with untrimmed bark, which are used for making the big rectangular crates for the conveyance of heavy earthenware.
The clay for the pipes and pots is obtained on the surface, but the fire clay for furnace bricks has to be reached from a depth, by sinking shafts equipped with hoisting machinery.
Imperceptibly, Swadlincote grows into Woodville, where the large pipe works are situated, with their groups of ever-smoking furnaces and yards stacked with great heaps of pipes for sewerage and drainage purposes. But the broken pottery is even more aggressive than the sound ware. Every ‘grotto’, or ‘rockery’, is made of it; every garden path is edged with it, or with fused fire bricks. The mounds of refuse adjacent to the works are continually extending their borders and spreading over the country.” [1: p55]
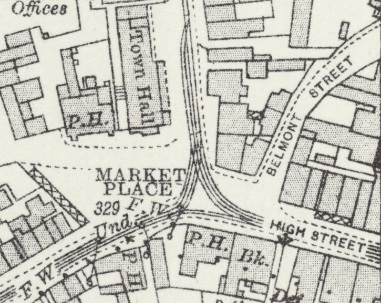
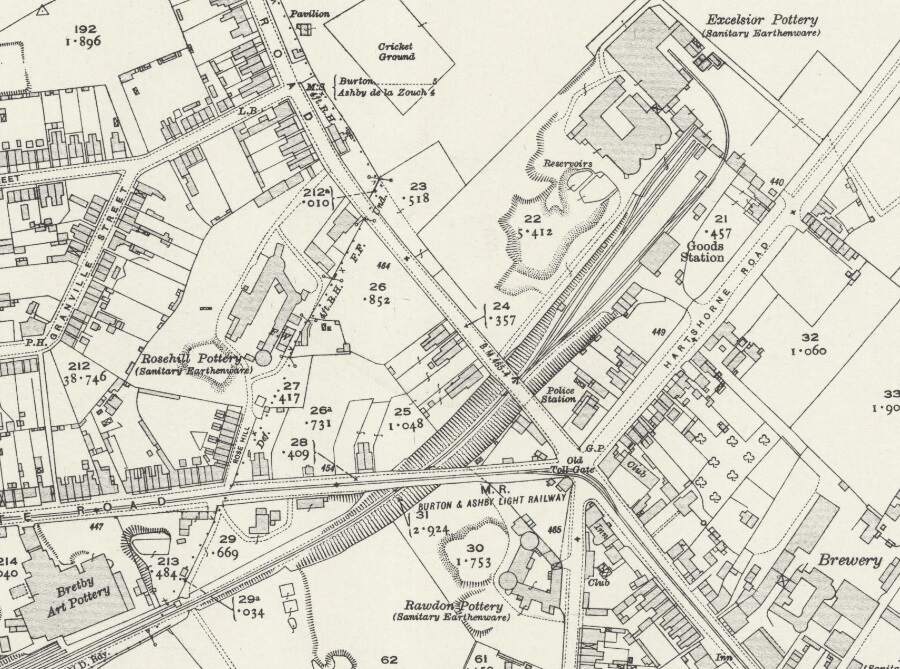
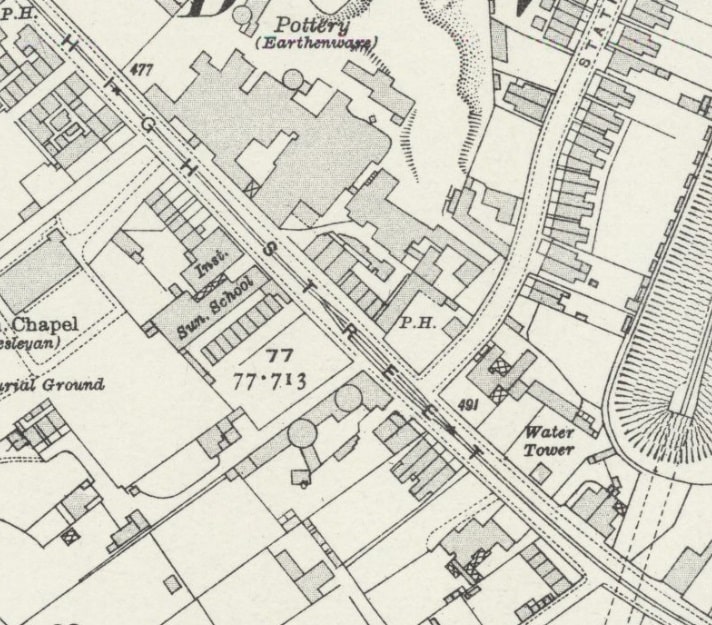
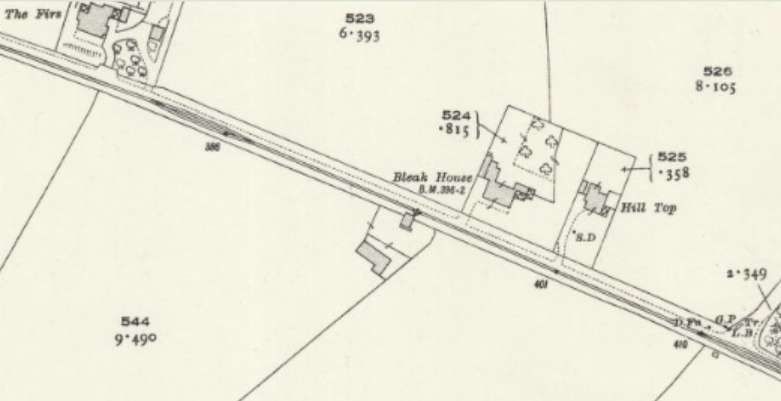
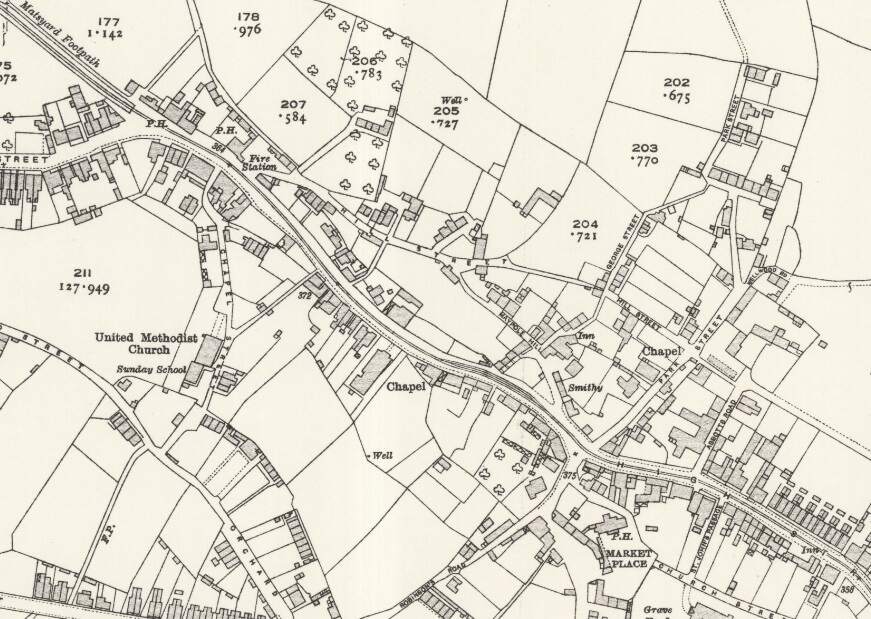
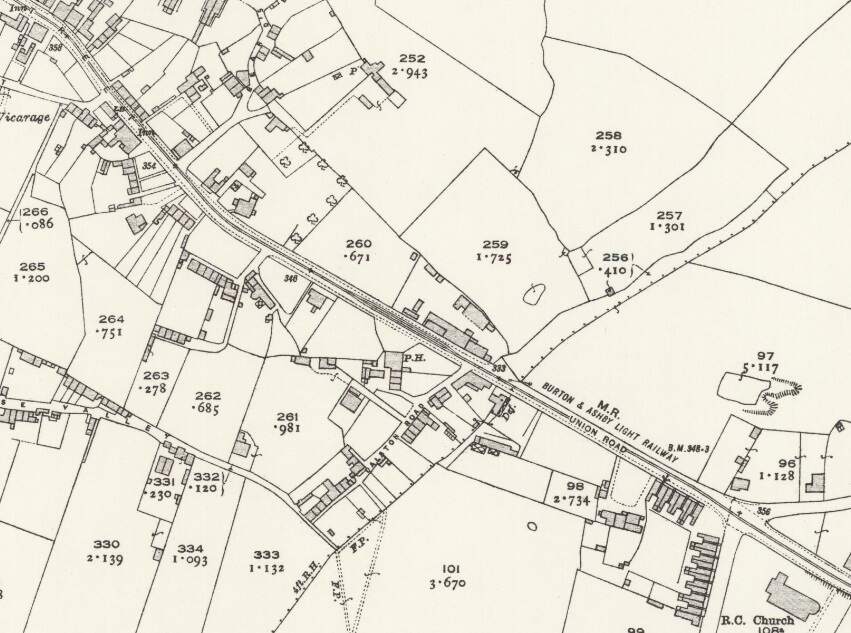
The road East of Swadlincote Market Place is High Street. As can be seen from the closely cropped extract from the 1920 25″ Ordnance Survey, the line was dual-tracked in the vicinity of the Market Place. Midland Road runs down to the Market Place on the East side of the Town Hall. Trams for Ashby left to the bottom-right of the map extract. [5]
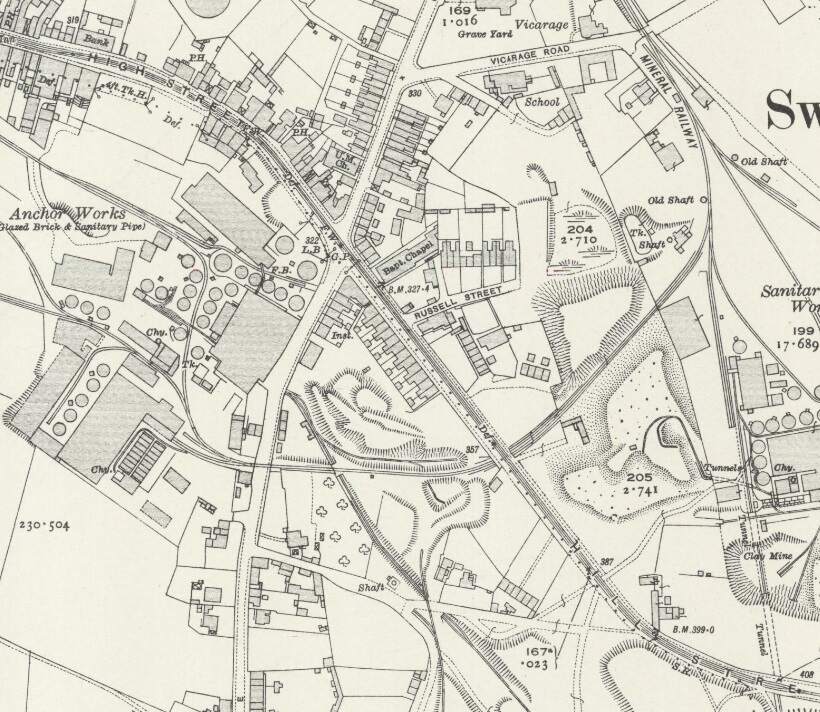
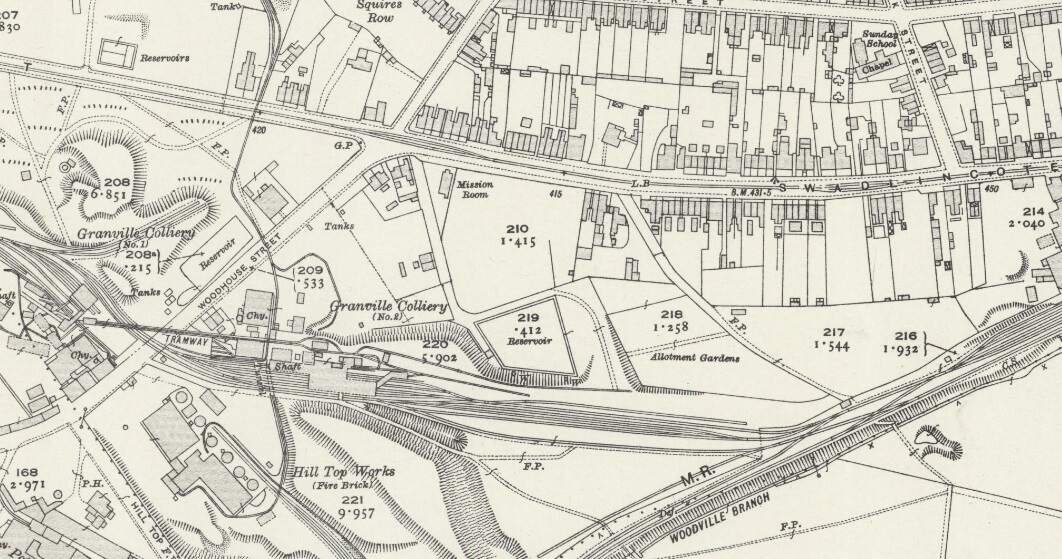
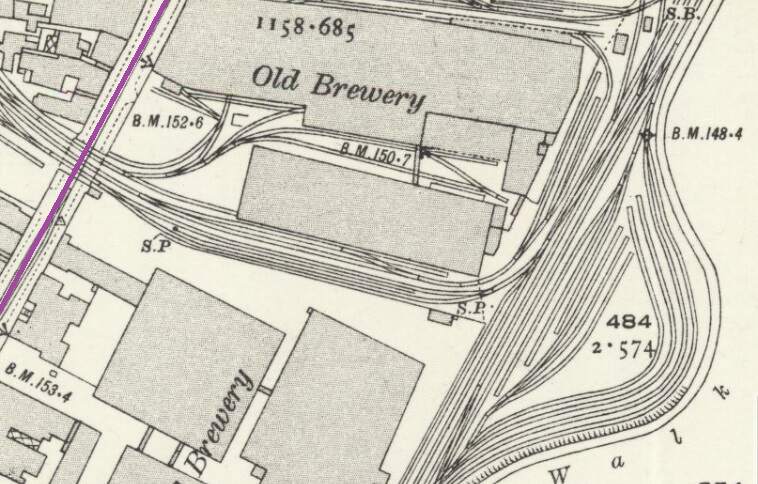
Trams ran East along High Street and turned Southeast and the road became Hill Street. The area to the East of the town centre was heavily industrialised. Different industrial concerns were linked by a network of tramways which were generally below the level of the public road and passed under it, as necessary, by means of bridges and tunnels as the map extract below illustrates.
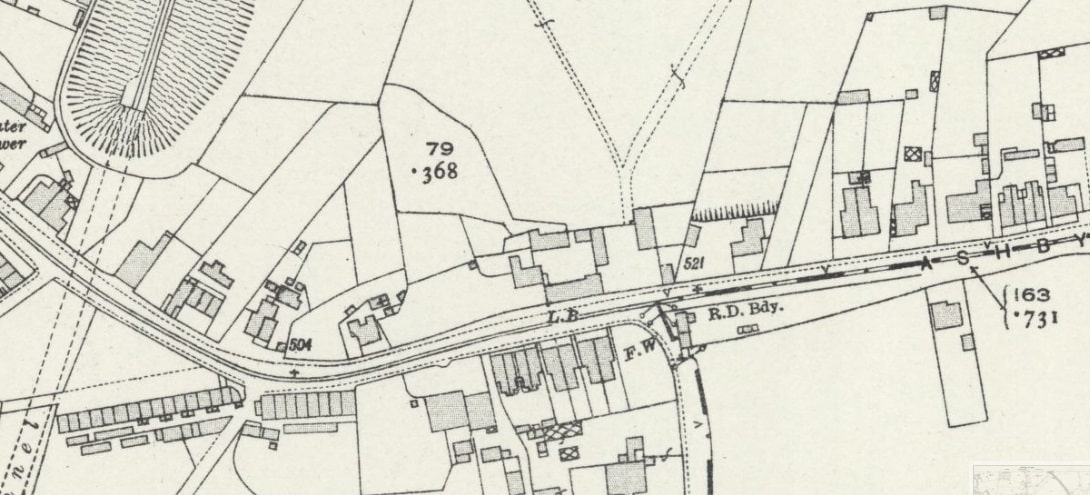
Another estract from the Ordnance Survey revised sheets of the 1920s. This sheet was surveyed/revised on the basis of what was present on the ground in 1921. [15]
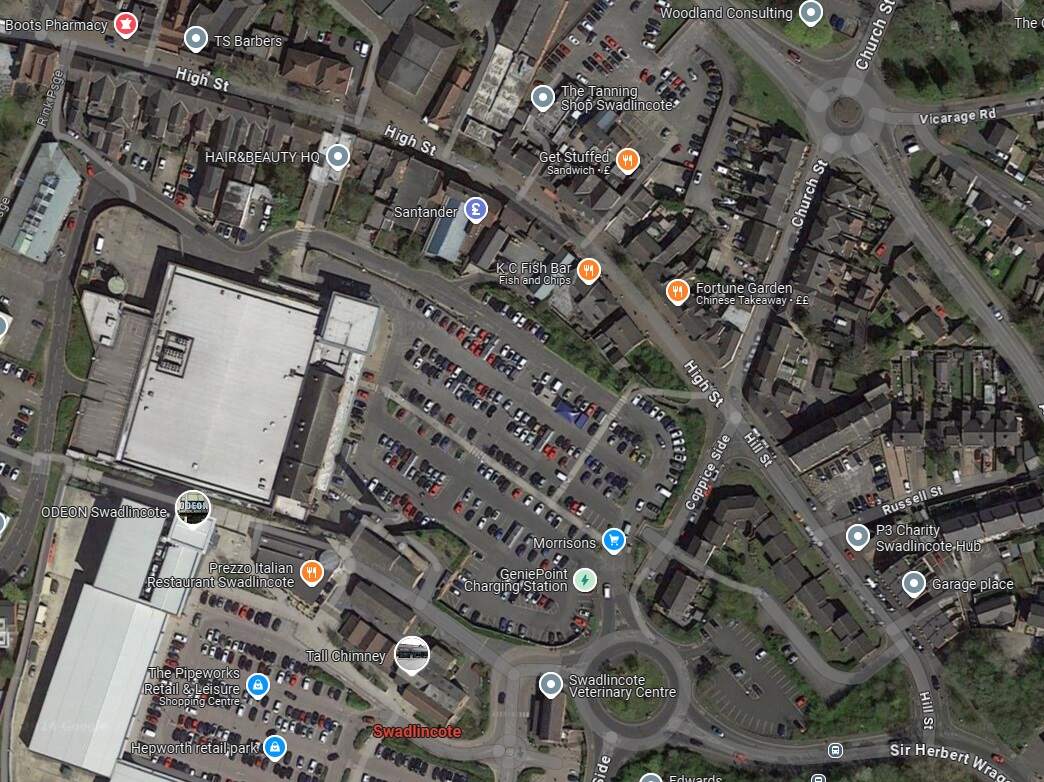
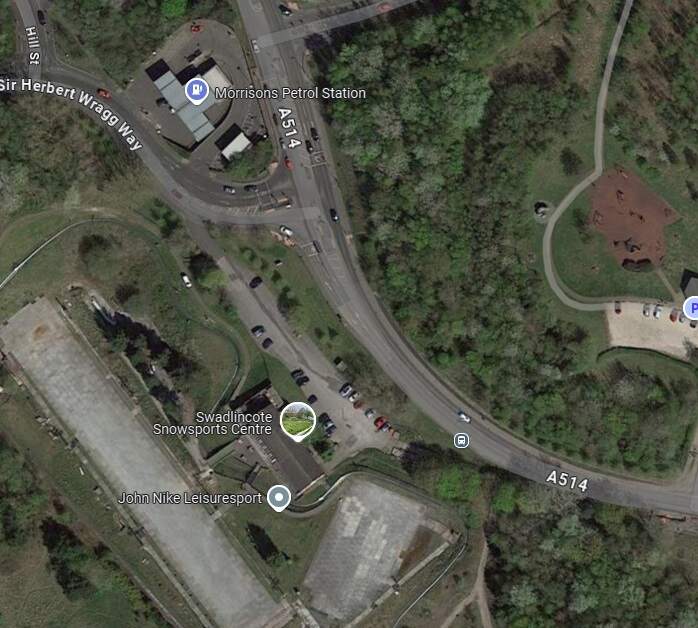
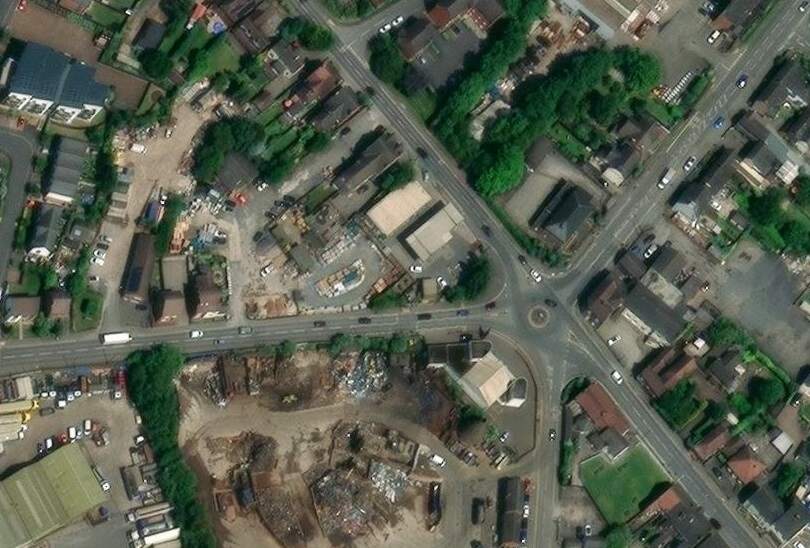
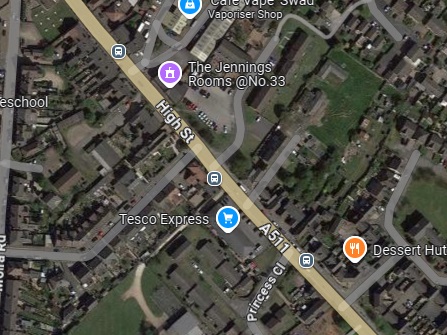
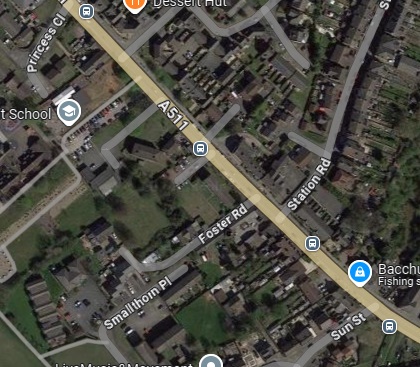
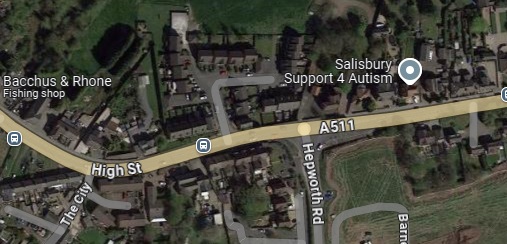
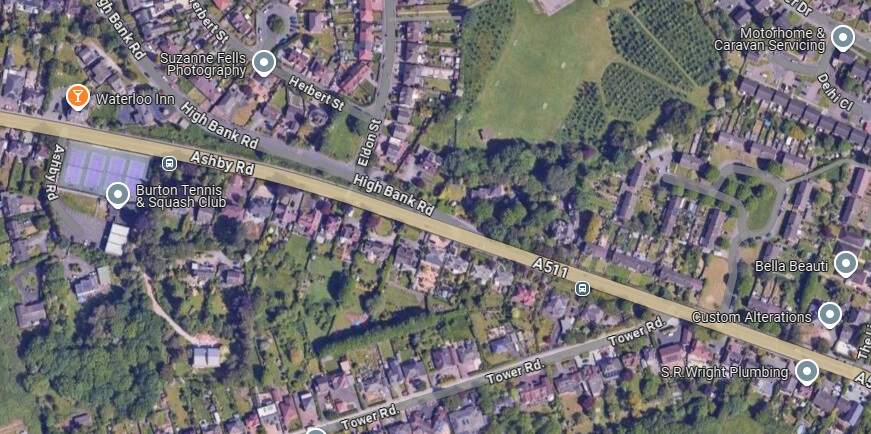
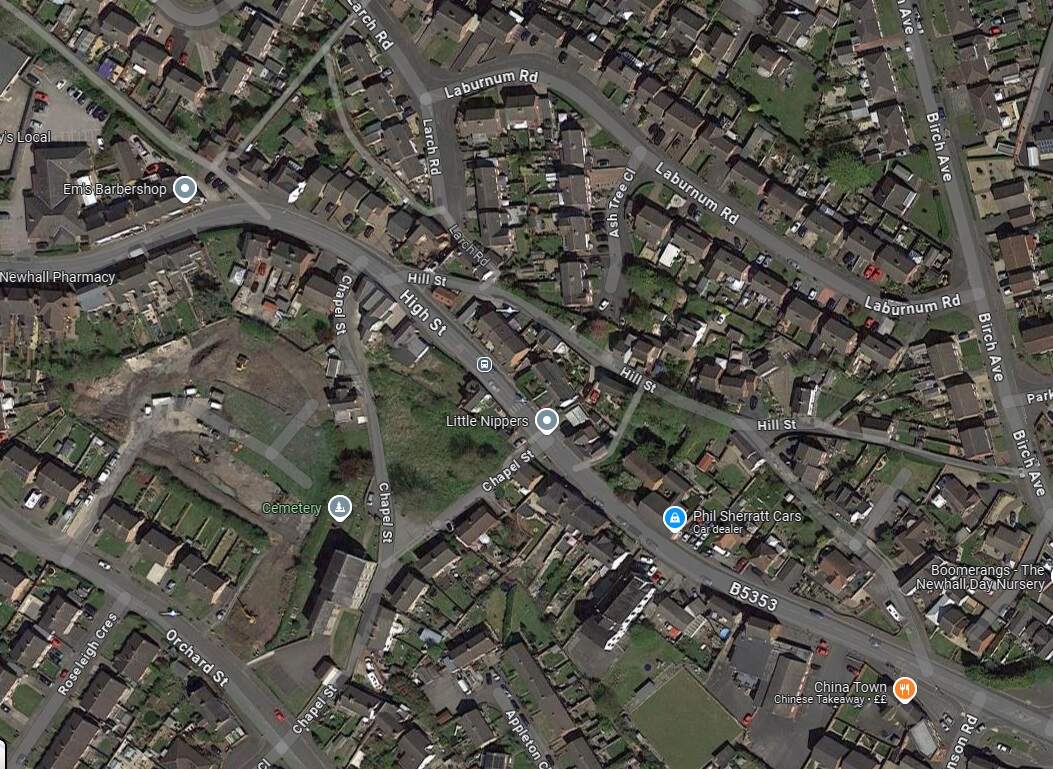
These two extracts from Google Maps satellite imagery cover the same length of the Light Railway as shown on the extract from the 1921 25″ Ordnance Survey above. The Southeastern length of what was Hill Street is now the A514 which bypasses the centre of the town. [Google Maps, October 2024]
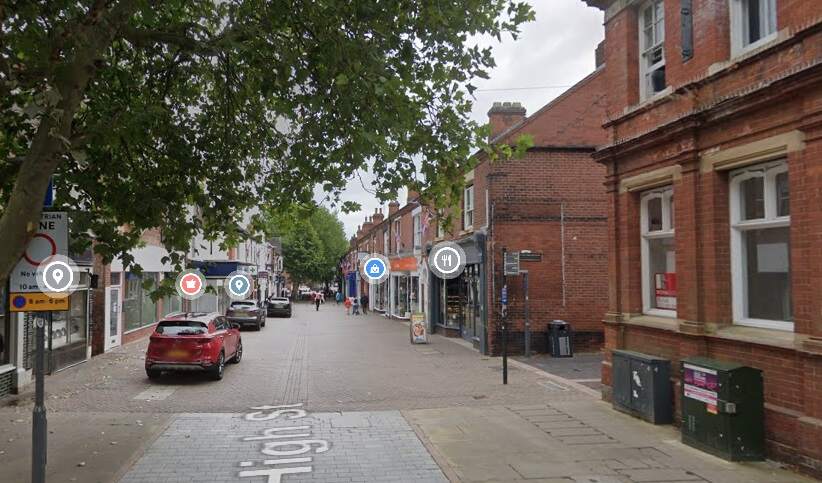
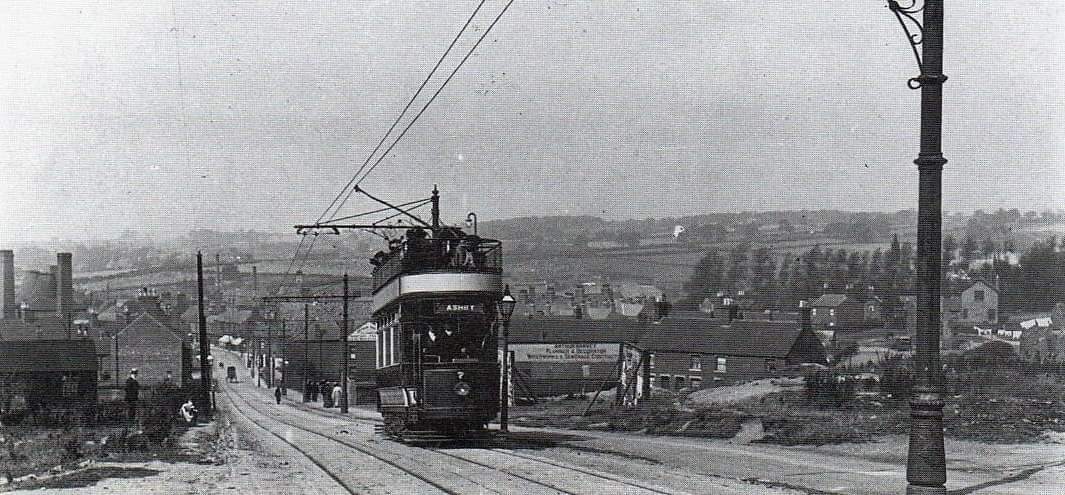
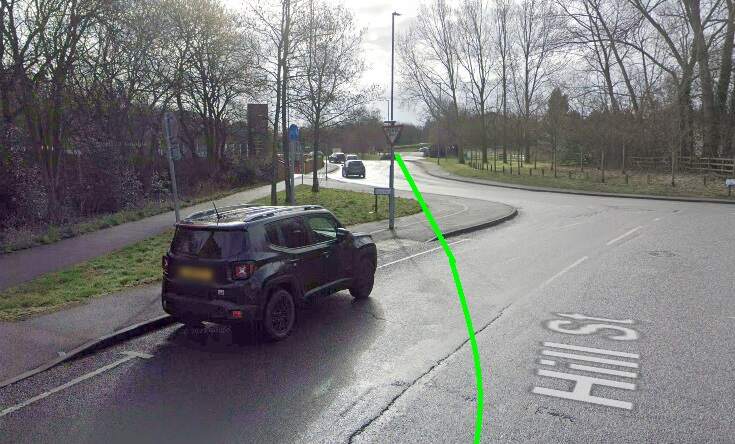
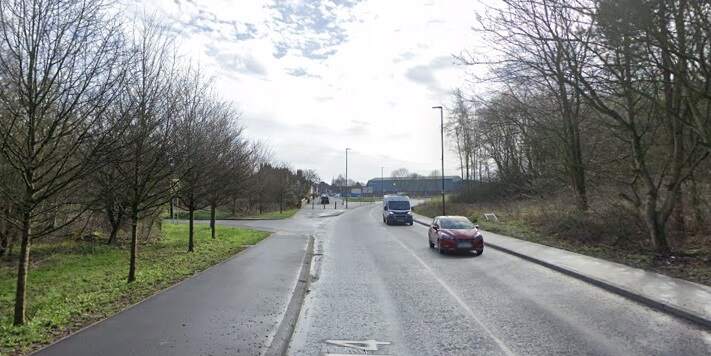
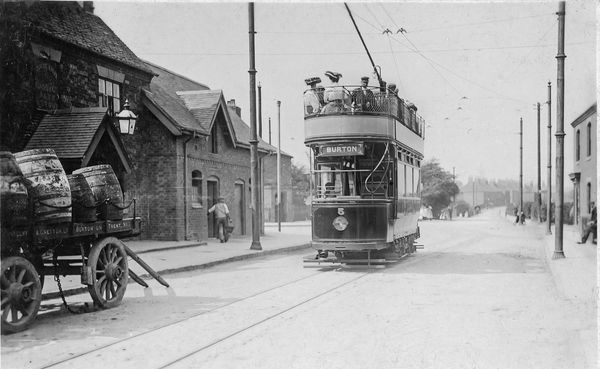
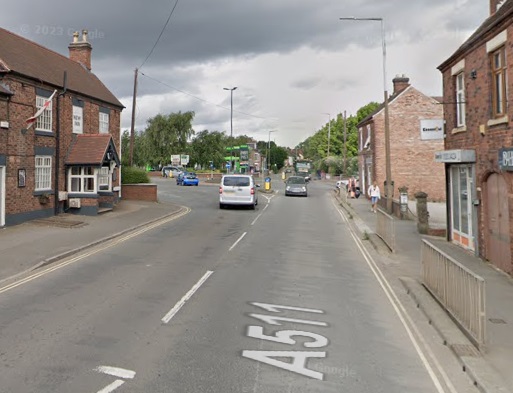
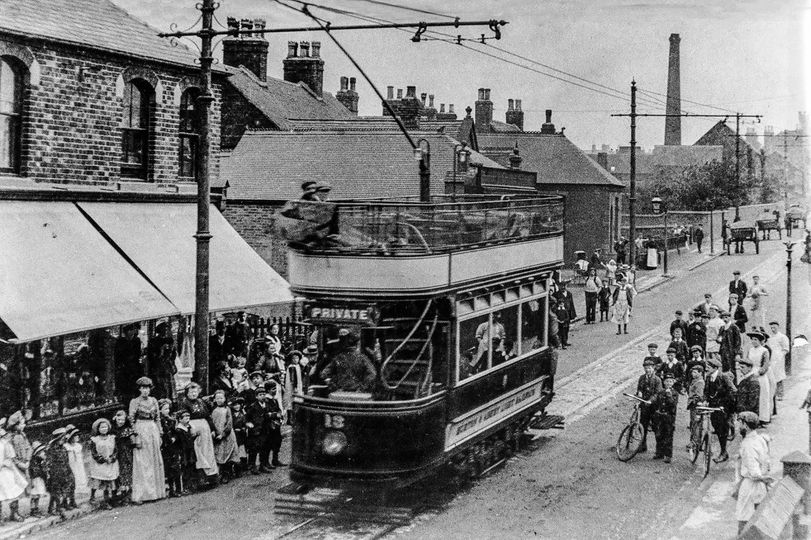
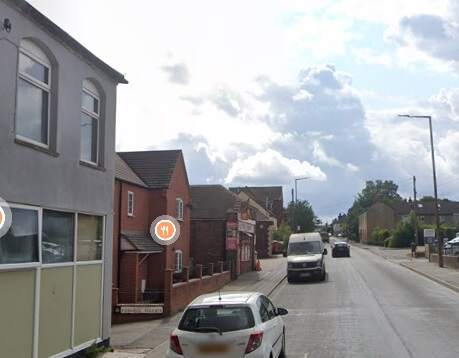
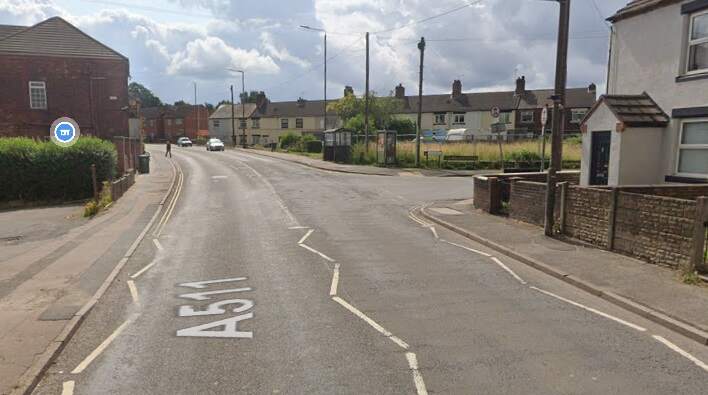
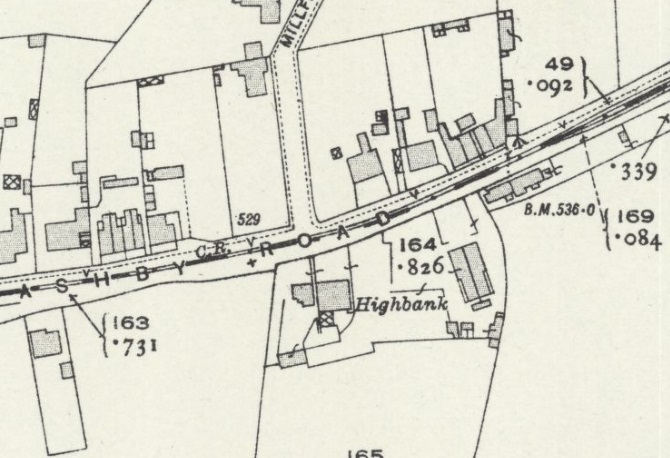
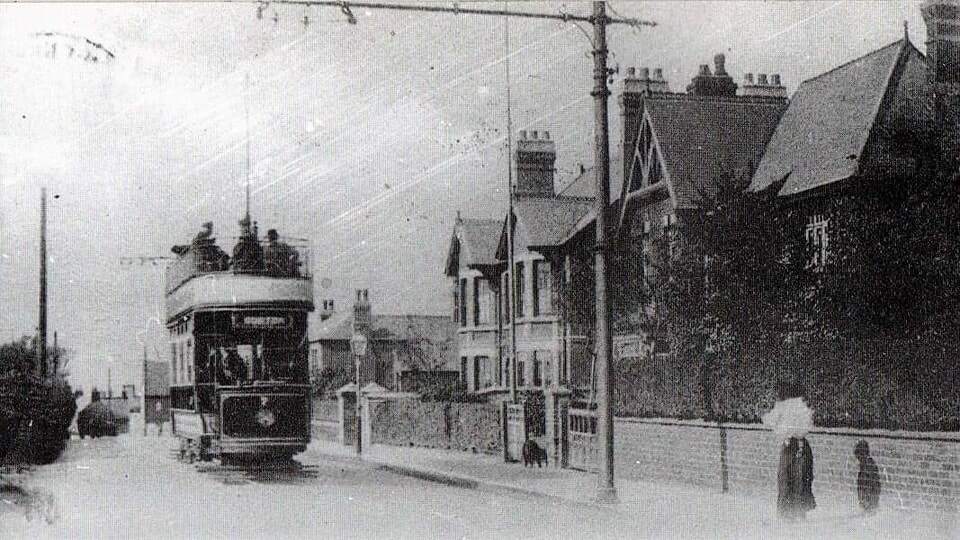
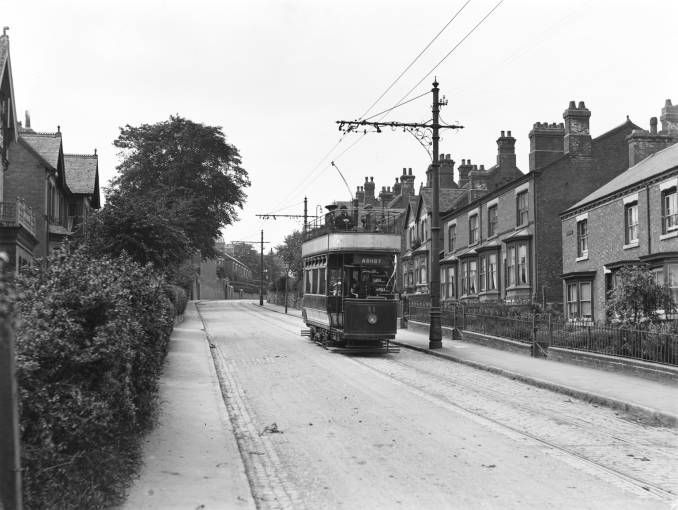
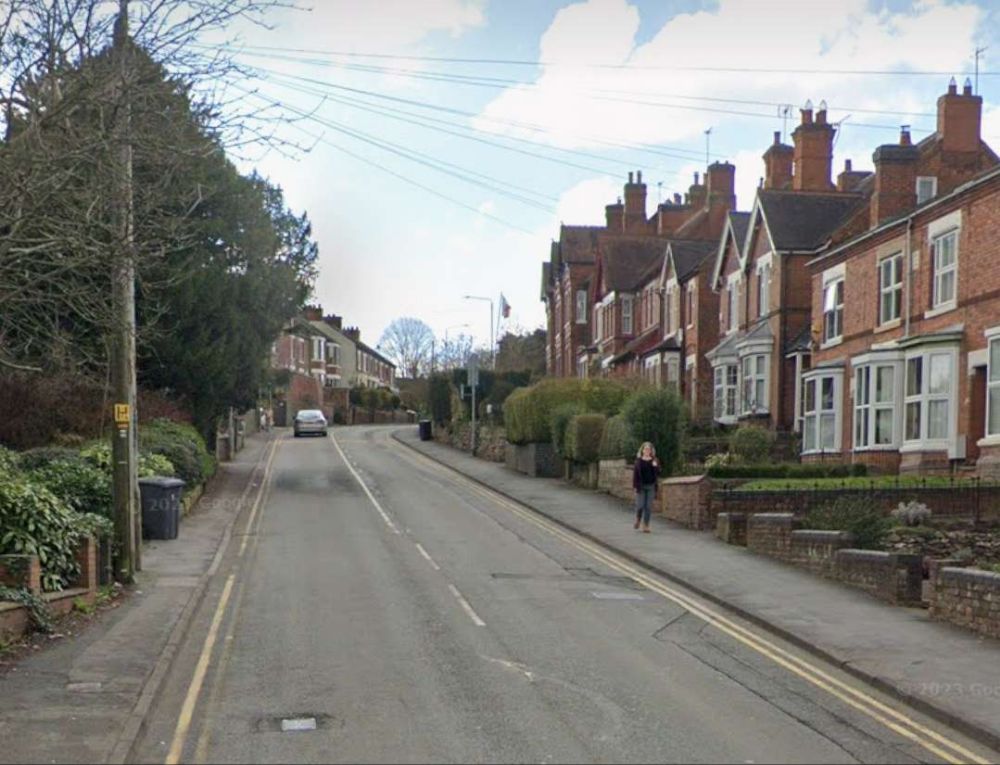
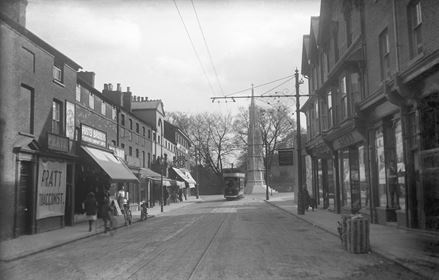
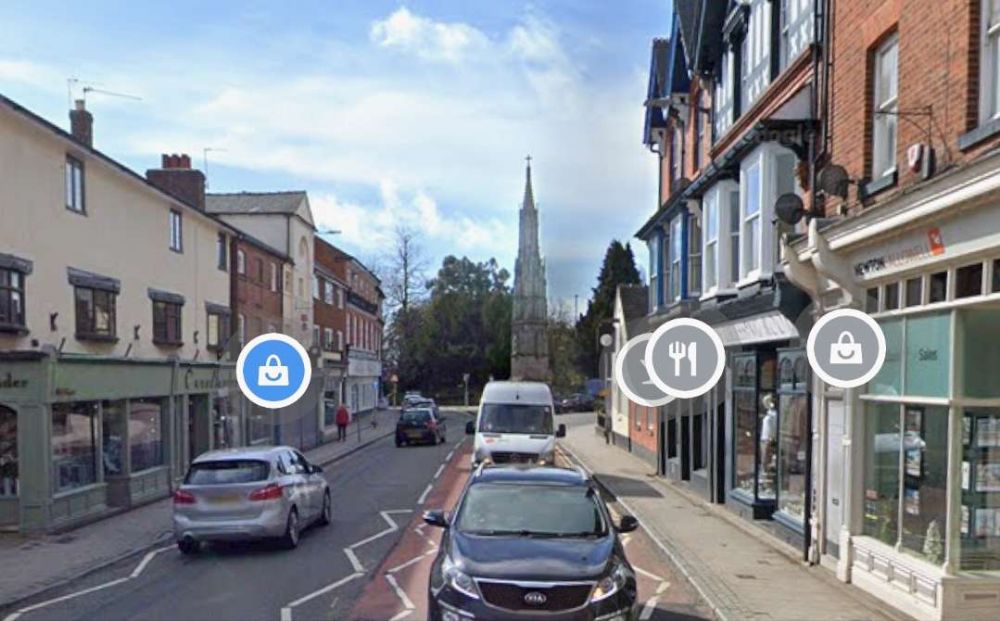
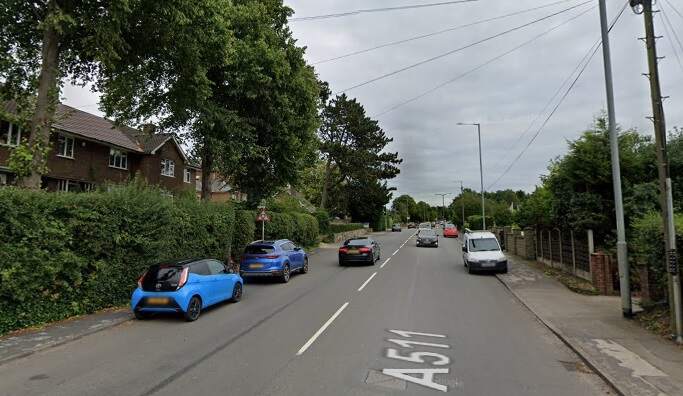
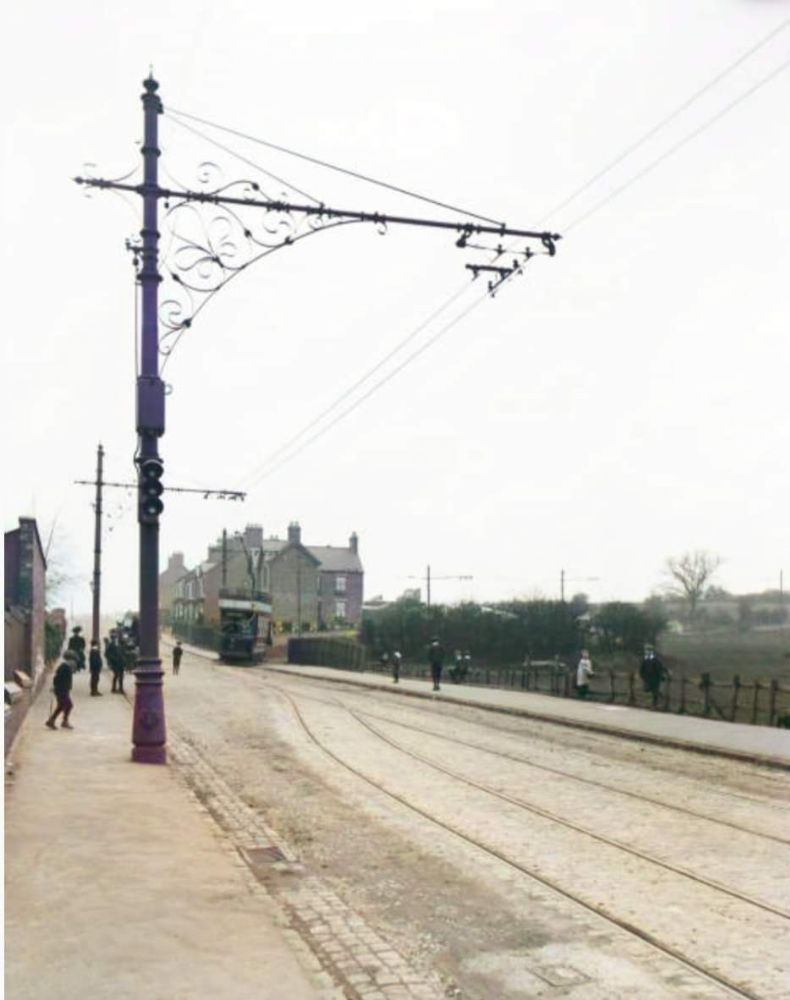
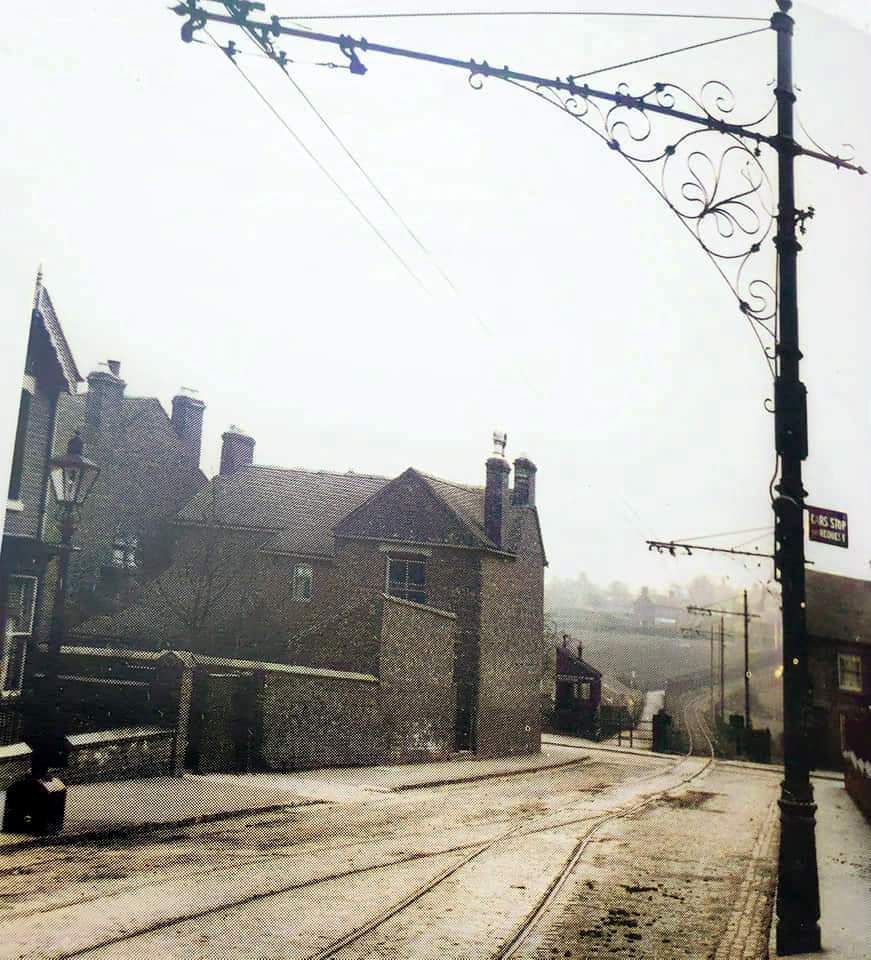
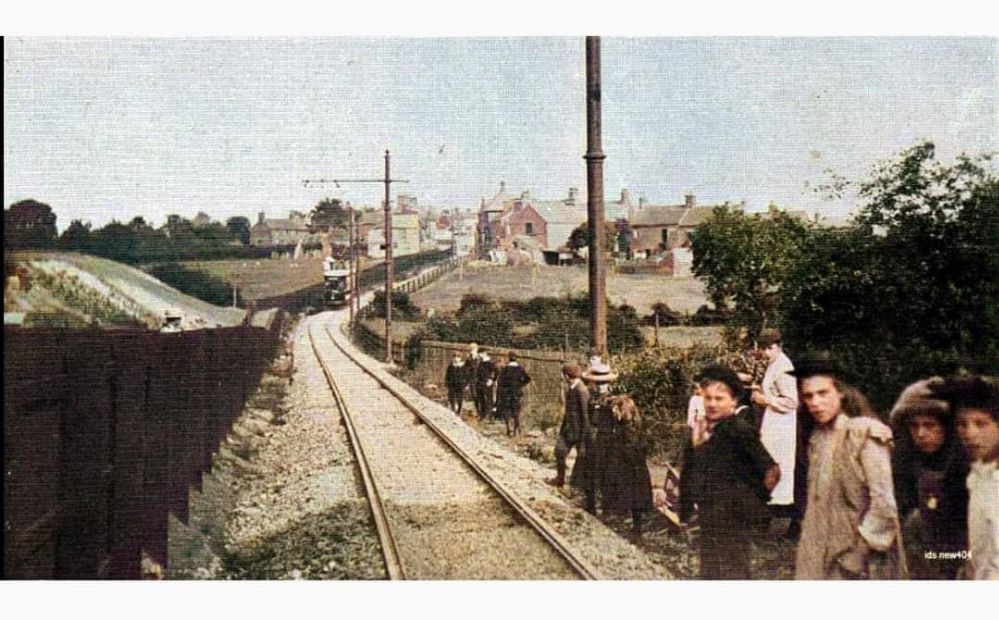
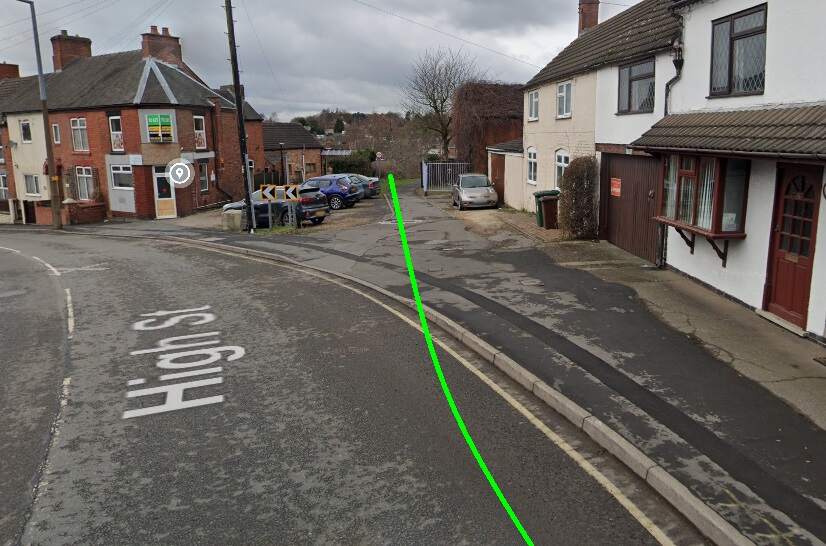
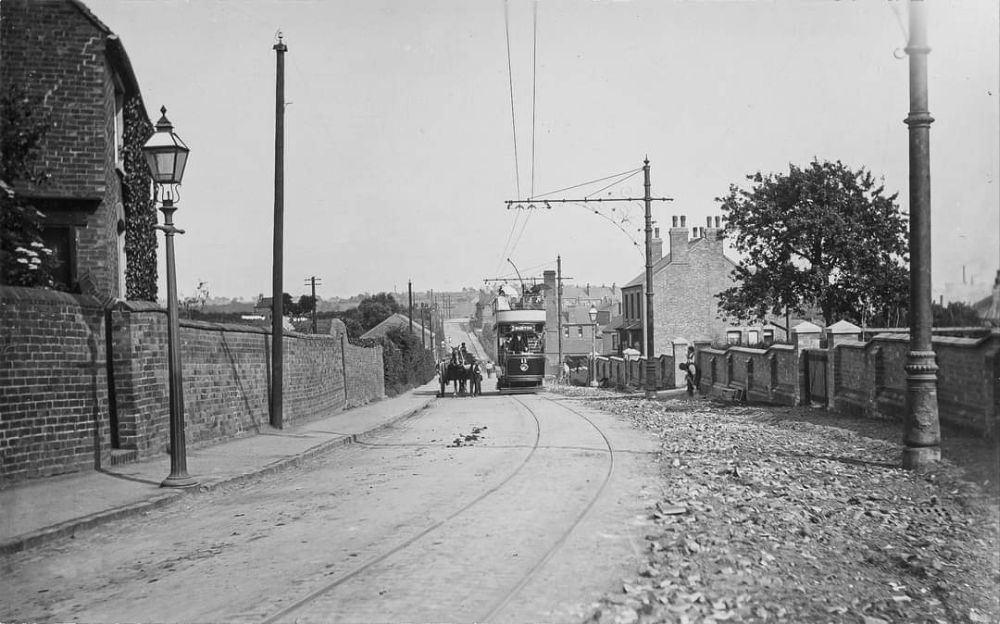
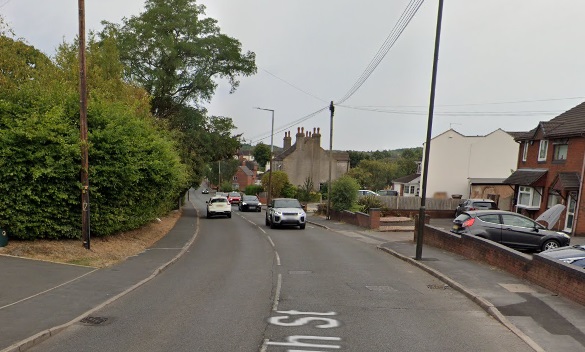
A view East along High Street, Swadlincote from the Market Place. This image was shared on the photographs New and Old of Swadlincote & Burton on Trent Facebook Group by Darren Jones on 8th July 2024. [17]A similar view down High Street in the 2st century. [Google Streetview, August 2022]Facing Southeast along High Street, Swadlincote in the 21st century. [Google Streetview, August 2022]A tram climbs Hill Street towards the Centre of Sawdlincote circa. 1910. This image was shared on the Swadlincote Area Railways, Tramways and Industrial History Facebook Group by Ian Siddalls on 24th February 2019. [33]From Hill Street the line of the old Light Railway runs along a short length of Sir Herbert Wragg Way . Ignoring the junction with the A514, the old line continued to curve gently to the East to follow the modern A514. [Google Streetview, March 2023]Facing East along the A514, the land either side of the modern road has been landscaped and shows little sign of its industrial heritage. [Google Streetview, March 2023]This next extract from the 1921 25″ Ordnance Survey shows the Light Railway running East along Swadlincote Road. The Midland Railway Woodville Brach Line can be seen entering the extract from the South. [15]Further to the East the Light Railway crossed the Woodville Goods Branch of the Midland Railway and ran through the centre of Woodville. [15]The same location in the 21st century. The goods depot is long-gone as are both the road overbridges close to the junction. [18]A tram on its way to Swadlincote passing New Inn, Woodville in the early part of the 20th century. This image was shared on the photographs New and Old of Swadlincote & Burton on Trent Facebook Group by Keith Townsley on 10th January 2023. [19]A similar view looking Northeast on High Street, Woodville, A511 in the 21stcentury. New Inn is on the left of the photo. [Google Streetview, July 2023]Woodville High Street on the 1921 25″ Ordnance Survey. [15]A similar area in the 21st century. [Google Maps, October 2024]Tram No. 13 on High Street Woodville on its test run in 1906. This image, which looks Southeast, was shared on the photographs New and Old of Swadlincote & Burton on Trent Facebook Group by Keith Townsley on 3rd May 2021. [16]A similar vantage point in the 21st century. [Google Streetview, July 2023]Further Southeast on Woodville High Street. [15]A similar area in the 21st century. [Google Maps, October 2024]Further to the Southeast once again. Trams followed the bend in the highway from High Street into Ashby Road. [15]Approximately the same length of road in the 21st century. [Google Maps, October 2024]High Street, Woodville bears left and becomes Ashby Road. [Google Streetview, July 2023]This next extract from the 1921 25″ Ordnance Survey takes us to the East edge of the particular map sheet. [15]Heading away from the camera circa 1911 Is Tram No. 7 en-route from Ashby to Burton on what is now the A511. In a minute or two, the tram would be running Northwest along High Street, Woodville. [34]The same location in the 21st century, looking West towards Woodville. [Google Streetview, July 2023]
The next three extracts for the 1920 25″ Ordnance Survey follow the line across the next map sheet.
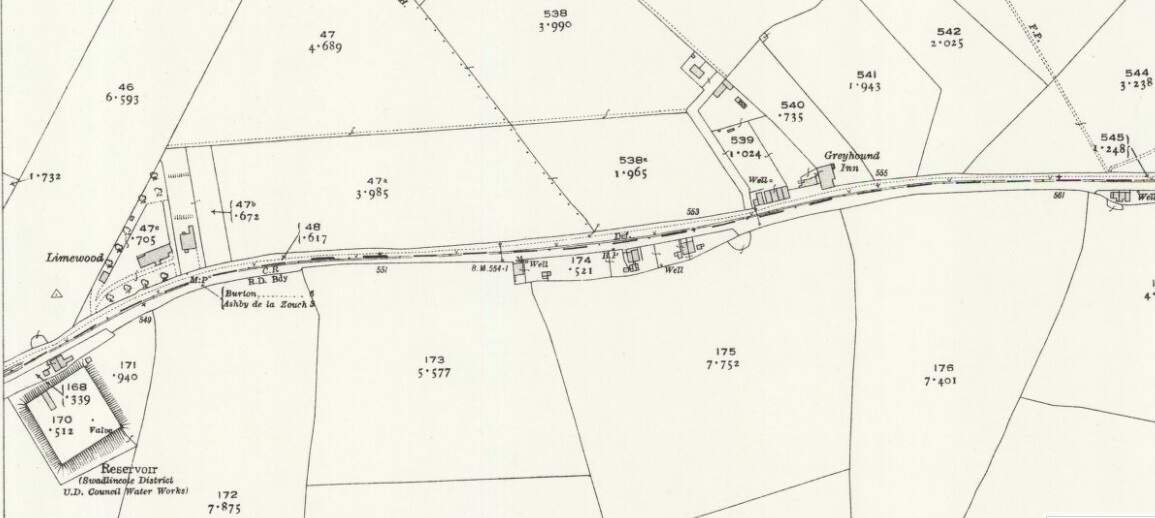
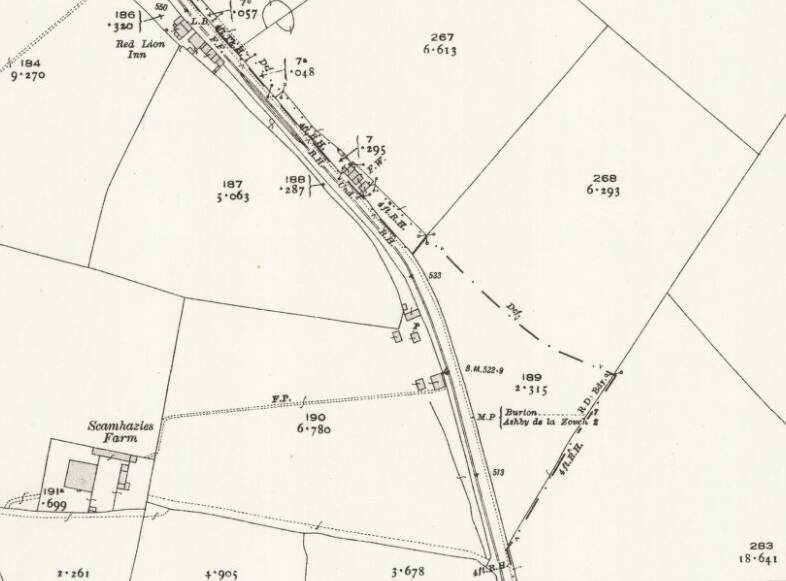
The Burton and Ashby Light Railway to the East of Woodville. [20]The Burton and Ashby Light Railway further to the East. At Boundary the line/road run Southeast towards Ashby. [20]Further to the Southeast, the bottom of this extract is also the bottom of the particular map sheet of the 25″ Ordnance Survey of 1920. [20]
Glendenning continues:
“After passing Swadlincote and Woodville, – the top of a hill is reached, 569 ft. above the sea level. Cornfields and meadows abound on either side, and there is also the magnificent landscape of Charnwood Forest. Then comes the hamlet of Boundary, so called, as it is a boundary of shires, parishes, and manors. Close by is the notable village of Smisby, set amongst fine park-like scenery.
It can still boast of its tournament field, which Sir Walter Scott made allusion to in “Ivanhoe.” The situation is very exposed at Boundary; severe storms rage there periodically, and the inhabitants say that anyone who can live winter and summer at Boundary could live anywhere. After entering Leicestershire, the new line makes a quick descent into Ashby-de-la-Zouch. The old town has the refined air of a fashionable inland watering-place, though its medicinal saline baths are not more than a century old. The fourteenth-century castle was wrecked during the seventeenth-century civil wars; but even the portions that remain are magnificent, alike in size, strength and beauty of architecture.” [1: p55-56]
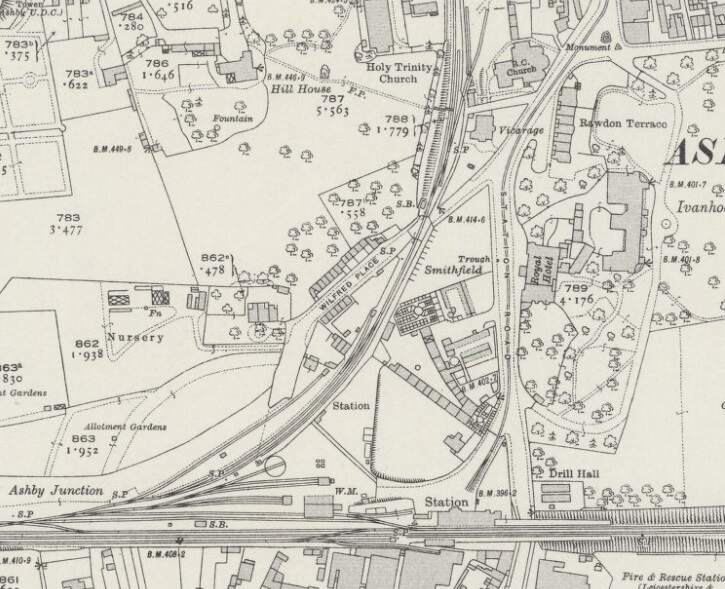
On its way down to Ashby-de-la-Zouch the road and light railway traverse another full 1921 25″ OS Sheet with little worthy of note. [21] The next image shows the line as it appears on the 25″ Ordnance Survey, much closer to Ashby-de-la-Zouch. [22]
“The power station and car shed have been built at Swadlincote, which is about midway between Burton and Ashby. These premises are designed to give every facility for convenient and economical working, with ample margins for any extensions that may be necessary in future. The shed has six lines of rails, and underneath there are pits about 4 ft. deep, like a railway engine shed, so that the motor machinery on the cars may be easily got at for the purpose of examination and repairs. Adjacent to the car shed is the spacious and well-equipped power station. Here we find that not only is steam out of date for light locomotive purpose, on a short track, but it is also being superseded as a prime-mover for the generation of electricity; at any rate, in comparatively small and isolated stations, where a varying and not very heavy load has to be dealt with.” [1: p56]
Perhaps for an audience unfamiliar with the use of electricity as a power-source for a railway, Glendenning spends quite a few words explaining the reason for the choice of diesel engines to create electricity for the network. Not initially the most obvious choice in a coal-mining area. He goes on to say that:
“There are two three-cylinder vertical engines of 240 18.1lp each with a huge fly-wheel weighing about nine tons, coupled direct to two cylinders, each capable of giving an output of 150 kilowatts.” [1: p57]
The Depot was “built with accommodation for 24 trams, 8 tracks x 3 deep but only 20 trams were owned.” [6]
Following closure of the system, “the tram sheds were used to accommodate Thomson’s Fair from 1935 into the 1940s and then for munitions during the Second World War.” [7]
Rolling Stock
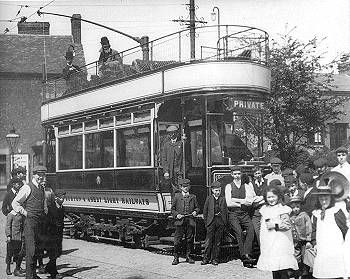
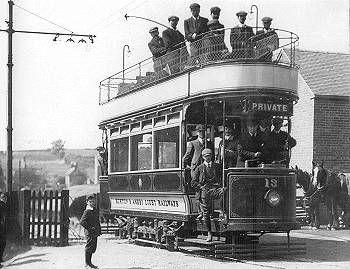
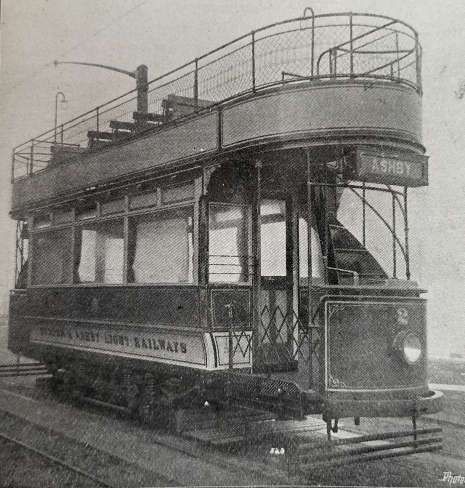
Glendenning reports that the new line was to be operated by open-topped cars “with all the latest possible improvements, … Built at the Brush Electrical Company’s Works, Loughborough.” [1:p57]
Glendenning goes on to describe the tramcars:
“They bear the Midland Railway Company’s coat-of-arms, and are designed to carry 57 passengers each, 22 inside and 35 outside. They are mounted on Brush rigid wheel base trucks, with steel tyred wheels, provided with Hudson-Bowring-lifeguards, and magnetic track brakes. The electrical equipments, powerful motors, etc., were furnished by the British Westinghouse Electric Manufac- turing Company, of Trafford Park, Man- chester. Accommodation has been provided for the carrying of a limited number of parcels on the platforms of the cars, while, at a later stage, it is intended to carry booked parcels. Workmen’s cars, with special fares, will be run as soon after the formal opening of the line as possible.” [1: p57]
Electric Tramcar No. 2. [1: p56]
The LMS Society notes that: “The cars were in Crimson Lake and a white livery with ornate gold panelled lining and Midland crest. It was in this condition that the cars came into LMS ownership but all the cars were repainted in a simpler livery at Derby Works. The original white had weathered to a light cream and the later cream mellowed in a short life to a yellow. Although the method of tramsport to Derby Works is not certain the LMS owned bogie tramcar wagons and with an open top tramcar the bodies would almost certainly come within the loading gauge. The trolley pole, seats and wire screens were easily removed and so it is more than likely visits to works were by rail journey.” [6]
There was also a horse-drawn trolley tower/maintenance platform which can be seen in the photograph of the tram depot above.
The Service Provided
Glendenning notes that the frequency of service “between Ashby, Swadlincote and Burton [is] every half hour. … Between Woodville, Swadlincote, Newhall and Gresley, every 15 mins. … Ordinary service commences at 8 am. … Passengers between Ashby and Gresley change at Swadlincote Market Place or Woodhouse Road.” [1: p57]
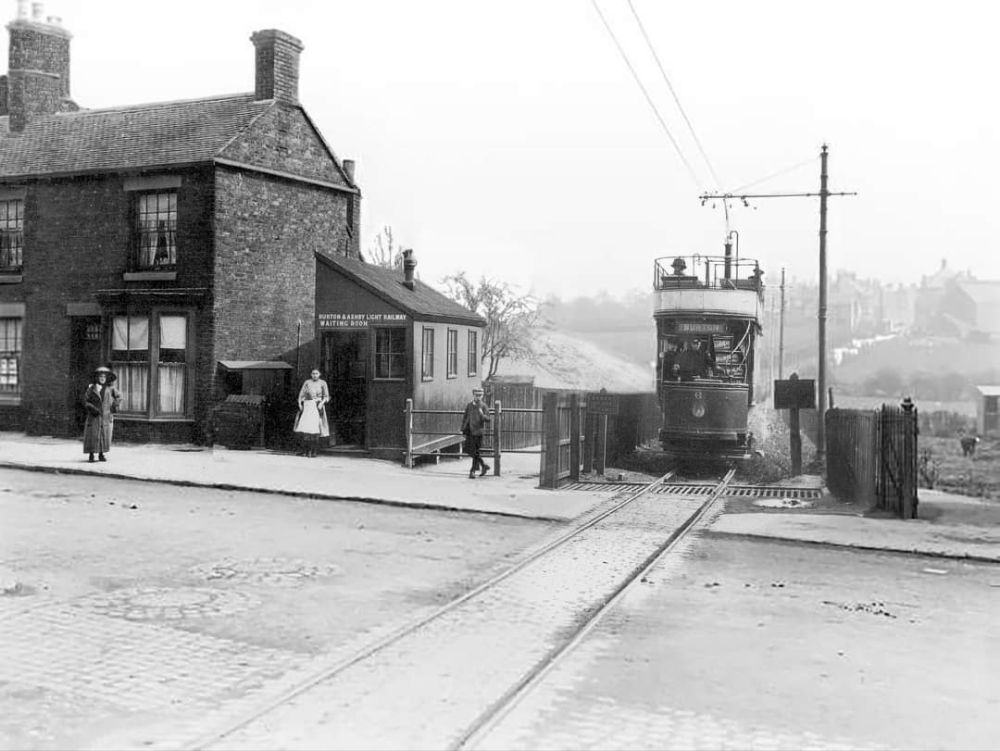
This photograph was taken on West Street, Swadlincote. It is probably a picture of one of the Sunday School outings. The image was shared on the Photographs New and Old of Swadlincote and Burton on Trent Facebook Group by Keith Townley on 19th June 2021. [11]
The LMS Society goes on to tell us that:
“Special services were often run, Sunday School Outings and other Club Outings, and even a Railway Club on 8th July, 1909 hired three trams for a return trip from Burton to Ashby. Special services to feed passengers to excursions from Burton Station before normal services, and upon their return after the last train, were another feature.
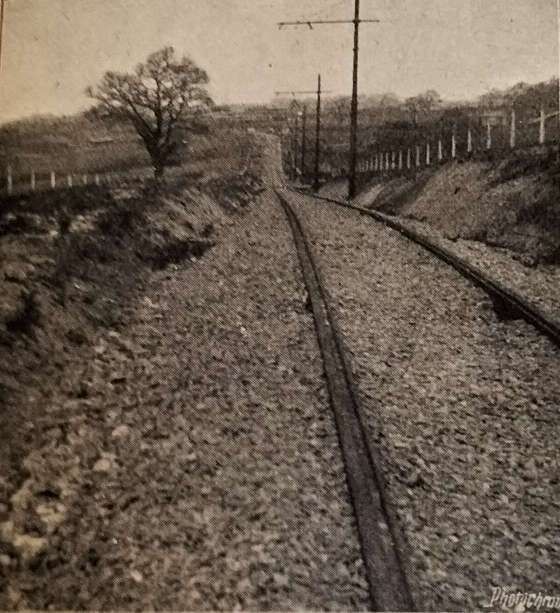
Three Aspect Colour light signalling was installed on the reserved country stretch between Stanhope Bretby and Sunnyside, Newhall where the line traversed the brow of a hill and the west passing loop was out-of-sight from both sides. The lights were operated by a trolley wheel contact on a solenoid, a system devised and installed by a firm, Bracknell, Munro and Rogers.” [6]
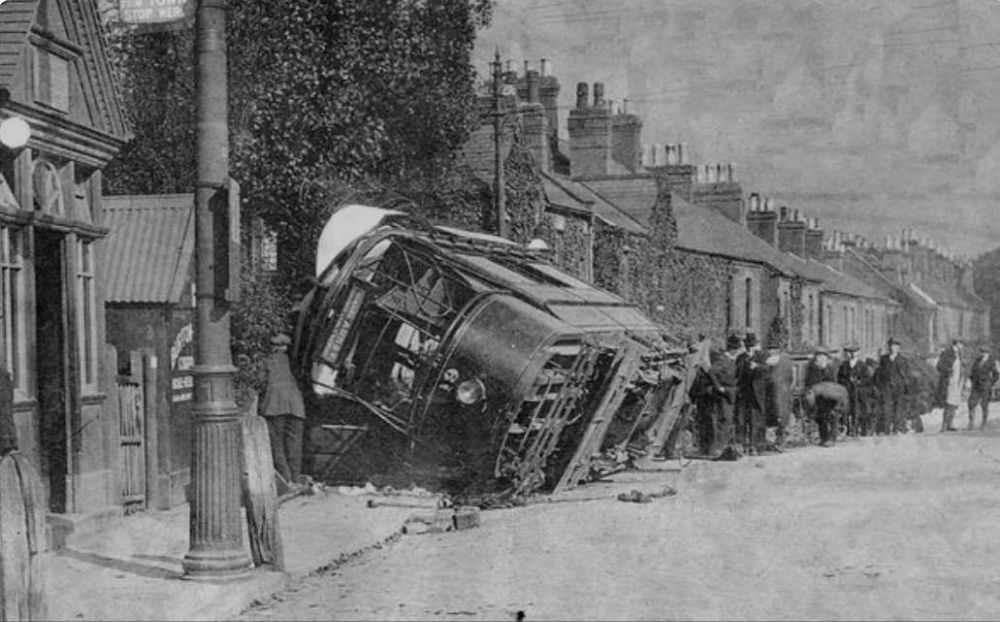
The safety record of the Light Railway “was marred by only one serious accident. No. 19 ran away and overturned at the foot of Bearwood Hill in 1915 but there were few injuries.” [6] Another source says that there was an accident in 1919 which resulted in the death of two people. [10]
The 1919 accident at the bottom of Bearwood Hill which resulted in the death of two people. [10]
The line was completed in 1906 and was assumed locally and by Glendenning to have a bright future. It was, in fact, short-lived:
“The Burton and Ashby Light Railway Company had a fleet of 20 tramcars and these operated until early in 1927. … With the increasing use of the motor bus, competition for passengers was intense and the tramway services were reduced to rush hours only. With costly maintenance required on the now 20 year-old trackwork, the tramways were beset with problems and finally the doors were closed on 19th February 1927.
Rail passenger services were still running through Castle Gresley, Swadlincote, Woodville and Ashby and motor buses took over the tram services.
The major undertaking ‘Midland Red’ or the Birmingham and Midland Motor Omnibus Co. Ltd., to quote its full title, in which the LMS had a controlling interest, took over the main services. Other local operators, Victoria Motorways, Regent buses, Brooks Blue buses ran alongside the trams for a period.” [6]
2026 is the 120th anniversary of the opening of the line. Graham Nutt shared a YouTube video with me in early July 2026. … https://www.youtube.com/watch?v=tpEtiyTisH8. [35]
References
Seymour Glendenning; The Burton and Ashby Light Railway; in The Railway Magazine, London, July 1906, p53-57.
An article by Seymour Glendenning in the July 1906 issue of The Railway Magazine focussed on the newly opened Burton & Ashby Light Railway. [1]
The light railway was a 3ft 6in gauge electric tram line supplied with electricity from a diesel generator plant near Swadlincote. [17] The power plant sat alongside the tram depot. [1: p56]
Glendenning explains that the rail network in the area between Burton and Ashby-de-la-Zouch was, of necessity design round the topography of South Derbyshire which resulted in the Midland Railway bypassing some significant industry and associated communities. A branch, built by the Midland Railway, off the main line penetrated the South Derbyshire Hills to serve Bretby Colliery. Another Midland Railway branch line described a rough horseshoe alignment, leaving the mainline not far from the Bretby Colliery line. This second branch served Newhall, Swadlincote and Woodville with a short branch designated as the Woodville Goods Branch.
This network of lines meant that the journey from Burton to Ashby was longer than the two towns might have hoped, and that transport to and from Ashby and Burton and the villages in the hills was much longer than it might be if an alternative could be designed which could cope with the steeper gradients necessary on a more direct route.
Initially local interests brought a bill before Parliament for the construction of a Light Railway. The Midland Railway opposed the bill which was then withdrawn with the Midland Railway agreeing to construct the line. Glendenning notes that it took only two years from the Midland’s agreement to carry out the project to its completion in 1906.
The Light Railways was “an electric railway, laid upon the public highway, with stopping places at all penny stages and intermediate points, while the various villages and towns through which it passes will practically serve as stations. … [Some] of the line … resembles that of a branch railway, fenced or hedged in on either side, this being necessary in consequence of short cuts across fields or garden plots. … The electric current is taken from an overhead cable, suspended from steel poles or standards, placed at frequent intervals along the line of route.” [1: p54]
Glendenning tells us that “the greater part of the track [was] laid singly and on one side of the public highway, a double road being laid at frequent intervals to serve as crossing places. An enormous expense, however, [was] incurred in widenings and clearance. For nearly half-a-mile in Newhall the street … had to be widened, involving the demolition of a number of houses and the clearing away of numerous front gardens. In Ashby itself, also, where the tram [had] to take some very abrupt curves on its tortuous way to the station, valuable property [was] cleared away in Bath Street and Market Street, in order to afford a safe route for the cars.” [1: p54]
The route of the line(s) is shown in black on the map extract below.
The line runs through 3 counties – Staffordshire, Derbyshire and Leicestershire. In 1906, Glendenning starts to describe the route:
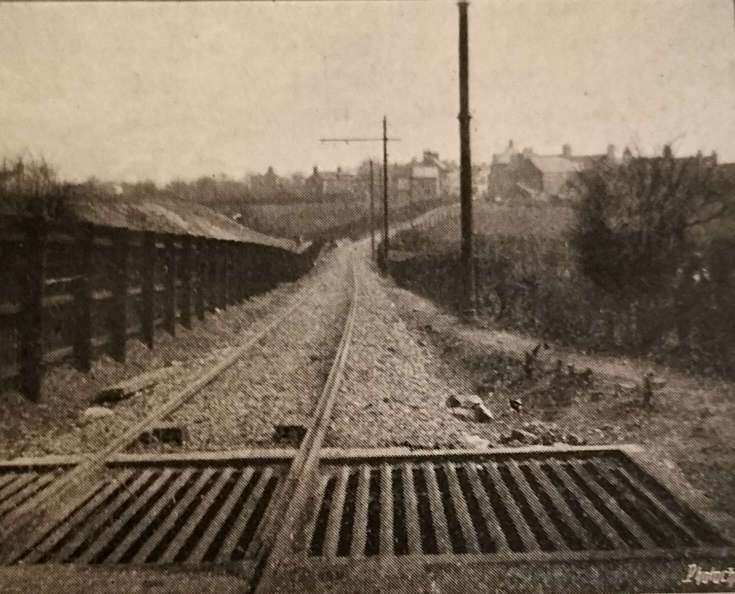
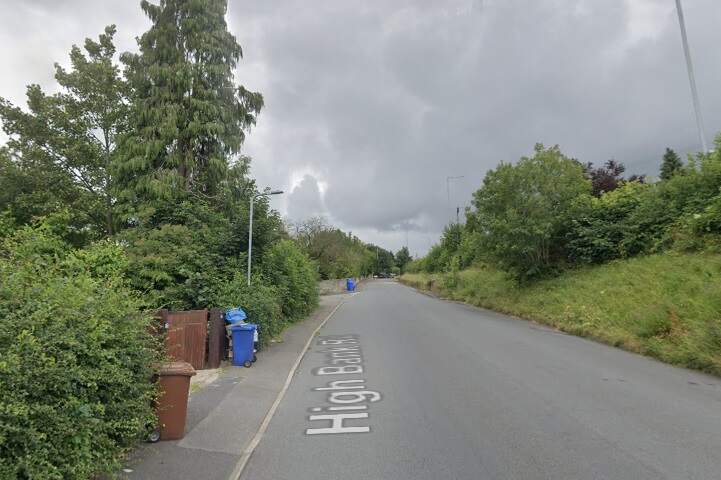
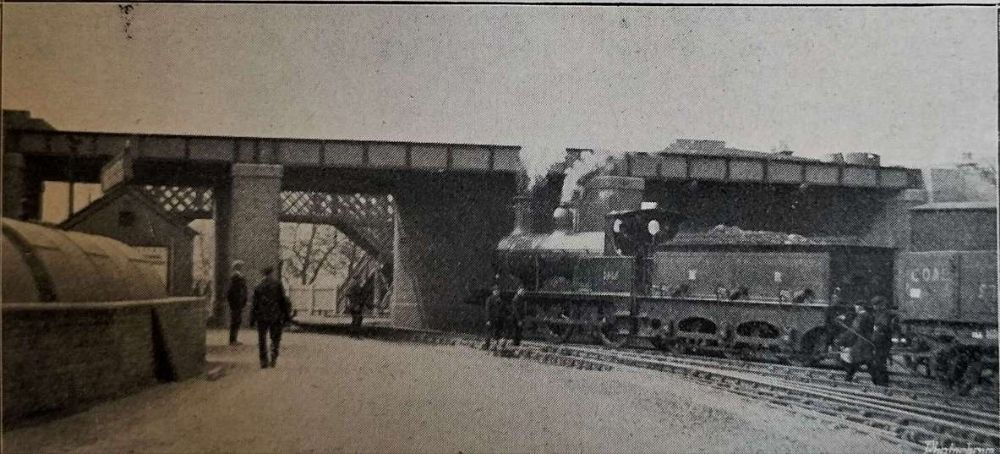
“At the western extremity is Burton, with its huge breweries which supply a great part of the world’s beer. It was intended at first that, after crossing the Trent Bridge, the railway should leave Burton up a steep slope between the Winshill and Stapenhill roads, but eventually it was mutually agreed between the town and the railway that the Corporation track should be used as far as Winshill. The new line, therefore, begins at High Bank Road, with a very deep curved gradient up to Moat Bank, where a height of 250 ft. above Burton is reached. A fine stretch of hilly country then opens to view, with Brizlincote Hall on the right; next the line dips 60 ft. to cross a lateral valley. Then it rises again, and follows a number of switchback undulations until it enters Newhall, which is 400 ft. above ordnance survey datum line. Newhall furnishes a strong contrast to the fair country west of it. Collieries, brick yards, and pipe works abound. Newhall displays the characteristics of mining villages, i.e., it is dingy, squalid, and untidy. However, its teeming population will doubtless find the new line a very great convenience, both for business and pleasure purposes, and there seems little doubt but what the Midland Railway Company will reap a continued harvest of fares from the thousands of miners and their families. From Newhall, the level of the track gradually descends until it is below 200 ft., and then leaves the Ashby main road to take a right-angled turn into Swadlincote. Here the line, after going due south for a time, is carried over the old railway the single loop to Swadlincote and Woodville before mentioned on a long bridge of steel girders, resting on blue brick piers. The bridge [as can be seen below] has a switchback appearance, while the [second view below] taken from Swadlincote goods yard, shows a Midland Railway train passing under [the bridge there]. Shortly after crossing the bridge the track takes an abrupt turn to the left, in order to resume its eastward direction. At the same place, there is a branch about two miles long, going first south and then south-west to Gresley. The road towards Ashby rises continuously until it reaches a height of 569 ft. above sea level. It passes through the heart of the Derbyshire Potteries, where a great industry is carried on in the manufacture of furnace bricks, sanitary pipes, and common earthenware. Furnaces and kilns abound in Swadlincote, and the subsidiary industry of crate making is also much in evidence.” [1: p54-55]
Before continuing to follow Glendenning’s description of the line East from Swadlincote, it is worth looking at the first part of the line already described by Glendenning on contemporary mapping from the early 20th century, and as it appears in the 21st century.
The Burton terminus of the line was in Wellington Street, although as we have already noted the route within Burton ran not on Midland Railway metals but on those of the Corporation.
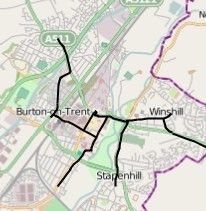
Burton-on-Trent’s tramway network opened on 3rd August 1903. “The system comprised four routes going out from Station Street to Horninglow, Branston Road, Stapenhill, and Winshill. The depot was in Horninglow Road. … The initial 20 tramcars were built by the Electric Railway & Tramway Carriage Works of Preston. A further four cars were obtained in 1919. … The system was closed on 31 December 1929.” [3]
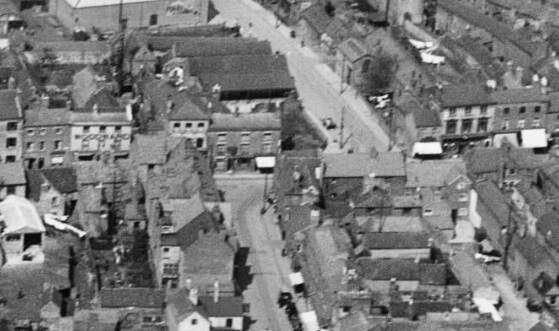
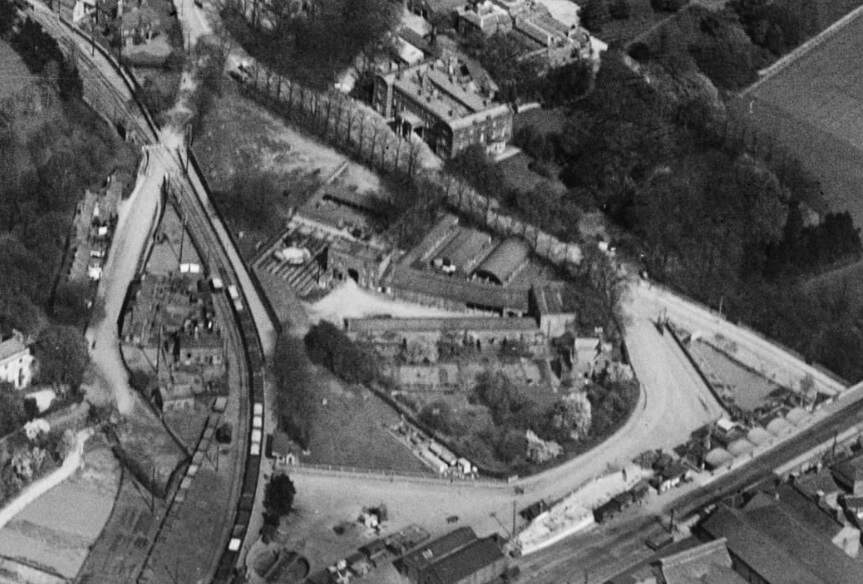
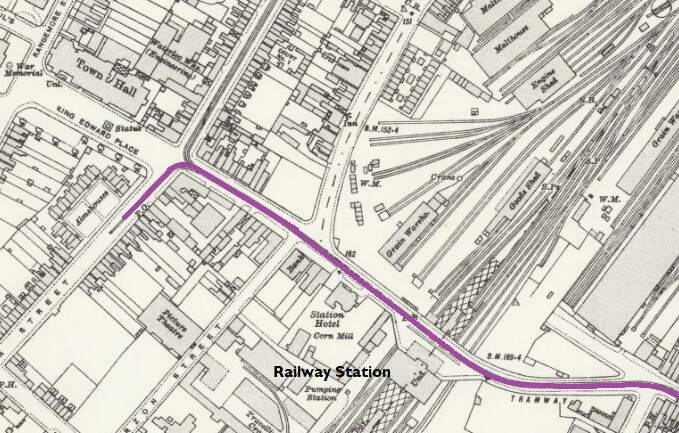
The Burton-on-Trent tramway network. The terminus of the Burton and Ashby Light Railway was to the West of the railway station which sits, in the adjacent map extract, below the second ‘n’ of Burton-on-Trent. The terminus of the tramway was close to the Town Hall on Wellington Street, just beneath the second ‘o’ of Burton-on-Trent.
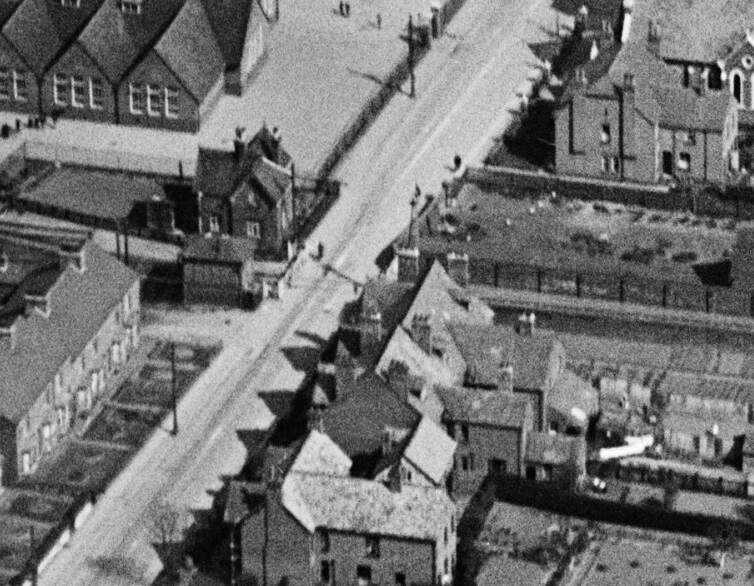
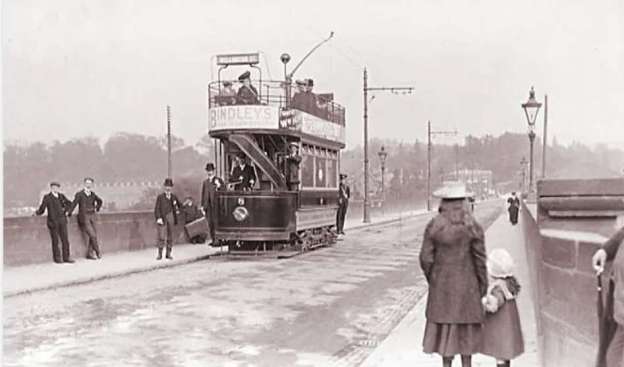
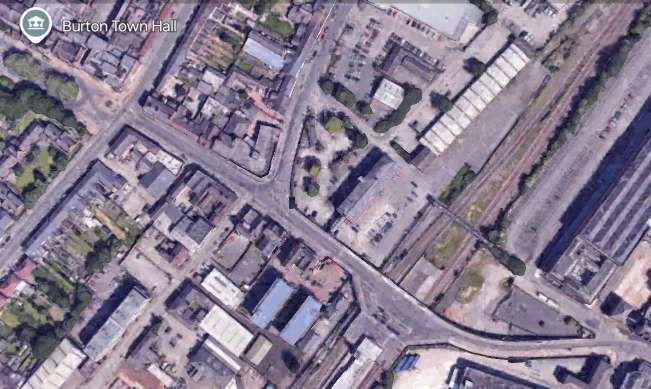
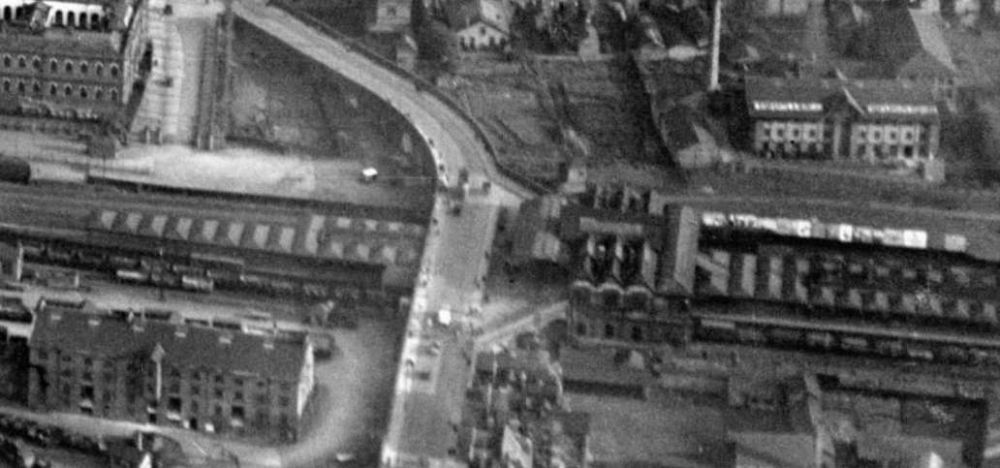
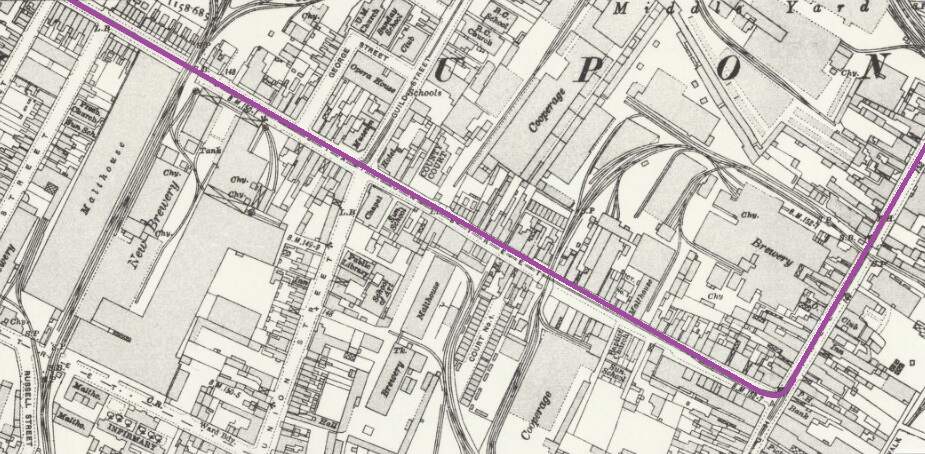
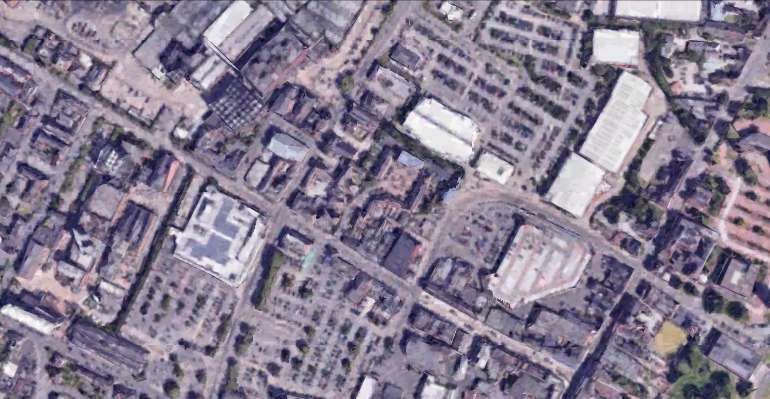
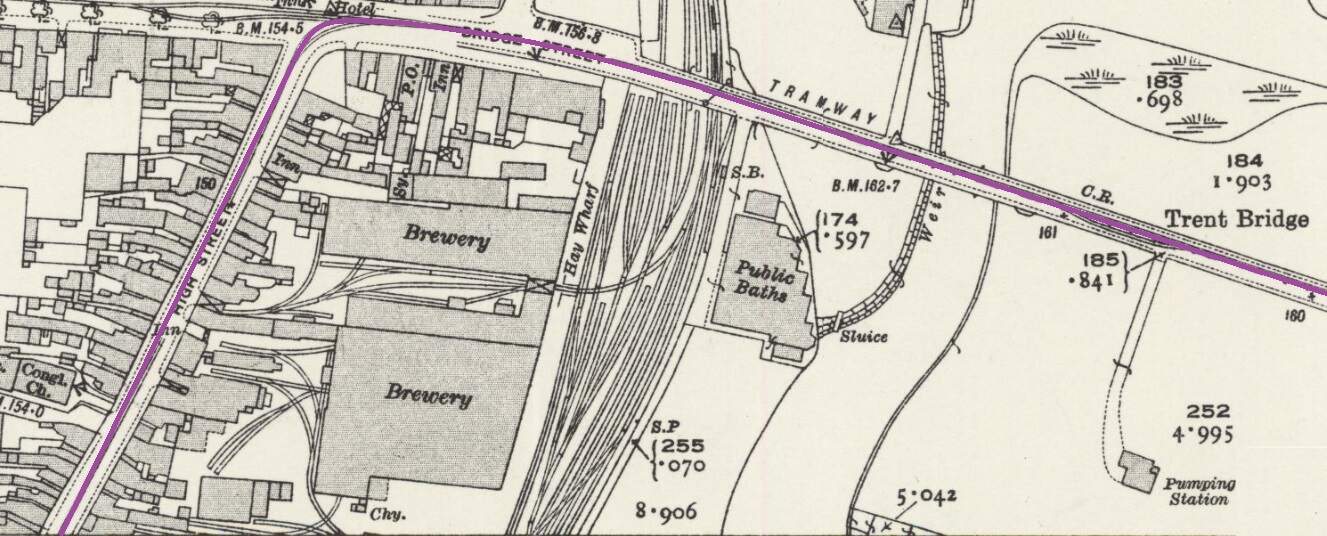
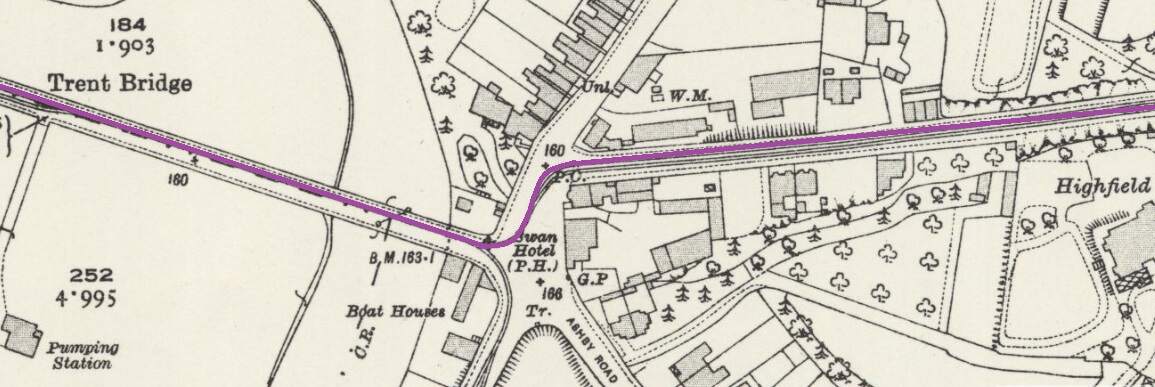
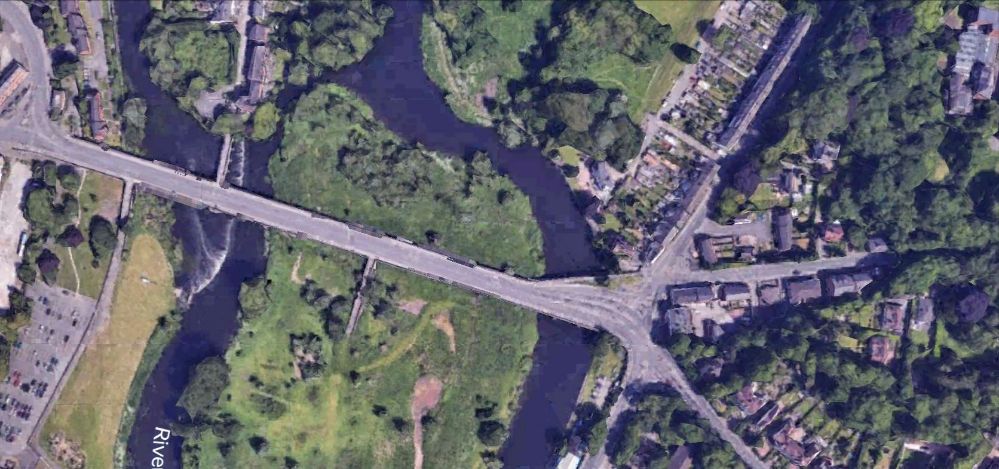
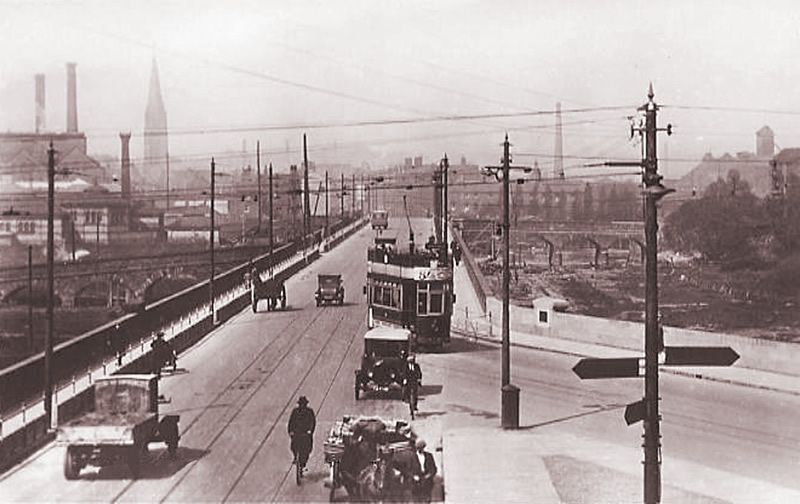
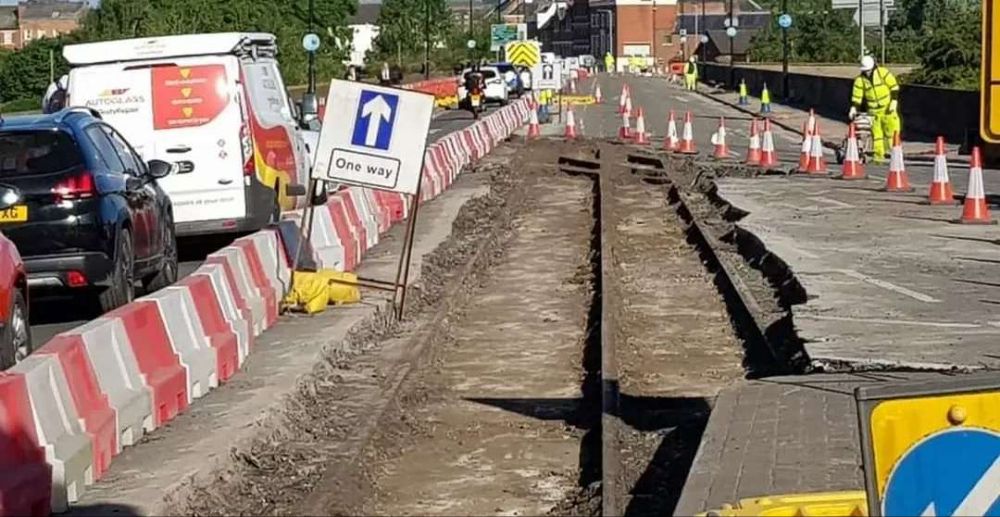
The terminus of the Burton and Ashby Light Railway was outside the post office on Wellington Street, just a stone’s throw from Burton Town Hall and the railway station just a short distance to the Southeast. The lilac line superimposed on the 1920 25″ OS map (published in 1922), shows the route of the line which ran along the town’s tramway network. [4]The same area in the 21st century. [Google Earth, October 2024]The railway station, seen from the Northwest in 1927. Burton-on-Trent Railway Station Passenger Facilities were at road level above the station platforms. Borough Road ran across the front of the station building, at the centre of this extract from Britain From Above aerial image No. EPW019724. The route followed by trams from the Burton and Ashby Light Railway started off the bottom of the image on Wellington Street and followed Borough Road. [11]The 1920 25″ OS mapping shows the route continuing along Station Street and turning up High Street. [5]Approximately the same area in the 21st century. [Google Earth, October 2024]Burton and Ashby Light Railway trams continued Northeast on High Street. [6]The Light Railway trams continued to follow the track of the Corporation Tramways across Trent Bridge. [7]The Light Railway’s trams continued to the East along Bearwood Hill Road. [7]Trent Bridge and Bearwood Hill Road to the East.
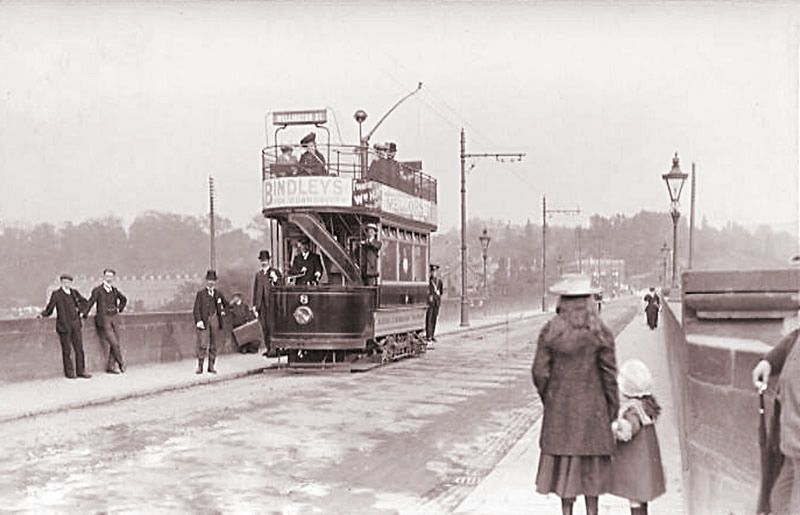
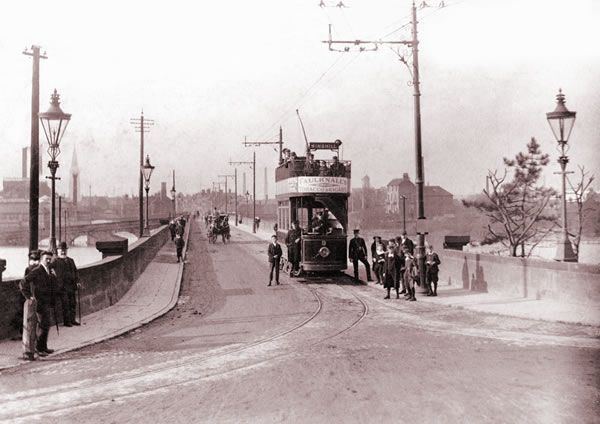
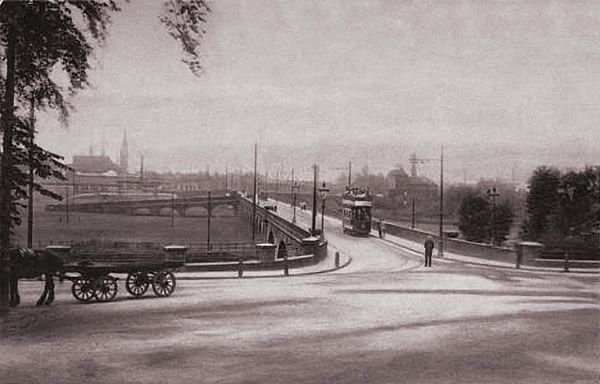
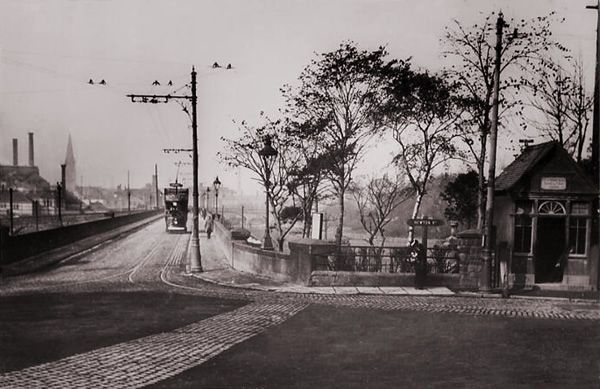
A series of images showing Trent Bridge in tramway days follows below.
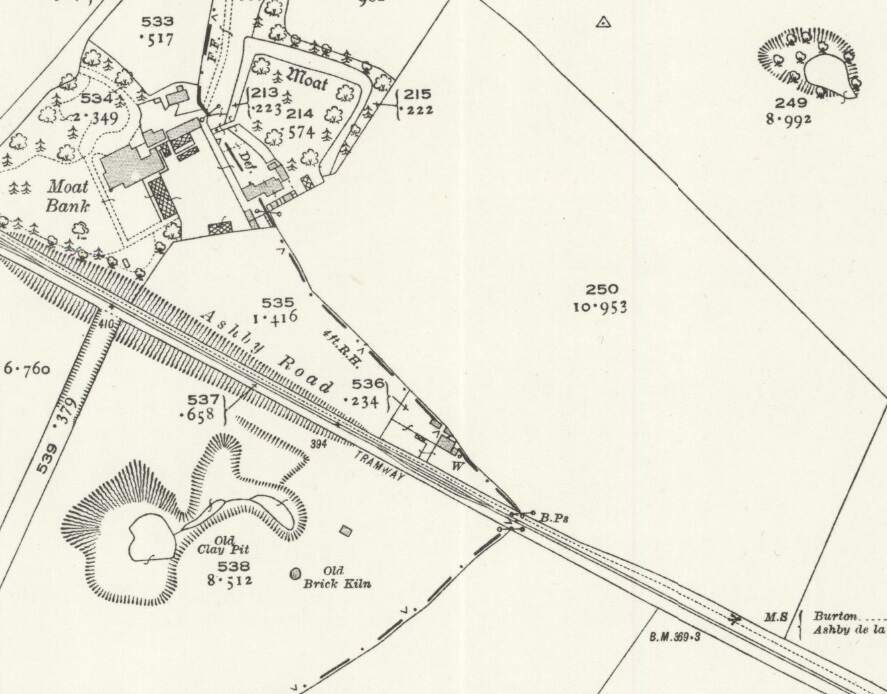
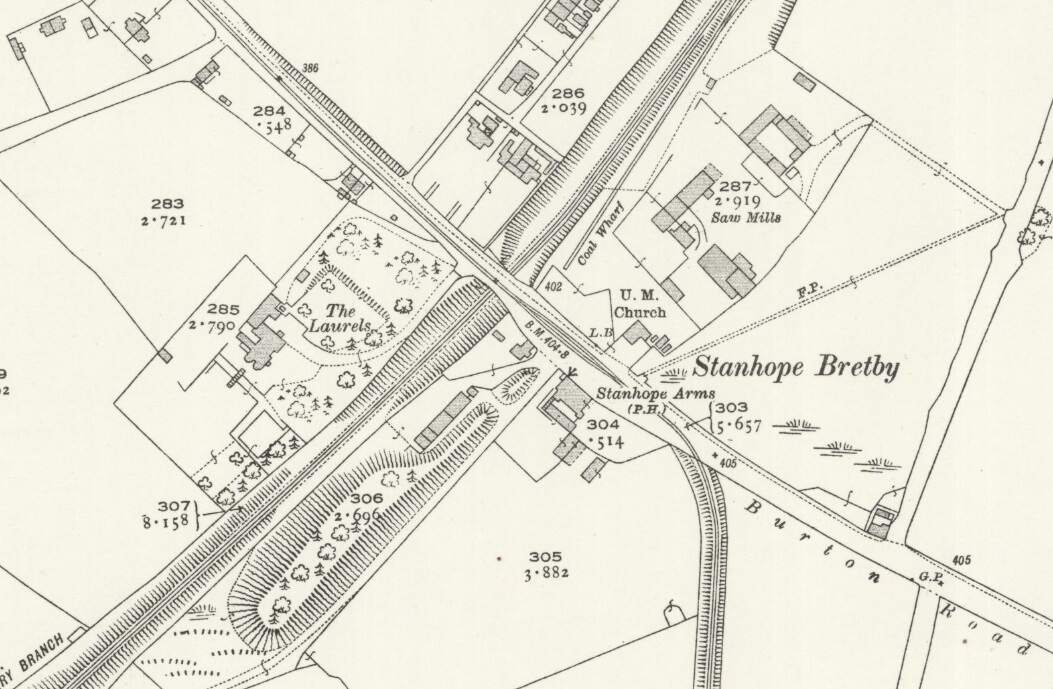
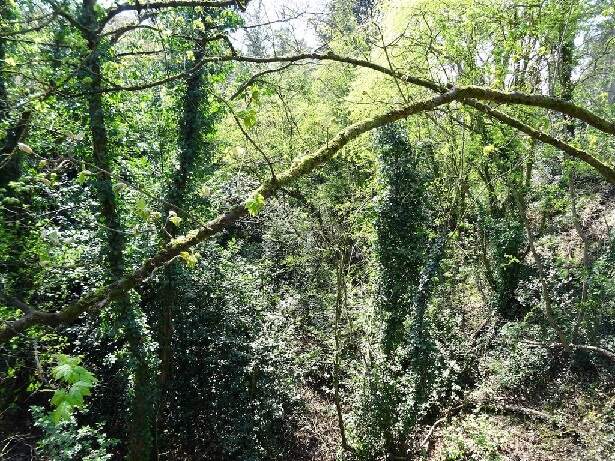
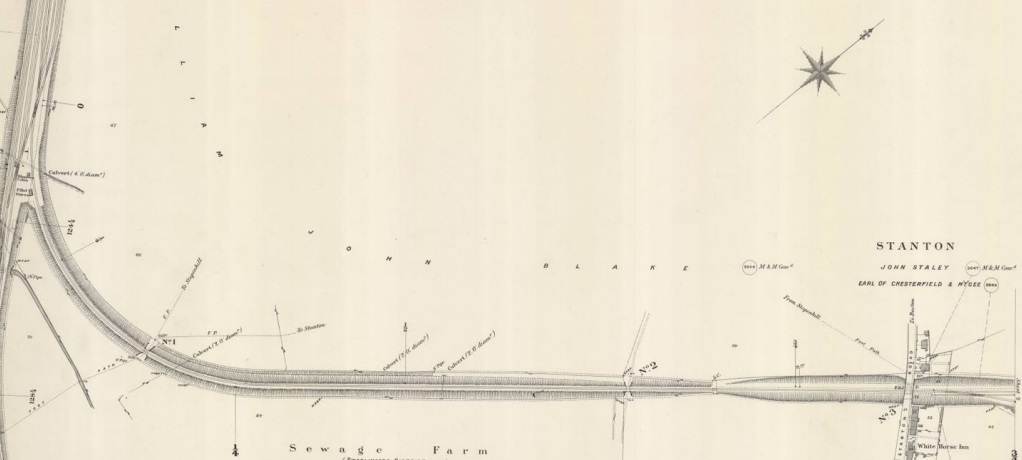
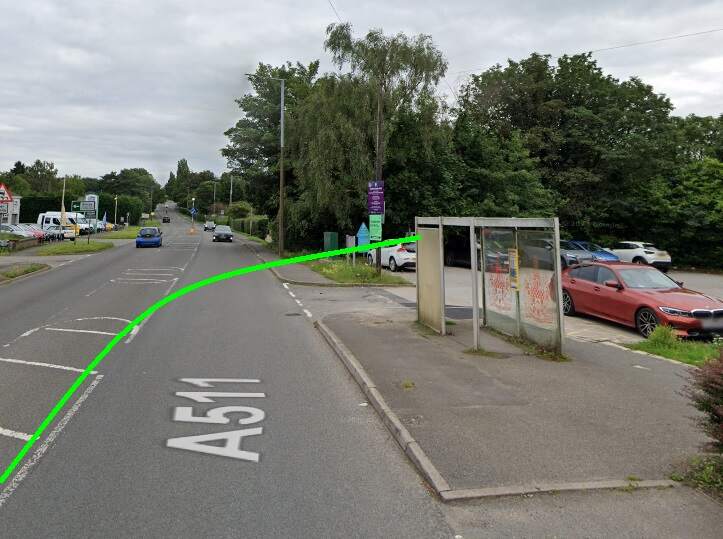
After crossing the Midland Branch the Burton and Ashby Light Railway turned of the road that became the A511 (Burton Road) to the South and rather then following a highway picked its own route through the fields.
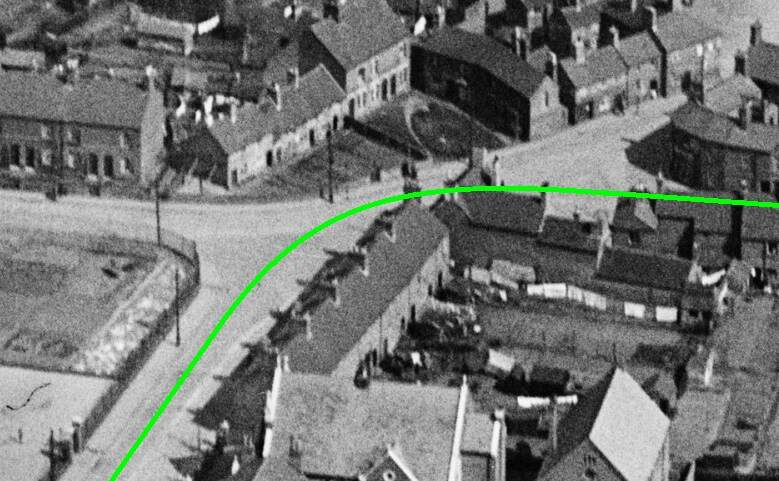
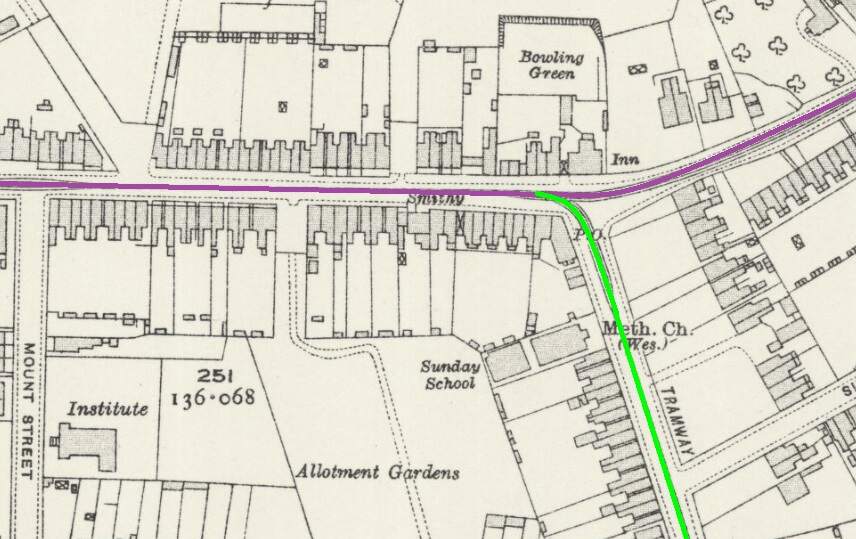
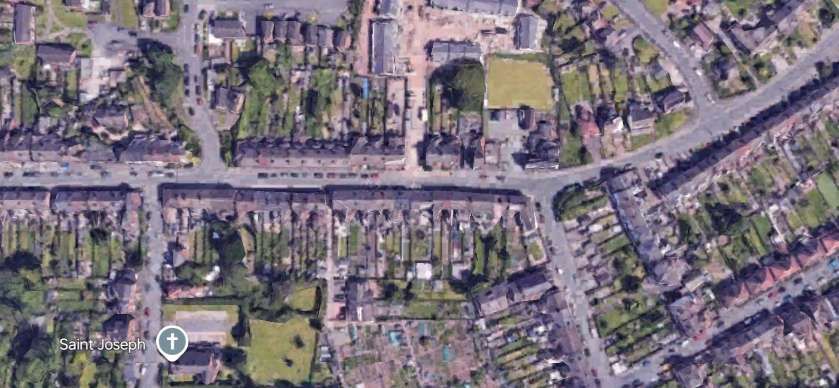
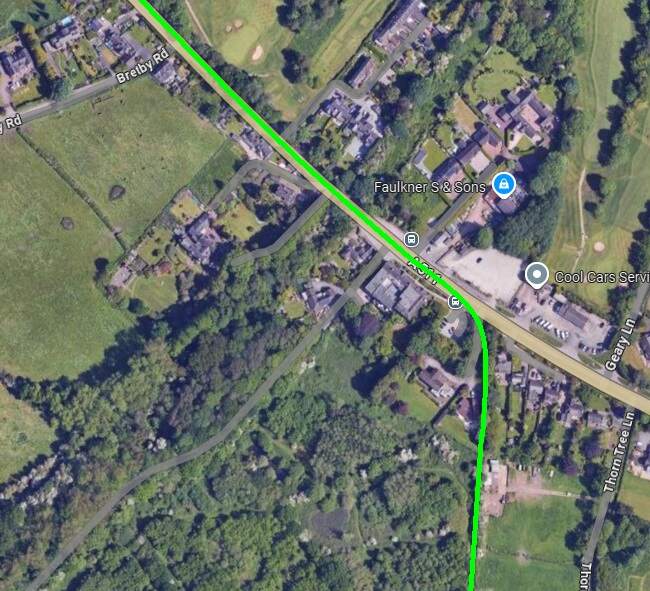
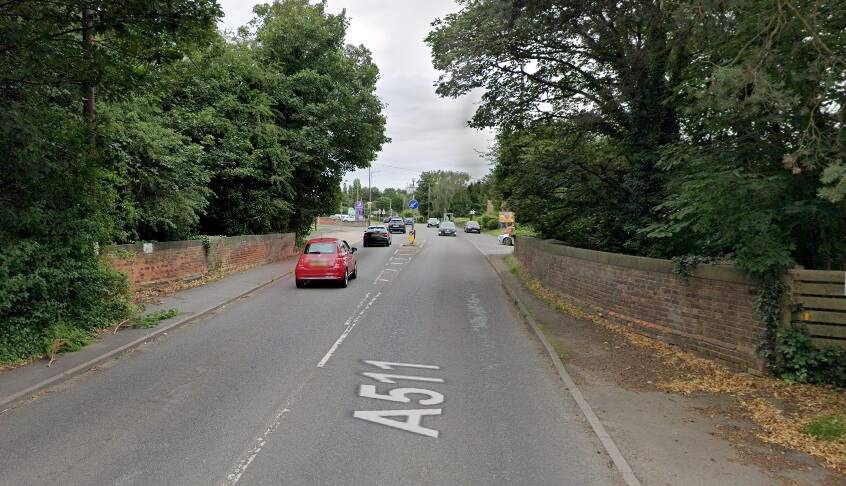
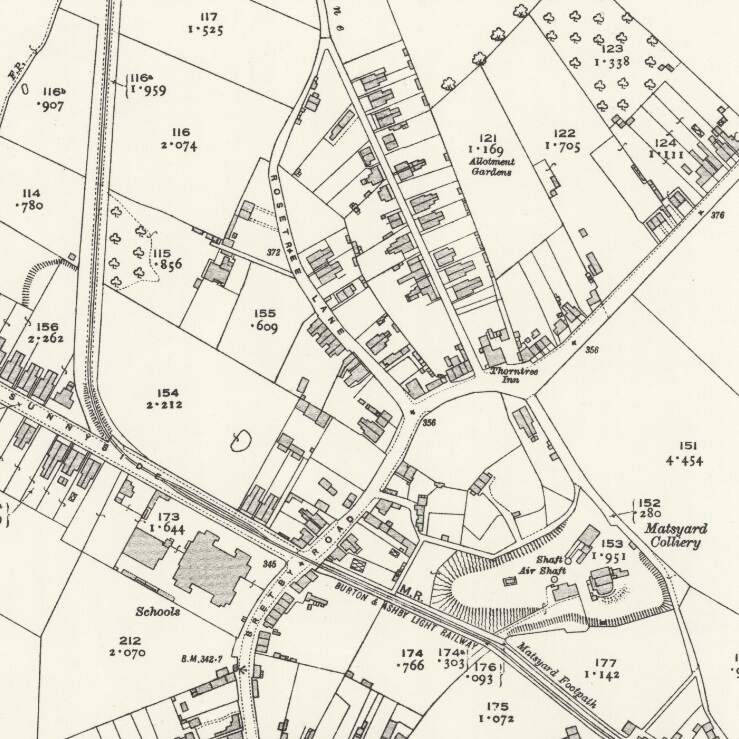
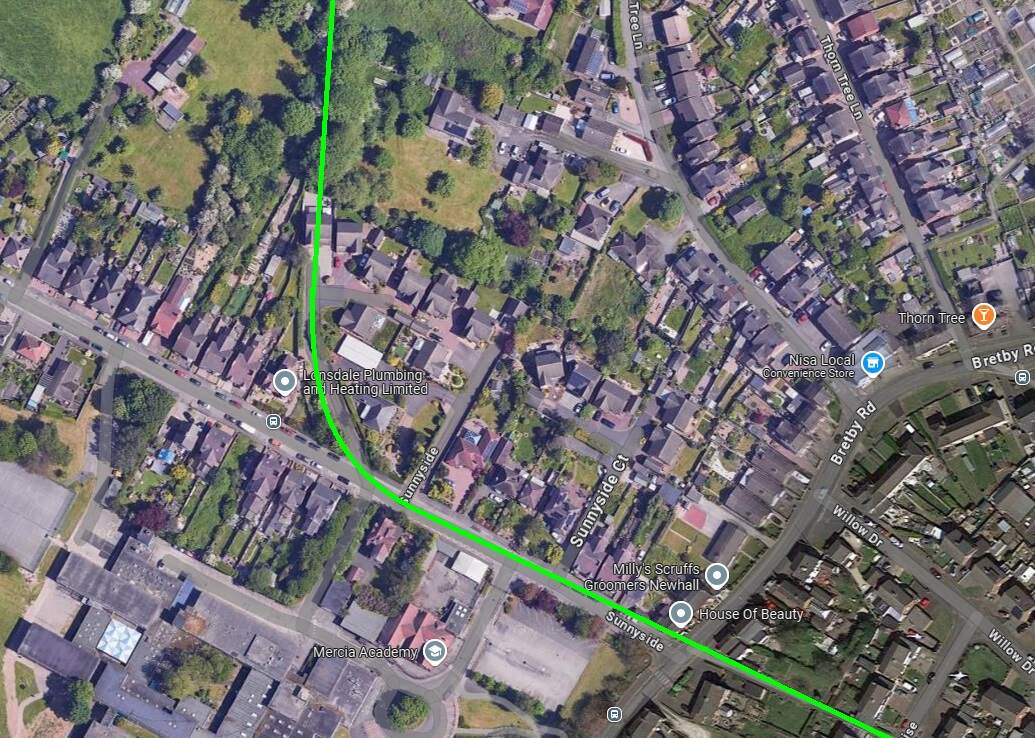
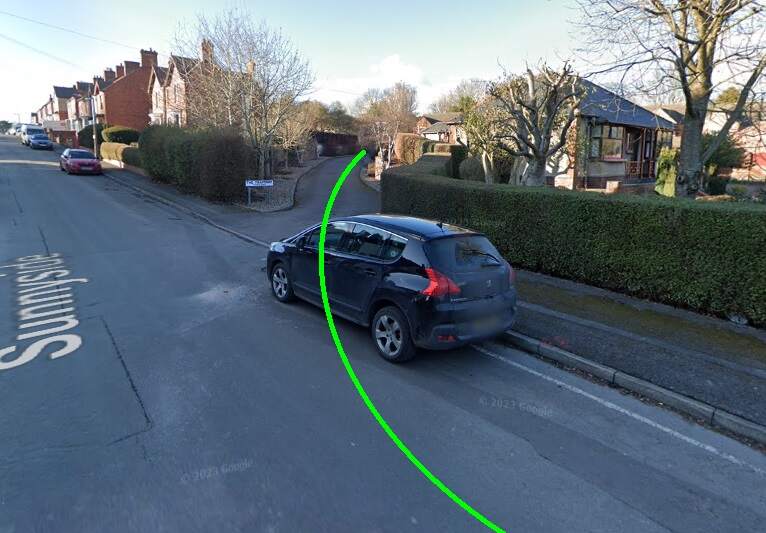
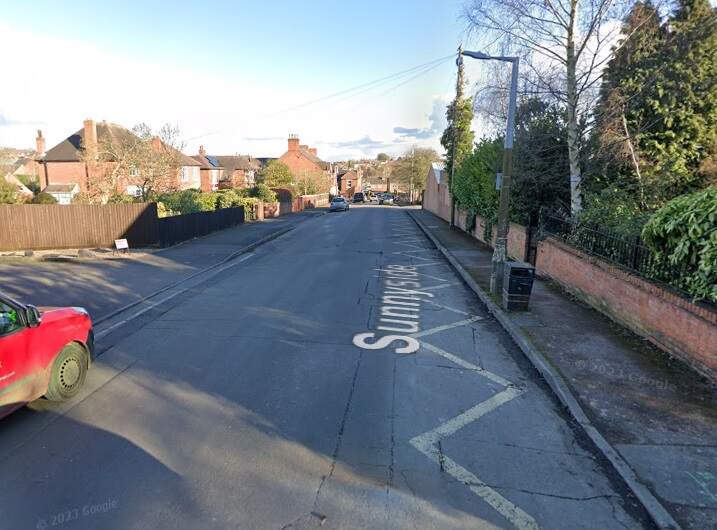
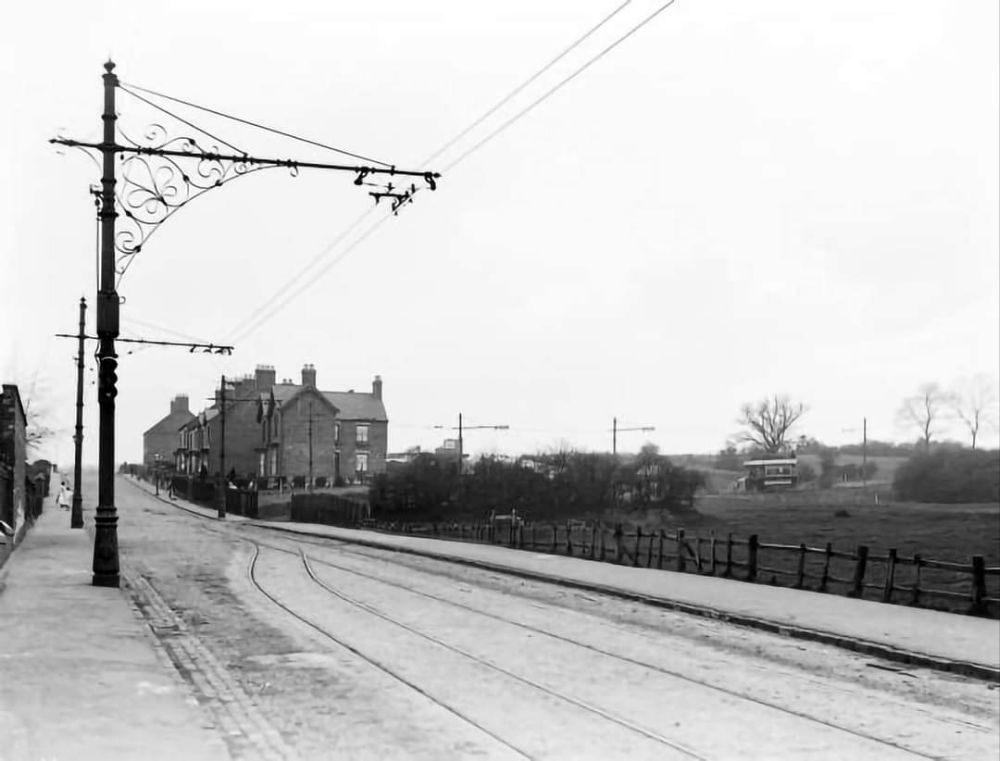
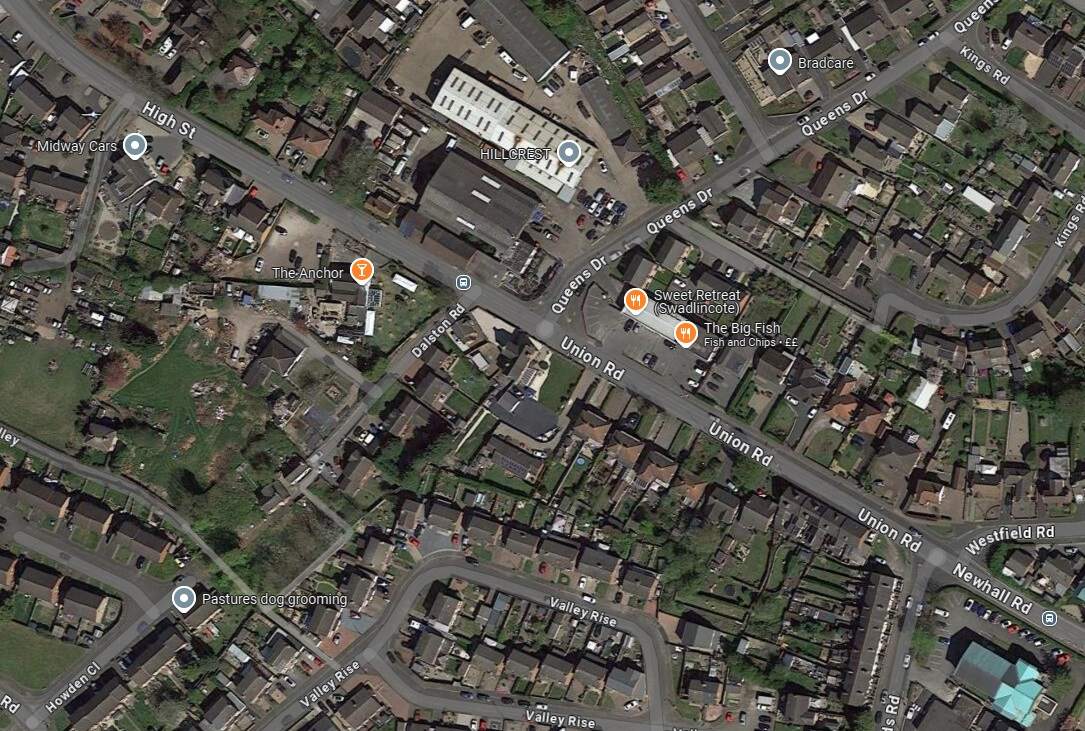
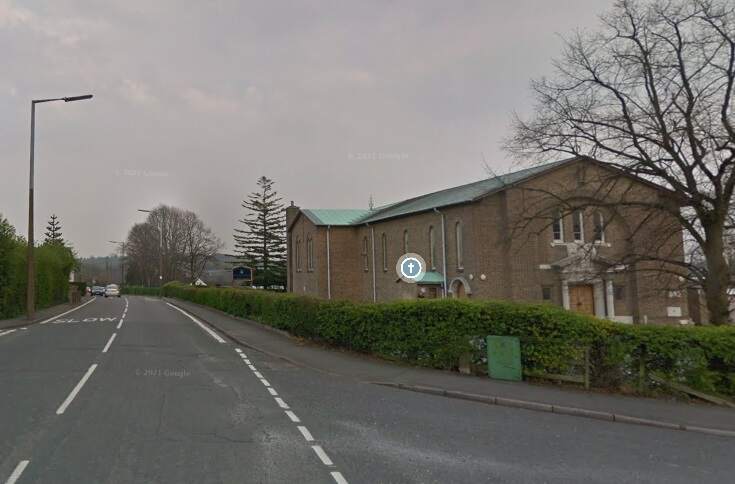
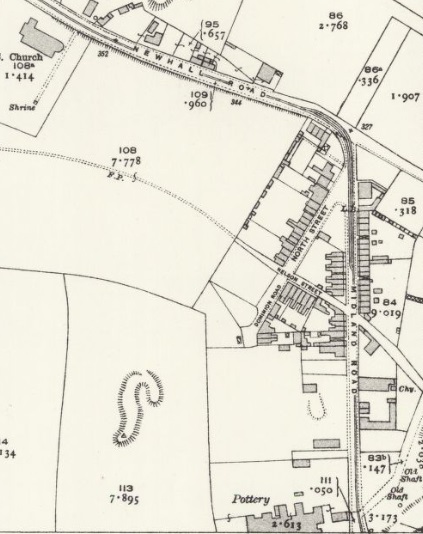
The Burton and Ashby Light Railway turned South off Burton Road (A511) to the East of what was the Stanhope Arms. [Google Streetview, August 2023]A tram on what appears to be the length of the line between the A511 and Sunnyside, (c) Public Domain. [9]The Burton and Ashby Light Railway followed its own fenced route South as Far as Sunnyside where it turned to the East. [16]The modern satellite image has the approximate route of the tramway superimposed in green. Before reaching Sunnyside, the railway followed what is now the line of ‘The Tramway’ a modern small estate road. It then turned towards the East running down Sunny side and across it junction with Bretby Road. [Google Maps, October 2024]Looking Northwest from Sunnyside, the green line shows the route of the old railway. [Google Streetview, March 2023]Looking Southeast along Sunnyside, the old railway ran down the centre of the road. There was a passing loop immediately in front of the camera. [Google Streetview, March 2023]A view looking Northwest on Sunnyside – on the right of this image a tram can be seen approaching Sunnyside from the North. This image was shared on the Newhall, Stanton & BretbyYesteryears Facebook Group by Keith Townsley on 5th December 2020, (c) Public Domain. [27]On this very similar image, a tram is turning onto Sunnyside. This image was shared on the Newhall, Stanton & Bretby Yesteryears Facebook Group by Marcus Payne on 10th September 2020, (c) Public Domain for the original image. [24]Looking Southeast along Sunnyside towards Bretby Road with the Light Railway rails in the road surface. This image was shared on the Newhall, Stanton & Bretby Yesteryears Facebook Group by Marcus Payne on 12th September 2020, (c) Public Domain for the original image. [24]Looking Southeast from Sunnyside across its junction with Bretby Road and along the line of the Light Railway which ran next to Matsyard Footpath. This image was shared on the Newhall, Stanton & Bretby Yesteryears Facebook Group by Julie Brown on 14th August 2022, (c) Public Domain [25]A similar view in 2024. The Light Railway ran along the line of the footpath. {Google Streetview, February 2023]The view towards Newhall from Bretby Road. This image was shared on the Newhall, Stanton & Bretby Yesteryears Facebook Group by Marcus Payne on 10th September 2020, (c) Simnett, Public Domain for the original. [24]This further extract from the 1920 25″ Ordnance Survey shows the line entering Newhall village alongside Matsyard Footpath and then running along the High Street. [16]Approximately the same area as it appears on Google Maps satellite imagery. The line entered at the top left corner of this image and then ran onto and along High Street (B5353). [Google Maps , October 2024]Looking Northwest from High Street, Newhall along Matsyard Footpath. The green line shows the approximate line of the old railway. [Google Streetview, February 2023]A tram approaching High Street, Newhall from the Northwest. This image was shared on the Newhall, Stanton & Bretby Yesteryears Facebook Group by Marcus Payne on 10th September 2020, (c) Public Domain for the original image. [24]Tram No. 13 entering Newhall at the same location as the Google Streetview image above, (c) Public Domain. [18]High Street, Newhall. This image was shared on the Newhall, Stanton & Bretby Yesteryears Facebook Group by Marcus Payne on 10th September 2020, (c) Public Domain for the original image. [24]A tram on Newhall High Street. This image was shared on the Newhall, Stanton & Bretby Yesteryears Facebook Group by Julie Brown on 16th January 2023, (c) Public Domain [26]The line ran on Southeast along High Street, Union Road and Newhall Road (B5353) passing St. Peter & St. Paul’s Catholic Church (which appears bottom-right on this map extract). [16]A tram on High Street/Union Street, Newhall. This image was shared on the Newhall, Stanton & Bretby Yesteryears Facebook Group by Julie Brown/Keith Townsley on 15th February 2023, (c) Public Domain. [24] Much the same location in the 21st century. [Google Streetview, August 2022]Approximately the same area as that shown on the extract from the 1920 25″ Ordnance Survey. [Google maps, October 2024]Looking Southeast along Newhall Road, B5353 with St. Peter and St. Paul Roman Catholic Church on the right of the image. The Button and Ashby Light Railway ran down Newhall Road towards Swadlincote. [Google Streetview, Aril 2019]
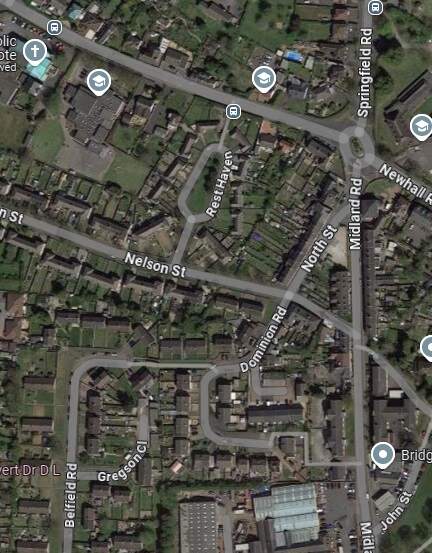
Another extract from the 1920 25″ Ordnance Survey. Trams from Burton-on Trent remained on Newhall Road for only a short distance, turning South along Midland Road. [16]
The same area in the 21st century, as shown by Google Maps satellite imagery. [Google Maps, October 2024]
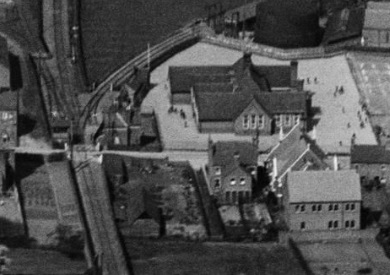
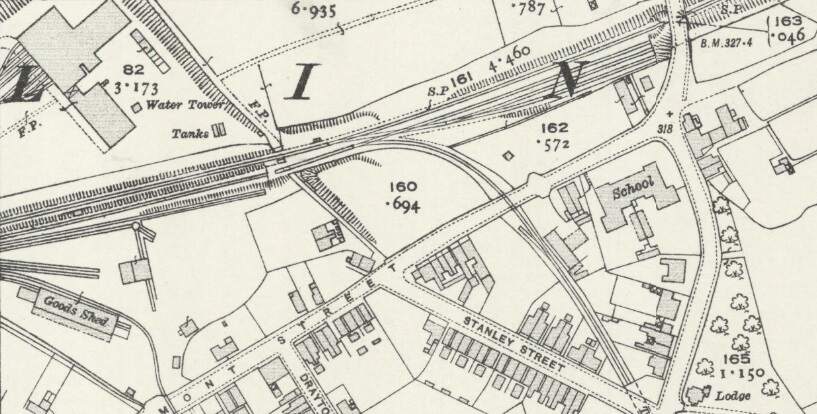
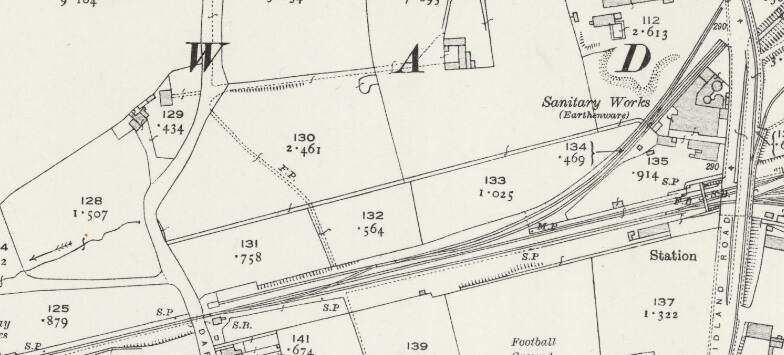
This next extract from the 1920 25″ Ordnance Survey shows the Burton and Ashby Light Railway heading South towards Swadlincote Market Place along Midland Road. Sitting to the West of the Light Railway Bridge and at a lower level was Swadlincote Railway Station. To its North were some Sanitary Earthenware Works. [20]
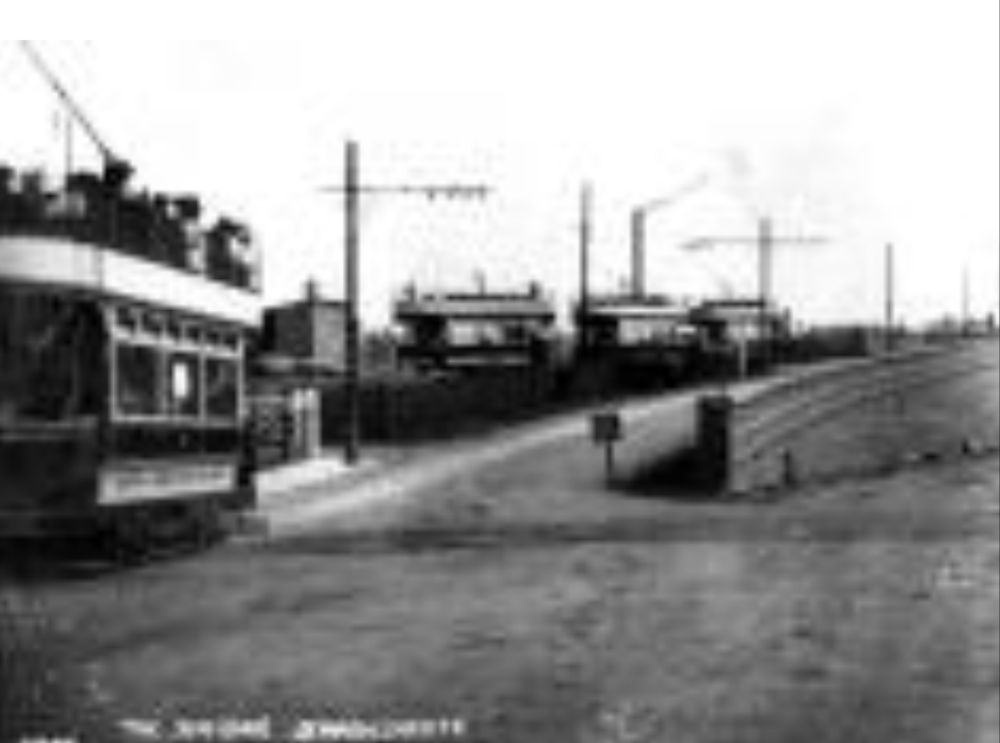
The North end of the bridge on Midland Road, a tram is approaching from the North. Three trams are waiting to head out from the depot access road towards the Market Place. [29]
Glendenning provided a photograph of the bridge in this photograph under construction (see above). The bridge appears on the map extract immediately above and is seen here in use by the Burton and Ashby Light Tramway, (c) Public Domain. [19]The bridge over the Swadlincote and Woodville Branch seen from the East. A Midland Railway locomotive is about to depart the yard through Swadlincote Railway Station which is on the far side of the bridge. The station footbridge can be seen beneath the Light Railway Bridge. [1: p57]A similar view in the 21st century. [Google Streetview, August 2022]
The tram depot for the Burton and Ashby Light Railway was accessed at high level off the bridge shown above.
The tram depot off Midland Road, Swadlincote, seen from the West. The trams on the depot are (left to right) Nos. 18, 5, 14, 9 and 10. On the left of the depot is the horse-drawn trolley tower. The map extract immediately below shows the depot (top-left). [17]
We digress a little here to take a quick look at the Midland Railway’s Swadlincote and Woodville Branch which passes under the Light Railway in the image above.
This extract from the 1921 revision of the 252 Ordnance Survey shows the Swadlincote and Woodville Brach to the East of the Light Railway overbridge. Note the Mineral Railway leaving the Branch approximately at the centre of this extract. [21]
To the East of the overbridge a Mineral Railway left the Swadlincote & Woodville Branch in a southerly direction, it served a number of industrial concerns including: Anchor Glazed Brick and Sanitary Pipe Works (which sat to the Southwest of Swadlincote High Street and which were served by means of a bridge under High Street); Swadlincote Sanitary Pipe Works (on the East side of the High Street/Hill Street); Jack i th’ Holes Pottery (by means of a tunnel under Hill Street and Granville Colliery); Middle Sinks & Chimney Pots Works; and Hill Top Works (by means of a tunnel under Granville Colliery.
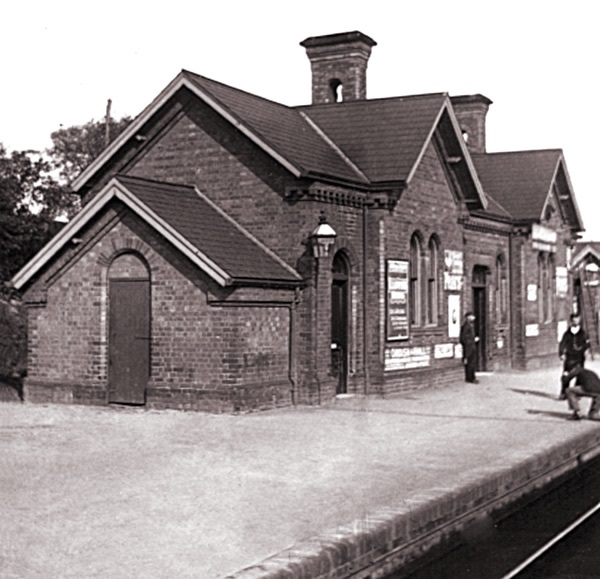
To the West of the overbridge sat Swadlincote Railway Station and the branch line headed away from Swadlincote to the West-southwest.
Swadlincote Railway Station sits on the West side of Midland Road close to the Light Railway Bridge. The map extract shows the Swadlincote and Woodville Brach heading away to the West-southwest. [20]
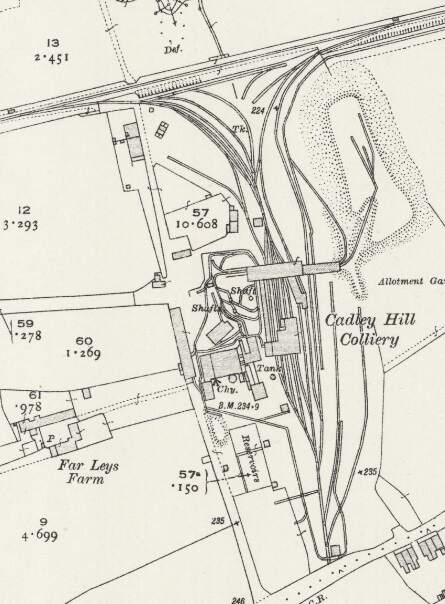
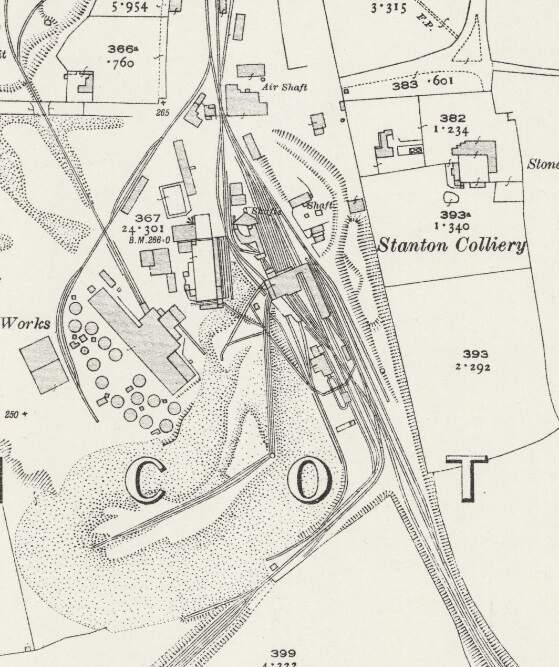
West of Swadlincote, the Swadlincote and Woodville branch served a number of industrial concerns, those closest to Swadlincote included: Swadlincote Old Colliery (and associated Brick & Pipe Works); Stanton Colliery (and Hawfields Brickworks); and Cadley Hill Colliery.
Cadley Hill Colliery. [20]Stanton Colliery. [20]Swadlincote Old Colliery. [20]
Returning to the Light Railway, we note that at Swadlincote Market Place a branch left the main line to Ashby-de-la-Zouch which ran South from Swadlincote to serve Castle Gresley.
The Castle Gresley Branch
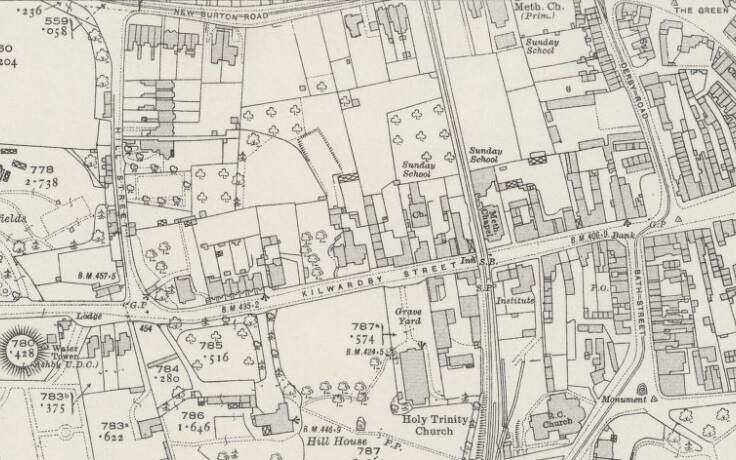
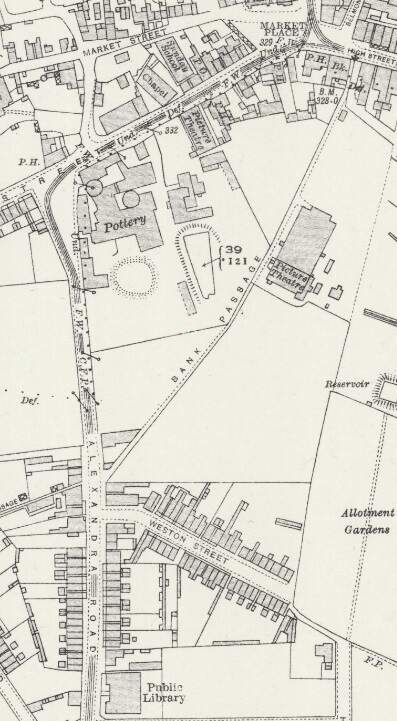
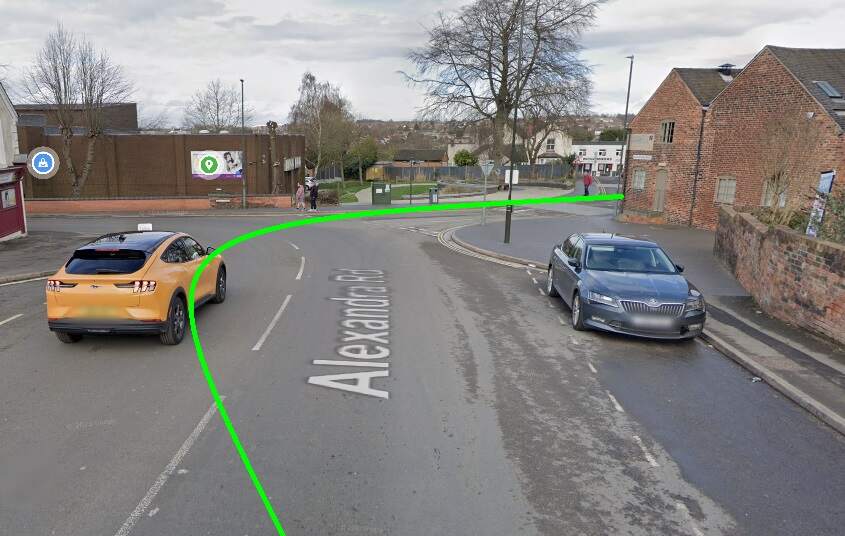
The branch line to Castle Gresley first ran West-southwest along West Street and then, by means of a relatively wide arc (see the small image below), turned down Alexandra Road. Track was dualled along these two streets as far as a point a little to the South of the Public Library. [20]
The Light Railway turned South into Alexandra Road by means of a wide arc. The green line gives the approximate alignment of the double track tramway at this location. [Google Streetview, March 2023]
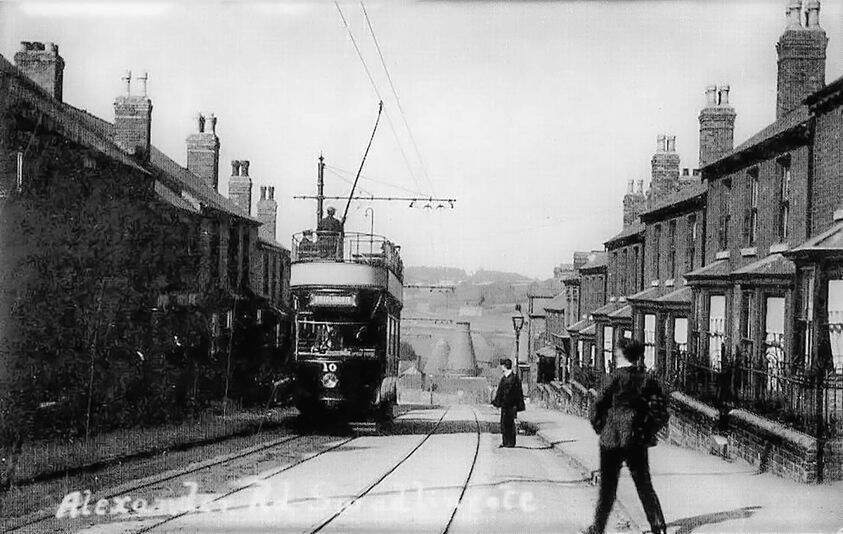
Tram No. 10 dropping down Alexandra Road towards Swadlincote Town Centre. Sharpe’s can be seen at the bottom of the hill. This image was shared by Keith Townsley on the New and Old of Swadlincote & Burton on Trent Facebook Group on 10th April 2021. [28]
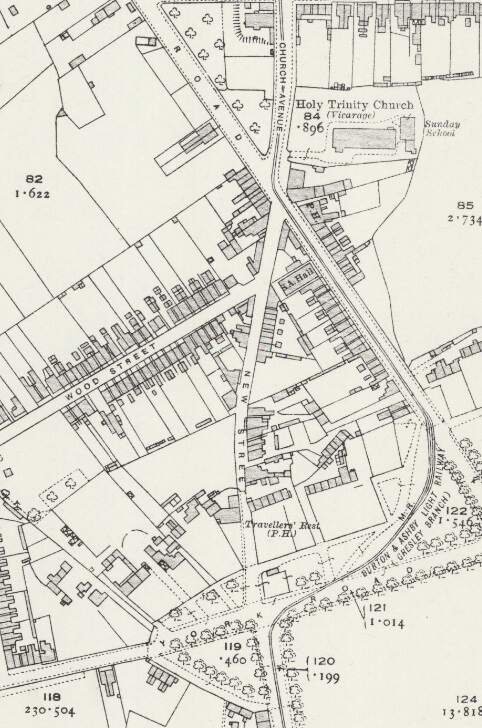
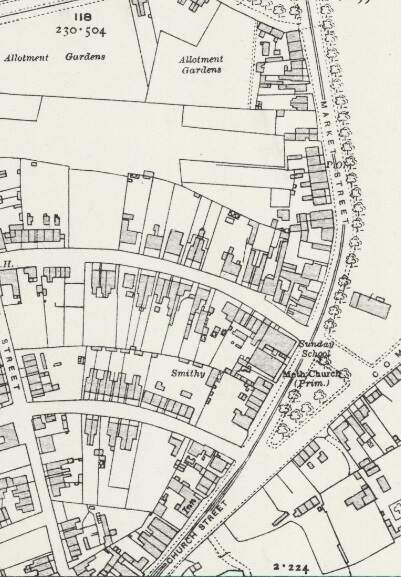
The line ran South from Alexandra Road into Church Avenue. It then turned to the South-southeast along Wilmot Road before sweeping round to the West on York Road before turning sharply into Market Street. [20]
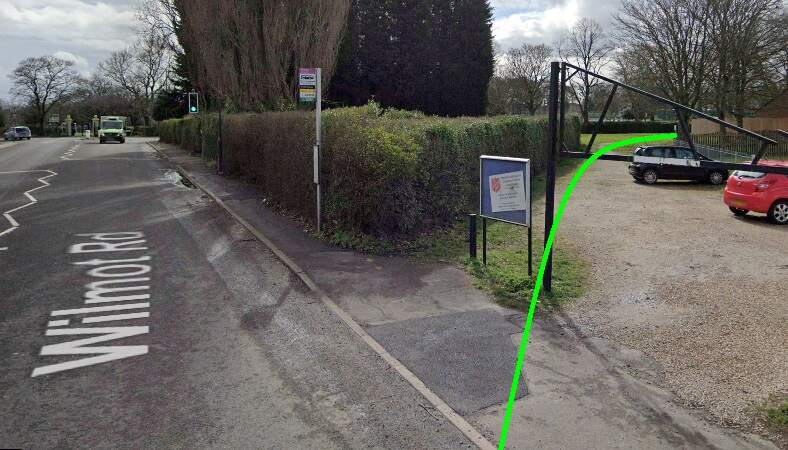
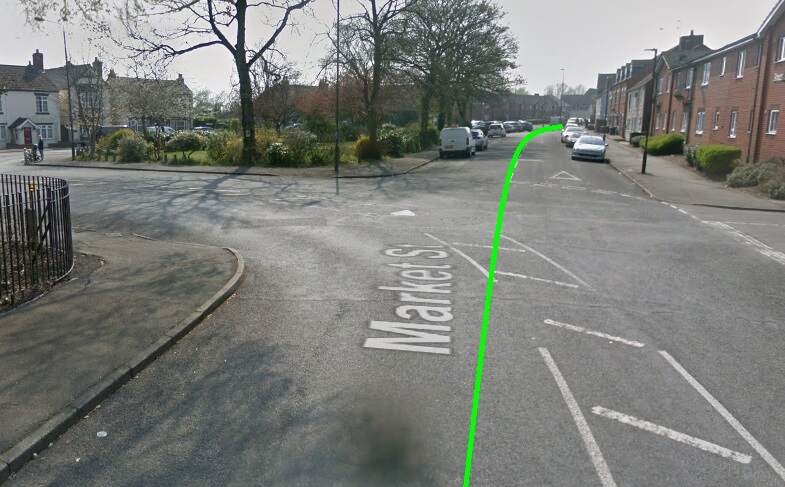
The Light Railway ran off Wilmot Street in a wide arc through what is now park land. [Google Streetview, March 2023]
The Burton and Ashby Light Railway (Gresley Branch) swept round from Market Street into Church Street. [20]
Trams swept round from Market Street into Church Street. [Google Streetview, April 2019.
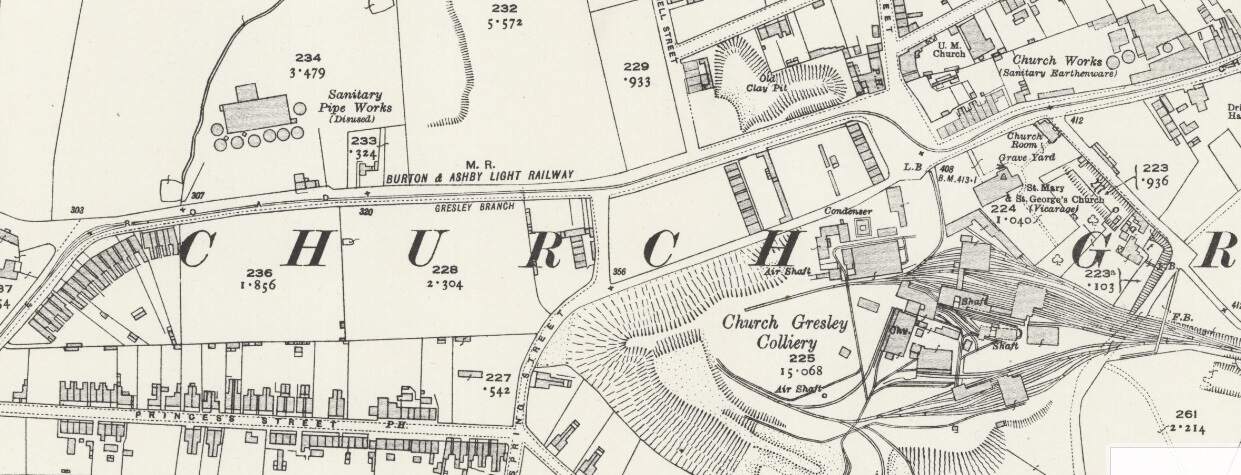
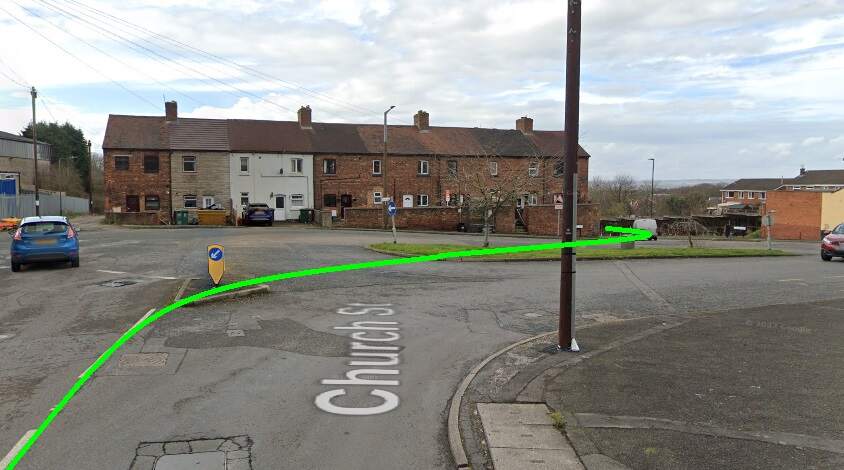
The line continued in a generally westerly direction passing Church Sanitary Earthenware Works and Church Gresley Colliery. Sharp right and left curves took the railway through the square at the colliery gates and onto Castle Street. [22]The light Railway served the square outside Castle Gresley Colliery which is now a roundabout. It turned sharply towards the North and then back to wards the West as it left the square. [Google Streetview, March 2023]
A short distance along Castle Street took the line as far as Gresley Railway Station where the Gresley Branch terminated in front of the Station buildings.
The branch line terminated outside Gresley Railway Station buildings. [22]These two views shows the Gresley Station buildings before closure of the Station. Both show the platform elevation of the station, (c) Public Domian, found on the Burton-on-Trent Local History site maintained by Kevin Gallagher. [23]
Gresley Station is long-gone, the railway remains in place in the 21st century.
The location of Gresley Station seen from High Cross Bank Roundabout on the A444. [Google Streetview, March 2023]
References
Seymour Glendenning; The Burton and Ashby Light Railway; in The Railway Magazine, London, July 1906, p53-57.
Towards the end of March 2024, I stumbled across a number of journals of the New Zealand Model Railway Guild. One of these, the March 2021 edition, included a pictorial article about J1211 North British 4-8-2 Locomotive No. 24534 of 1939. [6] The June 2021 issue included a history of the class [7: p13-15] and General Arrangement plans as originally carried in the Railway Gazette in 1940. [7: p22-24] Also in that journal are four photographs of J1211 in service between 1960 and 1970. [8]
40 No 4-8-2 locomotives which were built in 1939 by the North British Locomotive Company and became the New Zealand Railways (NZR) J class.
They were designed to provide a mixed traffic locomotive suitable for running on the lighter secondary lines of the NZR network, and for express passenger trains in major routes.
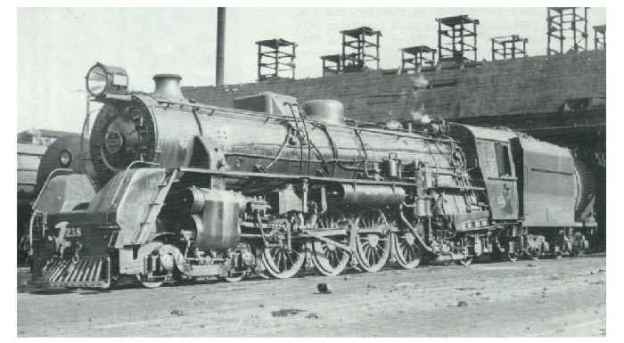
“The J class incorporated roller bearing axles, hydrostatic lubrication and twin Westinghouse brake pumps. … They had bar frames instead of plate frames and were equipped with Baker Valve-gear. The locomotives were attached to Vanderbilt tenders and were outshopped with distinctive bullet-nosed streamlining.” [1] The streamlining also encompassed the full length of the top of the boiler between the cab and the smoke box door and the area immediately beneath the smoke box door.
The J Class locos were out shopped with a distinctive streamlining from the cab to the top of the smoke box door and with a bullet-nosed smoke box door. [2]
New Zealand’s North Island benefitted from the first thirty of the class placed into service. The South Island hosted the remaining ten locomotives which apparently were used “The first 30 of the class in service were allocated to the North Island, with the remaining ten locomotives allocated to the South Island where they were used “on the hilly section between Dunedin and Oamaru. They were immediately placed into service on the main trunk routes in both islands in order to help move wartime traffic during the Second Word War. Although used on freight trains as well, the class was well suited to high-speed running on the passenger trains of the era.” [1]
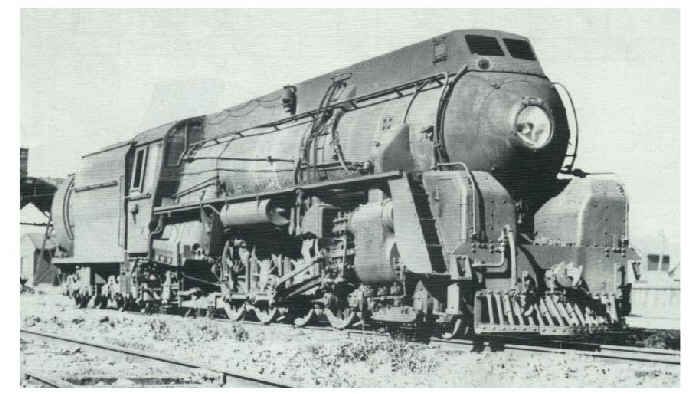
Apparently, the streamlining became “burdensome for maintenance and the skyline casing, which was open at the top proved to be a trap for soot from the locomotive’s exhaust. After a time, the skyline casing started to be removed from some examples of the class leaving them with just the bullet nose.” [1]
Ultimately the bullet nose was also removed from the majority of these locomotives.
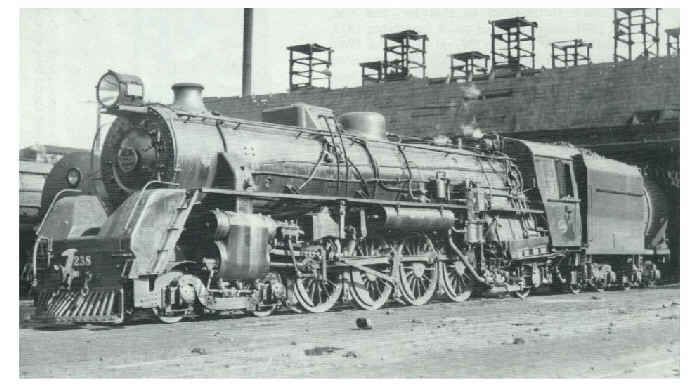
The locomotives of the class had their streamlining removed in the war years. [2]
Members of the class “were generally considered to be a very reliable engine and well suited to their task. … They were capable of speeds of over 60 mph with a 300-ton express train. …. However, today surviving engines being used to haul excursion trains are restricted to 80 kph. … On favourable grades a single J could move a 1000-ton train.” [7: p14]
“The design was successful enough that NZR opted to build an improved variant … in its own Hillside workshops from 1946.” [1] These ‘Ja’ class locomotives were numbered 1240 to 1274 and became “the mainstay of the South Island rail services. Meanwhile North British were commissioned to build another 16, numbered from 1275 to 1290, also classified ‘Ja’, but they were oil fired and to be based in the North Island. … The sixteen ‘Ja’ from North British were the last steam locomotives to enter service with the NZR.” [7: p15]
Three J Class 4-8-2 are noted by Trainweb [2] as having been preserved:
J 1234, North British #24557/1939. For some time based at Glenbrook Vintage Railway, Auckland.. This locomotive is owned by Steam Incorporated of Paekakariki, and was leased to the Glenbrook Vintage Railway in 1998. The locomotive was returned to Paekakariki in June 2015. [4] It is now in storage awaiting a 2nd restoration at Paekakariki. [5]
J 1211 “Gloria”, North British #24534/1939. Mainline Steam Heritage Trust, Auckland (Operational). [3]
J 1236, North British #24559/1939. Mainline Steam Heritage Trust, Auckland (Being Restored). [2]


