Category Archives: Railways and Tramways Blog

Tramways de l’Aude – Fabrezan to Mouthoumet

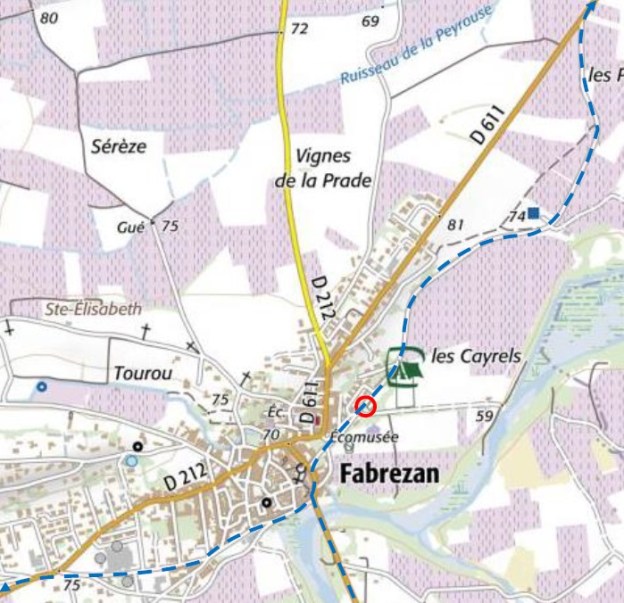
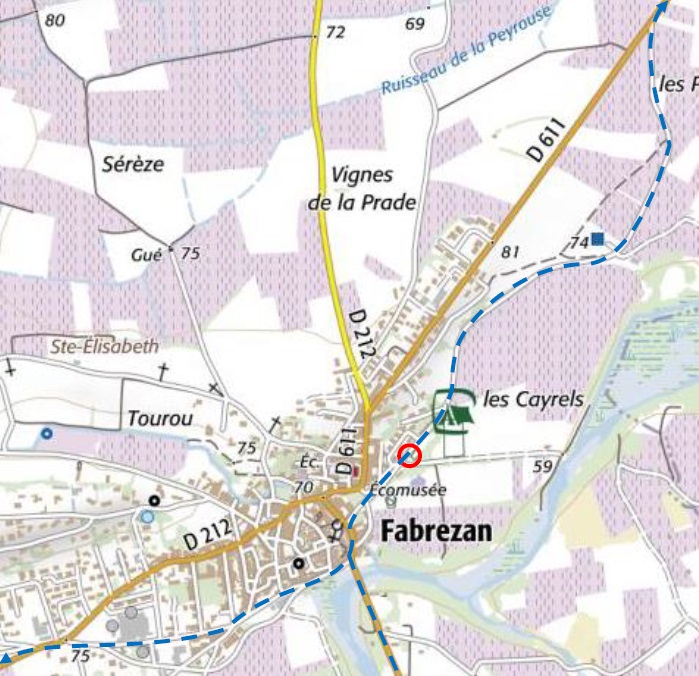
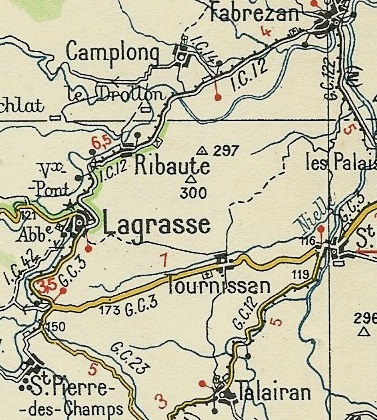
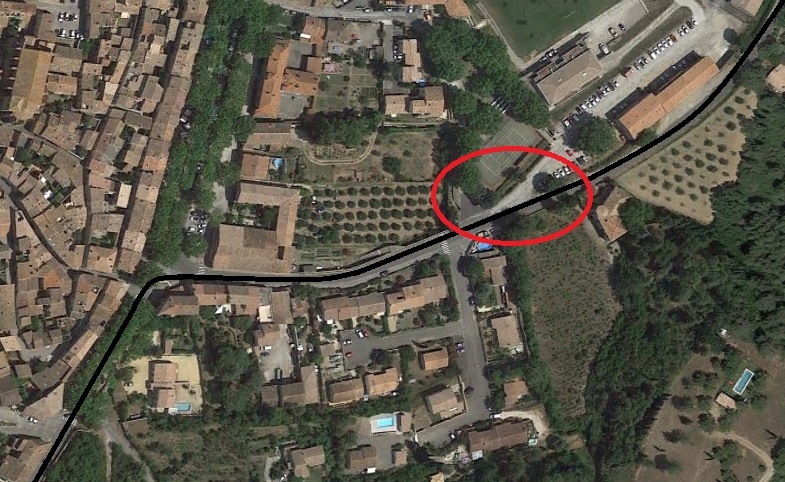
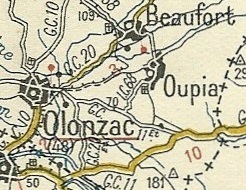
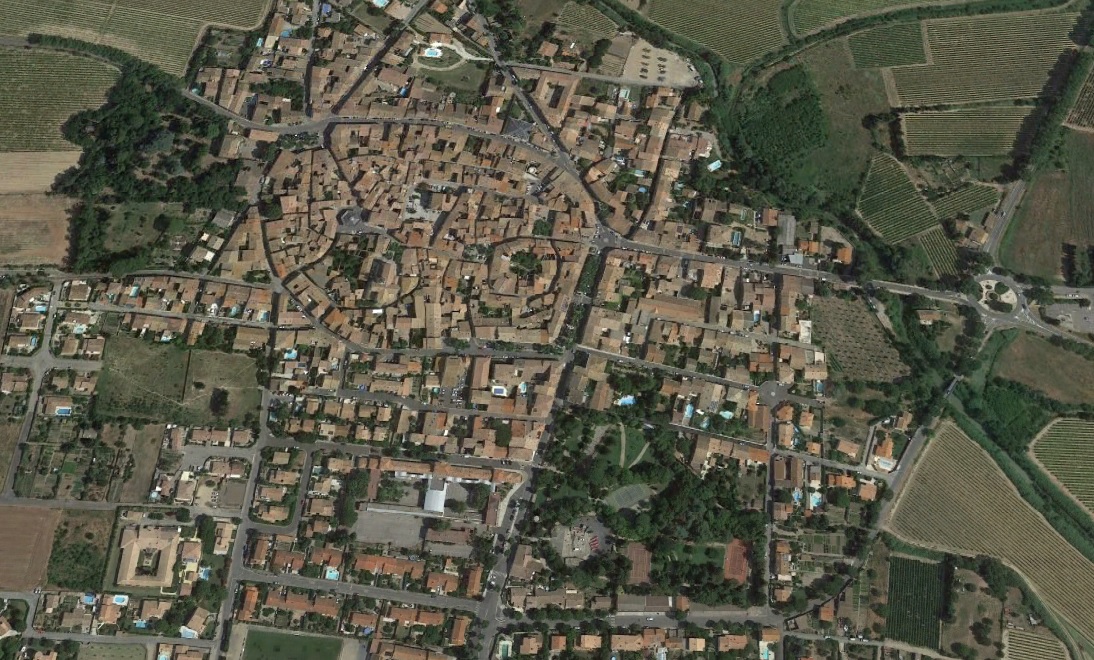
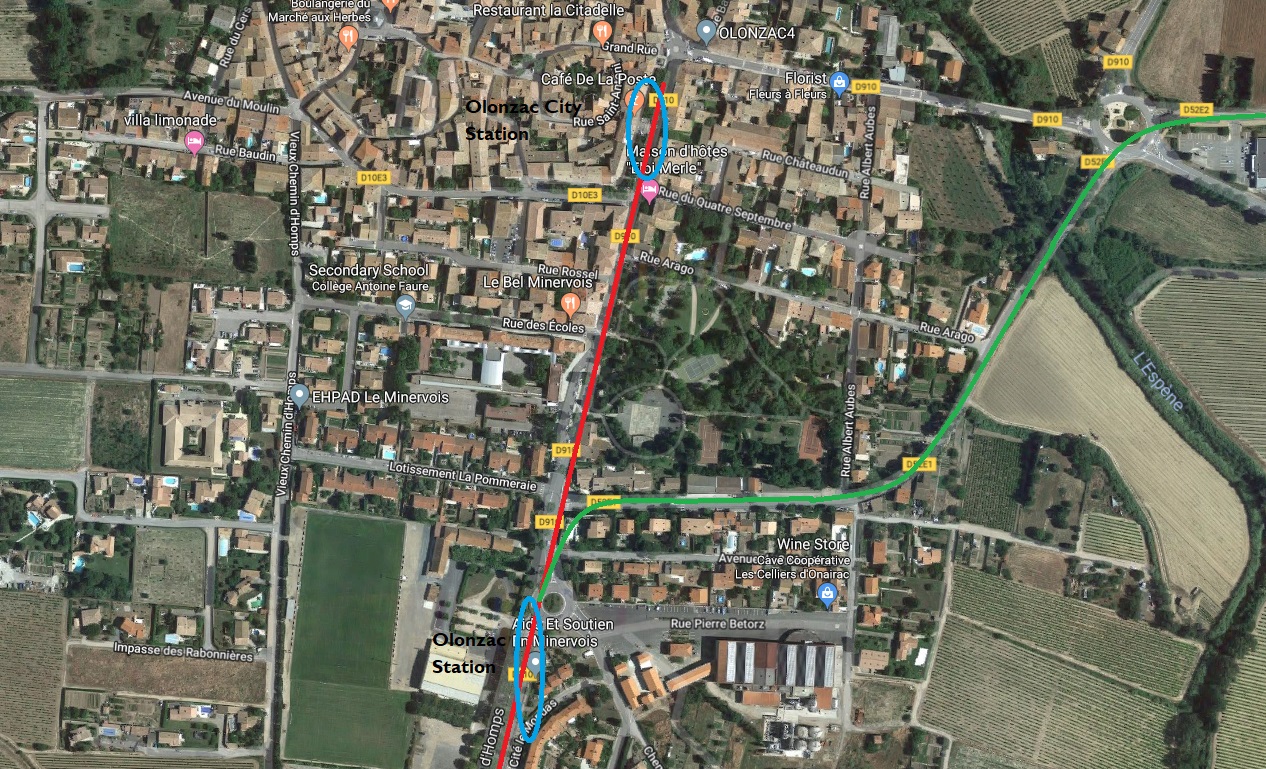
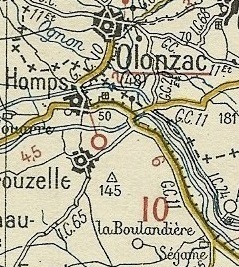
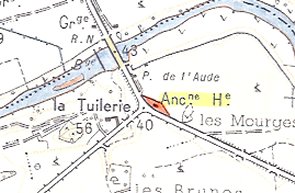
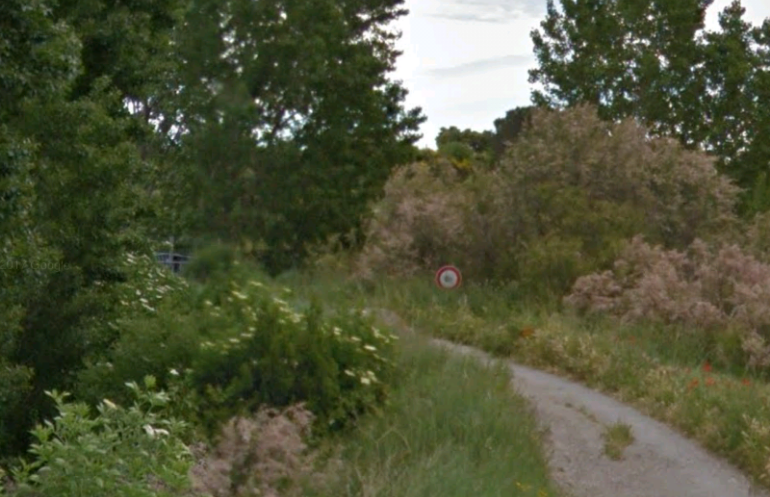
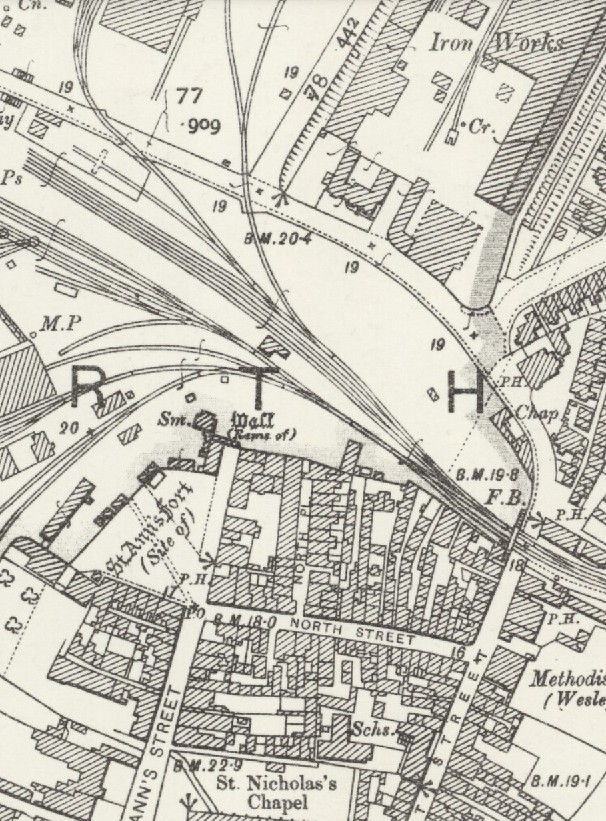
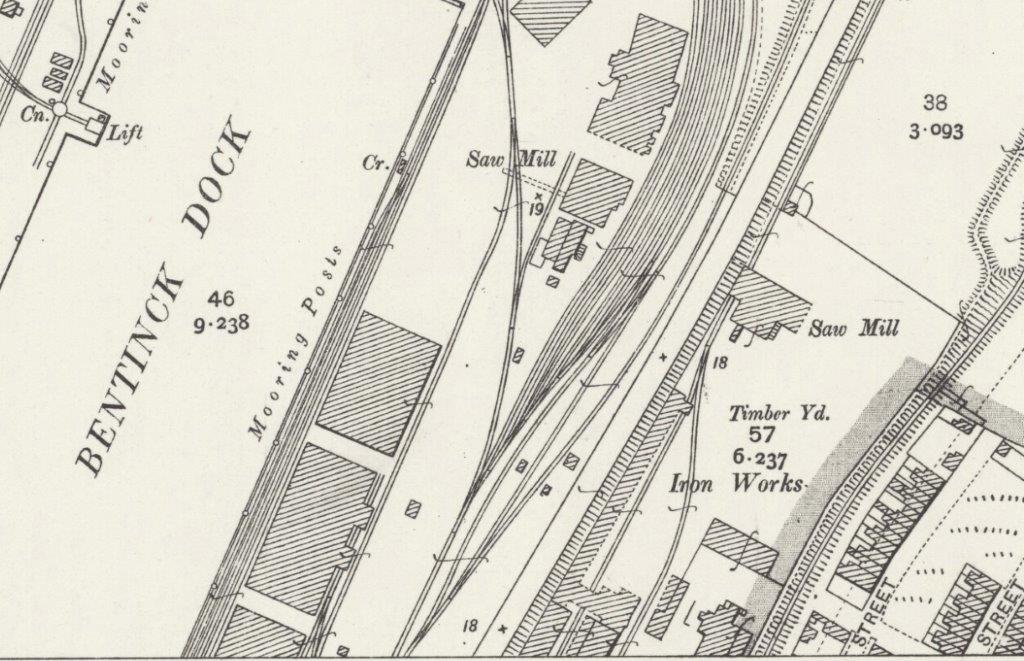
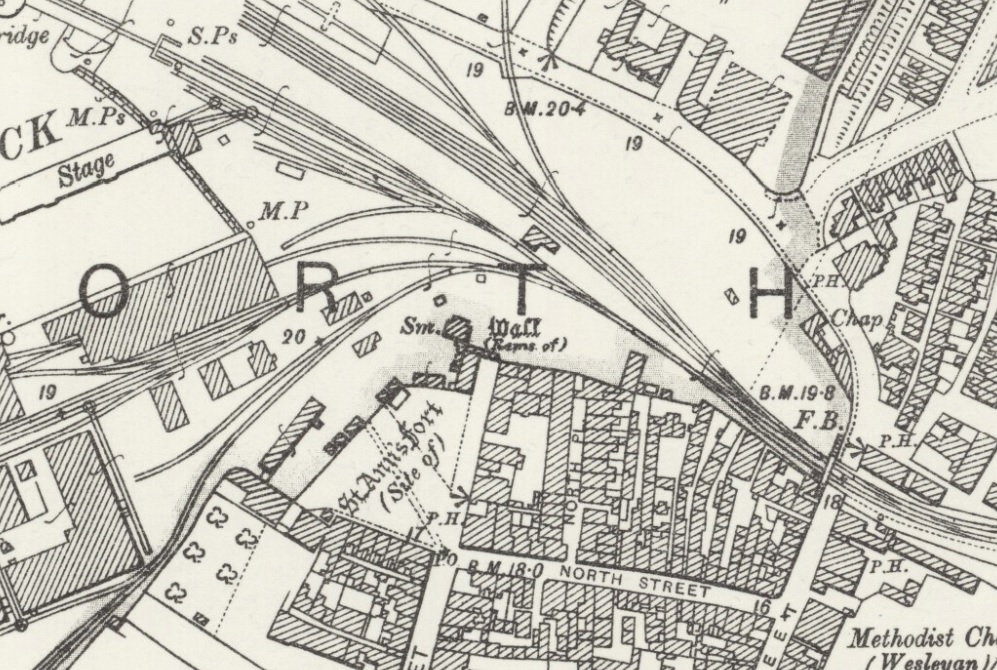
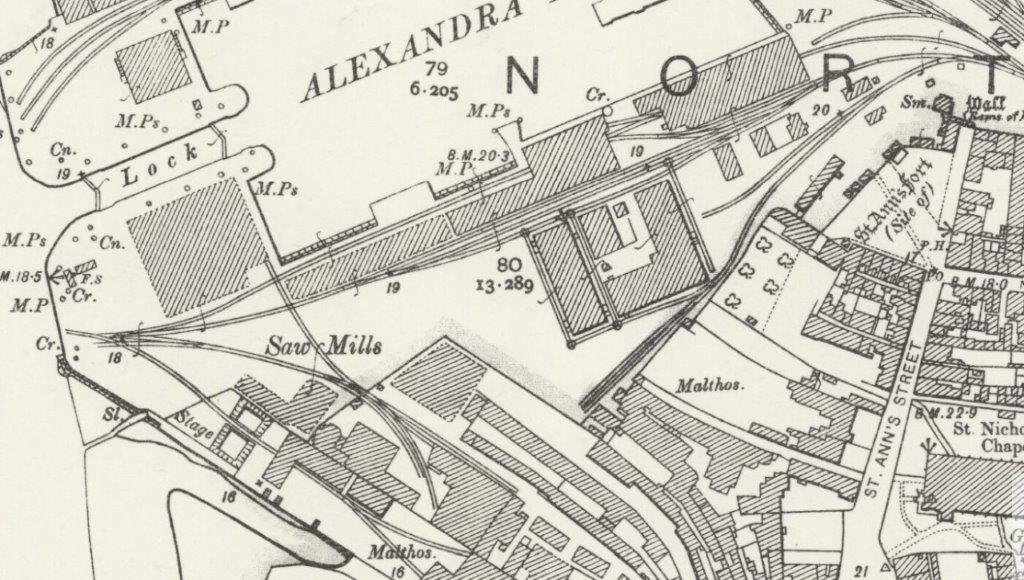
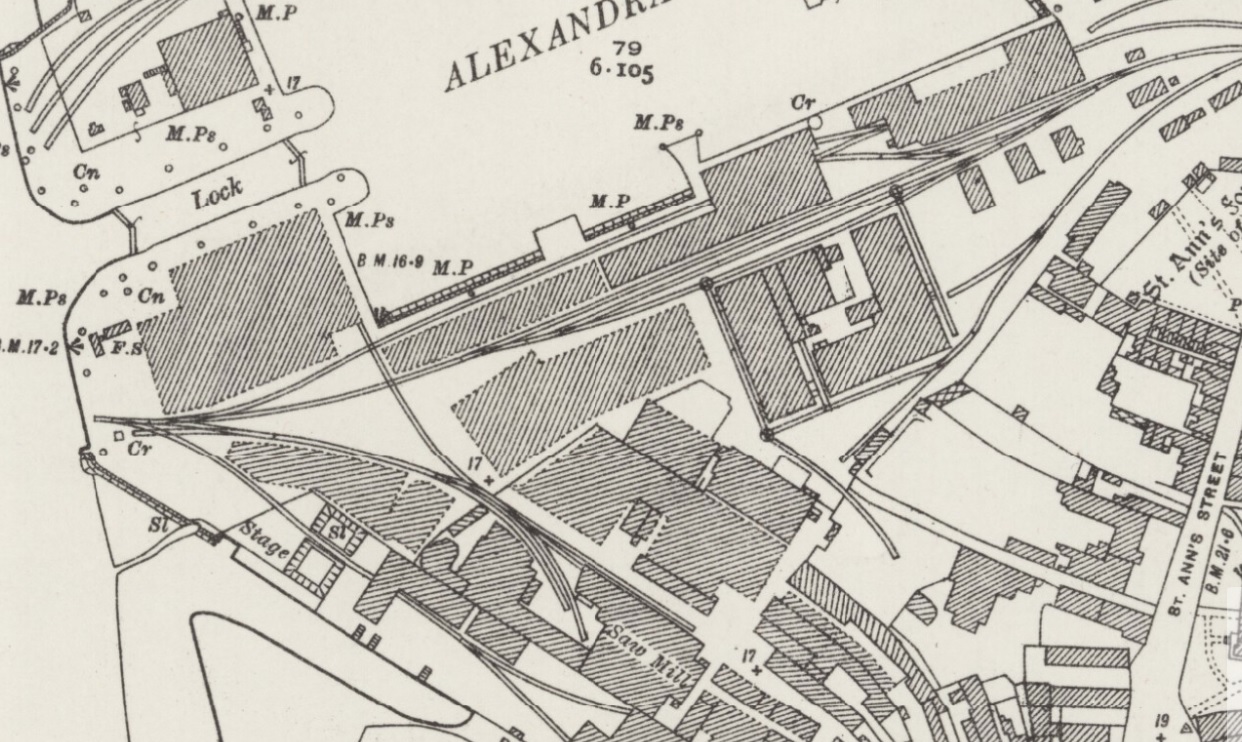
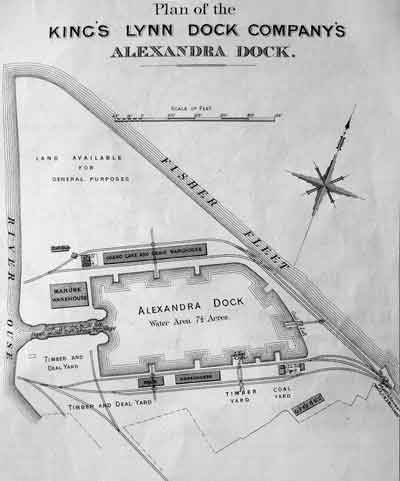
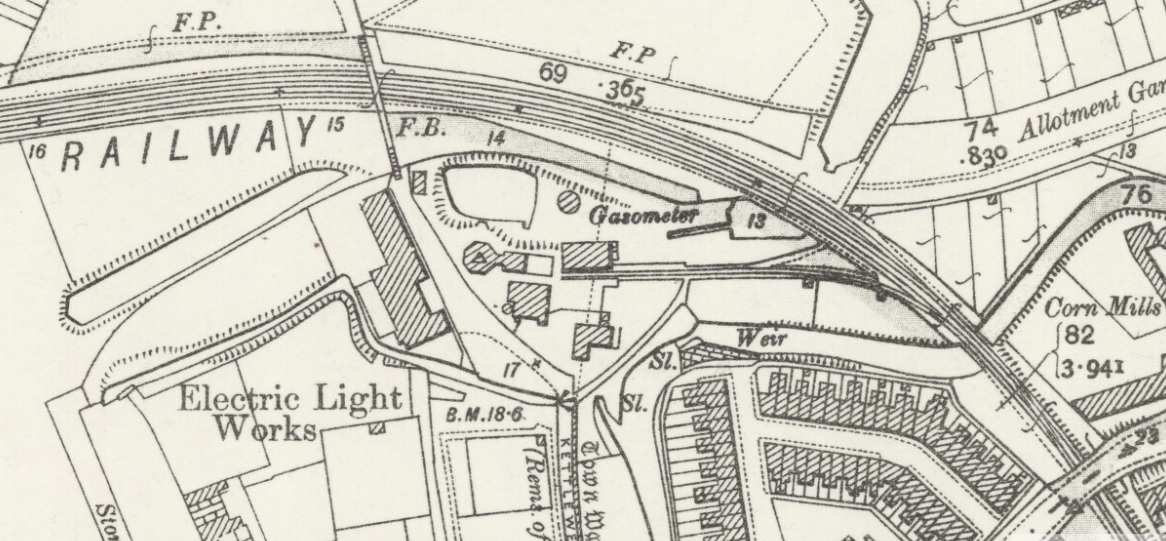
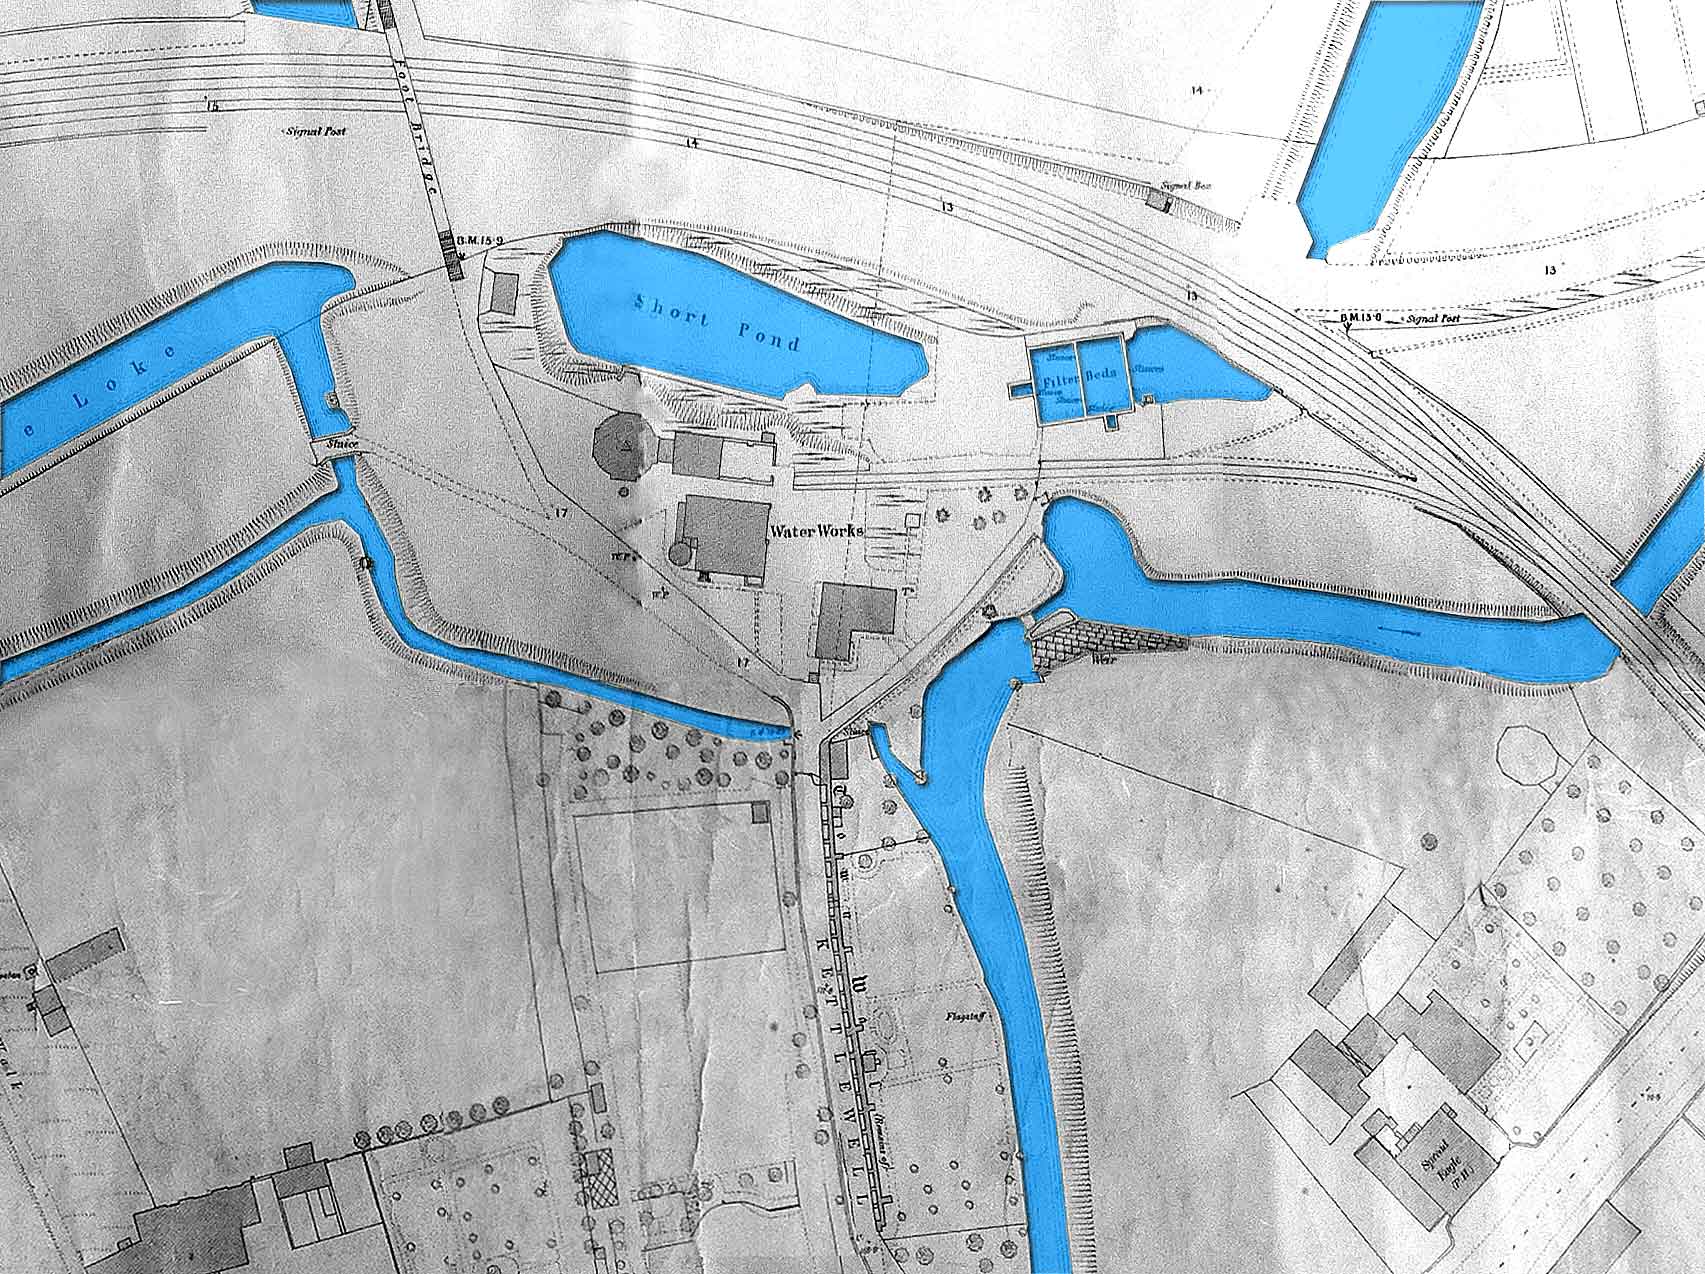
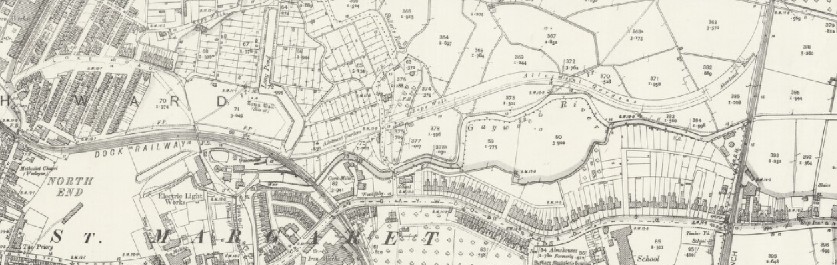
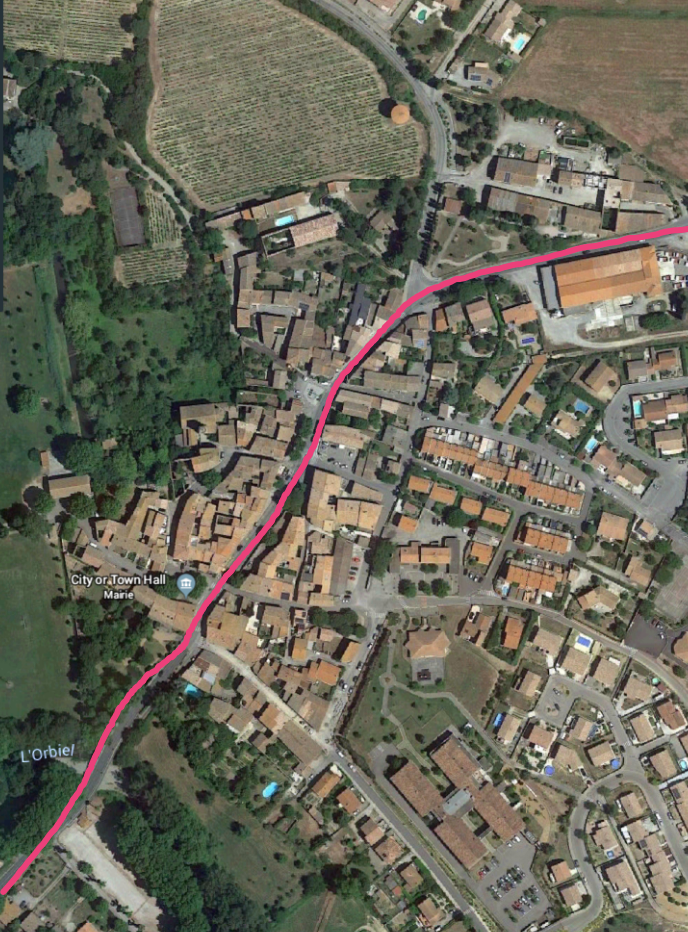
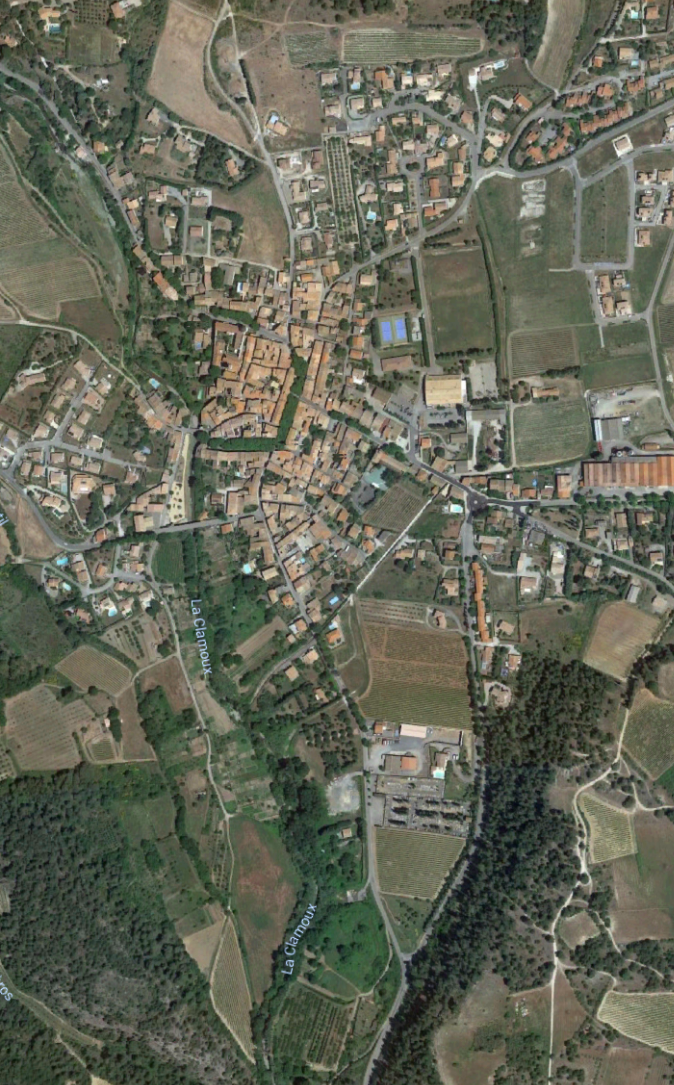
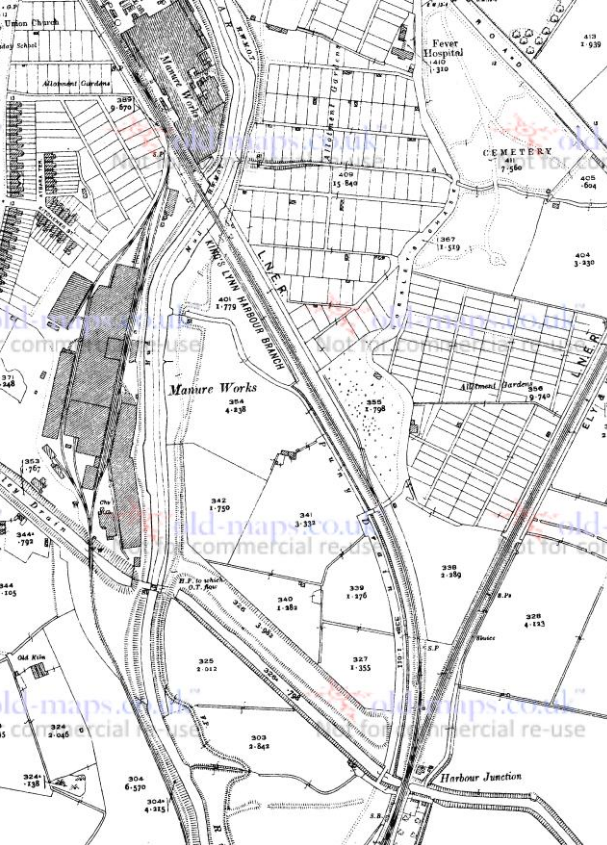
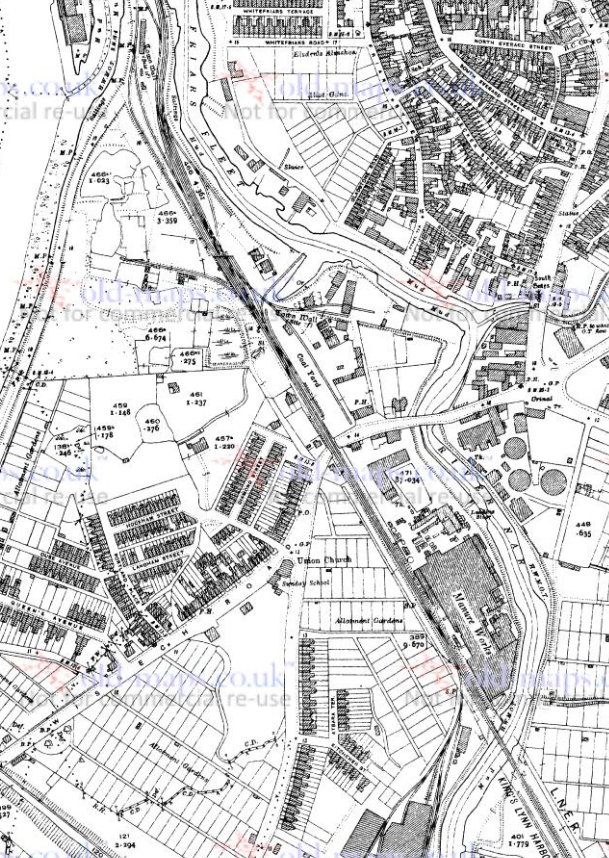
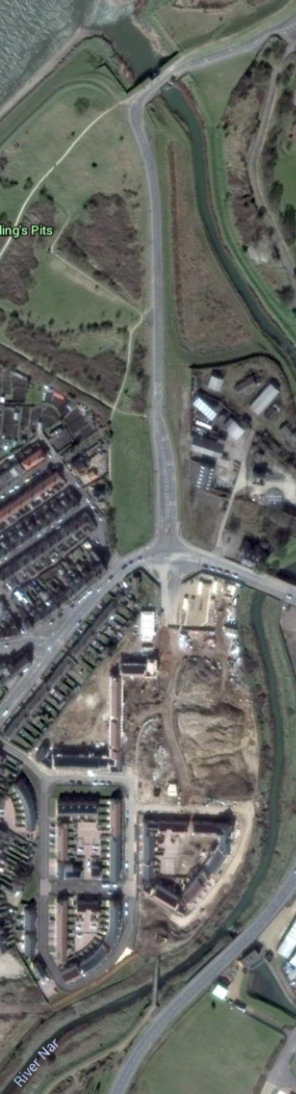
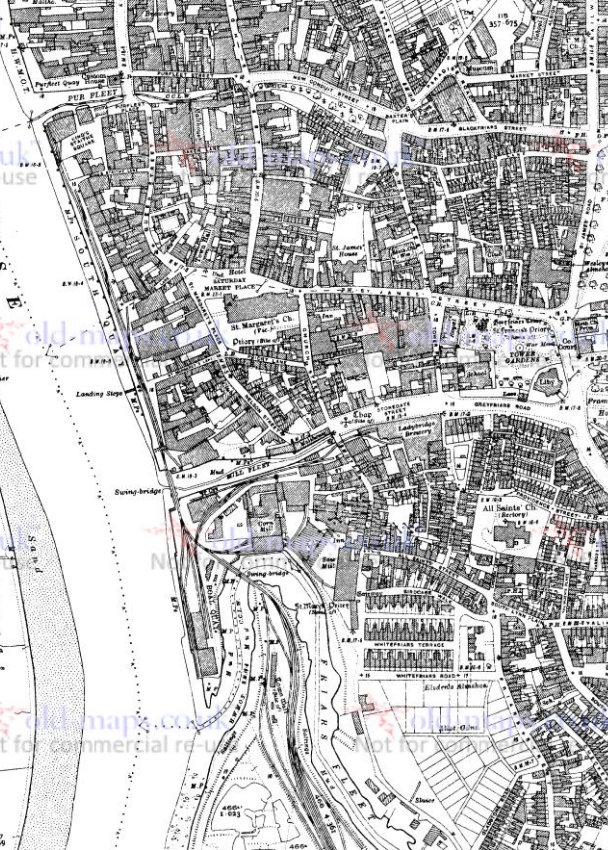
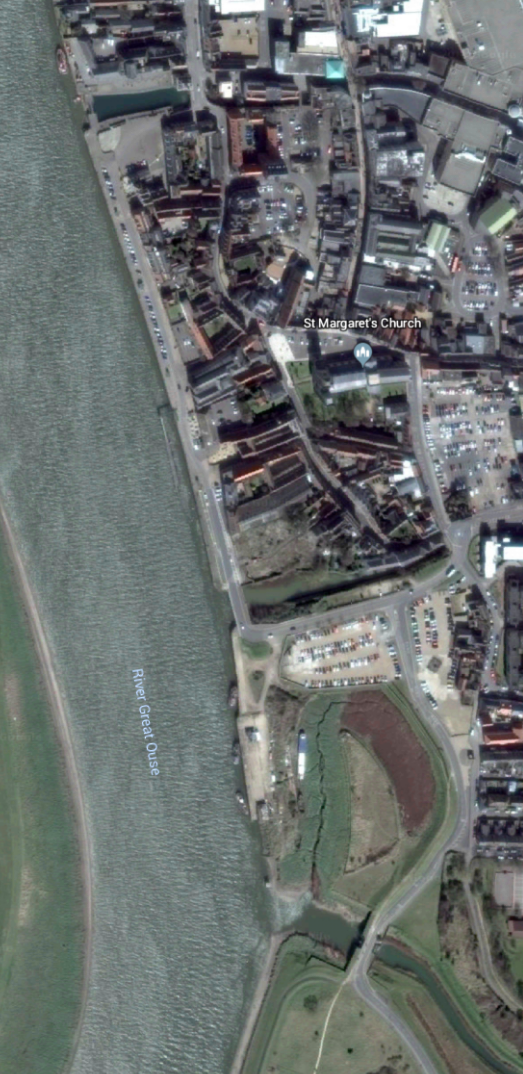
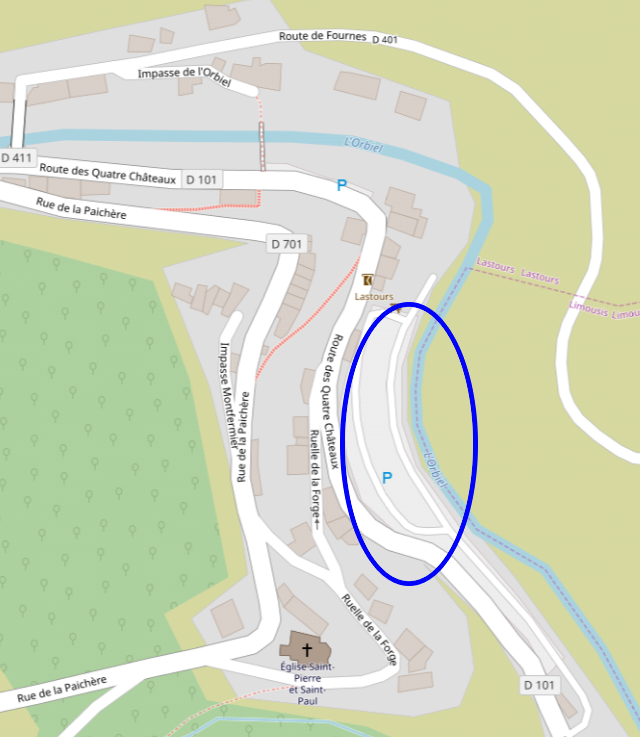
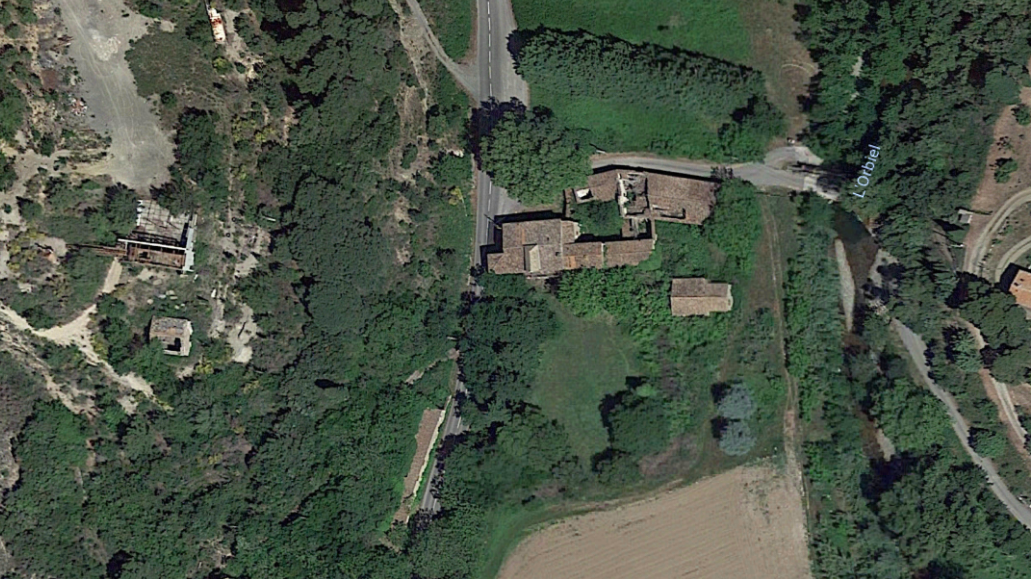
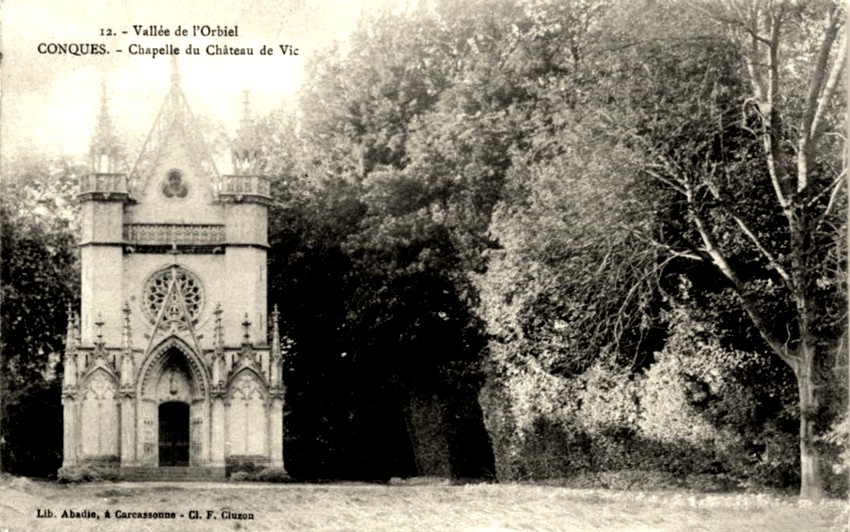
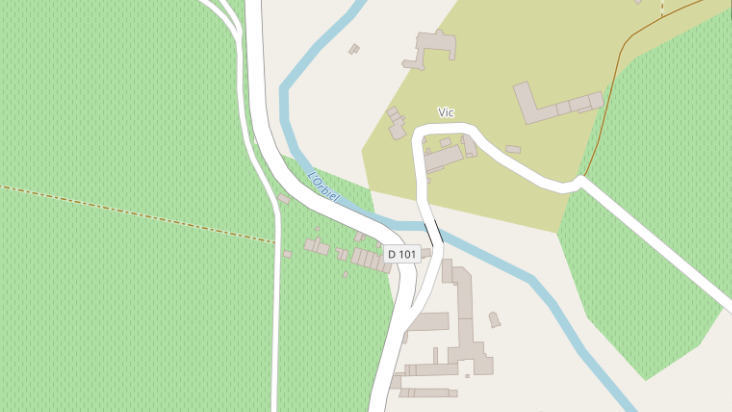
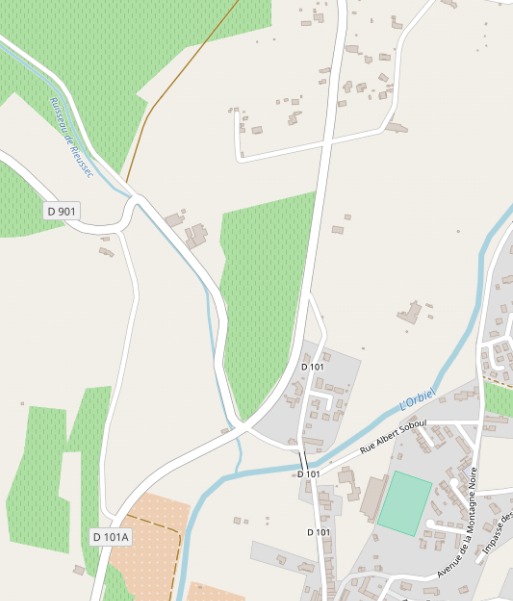
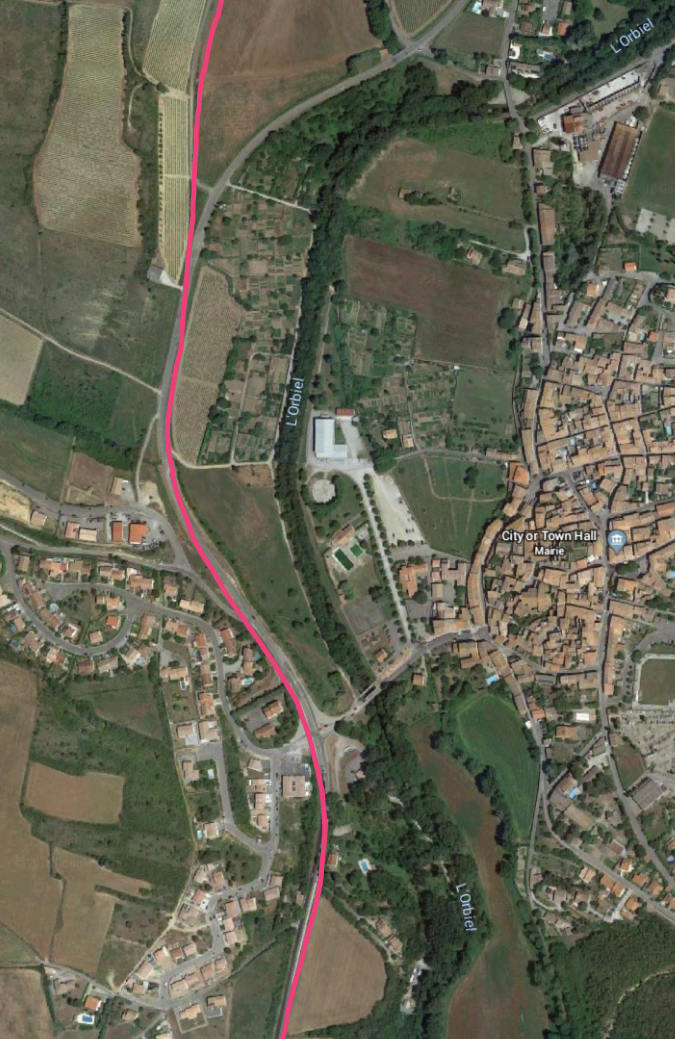
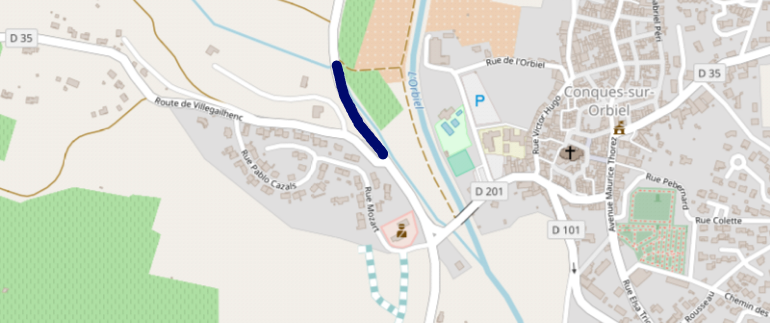
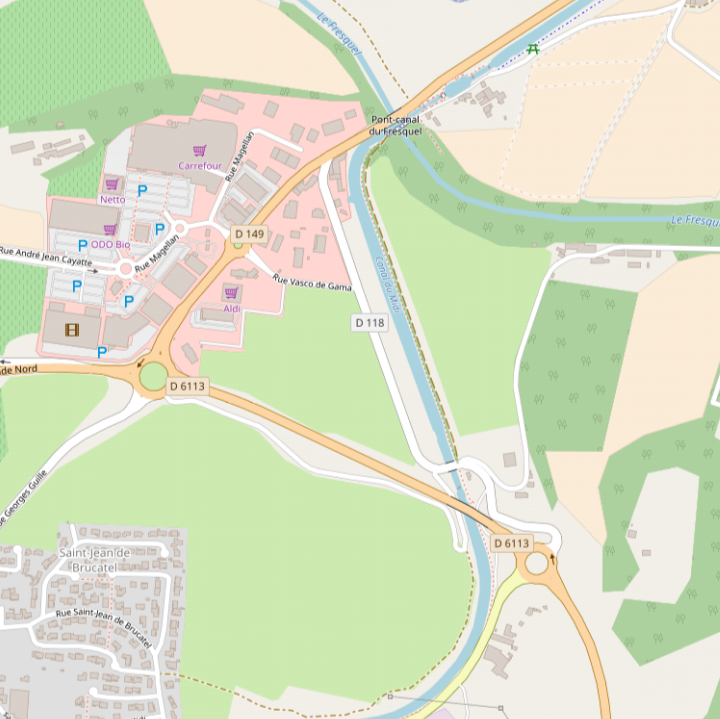
We return to Fabrezan in order to continue our journey on Les Tramways de l’Aude. 
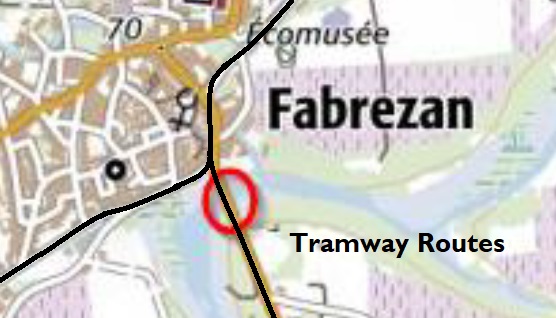
The tramway routes in the village of Fabrezan are shown as black lines on this map. The bridge over the River Orbieu is circled in red. The village station was on the northern edge of this map. [1]
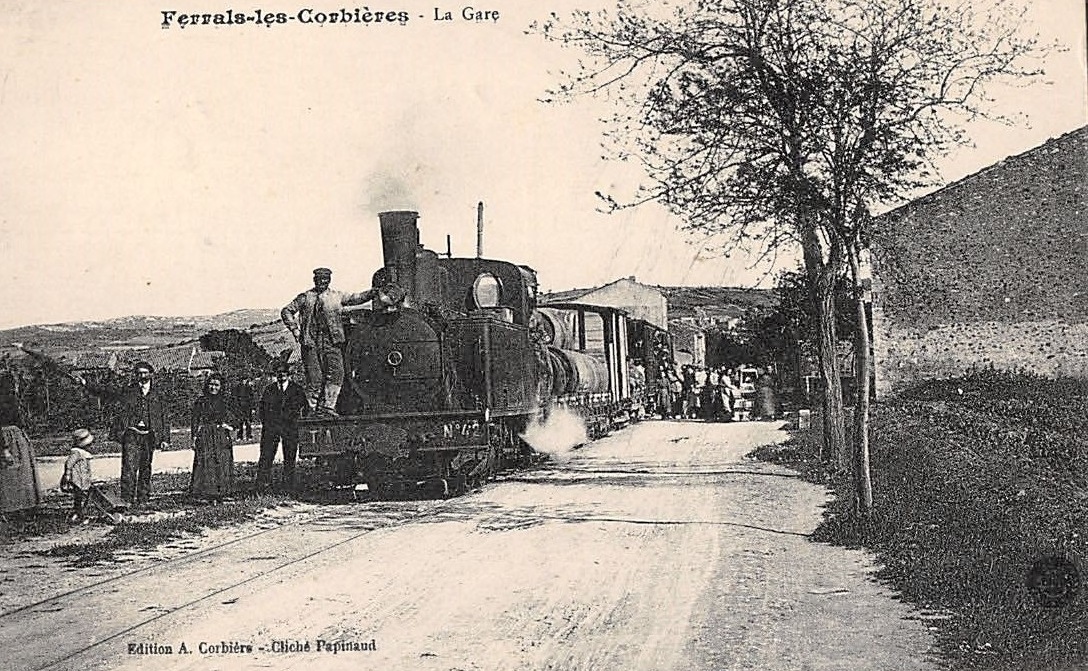
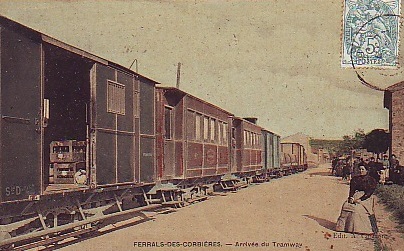
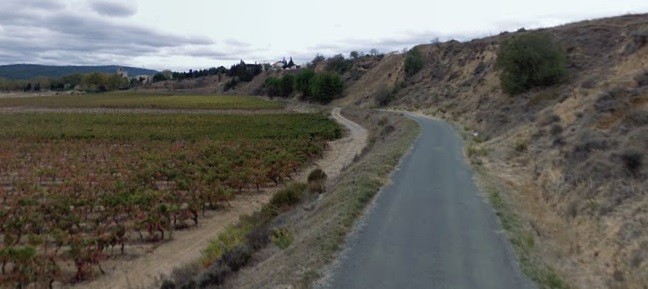
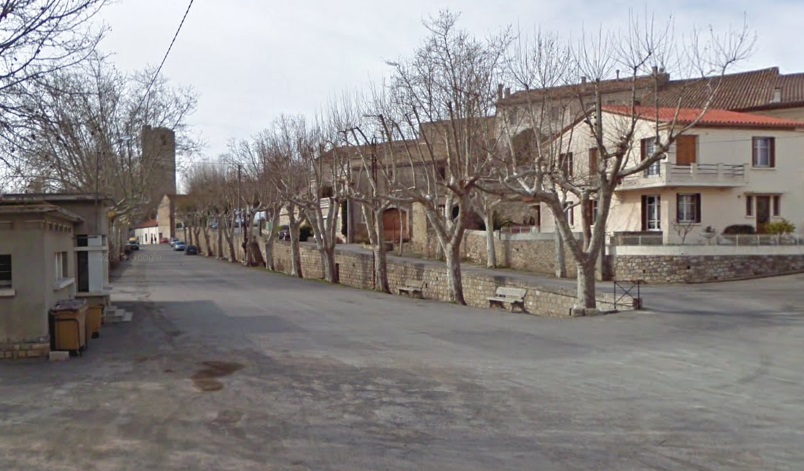
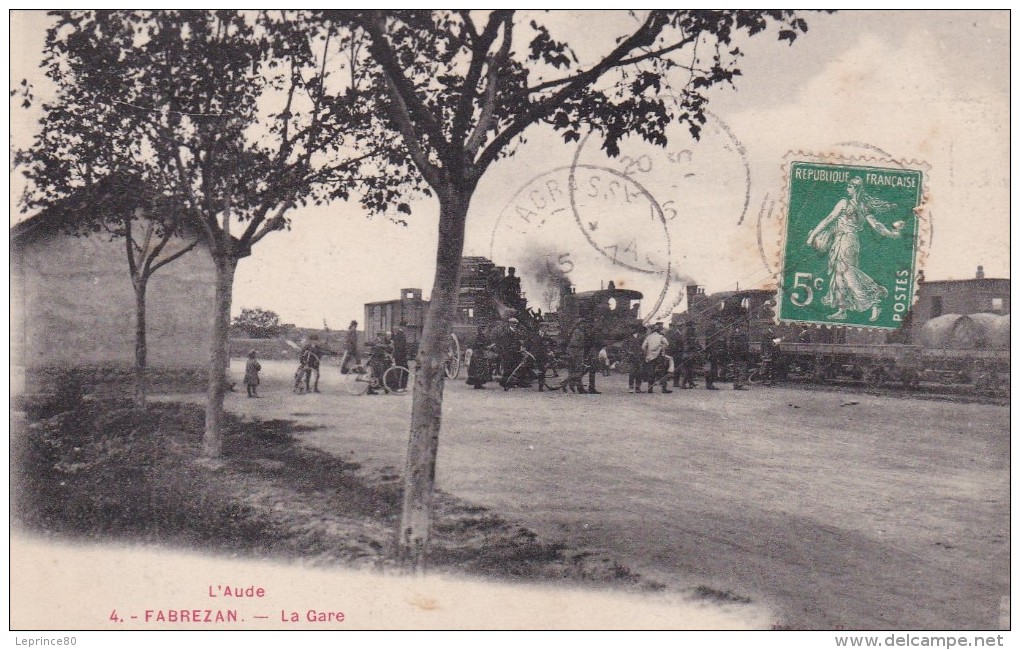
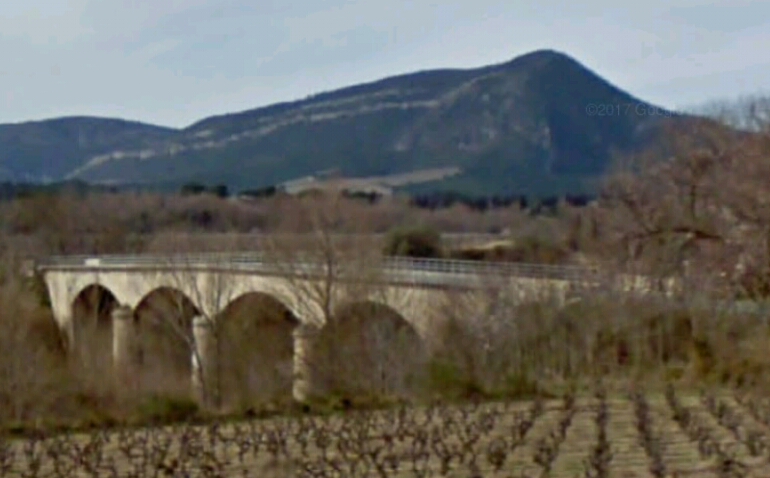
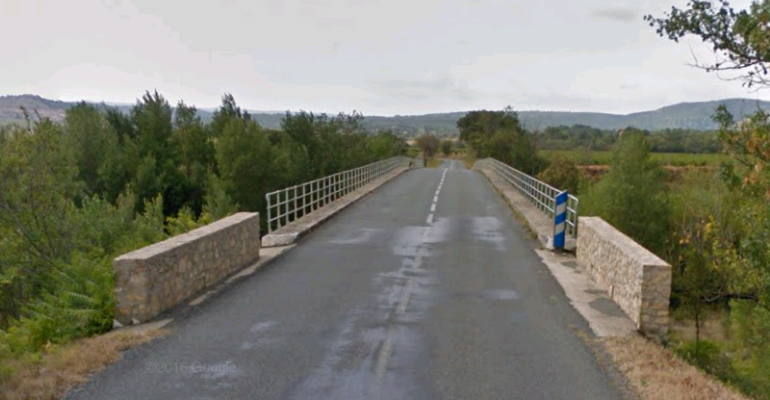
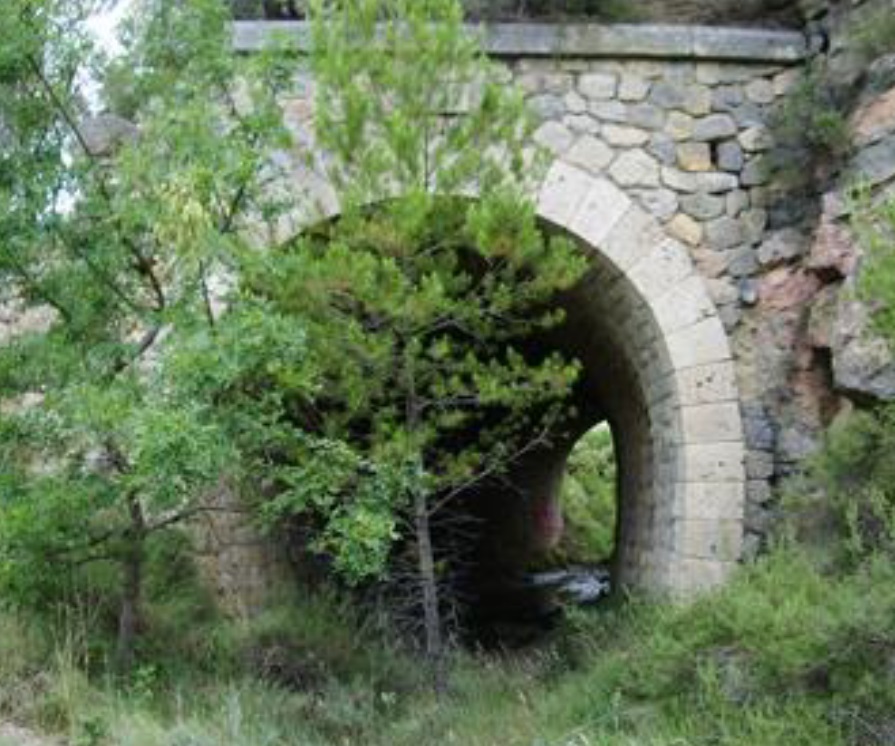
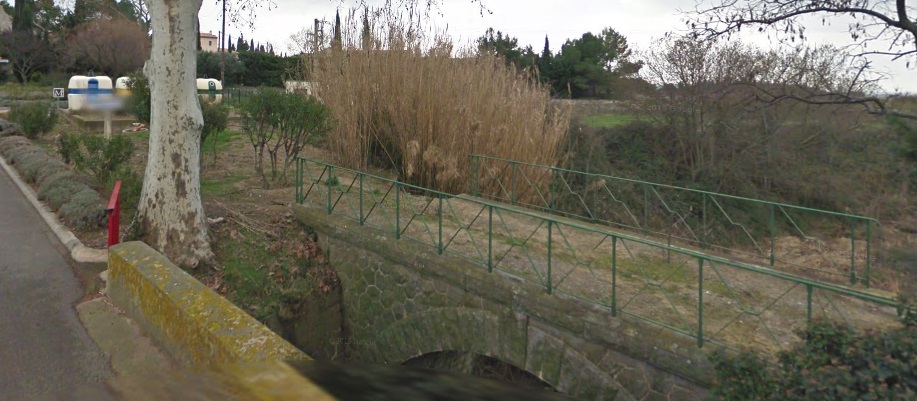
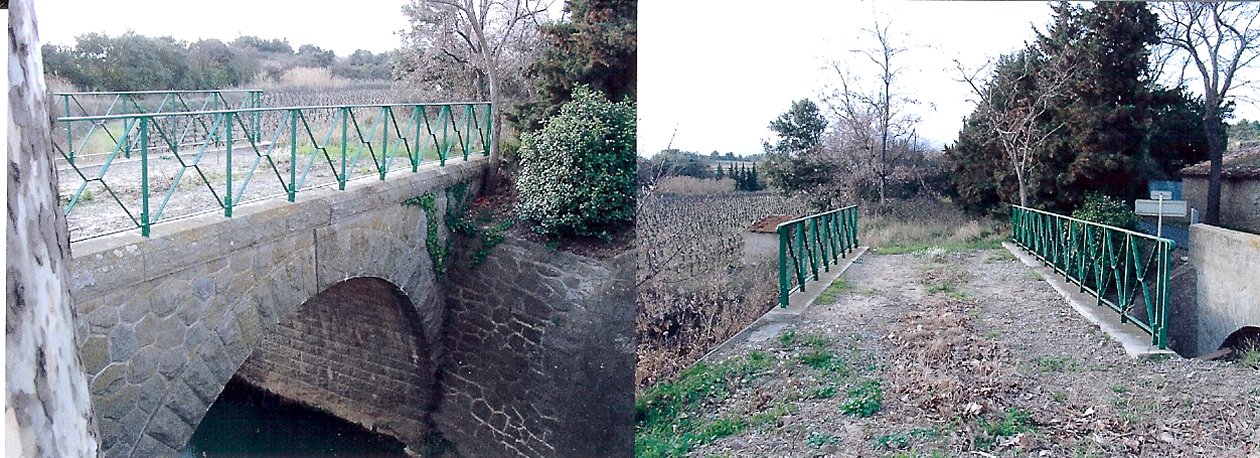
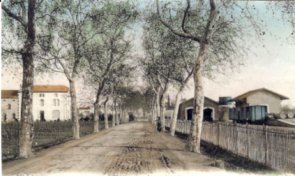
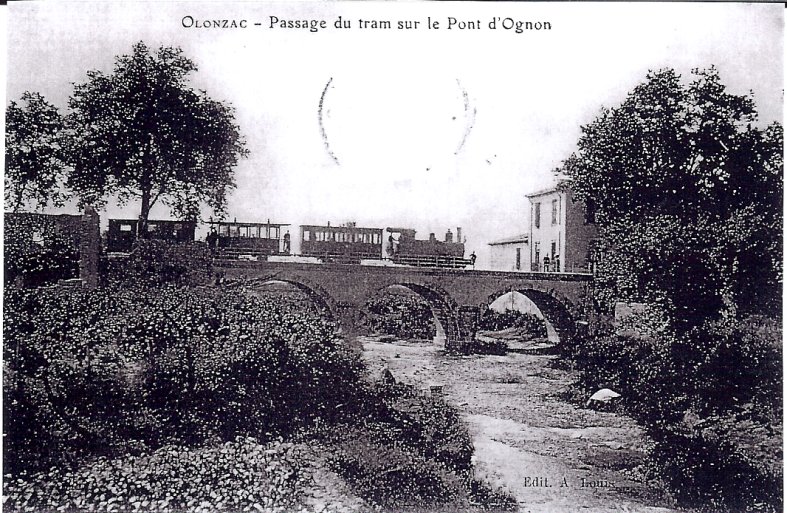
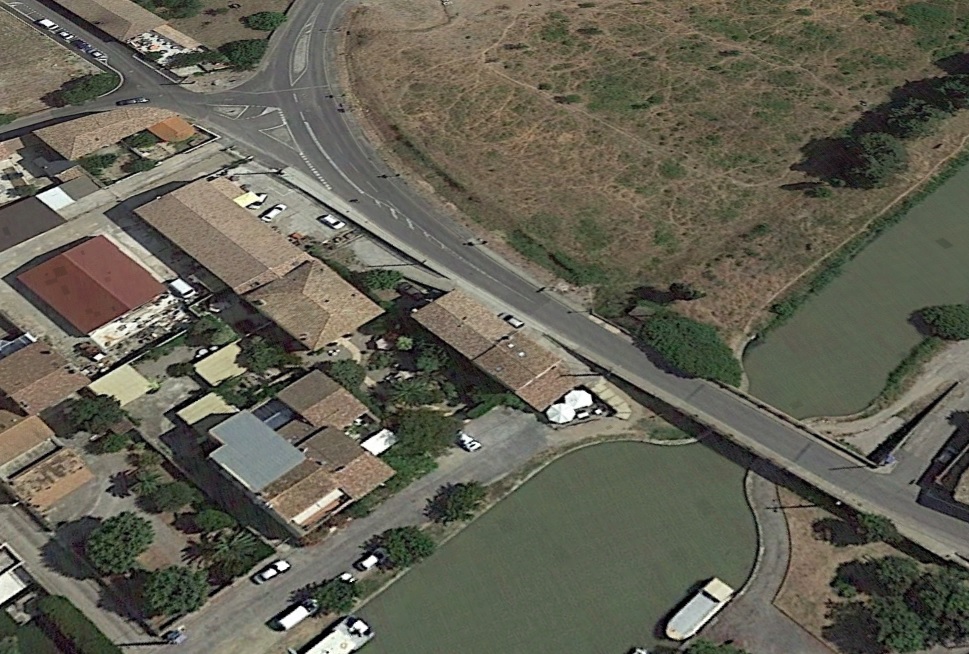
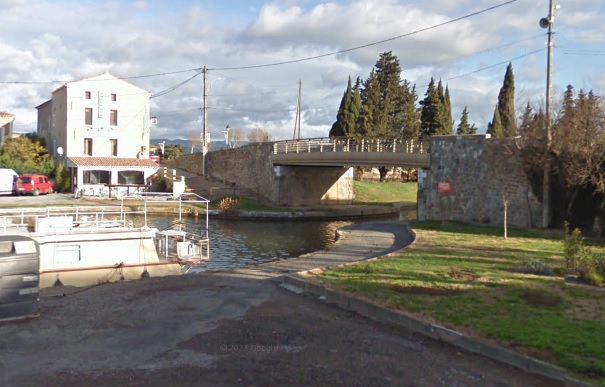
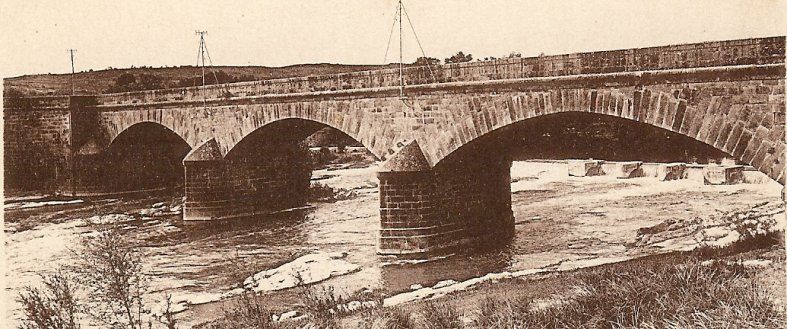
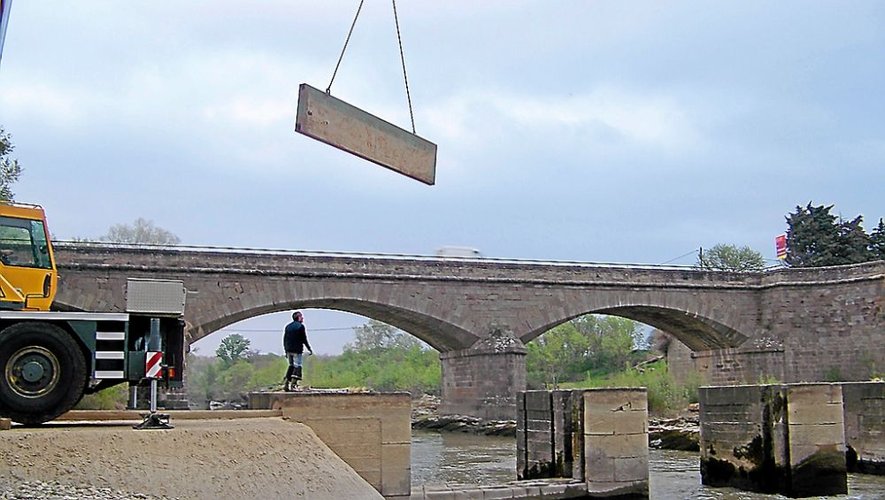
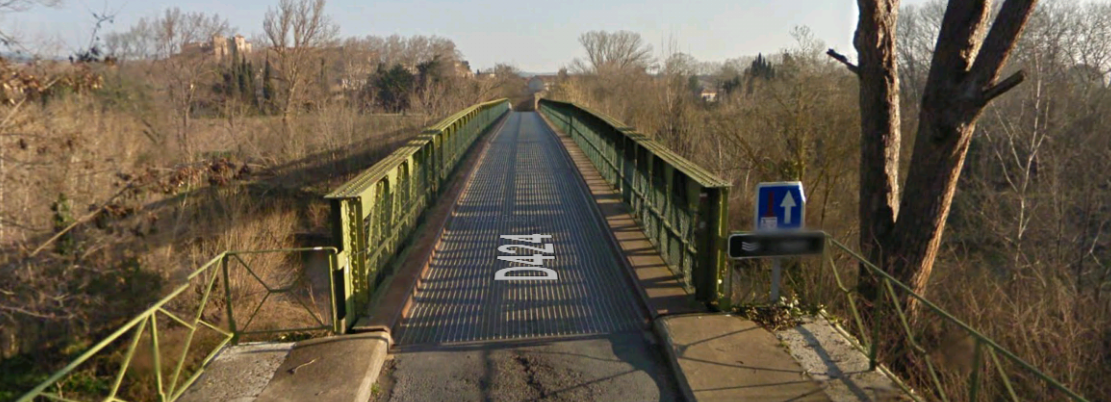
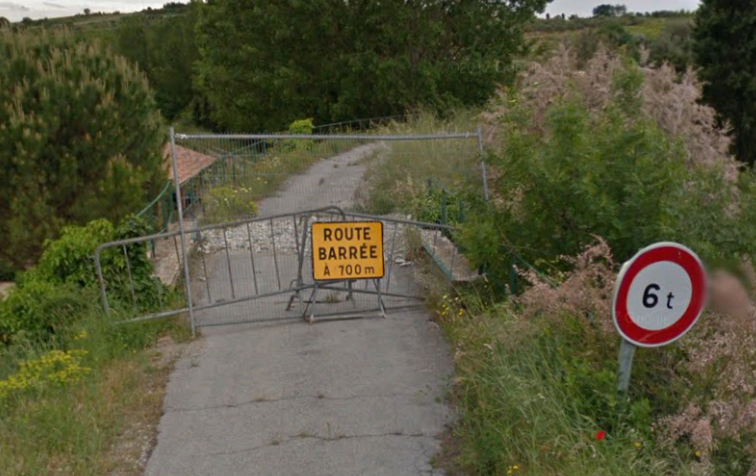
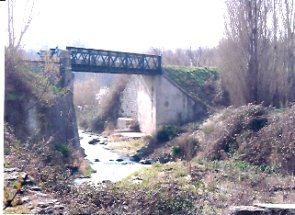
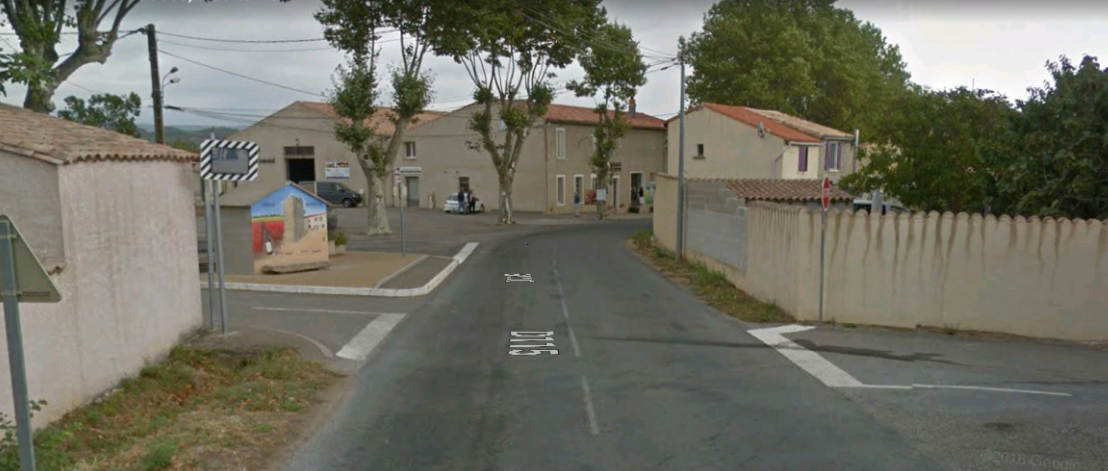
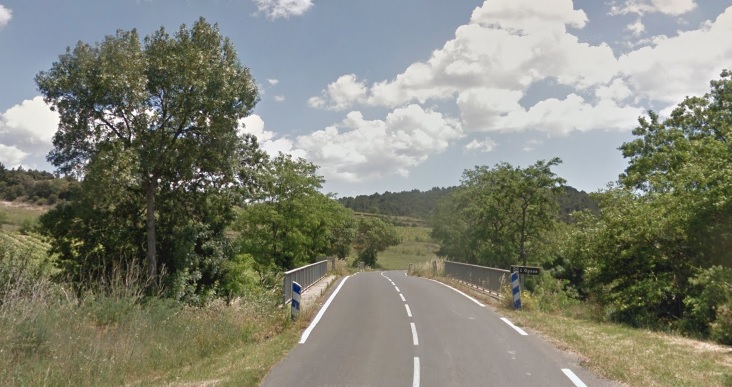
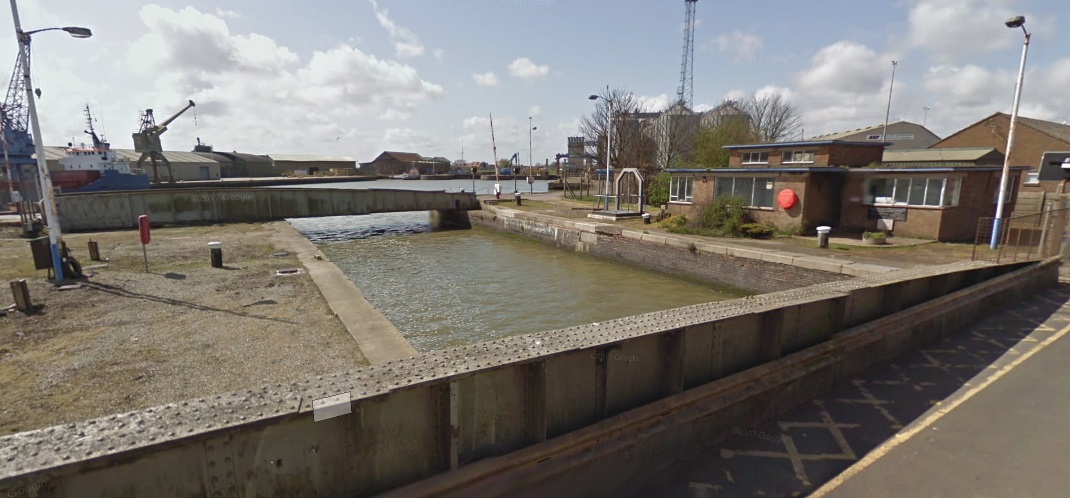
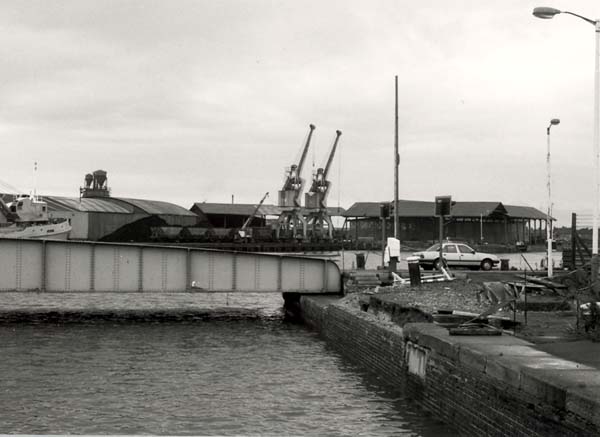
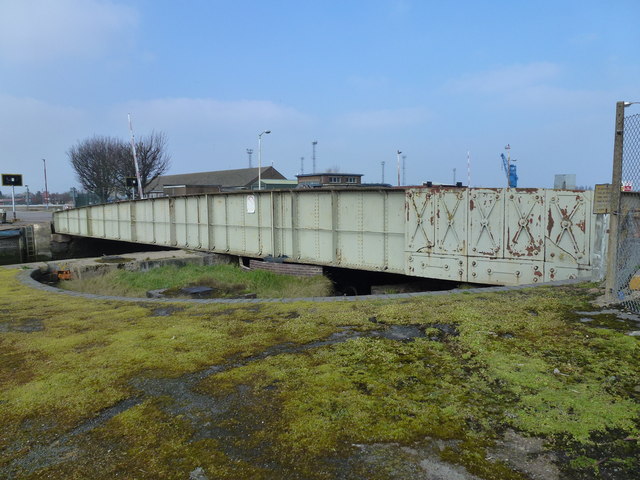
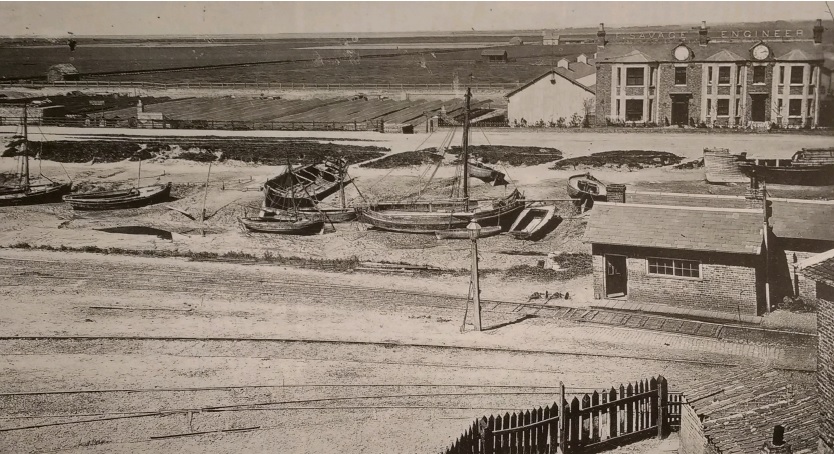
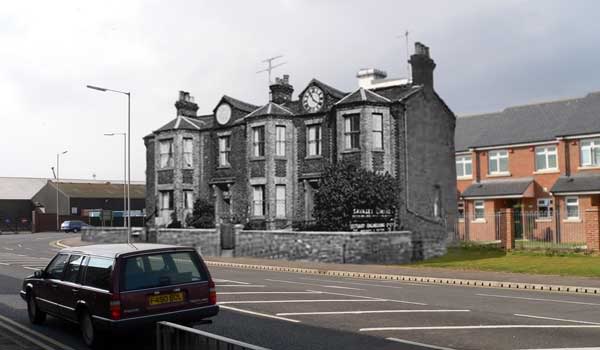
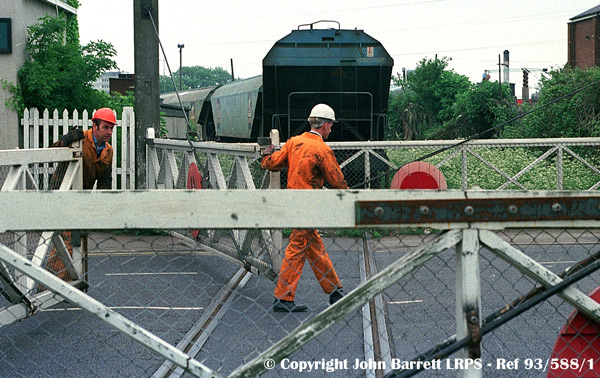
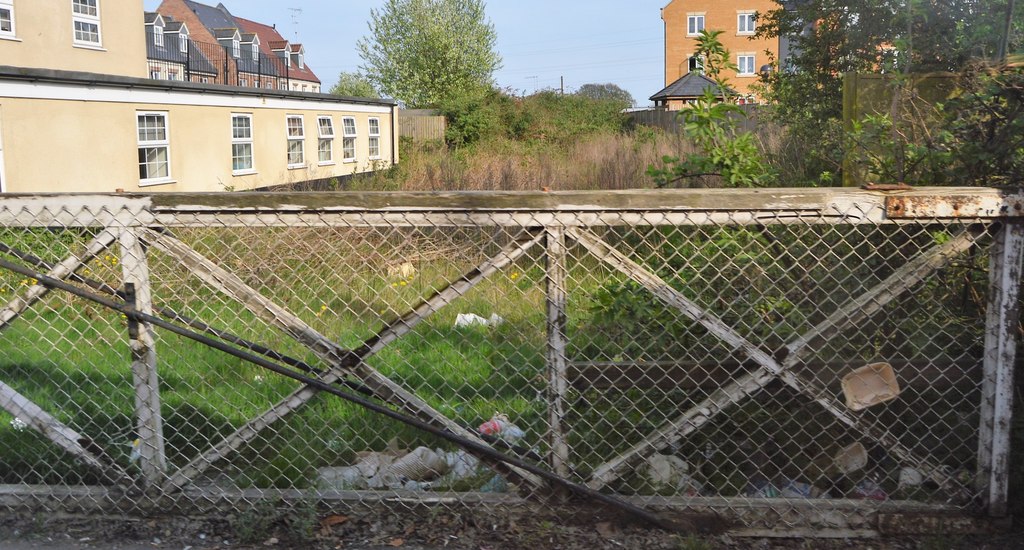
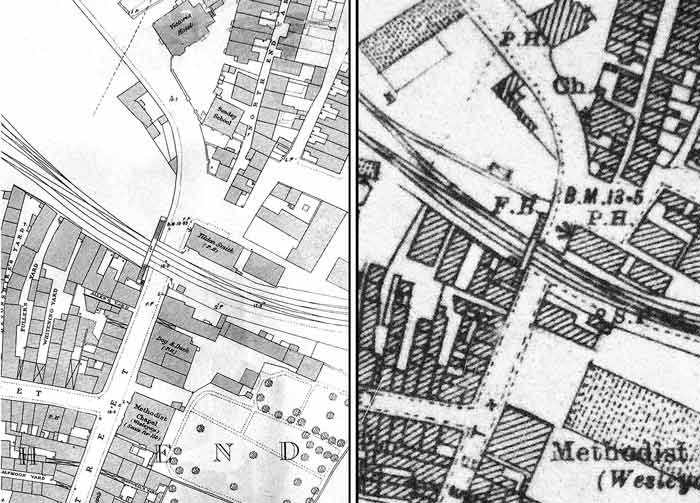
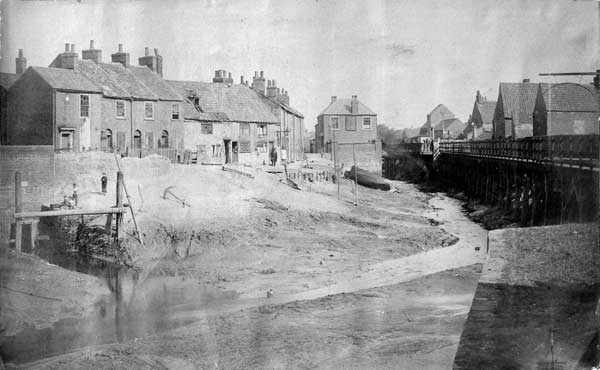
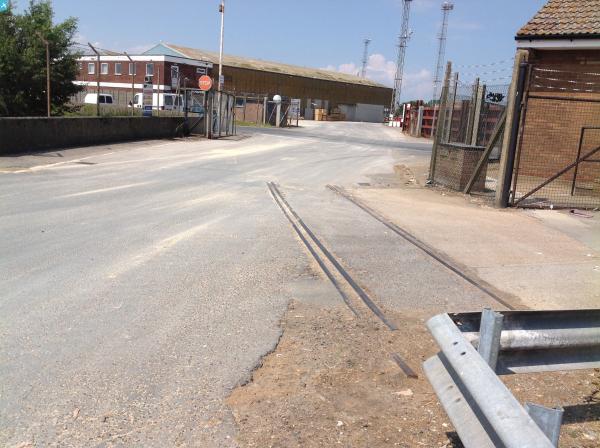
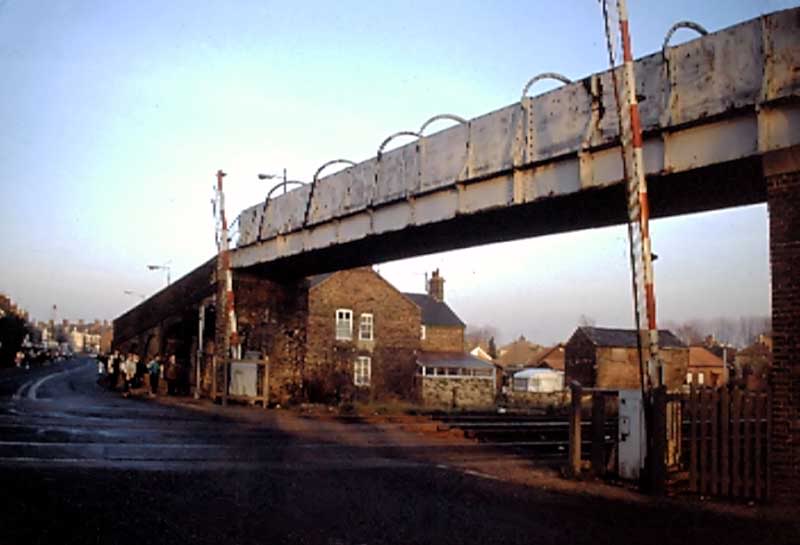
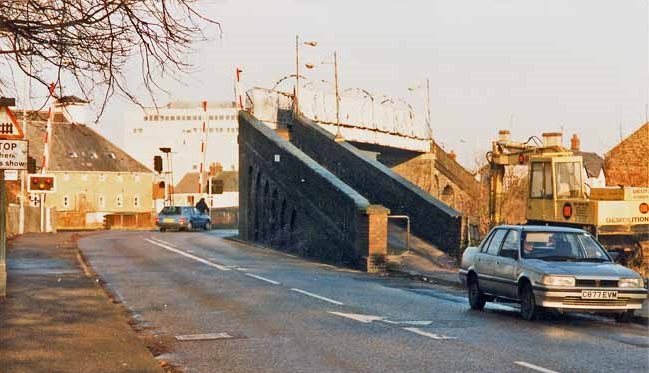
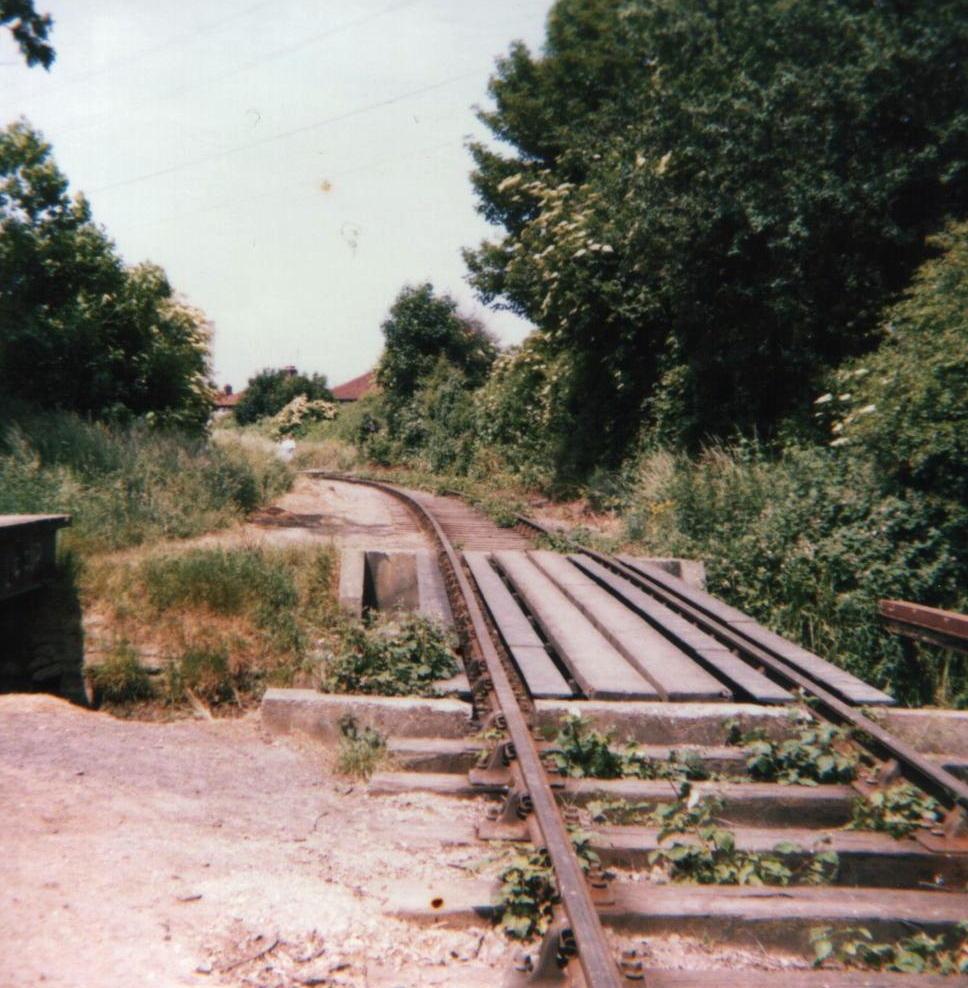
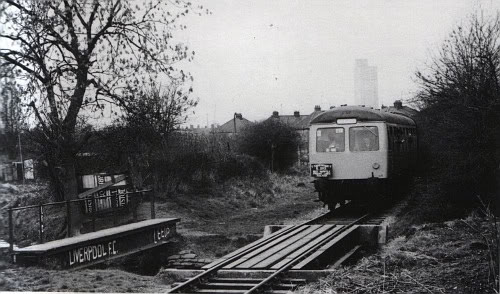
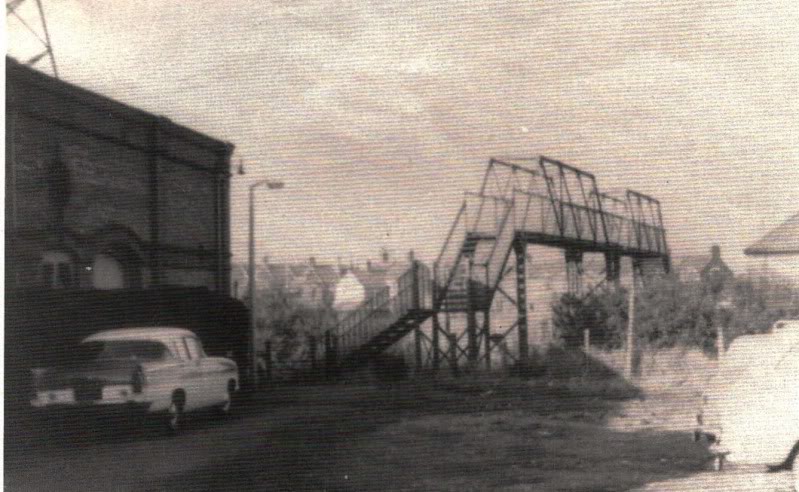
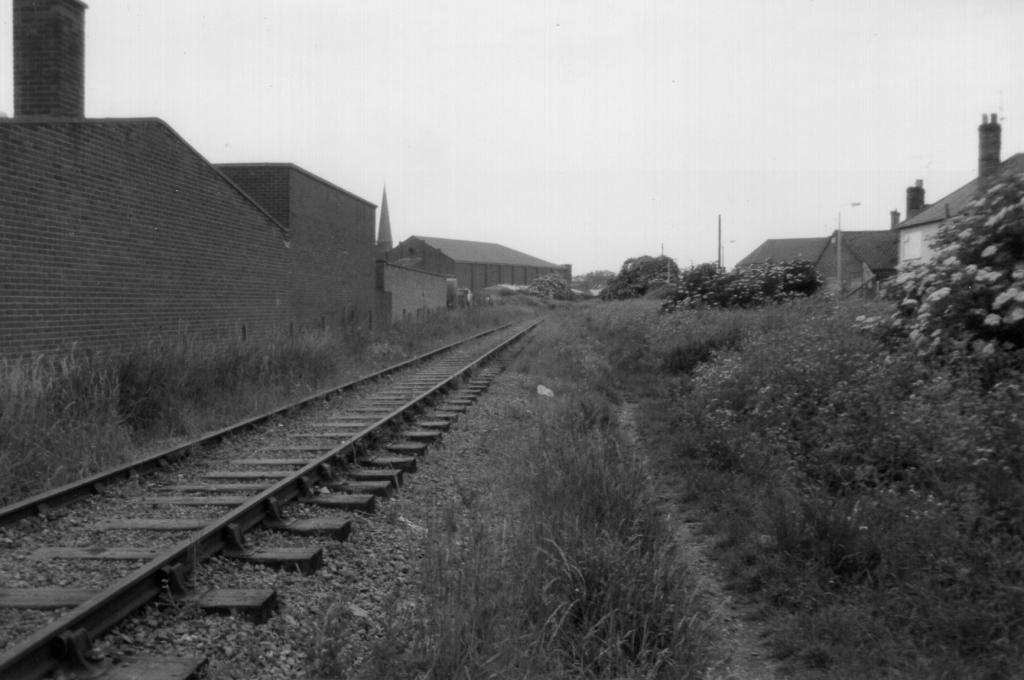
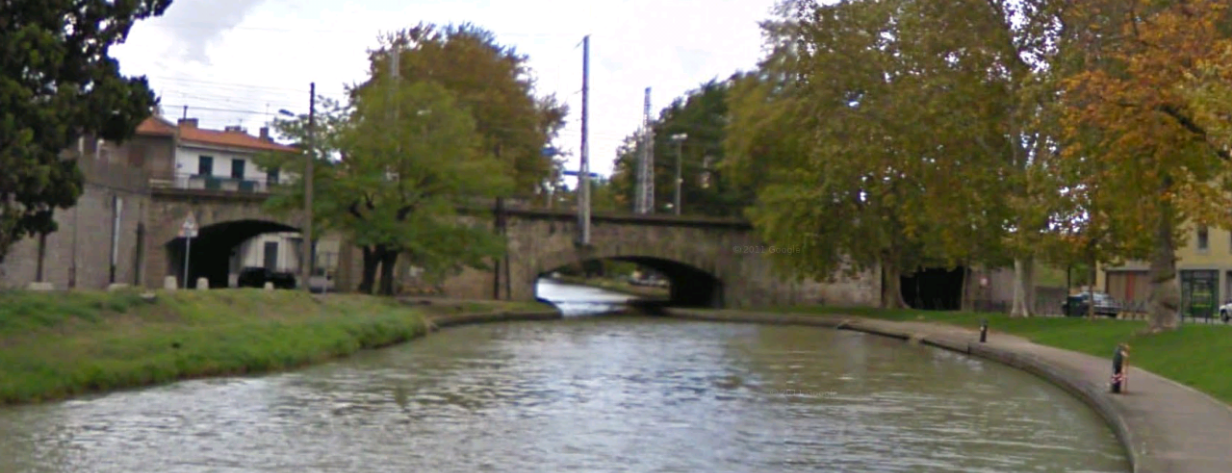
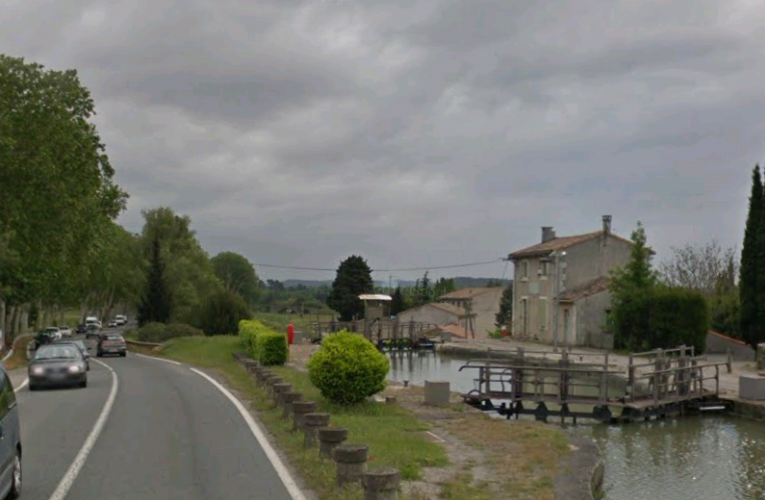
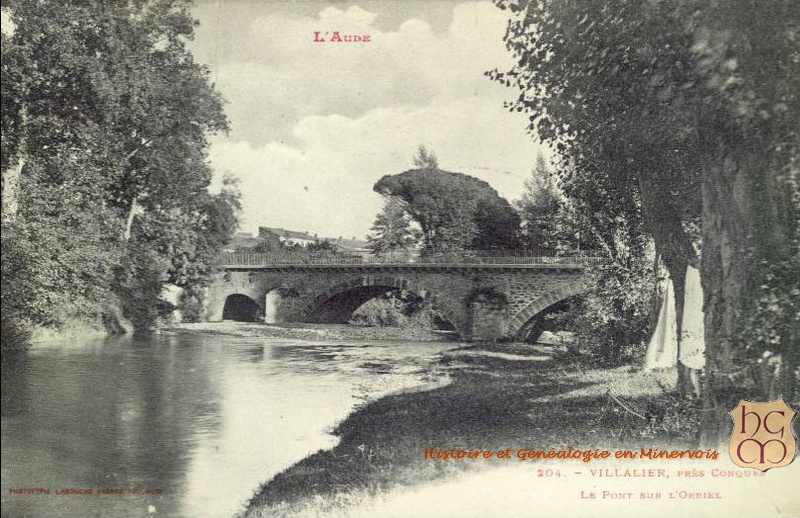
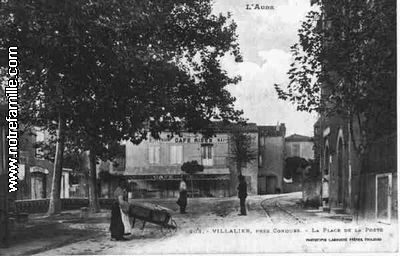
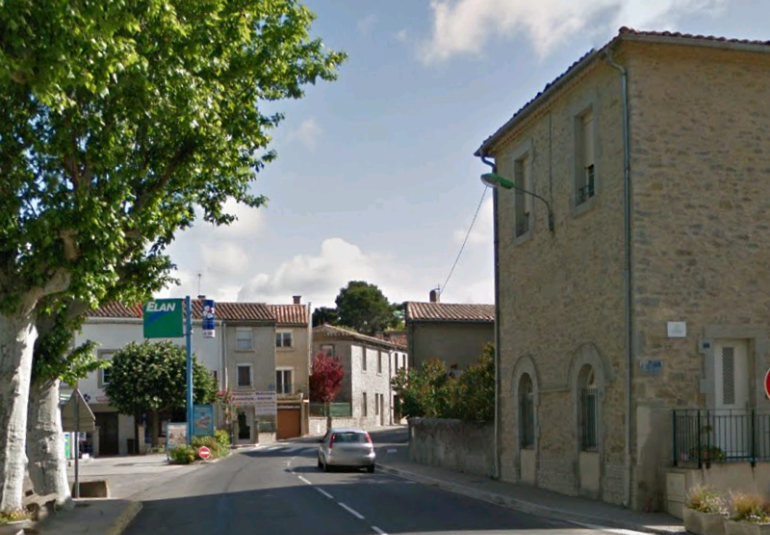
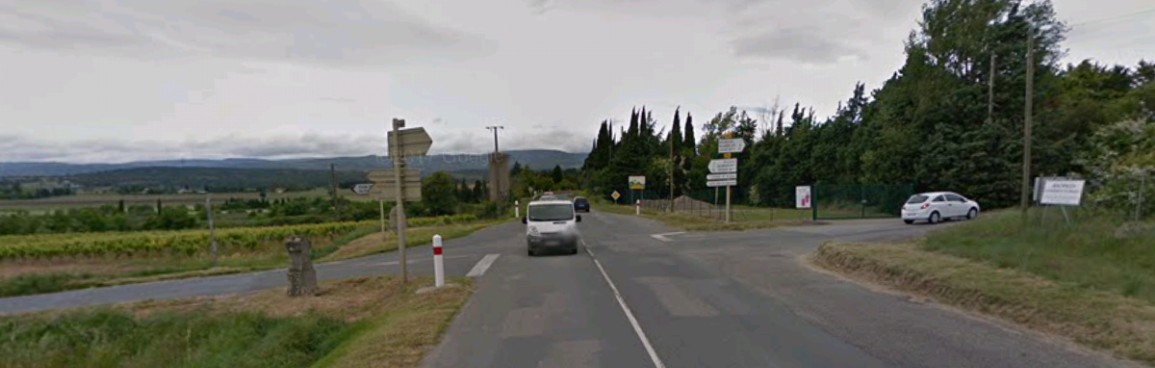
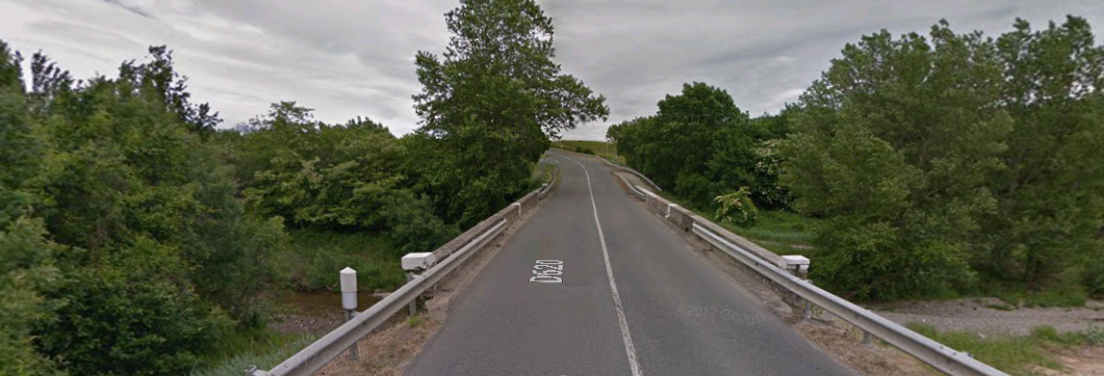
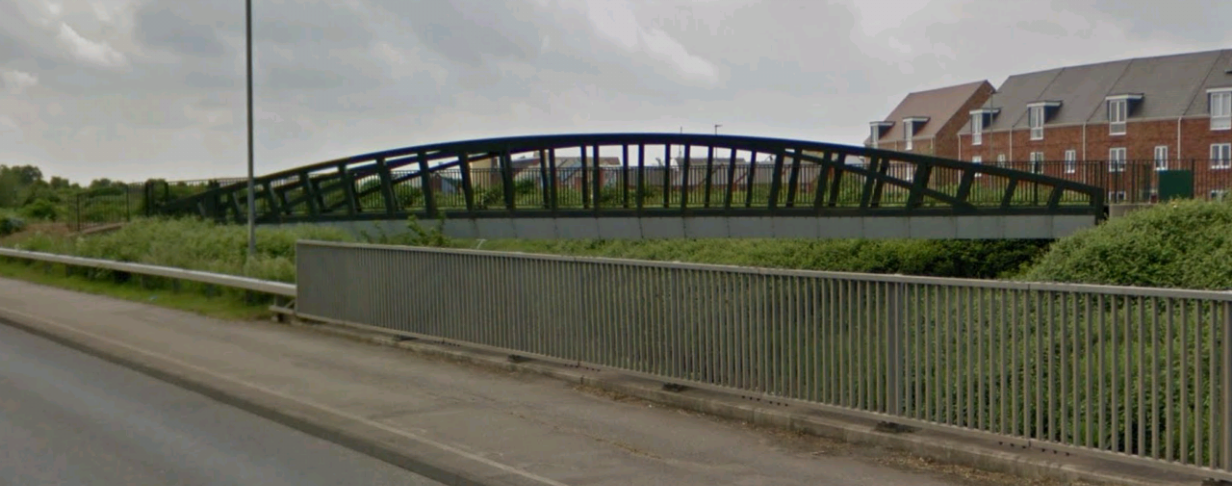
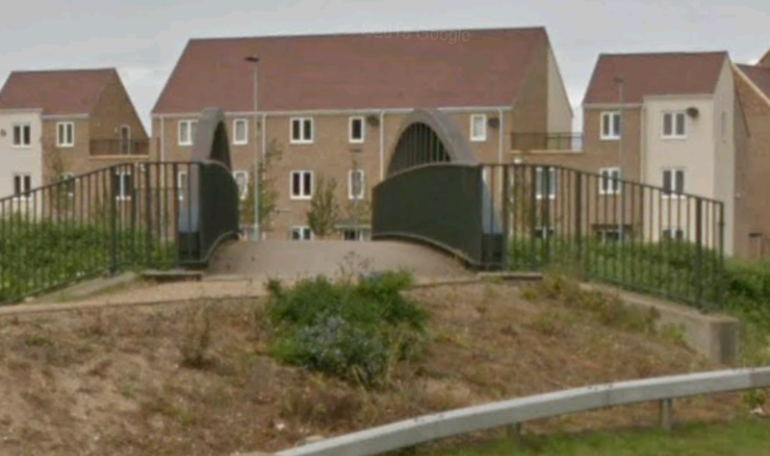
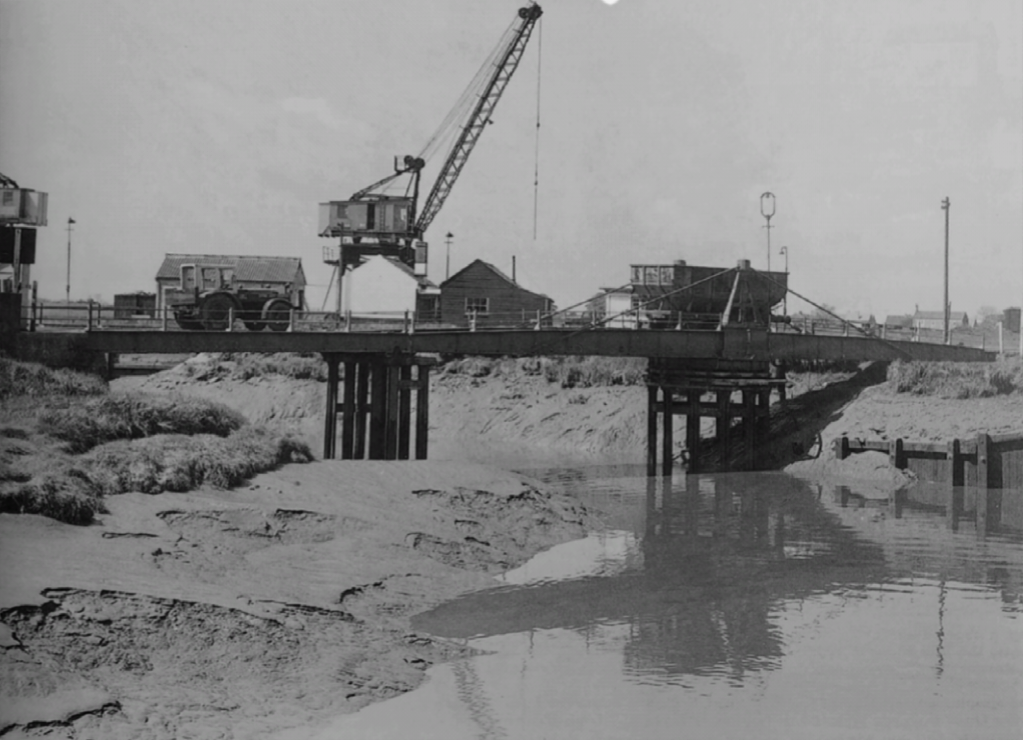
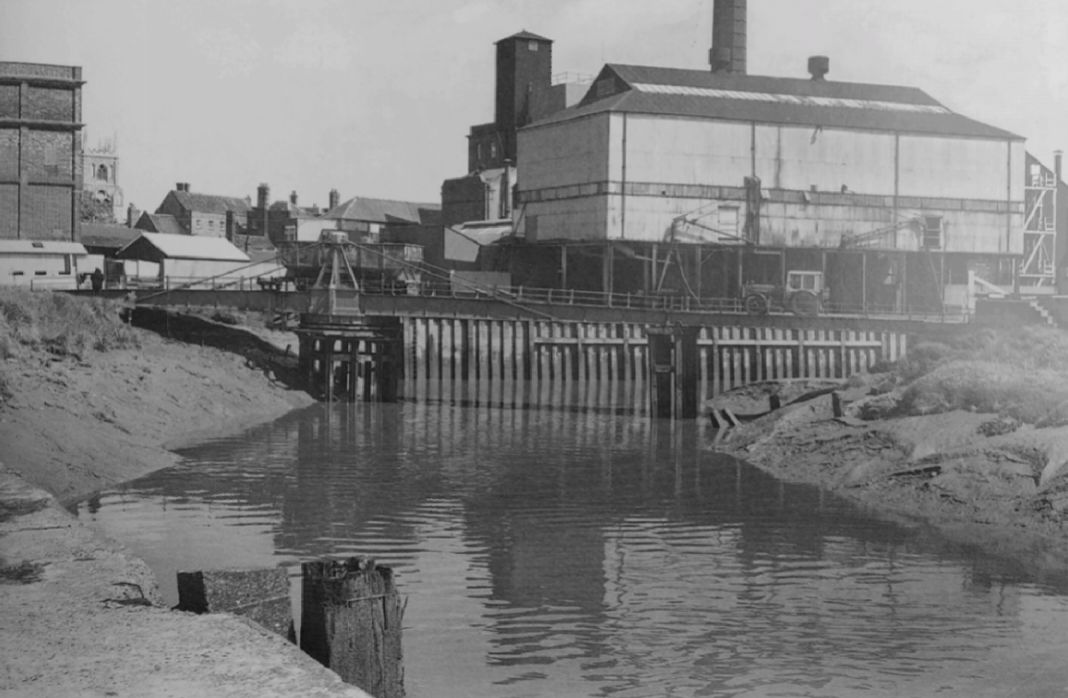
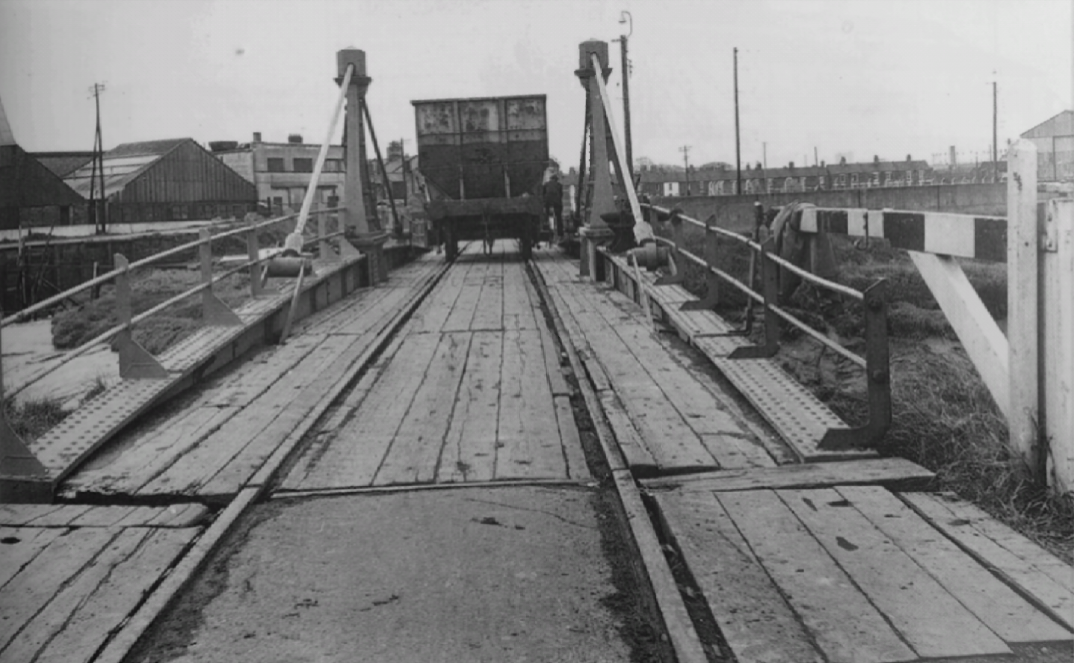
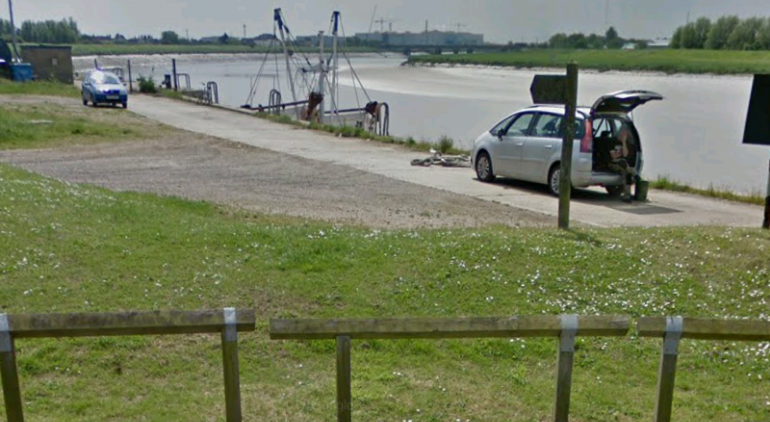
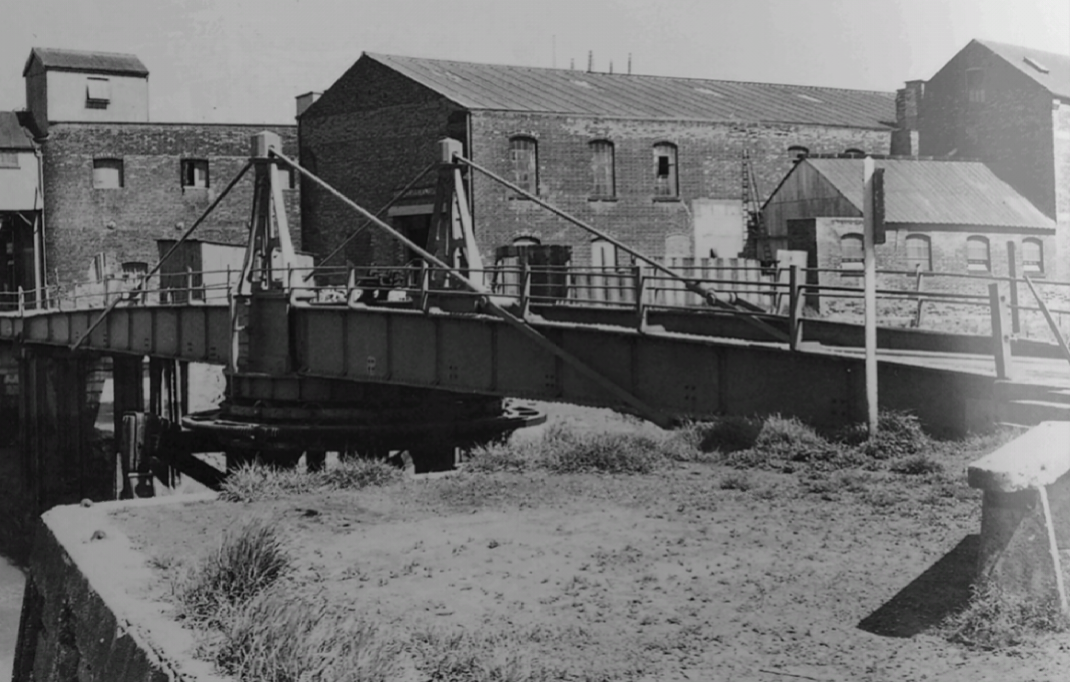
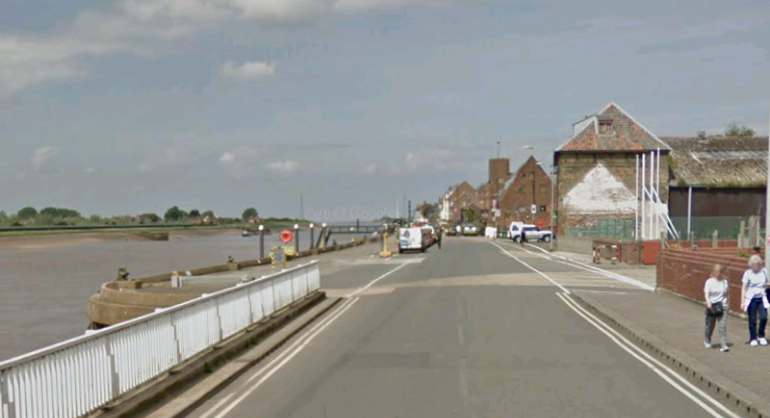
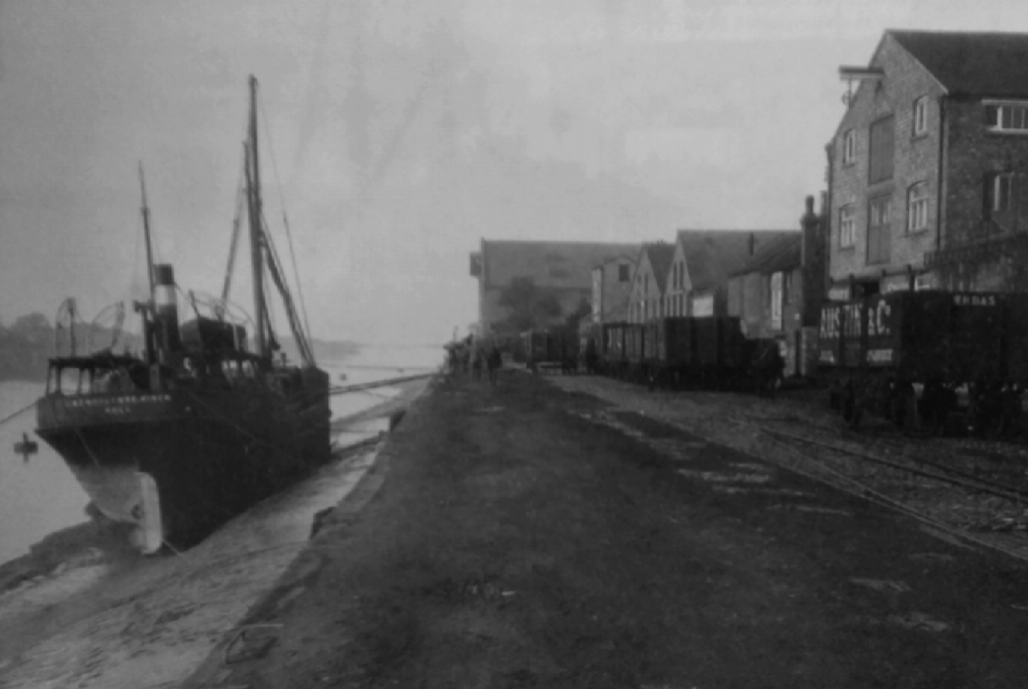
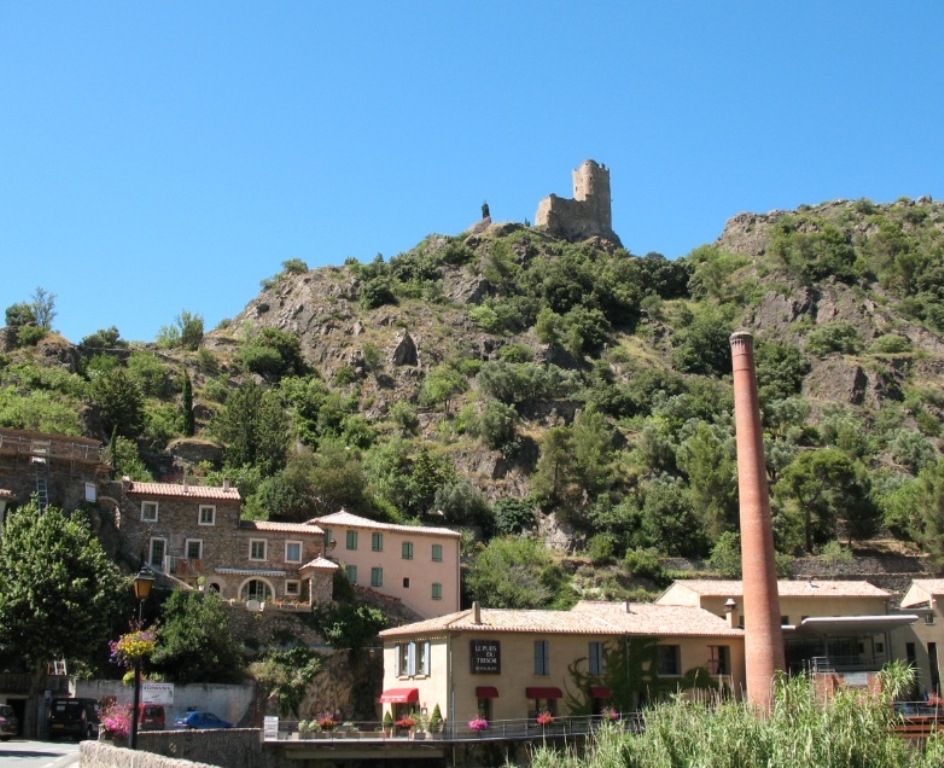
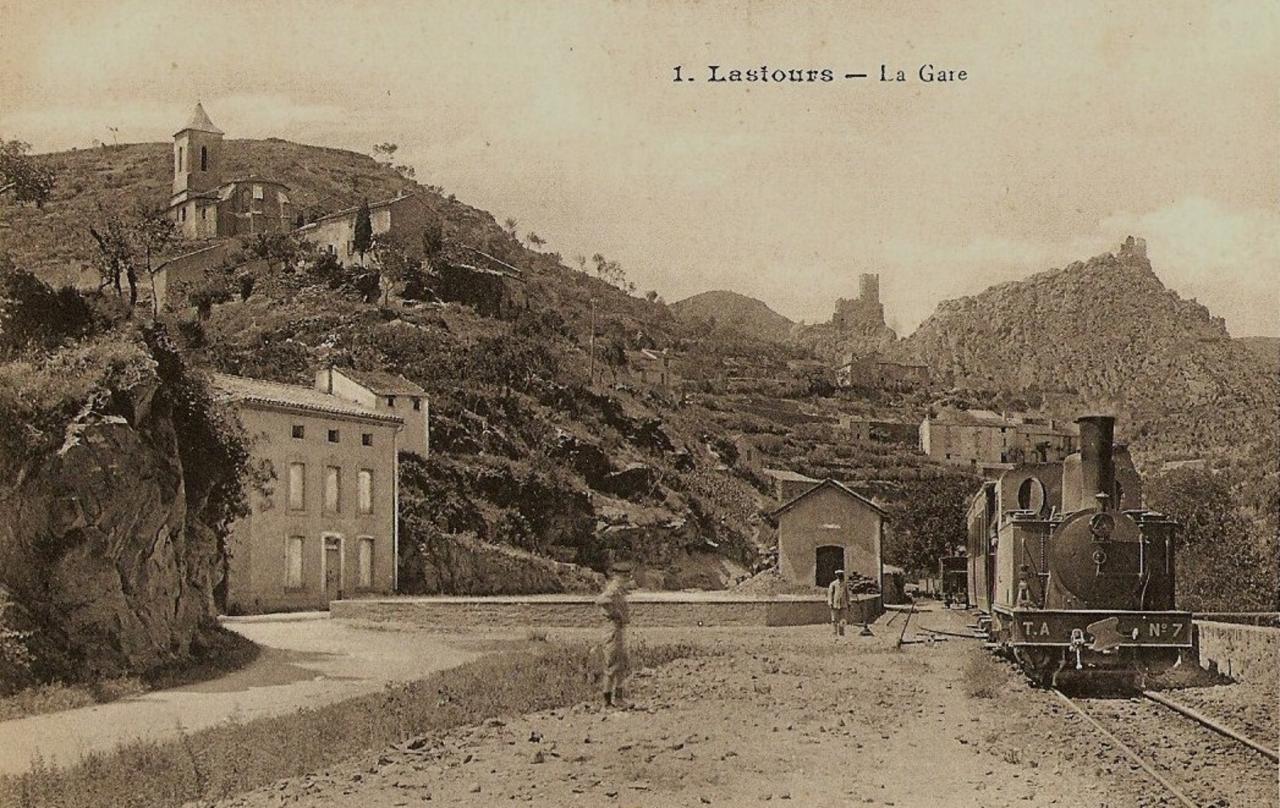
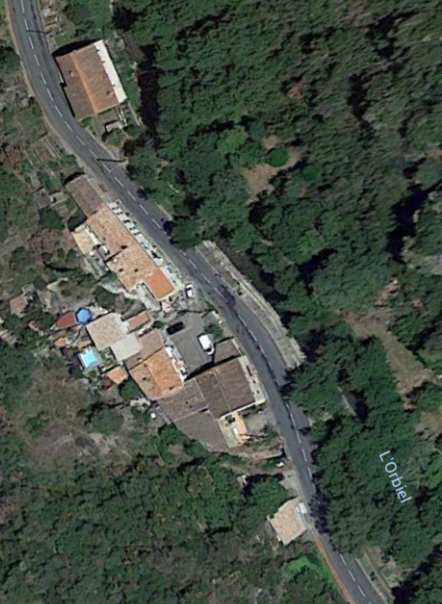
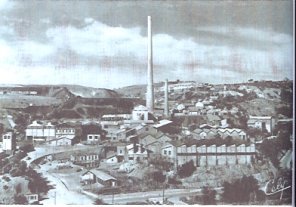
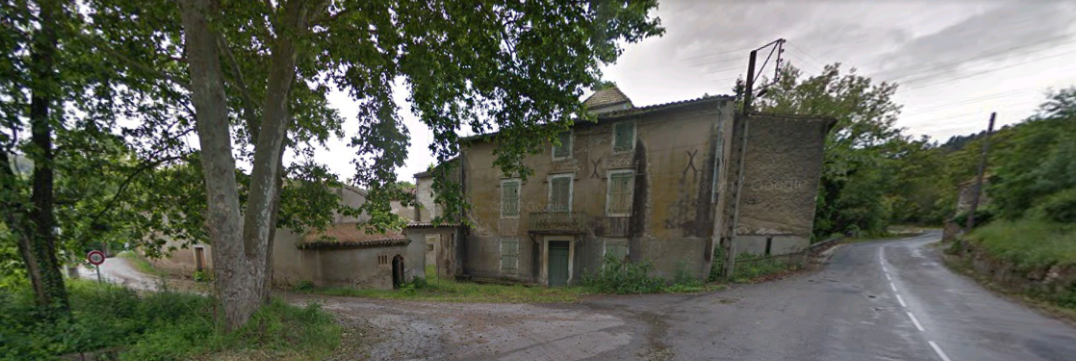
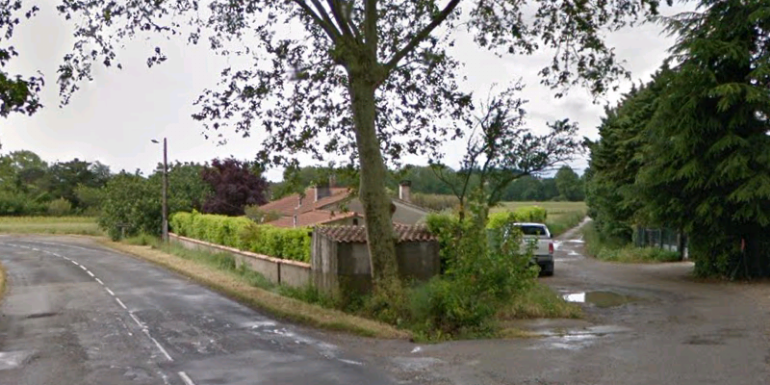
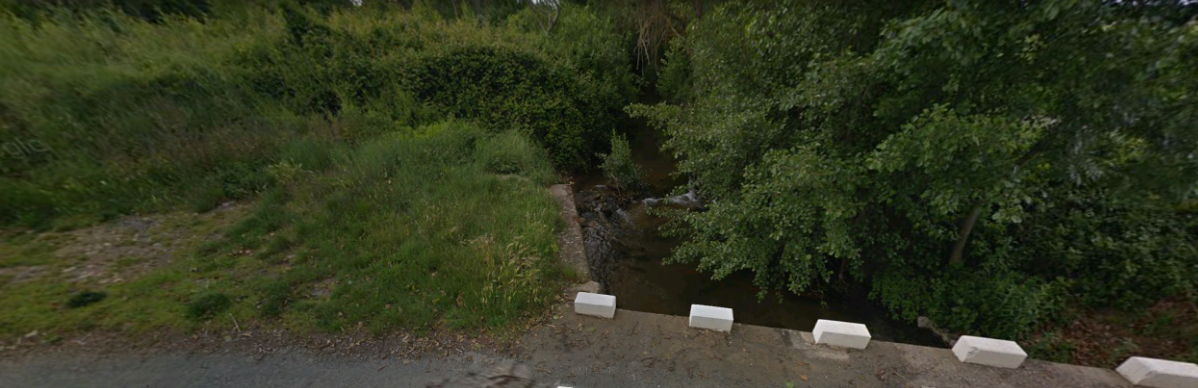
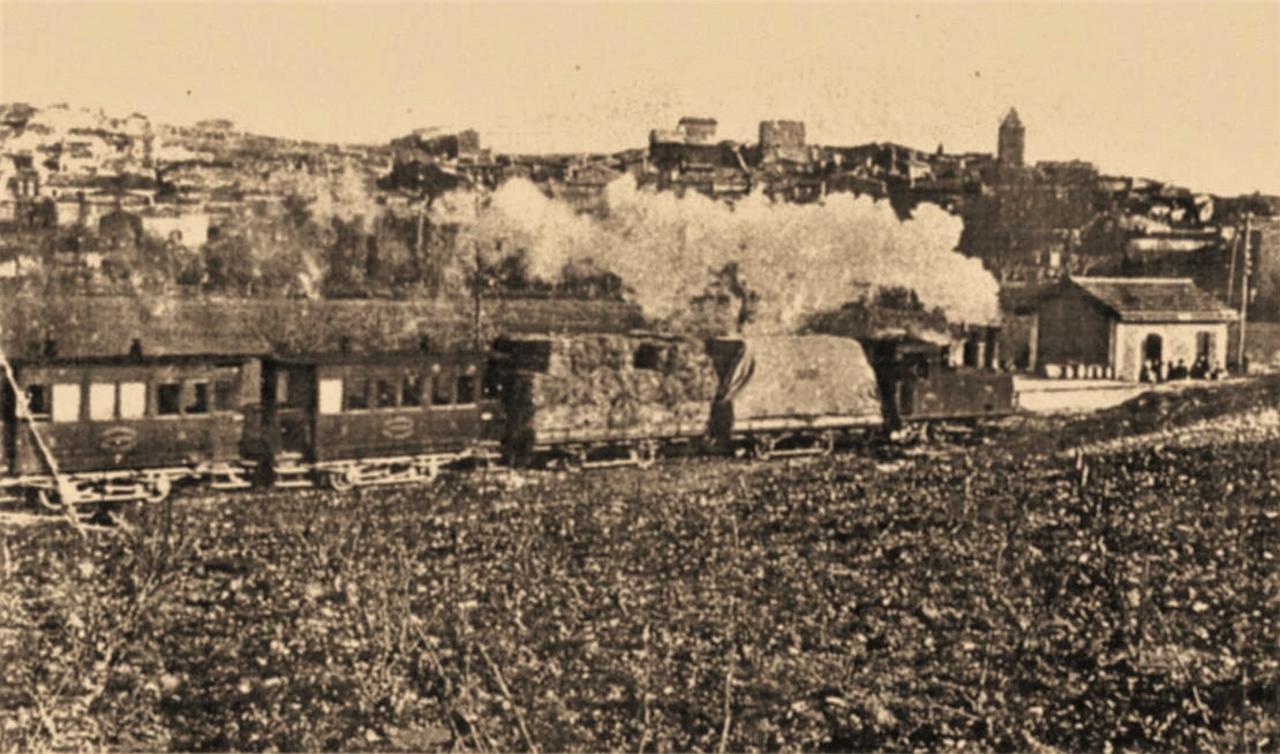
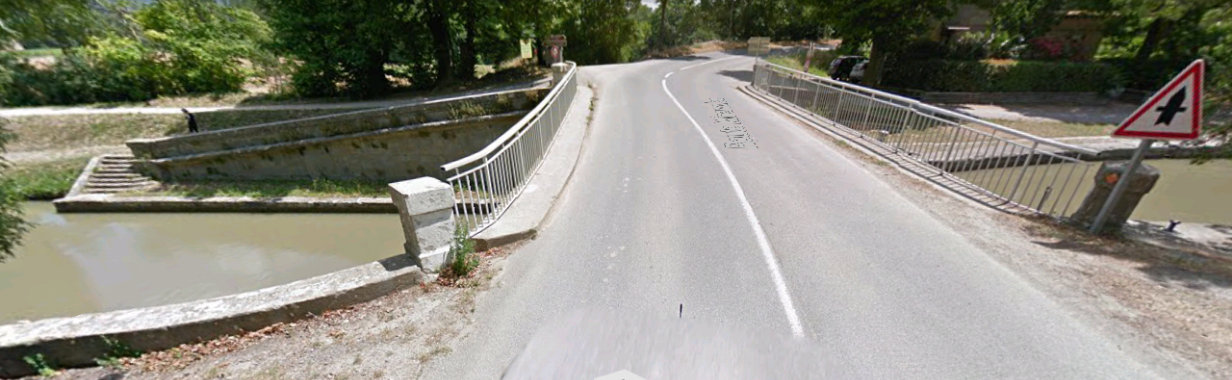
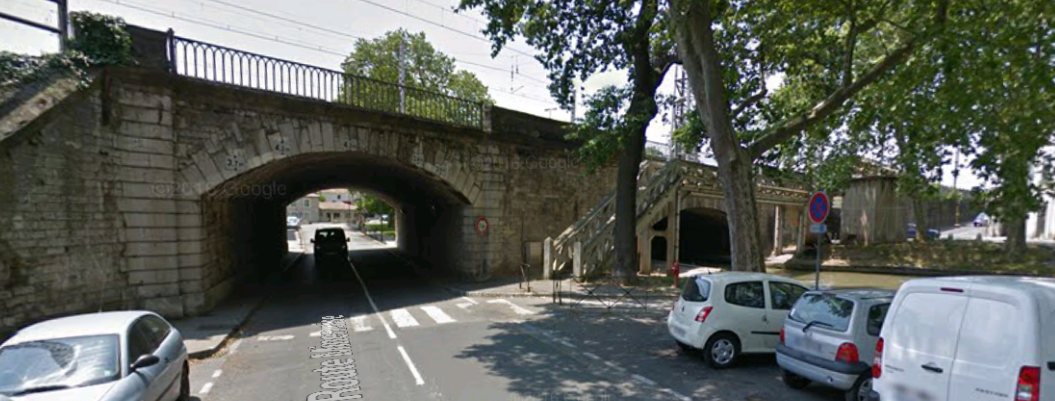
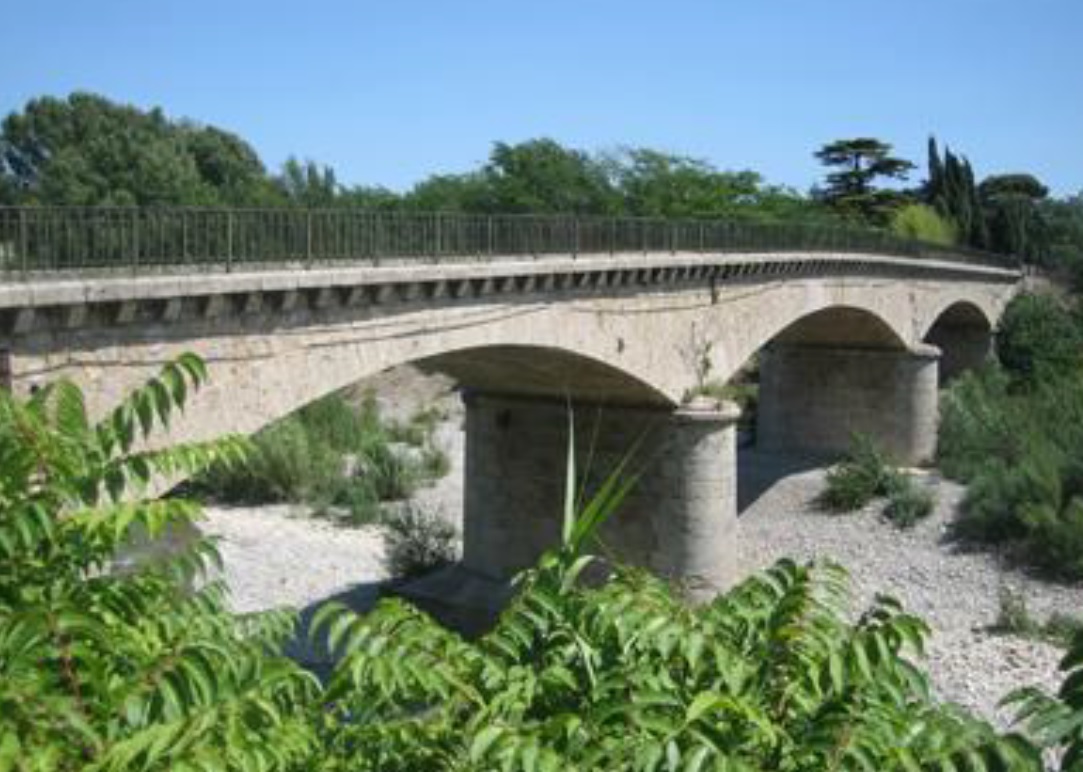
The two images above show the bridge at Fabrezan. The first, at the time the tramway was in use, the second, in the early 21st century. [1]
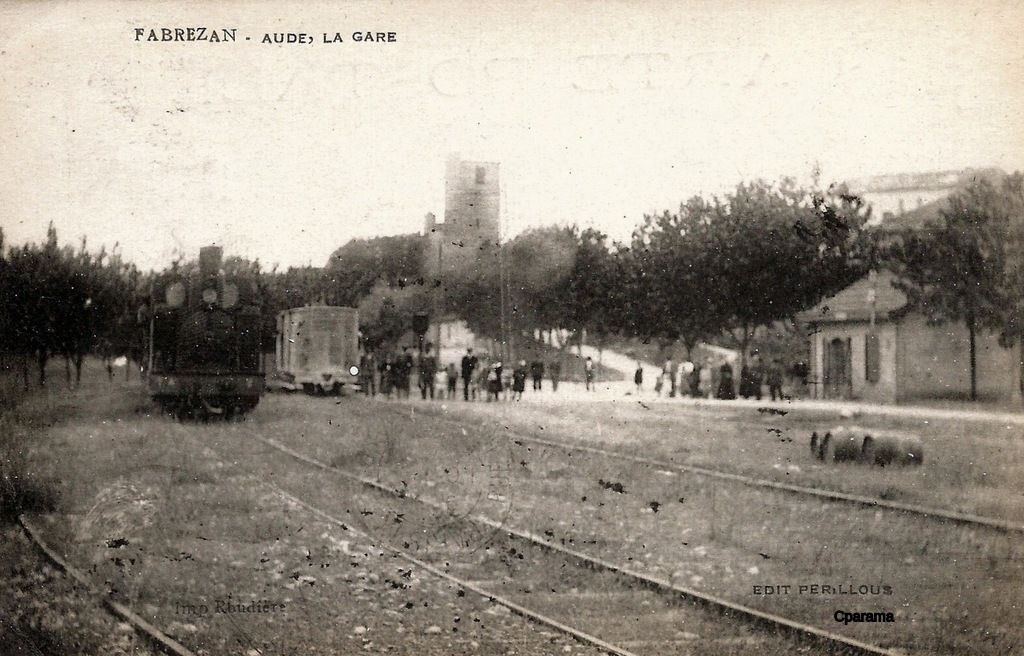
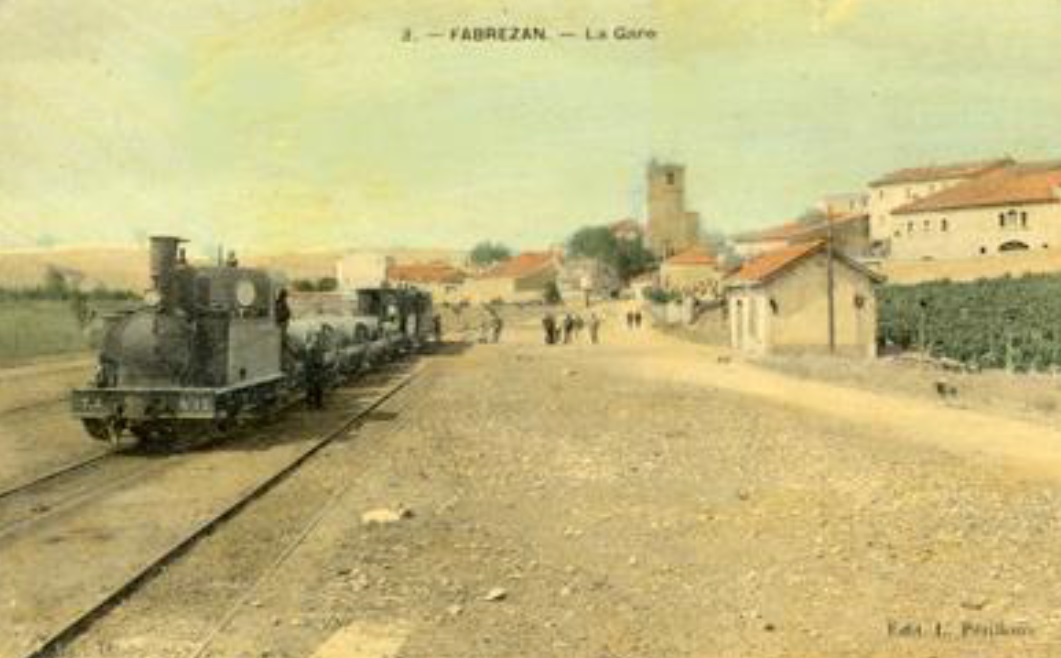
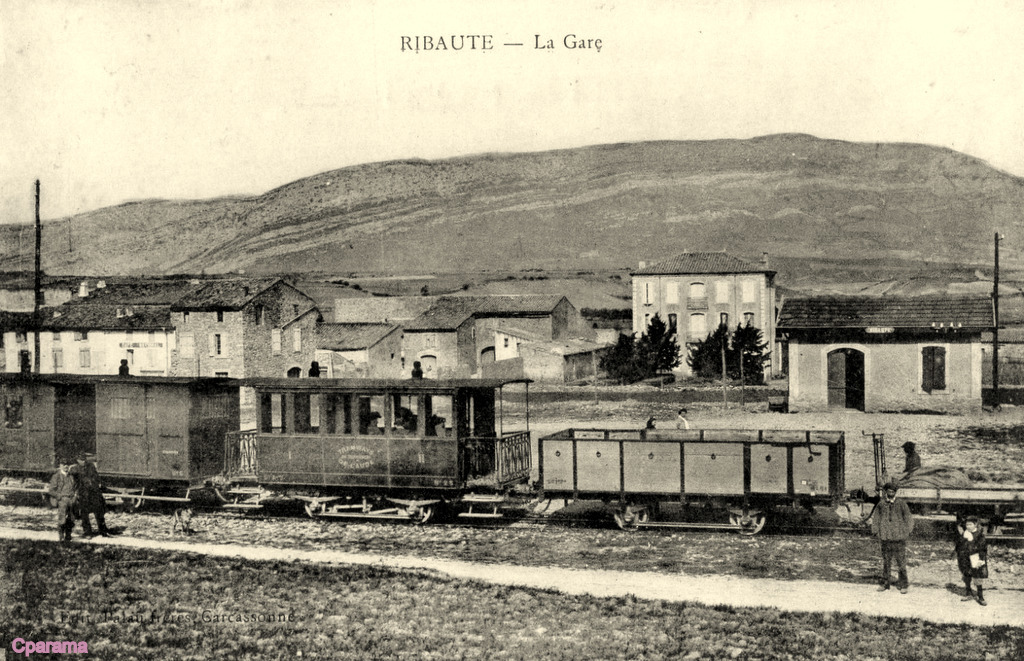
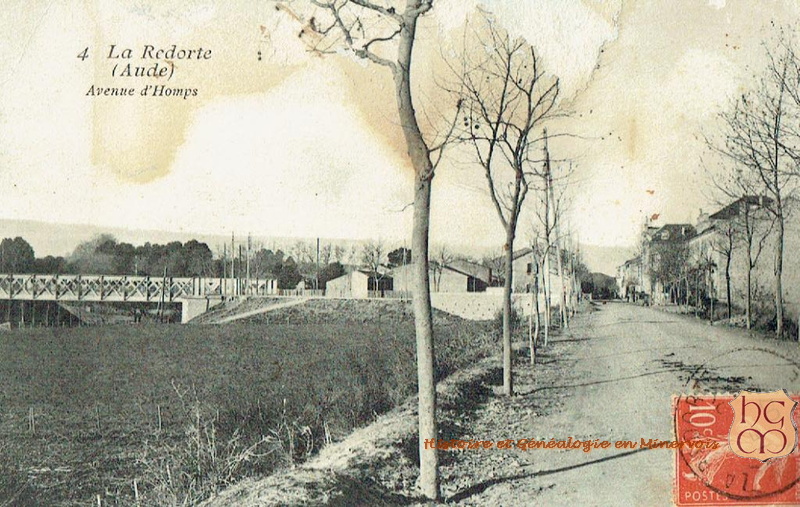
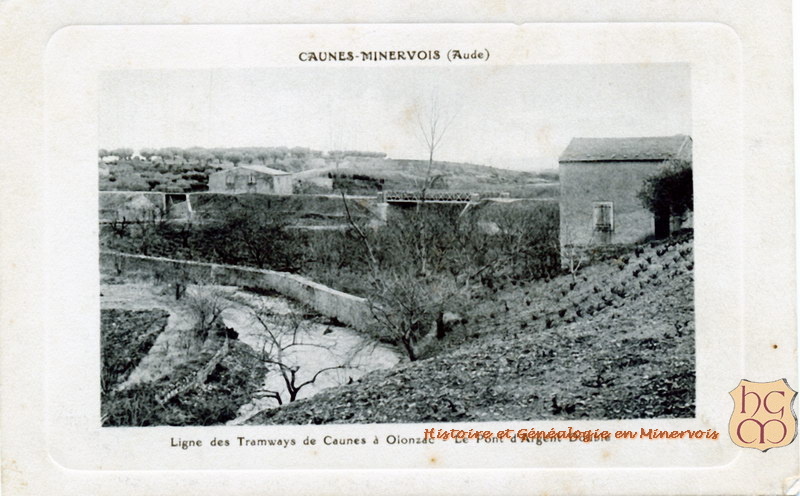
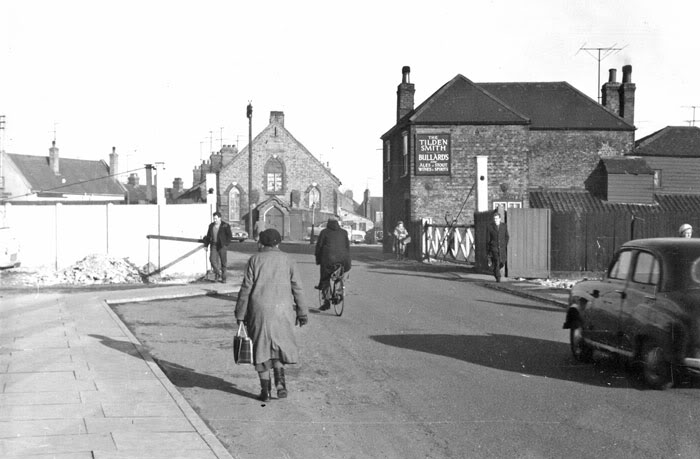
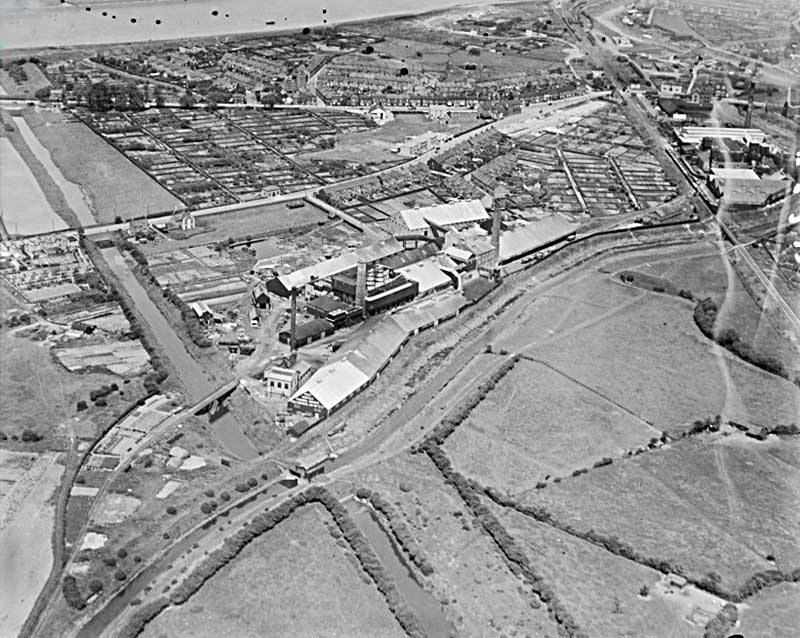
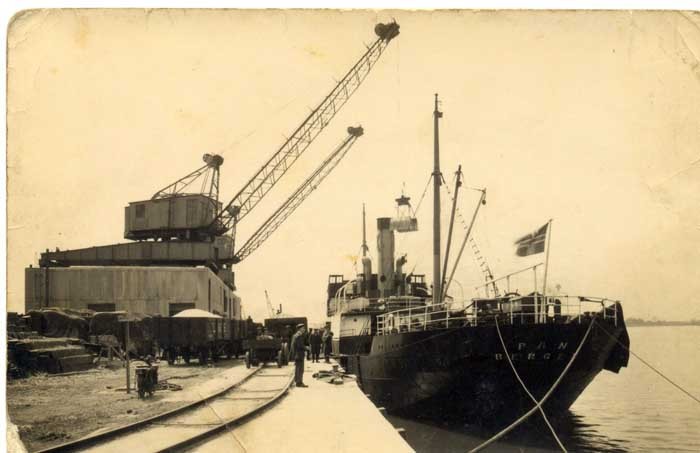
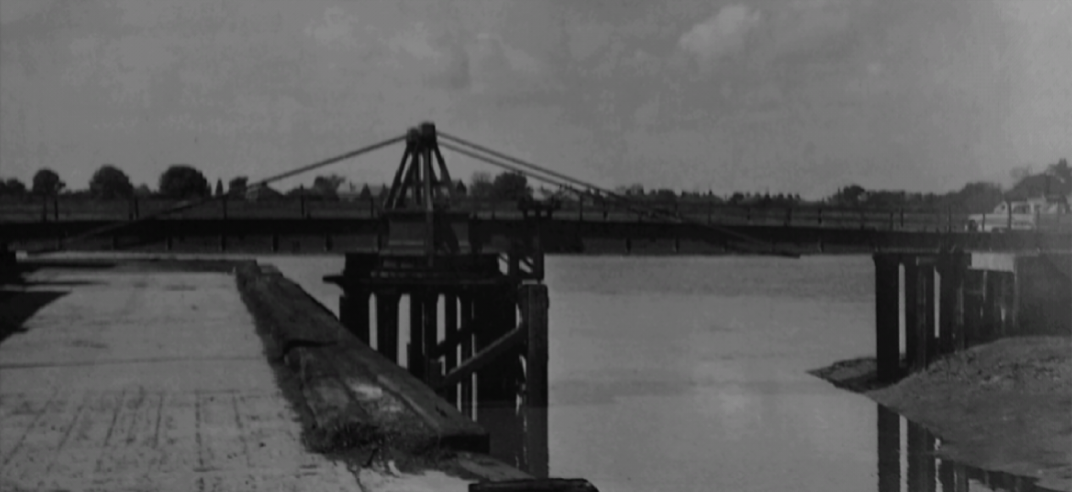
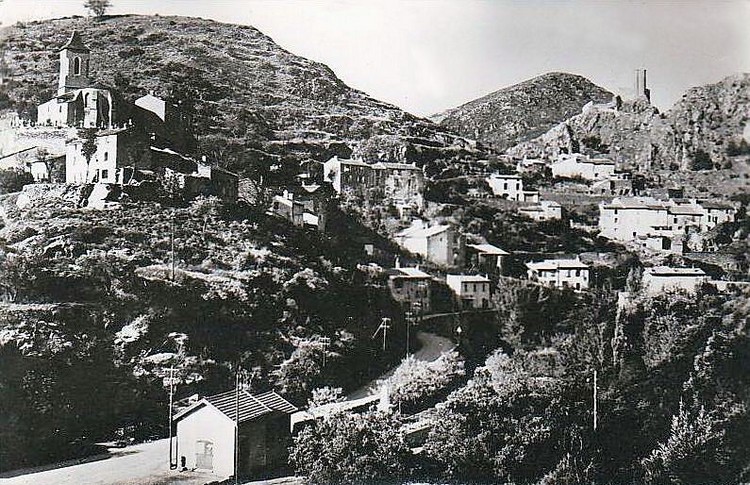
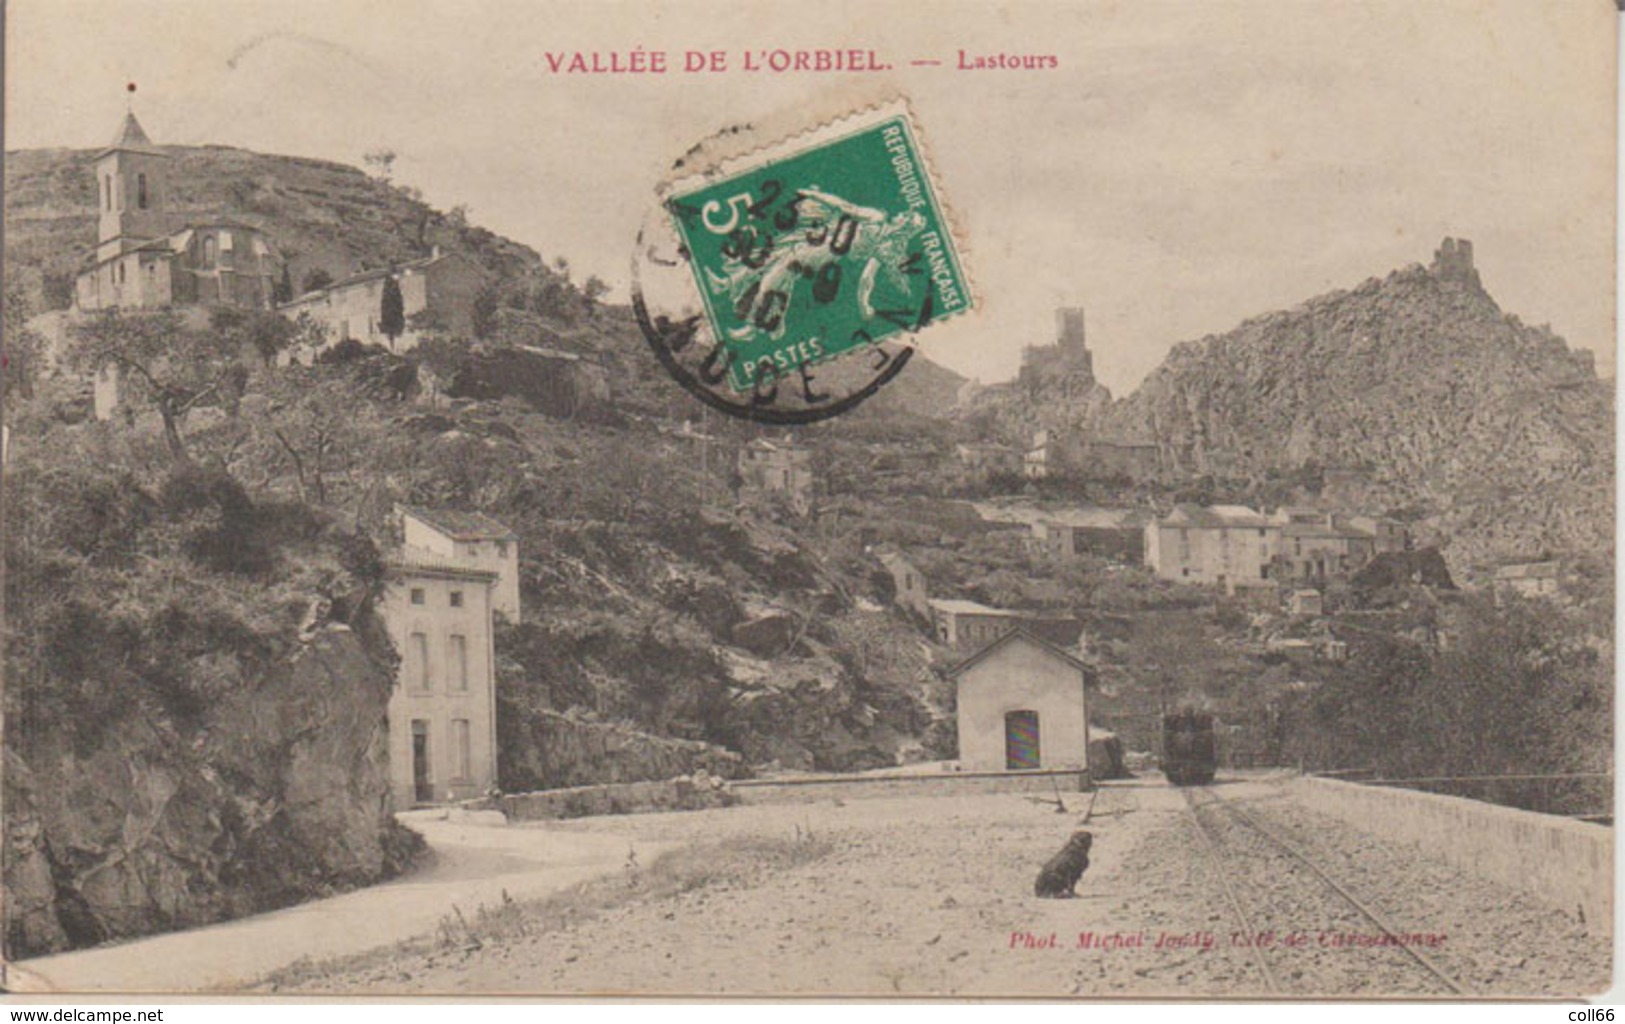
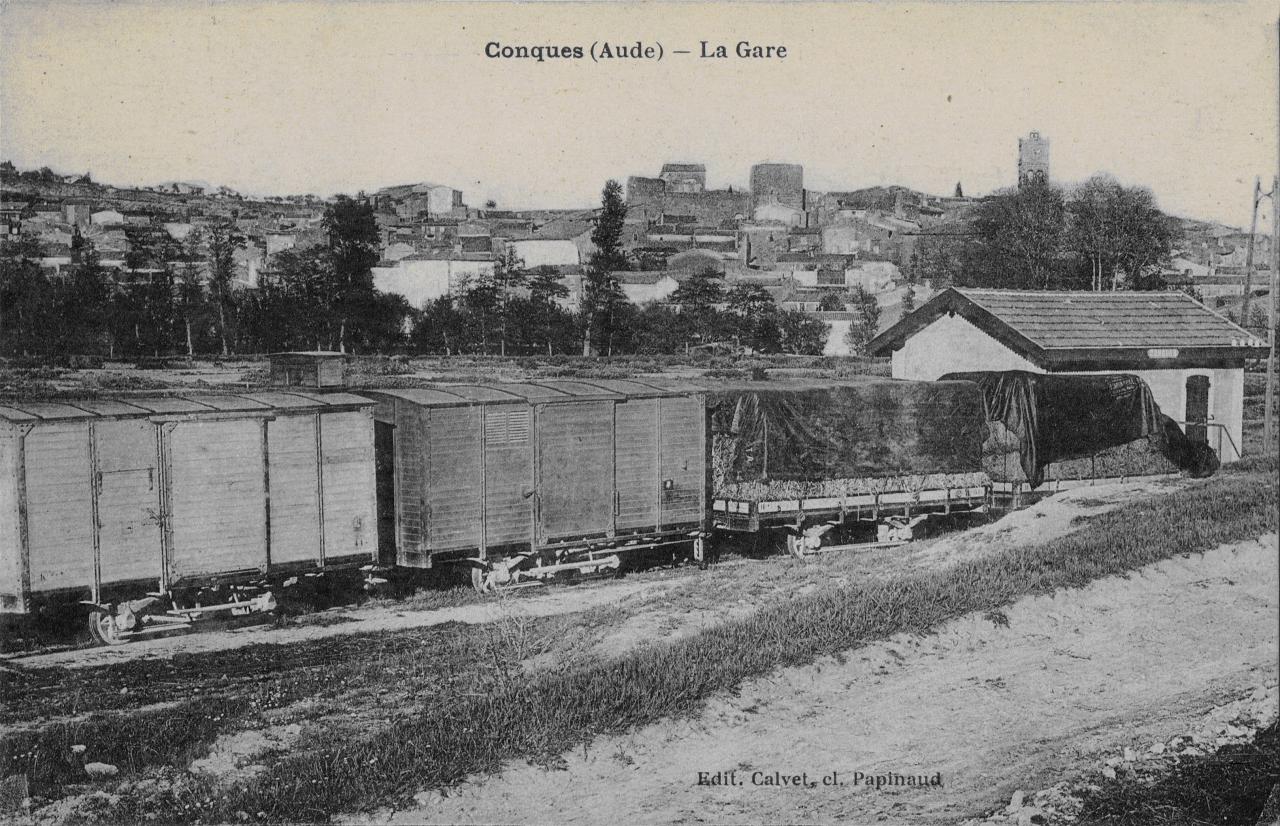
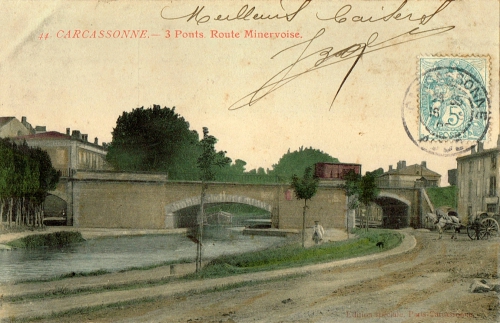
This postcard shows a view of the village and bridge and is taken in the early 20th Century from the East. [2]
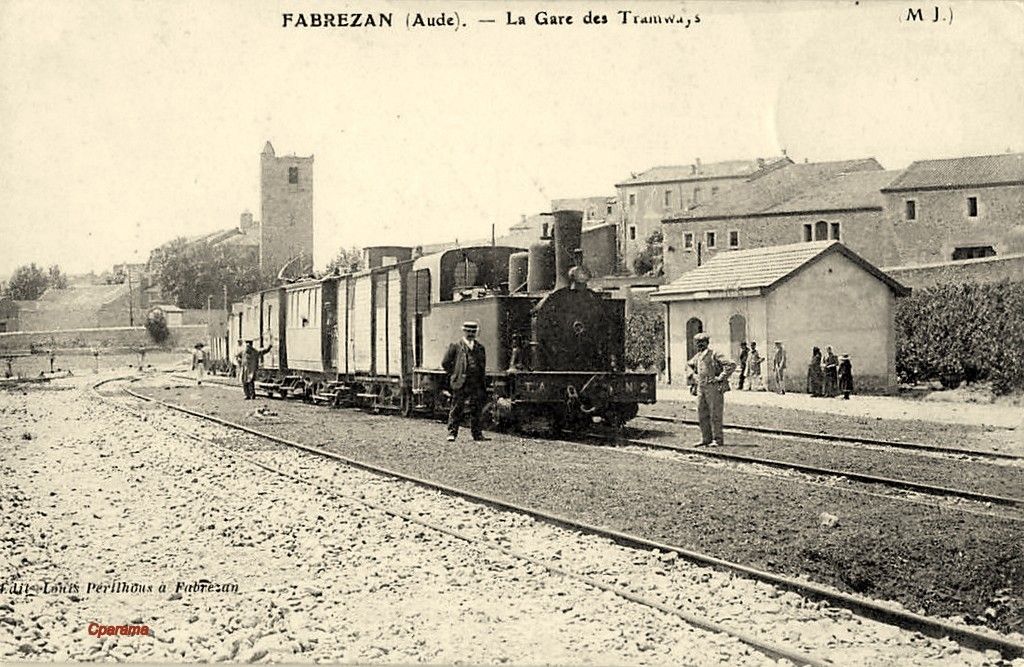
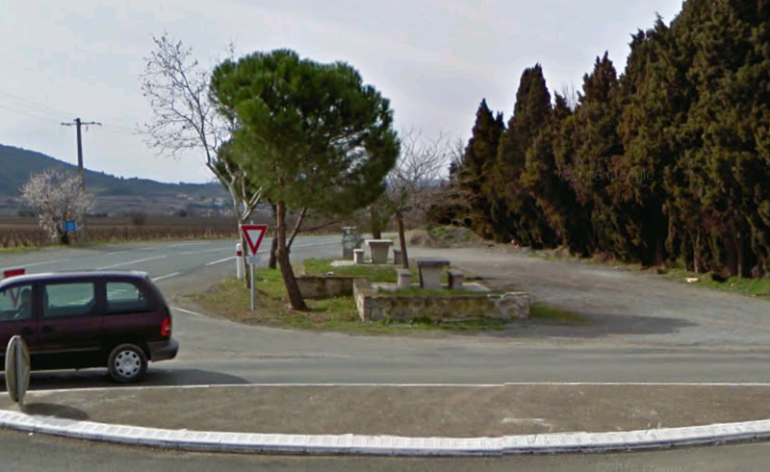
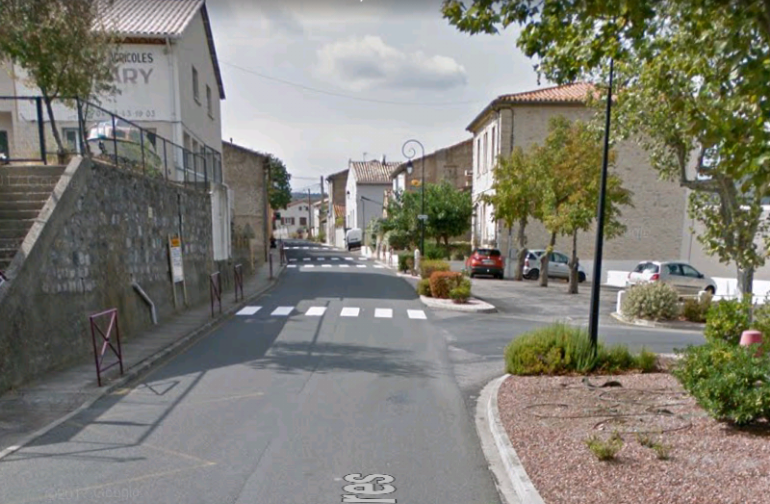
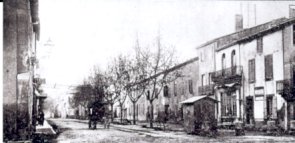
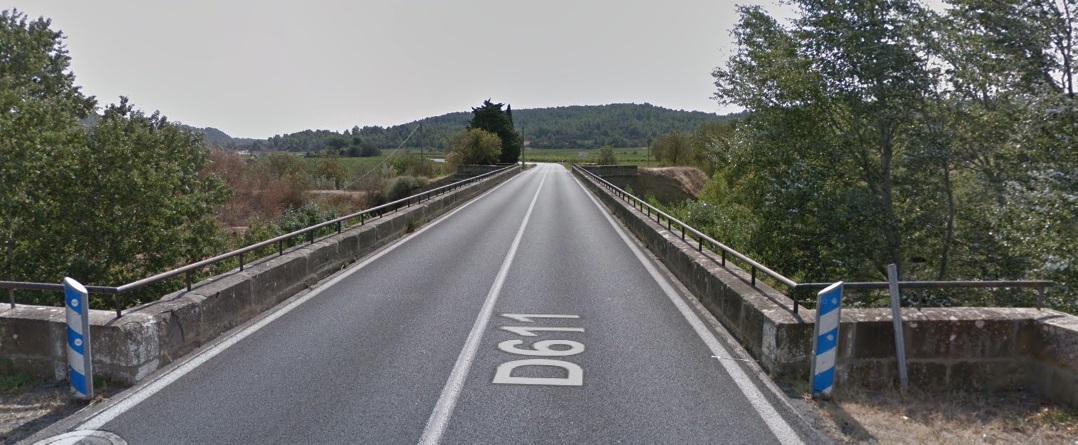
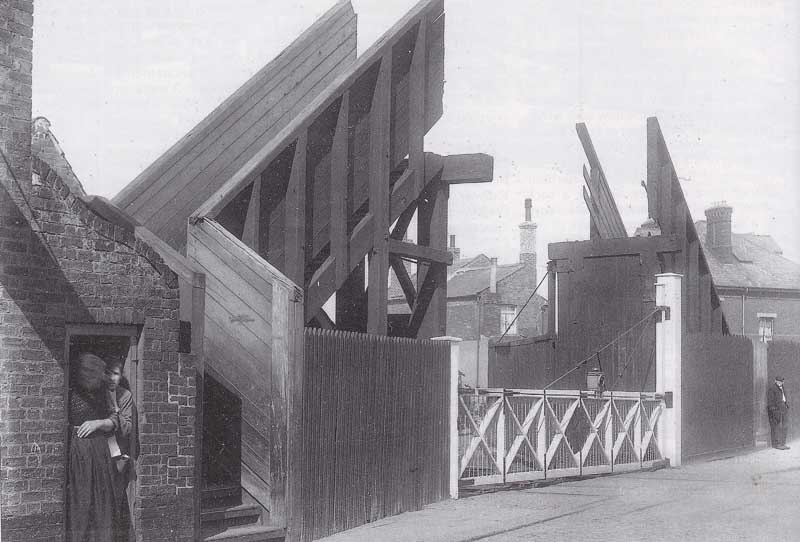
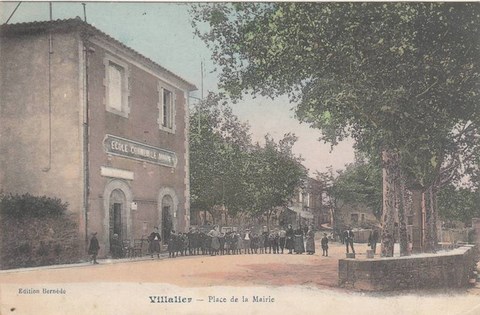
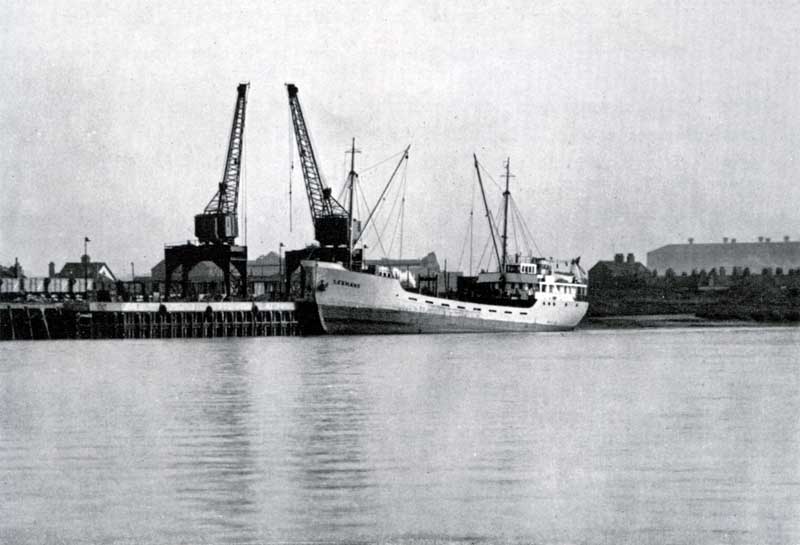
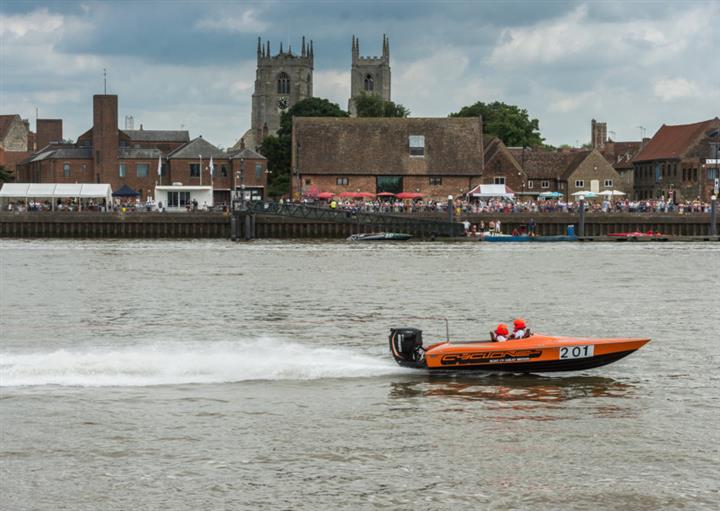
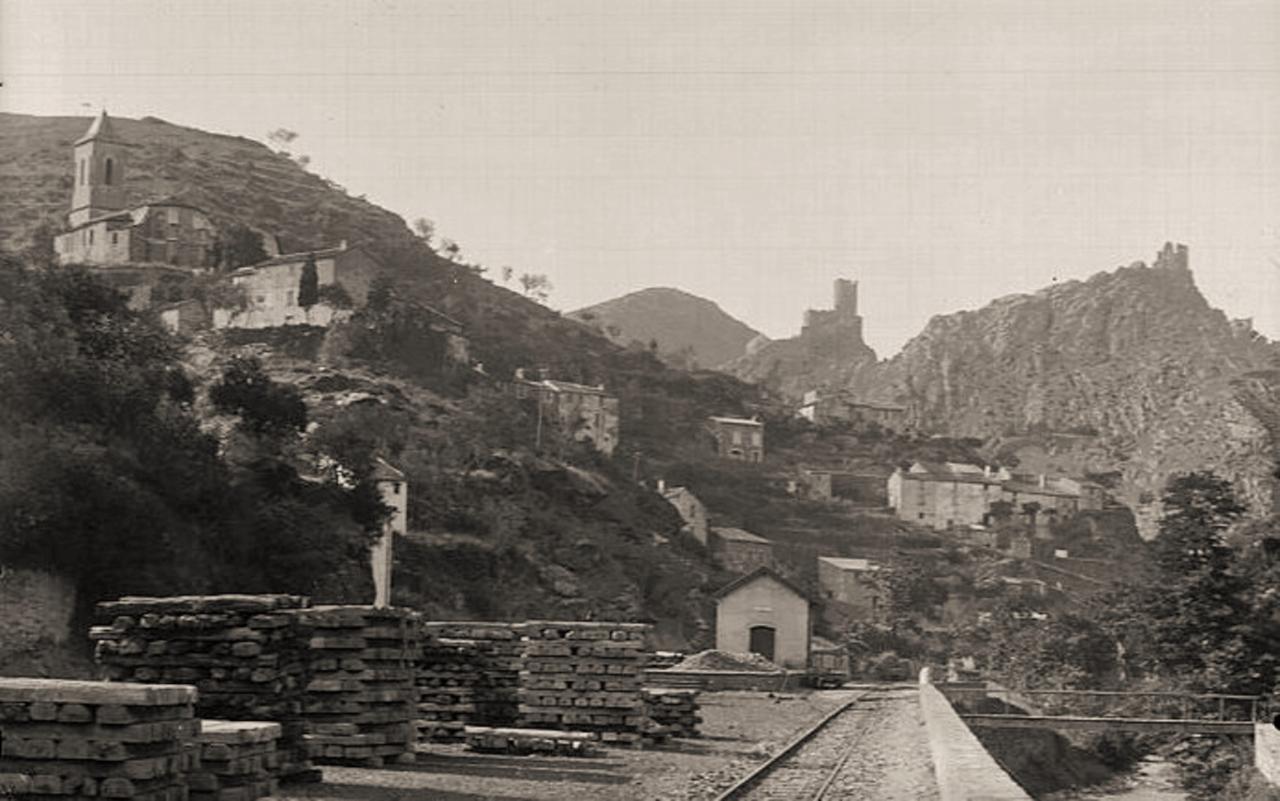
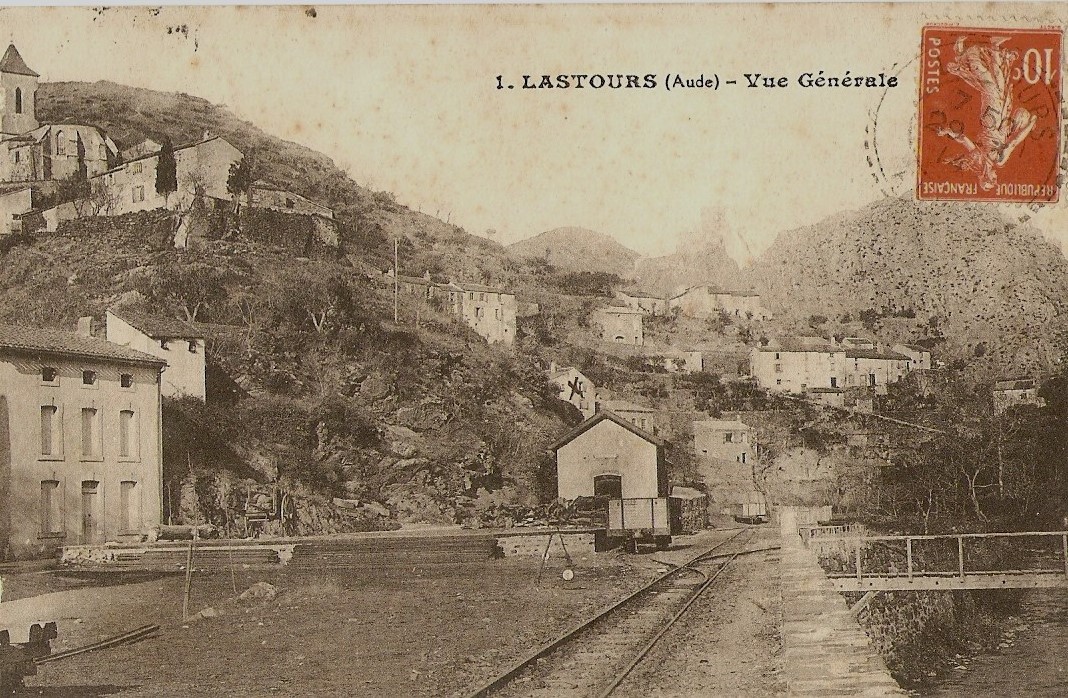
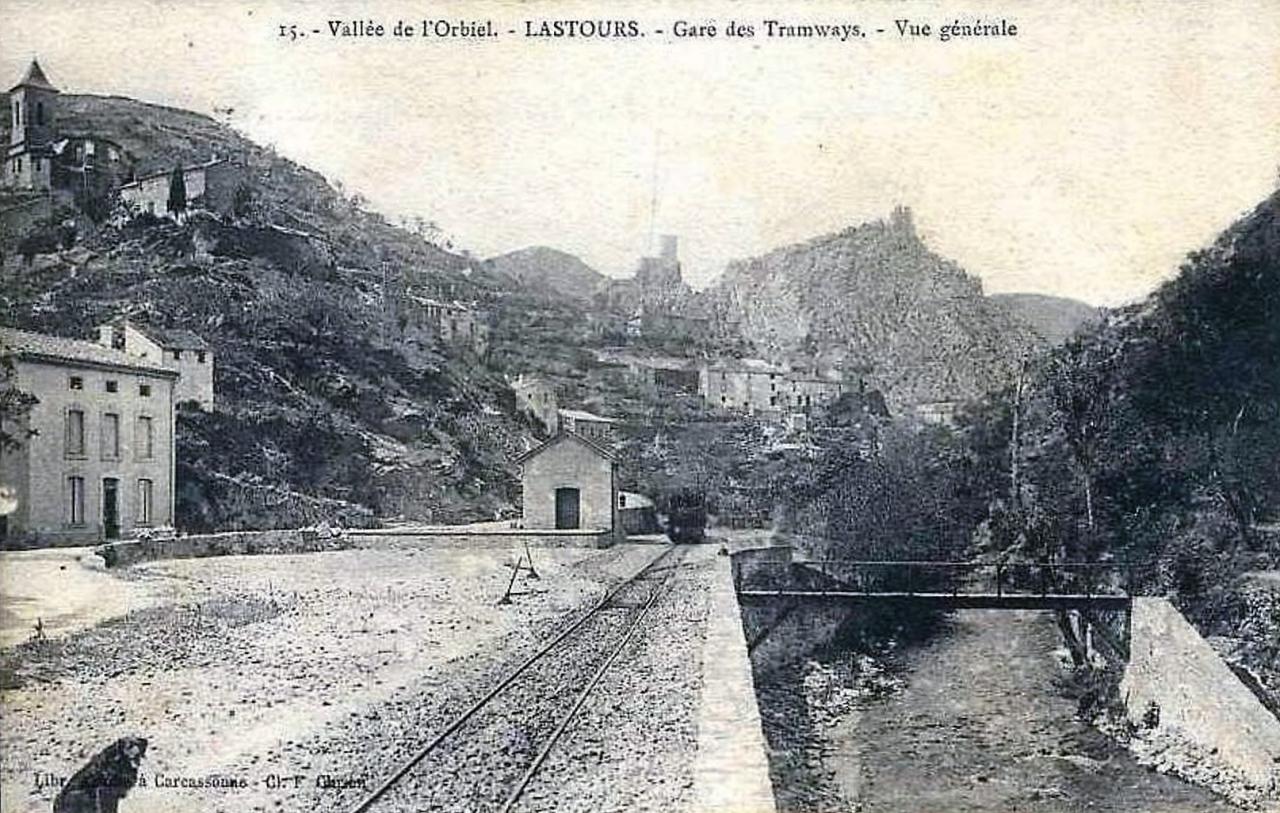
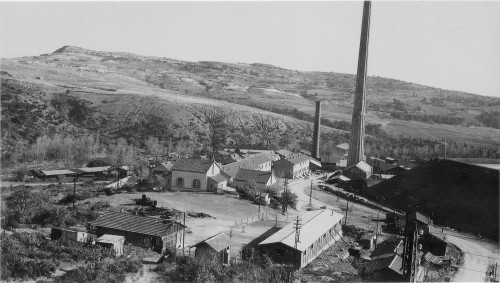
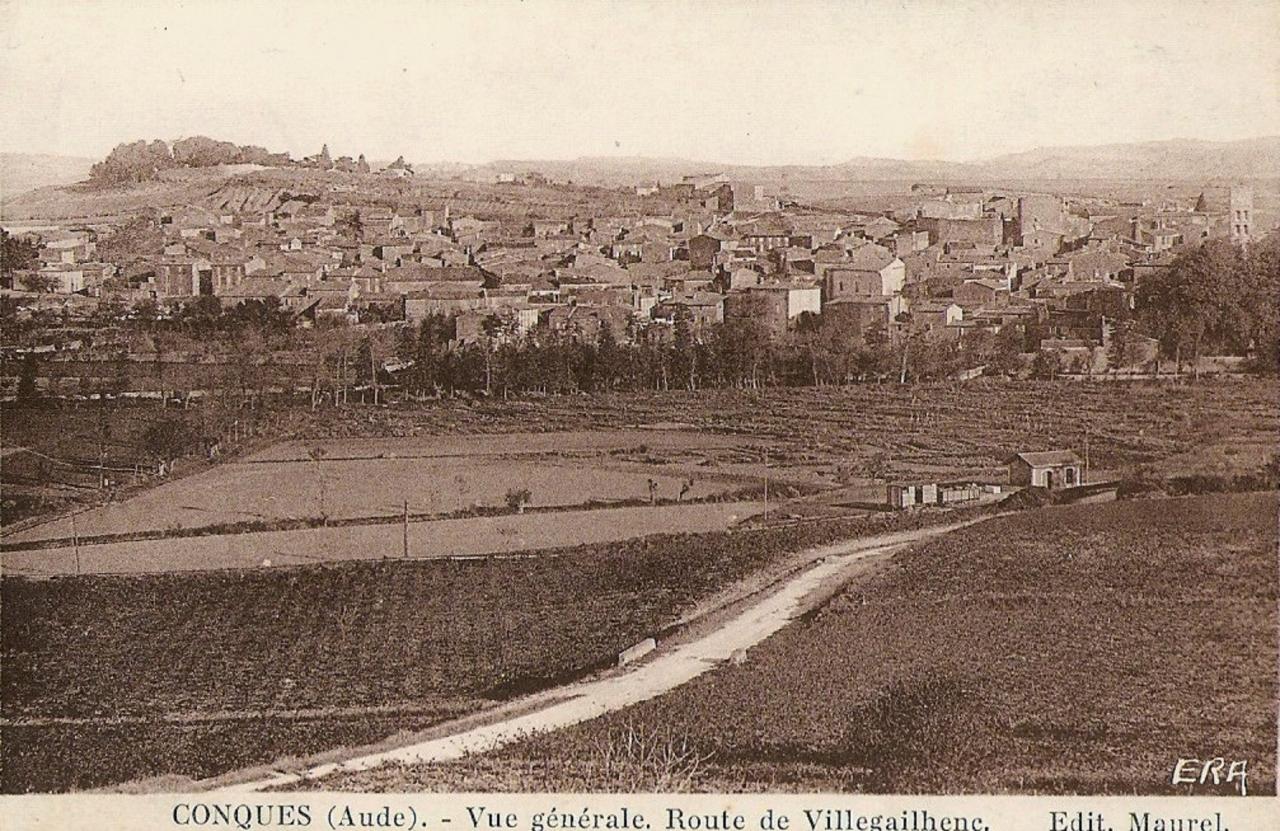
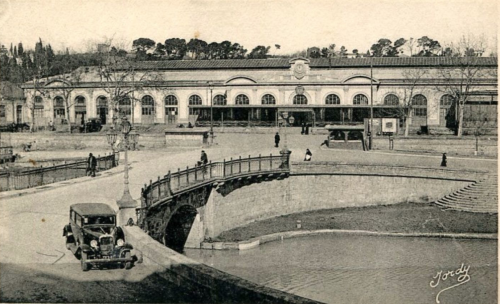
This view is taken from the West. [3]

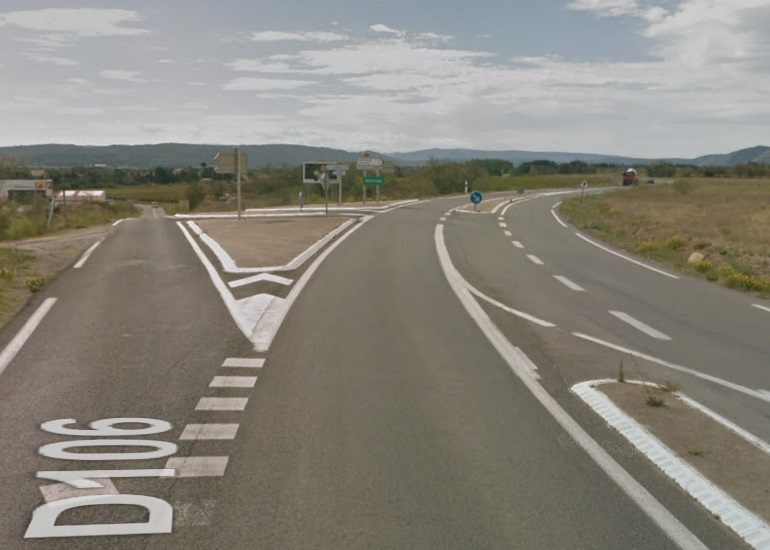
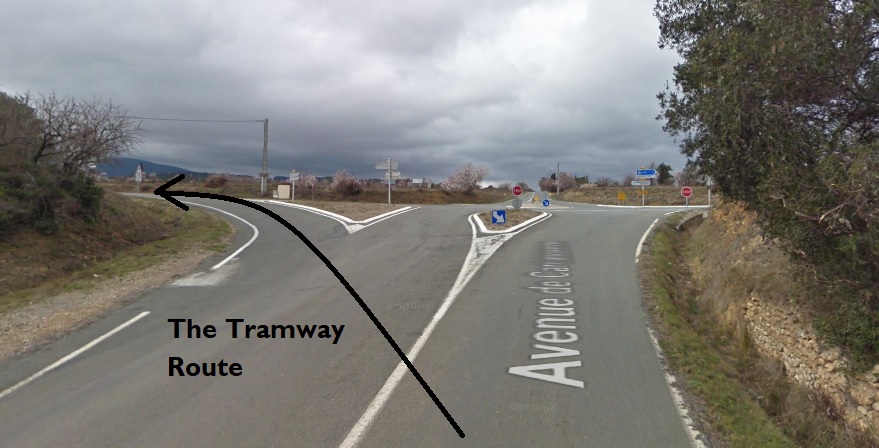
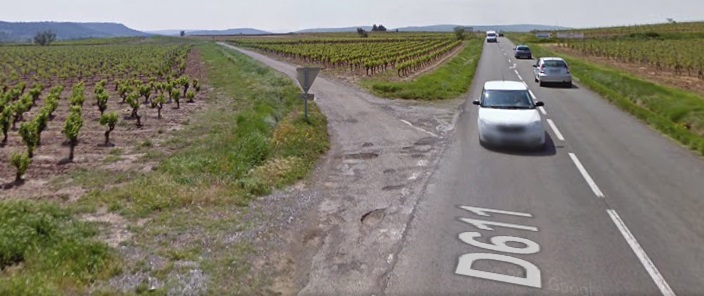
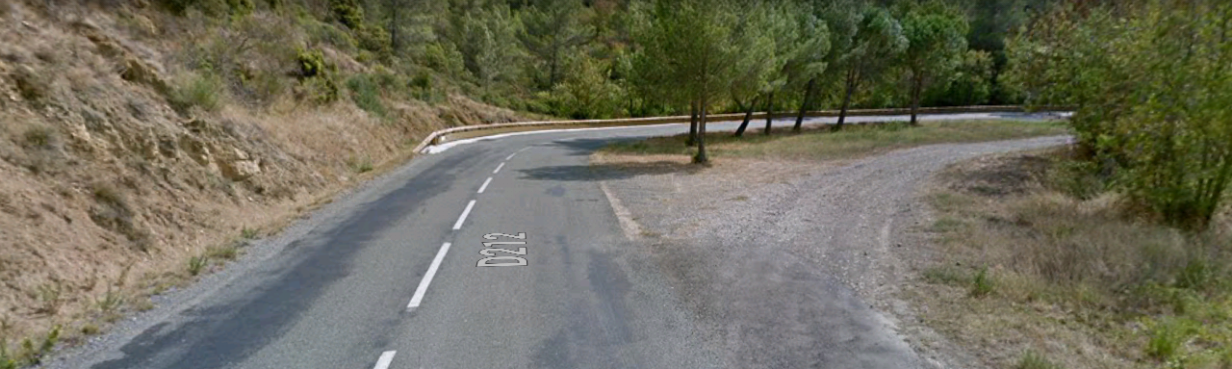
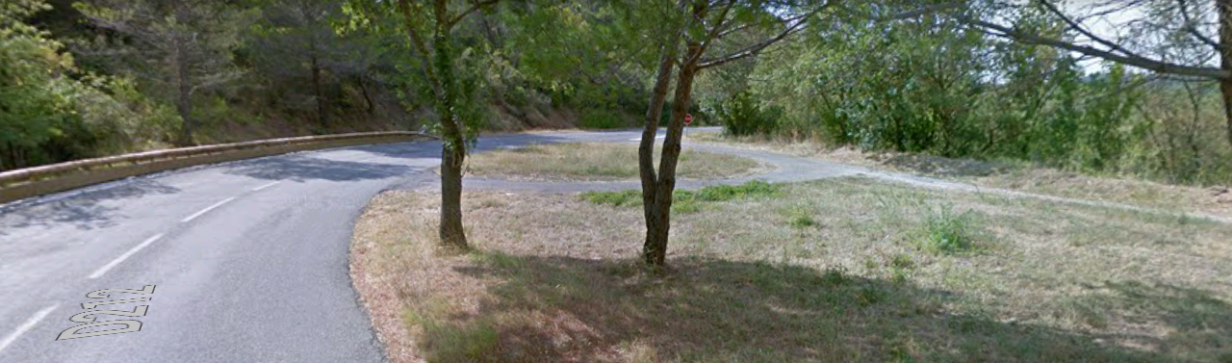
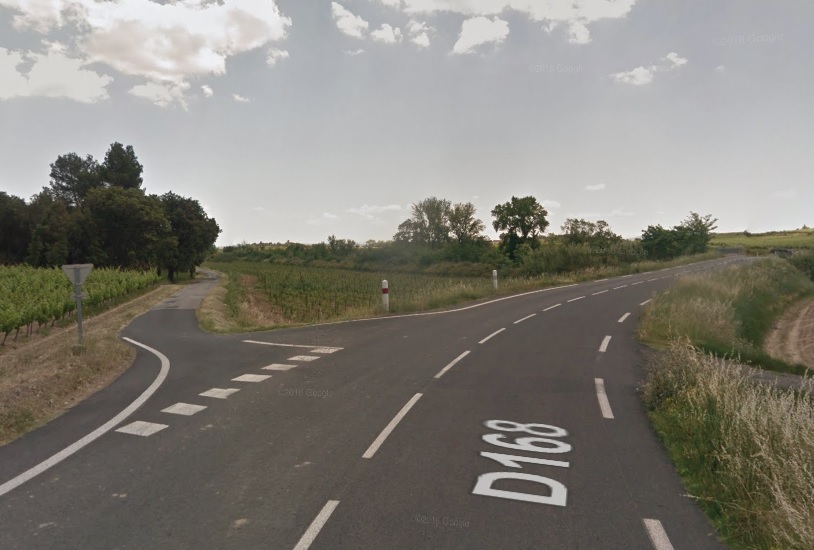
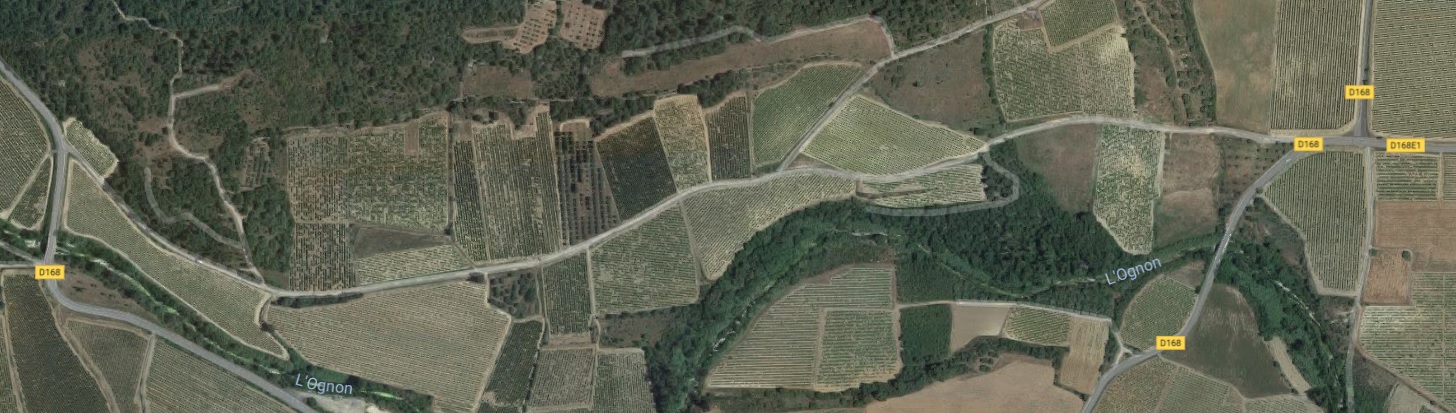
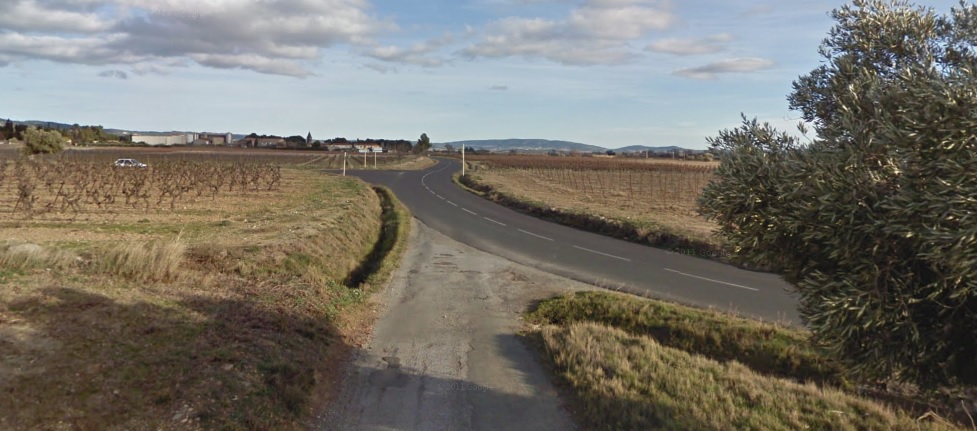
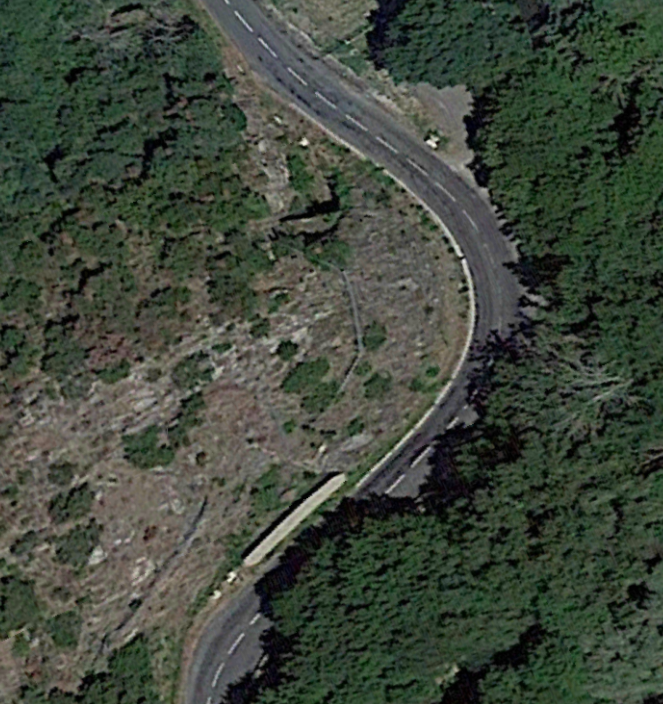
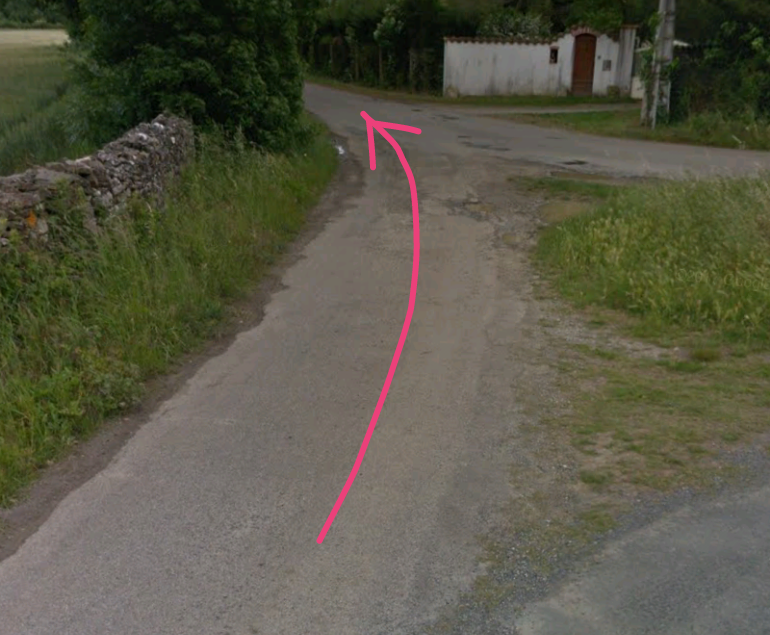
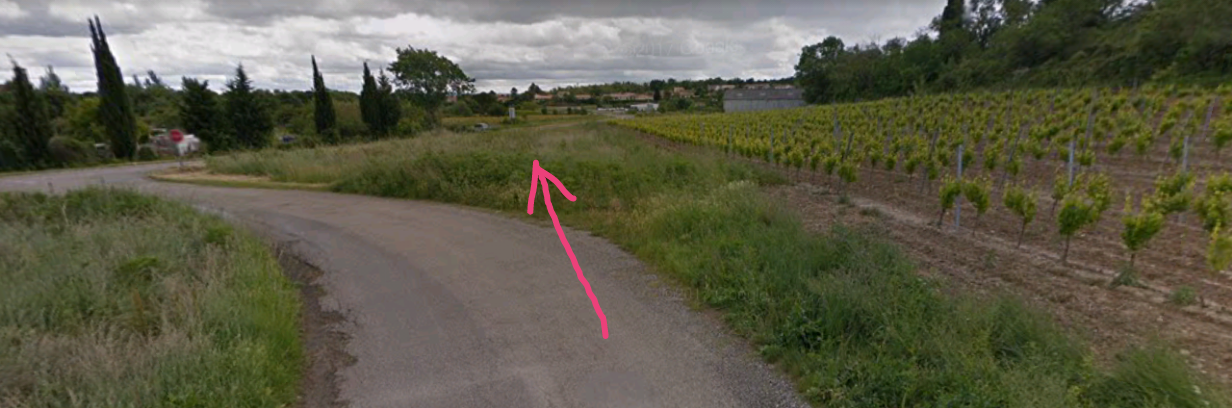
After crossing L’Orbieu the tramway followed the GC112 (D611) as far as Les Palais. In the course of this short journey, it first followed the wetsern shoulder of the GC112 and then swung away from the old road to the West, to loop round to join the road crossing the River Nielle a  tributary of L’Orbieu. It appears that the modern D611 now follows the tramway alignment. The tramway then swung southwards through the hamlet of Les Palais and then entering the village station. 

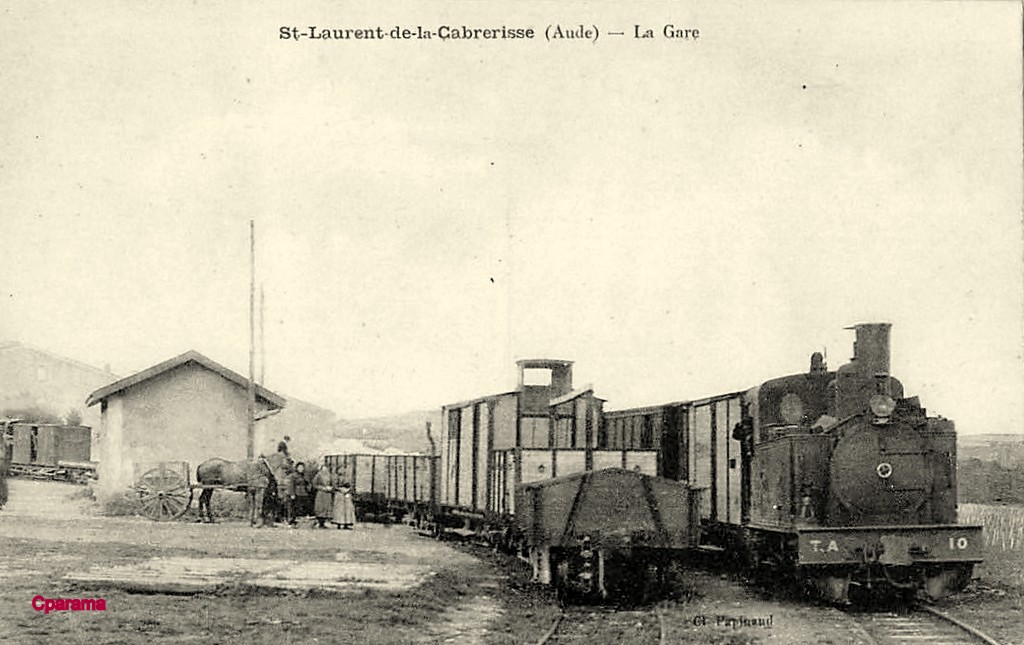
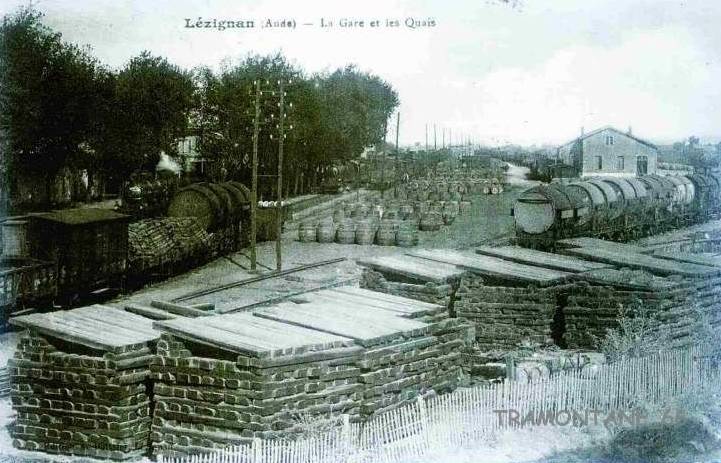
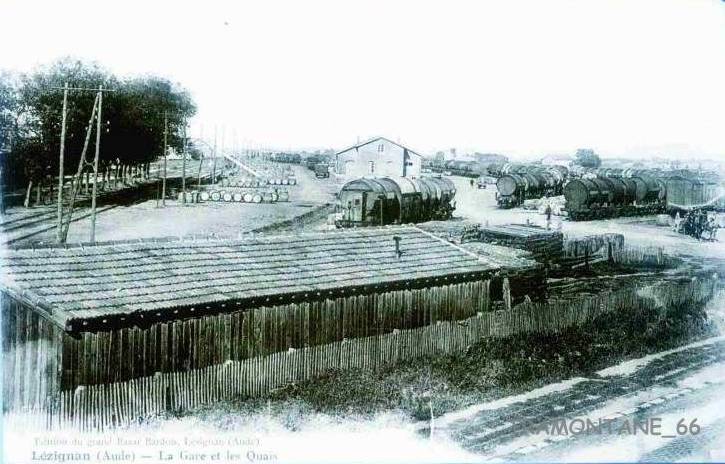
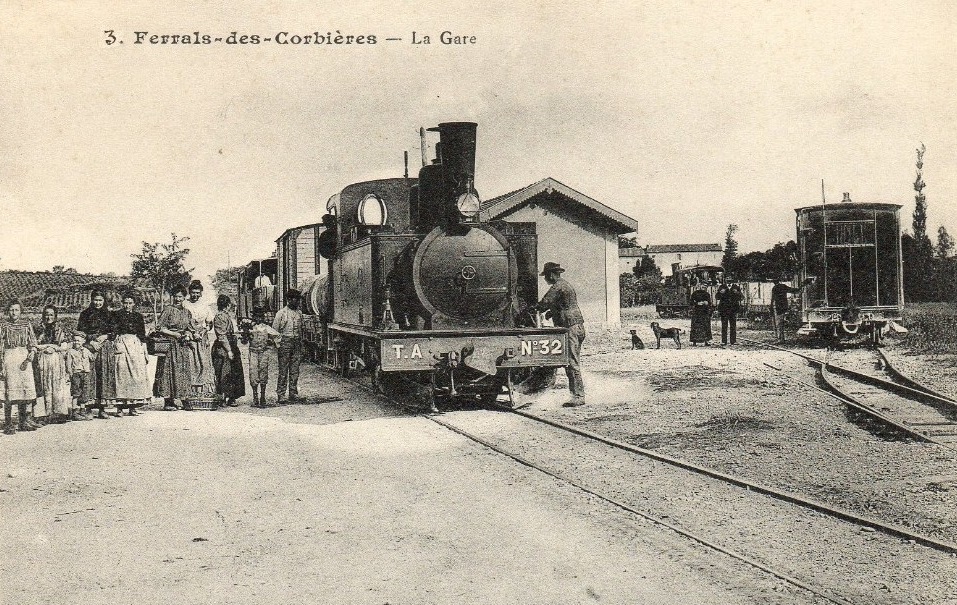
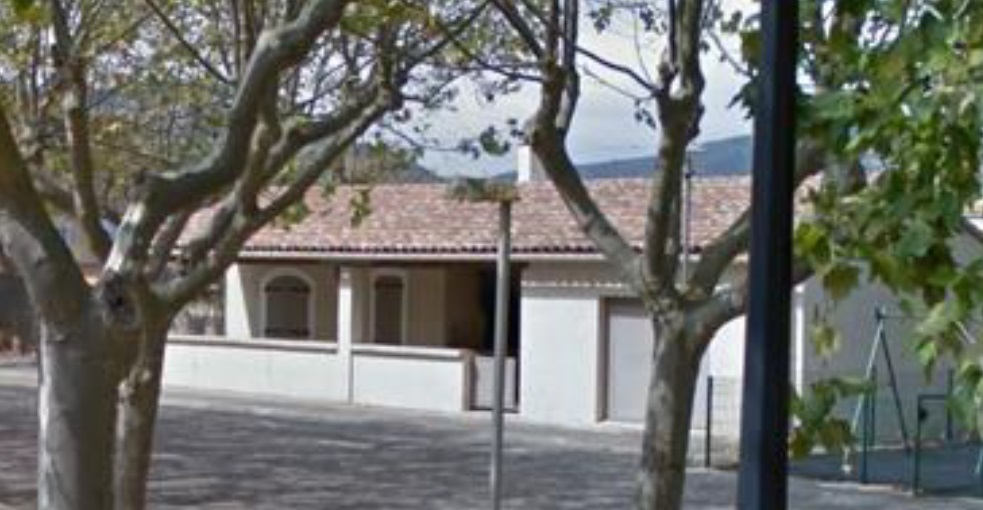
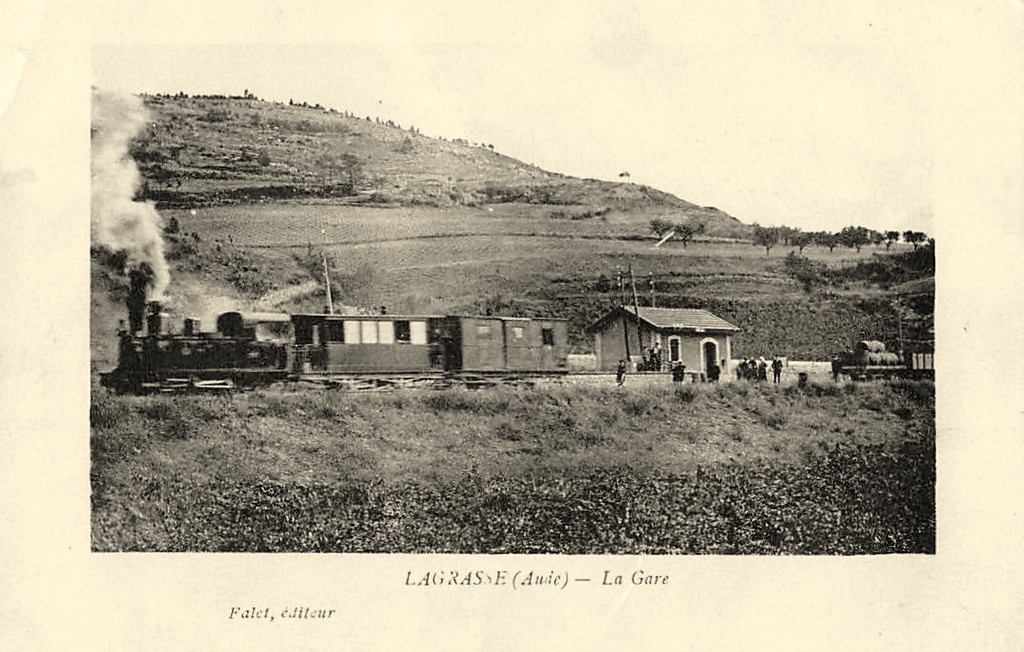
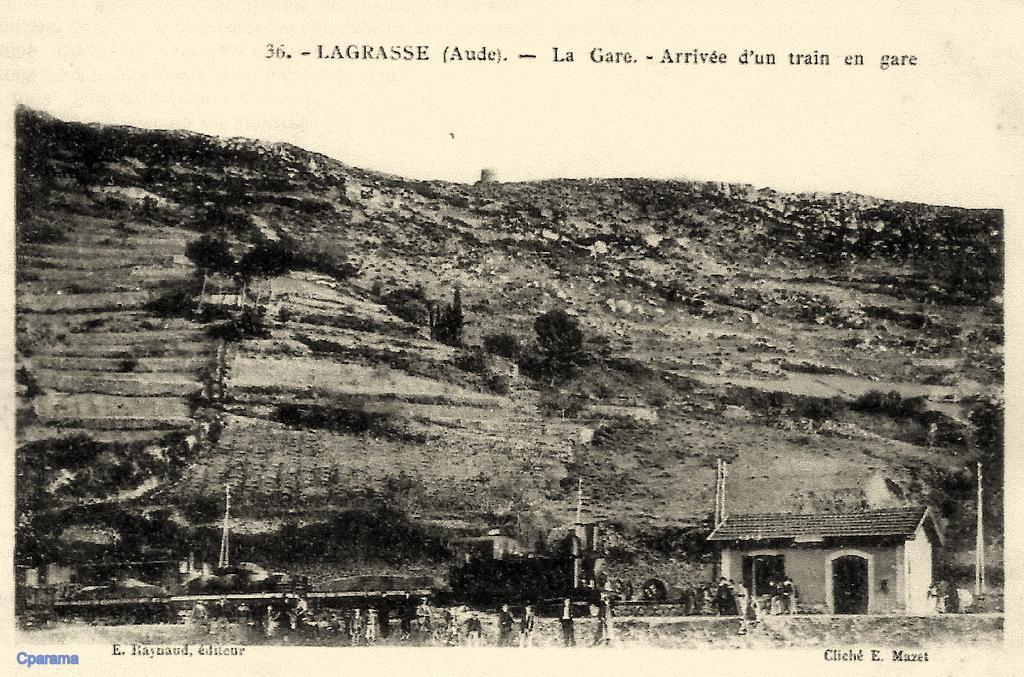
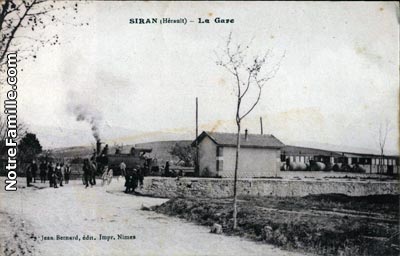
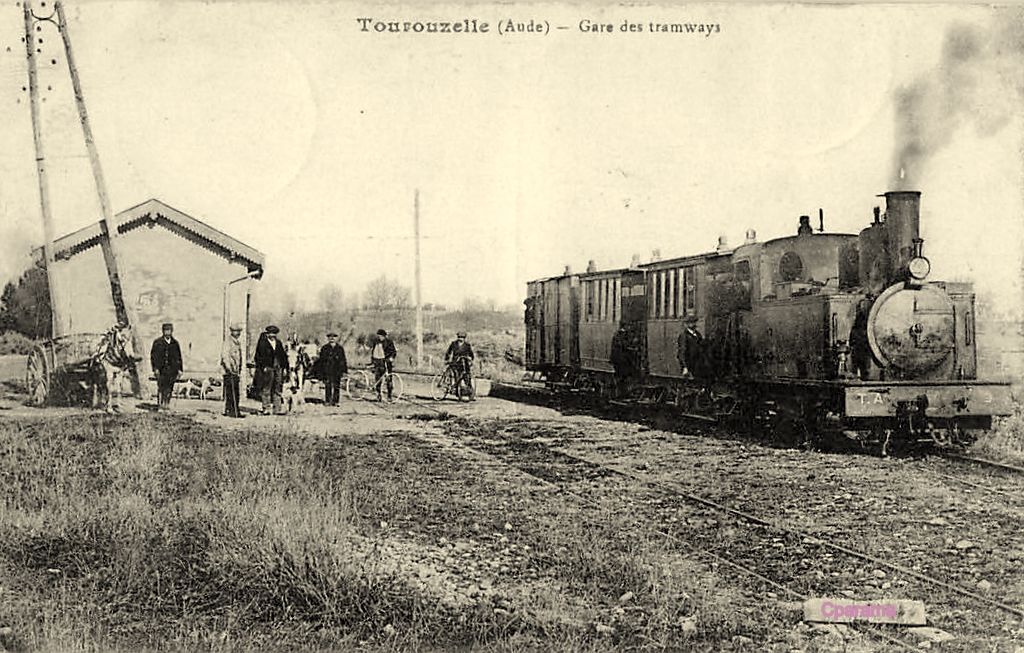
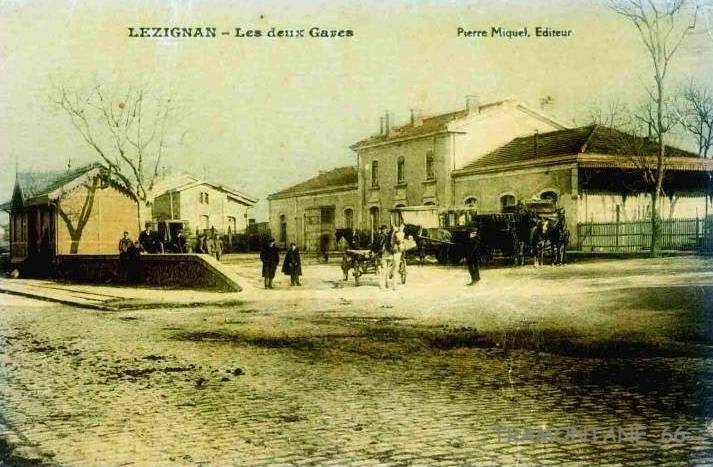
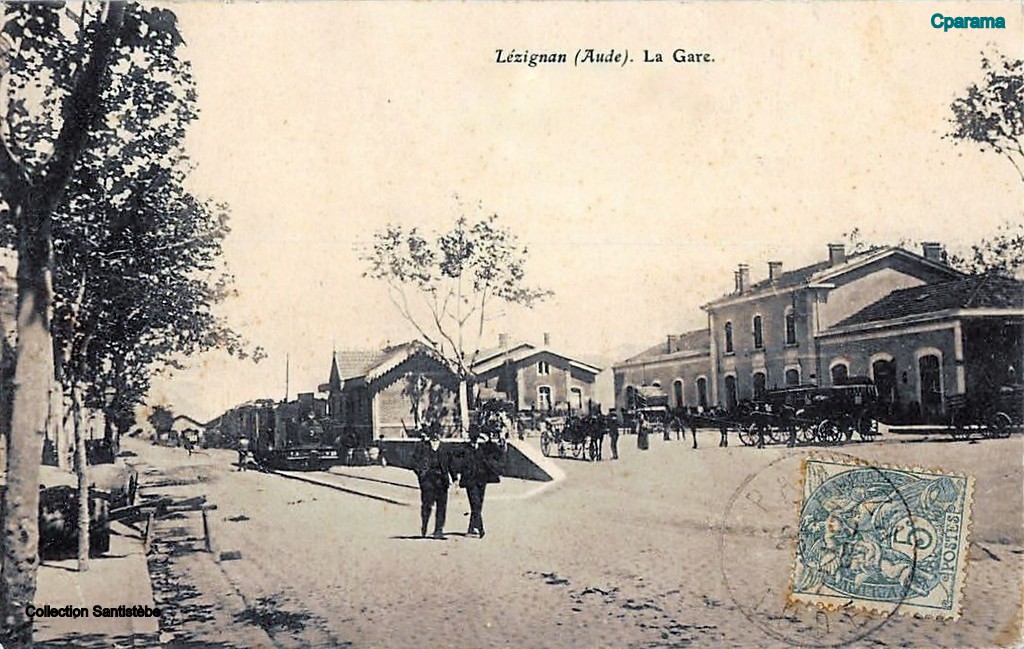
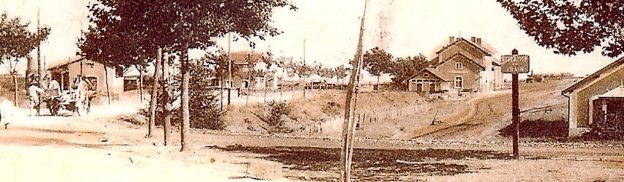
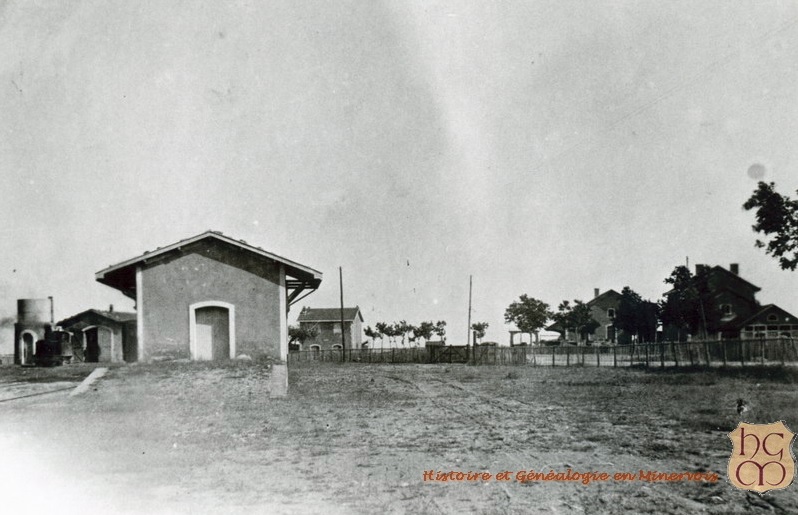
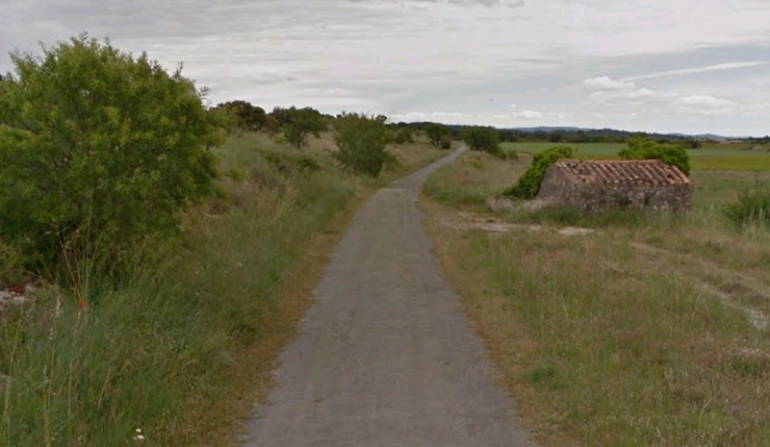
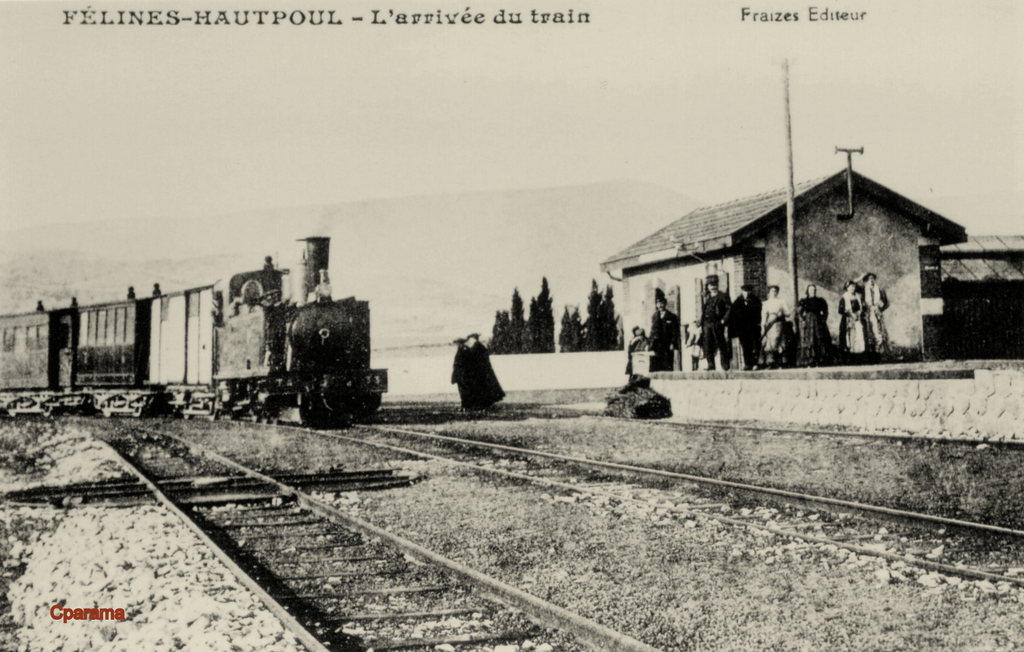
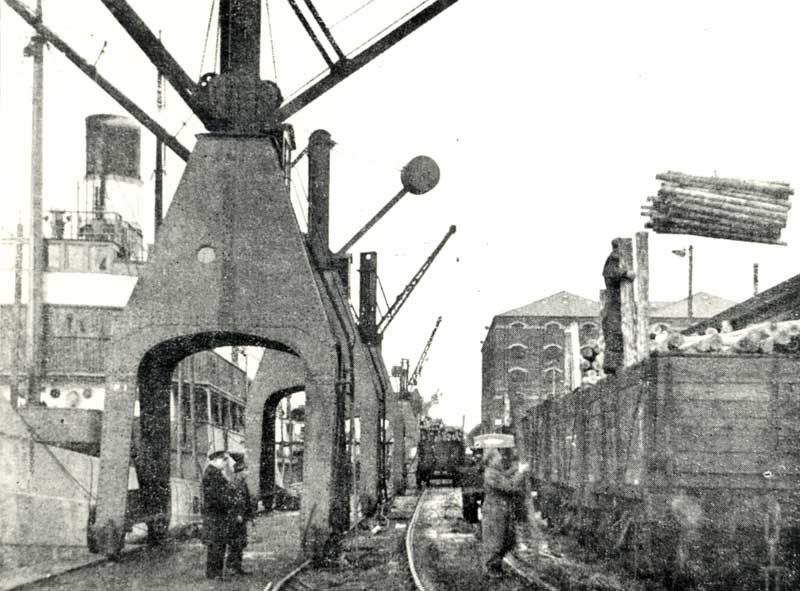
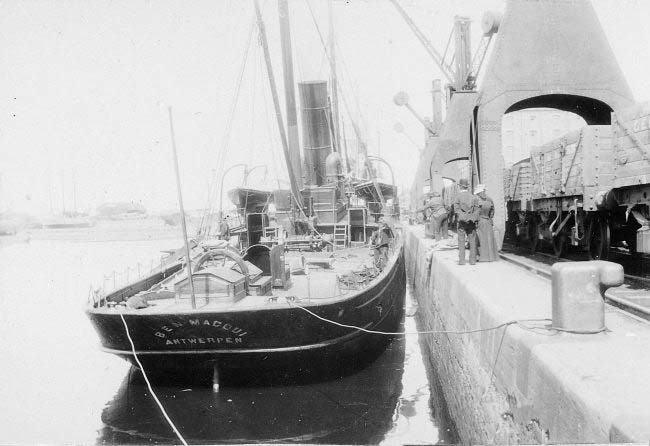
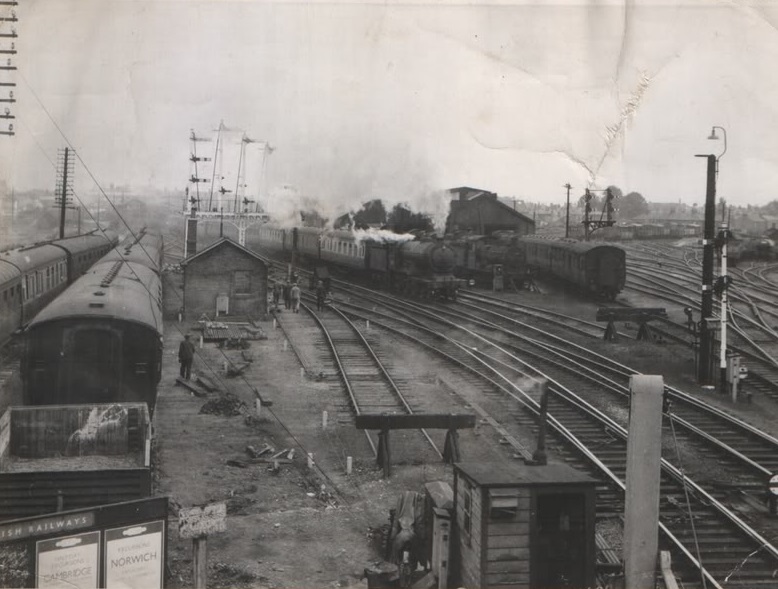
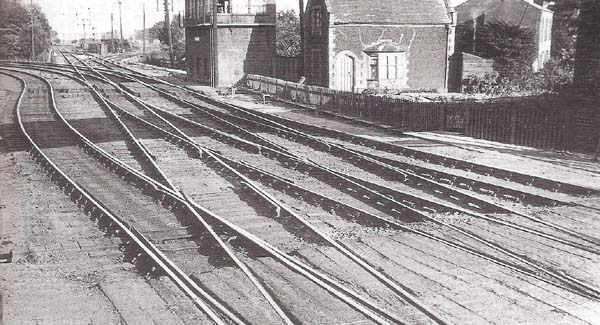
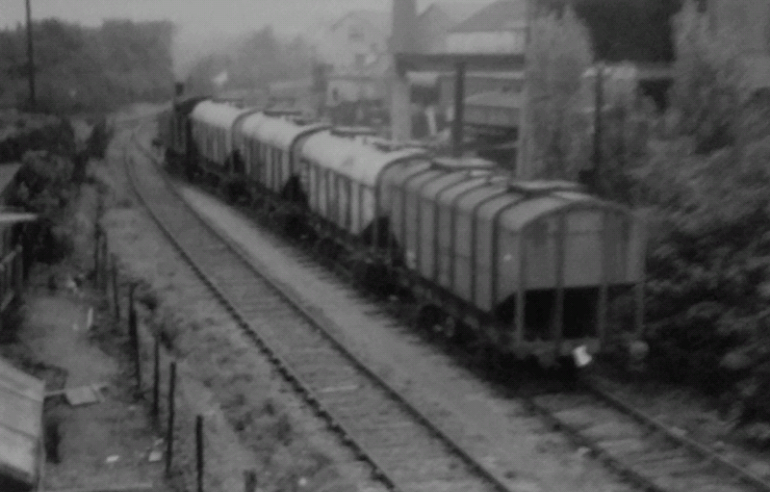
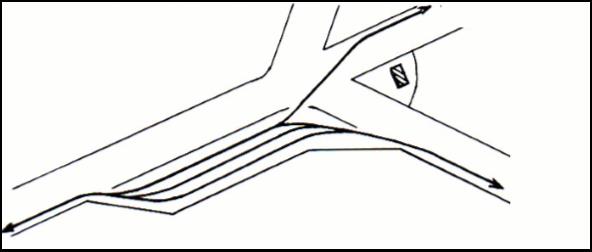
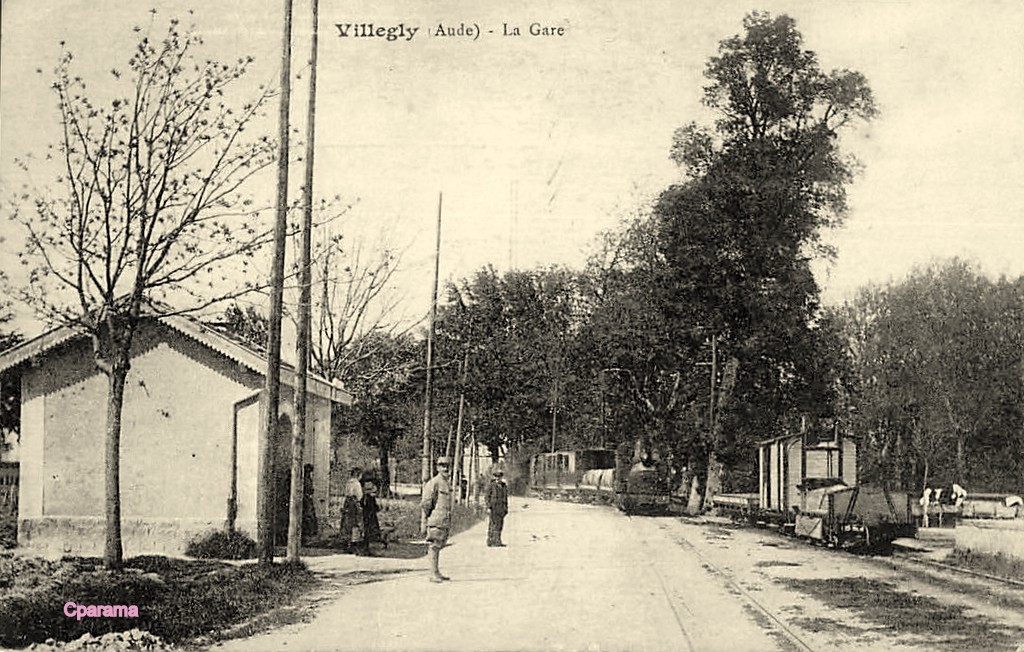
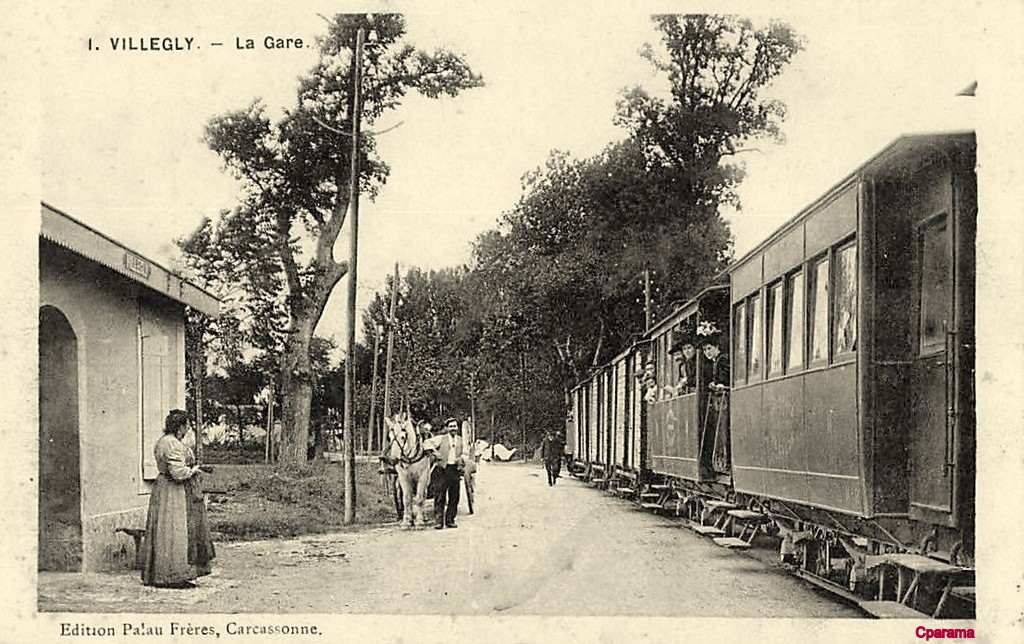
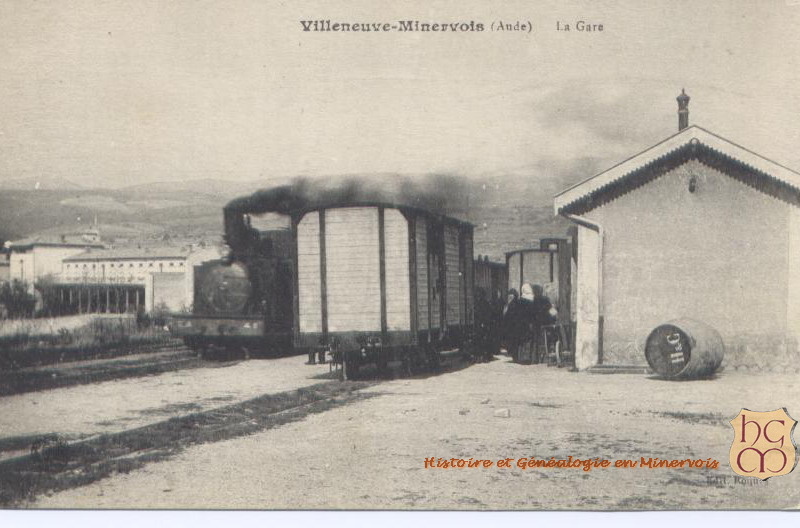
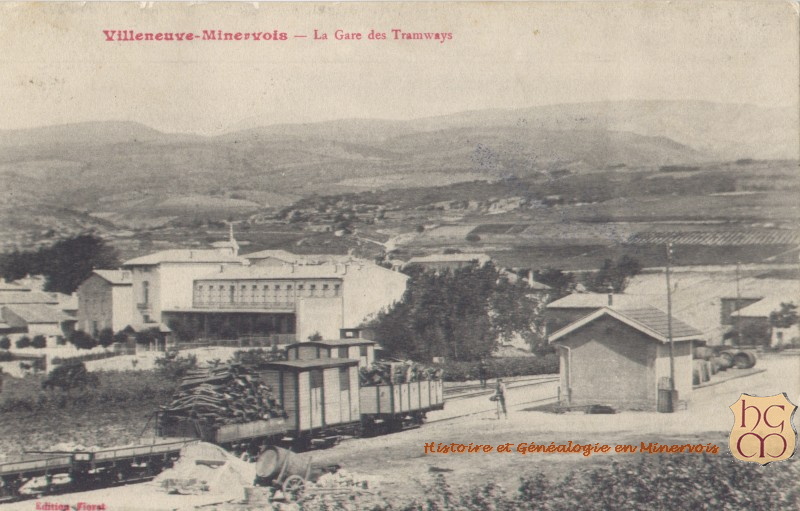
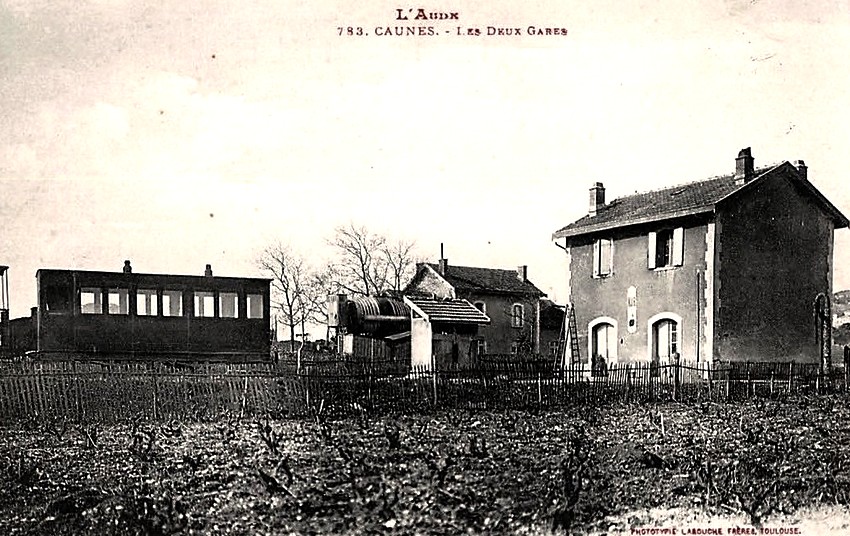
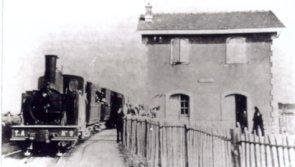
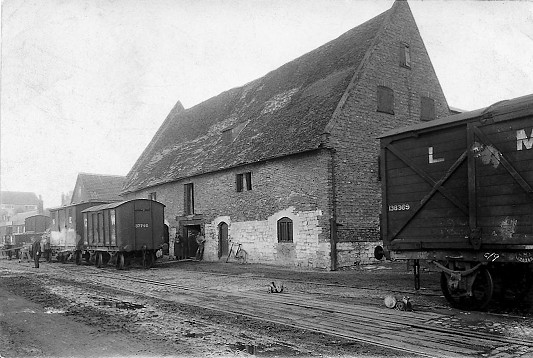
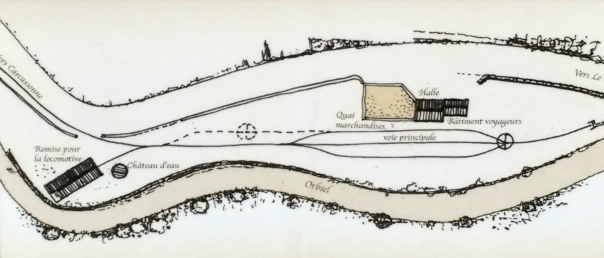
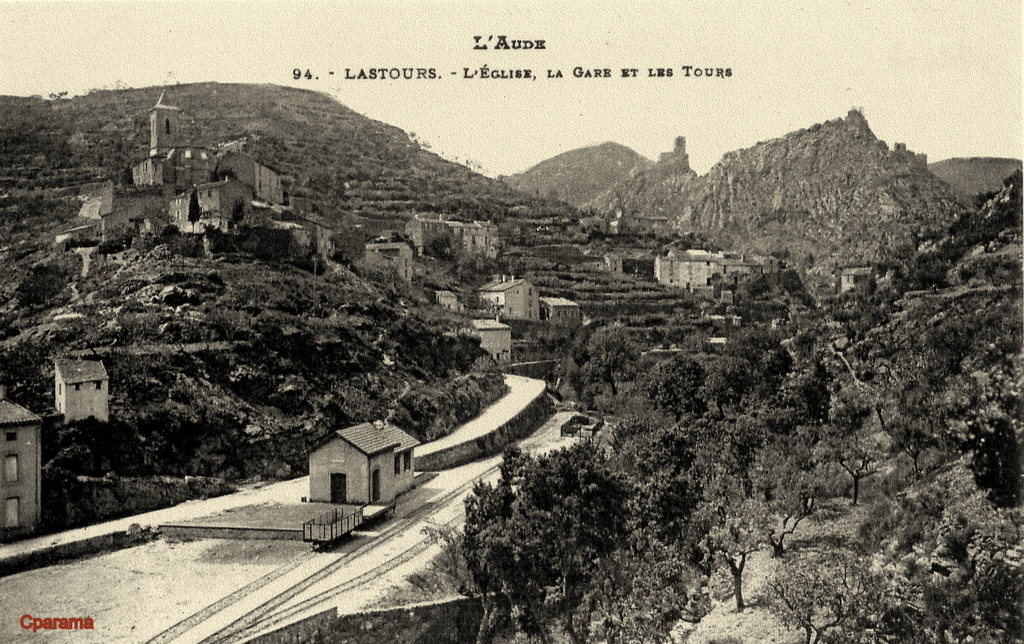
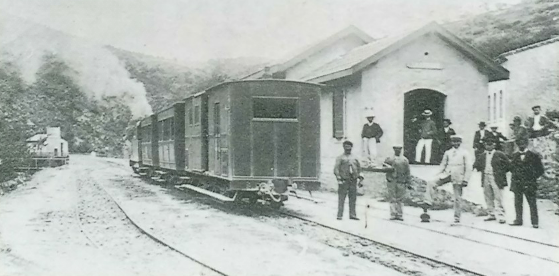
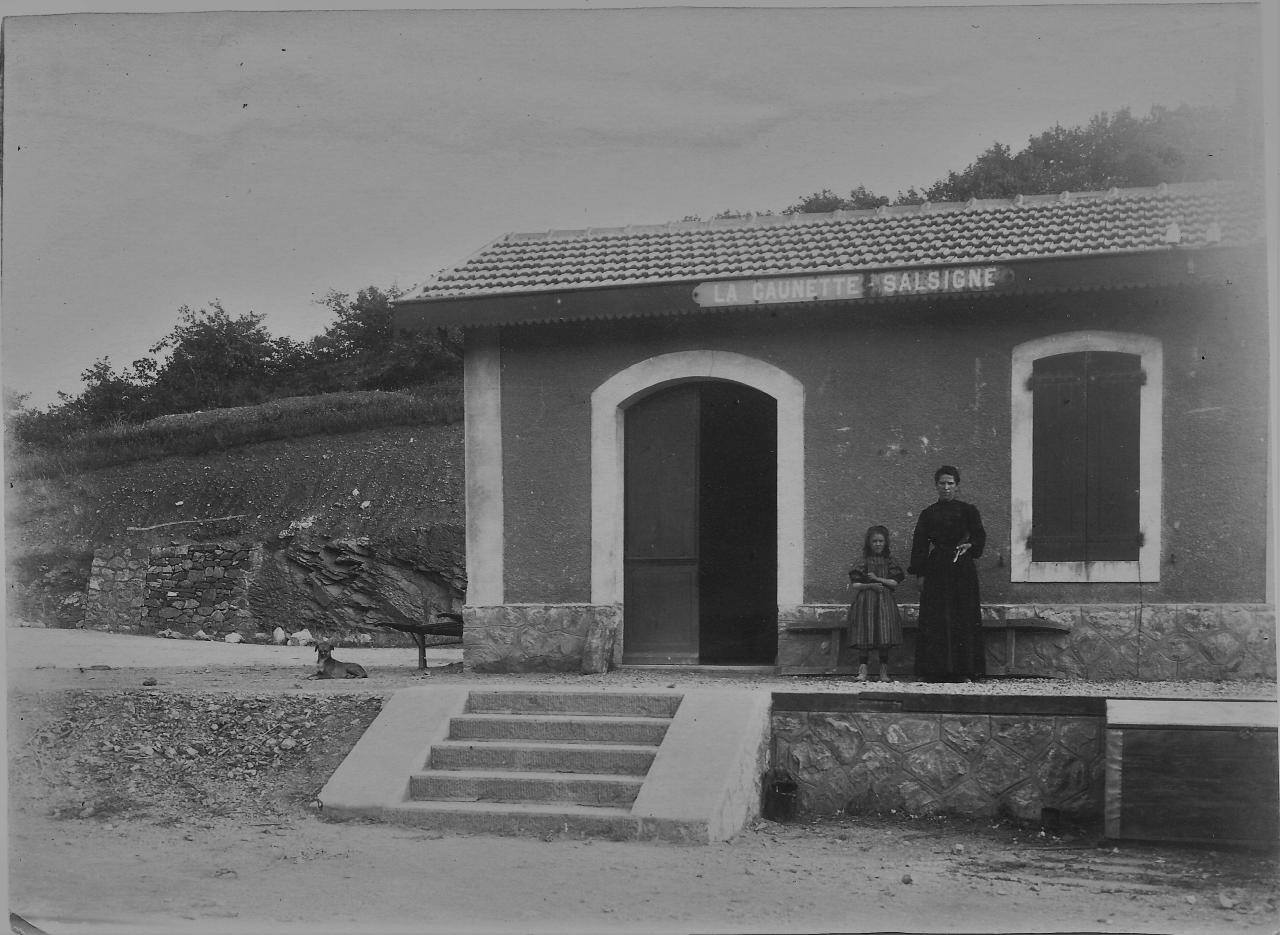
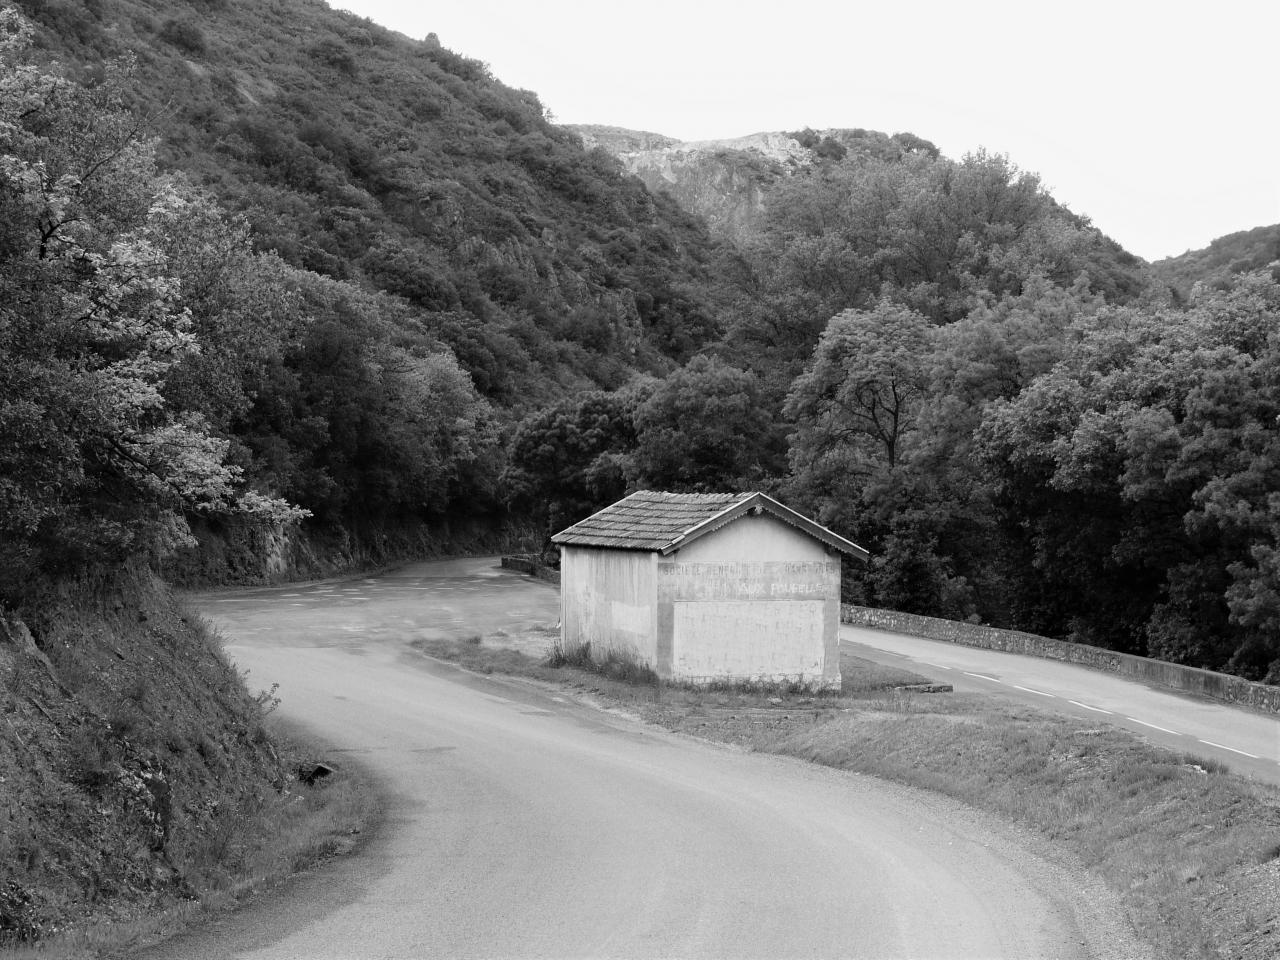
Les Palais station is in the middle of a triangle of tracks which allows trains to be directed between Fabrezan, the terminus at Mouthoumet and Thezan, This is not in an urban area, it is isolated and only a short distance from Saint-Laurent-de-la Cabrerisse, hence the legend of the postcard below.The two-storey building is used as a residence by the station manager and his family, the ground floor is reserved for the administration. The stationmaster’s wife is also at her window,  there is also a group of young girls among whom there are probably two twins, if we can trust their identical clothes. … Barrels lie on the ground, and we can decipher the names of their owners: A. Bouyssiere, Paris;  Monsieure Fabre; Monsieur Monge; Monsieur Boussieux. Behind, the water pump seems to be in action feeding the locomotive, the water comes from the River Nielle. The goods train, of which we can see two wagons, comes from Mouthoumet and is bound for Thézan. The rails we can see in the foreground are the siding serving the loading platform. [4]
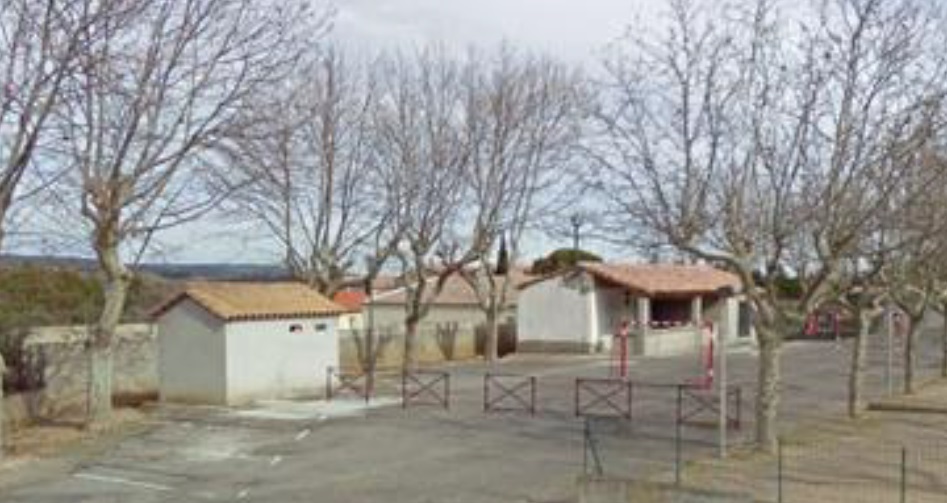
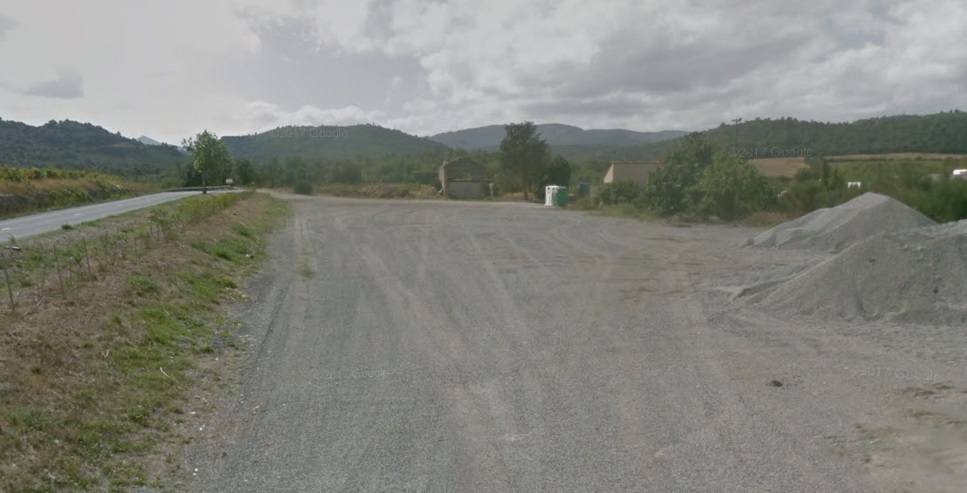
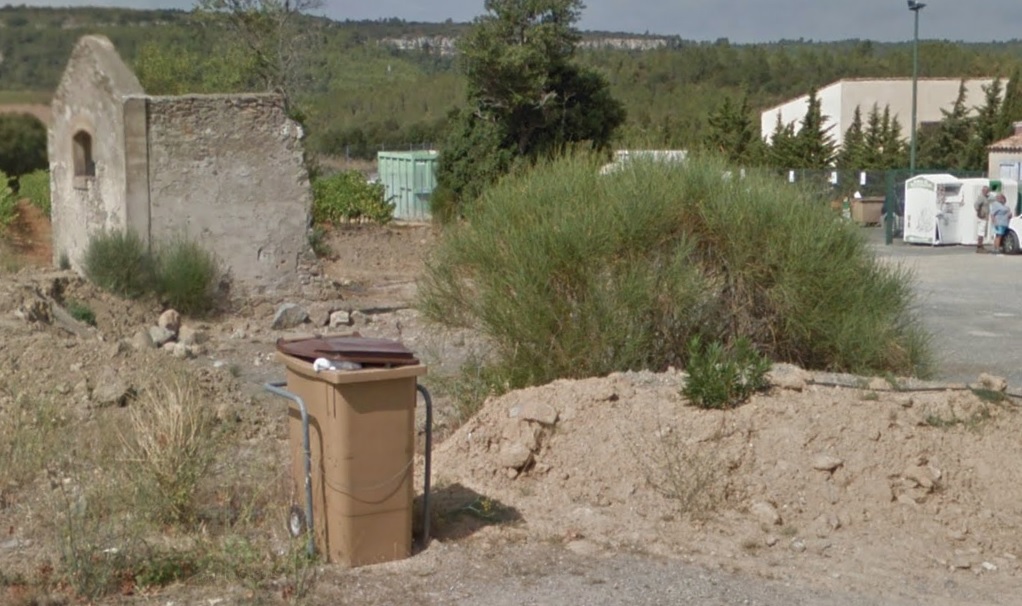
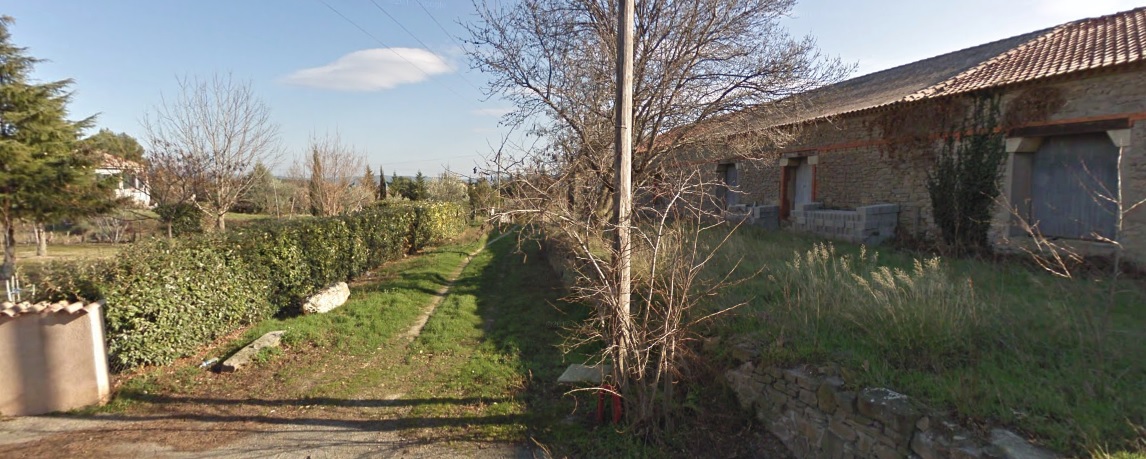
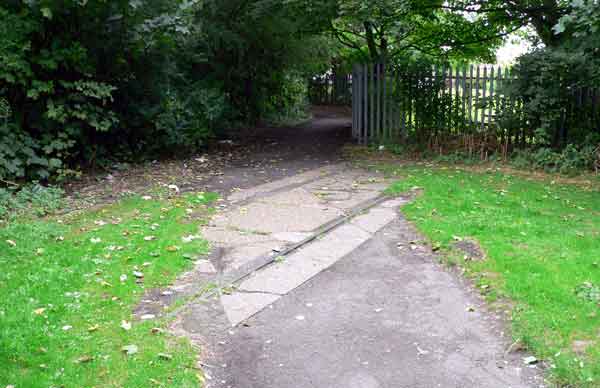
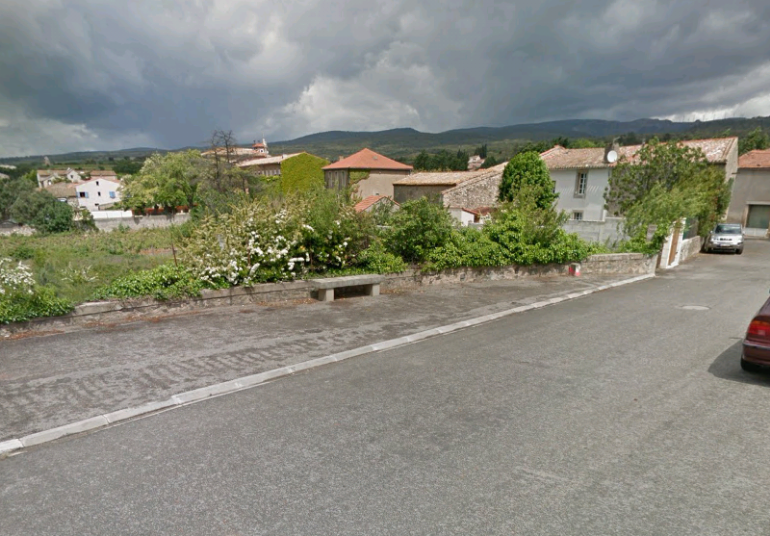
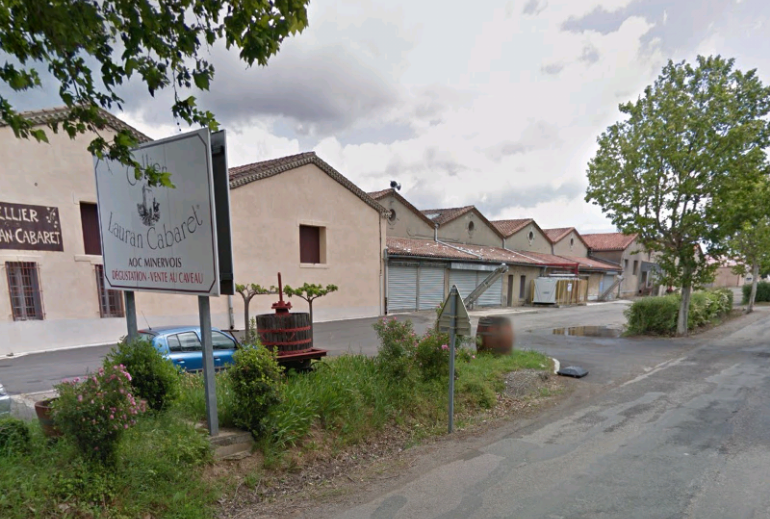
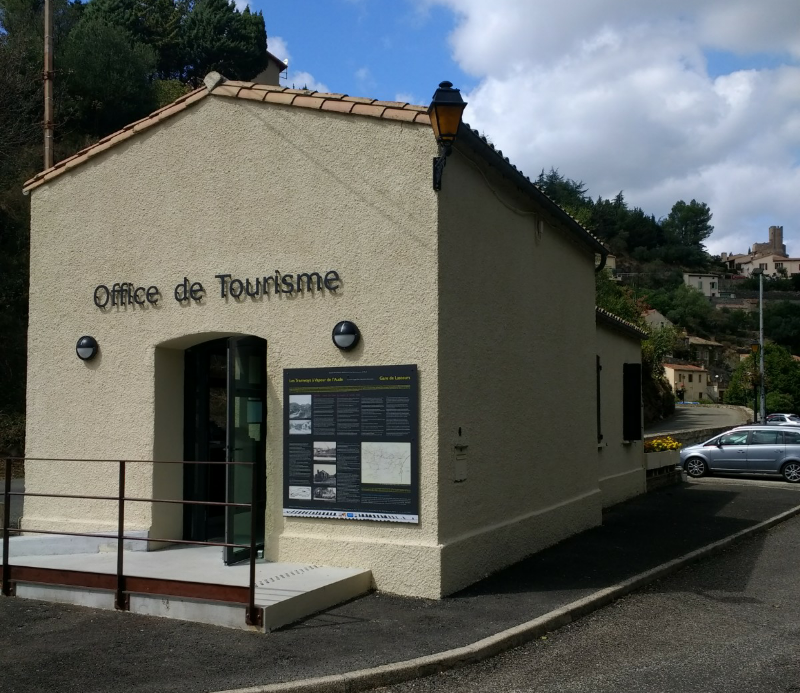
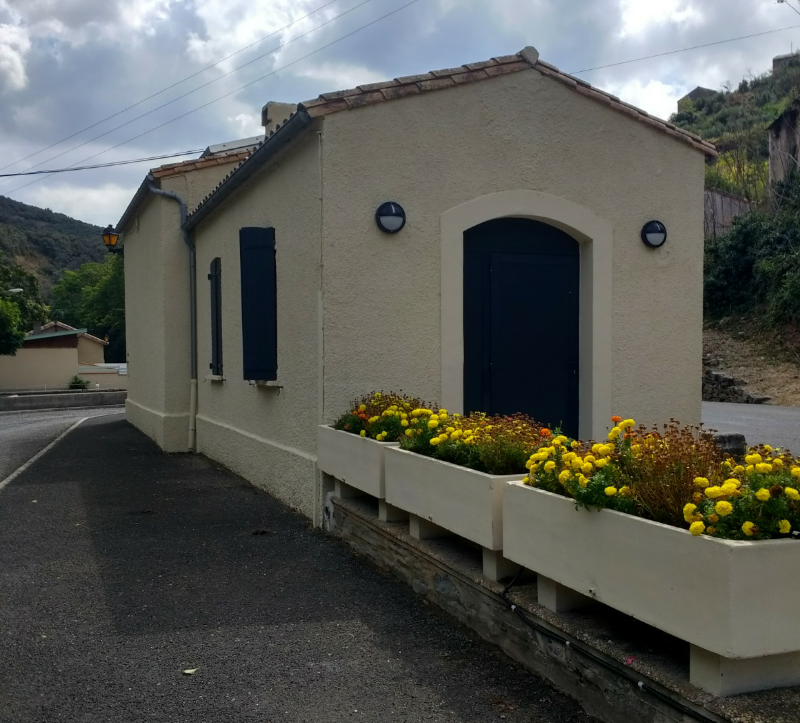
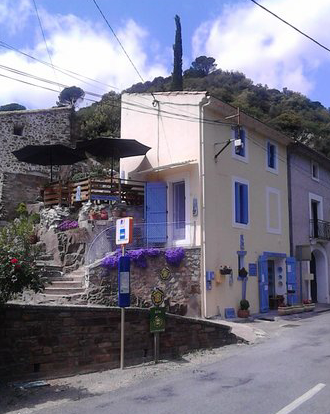
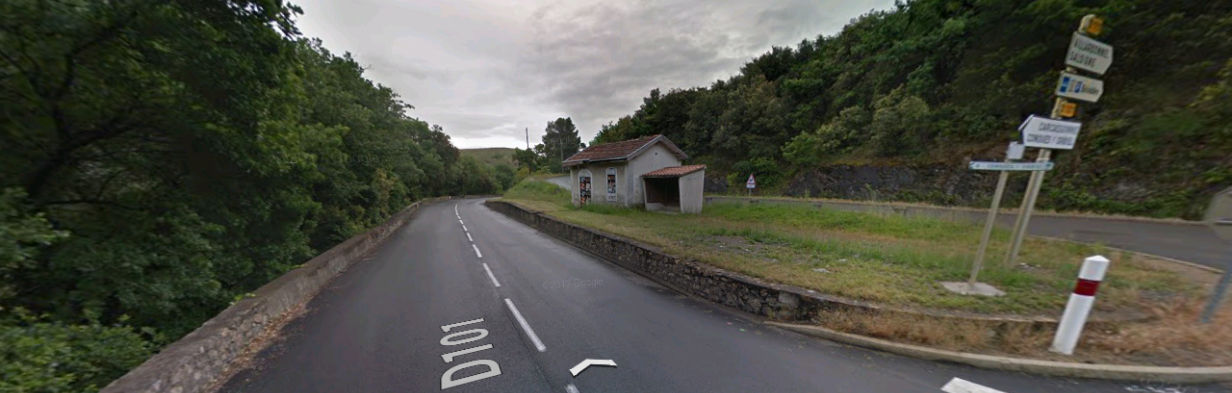
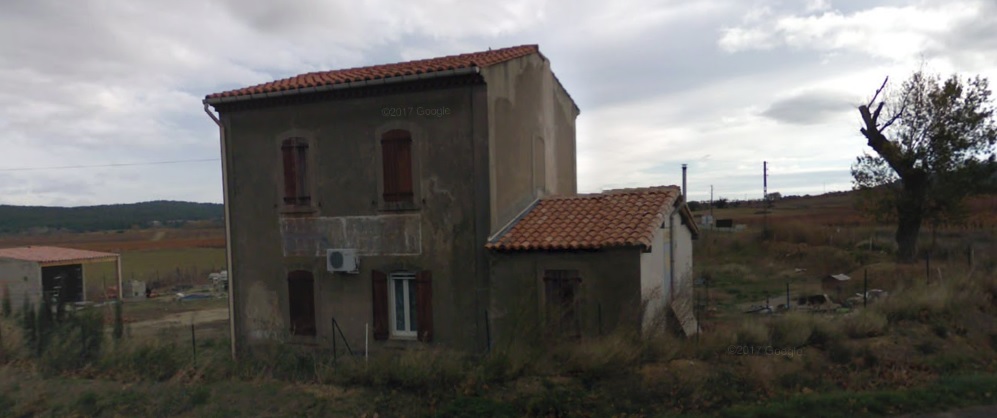
The station building at Les Palais in the very early 21st Century!
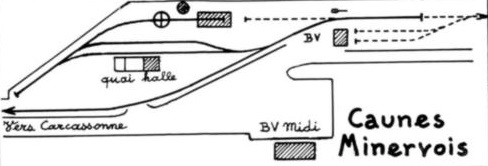
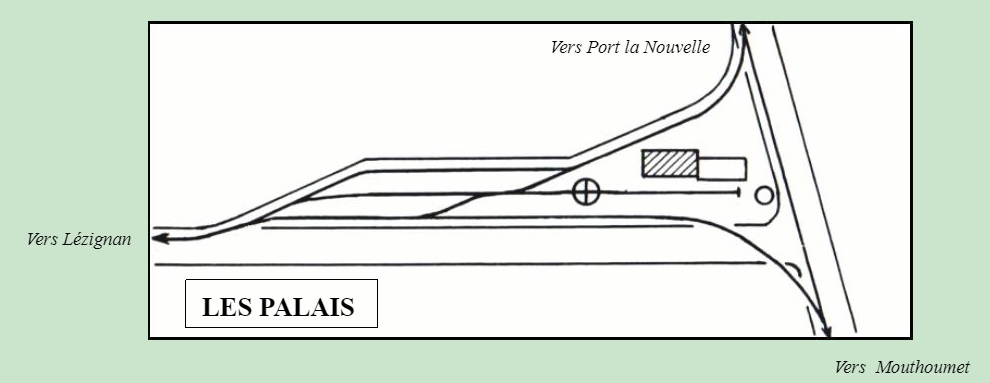
A schematic plan of the station. [13]

Continuing eastward towards Thezan and La Nouvelle, the train passes in front of the Pech Maurel farm, crosses the road to Coustouge, in the Aude, not to be confused with Coustouges in the Pyrenees Orientales, and approaches the Parazols stopover at KP 17,502, named after a stream. However, we will leave that arm of the tramway and focus on the westerly route to Mouthoumet.

Heading West from Les Palais, the tramway first encounters Saint-Laurent-de-la-Cabrerisse.

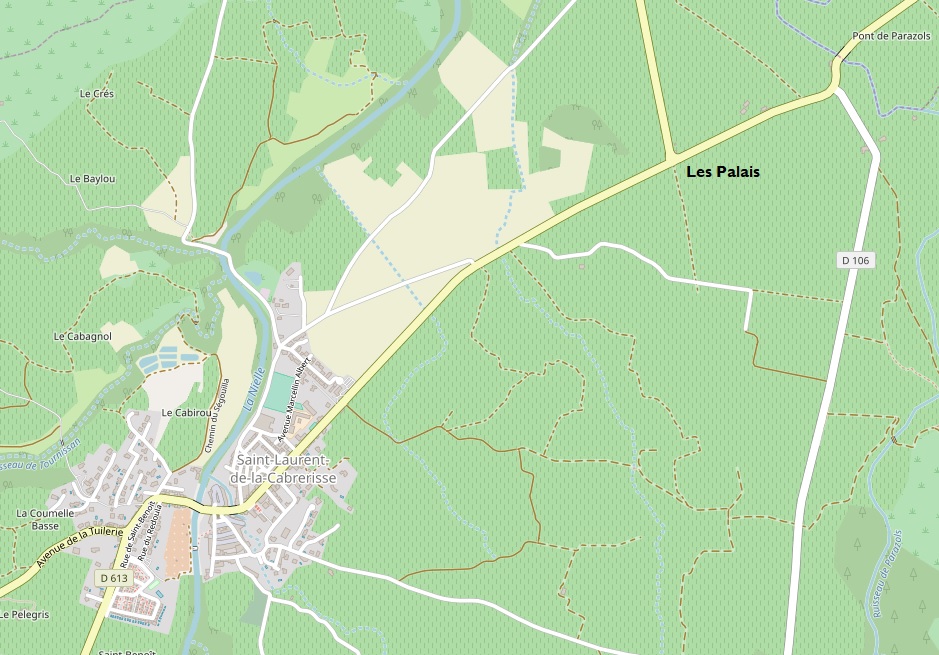
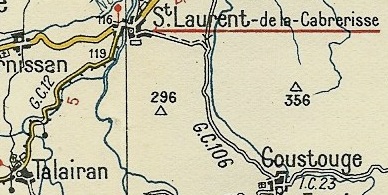
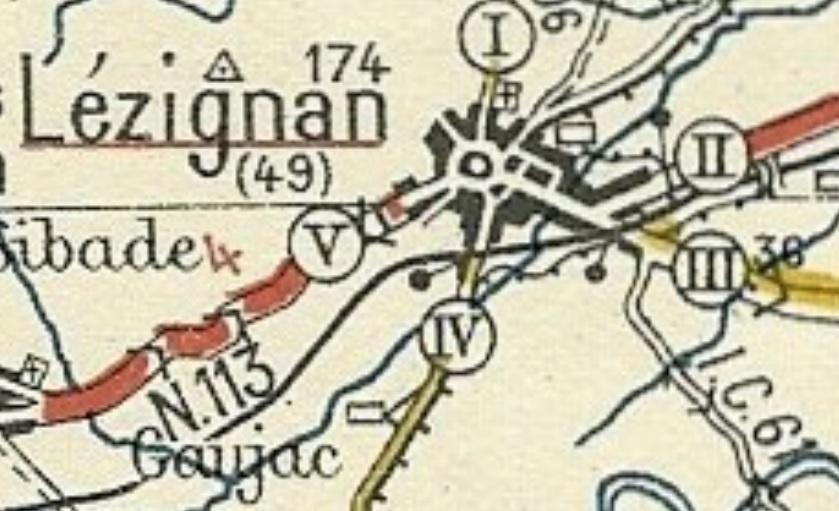
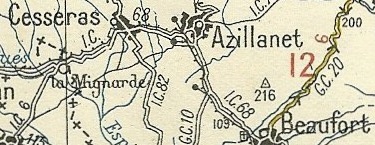
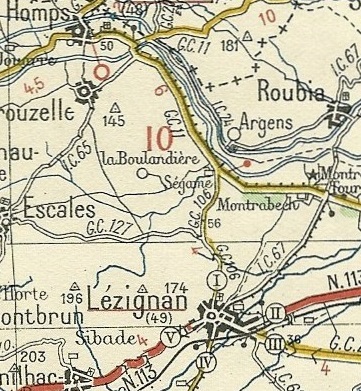
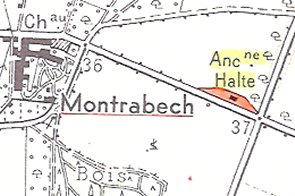
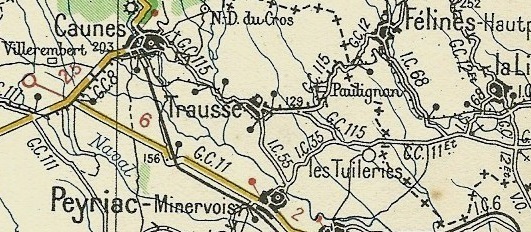
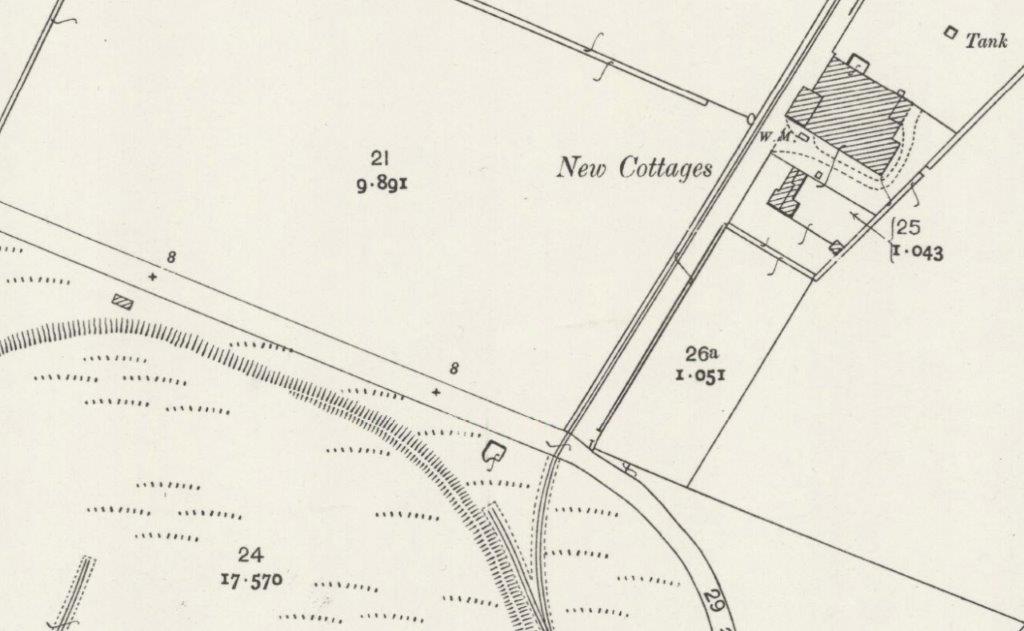
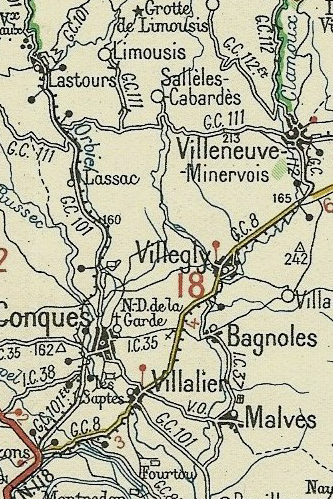
As the adjacent Michelin map from the 1930s shows the tramway followed the northern shoulder of the GC3 (D613) to Saint-Laurent-de-la-Cabrerisse and the station can be picked out on the North side of the road close to the village.

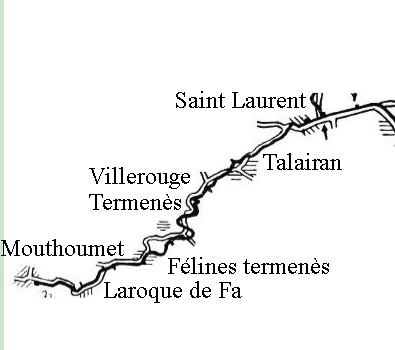
The tramway continued from there through Talarain, Villerouge Termenes, Felines Termaines, Laroque de fa and on to Mouthoumet.


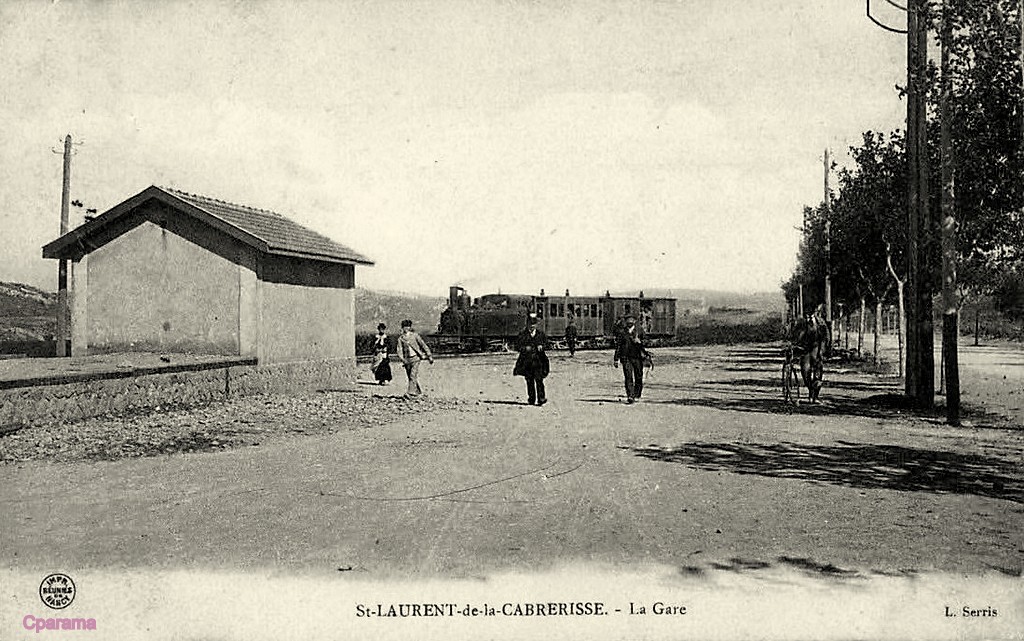
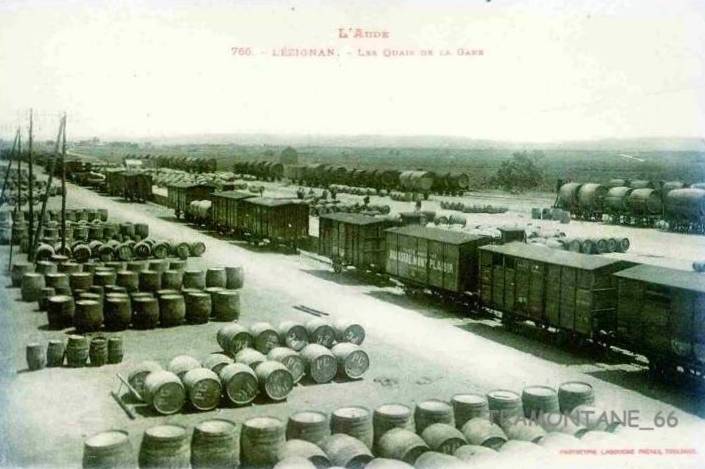
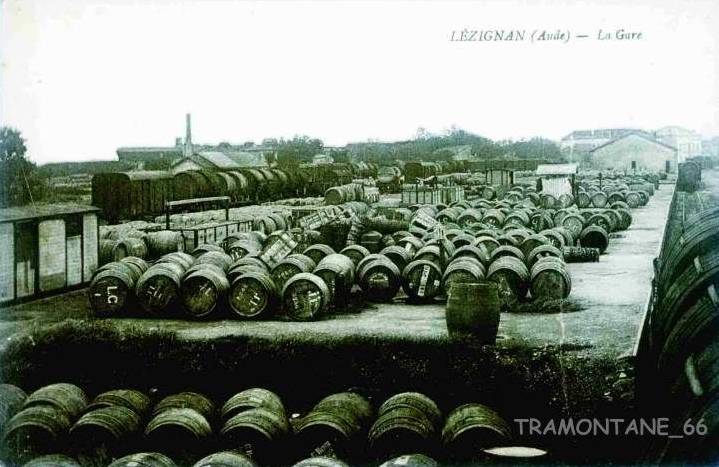
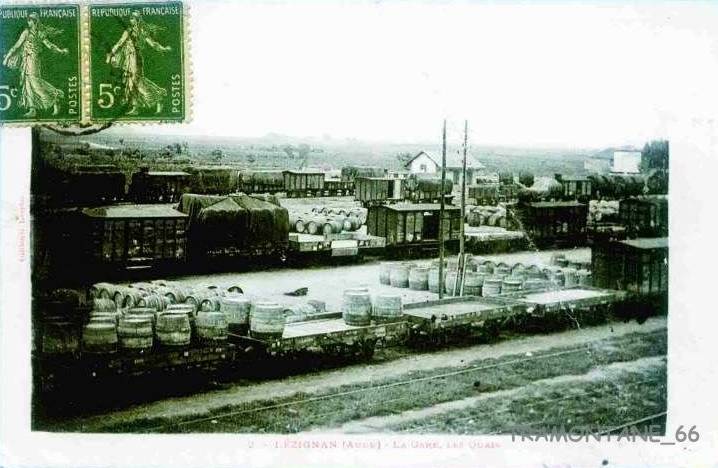
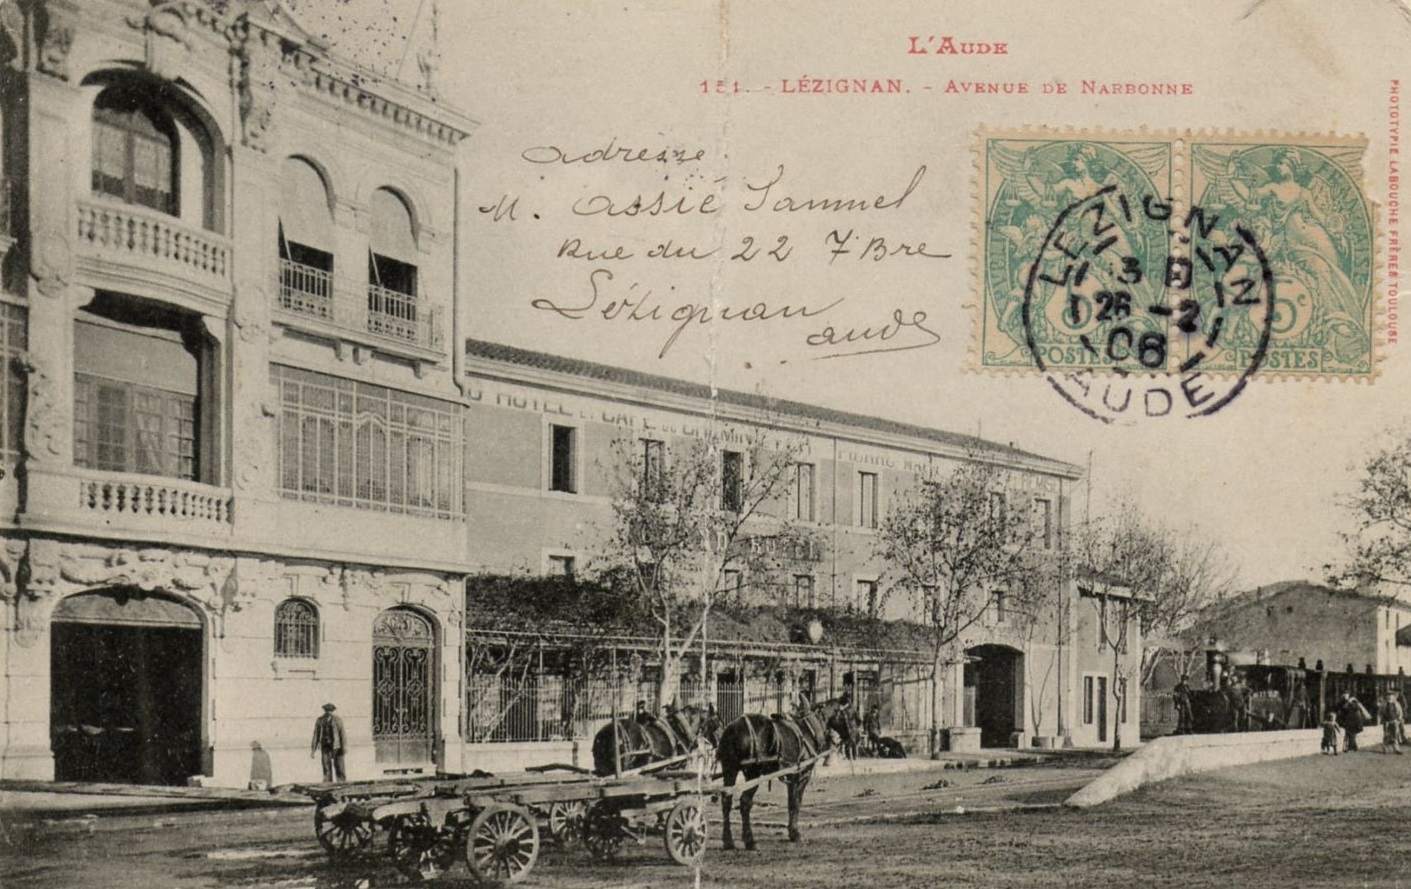
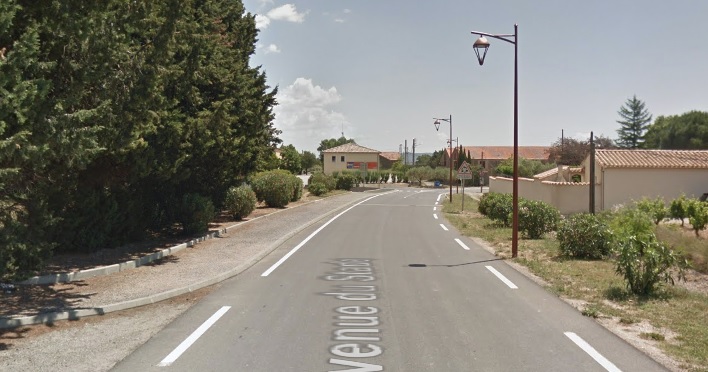
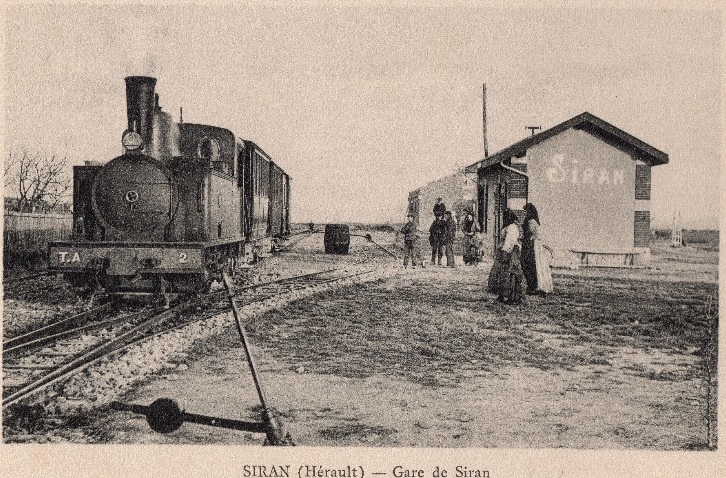
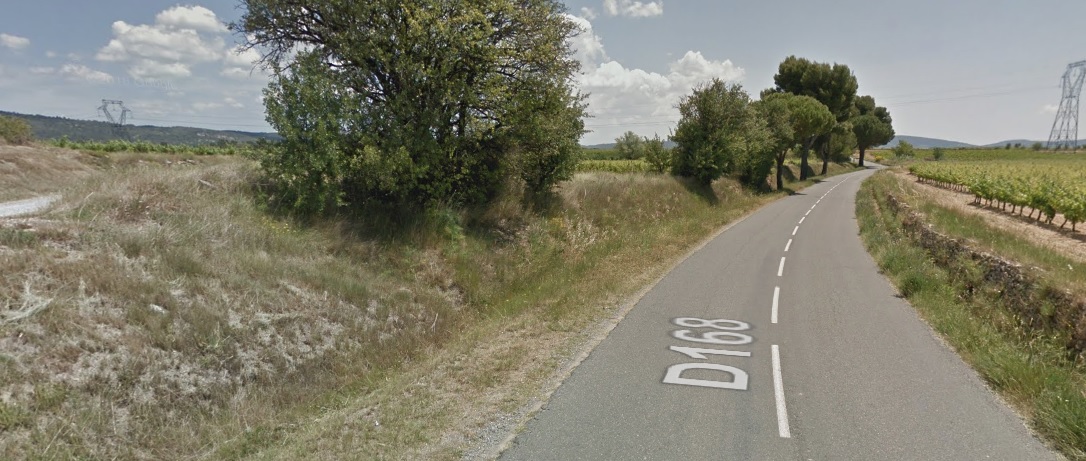
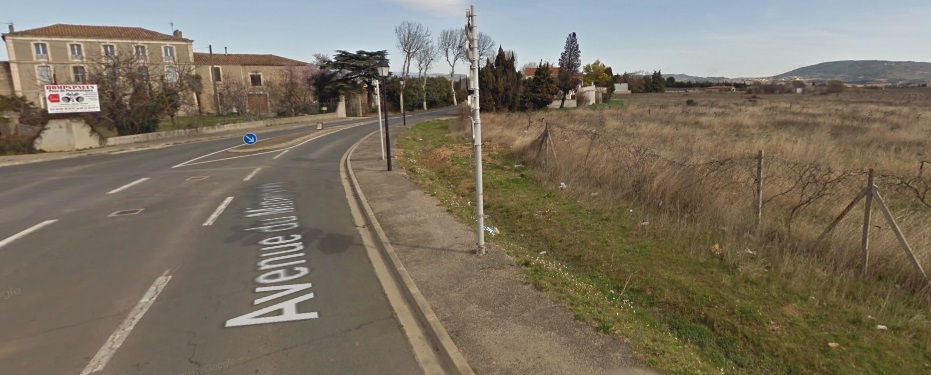
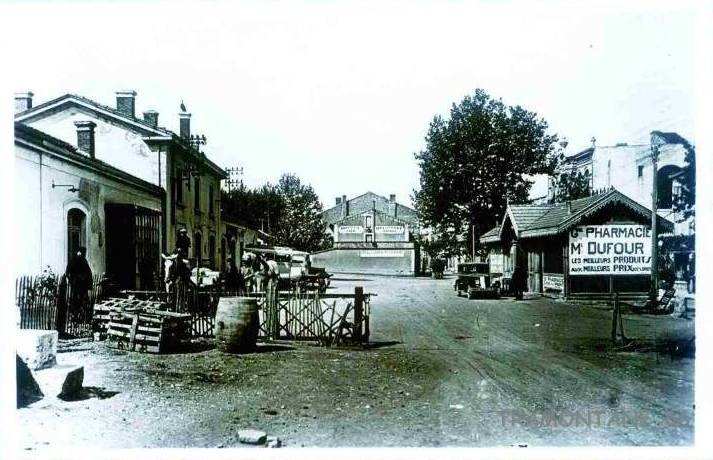
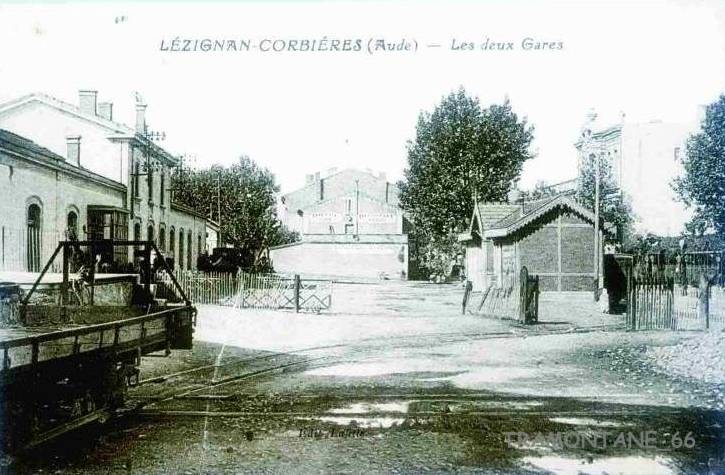
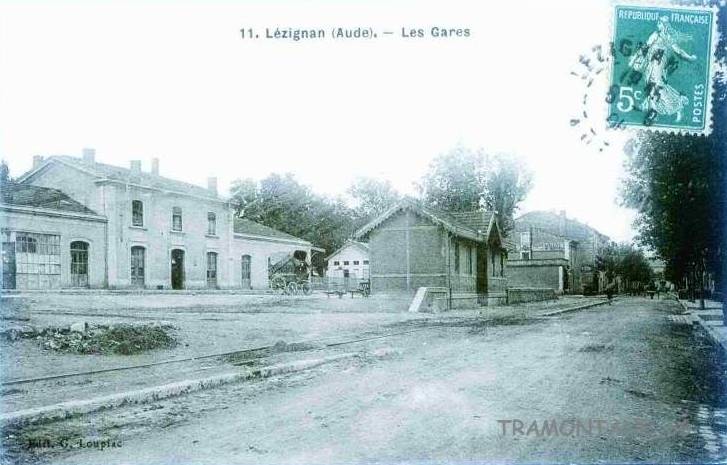
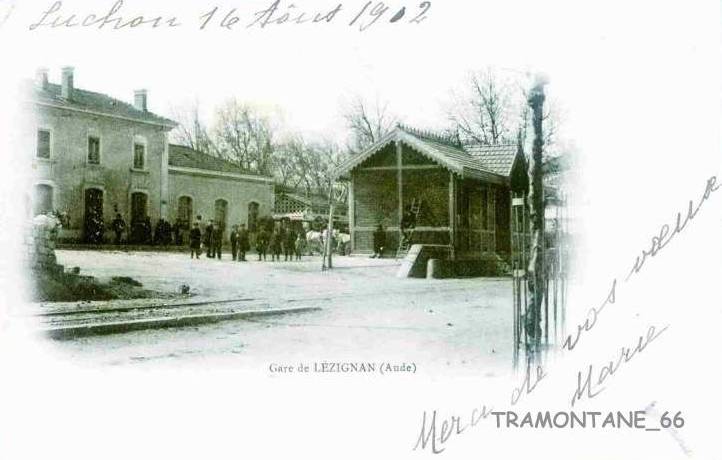
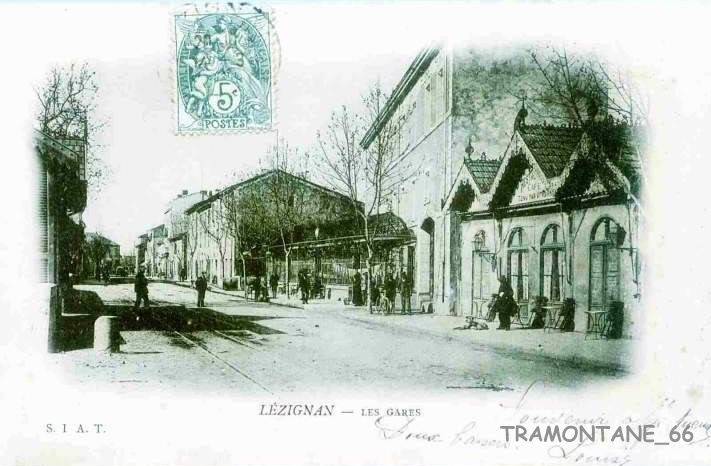
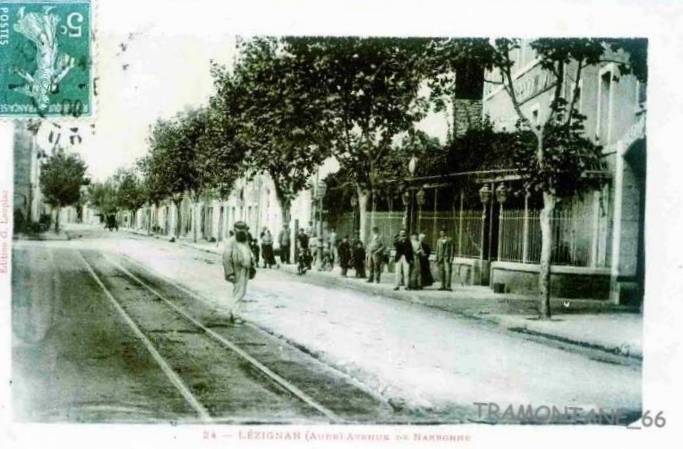
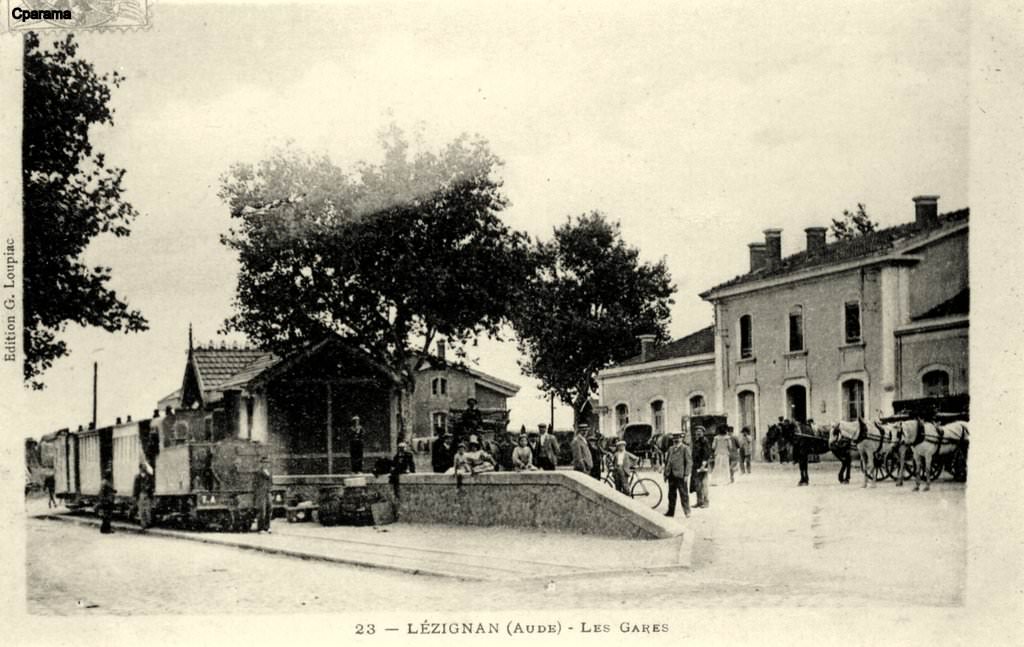
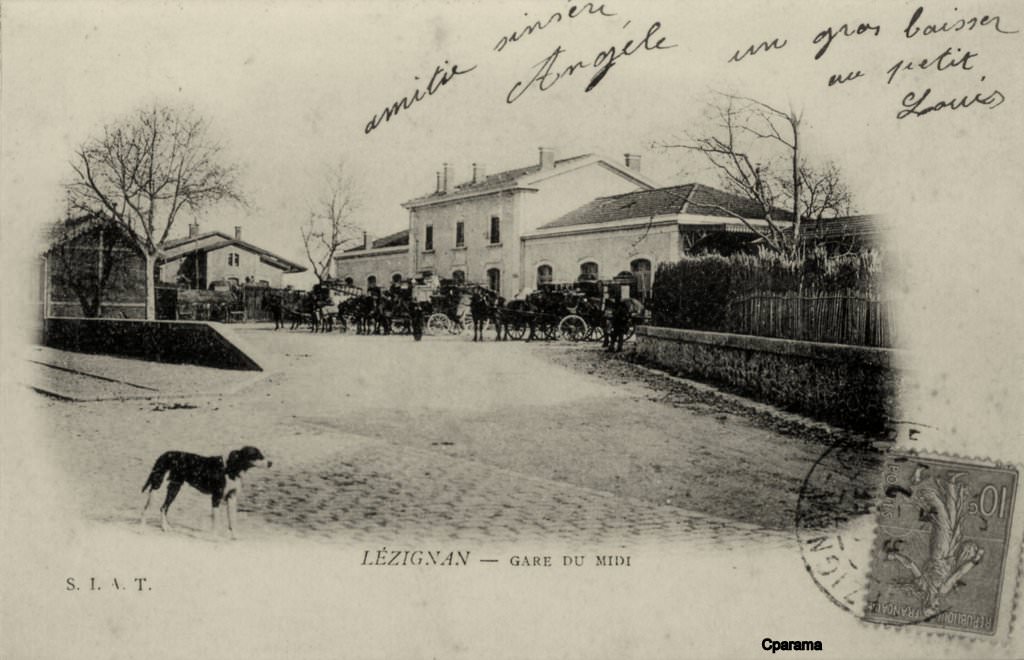
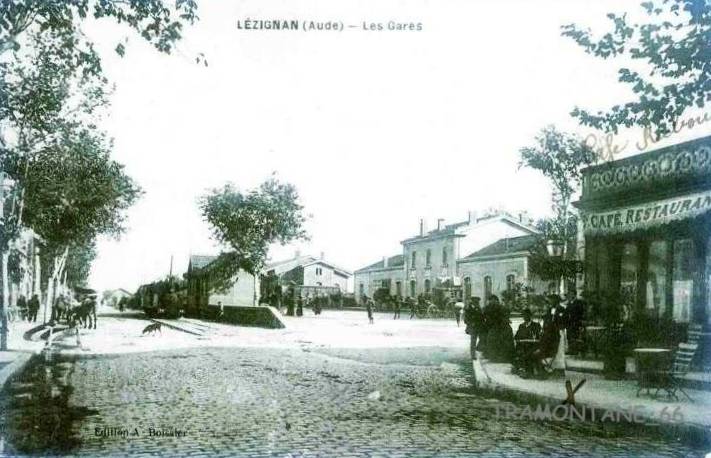
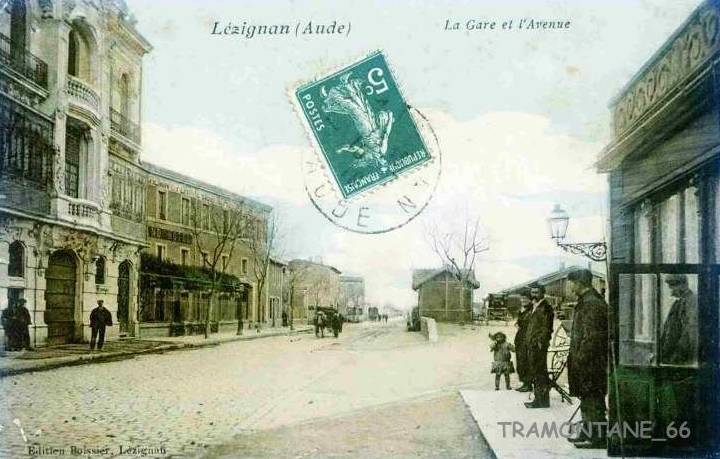
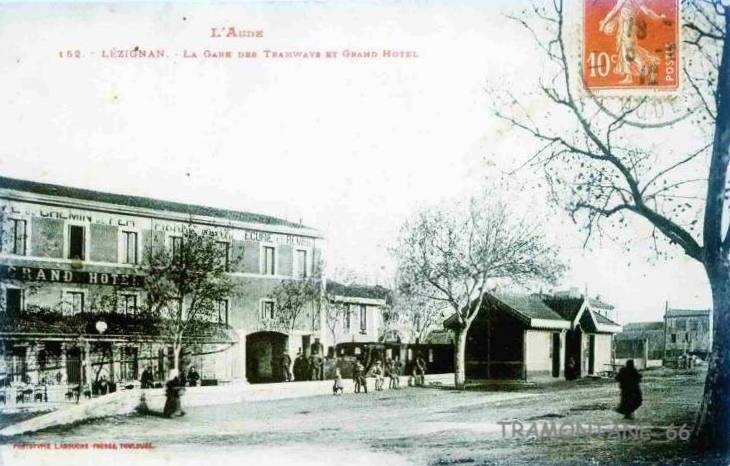
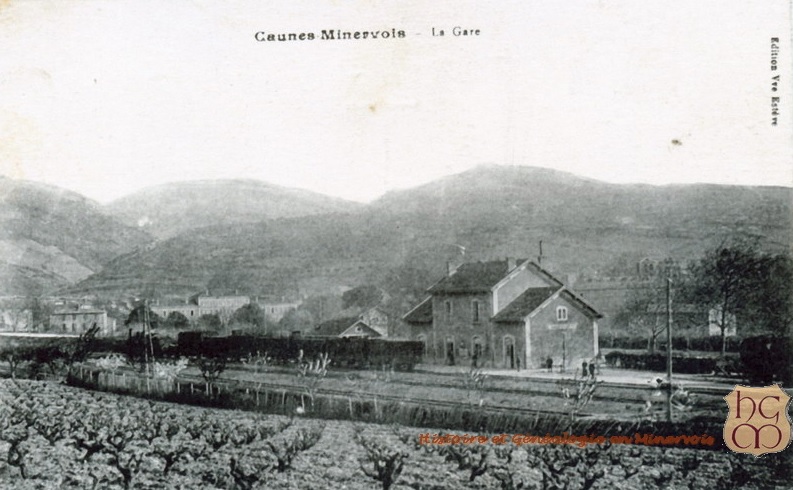
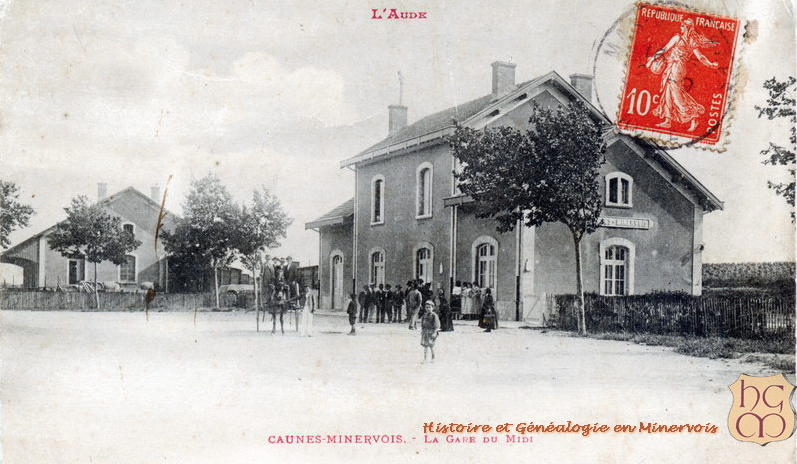
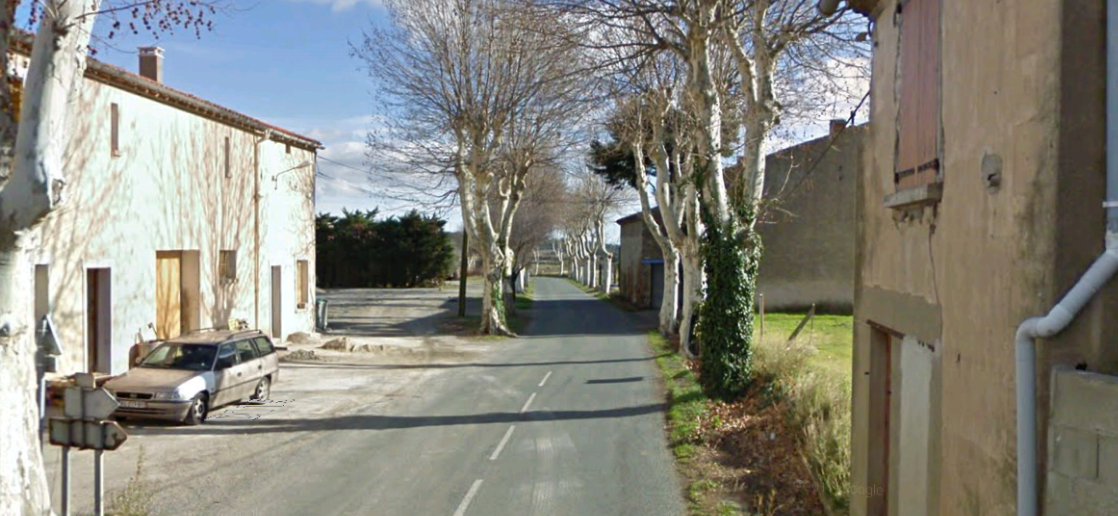
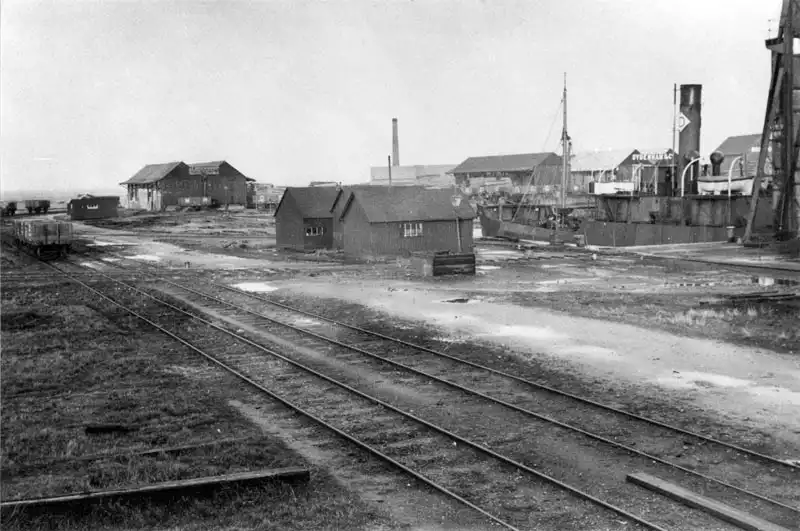
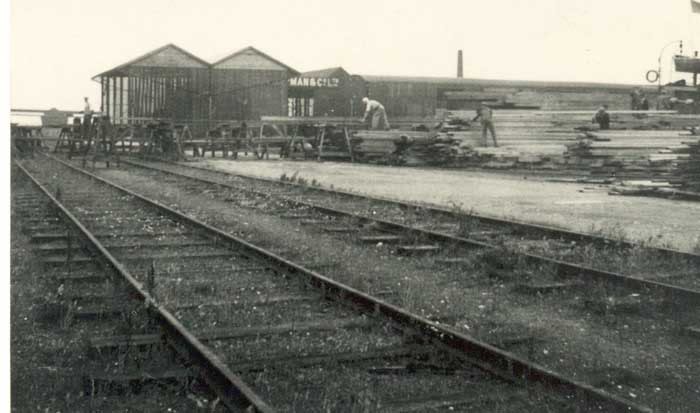
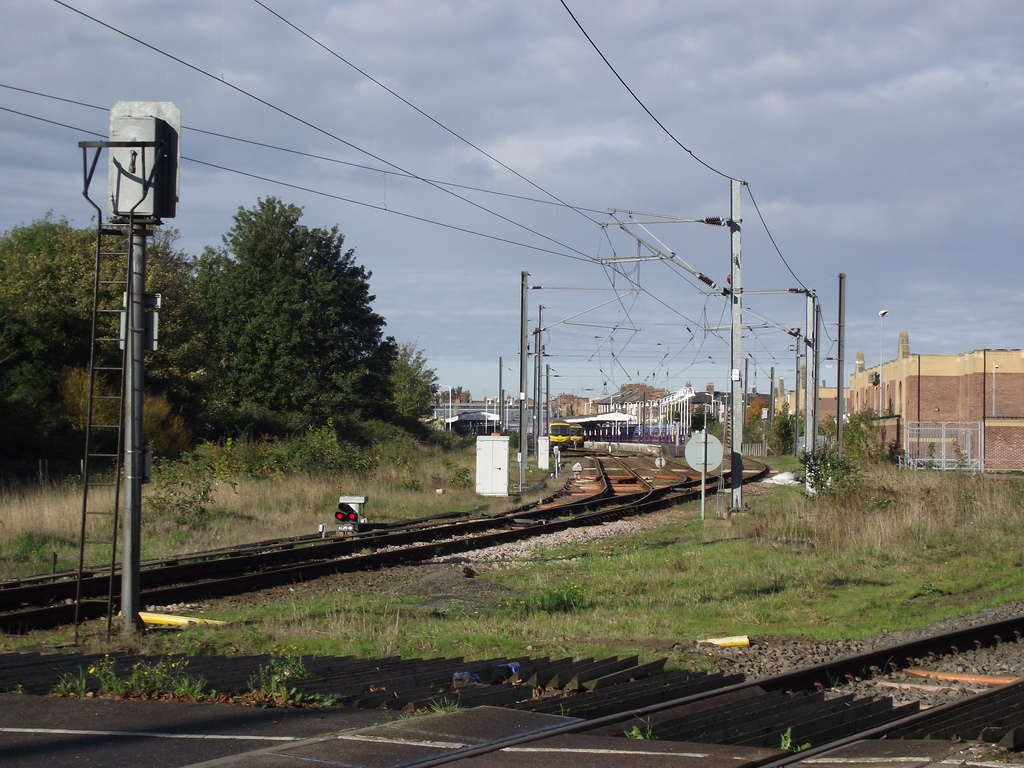
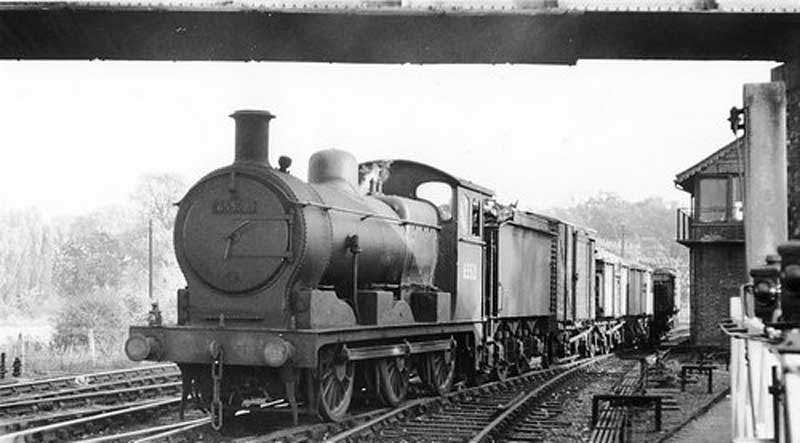
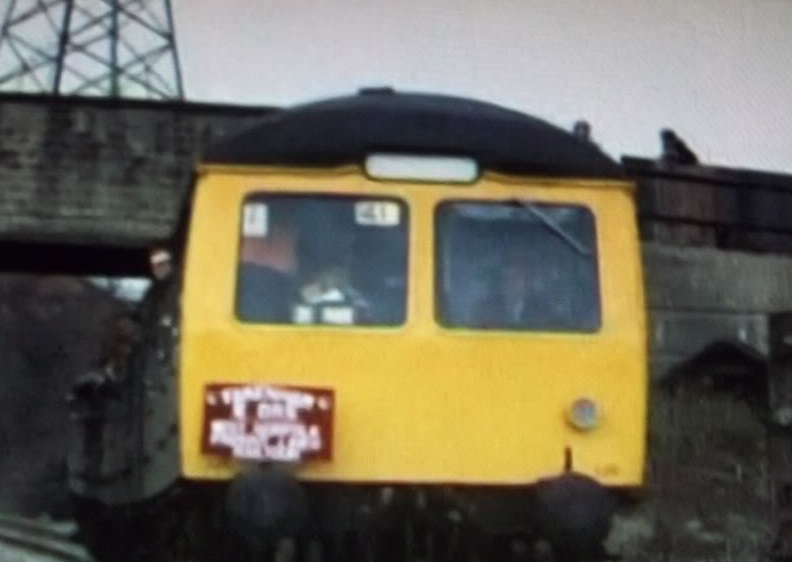
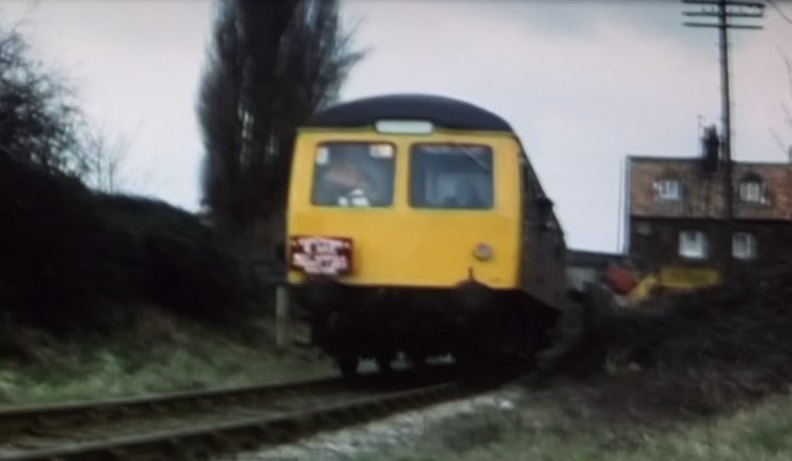
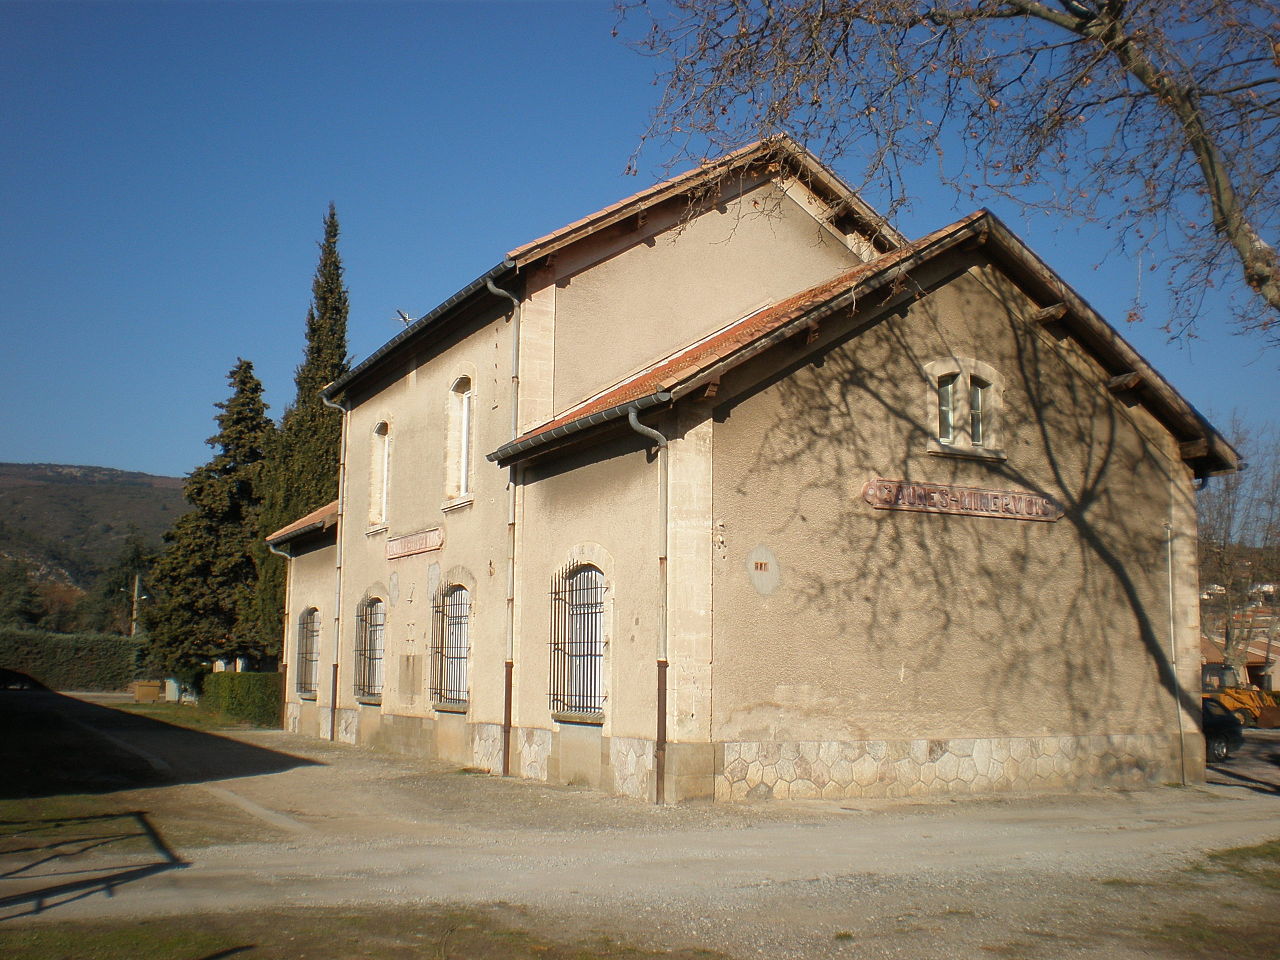
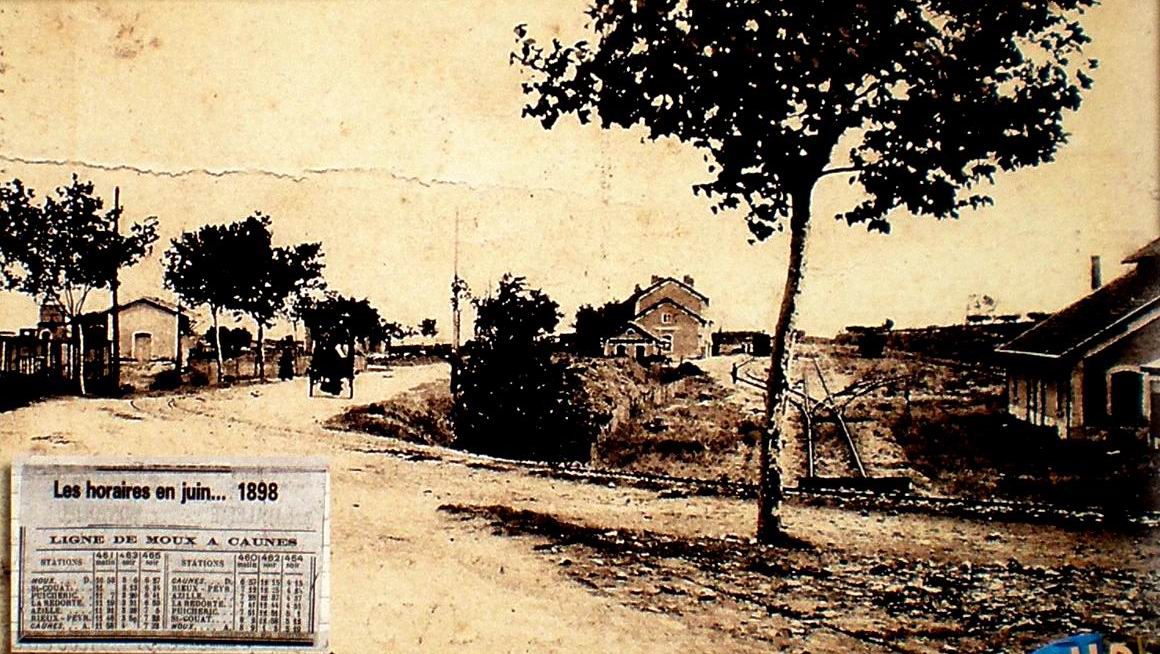
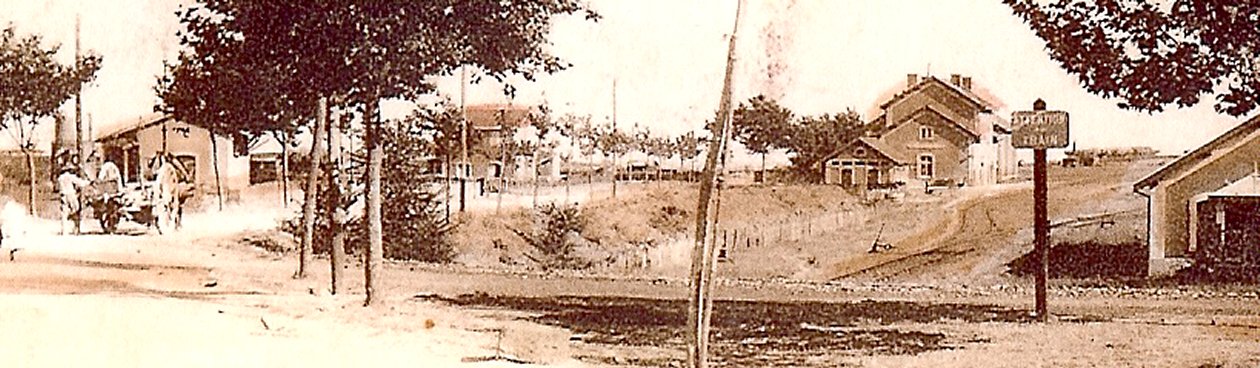
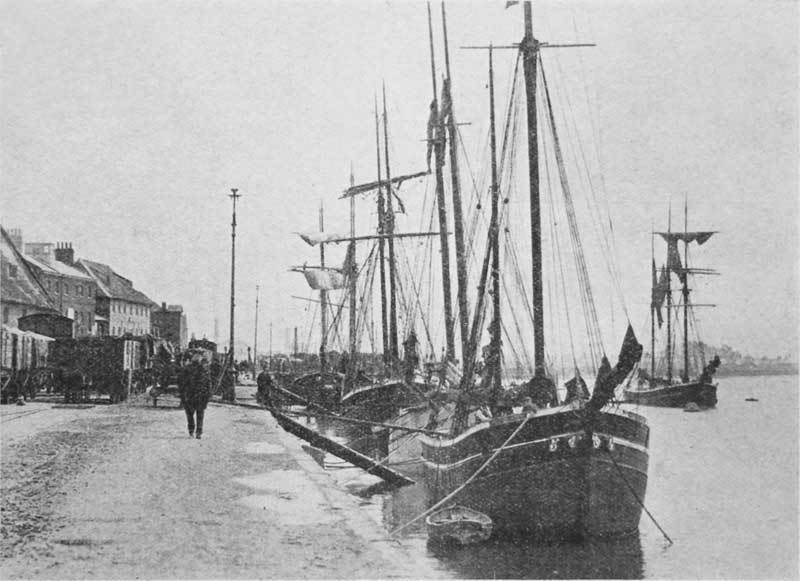
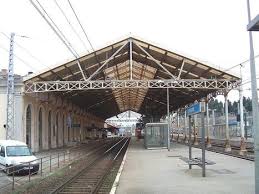
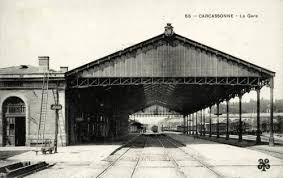
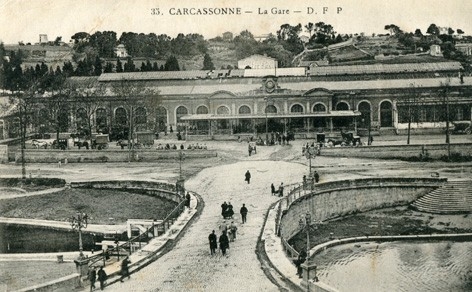
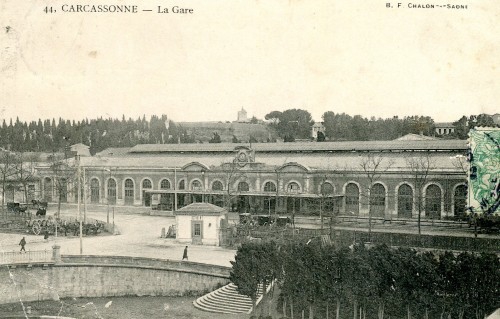
The images immediately above show the station at Saint-Laurent-de-la-Cabrerisse. The second image shows the GC3 road (on the right) with a train approaching from Les Palais. The first image shows an altogether much busier scene taken from the approximate location of the train in the second image. [5] The smaller adjacent image is taken at a similarly busy time to the first image above. [7]
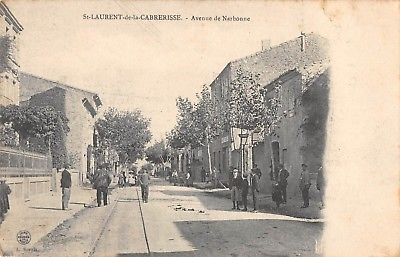
Saint-Laurent-de-la-Cabrerisse, Avenue de Narbonne. the location is probably a few hundred meters closer to the village centre than the station. [6]
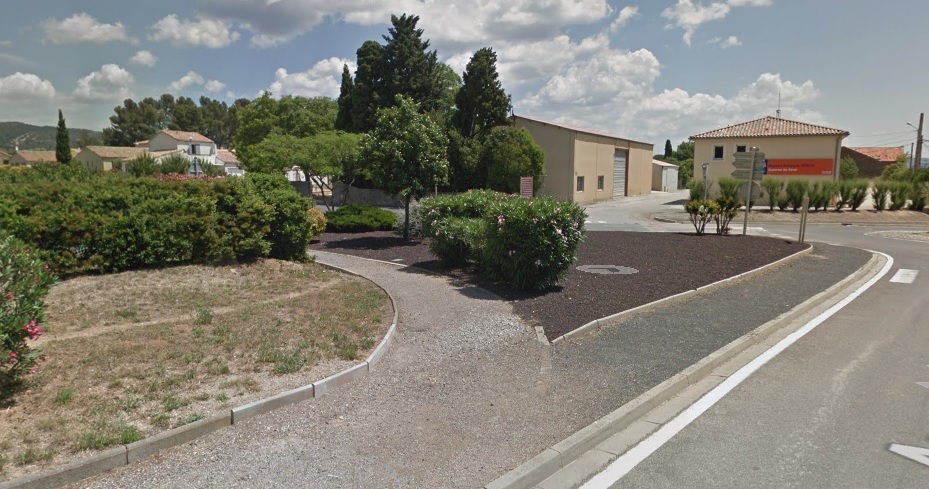
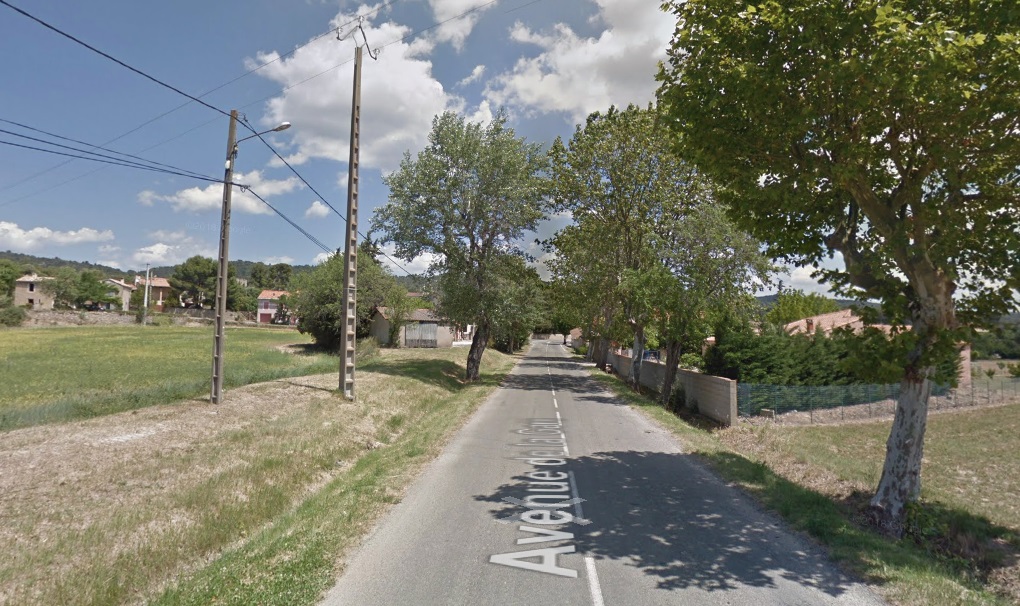
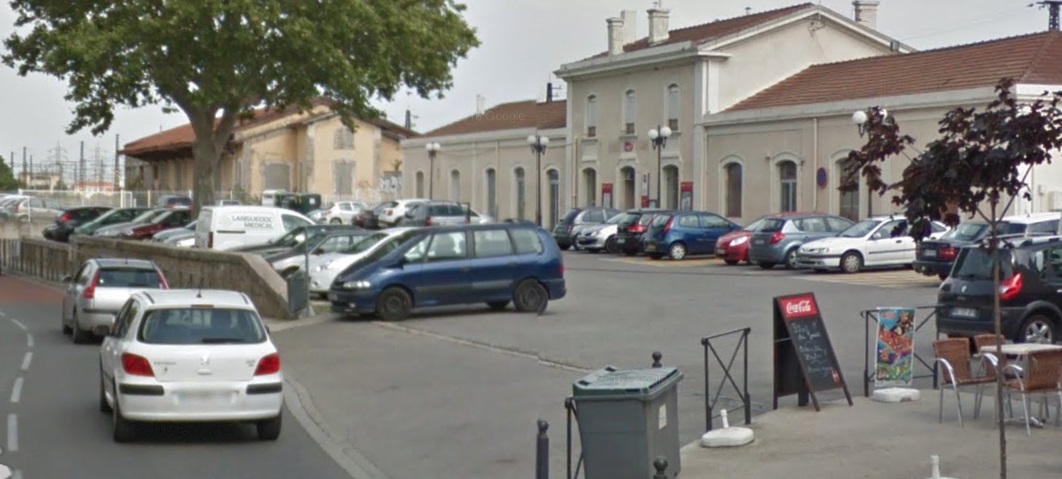
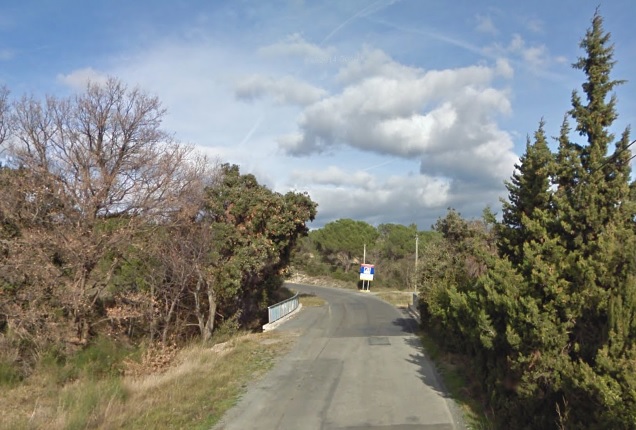
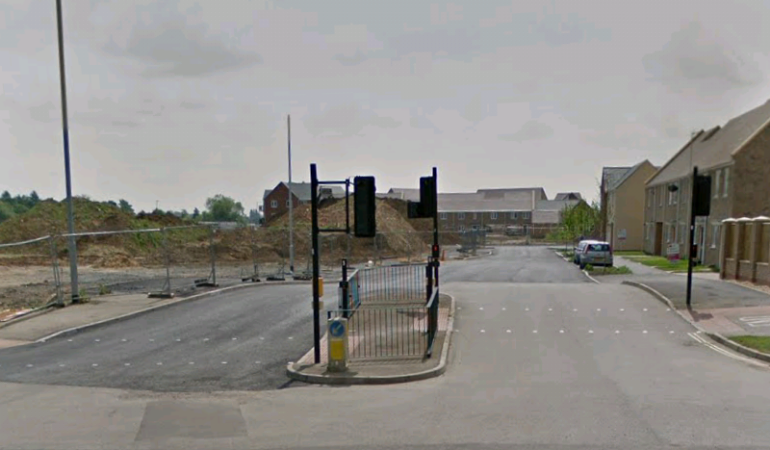
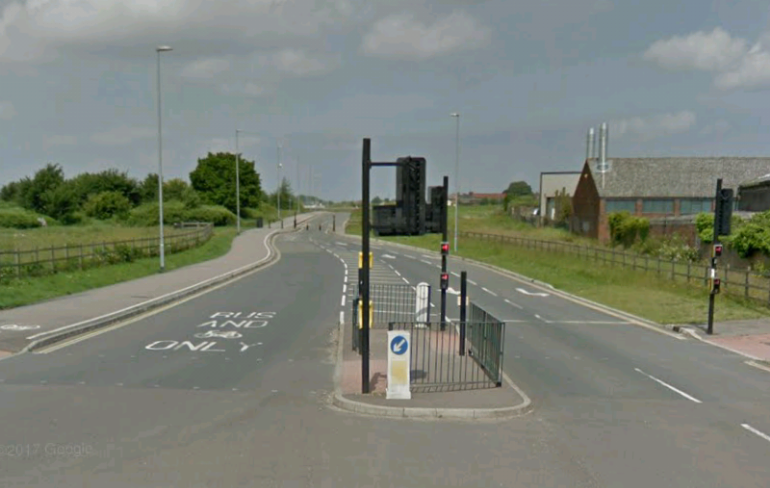
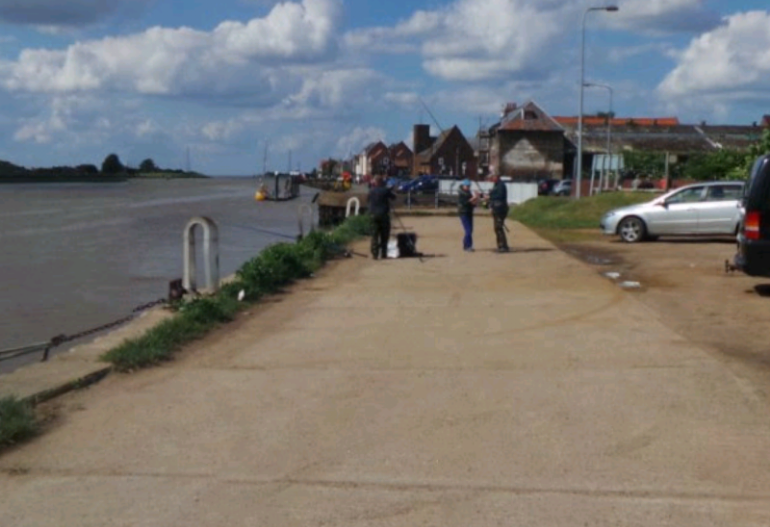
The picture above possibly sows the same location in 2017.

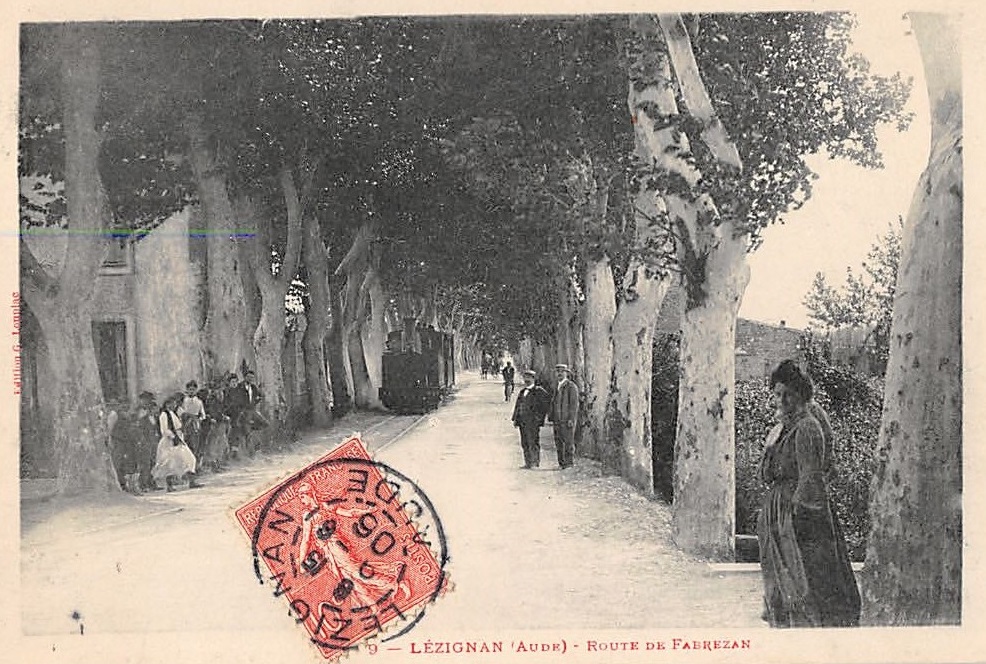
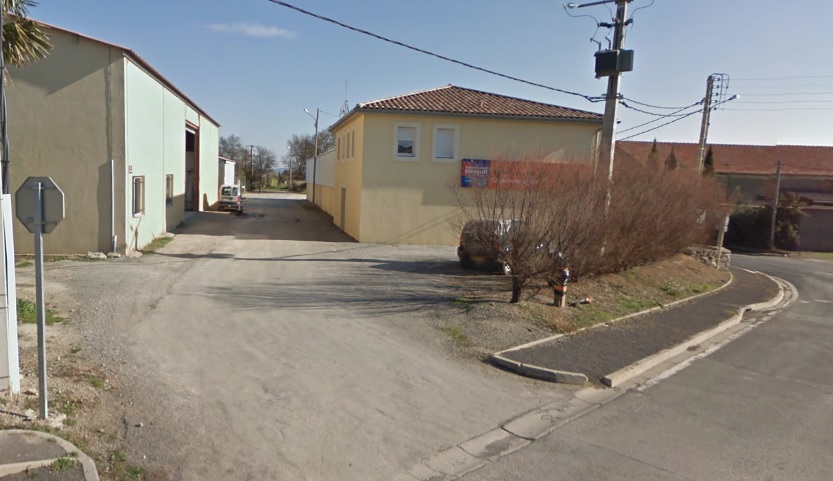
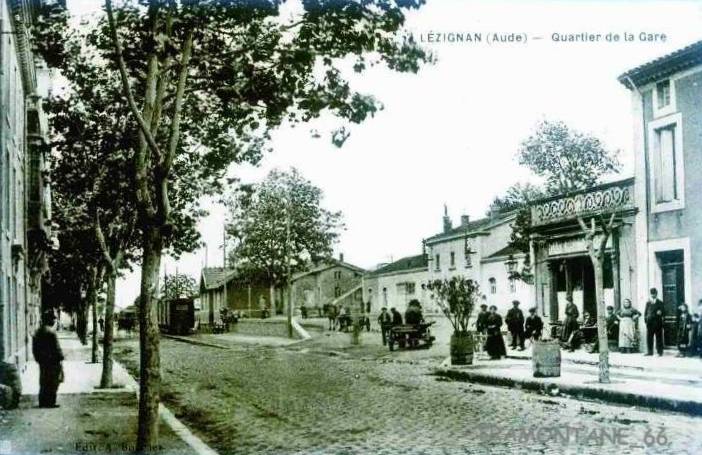
The adjacent image is taken in the opposite direction on the Avenue de Narbonne.Close to the centre of the village. [12]
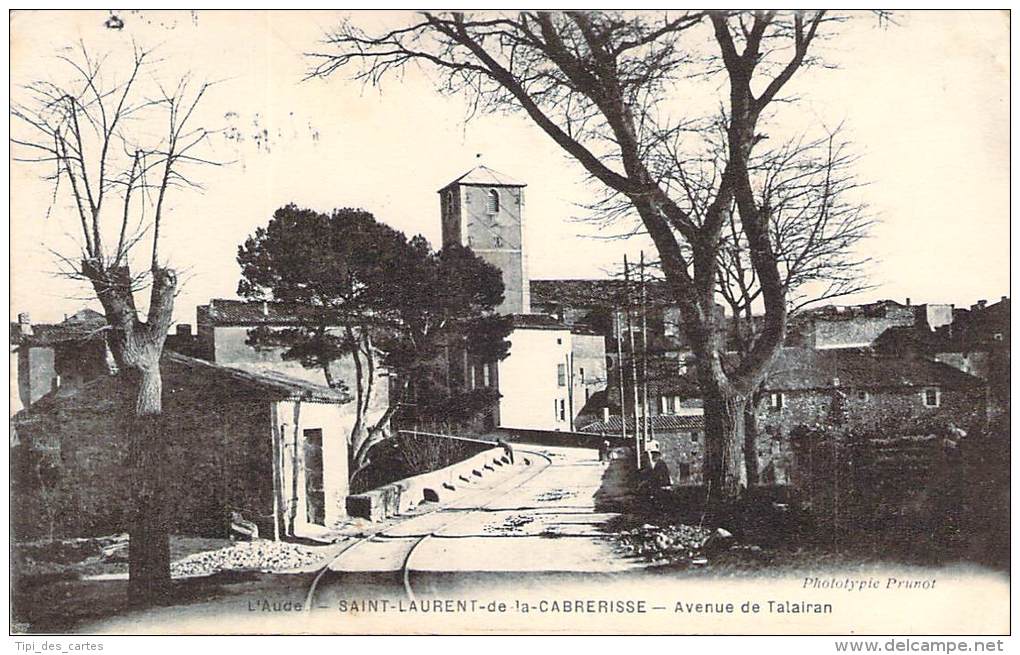
The tramway – looking back into the village of Saint-Laurant-de-la-Cabrerisse. [10]
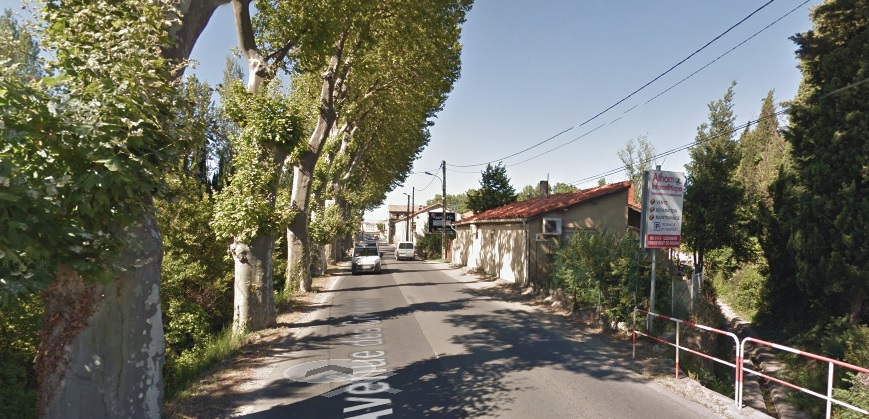
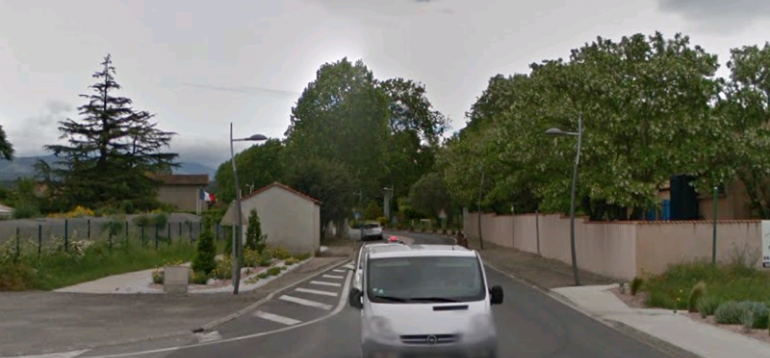
Looking back along the line of the tramway/road into the village of Saint-Laurent-de-la-Cabrerisse in the early 21st Century. The picture is taken from almost the same position as the monochrome image above. It is interesting to note that the church tower has been rebuilt but that the design is different!
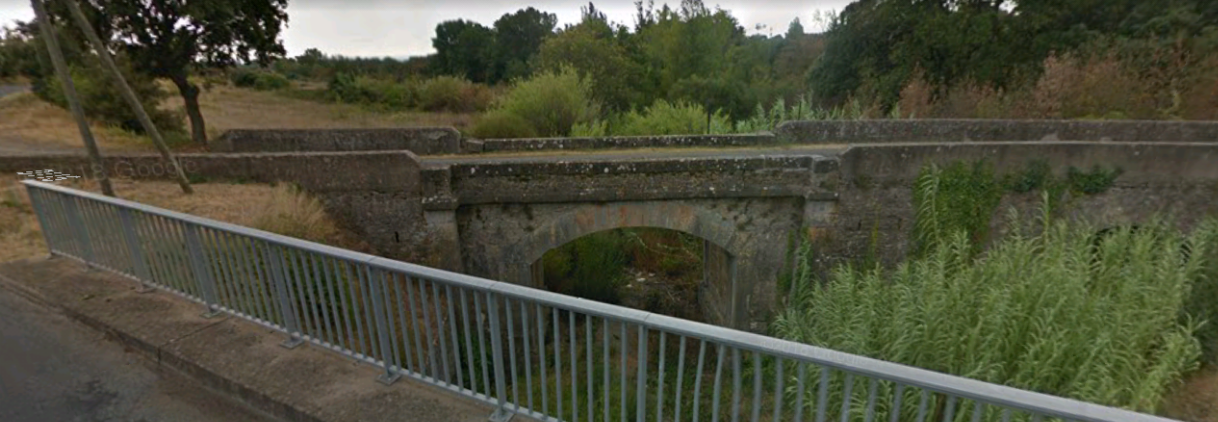
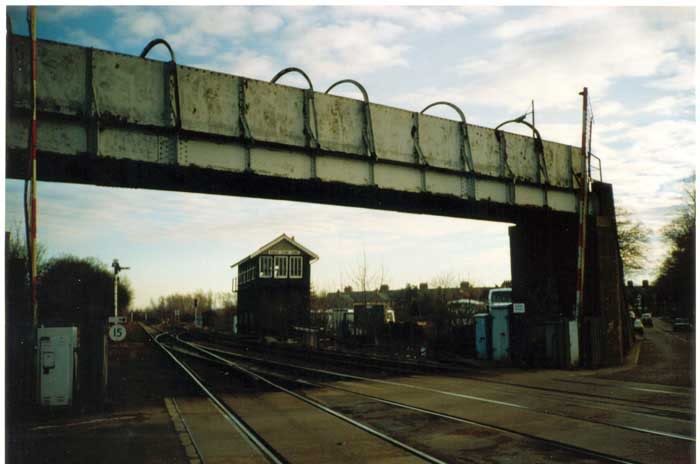
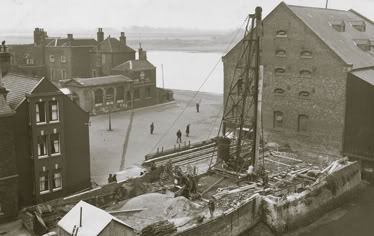
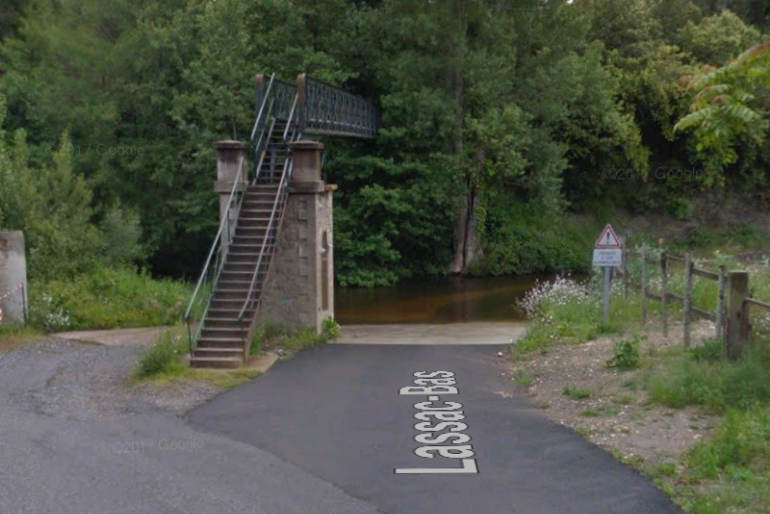
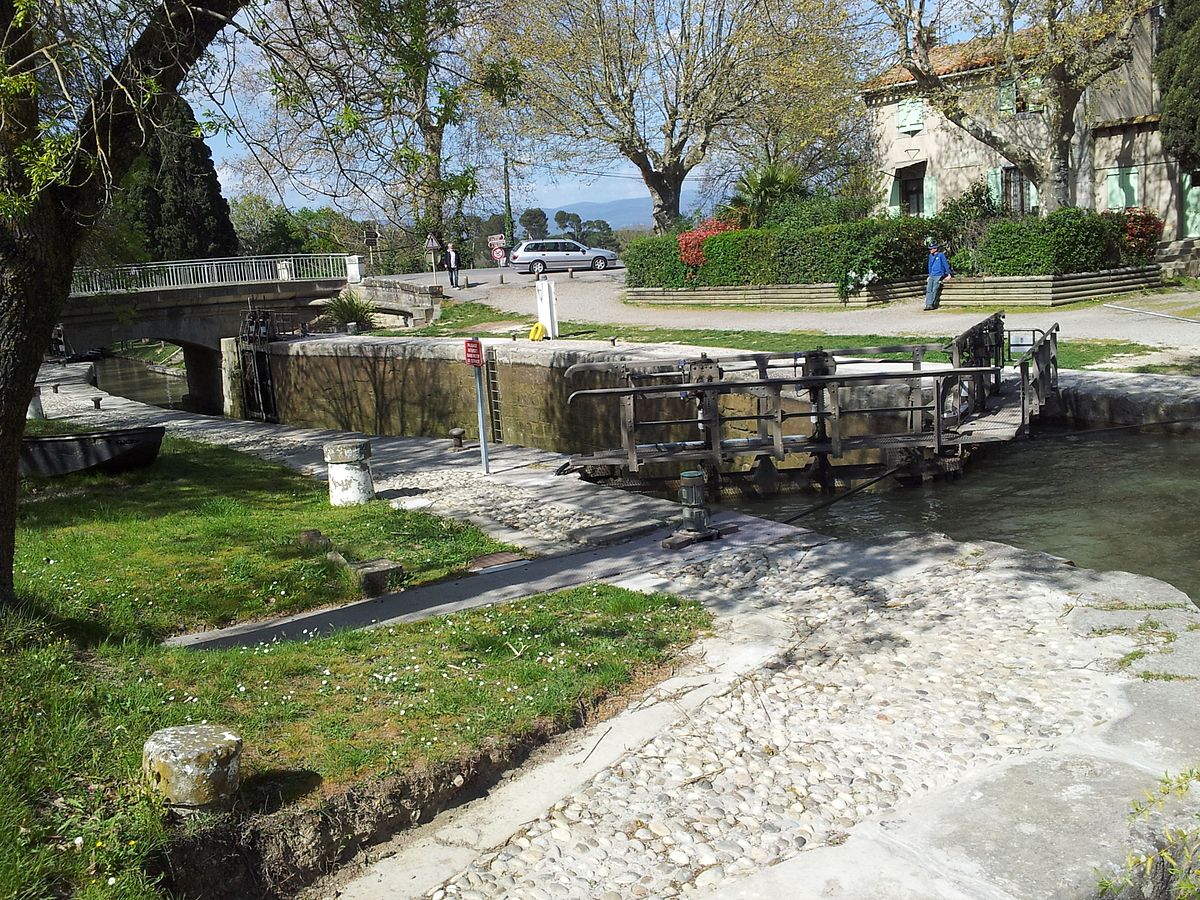
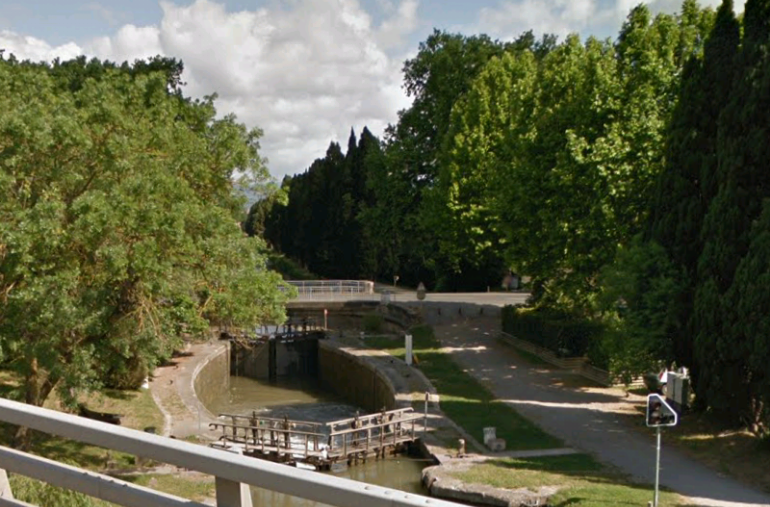
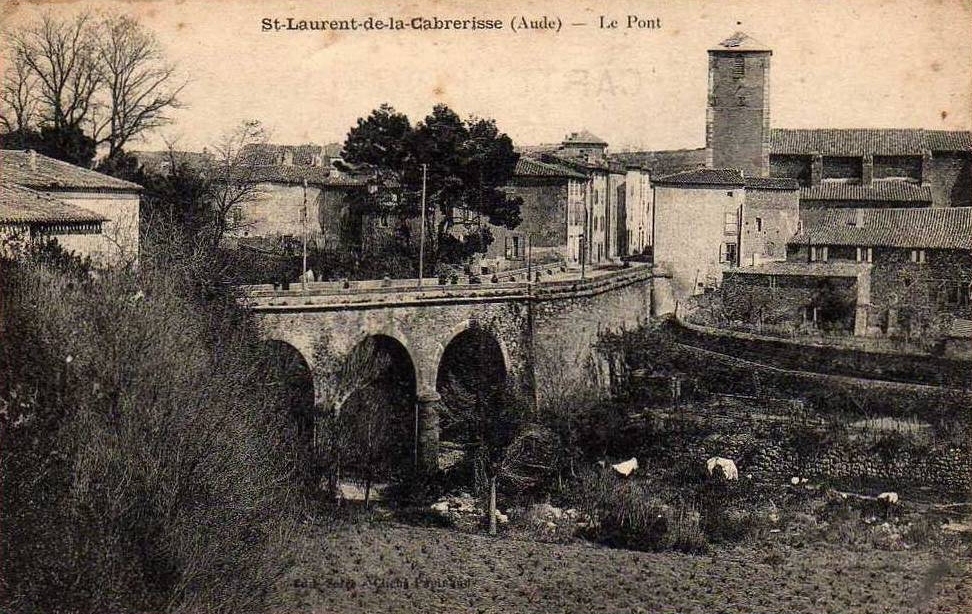
The bridge at Saint-Laurent-de-la-Cabrerisse at the time of the tramway. [8]
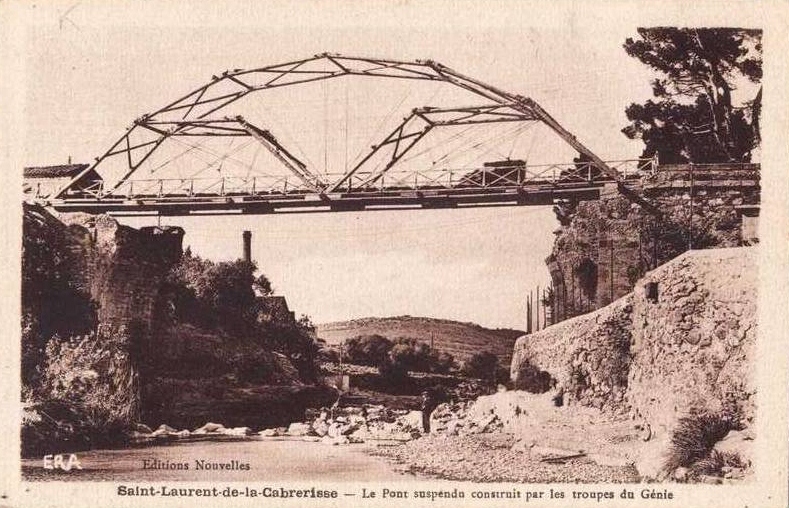
The bridge was destroyed during WW2. This was the temporary structure built to replace it. [8]

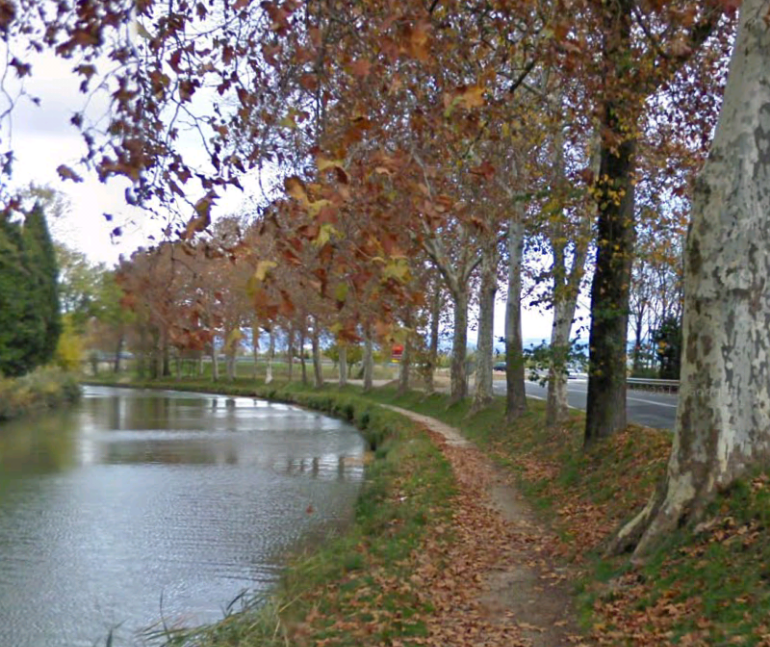
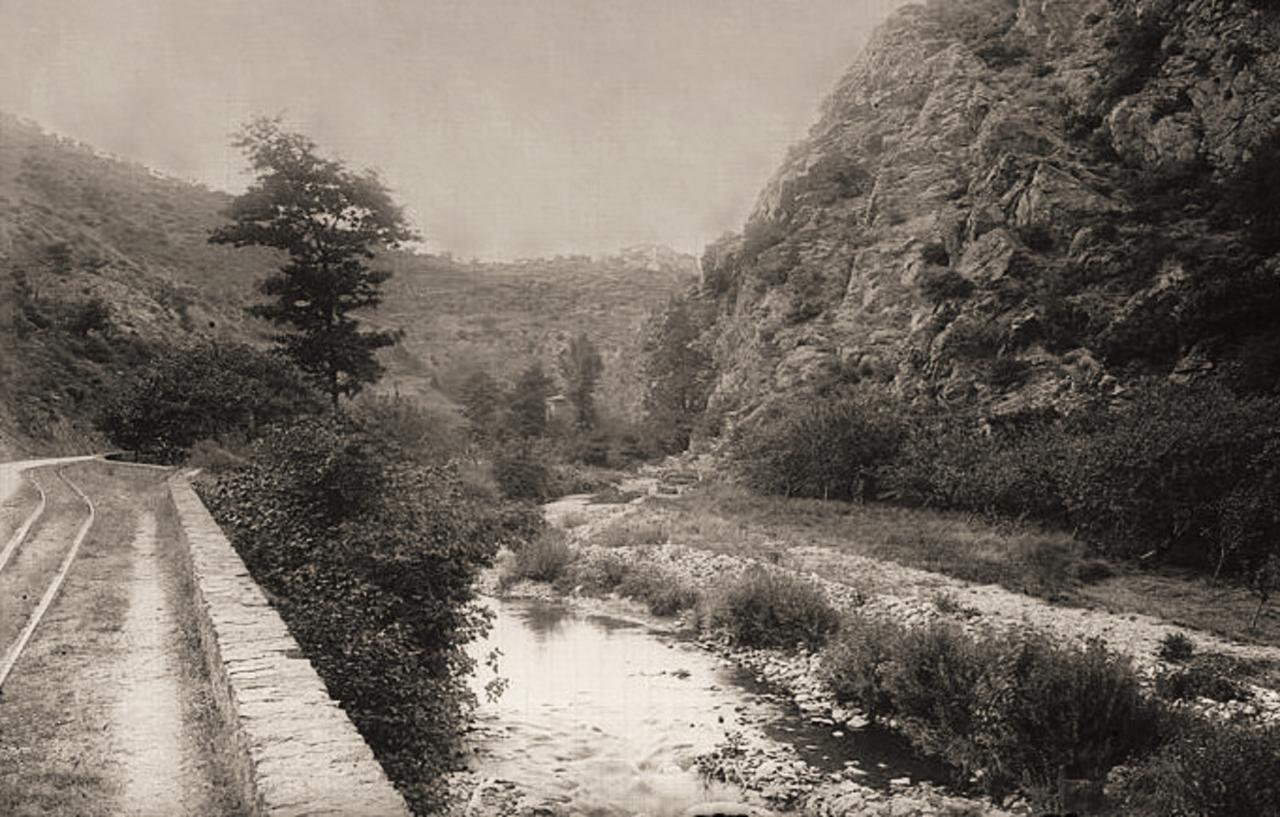
After Saint-Laurent-de-la-Cabrerisse, the tramway headed southwest, along the eastern shoulder of the GC12 (D613) towards Talairan. At first the road and tramway travelled across open vineyards but as Talairan came closer the tramway and road found themselves within the increasingly narrow valley of the Ruisseau de Remouly a tributary of the River Nielle. The tramway had to negotiate a more tortuous course alongside the river.
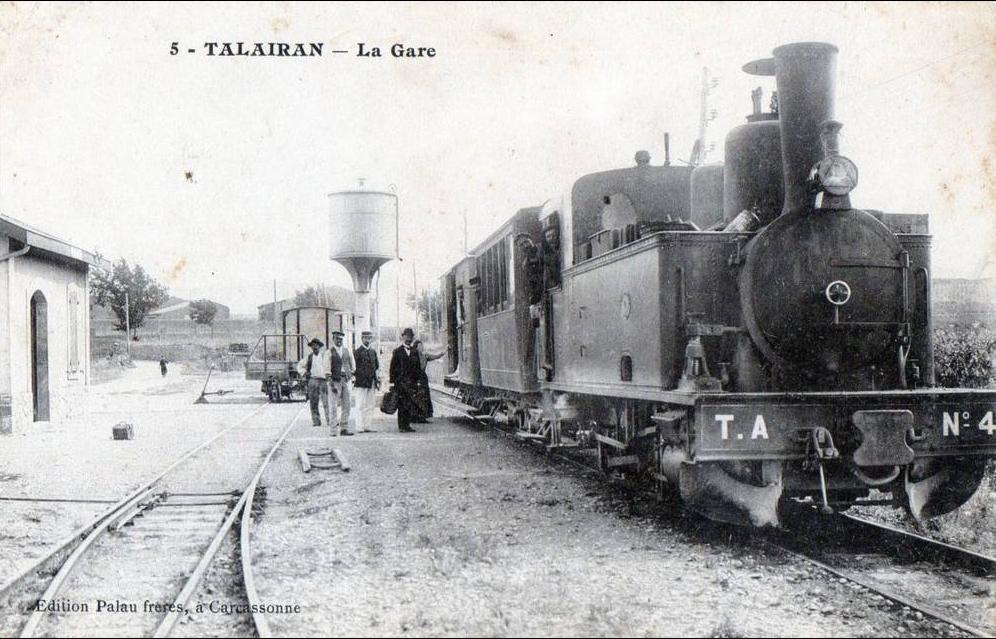
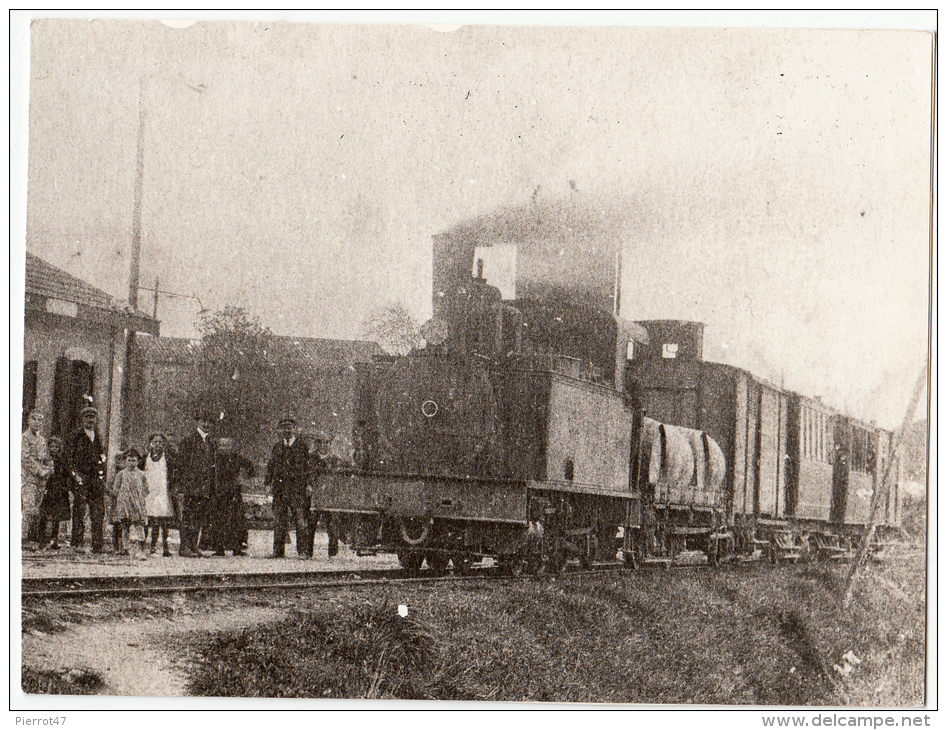
The station at Talairan appears in the three postcard images immediately above. [9][10]A schematic plan of the station at Talairan which was alongside the road approaching the village of Talairan from Les Palais. [11]
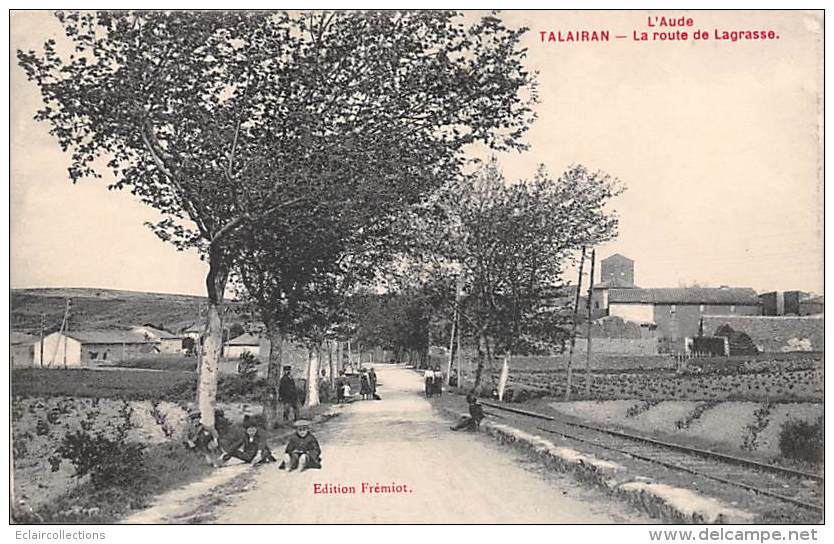
After passing through the centre of Talairan the tramway followed the southern shoulder of the GC12. [10]
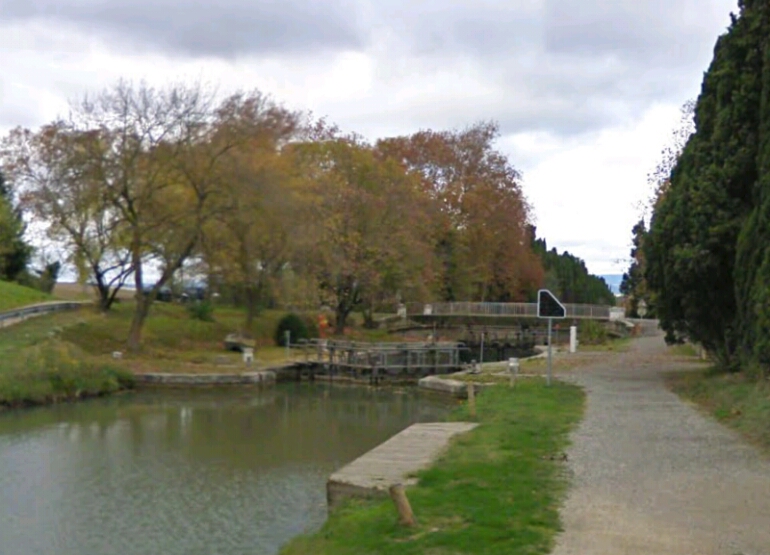
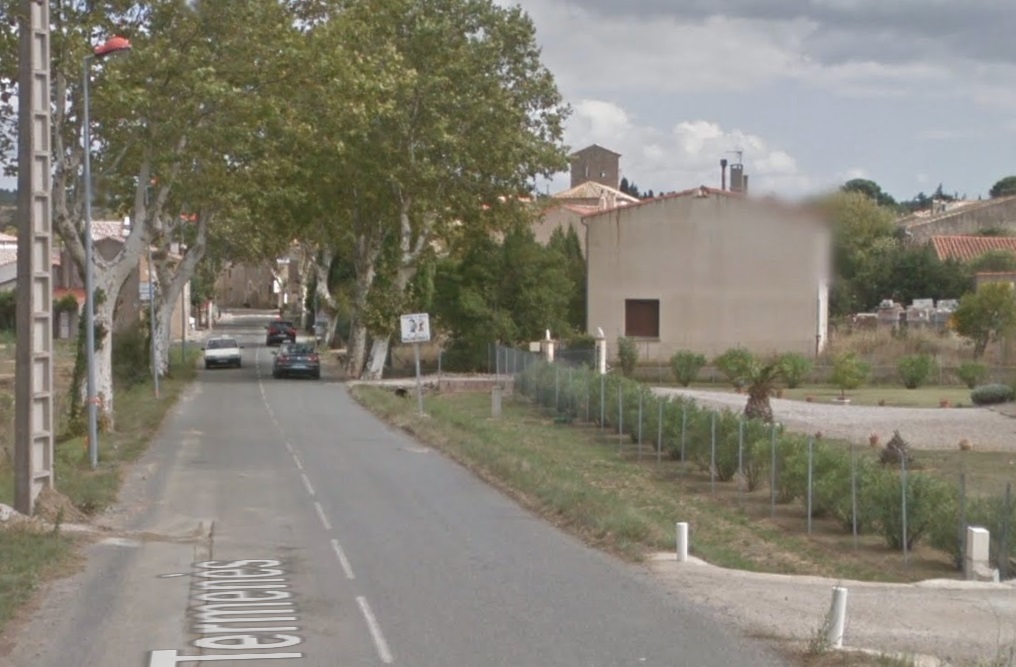
A similar view in 2017.

Then next village along the line was Villerouge-Termenes, an intersting historical village with a large castle. The tramway stayed above the village on what is now the D613.An excellent schematic plan of the village. [17]
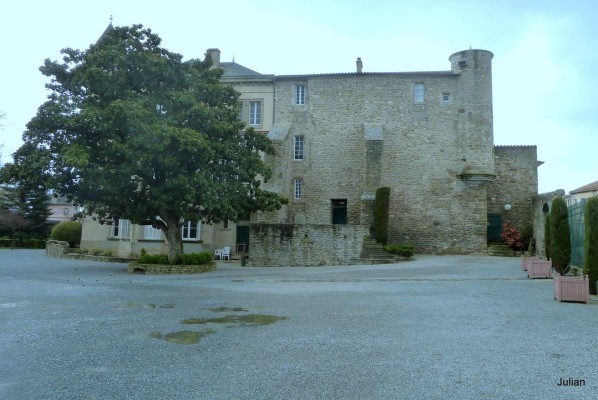
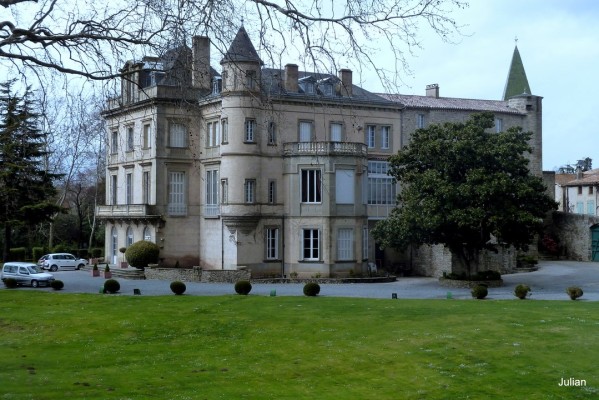
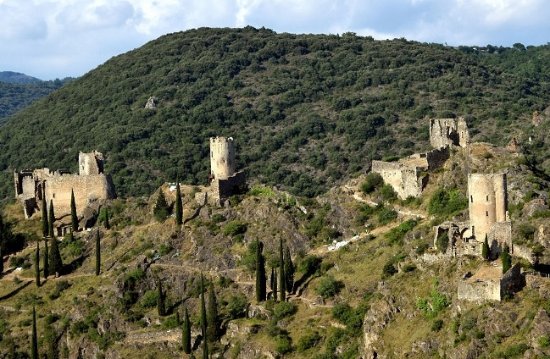
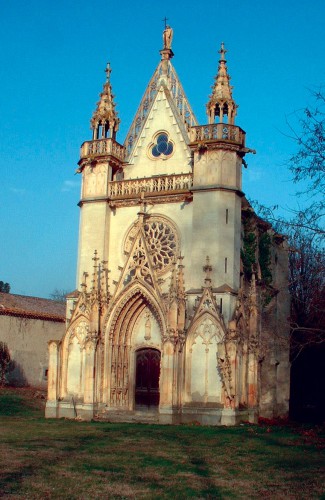
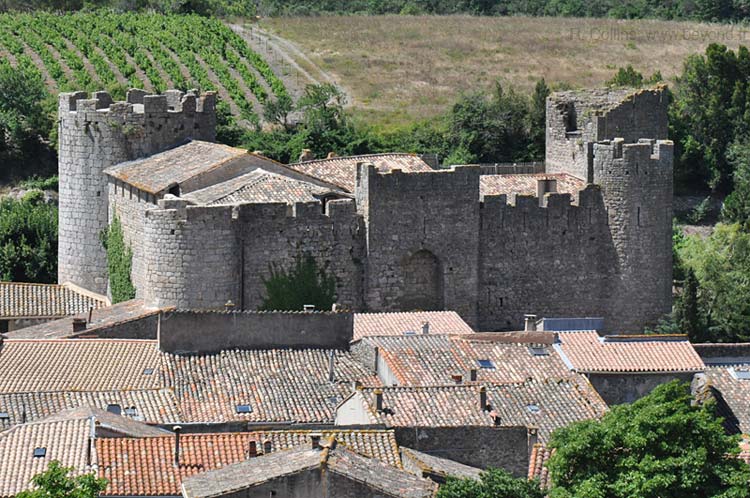
The Cathar Castle of Villerouge-Termenes. [14]
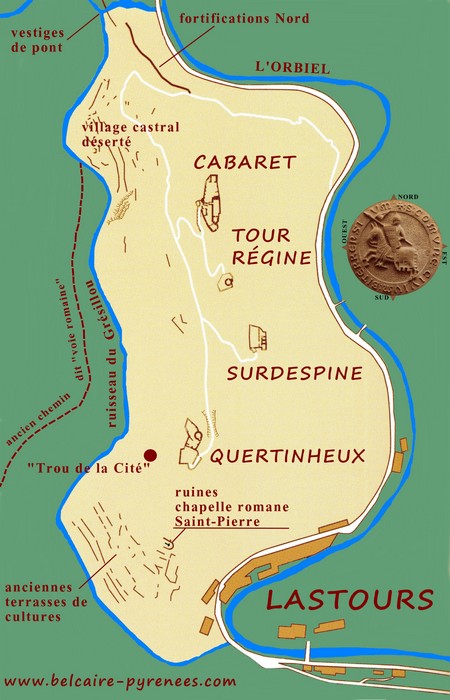
The tramway route was about 100 metres behind the church in this image. [15]

I have been unable to identify the actual location of the station in the village – it seems as though the most likely location is an area of open ground to the south of the church and on the south side of the GC12 (D613) The area laaid out for parking at the bottom of the adjacent image. The church can be seen at the top of the picture and the village is just off the north edge of the photograph.

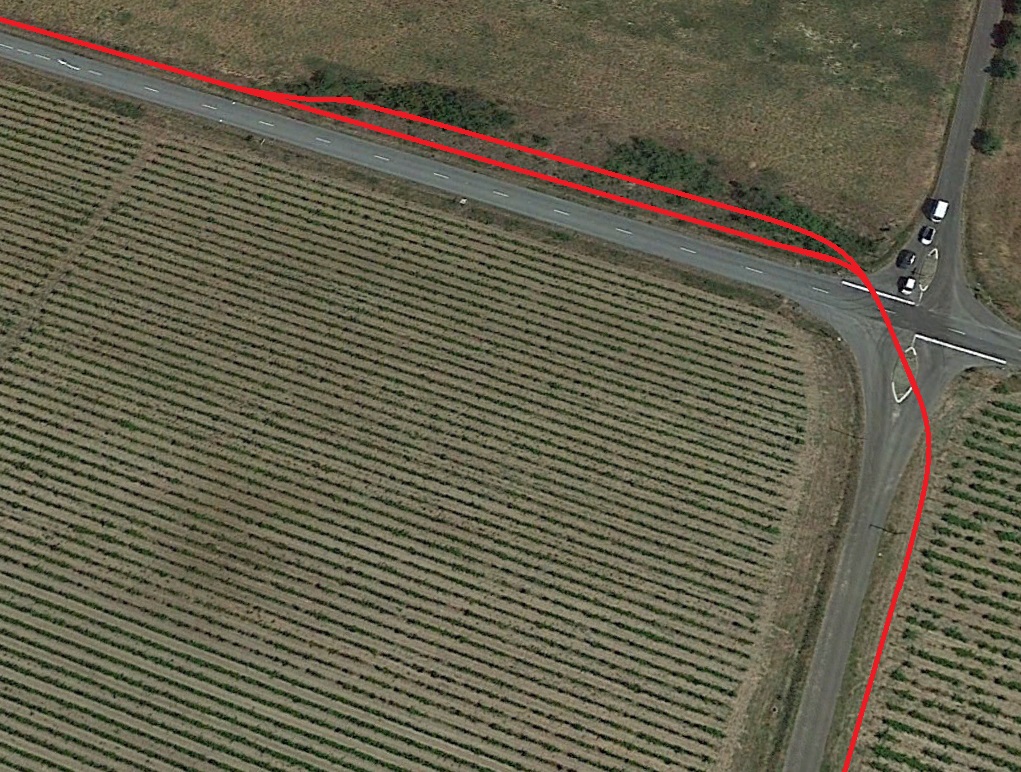
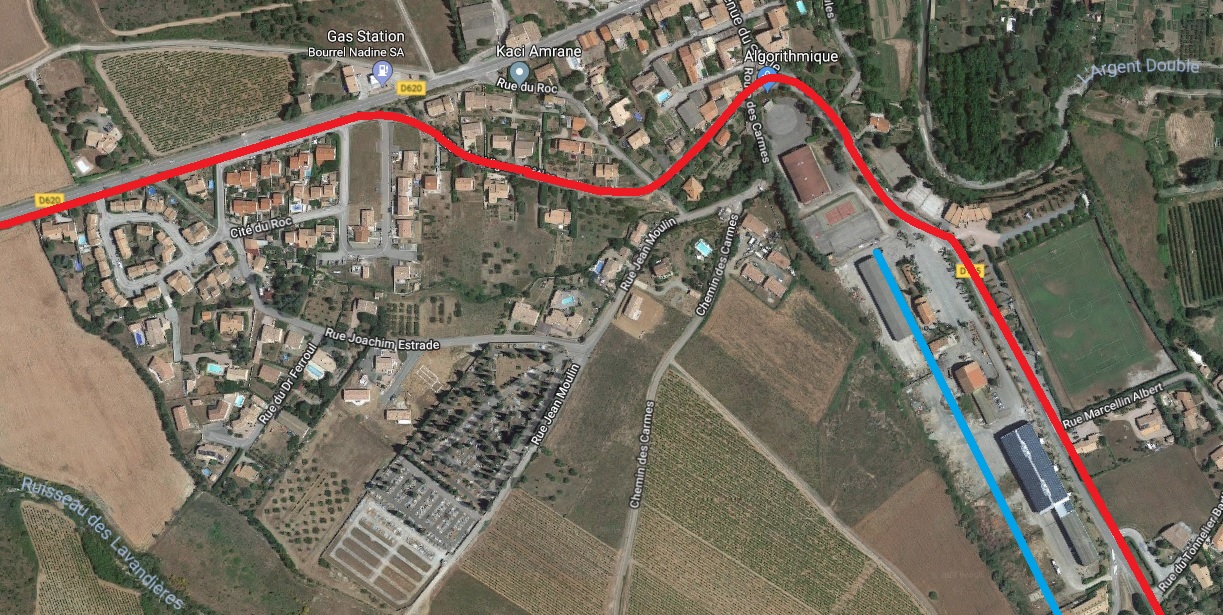
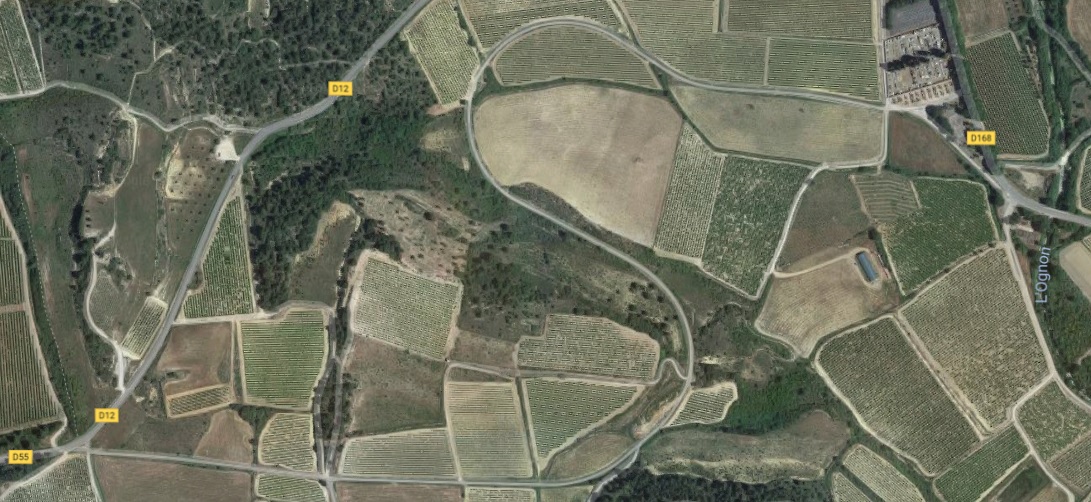
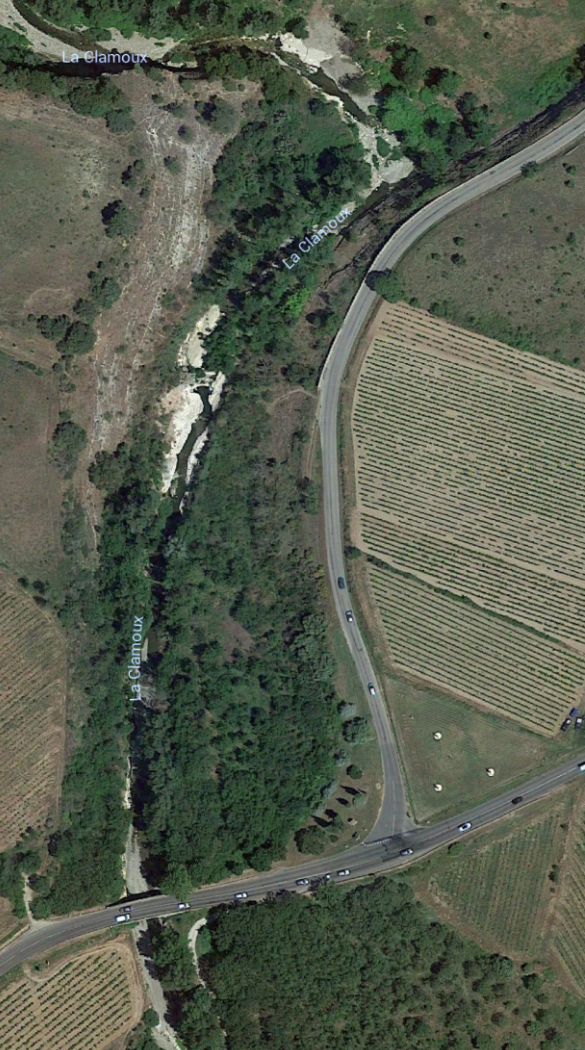
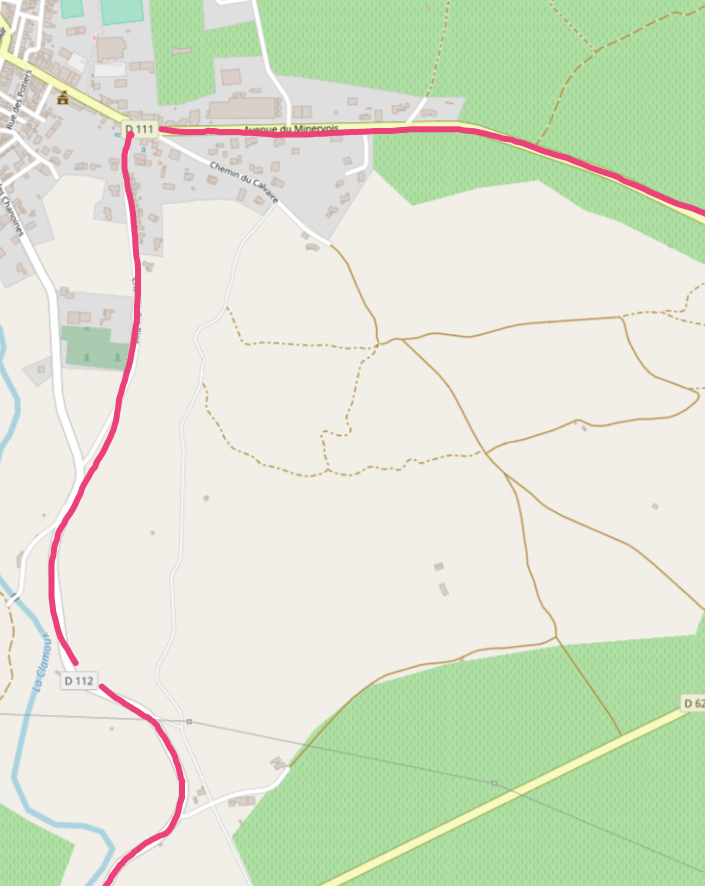
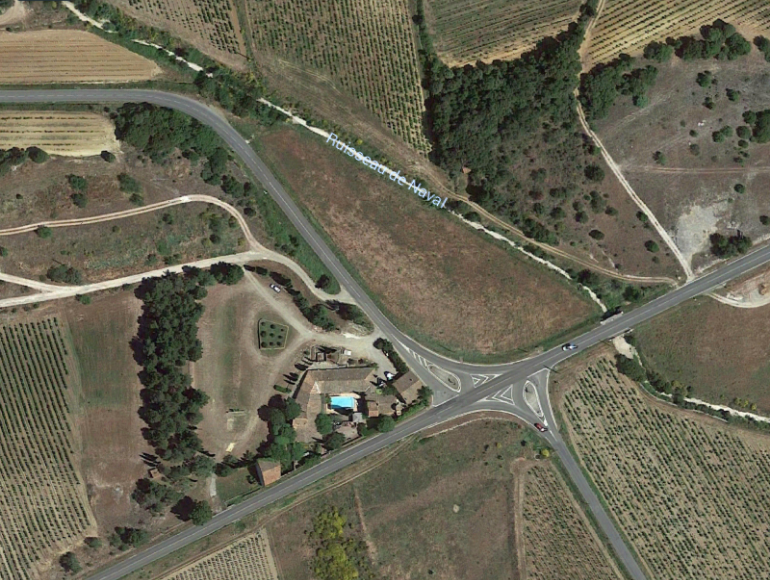
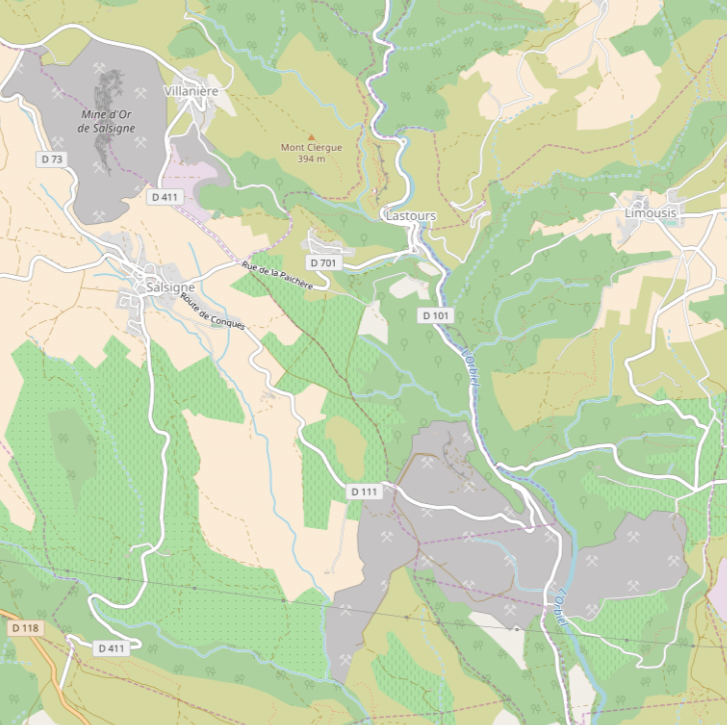
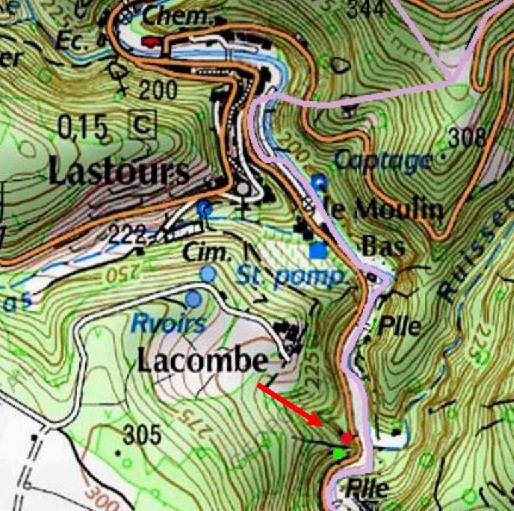
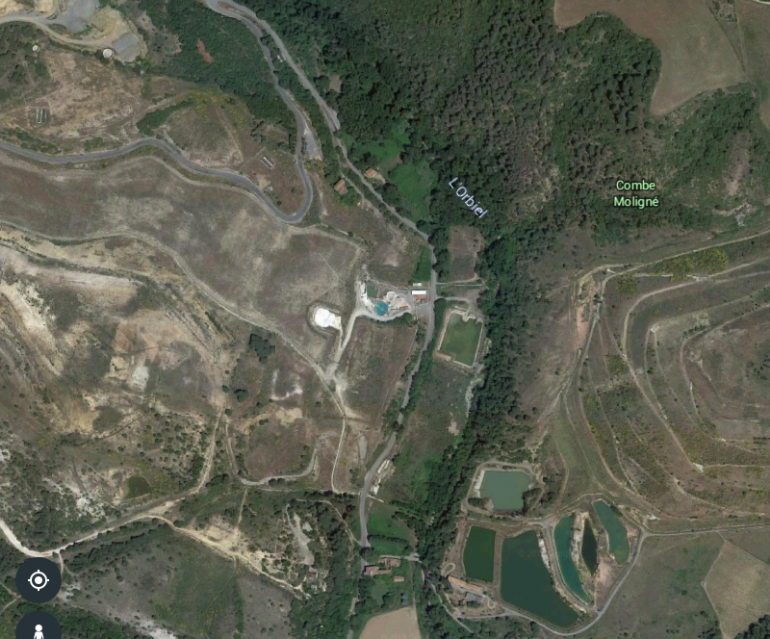
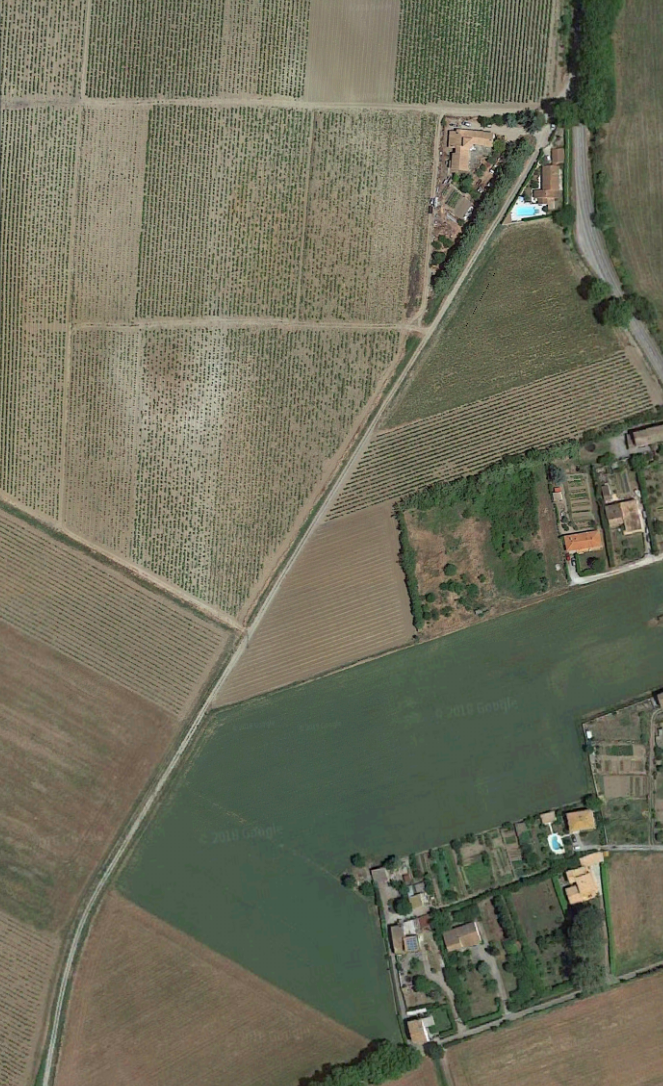
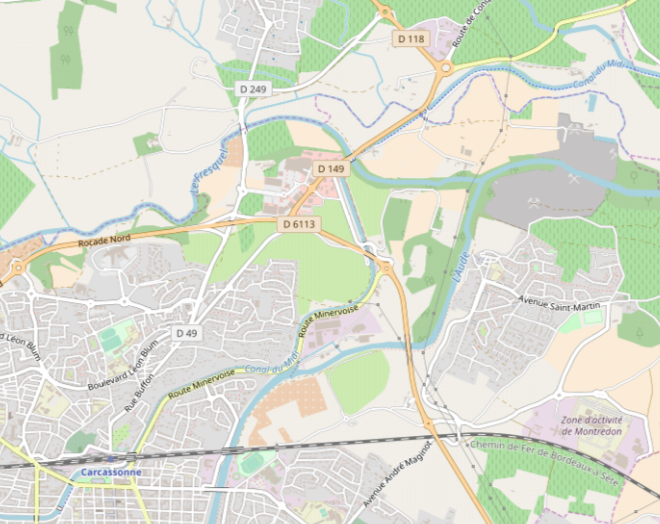
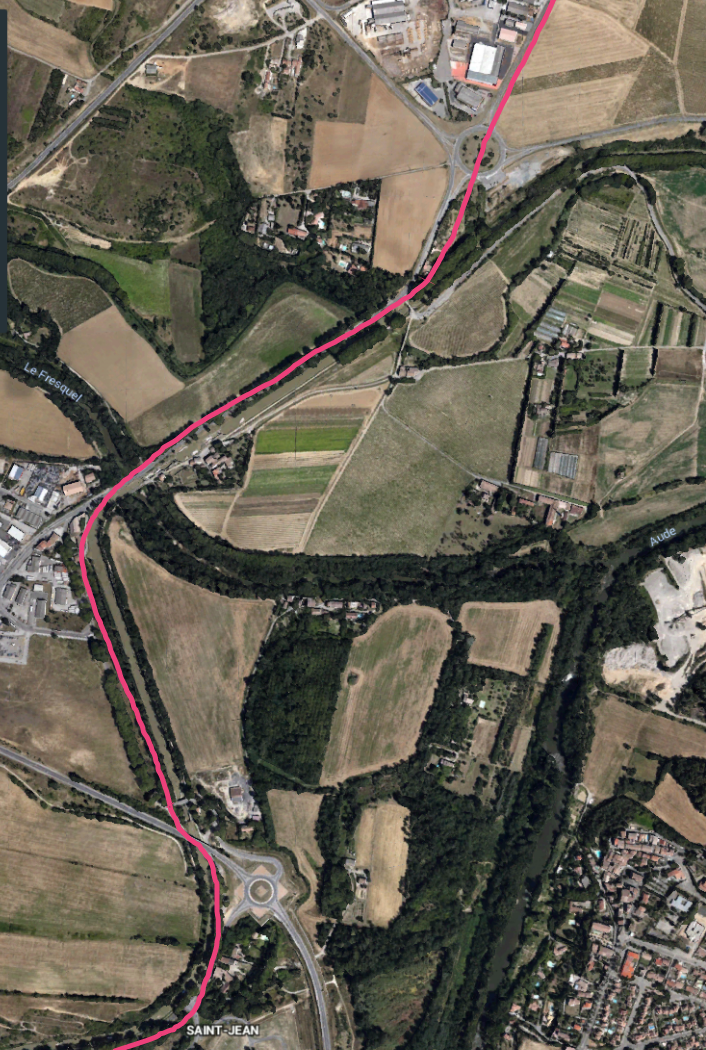
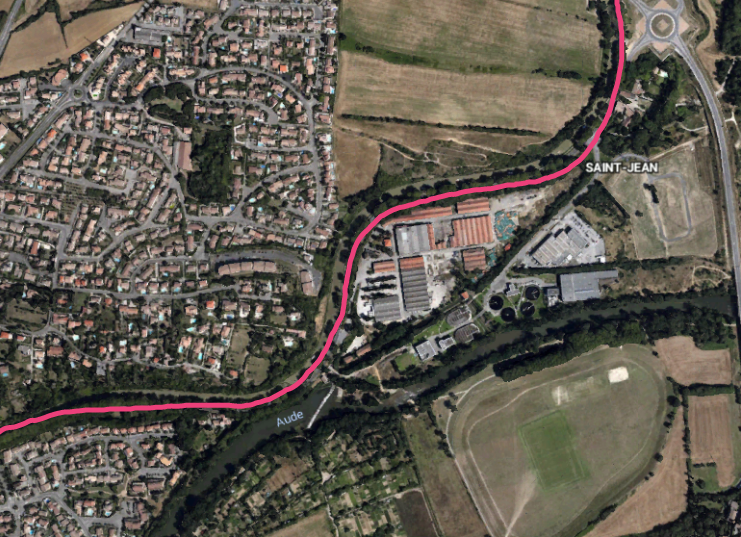
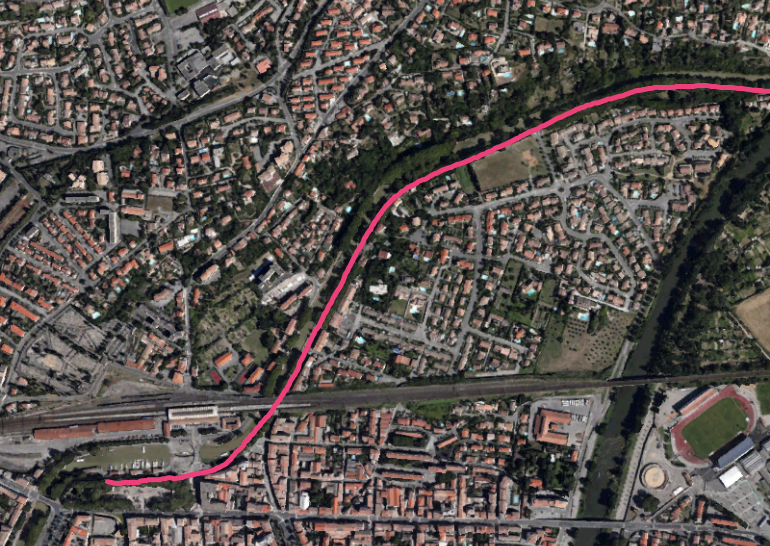
A short distance after Villerouge the tramway entered Felines-Termenes. On the way there it was necessary for the tramway route to separate from the road as the GC12 encountered a steep gradient. The two routes are highlighted on the satellite image below.
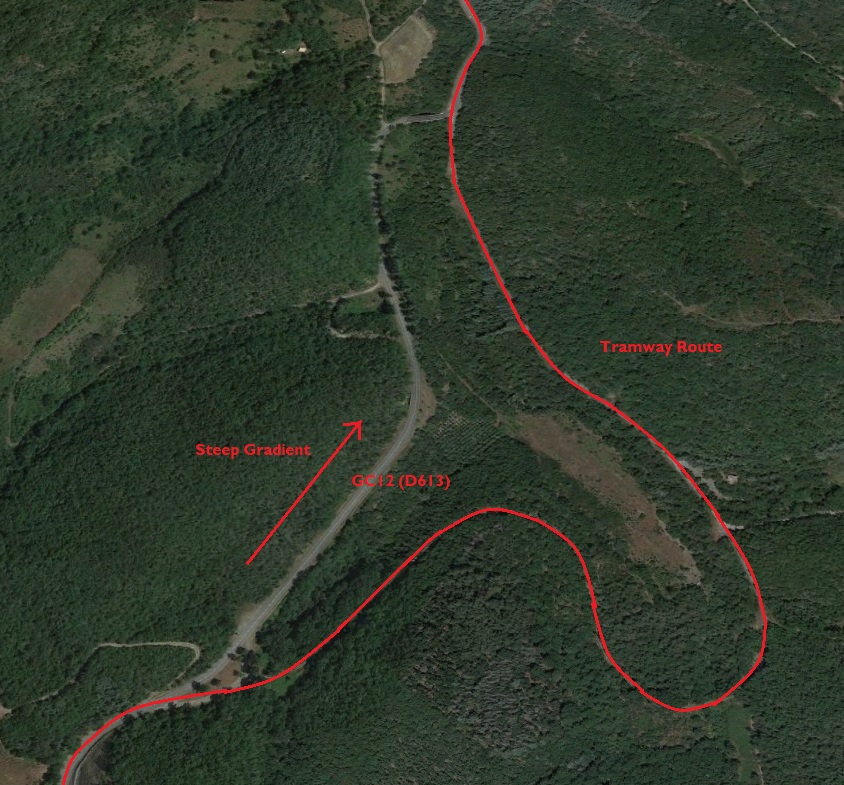
The tramway came down the hill into Felines-Termenes following the Ruisseau du Gazel and after crossing the Ruisseau de Saint-Jean it crossed the River Libre. The station was 100 metres or so beyond the bridge over Le Libre. Its layout is shown immediately below. [16]
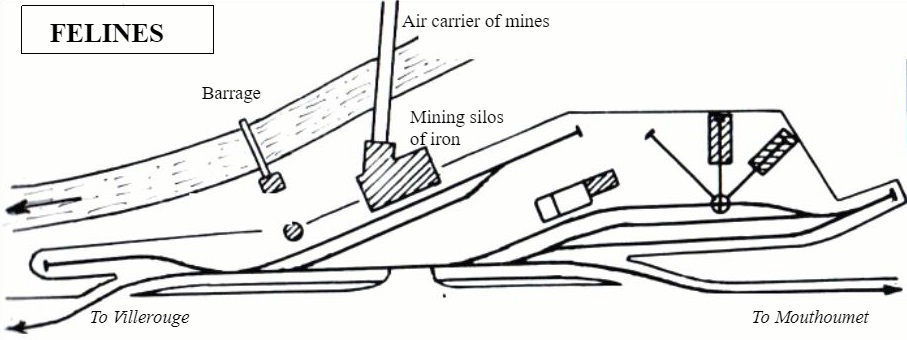
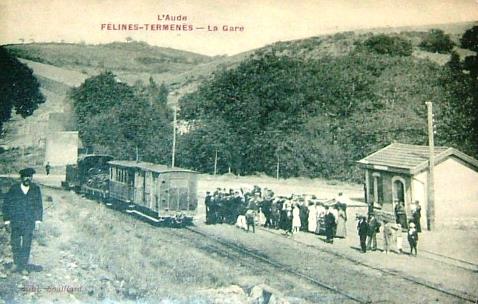
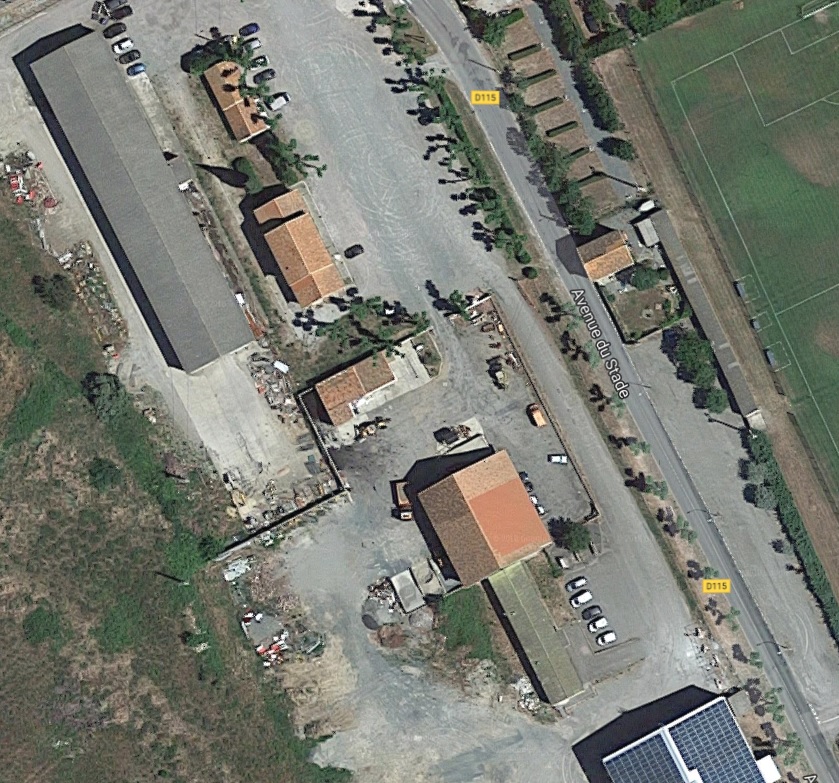
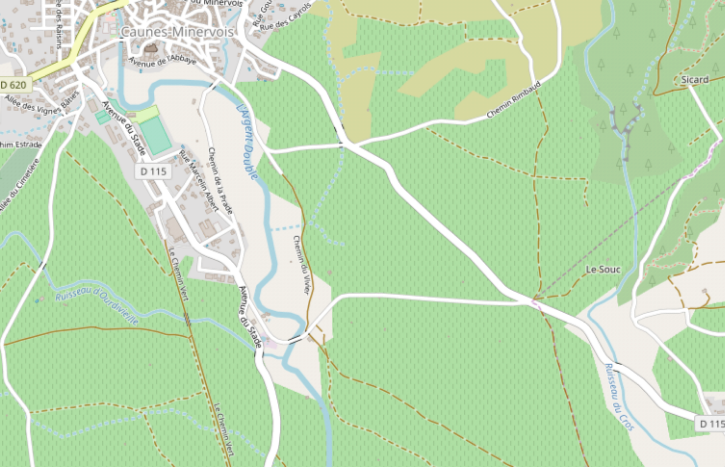
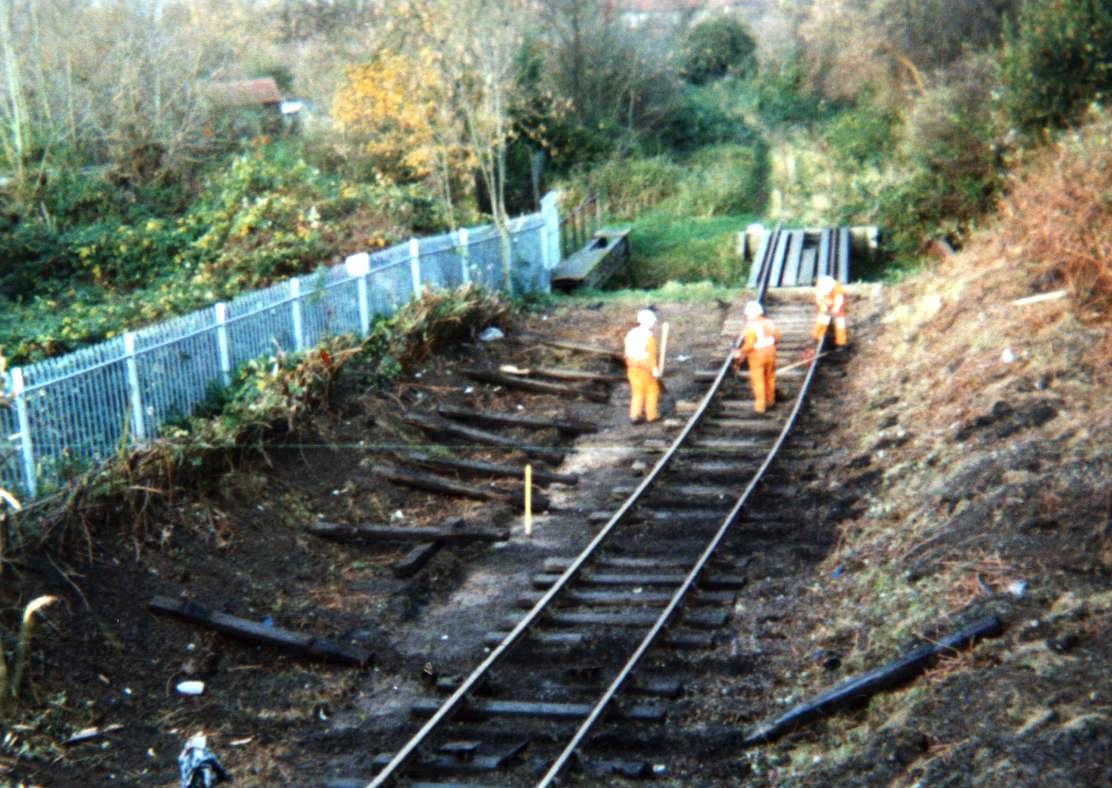
The three images immediately above show the site of the station at Felines. I is impossible to finally confirm the exact location of the station but the barrage in the plan above appears to be visible in the river on Google satellite images of the village as shown below. [16]
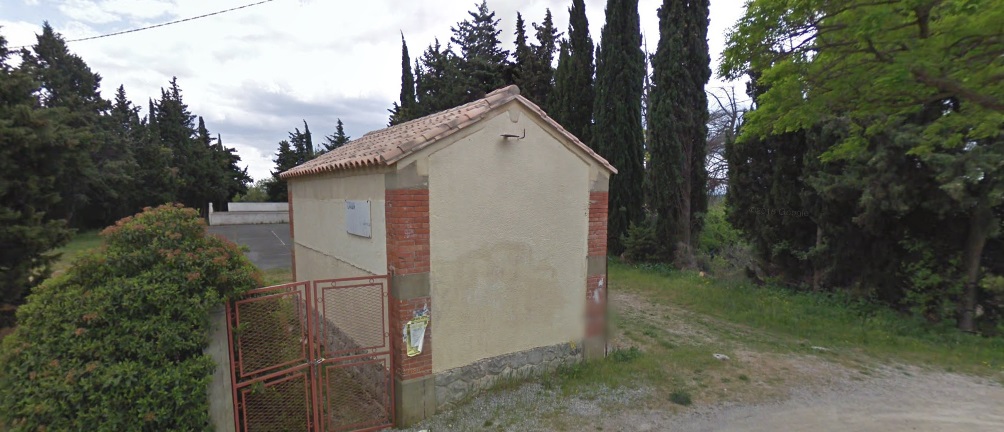
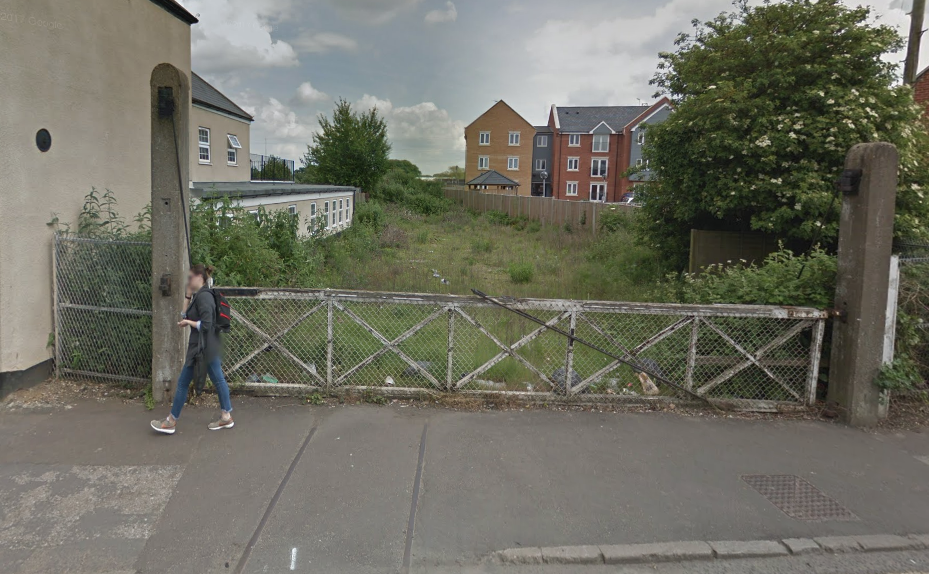
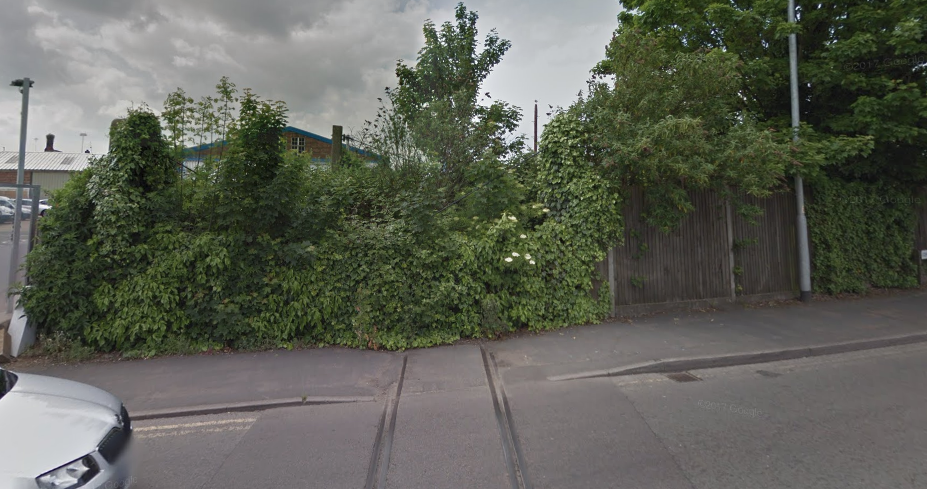
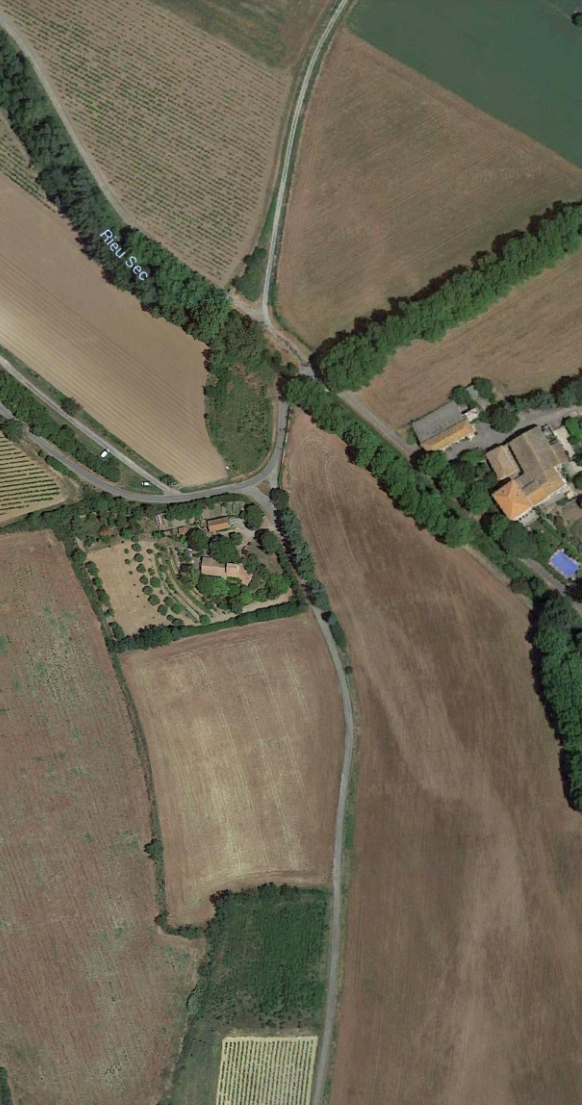
The red flag denotes the station location, the  barrage referred to above is in the River to the Northeast of the station. Philip Morand says: the station was at 42.987159, 2.612986, where there’s another stone water tower and the remains of a building (south east of the co-ords I’ve given) which I think is the ‘mining silos of iron’ shown in the plan of the station” above. [24]
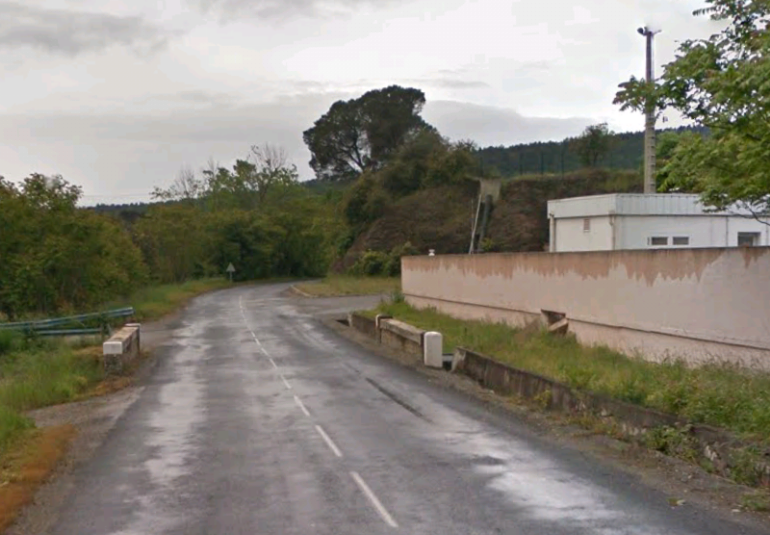
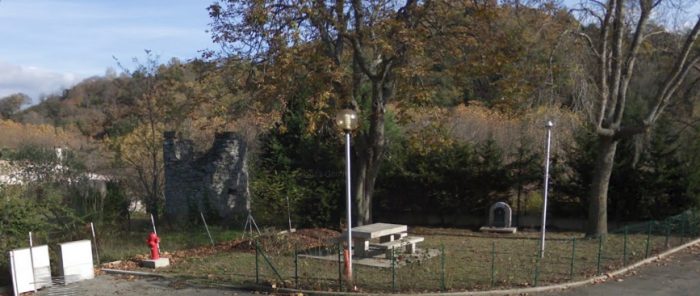
The water tower mentioned by Philip Morand can be seen in this Google Streetview image.

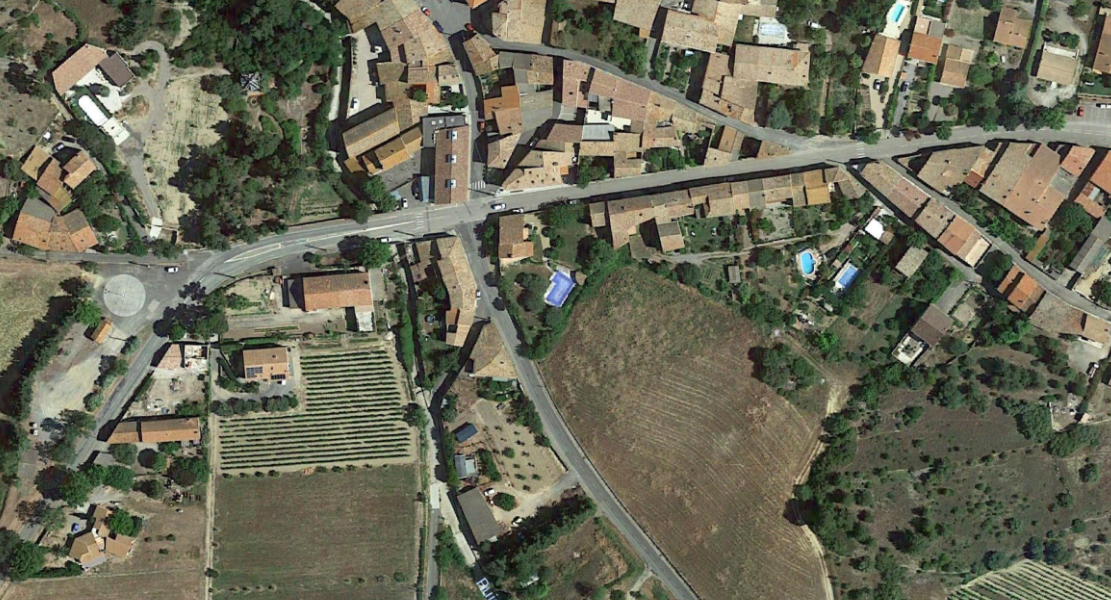
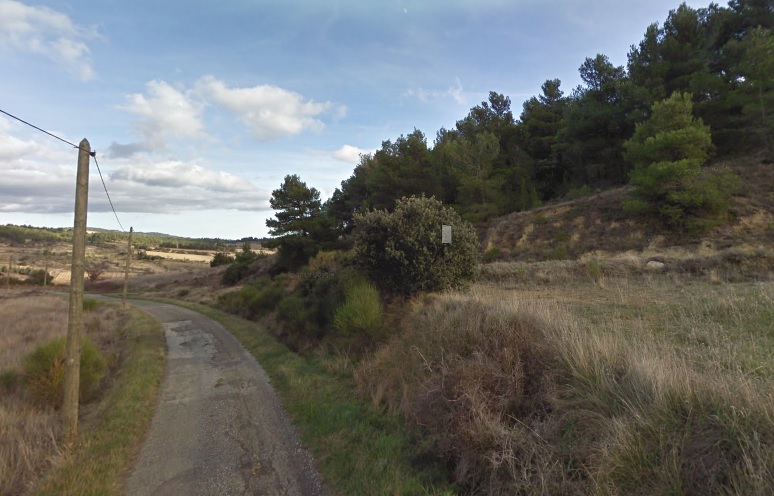
Beyond Felines-Termenes  the tramway and road meandered through the forested hills to Laroque de Fa.
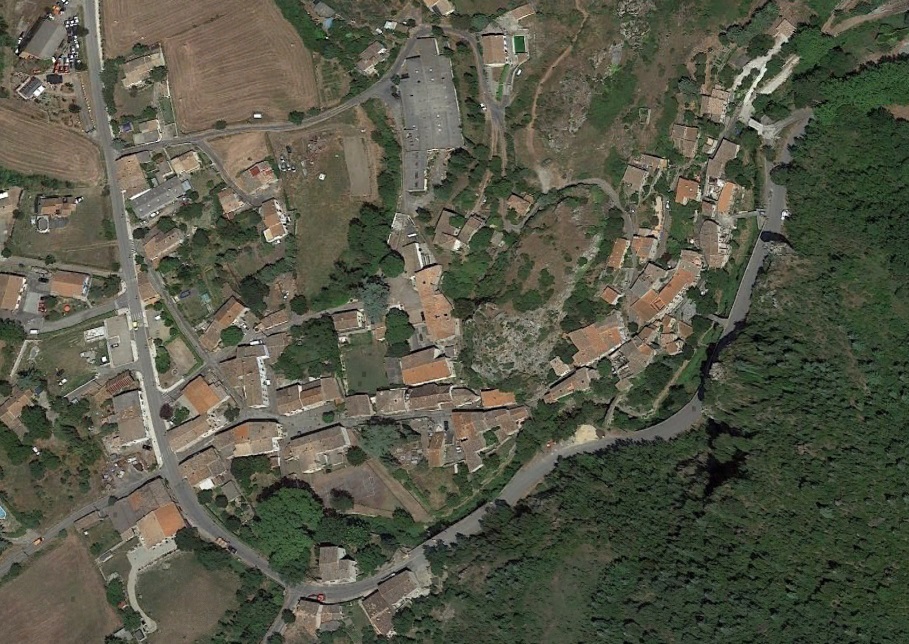
Once again the tramway and main road remained outside the village of Laroque and on this occasion, travelling round three sides of the village.
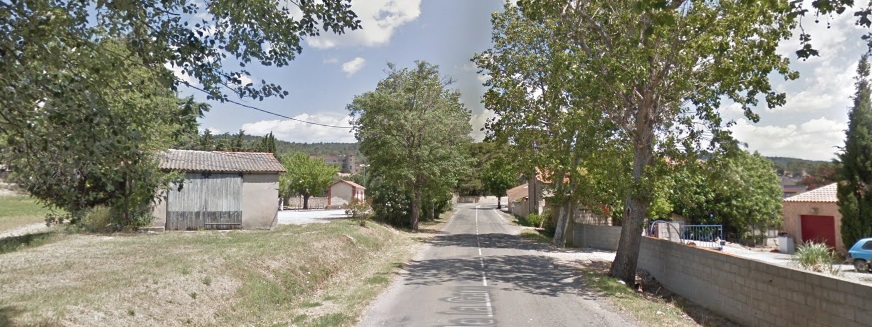
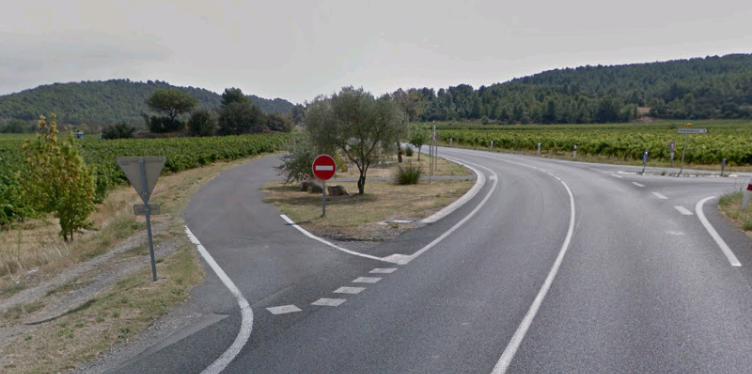
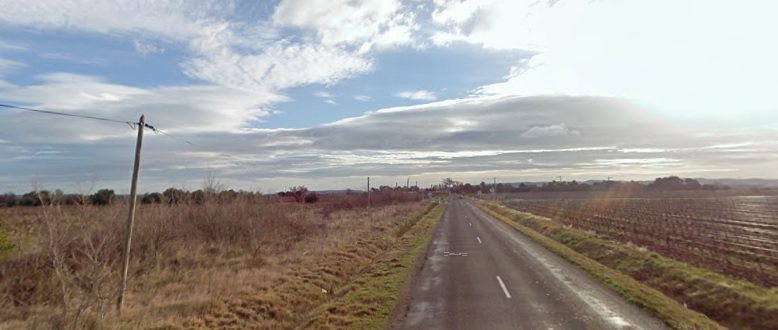
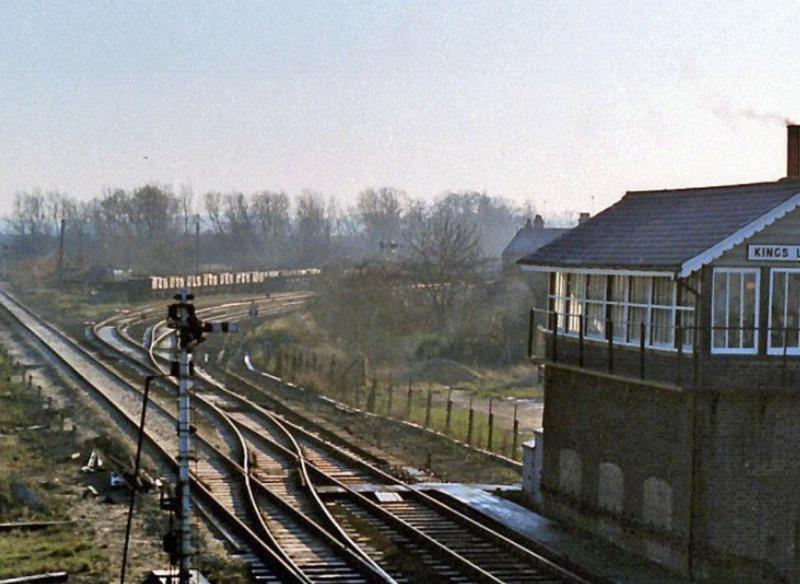
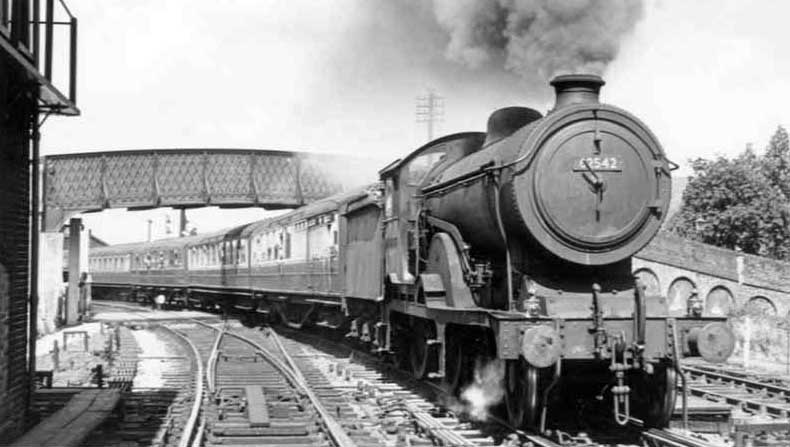
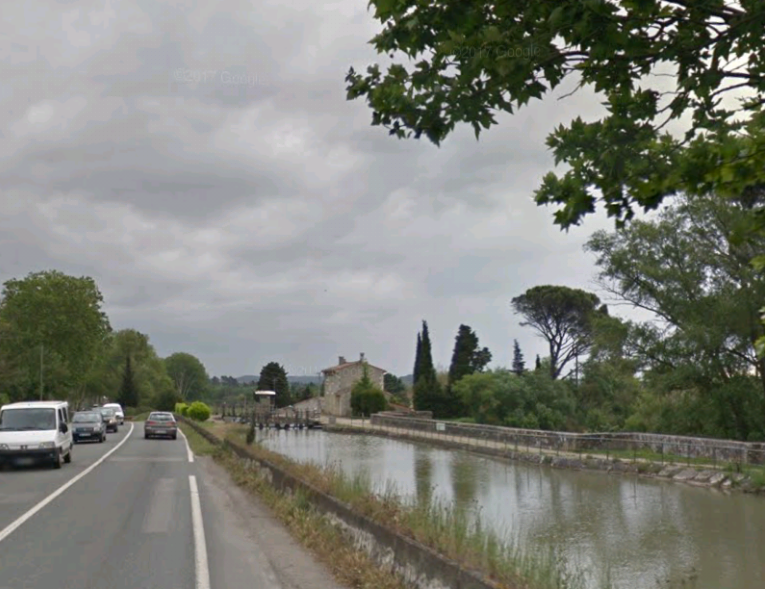
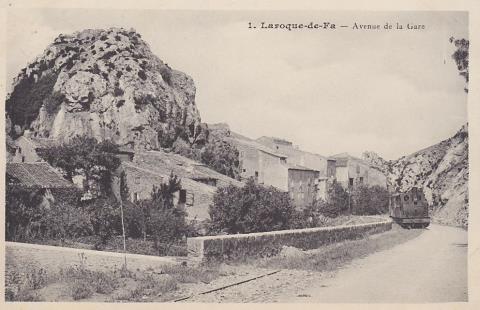
The tram approaching Laroque on the GC12 (D613). The road can be seen to the right of the tram. It is difficult to locate the station in the village but the 1930s Michelin map shows the tramway on the left side of the road travelling round the village and then just to the North of the village on the GC12 switching to the other shoulder of the road to complete the journey to the terminus at Mouthoumet [18] 
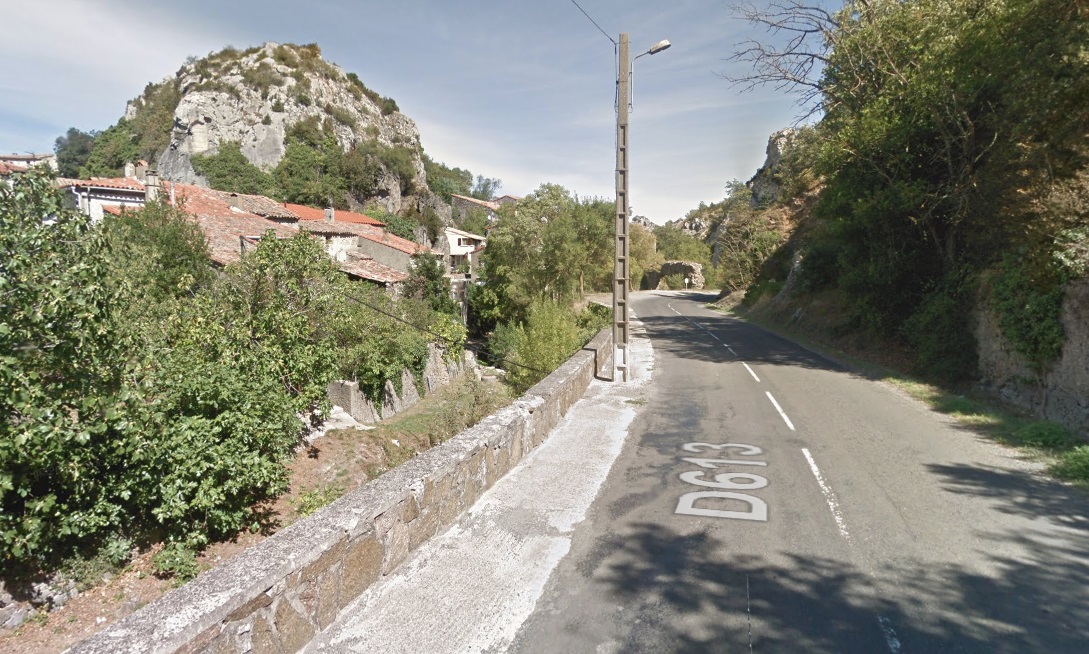
Approximately the same location as the above monochrome photograph in the early 21st century.

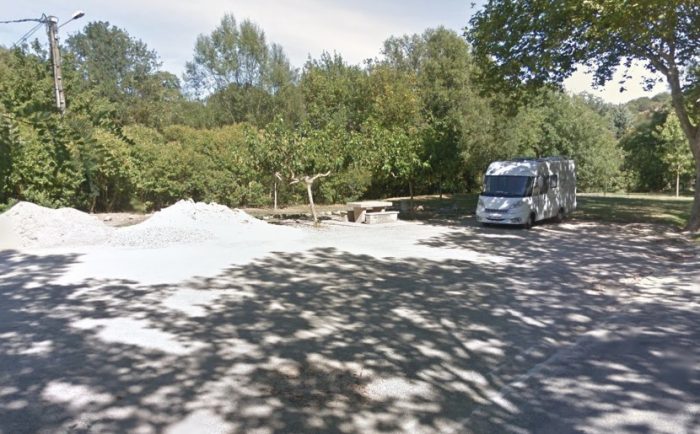
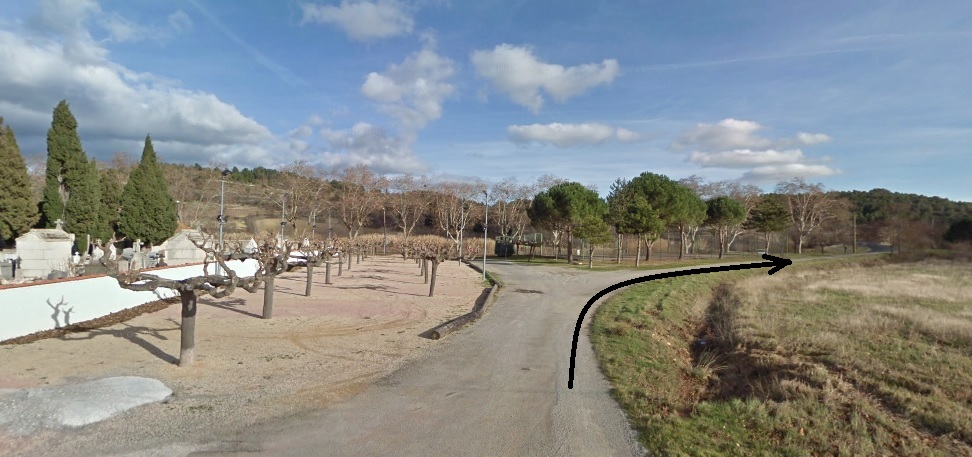
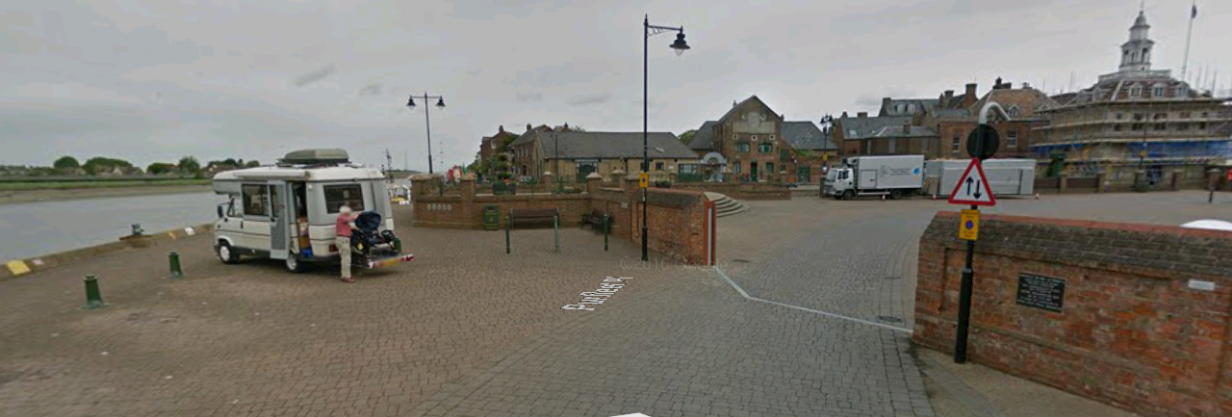
Philip Morand who lives in Laroque de Fa says: “I think the station in Laroque de Fa was at 42.958147, 2.568130, where there’s also a short stone tower which I’m told was used for water for the steam locomotive. Nowadays the space is used as an unofficial aire for camper-vans and the Marché nocturne in the Summer.” The location, to the Northeast of the village, is shown on the map and in the photo below (September 2012). [24] 
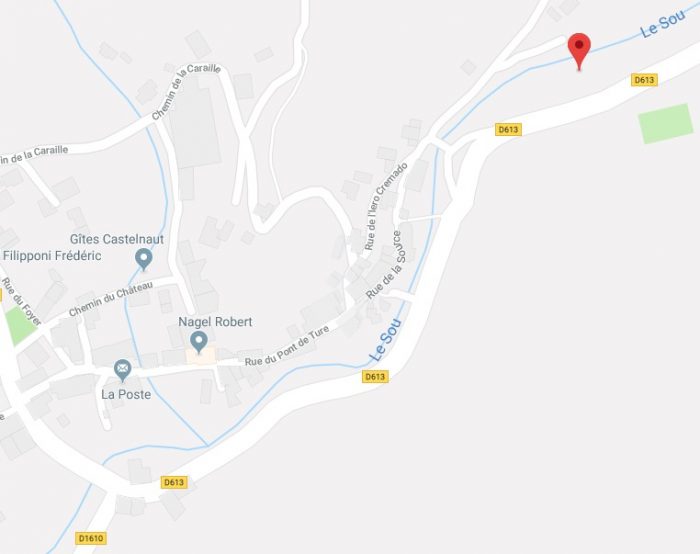
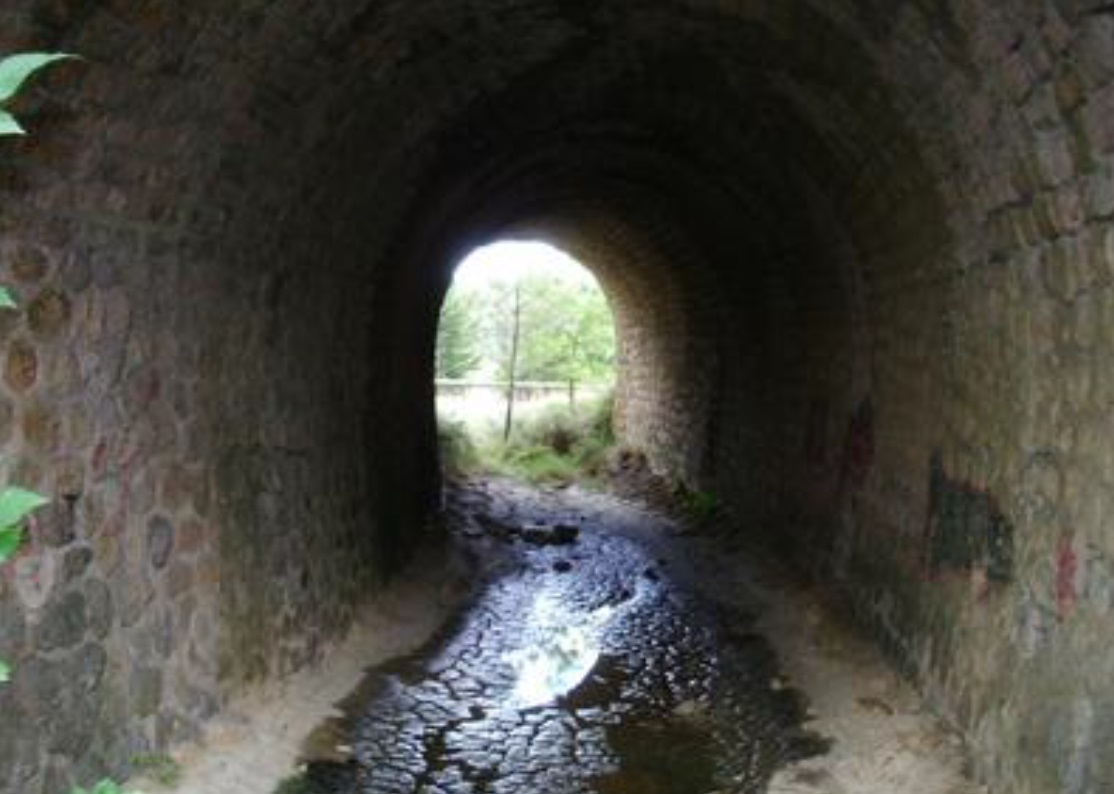
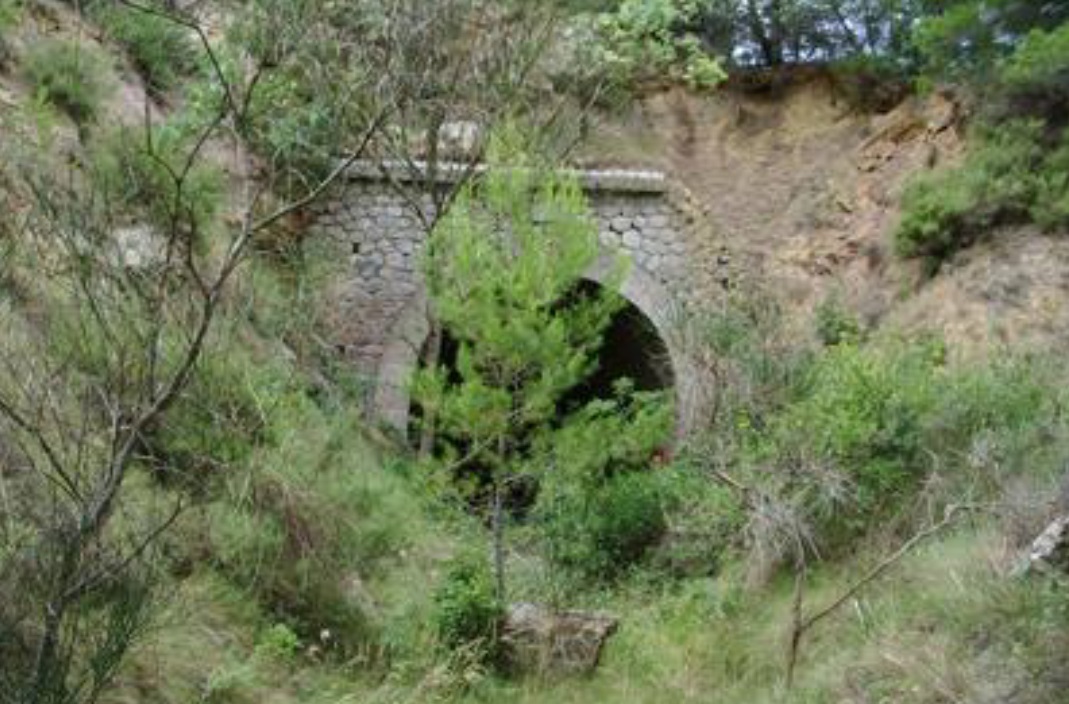
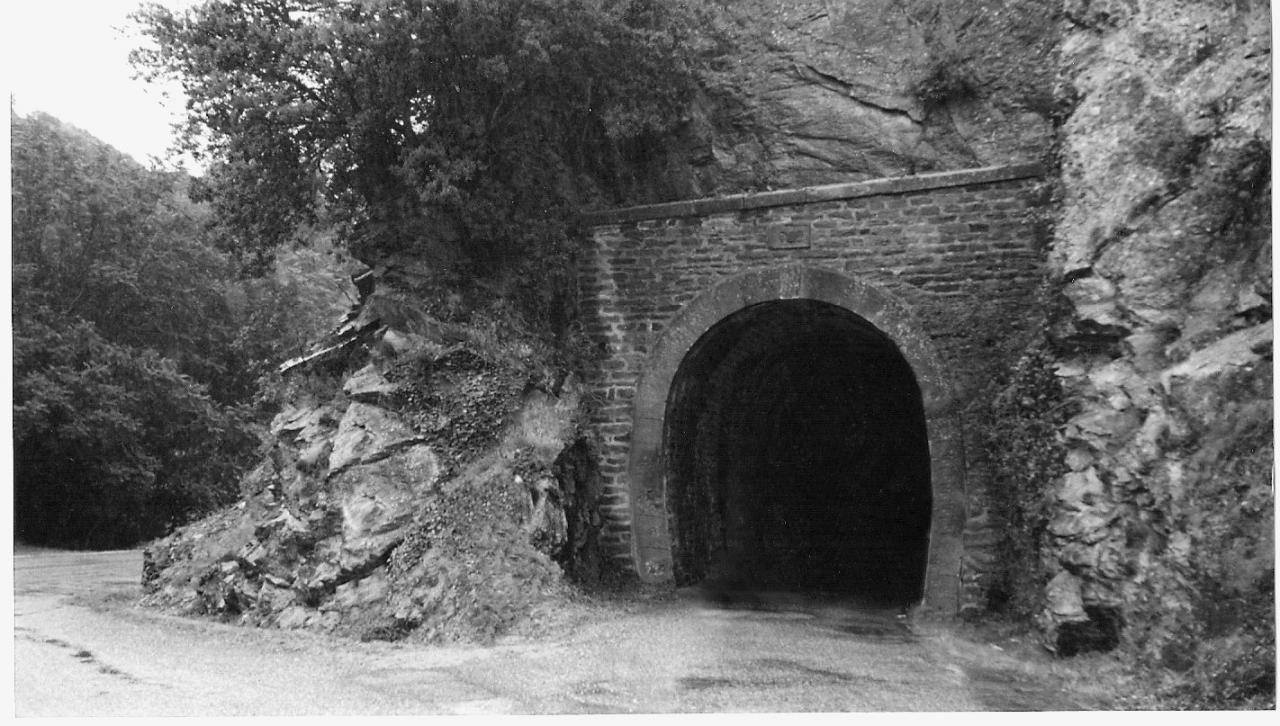
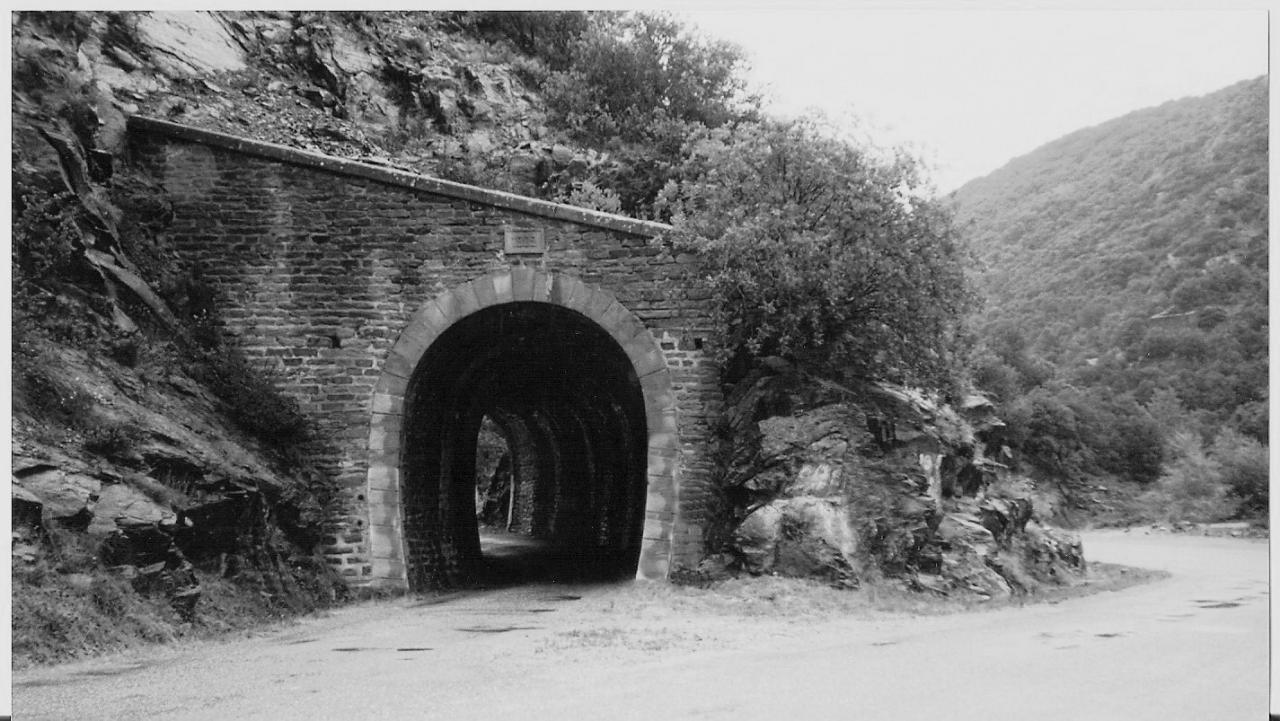
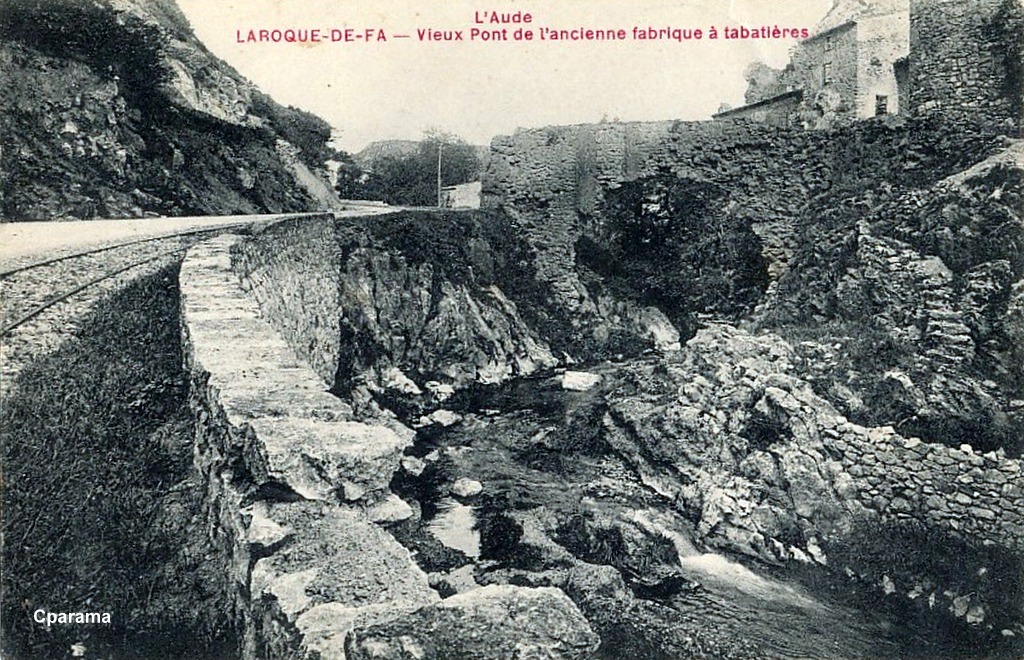
A crumbling bridge in Laroque! [23]
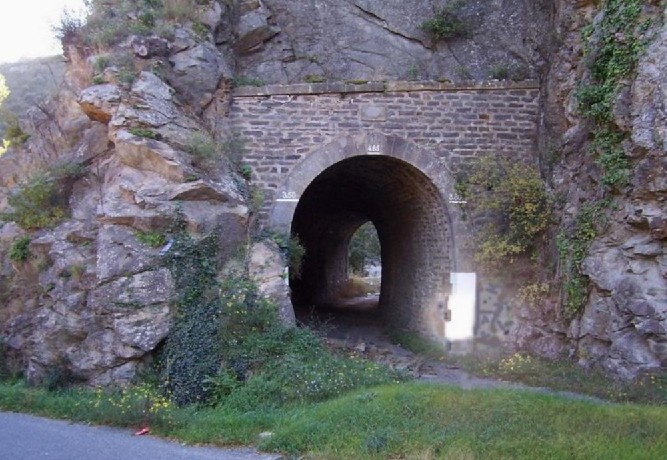
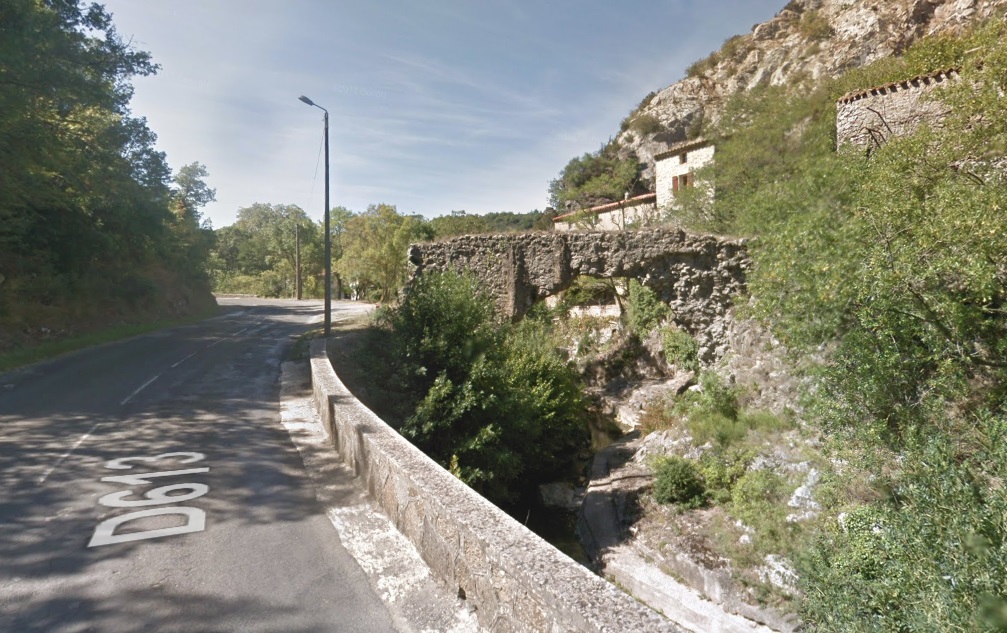
Almost the same location in 2017.
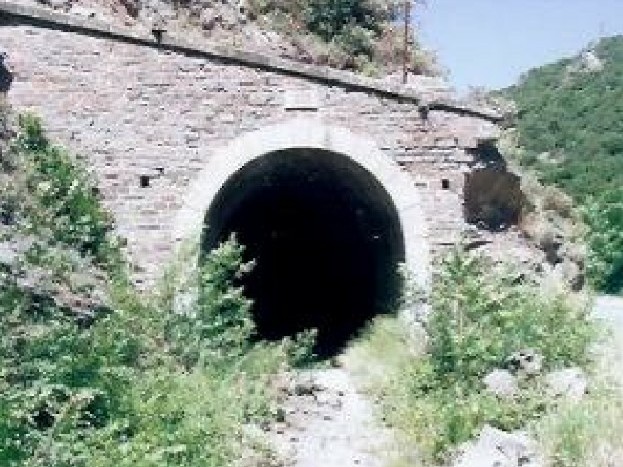
This image shows the tramway curving around the village and the picture below shows the same location in the early 21st century. [21]
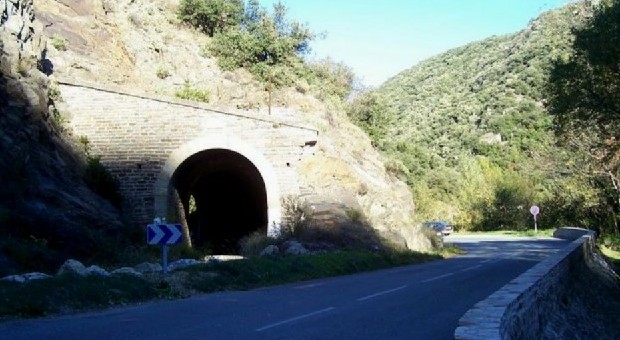
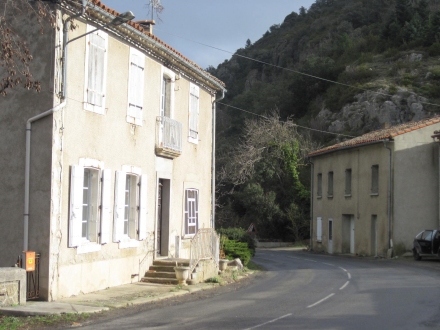
The remaining journey to Mouthoumet was completed on the South side of the GC12.

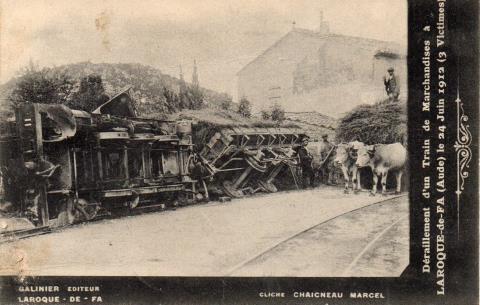
Before leaving Laroque it is worth noting that there was a tramway accident in the village in 1912. [19]

The accident is noted on Les Forums de Passions Métrique et Etroite!! [19]

This note is provided on that forum in French. It has been translated using “Google translate”:

“This Monday, June 24, 1912, it is 1 pm, from Monthoumet, the machine No. 11 driven by the mechanic Mr. Olive, enters the village, pulling behind a wagon of forage which may have been badly loaded or the load may have shifted. The locomotive and wagon derailed and, in its fall, disemboweled the wall of Dr. Lautier’s shed. Jets of vapours escaped from the exploding boiler burning to the third degree. The unfortunate Mr. Olive, according to the witnesses of the scene, did not die quickly,  but his sufferings were atrocious. He absorbs into his lungs the steam that escapes. Despite all the care that will be lavished on him, he will die the next day at Lézignan hospital. ”

The source of this short story is Mr. Fabre, quoted by Michel Vieux, Steam Tramway of the Aude, p. 102. [4]

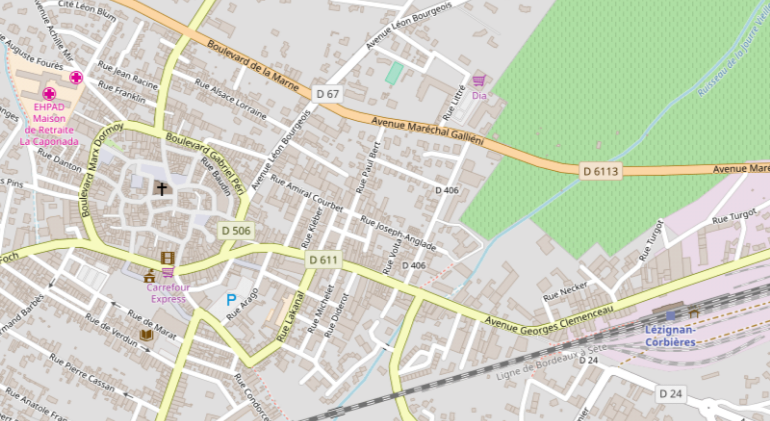
Having noted this accident and particularly having commiserated with those affected by it, we move on towards the terminus of the line at Mouthoumet. The tramway followed the lefthand shoulder of the GC12.
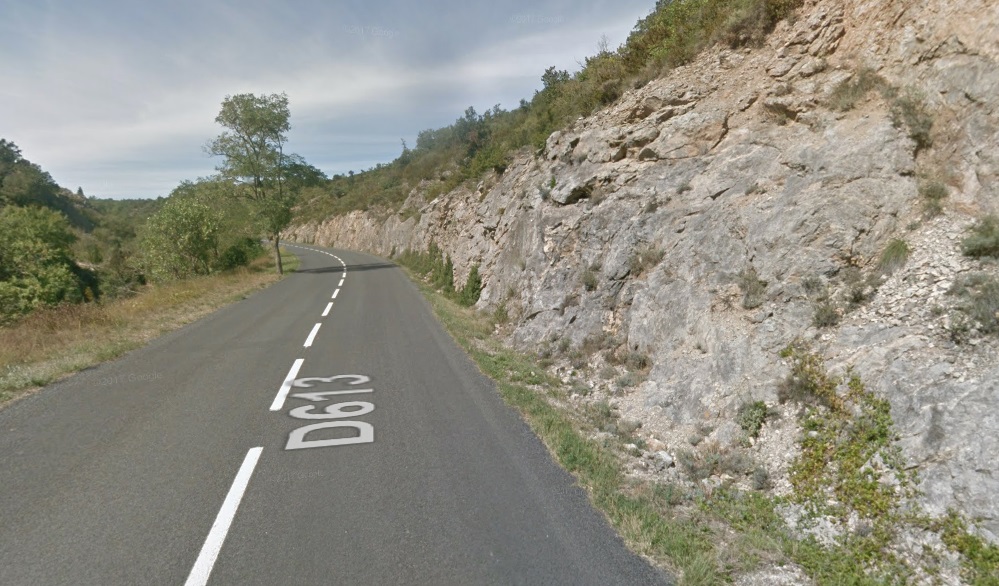
Gradients along this final length of this branch of the tramway were not steep and the final few kilometres of the tramway were straight as a die. The station was set to the north of the main road. North is at the bottom of the plan below.
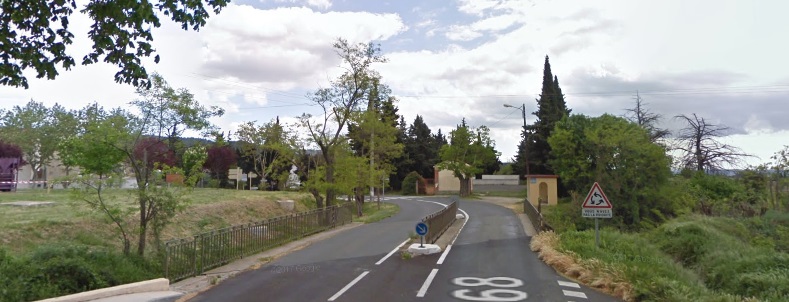
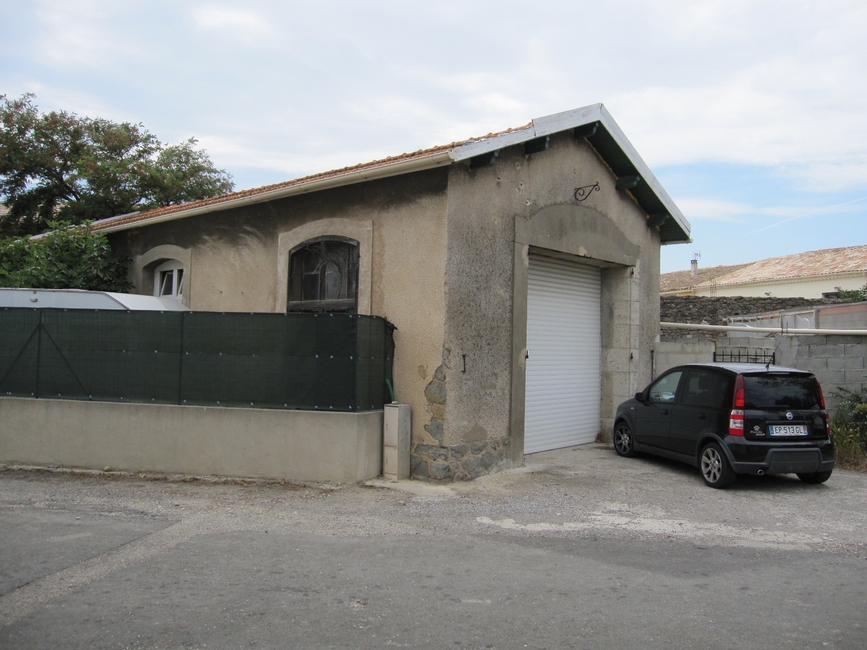
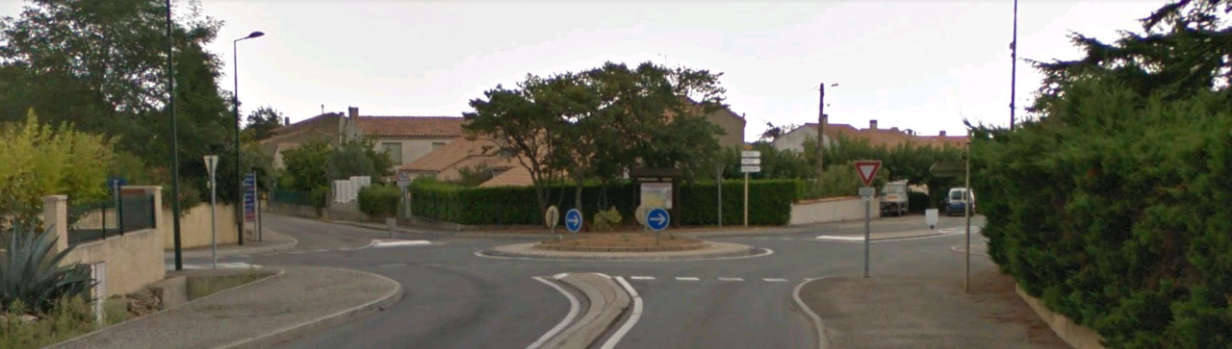
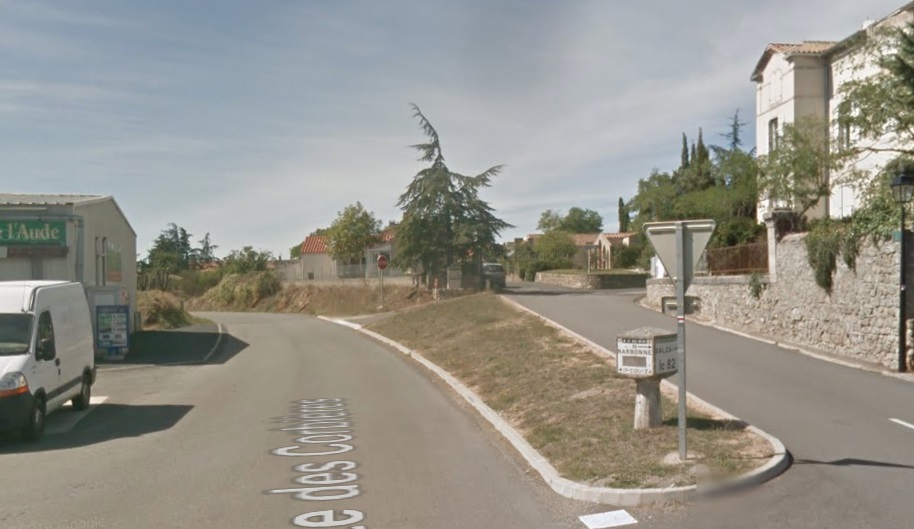
The road on the right of the photograph above is Rue de la Gare. The engine shed would have been at about the location of the young Cyprus Tree, perhaps just beyond it on the line of the side road. The main road turns away to the south in the image, just as it does on the sketch plan above.
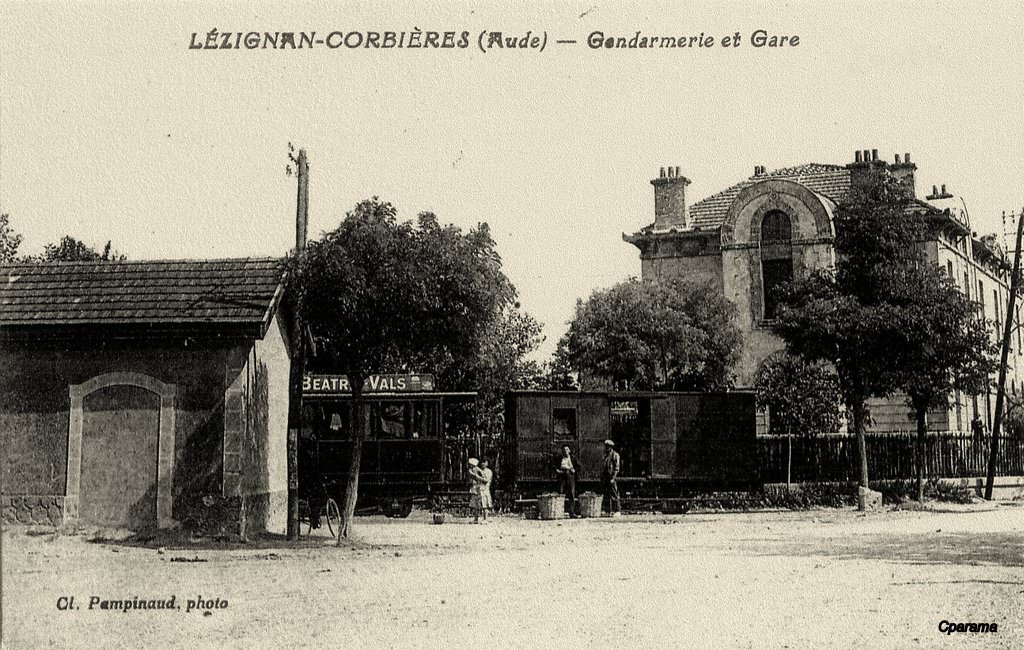
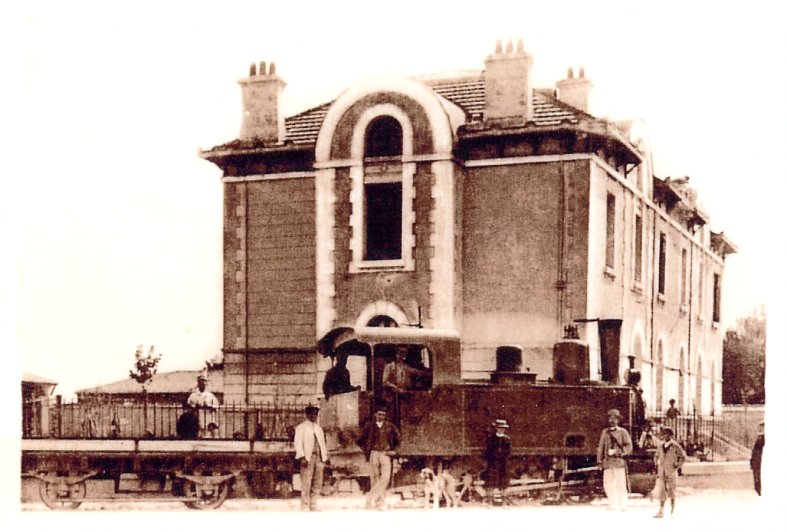
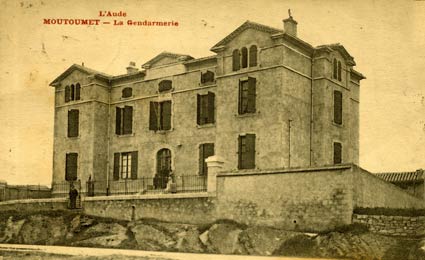
The tramway station was immediately in front of the Gendarmerie in Mouthoumet! [22]
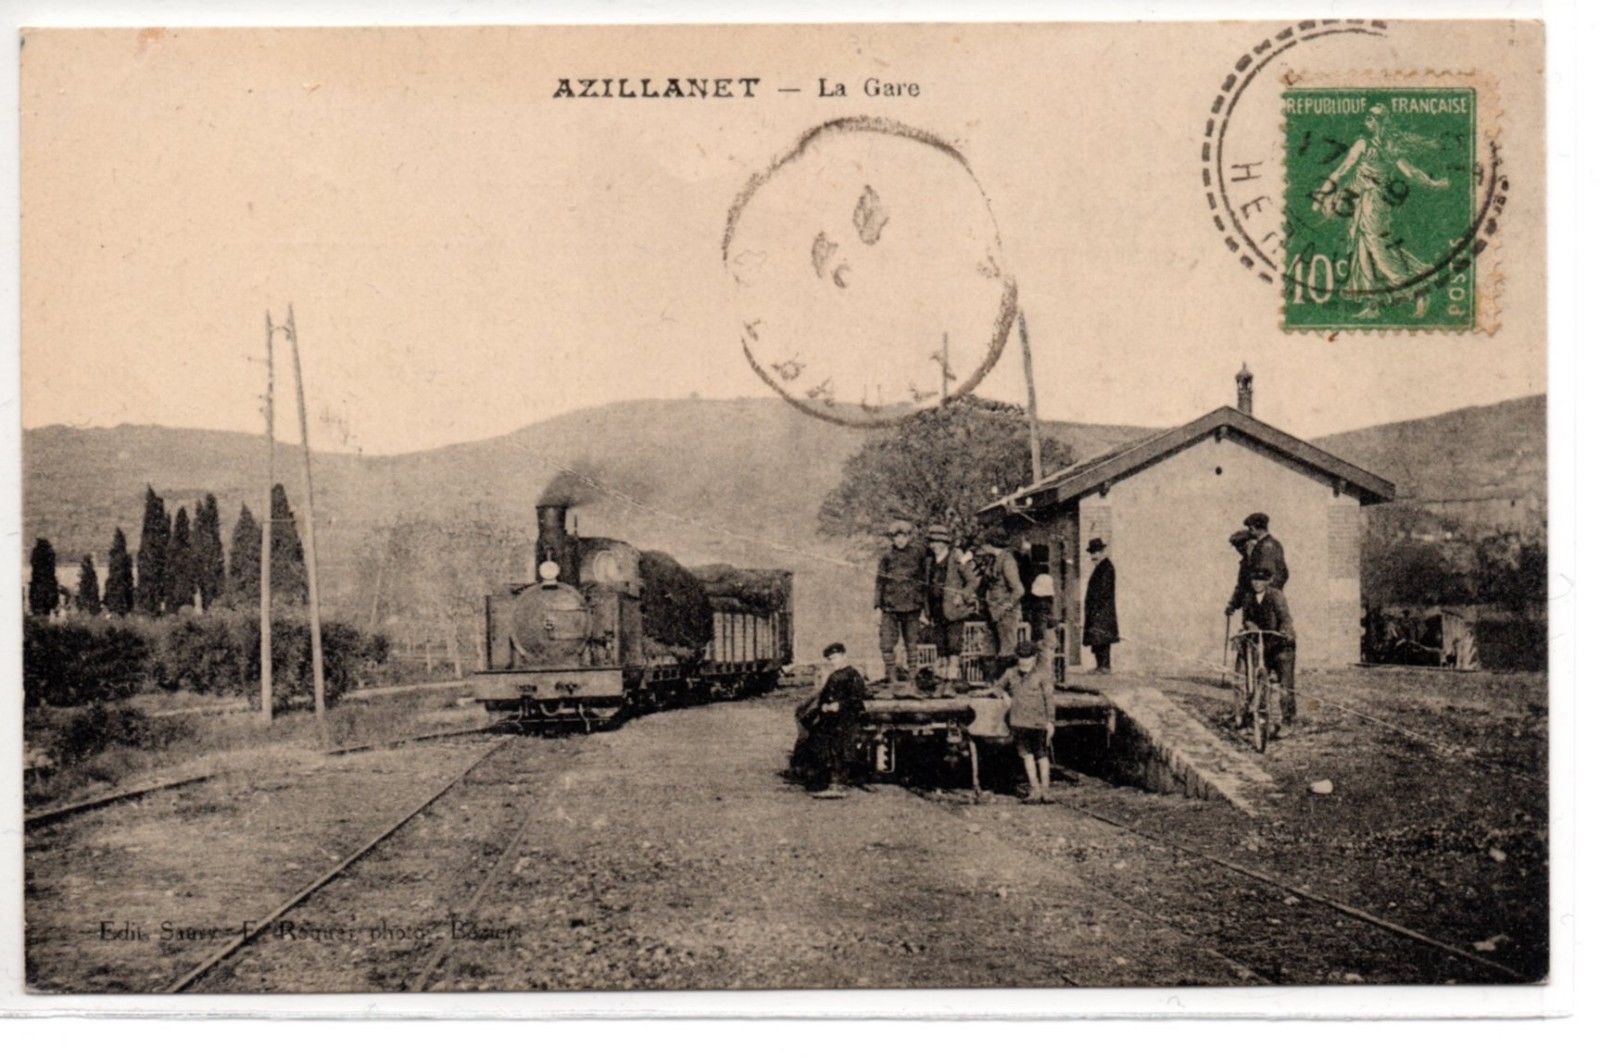
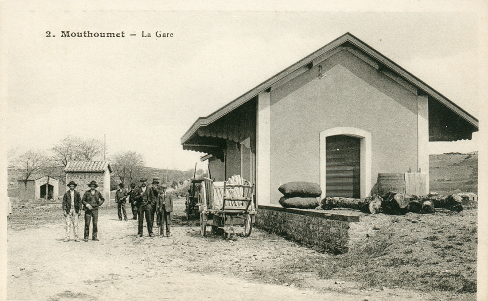
The station at Mouthoumet. [20]

Another journey is over. …. In the next post we will return to Les Palais and start to explore the remainder of the Tramways de i’Aude system.

References

  1. http://www.inventaires-ferroviaires.fr/hd11/11203.a.pdf, accessed on 15th October 2018.
  2. https://www.geneanet.org/cartes-postales/view/4728335#0, accessed on 18th October 2018.
  3. https://www.geneanet.org/cartes-postales/view/4728343#0, accessed on 18th October 2018.
  4. Michel Vieux; Tramways a Vapeur de l’Aude; R. Latour Editions 14 rue Sébile 09300 Lavelanet, 2011.
  5. https://www.cparama.com/forum/saint-laurent-de-la-cabrerisse-t29081.html, accessed on 18th October 2018.
  6. http://www.thezandescorbieres.com/train.htm, accessed  on 18th  October 2018.
  7. https://www.communes.com/cartes-postales-anciennes-saint-laurent-de-la-cabrerisse, accessed on 18th October 2018.
  8. https://www.geneanet.org/cartes-postales/search/?country=FRA&go=1&place=saint-laurent-de-la-cabrerisse&sort=date_depot, accessed on 18th October 2018.
  9. https://www.geneanet.org/cartes-postales/view/5928362#0, accessed on 18th October 2018.
  10. https://www.delcampe.net/fr/cartes-postales/europe/france/11-aude/autres-communes?f=keyword:talairan, accessed on 18th October 2018.
  11. http://www.cpaaude.fr/THEMES/TRAMWAYS/index_fichiers/Page3929.htm, accessed on 18th October 2018.
  12. http://www.cpaaude.fr/THEMES/TRAMWAYS/index_fichiers/Page3875.htm, accessed on 18th October 2018.
  13. http://www.cpaaude.fr/THEMES/TRAMWAYS/index_fichiers/Page3648.htm, accessed on 18th October 2018.
  14. http://www.beyond.fr/villages/villerouge-termenes.html, ,accessed on 19th October 2018.
  15. http://chateauvillerouge.wix.com/termenes#!, accessed on 19th October 2018.
  16. http://www.cpaaude.fr/THEMES/TRAMWAYS/index_fichiers/Page4163.htm, accessed on 19th October 2018.
  17. http://www.belcaire-pyrenees.com/article-le-chateau-de-villerouge-termenes-2eme-partie-50304313.html, accessed on 19th October 2018.
  18. http://www.cpaaude.fr/THEMES/TRAMWAYS/index_fichiers/Page4005.htm, accessed on 19th October 2018.
  19. http://www.passion-metrique.net/forums/viewtopic.php?f=2&t=9326&start=90, accessed on 19th October 2018.
  20. http://www.cpaaude.fr/THEMES/TRAMWAYS/index_fichiers/Page4066.htm, accessed on 19th October 2018.
  21. http://www.laroquedefa.fr/village/photos1900.htm, accessed on 19th October 2018.
  22. http://www.audecathare.fr/villages/mouthoumet.htm, accessed on 19th October 2018.
  23. https://www.cparama.com/forum/laroque-de-fa-t249.html, accessed on 19th October 2018.
  24. Email from Philip Morand on 14th July 2019.

Tramways de l’Aude – Lezignan-Corbieres to St. Pierre-des-Champs

We continue our journey on the Tramways de l’Aude. This time we are travelling South of Lezignan. We start our journey with a dispute about the line of the tramway leaving Lezinan-Corbieres. The 1930s MIchelin Map is likely to the be the most reliable source. This suggests that the tramway terminated opposite the Gare du Midi. It shows two lines approaching the Station – one from Carcassonne and one from Narbonne, both being circuitous routes.

The Map, below, shows the routes. That running south for Lezignan is first shown running East to find a bridging point over the Chemin de Fer du Midi and then running West before heading off to the South.An alternative route is suggested by Randonnees Ferroviaires [1] It shows the line running West along what was the Avenue de Narbonnes and then South down the D611. As I have already mentioned, I believe that the Michelin Map is the most reliable source.Some work would be required to establish the actual route of the tramway! Whichever route is correct, the alignment has been lost under roads and various developments. My assessment of the most likely route follows approximately that shown on the 1930s Michelin Map. The exact location of the bridge under the standard-gauge line is not clear. Both red and green routes on the OpenStreetMap below are approximate.A number of people have been in touch with me in the past few days to point to the IGN site called ‘Remonter le Temps’ and as a result I have been able to find 1942 aerial images of the East end of Lezignan. The green line above can be seen to be approximately correct on the image below. [10] The large loop below the Midi line is probably misplaced on the map above. The tramway on the aerial image appears to run North of the route of the road and much closer to the standard gauge sidings (as below). [10]On the North side of the standard gauge line the rea and green lines are indicative only. I have found two plans in a copy of the Loco Revue magazine from 1961 which show the track layout at two locations on the green route north of the standard-gauge railway. The updated edition of the last post now has one of these maps which shows the approach from the north into the tramway station and the route out heading towards the East. [11][12]The resolution of the second map, below, leaves something to be desired but it shows the tramway on the North side of the standard-gauge line almost at its most eastern extent. [13]This aerial image shows the location of the sketch map above.

As a result of posting on a number of French language forums. I have been contacted by Pascal_pmidi on the LRPresse ForumForum who has provided two images showing the route of the tramway. In the first aerial image, the orange line shows the approximate line of the tramway after leaving Lezignan station. The second provides greater detail in the section before the line heads South away from the town. top left. [14]

In the searching the internet for information and pictures of the tramways I have encountered a number of photographs of the standard gauge railway. Before setting off on our journey southwards it is worth reviewing the photographs of the Gare du Midi and its goods yards.Looking West along the Standard-gauge line. [3]Looking West along the Standard-gauge line. [4]Looking East along the Standard-gauge line. [3]Looking West across the Standard-gauge goods yard. [3]Looking East along the Standard-gauge line, this image shows the station to the left and the sidings to the South of the mainline in the middle and right of the image. [3]The Standard-gauge sidings make it abundantly clear that the main goods traffic on the Chemin de Fer du Midi in this area was wine! It seems that this is a view looking east with the unloading wharf just visible between wagons. [3]Looking West towards the station (in the top right corner of the image). [2]The mixed traffic on the standard gauge line is highlighted in this image and the one below. [2]The South side of the mainline looking East. [2]And finally we get on our train on the tramway. This train has just arrived on the tortuous Route from Carcassonne and the locomotive is about to run round its train to set off East before crossing the standard gauge line.

We pick up the tramway as it heads out of Lezignan to the South along the GC106 (D611) towards Ferrals and Fabrezan. The first image below shows the tram en-route out of Lezignan towards Ferrals on the GC106 (Route de Fabrezan). The road and tramway run in a straight line heading South-southeast. The plane trees mean that the scene feels quite cramped. [5] The image below is taken at a similar location in the 21st century, the road is now know as the Avenue de Corbieres.The plane trees now only follow one shoulder of the road as doom had to be made for cars and lorries to pass. The tramway is long-gone!

When the D611 sweeps to the right to head for Fabrezan, the tramway route follows the modern D106 into Ferrals les Corbieres.On modern maps Ferrals appears to be known as Le Faubourg. (Joseph Pestells on RMWeb points out that ‘Faubourg’ is a French term for suburb and that the village name of ‘Ferrels’ will appear elsewhere on the map.) The tramway route is schematically marked on the map below as a blue dotted line with the Station location at Ferrals circled in red.The tramway turns right in the village to follow the line of the modern D111. It is highly likely that the house on the corner (on the right side of the junction) was built after the tramway was removed as the turn would have been too tight for the tramway. (My thanks to Joseph Pestell on RMWeb for this observation.)A few hundred metres to the West of the centre of the village we encounter what remains of the tramway station at Ferrals.This postcard shows the view looking east from the Station into Ferrals. [5]The view above looks West through the Station site and shows both the main-line and the sidings with the station building also in view. It appears that trains were permitted to pass at this location by taking the West bound train into the sidings. [5] The adjacent view looks East into Ferrals and shThe location of the Station shown in the early 21st Century.ows a significant mixed train. [5]

After the station at Ferrals trams headed westwards to the next major road junction with the IC12 (D611) and then travelled South-southwest to Fabrezan.Before reaching Fabrezan the old tramway route leaves the line of the IC12 (the modern D611). It followed its own route through the fields. That route has now become a minor road.On this map the tramway route is marked by blue dashes, the station location by a red circle. As can be seen there is a tramway junction in then village. We will follow the western route which heads for St. Pierre. [1]North of Fabrezan, the tramway route bears off to the left of the modern D611. Both routes run through the vineyards of Corbieres.The location of the Station shown in the early 21st century. Two earlier postcard images which show a similar view. [6][7]The station viewed from the opposite direction. [6]In this early coloured image, the station site is shown to great effect. The gradient on the road to the centre of the village and the church can also be seen. This explains the tramway route, it followed the contours around the village which was built on a ridge and was at a higher level than the surrounding countryside. [1]

From Fabrezan Station, the tramway continued to flank the South-eastern side of the village and then joined GC122 (the modern D611). Along this length of road the two tramway routes divided with our chosen route heading first along Quai d’Orbieu, then Rue de l’Egalite before running along the shoulder of the IC12 (D212) towards Lagrasse and St. Pierre-des-Champs. The other route will be covered elsewhere. It follows the GC122 (D611) South to Les Palais and beyond.

The tramway route along the IC12 (D212) followed the northern shoulder. At the cross-roads between the IC12 and IC14 there was a Station for Camplong. In 2018, the Station site is now a picnic area. Travelling westward the tramway and road crossed the River Orbieu on a large viaduct.The view westward in the 21st century, from the vineyards South of the D212.A view along the modern viaduct on the D212.

The next station on the Tramway was at Ribaute, the tramway continued to Ribaute on the North side of the IC12.A view of the Station and village at Ribaute, taken from the South. [8]The tramway followed the line of what is now the Avenue des Corbieres in Ribaute and this picture is taken looking along the line of the tramway from what was the station. The road to the right is still called Rue de la Gare. The station building shown in the monochrome image above still exists but it has been heavily modified! Two pictures of the old station building which has been modified and extended. [1]

Beyond Ribaute, the tramway remained on the right-hand side of the road travelling towards Lagrasse apart from one location which was around 1 kilometre West of Ribaute at a tight left-hand hairpin bend, where the tram needed to tunnel trough the rock to provide a suitable curvature for the track. The tunnel route is shown on the map above and the tunnel is pictured in the direction we have been travelling – towards Lagrasse. [1]The North Portal of the Tunnel. [1]The South Portal of the Tunnel. [1]

Subsequently, a right-hand hairpin required that the tightness of the road curvature was lessened by the tramway finding a less sharp route around the bend.The road and tramway eventually entered Lagrasse from the East along Route de Ribaute.As far as I can ascertain the location of the tramway station in Lagrasse was in the area circled in red above. It is just before the Route de Ribaute meets the D3, Boulevard de la Promenade where the tramway turned south to head for St. Pierre. Two images on postcards which show the station at Lagrasse. [9]

The tramway followed the western shoulder of the GC3 (D3) out of Lagrasse and followed that road to its junction with the GC23 (D23). The line then followed the GC23 until it reached the side road which led to St. Pierre-des-Champs which today is number D212. Only a short distance along the D212 the tramway reached its terminus. The D212 approaching the terminus station for St. Pierre-des-Champs.The site of the terminus. The remains of the station building can be seen in the distance. The station site was alongside the road (now the D212).The terminus building at St. Pierre-des-Champs was over a kilometre from the village. All that remains of the building in the early 21st century can be seen in this picture which comes, as do the other images immediately above, from Google Streetview.

We complete this leg of our journey on Les Tramways de l’Aude at St. Pierre-des-Champs having been unable to find any images from the time of operation of the tramway.

References

  1. http://www.inventaires-ferroviaires.fr/hd11/11203.a.pdf, accessed on 15th October 2018.
  2. https://www.cparama.com/forum/lezignan-corbieres-gare-t28257-20.html, accessed on 15th October 2018.
  3. https://www.cparama.com/forum/lezignan-corbieres-gare-t28257.html, accessed on 15th October 2018.
  4. https://www.geneanet.org/cartes-postales/view/5928361#0, accessed on 15th October 2018.
  5. https://www.delcampe.net/fr/cartes-postales/europe/france/11-aude/autres-communes?f=moyens-de-transport:tramway, accessed on 16th October 2018.
  6. https://www.delcampe.net/fr/cartes-postales/europe/france/11-aude/autres-communes?f=keyword:fabrezan, accessed on 16th October 2018.
  7. https://www.pinterest.co.uk/pin/594615957024942068, accessed on 16th October 2018.
  8. https://www.cparama.com/forum/ribaute-t313.html, accessed on 16th October 2018.
  9. https://www.cparama.com/forum/lagrasse-t170.html, accessed on 17th October 2018.
  10. https://remonterletemps.ign.fr, 25th October 2018.
  11. https://rogerfarnworth.com/2018/10/13/tramways-de-laude-siran-to-lezignan-corbieres, accessed on 8th November 2018.
  12. Loco Revue Volume No. 212 November 1961, p385.
  13. Loco Revue Volume No. 212 November 1961, p384.

Tramways de l’Aude – Siran to Lezignan-Corbieres

The Tramway Station at Siran was Northeast of the old town centre on the site of what is now a fire-station. The location can be picked out on the Google Earth Satellite image below to the northeast of the roundabout in the top right of the image. The line ran to the rear of the white roofed building and the station building was located under the same building. The line ran behind the ‘Cave’ which can just be seen at the top right of the image.Approaching the Station from the West.The tramway ran to the North side of the road along a line just in front of the bushes at the left of this picture and crossed the accommodation road to pass between the two buildings evident to the right of centre in the picture.The tramway passed between these two buildings. This picture is taken from roughly the same position as the older image below. [1]This image is taken from the approximate location of the modern roundabout on the D168E4 and looks to the North. [2]

In the image below, the tramway continues behind the ‘Cave’ which ids the low long building on the right. the Tramway alignment is running parallel to the IC68 (D168) which can be found on the south side of the ‘Cave’ and is shown in the second image below.From Siran, the Tramway travelled on the Northside of the IC68 (D168) to Cesseras. As far as I can ascertain, the tramway ran on a raised embankment on the North side of the road, as shown below.This image shows the remains of a tramway bridge over a stream. Old abutments and one beam are visible.The approach to Cesseras. The tramway is still on the north side of the D168 (IC68). The slight embankment to the left of the road shows the tramway alignment. The station at Cesseras is just beyond the building ahead on the left of the road.A hundred metres or so closer to the village the old station building can still be seen in the early 21st century.The Tramway Station building in Cesseras was encountered just before the trams entered the village. The image above attempts to produce a similar view to the adjacent earlier image. [3] The platform has been removed and a bench provided.This view looks back from Cesseras towards Siran. [4]A similar view of the station building in the early 21st century.

The village of Cesseras retains vestiges of its ramparts (towers and curtain walls). It also has some old houses (mullioned windows) and elements of the old castle, dismantled from the Revolution: two round towers, one crowned with a glazed tile roof. The station building can just be picked out on the bottom edge of the satellite image below to the left of the D168.The tramway continued in an easterly direction through the village on the IC68 (D168). The route is easily seen in the satellite images above and below.Beyond the village of Cesseras, the tramway followed a generally easterly path through vineyards towards Azillanet, still running on the North shoulder of the IC68 (D168). The main  road by-passed Azillanet to the South and the tramway followed it, crossing the road into the village and then running on the southwest side of what became the D168. The old tramway crossed the River Tay on the right side of the bridge in the foreground of the picture below. And when the road turned East, the tramway continued in a southeasterly direction into the tramway station site. The old station building can still be seen beyond the central bridge railings.The station building at Azillanet.Azillanet station looking back towards Cesseras. [5]

After Azillanet the GC10 (nowadays the D10) followed a southerly path, wandering through vineyards towards Beaufort. The tramway shadowed the GC10 on its western shoulder until the GC68 (D168) branched off towards Beaufort. The tramway then followed the southwestern shoulder of the GC68 to Beaufort.The lay-by to the right of the road is on the approximate line of the tramway.The D168 is the left-hand road. The tramway followed its right-hand shoulder as can be seen below. Again, vineyards are very much in evidence.The satellite image above shows the tramway alignment as it approached Beaufort. The green (grass) to the west of the road at the top of the image is the tramway route. On reaching the village cemetery, the tramway moved into the centre of the GS68 (D1680 and shared space with road traffic for a short distance and then slipped back to the southwestern shoulder. Vineyards still dominate the landscape.At the village boundary sign the road (on the left above) and the tramway crossed the Ruisseau de Beaufort on small independent bridges. The tramway bridge is in an excellent state of repair as can be seen below. [6]
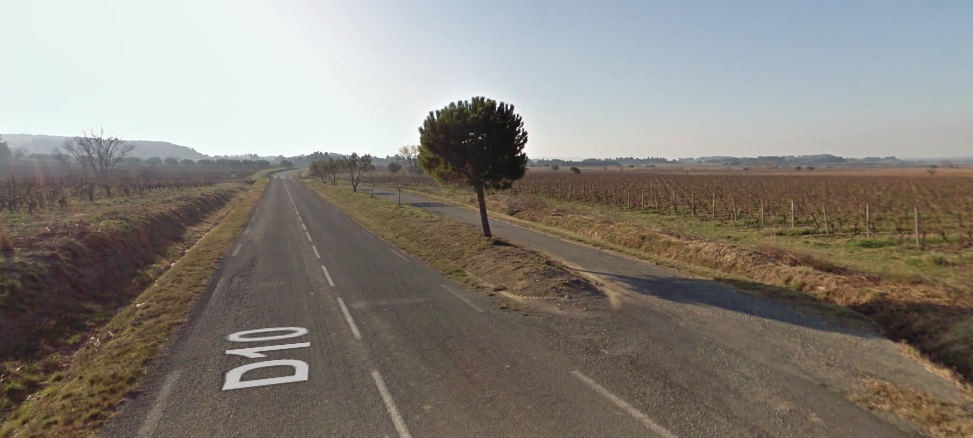
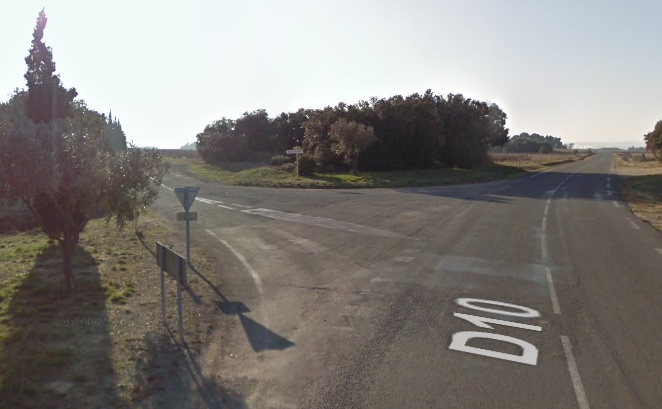
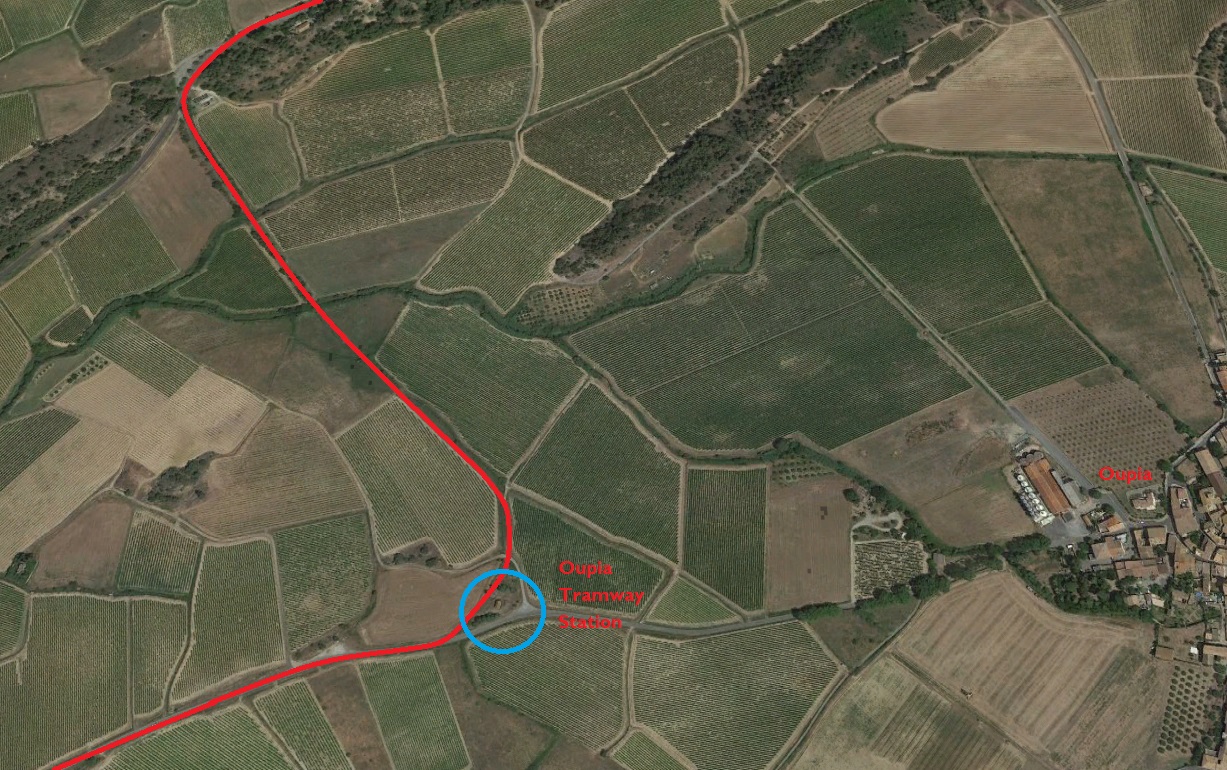
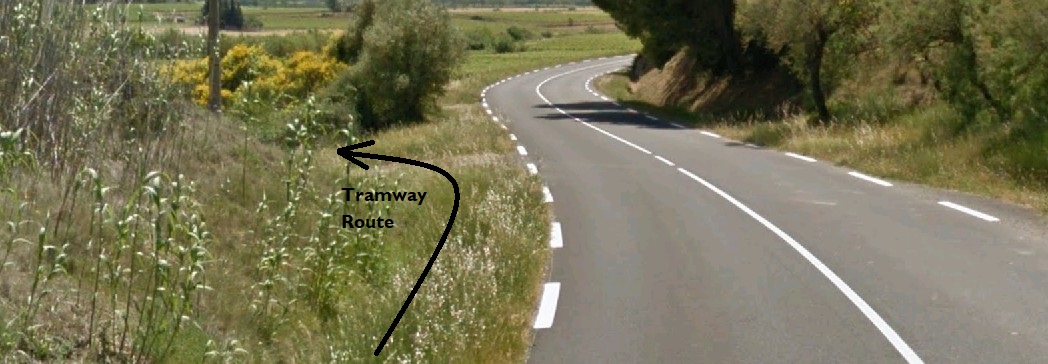
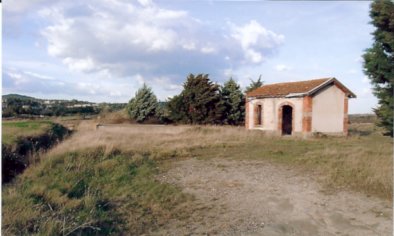
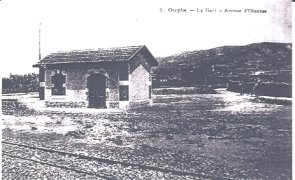
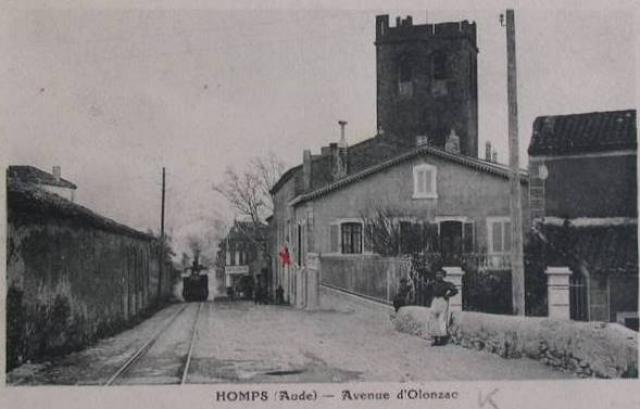
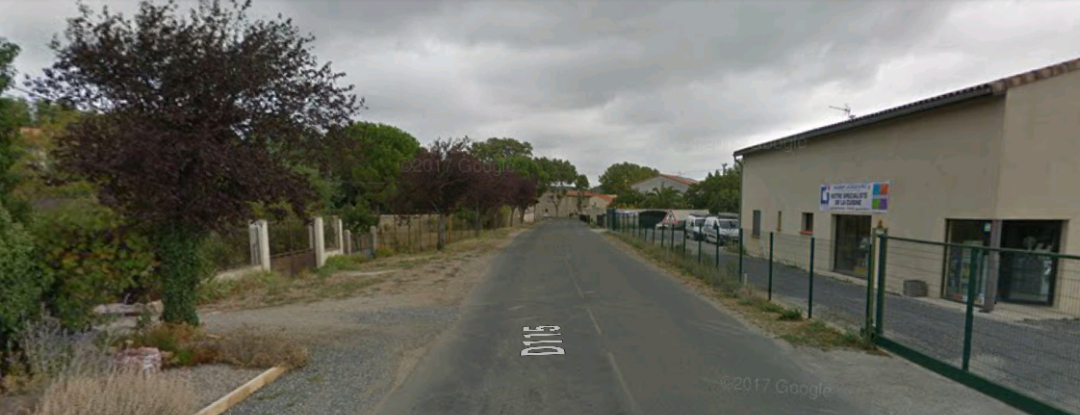
The tramway then left the road to cross on the south side of the village of Beaufort before crossing the road to Olonzac – the GC 20 (D910). The route of the tramway has been converted into a minor road – Rue de l’Ancienne Gare.  The monochrome postcard view below shows the old station in its heyday. A passing loop was provided along with a small station building. The old station site is now an area for playing boules/petanque. Beyond the station the line crossed followed the route to Olonzac (the GC20 (D910)) for a few hundred metres before heading across the fields towards Oupia.
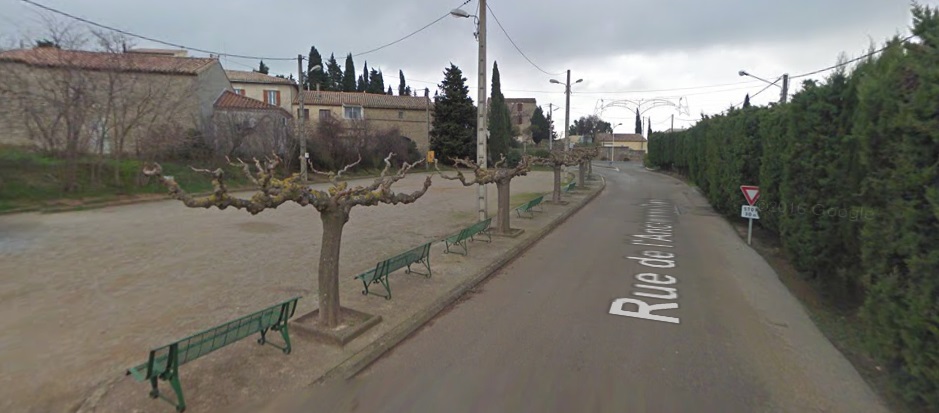
The satellite image and the picture above show the point of deviation of the tramway from the GC20 (D910). The photograph is taken at a point on the red line in the satellite image close to the top of that picture. The satellite image then shows the tramway route to Oupia Station which was some way from the village of Oupia (of which a portion is visible on the right-hand side of the satellite image. The adjacent photos show first, the state of the station of Oupia in the early 21st Century and second, the station in use. [7]

On the way to the station of Oupia, trams crossed two girder bridges with 15 metre spans over the streams of Oupia and Escut. These bridges were demolished and sold in around 1948. The abutments remain [7]. After the station the tramway followed the route of the modern D52E2 towards Olonzac. Nowadays there is a roundabout at the point where the tramway encountered the GC20 (D910) at its junction with the GC70 (D52).

The tramway route round Olonzac is now covered by the D52E1 which forms a by-pass on the southeastern side of Olonzac. From the poisiton of the present roundabout the tramway headed southwest and crossed the River Espene almost immediately. The satellite image below shows the whole town of Olonzac.The next image focusses in on the South side of the town. The tramway arrangement in the town are shown schematically. The town was for a time the terminus of the line. After crossing the River Ognon to the South of the town trams first encountered the main Olonzac Station highlighted by the first blue oval. The line continued into the town to a point just South of the War Memorial where there was a small wooden platform which formed the terminus station of Olonzac City. The main tramway facilities were to be found at the station in the suburbs. It included a passenger building, a large hall with dock, a shed for equipment, a water intake and a dormitory for staff. [7]
The green line on the satellite image above approximates to the route of the tramway arriving from Beaufort, Cesseras and Siran.

The adjacent image shows the station which was at the bottom of the satellite image above. [7]

The next image is of Olonzac City Station close to the War Memorial in the centre of the town. [7] And it is followed by a postcard showing that town centre line in operation. [8]


The adjacent image shows the same length of line, this time with a maintenance train in view. [7]

The next three historic images show the more southerly station in use. [8] After leaving the main Station in Olonzac, trams soon crossed the River Ognon on a masonry Arch Viaduct as below. The viaduct was close to the town distillery, it was a three-arched road and tramway bridge, each arch was of 8 metres span. [7]The line has now turned southwards and as it leaves Olonzac soon exits Herault and returns to the Aude. It follows the GC10 (D910) to the departement boundary, and then the D2560 into Homps.

Just before reaching Homps the tramway and the road which is now the D2560 crossed the Canal du Midi.

Like Olonzac, Homps has grown since the days of the tramway. It stretches along the South side of the Canal.

The picture below is a satellite image of the village and Canal.The Station at Homps was on the North side of the Canal du Midi. It was a three-track station alongside the GC10. The location was at the top of the image below and to the right of the main road. The route from Olonzac enters the satellite image at the top and then curves round to pass over the Canal.This image is taken from the end of the retaining walls on the North side of the Canal. It shows Avenue de Minervois, looking towards Olonzac. It shows the location of the Station at Homps.

The earliest bridge over the Canal du Midi was a lattice girder bridge of the type seen in La Redorte, on the left of the postcard below.The later replacement Canal bridge was a substantial structure as can be seen in the adjacent old postcard image. It was a 15 metre span which carried both road and tramway. Its approach retaining walls remain, but the superstructure has been replaced by a modern open- parapeted bridge of a slightly longer span.

As an interesting aside, I came across this postcard while searching the internet. It is a complete flight of fancy as no standard gauge railway line ever served Homps!

The image on the postcard also seems to exaggerate the size of the village. A further search on the internet resulted in a series of postcards for different towns and villages all bearing the same image!This image was taken from close to the Canal bridge looking into Homps.

On leaving the old village of Homps the tramway followed the original GC5 (D611, which now-a-days joins the D610), before turning right down the GC11 (D611) and then crossing the River Aude on  a masonry viaduct of three 20 metre-span arches. [7]The bridge over the River Aude taken in 2012 during the construction of the wier which improved the water supply to Tourouzelle. [10]The viaduct in 2016.

Immediately after crossing the bridge over the River Aude the trams encountered another Halt. The Halt/Station was close to the hamlet of La Tuilerie to the Northeast of Tourouzelle, and served Tourouzelle. [7][9]The image above shows the location of the Station for Tourouzelle. It is, in the 21st century, a kind of lay-by alongside the D611.

After the station at Tuilerie the  tramway follows the northeast shoulder of the GC11 (D611) to Segame (Serame) and on to Montrabech on the GC11 (D11).Segame (Serame) was close to Argens-Minervois and Argens was connected to the tramway by a bridge over the River Aude.

The Halt at Montrabech was  known as Lezignan-Montrabech. It was to the East of the hamlet of Montrabech. The area of the Station is still visible on the satellite image below. The approximate rail alignment is also shown in red.The area of scrub land to the left of the D11, in between the vineyard and the road, is the location of the old station.

The tramway followed the eastern shoulder of the IC67 (D67 – Avenue Leon Bourgeois) into the northeastern outskirts of the town of Lezignan-Corbieres, usually known as Lezignan. It then drifted away from the road, following a line that approximates to the modern D6113 (Avenue Marechal Gallieni, which then becomes Avenue Marechal Lyautey.The image above shows the tramway’s tight turn from the IC67 to travel East. The buildings to the left of the tramway alignment were the site of the old Gendarmerie which appears in a couple of postcard images because a tramway halt could also be found at this location. [13]

As we have already noted, after the station at the Gendarmerie the tramway took an easterly course along the line of the modern D6113 before turning southwards across some waste ground and then following the line of the present day Rue des Glycines and then to the West Southwest on Avenue Frederic Mistral before travelling to the South of that route and swinging round into Lezignan station. The orange line on the aerial image below shows that route entering from the top left. I am indebted to by Pascal_pmidi on the LRPresse Forum for this image. [16]This sketch plan was made for the Magazine Loco Revue and shows the two lines approaching Lezignan Station. Comparing the two maps/plans it can be seen that one of the buildings accessed by turntable remains to be seen in the 21st Century. [15]One building remains from the loco depot shown on the plan above. This picture was taken in July 2017. [16]

The following pictures all show the terminus line of the tramway which ran parallel to the standard gauge line/sidings to the Gare du Midi aliong what was originally known as the Avenue de Narbonne.The line to the right runs immediately alongside the tramway. [14]The low level building on the right is the station building for the tramway. [14]The building appears again in earlier days in this image with a track leading to what must have been interchange sidings behind the camera. [14]Both the Gare du Midi and the tramway station building appear in this image and the image below. [14]The Avenue de Narbonne appears in the two images above. [11][13]The seven images above are all taken looking East along the Avenue de Narbonne and show the tramway station with the Gare du Midi behind. [13][14]This modern image shows the Gare du Midi forecourt as it is in the early 21st Century.The Gare du Midi forecourt above with the tramway station building in the middle right and the Grand Hotel across the Avenue de Narbonne. [14]

The adjacent image shows the two station buildings and the station forecourt. [7]

We finish this particular journey in Lezignan!

References

  1. https://www.delcampe.net/fr/cartes-postales/europe/france/34-herault/autres-communes?f=keyword:siran, accessed on 9th October 2018.
  2. https://www.communes.com/ville-siran-34, accessed on 9th October 2018.
  3. http://cahiers.de.minerve.pagesperso-orange.fr/HTML/cdf_lezignancaunes.html, accessed on 25th September 2018.
  4. https://www.delcampe.net/fr/cartes-postales/europe/france/34-herault/autres-communes?f=moyens-de-transport:transports, accessed on 12th October 2018.
  5. https://picclick.fr/Rare-Cpa-34-Herault-Azillanet-la-Gare-183374972512.html
  6. https://cahiers.de.minerve.pagesperso-orange.fr/HTML/cdf_hompsminerve.html, accessed on 13th October 2018.
  7. http://cahiers.de.minerve.pagesperso-orange.fr/HTML/cdf_lezignancarcassonne.html, accessed on 25th September 2018.
  8. https://www.cparama.com/forum/olonzac-t197.html, accessed on 13th October 2018.
  9. https://www.cparama.com/forum/tourouzelle-t266.html, accessed on 14th October 2018.
  10. https://www.lindependant.fr/2012/04/11/de-l-eau-de-l-aude-pour-alimenter-le-village,130415.php, accessed on 14th October 2018.
  11. https://www.cparama.com/forum/tourouzelle-t266.html, accessed on 15th October 2018.
  12. https://www.geneanet.org/cartes-postales/view/5928361#0, accessed on 15th October 2018.
  13. https://www.cparama.com/forum/lezignan-corbieres-gare-t28257-20.html, accessed on 15th October 2018.
  14. https://www.cparama.com/forum/lezignan-corbieres-gare-t28257.html, accessed on 15th October 2018.
  15. Loco Revue Volume No. 212 November 1961, p385.
  16. Aerial image provided with the line sketched by Pascal_pmidi on the LRPresse Forum on 1st December 2018.

Tramways de l’Aude – Caunes-Minervois to Siran

Our journey on the metre-gauge lines of the Tramways de l’Aude continues from the station at Caunes-Minervois. As the plan above shows, the route was tortuous, it certainly wasn’t the quickest route to Lezignan. It ran through a good number of the villages in the Occitanie region, including the canton of Les Haut-Minervois, in Hérault and in the Corbières wine region of i’Aude.

The shorter and faster route would have been to travel from Caunes-Minervois down the standard gauge line to Moux and then along the mainline to Lezignan.

Nonetheless we are going to enjoy the bucolic journey by the slower metre-gauge tramway through the French countryside!

The Featured Image at the top of this post shows the buildings of both stations in Caunes-Minervois. The tramway buildings are to the left of the image, the standard-gauge terminal is featured int he centre-right of the image.

Wikipedia describes the village’s railways in a section about the marble quarries which brought some prosperity to the village:

“The marble quarry brought prosperity and kudos to Caunes and a railway spur was run across the plain from Moux in 1887 to transport passengers, quarried marble and the region’s wine. The station was finally closed to passengers in 1939 and to goods in 1965. Some station buildings still retain a link with the past as a marble carving workshop.”

“During the first part of the 20th century, and operating via a second station almost opposite the first, there was a 1-metre gauge tram line from Caunes connecting the town to Lezignan and Carcassonne. This tramway was closed down in 1932. This additional station may be seen in old postcards but is still in use as a private home today.” [1]

The tramway arrived at Caunes-Minervois on the southern shoulder of the GC8 (today’s D620) and then, just before the centre of the village dropped down towards the standard gauge station, before turning to run parallel to the standard gauge railway for a few hundred metres on its eastern side. The postcard immediately below the map shows the two stations. It is taken from the village and shows the Gare du Midi with the Tramways de l’Aude station behind. [2] The large building on the right of the photograph is the goods shed for the standard-gauge line.The two pictures above are taken of the Gare du Midi from a similar vantage point to the southwest of the station buildings. [2][3]An early view of the Gare du Midi from the same angle but from a greater distance. [2]This view shows the same building but from the station yard rather than trackside. [2]This view is taken from the village looking towards both stations. The Gare du Midi and its goods-shed are almost hidden by the trees but the facilities at the Tramways de l’Aude station and much more in evidence. The goods-shed is in the foreground with the passenger station building to the right and the engine shed and water tower to the left. [2]This modern image from Google Streetview is taken from the North and shows the two station buildings still in use. On the right is the Gare du Midi used now as a marble workshop. On the left is the Tramways de l’Aude station building in use as a private home.Here we have an approximate alignment for the route of the Tramways de l’Aude line through Caunes-Minervois (in red) and the standard-gauge Ligne du Midi which terminated in the village (in blue).The satellite image above shows the proximity of the two station buildings. The present D115 follows the line of the old tramway.

The tramway route can easily be picked out on the 1930s Michelin map above.  After finding its own way through the countryside, it joined the GC115 about halfway between Caunes and Trausse. On the modern OpenStreetMap image below its formation is under the D115, Avenue due Stade heading south of the village before it follows what is now a minor road and bridges the River Argent Double travelling East to join another arm of the D115.The tramway left the shoulder of the western arm of the modern D115 and turned down the minor road in the image above.This is as far down the minor road that that has replaced the tramway that Google Streetview will take us. The bridge over l’Argent Double can just be glimpsed ahead. The sign is a weight restriction sign.The pink line approximates to the tramway alignment.The bridge which used to carry the tramway has gone – it appears that this has been due to neglect and flooding. Historic satellite images on Google Earth show that the route was eroded to the East of the bridge before the bridge itself failed! The view above is from the tramway route to the East. The adjacent image shows the bridge before it was lost and appears to have been taken from the South. [4] The image below shows the two bridges at this location from the North. [2]The tramway formation has been used to create a minor road which runs from the bridge to the eastern arm of the D115. The old formation is only lightly tarmacked.At the junction with the D115 the modern road forms a right-angled junction but the tramway route curves to the right. and follows the D115.There is one deviation from the modern D115 before we reach Trausse. It is shown below. The old rad/tramway cross the Ruisseau du Cros almost at right-angles on an old arch bridge. The newer road has its own bridge.In this image the road bearing to the left is the route into the village and that bearing right is the modern D115 and the route of the old tramway. The tramway ran round the south side of Trausse.

The village of Trausse is pleasantly set in the middle of vineyards close to the boundaries of the Aude and Herault, in the foothills of the Cevennes. The village was once fortified. There are still many vestiges of the 9th century ramparts.

The tramway ran round the outskirts of the village and the station was on the southeast of the village. There is no evidence of the station nowadays. It was on the length of the D115 shown in the pictures below.The tramway left town East along the D115. Of the pictures below, the first looks back toward the village centre with the tramway entering stage left. The second shows the route ahead.Travelling East from Trausse the tramway headed for Felines-Hautpoul in Herault. The tramway followed the old GC115 to the departement boundary where the road number changed to the GC12. Modern raod numbers are different. The GC115 is numbered D115 for the first few kiloemetres fraom Trausse. It then becomes the D55 as far as the departement boundary. En-route the raod/tramway crosses the Ruisseau du Canet and then passes to the Southwest of Le Chateau de Paulignan.At the departement boundary, as the D55 becomes the D12, the tramway left the route of the old road. In our direction of travel there is a significant climb and the tramway needed to find its own route as road gradients were too steep. Its route is now a minor road linking the D55/D12 with the D168 and running across vineyards to the South of Felines-Hautpoul.Felines-Hautpoul station was adjacent to the Cemetery where the tramway curved away to the South and joined the D168.As the tramway travelled southwards is crossed L’Ognon. The modern D168 was once the IC68. The tramway ran along the western shoulder of the IC68.The station at Felines-Hautpoul no vestiges remain. [5]

The tramway left the IC68 (D168) along the route of what is now another minor road and headed for La Liviniere. The route is shown turning of the D168 to the left and then can be followed on the satellite image below for a couple of kilometres. It then meets the D168(D168E1) once again.La Liviniere was, and is, a small village alongside the main-road. There was a small halt to the South of the village, its station building is shown in the adjacent image. [4]

The halt was close to the Notre-Dame du Spasm church which was protected from the tramway by a large masonry retaining wall. [4]

The tramway continues along the IC68 until the road approaches Siran. Siran has grown since the days of the tramway and its route is now underneath the modern D168E4.The image above shows the passing loop at Siran Station. [6] The adjacent image shows the station at Siran taken from the South. [7]


References

  1. https://en.m.wikipedia.org/wiki/Caunes-Minervois, accessed on 7th October 2018.
  2. http://album.minervois-gen.org/index.php?/categories/posted-weekly-list-any-35-6/start-120, accessed on 8th October 2018.
  3. https://www.cparama.com/forum/caunes-minervois-aude-t24644.html, accessed on 8th October 2018.
  4. http://cahiers.de.minerve.pagesperso-orange.fr/HTML/cdf_lezignancarcassonne.html, accessed on 24th September 2018.
  5. https://www.cparama.com/forum/felines-hautpoul-ou-olonzac-t26747.html, accessed on 9th October 2018.
  6. https://www.delcampe.net/fr/collections/cartes-postales/france/autres-communes-34/siran-gare-de-siran-tres-rare-train-locomotive-animation-minervois-minerve-olonzac-pepieux-azille-386933772.html, accessed on 9th October 2018
  7. https://www.communes.com/cartes-postales-anciennes-siran-34, accessed on 9th October 2018.

King’s Lynn Docks Branch – Part 3

The Featured image at the start of this post shows the Bentinck Dock and its surroundings in a satellite image from Google Earth.

The Dock Branch from King’s Lynn Station to John Kennedy Road and the area around the Alexandra Dock were covered in previous posts:

King’s Lynn Docks Branch – Part 1

King’s Lynn Docks Branch – Part 2

The Bentinck Passage – the channel between Alexandra and Bentinck Docks

We concluded the last post with an image from Google Earth showing the Alexandra Dock and the channel between it and the Bentinck Dock, and a short series of pictures of the channel. This post starts with that the Google Earth satellite image from the last post and a few of the photographs of the channel and bridges which introduce us to the Bentinck Dock and ts surroundings.

The Dock from above on Google Earth in 2016 the two swing bridges over the channel are easily picked out. The one closest to the top of the image was reserved purely for road traffic and has become a public highway. The other bridge allowed for rail and road access and remains within the limits of the Dock fences.

This Google Streetview Image shows both of the swing bridges, the internal docks bridge can be picked out to the left of the control signals for the bridge on Cross Bank Road.

This image gets us the closest to the Alexandra Dock that we can using Google Streetview. It shows both swing bridges and the dock beyond.

A similar but older view of the Alexandra Dock with the railway/road swing bridge in the foreground.

A closer shot of the internal docks bridge which once carried the dock railway. [16]

The channel in use in the early years of the 21st century. [21]

Bentinck Dock

In the last post we noted that traffic volumes resulted in the need for an expansion of the docks. The measure put to parliament was strenuously resisted by the Norfolk Estuary Company whose land was required for the new dock. The company was not opposed to the extension in principle but implied that then development would block access to its own land.

The development of the new dock required the Cross Bank Road to be cut by the access channel. This channel would have prevented the Duke of Portland accessing the eastern half of his farm. [10: p51]

“In order to offset the inconvenience to road users, the dock company proposed to cross the breach by men’s of a swing bridge and to construct a diversionary road (now known as Estuary Road) from the Cross Bank which could be used as an alternative route by the Duke of Portland when the swing bridge was open for shipping.” [10: p51]

The reference in the quote above to Estuary Road refers to the road which is now know as Edward Benefer Way, and already was known as this in the time I lived in King’s Lynn in the 1970s. On the 1893 plan below, this road is marked ‘ROAD’.


The Estuary Company argued that the diversionary road should be continued into the town across the fan of sidings that served Alexandra Dock to join up with St. Ann’s Street. They hoped that this would avoid the awkward route via North Street and Pilot Street. The route proposed was from the junction between Cross Bank Road and the modern Edward Benefer Way (to the left of the Iron Works on the plan below) almost directly South to St. Ann’s Street and would have resulted in the demolition of a small section of the old town walls next to the site of St. Ann’s Fort. As can be seen below, on plan, this seemed to make a great deal of sense.

The junction between Edward Benefer Way and Cross Bank Road in the 21st Century.

The view South from the above junction across the docks at the location where the fan of points/sidings would have been crossed by the proposed road.
However, there were real problems with this proposal. The Dock Company showed that the average time that the crossing gates on Pilot Street were closed to road traffic each day was 33 minutes but, on an average day, locomotives on shunting duty crossed the fan of sidings 156 times and any road across that location would be closed for very large parts of the day. [10: p53]

The view North from St. Ann’s Street in the 21st Century.

The ‘Engineering Works’ on the 1893 plan just below Estuary Road were the same works as those marked on the OS Map as ‘Iron Works’.

These were the works of F. Savage. His house is seen in the image below. The house was placed adjacent to the works entrance and faced onto Cross Bank Road. The image comes from Mike G. Fell’s book [10] and shows the fan of sidings close to Alexandra Dock before Bentinck Dock and Estuary Road had been constructed. Fisher Fleet is in evidence across the middle of the picture. Savage’s Works were known as St. NIcholas’ Works and stretched along the Southeast side of the site of Bentinck Dock.


Savage’s was a local engineering firm with a national, if not international, reputation and is worth a detour from our survey of the Dock railways. Throughout much it their life the Works were rail-served.
F. Savage Engineering Ltd: The company was founded by Frederick Savage in 1853. He worked from several locations, including a forge in the “Mermaid and Fountain” Yard in Tower Street, a forge in Railway Road, and the former premises of St James’ Workhouse on London Road before moving to this site on St Nicholas Street, known as St Nicholas’ Works. In 1873, eight years before construction started on the Bentinck Dock, four acres were purchased for the Ironworks, and a further five acres were added later. The site included a foundry, boiler and fitting shops, warehouse, and drying sheds and a railway access was eventually added. “Estuary House” was constructed adjacent to the yard as the residence of Mr. Savage. The firm became well known for its agricultural machinery, particularly steam engines and steam roundabouts, and gained an international reputation for steam-powered fairground rides. Savage himself became Mayor of King’s Lynn in 1889. [11]

Until recent years, no fairground was complete without its share of Savage-built merry-go-rounds, switchbacks and showmen’s engines. Each machine was a masterpiece, not only of engineering ingenuity, but also of flamboyant art and craftsmanship. Savages’ fairground machinery was exported all over the world, but the root of this success lay in agricultural implements originally made for local farmers. [12]

The mid-nineteenth century drainage of the Fens by steam power opened up new agricultural opportunities. Savage was quick to exploit these and built and developed carts, hoes and steam threshing machines. From these, the manufacture of traction, or self-moving, engines was a logical development. His Juggernaut, c.1856, was an extremely advanced model. At a time when most engines were driven by an endless chain, the Juggernaut had its rear wheels gear-driven from the crank-shaft which could be disengaged on sharp bends and was therefore easy to manoeuvre. In spite of a warm reception at the Long Sutton Show in 1858, it was never developed and Savage returned to more orthodox chain-engines. [12]

Expansion led to the firm’s move to St. Nicholas Street in 1860, where Savage is described as a machine maker involved in the ‘noisome trade or business of making and repairing steam engines’. In 1873 he was able to purchase reclaimed land off Estuary Road for the St. Nicholas Ironworks site. His biographer, William Sparkes, stated that ‘the securing of the first four acres well nigh exhausted all his money, of which there only remained some £10 or £12 in the bank’. This financial problem was short-lived, however, for Savages was now about to enter its most prosperous era in which it was to receive international acclaim. All activity was now focused at St. Nicholas Ironworks which was equipped with the most modern machinery and staffed by up to 400 employees. [12]

It was in the sphere of fairground machinery that Savages reigned supreme. In the words of their 1902 Catalogue for Roundabouts ‘we have patented and placed upon the market all the principal novelties that have delighted the many thousands of pleasure seekers at home and abroad’. As the expanding railway network made goods cheaply and nationally available, the ancient trading fairs turned to showmanship and public amusement for their survival. Prior to the mid 1860s, roundabouts were driven by young boys or horses pulling round the spinning frame. Similar technology had been applied to horse-driven threshing machines, which Savage was manufacturing at the time. Frederick Savage did not invent the steam-driven roundabout; that privilege probably belongs to Sidney George Soame of Marsham, Norfolk, who exhibited his steam organ engine and roundabout in the 1860s. Nevertheless, Savage was a major pioneer whose engineering skill and commercial flair rapidly outstripped any potential rivals. His Velocipedes and Dobby Horses which proved so popular at the Lynn Mart quickly received nationwide admiration. [12]

As showmen jostled with each other for trade, they required larger, faster and more opulent rides to attract the punters’ attention. Savage responded not only with Racing Peacocks, Jumping Cats and Flying Pigs as variations on the Gallopers theme, but also with the Switchback, the forerunner of most modern rides. Patented in 1888, eight cars ran on an undulating track to which a third compensating rail was added. The undulations of this rail, on which only the front wheel of each car ran, were out of sequence with the inner and outer rails and thereby corrected the proneness of the cars to overbalance. Switchbacks were the most lavish machines ever produced, their cars taking the form of Baroque-style gondalas, gilt-encrusted dragon carriages and the newly invented motor-cars. When steam centre engines were replaced by electric drive, rides became known as Scenics. [12]

Further thrill and amusement was provided by Steam Yachts, Sea-on-Land, Tunnel Railway (incorporating a model locomotive), Razzle Dazzle, Wheely Whirly, Cakewalk and Aeroflyte, to name but a few. These machines could transport people to new realms of ecstasy with their faster speed and sickening dips, all accompanied by the noise, smoke and smell of steam centre engines, the strident music of steam organs and glittering lights provided by Savage Sparklers – new steam-powered electric light engines. It was the golden age of the showman. According to William Sparkes ‘immense sums of money have been paid for the purchase of these respective sets, and as much as £100 to £150 has been received by their proprietors in one day in penny and two penny fares’. [12]

The interior of the Works Yard at Savages in the middle years of the 20th Century. [13]

From 1914 to 1918 the factory was used to manufacture Voisin biplanes (patents acquired from Bleriot in 1914). A field was also acquired to use as a landing strip for testing the aircraft. This airfield may have been location to the north of the factory, but the exact location is uncertain. The aircraft factory itself is said to have been constructed from the buildings of a brick-works at Sedgeford. [11]

The company struggled in the middle 20th century and, although it managed to survive beyond the life of almost all of its competitors, by the late 1960s it was in real trouble and it eventually closed in the early 1970s after a number of rescue bids/attempts. The site was cleared by 1974 and many of the original buildings have been demolished.

Savage’s own house dominated the area around Fisher Fleet. A member of King’s Lynn Forums (‘old-git’) cleverly provided in 2004 a superimposed image showing the house in relation to the modern 21st century layout of the area. [13]

The site of the old Savage’s Works is on the near side of the modern grain silo next to Bentinck Dock. Edward Benefer Way is between the Silo and the Savage’s site, (c) John Fielding. [23]

Bentinck Dock, its Railways and Buildings

The Act authorising the construction of the Bentinck Dock received Royal Assent on 23rd July 1877 but construction work was delayed by problems raising capital. It was not until 1881 that the directors were able to report that all the obstructions thrown in their way had been overcome. The Dock was completed in October 1883 and it was named after William John Arthur Charles James Cavendish-Bentinck (1857-1943), the Sixth Duke of Portland, who officiated at the opening ceremony. [10: p55]

The Dock had vertical walls rather than the originally battered walls of the Alexandra Dock. It was over 10 acres in area. Its opening coincided with an economic downturn which lasted until 1890, when began to pick up once again. [10: p56]

Trade figures show the downturn which followed the opening of the Dock. … In 1883, the total traffic in tons was 280,605. The figure dropped to a low of 155,250 tons on 1888 and gradually increased again, only surpassing the 1883 figure in 1891. After this date, traffic increased to as much as 780,587 tons in 1907 before dropping back to a more steady figure of round 450,000 tons before the First World War. [10: p56]

After the grouping, the LNER became responsible for working the Docks branch and the shunting of dock traffic under an agreement with the docks company. In 1925 the Anglo-American Oil Company constructed five storage tanks with a capacity of over 1.25 million gallons on Estuary Road. These tanks were linked by a pipeline to a berth on the Dock. [10: p61]

The first seaborne oil cargo arrived in September 1925. Soon after this a whole series of different oil companies were using the docks and their logos could be seen on tank wagons using the docks branch.

Molasses were also stored in tanks alongside the docks. They were a by-product of the processing of sugar beet. A large storage tank was erected on the West side of Bentinck Dock with a capacity of 2,500 tons. It was connected to another berth by pipeline. [10: p62]

A 1935 Development Plan shows the layout of the railways around Bentinck Dock. Estuary Roadbis marked to the Southeast side of the dock and although Savage’s Works are not shown, the spur into the Works is shown crossing Estuary Road. It the ran down the Southeast shoulder of the road and entered the northern corner of the Works.

This aerial image shows Bentinck Dock in 1928. The coal lift can be seen on the Northwest side of the dock. The large warehouse was known as No. 3. While the dock is empty of shipping the railway sidings appear to be busy and wagons wait close to the dockside cranes for loading or unloading. [24] The same image appears below as a postcard of the docks.

This later aerial image shows further development of the buildings around Bentinck Dock. In the bottom left we can see Savage’s Works. The sidings alongside the dock warehouses are particularly busy. The coal lift is still visible to the Northwest side of the dock. Development around the Dock now stretches alongside Fisher Fleet all the way to the River Ouse.

The large warehouse known as No. 3 Warehouse is shown in a series of pictures below from different eras in the life of the docks. In most of the images the rail sidngs which ran along the quay are visible and frequently the travelling cranes which served the dockside can be seen as well.

This image is taken after 1960 when the old hydraulic cranes were replaced by more modern cranes.

In this image 4 hydraulic cranes were being used to transfer goods from the steamship Moidart into No. 3 Warehouse. “This was the first time that four cranes had been used simultaneously on the same ship to discharge cargo into the warehouse. There are about 15 bags in each sling, all of which had to be individually man-handled in the holds and again in the warehouse.” [10: p82] Careful inspection of the image will show that the furthest crane of the four from the camera is discharging these bags to a makeshift stage supported by two wooden-bodied railway wagons. At a higher level there are two other stages jutting out from the side of the warehouse upon which the bags were landed. They are supported by packing placed on the more solid platforms below. Dockworkers lives were at risk throughout these operations! [10: p83]

This aerial image is taken from the South. St. Nicholas’ Chapel is prominent in the foreground. Bentinck Dock is close to the top centre of the image. Savage’s can be seen to the right of the Dock with the owner’s house prominent to the right of Estuary Road facing Cross Bank Road. The fan of sidings to the West of Pilot Street are centre-stage. [25]

There were 8 hydraulic cranes along the east side of Bentinck Dock. They are evident in a number of pictures above. They had capacities from 30 cwt to 5 tons and were often used to transfer goods directly from ships into No. 3 Warehouse.

The two images immediately above are taken on the Northwest side on Bentinck Dock in 1911 looking North towards the buildings of Sydenham & Co Ltd. In the first image the hydraulic coal lift just sneaks in on the right-hand side of the picture. There were a number of timber merchants with premises aroun Bentinck Dock in the early and middle 20th century. These included: Bristow & Coply; F. E. Chapman; J. T. Stanton; and a little later, Travis & Arnold.

The two images above show the hydraulic coal lift which was sited on the Northwest side of Bentinck Dock at different times in its life. [26]

These three excerpts from the OS Map of 1928 show the railway layout around the east side of Bentinck Dock at the time.

This map shows the much later layout of the Docks with a considerably reduced rail network (1970s and later). The extension which served Dow Chemicals can be seen north of Bentinck Dock.

Dow Chemical Company arrived in King’s Lynn in the 1950s establishing a large site to the Northwest of Bentinck Dock. Dow Chemicals Plant stretched from Cross Bank Road in the south to Estuary Road in the North – the Grey area north of Fisher Fleet on the plan above.

This picture shows the Dow Chemicals site in the mid-1970s just before the major incident in 1976 during the very hot summer of that year. [27] The Fisher Fleet can be made out just below the top of the picture. The River Ouse crosses the top right of the image. The fact that the site was rail served is also evident – rail tracks can be made out on the laft of the image.

The plant was served by rail until the closure of the docks branch. The track layout at the time of the explosion in 1976 is drawn on the plan immediately below. [27] The plan is not aligned north-south but uses the River Ouse to define its alignment. The main site railway travels in an approximately northwesterly direction from the site gates.

Details of the explosion, its aftermath and the learning which followed are contained in a report promulgated on-line by the Institution of Chemical Engineers – http://www.icheme.org. [27] The report was first published by the Health and Safety Executive in March 1977.

This image in the 1977 Health and Safety report was taken to show steel flooring embedded in the roof of the boiler house, 99 metres from the area of the explosion, but for the purposes of this post, it shows another view of the rail sidings in the plant. [27]

The next three pictures show the rail approach to the Dow Chemicals site from the lines on the East and North of the Bentinck Dock. The third image is taken inside the gates of the site.


The image below shows another location close to Bentinck Dock. There was a spur that headed north across Estuary Road which then ran alongside New Cottages on the 1928 OS Map above. This became the location for an oil tank farm which is still in use in the early 21st Century.

The tank farm north of Estuary Road taken in June 2008. The picture was taken from the road not, as suggested by Wikipedia Commons, within the Dow Chemicals site. The site at this location is, in 2018, operated by Pace Petroleum Ltd. A number of the tanks have been removed, as can be seen below.

References: (NB: these references cover parts 2 and 3 about the Docks Branch, if you cannot find the location to which a reference refers in the text of this post, please check in Part 2)

  1. http://www.geograph.org.uk, accessed on 24th September 2018.
  2. http://www.geograph.org.uk/photo/5824045, accessed on 24th September 2018.
  3. http://www.geograph.org.uk/photo/4859696, accessed on 24th September 2018.
  4. http://www.geograph.org.uk/photo/4627190, accessed on 24th September 2018.
  5. http://www.kingslynn-forums.co.uk/viewtopic.php?f=14&t=633, accessed on 24th September 2018.
  6. http://norfolkmuseumscollections.org/#!/collections/search?q=Kings%2BLynn%2BDocks, accessed on 24th September 2018.
  7. http://www.kingslynn-forums.co.uk/viewtopic.php?f=14&t=1386&hilit=docks+railway, accessed on 23rd September 2018.
  8. http://www.kingslynn-forums.co.uk/viewtopic.php?f=14&t=1386&hilit=alexandra+dock, accessed on 24th September 2018.
  9. http://www.edp24.co.uk/news/bird-s-eye-view-of-king-s-lynn-half-a-century-or-more-ago-1-5015740, accessed on 24th September 2018.
  10. Mike G Fell; An Illustrated History of The Port of King’s Lynn and its Railways; Irwell Press, Clophill, Bedfordshire, 2012.
  11. http://www.heritage.norfolk.gov.uk/record-details?MNF13622-Savage%27s-Engineering-Works&Index=12818&RecordCount=56734&SessionID=61d2a652-a74b-4c81-a979-dc394157106a, accessed on 29th September 2018.
  12. https://www.museums.norfolk.gov.uk/-/media/museums/downloads/learning/kings-lynn/a-history-of-savages.pdf, accessed on 29th September 2018.
  13. http://www.kingslynn-forums.co.uk/viewtopic.php?f=14&t=16&start=75, accessed on 30th September 2018.
  14. http://www.kingslynn-forums.co.uk/viewtopic.php?f=14&t=16, accessed on 30th September 2018.
  15. http://www.kingslynn-forums.co.uk/viewtopic.php?t=160, accessed on 30th September 2018.
  16. https://www.geograph.org.uk/photo/4859816, accessed on 30th September 2018.
  17. http://www.kingslynn-forums.co.uk/viewtopic.php?f=14&t=1386&hilit=docks&start=15, accessed on 28th September 2018.
  18. http://www.jcbarrettphotographic.co.uk/portoflynn_railways.html, accessed on 25th September 2018.
  19. http://www.kingslynn-forums.co.uk/viewtopic.php?f=14&t=1386&p=38109&hilit=last+train+docks#p38109, accessed on 30th September 2018.
  20. https://www.youtube.com/watch?v=k-SxJiGGAgk, accessed on 30th September 2018.
  21. http://www.kingslynn-forums.co.uk/viewtopic.php?f=14&t=1386&start=75, accessed on 30th September 2018.
  22. https://www.google.co.uk/maps/@52.7607969,0.3925969,3a,75y,167.73h,83.45t/data=!3m8!1e1!3m6!1sAF1QipM1J3080sMdNrn1EEah9fq3d7RFvQ8zYEXfIBCD!2e10!3e11!6shttps:%2F%2Flh5.googleusercontent.com%2Fp%2FAF1QipM1J3080sMdNrn1EEah9fq3d7RFvQ8zYEXfIBCD%3Dw203-h100-k-no-pi-0-ya215.55334-ro0-fo100!7i5028!8i1477, accessed on 30th September 2018.
  23. http://www.edp24.co.uk/news/aerial-photos-kings-lynn-history-1-5403574, accessed on 30th September 2018.
  24. https://britainfromabove.org.uk/en/image/EPW021481, accessed on 29th September 2018.
  25. https://www.cambridgeairphotos.com/areas/kings+lynn+and+west+norfolk, accessed on 23rd September 2018.
  26. http://www.kingslynn-forums.co.uk/viewtopic.php?t=95, accessed on 3rd October 2018.
  27. https://www.icheme.org/communities/special-interest-groups/safety%20and%20loss%20prevention/resources/~/media/Documents/Subject%20Groups/Safety_Loss_Prevention/HSE%20Accident%20Reports/The%20Explosion%20at%20Dow%20Kings%20Lynn.pdf, accessed on 6th October 2018.
  28. https://commons.m.wikimedia.org/wiki/File:Dow_Chemical_spur_5.jpg, accessed on 6th October 2018.

King’s Lynn Docks Branch – Part 2

The Dock Branch from the Station to John Kennedy Road was covered in a previous post:

King’s Lynn Docks Branch – Part 1

We start this post with two pictures of one of the last passenger carrying trains to travel along the docks Branch at John Kennedy Road Level-Crossing. The images come from the railtour organised by the Fakenham Railway Society in March 1980 which included (among other things) a trip up the docks branch in King’s Lynn. [7]The pub on the left of the last image was ‘The Retreat’, it is much easier to see on this monochrome image. [8]

The final freight train to travel along the line is shown in the above image which was taken in May 1993. The last railway movement in the docks recovered remaining rolling stock from the docks in June 1994, (c) John Barrett LRPS – Ref: 93/588/1. [18][19]

Three images from the Geograph website, http://www.geograph.org.uk, follow, which show the crossing at John Kennedy Road early in the 21st Century. [1]Looking East, back towards King’s Lynn Station © Copyright N Chadwick. [2]The Road Crossing © Copyright Richard Humphrey. [3]Looking West towards the docks © Copyright David Dixon. [4]

John Kennedy Road was constructed in the mid-1960s. The original road crossing at this location was over Pilot Street.and is shown on the early 20th Century Ordnance Survey map below. To the west of Pilot Street, its level-crossing and footbridge, the docks railways fanned out to serve the two docks at King’s Lynn and their associated industry.The footbridge shown on the above map is picked out on both the maps below. The left-hand map is from 1886, the right-hand map from 1929. The paired maps were found on the King’s Lynn Forums. [5] The right-hand map shows the Pilot Cinema which I think was where I watched James Bond movies in the 1970s!Pilot Street looking North in the late 1950s or early 1960s. The footbridge over the railway has been removed. An accurate date on its removal would date the picture as I believe that John Kennedy Road was constructed in the early to mid-1960s. The pub now known as ‘The Retreat’ was in the days of this photograph known as ‘The Tilden Smith’. [5]The two pictures above were taken in 1920 not long after a out-of-gauge load removed the main span of the footbridge. [5]This very early picture of the Fisher Fleet is taken before the stream had been culverted and shows the line of the railway into the docks supported on a wooden trestle. ‘The Tilden Smith’ public house, now ‘The Retreat’ is in the centre of the image. [15]

The first of the two monochrome images above gives us the first glance into the docks. It looks West from the crossing on Pilot Street and shows the tracks of the Branch curving slightly to the North. The left-hand track, under the loading gauge, heads towards the Alexandra Dock. The plans below show the southern side of the Alexandra Dock. All of the warehouses and industrial buildings were rail-served. The plan immediately below is from the very early 20th Century. The second plan below comes from the late 1920s. The railway layout is very similar but the structures on the site have developed.The final layout of the railways around the docks in King’s Lynn is nothing like what was originally intended. The plans for the construction of the docks anticipated a connection to the Harbour Branch further south down the river.

Alexandra Dock

Mike Fell’s book [10] includes the plan below which shows the planned location of the Alexandra Dock with a diversion of Fisher Fleet. The line of a proposed railway is shown curving round the north side of existing buildings and then running beside the river to join the Harbour Branch on South Quay. [10]The route would have required a swing bridge across the Purfleet [10: p47] and a timber viaduct 297 yards in length! [10: p23]  “In 1864, the Corporation of Lynn sanctioned a proposal to construct an enclosed dock … The new dock was to be serviced by a new branch railway, half a mile in length, which would connect with the Great Eastern Railway’s harbour branch at the Purfleet and run in front of the existing warehousing.” [10: p45]

The planned route was not constructed, as it proved to be impracticable and expensive [10: p47] and the idea was superseded with a revision of the Docks scheme in 1869 which authorised a new route running from the railway station in a king’s Lynn to the docks. “Under the new authorisation, the dock company had to provide sufficient siding accommodation near to the new junction so as not to interference with GER traffic. Sidings had to be constructed capable of holding 40 wagons in each direction independently of the doc approach railway and the existing GER lines were not to be used for shunting.” [10: p47] An agreement between the various railway companies involved was eventually signed in 1873. 

The early track layout was very quickly proven to be inadequate for the rapidly increasing levels of traffic. By 1877, only a few years after the dock was opened traffic had grown from 33,174 tons in the first year of operation to 174,010 tons of which 157,813 tons was carried by rail. … By 1879, two engines were required to undertake the shunting on the dock whereas one engine had sufficed hitherto. [10: p51]

The adjacent plan comes from the very early years of the Alexandra dock. Fisher Fleet is of a significant length on the plan. The railways are much less well developed, although the basic layout is much as in the later plans of the completed dock above. The track layout expanded quickly in the 1870s. [5]

Below the adjacent plan is a picture from the every early life of the Alexandra Dock which I believe was taken from the Southeast of the site. The Coal Yard on the adjacent plan can be seen in the foreground of the image. [7]The same location just a few years later, the buildings of the Coal Yard have developed somewhat. [7]Also from the early life of the Docks, this image is taken from the South Side of the lock providing access from the River Great Ouse into the Alexandra Dock. Railway wagons can be seen on the North side of the Dock in front of the long low warehouse which appears on the plan above. [8]These two aerial images were found on King’s Lynn Forums, the first shows the development around the Alexandra Dock in the mid to late 1920s. [8]The Alexandra Dock is also in the foreground of this image which was taken in the years soon after the Second World War. [8]Taken from the Northeast in the late 1950s/early 1960s this image shows one of the swing bridges over the channel which linked the two docks, it provides a good overview of some of the railway tracks around Alexandra Dock and shows the three major warehouses on the South side of the dock. [9]The three large warehouses on the South side of the Alexandra Dock were known as R1, R2 & R3. They are the main focus of this image. The spire in the background is that of St. Nicholas’ Chapel. In the image, R1 is on the right, R3 on the left and R2 is hidden behind. [10: p51, p90]

The South side of the Alexandra Dock initially accommodated a series of timber yards, a coal yard and some smaller grain warehouses. These can be seen in the early map of the Dock. That map also shows the dock offices in the bottom right and which csan be seen clearly in the image below from 1928. They are in the bottom left of the picture, looking like a row or terraced houses. [10]This view from 1928 shows the South side of the Alexandra Dock, the original two sidings are in evidence with the one nearest the dock wall passing through the low level warehousing and the other siding running to the left of the same warehouses. The large grain warehouses are: R1, furthest from the camera; R3, closest to the camera; and R2, linking the other two. To the rear of the image, timber is much in evidence and dark rooves are covered storage areas for timber. There also appears to be timber floating in the dock in the right foreground close to the remains of the old timber jetty (in the bottom right of the picture). The timber sheds are focussed on on the image below. Careful inspection of the picture will show that the timber sheds were well-served by rail. [10]We have already noted the rapid rise in use of the Alexandra Dock. Very quickly, the need for further dock-side accommodation for shipping became apparent and work started to find room for an extension dock. Bentinck Dock was only created after protracted passage of an Act through Parliament and we will come back to that story later in this blog.

There was a rapid expansion of facilities around Alexandra Dock in the late 19th Century. By 1893 two large tall grain warehouses (R1 and R2) had been constructed on the South side of the Dock. Another (R3) was planned. [10: p51] Much of the railway infrastructure was in place and serious concern was being expressed about access to the docks by road. The main access road, Pilot Street was narrow and the route to it through the town was tortuous. [10: p 51]

The area immediately to the Northwest of Alexandra Dock was also quickly developing. Rail infrastructure was in place late in the 19th century. By the early 1870s significant structures were already in place – a manure warehouse on the north side of the lock and a long single storey warehouse which was designated as a guano cake and grain warehouse.

By 1877 an oil mill (Oilcake Manufactory, below) and warehouse had been constructed in the land between the Dock, the new straight alignment of Fisher Fleet and the River Ouse. an additional grain warehouse was built alongside this and the rail infrastructure was amended to cope with the additional traffic. The OS plans from the turn of the century show what was in place at that time. It is important to note the significant storage sidings alongside Fisher Fleet.The North side of Alexandra Dock in 1928. The two swing bridges over the channel to Bentinck Dock are in the foreground. The nearest structure had a ban placed on its use as a rail route within the Act of Parliament which authorised the construction of Bentinck Dock. Timber storage is again much in evidence as are the rail sidings between the grain warehouses. The manure warehouse is in the top left and the oil works are shown after a major fire which resulted in the closure of the factory. The chimney was demolished in 1929. [10]The dock after the removal of the Oilworks chimney. [17]

The two pictures above come from Google Streetview and show the access roads to the Alexandra Dock in the 21st Century. In both images, the water of the dock can be made out through the gates of the port. The port is surrounded now by modern industrial buildings and silos.The Dock from above on Google Earth in 2016 the two swing bridges over the channel are easily picked out. The one closest to the top of the image was reserved purely for road traffic and has become a public highway. The other bridge allowed for rail and road access and remains within the limits of the Dock fences.This Google Streetview Image shows both of the swing bridges, the internal docks bridge can be picked out to the left of the control signals for the bridge on Cross Bank Road.This image gets us the closest to the Alexandra Dock that we can using Google Streetview. It shows both swing bridges and the dock beyond.A similar but older view of the Alexandra Dock with the railway/road swing bridge in the foreground.A closer shot of the internal docks bridge which once carried the dock railway. [16]

Four rail routes diverged to the Northwest of the bridge above, two of which served the northern side of Alexandra Dock, one served the series of long sidings alongside the Fisher Fleet and one turned North to serve the West side of Bentinck Dock. The remains of this last route are visible curving to the North just to the West of the swing bridge on the satellite image below.A short length of track remains in the tarmac close to the docks gates on the South side of Cross Bank Road.

The video below shows the channel between the two docks in use, with a ship moving from the Alexandra Dock to the Bentinck Dock. The quality is poor. [20]

The channel in use in the early years of the 21st century. [21]In order to create the channel between the two docks, Fisher Fleet had to be truncated. This is Fisher Fleet in the early 21st century, (c) Martin Pearman on Google Streetview. [22]

References (NB: these references cover parts 2 and 3 about the Docks Branch, if you cannot find the location to which a reference refers in the text of this post, please check in Part 3)

  1. http://www.geograph.org.uk, accessed on 24th September 2018.
  2. http://www.geograph.org.uk/photo/5824045, accessed on 24th September 2018.
  3. http://www.geograph.org.uk/photo/4859696, accessed on 24th September 2018.
  4. http://www.geograph.org.uk/photo/4627190, accessed on 24th September 2018.
  5. http://www.kingslynn-forums.co.uk/viewtopic.php?f=14&t=633, accessed on 24th September 2018.
  6. http://norfolkmuseumscollections.org/#!/collections/search?q=Kings%2BLynn%2BDocks, accessed on 24th September 2018.
  7. http://www.kingslynn-forums.co.uk/viewtopic.php?f=14&t=1386&hilit=docks+railway, accessed on 23rd September 2018.
  8. http://www.kingslynn-forums.co.uk/viewtopic.php?f=14&t=1386&hilit=alexandra+dock, accessed on 24th September 2018.
  9. http://www.edp24.co.uk/news/bird-s-eye-view-of-king-s-lynn-half-a-century-or-more-ago-1-5015740, accessed on 24th September 2018.
  10. Mike G Fell; An Illustrated History of The Port of King’s Lynn and its Railways; Irwell Press, Clophill, Bedfordshire, 2012.
  11. http://www.heritage.norfolk.gov.uk/record-details?MNF13622-Savage%27s-Engineering-Works&Index=12818&RecordCount=56734&SessionID=61d2a652-a74b-4c81-a979-dc394157106a, accessed on 29th September 2018.
  12. https://www.museums.norfolk.gov.uk/-/media/museums/downloads/learning/kings-lynn/a-history-of-savages.pdf, accessed on 29th September 2018.
  13. http://www.kingslynn-forums.co.uk/viewtopic.php?f=14&t=16&start=75, accessed on 30th September 2018.
  14. http://www.kingslynn-forums.co.uk/viewtopic.php?f=14&t=16, accessed on 30th September 2018.
  15. http://www.kingslynn-forums.co.uk/viewtopic.php?t=160, accessed on 30th September 2018.
  16. https://www.geograph.org.uk/photo/4859816, accessed on 30th September 2018.
  17. http://www.kingslynn-forums.co.uk/viewtopic.php?f=14&t=1386&hilit=docks&start=15, accessed on 28th September 2018.
  18. http://www.jcbarrettphotographic.co.uk/portoflynn_railways.html, accessed on 25th September 2018.
  19. http://www.kingslynn-forums.co.uk/viewtopic.php?f=14&t=1386&p=38109&hilit=last+train+docks#p38109, accessed on 30th September 2018.
  20. https://www.youtube.com/watch?v=k-SxJiGGAgk, accessed on 30th September 2018.
  21. http://www.kingslynn-forums.co.uk/viewtopic.php?f=14&t=1386&start=75, accessed on 30th September 2018.
  22. https://www.google.co.uk/maps/@52.7607969,0.3925969,3a,75y,167.73h,83.45t/data=!3m8!1e1!3m6!1sAF1QipM1J3080sMdNrn1EEah9fq3d7RFvQ8zYEXfIBCD!2e10!3e11!6shttps:%2F%2Flh5.googleusercontent.com%2Fp%2FAF1QipM1J3080sMdNrn1EEah9fq3d7RFvQ8zYEXfIBCD%3Dw203-h100-k-no-pi-0-ya215.55334-ro0-fo100!7i5028!8i1477, accessed on 30th September 2018.
  23. http://www.edp24.co.uk/news/aerial-photos-kings-lynn-history-1-5403574, accessed on 30th September 2018.


King’s Lynn Docks Branch – Part 1

King’s Lynn was my home from 1972 to 1978 – my teenage years. I have often thought about investigating the ports and railways of the town. King’s Lynn has a long and distinguished history as a port. Until 1537, the town was called Bishop’s Lynn with a population of 5,500-6,000. Wool, grain and salt were exported and pitch, fish and iron were imported. The adjacent image gives an impression of the town in the Medieval period. [21]

In 1101 Bishop Herbert de Losinga of Thetford began the first Medieval town between the Purfleet and Mill Fleet by building St. Margaret’s Church (now King’s Lynn Minster) and authorising a market. A small prosperous town grew up quite quickly and, in 1204, following a charter from Bishop John de Grey of Norwich, the town became Bishop’s Lynn (Lenne Episcopi).

Trade built up along the waterways that stretched inland from Lynn, and the town expanded and quickly filled the space between the two rivers, Millfleet to the south and Purfleet to the north.

By the late 12th century, a further period of expansion began, more deliberately planned than the first, with wider straighter streets and a much larger market place – this is the second Medieval town between the Purfleet and Gaywood River or Fisher Fleet.

Bishop’s Lynn grew rich on trade, both within Britain and abroad. The Hanseatic League, a powerful German trading organisation made up of merchants from North Germany and neighbouring countries around the Baltic Sea contributed greatly to this prosperity. The legacy of trade can be found in the many merchant houses and other fascinating buildings in this medieval port. Visit West Norfolk provides a good history of the Hanseatic period in the life of the town:

“By the early 13th century Lynn had become a significant market town and seaport, having grown rapidly since 1101 when Bishop Losinga of Norwich recognised it as a settlement on his Gaywood estate. He had endowed the Benedictine monks of Norwich Cathedral with the lordship. Their Priory Church of St Margaret was, nevertheless, only to be built and rebuilt through the wealth of Lynn’s mercantile community, though the Norwich bishops were determined to retain their grip on the town. They had founded a second town and market in the 1140s on the Newland to the north of the first and assumed the lordship of both centres – of Bishop’s Lynn – in 1205. When Lynn received its first royal charter of borough freedom in 1204, giving its merchants a degree of self-government, it was already the third or fourth port of the Kingdom.” [2]

“German merchants from the Baltic and Hamburg secured trading privileges at Lynn in 1271 and these were confirmed, after some local disputes, in 1310. The right to maintain their own houses was a critical concession (other alien merchants had to lodge with burgesses). Lübeckers and other merchants from the East appear to be visiting English ports at the beginning of the 13th century, following traders from Got land, to Lynn, Hull and Boston, then to London. Professor Friedland has also referred to Lynn and Boston as destinations for Hanseatic merchants trying to establish themselves in the West. The Norfolk town accepted them as “the fraternity of the German Hanse” (fratres de hansa alemanies in Anglia existentes, Lynn 1302). Boston and Lynn attracted the German Hanse because their extensive hinterlands offered commercial opportunities and rewards. They travelled to these Wash ports for wool in the 13th century, visiting their annual summer fairs, as did the Lübeckers in 1271.” [2]

“Once the export of wool from England began to fall in the later 14th century, Hanseatic towns tended to link up with particular English ports. German trade to Boston was interlocked with the Kontor at Bergen where Lübeckers enjoyed a dominant role; their ships carried fish to the Wash and took away wool, cloth and salt. Lynn merchants made Danzig their chief destination from the 1380s and, sure enough, it was ships from Danzig that had already started to visit the Norfolk seaport, though Hamburg and Bremen men traded through Lynn too.” [2]

“Herring, timber, wax, iron and pitch were imported into England via Lynn in Hanseatic ships which sometimes carried grain from the Wash to Flanders. Wool, skins, cloth and lead were commodities taken back to Danzig and other German harbours. Lynn merchants sent cargoes to Prussia in Danzig ships and to Bergen in Lübeck bottoms, but none of them appear to have been resident in Norway or Hanseatic cities until the 1380s. Lynn was soon more heavily dependent on the Prussia trade through Danzig than any other English port.” [2]

“A number of Lynn merchants and their associates seem settled in several Baltic seaports by the early 15th century, particularly in Wismar, Stralsund and Danzig. That Lynn treated independently with the Hanseatic cities in the resolution of disputes or grievances testifies to a not inconsiderable presence. Details of this commercial and diplomatic interaction can be found in the memorandum book belonging to William Asshebourne, Lynn’s town clerk. In 1408 he received a letter from Lynn men in Danzig setting out their ordinances recently drawn up for “their company” there. The son of Margery Kempe married a Prussian woman and both travelled to Lynn in 1431, leaving their child in Danzig. Unfortunately, Margery’s son died in Lynn and she escorted her daughter-in-law back to Danzig. There appears also to have been an exchange or transfer of sailors and artisans between Wash and Baltic seaports. A sizeable group of German shoemakers were living in Lynn by the 1420s for example.” [2]

“Commercial relations between England and the Hanse deteriorated following the seizure of its Bay salt fleet (from south-west France to the Baltic) by English privateers in 1449. Then all Hanseatic towns united against England after a major incident off Denmark in 1468. Peace was negotiated at Utrecht in 1473/74 after several years of sea warfare and the German delegation achieved most of its diplomatic aims. It insisted on a free gift of their former trading posts or steelyards at London and Boston and of a new one at Lynn. The Treaty of Utrecht was signed in 1474 and the English King conveyed a quay and tenements in the Norfolk town to the Hanse. Lübeck invited Danzig to take charge of the property, the complex now known as Hanse House. This is today the only surviving Hanseatic business headquarters or steelyard in England.” [2]

After the dissolution of the monasteries by Henry VIII, Lynn changed it name to Lynn Regis – subsequently King’s Lynn – remaining an active port to this day. [1] Henry VIII finally dispossessed the Norwich bishops and transferred full political power to the town’s merchants.

“By the 16th century the east coast trade in corn and coal, mainly involving London and Newcastle respectively, kept the commercial wheels of this Norfolk seaport turning. Though its international trade with the Baltic and south-west France (wine imports were substantial) continued, it was relatively less important than before. Lynn’s hinterland remained the key to its success. In 1722 the travel writer Daniel Defoe was impressed by the fact that the Wash haven enjoyed “the greatest extent” of inland navigation of any English port outside London and served six counties “wholly” and three “in part” with coal, wine and provisions. Lynn was in turn a major corn exporter with granaries lining the river. But the town failed to develop any manufacturing industries in the course of the 18th century and, despite the buoyancy of shipbuilding and brewing, its population was only 11000 in 1801.” [2]

“Lynn’s population doubled between 1801 and 1851 as the market and port expanded with East Anglia playing a leading role in feeding London and the new industrial regions. Then the coming of the railways in the 1840s robbed Lynn of its geographical advantages as river and coastal traffic gave way to the iron road. Population fell from 20,000 to 17,000 in the period of 1851-1871 and economic recovery followed through the building of docks linked to the new national railway network, which sparked the town’s first industrial revolution. New factories began to supply English farmers with machinery, artificial manure and animal feed. Yet the town grew slowly because it was too remote from the industrial regions; its hinterland remained agricultural when food imports into England from America increased to compete with home farmers.” [2]

“Despite the growth of suburbs and some redevelopment in the 1960s and 1970s, the Old Town of King’s Lynn remains of national significance for its architectural and historic interest. Its connection with the Hanseatic League of the Middle Ages was highlighted in 2004 with the visit of the Kieler Hansekogge; then in 2005 the Borough of King’s Lynn and West Norfolk became a member of the New Hanseatic League – England’s first representative.” [2]

The Hanseatic League Warehouse in King’s Lynn is the only surviving League structure in England [17]

The harbour was historically along the waterfront on the river. In the middle ages the River had a more easterly course and some of the medieval buildings were on an island. the river course was moved westwards and Boal Quay and South Quay were formed. King’s Lynn Harbour Branch was constructed to serve these quays. deatils of the Harbour Branch can be found on in this post:

Kings Lynn Harbour Branch

The port infrastructure developed in the 19th century following the formation of a docks and railway company in 1865. This built the Alexandra Dock which was completed in 1869 and linked by rail in 1870. By 1876 over 500 ships were using the new dock each year. [3].

The larger Bentinck Dock with a length of 800 metres (2,600 ft) was opened in 1883. [3][4] The port has traditionally relied on exporting agricultural produce for the bulk of its traffic. [3][16]

In the early 21st Century, the docks are operated as the Port of King’s Lynn by Associated British Ports. The port handles around 750,000 tonnes of cargo a year, including agricultural and forest products, chemicals, steel and other metals. [4] Three docks, including the tidal Riverside Quay, can accommodate vessels up to 140 metres (460 ft) in length. [4] The docks cover an area of 39 hectares (96 acres) and include the 25,000 tonne capacity Alexandra Grain Silo complex. [4][16]

The Docks Branch
The branch left the main line at what feels like a major junction just to the East of the Station. Lines to Swaffham and Hunstanton diverge from the main line in initially and easterly direction and the Dock Branch heads away to the north. The busy railway junction was intersected by a level crossing for what became known as Tennyson Avenue. The map below is sourced from the National Library of Scotland and is an extract from the OS Maps of the early 20th Century. [8]


Every train heading for the Docks had to cross Tennyson Avenue.


The picture above shows that pedestrians were not using the footbridge despite the dangers of the busy road. [9] The picture below shows the level-crossing and footbridge as I remember it in the 1980s. [5] I was unaware that the bridge was actually relatively newly refurbished at that time! The original footbridge had less headroom and needed to be lifted to accommodate electrification. It was a lattice-girder structure which was considerably more graceful that that in these images! [9]


The next image shows the same location in the early 20th Century, the footbridge is long gone.


The larger white building beyond the crossing in both images is part of what I knew as King’s Lynn Technical College. It was where my father taught in the Engineering Department until the mid-1980s. In the second of the two images, the bend remains sharp but the sight-lines for road traffic are much improved.

The first picture below is taken looking west from the footbridge steps in the late 1980s. The docks branch curves away to the right. [9]

The next picture is another view towards King’s Lynn Station from Tennyson Avenue in 2010. The docks branch is the line in the immediate right foreground, (c) Gary Troughton. [7]

Compare the sparsity of the track-work in the two images above with that shown in the monochrome image immediately below. The image below looks towards King’s Lynn Station and is taken from the footbridge and the old crossing gates can be seen in the foreground. [9]

The next shows a late 20th Century view looking to the East. The footbridge is still in place and the junction between the docks branch and the main line is visible on the left beyond the 15 mph speed limit sign. The line straight ahead is the remains of the line to Swaffham. [9]

The mainline to Ely and beyond curves to the south around behind the signal box as can be seen in both the images immediately below. [9][25]

Before moving on down the docks branch, here are a couple of images taken when the old footbidge was in place adjacent to the Tennyson Avenue Level-Crossing. [9]

The site has changed dramatically today, the footbridge is gone and shops have been built adjacent to the crossing. These next two pictures were taken at the beginning of October 2018 by Beeyar Wunby on the King’s Lynn Forums website. [28]


Moving on from the junction at Tennyson Avenue Level Crossing,, the branch consisted of a series of sidings in parallel providing space for trains to be marshalled.

There were two significant workplaces alongside the docks branch. The first was the Malthouse and the second the Iron Works. They were int he area of the town known as Highgate and both feature on the adjacent map.

The Malthouse was a substantial building which, in the early 21st Century, is now converted into flats and known as the Maltings. It was rail-served, having its own sidings and stands close to the old station goods yard but on the East side of the Docks Branch with a trailing point providing access to its sidings.

The first image below shows the end of the Malthouse building in 1986. [10]

A train of wrapped coiled steel passes in front of the Malthouse in the later days of the Docks Branch. [19]


This aerial image shows the Malthouse and Tennyson Avenue footbridge in the bottom left. The dock branch runs left to right just above the Malthouse. The station goods-yard is a hive of activity. The engine shed is just above the Malthouse. [11]


The Malthouse and the Engine Shed appear at the bottom of this image. The docks branch heads off to the right of the picture just above the Malthouse. [12]

To the North of the Malthouse, the docks branch followed a straight path to the over-bridge at Gaywood Road (A148) running behind King’s Lynn Technical College campus. In the early (and later) 20th Century there was an Ironworks on the South side of Gaywood Road.

The bridge which took Gaywood Road over the Docks Branch was referred to locally as Dodman’s Bridge. [13] The works were called Dodman’s Ironworks. The image below was taken in the 1930s by someone standing on Dodman’s Bridge and looks East towards Gaywood. The procession is associated with the Norfolk Show which was held in King’s Lynn at that time. There is a healthy discussion on King’s Lynn Forums about the picture! [13]

View East from Dodman’s Bridge along Gaywood Road. The School in the background is Highgate School. [13]

An aeriel view of Dodman’s Works on the South Side of Gaywood Road. The Docks Branch runs between the works and the gable end of the terraced house beyond. [14]

The gates of the factory as seen in the picture above. [14]

Inside the works. [14]

Dodman’s Heavy Load Road Transport. [14]

The pictures of Dodman’s have been sourced from King’s Lynn Forums. [13][14] The works were built by Alfred Dodman. He was a prominent figure in King’s Lynn’s industrial scene. Starting up in 1854 he owned, co-owned and ran several foundries of increasing size until he was leased the site of Highgate Field and built a new foundry there in 1875. The firm mostly made ‘land’ boilers or the Cornish and Lancashire types but eventually branched out into locomotive, traction, portable and marine boilers and hardware. In the early 1900s they began making mining pumps, mill machinery, oil engines and cranes.

In 1902 Dodman’s were contracted to make boilers for the army and navy. In 1905 they were also contracted by the Crown Agents for the Colonies.

Alfred Dodman died in 1908, however the firm continued, manufacturing for the army and admiralty throughout the First World War, and for the navy and RAF in the Second World War. After 1945 the company kept expanding, landing contracts in India and the Persian Gulf. To keep up with technology they moved away from steam and oil power and focused on building pressure machinery for and storage tanks for the petro-chemical and North Sea industries.

In 1972 the directors planned a move to a new site on the Hardwick Industrial Estate, however financial difficulties in 1975 marred this move and forced the company to shut down. The Highgate site was cleared in 1977 for housing. [15] The picture above is taken from ‘King’s Lynn in Colour’ Volume 1. [18]

Dodman’s Bridge in the 21st Century, looking East with the site of the Ironworks to the right.

The view South along the line from Dodman’s Bridge in July 2012. [24]

In this image and the next we see the same location at a much earlier date. Both images are in Mike G. fell’s book about the Docks and their railways. Both images have the Dodman’s works on the right. In the first image a train with items from Portugal passes the works with cattle wagons in the siding beyond. [26]

In this image, a short train of grain wagons passes Dodman’s works on its way from the Docks. [26][27]

The next two pictures were taken on a railtour organised by the Fakenham Railway Society in March 1980 which included (among other things) a trip up the docks branch in King’s Lynn. These two images are taken below the bridge next to Rodman’s on Gaywood Road. Neither image is of the highest quality but they are the only one’s that I can find taken from track-side and including the over-bridge. [19]

North of Dodman’s Bridge and the Gaywood River, the Docks Branch turned to the West on the North side of the Water Mill and Electric Works in North Lynn.

Workmen dismantling the Docks Branch with the Gaywood River bridge beyond. [19] Thanks to SEDFreightman on the RMWeb Forum [29] for the following comment about the photo above: “The photo shows employees of Grant Rail (Railtrack’s contractor) undertaking spot re-sleepering on the section of Dock Branch that was to become the Shunt Neck for a new loop on the Branch formation to allow removal of the loop in Kings Lynn Yard. The photo would have been taken in November or early December 1999.”

The Gaywood River Bridge (above). [19]

The Fakenham Railway Society tour, once again. This time returning from the Docks and crossing the River Bridge. [19]

The Works had a single siding serving it from the Docks Branch. [20] Access by road was via Kettlewell Lane which ran alongside the old town walls from the old Eastgate of the town on Littleport Street (the Western extension of Gaywood Road at the time).


Kettlewell Lane led through the works to the footbridge over the docks branch.

Kettlewell Lane and the Works prior to the construction of the Electric Works. The Gaywood River passes under the Dock Branch at the right side of this map. The siding is shown just to the North of the river. [22]

All that remains of the siding in the early 21st Century. [22]


Gaywood Road appears in the foreground of this image. The works and the Docks Branch are towards the top of the image. [22]

In this image (above), the Docks Branch is in the foreground, the site of the works in the centre with the Electric Works to the right of the image. By the late 1970s and early 1980s the three tracks of the Branch had been reduced to one. [22]

The adjacent sketch shows the works from the River in earlier times. [22]

I can remember undertaking a project for my O-Level in Biology which focussed on ecology of the Gaywood River in 1976, along the length of the river on the map above, but not realising just what was in the immediate area – not the old town walls, nor the industrial archeology either! In the very early years, the Docks Branch appears to have had a connection to the King’s Lynn to Hunstanton line north of Gaywood, the abandoned line is shown on the map below. Appearances can be deceptive. What the map actual shows is an unopened connection from M&GN to it’s planned new terminus at Austin Street. The connection was built in the 1890s along with the proposed new station and crossed the docks branch. The line and station at Austin Street were built to avoid the use of the GER’s King’s Lynn station but were not opened when common sense prevailed and agreement was reached by the M&GN with the GER. Thanks to Iain Scotchman for this correction.

The footbridge over the Docks Branch adjacent to the Electric Works. [22]
The Branch continued West from the footbridge to meet, Pilot Street (which is now John Kennedy Road). The picture below shows this length of the line.

This picture shows the approach to the John Kennedy Road Crossing with the Pilot Cinema to the left of the line and St. Nicholas’ Chapel spire beyond. I twas taken at the end of the 1980s/early 1990s, (c) Bramleyman on http://www.railwayforum.net [30]
At Pilot Street (John Kennedy Road) there was another level-crossing and footbridge as shown below. [20]

The crossing gates on the East side of John Kennedy Road. [23]

Google Streetview provides more up to date images of the crossing.

The crossing gates on the East side of John Kennedy Road.

The West side of John Kennedy Road.

View looking North along John Kennedy Road.

The level crossing on Pilot Street was the effective entrance point to the docks and it is at this point that the present post concludes. A future post will explore what information is available about the railways within the Docks.

References

  1. https://www.visitwestnorfolk.com/places/kings-lynn/history-of-kings-lynn, accessed on 20th September 2018.
  2. https://www.visitwestnorfolk.com/places/kings-lynn/history-of-kings-lynn/hanseatic-kings-lynn, accessed on 20th September 2018.
  3. https://en.wikipedia.org/wiki/King%27s_Lynn_Docks, accessed on 20th September 2018.
  4. http://www.abports.co.uk/Our_Locations/Short_Sea_Ports/Kings_Lynn, accessed on 20th September 2018.
  5. http://www.kingslynn-forums.co.uk/viewtopic.php?f=14&t=353, accessed on 22nd September 2018. This is a link to a topic on King’s Lynn Forums entitled “Tennyson Avenue Level Crossing.
  6. http://abcrailwayguide.uk/tennyson-avenue-public-level-crossing-norfolk#.W6ZULGhKiUk, accessed on 22nd September 2018.
  7. https://www.flickr.com/photos/gary_troughton/5089709764, accessed on 22nd September 2018.
  8. https://maps.nls.uk/view/120848786, accessed on 22nd September 2018.
  9. http://www.kingslynn-forums.co.uk/viewtopic.php?f=14&t=1642&start=60, accessed on 22nd September 2018.
  10. http://www.kingslynn-forums.co.uk/viewtopic.php?f=14&t=6667, accessed on 22nd September 2018.
  11. http://www.kingslynn-forums.co.uk/viewtopic.php?f=14&t=273&start=90, accessed on 22nd September 2018.
  12. https://historicengland.org.uk/listing/the-list/list-entry/1391201, accessed on 22nd September 2018.
  13. http://www.kingslynn-forums.co.uk/viewtopic.php?f=14&t=9192&p=55368&hilit=Dodmans#p55368, accessed on 23rd September 2018.
  14. http://www.kingslynn-forums.co.uk/viewtopic.php?f=14&t=1390&hilit=Dodmans, accessed on 23rd September 2018.
  15. http://www.heritage.norfolk.gov.uk/record-details?MNF61652-Highgate-Iron-Works&Index=53325&RecordCount=57339&SessionID=413fd24e-8645-4c54-b1aa-fc2c80303e66, accessed on 23rd September 2018.
  16. https://www.cambridgeairphotos.com/areas/kings+lynn+and+west+norfolk, accessed on 23rd September 2018.
  17. https://commons.wikimedia.org/w/index.php?curid=6921557, accessed on 23rd September 2018.
  18. http://www.trickysampublishing.co.uk/picture-gallery-2.php, accessed on 23rd September 2018.
  19. http://www.kingslynn-forums.co.uk/viewtopic.php?f=14&t=1386&hilit=docks+railway, accessed on 23rd September 2018.
  20. https://maps.nls.uk/view/120848786, accessed on 23rd September 2018.
  21. http://users.trytel.com/tristan/towns/lynnmap1.html, accessed on 23rd September 2018. Following this link provides access to the details associated with each reference on the image.
  22. http://www.kingslynn-forums.co.uk/search.php?keywords=The+Kettle+Mill, accessed on 23rd September 2018.
  23. https://commons.m.wikimedia.org/wiki/File:King%27s_Lynn_docks_line,_John_Kennedy_Road_crossing.jpg, accessed on 23rd September 2018.
  24. https://mapio.net/pic/p-73764797, accessed on 24th September 2018.
  25. http://www.rmweb.co.uk/forum/viewtopic.php?f=5&t=4818, accessed on 24th September 2018.
  26. Mike G Fell; An Illustrated History of The Port of King’s Lynn and its Railways; Irwell Press, Clophill, Bedfordshire, 2012.
  27. https://www.transport treasury.co.UK, accessed on 25th September 2018.
  28. https://www.railwayforum.net/showthread.php?p=90587#post90587, accessed on 4th October 2018
  29. http://www.rmweb.co.uk/community/index.php?/topic/137599-kings-lynn, accessed on 6th October 2018.
  30. https://www.railwayforum.net/showthread.php?p=90601#post90601, accessed on 8th October 2018.

Tramways de l’Aude – Carcassonne to Caunes Minervois

The Tramways de l’Aude Station in Carcassonne. [1]The facilities for the tramway in Carcassonne were significant. In the sketch plan immediately above we have the detail of the station facilities at ‘C’. The two routes which lead off the plan are: ‘A’, the tramway which runs to the South side of the Canal basin close to the Gare du Midi and then on through the Carcassonne suburbs to the rest of the network; ‘B’ the line feeding the Gare de l’Estagnol, which is marked ‘III’ and ‘IV’ in the plan above. [2]The tramway route to Lezignan is sketched out above and the 1927 timetable is shown immediately above. [1] Two further images of the Station in Carcassonne. The lower of these sows the train immediately across the Canal basin from the La Gare du Midi. [2]

Trains left Carcassonne Station and followed the South/East side of the Canal du Midi out of the city. The route out of the city is covered in the previous blog in this series:

https://rogerfarnworth.com/2018/09/11/tramways-de-laude-lastours-to-carcassonne.The first significant structure encountered was the Compagnie du Midi mainline’s bridge over the Canal which also spanned the tramway and road. In this image a short passenger train can be seen leaving Carcassonne Station and following the curve of the canal basin. [2]A similar picture from 21st Century.

The tramway followed the Canal bank through Saint-Jean before bridging the canal and passing through Pont Rouge.The Canal at Saint-Jean in 21st Century. The picture is taken from the Canal towpath to the south of the lock at Saint-Jean. The tramway ran to the right of the trees flanking the Canal.The Canal du Midi lock at Saint-Jean. The tramway approached the lock behind the trees on the right of the image and then swung sharply over the bridge which is visible beyond the lock, before turning North once again to follow the West bank of the canal.The view Northeast from Pont Rouge. The River Fresquel flows below the Canal and road just this side of the locks in the distance. The tramway ran on the left side of the Canal. The locks at Fresquel (Les ecluses de Fresquel). The tramway ran along the lefthand side of the Canal.The tramway continued alongside the Canal to Carrefour de Bezons.Carrefour de Bezons is a junction station. One line follows the valley of the Orbiel to Lastours. The other followed a wide arc through the French countryside to Lezignan. This route is the lower of the two branches in the sketch plan above.

The tramway first followed the GC8 through Villalier and Villegly and then the GC112 to Villeneuve-Minervois. There is very little evidence of the existence of the tramway along the way.

Villalier is a village with a population of less than 1,000 people. Its population reached a peak of 923 in 1990. [3] It dates back to the 9th century, when it was a castle surrounded by ditches belonging to the counts of Carcassonne, with a small group of houses clustered around the castle. The lands and lordship of Villalier were given, in 1217, by Simon de Montfort to the bishops of Carcassonne who owned them until 1790. [1] Just before entering the village of Villalier the GC8 and the tramway crossed the River Orbiel. [7]The tramway ran through the centre of the village, past the school in the images below.The tramway ran across the front of the school which appears in the image immediately above. The first of the two images shows the tramway, the second is an earlier image of the location from a different angle.The same location in the 21st Century.The tramway ran from the bridge over L’Orbiel through the centre of the village of Villalier. The square to the Northeast side of the village is the location of the school in the images above.

The next village along the route was Villegly. The tramway followed the GC8 from Villalier to Villegly. It was an uneventful journey apart from a small halt for Bagnoles. The village was a short distance to the East of the GC8 at the junction of the IC35 and the IC37. Bagnoles Halt was at the junction of the GC8 (today’s D620) and the IC35 (today’s D35).

Bagnoles is located in a pleasant valley on the left bank of the Clamoux in the middle of vineyards, gardens and meadows. In ancient times it belonged to the Abbey of Lagrasse and later to the monastery of Caunes until the Revolution. It has a Gothic church with a very high square bell tower. [1]The station at Villegly was as shown in the two images below. [9]The approximate alignment of the tramway through Villegly is marked in light pink. The station was at the South side of the village. The station building remains and is just about identifiable on the satellite image North of the roundabout at the bottom of the image. It is to the left of centre in the image below. While the station building was to the West side of the road, the postcard images above show that the tramway followed the eastern shoulder.Villegly is a pretty village with its beautiful renovated church. At the time of Viscount de Minerve in the 13th century, Villegly Castle was a significant structure. it had a stone tower surrounded by an enclosure of high stone walls.The chateau at Villegly. [10]The chateau at Villegly. [10]

The tramway continued through the village of Villegly and on towards Villeneuve-Minervois on the Southeast shoulder of the GC8 (D620) until it met the GC112 (D112). On the way it can crossed the River Clamoux.The D112 leaves the D620 just to the East of the bridge over the River Clamoux. The tramway took the curve and headed North along the shoulder of the GC112 (D112).The bridge over La Clamoux with the junction with the D112 just beyond.

The tramway followed the eastern shoulder of the GC112 (D112) to Villeneuve-Minervois.The tramway/road followed the valley of La Clamoux into Villeneuve-Minervois.

Villeneuve-Minervois is located in the valley of the Clamoux, at the foot of the Montagne Noire. The town dates back to the 9th century. [1] Its castle was probably built under the influence of Isarn of Aragon (canon and archdeacon), between 1195 and 1236. The ancient castle is now a private residence, it is still an imposing building. [11][12]The tramway left the GC112 (D112) on the South side of Villeneuve-Minervois and followed the route of the Chemin des Pins which ran between the GC112 and the GC111 (D111) on the East side of the village. The station was on what is now the Chemin des Pins although there is nothing left to show for it. The pictures below show the station in use. [7] The best modern image that I can find is this provided by Google Streetview. The image uses a much wider angle lens than the ones used for the postcard images of the station.

At the junction between Chemin des Pins and the Avenue du Minervois, the tramway turned East along what was then the GC111 and ran passed the village’s wine co-operative, before heading out of the village.The tramway followed the GC111 (D111) east from Villeneuve-Minervois to its junction with the GC8 (D620). The road junction still bears the evidence of the tramway curve from the D111 to D620 and the route crossed the Ruisseau de Naval.The journey across to Caunes Minervois was relatively uneventful. The roads and the tramway travelled in straight lines with short curves until they entered Caunes.

Caunes-Minervois is a small medieval town. It is known particularly for its ancient Abbey, dating from the eighth century, and for its outstanding red marble that has been quarried locally from Roman times. It was a town with two railway stations. The metre-gauge line from Carcassone to Lezignan was met by a standard gauge branch line from Moez which was the responsibility of the Compagnie du Midi. The Compagnie du Midi station building in the 21st Century. [13]

These next two images indicate the relative positions of the two stations. That on the right in each image is the terminus of the standard gauge branch. That on the left is the tramway station on the through route from Carcassonne to Lezignan. [14][1] The tramway station at Caunes-Minervois. [15][1]

We finish this leg of our journey here in Caunes-Minervois. We note that this is what the tramway itself did until 1910! The arrangement of the tracks at the terminus is shown on the final plan in this post. The solid lines show the track arrangement at the terminus station, the dotted lines show the additional tracks when the line was extended beyond Caunes- Minervois. [16]


References

  1. http://cahiers.de.minerve.pagesperso-orange.fr/HTML/cdf_lezignancarcassonne.html, accessed on 10th September 2018.
  2. http://www.cpaaude.fr/THEMES/TRAMWAYS/index_fichiers/Page2097.htm accessed on 11th September 2018.
  3. https://en.m.wikipedia.org/wiki/Villalier, accessed on 14th September 2018.
  4. http://www.villalier.fr, accessed on 15th September 2018.
  5. https://collection-jfm.fr/p/cpa-france-11-villalier-pont-sur-l-orbiel-158260, accessed on 16th September 2018
  6. https://www.cartes-et-patrimoine.com/aude-villalier-c-65_129_4086.html, accessed on 16th September 2018.
  7. https://www.minervois-gen.org, accessed on 17th September 2018.
  8. http://boutique.genealogie.com/carte-postale/carte-postale-La-Place-de-la-Poste-11600-villalier-11-aude-199282-74506-detail.html, accessed on 17th September 2018.
  9. https://www.cparama.com/forum/villegly-t29082.html, accessed on 17th September 2018.
  10. http://maynys.over-blog.com/article-villegly-le-chateau-121550664.html, accessed on 18th September 2018.
  11. http://www.villeneuve-minervois.com/english/tourisme-patrimoine-monuments.asp, accessed on 18th September 2018.
  12. http://www.map-france.com/Villeneuve-Minervois-11160/photos-Villeneuve-Minervois.html, accessed on 18th September 2018.
  13. https://fr.m.wikipedia.org/wiki/Fichier:Caunes_La_Gare.jpg, accessed on 18th September 2018.
  14. https://fr.wikipedia.org/wiki/Fichier:Caunes_la_Gare_(photo_ancienne).jpg, accessed on 18th September 2018.
  15. http://www.en-noir-et-blanc.com/search.php?mots=car&page=123&nb_results2show=20&booleen=AND&nb_sites_trouves=8769, accessed on 18th September 2018.
  16. Michel Vieux; Tramways a Vapeur de l’Aude; R. Latour Editions 14 rue Sébile 09300 Lavelanet, 2011.

Kings Lynn Harbour Branch

Kings Lynn was my home in the 1970s. From the age of 12 to 18, I attended Kings Lynn Grammar School and lived on the East side of the town. I have recently been reading some old railway magazines and came across an article about the Harbour Branch in Kings Lynn. The article was in Railway Bylines in January 2002.

By the 1970s, it was my presumption that most of the infrastructure in the article in the January 2002 issue of Railway Bylines would have been abandoned or removed. My memories of the riverside in Kings Lynn in the 1970s are of a relatively derelict area of little interest to a teenager. Apparently, the line closed in 1968 and much of the infrastructure was removed at that time. However the rails remained intact in the bridge over the River Nar close to the fertiliser factory until the turn of the millenium. [2]

Kings Lynn was surprisingly included in the rail network early in the development of the UK network. Services between Kings Lynn and Downham Market commenced on 27th October 1846. The Lynn & Ely Railway opened its harbour branch on the same date. It completed the coal handling facilities at the Harbour in May 1848. 1849 saw an extension of the length of the branch as far as South Quay completed. The branch diverged from the mainline to the north of South Lynn.

Access to the branch was controlled by the Harbour Junction Signal Box. The box was completed and in use by 1880. It has a 36-lever Saxby frame. It remained staffed until 8th March 1983. In 1984, it was reduced to the status of a ground-frame and it was closed completely on 10th February 1985. [1]This picture was taken in June 1983. It shows that the box was well maintained right through to closure. [1] It suggests that the fertilizer factory continued to be rail served until the 1980s.Harbour Junction appears at the bottom of this 1920s O.S. Map. [3] The branch crosses the River Nar for the first time North of the junction close to the manure/fertilizer works. The works link both to the Harbour Branch and to the curve in South Lynn between the main north-south line to Kings Lynn Station and the cross-country line south of Kings Lynn. The footbridge shown on the OpenStreetMap plan and in the two pictures taken from the A148 below in almost exactly in the same position as the old bridge over the river. Between the Harbour Junction and the footbridge above, the new A148 (Nar Ouse Way) approximately follows the line of the Branch. North of the footbridge the route of the line is underneath modern housing development which has replaced part of the fertilizer works. North of the old works the line followed a straight north-easterly course crossing what, in my teenage years, was the A148. It was joined, alongside the more northerly buildings of the fertilizer works by the industial railway which served the works.The Branch crossed the Wisbech Road at the point where it is now met by Sandpiper Way. Indeed, the northern end of Sandpiper Way follows the old line which then continues on the north side of the Wisbech Road as Hardings Way.This excellent aerial view (above) of the fertilizer works [4] shows the Branch in the top right. Just above the halfway point on the right side of the photograph is the first bridge over the Nar, then the northern part of the works is followed by the crossing of the Wisbech Road and the coal sidings beyond. [4]


The railway passed just to the West of the Railway Tavern, in the adjacent picture. [5]This aerial image was also sourced from the Historic England Website: ‘Britain From Above’ and shows the Harbour Branch running across the centre of the image with Wisbeach Road at the left hand edge of the image. The River Nar flows under the line to the right side of the picture and the location of the Gas Works is prominent centre-top. Southgates can just be identified in the top left of the image. [7]

Until very recently I had not found any pictures of the level crossing at Wisbech Road. It appears that it was sited just west of the Railway Tavern and under what is now the junction between Wisbech Road, Sandpiper Way and Hardings Way.This picture of the Muck Works in South Lynn shows the Harbour branch and the level crossing at Wisbech Road can be seen to the left of the image. Th eimage was posted on Kings Lynn Forums on 22nd October 2018. [14]This image of flooding in South Lynn was posted on King’s Lynn Forums on 21st October 2018 and shows the gated crossing on Wisbech Road. The image is taken looking westwards. The lighter coloured building is the Railway Tavern. [14]

Looking South from Wisbech Raod along what was the route of the Branch and is now Sandpiper Way.Looking North (above) from Wisbech Road along the old Harbour Branch which now forms Hardings Way.The coal sidings mentioned below would have been on the right-hand side of this image, to the left of the brick built building.

In the adjacent satellite image, the route of the Branch can be picked out by following a straight line from the footbridge at the southerly edge of the image through the building site to Wisbech Road and then along Hardings Way to the bridge over the River Nar at the northerly extent of the picture.

Along the length of the Branch to the north of Wisbech Road, there were a series of coal sidings which were still in evidence in the 1960s. [6]

As can be seen on the 1920s map above, the coal sidings gave way to an extensive area of sidings on the South side of the River Nar. [6] These sidings filled a tongue of land which extended northwards creating a tight loop in the River Nar. At this point the river was usually referred to as Friar’s Fleet. That layout of the river mouth is no longer evident on the ground, nor in the adjacent satellite image. But it can be clearly seen in the 1920s maps which form a part of this blog (above and below). [6]

The tongue of land was connected to the remainder of the harbour on the banks of the River Ouse by a swing bridge which can be picked out easily in the map below.

There were two swing bridges on the line – the first over Friars Fleet and second over Mill Fleet. The article in Railway Bylines has a number of pictures of the swing bridge and these are reproduced below. [1]

The map above shows the northerly extent of the Harbour Branch. It reached northwards to Purfleet and close to the Customs House. [6]This view looks West along the River Nar. The tractor on the bridge was kept  in a converted stable, a reminder of the earlier form of traction used on the sidings. The crane in the background is on the Boal Quay. [1]Another view of the same bridge. This view is taken looking Northeast from Boal Quay. The town is the backdrop to the view, St. Margaret’s Church can be seen in the background. The bridge was moved using a handle which operated a simple geared mechanism. The bridge was constructed by H & M. D. Grissell of Regents Canal Ironworks in London. [1] The swing bridge over the River Nar was built in 1854 when the harbour branch was extended. This view looks Southeast. Road vehicles were prohibited from crossing the bridge. Pedestrians were permitted but it was a tight fit especially when on a bicycle with a wagon to circumnavigate. When the bridge was open to river traffic, a swinging hinged beam was the only deterrent to rail traffic. [1]

There was only a short distance at the neck of Boal Quay between Friars Fleet and Mill Fleet. There were a number of short sidings which served Boal Quay and the adjacent Corn Mill. Boal Quay with clear evidence that the Quay was rail served. [8]Boal Quay taken from West Lynn. The sidings seem to be full of open wagons. [8]Boal Quay in the early 21st Century. A view looking North.Boal Quay – this time the view is looking South.

The line continued over Mill Fleet. The swing bridge was of a similar design to that over Friars Fleet.The swing bridge over Mill Fleet carried the Harbour Branch onto South Quay. This view is taken from the North end of Boal Quay looking Northeast towards the town. The pinnacles of the tower of St. Margaret’s Church can be seen peeping bout above the roof of Gregory & Hampson’s warehouse in the centre. [1]The construction of these bridges was simple. This view is taken looking West across the River Ouse to West Lynn. Boal Quay is to nthe left and South Quay to the right. The Mill Fleet bridge and that across Friars Fleet were demolished at the beginning of 1970, just before I moved with my family to King’s Lynn. [1]I think that this is one of the best pictures (above) that I have seen of the quayside in King’s Lynn. The picture is taken looking North across Mill Fleet and its swing bridge towards South Quay. On South Quay the railway was set in cobbles. The cars parked on South Quay overlooking the River Ouse suggest that the picture was taken in the early to mid-1960s. The handful of vanfit wagons on the South Quay confirm that there is still some rail traffic to be had. [1]

The satellite image clearly shows the old course of Friars Fleet and the shape of Boal Quay. It also shows the full length of the South Quay from Mill Fleet to Purfleet.

South Quay had two sidings along the water’s edge – these were linked at regular intervals to aid shunting.This view of South Quay is taken from almost the same position as the early to mid-1960s photograph above.Marriott’s Warehouse, South Quay in the 1920s (above). [9]

The North end of South Quay is shown in the adjacent image. [10]

Another view of South Quay (below), taken on 18th May 1910. plenty of railway wagons are visible! [11]Motor vessel Gwendolynne Birch at low water alongside South Quay. Scott & Sons furniture warehouse is on the right. The first wagon on the right belongs to Austin & Co., coal merchants from Cambridge. [13]A modern view of South Quay taken from West Lynn and showing Marriott’s Warehouse!  [12]A modern view of South Quay with Marriott’s Warehouse on the right.And finally, a view of the North end of South Quay in the early 21st Century. Flood protection measures are in evidence.

References

  1. Bryan L. Wilson; Nooks, Crannies and Swing Bridges – Fixtures and Fittings on the Kings Lynn Harbour Branch; Railway Bylines, January 2002.
  2. http://www.heritage.norfolk.gov.uk/record-details?MNF13593-Route-of-King%27s-Lynn-Harbour-Railway&Index=12729&RecordCount=57339&SessionID=35f84934-5757-4669-a3fc-9b20c56352a3, accessed on 15th September 2018.
  3. https://www.old-maps.co.uk, accessed on 15th September 2018.
  4. http://www.kingslynn-forums.co.uk/viewtopic.php?f=14&t=1470, accessed on 16th September 2018.
  5. http://www.norfolkpubs.co.uk/kingslynn/nkingslynn/klnrt.htm, accessed on 16th September 2018.
  6. https://www.old-maps.co.uk, accessed on 16th September 2018.
  7. https://www.britainfromabove.org.uk, accessed on 16th September 2018.
  8. http://www.kingslynn-forums.co.uk/viewtopic.php?f=14&t=157&sid=fe93ef8ae649a779d55f01b37425e368, accessed on 16th September 2018.
  9. http://www.kingslynnonline.com/2014/04/lynns-port-and-railways-a-weekend-of-heritage, accessed on 16th September 2018.
  10. http://www.kingslynn-forums.co.uk/viewtopic.php?f=14&t=218&start=15, accessed on 16th September 2018.
  11. http://www.kingslynn-forums.co.uk/viewtopic.php?t=218, accessed on 16th September 2018.
  12. https://www.lynnnews.co.uk/news/water-ski-races-bring-thousands-to-king-s-lynn-quay-1-8015320, accessed on 16th September 2018.
  13. Mike G Fell; An Illustrated History of The Port of King’s Lynn and its Railways; Orwell Press, Clophill, Bedfordshire, 2012.
  14. http://www.kingslynn-forums.co.uk/viewtopic.php?f=14&t=273&start=150, accessed on 21st October 2018.

Tramways de l’Aude – Lastours to Carcassonne

On 6th September 2018, my wife and I travelled down the length of the line from Lastours to Carcassonne. There were not too many opportunities for me to stop to take pictures as we had spent the whole morning following the line from Fanjeaux to St. Denis.

However, it is good to be writing about some things I have seen.

Lastours is located 12 km (7.5 mi) outside Carcassonne, in the valley of the Orbiel. There are four small castles each built on a large 300 m high rocky ridge. The castles were built to control the access to Montagne Noire and the Cabardes region. These are some of the few original Cathar castles left. In the mid-1960s, the village of Lastours had a population of around 500, many working in the mill in the village. The mill is now closed and is used as a visitor centre for the castles on the rock outcrop above. The population in 2008 was 165. [1]

The four castles (Cabaret, Tour Régine, Surdespine and Quertinheux) which are shown on the adjacent schematic plan [3]) illustrate both the pride of the feudal lords and the fragmentation of their power. The castles not only stand as guardians of access into the Black Mountains but also vie with each other for the rile of protector, much as their feudal lords would have been doing. The first mention of Cabaret goes back to 1063. The lords of the place were vassals of the Counts of Béziers and Carcassonne and maintained good relations with the monks of the abbey of Fontfroide . The lords of Cabaret became protectors of the ‘Cathars’ and les parfaits (the perfect ones) who settled there. [2]

A first assault, of Simon de Montfort, against Cabaret in 1210, failed. In 1211, Cabaret eventually submitted voluntarily. But the hostilities towards the crusaders of Simon de Montfort resumed quickly. A Cathar bishop, Pierre Isarn, who stayed at Cabaret in 1223 went up to the stake in 1226 . A new crusader assault took place in 1227 but failed. Finally, the 4 fortresses fell in 1243, although this did not prevent the castellans from continuing their Cathar faith in peace. [2]

As the centuries progressed the village below the castles became a centre for industrial textile-working and the mill was built. The Rabier factory was eventually closed in the mid-20th Century when its production was no longer economic. It is now the tourist reception facility for the Chateaux.

Since 1995, Lastours has been developing a thematic display around mining and metallurgy in the Black Mountains . The region was very rich in iron, copper, lead but especially gold. Gold mines remain operational in the area. [2] Mining areas are shown grey on the map below.The rich mineral deposits in the area, together with the need to transport textile products from Lastours to the wider world became the dominant factors in the push to establish better transport links. As a result the tramway from Lastours was born. It provided effective communication with Carcassonne and the wider railway network. It, in turn, sustained the larger population required as labour in the factory. Products from the surrounding plain could be brought more easily to Lastours.A picture of the factory complex from the 1920s. The chateaux sit above the factory to the right. [3]Damage to factory buildings in floods in 1930. [9]The factory as a visitor centre with one of the chateau above. [8][10]

The Tramway accessed the lower village. It was not possible, because of the constraints of the site, to gain direct access to the mill. As the valley widened, the first opportunity was taken to establish the tramway terminal facilities. Passengers were, of course, expected and provided for but the main focus of investment was the products which would be transported and which would provide the dominant income for the tramway. [10] The small community of Lastours grew in wealth as a result of the immediate access to hydroelectric power and the ability to transport goods to markets. Often these mountain communities that outstripped their neighbours in the plain in economic prosperty. [10] It is however unlikely that this economic prosperty was felt by those who laboured in the mill. It probably secured their jobs even if they remained relatively poorly paid.This image from the 1950s [3] shows the station building in the foreground. It had already survived around 20 years after the closure of the line. Today (2018) the building functions as the village tourist office and bears, on the elevation facing the photographer, a panel describing the tramway and its operation with pictures taken from the book written by Michel Vieux. [4] The station yard in Lastours. [6]The station area is encircled by the blue oval.This is the Station plan shown on the board on the wall of the old station building in 2018. It comes from the book by Michel Vieux and represents the station in 1905. [4]A clearer photograph of the Station at Lastours taken at a different time to the drafting of the plan above. In this image the station has a siding with an end-on connection to the goods platform. [7]Damage to the Station site in the floods in 1930. It is very unlikely that all of the buildings lost in this flood were replaced as the line only had around 2.5 years before closure. [9] The two images above show the station building at Lastours on 6th September 2018. Its use as a tourist information centre has secured its immediate future. The information board about the railway is great. It can be seen in a prominent position in the first of the two pictures. The image below shows that the modern building has been re-roofed, the older overhanging roof has gone.Departure is now imminent. The last image of the Station at Lastours. The water tower and engine shed can be seen in the distance on the left of the picture. [4]The tramway sitting between river and road south of Lastours. [15]

Trams left Lastours on their journey down the valley of the River Orbiel on the left side of the road but very soon they switched to the right (west) side of the road and then entered a short tunnel which was built to smooth out a very tight curve in the road down the valley. There are very few tunnels on the Tramways de l’Aude network and this is one of them. It bears the name Lacombe and is no more than 34m long. The portals are marked on the map above with a red dot and a green dot and are shown below. The pictures were taken from the highway, the first pair in the early to middle part of the 20th CenturyCentury after the tram tracks had been removed, the others in the very early 21st Century, the view of the more southerly portal is now blocked. [15]The north portal. [15]The south portal. [15]The north portal (above). [11]

The south portal taken close to the opening. [11]

The south Portal (below) taken so as to show the road alignment. [11] This view is no longer available as a large concrete barrier has been placed in front of the south portal. Google Earth Streetview is a little out of date as it does not show the barrier which is on the satellite image.

The satellite image clearly shows the large, high concrete barrier which was present when we passed the tunnel on 6th September 2018. I can only surmise that, at night, car headlights shining through the short tunnel have been responsible for some accidents. It would seem likely that cars have not negotiated the tight bends after being led to believe that the tunnel provided a gentler alignment for the road.

After the tunnel, trams continued to follow the western shoulder of the road for a while before then switching back to the eastern side of the road as the halt at Moulin d’Artigues was approached.

The constraints of the site were tight, the road was narrow and it was trapped between the valley side and the River Orbiel. [5] Somehow the engineers of the time managed to fit both the tramway halt and road between the mill and the river.

One might presume that, in the middle of a rural area, a mill of this nature might have been put to annagricultural use. It would be a poor presumption to make, the valley was not rural in the normal use of the word. It was a hive of industrial activity and this mill was used for grinding, crucpshing and then blasting iron ore from Salsigne which was then used in gas purification.

Part of the mill in now in use as a restaurant. The adjacent picture reminds us that when the tramways were closed the valleys they served were not abandoned. Bus services replaced them and often it was the presence of a reliable alternate for of transport which brought about the end of the tramways.

Much of the heavy industry of the valley failed in the mid-20th Century and the resident population moved away to find work.

The trams travelled on down the valley of l’Orbiell’Orbiel to the next halt ‘La Caunette’, thius was at the junction of the road leading to Salsigne and its mines, and close to the lower mining area of La Combe du Sault. At la Caunette Station there was a loading wharf for the Salsigne mines. The wharf and station building remain visible today.A single track branch siding was provided to a loading wharf as shown in the sketch map above. [19] The tramway station had three tracks for the marshalling of tains and to allow two trains to pass each other. Mining products were transported from Salsigne Silver (and Gold) Mines and more immediately from La Caunette Silver Mines. It was a 5km trek to bring goods down from the Salsigne mines and a more arduous uphill trek to take goods transported by the tramway to the mines. [5] The condition of the road was poor and a 600mm gauge railway was provided to transport goods to and from Salsigne. The sketch plans shows its relation to the metre-gauge tramway.

Associated with the mines was a large factory complex at La Combe du Sault. It was a dominant feature in the valley. It processed all the raw materials from the mines.

Incidentally, the gold content in the arsenic ore in the Salsigne mines has been measured as being 12gms/tonne. [5]

The mining complex of La Combe du Sault was of great significance in the 20th Century and greatly enhanced the prosperity of the Orbiel Valley. Once the factory closed, it was demolished in 1986 along with the accommodation which had been provided for workers. [12]

The line continues down the valley following the GC101 (today’s D101). The next significant location marked on the Michelin map is Lassac. It was an inhabited hamlet, with castle, buildings, church placed under the name of Saint-Martin united with the Episcopal Mention of Carcassonne. Its territory is part of the communes of Sallèles-Cabardès and Limousis. The Villa Lassac, was on the right bank of the Orbiel with picturesque garden, orchards, meadows, vineyards, olive groves and mill. [5]

It appears, in 2018, that all that remains are ruins and that the hamlet is uninhabited. There was a major local campaign in the period 2006 to 2009 to prevent destruction of the immediate environs by the Departement. My French is not good enough to understand the technical terms involved but it appears that the issue was the creation of an industrial landfill site at Lassac on what were then polluted stilling ponds from the old works. [13]

As late as 2015 it was reported that the enterprise to create a landfill site at Lassac had failed. The courts declared the enterprise illegal and the Departement cancelled its contract with the company who were to undertaken the work. [14] This leaves unresolved the question of a suitable landfill site for the Aude.This satellite image shows the location of the station at La Caunette at its northern (top) edge.  La Combe du Sault appears at the centre of the picture and Lassac in the bottom part of the photograph.The gateway for La Combe de Sault.Lassac is shown in plan above and the buildings are shown in a photo taken from the D101 below.The river, ford and footbridge at Lassac.

From Lassac, the trams continued down the valley towards Conques-sur-Orbiel. It passes through two further halts on the way. Vic la Vernede was at the site of a priory. The priory at Vic was under the patronage of St. Peter and appeared in the 13th century.

The chapel has relatively recently been renovated.

In La Vernède, there is also a beautiful castle overlooking the valley which included a farm with vegetable gardens, vineyards, meadows, olive trees, herd of merinos thanks to the enlightened vision of its successive owners through time since at least the 17th century. [16] Shortly after passing through the hamlet of Vic la Vernede the tramway switched to the West side of the road and then deviated from the GC101 (D101). It branched away to the West. The route of the diversion can be seen in the picture below, on the right of the image, to the left of the trees. The route of the diversion is initially straight. It then curves to the south.It the encounters the River Rieussec and crosses this on a 13 metre span metal bridge adjacent to the Salitis Road (D901) where the second of the two halts was sited. [5] After the halt the tramway continued in a southerly direction following the route of the lane south of the D901.

One of the abutments of the tramway bridge remain on the north side of the D901. The tramway alignment is just off the D901 to the north and the old bridge abutment is still present.

After the Salitis Road halt the tramway continued in a southerly direction following the route of the lane south of the D901.A new road, the D101A, bypasses Conques-sur-Orbiel and we used this route as we travelled south to Carcassonne on 6th September 2018. The lane which follows the route of the tramway, joins this new road.The D101A enters the photograph above from the left. The old tramway route enters from the bottom of the image and follows the edge of the vineyard field into the middle distance where it meets the D101A.The station was located at the point where the IC35 (the modern D35) met the tramway.Comparing the above pictures of the station and the village of Conques with Google Street view images ties down the station location to the length of tramway to the north of the Route de Villegailheric (D35). The location is shown marked blue on the OpenStreetMap plan.The station provided for trains to pass and also for the loading and unloading of goods. There was a 12m long platform for goods, one siding alongside the platform and another for storing wagons. The sidings were usually full because the line, although a metre-gauge lightly built line, saw heavy traffic. The industrial development of the valley ensured that significant loads were carried. In 1923, 20,600 tonnes were transported on the line. Because of the nature of the permanent way, train lengths and weights had to be limited. The limits placed on movements were: 56 tonnes between Carcassonne and Carrefour de Bezons, 51 tons to Conques, 60 tons from Conques to La Caunette and 51 tons from there to Lastours. [5]

This video has been produced locally. [17]

Travelling on from Conques the tramway followed the GC101 (D201) towards Carcassonne.

The tramway next arrived at the crossroads of Carrefour de Bezons. The station was south of the meeting point of the roads to Conques and to Villalier. It welcomed travelers from Villemoustoussou and the surrounding area. There were three lines in the station which was a junction station and trains could be taken to Caunes as well as to Lastours and Carcassonne. [5] A sketch plan of the station is shown below. [18]The station at Carrefour de Bezons was to the Northeast of the roundabout at the top of the above map close to the Canal du Midi. The tramway then followed the north/west bank of the Canal, first alongside the D149, then alongside the D118d(Route Minervoise) before crossing the Canal to the south/east side and then following what is now called the Route Minervoise all the way to its terminus across the Canal from what is now the SNCF station in Carcassonne. The first part of the route into Carcassonne is approximately shown by pink line on the satellite image below.The area of Carcassonne immediately to the West of the River Fresquel is called Pont-Rouge. There was a halt on the tramway serving this community which was sited close to the road and canal bridge over the Fresquel.At Le Pont Rouge, the double bridge-viaduct and aqueduct over the Fresquel sits alongside a succession of locks which allowed the Canal du Midi to be diverted from its originally proposed route into Carcassonne, permitting the creation of a port capable of serving the interests of the City. [5][22]

From this point the tramway followed the Canal du Midi South along the Route Minervoise (D118) towards Saint-Jean and crossed the Canal at right-angles just to the north of the lock at Saint-Jean.The tramway turned sharply to cross the Canal du Midi from its West bank to its East bank and then arrived at Saint-Jean.The Saint-Jean lock is a single lock on the Canal du Midi, built around 1674. [21]The lock at Saint-Jean.There was a halt at Saint-Jean and the tramway the followed the East/South bank of the canal into Carcassonne.The tramway formation is now covered by a tarmac road, the route Minervoise, on its way into the city.The tramway passes under the Compagnie du Midi mainline and then turns West to run on the South side of the Canal basin.

We finish this blog with a few views of the station and canal basin in Carcassonne and a couple of sketch plans of the tramway facilities in the city.  The Canal basin near the Gare du Midi. The tramway ran on the left of the buildings visible beside the water. The Compagnie du Midi mainline crosses both the Canal, and to the right the road/tramway. The Compagnie du Midi Station in Carcassonne – the Gare du Midi. The tramway ran just off the bottom of this picture. The two smaller pictures below show the overall train-shed roof , first in the 21st Century and second in the early 20th Century.

 Another picture of the Gare du Midi in the early 20th Century.A final shot of the Gare du Midi. The small office in front of the station was of a similar size to one on the opposite bank of the Canal which was the ticket office for the Tramways de l’Aude and which is marked ‘I’ on the sketch plan below.The facilities for the tramway in Carcassonne were significant. In the sketch plan immediately above we have the detail of the station facilities at ‘C’. The two routes which lead off the plan are: ‘A’, the tramway which runs to the South side of the Canal basin close to the Gare du Midi and then on through the Carcassonne suburbs to the rest of the network; ‘B’ the line feeding the Gare de l’Estagnol, which is marked ‘III’ and ‘IV’ in the plan above.

After following this line from Lastours to Carcassonne, my wife and I enjoyed walking round the old Cite of Carcassonne on 6th September 2018.

References

1. https://en.m.wikipedia.org/wiki/Lastours, accessed on 7th September 2018.

2. http://lescathares.free.fr/chateau/lastours.html, accessed on 7th September 2018.

3. http://www.belcaire-pyrenees.com/tag/histoire/9, accessed on 7th September 2018.

4. Michel Vieux; Tramways a Vapeur de l’Aude; R. Latour Editions 14 rue Sébile 09300 Lavelanet, 2011.

5. http://cahiers.de.minerve.pagesperso-orange.fr/HTML/cdf_carcassonnelastours.html, accessed on 7th September 2018.

6. https://www.delcampe.net/fr/collections/cartes-postales/france/autres-communes-10/11-lastours-1910-vallee-de-lorbiel-gare-et-loco-petit-plan-le-chien-fait-lanimation-phot-michel-jordy-carcassonne-591997285.html, accessed on 7th September 2018.

7. https://www.cparama.com/forum/lastours-t29076.html, accessed on 7th September 2018.

8. http://baetlanguedoc.blog50.com/apps/m/archive/2012/02/18/beaux-villages-du-languedoc-7.html, accessed on 7th September 2018.

9. http://conques.e-monsite.com/album-photos/de-1900-a-1950/innondation1930, accessed on 7th September 2018.

10. https://journals.openedition.org/insitu/3412, accessed on 7th September 2018.

11. http://www.tunnels-ferroviaires.org/tu11/11194.1.pdf, accessed on 8th September 2018.

12. Claude Gironis; La Combe du Saut; Editions Qui Lit Vit, 2012.

13. https://www.lindependant.fr/2013/12/12/lassac-nouvelle-victoire-de-terres-d-orbiel,1823748.php, accessed on 9th September 2018

14. https://france3-regions.francetvinfo.fr/occitanie/aude/le-projet-de-decharge-de-lassac-definitivement-enterre-634642.html, accessed on 9th September 2018.

15. http://conques.e-monsite.com/album-photos/de-1900-a-1950/les-tramways-de-l-aude, accessed on 9th September 2018.

16. http://www.belcaire-pyrenees.com/2016/06/conques-sur-orbiel-le-chateau-des-saptes-2eme-partie-et-fin.html, accessed on 9th September 2018.

17. https://youtu.be/S5t02UsNllI, accessed on 10th September 2018.

18. http://www.cpaaude.fr/THEMES/TRAMWAYS/index_fichiers/Page2636.htm, accessed on 10th September 2018.

19. http://www.cpaaude.fr/THEMES/TRAMWAYS/index_fichiers/Page2489.htm, accessed on 10th September 2018.

20. http://www.cpaaude.fr/THEMES/TRAMWAYS/index_fichiers/Page2097.htm, accessed on 10th September 2018.

21. https://fr.m.wikipedia.org/wiki/Écluse_de_Saint-Jean, accessed on 11th September 2018.

22. http://aavccarcassonne.blogs.lindependant.com/apps/m/tag/le+pont+rouge, accessed on 11th September 2018.