Tag Archives: harbour

The Cornwall Minerals Railway – Part 2 – Par, its Harbour and St. Blazey Engine Shed

A first article about the Cornwall Minerals Railway can be found here:

https://rogerfarnworth.com/2020/05/17/the-cornwall-minerals-railway-part-1. [32]

In this second article we look at Par and its harbour, include some information about Treffry’s Tramway which transported goods to and from the Port and take note of St. Blazey Loco Shed. …
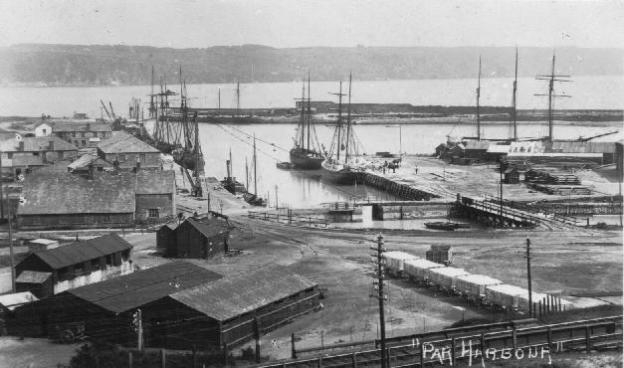
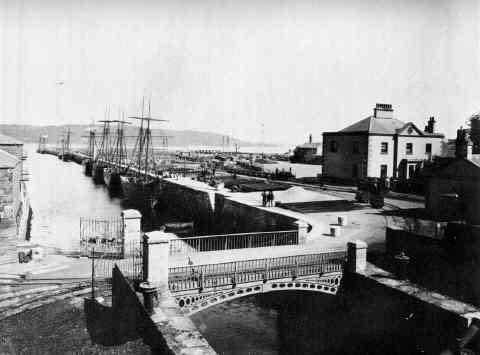
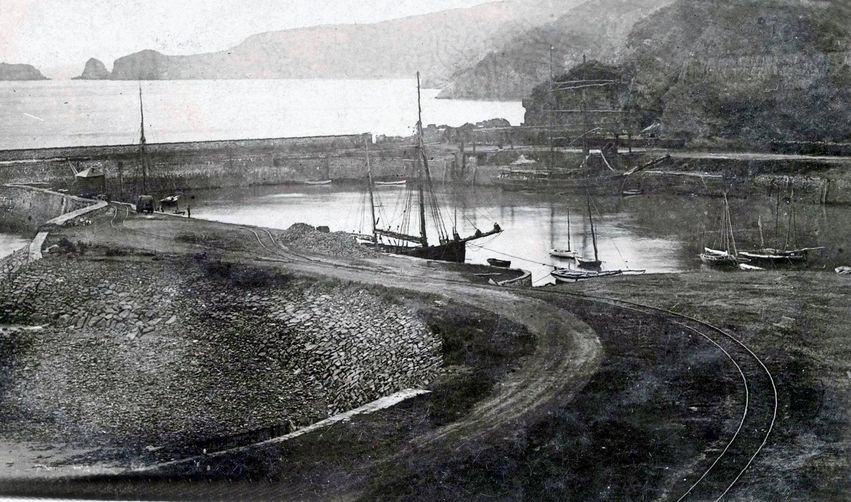
Par Harbour was built in 1829 by a local entrepreneur Joseph Thomas Treffry who was known as the “King of Mid Cornwall”. [1: p13]

The first ships used the port at Par in 1833 and it was finished in 1840. The breakwater enclosed 36 acres (15 hectares) of harbour and was capable of taking up to about 50 vessels of 200 tons each. The port is tidal so the vessels would sit on the bottom at low tide. Cornish granite was exported from Par in the early days for such famous landmarks as Waterloo Bridge in London, Chatham Docks, Gibraltar Docks & Glasgow Docks.” [33] As the china clay industry grew during the 19th century this became the main export through the port.

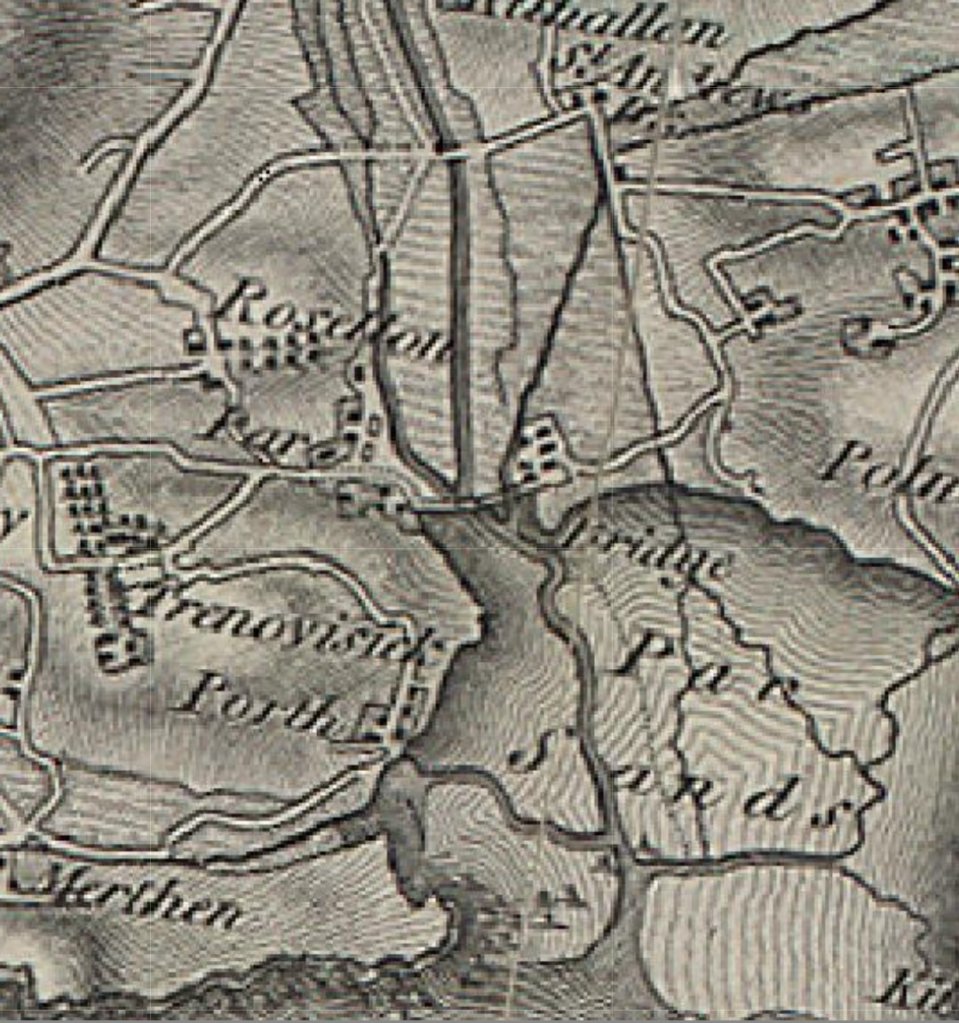
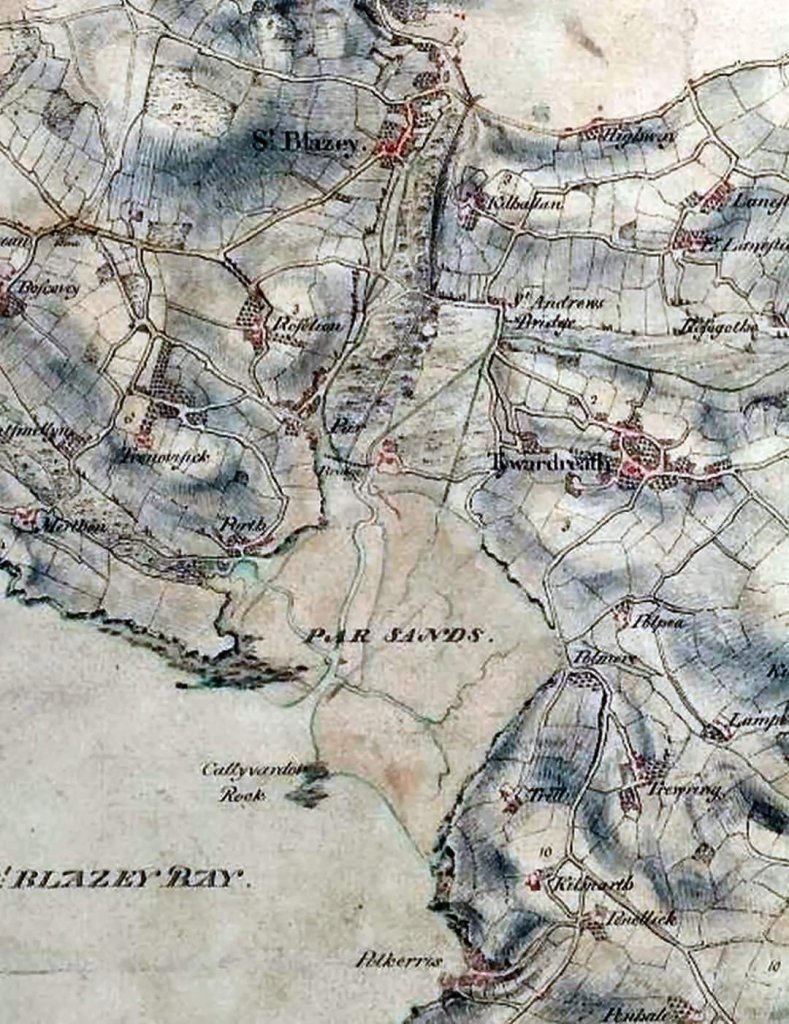
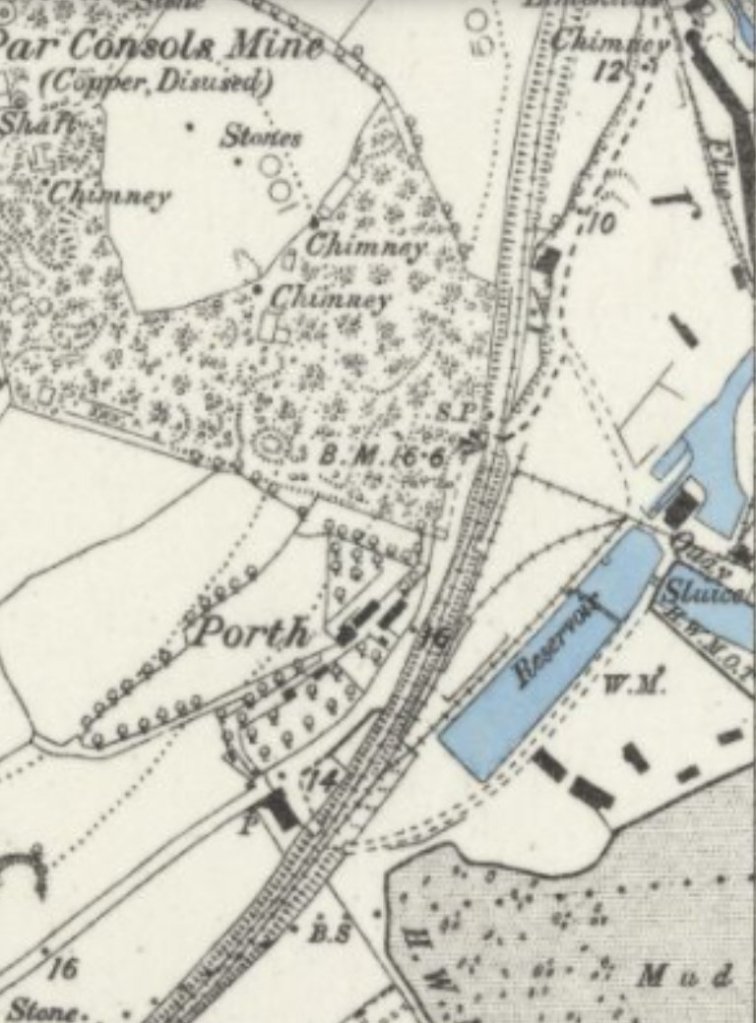
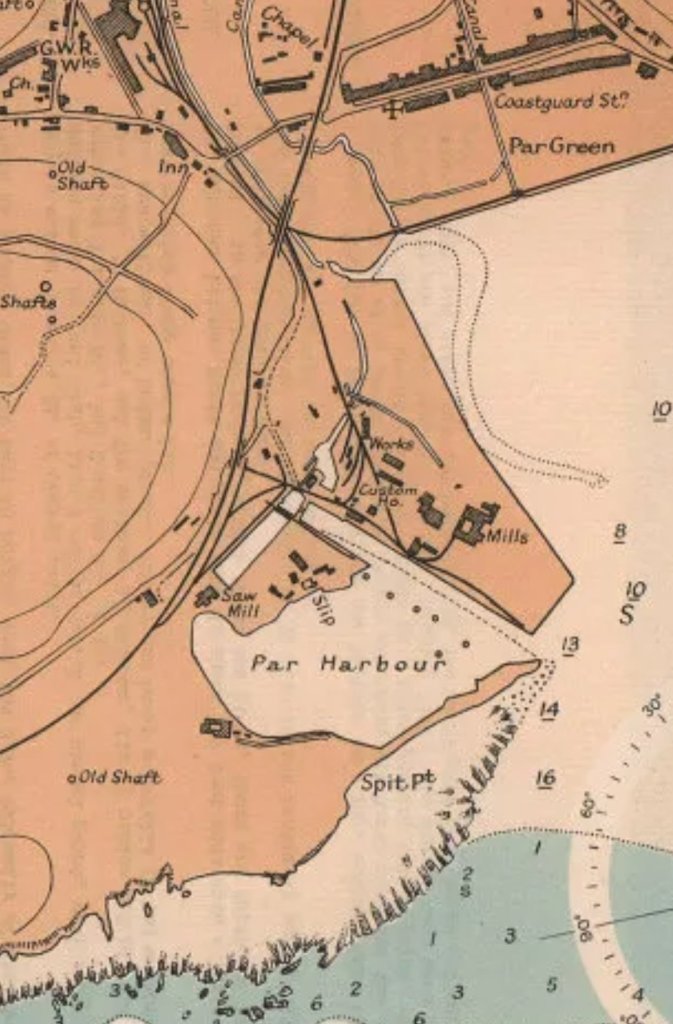
The first map below comes from the Ordnance Survey 1st series of the very early 19th century.

Par Harbour, OS First series, early 19th century. [5]
Old map of Par Harbour shared on the St. Blazey and Par Old Photos and Postcards Facebook Page on 18th June 2019. [6]

Coal needed to be imported from Wales to power Treffry’s mines, and copper, lead, and granite needed to be exported all over the country. Treffry, as a leading industrialist of the time, “had an urgent need for a harbour to serve his mines and quarries and the narrow streets of Fowey hampered the process when cargos could only be transported from the mines by mules and wagons. After he had completed his safe haven, up to fifty small sailing vessels of the time could be accommodated in the harbour, while larger ships lay at anchor in St Austell bay where their cargoes were loaded from barges. Other industries and businesses developed inside the port area such as ship repair, rope works, sail making, timber and coal merchants and brickworks.” [1: p13]

Hugh Howes notes that the new harbour “was a vital outlet for minerals particularly the expanding china clay industry and a rival to Fowey, Pentwan and Charlestown. [Teffry’s] Fowey Consols Mine was reaching its peak production in the late 1830s at 15,000 tons. The output at Par Consols Mine peaked a little later at nearly 8,500 tons. They were producing profitable amounts of copper at that time. … He had brought industrial success firstly with the copper mines in Tywardreath and St. Blazey, then with the granite workings at Luxulyan, and finally with china clay extraction to serve the fast developing ceramics industry in the Potteries.” [27: p48-49]

Canal and tramways in the Luxulyan Valley in 1835, © Copyright Afterbrunel and included here under a Creative Commons Attribution-ShareAlike 3.0 Unported (CC BY-SA 3.0) Licence. [7]

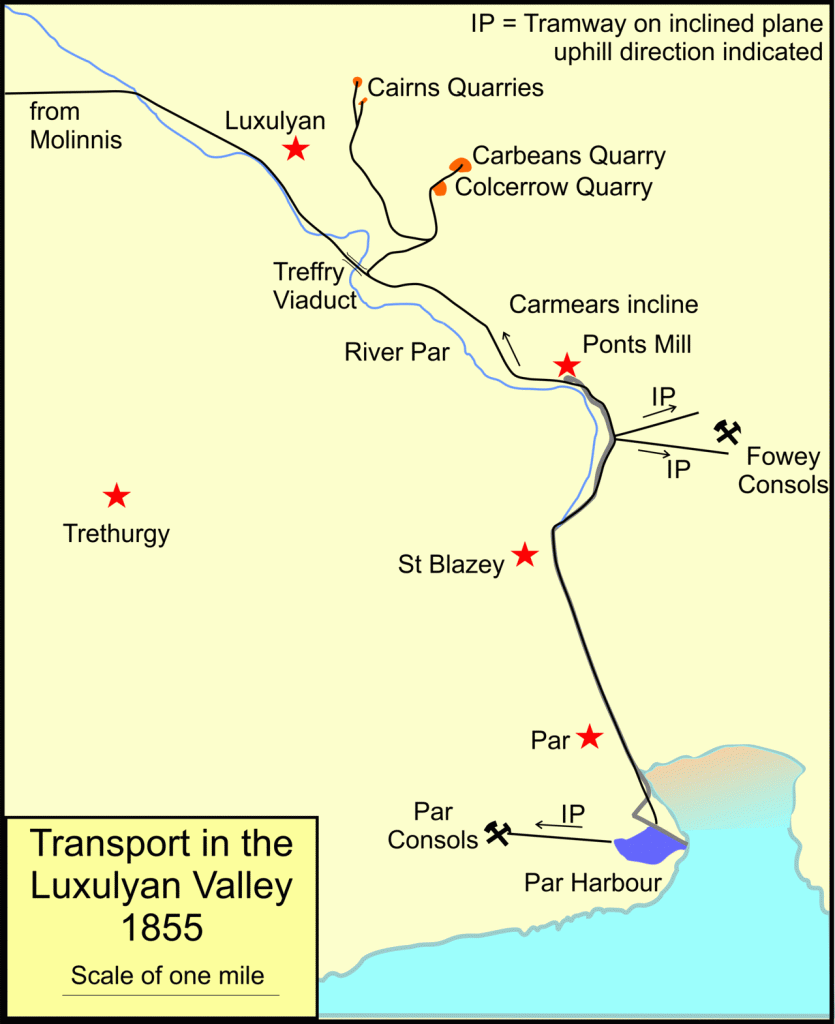
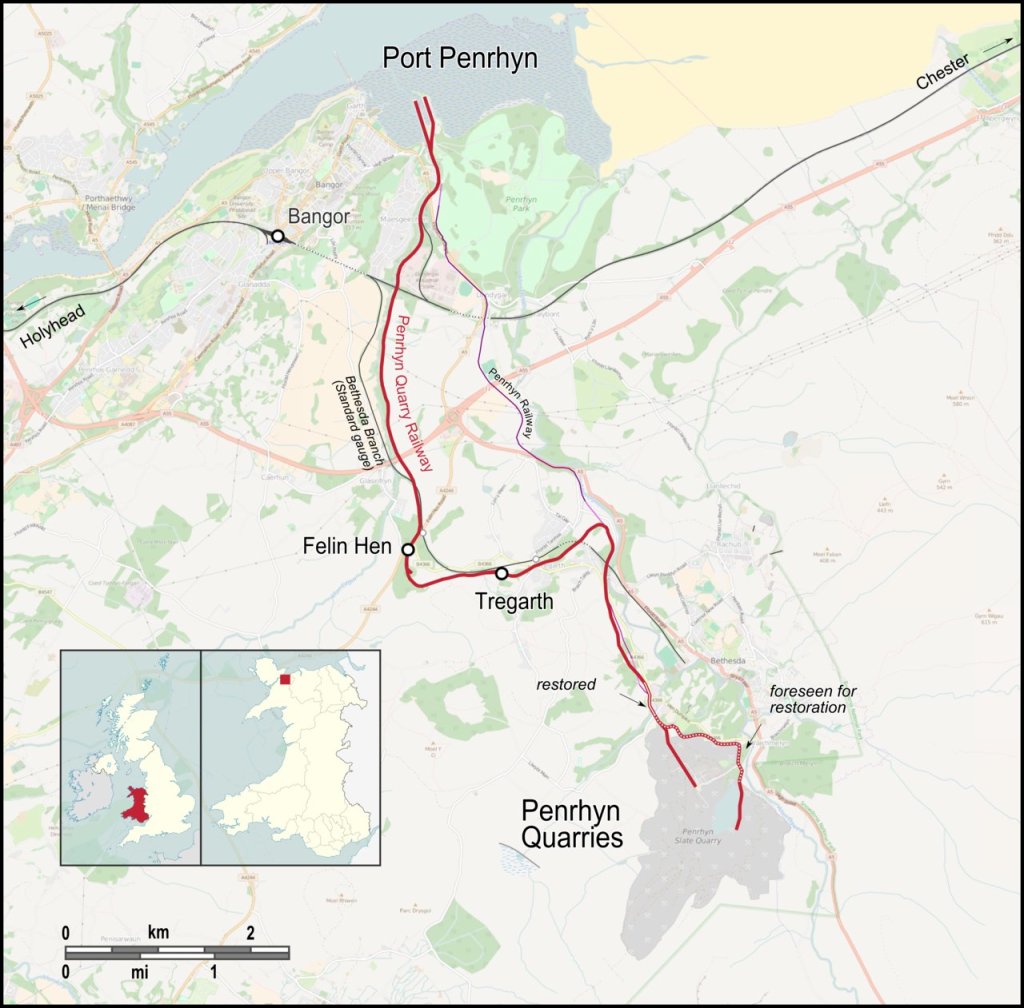
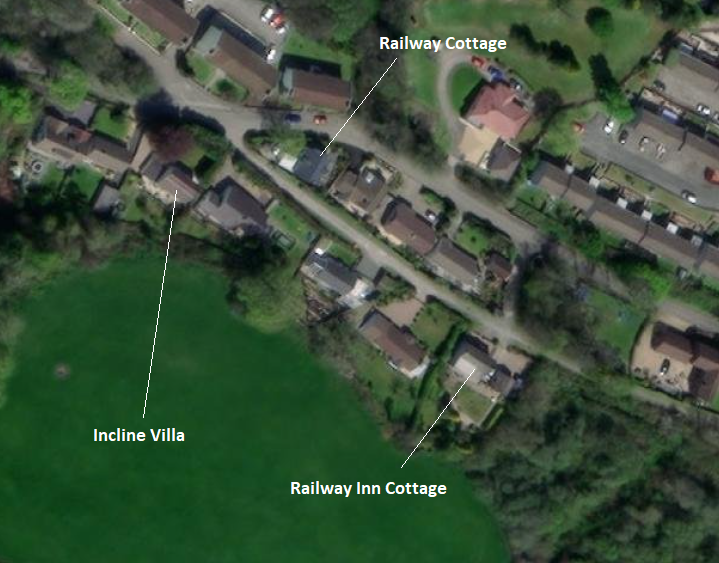
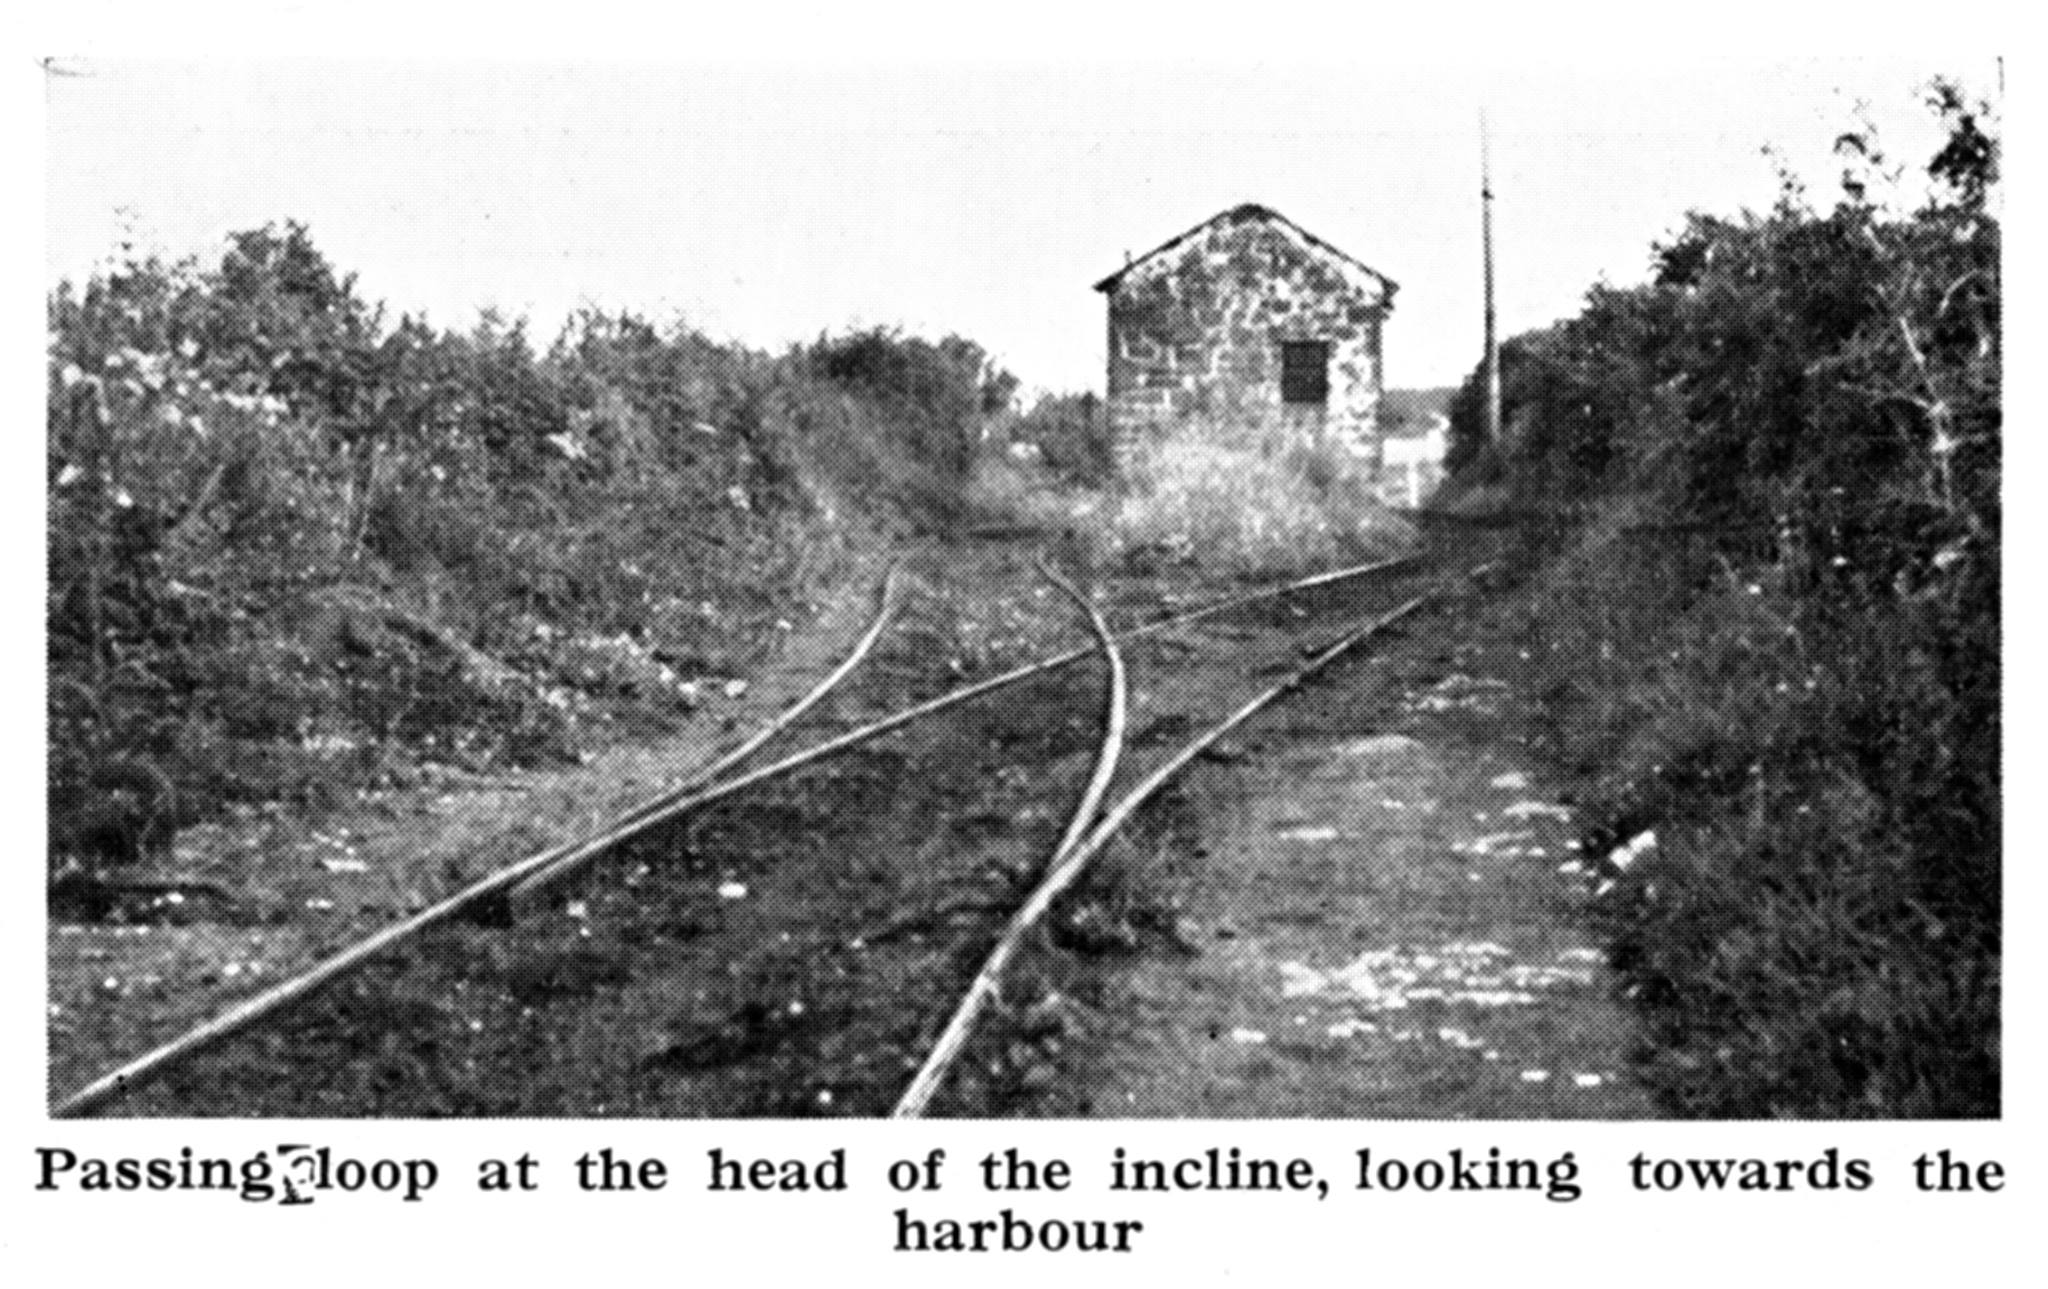
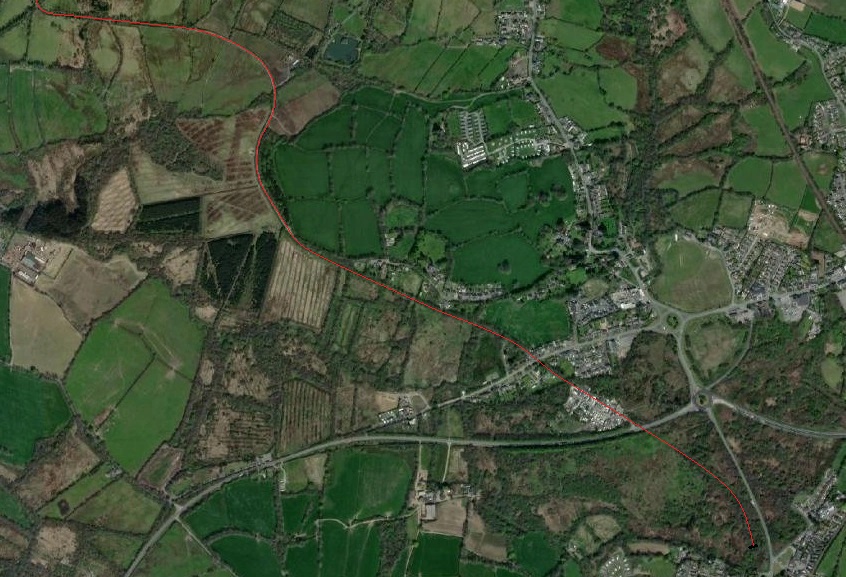
The Par Canal was built by Treffry to transport his minerals from Pontsmill to Par Harbour and was operational from 1833 [8][33], 1842 [1: p21] or 1844 [10], depending on which source you rely on. A number of tramway inclines were associated with it. One from Fowey Consols Mine to a location to the South of Pontsmill was in use by 1835. A second, was built a little to the South of the first, both seem to have served Fowey Consols Mine. A third tramway inclined plane was built between Par Consols Mine and Par Harbour. That inclined plane was working by 1841. [8] The Canal was closed in 1873. [10]

The Treffry Tramway was built in stages. The first length headed North from Pontsmill to Colcerrow Quarry and included an incline to lift the line out of Pontsmill. This line was extended to Molinnis near Bugle. To get there a large viaduct was needed, to cross the valley of the River Par (the Luxulyan Valley). The Teffry Viaduct, was 648 feet in length with ten arches, and was 98 feet high. It was the first large granite viaduct in Cornwall. This section of Treffry’s tramway opened in early 1844. [8]

Tramways in the Luxulyan Valley in 1855, © Copyright Afterbrunel and included here under a Creative Commons Attribution-ShareAlike 3.0 Unported (CC BY-SA 3.0) Licence. [7]

Construction of the Tramway continued from it’s planned Northern terminus at Newquay. There were delays as a result of Treffry’s death in 1850 but his work was eventually continued by his cousin who had the Hedra Incline operational by 1857 at the latest, possibly as much as five years earlier. [7]

Treffry’s Tramways by 1857, © Copyright Afterbrunel and included here under a Creative Commons Attribution-ShareAlike 3.0 Unported (CC BY-SA 3.0) Licence. [7]

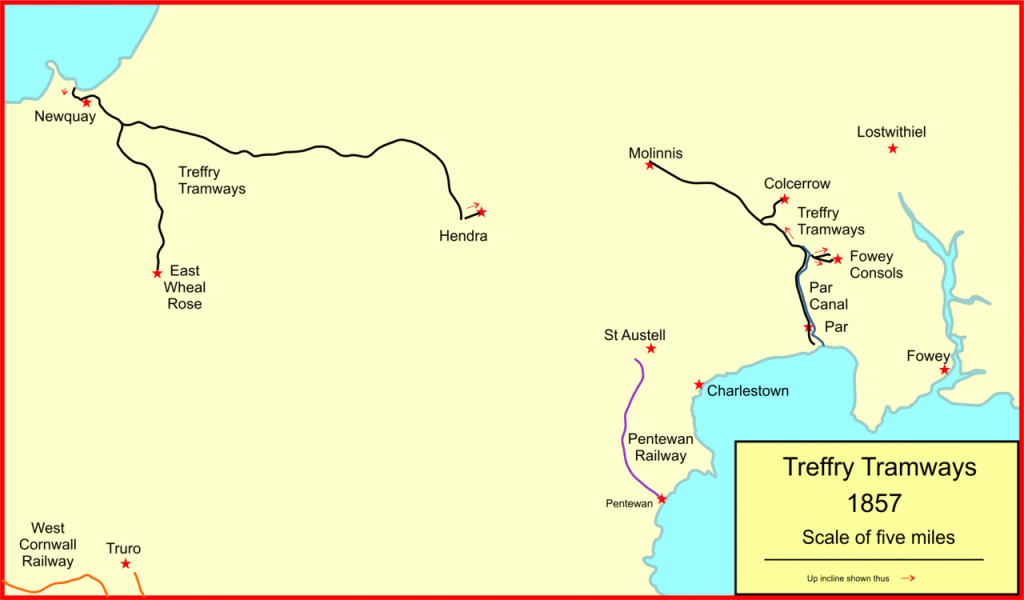
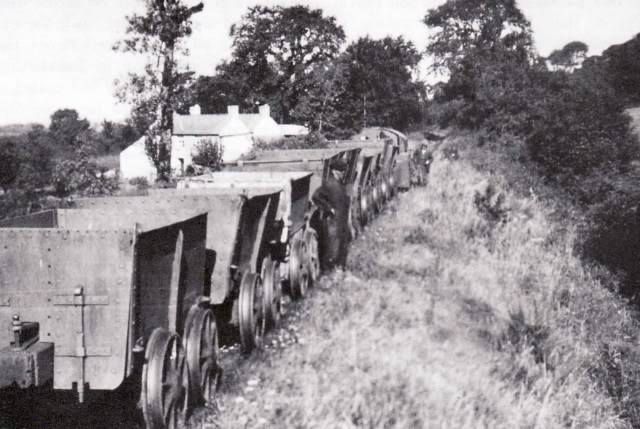
The Fowey Consols Mine was geologically exhausted by 1865. It closed, as did the connecting tramway inclines. Copper extraction in the area was in steep decline, tin ore extraction proved commercially unsuccessful, but granite quarrying “enjoyed an upsurge, and new quarries opened on a small scale at Rock Mill Quarry and Orchard Quarry, above Pontsmill on the south-west side of the river. In 1870 a branch of the tramway was extended from near Pontsmill to serve the two quarries. The line was on the north-east side of the river, and it had two branches for the quarries; each of them crossed the river, and the Orchard Quarry line had an incline to reach the site. The tramway on the incline may have been narrow gauge and was probably gravity operated.” [7][12][14]

Joseph Treffry’s decision in 1844 to use horse-power meant that by the 1870s his tramways were becoming inefficient. Modernisation was essential but the Teffry Estate’s finances precluded that work being undertaken solely by the estate. [7]

In 1872 William Richardson Roebuck leased the tramways. He formed a limited company, the Cornwall Minerals Railway Limited and obtained “parliamentary authority on 21st July 1873 to acquire the lines, form a new railway to connect them, and to make an extension to Fowey, and to improve the original tramway sections so as to make them suitable for operation by steam locomotive.” [7][11][6][15]

The Cornwall Minerals Railway (CMR) took over Treffry’s lines and improved them. They quickly built the link between Hendra and Molinnis, and their new line to Fowey, and Treffry’s vision of a through line from Newquay to Fowey was realised when on 1 June 1874 the CMR opened the line throughout.” [7] The line required a “new route up the Luxulyan Valley so as to avoid the rope-worked Carmears Incline.” [7]

The new line in the Luxulyan Valley by-passed the Treffry Viaduct, but Colcerrow Quarry continued to be rail served. Traffic from the quarry reversed at the junction with the old main line at the Par end of the viaduct, and then crossed it, joining the new line at Luxulyan. This operation was horse worked, and the track was still the original Treffry stone-block type in 1933.” [7][17] By 1959 the Colcerrow route at Luxulyan had been shortened to a stub siding. [7][16: p21]

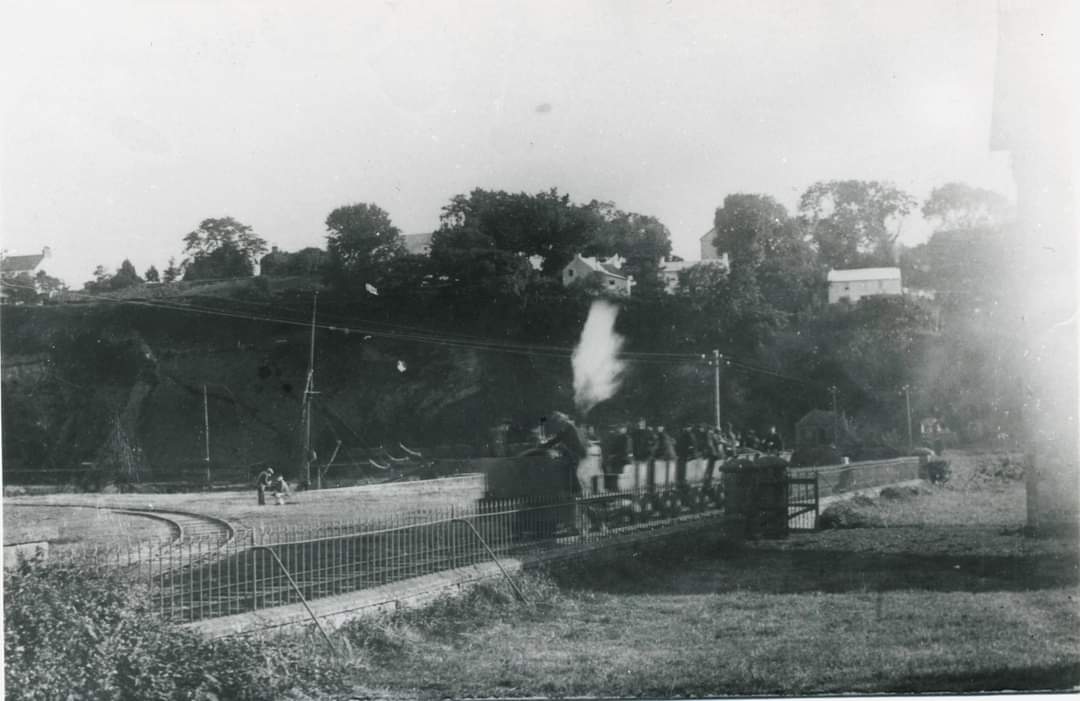
Passenger operation commenced in 1876. The GWR leased the lines from the CMR in 1877, and purchased them in 1896. “The East Wheal Rose branch remained a mineral section until the Great Western Railway (GWR) … built its line from Newquay to Perranporth and Chacewater, partly taking over the line of route.” [7]

The Treffry Tramways and the Par Canal warrant separate articles in this series which will be written in due course. …..

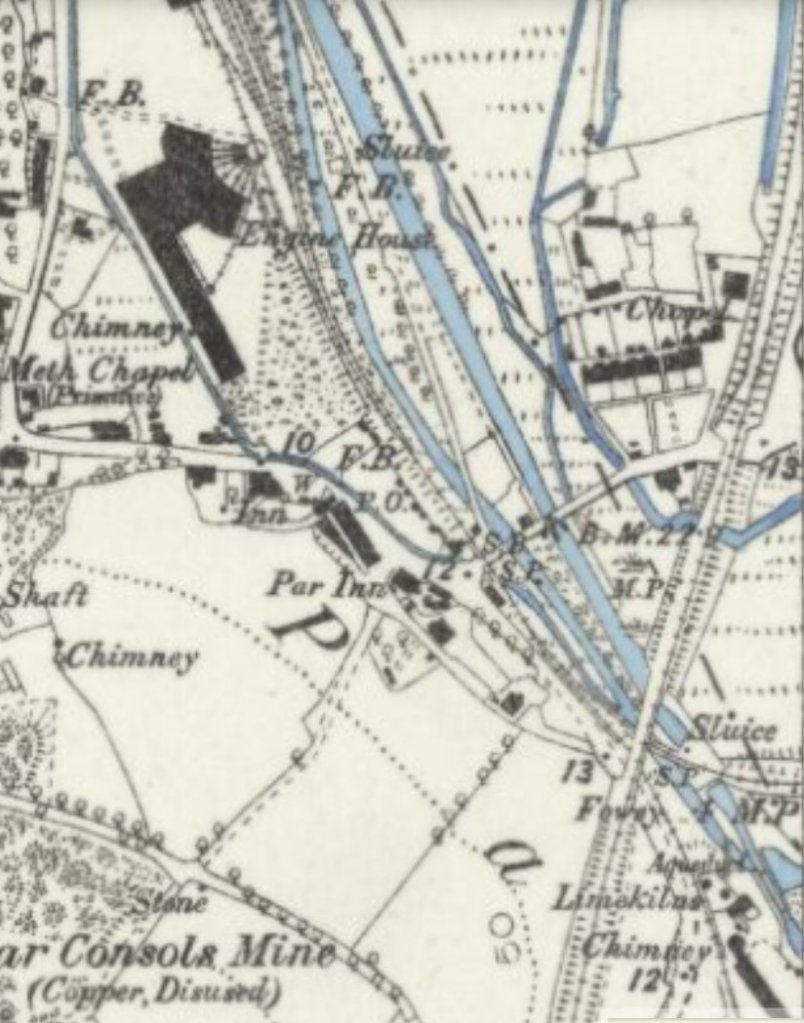
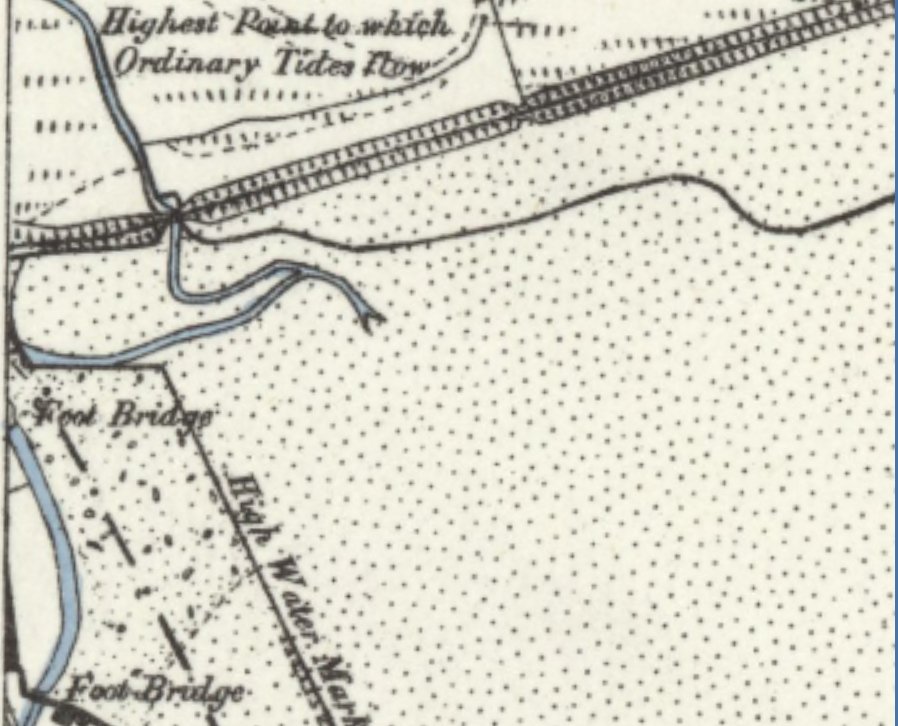
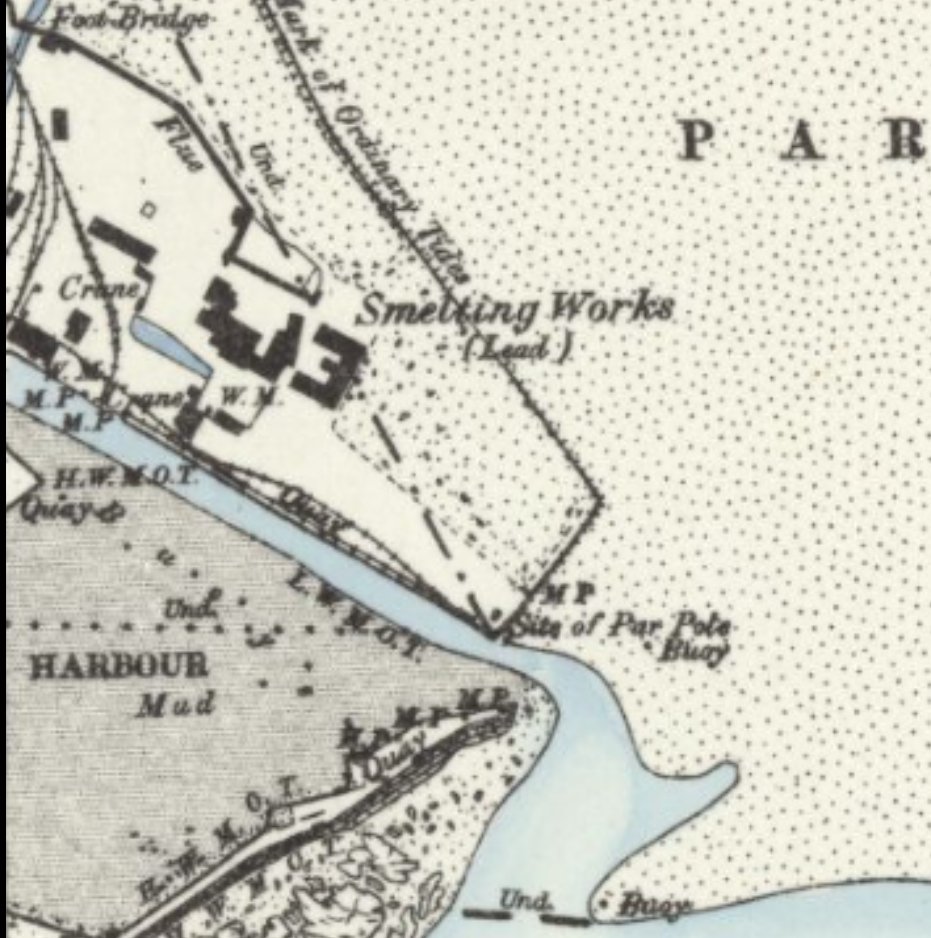
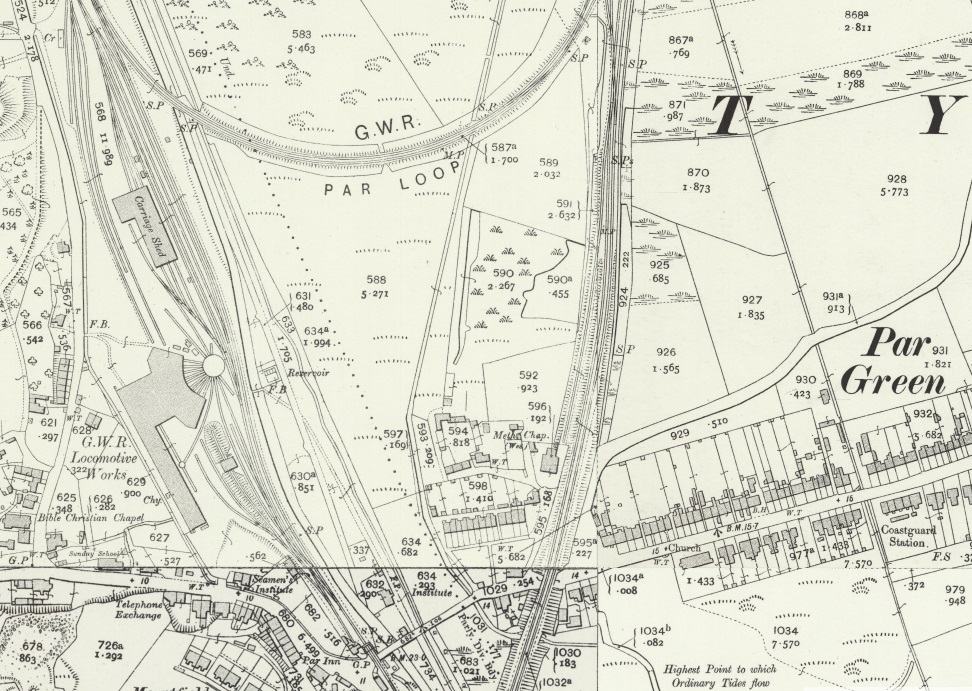
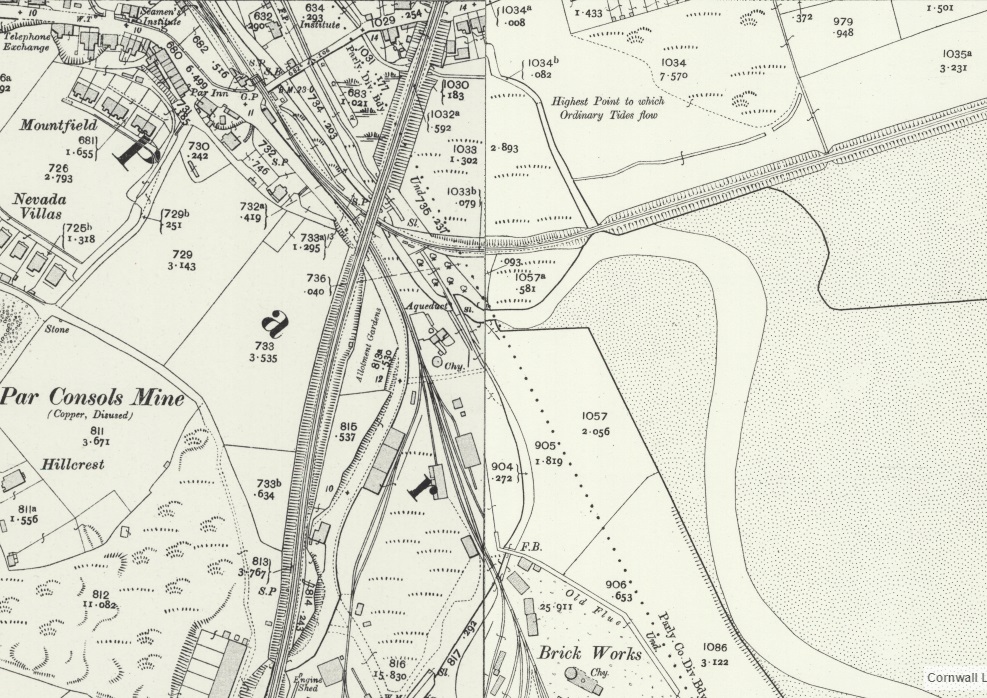
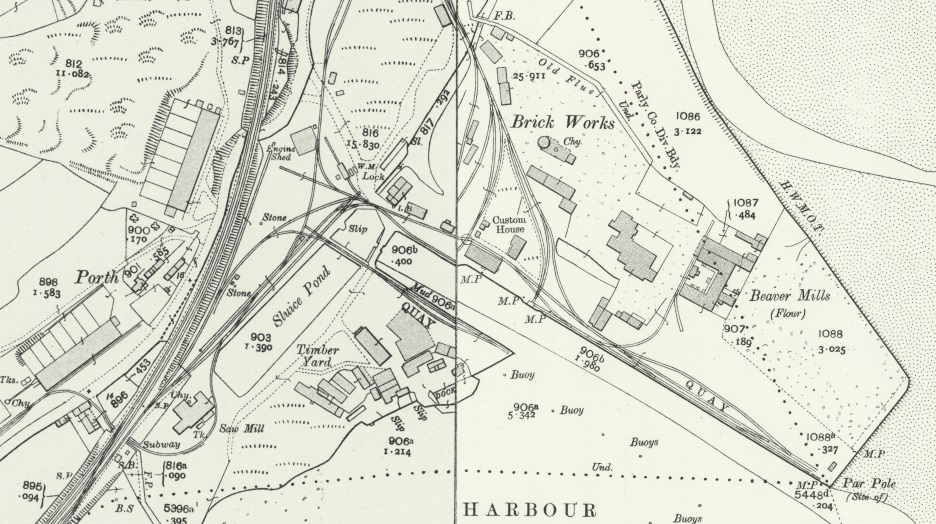
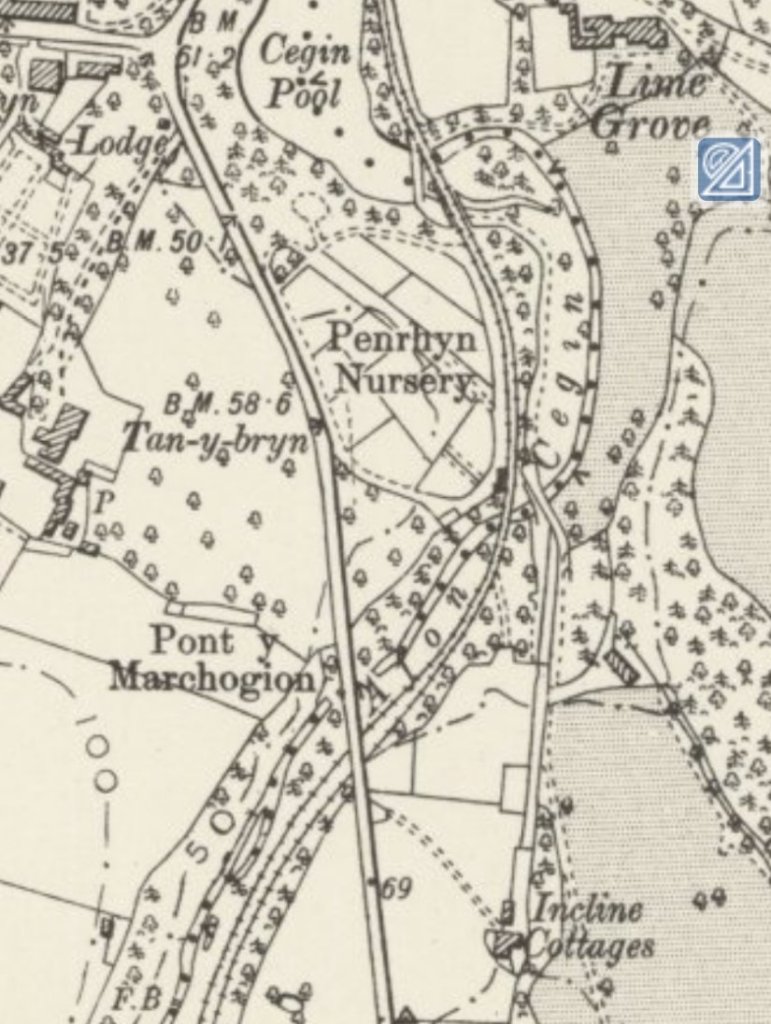
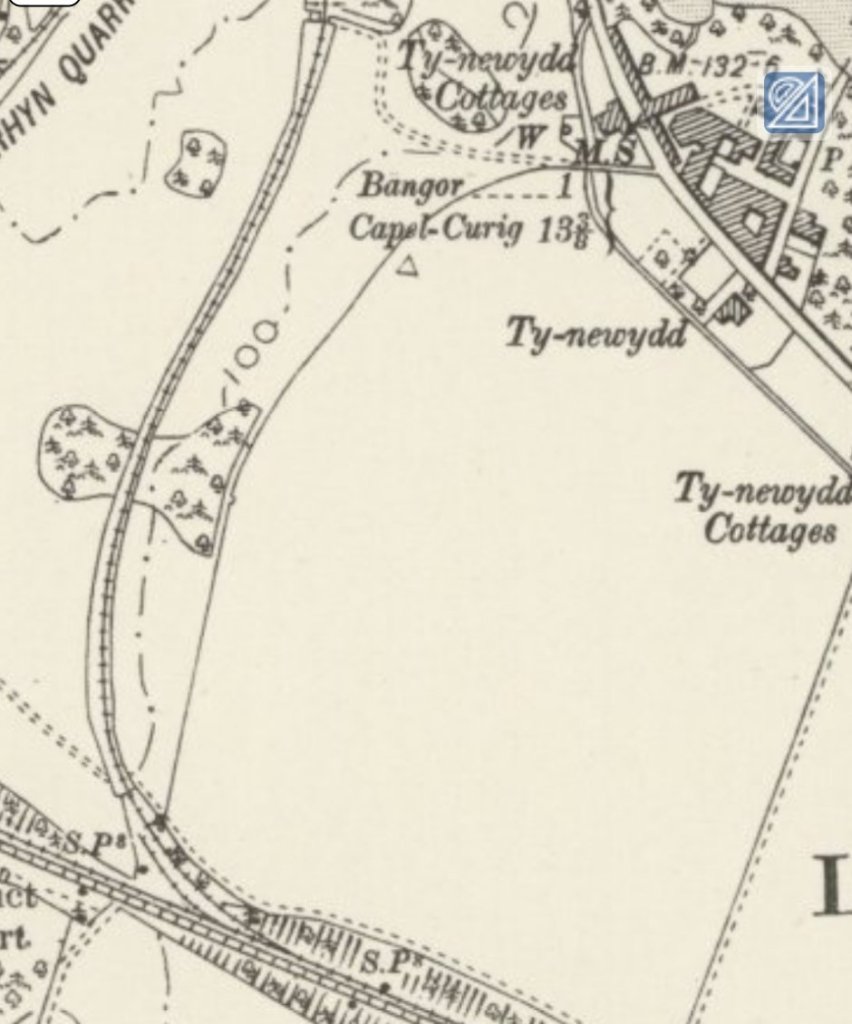
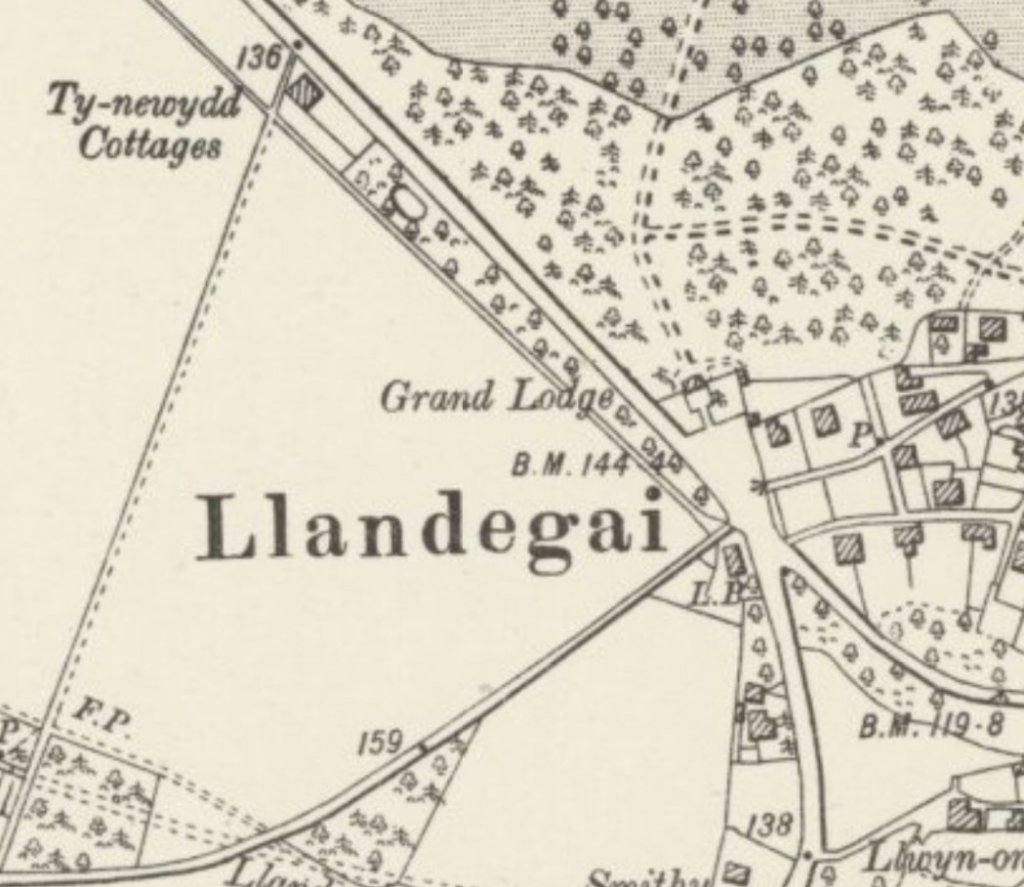
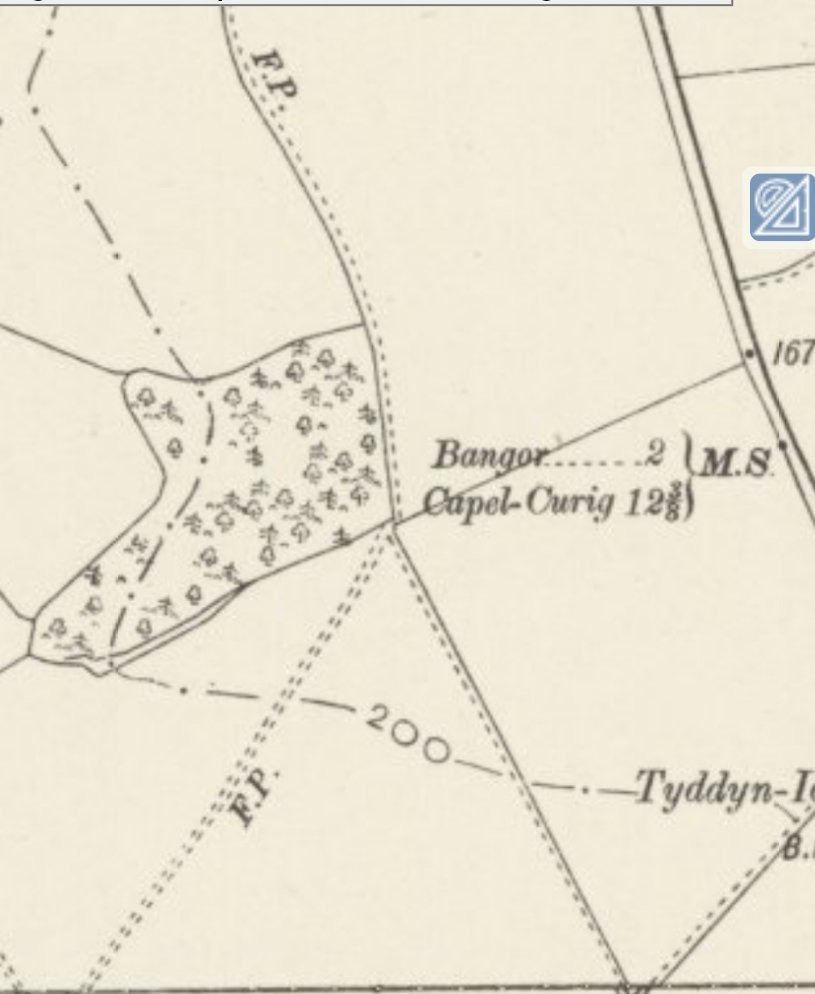
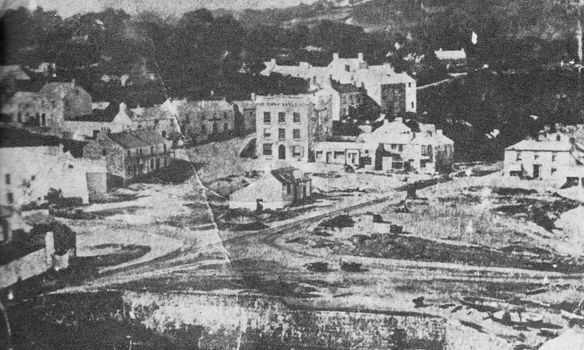
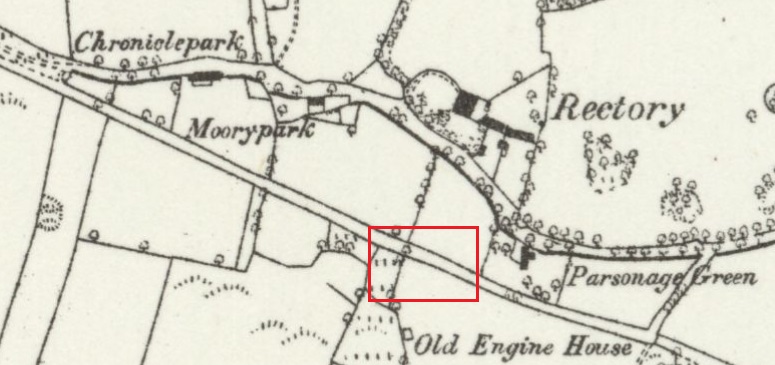
These next set of extracts from the Ordnance Survey belong together but cross the boundary between two OS Map sheets and come from the 1881 survey which was published in 1888. Treffry’s harbour is shown, as is the canal he built. The rail track shown running alongside the canal follows the route of the Treffry Tramway.

As well as the Treffry Tramway and the, already closed, Par Canal, there is a railway shown running roughly North to South on the first two map extracts. This was the Cornwall Railway, the railway company which built the majestic Royal Albert Bridge over the River Tamar. Because of the difficult terrain it traversed, it had a large number of viaducts, built as timber trestles because of the shortage of money. It was a 7 ft 1⁄4 in (2,140 mm) broad gauge railway from Plymouth in Devon to Falmouth in Cornwall, built in the second half of the nineteenth century. It was constantly beset with shortage of capital for the construction, and was eventually forced to sell its line to the Great Western Railway (GWR) in 1889, a little after the date of the 1881 Survey. [9]

On this map extract from the 1881 survey, the line of the Treffry Tramway is to the East of the Par Inn. It is followed closely, to its East, by the Par Canal and then by the River Par. Also visible is the Par Engine Shed which later became known as the St. Blazey Engine Shed. The engine shed is prominent on this map extract, it was built for the eighteen 0-6-0T locomotives that were built by Sharp Stewart in 1873 and 1874. These locos were intended to operate in pairs, back to back and each road in the engine shed was designed to accommodate one pair of locomotives. Traffic never warranted the paired use of these locomotives and only nine were put to use. What happened to the other nine locomotives is covered in the first article in this short series, (cf. [32]) [2][18][31]
St. Blazey Station and Engine Shed seen from the North in 1930. This image is an extract from EPW033131, the roundhouse is in the middle distance close to the centre of the image, © Historic England. [40]

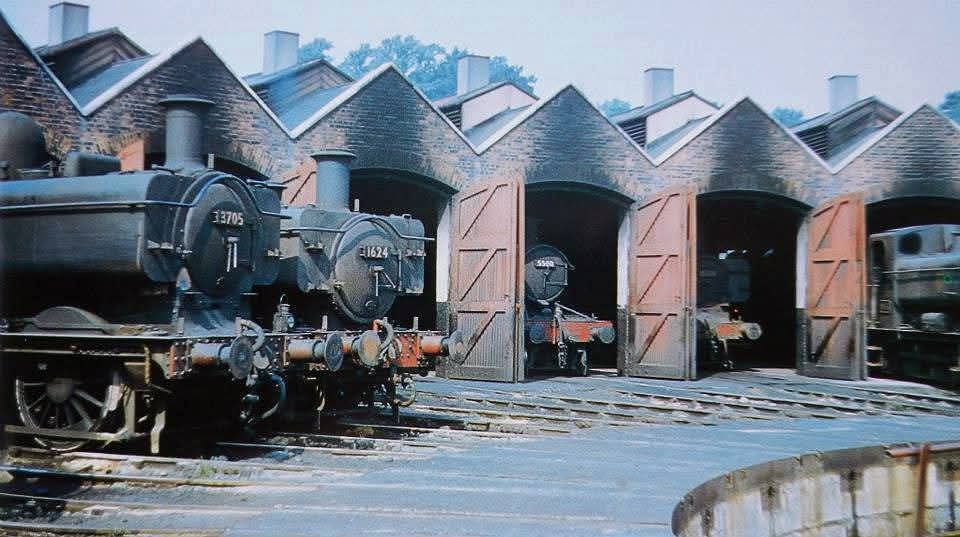
Stephen Austin, in a May 2003 article in Steam Days, describes the workshops and depot this:

“At Par, the Cornwall Minerals Railway set up a new headquarters and engineering depot on a piece of flat ground between the river and the original valley side where once ships moored in front of the Sloop Inn.

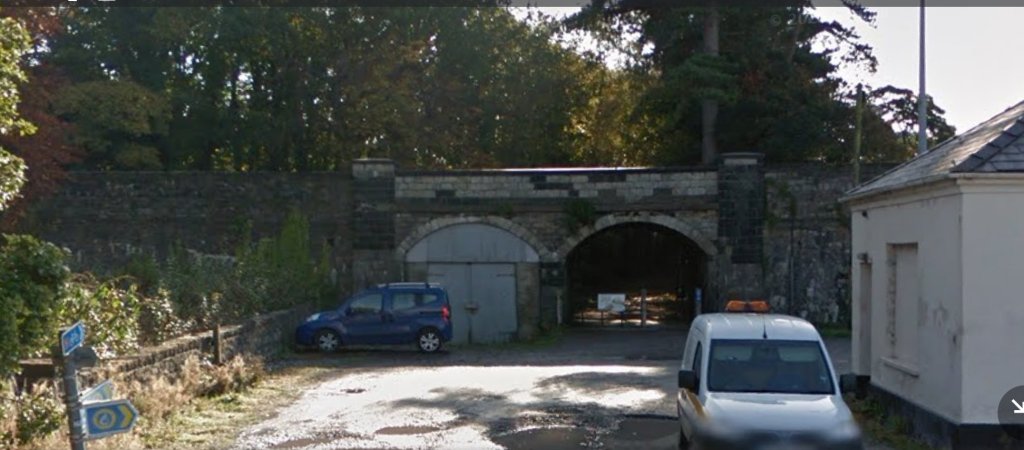
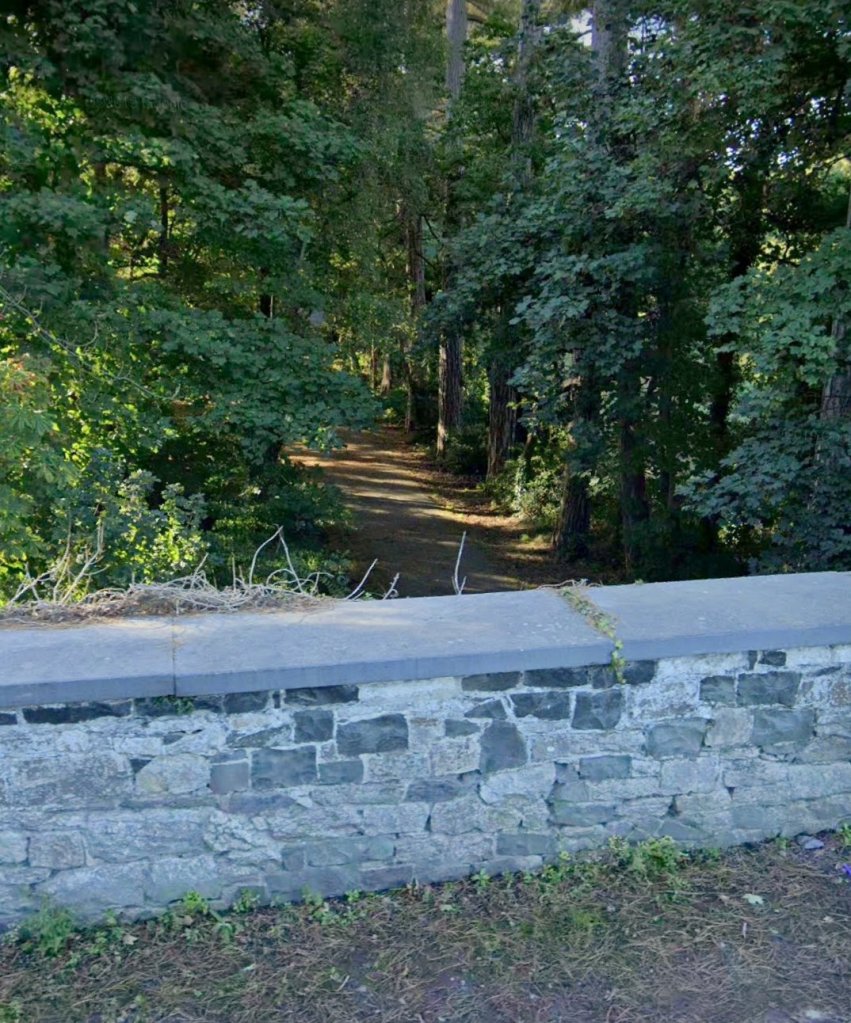
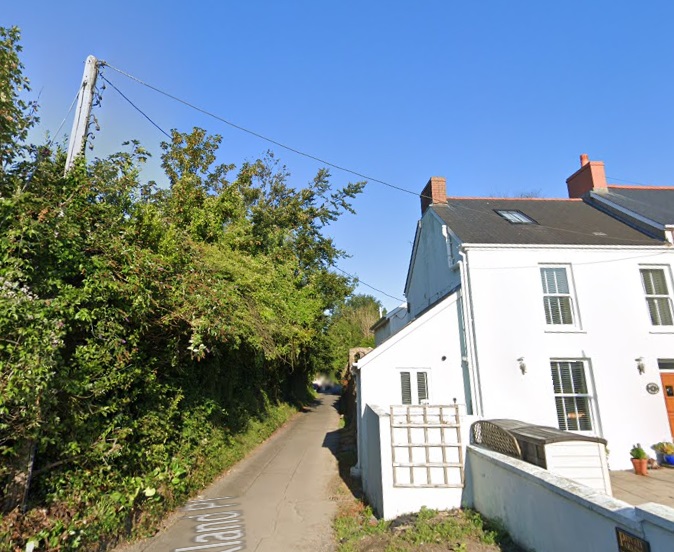
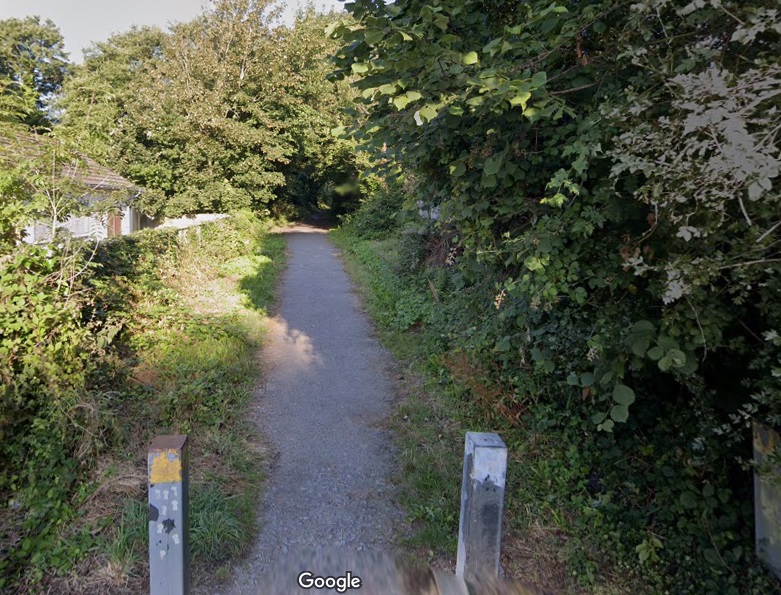
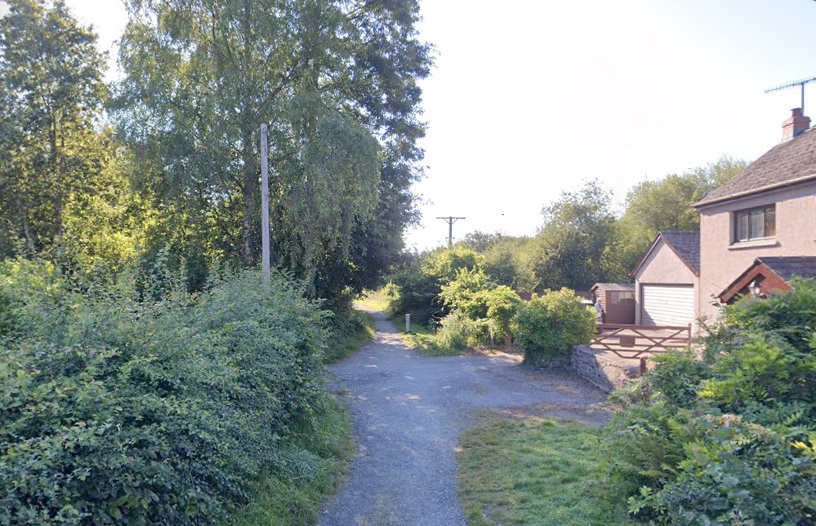
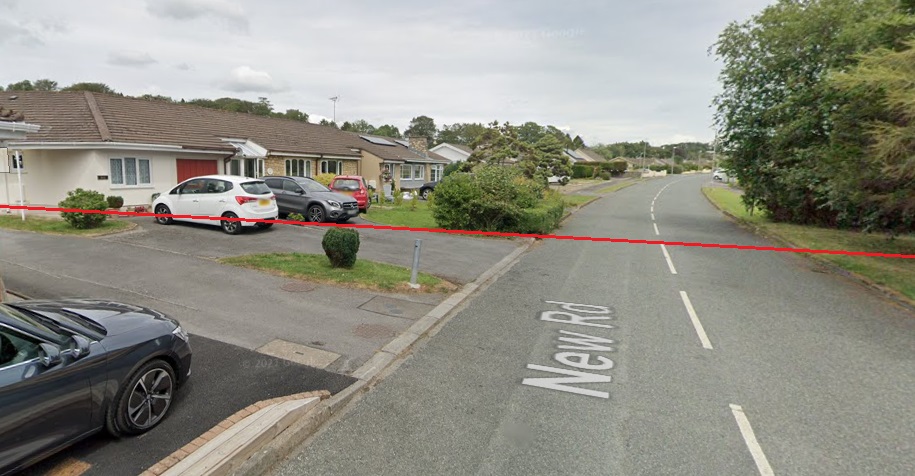
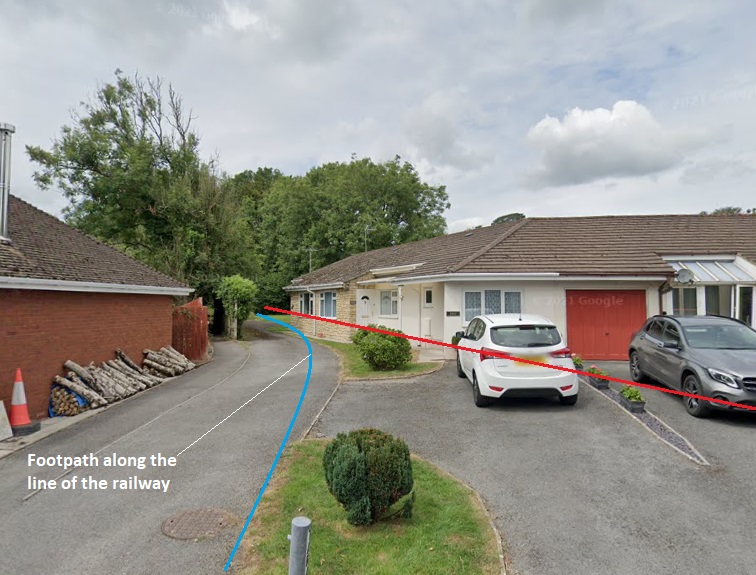
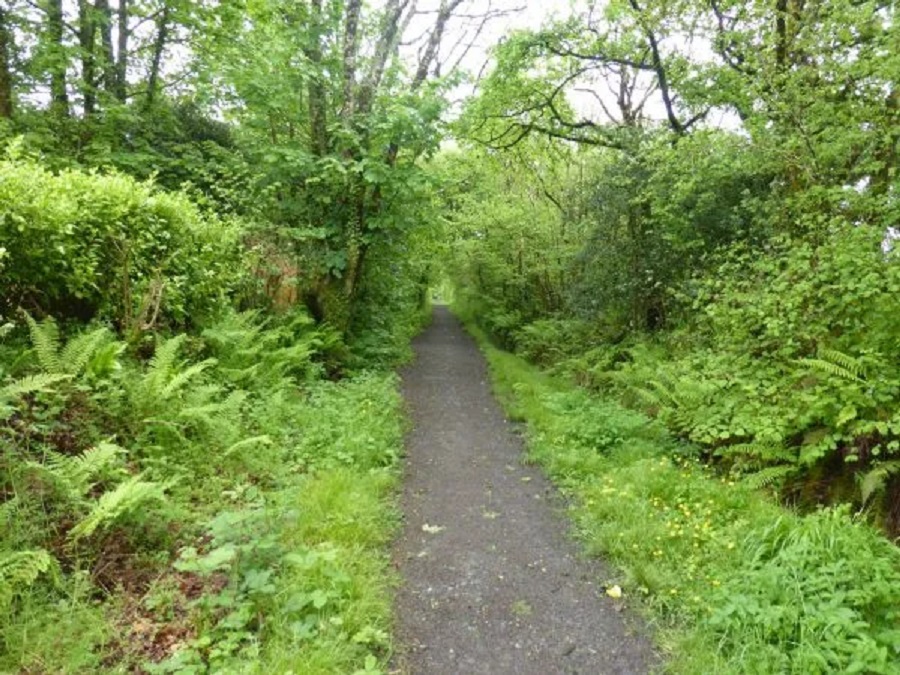
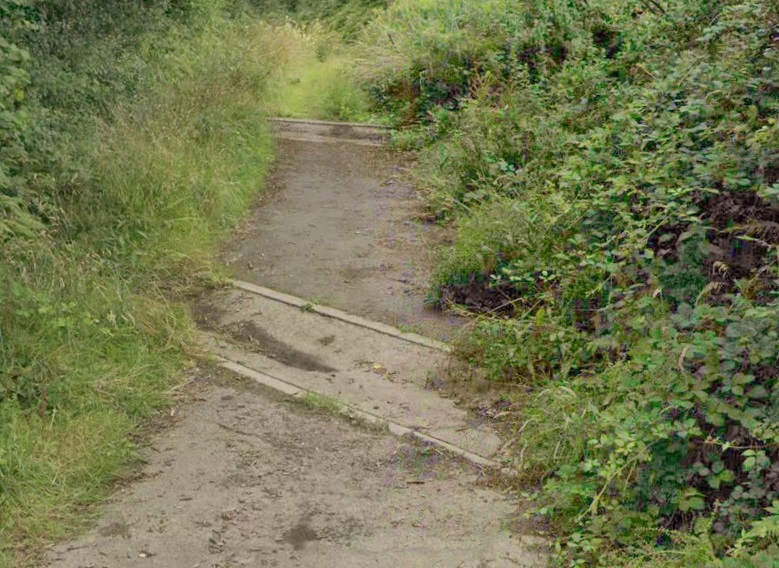
It was fortunate that the Cornwall Railway line, at the south end of this site, was elevated on a viaduct, for its five arches now spanned the canal, the Cornwall Mineral Railways main line to Fowey, a branch into Par Harbour, the river, and a public road. At the north end the new line swung across the river on a sharp reverse curve to join the 1855 causeway. On this length from Par Bridge to Middleway Bridge the original railway between the river and canal was abandoned, and is today a public footpath where some of the sleeper blocks may still be seen.

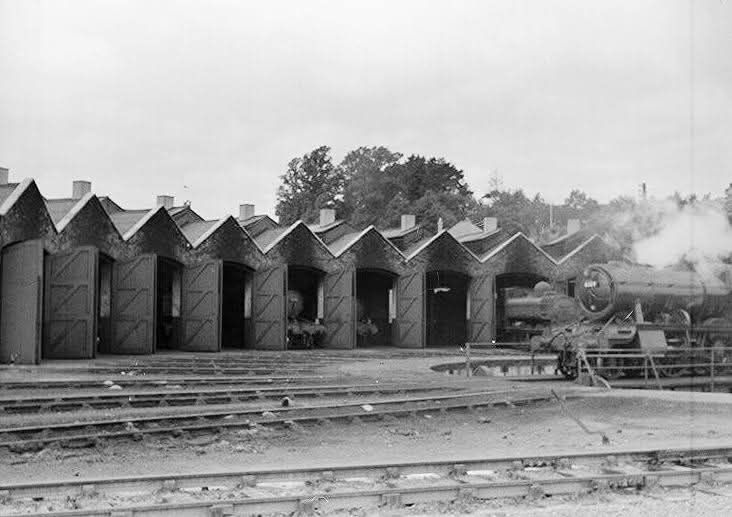
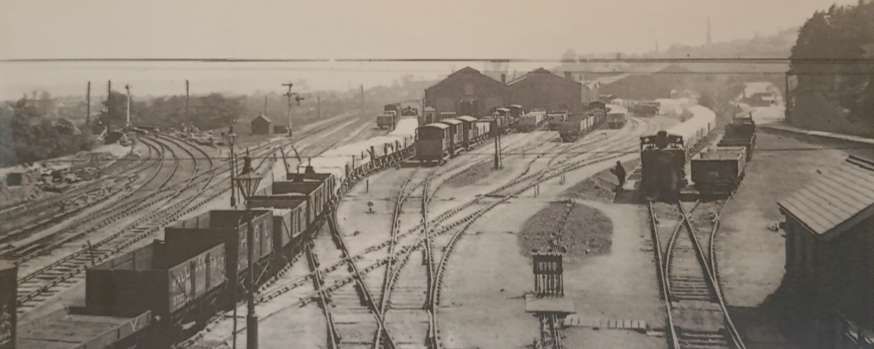
The railway depot, finished by the end of 1873, had two main buildings. One was a wagon repair shed and the other contained a Signal & Telegraph repair shop, smithy, boiler room, water tank, a two-storey office suite, machine shop, and locomotive repair shop. Adjoining the latter was a locomotive running shed constructed in what was then a frequently-used layout – a segment of a circle-covering tracks which radiated from a turntable in the centre of the circle. This shed, which became known locally as ‘the roundhouse’, contained nine tracks, each with its own gable-ended roof, of which the middle three extended through the back wall into the repair shop.

The buildings at the depot were handsome, elegantly-proportioned brick structures. The whole workshop group cost £16,000 and was a huge development for the time and place of its construction, exceeding the Cornwall Railway Works at nearby Lostwithiel. … The reason for the nine roads in the running shed was that it was to accommodate the whole of the company’s locomotive fleet. They ordered eighteen 0-6-0Ts from Sharp Stewart & Company of Manchester. The design was attributed to Francis Trevithick, formerly of the L&NWR and a descendant of the great Richard Trevithick, and was conventional except that the cab had no back. The intention was to run the locomotives in pairs, coupled back to back, with one crew. This was because Robert Fairlie had recently created a sensation with his double-ended locomotive mounted on two power bogies, able to do the work of two smaller engines without the expense of two engine crews; the Cornwall Mineral Railways’ idea was to obtain this last benefit without having to pay royalties to Robert Fairlie.

The prospect of a driver having to leap from one footplate to another whenever a control needed adjusting is an alarming one, but in practice it was seldom, if ever, put to the test. Far from needing two locomotives to a train, one was ample, and half of the new fleet of locomotives was never used at all. The staple traffic on which the hopes of the firm were raised iron-ore from the Perran Iron Lode never appeared. All that was offered was stone, and the then-modest output of china-clay, and within a year it was clear that the railway was a financial failure.” [31: p279-280]

St. Blazey Shed in early BR days. This image was shared by Colin Bangs on the St. Blazey Roundhouse Facebook Group on 30th April 2024 © Unknown. [35]
All nine roads appear in this image which was shared on 24th August 2015 on the Old Cornwall in Pictures Facebook Page, © Unknown. [38]
This image of the roundhouse in use in the early 1969s was shared on the Didcot Railway Centre Facebook Page on 28th April 2016, © possibly HMRS or Colour Rail as the image is reproduced in Stephen Austin’s article with that attributation. [39] [31: p285]
On this extract from the 1881 Survey, the Cornwall Railway at Porth is shown to have connecting lines to Par’s dockyard area. [2]
This extract from the 1881 Survey is included for the sake of completeness. It shows the Par Canal, being crossed by two footbridges, the most southerly of which also appears on the next map extract. [3]
This extract from the 1881 6″ Ordnance Survey shows the tramway serving the quayside. Much of the harbour area was mud flats at low tide with just a narrow channel of water remaining. [3]

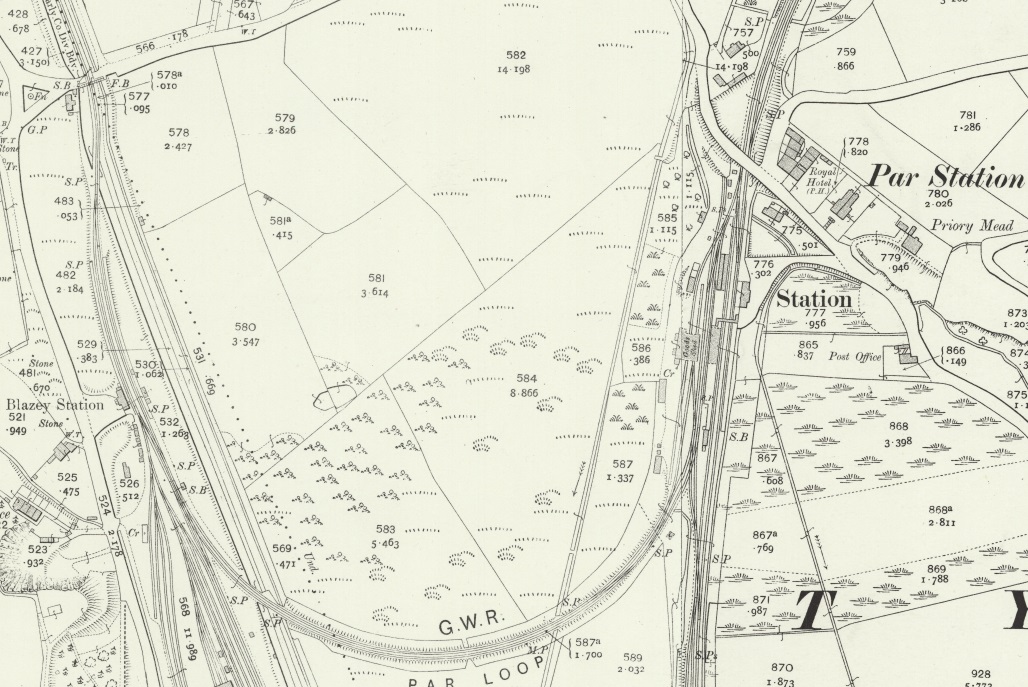
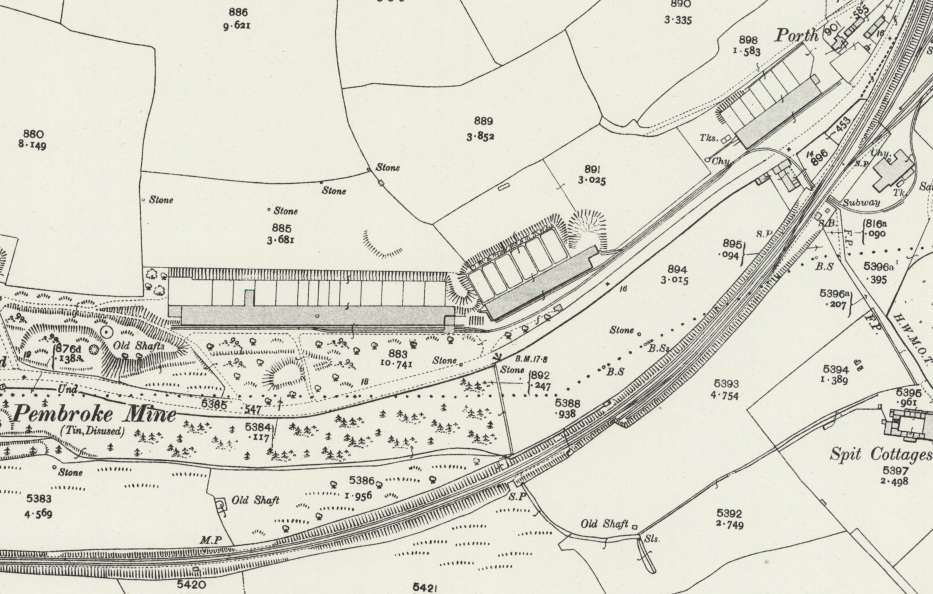
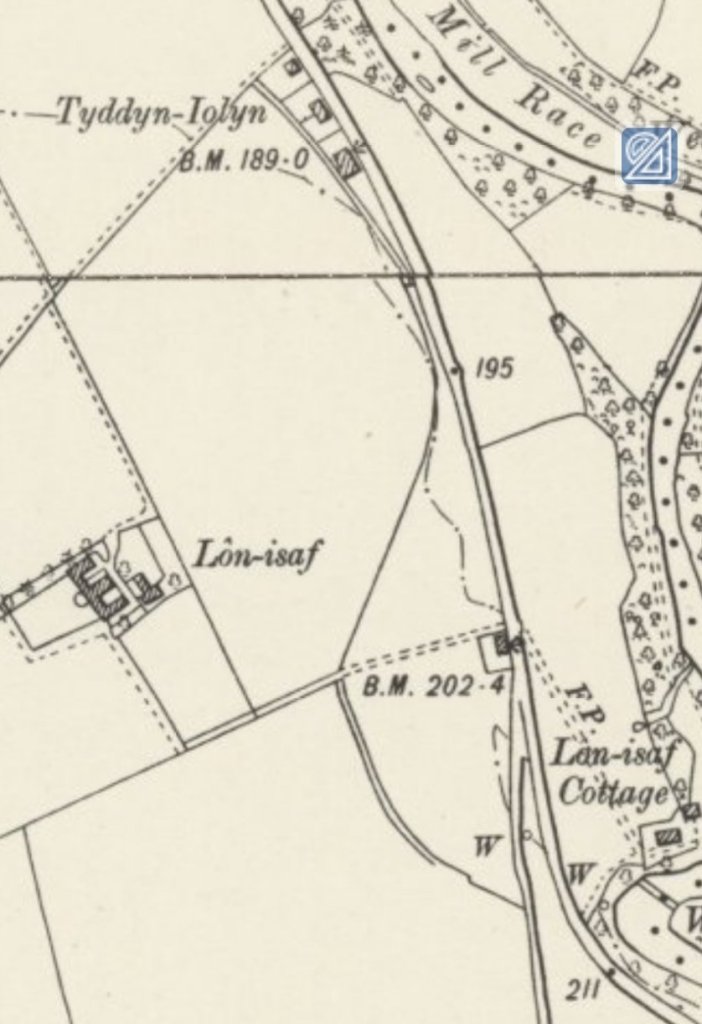
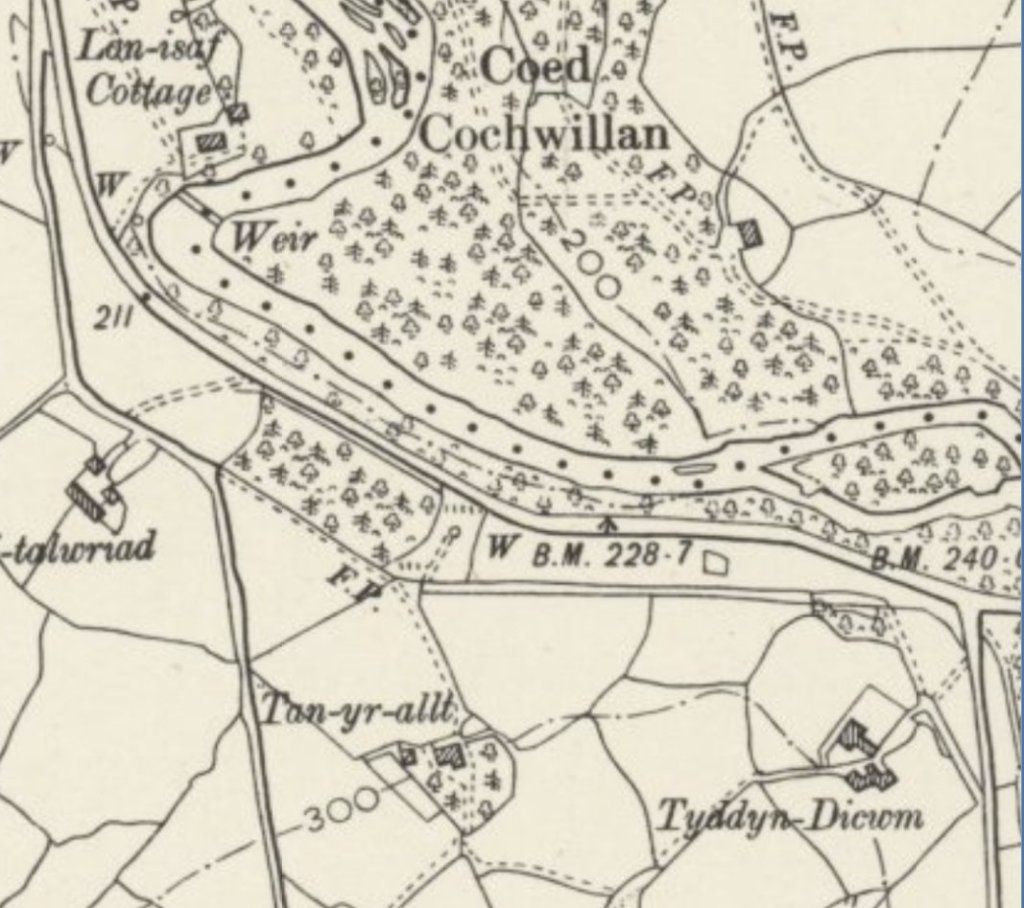
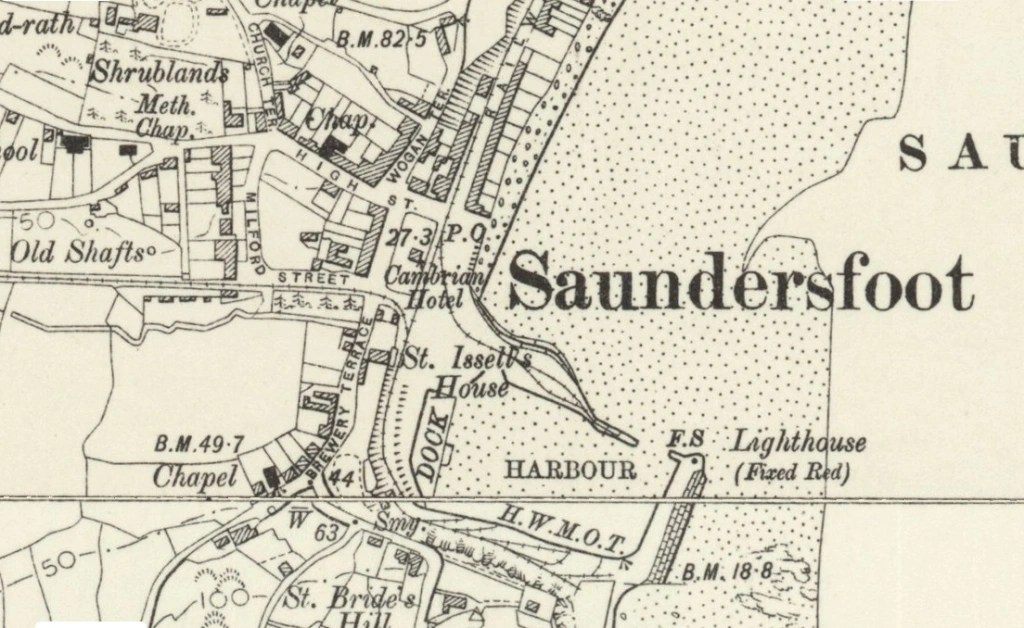
The next images show the area as recorded for the 25″ Ordnance Survey in 1905/1906 and published in 1907.

This extract from the 25″ Survey of 1905/1906 published in 1907, shows the Northern half of the area immediately around Par Harbour. St. Blazey Engine Shed is in the top-left quadrant. [19]
The view looking South in 1922 from St. Blazey Railway Station. The curve running away to the left is the link to what was the Cornwall Railway at Par Station. The wagon works are just to the right of centre. At the top of the image with the locomotive shed beyond and to the right. The down to Par Harbour runs ahead of the camera to the left of the wagon works; that to Fowey leaves the image bottom-left. The image is greatly enhanced by the two movements taking place. Immediately to the left of the wagon works what appears to be a saddle tank heads a train of, mixed empty and loaded general fright wagons and loaded and sheeted china clay wagons. To the right of the works, a pannier tank heads a train of china clay wagons within the sidings. Presumably the various wagons and brake vans in front of the wagon works are awaiting servicing or return to use on the railway, © Public Domain. [31: p281]
This next extract from the 25″ Survey of 1905/1906 published in 1907, shows the Southern half of the area immediately around Par Harbour. [20]

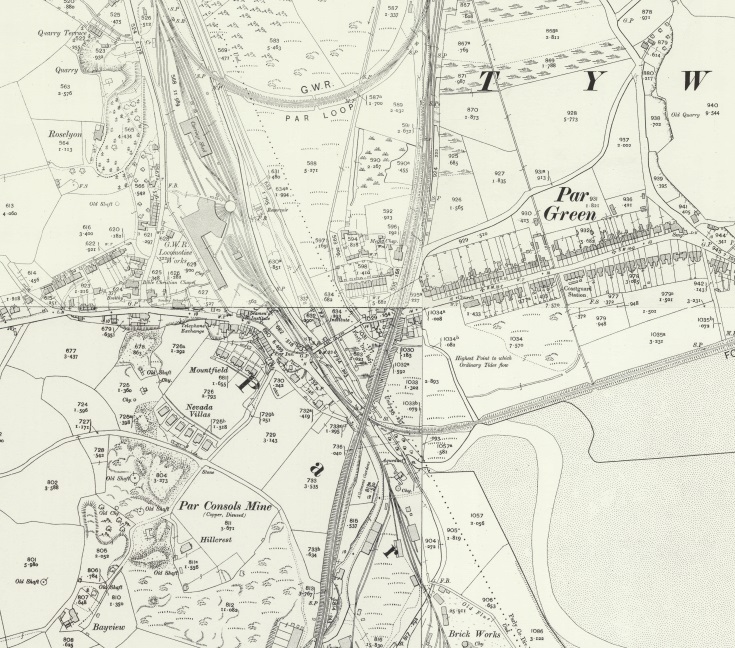
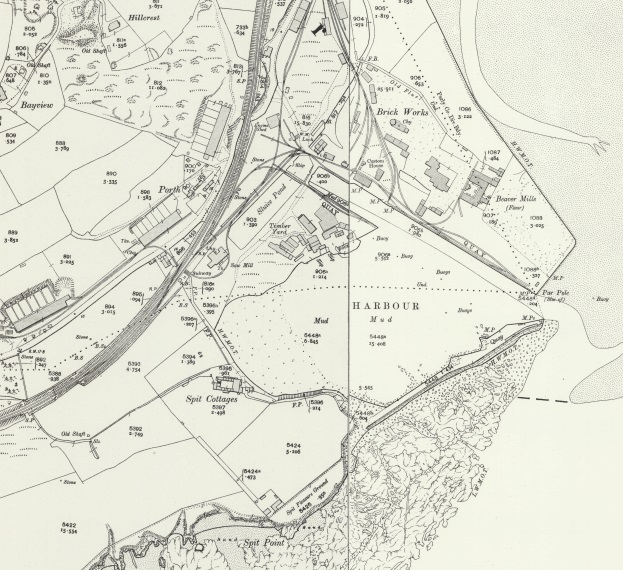
The next few images show a number of the areas in greater detail. All these extracts come from the 25″ OS mapping published in 1907.

The GWR Loop between St. Blazey Railway Station and Par Railway Station. [25]
St. Blazey Engine Shed and Par Green with the GWR Par Loop visible at the top of the map extract. [24]
The area North of the Quay including the Fowey branch on its causeway. [23]
The immediate area around the Quay. [22]
The area between Pembroke Mine and Porth on the North side of the mainline. [21]
Par Harbour, as it appears on the 1943 Admiralty Chart. [4]

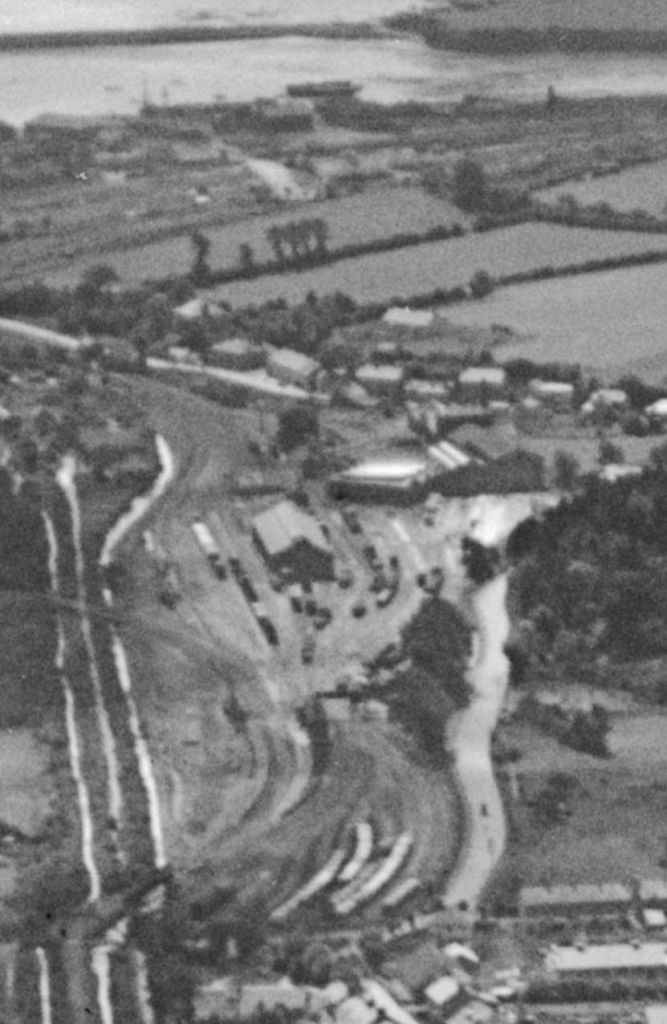
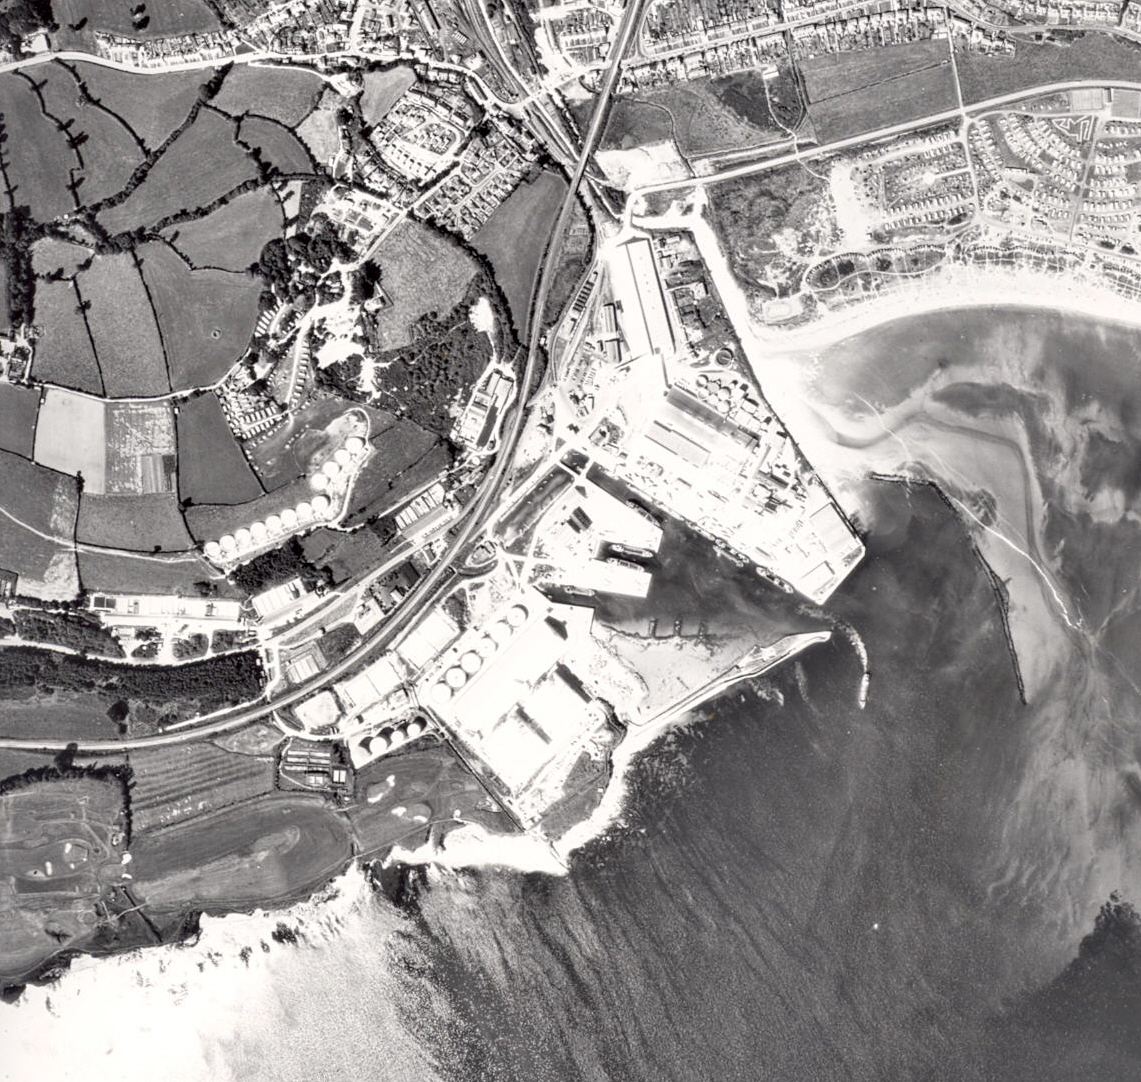
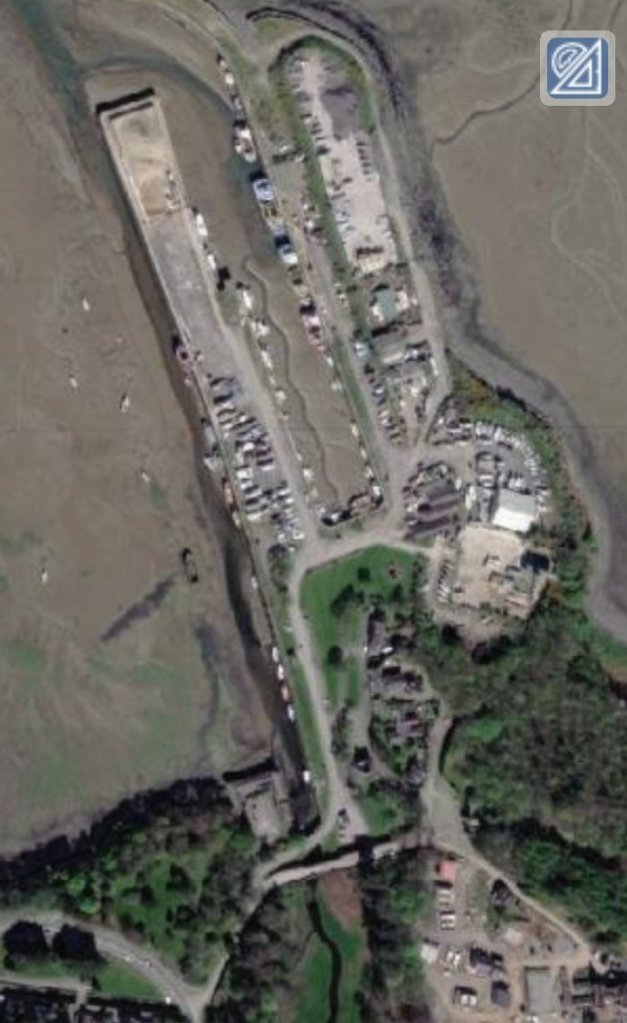
Par Docks saw significant developments in the late 1940s. The image below is an aerial image of Par taken in 1950 for English China Clay.

An aerial image of Par Docks taken on 20th April 1950, shared under a Creative Commons Licence (Attribution-Share Alike 2.5 Generic (CC BY-SA 2.5)). [26]

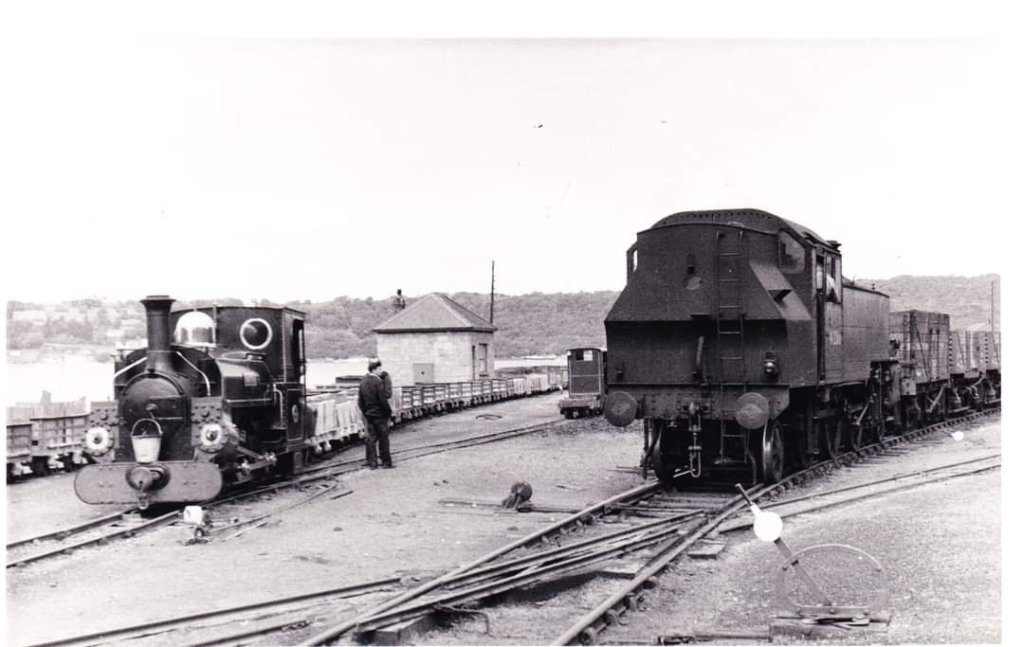
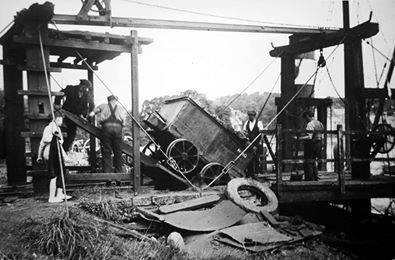
Railway Bylines has at least two articles about Par Harbour. The first, a 10 page article about the history of the Harbour, appeared in Railway Bylines Volume 2 No. 5 of August/September 1997. The second, an article entitled ‘Cornish Cream’ with text and photography by Tom Heavyside, was included in Railway Bylines Volume 9 No. 12 of November 2004. [28] It focussed on the diminutive locomotives which served the port’s railways. … Alfred and Judy were still at Par in 1977 when Tom Heavyside visited. Judy was no longer in working order. Alfred was ‘in steam’ on Wednesday 15th June. Alfred was stood-down in August 1977 with its duties being undertaken by a tractor with the occasional use of a BR ’08’ shunter from St. Blazey depot as and when required. Both Alfred and Judy were subsequently removed from the site and saved for posterity.

Tom Heavyside comments: “Fortunately, Alfred and Judy we both saved for posterity. Initially, Alfred went to the Cornish Steam Locomotive Society depot at Bugle and Judy to the Wheal Martyn China Clay Museum near St.Austell. However, in 1987 Alfred moved to the Bodmin & Wenford Railway and in the autumn of 2002 Judy also moved to the Bodmin & Wenford. Fittingly, Alfred became something of a celebrity, not only at Bodmin but elsewhere; I well remember e it making a guest appearance at the Exeter Rail Fair in April/May 1994 when it mingled with a number of much larger steam locomotives including a couple of Bulleid Pacifics and a GWR King.” [28: p590]

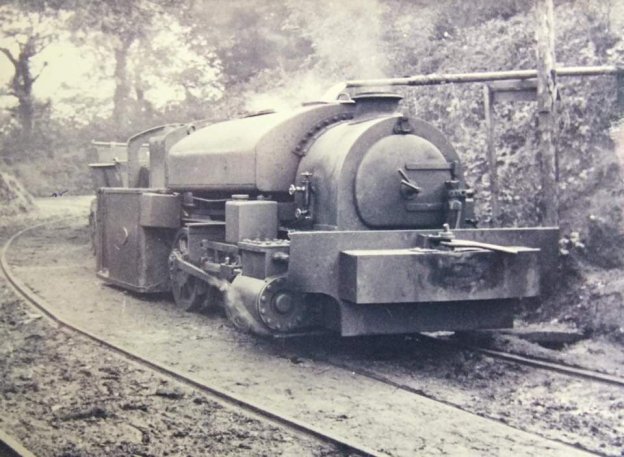
Wikipedia tells us that: “Alfred and Judy are two 0-4-0 saddle tank steam locomotives. They were built by W. G. Bagnall for use at Par Docks in Cornwall, United Kingdom. The unusually low design was required to cope with extremely tight curves and a very low bridge under the Cornish Main Line. The locomotives are both preserved in operational condition on the nearby Bodmin and Wenford Railway and inspired the Reverend Wilbert Awdry to include them in The Railway Series of children’s books as Bill and Ben.” [29]

The bridge under the Cornish Mainline served the china clay works. It had a maximum headroom of 8ft. Operating curves in the Port were as tight as 70ft radius. The locomotives used in the Port needed to meet these stringent restrictions. A series of different locomotives were used over the years.  One of those locomotives was ‘Toby’, a low-profile Sentinel, which served the Port throughout much of the first half of the 20th century. By September 1937, demands on the older locomotives were such that a new locomotive was required to work alongside Toby.

W. G. Bagnall & Co. built a suitable locomotive which was delivered to Par in 1937. That locomotive was to be given the name ‘Judy’ in 1955. The locomotive was delivered at a cost of £1200 carrying the works number 2572. “By 1952, ‘Toby’ required replacement and an upturn in traffic meant an order was placed for another locomotive. In 1954, Alfred was delivered (named after the manager of the harbour Alfred Truscott). Whilst nominally the same, Alfred had some differences to Judy with different bunker style, tank and handrail alterations (such as a tank filler that opened in the opposite direction) and a different purchase price – this time £7500.” [30]

Par Docks in the 2020s. [Google Earth, January 2025]
Par Docks, Clay Dries in use in April 2003, © Tony Atkin and licenced for reuse under a Creative Commons Licence (CC BY-SA 2.0). [36]
Par Docks, Clay Dries in 2013, © Chris Gunn and licenced for reuse under a Creative Commons Licence (CC BY-SA 2.0). [37]

The Imerys Blueprint for Cornwall, published in 2003, provided information about the history of china clay production in Cornwall. It included information about the amount of china clay that was shipped out of Par Docks between 1858 and 2002:

1858 – 15,154 tons of china clay

1885 – 86,325 tons of china clay

1987 – 700,000 tons of china clay

2002 – 313,425 tons of china clay, 134,810 tons of aggregates.

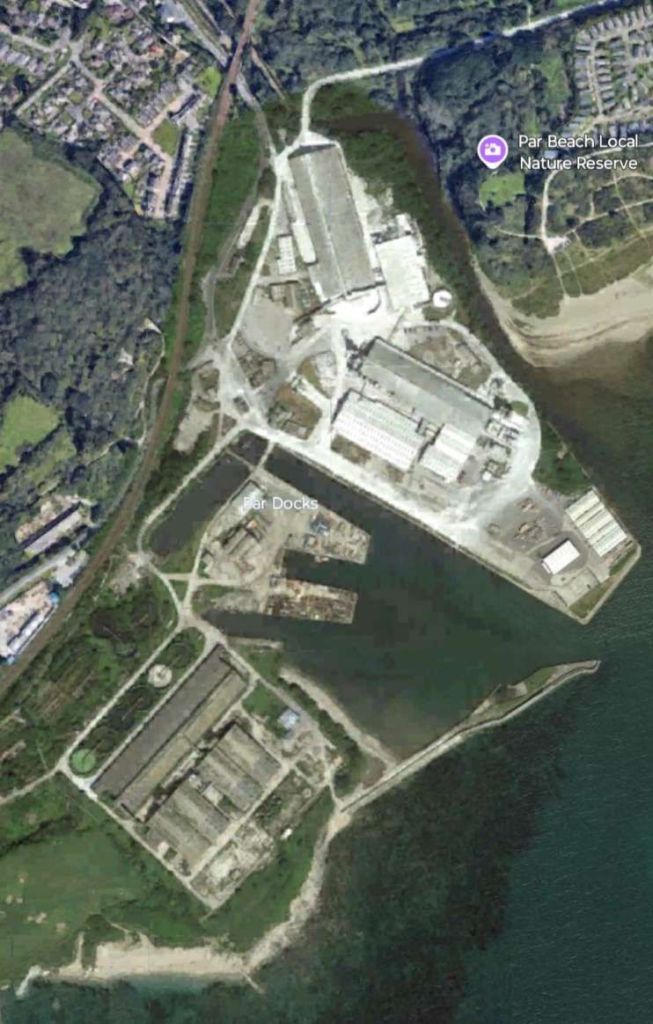
Incidentally, the blueprint also noted: the sale of the harbour by the Teffry Estates to English China Clay (ECC) in 1964; the construction of dryers at the site in the 1950s and 1960s; and the closure of the port in 2007.

After closure the port was used as a Milling Centre and a Grade Dryer with all bins clay shipment being handled by Fowey Docks.

Stephen Austin notes the use of the locomotive shed over the years from the 1980s to the new millennium as follows:

“St Blazey depot, much diminished as it was, was still very much alive. It maintained a dedicated fleet of china-clay wagons introduced in 1954, and from 1970 a fixed cover for these wagons was designed and fitted in the Wagon Works, producing the distinctive ‘Clay Hood’. The staff was proud of their self-sufficiency, and when the Clay Hoods were replaced by the Type CDA hopper wagons in 1987 the fitters, on their own initiative, rebuilt the example which now stands as gate-guardian at the Wagon Works. Other freight business disappeared, and the Newquay line was reduced to a long siding on which a railcar shuttled desultorily, but following the break-up of British Rail in 1993 there was renewed optimism.

The depot was taken over by a company named English, Welsh & Scottish Railway Company … and St Blazey was that company’s only depot in Cornwall. It stabled and serviced the TPO coaches of the mail services which were tripped empty from and to Plymouth and Penzance every day, and wagons carrying cement to Blue Circle at Moorswater and products from Fitzgerald Lighting Ltd at Bodmin were staged through the yard. In 1995 some of the locomotives allocated in Cornwall were given names of local association. Among them was No. 37674 St Blaise Church 1445-1995, named after the nearby parish church and unveiled in the yard. In 1998 St Blazey began operating the new locomotives imported by EWSR (Class 66) on the china-clay trains.

On 11th August 1999, in its 125th anniversary year, St Blazey hosted perhaps the biggest assembly of preserved coaches ever gathered on the national network, and excursions brought people down to view the total eclipse of the sun. On 26th February 2000 diesel locomotive No 67008 arrived to begin the depot’s association with the Class 67 diesel then the fastest true self-contained locomotives running anywhere in the world, and worthy successors to those little Sharp Stewart tank engines. …

… The new millennium brought more uncertainty to St Blazey’s future. The last train conveying Fitzgerald Lighting’s wagons, the last consignment of any West Country manufacturer’s goods to be sent out by railway, left the yard on 25th July 2001. The remaining customers, the cement, china-clay, and the mails, made it clear that if the railway did not satisfy them on price and speed they would take to the roads. The only hope [lay] in the fact that … after 128 years of service, St Blazey is still very much a going concern.

Notwithstanding the unique nature of St Blazey Works, it received no attention at all from the enthusiasts in the fields of railways, architecture, or history, nor from the ‘official’ bodies paid to safeguard these things. The roundhouse building was divided up and rented by local traders, and the yard was a dump for rubbish and wrecked cars. However, even the tracks into the building remained intact, and apart from the demolition of the coaling stage nothing else was done until the summer of 2001 when the ownership changed hands, and plans were announced for new building on the site. Thus the original character of the Works, and the practicality of returning it to railway use, will finally be extinguished.” [31: p284, 286]

The news in 2024/2025 is that the anticipated removal of the St. Blazey roundhouse did not occur. St. Blazey Engine Shed has recently been restored as the base for MPower Kernow CIC (MPower), a new Cornish social enterprise company. [34]

The restored depot at St. Blazey. [34]

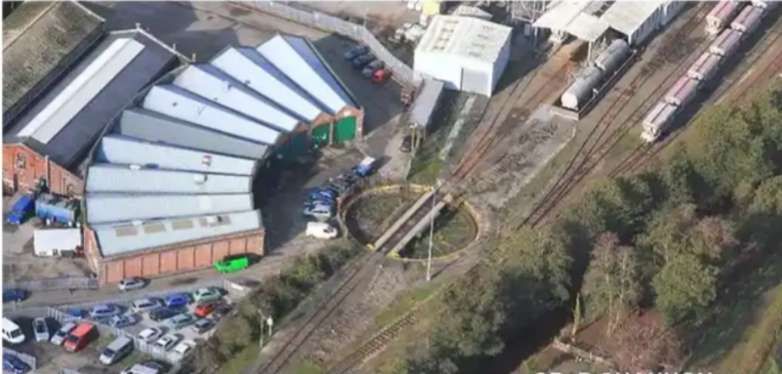
In April 2023, World of Railways reported that “the ongoing restoration of the turntable and the creation of a servicing facility for steam locomotives is expected to provide many and varied training opportunities for a broad cross section of the community and MPower is already working with local education and training organisations to provide hands-on experience in a range of skills, from woodwork to plumbing, electrics, construction and engineering.” [34]

Future articles?

It is, finally, worth noting that the Cornwall Minerals Railway had a total of 46 miles of track with “a main line from Fowey to Newquay … and branches from Bugle to Carbis, St Dennis Junction to Melangoose Mill and Newquay to East Wheal Rose. These connected clay works, quarries, mines and harbours (Newquay, Par and Fowey) in the area with the headquarters and works being sited at St Blazey (part of which is still in use).” [1: p21]

Other clay lines were built in later years, Bugle to Carbean Siding in 1893 and Trenance Junction (just West of St Austell on the main line), to Bojes Sidings in 1520 Two narrow gauge lines were also in use at various times. The Gothers Tramway of … from Pochin’s siding near St Dennis Junction to a clay works a Gothers opened in 1884 and closed in 1931.” [1: p22]

These lines will hopefully be covered in future articles.

References

  1. Pit to Port; The Cornish Steam Locomotive Preservation Society, 2009.
  2. https://maps.nls.uk/view/101438942, accessed on 20th January 2023.
  3. https://maps.nls.uk/view/101438954, accessed on 20th January 2023.
  4. Admiralty Chart Misc. 645, corrected 15th April 1943; https://www.ebay.co.uk/itm/274499586563?mkcid=16&mkevt=1&mkrid=711-127632-2357-0&ssspo=F5J0o5CiRha&sssrc=2349624&ssuid=afQhrar7TGK&var=&widget_ver=artemis&media=COPY; accessed on 20th January 2023.
  5. http://www.visionofbritain.org.uk/maps/series, accessed on 20th January 2023.
  6. https://m.facebook.com/story.php?story_fbid=pfbid0Py845Q675ooziPmV7A5PJqJVKMkFTs9xPnmrFARWQPpX7arVtvHGEMqosiKtEtXWl&id=171605006288707, accessed on 20th January 2023.
  7. https://commons.m.wikimedia.org/wiki/File:Lux_valley_1835.gif#mw-jump-to-license, accessed on 20th January 2023.
  8. https://en.wikipedia.org/wiki/Treffry_Tramways, accessed on 20th January 2023.
  9. https://en.wikipedia.org/wiki/Cornwall_Railway, accessed on 21st January 2023.
  10. https://www.cornwall-calling.co.uk/mines/tramways/par-canal.htm, accessed on 21st January 2023.
  11. John Vaughan; The Newquay Branch and its Branches; Haynes/Oxford Publishing Company, Sparkford, 1991.
  12. Martin Bodman; Inclined Planes in the South West; Twelveheads Press, Chacewater, 2012.
  13. E T MacDermot; History of the Great Western Railway, Vol II; the Great Western Railway, London, 1931.
  14. Cornwall Archaeological Unit; The Luxulyan Valley Project: an Archaeological and Historical Survey; Cornwall County Council, Truro, 1988.
  15. E F Carter; An Historical Geography of the Railways of the British Isles; Cassell, London, 1959.
  16. Maurice Dart; Images of Cornish Railways; Halsgrove House, Wellington, Somerset, 2007.
  17. D S Barrie and “Precursor”; Railway Relics in West Cornwall; Railway Magazine, December 1933.
  18. https://en.wikipedia.org/wiki/St_Blazey_engine_shed, accessed on 21st January 2023.
  19. https://maps.nls.uk/geo/explore/#zoom=16.0&lat=50.35131&lon=-4.70645&layers=168&b=1, accessed on 1st March 2023.
  20. https://maps.nls.uk/geo/explore/#zoom=16.0&lat=50.34419&lon=-4.70495&layers=168&b=1, accessed on 1st March 2023.
  21. https://maps.nls.uk/geo/explore/#zoom=17.0&lat=50.34387&lon=-4.71396&layers=168&b=1, accessed on 1st March 2023.
  22. https://maps.nls.uk/geo/explore/#zoom=17.0&lat=50.34528&lon=-4.70401&layers=168&b=1, accessed on 1st March 2023.
  23. https://maps.nls.uk/geo/explore/#zoom=17.0&lat=50.34883&lon=-4.70290&layers=168&b=1, accessed on 1st March 2023.
  24. https://maps.nls.uk/geo/explore/#zoom=17.0&lat=50.35257&lon=-4.70492&layers=168&b=1, accessed on 1st March.
  25. https://maps.nls.uk/geo/explore/#zoom=17.0&lat=50.35595&lon=-4.70647&layers=168&b=1, accessed on 1st March 2023.
  26. https://en.wikipedia.org/wiki/Par_Docks#/media/File:Par_Docks_ECC_Aerial_Photograph.jpg, accessed on 1st March 2023.
  27. Hugh Howes; The Struggle for the Cornwall Railway – Fated Decisions; Twelveheads Press, Truro, 2012.
  28. Tom Heavyside; Cornish Cream; in Railway Bylines Volume 9 No. 12, November 2004, p586-590.
  29. https://en.m.wikipedia.org/wiki/Bagnall_0-4-0ST_%22Alfred%22_and_%22Judy%22, accessed on 8th March 2024.
  30. https://rapidotrains.co.uk/port-of-par-bagnall-tanks, accessed on 8th March 2024.
  31. Stephen Austin; St. Blazey: At the Heart of West Country History; in Steam Days, May 2003, p278-286.
  32. https://rogerfarnworth.com/202y0/05/17/the-cornwall-minerals-railway-part-1.
  33. https://en.m.wikipedia.org/wiki/Par_Docks, accessed on 24th January 2025.
  34. https://www.world-of-railways.co.uk/news/st-blazeys-restored-turntable-set-for-scotsman-visit, accessed on 24th January 2025.
  35. https://www.facebook.com/share/p/15WHnYinBM, accessed on 24th January 2025.
  36. https://www.geograph.org.uk/photo/104676, accessed on 24th January 2025.
  37. https://www.geograph.org.uk/photo/3824704, accessed on 24th January 2025.
  38. https://www.facebook.com/share/14r1jXREEN, accessed on 25th January 2025.
  39. https://www.facebook.com/share/p/18VjPfoZGu, accessed on 25th January 2025.
  40. https://www.britainfromabove.org.uk/image/EPW033131, accessed on 25th January 2025.

The Penrhyn Quarry Railway – Part 1

A short history of the line is followed by some information about the locomotives used on the line. This first article then focusses primarily on the horse-powered tramroad which preceded the later Penrhyn Quarry Railway.

Penrhyn is the Welsh word for ‘promontory’.

“The history of Port Penrhyn can be traced back as early as 1713 when it was recorded that 14 shipments totalling 415,000 slates had been sent to Dublin. In 1720, another 8 shipments totalling 155,000 slates were sent to Dublin, two to Drogheda (20,000) and one to Belfast (35,000). Two years later, a shipment of 80,000 slates were sent to Dunkirk. After these few shipments only coastal traffic left from Aber-Cegin (Port Penrhyn) until Richard Pennant took over the ownership of Penrhyn Estates and appointed Benjamin Wyatt in 1786 as agent.” [23]

Porth Penrhyn in the mid- to late- 19th century. [23]

The Penrhyn Railway opened as a tramroad in 1801 which ran from quarries a few miles inland from Bangor in North Wales to the coast at Port Penrhyn. The gauge of the tramroad was 2ft 0.5in. It was constructed by Lord Penrhyn at a cost of around £175,000. [1][2] The alignment was as shown on the map immediately below.

The Penrhyn Railway 1801 to 1878: rendered with Maperitive, text and integration: Pechristener Wales in United Kingdom.svg: TUBS United Kingdom location map.svg: NordNordWest • CC BY 3.0. [1]

It was thought that there was an earlier line which ran between Port Penrhyn and Llandegai. That tramway, if it existed, was constructed in 1798. Its route paralleled that of the northern end of Lord Penrhyn’s tramroad. One theory is that this earlier tramway was operational until 1831. [1] There appear to have been two inclines on the Llandegai Tramway, one close to the port and the other directly adjacent to Llandegai Penlan Mill at Llandegai at the Southern end of that line. Both are shown on the image below.

The Llandegai Tramway: rendered with Maperitive, text and integration: Pechristener Wales in United Kingdom.svg: TUBS United Kingdom location map.svg: NordNordWest • CC BY 3.0. [1]

Research in 2021 suggests that the earlier tramway did not exist. [2]. If it did, it is likely that it was subsumed into the tramroad built by Lord Penrhyn. There is also research, undertaken in 2019, which suggests that a tramway was probably constructed in 1798 in connection with the Penrhyn Mills on the lower Ogwen. [35] My thanks to David Elis-Williams for providing a link to this research by Barrie Lill.

Lill comments that the Penrhyn Mills at Llandegai had a part in the development of the tramway/tramroad which eventually served the Penhryn Quarry: “The mill had what David Gwyn believes to be part of the first iron-railed overland edge railway of any length in the world, and the first iron edge railway built for the mass movement of stone. However, whereas James Boyd conjectures that originally the Penlan railway only extended from Port Penrhyn to the mill at Llandegai, pre-dated the Penrhyn Quarry Railway by three years, and was only later extended to the Quarry, [36] Gwyn does not agree. Instead he believes that the Penlan line merely was an off-shoot from the Quarry Railway. [37] At present there is no available evidence to confirm either theory, although there is a belief that prior to publishing his book on the Penrhyn Quarry Railways, Boyd had obtained supporting documents which no longer are publicly available. Irrespective of the above it seems unlikely that the mill would have opened without an adequate transportation system such as some simple form of tramway being in place, and in this scenario it is likely that the problems encountered with the working of this system are what prompted Wyatt to adapt the system and introduce the iron-railed edge railway to which David Gwyn refers.” [35]

Lord Penrhyn was persuaded by William Jessop to build the tramroad. “Jessop and his partner Benjamin Outram were then constructing the Little Eaton Gangway in Derbyshire. Samuel Wyatt was also involved in the construction of the gangway, and his brother Benjamin was the Penrhyn estate manager.” [1][2]

“Benjamin Wyatt was put in charge of building the tramway. Construction started on 2 September 1800, with the first slate train travelling on 25 June 1801. … The track used oval rails designed by Benjamin Wyatt, and their quoted gauge of 2 ft 1⁄2 in (622 mm) was measured between the centres of the rails. The railroad was operated by horse power along with gravity and three balanced inclines – “Port” (sometimes called “Marchogion”), “Dinas” north east of Tregarth and “Cilgeraint” a short distance north of Coed-y-Parc workshops in Bethesda. The longest was 220 yards (200 m).” [1]

Before the tramroad was constructed, slate was transported to the port by horses along mountain paths. After the tramroad was brought into service the local costs of transport fell from 4 shillings/ton to 1 shilling/ton. [1][4: p42-43]

In 1832, “Wyatt’s oval rails were replaced with more conventional … rails. The gauge of this new track was 1ft 10.3⁄4in (578 mm), measured between the inner edges of the rails – the conventional way of measuring track gauge.” [1][3]

In 1876 the tramroad was “rebuilt on a new course with steel rails laid on wooden sleepers. Steam locomotives were introduced, supplied by De Winton & Co. Engineers of Caernarvon.” [5]

Thomas Middlemass tells us that De Winton supplied ten locomotives to the line. “Seven were to be used at the quarries, three were to work the ‘main line’ to the coast, and all* were vertical-boilered 0-4-0 tanks.” [6: p16] They had two cylinders secured below the running plate with direct drive to one axle. The total weight varied between 4 and 5 tons. [7]

* … It appears that Middlemass has overlooked the fact that 3 of the 10 locomotives were fitted with horizontal boilers and were 0-4-0ST locos. They were named ‘Edward Sholto’, ‘Hilda’ and ‘Violet’, and were supplied in 1876, 1878 and 1879 respectively. [34]

Between 1882 and 1909 the Hunslet Engine Company of Leeds supplied sixteen four-wheeled locomotives for use in the quarry and on the line to Port Penrhyn.” [5]

One surviving Penrhyn locomotive is 0-4-0 vertical-boiler tank engine “George Henry,” which was built in 1877 and still looks good 140 years later at the Narrow Gauge Railway Museum in Tywyn, Wales.

‘George Henry’: a vertical-boilered 0-4-0 locomotive now on display in the Narrow Gauge Museum at Tywyn, Wales once played it’s trade in the Penrhyn Quarries. Both pictures © rlkitterman. [7]

The new route to suit steam-power obviated the need for the inclined planes, maintaining the easiest possible gradients. “Between coast and quarry it rose 550 feet, and, allowing for a stretch of 1/4 mile at 1 in 37 and 3 miles at 1 in 40, the average gradient emerged as 1 in 91. Flat bottomed rails were laid at first, but these were replaced in 1894 by the 50 lb bullhead variety.” [6: p15-16]

The new route of the Penrhyn Railway which opened in 1879: rendered with Maperitive, text and integration: Pechristener Wales in United Kingdom.svg: TUBS United Kingdom location map.svg: NordNordWest • CC BY 3.0. [1]

“The first locomotives used on the new railway were three De Winton’s. … Although successful, these locomotives were not powerful enough for the substantial traffic that passed down the line.” [1]

In 1882 the railway ordered ‘Charles’, a large 0-4-0ST from Hunslet. Charles proved very successful and was followed by ‘Blanche’ and ‘Linda’ in 1893 to the same basic design. These locomotives were the mainstay of the railway for the rest of its life.

In 1882 Penrhyn switched to more conventional locomotion, ordering “‘Charles’, a large 0-4-0ST from Hunslet. Charles proved very successful and was followed by ‘Blanche’ and ‘Linda’ in 1893 to the same basic design. These locomotives were the mainstay of the railway for the rest of its life.” [1]

“Between then and 1909 a positive spate of tank locos flowed, new, from Hunslet Engine Co. All were 0-4-0 saddle tanks, with weight and power variations introduced to meet specific Penrhyn requirements. Three were designed to work the ‘main line’, three were employed shunting at Port Penrhyn. Four of the smallest were confined to quarry work, and these were supplemented a few years later when six larger tanks arrived. As it happened, the latter were the last new purchases by Penrhyn.” [6: p16]

Among the Hunslet locomotives were the Penrhyn Port Class of three locomotives “built for the Penrhyn Quarry Railway (PQR). These locomotives were built by the Hunslet Engine Company between 1883 and 1885 and supplied specifically to work at Port Penrhyn near Bangor, North Wales. They were a variant of the standard Dinorwic Alice Class design.” [8]

Quarry Hunslet Lilian (No. 317, 1883) at the Launceston Steam Railway (June 2010) ©FritzG This file is licensed under the Creative Commons Attribution-Share Alike 3.0 Unported license – CC BY-SA 3.0.

“The Penrhyn Main Line class was a class of three narrow gauge steam locomotives built for the Penrhyn Quarry Railway (PQR). These locomotives were built by the Hunslet Engine Company between 1882 and 1893 and supplied specifically to work the railway that connected the Penrhyn Quarry near Bethesda in north Wales to Port Penrhyn on the Menai Strait.” [9]

“All three locomotives were preserved after the closure of the PQR. Charles was donated to the Penrhyn Castle Railway Museum. Linda was loaned to the nearby Ffestiniog Railway in July 1962. For the 1963 season the locomotive was re-gauged to the Ffestiniog’s 1 ft 11.5 in (597 mm) and purchased, along with Blanche at the end of the year. Both have since received extensive modifications including tenders, pony trucks and superheating.” [9]

Ex-Penrhyn Ffestinog Railway 0-4-0 saddle-tank Linda at Blaenau Ffestiniog railway station (2004) ©Thryduulf This file is licensed under the Creative Commons Attribution-Share Alike 4.0 International license – CC BY-SA 4.0.

The post-First World War years brought such economic instability that second-hand locos were not hard to find. Penrhyn bought 15 such from 1922 onwards. [5]

In 1923, three ex-US Army Baldwin 2-6-2Ts were also imported for ‘main line’ use, but, as happened elsewhere in Britain, they were never popular, and their working life was short.

The railway was private, providing no public service for either goods or passengers. Quarrymen’s trains were run, paid for by the quarrymen themselves.” [5]

“Today Porth Penrhyn in Bangor still serves the Penrhyn Quarry at Bethesda. Although today slate production and exports are not at 19th century levels it continues to be a key part of the business of slate. Exports of crushed slate (aggregate) by Penrhyn Quarry, through Porth Penrhyn  currently to Rotterdam, or ports along the south coast of England, have grown to become a significant proportion of Welsh Slate sales in addition to several containers  of roofing slates being shipped every month to Australia alone (taking approximately 45 days).” [23]

“Welsh slate is now covering the roofs of buildings as prestigious as the New South Wales Supreme Court and historic as Unwin’s Stores, both in Sydney Australia, as well as the Arts Centre in earthquake-hit Christchurch, New Zealand 2012. Europe also is a prime destination for Welsh slate with shipments of slate and decorative aggregate within Europe continuing to grow and evolve in particular.” [23]

All rail connections to the quarry disappeared in the mid-20th century under competition from road transport

The Post-1879 Route of the Railway

We start at the North end of the old railway at Porth Penrhyn. Porth Penrhyn) is a harbour located just east of Bangor in north Wales at the confluence of the River Cegin with the Menai Strait.

We follow the route on the Ordnance Survey 6″ Maps from around the turn of the 20th century as supplied by the National Library of Scotland (NLS). [10]

The railway layout at Porth Penrhyn on the 6″ OS Maps from around the turn of the 20th century. [11]
Approximately the same area as shown on the OS Map above, this time on the ESRI satellite imagery provided by the NLS [11]
This photograph was taken from a point Northeast of University College (shown on the 6″OS map extract above. [21]
Linda departing with a train of empties from Porth Penrhyn in September 1961. The standard-gauge line is on the right, © Jim Fraser. [16]
A little further North, this picture shows a Standard Class 2MT (41200) on the standard-gauge and two narrow-gauge locomotives. The one almost hidden by the 2MT is a Ruston Diesel locomotive
(ex-works May 1953, no. 383820). It is a 40HP, Ruston 0-4-0 with 3VRH diesel engine. The narrow-gauge steam locomotive is ‘Blanche’, © Eric Foulkes. [17]
The view looking South from the port area at Porth Penrhyn along the line of the old railway which is now the Sustrans Cycle Route No. 82. [Google Streetview, 2015]
The view looking South from the road bridge at Porth Penrhyn along the line of the old railway which is now the Sustrans Cycle Route No. 82. [Google Streetview, 2022]
The view looking South along the line of the old railway from about 100metres South of the road bridge, © Ian S and licenced for reuse under the Creative Commons Attribution-ShareAlike 2.0 Generic Licence (CC BY-SA 2.0) [12]
The railway layout Southeast of Cegin Pool on the 6″ OS Maps from around the turn of the 20th century. [15]
The same area as shown on the OS 6″ Map above. The alignment of the old tramroad is illustrated by the red line. The newer railway is shown light-blue. Parallel and immediately adjacent to the East of the Penrhyn Quarry Railway was the standard-gauge LNWR line. The two lines began to separate to the Southwest of the A5 road. [15]
The Old Railway Bridge close to Cegin Pool: Originally carried the Standard-Gauge Branch and Penrhyn Quarry lines to Port Penrhyn. Now a footpath/cycle path. In the foreground is part of the earlier bridge carrying the horse tramway from Penrhyn Quarry, © Copyright Chris Andrews and licensed for reuse under the Creative Commons Attribution-ShareAlike 2.0 Generic (CC BY-SA 2.0) [13]
Cegin viaduct: A view from the cycle track of the viaduct crossing the Afon Cegin just on the Southeast side of Cegin Pool, on the original line of the Penrhyn Quarry Railway. This view is taken from the Southern end of the viaduct. The re-engineered line took a more gently inclined route that avoided the rope-hauled incline just to the south. The abutments of the more recent bridge are much wider than the modern path because it carried the parallel tracks of both narrow gauge and standard gauge lines to Port Penrhyn, © Copyright Jonathan Wilkins and licensed for reuse under the Creative Commons Attribution-ShareAlike 2.0 Generic (CC BY-SA 2.0) [14]
My sketch of the Tramroad route and its two bridges over the Afon Cegin based on a drawing in James Boyd’s book. The old main road crossed the Cegin at the same location as the tramroad. [36]
The old Tramroad Arch Bridge over the Afon Cegin to the South of the bridges above. The picture is taken from the later bridge which carried the two railways. Just to the right of this image was the bottom of the tramroad incline, © Ian S and licenced for reuse under the Creative Commons Attribution-ShareAlike 2.0 Generic Licence (CC BY-SA 2.0) [20]
Looking Southwest towards the modern Llandudno Road (A5) bridge spanning the cycleway which follows the route of the old Railway. At this point the old Railway alignment is also part of the Coastal Path, © Copyright Ian S and licenced for reuse under the Creative Commons Attribution-ShareAlike 2.0 Generic Licence (CC BY-SA 2.0) [16]
The same location on the A5 London to Holyhead road as it appeared prior to the construction of the modern bridge, when both the standard-gauge line and the quarry railway were still in place. The photograph comes from the Railway Magazine of October 1961, © J.M. Dunn.
This picture was taken in late 1963. The Penrhyn Quarry Railway bridge looking North, also at Maesgierchen. The standard-gauge line is out of sight to the right above the line, the Afon Cegin to the left below the line. A year later the rails had gone to the Ffestiniog Railway and the whole embankment was destroyed and rebuilt as part of a road-widening scheme, © M. Costello (courtesy of the Ffestioniog Railway Archives (where it is mislabelled as a photograph of the Welsh Highland Railway trackbed). [18]
The routes of three railways can be seen on this extract from the 6″ OS Maps from around the turn of the 20th century. It shows the area South of the A5 road bridge referred to above. On the right of the image, running South from the Incline Cottage at the top of the extract, field boundaries define the alignment of the old Tramroad.  To the West of the A5, which runs down the centre of the extract, are two lines which were in use when the survey was undertaken. Running closest to the A5 is the be LNWR standard-gauge branch. The narrow-gauge Penrhyn Quarry Railway is to the West of the standard-gauge line and follows the East bank of the Afon Cegin. [19]
The same area as shown on the OS 6″ Map above. The alignment of the old tramroad is illustrated by the red line. The newer narrow-gauge railway is shown light-blue. Parallel and immediately adjacent to the East of the Penrhyn Quarry Railway was the standard-gauge LNWR line. The two lines began to separate to the Southwest of the A5 road. The approximate alignment of the standard-gauge line is shown in purple. The A5 runs down the centre of the image. [19]
The approximate location where the old tramroad crossed the line of the modern A5.  The A5 is, here, viewed from the South looking toward Bangor. [Google Streetview, 2022]

Before the future A5 was developed as a turnpike in 1820, the tramroad ran within the width of the old highway from this point for a few hundred yards. When the turnpike was created, the road level was lifted and the tramroad crossed beneath the renewed highway and ran along the Southwestern side. The sketch below shows this.

The old tramroad which was operational until 1879 was diverted to accommodate the construction of the turnpike. We start following the route of that old Tramroad. This sketch is based on a drawing in James Boyd’s book. [36: p11] He refers to the diversion in the text of the book as well.[36:p22]
In this extract from the 6″ Ordnance Survey from around the turn of the 20th century, the short standard-gauge branch meets the mainline. The route of the old tramroad has now crossed the A5. The Penrhyn Quarry Railway only appears fleetingly in the top left corner if the map extract.  [24]
The same area as shown in the 6″ OS map above, as recorded on the ESRI satellite imagery provided by the NLS. The colour coding remains the same as in previous satellite images. [24]

A. The old tramroad

Beyond this point, we first follow the line of the old Tramroad to Penrhyn Quarries. …..

This next extract from the 6″ Ordnance Survey shows the route of the old tramway flanked by walls and passing in front of the Grand Lodge of Penrhyn Castle at Llandegai. [25]
The same area now shown on the ESRI satellite imagery provided by the NLS. The lodge can be made out just to the Northeast of the red line which shows the approximate route of the old tramway crossing the roundabout on the A5 at Llandegai. [25]
The approximate route of the old tramway is marked on this picture, as before, with a red line. The photograph is taken from the roundabout on the A5 at the entrance to Llandegai Industrial Estate which is in the top left of the satellite image above. The line ran just a few metres to the Southwest of what is now the A5. [Google Streetview]
The approximate line of the old tramway runs across the next roundabout on the A5 before curving round to the South. [Google Streetview]
Looking along the line of the old Tramroad from the modern roundabout, with the A5 heading South on the right. [Google Streetview]
This is a repeat of the sketch shown earlier which is based on a drawing from James Boyd’s book. [36: p11] After being diverted from its original route, the tramroad ran on the Southern side of the highway before turning away to the South. The Smithy shown in the sketch appears on the 6″ map extract below. Just to the North of the Smithy there was a branch from the old tramroad which served the bottom of the Llandegai Incline which connected the Upper Penrhyn Mill to the tramroad. There were two level crossings at this location, one of which became an over ridge when the turnpike was built in 1820.
The route of the old tramway continues on this next extract from the 6″ Ordnance Survey. At the top of the extract it is just to the left (West) of the Smithy. It crosses the standard-gauge line which is in tunnel at this point the Llandegai Tunnel). Further the south the formation, at the time of the survey was being used as an accommodation road to access ‘Bryn’ and then even further South, it was being used as a footpath. [26]
This is an extract from ‘RailMapOnline’ which shows the route of the old railway plotted on modern satellite imagery. The purple line close to the top of the image is the line of the Llandegai Tunnel on the standard-gauge mainline. [27]
Just to the South of the underground route of the standard-gauge mainline (Llandegai Tunnel), the old tramroad alignment crosses the access road to the A5 and runs South along the accommodation road visible to the left of the road in this image. [Google Streetview]
The old tramroad route followed this lane South. [Google Streetview]
At the end of the lane, a footpath can be seen running South. The hedge ahead in this image partially blocks the route but allows pedestrian access. [Google Streetview]
The route of the old tramroad and the later footpath remain on the same alignment as far as the top corner of the woods shown in this map extract. From that point southwards the Tramroad route crossed the fields in a Southeasterly direction. [28]
The same area as shown on the 6″ Ordnance Survey extract above. The North Wales Expressway is the notable modern addition to the image [27]
The obvious features on this next extract from the 6″ Ordnance Survey which mark the line of the tramroad are the walls to the rear (West) of the cottages at Tyddyn-Iolyn. South of these properties the tramroad ran alongside the road for a very short distance. After which it curved away to the Southwest before curving back towards the Southeast to a point to the South of Llan-isaf Cottage. [29]
The route described in the notes to the 6″ map extract immediately above are illustrated on this satellite image. [27]
Facing South along the lane to the South of Tyddyn-Iolyn, showing the approximate line of the old tramroad in red. [Google Streetview]
Looking back to the North along the lane to Tyddyn-Iolyn showing the point at which the old tramroad crossed the line of the lane. To the East of this point the Tramroad turned to the South and then to the West. [Google Streetview]
The walled route of the Tramroad can still easily be picked out on the 6″ Ordnance Survey. After a short distance travelling in an West to East direction and before reaching the banks of the Afon Ogwen at a point to the North of Tyddyn-Dicwn it turned once again towards the South. [30]
On the modern satellite imagery from RailMapOnline, the tramroad route appears to be within the width of the modern A5. There are signs that the actual formation of the old tramroad runs through the woodland to the South of the A5. Boyd shows this diversion on his map of the route. [36: p11] Its route can be picked out some metres to the South of the A5 but then rather than following a curving hedge line to the North and the East of Tyddyn-Dicwn at the bottom right of this satellite image. It continued towards the road junction, crossing the Southbound road just to the South of the junction. [27]
The probable route of the old tramroad at the point where it crossed the road South towards Tregarth. From this point it travelled South between the road and the Afon Ogwen for a few hundred yards. [Google Streetview]
The route of the old tramroad can again be picked out easily on the West Bank of the Ogwen passing an old quarry and then running immediately adjacent to Pen-isa’r-allt and on to meet Lon Ddinas. [31]
RailMapOnline shows the tramroad crossing fields to the South of Lon Ddinas to join the route of the later Penrhyn Quarry Railway. This extract shows that route. Looking at the gradients involved and the 6″Ordnance Survey, it seems possible that this was the case only if an incline was used. There is no evidence of this on the ground. It seems more likely that Lon Ddinas runs along the line of the old Tramroad and may well, in times past have shared the same formation. The gradient along Lon Ddinas would have been much more suitable. However, records indicate that there was an incline at this location – known as the Ddinas Incline. [27]
The lane which can easily be confused with the route of the old tramway is clearer on the 6″ Ordnance Survey. However, the Ddinas Incline followed the present field boundaries from close to Ddinas Farm up the relatively steep escarpment to meet the later Penrhyn Quarry Railway route. [32]

The Ddinas Incline was one of three gravity-worked inclines on the original line of the Penrhyn Railway, built 1800-1801 to transport slate from the Penrhyn quarries to Port Penrhyn. … About half-way up the incline was an overbridge carrying a minor road, now widened and straightened at this point. To the north a cutting can still be seen, but the lower part of the incline has been destroyed by construction of a sewage works. To the south the line is visible as a terrace in the field. A ruined wall constructed of large roughly squared stone blocks near the top of the incline may be a surviving fragment of the winding house.” [33]
W J Crompton, RCAHMW, 5 November 2009.

From this point on, the old Tramroad and Penrhyn Quarry Railway followed approximately the same route. The second article about these lines will follow the Penrhyn Quarry Railway to this point at Tregarth.

References

  1. https://en.m.wikipedia.org/wiki/Penrhyn_Quarry_Railway, accessed on 27th December 2022.
  2. Dan Quine; The development of Port Penrhyn, Part One: 1760-1879; Archive. No. 110. Lightmoor Press, June 2021.
  3. James I.C. Boyd; Narrow Gauge Railways in North Caernarvonshire, Volume 2 The Penrhyn Quarry Railways; The Oakwood Press, Usk, 1985. (The British Narrow Gauge Railway No. 5.)
  4. Susan Turner; The Padarn and Penrhyn Railways; David & Charles; Newton Abbot, 1975.
  5. https://narrowgaugerailwaymuseum.org.uk/collections/industrial-railways/penrhyn-quarries, accessed on 27th December 2022.
  6. Thomas Middlemass; Encyclopaedia of Narrow Gauge Railways of Great Britain and Ireland; Patrick Stephens Ltd., Sparkford, Yeovil, 1991.
  7. Both these photographs can be found on the DeviantArt website: https://www.deviantart.com/rlkitterman, accessed on 27th December 2022.
  8. https://en.wikipedia.org/wiki/Penrhyn_Port_Class, accessed on 27th December 2022.
  9. https://en.wikipedia.org/wiki/Penrhyn_Main_Line_class, accessed on 27th December 2022.
  10. https://maps.nls.uk/os/6inch-england-and-wales/index.html, accessed on 27th December 2022.
  11. https://maps.nls.uk/geo/explore/#zoom=15.8&lat=53.23498&lon=-4.11253&layers=6&b=1, accessed on 27th December 2022.
  12. https://www.geograph.org.uk/photo/4180528, accessed on 27th December 2022.
  13. https://www.geograph.org.uk/photo/6960097, accessed on 27th December 2022.
  14. https://www.geograph.org.uk/photo/6554213, accessed on 27th December 2022.
  15. https://maps.nls.uk/geo/explore/#zoom=16.0&lat=53.22925&lon=-4.11044&layers=6&b=1, accessed on 28th December 2022
  16. https://m.facebook.com/groups/418992338717208/permalink/1139980376618397, accessed on 28th December 2022.
  17. https://m.facebook.com/groups/narrowgauge/permalink/6708832335795404, accessed on 28th December 2022.
  18. https://m.facebook.com/groups/narrowgauge/permalink/5131244703554183, accessed on 28th December 2022.
  19. https://maps.nls.uk/geo/explore/#zoom=16.0&lat=53.22458&lon=-4.11050&layers=6&b=1, accessed on 28th December 2022.
  20. https://www.geograph.org.uk/photo/4180575, accessed on 28th December 2022.
  21. https://m.facebook.com/groups/417502465072892/permalink/2232508116905642, please see the comments on this thread. Accessed on 28th December 2022.
  22. https://m.facebook.com/groups/417502465072892/permalink/529969163826221, accessed on 28th December 2022.
  23. https://m.facebook.com/groups/417502465072892/permalink/1512499952239799, accessed on 28th December 2022.
  24. https://maps.nls.uk/geo/explore/#zoom=16.0&lat=53.21987&lon=-4.10971&layers=6&b=1, accessed on 28th December 2022.
  25. https://maps.nls.uk/geo/explore/#zoom=16.0&lat=53.21884&lon=-4.10291&layers=6&b=1, accessed on 28th December 2022.
  26. https://maps.nls.uk/geo/explore/#zoom=16.0&lat=53.21309&lon=-4.10235&layers=6&b=1, accessed on 29th December 2022.
  27. https://www.railmaponline.com/UKIEMap.php, accessed on 29th December 2022.
  28. https://maps.nls.uk/geo/explore/#zoom=16.0&lat=53.20823&lon=-4.10044&layers=6&b=1, accessed on 29th December 2022.
  29. https://maps.nls.uk/geo/explore/#zoom=16.0&lat=53.20527&lon=-4.09580&layers=6&b=1, accessed on 29th December 2022.
  30. https://maps.nls.uk/geo/explore/#zoom=16.0&lat=53.20204&lon=-4.09043&layers=6&b=1, accessed on 29th December 2022.
  31. https://maps.nls.uk/geo/explore/#zoom=16.4&lat=53.19818&lon=-4.08442&layers=6&b=1, accessed on 29th December 2022.
  32. https://maps.nls.uk/geo/explore/#zoom=15.9&lat=53.19386&lon=-4.08259&layers=6&b=1, accessed on 29th December 2022.
  33. W J Crompton, RCAHMW, 5 November 2009, accessed via: https://coflein.gov.uk/en/site/409718, accessed on 31st December 2022.
  34. https://en.m.wikipedia.org/wiki/De_Winton, accessed on 3rd January 2023.
  35. Barrie K Lill; Richard Pennant, Samuel Worthington and the mill at Penlan: a history of the Penrhyn Mills on the Lower Ogwen; Bangor University, 2019, accessed via https://research.bangor.ac.uk/portal/files/22801787/2019_Lill_B_PhD.pdf, accessed on 5th January 2023.
  36. J.I.C. Boyd; Narrow Gauge Railways in North Caernarvonshire, Vol.II, The Penrhyn Quarry Railways; The Oakwood Press, Usk, 1985.
  37. Personal correspondence dated 20th November 2017 alluded to by Barrie Lill in reference [35]
  38. Permission sought to share some further photographs of Porth Penrhyn (https://www.ebay.co.uk/itm/293353217633?mkcid=16&mkevt=1&mkrid=711-127632-2357-0&ssspo=vFhrxofnRnO&sssrc=2349624&ssuid=afQhrar7TGK&var=592202447151&widget_ver=artemis&media=CO)

Railways in West Wales Part 1C – Pembrokeshire Industrial Railways – Section B – The Saundersfoot Railway (Second Part)

The featured image above shows the Locomotive Bulldog which was used on the length of the line between the Inclined Plane and Reynalton Colliery.

This is a follow-up to the first article about the Saundersfoot Railway. The first article covered the history of the Railway and then went on to look at the route of the line from Saundersfoot Harbour via Wiseman’s Bridge to Stepaside. That is the arm of the Railway shown on the right-hand side of the image below.

The first article can be found by following this link:

Railways in West Wales Part 1C – Pembrokeshire Industrial Railways – Section B – The Saundersfoot Railway (First Part)

These articles are part of a series looking at the railways of Pembrokeshire. Full details of that series can be found in the first article about the Saundersfoot Railway.

This map of the Saundersfoot Railway was shared on the Tenby and Saundersfoot Through Time Facebook Group by Mark Davies on 26th November 2015.  [148]

This article follows the line running West from Saundersfoot Harbour under Saundersfoot Railway Station to Reynalton at the left side of the map above.

Saudersfoot Harbour to Reynalton Via Saundersfoot Tunnel (Kingsmoor Tunnel)

We start this journey with some of the pictures from the first article of Saundersfoot Harbour. We begin with two very early views of the harbour and its tramroad.

As we noted earlier in this enlarged extract from the 1906 6″ Ordnance Survey which was published in 1908 there were two main tramroad lines. One heading immediately West along Milford Street and off the map extract centre-left. The other heading along what was then called Railway Street and leave the map extract centre-top. There were also a series of short lines which served both the North and the South quay walls of the harbour. When we leave the harbour on this occasion we will travel along the line to the West. [131]
An early 20th century view of the harbour which shows the North harbour wall. Careful inspection reveals trams and track on the wall adjacent to the crane, © reproduced by kind permission of Pembrokeshire Archives. [182]
Coal Staithes and loaded trams on the Southside of the harbour, © Amgueddfa Cymru – National Museum Wales. [181]

This picture showing coal being loaded onto a vessel at Saundersfoot Harbour was shared on the Saundersfoot & District Historical Society’s Facebook Group on 25th May 2020 by Gillian Hibberd.[141]

This picture showing Saundersfoot Harbour was shared on the Saundersfoot & District Historical Society’s Facebook Group by Gillian Hibberd on 24th May 2020. Note the railway tracks leading onto the North Harbour Wall. [225]
A 1936 image of Saundersfoot Harbour looking Southeast from the North wall with the railway in the foreground. This image was shared by Gary Davies on 15th September 2019 on the Tenby and Saundersfoot Through Time Facebook Group. Gary Davies writes that there appears to only be “one coal wharf operating to fill the hold of this steamer the industrial era of the Harbour is coming to an end. As Bonvilles Court Colliery had closed in 1929 and the screens there were washing coal from Broom and Kilgetty Collieries. It wasn’t to long before the coal was sent out on the mainline branch of the GWR via the siding at Bonvilles Court Colliery. This would have been one of the last few coal steamers to come into the Harbour to load coal as by 1939/40 the export of coal from the Harbour had ceased.” [159]
This image shows Rosalind heading away from the South quay at Saundersfoot Harbour. She is heading for Railway Street (The Strand) with the Miner’s Express. If she were to be travelling on Milford Street she would be turning left just behind where we are standing. [187]
1906 6″ Ordnance Survey [199]
Modern satellite imagery of the same area with the railway alignment shown as a red line. [199]
Looking West along Milford Street, Saundersfoot in the 21st century. [Google Streetview, March 2022]
Looking West along Milford Street, Saundersfoot in the 21st century. The railway ran approximately on the red line, heading off Milford Street (which turns to the right) down what is now called Brookland Place. [Google Streetview, March 2022]
Looking back East along Milford Street from Brooklands Place. The railway ran approximately on the red line. [Google Streetview, August 2021]
Looking West along Brookland Place. The road has been laid over the line of the old railway. [Google Streetview, August 2021]
The view West from the end of Brookland Place looking along what is in the 21st century known as ‘The Incline’. The footpath follows the line of the old railway. [Google Streetview, August 2021]
Looking back East along ‘The Incline’ towards Saudersfoot Harbour. [Google Earth, August 2021]
Looking West along ‘The Incline’. The footpath continues to follow the line of the Saundersfoot Railway. [Google Streetview, August 2021]
The route of the old railway crosses Westfield Road. [Google Streetview, August 2021]
This enlarged view of the 6″ OS Map of 1906 shows the area around the bottom of the Inclined Plane. [199]
The key buildings on the map above are highlighted on this NLS supplied satellite image of the same area. All of the buildings have been adapted for modern living. One, Incline Villa, is identified as a holiday let in the 21st century. [199]
Incline Villa as advertised as a holiday let. The two storey element of the building has been expanded by the single storey extension. [205]
The photograph was taken at approximately the point where the railway crossed what is now Westfield Road. It was shared on the Tenby and Saundersfoot Through Time Facebook Group by Mark Davies on 26th November 2015. [151]
Beyond Westfield Road the footpath follows the line of the old railway. [Google Streetview, August 2021]
Looking back towards Saundersfoot Harbour towards the line of the old railway from the East end of Incline Way. This footpath links to the line of the old railway. [Google Streetview, March 2022]
The east end of Incline Way almost meets the line of the old railway which is shown in red and which continues to be a footpath in 21st century. At this point the incline is carrying the railway up onto the escarpment behind Saunderfoot. [199]

This small extract from the 1906 6″ Ordnance Survey shows the same are as appears in the satellite imagery immediately above. As can be seen, very close to this location the three rails of the incline separated into four to allow wagons to pass. [199]

This extract from the 6″ Ordnance Survey shows the full length of the Incline. As can be seen there was a passing loop at half-height, referred to above, and a passing loop at the head of the incline. The building at the head of the incline shown below does not appear on the 1906 Survey, but does appear on the 1887 Map. [199]

The 1887 6″ Ordnance Survey shows the building at the head of the incline and a second loop closer to the highway which does not appear on the 1906 Survey. The existence of remains of the winding house in 2021 (see below) suggests that the building was missed off the 1906 survey. [201]

The photograph was shared on the Tenby and Saundersfoot Through Time Facebook Group by Mark Davies on 26th November 2015.  It shows the passing loop at the head of the Incline. The photograph was taken facing Southeast towards Saundersfoot Harbour. [151]
The remains of the winding house in November 2021. This photograph was taken by Jonathan Kedward and shared by him on the Ancient Monuments UK website. [204]
The excellent information board at the Winding House pictured above. [206]
The photograph was shared on the Tenby and Saundersfoot Through Time Facebook Group by Mark Davies on 26th November 2015. It shows the top of the Incline, facing Southeast, after closure and was probably taken from the location of the winding house shown in the picture above. [151]

Coflein records the Inclined Plane as follows: “The main line of the Saundersfoot Railway … opened in 1832 between Saundersfoot Harbour … and Thomas Chapel. It was built to a gauge of 4ft 0 3/8in and originally worked by horses. A self-acting incline, some 300m long and on a gradient of 1 in 5, lay about 800m west of the harbour. At the foot was a siding and hut whilst at the summit was a winding house. The track on the incline was double with a shared inner rail, widening to a loop midway allowing wagons to pass.” [203]

The incline was 363 metres long. Ancient Monuments UK’s website records the site as follows: “The monument consists of the remains of a complete tramroad incline formation from an important horse-drawn tramroad built in 1832, including a former counterbalance drum housing and marshalling areas at top and bottom. The monument is of national importance for its potential to enhance our knowledge of 18th and 19th century industrial and transportation practices. It retains significant archaeological potential, with a strong probability of the presence of associated archaeological features and deposits. The structure itself may be expected to contain archaeological information concerning chronology and building techniques. A drumhouse may be part of a larger cluster of monuments and their importance can further enhanced by their group value.” [204]

Looking back Southeast towards the Incline from ‘The Fan Road’, the modern road which follows the line of the old railway. Valley Road enters from the right in this image. [Google Streetview, March 2022]
Looking Northwest, The Fan Road follows the line of the Saundersfoot Railway. [Google Streetview, March 2022]
The Saundersfoot Railway’s branch into the Bonville’s Court Colliery. [Google Streetview, August 2018]
[201]
The 1906 Ordnance Survey shows the branch-line from the Great Western Railway which was installed around the turn of the 20th century after a long campaign by Boneville’s Court Colliery’s owner. It finally superseded the Saundersfoot Railway and its access to the mainline at Saundersfoot Railway Station, see below. [202]
The modern satellite image has the key features mark in red and ochre. [202]
The Locomotive Bulldog sits taking water close to the entrance to the colliery. This image was shared by Gary Davies on the Saundersfoot and District Historical Society Facebook Group on 10th November 2018. [180]
Bonvilles Court Colliery, which was active between 1842 and 1930; it was served first by the Saundersfoot Railway (and then from 1896 by a branch from the Pembroke & Tenby Railway (GWR). Following closure, part of the site was converted into a screening plant and storage yard. This picture was shared on the Tenby and Saundersfoot Through Time Facebook Group by Kenneth Townsend on 12th July 2019. [156]
The photograph was shared on the Tenby and Saundersfoot Through Time Facebook Group by Mark Davies on 26th November 2015. [151]
Looking North-northwest along The Fan Road, beyond Bonville’s Court Colliery, which follows the line of the old railway. [Google Streetview, March 2022]
The 1906 6″ Survey shows the Saunders foot Railway snaking across the fields towards Saundersfoot Station. [200]
Modern satellite imagery confirms that The Fan Road follows the alignment of the old railway to reach the B4316. The trees on the North side of the B-road hide the alignment of the old railway as it approached Saundersfoot Station along an alignment separate from but parallel to the B4316. [200]
Saundersfoot Railway Station as shown on the 1906 6″ Ordnance Survey provided by the NLS. Both the transshipment siding and the line down to the tunnel have been added as red-lines. [210]
The same area on the modern ESRI satellite imagery provided by the NLS. The area of the siding as theaccess to the tunnel are shown heavily wooded. In around 2018 the undergrowth was cutback to reveal the man-made embankment and rail routes. Please see the photograph below. [210]
The same location on the 1887 6″ Ordnance Survey. By this time, the tunnel already appears dis-used. However, at a later date, 1915 or so, the line was opened up again and the locomotive Bulldog was purchased to supply the colliery at Reynalton. Sadly that period of operation is not picked up by the Ordnance Survey as the next revision took place in 1948 after closure of the line. [211]
from the site of Saundersfoot Railway Station in 2018, this view shows the alignment of the Saundersfoot Railway. The B4316 is on the right of the image. This photograph was shared on the Tenby and Saundersfoot Through Time Facebook Group by Gary Davies on 15th April 2018. He commented at the time: “Now the trees have been cut its … possible to see the route of the Saundersfoot railway. On the left side is the route to the Kingsmoor tunnel and on the right is the embankment siding for discharging coal from the Saundersfoot railway onto coal wagons of the Main Pembroke Dock to Whitland Railway via the exchange siding which came in behind Saundersfoot Station.” [164]
Saudersfoot Railway Station. This picture was shared on the Tenby and Saundersfoot Through Time Facebook Group by John Stoot on 16th December 2017. [162]
Saundersfoot Railway Station in 1914. This photograph was shared on the Tenby and Saundersfoot Through Time Facebook Group by Penny Brace on 13th February 2020. [163]
Saundersfoot Railway Station. This photograph was share by Sarah Whiddett on the Saundersfoot & District Historical Society’s Facebook Group on 3rd March 2020. [207]
Saundersfoot Station Bridge. Mark Davies shared this image on the Tenby and Saundersfoot Through Time Facebook Group on 26th November 2015. [165]

The tunnel under Saundersfoot Railway Station was constricted in size and as a result dictated the size of any locomotive which could be used. Bulldog was purchased in 1915. Full details of the loco can be found on the first post about the Saundersfoot Railway. There is a picture of it above at the entrance to Bonville’s Court Colliery. [213]

Coflein records the tunnel as follows: “The main line of the Saundersfoot Railway opened in 1832 between Saundersfoot Harbour and Thomas Chapel. It was built to a gauge of 4ft 0 3/8in and originally worked by horses. King’s Moor Tunnel carried the line under rising ground below the hamlet of Hill and the site of the 1866 Saundersfoot Station on the Whitland extension of the former Pembroke & Tenby Railway. The tunnel is 450m long, 2.44m wide and approximately 2.6m high with a semi-circular arch.” [214] The route of the tunnel appears most clearly on the 1948 revision of the 6″ Ordnance Survey. …

The Kingsmoor or Saundersfoot Railway Station Tunnel alignment is most clearly seen on this 1948 revision of the 6″ Ordnance Survey. The South Portal is adjacent to Saundersfoot Station. The Northwest portal can be made out at the top of this map extract just Northwest of Little Killawen Farm. [216]
This picture of the South portal of the tunnel appears on the geograph website and was taken on 3rd October 2010 © Copyright Alistair Hare and licensed for reuse under a Creative Commons Licence (CC BY-SA 2.0) [184]
Kingsmoor Tunnel or Saundersfoot Station Tunnel. Mark Davies shared a series of about 30 photographs of the tunnel on the Tenby and Saundersfoot Through Time Facebook Group on 26th November 2015. This is one of those photographs, the full series of photographs is excellent! [165]
The Northwest portal of the tunnel. This picture was taken on 27th April 2011 (cc-by-sa/2.0) – © Alistair Hare. [212]

28dayslater comments that the tunnel “is very wet and very muddy in places due to the years of neglect and non-use but is a very important part of Welsh industrial history.” [167]

To the North of the tunnel the line was in cutting for 200metres or so. It then traversed open country until passing on an embankment and bridge over New Road (it’s present name).

The 6″ 1906 Ordnance Survey shows the line continuing in a generally northwesterly direction [215]
A thind red line shows the route of the old railway on this ESRI satellite image. Modern roads seem to make the most impact on the landscape although there is a caravan site sitting over the line of the railway in the bottom right quadrant of the satellite image (Kingsmoor Caravan Site). [215]
Looking East along the A477 at the approximate location where the old railway route crosses the main road. It appears that it enters the caravan site (on the left) just at the Eastern edge of the entrance road. [Google Streetview, March 2022]
As we have just noted, it appears that the route of the old railway enters the caravan site just at the Eastern edge of the entrance road and then runs roughly parallel to the road through the site but perhaps 50 to 100 metres to the Northeast. [Google Streetview, March 2022]
[215]
The point at which the Saundersfoot railway crossed New Road, Begelly. Note the relatively large bungalow with its wall running parallel to the old railway. It would seem that the property boundary followed the line of the embankment![215]
The location of the old railway in relation to New Road can be fixed by the bungalow shown to the left of this image, of which part seems to straddle the route of the old railway. [Google Streetview, March 2022]
Begelly Railway Bridge over what is now New Road. This picture looks through the bridge to the West. The photograph was share on the Tenby and Saundersfoot Through Time Facebook Group by Ron Powell on 24th January 2017. [166]
North of New Road a public footpath follows the old railway line as far as the West end of Parsonage Lane. [Google Streetview, March 2022]
The route of the Miner’s Walk Path is shown here in mauve. It follows the old railway which is now a bridleway. [218]
The path as it approaches Parsonage Lane, (c0 Two Dogs and an Awning. [217]
The view West from the end of Parsonage Lane. The gated track is met by the old railway route coming in from the left and the track then follows the Saundersfoot Railway formation. [Google Streetview, March 2022]

Bulldog at the head of a train of wagons North of Kingsmoor Tunnel. This picture was shared by Gavin Thomas on the Saundersfoot & District Historical Society Facebook Group on 17th October 2018. I am not sure of the location of this photograph but it is possible that is in the length that we are currently looking at. If so, Parsonage Lane runs just to the left and the buildings visible beyond the train are at Parsonage Green. [140]
This extract from the 6″ OS Map published in 1889 is of what I consider to be the likely location of the photograph above. The rectangle shows the suggested location, with the train facing East towards the bridge at what is now called New Road. If I am right, the original building in the photograph no longer exists, it has been replaced by a bungalow. [219]

The line continued across the fields before it approached Thomas Chapel. We do know that there was a short branch to Broom Colliery. Its existence is recorded by Coflein: “An earthwork linear feature, probably a relict tramway, runs for c.400m NE-SW from SN11220814, at Broom Pit, … to SN10900788, where it effects an apparent junction with the Saundersfoot Railway . … It is not depicted as a railway on Ordnance Survey County series 25inch mapping of 1889 as it was disused by this time. … Broom Colliery was re-constructed and re-opened in 1933 and improvements included a 600-yard electrically-hauled narrow-gauge tramway to carry coal to the Saunderfoot Railway.” [228]

That statement from Coflein is supported on their website by an Ordnance Survey extract which is reproduced here and annotated with the key features. [228]

Thomas Chapel on the 62 Ordnance Survey of 1906. The Saundersfoot Railway can be seen approaching from the South. [220]
Approximately the same are as on the map extract above. The red line on the satellite image shows the route of the old railway. [220]

The lane serving Honeywood Cottage and other deellings runs across the top-half of the map and satellite image above. Just left of, and above the centre of, the image it is crossed by the old railway. The location is marked with a red arrow. It is of interest because there appears to be a remnant of the Saudersfoot Railway just at this point. I am not entirely sure that this is the case. However, if it is then is fixes the route of the line beyond here to Reynalton. I’d be interested to know whether anyone can provide details of what it ia that appears in the photograph below.

The location of the Reynalton Cooliery and the New Reynalton Colliery as indicated by Coflein. [221]

Urbex tells us that the railway “was extended for about one and a half miles beyond Thomas Chapel to serve a new colliery at Reynalton. To avoid heavy expenditure on earthworks and bridges, the line followed a somewhat circuitous course through open country. The existing railway from Thomas Chapel to Saundersfoot was relaid.” Horse traction was finally abandoned, and all traffic between Reynalton and the head of the incline was worked by 0-4-0ST Bulldog. Bulldog was slightly larger than than Rosalind which worked the line between Stepaside and the harbour. “It had 9inch by 15inch outside cylinders, 2feet 6inch wheels, and weighed 12 and a half tons in working order. To enable it to pass through the tunnel under the Great Western Railway to Saundersfoot, the maximum height and width had to be restricted to six feet nine inches respectively.” [227]

Coflein comments that the colliery site at Reynalton was a former anthracite drift mine. “Reynalton Colliery was opened by 1906. It was rebuilt in 1914 under the New Reynolton Anthracite Colliery Co., and served by an extension of the Saundersfoot Railway. … The mine closed in 1921 and the site was cleared, the only survivors being a brick-built winding house, six houses in the village and some railway embankment. There are various shafts and pits shown on the 1948 OS 6inch map. A cinder and slag heap near the church was removed during the Second World War to assist with the construction of Templeton airfield, … 2km to the north. [217]

Reynalton Bridge Abutments. This photograph was taken and shared by Dewi H. Davies on 7th October 2015 (c) People’s Collection Wales and used here under the Creative Archive Licence. [222]
[223]
We know that the Reynalton extension was constructed with frugality in mind, that it sought to follow the contours as much as possible and avoided building embankments, cuttings or structures as much as possible. With these factors in mind the red line shown on this satellite image is an estimation of the likely route which roughly follows the contours of the land and picks up on features that exit in the 21st century. A solid red line has been used where I have reasonable confidence over the alignment of the railway, the red-dotted line where I have a greater uncertainty but feel that showing the probable line is warranted.

We have already identified the two bridge abutments alongside the road South of Reynalton and it is possible (see below) to pick out the line of the railway either side of that for a couple of hundred yards at most. Closer to the line to Thomas Chapel there is a linear section of woodland which is in the shape of an upturned ‘U’ which closely follows the contours of the land. Between these two lengths the presumed route does approximately follow the contours and existing features, specifically, a lane to the East of the modern tarmacked road running North-South at the centre of the picture and an obvious lane running to the West of that road which does not appear on any of the revisions of the OS mapping carried by the NLS.

This leaves us with a question about the line’s approach to Reynalton colliery. The blue flag on the Coflein map above locates the colliery with reasonable accuracy. That position is shown again below and is marked on this satellite image as an ochre-coloured circle. At the moment the line approaching the colliery is shown in ochre as well and dashed because I have little certainty over its exact line. I hope to be able to clarify this further as time goes by. [223]
Coflein provides two aerial photographs looking from the North across Reynalton to the most visible remains of the Saundersfoot Railway extension to Reynalton Colliery. The remains can be picked out towards the top of this image. A tree-lined curve runs from the West to two bridge abutments and the line can then be seen as a straight line running East through the first two fields East of the highway. The photograph was taken taken on 11 January 2006 by Toby Driver. [224]
The location of Reynalton Colliery. An enlarged version of the map as shown by Coflein. [221]

This last satellite image taken from Google Earth shows that my presumptions about the line of the railway close to the colliery may be right. The field which is centre-right on this image has an area of curved land which appears to have retained water differently to the rest of the field and which is as a result greener. [Google Maps, September 2022]

Writing about the Reynalton extension to the Saundersfoot Railway, Coflein says: “The main line was extended to serve Reynalton Colliery … in 1915. The colliery closed in 1921 and the extension was abandoned, the whole Saundersfoot Railway closing finally in 1939.” [226] Some detailed reasoning for my proposed alignment for the extension is given in the comments under the satellite image above. I am hoping that at some time I may be able to find further information on the alignments that I have shown and would be very happy for someone to correct my assumptions.

Making the assumption that I have the correct alignment a few more photos on the line of the old railway can be offered. …

A telephoto image looking along the line of the railway to the East from the lane at the centre of the satellite image above. [Google Streetview, August 2021]
A wider view of the probable line of the old railway taken from the same lane, looking East. [Google Streetview, August 2021]
This time looking ahead along the probable line of the Saundersfoot Railway Extension. [Google Streetview]

It goes without saying that if anyone has photographs from along the routes shown, and is prepared to share them, I would be delighted to include them properly referenced in this article.

One final note: OpenRailwayMap [235] is usually an excellent source for following rail lines throughout the UK and abroad. Sadly the only length of the Saundersfoot Railway covered is a short length either side of Saundersfoot Railway Station. That length include the tunnel under that station. [235]

References

131. https://maps.nls.uk/geo/explore/#zoom=17.0&lat=51.71103&lon=-4.69706&layers=6&b=1, accessed on 22nd September 2022.

140. https://www.facebook.com/photo/?fbid=10156977603767859&set=gm.2078153078876132&cft%5B0%5D=AZWT7bn815NyzpCpBBLC2HZvBTrfrxDyTo-ZvOW9NTUxLpk3TjiNa54DbuGtyhLpS3hgQViJFmWLBpFi2Tie16dxvjB9orVLUAD2e2hghR1hQjPoDihdOY7KRozUvMoaoQ65Ej7zh5wOYf-1S__QUXk4TJYKhtTxc8aGAMBCATtpLQ&tn=EH-y-R, accessed on 23rd September 2022.

141. https://www.facebook.com/photo/?fbid=10222629753755569&set=gm.3342246502501338, accessed on 28th September 2022.

148. https://scontent-lcy1-1.xx.fbcdn.net/v/t31.18172-8/12239217_10153292740546220_1364977808131440036_o.jpg?_nc_cat=110&ccb=1-7&_nc_sid=b9115d&_nc_ohc=T1j6evBs-qUAX-qTyVf&_nc_ht=scontent-lcy1-1.xx&oh=00_AT99_FCh-C8qMzKvptVV7M45ErozbSBljfm6La4_WuxP-w&oe=6354DACD, accessed on 23rd September 2022.

151. https://www.facebook.com/photo?fbid=10153292740386220&set=pcb.2488352051304047, accessed on 23rd September 2022.

156. https://www.facebook.com/photo/?fbid=2645549072131811&set=gm.3230563843749527, accessed on 23rd September 2022.

158. https://www.facebook.com/photo/?fbid=1300990836642576&set=pcb.2667192270086690, and https://www.facebook.com/photo?fbid=1300991336642526&set=pcb.2667192270086690, accessed on 23rd September 2022.

159. https://www.facebook.com/photo/?fbid=2929529600408275&set=gm.3279183382220906, accessed on 23rd September 2022.

162. https://www.facebook.com/photo?fbid=10214777776135221&set=gm.2842611899211392, accessed on 23rd September 2022.

163. https://www.facebook.com/photo/?fbid=10163222482380387&set=gm.3100220613370596, accessed on 23rd September 2022.

164. https://www.facebook.com/photo?fbid=2068424579852119&set=pcb.2907099849429263, accessed on 23rd September 2022.

165. https://www.facebook.com/photo/?fbid=10153292770086220&set=pcb.2488356474636938, accessed on 23rd September 2022.

166. https://www.facebook.com/photo?fbid=1318537364887923&set=pcb.2675460549259862, accessed on 28th September 2022.

167. https://www.28dayslater.co.uk/threads/kingsmoor-hill-tunnel-saundersfoot-west-wales-september-2021.130226, accessed on 28th September 2022.

180. https://www.facebook.com/groups/saundersfootdistricthistorialsoc/permalink/2161261967266470, accessed on 25th September 2022.

181. https://museum.wales/collections/online/object/0a0dad7c-06d6-3d40-8eb0-88b2777f3350/Coal-Staithes-at-Saundersfoot-Harbour-postcard, accessed on 25th September 2022.

182. https://www.peoplescollection.wales/items/381602, accessed on 25th September 2022.

184. https://www.geograph.org.uk/photo/2095041, accessed on 28th September 2022.

199. https://maps.nls.uk/geo/explore/#zoom=16.0&lat=51.71351&lon=-4.70532&layers=6&b=1, accessed on 27th September 2022.

200. https://maps.nls.uk/geo/explore/#zoom=16.2&lat=51.71977&lon=-4.71862&layers=6&b=1, accessed on 27th September 2022.

201. https://maps.nls.uk/view/102188916, accessed on 27th September 2022.

202. https://maps.nls.uk/geo/explore/#zoom=16.2&lat=51.71579&lon=-4.71964&layers=6&b=1, accessed on 27th September 2022.

203. https://coflein.gov.uk/en/site/308430, accessed on 27th September 2022.

204. https://ancientmonuments.uk/131820-tramroad-incline-at-saundersfoot-saundersfoot#.YzL3dnbMKUk, accessed on 27th September 2022.

205. https://www.booking.com/hotel/gb/incline-villa.en-gb.html?activeTab=photosGallery, accessed on 27th September 2022.

206. http://www.industrialgwent.co.uk/w-b12-pembroke/index.htm#saundersfoot, accessed on 27th September 2022.

207. https://www.facebook.com/photo/?fbid=10163322666785387&set=gm.3141496132576377, accessed on 27th September 2022.

208. http://www.welshcoalmines.co.uk/pembroke/Bonvilles_Court.htm, accessed on 27th September 2022.

209. This picture appeared on a Google search as being available on the aditnow.co.uk. That site now seems to be unavailable.

210. https://maps.nls.uk/geo/explore/#zoom=17.3&lat=51.72204&lon=-4.71834&layers=6&b=1, accessed on 28th September 2022.

211. https://maps.nls.uk/view/102188916, accessed on 28th September 2022.

212. https://www.geograph.org.uk/photo/2380636, accessed on 28th September 2022.

213. https://rogerfarnworth.com/2022/09/26/railways-in-west-wales-part-1c-pembrokeshire-industrial-railways-section-b-the-saundersfoot-railway-first-part/

214. https://coflein.gov.uk/en/site/308433, accessed on 28th September 2022.

215. https://maps.nls.uk/geo/explore/#zoom=15.0&lat=51.73323&lon=-4.73637&layers=6&b=1, accessed on 28th September 2022.

216. https://maps.nls.uk/view/102188910, accessed on 28th September 2022.

217. https://twodogsandanawning.co.uk/on-the-miners-trail-a-circular-walk-from-kilgetty, accessed on 28th September 2022.

218. https://www.facebook.com/PembrokeshireCoastPath/photos/p.2239833496135297/2239833496135297/?type=3, accessed on 28th September 2022.

219. https://maps.nls.uk/view/102188907, accessed on 28th September 2022.

220. https://maps.nls.uk/geo/explore/#zoom=16.0&lat=51.74323&lon=-4.75060&layers=6&b=1, accessed on 28th September 2022.

221. https://coflein.gov.uk/en/site/91716, accessed on 28th September 2022.

222. https://www.peoplescollection.wales/items/475105, accessed on 28th September 2022.

223. https://maps.nls.uk/geo/explore/#zoom=16.0&lat=51.74485&lon=-4.75803&layers=6&b=1, accessed on 28th September 2022.

224. https://coflein.gov.uk/en/site/408319/images, accessed on 28th September 2022.

225. https://www.facebook.com/photo?fbid=10222618406991907&set=gm.3339455612780427, accessed on 28th September 2022.

226. https://coflein.gov.uk/en/site/408319, accessed on 28th September 2022.

227. http://www.urbexforums.com/showthread.php/2136-Saundersfoot-Coal-Mine-Railway-Pembrokeshire, accessed on 28th September 2022.

228. https://coflein.gov.uk/en/site/400202, accessed on 29th September 2022.

235. https://www.openrailwaymap.org, accessed on 29th September 2022.