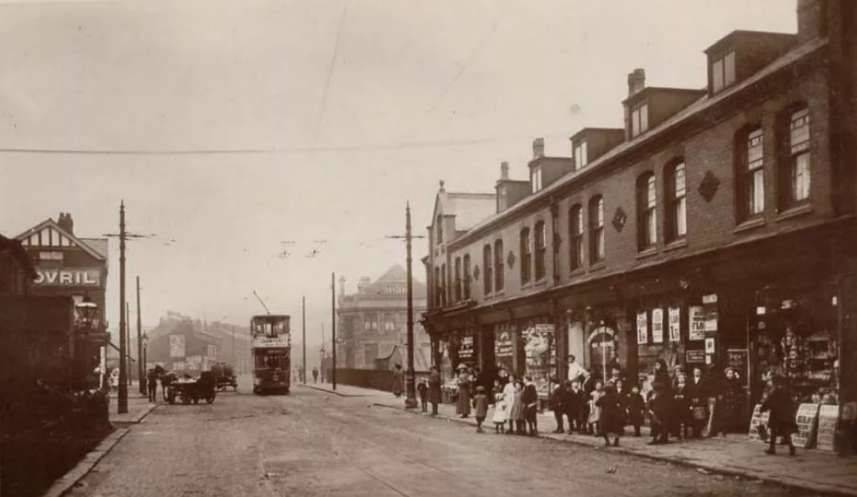
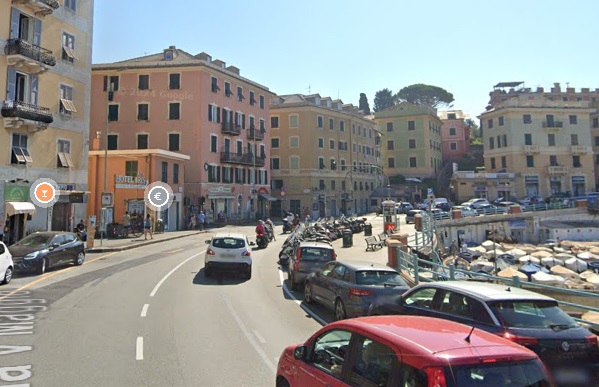
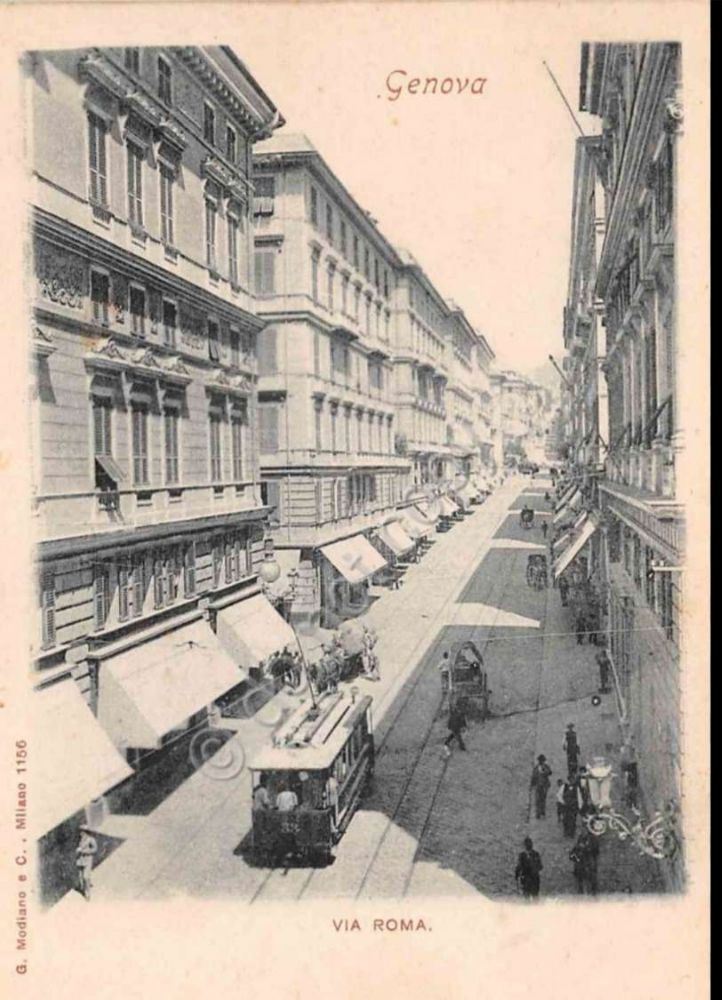
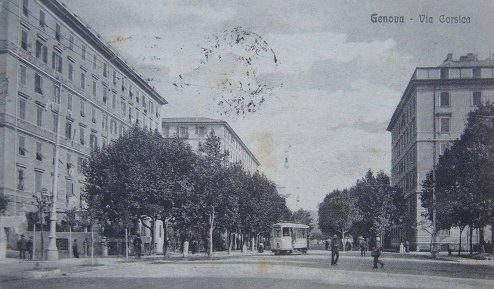
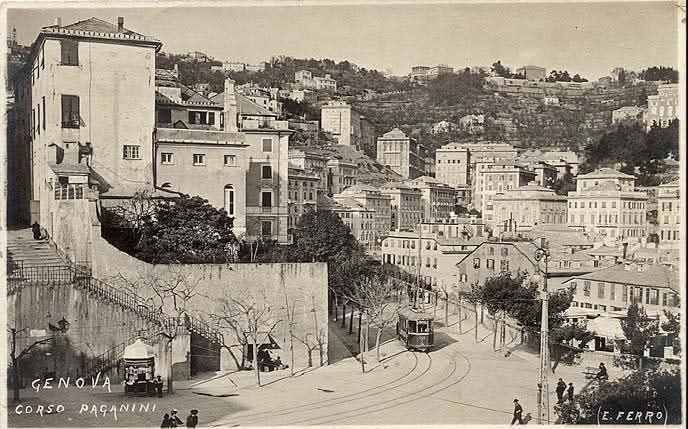
P.W. Gentry wrote about Stockport’s trams in the July 1949 issue of Modern Tramway.
He says: “Besides possessing several interesting features of its own, the Stockport system today commands added attention as the last last surviving member of that once network of standard gauge undertakings encircling Manchester. It is an unusually pleasing system by virtue of its compact and simple arrangement, its focal point being Mersey Square.” [1: p123]
The article in Modern Tramway caught my attention because for about 9 years I worked in Stockport as a highway engineer.
This is a second article looking at Stockport Corporations Tramways. The first article which looked at the history of the network and followed one axis of that network can be found here. [2]
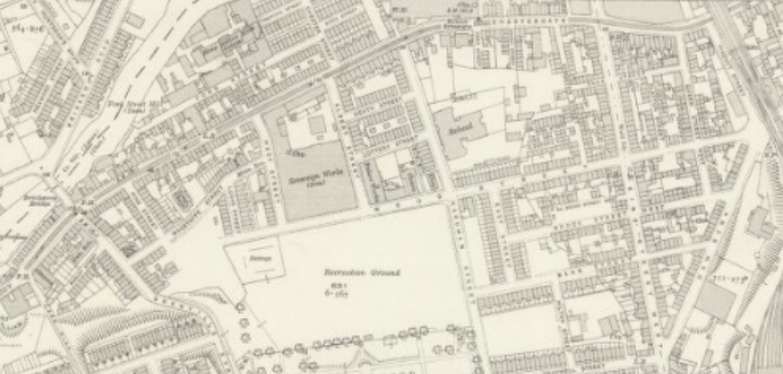
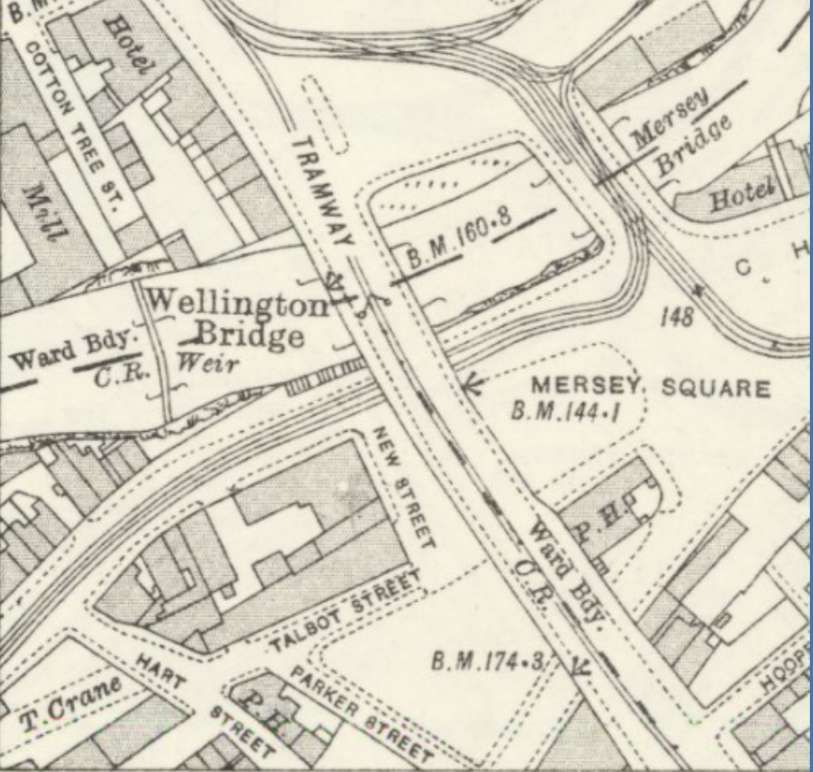
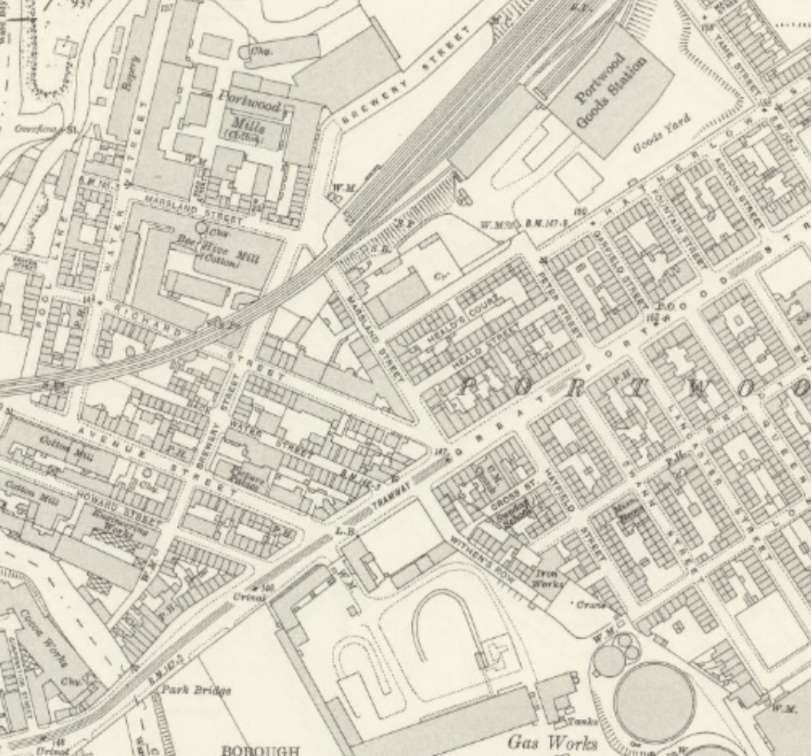
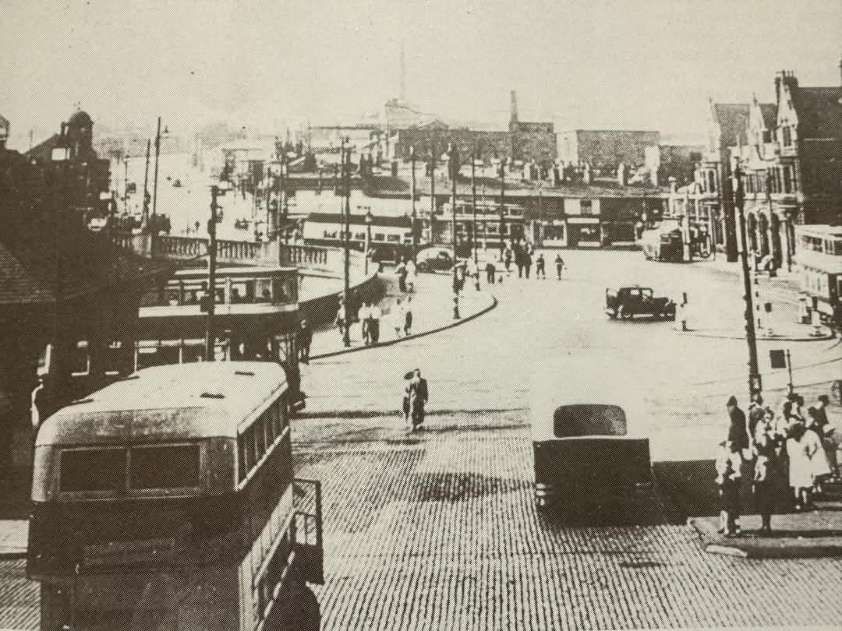
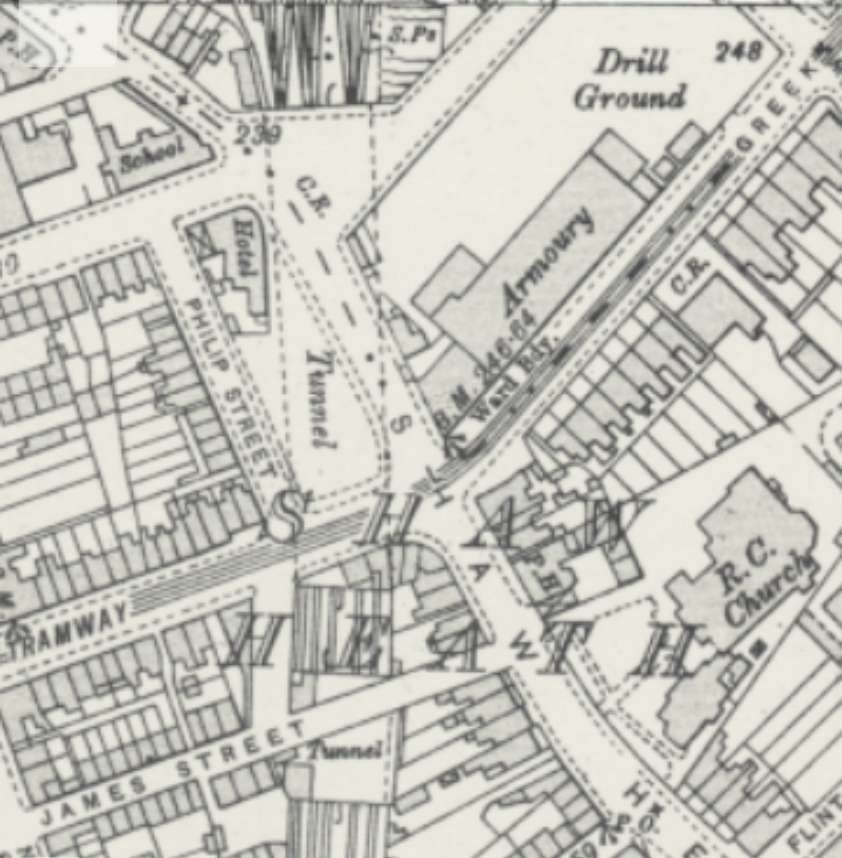
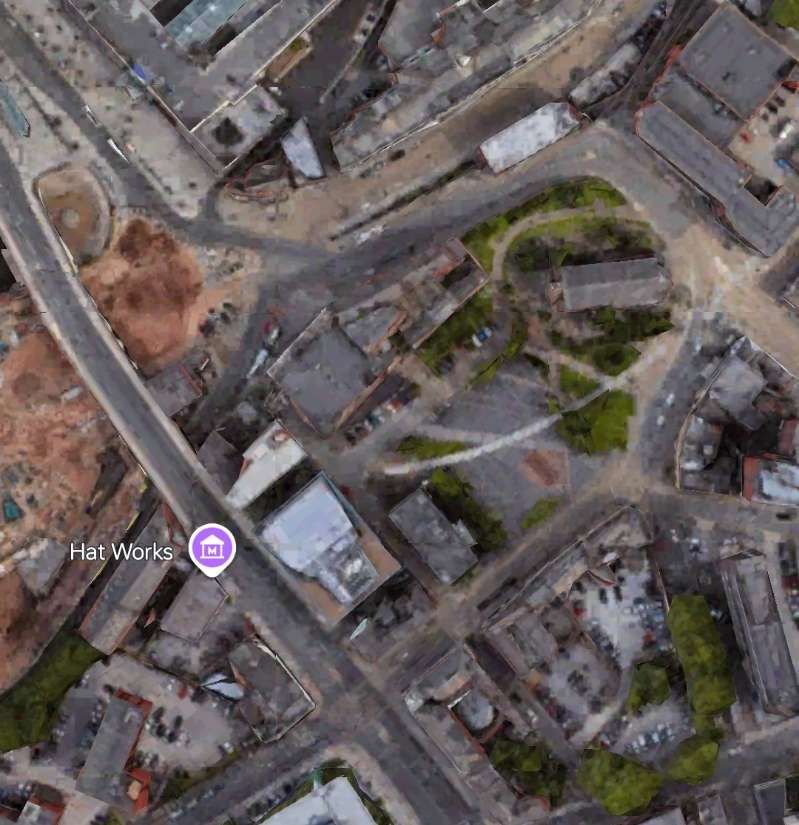
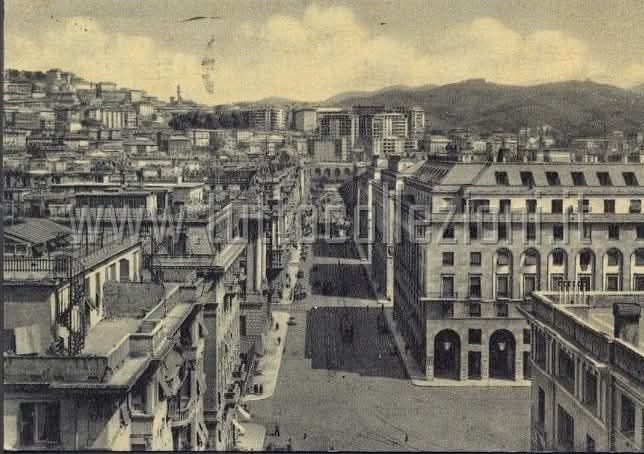
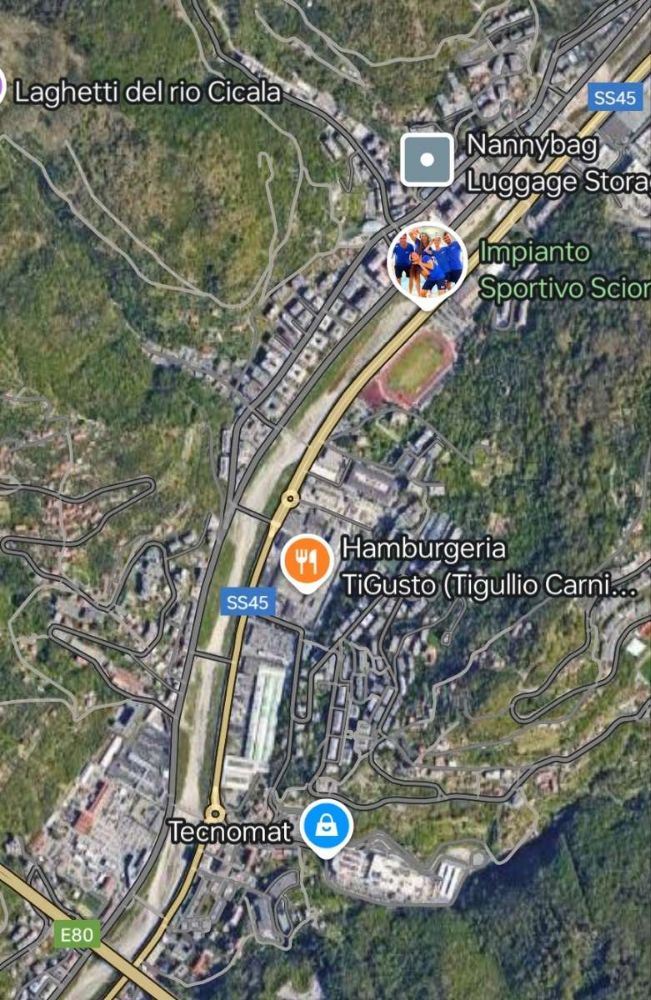
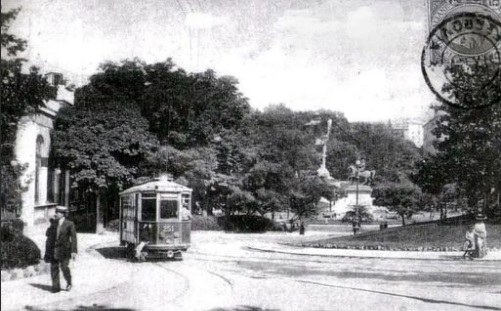
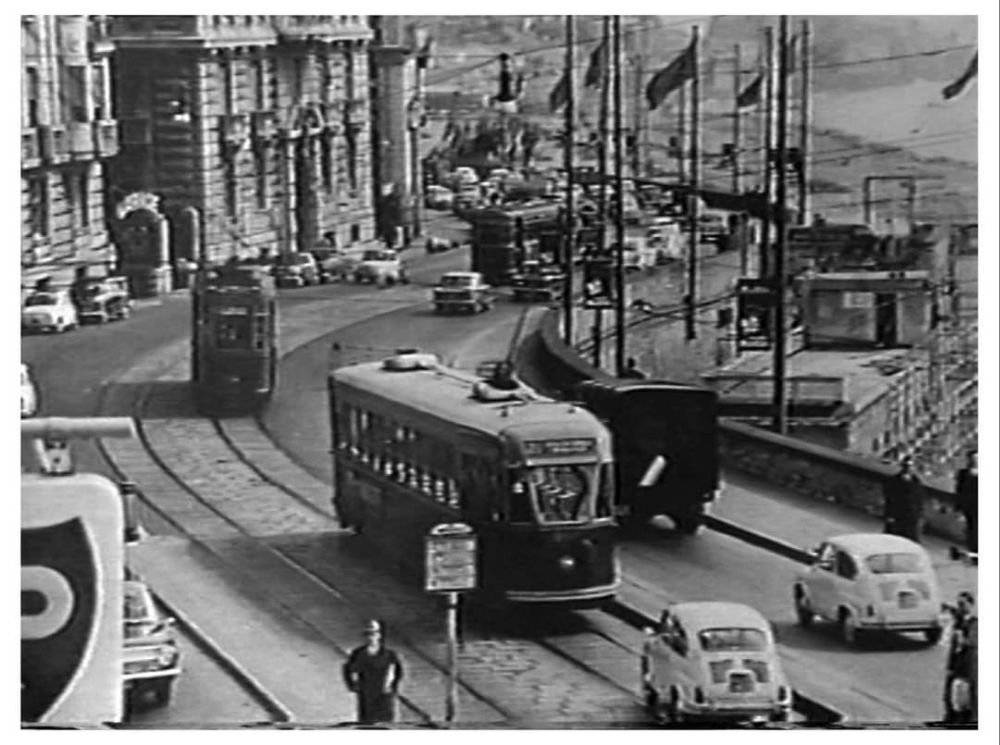
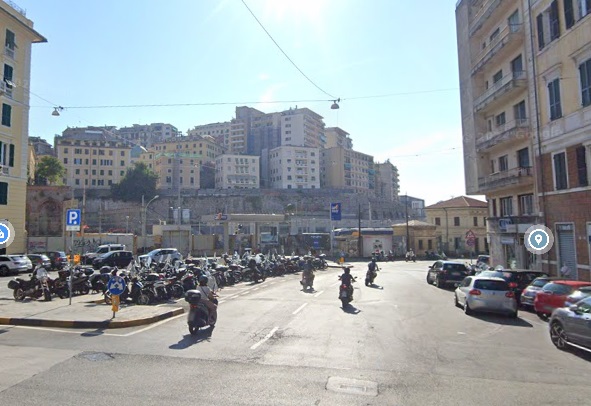
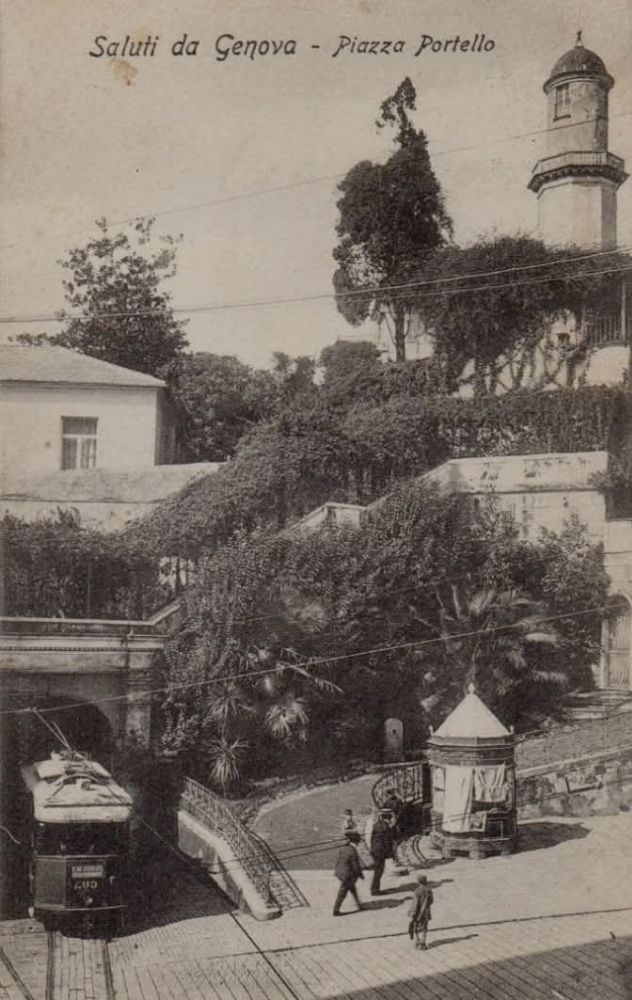
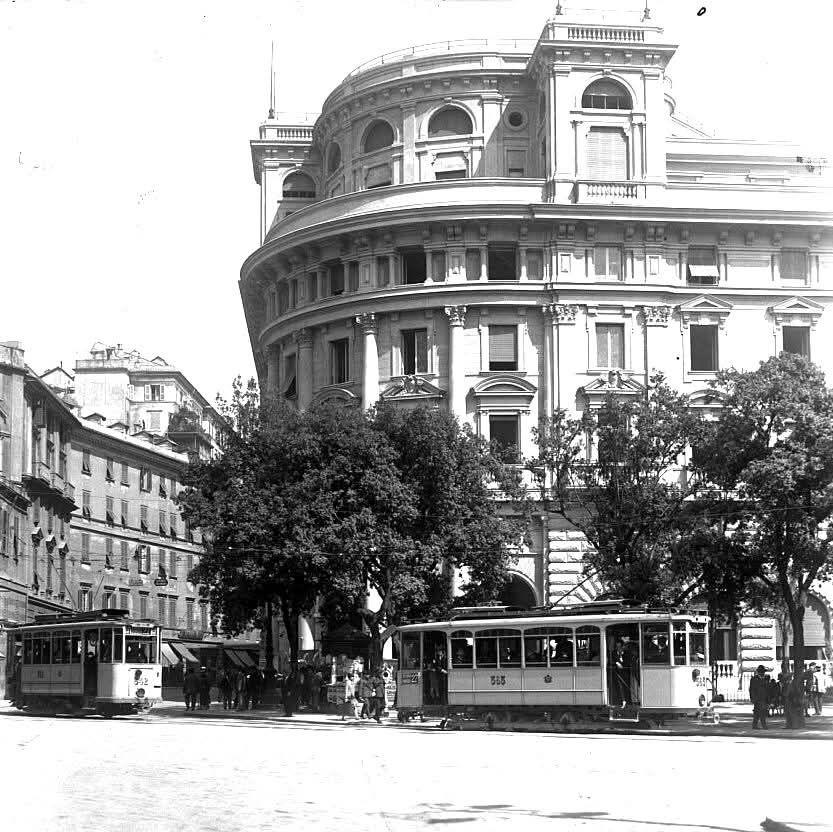
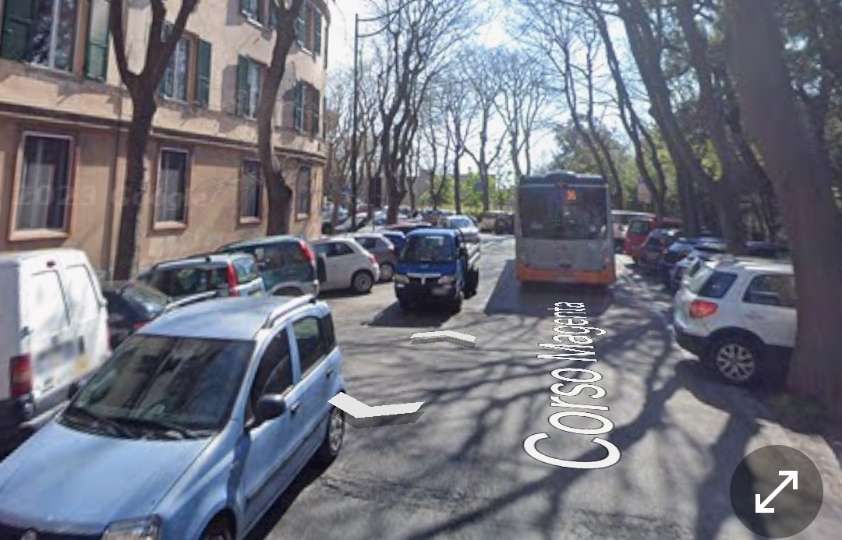
Mersey Square was the main hub of Stockport’s tramway network and appeared as a schematic plan in Gentry’s article in The Modern Tramway. …
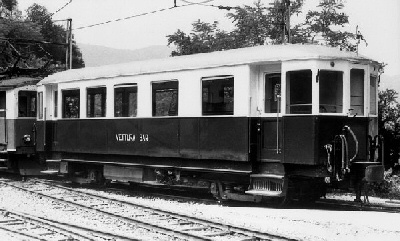
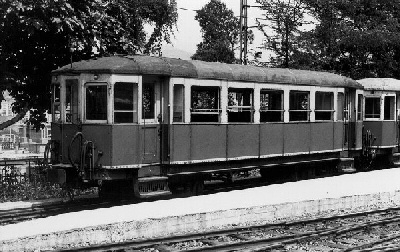
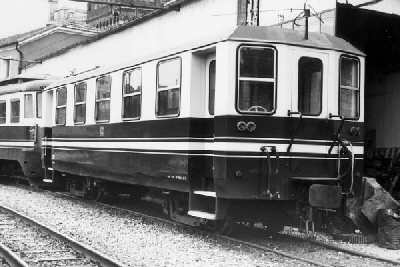
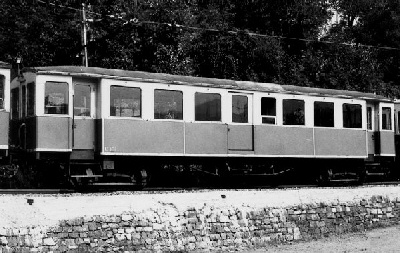
Before looking at the remaining tram routes operated by Stockport Corporation it is worth noting the trams which Stockport Corporation used to operate the network. P.W. Gentry listed these as follows:
This table is taken from Gentry’s article. [1: p126]
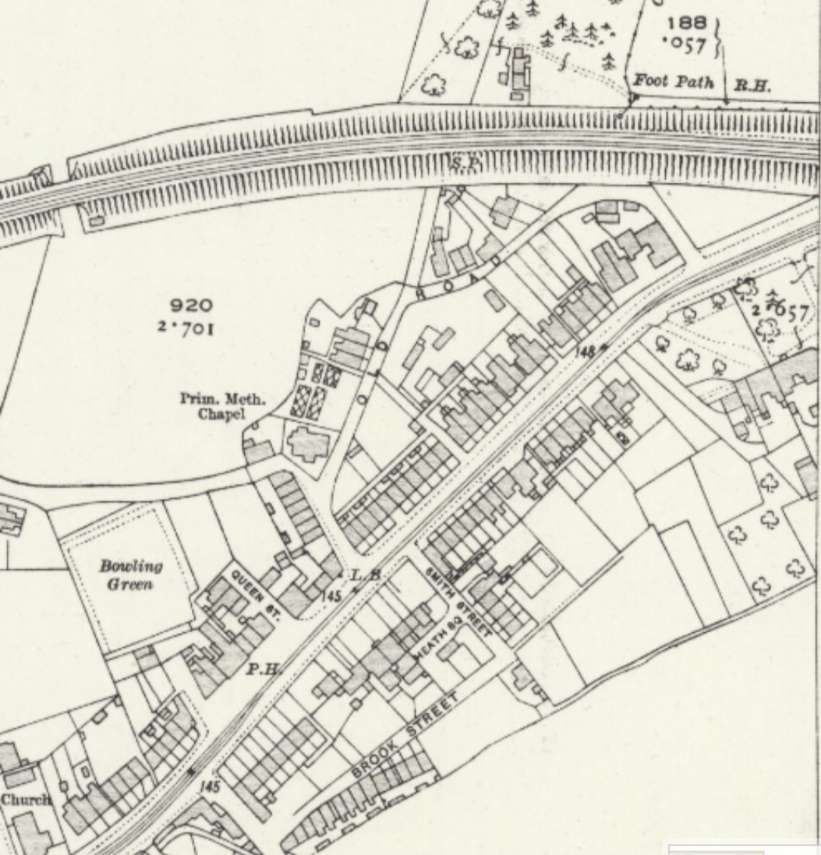
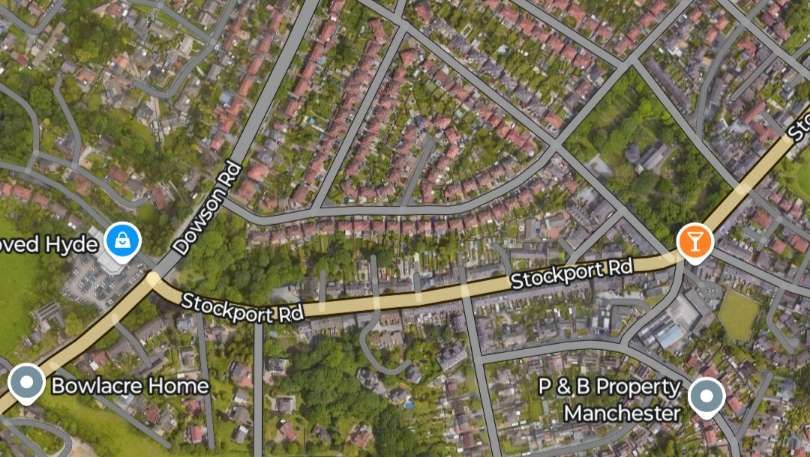
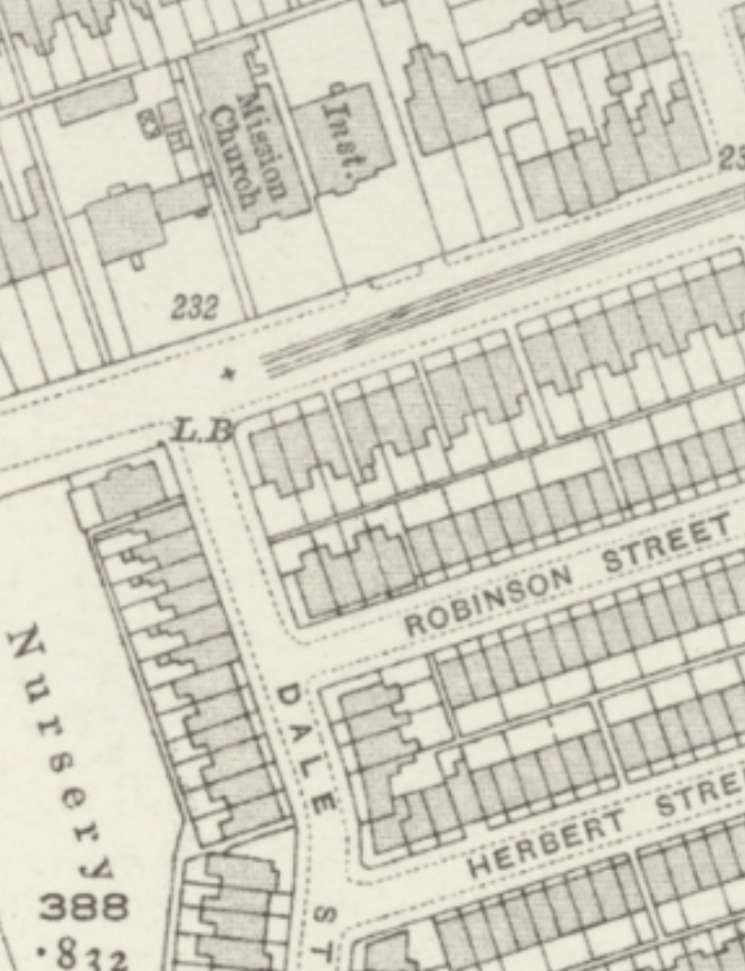
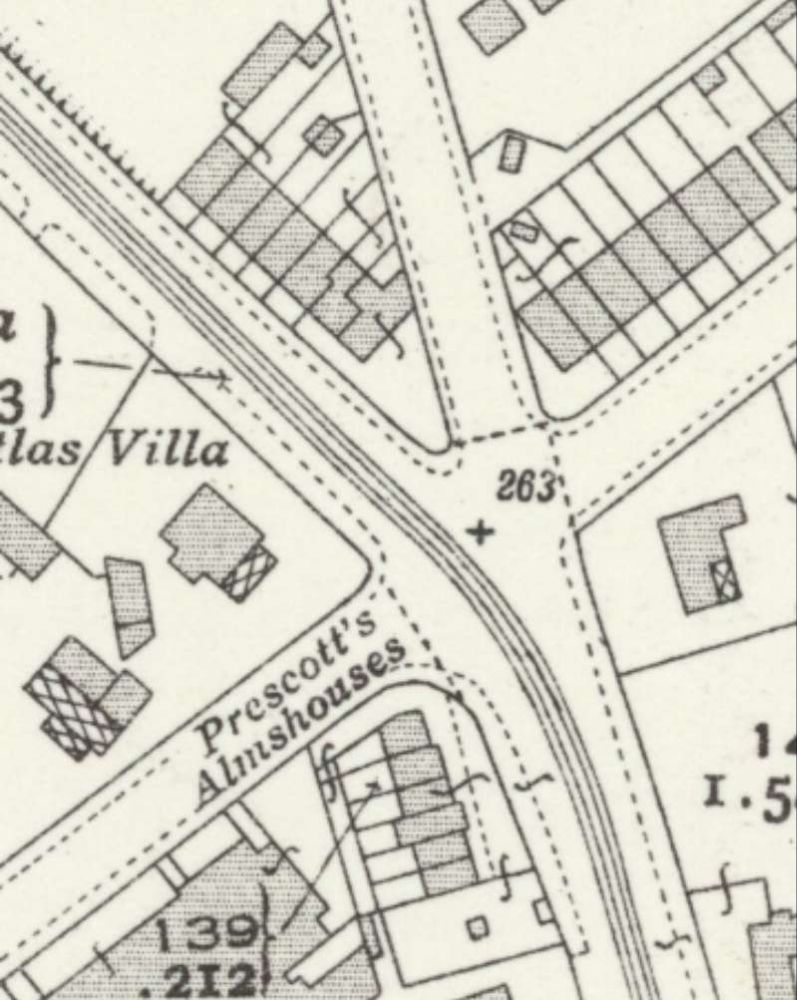
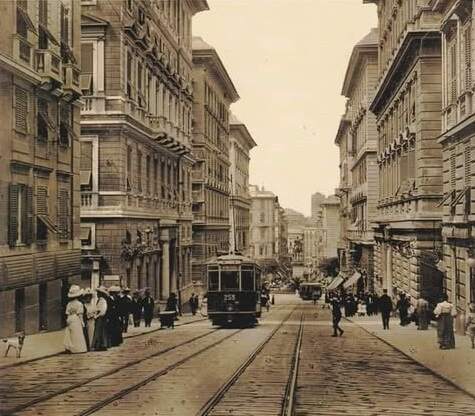
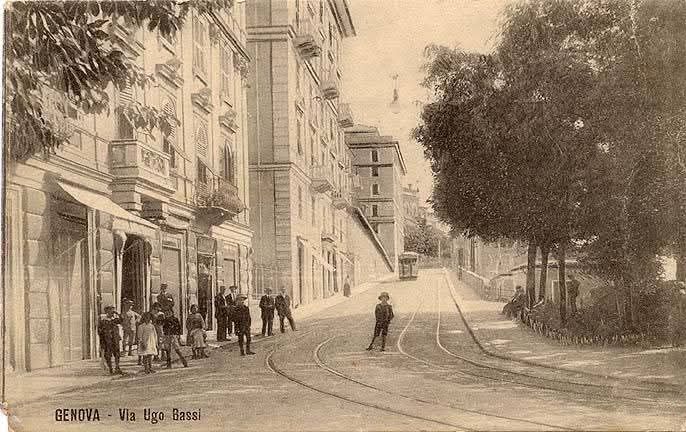
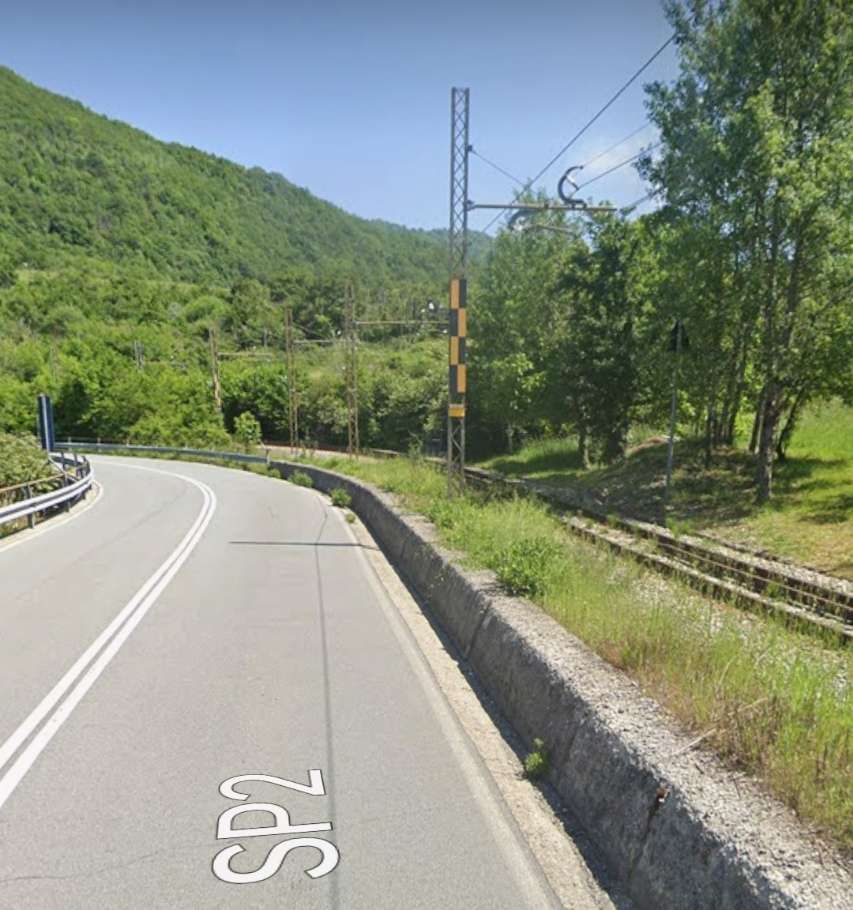
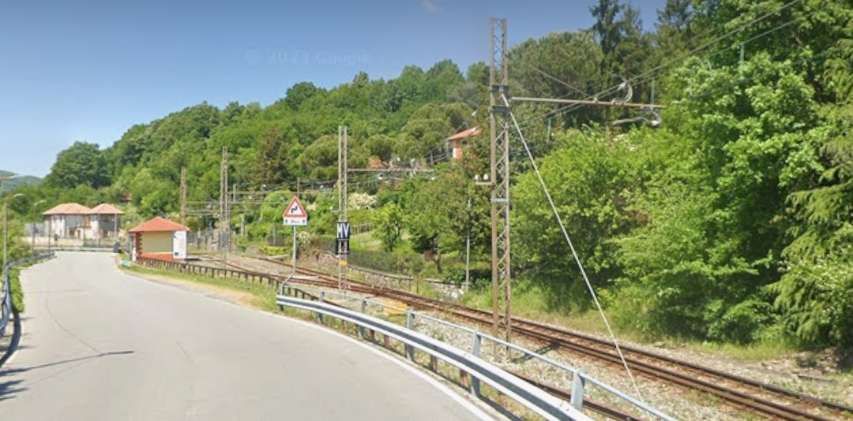
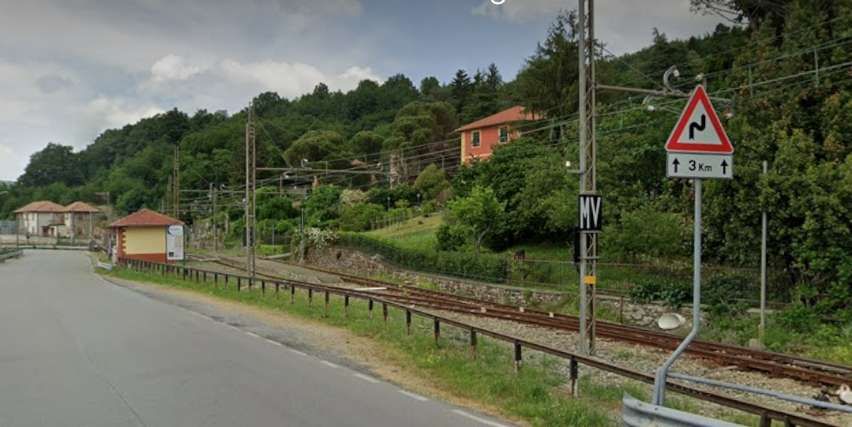
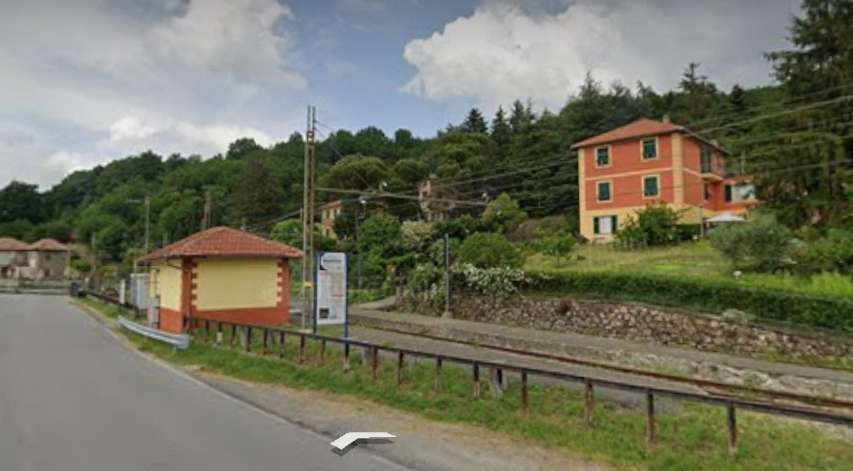
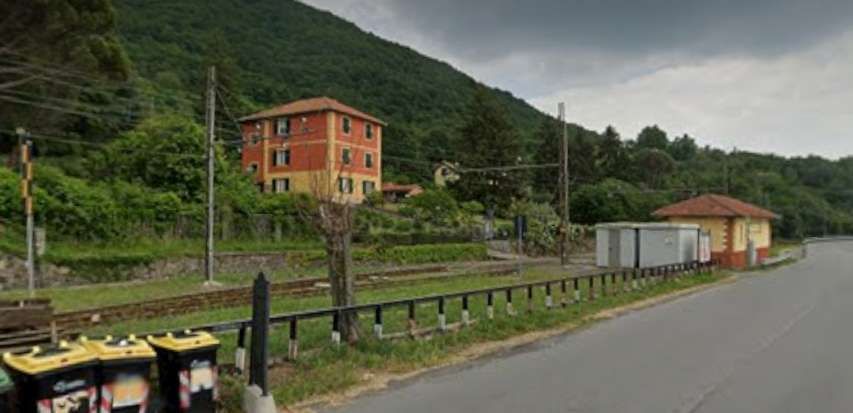
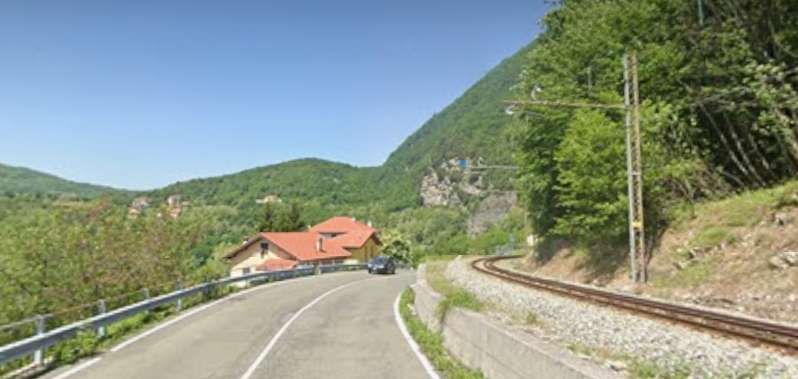
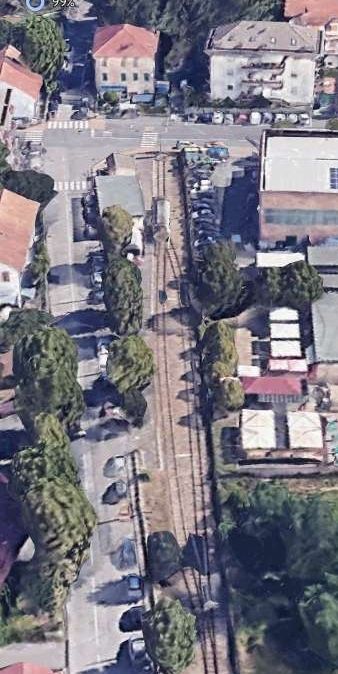
Edgeley to Mersey Square and Mersey Square to Reddish andGorton
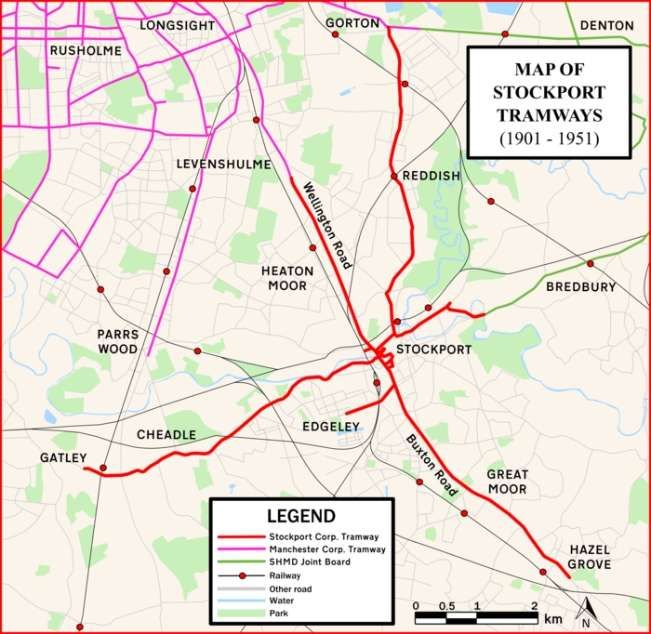
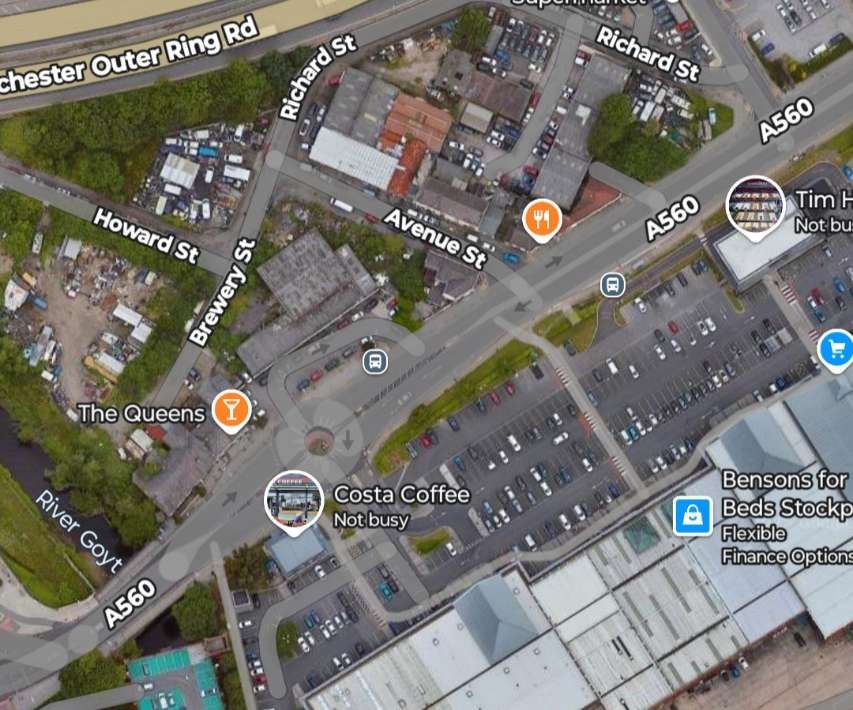
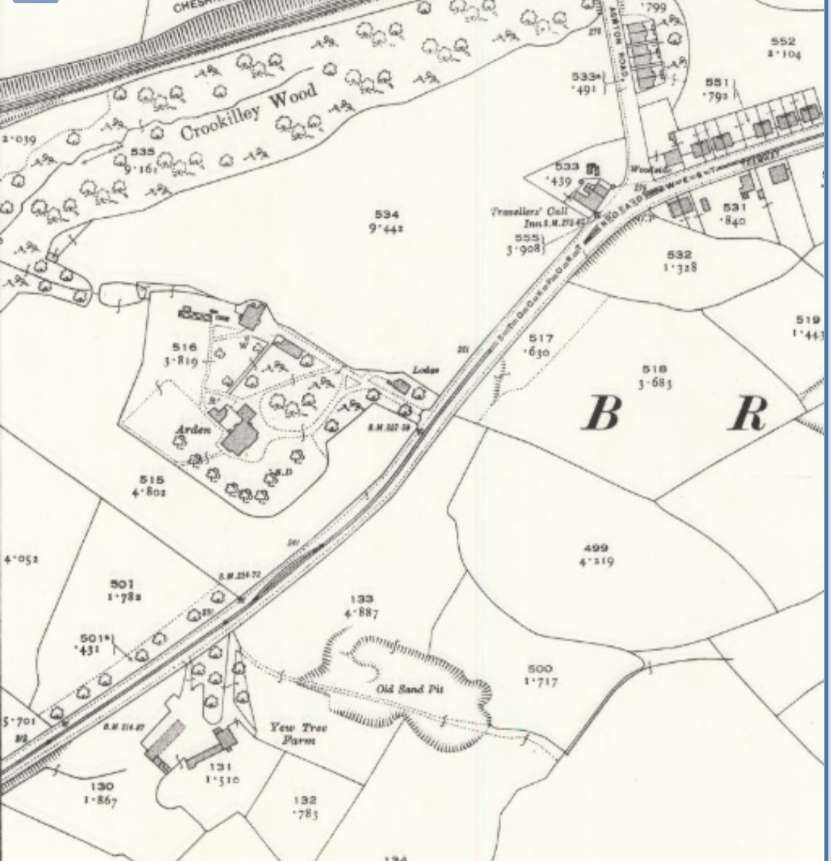
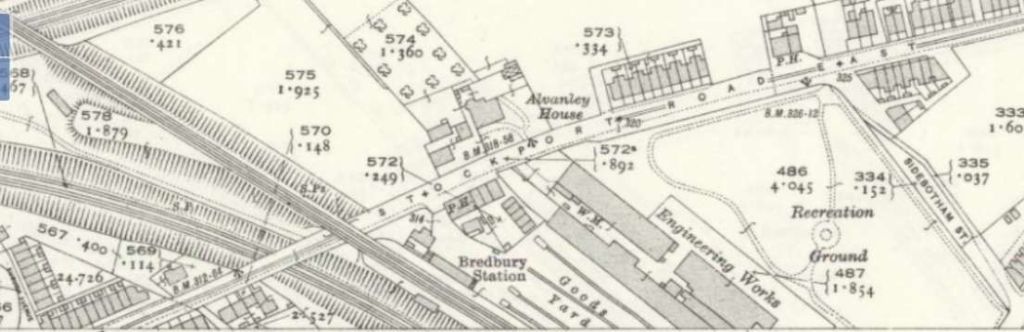
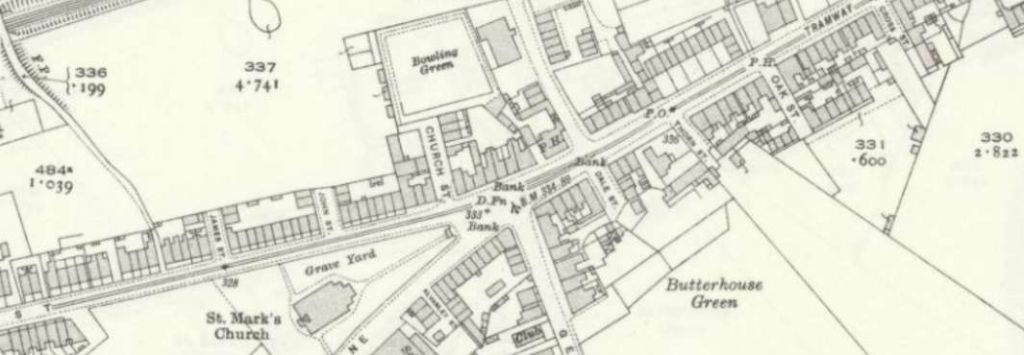
This first axis of the network was covered in my first article about Stockport Corporation Trams, here. [2] Two further axes are worth our attention: the first, below, that between Gatley and Bredbury; the second that between Manchester and Hazel Grove.
Gatley to Mersey Square and Mersey Square towards Bredbury
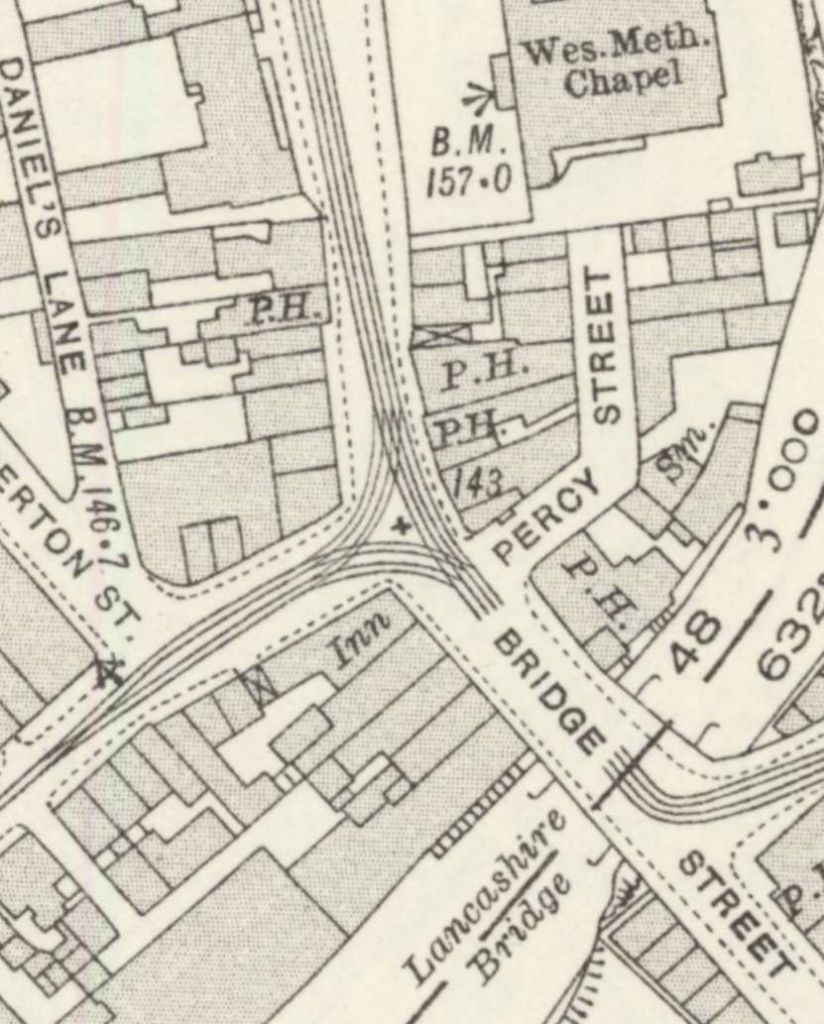
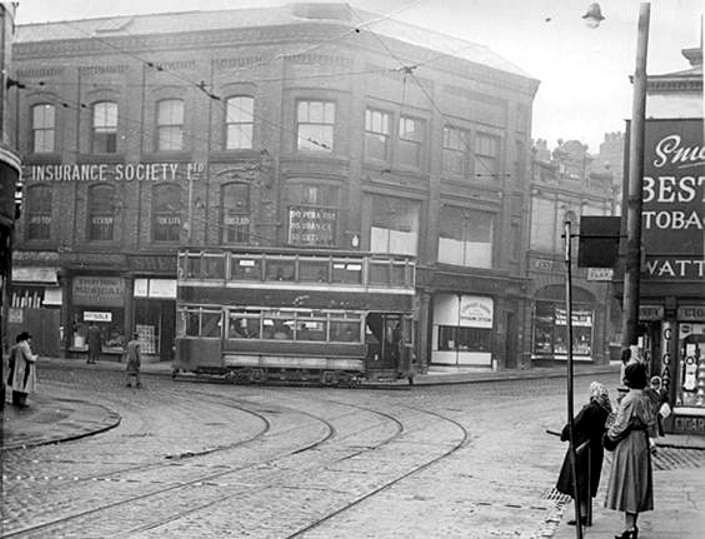
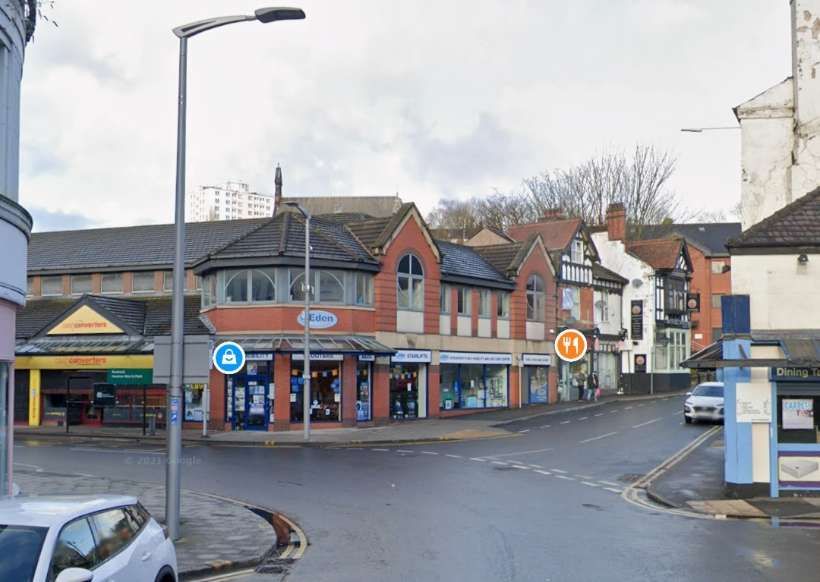
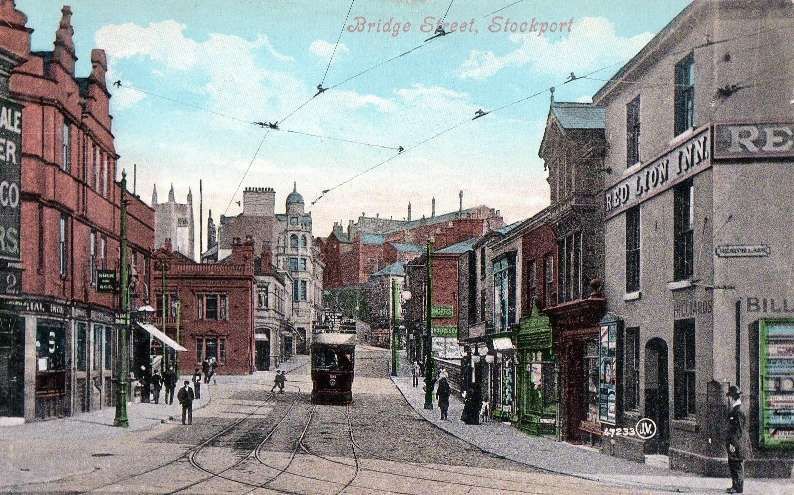
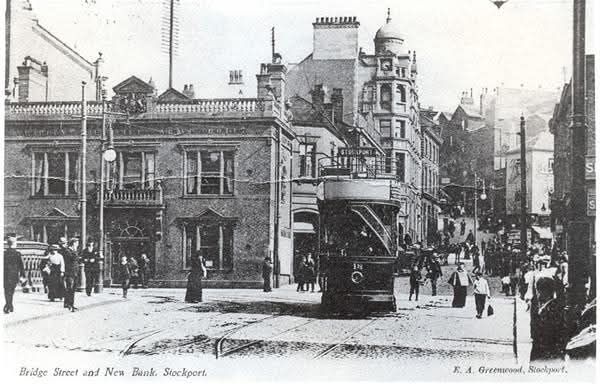
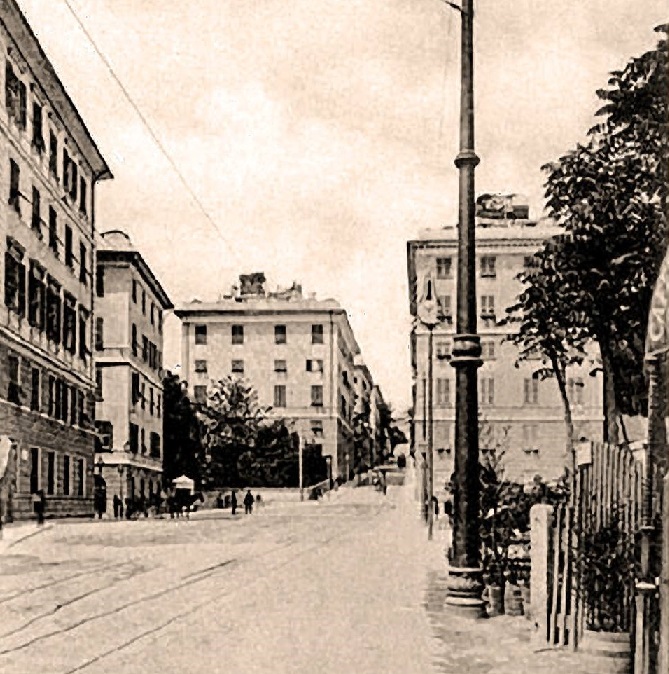
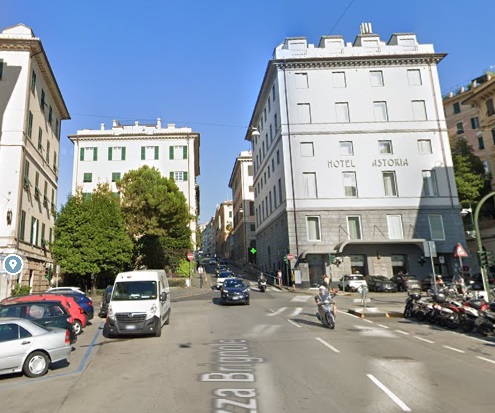
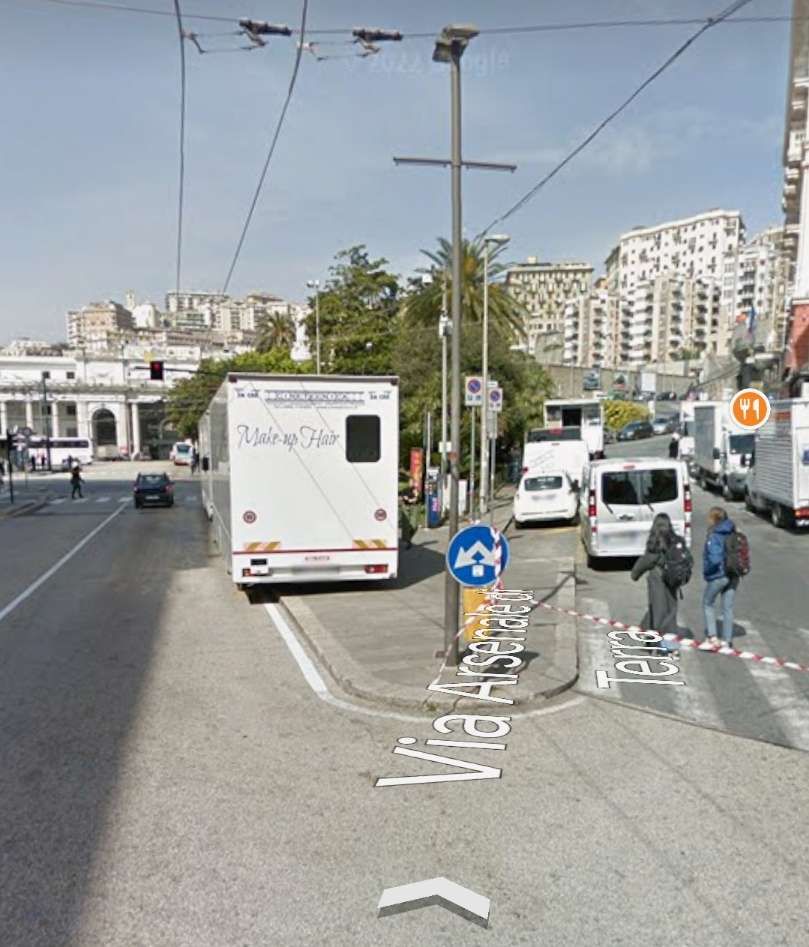
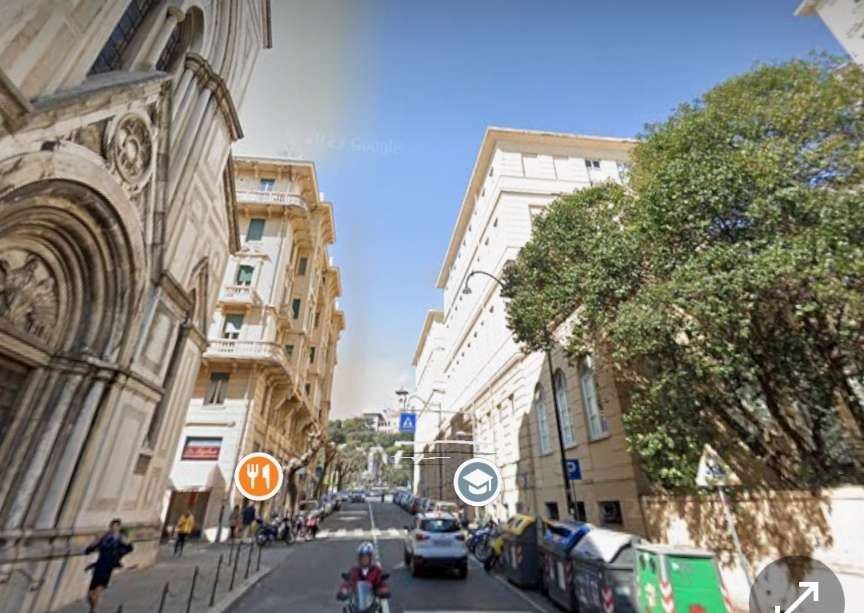
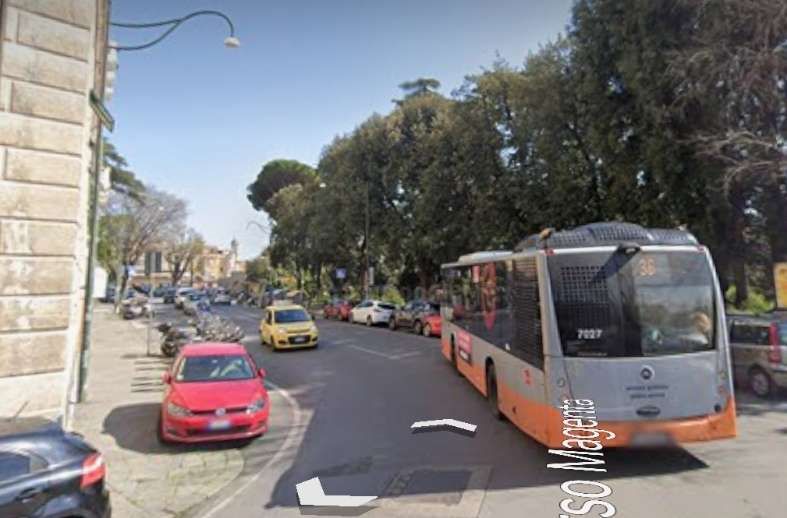
Tram services entered Mersey Square and crossed the Mersey. Services to the West of the town commenced here and ran along Princes Street to Bridge Street. That length of the network is covered in an earlier article which can be found here. [2]
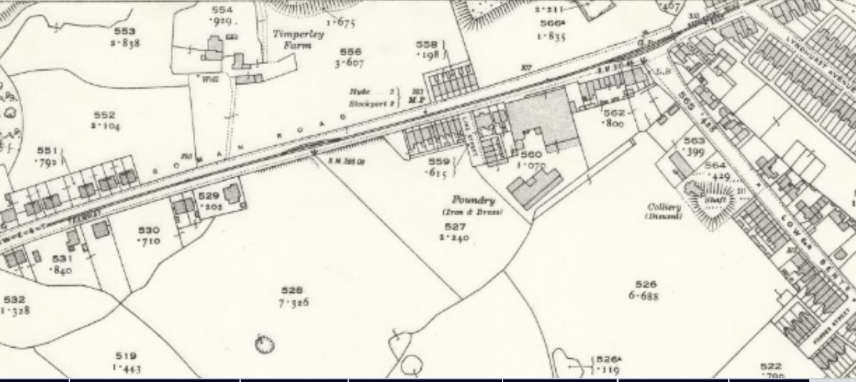
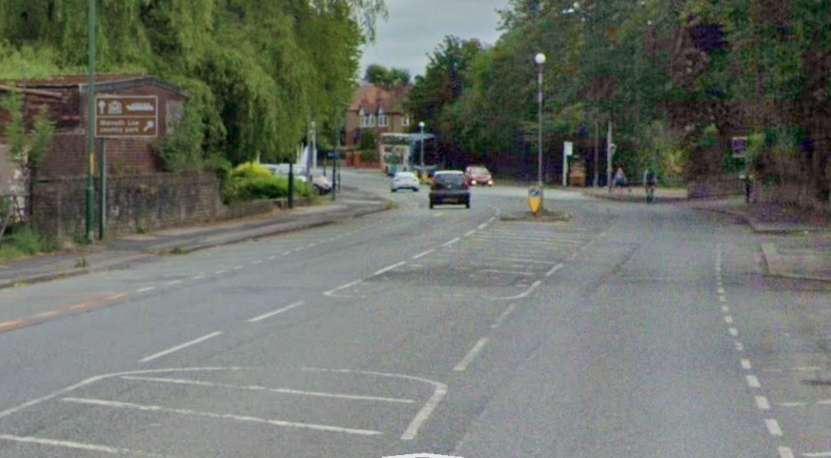
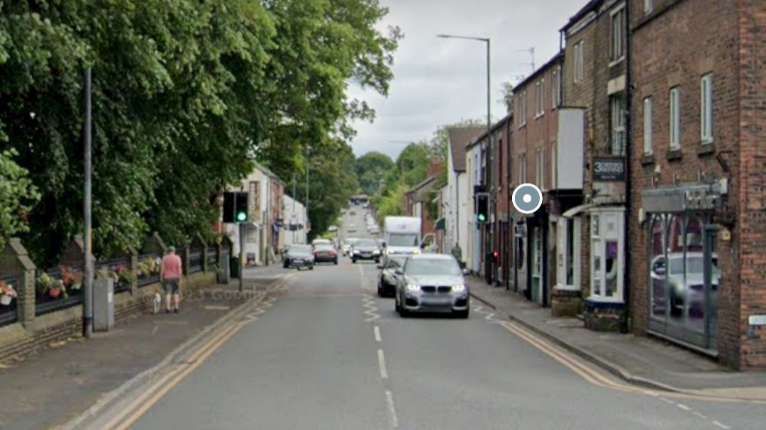
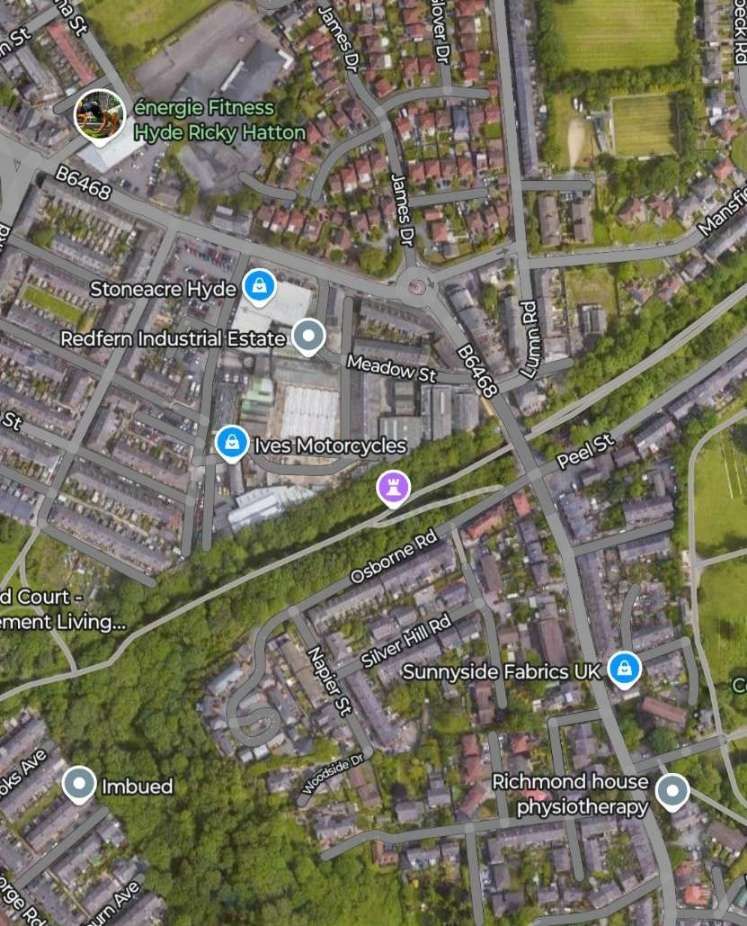
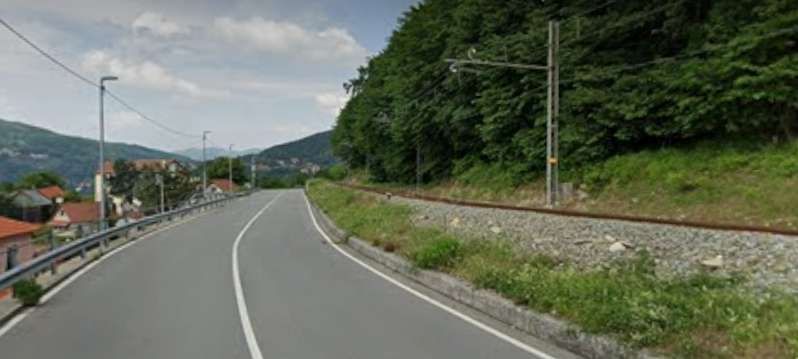
We resume this article at the Northeast end of Princes Street and its junction with Bridge Street and then follow the route to Hyde.
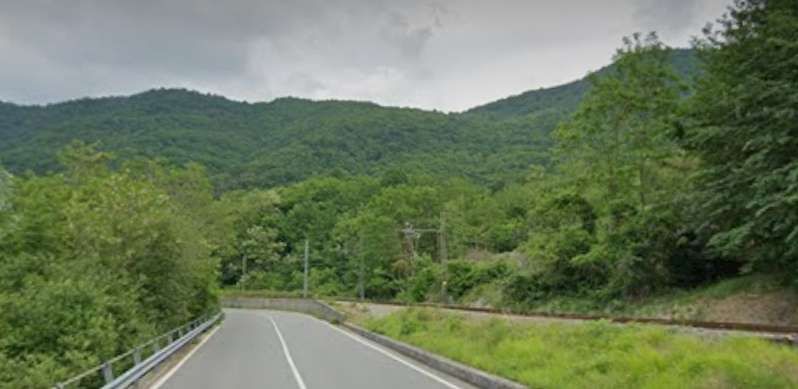
This completes the length of the tramway from Stockport to Hyde. The next article in this short series will cover the line from Manchester to Hazel Gri
References
P.W. Gentry; Stockport Corporation Tramway; Modern Tramway, Vol. 12 No. 138, June 1949, p123-126.
Harry Postlethwaite, John Senior & Bob Rowe; Super Prestige No. 14, Stockport Corporation; Venture Publications, Glossop, Derbyshire, 2008. This document is made freely available by MDS Books as a .pdf: https://www.mdsbooks.co.uk/media/wysiwyg/Stockport_Download_1.pdf, accessed on 14th January 2025.
P.W. Gentry wrote about Stockport’s trams in the July 1949 issue of Modern Tramway.
He says: “Besides possessing several interesting features of its own, the Stockport system today commands added attention as the last last surviving member of that once network of standard gauge undertakings encircling Manchester. It is an unusually pleasing system by virtue of its compact and simple arrangement, its focal point being Mersey Square.” [1: p123]
This article in Modern Tramway caught my attention because for about 9 years I worked in Stockport as a highway engineer.
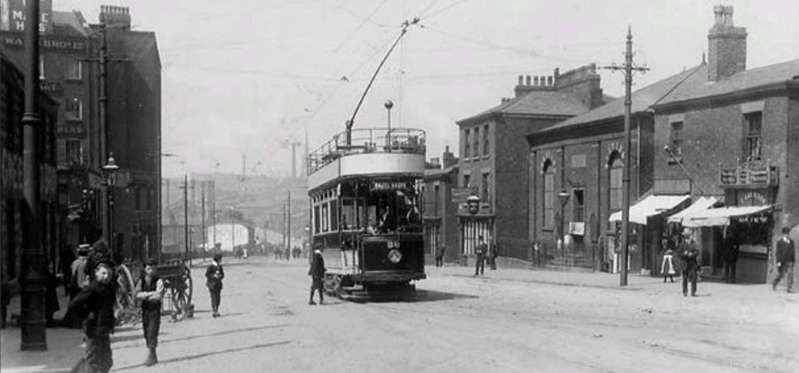
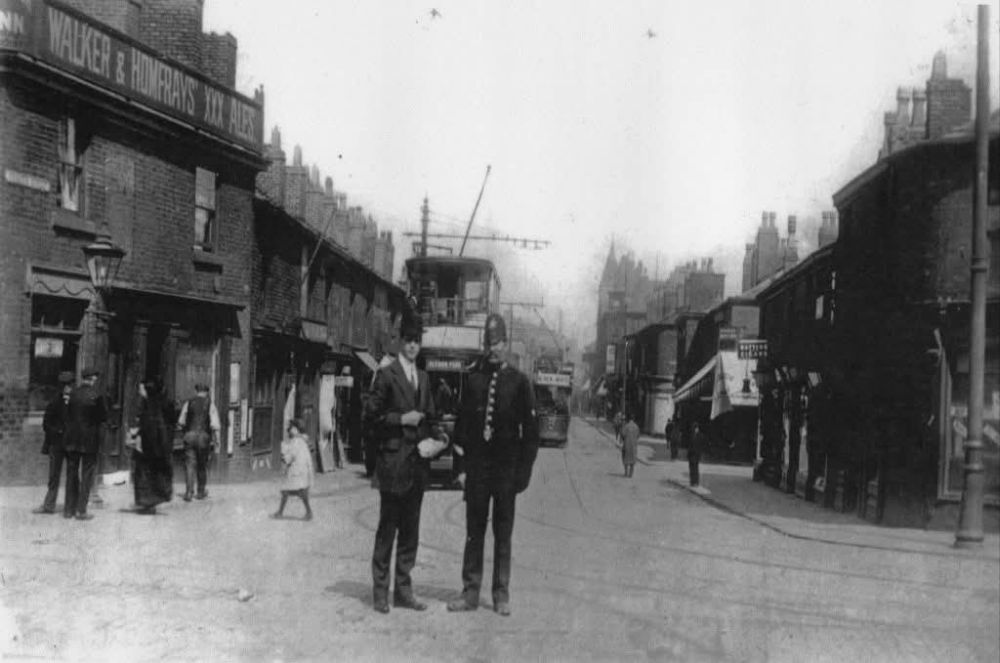
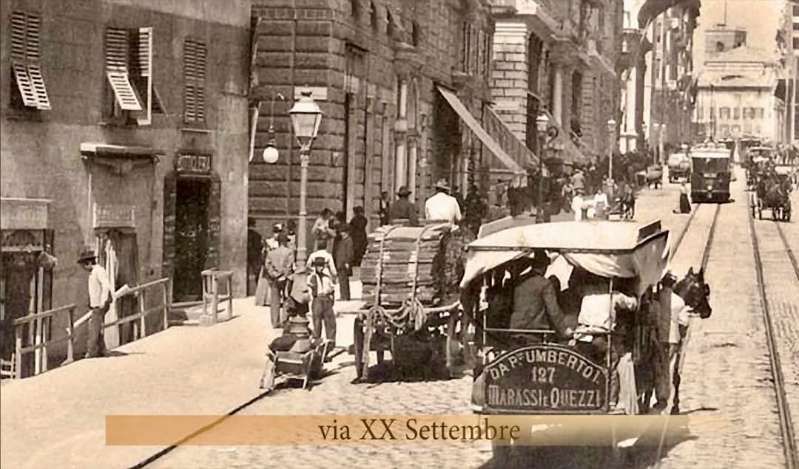
We know that tramways arrived in Stockport in the 1880’s from the Manchester direction when “the Manchester Tramways and Carriage Co, Ltd., [opened] a horse-car service into Mersey Square via Levenshulme.” [1: p123]
In 1889, the Stockport and Hazel Grove Carriage and Tramway Co. Ltd. was formed and “instituted horse car services southwards to Hazel Grove and Edgeley at Easter 1890.” [1: p123]
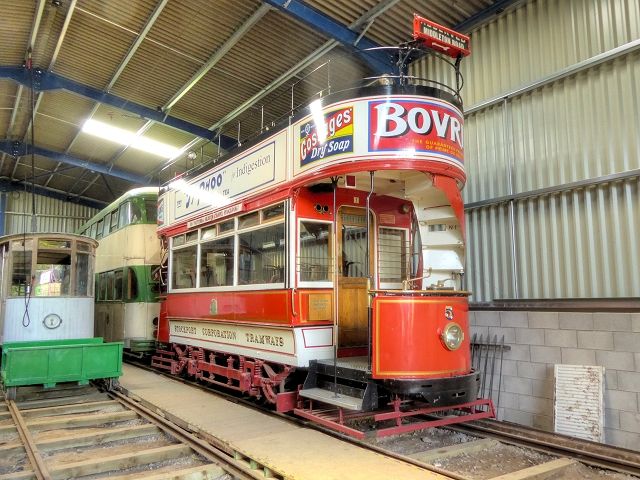
Stockport tramcar No. 5, dating from 1901, is preserved at the Heaton Park Tramway. The lower saloon of tramcar No. 5 was recovered from a field, where it had been used as a hen house, in 1971. It was restored by the ‘Stockport 5 Tramway Trust’. It now runs on the Heaton Park Tramway, a tramway museum in Heaton Park, Manchester. [2]
Stockport Corporation began tramway operations when, in 1890, “an Order under the Tramways Act was obtained for the construction and operation of electric tramways. Work commenced in Sandy Lane on 12th February 1901 and the three routes projected were opened in stages.” [1: p123]
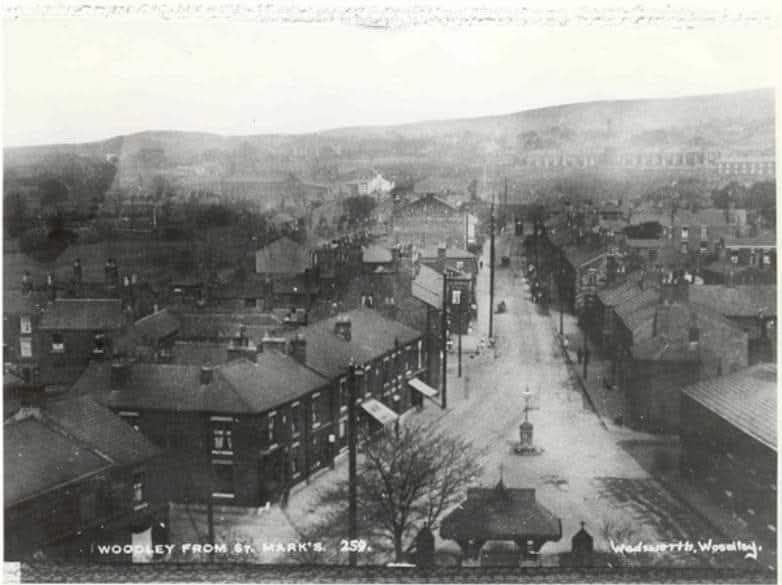
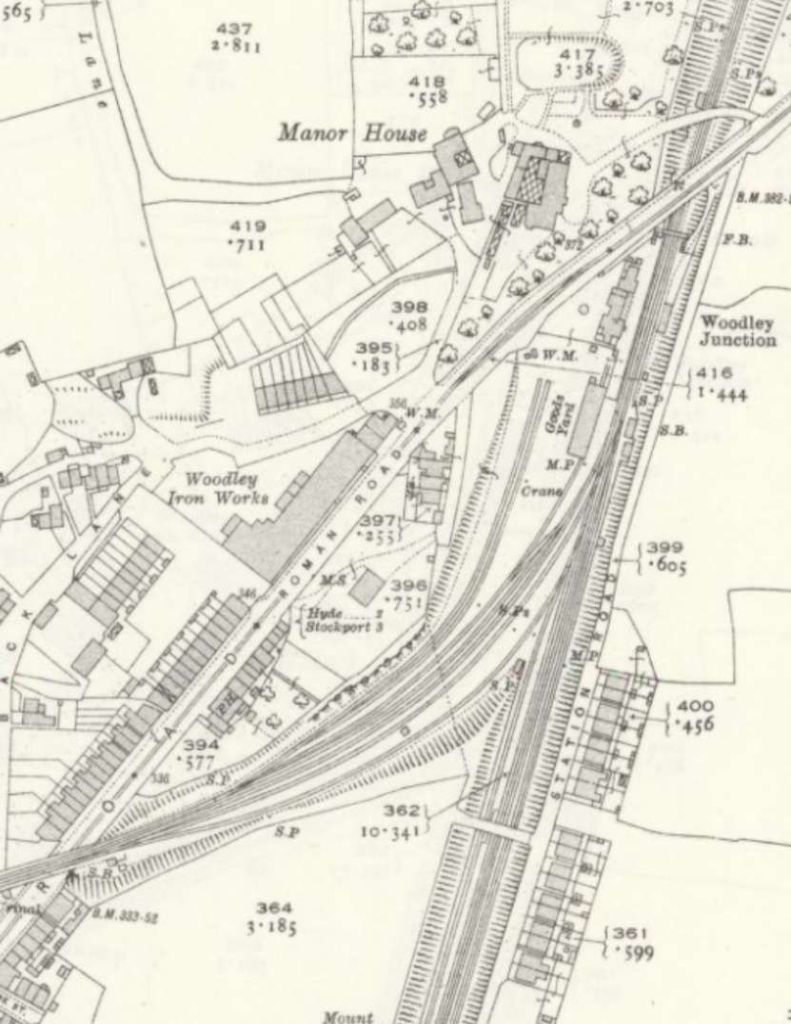
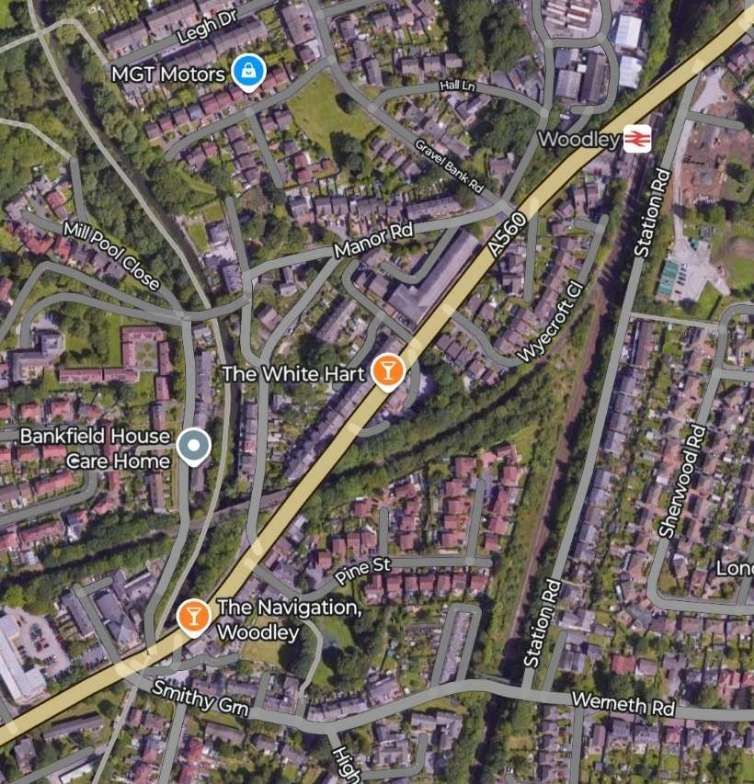
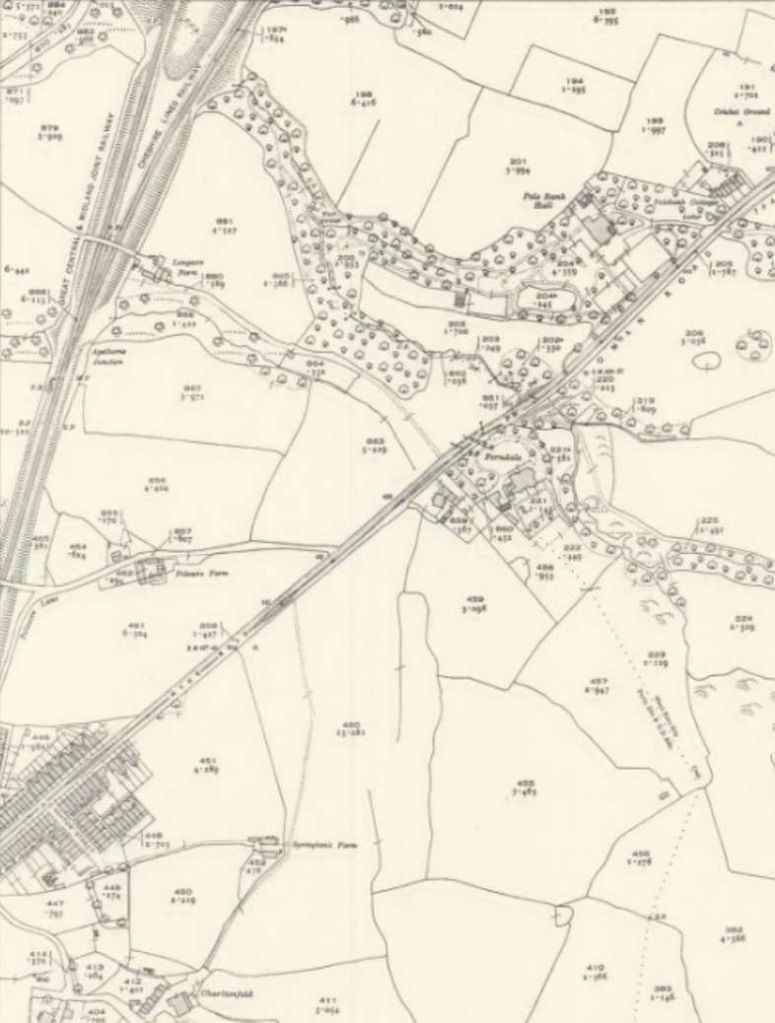
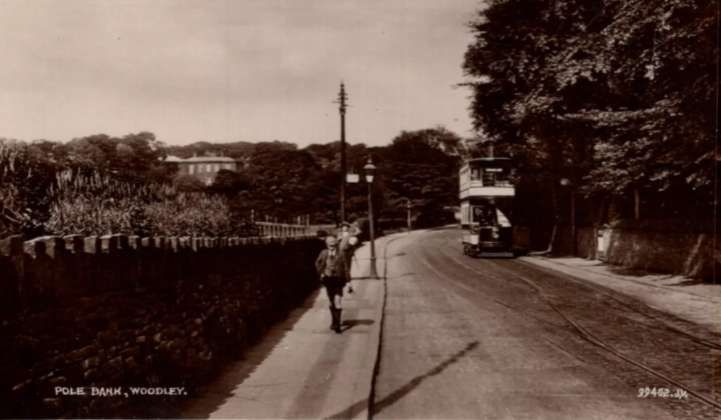
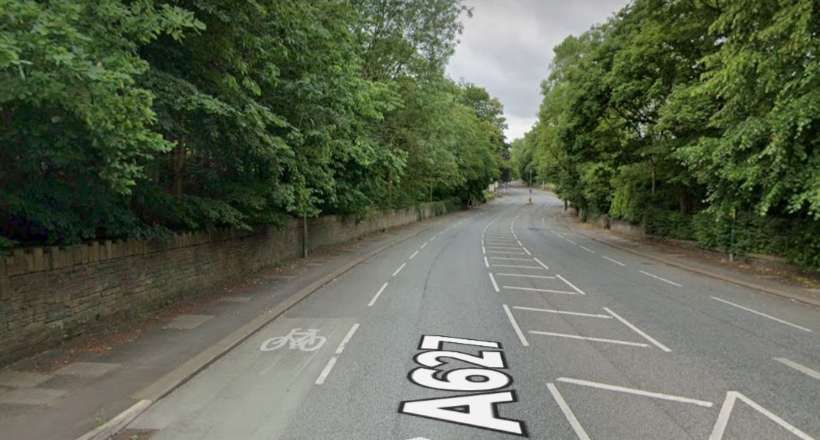
Woodley Route: to Woodley Station by 26th August 1901; and Pole Bank by 30th May 1902.
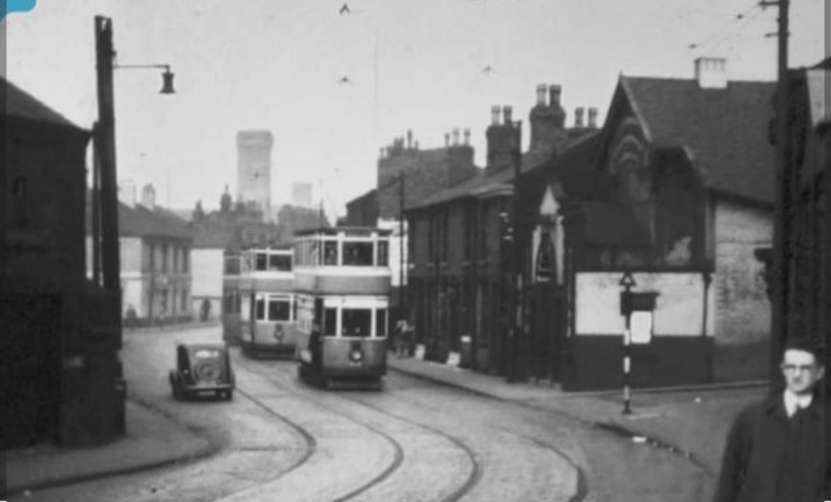
Reddish Route: to Sandy Lane by 3rd September 1901; to Holdsworth Square by 30th May 1902; and to the Bull’s Head in Reddish by 25th November 1903.
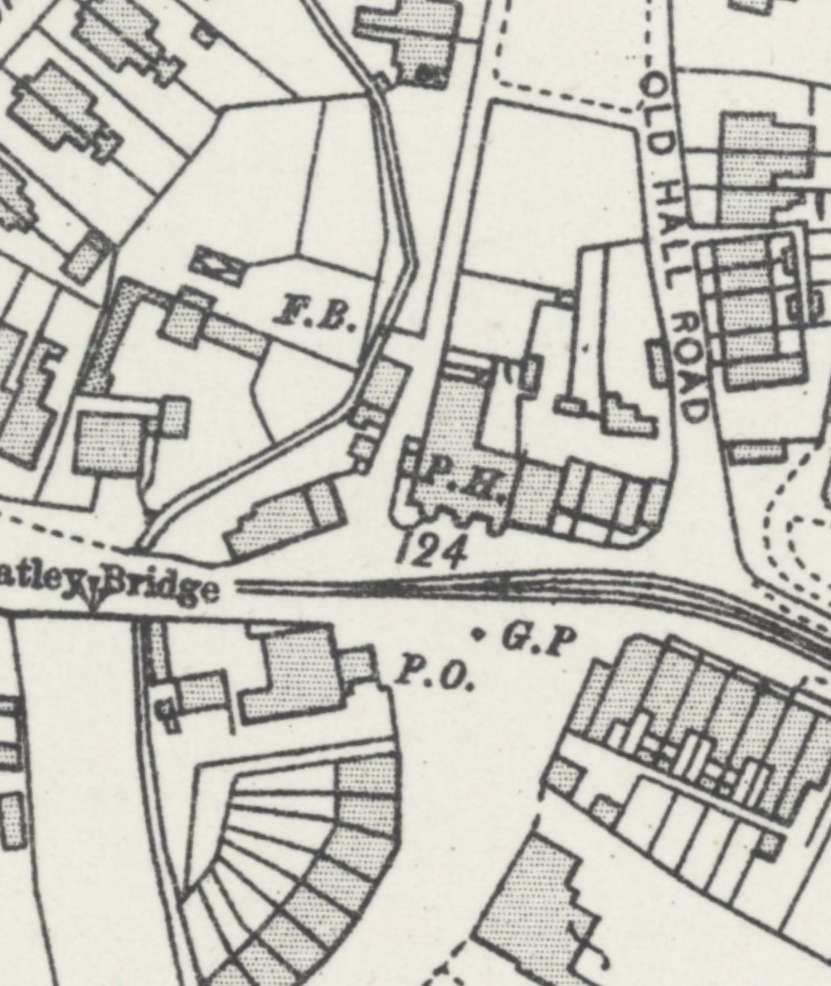
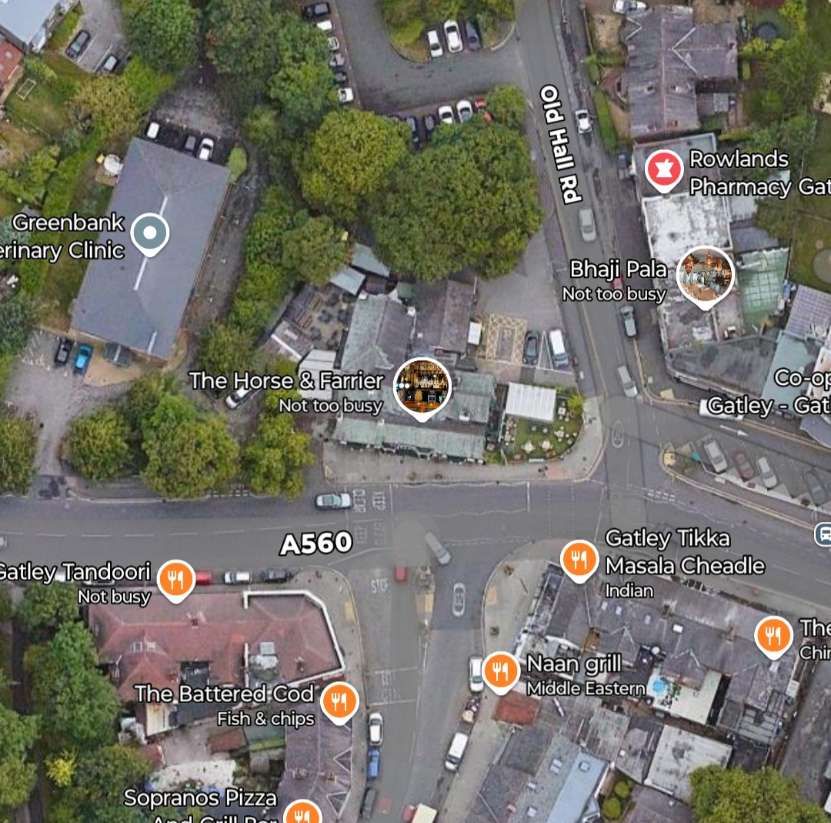
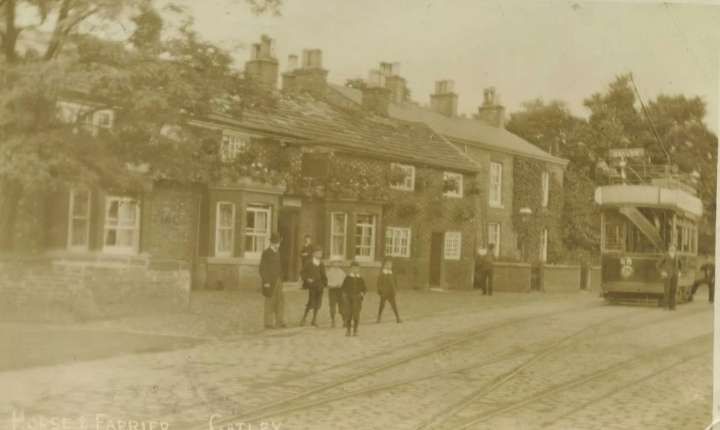
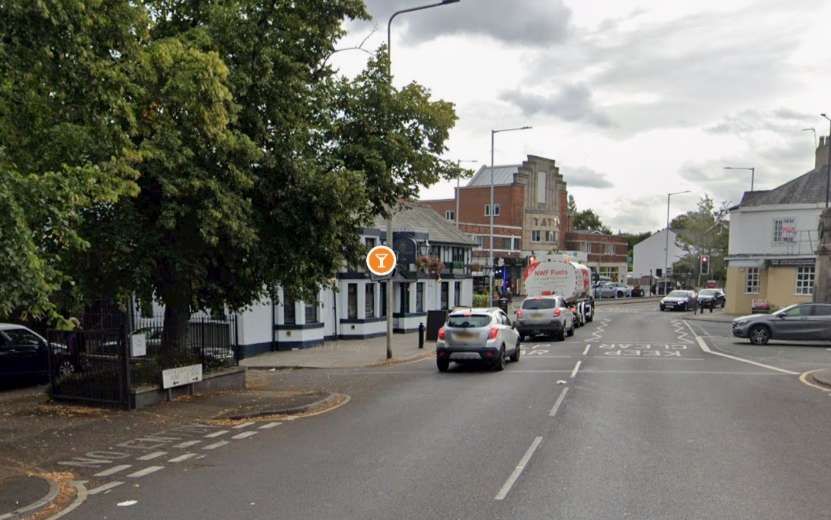
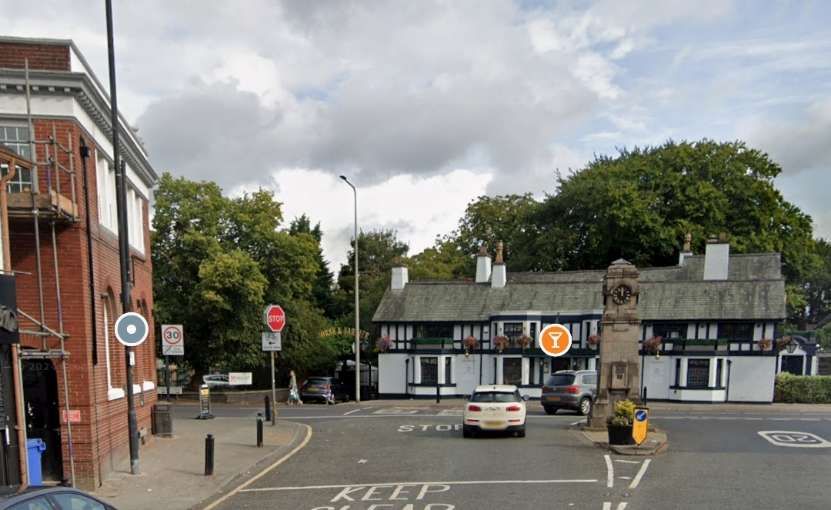
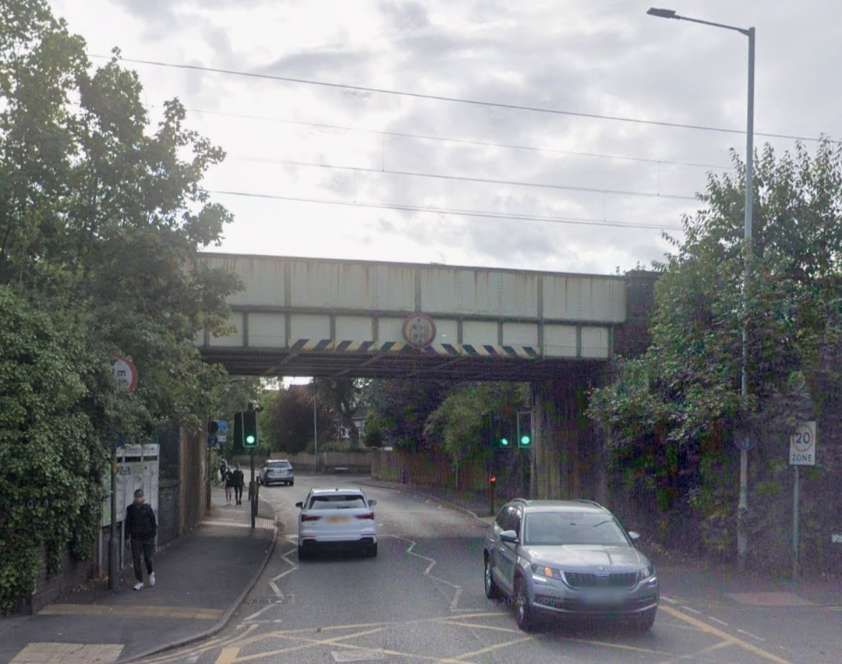
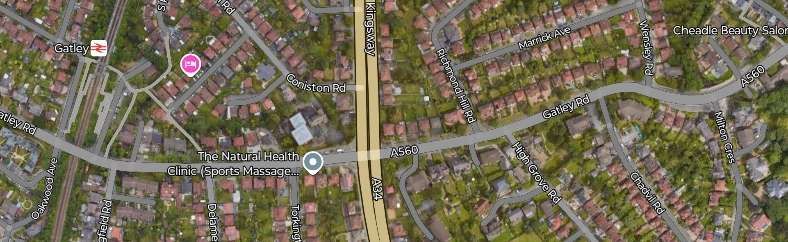
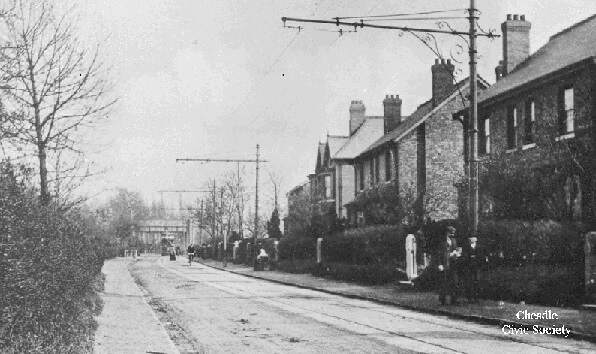
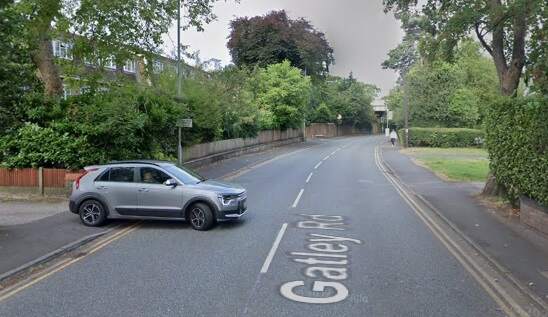
Cheadle Route: to the Robin Hood on Brinksway by 23rd January 1902; to Cheadle Heath Bridge by 25th July 1903; to Cheadle Green by 5th May 1904; and to the Horse & Farrier, Gatley Green by 24th May 1904.
In parallel, negotiations secured the purchase of the horse tramways. First, the Levenshulme line (which was electrified by Manchester Corporation by 1903 and maintained by them). The Stockport & Hazel Grove undertaking was purchased in 1994 for £14,000 and electrified by 5th July 1905.
Tram service No. 35 was by then running from Manchester to Hazel Grove.
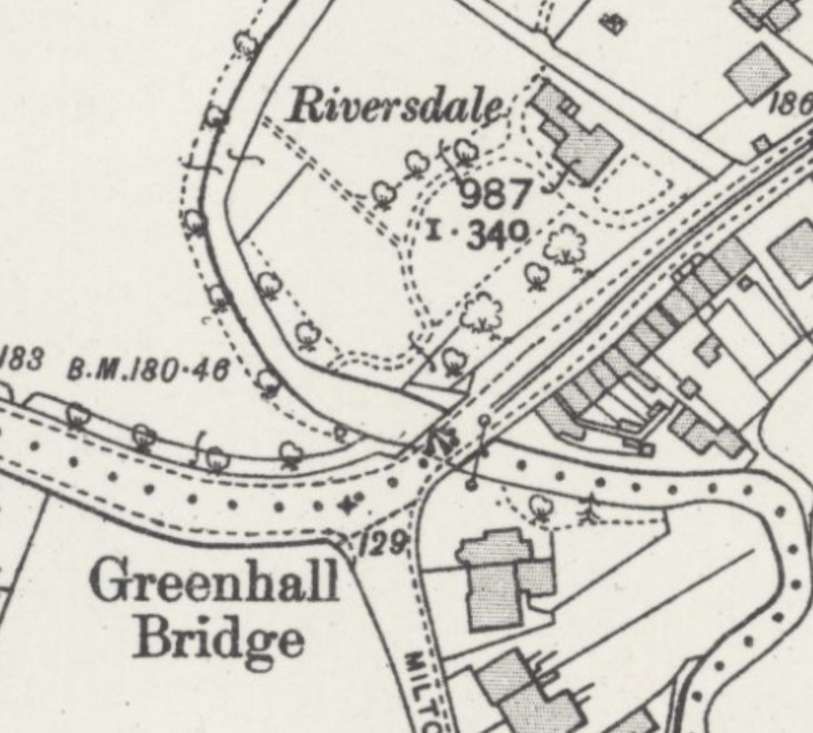
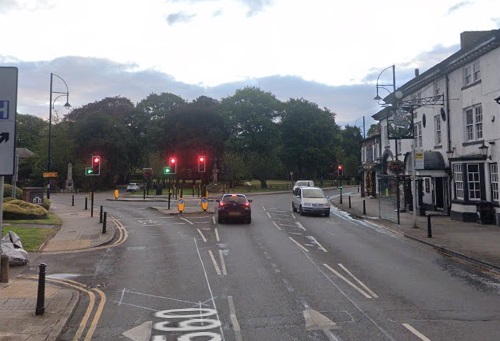
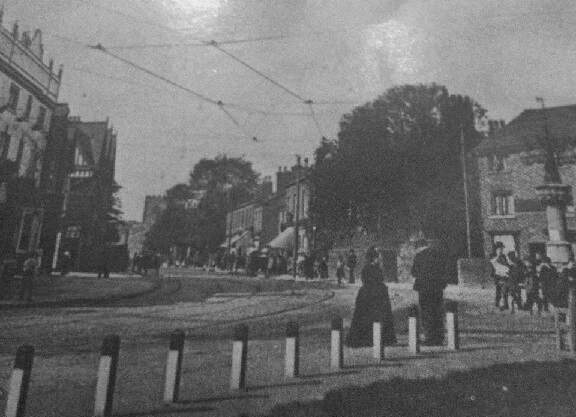
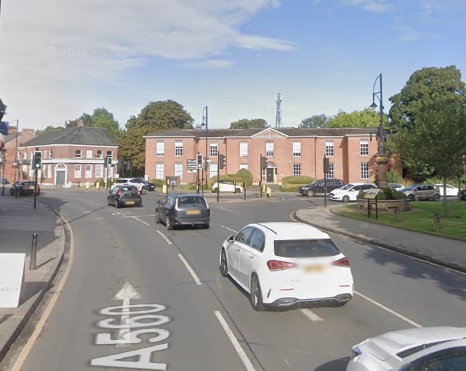
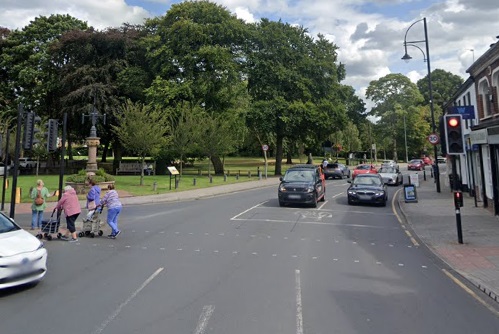
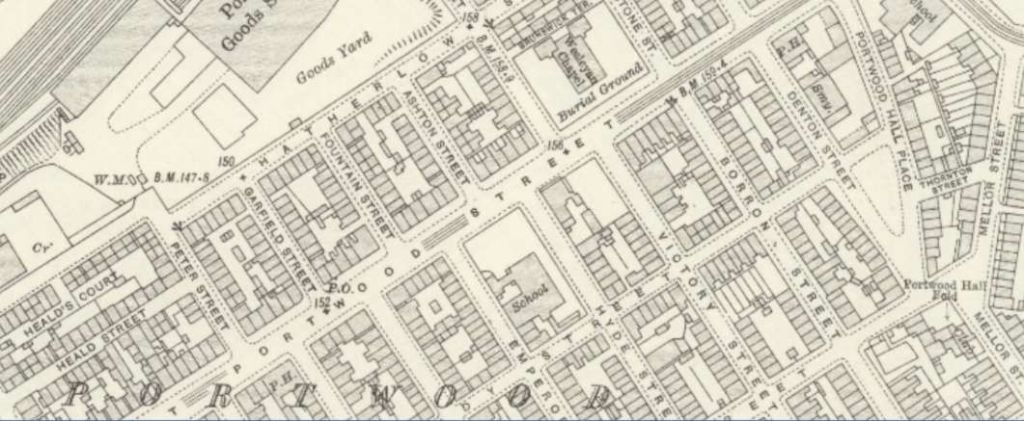
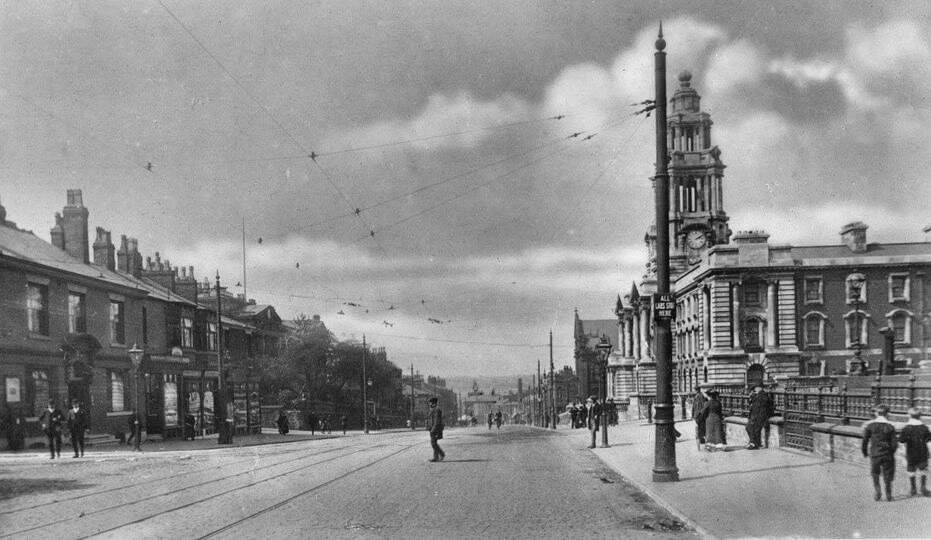
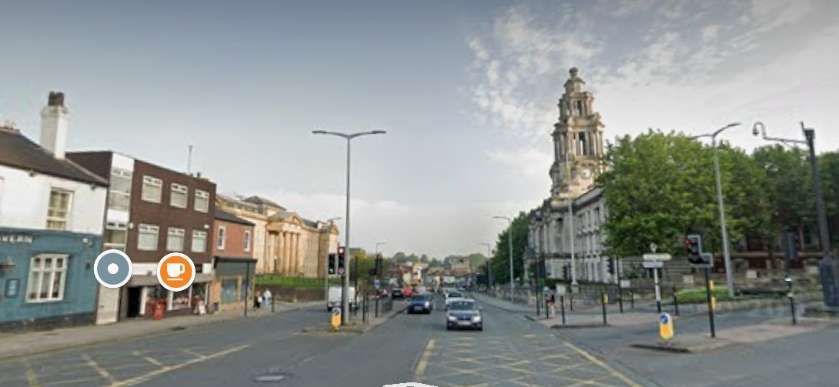
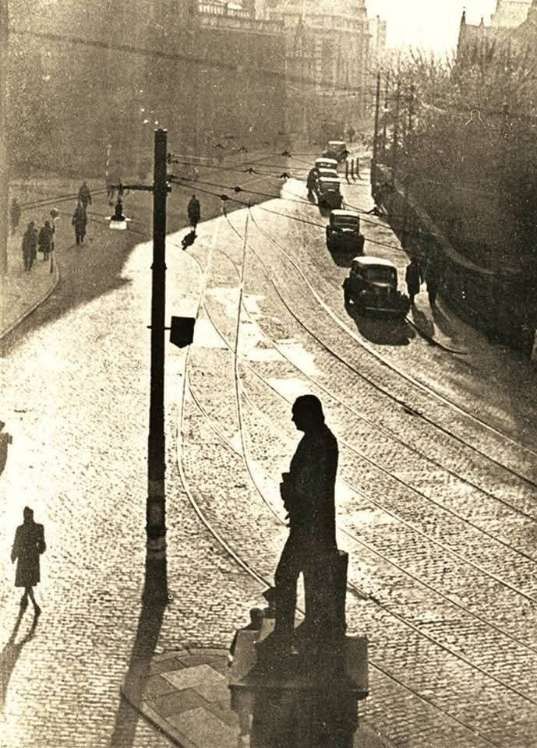
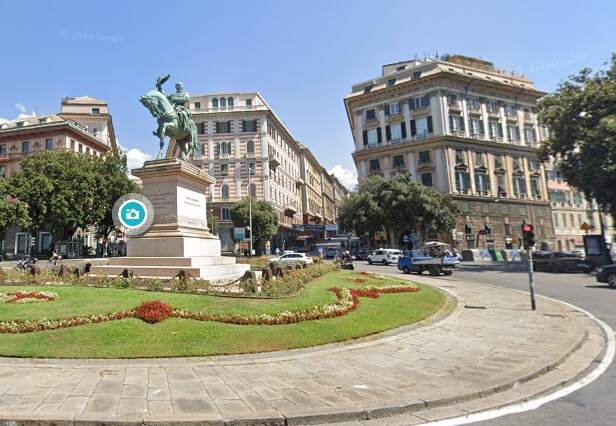
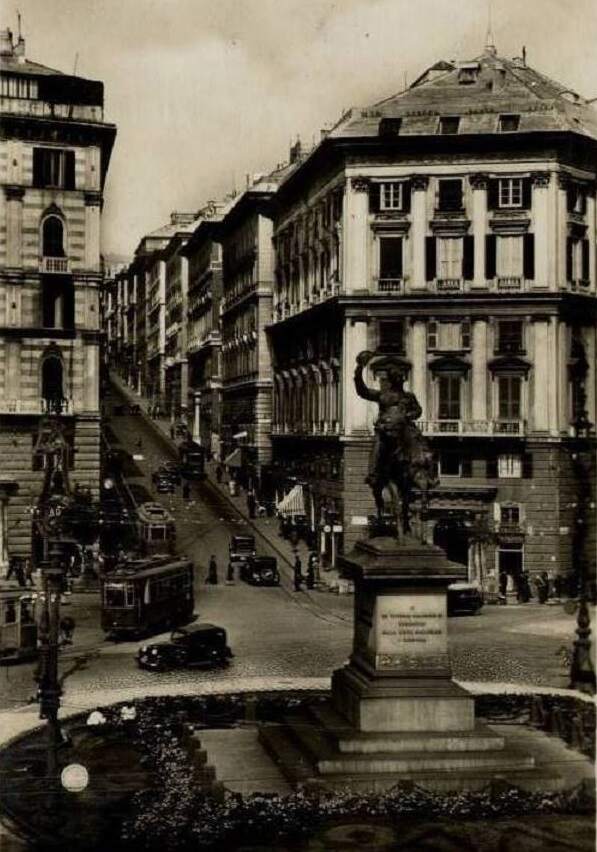
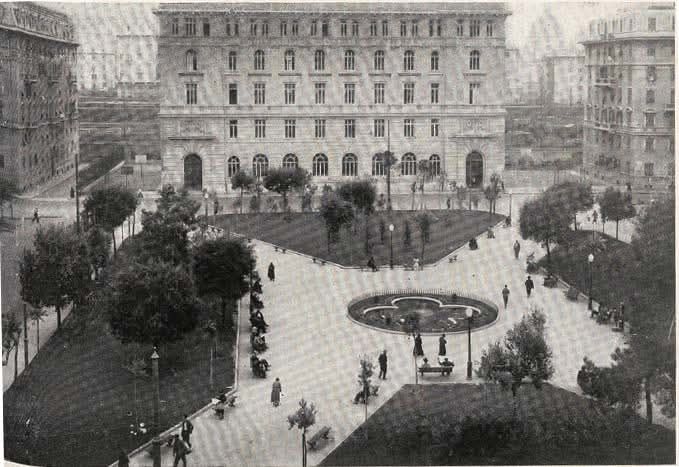
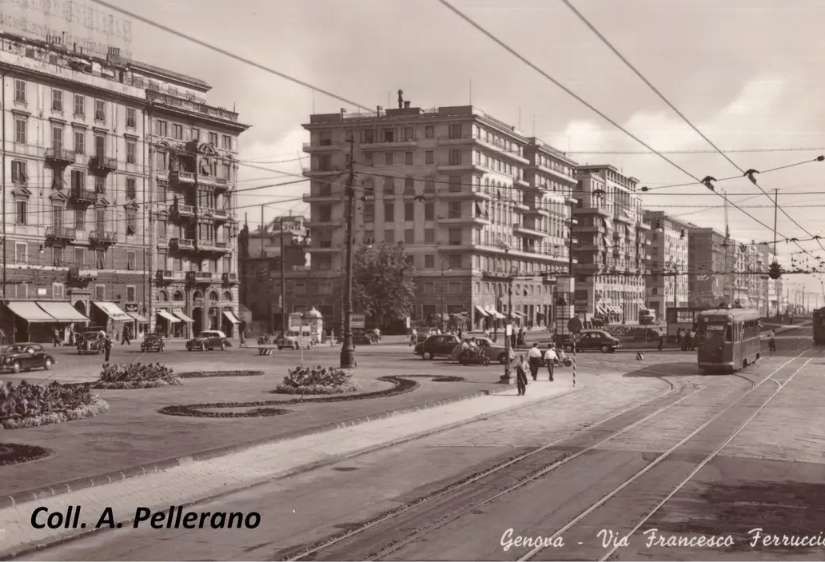
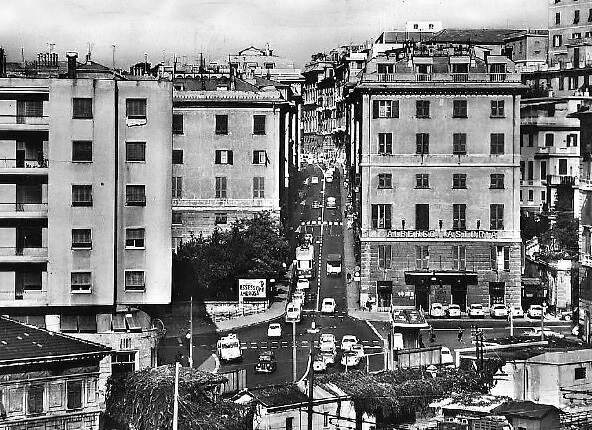
Mersey Square was the main hub of Stockport’s tramway network. …
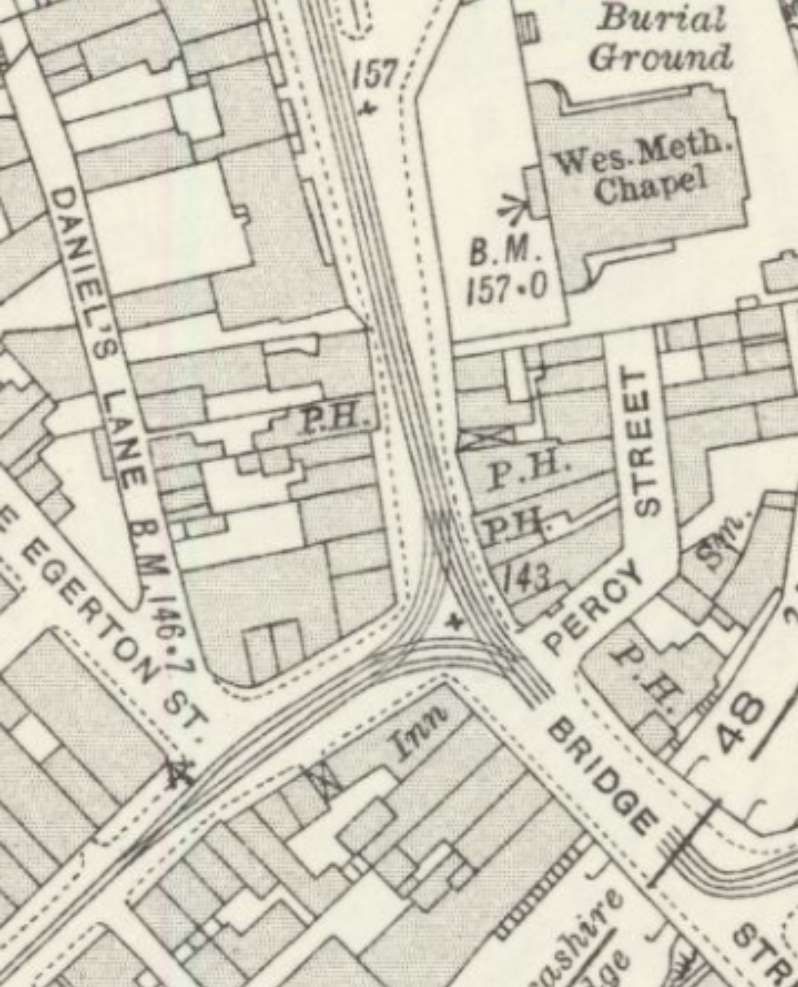
The National Library of Scotland retains three digital versions of the OS 25″ mapping:
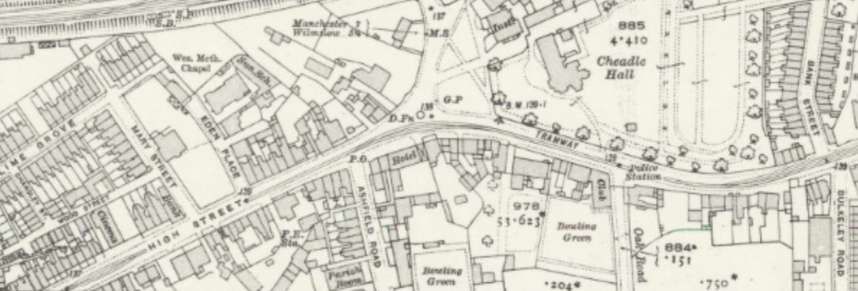
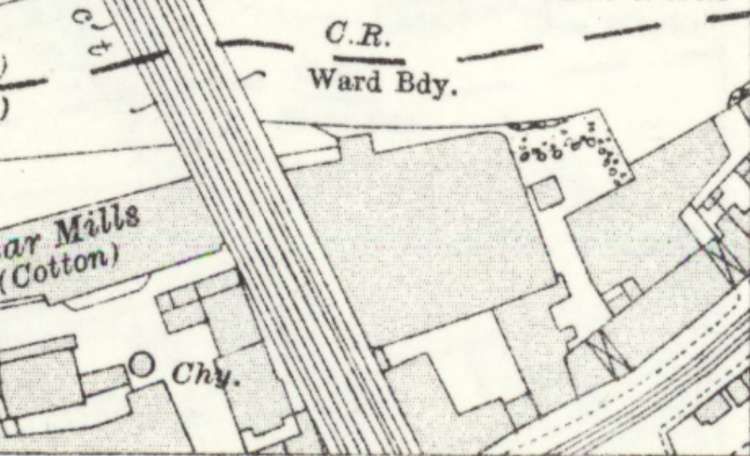
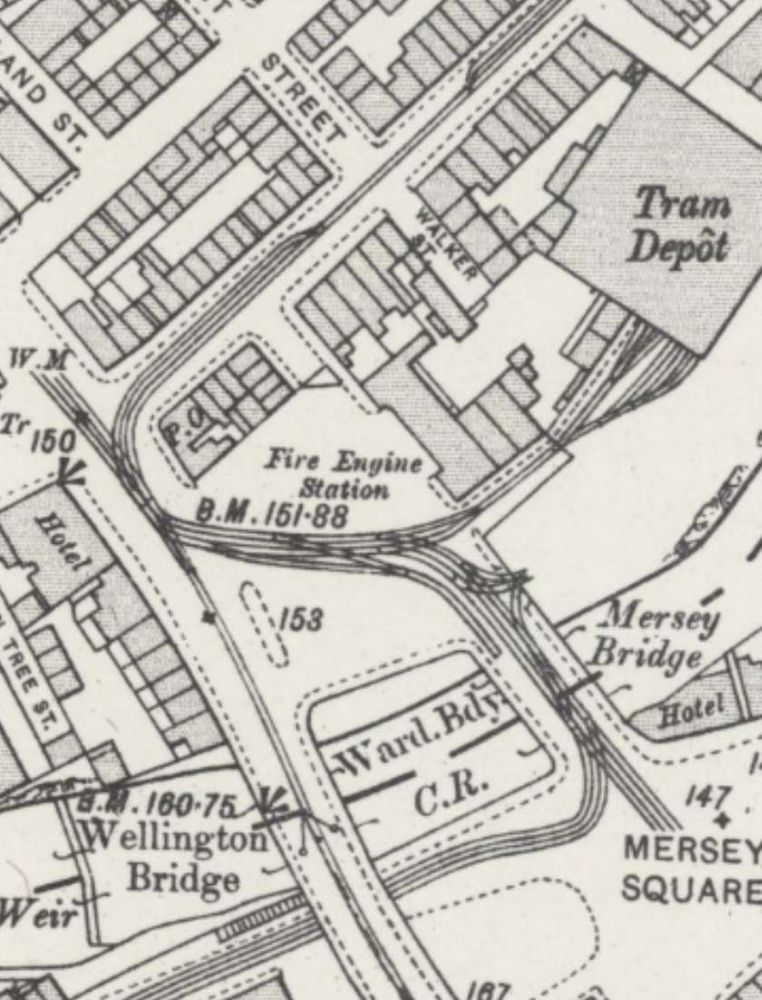
An extract from Map: Cheshire X.15; Ordnance Survey, 25 inch to 1 mile; revised: 1907; published: 1932 which shows Mersey Square as it was in 1907. It seems as though publication of this map was delayed for 25 years! [6]An extract from Map: Lancashire CXII.9; Ordnance Survey, 25 inch to 1 mile; revised: 1917; published: 1922, which shows Mersey Square as it was in 1917. [7]An extract from Map: Lancashire CXII.9; Ordnance Survey, 25 inch to 1 mile; revised: 1934; published: 1936, showing Mersey Square as it was in 1934. The tram depot has been enlarged and the additional depot on Heaton Lane constructed. Heaton lane Depot is accessed via the branch West off Wellington Road. [8]
The sequence of extracts from the Ordnance Survey’s 25″ series of maps shows the development from 1907 to 1934. The most significant changes in that period were: the dualling of the trackwork on the A6 South of the Square; and the development of the Tram Depot. As can be seen from the map extracts, the main depot building was widened to reach the river bank and then extended Southwest towards Mersey Square. A surprising change appears in the latest extract – the conversion of the dual track work on Chestergate where it passes under the A6, Wellington Road to a stretch of single track.
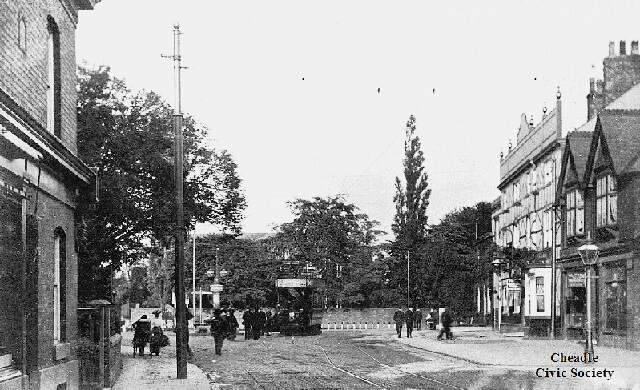
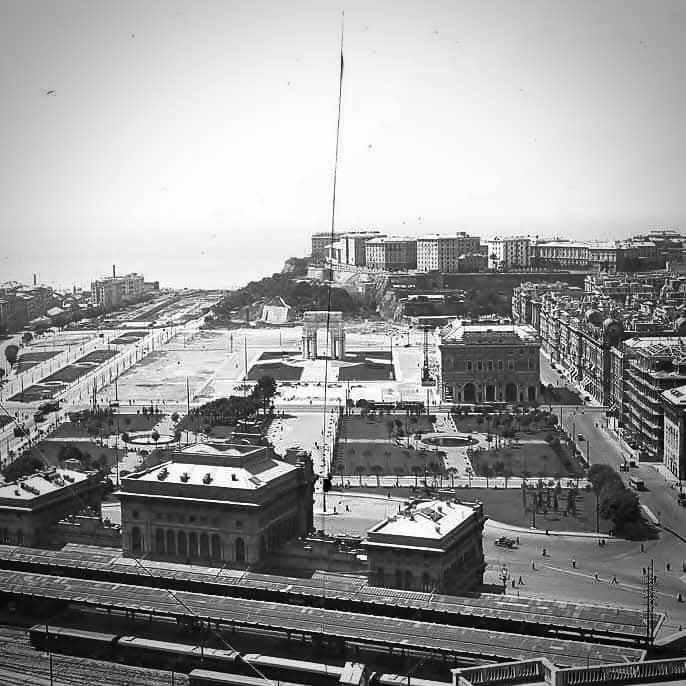
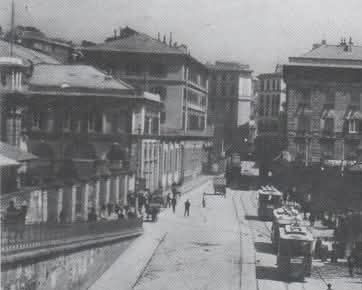
Mersey Square in 1932, seen from the West. This image was shared on the Memories of Stockport Facebook Group on 19th January 2021 by Chris Paul. [13]
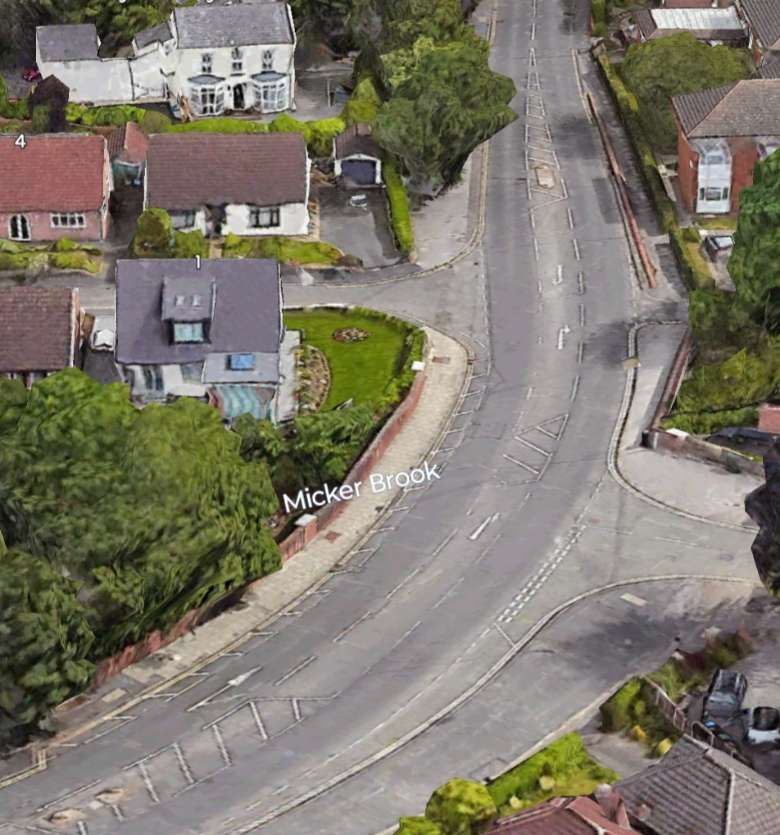
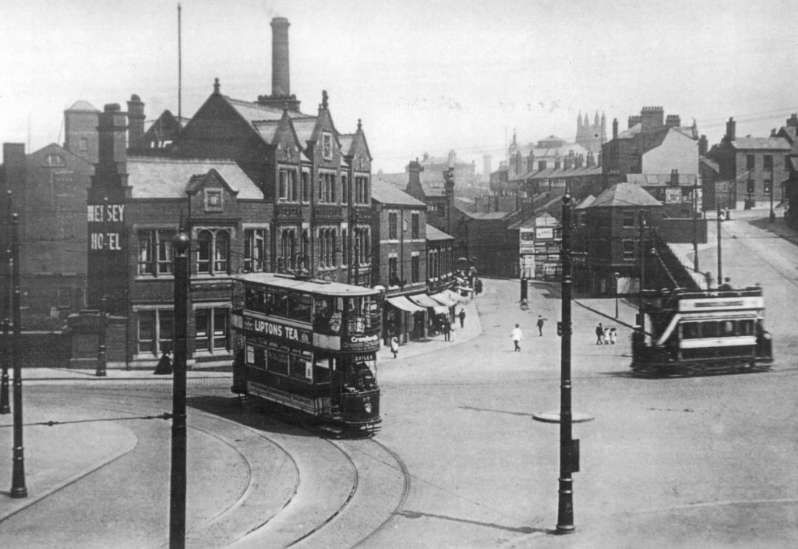
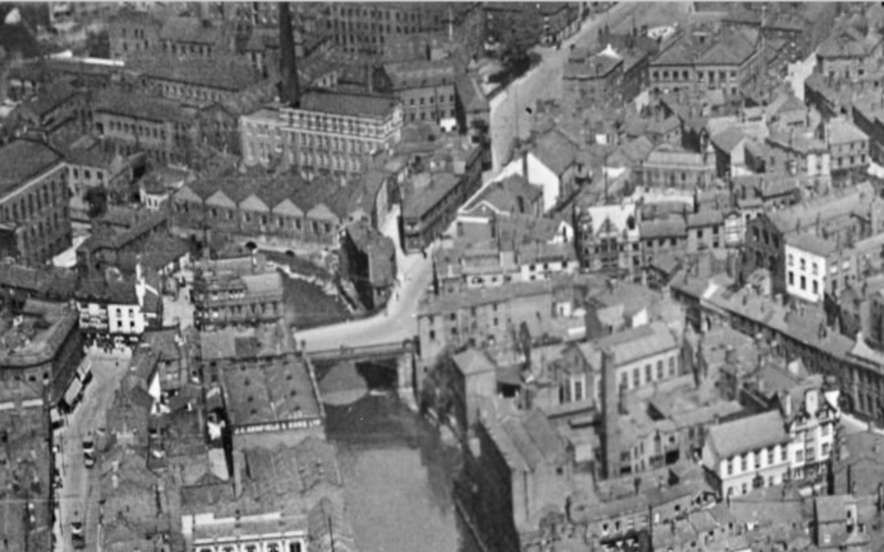
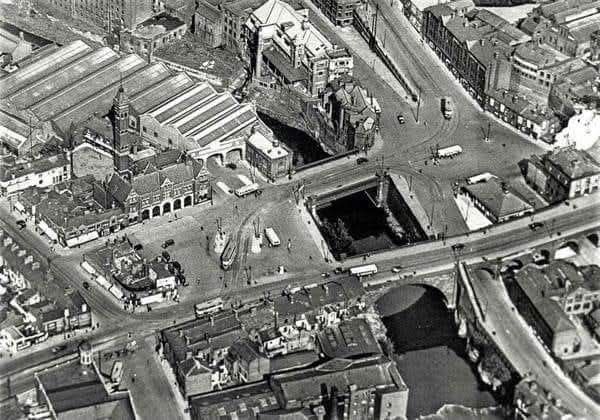
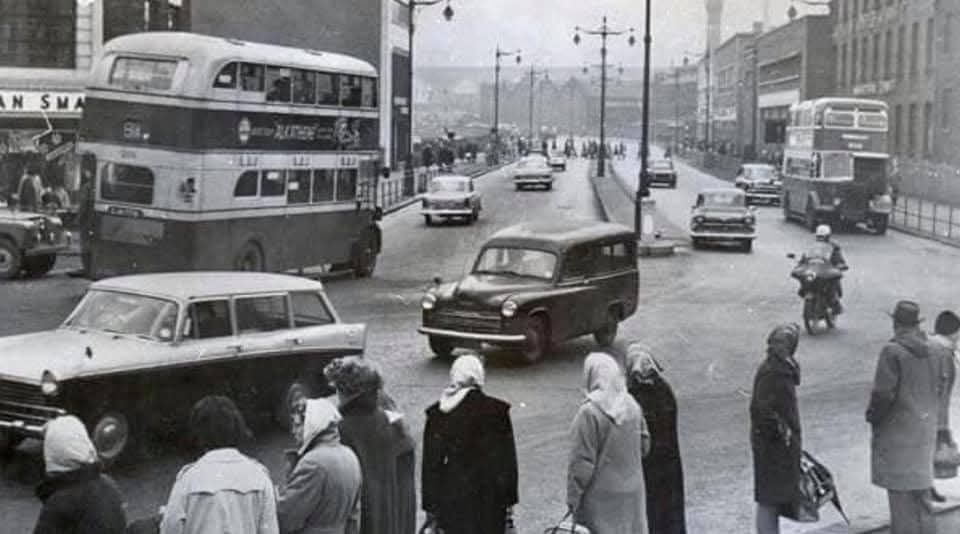
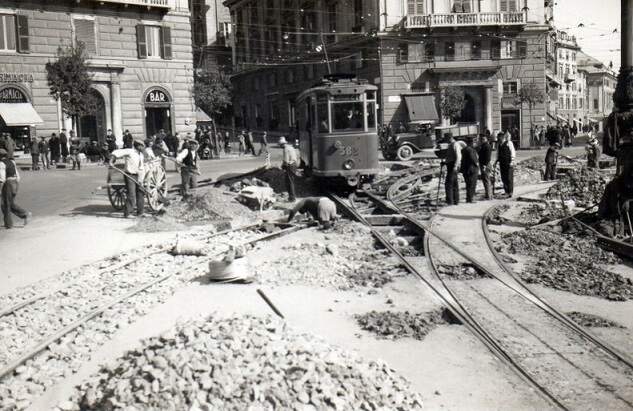
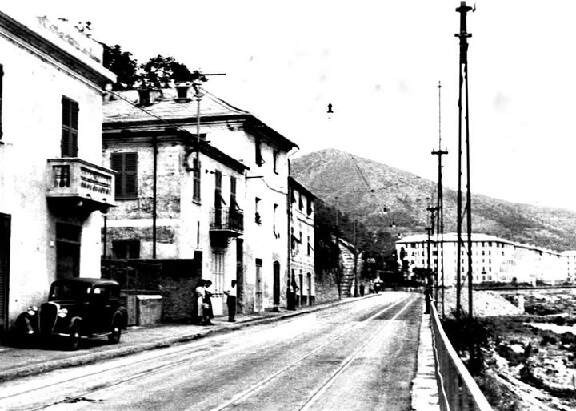
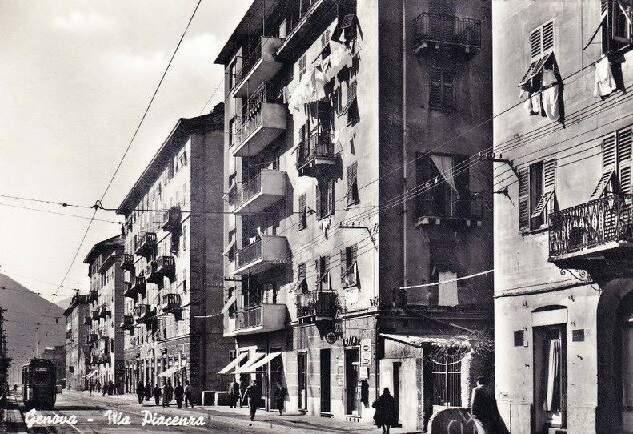
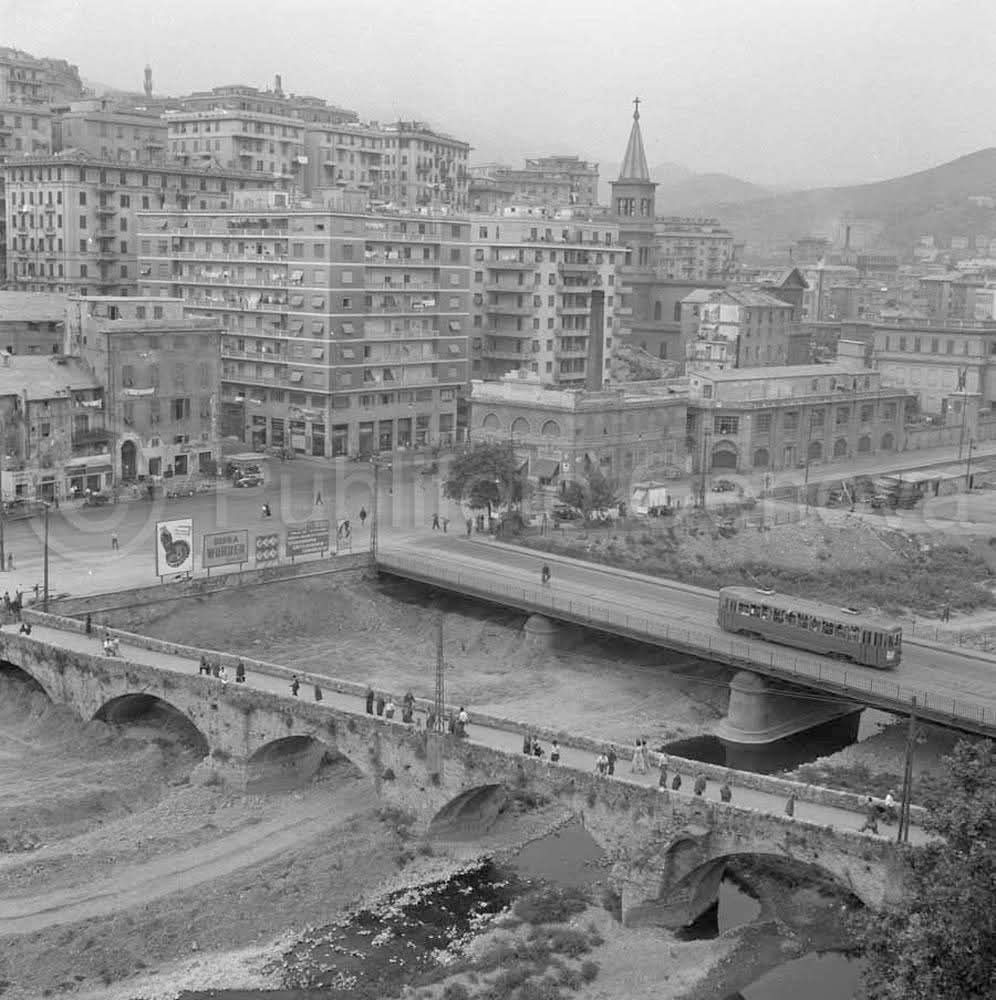
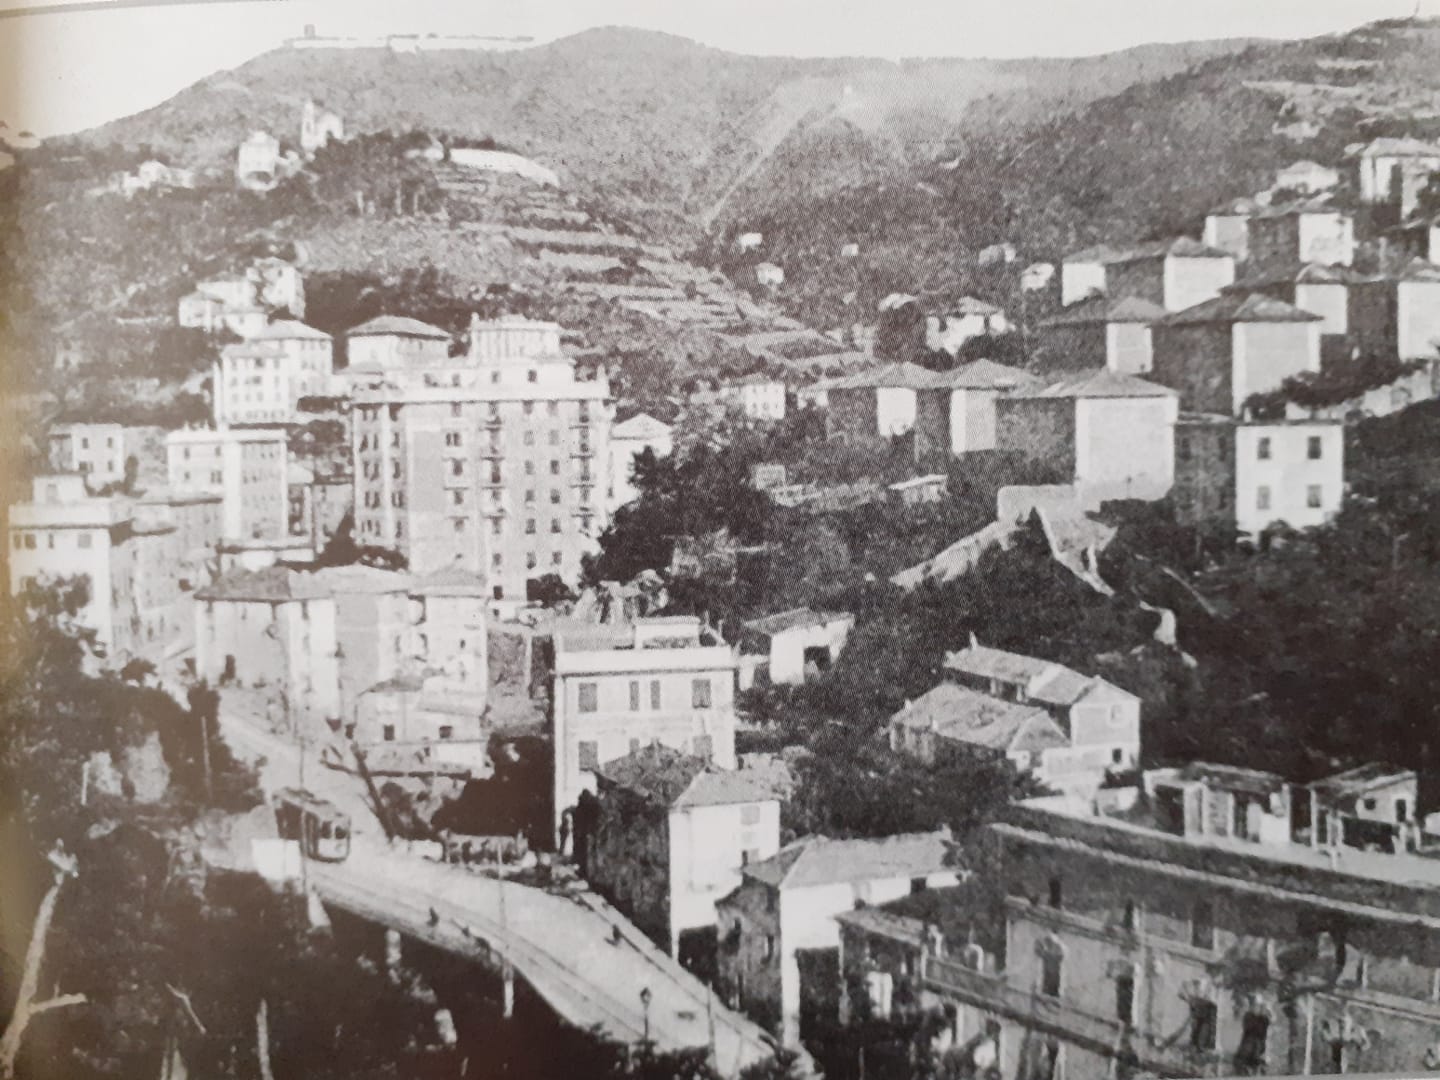
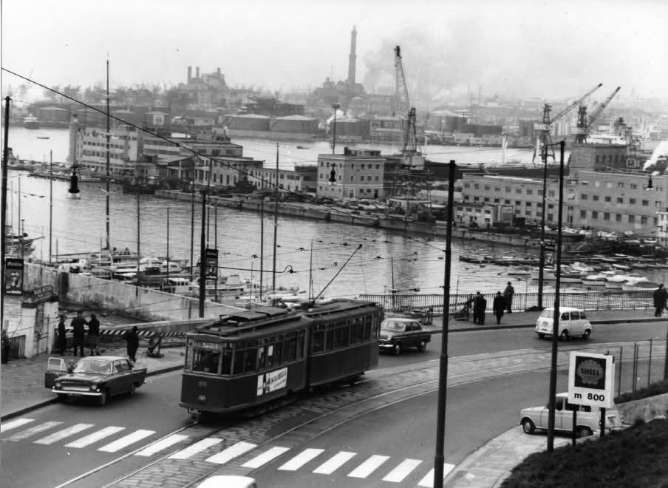
The 1930s to the 1970s saw major changes to the centre of Stockport. The River Mersey was culverted from Mersey Square, Northeast to Bridge Street and a dual carriageway road was created along the line of the River Mersey. This new road was not used by trams but it altered traffic arrangements at Mersey Square while it was in use.
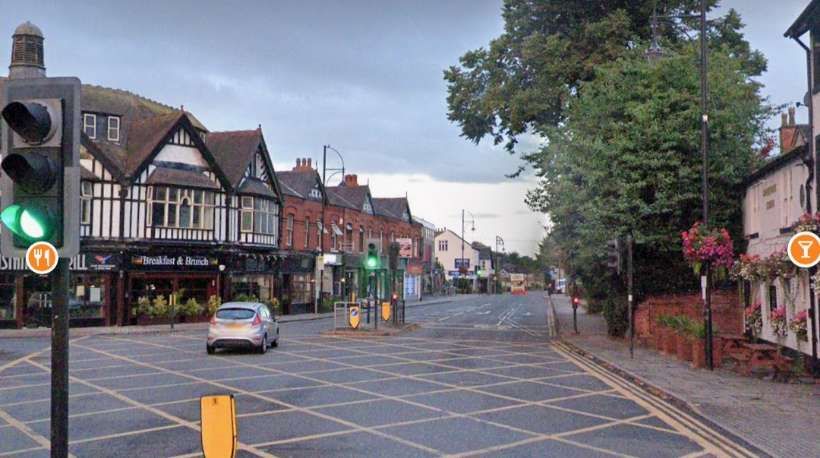
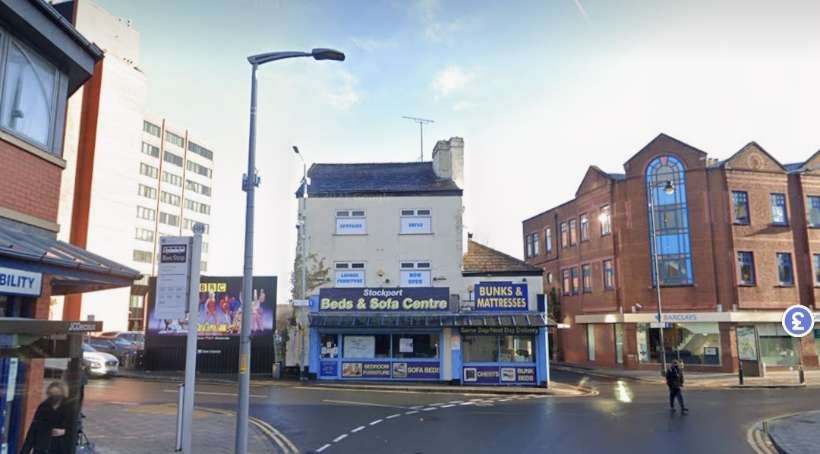
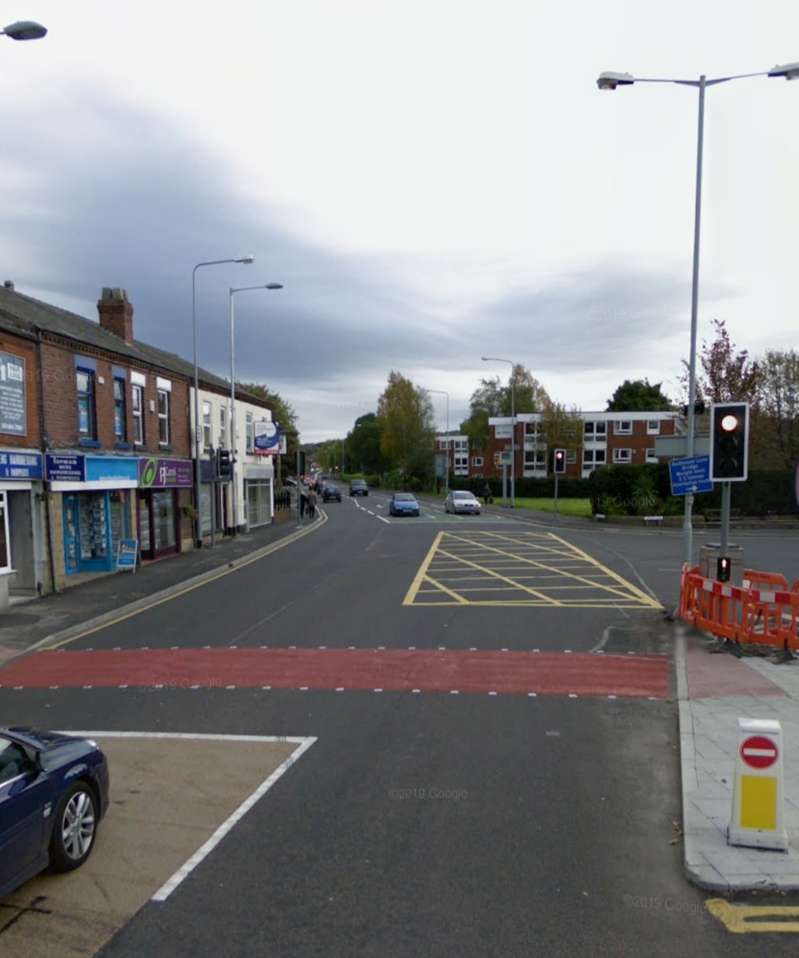
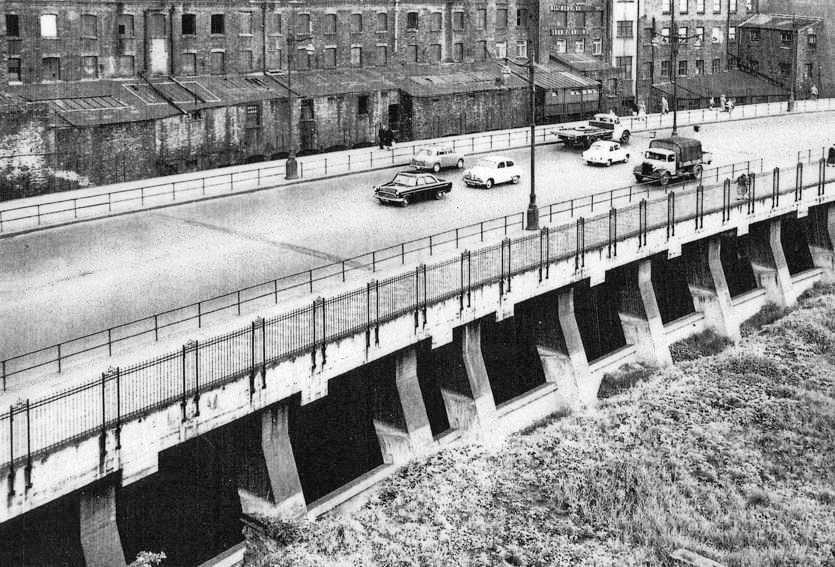
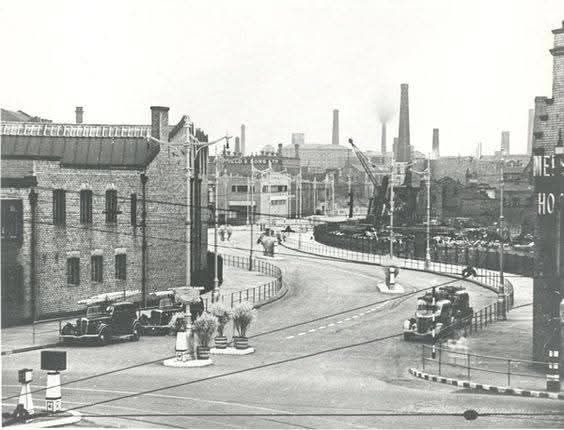
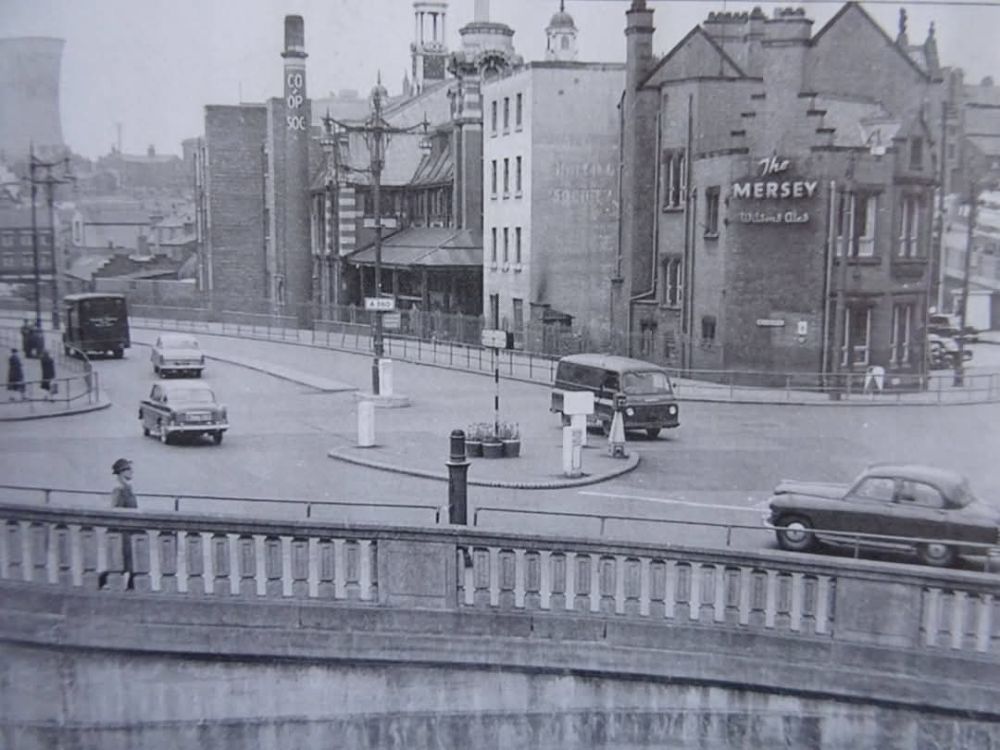
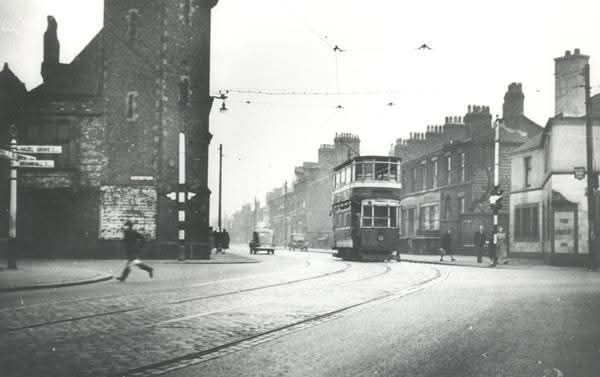
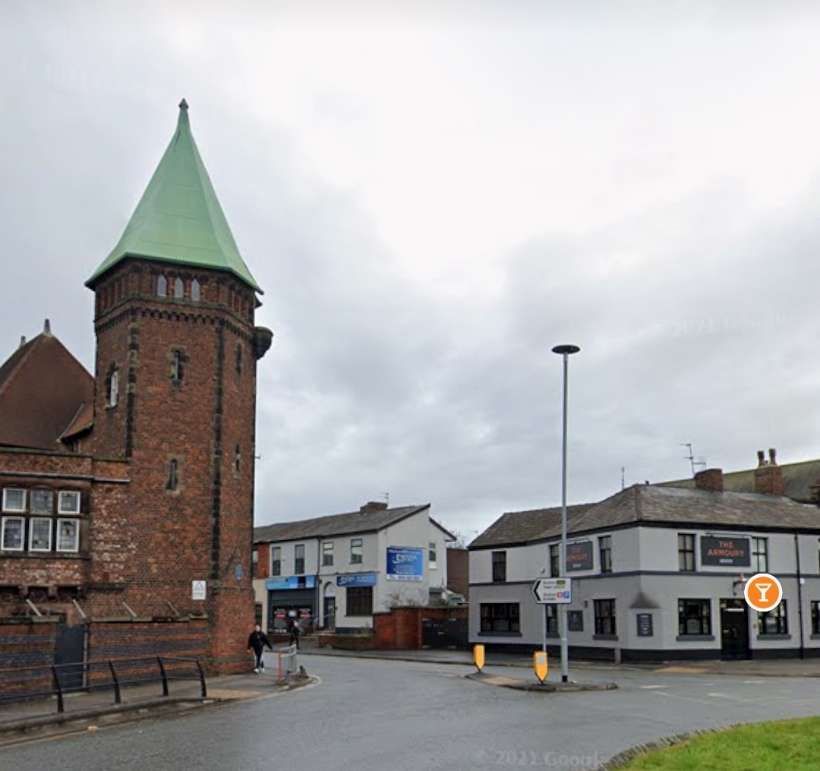
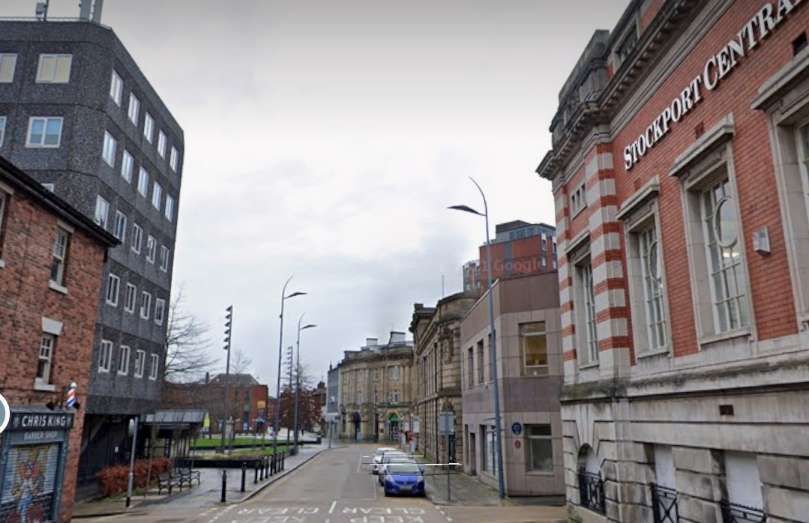
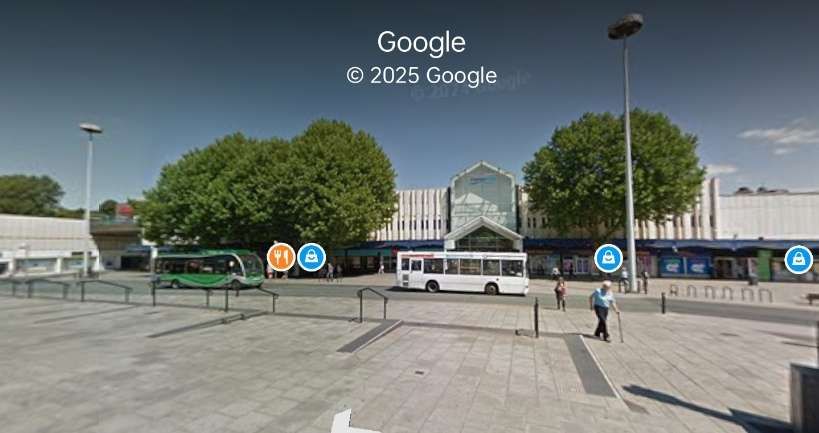
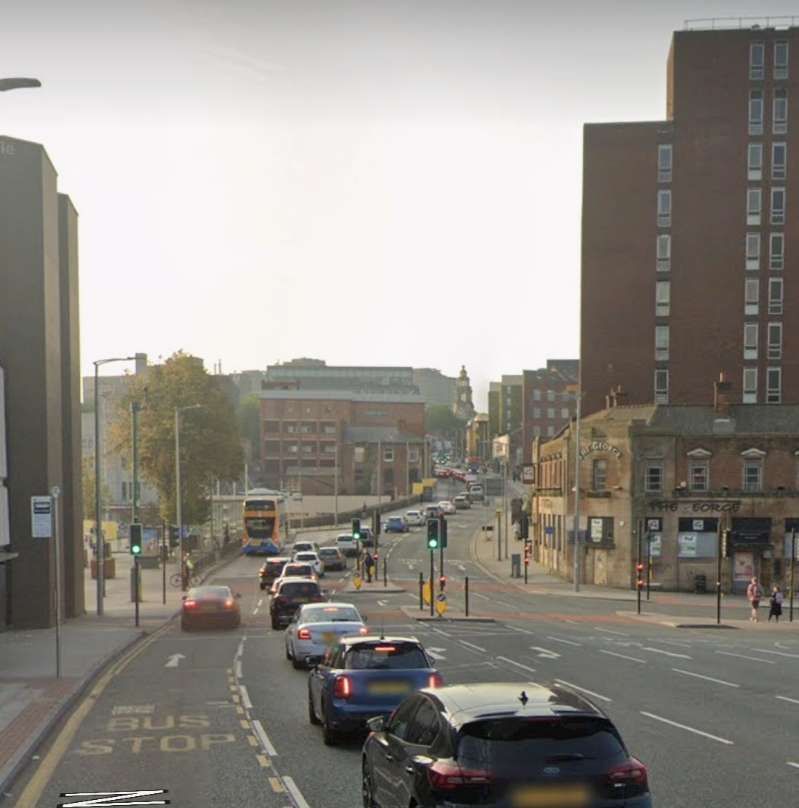
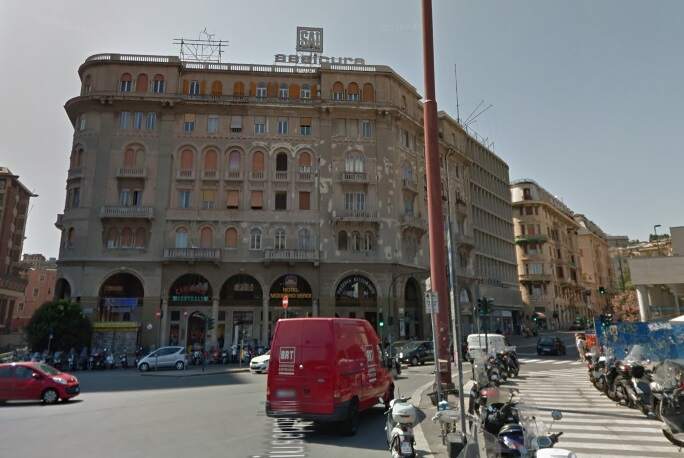
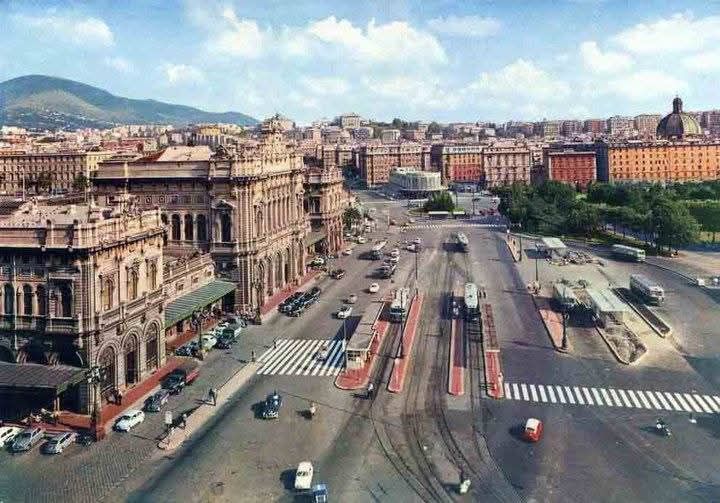
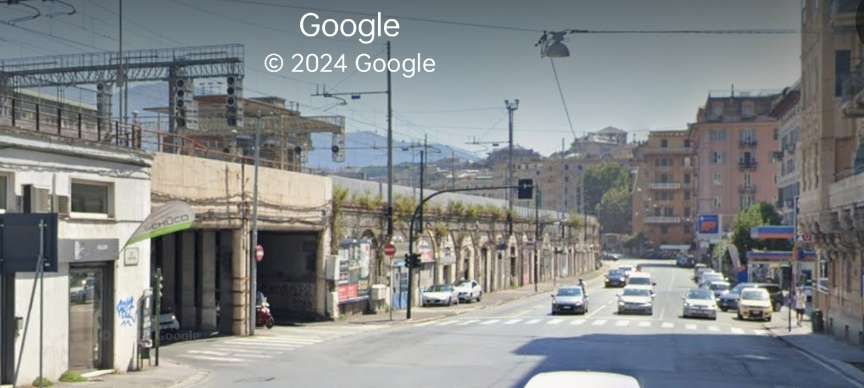
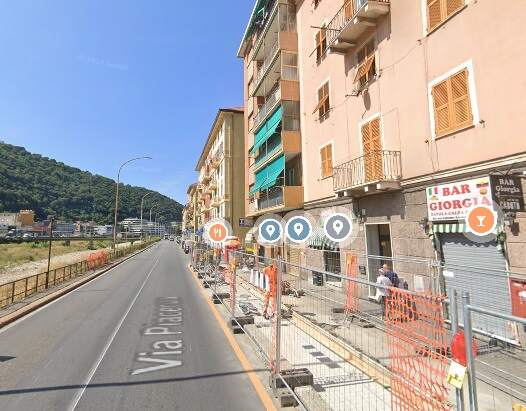
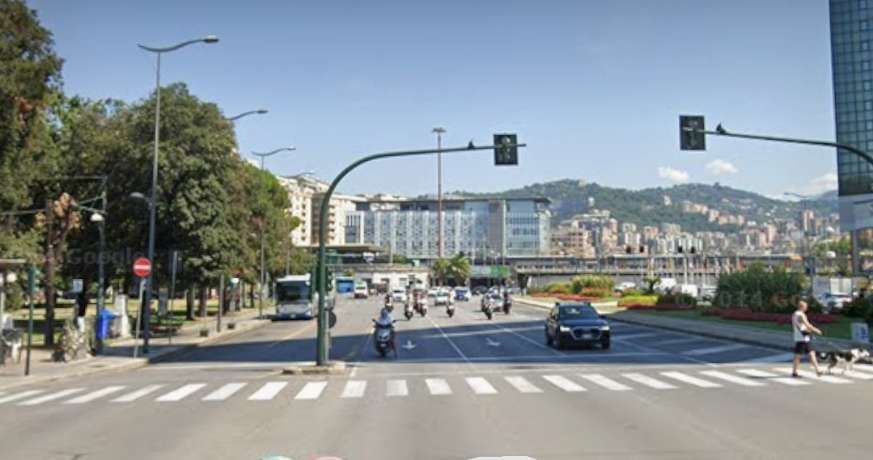
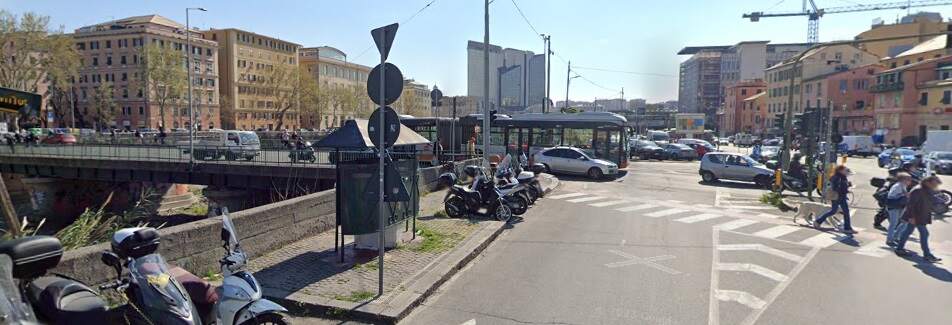
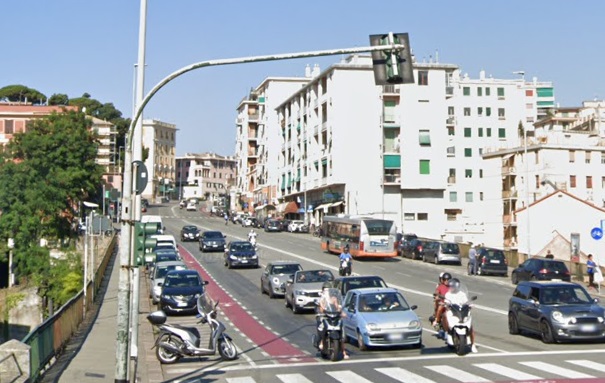
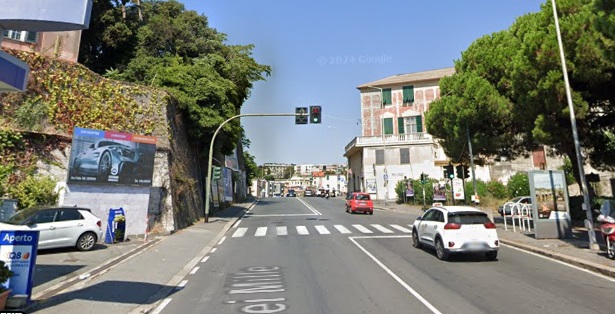
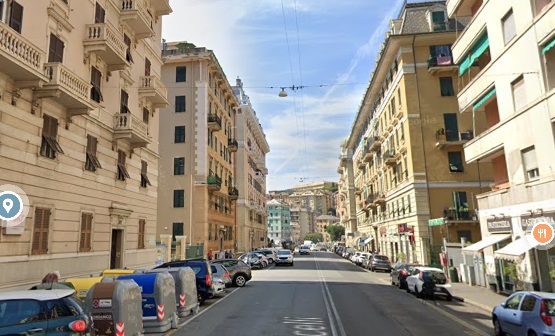
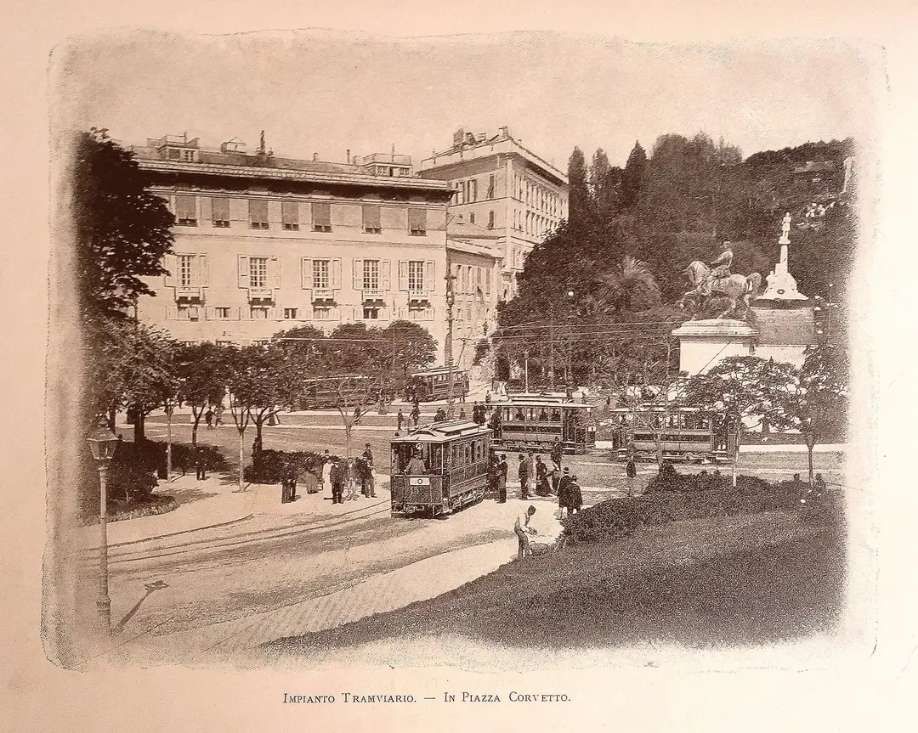
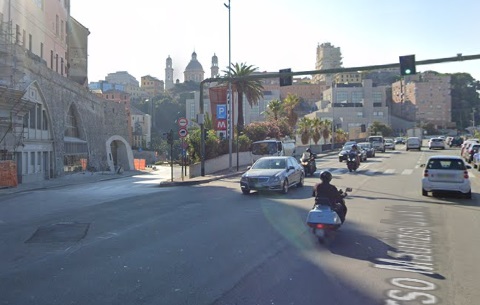
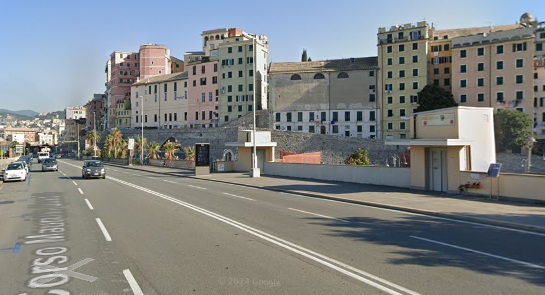
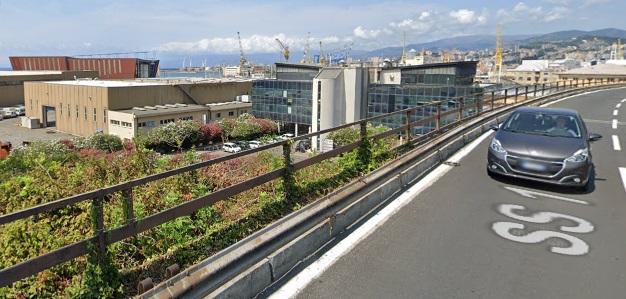
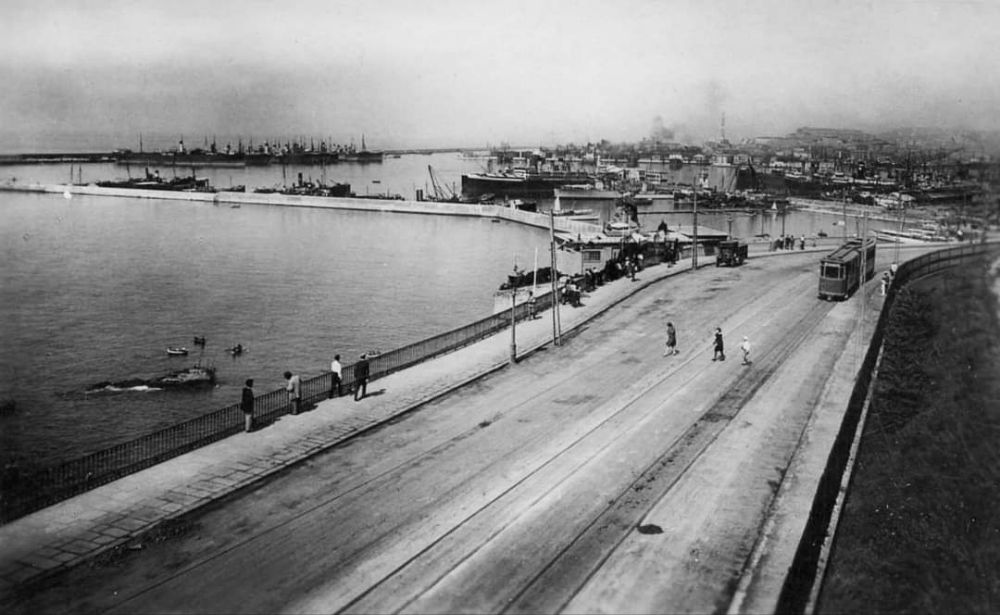
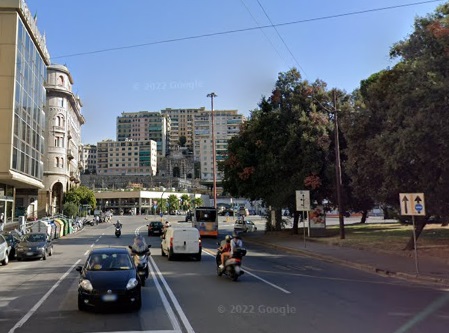
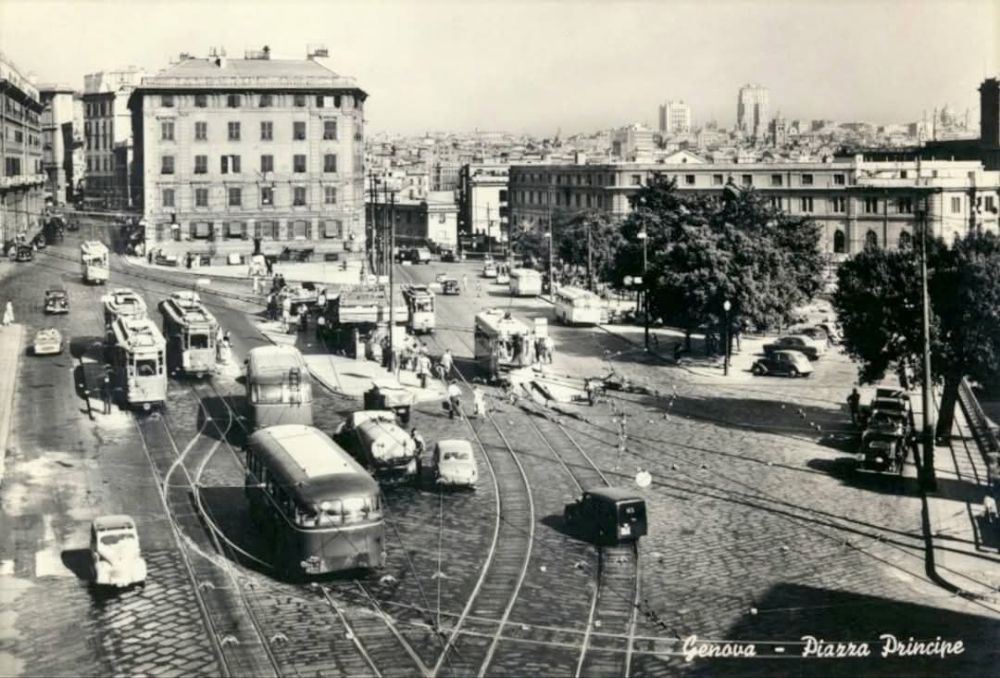
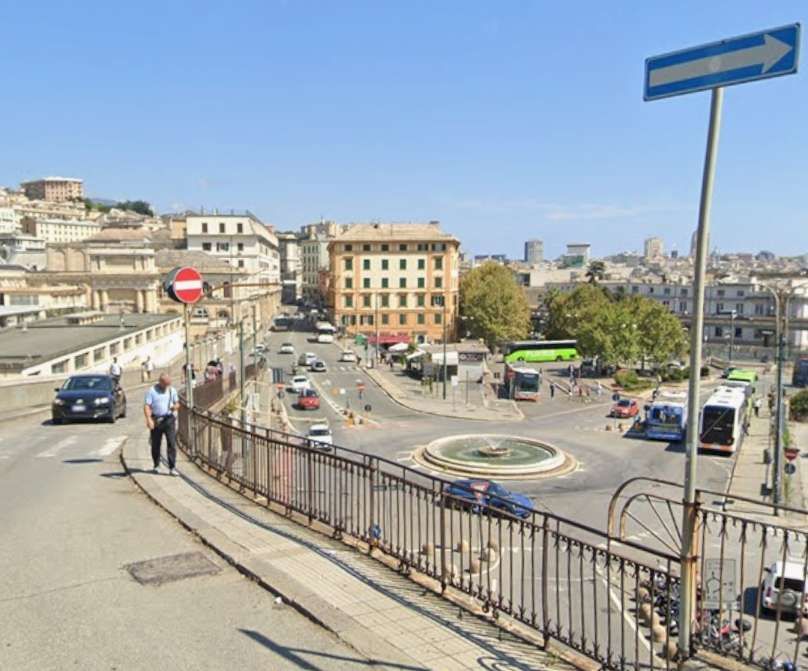
The construction of Merseyway in the 1930s is nearing completion in this photograph which was shared on the Memories of Stockport Facebook Group on 18th October 2020 by Dave Moran. [12]The view Southwest from Bridge Street, showing the dual carriageway over the River Mersey in the mid-20th century. This image was shared on the Memories of Stockport Facebook Group on 26th June 2020 by Julian Ryan. [9]Merseyway was built on a series of reinforced concrete portal frames spanning the river. Given the positioning of the vehicles on the structure, this image probably comes from while the road was closed. The image was shared on the Memories of Stockport Facebook Group on 26th September 2018 by Marilyn Ann Cronshaw. [11]Merseyway is seen from the Southwest, looking Northeast in the mid-20th century. The tram depot is on the left. This image was shared on the Memories of Stockport Facebook Group on 10th August 2020 by Keith Povey. [10]A final view of Merseyway as a road across the roundabout at its Southwest end in Mersey Square. The photograph was taken from Wellington Road and it was shared on the Memories of Stockport Facebook Group on 6th October 2020 by Mark Lloyd. [14]Mersey Square seen from the Southeast in 1948. The oddly shaped roundabout at the end of Merseyway is on the right with the old fire station above it. This image was shared on the Memories of Stockport Facebook Group on 28th August 2023 by Michael Sidebottom. [15]Traffic emerging from Mersey Square onto Wellington Road (A6). Manchester is away to the right, Hazel Grove to the left. Heaton Lane Tram Depot is beyond Wellington Road on the right of the image. This photograph was shared by Marilyn Ann Cronshaw on 24th June 2015. [16]Mersey Square, Stockport in the 21st century. [Google Maps, January 2025]
By July 1905, the network was “in its final shape, with a total route mileage of 19.46. Of this, however 2.51 route miles (Vernon Park Pole Bank) was the property of Bradbury and Romiley Urban District Council, 1.64 miles (Cheadle Heath Bridge Gatley Green) belonged to Cheadle and Gatley U.D.C. and 0.88 miles to Hazel Grove and Bramhall U.D.C., all these sections being leased to Stockport Corporation for operating purposes. The total length of track over the system as a whole was 34.03 miles, and the cost of track construction averaged the modest figure of £7,227 per route mile.” [1: p124]
In addition to joint working with Manchester Corporation, a similar arrangement was made with “The Stalybridge, Hyde, Mossley and Dukinfield Transport and Electricity Board, Pole Bank being the point of connection between the two systems. Stockport cars were operated through to Hyde Town Hall from 1st January, 1903, when the Pole Bank Hyde line was the property of the Oldham, Ashton and Hyde Electric Tramways, Ltd., a B.E.T. subsidiary, but it was not until 1923, when this undertaking sold out to local authorities and the Hyde – Pole Bank section was taken over by the Joint Board, that mutual through running could be started. A joint S.H.M.D.-S.C.T. service was introduced in March 1925, between Hyde and Edgeley via Mersey Square and continued until the Joint Board ceased to operate trams on 26th May, 1945. Thereafter, Stockport maintained the service unaided until 2nd March, 1947, when buses took over and the trams were cut back to Vernon Park.” [1: p124]
The withdrawal of the through services into Manchester occurred in the late 1940s but, Gently says, “luckily, only one section of the purely local system [had] suffered likewise, that being the Cheadle-Gatley section, on which buses were substituted on 21st September 1931. An early trolleybus route to Offerton was given up as impracticable many years [earlier].” [1: p124]
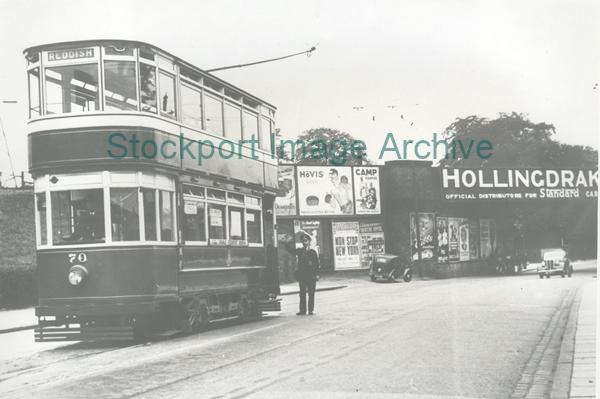
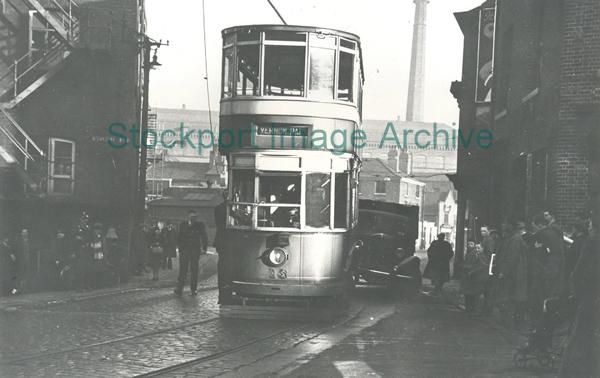
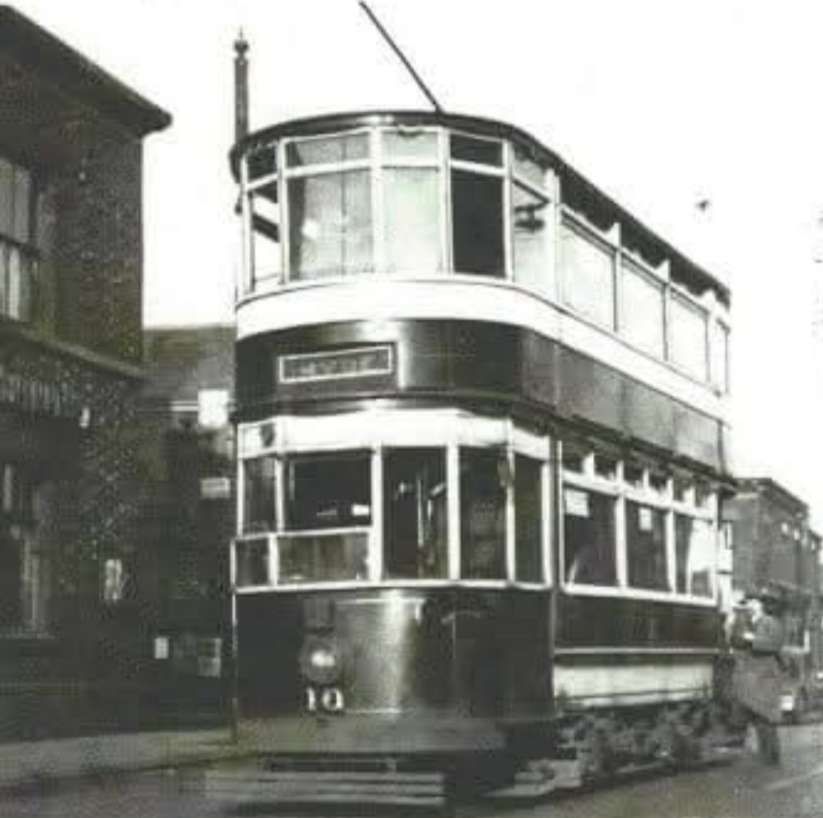
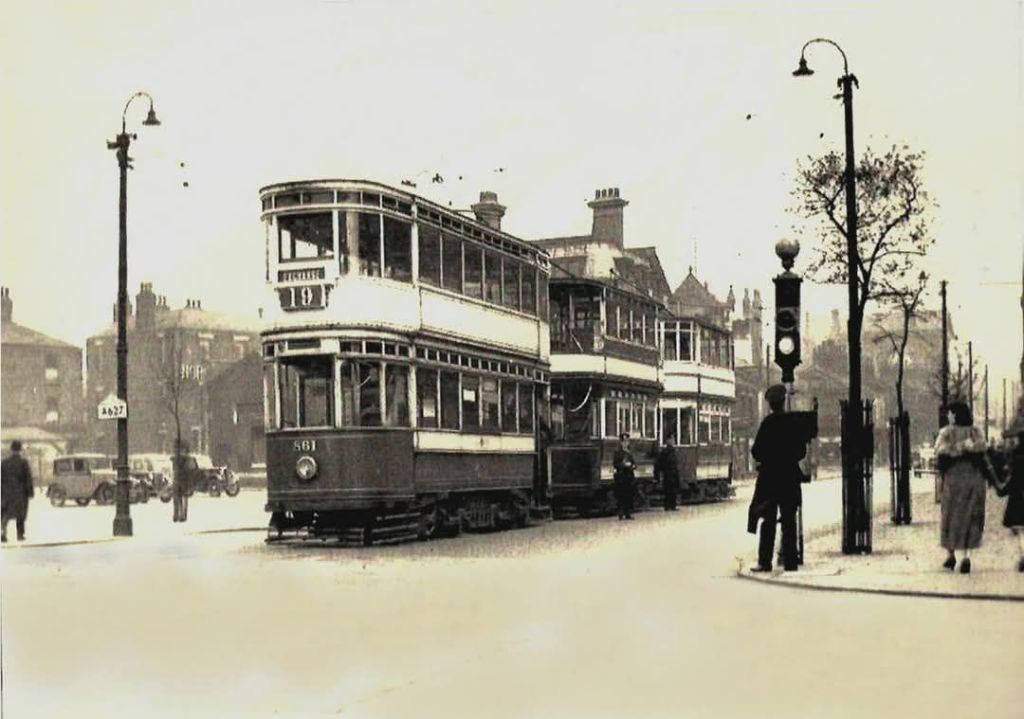
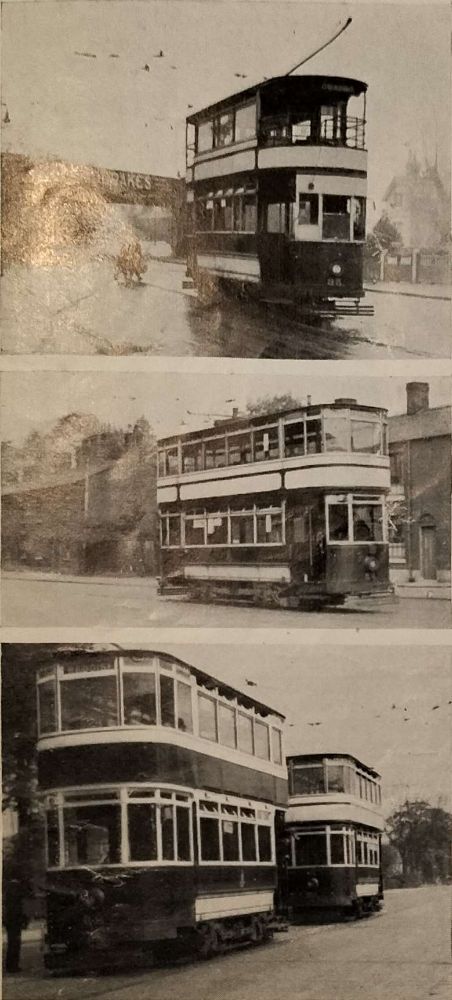
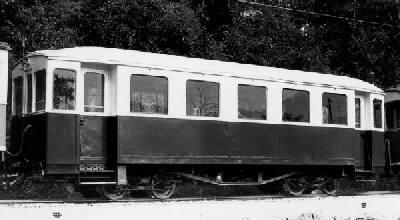
Wikipedia tells us that the fleet of tramcars steadily increased, with the Corporation owning a total of 87 double-deck electric tramcars through the life of the system, [3] although the highest number at any one time was 85 [4] and numbers settled down at 82, “all of which [were] of the single-truck top-covered vestibuled type with an average seating capacity of 60. Only 26 cars [had] open balconies, and these [were] used only at peak periods; ten of them [had] reversed staircases. The 56 totally enclosed cars [included] 30 which [were] fully upholstered on both decks, the seats being particularly deep and comfortable. The car [equipment comprised] Westinghouse, DK.30 or DK.35 motors and Dick, Kerr DB.1 (form K3) controllers, and hand-operated track brakes [were] fitted on account of the steep gradients. In 1944, the fleet numbering was re-arranged with the primary object of grouping together between 1 and 29 all those cars which, on account of a low bridge near Bredbury, had low-built top-covers, these being identified by a large H (denoting “Hyde,” the route concerned) on either side of the headlamp.” [1: p124] This was needed until abandonment of the lines beyond Vernon Park rendered this unnecessary. [5]
Most of the network survived the Second World War but was progressively closed in 1950 and 1951, only surviving for a short while after the Modern Tramway article of 1949. … “The Crossley Road to Hazel Grove route was the first to go, on 14th January 1950, followed by the Edgeley to Vernon Park route on 3rd March 1951, the Cheadle route on 10th April 1951 and finally the Reddish line on 25th August 1951.” [3]
Wikipedia also explains that: “The Corporation also ran a small trolleybus line, using three vehicles which collected current from the overhead lines using the German Lloyd-Kohler system, the only use of this system in Britain. The route opened in 1913, but the onset of the First World War made obtaining spare parts from Germany impossible, and it ran intermittently, due to maintenance problems. It was replaced by motor buses in 1920.” [3]
It is interesting to note that the deals made with adjacent networks “allowed long journeys to be made by tram, with the route from Hazel Grove to Seaforth Sands near Liverpool being 51.5 miles (82.9 km). One lady is known to have travelled between Liverpool and Stockport for pleasure on several occasions, although it took almost a whole day to reach her destination.” [3]
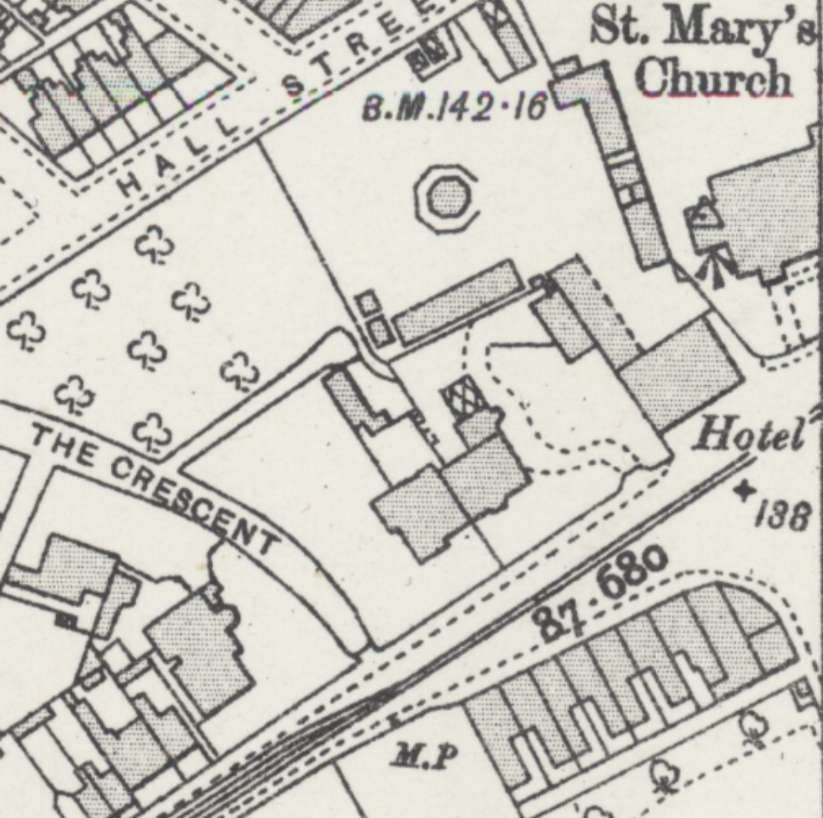
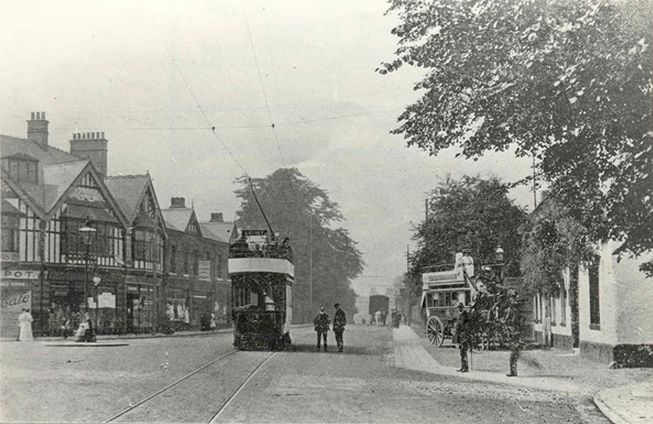
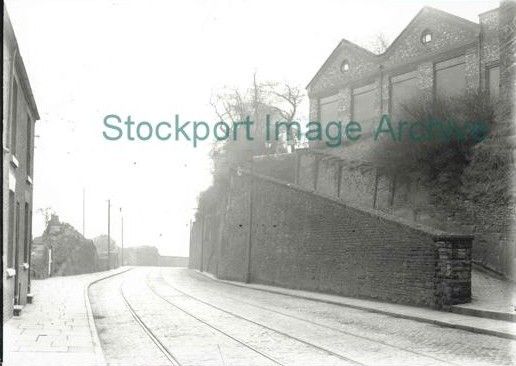
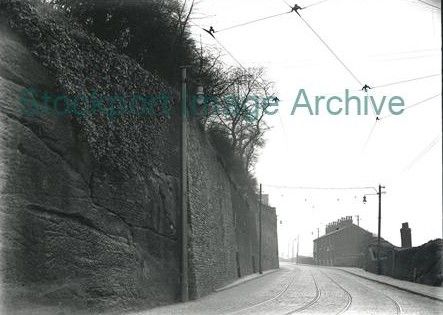
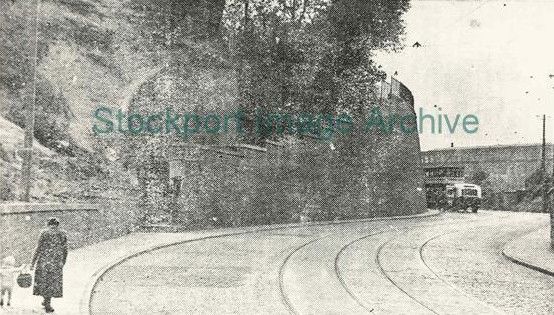
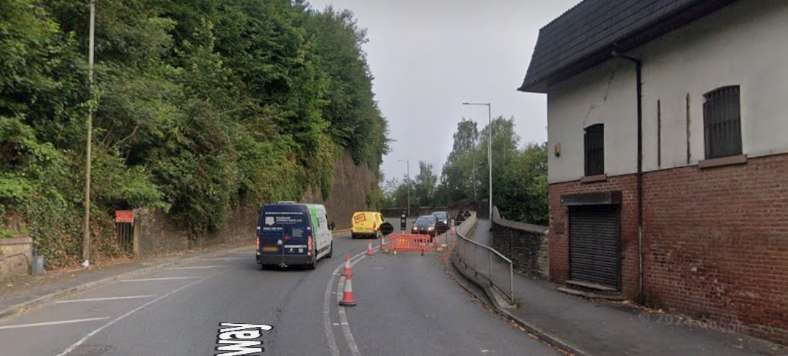
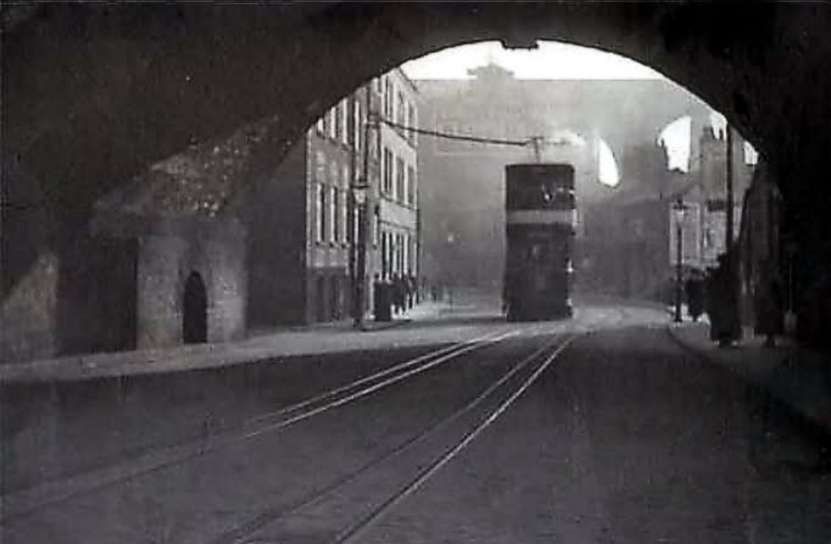
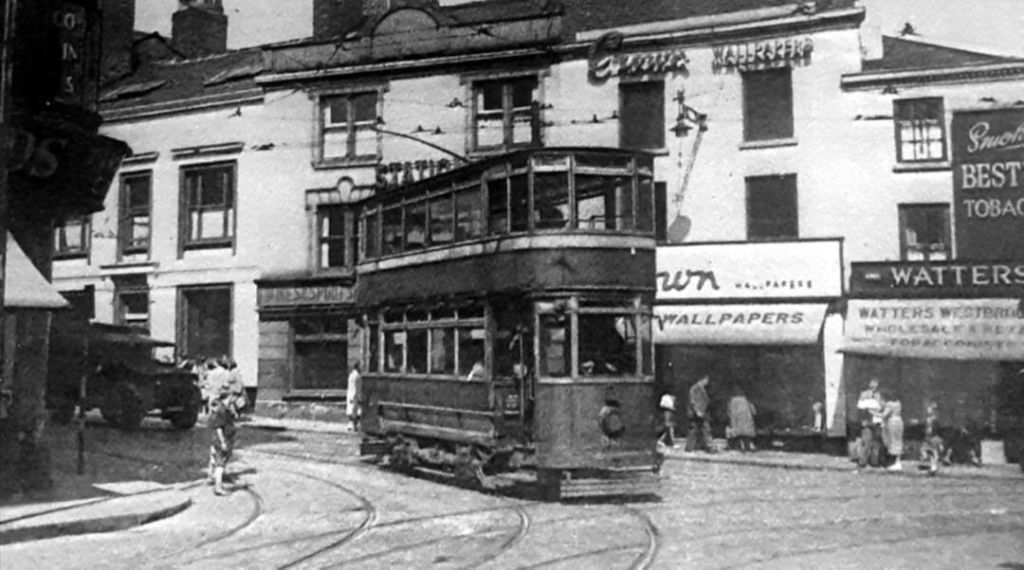
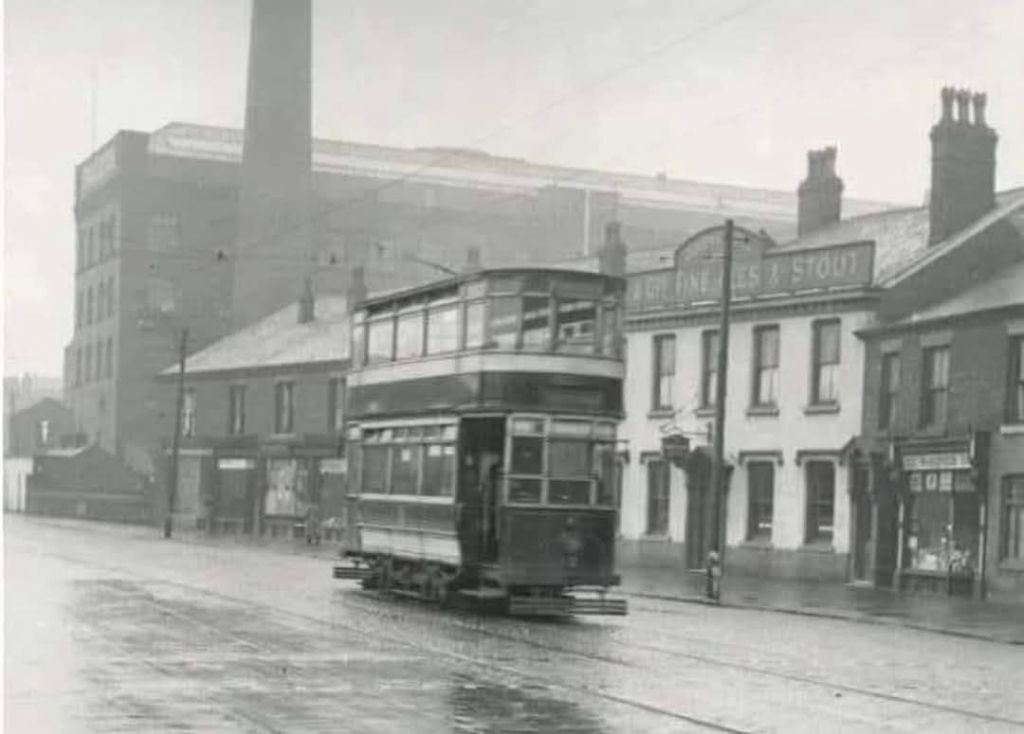
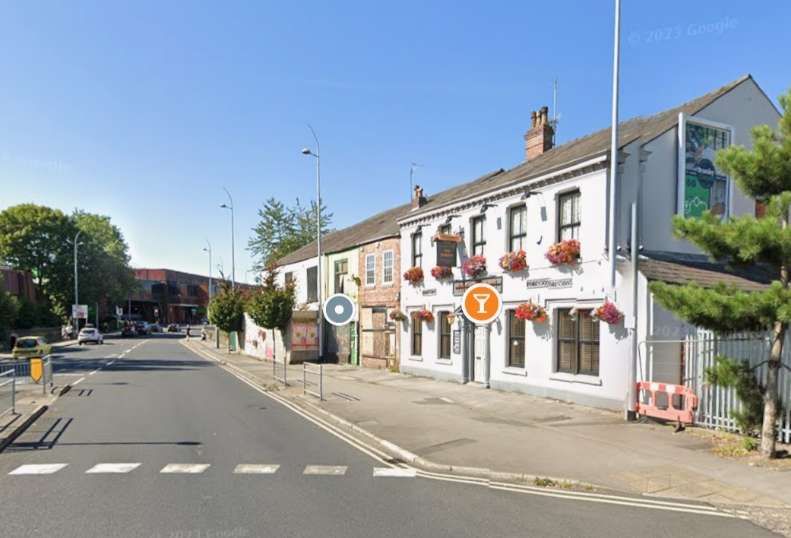
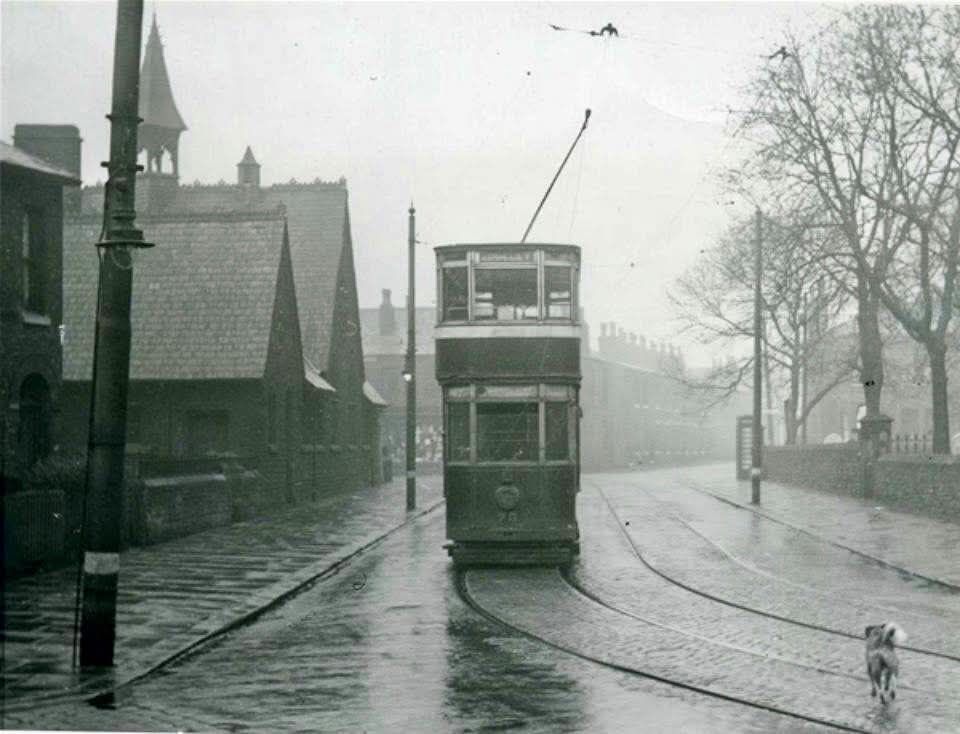
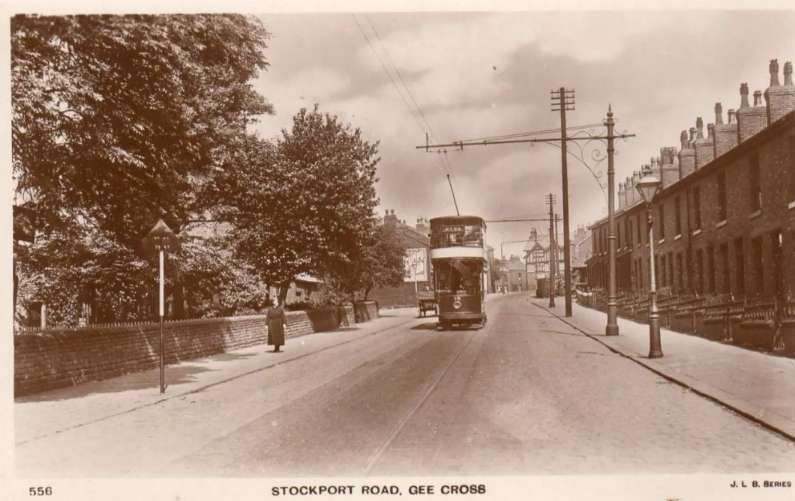
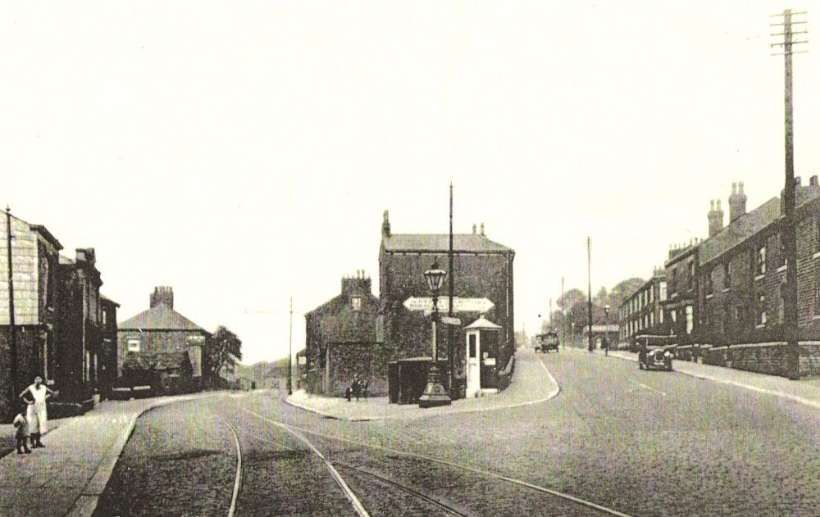
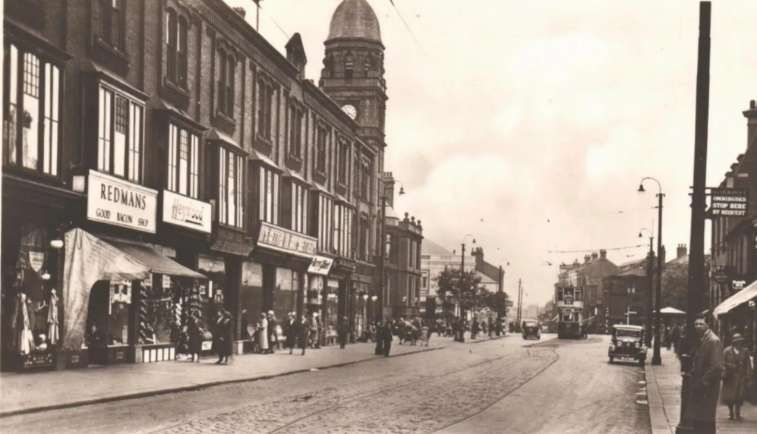
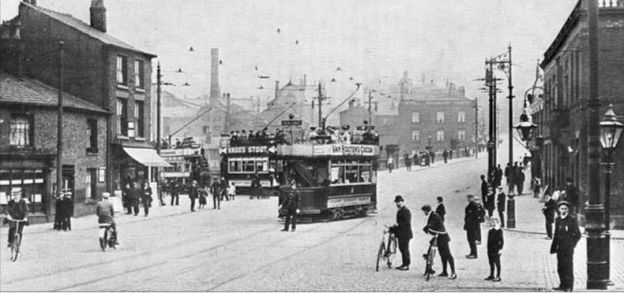
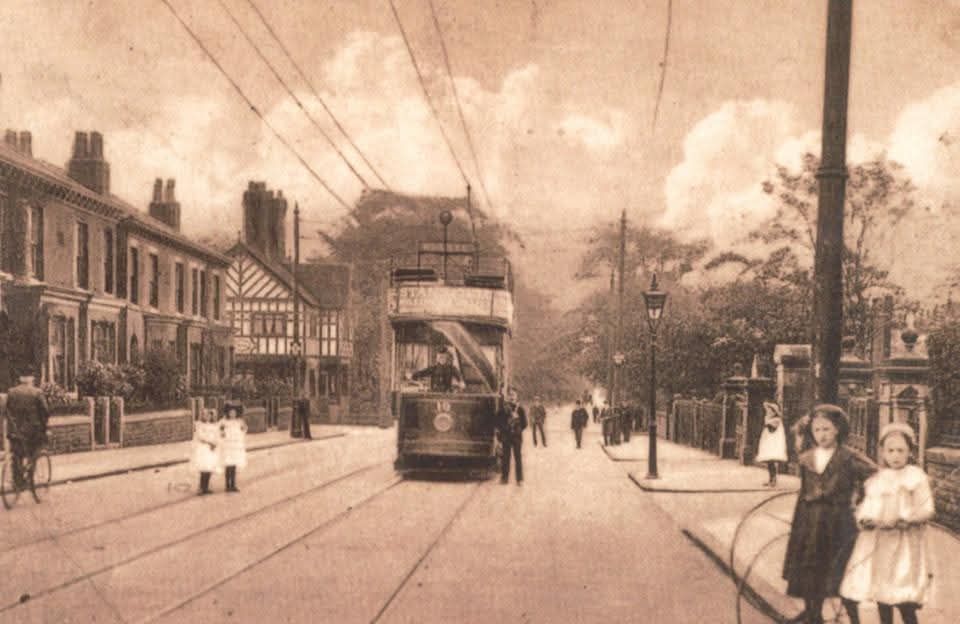
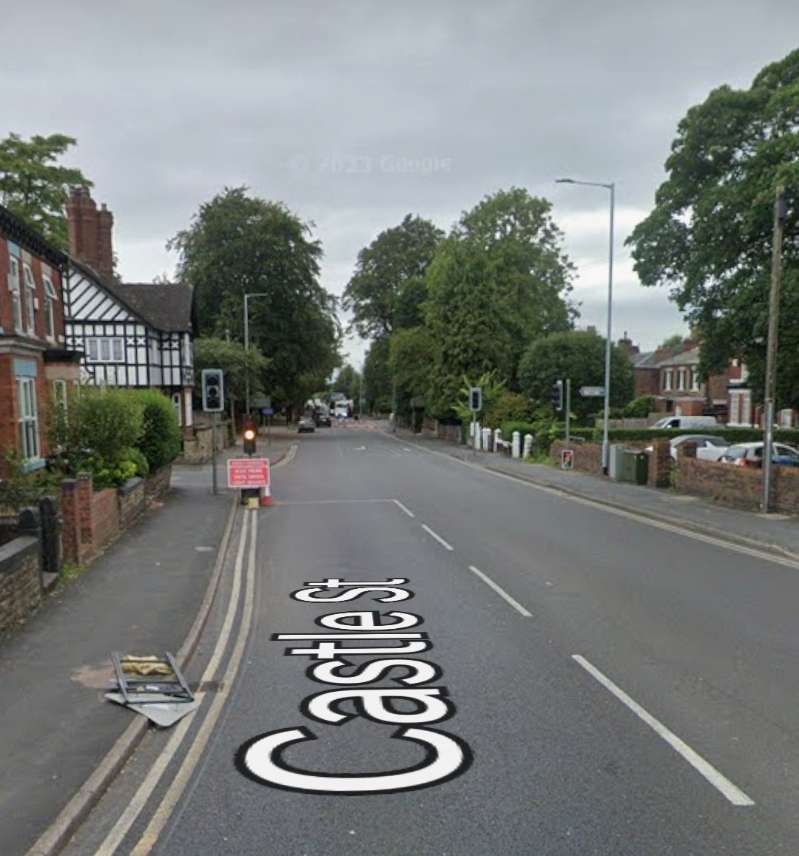
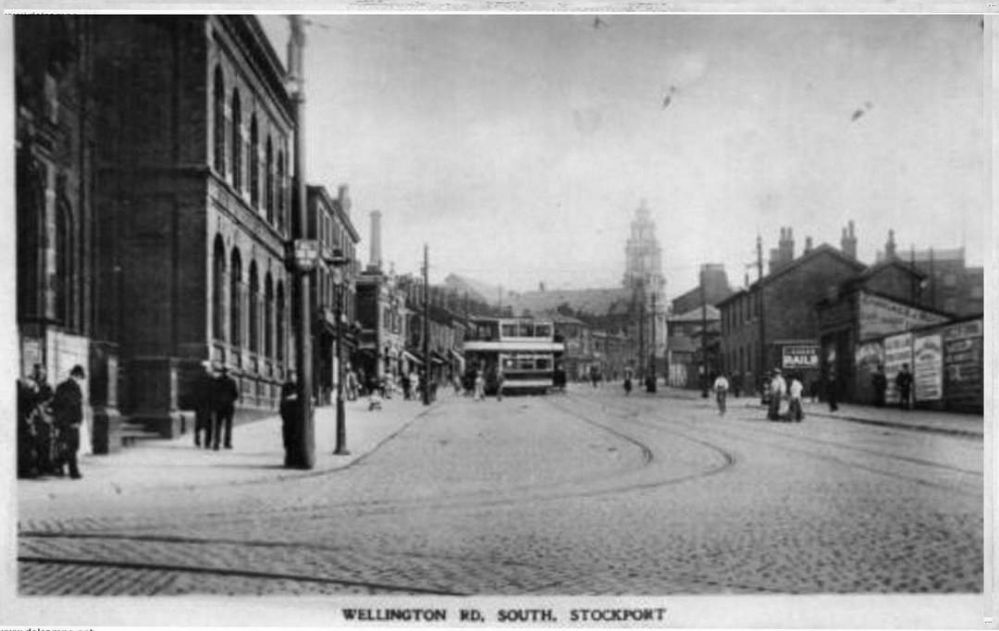
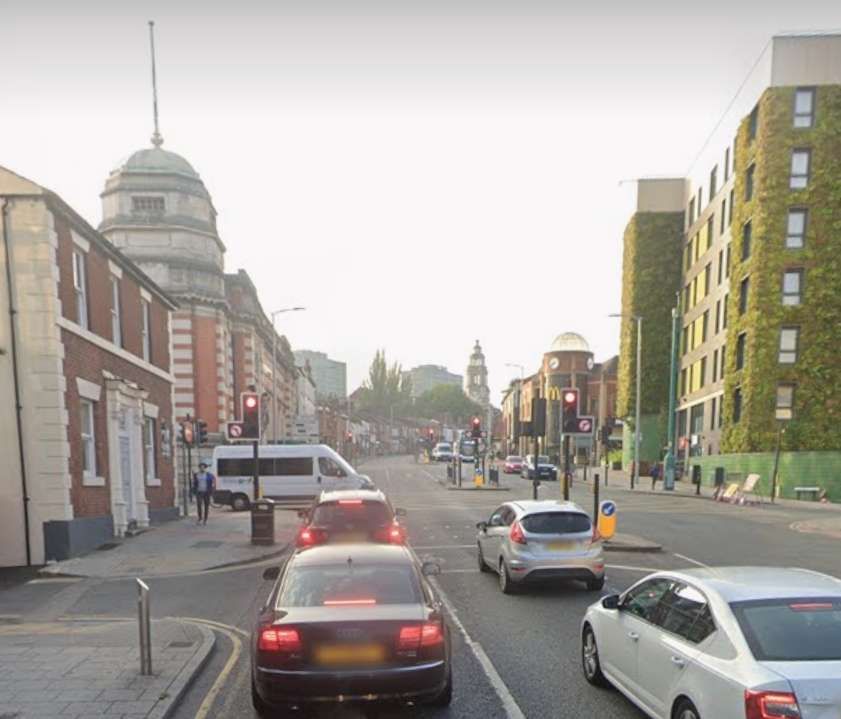
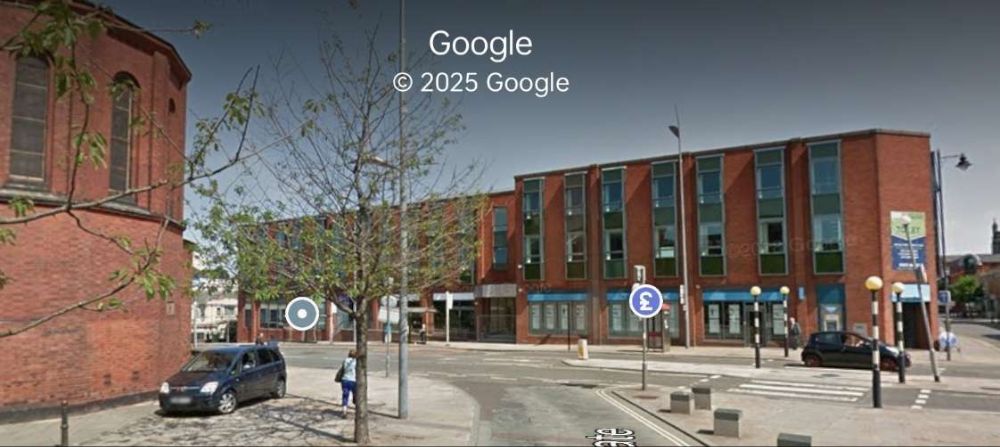
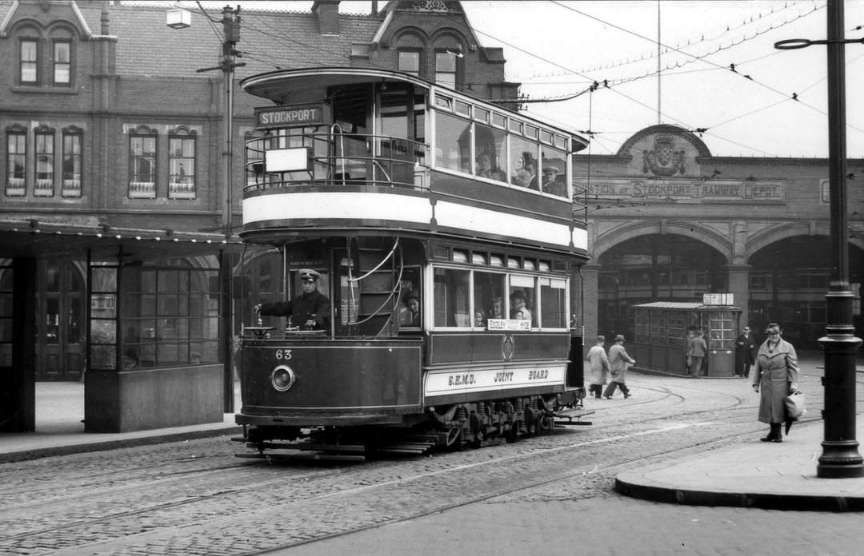
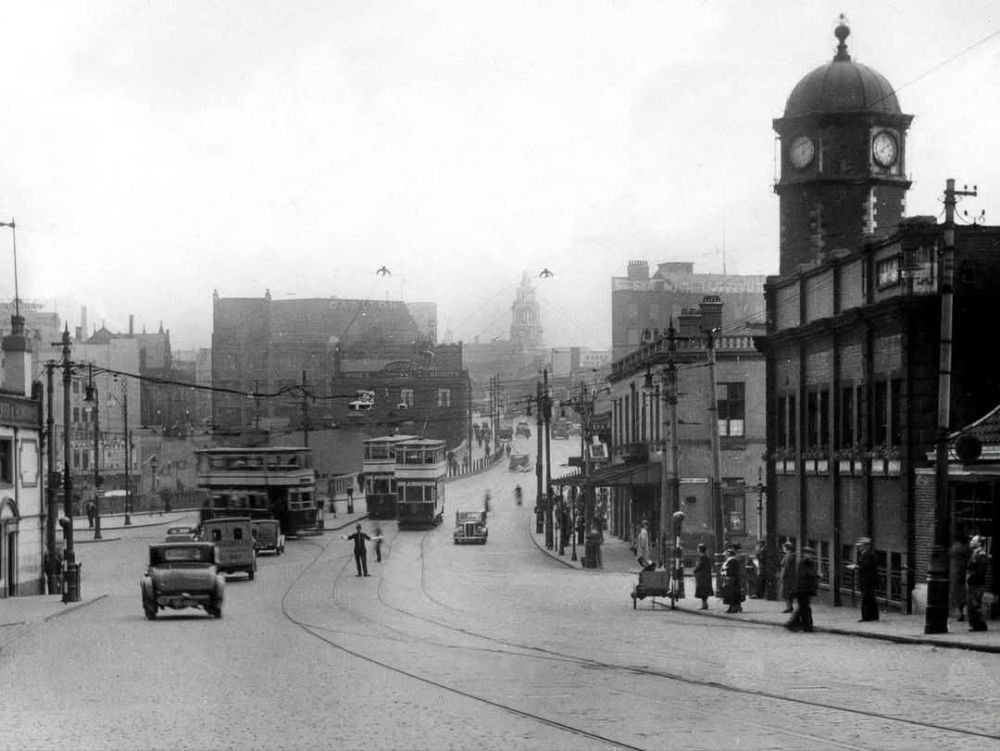
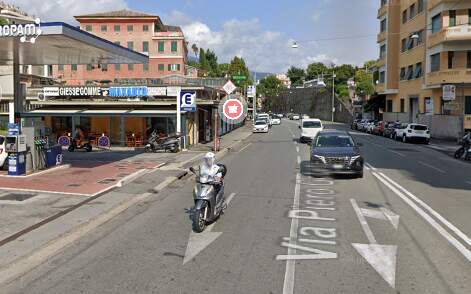
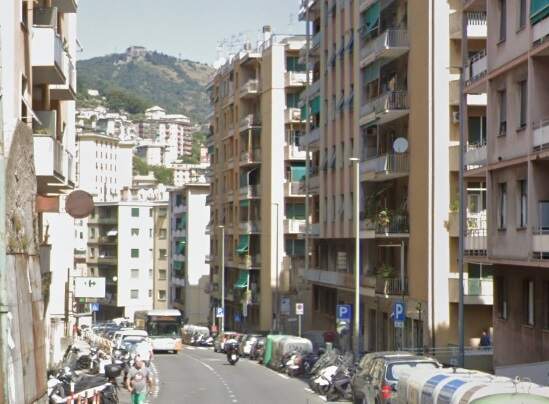
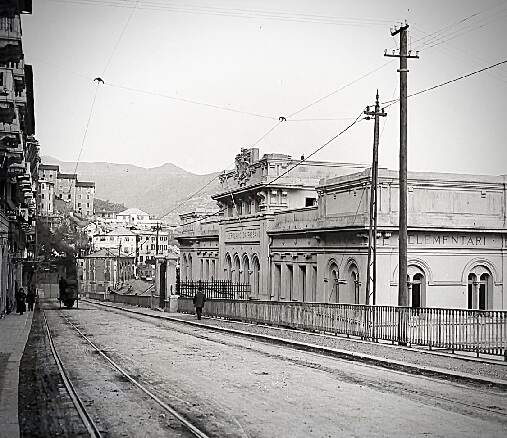
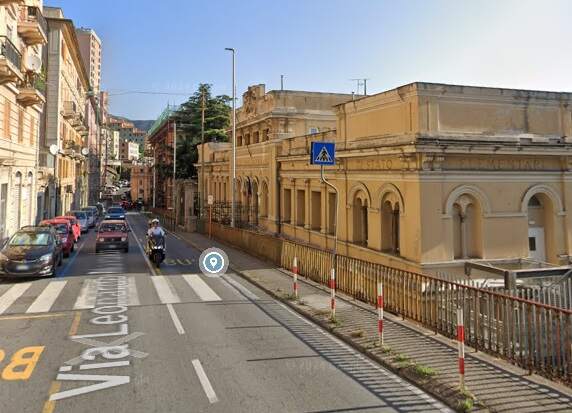
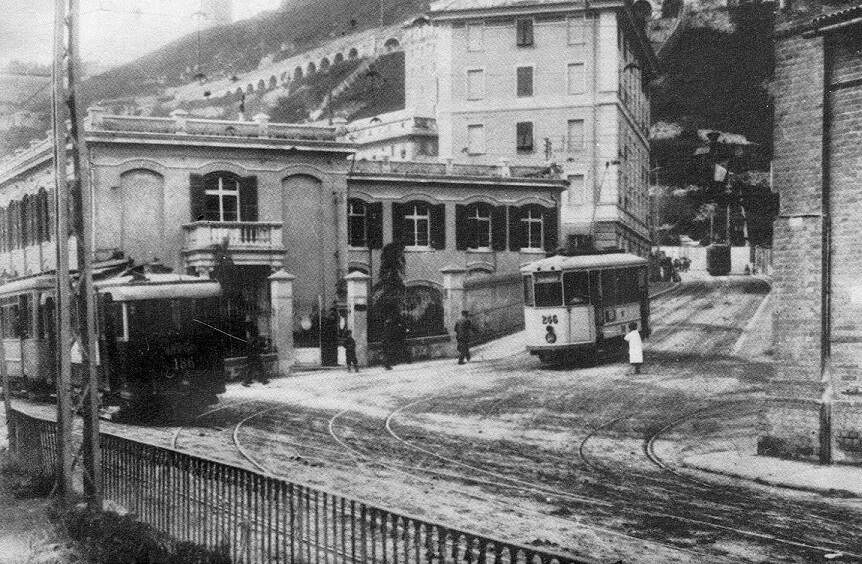
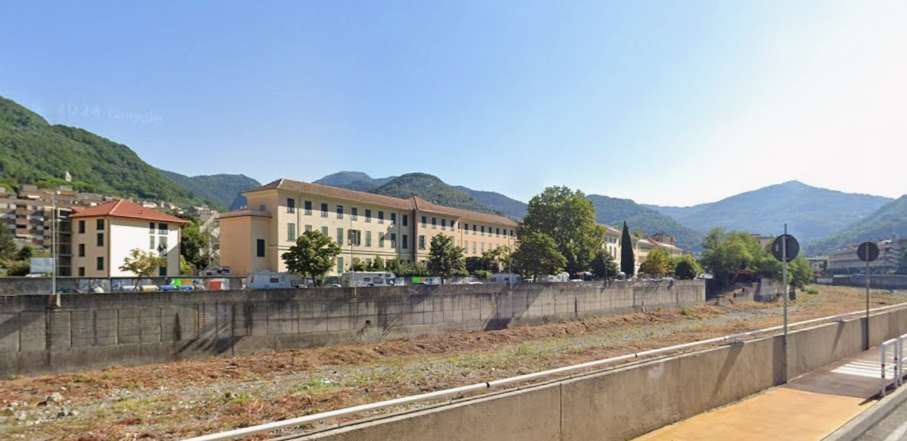
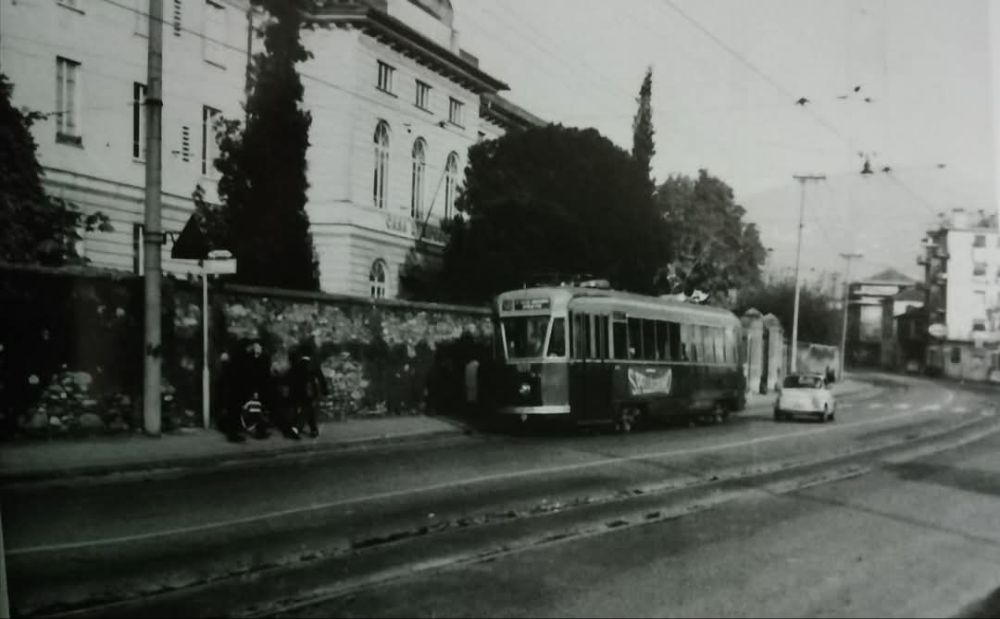
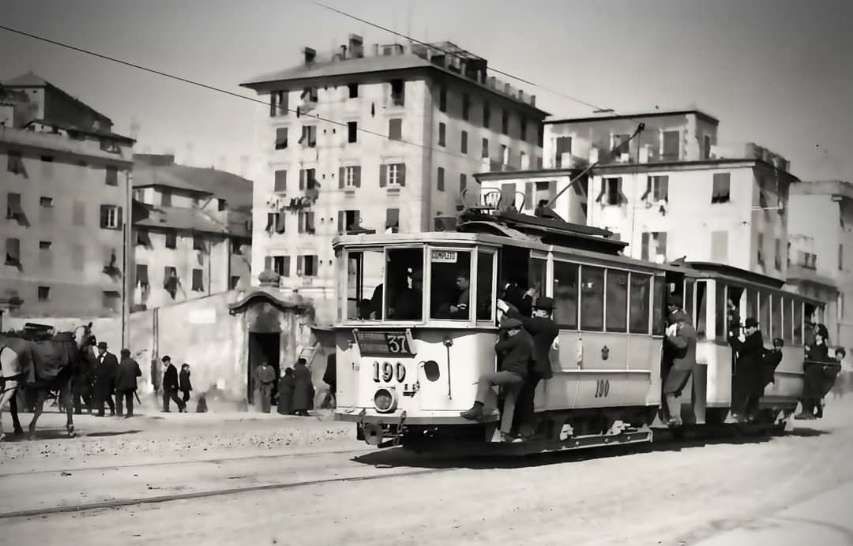
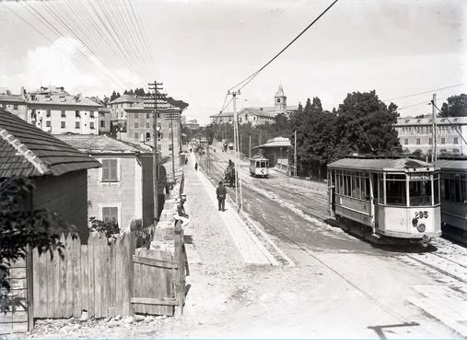
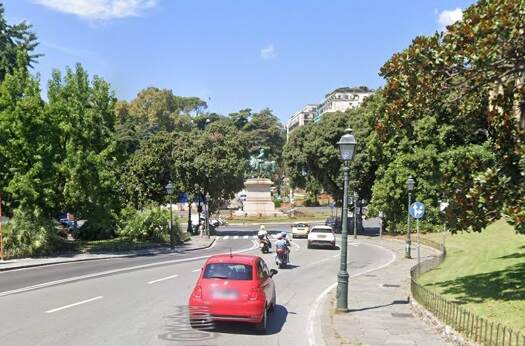
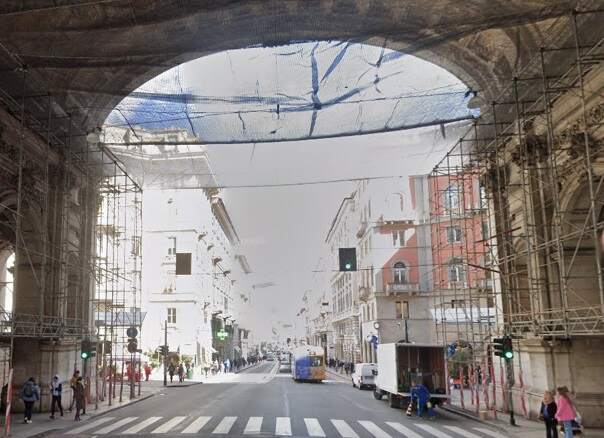
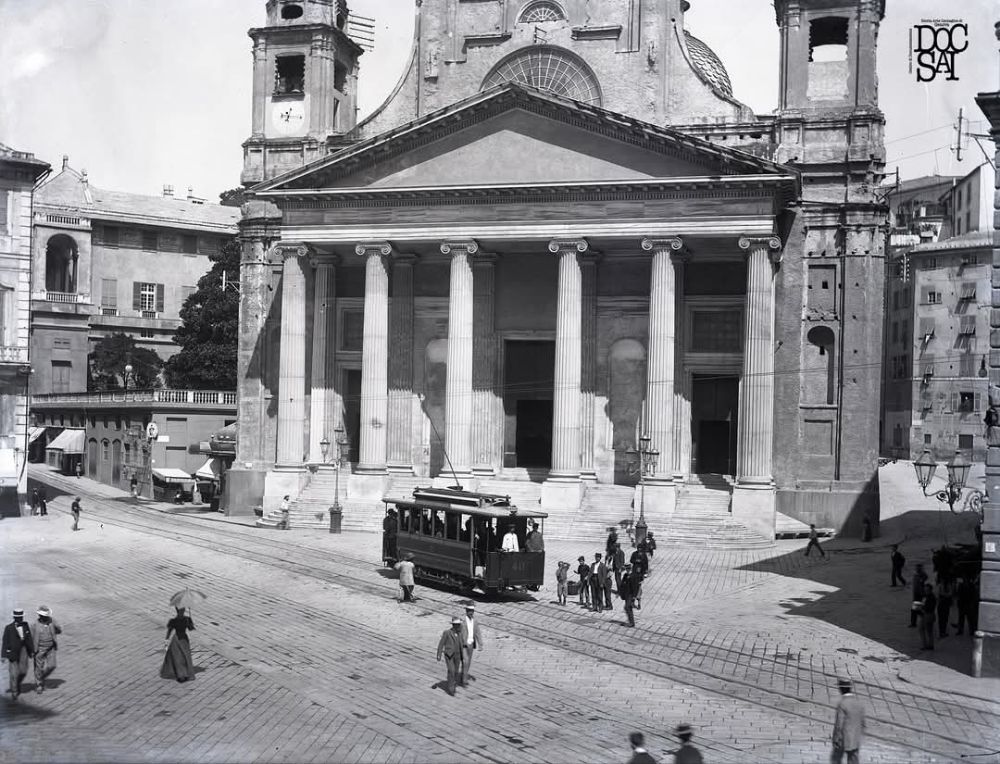
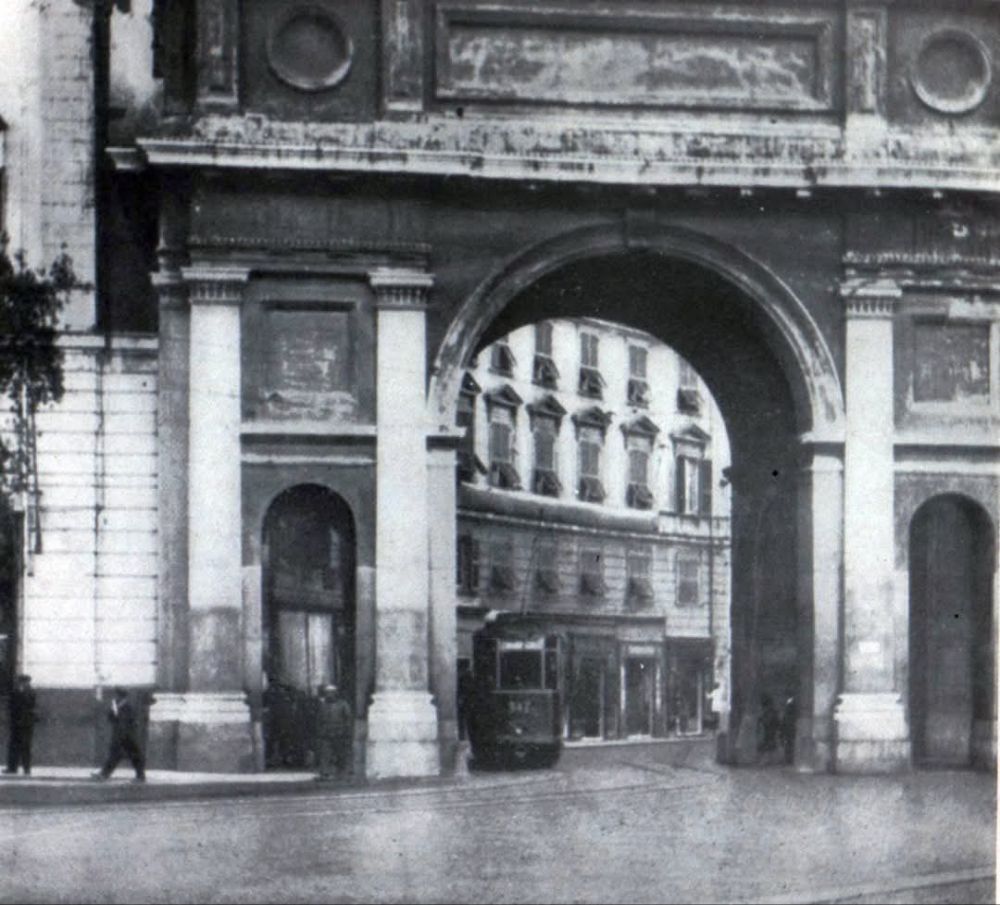
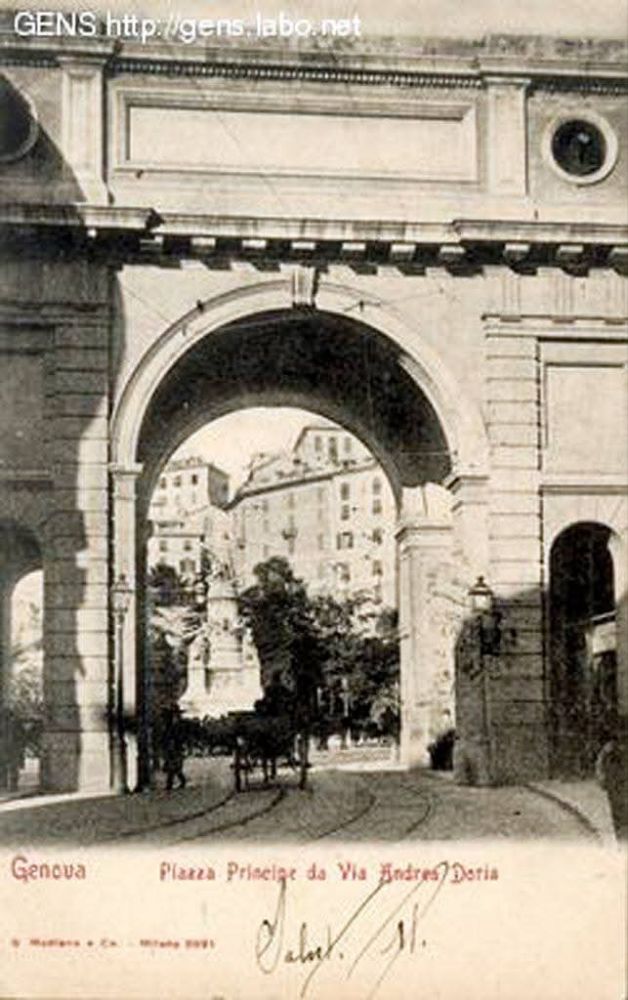
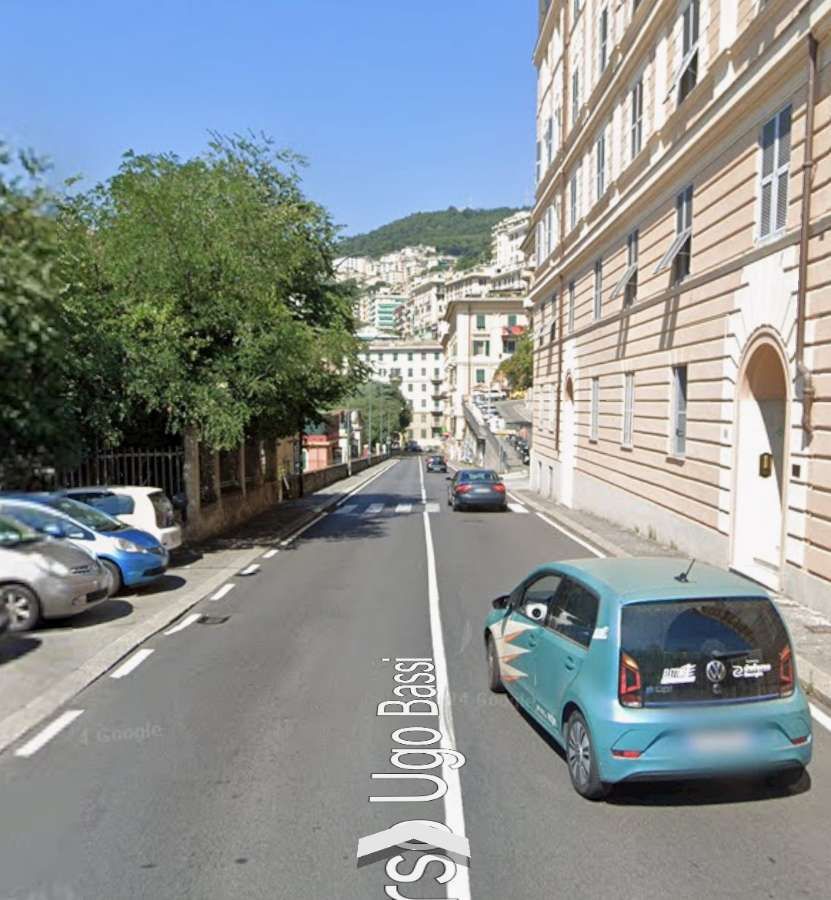
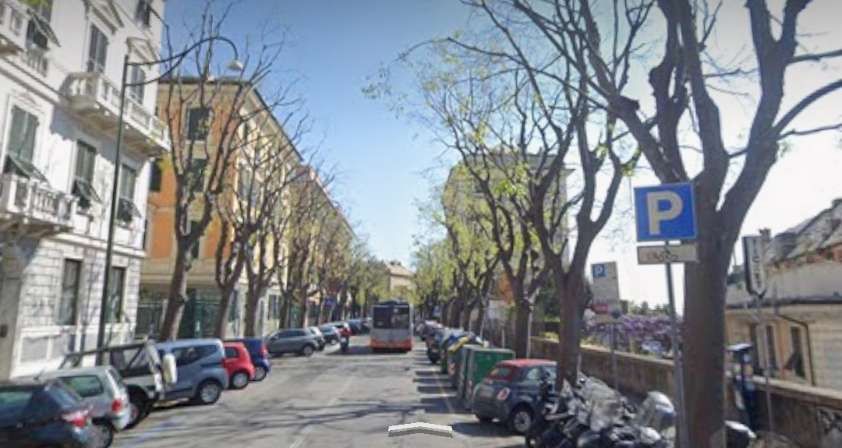
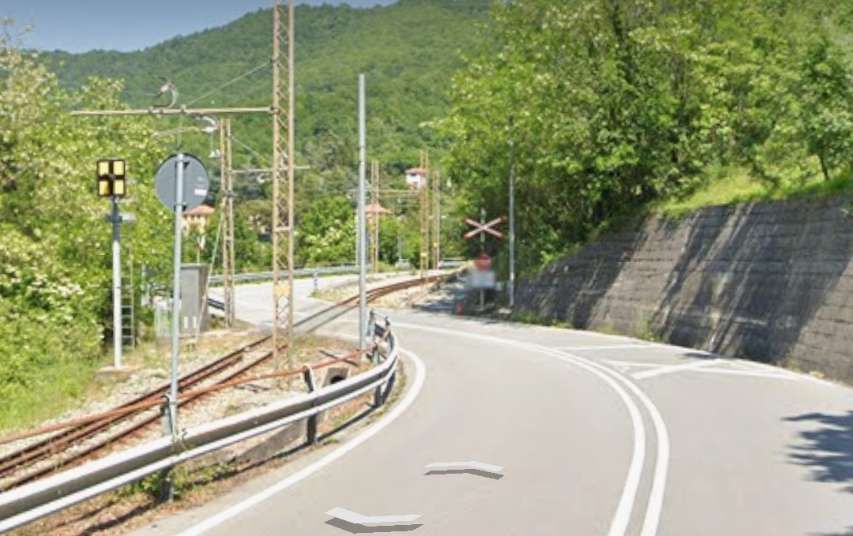
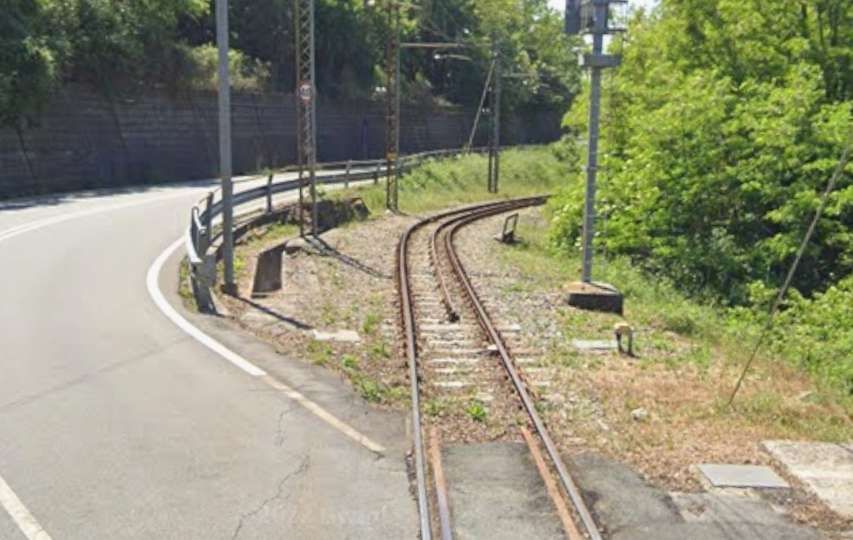
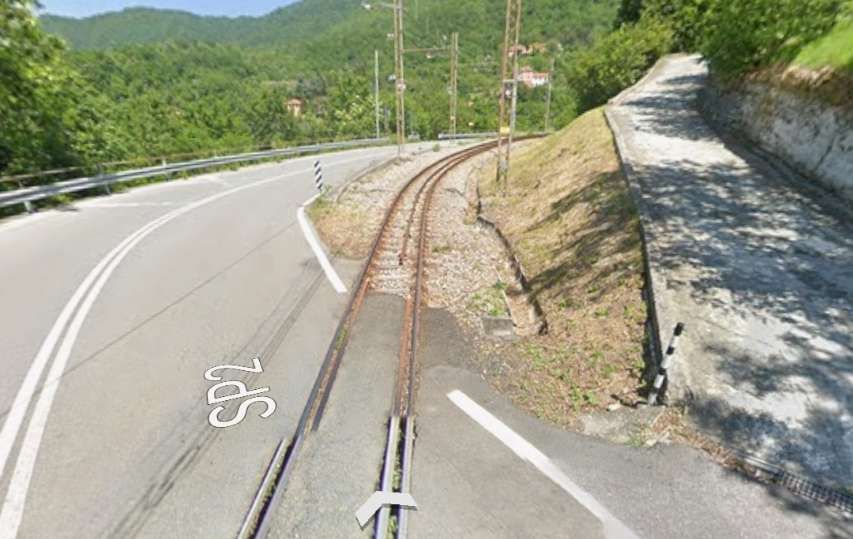
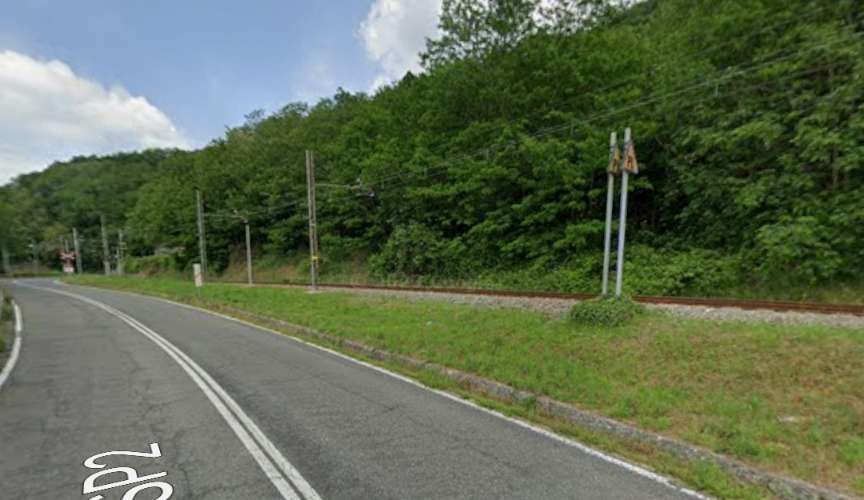
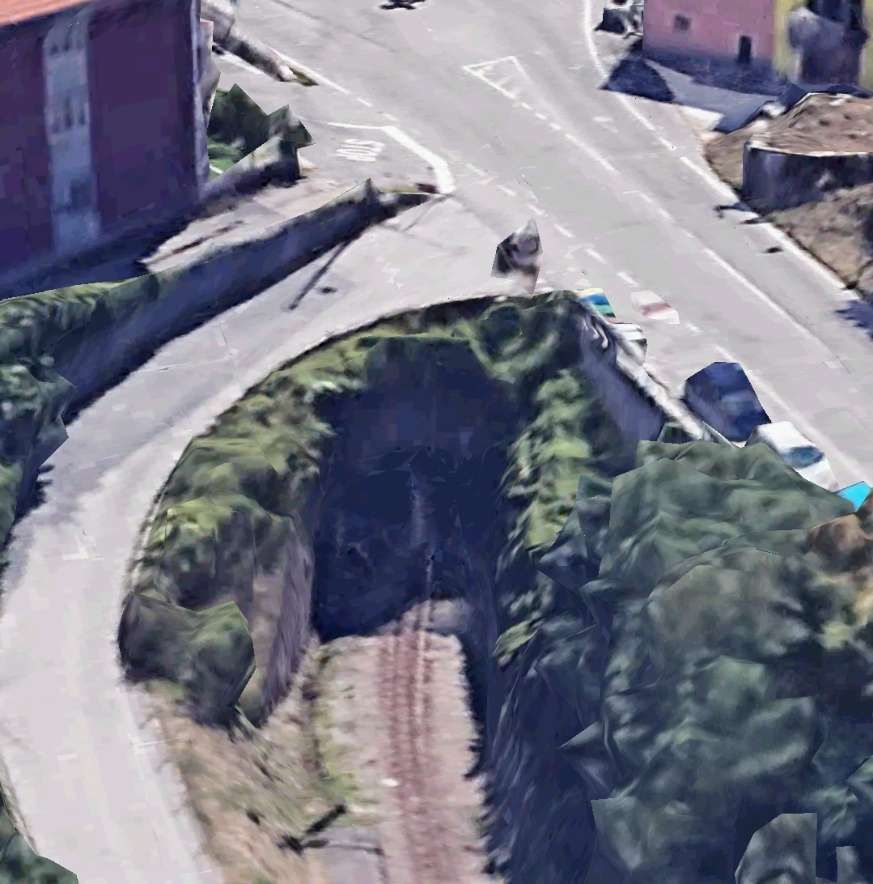
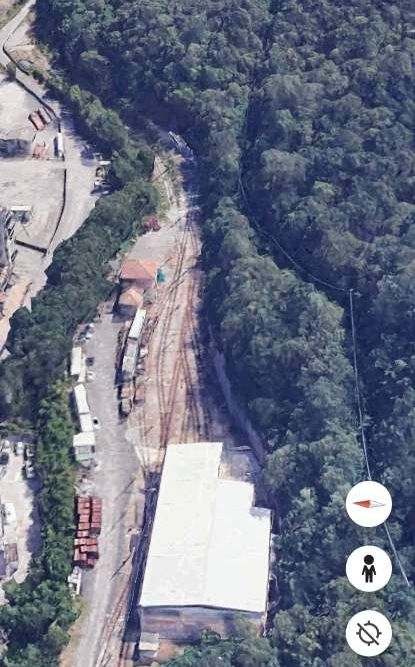
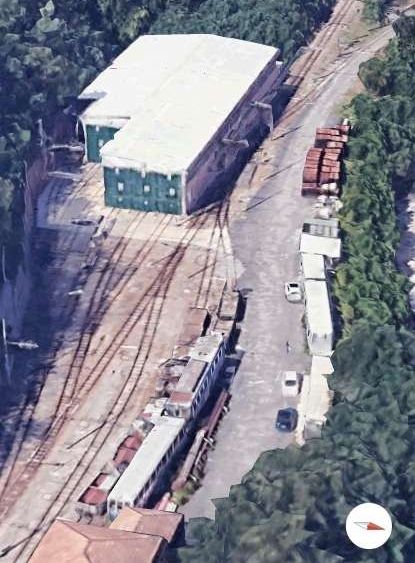
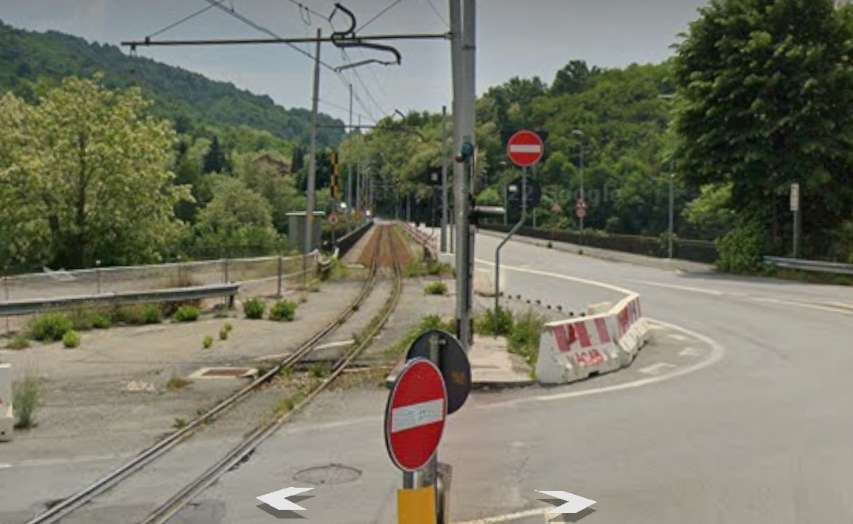
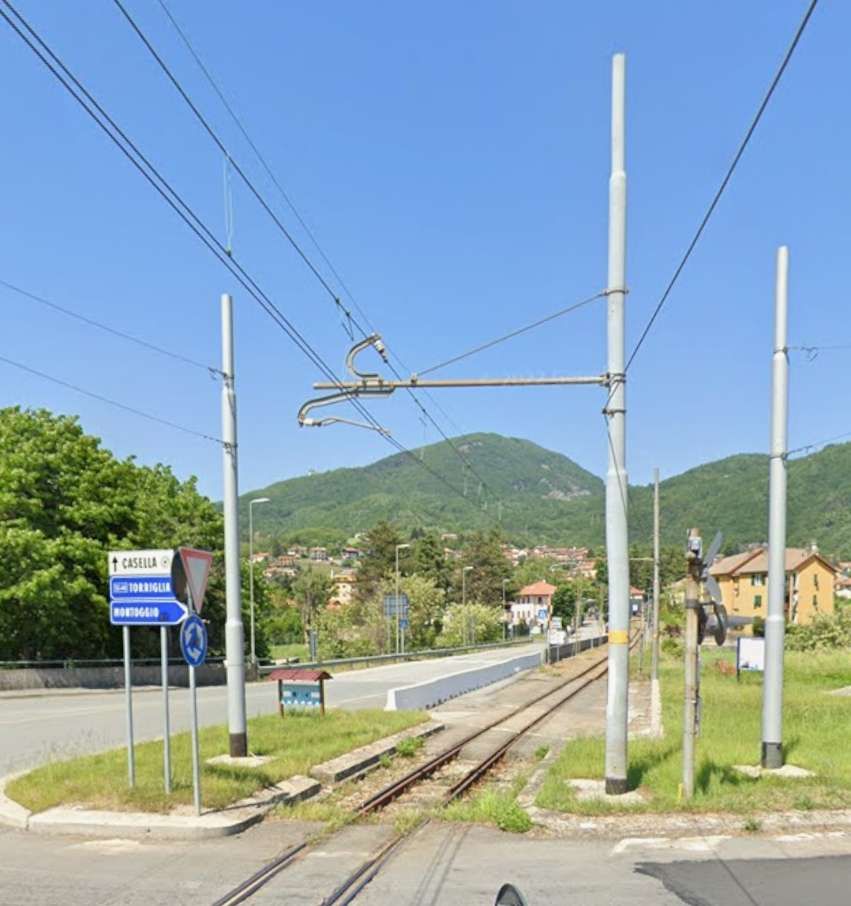
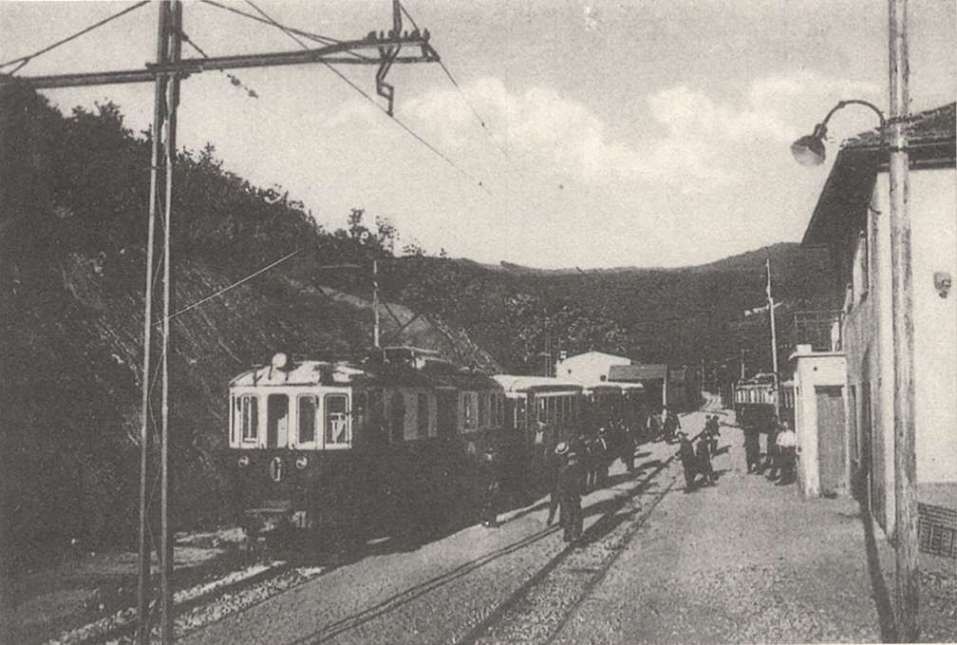
Gentry noted that Stockport’s track was “double throughout on the Levenshulme, Cheadle Heath, Edgeley and Hazel Grove routes and mostly so on Reddish except between the top of Lancashire Hill and Clare Road; this latter section, together with Princes Street and most of the Vernon Park route [was] single-and-loop. The rail used [weighed] 101 lbs. per yard. The chief depot [was] located in Mersey Square, with a subsidiary depot nearby in Heaton Lane.” [1: p124]
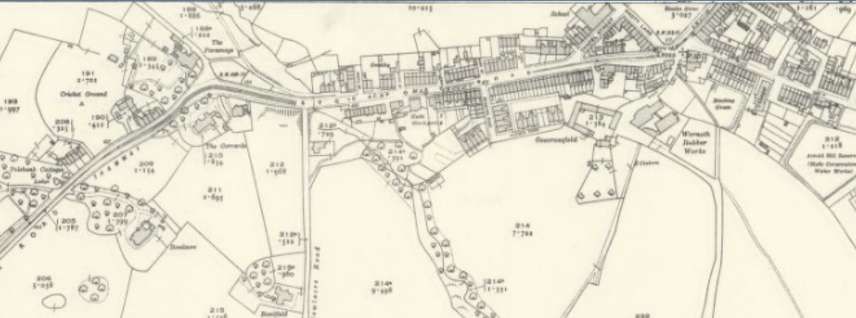
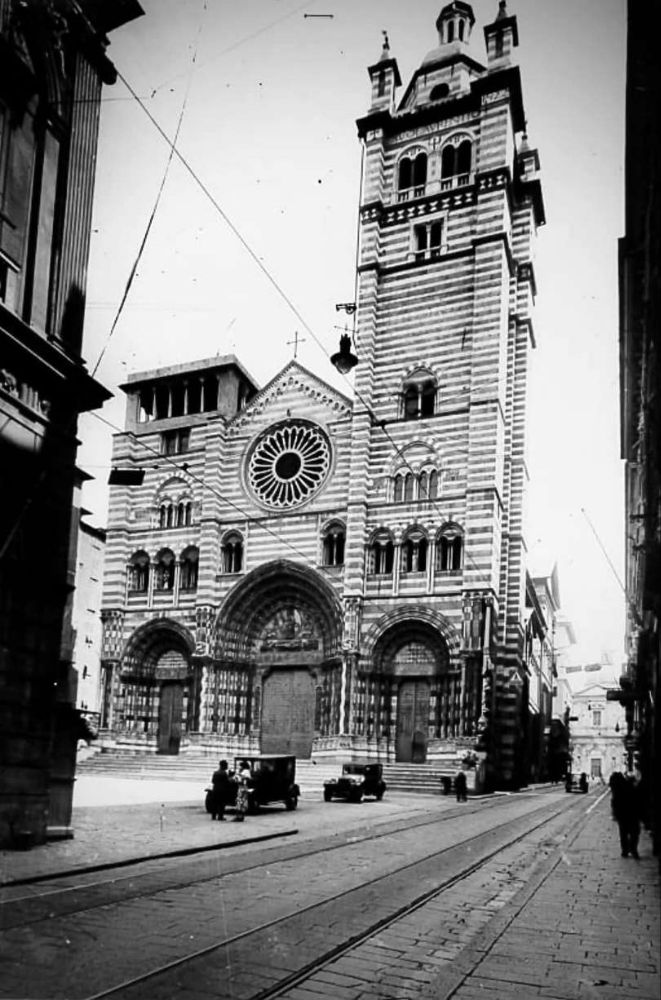
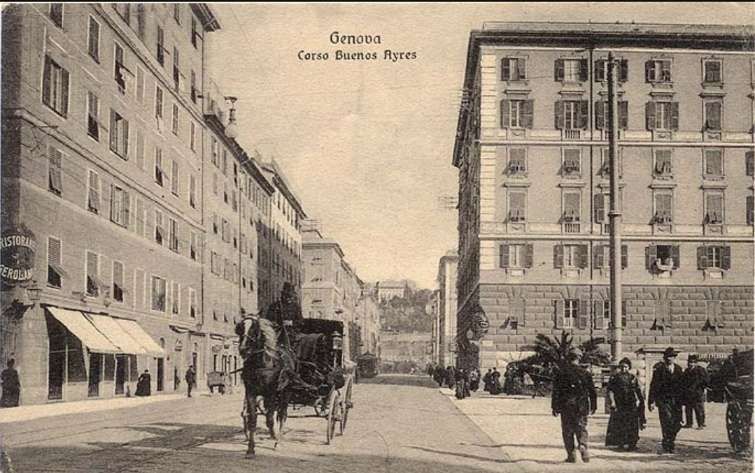
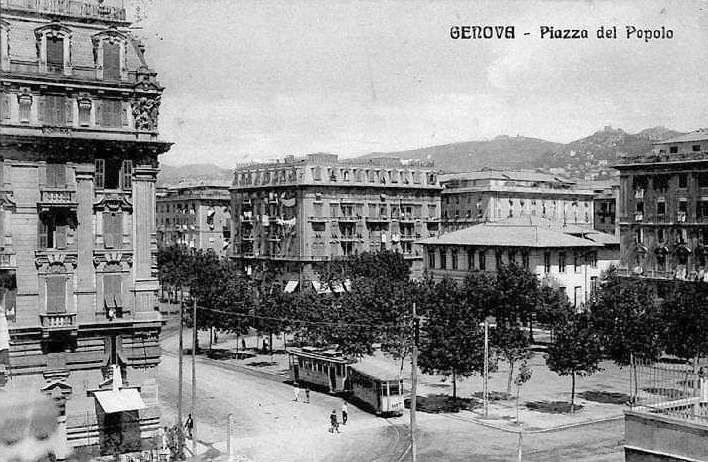
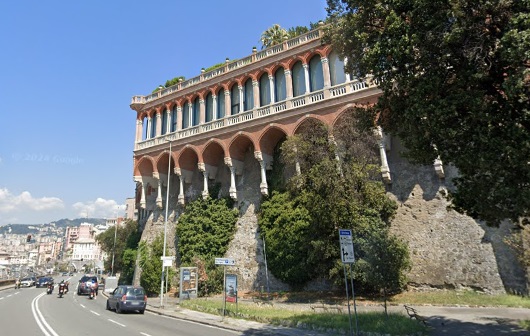
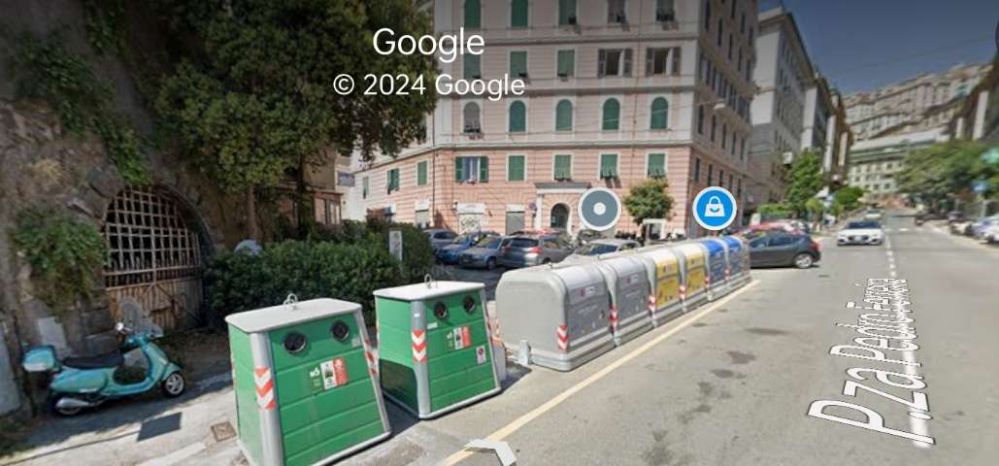
Trams ran through St. Peter’s Square and down the ramp into Mersey Square. The tram stop was in the centre of the paved area with both the Tram Depot and the Fire Station close by.
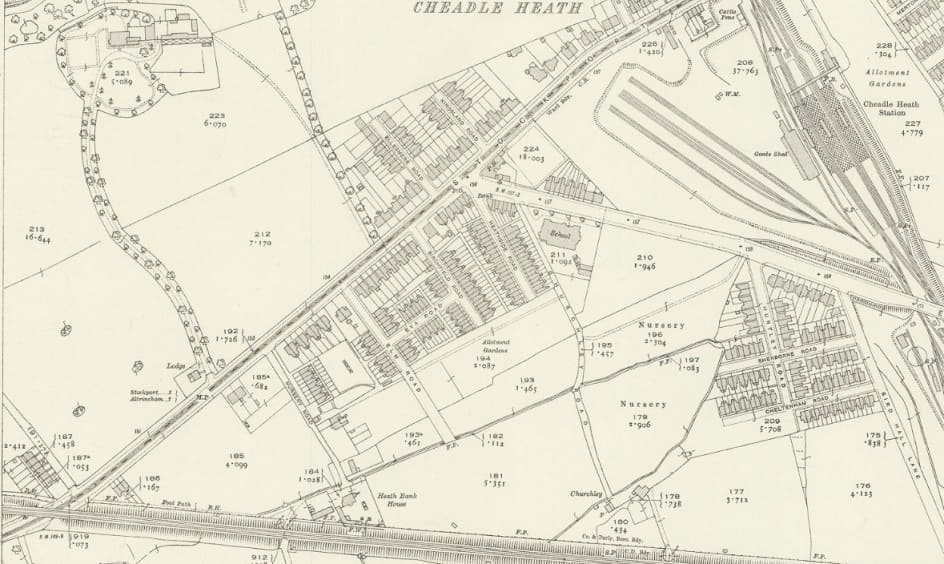
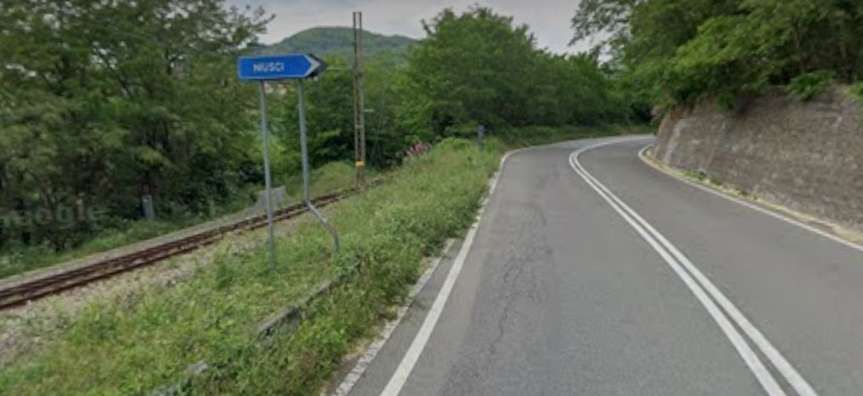
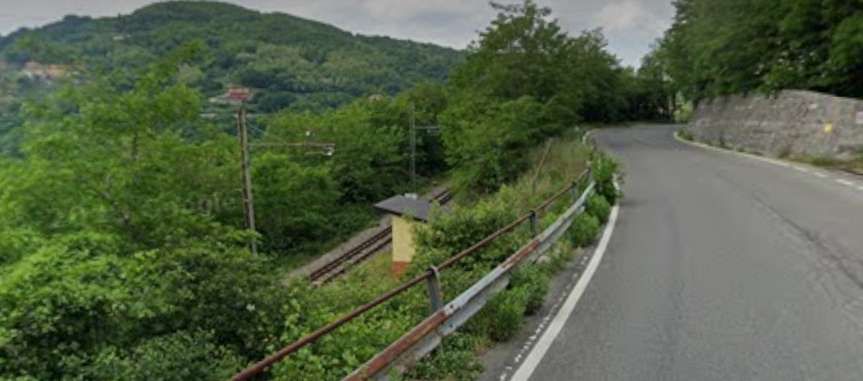
Reddish Road then turns to the North and later to the Northwest.
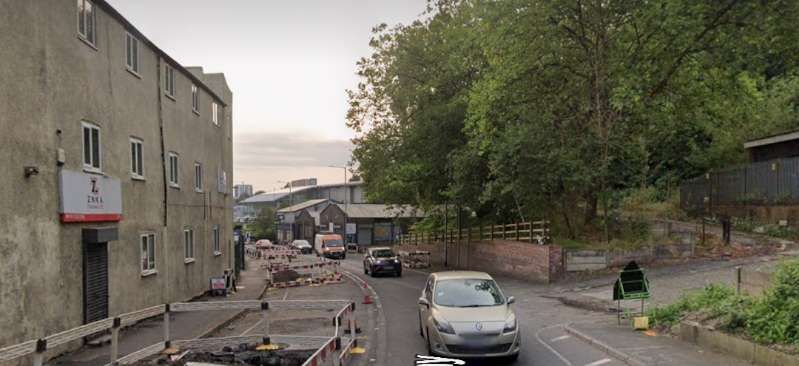
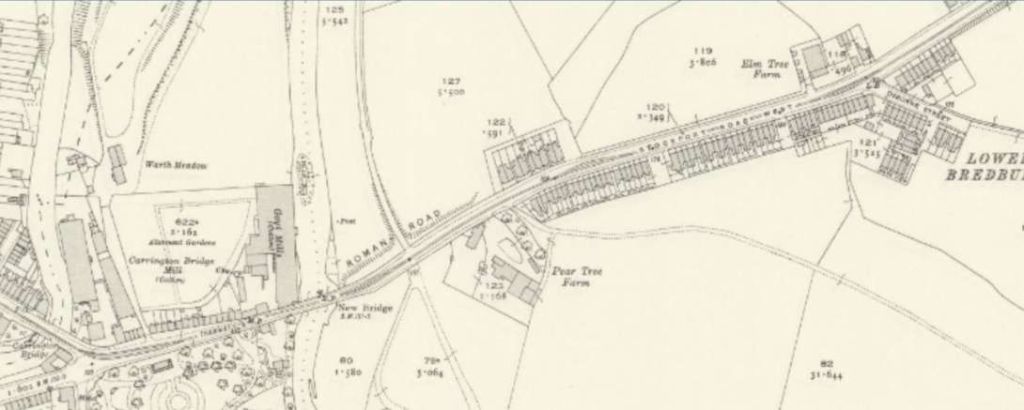
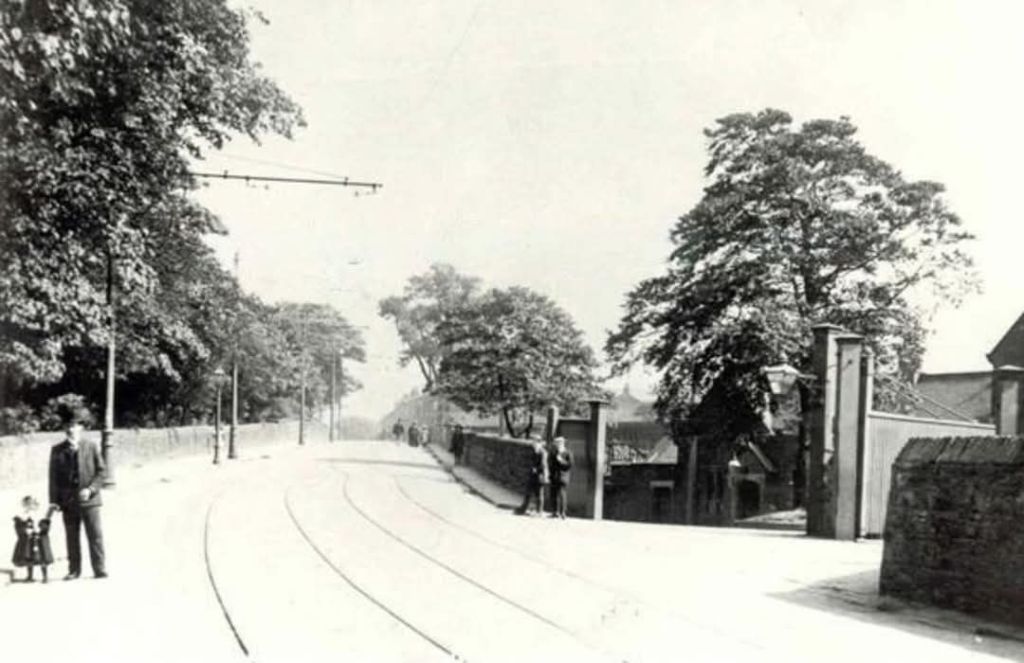
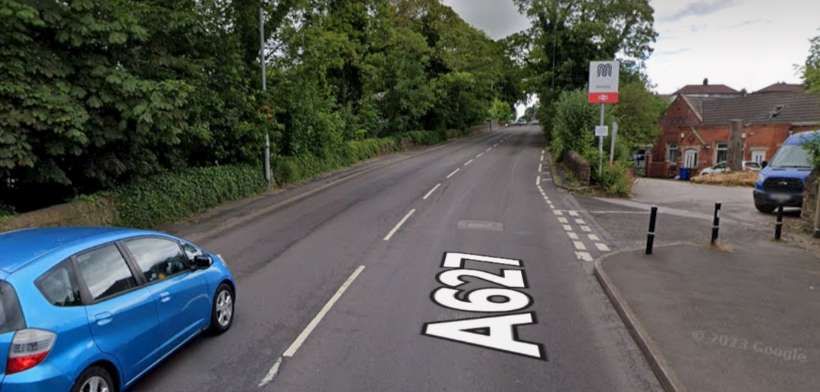
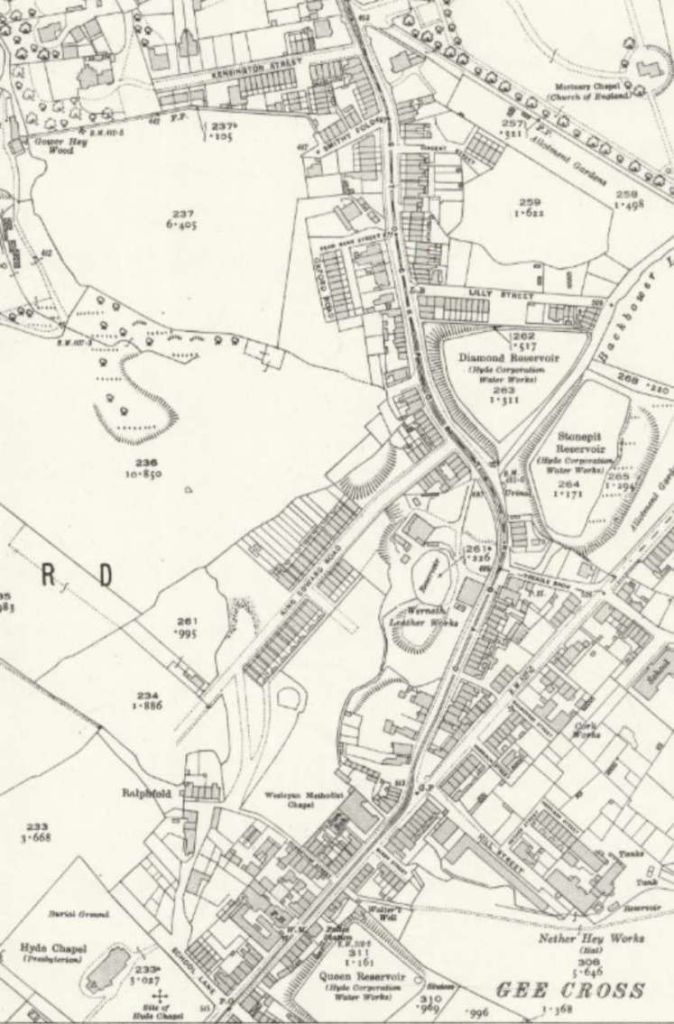
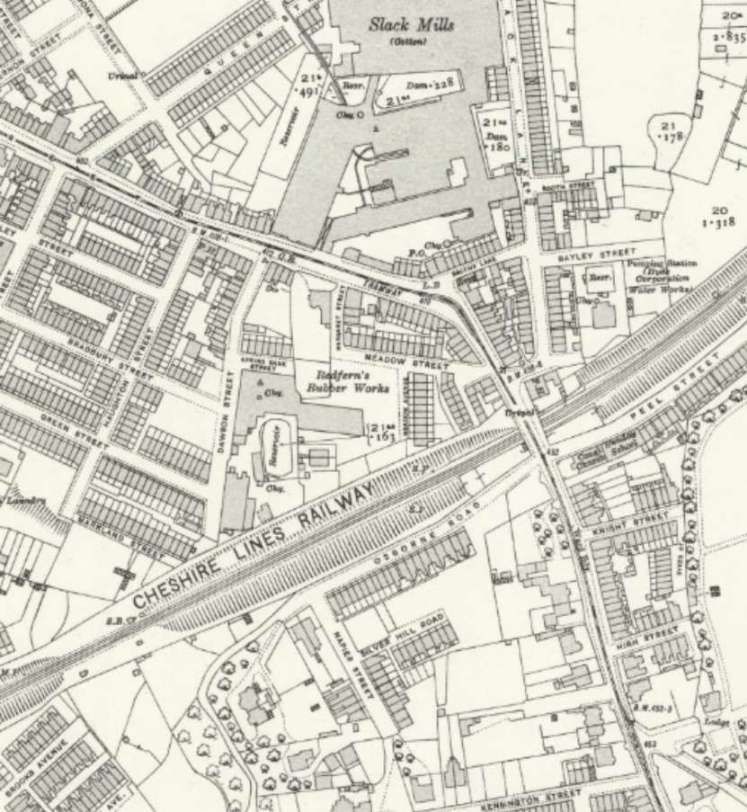
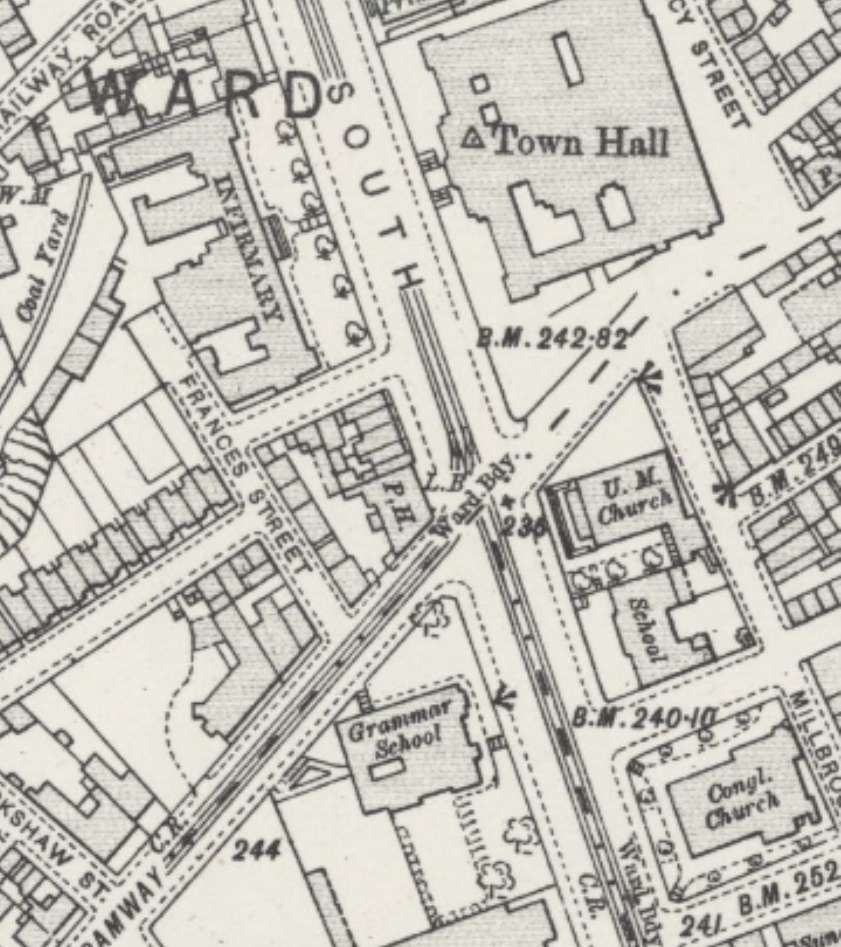
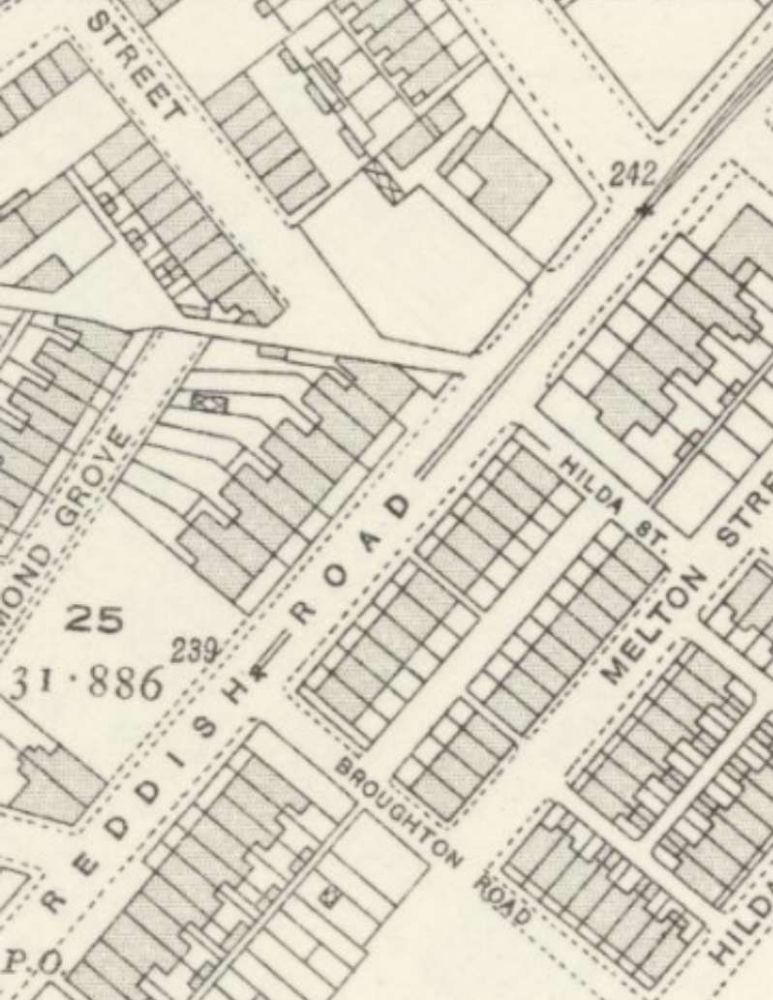
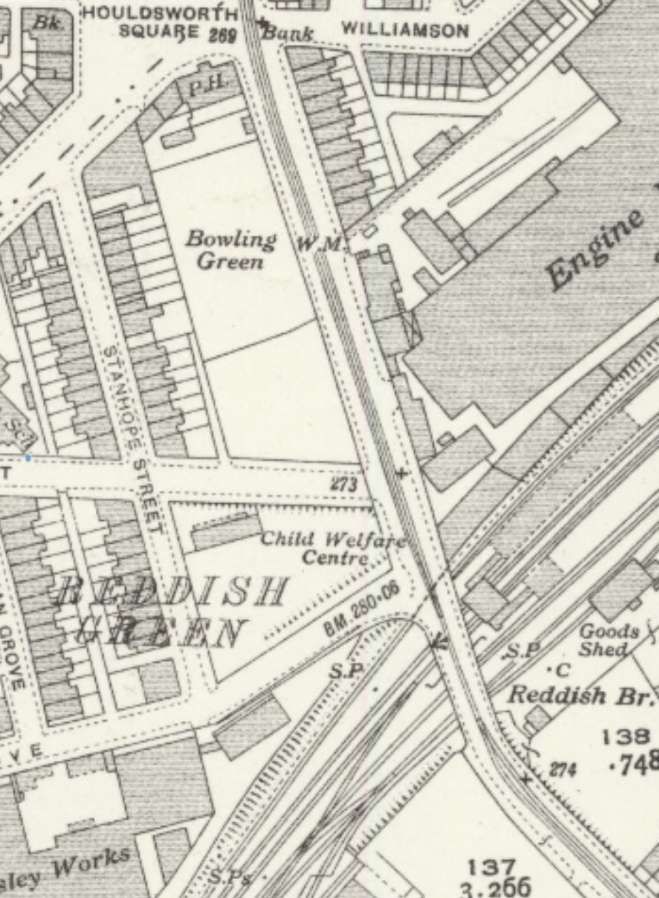
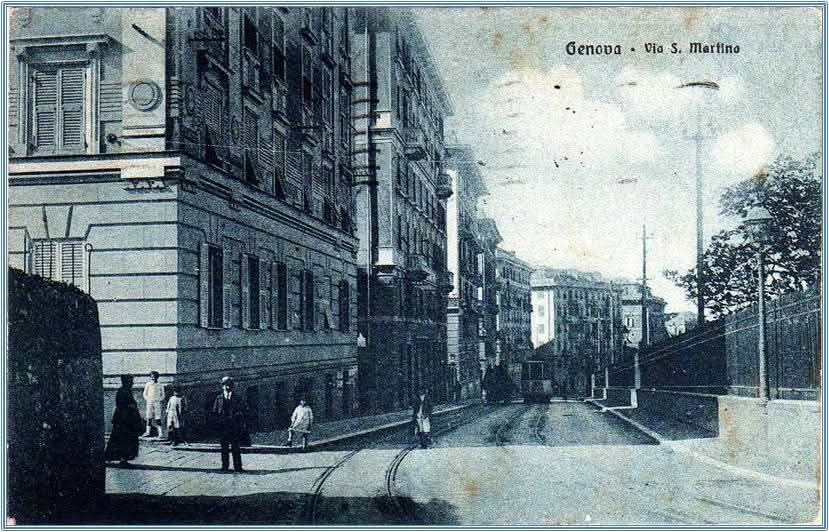
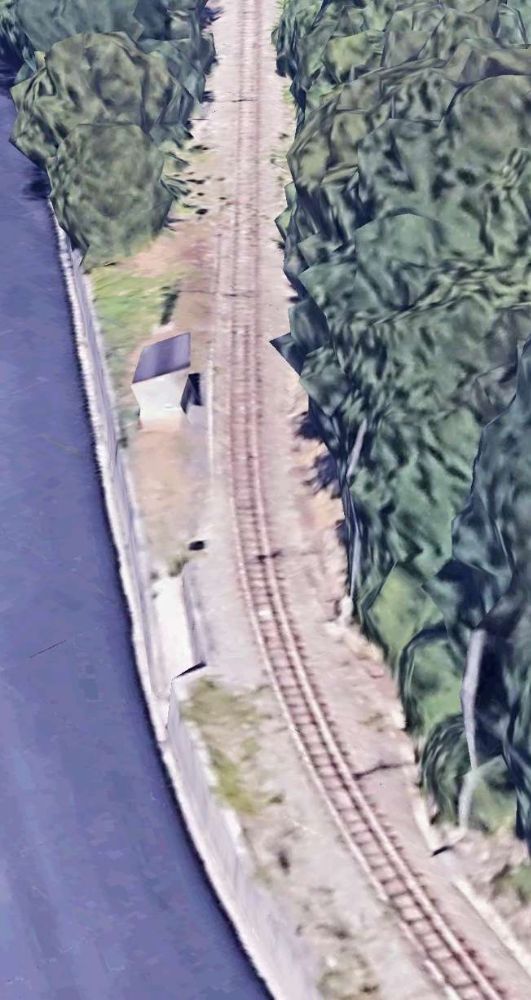
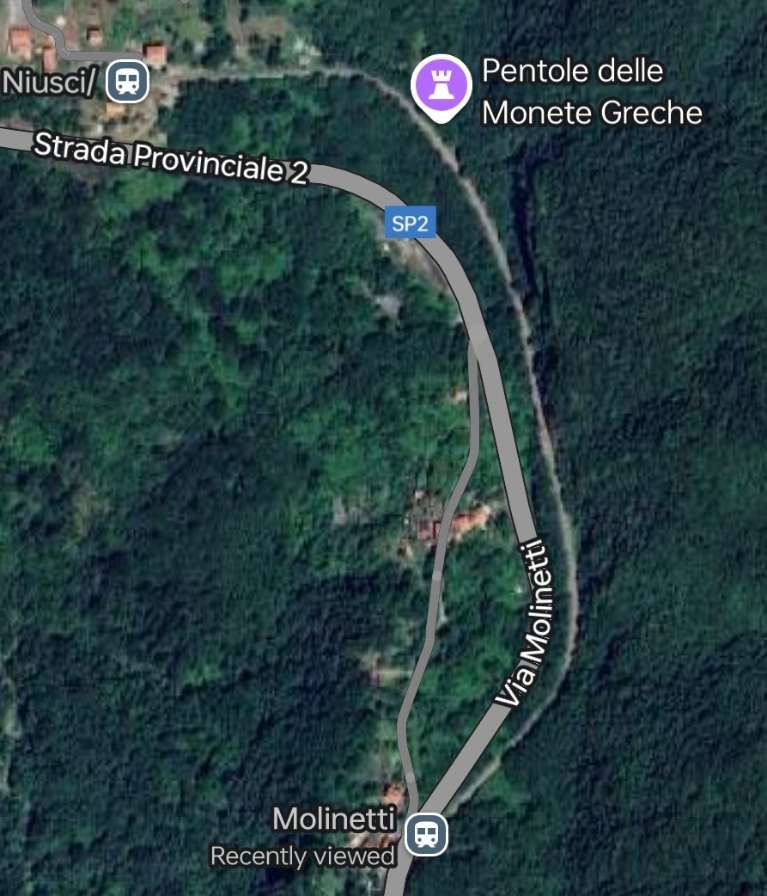
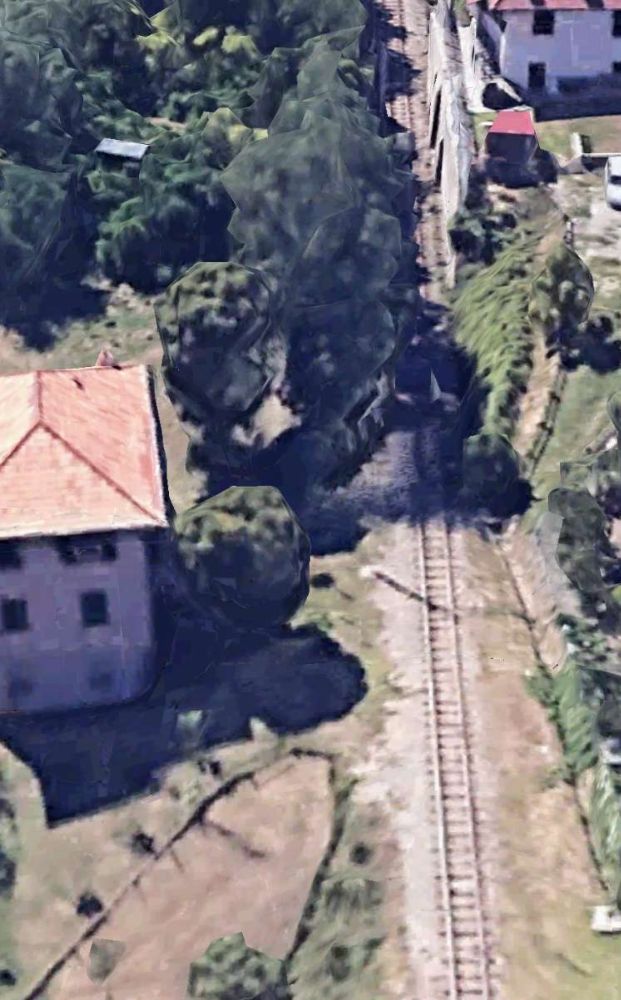
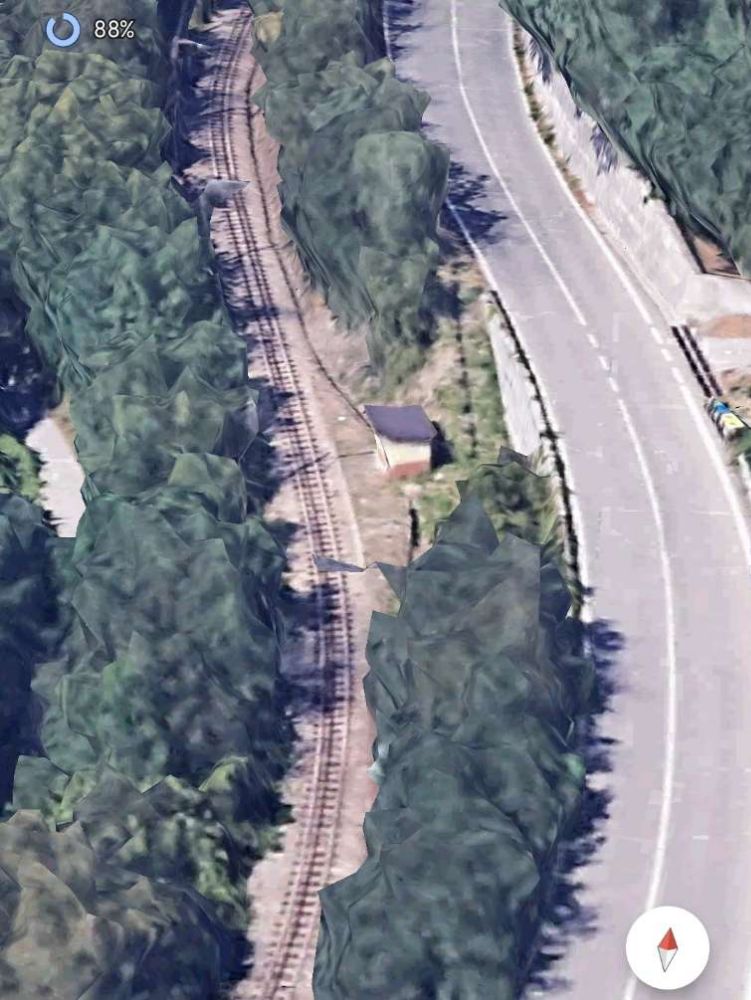
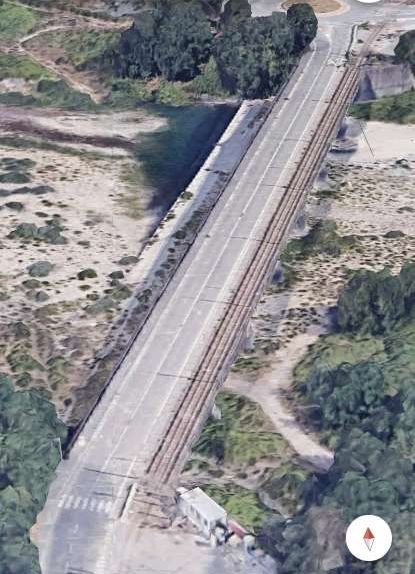
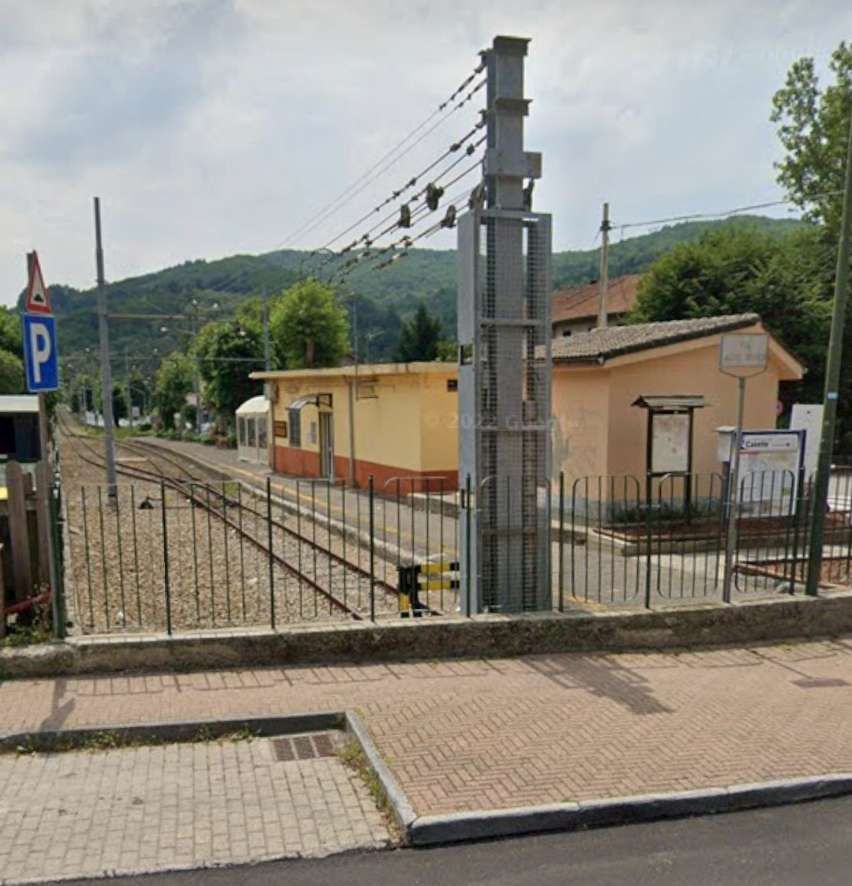
Another extract from the 25″ Ordnance Survey of 1934 (this sheet published in 1935). The tram tracks turned with Reddish Road as the road ahead led to Reddish Station forecourt. [36]As this next extract from the 25″ Ordnance Survey of 1934 shows, trams followed Reddish Road over the railway via Reddish Bridge and on to Holdsworth Square. [36]North of Holdsworth Square trams ran North along Gorton Road crossing the LMS & LNER Joint Railway between Manchester and Hayfield adjacent to that line’s Reddish Station. The location is shown on this extract from the 1934 25″ Ordnance Survey. [37]
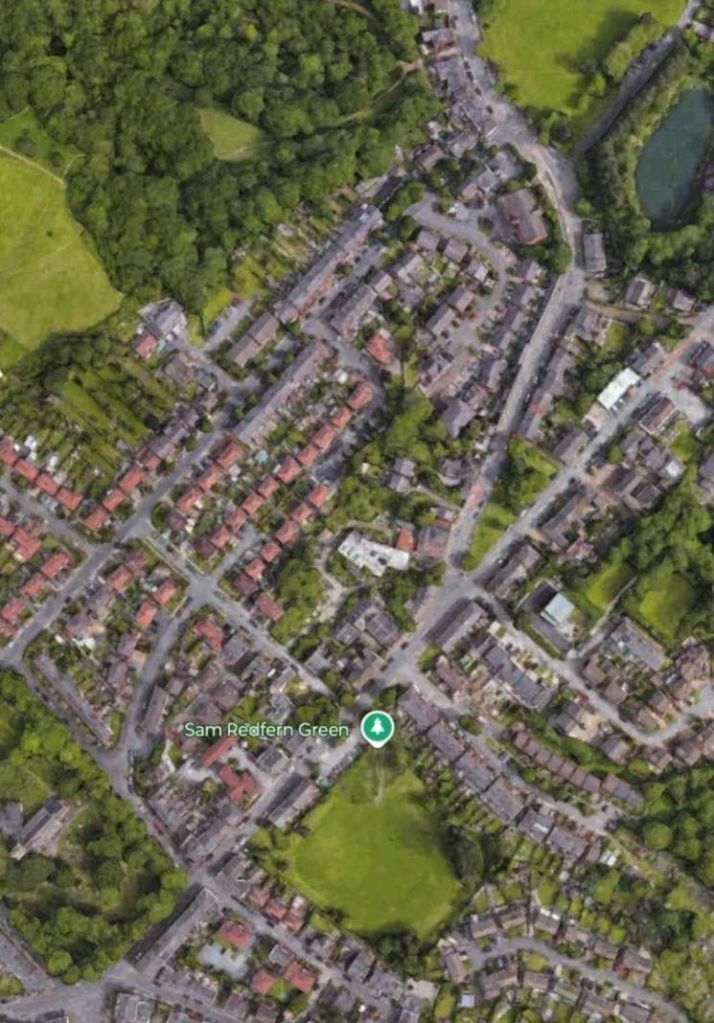
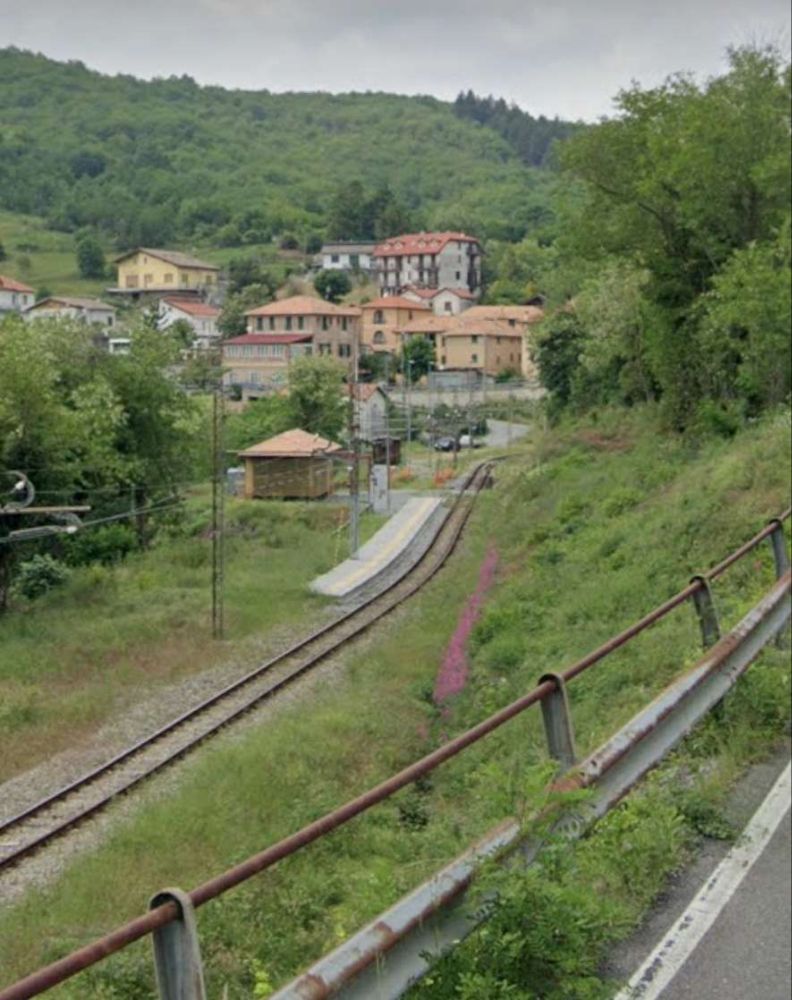
The next map extract and photograph show the terminus of the route we have been following from Mersey Square to Gorton. …
This first article has looked at the history of Stockport Corporation’s Tramways and has highlighted two of the tramway routes operated by Stockport Corporation. The line from Edgeley to Mersey Square and the line from Mersey Square to Gorton. Subsequent articles will look at other routes operated by the Corporation.
References
P.W. Gentry; Stockport Corporation Tramway; Modern Tramway, Vol. 12 No. 138, June 1949, p123-126.
Harry Postlethwaite, John Senior & Bob Rowe; Super Prestige No. 14, Stockport Corporation; Venture Publications, Glossop, Derbyshire, 2008. This document is made freely available by MDS Books as a .pdf: https://www.mdsbooks.co.uk/media/wysiwyg/Stockport_Download_1.pdf, accessed on 14th January 2025.
The first three articles in this series covered the network as it was established by the beginning of the First World War. These articles can be found here, [1] here [2] and here. [3]
We have already noted that there were changes to the network above which occurred before WW1, particularly the second line to Piazza Sturla in the East, the additional line to Sampierdarena in the West and the Municipal line to Quezzi in the Northeast.
In this article we look at the network from World War 1 to the beginning of World War 2.
After WW1 and into early WW2
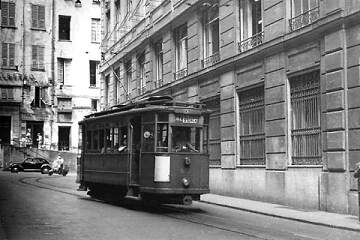
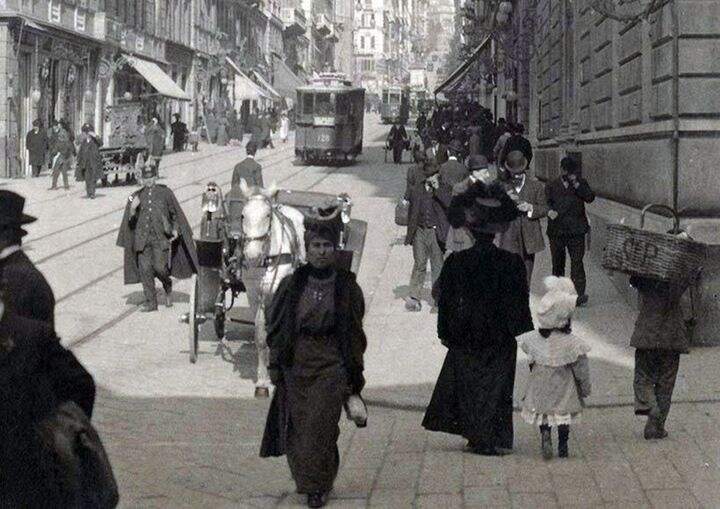
In 1923, driving on the right was imposed on roads throughout the country (until then, individual cities had discretion over the matter). Genoa complied on 31st August 1924. The change did not cause major upheavals in the tram service as it had always been undertaken by bidirectional carriages with doors on both sides. [19][21: p56]
In the mid 20s the autonomous municipalities between Nervi and Voltri along the coast, up to Pontedecimo in Val Polcevera and up to Prato in Val Bisagno, were annexed to the capital and a ‘Greater Genoa’ was formed. The entire tram network fell within the new municipal area. [19]
During this time UITE remained as a private company but the City acquired a majority of shares. [19][20: p223] and began to direct the development of the company and the network. [19][21: p62]
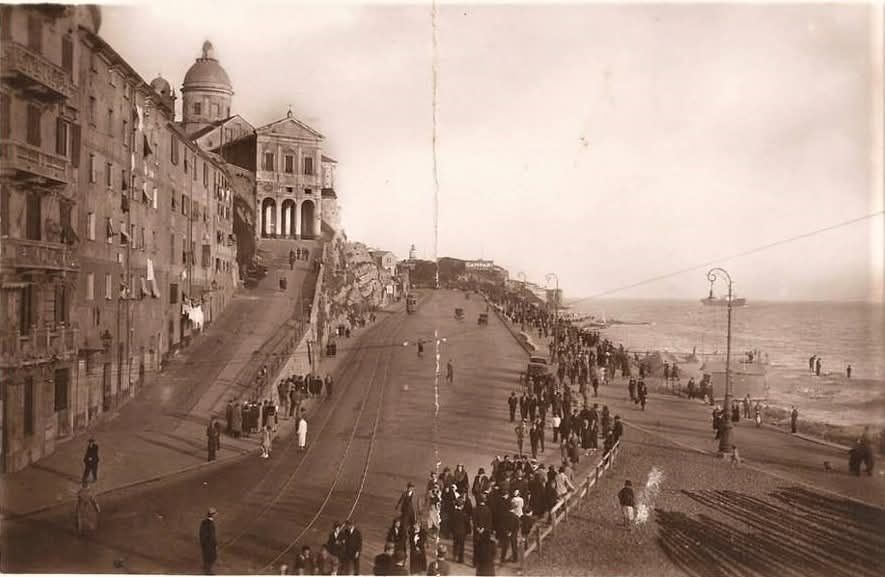
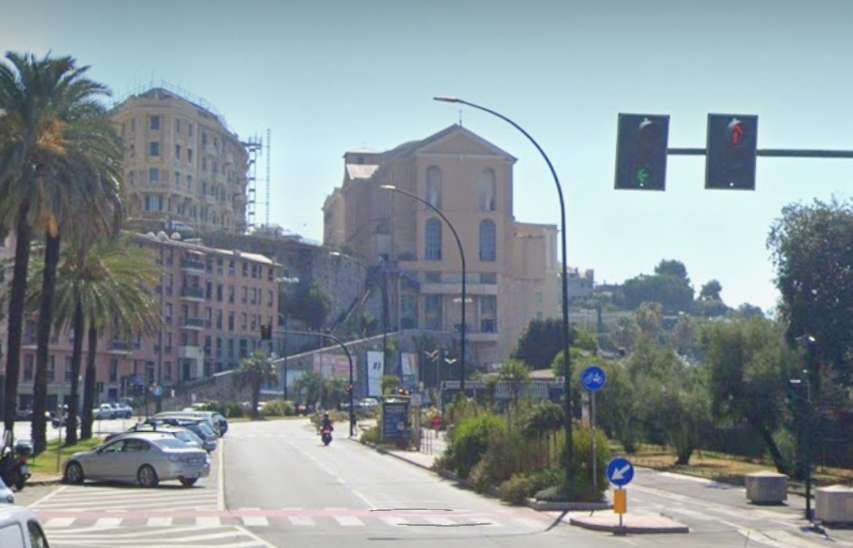
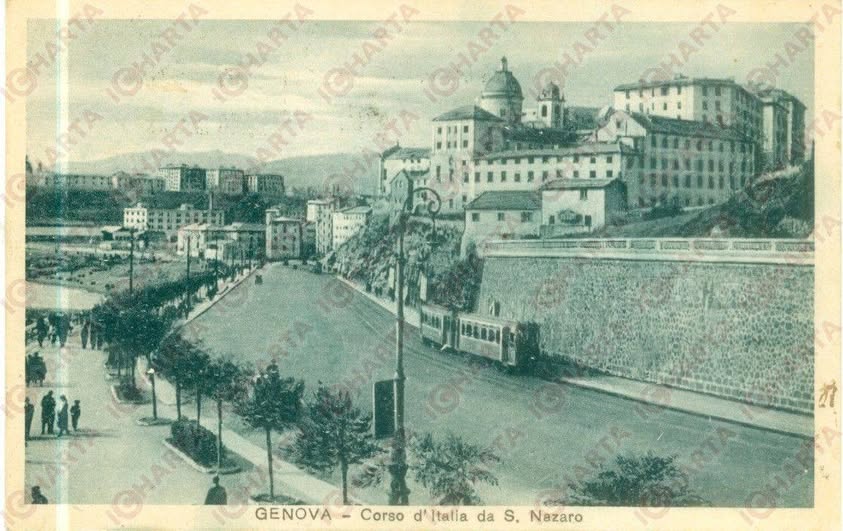
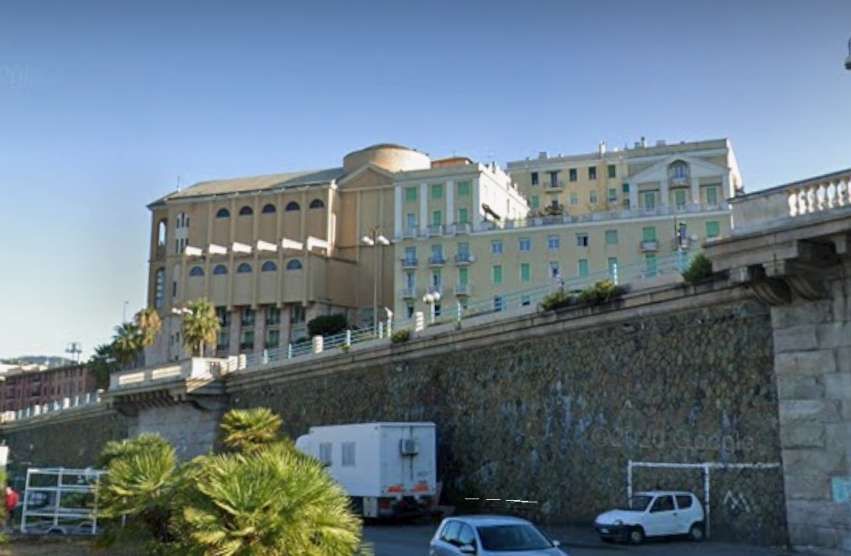
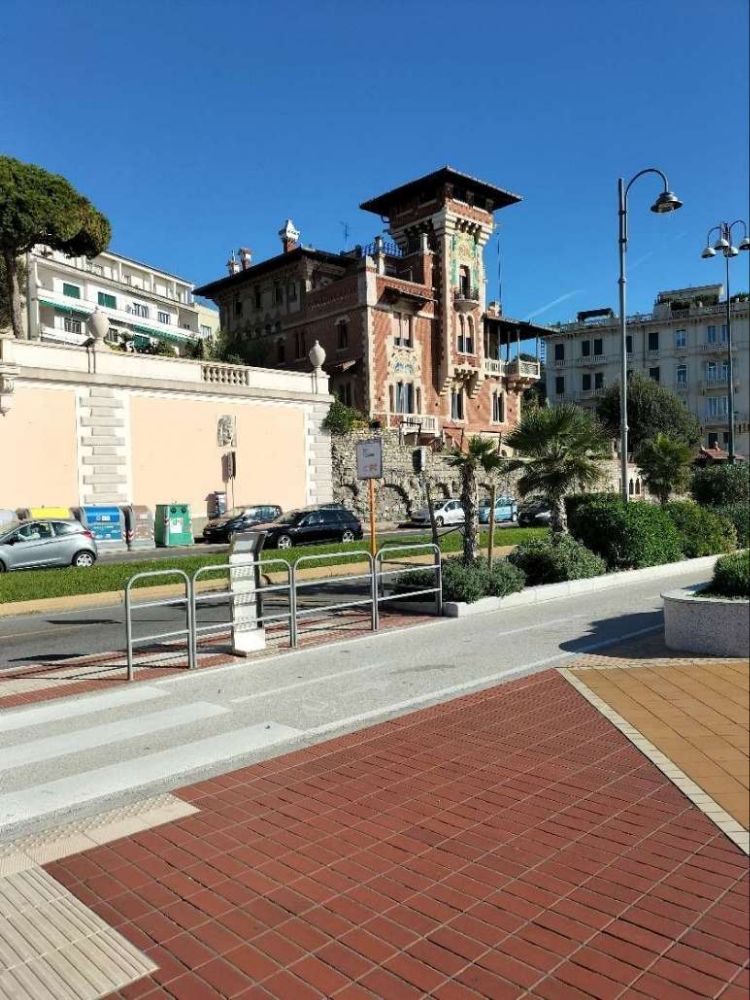
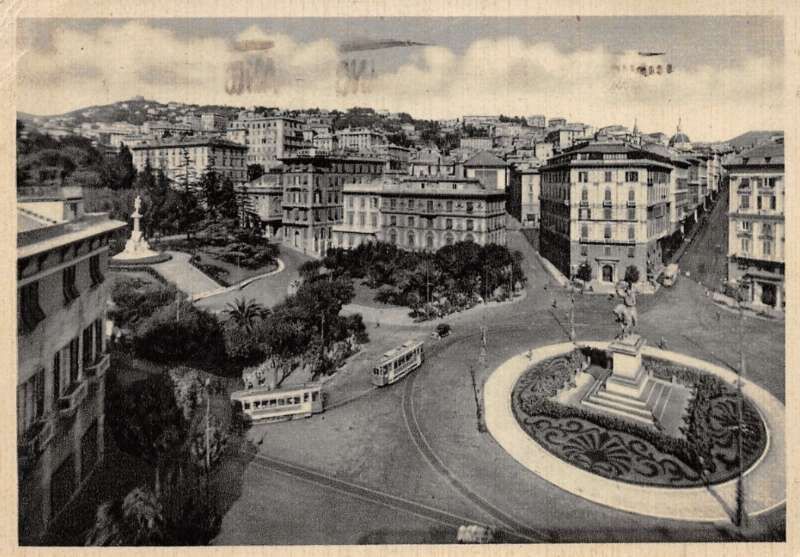
In 1934, major reform of the network took place. Trams ceased to use Via Roma, Via XX Settembre, and Piazza de Ferrari. The piazza saw major change – the lifting of the ‘tramway ring’ allowed, first, the planting of a large flower bed, and later (in 1936) the construction of a large fountain designed by Giuseppe Crosa di Vergagni. The trams were diverted through Piazza Dante and Galleria Colombo which was newly opened. [20: p224] At the same time new lines crossing the city were activated, with the aim of better distributing passengers in the central areas. [19][21: p62] The following year the trams also abandoned Corso Italia, in favour of a new route further inland which also included the new Galleria Mameli. [19][21: p125]
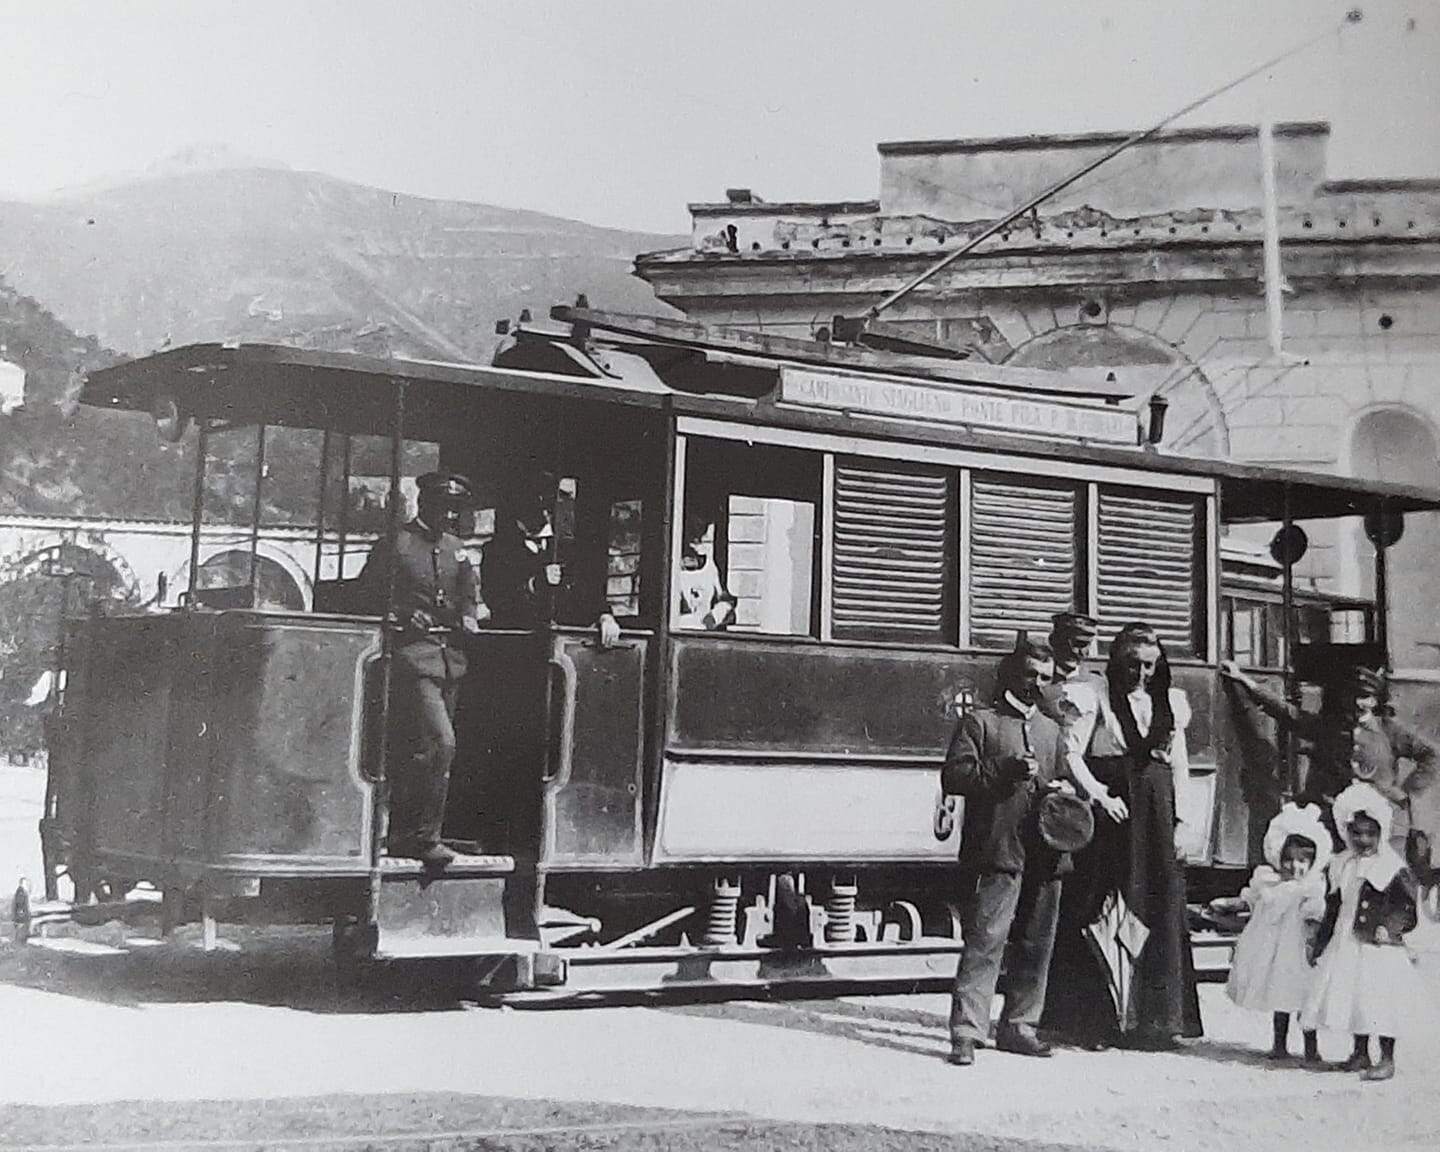
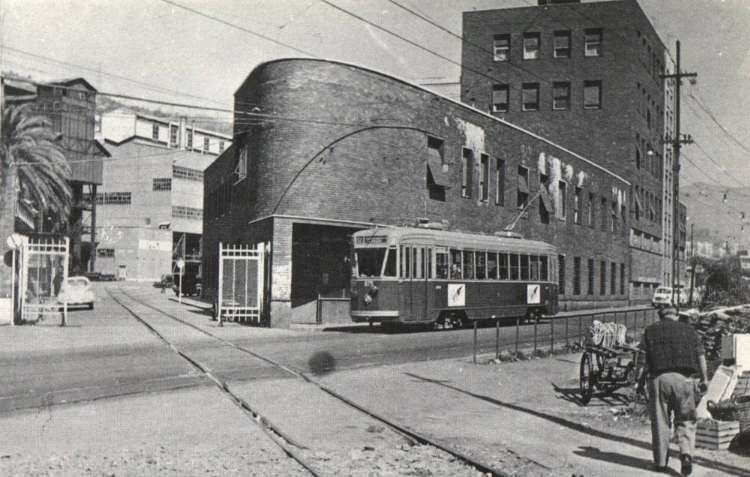
The modernization of the network included renewal of the fleet of trams. That renewal commenced in 1927 with the introduction of ‘Casteggini’ (trolley/bogie trams – named after the UITE engineer who designed them). These were followed in 1939 by modern ‘Genoa type’ trams, [20: p657] built first as single units and then, from 1942, in an articulated version. [19][20: p660]
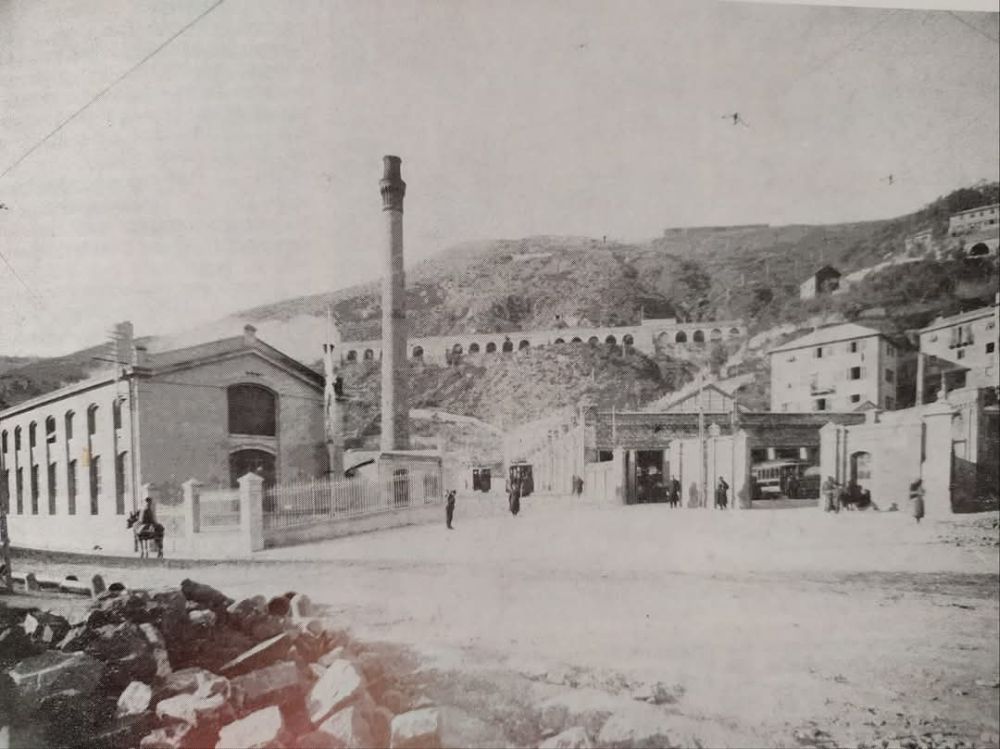
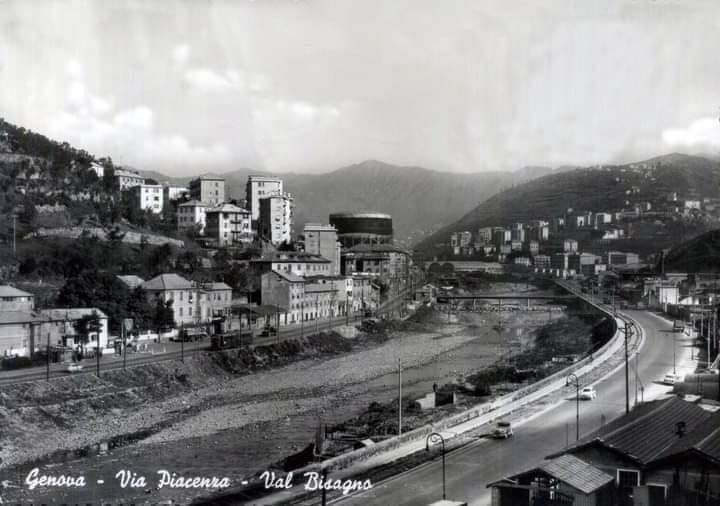
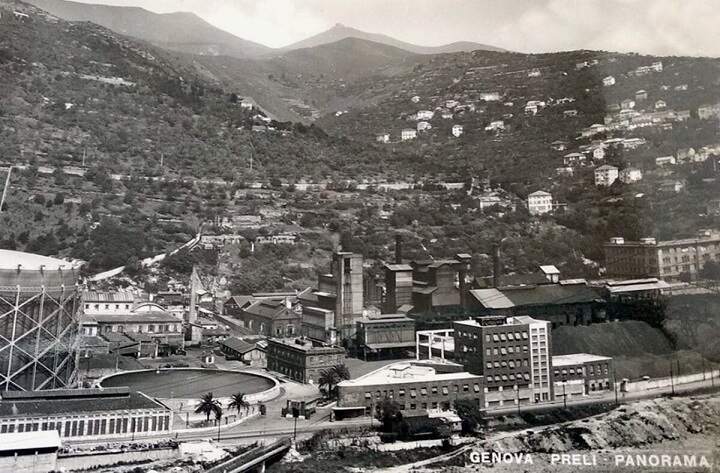
In 1935, the large Littorio depot near Ponte Carrega (Val Bisagno) came into operation. In 1940, workshop facilities were opened at the depot. [20: p237-238]
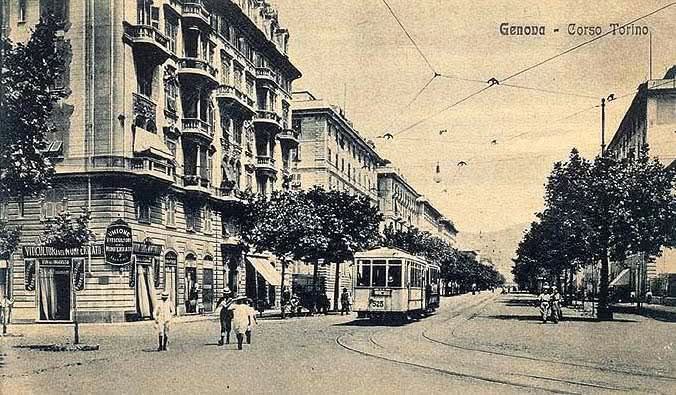
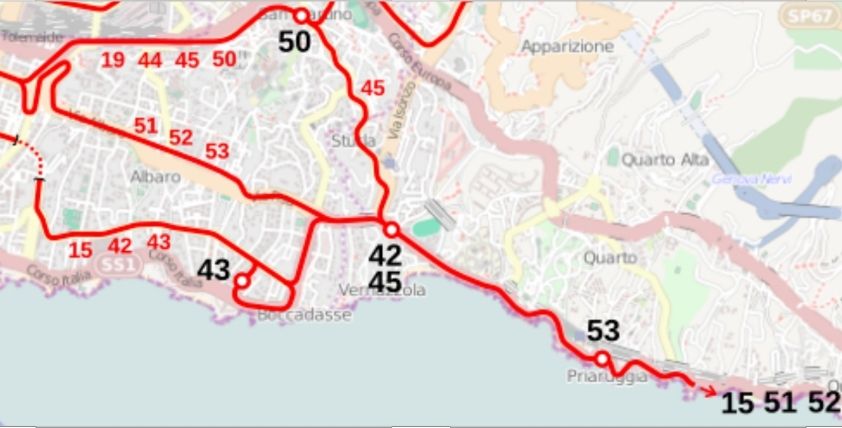
Italian Wikipedia tells us that after the changes made in 1934, the following list covers the tram routes on the network: [19][21: p125]
1 Banco San Giorgio – Voltri 2 Banco San Giorgio – Pegli 3 Banco San Giorgio – Sestri 4 Banco San Giorgio – Sampierdarena 5 Banco San Giorgio – Sampierdarena – Rivarolo 6 Banco San Giorgio – Sampierdarena – Bolzaneto 7 Banco San Giorgio – Sampierdarena – Pontedecimo 8 Banco San Giorgio – Sampierdarena – Campasso 9 Banco San Giorgio – Galleria Certosa – Rivarolo 10 Banco San Giorgio – Galleria Certosa – Bolzaneto 11 Banco San Giorgio – Galleria Certosa – Pontedecimo 12 Banco San Giorgio – Galleria Certosa – Certosa – Sampierdarena – Banco San Giorgio 13 The reverse of Line 12 14 Banco San Giorgio – Cornigliano 15 Banco San Giorgio – Pra 16 Brignole – Corvetto – Pegli 18 Marassi – Bolzaneto 21 Dinegro – Manin – Staglieno 22 Manin – Corvetto – Piazza Santa Sabina 23 De Ferrari – Marassi – Quezzi 24 Corso Dogali – Manin – Corvetto – Principe – Corso Dogali (circulating clockwise through the hills) 25 The reverse of Line 24 (circulating anti-clockwise through the hills) 26 Dinegro – Principe – via Napoli 27 Corso Dogali – Manin – Corvetto – Tommaseo 28 Principe – Corvetto – Via Atto Vannucci – Banco San Giorgio 30 De Ferrari – Foce 31 Banco San Giorgio – Staglieno – Prato 32 Banco San Giorgio – Molassana – Giro del Fullo
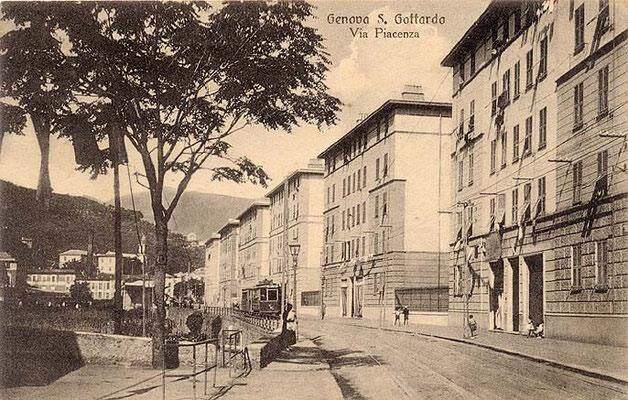
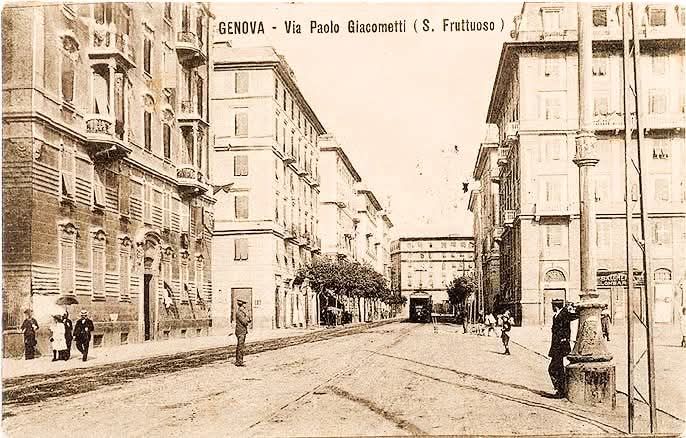
33 De Ferrari – Piazza Verdi – Staglieno 34 Piazza della Vittoria – Staglieno – San Gottardo – Doria 35 Piazza della Vittoria – Staglieno 36 Piazza della Vittoria – Ponte Carrega 37 De Ferrari – Piazza Verdi – San Fruttuoso 38 De Ferrari – Via Barabino – Boccadasse 39 De Ferrari – Sturla – Nervi 40 Banco San Giorgio – De Ferrari – Albaro – Quinto 41 Piazza Cavour – Via Barabino – Corso Italia – Priaruggia 42 De Ferrari – San Francesco d’Albaro – Sturla 43 De Ferrari – San Francesco d’Albaro – Lido 44 Banco San Giorgio – De Ferrari – Borgoratti 45 De Ferrari – San Martino – Sturla 46 De Ferrari – Tommaseo – San Martino 47 De Ferrari – San Francesco d’Albaro – Villa Raggio 48 Piazza Cavour – Piazza della Vittoria – San Fruttuoso 49 De Ferrari – Tommaseo – ‘Ospedale San Martino 50 San Martino – Brignole – Corvetto – Sampierdarena – Campasso 51 Quezzi – Brignole – Principe – Galleria Certosa – Rivarolo 52 San Giuliano – Brignole – Principe – Dinegro 53 Tommaseo – Brignole – Principe – Sampierdarena – Campasso 54 Sturla – Albaro – De Ferrari – Banco San Giorgio – Dinegro 55 Foce – Brignole – Principe – Dinegro 56 Marassi – Brignole – Principe – Dinegro
The lines marked with a red ‘X’ are those which closed in the city centre with the reorganisation of 1934, (c) Paolo Gassani. [8]
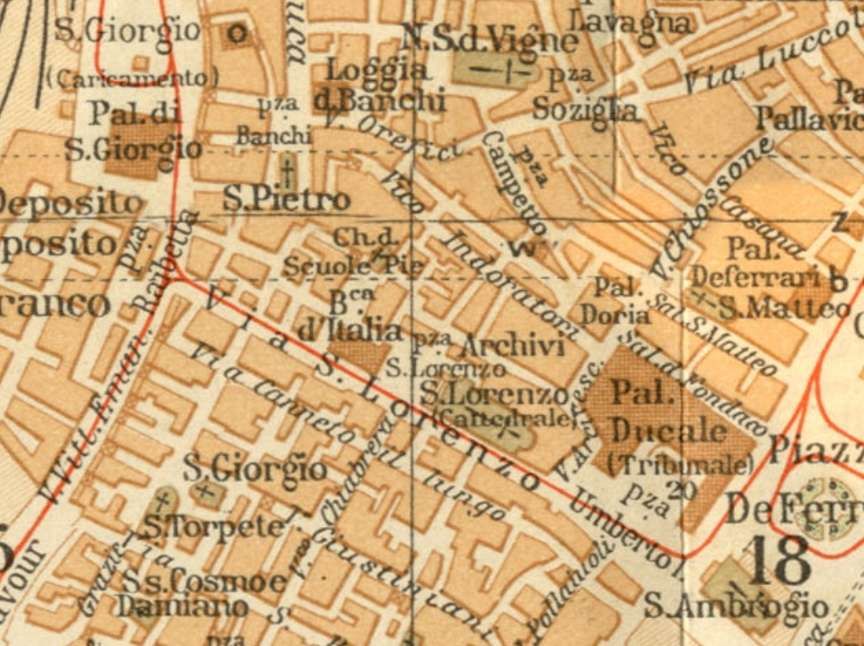
After 1934, Piazza Banco di San Georgio became the centre of the altered network (it was referred to originally as Piazza Caricamento). This was facilitated by earlier alterations to the network which included:
Piazza Railbetta, Piazza di San Georgio, Via San Lorenzo and Piazza Umberto 1
These earlier alterations included a very short line, shown on the Baedecker 1916 map of Genova, connecting Piazza Banco di San Georgio and Piazza Raibetta. In addition, a line along Via San Lorenzo and Piazza Umberto 1 made a connection from that short line to Piazza Raffaele de Ferrari which at the time was at the heart of Genova’s tram network. This three-way length of connecting tramways opened up the possibility of the significant revisions to the network which occurred in 1934. The 1916 Baedeker map is the first I have found which shows these links, early Baedeker maps available online do not show these lines. There is photographic evidence of these lines being in use by 1906.
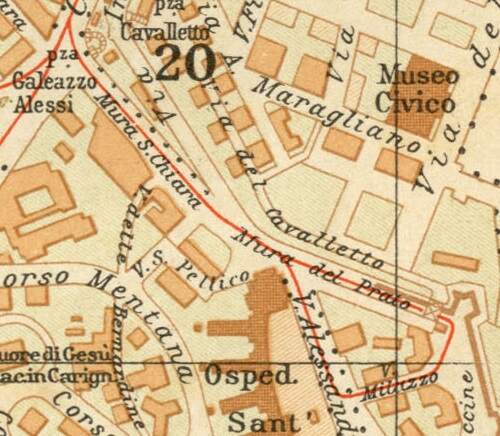
An additional short line was provided from Piazza Galeazzo Alessi at the top of Via Corsica along Mura Sant Chiara, Mura del Prato, Viale Milazzzo and Via Alessandra Volta, as shown below.
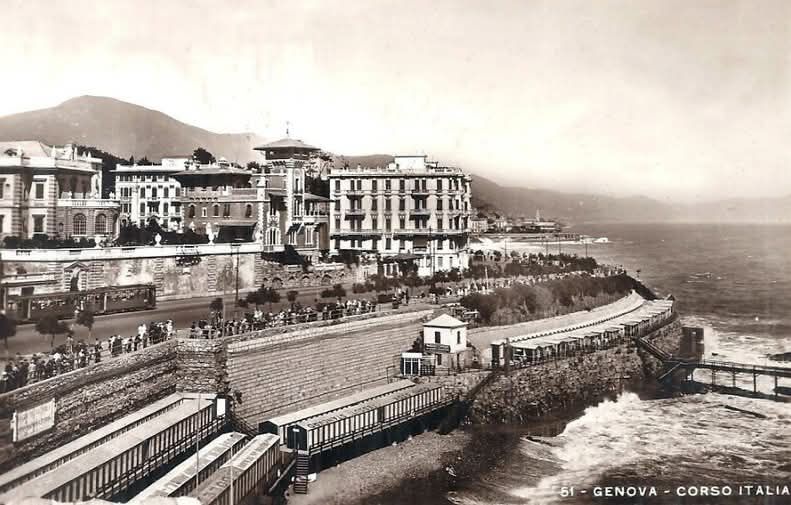
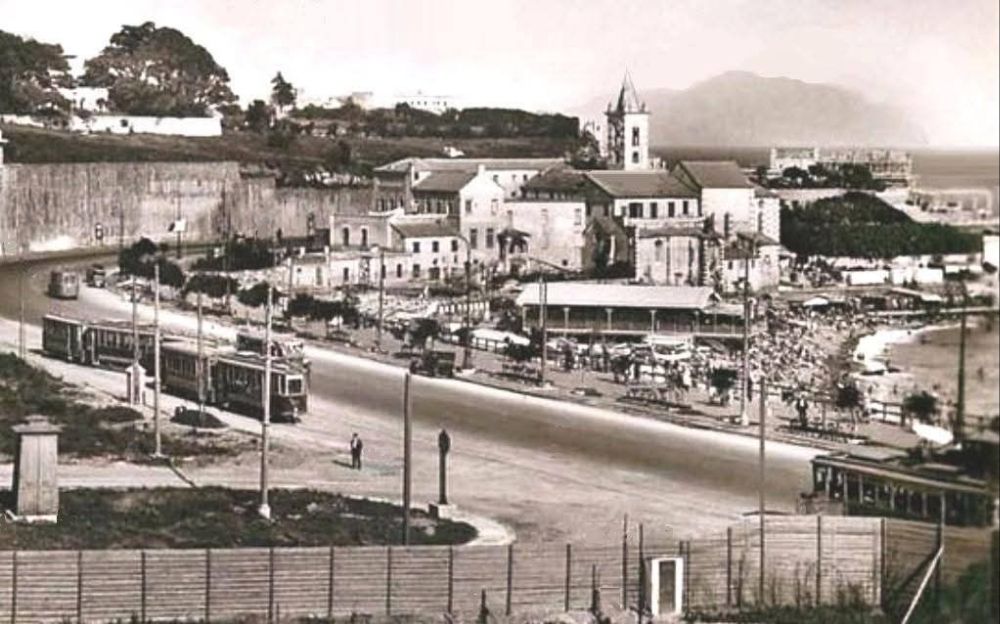
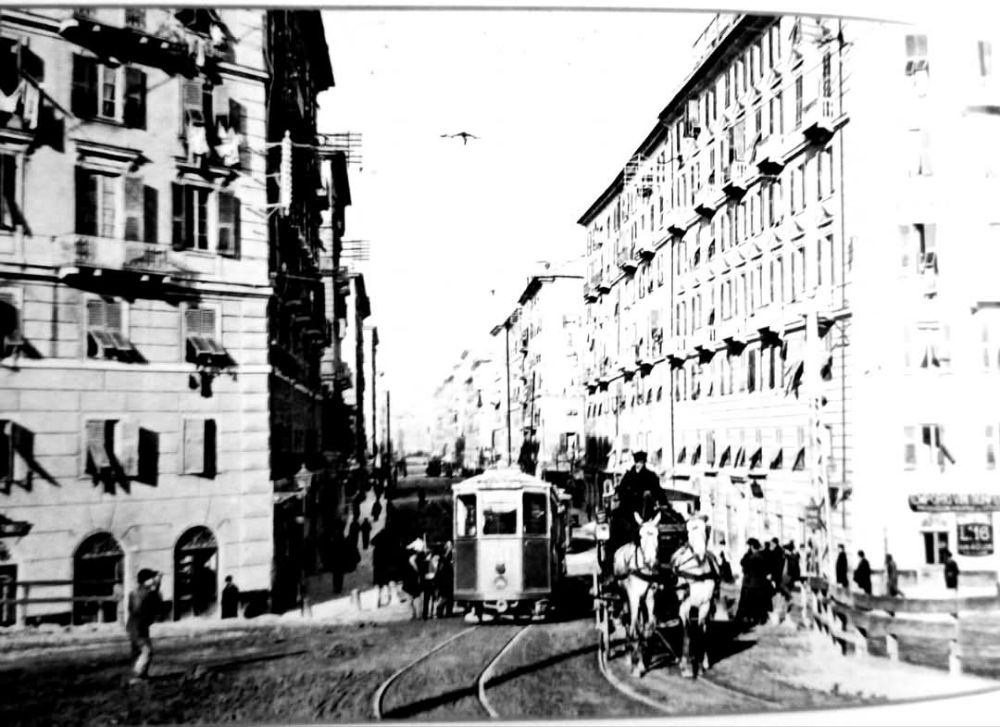
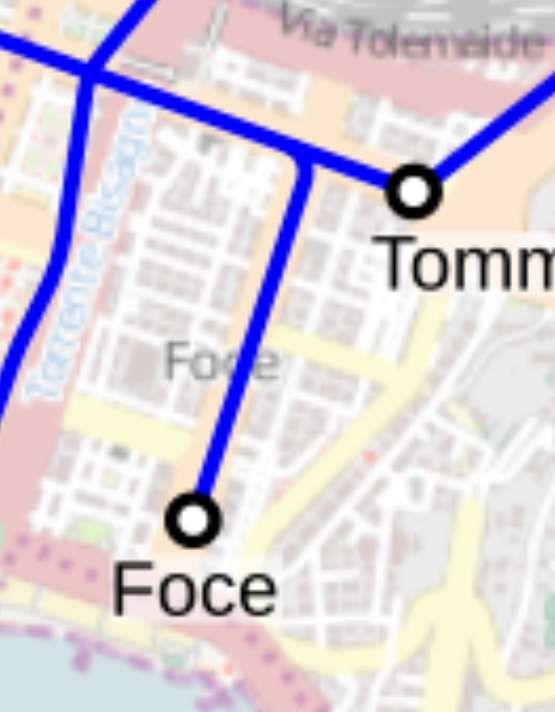
Corso Italia was built between 1909 and 1915 [6] and the tram line to Foce was extended along Corso Italia sometime in the early 1920s. The tram line can be seen (dotted) on the map extract below.
Other links were added such as a line between Piazza Brignole and Piazza Giuseppi Verdi (outside Brignole Station). With the culverting of the Bisagno River in 1930/31, a link along Via Tolemaide from Piazza Verdi to meet the existing tramway which ran Northeast/Southwest on Via Montevideo and continued East towards San Martino, became possible.
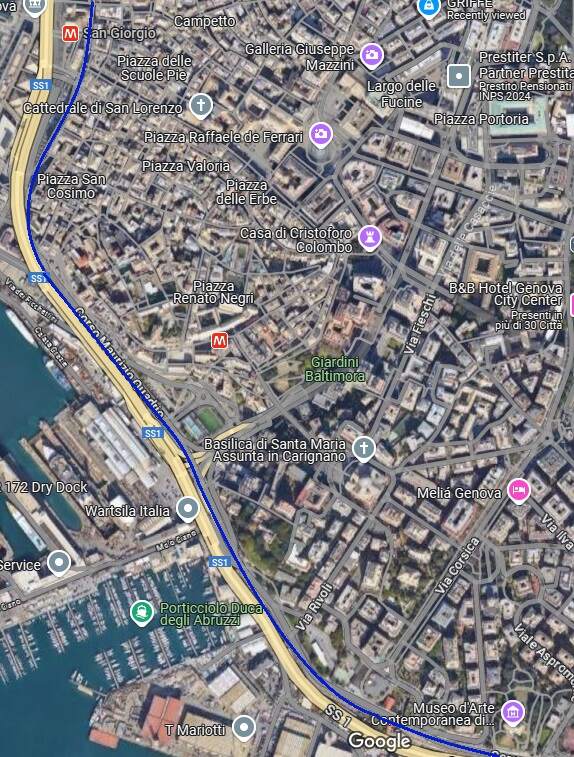
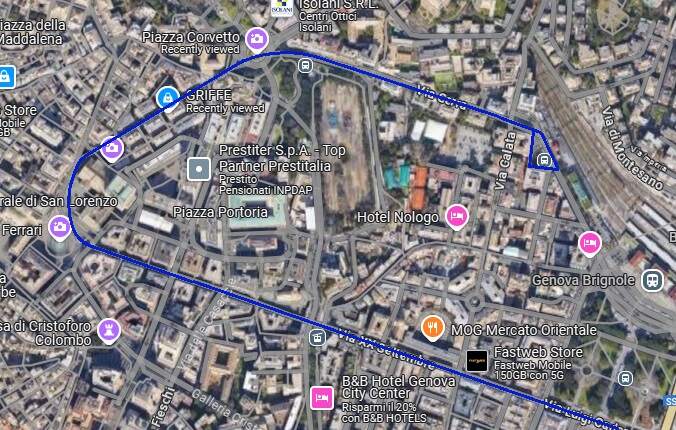
Piazza Raffeale de Ferrari, Piazza Dante and routes East
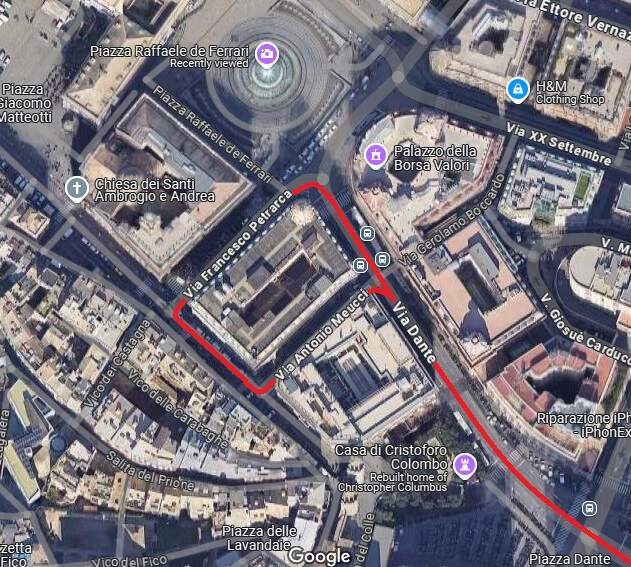
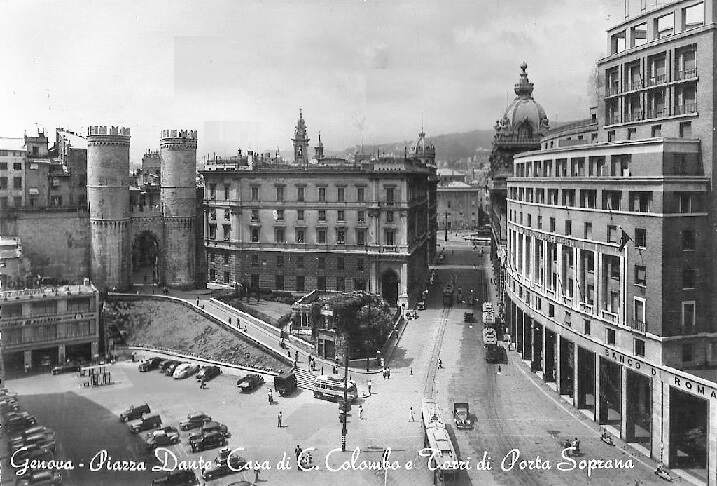
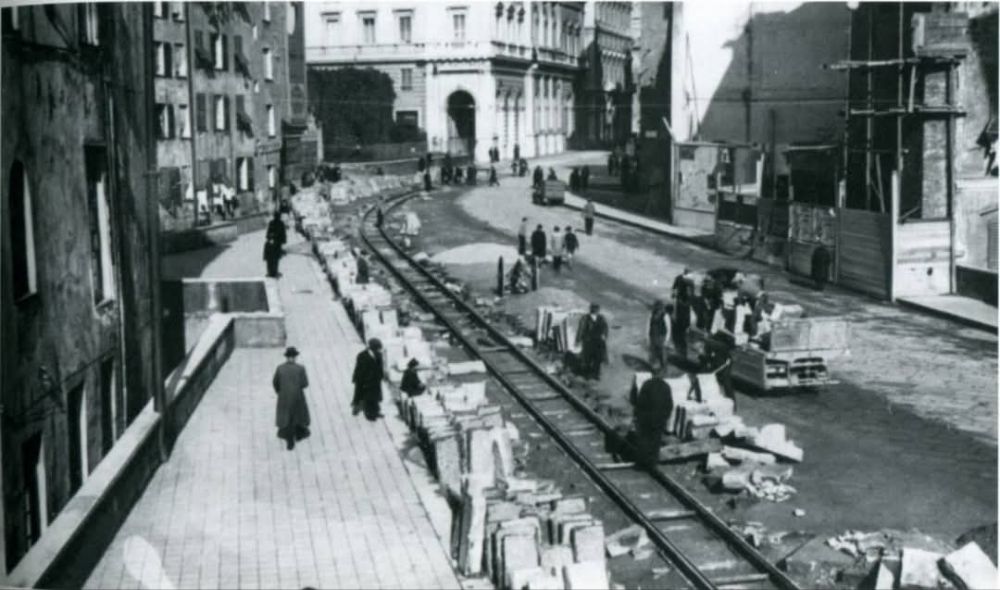
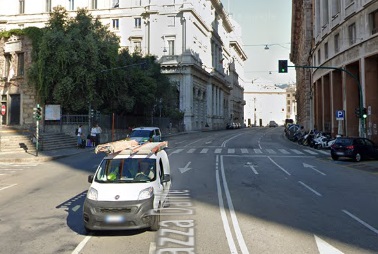
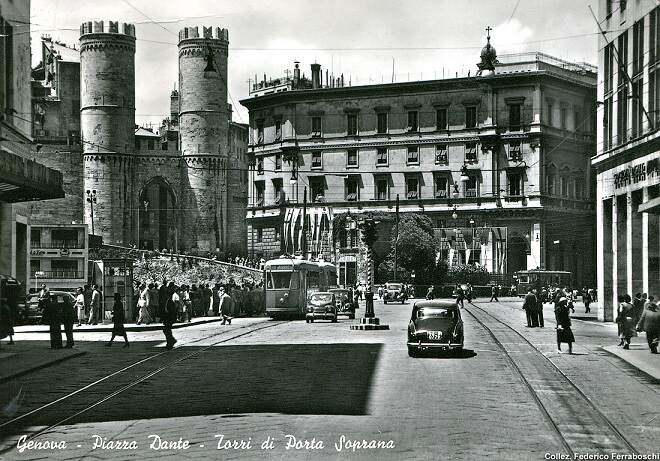
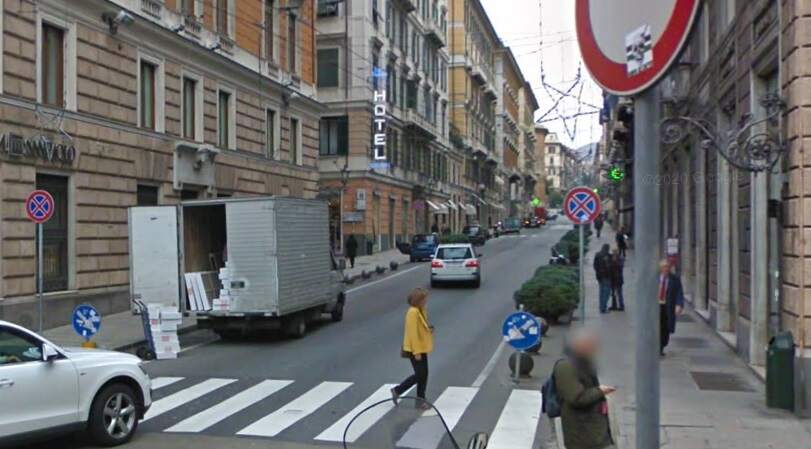
We have already noted that Piazza Raffaele de Ferrari ceased to be the main focus of the network in 1934 and that trams were removed from Via XX Settembre and Via Roma at the time. What remained in the vicinity of Piazza de Ferrari was a single loop line were 11 lines from the East and Valbisagno terminated. The terminus was on Via Petrarca with a return loop through Via Porta Soprana and Via Antonio Meucci to Piazza Dante and then on to their destinations. The first image below shows the revised arrangements on the South corner of Piazza Raffaele de Ferrari.
Trams which originally entered Piazza Raffaele de Ferrari from the north along Via Roma were diverted from Piazza Corvetto along Via Serra toward Piazza Brignole. More about this further down this article.
A 600 series tram in Via Meucci on the return loop. The tram is approaching Via Dante where it will turn right to head East out of the centre of Genova, (c) Public Domain. [13]
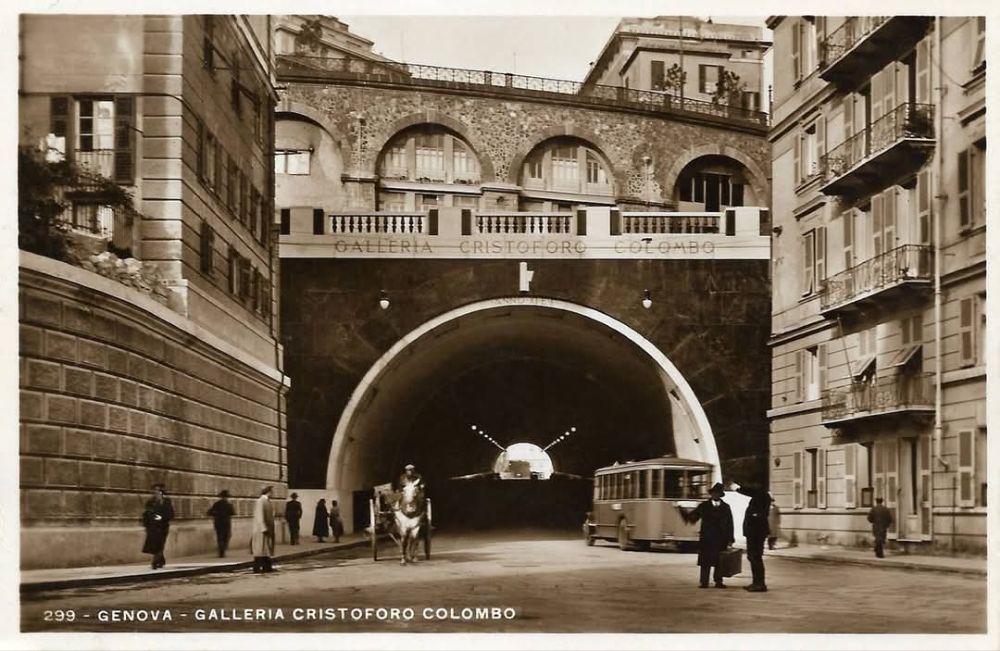
Trams travelled up and down Via Dante and through Galleria Cristoforo Colombo to serve the East of the city and the coast.
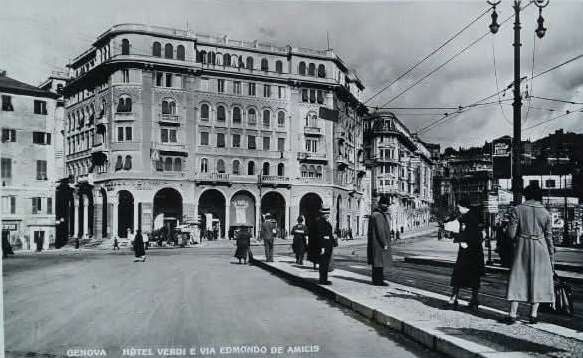
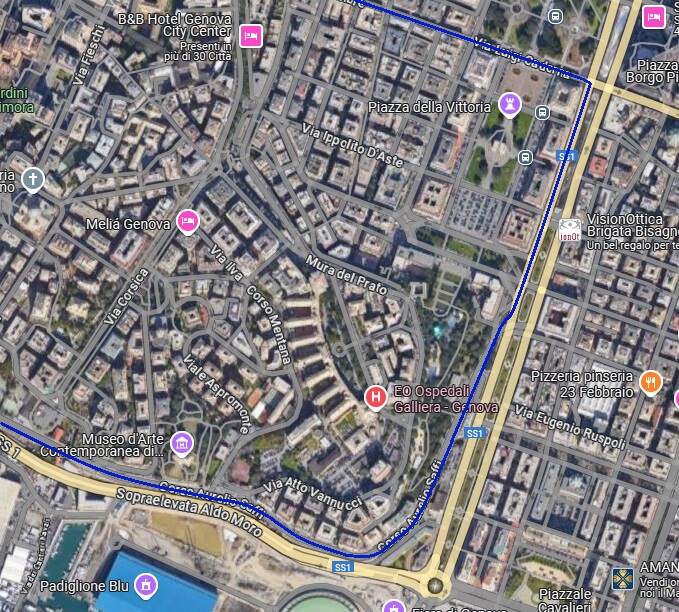
When trams were diverted away from Piazza De Ferrari, those which used to travel down Via Roma were diverted along Via Serra and Piazza Brignole. A new length of tramway was built along Via Edmondo de Amicis to link Piazza Brignole with Piazza Verdi and Brignole Railway Station.
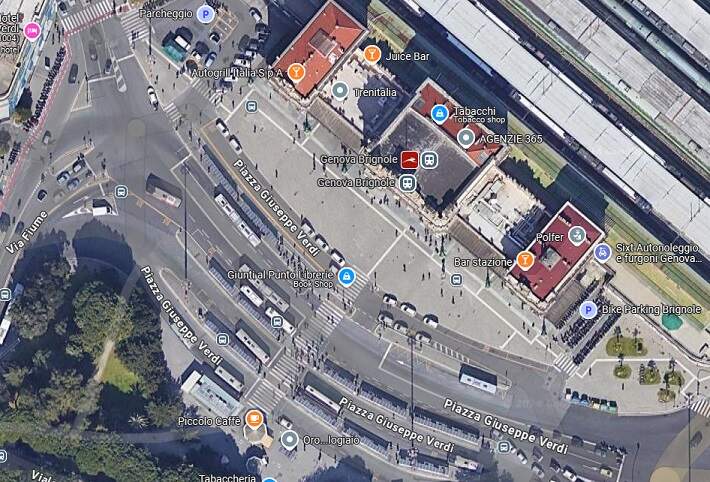
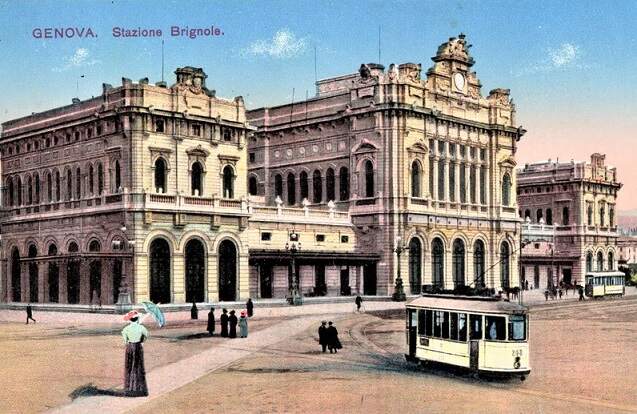
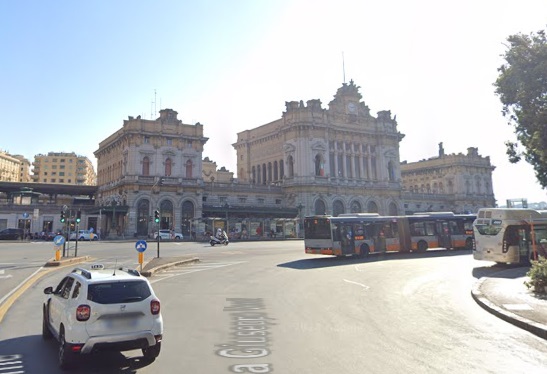
The station forecourt of Brignole Railway Station and the North side of Piazza Giuseppe Verdi became a significant hub within the new network inaugurated in 1934.
Looking East across the face of Brignole Railway Station in the 1960s with the tram station in the centre of the view. This image was shared by Gianfranco Curatolo on the C’era Una Volta Genova Facebook group on 20th August 2016. [29]Piazza Giuseppe Verdi and Brignole Railway Station in the 21st century. [Google Maps, December 2024]
East from Piazza Verdi (Via Tolemaide)
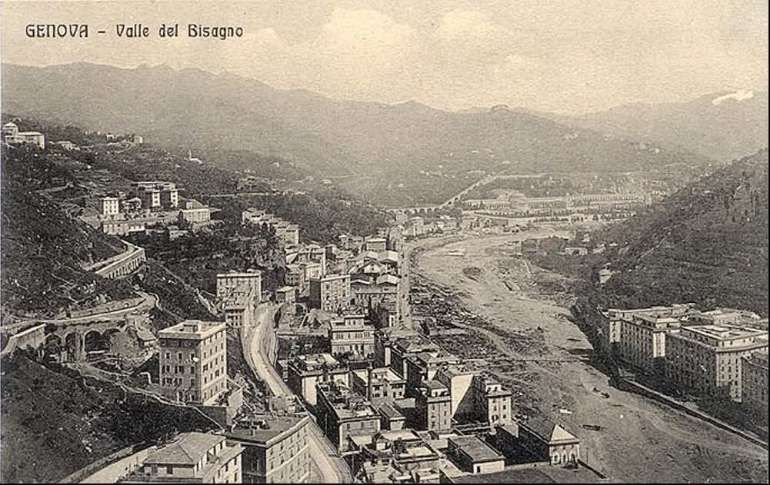
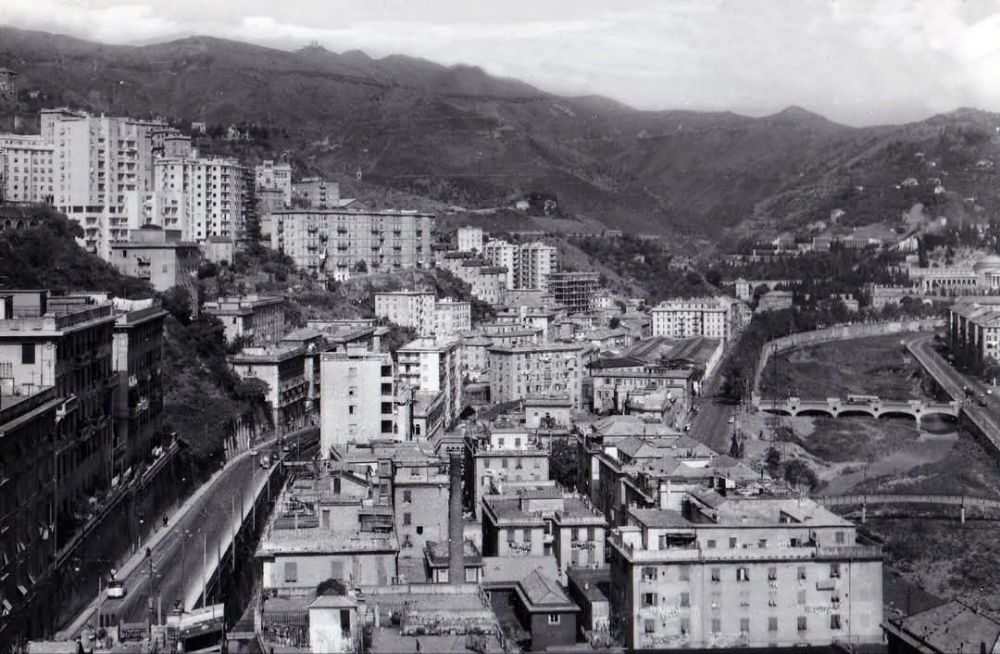
Major work was undertaken in the 1930s along the length of the River Bisagno from the railway to the sea shore. That full length of the river was converted and a broad boulevard was created.
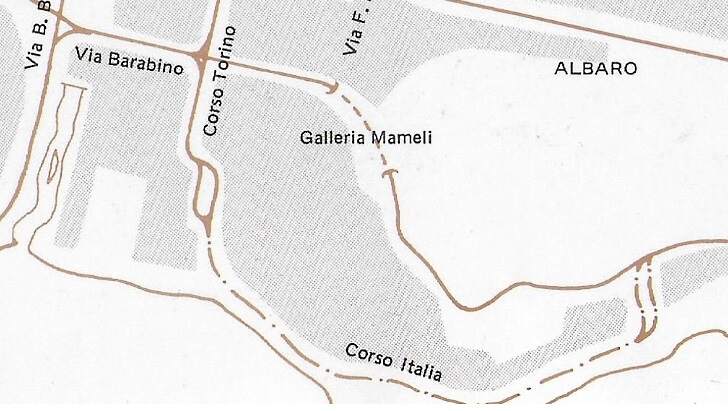
Piazza Verdi (Brignole Railway Station), Viale Brigata Partigiane/Viale Brigata Bisagno, Via Barabino, Galleria Mameli, Via Carlo e Nello Rosselli and further East
The construction of Galleria Principe di Piemonte (later Galleria Mameli) allowed a further route East from the city centre to be exploited.
A summary of what was covered in the first two articles
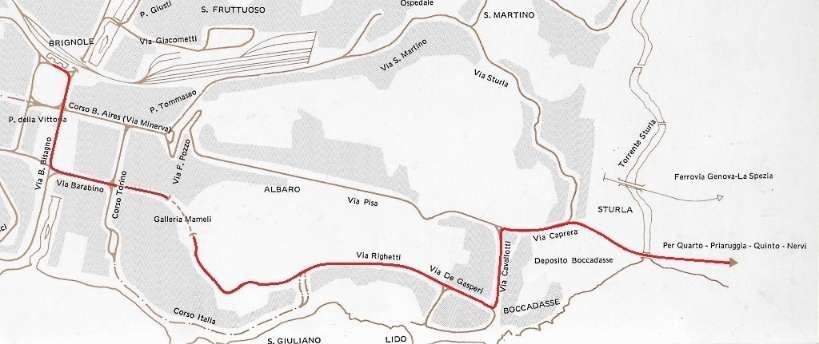
In the previous articles in this short series we looked at the history of trams in Genoa (Genova) – both horse trams and electric trams. In the first article, we covered the story as far as the beginning of the First World War. That article can be found here. [1]
In that article we looked at the tunnels which the city created in order to facilitate access to different parts of the tram network.
That article also covered the Western Network (which is marked in green on the map below).
In the second article we looked at a large part of the Eastern Tram Network. That article can be found here. [2]
We still have to look at the remainder of the network and the history of the network through to its final closure in the mid-1960s.
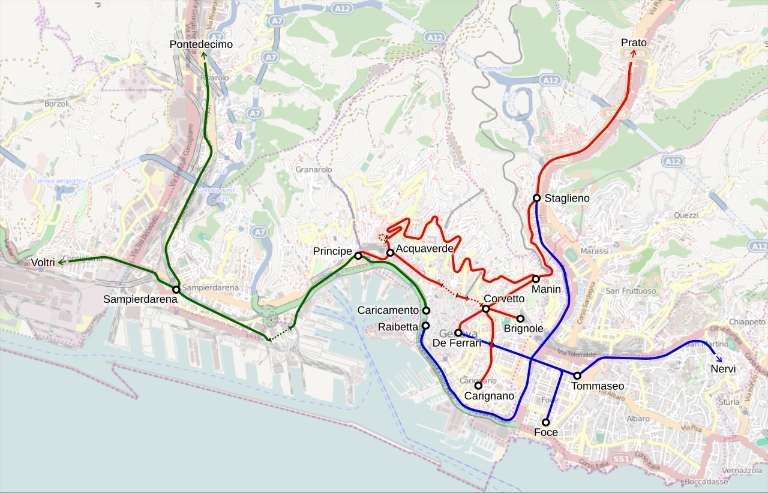
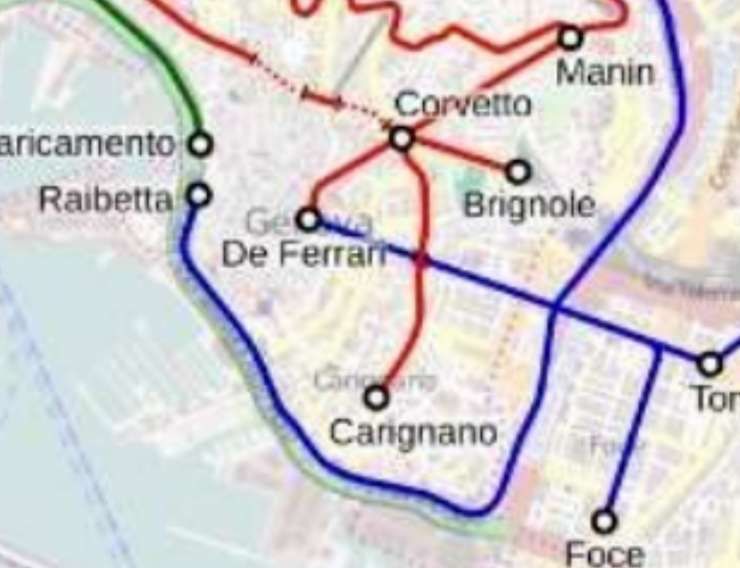
In this article we look at the services provided on the route from Piazza Corvetto to Prato (via Piazza Manin and Staglieno) which appears in red on the map above and the blue lines which ran out of Piazza Raffeale di Ferrari along Via XX Settembre to Staglieno, Foce, Thommaseo and Nervi. Firstly, looking as those provided before the First World War.
The Years Before World War One – The Eastern Network
Before the start of World War 1, the Eastern network provided these services: [19]
I. Eastern Network:
21 De Ferrari – Manin – Staglieno 22 De Ferrari – Manin 23 De Ferrari – Manin – Castelletto 24 De Ferrari – Manin – Castelletto – San Nicholo 25 Circuit in the hilly suburbs 26 Piazza Principe – Corso Ugo Bassi 27 De Ferrari – Zecca – Principe 28 Caricamento – De Ferrari – Galliera ‘Ospital 29 De Ferrari – Carignano 30 Circular Raibetta – Brignole – Corvetto – Raibetta 31 De Ferrari – Staglieno – Molassana – Prato 32 De Ferrari – Staglieno – Molassana 33 De Ferrari – Pila – Staglieno 34 Staglieno – Iassa 35 Pila – Staglieno 36 Pila – Staglieno – Molassana 37 De Ferrari – San Fruttuoso 38 De Ferrari – Foce 39 De Ferrari – San Francesco – Sturla – Priaruggia – Quinto – Nervi 40 De Ferrari – San Francesco – Sturla – Priaruggia – Quinto 41 De Ferrari – San Francesco – Sturla – Priaruggia 42 De Ferrari – San Francesco – Sturla 43 De Ferrari – Villa Raggio – Lido 44 De Ferrari – Tommaseo – San Martino – Borgoratti 45 De Ferrari – Tommaseo – San Martino – Sturla 46 De Ferrari – Tommaseo – San Martino 47 De Ferrari – Tommaseo 48 Raibetta – Pila
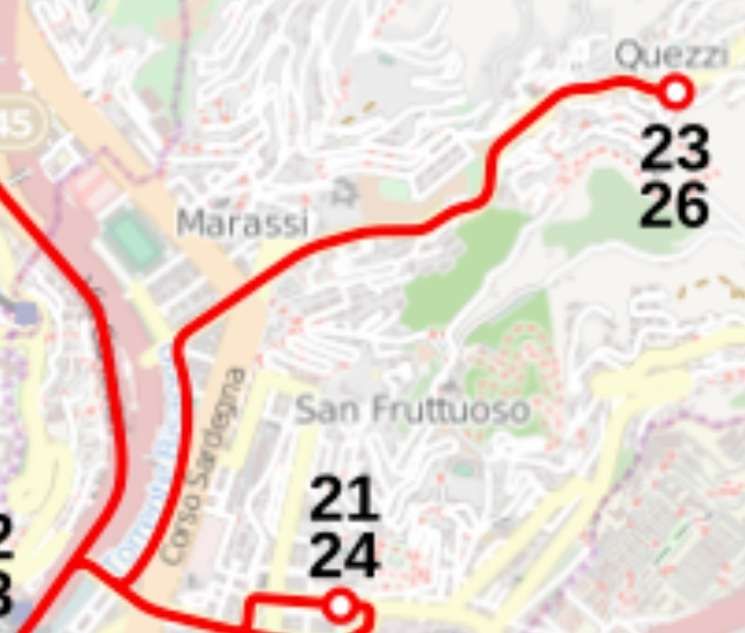
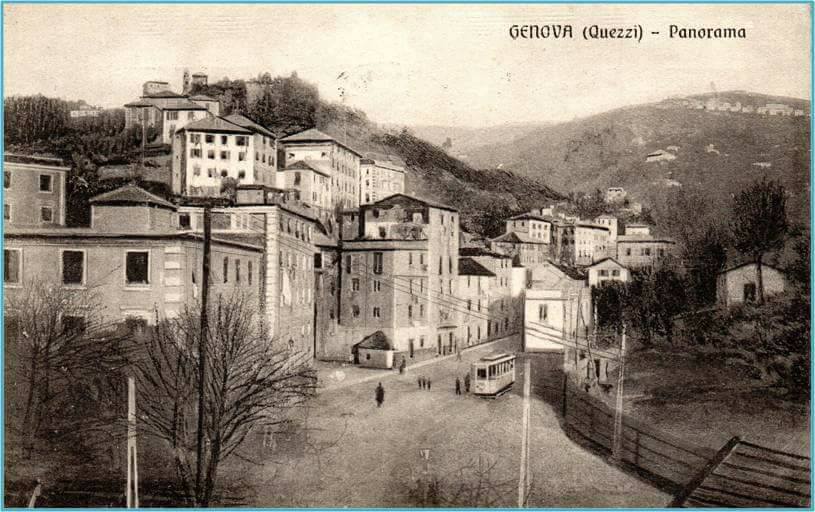
II. Municipal line: De Ferrari – Quezzi
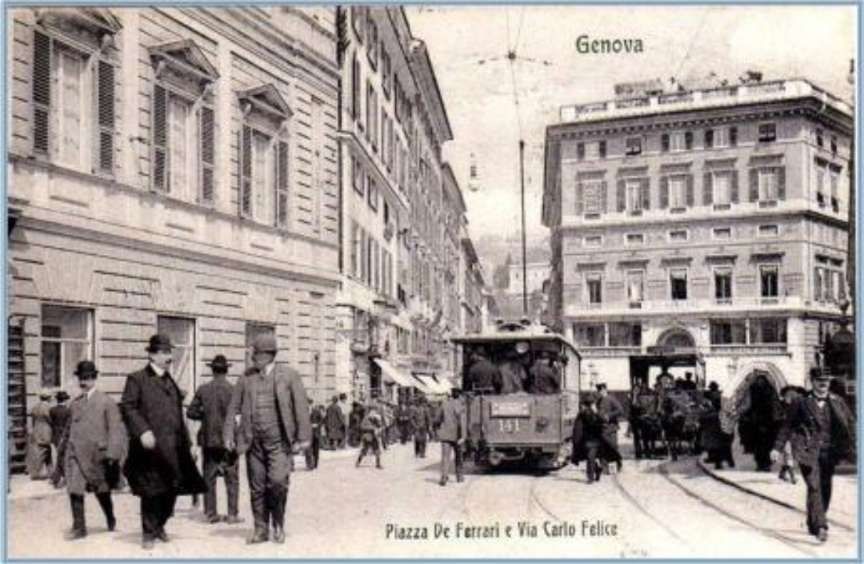
The Eastern network focussed on Piazza Raffeale de Ferrari. We looked at images from that piazza in the first article [1] about the trams of Genoa (Genova). At one time, Piazza de Ferrari was full of ‘circular tramlines’ and it was congested through much of the day.
Tram lines left Piazza Raffeale de Ferrari along Via Roma, to the Northeast and along Via XX Settembre. We covered most of those which radiated from the Northeast end of Via Roma (Piazza Corvetto) in the second article. [2]
This Article: The Rest of the Eastern Network
The line running from Piazza Corvetto to Prato will be covered in this article, along with those which ran out of Piazza Raffeale de Ferrari along Via XX Settembre.
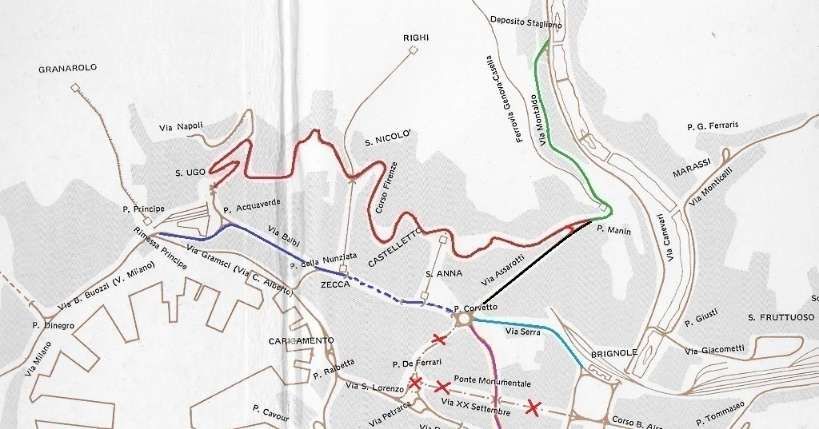
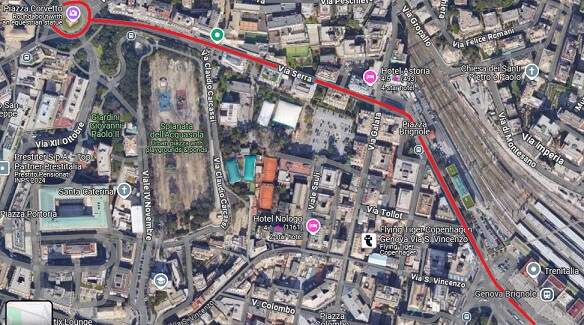
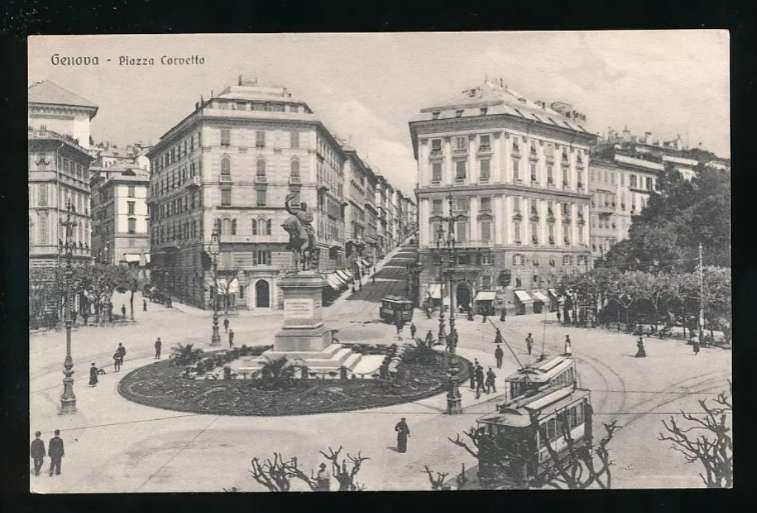
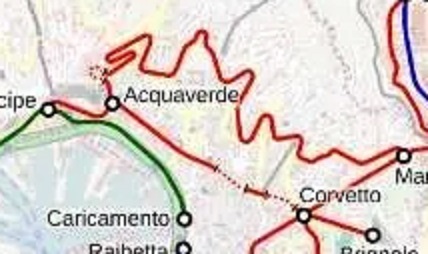
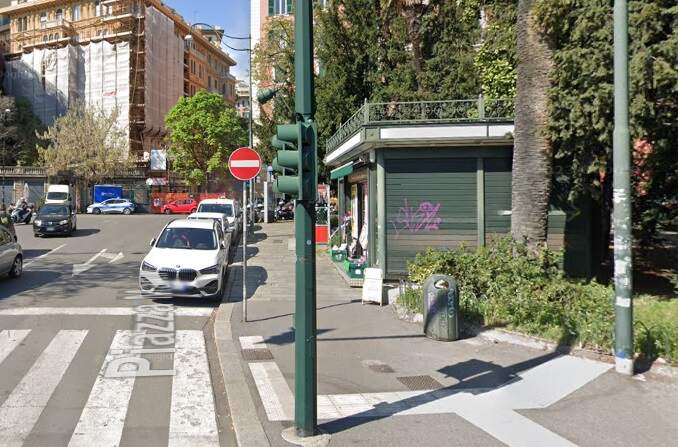
As we have already noted in the second article in this short series, at Piazza Corvetto lines diverged to Piazza Carignano, Brignole, Manin and Acquaverde and Principe. The line to Prato ran Northeast from Piazza Corvetto through Piazza Manin.
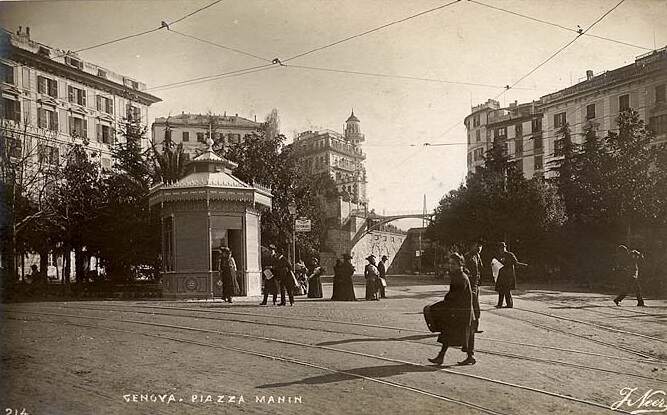
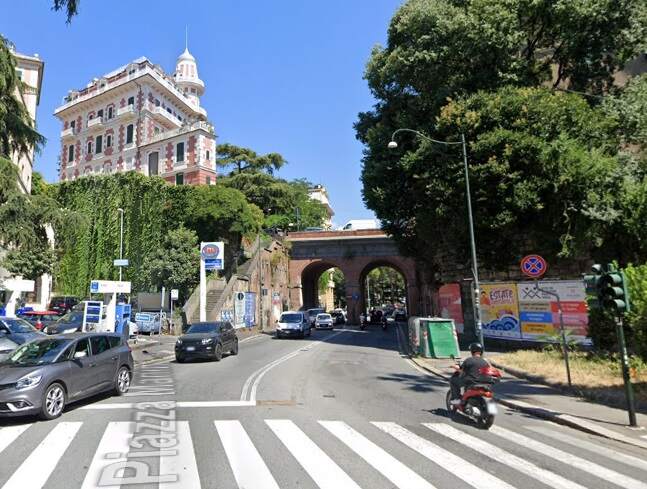
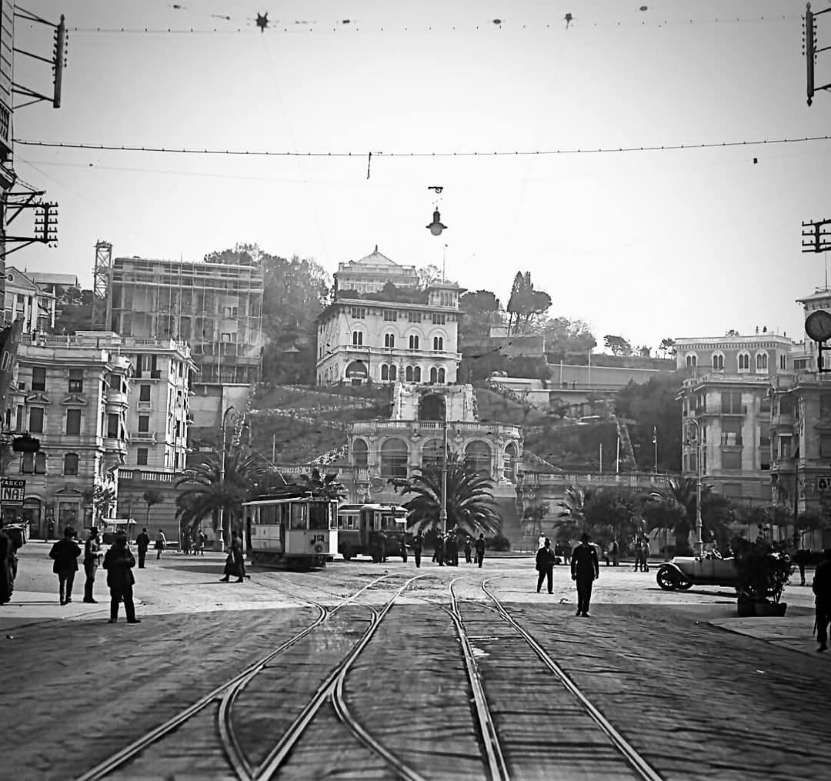
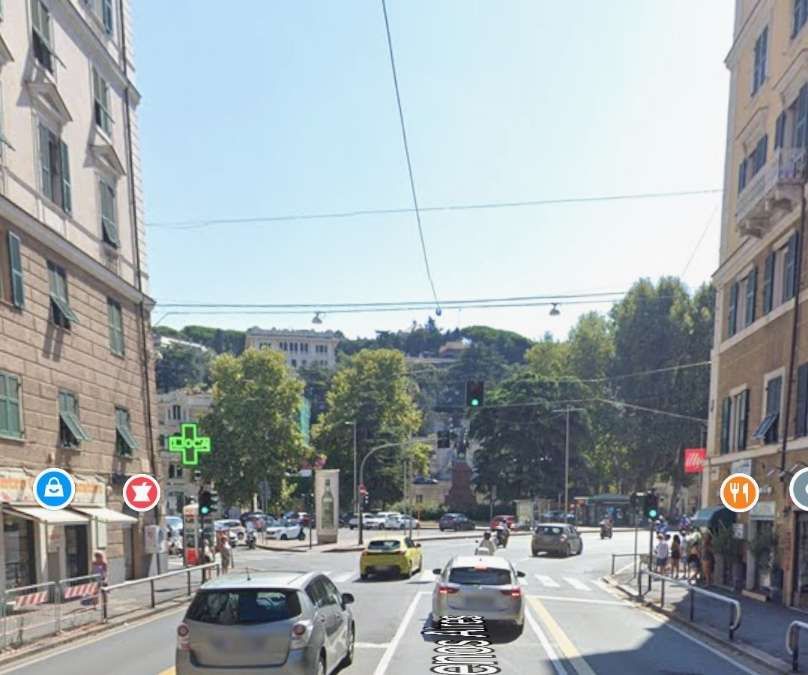
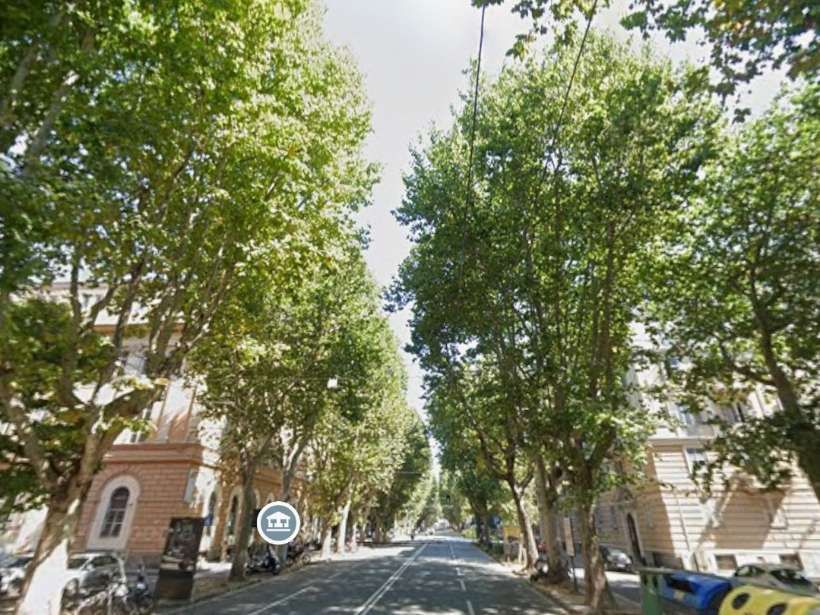
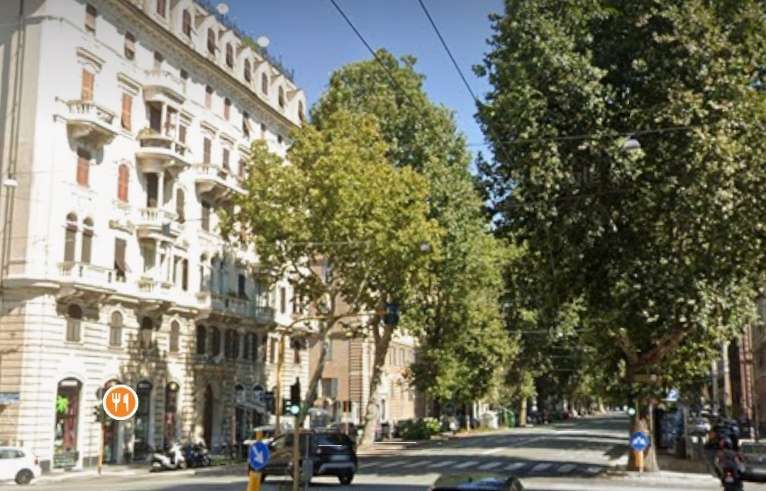
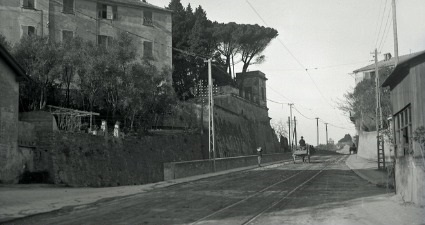
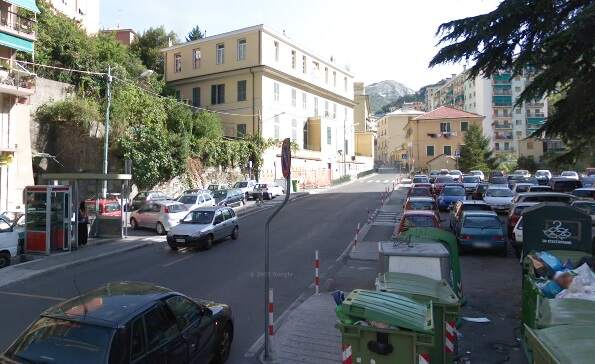
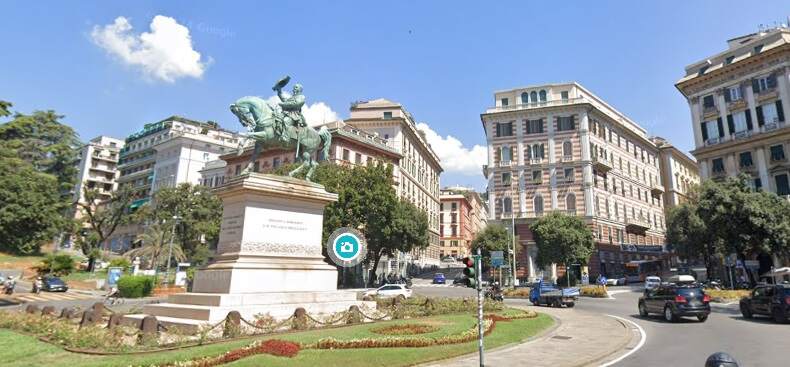
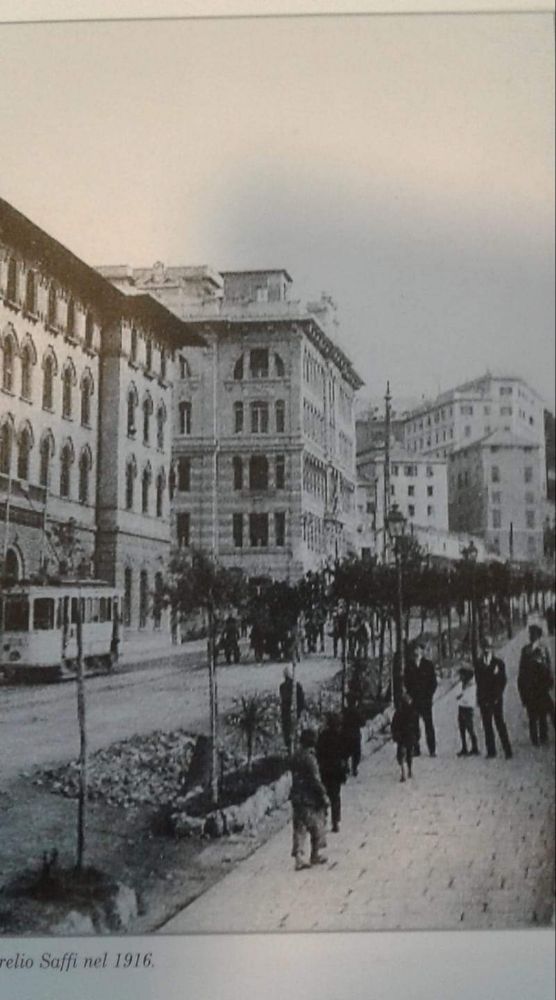
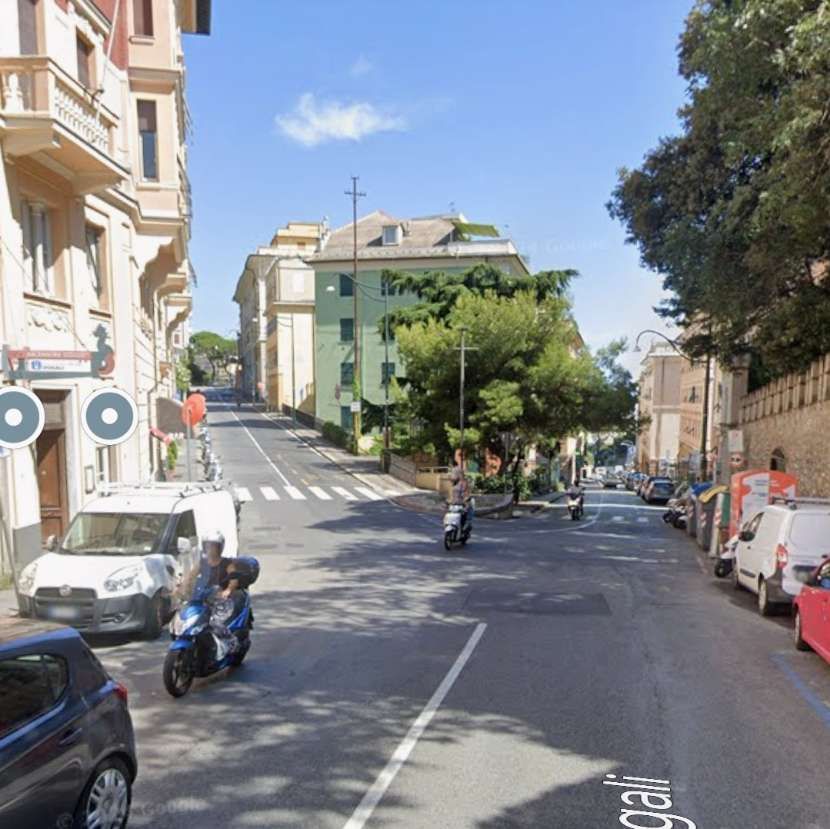
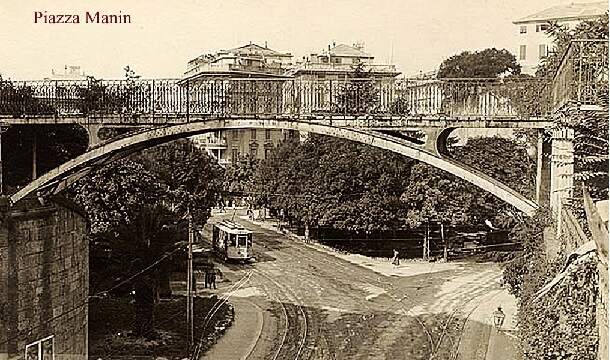
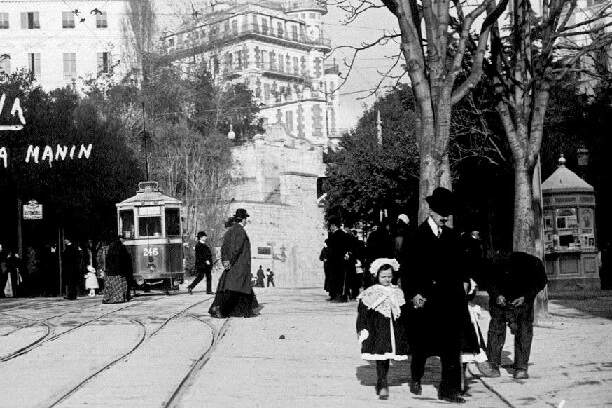
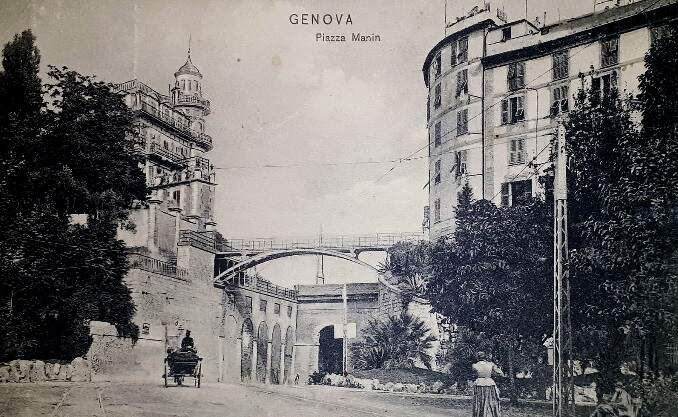
Trams ran between Piazza Corvetto and Piazza Manin along Via Assarotti. [Google Maps, December 2024]Looking Northeast along Via Asserotti in the 1940s. Traffic is now driving on the right. Genova had vehicles driving on the left until 1923 when the national government imposed a common practice across the country, (c) Public Domain. [5]Later roadworks at the mouth of Via Asserotti on Piazza Corvetto. Behind the tram is Via Asserotti and to the right, Via S.S Giacomo e Filippo, (c) Public Domain. [3]A postcard view from the 1970s along Via Asserotti from Piazza Corvetto. This is an extract from an image shared on the C’era una volta Genova Facebook Group by Paolo Nuzzo on 12th July 2019. [4]Looking Southwest along Via Asserotti towards Piazza Corvetto, (c) Public Domain. [6]A similar view Southwest along Via Asserotti in the 21st century. [Google Streetview, August 2024]Piazza Manin, looking East towards the city walls. Via Asserotti is behind the camera to the right, (c) J. Neer, Public Domain. [8]A similar view in the 2st century. [Google Streetview, August 2024]Trams ran through the city walls under Ponte di Via alla Stazione per Casella. [Google Streetview, August 2024]Looking West toward Piazza Manin from outside the city walls. (c) Public Domain. [10]An earlier view looking West with a tram heading towards the camera, (c) Public Domain. [11]
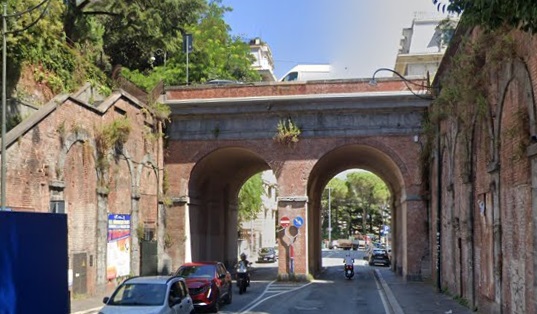
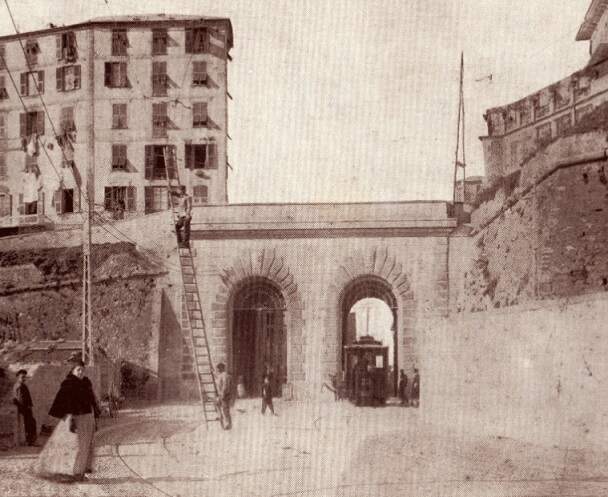
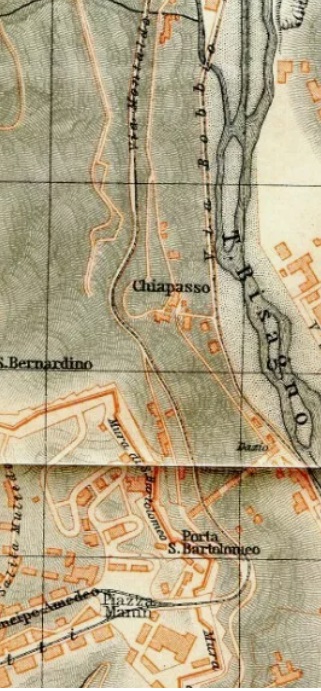
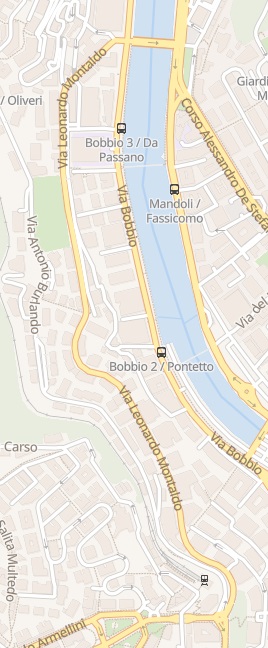
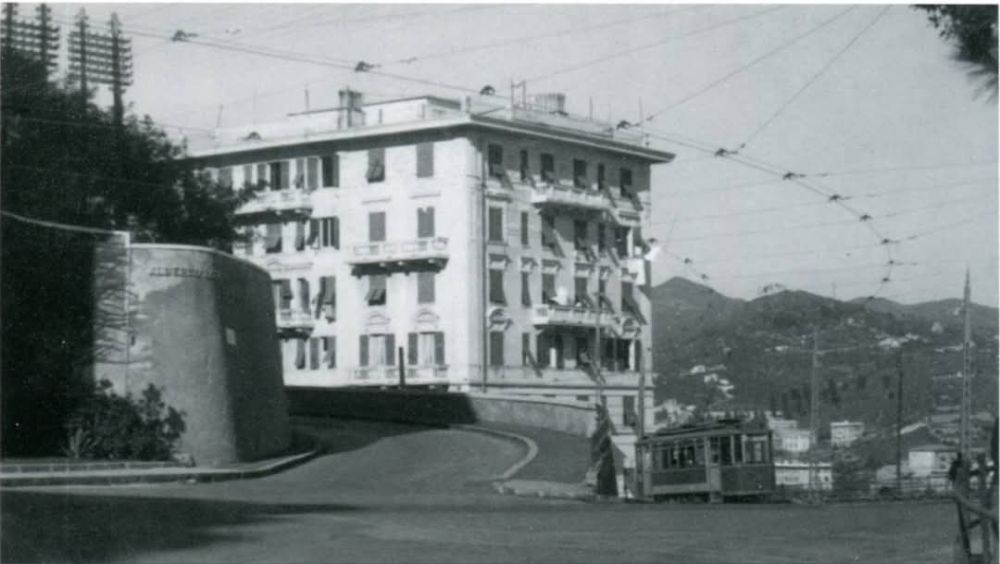
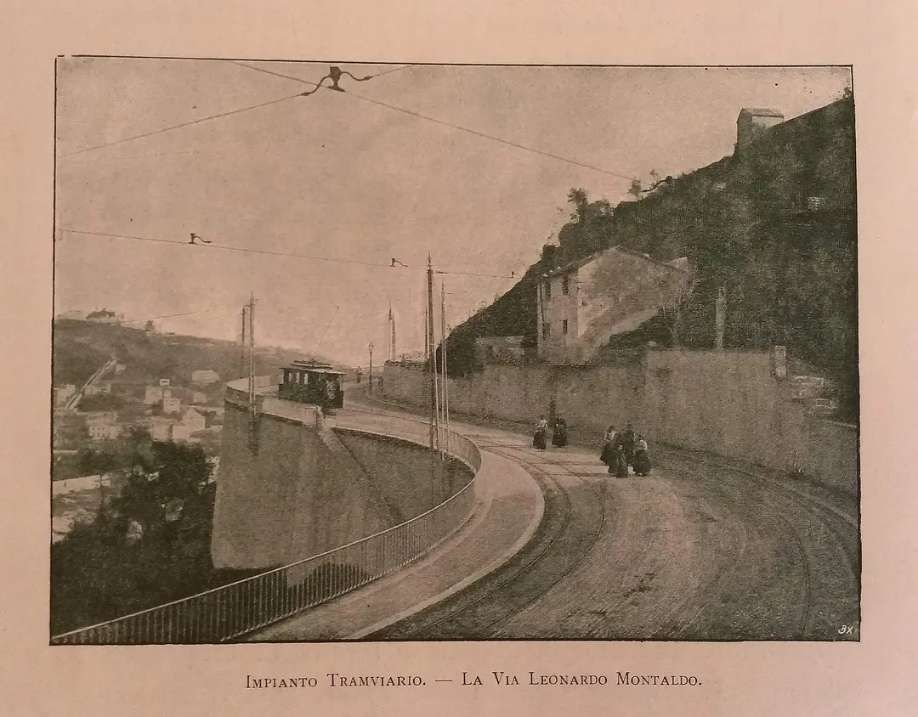
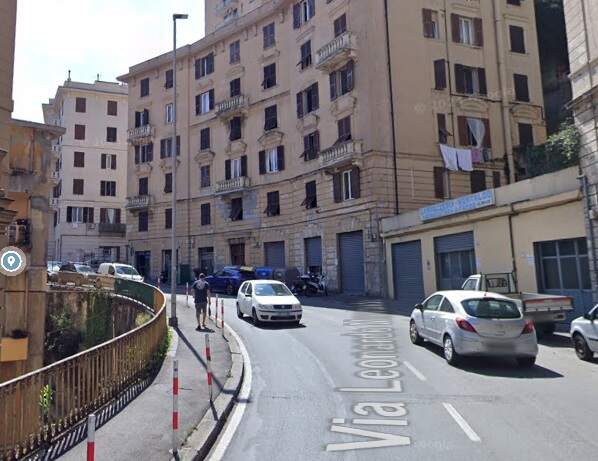
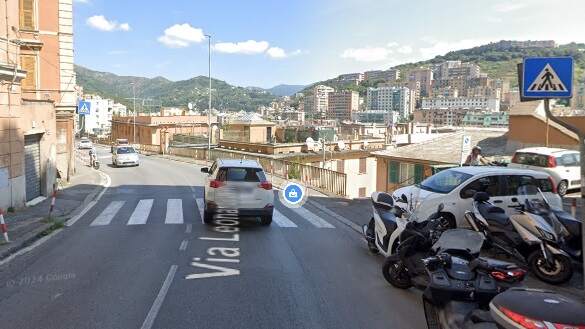
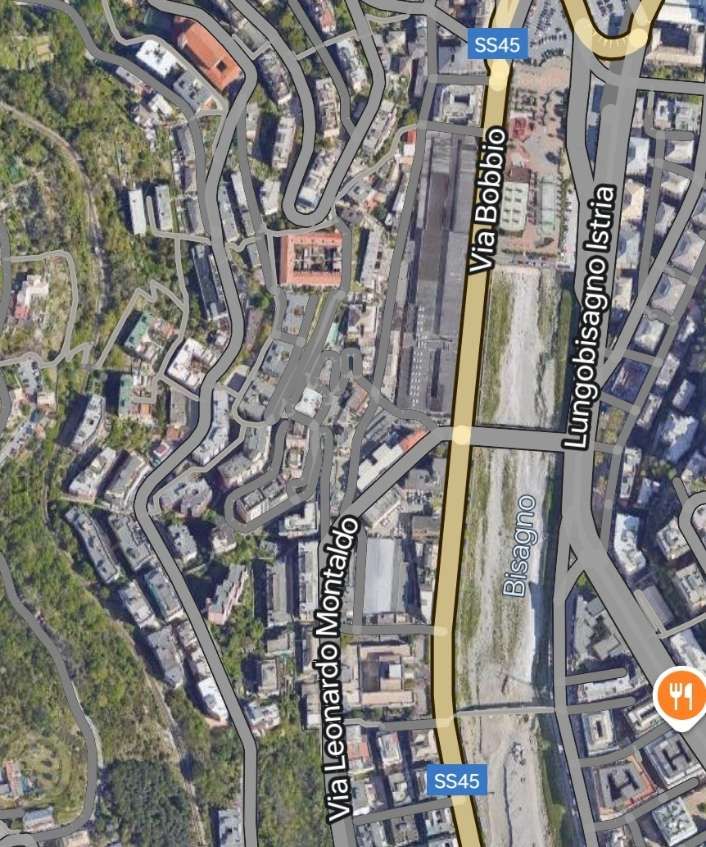
Just East of Piazza Manin, trams passed through the old city walls & turned North following the contours of the side of the Bisagno Valley. This extract from the Baedeker 1906 map of Genova shows the route of the tramway as it heads North. The openstreetmap.org extract shows that the route is along Via Leonardo Montaldo. [13][14]
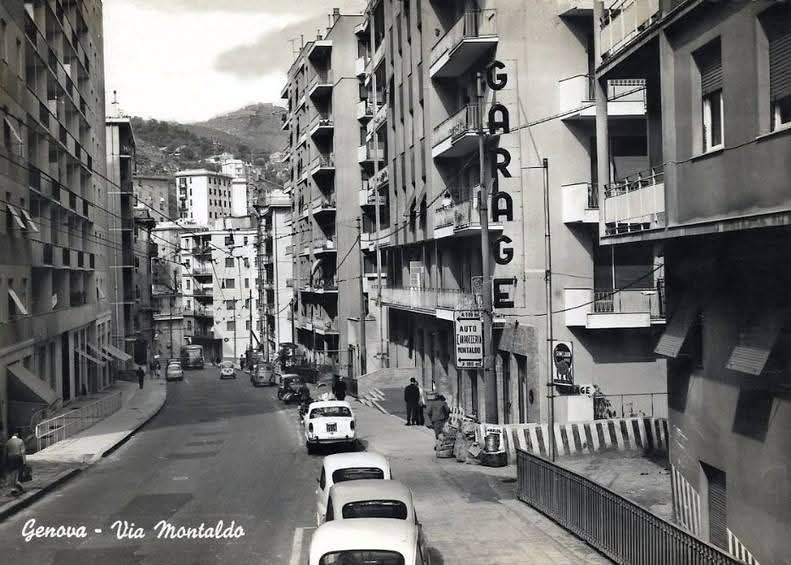
Trams ran North along Via Leonardo Montaldo. The road was built, initially through undeveloped land, to accommodate the tram service.
Trams from the centre of Genoa arrived at the junction shown above, both along Via Bobbio and Via Montaldo and then continued North and East up the valley of the Bisagno River, passing the Cemetery on the way.
The line which served the Gavette works ran up the East side of the River Bisagno, crossing the river on its approach to the works. It was primarily used for bringing coal to the works in the days when it produced town gas. The article about that railway can be found here. [44]
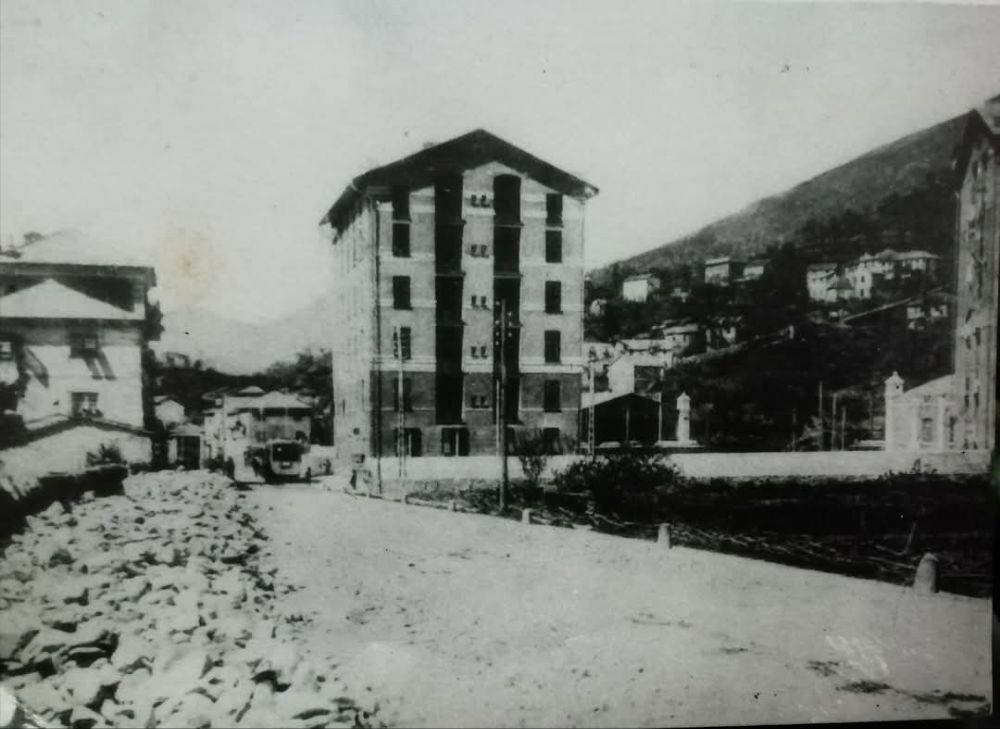
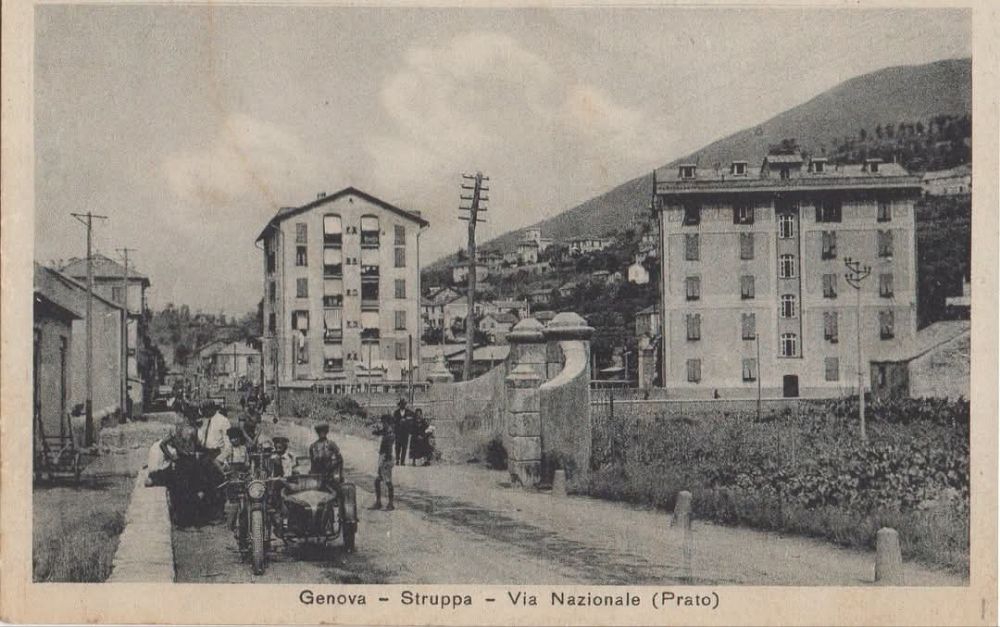
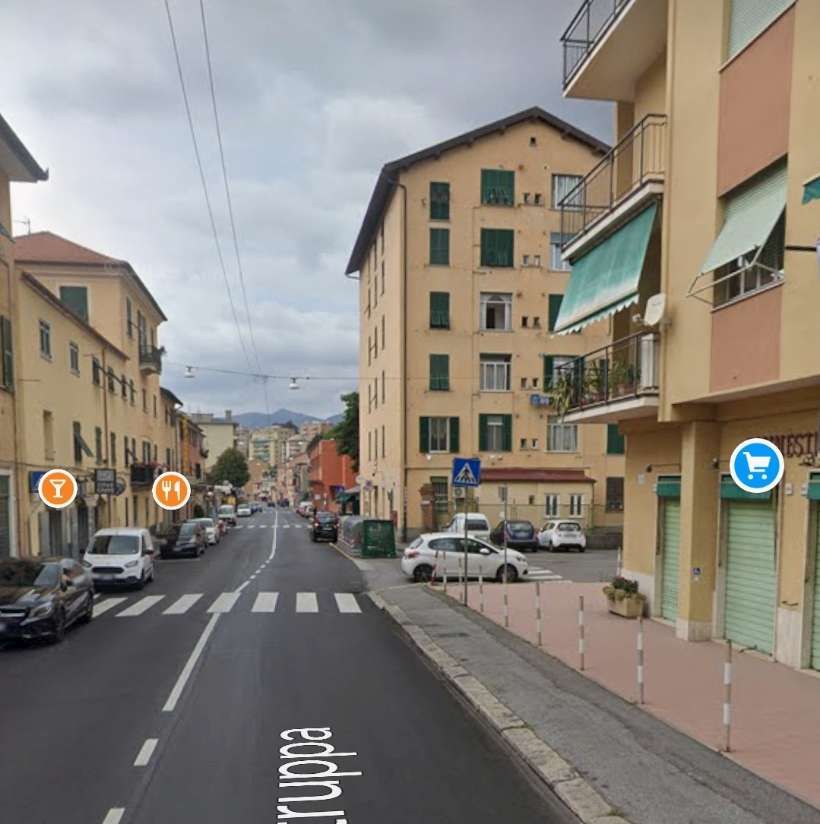
The terminus of the tramway is a little further East from the hospital/health buildings. These next few images take us to the end of the line in Prato.
Having arrived in Prato we have now covered all the ‘green lines’ and the ‘red lines’ on the network plan provided close to the start of this article. We still have to look at most of the ‘blue lines’. …..
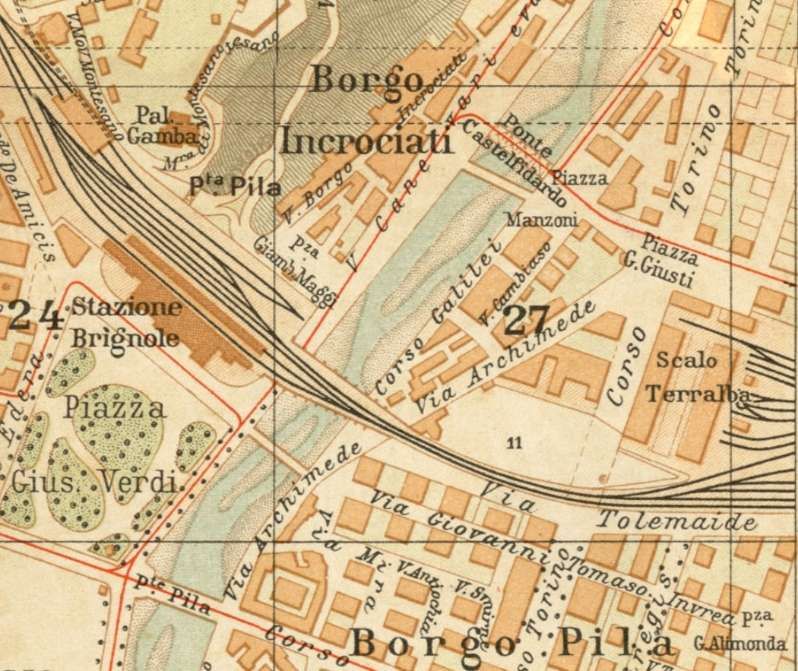
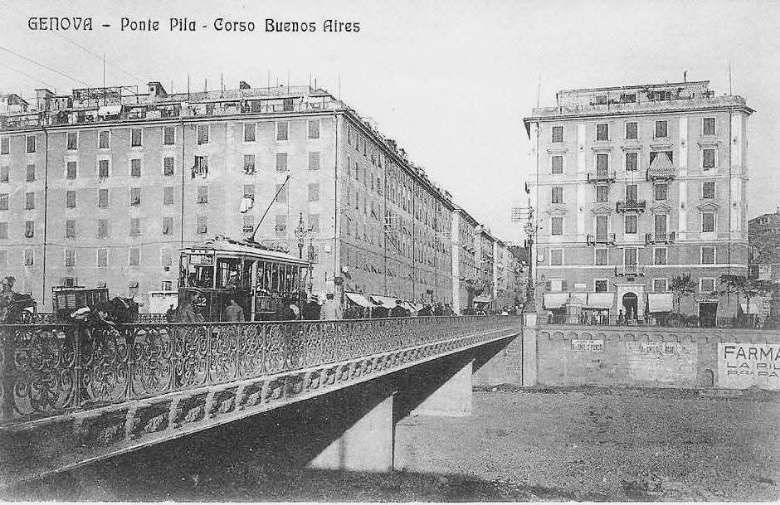
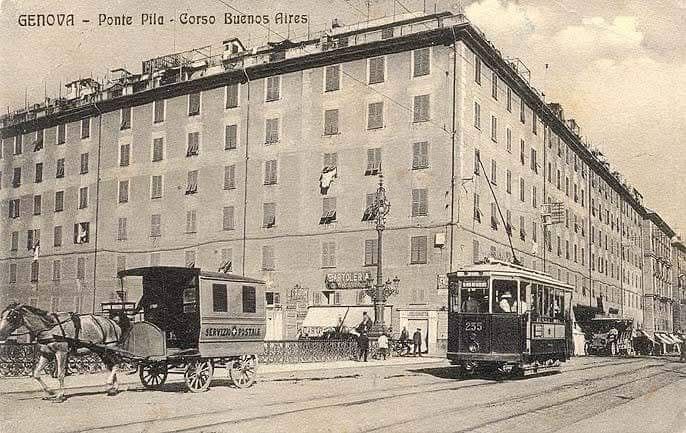
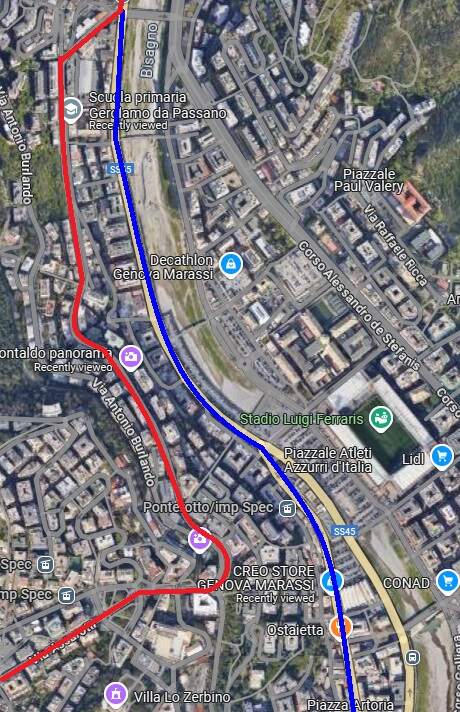
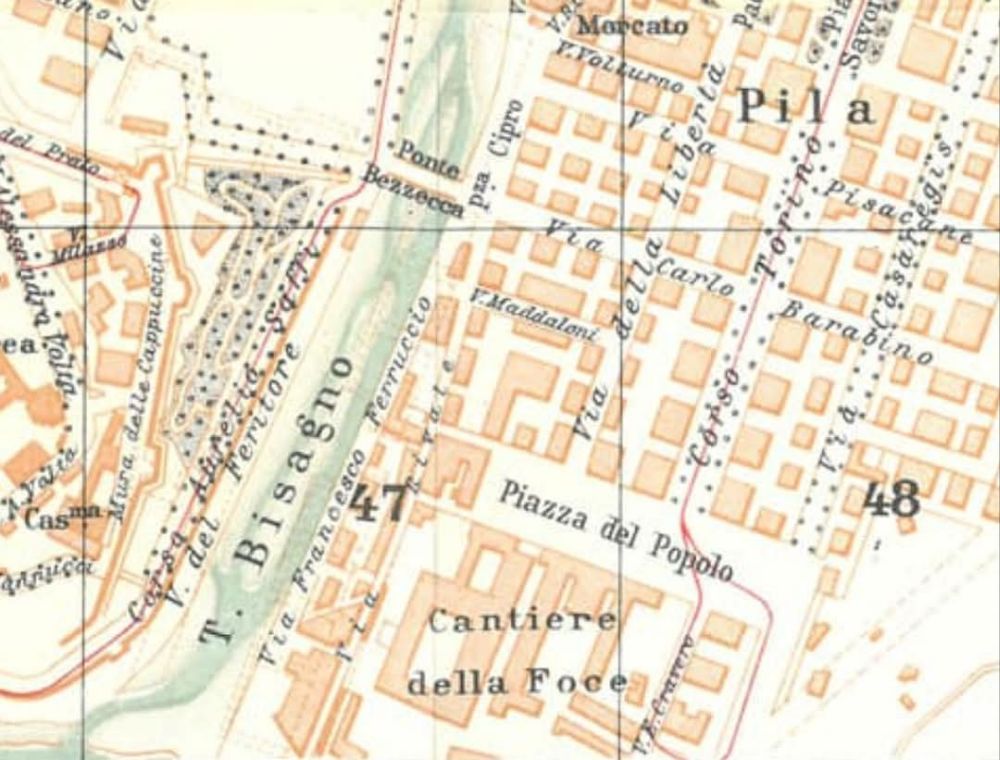
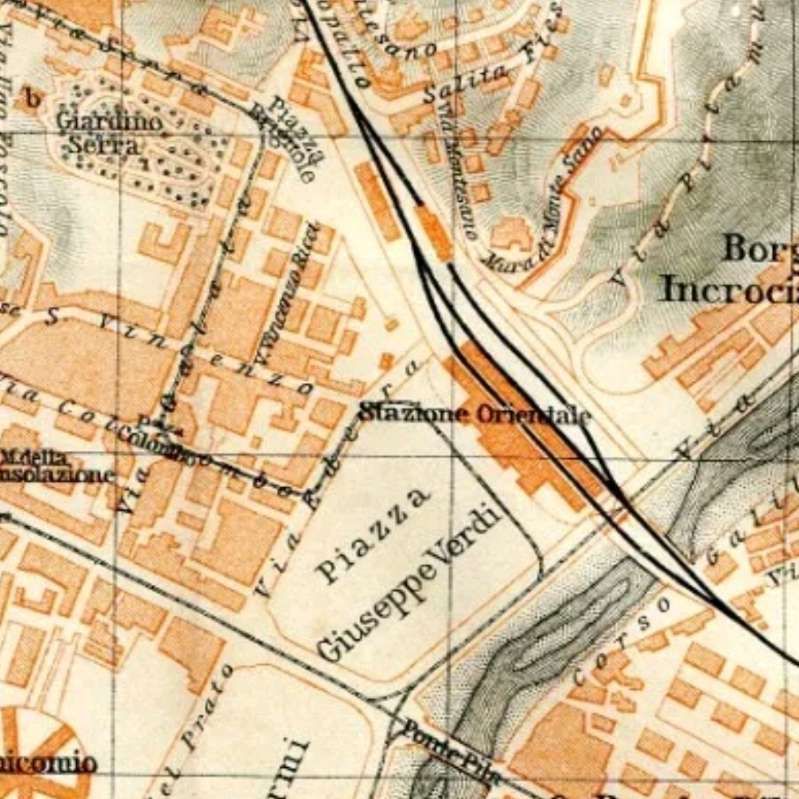
Trams following the route North alongside the River Bisagno started and ended their journeys at Piazza Raffeale de Ferrari and travelled along Via XX Settembre and Via Luigi Cadorna to the location of Ponte Pila. What was once a bridge over the Bisagno River is now part of the culverted length of the river.
In the 21st century, the road North from this location is Viale Emanuele Filiberto Duca d’ Aosta (SS1). Facing North from Ponte Pila the large Piazza Giuseppe Verdi was to the left of the road. This remains as a large garden area. Further ahead on the left is Brignole Railway Station.
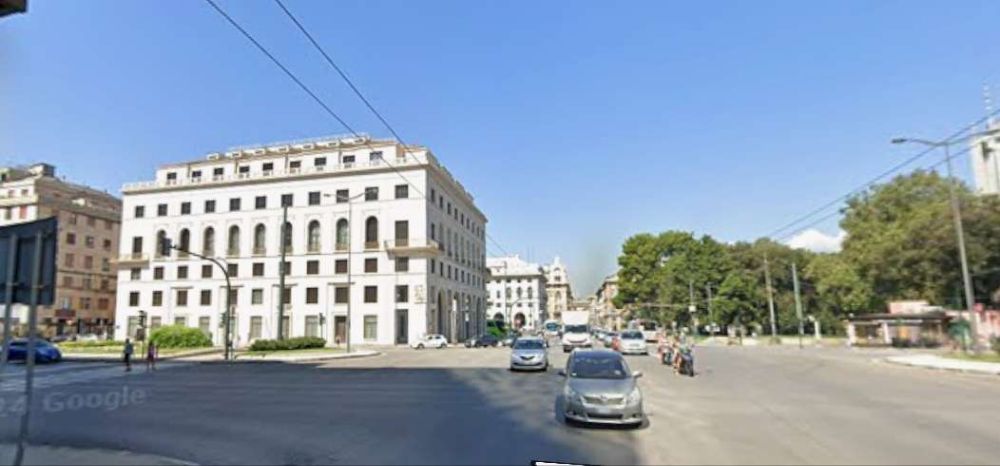
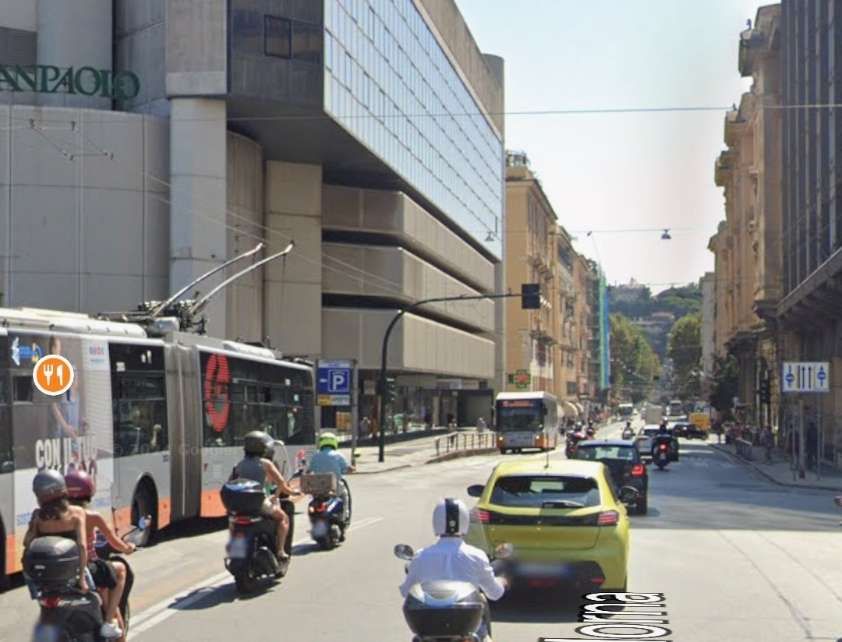
The next two images are difficult to location on the modern landscape as so much has change in the are around the River Bisagno. Most probably the building shown are on the line of the dual carriageway which sits over the culverted river.
The junction shown in the image above appears left as a satellite image [Google Maps, December 2024] and below as a Streetview image [Google Streetview, April 2023]
The satellite image shows the remaining length of the route (in blue) as far as Staglieno where it joins the route from Via Lombardo Montaldo (in red). Two views typical of this length in the 21st century are shown below.
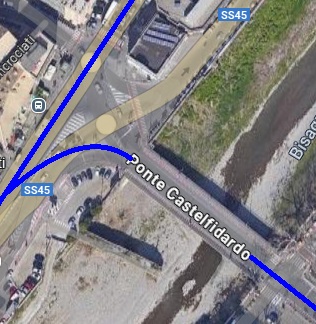
Ponte Castelfidardo to Piazza Terralba
We saw a picture of a tram on Ponte Castelfidardo above, on a section of tramway not recorded on the map of pre-1902 tramways of Genova, but Line No. 37 is recorded as running to the area of San Fruttuosa which is the area to the East of the River Bisagno through which this tram ran so was inaugurated between the turn of the century and the start of WW1. We will also see further below that a municipally owned line crossed the bridge and ran out to Quezzi. This line was also put in service before WW1.
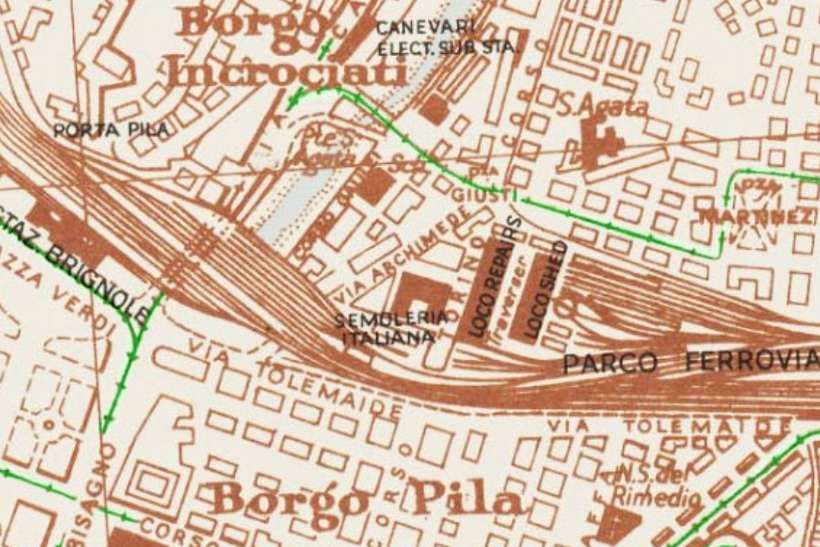
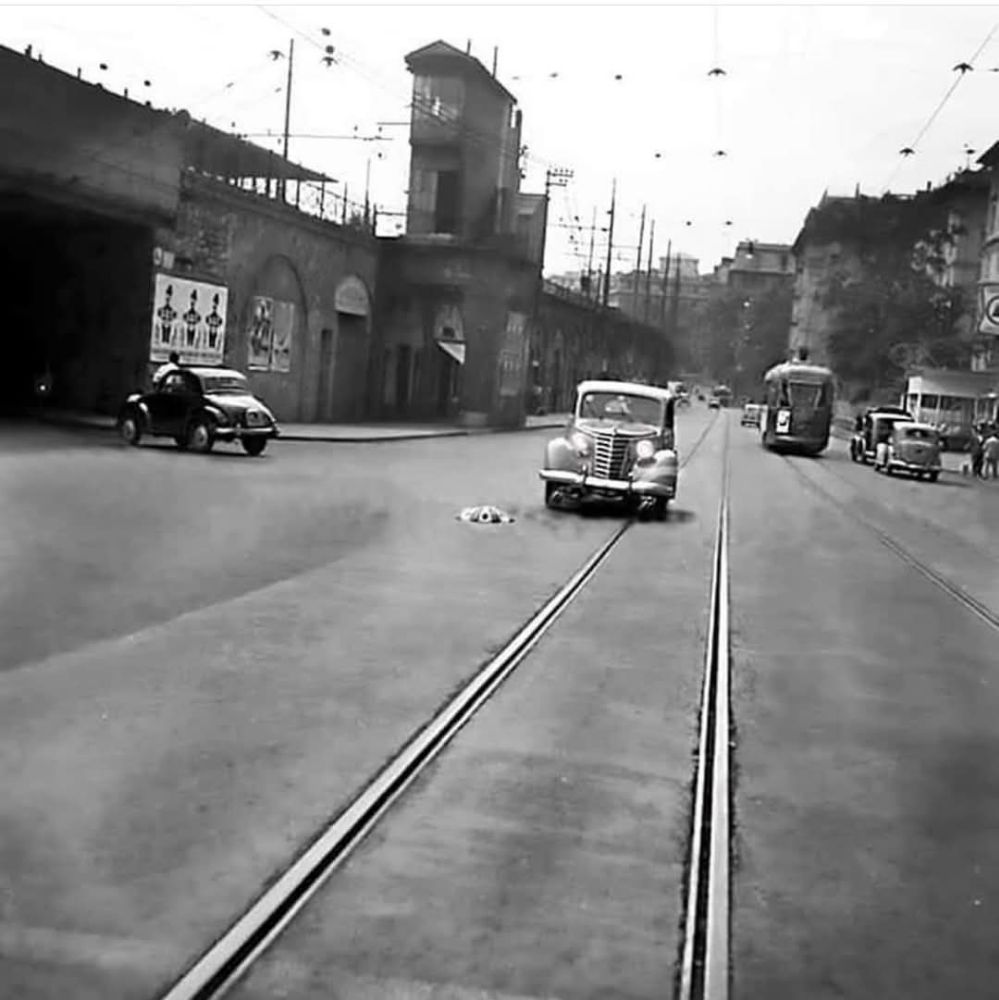
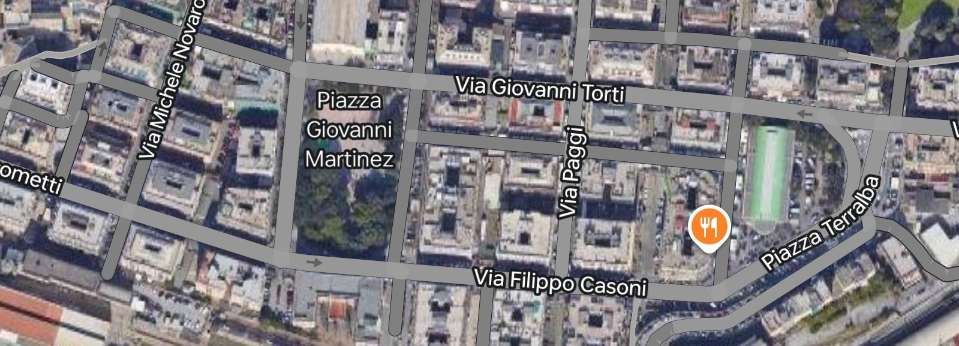
To the East of Ponte Castelfidardo trams entered Piazza Manzoni.. Piazza Manzoni led East into Piazza Giusti. The industrial railway from Terralba to Gavette crossed Piazza Giusti. Information about that line can be found here. [64] The photograph below shows a train of covered wagons, probably from the fruit and vegetable market on Corso Sardegna, heading into the goods yard at Terralba. In the picture is the tramway crossing the line of the railway.
A train of covered wagons, probably from the fruit and vegetable market on Corso Sardegna, heads into the goods yard at Terralba. In the picture is a tramway crossing the line of the railway. By the time of this photo, the tramway appears disused as cars are parked across it. [65]
After 1901 and before WW1 a significant extension was made to the route to Foce which took trams South of Piazza del Popolo to the coast and along Corso Italia. That line is illustrated (dotted) on the map extract from the Markilnfan.com Forum below.
This map extract comes form a slightly larger one on the Marklin.com Forum. That new line connected in the East with a later line which ran along Via Barabino and through Galleria Marneli. Phots of the construction work on Corso Italia show it being built immediately after WW1, so it is not strictly relevant to the period we are looking at. [111]
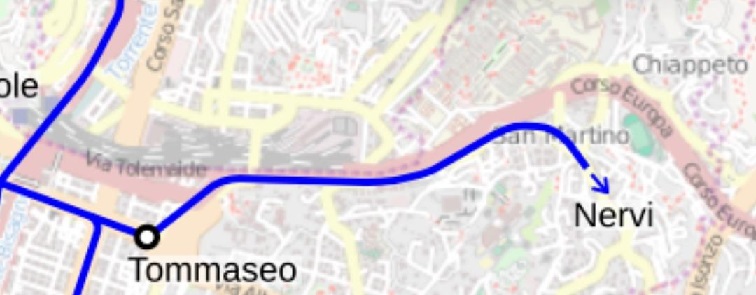
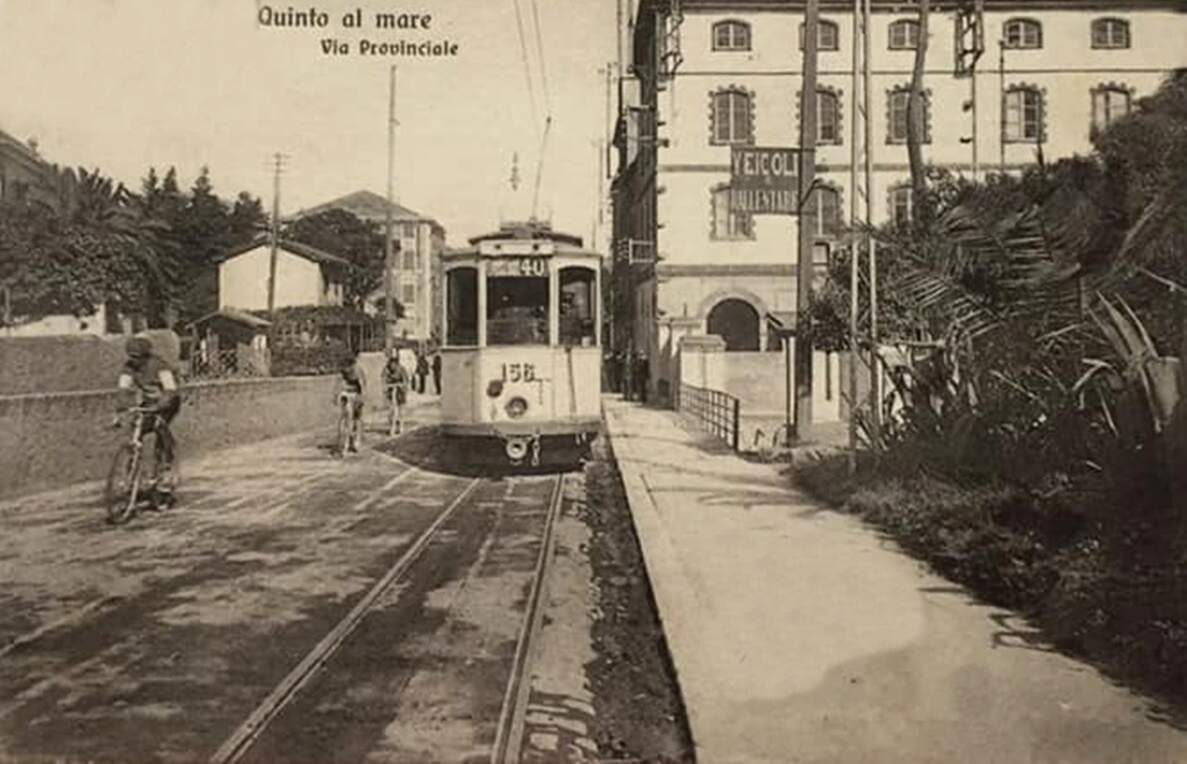
Piazza Thommaseo to Nervi
There were two possible routes to Nervi. That shown blue on the image below was one of these.
A second route can be seen on the map of tramlines in 1956 below. It is not clear when the alternative route began offering a service. We will look at this route later when we have followed the more northerly route as far as Piazza Sturla.
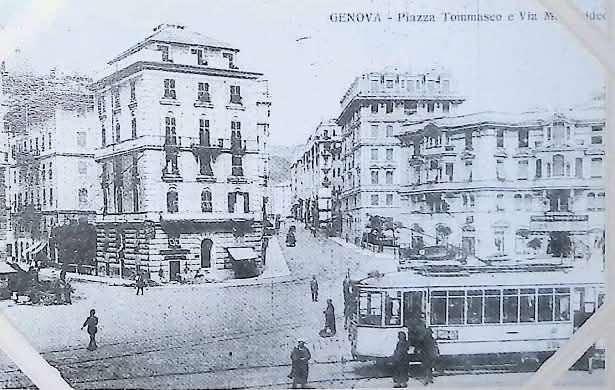
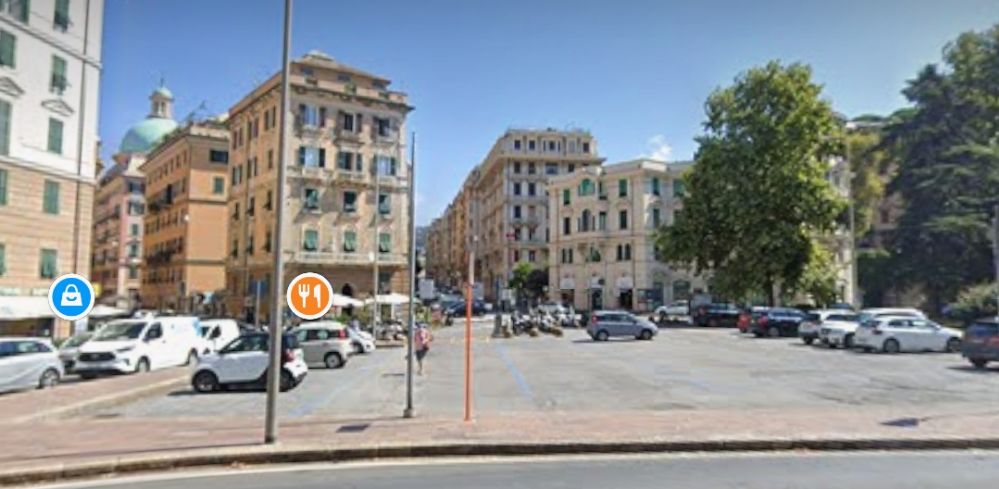
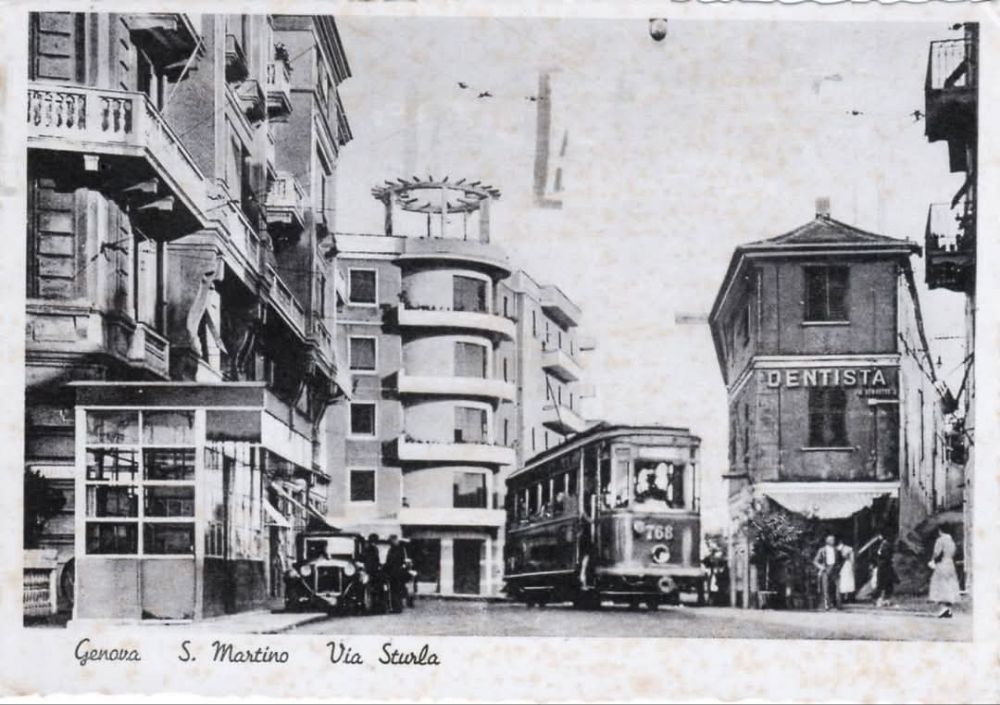
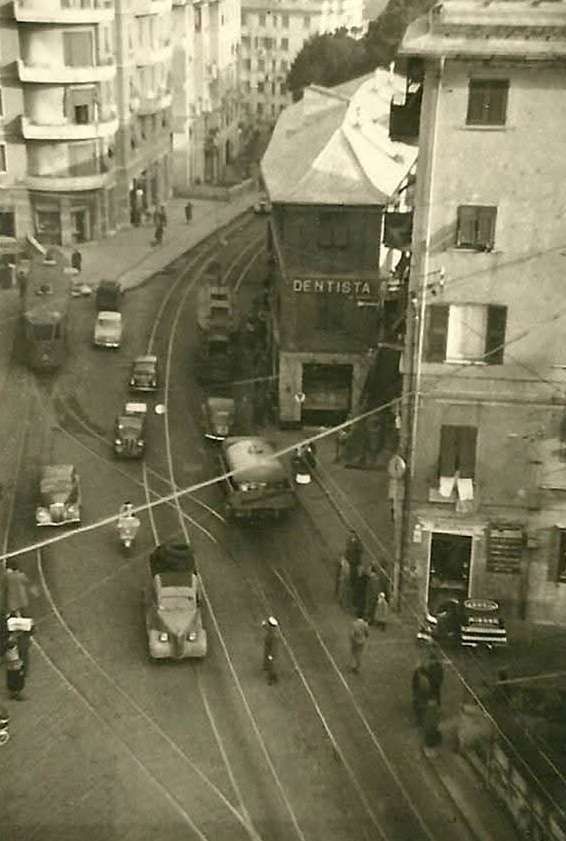
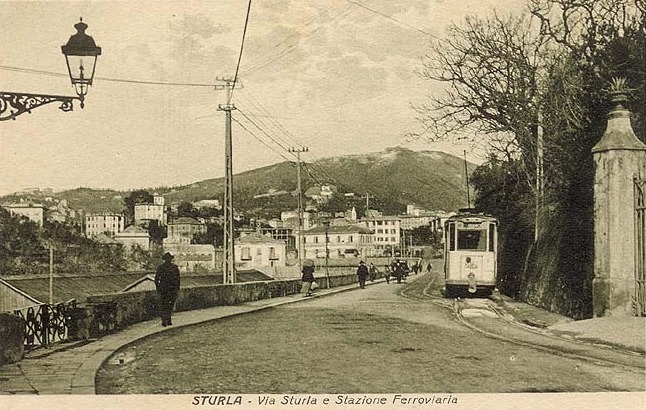
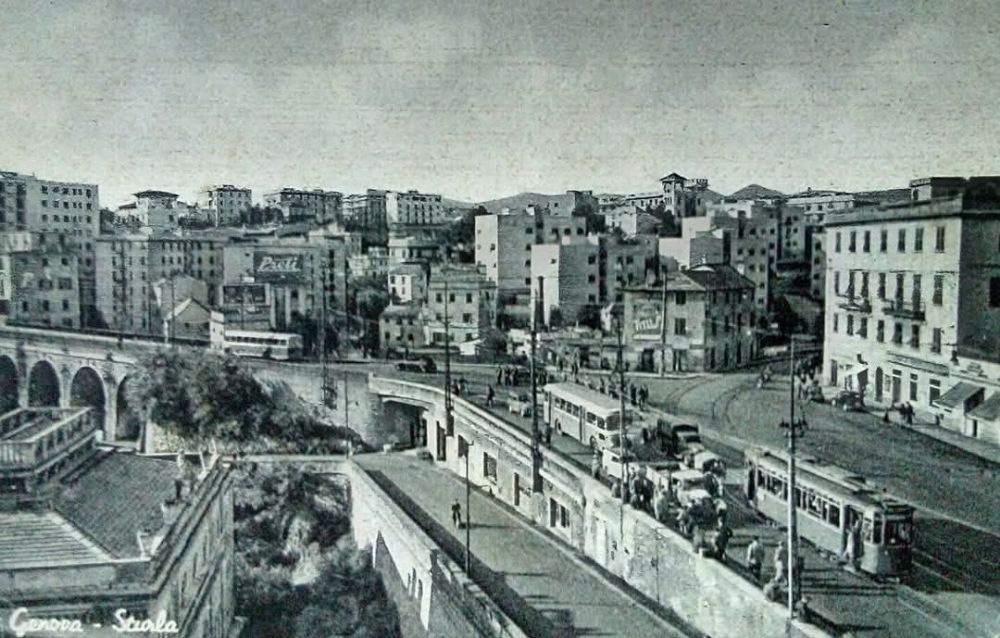
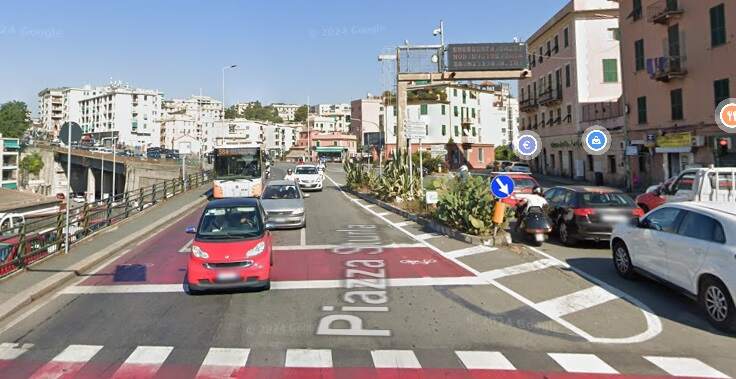
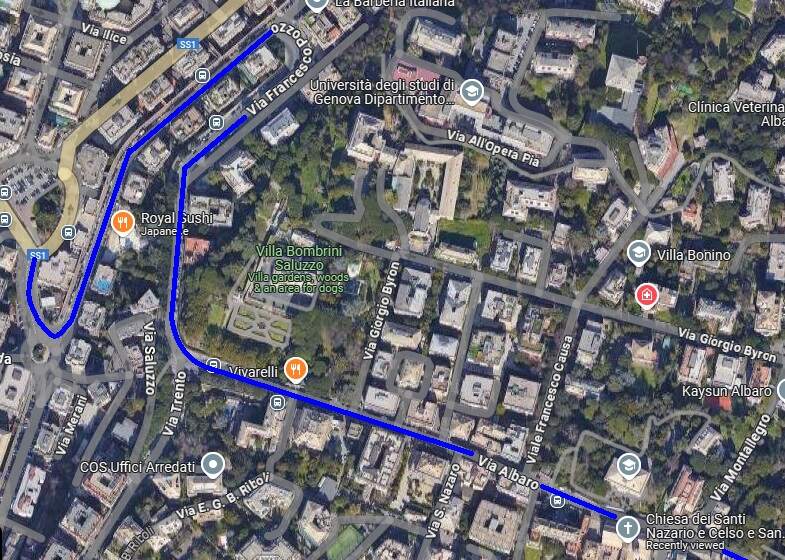
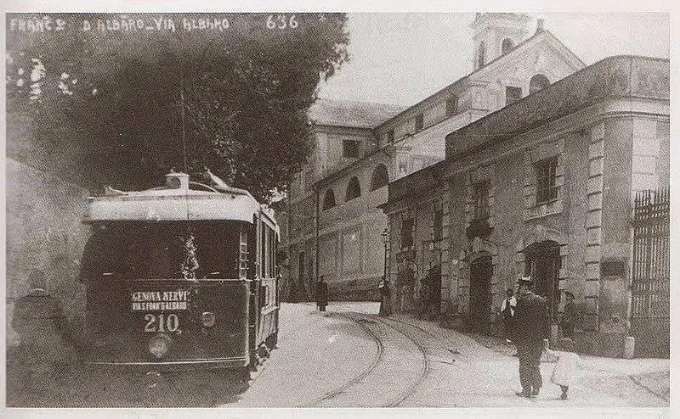
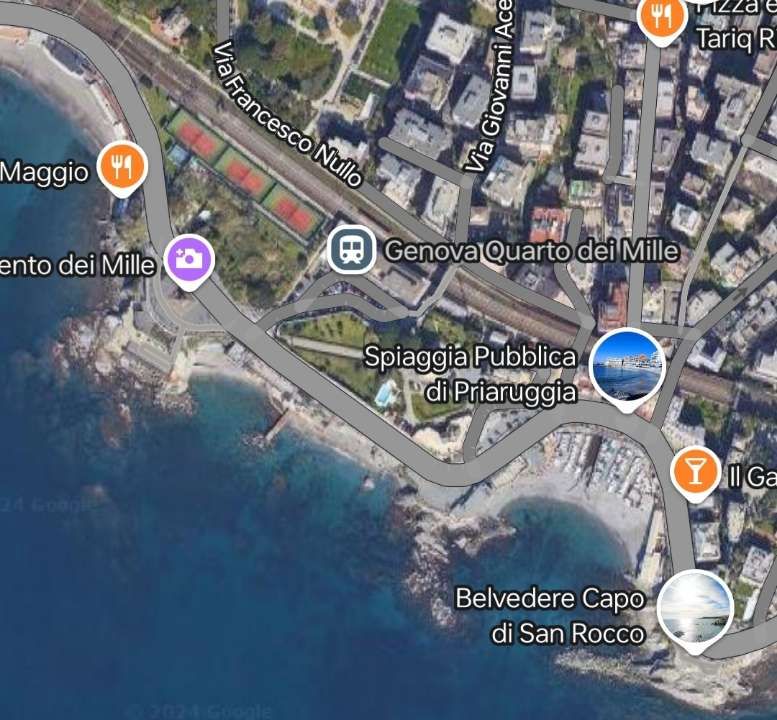
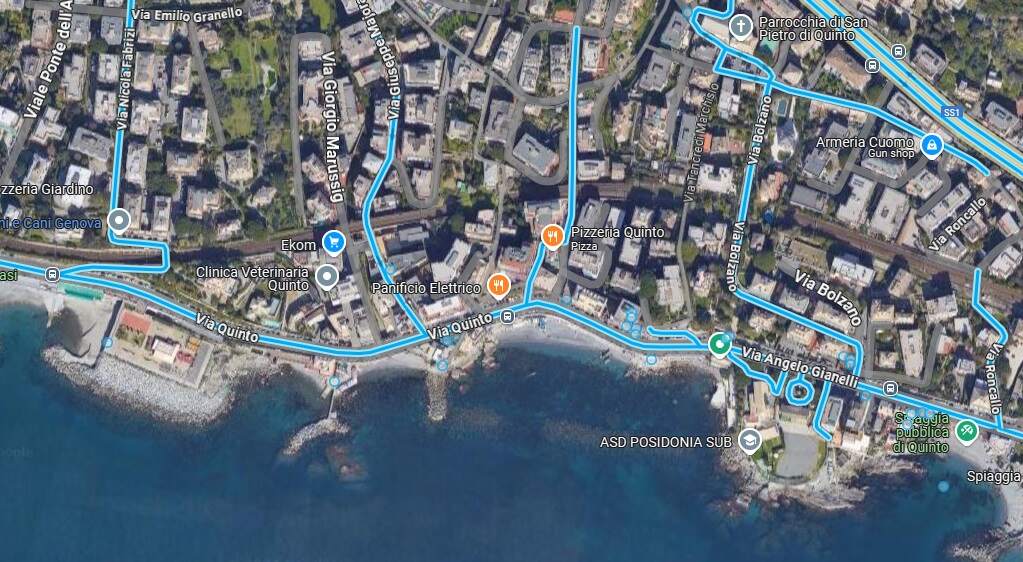
Before heading on towards Nervi along Via dei Mille we need to look back at the alternative route to Piazza Sturla. Trams using this route left Piazza Thommaseo. It is not entirely clear when trams began serving this route. An early, probably pre-WW1 image, shows a tram on Via Albaro near the church of San Francesco.
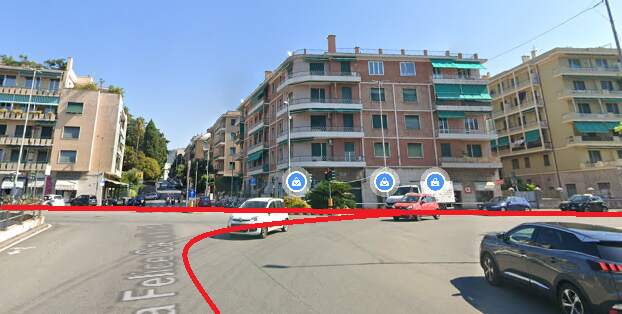
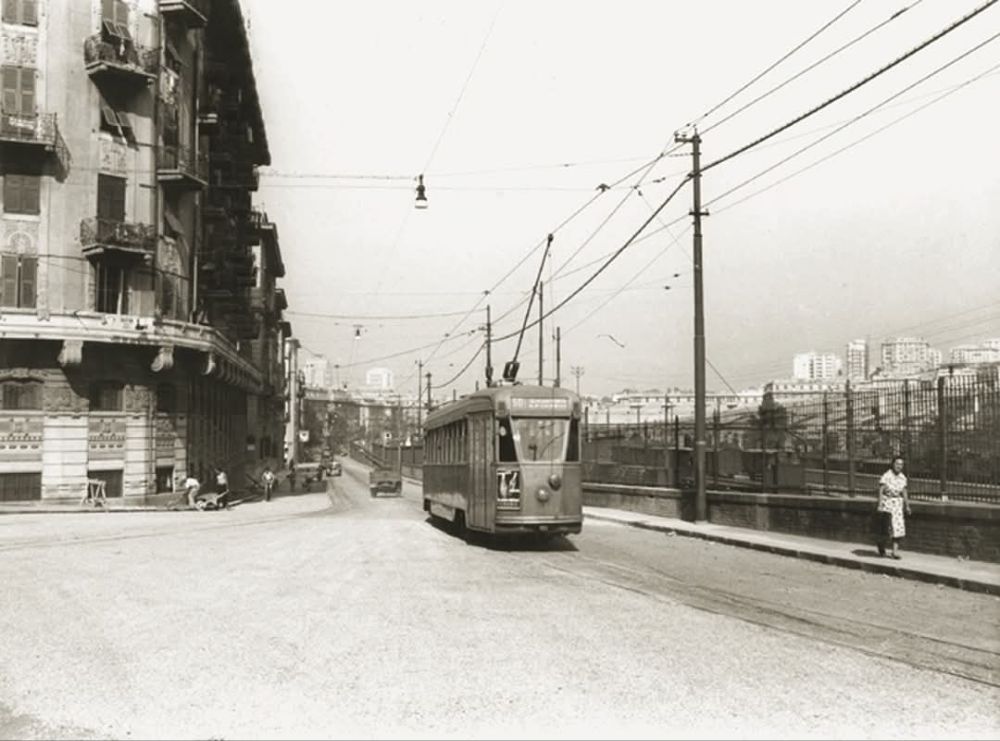
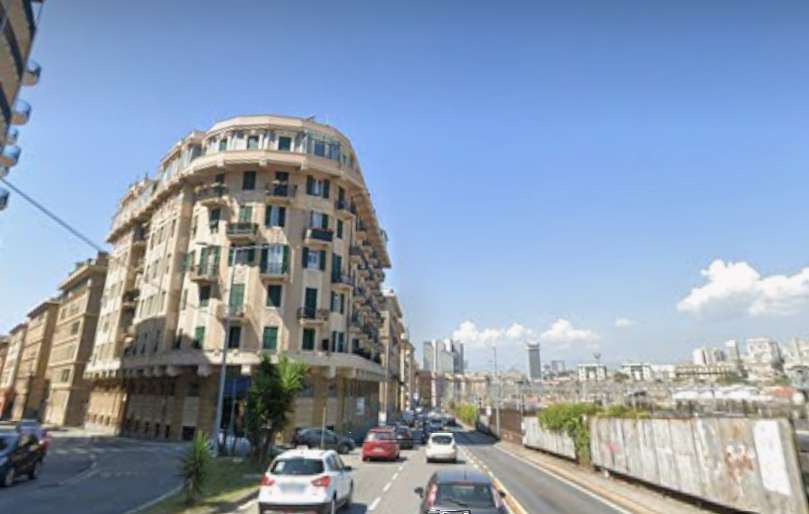
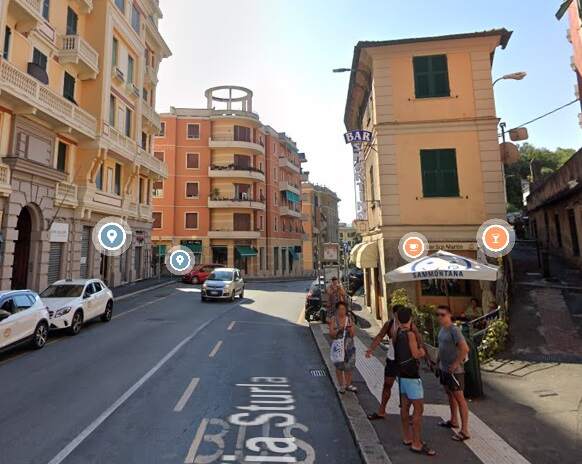
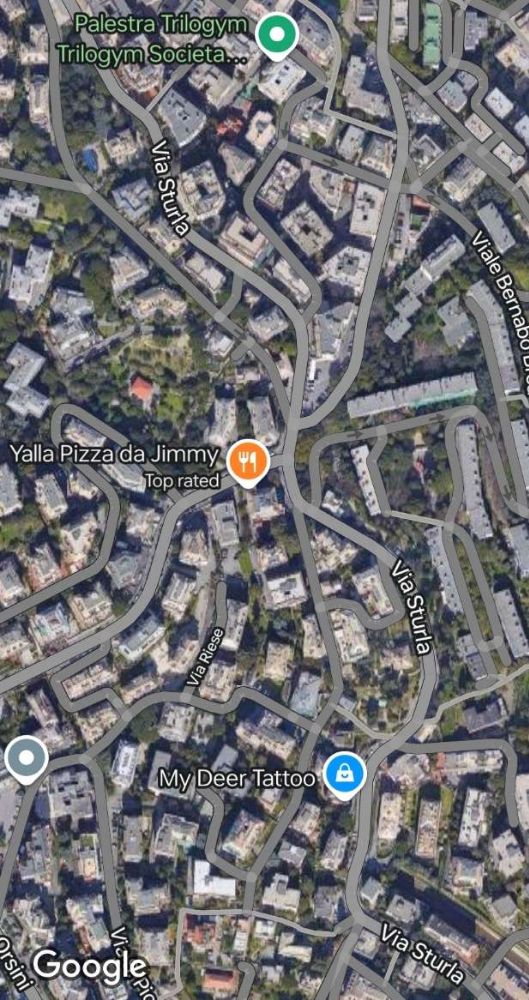
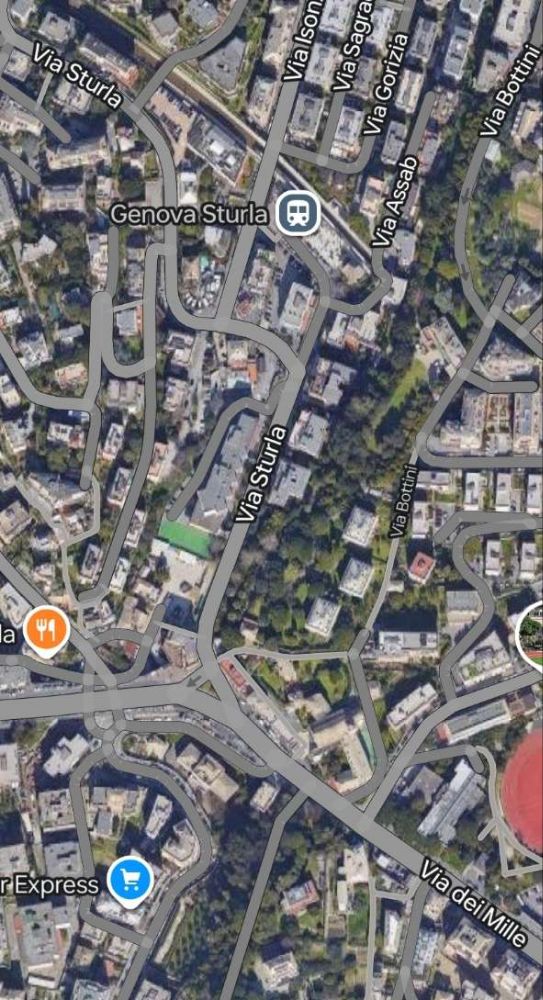
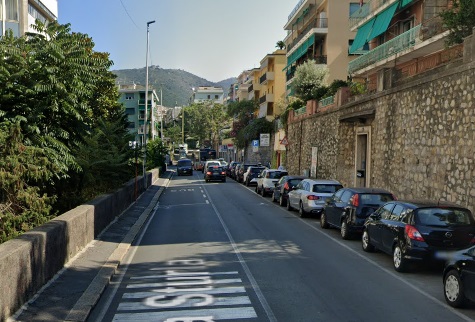
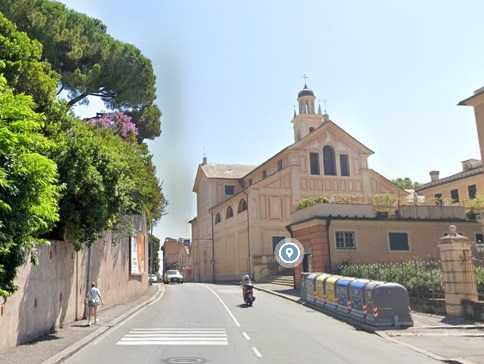
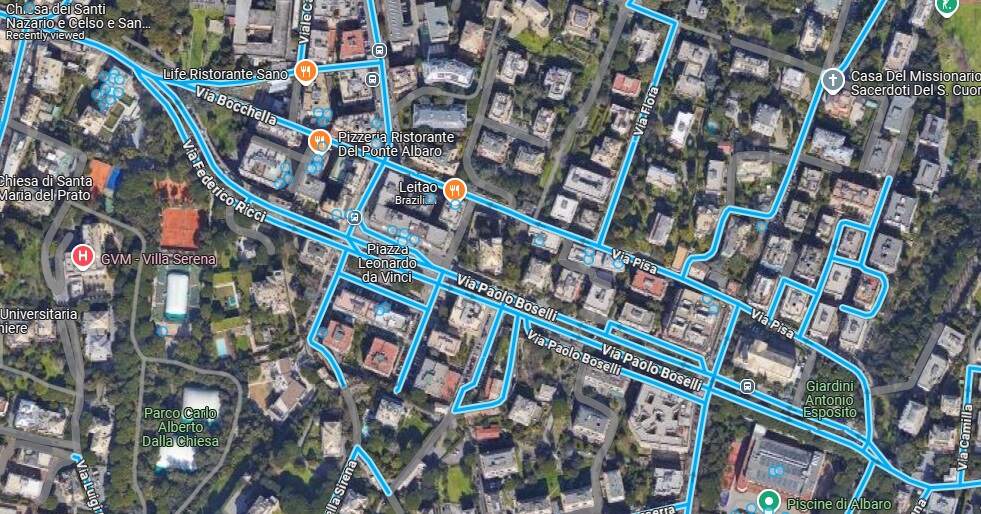
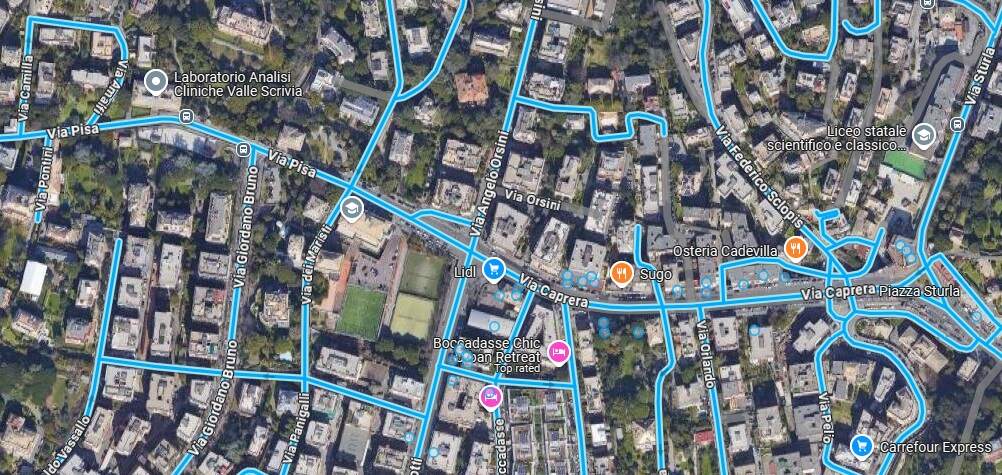
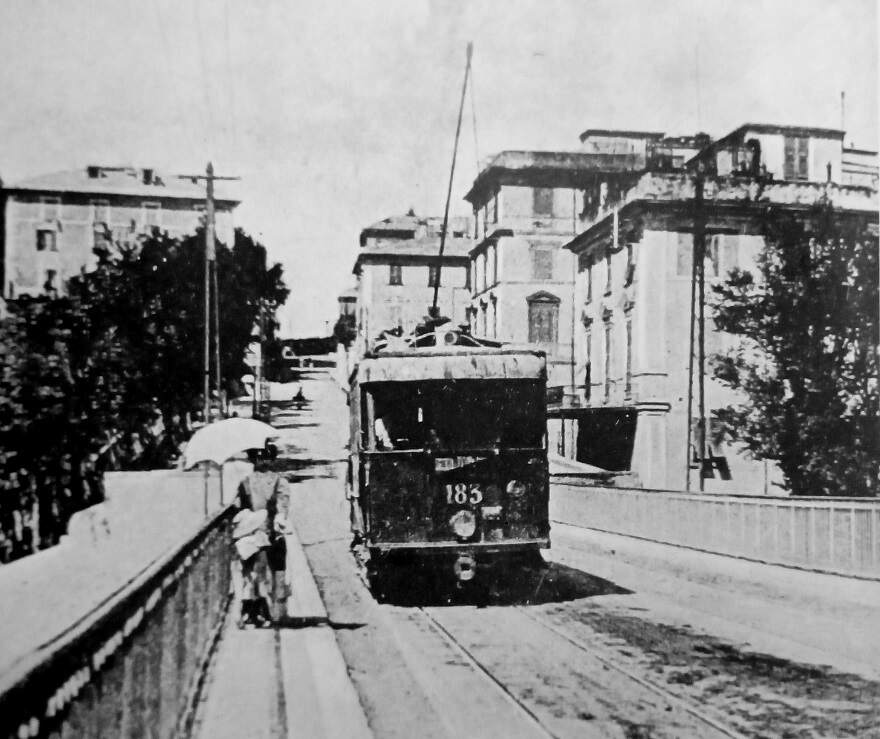
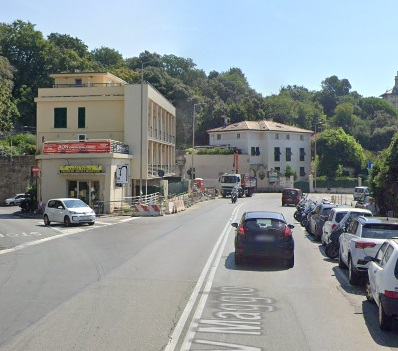
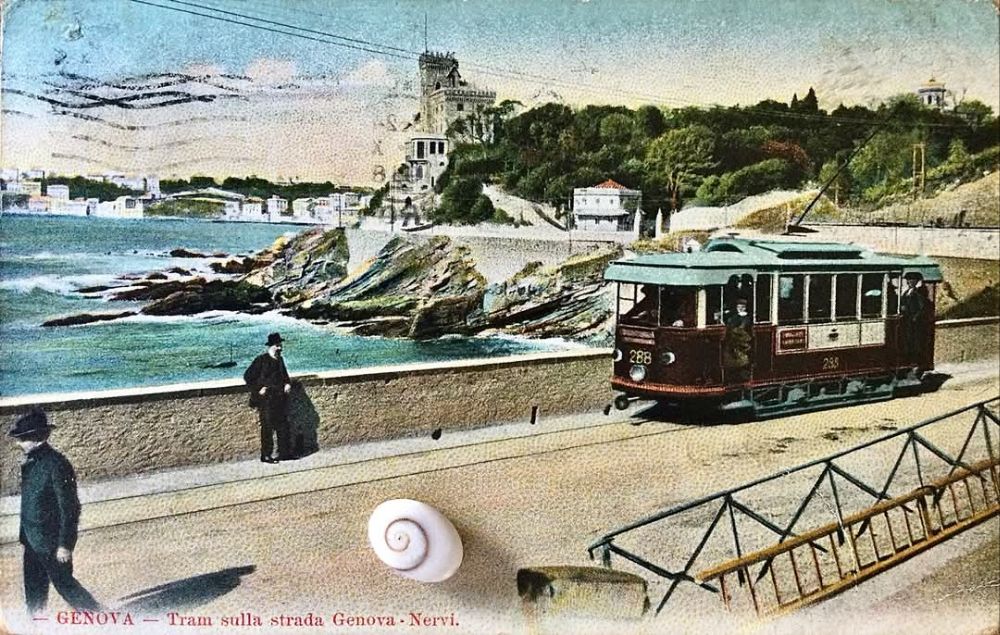
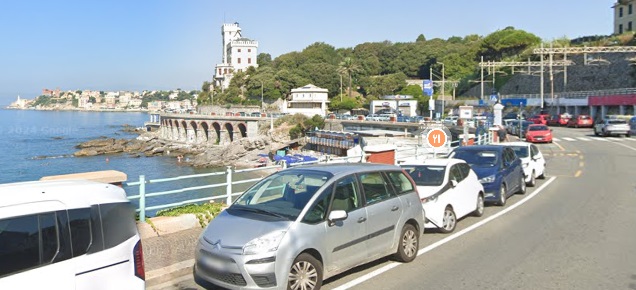
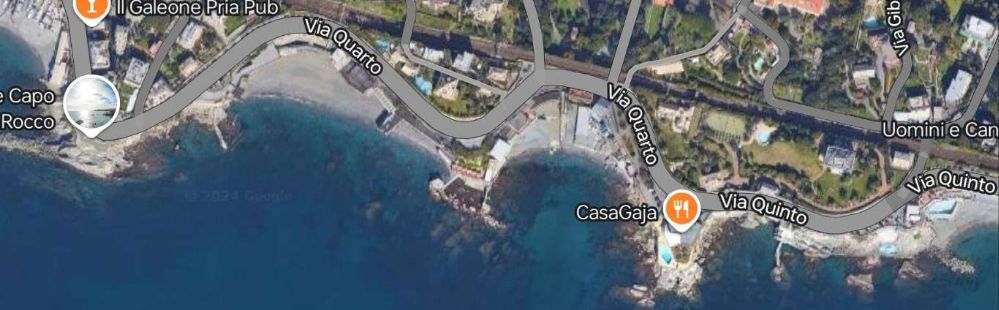
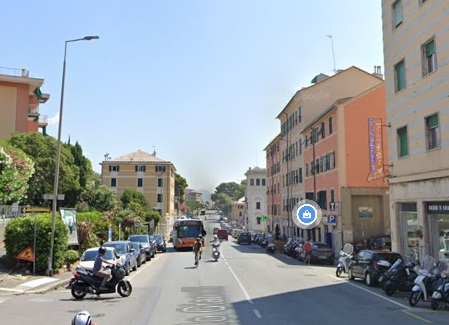
This satellite image shows Piazza Thommaseo on the left. The blue line shows the tram route as far as the Church of San Francesco. The image below shows a tram using the route between Genova (Genoa) and Nervi. [Google Maps, December 2024]A tram heading for Nervi is travelling along Via Albaro close to the church of San Francesco, (c) Public Domain. [85]The same location in the 21st century, also looking East. [Google Streetview, August 2024]Trams continued Southeast along Via Frederico Ricci and Via Paolo Boselli. [Google Maps, December 2024]Continuing, East-southeast trams ran along Via Pisa and Via Caprera to Piazza Sturla. [Google Maps, December 2024]Before the first world war, a tram heads for the city centre along Via Caprera over the old viaduct, (c) Public Domain. [84]The same view towards the city centre in the 21st century. [Google Streetview, August 2024]
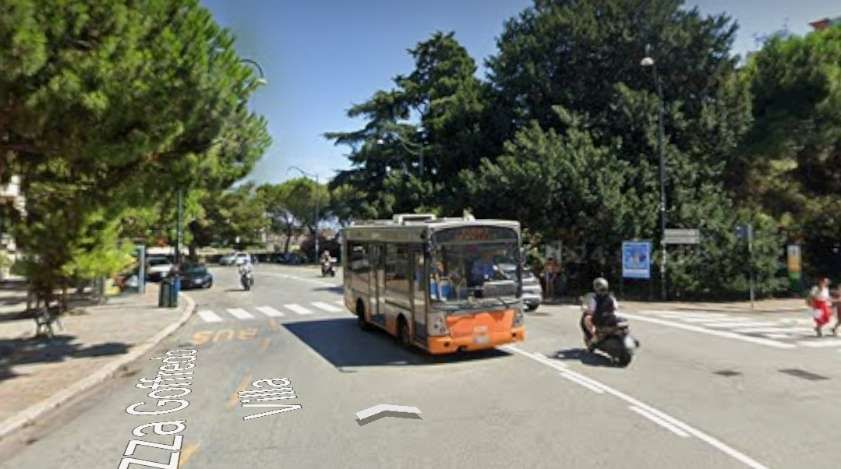
Two different routes to the West of Piazza Sturla have been covered. We now go on from Piazza Sturla to Nervi, setting off along Via dei Mille.
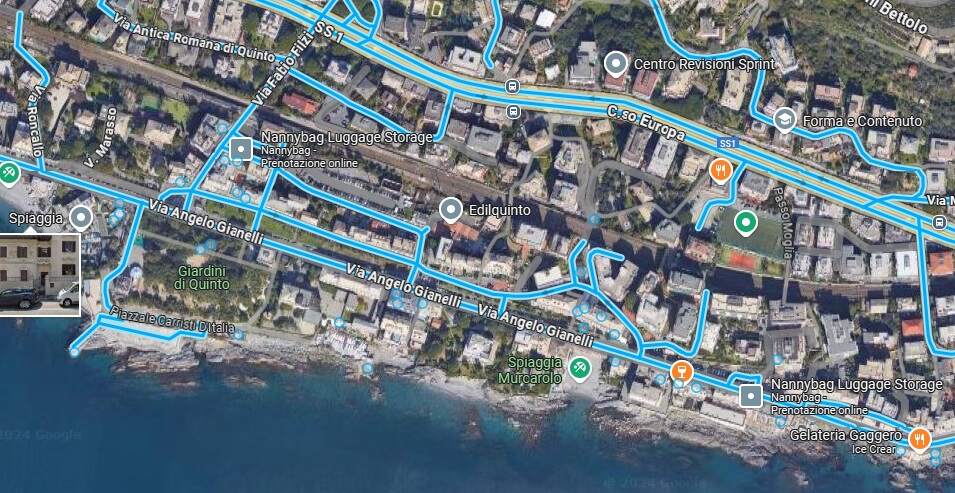
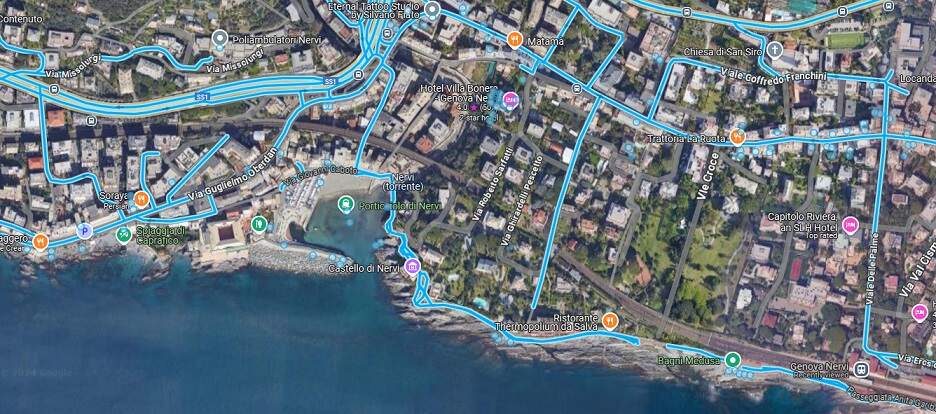
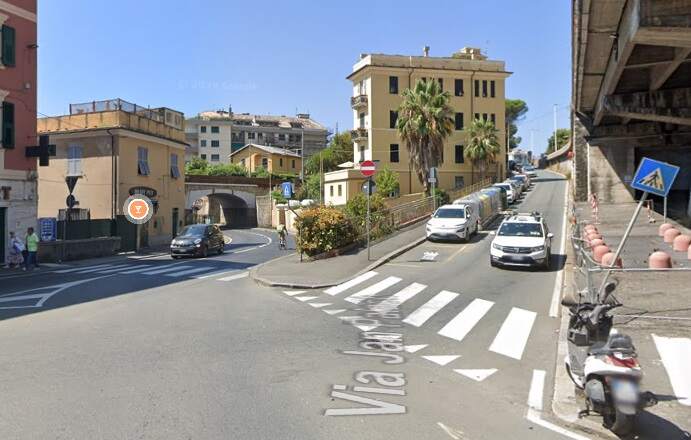
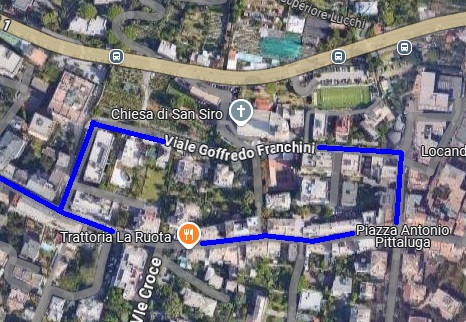
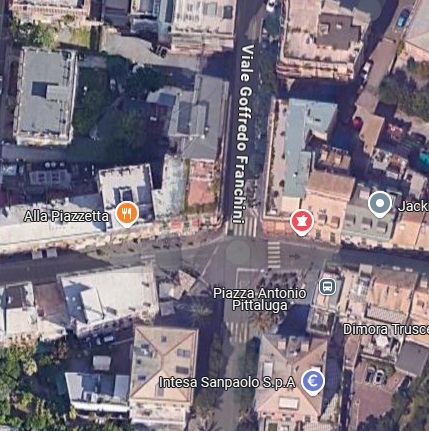
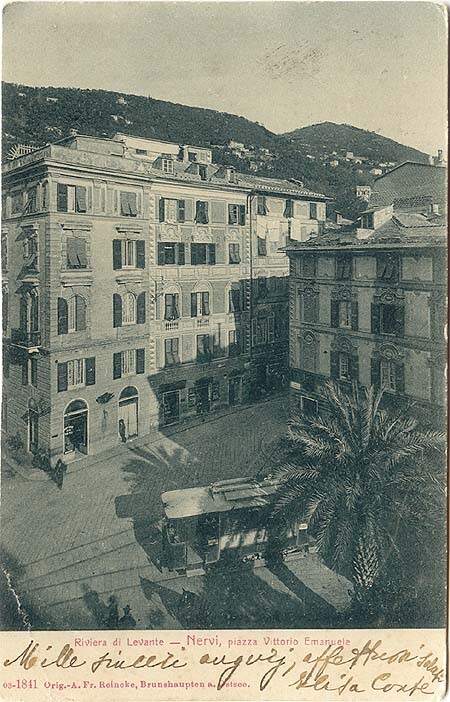
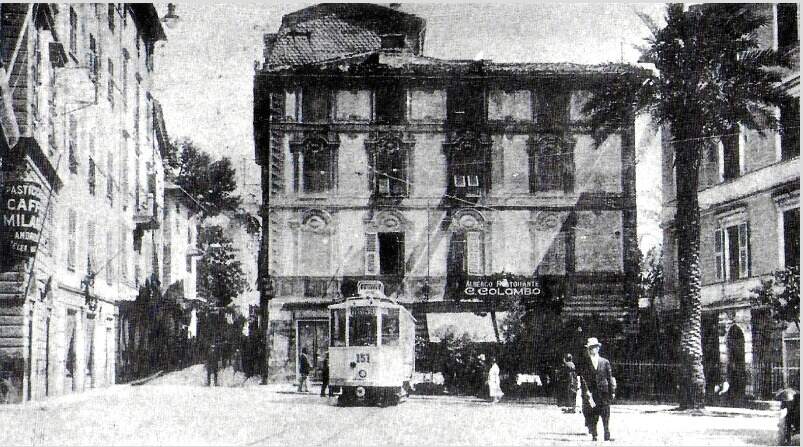
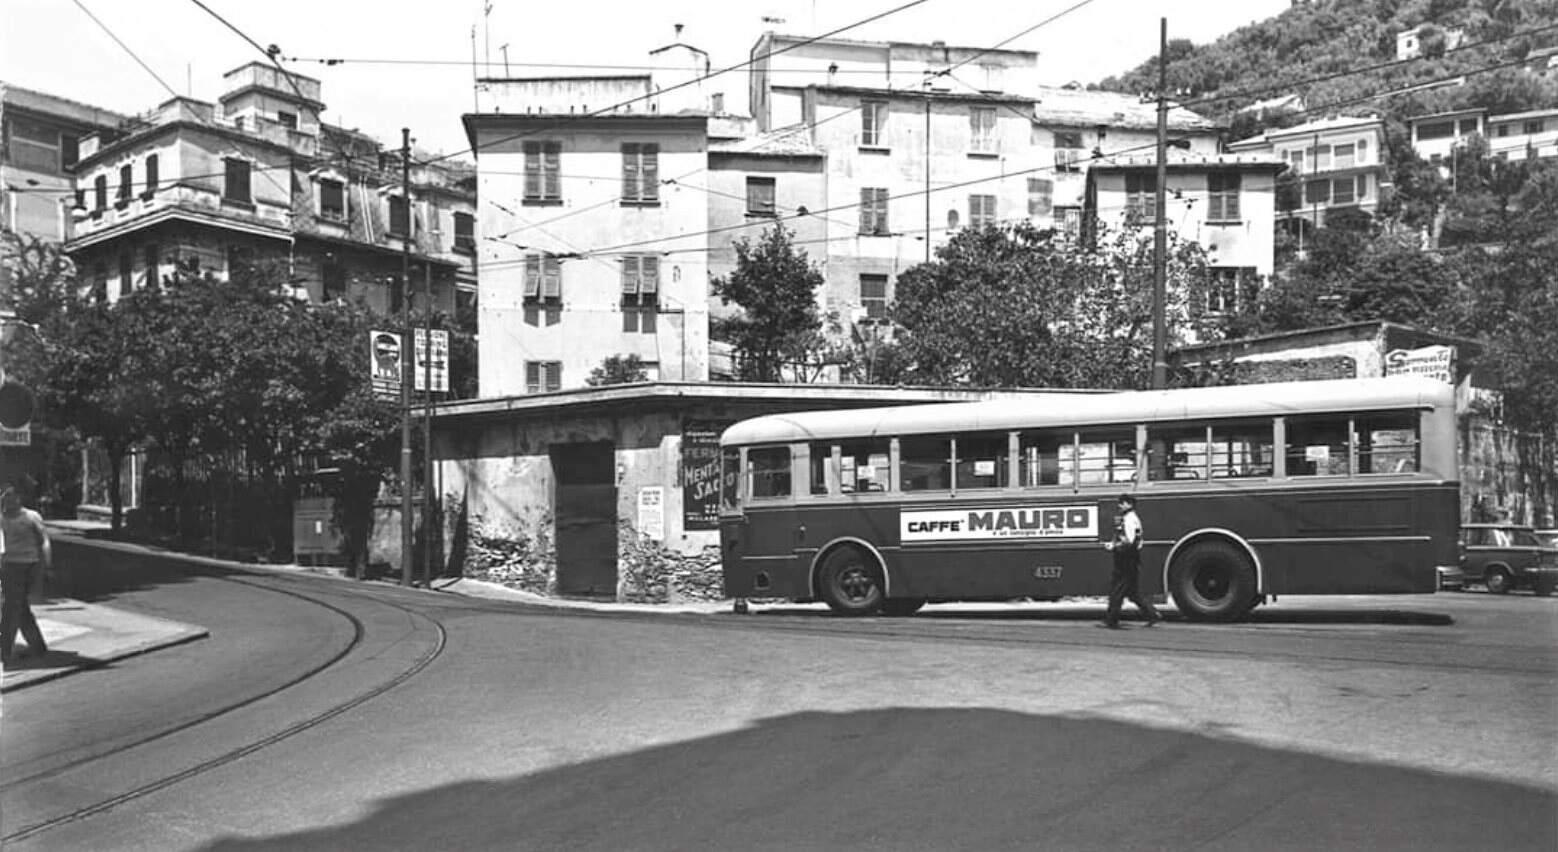
The tram terminus in Nervi was in Piazza Antonio Pittaluga (once Piazza Vittorio Emanuele) Early in the life of the network the terminus was in the piazza, later it was in Viale Goffredo Franchini on the North side of the piazza.
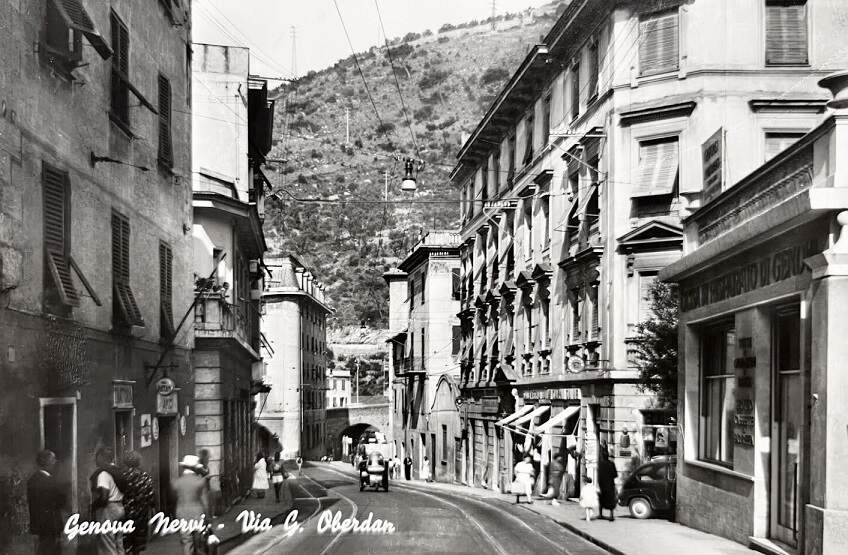
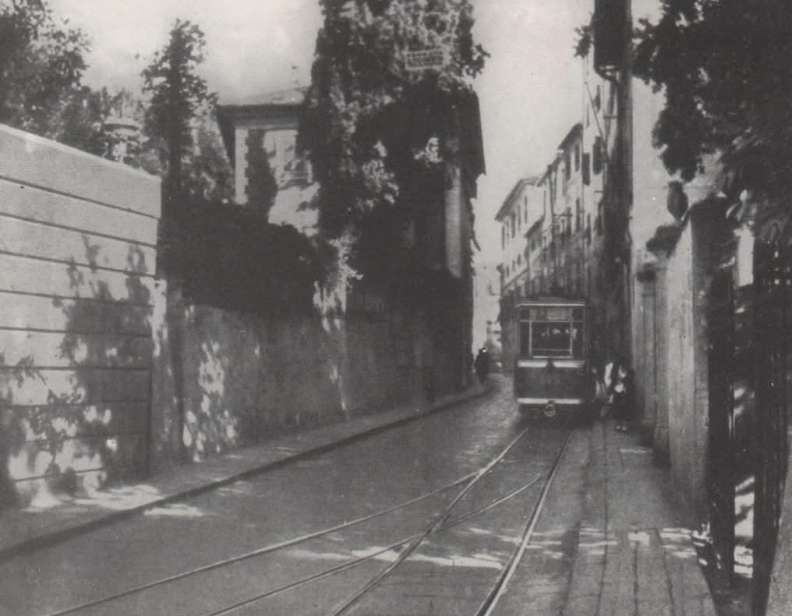
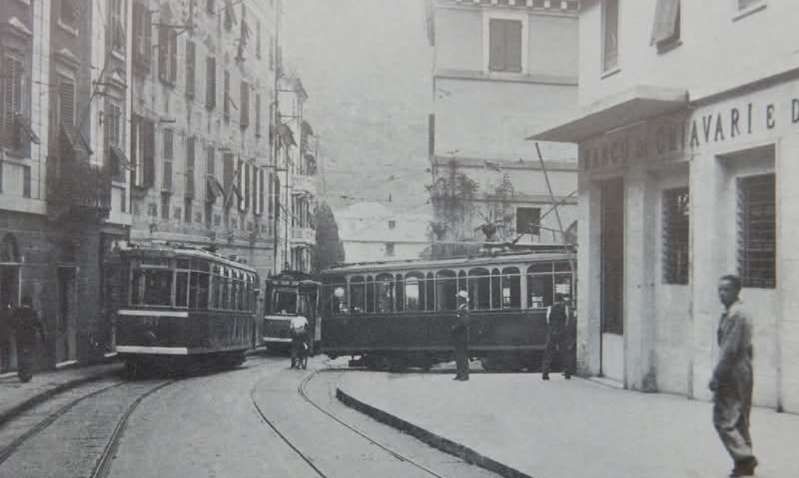
Piazza Vittorio Emanuele (later Piazza Antonio Pitta luga), Nervi, (c) Public Domain. [104]The tram terminus in what is now Piazza Antonio Pittaluga, Nervi, (c) Public Domain. [106]Piazza Antonio Pittaluga, Nervi, The terminus has, by the time of this photograph, been moved into Viale Goffredo Franchini on the North side of the piazza. (c) Public Domain. [88]Piazza Antonio Pittaluga, Nerve. Although busses have replaced trams by the time of this 1960s photograph, the tram tracks remain in place. This image was shared on the Foto Genova Antica Facebook Group by Gianfranco Dell’Oro Bussetti on 14th November 2019, (c) Unknown Photographer. [103]The tram terminus at Nervi in the mid-20th century. This image was shared on the Foto Genova Antica Facebook Group by Giovanna Levaggi on 13th May 2022, (c) Unknown Photographer. [87]The same location in the 21st century. [Google Streetview, May 2022]
The Line to Quezzi
Partially in anticipation of taking control of the whole tram network before WW1, the municipality constructed its own line to Quezzi which used existing tram tracks as far as Ponte Castelfidardo. The transfer of the network to the municipality did not happen and this line, while remaining in the ownership of the city authorities was operated on their behalf by the tram company.
The first three articles about the trams of Genoa cover the network up until the First World War. Future articles will go on to look at the later history of the network and the rolling stock used.
I have not been able to identify the source of this image. It was sourced on line and is likely to no longer be within copyright. Please let me know if this is not the case.
A Summary of what was covered in the First Article
In the previous article in this short series we looked at the history of trams in Genoa (Genova) – both horse trams and electric trams. We covered the story as far as the beginning of the First World War. That article can be found here. [1]
In that article we looked at the tunnels which the city created in order to facilitate access to different parts of the tram network.
That article also covered the Western Network (which is marked in green on the map below). We still have to look at the remainder of the network and the history of the network through to its final closure in the mid-1960s.
As well as looking in detail at the Western network, we noted the services provided on the whole network before the First World War. Details of the lines which formed the Western network can be found in the earlier article – here. [1]
In this article we look at the service provided on another large portion of the remainder of the network in the period up to the First World War.
The Years Before World War One – The Eastern Network
Before the start of World War 1, the Eastern network provided these services: [19]
I. Eastern Network:
21 De Ferrari – Manin – Staglieno 22 De Ferrari – Manin 23 De Ferrari – Manin – Castelletto 24 De Ferrari – Manin – Castelletto – San Nicholo 25 Circuit in the hilly suburbs 26 Piazza Principe – Corso Ugo Bassi 27 De Ferrari – Zecca – Principe 28 Caricamento – De Ferrari – Galliera ‘Ospital 29 De Ferrari – Carignano 30 Circular Raibetta – Brignole – Corvetto – Raibetta 31 De Ferrari – Staglieno – Molassana – Prato 32 De Ferrari – Staglieno – Molassana 33 De Ferrari – Pila – Staglieno 34 Staglieno – Iassa 35 Pila – Staglieno 36 Pila – Staglieno – Molassana 37 De Ferrari – San Fruttuoso 38 De Ferrari – Foce 39 De Ferrari – San Francesco – Sturla – Priaruggia – Quinto – Nervi 40 De Ferrari – San Francesco – Sturla – Priaruggia – Quinto 41 De Ferrari – San Francesco – Sturla – Priaruggia 42 De Ferrari – San Francesco – Sturla 43 De Ferrari – Villa Raggio – Lido 44 De Ferrari – Tommaseo – San Martino – Borgoratti 45 De Ferrari – Tommaseo – San Martino – Sturla 46 De Ferrari – Tommaseo – San Martino 47 De Ferrari – Tommaseo 48 Raibetta – Pila
III. Municipal line: A. De Ferrari – Quezzi
Initially the East and West networks touched only at a location close to Principe Railway Station. Later, after a link was made between Piazza Caricamento and Piazza Raibetta (only a short length of rails) there was a coastal line which linked Piazza Caricamento to the Eastern lines through Raibetta.
The Eastern network focussed on Piazza Raffeale de Ferrari. We looked at images from that piazza in the first article about the trams of Genoa (Genova). At one time, Piazza de Ferrari was full of ‘circular tramlines’ and it was congested through much of the day.
Tram lines left Piazza Raffeale de Ferrari along Via Roma, to the Northeast and along Via XX Settembre.
The lines along Via Roma led to Piazza Corvetto where lines diverged to Carignano, Brignole, Manin and Acquaverde and Principe. A further line looped through the hills North of the city centre from Acquaverde to Manon, and a line ran North from Manin up the Val Bisagno to Staglieno and Prato. We will lookat these line in this article, those which ran out of Piazza de Raffeale Ferrari along Via XX Settembre will be for a further article.
As we have already noted, at Piazza Corvetto lines diverged to Piazza Carignano, Brignole, Manin and Acquaverde and Principe.
Line No. 29 – Piazza Corvetto to Carignano
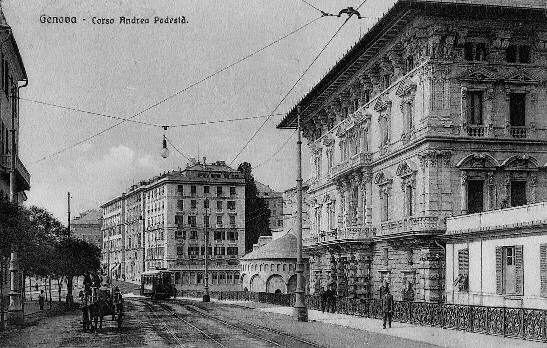
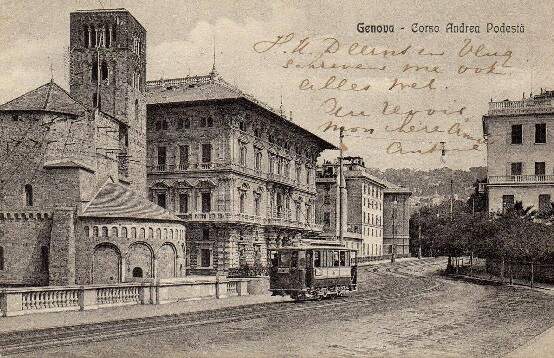
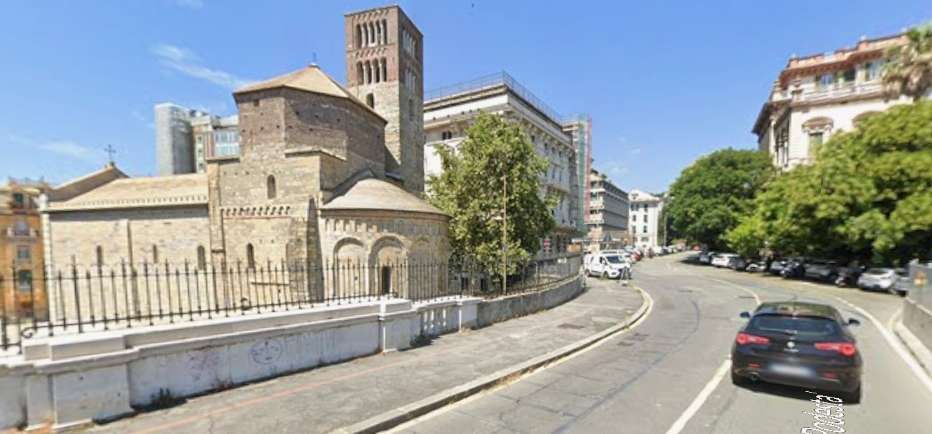
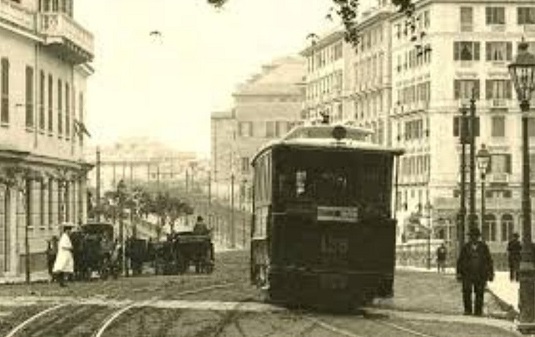
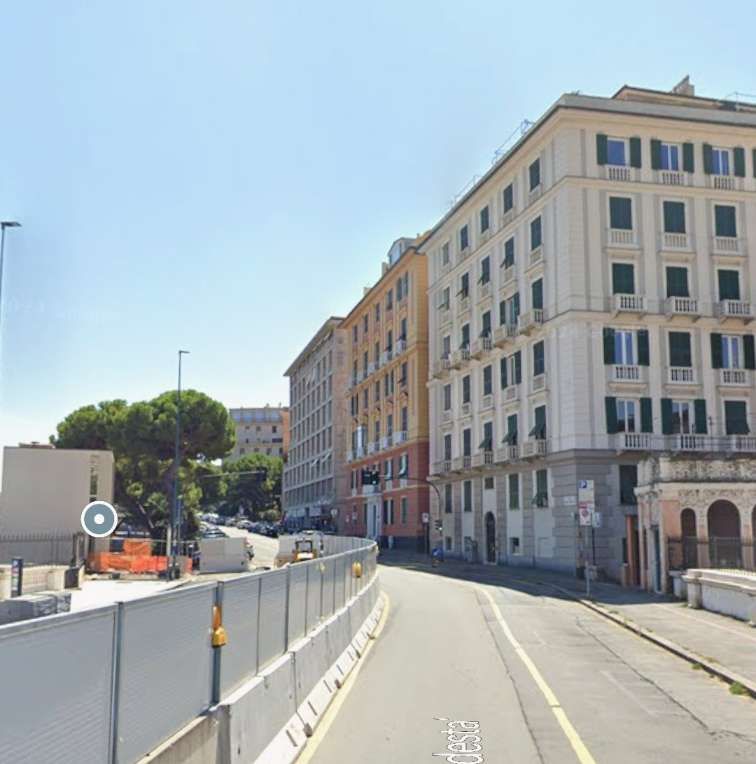
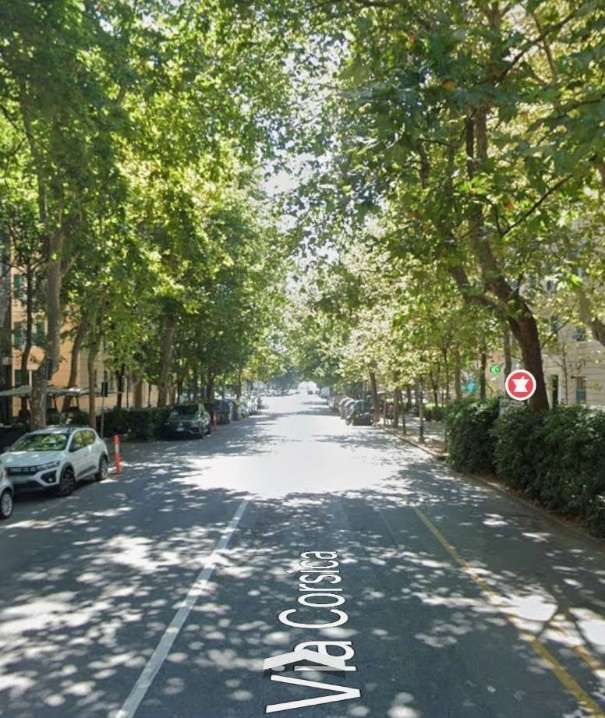
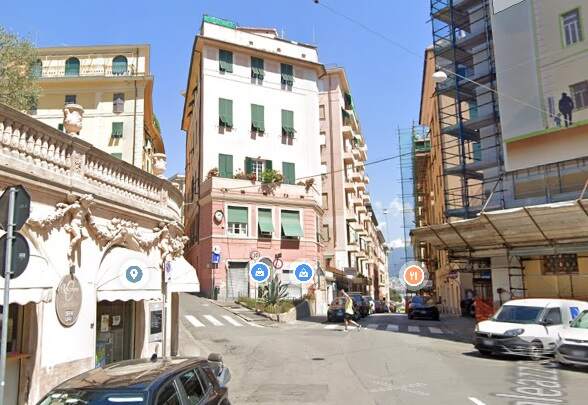
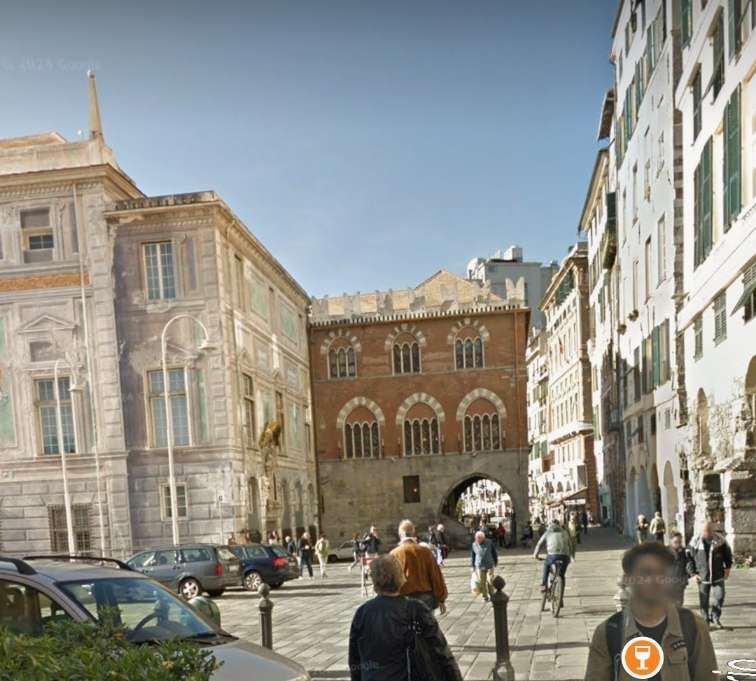
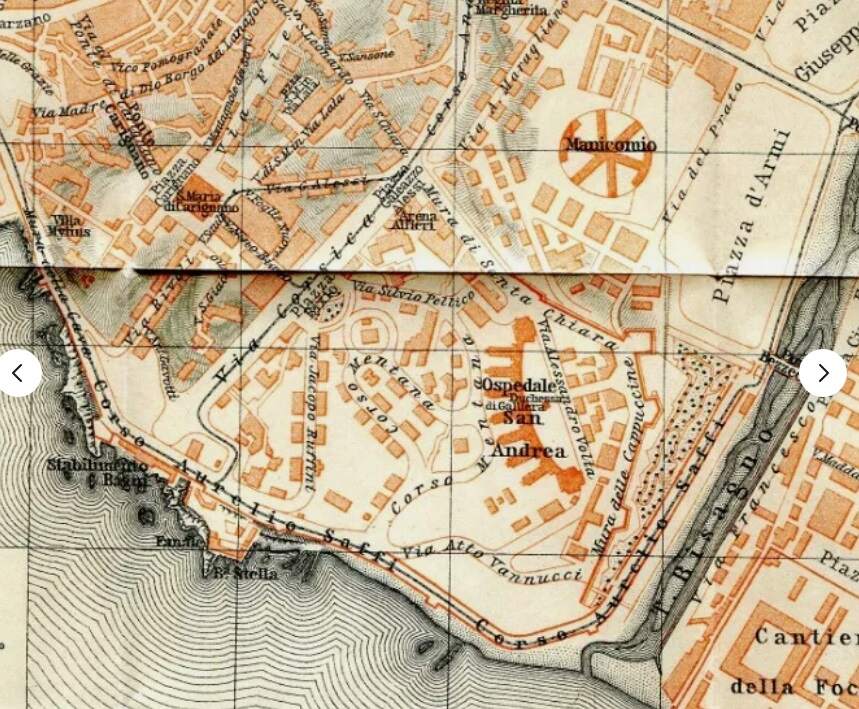
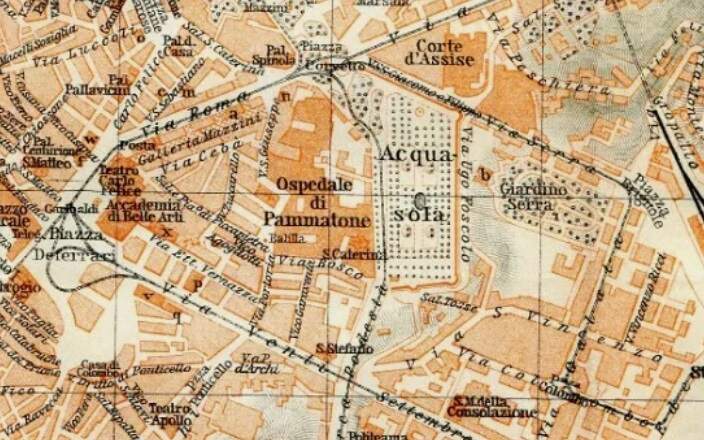
The line to Carignano left the piazza in a South-southwest direction. The roads used are currently named Via XII Ottobre and Viale IV Novembre, Corso Andrea Podesta (which bridges Via XX Settembre), Via Corsica, Via Galeazzo Alessi.
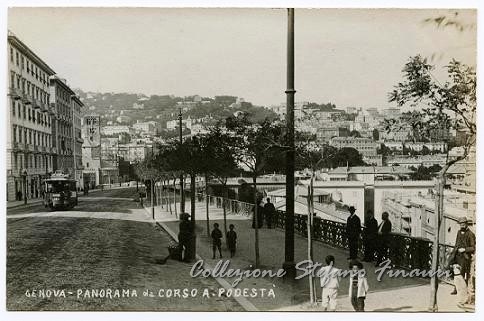
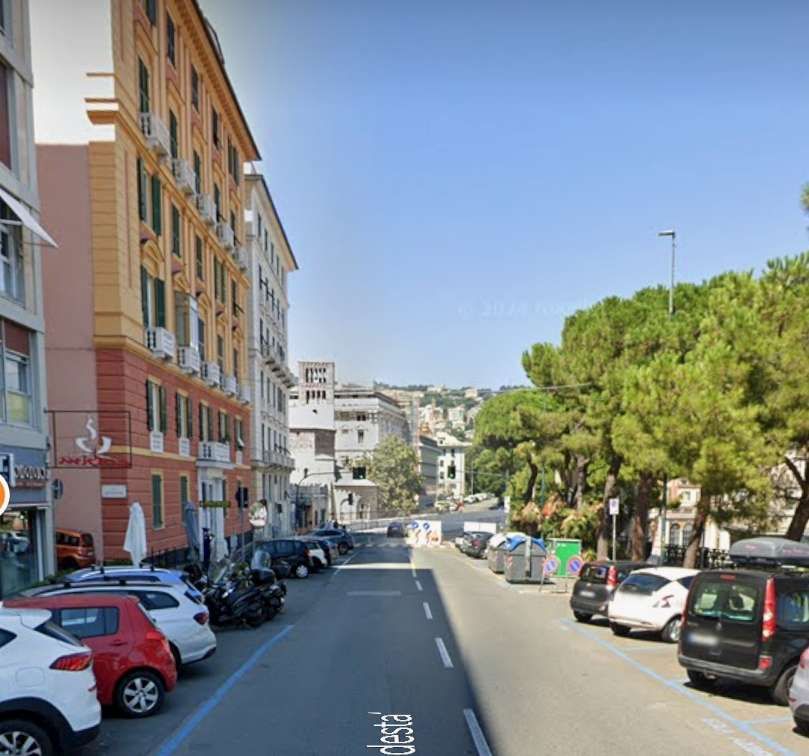
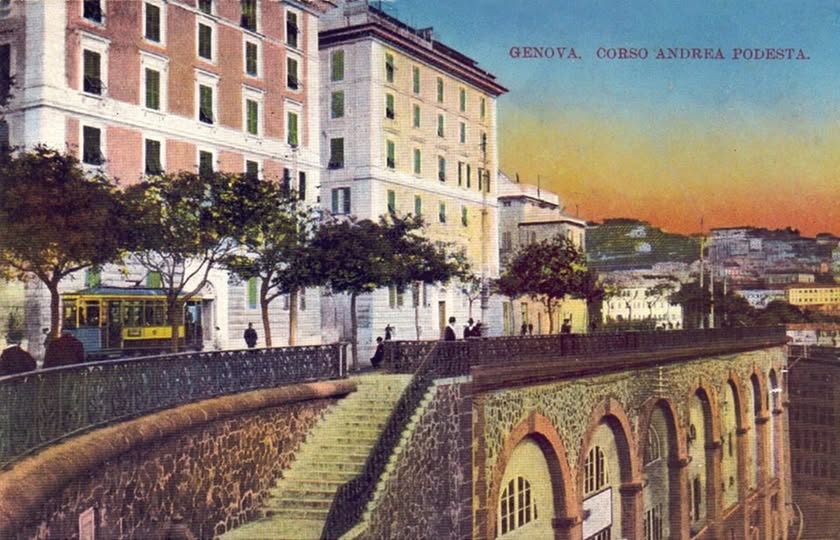
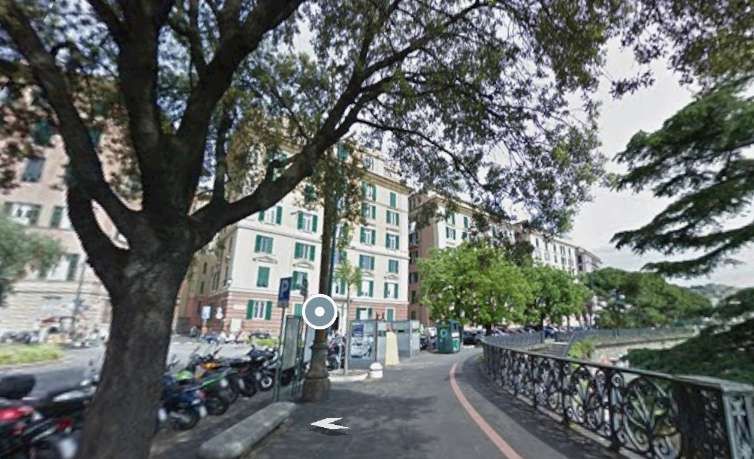
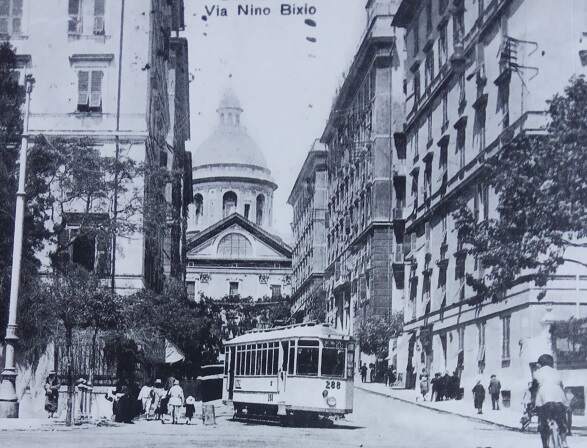
This extract from the Baedeker Map of Genova from 1906 shows the route of Tram No. 29 – from Piazza de Ferrari to Piazza Corvetto, then South on the East side of Ospidale di Pammatone, along Corso Andrea Podesta (which bridges Via XX Settembre), then in a loop including Via Corsica, Via Nino Bixio, Piazza Carignano and Via Galeazzo Alessi, (c) Public Domain. [40]The route of Line No. 29 is shown dotted on this extract from Google’s satellite imagery. [Google Maps, December 2024]This image shows a tram heading out of Piazza Corvetto in the Carignano direction down the present Via XII Ottobre. The image was shared on the C’era una volta Genova Facebook Group by Alessandro Pellerano on 23rd March 2021, (c) Public Domain. [22]A similar view looking towards Piazza Corvetto along Via XII Ottobre in the 21st century. [Googl;e Streetview, August 2024]If this image is prior to 1923, traffic in Genova would have been on the left. This tram would then be travelling away from the camera leaving Viale IV Novembre to run along a short length on Via XII Ottobre to Piazza Corvetto. This image was shared on the Foto Genova Antica Facebook Group by Silvia Brisigotti on 31st May 2024, (c) Public Domain. [26]A similar view towards Piazza Corvetto from Via IV Novembre. [Google Streetview, August 2024]Looking South along Corso Andrea Podesta with Abbazio di Santo Stefano peeping out behind the first building on the right. This image was shared on the Foto Genova Antica Facebook Group on 15th February 2020 by Enrico Pinna, (c) Public Domain. [33]The same view in the 21st century. [Google Streetview, August 2024]Looking North along Corso Andrea Podesta. This image was shared on the Foto Genova Antica Facebook Group on 14th March 2019 by Enrico Pinna, (c) Public Domain. [31]A similar view facing North on Corso Andrea Podesta across the bridge over Via XX Settembre.on the left of the photograph is Abbazio di Santo Stefano. [Google Streetview, August 2024]Looking East along Via XX Settembre with Abbazio di Santo Stefano on the left and the bridge carrying Corso Andrea Podesta ahead. [Google Streetview, August 2024]Corso Andrea Podesta, 1906. This image was shared on the Foto Genova Antica Facebook Group on 26th July 2022 by Renata Fergola, (c) Public Domain. [30]A similar view in the 21st century. The three buildings on the right of the monochrome image above dominate this photo. [Google Streetview, August 2024]Looking North along Corso Andrea Podesta from a point a few hundred metres to the South of the bridge over Via XX Settembre. This image was shared on the Foto Genova Antica Facebook Group on 7th July 2024 by Zenzero Secondo from the Collection of Stefano Finauri, (c) Public Domain. [29]A similar view in the 21st century. [Google Streetview, August 2024]At the South end of Corso Andrea Podesta, looking North. This image was shared on the Foto Genova Antica Facebook Group on 26th July 2024 by Pietro Spanedda, (c) Public Domain. [27]This view seems to be as close as it is possible to get on Google Streetview to the colourised postcard image above. The steps which are prominent in the image above can be seen through the balustrade to the right of this image. [Google Streetview, 2019]Via Corsica, 1916. This image was shared on the C’era una volta Genova Facebook Group on 23rd November 2019 by Pietro Cassani, (c) Public Domain. [34]Via Corsica in the 21st century – the trees evident in the monochrome image above have matured significantly since the early 20th century. As a result it is difficult to determine the modern equivalent of the older view. [Google Streetview, August 2024]
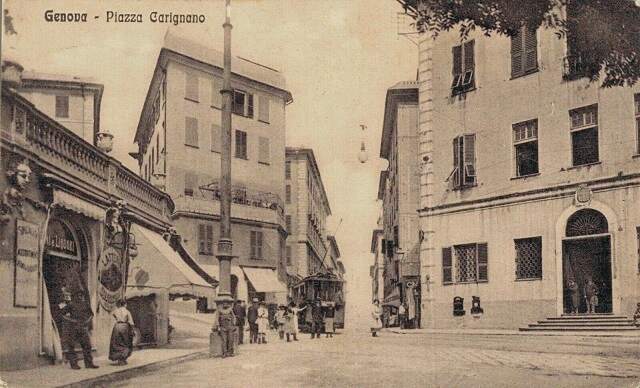
A loop ran round Via Galeazzo, Piazza Carignano and Via Corsica as shown below
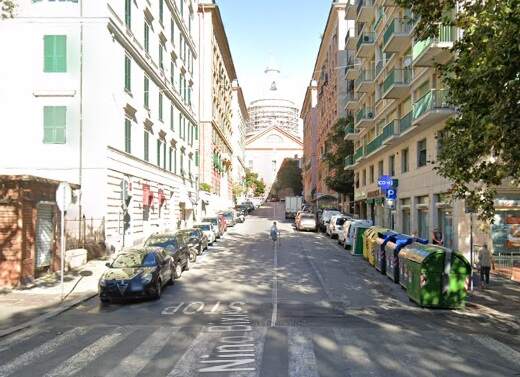
Piazza Carignano in the early years of the 20th century looking along Via Galeazzo Alesi. The tram in the picture appears to have travelled to Piazza Carignano along Via Galeazzo Alesi. It will turn to its left along the side of Piazza Carignano before leaving the piazza along Via Nino Bixio. The loop may also have been travelled in the reverse direction, if so, this tram is leaving Piazza Carignanao down Via Galeazzo Alesi. This image was shared on the C’era una volta Genova Facebook Group by Franco Bonadonna on 18th October 2022, (c) Public Domain. [25]Tha same view in the 21st century. [Googl;e Streetview, August 2024]This picture shows the tram tracks running along the side of Piazza Carignano from Via Galeazzo Alesi and turning down Via Nino Bixio. This image was shared on the Foto Genove Antica Facebook Group on 30th April 2024 by Pietro Spanedda, (c) Public Domain. [23]This view of Via Nino Bixio seen from Via Corsica shows a tram running away from the camera along Via Nino Bixio having turned right from Via Corsica. Prior to 1923 Genova traffic travelled on the left. This image was shared on the C’era una volta Genova Facebook Group by Roberto Cito on 9th September 2023, (c) Public Domain. [24]A similar view in the 21st century of Via Nino Bixio from Via Corsica. [Google Streetview, September 2020]
Line 30 – Piazza della Raibetta to Piazza Brignole via Piazza Corevetto
Italian Wikipedia describes this route as a ‘circular’ (Circolare) – we will need to consider how this route differs from an ‘out-and-back’ service (such as Line 29 between Piazza de Ferrari and Piazza Carignano).
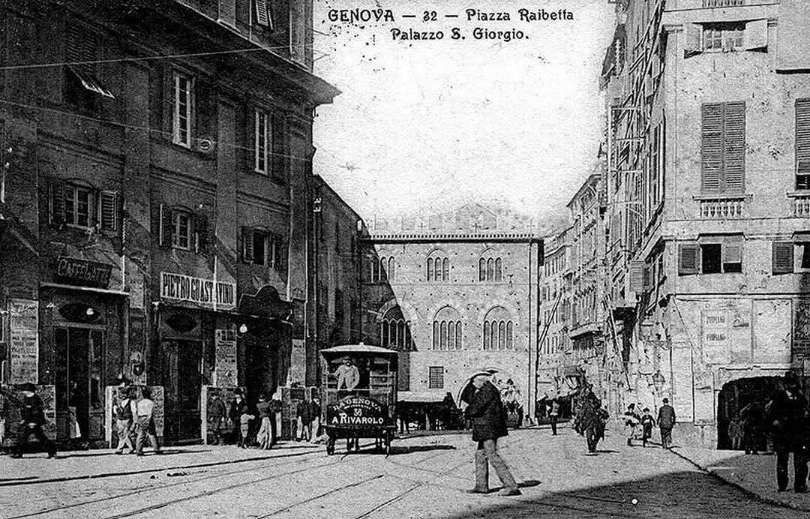
Piazza della Raibetta was the terminus of a coastal tram route. Initially, it was only served by Line No. 30.
These three extracts from the Baedeker 1906 map of Genoa show the route of Line No. 30.
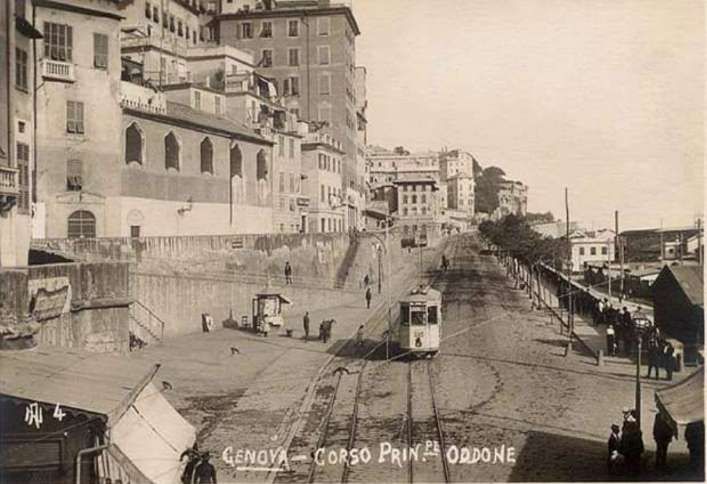
Again, assuming the map by Arbalete is correct, the line ran South from Piazza Raibetta along (probably) Via Filippo Turati and then through Piazza Cavour onto Sottopasso di Carcimento. The line continued around the South side of the city along Corso Maurizio Quadro and Corso Aurelio Saffi (previously Corso Principe Oddone) to the mouth of the River Bisagno where it turned inland, following the Val Bisagno as far as Via Luigi Cardorna where trams turned left following that road to the West which continued into Via XX Settembre. Then into Piazza de Ferrari, Via Roma, Piazza Corvetto, Via Serra and finally Piazza Brignole, (c) Public Domain. [40]
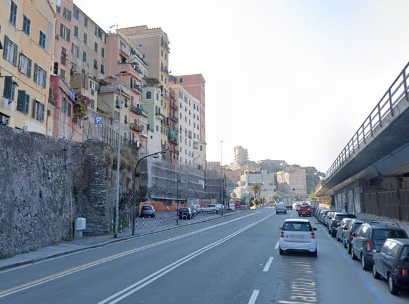
Line No. 30 from Piazza Raibetta along (probably) Via Filippo Turati and then through Piazza Cavour onto Sottopasso di Carcimento. The line then continued around the South side of the city along Corso Maurizio Quadro and, at the bottom of this satellite image, Corso Aurelio Saffi. [Google Maps, December 2024]Trams followed Corso Aurelio Saffi (previously Corso Principe Oddone) to the mouth of the River Bisagno where they turned inland, following the Val Bisagno as far as Via Luigi Cardorna where trams turned left following that road to the West which continued into Via XX Settembre. [Google Maps, December 2024]From Via XX Settembre trams entered Piazza de Ferrari ran along Via Roma, through Piazza Corvetto onto Via Serra and into Piazza Brignole. [Google Maps, December 2024]
There is an alternative to this route. This would have trams returning from Brignole to Ponte Pila by a more direct route and so completing a ‘circular’ as suggested by the route listings above. The 1906 Baedeker below shows a tram route which would permit this option.
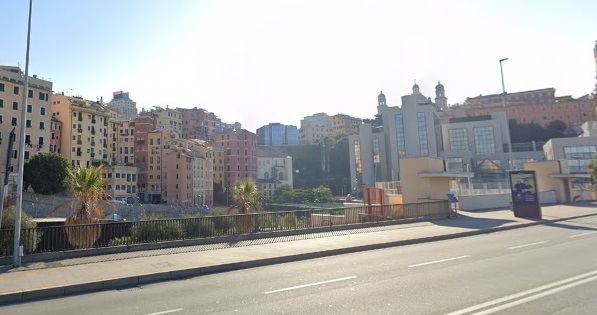
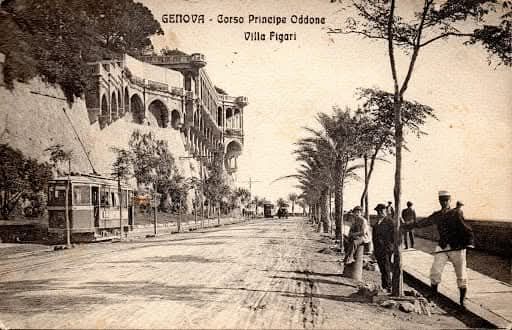
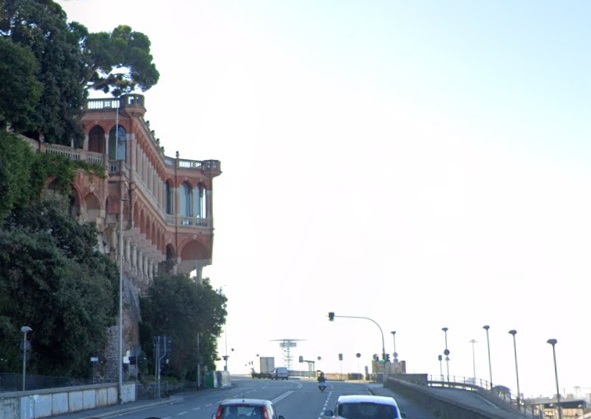
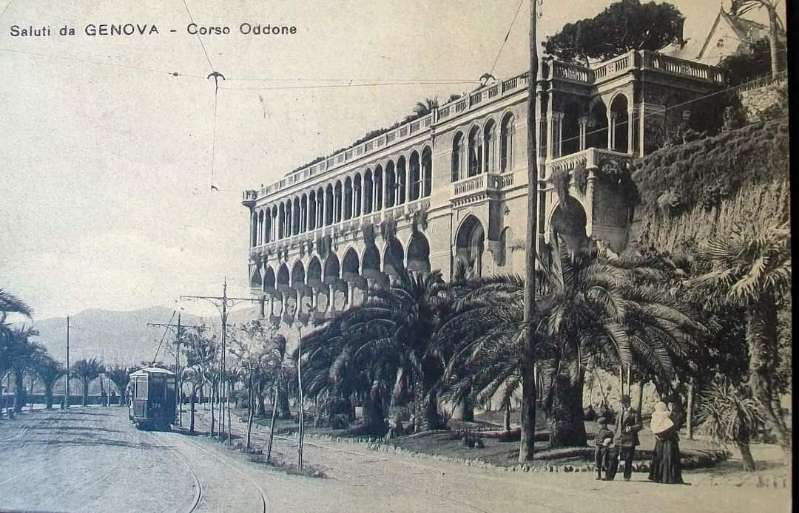
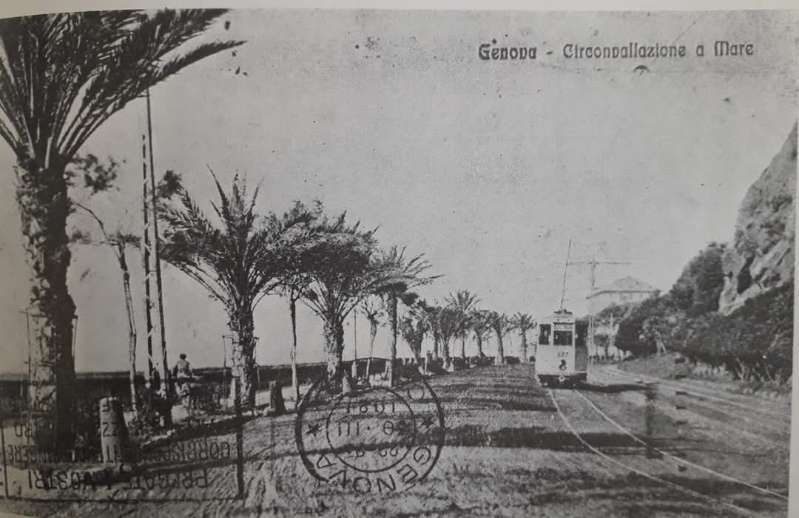
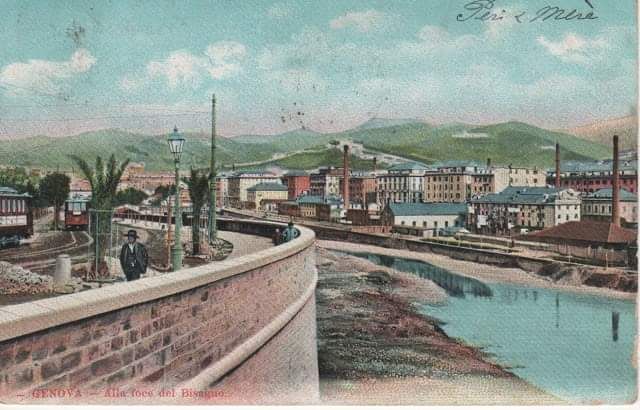
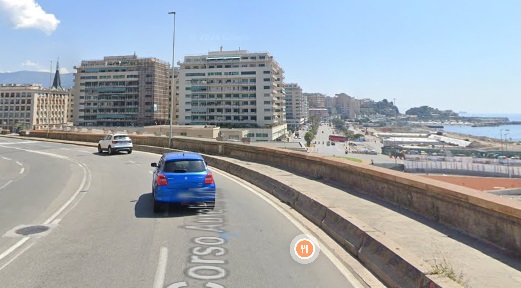
These next few photographs of the coast road (Circonvallazione a Mare) focus on a dramatic Villa which overhung the road – Villa Figari (also known as Villa Mylius).
Via Settembre feeds into Piazza de Ferrari and trams passed through Ferrari onto Via Roma and then on to Piazza Corvetto. Pictures of this length of the route can be found in the part of this article (above) covering Line No. 29.
From Piazza Corvetto the trams ran along Via Serra to Plaza Brignole.
The view East from Piazza Corvetto along Via Serra towards Piazza Brignole. [Google Streetview, August 2024]A view across the railway tracks at Brignole station, looking West through Piazza Brignole and along Via Serra, (c) Public Domain. [50]Looking West from Piazza Brignole along Via Serra. This image was shared by Gino Ratto on the C’era una volta Genova Facebook Group on 14th July 2020, (c) Public Domain. [55]The view along Via Serra from Piazza Brignole in the 21st century. [Google Streetview, August 2024]Piazza Brignole to the Northwest of the Railway Station. This image was shared by Corallo Giorgio on the C’era una volta Genova Facebook Group on 9th November 2016, (c) Public Domain. [61]Piazza Brignole in the 21st century. [Google Streetview, August 2024]
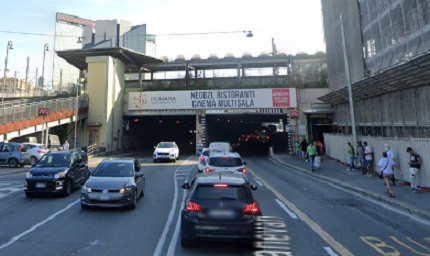
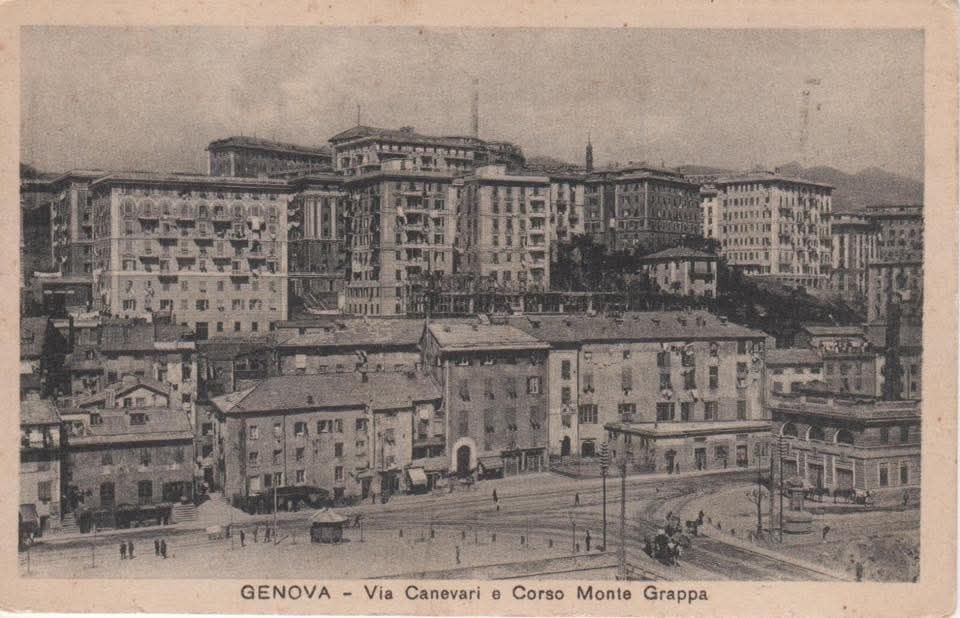
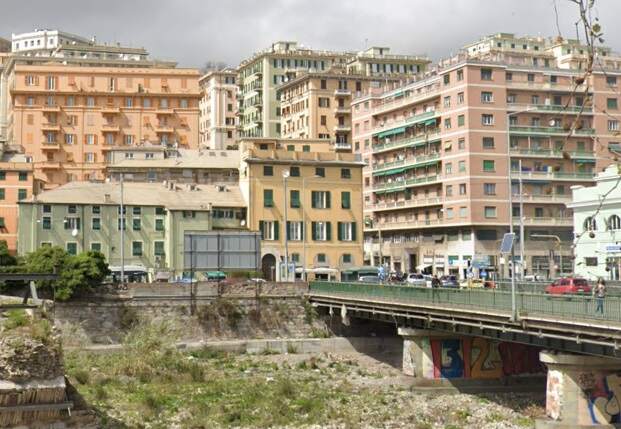
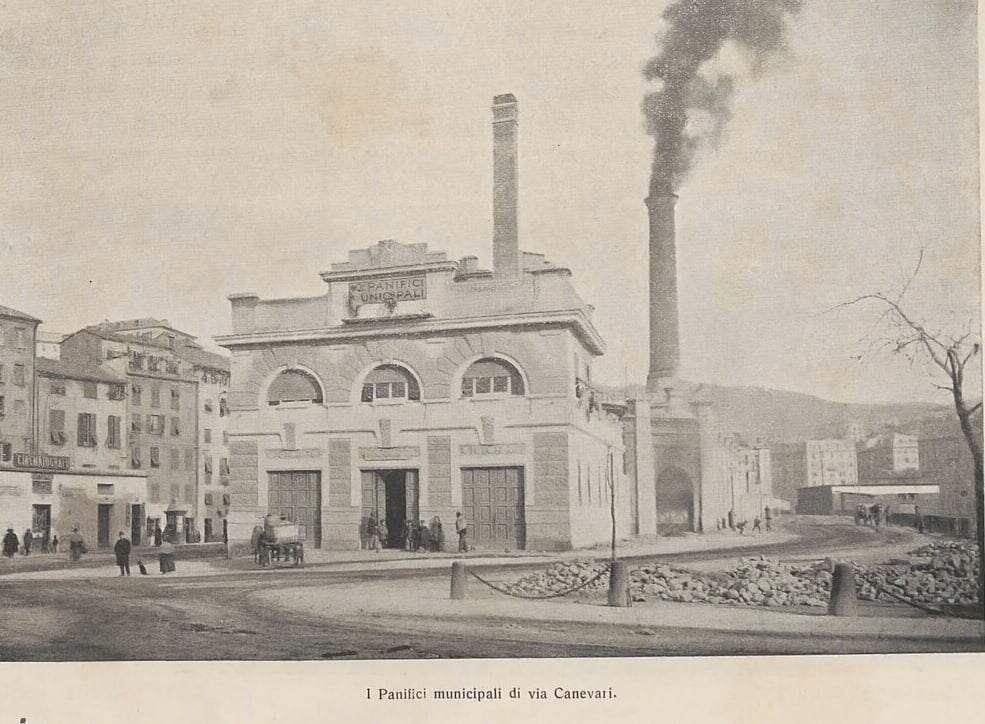
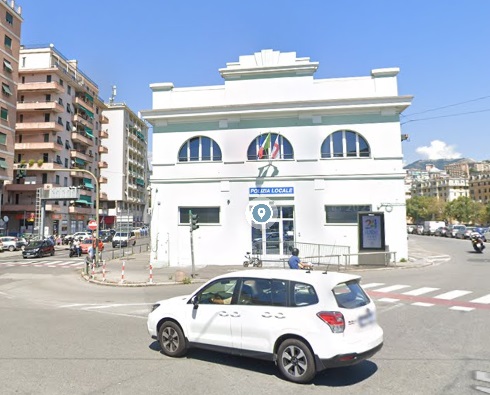
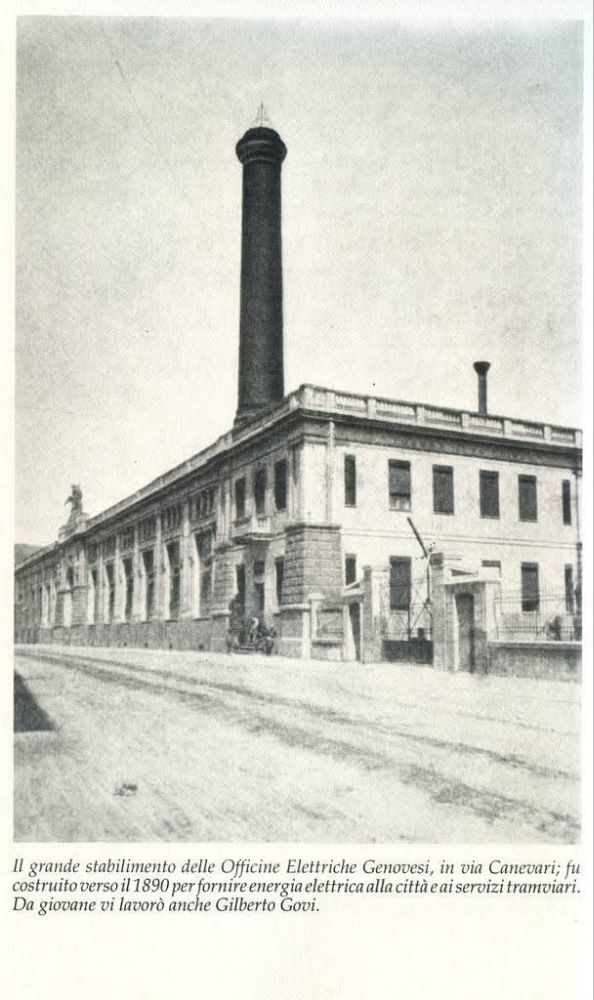
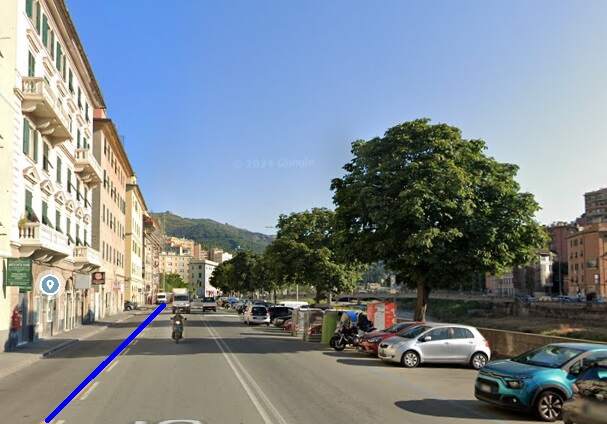
Just to the West of Piazza Brignole, a tram line ran along Via Galata, South from Via Serra to Via Colombo, along Via Colombo to Via Ederra (now Via Fiume), then North on Via Ederra before turning Southeast across the front of Brignole Railway Station (across the North side of Piazza Guiseppe Verdi and then Southwest alongside the River Bisagno on Via Canevari.
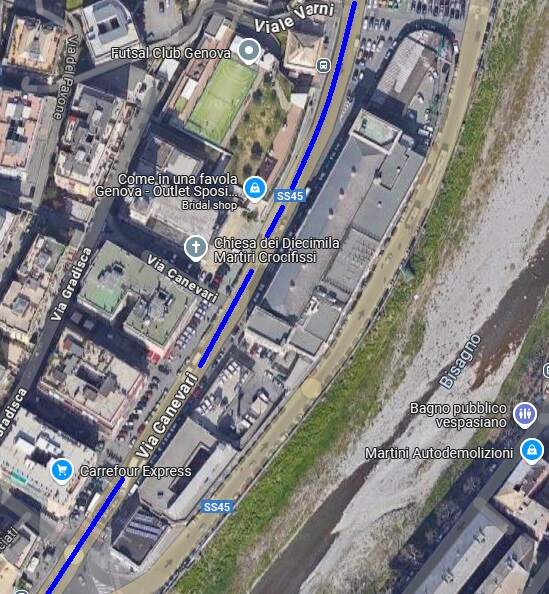
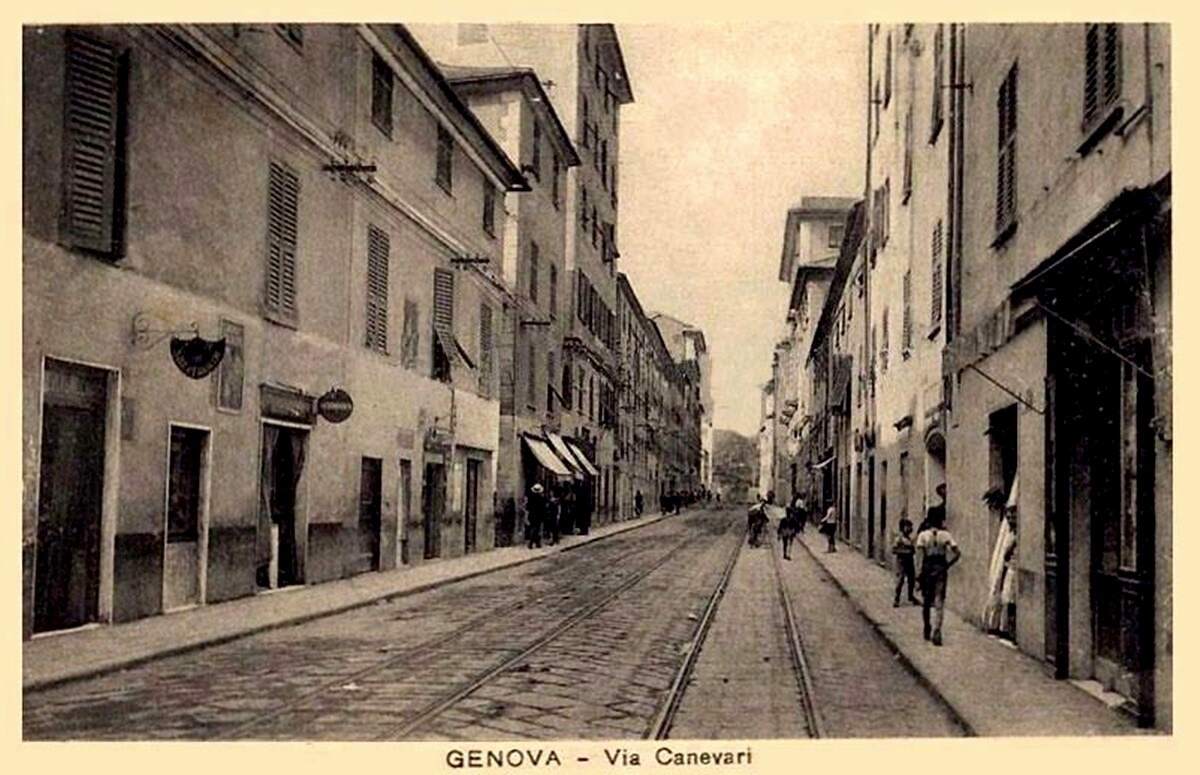
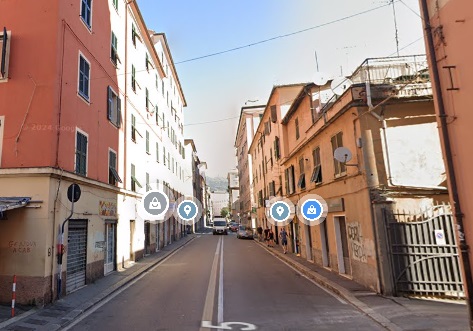
Trams ran South on Via Galata. [Google Streetview, August 24]Trams ran East on Via Colombo. [Google Streetview, April 2023]Looking North on Via Fiume (once Via Edeera) which trams followed towards Brignole Station which sits beyond the trees to the right of this image. [Google Streetview, August 2020]The curve round to the front of Brignle Railway Station, (c) Public Domain. [60]A similar view in the 21st century. [Google Streetview, August 2024]Looking South down the line of the right bank of the River Bisagno (now culverted). The street is Via Canevari. Trams ran South alongside the river on Via Canevari.Looking North up Via Canevari with the River Bisagno on the right. This image was shared on the Foto Genova Antica Facebook Group by Asinus Natator on 7th February 2022, (c) Public Domain. [52]Looking North from a similar position in the 21st century. [Google Streetview, August 2024]
From the location of Ponte Pila trams followed the route alongside the River Bisagno and then along Corso Aurelio Saffi back to Piazza Raibetta.
Piazza Corvetto to Piazza del Principe
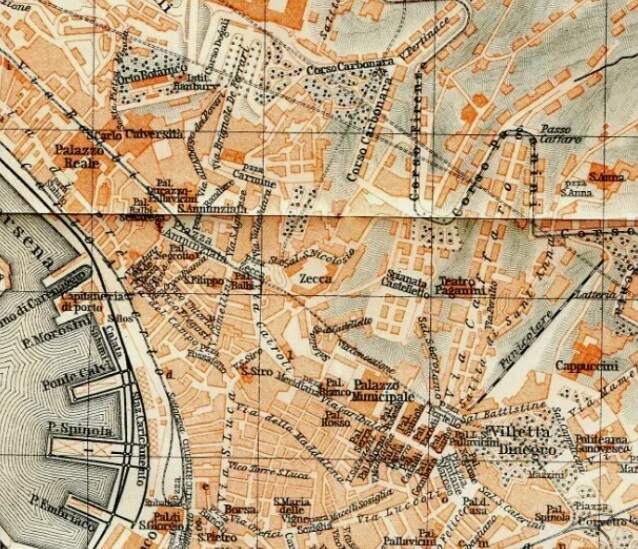
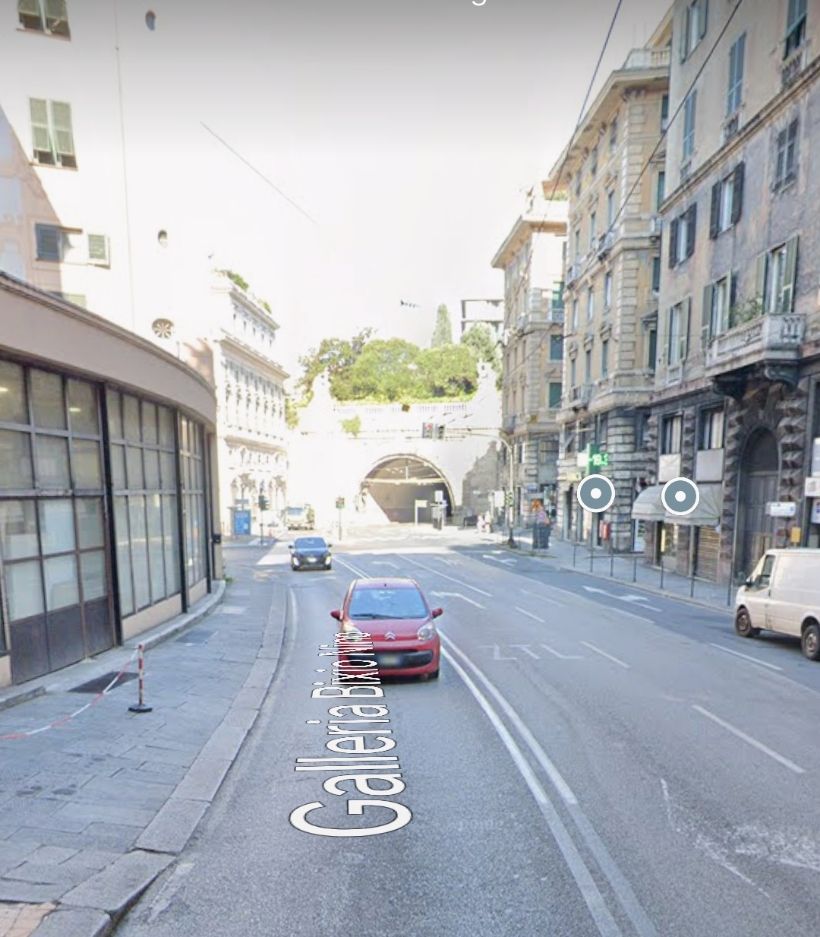
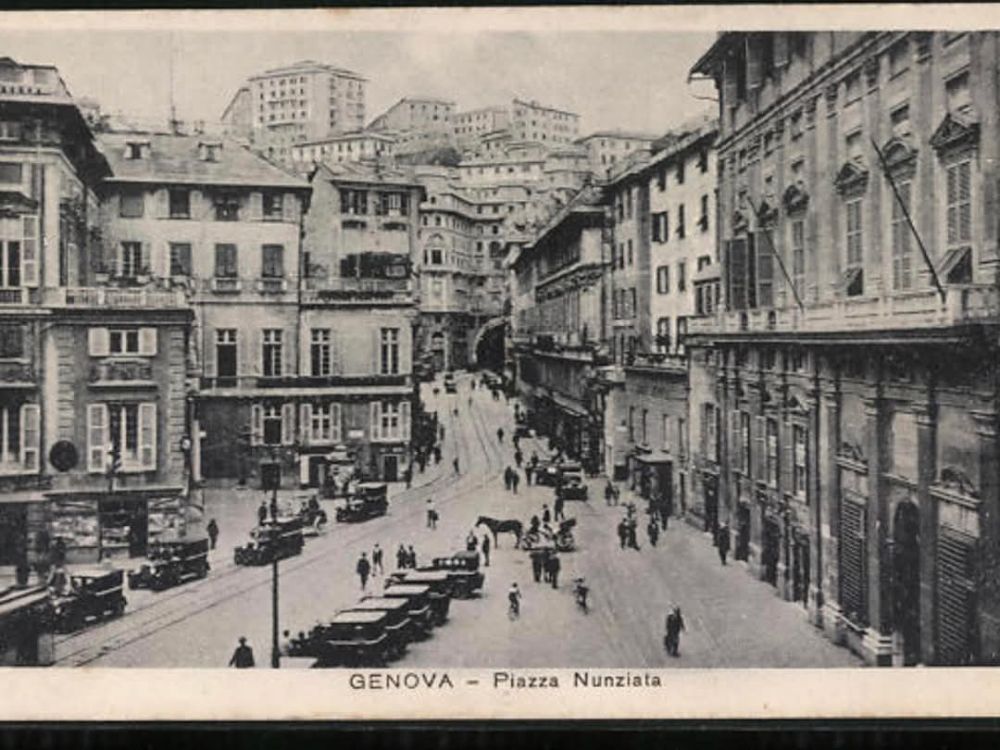
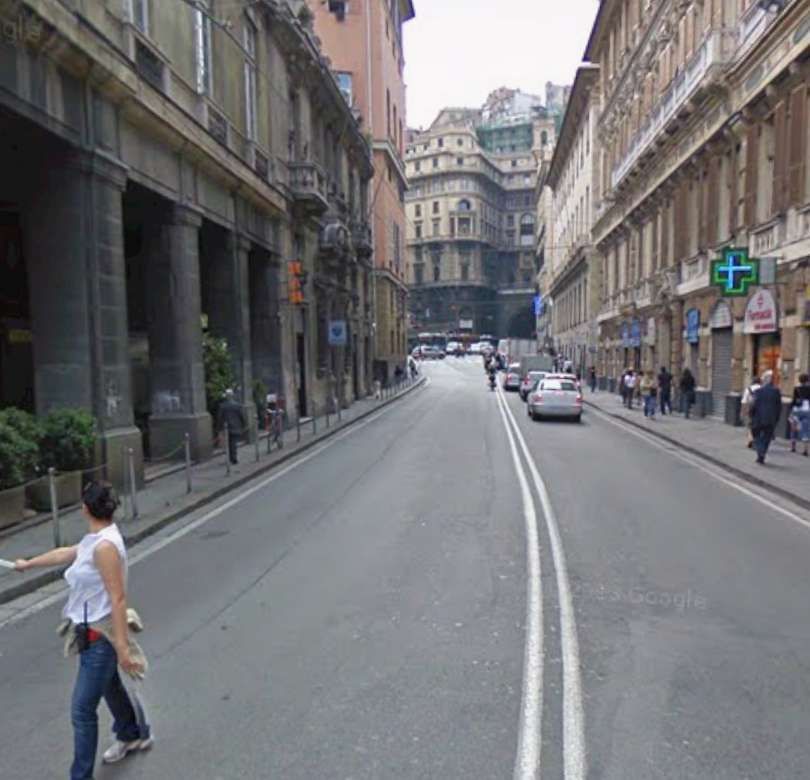
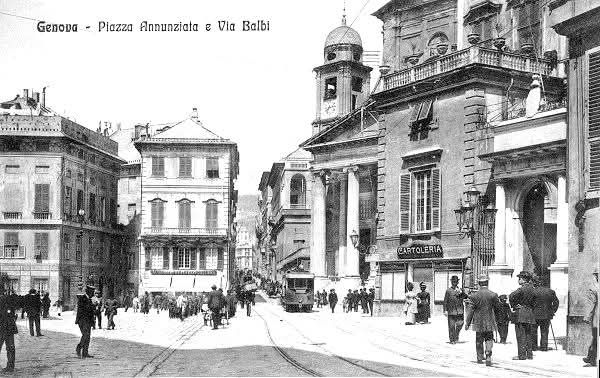
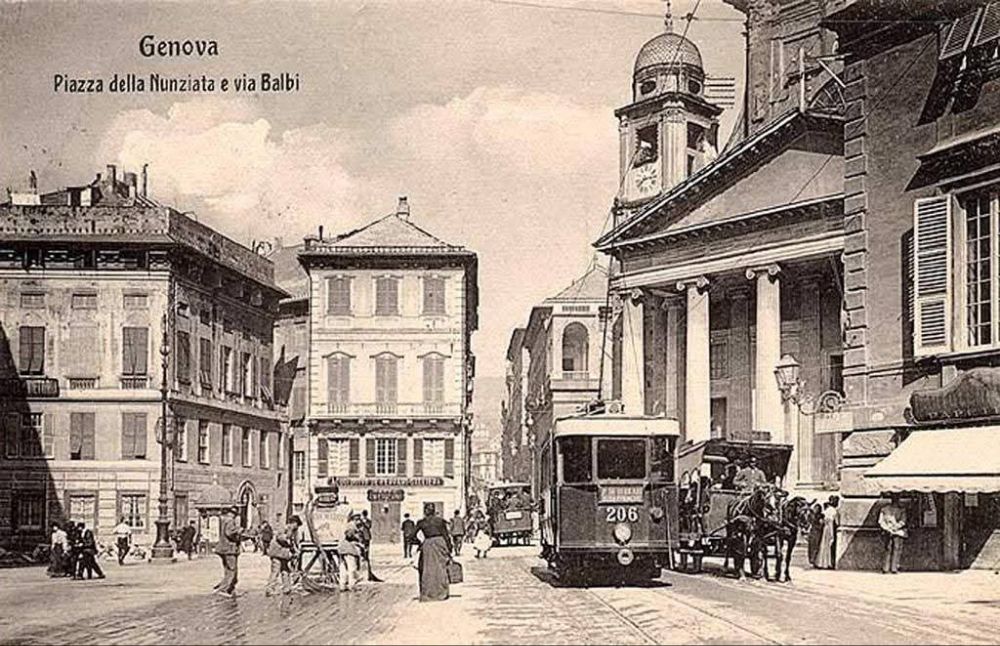
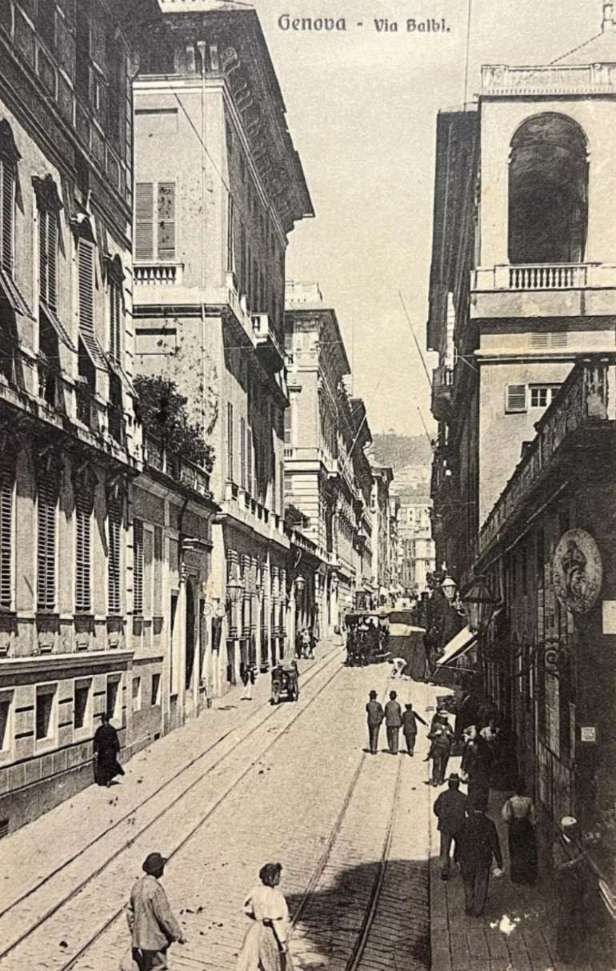
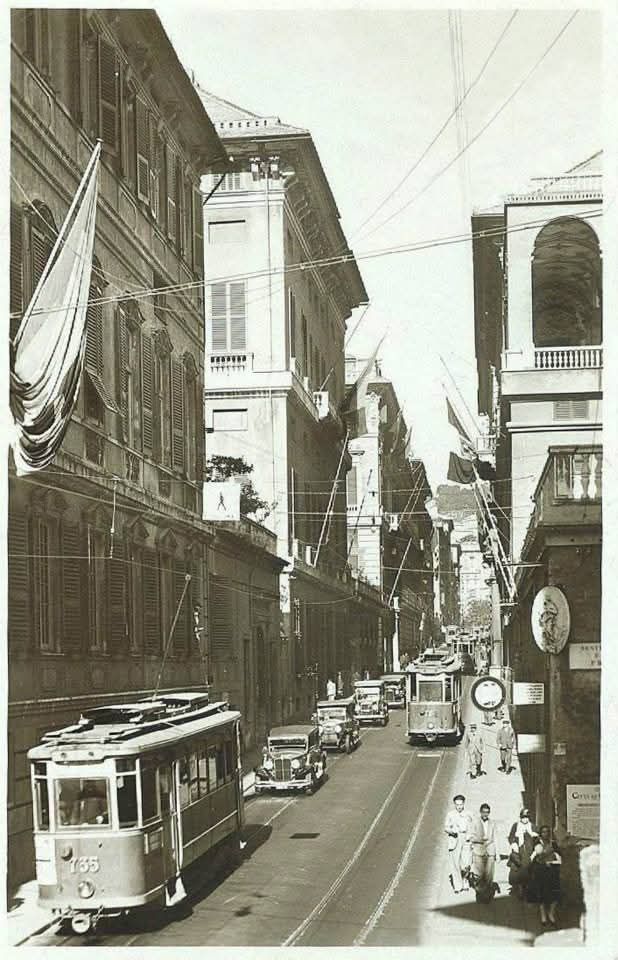
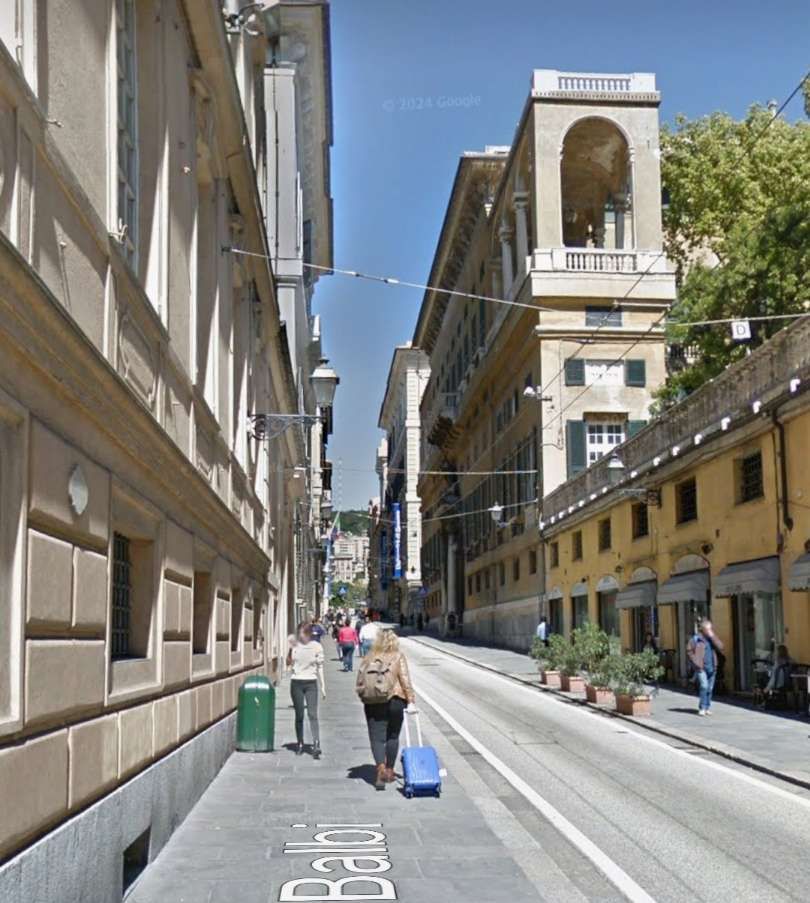
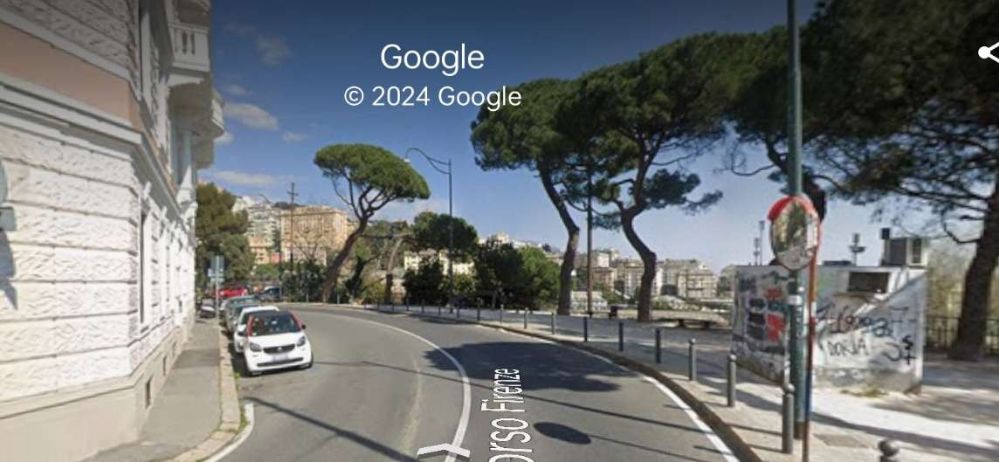
Two tunnels made it possible for trams to run between Piazza Corvetto and Piazza Principe. The route ran via, what are now Galleria Nino Bixio and Galleria Giuseppe Garibaldi, through Largo della Zecca, along Via Paolo Emilio Bensa, through Piazza della Nunziata, along Via Balbi, through Piazza Acquaverde and then along the South side of Principe Railway Station along Via Andrea Doria to Piazza del Principe.
The tram route we are looking at now runs West-northwest out of Piazza Corvetto through two tunnels and through Piazza Acquaverde before reaching Piazza del Principe. A relatively straight route except for the dog-leg close to Piazza Acquaverde. [19]
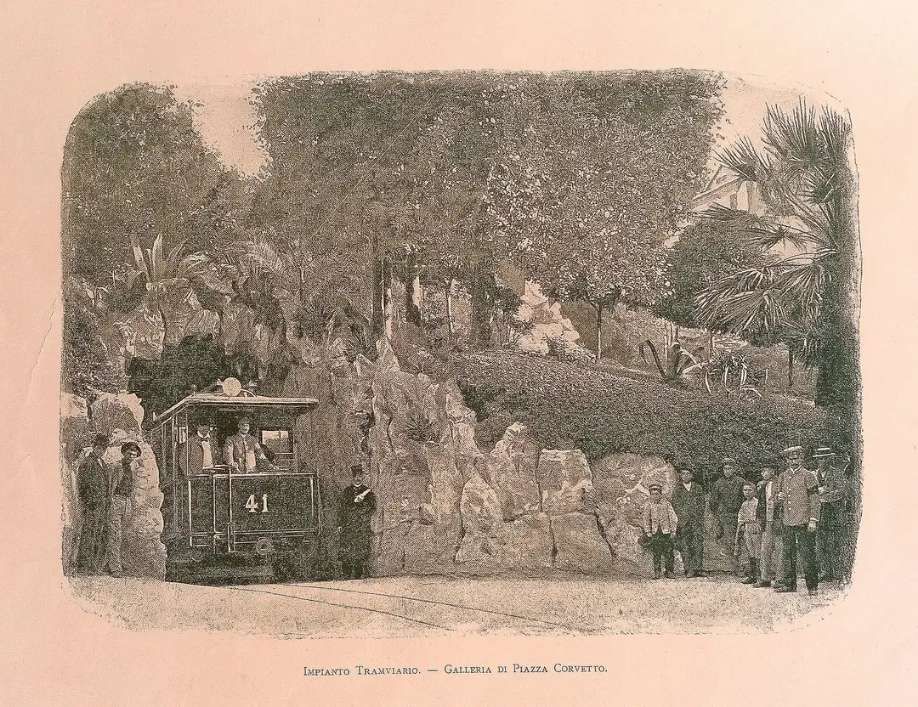
Trams on Line No. 25 turned to the Northwest at the East end of Piazza Acquaverde. A short climb led to the lower entrance to Galleria Sant’Ugo. That tunnel is covered in the earlier post in this short series, here. [1]
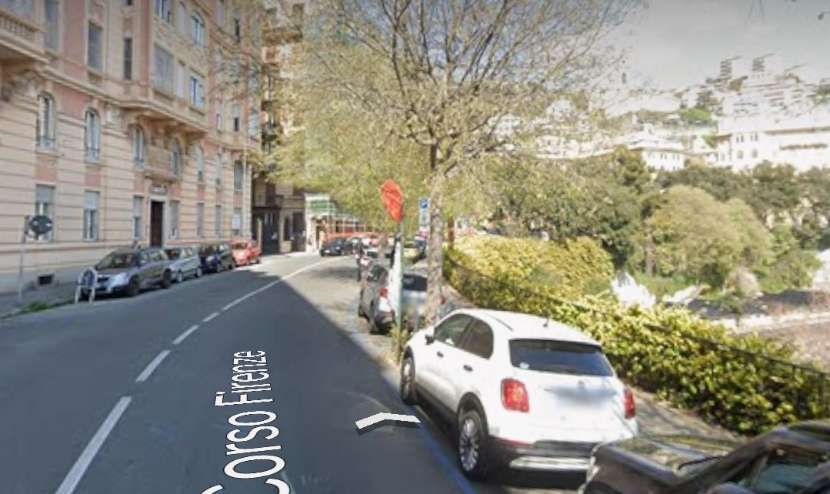
Galleria Sant’Ugo was a horseshoe shaped tunnel which lifted trams to pavement level in Piazza Pedro Ferriera. Leaving the tunnel trams ran Northeast along Via Sant’Ugo.
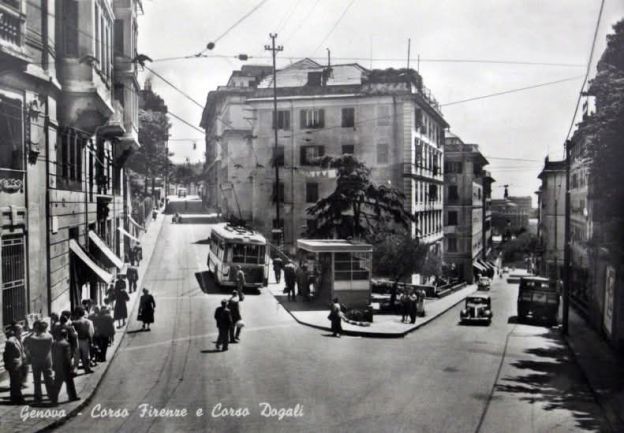
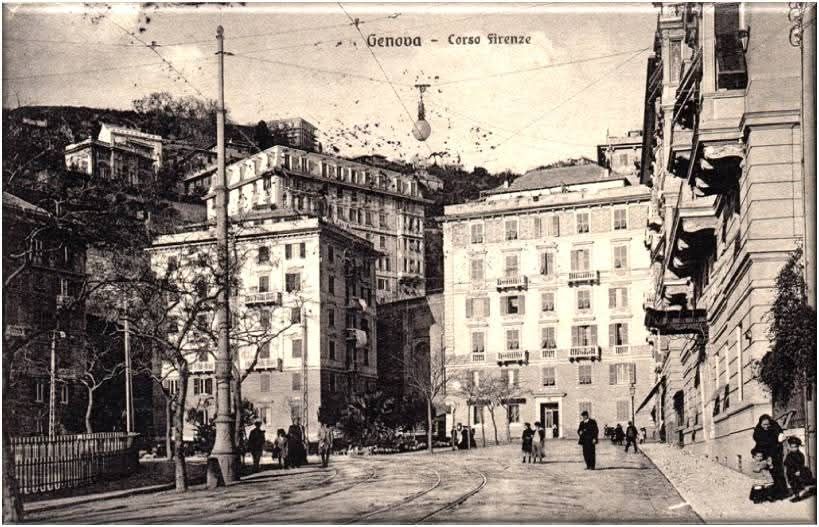
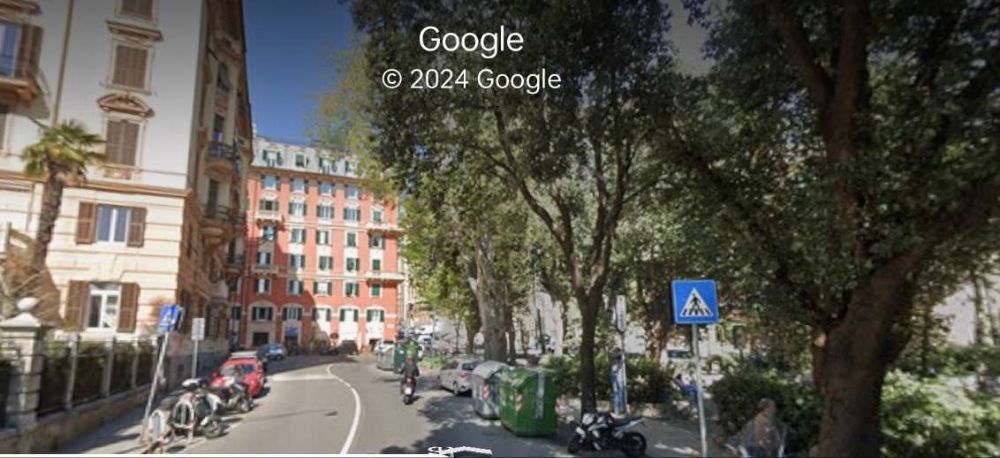
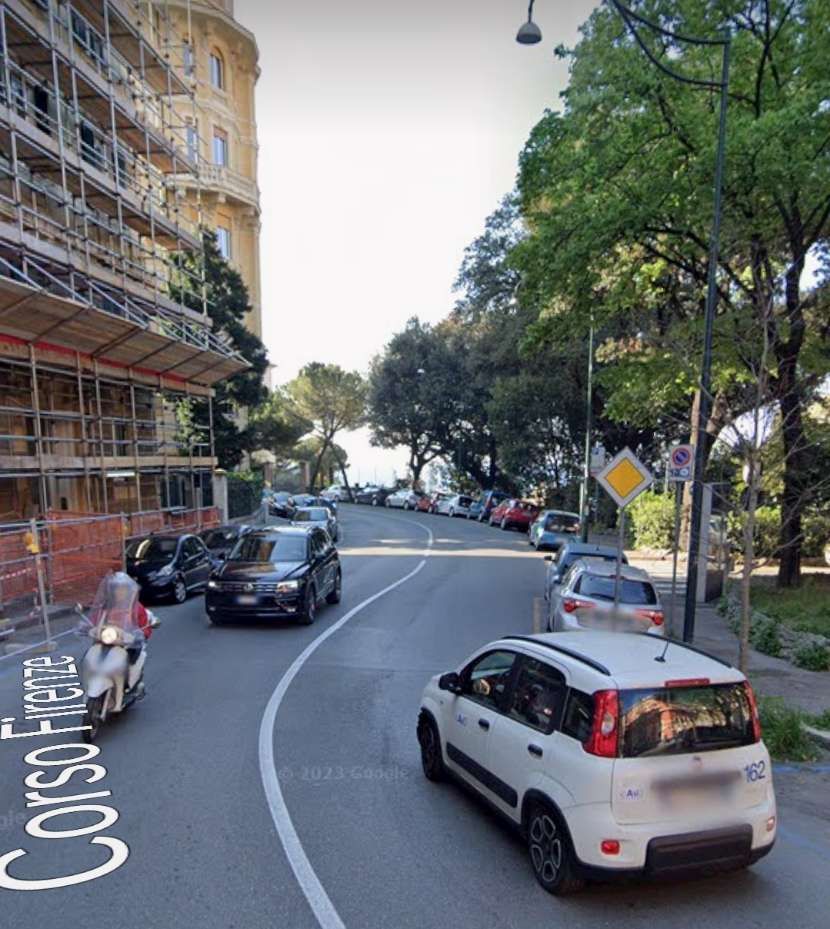
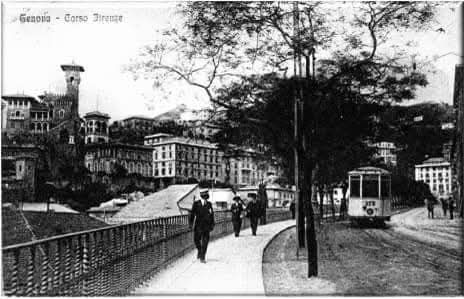
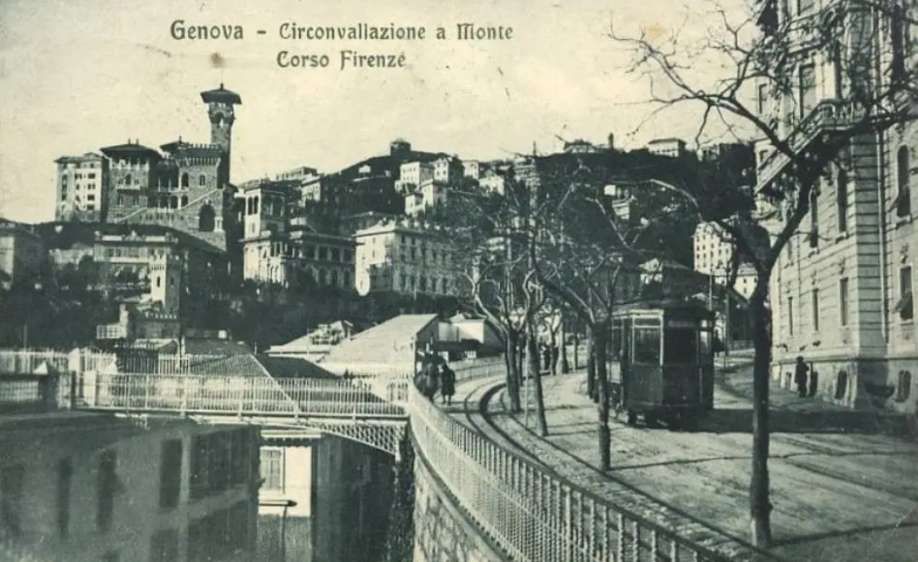
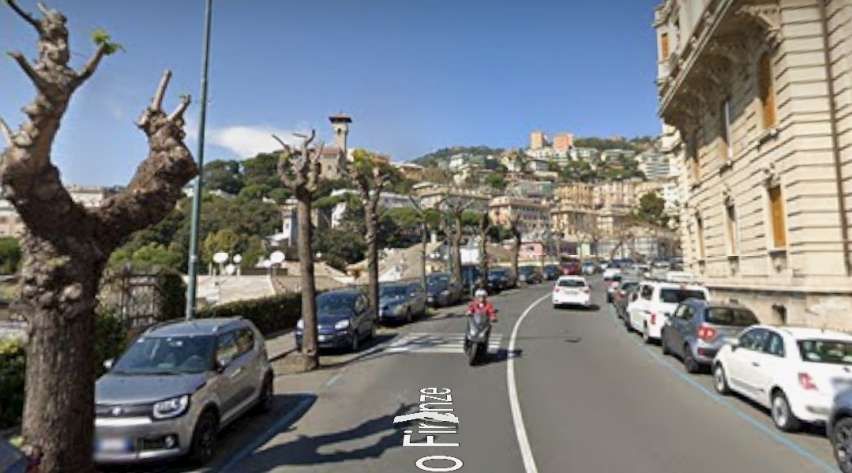
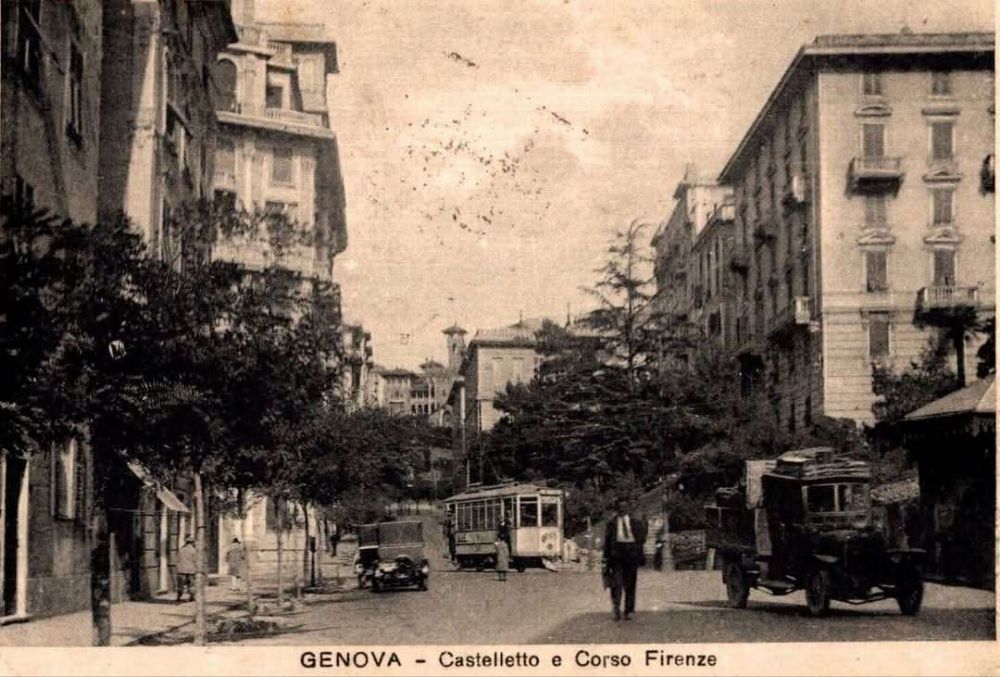
Corso Firenze continues East then Northeast. It then turns sharply to the right, heading Southwest. The next monochrome image looks North from the end of that southwesterly length of the road.
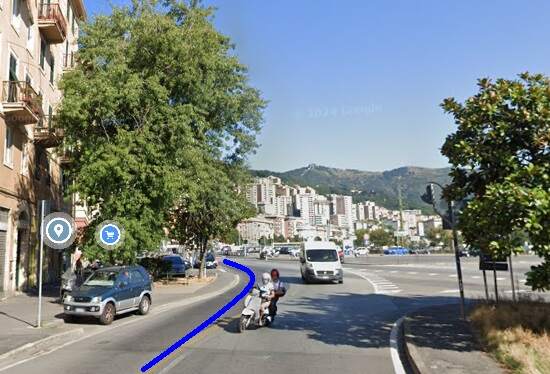
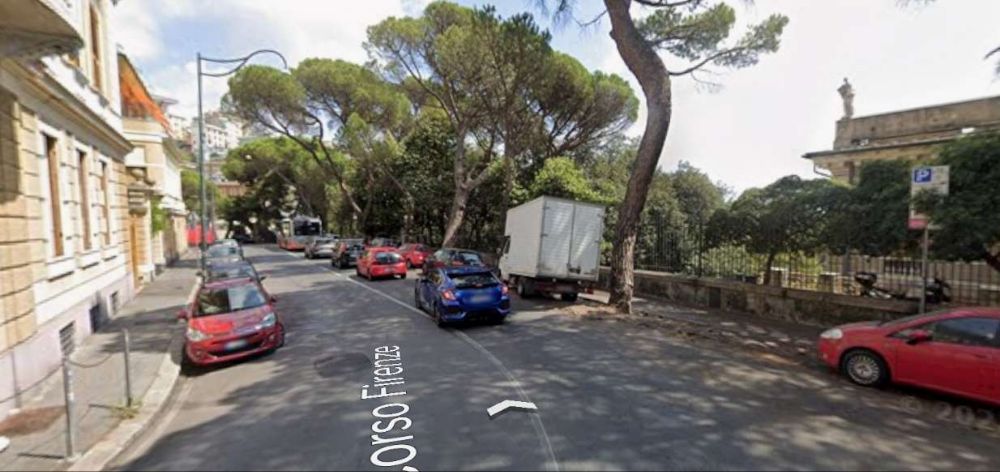
Corso Firenze gives out onto Piazza Goffredo Villa where the tram route ran Northwest-Southeast for a short distance before heading Northeast on Corso Niccolo Paganini.
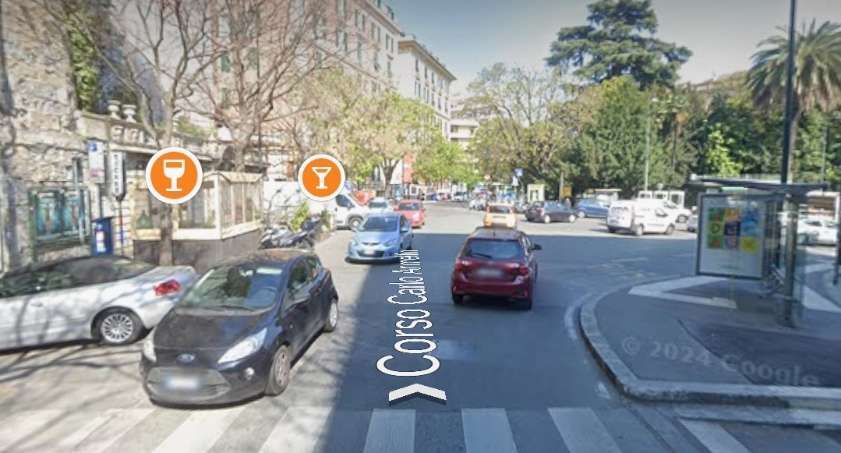
Trams ran the full length of Corso Magenta and onto Corso Solferino which in turn led to Corso Carlo Armellini. Passing the Manin/Contardo Lift on their left, trams entered Piazza Manin.
Looking East into Piazza Manin from Corso Carlo Armellini. [Google Streetview, April 2023]Piazza Manin seen from the East looking off The Ponte di Via della Crocetta, (c) Public Domain. [82]Piazza Manin, (c) Public Domain. [84]A simila view in the 21st century. [Google Streetview, April 2023]Piazza Manin, (c) Public Domain. [86]Piazza Manin, looking East, (c) Public Domain. [87]A view looking East from Piazza Manin in the 21st century. [Google Streetview, August 2024]
Piazza Corvetto to Piazza Manin, Staglieno and Prato in Val Biasagno.
This article has covered the Western half of the Eastern tram network. We will cover the length of line from Piazza Corvetto to Plato (via Paizza Manin and Staglieno) along with the lines which ran East along Via XX Settembre to Val Bisagno and then diverged to serve Staglieno, Raibetta (which we have already looked at), Foce, Thommaseo and Nervi in another article.
We will also cover the history of the Genoa Network from the end of the first World War in that next article and, either in that article of a further article, the rolling stock used on the network.
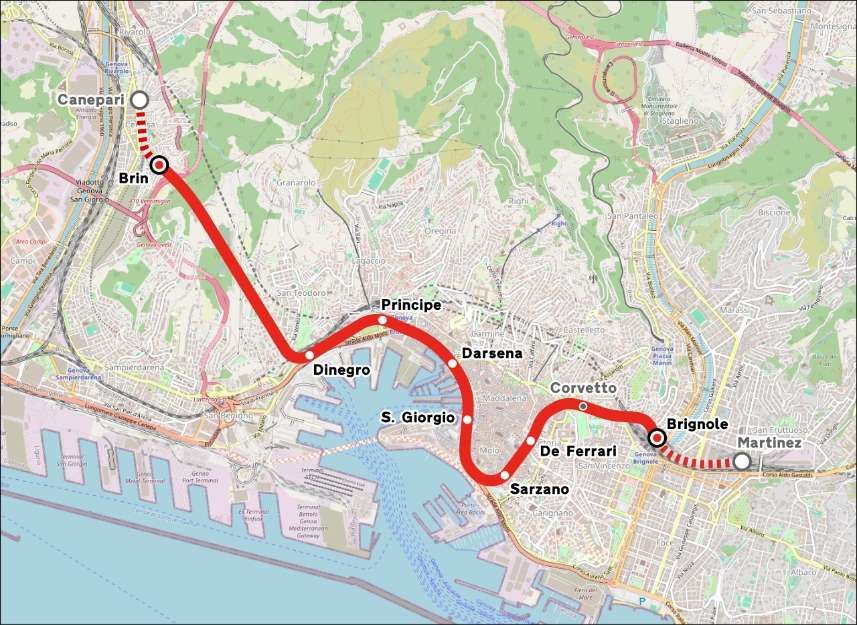
The Metropolitana di Genova is, in 2024, a single-line, double-track light rapid transit system that connects the centre of Genova, Italy with the suburb of Rivarolo Ligure, to the north-west of the city centre. It runs through to Brignole Railway Station in the East of the city. In 2024, the service is managed by Azienda Mobilità e Trasporti (AMT), which provides public transport for the city of Genoa. [1]
The Metro is a 7.1 kilometres (4.4 mi) long 1,435 mm (4 ft 8 1⁄2 in) (standard gauge) double-track line and is electrified with overhead lines at 750 volts DC. It has a direct connection with Trenitalia’s mainline railway station, Principe. [1]
The origins of a subway in Genoa date back to the beginning of the twentieth century; in 1907 Carlo Pfalz, who had already designed the Zecca-Righi Funicular, [2] was the first to explore the construction of an underground railway with electric traction. Several projects, including that of the engineer Angelo Massardo and those of Renzo Picasso (1911 and 1930), were proposed without being realized. Instead, a tram system at surface level was built which ultimately was abandoned in 1966. An attempt to introduce an alternative means of transport was made on the occasion of the International Exhibition of Marine and Maritime Hygiene of 1914: it was a ‘Telfer’, an elevated monorail that connected the Port (Giano Pier area) to the exhibition area in Piazza di Francia, in front of the Brignole station. The infrastructure was then abandoned and finally demolished in 1918. [1]
An article about the Telfer can be found here. [3]
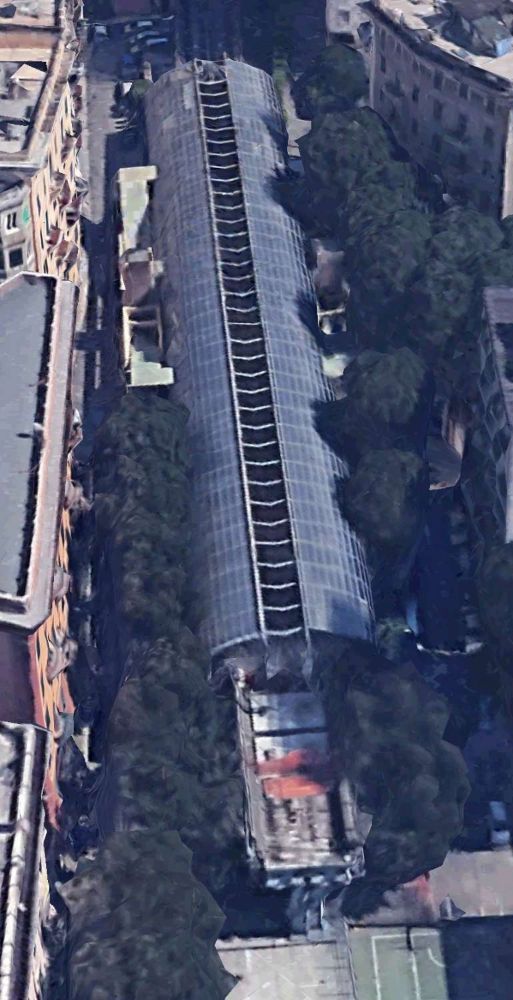
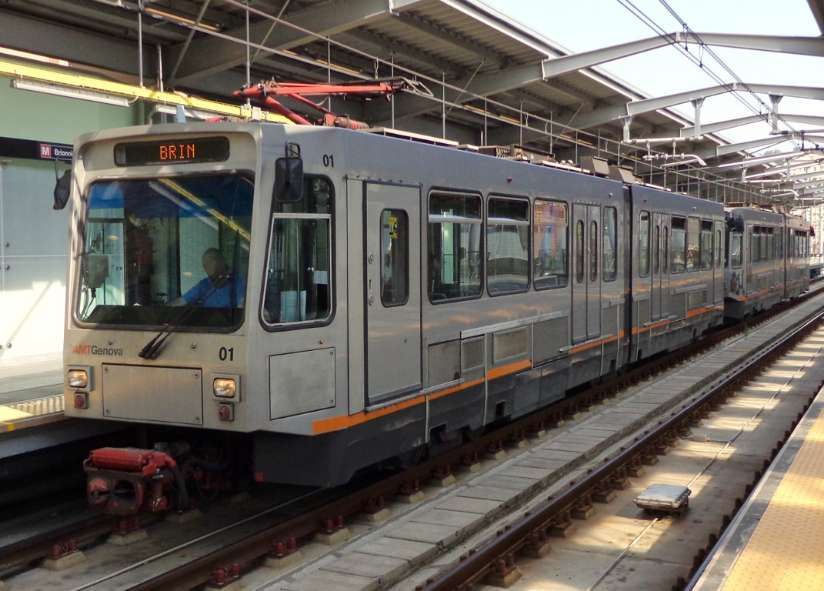
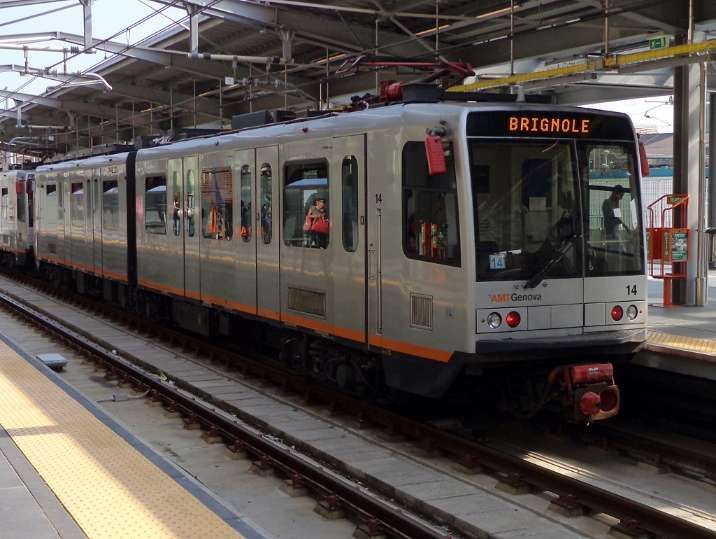
The underground ‘Metro’ was built in a series of phases. “The first section, opened on 13th June 1990 in time for the 1990 FIFA World Cup, was 2.5 kilometres (1.6 miles) [6] between the stations of Brin and Dinegro. [7] The line was extended to Principe in 1992, [6] to San Giorgio-Caricamento in 2003, [6] to De Ferrari (the underground station at Piazza De Ferrari) in 2005, [6] and to Brignole in 2012.” [8]
Since 2024, citizens of Genoa have been able to use the subway free of charge without any time restrictions.[9]
Stations
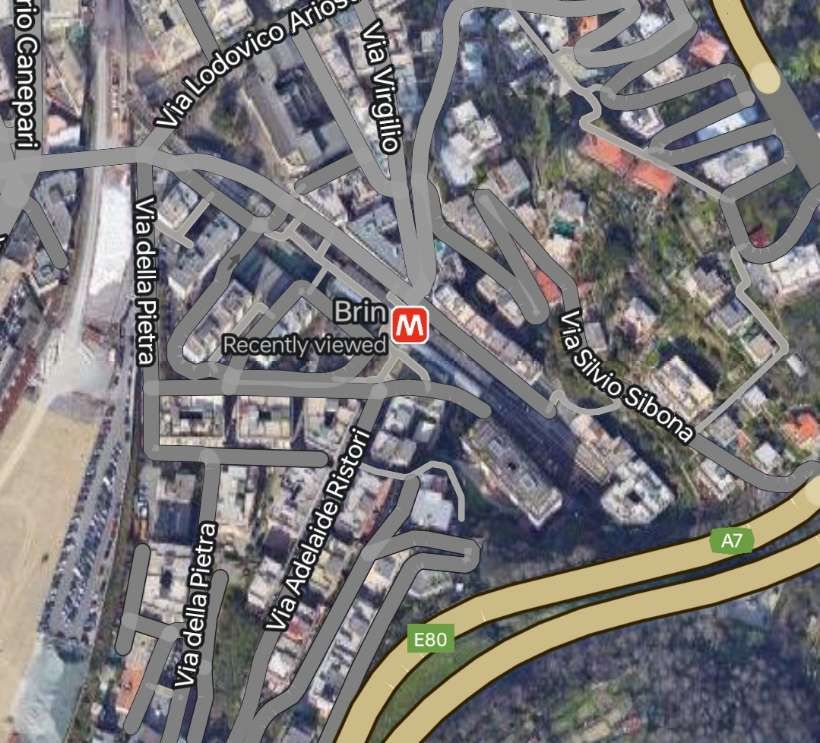
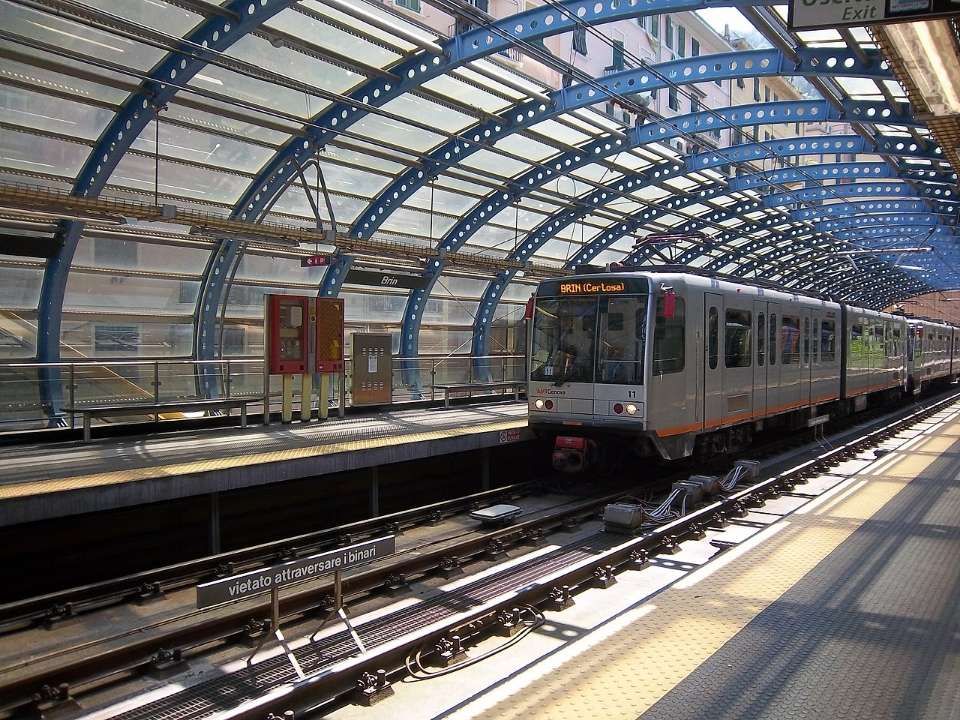
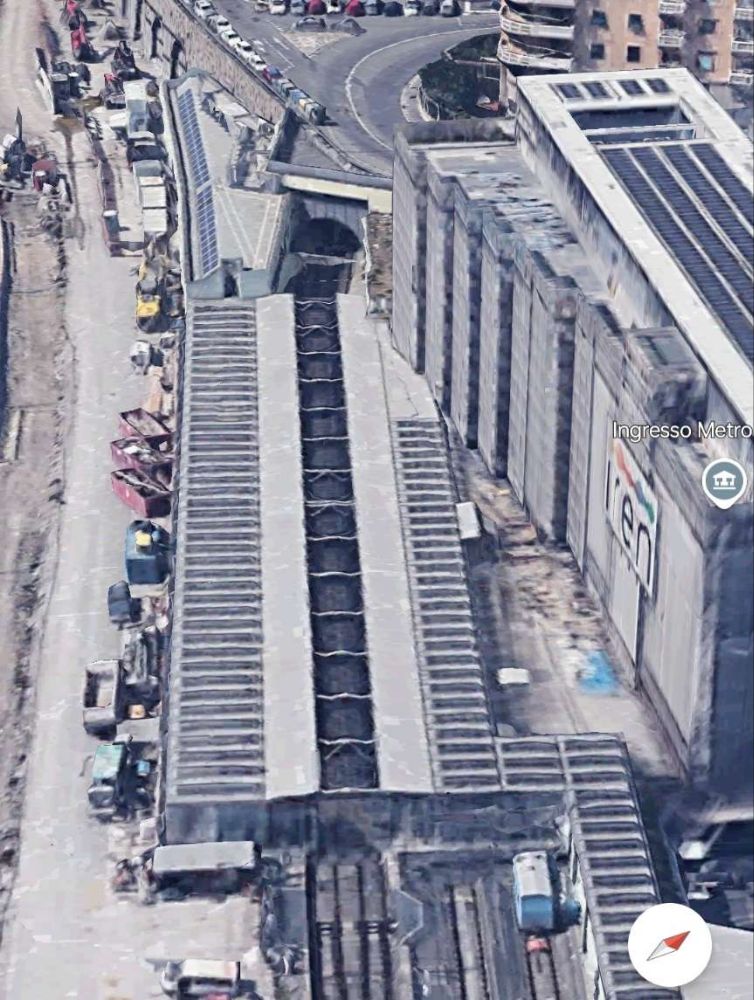
Brin Station – is currently (2024) the Northwest terminus of the line. It is situated along Via Benedetto Brin in the neighbourhood of Certosa in Rivarolo Ligure, a suburban area in the north-western outskirts of Genoa, Italy. The station, currently the terminus of the line, is located just west of the tunnel mouth on the line from Dinegro station. [10] It is built on a viaduct, which allows for the line to be extended to the north.
The station was designed by architect Renzo Piano, the station’s official opening took place on 13th June 1990. [10]
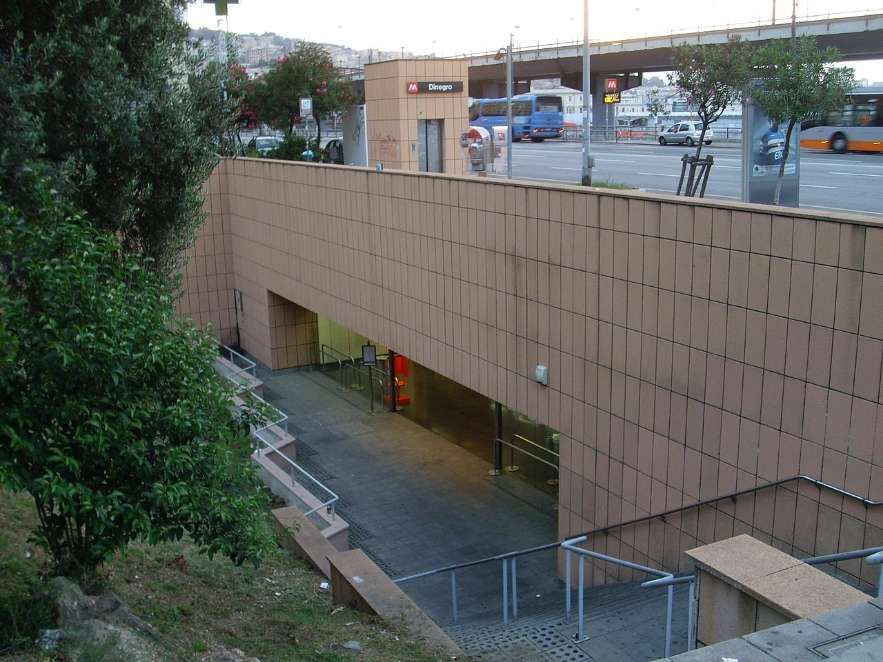
Dinegro Station is located under Via Milano, adjoining the Piazza Dinegro from which it derives its name, in the Fassolo area of Genova. It is just East of the business district of San Benigno and close to the ferry terminal.
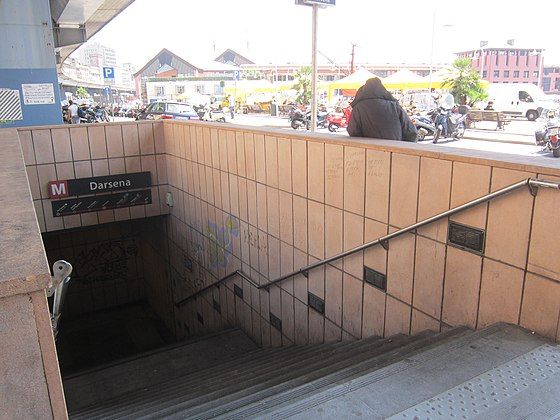
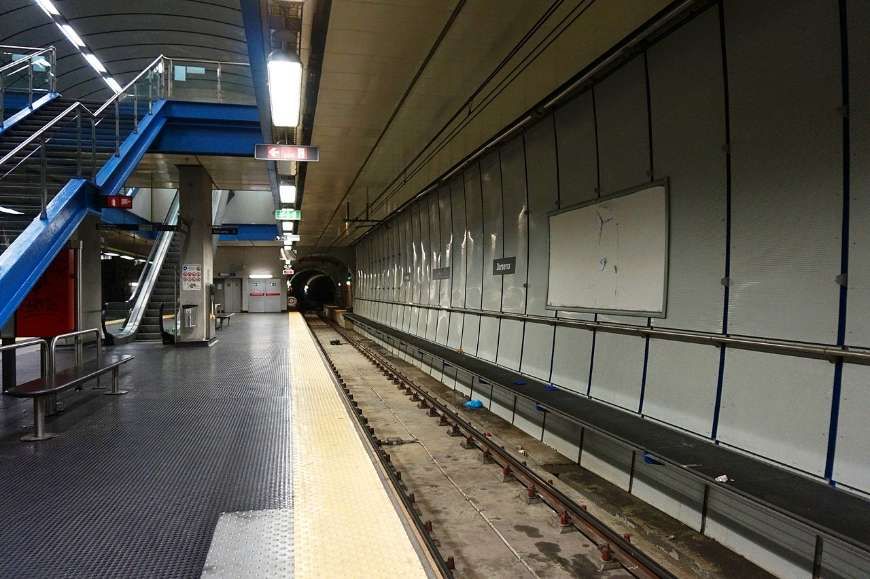
Darsena Metro Station is located on Via Antonio Gramsci close to Piazza della Darsena. ‘Darsena’ translates to ‘dock’ in English. The station serves the old port area of the city. [15]
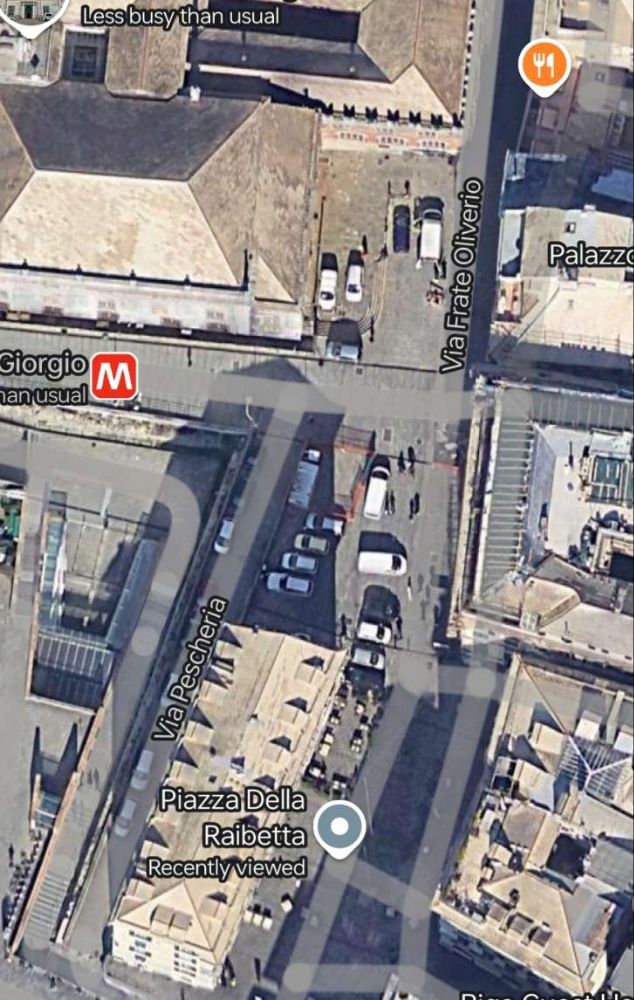
San Georgio Station is located under Piazza della Raibetta beside the Palazzo San Giorgio, after which it is named. It is in the Old Harbour area near the Aquarium of Genoa. It was opened together with Darsena Station on 25th July 2003 and saw its first trains on 7th August 2003. [17]
The tracks of the San Giorgio station run beneath the Piazza Caricamento underpass and its underground architecture is similar to the model adopted for the Principe and Darsena stops, that is, with the tracks on the sides of the single central platform. During 2006, some electronic display boards were installed to inform users of the arrival times of trains. [17]
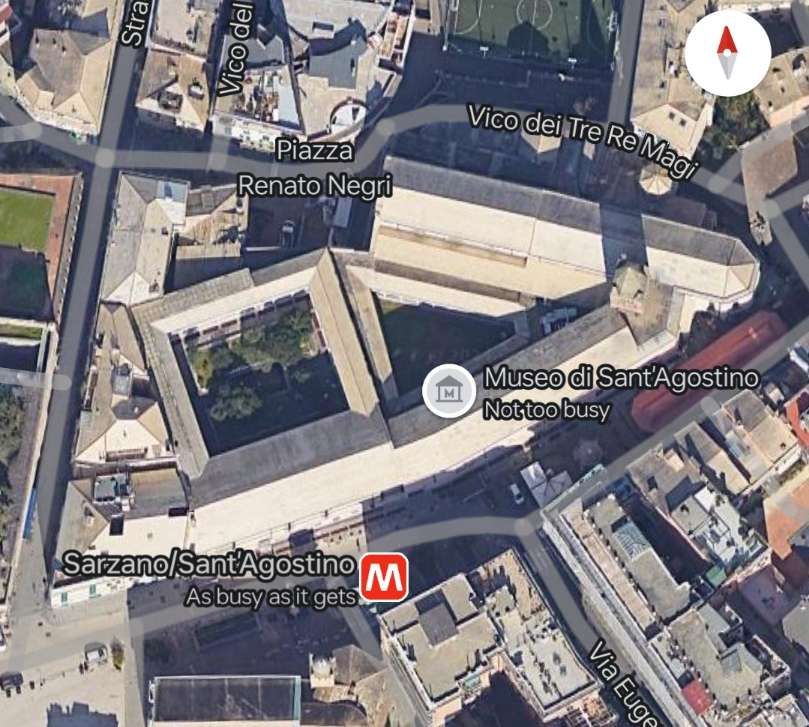
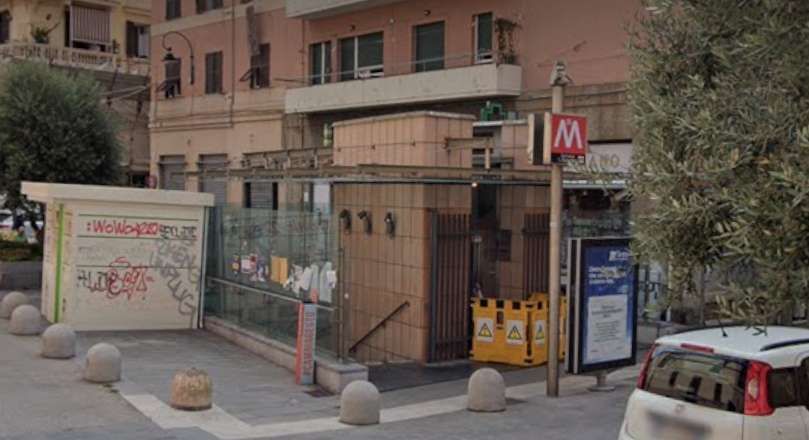
Sarzano/Sant’Agostino Station is located in the historical centre of Genoa. The main entrance is in the Piazza di Sarzano near the Church of St. Augustine, now deconsecrated and turned into a museum, with a second entrance on the Mura della Marina, the old seawall. It opened on 3rd April 2006. [19]
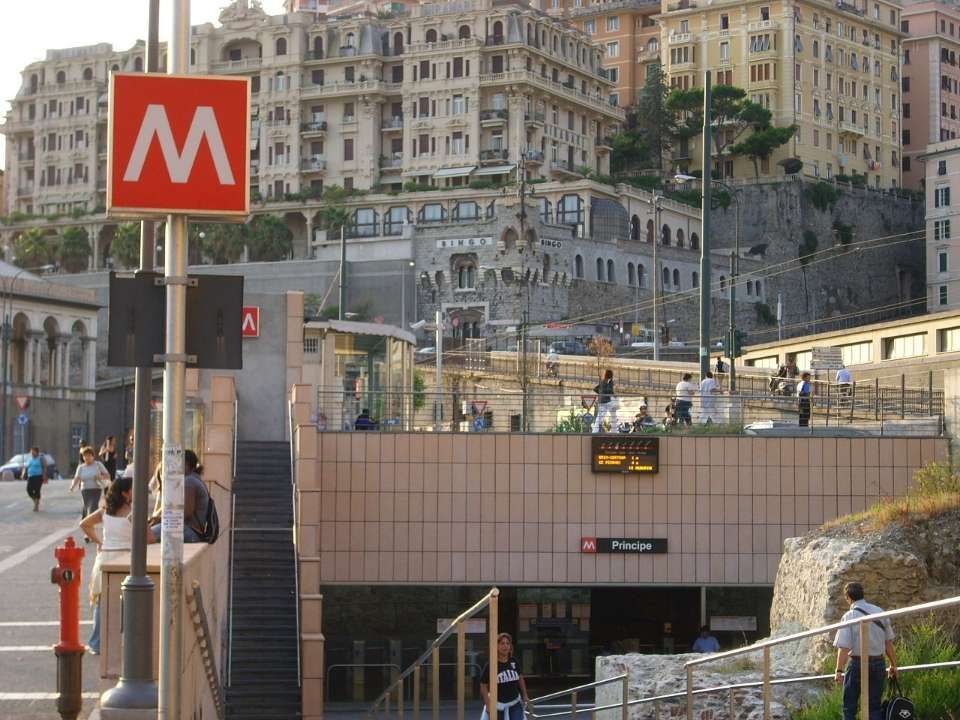
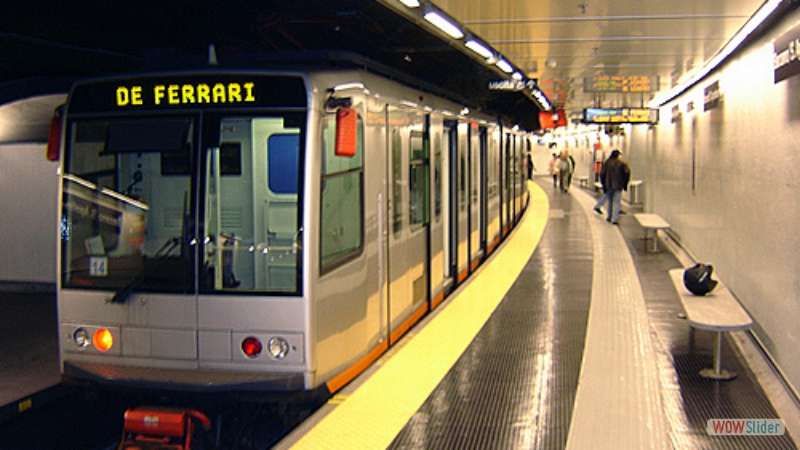
De Ferrari Station is close to Teatro Carlo Felice, Galleria Mazzini, the Doge’s Palace, and Via XX Settembre. It opened on 4th February 2005. It was originally designed, like others, by Renzo Piano with finishing touches by Renzo Truffelli. This used to be the last station on the line until the easterly extension towards Genova Brignole Railway Station opened in 2012. [21][22]
The entrance to de Ferrari Station. [23]Platform level at de Ferrari Station. [€23]
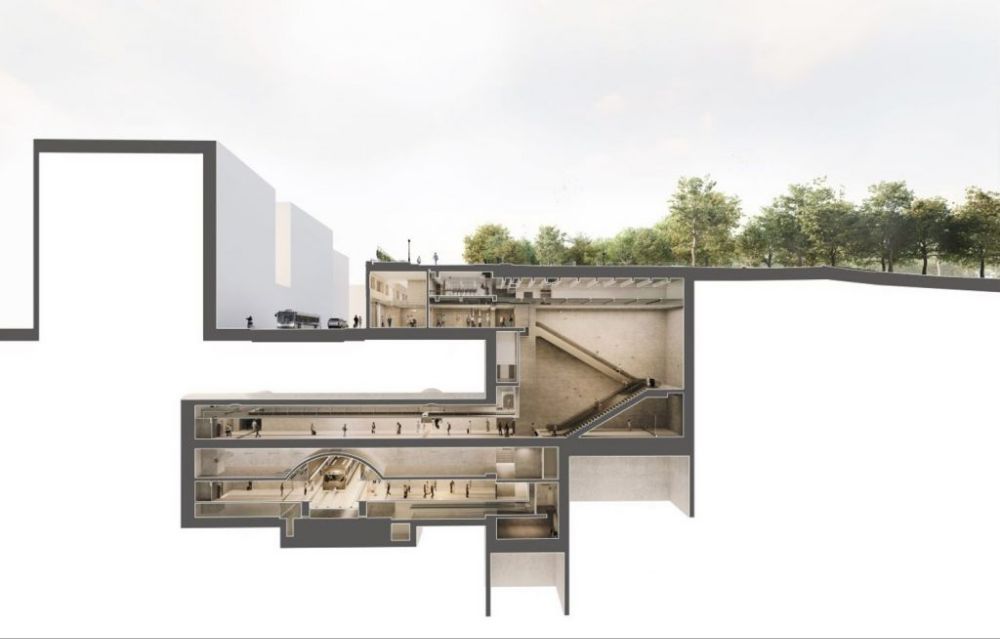
Corvetto Station – In March 2024 3Ti Projeto announced that the design of Corvetto Station had been approved by the municipality. Work is expected to cost around 38.3 million Euros and be completed late in 2024 or early in 2025. [24][25][26]
These two images show the 3Ti Projeto design for Corvetto Station. [24]
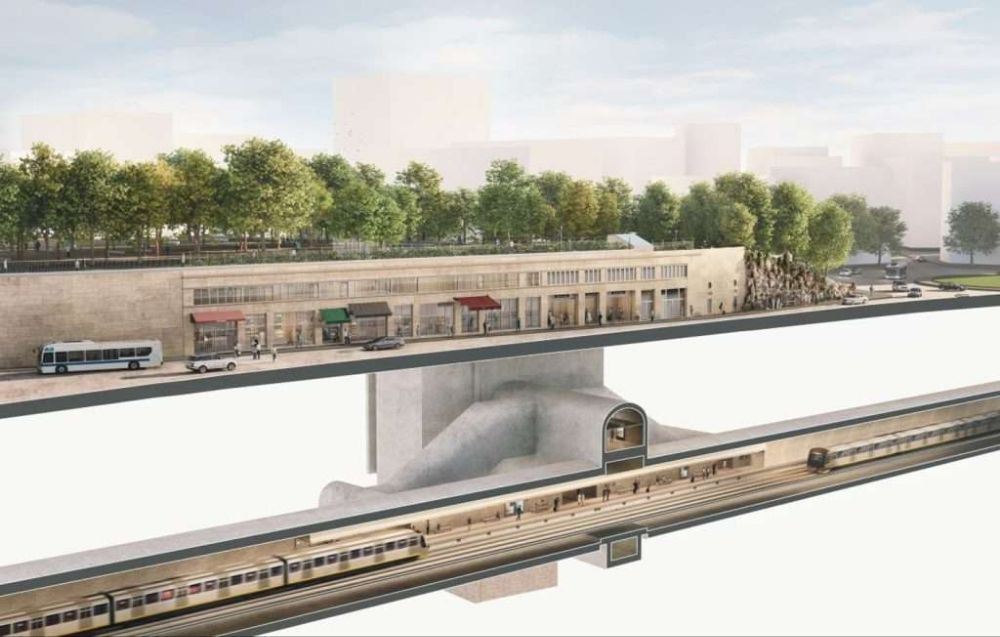
Brignole Station – sits close to the main line Brignole Station to the West of the city centre. It opened in 2012. [27]
Wikipedia tells us that Genova is just (in 2024) bringing a fourth generation of trams into service. The three previous generations each served the city well.
First Generation Rolling Stock – consisted of 6 sets of articulated cars, built by Ansaldo, and introduced in 1990. They were derived from the Zurich Tram 2000 tram used in Switzerland, but altered for standard gauge running. Each vehicle had two sections with one central articulation. They were supported on three bogies The two outer bogies were motorised. The vehicles were bidirectional and had four sets of doors on each side. They had blue seats in a transverse arrangement. The train were numbered 01 to 06. [1][29]
Second Generation Rolling Stock – was made up of a group of 12 trains. Numbered 12 to 24. Like the first generation, each train was made up of two sections resting on three bogies, with the outer two motorised. The trains were bidirectional with six doors on each side, and the seats were arranged longitudinally. The trains were built by Ansaldo and introduced in 1992. [1][30]
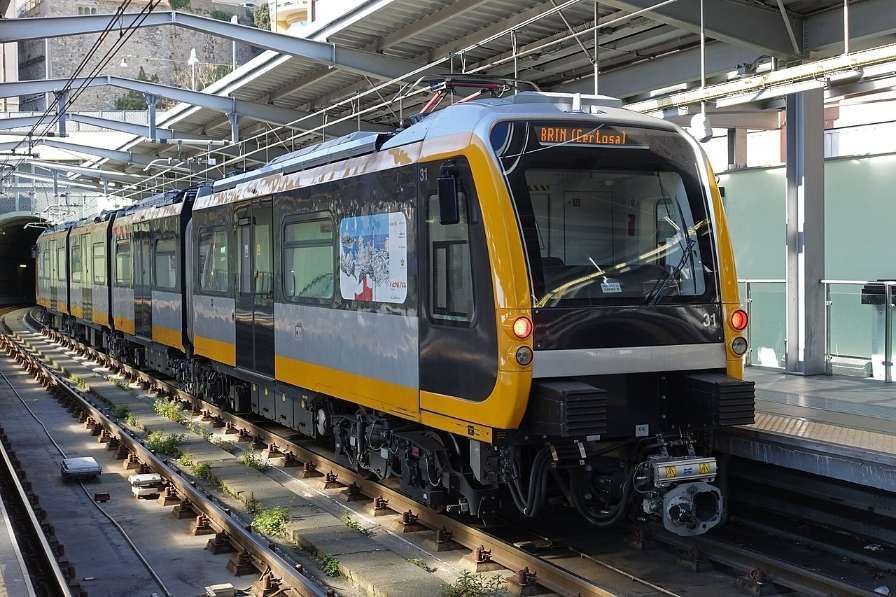
Third Generation Rolling Stock – these trams/trains significantly differ to the previous two. They were delivered by Hitachi Rail Italy in 2016. There are 7 trains numbered 31 to 37. The trains are longer than previous generations at 39 metres and four articulated sections with five bogies. Of the five bogies, the central three are motorised. There are a total of four doors per side of the bidirectional sets. [1][31]
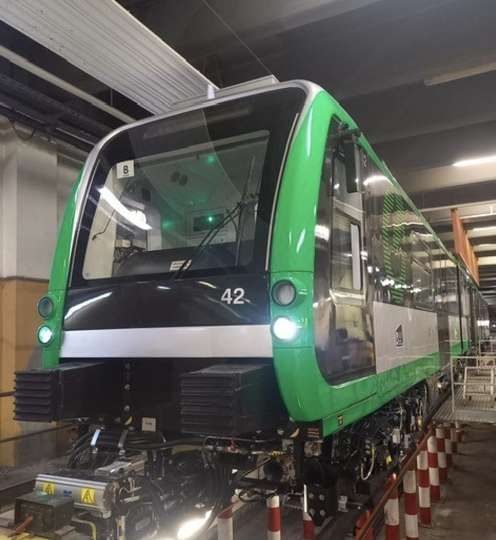
Fourth Generation Rolling Stock – In anticipation of the planned extensions (see below) and considering the now thirty-year service of the first generation trains, in 2020 the Municipality obtained a loan of 70 million Euros to purchase 14 new generation trains. [32] In 2021, Hitachi Rail signed the contract to supply the new trains on a rolling programme, monthly by month, to coincide with the inauguration of the Brin-Canepari and Brignole-Martinez routes. [33]
In June 2024, Sustainable Bus E-magazine reported that the first of these new units had arrived in Genoa. [26]
New tram/train No. 42. [26]
The new units will be numbered 41 to 54. “Each of the 14 new vehicles is made up of four half-cars, resting on five bogies, for a total length of 39 metres, will be able to accommodate up to 290 passengers, will be bidirectional, and will also run in double formation for a total length of 78 metres and a capacity of 580 passengers.” [26]
“In order to ensure greater operating flexibility, these trains will also be able to operate in double traction with the 7 third-generation vehicles, the 31-37 series delivered in 2016, currently in service.” [26]
The new units entry into service will “allow the scrapping of the 6 first-generation trains, series 01-06, … the average age of the fleet will thus be lowered from 18.5 years to 9.8 years. The 10-series trains (11-22 series) built between 1991 and 1995 will be kept in operation.” [26] The fleet will therefore consist of the 21 trains of the 30, 40 and 10 series trains.
Extensions to the Network
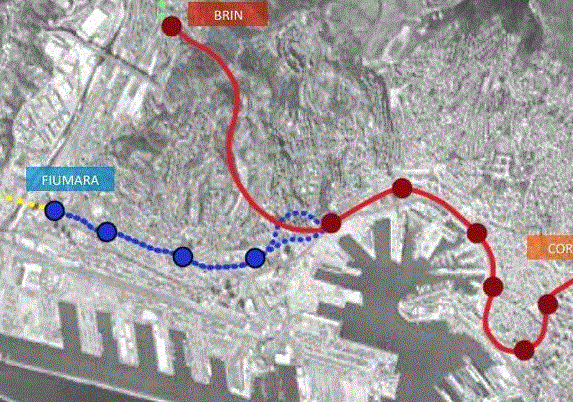
In 2022, the Railway Gazette reported that Genova municipality had approved plans for a 3 km western branch of the metro with four stations, linking Fiumara with the city centre. [4]
The western extension of Genoa’s Metro is shown in blue. [4]
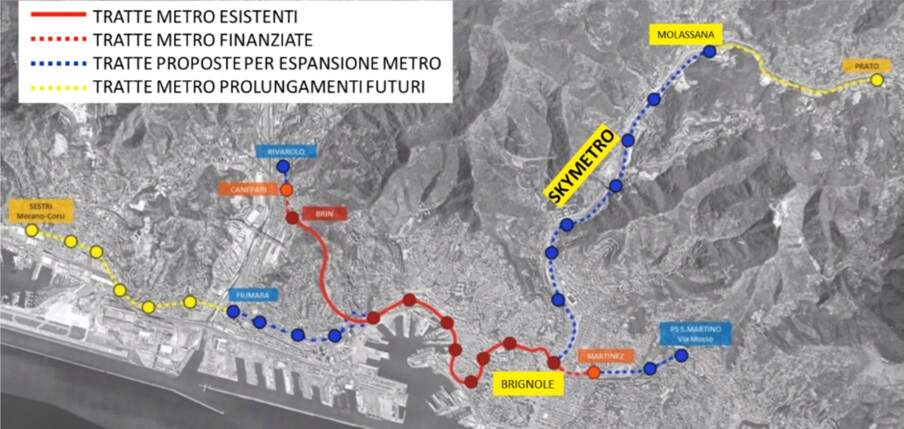
In September 2024, the city secured 74.5 million Euros to significantly expand the Metro network as shown on the map below. [5]
The planned Metro network for Genoa (Genova) as reported in September 2024. [5]
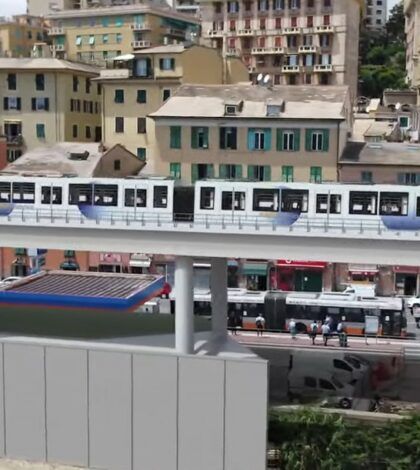
As can be seen in the map above these significant additions to the network include a length up the Val Bisagno of elevated railway (SkyMetro).
The planned SkyMetro, running up the valley of the River Bisagno. [34]
The planned investment is over 400 million Euros at 2022 prices. Genoa will receive 418.9 million Euros to finance the SkyMetro of Val Bisagno, the extension of the metro from Brin to Via Canepari and work associated with the Rio Maltempo. The majority of the new money (398.8 million Euros) is intended for the construction of the SkyMetro.
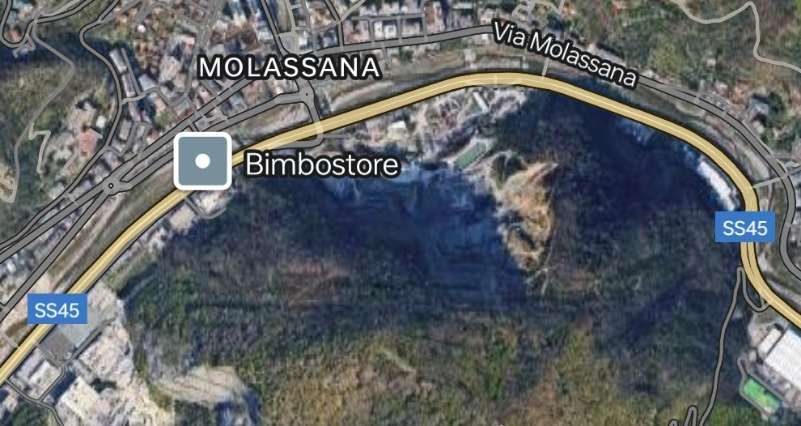
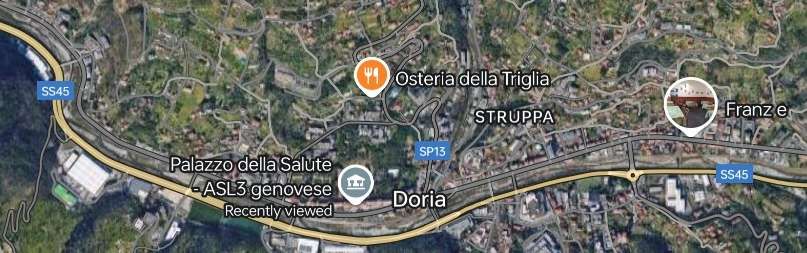
During rush hour, the new line will be able to transport eighty percent of the valley’s users, resulting in a significant reduction in the production of exhaust fumes from private cars. It will be seven kilometers long and will have a neutral energy balance thanks to the photovoltaic system mounted on the roof, which will make the SkyMetro partially sustainable. The project will reach as far as Molassana but the city has every intention to take the scheme further, as far as Prato. [34]
Veronica Pallotta; Metropolitane: Genova, Comune e Ferrovie siglano accordo per il prolungamento verso Canepari; in Ferrovie.Info (in Italian), 30th December 2020, accessed on 24th February 2022.
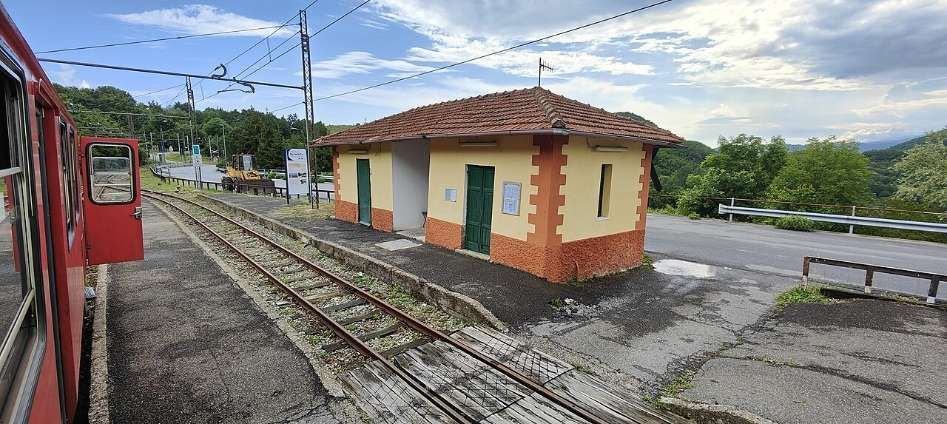
This article covers the northern half of the line and has a quick look at the motive power and rolling-stock used.
Another article covers the history of the Line and the southern half of its route. It can be found here. [18]
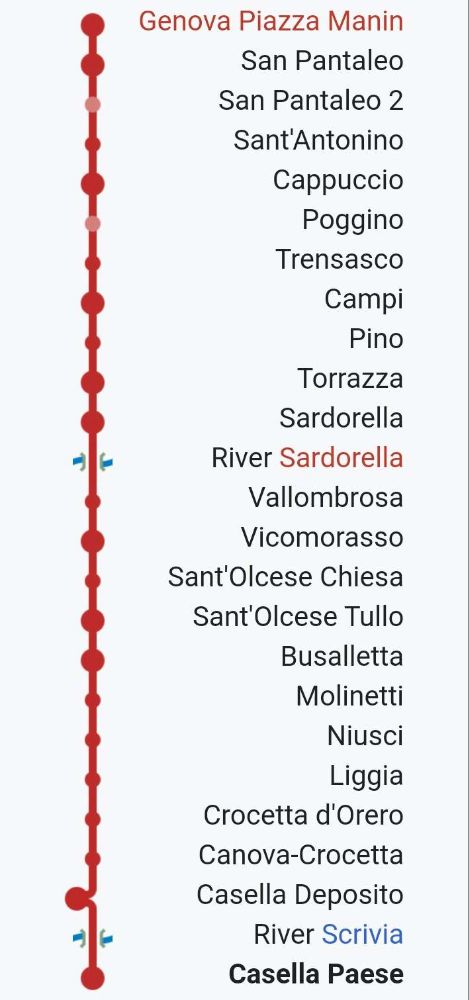
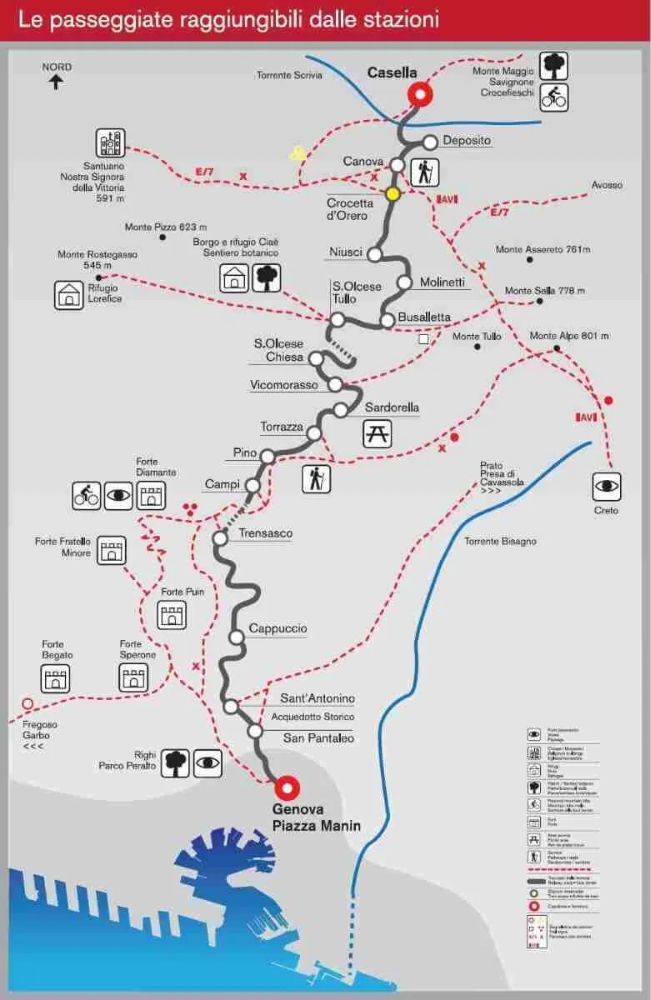
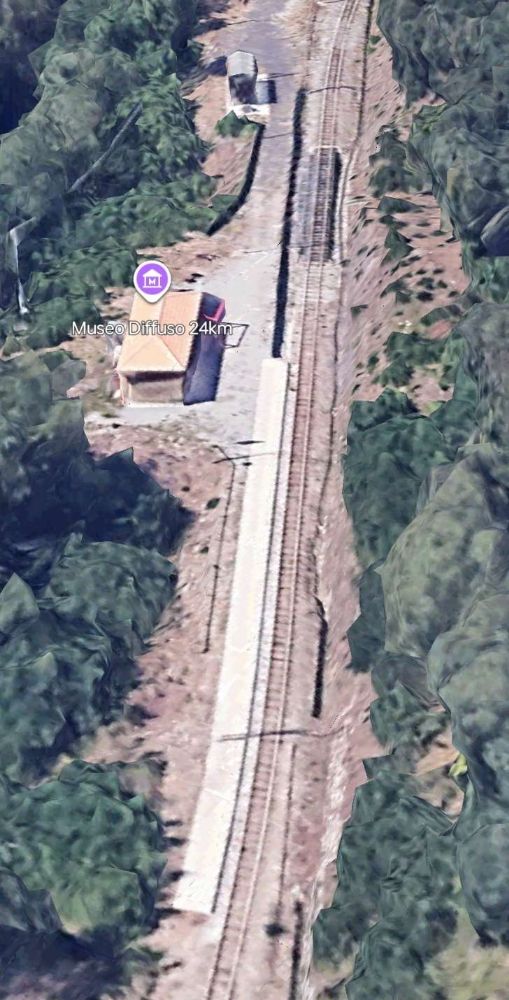
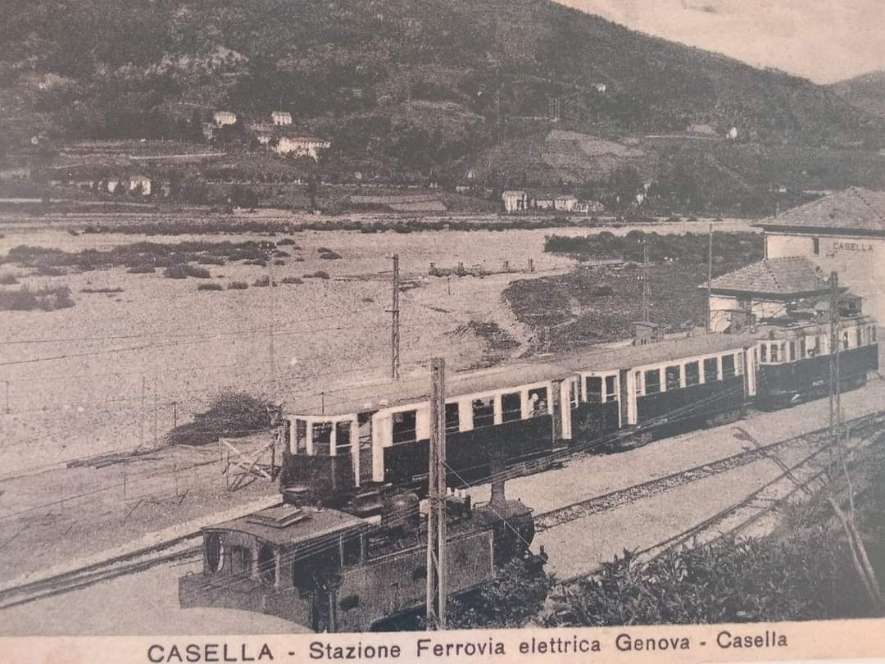
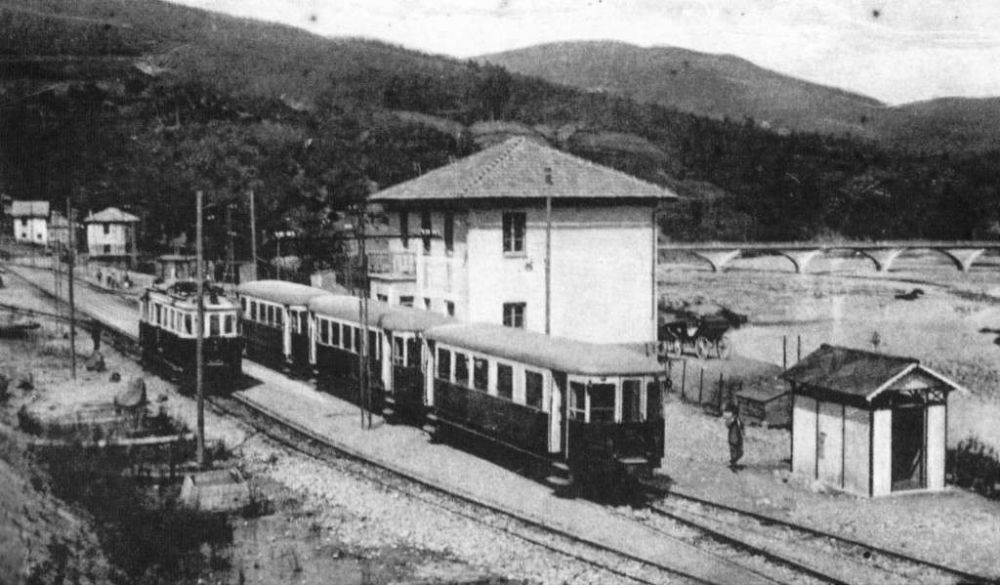
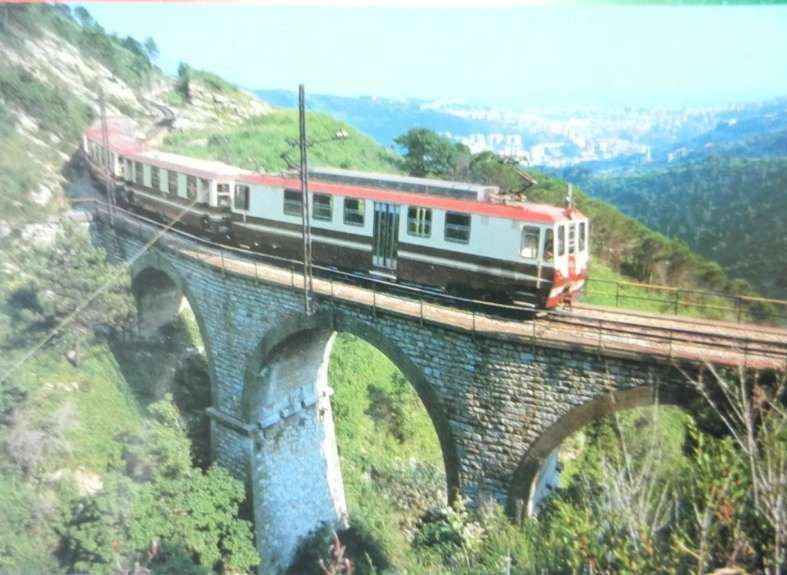
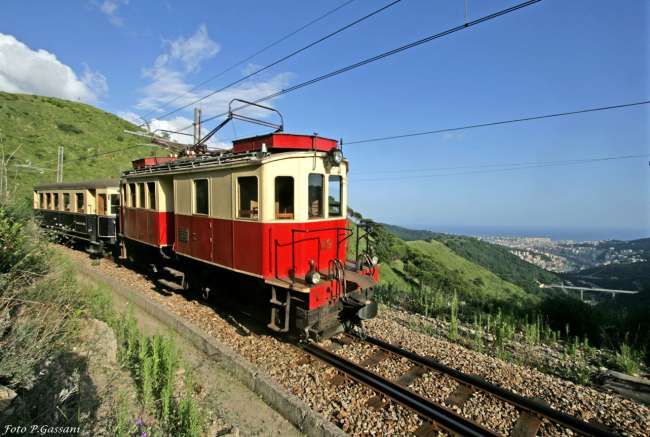
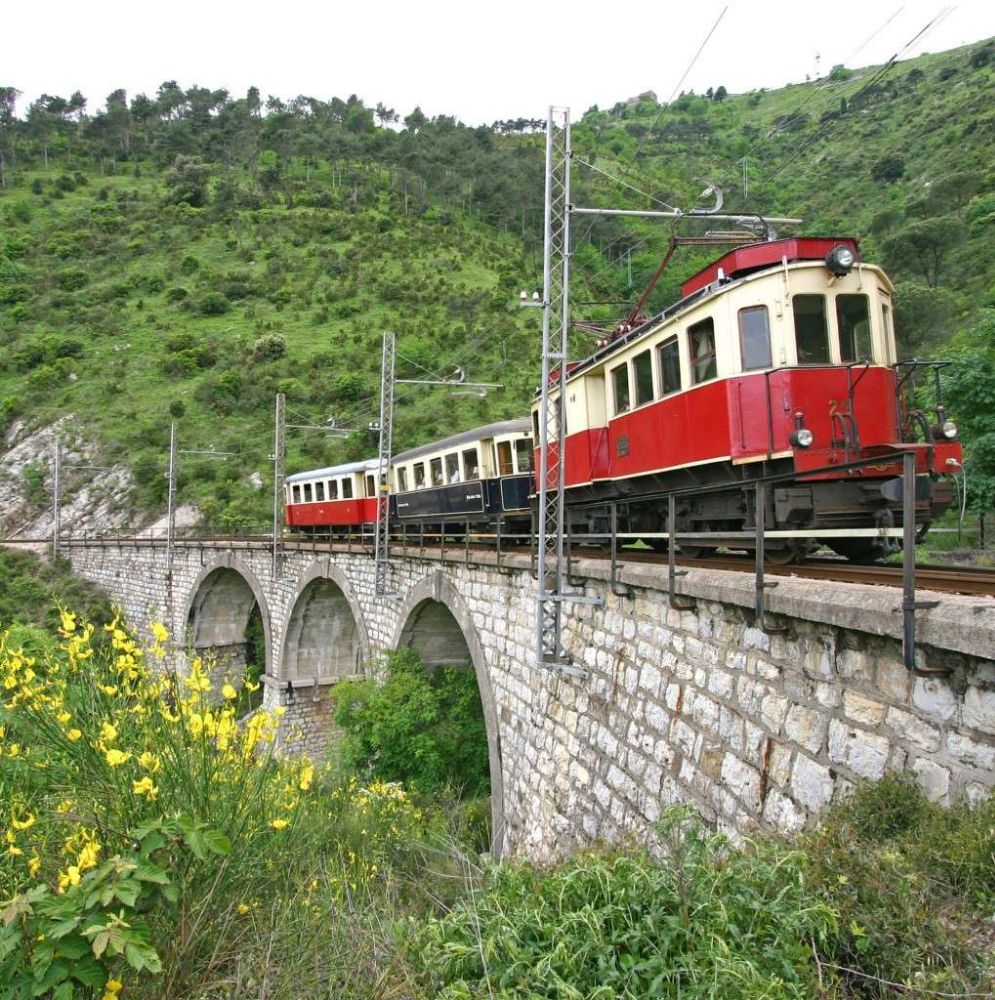
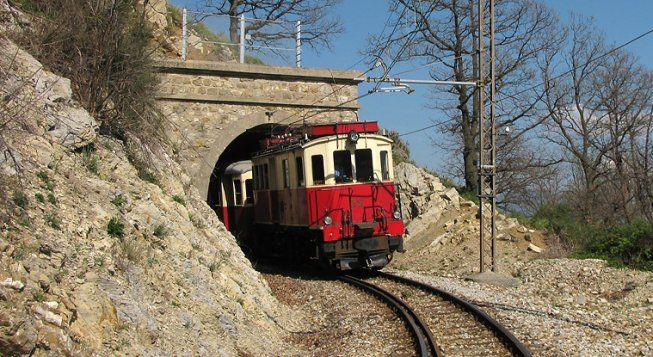
This article covers the length of the line from Sardorella to Casella. [1]A topographical map of the route. [1]Perhaps a little clearer than the topographical map. [2]
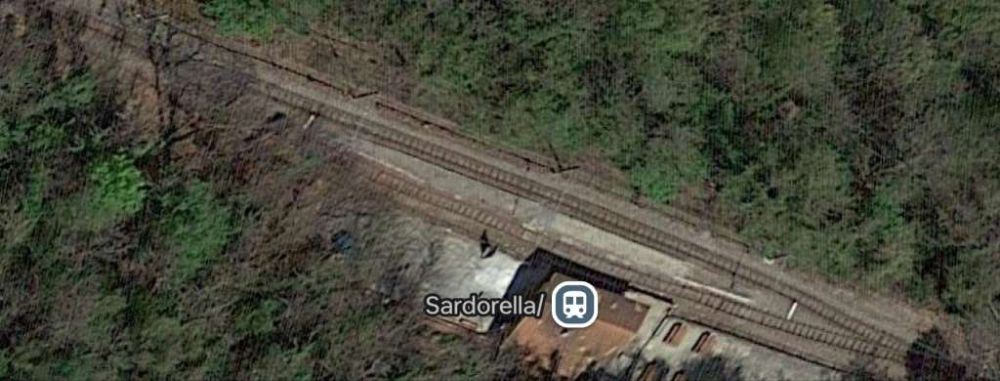
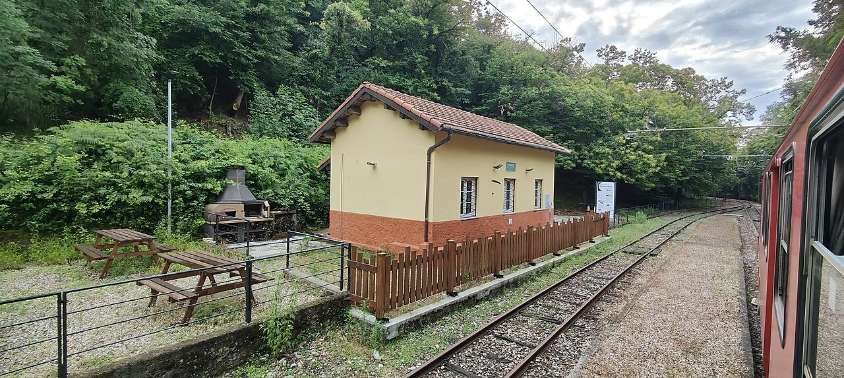
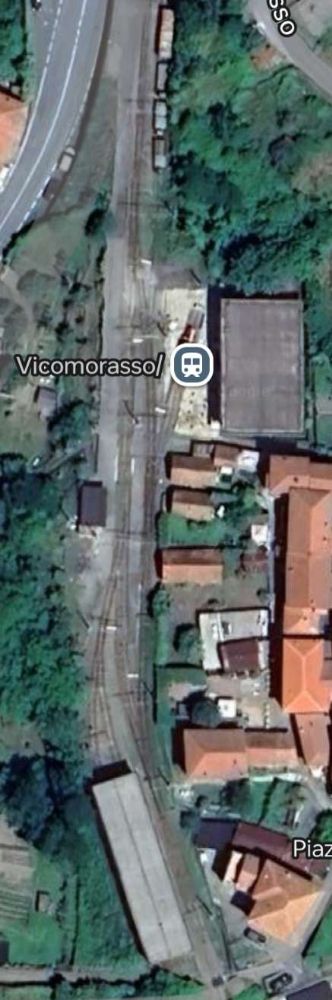
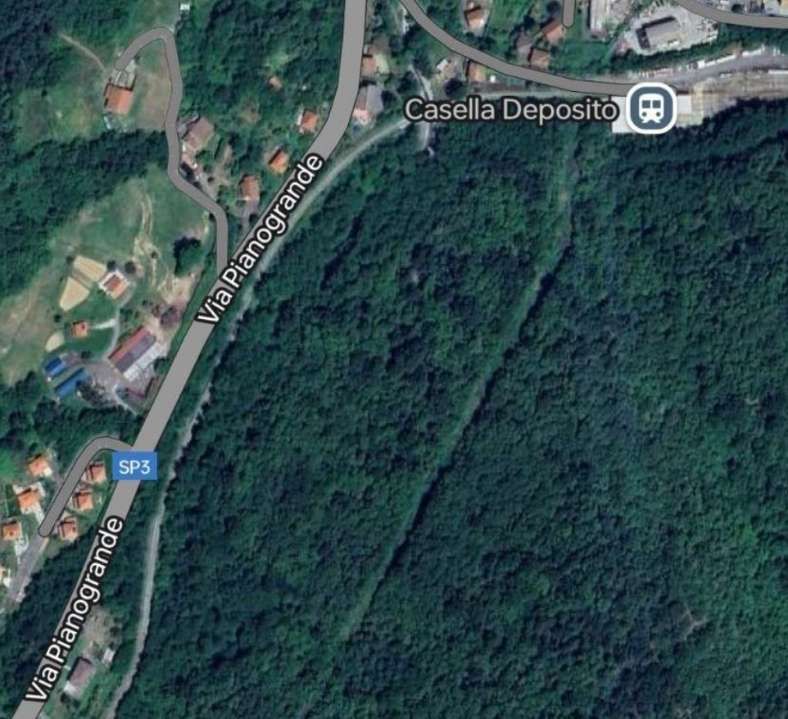
We restart our journey from Genoa to Casella at Sardorella Halt. …
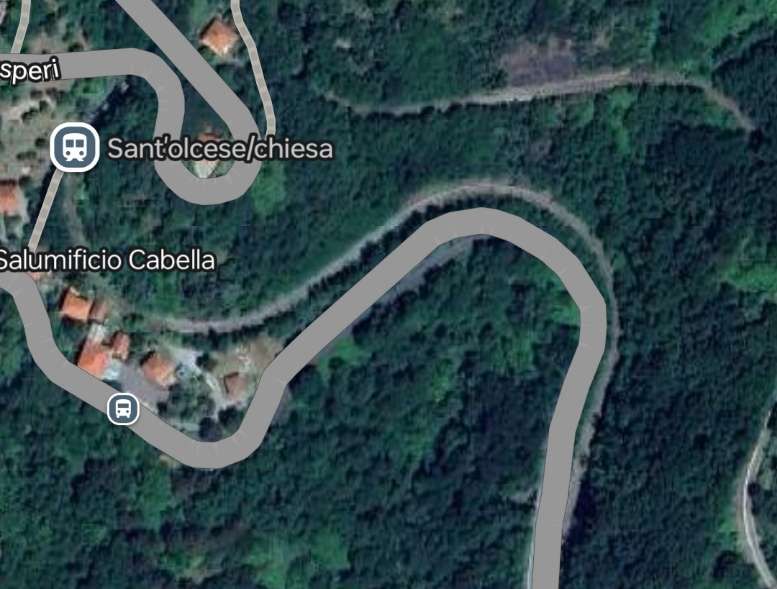
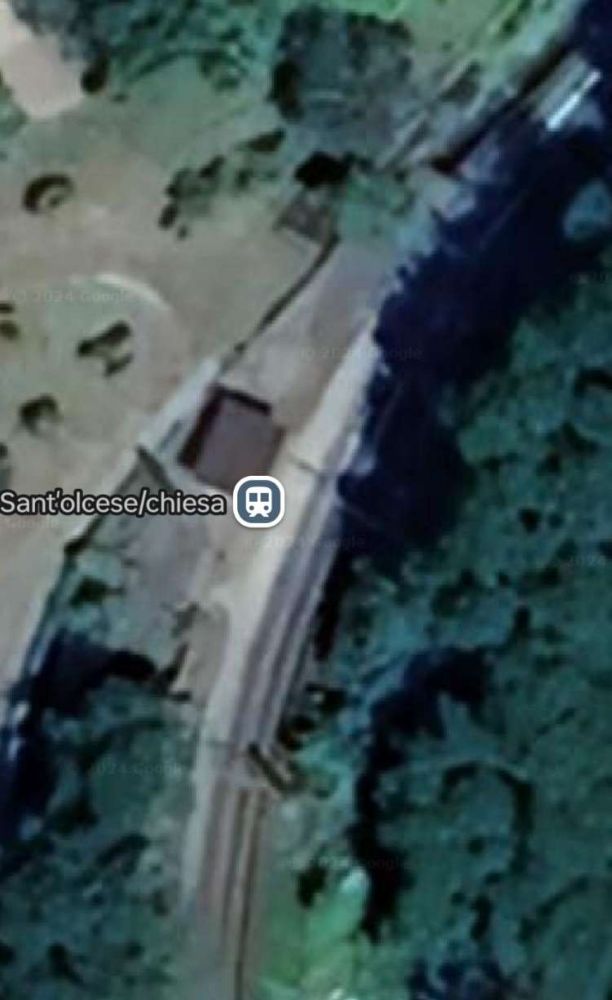
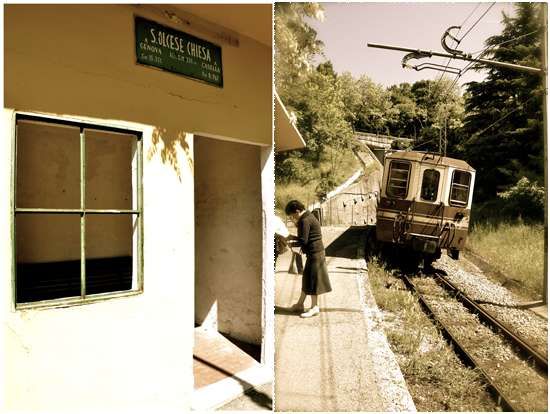
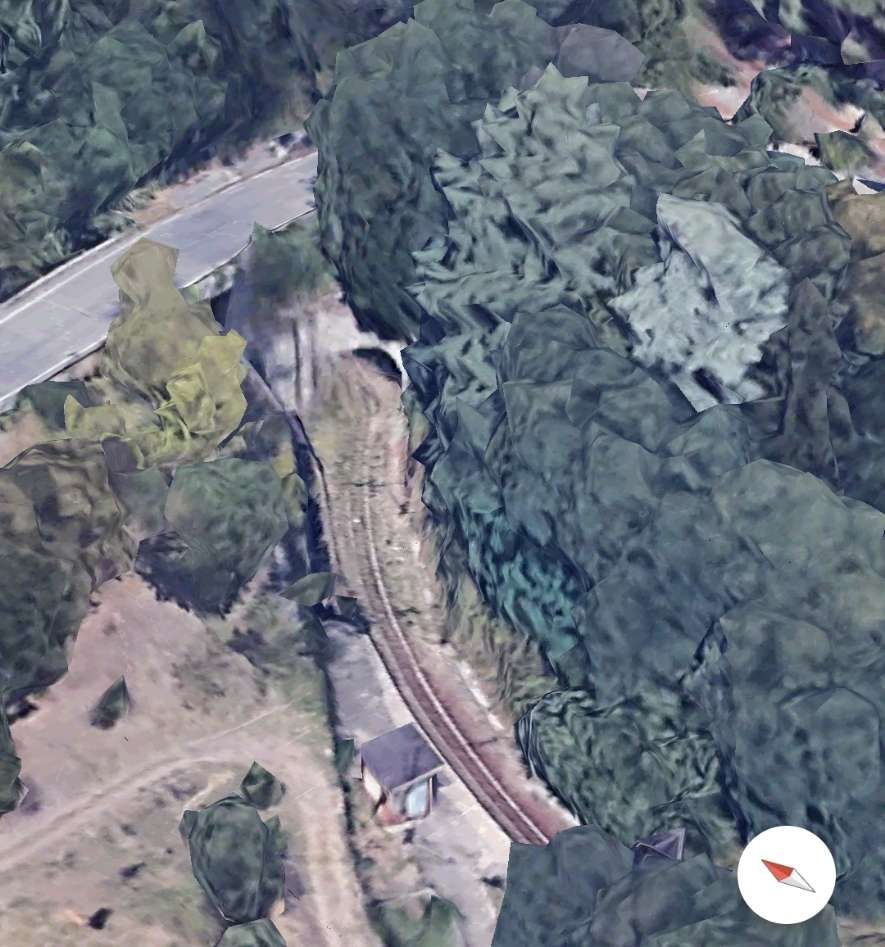
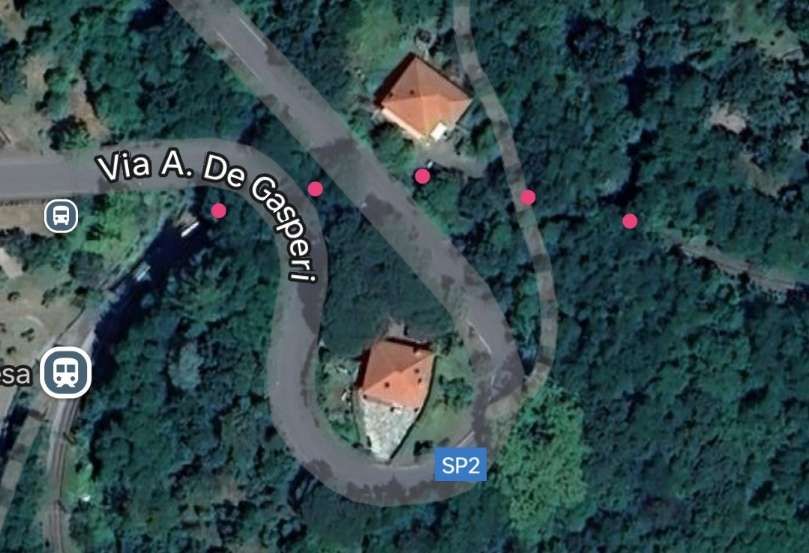
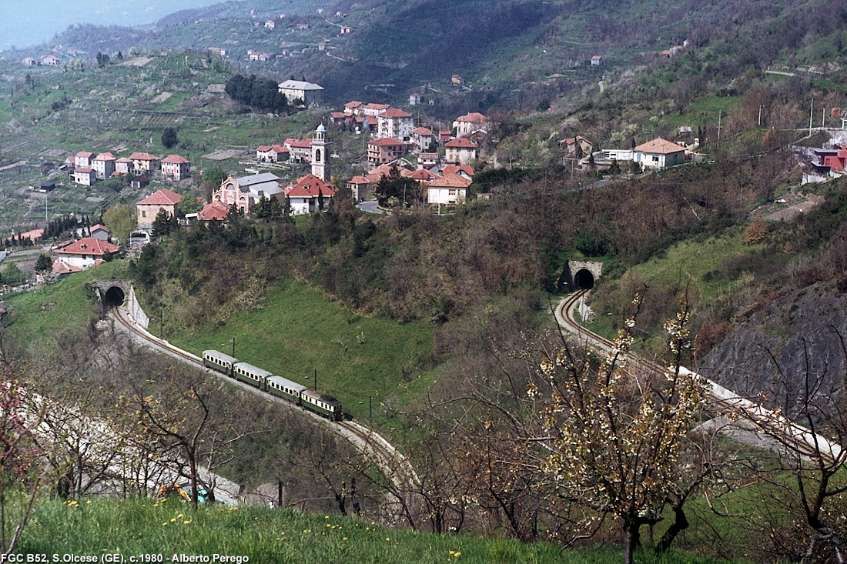
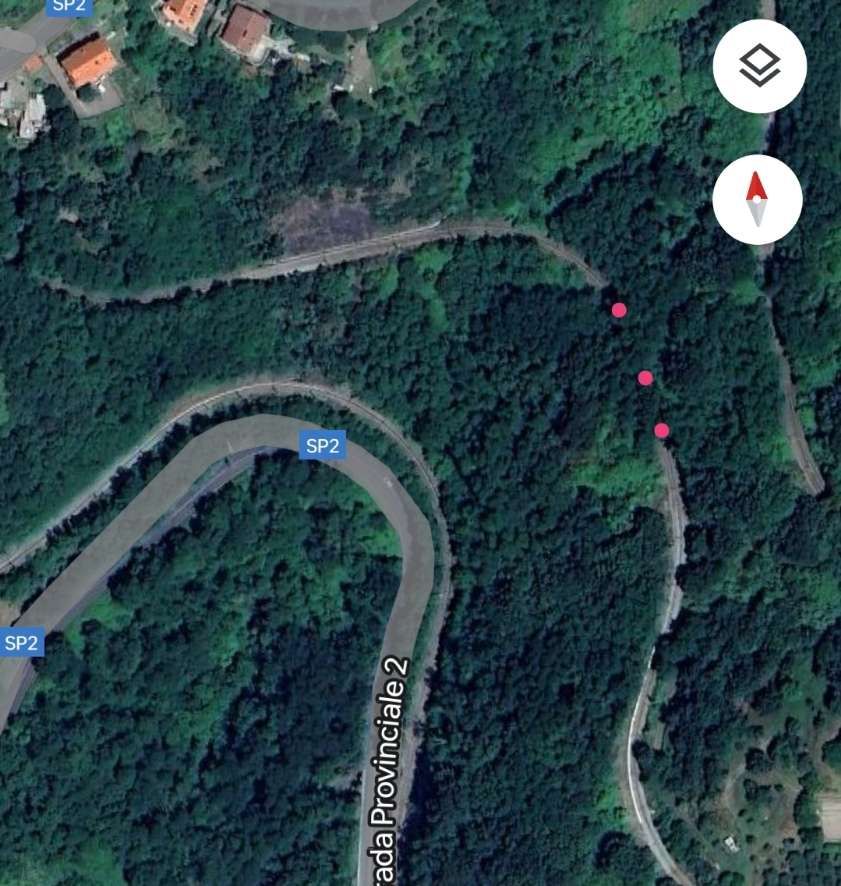
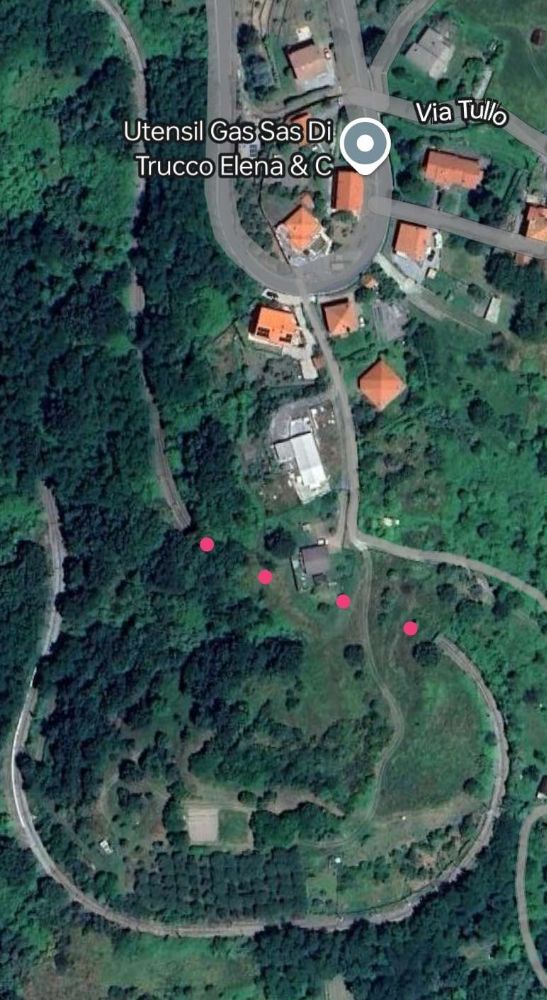
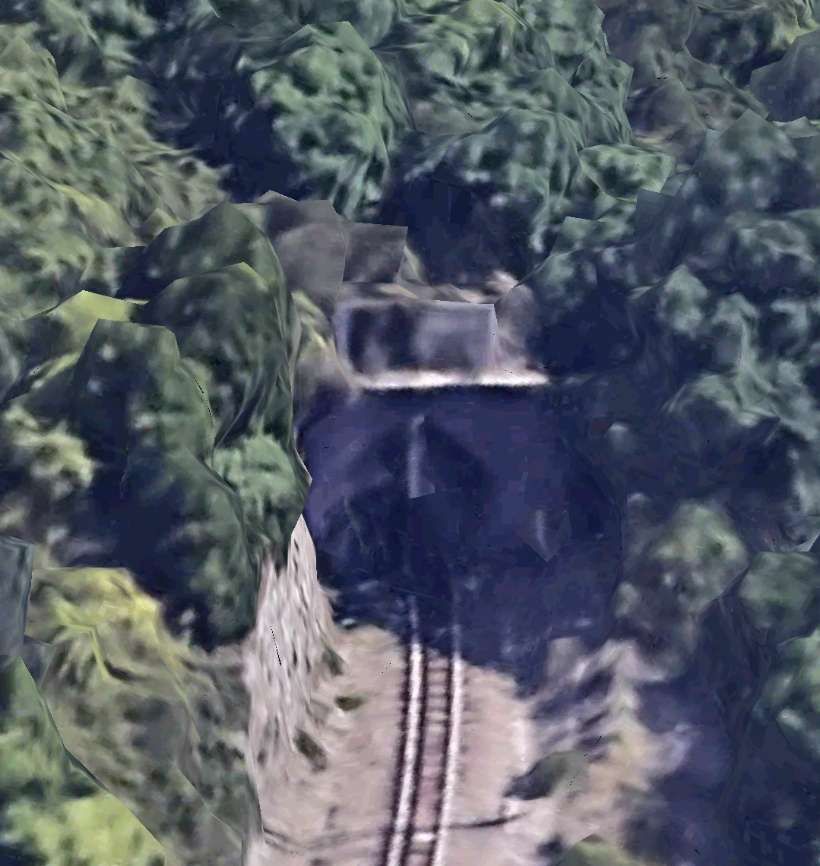
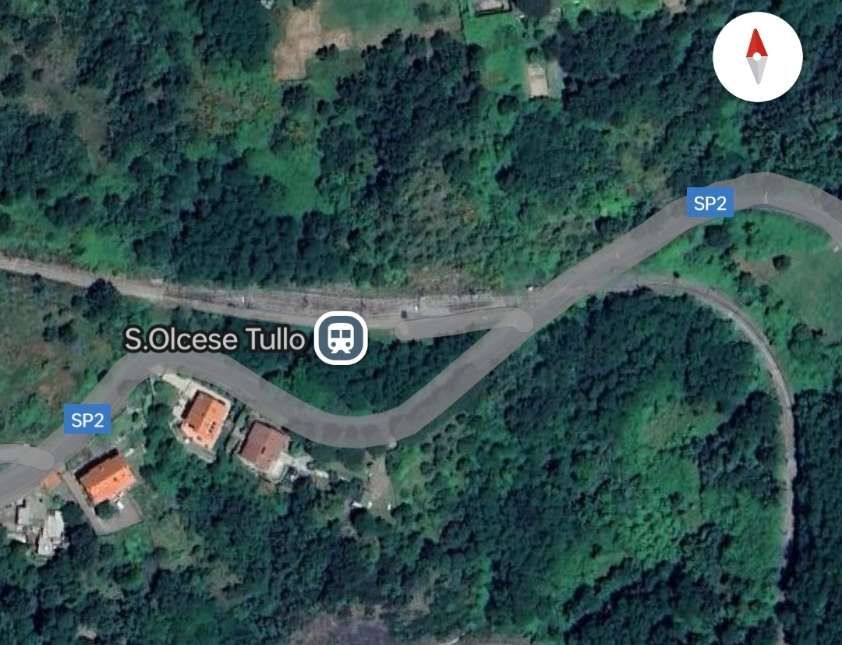
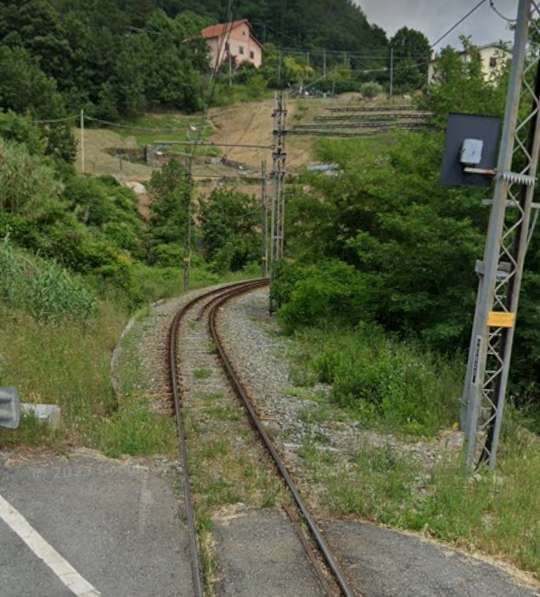
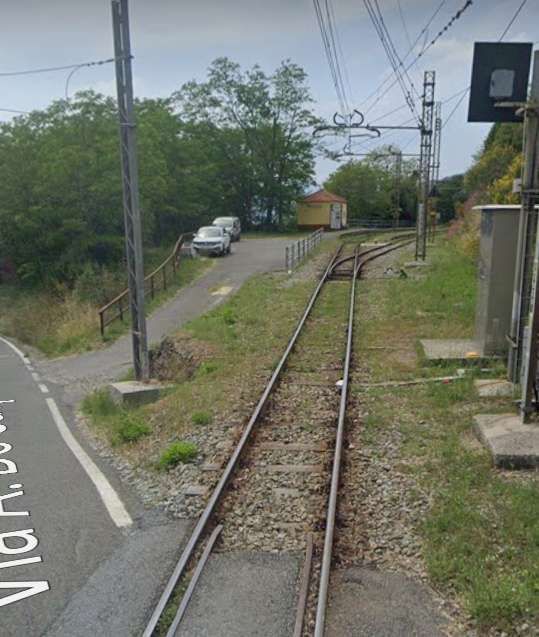
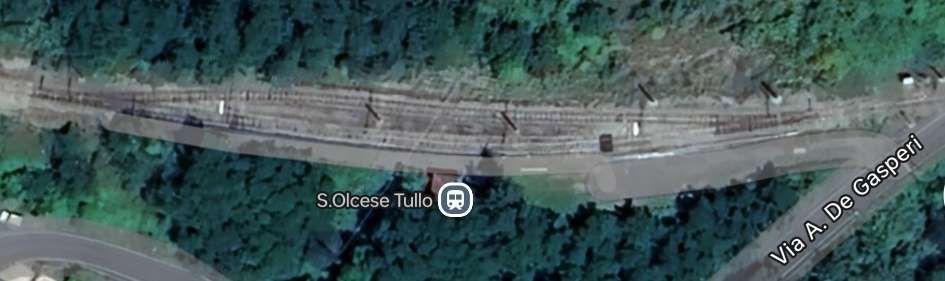
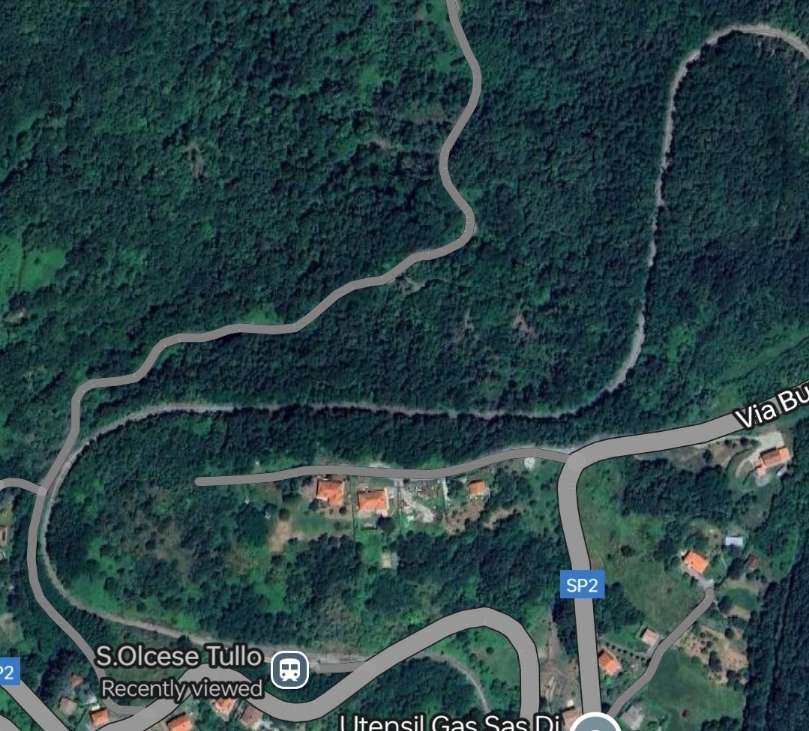
The railway is on three different levels on the hillside at Sant’Olcese. The first accommodates the Chiesa Halt, the tunnel above opens out onto the second level. The third level hosts the Tullo Halt.
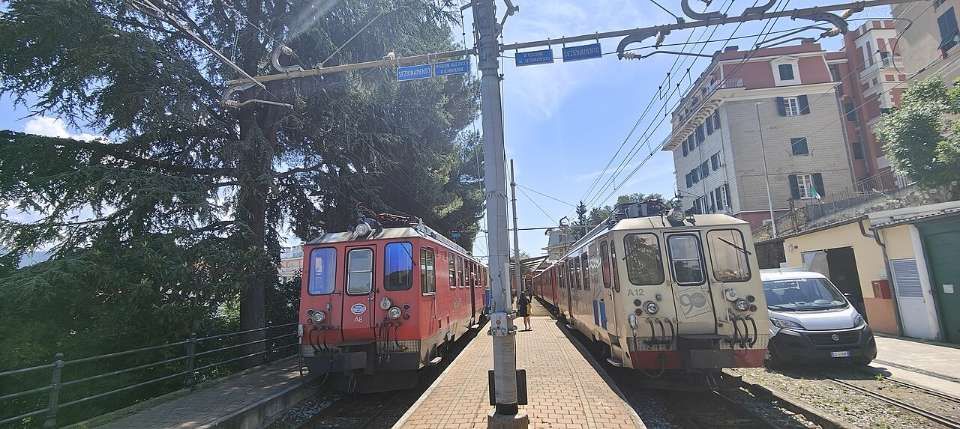
A photograph of a later elettromotrice travelling on this curve can be found here. [17] In the linked image, unit A12 is shown on the curve from Casella Deposito to the Vittorio Veneto bridge (over the River Scrivia). It was shared by Gian-Paolo Codebo on the Sei de Casella se… Facebook Group on 7th May 2020.
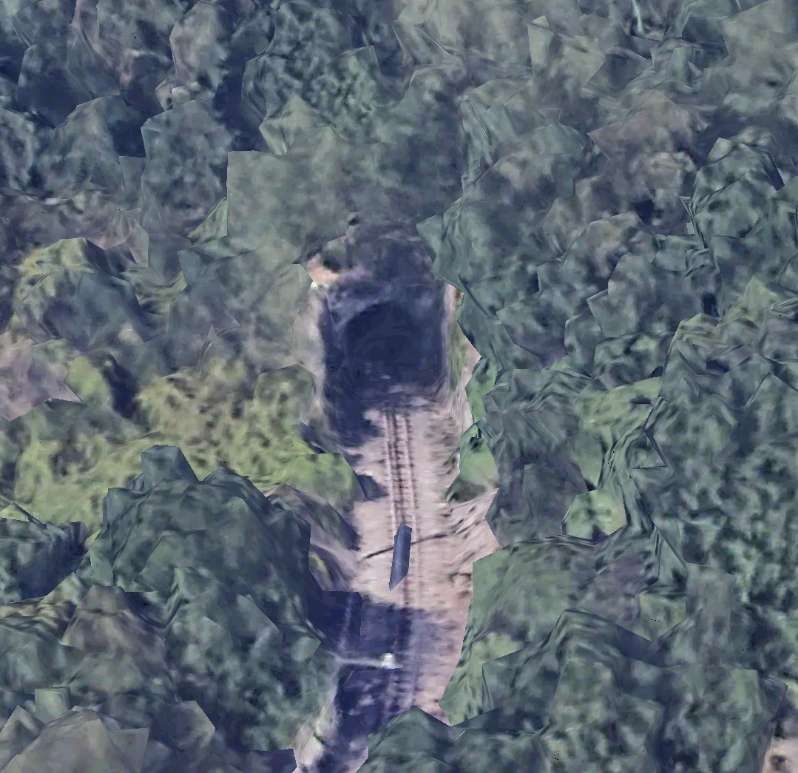
During Construction steam power was employed by the contractor and there are images around which show at least one excursion event that was steam hauled prior to the Line’s formal opening.
Two pictures can be found on the first article in this series, here. [18]
In that first article, we noted that the electric supply was originally 2400V DC. “The first electric locomotives were supplied by Breda, numbered 1 to 3. They were 360 horsepower Bo-Bo locomotives with an innovative Breda-Somarini energy recovery system, unique in Italy. In addition to the motive power, 4 third-class carriages (Nos. 50-53); 3 mixed first-third class carriages (Nos. 20-22) and 16 freight wagons of various types were delivered in 1926, well before the railway opened.” [1]
Unless noted otherwise, the paragraphs below are translated/paraphrased/amended from the Italian Wikipedia page about the Genoa (Genova) to Casella Railway. [21]
Locomotives
At the commencement of the service on the railway, the three locomotives mentioned above were supplied by Breda and numbered 1 to 3. [21]
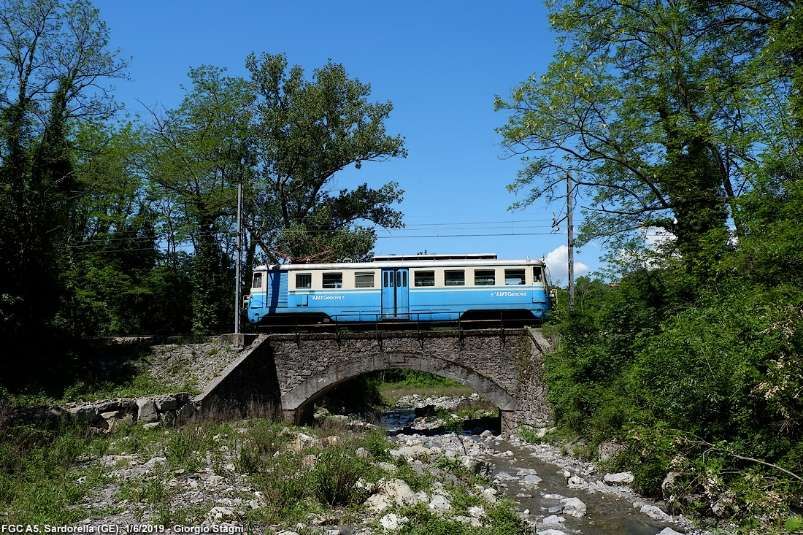
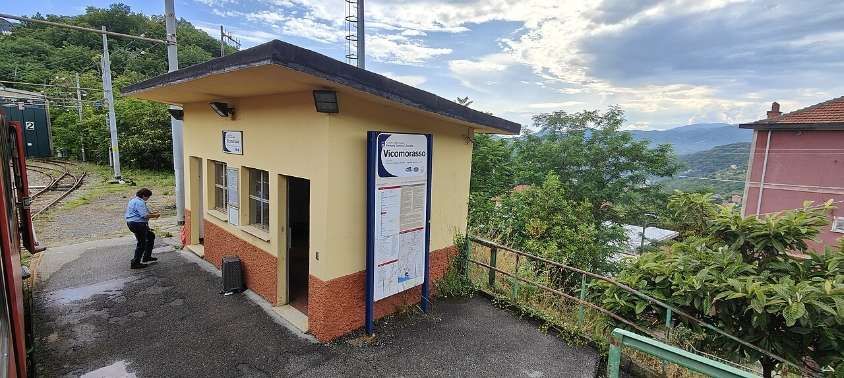
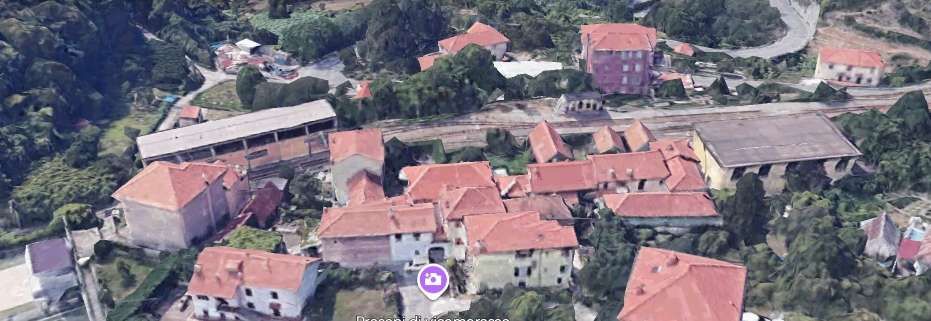
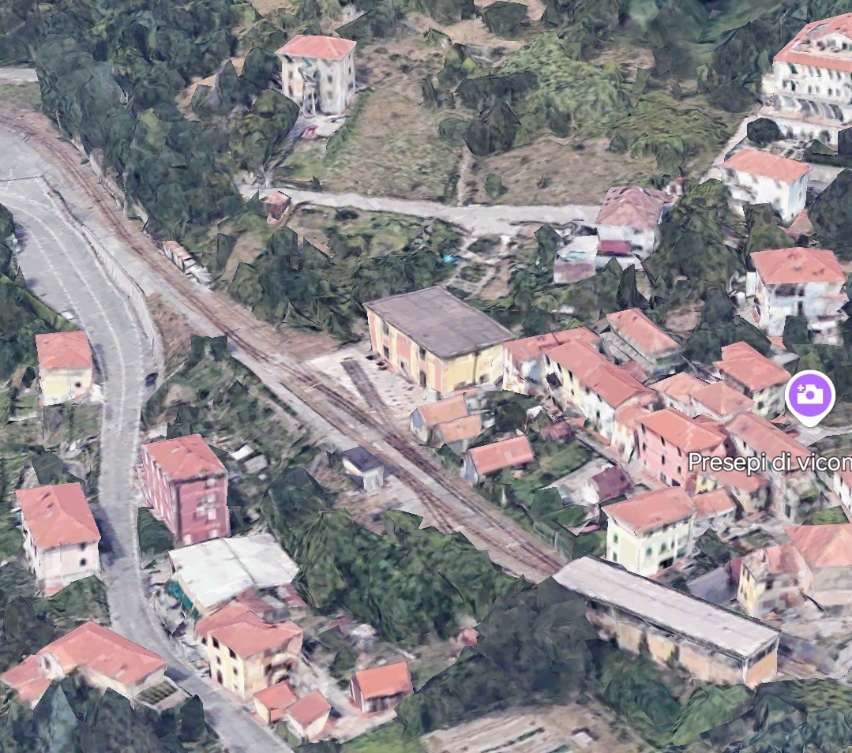
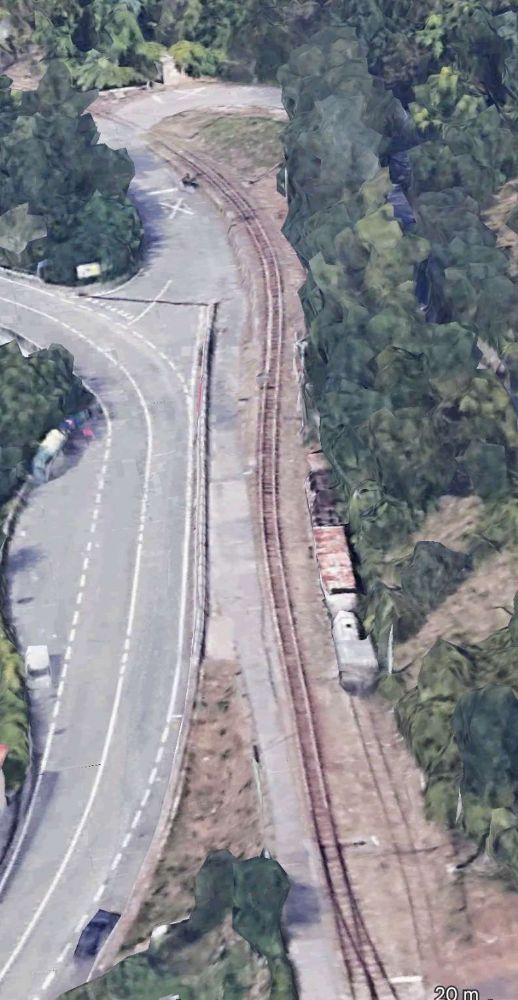
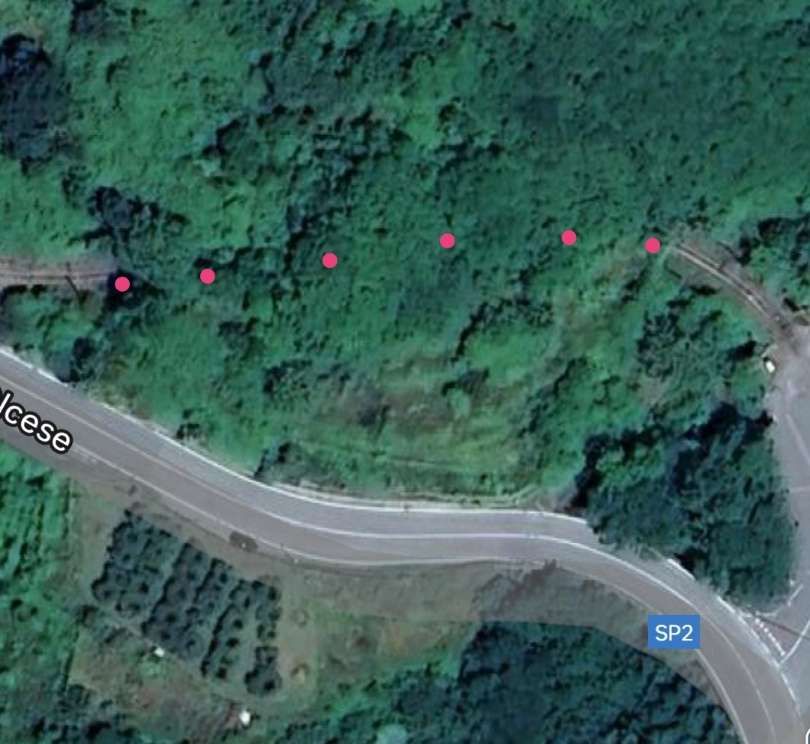
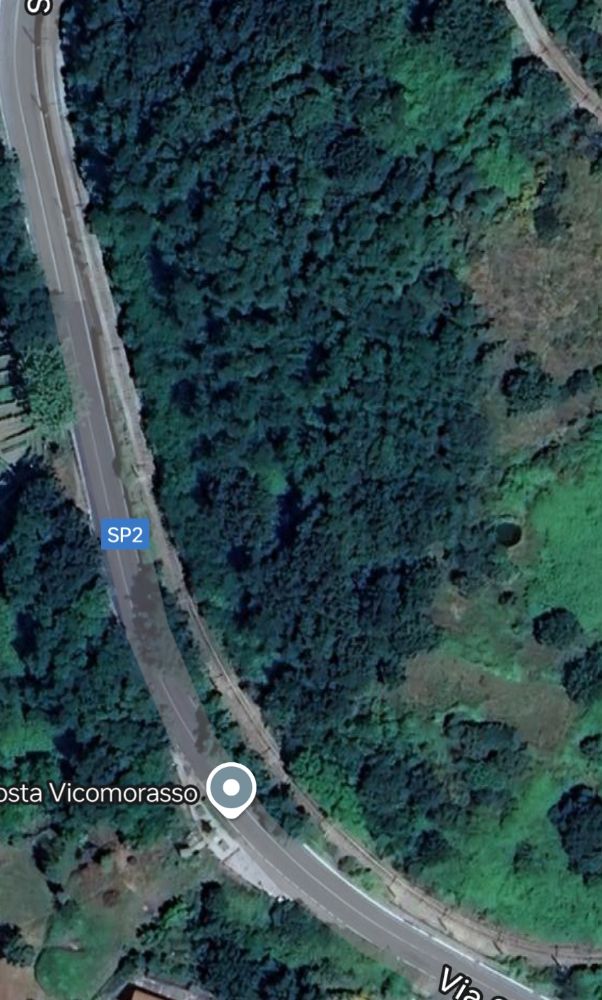
On 23rd August 1937, two of the locomotives were destroyed in an accident near Vicomorasso in which five people lost their lives. [22: p67]
This accident meant that replacement locomotives were required. Three electric locomotives were purchased from the Società Veneta. They had been built by MAN in 1913 for the Montebelluna – Asolo and Montebelluna – Valdobbiadene tramways in Veneto which closed in 1931. [21]
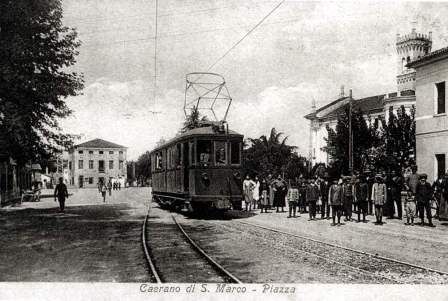
One of the locomotives mentioned in the paragraph above at Stazione di Caerano sometime between 1913 and 1931 in Montebelluna, at [23]
“These locomotives entered service in 1939, initially maintaining the original numbering (053, renumbered 055 in 1943, 054 and 056), after conversion of the original power supply system from 975 V DC to 2400 V DC.” [1]
Locomotive 28 and 29 were built in 1924 for the Adriatic-Appennino Railway. The electrical equipment was supplied by TIBB of Vado Ligure; the body and bogies were made by Carminati & Toselli of Milan. Originally, they were part of a 1922 order for 14 locomotives of 950 mm gauge for the Sangritana Railway. Two (Nos. 28 and 29) were sold to Ferrovia Genova Casella (FGC) – No. 28 in 1956 and No. 29 in 1960. [22: p98 & 184] Conversion was necessary as the locomotives required a gauge change and modification from freight/baggage locomotives to passenger locomotives.
The two locomotives entered service in 1962. No. 29 is currently the oldest electric locomotive still in operation in Italy and is used in composition with three carriages (C22-C103-C104) as a historic train used on charters. No. 28 was placed in storage in 1975 and finally decommissioned and dismantled in 1998. [21][22: p184]
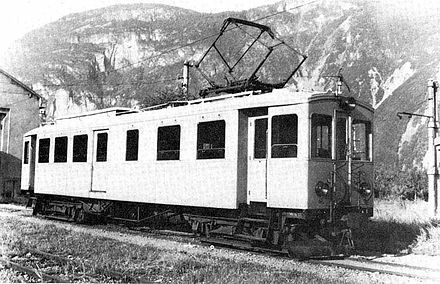
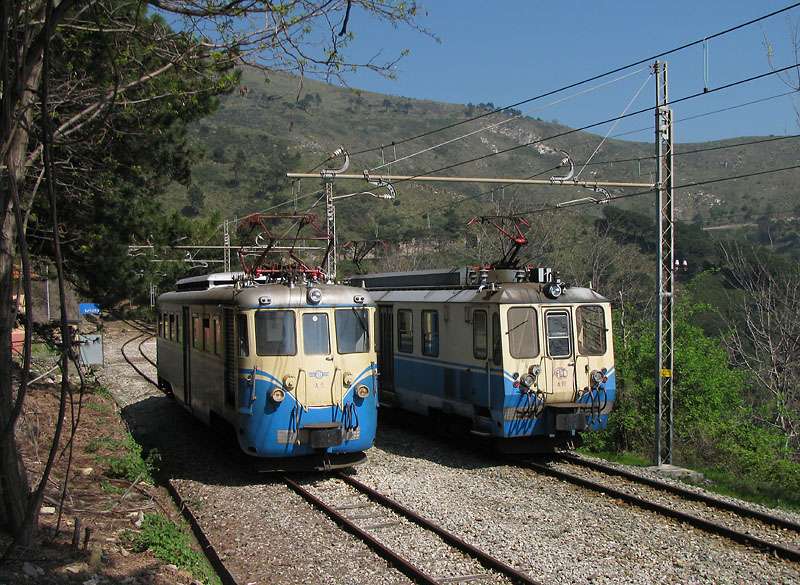
Electtromortices A1, A2 and A3 were built in 1929 for the Ferrovia della Val di Fiemme (Ora – Predazzo), similarly by TIBB and Carminati & Toselli. These were transferred on the closure of the Ora – Predazzo line in 1963 to the Ferrovie Genoa Casella. [21][1]
Elettromotrice A1 while employed by Ferrovia della Val di Fiemme (Ora – Predazzo) at Ora depot. [25]
A1 was painted blue/cream in 2011 with AMT logos. It was used for ordinary trains until 2019 and in 2022 it was set aside awaiting significant maintenance. [21]
A2 was reconditioned and returned to its 1929 condition. It re-entered service in June 2018. In that December it was involved in an accident but emerged with little damage. In September 2019, further restoration work was completed and from February 2020 it was undertaking a regular historic train service, usually being timetabled for Saturday running. [21][26]
A3 was built by Gleismac/EAA, after having suffered serious damage in an accident at Sardorella in 1974. It returned to service in 1983. It remained in service until 1999. After it was withdrawn, it doesn’t 12 years in storage before ultimately being dismantled in 2011. [21]
Elettromotrices, A1, A2 and A3 were part of a batch of about thirty electric locomotives which were built by Carminati and Toselli of Milan. Twenty-three of these were very similar to each other. being produced between 1924 and 1940. Three of this batch of locos (A1-A3) were deployed on the Ora-Predazzo line and on its closure came to the FGC. [21]
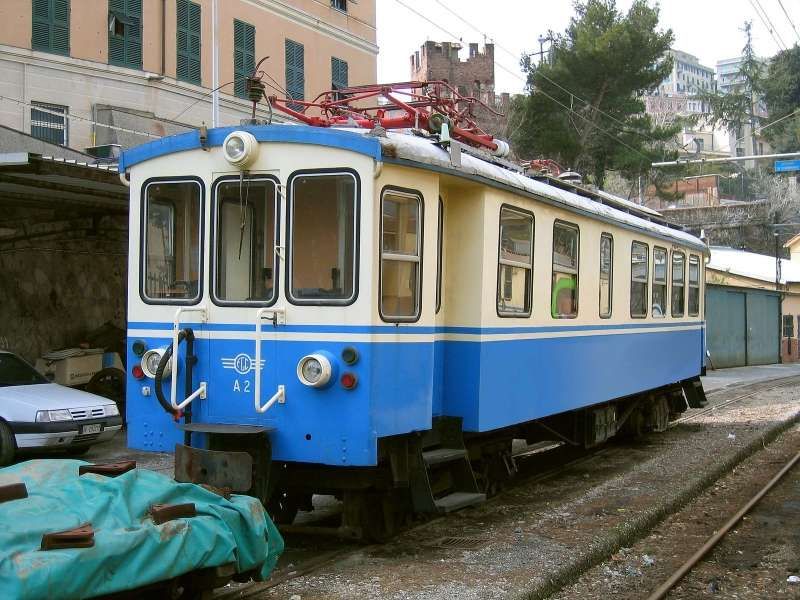
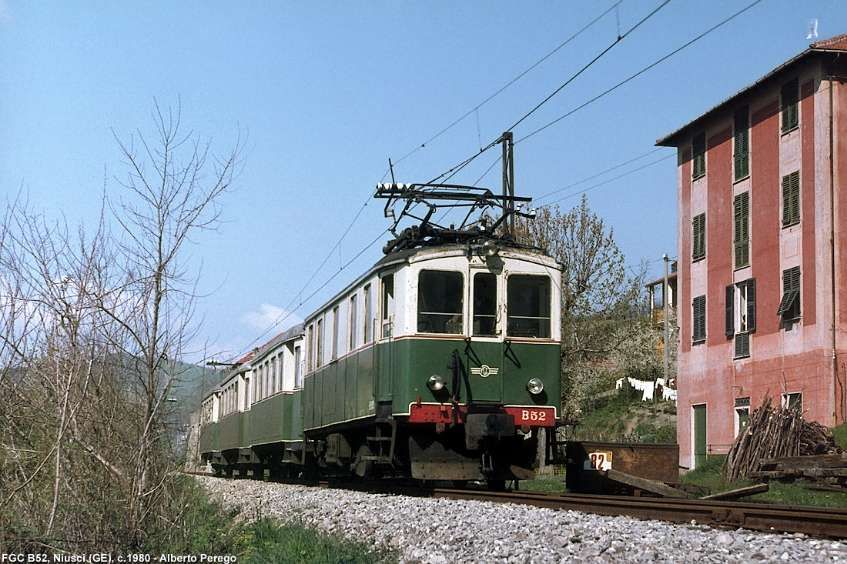
In addition, two 420 horsepower locomotives (max. speed 45 km/hr), B51 and B52 with Bo-Bo running gear were also transferred to the FGC in the early 1960s. [1]
Also from Val di Fiemme came six bogie-carriages, two longer coaches numbered C101 and C102 and four of shorter carriages, numbered from C103 to C106. [1]
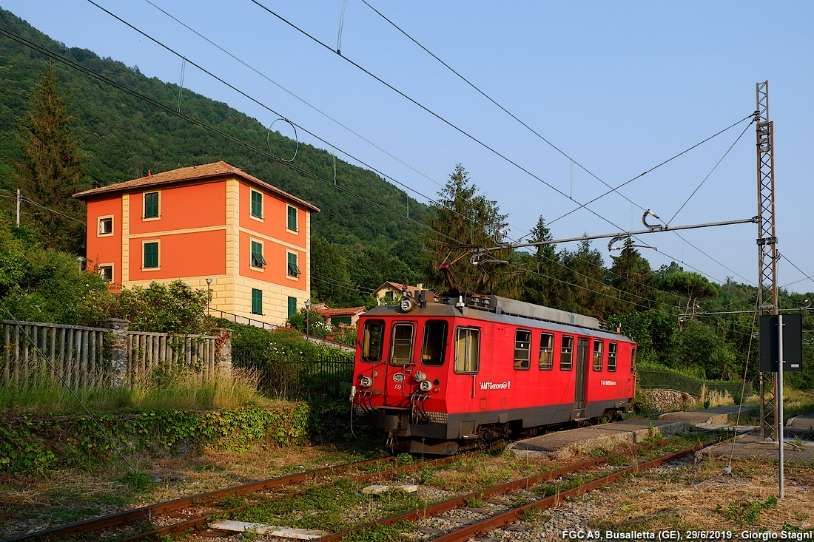
Elettromotrices A4-A7 were built in 1957 on the chassis and bogies of locos built by TIBB/Carminati & Toselli in 1926 for the Spoleto-Norcia railway. That reconstruction was undertaken by Casaralta-TIBB. It saw the application of new electrical equipment and the adoption of a new rounded body, typical of the mid-20th century. These elettromotrices transferred to Genoa in 1970 with the closure of Spoleto-Norcia line. They entered regular service, re-numbered A4-A7, between 1971 and 1973 after gauge-conversion from 950mm to metre-gauge. [21]
Units A6 and A7 were visually the same as units A4 and A5.
Elettromotrice A6 at work on the line before it was set aside. [10]
Units A4 and A7 were scrapped (in 2014 and 2016 respectively), while A5 was restored to running order in February 2010, with the installation of fully electronic speed measuring devices and a dead man’s device, the application of a cream/blue anti-graffiti film and new AMT logos. It was taken away for restoration in 2022, and finally A6 has been shelved for over 10 years awaiting restoration. [21][22: p191]
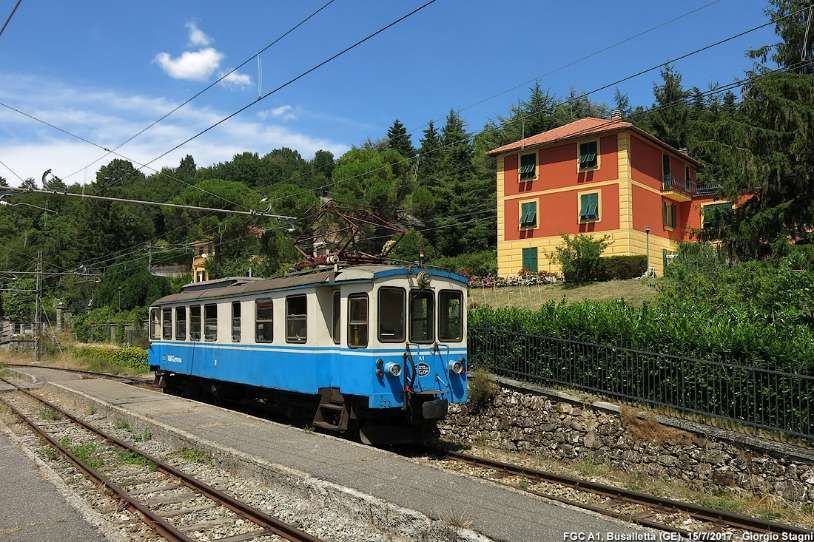
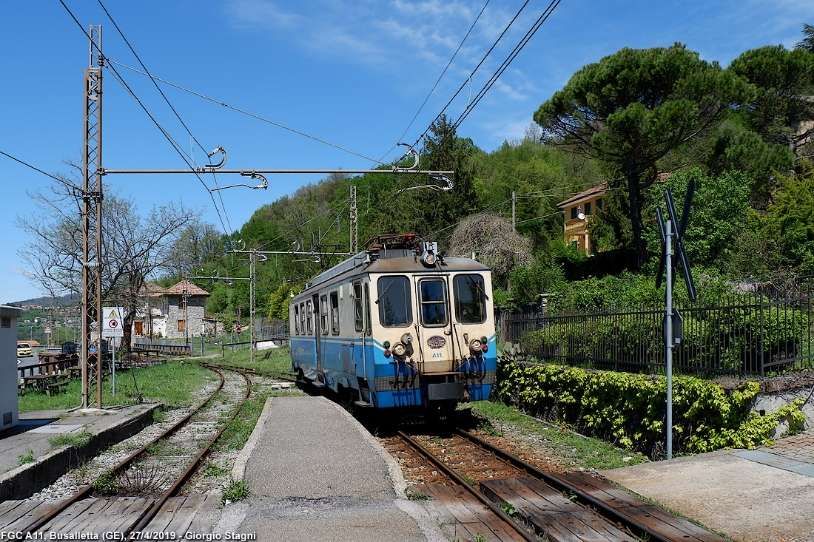
Electric locomotives A8-A10 were built in 1993 by Firema-Officine di Cittadella at the request of Ferrovia Genova-Casella, they have identical bodies to the decommissioned A3. However, A8 uses the TIBB bogies from B51, the A9 those from B52 and the A10 those from A3. This last unit also has a body slightly different from the others due to the lower window line. [21]
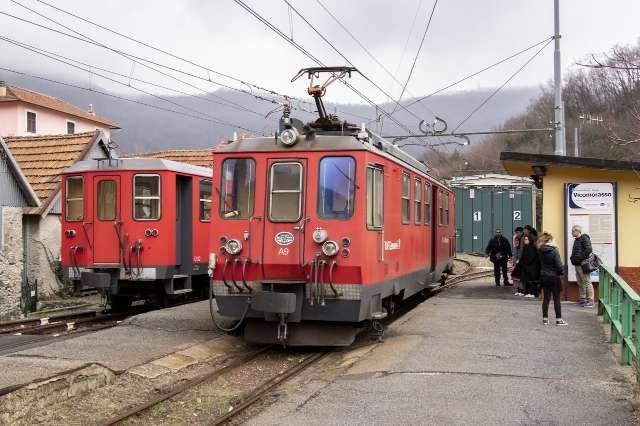
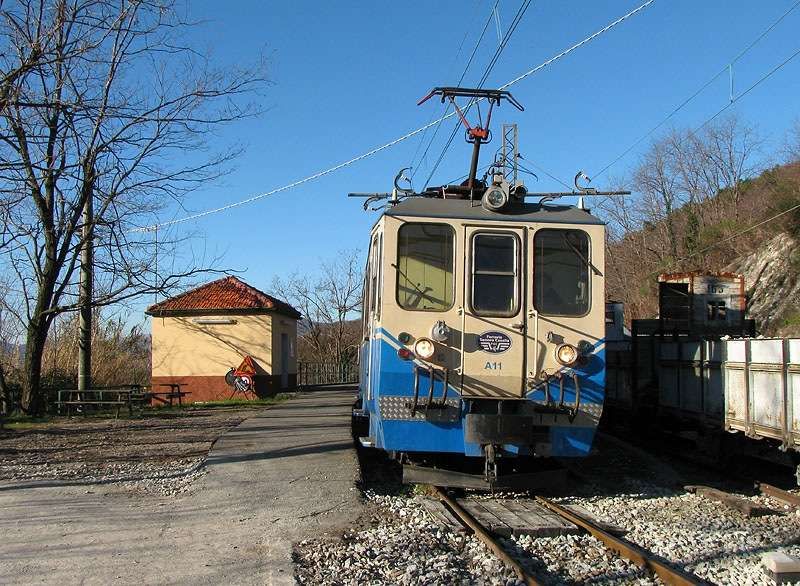
Elettromotrices A11-A12 were built in 1998 by FiReMa-Officine di Cittadella at the request of Ferrovia Genova-Casella. They have a body identical to the A10. A11 underwent a restyling in 2011 with the application of cream/blue anti-graffiti film and new AMT logos and is currently used in regular service. A12 is also back in service after an extraordinary overhaul of the bogies. [21][22: p198]
Locomotive D1 was built in 1964 on behalf of the German railways by the manufacturer Gmeinder & Co. by adapting the MaK V100 standard-gauge locomotive to metre gauge, it was numbered V52 902 (later 252 902) and used on the 28 km long Mosbach-Mudau metre-gauge line. When it’s service on that line came to an end (2nd June 1973), it was first converted to standard-gauge by Gmeinder and used by Sudwestdeutsche Eisenbahngesellschaft (SWEG) which put it to work on the Breisach-Endingen-Riegel line (numbered VL46-01). In 1986, it was sold to the Gleismac company which converted it to metre-gauge and then sold it to the FGC. It was used to haul construction and passenger trains during the renovation of the overhead line. It was then set aside at Casella Deposito for over 10 years until in 2008 it was sent to Monopoli where it was rebuilt by 2014 and it returned to service on the line in November 2015. [33][34]
Locomotive D1 responsible for a single coach. [9]And here with two coaches. [9]And here, escaping from a tunnel portal. [19]
Other Rolling Stock
We have already picked up some snippets of information about coaching stock and wagons. …
When the line opened there were “4 third-class carriages (Nos. 50-53); 3 mixed first-third class (Nos. 20-22) and 16 freight wagons of various types (delivered in 1926, well before the railway opened).” [1]
We also noted that, along with the B51 and B52 locos “from Val di Fiemme came six bogie-carriages, two longer coaches numbered C101 and C102 and four of shorter carriages, numbered from C103 to C106.” [1]
The following information is gleaned from H Rohrer’s detailed website about Italian railways. That website can be found here. [35]
Coaches C20-C22 were built by Breda and supplied in 1926, of which C22 was renovated by FGC in 1960 and C21 was renovated by Gleismac in 1979-1980. An image of Coach 22 can be found here. [36]
Coaches C50-C53 were built by Breda and supplied in 1926. An image of Coach C50 can be found here. [37] An image of refurbished Coach C53 can be seen here. [38]
Coaches C101-C102 were long-wheelbase bogie coaches, built by Carminati Toselli and supplied in 1929. These were later renovated by Gleismac between 1980 and 1983. An image of Coach 101 in original condition can be found here. [39] The renovated Coach 101 can be seen here. [40]
Coaches C103-C106 were short-wheelbase bogie coaches built by Conti (?) and supplied in 1929 (?). Of these C105 and C106 were later renovated by Gleismac between 1980 and 1983. The original Coach 104 can be seen here. [41] A refurbished Coach C106 can be seen here. [42]
Coaches C60-C62 were built by Citadella Firema and supplied in 1996/1997. An example can be seen here. [43]


.jpg)
#/media/File%3AL04_163_Hp_Dinegro%2C_ET_37.jpg)