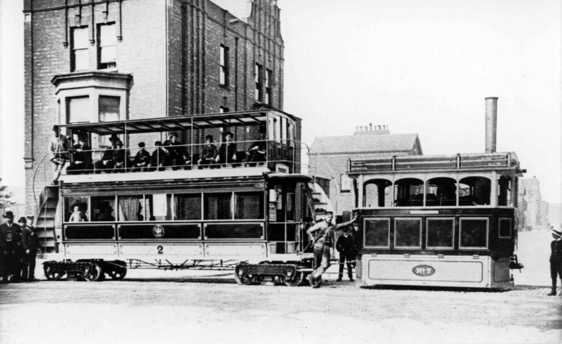
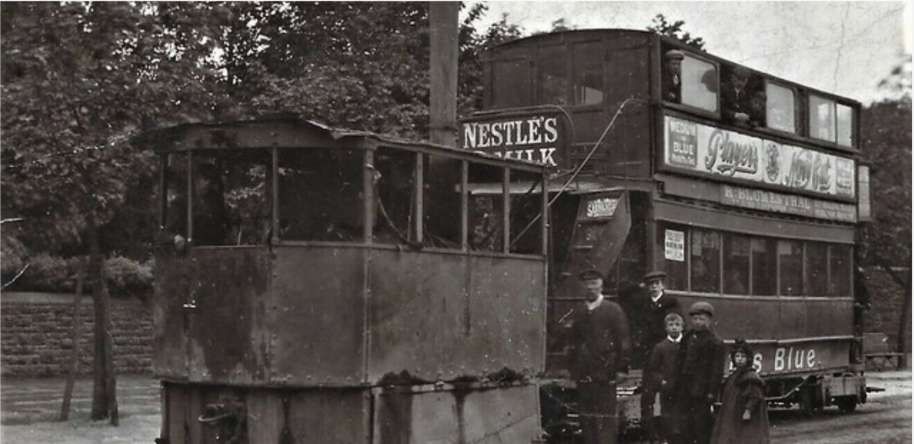
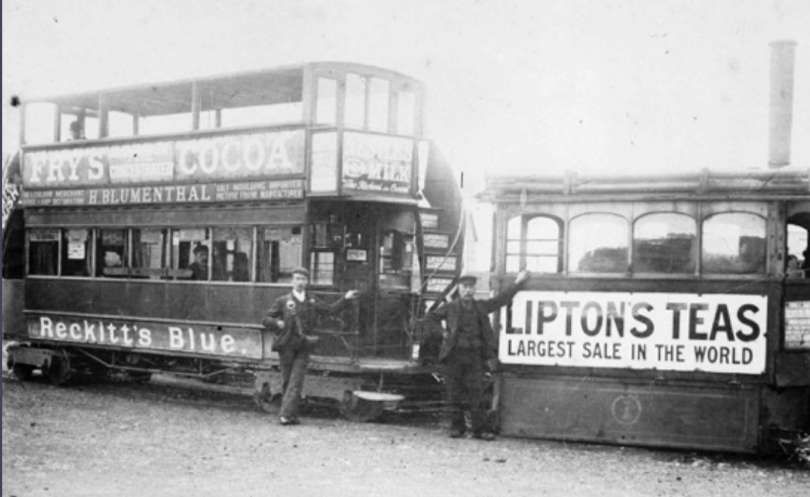
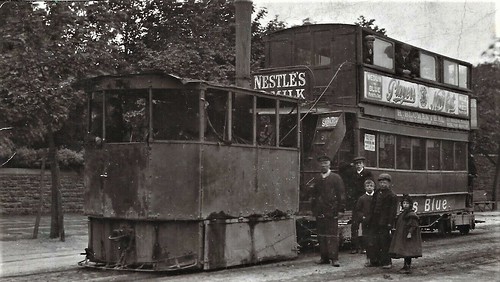
The Barrow-in-Furness Tramways Company operated a steam-powered tram service from 11th July 1885 until electrification in 1904. Using a 4 ft (1.219 m) gauge, the tramway reached Ramsden Dock by 1886 and continued expanding through the electric era to locations such as Bigger Bank. Ultimately, on 5th April 1932 the tramway network was closed in favour of buses. [1]
From 1876 to 1901 the Kitson built over 300 steam tram engines and steam railmotor units, which were developed from a design by W. R.Rowan. [6][7]
The tramway network connected the town centre with areas like Ramsden Dock (1886) and eventually extended to Biggar Bank on Walney Island in 1911. After the network was bought by British Electric Traction, the company embarked on a modernisaton programme and the network saw its first electric service in 1904. [1]
Barrow-in-Furness Corporation took over operation of the service on 1st January 1920 at a cost of £96,250 (close to £5 million in 2026). Technological advancements in the form of petrol and diesel powered buses resulted in the closure of the tramway, with the last service running on 5th April 1932. [1]
The Network in 1899/1890
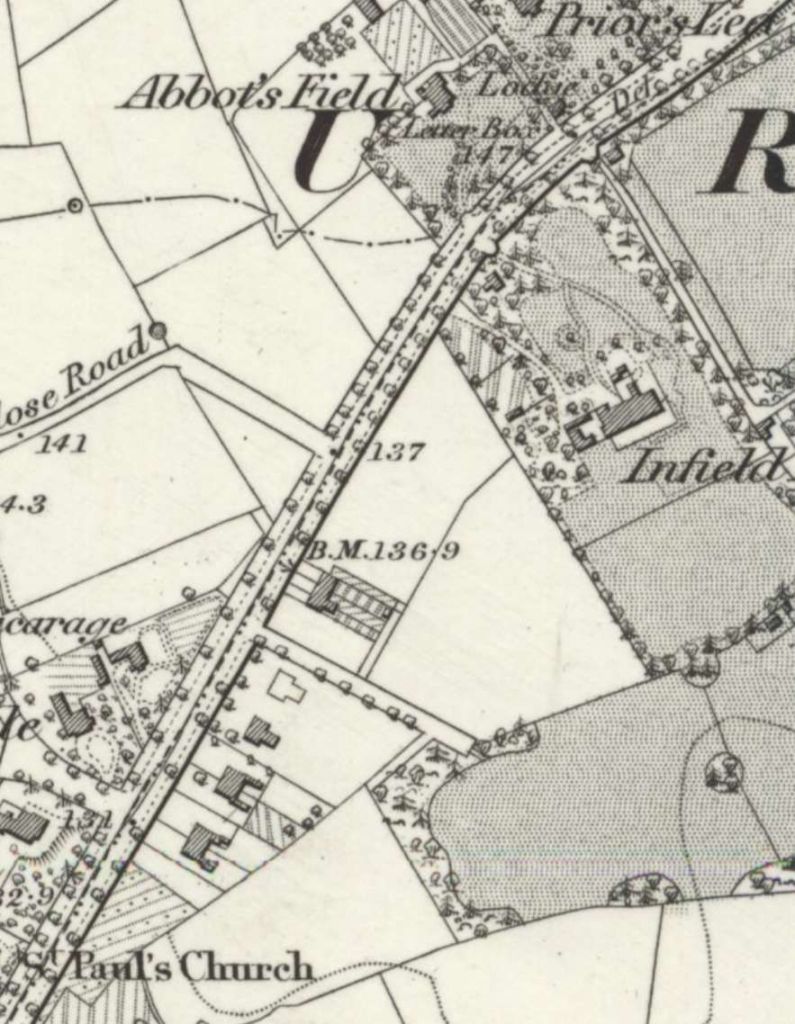
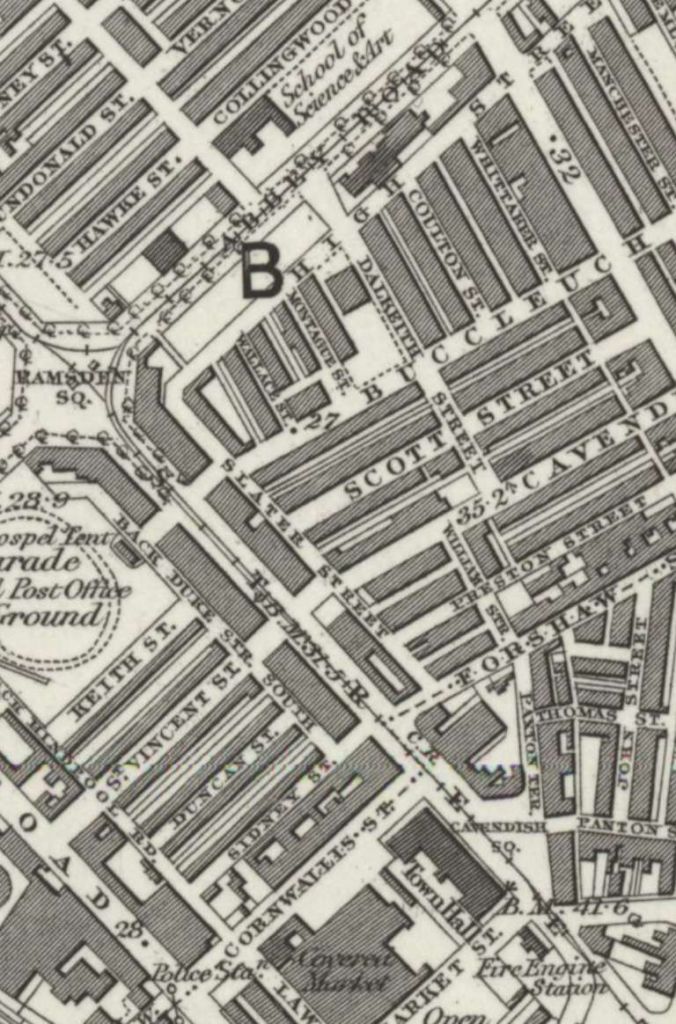
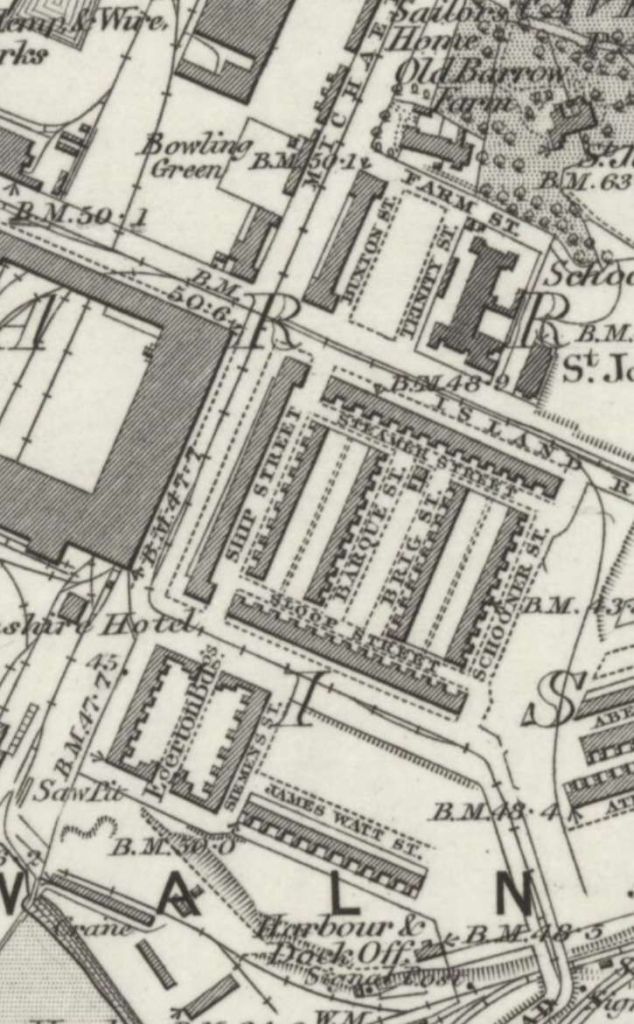
The steam tram network appears on the 1889/1890 6″ Ordnance Survey which was published in 1895. Three element can be identified:
1. Priors Lea to Ramsden Dock Station
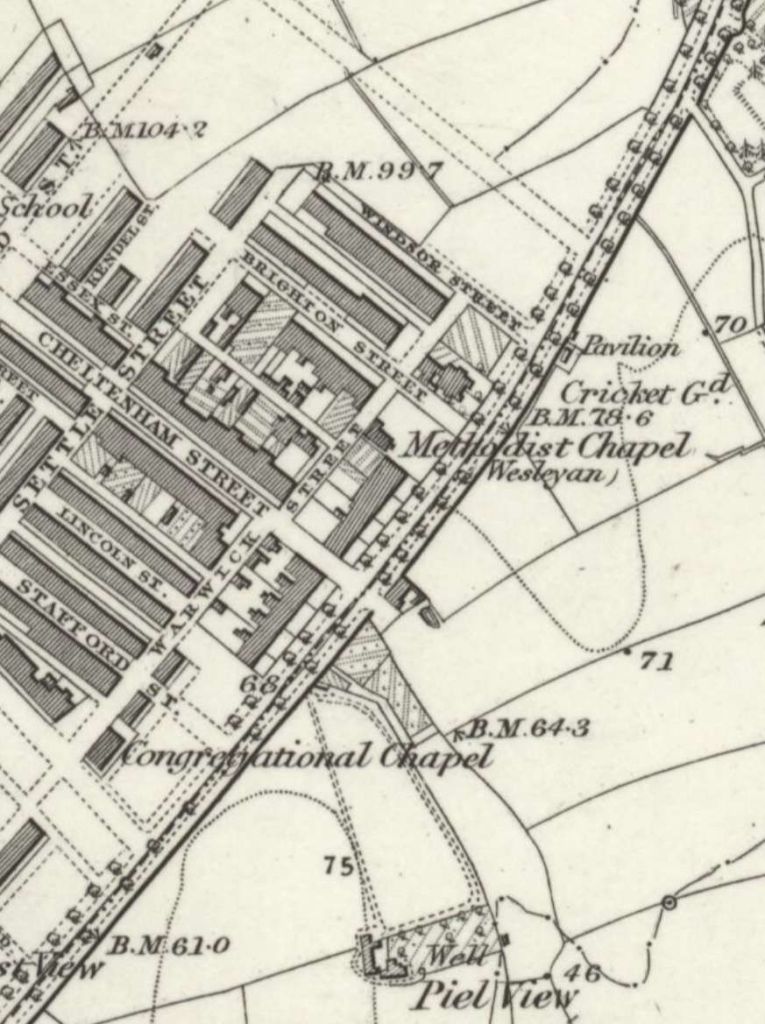
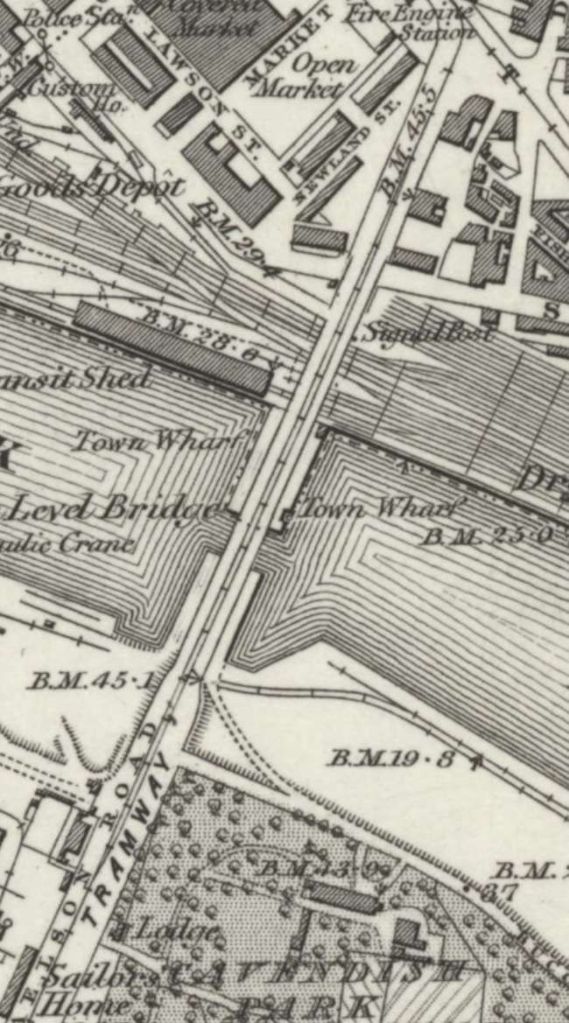
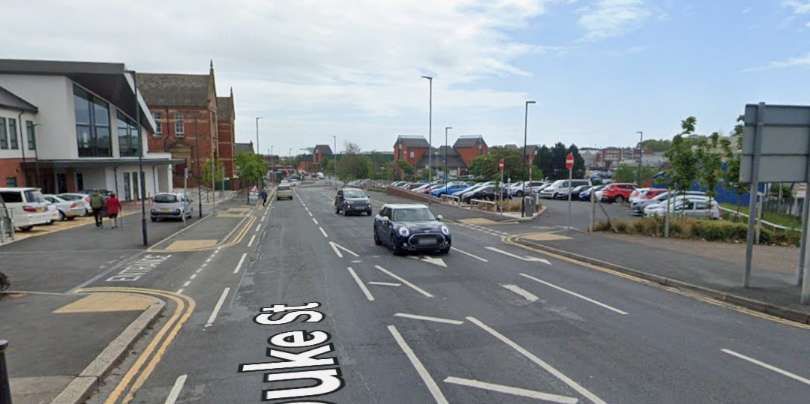
One axis of the steam tramway appears to have run from Priors Lea in the North to Ramsden Dock in the South via Ramsden Square. … The route appears on the next eight extracts from the 6″Ordnance Survey of 1889/1990 which was published in 1895.
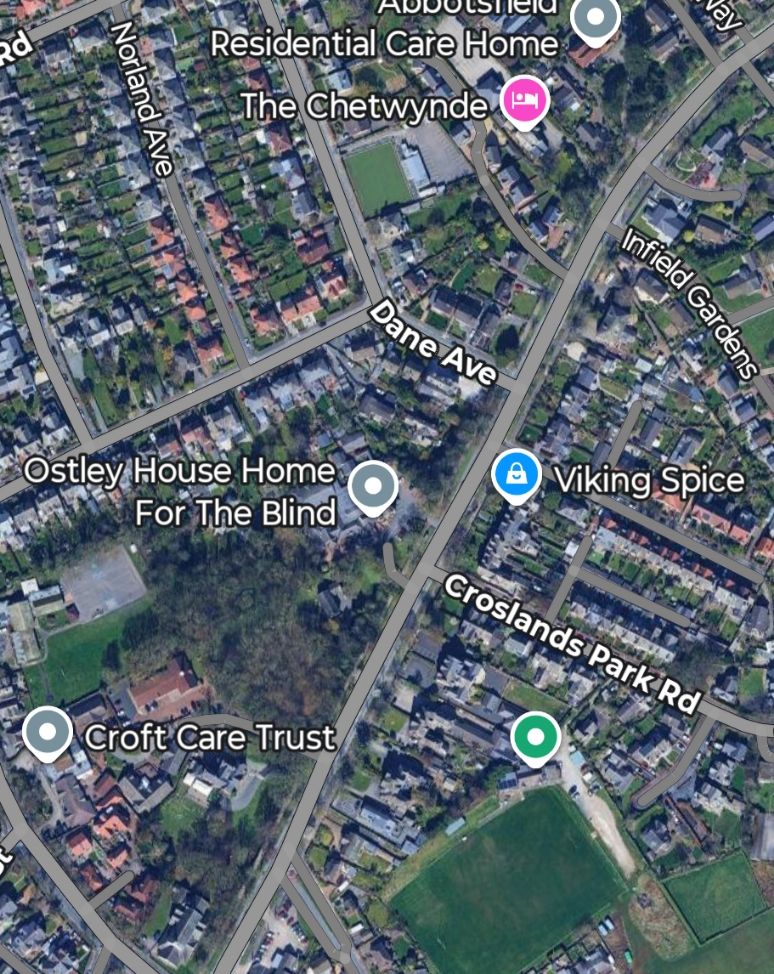
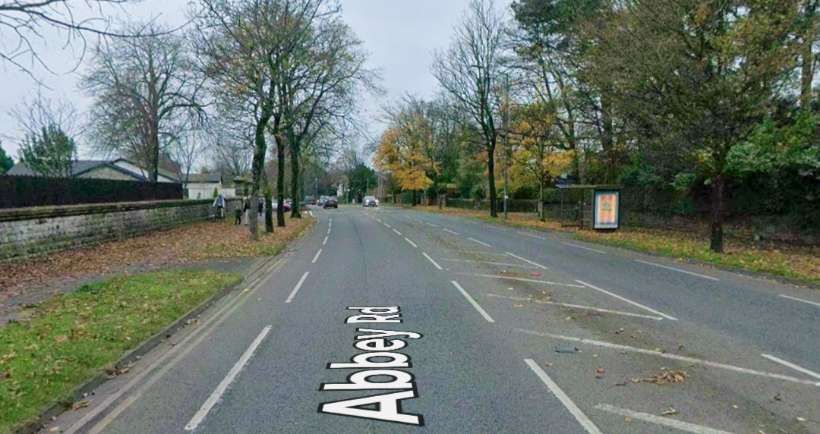
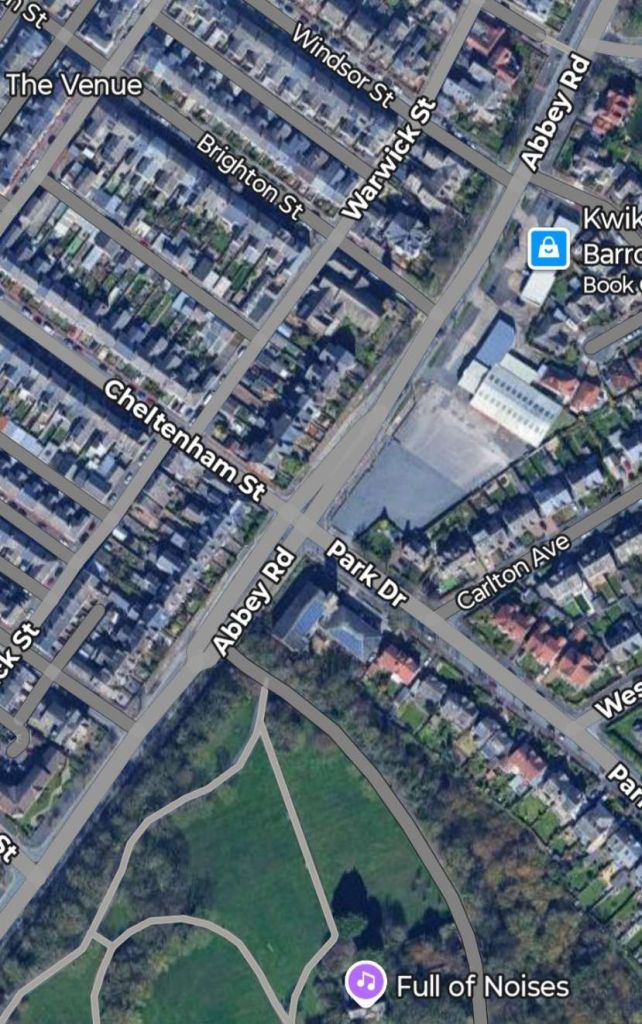
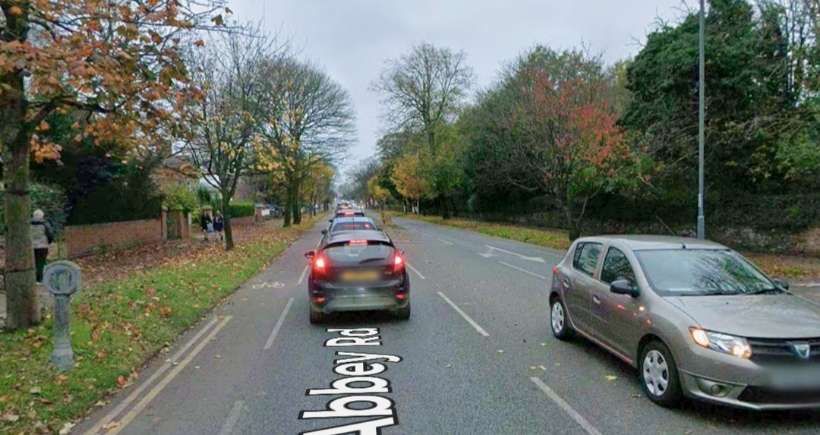
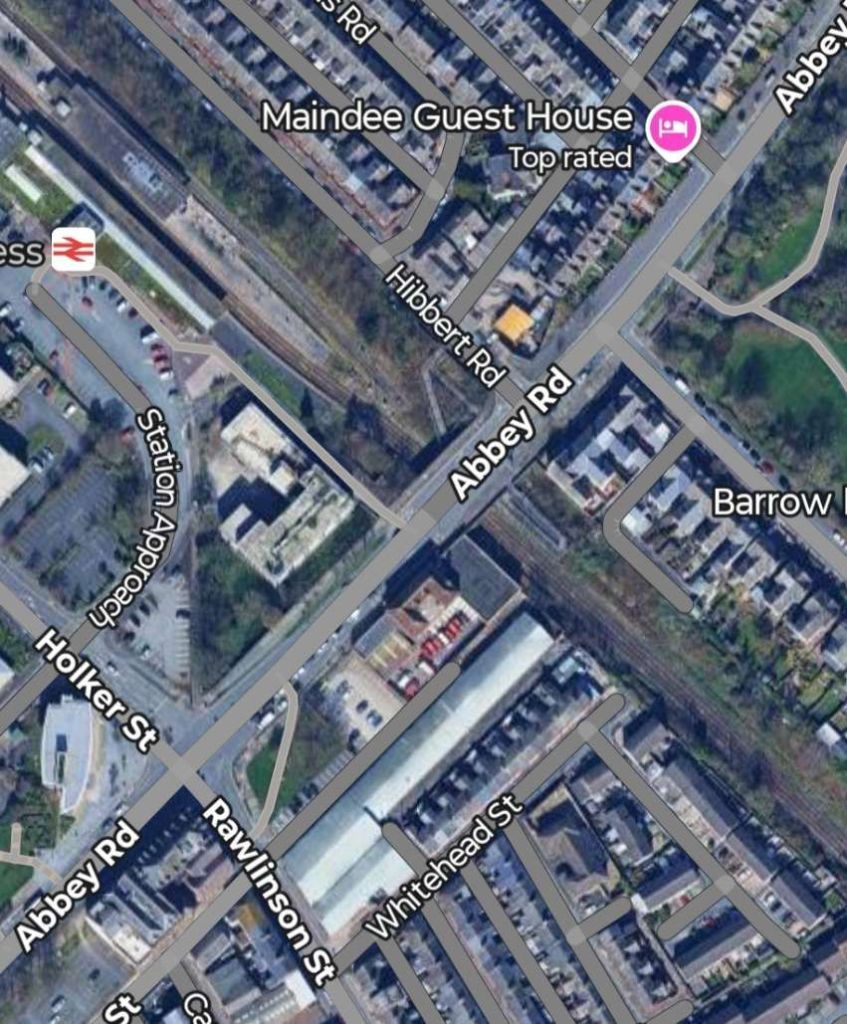
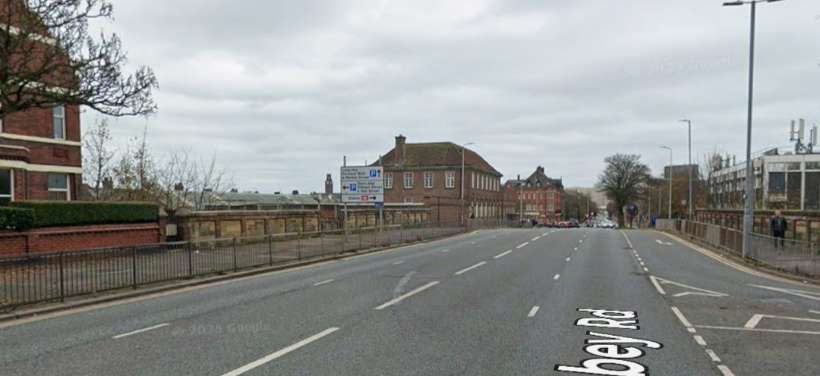
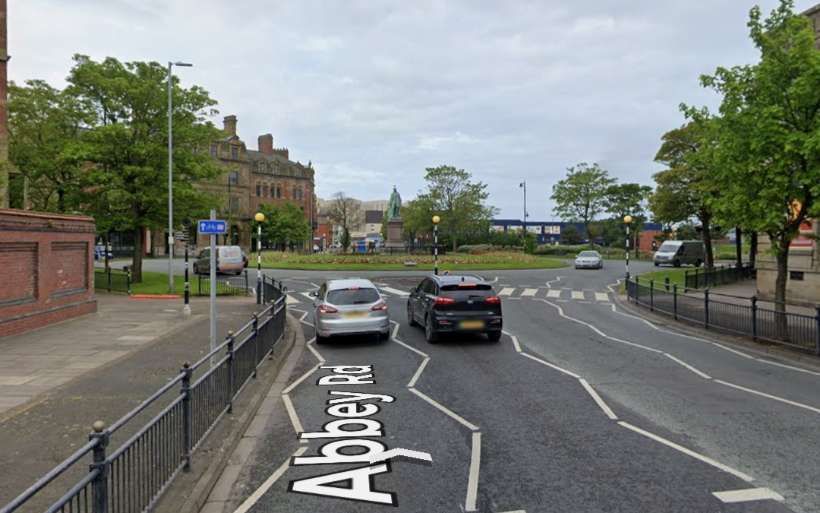
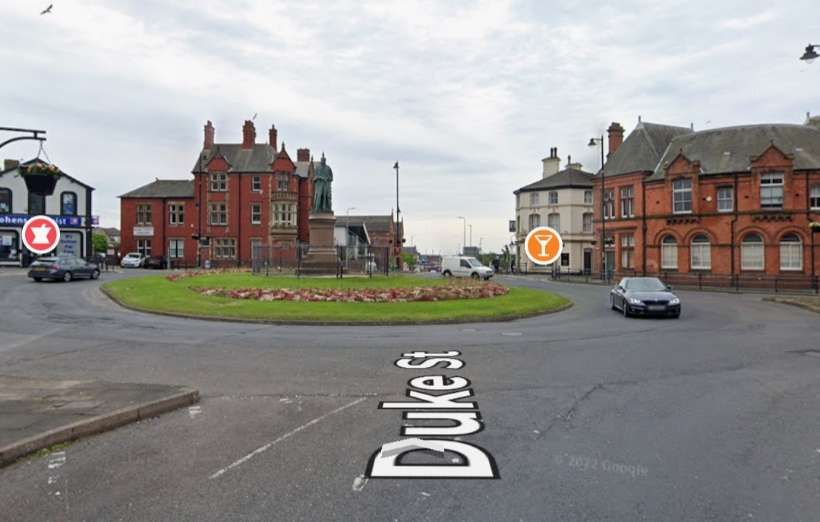
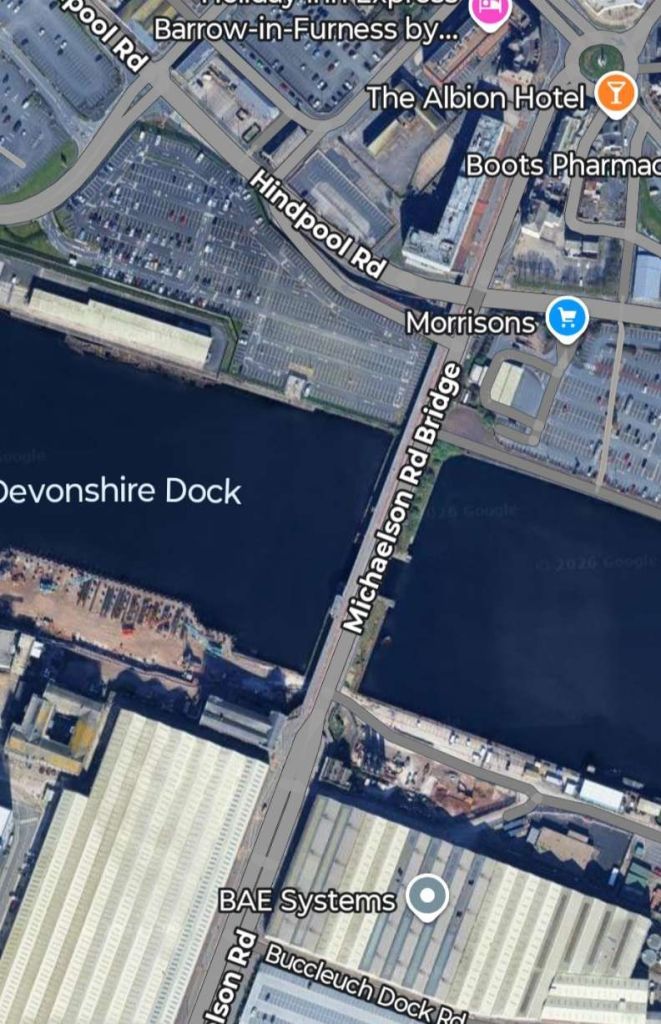
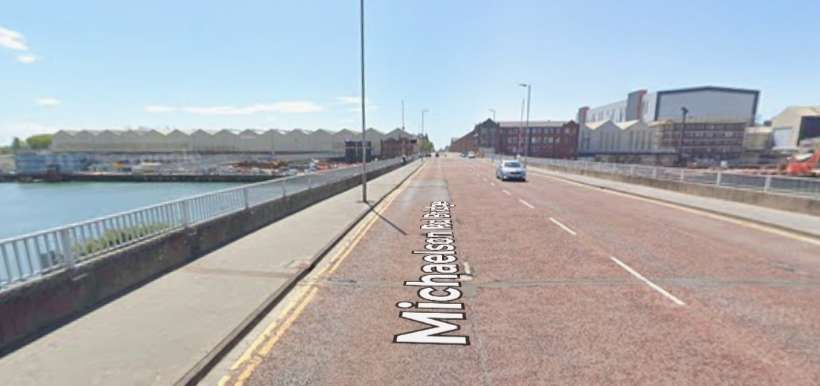
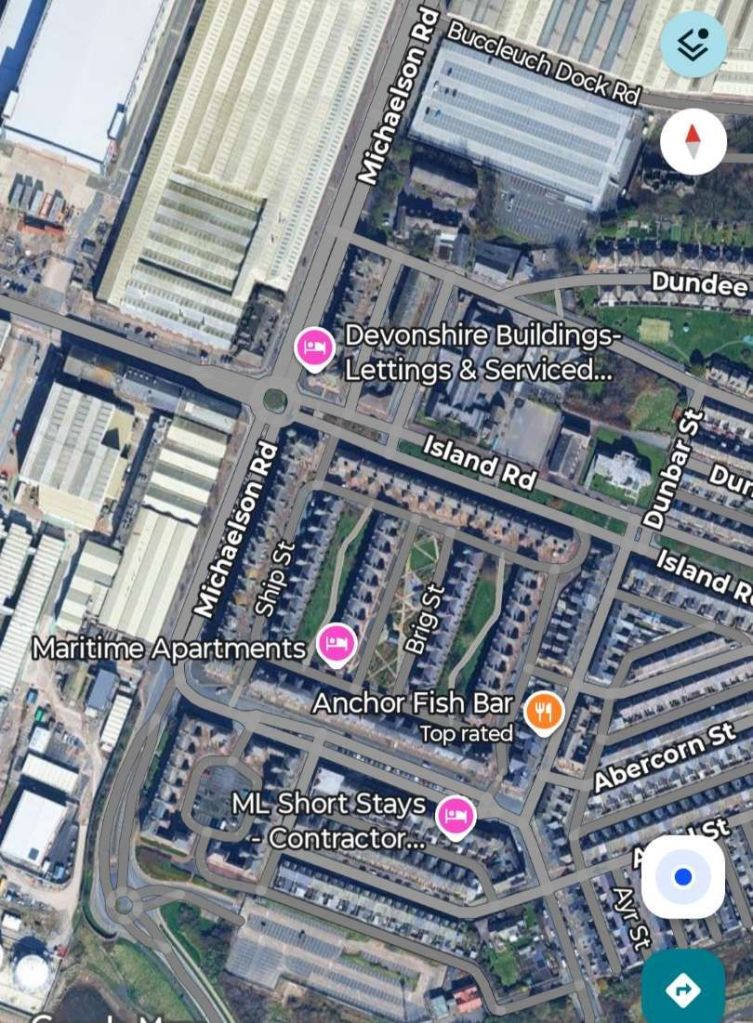
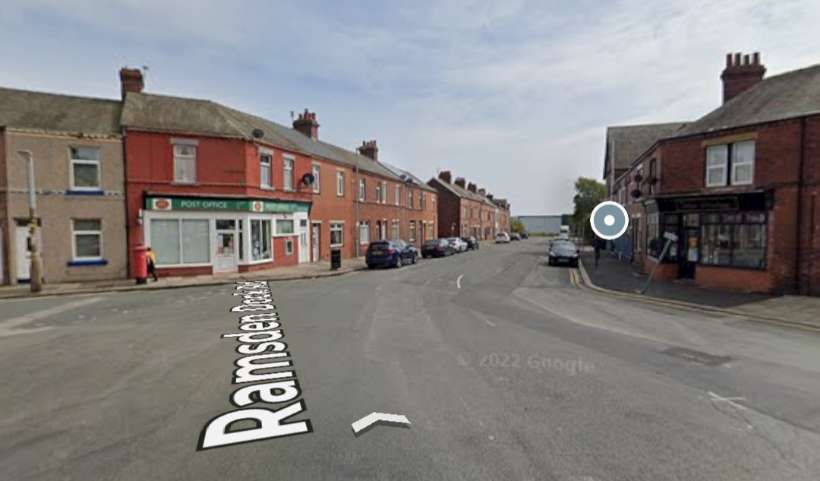
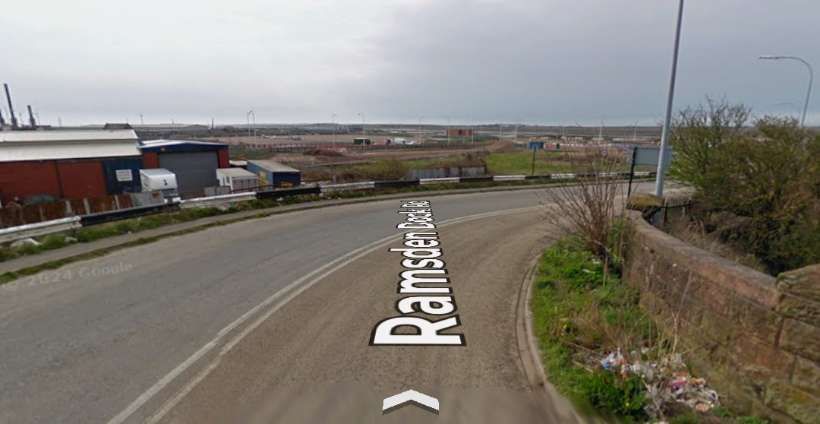
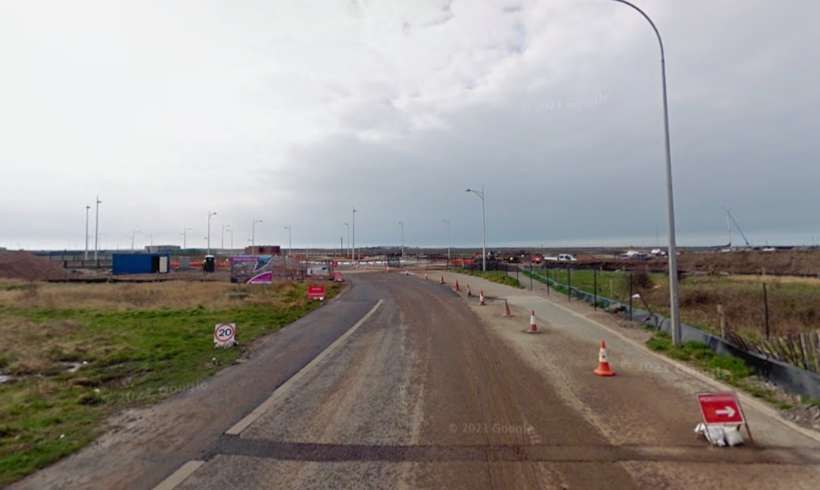
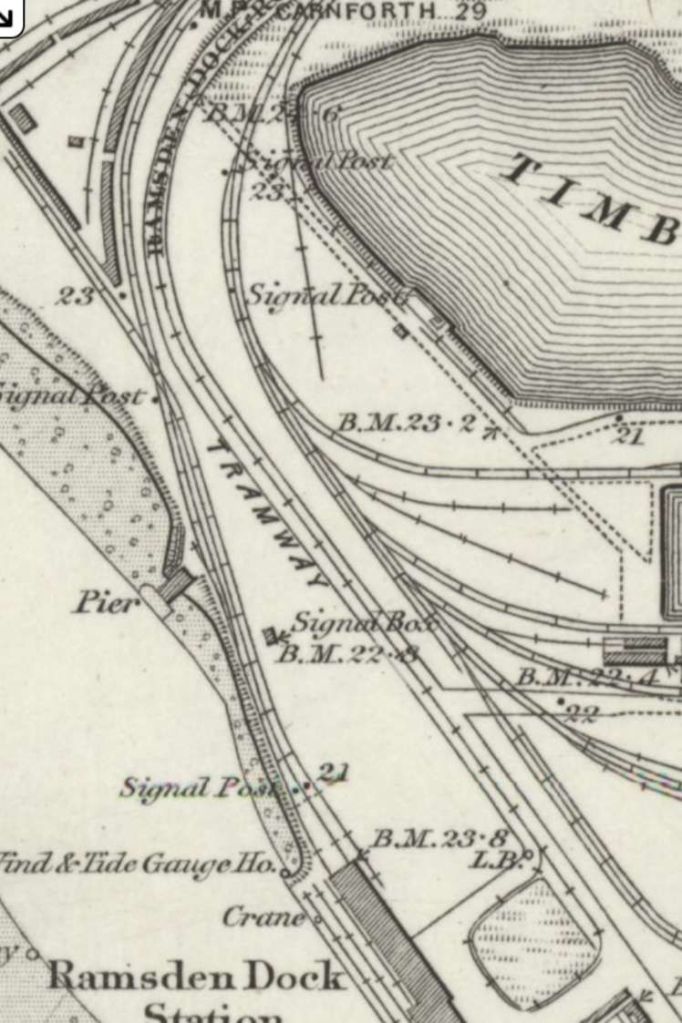
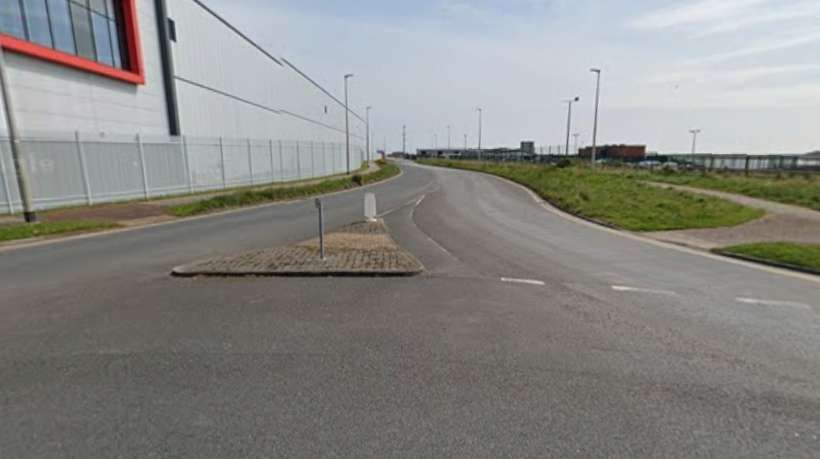
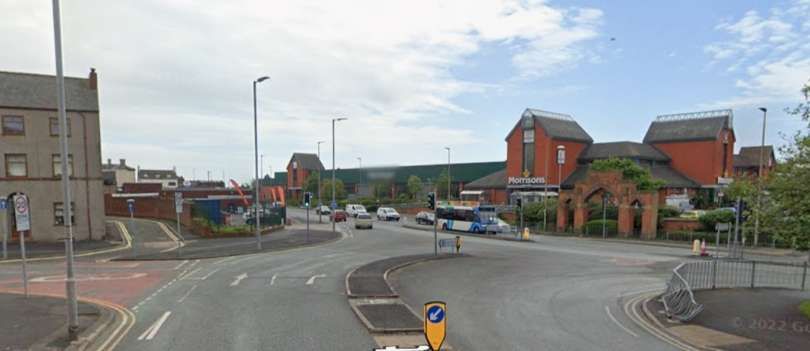
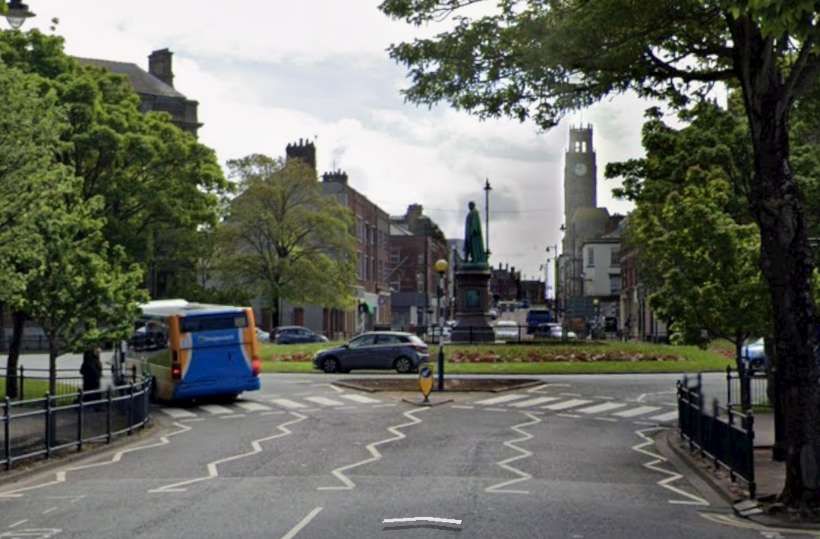
At the Priors Lee terminus, Top-right a tram engine had to run round its carriage. [5]The same length of Abbey Road in the 21st century, as shown above. [Google Maps, February 2026]Looking South on Abbey Road approximately at the location of the old tramway terminus. [Google Streetview, November 2024]Trams ran up and down Abbey Road. [5]The same length of Abbey Road in the 21st century, as shown above. [Google Maps, February 2026]A Methodist Chapel and Congregational Chapel sat to the West of the line. [5]A similar length of Abbey Road. [Google Maps, February 2026]Travelling South down Abbey Road. [Google Streetview, November 2024]The line crossed Abbey Road Bridge, with the Station a short distance away to the Northwest. [5]A similar length of Abbey Road in the 21st century. [Google Maps, February 2026]Looking Southwest along Abbey Road. Ahead is the bridge carrying the road over the railway. [Google Streetview, November 2024]At Ramsden Square the tramway turned Southeast along Duke Street. [5]Abbey Road, Ramsden Square, Duke Street and the very top of Michaelson’s Bridge Road. [Google Streetview, February 2026]The approach to Ramsden Square along Abbey Road. [Google Streetview, May 2022]Having turned left into Duke Street, trams continued in. Southeasterly direction. [Google Streetview, May 2022]A roundabout now sits at the top end of Michaelson Road. Trams would have been confined by the road layout of earlier time and swept round to the right on the near side of the modern roundabout. [Google Streetview, May 2022]It then turned Southwest along Michaelson Bridge Road [5]Michaelson Road Bridge carried the Tramway across the Devonshire & Buccleuch Docks. [Google Maps, February 2026]Looking South along the line of the old tramway across Michaelson Bridge. [Google Streetview, May 2022]Further South down Michaelson Road trams turned to the left into Ramsden Dock Road. [Google Streetview, May 2022]Trams ran along Ramsden Dock Road from its right-angle junction with Michaelson Road. [5]Approximately the same area in 21st century. [Google Maps, February 2026]Trams followed Ramsden Dock Road sweeping round to the South. [Google Streetview, May 2022]A relatively sharp curve to the right followed Ramsden Dock Road after the road had bridged the dock railways. [Google Streetview, May 2022]Ramsden Dock Road has now been closed to traffic. This photograph in 2009 appears to have been taken as the work to close the road was underway. [Google Streetview, April 2009]The steam tram served Ramsden Dock Station at its Southern terminal, where a loop was provided to obviate the need for the steam tram to run past its carriage. [5]The same length of the route of the old tramway as is shown on the above map extract. [Google Maps, February 2026]This final photograph faces South along the line of the old tramway towards the location of Ramsden Dock Station. [Google Streetview, May 2022]
2. A Line to Roose Station
A line left the route to Ramsden Dock Station at the North end of Michaelson Road, continuing Southeast on Duke Street and then along Strand to Cambridge Hall Mechanics Institute where it turned Northeast.
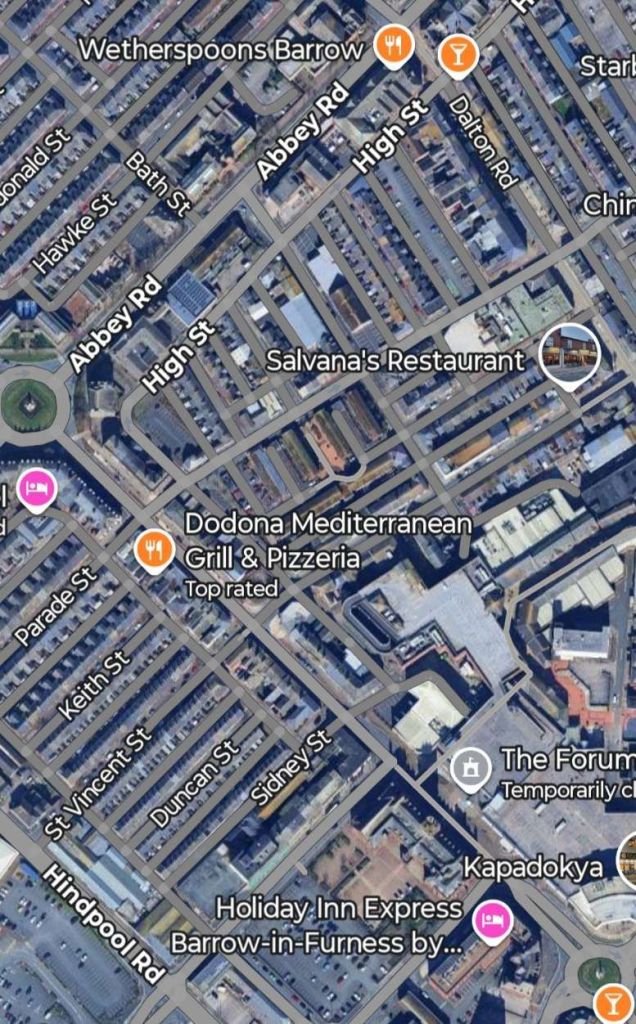
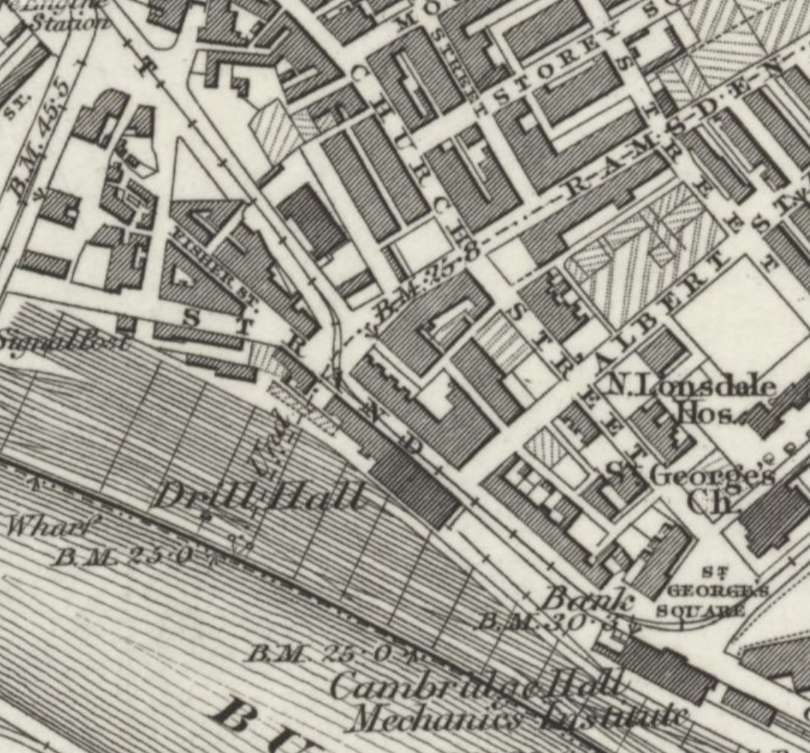
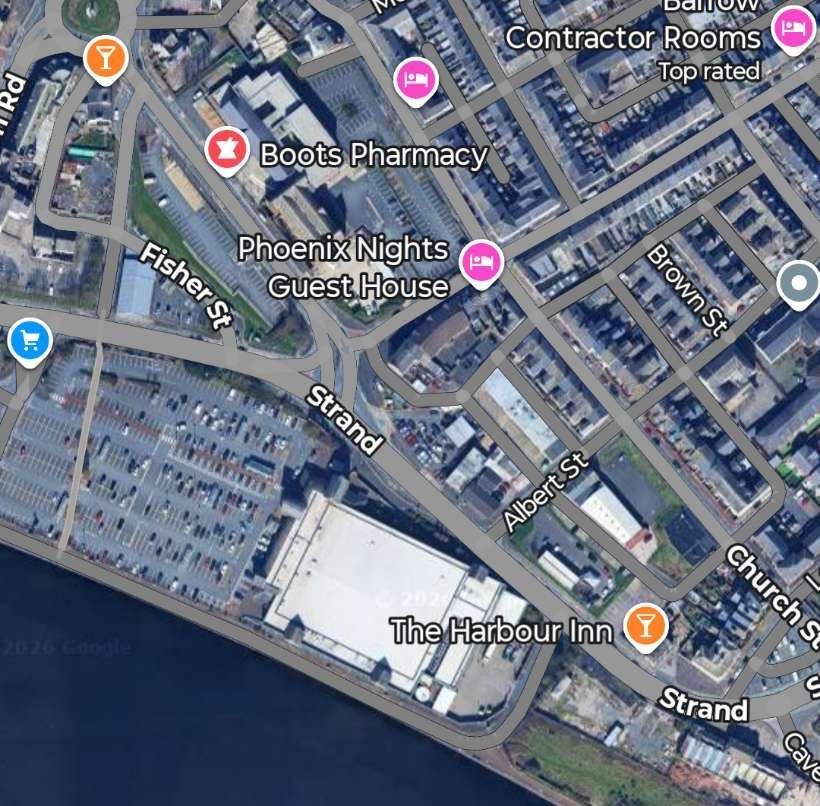
This tramway route ran along Duke Street and Strand to Cambridge Hall Mechanics Institute and the old Strand Station where it turned Northeast at St. George Square. [5]The roads mentioned above still remain – Duke Street, Strand. St. George’s Square still exists but Salthouse Road now runs through it to meet Strand. [Google Maps, February 2026]Duke Street immediately beyond the roundabout. [Google Streetview, May 2022]Duke Street meets Strand, the tramway ran round to the left, almost straight on. [Google Streetview, May 2022]Further along Strand with the old railway station in the distance. [Google Streetview, May 2022]Trams turned from Strand onto Salthouse Road. [Google Streetview, May 2022]
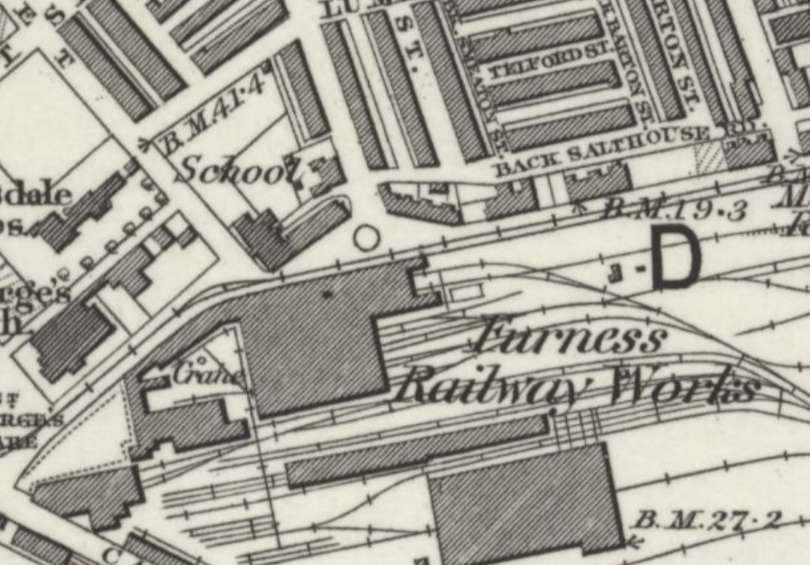
The tramway then ran along Salthouse Road on the North side of the Furness Railway Works.
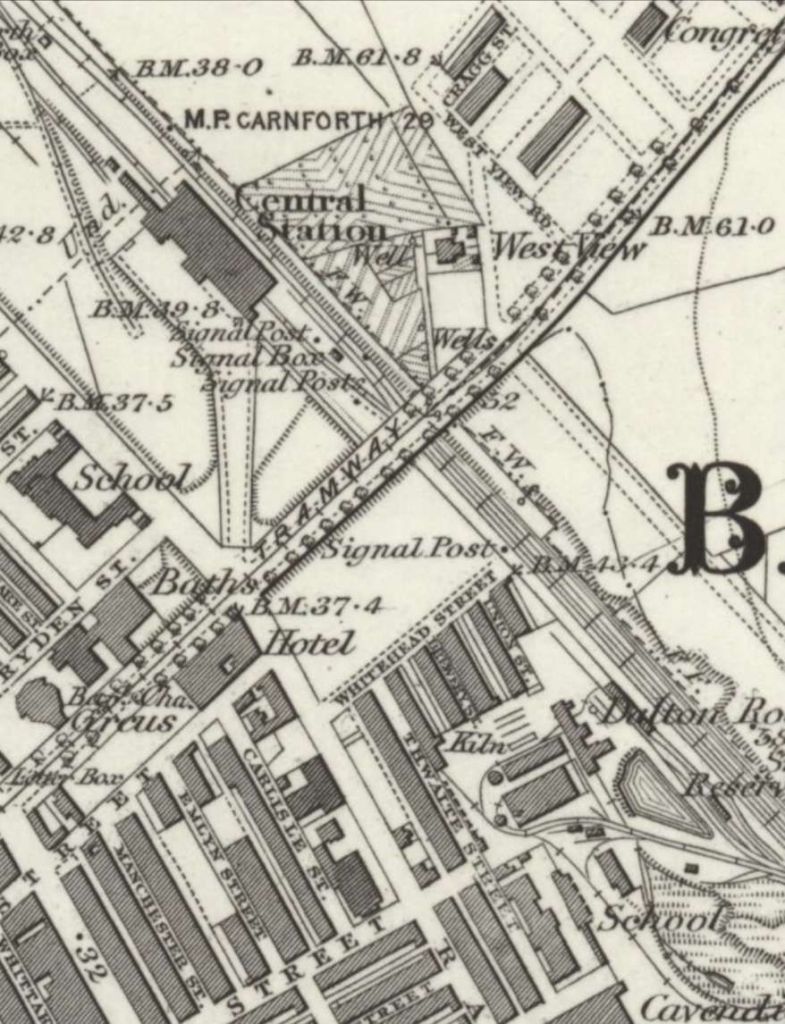
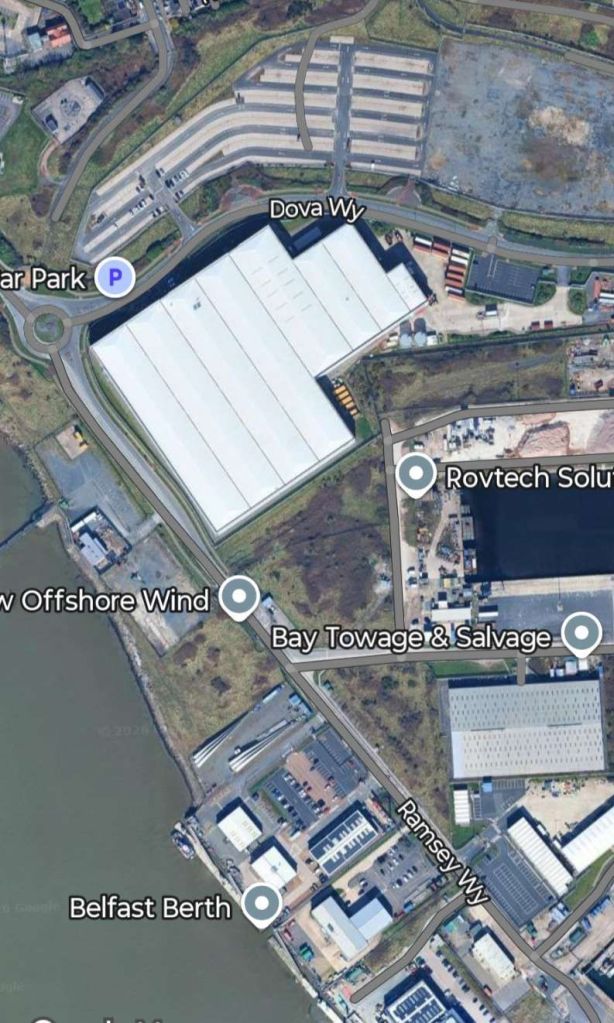
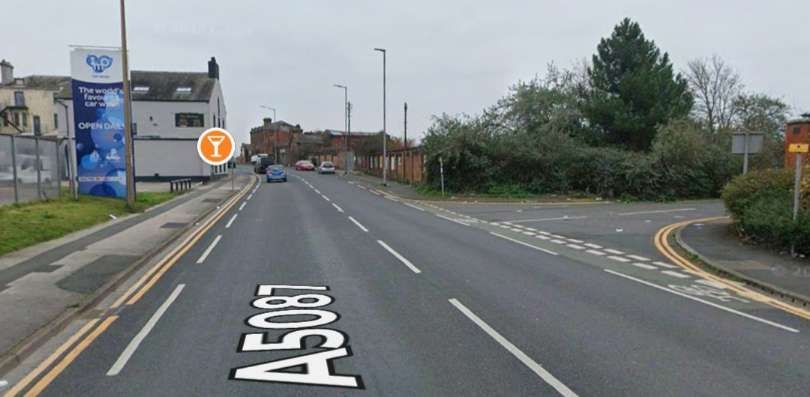
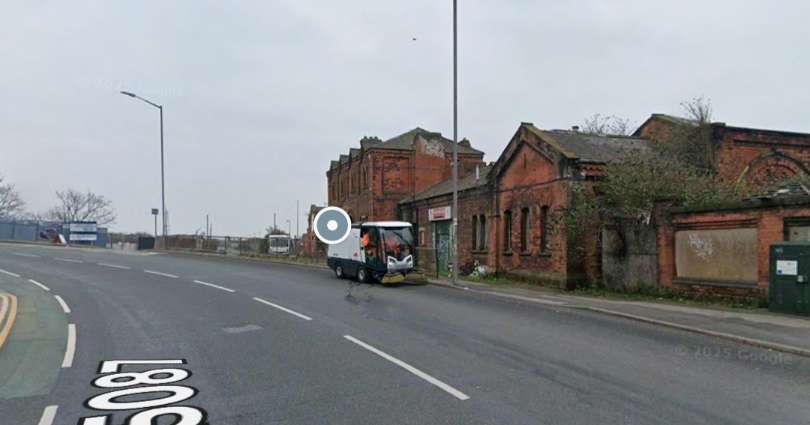
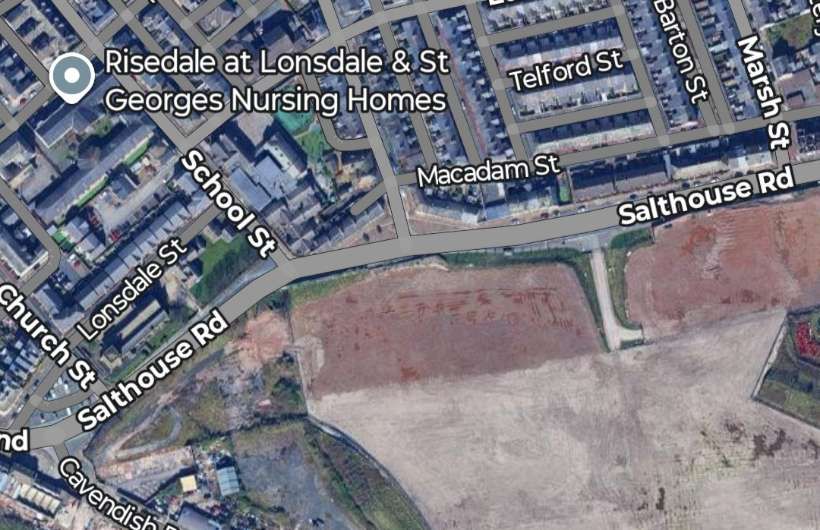
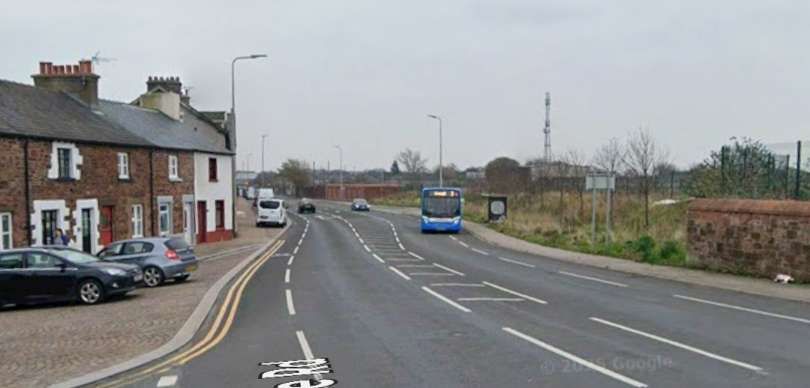
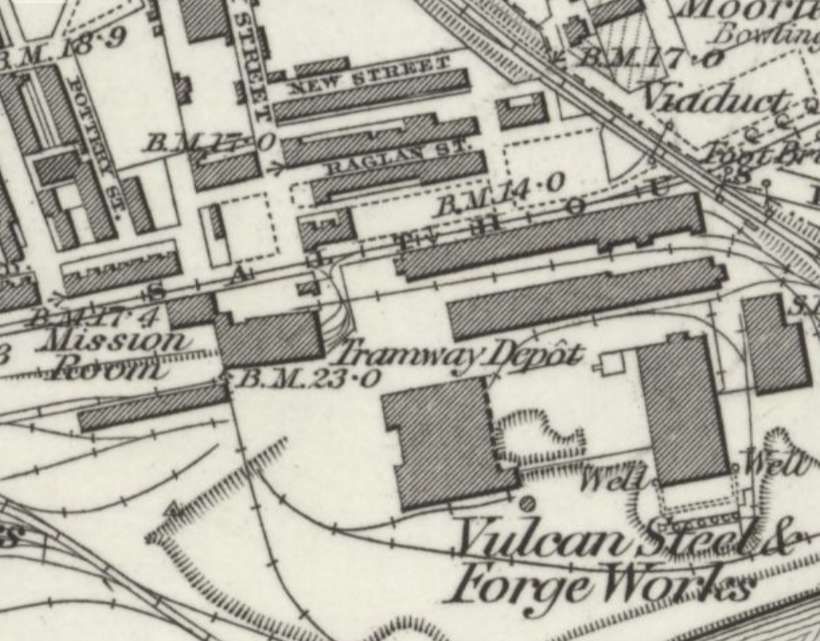
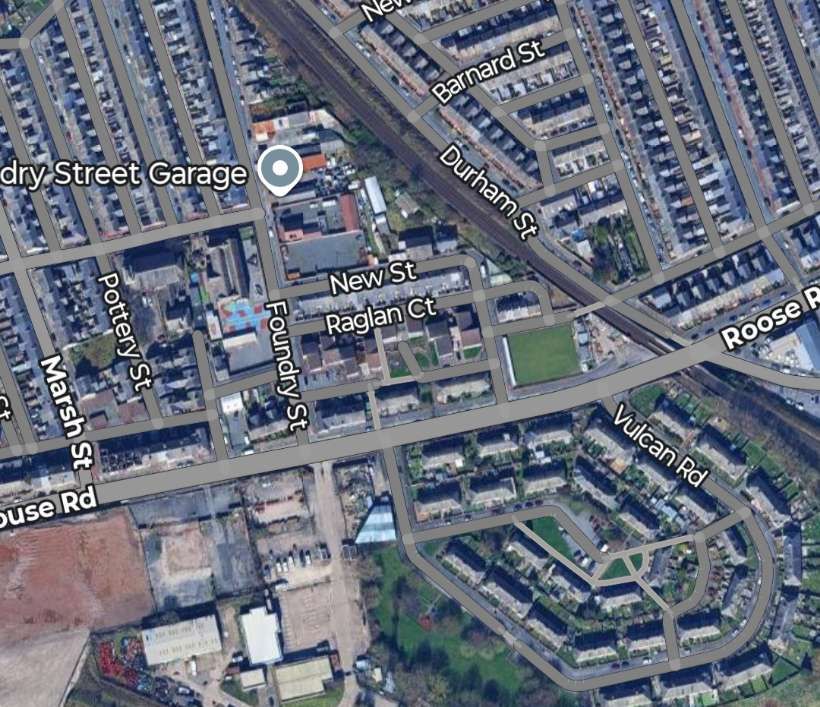
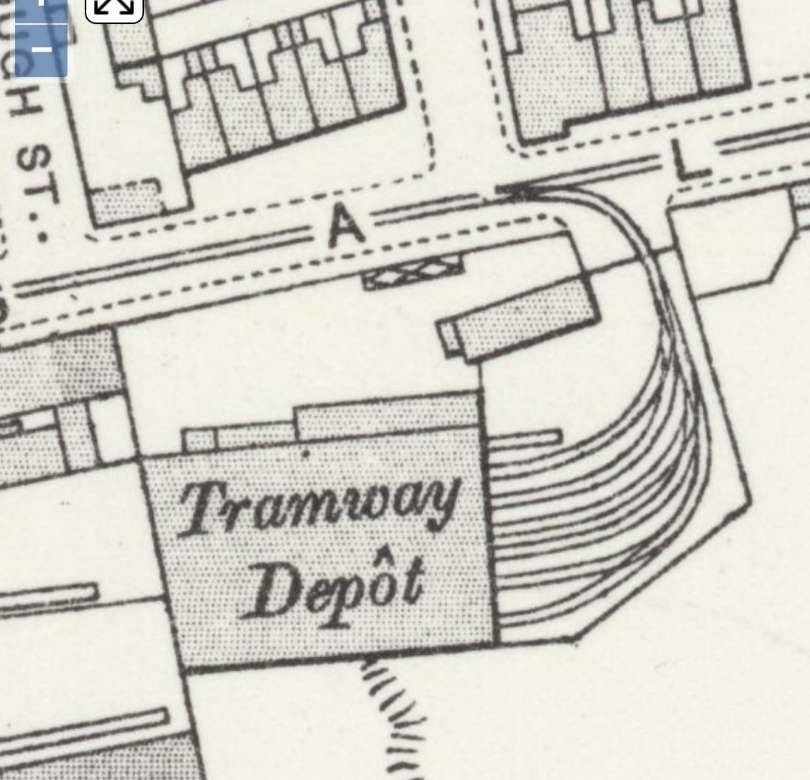
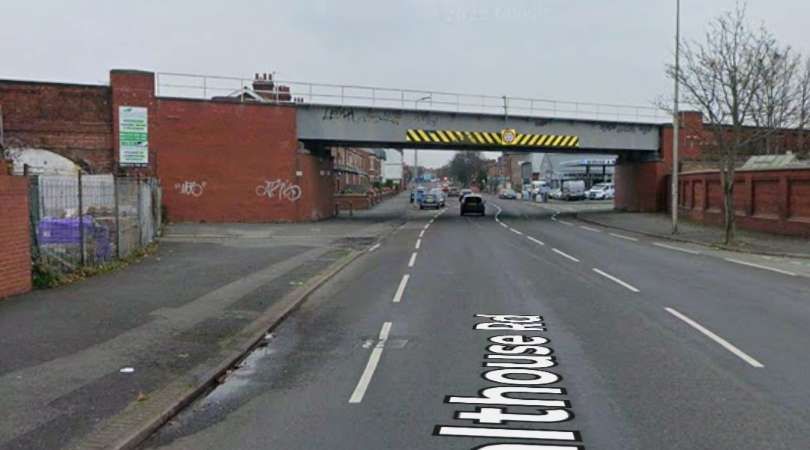
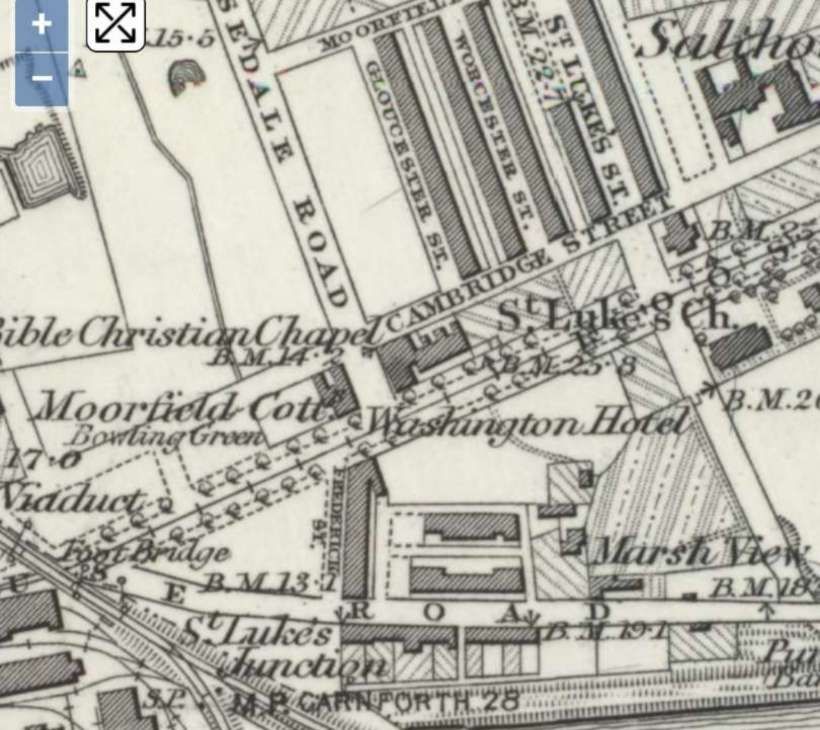
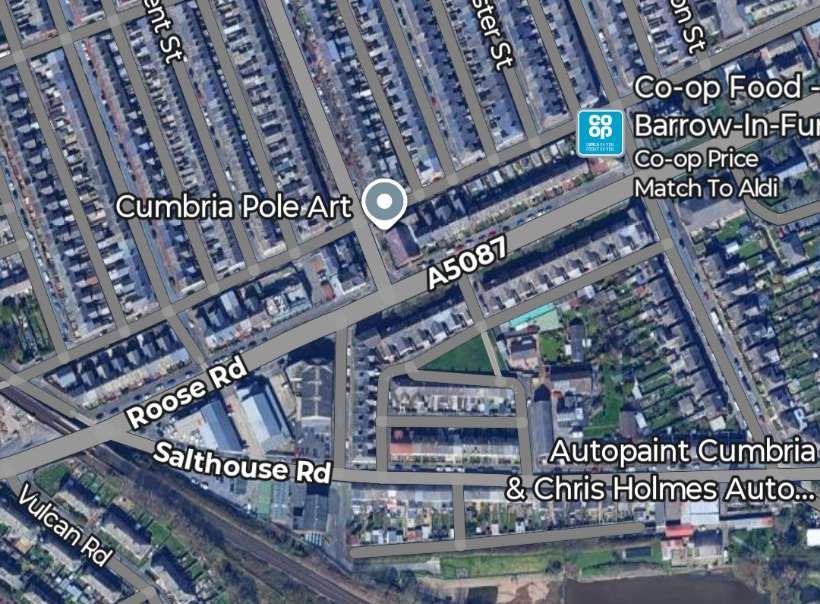
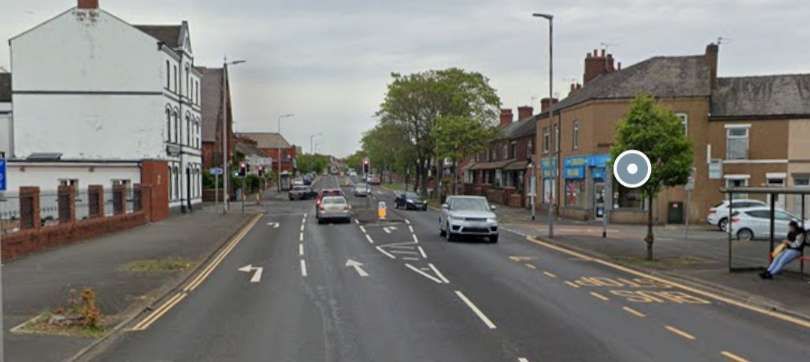
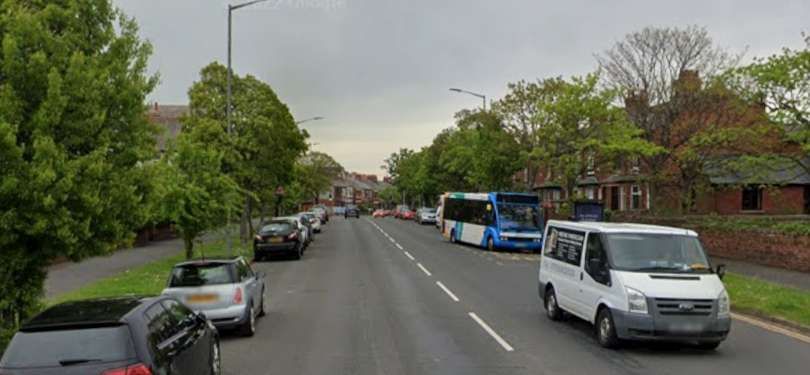
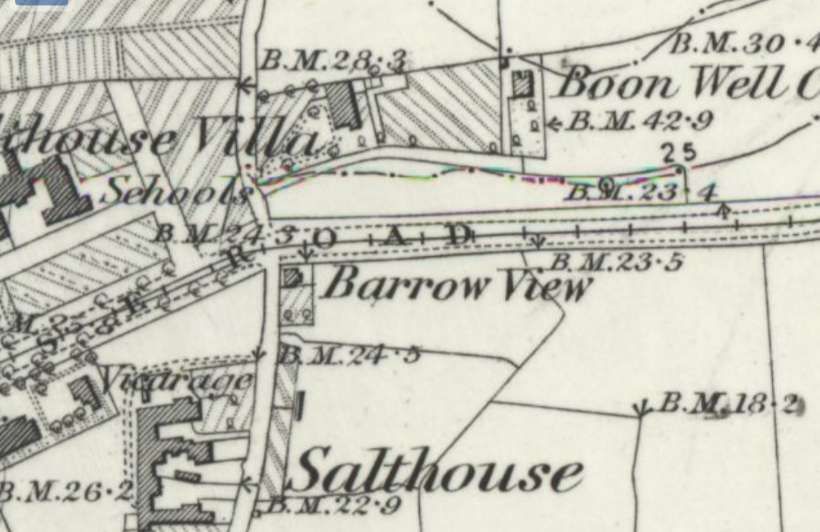
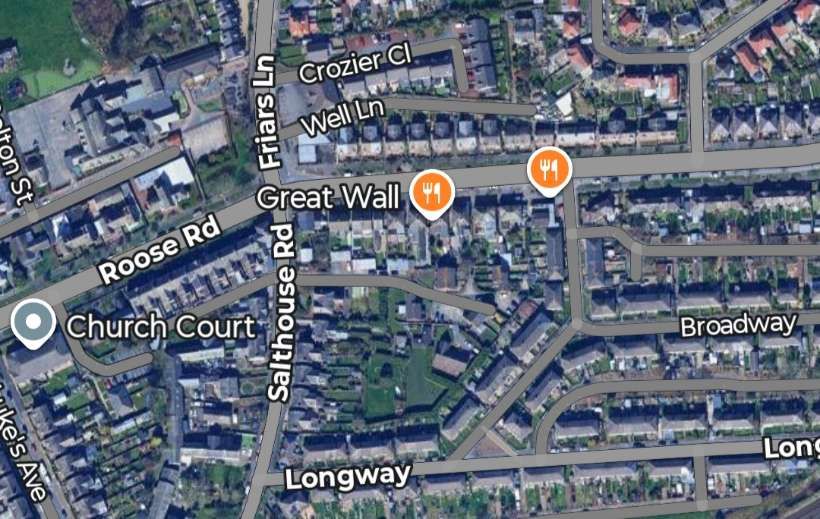
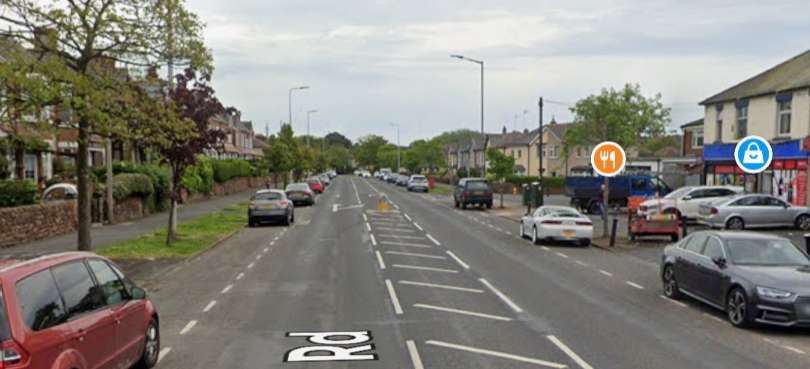
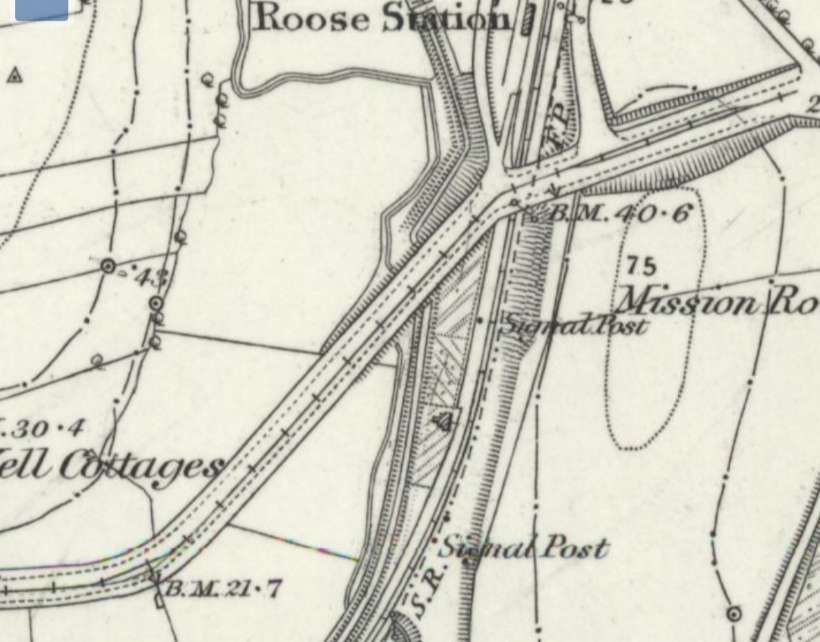
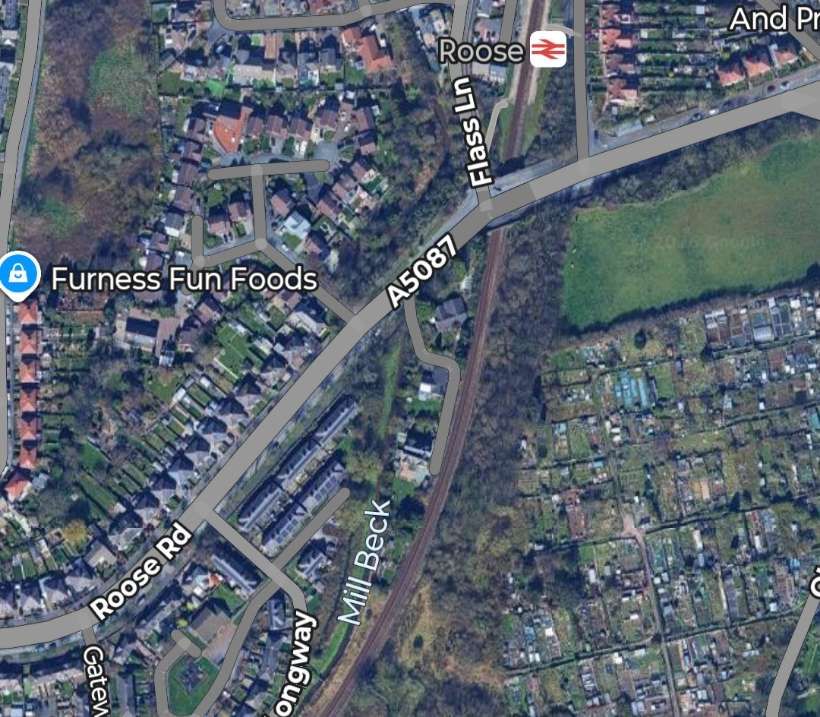
From St. George’s Square the line ran along Salthouse Road on the North side of the Railway Works. [5]The area of Furness Railway Works appears to be underdevelopment in this image. Salthouse Road runs across the top of the site. [Google Maps, February 2026]Salthouse Road with the old Furness Railway Works on the right. The rod curves round to the right. [Google Streetview, May 2022]Further East on Salthouse Road. [Google Streetview, May 2022]Close to the Vulcan Foundry was a tramway depot on the South side of Salthouse Road. The tramway then passed under the viaduct carrying the line Northwest from St. Luke’s Junction to Barrow Central Station. [5]The same area in the 21st century. A housing estate sits on the site of the Vulcan Steel & Forge Works. [Google Maps, February 2026]The tramway depot on the South side of Salthouse Road, as it appears on the 1910 25″ Ordnance Survey. [8]The Viaduct carrying the railway from what was St. Luke’s Junction, Northwest towards Barrow Central Station. Google Streetview, May 2022]St. Luke’s Junction is bottom left of this next map extract, St Luke’s Church is at the right side of the image. The tramway continues Northeast up Roose Road. [5]The same location in the 21st century. [Google Maps, February 2026]Further East, the old tramway ran ahead along Roose Road. [Google Streetview, May 2022]Further East the tramway continued along Roose Road. [Google Streetview, May 2022]The tramway continued East on Roose Road. [5]The same area in the 21st century. [Google Maps, February 2026]Continuing along Roose Road. [Google Streetview, May 2022]Approaching Roose Station and the terminus of the tramway, the road and tramway turned Northeast before bridging athe railway at the South end of Roose Railway Station. A loop was provided to allow a steam tram to run round its carriage. [5]The final length of the tramway was on Roose Road. The terminus was to the East of the railway line and Roose Station. [Google Maps, February 2026]Roose Road bends round towards the Northeast. [Google Streetview, May 2022]Approaching the location of Roose Station, the road curves back towards the East a crosses a railway bridge. Google Streetview, May 2022]The location of the tramway terminus, the photograph is taken facing away from Barrow in an East-northeast direction. Google Streetview, May 2026]
3. A Short Line Serving the Steelworks
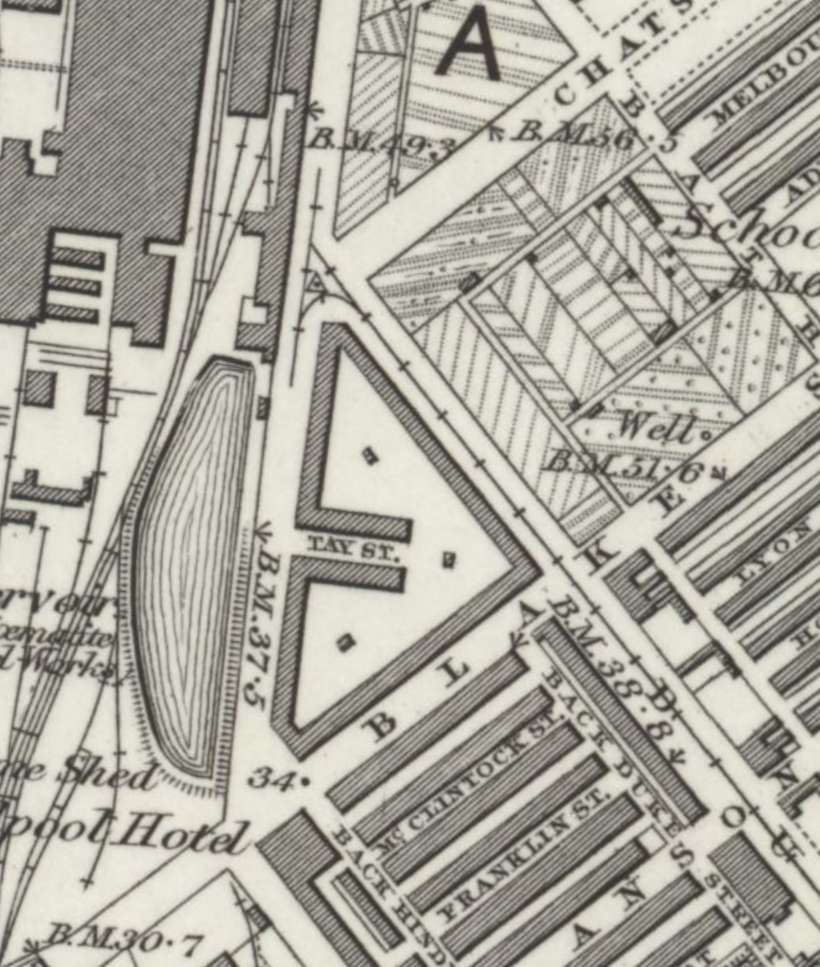
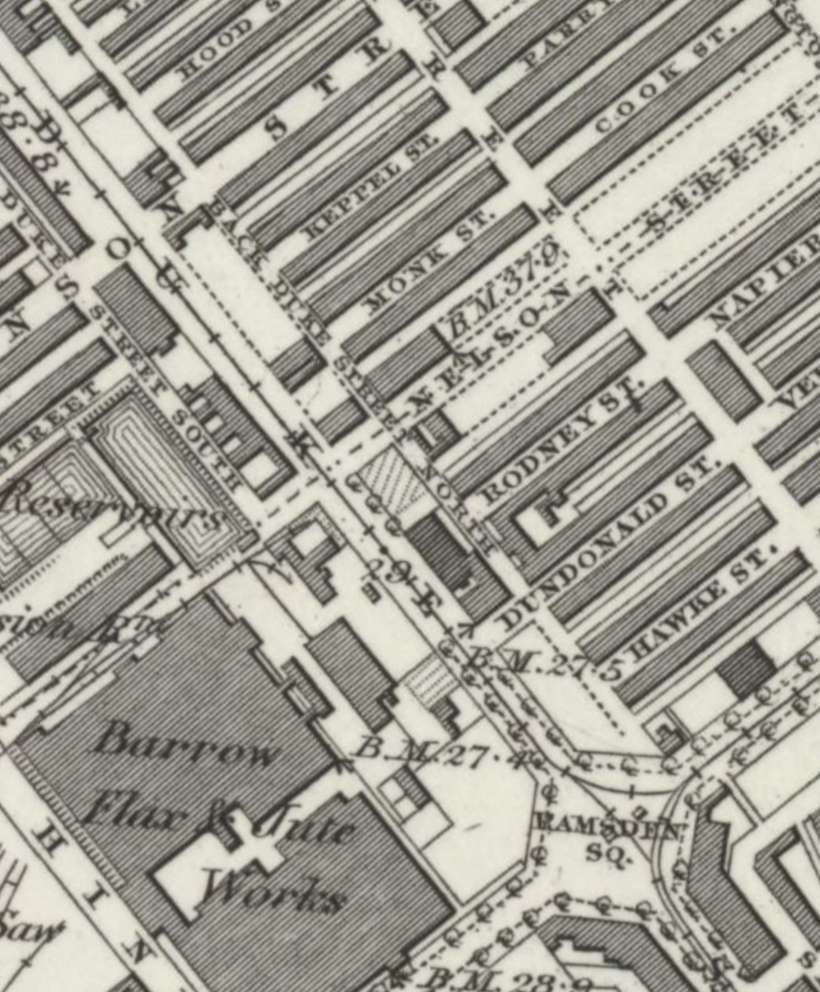
Just two map extracts are all that is needed to cover the length of this short line which ran along Duke Street between the Steelworks and Ramsden Square.
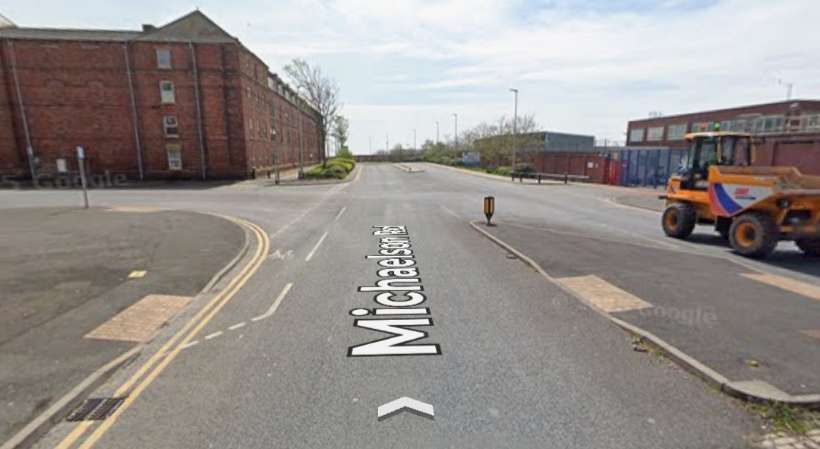
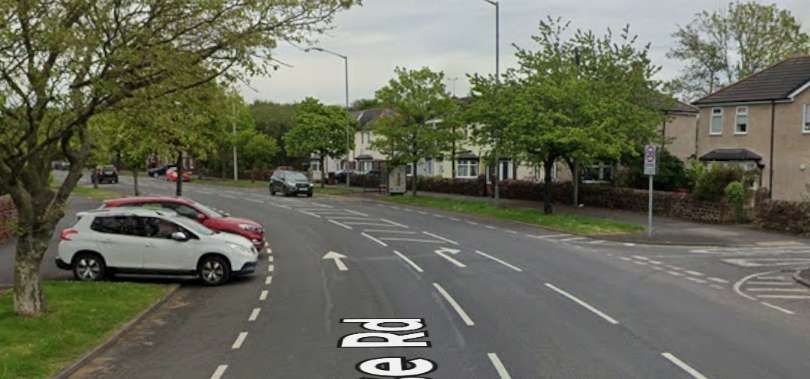
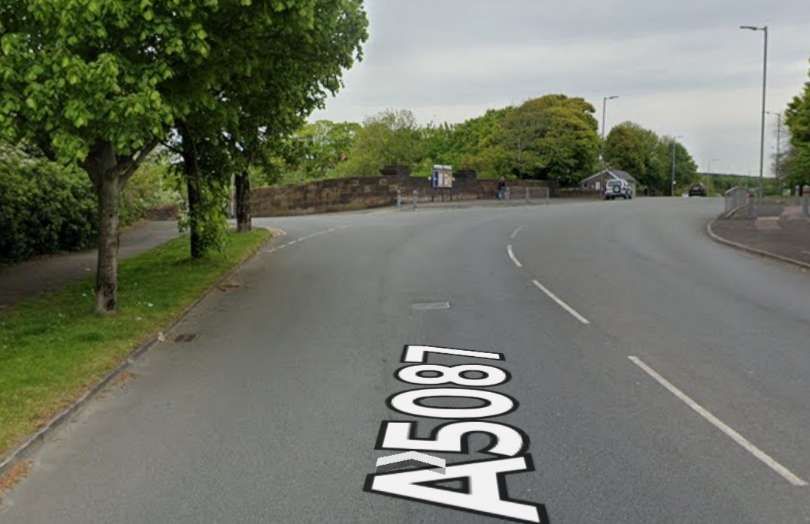
A triangular junction was formed at the Northwest end of Duke Street. A short length of tramway with its mid-point at the junction with Duke Street, ran North-South on Walney Road outside the Steelworks. From there the line ran Southeast along Duke Street. [5]The line continued Southeast on Duke Street and met the wider tramway network at Ramsden Square. [5]
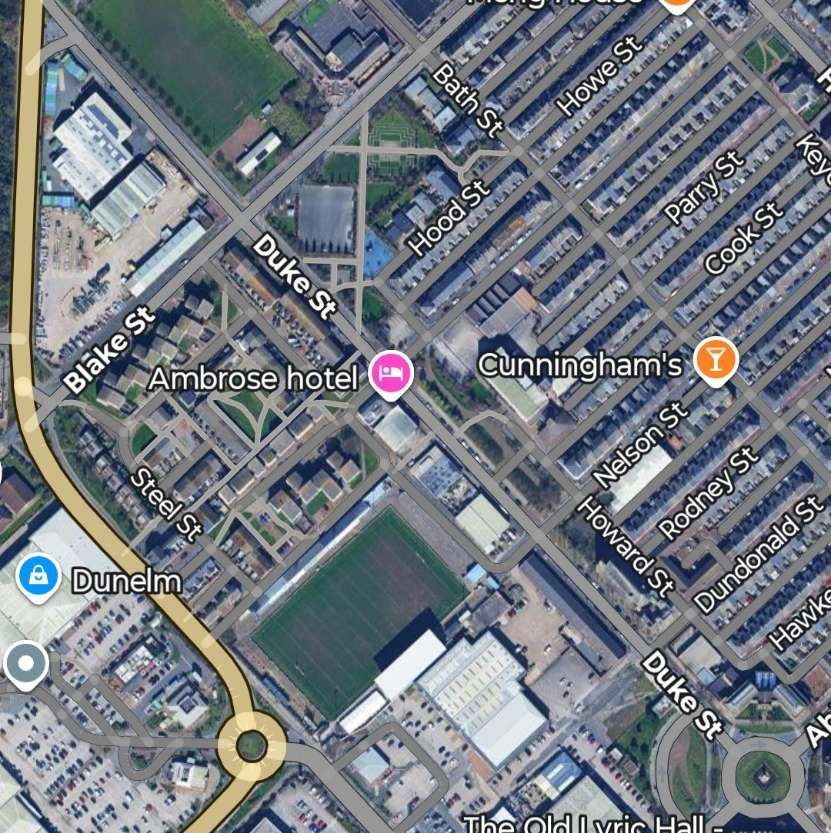
The full length of the line is shown on modern mapping below. ….
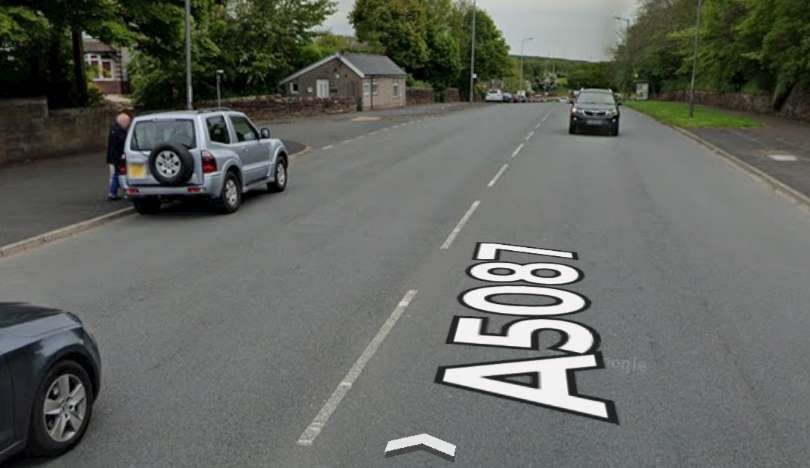
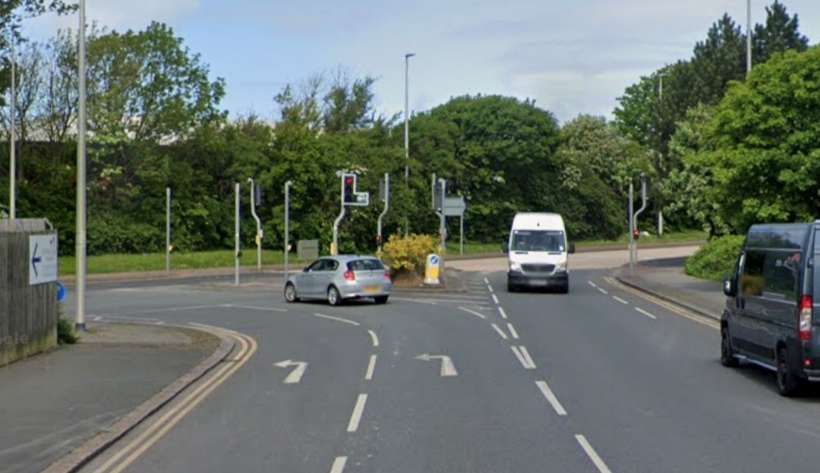
The old tramway ran from Walney Road to Ramsden Square along Duke Street. [Google Maps, February 2026]The View Northwest along Duke Street towards the junction at Walney Road. In times past this view would have been dominated by the Steelworks and no doubt shrouded in a pall of smoke. Google Streetview, May 2022]A view along Duke Street, facing Southeast towards Ramsden Square. [Google Streetview, May 2022]Looking Southeast along Duke Street close to Ramsden Square. [Google Streetview, May 2022]
Changes Immediately After Electrification
The short line along Duke Street serving the Steelworks does not feature on the 1910/1911 25″Ordnance Survey published in 1911/1913.
A new tramway line left Michaelson Road at its junction with Bridge Road. The surface of Bridge Road was littered with a whole series of different lines. The tramway sat on the North side of the road and ran on Northwest into Ferry Road, terminating opposite the Walney Bridge Approach Road.
Summary
Steam powered trams in Barrow-in-Furness, like elsewhere we’re a relatively short-lived phenomenon which last only until electrical technology had advanced sufficiently to be used on street networks.
“Kitsons entered the steam tramway locomotive field in 1876 building some combined steam cars to W.R. Rowan’s design. In 1878 they built three to their own design with vertical boilers, four coupled wheels and inclined outside cylinders. Motion was by means of a modified version of Walschaerts valve gear. All was enclosed in bodywork and the wheels and motions were surrounded by protective plates. The condensing system was placed on the roof and consisted of a series of copper tubes through which the exhaust steam passed, the surrounding air cooling the steam and the condensate returning to the feed water tank. After many trials it was decided to replace the vertical boiler by a horizontal type and this was standardised for future steam trains. Various types of condensers were tried and the final type was a series of arched transverse tubes which were a great improvement.
In Kitson’s patent valve-gear, a modification of Walschaert’s valve gear, the ends of a floating lever are linked to the crosshead, the valve-spindle, and intermediately at a point near the valve-spindle; the lever is pinned to the radius-link, which receives its rocking movement through an arm linked to the coupling rod. The motion of the valve and its spindle is a compound of two movements: one, a movement directly the inverse of that of the piston, on a reduced scale, for the lead; the other a reduced duplicate of the vertical movement of the coupling rod, to open the port for steam” (D. K. Clark Tramways, their construction and working, 2nd Ed., 1894).
More than 300 units were built and besides supplying many to the tramway systems of the British Isles, others were sent to New Zealand. Australia and the continent. The last one built was in 1901 for the Portstewart Tramway (Works No. T302). Work numbers for tram locomotives were kept separate and bore a prefix T.”, via, https://steamindex.com/manlocos/kitsons.htm, accessed on 16th February 2026.
A holiday in West Wales in the early Autumn of 2022 led to a little research on the railways in the area.
This is the fourth article about Pembrokeshire’s Railways. The first focussed on the pre-railway age, the second focussed on the mainline railways of the county. The third article focussed on the industrial railways in the vicinity of Milford Haven. The links to these three posts are provided below. This article looks specifically at the Saundersfoot Railway in Pembrokeshire.
The Saundersfoot Railway (covered in this article and a follow-up article).
The Milford Haven Docks Railways (covered in a previous article).
The Milford & St. Bride’s Bay Light Railway and proposals for expansion of the Docks at Milford Haven (covered in a previous article).
The Royal Navy Armaments Depot at Newton Noyes (RNMD Milford Haven) (covered in a previous article).
The Royal Navy Armaments Depot at Trecwn (RNAD Trecwn) (covered in a future article).
Milford Haven Oil Refineries (covered in a previous article).
The Freystrop Colliery Railway (covered in a previous article).
The Hook Colliery Railway (covered in a previous article).
The Saundersfoot Railway
“Saundersfoot began life as a few medieval cottages in a forest clearing in Coedrath, a hunting ground of the Norman Earls of Pembroke. Five hundred years later it had grown into thriving coal port with its abundance of anthracite coal, and exported 30,000 tons annually from its harbour.” 150 years on when the coal industry vanished Saundersfoot evolved into a seaside resort. [132]
“‘Saundersfoote’ was first referred to by the Elizabethan Historian George Owen when describing the coal measures of Pembrokeshire, however on county maps from the 16th century it was referred to the village as St. Issells, the name of the parish. A water course paid rent for by Walter Elisaunder in 1332, Elisaunder’s Ford may originally have given the hamlet its name, being shortened to Saundersford.” [132]
Wikipedia tells us that the Saundersfoot Railway was an industrial narrow-gauge railway in Pembrokeshire, Wales, built between 1830–1834, to connect Saundersfoot harbour to the local coal mines. Trading began on 1st March 1834 and within a few years it comprised a small network of over 4 miles (6.4 km) along the coast from Saundersfoot to Wisemans Bridge and on to the collieries at Stepaside and Kilgetty, and later, running inland to Thomas Chapel near Begelly. [1: p131][49]
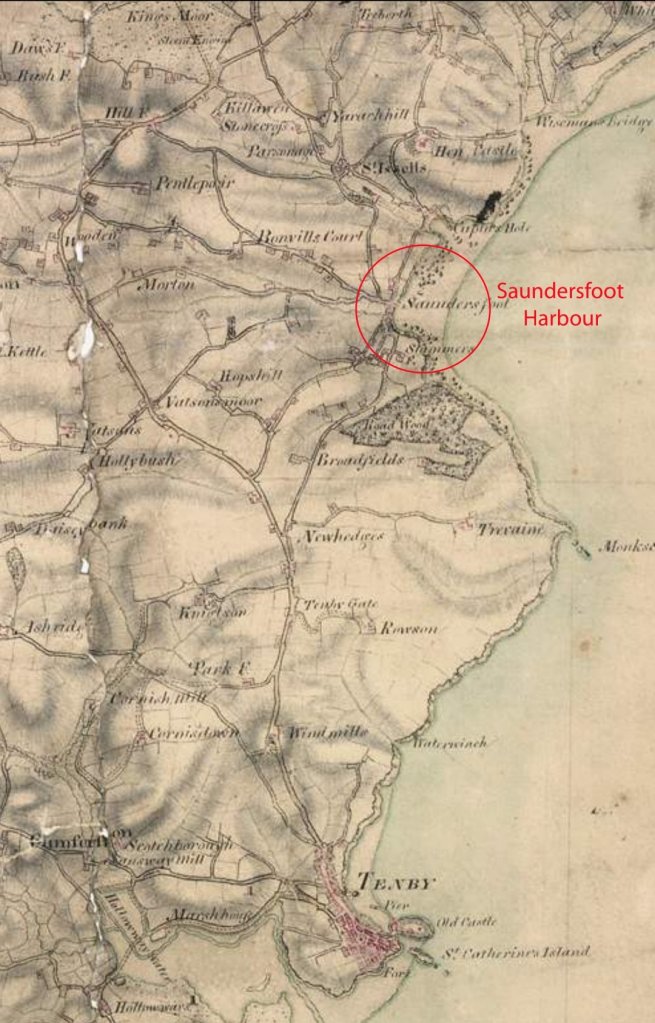
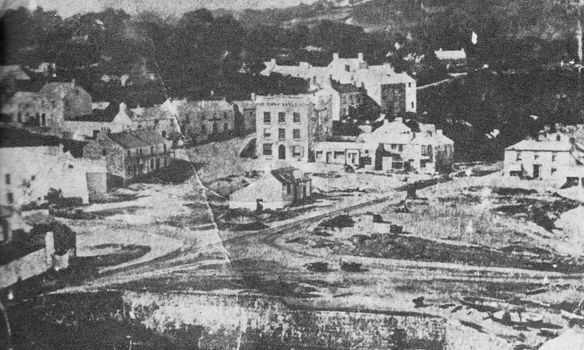
The Saundersfoot Railway provides the first example in Pembrokeshire of the joint construction of a harbour and tramway, and remained independent until it closed in 1939.[1: p128][49] The first image below comes from the very early 19th century and shows Saundersfoot before the construction of the harbour and railway. …
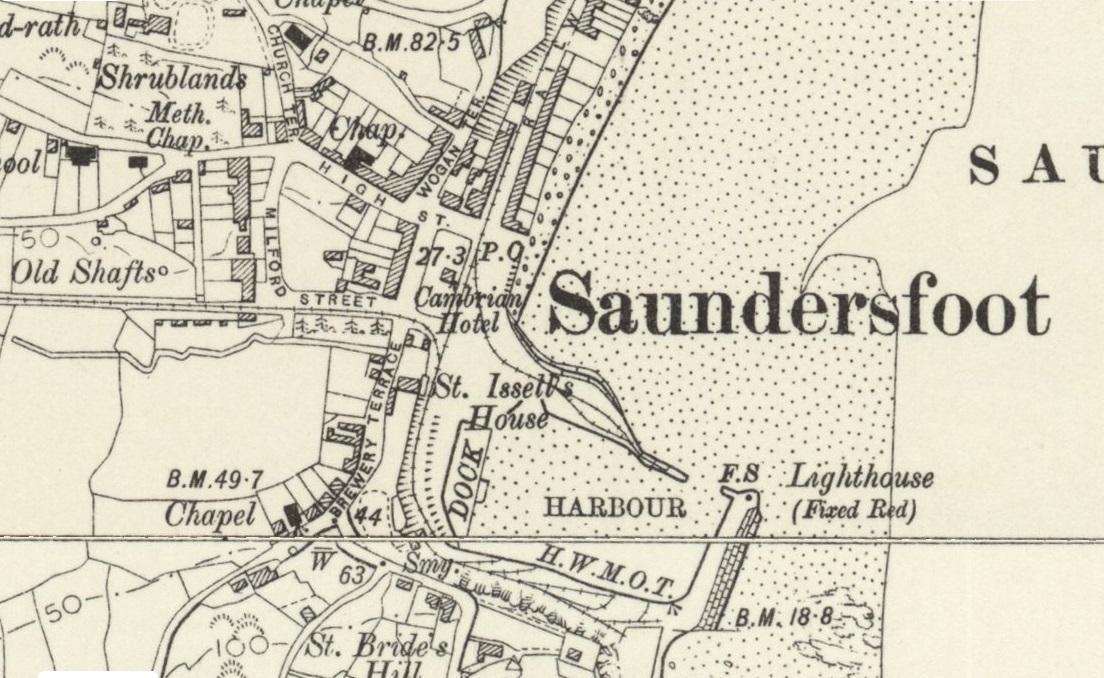
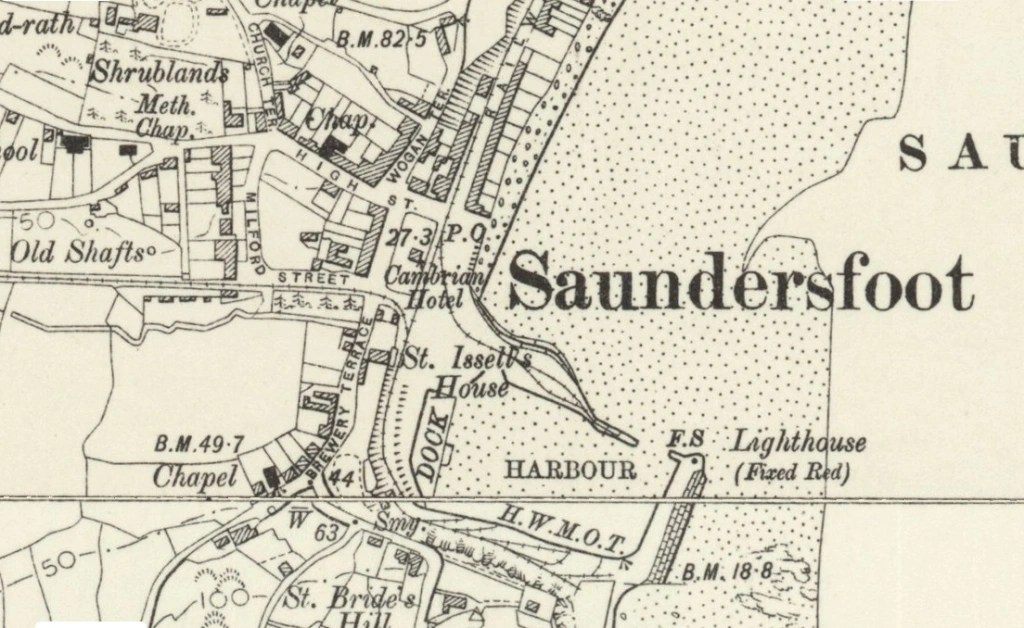
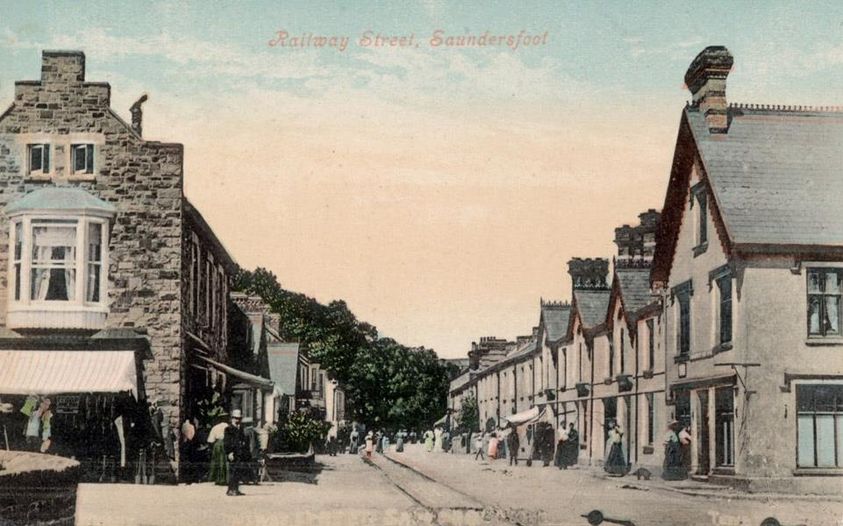
The 1809/1811 Ordnance Survey shows Tenby (at the bottom of this extract) and Saundersfoot village before the construction of the harbour and railway [130]This enlarged extract from the 1906 6″ Ordnance Survey which was published in 1908 focusses on the harbour at Saundersfoot and shows the two main tramroad lines. One heads immediately West along Milford Street and off the map extract centre-left. The other heads along what was then called Railway Street and leave the map extract centre-top. [131]
I guess that it is appropriate to ask whether it is a tramway/tramroad or a railway. I have chosen to treat it as a ‘railway’ because of its longevity, it’s own claim to be a ‘railway’ and because, ultimately it’s tracks were re-laid with flat bottom edge-rails on wooden sleepers which made it as much of a railway as any other line. Indeed Connop-Price says that “the Saundersfoot Railway and Harbour Company was an important undertaking in the context of Pembrokeshire. As it developed it metamorphosed from early tramroad to true railway (my emphasis), and by so doing was, in transport terms, a pivotal enterprise.Futhermore it was the earliest example in Pembrokeshire of an idea pioneered in South Wales – the planning of a railway and harbour as a single combined undertaking.” [1: p128]
High quality anthracite was found in the Saundersfoot area which was part of what became known as the Pembrokeshire Coalfield. The likely quantities involved were large and it quickly became essential to create a tramroad to move the extracted coal to the coast for onward shipping. “The Saundersfoot Railway and Harbour Company was formed in 1828 to build a harbour at Saundersfoot and a tramway to connect it to the collieries around Begelly and Stepaside. In 1829, Parliamentary authorisation was given for the Saundersfoot Railway and Harbour Company. This was to be a four-feet gauge horse operated tramroad, connecting collieries with a new harbour at Saundersfoot.” [49]
This map of the Saundersfoot Railway was shared on the Tenby and Saundersfoot Through Time Facebook Group by Mark Davies on 26th November 2015. [148]
The Act authorised a length of tramroad from the new harbour to pits in the hamlet of Thomas Chapel, Northwest of Begelly – close to 5 miles inland. “Two branches were also approved – the first from Ridgeway near Saundersfoot due West to Morton, … a distance of about a mile, and the second running North along the coast from the harbour to Wiseman’s bridge.” [1: p128 &131]
It is interesting to note that prior to the coming of the tramroad through Wiseman’s Bridge to Stepaside and Kilgetty a canal, the Kilgetty Canal, was built about 1792 to link collieries in Kilgetty/Stepaside to Wiseman’s Bridge, where high quality anthracite was carted onto beached schooners for dispatch to UK and European customers. The canal was only 10’-12’ wide and without locks, only tub boats would have operated along it. Being poorly designed, the canal was not successful and a horse-drawn tramway to Wiseman’s Bridge replaced it. Little remains of the canal today, except for the canal basin and the sluice at Wiseman’s Bridge, which controlled the level of water in the canal. [144]
Coflein tells us that “the harbour was built in 1829-30 … for the exportation of anthracite. By 1837, the harbour had five jetties handling coal, iron ore, pig iron and firebricks from local companies and mines. In 1884, Sailing Directions noted that the southern pier … ‘has a spur for checking the in-run of the sea, the entrance faces east, and is 35 yards wide; off which is a warping buoy. The bottom on the west side of the harbour is hard, but the rest consists of mud and sand, with a shelving beach in the northeast corner. At the south pier end, a yellow ball is hoisted while there is a depth of 8 feet water within the entrance; at night a red light is shown during the same time, which is elevated 15 feet above the highwater. Vessels of 16 feet draught can enter the harbour on spring tides, and those of 9 feet on neaps; two qualified pilots attend every tide, and whose charge is by agreement. In entering, it is necesssary to luff short round the south pier head and check the vessel’s way in time?’ Those Directions also note: ‘Tramroads connect the western side of the harbour with the collieries, which are situated about 3 miles within.’ [133]
Coflein comments: “The Saundersfoot railway was built to link Bonville Court mine and others to the Stepaside Ironworks (NPRN 43501, 43052).” [133] It seems, however, that Boneville Court Colliery and the Ironworks were built a little later than some of the other collieries opened, [134] so it seems fairer to say that a component of traffic on the line was generated by the existence of the Stepaside Ironworks until its closure in the mid- to late-1870s.
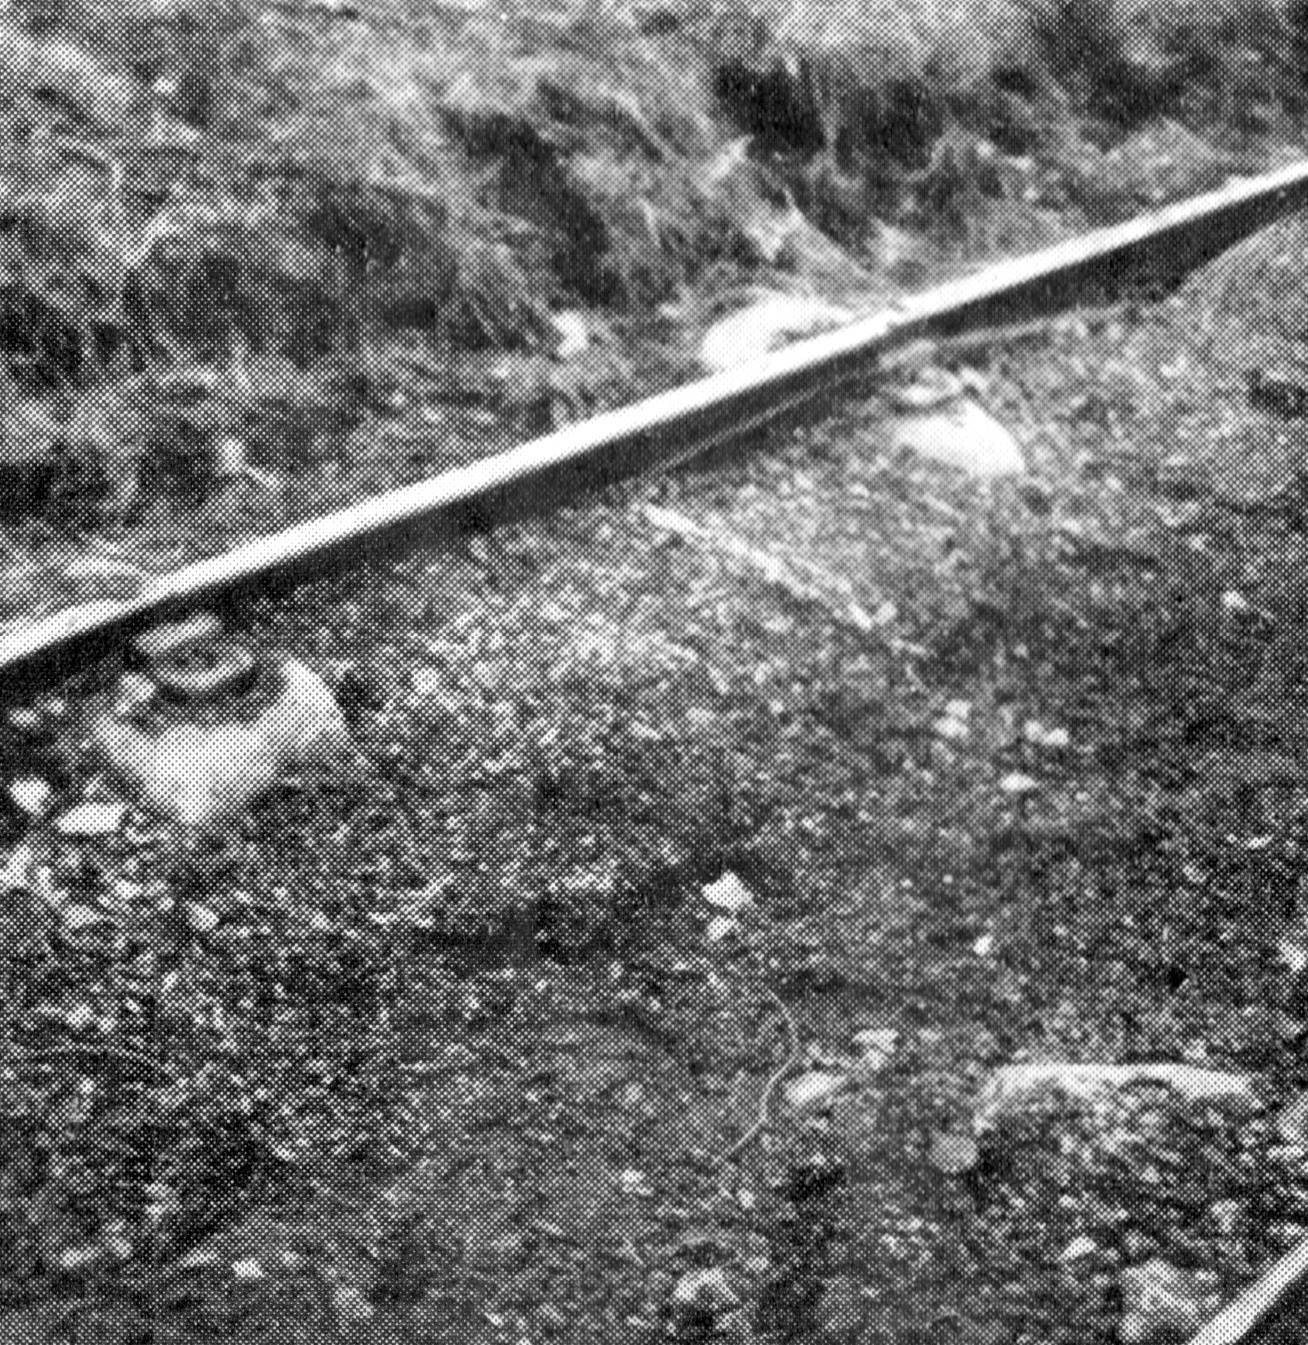
In its original form the Saundersfoot Railway was an edge-railway but it was like a tramroad in that the Company provided a transport facility for which it charged tolls to users of the line. Connop-Price says that “such a line was an entirely logical development from the era of canals and turnpike trusts, but it was only adequate when traffic was not continuous, and haulage was by horse or oxen.” [1: p131] As we have already noted, the original cast Iron rails supported on stone-blocks had to be replaced and the line developed into a railway, albeit of 4ft gauge (perhaps 0.75in wider?), rather than standard-gauge and, as we will see, a very reduced headroom.
This photograph shows one of the original cat-iron fish-bellied rails of 4ft length used on the Saundersfoot Railway. They spanned bewteen stone blocks laid in the ground. The rails were made locally. The image was shared on the Tenby and Saundersfoot Through Time Facebook Group by Mark Davies on 26th November 2015. [151]
The authoritative text is ‘The Saundersfoot Railway’ written by M.R. Connop-Price which is No. 28 in the Oakwood Press series of Locomotion Papers. [136] Oakwood Press is now owned by Stenlake Publishing but existed independently from its founding in 1931 until 2016. The early editions of this book were all published from Usk in Monmouthshire. Connop-Price has also written ‘Pembrokeshire: the Forgotten Coalfield, publihed in 2004 by Landmark Publishing, Ashbourne Derbyshire which contains a significant chapter on Mining Transport. [1: p120-144]
The Saundersfoot Railway had two main mineral lines which were fed by a number of branches. Horse-power was used at first with horses pulling up to three laden trams (wagons). Wikipedia tells us that the two main lines were:
A line connecting the collieries and the later ironworks close to Stepaside which ran along the coast to the harbour in Saundersfoot. [32][49]
A line from Thomas Chapel colliery near Begelly to the harbour in Saundersfoot. This line passed beneath the GWR station in a tunnel at King’s Moor and had an incline around half-a-mile from the harbour which had a gradient of 1 in 5. [49]
This, while true, somewhat simplifies the development of the line. We noted above that the 1829 Act authorised two branches, one of which was the nascent form of first line mentioned immediately above, although it limited the line running North to a terminus at Wiseman’s bridge until the harbour was operational at Saundersfoot. [1: p131]
The mainline running towards Begelly and Thomas Chapel was substantially complete between Begelly and the harbour by the time the Company officially began trading on 1st March 1834. The branch to Moreton, however, was not constructed immediately. The line to Wiseman’s Brdige was substantially complete by June 1834. Connop-Price tells us that the line suffered a number of rock falls and, as a result, broken rails and it seems highly unlikely that the line saw any significant use. [1: p131]
Both the branch along the coast and the harbour suffered storm damage. An extension to the North pier of the harbour narrowed the harbour entrance and gave much greater protection to vessels within. [1: p131]
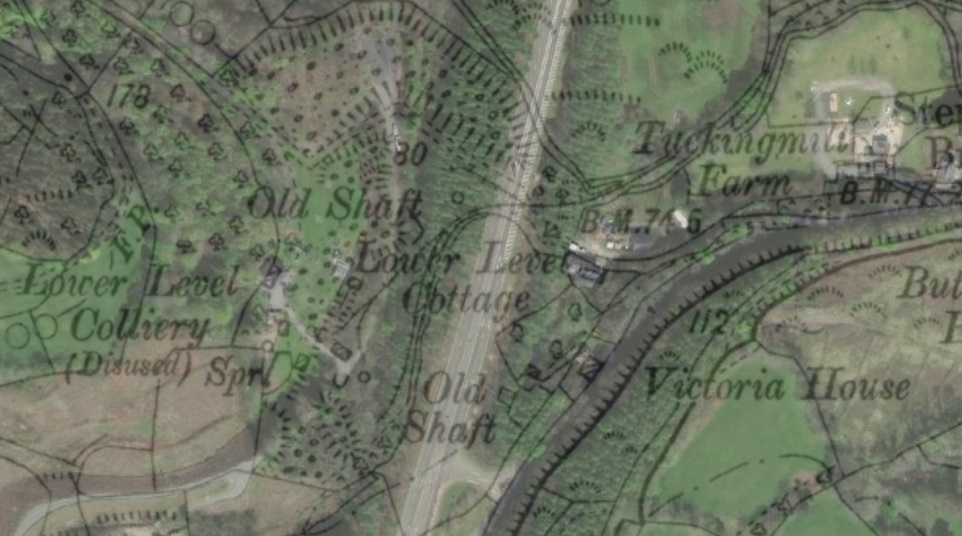
It was decided to realign the tramroad to Wiseman’s Bridge and, when another Act of Parliament was needed to renew powers to build the Moreton branch (1842), the realignment of the coastal line was included as well as an extension to Lower Level Colliery at Kilgetty. “The line to Wiseman’s Bridge was rebuilt on a slightly altered alignment, and at a slightly higher level beneath the cliffs North of Coppet Hall; the extension to Kilgetty gradually steepened over its final mile until it reached a gradient of 1 in 32 on the approaches to Lower Level Colliery.” [1: p132] That 1842 Act also authorised another branch from Kingsmoor to Broadmoor and Masterlands, although a decision not to contract that line was made before the middle of the 1840s. {1: p132]
On the line West from the harbour after about a half-mile journey there was a self-acting incline which worked well for those exporting goods from the harbour bringing it down the line. The loaded trams lifting the empty trams up the incline. It did not work well for those importing freight such as pit-props or stone. Eventually a winch was provided so as to avoid damage to the land alongside the incline. [1: p132]
On learning of the South Wales Railway’s plan to build a branch from its mainline to Pembroke, the Saundersfoot Railway’s board of directors decided to construct a line to meet the GWR at Reynalton. Their scheme was authorised in 1846. However, the South Wales Railway failed to provide the branch to Pembroke. The Saundersfoot Railway’s proposed Tenby, Saundersfoot & South Wales Railway and Pier Company line was not built. [49] Another Company built a standard-gauge line between Pembroke and Tenby -The Pembroke and Tenby Railway (in 1863), and then extended that line to meet the South Wales Railway at Whitland. (in around 1865). Moreton Colliery got its own siding on that line but Boneville Court Colliery did not. Coal drops were provided at the point where the Saundersfoot Railway passed under the standard-gauge line. [1: p133] Eventually Saundersfoot Station was built at this site.
As part of a modernisation project, the whole line was upgraded to a narrow gauge railway in 1874. The tramway along the coast was re-laid with flat bottom rails on wooden sleepers allowing a locomotive to be used on the line to Stepaside. [49]
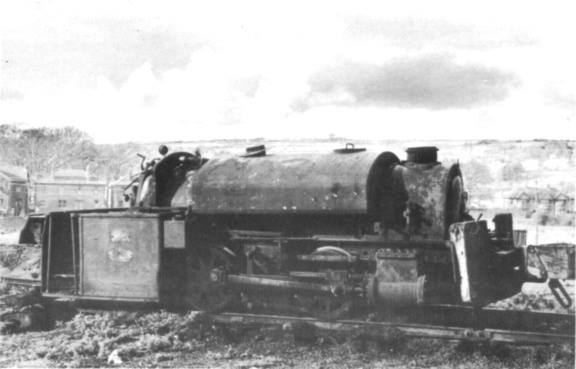
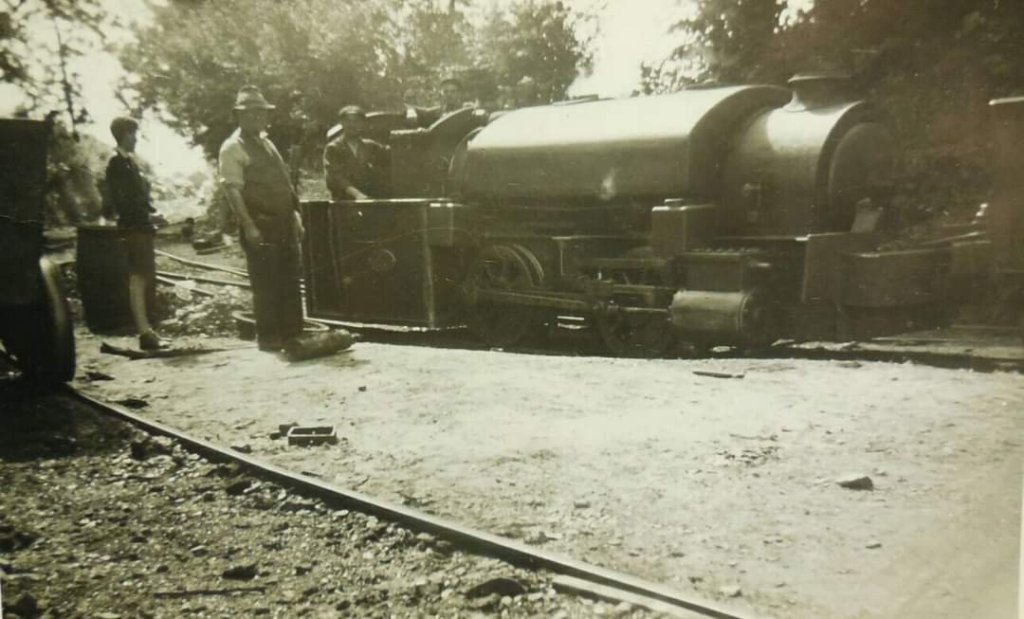
In April 1874 an 0-4-0ST built by Manning Wardle of Leeds (Rosalind) was purchased and worked the line between the harbour and Lower Level Colliery. “Horses were retained to work the portion of the line from the harbour to the incline, and also from the top of the incline to to the exchange siding at Saundersfoot Station. The failure of collieries at Thomas Chapel, and the decline in mining at Begelly, meant that by this date traffic worked through Kingsmoor Tunnel was negligible.”[1: p133]
The track north of the standard-gauge line was lifted in 1887, however, in 1914 it was re-laid and a new 1.5 mile branch line built to support the opening of a short-lived colliery at Reynalton. A new engine was purchased for this purpose. [49]
In 1889/1890 the track between the harbour and the incline was re-laid to allow it to be worked by Rosalind. In 1893, Bonevilles Court colliery was provided a siding from the standard-gauge line and the exchange sidings at Saundersfoot Station fell into disuse as did the line between the incline and the station. By this time harbour traffic was limited to coal and culm from two collieries, Bonevilles Court and Lower Level. [1: p133]
By the late 1920s coal mining was in recession and the line closed. In 1932 a brief resurgence in local mining led to the lines being briefly reopened. [49]
However, only seven years later, due to financial considerations and the workings becoming exhausted, the railway finally closed on the eve of the Second World War. Subsequently, the rolling stock along with the tracks were scrapped for use in the war effort. [49]
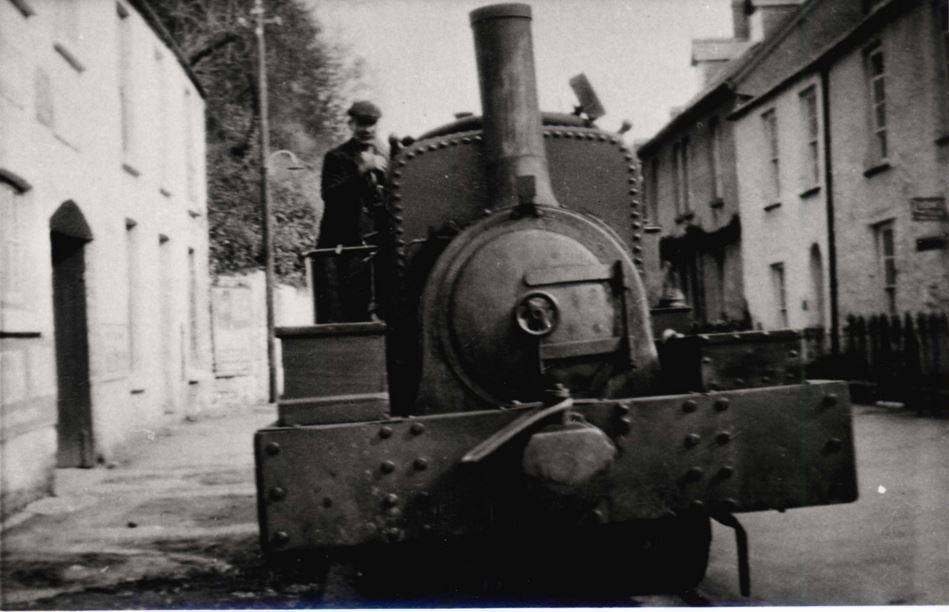
Locomotives – Both engines used on the line had low profiles so they could work the tunnels. Although Rosalind was scrapped, Bulldog continued to work at Llanelli steel works until 1951. [49]
Name
Builder
Wheel arrangement
Date
Works number
Notes
Rosalind
Manning Wardle
0-4-0ST
1874
476
Bulldog
Kerr Stuart
0-4-0ST
1915
2040
Purchased from the New Reynalton Anthracite Coal Company in 1921
This table comes directly from the Wikipedia article about the Saundersfoot Railway [49]
We have already noted that there were two main lines which met at Saundersfoot Harbour. It seems to be a good idea to start at the harbour and to look at each line in turn. This article covers the line to Stepaside via Wiseman’s Bridge. A second article will cover the line which heads West from the Harbour.
Saudersfoot Harbour to Stepaside via Wiseman’s Bridge
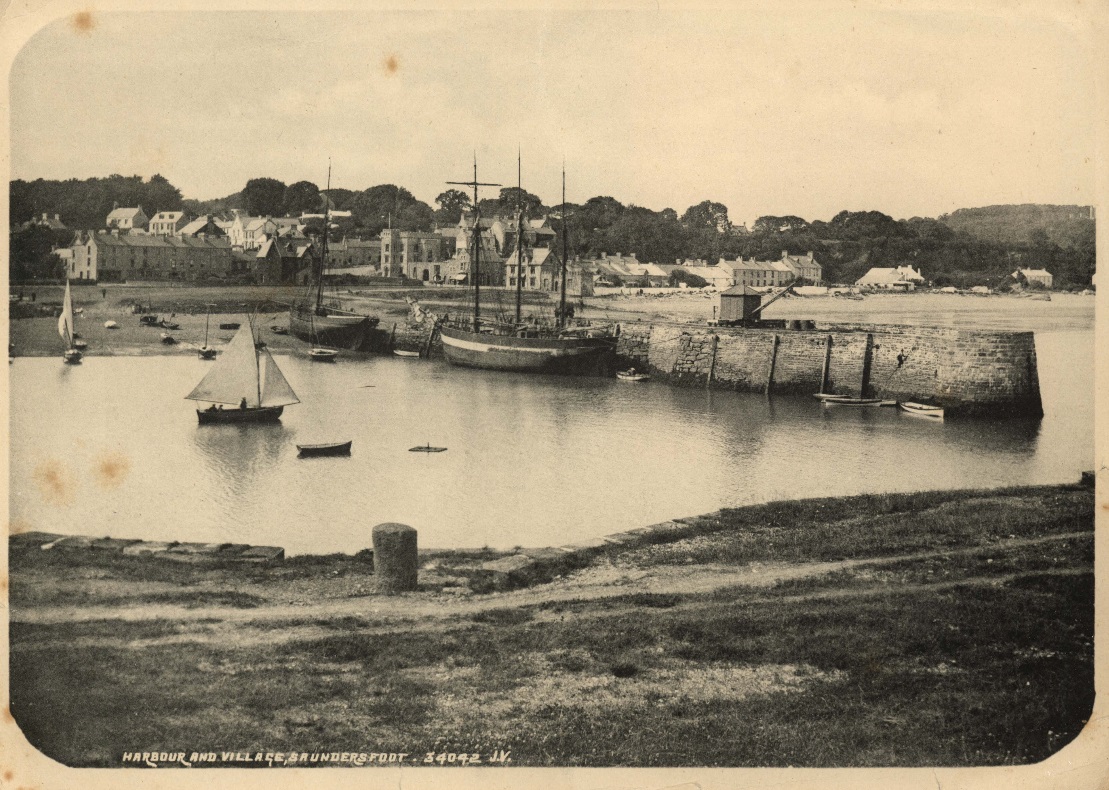
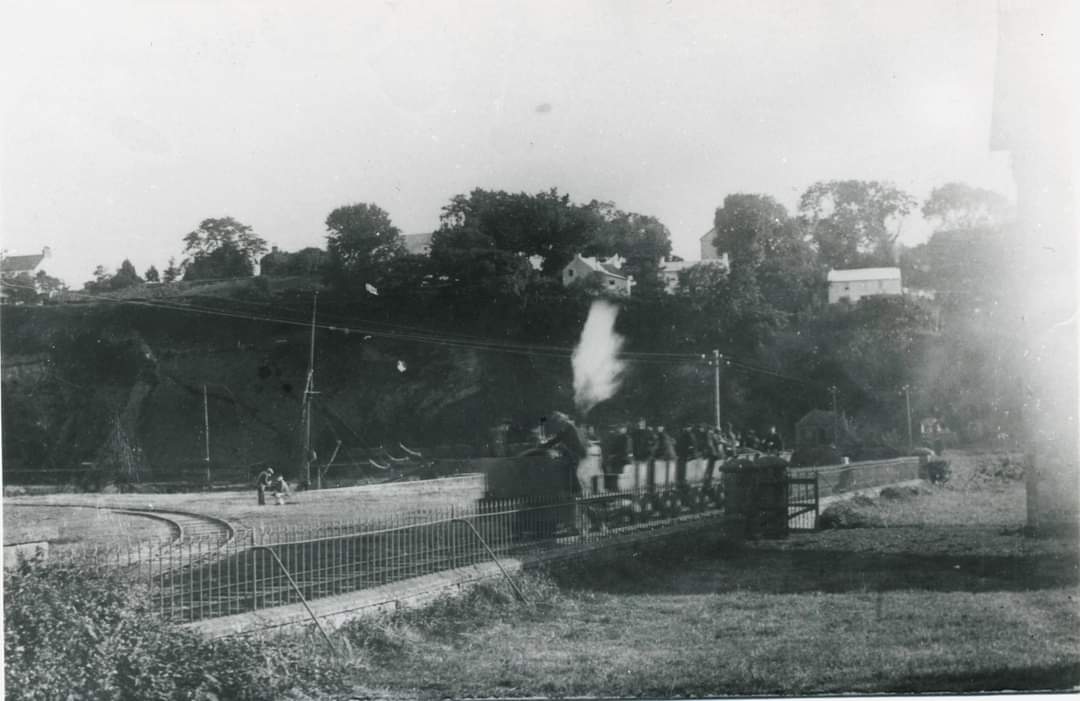
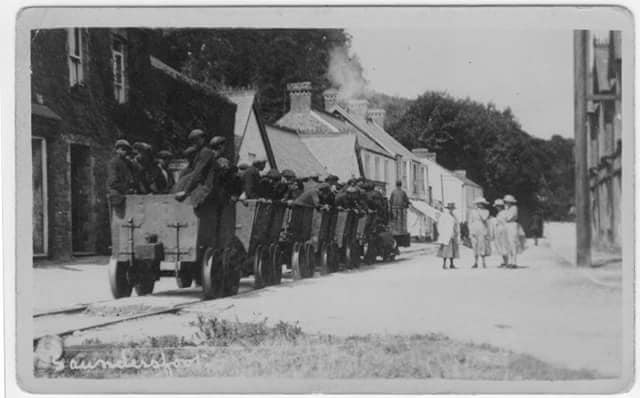
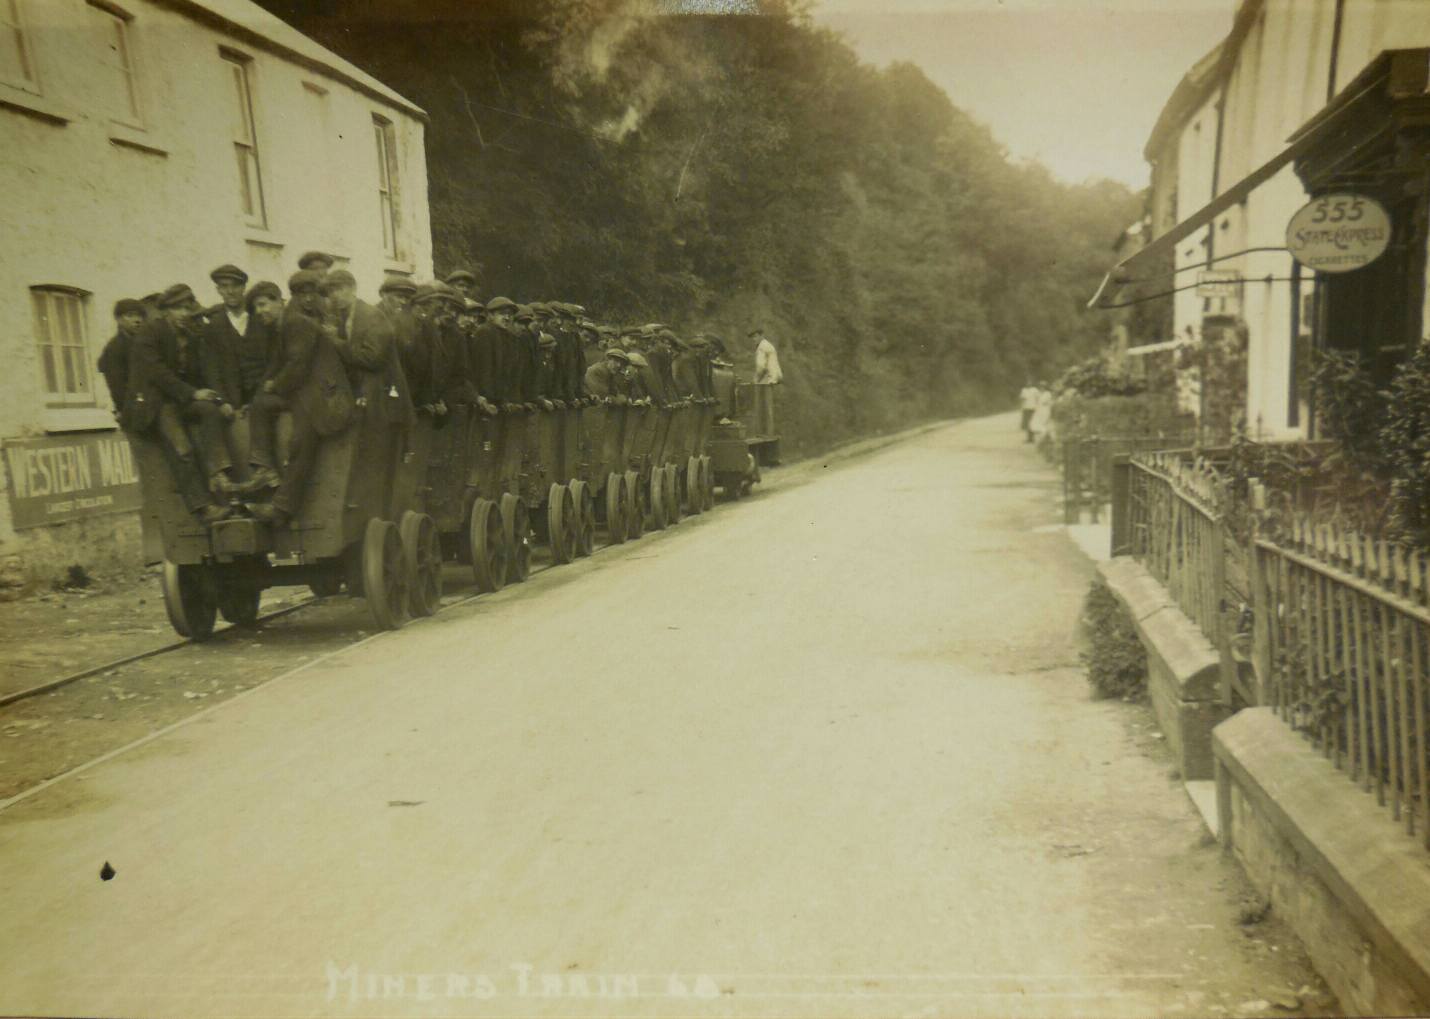
We start this journey at Saudersfoot Harbour with two very early views of the harbour and its tramroad.
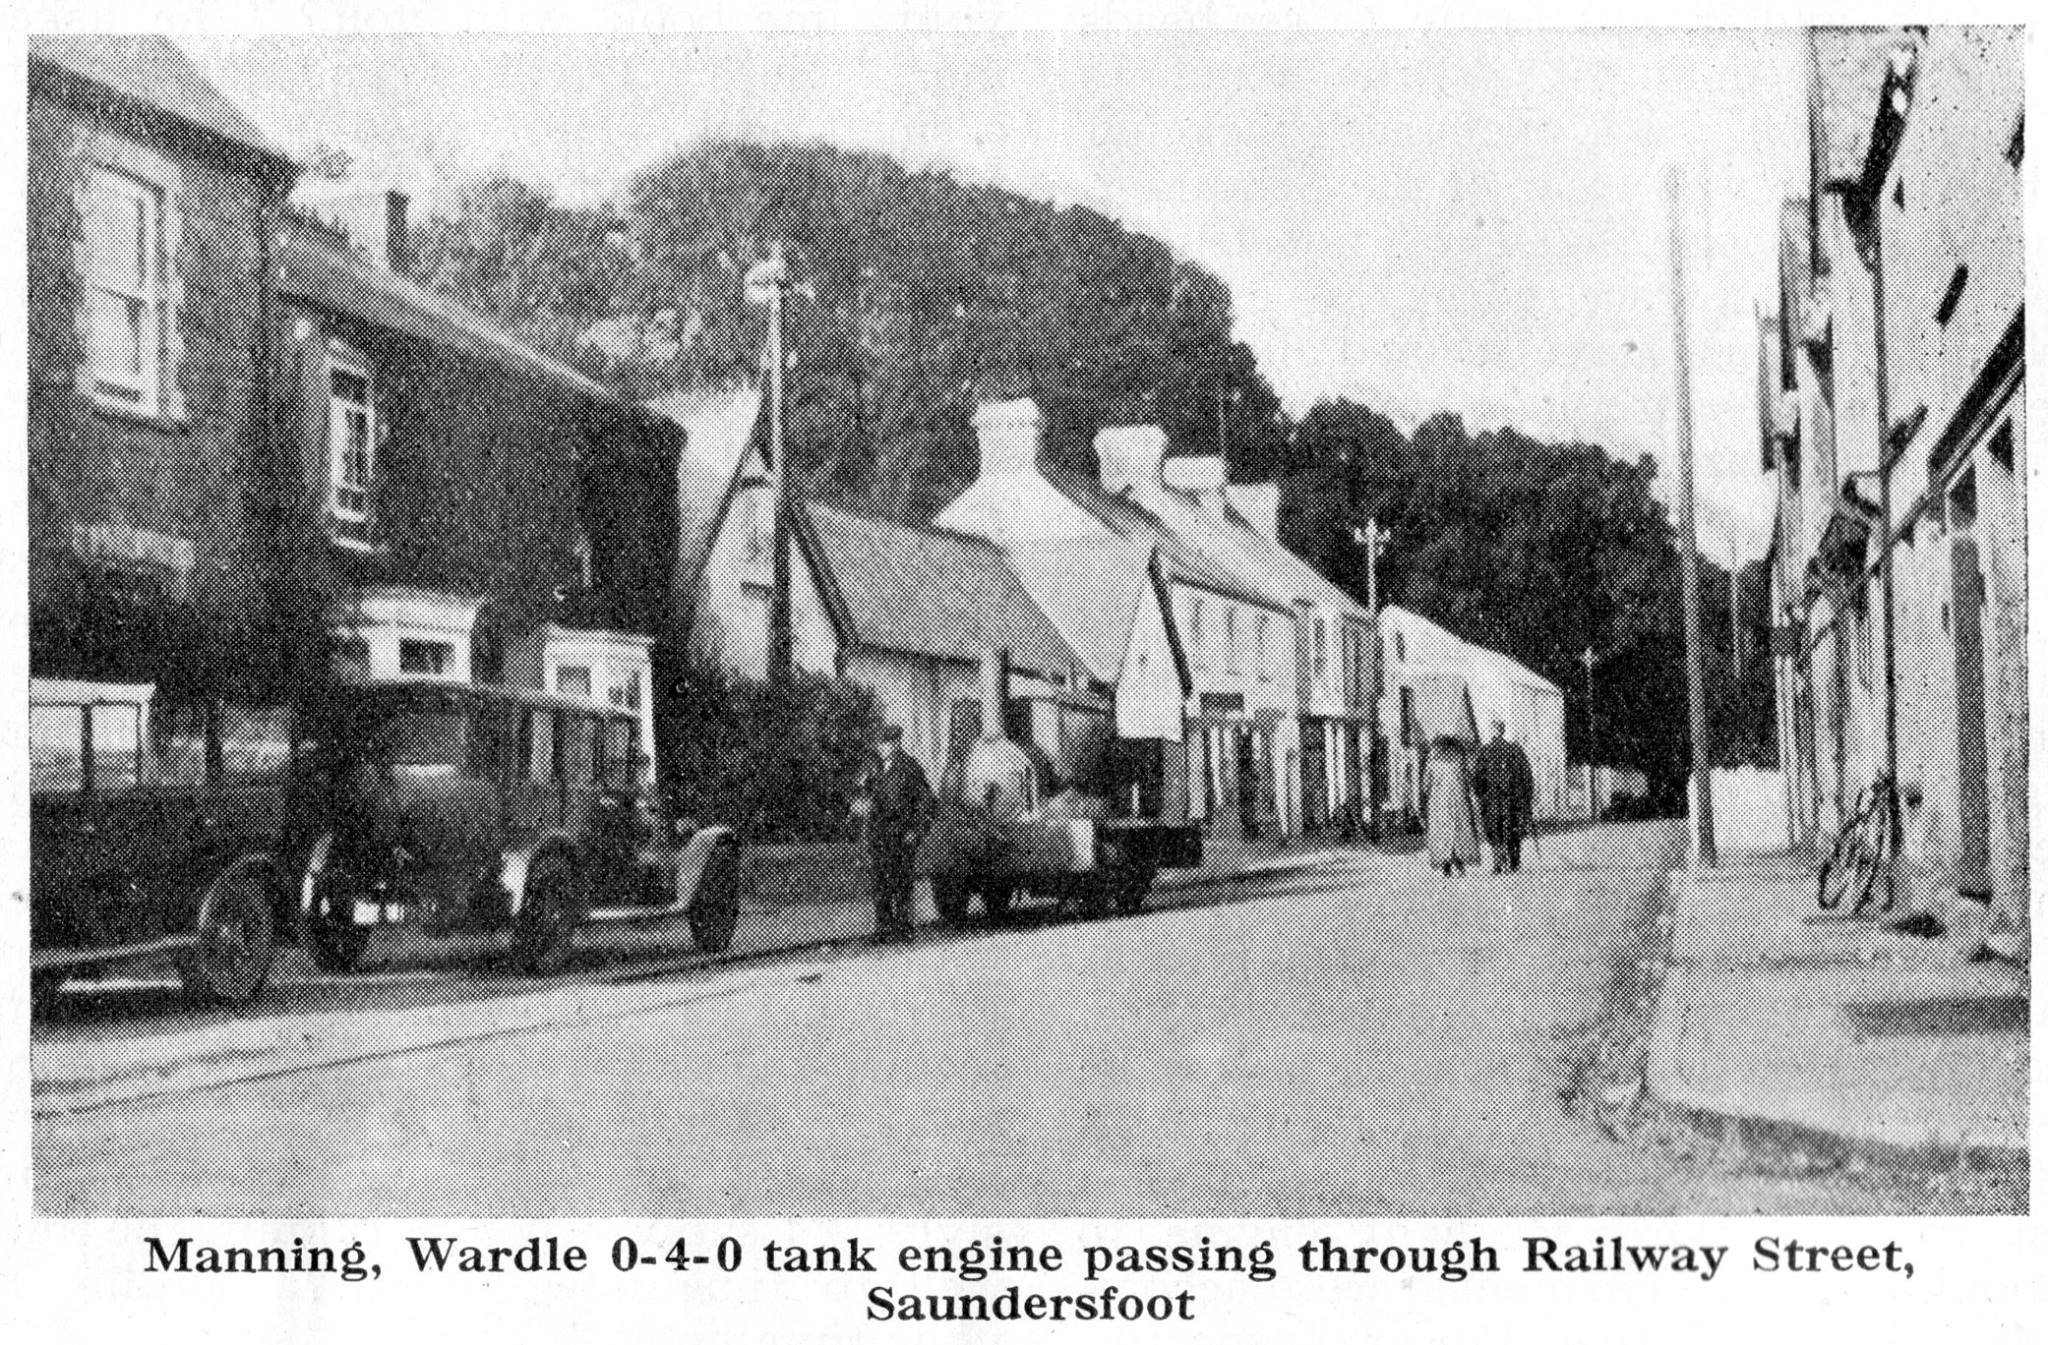
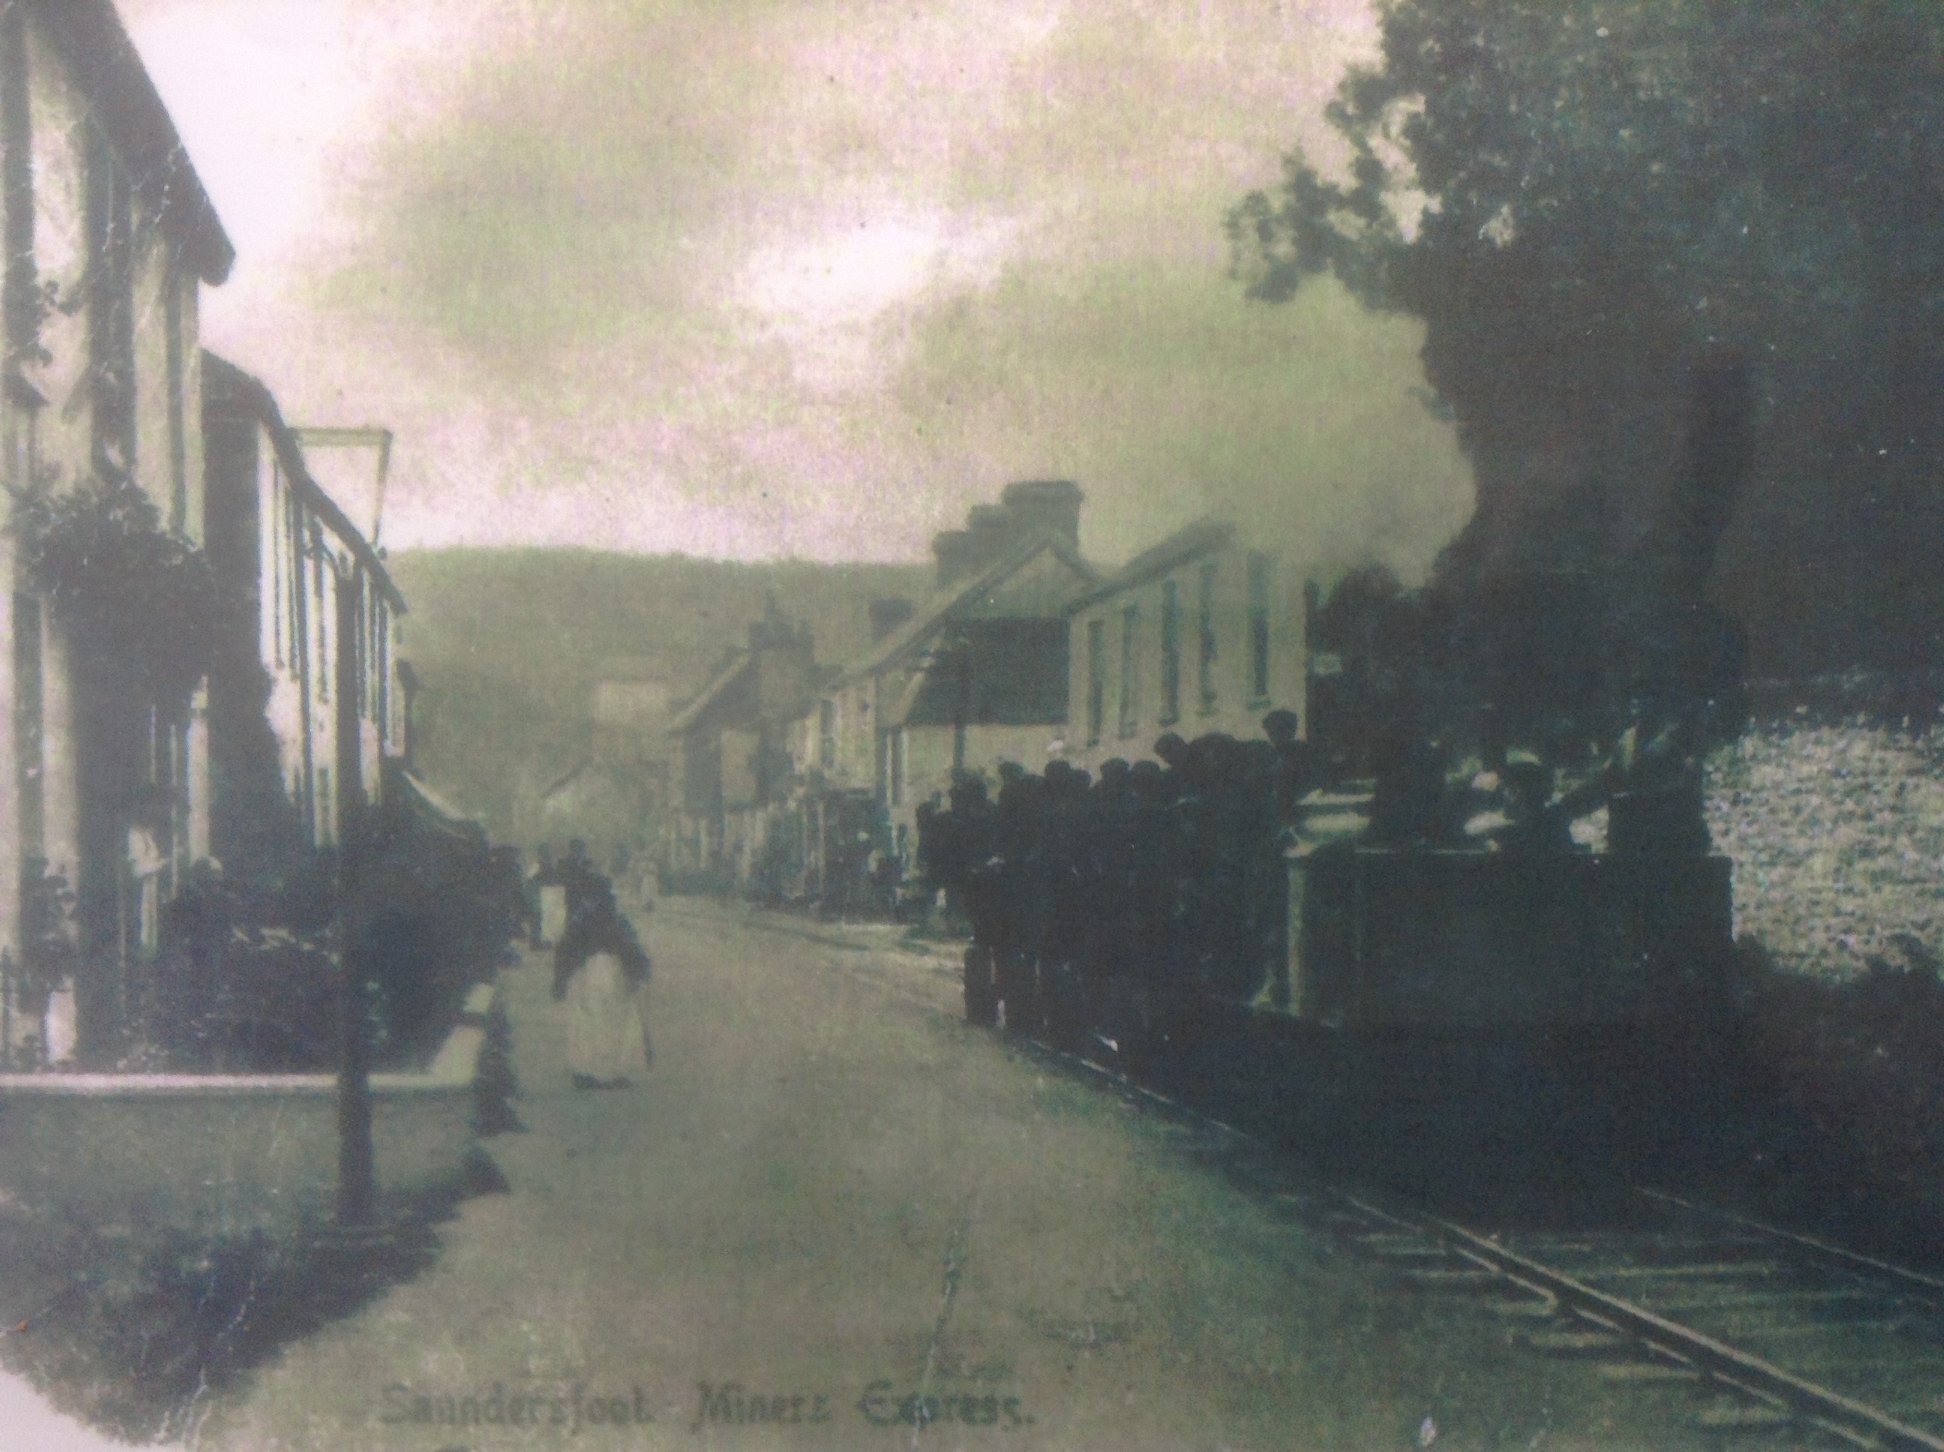
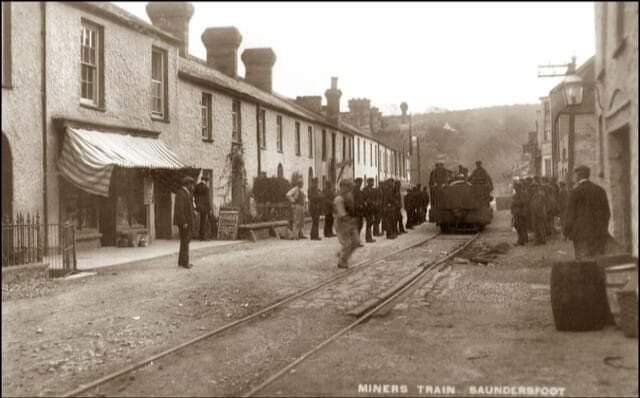
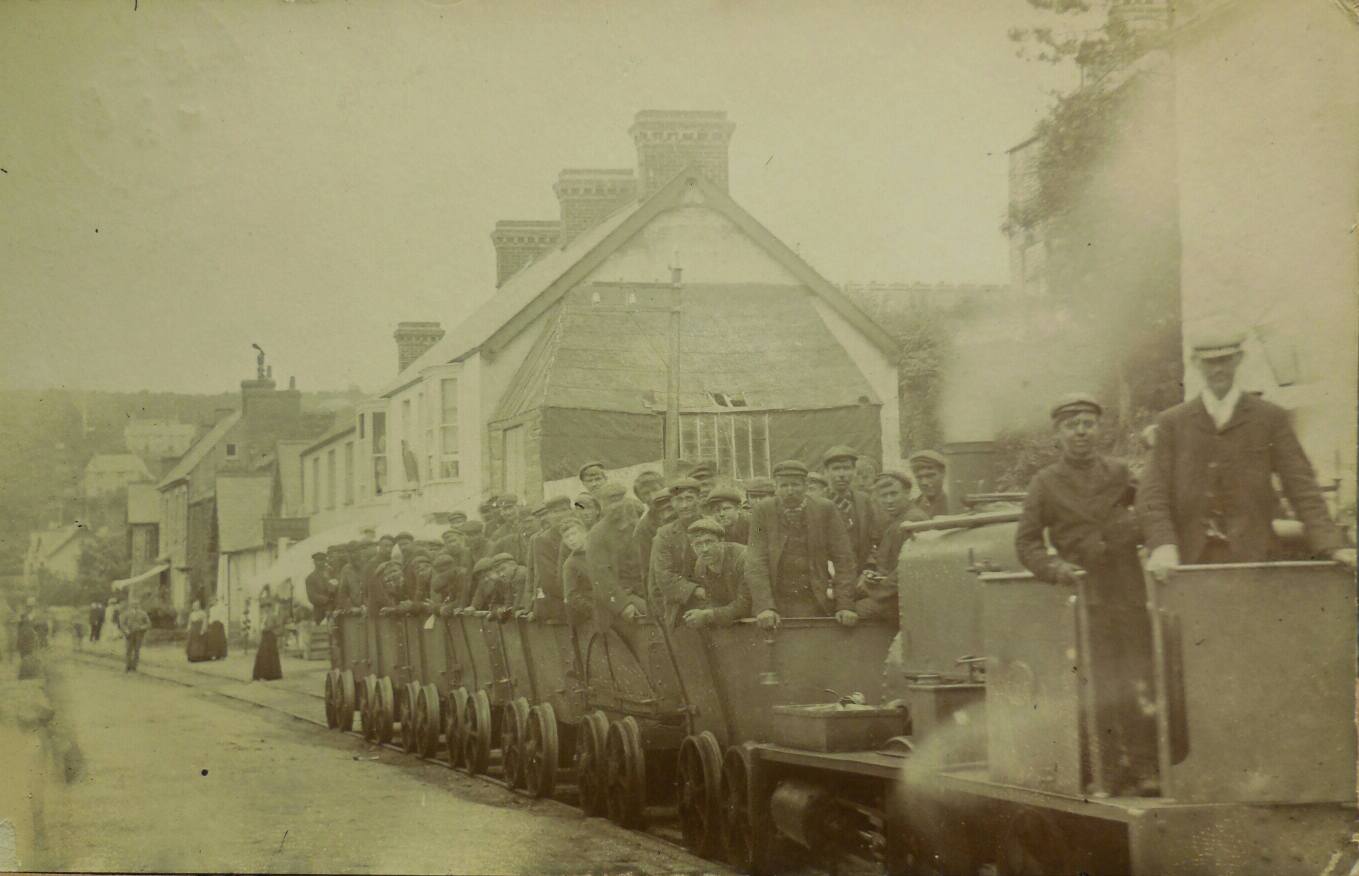
From the harbour we head out along what was Railway Street (now called ‘The Strand’). First we have a series of views of Railway Street and its railway from the late 19th century and the early 20th century.
Before Saundersfoot Harbour’s development, coal was loaded into boats at Swallow Tree Bay (South of Saundersfoot) and Coppet Hall, (thought to derive from ‘coal pit haul’). [169]
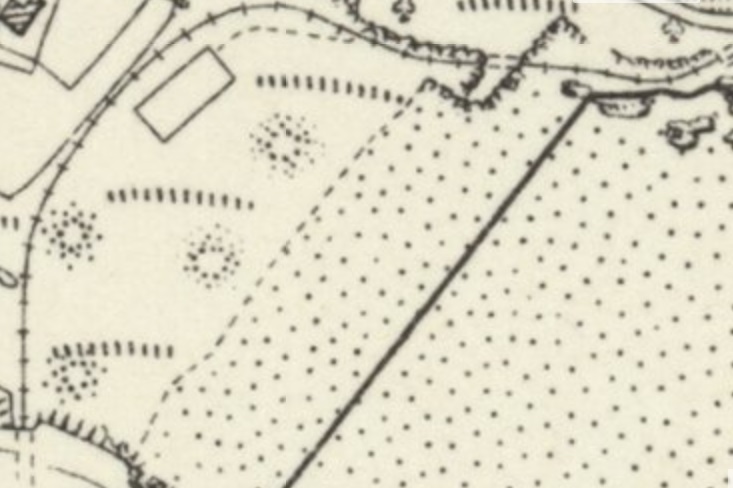
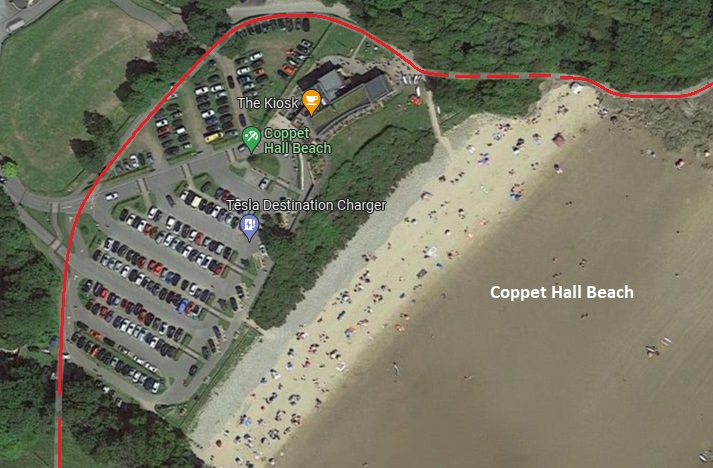
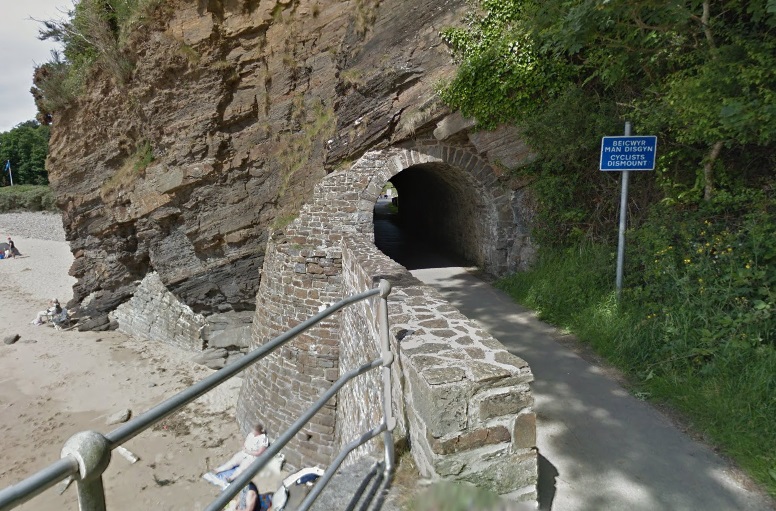
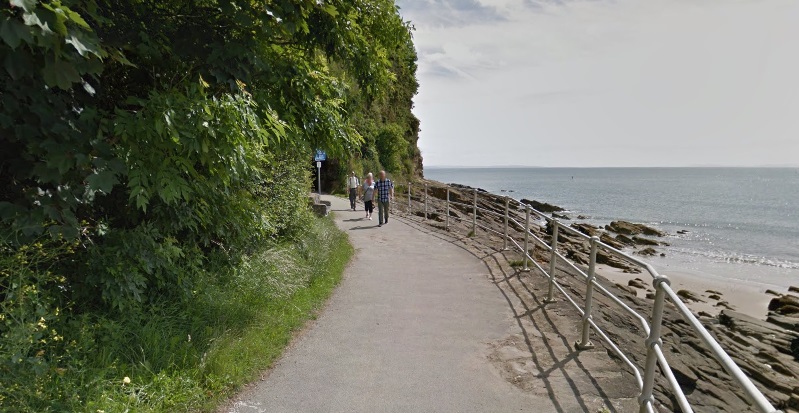
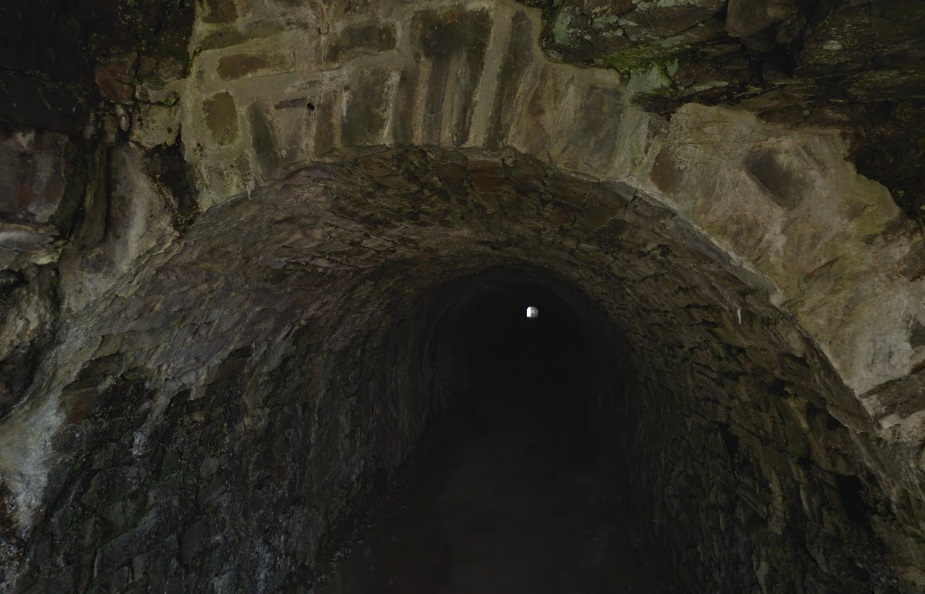
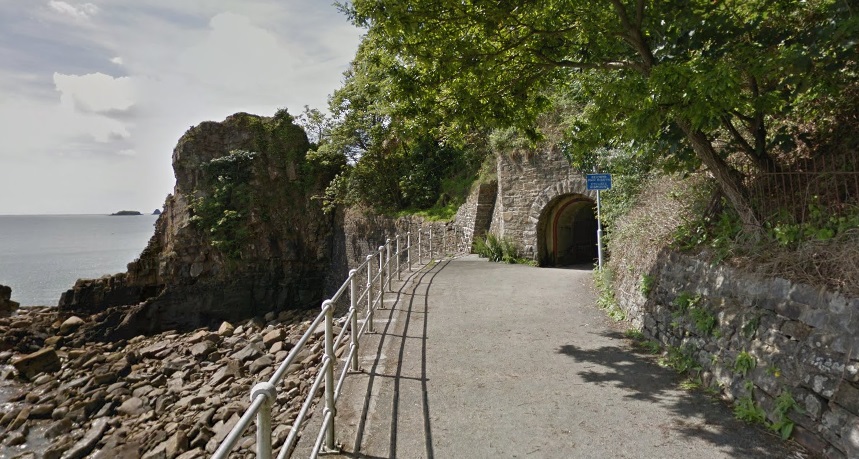
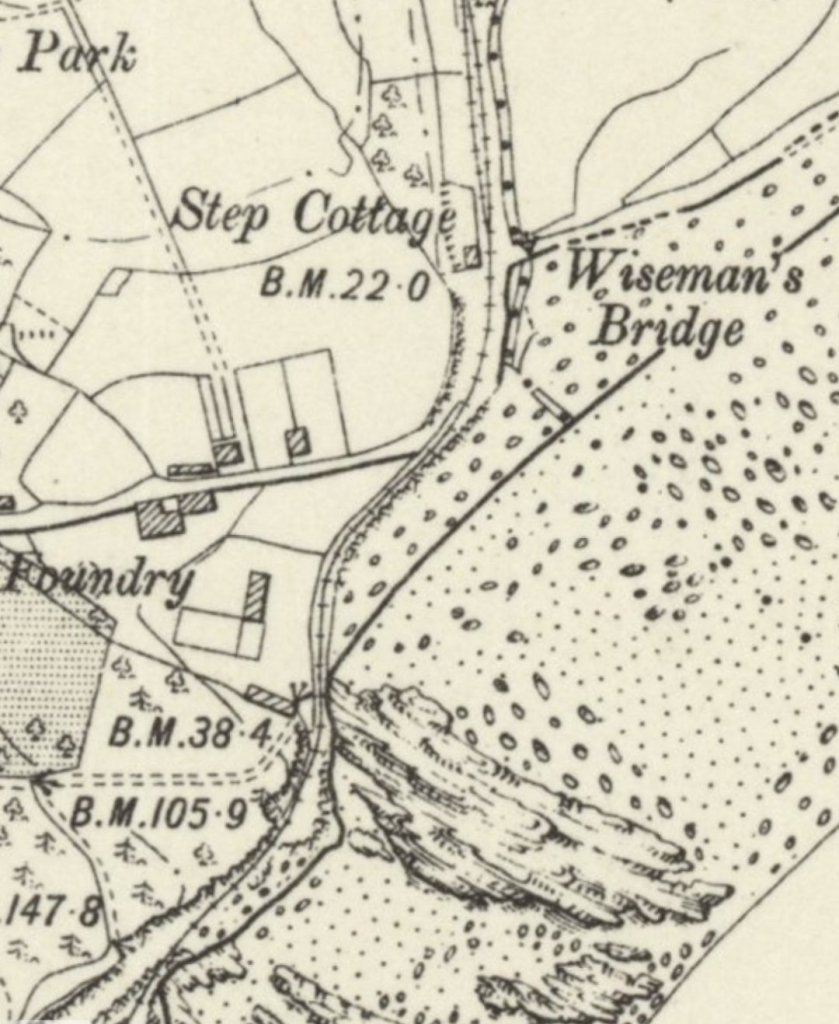
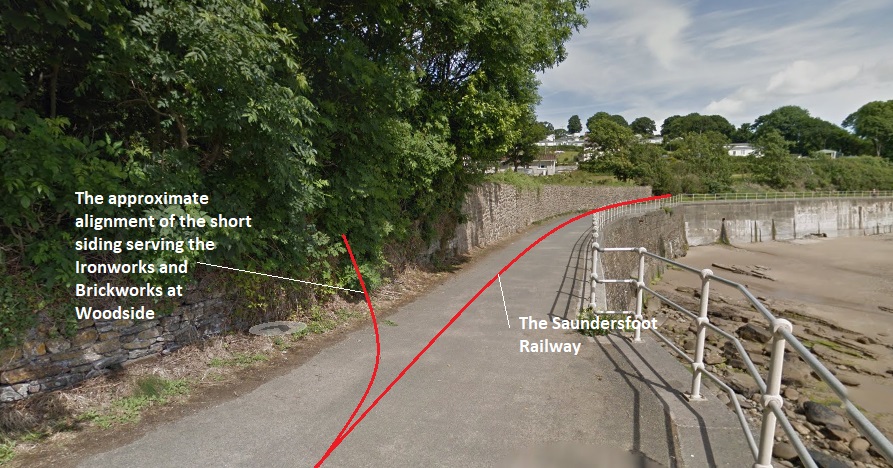
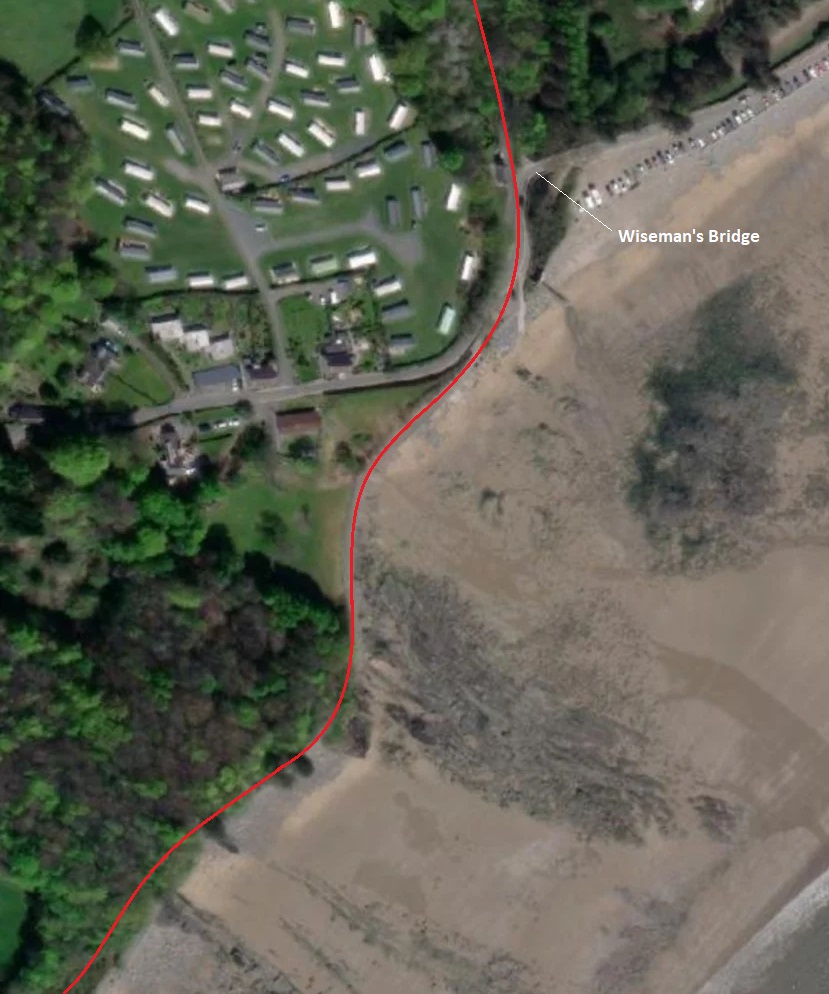
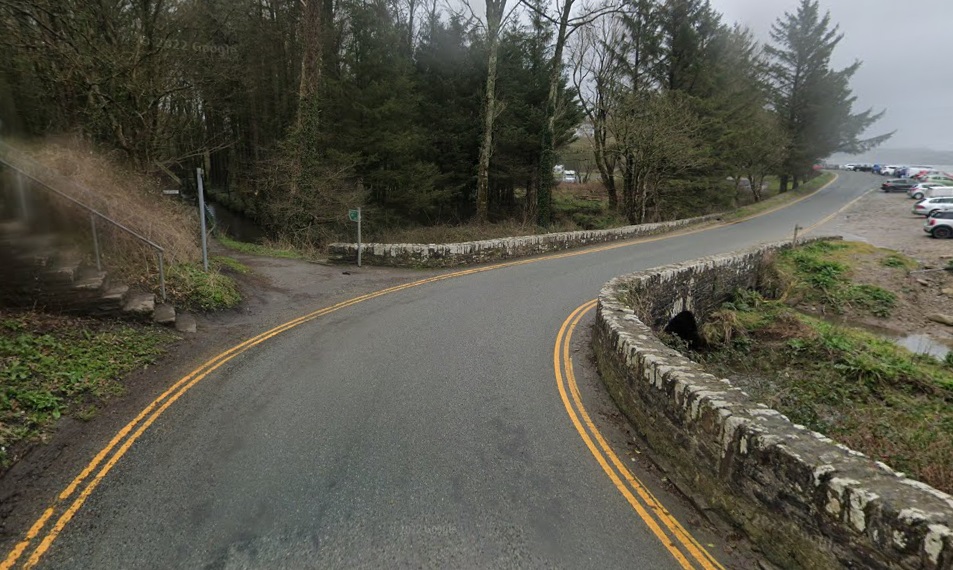
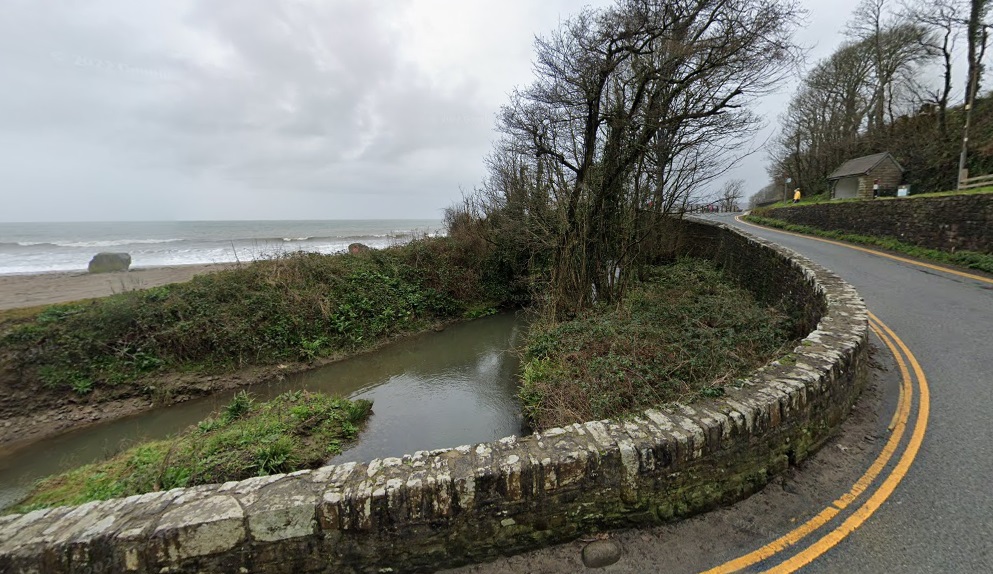
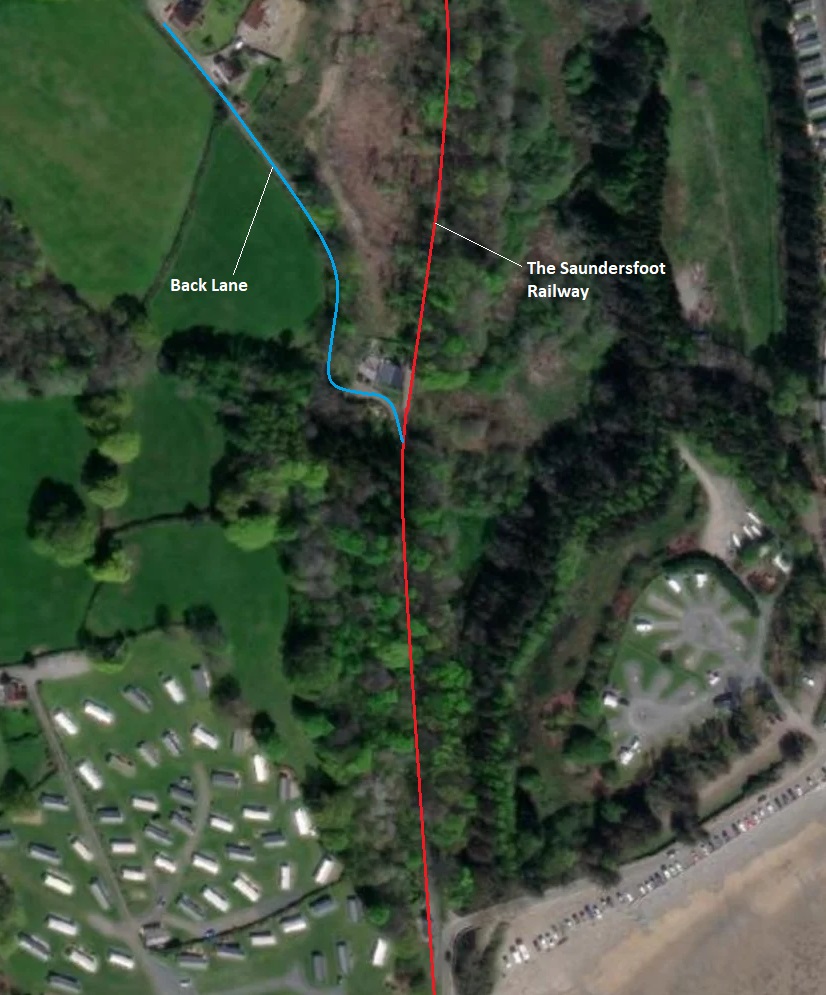
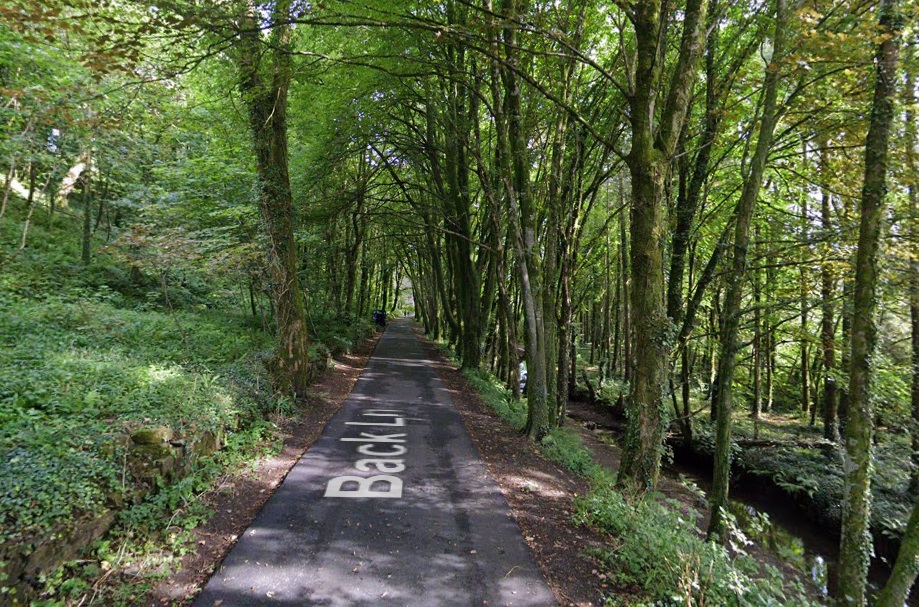
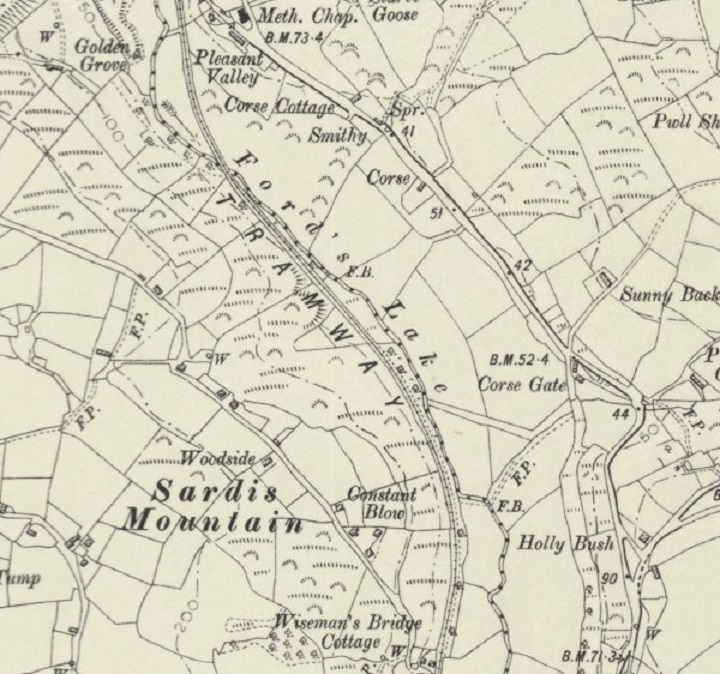
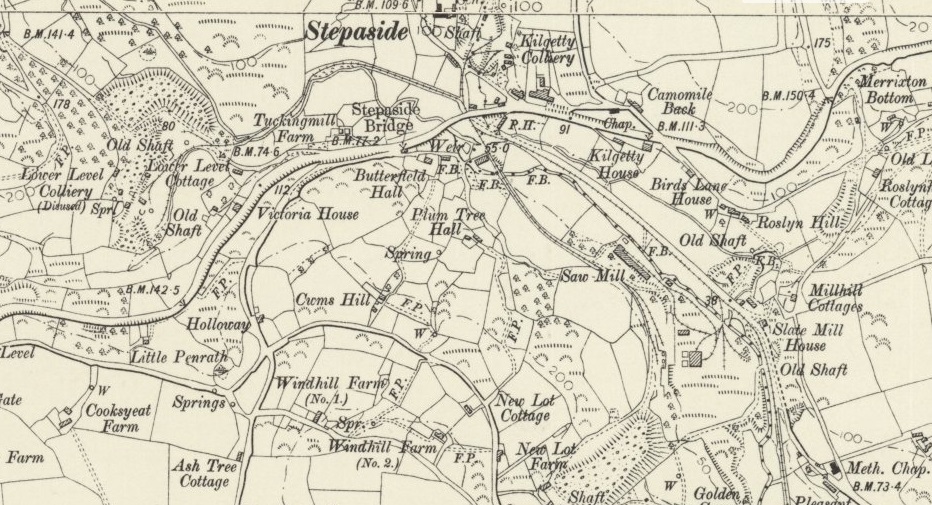
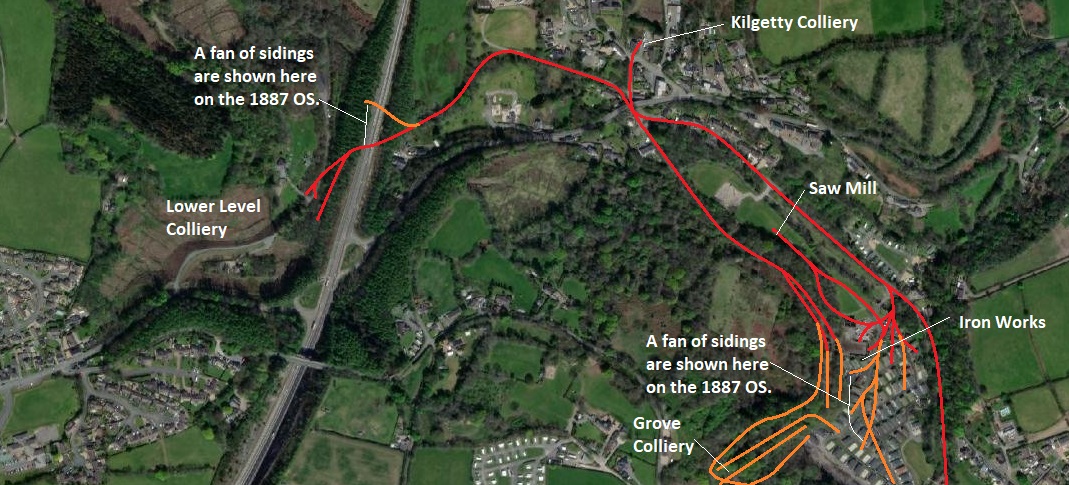
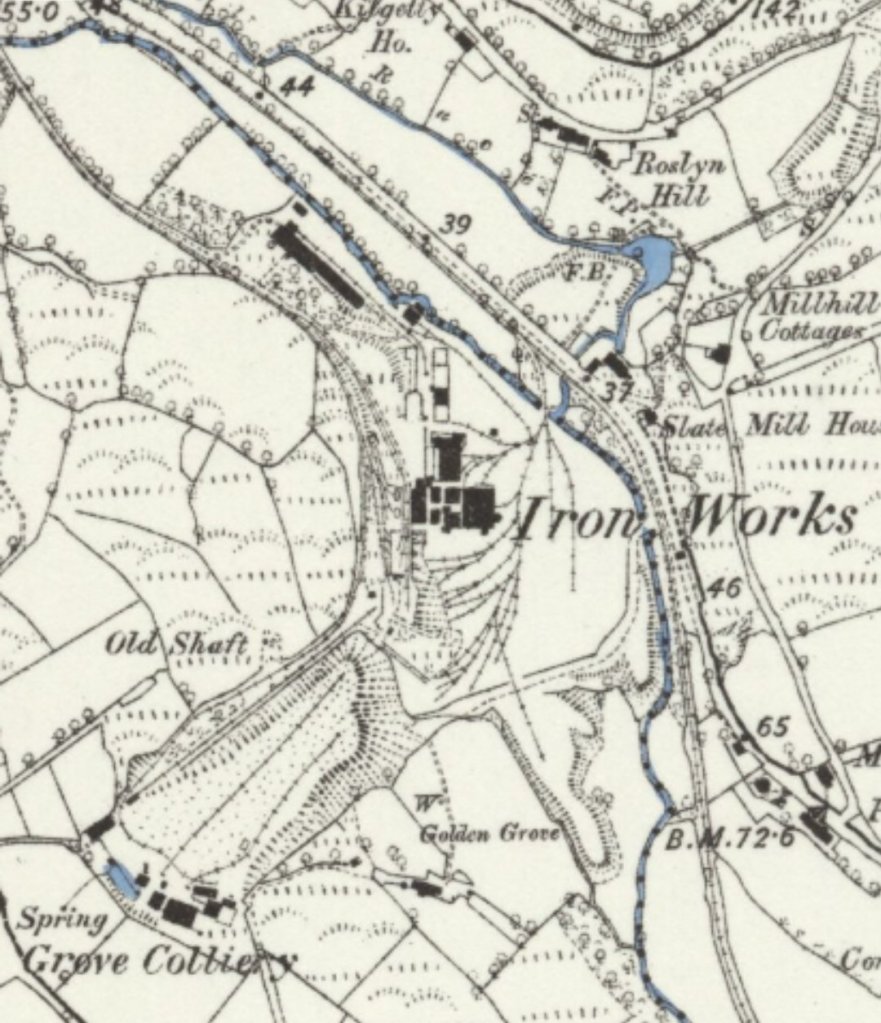
The 1906 6″ Ordnance Survey of Coppet Hall showing the old tramroad curving from the tunnel under Craig-y-Mor to then pass through a very short tunnel while traveling to the East on the North side of the beach. The following tunnel entrance can just be made out to the top-right of the image. [170]The line of the old railway through Coppet Hall follows the line of the Coastal Path highlighted by the red line, dashed through tunnels. [Google Maps, June 2022]An information board at Coppet Hall giving some details about the Saundersfoot Railway, (c) Gareth James, 20th May 2010, authorised for us under a Creative Commons Licence [CC BY-SA 2.0) [183]This view from the tunnel mouth of the coastal line to Wiseman’s Bridge faces back towards Saundersfoot with Coppet Hall Beach visible in the centre of the image beyond the railway tracks. The image was shared by Stephen Hughes on the Pembrokeshire – I LOVE IT! Facebook Group on 12th January 2018. [138]A view back to Saundersfoot along the Coastal Path from approximately the same location as the monochrome image above. Around the curve ahead is a short tunnel before Coppet Hall and its beach which can be seen beyond the railings. [Google Streetview, June 2016]Turning through a half-circle the view looks along the tunnel from the position of the last image. [Google Streetview, June 2016]The 1906 6″ Ordnance Survey shows the tramroad/railway heading North after leaving the tunnel at the bottom of the map extract, closely following the sea wall. [171]the coastal path continues to follow the route of the old railway [171]The North portal of the railway tunnel which appears at the bottom of the last two images and carries the modern coastal path, looking back South towards Saundersfoot. [Google Streetview, June 2016]Turning 180 degrees, this photograph shows the coastal path and hence the old railway’s route heading North towards Wiseman’s Bridge. [Google Streetview, June 2016]The 1096 6″ OS Map shows the railway continuing North through an S-bend along the sea wall and then running along the highway yo Wiseman’s Bridge. The Iron Foundry was Woodside Iron Foundry. Coflein says that it was serves by a siding from the Saundersfoot Railway, (although the siding does not appear on this edition of the Ordnance Survey) It is shown on OS 1st edition mapping of 1889. The tramway siding terminated in the yard of a disused brickworks – comprising a large building and four kilns. Opened in 1849/50, Hean Castle Brickworks produced firebricks from black clay underlying the coal seams and were reputedly the best in the country. [172][173][174]The 1887 6″ Ordnance Survey published a year or so later shows the Iron Foundry and Brickworks together with the tramroad branch which ran from the Saundersfoot Railway in-between the two curves of the S-bend in the line. It then ran along the South side of the Foundry before turning to the North, close to the Brickworks. [175]This modern image shows the location at which the short siding referred to above diverged from the Saundersfoot Railway. [Google Streetview, June 2016]The same area as shown on the 1906 6″ OS map extract above which the line of both the coastal path and railway marked by the red line. The Ironworks discussed above were sited in the grass area to the West of the railway to the North of the woodland. The brickworks were to their West. [172]This photograph shows the point at which the old railway joined the verge of the road to Wiseman’s Bridge. It is takenlooking back towards Saundersfoot with the old railway’s route on the left adjacent to the sea-wall. [Google Streetview, June 2016]The old railway crossed the coast road and followed Back Lane northwards. [Google Streetview, June 2016]Wiseman’s Bridge. The old railway ran off the left of this image at the top of the steps which can be seen on the left. Ahead between the steps and the bridge Kilgetty Canal can be glimpsed. The railway and Canal followed each other up the valley. The canal passed under the nearest arch of Wiseman’s Bridge. [Google Streetview, March 2022]Wiseman’s Bridge and Step Cottage on 28th January 2010. The Saundersfoot Railway ran on top of the wall in front of the cottage along what is now called Back Lane. There was a passing loop on the railway which ran from the front of the cottage to the right of the image. It can be seen at the top of the 1906 6″ OS map extract above and at the bottom of the 6″ extract below, (c) Humphrey Bolton, authorised for use under a Creative Commons Licence (CC BY-SA 2.0). [176]The Kilgetty Canal and towpath seen from the road crossing Wiseman’s Bridge. [Google Streetview, March 2022]The Kilgetty Canal Basin between the sea and the coastal road/path. The Saudersfoot Railway ran at the top of the wall visible to the right of the picture. [Google Streetview, March 2022]The old railway heads North up the valley from Wiseman’s Bridge. We have already noted the passing loop which features at the bottom of this map extract. [The old railway route runs North from Wiseman’s Bridge along Back Lane. Immediately South of what is called Wiseman’s Bridge Cottage on the OS Map extract. Back lane turns away to the left and the route of the old railway continues up the valley. [177]The Saundersfoot Railway followed Back lane heading North from Wiseman’s Bridge. The canal can be seen on the right of the image. [Google Streetview, July 2021]The point at which Back Lane and the Railway diverged as it was in July 2021. A footpath now follows the old railway. [Google Streetview]The old railway turned gradually towards the West as it ran North. The 1906 6″ Ordnance Survey again. [178]The same area as on th emap extract. There is no need to mark the route of the old railway as the public-right-of-way which follows it can be clearly seen on this 21st century satellite image as provided by the National Library of Scotland (NLS). [178]This next extract from the 1906 6″ Ordnance Survey covers the remaining length(s) of the line to Stepaside. The line served a number of industrial sites. Low Level Colliery, Kilgetty Colliery and the Saw Mill are all shown as having connections to the railway. [185]The modern satellite image supplied by the NLS covers the same area as the 6″ OS Map extract above but it shows a dramatically different transport situation! The old railway and sidings have gone and the most prominent feature is the A477 running North-South across the image. [185]This extract from the 1887 Ordnance Survey shows, in addition to the Saw Mill appearing on the 1906 revision, the Ironworks and Grove Colliery which were at that time alongside the Railway branch to the South of Stepaside. The Ironworks and the Saw Mill (in 1887) had their own connection from the mainline of the Railway in the valley to the East of Stepaside, having a bridge across the canal adjacent to the Ironworks. The truncated network in the vicinity of the Ironworks appears on the 1906 survey, the full extent appears on this extract. Elsewhere in the immediate area, there is little difference between the 1887 and 1906 OS Maps. [186]
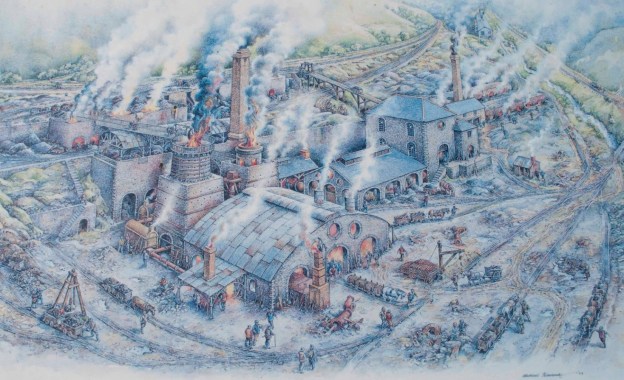
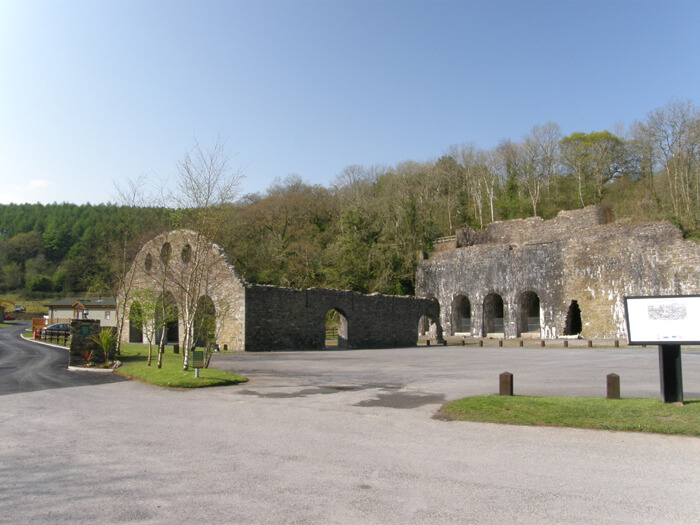
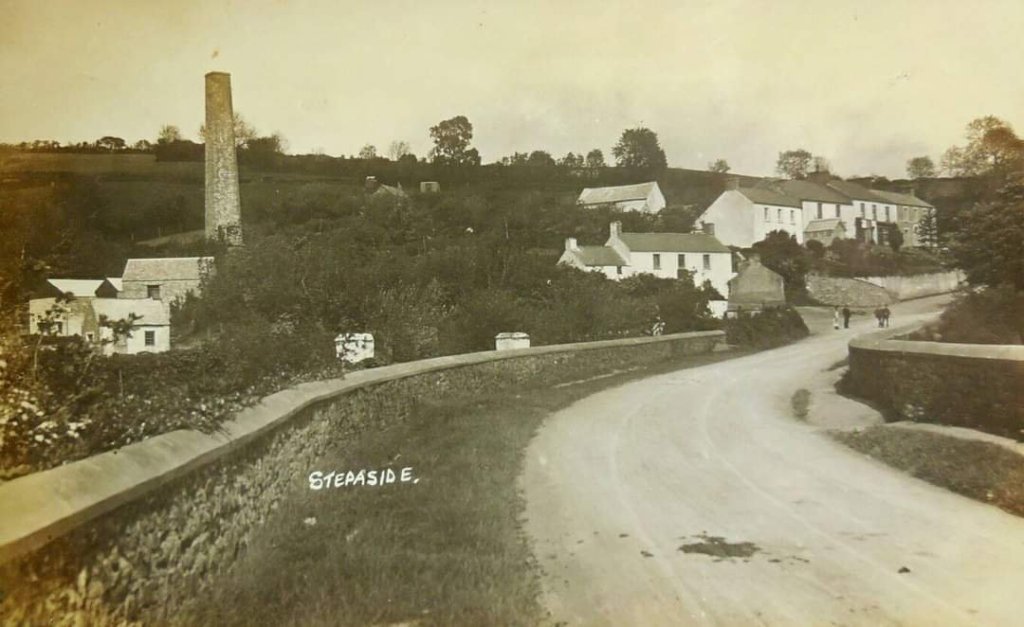
The satellite image above shows how significant the industry in the area of Stepaside was. Only a little remains. Amroth and District Community Association say that Stepaside was “a heavily industrialised site during the latter end of the nineteenth century with a thriving iron works using iron ore and limestone from local quarries. Today, this site is privately owned and features a chalet style complex. At one time, the village offered a school, post office, shop, garage and petrol station, a cobbler, a tailor and numerous public houses. Today, the only industry is the very busy coachworks, with several small housing estates.” [188]
Stepaside Ironworks as they appear in the 21st century. [188]
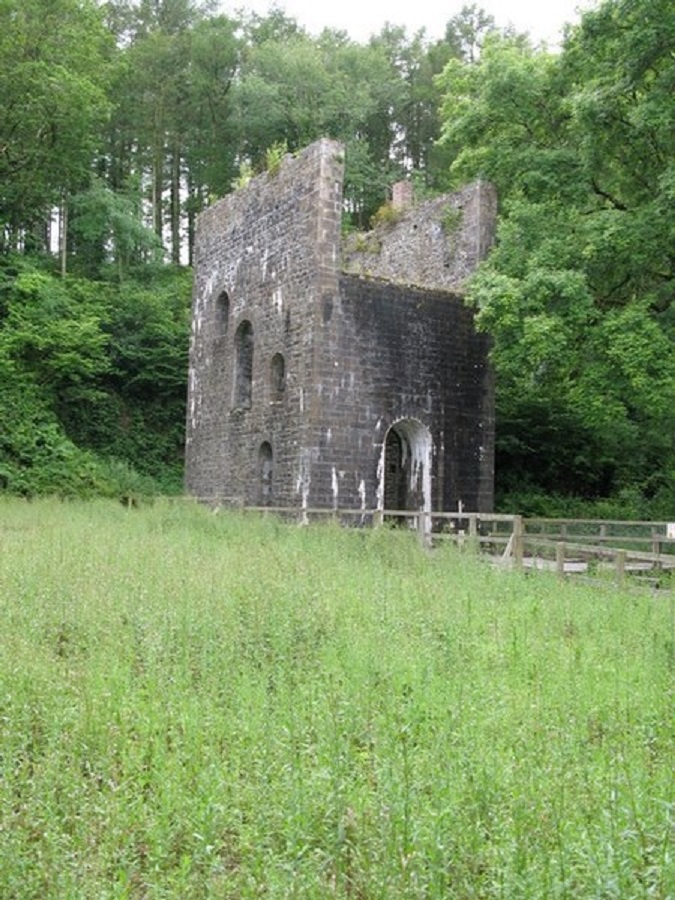
The remains of Stepaside’s Ironworks are pictured above. Grove Colliery’s Engine House remains as a substantial ruin and is shown below.
Grove colliery had a deep shaft which extend 182 metres down into the ground and it’s workings extended over a large area as it followed the anthracite-bearing strata to extract the coal. The owners aim was to find the Kilgetty vein, which took until 1858, a period of some 5 years after opening and at a cost of £30,000. Eventually, the Grove Colliery was linked underground to the Kilgetty Colliery, a distance of some 795 metres.
Coal from the Grove Colliery was carried both on the Saundersfoot Railway via Stepaside and on a self-acting incline to the Ironworks in the valley below. The colliery had its own stables, stores, carpenter’s shop and smithy.
Lower Level Colliery, according to Coflein, appears on the early OS mapping (1887/1889) but on the second edition of 1906/1907 it is marked as disused, having closed in 1900. According to OS mapping of 2013, the site has been cleared and landscaped. [190]
Coflein also notes that Kilgetty Colliery was an anthracite colliery dating from around 1843. It closed in 1873 but was re-developed and re-opened in 1935, with a weighbridge house, ventilation drift and winding engine house. Another winding engine house (now converted) stood nearby. The colliery closed finally in 1939 by 2003 the site was largely built over. [191]
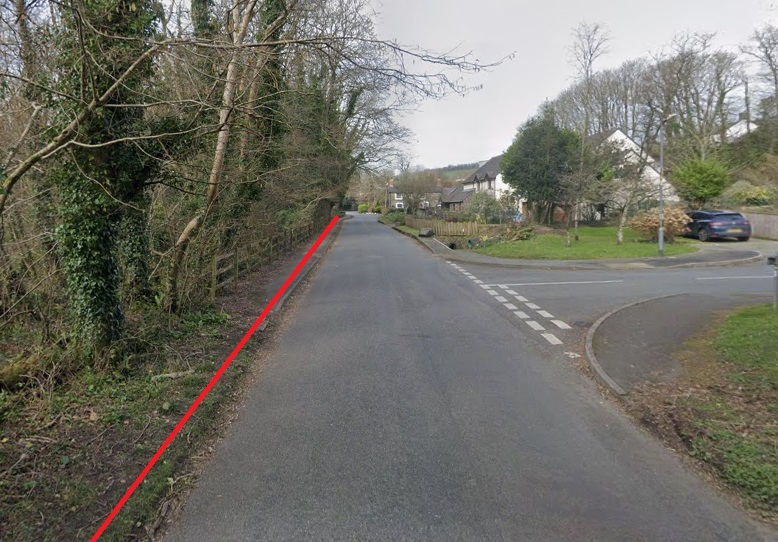
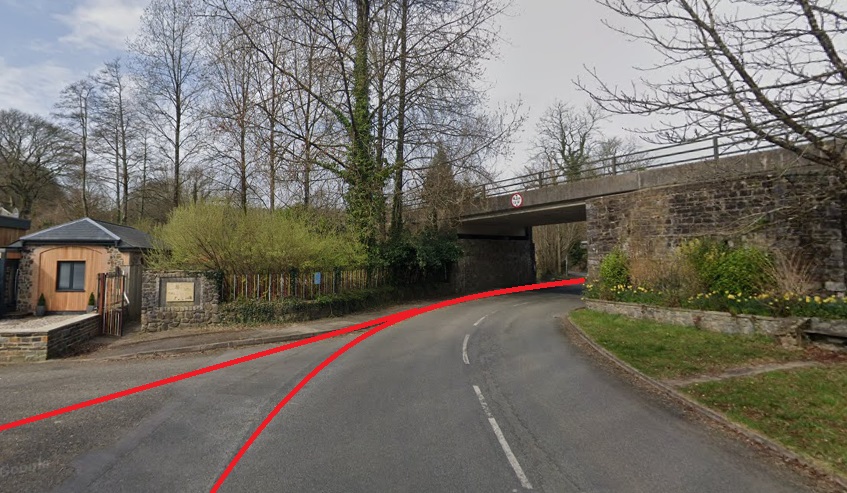
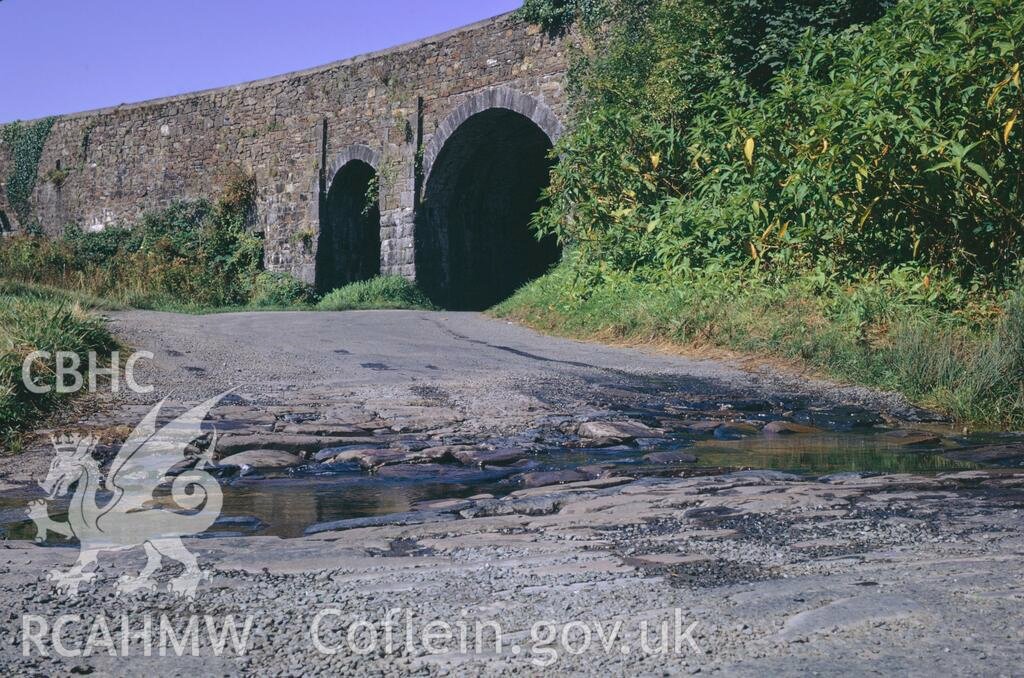
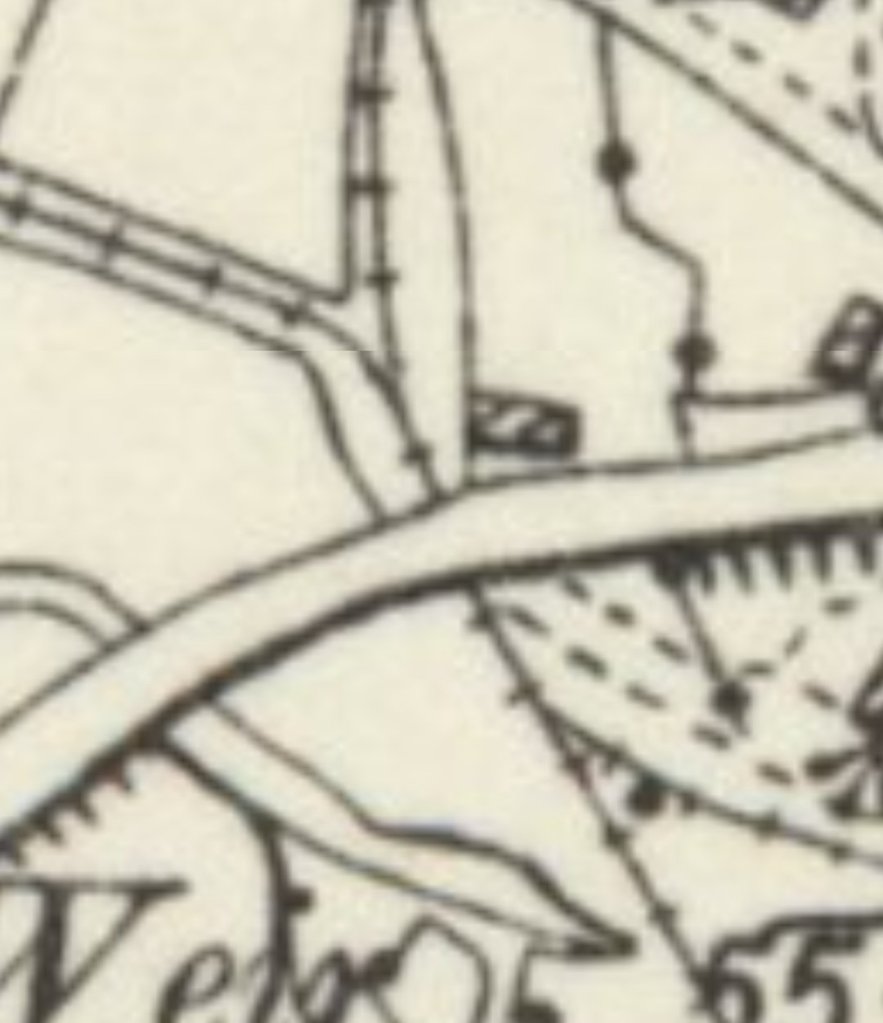
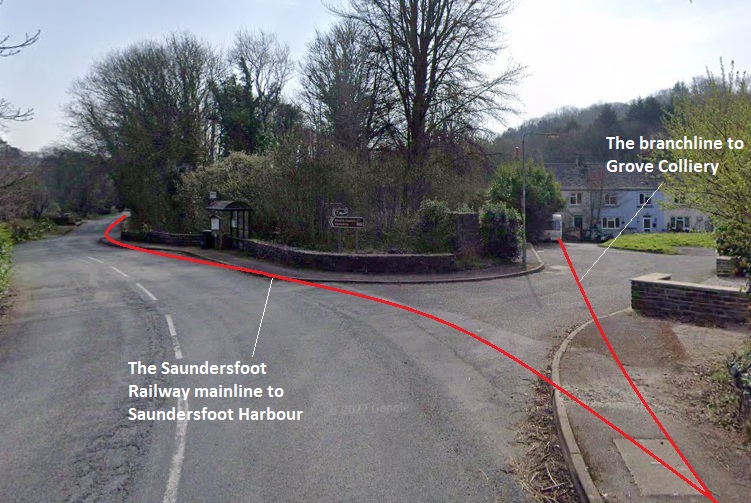
On the approach to Stepaside village the railway ran adjacent to the road. In 22st century the railway route remains protected as a footpath running just below the the level of the road. It is highlighted on this image by the red line. [Google Streetview, March 2022]This Google Streetview image shows that the remains of the Ironwork sit at the entrance to a caravan park. [Google Streetview, March 2022]The Kigetty Ironworks (or the Stepaside Ironworks) drawn as they were in 1866. The tramroads serving the site feature prominently. This is the picture on the information board at the site of the Ironworks in the 21st century. THe picture is an extract from an image shared by David Holland on the Tenby and Saundersfoot Through Time Facebook Group on 20th April 2020. [198]Closer in to the village the railway ran immediately on the verge. [Google Streetview, March 2022]The old railway with the lane beside it used to pass under the road above. There is a modern bridge in place of the double-arched masonry structure that once stood at this location. The read line entering the image from the left was the Saundersfoot Railway branch to Grove Colliery [Google Streetview, March 2022]A distant view of Stepaside from the Southwest. The arch bridge is visible at the centre of the image. This photograph was shared by Paul Wyatt on 28th January 2020 on the Kilgetty, Begelly, Stepaside and Pentlepoir Community Voice Facebook Group. [194]Looking East across the old arch bridge in Stepaside. This picture was shared on the Kilgetty, Begelly, Stepaside and Pentlepoir Community Voice Facebook Group by Paul Wyatt on 27th April 2018. [193]The old bridge at the centre of Stepaside. [192]Gary Davies shared this image from May 1970 of the old bridge. He notes that it was built by Thomas Telford. The image was shared on the Tenby and Saundersfoot Through Time Facebook Group on 9th May 2020. [197]This close up image of the 6″ OS Map shows the railway and lane running under the double-arched masonry structure supporting the road. It also highlights the two railway junctions either side the the bridge. [185]
Before passing under the bridge we take a quick look back down the branch to Grove Colliery.
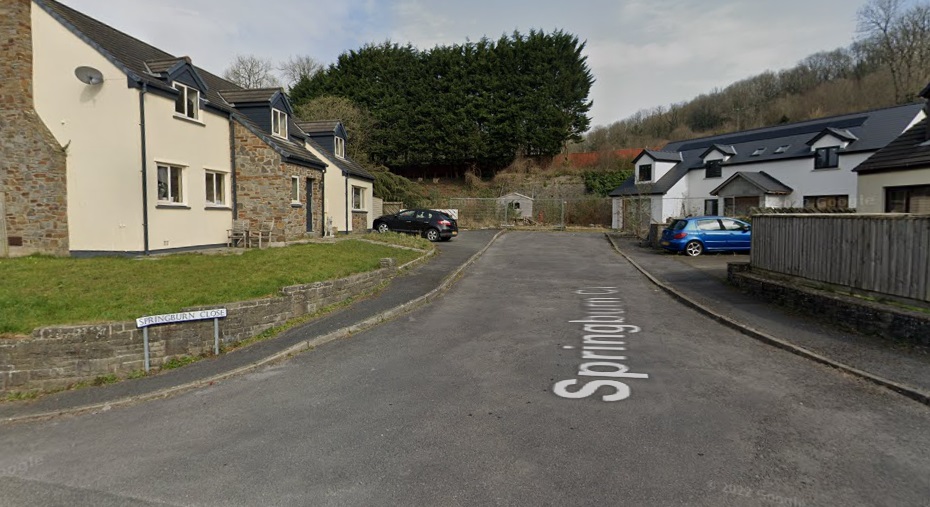
Looking south from the modern bridge over the old railway route the Saundersfoot Railway ran along the verge of the highway. A branch-line ran off to the West to Grove Colliery. The old line has been built over by a small housing estate. That branch climbed the hill behind the estate in this picture. [Google Streetview, March 2022]
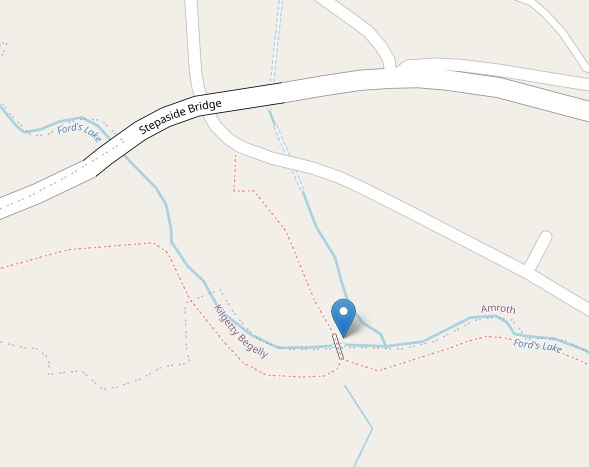
Beyond the housing visible in the picture above the railway crossed the old Kilgetty Canal before climbing the hill beyond. The tramway bridge now carries a footpath as shown on the OpenStreetmap extract below. British Listed Buildings website tells us that the bridge carried the “private branch of the tramway known as the Saundersfoot Railway to the high level of Kilgetty Ironworks of the Pembrokeshire Coal and Iron Company (which commenced production in 1849) and on to Grove Colliery of the same Company. As it is likely to have been one of the first things constructed, its date is probably c.1846. It probably remained in tramway use until the closure of the colliery in c.1900.” [196]
The bridge is a single-arch skew bridge of local sandstone, with an arch span of about 4 m. and a width of about 6 m. Low parapet on the SW side, restored, with modern railings.
The location of the bridge on the line to Grove Colliery (c) Openstreetmap. [196]
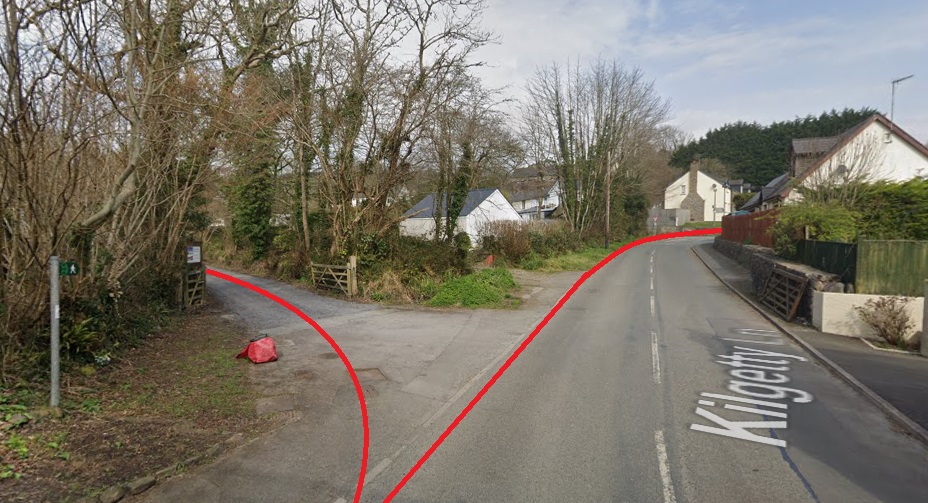
On the other side of the bridge the old railway has another junction. The longer arm to the left heads for Lower Level Colliery. The route ahead served Kilgetty Colliery. I have not as yet been able to find photographs of these two collieries.
The Railway ran on to Lower Level Colliery along the track to the left. Kilgetty Colliery was ahead on what is now called Kilgetty Lane. [Google Streetview, March 2022]The site of Kilgetty Colliery in the 21st century. [Google Streetview, March 2022]
We noted above how the route of line to Lower Level Colliery crosses the line of the A477. The composite image below brings together the 6″ OS Map of 1906 and modern satellite imagery to show how close Lower Level Colliery was to the line of the new road.
A translucent combined image of Lower Level Colliery and the modern A477. [185]
This is the point at which we leave the arm of the Saundersfoot Railway which ran North from the Harbour.
This picture of the ……. portal of the tunnel was taken and shared by Steve Briers on the Kilgetty, Begelly Stepaside & Pentlepoir Community Voice on 2nd February 2019. [184]
32. D S M Barrie, revised Peter Baughan; A Regional History of the Railways of Great Britain: volume 12: South Wales; David St John Thomas, Nairn, 1994.
36. Wing Commander Ken McKay; A Vision of Greatness: The History of Milford 1790-1990; Brace Harvatt Associates, 1989.
134. The tramroad was built between 1839 and1834, [1: p131][49] the harbour, between 1829 and 1830. [133] Boneville Court Colliery was not established until 1842 [1: p132] and the Ironworks were established in 1848/1849. The Ironworks were active intermittently until 1868 when the complex was sold to Bonville’s Court Coal and Iron Company around 1873. The ironworks finally closed in 1877 and were dismantled in 1887-89. The chimney stack above the furnaces was eventually demolished in 1909. [135]
144. These comments were made by Mike Roch and he indicates that he picked up the information from a book by M.R. Connop-Price, ‘Industrial Saundersfoot’. The comments are made alongside a series of photographs of the remailing lengths of the canal taken and shared by Mike Roch on 23rd November 2021 on the Saundersfoot & District Historical Society Facebook Group. The pictures can be found by following this link: https://www.facebook.com/groups/1806381086087895/search/?q=tramway, accessed on 23rd September 2022.
187. I found this image while searching on Facebook and cannot now find the dull link back to it. This is the record of the image that I kept … facebook_1664055146584_6979553157540841155.jpg … if anyone is better at following these things through on Facebook, please feel free to do so.


