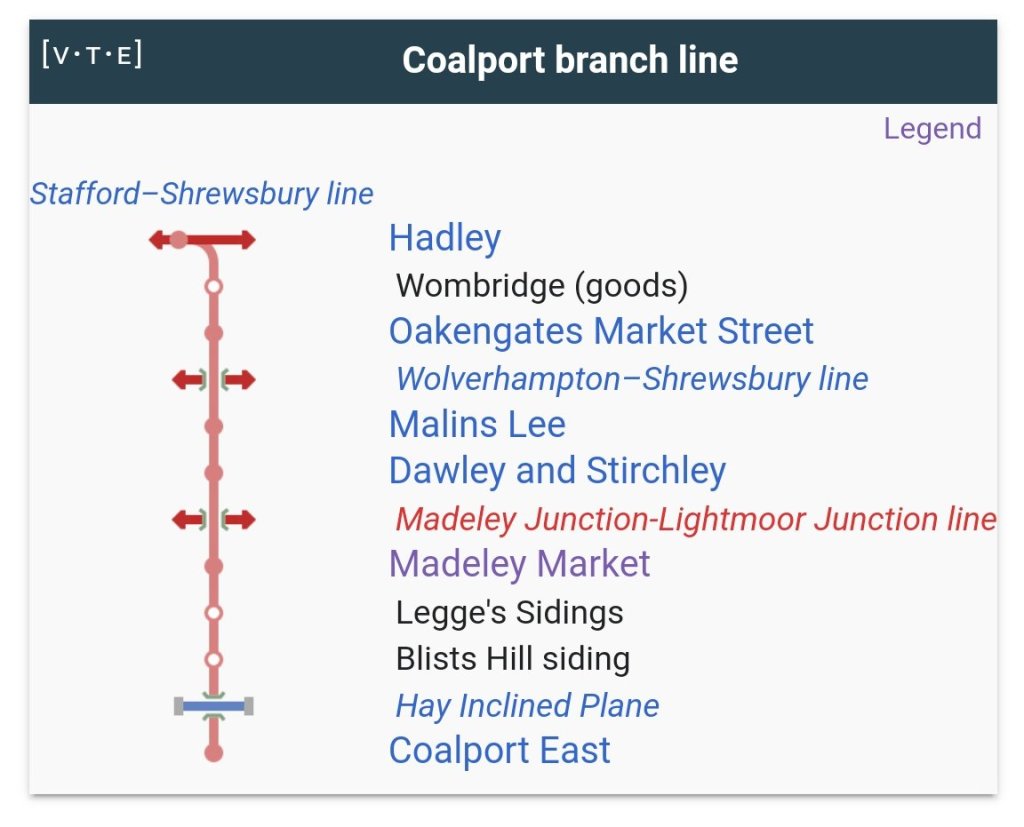
Wikipedia provides this schematic map of the Coalport Branch which highlights the key stations and sidings. [17]
History
The history of the Coalport Branch begins with competition between rival rail companies in the area during the mid 1850’s. The GWR had control of the industrial areas of East Shropshire, whereas the LNWR only had access to the area via the Shropshire Canal which ran from Trench down to Coalport.
The Canal was going into disrepair and suffering from water shortages and subsidence. Canals in the area were difficult to maintain as the various mines in the area were causing significant subsidence.
The LNWR decided that it was best to discontinue costly maintenance and instead to build a railway line along the length of the Canal from Hadley to Coalport. Parts of the Canal were converted into railway track bed.
This is the last of a series of posts about the Coalport Branch the earlier two can be found at:
The use of a canal to provide a route for the railway was something that a number of railway companies pursued. In this case, the Canal provided a route for the railway down the East side of Dawley through what is now Telford Town Park, taking it past Aqueduct, Madeley and onto Coalport by the River Severn.
The Coalport Branch of the Shropshire Canal.
The history of the LNWR railway branch line is built on the story of the Canal and it is with that story that any investigation should begin. Separate articles cover the route of the Canal and the first of these can be found on this link:
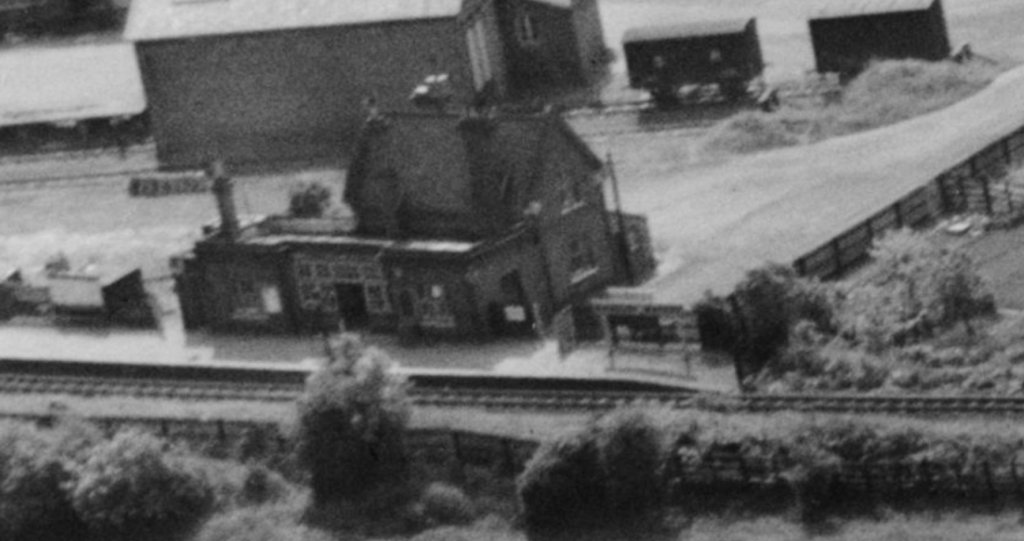
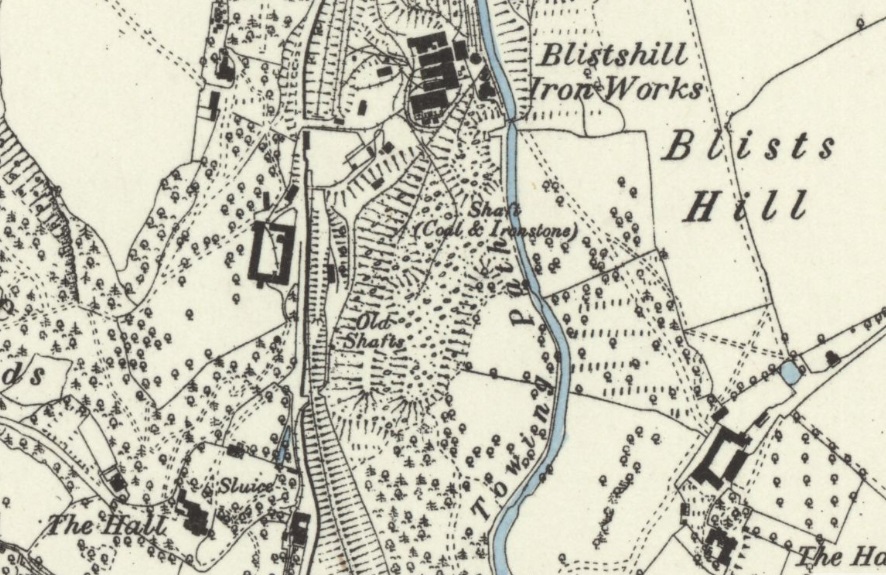
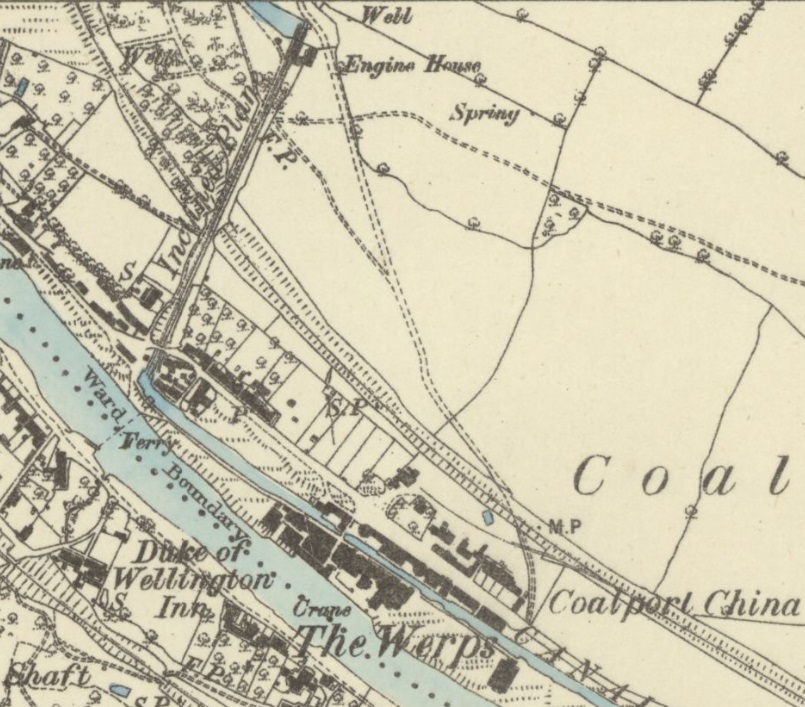
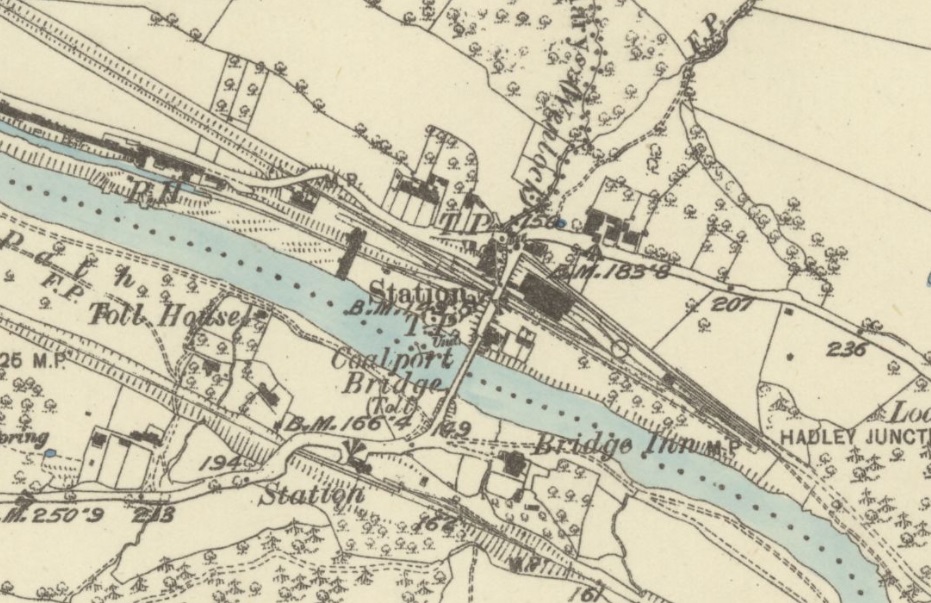
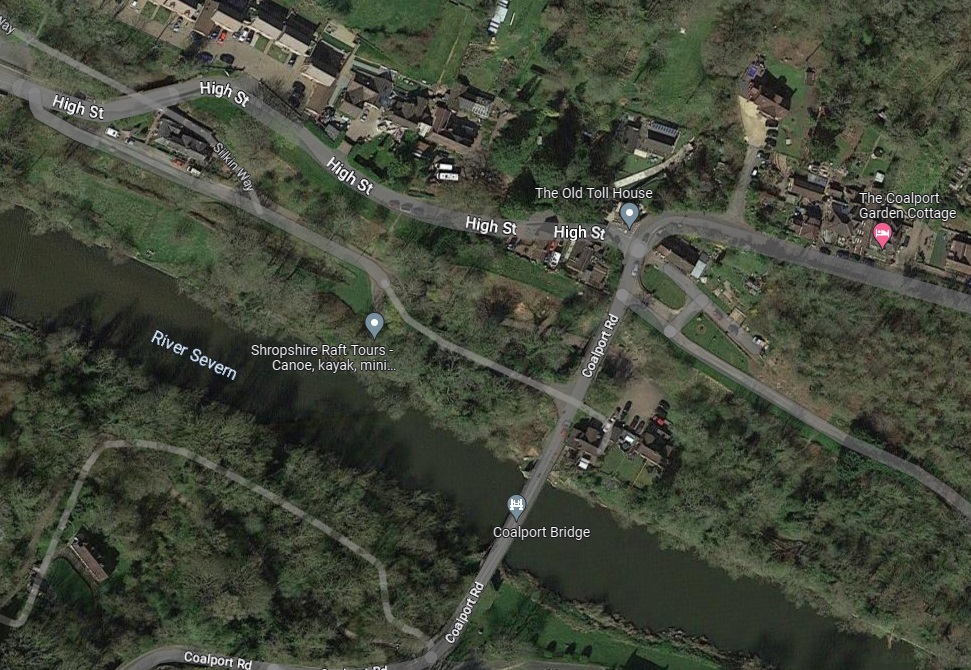
Immediately to the South of Madeley Market Station was the station goods yard. Trains from Hadley Junction accessed the yard by means of a trailing connection, as can be seen on the Ordnance Survey map extract below.
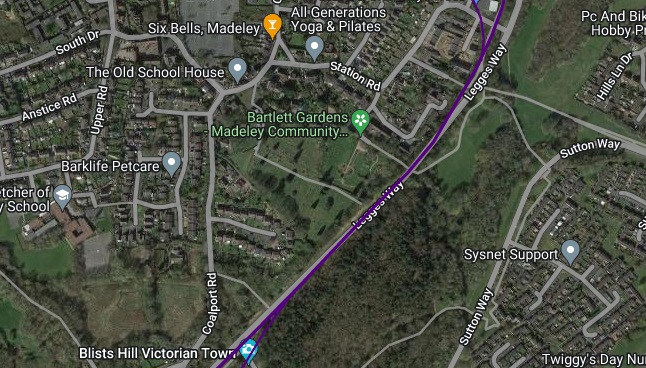
There was a siding providing access to the Blists Hill site which was known as Legge’s Siding. It is interesting to note that, while there is local confidence that Legge’s siding existed, there is little evidence of it on maps of the area. Dave Cromarty comments: “Legge’s Siding (the connection to the Blists Hill Brickworks)? … Where did it leave the branch? You try finding a map with it on it. When you do, leg it down Legges Way (the road built on that portion of the branch alignment in the 1980s) and try and fathom out where it was. I settled on lamppost MY460 as a best guesstimate, but I’m still not convinced. Just down the road there’s a quite spectacular, by horse tramway standards, bridge which carried a tramway from Meadowpit Colliery in Madeley, to Blists Hill.” [8]
The Legge in the name of the modern road and this siding was George Legge of George Legge and Sons who bought Blists Hill Brick and Tile Works in 1912 and continues in operation there unitl 1938.
Legges Siding and the shorter siding to the South provided access to the Blists Hill site. We have already noted the large number of tramroad line in the immediate area (as shown on the 1881 OS map). Looking in detail at these tramroads is not part of the plan for this article. They will be covered in another article in due course. Anyone interested in the tramroads of East Shropshire will find an introductory article on this link:
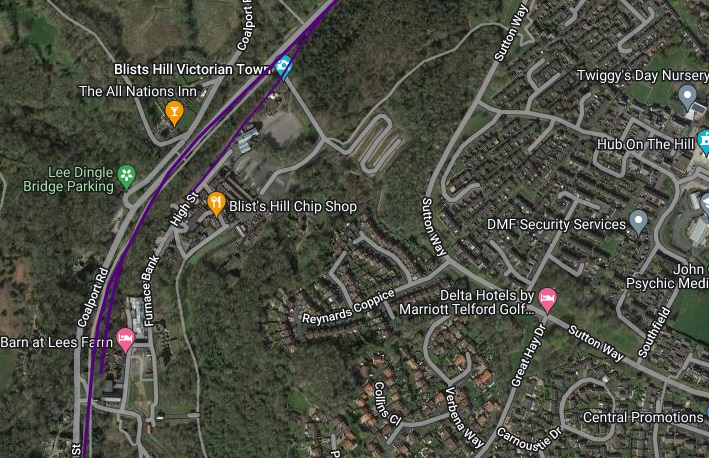
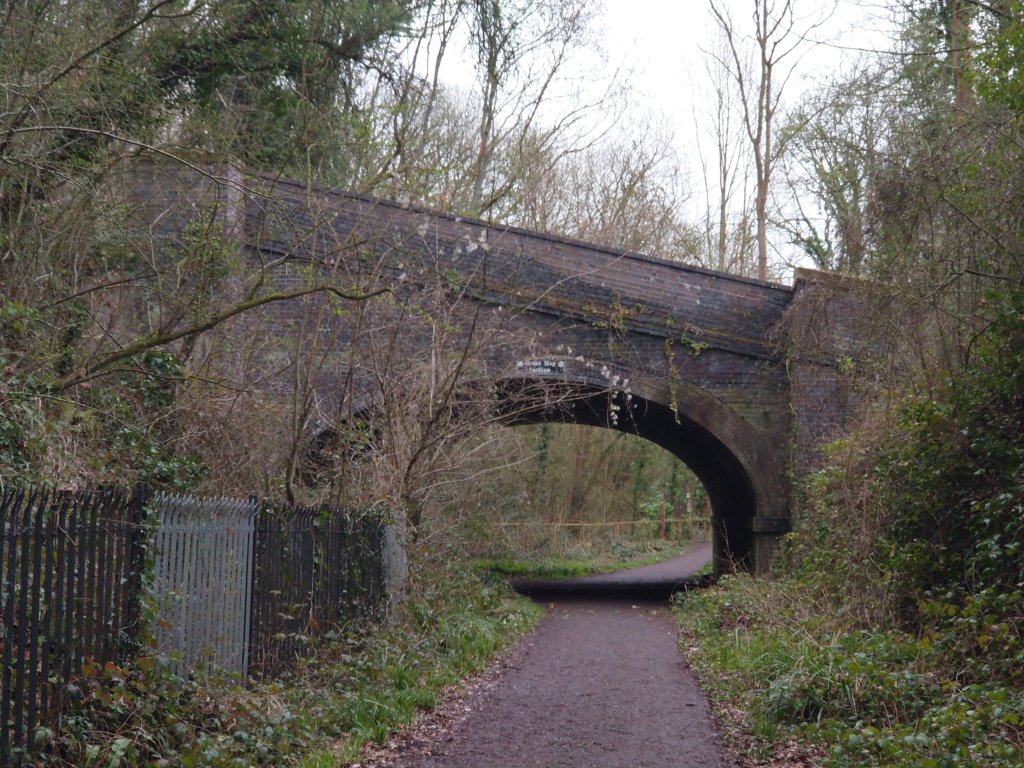
The Bridges and the Tunnel over the Coalport Branch at Blists Hill
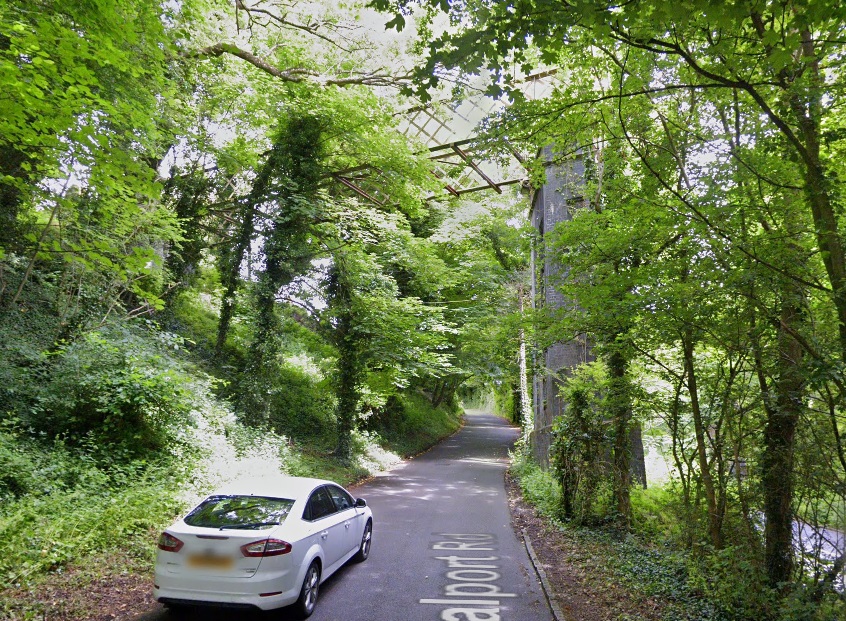
We saw these two bridges in a Google Streetview image above. The tunnel appears on the second 25″ map extract below, the two bridges on the first.
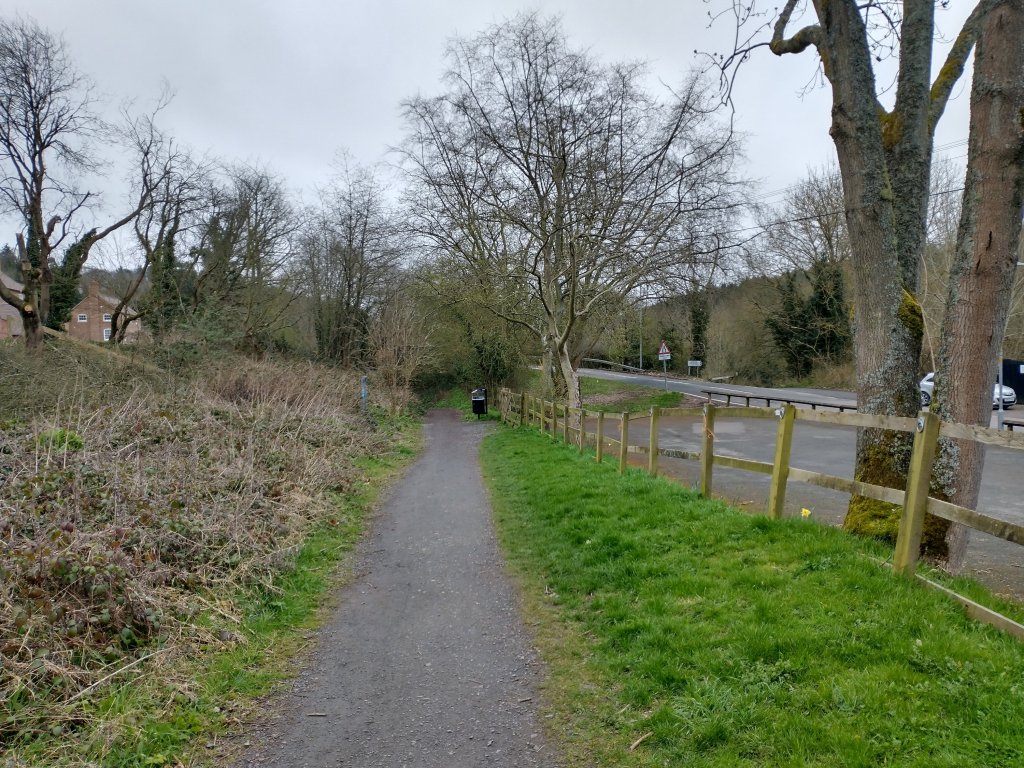
The two bridges crossing the valley can be seen in this image. Around 100 metres beyond the first bridge the old Coalport Road joins the modern road and the name of the road becomes Coalport Road. The road is then following its historic route and the old railway can be seen veering away to the left. The Silkin Way resumes following the old railway at that point. [Google Streetview, June 2022]
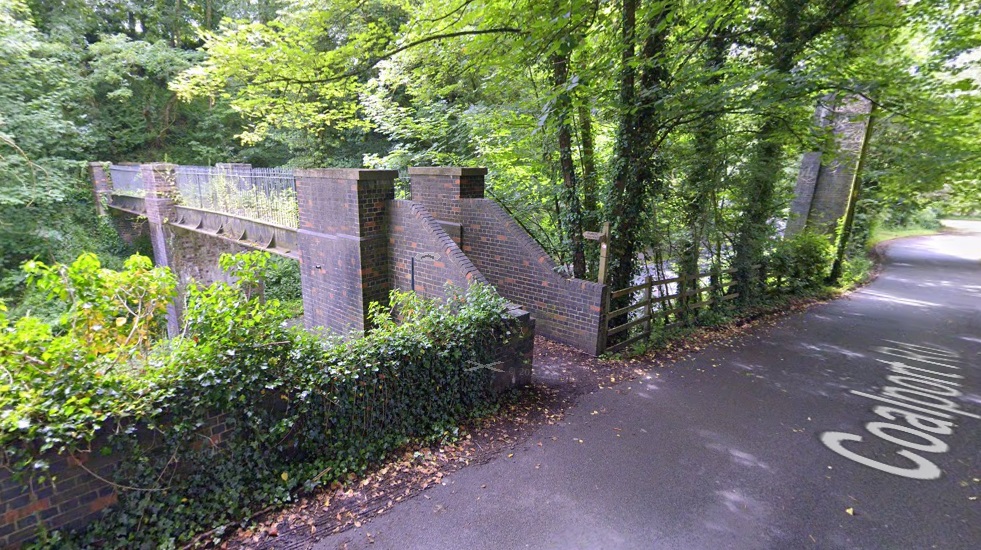
The first and lowest bridge is a footbridge which originally provided access from Coalport Road, which sits at bridge-deck level, to the Brick and Tile Works.
The footbridge which used to provide access over the Coalport Branch to the Brick and Tile Works at Blists Hill. This picture looks Southeast across the valley. [Google Streetview, June 2022]
The second, much higher bridge carried a plateway/tramway incline over the line of the Coalport Branch. the plateway brought coal from Meadowpit Colliery to power the blast furnaces at Blists Hill.
A view Northeast along Coalport Road and looking up towards the plateway bridge. [Google Streetview, June 2022]This schematic 3D map of the Blists Hill Site shows the plateway/tramway bridge bottom-centre (marked ’26’), the tunn el can be seen centre-right (marked ’56). The Silkin Way which follows the old railway curves between the two. This image looks at the site from the Northwest. [18]
The two bridges as seen from the North soon after the lifting of the track on the Coalport Branch. This image was shared on the Telford Memories Facebook Group by Andy Rose on 16th December 2021. [14]
The two bridges viewed from the Southwest with the old Coalport Branch passing underneath them. This image was also shared on the Telford Memories Facebook Group by Andy Rose on 16th December 2021. [14]
The two bridges viewed from the Southwest with the old Coalport Branch in the 21st century. This image was also shared on the Telford Memories Facebook Group by Andy Rose on 16th December 2021. [14]
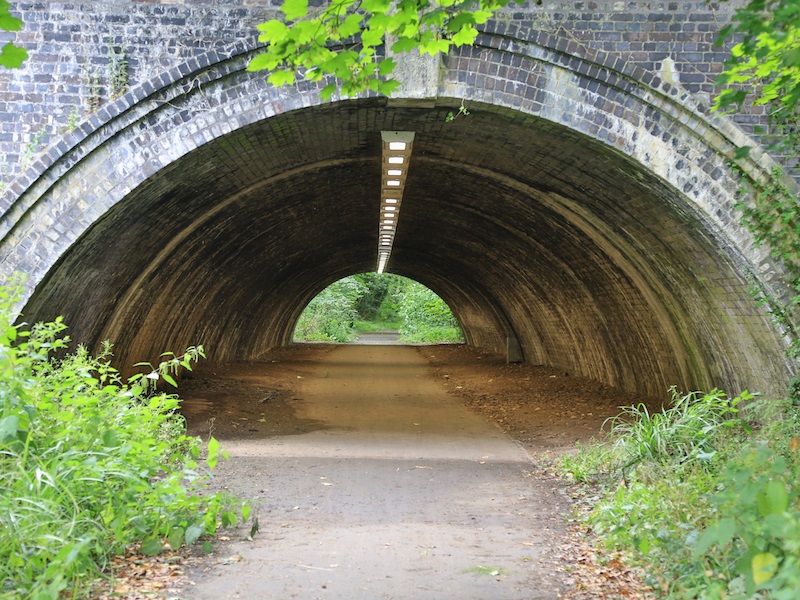
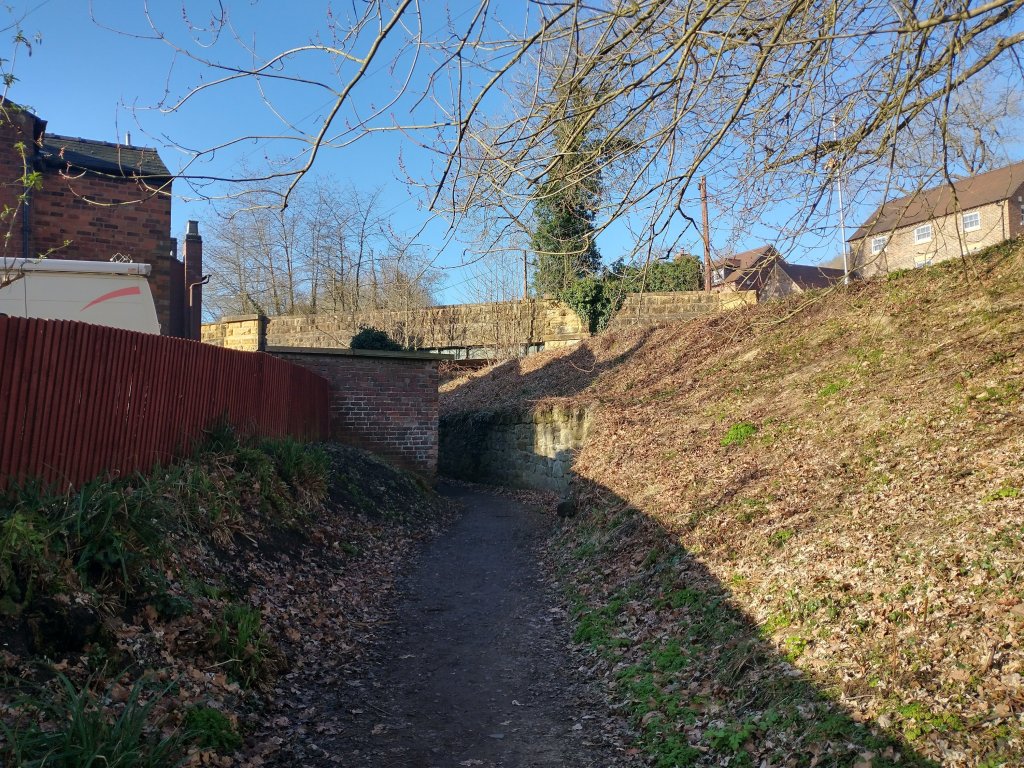
The view North from the footbridge which crosses Legges Way and used to span the Coalport Branch. [My photograph, 29th March 2023]The view South from the footbridge with the high-level tramway bridge a few tens of metres away. The point where the original Coalport Road joins Legges Way can be seen on the right close to the white van. The road South is Coalport Road and the Simkin Way which follows the old railway alignment can be seen drifting away to the left at the same point. [My photograph, 29th March 2023]A view of one of the supporting piers of Lee Dingle Bridge which carried a tramway over the line of the Coalport Branch. As far as tramway/plateway structures go, this bridge is one of the more significant! [My photograph, 29th March 2023]An enlarged map extract of the 25″ OS mapping of 1901 which focusses on the Iron Works and furnaces. Top-left, the wharf which allowed transshipment between the tramroad network and the Coalport Branch is much easier to make out. The short tunnel which carried the Coalport Branch under the site is shown clearly. [10]Google Maps 3D view of the modern Blists Hill site from the South. The old furnaces were in the area in shadow in the top-right quadrant of the photo. Railmaponline.com has superimposed the line of the old railway on the image. [5]The view South at the point where Legges Way meets the old Coalport Road. The Silkin Way which follows the old railway is on the left. [My photograph, 29th March 2023]One of the large wheel castings that mark the route of the Silkin Way. [My photograph, 29th March 2023]The Silkin Way, the route of the old railway, continues to bear away to the left. Coalport Road can just be picked out on the right of this picture rising away from the line of the old railway. [My photograph, 29th March 2023]In a short distance the line passed under the Blists Hill Works site in a short tunnel. [My photograph, 29th March 2023]The old railway tunnel adjacent to Blists Hill Furnaces. As these various images of the tunnel show, the headroom is no longer large enough for standard gauge trains. It was retained to allow pedestrian access but was also used as the route of Telford’s main rainwater drain. [12]The North portal of the tunnel from the embankment on its Northeast. [My photograph, 29th March 2023]The view North along the route of the Coalport branch from above the North Portal of the tunnel. [My photograph, 29th March 2023]The view South from over the South Portal of the tunnel. [My photograph, 29th March 2023]
The South Portal from a few tens of meters further to the South. The large retaining structure on the left holds the Coalport Road above the line of the old railway. [My photograph, 29th March 2023]
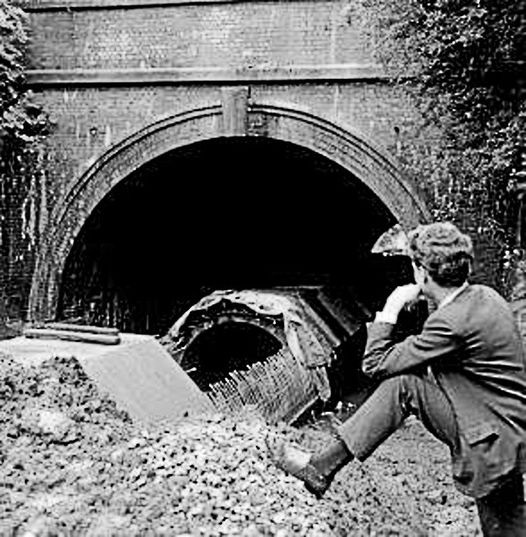
The tunnel during the construction of the surface water storm drain which passes through it. This image was shared on the Telford Memories Facebook Group by Marcus Keane on 7th January 2022. [16]
A video featuring the tunnel, made in August 2020 by Andy PCD. [17]
“The brick-lined tunnel, through which the London and North Western Railway branch line to Coalport ran, was built in the 19th century to carry plateways on top so that materials could be taken from the Lloyds Coppice area to the Blists Hill Ironworks. The tunnel is 60-70 metres in length, with a wonderful echo.” [13]
“The railway track closed in 1964 and the line became part of the Silkin Way in 1977. Underneath the old track bed lies the main sewers and water run-off for the town of Telford.” [13]
Opinion on whether this is a surface water sewer or for foul water differs. It seems most likely that it is a surface water drain.
The same surface water drain to the South of the tunnel. This photograph was shared by Dave Thomas on the Telford Memories Facebook Group on 10th March 2021. It is taken from Coalport Road and looks down the line of the Coalport Branch [19]
Recent comments from Rob Breeze clarify the position over the sewers which follow the Silkin Way …… Rob says that there are two sewers, one foul water sewer and one surface water drainage sewer for some considerable distance. He says: “I’m not sure where they merge, but from somewhere north of Blists Hill the sewer pipe is carried on brackets in the upper corner of the stormwater drain. A few hundred yards south of the Blists Hill tunnel there is a concreted area with railings overlooking Coalport Road. At this point the stormwater drain diverges down and to the right to its outfall into the river just downstream of the road junction. The sewer continues underneath the former railway line/Silkin Way to where you saw it passing under the Coalport High Street bridge in your photo. From there it runs roughly parallel to the river to near Sutton Wharf, where it crosses over to the Coalport/Gitchfield Sewage Treatment Works.” …. My thanks to Rob for his comments.
This modern photograph is taken at a similar position to the monochrome image above but, in this case from above the surface water drain. Coalport Road can be seen on the right. [My photograph, 29th March 2023]A little further to the South there is evidence of the surface water drain running under the Silkin Way. Large manholes provide access to the drain. As the old railway dropped down towards Coalport, the drain was placed ina trench which meant that the level of the Silkin Way dropped to the level of the old railway formation. [My photograph, 29th March 2023]
Blists Hill
A detailed history of the site can be found on the ironbridge.org.uk website. [11] Sections of that website are reproduced below.
An artist’s impression of the furnaces at Blists Hill, probably more idyllic than real! The picture was painted in watercolour by Warrington Smyth (1817-1890) in 1847. [11]
Blists Hill in the mid to late 19th century. [11]
“Blists Hill’s industrial peak arguably occurred in the early 1870s, when the blast furnaces were their most profitable and a new mechanised brickworks was developing. However, this decade also saw the start of the site’s decline. It was during this decade that Blists Hill’s mine stopped producing ironstone and coal. Brick and tile clay continued to be mined and used by the adjacent brickworks, but the Madeley Wood Company had to begin sourcing its raw materials for Blists Hill’s blast furnaces from further afield and in 1872 built the Lee Dingle bridge to transport materials from Meadow Pit colliery in Madeley to Blists Hill’s furnaces. The mine at Blists Hill continued to operate but by 1900 only 12 people were employed there and following the First World War it was sold several times. Abandonment plans were discussed as early as 1925 but it wasn’t until June 1941 that the mine was completely abandoned, and the shaft was filled in.” [11]
“Blists Hill’s blast furnaces also suffered declining profits from the 1870s. By this time, the furnaces’ technology was old fashioned, but its cold-blast pig iron filled a niche in the market. However, like most of the Shropshire iron industry, it was facing competition from cheaper imports of iron from Europe and America and competition from the steel industry. The lack of raw materials being mined at Blists Hill and the subsequent need to transport them from further afield also increased costs. In 1908, two of the three furnaces were blown out (ceased operating) and following a national miners’ strike in 1912, which severely impacted the supply of raw materials, the final furnace was blown out. By this time, the Madeley Wood Company’s profits were coming from coal mining rather than iron or brickmaking and so they also sold their Blists Hill brick and tile works to George Legge & Sons in 1912. Under George Legge & Sons the works produced handmade and specialist products alongside their mass-produced bricks and tiles and continued to manufacture these products until 1938, when the company was liquidated. From 1945, sanitary pipes were made at the works but this ceased in 1956 and the works was closed.” [11]
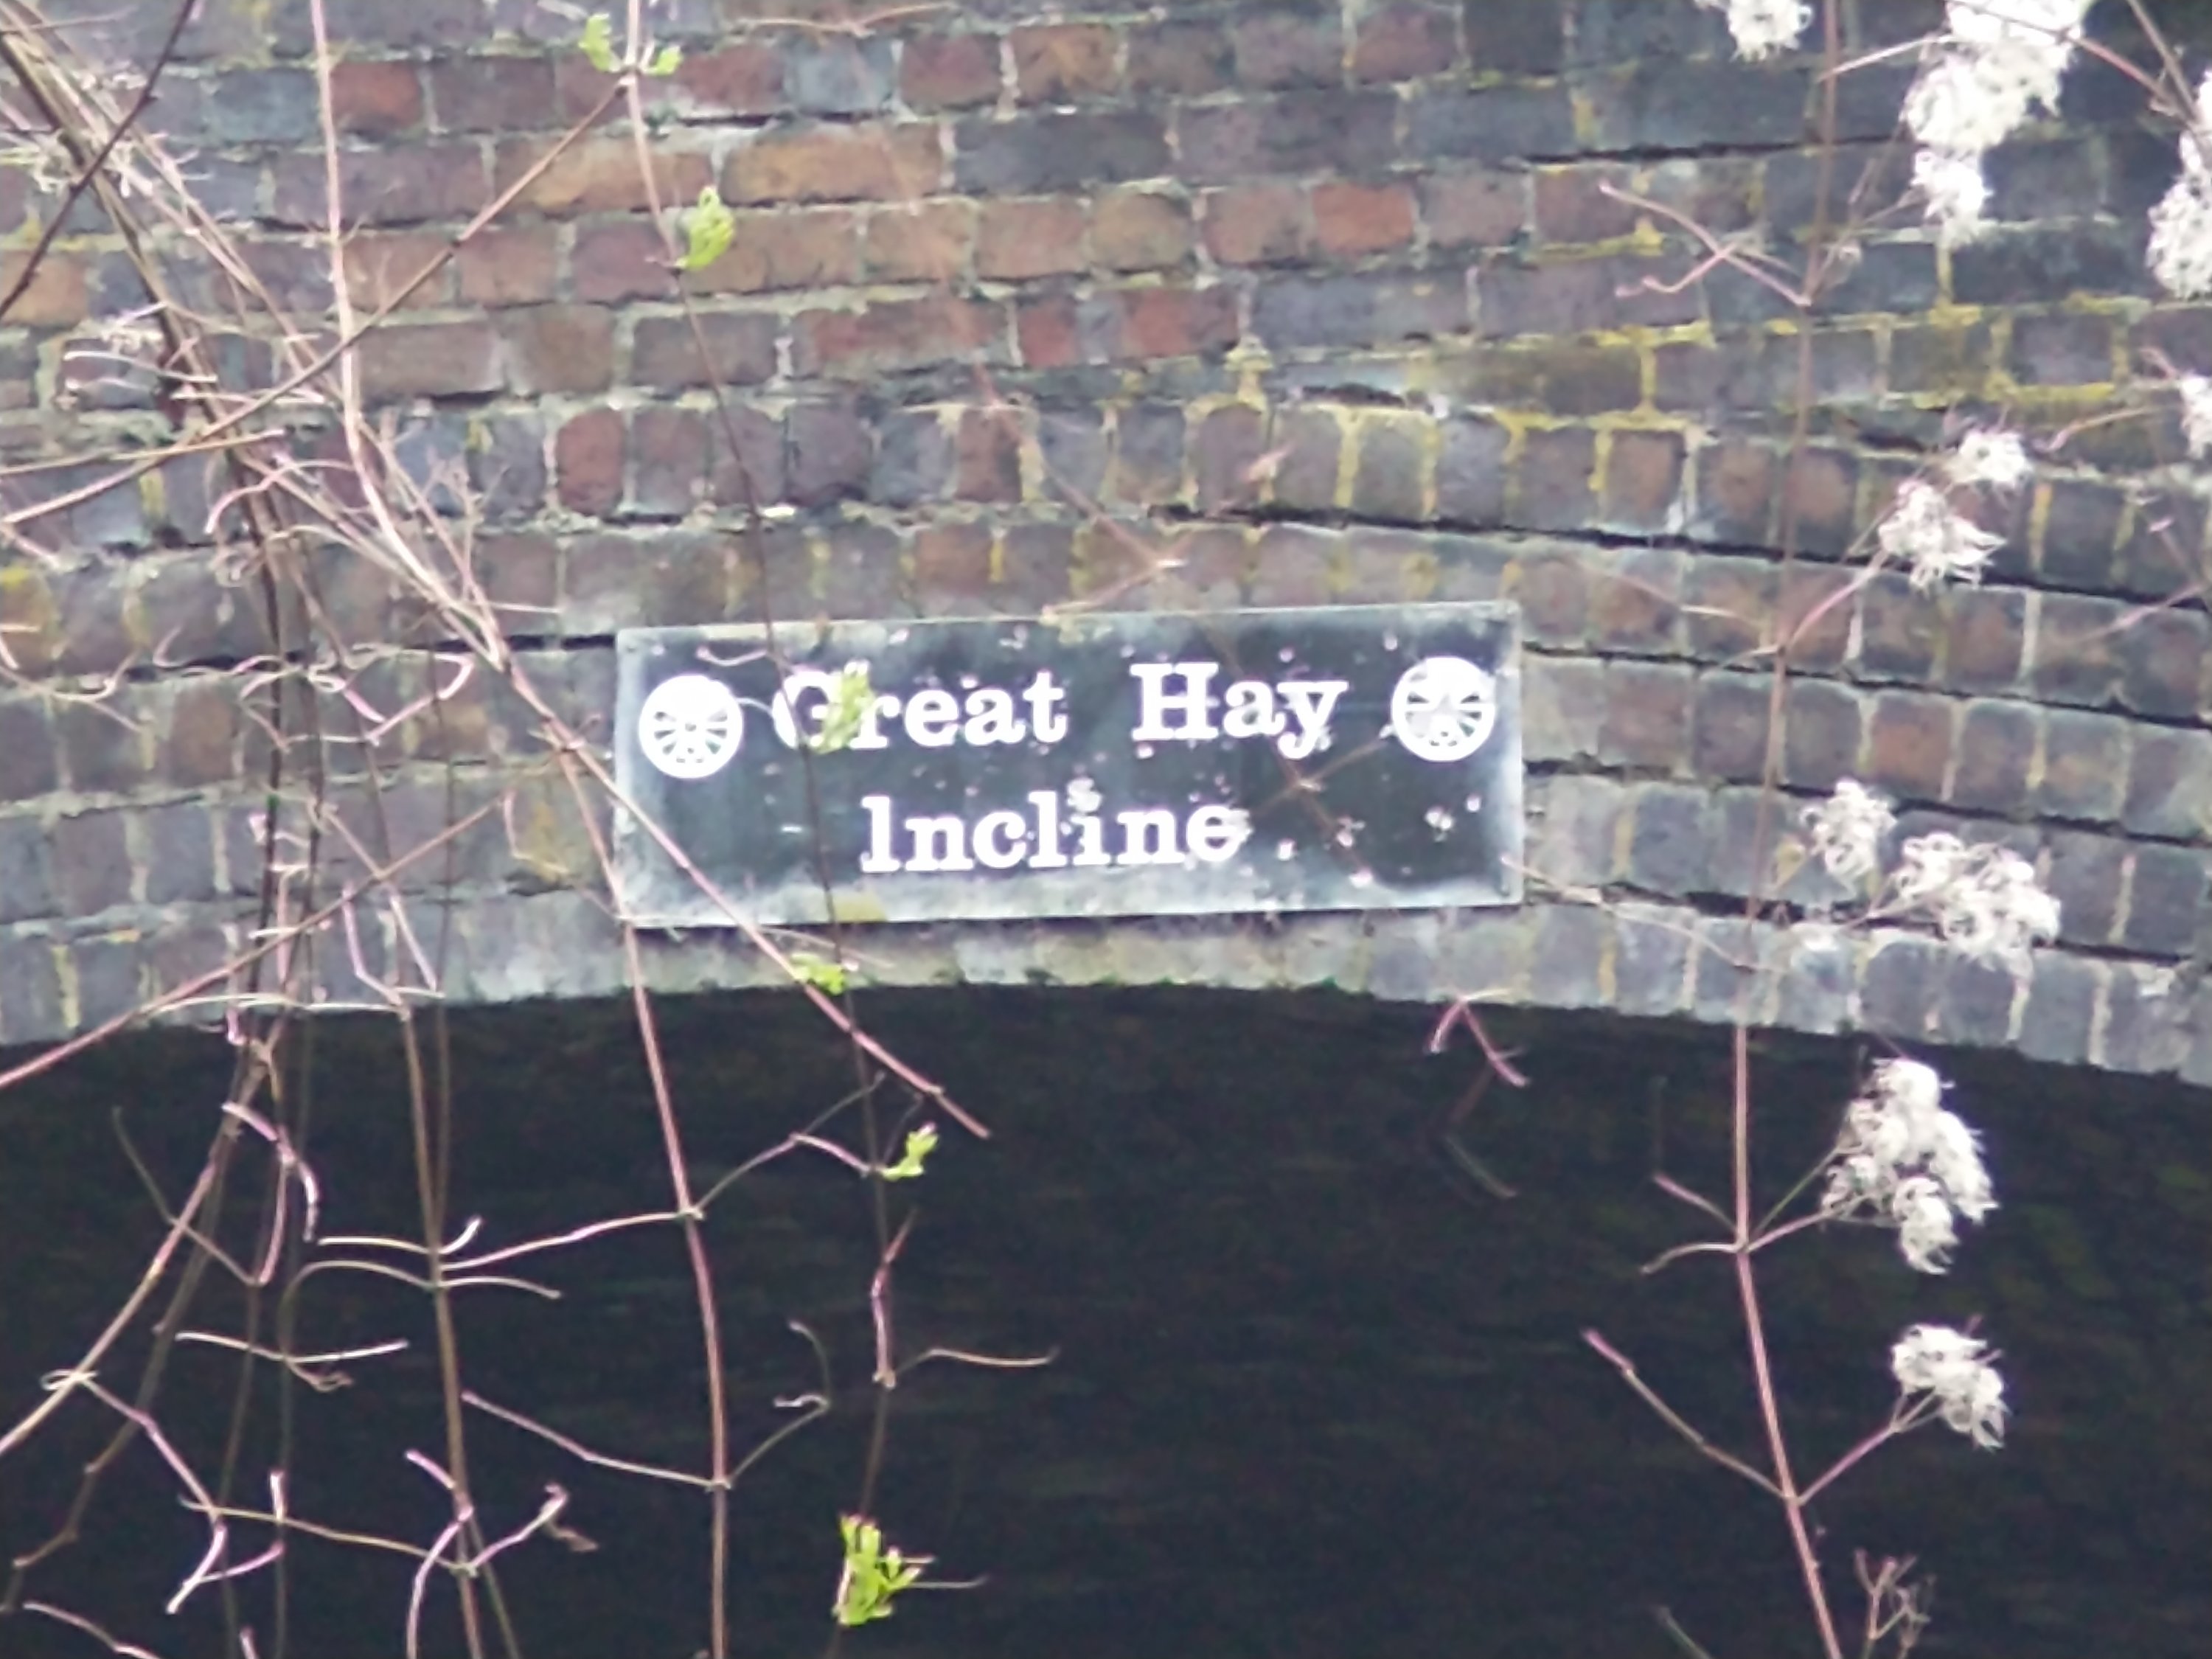
Further information about the Hay Incline Plane can be found here and here.
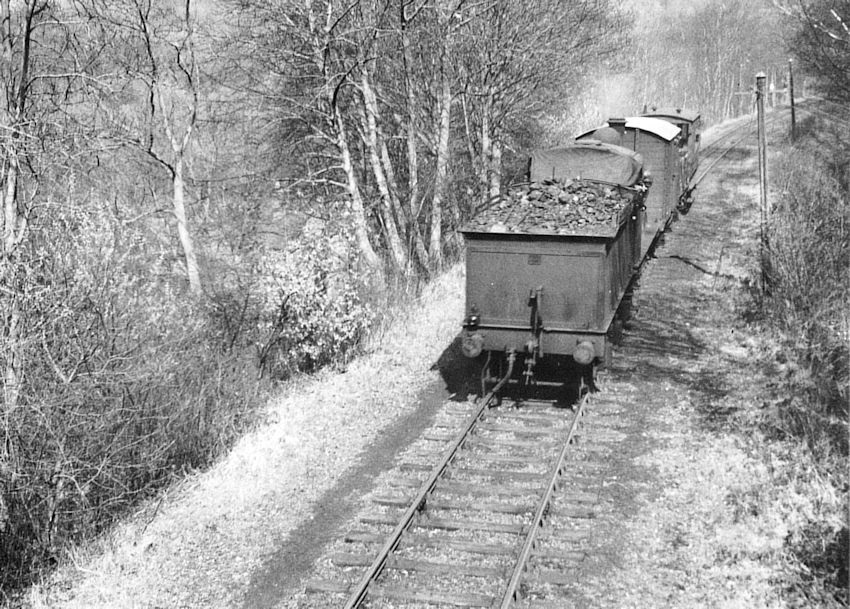
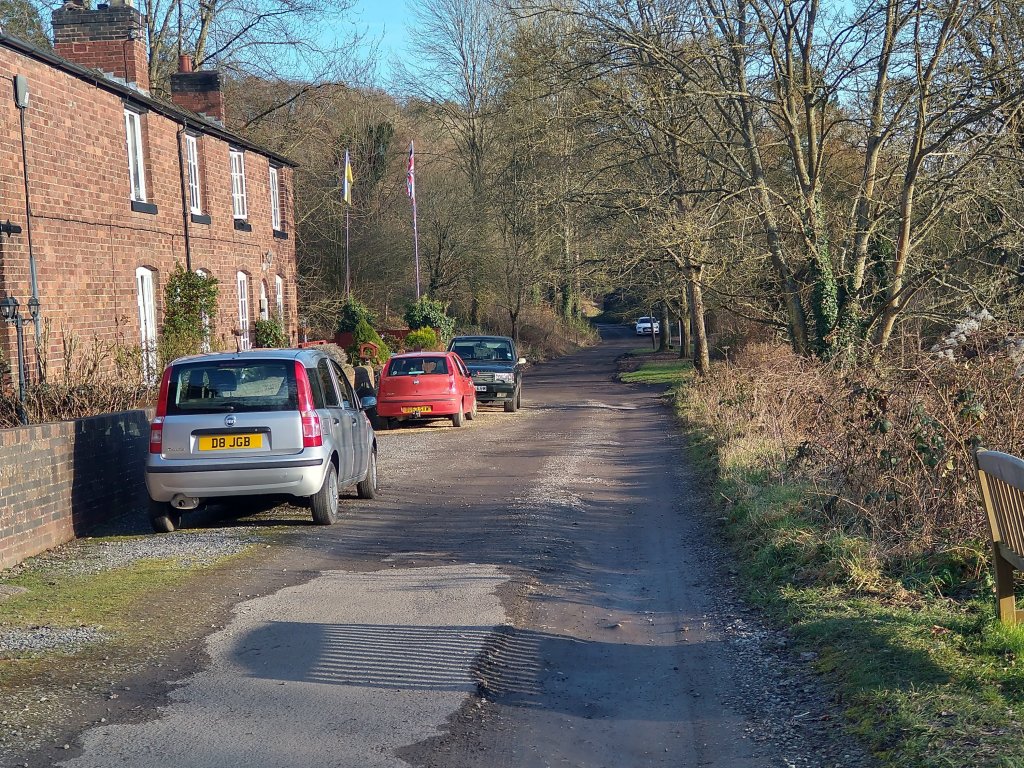
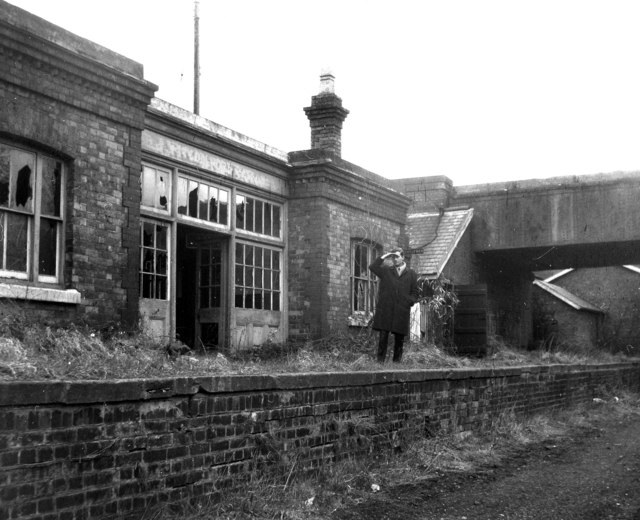
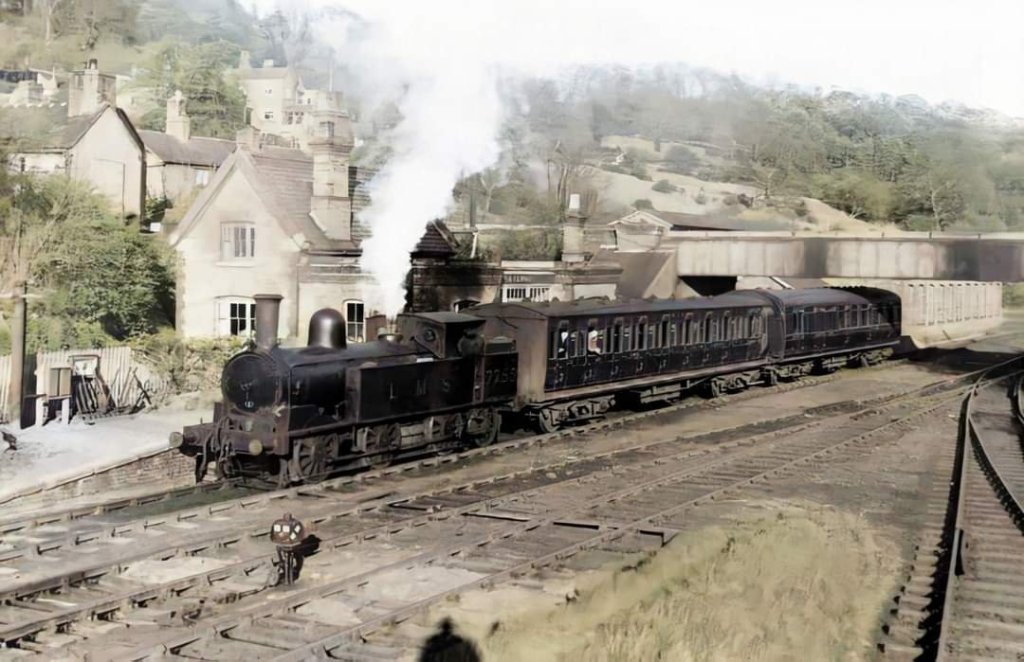
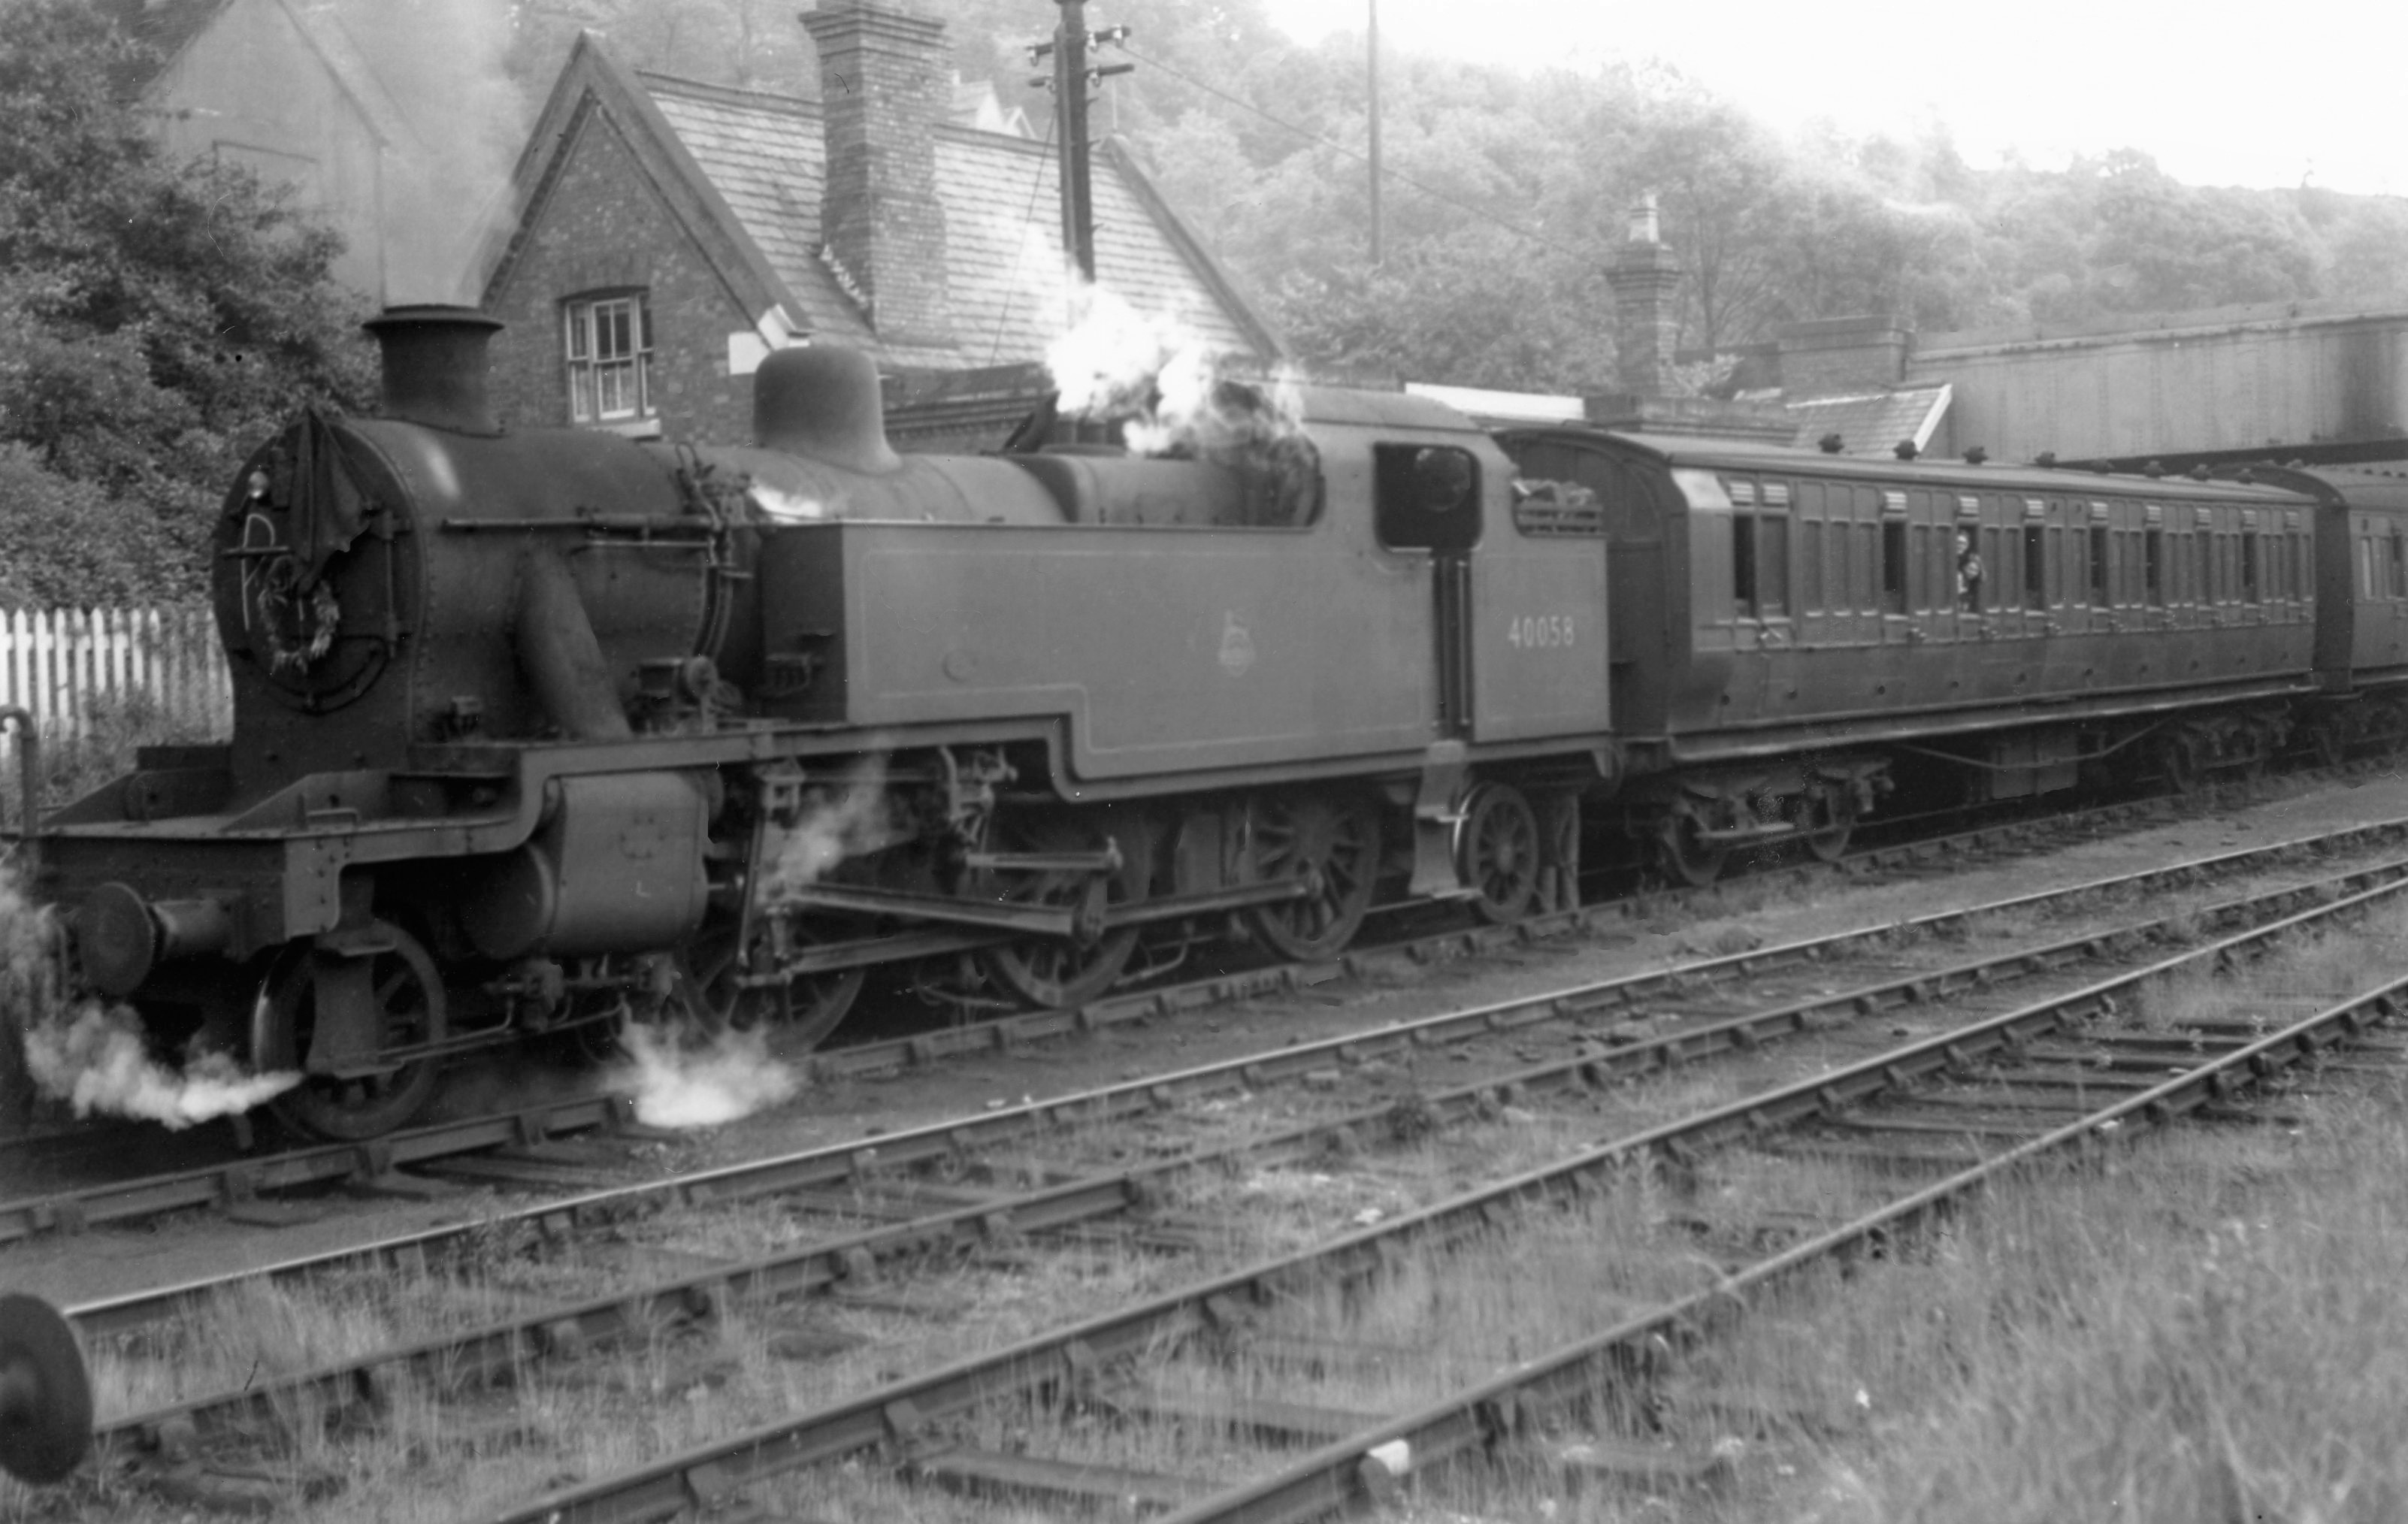
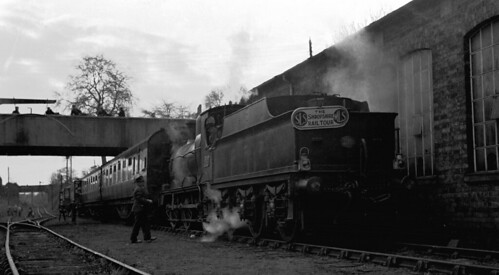
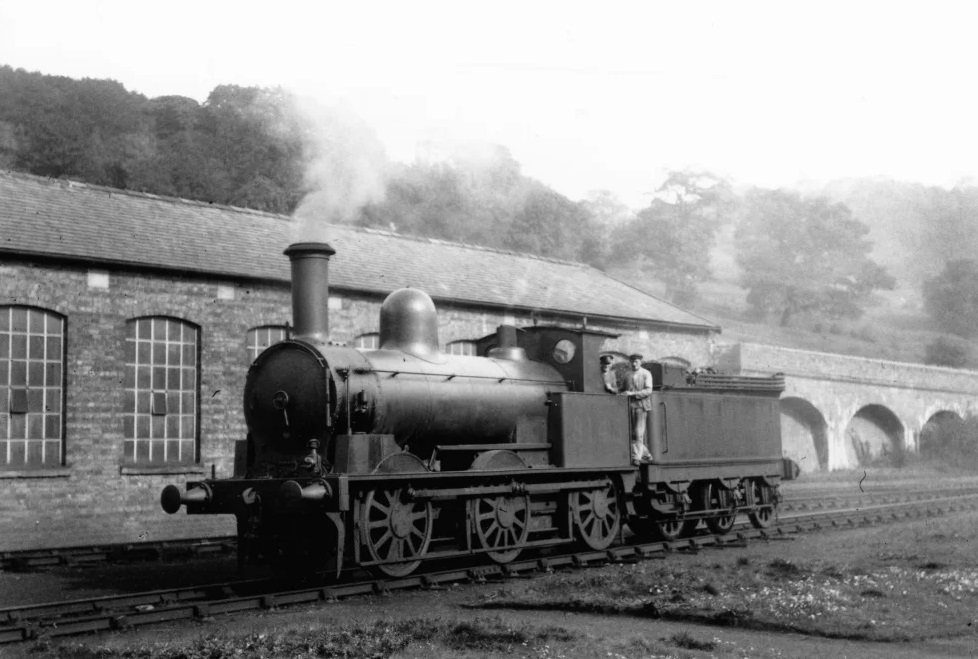
The view Southeast from under the Hay Incline. The Coalport Branch continued curving lazily to the Southeast. [My photograph, 29th March 2023]A general view from the canal at the base of the incline which shows the bridge carrying Coalport High Street across the bottom of the incline. The Silkin Way passes beneath the incline about 60 metres beyond Coalport High Street. [My photograph, 17th February 2023]Looking Southeast along the canal. What is now the Coalport China Museum is on the right between the canal and the River Severn. The buildings on the left are now a Youth Hostel. The buildings on both sides of the canal are Coalport’s two historic China Works. [My photograph, 17th February 2023]A closer view of the China Works between the canal and the river. [My photograph, 17th February 2023]Now travelling Southeast behind properties in Coalport Village. The China Works Museum and the last length of the Shropshire Canal are away to the right off the photograph. [My photograph, 29th March 2023]The route of the old railway runs at the back of properties on Coalport High Street and Riverside Avenue. [My photograph, 29th March 2023]In this next extract from the 6″ 1881/1882 Ordnance Survey which was published in 1883 we see the approach to Coalport East Station on the North side of the River Severn. The bridge carrying Coalport High Street across the station mouth and the bridge carrying Coalport Road across the main station site. [21]In this next extract from the 6″ 1881/1882 Ordnance Survey which was published in 1883 centres on Coalport East Station. The bridge carrying Coalport High Street across the station mouth and the bridge carrying Coalport Road across the main station site. Extending West from the station towards the end of the canal, is a single siding. [21]The same location but on the 25″ Ordnance Survey of the same date. Both of the two Coalport Stations show very clearly on this extract. [22]The last length of the Branch and the station site at Coalport as shown on Google Maps. [Google Maps, 1st April 2023][32]New buildings now occupy the land on the North side of the old railway. [My photograph, 29th March 2023]Approaching the Coalport East Railway Station and before passing under Coalport High Street, the car park for the Brewery Inn sits, today, on the right side of the old line. [My photograph, 29th March 2023]The bridge carrying Coalport High Street over the Silkin Way and the old railway route. The storm drain which runs under the Silkin Way is here occupying significant space under the road-bridge. [My photograph, 29th March 2023]The Silkin Way passes under Coalport High Street alongside the modern storm drain. [My photograph, 7th February 2023]Looking Northwest towards the Coalport High Street bridge across the railway. [My photograph, 7th February 2023]Looking north across the bridge carrying Coalport High Street across the station throat. [Google Maps, October 2022]Looking Southeast from the South side of the bridge past cottages on the approach to the site of what was part of the railway station yard. [My photograph, 7th February 2023]Looking West along the same road towards Coalport High Street. [My photograph, 7th February 2023]Standing close to what was the station throat looking into the station site. [My photograph, 7th February 2023]The bridge over Coalport East station as in appears in 2023. [My photograph, 7th February 2023]Much closer to the bridge. The river is on the right. [My photograph, 7th February 2023]Coalport East station building on 15th April 1963. It was still standing despite the closure of passenger services in 1952. It sat on the West side of the bridge. Beyond the bridge the carriage shed can be seen, (c) Dr Neil Clifton and included here under a Creative Commons Licence. As can be seen, the original bridge is of a different construction from that in place in 21st century. (CC BY-SA 2.0) [23]A similar view of Coalport East Station when the passenger service was still operating. The train was known as the Coalport Dodger. The picture was taken between the two world wars. Apparently, this picture came originally from Gerry Hadley, grandson of engine driver Charles Hadley, of Coalport, who used to drive the train. It was carried by the Shropshire Star on 24th June 2020. [24]Another view of the station building and road bridge. The service from Wellington has just arrived at the platform. This image was shared by Metsa Vaim EdOrg on the Telford Memories Facebook Group on 12th December 2020. [25]Coalport East Railway Station seen from the passenger approach to the station. This image was shared on the Telford Memories Facebook Group by Marcus Keane on 28th January 2017. [26]The passenger facilities at Coalport East in the 1930s. This image comes from David Clarke’s collection and was kindly shared with me by email in April 2023. [41]The Coalport Dodger leaving Coalport East in 1948 in the hands of LMS 6601. The loco was renumbered 46601 by BR. It was a Webb 1P 2-4-2 5′ 6″ tank. This image was shared by Derek Norry on the Telford Memories Facebook Group on 3rd January 2016, copyright/photographer not known. [27]Standing in approximately the same place as the locomotive in the last image this 0-6-0 tender loco is in charge of a four coach excursion train at Coalport East Railway Station. The locomotive is numbered 2516 and is an ex-GWR Dean Goods, not to be confused with a Churchward 43xx 2-6-0 which for a time carried this number. 2516 was built in March 1897 and withdrawn in May 1956 The train is the SLS Shropshire Special and the photo was taken on 23rd April 1955. The picture was shared by Lin Keska on the Telford Memories Facebook Group on 5th February 2017. [28][37]2516 is shown here in colour still at the same location (note the efflorescence on the brickwork of the retaining wall. This time the loco is probably ready to depart as all the individuals around it in the image above are now back on the coaches. This image comes from David Clarke’s collection and was kindly shared with me by email in April 2023. [41]Another SLS special, this time in September 1959. David Clarke notes that the picture was taken on 12th September 1959. This image comes from David Clarke’s collection and was kindly shared with me by email in April 2023. [41]The Coalport Dodger at Coalport East Railway Station. This picture was taken by W.A. Camwell in 1948 and colourised by Simon Alun Hark. It was shared by him on the Shropshire Nostalgia and Film Facebook Group on 28th January 2022. The carriage shed is visible beyond the overbridge. The locomotive is an 0-6-2T ex-LNWR Coal Tank loco now carrying the LMS No. 7755. he leading coach is LMS No. 7199. Locomotive No. 7755 had previously carried the LNWR numbers 237 (from 1886 to 1921) and 3739 (from 1921 to 1928). It was built at Crewe, entering service in August 1886. It was withdrawn in September 1947, giving it a service life of just over 61 years [29][35]1952 was that last year with a passenger service on the line. This photo shows one of the last passenger services to leave Coalport East Railway Station. Probably it was the last such service. This appears to be BR loco No. 40058. The image was shared on the BROS Facebook Group by Peter Hunting on 7th May 2015. It was also sent to me by David Clarke. [30][41]LNWR loco No. 549, a Webb Coal Tank (2F), preparing to leave Coalport for Wellington. This is clearly a stage shot with those involved posing for the camera. The loco bore this number from entering service in December 1886 until it was renumbered 3287 in January 1922. It was renumbered by the LMS at the end of 1927 to LMS No. 7550. It was withdrawn in July 1931. The image is clearly a staged shot with those involved posing for the camera This image comes from David Clarke’s collection and was kindly shared with me by email in March 2023. [33][36]
Locomotives and Rolling Stock on theCoalport Branch
In LNWR days the branch passenger service was generally served by small tank locos and goods by 0-6-0 tender locos. However, details are are a bit sketchy. William H. Smith points to allocation of locomotives to Shrewsbury Shed (LNWR No. 30) as a way to narrow down the field of possible motive power on the line. He says that there is only one eyewitness confirmation of a locomotive that operated on the line 2-4-0 LNWR No. 1000. [15] Locomotives from the shed allocation in 1917 which may have operated on the line include, “0‒6‒2T ‘Coal tanks’, LNWR Nos. 119, 292, 2459 and … 2‒4‒2T LNWR No. 1157 … along with 17in Goods 0‒6‒0s 1713, 2437.” [15]
Smith presumes that goods traffic between the two world wars would have been carried predominantly in ‘private owner’ open wagons. He mentions local coalfield owners, Cornish china clay companies, “‘North and Rose’ and ‘St. Austell China Clay Co’ are two such wagons noted from photographs. ‘Lilleshall’ and ‘Madeley Wood Co’ were locals, as was the ‘Mid-Shropshire Coal Co, Coalport’. …. Movement of wagons to and from the Staffordshire and Shropshire Coalfields would be expected and indeed, following a check on some post-war wagon labels from the branch, consignments from Littleton, Baggeridge, Donnington and Rugeley Collieries were confirmed.” [15]
“During the war passenger services were reduced and the branch provided storage sites for ammunition and special trains were observed hauled by Stanier Class 5 4‒6‒0s.” [15]
Nationalisation initially brought little change. “The ‘Dodger’, as it was popularly known, was still hauled by the 0‒6‒2T coal tanks and there was still ex-LNWR 2‒4‒2Ts Nos. 46601 and 46757 around in 1949 and 1950 as a reminder of past days. However, in December 1949 Wellington shed received its first allocation of Fowler 2‒6‒2Ts (40005 and 40006) and these took over much of the passenger work.” [15]
Throughout much of the life of the branch, passenger services consisted of four trains on weekdays, the journey taking 30 minutes. [42] It seems that the quality of the service deteriorated somewhat over the last 2 to 3 years of the life of the line. If a train arrived at all, it was often made up of a single coach. Midland Red replacement bus services became more frequent and passenger numbers became unsustainable.
By 1952, Fowler 2‒6‒2T No. 40058 was in use on the line often pulling a single coach, bunker first down the line to Coalport before running round it’s coach and returning to Wellington smoke-box first. Rumours of closure during the autumn of 1951 “became fact and it was 40058 which hauled the final regular passenger train over the branch on 31st May 1952. Malins Lee station was also closed completely from this time.” [15]
The goods service was also undergoing changes, “in May 1953 the 0‒6‒2T Coal Tanks were withdrawn from the Shrewsbury shed and ex-Midland 2F 0‒6‒0s began to appear on Coalport goods trains. Soon afterwards control of the line passed to the Western Region and Coalport became known as Coalport ‘East’, supplies of stores now arriving from Swindon.” [15]
By December 1960, very little goods traffic was being generated on the southern portion of the line and the section of the line from Dawley and Stirchley Station to Coalport was closed. It seems that traffic from the Lilleshall Company had also ceased. The remainder of the line was clearly in terminal decline and was closed in July 1964. [15]
And finally …
It seems as though the Coalport Branch was given some serious consideration as a home for a Railway Preservation Society. … The group which eventually became the Chasewater Railway (Chasewater Country Park, Brownhills West Station, Pool Lane (Off the A5), Burntwood, Staffs WS8 7NL).
The Coalport Branch was one of three lines under consideration when looking for a permanent home for the railway. These notes were made in 1960 after a visit to Coalport. [43]
“On Sunday, October 23rd 1960, a small party consisting of David Ives, James Slater, T. Jones, Frank Harvey and D. Noel Draycott visited the Coalport to Hadley line in North Shropshire. Built by the London & North Western Railway, it runs from the very attractive Vale of Severn across high land and through an early centre of the iron and steel industry to a junction on the Wellington to Stafford line.
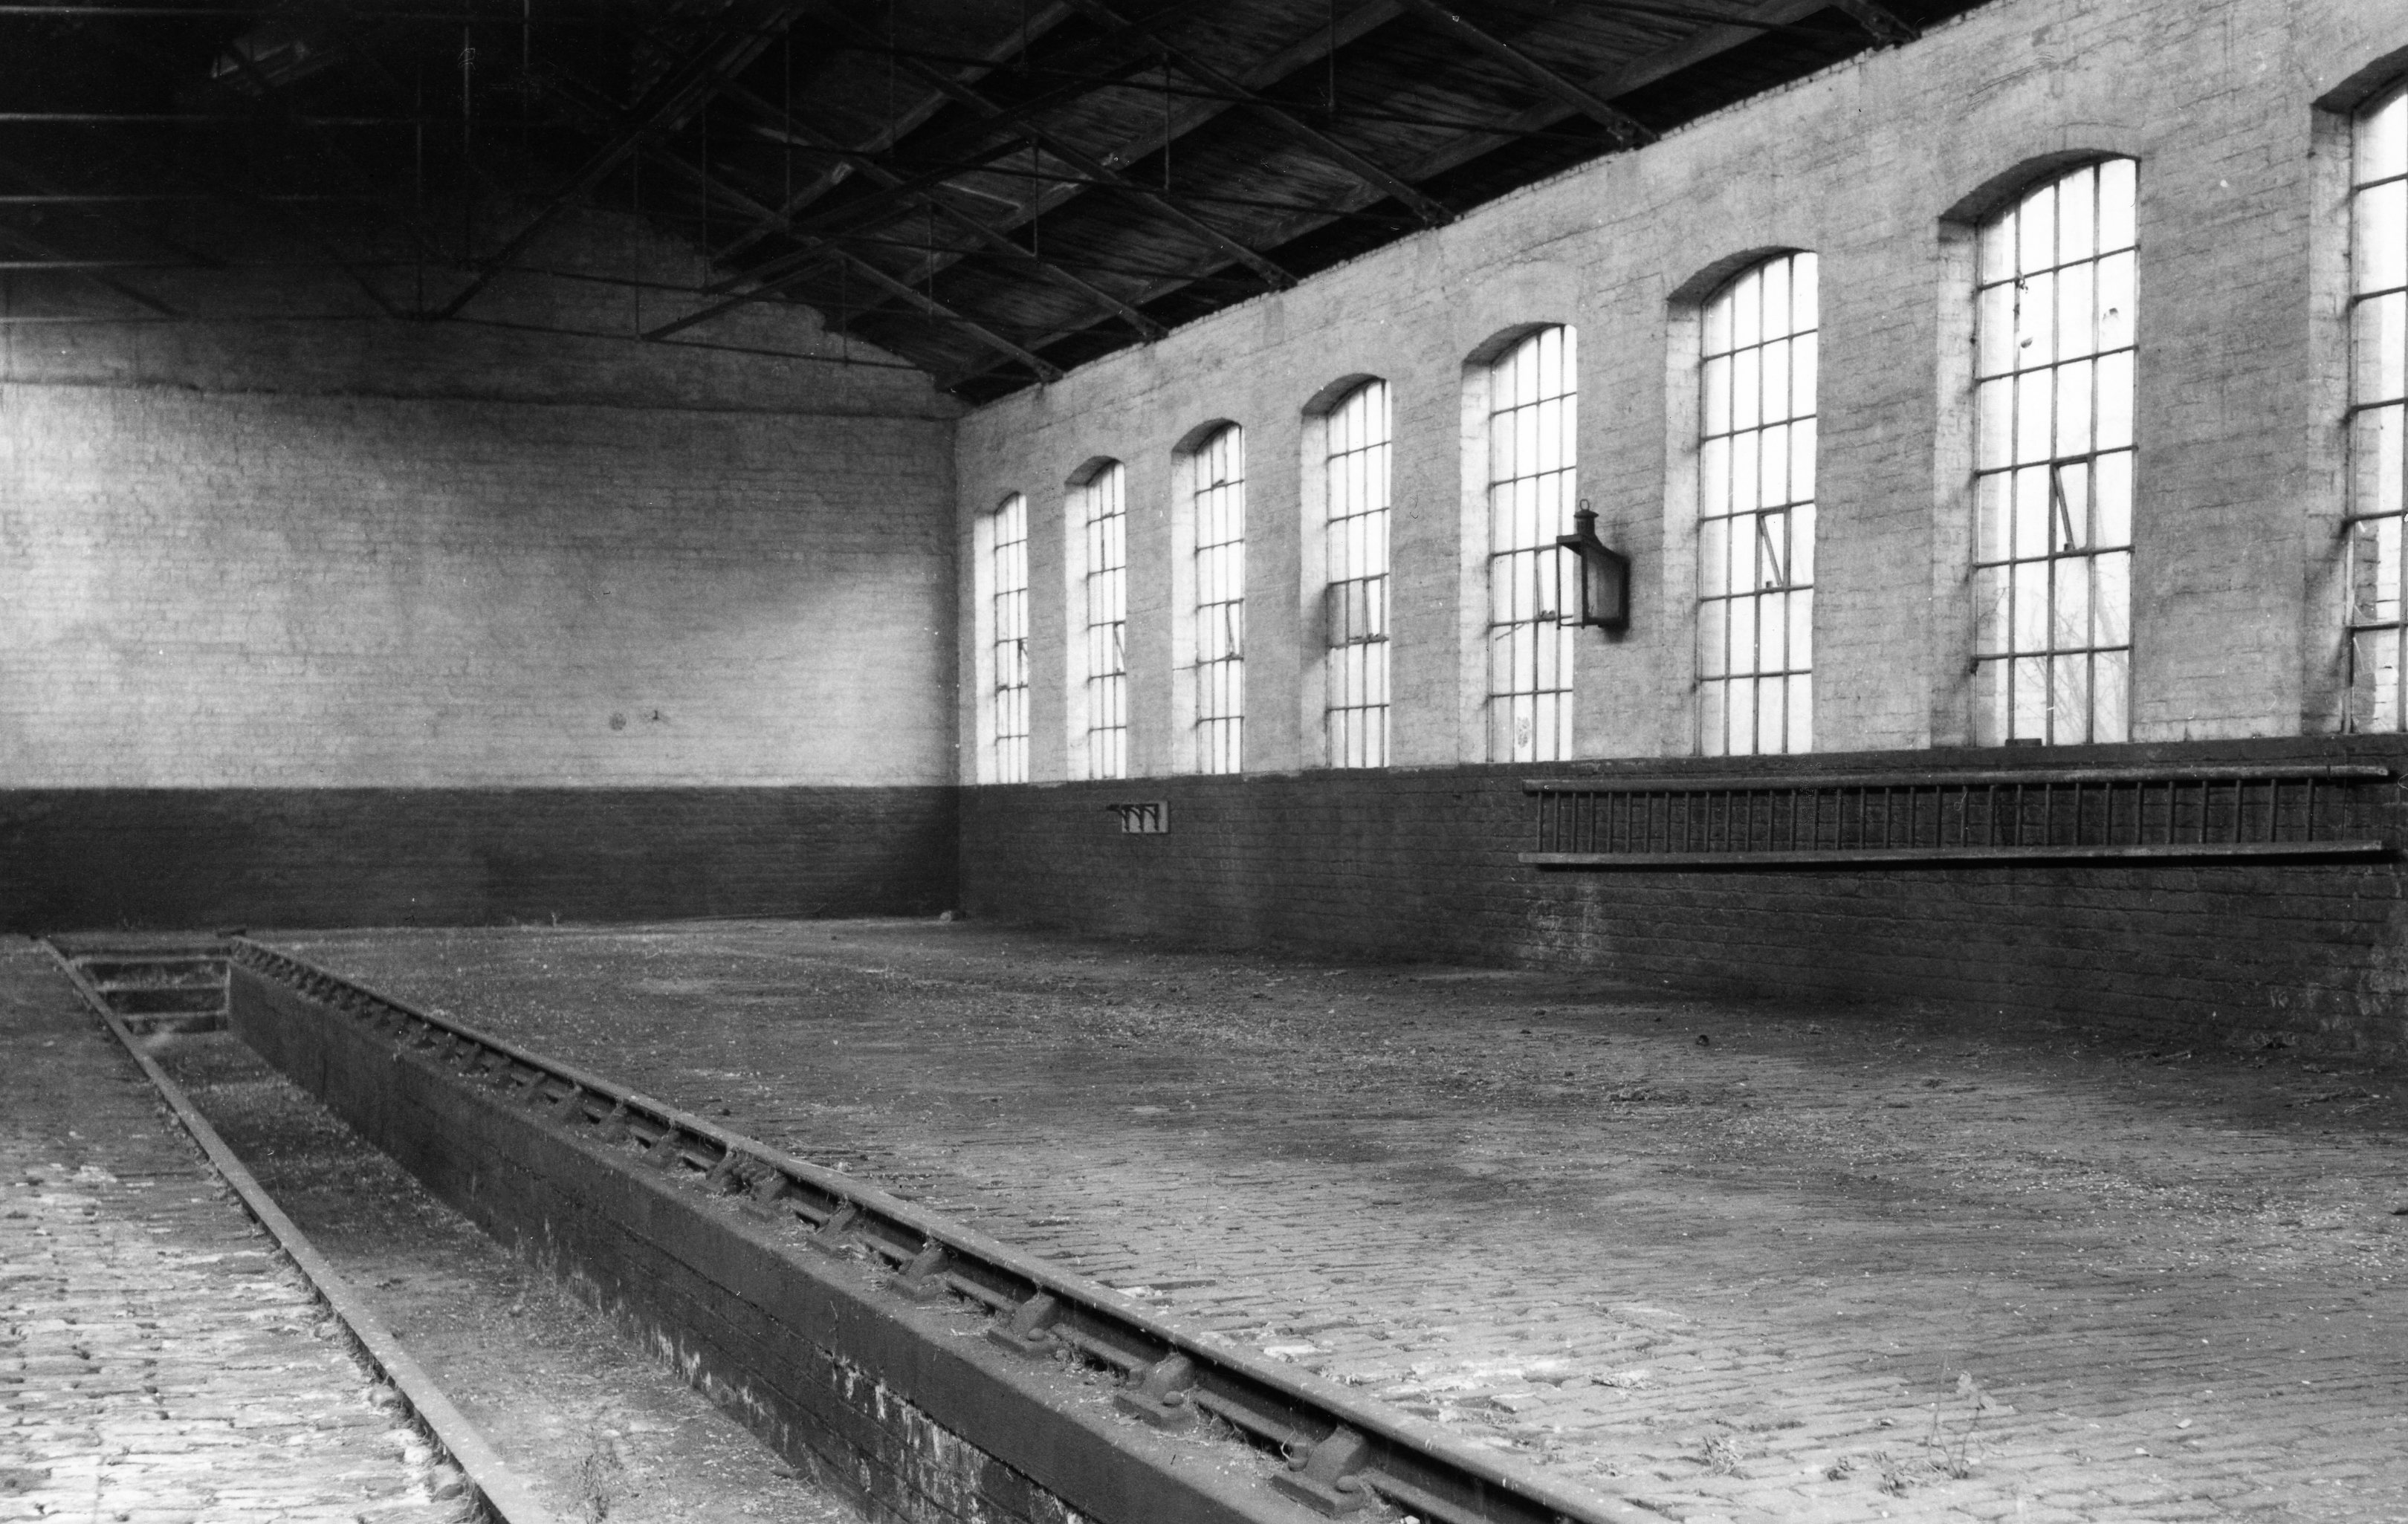
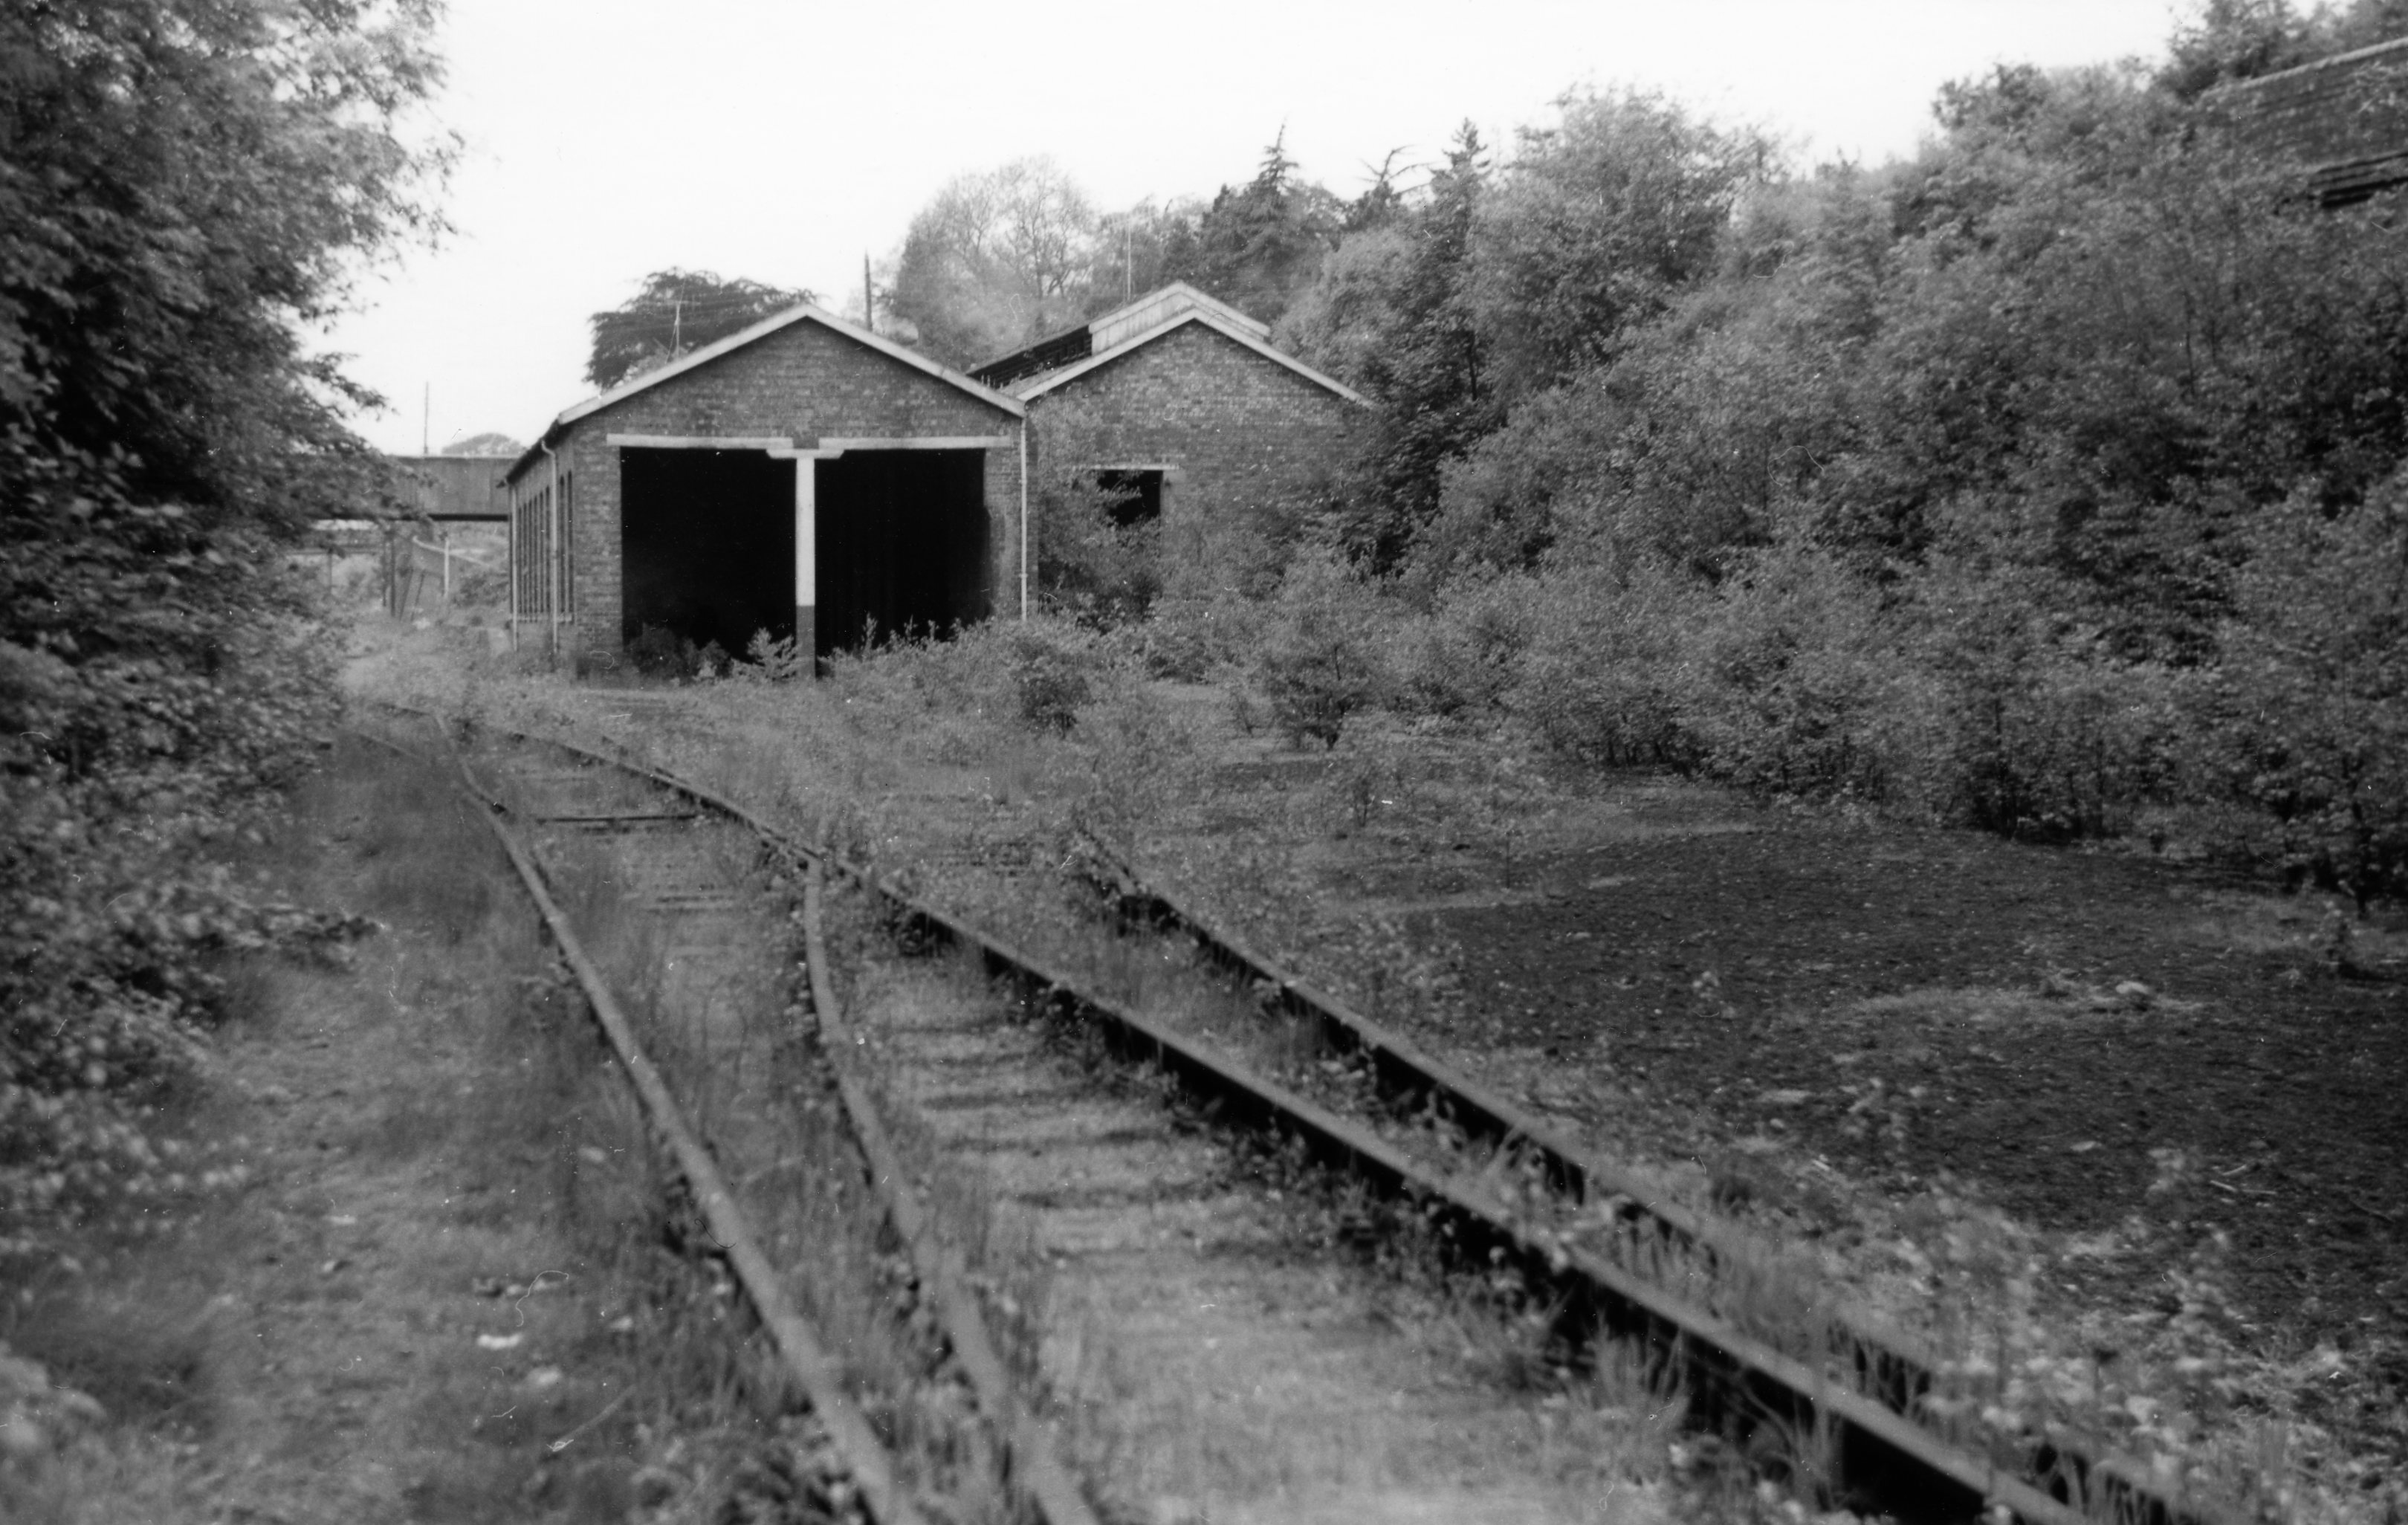
The branch had a terminus at Coalport Station which stands on a long shelf, part cut out and part built up on the steep bank of the Severn. The station buildings comprise a booking office, general and ladies waiting rooms, backing on to the station master’s house. The signal box was demolished and a ground frame installed shortly before services were withdrawn in 1952. The goods shed has also been demolished, but the three short sidings remain in the yard.
Further along the shelf past the station, there is a carriage shed sufficient for four bogie carriages, and an engine shed for two locomotives. These buildings are in fair condition, and the engine shed contains a large workshop space as well as a pit. All these buildings back on to the hillside, and on the opposite side there is a pleasant stretch of wooded land before it falls steeply away to the river which forms the boundary of the railway property.
The line rises steeply from Coalport Station with attractive views across and up the Severn Valley before it turns away to cross pleasant rolling countryside to the small town of Madeley. Here the station building is used as an office by an engineering firm, but the yard of some half dozen sidings is practically disused.
The line then continues to Dawley and Stirchley Station where a total of some 15 wagons of coal showed that an active coal merchant used the yard. As dusk was falling, the tour of inspection finished at this point. All the members of the party were impressed by the potentialities of the line for day trippers.” [43]
It seems that, had the decision been made to create a preservation line on the alignment of the Coalport Branch, Telford Steam Railway on the Wellington and Severn Junction line would have been very unlikely to have been formed. The line would, however, have been an excellent partner to the museum developments in the Severn Gorge which were to follow over the following decades, even if there would have been little room for the Silkin Way.
References
Bob Yate; The Shropshire Union Railway: Stafford to Shrewsbury including the Coalport Branch; Oakwood Press, Usk, 2003.
Just after I completed the first article in this series, David Clarke, who wrote the book ‘The Railways of Telford‘, [34] contacted me to offer some photographs from his collection for inclusion in this short series of articles. I reviewed David’s book soon after we moved to Telford. It was an invaluable first step for me in exploring the railways and plateways (tramroads/tramways) of the area. That review can be found here.
David Clarke; The Railways of Telford; Crowood Press, Marlborough, Wiltshire, 2016.
3 thoughts on “The Railways of Telford – the Coalport Branch of the LNWR – Part 3 – Madeley Market Station to Coalport East Station”
robbreeze
Hello Roger – I was interested by your comment concerning “stormwater drain or sewer?” on the section of the branch south of Blists Hill. The answer, for some considerable distance, is both. I’m not sure where they merge, but from somewhere north of Blists Hill the sewer pipe is carried on brackets in the upper corner of the stormwater drain. A few hundred yards south of the Blists Hill tunnel there is a concreted area with railings overlooking Coalport Road. At this point the stormwater drain diverges down and to the right to its outfall into the river just downstream of the road junction. The sewer continues underneath the former railway line/Silkin Way to where you saw it passing under the Coalport High Street bridge in your photo. From there it runs roughly parallel to the river to near Sutton Wharf, where it crosses over to the Coalport/Gitchfield Sewage Treatment Works.


Hello Roger – I was interested by your comment concerning “stormwater drain or sewer?” on the section of the branch south of Blists Hill. The answer, for some considerable distance, is both. I’m not sure where they merge, but from somewhere north of Blists Hill the sewer pipe is carried on brackets in the upper corner of the stormwater drain. A few hundred yards south of the Blists Hill tunnel there is a concreted area with railings overlooking Coalport Road. At this point the stormwater drain diverges down and to the right to its outfall into the river just downstream of the road junction. The sewer continues underneath the former railway line/Silkin Way to where you saw it passing under the Coalport High Street bridge in your photo. From there it runs roughly parallel to the river to near Sutton Wharf, where it crosses over to the Coalport/Gitchfield Sewage Treatment Works.
I hope this helps, Rob
Dear Rob, thank you, that is a great help.
I have added a note into the text of the article.