Tag Archives: standard-gauge

Railways in West Wales Part 1C – Pembrokeshire Industrial Railways – Section C – RNAD Trecwn

A holiday in West Wales in the early Autumn of 2022 led to a little research on the railways in the area.

This is the sixth article about Pembrokeshire’s Railways. The first focussed on the pre-railway age, the second focussed on the mainline railways of the county. The third article focussed on the industrial railways in the vicinity of Milford Haven. The fourth and fifth on the Saundersfoot Railway in Pembrokeshire. The links to these posts are provided below. This article concentrates on the railways associated with RNAD Trecwn (the Royal Navy Armaments Depot at Trecwn).

Railways in West Wales Part 1A – Pembrokeshire – Before the Railway Age

Railways in West Wales Part 1B – Pembrokeshire – the Mainline Railways

https://rogerfarnworth.com/2022/09/20/__trashed-3/

Railways in West Wales Part 1C – Pembrokeshire Industrial Railways – Section B – The Saundersfoot Railway (First Part)

Railways in West Wales Part 1C – Pembrokeshire Industrial Railways – Section B – The Saundersfoot Railway (Second Part)

The Royal Navy Armaments Depot at Trecwn (RNAD Trecwn)

RNAD Trecwn is, in the 21st century, a decommissioned Royal Navy Armaments Depot, south of Fishguard in the village of Trecwn, Pembrokeshire, West Wales.

It was built in 1938 to store and supply naval mines and munitions ordnance to the Royal Navy. The depot apparently came into its own during the cold war. During those times 400 permanent workers were employed at the site, housed in an MoD built small town. The site had an on-site, 2ft 6in (762mm) narrow gauge railway, built using copper to reduce sparks. Weapons were both delivered to the site and then distributed using standard gauge rail to Fishguard, Neyland for Milford Haven, and latterly Pembroke Dock. [56]

Trecwn as shown on the 1948 revision of the 6″ Ordnance Survey published in 1953. A series of three sidings are shown to the South of the main RNAD site. [57]

The Standard-gauge Branch Line and Sidings – Just south of the main entrance to RNAD Trecwm and the main security fence to the site was a single railway platform, for workers access to the depot. Within the security fence, a marshalling yard of 8 parallel loops existed, shunted by a dedicated MoD diesel hydraulic shunting locomotive. The line then extended on down the valley, through a gauge exchange shed for access to the narrow gauge network, and then provided direct access to the 58 cavern storage chambers via a series of herring-bone shaped sidings. [59]

Supply trains would run along the dedicated branch-line from the site: to Fishguard Harbour; to Neyland for Milford Haven; and Pembroke Dock. At Fishguard the line extended beyond the ferry terminal at Fishguard Harbour railway station, continuing along the breakwater to a single line spur, allowing for transfer of munitions to Royal Navy ships. [59]

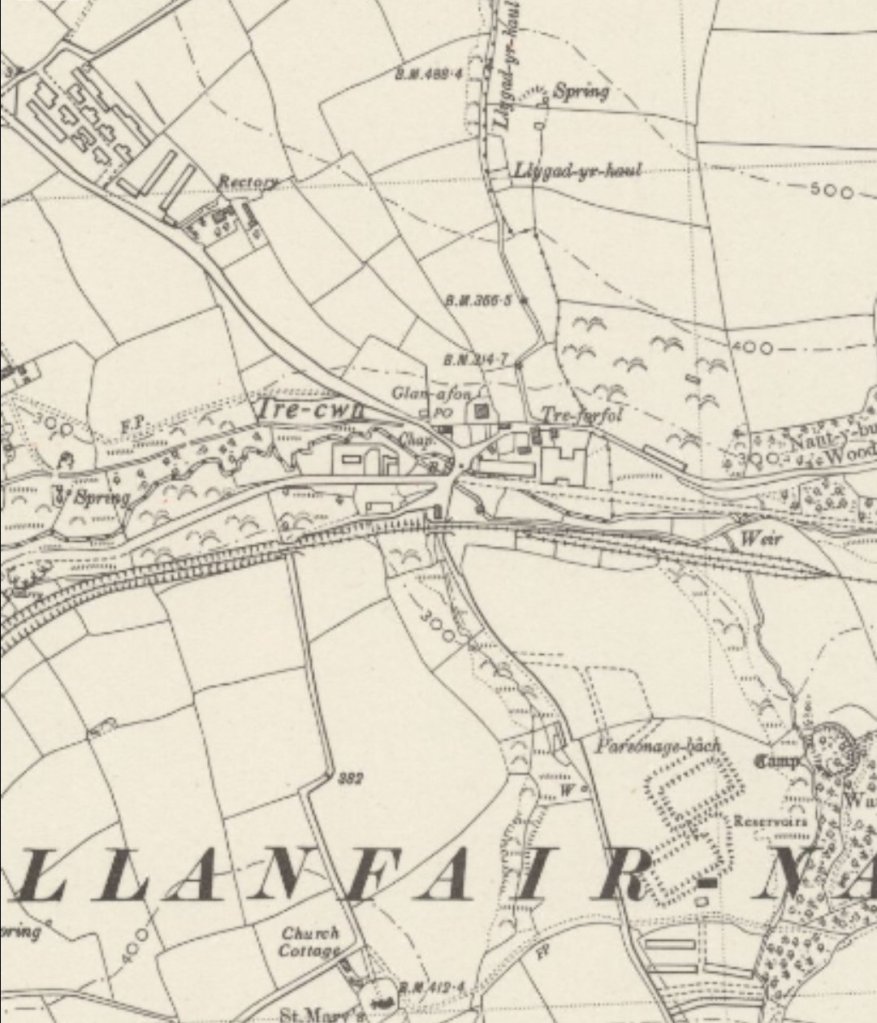
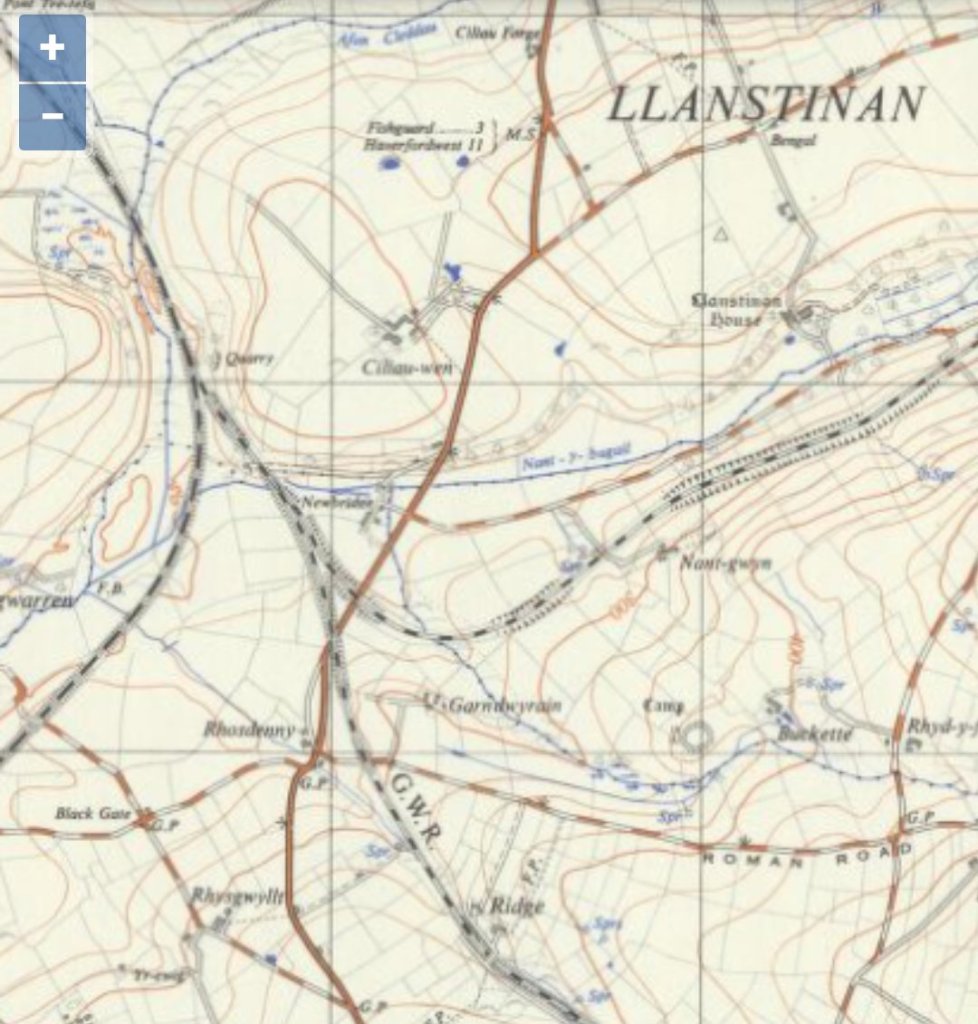
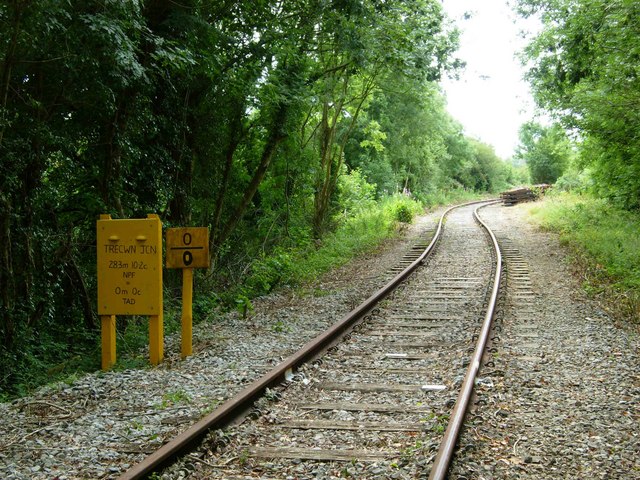
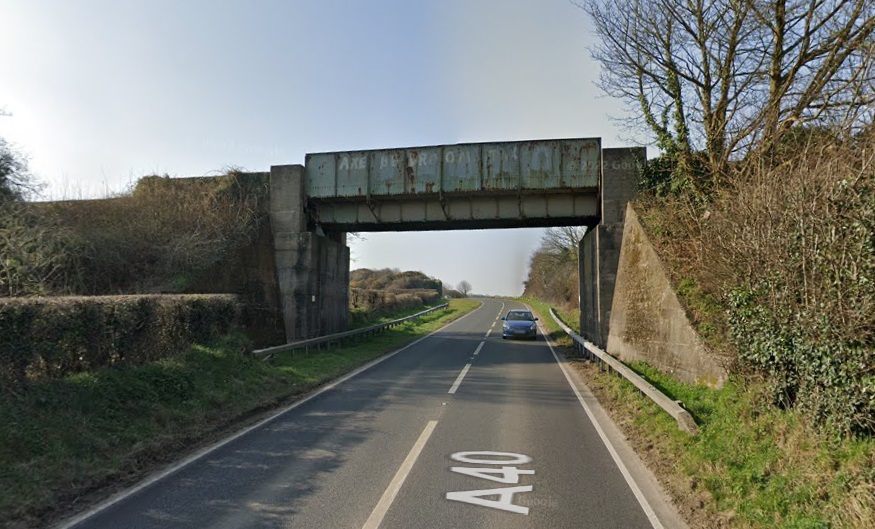
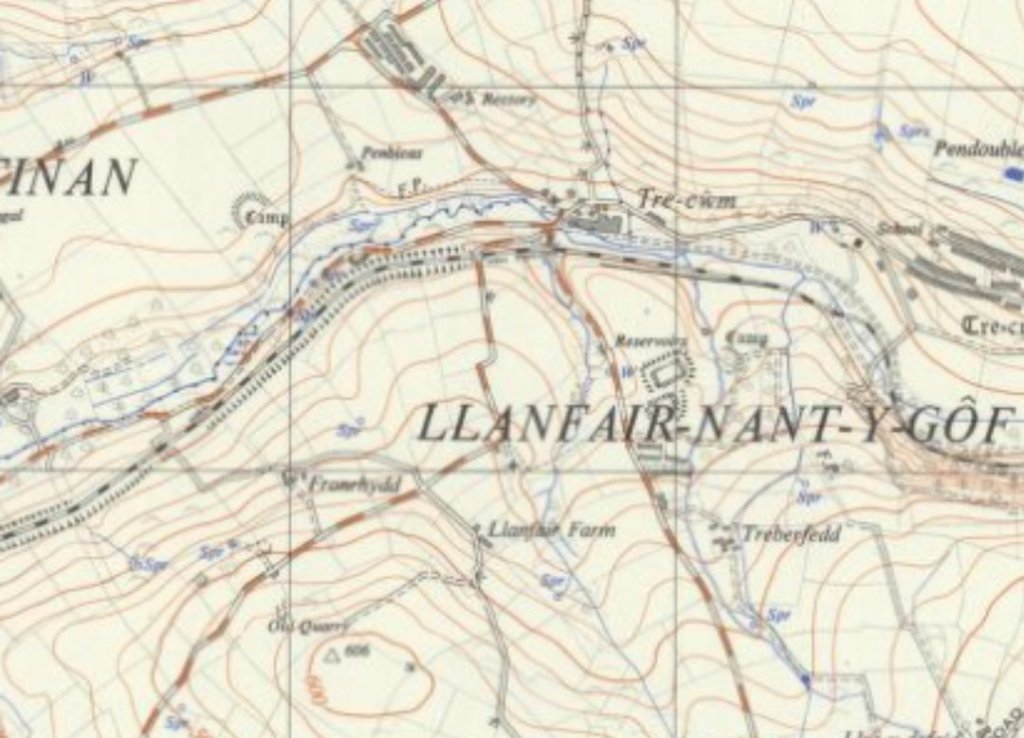
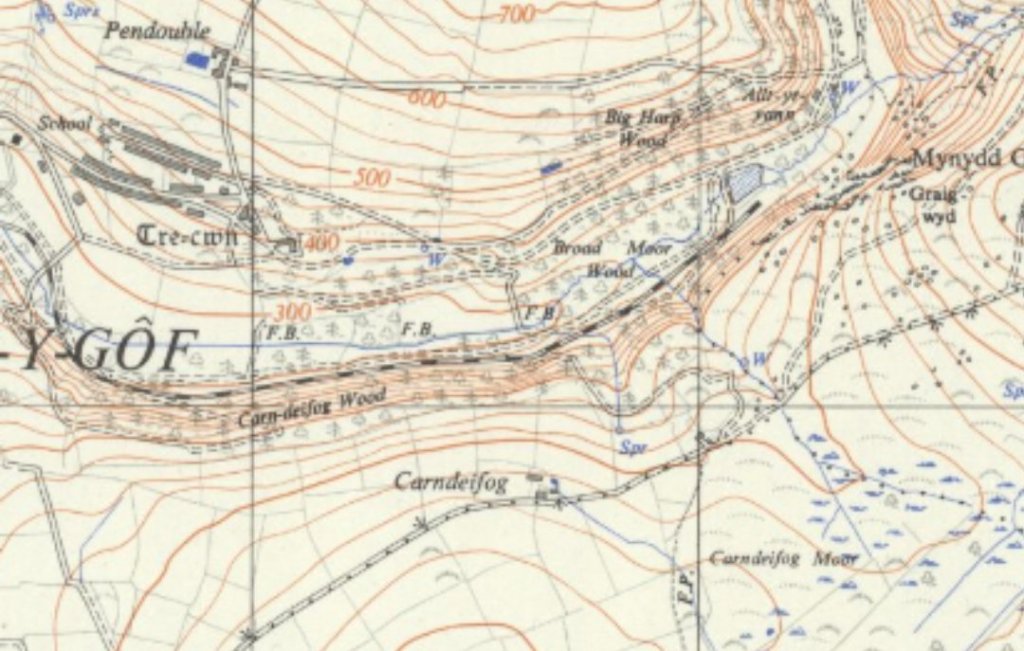
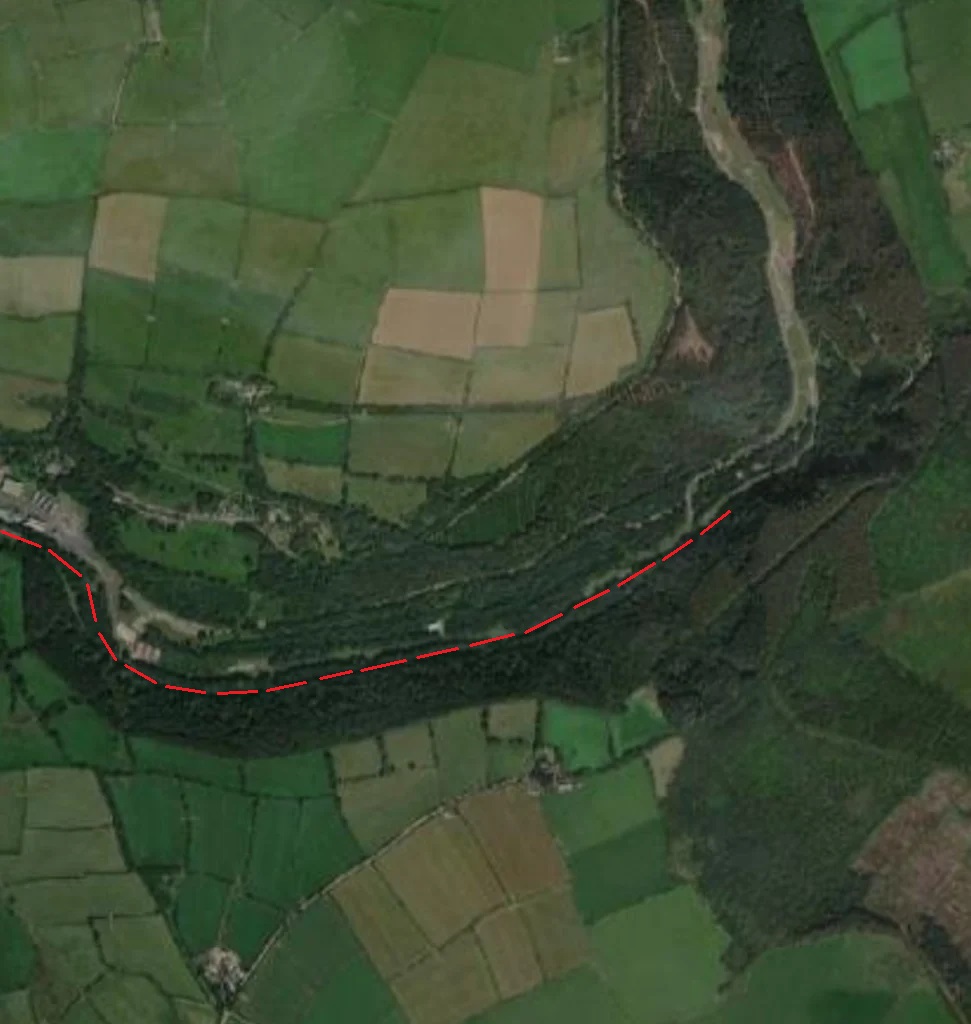
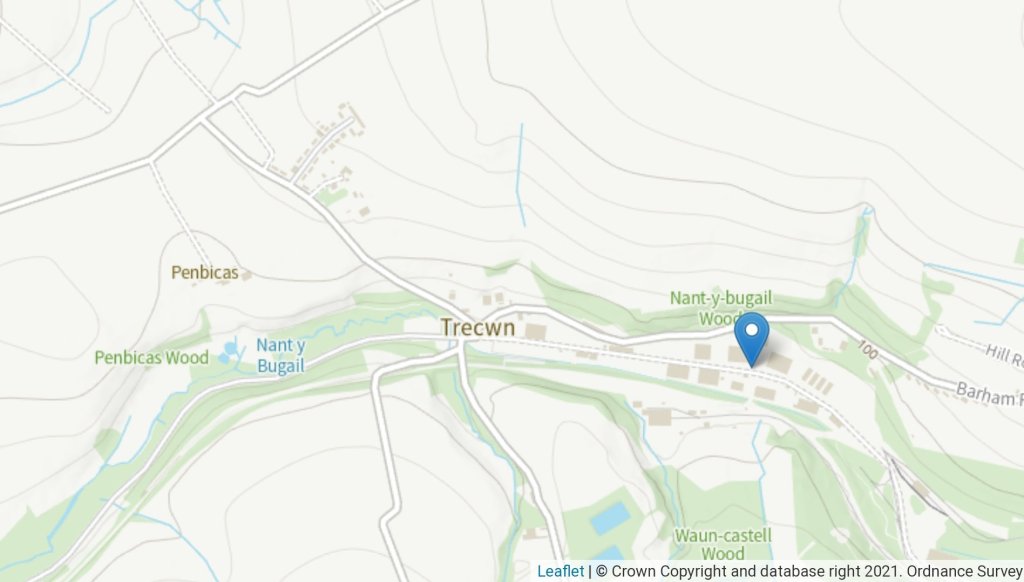
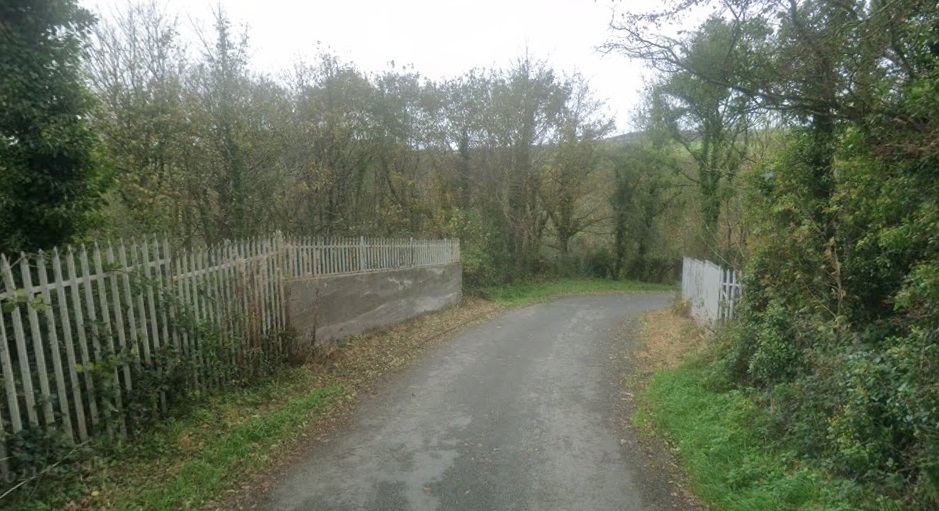
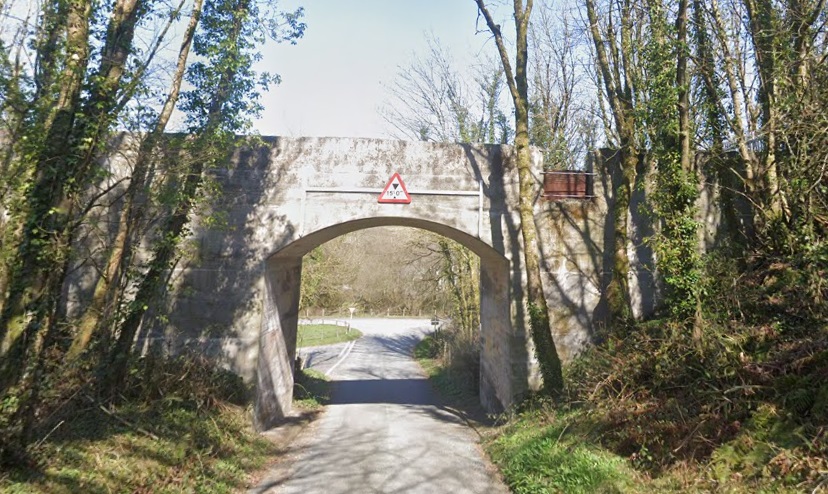
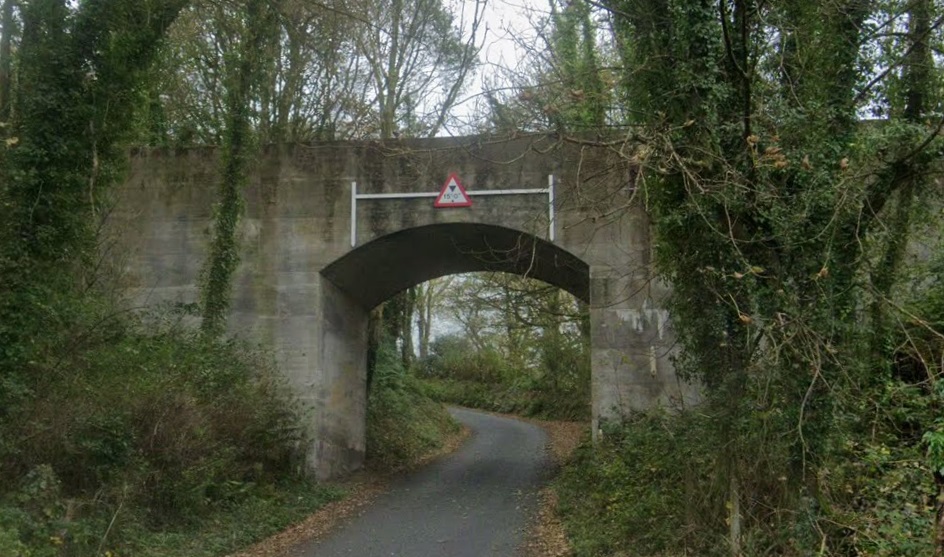
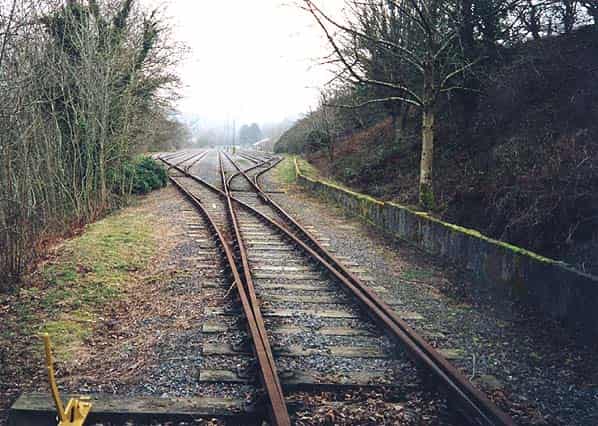
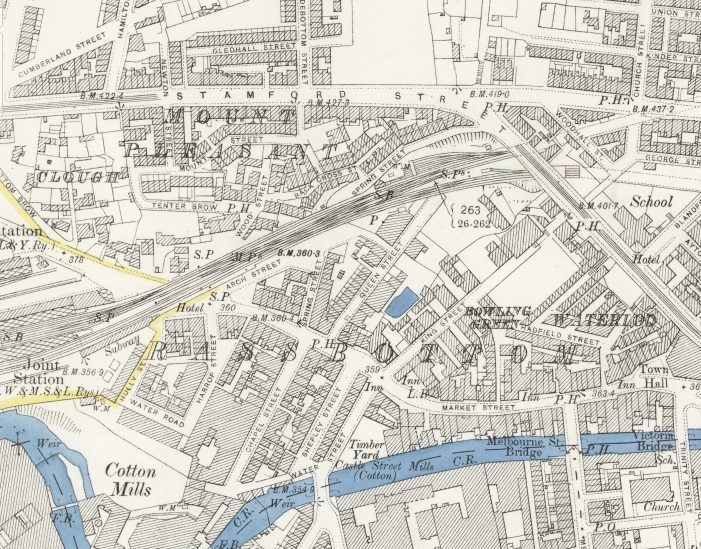
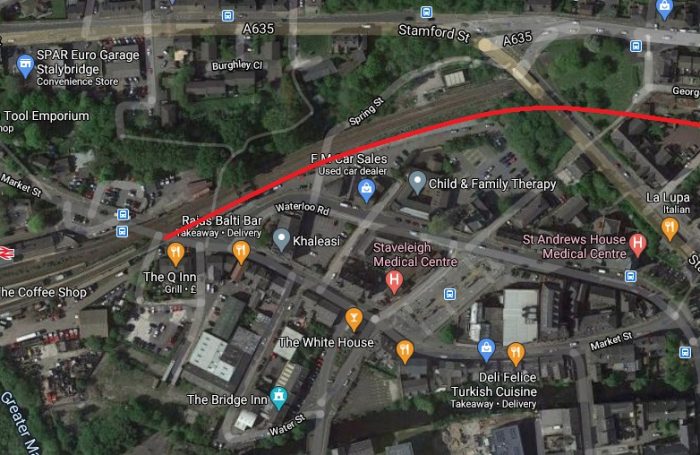
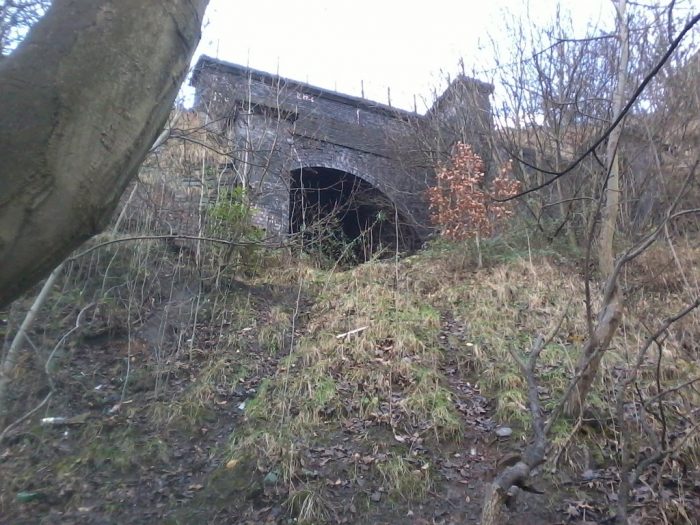
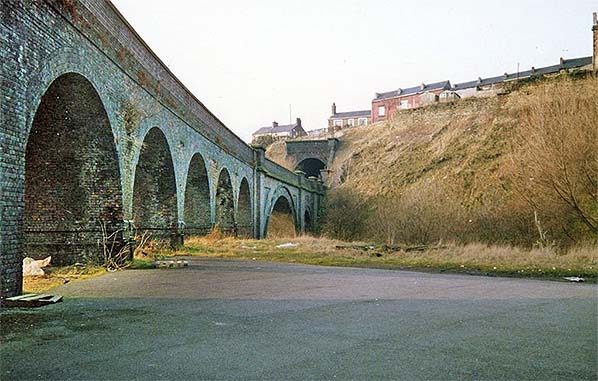
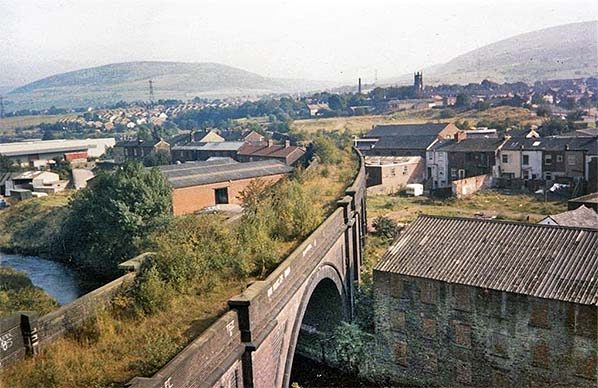
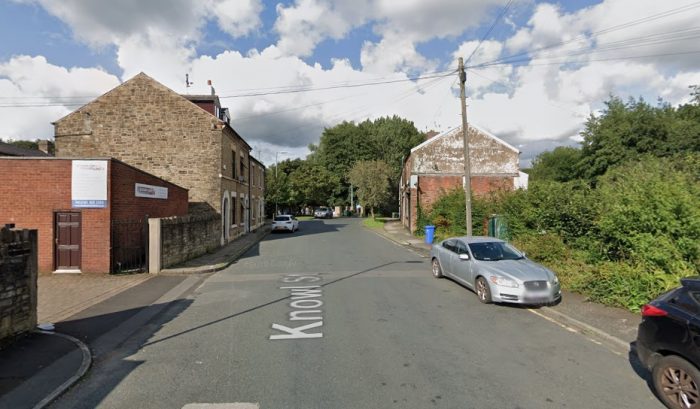
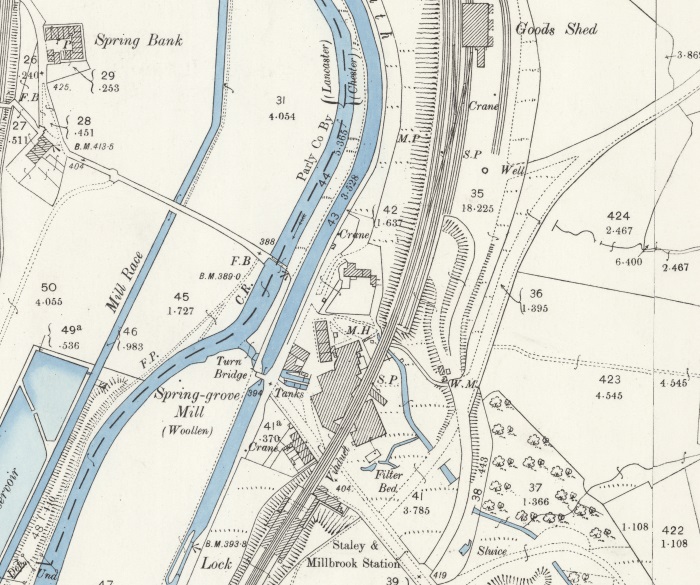
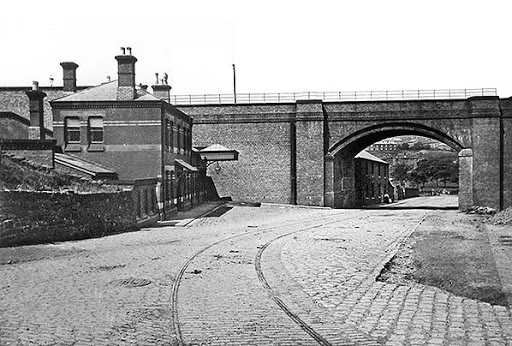
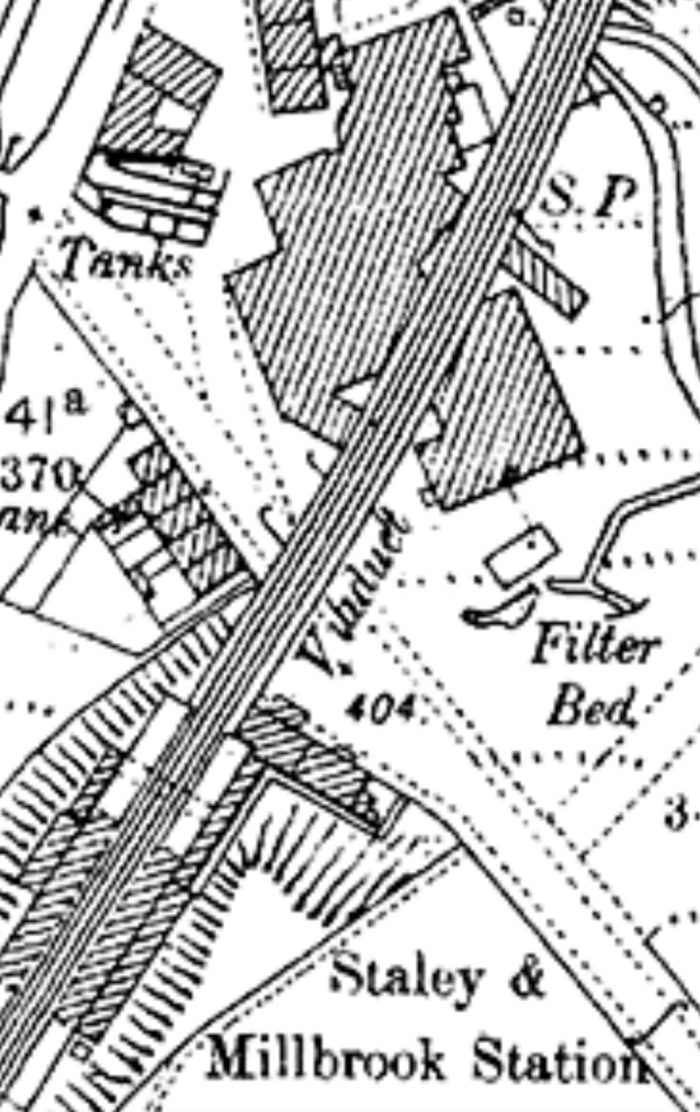
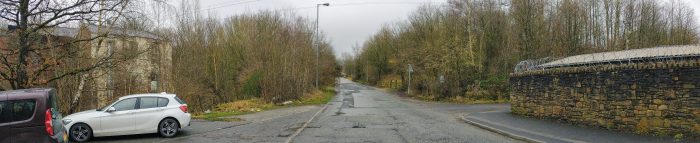
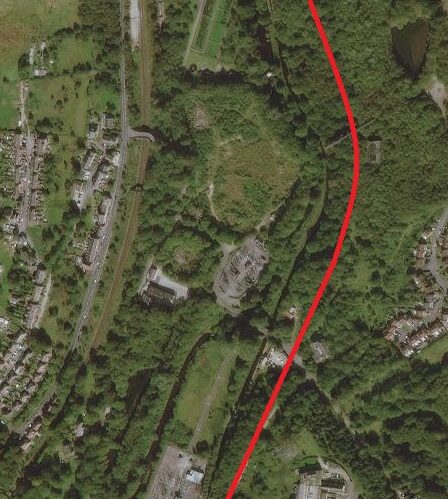
These next few images show the Trecwn branch-line. The first shows its junction with what was the GWR line to Fishguard from which the branch runs Northeast towards Trecwn …

The Trecwn branch-line junction with the old GWR as shown on the 1951 1:25,000 Ordnance Survey. [60]
The ESRI satellite image from the National Library of Scotland has the route of the Trecwn Branch-line imposed on it. [80]
The view at the junction from a train window in 9th August 2007, (c) Ceridwen, authorised for use under a Creative Commons Licence (CC BY-SA 2.0). [238]
A little to the South of the junction, a lane crosses the branch. This photograph looks along the line to the accommodation crossing on 5th May 2010, (c) Ceridwen, authorised for use under a Creative Commons Licence (CC BY-SA 2.0). [239]
The view East along the line on 23rd July 2006. (c) Stephen McKay, authorised for use under a Creative Commons Licence (CC BY-SA 2.0). Stephen comments: “Taken from an accommodation level crossing looking along what was once a meandering branch to Clunderwen. [241] That route was abandoned in the 1940s, but a stub was retained to give access to the Royal Naval Armaments Depot at Trecwn.” [240]
The view from the North along the A40 of the bridge carrying the branch over the road. [Google Streetview, March 2022]
The view of the same bridge from the South [Google Streetview, March 2022]
After a short distance running Northeast, the standard-gauge line runs adjacent to the main gates of Trecwm on an East-West axis before turning South and the East again. [60]

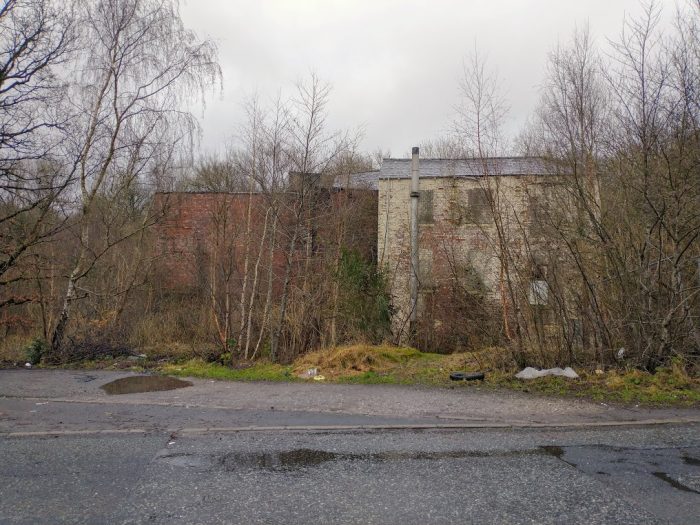
The depot was decommissioned in 1992. All 58 cavern storage bunkers and the extensive above ground network of storage sheds and other military buildings remain in place. Ownership of the site was transferred from the Ministry of Defence to Anglo-Irish consortium Omega Pacific in 1998, and then by court order to the Manhattan Loft Corporation in 2002. The site is being redeveloped as an industrial park. [56]

Dashed-red lines show the approximate route of the old standard-gauge line which was lifted in the early 21st century. [82]
The remaining length of the Trecwm branch-line as shown on the 1951 1:25,000 Ordnance Survey. [60]

The same area as shown in the OS Map above[230]
Coflein provides this map of the main site in 2021.  Careful inspection will show that the standard-gauge branch-line has been lifted by the date of this Ordnance Survey edition. [61]
The 1906 6″ Ordnance Survey shows no sign of either the standard-gauge branch nor the infrastructure that made up RNAD Trecwn. [231]
The same area on modern satellite imagery shows much of the infrastructure of the Depot remaining after closure. The standard-gauge sidings remain at the date this image was produced. [231]
Just before reaching Trecwm, the line passed under the lane which can be seen at the left side of the satellite image above. The bridge parapets have been extended upwards for safety reasons using galvanised metal fencing. [Google Streetview, October 2021]
The concrete bridge carrying the standard-gauge branch-line over a local road just prior to its entry into the Depot. [Google Streetview, March 2022]
The same structure viewed from the North. [Google Streetview, October 2021]
Google Maps in 2022 still shows the sidings in place in RNAD Trecwn. No doubt this will get updated in due course. [Google Maps, 29th September 2022]
The site extends across the join between two OS Maps. This 1948 revision of the 6″ OS Mapping shows the West end of the Depot. The map was published in 1953. [232]
At approximately the same scale, the next OS Sheet shows only the standard-gauge line and not the internal narrow-gauge lines. It is shown terminating at the same location as the mapping further above. [233]
The fan of standard-gauge sidings just inside the Depot fencing, (c) Dave Mansell, taken in 2003. This image is used with the kind permission of the Subterranea Britannica website. [234]

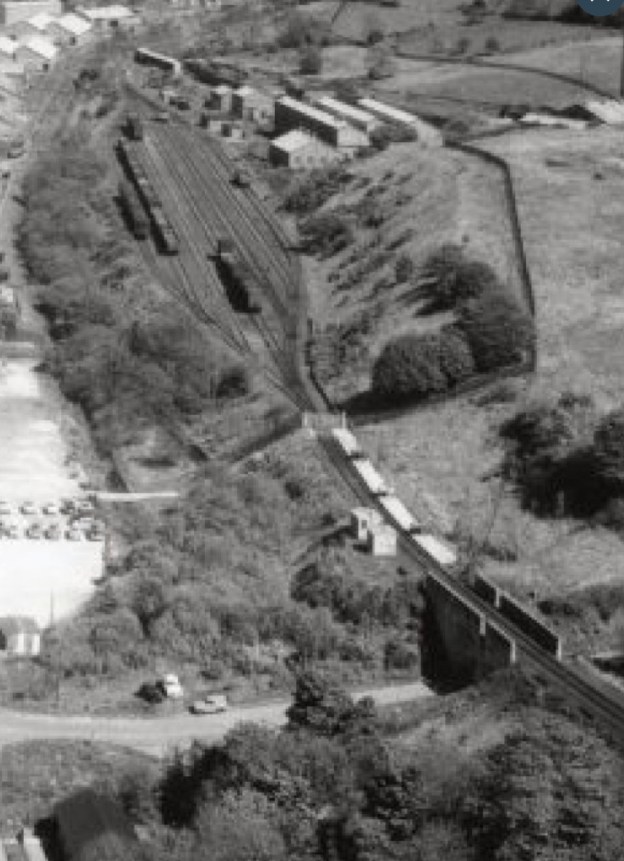
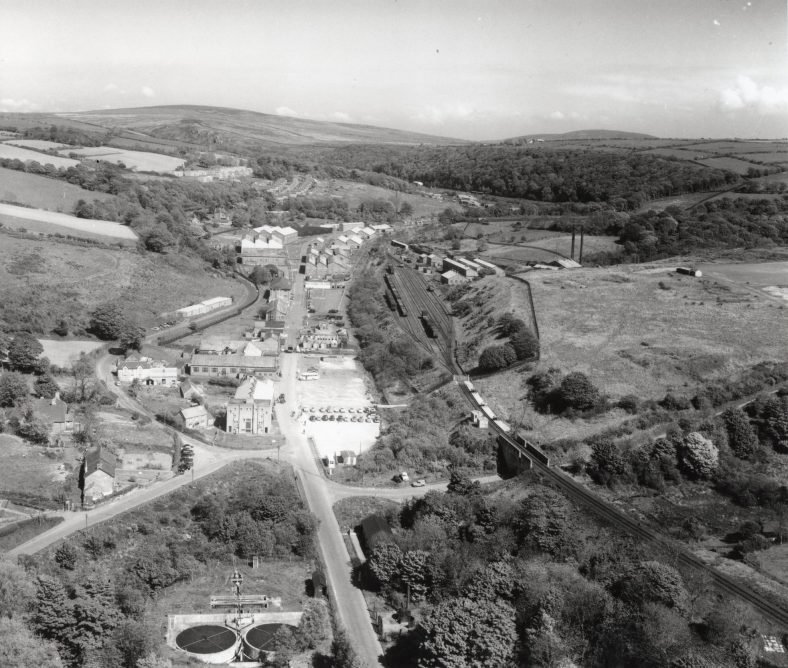
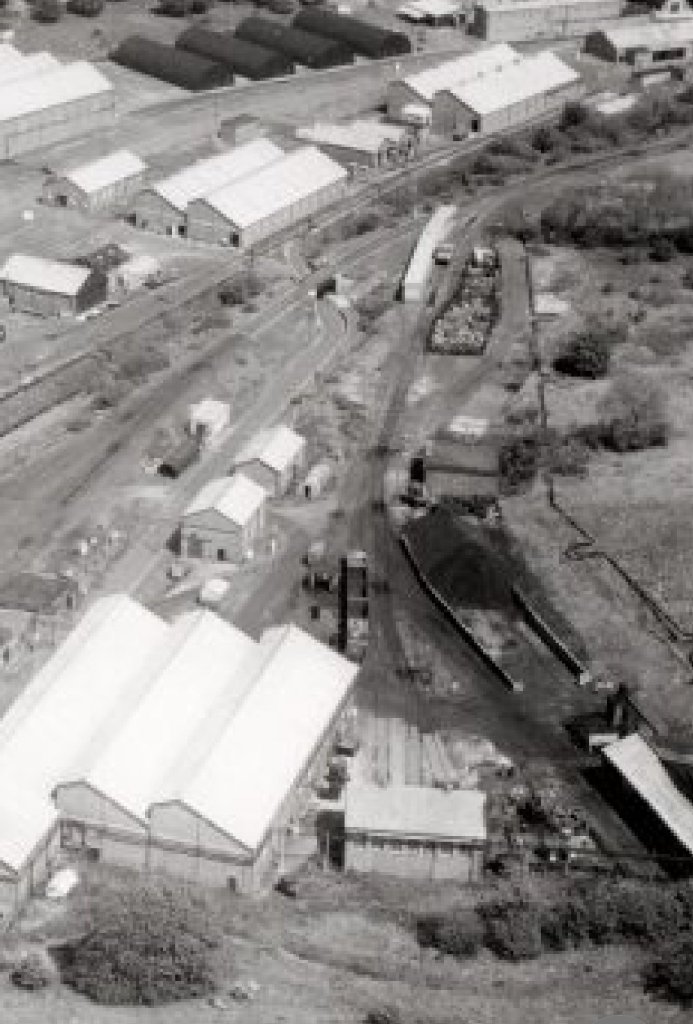
Three aerial photographs are provided by the Fishguard and Goodwick Local History Society. Posted by Ian Evans, they are used here by kind permission.

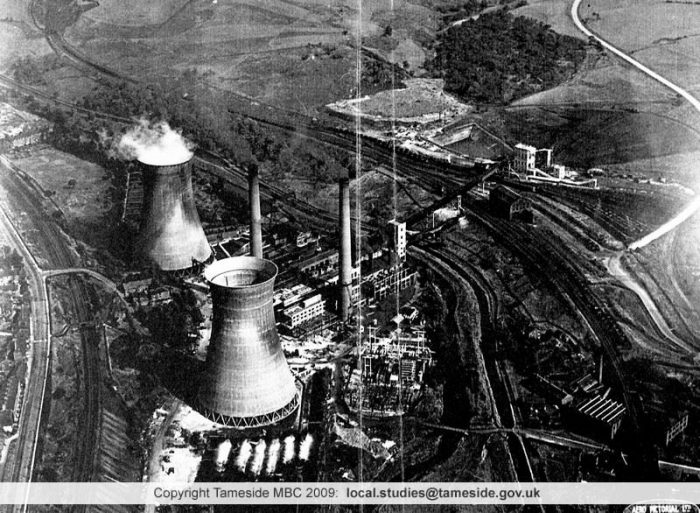
The first one shows the main entrance to the depot at it’s southern end. It can be dated to the mid-1950’s. “At the bottom right of the image can be seen the main railway line into the valley, leading to the railway sidings. The buildings to both sides of the railway sidings included a number of specialist workshops and storage facilities, there were no live explosives handled in this area.” [247]

This aerial photograph looks from the West along the valley of the Afon Aer. To the right of centre, the fan of standard-gauge sidings can be made out. An enlarged image taken from this picture follows below. The picture was taken in 1955 and is used with the kind permission of Ian Evans and the Fishguard & Goodwick Local History Society. [247]
An enlarged section of the photograph above which shows the bridge which carries the line over a minor road close to the Depot gates, in the bottom-right. The fan of sidings feature prominently towards the top of this extract. The branch beyond the sidings first curves away to the South  [247]

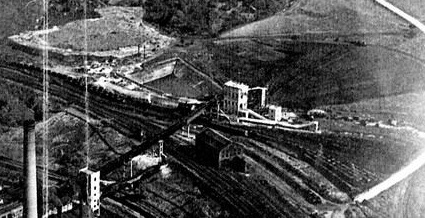
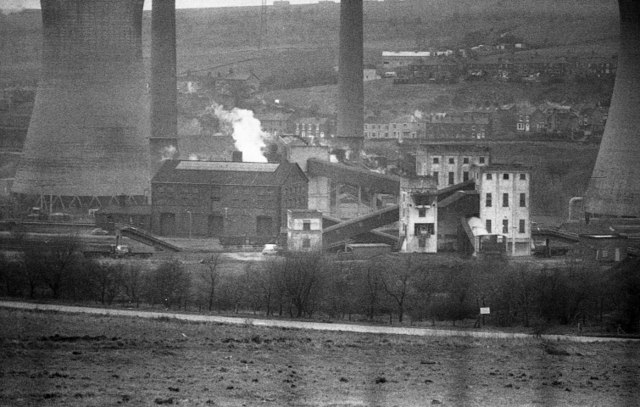
The second “shows the workshops and stores buildings in more detail. The building at the bottom right with the tall chimneys was the southern boiler house which supplied steam to most of the buildings seen here. It was in this area that the narrow gauge railway system started, it extended right up the north end of the site.” [247]

This aerial photograph looks from the Southwest across the same fan of sidings. Enlarged images taken from this picture follow below. Again, the picture was taken in 1955 and is used with the kind permission of Ian Evans and the Fishguard & Goodwick Local History Society. [247]
There is some good detail in this extract from the aerial image above. The types of wagons used to supply the Depot can be seen but so also can part of the narrow-gauge network be discerned running between the buildings towards the top of the extract. [247]
The standard-gauge yard at Trecwn. This is an enlarged extract from the same aerial image. Note the bridge carrying the standard-gauge line across the narrow-gauge line. [247]
From beyond the sidings in the last few photos, looking back West over the Depot with the fan of standard-gauge sidings evident at the top of the image, © (Coflein) RCAHMW. [61]
Taken a little further to the East, this shows the buildings at the Western end if the Depot along with the fan of sidings and the standard-gauge buildings on the left. This image was used by RD Wales to advertise the Depot site for sale. The standard-gauge extends eastward from the sidings within the trees on the left of this image. [250]

Of interest, to me at least, is that when I load Google Earth onto my desktop I automatically get the railway tracks at Trecwn added. I am not sure how that happened, but it is useful for this article. ….

A Google Earth extract with the network of lines in the valley of the Aer shown in black. This is the first length inside the Depot. [Google Earth, 29th September 2022.
The remaining length of the Depot in the Aer Valley. [Google Earth, 29th September 2022]

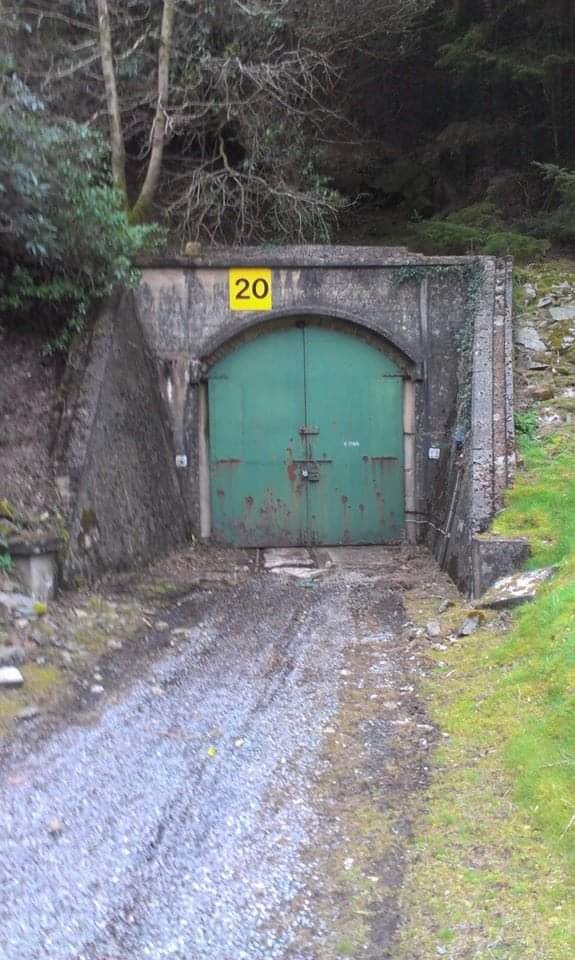
The third of three aerial images from the mid-1950s appears below. It “shows the red area where live explosives were handled and stored, everything from .303 Rifle bullets to 1 Thousand pound bombs were processed here and stored in 58 Magazines built into each side of the valley, If you zoom in you can see a number of the tunnel entrances quite clearly. A lot of the smaller buildings have blast walls surrounding them. The complex extended further north from this photo to the north end Boiler House and security gates.” [247]

The remaining length of the Depot taken from the air looking North along the valley of the Aer. Again, the picture was taken in 1955 and is used with the kind permission of Ian Evans and the Fishguard & Goodwick Local History Society. These images can be found at http://www.hanesabergwaun.org.uk/ [247]
These two images are enlarged extracts from the last of the three aerial images above. It is possible to see something of the network of lines which existed in the valley. [247]

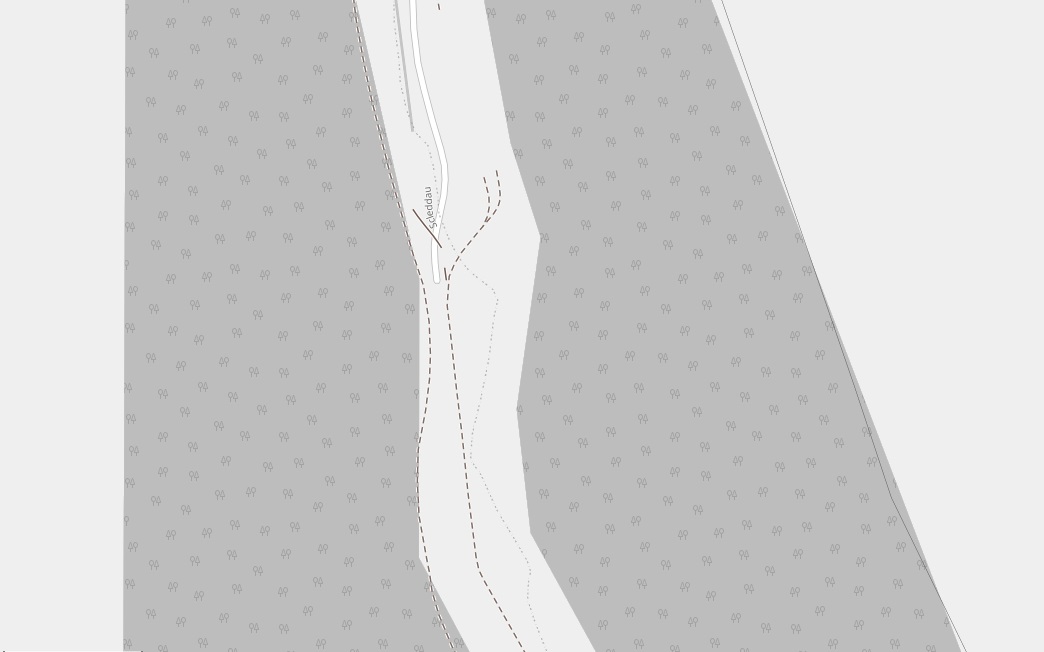
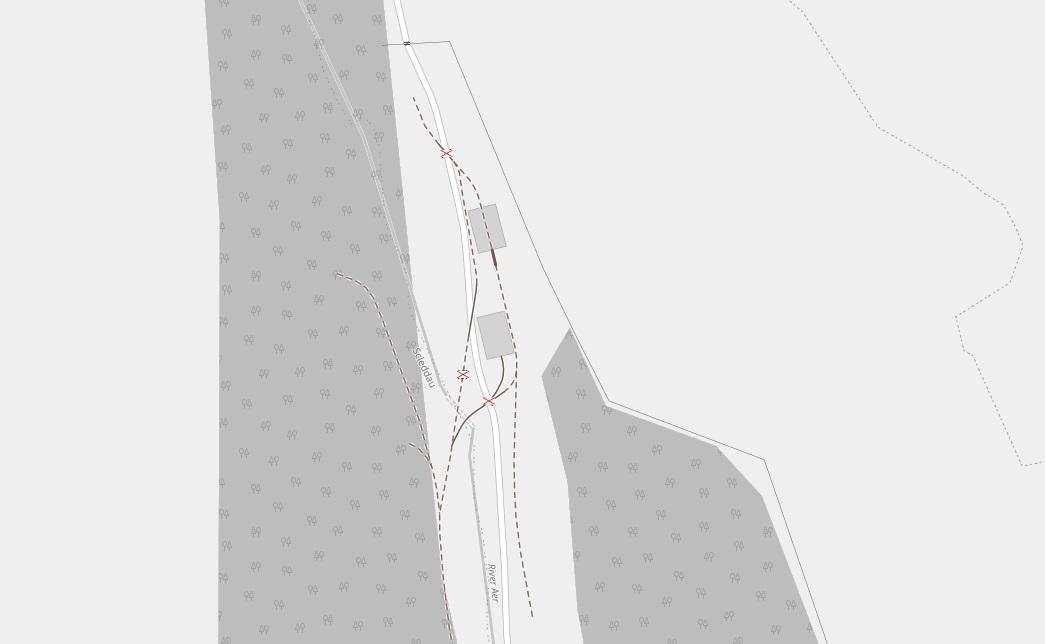
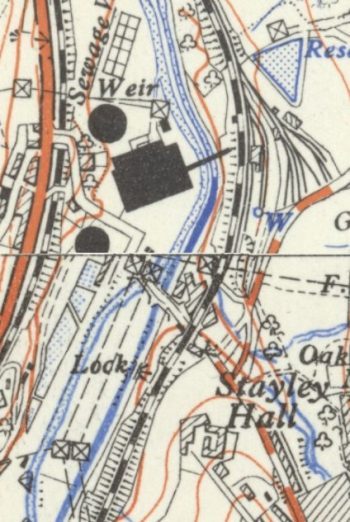
The OpenRailwayMap [235] is also of great help in establishing what railways existed inside the  Depot. It is clear that the standard-gauge line extended much further to the Northeast along the valley of the Afon Aer than the Ordnance Survey mapping records.

To complete this section on the Standard-gauge line, I have included a series of screen-dumps from the OpenRailwayMap [235][236]. Having them at this point in the article should hopefully minimise scrolling when we look at the Narrow-Gauge network at the depot. The sequence of the map extracts runs from the Depot gates in the West, closest to the hamlet of Trecwn, eastwards to the point where the valley turns to the North and then follows the valley northwards.

Rail network inside Trecwn – Image 1. [235]
Rail network inside Trecwn – Image 2. [235]
Rail network inside Trecwn – Image 3. [235]
Rail network inside Trecwn – Image 4. [235]
Rail network inside Trecwn – Image 5. [235]
Rail network inside Trecwn – Image 6. [235]
Rail network inside Trecwn – Image 7. [235]
Rail network inside Trecwn – Image 8. [235]

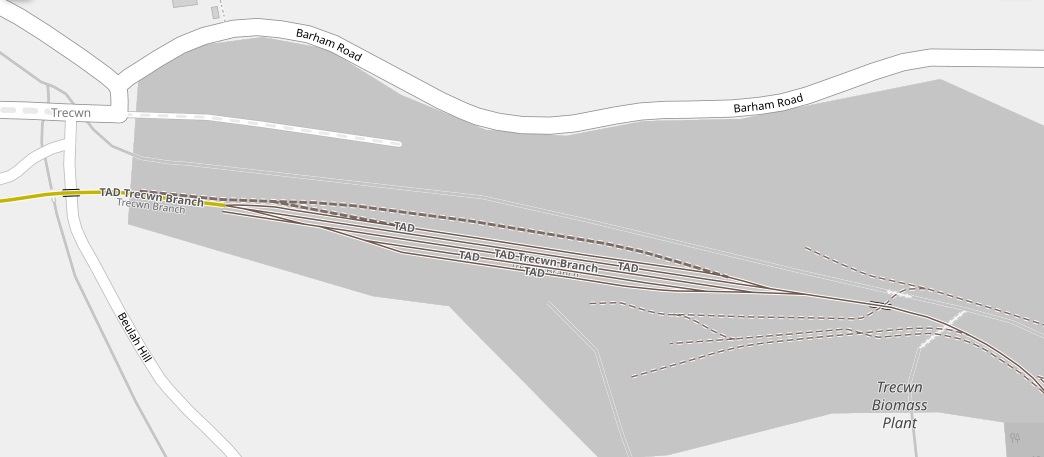
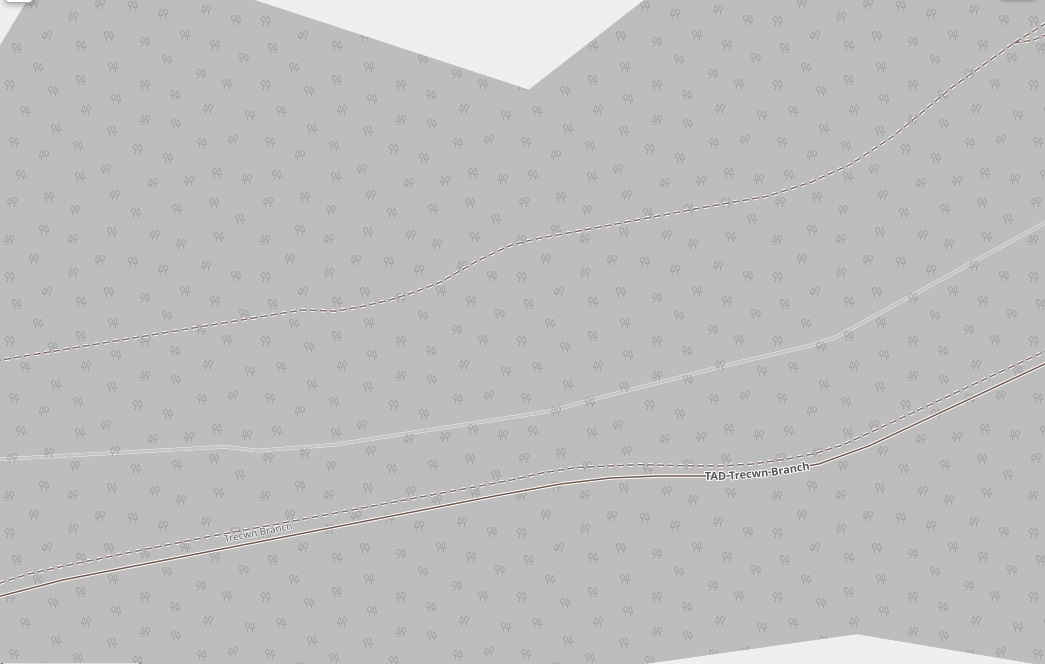
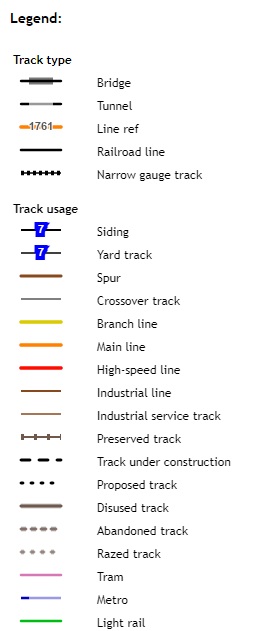
This final image is the key/legend provided by the OpenRailwayMap [235][236] editors. The Trecwn branch as far as the depot gates is shown in yellow above. The standard-gauge lines within the Depot are deemed industrial lines and are therefore shown as thin brown lines. The length of these line inside the Depot is significantly longer that that shown on the Ordnance Survey maps. Abandoned standard gauge lines are shown as thick dashed brown lines (not grey as in the key).

The narrow gauge lines are shown as thin dashed brown lines. It is possible that by the time the mapping was undertaken these had been abandoned and are hence shown dashed. There are a very few lengths of narrow-gauge track shown solid brown.

The extent of the network of these lines is, for me, the most engaging element of this mapping. RNAD Trecwn had a very significant internal narrow-gauge network. …

The Narrow Gauge (2ft 6in) Lines – A 2ft 6in (762 mm) gauge network traverses the entire site, with direct access to the 58 cavern storage chambers. All rail infrastructure was built in copper to reduce the risk of sparks. Serviced via its own on-site locomotive shed and works, the line was equipped with a series of specially provided wooden enclosed wagons, with sliding roof covers. This allowed sea mines and other munitions to be directly placed within the wagons from overhead gantries, and transported over the entire site without access via any form of side door, hence enhancing safety. The narrow gauge line therefore became the main method of on-site distribution, with standard gauge rail or road the off site access method. [56]

Storage Chamber  No. 20 © Marc Thomas, 19th August 2014. This image shows one of the storage chambers’ entrance doors. This is typical of other entrances to the storage chambers on site. A remnant of the narrow-gauge rail system can be seen in the rails which protrude beyond the chamber’s doors. [243]

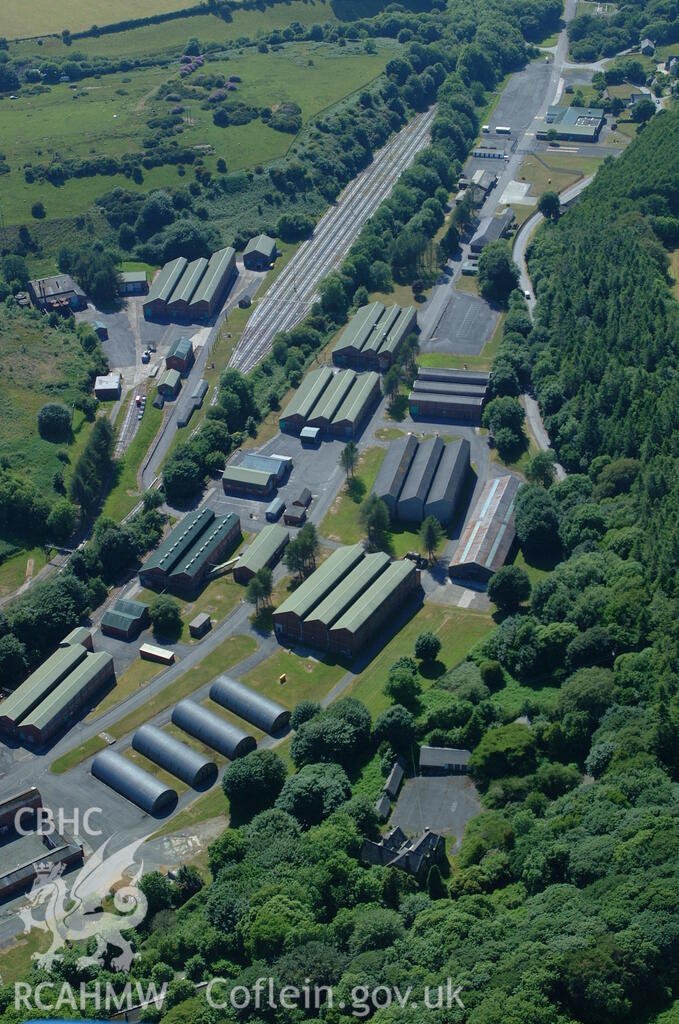
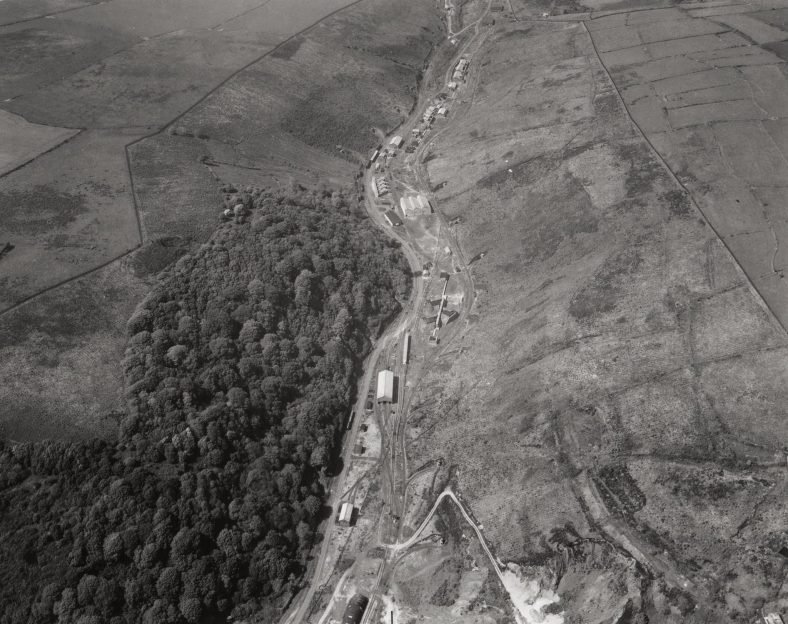
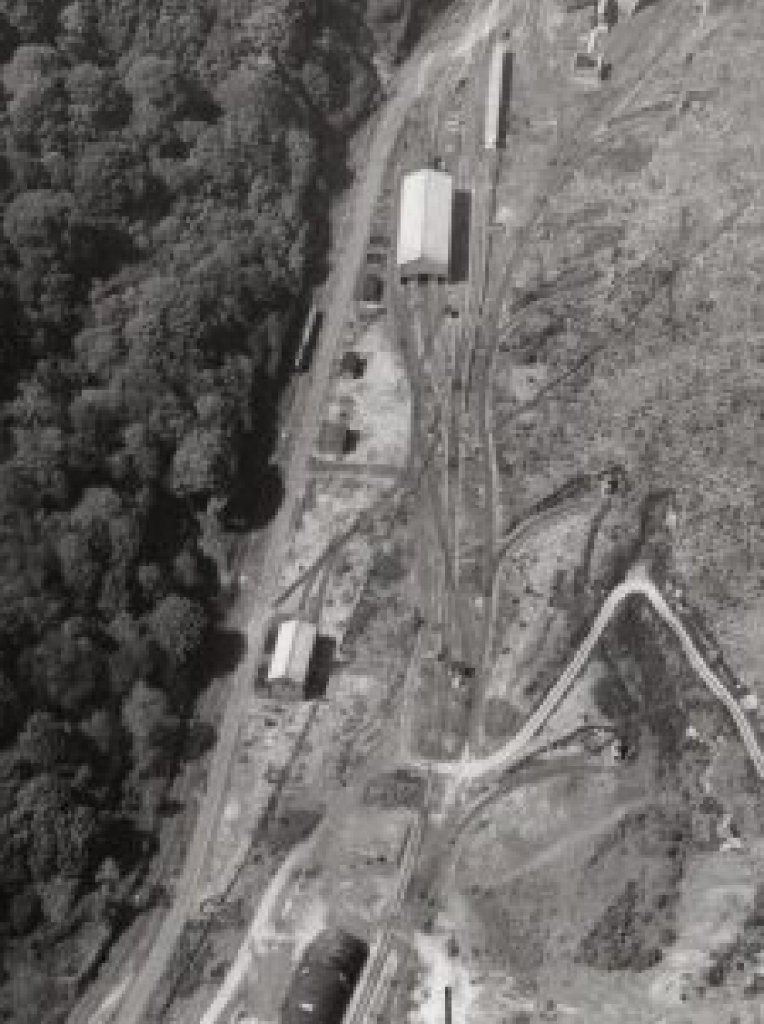
The next few aerial images can be found on the Coflein website and show elements of the narrow-gauge system running along the site. In places the standard-gauge and narrow -gauge sit side-by-side.

This next aerial image comes from before the narrow-gauge tracks were lifted. The most obvious lines are standard-gauge lines but careful inspection will show the narrow-gauge network as well. This photograph was taken in 2006. [61]
Turning through 180° this next aerial image from 2009 comes from the time when large parts of the narrow-gauge system had been lifted but before the narrow-gauge tracks at locations crossing site roads or standard-gauge lines were lifted. Careful inspection will identify a number of such locations. [61]
View from the North in 2006 looking down on the upper area of the Depot with both standard-gauge and narrow-gauge lines visible. [61]
Also taken in 2006 from the North, this view shows a number of the storage bunkers on site and the rail system. [61]
Again taken in 2006, this photograph looks from the Southeast showing more of the bunkers in the northern length of the Depot. [61]

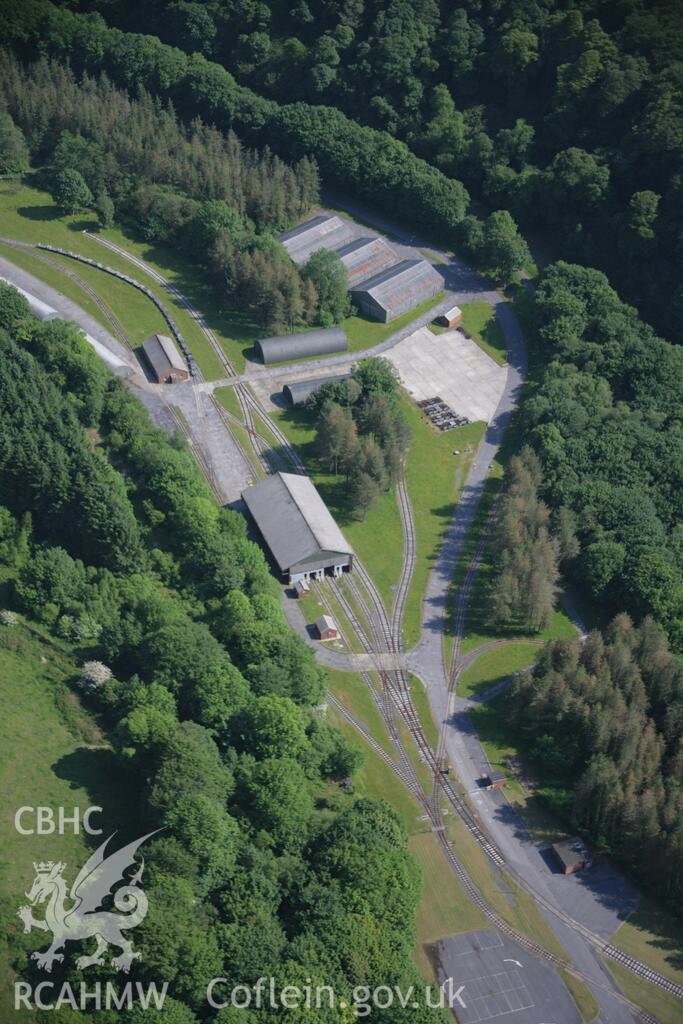
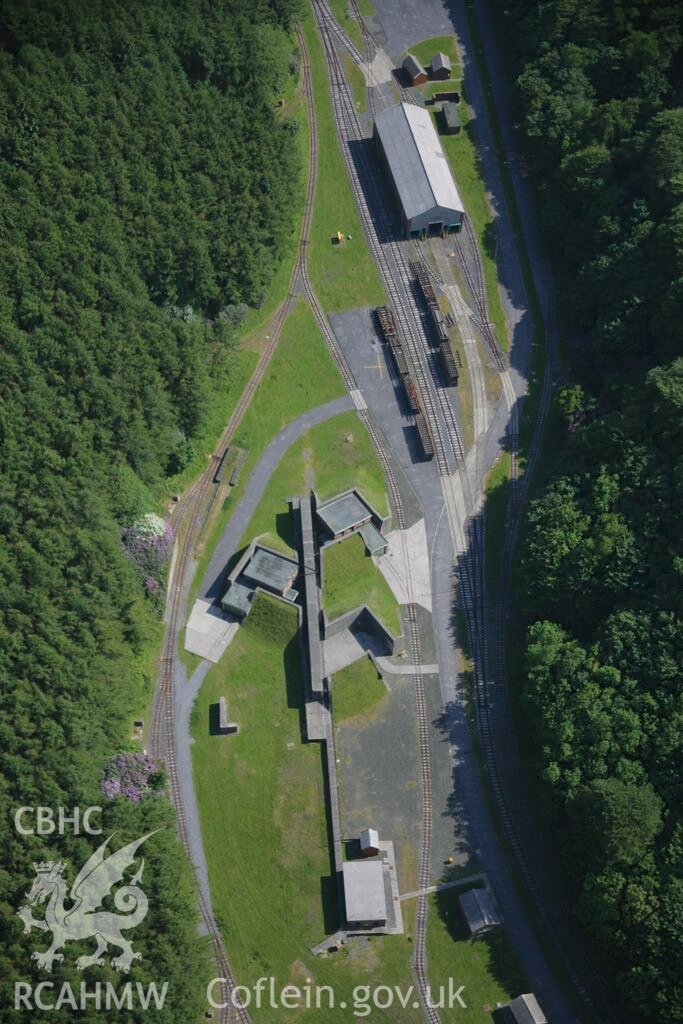
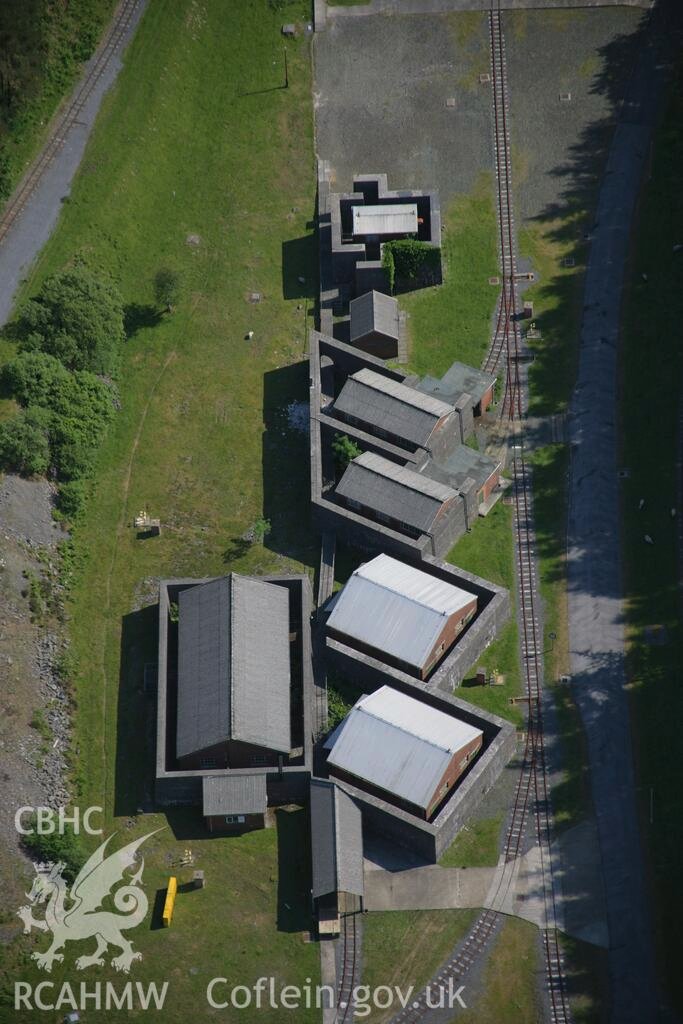
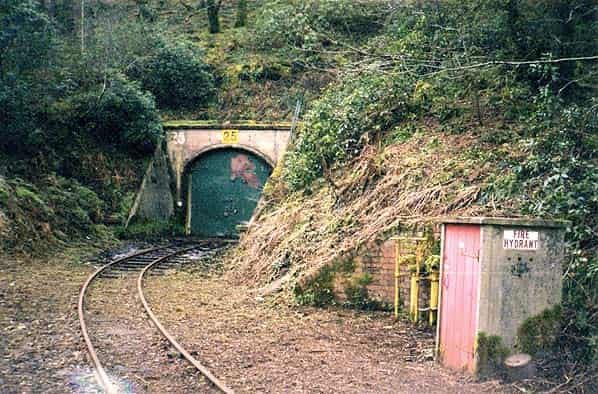
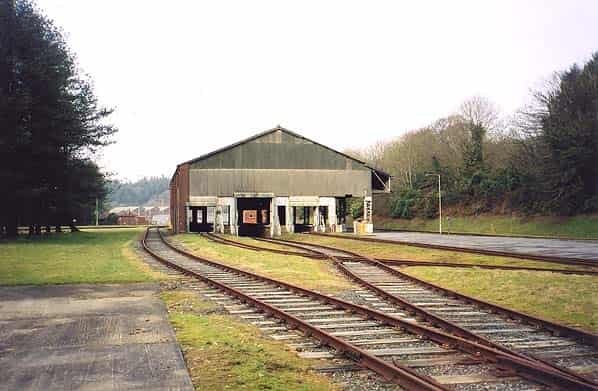
In 2003, David Mansell, writing about the site commented: “About a mile into the site the narrow gauge railway facilities commence with maintenance sheds and a covered transfer building. There are a total of 58 storage chambers, each extending into the hillside for 200 feet, arranged in a herringbone formation along both sides of the valley. Each one has alarmed steel doors with its own siding off the narrow gauge railway.” [234] … His opinion at the time, was that RNAD Trecwn was “a railway enthusiasts dream with both standard and narrow (2ft 6in) gauge lines. The depot has its own branch off the Fishguard to Carmarthen line and after a small platform area outside the depot for staff the line enters the site via lockable steel gates into the main marshalling yard where the line splits into 8 parallel loops. The standard gauge line then travels the entire length of the valley alongside the narrow-gauge line which has points for the siding to each storage chamber.” [234] …

The wooden wagons used for the transport of munitions within the Depot had sliding roofs to allow top-loading © Dave Mansell, 2003 and used by kind permission of the Subterranea Britannica. [234]

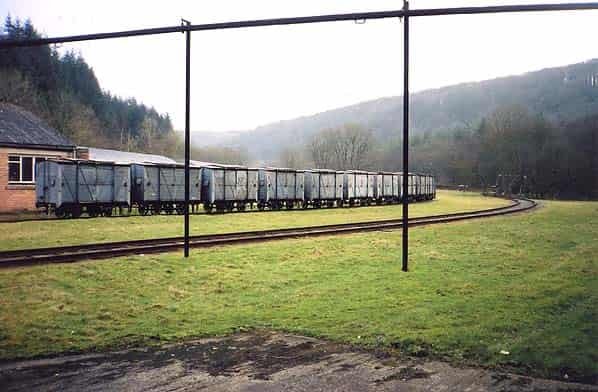
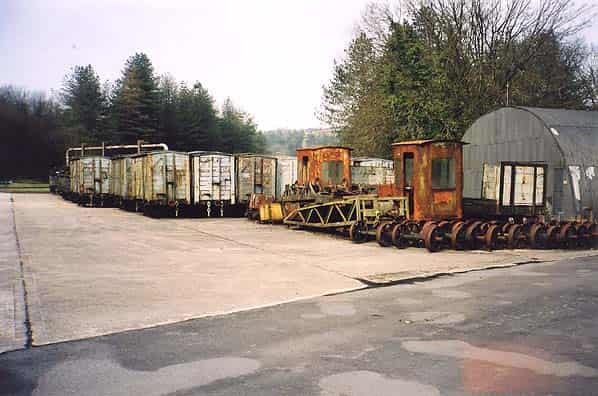
The narrow gauge rolling stock then consisted of the “well known ‘Trecwn’ wooden wagons with sliding roofs to enable mines to be lowered in and flatbed trucks for other munitions. Some of the stock can now be seen on the Welsh Highland and [Welshpool and] Llanfair light railways.” [234]

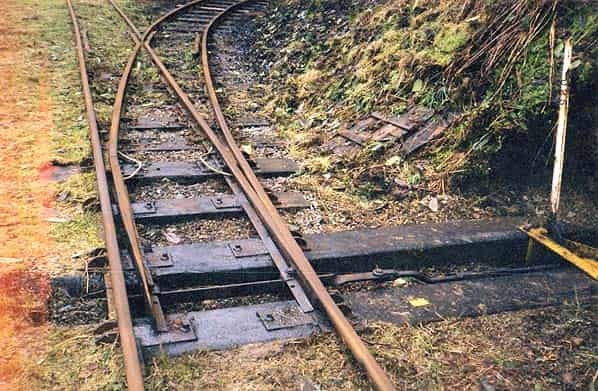
At the time Dave Mansell was writing, there was still a substantial amount on site. Locomotives included small diesel shunters and battery units; some derelict examples of which were still on the site in 2003. Points on both gauges were manually operated and still well greased. [234]

The next few photographs were all taken early in 2003 by Dave Mansell and are shared with his kind permission and that of Subterranea Britannica…..

The entrance to Storage Cavern No. 25 with the narrow-gauge rails still in place, © Dave Mansell [234]
The narrow-gauge point probably leading to Storage Cavern No. 25, © Dave Mansell [234]
The transfer shed with both standard-gauge and narrow-gauge rails still in place, © Dave Mansell [234]
Narrow-gauge locomotives and rolling-stock sitting in storage and no longer on the rails. © Dave Mansell [234]

Locomotives – a series of narrow-gauge locomotives were employed at the site. These are surviving examples:

Ruston & Hornsby 187069 – was a Class 25/30hp locomotive with a Ruston 3VSO engine and weighing 3.25 tons. It left the works on 28th October 1937. “It was one of forty of that type working on the Nuttall-Pauling Consortium contract to build the … Depot at Trecwn. … Construction was complete by 1941 but this locomotive was evidently still in the West of Wales in 1950, because a spares order was placed by Pauling on 26th May 1950 to be sent to Geo Bros Ltd., East Burrows Yard, Swansea, which may have been repairing it. In 1951 it was noted at Pauling’s Park Royal plant depot, Middlesex, numbered P250 in the Pauling list. It was later sold or scrapped at an unknown date. [229: p1-2]

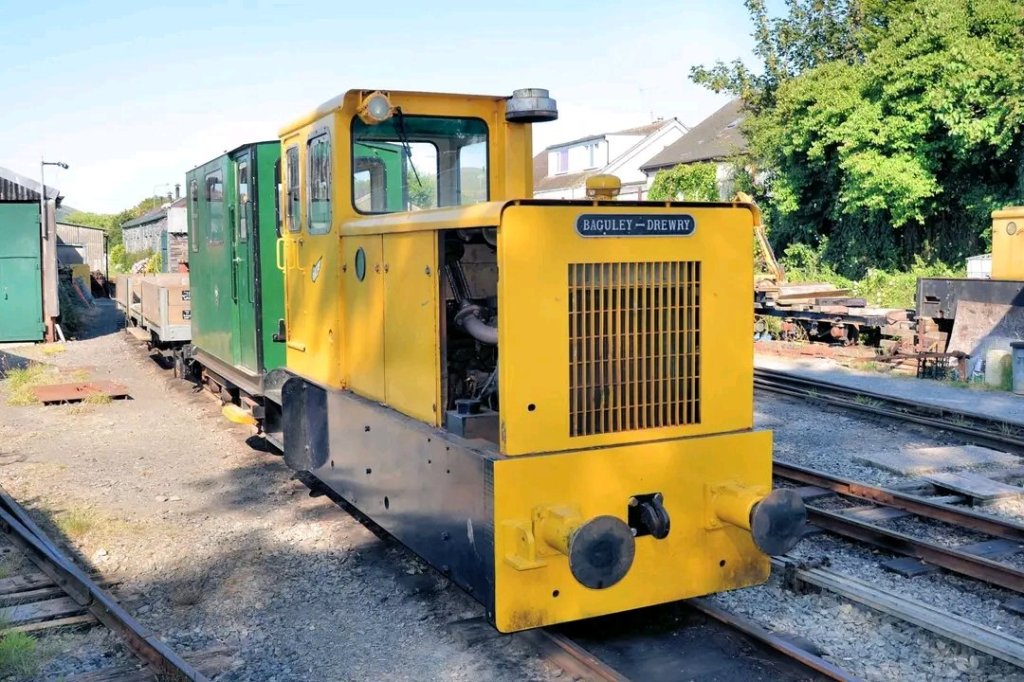
Baguley-Drewry Locomotives – Baguley-Drewry of Burton-on-Trent built a number of locomotives for this narrow gauge network.

Statfold Barn Railway – RNAD Trecwn A10. This is a 4wDH locomotive built in 1984 by Baguley-Drewry of Burton-on-Trent for the Royal Navy Armaments Depot at Trecwn near Fishguard. As built it was 2′ 6″ gauge but has now been re-gauged to 2′, © Chris Allen/Statfold Barn Railway – RNAD Trecwn A10 (CC BY-SA 2.0), 13th September 2014. This locomotive was transferred from the Statfold Barn Railway to the Amerton Railway in 2017. It is not in regular use on passenger trains, it requires some engine work to improve starting and emissions, and requires air brake modifications to make it compatible with the railway’s existing stock. You will however see A10 out in force at their Everything Goes Gala events, where it hauls passenger and freight trains using a braking system adapter. It is also used fairly regularly on engineering trains as it is far more powerful than any of the other diesel locomotives in the fleet. [58][248][249]
Talyllyn Railway No. 11 Trecwn on 16th June 2018, © Voice of Clam, made available as Public Domain. [
The body of former RNAD Trecwn narrow gauge Baguley-Drewry diesel hydraulic locomotive T 009 00 NZ 35 (works number 3781) at Tywyn Wharf on the Talyllyn Railway. [56]

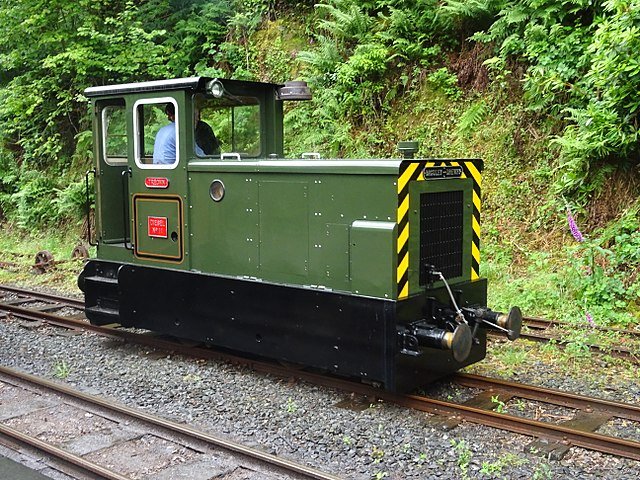
The Talyllyn railway purchased two of Trecwn’s narrow-gauge locomotives …. Diesel No.11 “Trecwn” & No.12 “St Cadfan” were purchased by Talyllyn volunteers from RNAD Trecwn in 2008. The names were decided by ballot in 2014 by the group that originally purchased the locomotives for the Talyllyn. Both Locomotives were re-gauged from 2ft 6in to the Talyllyn’s 2ft 3in Gauge. Talyllyn members also purchased over a mile of track from RNAD Trecwn complete with rail, sleepers, spikes and fishplates in June 2008. [251]

The Talyllyn’s Facebook Page provided photographs of these locomotives. These two images were included. [251]

References

1. M.R. Connop-Price; Pembrokeshire: the Forgotten Coalfield; Landmark Publishing, Ashbourne, Derbyshire, 2004

32. D S M Barrie, revised Peter Baughan; A Regional History of the Railways of Great Britain: volume 12: South Wales; David St John Thomas, Nairn, 1994.

36. Wing Commander Ken McKay; A Vision of Greatness: The History of Milford 1790-1990; Brace Harvatt Associates, 1989.

56. https://en.m.wikipedia.org/wiki/RNAD_Trecwn, accessed on 13th September 2022.

57. https://maps.nls.uk/view/102188136, accessed on 13th September 2022.

58. https://commons.m.wikimedia.org/wiki/File:Statfold_Barn_Railway_-RNAD_Trecwn_A10(geograph_4220678).jpg, accessed on 13th September 2022.

59. https://alchetron.com/RNAD-Trecwn, accessed on 14th September 2022.

60. https://maps.nls.uk/view/91857083, accessed on 14th September 2022.

61. https://coflein.gov.uk/en/site/96059, accessed on 14th September 2022.

229. Martin Shill; Number 250; in the Industrial Railway Record, Industrial Railway Society Volume 250 September 2022, p1-6.

230. https://maps.nls.uk/geo/explore/#zoom=15.0&lat=51.95523&lon=-4.93724&layers=6&b=1, accessed on 29th September 2022.

231. https://maps.nls.uk/geo/explore/#zoom=16.0&lat=51.95468&lon=-4.95372&layers=6&b=1, accessed on 29th September 2022.

232. https://maps.nls.uk/view/102188136, accessed on 29th September 2022.

233. https://maps.nls.uk/view/102188163, accessed on 29th September 2022.

234. https://www.subbrit.org.uk/sites/trecwn-royal-naval-armaments-depot, accessed on 29th September 2022.

235. https://www.openrailwaymap.org, accessed on 29th September 2022.

236. OpenRailwayMap (previously called “Bahnkarte”) is a detailed online map of the world’s railway infrastructure, built on OpenStreetMap data. It has been available since mid-2013 at openrailwaymap.org. This project was founded in December 2011 in order to create a world-wide, open, up-to-date and detailed map of the railway network, based on OpenStreetMap. The domain was registered on April 27th, 2013 and the corresponding website was launched in mid 2013. Since then it has received constant improvement. In February 2014 the project moved to a new server. In April 2014 a dedicated map for mobile phones was launched. [237]

The OpenRailwayMap includes all rail-mounted and automotive vehicles, e.g. railways, subways, trams, miniature railways and funiculars. The map does not include aerialways, monorails, and maglevs. The name OpenRailwayMap mostly refers to the online map, but the project also aims to support railroad-related data in OpenStreetMap. By developing a consistent data model, providing a mailing list for discussions, developing editor plugins, etc. the collection of these data is boosted and the data are made usable for other applications and developers. [237]

OpenRailwayMap is Open Source software and is freely available for download under the GPL version 3. It is runs on Linux and services its contents via Apache web server, PHP and Javascript. It is furthermore based on LeafletKothicJSNodeJSnode-tileserverosmfilterosmconvertosmupdateosm2pgsqlPostgreSQL and PostGIS. There is also a changelog.

237. https://wiki.openstreetmap.org/wiki/OpenRailwayMap, accessed on 29th September 2022.

238. https://commons.wikimedia.org/wiki/File:Old_branch_line_to_Trecwn_-geograph.org.uk-_520836.jpg, accessed on 29th September 2022.

239. https://commons.wikimedia.org/wiki/File:Level_crossing_on_dead_railway_-geograph.org.uk-_1855840.jpg, accessed on 29th September 2022.

240. https://commons.wikimedia.org/wiki/File:Branch_to_Trecwn_-geograph.org.uk-_208673.jpg, accessed on 29th September 2022.

241. This statement needs a minot clarification. The Trecwn Branch used to leave the line between Fishguard and Clynderwen just South of where that line diverged from the route from Fishguard tthrough Clarbeston Road. The North Pembrokeshire line was lost many years before the Trecwn branch closed. The tracks visible in the image above led only to Trecwn.

This plan appears at the head of the article on the Disused Stations website about the Fishguard to Clynderwen route – a.k.a the North Pembroke shire and Fishguard Railway. it shows the Trecwn branch leaving this railway just South if its junction with the line through Clarbeston Road. [242]

242. http://disused-stations.org.uk/features/north_pembrokeshire_and_fishguard_railway/index.shtml, accessed on 29th September 2022.

243. https://m.facebook.com/groups/trulypembrokeshire/permalink/755957217781489, accessed on 30th September 2022.

244. https://www.flickr.com/photos/rocketron7/albums/72157647842795154, accessed on 30th September 2022.

245. https://www.facebook.com/profile.php?id=100065502640813 … Ron Weatherall 17th. August 2017, accessed on 30th September 2022.

246. https://commons.m.wikimedia.org/wiki/File:Talyllyn_Railway_No_11_Trecwn_-_2018-06-16.jpg, accessed on 2nd October 2022.

247. https://www.hanesabergwaun.org.uk/places/industry-businesses/trecwn-aerial-views-rnad-trecwn, accessed on 2nd October 2022.

248. https://amertonrailway.co.uk/locomotives/diesel/a10, accessed on 10th October 2022.

249. https://amertonrailway.co.uk/events/everything-goes-gala, accessed on 10th October 2022.

250. http://www.rdwales.co.uk/trecwn-valley.htm, accessed on 2nd October 2022.

251. https://www.facebook.com/167680895449/posts/pfbid0wU9efHT2NErDUrXJpn7cf1nf9v8aXwQZBU7WR1qCEpwcpDTgM4bKhMNxJV8N8JD3l/?app=fbl, accessed on 10th October 2022.

The Micklehurst Loop – Part 1

I am indebted to Alan Young for a number of the images in this and the following articles about the Micklehurst Loop. This is his drawing of the Loop which appears at the head of his article about the Loop on the ‘Disused Stations‘ website. It is used with his kind permission, (c) Alan Young. [7]

During January 2021, my wife and I walked the majority of the length of the Micklehurst Loop from Stalybridge to Diggle. This was the goods relieving line for the main Stalybridge to Huddersfield railway line. It had been hoped to alleviate congestion by making the mainline into a 4-track railway but the geography mitigated against this and a route on the other side of the Tame Valley was chosen instead.

The maps used in this sequence of articles are predominantly 25″ OS Maps from 1896 through to 1922 and have been sourced from the National Library of Scotland. [1] There are a number of websites which focus on the Loop which are excellent. The sites concerned are noted immediately below and the relevant link can be found in the references section of this page or by clicking on the highlighted text here:

  1. The most detailed treatment of the line and its stations can be found on the Disused Stations – Site Records website. The particular pages on that site which cover the Loop were provided by Alan Young. One page covers the route and pages covering each of the stations can be accessed from that page. [7]
  2. Particularly good for old photographs of the Loop is the Table 38 webpage about the railway. [12]
  3. 28DL Urban Exploration has pages about Stalybridge New Tunnel under Cocker Hill [19] and about Hartshead Power Station. [20]

Part 1 – Stalybridge to Staley & Millbrook Station and Goods Yard

This first map extract shows the Western end of the Micklehurst Loop. It left the mainline at Stalybridge Station which can be seen on the left side of the extract. Both the mainline and the loop entered tunnels under Stamford Street, Stalybridge. [1]This modern satellite image covers approximately the same area of Stalybridge as the map extract above. The route of the former Micklehurst Loop is highlighted by the red line.Looking west towards Stalybridge Station circa 1960 from Stamford Street BR standard Class 5 No.73162 takes the Micklehurst Loop as it pulls away from Stalybridge Station with a Huddersfield-bound freight and approaches Stalybridge New Tunnel. Photo by Peter Sunderland courtesy of Alan Young. [7]

The Western portal of Stalybridge New Tunnel sits just to the East of the Bridge that carries Stamford Street over the route of the Loop. It is difficult to photograph and access is not easy. While search for images of the line I came across a video on YouTube:

This video shows the Western end of the tunnel and then covers a walk through the full length of the tunnel and a glance out of the Eastern Portal. [8]

This next map extract shows the Micklehurt Loop emerging from the tunnel under Cocker Hill. The main line is in tunnel further North. Just South of the tunnel mouth Old St. George’s Church can be picked out, an octagonal church building which has now been replaced by St. George’s Church which is off the map extract to the North. Immediately to the East of the tunnel entrance, the Loop crossed the course of the River Tame and the Huddersfield Narrow Canal on a Viaduct.Much has changed in the satellite image above which covers approximately the same area. The canal basin can just be picked out, as can Knowl Street. The course of the River Tame is unchanged. Old St. George’s is long-gone. There is no evidence left of the Viaduct which carried the line.

Old St. George’s Church was located almost directly over the tunnel. It was an unusual church building and over its life was rebuilt twice on essentially the same plan. “The first was built in 1776. It was the first recorded church in Stalybridge and it did fall down shortly after it was built. The next church was demolished around a hundred years later because of structural problems and the last church was demolished in the 1960’s as it was no longer used.” [3]The last incarnation of Old St. George’s Church on Cocker Hill. This coloured monochrome image is held in the archives of Tameside MBC. The Micklehurst Loop can be seen exiting the tunnel below the church to the right and immediately crossing the River Tame on Knowl Street Viaduct. [4]This monochrome image is provided with permission,  courtesy of Alan Young, once again. [7] He comments: “looking north up the River Tame the western end of Knowl Street Viaduct in Stalybridge is seen in this undated view. Having crossed this 16-arch viaduct the Micklehurst Loop promptly plunged into Stalybridge New Tunnel through Cocker Hill (left). This section of line ceased to handle traffic in 1972, when coal movements to Hartshead Power Station (near Staley & Millbrook) ceased, and the line was taken out of use in July 1976, but it was not until 1991 that the viaduct was demolished.” [7]

The Eastern Portal of the tunnel, which was directly below the church can still be reached with a little careful clambering. The image below has a Creative Commons Licence. (CC BY-SA 2.0).The East Portal of Stalybridge New Tunnel which is directly below the site of Old St. George’s Church © Copyright Tom Hindley and licensed for reuse under a Creative Commons Licence. (CC BY-SA 2.0). [5]

Knowl Street Viaduct carried the Loop over the River Tame, Knowl Street and the Huddersfield Narrow Canal and a series of arches in between. There were 16 arches in all.This photograph taken from the East alongside Knowl Street Viaduct is included with permission, courtesy of Alan Young. [7] Alan comments: “The Micklehurst Loop diverged from the original Huddersfield-Manchester line a short distance east of Stalybridge station, entered Stalybridge New Tunnel (about 300yd in length) then promptly crossed the broad valley of the River Tame on Bridge No.3 (also known as Knowl Street Viaduct). This impressive curving viaduct, in the blue engineering brick used by the LNWR on the Loop’s major structures, was 330yd in length with 16 arches. In addition to crossing the River Tame, the viaduct also strode across Huddersfield Narrow Canal and three roads. In this undated westward view, the viaduct and Stalybridge New Tunnel through Cocker Hill are shown. Coal trains that served Hartshead Power Station ceased to run over the viaduct in 1972, but it was not until July 1976 that the line was officially taken out of use. Fifteen years elapsed before the viaduct was demolished in 1991.” [7]A further image used with permission, courtesy of Alan Young. [7]  Alan comments: “Looking north-east from a point close to the eastern portal of Stalybridge New Tunnel. The Knowl Street Viaduct, 330yd in length and with 16 arches, is seen crossing the River Tame then curving away towards the next station of Staley & Millbrook. The local passenger service on the Micklehurst Loop, on which this viaduct was located, ceased in 1917, but occasional passenger trains and many freight workings continued into the 1960s; coal traffic continued to pass over the viaduct until 1972 en route to Hartshead Power station near Staley & Millbrook station and the line was officially taken out of use in 1976. Nature is taking over the former trackbed as seen on this undated photograph. The viaduct was demolished in 1991.” [7]A modern view of Knowl Street taken from Google Streetview. Knowl Street Viaduct crossed Knowl Street at this location. The spandrel walls on the North side of the Viadct passed very close to the gable end of the terraced building to the East of Knowl Street, the righthand side in this view.

After crossing the Huddersfield Narrow Canal the Loop line regained the embankment shown on the next OS Map extract below. Just to the North of the point where the viaduct crossed the canal is a stone bridge carrying what is now (in the 21st century) the canal-side walk. That bridge is shown at the centre of the Google Streetview image below and at the bottom left of the OS Map extract. It is named Knowl Street Bridge and carries the number 97. [8]

After crossing the Canal the line was carried on embankment, passing to the West of Brookfield House and running North by Northeast parallel to the Canal with Huddersfield Road a distance away to the South. Across the valley of the River Tame to the West were Riverside Mills.The approximate line of the railway, shown in red, runs parallel to the canal. We parked in a small car park just off the south of this satellite image, as illustrated below. The image shows that the site of the Riverside Mills is now occupied by the premises of Smurfit Kappa, Stalybridge. [9]Stalybridge and the Southwest end of the Micklehurst Loop.

Brookfield House was  “a large detached house built in the early 19th century for James Wilkinson, and shown on the 1850 Stayley Tithe Map. All that remains is the former mid-19th century lodge house at 93, Huddersfield Road, with the entrance to the former drive with stone gate piers on its south side. The grounds of Brookfield House are clearly shown on the 1898 OS Map, and included an oval lake and glasshouses, …. Brookfield House was demolished and the lake filled in between 1910-1933. The grounds are now overgrown with self-set woodland.” [2]This next OS Map extract illustrates, at the the top right, how tightly the river, railway and canal follow each other at times up the Tame Valley. The railway sits above the canal which in turn sits a little above the river. Also evident is the name used on this series of OS Maps for the Loop Line – the “Stalybridge and Saddleworth Loop Line.”

Alan Young explains: “Although described as both the ‘Stalybridge & Saddleworth Loop‘ and ‘Stalybridge & Diggle Loop‘ on Ordnance Survey maps, the line is more commonly known as the ‘Micklehurst Loop’.” [7]

River Meadow Cotton Mills were owned by Henry Bannerman who was a successful farmer in Perthshire, Scotland At the age of 55 in 1808 he “moved with his family to Manchester, determined to get involved in the burgeoning Lancashire cotton industry.” [10]

At one time the company had “four cotton mills in the Manchester area: Brunswick Mill in Ancoats, Old Hall Mill in Dukinfield and the North End Mill and River Meadow Mill, both in Stalybridge.” [10]

In 1929, the Lancashire Cotton Industry was struggling. It had not regained its markets after the First World War. In an attempt to save the industry, the Bank of England set up the ‘Lancashire Cotton Coroporation’. Bannermans’ mills were taken over a few years later. The mills were acquired by Courtaulds in 1964 and all production ceased in 1967.” [10] After closure the four-storey mill which was Grade II Listed “was used by Futura before they moved to Quarry Street and then S. A. Driver warp knitters, dyers , printers and finishers.” [11] As can be seen in the satellite image below, the Mill is now demolished.Souracre and River Meadow Cotton Mill and Souracre in the 21st century .

North of Souracre and visible at the bottom left of this next OS Map extract were Hartshead Calico Print Works East of Printworks Road and close by Heyrod Hall. Also visible on this map extract are Stayley Hall and the first Station on the Micklehurst Loop – Stayley and Millbrook Station.

Hartshead Print Works – is visible just below centre-left on the OS Map extract above. The works was listed in the Stalybridge Directory of 1891 as owned by John L. Kennedy &Co. Ltd, Calico Printers. lt was purchased in 1899 by the Calico Printers Association. [18]

Heyrod Hall – is shown on the top left of the OS Map extract above.

Stayley Hall – is a Grade II* Listed Building which dates back to at least the early 15th century.[14] The first records of the de Stavelegh family as Lords of the Manor of Staley date from the early 13th century. Stayley Hall was their residence. [15]

It came into the possession of the Assheton family through marriage and united the manors of Stayley and Ashton and thence into the family of Sir William Booth of Dunham Massey. In the middle of the 16th century. [15]

Stayley Hall 1795. [21]

In the middle of the 18th Century the Earldom of Warrington became extinct and the Hall, alonng with all the Booth’s estates passed to Harry Grey, 4th Earl of Stamford. Stayley Hall was owned by the Booth family until the death of  Roger Grey, 10th Earl of Stamford in 1976. [15]

Wikipedia concludes its history of the Hall as follows: “In 2004 the Metropolitan Borough Council announced that they had granted permission to a developer to build 16 homes next to Stayley Hall. A condition of the planning consent was that the hall be restored.[3] The developer has converted the hall and outbuildings into houses and apartments, most of which are now occupied.” [15]

Early 25″ OS Map covering the length of the passenger facilities and most of the goods facilities at Staley & Millbrook Station. [1]

Staley and Millbrook Station – Alan Young’s on his webpage about the Station comments as follows: “Staley & Millbrook station stood on a steep slope immediately south of Spring Grove Viaduct.  The two facing platforms were equipped with waiting rooms, most likely of timber construction, with glazed awnings, as is thought to have been the building style at all four of the Loop’s stations. The platforms, too, were most likely of timber construction as that material was used for the platforms at Micklehurst, where they were also on an embankment, and timber would be a much lighter load than masonry for an embankment to support. The stationmaster’s house and adjoining single-storey office range to its west faced Grove Road across a small, triangular forecourt. The station house was constructed of dark red brick with string courses of blue engineering brick and pale stone lintels.” [18]Staley & Millbrook Station building and the Sprong-grove Viaduct take from the East on Grove Road in the early 20th century. The picture shows a clean and relatively well maintained site, very different to what remains in the 21st century, please see the pictures below. [18]Staley and Millbrook Railway Station and Spring-grove Mill. [16]

Staley and Millbrook Station buildings have long-gone as has the Viaduct, the first arch of which spanned Grove Road and looked to be a graceful structure. Also of interest in the monochrome picture of the Station and Viaduct above is what appears at first sight to be evidence of a tramway or industrial railway in the cobbles of Grove Road. I have not as yet been able to find out anything about what this feature actually is. The feature is not marked on the map extract immediately above. Closer examination of the picture above suggests that rather than being part of a short industrial line the cobbles may have been laid to facilitate a particular movement around the Spring-grove Mill.

In the 21st century, this length of Grove Road has been tarmacked – a thin layer of tarmac covers the original sets. The next two pictures were taken on 30th January 2021 on a second visit to the site after walking the route of the Loop.

Taken from East of the route of the Micklehurst Loop, this photograph shows the location of the old station building. It sat facing the road on the left-hand side of the panorama. The Southern abutment of the viaduct sat adjacent to the station building, in the area of trees between the 5-bar field gate and the stone wall towards the right of the picture. The masonry wall is in the location of what were terraced houses between the canal and the railway viaduct. (My photograph, 30th January 2021)Another panorama, this time taken from the canal bridge to the West of the Loop. What is left of Spring-grove Mill can be seen on the left side of the image. Grove Road, heading towards Millbrook is central to the image. The masonry wall is the location of the terraced houses mentioned above. The first trees beyond it mark the line of the viaduct. The station building was sited beyond to the West. (My photograph, 30th January 2021)

Spring-grove Mill – As we have already noted, Spring-grove Mill is shown straddled by the viaduct on the OS Map extract above. When Staley & Millbrook station opened, “there was already some population and industry in the immediate neighbourhood. Spring Grove Cotton Mill faced the station across Grove Road, and map evidence suggests that the railway’s viaduct sliced through the existing mill building. A terrace of three cottages, also pre-dating the railway, stood immediately north of the platforms, and Stayley Hall was about 100yd south of the station. Millbrook village, with three cotton mills, was about ten minutes’ walk uphill east of the station.” [16] [18]The remaining buildings of Spring-grove Mill. The lighter (cream painted) brickwork is the part of the mill shown on the map extracts as being on the East side of the viaduct. The portion of the Mill to the West of the viaduct has been demolished. The red-brick portion of the remaining building would have been under the arches of the viaduct. The Western spandrels of the viaduct arches would have followed a line running from the intersecting kerb-stones in the right-foreground over the redbrick part of the present building. (My own photograph – 30th January 2021)

Spring Grove Mill was a cotton mill from 1818 to 1868 and then was a woollen mill for 100 years, it was the last steam-powered mill in the area. [17] The image of Hartshead Power station below, includes Spring-grove Mill in the bottom right-hand corner. By the time the aerial photograph was taken Grove Road appeared to extend across the Canal and the River Tame towards Heyrod.

Hartshead Power Station was also located North of Souracre to the West of the River Tame. It was a coal-fired station and was served by trains on the Micklehurst Loop up until the 1970s. The picture immediately below was posted by Tameside Council on their Facebook page in 2015.An aerial picture of Hartshead Power Station taken before the Second World War. It was opened by the Stalybridge, Hyde, Mossley and Dukinfield (SHMD) Joint Board in 1926 and the cooling towers were erected in the 1940s. The station closed in 1970 and was demolished in the 1980s. Although the Good Shed visible to the top right of the image still stands. The Micklehurst Loop curves from the bottom right to the top left of the picture. [13]This enlarged extract from the image above show the coal transfer facilities and railway sidings associated with the power station . [13] The resolution of the image is not wonderful but it does highlight the traffic which was brought to the site throughout the middle 50 years of the 20th Century.

OS 1:25,000 Map form the early- to mid-20th century, sourced from the National Library of Scotland – Hartshead Power Station. One of the two cooling towers is not shown in full as it crosses the map join. [14]

The full extent of the Hartshead Power Station site at Souracre can be seen on the adjacent OS Map extract from the middle of the 20th century, which also shows the location of Stayley Hall and the Stayley and Millbrook Station build just North-northwest of Stayley Hall.

Approximately the same area is shown below on a relatively recent extract from the ESRI World Image website which is the satellite mapping used by the National Library of Scotland. [13]

The Good Shed which is considered further below is visible on both the map extract and the satellite image and the extent of the railway sidings on the East side of the Loop line is evident.

ESRI Satellite Image extract showing the current status of the Hartshead Power Station site with the approximate route of the Micklehurst Loop Line shown in red. The Goods Shed is still standing and can be seen just to the right of the red line. Along with the Loop line all of the lines in the sidings have ben lifted. [13]A view from the East looking across the power station site with the Good Shed and coal transshipment facilities in the foreground. the lack of trees compared with the satellite image and all other pictures of the site in the 21st century is striking, © Copyright David Dixon and licensed for reuse under this Creative Commons Licence. [23]

The substantial Goods Shed was built at the same time as the Loop initially with two sidings to its East. These sidings were expanded with the advent of the power station in the early 20th century. The site is now overgrown and is returning to nature. The only exception being the Goods Shed itself. There is an excellent video showing its current condition on ‘Martin Zero’s’ YouTube Channel which is embedded below. My own pictures of the site also follow below.

The Goods shed at Stayley and Millbrook Station presided over a large expanse of sidings which served Hartshead Power Station on the opposite side of the Huddersfield Narrow Canal and the River Tame. [22]Looking South towards the location of the passenger facilities at Staley and Millbrook Station. The Goods shed is on the left (the East side of the Loop line). (My photograph, 18th January 2021).The Goods Shed taken from the same location as the last photograph – a substantial three-storey structure. (My photograph, 18th January 2021).

The next part of this walk following the line of the Micklehurst Loop sets off from this goods shed traveling North.

References

  1. https://maps.nls.uk, accessed on 18th January 2021.
  2. Copley Conservation Area Appraisal and Management Proposals; Tameside MBC, March 2013, p9-10.
  3. https://cockerhill.com/2010/07/06/old-st-georges-church-cocker-hill, accessed on 23rd January 2021.
  4. https://public.tameside.gov.uk/imagearchive/Default.asp & https://cockerhill.com/2010/07/06/old-st-georges-church-cocker-hill, accessed on 23rd January 2021.
  5. https://www.geograph.org.uk/photo/3119673, accessed on 22nd January 2021.
  6. http://nwex.co.uk/showthread.php?t=6918, accessed on 27th January 2021.
  7. http://disused-stations.org.uk/features/micklehurst_loop/index.shtml, accessed on 25th January 2021.
  8. https://canalplan.org.uk/waterway/cjdf & https://canalplan.org.uk/place/1hv4, accessed on 27th January 2021.
  9. https://www.smurfitkappa.com/uk/locations/united-kingdom/smurfit-kappa-stalybridge, accessed on 28th January 2021.
  10. http://cosgb.blogspot.com/2010/12/henry-bannerman-sons-limited.html, accessed on 28th January 2021.
  11. https://en.wikipedia.org/wiki/List_of_mills_in_Tameside#Mills_in_Stalybridge, accessed on 28th January 2021.
  12. http://www.table38.steamrailways.com/rail/Micklehurst/micklehurst.htm, accessed on 24th January 2021.
  13. https://scontent.fman2-1.fna.fbcdn.net/v/t1.0-9/10923473_10152970711638376_5311634515634523408_n.jpg?_nc_cat=102&ccb=2&_nc_sid=9267fe&_nc_ohc=TvOmLmn5KTcAX_Ayq7O&_nc_ht=scontent.fman2-1.fna&oh=2306db45618ba15e6bc27d582f00e643&oe=6037BA9F, accessed on 29th January 2021.
  14. Mike Nevell; Tameside 1066–1700; Tameside Metropolitan Borough and University of Manchester Archaeological Unit. p. 112 & 141, 1991.
  15. https://en.wikipedia.org/wiki/Stayley_Hall, accessed on 29th January 2021.
  16. https://m.facebook.com/story.php?story_fbid=784689891661955&id=121283594669258, accessed on 29th January 2021.
  17. https://www.google.com/url?sa=t&source=web&rct=j&url=https://www.tameside.gov.uk/countryside/walksandtrails/lowerbrushes.pdf&ved=2ahUKEwjXrum3xMHuAhVMTBUIHYmQAeQ4ChAWMAJ6BAgSEAI&usg=AOvVaw2DR5SZ9N3AM7__DD-ZN0Bv, accessed on 29th January 2021.
  18. https://gracesguide.co.uk/John_L._Kennedy_and_Co, accessed on 29th January 2021.
  19. https://www.28dayslater.co.uk/threads/stalybridge-new-tunnel-stalybridge-july-2012.72653, accessed on 26th January 2021.
  20. https://www.28dayslater.co.uk/threads/hartshead-power-station-heyrod-and-millbrook-2015-2019.119500, accessed on 29th January 2021.
  21. https://www.ebay.co.uk/itm/1795-Antique-Print-Stayley-Hall-Stalybridge-Greater-Manchester-after-E-Dayes-/292642997239, accessed on 29th January 2021.
  22. https://youtu.be/VdmWydx4VBw & https://www.facebook.com/martinZer0/?comment_id=Y29tbWVudDoxNTU4MjI2MDIxMDExNzUxXzE1NjA0NDMwMjQxMjMzODQ%3D, accessed on 31st January 2021.
  23. https://www.geograph.org.uk/photo/2204271, accessed on 31st January 2021.