I am indebted to ‘David’ for an update on the Plevin owned railway land in Mossley. …
It is a few years since I wrote a series of articles about the Micklehurst Loop which can be found on this blog. Circumstances have since changed at what was the Plevin site. Plevin’s relocated in 2024 to another site and their yard has been gradually deteriorating since then.
The original series of articles can be found here. [1] Following the link takes you to the latest blog post on the theme (which will be this one), scrolling down the webpage will bring you to the start of the series. My articles about the line follow the line from Stalybridge to Diggle. You will note that there are a number of addenda to the main series of articles.
When we walked the line as exercise during COVID it was not possible to gain access to Plevin’s site. Plevin’s property was covered in the second of four substantive articles about the line which can be found here. [2]
This coloured version of the 25″ Ordnance Survey of 1890/1891 was published in 1894. It shows Mossley’s stations on the Micklehurst Loop. At the top of the image the passenger station stands on embankment with the station building a little to the South on the East side of the line. The goods station which primarily consisted of the large goods shed is towards the bottom of the map extract. The railway and yard sit high above the Huddersfield Narrow Canal. [4]A closer satellite view of Plevin’s site in 2025 – this is the latest view of the site available on Google Maps. The lighter roof is that of the old goods shed the darker grey roofing is over later buildings built over the running lines of the Micklehurst Loop. [Google Maps, January 2025]The same buildings but this time as seen on Google Earth 3D imagery seen from the South. This is the current view on Google Earth at the beginning of 2025. [Google Earth 3D, January 2025]
‘David”s report on 28dayslater.co.uk is a comprehensive look at the site and its history. That report can be found here. [3] ‘David’ kindly sent through some of his photographs, of which a selection appear below.
‘David’ commented in January 2025 that the site is suffering some vandal damage now that no security is provided. A fuller impression of the site and its condition in 2025 can be gained by consulting David’s post on 28dayslater.co.uk.
Since publishing a series of articles about the Micklehurst Loop, I have, over the past couple of years, kept my eye open for interesting shots of the line. This is a selection of these that I have permission to share …. A big thank you to copyright holders/photographers. Their details appear with each image.
The first photograph was taken in the middle of the 20th century. The exact date is unknown. It begins our renewed focus on the Micklehurst Loop by showing a goods train leaving the Loop in Stalybridge. …
This image comes from the collection of Peter James Birchill and was shared by him on the Stalybridge Railway Photos Facebook Group on 25th September 2021. [3] It is shown here with his permission. The photograph shows a goods train in the capable hands of locomotive No. 49536 in BR days leaving the tunnel under Cocker Hill and heading towards Stalybridge Station. No. 49536 was an ex-LMS 0-8-0 Class 7F tender loco which was built in 1929 as part of the first batch of these locomotives built at Crewe in LMS days. It bore the LMS number 9536. These locomotives were derived from an earlier LNWR design of 0-8-0. None of the Class made it into preservation, all being scrapped between 1949 and 1962. As Midlandised versions of the LNWR Class G2 and Class G2A 0-8-0s, their major failing was the Midland design office decision to use axle bearings from the Midland 4F 0-6-0s which were too small for the loads they had to carry. PJBRailwayPhotos [4]A rebuilt ‘Patriot’ on the Micklehurst Loop with a train of coal wagons in the last days of steam, probably bound for Hartshead Power Station. The locomotive is marked with the diagonal yellow stripe which means that it cannot travel under electric wires. Note Old St. George’s Church on Cocker Hill which was an unusual octagonal shape and sat over the 572 yard New Tunnel which trains from Stalybridge Station passed through at the start of their journey on the Loop line. Public Domain, PJBRailwayPhotos. [2]John Marsh writes: “A lucky encounter with a train on the Micklehurst Loop which ran from Stalybridge to Diggle Junction happened on Saturday 20th April 1968. I and some friends were on the way to Disley to photograph a railtour (MRTS/SVRS North West Tour) hauled by a pair of Black 5s. We saw smoke when coming down into Stalybridge from Diggle and realised there was a train going up the Micklehurst Loop. We managed to get to a suitable location just in time to photograph the loaded coal train as it climbed towards Millbrook Sidings on a 1 in 100 stretch and Hartshead Power station. 48549 of Stockport Edgeley (9B) hauled the train. It was transferred to Patricroft (9H) the following month and withdrawn at the end of the month.” (c) John Marsh [1]
These next two photos were taken in the yard opposite Hartshead Power Station and show one of their fireless locos and a more normal steam loco, a 0-4-0ST. The pictures were taken by Keith Chambers who writes:
“I visited Hartshead Power Station as a teenager on 22nd May 1971. We had come up from down south (Woking) to spend a day tracking down surviving steam and had already been to Heaps Bridge and seen a working loco, Colyhurst to see a ‘Jinty’ in steam albeit as a stationary boiler and finished our little tour off at Hartshead. My abiding memory is of being guided by one of the station’s staff up and over the high level conveyor to get to the locos. It was spectacular up there and slightly scary. Being a Saturday afternoon nothing much was happening shunting wise and RSH 7661 was in the back of the engine shed along with the fireless HL 3805. There was however another RSH 0-4-0ST present stored in the sidings. This was works number 7646 of 1950.”
To complete this small section on the Power Station, the next photo shows the overhead conveyor which Keith Chambers refers to.
The truncated version of the overhead conveyor at the site of the now demolished Hartshead Power Station. [5]
As usual, I will continue to keep an eye open for further interesting images which might add to our appreciation of what was primarily an important short goods line but which was also used as a convenient diversion route for passenger trains.
If you want to read the other articles in this series, you can find them on these links:
While on holiday in September 2021, I was reading older copies of the magazine BackTrack from the turn of the millennium, from, at that time, Atlantic Publishers. (More recent editions are published by Pendragon Publishing.)
Volume 14 No. 3, March 2000 included an article by Jeffrey Wells [1] about the Micklehurst Loop (p142ff). Wells highlighted the congestion which led to the development of the LNWR line between Huddersfield and Stalybridge which was opened in 1849. The single-line ‘Nicholson Tunnel’ was the first impediment to the free flow of traffic. This was rectified with the construction by 1870 of the ‘Nelson Tunnel’. “Both tunnels were in use by 24th April 1871 following a period extending from the previous February when only the ‘Nelson Tunnel’ was in use during repairs to the ‘Nicholson Tunnel’.” ( p142)
Wells goes on to explain that ongoing problems with congestion between Stalybridge and Diggle led to alleviating alternatives being considered. Quadrupling of the line was ruled out on grounds of inadequate space.
The LNWR first addressed the length of line to the West of Stalybridge when it opened (in 1876) a line from Heaton Norris to Guide Bridge. It then decided that the construction of an alleviating relief line between Stalybridge and Diggle was the only feasible solution to congestion. The Act authorising the construction of the relief line received authorisation on 3rd July 1879. The route was in two parts – Railway No. 1 was the Hooley Hill Line “which left Denton Junction and joined the MSLR at Dukinfield Junction and Railway No. 2, the Micklehurst Loop Line stretching from Diggle to Stalybridge.” (p143)
Later, the LNWR opened its Stalybridge Junction Railway (1st August 1893) which provided a first link from Heaton Norris to Stalybridge.
The cost of the Micklehurst Loop was estimated at £213,000. The successful tender from Messrs. Taylor and Thomson of Manchester was £177,949 8s 2d. The work was completed and the line opened on 1st May 1886.
Wells talks of three utilities being connected to the Loop. …
The first was a 3ft gauge tramway which served the construction of high level reservoirs. Exchange sidings and the tramway were completed in 1908, “six contractor’s locomotives plied between the sidings at Roaches and a suitable stopping place short of the site.” (p146)
The second was the allocation, in 1916, of 26 acres of land between Stalybridge and Mossley for the construction of a power station. The plant finally opened in January 1927 and Millbrook Sidings were enlarged to accommodate a number of sidings. In addition, “In the 1930s the coal was moved from the sidings by a conveyor which passed under the line. This was later followed by an overhead steel-braced conveyor which stood on tall concrete piers.” (p146) In the summer of 2021 part of the conveyor structure remains standing as does the cavernous goods she’d which graced the sidings. In 2021, the sidings area at Millbrook was heavily overgrown with substantial trees having colonised the site. Plans were afoot for redevelopment of the area and some clearance and regrading had taken place.
The final utility which Wells points out was connected to the Loop was Mossley Corporation Gas Works. “The Works had its own internal rail layout and a complement of small standard gauge locomotives.” (p146) Movements in and out of the site were controlled by Friesland Gas Sidings signal box.
Some excellent monochrome photographs accompany the article, one of which is included here.
This excellent black and white study shows a Fowler 0-8-0 7F tender locomotive proceeding tender first towards Stalybridge. The caption above misidentifies the location. The goods shed visible on the right of the image is actually Micklehurst goods shed. It remains visible today on the site of a pallet works which occupies the old railway sidings. Two of these large goods sheds remain standing, this at Micklehurst and the one referred to in the caption above at Millbrook. As noted by Wells, the Millbrook shed was in a parlous state in 2021.
The article is also accompanied by two diagrammatic representations of the Loop line and the other lines referred to in the text. One of these maps is included here.
In a letter to BackTrack magazine carried in the June 2000 edition Vernon Heron points out that the reservoir tramway shown meeting the Loop line North of the Gas Works actually served exchange sidings near to half a mile South of the Gas Works. [2]
To finish his article, Wells points out that the Loop line suffered a gradual demise with passenger stations closing in the years prior to the end of the Great War. Rumours of final closure attended every significant maintenance problem on the line as the condition of the line’s brick bridges and viaducts began to deteriorate. The last train was to run on Sunday 30th October 1966 with the line gradually being dismantled in the following ten years. The final portion closed when Hartshead Power Station closed. That portion was dismantled in the late 1970s, 1980s and 1990s.
Jeffrey Wells completed his study of the line in the next edition of the magazine with a short series of pictures of Diggle Station which stood at the Western end of the Standedge tunnels. [3]
References
Jeffrey Wells; The Micklehurst Loop Line; in BackTrack Vol. 14 No. 3, Atlantic Transport Publishers, March 2000, p142ff.
Vernon Heron; The Micklehurst Loop; in Readers’ Forum in BackTrack Vol. 14 No. 6, Atlantic Transport Publishers, June 2000, p370.
Jeffrey Wells; Through the Lens at Diggle; in BackTrack Vol. 14 No. 4, Atlantic Transport Publishers, April 2000, p235ff.
I am indebted to Alan Young for a number of the images in these articles about the Micklehurst Loop. This is his drawing of the Loop which appears at the head of his article about the Loop on the Disused Stations website. It is used with his kind permission, (c) Alan Young. [7]
During January 2021, my wife and I walked the majority of the length of the Micklehurst Loop from Stalybridge to Diggle. This was the goods relieving line for the main Stalybridge to Huddersfield railway line. It had been hoped to alleviate congestion by making the mainline into a 4-track railway but the geography mitigated against this and a route on the other side of the Tame Valley was chosen instead.
The maps used in this sequence of articles are predominantly 25″ OS Maps from 1896 through to 1922 and have been sourced from the National Library of Scotland. [1] There are a number of websites which focus on the Loop which are excellent. The sites concerned are noted immediately below and the relevant link can be found in the references section of this page or by clicking on the highlighted text here:
The most detailed treatment of the line and its stations can be found on the Disused Stations – Site Records website. The particular pages on that site which cover the Loop were provided by Alan Young. One page covers the route and pages covering each of the stations can be accessed from that page. [7]
Particularly good for old photographs of the Loop is the Table 38 webpage about the railway. [9]
The first articles about the Micklehurst Loop can be found at:
There is a series of addenda to these articles which include additional material found or shared with me after the drafting of the relevant article. These can be found on the following links:
In my perambulations around the internet, I have also encountered a series of videos (on YouTube) which start from the Northern end of the line. 5 videos cover the length of the line in 2020 and a separate video covers some of the structures on the line. These videos are easily available on YouTube. This is the first [3] in the series:
Part 4 – Chew Valley Road, Greenfield to Diggle
We continue our journey travelling North from Chew Valley Road. The images immediately below appear at the end of the last article about the line which finished at Chew Valley Road. …………..
Man marking Ordnance Survey minor control revision point with an arrow on Chew Valley Road in Greenfield. The photograph looks Southeast along the Northern pavement of the road with the arch-bridge which carried the Micklehurst Loop visible in the background, (c) Manchester Libraries. [2]
Corner of Greenfield Conservative Club, converted to housing in 2019. The bridge visible carries the Micklehurst Loop line over Chew Valley Road. This view is also looking to the South east but on the opposite side of Chew Valley Road, (c) Manchester Libraries. [3]
Greenfield Viaduct. [4]
We finished the last length of the Micklehurst Loop at Chew Valley Road in Greenfield.
In concluding, we saw a couple of older postcard images of Greenfield Viaduct, the second of which looks along Chew Valley Road towards the Southeast, and a 21st century Google Streetview image of the point at which the Loop crossed Chew Valley Road.
Old Postcard Image looking past Wellington Mills and along Chew Valley Road to the Southeast. Greenfield Viaduct appears on the right side of the image, there is then a short section of embankment before the arched bridge over Chew Valley Road. Bentfield Mill sits behind the Viaduct. The line was on embankment to the Northeast of Chew Valley Road, to the left of this image. [5]
Chew Valley Road at the point where the Micklehurst Loop crossed the road by means of an arched bridge. The trees sit where the bridge abutments once sat! (Google Streetview.)
We get ready to set off on this last length of the Loop by looking at a few images of Chew Valley Road Bridge which I found on the “Greenfieldgoneby” Facebook group. [15]
The adjacent image looks from the Southeast along Chew Valley Road. [16]
The second image is taken from the same direction and a little closer to the bridge. The first was a winter-time shot, the second was taken in the summer. [17]
The third, below, is taken from the Northwest and shows the Conservative Club on the right side. [18]
This final image of the bridge before we begin our journey, is also taken from the Northwest, but from much closer to the bridge. [19]
An extract from the 25″ OS Maps from the early 20th Century. Chew Valley Road appears in the bottom left of the extract. [1]
Satellite image of approximately the same area in the 21st century (Google Maps).
Looking Northeast from Chew Valley Road in the 21st century along what would have been the line of the Micklehurst Loop (My Photograph – 25th January 2021)
Wellington Mills – the postcard above and the extract from the OS Mapping show Wellington Mills to the West of the railway in Greenfield. The mills were built in 1852 for Shaw, Son and Lees cotton Spinners who traded until 1858 and were succeeded by N. Broadbent and Sons. When Broadbent ceased trading the mills were left unused for 6 years (from 1932 to 1938). 1938 saw part of the buildings used as a general engineering works and in 1941 the rest of the premises were opened up with the installation of 362 looms by the fabric weaver B. Kershaw. [6]
The railway embankment between Chew Valley Road and Higher Arthurs has been regraded to tie in with surrounding land. (My photograph – 25th January 2021).
In the years up to 1946 the engineering section of the mill produced engine parts for bombers. It was then used for storage, first by the Navy and then by the British Wool Board. In 1946 the buildings and land were purchased by William Oddy. He transferred his woolen carding and mule spinning operations form Shipley to Greenfield. The Knoll Spinning Company was formed at this time. It seems that 362 looms were installed at this time. The company ceased trading in the 1990s and the mill again became vacant. [8]
The approach to Higher Arthurs in the 21st century – the original bridge has been removed. The railway embankment can be see rising ahead (My Photograph – January 2021).
Huddersfield Narrow Canal – along this stretch of the Loop the Canal is conspicuous by its absence. Having followed the Eastern valley side and hence having been very close to the Loop at times on the way up from Stalybridge, the Canal crossed both the Tame valley and the River Tame in the Friezland area. Through Greenfield and Uppermill it followed the line of the older mainline railway on the West side of the valley. The River Tame can just be made out in the Northwest corner of the map extract above running on the Southeast side of Frenches Dye Works. The Canal was on the northwest side of the Works.
Frenches Dye Works – Owen Ashmore, in The Industrial Archaeology of Northwest England, notes the existence of this Dye Works but as having been closed at the time of his survey – “At Frenches … is [the] site of [a] former Dye Works built on [the] site of [an] early 18C fulling mill.” [10: p130]
Our walk along the line of the Micklehurst Loop took us across Chew Valley Road and Higher Arthurs on 25th January 2021. Just to the north of Higher Arthurs, we had to choose between scrambling up the embankment face seen just beyond the dwarf wall which is all that is left of the abutment of the bridge which carried the Loop over the lane, or a short walk along Carr Lane to access the track-bed along the approved walking route. We chose the latter and joined the route of the old line a few tens of metres ahead of the steep track shown in the picture.
This slightly blurred image from the Saddleworthgoneby Facebook Group shows the bridge which carried the Loop over High Arthurs. A double-headed mineral train is travelling North on the Loop. The road in the foreground is Carr Lane. The photographer is not known. [60]
The old railway continued Northeast from Higher Arthurs curving gradually round towards a Northerly direction. At the time the map below was drawn, there was a footbridge carrying a footpath from Wellington Terrace across to Kinders Lane and Fur Lane Farm. This footbridge was a narrow blue-brick arched bridge. It remains in place in the 21st century. These next two pictures show it from track-bed level.
The footbridge is a two span blue-brick arch bridge. This picture is taken looking North toward Uppermill Station, (My photograph – 25th January 2021).
The footbridge again, this time looking South towards Greenfield, (Photograph taken by Jo Farnworth – 25th January 2021).
The track-bed continues to curve round towards the North.
The Micklehurst Loop track-bed approaching Uppermill Goods Yard, (My photograph – 25th January 2021).
An extract from the 25″ OS Mapping of the early 20th century. [1]
The same area on modern satellite imagery, (Google Maps). The encroachment of modern housing in significant.
The next map extract shows the immediate approach to what was Uppermill Goods Yard. The goods yard was protected on it southern boundary by another accommodation bridge which provided access to Ballgrove from Uppermill. On Google maps this bridge can be seen to carry Rush Hill Road.
This next extract from the 25″ OS Mapping shows the approach to Uppermill Goods Yard from the South. [1]
The same area as the map above, shown on modern satellite imagery. The site of the Goods Yard has been replaced by Uppermill Sports Club.
Northbound Goods approaching Rush Hill Road Bridge to the South of Uppermill Goods Yard. [25]
This image also appears on the ‘Disused Stations’ website, where Alan Young comments: “In the late 1940s a Leeds-bound goods train is seen from Rush Hill Road bridge approaching the goods station at Uppermill. The locomotive is Bowen-Cooke-designed ex-LNWR 7F 0-8-0, built at Crewe works in August 1896. Numbered 9020 by the LMS, and previously 2540 in LNWR ownership, she continued to work as British Railways No.49020 until October 1961 when she was withdrawn from 10A, Wigan Springs Branch shed, and cut up the same month at Crewe works – Photo by Jim Davenport.” [26]
A view from the East of Rush Hill Road as it crosses the line of the Micklehurst Loop – the blue brick parapets are almost hidden by summer vegetation, (Google Streetview).
Rush Hill Road Bridge Northern parapet taken from the Western end of the bridge, (Google Streetview).
Rush Hill Road Bridge was strengthened using and Armco Arch with stone backfill when the route of the line was turned into a linear walkway, This view looks forward into the former Uppermill Goods Yard, (My photograph – 25th January 2021).
Looking north along the route of the Micklehurst Loop from Rush Hill Road Bridge, (My photograph – 6th April 2021).
Looking back to the South along the line of the Micklehurst Loop through Rush Hill Road Bridge, (My photograph – 25th January 2021).
Once closed, Uppermill Goods Shed was demolished and the tracks were lifted. In the 21st century, the site is used for a variety of sporting interests. The route of the old line crosses the carpark facilities of the sports centre and continues to the North. Before following it, we take a look at some images of the goods facilities on the Loop at Uppermill.
Uppermill Goods Shed from across the Tame Valley [11]
The Uppermill Goods Yard from the West. In front of it there is a game of cricket taking place – from the “Saddleworthgoneby” Facebook group. [20]
This image also appears on the ‘Disused Stations’ website, where Alan Young comments: A view of “Uppermill goods station looking east c1937. A cricket match appears to be in progress on the ground to the left. The goods warehouse dominates the scene, built on a generous scale, as were those at the other Micklehurst Loop stations. The single storey section of the warehouse contains offices and toilet facilities. The sidings are occupied by numerous wagons. New houses can be seen beyond the railway, on Bankside Avenue – Photo from Peter Fox ‘Old Saddleworth’ collection.” [26]
The Uppermill Goods Yard taken from the Southeast. Saddleworth Viaduct can be seen to the right side of the image. This picture was also sourced from the “Saddleworthgoneby” Facebook group. [21]
The above image also appears on the ‘Disused Stations’ website. On that site Alan Young comments: This is “Uppermill goods station, looking north-west from near Ballgrove. This view (circa 1905) highlights the goods warehouse, a commodious structure in engineering brick. Some rakes of goods and mineral wagons occupy the sidings. A traction engine is standing in the yard (left). Uppermill (or Saddleworth) Viaduct is seen on the original Huddersfield-Manchester route which runs parallel to the Micklehurst Loop. Den and Ladcastle quarries, both in operation at this time, are excavated into the distant hill – Photo from Peter Fox ‘Old Saddleworth’ collection.” [26]
The Micklehurst Loop was designed to take pressure of the original line in the Tame Valley by separating Goods from Passenger traffic. This relatively shorts goods train is travelling South past Uppermill Goods Yard and Shed. Another image from the “Saddleworthgoneby” Facebook Group. [22]
The above image also appears on the ‘Disused Stations’ website. On that site Alan Young comments: “At all four stations on the Micklehurst Loop the passenger and goods facilities were some distance apart. This northward view from Rush Hill Road bridge is of the goods yard at Uppermill, and the passenger station is ahead but out of sight. The tall, brick-built warehouse on the left was a standard feature of these goods stations. On 5 June 1958 ex-WD 2-8-0 No.90671 is hauling loaded coal wagons southbound from Diggle (dep 5.55pm) to Heaton Norris (Stockport). The Riddles-designed locomotive was produced from 1943 for the War Department and entered British Railways service in 1948, based initially at 73C, Hither Green shed in Kent. She was withdrawn from 26F, Lees Oldham shed, on 30 September 1963 and cut up at Crewe works the following December – Photo by B Hilton.” [26]
A short parcel working passes Uppermill Goods Yard travelling South. The photograph includes an excellent shot of the Yard Signal Box. Another image from the “Saddleworthgoneby” Facebook group. [23]
An OS 25″ Series Map extract from the turn of the 20th century which centres on the Station building at Uppermill. [1]
Approximately the same area from satellite imagery in the 21st century, (Google Maps).
Uppermill in the 1920s. The Loop Line intrudes onto the photograph in the bottom left. The Passenger Station was just off the image to the left The Mill in the foreground adjacent to the Mill Pond is Albion Cotton Mill which appears on the 25″ OS Map extract above. Station Road leave the left side of the image beyond Albion Mill. Church Road runs under the bridge in the bottom left of the picture. [13]
Looking East across the Tame Valley from above the main line with the Loop Line visible in the distance. Uppermill Station and platforms can be made out just to the right of centre and just above mid-height in the image. [14]
Uppermill Railway Station building in the late 20th century. Another image from the “Saddleworthgoneby” Facebook group. [24]
Uppermill Passenger Station sat adjacent to the Station Road Bridge but at low level. Steps led up to wooden platforms which were sited to the North of the brick-built Passenger facilities. That arrangement can be picked out on the large image immediately above. The solid wooden area which looks a little out of place is the rear of the platform shelter on the Northbound side of the Loop.
The larger image above also appears on the ‘Disused Stations’ website. Alan Young, on that site comments: This is “a panoramic view eastwards across the old Diggle-Stalybridge line (with train) towards Uppermill c1910. In the village are Victoria Mill (cotton), lower left, with Alexandra Mill (cotton) on its right and Dam Head Mill (cotton spinning) in its dominant position beside Church Road. A little right of centre in the distance the platforms and waiting sheds of Uppermill station on the Micklehurst Loop can be seen, with the station building to the right, at a lower level close to the railway bridge. … Photo from Peter Fox ‘Old Saddleworth’ collection.” [26]
In this view from the West across Uppermill, Buckley Mill and Damhead Mill can be seen on the left and right of the image respectively. Behind Damhead Mill, the platform structures of Uppermill Station can be picked out. [31]
Uppermill Passenger Station Building, Station Road, Uppermill in the 21st century, (My photograph – 25th January 2021)
The Passenger Station Building was of the same design as others on the Loop Line. The front faces of these buildings were built in red-brick the side and rear walls in blue engineering brick. The building is in private hands. Station Road passed under the Loop Line immediately adjacent to the Station building as shown on the panorama below.
Uppermill Passenger Station building sat immediately next to Station Road in Uppermill. The line was originally carried across Station Road on a girder bridge. In this view in 2021 the modern footpath/cycleway is carried across Station Road on a laminated hardwood timber structure, (My photograph – 25th January 2021).
An extract from EPW016500, an image held by ‘Britain From Above’ on their website. The Loop Line and Uppermill Station can be seen at the top of the image. The remains of the ramp structures leading to the platforms can be made out on this photograph. The building at the bottom centre of the image is Albion Mill, (c) Britain From Above. [27]
Station Road Bridge in the 21st century, (My photograph – 25th January 2021).
In the text above a number of mills are mentioned:
Church Road Bridge in the 21st century. By January 2021, the footbridge crossing Church Road was removed because of defects, (My photograph).
Albion Mill – was a cotton mill, built circa 1854 [28] which is listed in the ‘1891 Worrall’s Cotton Spinners Directory’ along with Spring Hill Mill, Waterhead as belonging to John Lees. [29] The Mill has been converted to apartments.
Alexandra Mill – was a cotton mill “built in 1860 by flannel manufacturers J.Bradbury & Co. This four-storey stone built mill has had many uses over the years. In the mid 1980s it was a craft centre which was divided into small units. Today the mill, on the banks of the River Tame, has been converted into stylish living apartments. For reference, a 2-bedroom fourth floor flat was on the market for £199,950 in March 2009.” [28]
Church Road Bridge North abutment, (My photograph – 25th January 2021).
Dam Head Mill – was also known as Willow Bank Mill. [28] Neither this mill nor Alexandra Mill seem to be listed in the ‘1891 Worrall’s Cotton Spinners Directory’. [29]
Victoria Mill – was a cotton mill and housed Ellis Meanock, cotton spinners and manufacturers. [29] The mill has been demolished but what were outbuildings remain and house the Saddleworth Museum and Art Gallery. [28][30]
Church Road Bridge – South abutment, (My photograph – 25th January 2021).
Continuing North from Uppermill Station, the Line passed two further Mills and two relatively large houses.
Buckley Mill and Buckley New Mill sat either side of Uppermill High Street, neither is mentioned by Wikipedia [28] or Grace’s Guide [29]. They were owned by the Kenworthy family and produced flannels and shawls.
Two larger private dwellings stand out on the 25″ Map below and are relatively typical of a number of properties around Uppermill.
Another extract from the 25″ OS Survey maps from around the turn of the 20th century. Buckley Woollen Mill and Buckley New Mill (with buildings straddling the River Tame) can be seen to the West of the Loop Line. Fernthorpe and Hawthorpe Halls can be picked out to the East of the line. [1]
Fernthorpe Hall, Uppermill
Fernthorpe Hall – is now a series of luxury apartments.
Hawthorpe Hall, Uppermill
Hawthorpe Hall – is now two separate semi-detached family homes.
They both can be made out on the satellite image below.
It is now only a short distance to what was the mouth of Butterhouse Tunnel, named after Butter House which sat almost directly over the tunnel.
The next 25″ Map extract shows the tunnel mouth and also shows how the mainline and the Loop are now gradually moving towards each other as they travel North by Northeast. Brownhill Quarry and Saddleworth Station can be seen on the left side of the extract.
The Northern part of Uppermill which includes Saddleworth School. Both Fernthorpe and Hawthorpe Halls can be seen among trees and lawns to the East of the Loop Line, (Google Maps).
Another 25″ OS Map extract shows the last section of the Loop to the South of Butterhouse Tunnel. Saddleworth Station on the Mainline can also be seen on the left of the extract. [1]
North of Uppermill the Loop line began to curve round towards the Northeast and entered Butterhouse Tunnel. The most southerly portal of the tunnel has been infilled, (Google Maps).
The Micklehurst Loop Line in 1900 – this picture shows the line just before it entered Butterhouse Tunnel. In the background is Pickhill Clough. Photographer not known. [12]
The formation of the Micklehurst Loop North of Church Road, (My Photograph – 25th January 2021)
Google Maps satellite image in the vicinity of the South Portal of Butterhouse Tunnel. The line of the Micklehurst Loop through the tunnel is marked in red, the footpath/bridleway route in light blue.
North of Church Road we regained the old railway formation and walked North past Saddleworth School.
A short trek beyond Saddleworth School along the gentle gradient of the old Loop and approaching Ryefields Drive the public bridleway is forced away from the Line of the Micklehurst Loop as first the cutting and bridge under Ryefields Drive and then the tunnel portal have been infilled.
Once the footpath/bridleway separated from the old line and our walking route took us across Ryefields Drive at road level and then on towards Brownhill Lane. A left turn before reaching the junction of Brownhill Lane and Butterhouse Lane and Butter House.
It can be seen on the adjacent satellite image that two roadway lengths bear the name Ryefields Drive, both of which provide access to Rye Fields and that these are linked by the bridleway which also bears the name Ryefields Drive.
Rye Fields which sat above the Old Loop to the East is still occupied today. It is a Grade II listed 18th century structure. [32]
Butter House is similarly a Grade II 18th century property. [33]
But we are getting ahead of ourselves. …. The lower arm of Ryefields Drive crossed the Loop on a girder bridge, very soon after this the old railway entered Butterhouse Tunnel. I have so far only found one image relating to either of these structures. It is not reproduced hear for copyright reasons. It can be found in a short article carried on the Saddleworth Independent website in an article by Peter Fox entitled “History: Saddleworth by Rail – Part 2.” [43] The second image in the article on that webpage is a view taken from inside the South Portal of Butterhouse Tunnel looking towards the bridge which carried Ryefields Drive.
We then walked along Butterhouse Lane before following a footpath which led off the the left which brought us out close to the Northeastern portal of Butterhouse Tunnel. That portal is still open and the tunnel can be accessed from the track-bed if desired. [34]
Butterhouse Tunnel appears on this next extract from the 25″ OS Map series from the turn of the 20th century. [1]
Roughly the same area as in the map extract above, (Google Maps).
25″ OS Map extract from the turn of the 20th century, the main Huddersfield Line and the Loop run side by side towards Diggle. The point at which the footpath crossed under the rail lines appears just to the Soputh of the Works [1]
The Micklehurst Loop ran alongside the mainline towards Diggle Junction, (Google Maps)
This image comes from the Saddleworthgoneby Facebook Group and shows the point at which the Micklehurst Loop (on the left) meets the Mainline. Photographer not known. [47]
Butterhouse Tunnel North Portal, (My photograph – 25th January 2021).
The footpath that we used can be seen entering the above map extract from the bottom right and then turning North-northeast to run parallel to the railway. We left the footpath at the point where it turns North and wandered South toward the Tunnel portal.
North of the tunnel portal, the Loop left its cutting behind and ran alongside the main Huddersfield Line towards Diggle.
What was a 4-track line was (and is) closely followed by the Huddersfield Narrow Canal over this next length.
The 25″ OS Map extract above shows that at the time of its drafting the Dobcross Loom Works were rail served. The Dobcross Loom Works was built in 1860 and was set over a 22-acre site. [40] It still features a Grade II Listed building known locally as ‘The Cathedral’ which houses a Gothic clock tower. [35]
During the Great War, the factory doubled up as a munitions factory to assist with the war effort. Later, during the Second World War it helped create parts for Russian submarines to help counter the U-boat threat. [35]
The Loom Works closed in 1967 [35] and was then (in 1969) used for 37 years until 2006, as the home of Shaw’s Pallet Works, reputedly one of the largest pallet works in Europe. [40]
The Daily Mail [35] reported on the site just before it was demolished to make way for a new secondary school – Saddleworth School. Their report is online and includes some excellent picture of the works and its interior prior to demolition. Further excellent pictures can be found on the www.28dayslater.co.uk website. [36]
The works are shown from the air on the monochrome aerial photograph below in 1926. They have been significantly extended compared to the buildings on the 25″ OS Mapping.
The Micklehurst Loop, the mainline to Huddersfield and the Huddersfield Narrow Canal can all be seen behind the Works and careful inspection also reveals the Works sidings. There is an added bonus of a goods train on the Northbound Loop line. Diggle Brook meanders in front of the Works.
There are a sequence of extracts from that image which focus on specific elements: The mainline railway; the canal and sidings and finally a grainy picture of private owner wagons in the Works sidings.
rail-online.co.uk carries an excellent photograph of the 4-track railway line to the North of the Loom Works in around 1964. It shows the siding drifting away to the west of the mainline and on the right side of the image the bridge over the Huddersfield Narrow Canal which gave access to the Works can also be seen. [39]
An extract from photograph EPW016481 held by Historic England – Dobcross Loom Works in 1926 looking across the site from the West. The Micklehurst Loop, the mainline to Huddersfield and the Huddersfield Narrow Canal can be seen behind the Works and careful inspection also reveals the Works sidings. There is a goods train on the Northbound Loop line, (c) Britain from Above. [38]
An extract from the image above which focusses on the Goods train on the Loop. It must have been a colourful sight with a significant range of different wagon liveries. Sadly the locomotive is not visible, (c) Britain from Above. [38]
Another extract from EPW016481, this time focussing on the Works sidings and the Canal. The bridge to the sidings from the mainline can be seen on the left of the extract. Three private owner wagons sit centre stage on the apparently sloping siding, (c) Britian from Above. [38]
Sadly, the photo-definition is not good enough to make out the livery on the wagons, (c) Britain from Above. [38]
There is an excellent short illustrated article about the small locomotive employed at the Loom Works. It is written by Peter Fox and appears in the Saddleworth Historical Society Bulleting Volume 49 No. 4 p128-129. The locomotive was nicknamed the Dobcross Donkey and arrived at the Works in 1931 to replace horse-drawn shunting operations. Parts of the locomotive seem to have been in use in the years prior to the purchase on 3ft gauge lines in Ireland (the Clogher Valley Railway and the Donegal Railways). [49]
Dobcross Loom Works and the Works sidings as shown on the 25″ OS Map from the run of the 20th century. [1]
Ward Lane and Diggle Junction on the 25″ OS Maps from the turn of the 20th century. There was a footbridge crossing the main line a little to the south of Ward Lane. It carried a footpath access from the East to the Canal towpath, immediately to the South of the bridge for the Works sidings. [1]
A similar area to that shown on the 25″ map extract above. The footbridge can still be made out to the southwest of Ravenstones Drive. Grandpa Green’s is a very popular destination which can create significant car traffic, (Google Maps).
There is an excellent monochrome image in the Brian Hilton collection which looks North from the footbridge on the 25″ OS map extract above and visible in the image below and shows the junction between the Works siding and the mainline and provides an excellent view of Ward Lane Bridge and has a hint of the pointwork of Diggle Junction beyond. Not included here for copyright reasons. [48]
This image comes from the Saddleworthgoneby Facebook Group. [46] Rebuilt Patriot approaches Diggle Junction on the mainline passing a L&Y ‘A’ Class idling in a siding adjacent to the Loop lines. The footbridge visible on both the 25″ OS map and the satellite image can be seen clearly against the haze. The bridge carrying the Works siding over the Huddersfield Narrow canal can be made out in the middle distance above the train. The photographer is standing on Ward Lane Bridge. Photographer not known. [44]
Also from the Saddleworthgoneby Facebook Group but now in the blue-grey livery era and with the Loop line lifted this view is taken from the footbridge in the image above. Photographer not known. [45]
Diggle Junction was the site of a significant accident in 1923. This photograph is taken from Ward Lane Bridge. There seem to be a lot of people watching the recovery operation! The footbridge South of Ward Lane can be seen on the right of the image. The photographer not known. [64]
Diggle Junction was the point at which the Loop joined the main Huddersfield line before passing through Diggle Station and on into Standedge Tunnels. There was a relatively complex series of points which allowed access to the different lines to the North, and into the Works sidings to the South. Ward Lane spanned the tracks at this point. Diggle Junction was the scene of a significant rail accident in 1923, one picture of the aftermath of the accident is shown above. Full details of the accident can be found in an article by Alan Schofield in the Saddleworth Historical Society Bulletin Volume 43 No. 1 of Spring 2013. [41]
The complexity of Diggle Junction can be seen on this 25″ OS Map extract from the turn of the 20th Century. [1]
As far as the railway layout is concerned, things are far less complex in the 21st century, (Google Maps).
Another photograph from Saddleworthgoneby Facebook Group. A view Northwest from Ward Lane Bridge. The chimney is that of Warth Mills which appear on both the 25″ and 1:2,500 OS map extracts (above and below). The buildings are still standing in 21st century. Photographer not known. [50]
Warth Mill in the 21st century, (c) Paul Anderson (Warth Mill Diggle – CC BY-SA 2.0). [52]
An early image, also from Saddleworthgoneby. Warth Mill is centre stage and the railway can be seen running right to left Southwest to Northeast roughly halfway up the image. Sadly the resolution is not good enough to focus in on the railway. Photographer not known. [56]
Warth Mill was constructed in 1919 in its present form, although there was an earlier, smaller mill on the site beforehand. It was acquired by the Tanner family in 1928 and in its prime was producing 50 tons of tyre fabric for the automotive industry every week. The building is now in use by a range of small industrial concerns – a café and a catering school are of most interest to me! Until recently Wooly Knits had a factory shop int he building, [61]
This 1:2,500 OS Map extract from 1932 shows that between the turn of the 20th century and the 1930s the number of sidings provided at Diggle increased significantly on both sides of the running lines. This map comes from the Disused Stations Website and is used with the kind permission of Alan Young. [51]
Another image from Saddleworthgoneby. A short distance along the line from the last monochrome image was Diggle Junction Signal Box. [53]
Another image from Saddleworthgoneby. An Austerity 2-8-0 in charge of a train of mineral wagons comes out of the gloom adjacent to Diggle Junction Signal Box. Photographer not known. [54]
Also from Saddleworthgoneby. The same location again, this time in colour in the mid- to late1960s with a Jubliee in charge of a rake of marron stock. The first coach appears to be LNER Gresley stock. The others appear to be Mark 1 stock. Photographer not known. [55]
Saddleworthgoneby again – although monochrome this is a much later image. The Sidings on both sides of the main line and the Micklehurst Loop lines have seemingly recently been removed. Photographer not known. [57]
A final 25″ OS Map extract shows Diggle Station and the Tunnel mouths of Standedge Tunnels – a double bore carries the modern mainline and two single bores used to carry two other lines under the Pennines. [1]
And in the 21st century, (Google Maps)
Saddleworthgoneby again, a very early image looking across the railway towards Sam Road with Harrop Green behind. The photograph was taken from the South. The photographer is not known. There appears to be a goods shed in the sidings on the near side of the mainline which does not appear on either of the OS Map extracts of the location. [58]
Another early image also from Saddleworthgoneby. It is a view from Station Road across the throat of Diggle station from the North. The shows the good shed to better advantage. The buildings beyond the railway make up the hamlet of Kiln Green. The mill chimney is on the left of the image. The photographer is not known. [59]
Kiln Green Mill was a Works that produced Ceramyl. It is marked as such on the 25″ OS Map from the turn of the 20th century. Ceramyl appears to be a hard synthetic product used in bathroom fittings – mainly basins and baths. Most modern references to the product on the internet are from Europe or North America. The word does not appear in the majority of on-line English dictionaries, but it was clearly being produced in Kiln Green early in the 20th century.
Diggle Station sat at the mouth of the Standedge Tunnels. 4 tracks ran through the Pennine Hills in Tunnel between Diggle and Marsden in West Yorkshire. The first tunnel was completed in 1848 and was large enough for just one railway track. The second was completed in 1871 and was also single-bore. The third tunnel was large enough for two tracks and was completed in 1894. It is the double-track tunnel which remains open in the early 21st century. [62]
Diggle Station was “opened in 1849 along with the first rail tunnel and closed to passenger traffic in 1968. The station features on the Diggle Community Association Website. [65]
This photograph is carried by the Diggle Community Association Website. In addition to facts about the station, their comments include the following: “There is an indication of how small Diggle used to be. In the background, the fields below Harrop Edge are obviously used for farming. Today there are houses along Devon Close and Dorset Avenue. Note also the chimney at Wharf mill. The bridge crossing the railway is still in use today and a car has just turned round the corner at the top of Sam Road. The fields to the right of the car are now occupied by houses on Clydesdale Rise. Just to the right of the steam train is an expanse of water, which is the canal lagoon used for turning barges around.” [65]
In its heyday, the station had platforms serving all four lines but little trace remains of it today—all of the buildings and much of platforms having been demolished.” [63]
The next two monochrome photographs were carried by the Saddleworthgoneby Facebook group. They show trains leaving two of the different tunnel bores, with the third bore visible in the first of the two images.
An image rom the Saddleworthgoneby Facebook Group. It shows a goods train emerging from one of the two single-bore tunnels and immediately into Diggle Station. The photographer is not known. [66]
Another Saddleworthgoneby Facebook Group photograph. This one shows a passenger train breaking out into the summer light from the double-bore tunnel which is still in use in the 21st century. The platforms of Diggle station begin at the tunnel portal. Again, the photographer is not known. [67]
And another Saddleworthgoneby Facebook Group image which shows the southwest end of the platforms. The picture was taken from a point just to the Southwest of the station footbridge which was, in turn, just to the the Southwest of the road bridge. On the left of the image the goods shed can be seen behind a row of mineral wagons. The photographer is not known. [68]
Saddleworthgonebay Facebook Group also provided this photograph taken from the station approach road (Station Road/Sam Road) which shows the footbridge and road bridge and also shows the small station building at high level next to the road and carried on girders over the most easterly of the tracks at the station which was a terminus line. The photographer is again not known. [69]
The next sequence of photographs were taken in April 2021 and show the condition of the station site in the 21st century. The first three pictures are from Google Streetview. The subsequent images are my own photographs.
Looking Southeast across Station Road bridge in Diggle, (Google Streetview).
Looking Northwest along Station Road Bridge in Diggle, (Google Streetview).
Looking Northeast towards the double-bore tunnel still in use, (Google Streetview).
A similar view of the single-bore tunnel but this time taken in the 21st century, (My photograph – 9th April 2021).
The double-bore tunnel on 9th April 2021, (My photograph).
A panorama which shows the relative positions of the three tunnel bores. The two single-bore tunnels are marked by the yellow panels, (My photograph – 9th April 2021).
A 21st century view along the line of the old station footbridge, (My photograph – 9th April 2021).
The view Southwest along the railway on 9th April 2021, (My photograph).
While I was writing the second article about the Micklehurst Loop I was contacted by Keith Norgrove. He sent me two pictures which came from a cycle ride along the Huddersfield Narrow Canal Towpath in 1963, one of which was relevant to the length of the Loop covered by my first article. The second image showed the Canal with a view of the Micklehurst Loop including a train climbing towards Diggle with the Saddleworth Moors behind. [1] As far as I can tell, this location is adjacent to the Woodend Mills North of the centre of Mossley.
This picture was taken in 1963 by Keith Norgrove while he was on a cycle ride along the Huddersfield Narrow Canal towpath. The photograph predates by some years the renovation work which took place on the canal. At that time the lock alongside the Woodend Mills in Mossley has been allowed to become nothing much more than a weir on the canal. This view of the old Micklehurst Loop is no longer available because of tree growth, but the Canal has been fully renovated. It has outlasted the Micklehurst Loop and now carries pleasure craft up to the tunnel at Diggle, (c) Keith Norgrove. [1]
Woodend Mills – were built by 1848 by Robert Hyde Buckley, close to his father’s mills. These buildings made up an integrated cotton mill, built in several phases. Historic England say that they are “a near complete example of a first generation integrated cotton mill site, where both weaving and spinning processes were planned from the outset. Before this the two processes had been done on separate sites.” [3]
The close association of mills in the immediate area can be seen on the aerial image below. The lock in the 1963 image above can be seen in front of Woodend Mills.
The layout of the mills as seen in 1947 from the air to the South. Winterford Road Bridge is on the right of the image. The lock in the 1963 photograph is immediately in front of Woodend Mills. [2]
An extract from the 25″ OS Maps showing Woodend Mills and the probable location from which Keith Norgrove took the 1963 picture. [4]
The lock adjacent to Woodend Mills. This picture is taken from a similar location to the one from 1963. The route of the Micklehurst Loop is hidden in the trees ahead. The Moor still looms large. [5]
Mossley Gas Works
Two additional pieces of information on the Gas Works:
First, from an email discussion forum
David Beilby on the IndustrailRailwaySociety@groups.io email discussion group quotes the following from a booklet on the inauguration of the new works by the Rt. Hon. The Earl of Derby K. G. on 22nd June 1931 about the Gas Works which feature in Part 3 of these articles about The Micklehurst Loop.
“The original gasworks was built by the Stalybridge Gas Company in 1862 and located alongside the canal. … In 1884 an agreement was made for the Corporation of Stalybridge and the Mossley Local Board to jointly purchase the company. The Mossley Local Board became Mossley Corporation when Mossley became a Borough in 1885 (and lost its status of being in three counties – Lancashire, Cheshire and Yorkshire). In addition to Mossley the works also supplied much of Saddleworth with gas as well. In 1925 the Borough’ Gas Engineer reported that the best way to improve the plant and increase output was to move to a new site, with rail access also removing the need to transport raw materials and by-products by road to Mossley station.” [6]
He also mentions that the booklet contains “details of a 2′-0” gauge line which was used to move excavated material from site to a central loading point whence it was conveyed by an “Breco” aerial ropeway to the tipping site, the ropeway being 720 yards long. The booklet notes that the railway was worked by petrol locomotives. No contractor is mentioned , despite many suppliers of equipment being acknowledged. It would seem the work was project managed in-house, certainly much of the design work is credited to the gas department.” [6]
“For information, the retorts were horizontal. … It was believed the cubic capacity of these retorts was the greatest in the world at the time. The works were, later, extended. This was anticipated at the design stage as the end wall of the retort house was built using corrugated asbestos.” [6]
“Wagons were unloaded using a rotary wagon tippler supplied by Messrs. Strachan and Henshaw of Bristol which had the patented “Whitehall” clamping mechanism.” [6]
Second from the Saddleworth Historical Society Bulletin
There is an article about the Gas Works in the Summer 1996 edition of the Saddleworth Historical Society Bulletin (Vol. 26, No. 2, p1-5). Sadly, the scanned .pdf of that edition of the bulletin on their website omits two of the 5 pages of the article. [7] The article is by Jeffrey Wells and includes a sketch plan of the Gas Works site. [7: p4]
Mossley Gas Works Sketch Plan, (c) Jeffrey Wells. [7: p4]
References
Keith Norgrove is a contributor to the RMWeb Forum under the pseudonym ‘Grovenor’. Keith’s two pictures (one of which is included here) were a response to my articles about the Micklehurst Loop on that Forum: https://www.rmweb.co.uk/community/index.php?/topic/161854-the-micklehurst-loop, accessed on 15th February 2021.
Just a few days after I completed addendum 1A about the first length of The Micklehurst Loop and particularly about Staley and Millbrook Station and Goods Yard, I heard from James Ward who recollected some photographs taken by his father of the demolition of the Spring Grove Viaduct. On 11th February 2021, he sent me copies of those photographs along with permission to share them here.
My first article on the Micklehurst Loop can be found using this link:
In his emails, James Ward also provided links to some photographs on the ‘Timepix’ website. These, at present, are predominantly photographs of the Greater Manchester Revision Point Collection undertaken by/on-behalf-of the Ordnance Survey in the early 1950s and are held by Manchester Libraries. The introduction to the ‘Timepix’ website makes it clear that all of their watermarked images are free to download and share. [3]
Some of these pictures show locations close to the Staley and Millbrook Station and Goods yard. These are shared on this page below those taken by Stephen Ward, James’ father.
The Demolition of Spring Grove Viaduct.
The pictures below are taken from Grove Road/Spring Bank Lane in 1991 by Stephen Ward. I have maintained the numbering of the photographs as they were given in the email attachments from James Ward. It was only possible to take pictures of the work from public land and the highway. No trespass over the demolition site was possible. There are signs in these pictures of the growth of vegetation around the line of the Micklehurst Loop, growth, which in the 2020s has swamped the remains of the railway.
Key to photographs taken by Stephen Ward in 1991, imposed on the 25″ OS Map from the turn of the 20th century. [1]
Photograph GRV1; Spring Grove Viaduct Demolition in 1991, this photograph is taken from the East along Grove Road (c) Stephen Ward [2]
Photograph GRV2; Spring Grove Viaduct Demolition in 1991, this photograph is taken from the West from close to the Huddersfield Narrow Canal. The larger road span is visible and the first two arched spans of the viaduct to the North, (c) Stephen Ward . [2]
Photograph GRV3; Spring Grove Viaduct Demolition in 1991, this photograph is taken from the Northwest from the Old Spring Mill access road between the railway and the Canal, (c) Stephen Ward . [2]
Photograph GRV4; Spring Grove Viaduct Demolition in 1991, this photograph is taken from the East on Grove Road. Had the old station building still been standing it would have just been visible on the left of the image, right next to the abutment wall, (c) Stephen Ward . [2]
Photograph GRV5; Spring Grove Viaduct Demolition in 1991, this photograph is taken from above the location of the old Station House on the East side of the viaduct abutment in the foreground. Part of the Spring Grove Mill is visible on the right of the picture. The Goods Shed and the remains of the coal conveyor can be seen on the horizon, The top of the arch which provided pedestrian access to the platform closer to the Canal can be seen in the left foreground, (c) Stephen Ward . [2]
Photograph GRV7; Spring Grove Viaduct Demolition in 1991, this photograph is taken in the early evening from the East on Grove Road. One street light has just come on. The over-road skew-arch bridge is now gone and the view West down Grove Road to the hills behind is no longer interrupted by the railway structure, (c) Stephen Ward . [2]
Photograph GRV8; Spring Grove Viaduct Demolition in 1991, this photograph is taken from the West, close to the Canal. Both the road-span and the adjacent arch have been demolished and much of the brickwork has been cleared, (c) Stephen Ward . [2]
Photograph GRV9; Spring Grove Viaduct Demolition in 1991, this photograph is taken from Grove Road. Had the old station building still been standing, it would have filled the image. We are looking Southwest across the location of the building at the remaining length of surviving viaduct abutment in the gloom of early evening. The pedestrian access to the West side of the line can be seen above the chestnut-paling fencing, (c) Stephen Ward . [2]
Photograph GRV10; Spring Grove Viaduct Demolition in 1991, this photograph is taken from the East on Grove Road, also late in the evening. The white painted wall is the end of the surviving buildings of the old Spring Grove Mill, (c) Stephen Ward. [2]
The Ordnance Survey Greater Manchester Revision Point Collection from the early 1950s.
The following pictures were taken to record Ordnance Survey work and have the incidental benefit of being within the landscape we are interested in.
Key to the Manchester Libraries Ordnance Survey Photographs below.
The first picture can be precisely located as being at the North end of Spring Grove Viaduct above the buildings of Spring Grove Mill which can be seen in the photograph.
The Huddersfield Narrow Canal was a hundred metres or so to the East of the viaduct and the next two pictures show locations either side of the point were Grove Road/Spring Bank Lane crossed the Canal.
Photograph ML5: Man marking Ordnance Survey minor control revision point on the corner of the Good Shed at Staley and Millbrook Yard. Staley Hall can be seen on the horizon, (c) Manchester Libraries. [3]
Photograph ML6: Man marking Ordnance Survey minor control revision point on the coal handling facilities in Staley and Millbrook Goods Yard. The conveyor which transported coal across the Micklehurst Loop, The Huddersfield Narrow Canal and the River Tame can be seen in the background, (c) Manchester Libraries. [3]
Just after I posted my first article about the Micklehurst Loop, I was sent a series of photographs by an online acquaintance, Tony Jervis. In February 1981, he visited the same length of the Micklehurst Loop as covered in that article. Tony’s pictures show the line before removal of the two viaducts but after the lifting of the length of line retained to serve the Staley and Millbrook Sidings opposite Hartshead Power Station.
Tony also pointed out a further YouTube video from Martin Zero which is embedded towards the end of this addendum. …..
My first article on the Micklehurst Loop can be found using this link:
At the time of Tony Jervis’ visit on 14th February 1981, only one section of the Spring-Grove Viaduct had been removed – a simply supported span which took the line over the Spring-Grove Mill. Toney was very happy for me to share these pictures as an addendum to my original article and he very kindly provided some notes to go with a number of the photographs. I have provided some annotated OS Maps to go with the pictures.
I have retained the reference numbers of the photographs used by Tony Jervis. I find the images fascinating. The first three photographs speak for themselves and are centred on Knowl Street Viaduct at the bottom end of the loop immediately adjacent to Stalybridge New Tunnel.
The 25″ OS Map showing the area to the East of Cocker Hill where the Micklehurst Loop broke out of Stalybridge New Tunnel and immediately spanned the River Tame. The locations of three of Tony’s photographs marked. [1]
Photograph 15, 1981, (c) Tony Jervis. [2]
Photograph 632-16, shows the length of the viaduct and is taken from above the Eastern Portal of Stalybridge New Tunnel, 1981, (c) Tony Jervis. [2]
Photograph 632-17,shows the skew span over the Huddersfield Narrow Canal looking towards the Centre of Stalybridge, 1981, (c) Tony Jervis. [2]
The next few pictures were taken in and around the Staley and Millbrook Station. The software I use allows me to add arrows which are vertical or horizontal but not at an angle, so the locations of the pictures shown on the OS Map immediately below are approximate.
25″ OS Map of Staley & Millbrook Station site at the turn of the 20th century. [1]
Photograph 632-18 shows Spring-Grove Mill was spanned by a simply-supported girder bridge which had already been removed when Tony Jervis visited in 1981, (c) Tony Jervis. [2]
Tony comments about the above image: this picture shows “the gap in the viaduct over the roof of Spring Grove Mill. I assume the gap was spanned by a horzontal girder bridge, which would have been easier to lift away for scrap than demolish a viaduct arch. In the background, the power station’s coal conveyor and bunkers are still intact, though the station had been closed about 18 months earlier. The goods shed … was still in the hands of Firth Hauliers.” [2]
The Goods shed and part of the conveyor are still in place. The viaduct, the mill chimney,the section of the mill visible to the extreme left of the image, the coal handling facilites are long-gone in the 21st century.
Photograph 632-19A, 1981, the portion of the mill on this (West) side of the viaduct and the mill chimney, still present in 1981, were demolished along with the viaduct in the later part of the 20th century (c) Tony Jervis. [2]
Tony Jervis, writing in 1981, comments: “the station platforms were up to the right at the top of the grassy bank but would not have been accessible for passengers from this side. Beyond the third arch was a span across the top of Spring-Grove Mill, which was presumably modified to allow the railway to be built. I assume the span was some sort of flat girder bridge which has since been craned away.” [2]
Photograph 632-20A, 1981, (c) Tony Jervis. [2]
He continues: “Passengers for the northbound platform would have climbed a covered passage from the booking office and come through this subway (picture 632-20A) whence another short covered ramp or steps would have led up to the platform waiting room. Note the glazed white tiles designed to slightly lighten the subway’s gloom. Since I appear not to have photographed them, I assume that the station platforms had long been swept away.
Photograph 632-21A, 1981, (c) Tony Jervis. [2]
Tony Jervis says: “Picture 632-21A (below) is taken from the middle of Grove Road east of the viaduct. The red brick wall would have been the end of the booking office; the station master’s house would have been out of shot to the left. In the distance is the entrance to the subway. There are marks of the platform retaining wall, which is partly of red brick at the bottom and blue engineering brick further up, that suggest a flight of stairs with an intermediate landing led up the southbound platform and that a lower ramp alongside followed the grass bank up to the subway. One might wonder, thinking of travel a century ago, whether there might have been a need for sack trucks or even a four-wheeled luggage trolley to reach the platforms. The white notice forbidding tipping and trespassing is not in the middle of the road but at the edge of the triangular station forecourt; it won’t show up on the posted picture but above the words is the BR “kinky arrow” symbol. Looking at the 25-inch OS plan, it is interesting to note that the formal entrance to nearby Staley Hall was from Millbrook village to the south but from the back of the building a footpath dropped down to Grove Road alongside the the stationmaster’s house, a tradesmen and servants’ entrance maybe?”
Tony has also provided photographs which were taken late in the evening on 14th 1981 of the Goods Yard across the river and canal from Hartshead Power Station. Their locations are again marked on the 25″ OS Map immediately below ……
25″ OS Map of the Staley & Millbrook Coal Sidings site. The extract does not show the full extent of the sidings which were in place in the mid-20th century..[1]
Photograph No. 632-21B 9-644 14 Feb 1981 SD 976000 S Former coal drops at Staley & Millbrook Goods Depot alongside Spring Grove Viaduct. The ruined structure on the horizon is Staley Hall. These drops were just to the North of Spring-Grove Viaduct, (c) Tony Jervis, 1981 – [Tony comments: The “B” suffix is because I managed to give two slides the same number when I numbered them back in 1981.] [2]
Tony Jervis comments: “These coal drops are near the end of the two sidings on the 25-inch OS map closest to the running lines. They are not marked on the map but the road approach for coal merchants’ lorries is clearly shown. I did wonder if the apparent tramway in Grove Road in one of [the photographs in the previous article] was a way of transferring coal from here round to the mill’s boiler house (below the chimney, one presumes) but I have seen no indication of it on any map. The viaduct over Spring Grove Mill starts by the rusty car. The building on the hill is Staley Hall and the “tradesmen’s” footpath I mentioned in a previous description can be seen descending the bank.” [2]
Photograph No. 632-22 9-646 14 Feb 1981 SD 976001 N Staley & Millbrook Goods Warehouse and the former Hartshead Power Station coal conveyor, (c) Tony Jervis, 1981. [2]
Tony comments: This picture shows “the goods shed when in use by Firth Transport. The cleaner ballast in the foreground was the southbound running line and the smoother patch to left of that is presumably where the walkway is today. In the background is the part of the coal conveyor that remains in situ today.” [2]
Photograph No. 632-23 9-645 14 Feb 1981 SD 977002 NW Hartshead Power Station Sidings and start of coal conveyor, Staley & Millbrook Goods Depot, (c) Tony Jervis, 1981. [2]
Tony comments: “One of the two towers on the edge of the power station coal sidings. I presume the “stepped” areas fenced in orange surrounded conveyor belts lifting the coal from siding level up to the high-level conveyor.” [2]
Photograph No. 632-24 9-647 14 Feb 1981 SD 977002 WNW Site of Hartshead Power Station Sidings and coal conveyor, Staley & Millbrook Goods Depot, (c) Tony Jervis, 1981. [2]
Tony comments: “Swinging left about 45 degrees from the previous photo, I’m not sure what purpose this building served. There is a capstan in front of it, suggesting that locomotives were not allowed to traverse the length of surviving track and wagons thereon were moved by cable. Could it have been an oil depot of some sort? The tall pipes at the far end could have been used to empty rail tank cars. Some power stations could burn oil as well as coal; was Hartshead one of them?” [2]
Photograph No. 632-25A 9-648 14 Feb 1981 SD 978002 WSW Staley & Millbrook Goods Warehouse; Hartshead Power Station beyond, (c) Tony Jervis, 1981 [2]
Tony comments: that it was really too dark by the time this picture was taken, none-the-less by screwing the contrast control to its maximum a grainy image of the shed and power station appears reasonably clear but very grainy. [2]
Flicking back and forth between this short article and the latter part of my first article about the Micklehurst Loop (https://rogerfarnworth.com/2021/01/31/the-micklehurst-loop-part-1), will allow a comparison with images of the Staley and Millbrook Station and Goods Depot Sites early in their life and in the 21st century.
To complete this short addendum to my first post here is another video from Martin Zero.
Tony Jervis comments: [4] “After watching the half-hour video, I read some of the comments by other viewers, some of whom had worked on the site. The tunnel turned out to be the power station’s engine shed and the steps led down to a conical underground coal hopper from which conveyor belts took the coal onwards or, perhaps, removed fly-ash.”
“Martin also found on the surface a length of surviving rail track with a lump of iron between the rails that might have been a “mule” or “beetle” for moving wagons slowly past an unloading point. It was mentioned by some people that there had also been an “oil conveyor” — surely a pipeline? — leading from the sidings owards the power station. That makes me wonder if my postulation that the low building in my “S & M Goods 4” posting (slide 632-24) may have been a tank wagon unloading station was in fact correct.”
“Martin did also show a circular object buried in the ground nearby which could perhaps have been the base of the capstan that appears in my photo. But the area is nowadays so afforested that it was impossible to work out accurately how the various items and buildings he found related to one another.”
I am indebted to Alan Young for a number of the images in this and the following articles about the Micklehurst Loop. This is his drawing of the Loop which appears at the head of his article about the Loop on the ‘Disused Stations‘ website. It is used with his kind permission, (c) Alan Young. [7]
During January 2021, my wife and I walked the majority of the length of the Micklehurst Loop from Stalybridge to Diggle. This was the goods relieving line for the main Stalybridge to Huddersfield railway line. It had been hoped to alleviate congestion by making the mainline into a 4-track railway but the geography mitigated against this and a route on the other side of the Tame Valley was chosen instead.
The maps used in this sequence of articles are predominantly 25″ OS Maps from 1896 through to 1922 and have been sourced from the National Library of Scotland. [1] There are a number of websites which focus on the Loop which are excellent. The sites concerned are noted immediately below and the relevant link can be found in the references section of this page or by clicking on the highlighted text here:
The most detailed treatment of the line and its stations can be found on the Disused Stations – Site Records website. The particular pages on that site which cover the Loop were provided by Alan Young. One page covers the route and pages covering each of the stations can be accessed from that page. [7]
Particularly good for old photographs of the Loop is the Table 38 webpage about the railway. [12]
Part 1 – Stalybridge to Staley & Millbrook Station and Goods Yard
This first map extract shows the Western end of the Micklehurst Loop. It left the mainline at Stalybridge Station which can be seen on the left side of the extract. Both the mainline and the loop entered tunnels under Stamford Street, Stalybridge. [1]This modern satellite image covers approximately the same area of Stalybridge as the map extract above. The route of the former Micklehurst Loop is highlighted by the red line.Looking west towards Stalybridge Station circa 1960 from Stamford Street BR standard Class 5 No.73162 takes the Micklehurst Loop as it pulls away from Stalybridge Station with a Huddersfield-bound freight and approaches Stalybridge New Tunnel. Photo by Peter Sunderland courtesy of Alan Young. [7]
The Western portal of Stalybridge New Tunnel sits just to the East of the Bridge that carries Stamford Street over the route of the Loop. It is difficult to photograph and access is not easy. While search for images of the line I came across a video on YouTube:
This video shows the Western end of the tunnel and then covers a walk through the full length of the tunnel and a glance out of the Eastern Portal. [8]
This next map extract shows the Micklehurt Loop emerging from the tunnel under Cocker Hill. The main line is in tunnel further North. Just South of the tunnel mouth Old St. George’s Church can be picked out, an octagonal church building which has now been replaced by St. George’s Church which is off the map extract to the North. Immediately to the East of the tunnel entrance, the Loop crossed the course of the River Tame and the Huddersfield Narrow Canal on a Viaduct.Much has changed in the satellite image above which covers approximately the same area. The canal basin can just be picked out, as can Knowl Street. The course of the River Tame is unchanged. Old St. George’s is long-gone. There is no evidence left of the Viaduct which carried the line.
Old St. George’s Church was located almost directly over the tunnel. It was an unusual church building and over its life was rebuilt twice on essentially the same plan. “The first was built in 1776. It was the first recorded church in Stalybridge and it did fall down shortly after it was built. The next church was demolished around a hundred years later because of structural problems and the last church was demolished in the 1960’s as it was no longer used.” [3]The last incarnation of Old St. George’s Church on Cocker Hill. This coloured monochrome image is held in the archives of Tameside MBC. The Micklehurst Loop can be seen exiting the tunnel below the church to the right and immediately crossing the River Tame on Knowl Street Viaduct. [4]This monochrome image is provided with permission, courtesy of Alan Young, once again. [7] He comments: “looking north up the River Tame the western end of Knowl Street Viaduct in Stalybridge is seen in this undated view. Having crossed this 16-arch viaduct the Micklehurst Loop promptly plunged into Stalybridge New Tunnel through Cocker Hill (left). This section of line ceased to handle traffic in 1972, when coal movements to Hartshead Power Station (near Staley & Millbrook) ceased, and the line was taken out of use in July 1976, but it was not until 1991 that the viaduct was demolished.” [7]
Knowl Street Viaduct carried the Loop over the River Tame, Knowl Street and the Huddersfield Narrow Canal and a series of arches in between. There were 16 arches in all.This photograph taken from the East alongside Knowl Street Viaduct is included with permission, courtesy of Alan Young. [7] Alan comments: “The Micklehurst Loop diverged from the original Huddersfield-Manchester line a short distance east of Stalybridge station, entered Stalybridge New Tunnel (about 300yd in length) then promptly crossed the broad valley of the River Tame on Bridge No.3 (also known as Knowl Street Viaduct). This impressive curving viaduct, in the blue engineering brick used by the LNWR on the Loop’s major structures, was 330yd in length with 16 arches. In addition to crossing the River Tame, the viaduct also strode across Huddersfield Narrow Canal and three roads. In this undated westward view, the viaduct and Stalybridge New Tunnel through Cocker Hill are shown. Coal trains that served Hartshead Power Station ceased to run over the viaduct in 1972, but it was not until July 1976 that the line was officially taken out of use. Fifteen years elapsed before the viaduct was demolished in 1991.” [7]A further image used with permission, courtesy of Alan Young. [7] Alan comments: “Looking north-east from a point close to the eastern portal of Stalybridge New Tunnel. The Knowl Street Viaduct, 330yd in length and with 16 arches, is seen crossing the River Tame then curving away towards the next station of Staley & Millbrook. The local passenger service on the Micklehurst Loop, on which this viaduct was located, ceased in 1917, but occasional passenger trains and many freight workings continued into the 1960s; coal traffic continued to pass over the viaduct until 1972 en route to Hartshead Power station near Staley & Millbrook station and the line was officially taken out of use in 1976. Nature is taking over the former trackbed as seen on this undated photograph. The viaduct was demolished in 1991.” [7]A modern view of Knowl Street taken from Google Streetview. Knowl Street Viaduct crossed Knowl Street at this location. The spandrel walls on the North side of the Viadct passed very close to the gable end of the terraced building to the East of Knowl Street, the righthand side in this view.
After crossing the Huddersfield Narrow Canal the Loop line regained the embankment shown on the next OS Map extract below. Just to the North of the point where the viaduct crossed the canal is a stone bridge carrying what is now (in the 21st century) the canal-side walk. That bridge is shown at the centre of the Google Streetview image below and at the bottom left of the OS Map extract. It is named Knowl Street Bridge and carries the number 97. [8]
After crossing the Canal the line was carried on embankment, passing to the West of Brookfield House and running North by Northeast parallel to the Canal with Huddersfield Road a distance away to the South. Across the valley of the River Tame to the West were Riverside Mills.The approximate line of the railway, shown in red, runs parallel to the canal. We parked in a small car park just off the south of this satellite image, as illustrated below. The image shows that the site of the Riverside Mills is now occupied by the premises of Smurfit Kappa, Stalybridge. [9]Stalybridge and the Southwest end of the Micklehurst Loop.
Brookfield House was “a large detached house built in the early 19th century for James Wilkinson, and shown on the 1850 Stayley Tithe Map. All that remains is the former mid-19th century lodge house at 93, Huddersfield Road, with the entrance to the former drive with stone gate piers on its south side. The grounds of Brookfield House are clearly shown on the 1898 OS Map, and included an oval lake and glasshouses, …. Brookfield House was demolished and the lake filled in between 1910-1933. The grounds are now overgrown with self-set woodland.” [2]This next OS Map extract illustrates, at the the top right, how tightly the river, railway and canal follow each other at times up the Tame Valley. The railway sits above the canal which in turn sits a little above the river. Also evident is the name used on this series of OS Maps for the Loop Line – the “Stalybridge and Saddleworth Loop Line.”
Alan Young explains: “Although described as both the ‘Stalybridge & Saddleworth Loop‘ and ‘Stalybridge & Diggle Loop‘ on Ordnance Survey maps, the line is more commonly known as the ‘Micklehurst Loop’.” [7]
River Meadow Cotton Mills were owned by Henry Bannerman who was a successful farmer in Perthshire, Scotland At the age of 55 in 1808 he “moved with his family to Manchester, determined to get involved in the burgeoning Lancashire cotton industry.” [10]
At one time the company had “four cotton mills in the Manchester area: Brunswick Mill in Ancoats, Old Hall Mill in Dukinfield and the North End Mill and River Meadow Mill, both in Stalybridge.” [10]
In 1929, the Lancashire Cotton Industry was struggling. It had not regained its markets after the First World War. In an attempt to save the industry, the Bank of England set up the ‘Lancashire Cotton Coroporation’. Bannermans’ mills were taken over a few years later. The mills were acquired by Courtaulds in 1964 and all production ceased in 1967.” [10] After closure the four-storey mill which was Grade II Listed “was used by Futura before they moved to Quarry Street and then S. A. Driver warp knitters, dyers , printers and finishers.” [11] As can be seen in the satellite image below, the Mill is now demolished.Souracre and River Meadow Cotton Mill and Souracre in the 21st century .
North of Souracre and visible at the bottom left of this next OS Map extract were Hartshead Calico Print Works East of Printworks Road and close by Heyrod Hall. Also visible on this map extract are Stayley Hall and the first Station on the Micklehurst Loop – Stayley and Millbrook Station.
Hartshead Print Works – is visible just below centre-left on the OS Map extract above. The works was listed in the Stalybridge Directory of 1891 as owned by John L. Kennedy &Co. Ltd, Calico Printers. lt was purchased in 1899 by the Calico Printers Association. [18]
Heyrod Hall – is shown on the top left of the OS Map extract above.
Stayley Hall – is a Grade II* Listed Building which dates back to at least the early 15th century.[14] The first records of the de Stavelegh family as Lords of the Manor of Staley date from the early 13th century. Stayley Hall was their residence. [15]
It came into the possession of the Assheton family through marriage and united the manors of Stayley and Ashton and thence into the family of Sir William Booth of Dunham Massey. In the middle of the 16th century. [15]
Stayley Hall 1795. [21]
In the middle of the 18th Century the Earldom of Warrington became extinct and the Hall, alonng with all the Booth’s estates passed to Harry Grey, 4th Earl of Stamford. Stayley Hall was owned by the Booth family until the death of Roger Grey, 10th Earl of Stamford in 1976. [15]
Wikipedia concludes its history of the Hall as follows: “In 2004 the Metropolitan Borough Council announced that they had granted permission to a developer to build 16 homes next to Stayley Hall. A condition of the planning consent was that the hall be restored.[3] The developer has converted the hall and outbuildings into houses and apartments, most of which are now occupied.” [15]
Early 25″ OS Map covering the length of the passenger facilities and most of the goods facilities at Staley & Millbrook Station. [1]
Staley and Millbrook Station – Alan Young’s on his webpage about the Station comments as follows: “Staley & Millbrook station stood on a steep slope immediately south of Spring Grove Viaduct. The two facing platforms were equipped with waiting rooms, most likely of timber construction, with glazed awnings, as is thought to have been the building style at all four of the Loop’s stations. The platforms, too, were most likely of timber construction as that material was used for the platforms at Micklehurst, where they were also on an embankment, and timber would be a much lighter load than masonry for an embankment to support. The stationmaster’s house and adjoining single-storey office range to its west faced Grove Road across a small, triangular forecourt. The station house was constructed of dark red brick with string courses of blue engineering brick and pale stone lintels.” [18]Staley & Millbrook Station building and the Sprong-grove Viaduct take from the East on Grove Road in the early 20th century. The picture shows a clean and relatively well maintained site, very different to what remains in the 21st century, please see the pictures below. [18]Staley and Millbrook Railway Station and Spring-grove Mill. [16]
Staley and Millbrook Station buildings have long-gone as has the Viaduct, the first arch of which spanned Grove Road and looked to be a graceful structure. Also of interest in the monochrome picture of the Station and Viaduct above is what appears at first sight to be evidence of a tramway or industrial railway in the cobbles of Grove Road. I have not as yet been able to find out anything about what this feature actually is. The feature is not marked on the map extract immediately above. Closer examination of the picture above suggests that rather than being part of a short industrial line the cobbles may have been laid to facilitate a particular movement around the Spring-grove Mill.
In the 21st century, this length of Grove Road has been tarmacked – a thin layer of tarmac covers the original sets. The next two pictures were taken on 30th January 2021 on a second visit to the site after walking the route of the Loop.
Taken from East of the route of the Micklehurst Loop, this photograph shows the location of the old station building. It sat facing the road on the left-hand side of the panorama. The Southern abutment of the viaduct sat adjacent to the station building, in the area of trees between the 5-bar field gate and the stone wall towards the right of the picture. The masonry wall is in the location of what were terraced houses between the canal and the railway viaduct. (My photograph, 30th January 2021)Another panorama, this time taken from the canal bridge to the West of the Loop. What is left of Spring-grove Mill can be seen on the left side of the image. Grove Road, heading towards Millbrook is central to the image. The masonry wall is the location of the terraced houses mentioned above. The first trees beyond it mark the line of the viaduct. The station building was sited beyond to the West. (My photograph, 30th January 2021)
Spring-grove Mill – As we have already noted, Spring-grove Mill is shown straddled by the viaduct on the OS Map extract above. When Staley & Millbrook station opened, “there was already some population and industry in the immediate neighbourhood. Spring Grove Cotton Mill faced the station across Grove Road, and map evidence suggests that the railway’s viaduct sliced through the existing mill building. A terrace of three cottages, also pre-dating the railway, stood immediately north of the platforms, and Stayley Hall was about 100yd south of the station. Millbrook village, with three cotton mills, was about ten minutes’ walk uphill east of the station.” [16] [18]The remaining buildings of Spring-grove Mill. The lighter (cream painted) brickwork is the part of the mill shown on the map extracts as being on the East side of the viaduct. The portion of the Mill to the West of the viaduct has been demolished. The red-brick portion of the remaining building would have been under the arches of the viaduct. The Western spandrels of the viaduct arches would have followed a line running from the intersecting kerb-stones in the right-foreground over the redbrick part of the present building. (My own photograph – 30th January 2021)
Spring Grove Mill was a cotton mill from 1818 to 1868 and then was a woollen mill for 100 years, it was the last steam-powered mill in the area. [17] The image of Hartshead Power station below, includes Spring-grove Mill in the bottom right-hand corner. By the time the aerial photograph was taken Grove Road appeared to extend across the Canal and the River Tame towards Heyrod.
Hartshead Power Station was also located North of Souracre to the West of the River Tame. It was a coal-fired station and was served by trains on the Micklehurst Loop up until the 1970s. The picture immediately below was posted by Tameside Council on their Facebook page in 2015.An aerial picture of Hartshead Power Station taken before the Second World War. It was opened by the Stalybridge, Hyde, Mossley and Dukinfield (SHMD) Joint Board in 1926 and the cooling towers were erected in the 1940s. The station closed in 1970 and was demolished in the 1980s. Although the Good Shed visible to the top right of the image still stands. The Micklehurst Loop curves from the bottom right to the top left of the picture. [13]This enlarged extract from the image above show the coal transfer facilities and railway sidings associated with the power station . [13] The resolution of the image is not wonderful but it does highlight the traffic which was brought to the site throughout the middle 50 years of the 20th Century.
OS 1:25,000 Map form the early- to mid-20th century, sourced from the National Library of Scotland – Hartshead Power Station. One of the two cooling towers is not shown in full as it crosses the map join. [14]
The full extent of the Hartshead Power Station site at Souracre can be seen on the adjacent OS Map extract from the middle of the 20th century, which also shows the location of Stayley Hall and the Stayley and Millbrook Station build just North-northwest of Stayley Hall.
Approximately the same area is shown below on a relatively recent extract from the ESRI World Image website which is the satellite mapping used by the National Library of Scotland. [13]
The Good Shed which is considered further below is visible on both the map extract and the satellite image and the extent of the railway sidings on the East side of the Loop line is evident.
The substantial Goods Shed was built at the same time as the Loop initially with two sidings to its East. These sidings were expanded with the advent of the power station in the early 20th century. The site is now overgrown and is returning to nature. The only exception being the Goods Shed itself. There is an excellent video showing its current condition on ‘Martin Zero’s’ YouTube Channel which is embedded below. My own pictures of the site also follow below.
The Goods shed at Stayley and Millbrook Station presided over a large expanse of sidings which served Hartshead Power Station on the opposite side of the Huddersfield Narrow Canal and the River Tame. [22]Looking South towards the location of the passenger facilities at Staley and Millbrook Station. The Goods shed is on the left (the East side of the Loop line). (My photograph, 18th January 2021).The Goods Shed taken from the same location as the last photograph – a substantial three-storey structure. (My photograph, 18th January 2021).
The next part of this walk following the line of the Micklehurst Loop sets off from this goods shed traveling North.

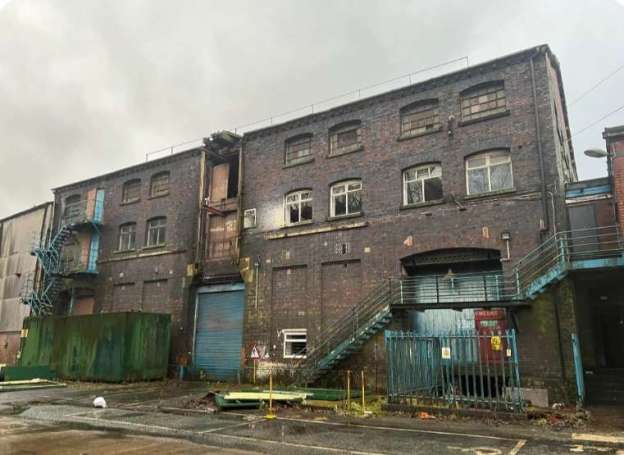

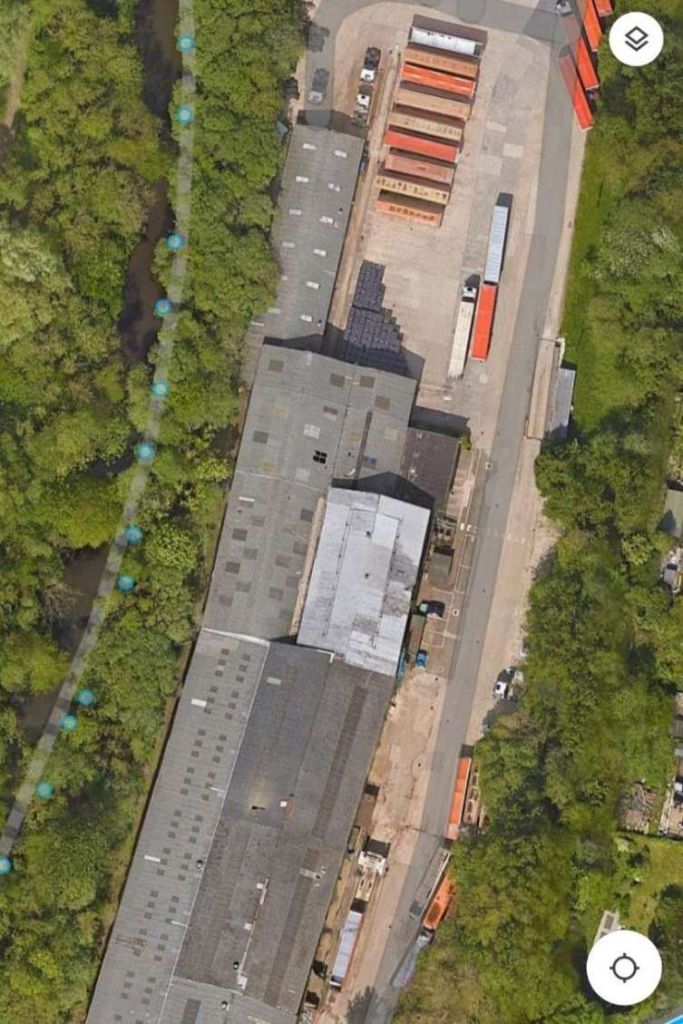


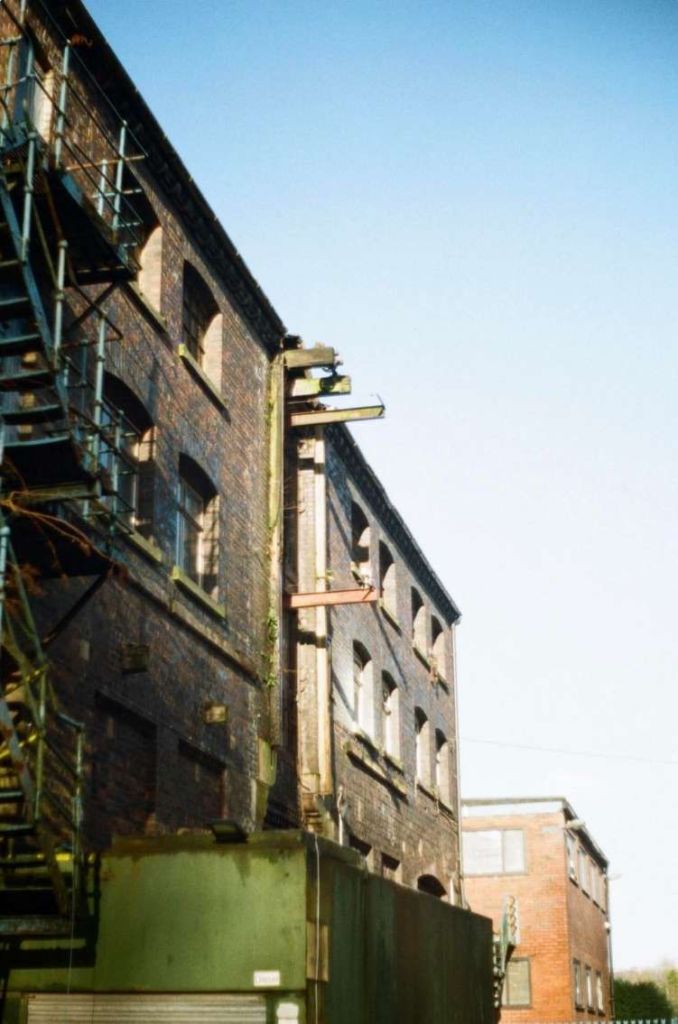
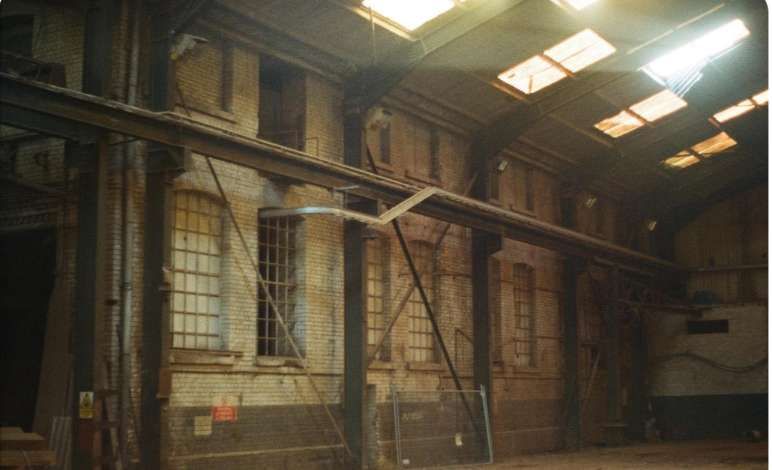
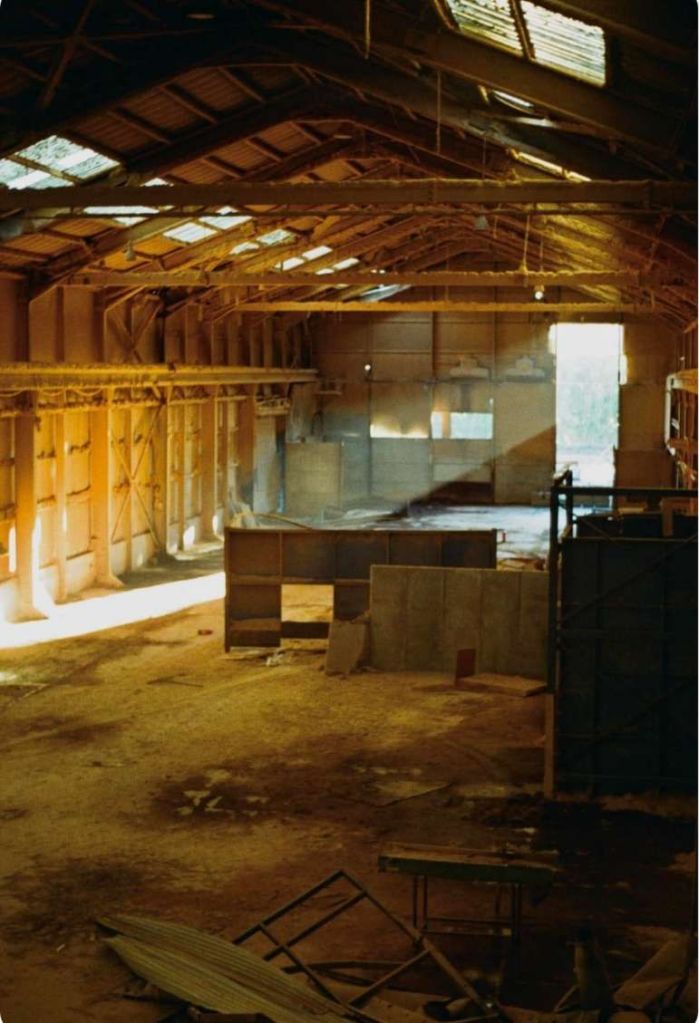
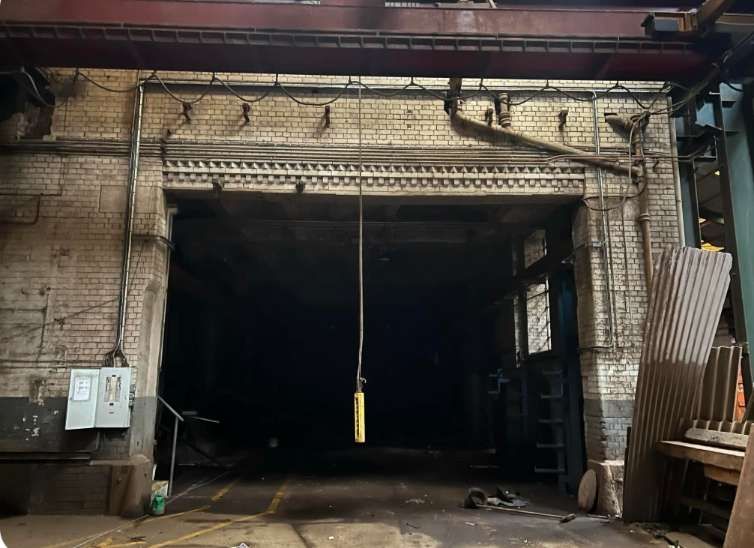
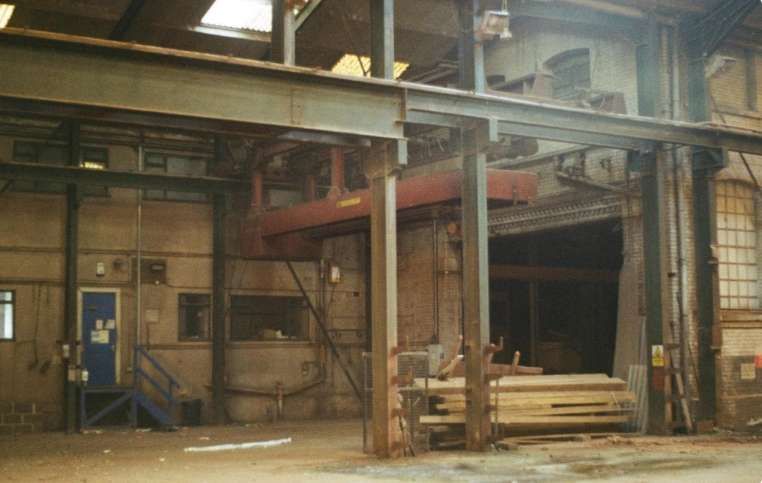
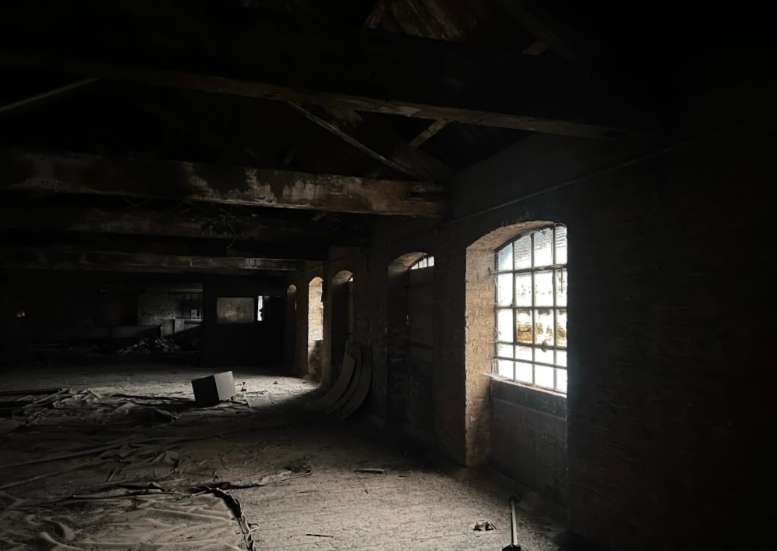
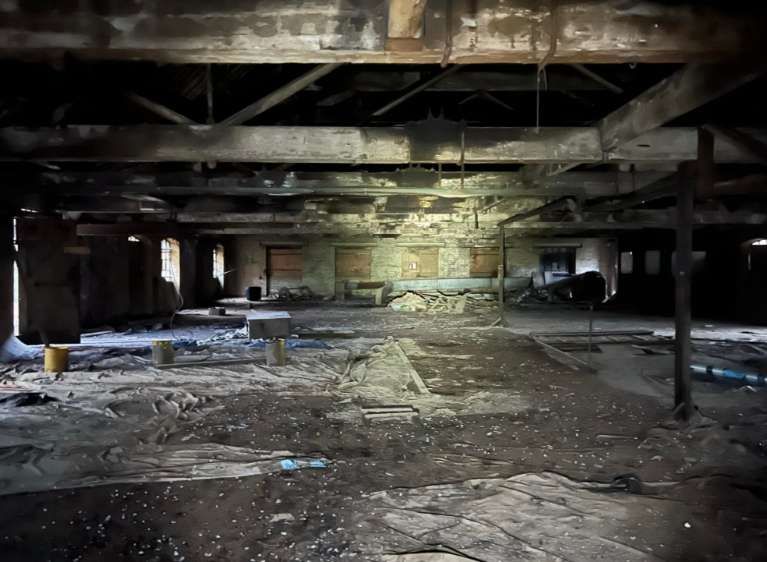
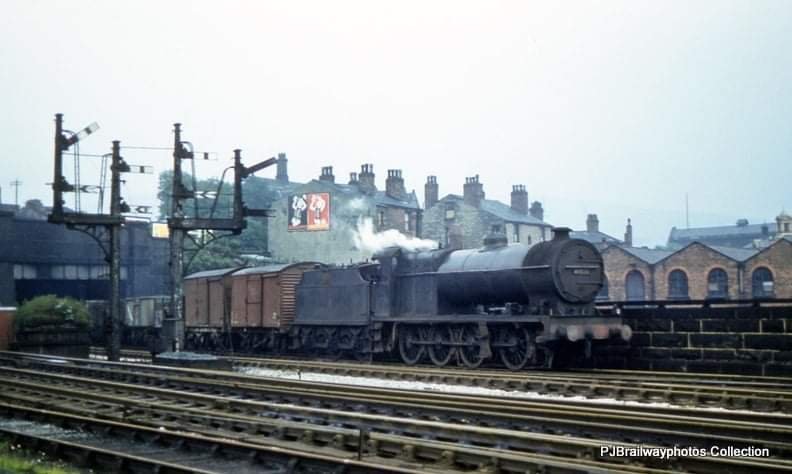

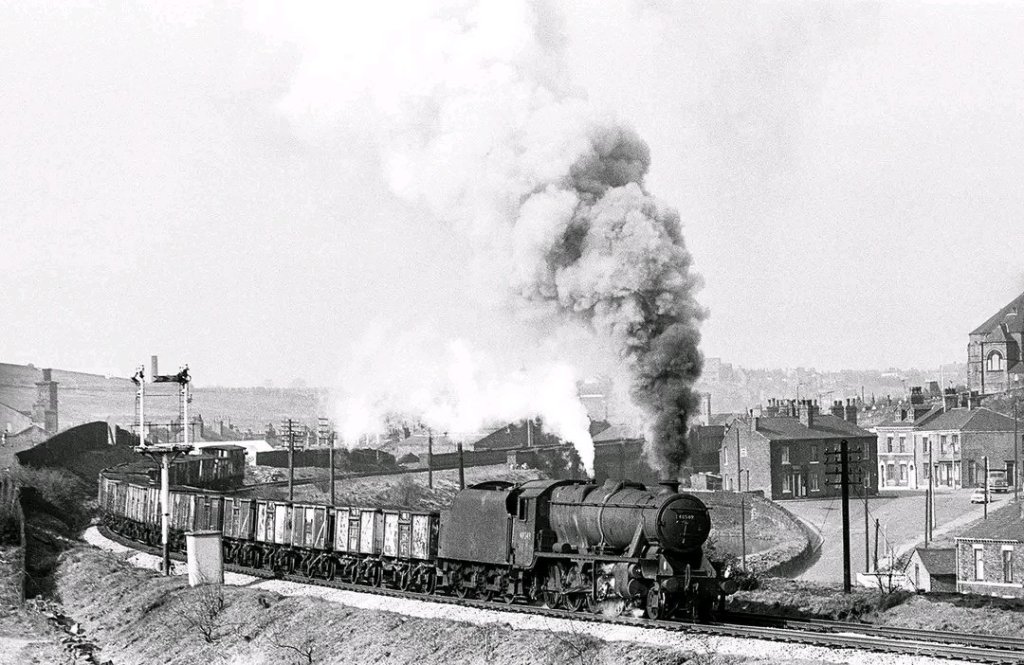
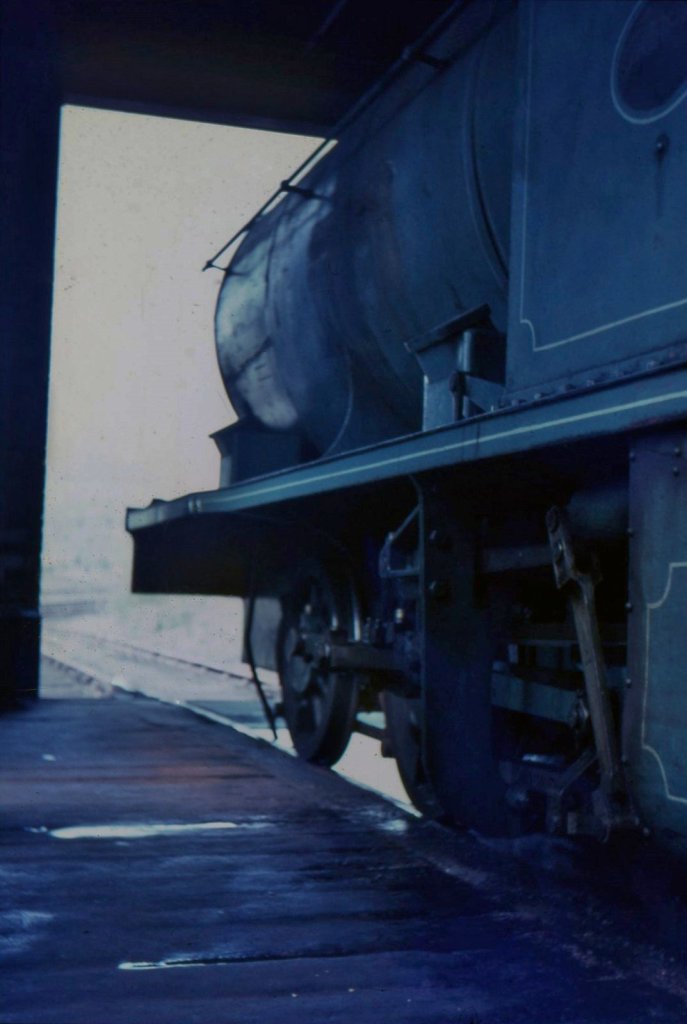
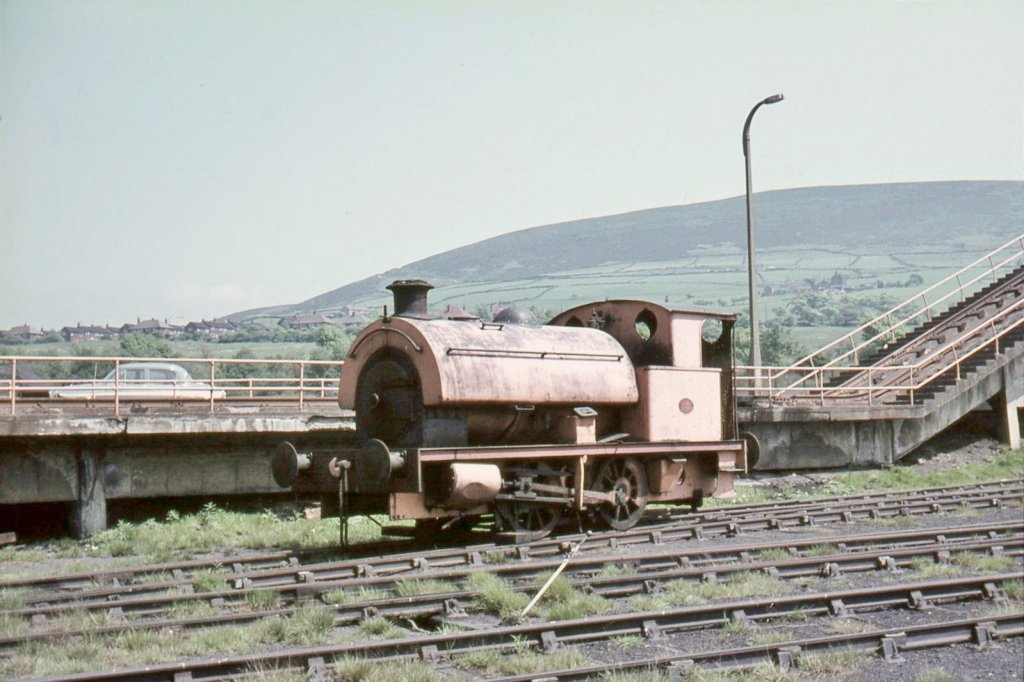
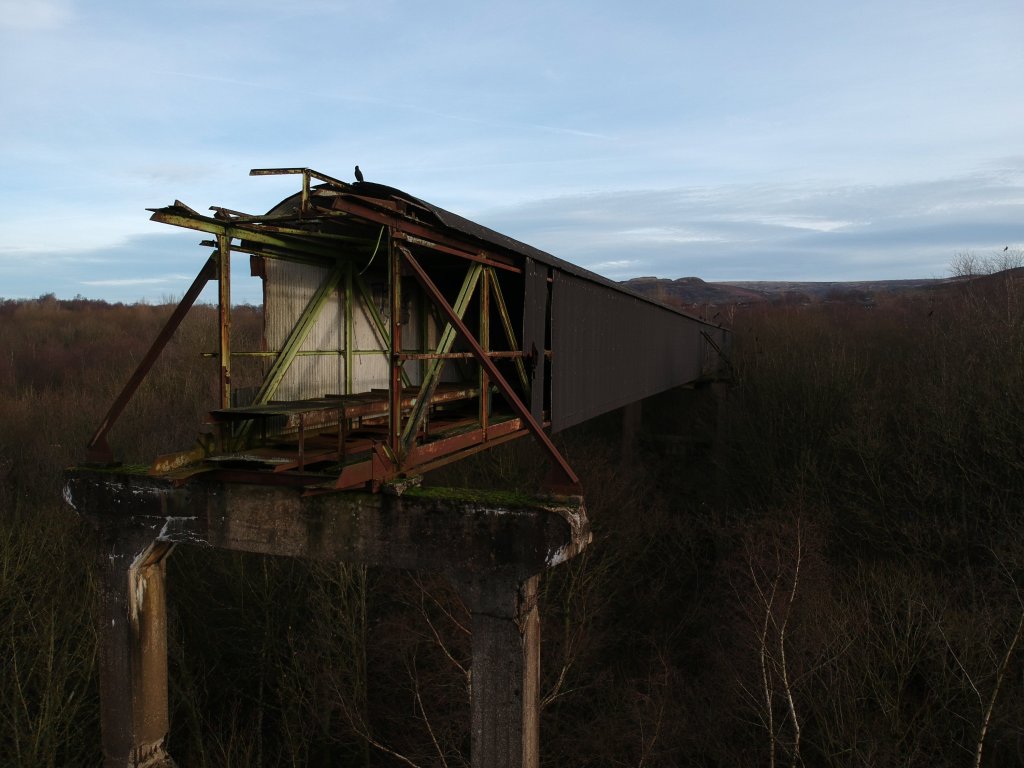

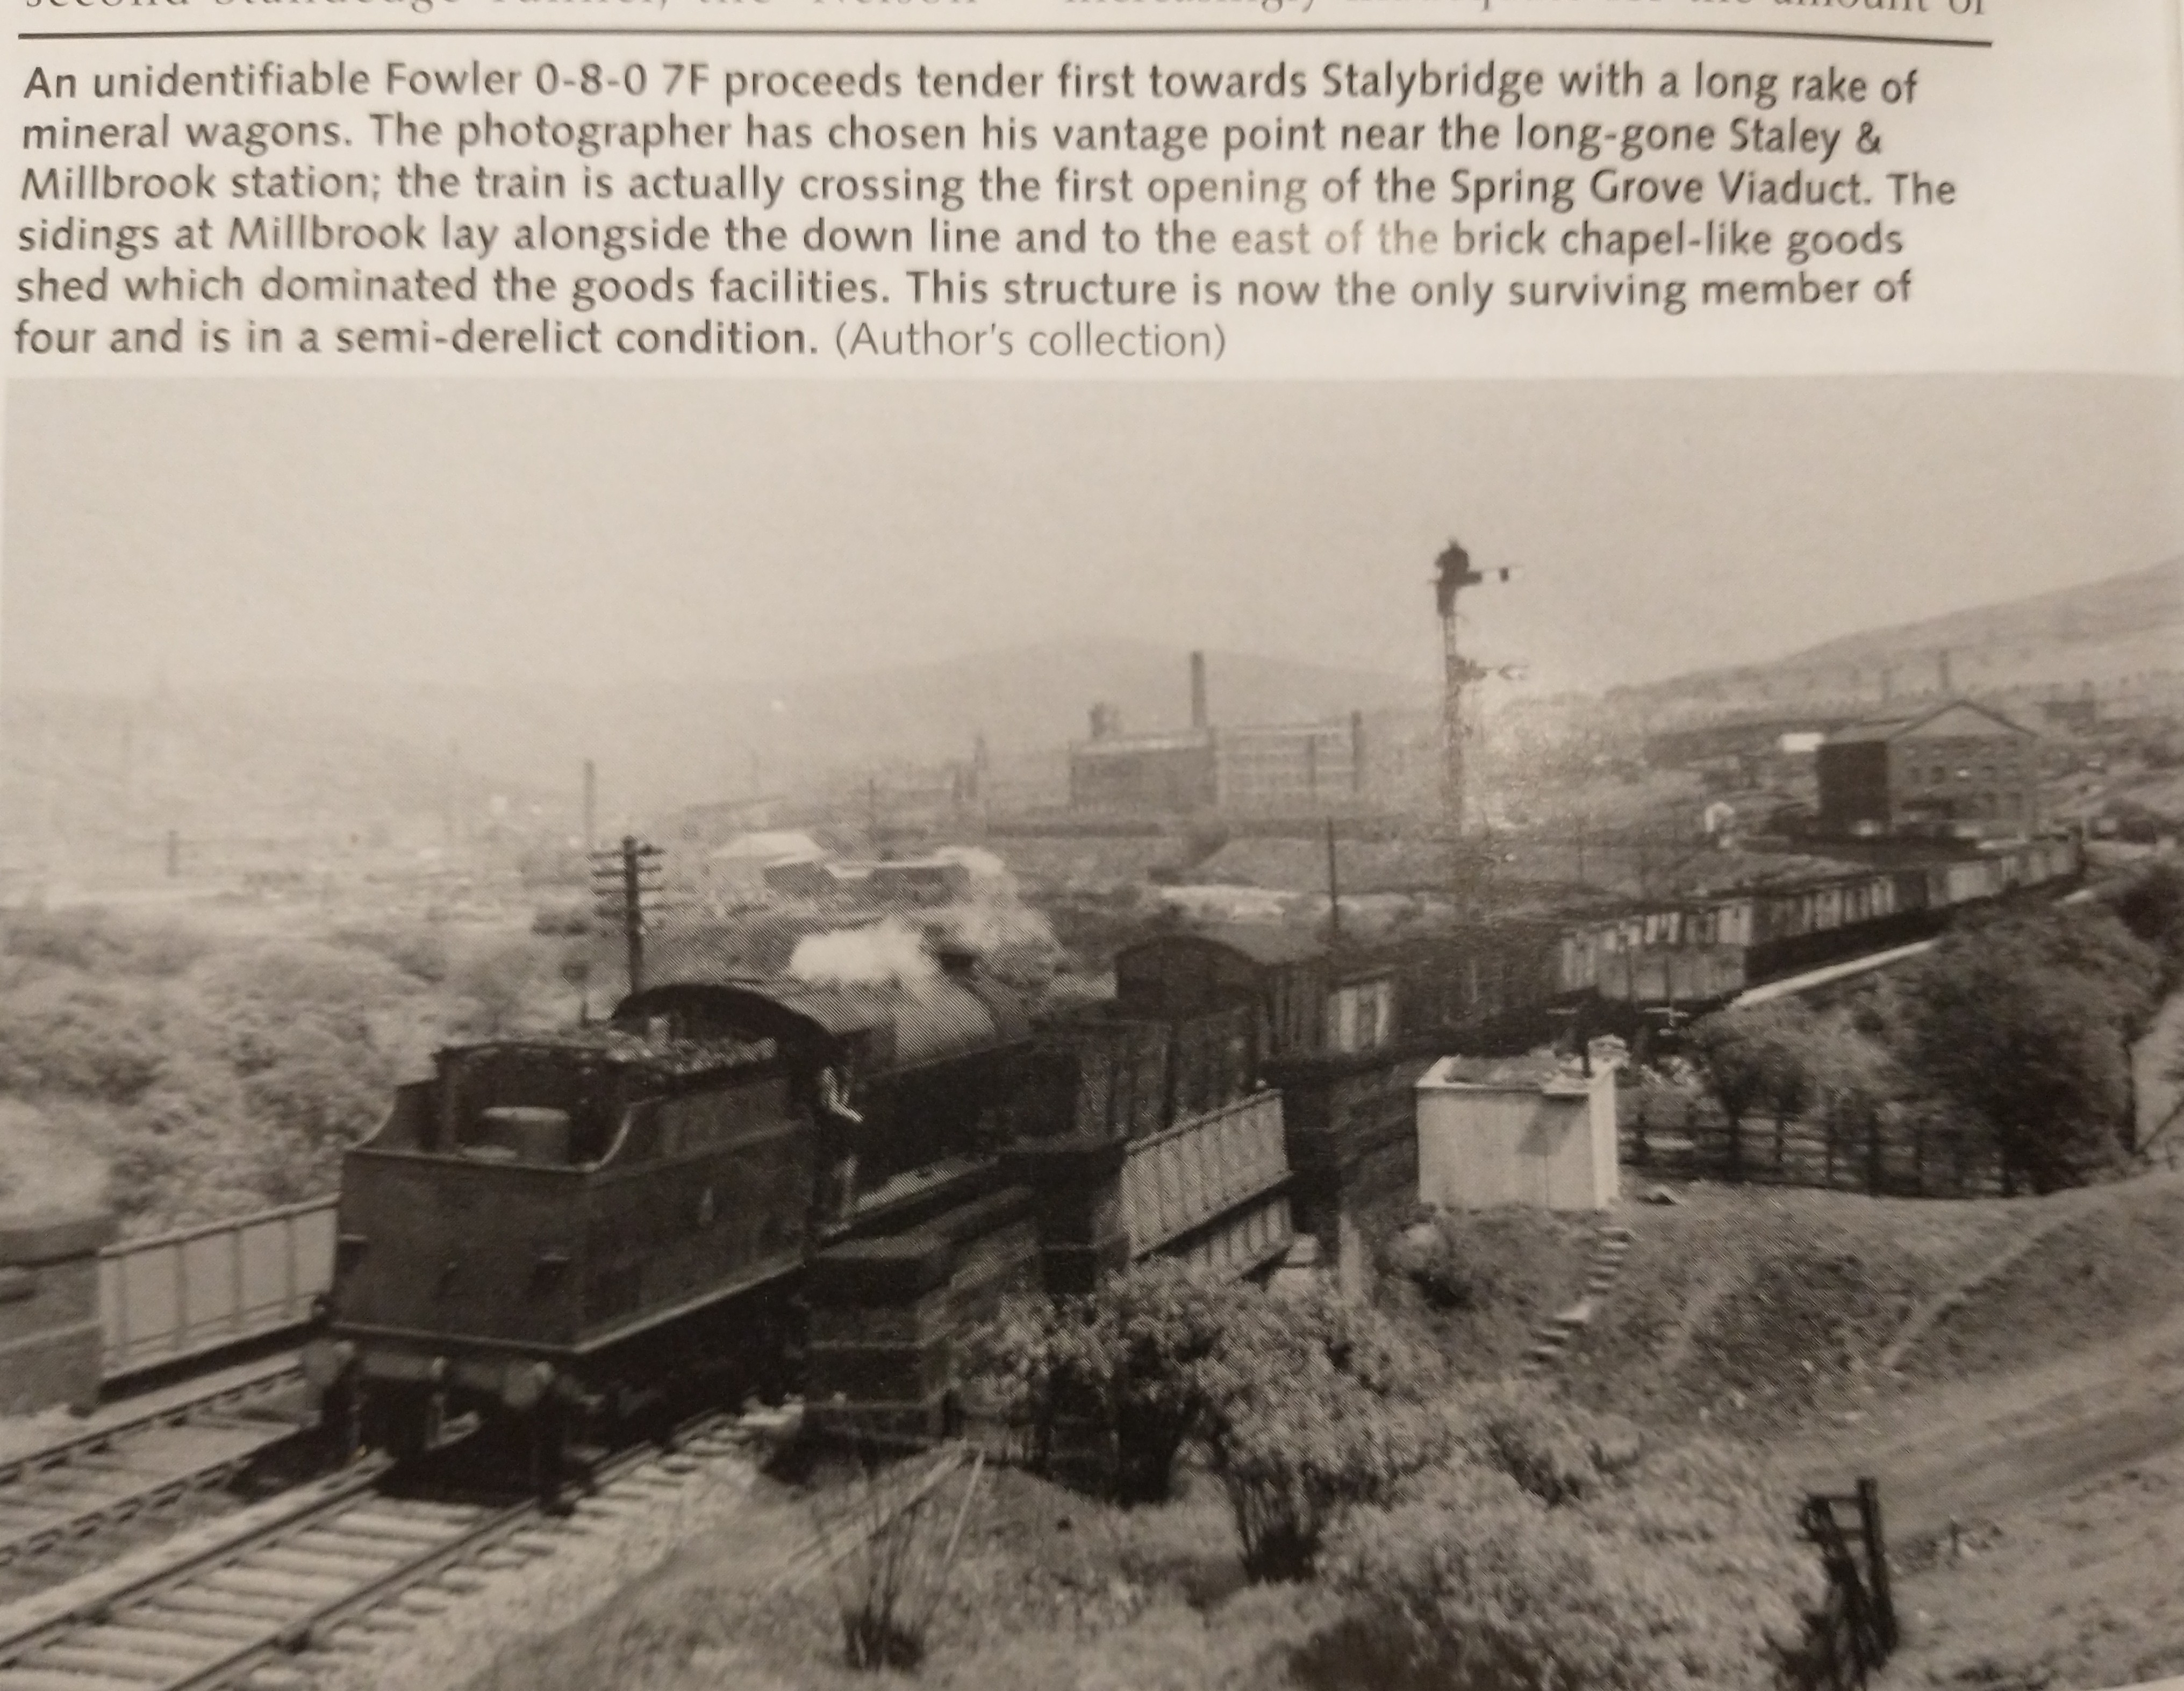
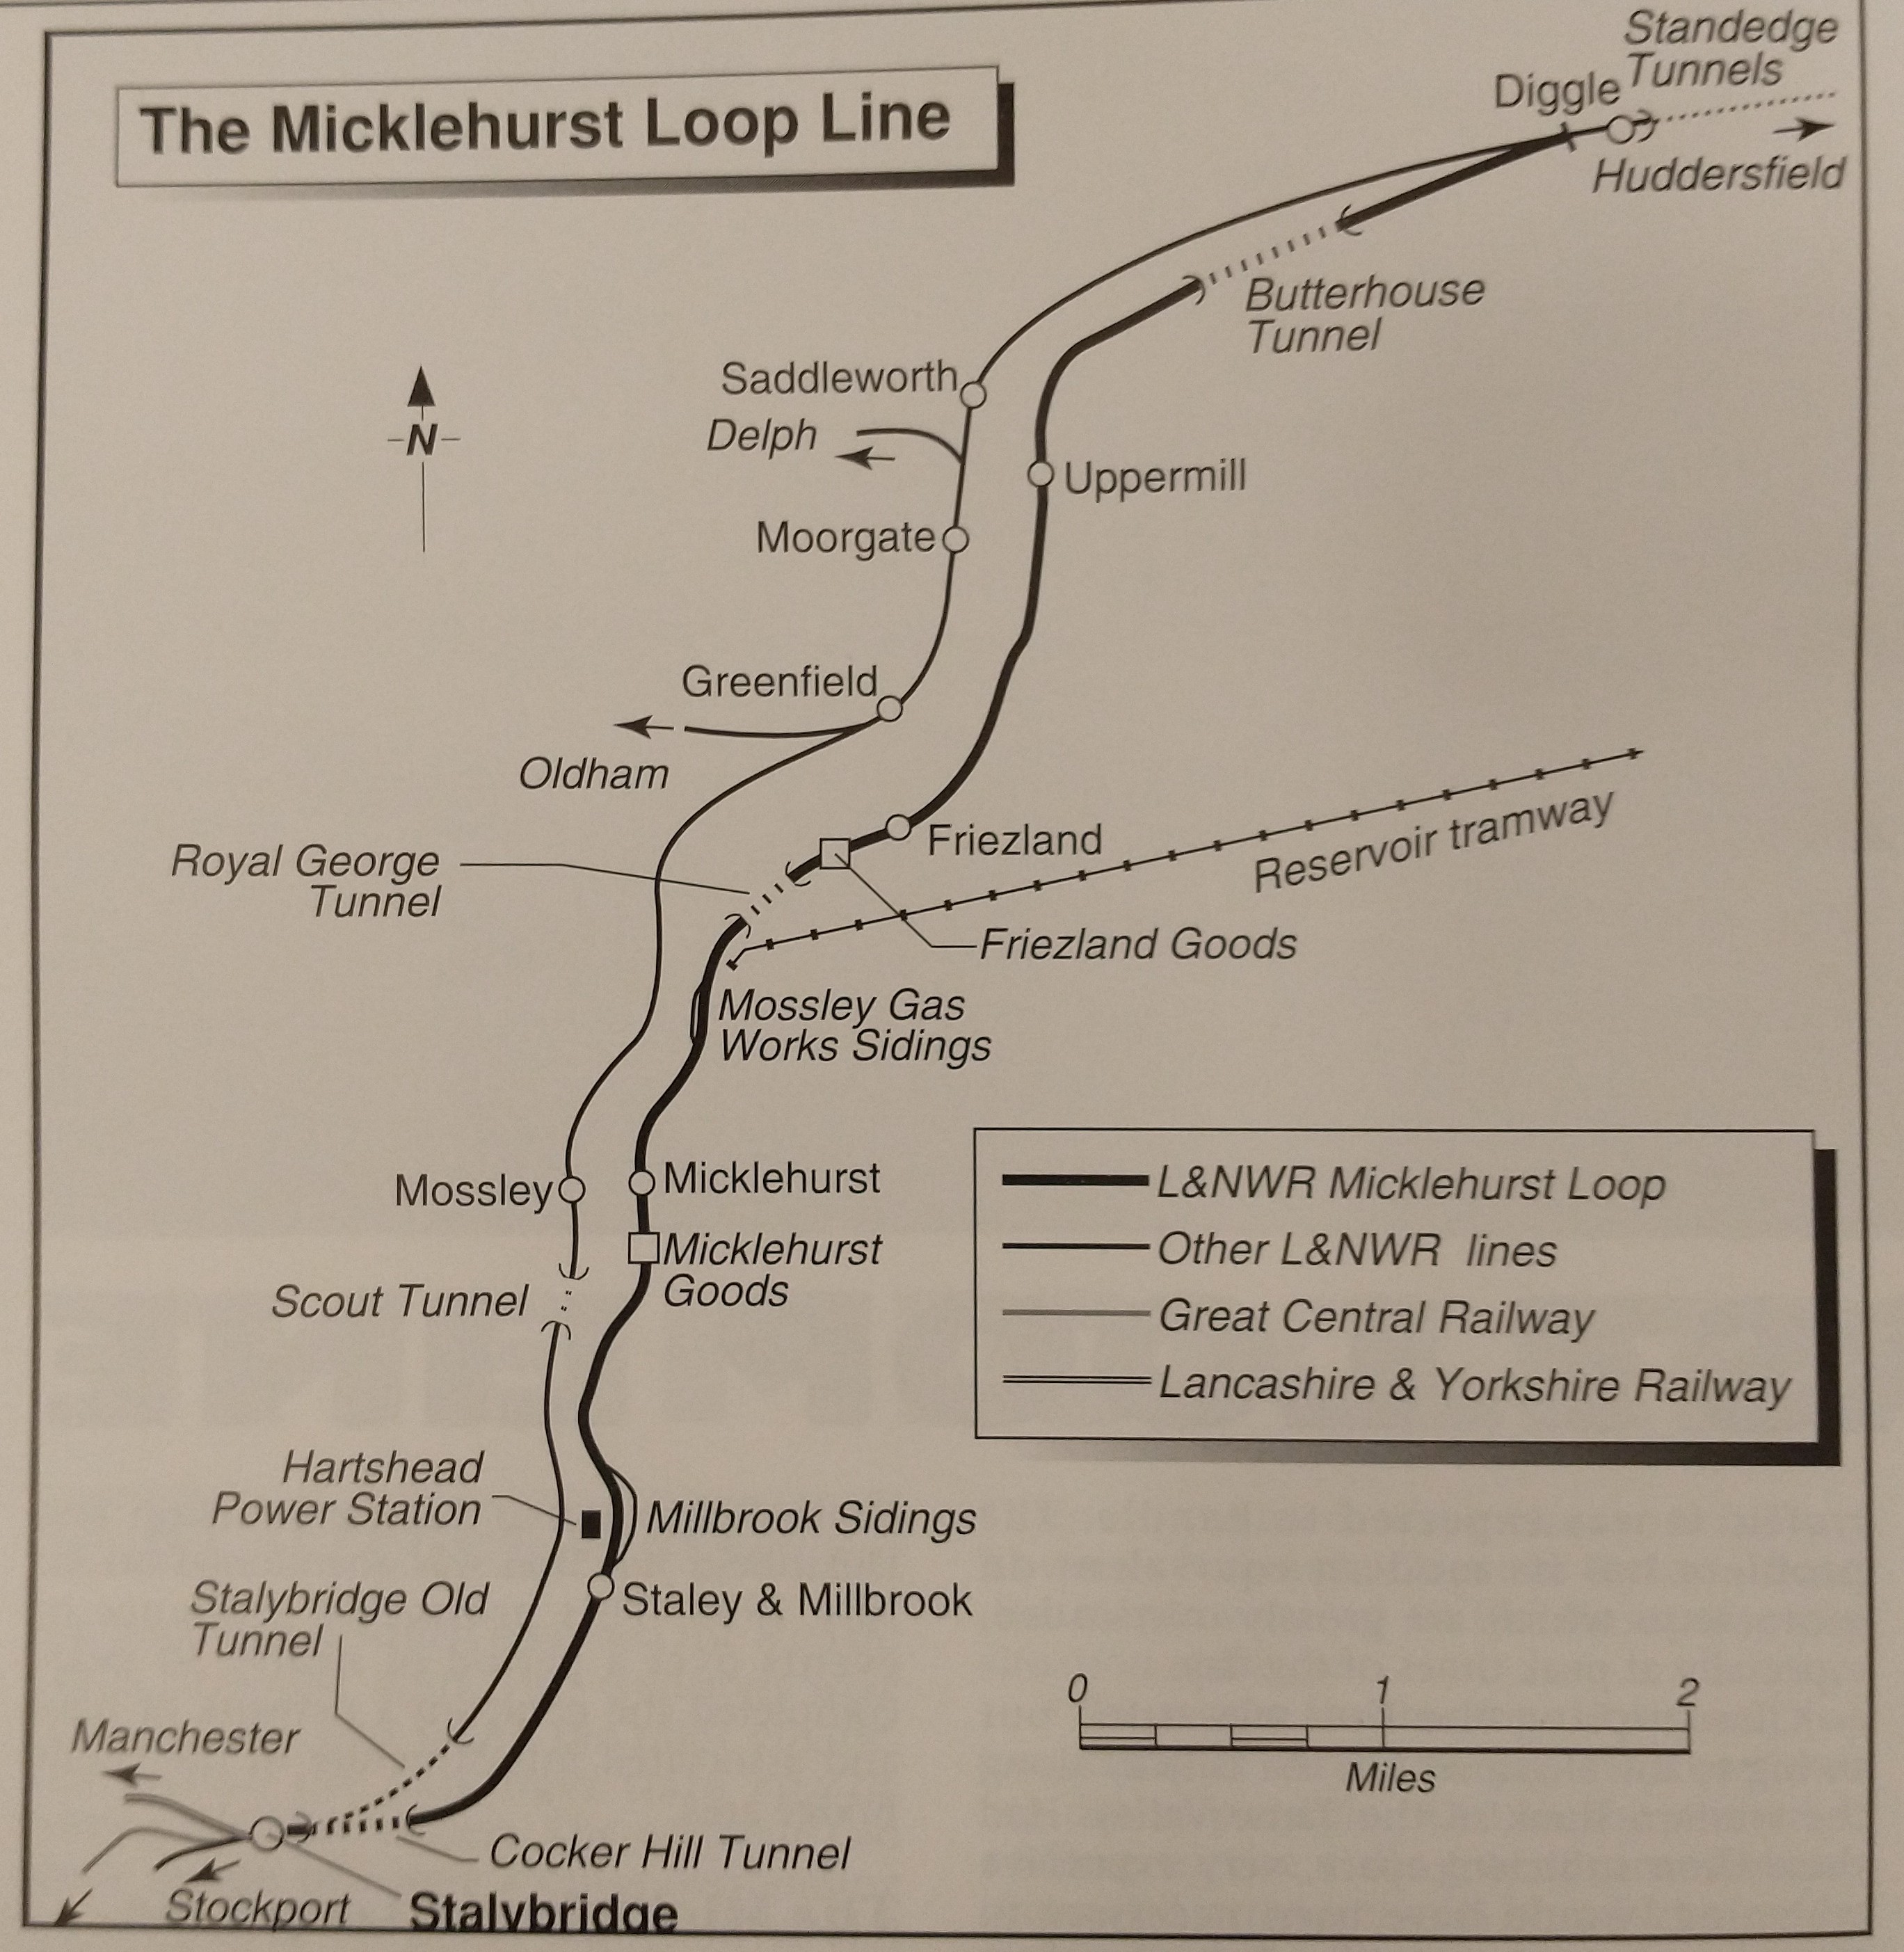
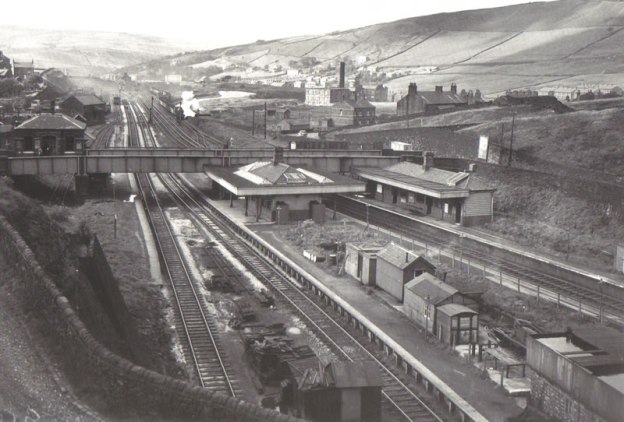
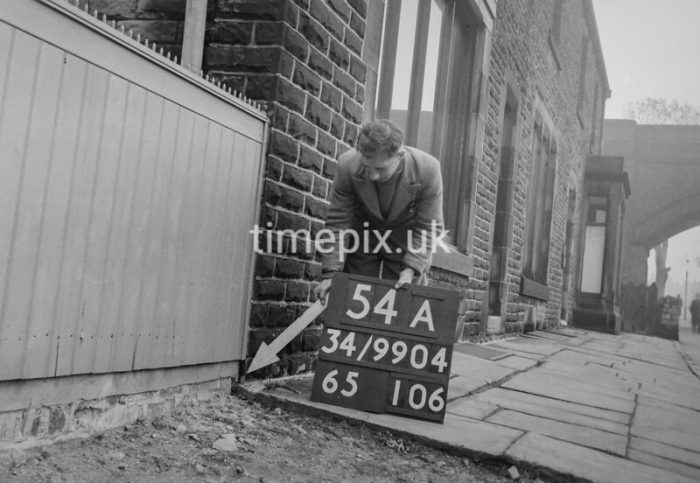
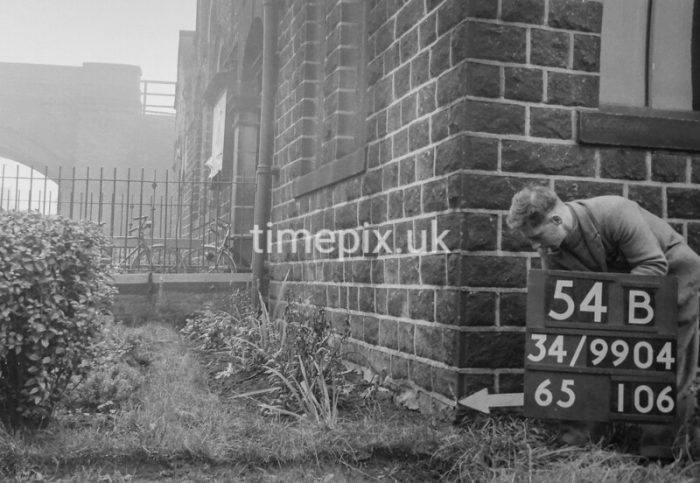
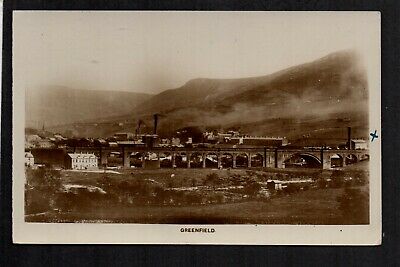
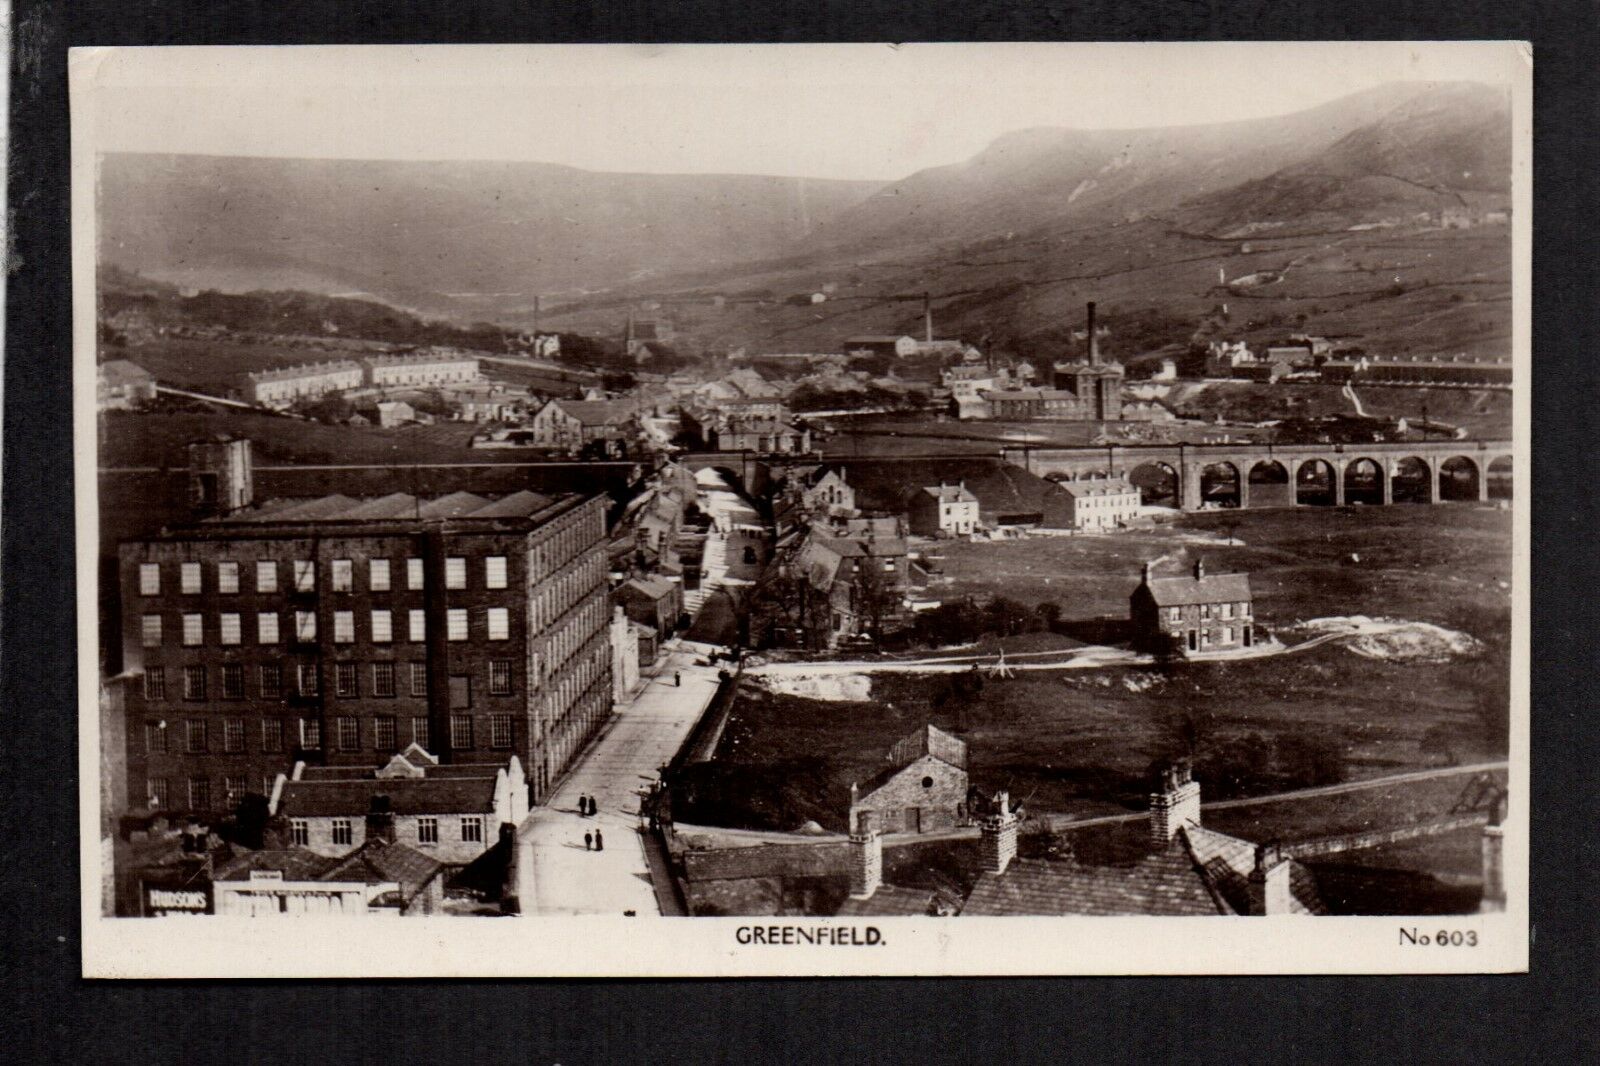
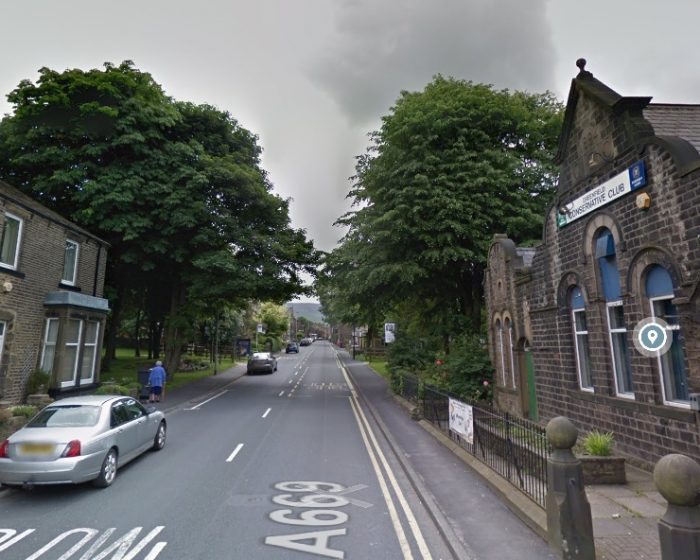
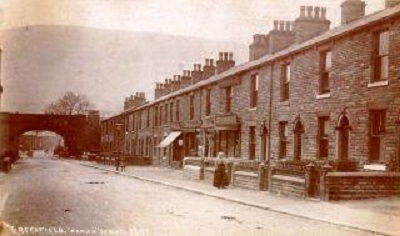 The adjacent image looks from the Southeast along Chew Valley Road. [16]
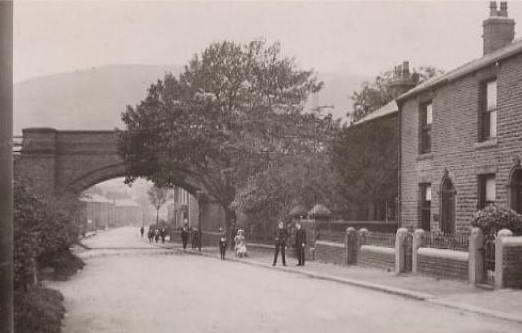
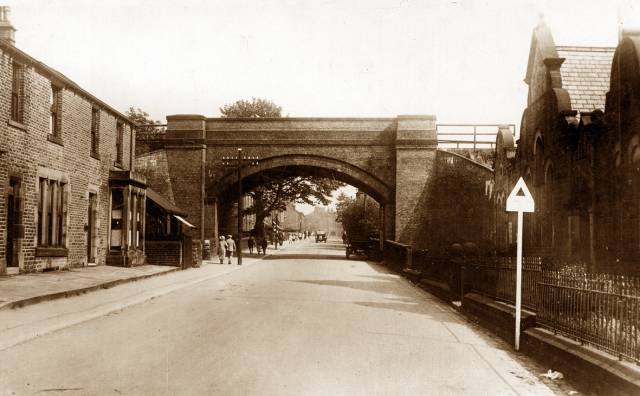 The third, below, is taken from the Northwest and shows the Conservative Club on the right side. [18]
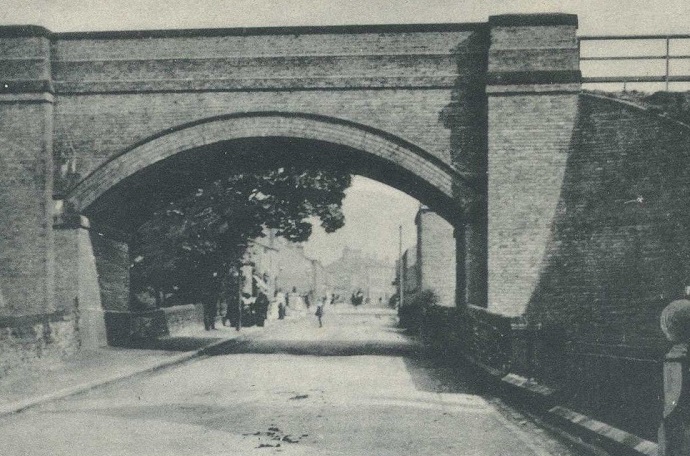
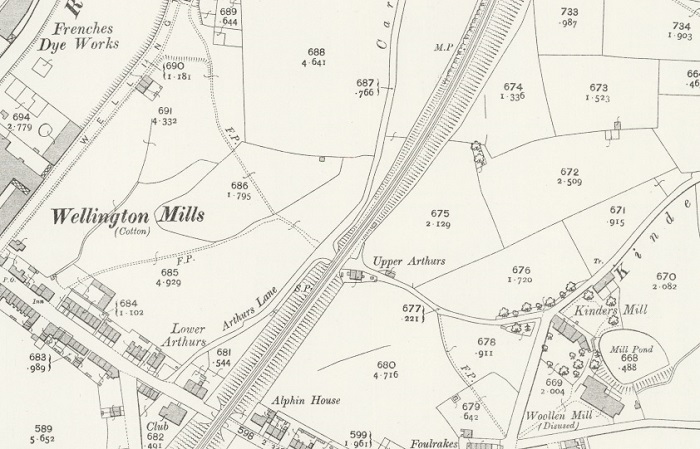
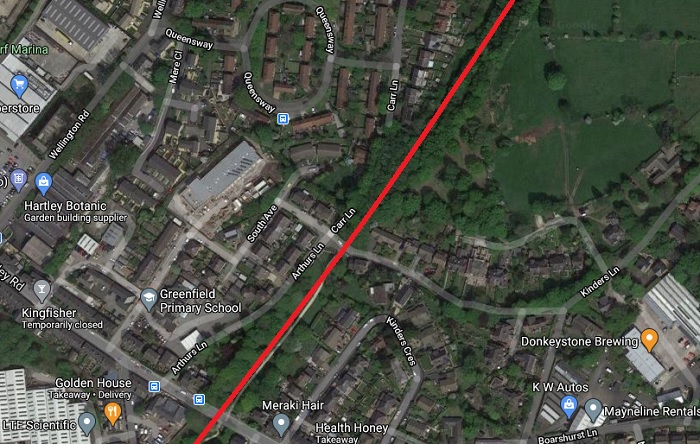
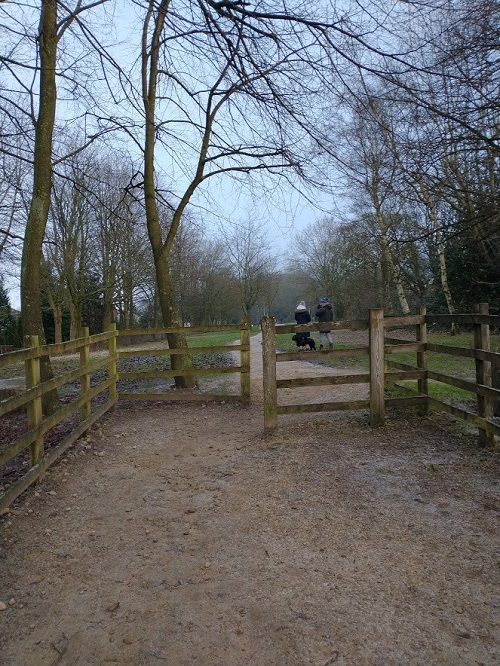
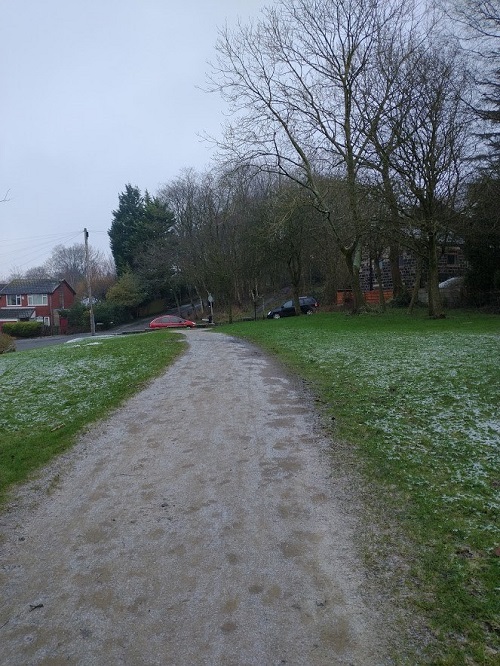
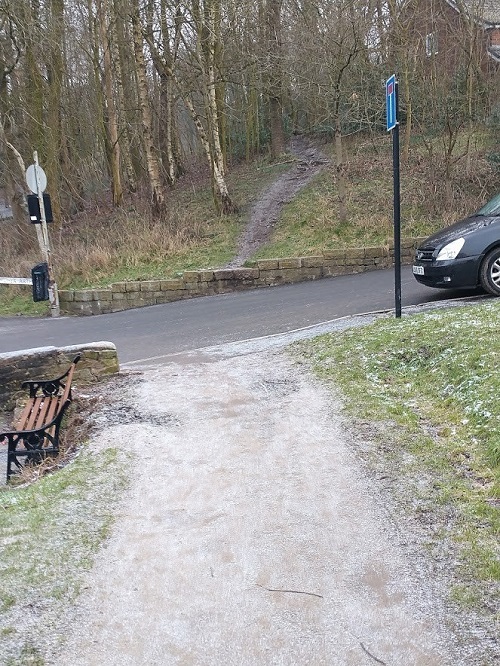
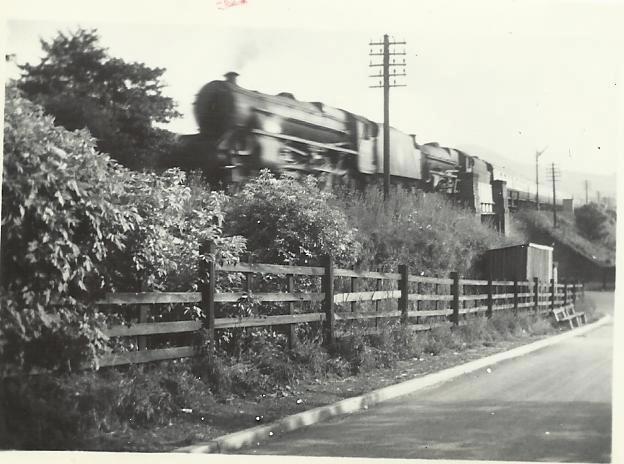
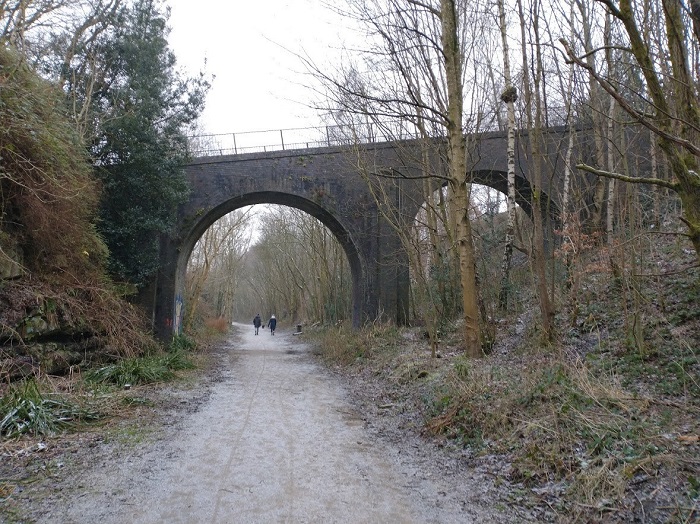
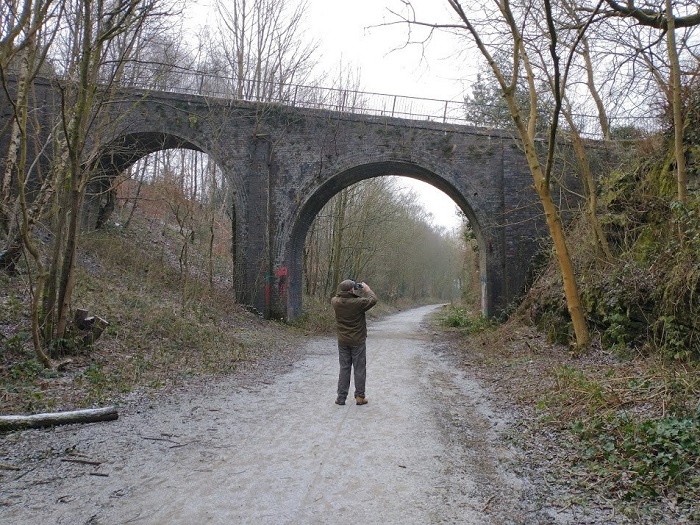
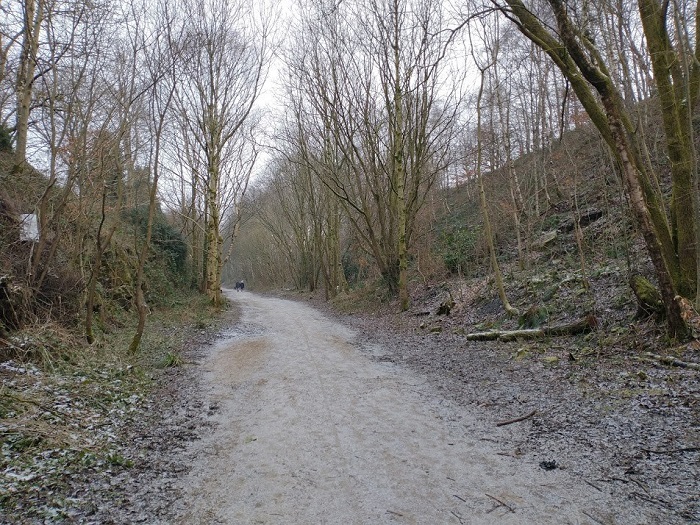
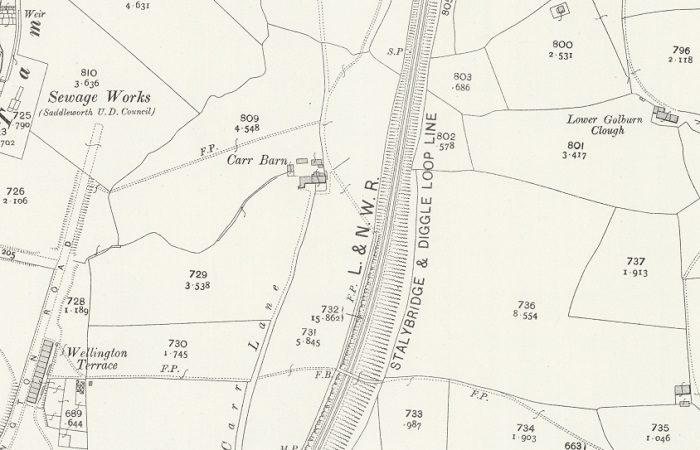
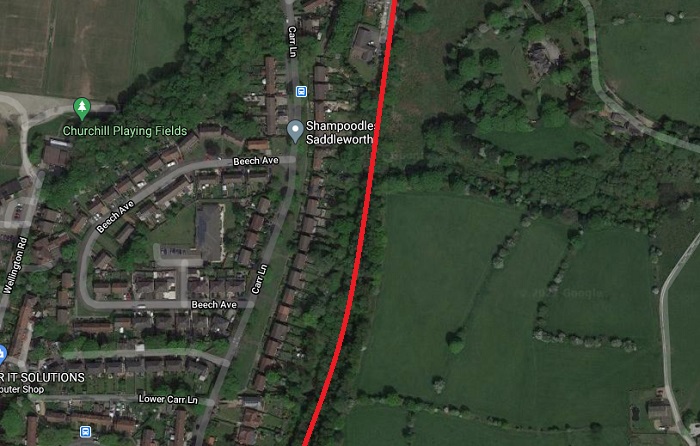
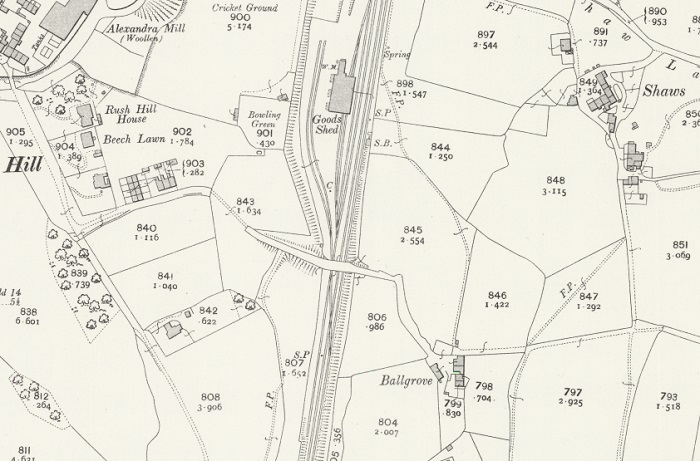

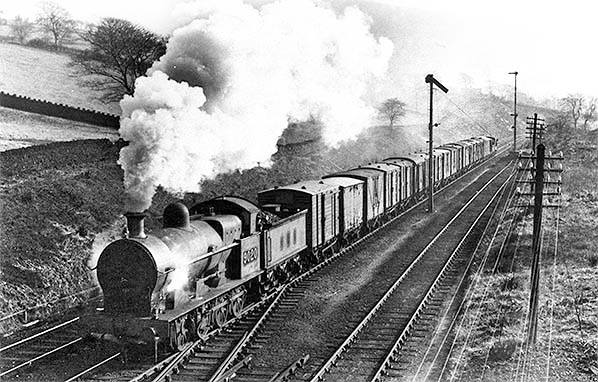
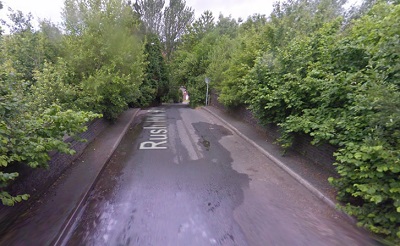
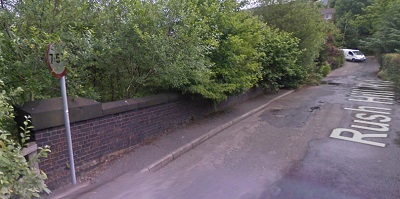
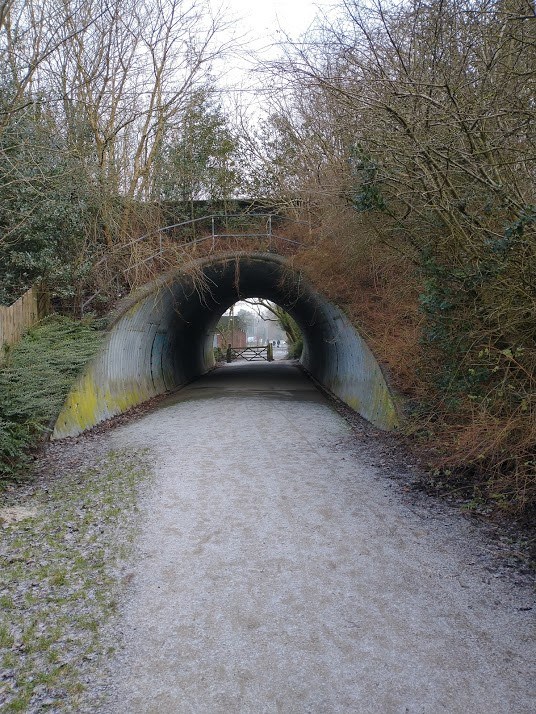
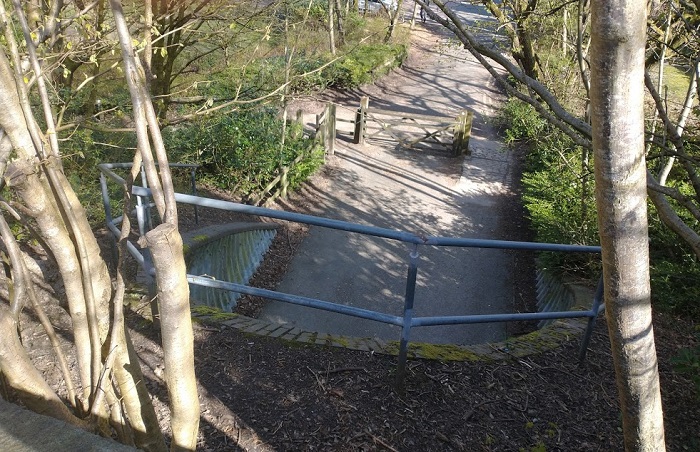
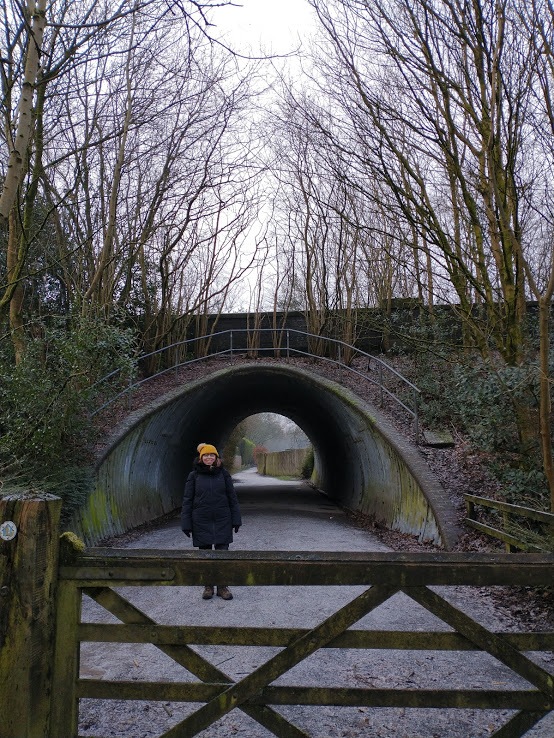
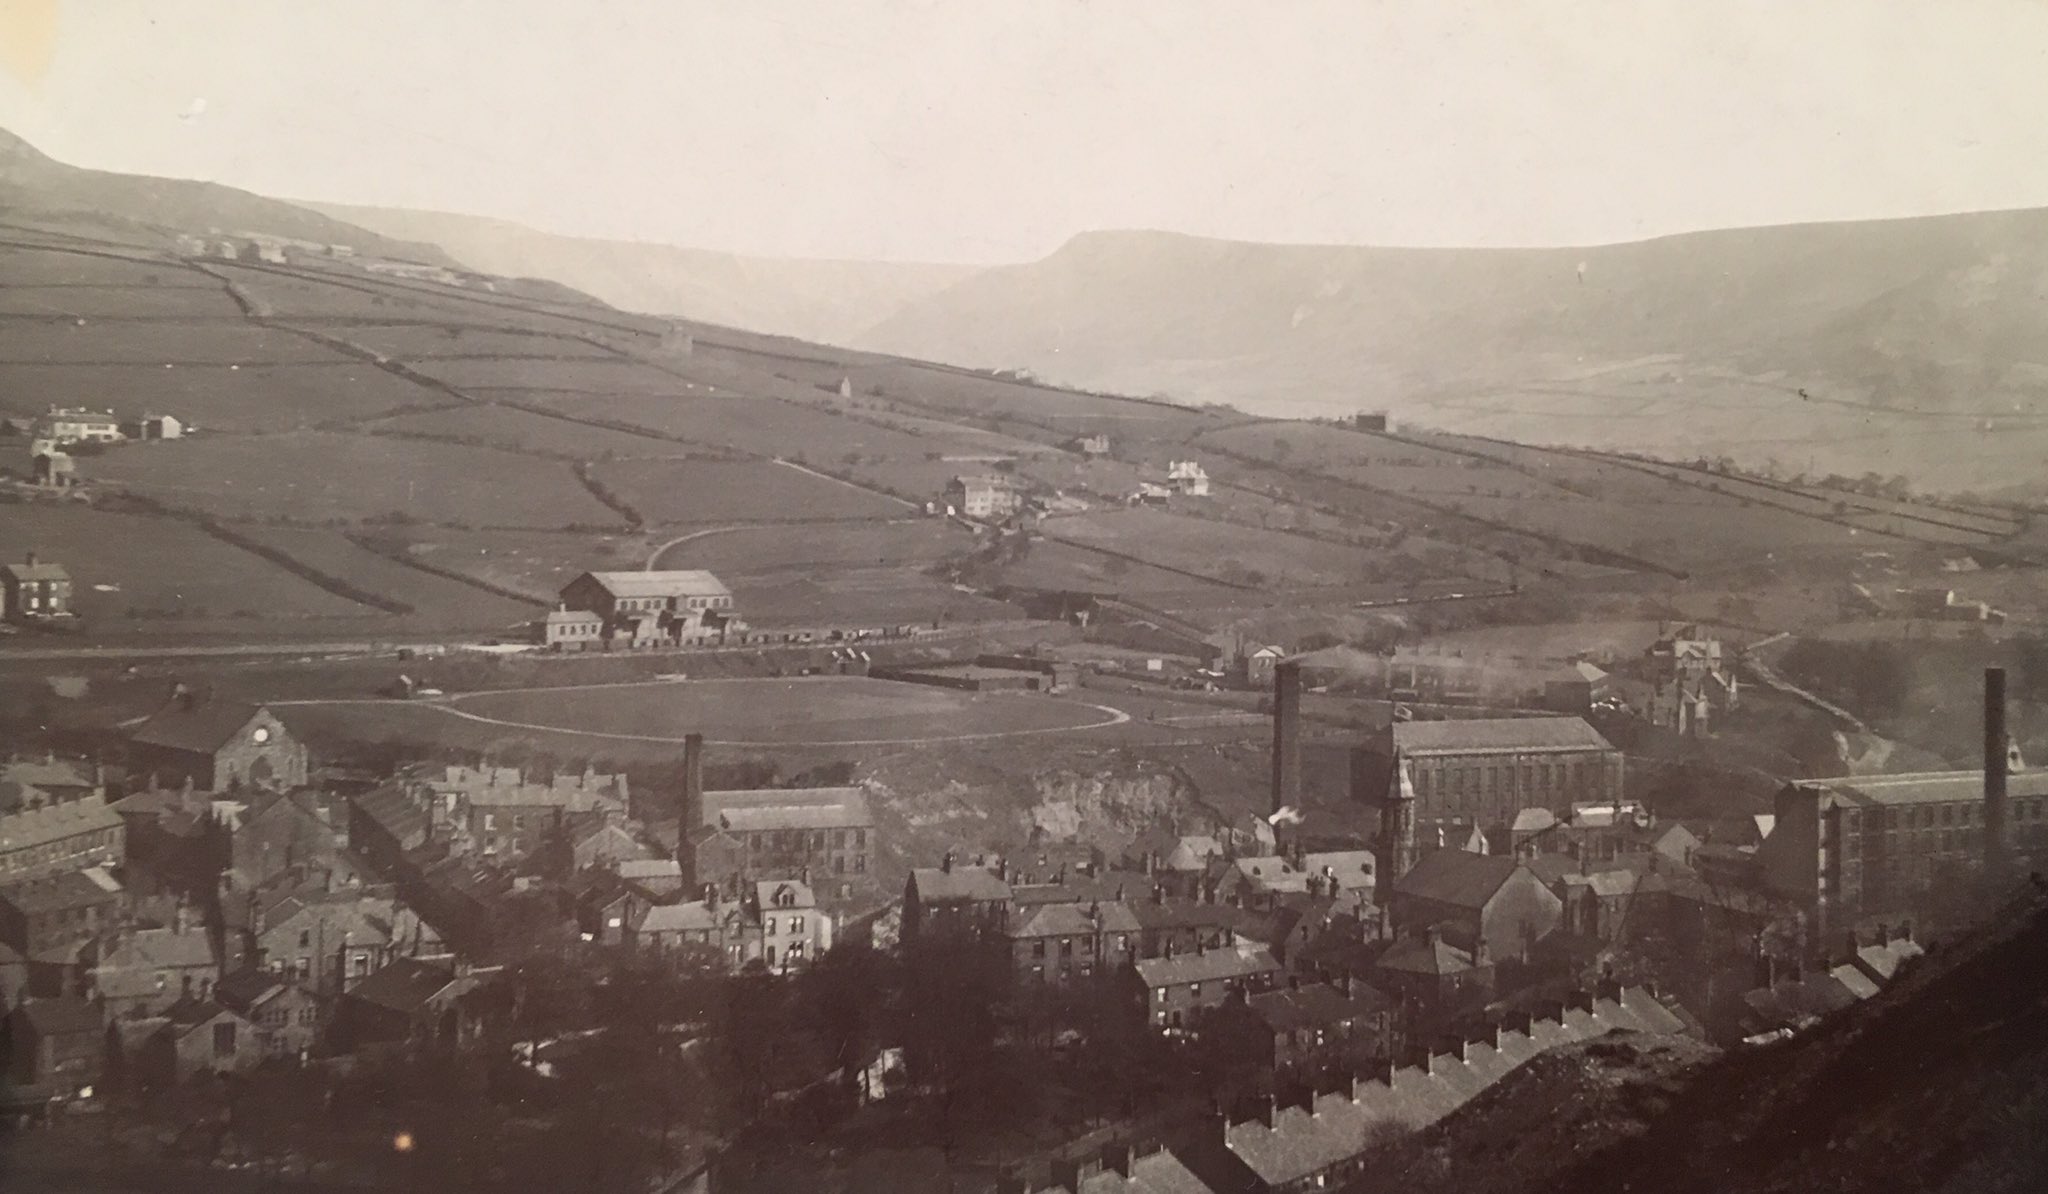
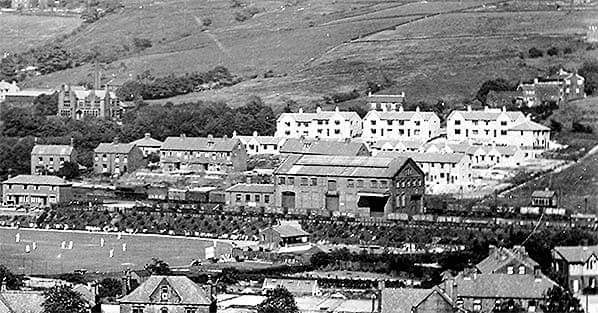
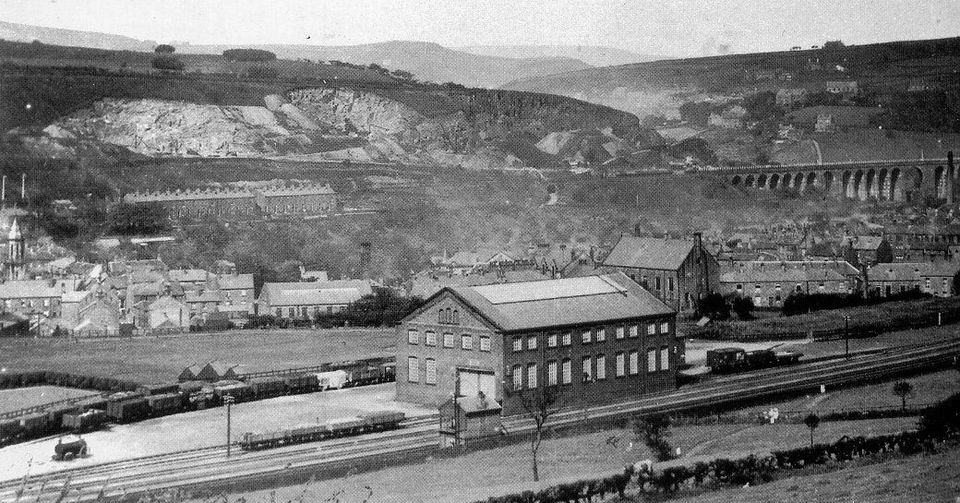
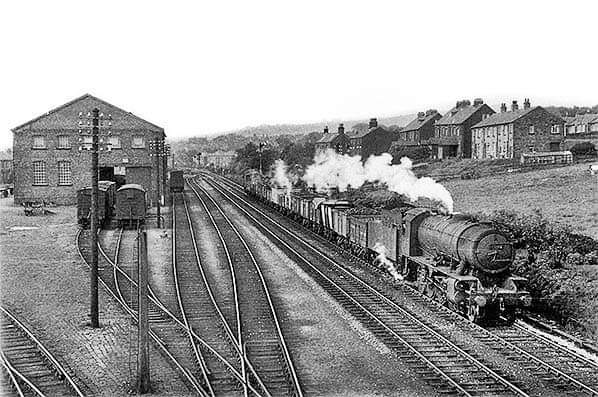
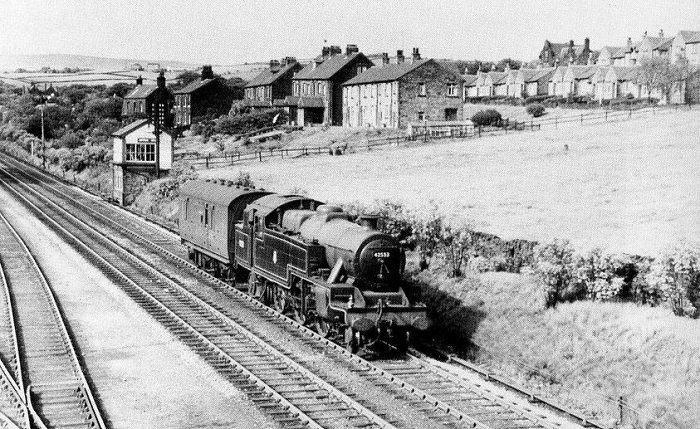
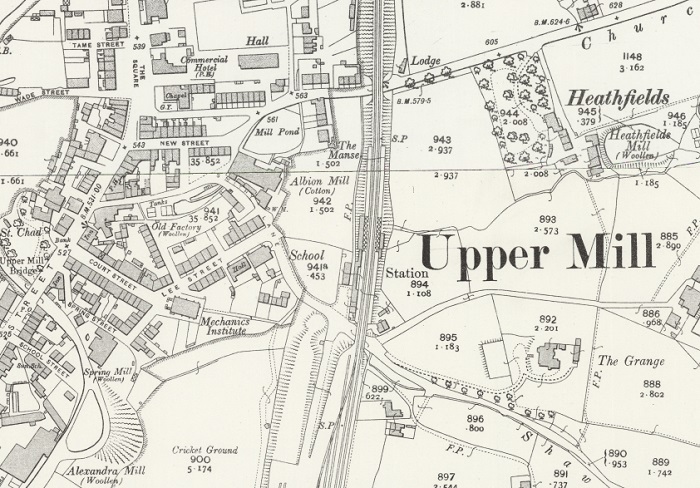
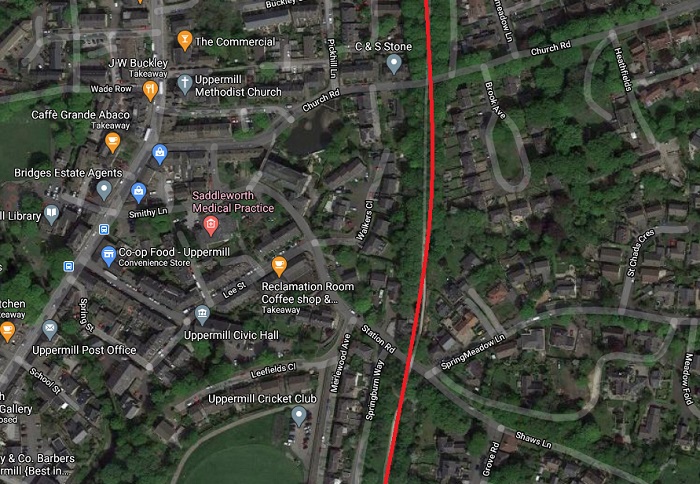
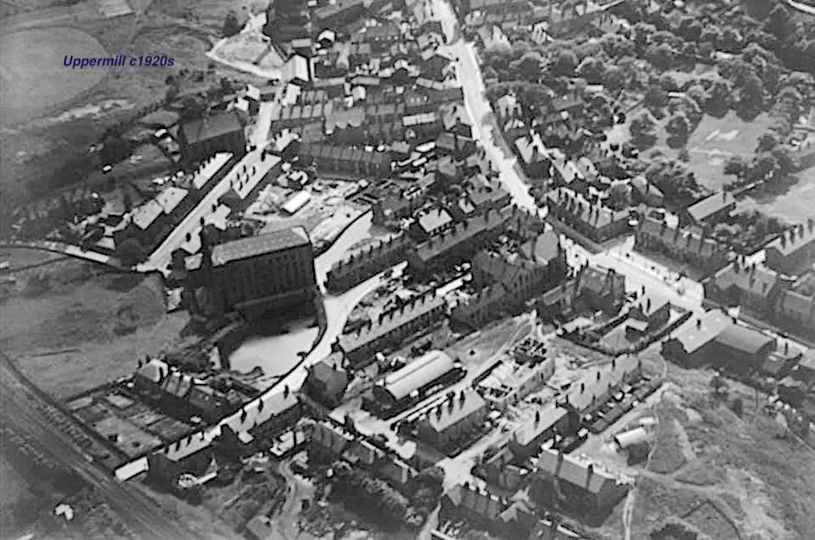
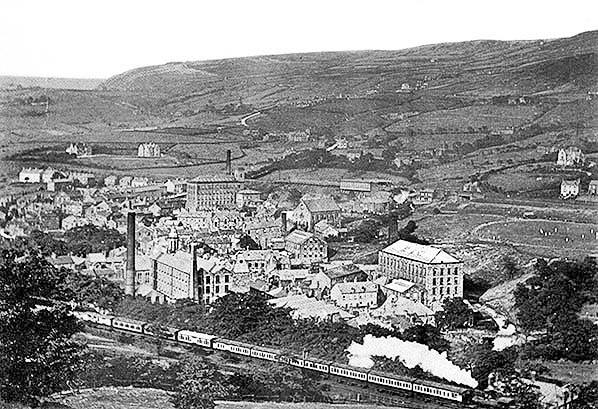

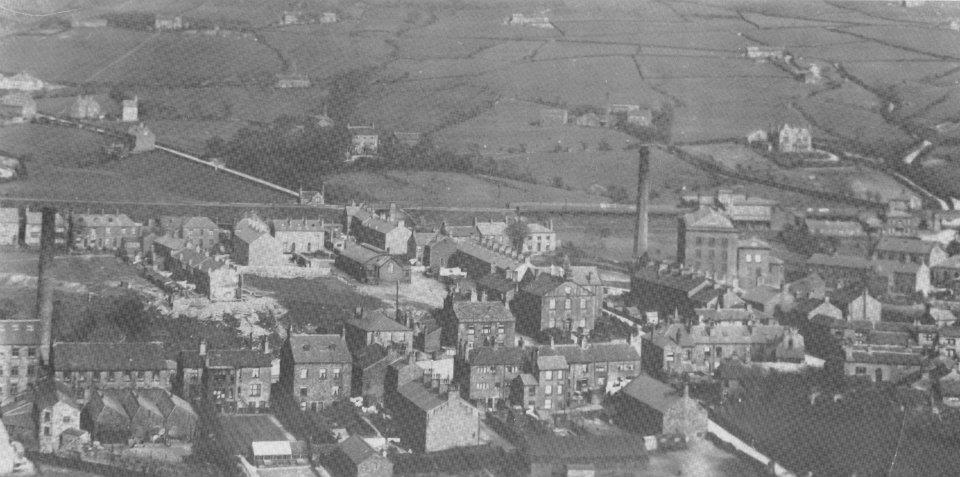
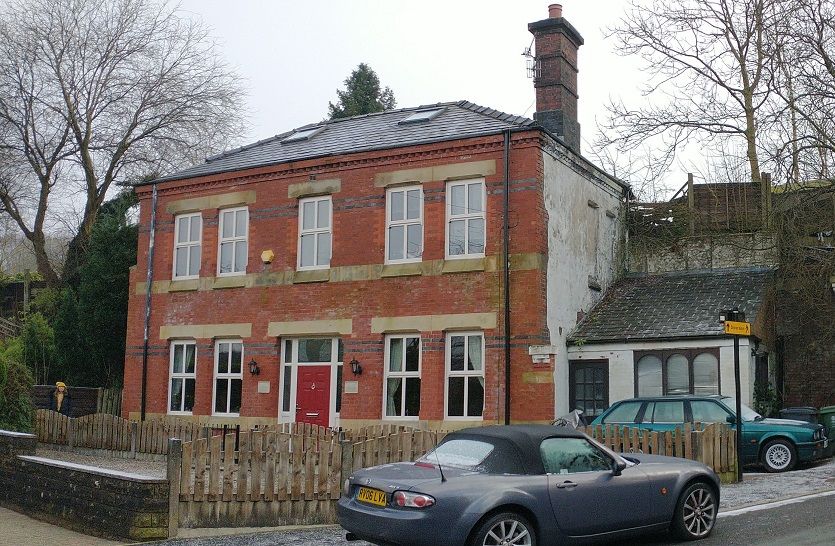
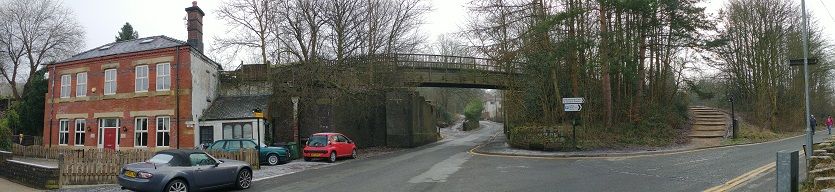
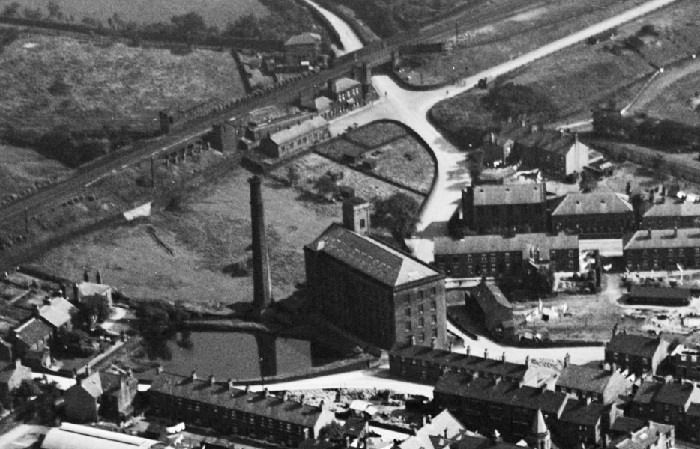
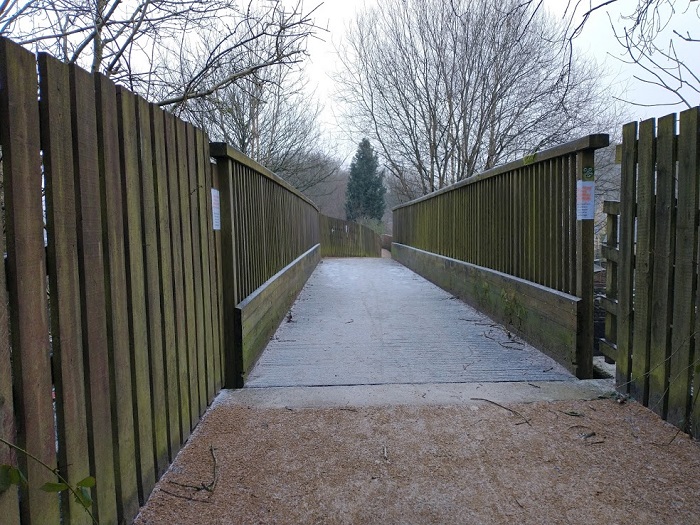
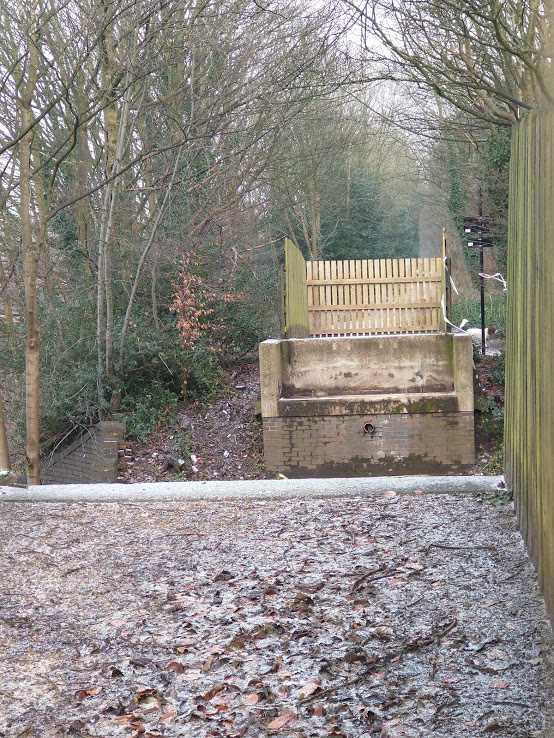
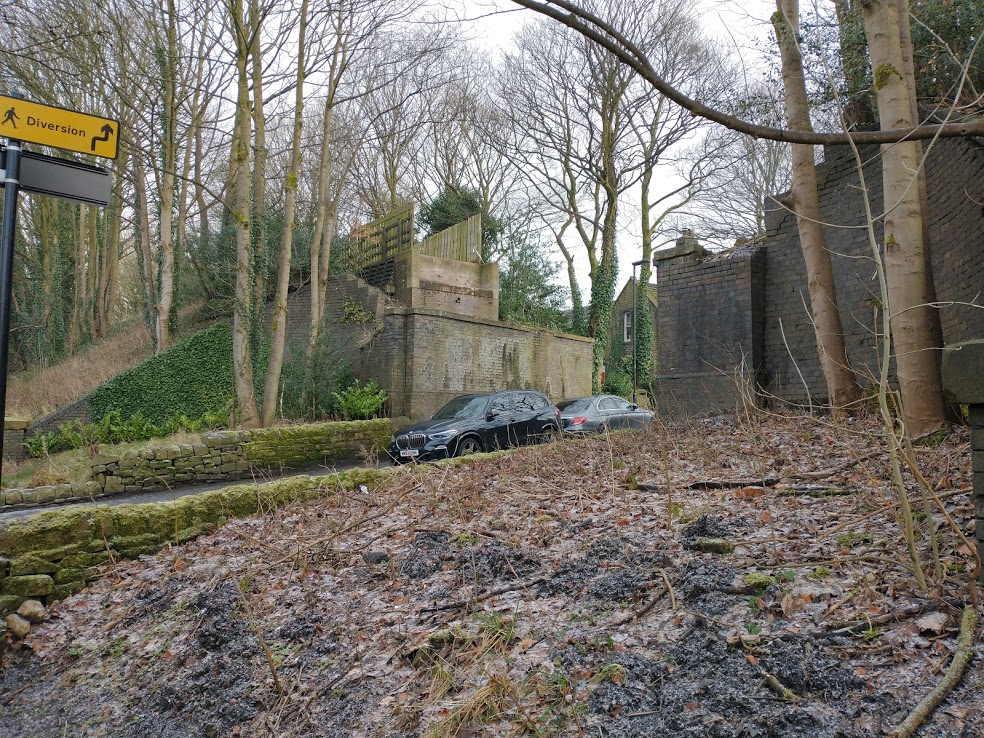
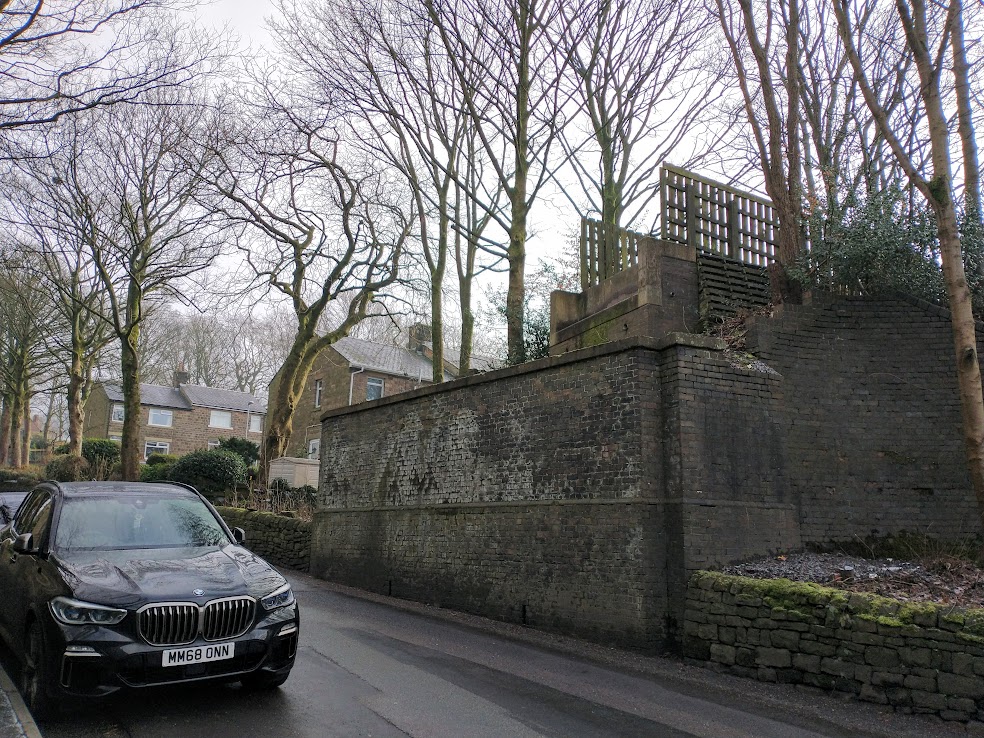
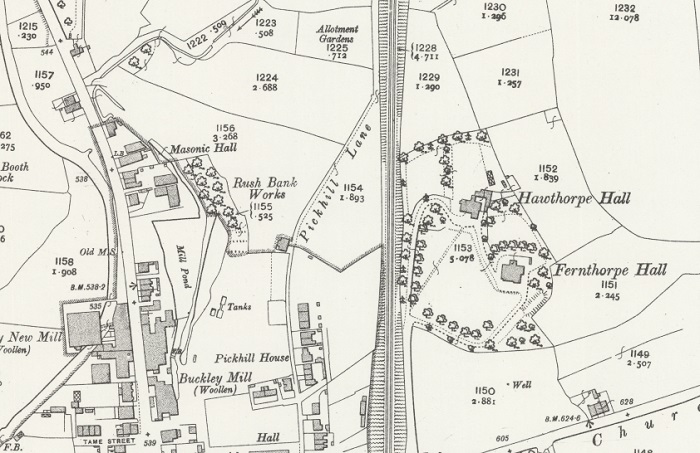
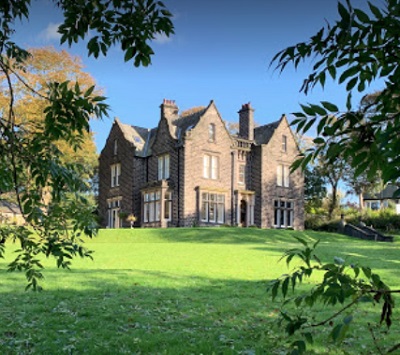
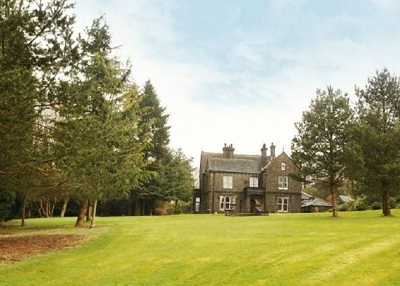
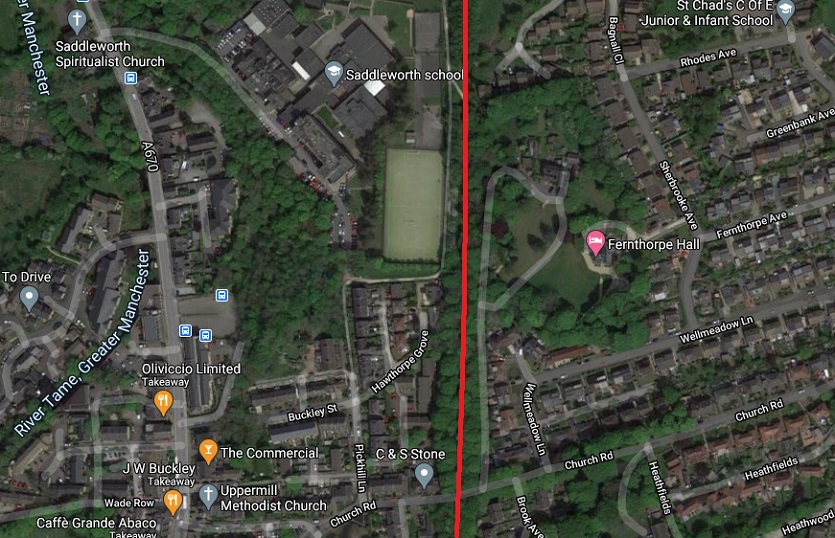
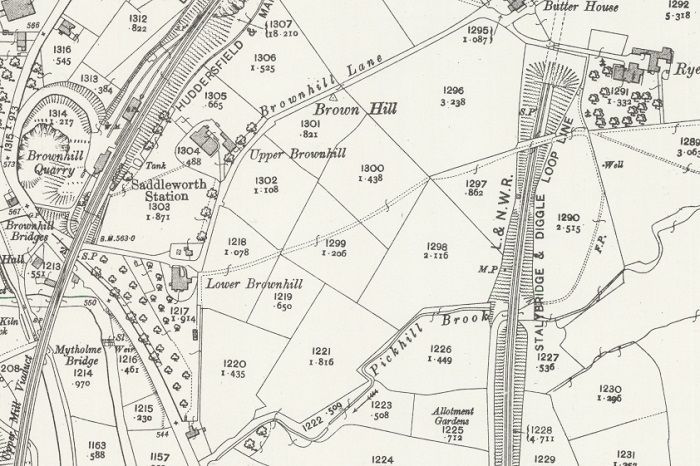
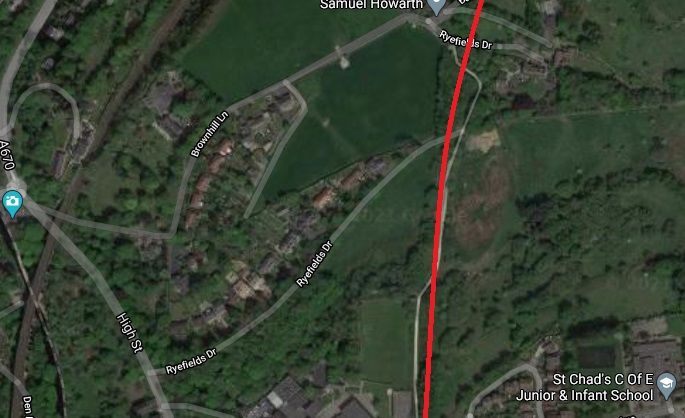
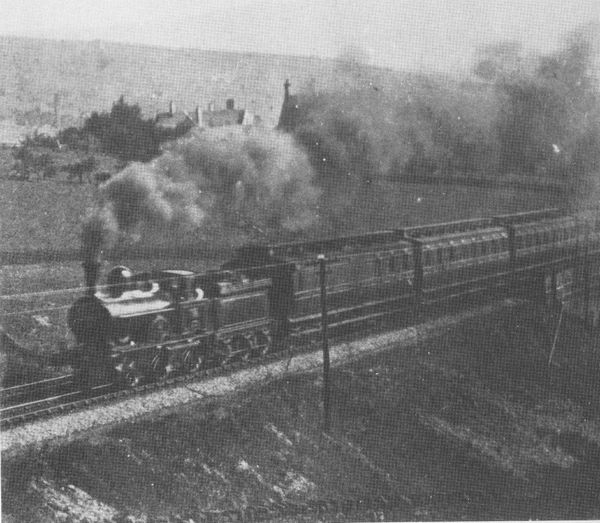
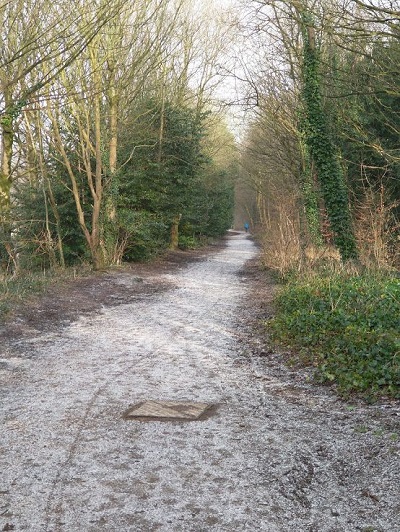
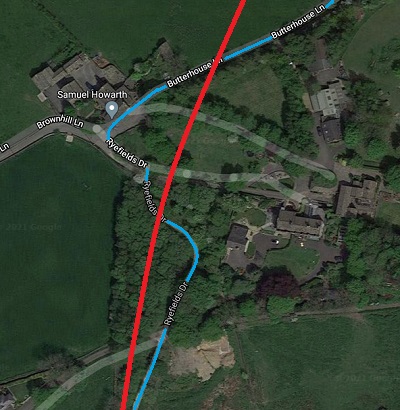
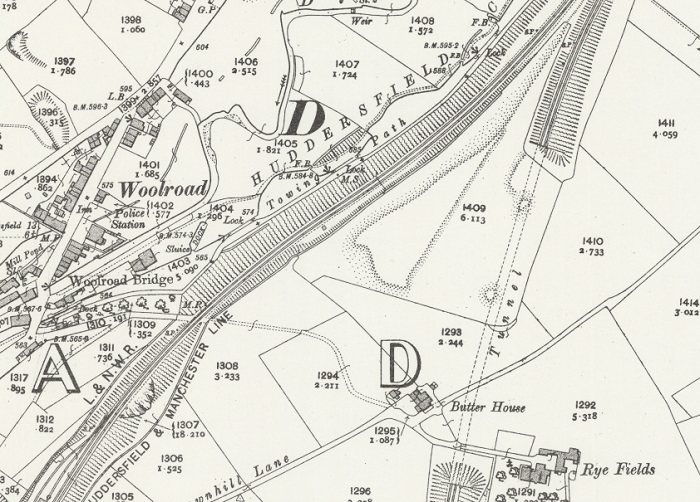
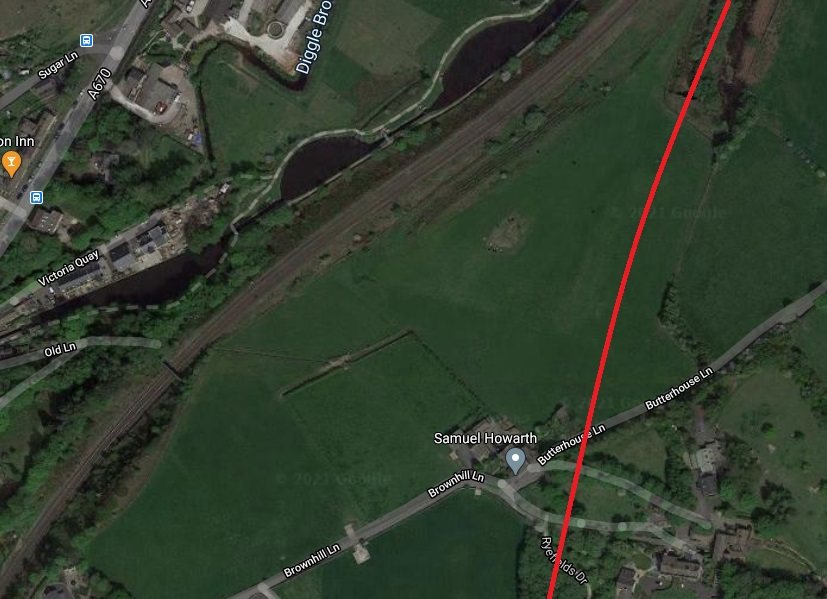
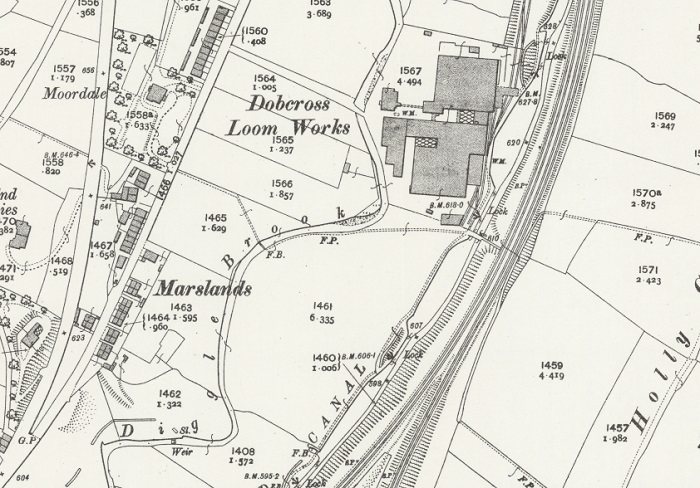
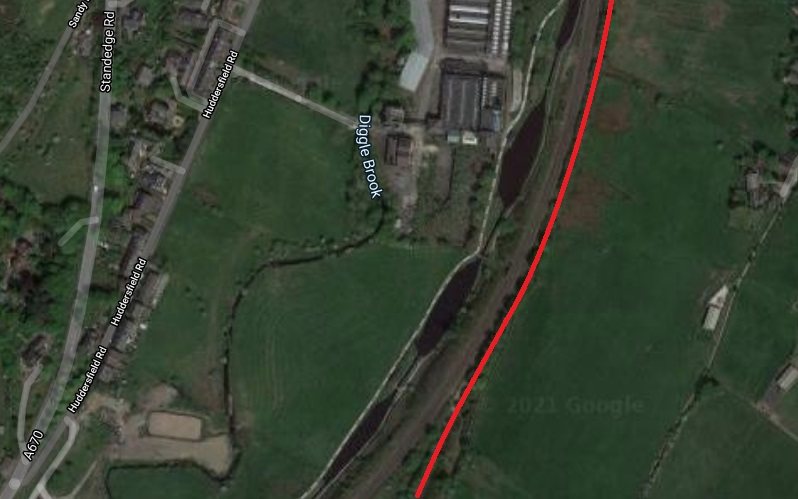
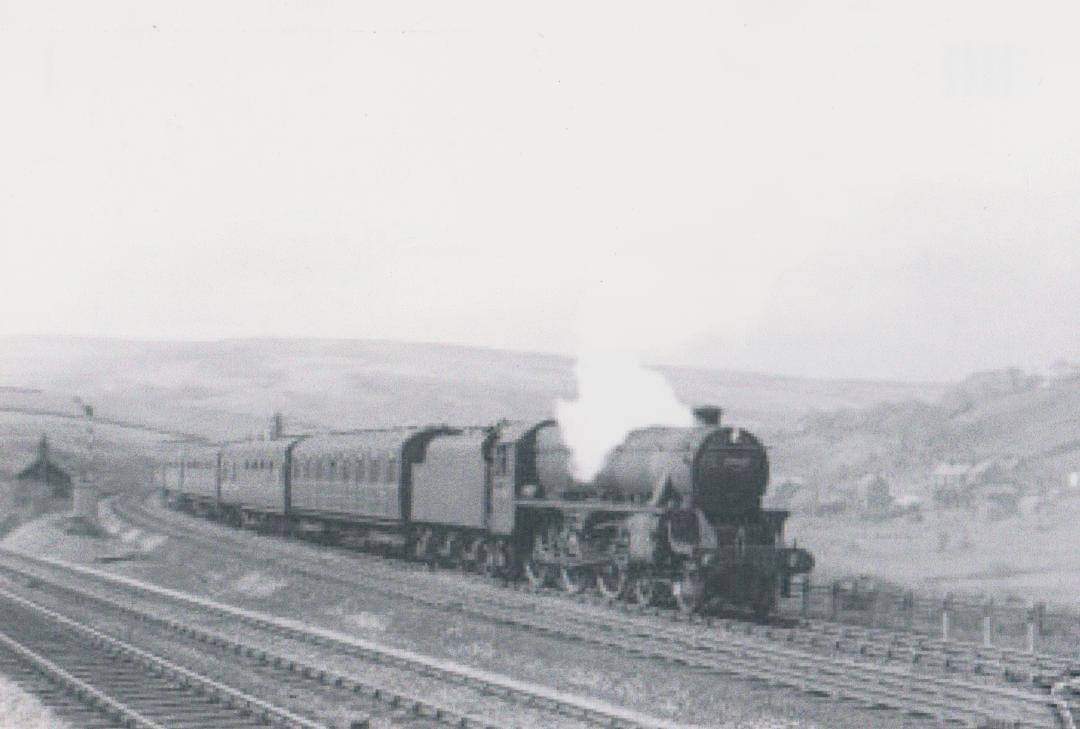
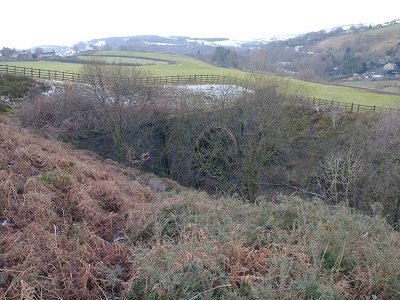
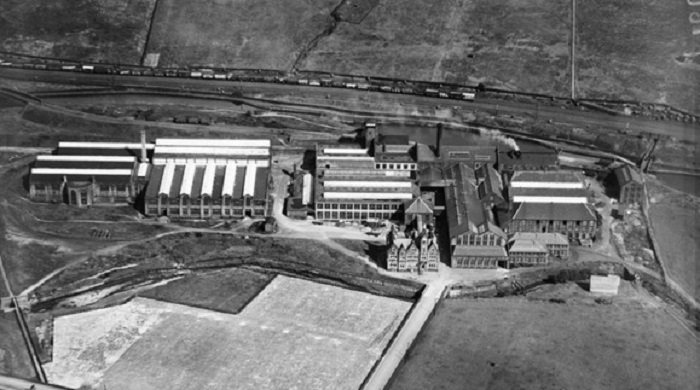
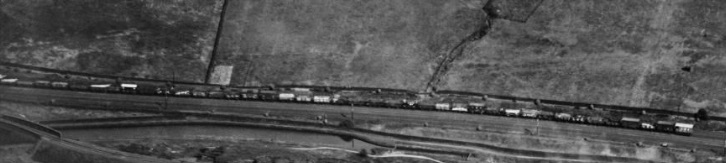
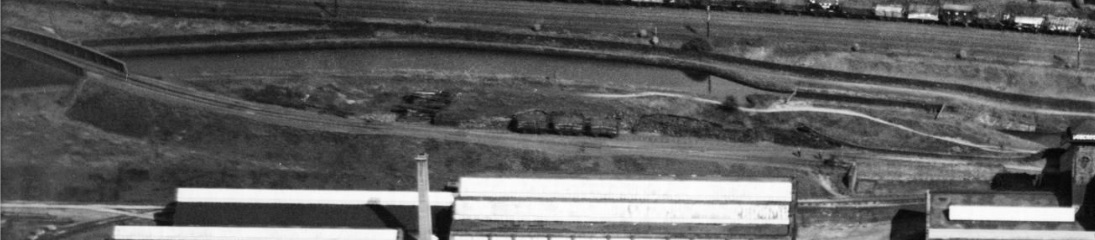

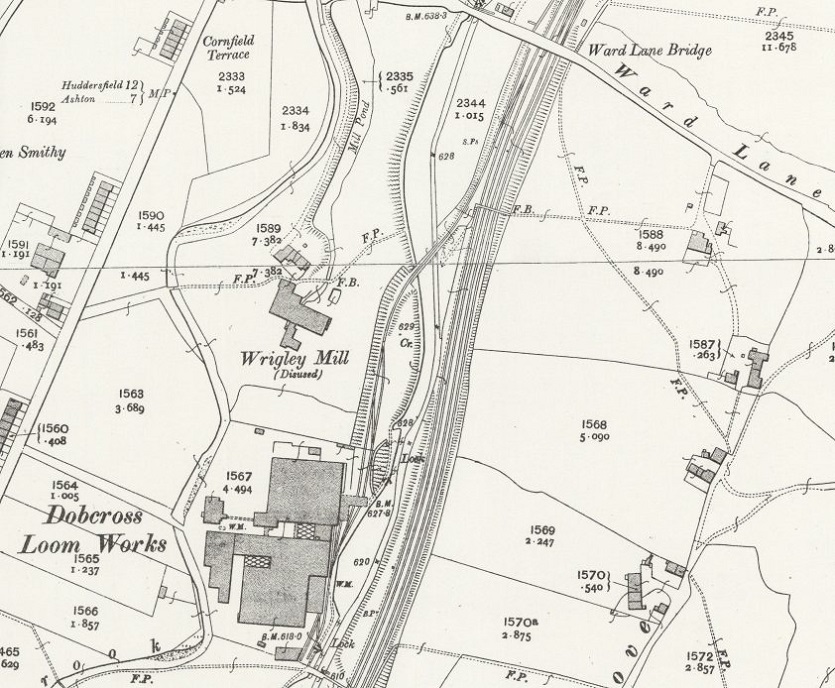
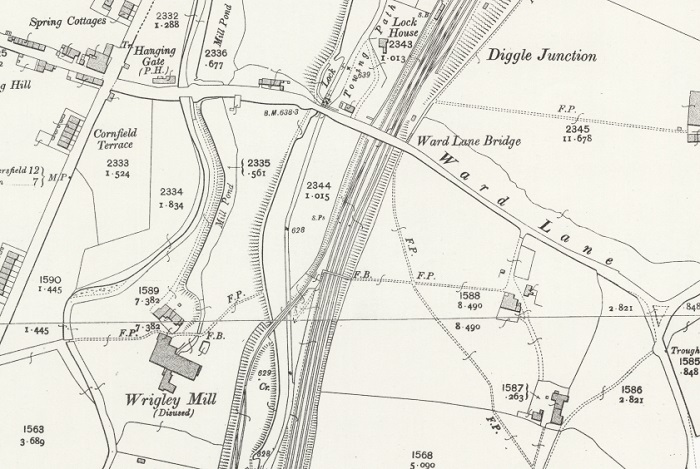
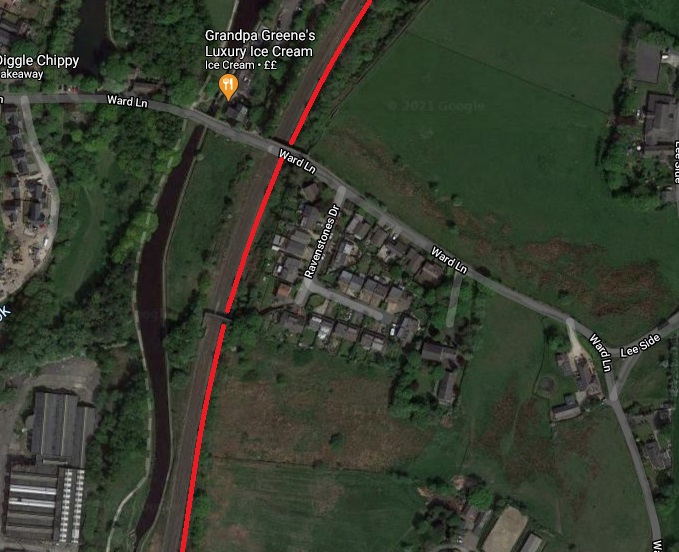
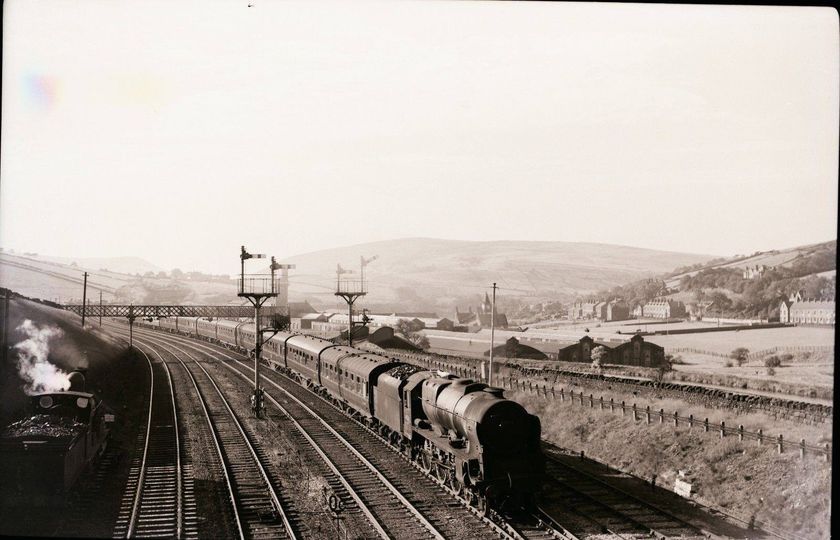
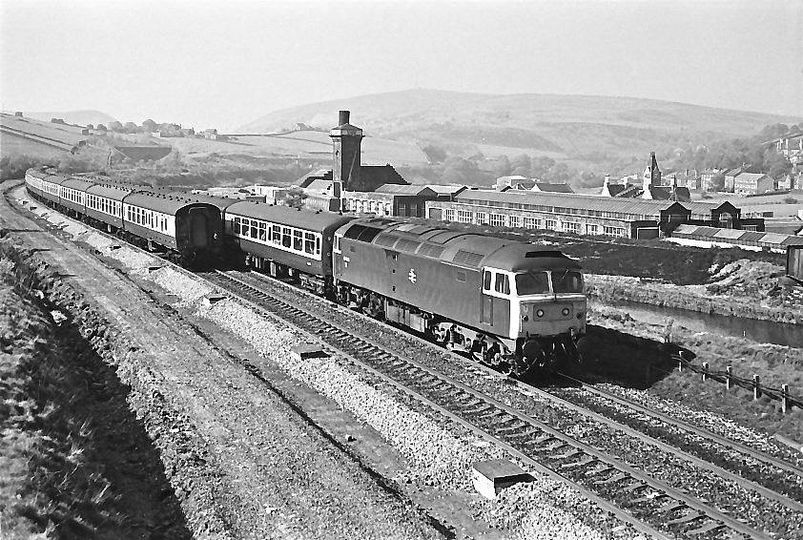
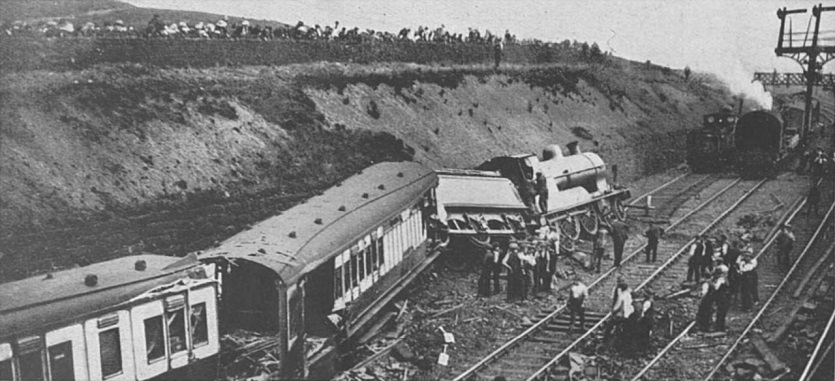
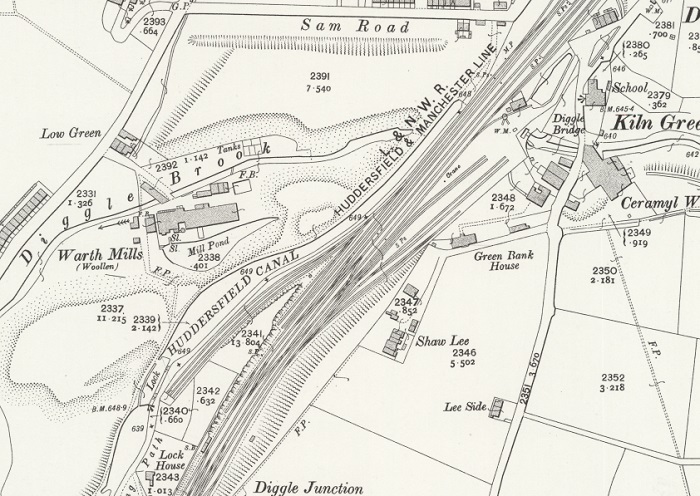
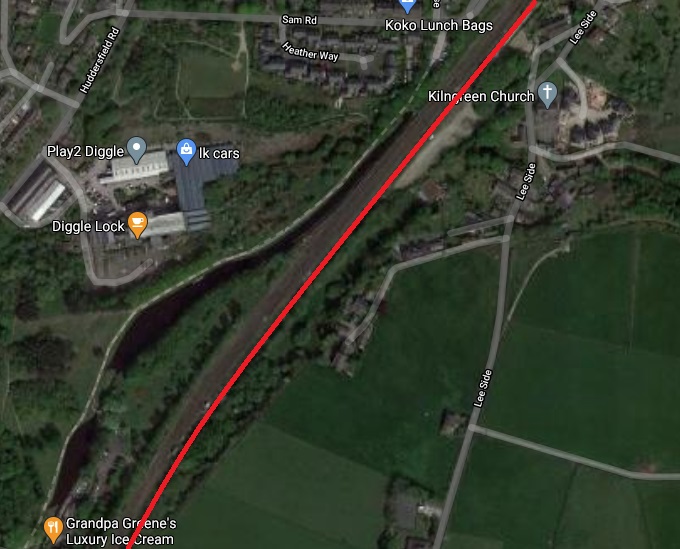
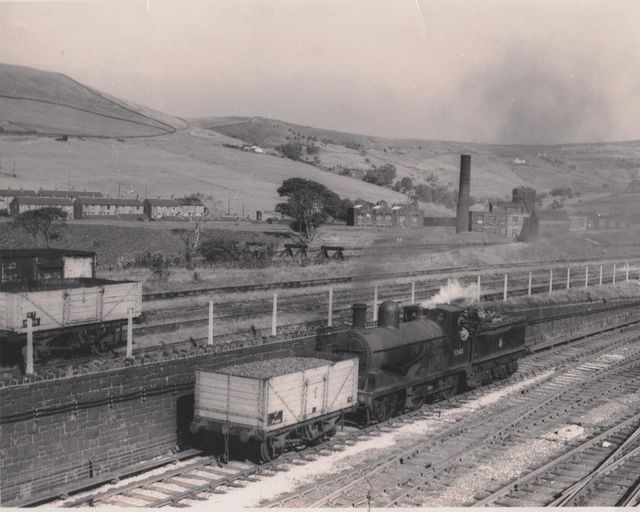
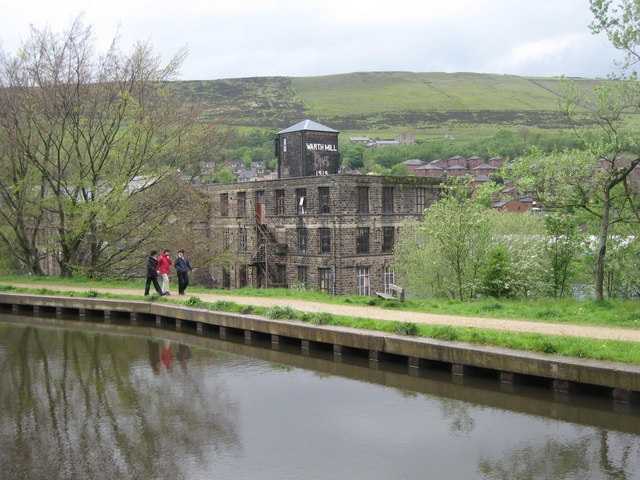
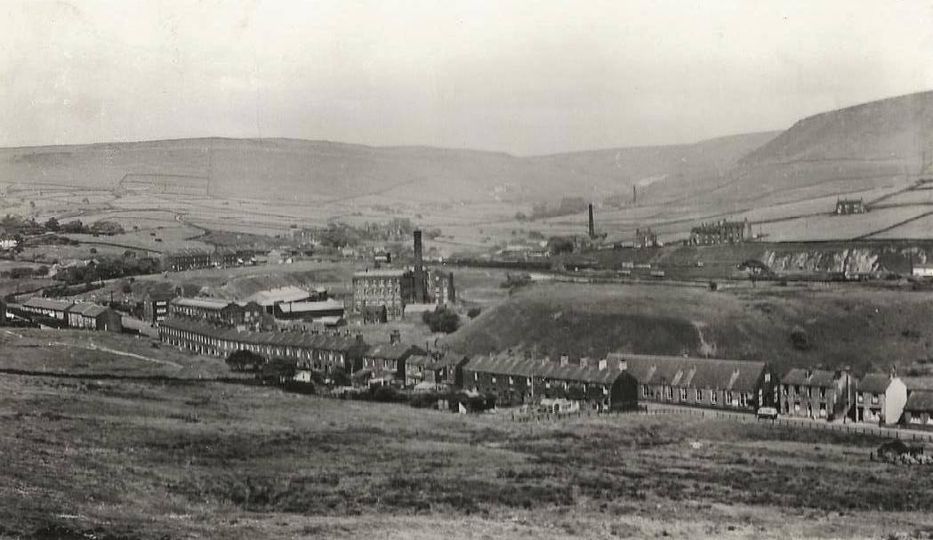
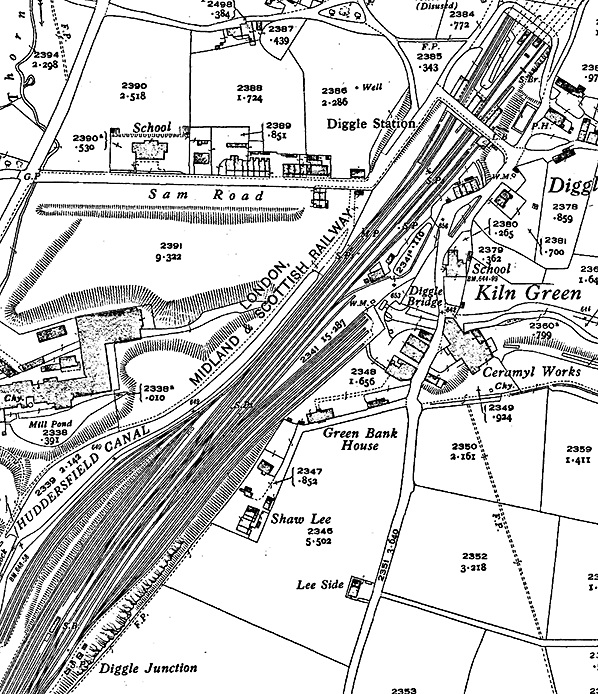
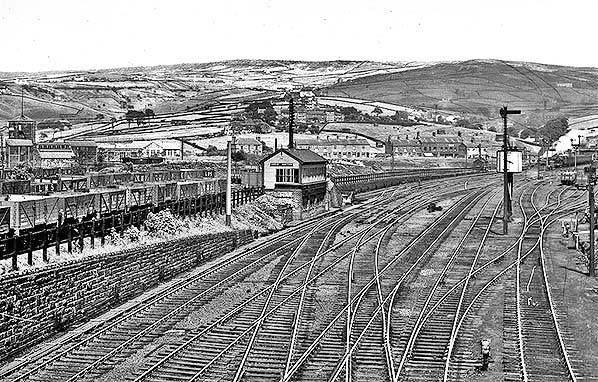
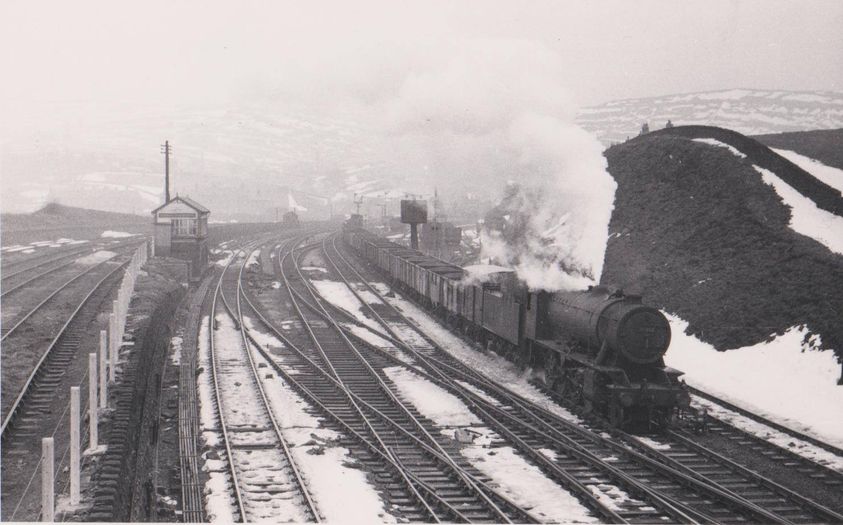
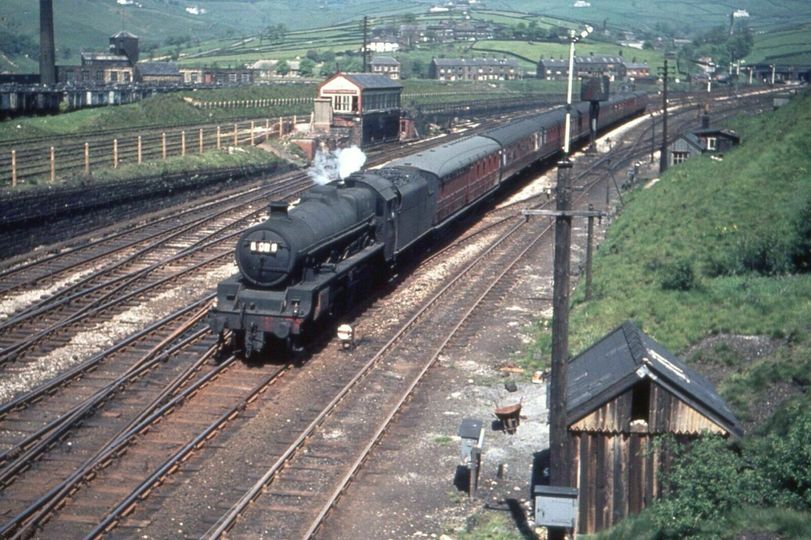
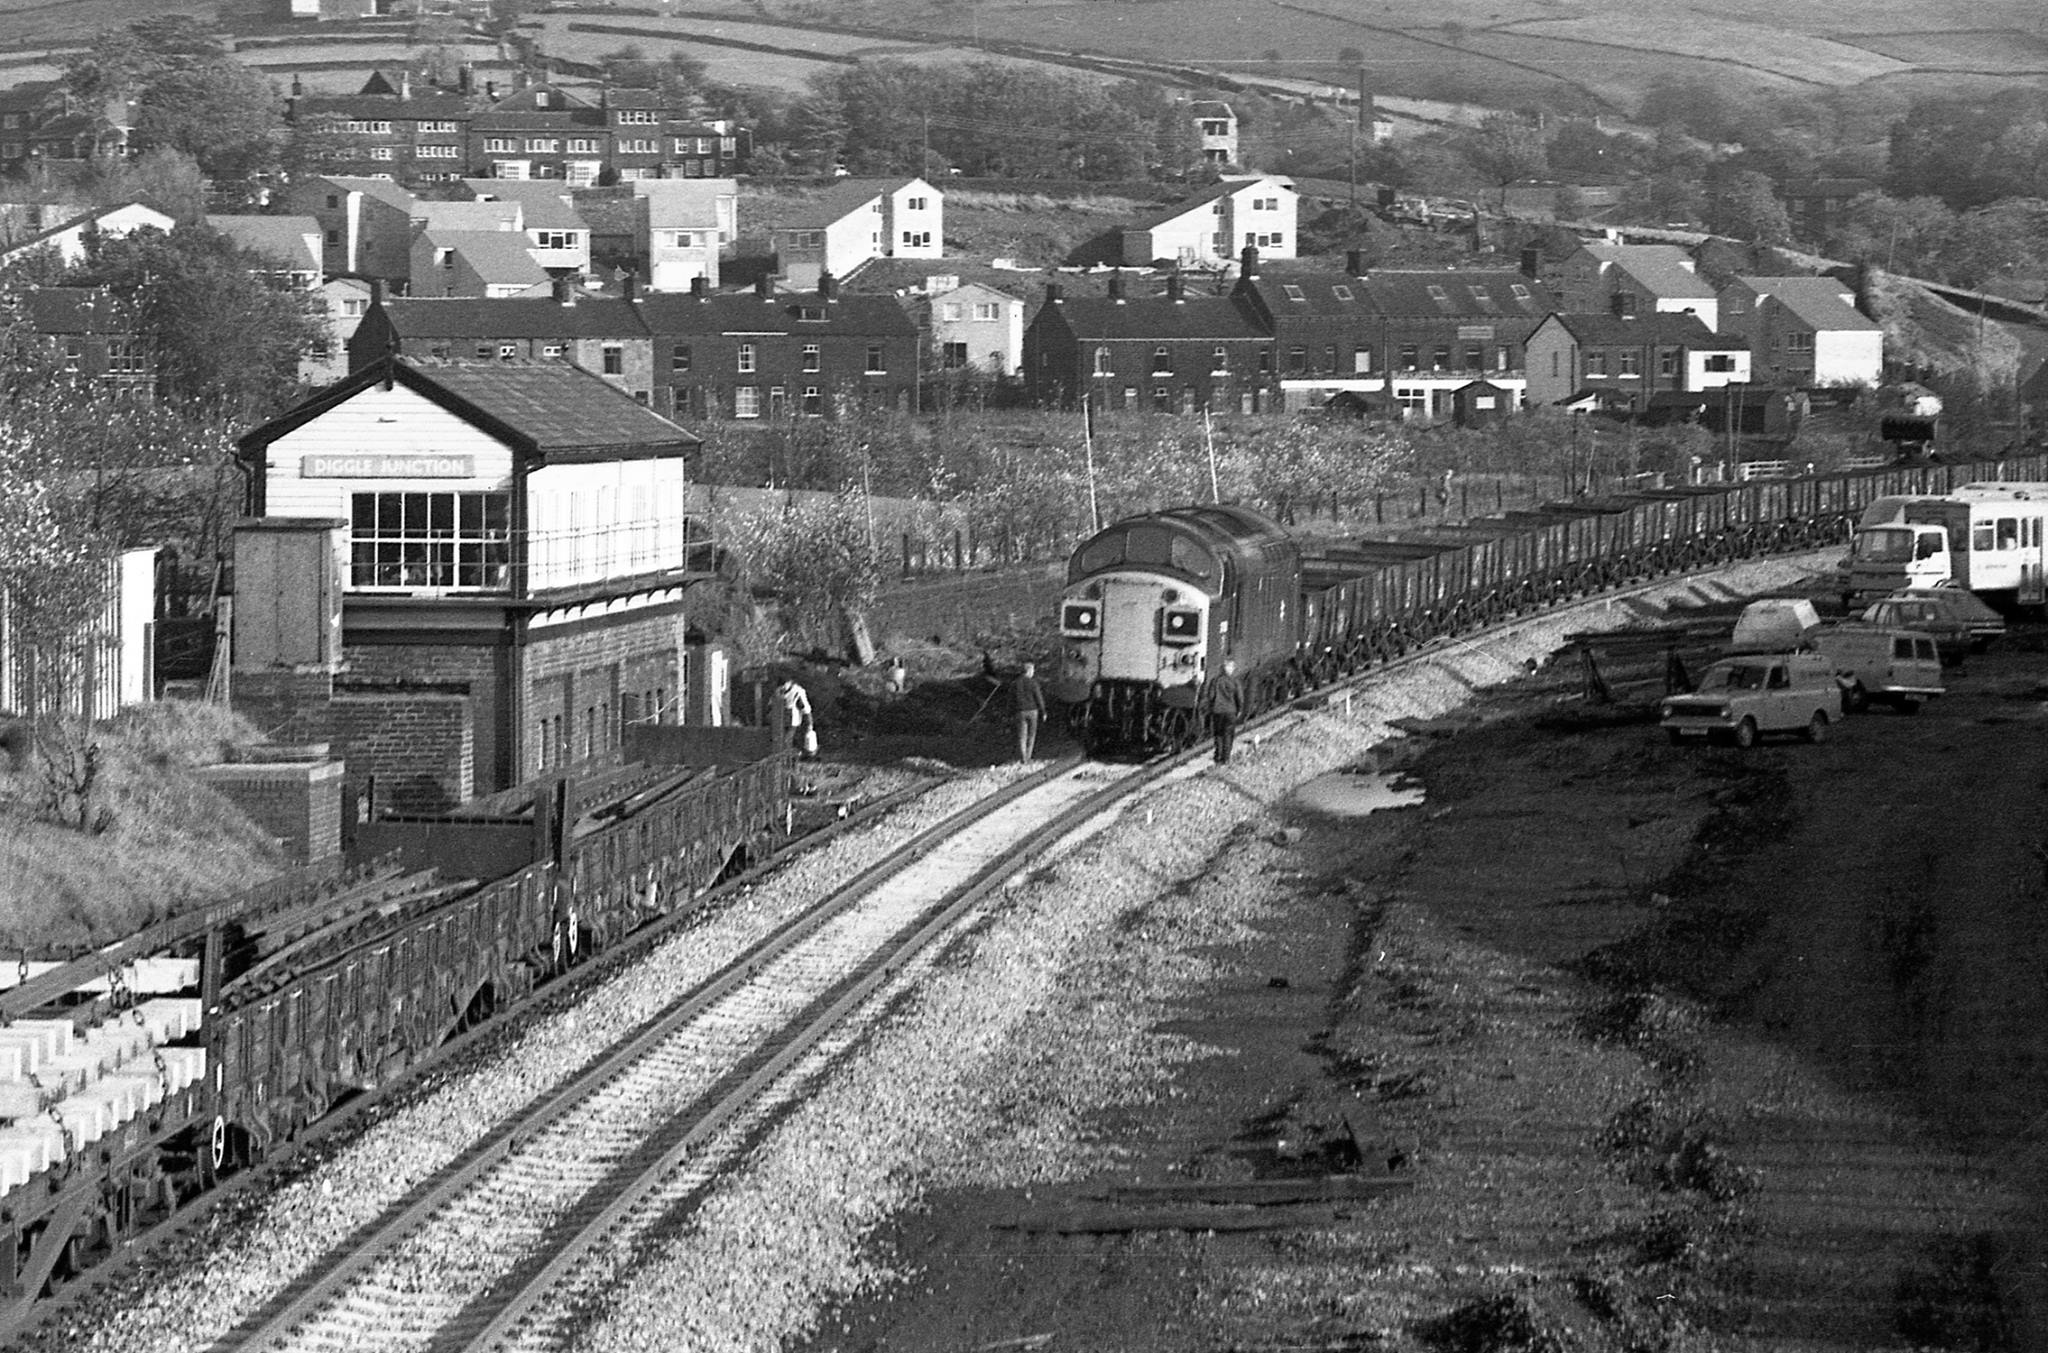
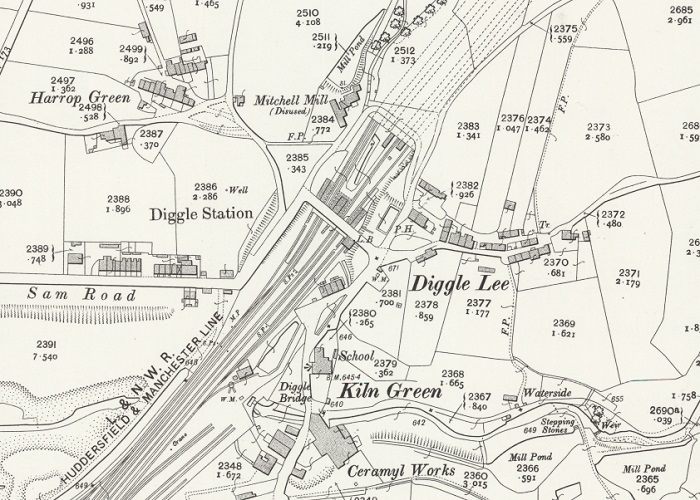
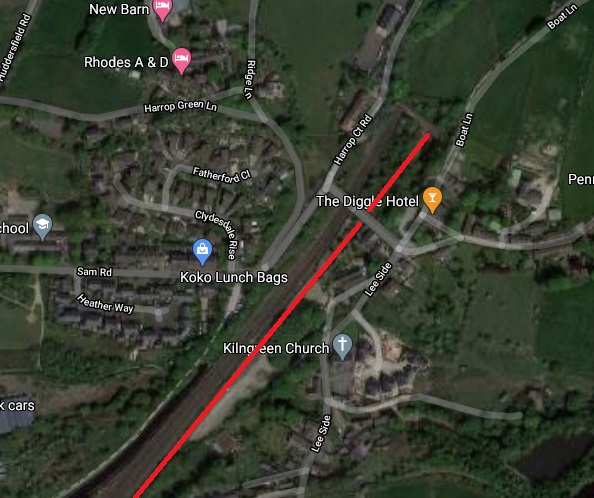
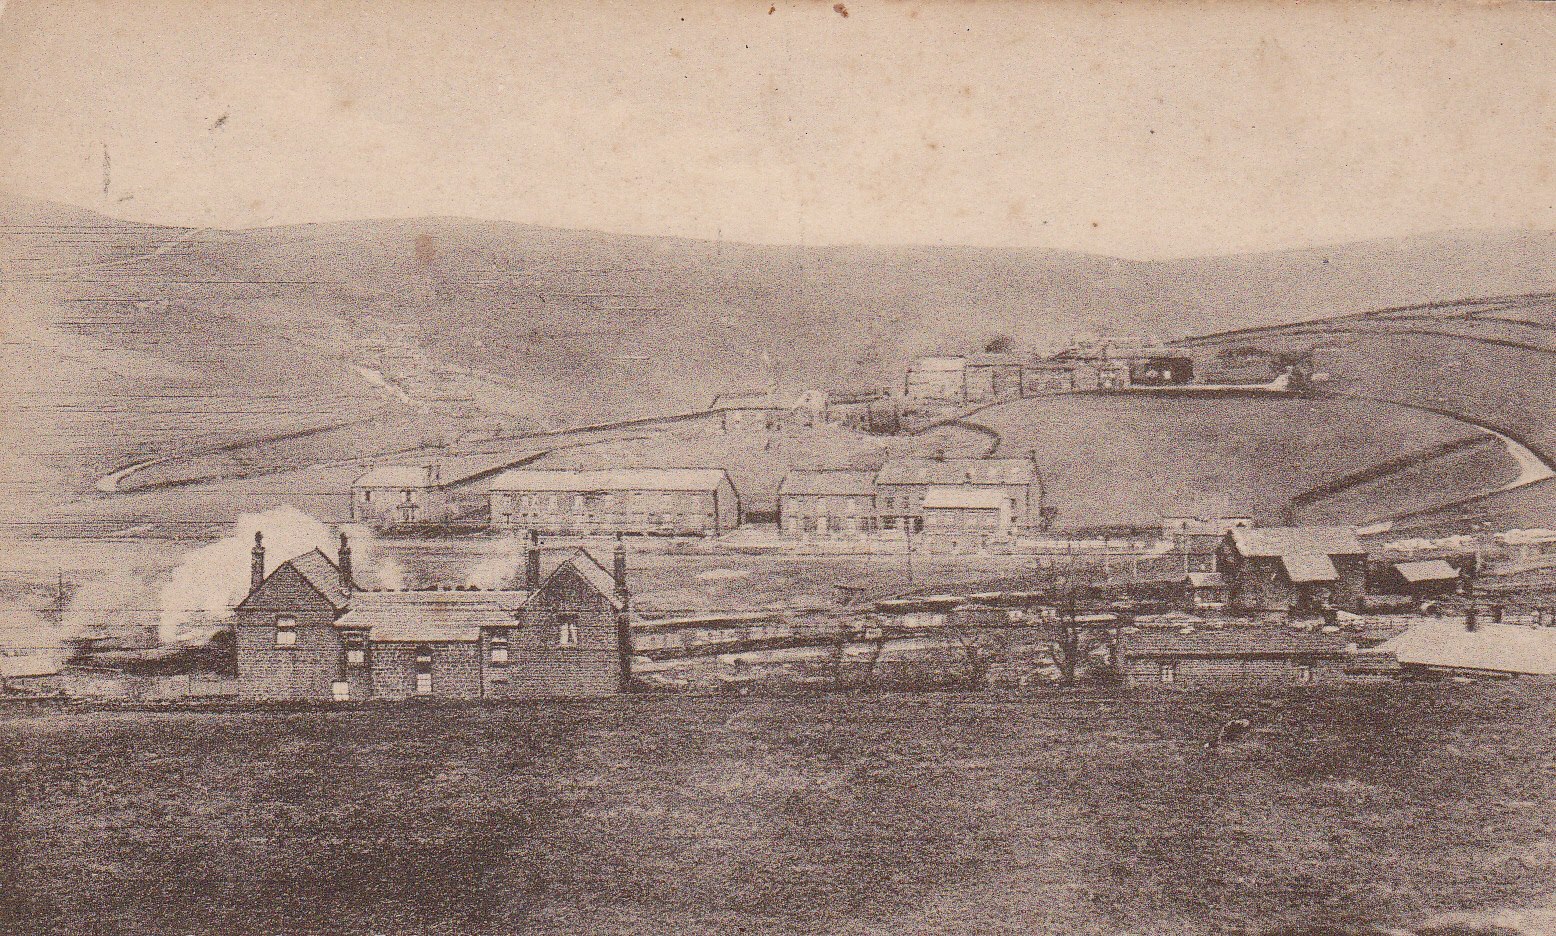
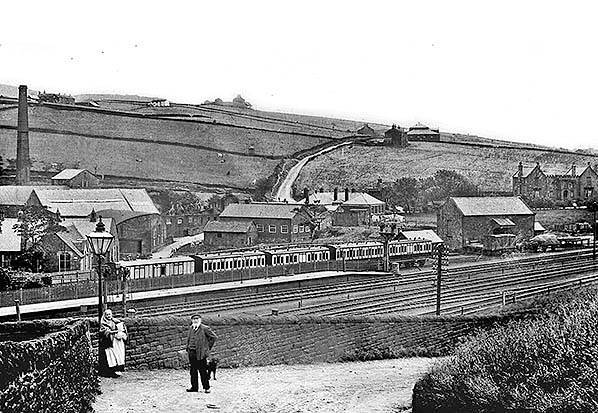

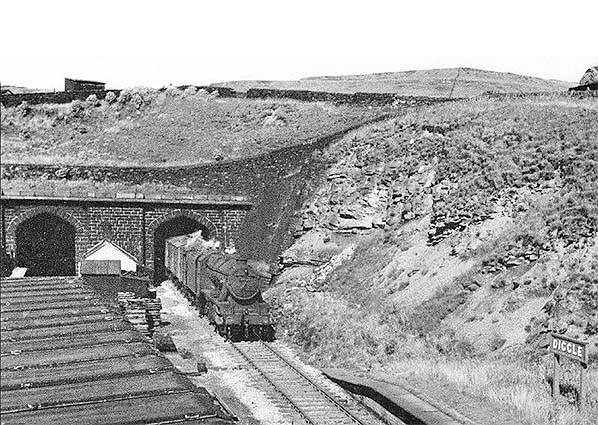
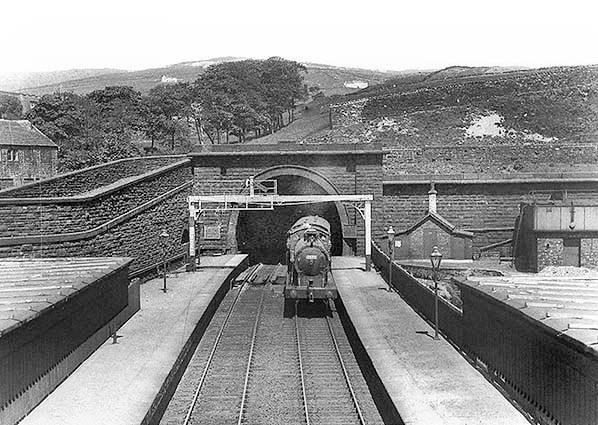

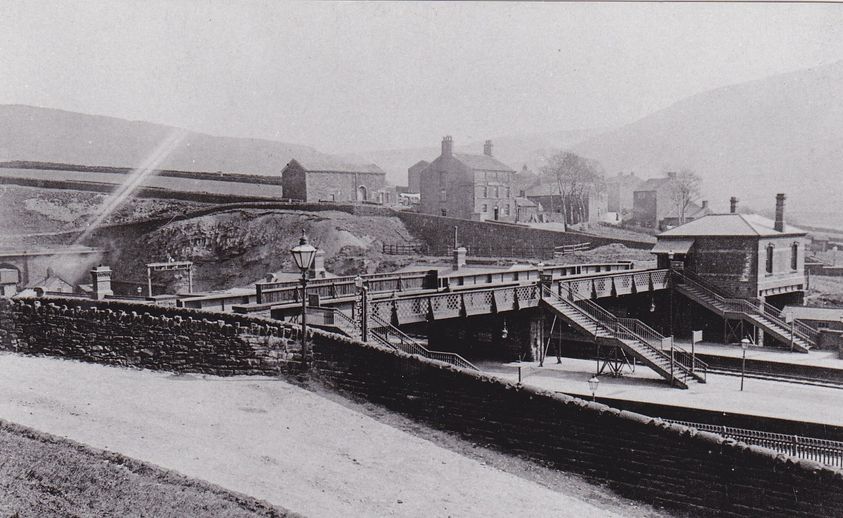
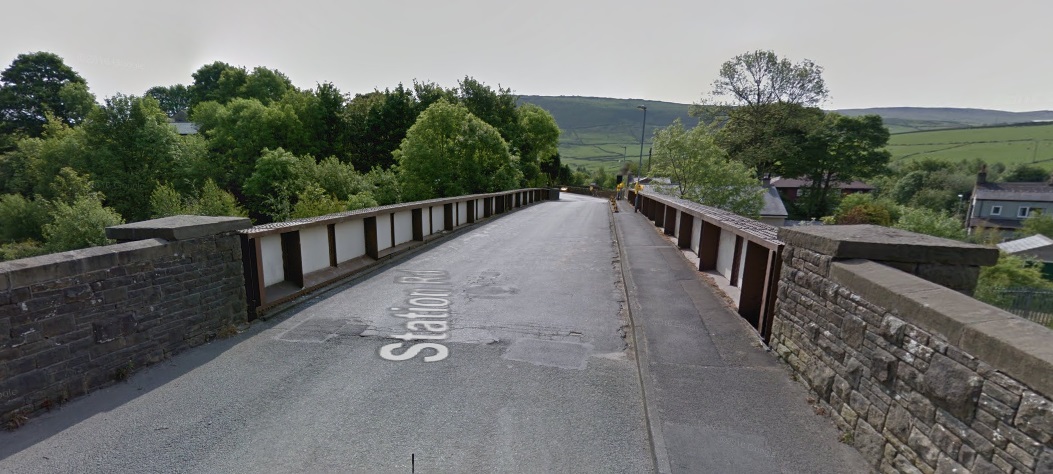
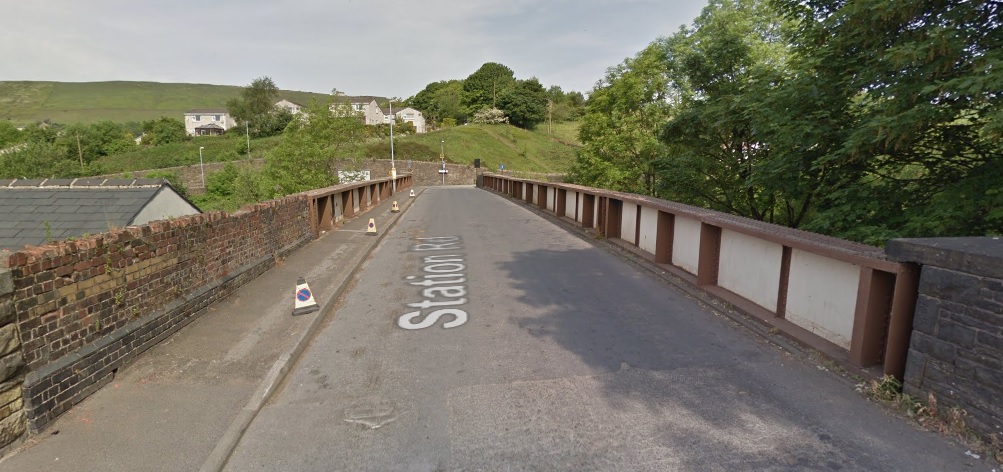
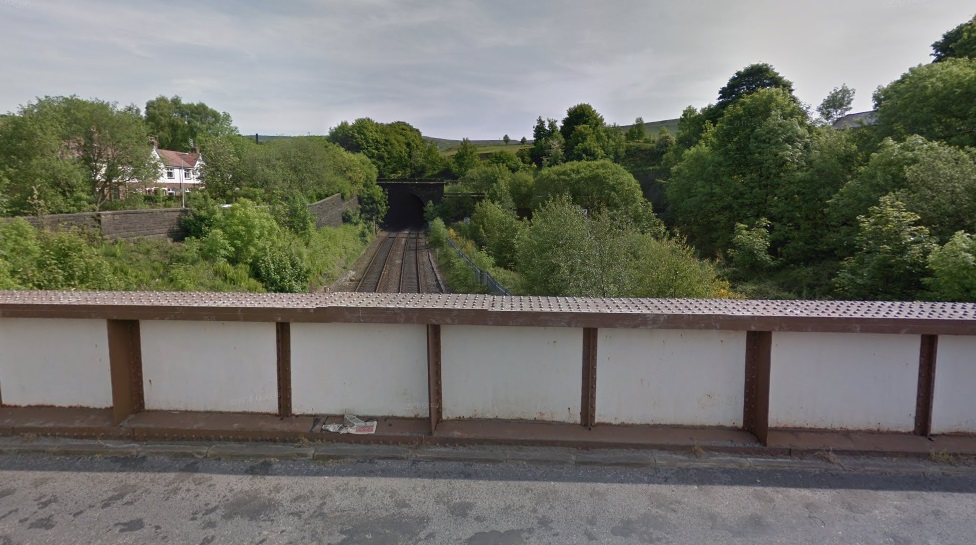
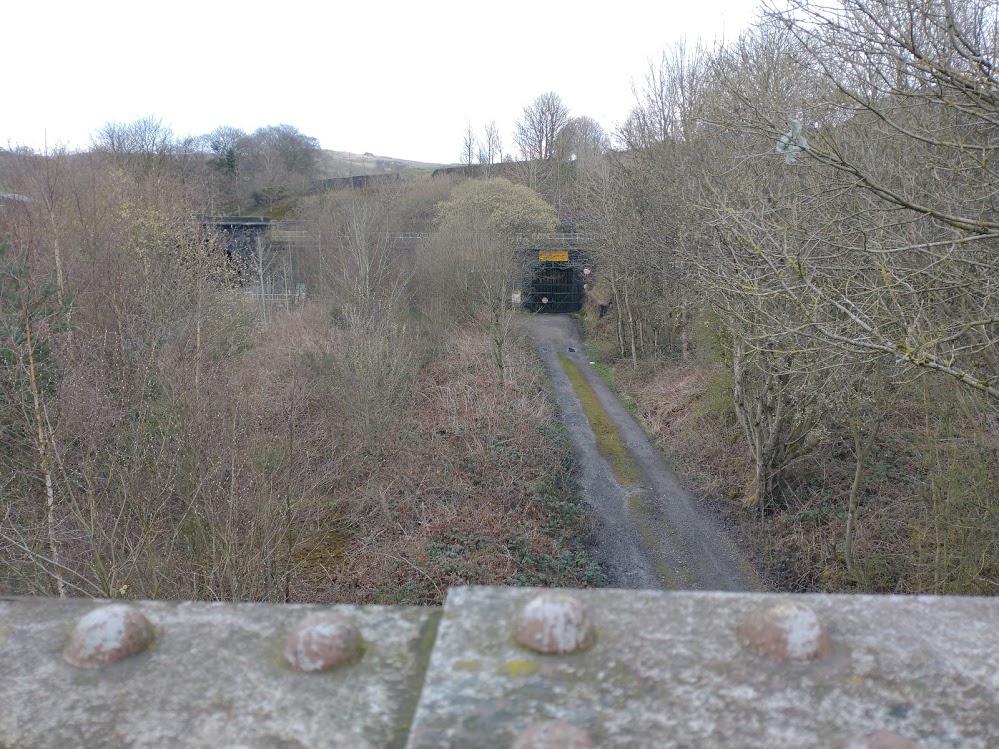
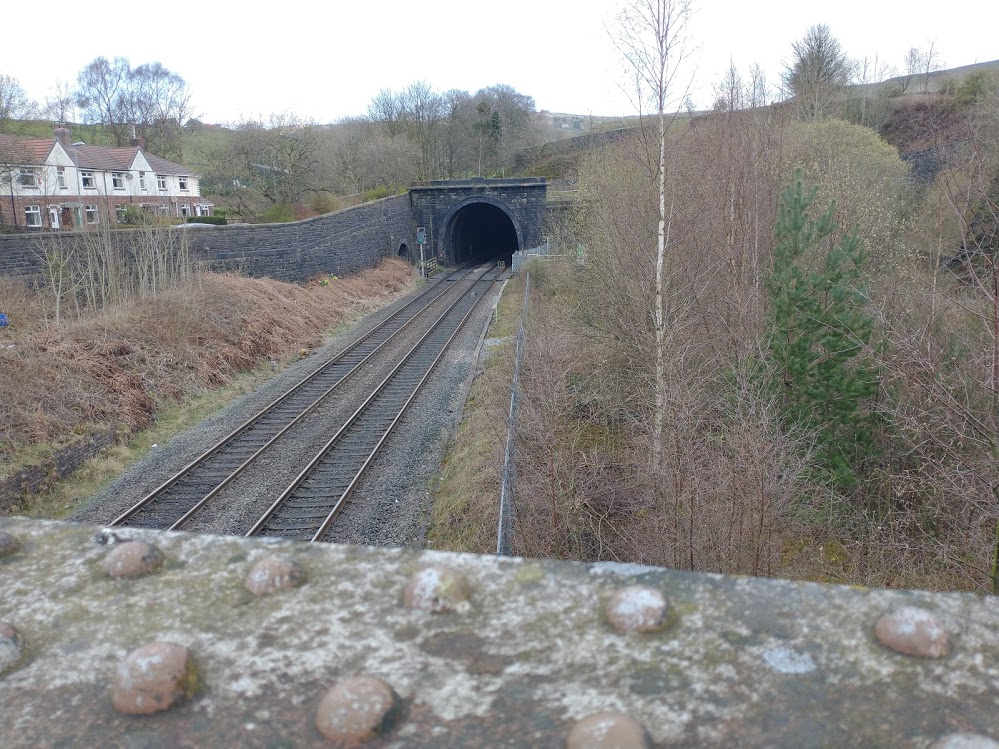

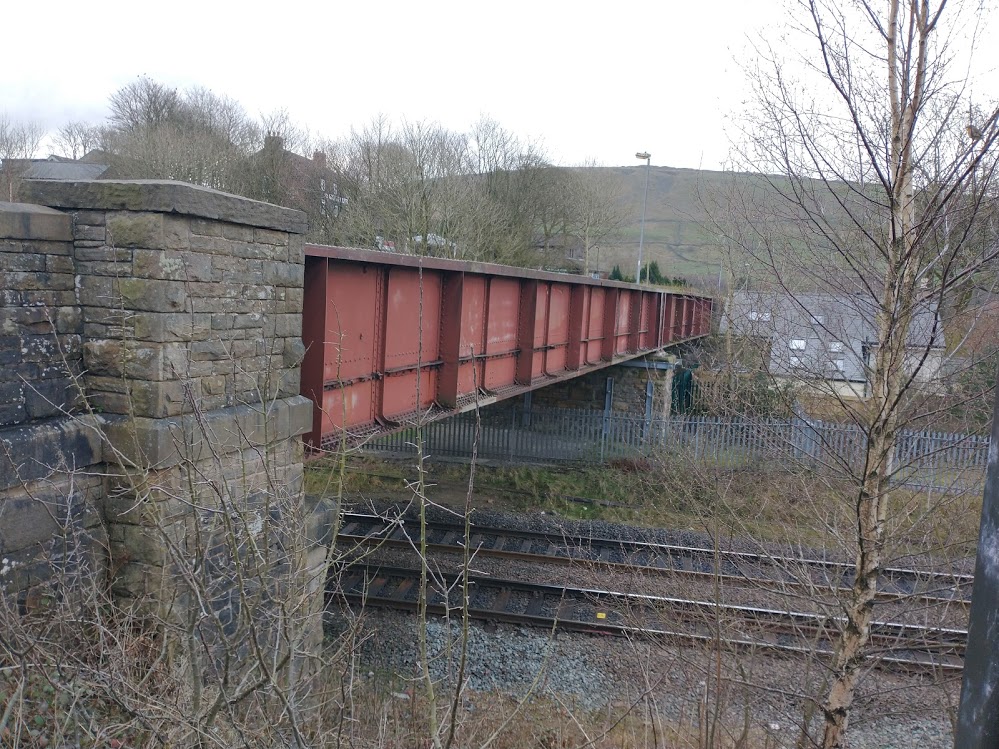
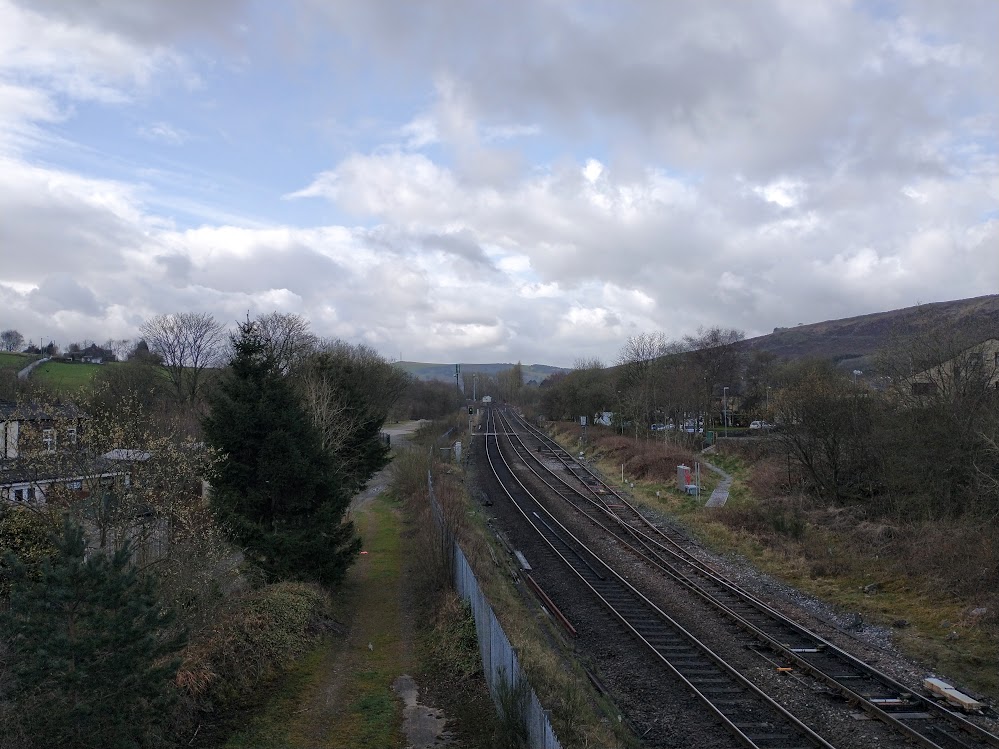

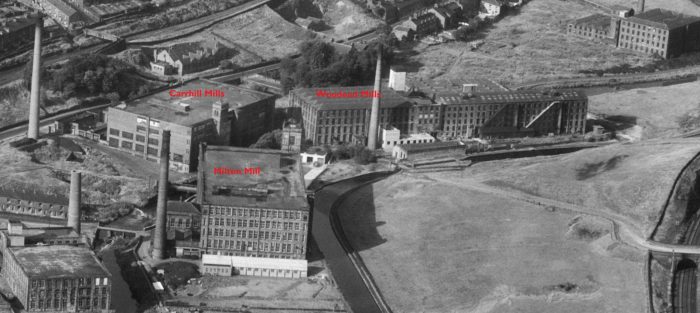
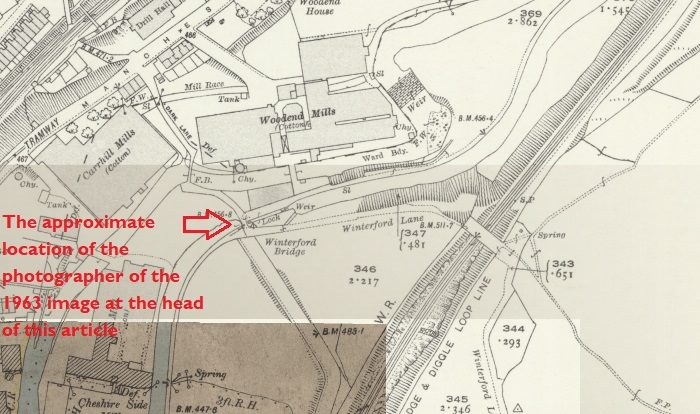
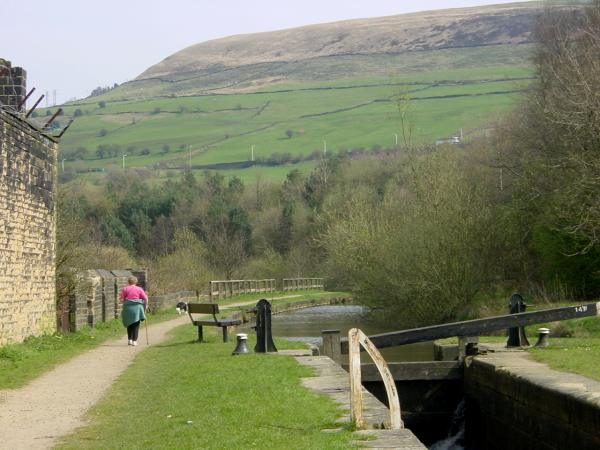
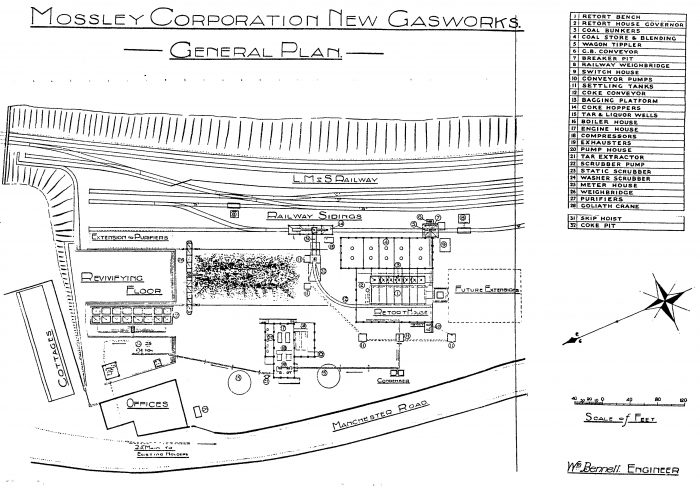

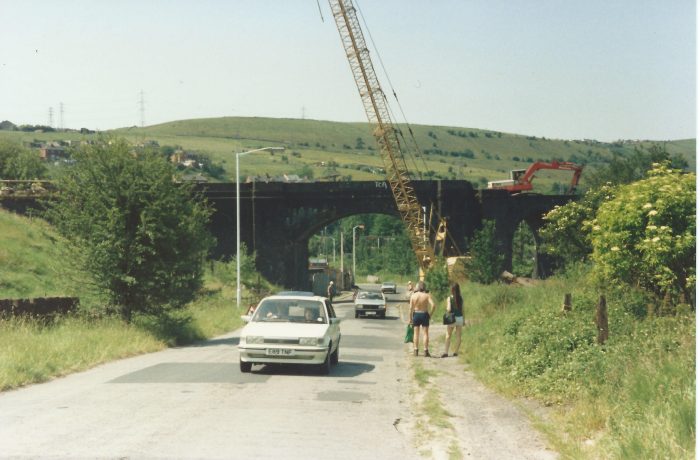
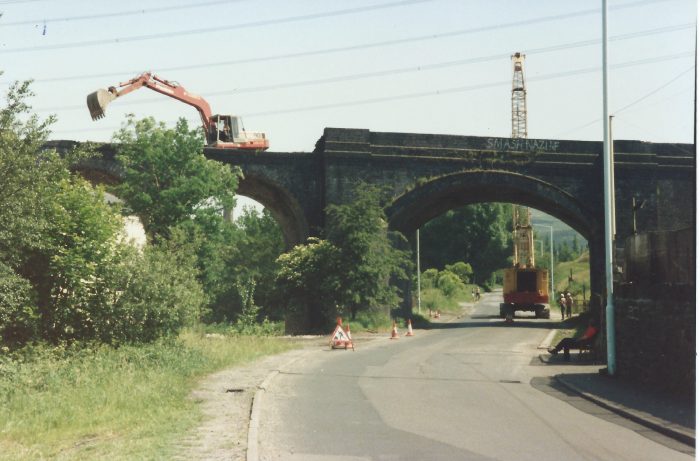
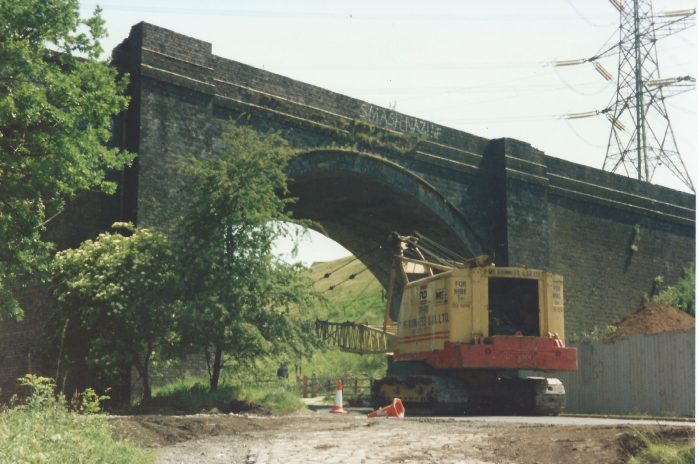
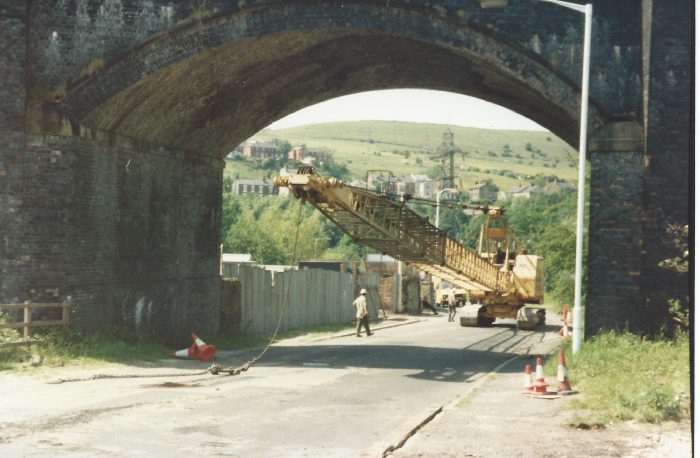
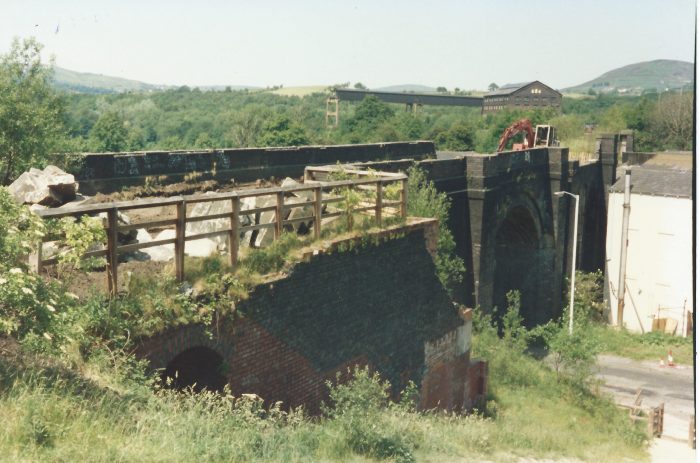
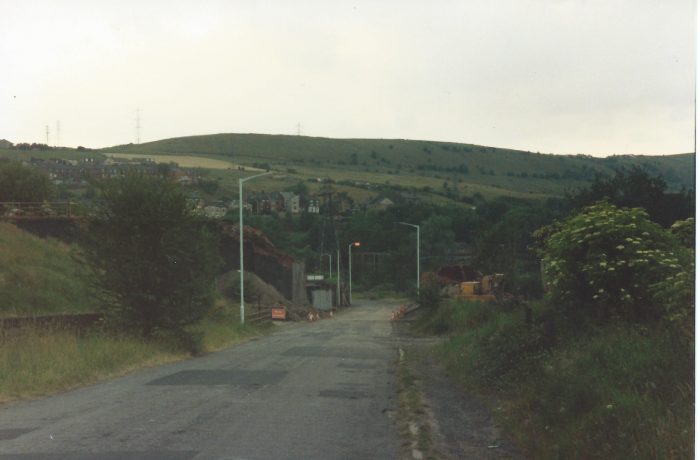
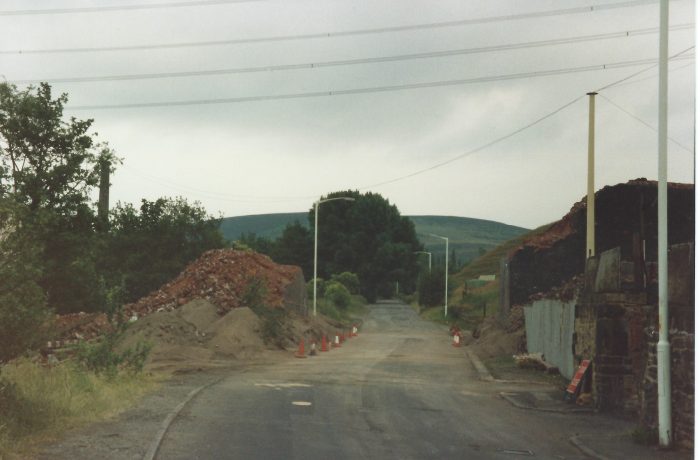
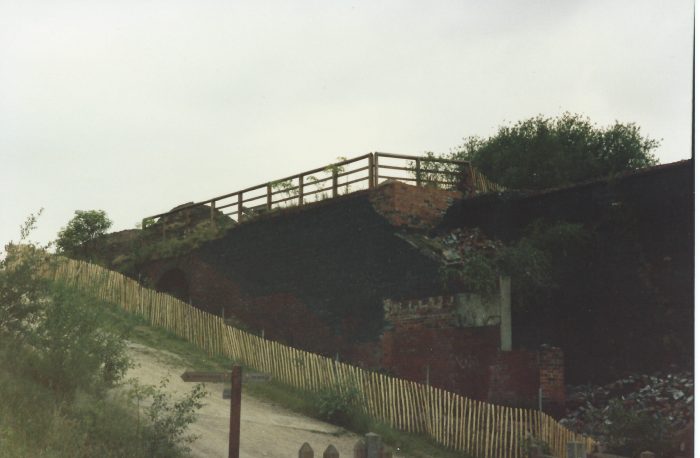


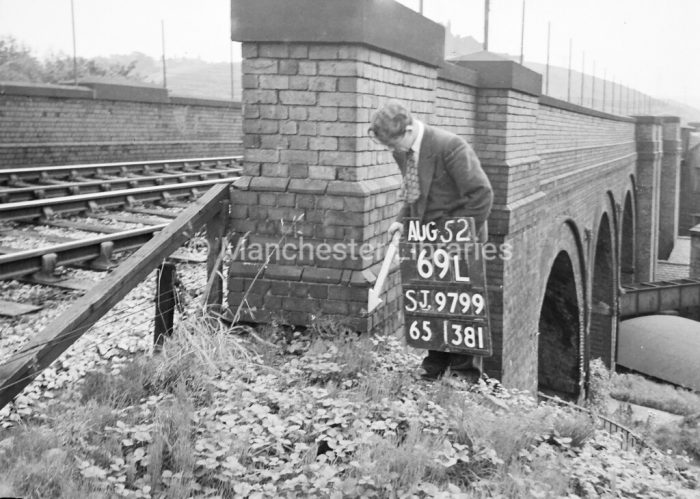
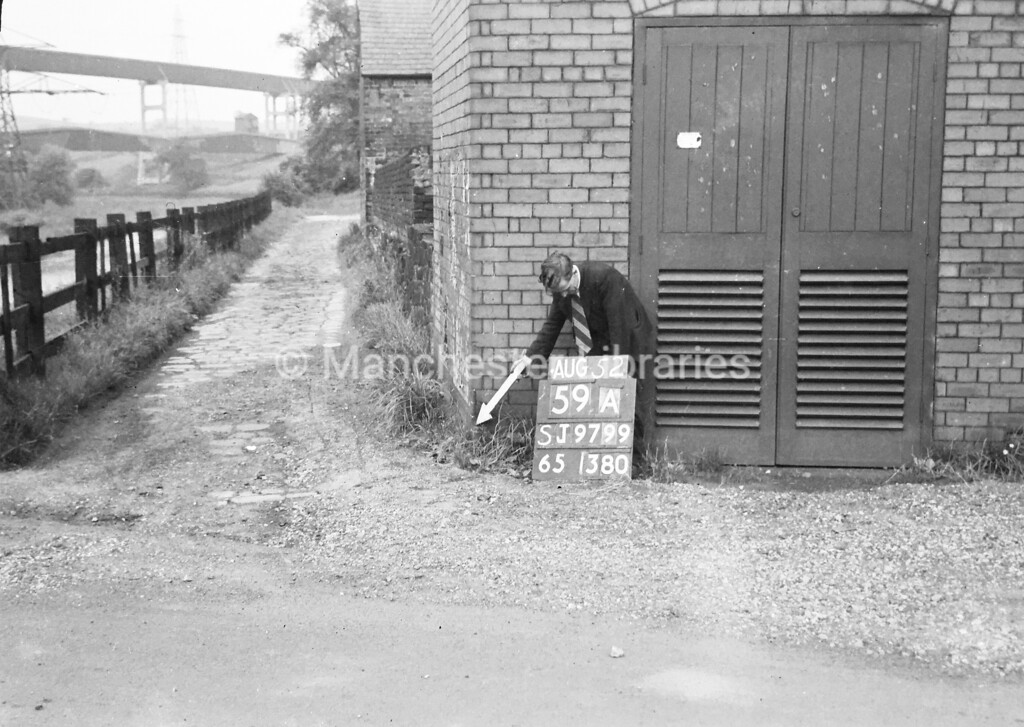

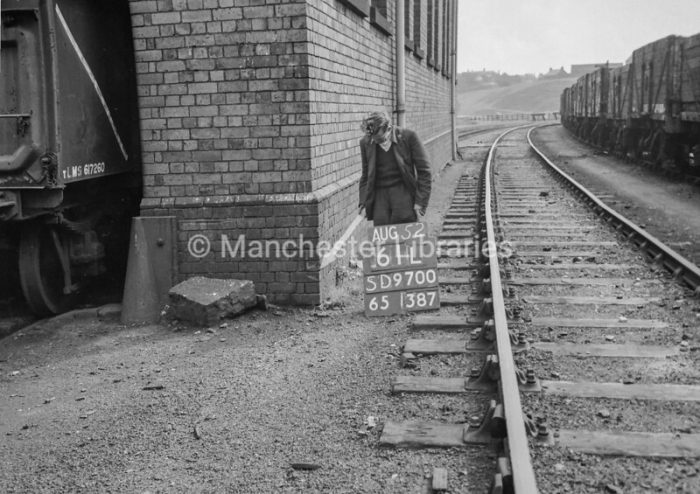
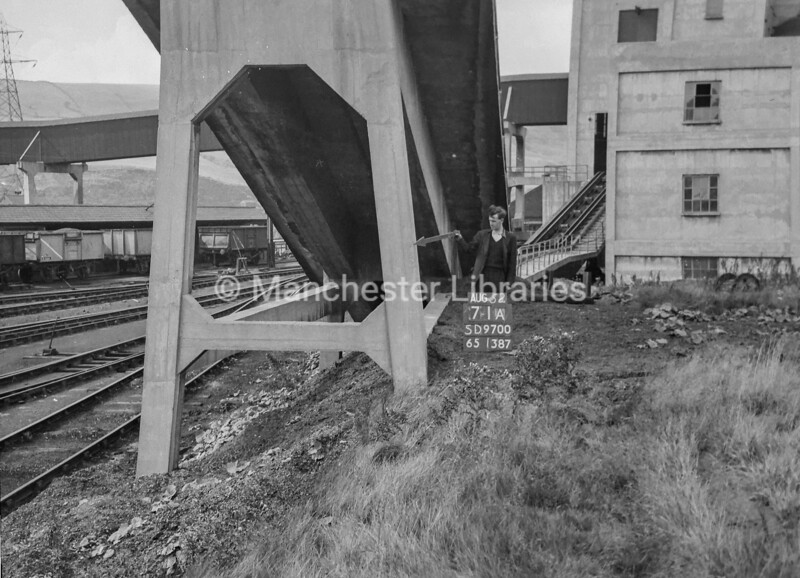
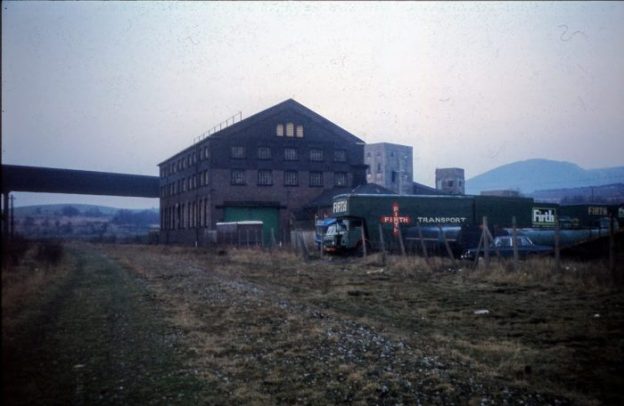
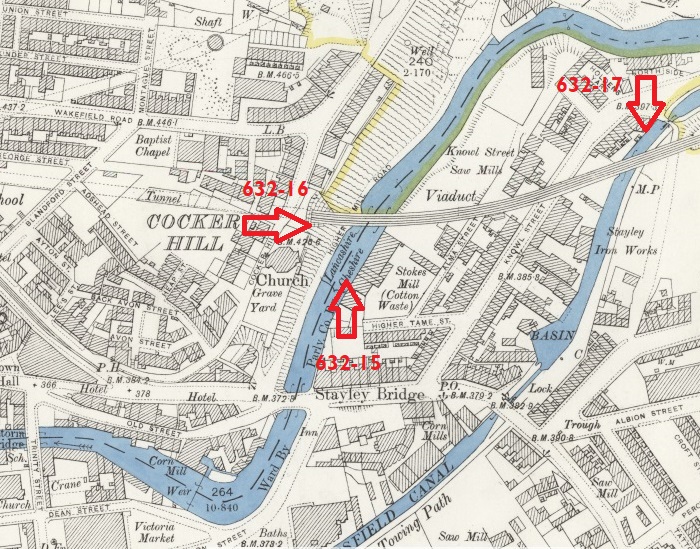
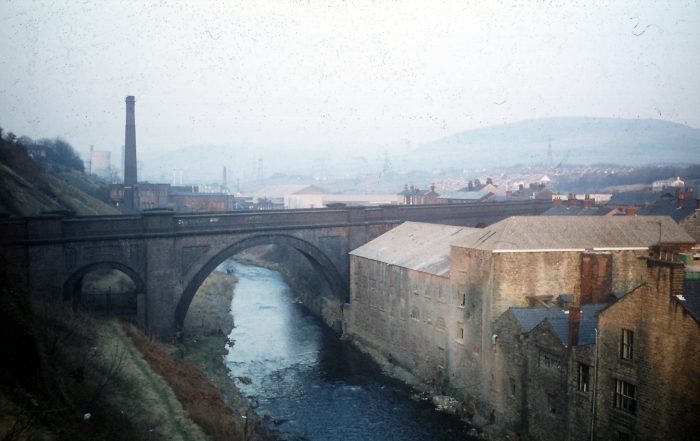
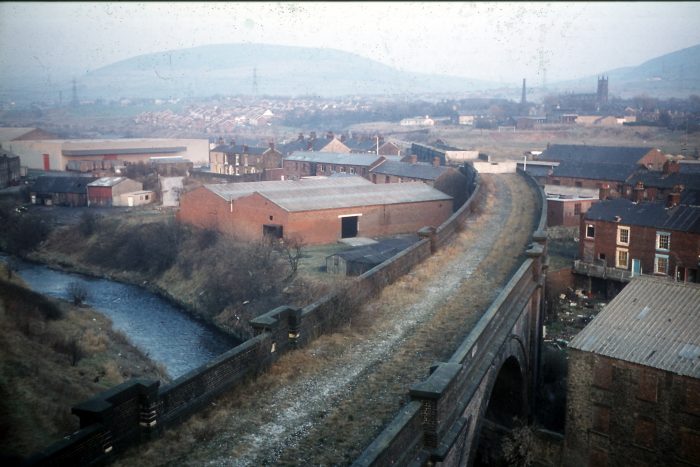
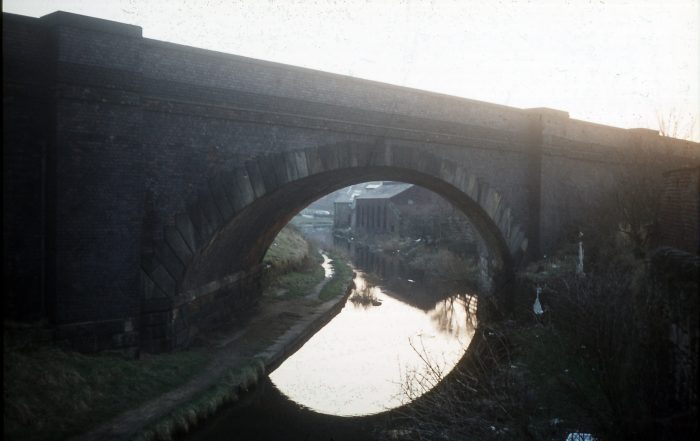
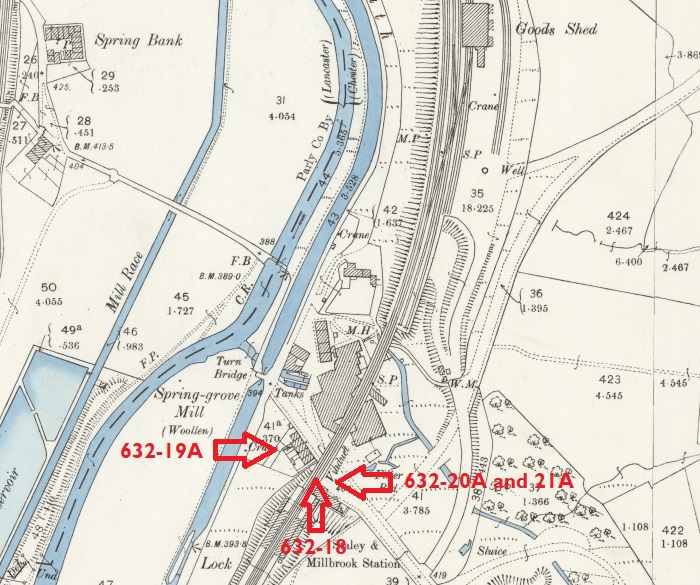
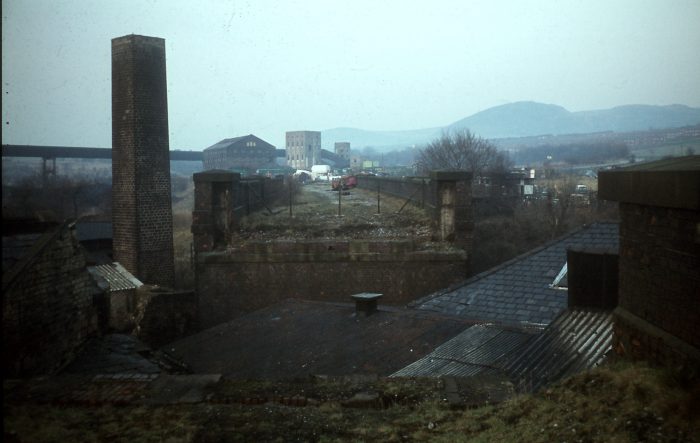
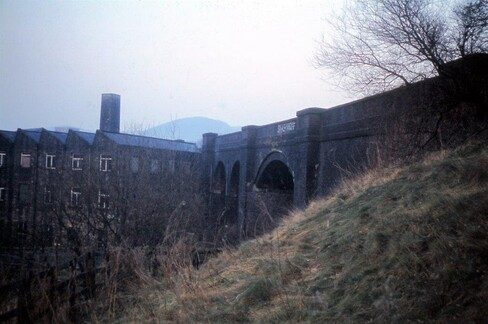
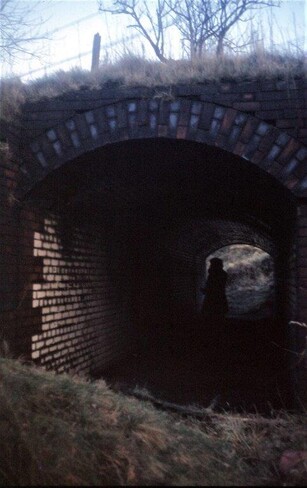
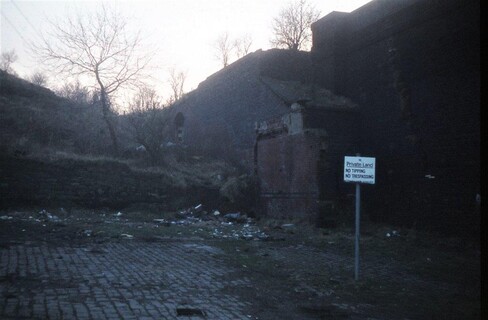
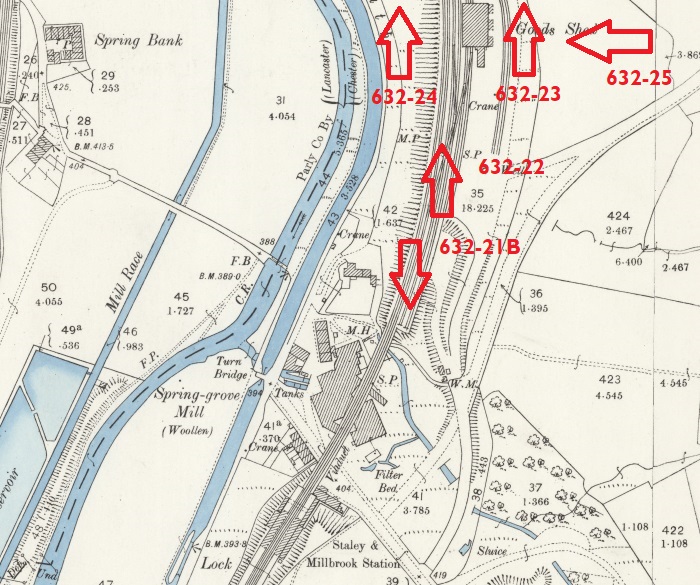
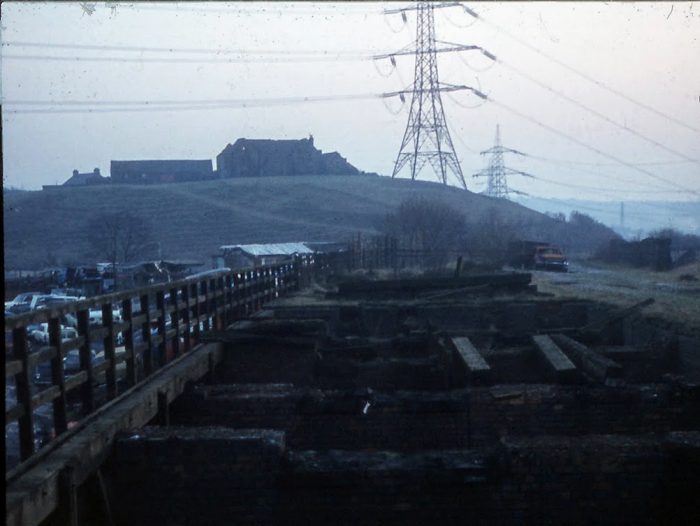


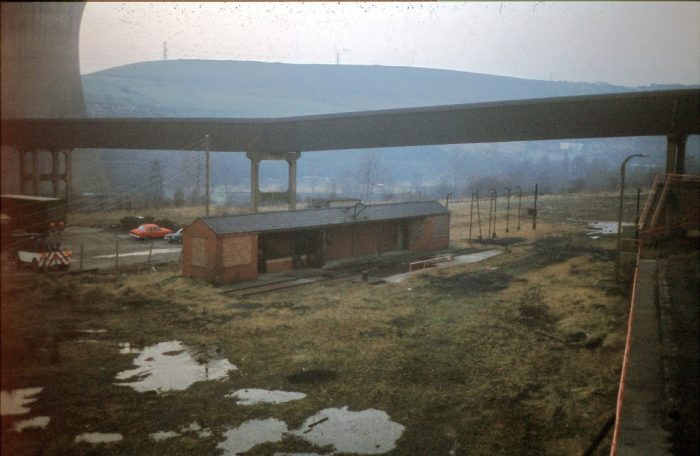
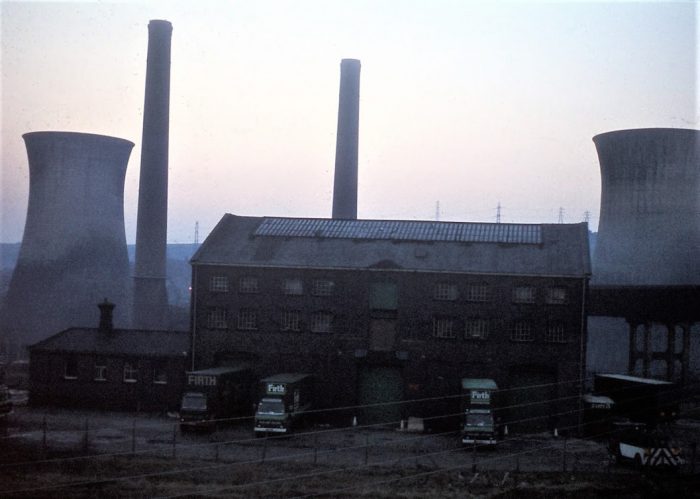
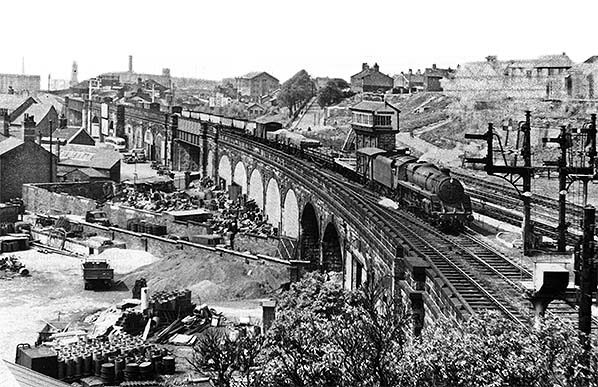
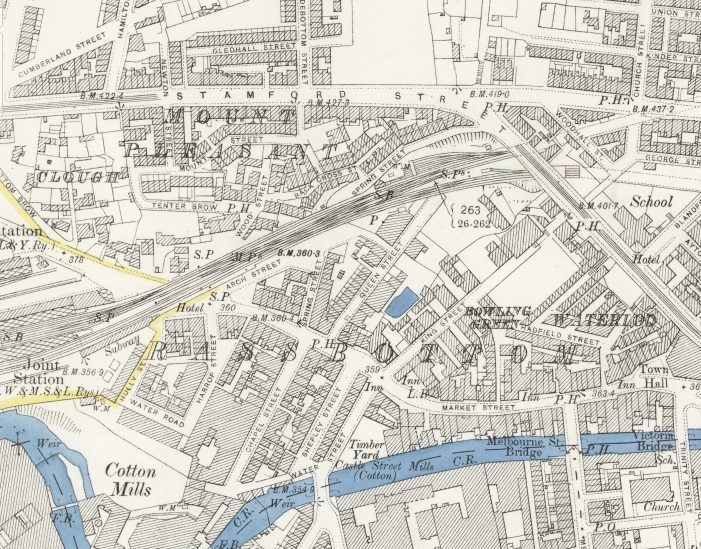
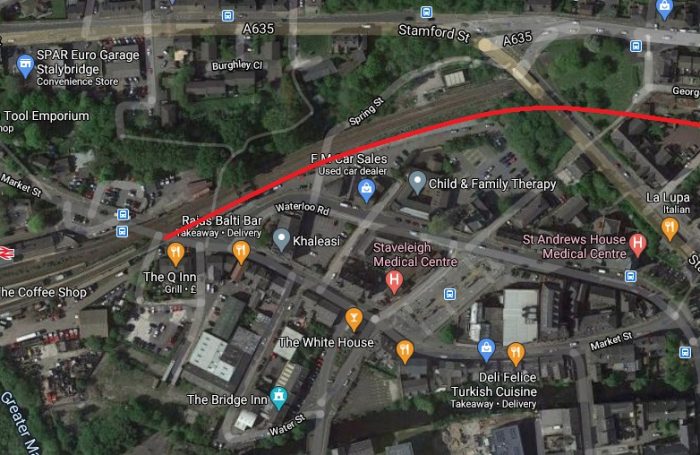

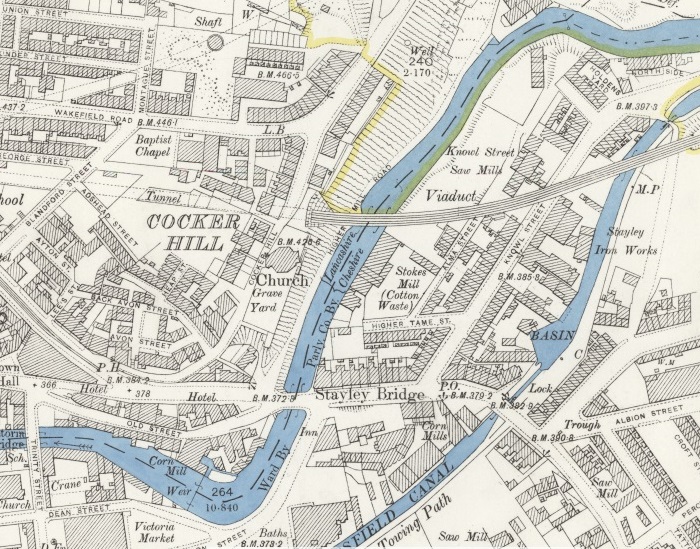
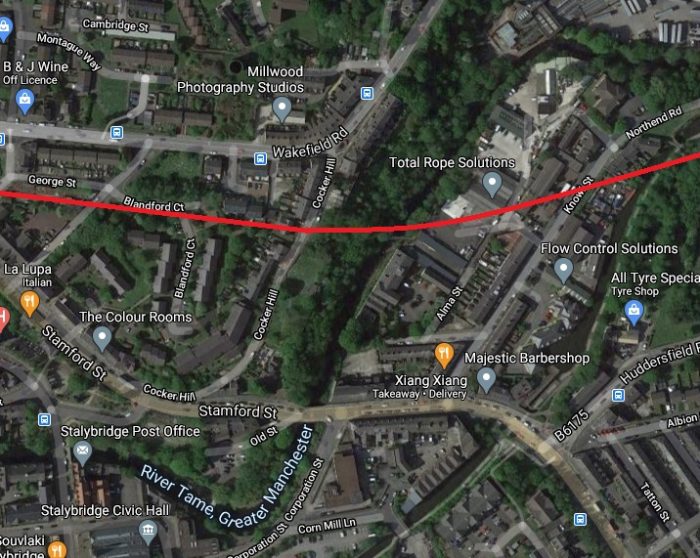
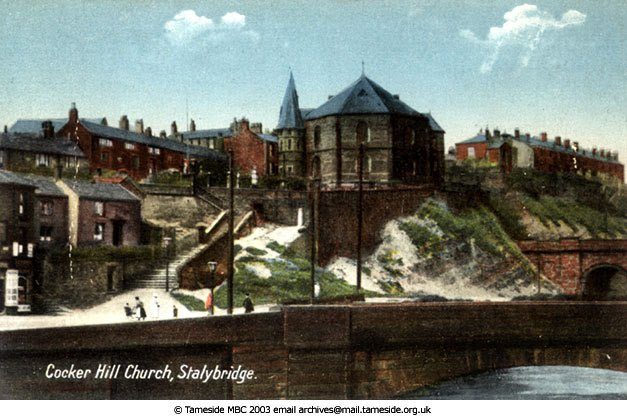
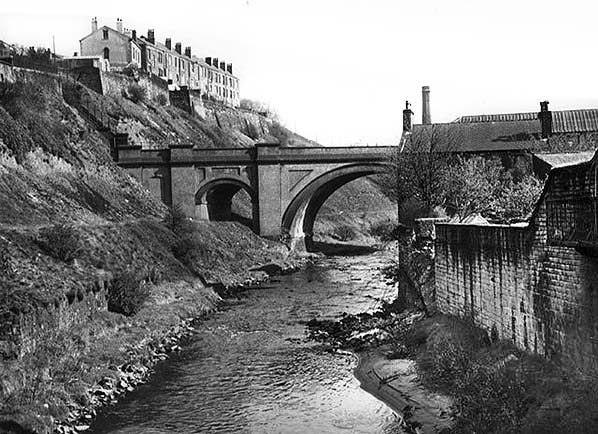
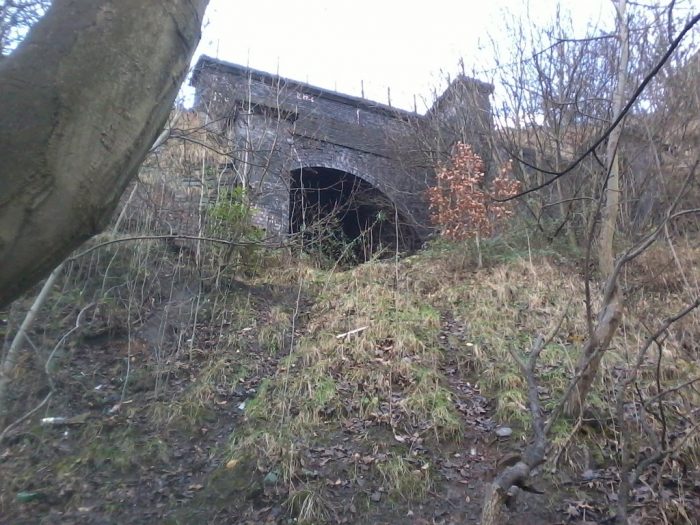
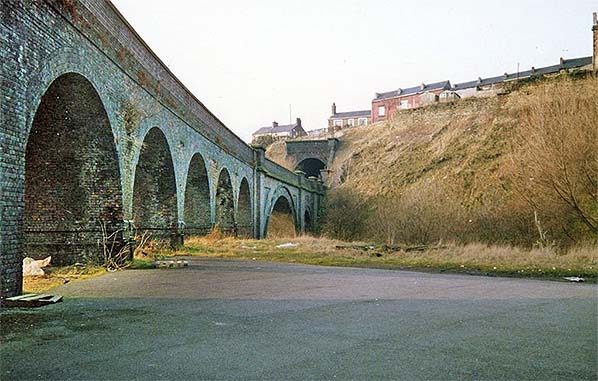
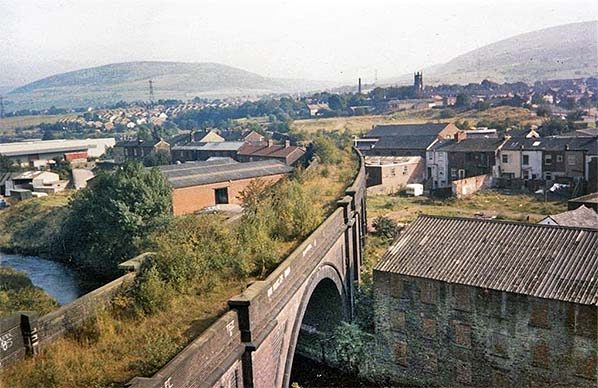
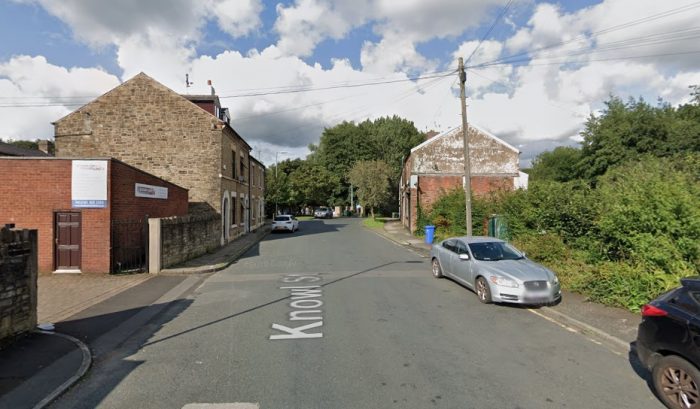
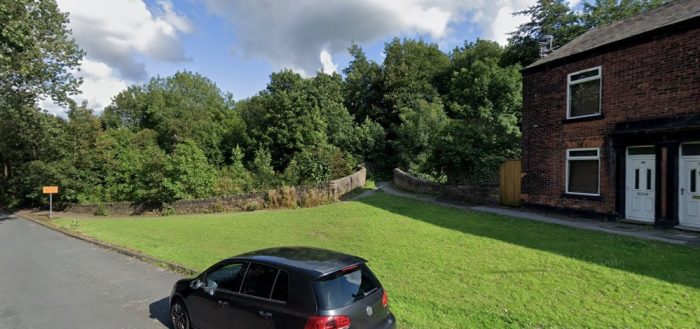
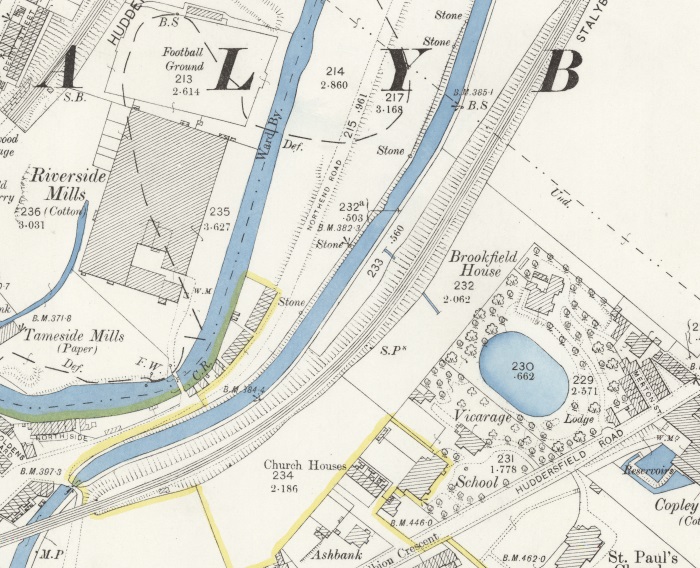
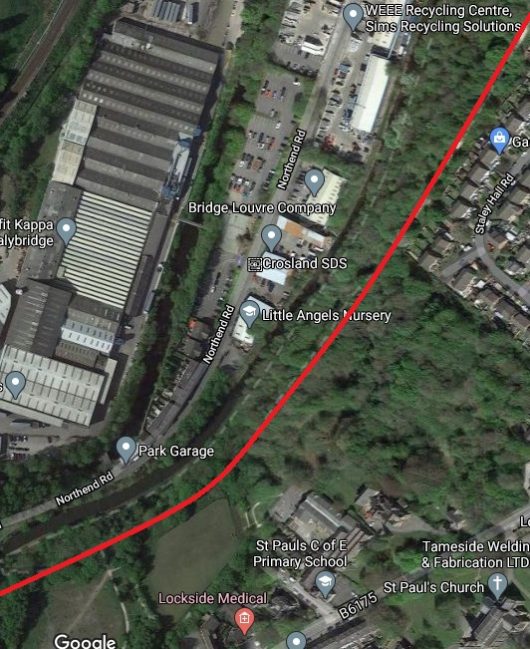
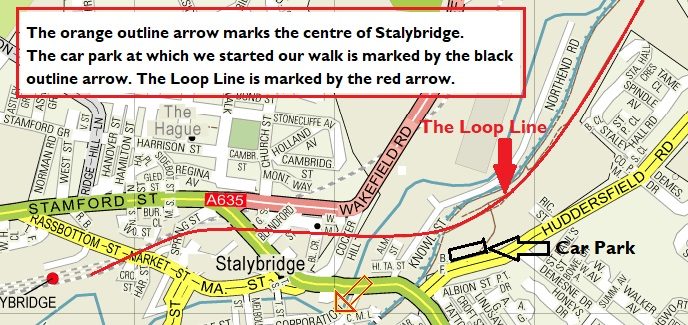
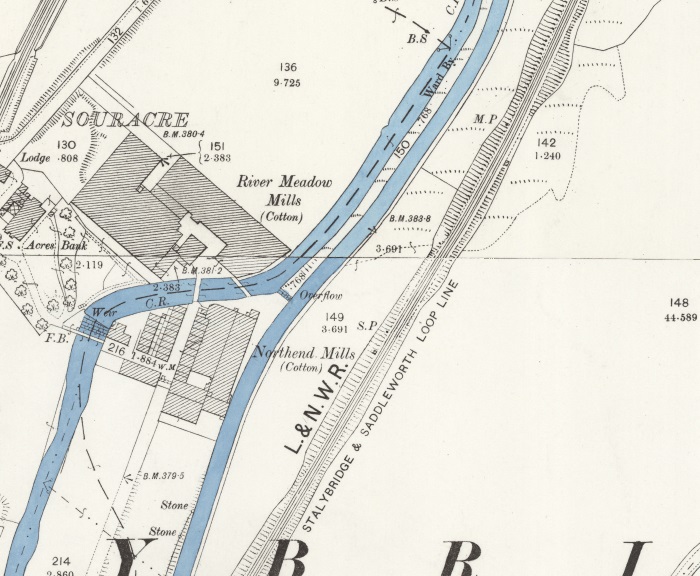
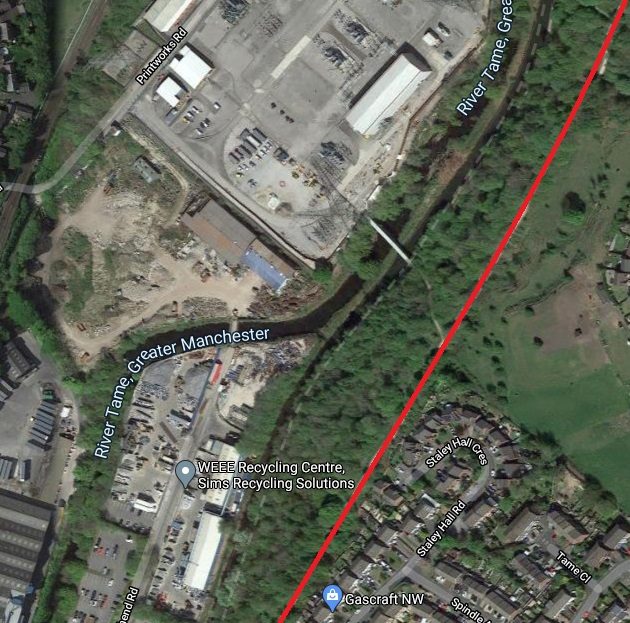
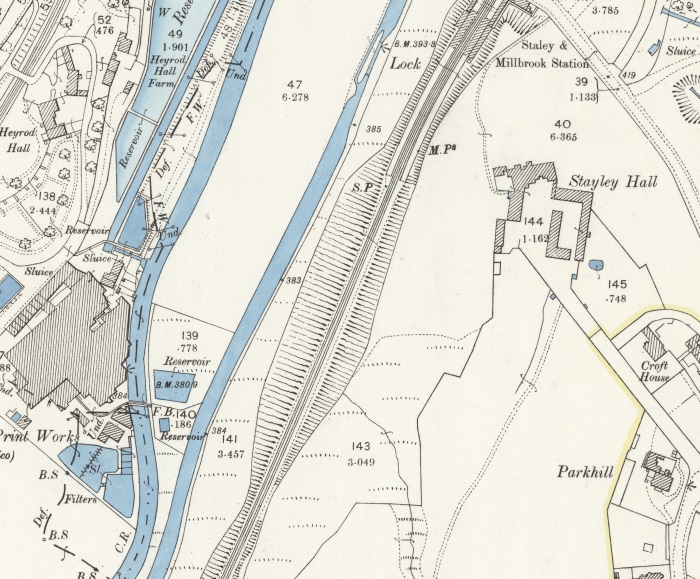
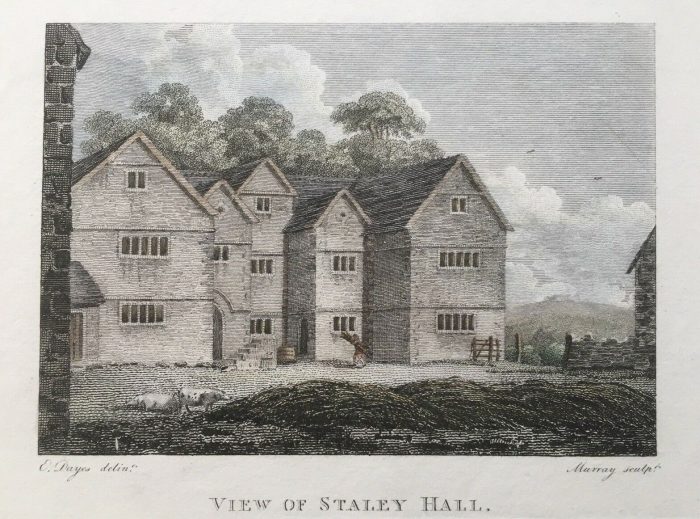
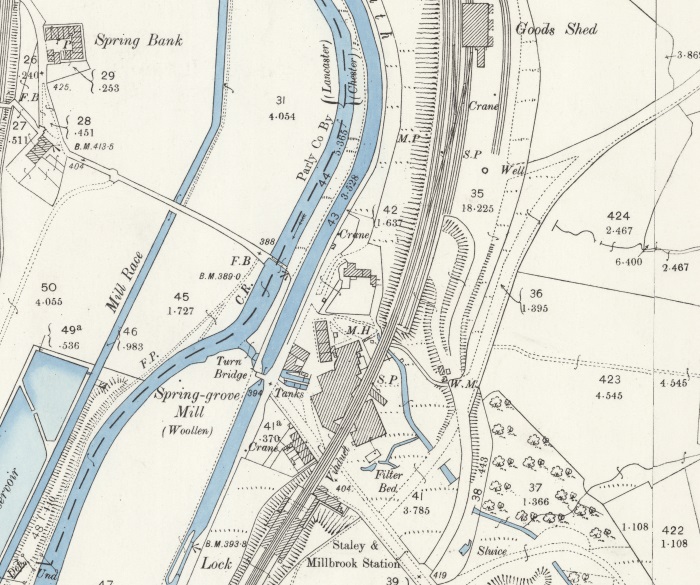
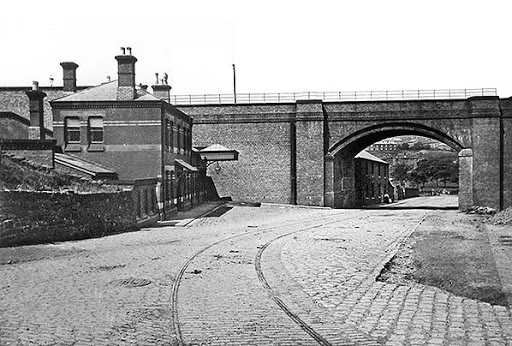
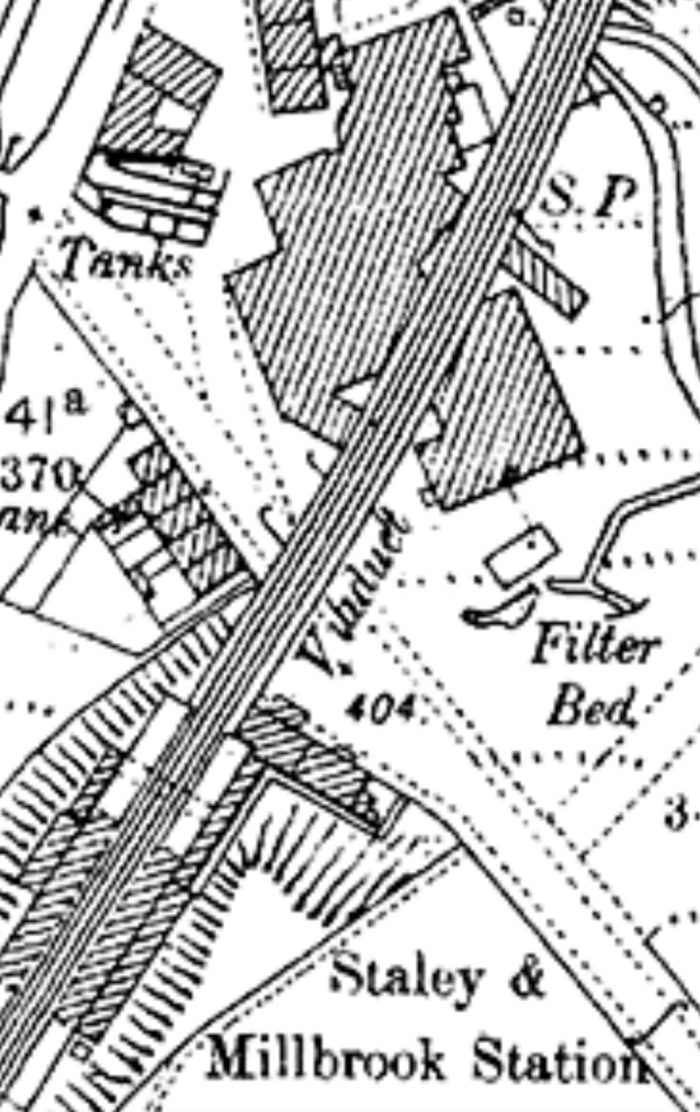

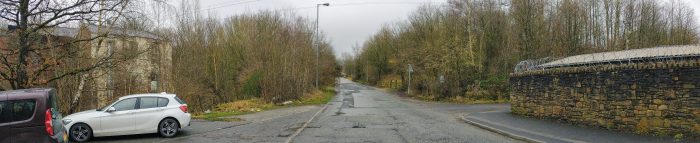
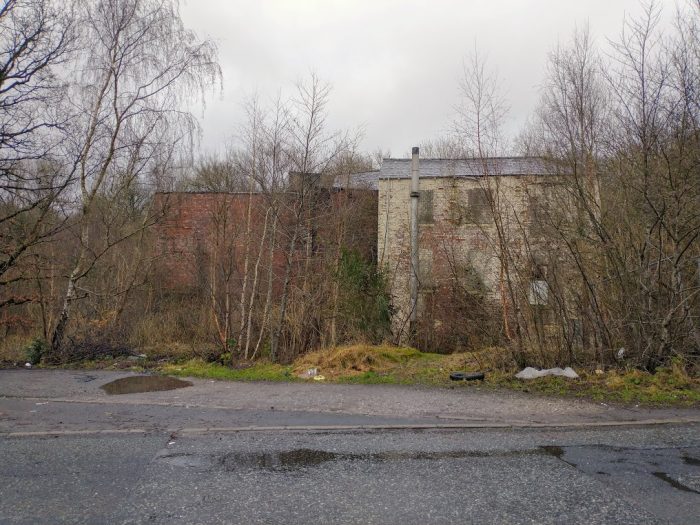
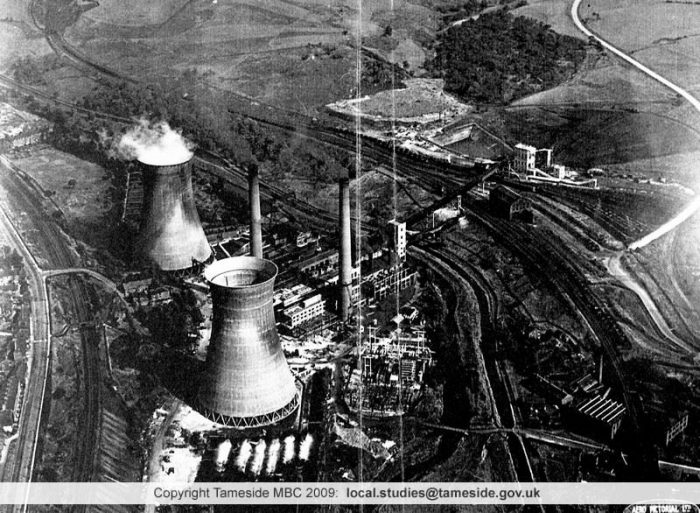
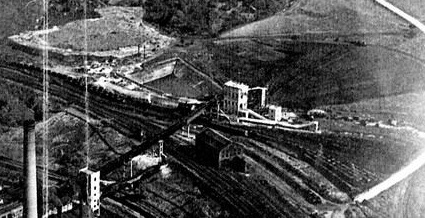
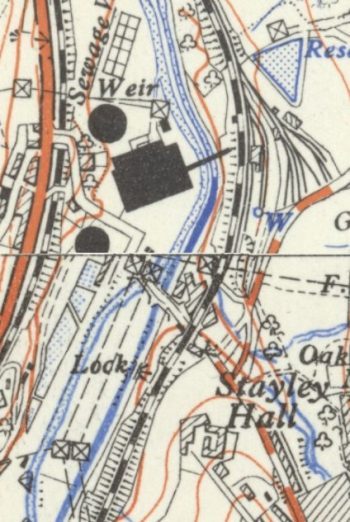
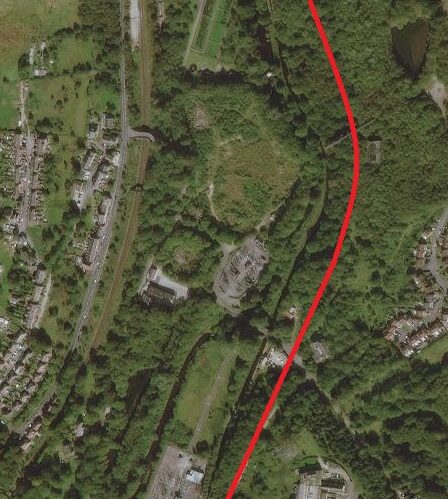
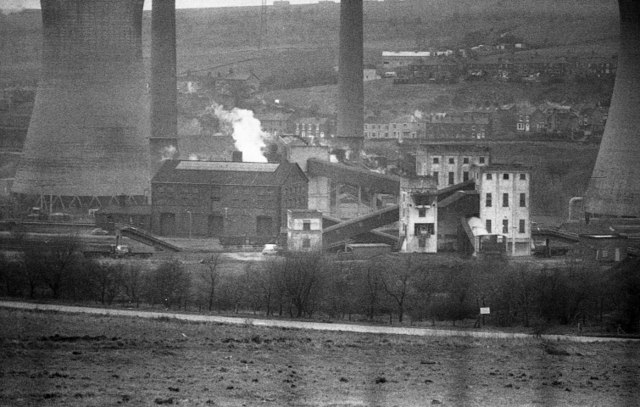
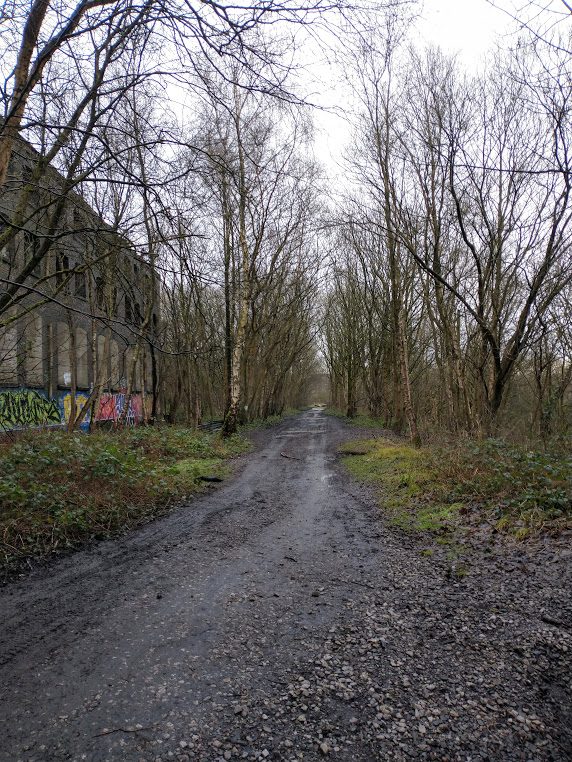

