Category Archives: Telford

Early Tramroads near Telford – Part 8 – Malinslee Part 4 – the East side of Malinslee in the vicinity of the later Coalport (LNWR) and Stirchley (GWR) Branches

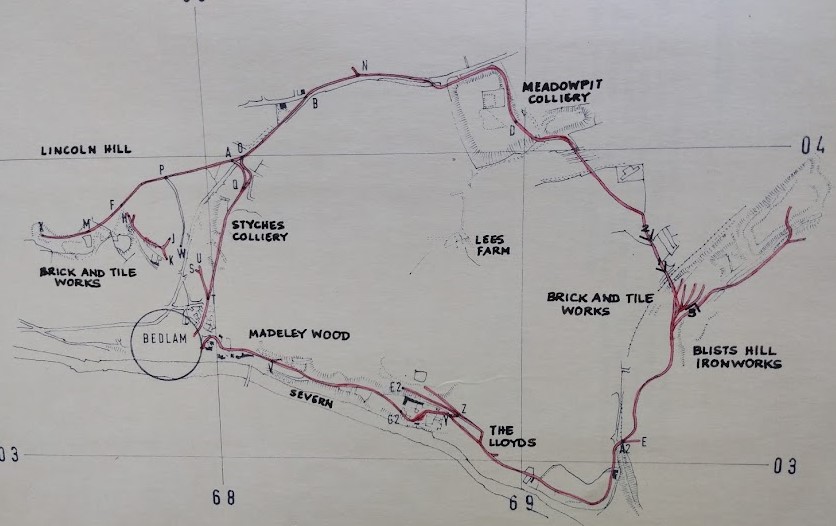
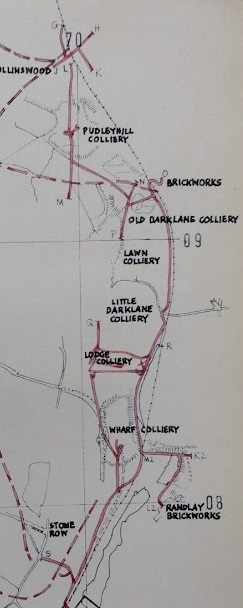
The area covered by this article is the area on the East side of Savage & Smith’s tracing [1: p164] and is as shown in the adjacent extract.

They included the line of the Coalport Branch on their plan (the continuous thin black line with circular dots). The Stirchley Branch was a little to the East of the Coalport Branch. It ran down past the Randlay Brickworks towards Old Park Ironworks which were South of the bottom end of Randlay Pool. Savage & Smith grouped the two ironworks in the vicinity under one title of ‘Stirchley Furnaces’.

It should be noted that the Shropshire Canal pre-dated the Coalport Branch but was on very much the same line as the railway. Small deviations in the alignment remain visible in the 21st century, particularly the length close to Hinkshay Pools and that close to Wharf and Lodge Collieries.

Tramroads on the remainder of the tracing [1:p164] are covered in previous articles, particularly those noted below.
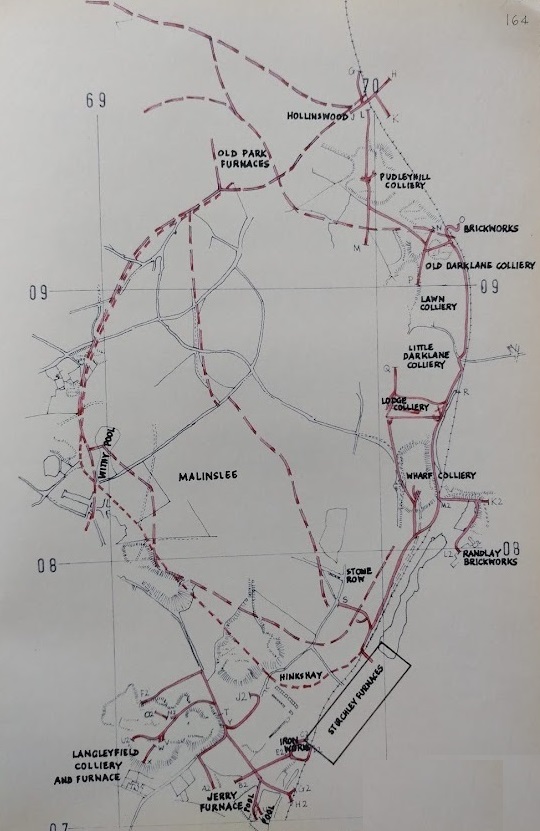
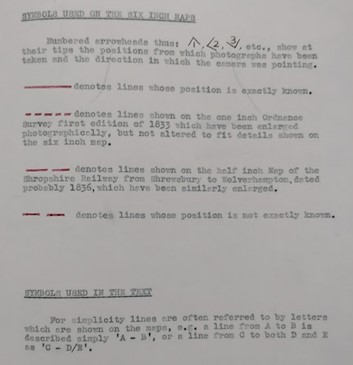
The tramways alongside first the old Shropshire Canal and the later LNWR Coalport Branch were not all operational at the same time. However, Savage and Smith were highly confident of the routes of most of these tramways. Only a few lengths are shown as dotted on these plans. The solid red lines are those which they could locate relatively precisely.

As can be seen on these drawings, the lines associated with the Shropshire Canal Coalport Branch and the later LNWR Coalport Branch railway are shown as solid red. The lines shown with the longer red dashes are translated from the 1836 Shropshire Railway Map. The scale of that map is relatively small – just ½” to a mile. The shorter red dashes denote lines as drawn on the 1833 1” Ordnance Survey. Enlarging from both of these maps leaves room for discrepancies to be introduced.

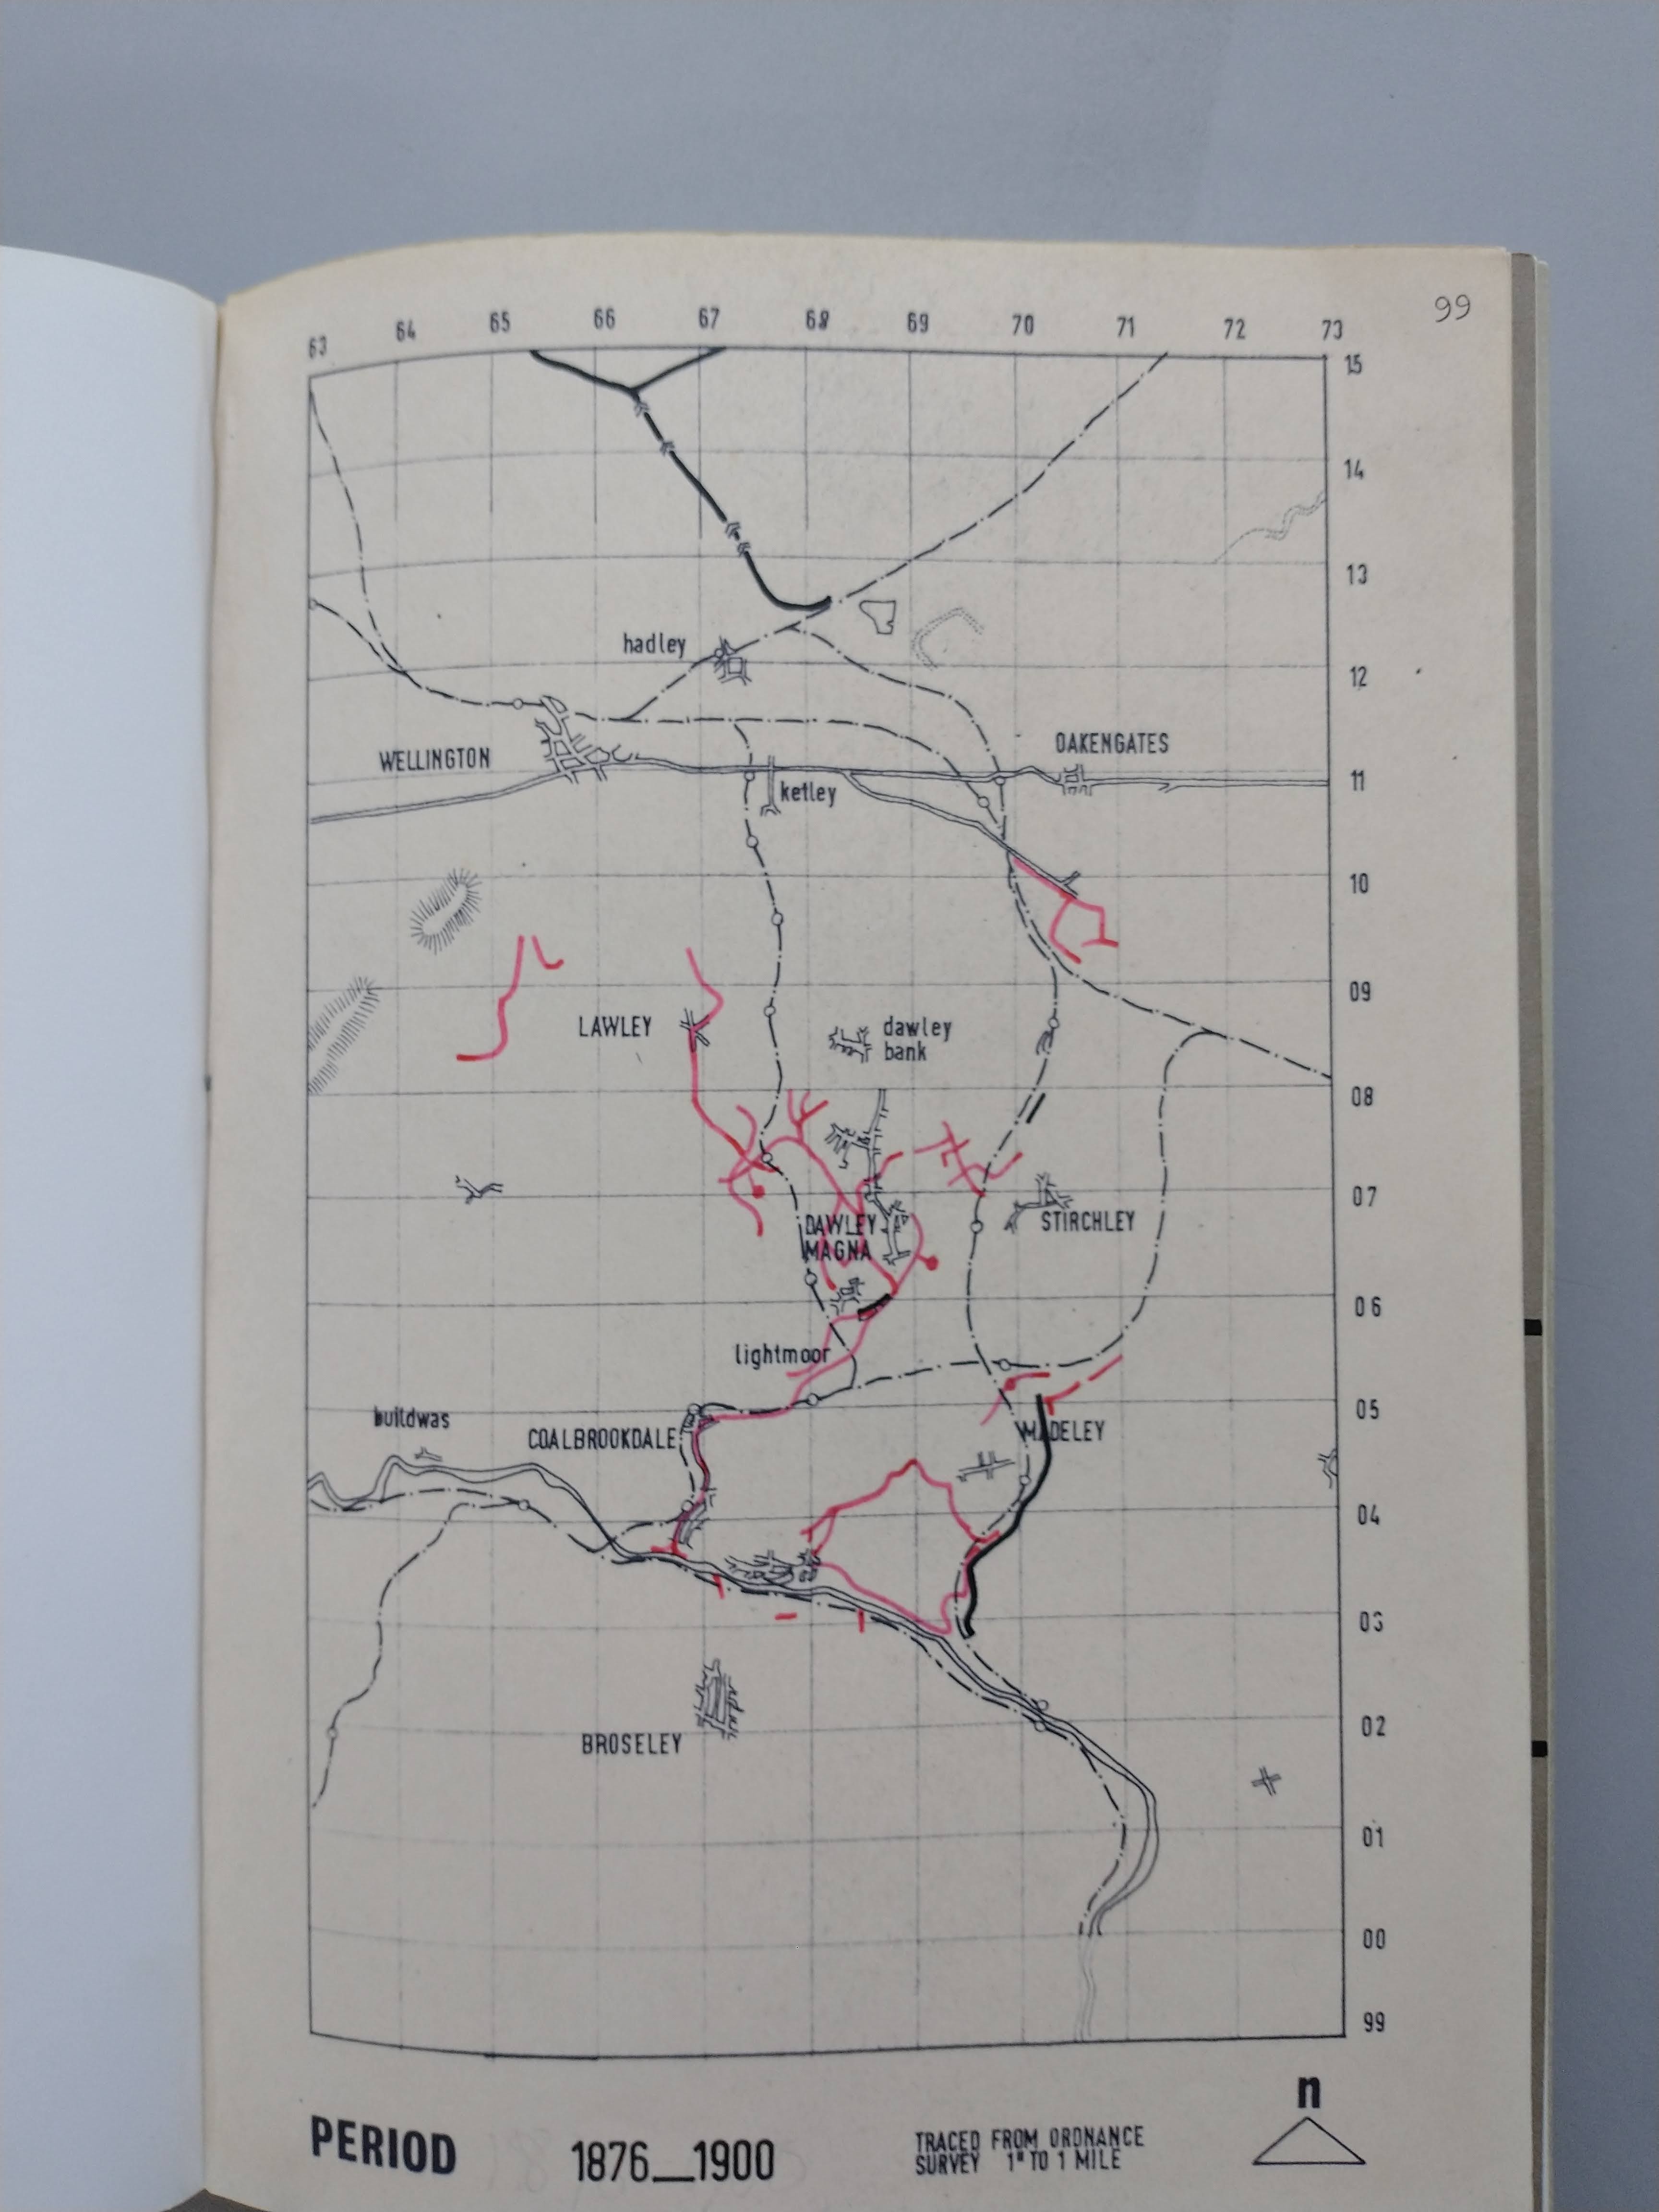
Savage and Smith highlight many of these lines on a 1″ to the mile map representing tramway additions between 1851 – 1860. During that decade their 1″ plan shows the Shropshire Canal as active to the North of Stirchley but without a northern outlet to the wider canal network. At the southern end of the active canal, the Lightmoor branch to the South of Dawley Magna suggests that much of the movement of goods on the canal was related to the Lightmoor Ironworks and the Lightmoor Brick and Tile Works. Unless there was only local movements during this period, perhaps associated with the Priorslee Furnaces and any other works in that immediate area.

Tramway/Tramroad changes in the 1850s. [1: p95]
An enlarged extract from Savage & Smith’s 1″ to a mile plan of the Malinslee area (1851-1860), showing some of the tramroad routes alongside the Shropshire Canal. [1: p95]
The Ordnance Survey of 1881/1882 published in 1888. The lettered locations match those on the Savage & Smith extract above. Further details are provided below. [2]

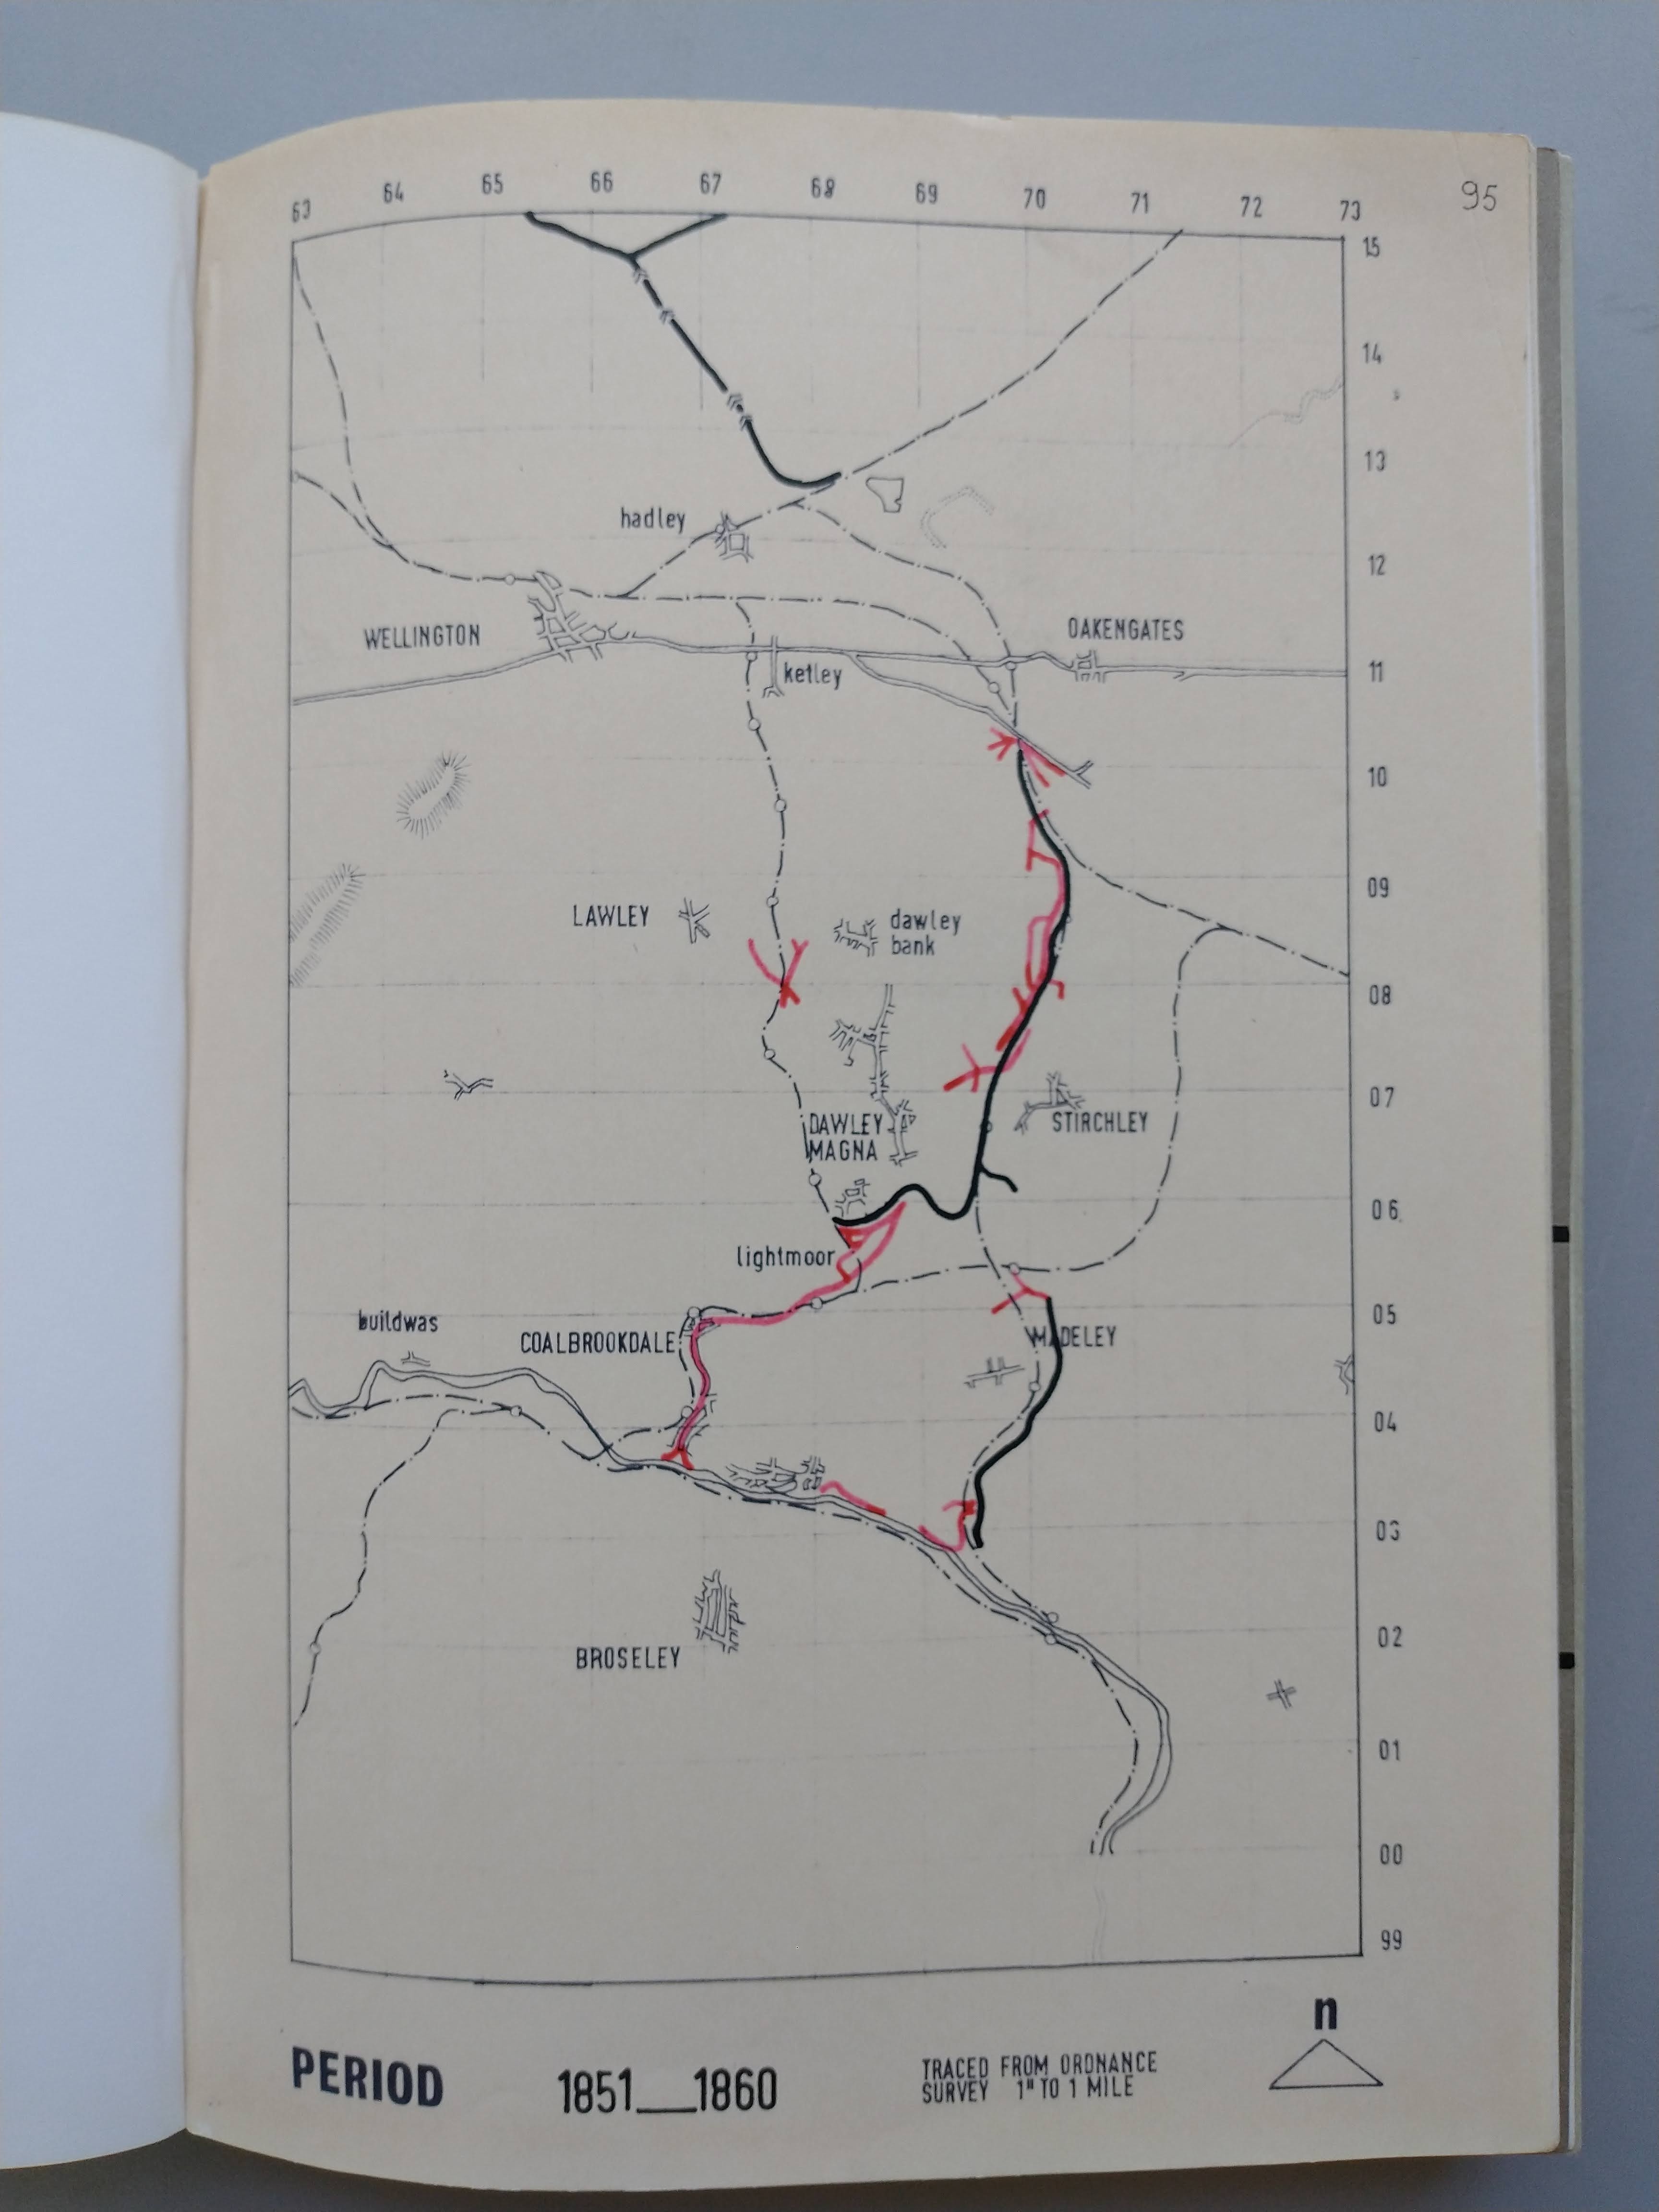
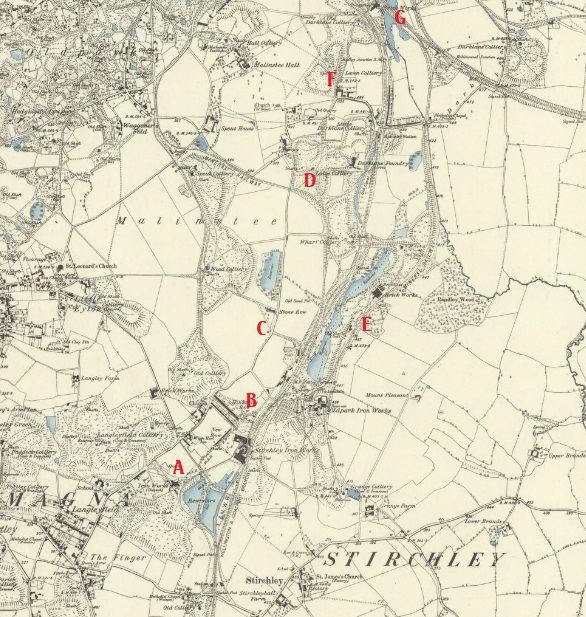
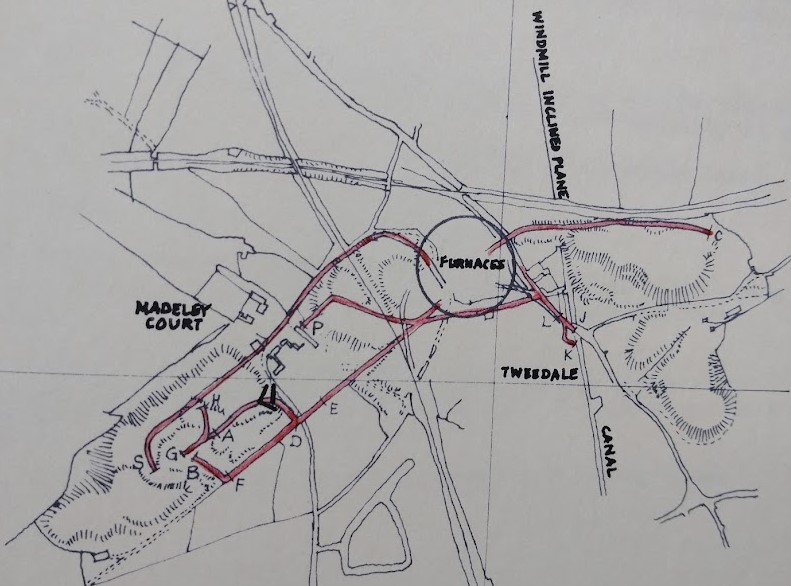
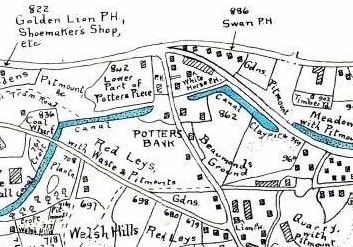
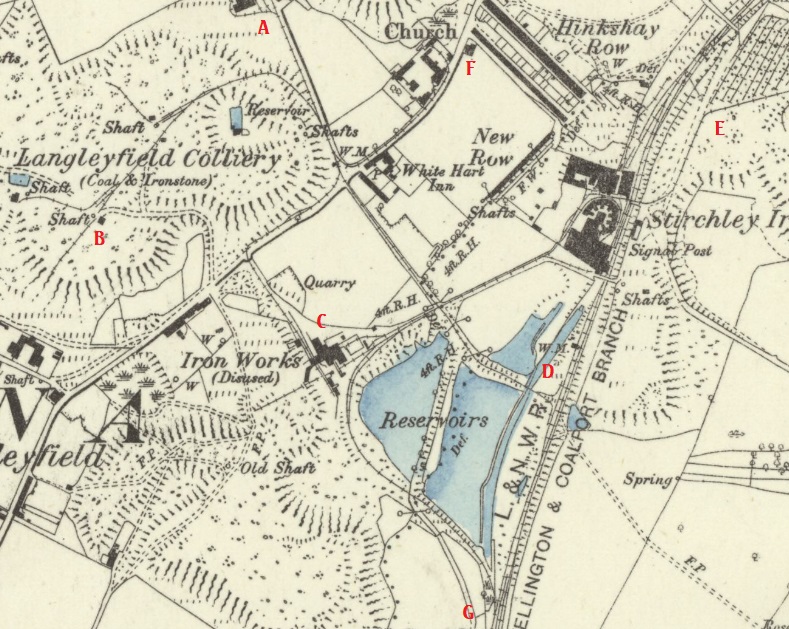
Savage & Smith provide notes about the Tramways/Tramroads close to the line of the LNWR Coalport Branch (and the Shropshire Canal Coalport Branch). They comment: “By 1856, there is a considerable amount of industry along the canal from Hinkshay to Shedshill. The upper reservoir at Hinkshay had appeared before 1833, but the site of the lower reservoir was in 1856 just a small canal basin with a line running to it probably from Langleyfield Colliery. A line from Jerry Furnaces to the ironworks at the rear of New Row crosses it at right angles and a common type and gauge of rail cannot be assumed. This second railway from Jerry Furnaces reverses and continues in to Stirchley Furnaces. … To the north of Stirchley Furnaces the line runs on the west side of the canal on the towpath. There is a branch near Stone Row, perhaps to pits; to Randley Brickworks and perhaps to pits to the north of the brick- works; to Wharf Colliery and Lodge Colliery; past Dark Lane Foundry; to old Darklane Colliery and Lawn Colliery with a branch to old Darklane Brickworks. After a reverse the line carries on to Dudleyhill Colliery and Hollinswood Ironworks ” [6: p166]

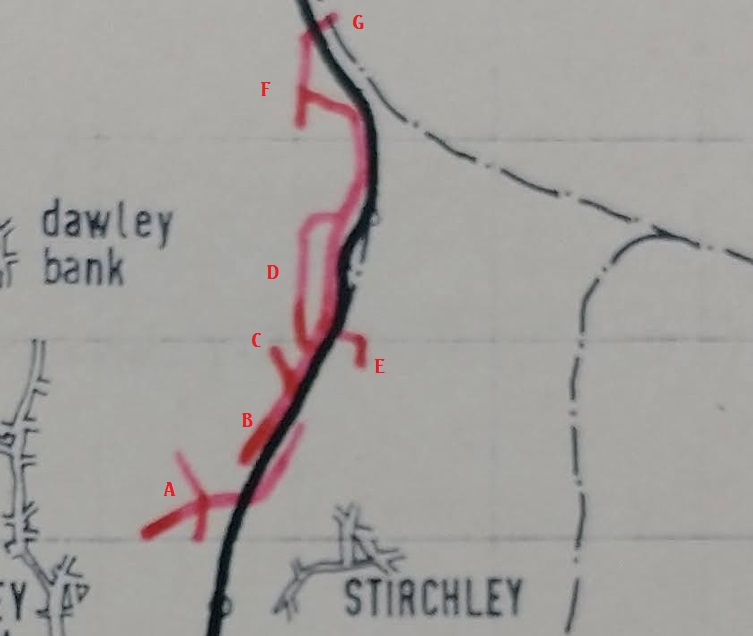
The tramroads marked are:

  • A: Tramroads in the immediate area of Stirchley Ironworks.
  • B: A line to the North of Stirchley Ironworks on the West side of the Canal, on or alongside the towpath.
  • C: a branch near Stone Row which probably extended further than shown by Savage & Smith to Wood Colliery to the Northwest of Stone Row.
  • D: a looped branch probably serving Wharf Colliery, Darklane Foundry, Lodge Colliery, Little Darklane Colliery and Lawn Colliery.
  • E: a short branch to pit heads to the Southwest of Randlay Brickworks, perhaps also serving the Brickworks.
  • F: Tramways around Old Darklane Colliery.
  • G: a short branch serving the Brickworks at Hollinswood.
Another enlarged extract from Savage & Smith’s 1″ to a mile plan of the Malinslee area (1851-1860), showing their remaining tramroad routes close to the Shropshire Canal. The red letters match those on the 6″ Ordnance Survey plan immediately below [1: p95]
An extract from the 1881/1882 Ordnance Survey published in 1888. The redlines drawn on the extract match those drawn by Savage & Smith on their plan above. In the period from 1855 through to 1880 the profile of theland in this vicinity was markedly altered by the construction of the railways shown on the map. Lines to A, B, C and D have all gone by 1881. The line to E connects with the line running East-southeast from Priorslee Furnaces and shown on plans below. [2]

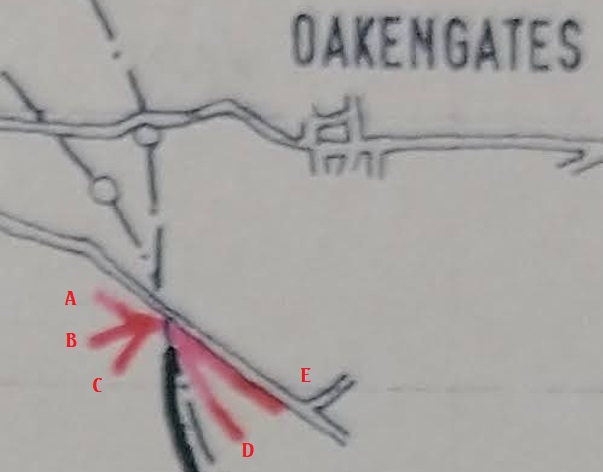
By the 1860s, Savage & Smith show that the Shropshire Canal was no longer in use. Between the 1870s and the turn of the 20th century, some further minor additions to the network in the immediate are of Stirchley and just to the South of Oakengates associated with the Priorslee furnaces can be seen on their 1″ to the mile

Tramway/Tramroad changes between 1876 and 1900. [1: p99]

The later changes to the tramroad/tramway network relate partly to the coming, in 1861, of the Standard-Gauge LNWR railway branch to Coalport. Stirchley and Jerry Furnaces – on the 1876-1900 map, have tramroad links to the railway.

The tramroad/tramway network changes to permit access to the LNWR line close to Stirchley. The locations marked with red letters match those on the OS map extract below. [1: p99]
The Ordnance Survey of 1881/1882 published in 1888. The lettered locations match those on the Savage & Smith extract above. [2]
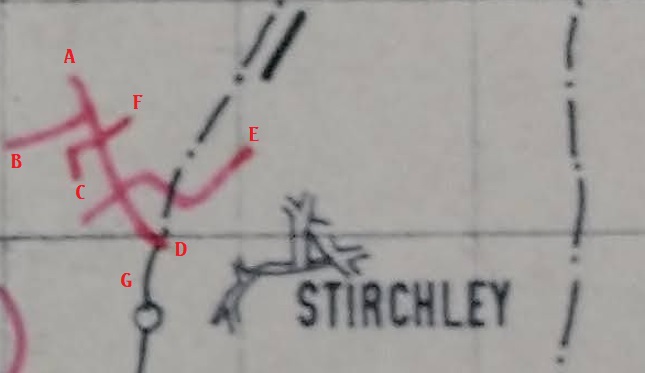
  • A: Langley Fields Brickworks, at on e time this line extended Northwest towards St. Leonard’s, Malinslee to serve Little Eyton Colliery.
  • B: Langleyfield Colliery.
  • C: Jerry Ironworks – serve by two different lengths of tramroad, one at high level and one at low level.
  • D: A connection which crossed the old Shropshire Canal to a wharf running alongside the LNWR Branch.
  • E: a line connecting Stirchley and Oldpark Ironworks to the network and so providing access to the wharf at D.
  • F: access to an ironworks to the Northwest of Hinkshay Row.
  • G: A line which curved round the West side of Hinkshay Pools to provide access to another length of wharf alongside the LNWR branch close to Dawley & Stirchley Railway Station. This is not shown on the plan drawn by Savage & Smith.

The lines noted above were all walked when I was looking at the immediate area for an earlier article (https://rogerfarnworth.com/2022/06/15/ancient-tramroads-near-telford-part-4-malinslee-part-1).

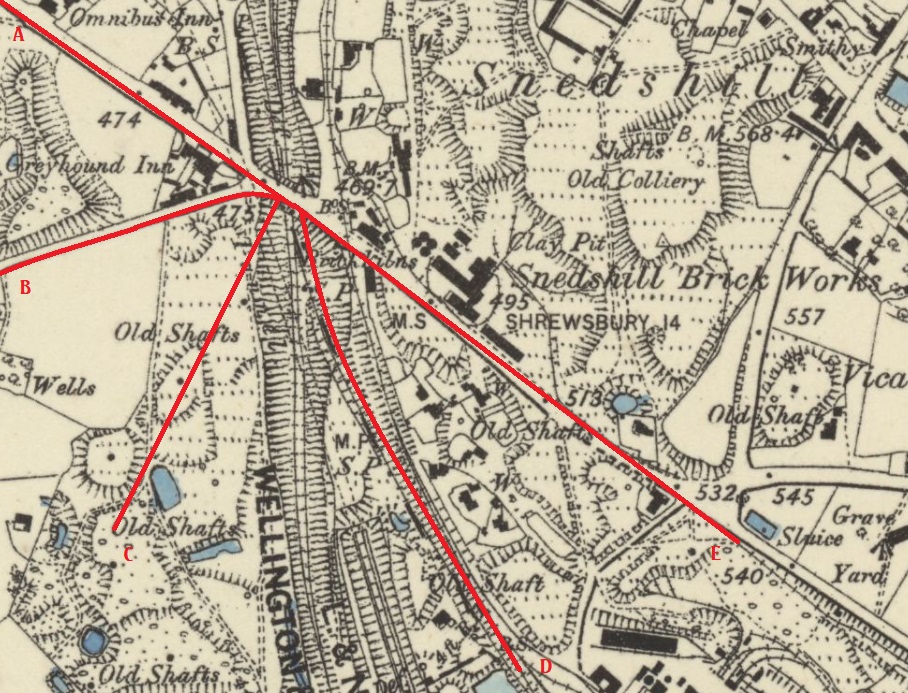
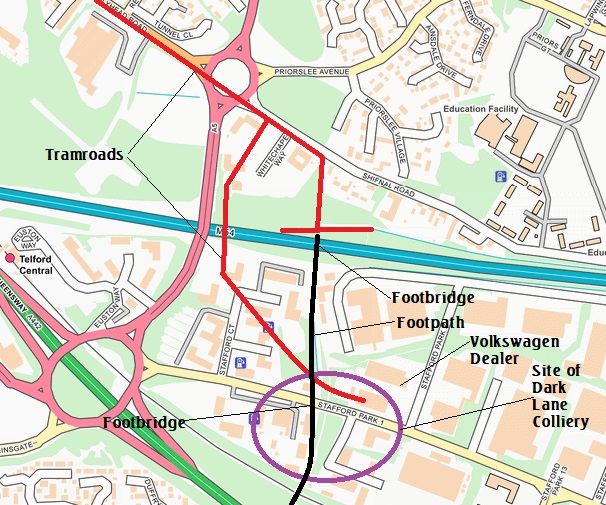
The other changes between 1876 and 1900 relate to Priorslee, where tramroads are shown to the Southeast of Priorslee Furnaces. The 6” Ordnance Survey of 1903 shows the bottom arm at this location linking Darklane Colliery to the Furnaces. The upper arm is shown on the 6” Ordnance Survey of 1885 as serving a colliery adjacent to the Lion Inn. The tramroad link to the colliery is not shown on the later survey.

The tramroad/tramway network changes associated with Priorslee Furnaces. The locations marked with red letters match those on the Ordnance Survey extract below. [1: p99]
The 1880/1882 Ordnance Survey published in 1885 showing the Oakengates/Priorslee area. The locations marked by red letters match those highlighted on the Savage & Smith extract above. [3]
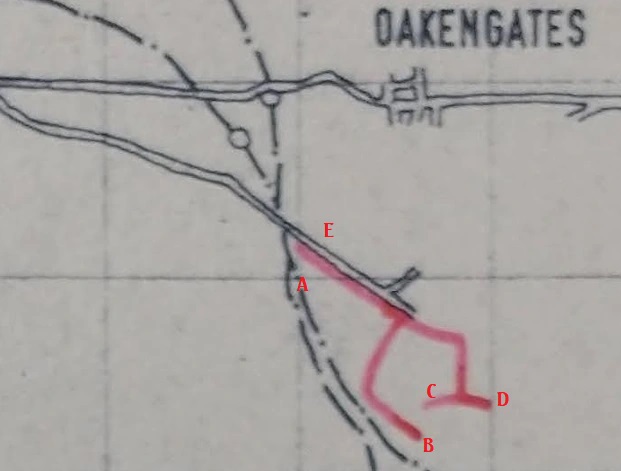
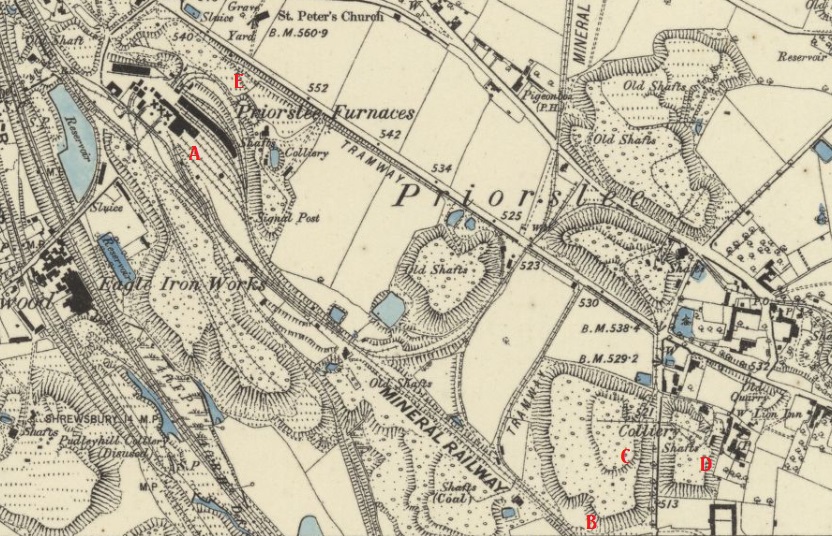
  • A: Priorslee Furnaces.
  • B: Darklane Colliery.
  • C & D: tramroads serving a colliery adjacent to the Lion Inn..
  • E: the tramroad access from Priorslee Furnaces.

Telford in the 21st century

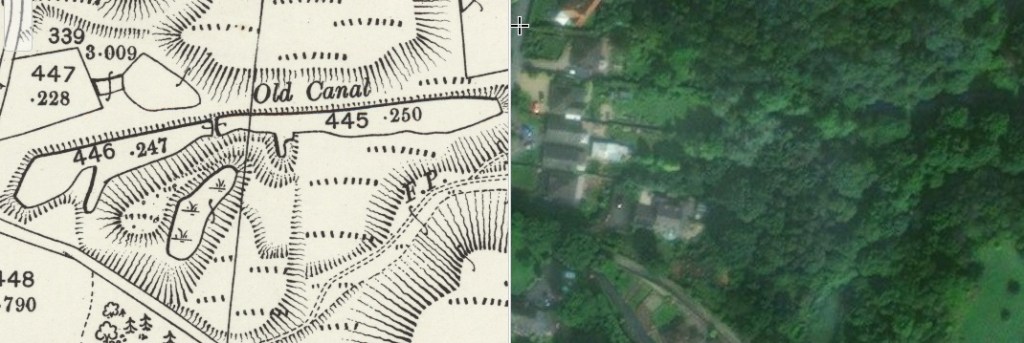
The area covered by these maps has been dramatically altered by the construction of Telford Town Centre. The centre of Telford sits directly over the area covered by this article. This is demonstrated by the side-by-side image provided below. 21st century satellite imagery is set alongside the 1901 Ordnance Survey.

The National Library of Scotland provides a version of its mapping software that allows two different images to be placed side by side and geographically related to each other. The image on the right covers the same area as that on the left. [4]

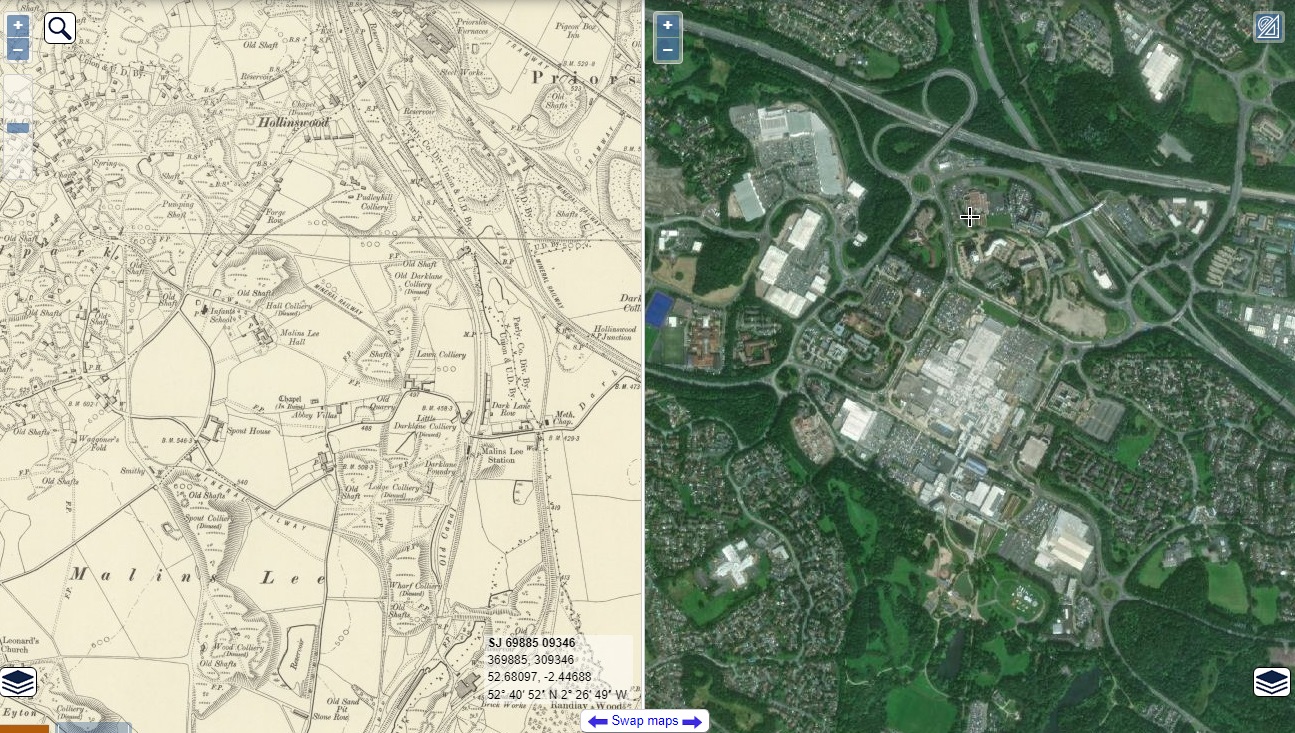
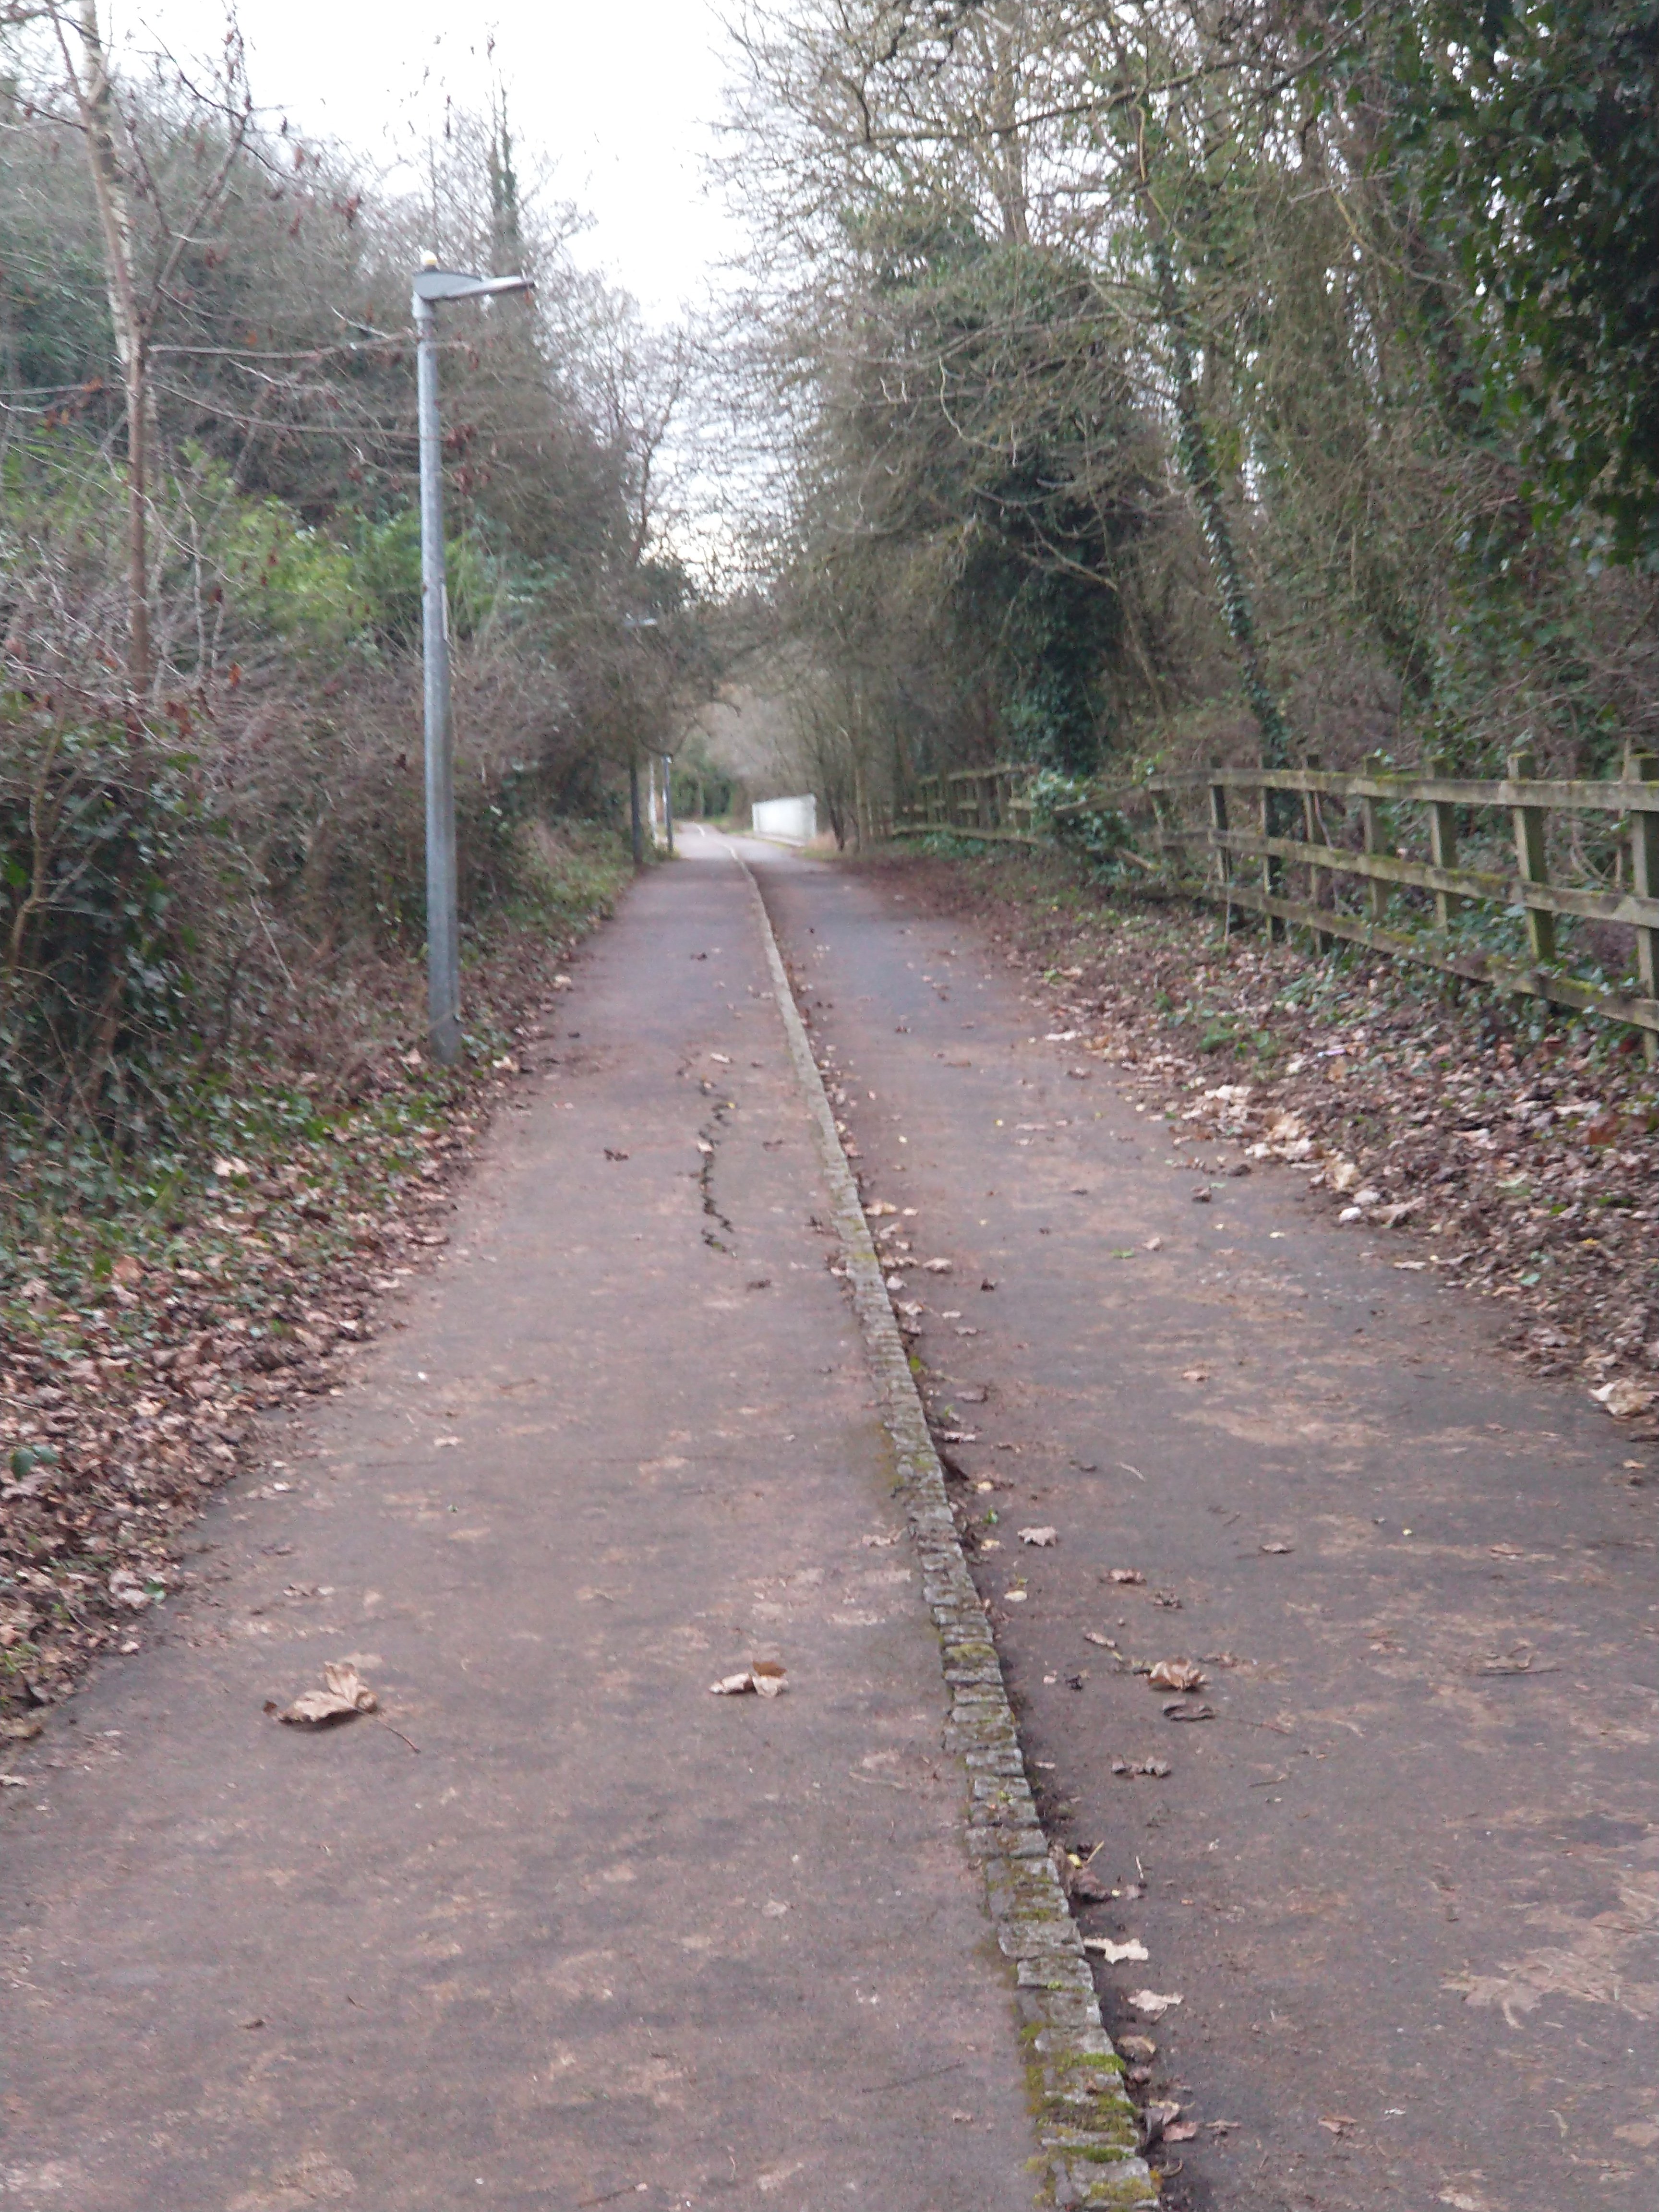
There is nothing to be gained by attempting to walk most of the routes covered in this article. However, some limited areas can still be seen (topographically) roughly as they were. That is true of the Priorslee area, Northeast of the town centre and the area North from Stirchley to the North end of Randlay Pool. Most of the second of these two areas is the subject of earlier articles (https://rogerfarnworth.com/2022/06/15/ancient-tramroads-near-telford-part-4-malinslee-part-1, https://rogerfarnworth.com/2022/06/24/ancient-tramroads-near-telford-part-6-malinslee-part-2-jerry-rails, and https://rogerfarnworth.com/2022/08/11/ancient-tramroads-near-telford-part-7-malinslee-part-3). The remainder of this article focusses on the area around Priorslee Furnaces. (NB: these tramroads really fall into another series but we will pick them up again when we look at the area around Oakengates and Priorslee)

The area around Priorslee Furnaces in 1901 and in the 21st century. By 1901 the Furnaces made use of the Mineral railway to their Southside rather than access to the tramroad along Holyhead Road. On the 1901 mapping the tramroad link into the works ahs been cut. This suggests that the line along Holyhead Road was probably no longer active by 1901. [5]
Facing Northwest along Holyhead Road in June 2022. The access road from the A442 Queensway is ahead on the left. The old tramroad would have run roughly where the footpath is on the left. [Google Streetview]
Turning through 180 degrees and now looking Southeast, the tramroad was on the south side of the road. [Google Streetview, June 2022]
A little further to the Southeast and the tramroad was still alongside Holyhead Road (B5061). [Google Streetview, June 2022]
we are now running alongside the site of what were Priorslee Furnaces. There was a tramroad access from the site to the tramroad running alongside Holyhead Road. [Google Streetview, June 2022]
Further Southeast the tramroad continued to follow the verge of Holyhead Road. [Google Streetview, June 2022]
East of Priorslee Furnaces the tramroad ran on the South side of Holyhead Road. A branch headed South towards Darklane Colliery. The ‘mainline’ only contiued a short distance further East. [6]
Further Southeast and now approaching the modern roundabout shown on the side-by-side image from the NLS above. [Google Streetview, June 2022]
Looking Southeast across the roundabout towards Shiffnal Road. The tramroad alignment remains on the south side of the road. [Google Streetview, June 2022]
On the other side of the roundabout and now on Shiffnal Road. The tramroad ‘mainline continues Southeast toward Stafford Colliery, the branch heads towards Darklane Colliery and, as it is under modern buildings cannot be followed on the North side of theM54. Photos of the area it travelled on the South side of the M% can be found further below [Google Streetview, June 2022]
Both the Darklane branch and the ‘Mainline’ terminate in these images. The DarkLane route cannot easily be found on site, apart from the approximate location of what would have been its at-level crossing of what was once a road and is now a footpath. That to the Stafford Colliery near the Red Lion Pub can still be followed! [7]
For a short distance further the tramroad remained alongside the old road before turning sharply to the South along what is now a footpath and cycleway. [Google Streetview, June 2022]
Looking South from Shiffnal Road along the footpath/cycleway which follows the route of the old tramroad to Stafford Colliery. [Google Streetview, June 2022]
Looking South from a point 100 metres or so along the footpath/cycleway which follows the route of the old tramroad to Stafford Colliery. [My photograph, 2nd February 2023]
The approximate limit of the tramroad heading South. [My photograph, 2nd February 2023]
This view from the Eastbound carriageway of the M54 shows the footbridge which carries the path that followed the line of tramroad. The Stafford Colliery was on the North side of what is now the motorway. Somewhere close to the top of the motorway cutting is the location of two tramroad arms which ran approximately East-West serving the Stafford Colliery site. [Google Streetview, November 2022]
Looking North along the line of the footbridge which crosses the M54. Shiffnal Road is ahead beyond the site of the old Stafford Colliery. The redlines are indicative of the tramroads serving the colliery. [Google Streetview, March 2021]

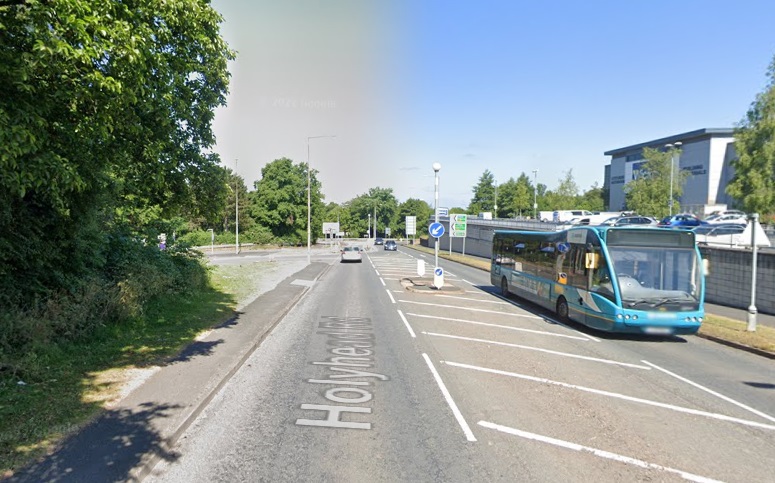
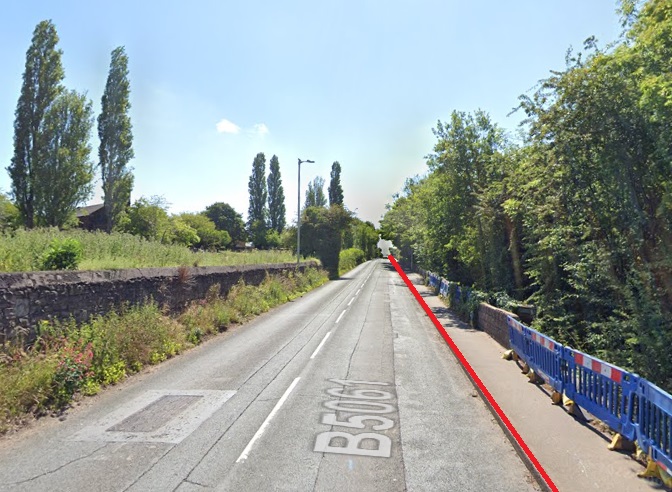
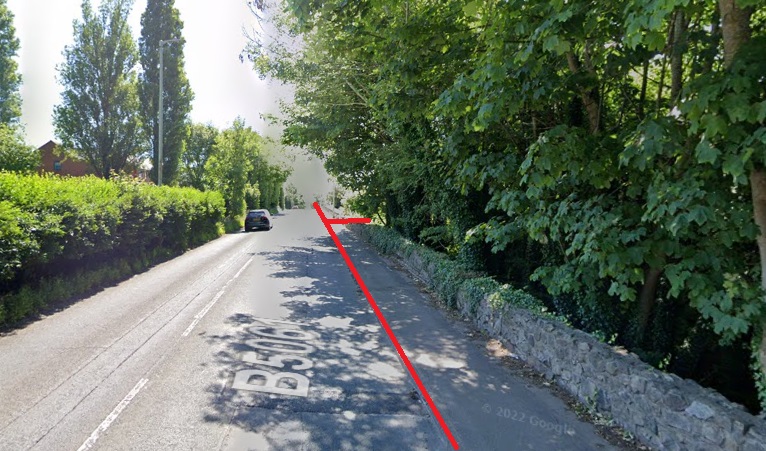
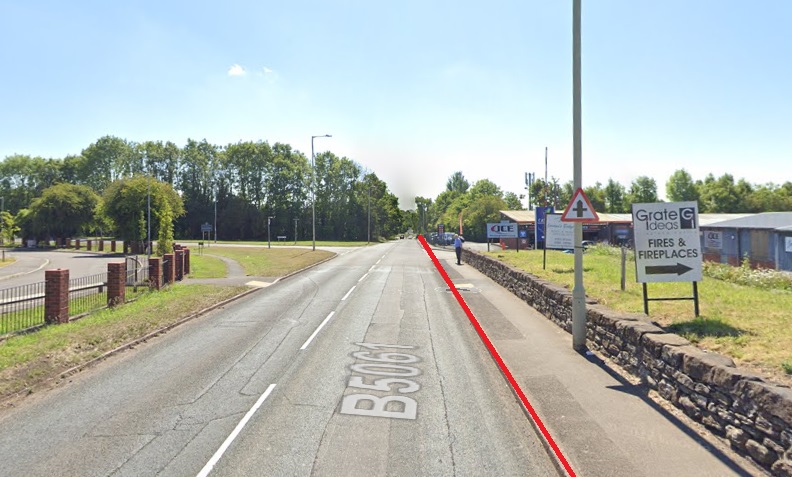
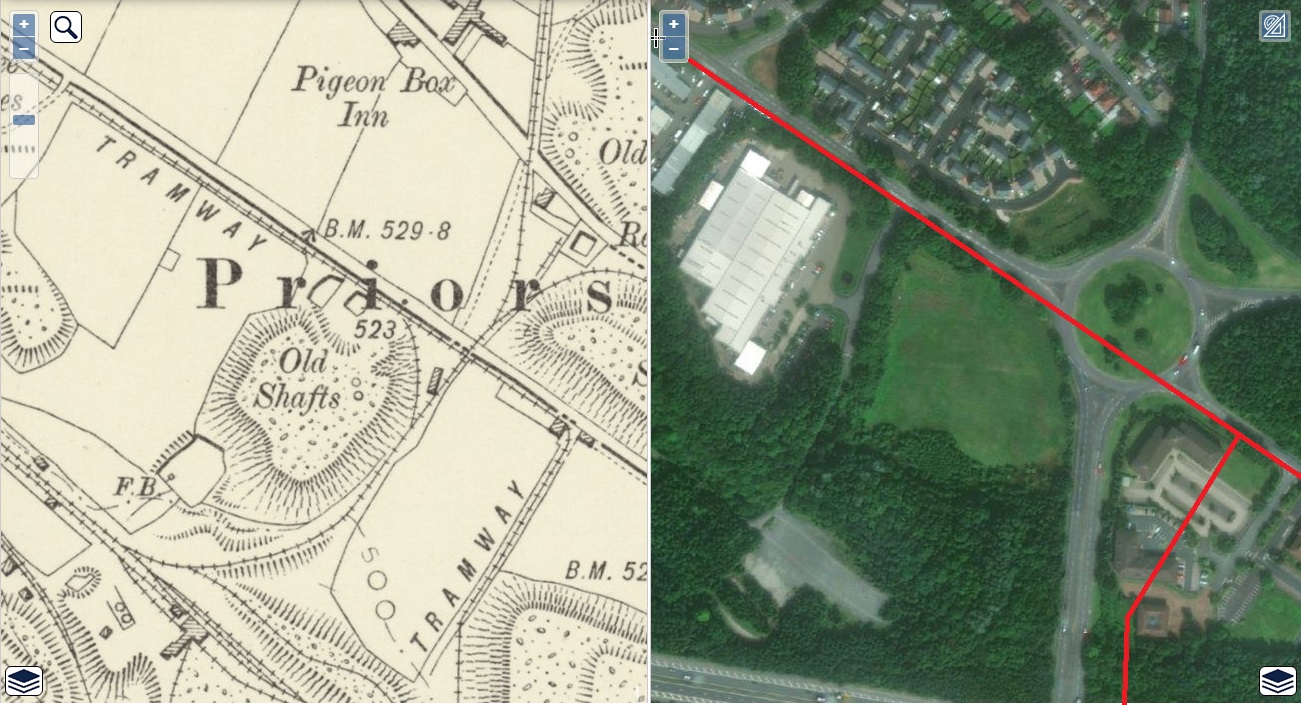
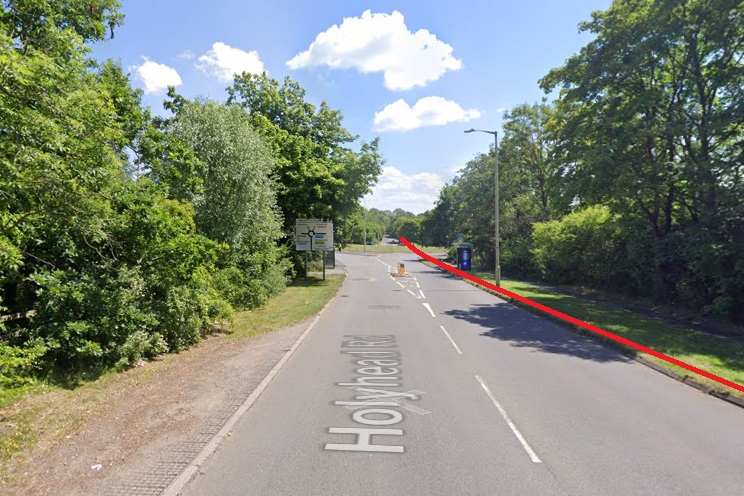
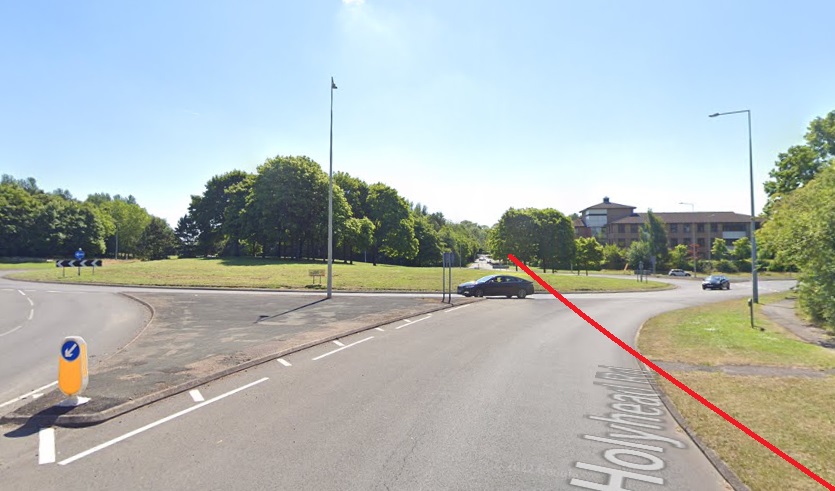
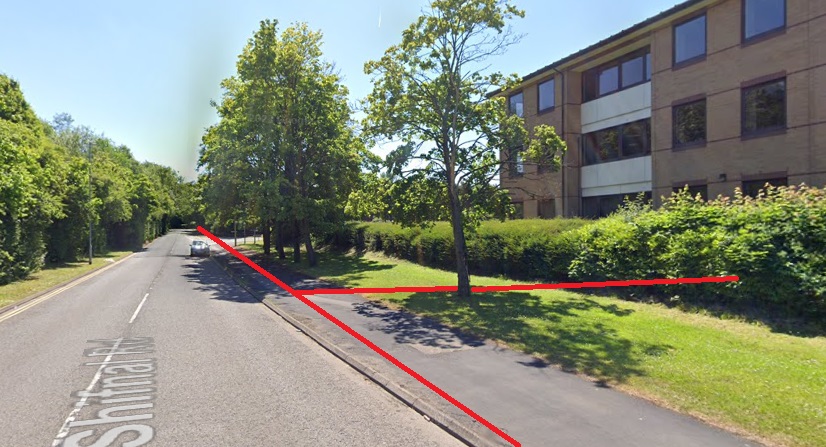
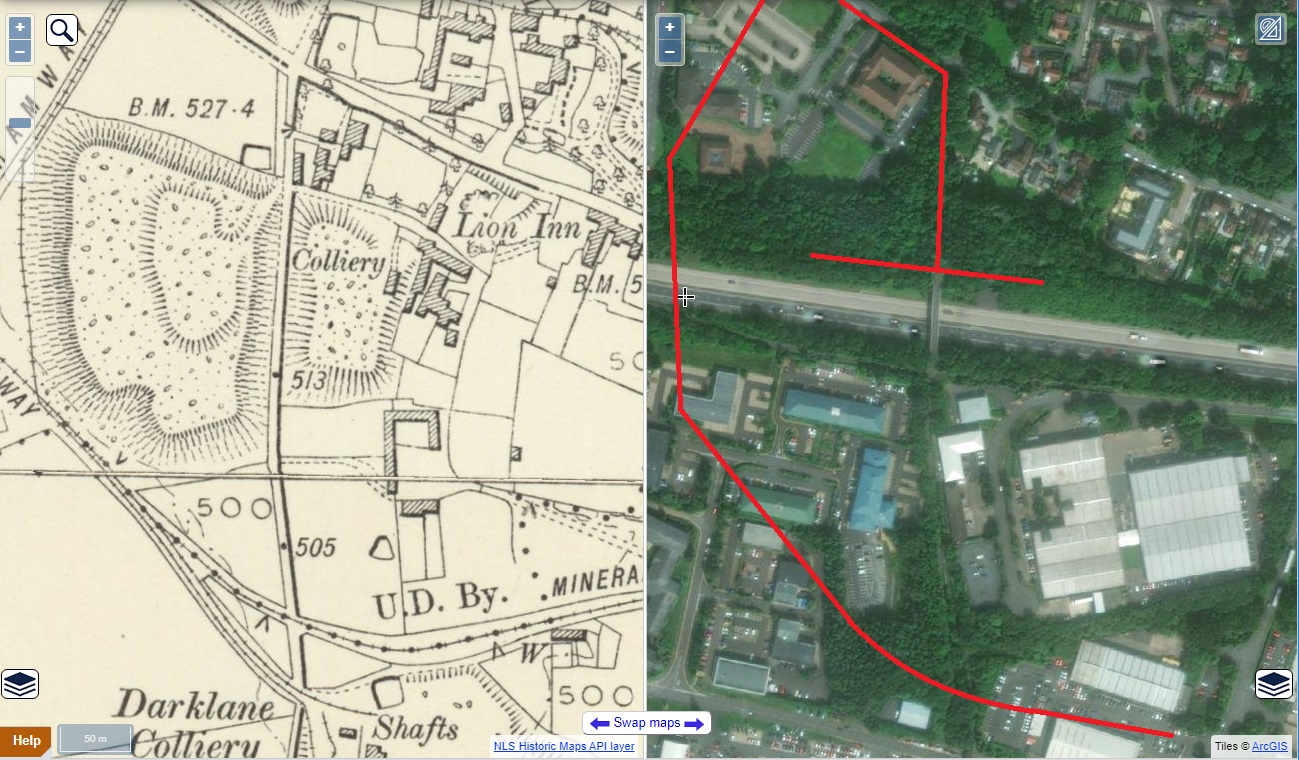
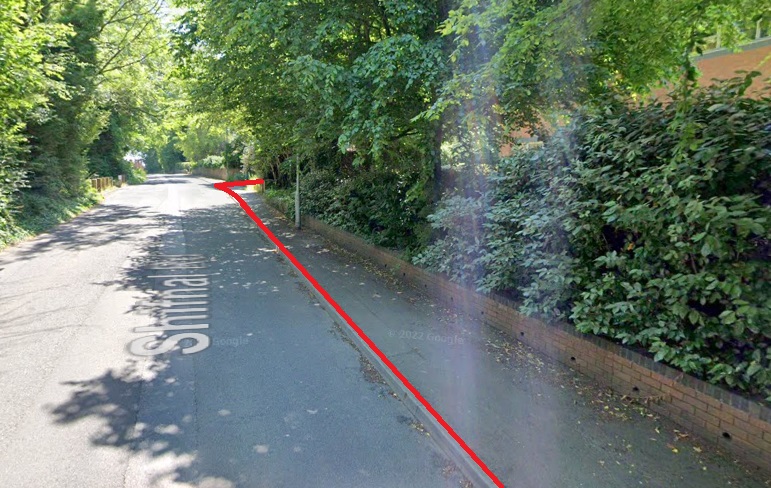
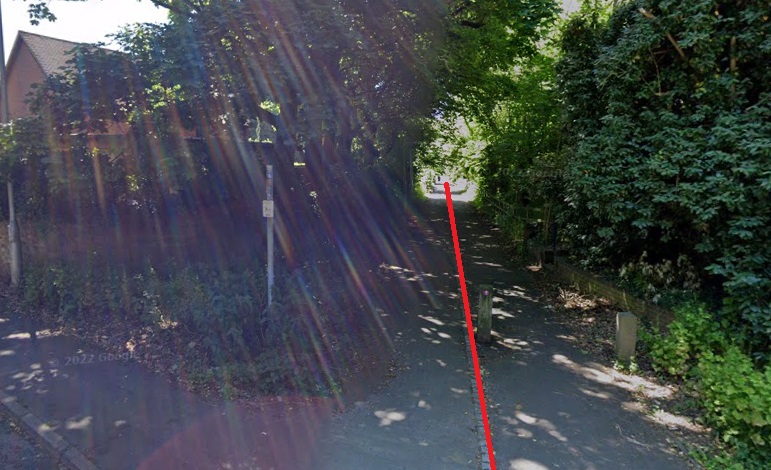
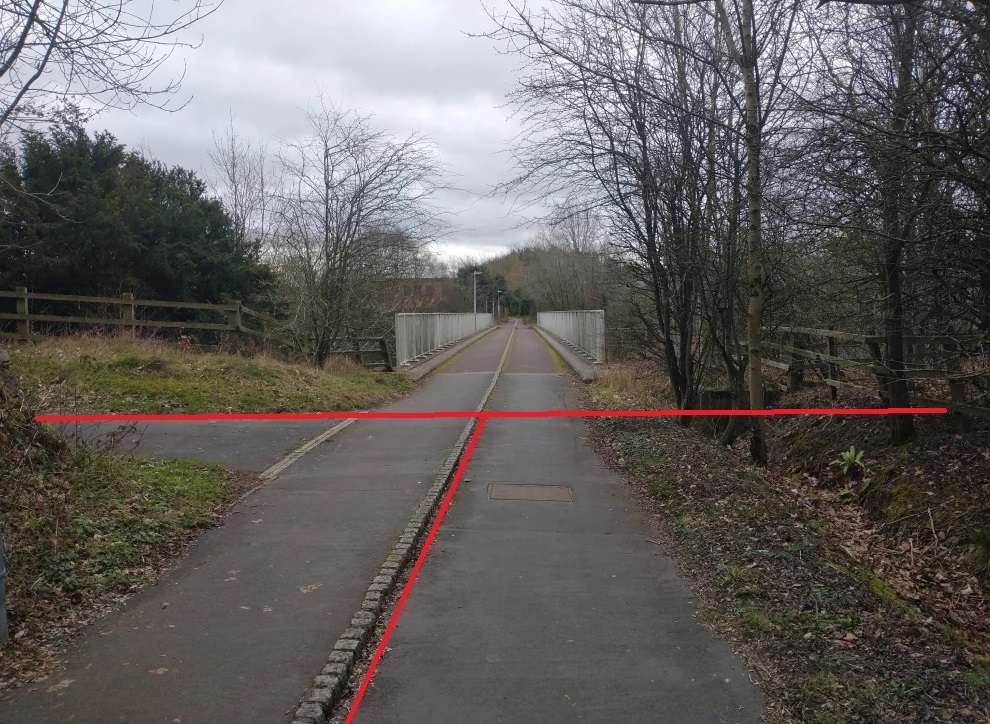
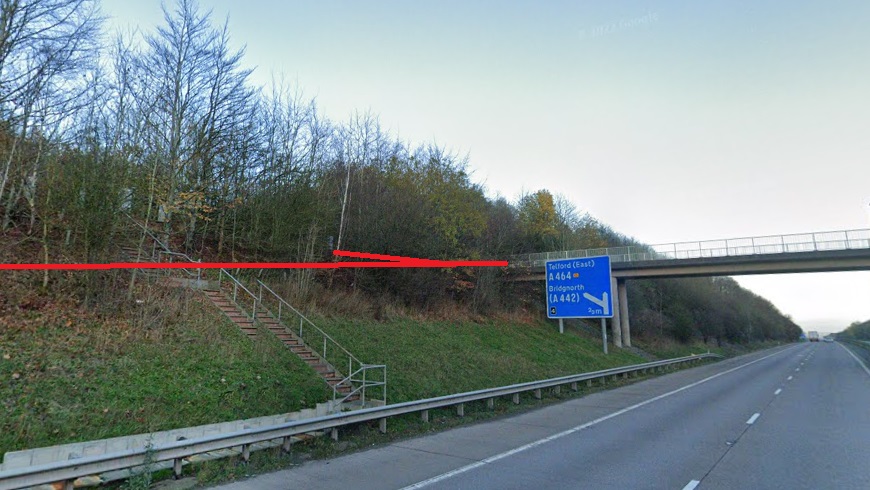
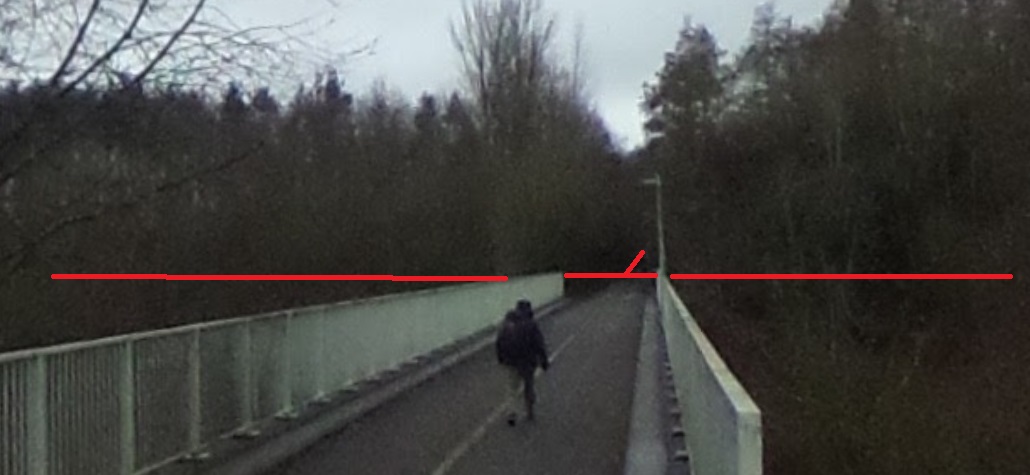
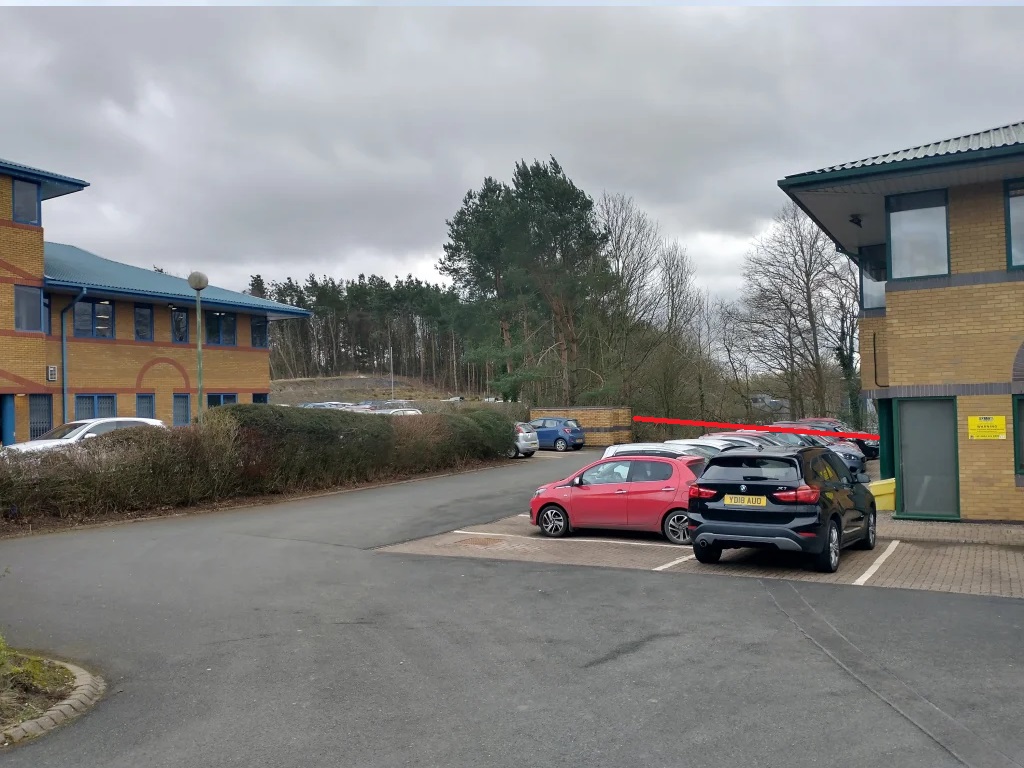
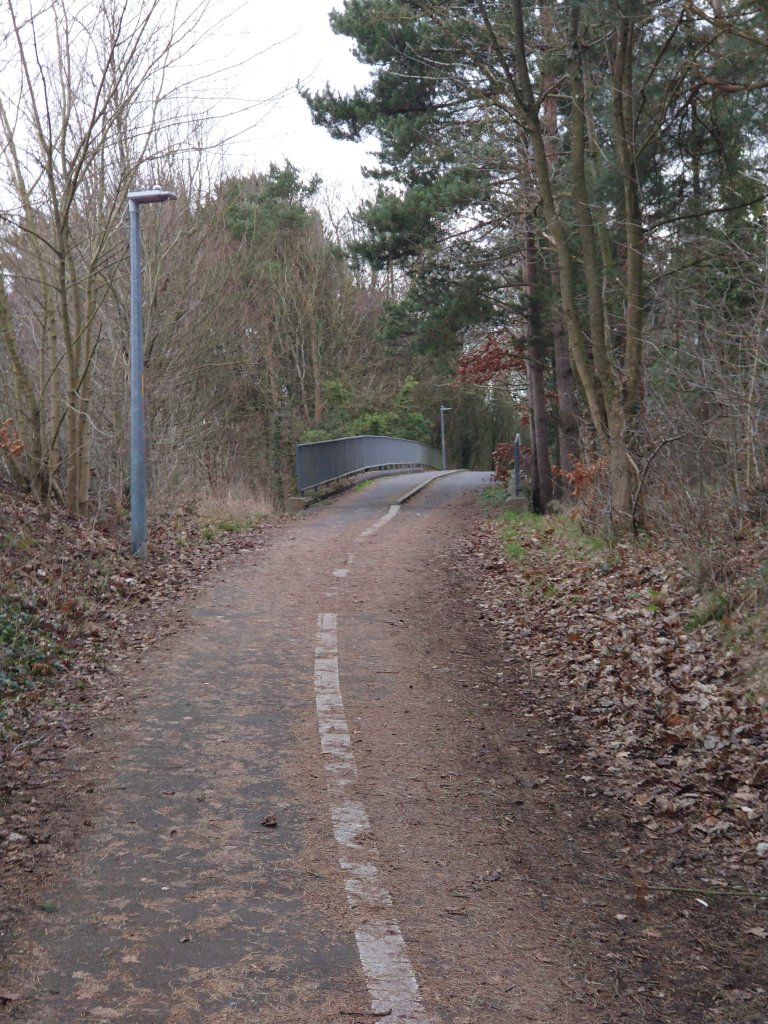
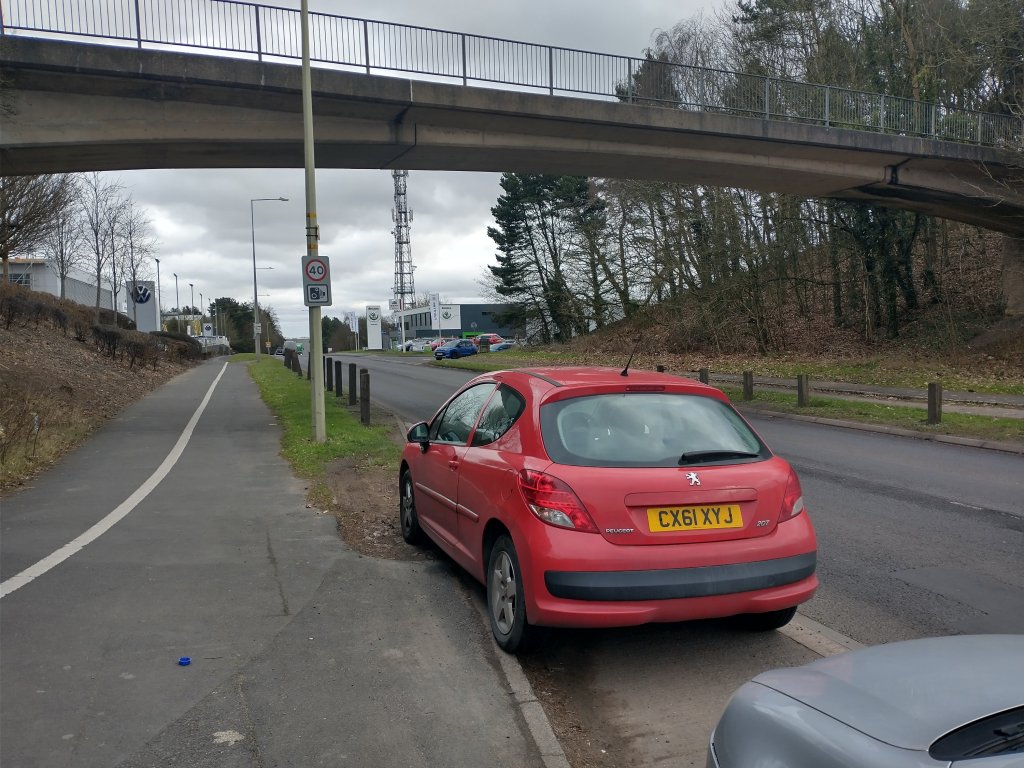
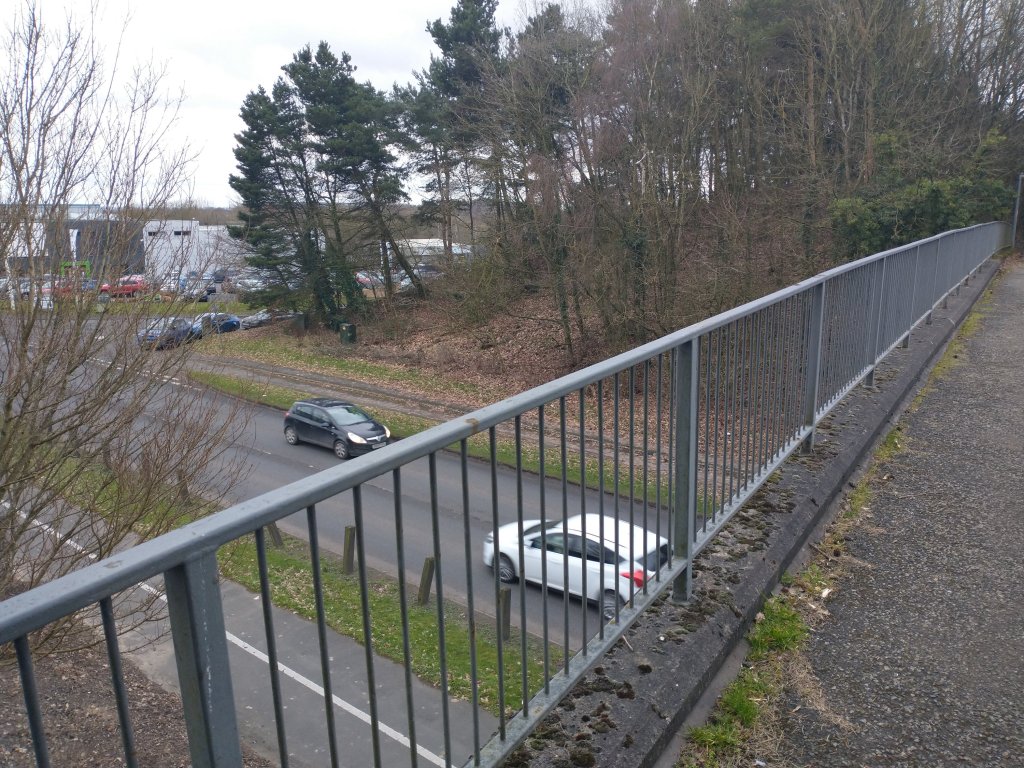
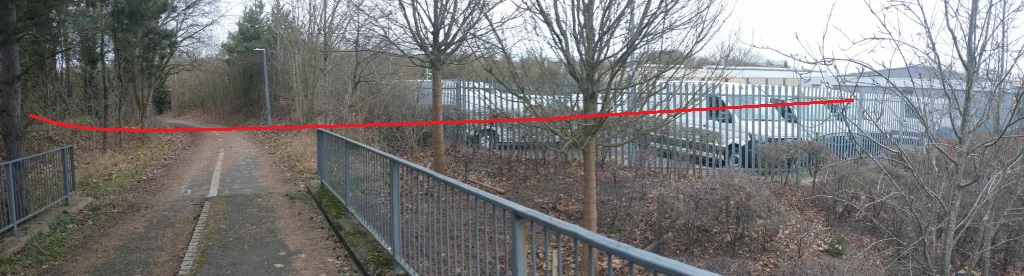
The tramway/tramroad route which led to Darklane Colliery crossed the line of the M54 a short distance to the West of the modern footbridge.

Looking North across the M54, on the approximate line of the old tramroad/tramway. [My photograph, 2nd February 2023]
Looking approximately in a northerly direction. The old tramway ran approximately as shown by the red line. [My photograph, 2nd February 2023]
Turning through around135 degrees to the East this is the view along the line of the tramway/tramroad. The alignment is roughly as shown by the red line. [My photograph, 2nd February 2023]
The tramroad ran on a line which now runs from the rear of Syer House towards the Volkswagen dealership on Stafford Park 1. It would have passed the spoil heaps from Darklane Colliery as it did so. Darklane Colliery straddled the line of Stafford Park 1.
Sketch of the old tramroad route on the modern ‘Street Map’ of the immediate area. [8]
The footbridge over Stafford Park 1 sits over the site of Darklane Colliery. [My photograph, 2nd February 2023]
Looking East along Stafford Park 1 which is spanned by a modern footbridge. The photograph is taken from within the site of Darklane Colliery. [My photo, 2nd February 2023]
Two views looking South over the site of Darklane Colliery from the footbridge spanning Stafford Park 1. [My photo, 2nd February 2023]
This final photograph looks North along the footpath/cycleway and shows the approximate route of the tramway/tramroad which terminated a short distance to the East of the modern footpath. [My photograph, 2nd February 2023]

References

  1. R.F. Savage & L.D.W. Smith; The Waggon-ways and Plateways of East Shropshire; Birmingham School of Architecture, 1965. Original document is held by the Archive Office of the Ironbridge Gorge Museum Trust.
  2. https://maps.nls.uk/view/101594470, accessed on 1st February 2023.
  3. https://maps.nls.uk/view/101594308, accessed on 1st February 2023.
  4. https://maps.nls.uk/geo/explore/side-by-side/#zoom=15.0&lat=52.67809&lon=-2.44688&layers=6&right=ESRIWorld, accessed on 1st February 2023.
  5. https://maps.nls.uk/geo/explore/side-by-side/#zoom=17.0&lat=52.68634&lon=-2.44238&layers=6&right=ESRIWorld, accessed on 1st February 2023.
  6. https://maps.nls.uk/geo/explore/side-by-side/#zoom=17.0&lat=52.68432&lon=-2.43633&layers=6&right=ESRIWorld, accessed on 1st February 2023.
  7. https://maps.nls.uk/geo/explore/side-by-side/#zoom=17.0&lat=52.68130&lon=-2.43190&layers=6&right=ESRIWorld, accessed on 1st February 2023.
  8. https://streetmap.co.uk/map?x=505180&y=249173&z=0, accessed on 2nd February 2023.

Early Tramroads Near Telford – Part 10 – An overview of the East Shropshire Area’s Historic Tramroad Network

I have recently undertaken a detailed review of a book by R.F. Savage and L.D.W. Smith entitled, The Waggon-ways and Plate-ways of East Shropshire. [1] This was a research paper produced in 1965. The original document is held in the Archive Office of the Ironbridge Gorge Museum Trust. It was a timely document. Large parts of the area surveyed by the authors were changed almost beyond recognition as the Development Corporation got to work on creating what became the new town of Telford, where (in 2023) I now live. Their work included a detailed series of drawing produced by hand, tracing as best they could the lines of tramroads from smaller scaled plans onto 6″ to the mile and 1″ to the mile drawings. There are two examples of their 6″ to the mile plans below.

Savage & Smith’s 6″ to the mile plan of the Madeley Wood and Bedlam Furnace Area on the North side of the River Severn Gorge. [1]
Savage & Smith’s 6″ to the mile plan of the Madeley Court Area to the North of the River Severn Gorge. [1]

Savage & Smith were diligent in their research and careful in their documenting of the historic sources and information gleaned on site. The resulting document is wonderful and I have enjoyed engaging with it. This document alone would justify a research visit to the Ironbridge Gorge Museum Trust Archive. My thanks to the Archive for the welcome offered to me and their generous agreement to my using the material from this resource.

As a result of undertaking this and other research at the Archive, I was asked to give a talk at one of the meetings of the Friends of the Ironbridge Gorge Museum Trust. The detailed notes associated with the talk and a PowerPoint presentation can be downloaded using the links below.

These detailed notes are the background information for a talk given on 18th October 2023.

The PowerPoint presentation used on 18th October 2023.

I hope that these notes and slides are of interest to some. It is possible that you may read them and find things in the notes that are incorrect. If so, please do let me know. I will be using this material for future talks. I would really appreciate any comments that you might have.

References

  1. R.F. Savage & L.D.W. Smith; The Waggon-ways and Plate-ways of East Shropshire, Birmingham School of Architecture, 1965. An original document is held by the Archive Office of the Ironbridge Gorge Museum Trust.

Early Tramroads near Telford – Part 3 – Ketley Tramways/Plateways/Waggonways and Canal – Part 1. …

This is a first look at the Ketley area just a few miles from where we live in Malinslee.

This was a short walk which encompassed a variety of industrial remains. The route taken is shown by the red line on the image below which comes from the Ketley Paddock Mound website. ……

Ketley Paddock Mound. [26]

I parked close to the church of St. Mary the Virgin in Red Lake and walked North up Shepherd’s Lane, turning left into Hill Top. Hill Top becomes Red Lees. The route of Red Lees was crossed by a high-level tramway which probably linked a colliery to what is now called Ketley Paddock Mound and was a colliery slag heap. the extract from the 1882 25″ OS Map below shows the location.

Tramway Bridge abutments or piers shown on the 1882 25″ OS Map. [1]

It seems to me to be unlikely that the tramway which used this bridge was directly associated with a larger network of tramways in the area. The map extract shows other short sections of tramway immediately at the colliery location and is seems highly likely that there was a need to cross Red Lees at high-level to reach the large slag heap to the North of the lane.

The view Northwest on Red Lees on 2nd June 2022. The shaping of the stonework to the right of this image suggests that it was a pier and that the bridge was therefore a two span structure. [My Photograph]
The view Southeast along Red Lees on 2nd June 2022. [My photograph]

Recently, reading ‘A Ketley Mon’ by Terry Low, I came across an older photograph at this location. It was taken in 1906 and shows the pier probably at its fullest height. It seems as though it was originally built in masonry and, at a later date, extended upwards in brick. Whilst it is impossible to be sure what this means, it suggests that there was a need at some stage to lift the line of the tramway. An obvious explanation for this would be the growth of the slag heap which is to the right of the picture below.

Red Lees in 1906, looking Northwest. The old colliery was to the left of this image, the slag heap to the right. In all probability a timber deack was used to carry the tramway rails. Each span would have been made up of a horizontal deck supported at third points by raking timber props. [Photographer not known – Alan Harper collection][2: p27] The image also appears on the Historic Ketley website. [5]

Walking Northwest from the location of the tramway bridge, it was apparent that this section of Red Lees followed a straight course. Possible explanations for this include:

  • the development of the colliery and the slag heap required an established right of way to be redrawn to accommodate the work. I cannot find maps early enough to look at what predated the industry at this location; or
  • Red Lees itself, may have been part of the route of a tramway.

It would be interesting to be able to test these ‘theories’, if earlier detailed maps were available.

Red Lees to the Northwest of the tramway bridge remains looking to the Northwest on 2nd June 2022. [My photograph]

We know from early maps that the Ketley Canal once crossed Red Lees to the East of Ketley Hall.

A extract from a hand drawn map which was posted on The Ketley History Group on Facebook. The Ketley Canal is shown in blue on the sketch map and crosses Red Lees immediately adjacent to Ketley Hall which appears far-left on this extract.[3]
This image appeaars on the website of the Friends of Ketley Paddock Mound. It also shows the canal route passing under Red Lees just East of Ketley Hall. [4]
In this image taken from the National Library of Scotland’s website the 25″ OS Map, published in 1902, is placed immediately alongside precisely the same area on modern satellite imagery. The canal arm is central to the image. The wider area at the western end of the remaining canal (in 1902) was a wharf. [6]
This image shows the two images above superimposed on each other. The old wharf can be seen to be under the site of modern housing on the North side of Red Lees. The Hall was to the South. According to the earlier images, the canal continued down the East side of the Hall. It then probably ran West on the South side of the Hall. [7]
This picture shows a map of Ketley Paddock Mound which is on display on the South side of the nature reserve. The blue dotted line, superimposed on the image, shows the approximate line of the canal as it passes under Red Lees. The present length of the canal arm is shown in light blue on the original sign board. The Friends of Ketley Paddock Mound’s website can be found here. [My photograph, 2nd June 2022]
A view from Red Lees footpath looking Northwest to where it widens out to become a road. There is a slight rise in the road surface just in front of where the pedestrian is walking. This is the most likely location for what would have been an arched bridge, now buried and inaccessible. [My photograph, 2nd June 2022]

I followed Red Lees down to the junction with the B5061, before walking back along Red Lees following what probably was a tramway route which then drifted away from Red Lees to the Northeast as shown on tthe sketch map at the head of this article. The Ketley History website says the following: “Behind the Victorian school building that is now Ketley Community Centre, there is a footpath that leads down to Red Lees and this is also the line of a tramway, probably to serve the coal wharf that was situated on Ketley Canal where School Lane meets Red Lees now.” [5]

The view Northwest towards the junction with the B5061. [My photograph]
The view from Red Lees along the line of the probable tramway. [My photograph]
The view Northeast along the line of the tramway. [My photograph]
Further along the tramway route with what was Ketley primary school in sight. [My photograph]
Looking along the route of the tramway to what was the Canal Wharf area. The old school buildings are on the left. [My photograph]

I turned to the left and walked along School Lane to the B5061, which, incidentally was the A5 and so was Thomas Telford’s trunk road to North Wales, and so it carries the name ‘Holyhead Road’.

The Ketley Canal

The Ketley Canal was about 1.5 miles (2.4km) long. It linked the Shropshire Canal, in the small town of Oakengates, with Ketley Iron Works. It was built in the late 18th century (around 1788) and required the construction of an inclined plane to lower and raise tub-boats a little over 70ft between the level of the Works and the higher ground that it travelled over from Oakengates. [8]

The inclined plane was the first effective inclined plane in the UK. [9]

The canal predominantly carried coal and ironstone in horse-drawn tub-boats. These tub-boats where in use across Shropshire and beyond. They “were rectangular in plan, 19 feet 9 inches long x 6 feet 2 inches wide made of wrought-iron plates rivetted together. An inclined plane consisted of two rails laid parallel to each other, on each of which ran a cradle raised or lowered by a wire rope and capable of carrying one tub boat at a time. The descending cradle assisted in balancing the weight of the ascending one and the extra power required was supplied by a stationary winding engine. A boat descending an inclined plane entered a chamber where it was manoeuvred over a submerged cradle. Once in place, the boat was secured to the cradle in readiness for its journey down the plane. The cradle was then hauled up over a sill and onto the plane, at which point it was still inside the chamber. When everything was ready it commenced its descent, which required just a few minutes, and a small number of workmen were able to complete the whole operation.” [12]

The inclined plane lasted in service until 1816, closing with Ketley Iron Works. The length of canal between Ketley and Oakengates remained open for more than 60 more years until the 1880s.

“One tub-boat is preserved in the Blists Hill Victorian Town museum. It was rescued from a farm in 1972, where it was in use as a water tank. Before its discovery, it was thought that all tub boats on the Shropshire Canal were made of wood.” [13]

This tub-boat is on display at Blists Hill Museum near Ironbridge in Shropshire.

The canal ran on the north side of Holyhead Road. A few hundred yards to the West of Shepherd’s Lane the canal passed under the Holyhead Road. It “clung to the southern side of the main road for a few hundred yards … but then it moved away from the road, heading westward at the backs of what are now gardens on Holyhead Road until it reached Shepherd’s Lane.” [9]

The Eastern portal of Shepherd’s Lane Tunnel is still visible in a private garden. [4]

The canal entered a short tunnel under Shepherd’s Lane and emerged into Ketley Paddock Mound (as it is now called). The length of canal which is preserved in the nature reserve can be reached from a number of directions.

The route I took was to walk East along Holyhead Road to the bus stop adjacent to one entrance to Ketley Paddock Mound. The bus stop is a delight! It was painted in 2018 by Fran O’Boyle and funded by the Ketley Parish Council and the Friends of Ketley Paddock Mound. [10][11]

The bus stop which is owned by Ketley Parish Council is outside Ketley Paddock Mound was decorated in 2018. It was created by Fran O’Boyle and funded by the Parish and the Friends of Ketley Paddock Mound. [10][11]

And I then entered the nature reserve through the gate visible in the photograph above. Immediately inside the gate is another public information board. The image below is an extract from my photograph of the board. …

Entering the nature reserve from adjacent to the Bus Stop on Holyhead Road, the path climbs through open meadow and paddock. It curves round a small pond before the remaining section of the Ketley Canal is reached. [15]

This next sequence of photos shows the walk up to the remaining section of the Ketley Canal as highlighted on the map extract immediately above.

The path from Holyhead Raod. [My photograph]
Buttercups in flower in the paddock to the East of the footpath. [My photograph]
The footpath winds gently up hill to the old canal. [My photograph]
The Ketley Canal. This remaining section of the tub-boat canal is now given over to nature. Just before taking this picture I watched a Kingfisher fly along the length of the water. Behind the camera is the cutting which led to the tunnel under Shepherd’s Lane. [My photograph, 2nd June 2022]

The walk back to my car took me over the top of the Paddock Mound which was the slag-heap made up of arisings from local pits and mines.

References

  1. https://maps.nls.uk/view/121150301, accessed on 2nd June 2022.
  2. T. Lowe; A Ketley Mon; British Bus Publishing Ltd., Wellington, Shropshire, 2000.
  3. https://www.facebook.com/groups/232901083430144, accessed on 31st May 2022.
  4. https://ketleypaddockmound.org/history, accessed on 2nd June 2022.
  5. https://historicketley.wordpress.com/ketley-wagonways-tramways, accessed on 3rd June 2022.
  6. https://maps.nls.uk/geo/explore/side-by-side/#zoom=18&lat=52.69405&lon=-2.47516&layers=168&right=ESRIWorld, accessed on 3rd June 2022.
  7. https://maps.nls.uk/geo/explore/#zoom=18&lat=52.69408&lon=-2.47518&layers=168&b=1, accessed on 3rd June 2022.
  8. https://en.m.wikipedia.org/wiki/Ketley_Canal, accessed on 3rd June 2022.
  9. http://www.canalroutes.net/Ketley-Canal.html, accessed on 3rd June 2022.
  10. https://ketleypaddockmound.org/how-to-find-ketley-paddock-mound, accessed on 3rd June 2022.
  11. https://www.shropshirestar.com/news/local-hubs/telford/2018/12/13/animal-magic-fran-transforms-telford-bus-shelter-with-wildlife-mural, accessed on 3rd June 2022.
  12. http://www.pittdixon.go-plus.net/shropshire-tbc/shropshire-tbc.htm, accessed on 4th June 2022.
  13. https://www.wikiwand.com/en/Tub_boat, accessed on 4th June 2022.
  14. https://ketleypaddockmound.org/how-to-find-ketley-paddock-mound, accessed on 26th January 2023.
  15. https://www.pogomap.info/location/52,695131/-2,473662/18, accessed on 26th January 2023.