Category Archives: Railways and Tramways Blog

Gloucester Docks and Railways – Part 2 – The High Orchard Branch and Railways to the East Side of the Docks

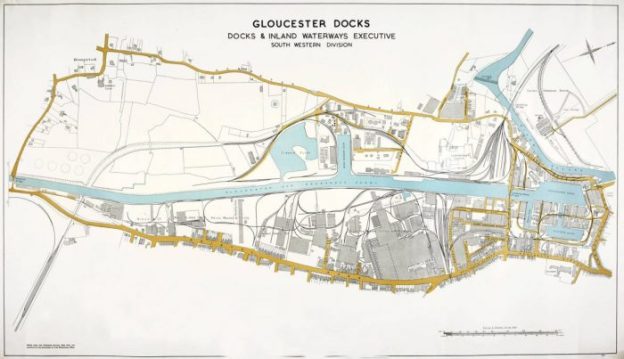
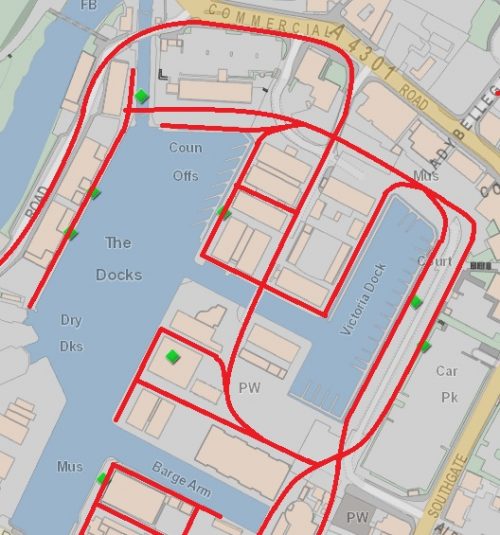
The featured image above is a 1951 Plan of Gloucester Docks which was produced by the Docks and Inland Waterways Executive South Western Division in 1951 which was found on the Llanthony Secunda Website. [14]

Railways on the East Side of the Docks

The railways on the East side of the docks replaced the older tramroad/plateway which served the dockside. They were sidings from the Midland Railway in Gloucester, whereas the railways to the west of the docks were sidings from the Great Western Railway.

It had initially been intended to follow the alignment of the Gloucester and Cheltenham Tramroad into the docks from the East. This was always going to be impracticable as the tramroad operated with tight curves through the streets of Gloucester. In the end, these Eastern sidings had to be served from elsewhere. Within the main docks area they took over the role of the tramroad in two separate phases. The first phase came about as a result of the tramroad route along the east side of the Main Basin between it and what became the Victoria dock, was cut as part of the construction of the Victoria Dock and was not re-instated.

In this phase, the Midland railway sidings took over the whole of the area North of the Barge Arm. A new Midland Railway Branch was built to make this possible – The High Orchard Branch.

In a second phase the Midland Railway took an effective monopoly over the area immediately  to the South of the Barge Arm. It was at this time (1861) that the tramroad closed completely. These additional sidings were also served from the High Orchard Branch.

Steam was used on the main sidings of the new system but horse were still gainfully employed on some of the wharves, warehouse sidings and quays of the docks, specifically where these were accessed by wagon turntable rather than points.

The High Orchard Branch

I first came across the branch when reading one of the volumes of ‘British Railway History in Colour’ published by Lightmoor Press and compiled by Neil Parkhouse. [1]

In this volume of what is a magnificent series of books there is a section dedicated to the High Orchard Branch and the Sidings on the East side of the Docks. [1: p51-80]

Parkhouse notes that the Midland Railway opened its High Orchard Branch in 1848 which was 6 years before the Great Western Railway opened its Llanthony Branch. [1: p52] He notes that as the 19th century progressed the network, in and around the Docks, developed significantly. Many of the sidings were owned by the Docks Company and leased jointly to the two railway companies to operate. This did not work effectively and from 1880 it was agreed that the Midland (MR) would operate on the East side of the Canal and Docks and that the Great Western (GWR) would operate on the west side of the site. [1: p52]. This arrangement held, with the exception of some disputes over a new branch built by the Midland as the end of the 19th century approached.

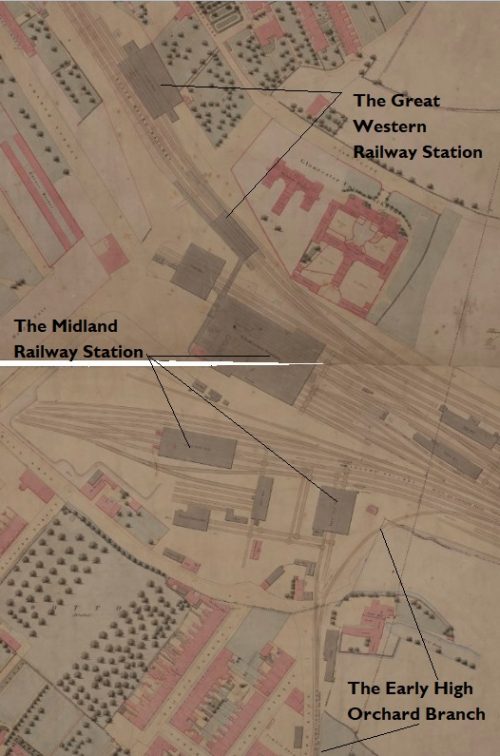
The 1843 map of Gloucester does not show the Midland Railway line which curved through the eastern area of the City of Gloucester. It clearly shows the route of the old tramroad and Gloucester Railway Station which sat on the East side of the old city on roughly the same latitude as the cathedral. The MR took over the Bristol and Gloucester Railway and the Birmingham and Gloucester Railway in 1845 and the original station became the MR Station in the City. This is shown on the  extract from the map drawn 1843 below.

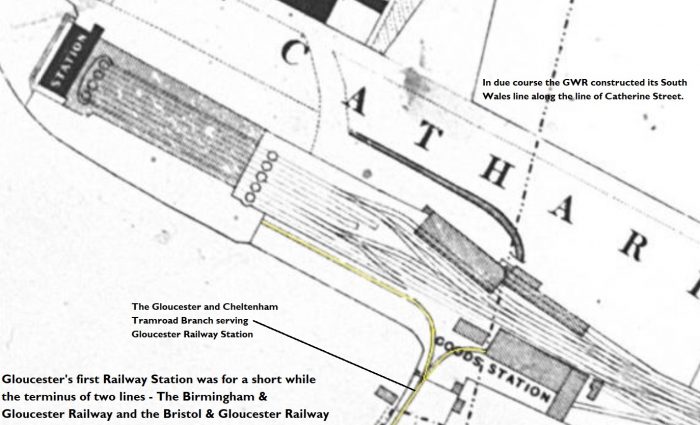
The Midland Railway Station in Gloucester – the image is an extract from Causton’s 1843 Map of Gloucester. [2]

The Midland Railway Station in Gloucester – the image is another extract from Causton’s 1843 Map of Gloucester and shows the planned railways close to the station. [2]

In 1848 the High Orchard Branch was completed it ran from the mainline access to the MR railway station down across Barton Street and then curved to the west through the bottom corner of the Park. Its route is shown in red below.

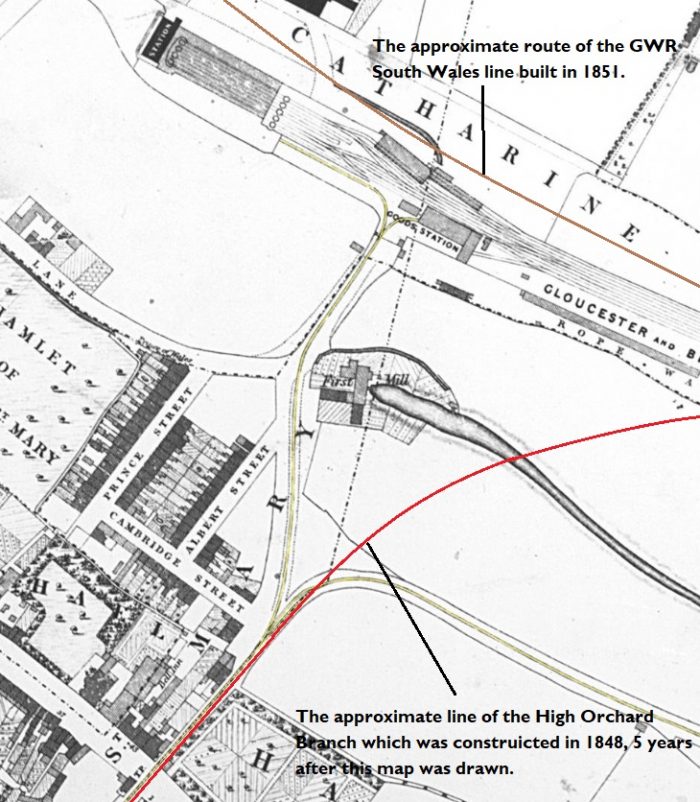
In 1851 the GWR built its South Wales line across the North of the city and built its own station to the North of the MR station. The approximate line of the GWR South Wales Route near the MR Station is shown on the plan above. The two stations shared the same throat although they were still operating on different track gauges.

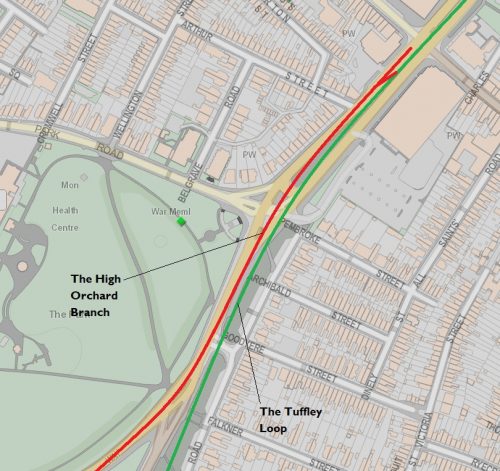
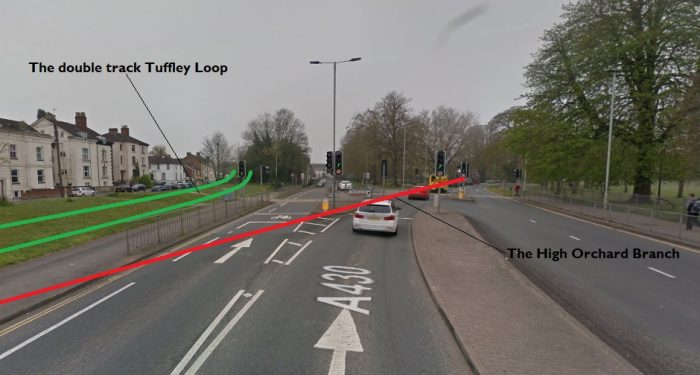
In 1854 the MR built its Tuffley Loop because the rapid expansion of the rail network had left their station difficult to work. The Loop followed the first part of the original High Orchard Branch and then headed away t the Southeast to meet the MR mainline which ran to the East of Gloucester. Parkhouse notes that the issues surrounding the MR station were only partially resolved by the construction of the Tuffley Loop. It did however allow the MR to “dispence with the operation of broad gauge trains. The line was effectively and extension of the High Orchard Branch to the docks, with the twin tracks of the loop curving away from the docks branch between Barton Street and what was to be the site of California Crossing.” [1: p82]

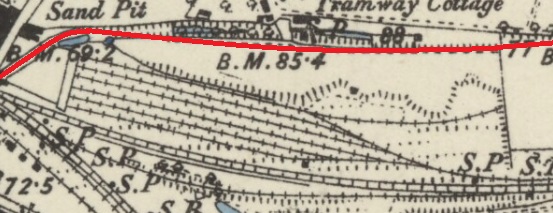
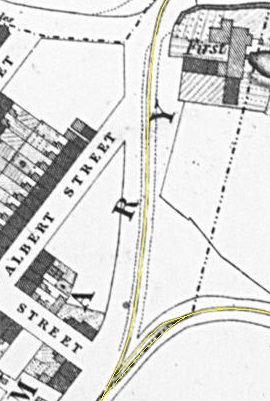
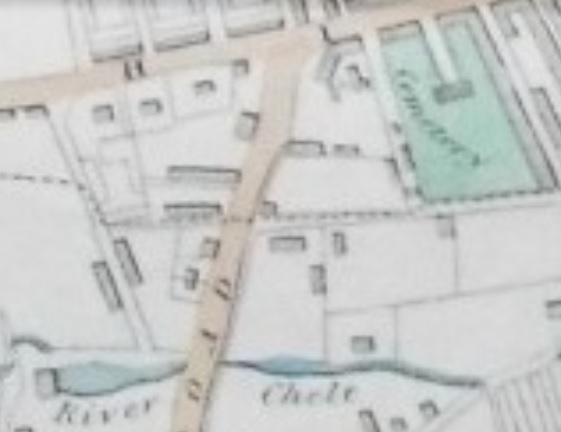
The 1852 Map drawn for the Local Board of Health can be found in an interactive form on the ‘Know Your Place’ Website [3] This Map predated the construction of the Tuffley Loop. It shows the original form of the High Orchard Branch and its route through into the docks There is a short section of the route which falls outside the mapping area. The name ‘High Orchard’ acknowledges the early use of the land as an Orchard for Llanthony Priory.

In the 1852 map the developments in the station area are visible – the GWR line is shown as was, at the time, only recently open to traffic. The station ‘yard’ and sidings of the MR station are by this time more complex.[3]

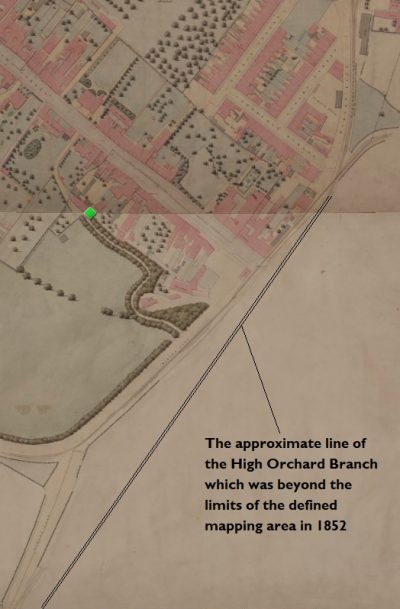
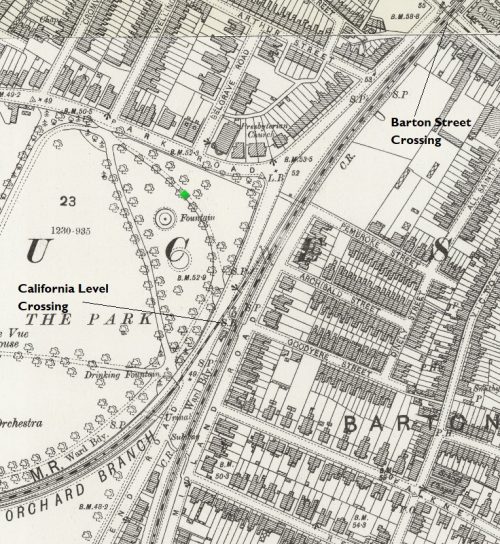
The Branch crossed Barton Street close to the old Tramroad and curved to the West around the bottom of Gloucester’s Park. On the curve, it  became double-track for a short distance which, I guess, gave trains room to pass and may also have been used as storage space when trains arrived before they could be taken down into the docks. This can be seen on the third of the map extracts on the bottom side of the Park. [3]

As it left the Park area, the Branch once again became single track. This can be seen at the left-hand side of the third extract from the 1852 map. It was then just a matter of a few 10s of yards before the dock complex was reached and the fourth map extract shows this area. [3]

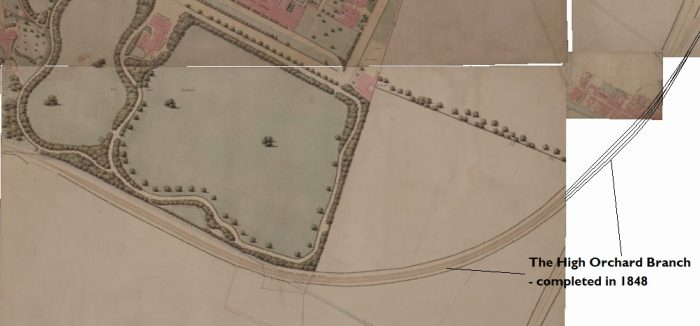
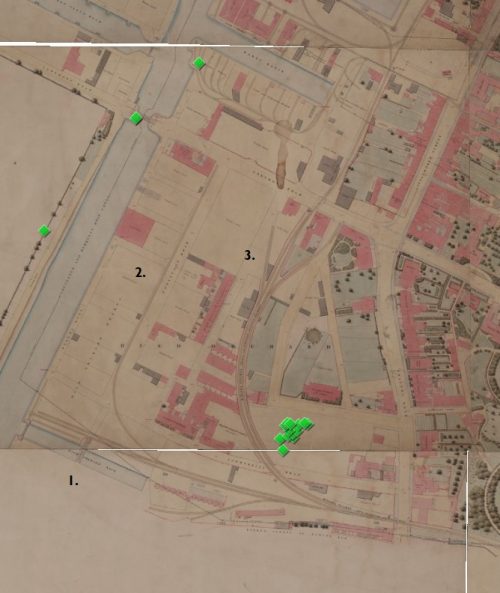
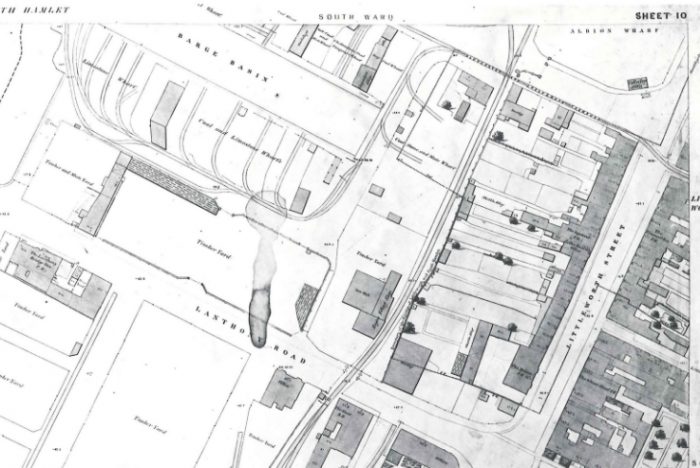
The fourth map extract shows three main areas to the South of the Barge Arm which can be seen centre-top of the map extract.

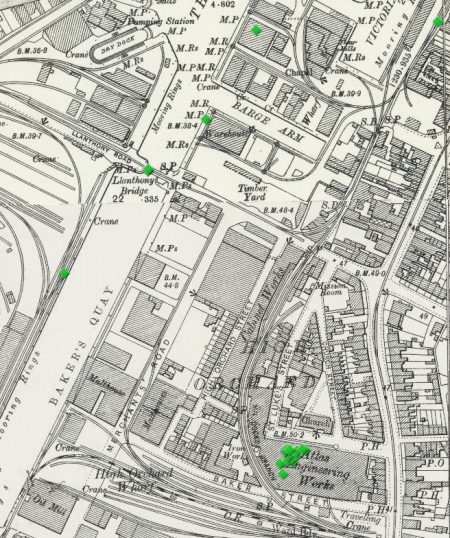
First, there are sidings around the High Orchard Dock at the bottom left of the extract. (1)

Second there is a single long siding giving limited access to the rail network for canal frontages between High Orchard Dock and the more northerly Barge Arm. (2)

Third, a series of sidings (3)accessed from the main branch which curved round to the north to serve properties North of the Barge Arm.

The fifth extract from the 1852 Map (adjacent) highlights the sidings which served the Northern part of the docks at this early stage. It is worth noting that the Tramroad sidings on the North side of the Barge Arm have now been removed and replaced by standard-gauge lines. On the map, the Gaol can be picked out centre-top (4) next to the River Severn (5). The two main basin are central to the extract – The Basin (or Main Basin) (6) and Victoria Dock (7). These two docks are linked by a short canal which severed the tramroad access and which has not by the time of the map been bridged by the MR sidings. [3]

The next series of maps of Gloucester which we have access to are those prepared between 1880 and 1925. Three series of 25″ OS Maps appeared in relative quick succession – Series 1 (1886), Series 2 (1901) and Series 3 (1923).

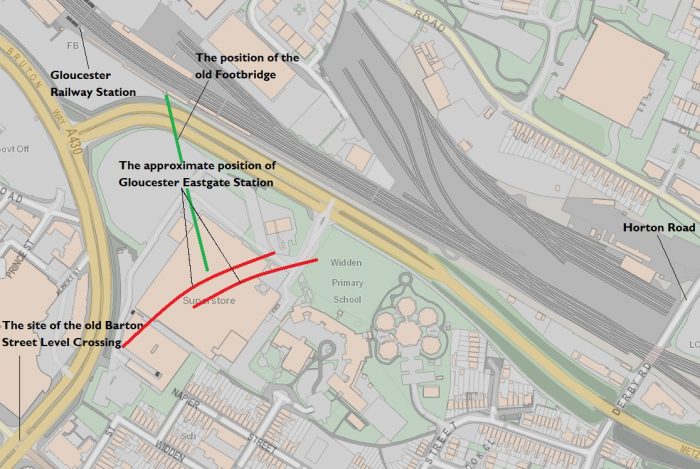
Firstly, Series One.  In the first extract below we see what was the northern end of the High Orchard Branch in the East of the City. By the time this map was drafted, the railway network had expanded considerably. The pattern of railway lines close to Gloucester Station had begun to look much like it would be in later years. The two Gloucester Stations (A & B) were at this time still adjacent to each other. The Midland Loco Shed is in a position (C) which would soon eb seen to be preventing expansion. The lines of the Tuffley Loop follow what was the older High Orchard Branch across Barton Street (D).

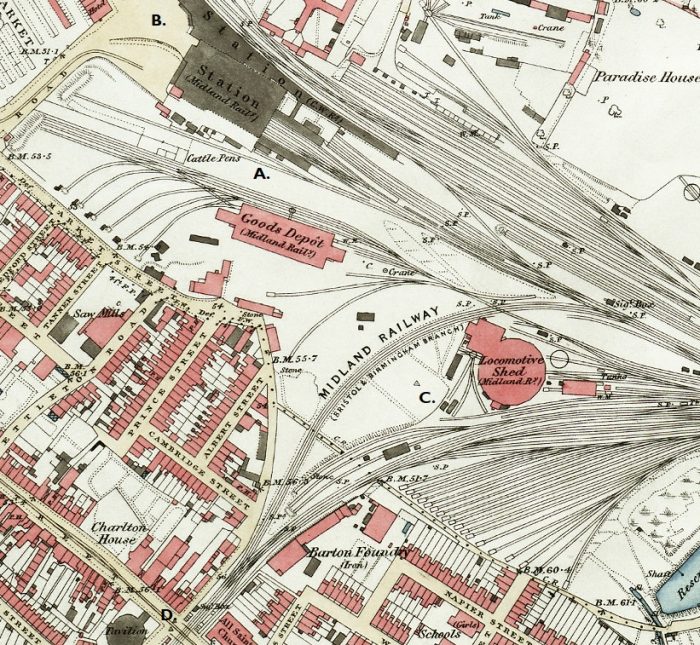
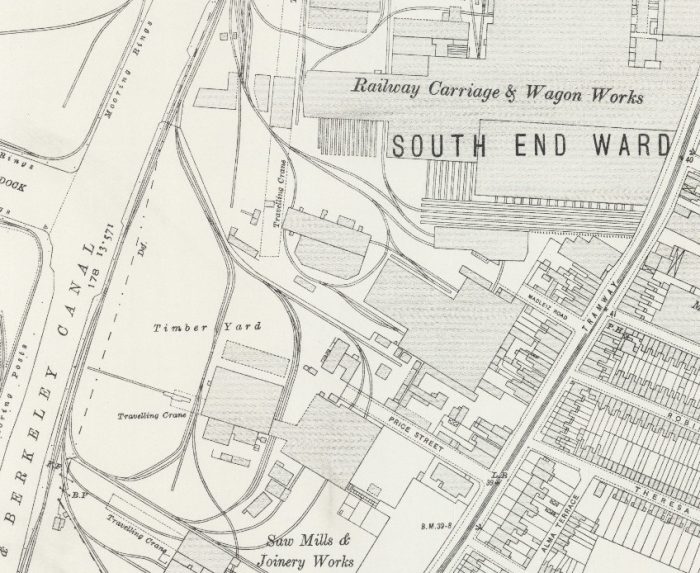
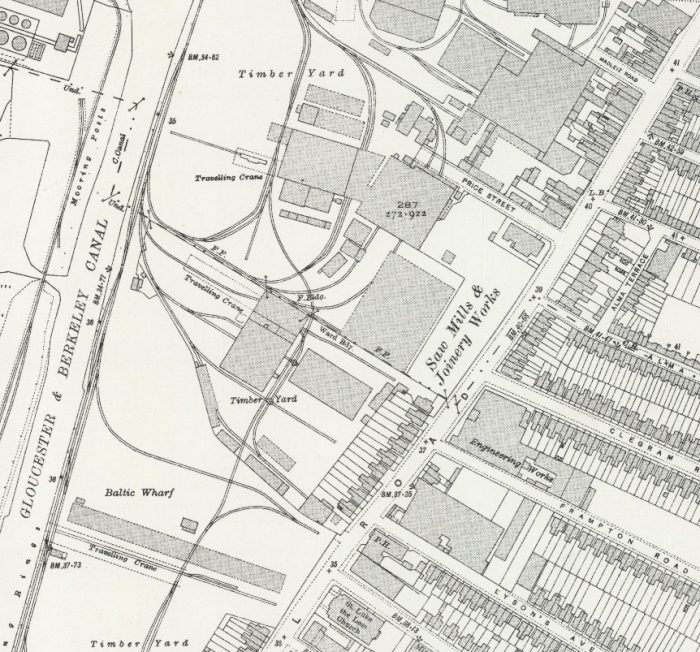
Very little else on the High Orchard Branch differs from what can be seen on the Series 2 Map extracts below. However, one area which was still under used at this time, was that South of the early buildings of the Wagon Works shown on the adjacent extract. Railway sidings hugged the canal bank to provide access to timber yards further south along the canal. These appear in the bottom left of the map extract.

The area alongside the Canal at that location was known as Canada Wharf.

Secondly, Series Two, The first extract below shows that the Midland Station had been moved to the Southeast when this map was drafted. This meant that it was possible for the New Midland Station (Eastgate) to be a through station, making the handling of trains significantly easier. The Loco Shed  to the east side of the map is the GWR Shed at Horton Road. A footbridge now links the two stations. The MR Loco Shed was just off the east side of the map extract.
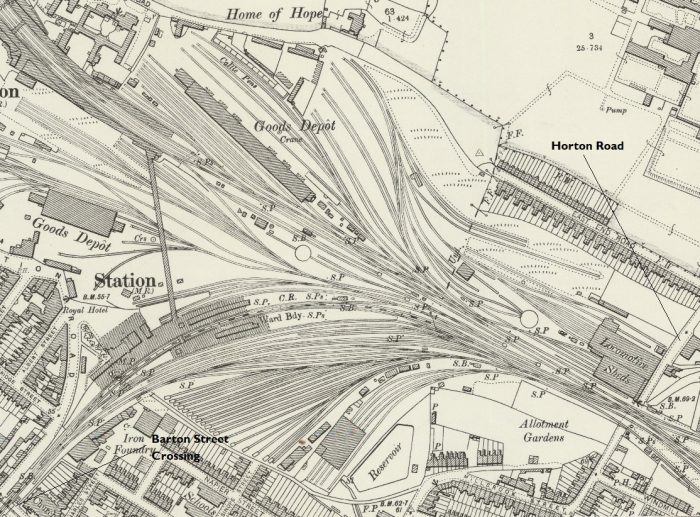
EPW041489 – Britain From Above – Great Western Road, the railway stations and city centre Gloucester, from the east, 1933. [4]
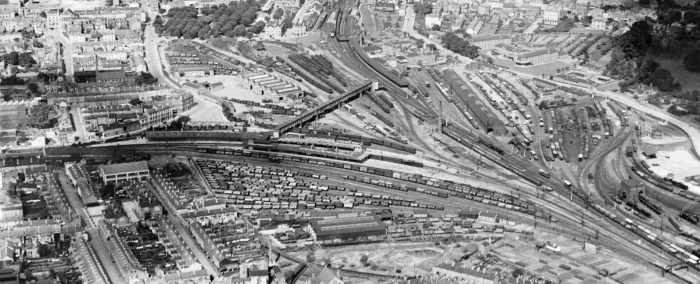
EPW024156 – Britain From Above. Central Station, Eastgate Station and railway sidings, Gloucester, 1928. [5]

Heading to the Southwest across the Barton Street level crossing the map shows the Tuffley Loop leaving Eastgate Station (the MR Station).

The second extract shows the High Orchard Branch leaving the Tuffley Loop at a very shallow angle and crossing Parkend Road, again on a very shallow angle and curving round to the West.

EPW024171 – Britain From Above. The area between Park Road and the railway station, Gloucester, 1928. This shows the route of the Tuffley Loop down the East side of Gloucester and the point at which the High Orchard Branch left that route. [6]
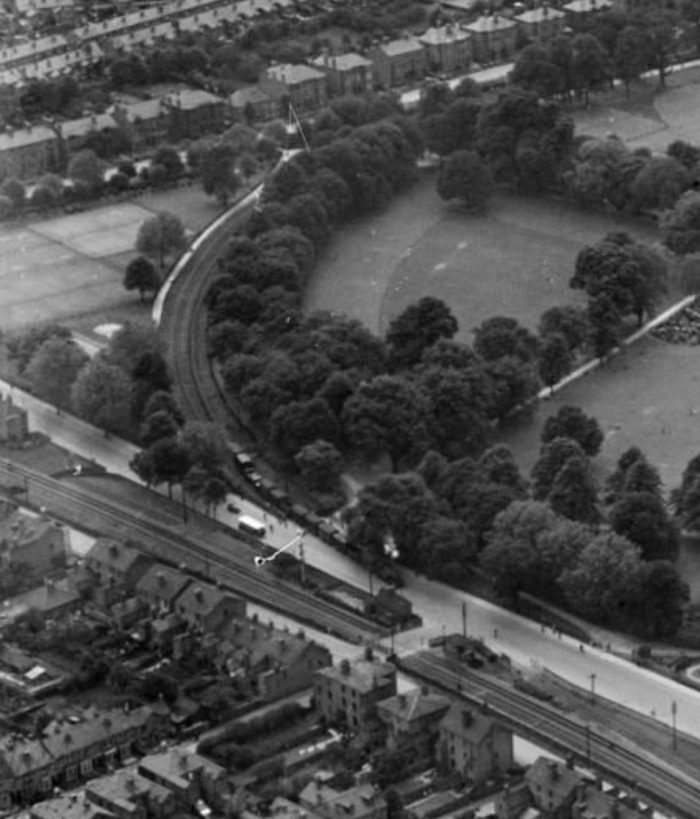
An extract from EPW050780 – Britain From Above. The photograph was taken in 1936 and the extract shows the junction between the High Orchard Branch and the Tuffley Loop. California Crossing can be seen in the bottom-centre of the image. [50]

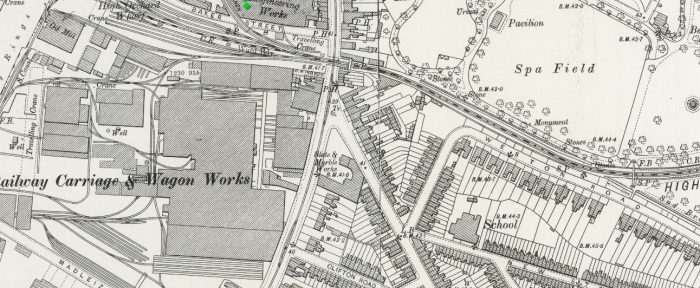
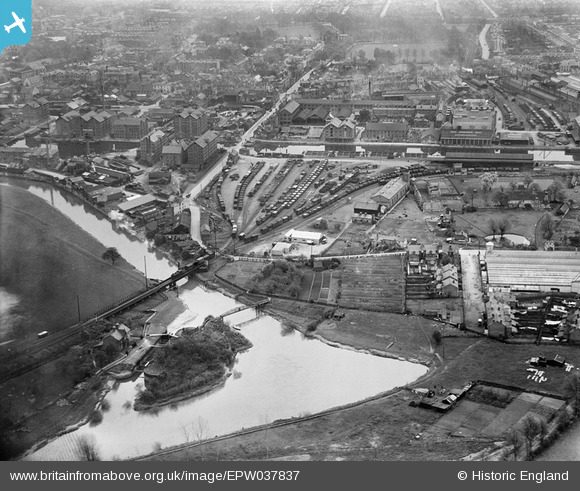
An extract from EAW012211 – Britain From Above. Gloucester Docks and the surrounding industrial area, Gloucester, 1947. This shows the High Orchard Branch and its sidings on the far side of the Canal. The photograph is taken from the West. [7]

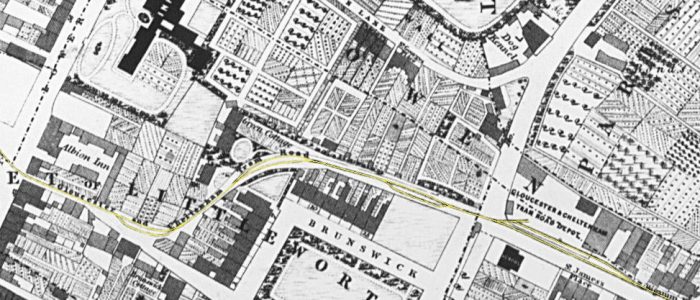
The third extract, which appears above at a slightly smaller scale, shows the Branch crossing Lower Southgate Street and providing access to enhanced siding approaching the canal. Space has been created for these sidings by infilling the High Orchard Dock which was visible on the 1852 Map. Gloucester Carriage and Wagon Works had grown significantly since they first opened in the 1860s and had a complex of lines serving its site.

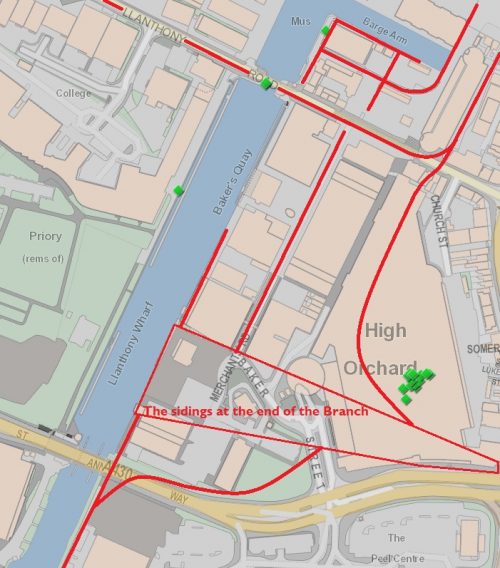
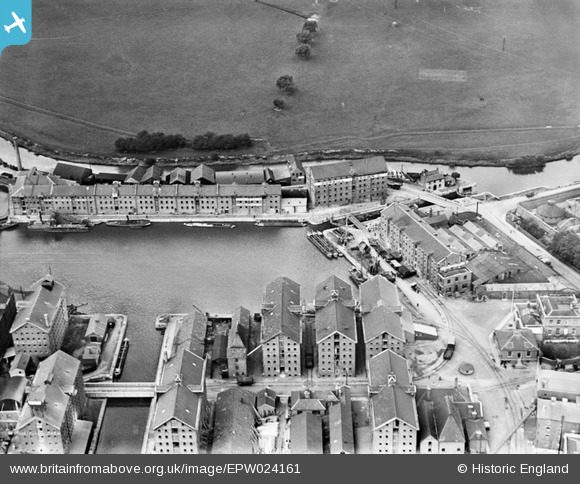
As shown by the fourth map extract, the two lines running north from the sidings had changed little until they reached Lanthony Road. An East-West line crossed Lanthony Bridge linking the West and East Sidings. and which met the ongoing Midland lines at a trailing crossing. This map also shows that new sidings had been developed on the South side of the Barge Arm to serve premises which in 1852 were still being served by the Gloucester and Cheltenham Tramroad.

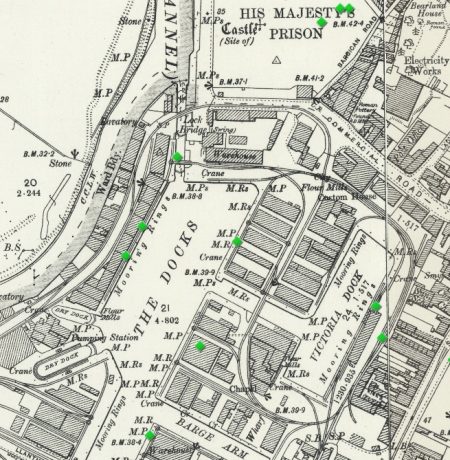
The fifth extract shows the most northerly end of the docks complex. Things to note here include: the line crossing the bridge across the canal between the Main Basin and Victoria Dock; the two link bridges across the locks leading to the River Severn, North of the Main Basin which allowed access to the West side of the Main Basin; the fact that no attempt has been made to serve the quays on the river to the North of these Locks.

An extract from EAW012204 – Britain From Above. Gloucester Docks and the surrounding warehouses, Gloucester, 1947. [8]

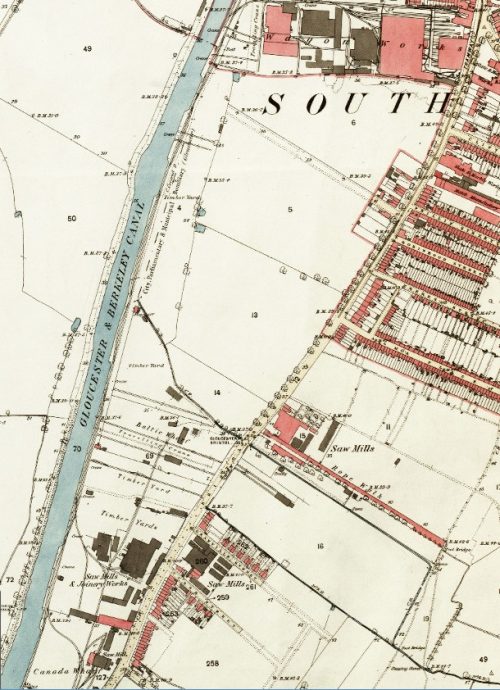
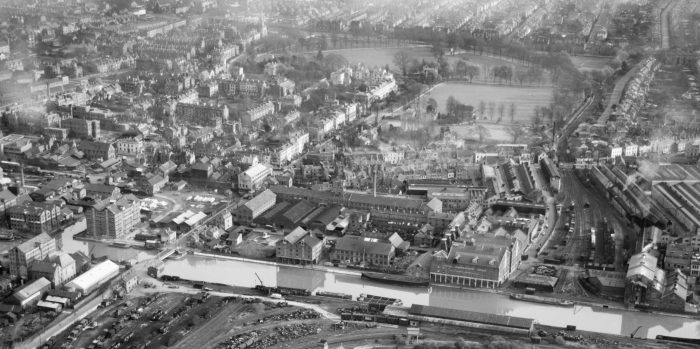
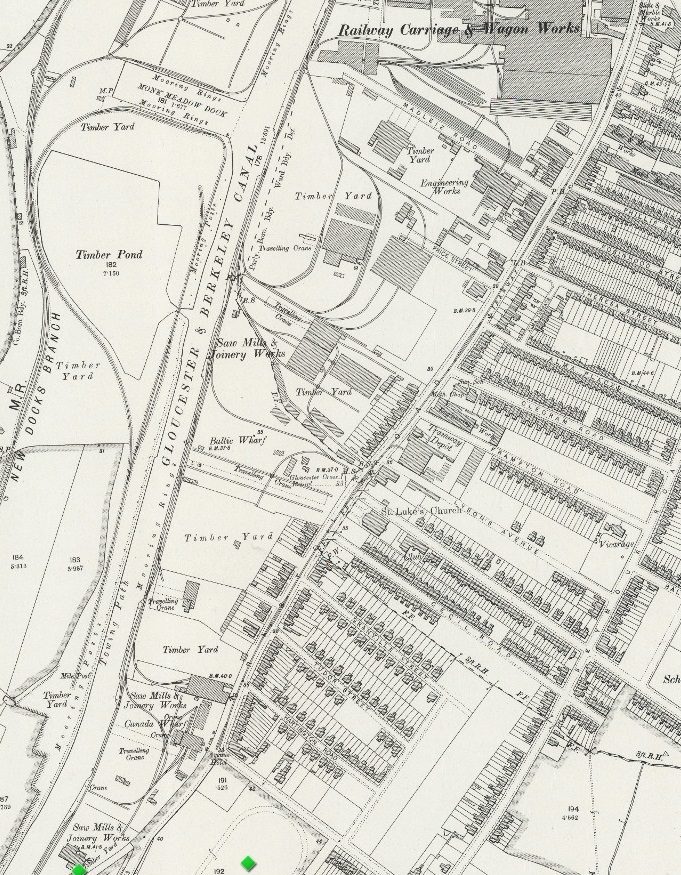
Finally, above, on the Series 2 mapping, we have zoomed out to get an idea of the railway system South of the Railway Carriage and Wagon Works alongside the Gloucester and Berkeley Canal, which were referred to in the notes about the Series 1 mapping. The Carriage and Wagon Works had expanded and new timber yards were now served by the railway.

An extract from EPW016965 – Britain From Above. This shows the Baltic Wharf and timber yards on the Gloucester and Sharpness Canal, Gloucester in 1926. Very soon after the Series 3 OS Maps were produced. The map extract below covers this area. [9]

The most significant overall difference between the Series 2 maps and the Series 3 OS Maps is the mapping style. However, there is one area of the map which has changed – the area shown below, This is the area south of the Carriage and Wagon Works. Madleiz  Road, just to the South of the main site of the Wagon Works, has been shortened significantly to allow the Wagon Works to expand southwards. The track-work has been expanded in this area to serve new works building(s).By the 1950s, the Carriage and Wagon Works was redeveloped and modernised. External track-work seems to be only marginally changed from the 1920s.
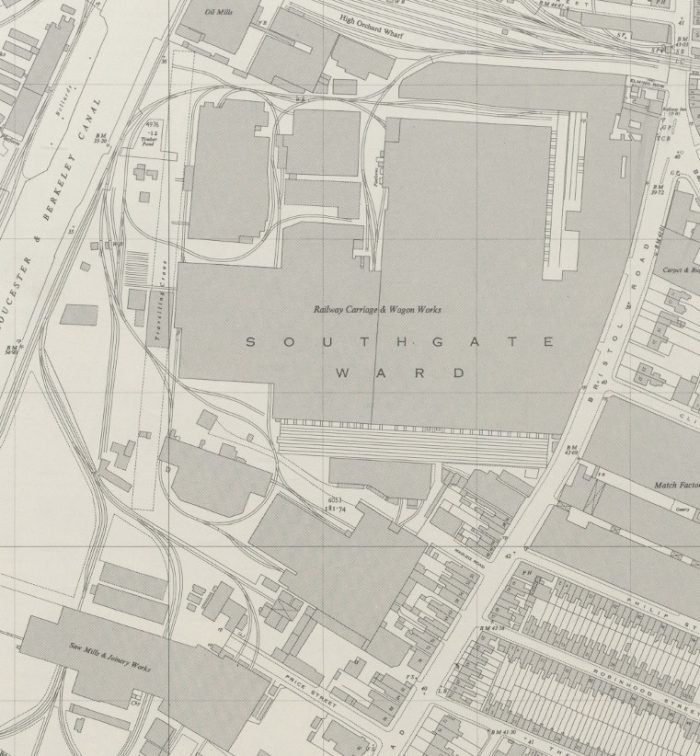
1950s 25″ OS Map of the Carriage and Wagon Works. [10]

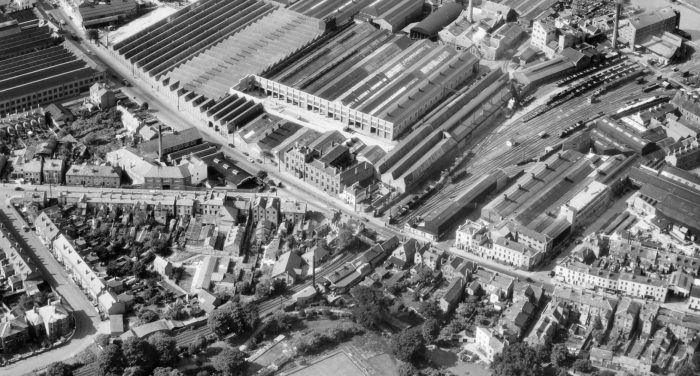
An extract from EAW032295 – Britain From Above. The Gloucester Railway Carriage and Wagon Company Works and environs, Gloucester, 1950. The main sigins of the High Orchard Branch seem tightly hemmed in between the industrial buildings. [11]
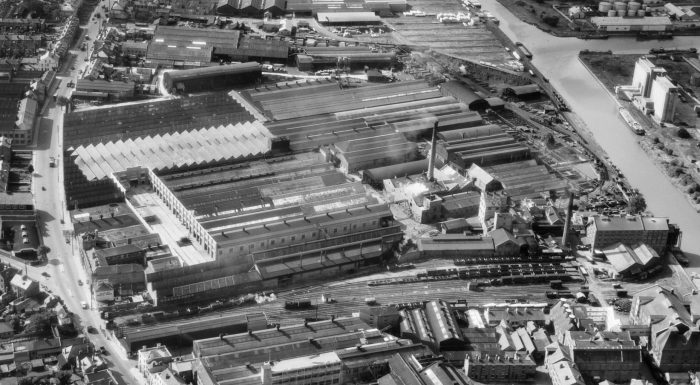
An extract from EAW032296 – Britain From Above. The High Orchard Branch sidings are shown to good advantage, 1950. [12]

A final set of maps [13] show the area to the east of the Docks as it is in the early 21st century after significant redevelopment has occurred.

The modern Trier Way (A430) follows the line of the old High Orchard Branch as far as Southgate Street. This is mapped on the adjacent image and on the one below. [13] The next map extract shows the approximate relation of old lines to the modern High Orchard Area, Shopping Centre and St. Ann Way (A430).

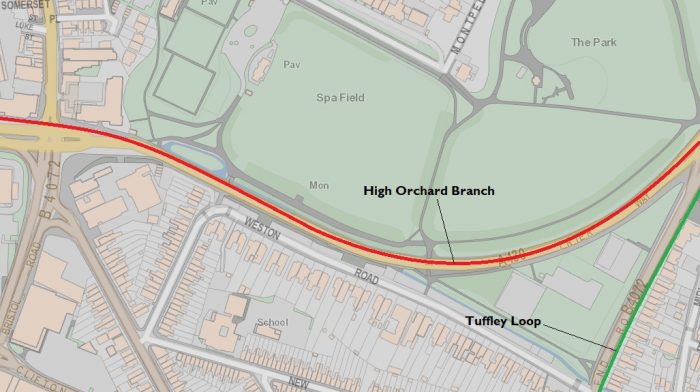
The final map in this sequence shows the Northern end of the docks. These maps do not always appear at the same scale in this blog. They are schematic illustrations rather than accurate plans. The lines shown for the dock railways and sidings are only approximate. Detail can be gleaned from the earlier maps above. However, these plans illustrate that modern development has generally respected the alignment of the old dock buildings. This clearly has not bee possible in the case of the new shopping development at High Orchard.

The High Orchard Branch

We have already noted that this Branch left the Tuffley Loop just to the south of the Barton Street Level Crossing. Up to now, we have primarily concentrated on mapping and aerial images to give an idea of the Branch and its sidings. We now look at the route of the Branch and its sidings from ‘street’ or ‘rail level’ wherever that detail is available to us.

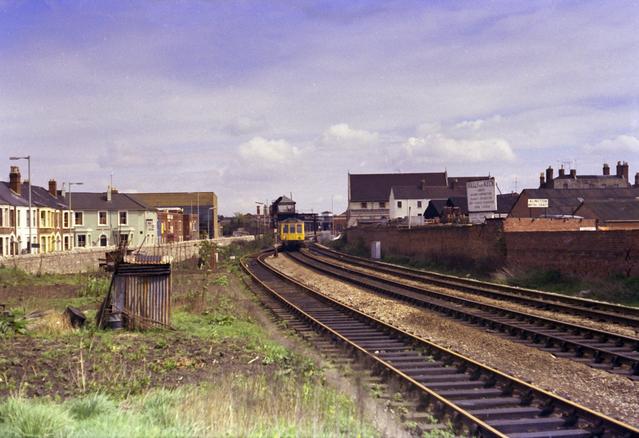
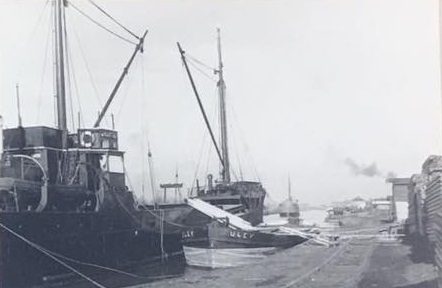
This view was taken in 1975 looking North towards Barton Street Crossing. The High Orchard Branch has not yet been lifted and is the railway track to the left of the mainline, leaving the mainline to the left of the  DMU, (c) David Stowell / Towards Barton Street / CC BY-SA 2.0 [16]
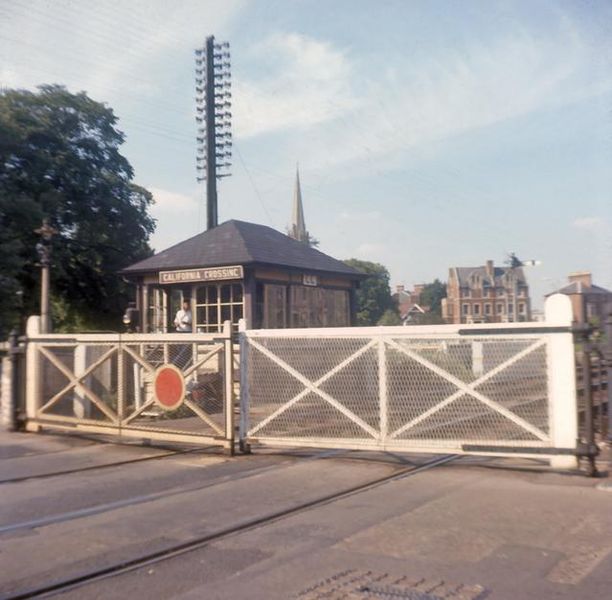
California Crossing looking North towards the Barton Street Crossing. The Park can be seen to the left of the image. The High Orchard Branch has left the Tuffley Loop and runs across Parkend Road at a very shallow angle behind the crossing gate in this picture, (c) David Stowell / California Crossing / CC BY-SA 2.0. [17]

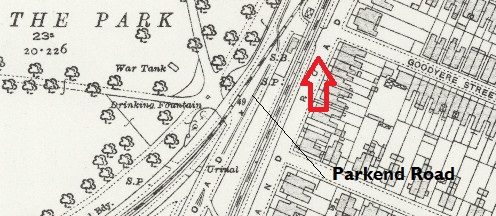
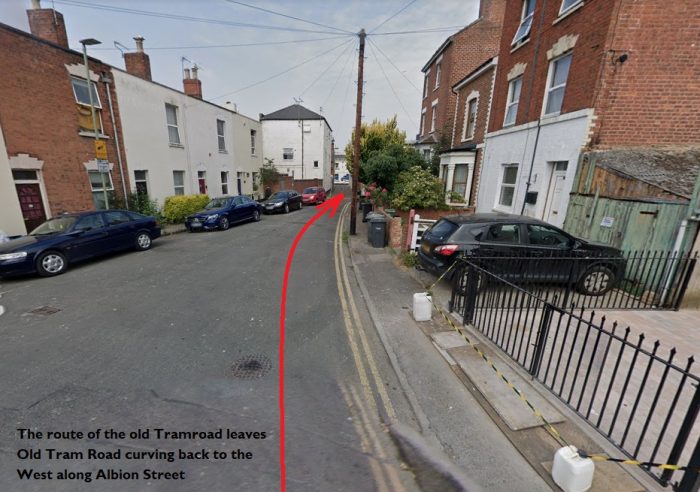
The picture above is taken, as shown by the red arrow, on the adjacent map extract.The next picture shows the California Crossing at an earlier date and is taken from within the park. The tracks of the High Orchard Branch cannot easily be picked out on this picture, but they run under where the Ford Anglia is waiting to turn across the Level Crossing. [18]

There are some excellent pictures of the eastern end of the High Orchard Branch in Neil Parkhouse’s book [1: p53-58], in Ben Ashworth’s pictorial essay on the railways of Gloucestershire in the steam era [21: p6-8], and in Colin Maggs’ book, ‘The Branch Lines of Gloucestershire’ [22: p66] but not many that I can find across the web. There are also photographs available in the Gloucestershire Archives. [23]

Colin Maggs’ book includes a picture of the gated entrance to the High Orchard Branch which was taken on 9th March 1968 by Derrick Payne. Ben Ashworth’s book includes a series of great photographs of steam at work in the docks area and a couple of excellent shots of the eastern end of the branch: one of ex S&DJR 2-8-0 53806 crossing Parkend Road heading away from the docks on 12th May 1961; and one, taken on 4th June 1962, showing MR class 0F 41535 hauling a timber load away from the docks and passing under the footbridge which gave access to the South side of the park from Weston Road.

Early 21st century view looking South across the location of California Crossing (Google Streetview).

There are a few photographs of the area around California crossing in Ben Ashworth’s first book, “The Last Days of Steam in Gloucestershire.” [51: p59-60] These include: a shot of Locomotive No. 41537 crossing Parkend Road on its way onto the branch, travelling cab first;  S&DJR travelling tender first onto the branch; and Wigmore Castle  on the Tuffley Loop heading south across California Crossing.

As we have already seen, the branch curved to the West on the South side of Gloucester Park. Neil Parkhouse’s book should to be consulted if you wish to see images along the length of the line as it runs towards Southgate Street. [1: p53-58] Ben Ashworth’s book also includes a picture of 41535 on 17th December 1962, shunting the yard at High Orchard which took it East along the branch before setting back across the Crossing at Southgate Street.

Southgate Street Level Crossing on the High Orchard Branch (c) A Rigby. [19]

The adjacent picture shows the level crossing at Southgate Street and is taken looking West into the docks complex. The factory buildings on the right are part of the former Fielding & Platt engineering works. [19]

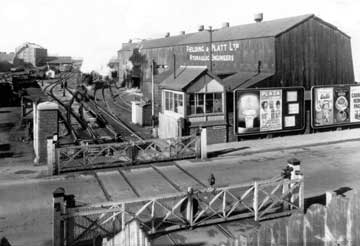
The ‘Fielding and Platt History’ website [20] has a number of pictures which show the High Orchard Yard.

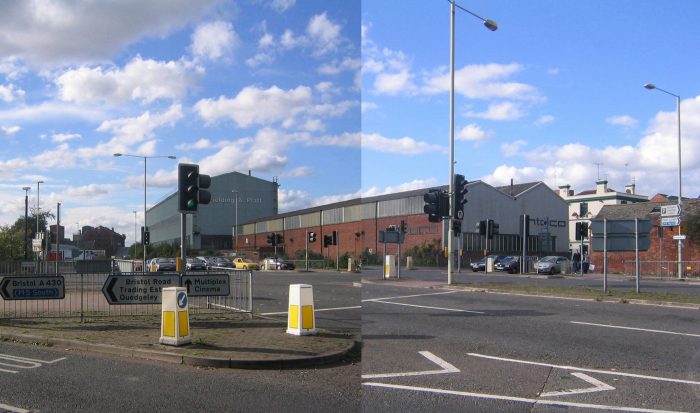
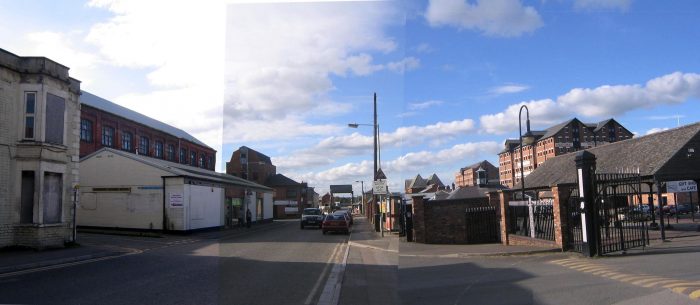
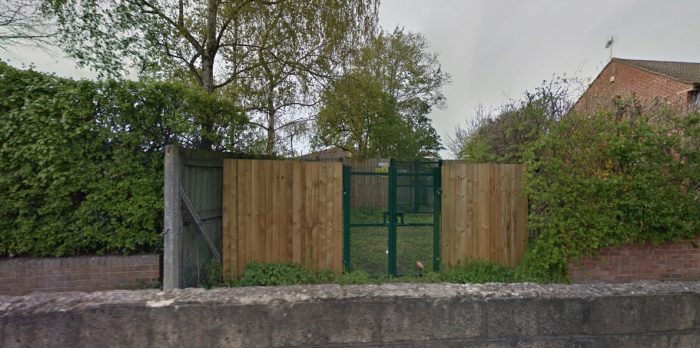
The same Junction in 2002 after the building of St. Ann Way, but before the demolition of Fielding and Platt’s site to make way for the High Orchard Shopping Centre (https://www.gloucestershirelive.co.uk). [24]
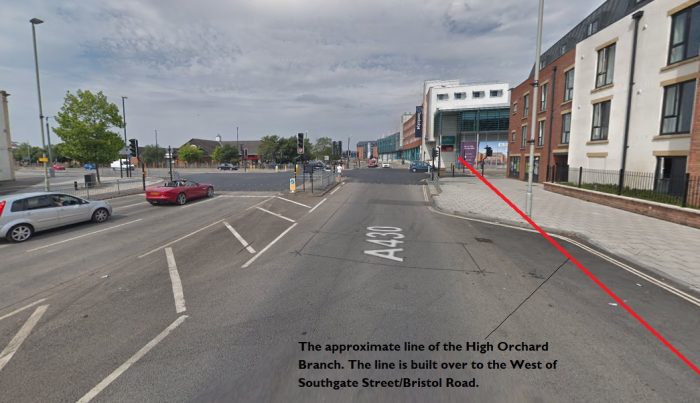
To the West of Southgate Street the line divided to form High Orchard Yard. Most of that Yard is now under the buildings of the High Orchard Shopping Centre (Google Streetview).

The High Orchard Yard ran along the South side of the Fielding and Platt site and on the North side of Gloucester Railway Carriage and Wagon Works site. As noted above, in searching the internet, I have discovered some pictures of the Yard on the The ‘Fielding and Platt History’ website [20] I have very kindly been given permission by them to share these pictures here. 
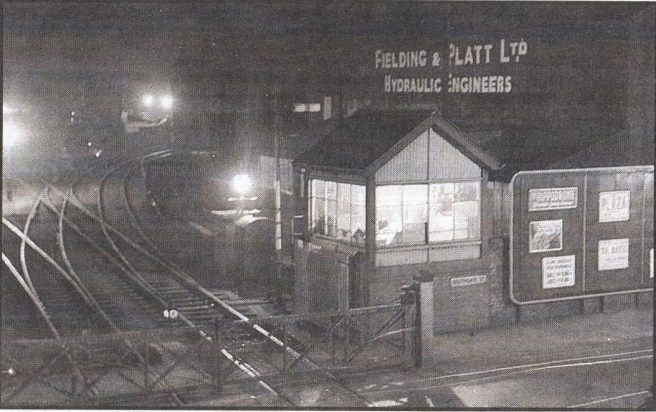
A night-time shot of the level crossing on Southgate Street/Bristol Road. The crossing provided access from the Branch into High Orchard Yard (c) Henry Jenner. [20]
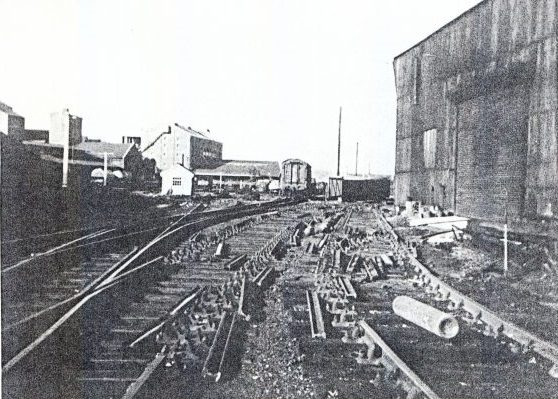
High Orchard Yard with the tracks in the process of being lifted. (c) Paul Regester. [20]High Orchard Yard again, this time prior to dismantling of the track-work but further into the site. (c) Paul Regester. The image shows the rear of No. 1 Hydraulic shop, the Boiler Yard and the Former Iron Foundry. The tracks curving away ahead of the photographer are the lines which provide access the the main dock basins. [20]
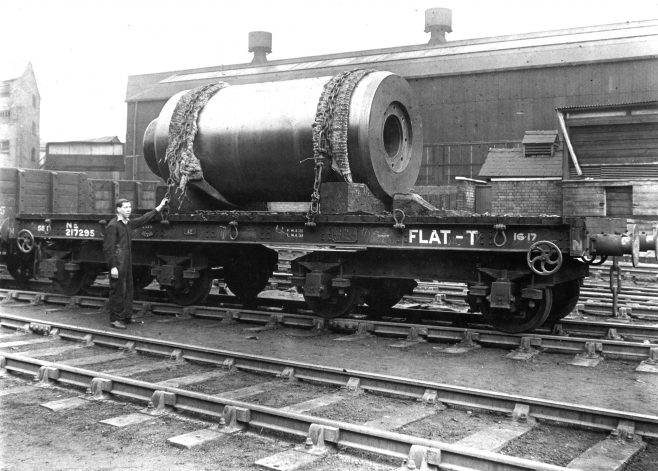
This picture is taken from the South looking towards No. 1 Hydraulic Shop (c) Ralph Tucker. [20]

Paul Regester notes this picture as showing the unloading of an F&P Press for modification in the plant (c) Paul Regester. [20]

The last three pictures show the unloading of wagons supplying Fielding and Platt in High Orchard Yard. The first looks from the South across the Yard towards Fielding and Platt’s factory. The remaining two pictures seem to have been taken of the same operation but from different angles. The first from the East, the second from the West.

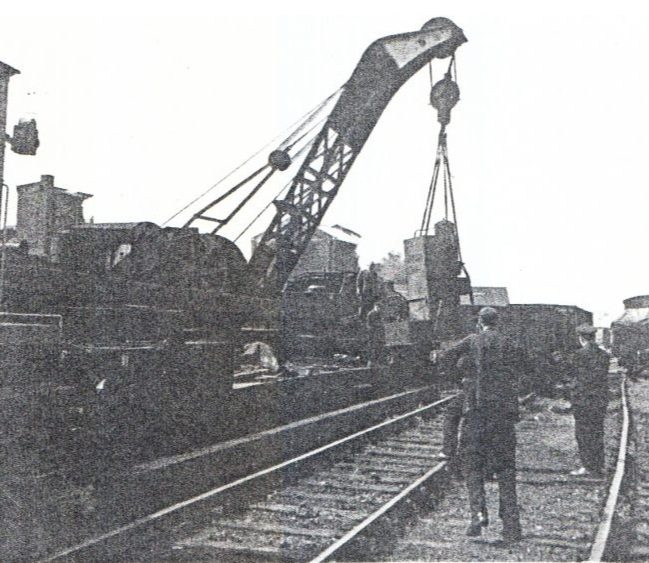
High Orchard Yard – Crane at work, probably taken looking West towards the Canal (c) Paul Regester. [20]
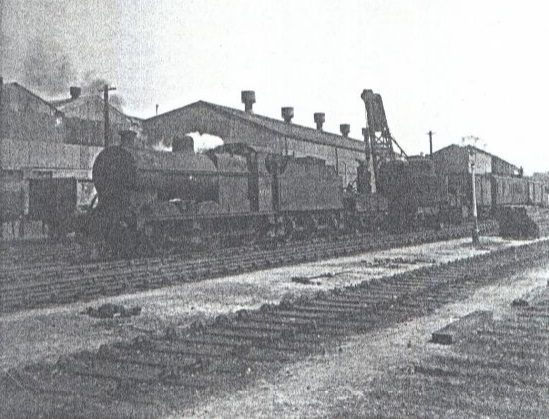
This final shot in the sequence appears to have been taken from the West looking back towards the Level Crossing and shows No. 1 Hydraulic shop behind the locomotive and crane, (c) Paul Regester. [20]

Turning North from High Orchard Yard there were three different lines. One was little more than a quay-side siding which ran up the East side of the canal and served a number of the properties very close to the Yard. Another ran up Merchants’ Road towards Lanthony Road but stopped short of making a junction with the tracks in Lanthony Road. The remaining  line was the most significant of the three. It appears in one of the pictures credited to Paul Regester above and appears in a couple of excellent images in Ben Ashworth’s book. One image shows No. 41537 on a short covered freight running between the high walls of Fielding and Platt’s site. The other image shows the same engine leaving the narrow channel between those high walls, crossing Baker Street and entering High Orchard Yard. [21: p14]

High Orchard Street looking North towards Gloucester Cathedral, showing the original Fielding and Platt buildings, (https://www.gloucestershirelive.co.uk). The railway to the main basin and the Victoria Dock runs to the right of the building in the centre of this image. Llanthony Road is just out of sight between the buildings two-thirds of the way up the image. [24]
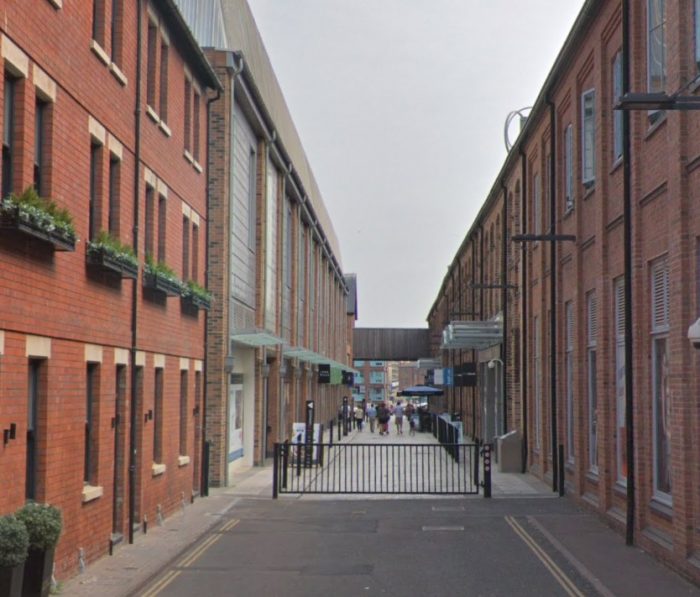
Looking North along High Orchard Street in July 2018 (Google Streetview).
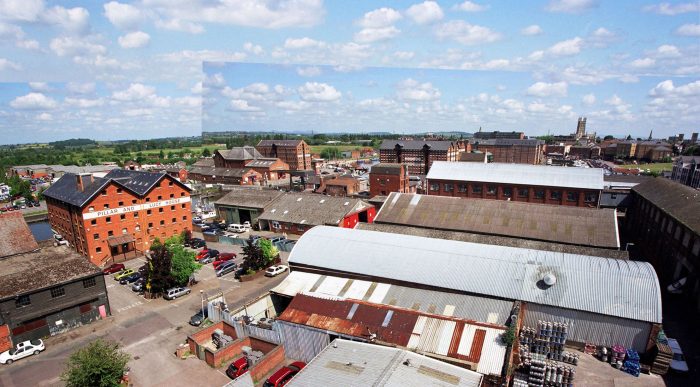
Turning to the left from the image above we get a glimpse of the Canal at Bakers Quay. Merchants’  Road runs into the shot from the bottom-left (https://www.gloucestershirelive.co.uk). [24]Street level view north along Merchants’ Road in 2019 (Google Streetview).

Llanthony Road looking West towards Llanthony Bridge in 2002. There was a line running East-West across Llanthony Bridge which connected the Docks sidings either side of the Canal, (https://www.gloucestershirelive.co.uk). [24]
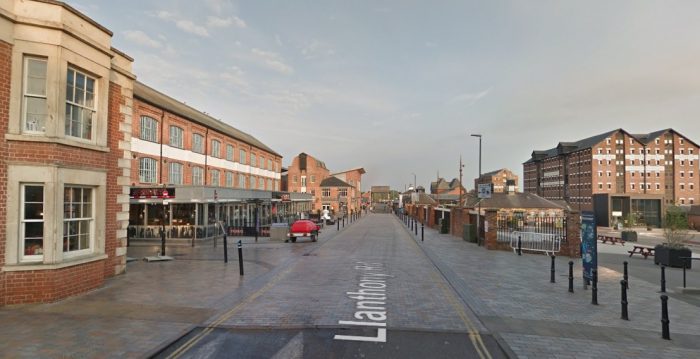
Llanthony Raod looking West in 2019 from roughly the same position as the image above (google Streetview). There has been major redevelopment of this area.

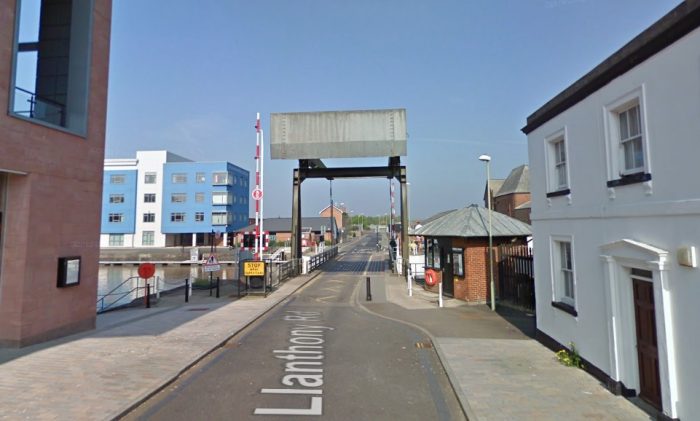
Llanthony Road Bridge – April 2011 (Google Streetview)

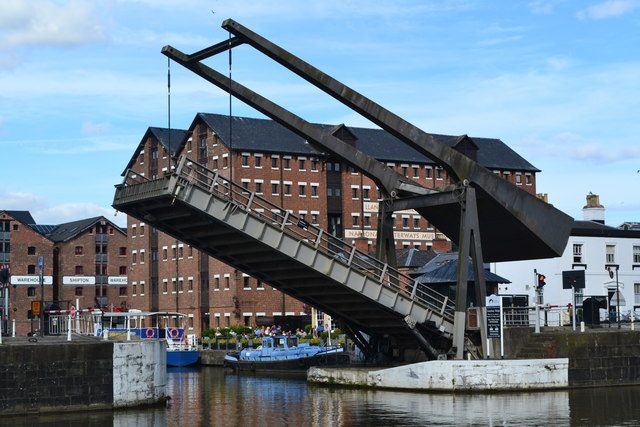
Llanthony Road Bridge lifting to allow access along the canal © Copyright David Martin and licensed for reuse under a Creative Commons Licence – CC BY-SA 2.0. [25]

Looking North using a long telephoto lens along what was the line of the Old Docks Railway. The older building which is coloured white, and which is only just visible below the tower of the Cathedral and above the parked cars, is Albion Cottages which can be seen on the images below. The photograph was taken from Llanthony Road. (Google Streetview). There is a photograph in Ben Ashworth’s collection from a similar position but taken in April 1962 which shows No. 41537 advancin towards the crossing at Llanthony Road and the line diverginf to run along Llanthony Road to the swing bridge. [21: p13] 
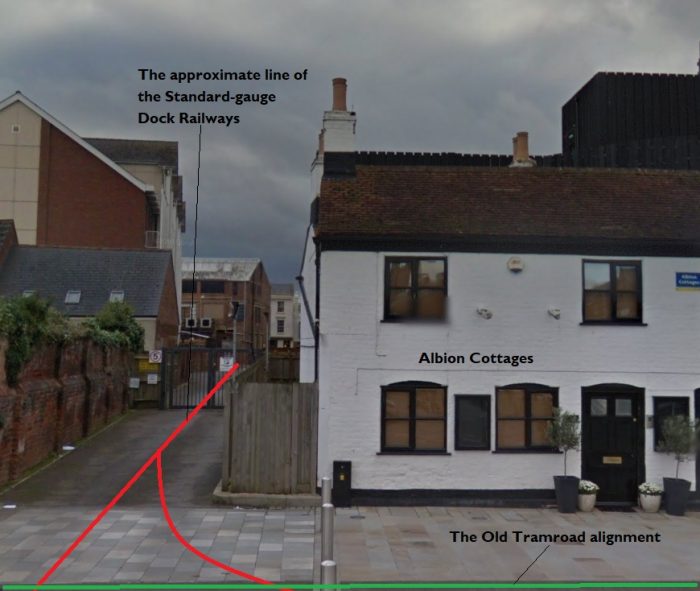
The old docks railway alignment (Google Streetview).

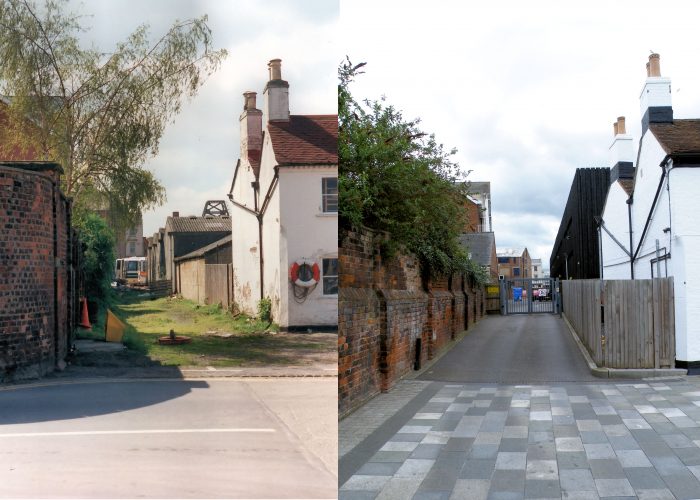
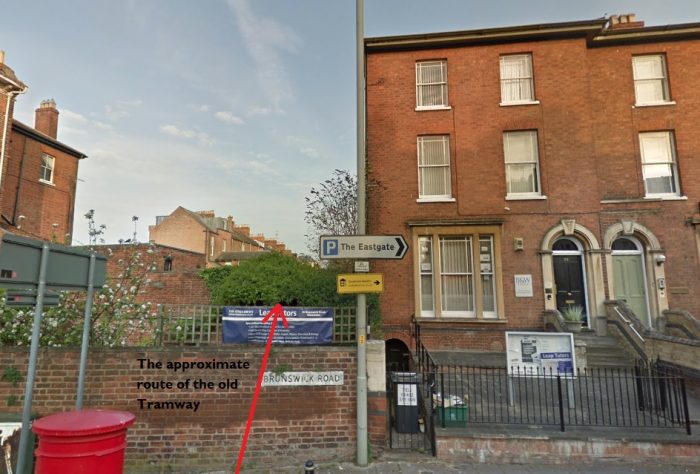
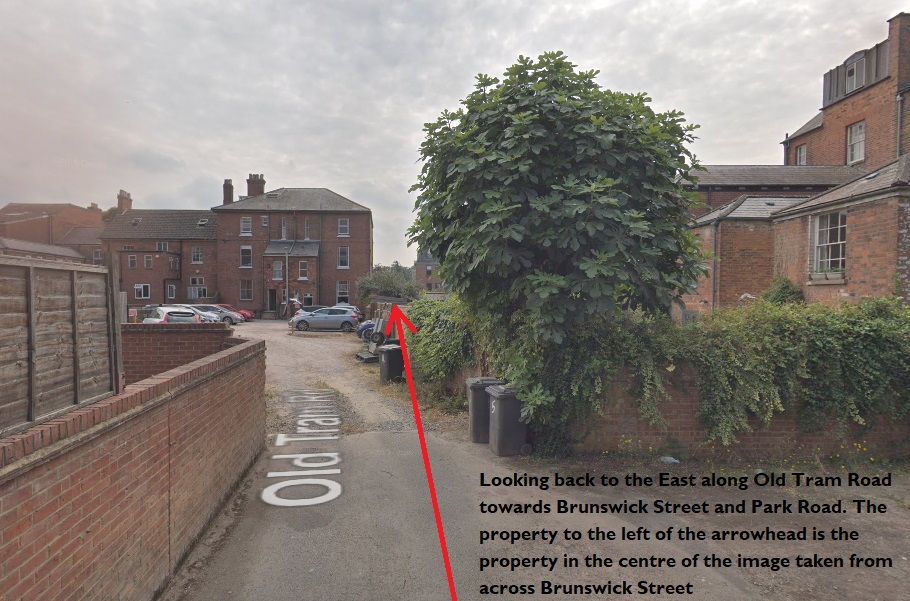
The same location adjacent to Albion Cottage (c) Roger Marks. He comments: The track-bed of one of the former Midland Railway lines at Gloucester Docks, looking towards Llanthony Road from the Southgate Street docks entrance in 1991 and 2015. The building on the right is known as Albion Cottages. If you look carefully at the wall on the left on the left hand picture, you can make out two gate pillars. This was the entrance where the Gloucester & Cheltenham Tramroad once entered the docks. The gateway was bricked up for many years but has recently been restored. [26]

The Docks Sidings and Quays on the East Side of the Canal and Main Basin

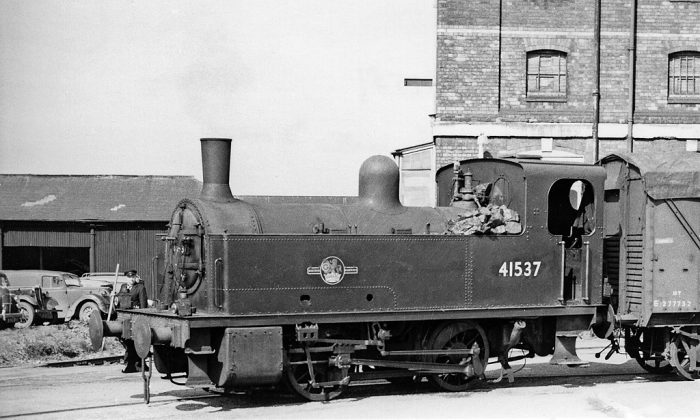
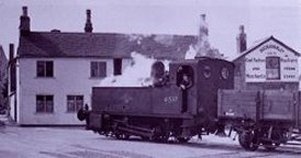
Tank Engine LMS 41537 (0-4-0T) close to the entrance to the docks off Southgate Street. Albion Cottages can be seen behind the locomotive. [15] The following monochrome image is taken looking East along the front of Albion Cottages. [27]

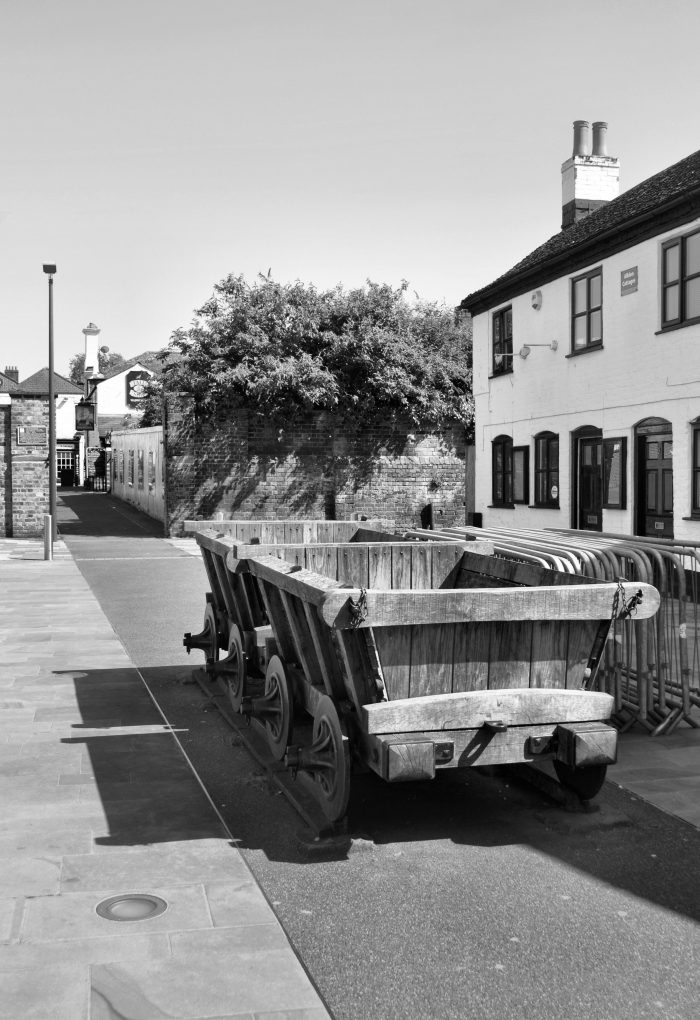
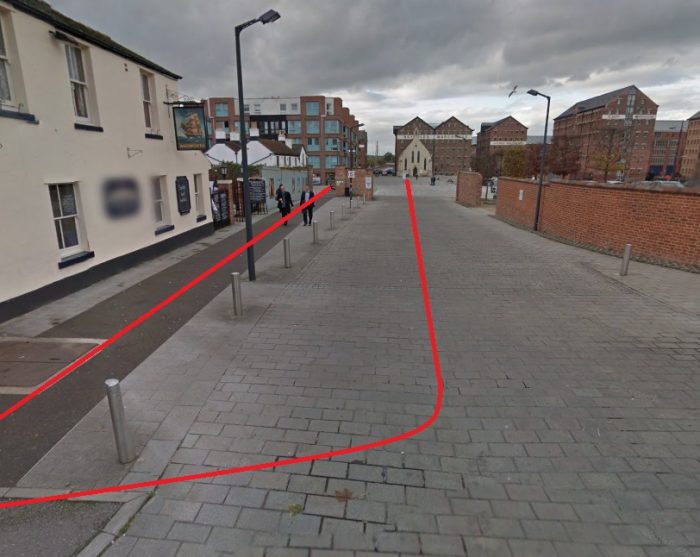
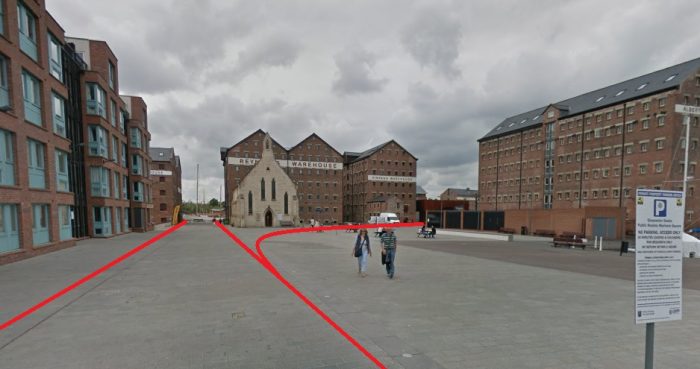
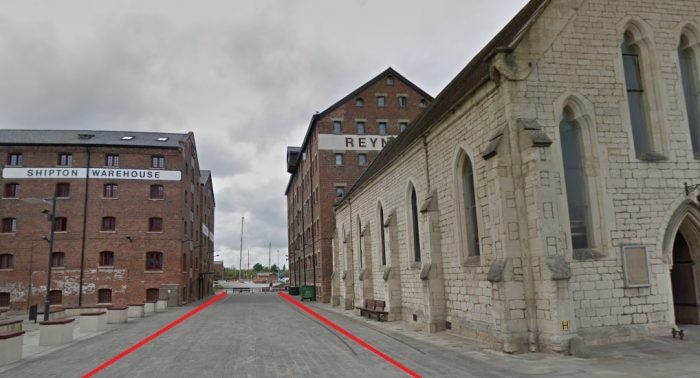
A pair of replica Gloucester & Cheltenham Tramroad wagons on display at Gloucester Docks on a section of original track. They stand on the original route of the Tramway, which entered the Docks through the gateway in the background. 21st May 2015 (c) Roger Marks. [27]

No. 41537 again. This picture is taken from almost the same position as the preious one featuring this locomotive, only the photographer is now facing West rather than facing South on 13th April 1959 (c) Ben Brooksbank
(Creative Commons Attribution Share-alike license 2.0) [35]

Wikipedia provides some details of this small class of locomotives – Midland Railway 1528 Class.  [34] Ten were built in two batches; all at the Midland Railway’s Derby Works: the first five, Nos 1528–1533, in 1907 on Derby order number 3031, and the second five, 1534–1537, in 1921–1922, with only minor detail differences between the batches. When they were given BR numbers a ‘4’ was placed in front of the original locomotive numbers – so ‘1537’ became ‘41537’. No. 41537 was withdrawn from service in 1963. As the picture above shows, these locomotives were unusual in not having a coal bunker and so carried spare coal on top of the side-tanks. The last locomotives of the Class were withdrawn in 1966 (41528, 41533).

Ben Ashworth’s first photographic collection includes a shot of 41537 travelling North away from the Southgate Street entrance to the docks in 1962. It was waiting for some road vehicles to be moved out of its way before propelling its train of four covered wagons towards the Commercial Road entrance to the docks. [51: p59] The colour image below mimics the same movement but a little further to the North.
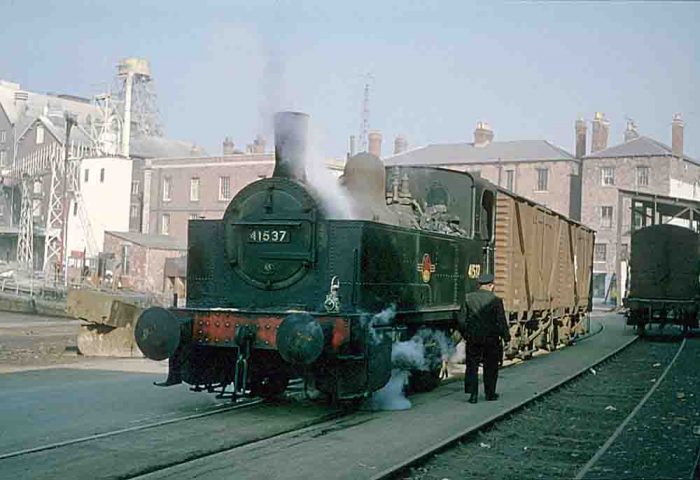
This photograph of No. 41537 is taken from the East side of Victoria Dock looking North. The building at the North end of the dock are still recognizable in the 21st century. Permission to use this image was kindly given by the Tewkesbury Direct website. [36]
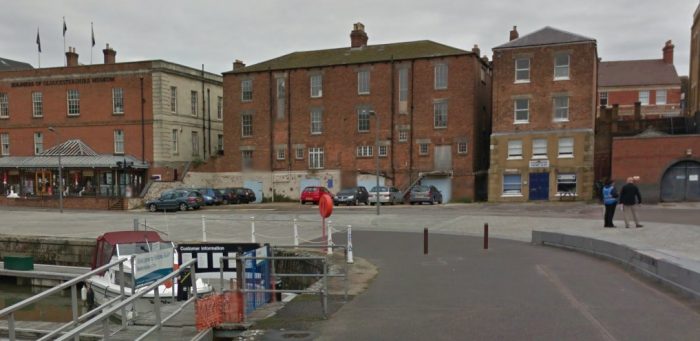
A view from a similar location in the 21st century (Google Streetview).
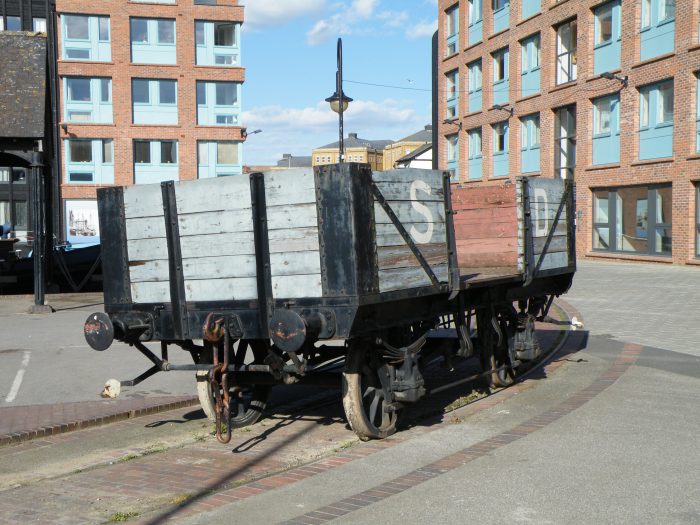
A five-plank open goods wagon displayed outside the National Waterways Museum, Gloucester. 29th March 2009 (c) Roger Marks. Immediately behind the wagon, just beyond the roofed area to the left, is the Barge Arm. The short length of track on which the wagon sits is on the line of one of the old docks railways which surrounded the Barge Arm. Turning 90 degrees to the left would bring the main building of the Museum into the picture.[28]
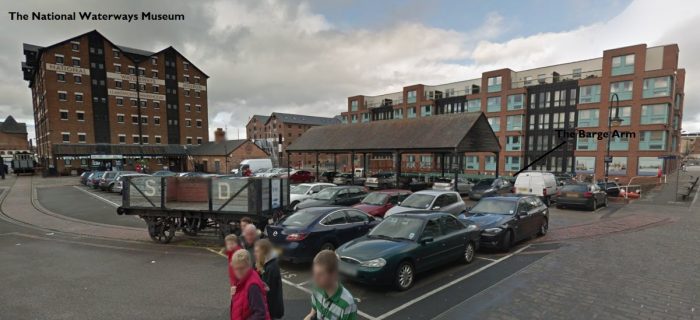
Close to the same location in 2012 (Google Streetview).

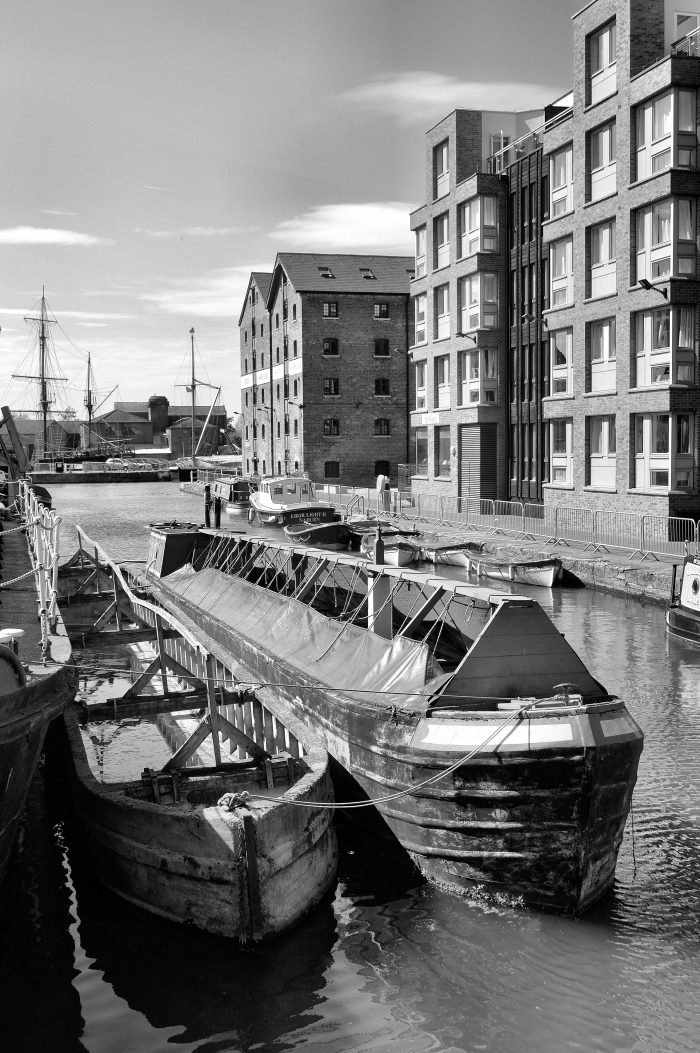
Severn & Canal Carrying Company motor narrowboat “Oak” in the Barge Arm, Gloucester Docks. 21st May 2015 (c) Roger Marks. Biddle & Shipton’s Warehouse is on the North side of the Barge Arm, in the centre of this image. At one time, railway sidings ran down each side of the Barge Arm. [33]The Biddle & Shipton Warehouses in 1989 (c) Roger Marks. These warehouses are that the Western end of the Barge Arm. A railway siding ran around the dock wall at this location. [31]
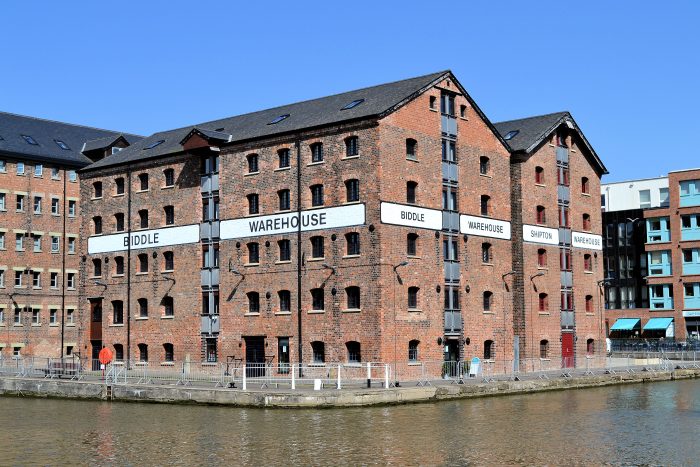
Biddle & Shipton Warehouses (c) Roger Marks.He writes: “The Biddle & Shipton warehouses, Gloucester Docks. 21st May 2015. Now rebuilt as residential apartments.” In this image, the Barge Arm is to the right. To the left, the Canal opens out into the Main Dock Basin and warehouse continue down its eastern edge. [30]
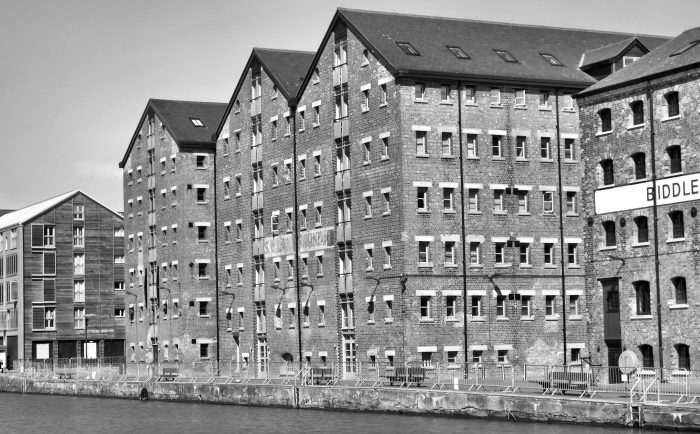
Warehouses on Gloucester Docks, 21st May 2015 (c) Roger Marks. These warehouses are alongside the Main Dock Basin to the North of the Biddle & Shipton Warehouses. The dockside railway ran in front of these buildings before turning sharply by means of a wagon turntable to the right just beyond the far wall of the warehouses. Access to these sidings required the use of horese-power. [32]
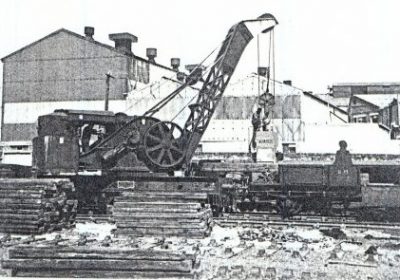
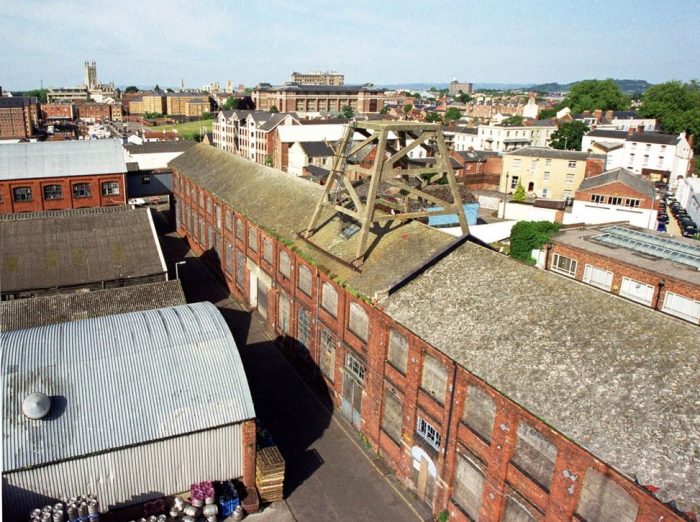
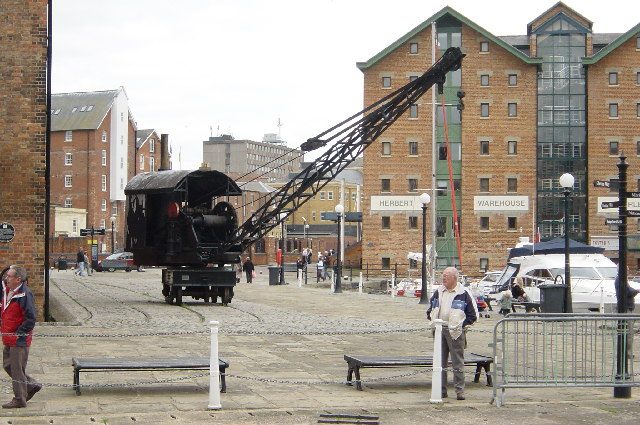
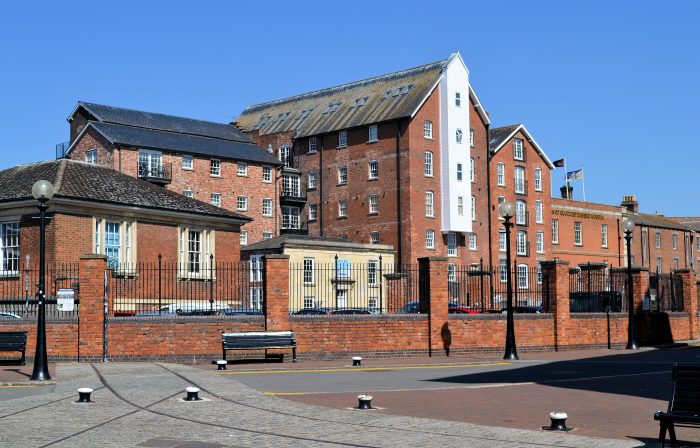
The City Flour Mills (c) Roger Marks. He writes: “The former City Flour Mills, Gloucester Docks, 21st May 2015. Anyone with an ounce of railway knowledge will immediately see that the railway track foreground is what is technically known as ‘utter bollocks’. Although it links two sections of authentic old docks railway, the physically impossible set of points is a figment of the mind of the developer who rebuilt this section of the docks in the late 1980s.” The Priday Flour Mills (these buildings) formed the northern backdrop to the Main Basin and the Victoria Dock. Behind the photographer is the old steam crane which has been placed on the North end of the docks and which was the first image in Part 1 of these notes about the Docks Railways. [29]Turning round to look to the West from the same position as the immediately preceding photograph, we look along the North end of the Docks Main Basin in the 21st century (Google Streetview)..

There is an excellent view of the East side of Victoria Dock on 5th July 1965 in Ben Ashworth’s photo collection. [21: p12]. The photograph shows the three lines on the East side of the Dock.

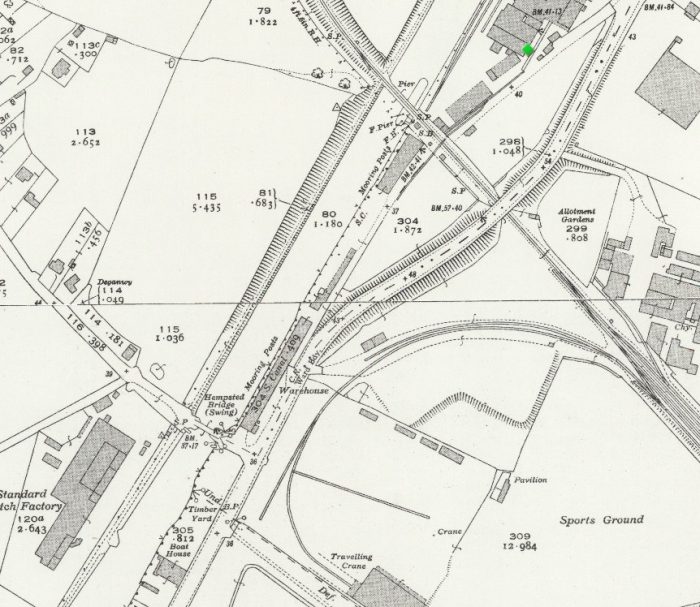
We have reached the northern end of the Docks complex. In order to finish our survey of the railways on the East Side of the Docks and Canal, we need to go back to the High Orchard Yard and turn to the South. A single line ran down the East bank of the Gloucester and Berkeley Canal and served a number of industrial concerns. The first, was the Gloucester Railway Carriage and Wagon Works and then there were a series of timber yards and Saw Mills along Baker’s Quay and Canada Wharf as far as the other Midland Railway Branch which for a time served the Docks. This branch was known as the Hempsted or New Docks Branch.

Baker’s Quay, Baltic Wharf and Canada Wharf

There was a single-track line serving the various industries which fronted onto Baker’s Quay. The Quay ran southwards from the High Orchard Yard down to the point where the Hempsted Branch was to cross the Canal just before the turn of the 20th century, The next three map extracts show the full length of Baker’s Quay, Baltic Wharf and Canada Wharf in the late 1940s and early 1950s. [3]

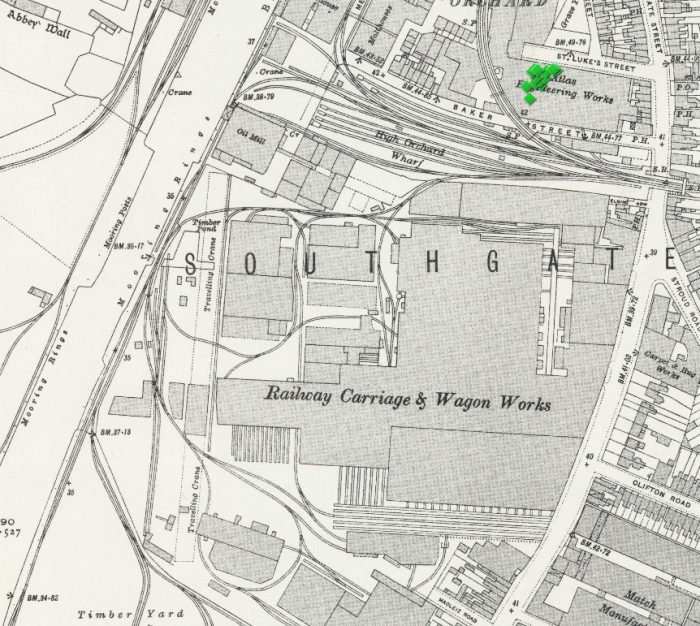
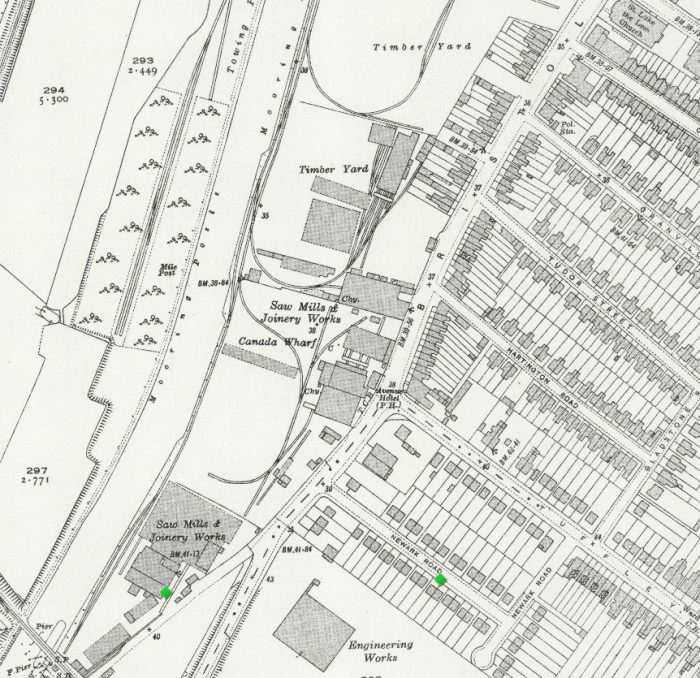
Gloucester Railway Carriage and Wagon Works were a significant employer in Gloucester> Their engineering products travelled all over the world. The business was formed in 1860 and lasted until 1986 when it was acquired by Powell Duffryn Rail, all operations ceased in 1993/1994. [39] The factory site was accessed by rail directly from High Orchard Yard and from Baker’s Quay.

The Timber Yards were used by a number of different traders during their lifetime. Once such was Nicks & Co. [40]

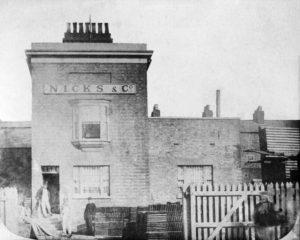
Nicks & Co. are still trading in 2020 from their site on Canada Wharf. The adjacent image shows their first offices, the picture was taken in 1863. [41] Hugh Conway-Jones has written a short history of this company which appeared in the GSIA Journal in 2007. [40]

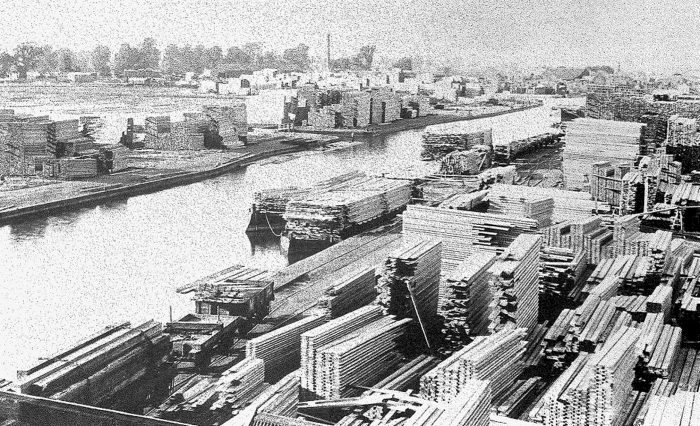
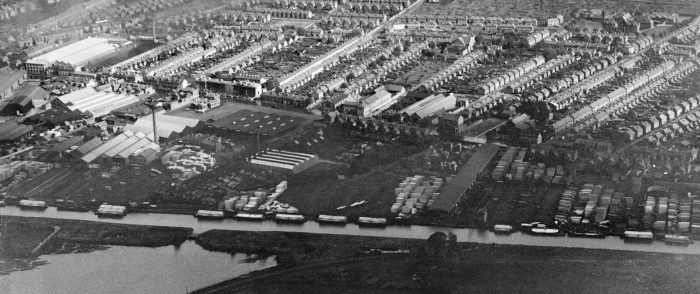
Typical view of the timber yards alongside the Canal. The view is taken looking North from Baltic Wharf towards the Docks. This is not a view of Nicks Timber Yard but shows the length of canal about 500 yards North. The access railway siding can easily be seen in the picture running from the bottom-left towards the top-right. Typical timer wagons stand on the siding  [42]

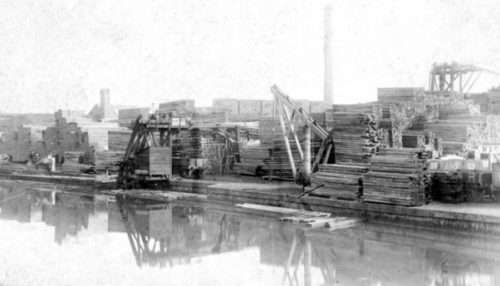
This smaller image comes from the 1880s and is included in an article by Hugh Conway-Jones published in the GSIA Journal, (c) Nicks& Co. Archive [40]. It shows Nicks & Co.’s frontage onto the Canal at Canada Wharf.

Nicks & Co.’s yard was rail served, initially along the canal-side, as can be seen by the first image below. The image shows the unloading of timber at the canal-side from one of the 1940 shipments. [43]

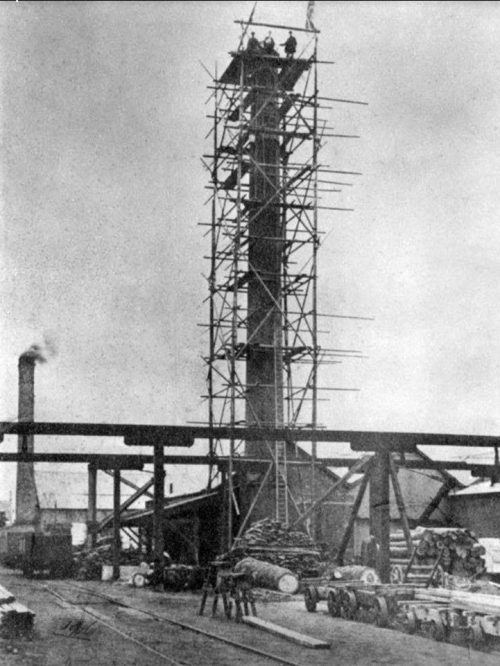
There were also internal sidings and the next picture shows. The main feature of the image is the construction of a new chimney in 1916. The internal sidings of the yard a visible towards the bottom of the image. [44]

Griggs’ Timber yard was at the South end of the wharves close to the Bristol Road. It started operating in 1875 and is still in operation in 2020. [48]

Saw Mills were an integral part of the industrial development of Baltic Wharf and Canada Wharf. Two large concerns are marked on the OS Maps at the Southern end of the site.

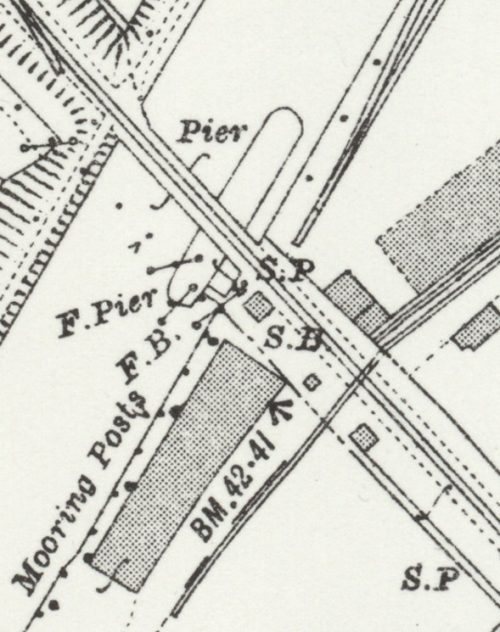
Rail access to all of these concerns was along the canal-side from High Orchard Yard, no connection seems to have been made to the Hempsted Branch when it was installed. All of the OS Map Series show a dis-connect (as in the adjacent extract) between the Canal-side lines and the Hempsted Branch,

The Hempsted Branch

The Hempsted Branch was a Midland Railway incursion into GWR territory. The two companies has reached a competitive truce which saw the Midland managing traffic on the East side of the Docks and the GWR operating on the West side of the Docks. Visit-Gloucestershire reports that the Hempsted Branch opened on 5th September 1898. [15] Colin Maggs says that, “The variously named New Docks, Tuffley, or Hempsted branch ran from Tuffley Junction (where the hitherto parallel MR and GWR divided to make their separate ways to Gloucester) to Hempsted Wharf. The branch opened to goods on 24 May 1900; a sub-branch, opened in 1913, served the gasworks. Another line crossed Monk Meadow where, until 1938, it linked with the GWR’s docks line. At Monk Meadow a dock and large pond for floating timber had been constructed west of the canal in 1891 and 1896 respectively. In 1969, the branch closed west of the gasworks siding and was shut completely two years later.” [22] Wikipedia supports the date Maggs has indicated for the opening of the line. [37]
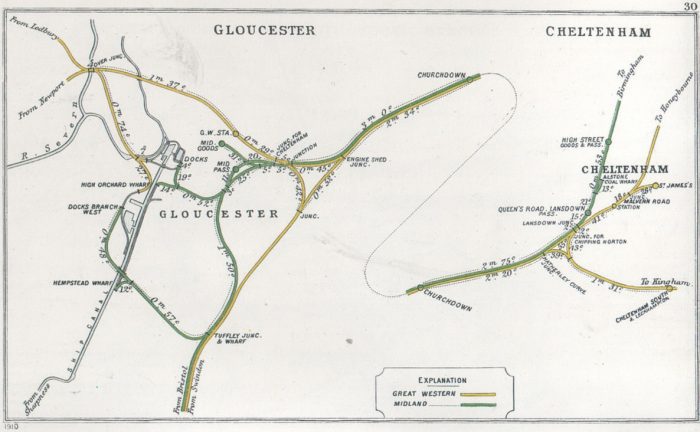
The Railway Clearing House Map of 1910 shows the Hempstead Branch on the bottom-left (Wikiwand) [38]
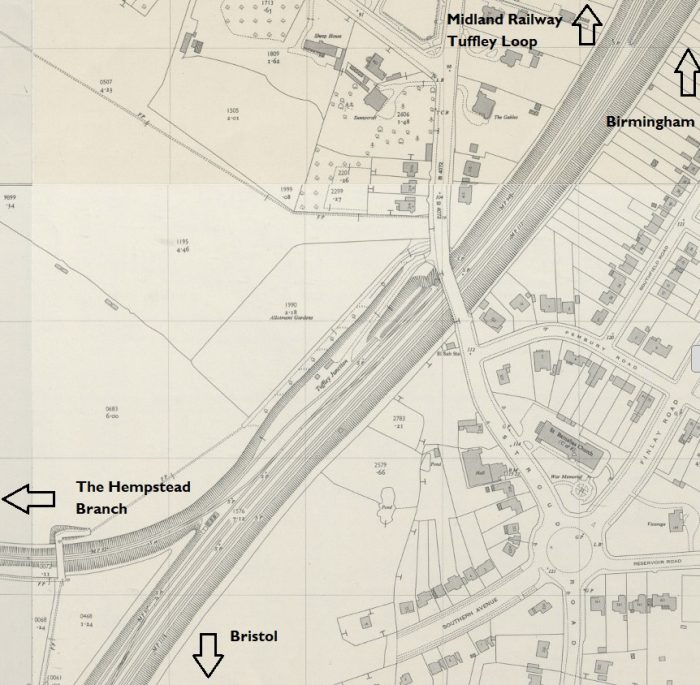
25″ OS Map – the Hempsted Branch leaves the main line. [3] Its primary purpose was to proved the Midland Railway with access to the West side of the Gloucester and Berkeley Canal. The next few 25″ maps show its route up to the Canal Bridge.
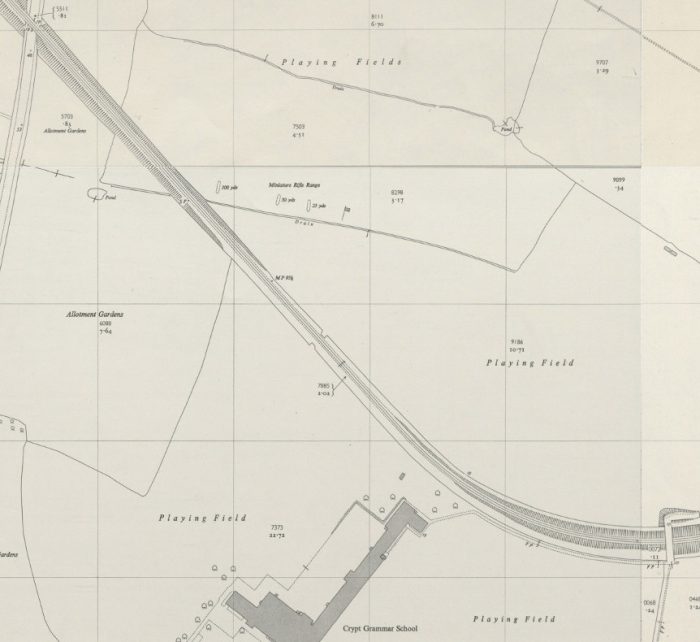
The ‘Know Your Place’ 2019 digitized maps [3] show the modern Podsmead Road at the hear of residential development. The old accommodation bridge which carried the Hempsted Branch over the road shown in the top-left of the 25″ OS Map above is long gone. Earlier OS Maps show the bridge in place  supporting the line long before Podsmead Road was extended South under the line. The old branch was carried on an embankment which is also long-gone.

Looking Northwest along the line of the old branch (Google Streetview). A little to the Northwest of Podsmead Road the branch broadened out into a series of sidings and at that point a ‘sub-branch’ turned away to the Southwest. [3]

A ‘sub-branch’ turned away to the Southwest at the beginning of the branch sidings. It does not appear on the 25″ 2nd Edition OS Maps. It first appears on the 25″ 3rd Edition OS Maps. It served the Bristol Road Gas Works. The Gasworks was not rail-served until 1920. A regular ‘4F’ 0-6-0 working saw coal delivered twice a day to Gloucester Gas Works Siding. Locomotive 4F 0-6-0 No. 44269 was photographed at the Gasworks in August 1965 by its fireman Dick Courtney. The photograph can be found on the Gloucestershire Railway memories Website. [45]

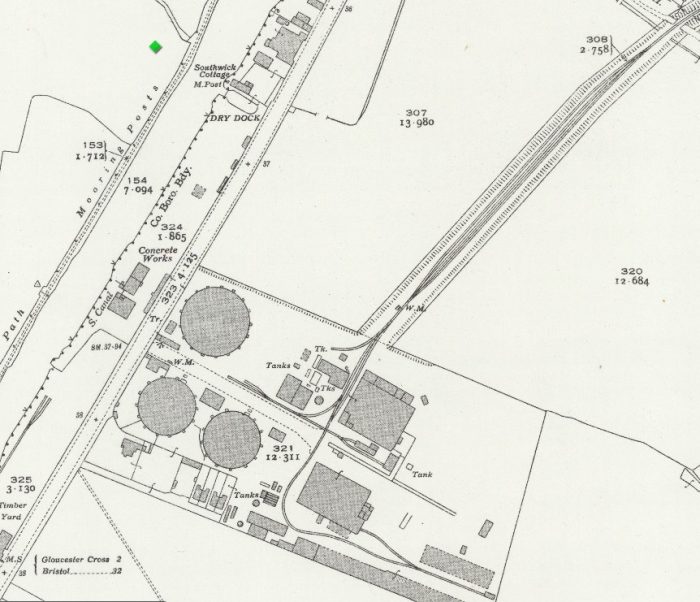
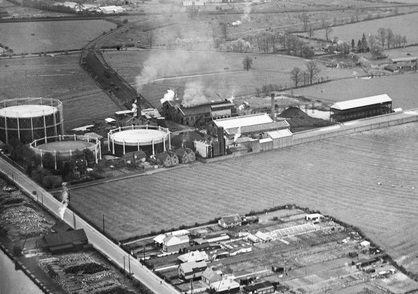
An extract from EPW037842 – Britain From Above. The picture was taken in 1932 and shows the Gasworks at the centre of the image. The canal can be seen in the bottom-left of the image with Bristol Road (A38) running parallel to it and almost empty of traffic! The Gasworks sidings can be seen heading away North towards the Hempsted Branch which runs across the top of the picture [46]

There are also two photographs of this working in Ben Ashworth’s first collection [51: p64]. the first shows 4F 0-6-0 No. 44264 leaving the sub-branch with a train of empties. The second shows the same engine propelling a train of coal onto the sub-branch.

Two further images appear in his second collection [21: p18-19]. The first shows 4F 0-6-0 No. 44264 in charge of a train of coal wagons heading along the Hempsted branch towards the Gasworks sidings in September 1965. [21: p18] The second is a view across the allotments which are centre-bottom of the first of the two map extracts above. [21: p19] The picture shows the 44264 returning, tender first, from the Gasworks with empties on the same day.

The gasworks were decommissioned in the early 1970s but it took around 40 years for the site to fully made safe. [46]

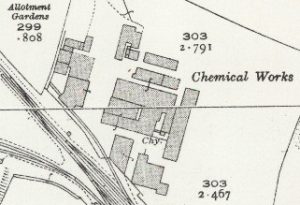
At the Northwest end of the sidings before the Branch passed under the Bristol Road ther was a further siding bearing away to the Southwest and a short stub-siding on the Northeast side of the running line. The first of these served Hempsted Wharf although it was divided from the Canal by Bristol Road (A38). The stub-siding served a chemical works.

And finally ……….

In order to build the Hempstead Branch the Midland Railway had to realign the A38 Bristol Road and build a substantial 3-arch bridge. This is the last significant feature before the branch crossed the Canal on a sing bridge.

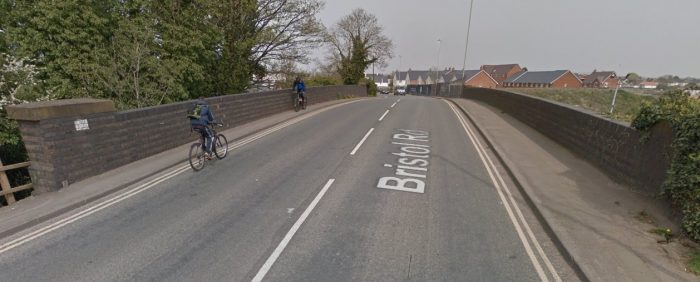
The parapets of the bridge over the Hempsted Branch, still in place in 2019 (Google Streetview).Looking to the East from the A38 bridge over what was the Hempsted Branch. This picture was taken in 2019 (Google Streetview).
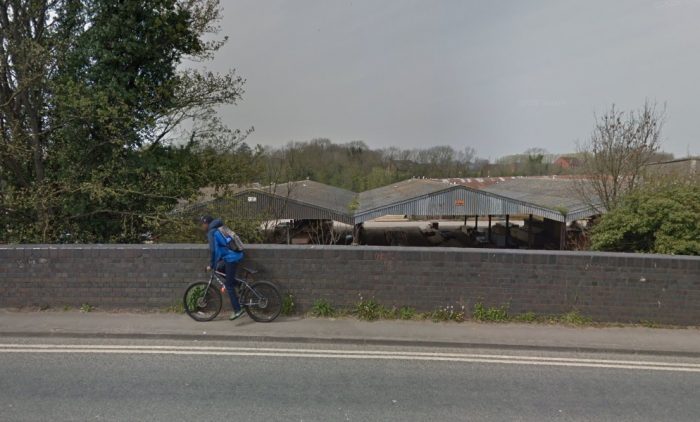
Looking West along what was the Hempsted Branch towards the Canal. Joseph Griggs’ Timber yard is beyond the bridge parapet.
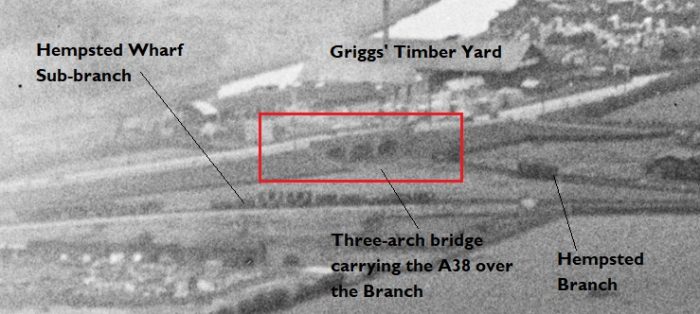
A grainy extract from EPW037841 – Britain From Above (1932). The bridge carrying the A38 Bristol Road is highlighted. The Hempsted Wharf Sub-Branch and the Hempsted Branch are indicated. Both have wagons sitting on them. It is impossible to make out the Canal Bridge on this image. [49]
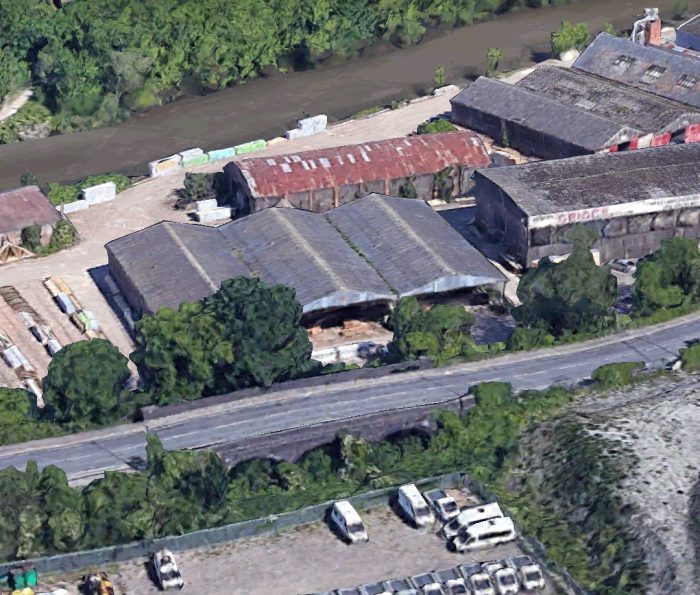
Bristol Road Bridge in 2019 looking along the old Hempsted Branch to the Canal (Google Earth 3D).
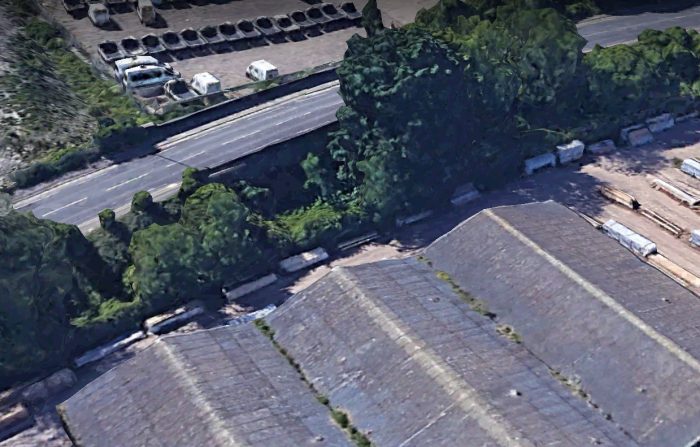
Looking East across the A38 from above Griggs’ Timber Yard in 2019. The three-arch bridge is hidden in the shadows created by the trees (Google Earth 3D)

The A38 bridge also appears in Ben Ashworth’s collection. A view taken from the West bank of the Canal in 1970 shows the structre to good advantage looking along what was the old railway but by then was part of Griggs’ Timber Yard. [21: p16]

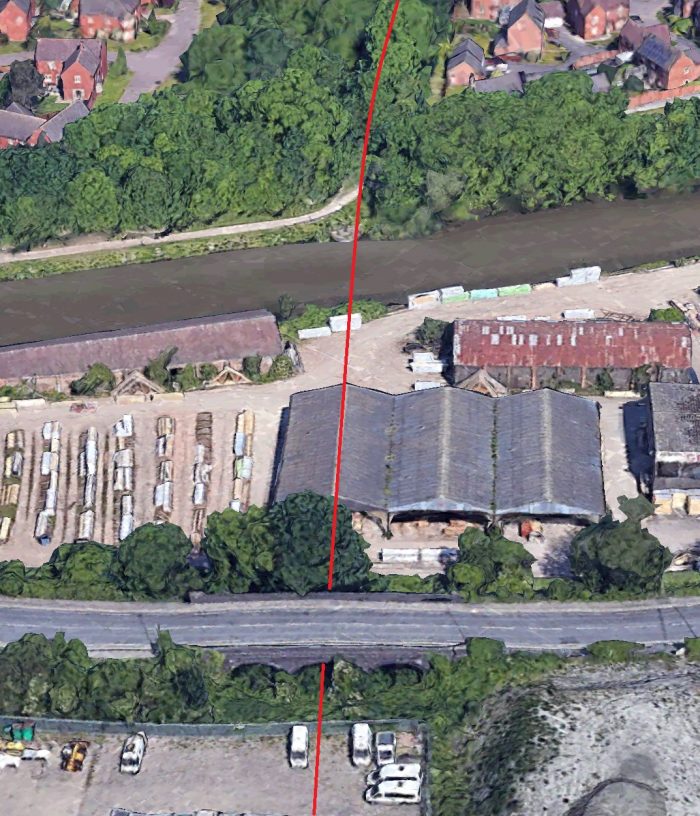
The route of the Hemsted Branch as it crosses the Canal is shown by the red line on this image. The swing bridge has long been removed. The route on the far side of the canal is now a footpath (2020 – Google Earth -3D).

References

  1. http://lightmoor.co.uk/books/gloucester-midland-lines-part-2-south/L8665, accessed on 18th April 2020
  2. https://www.gloucestercivictrust.org/gmp19, accessed on 30th April 2020.
  3. https://maps.bristol.gov.uk/kyp/?edition=glos, accessed on 16th May 2020.
  4. https://britainfromabove.org.uk/image/epw041489, accessed on 18th May 2020.
  5. https://britainfromabove.org.uk/cy/image/epw024156?filter=new, accessed on 18th May 2020.
  6. https://www.britainfromabove.org.uk/en/image/EPW024171, accessed on 18th May 2020.
  7. https://www.britainfromabove.org.uk/image/eaw012211, accessed on 18th May 2020.
  8. https://www.britainfromabove.org.uk/en/image/EAW012204, accessed on 19th May 2020.
  9. http://www.britainfromabove.org.uk/en/image/EPW016965, accessed on 19th May 2020.
  10. https://maps.bristol.gov.uk/kyp/?edition=glos, accessed on 18th May 2020.
  11. https://www.britainfromabove.org.uk/image/eaw032295, accessed on 19th May 2020.
  12. https://www.britainfromabove.org.uk/en/image/EAW032296, accessed on 19th May 2020.
  13. https://maps.bristol.gov.uk/kyp/?edition=glos, (2019 Q2 Base Map) accessed on 19th May 2020.
  14. https://llanthonysecunda.org/entry/1951-map-of-gloucester-docks, accessed on 20th May 2020.
  15. https://glostransporthistory.visit-gloucestershire.co.uk/Railgloschur2.htm, accessessed on 15th May 2020.
  16. https://commons.wikimedia.org/wiki/File:Towards_Barton_Street_-_geograph.org.uk_-_556948.jpg, accessed on 20th May 2020.
  17. https://commons.wikimedia.org/wiki/File:California_Crossing_-_geograph.org.uk_-_556928.jpg, accessed on 20th May 2020.
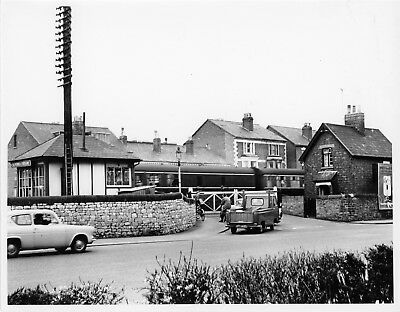
  18. https://picclick.co.uk/BRW-GLOUCESTER-CALIFORNIA-LEVEL-CROSSING-SIGNAL-BOX-8×6-372549205436.html, accessed on 20th May 2020.
  19. https://www.gloucesterdocks.me.uk/gloucester/gloquays/outletcentre.htm, accessed on 20th May 2020.
  20. https://www.fieldingandplatthistory.org.uk/content/people/the_paul_regester_collection_under_construction/historical/historical, accessed on 20th May 2020. These Photographs have all been included here with the kind permission of the Fielding and Platt Heritage Group given by their webmaster, Nick Bancroft.
  21. Ben Ashworth; The Last Days of Steam in Gloucestershire A Second Selection; Amberley Publishing, 2013.
  22. Colin Maggs; The Branch Lines of Gloucestershire; Amberley Publishing, 2013.
  23. Gloucestershire Archives, Clarence Row, Alvin Street, Gloucester. GL1 3DW, at the time of writing the Archives are closed to public access because of COVID-19.
  24. https://www.gloucestershirelive.co.uk/whats-on/shopping/gallery/take-look-gloucester-before-gloucester-2874249, accessed on 21st May 2020.
  25. https://www.geograph.org.uk/photo/5073947, accessed on 22nd May 2020.
  26. https://www.flickr.com/photos/rpmarks/47043165292/in/photolist-2iw1cDs-2eF3w5L-2iSbTEv-2iSak2W-bgMxZD-b2UkcD-6Do9cE-n2prPv-zCeDt9-fQfWct-mGV1bu-5w34Ly-8jVbZd-dBj9vC-e5iZyC-A81ge9-Heyqxg-DF2MSq-5kWsVr-ubMRWb , accessed on 20th May 2020.
  27. https://www.flickr.com/photos/rpmarks/27064068069/in/photolist-2iw1cDs-2eF3w5L-2iSbTEv-2iSak2W-bgMxZD-b2UkcD-6Do9cE-n2prPv-zCeDt9-fQfWct-mGV1bu-5w34Ly-8jVbZd-dBj9vC-e5iZyC-A81ge9-Heyqxg-DF2MSq-5kWsVr-ubMRWb, accessed on 20th May 2020.
  28. https://www.flickr.com/photos/rpmarks/24726893176/in/photolist-2iw1cDs-2eF3w5L-2iSbTEv-2iSak2W-bgMxZD-b2UkcD-6Do9cE-n2prPv-zCeDt9-fQfWct-mGV1bu-5w34Ly-8jVbZd-dBj9vC-e5iZyC-A81ge9-Heyqxg-DF2MSq-5kWsVr-ubMRWb, accessed on 21st May 2020.
  29. https://www.flickr.com/photos/rpmarks/18500102482/in/photolist-2iw1cDs-2eF3w5L-2iSbTEv-2iSak2W-bgMxZD-b2UkcD-6Do9cE-n2prPv-zCeDt9-fQfWct-mGV1bu-5w34Ly-8jVbZd-dBj9vC-e5iZyC-A81ge9-Heyqxg-DF2MSq-5kWsVr-ubMRWb, accessed on 21st May 2020.
  30. https://www.flickr.com/photos/rpmarks/18504446345/in/photolist-ucb8dn-2iw1cDs-fQfWct-bgMxZD-b2UkcD-Heyqxg-DF2MSq-5kKUHy-9bP8qM-248dmH2-22b7ugq-ZPRrAD-ZkXMPF-R1aR62-afMbgv-jAhbFe-DyZNGz-DyZU8V-6Do9cE-Dj7tjT-ubMRWb-u9QhmL-e5iZyC-b2UjRF-tf8VQ5-mGV1bu-8N16He-8N15nT-uvZ7Ab-bxVUAw-aFEGBZ-7aWPNr-aSXm9V-5w34Ly-7oV8n1-FzqJaC-5kHusR-ArqK5s-7BHWHb-BByqpD-w7byw5-DF2J6Y-amVikV-AGEsMR-A3gMTE-yXNocm-zX9eUM-B8AemT-cDGMBN-8Wq2ZN, accessed on 20th May 2020.
  31. https://www.flickr.com/photos/rpmarks/4323145085/in/photolist-7A2fqe-bspaaJ-bkLKkq-6NiztG-baXECF-6bnAm9-6cU957-6bnzCJ-gZMCPq-6Do9JN-bJpUW2-6b7mHT-6gBeLr-5kHusR-dJcxXz-aSXm9V-7oV8n1-5kKUHy-9bP8qM-jAhbFe-bxVUAw-aFEGBZ-gZMJrM-5w34Ly-a39pHr-6Do9cE-dBj9vC-f47T7B-dJaAsP-edBv71-5nGQVw-dJaBea-5npTsX-bzbZKB-dexgKR-ak1hdU-8Xbor1-dV9aTq-b2UjRF-fQfWct-dNzsnN-bgMxZD-b2UkcD-b5yBDt-cDGMBN-amVikV-5kWsVr-d4oAN3-bFq8nK-e5iZyC, accessed on 20th May 2020.
  32. https://www.flickr.com/photos/rpmarks/37638234505/in/photolist-ucb8dn-2iw1cDs-fQfWct-bgMxZD-b2UkcD-Heyqxg-DF2MSq-5kKUHy-9bP8qM-248dmH2-22b7ugq-ZPRrAD-ZkXMPF-R1aR62-afMbgv-jAhbFe-DyZNGz-DyZU8V-6Do9cE-Dj7tjT-ubMRWb-u9QhmL-e5iZyC-b2UjRF-tf8VQ5-mGV1bu-8N16He-8N15nT-uvZ7Ab-bxVUAw-aFEGBZ-7aWPNr-aSXm9V-5w34Ly-7oV8n1-FzqJaC-5kHusR-ArqK5s-7BHWHb-BByqpD-w7byw5-DF2J6Y-amVikV-AGEsMR-A3gMTE-yXNocm-zX9eUM-B8AemT-cDGMBN-8Wq2ZN, accessed on 20th May 2020.
  33. https://www.flickr.com/photos/rpmarks/18717311438/in/photolist-ucb8dn-2iw1cDs-fQfWct-bgMxZD-b2UkcD-Heyqxg-DF2MSq-5kKUHy-9bP8qM-248dmH2-22b7ugq-ZPRrAD-ZkXMPF-R1aR62-afMbgv-jAhbFe-DyZNGz-DyZU8V-6Do9cE-Dj7tjT-ubMRWb-u9QhmL-e5iZyC-b2UjRF-tf8VQ5-mGV1bu-8N16He-8N15nT-uvZ7Ab-bxVUAw-aFEGBZ-7aWPNr-aSXm9V-5w34Ly-7oV8n1-FzqJaC-5kHusR-ArqK5s-7BHWHb-BByqpD-w7byw5-DF2J6Y-amVikV-AGEsMR-A3gMTE-yXNocm-zX9eUM-B8AemT-cDGMBN-8Wq2ZN, accessed on 21st May 2020.
  34. https://en.wikipedia.org/wiki/Midland_Railway_1528_Class, accessed on 24th May 2020.
  35. https://commons.wikimedia.org/wiki/File:Gloucester_Docks_geograph-2224398.jpg, accessed on 19th May 2020.
  36. https://www.tewkesburydirect.co.uk/times-gone-by, accessed on 20th May 2020.
  37. https://en.wikipedia.org/wiki/Bristol_and_Gloucester_Railway, accessed on 25th May 2020.
  38. https://www.wikiwand.com/en/Gloucester_railway_station, accessed on 25th May 2020.
  39. https://en.wikipedia.org/wiki/Gloucester_Railway_Carriage_and_Wagon_Company, accessed on 25th May 2020.
  40. Hugh Conway-Jones; Nicks & Co. Long Established Timber merchants of Gloucester; Gloucestershire Society for Industrial Archaeology (GSIA) Journal for 2007, p3-13. Found online at https://www.gsia.org.uk/reprints/2007/gi200703.pdf, accessed on 25th May 2020.
  41. https://nickstimber.co.uk, accessed on 25th May 2020.
  42. https://www.gloucestershirelive.co.uk/news/history/gallery/day-docks-caught-fire-gloucesters-3960358, accessed on 25th May 2020.
  43. https://www.facebook.com/Nickstimber.co.uk/photos/a.1053087591401414/1536323183077850/?type=3&theater, accessed on 25th May 2020.
  44. https://www.facebook.com/Nickstimber.co.uk/photos/a.1053087591401414/1536323189744516/?type=3&theater, accessed on 25th May 2020.
  45. https://sites.google.com/site/gloucestershirerailwaymemories/home/train-services/31-october-1964, accessed on 27th May 2020.
  46. https://www.nationalgrid.com/sites/default/files/documents/25492-Gloucester%20case%20study%203pp.pdf, accessed on 27th May 2020.
  47. https://www.britainfromabove.org.uk/image/epw037842, accessd on 27th May 2020.
  48. https://www.griggstimber.co.uk, accessed on 27th May 2020.
  49. https://britainfromabove.org.uk/en/image/EPW037841, accessed on 27th May 2020.
  50. https://www.britainfromabove.org.uk/image/epw050778, accessed on 28th May 2020.
  51. Ben Ashworth; The Last Days of Steam in Gloucestershire; Amberley Publishing, 2009.

Co. Donegal Railways, Ireland – Part 1 – The Glenties Branch – Stranorlar to Ballinamore

My wife and I were due to take our annual holidays in 2020 in April and May. We would have been staying in Co. Donegal in Ireland and would, among other things, have explored some parts of the old 3ft gauge railways which served Co. Donegal.

Map of the Co. Donegal 3ft-gauge railway network. [25]

I have been reading through the 1948 editions of The Railway Magazine and on 16th May 2020, I found this short paragraph in the ‘Notes and News’ section of the May and June 1948 edition. Volume 94 No. 575. …

Closing of the Glenties Branch, County Donegal Railways Joint Committee

Passenger services were withdrawn on 13th December 1947, from the Stranorlar-Glenties branch of the County Donegal Railways Joint Committee in Ireland. The stations affected were Glenmore, Cloghan, Ballinamore, Fintown, Shallogans and Glenties. The branch of 3ft-gauge and 24.5 miles in length was constructed under the Light Railways (Ireland) Act of 1889, and opened on 23rd June 1894.

This seems to be far too short an obituary to the Glenties Branch. So, it seemed to me that I should start looking at the Co. Donegal Railways by looking at the Glenties Branch.

As part of my holiday reading, I had set aside the updated version of E.M. Patterson’s book about the Co. Donegal railways (which I first read as a teenager). That 2014 book has been a companion over a couple of weeks of lockdown in 2020. [3]

The Glenties Branch ran through a very rural part of Co. Donegal and seemingly stopped short of what could be considered a ‘sensible’ destination – the Atlantic Coast. Indeed it seems as though there were quite a few people in Ardara on the coast who thought that way. There was a concerted campaign over many years to get a short extension built between Glenties and Ardara. [3] But more of that later!

Grace’s Guide tells us that the line between Stranorlar and Glenties was 24 miles (38 km) long and that It opened in 1895. [2] Stranorlar and Ballybofey (located on the other side of the River Finn) together, form the “Twin Towns.” [5] It might interest you to know that there are no schools or churches in the town of Ballybofey itself, all these amenities were governed by laws during plantation times when certain Catholic buildings were not allowed within a specified range of Protestant towns. Times have changed a little now as Stranorlar has both a Roman Catholic and a Church of Ireland church. Both of the Twin Towns have their own railway station.

Stranorlar Railway Station was a junction Station with the line to Glenties branching off the Donegal to Strabane line. Ballybofey Railway Station was on the other side of the River Finn. Ballybofey Railway Station opened on 3rd June 1895 and closed on 15th December 1947 along with the rest of the Glenties branch.

Wikipedia tells us that Stranorlar Railway Station was built by the Finn Valley Railway and opened on 7th September 1863 and finally closed on 6th February 1960. “The old railway station was demolished to make way for a new bus garage owned and run by Bus Éireann. To celebrate the millennium, the old clock from the railway station was restored and installed in a new clock tower which sits at the old pedestrian entrance to the railway station yard. The town remains the main depot for Bus Éireann within County Donegal.” [5]

When first built, the station was the terminus of an Irish standard-gauge (5ft 3in – 1600mm) line which ran from Strabane to Stranorlar. It served in this form for a number of years.In 1880 work commenced on the West Donegal Railway which was built to 3ft-gauge and for a time Stranolar served in this new mixed-gauge era.In 1892, the Finn Valley Railway merged with the West Donegal Railway to form a new company, the Donegal Railway Company. The line from Stranorlar to Strabane was then reconstructed to (3 ft – 914mm) gauge. [6] Conversion took very little time as it only required the moving of a single rail and respiking of the railchairs on the smae sleepers that had been used for the 5ft 3in gauge line. As we have already noted the branch to Glenties opened in 1895.

The story of all machinations which eventually brought all these lines into the same fold is told well by Patterson, Begley and Flanders and does not need repeating here. [3]

An extract from the Ireland GSGS one inch OS Map Series of the early 1940s [4]

The station building in Stranorlar taken from the station forecourt. This image is shared with the kind permission of David Parks. It appears on his blog: Irish Postcards: irishpostcards.wordpress.com. [8]

Stranorlar Railway Station in 1948 (c) Wlater Dendy CC BY-SA 2.0. [7]

There are a number of excellent monochrome photographs of Stranorlar Railway Station available on Flickr on the Photostream “Ernies Railway Archive” [9] You might want to check out the links to a sample of the different images available which are included in the notes. [10-24]

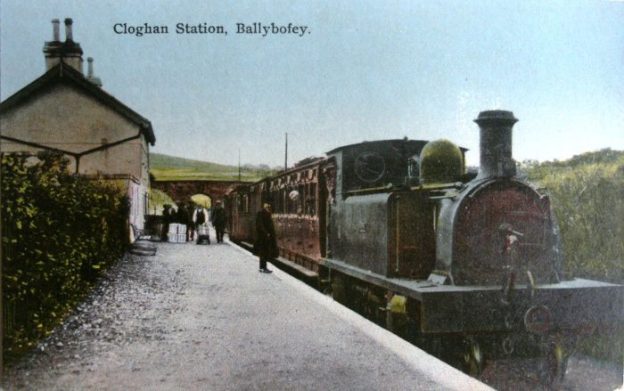
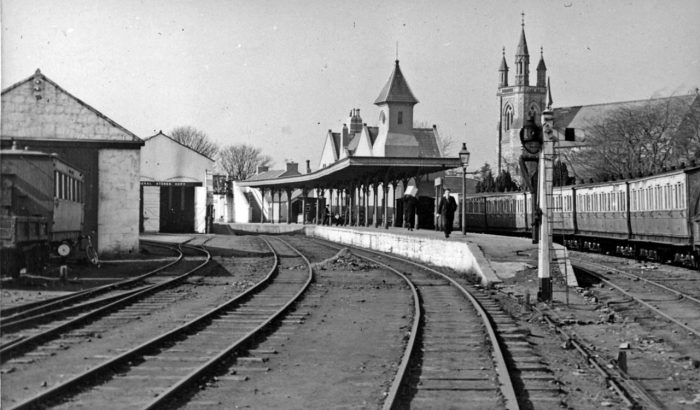
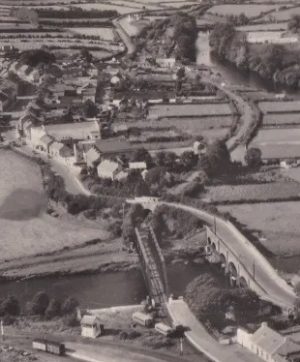
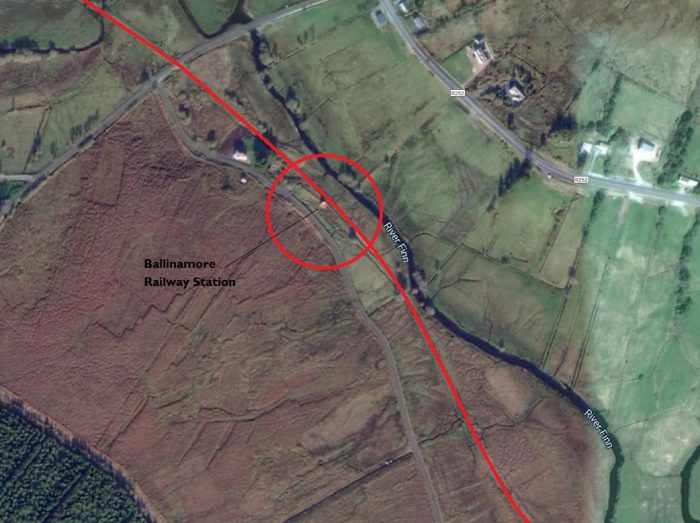
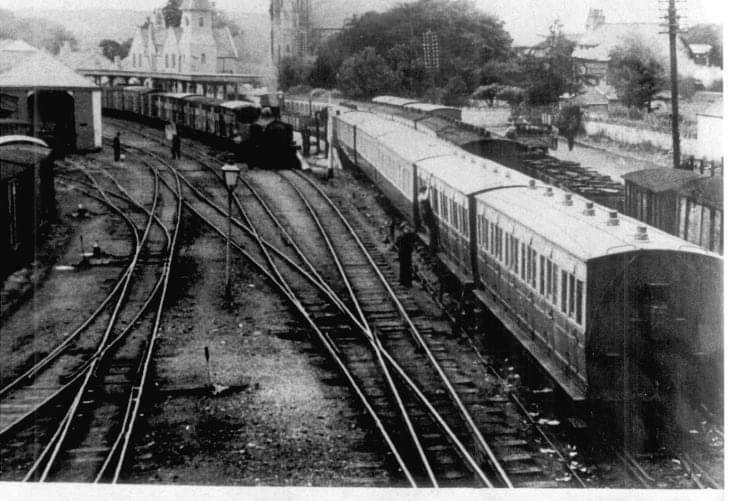
The image above looks into the site of Stranorlar Railway Station from the direction of Strabane. I found it on the Irish Railway Modeller’s Forum. [27] The contributor had found it on Facebook.Railcar No 8 arrives at Stanorlar from Glenties sometime in the 1930’s. These railcars had a single front axle and a chain-driven rear bogie, and did not provide the most comfortable rides, (c) John Langford. This image was found on the Donegal Railway Heritage Centre’s Facebook page and is used by kind permission. [40]

I have recently been given access to some station plans from the Co. Donegal Railways produced by Chris Amundson. The link immediately below shows what is known about the layout of Stranorlar Railway Station in different eras.

https://www.flickr.com/gp/spw45/J3354A

Stranorlar, based on Ordnance Survey and numerous photographs, (c) Chris Amundson (CC BY-SA 2.0), included by kind permission . [41]

The next two images show Stranorlar in the mid-1950s and come from the blog, “Hyde Park Now!” and are, in turn, sourced by that site from elsewhere. [25] In giving permission to use these two images, londonblogger expresses concern that it is easy for the historic content of blogs to be lost or dissipated in the sharing of images. The two blogs from ” Hyde Park Now! are very much worth a visit and give a great overall context to this post which focuses on one part of the whole network. These are the relevant links:

https://hydeparknow.uk/2019/12/31/the-county-donegal-railways [25]

https://hydeparknow.uk/2020/01/14/the-county-donegal-railways-2 [26]

Stranolar was effectively the headquarters of the Co. Donegal Railways. ‘londonblogger’ on the blog ‘Hyde Park Now!’ notes that it had “an extensive works for the maintenance of rolling stock.” [25] In the first of the two pictures above the maintenance facility is shown to really good advantage. Railcars were serviced in the buildings to the left of the image and steam locomotives to the right.The site of Stranorlar Railway Station as it appeared in 2009 – it functions as Bus Eireann’s Stranorlar Depot. None of the railway infrastructure and buildings remain. (Google Streetview).

Stranorlar to Clohan, GSGS Map of the early 1940s. [30]

The Glenties Branch set off West from Stranorlar Station with the line to Donegal bearing away to the Southwest. In a very short distance the branch crossed the River Finn.This image shows just how short the distance was from the end of the station platform, used by the Glenties Branch trains, to the bridge over the River Finn at Stanorlar. The village of Ballybofey can be seen at the top of this image. It had its own station. The image is used by kind permission from of David Parks. It appears on his blog: Irish Postcards: irishpostcards.wordpress.com. It was first published by ‘Aero-Views’, Dublin.  [28]

The Glenties branch can be seen crossing the bridge over the River Finn and then cuvidn around the North side of Ballybofey after having been crossed by the main road (N15) on a single-span stone-arch bridge. [28]

The Glenties Brach crossed the River Finn on a large-span truss girder bridge which sat on stone abutments.

Those abutments remain in the 21st century and can be glimpsed from the N15 as it approaches and then crosses the River Finn on its stone-arch viaduct. On the Stranorlar bank of the river, the line first passed over a narrow lane serving the river side on a girder-bridge before crossing the river. The remains of that bridge and the East abutment of the bridge can be seen on the first colour image below. You can just pick out the River Finn in the greenery to the right of the image. The stonework to the bottom right is a length of coping from the road-bridge parapet.

The Glenties Branch Bridge over the River Finn, east abutment. The picture was taken in June 2018 (Google Streetview).It is impossible to pick out the stone abutment to the West of the River Finn among the greenery on the river banks. This picture was also taken in June 2018. (Google Streetview).The view back into Stranorlar across the River Finn from Ballyfoley. The Glenties Branch Railway Bridge over the River Finn can be seen on the right of this picture [33]A postcard view of the Bridge over the River Finn (The Linen Hall Library Collection – available for sharing) [35]

The River Finn Railway bridge at Stranorlar/Ballybofey during construction of the line. The superstructure sits alongside the railway awaiting being moved into position across the river. The image is from the geocache webpage for this location. [36]

A postcard view looking back across the River Finn from Ballybofey towards Stranorlar Railway Station. Both of the river bridges are in the photograph, as is the bridge wingwall of the stone arch bridge which carried the road over the Glenties Branch. [37]

The adjacent small image shows the two River Finn Bridges (road and rail) in use. Sadly the rail bridge is only partially visible on the right of the photograph. The image is from the Facebook page ‘Ballybofey Stranorlar’. [34]

The route of the old branch-line to the Northwest of the N15 is now hidden by redevelopment. The early 1940s GSGS One-inch Map shows the railway crossing Back Road on an overbridge and then running alongside the river into Ballybofey Railway Station. [29]The approximate line of the old railway which ran across the North side of the village of Ballybofey, lifted from the GSGS Map of the early 1940s. [29]The site of Ballybofey Railway Station. This picture was taken in 2010 (Google Streetview)

At the West end of Ballybofey Station the line crossed what is now Railway Road/Beechwood Avenue on the level and then ran between Beechwood Avenue and Glenfin Street/Road (R252) parallel to the River Finn. The first length is now buried under domestic dwellings.

After a short distance the R252 (Glenfin Road) crossed the old line on an over-bridge. With the closure of the line, it became possible for a small road improvement scheme to straighten out the line of the roadas shown below.

The Glenties Branch West of Ballybofey. [31]After passing under an accommodation bridge the line continued in a westerly direction with the R252 once agin dog-legging to cross it close to the River Finn (Google Earth).

Glenmore Railway Station opened on 3rd June 1895. [32] There is no evidence of its existence in the early 21st century. The church which is marked on the GSGS Map of the early 1940s is still standing to the West of the old road junction. The railway passed to the South of the Church between it and the R253. I have shown the location ringed in red on the satellite image immediately above. The R252 curves through what would have been the station site. there would have been a level-crossing and the point above where the line crossed the old road (marked with a break in the red line).Looking East from the R253 adjacent to the churchyard at Glenmore in July 2011 (Google Streetview).The line of the old railway is so much easier to determine when the boundary walls still remain in place. This view looks to the West from the old road junction, again in July 2011. Glenmore Church can be seen on the right (Google Streetview).Cloghan Railway Station was a couple of kilometres South of the Village with the same name. The old railway turned gradually to the Northwest as it approached the station, still following the River Finn. The old station building retains the designation Station House although it is in the Townland of Gortiness. It has been extended along the line of the old platform tp the Southeast.This postcard view of Cloghan Station is a colourised monochrome image. It is taken from the Southeast. The station building can be seen on the left of the image and the road bridge can be seen beyond the platform. Permission to include this image was very kindly given by David Parks. It appears on his blog: Irish Postcards: irishpostcards.wordpress.com. [8]This view shows the old Station House which is in cream at the centre of the picture. It is taken from the road bridge shown in the postcard view, looking Southeast along the route of the old railway line. The line is marked by the line of bushes running towards the Station House (Google Streetview).The old Station House at Cloghan Railway Station. The image comes from June 2011. The first three windows from the left on the 1st floor were part of the original building. The extension is on the right (Google Streetview).

From Cloghan Railway Station the Glenties Branch turned North, crossing the River Finn twice as shown on the adjacent extract from the GSGS 1940s Map and continued up the Finn Valley. The next three photographs show the route of the line at the road bridge marked at the top of the map extract which was about a kilometre South of the village of Cloghan.

The first is a view on Google Streetview which is taken from just to the West of the the River Finn road bridge at the top of the adjacent map extract. The road alignment on the extract needs verifying. It seems as though the position of the railway was a little closer to the river.

The second image is a close up satellite view from Google Maps which has had the old railway route at its centre.The old road alignment is marked by the cartographers who have provided the road overlay to the satellite images associated with Google Maps. Teh road used to turn sharply to the South after crossing the river to a point where crossing the line was possible. It is not clear whether this was a bridge or a level-crossing.

I have been unable to find photographs of the two bridges over the River Finn. Nor are there any photos of the road crossing point near the top of the satellite image.

The next image shows the Glenties Branch alignment through this area. The red line, again, show the route of the railway.

The next map extract is at a smaller scale and shows the route of the old line to Ballinamore. The valley of the River Finn turns once again to the West after passing Cloghan village and the railway remained on the West and then South side of the river.

These next two satellite images follow the old railway route along the West side of the River Finn before it turns to the West again.

The first runs across open fields alongside the River Finn. The second continues in the same vein. At around the half-point of the satellite image extract a farm access track now uses the old railway formation as it travels North.

The first landscape image below is another satellite image which shows the gradual change of direction of the old line as it swung round towards the West. The next, illustrates the condition of the railway formation in 2009, At that time the gravel surface had newly been relaid. Further to the North the track shows up as having been tarmacked in 2009.

A sequence of photographs from Google Streetview covers the next few kilometres of the old railway. Various dwellings have been built since the closure of the line which have the old railway formation as their only access route.

A good number of these homes appear to have been constructed since the turn of the 21st century.

Eventually the tarmacked length of the old formation ends where the old railway crossed another road. A satellite image follows the Google Streetview photographs and again picks up the line close to that road crossing.The last Streetview photograph above shows the point at which the old railway formation meets what is now a local road. If the road had been present during the life of the Glenties Branch, this would have been a level crossing probably without gates. However the GSGS map (see below) does not show a road at this location in the early 1940s. The Glenties Branch continued westward on the South side of the River Finn. There was a need for a significant number of culverts to allow land drainage to reach the river. They show up particularly well of the extract from the GSGS map above.Ballinamore Station Building in 2010 seen from the R252. It is difficult to imagine a more remote location for a Station Halt nor a more run-down, but still standing, corrugated iron building. As we can see in the last picture of this article, the platform face still remains! (Google Streetview)Ballinamore Station Building! It was still standing in 2020 as can be seen on the Satellite image above. This picture was taken in 2009 (Google Streetview).

Ballinamore Railway Station opened in June 1895 and closed in December 1947. [38]

Former Ballinamore County Donegal Railway Station, June 1990 – The photographer says, “Miles from anywhere, not a house or tree in sight. Once the haunt of snub-nosed diesel railbuses. Ballinamore station, opened in 1895 was about half way between Glenties and Stranorlar on the CDR County Donegal Railway.” (Scanned slide) (c) G Sludge (Attribution-ShareAlike 2.0 Generic (CC BY-SA 2.0)). [39]

The location appears for a few seconds in “Off The Beaten Track – Stranorlar to Glenties in Donegal.” www.youtube.com/watch?v=7wclzaSSzWQ&t=13m20s

We have reached the end of this first part of the journey from Stranorlar to Glenties. It is hard to think of a worse place to stop and we only do so because it is roughly at the half-way point on the journey to Glenties.

References

  1. The Railway Magazine: ‘Notes and News’; May & June 1948 edition. Volume 94 No. 575, p202.
  2. https://www.gracesguide.co.uk/County_Donegal_Railways_Joint_Committee, accessed on 21st May 2020.
  3. Edward M Patterson (original author), Joe Begley & Steve Flanders (authors of additional material in the Revised Edition); The County Donegal Railways; Colourpoint Books, Newtownards, Co. Down 2014.
  4. https://maps.nls.uk/geo/explore/#zoom=15&lat=54.80218&lon=-7.77993&layers=14&b=1, accessed on 21st May 2020.
  5. https://en.wikipedia.org/wiki/Stranorlar, accessed on 21st May 2020.
  6. https://en.wikipedia.org/wiki/Finn_Valley_Railway, accessed on 21st May 2020.
  7. https://en.wikipedia.org/wiki/Stranorlar_railway_station#/media/File:Stranorlar_station,_County_Donegal_Railways_Joint_Committee,_1948_(geograph_5307210).jpg, accessed on 21st May 2020.
  8. https://irishpostcards.wordpress.com/transport, accessed on 23rd May 2020.
  9. https://www.flickr.com/photos/irishswissernie, accessed on 23rd May 2020.
  10. https://www.flickr.com/photos/irishswissernie/23589146660/in/album-72157662649694575 – CDRJC Stranorlar, goods entering from Strabane 1958 (c) Henry Emeleus/ARPT, accessed on 23rd May 2020.
  11. https://www.flickr.com/photos/irishswissernie/16492159115 – Stranorlar 1957, accessed on 23rd May 2020.
  12. https://www.flickr.com/photos/irishswissernie/23256677994 – CDRJC Stranorlar Railcar No. 19, 1958 (c) Henry Emeleus/ARPT, accessed on 23rd May 2020.
  13. https://www.flickr.com/photos/irishswissernie/6180278429/in/album-72157662649694575 – CDRJC Stranorlar just after closure 1960, taken from the Eastern approach from Strabane, accessed on 23rd May 2020.
  14. https://www.flickr.com/photos/irishswissernie/23858764346/in/album-72157662649694575 – CDRJC ‘Erne’ on shed at Stranorlar in 1958 (c) Henry Emeleus/ARPT, accessed on 23rd May 2020.
  15. https://www.flickr.com/photos/irishswissernie/41879605651/in/album-72157662649694575 – Class 5 on shed at Stranorlar in 1958, accessed on 23rd May 2020.
  16. https://www.flickr.com/photos/irishswissernie/23258058353/in/album-72157662649694575 – CDRJC Stranorlar in 1958 (c) Henry Emeleus/ARPT, accessed on 23rd May 2020.
  17. https://www.flickr.com/photos/irishswissernie/23539544992/in/album-72157662649694575 –  0956-3 Railcar Stranolar station (c) J W Armstrong/ARPT, accessed on 23rd May 2020.
  18. https://www.flickr.com/photos/irishswissernie/23258060463/in/album-72157662649694575 – CDRJC Stranorlar station, Railcar No. 19 arrives from Donegal in 1958. The former Glenties platform is in foreground (c) Henry Emeleus/ARPT, accessed on 23rd May 2020.
  19. https://www.flickr.com/photos/irishswissernie/15872003843/in/album-72157662649694575 – goods wagons outside the General Store at Stranorlar Railway Station in 1957, accessed on 23rd May 2020.
  20. https://www.flickr.com/photos/irishswissernie/16304711660/in/album-72157662649694575 – close-up of the plaform canopy columns at Stranorlar Railway Station in 1957, accessed on 23rd May 2020.
  21. https://www.flickr.com/photos/irishswissernie/6180266037/in/album-72157662649694575 –  CDRJC Stanorlar Railcar No. 19 on Killybegs service on 8th July 1956 (b726), accessed on 23rd May 2020.
  22. https://www.flickr.com/photos/irishswissernie/6180279023/in/album-72157662649694575 – colour image of Stranorlar Railway Station in 1958, taken from the Southwest, accessed on 23rd May 2020.
  23. https://www.flickr.com/photos/irishswissernie/6180277183/in/album-72157662649694575 – CDRJC_Stranorlar: Railcar No. 18 on the turntable in 1958, accessed on 23rd May 2020.
  24. https://www.flickr.com/photos/irishswissernie/6180272243/in/album-72157662649694575 – Stranorlar Railway Station Footbridge. Picture taken in May 1963 after closure of the line, accessed on 23rd May 2020.
  25. https://hydeparknow.uk/2019/12/31/the-county-donegal-railways, accessed on 23rd May 2020. The map of the network was in turn sourced from Twitter: https://twitter.com/velvetninja1/status/1188118651536314369
  26. https://hydeparknow.uk/2020/01/14/the-county-donegal-railways-2, accessed on 23rd May 2020.
  27. https://irishrailwaymodeller.com/topic/7262-donegal-railway/page/2, accessed on 23rd May 2020.
  28. https://irishpostcards.wordpress.com/aerial-cards, accessed on 24th May 2020.
  29. https://maps.nls.uk/geo/explore/side-by-side/#zoom=17&lat=54.80016&lon=-7.78155&layers=14&right=BingHyb, accessed on 24th May 2020.
  30. https://maps.nls.uk/geo/explore/#zoom=13&lat=54.81900&lon=-7.84274&layers=14&b=1, accessed on 21st May 2020.
  31. https://maps.nls.uk/geo/explore/side-by-side/#zoom=16&lat=54.79994&lon=-7.79374&layers=14&right=BingHyb, accessed on 26th May 2020.
  32. https://en.wikipedia.org/wiki/Glenmore_railway_station, accessed on 26th May 2020.
  33. https://www.heritageweek.ie/whats-on/event/past-times-photograph-exhibition, accessed on 26th May 2020.
  34. https://m.facebook.com/TheTwinTownsDonegal, accessed on 26th May 2020.
  35. https://www.postcardsireland.com/postcard/roman-catholic-church-and-road-and-rail-bridges-ballybofey, accessed on 24th May 2020.
  36. https://www.geocaching.com/geocache/GC27NQG_finn-valley-bridges-ballybofey-bridge?guid=0e6f9849-1b77-432e-bc57-a34712885176, accessed on 26th May 2020.
  37. http://ballybofeyandstranorlar.com, accessed on 26th May 2020. (A subsequent internet search to find this image only produced a similar but watermarked version of the photograph.)
  38. https://en.wikipedia.org/wiki/Ballinamore_railway_station, accessed on 28th May 2020.
  39. https://www.flickr.com/photos/sludgeulper/3611611930, accessed on 29th May 2020.
  40. https://www.facebook.com/DonegalRailwayHeritageCentre/photos/a.1230417866994452/2944521065584115/?type=3&theater, accessed on 15th July 2020.
  41. Chris Amundson has been working on a series of large scale map plans of the Co. Donegal Railway Stations. He has very kindly allowed me to link to that work. (https://www.flickr.com/gp/spw45/y49162)

Gloucester Docks and Railways – Part 1

Midland Railway Crane, Gloucester Docks, (c) Robert Powell, 2011, reproduced under a Creative Commons Licence. [24]

Gloucester Docks is an historic area of the city of Gloucester. It is important for its Victorian warehouses which are listed buildings. [2] Within the old Dock’s site are the Gloucester Waterways Museum [3] and the Soldiers of Gloucestershire Museum. [4] The docks are located at the northern junction of the River Severn with the Gloucester and Sharpness Canal. [7]

The docks were rail-served by both the Great Western Railway and the Midland Railway, later by the GWR and the LMS and ultimately by British Railways (BR).

Steam Crane, Gloucester Docks (c) Crispin Purdye, 2006, reproduced under a Creative Commons Licence [26]

Neil Parkhouse, in one of his fantastic collections of colour photographs from the last decades of steam in Gloucestershire  (British Railway History in Colour) focusses on the Midland lines serving the docks, specifically three lines in the area – the Tuffley Loop; the High Orchard Branch; and the Hempsted or New Docks Branch. [9] He covered the Western approaches to the docks in the first volume in his series. [41]

Wikipedia offers us the following volumes for researching the docks and the associated railways in Gloucester, although it is unable to provide links to the relevant texts: [10]

  • Hugh Conway-Jones; Gloucester Docks: An illustrated history; Sutton & Gloucestershire County Library. 1984. [35]
  • A Guide to Gloucester Docks; Sutton, 1988
  • Michael Stimpson; The History of Gloucester Docks and its Associated Canals and Railways; West London Industrial Archaeological Society, Potters Bar, 1980.

Further research on the internet produces a number of sites which focus on the railways of the Docks in Gloucester:

  • Gloucester Docks and the Sharpness Canal, Past and Present. [11]
  • Gloucester Transport History: Railways in Gloucester and Churchdown After 1845. [20]
  • Gloucester Transport History: Railways in Gloucester [34]

The Tramroad

However, the first rail link to the docks was not a standard-gauge edge railway, but rather a plateway – The Gloucester and Cheltenham Tramroad. Its primary economic purpose was the transport of coal from Gloucester’s docks to the rapidly developing spa town of Cheltenham and the transport of building stone from quarries on nearby Leckhampton Hill to Cheltenham and Gloucester. [16][33]

”The tramroad was opened for mineral traffic on 2 July 1810. The line was a 3ft 6 in (1,067mm) gauge plateway, with cast iron plates on stone blocks. Wagons with plain wheels could run on the plates and were guided by an upstand on the plates. The route was single track, but passing places were provided at four to the mile, or more frequently. It appears that more passing places were added later, no doubt in response to higher traffic densities.” [16][33]

The picture below is a sketch map of the route of the tramroad produced by the GSIA (Gloucestershire Society for Industrial Archaeology) of which I am a member. (Membership of the society costs £9 per annum.) [40]

The route of the tramroad between Cheltenham and Gloucester. [32]

I have read through some of the internet links to the Cheltenham & Gloucester Tramroad and I have undertaken further research into the history of the line. That research has resulted in the drafting of a number of articles about the Tramroad:

The Cheltenham & Gloucester Tramroad – Part 1 [33]

The Cheltenham & Gloucester Tramroad – Part 2 [36]

The Cheltenham & Gloucester Tramroad – Part 3 [37]

The Cheltenham & Gloucester Tramroad – Part 4 [38]

The tramroad/plateway was horse-powered and only briefly flirted with the use of steam-power. [39] But the use of horses did not stop with the construction of what we today would see as more conventional railways. After the Midland Railway had built its lines into the Dock complex, horses were still vital to the operation of the railways in the docks. Hugh Conway-Jones explains:

“Horses were used on the dock railways to distribute incoming wagons, marshall outgoing wagons and make short transfers between quay and warehouse etc. These movements could be quite time consuming as many of the lines along the quays were only linked to the main system by small turn-tables that could only take one wagon at a time. The horses knew exactly where to stop to position a wagon correctly on a turntable, which was then rotated by pushing on an extending arm. Sometimes a horse was hitched up to the arm to get the turntable moving, but care was required not to exert too much force or the wagon could swing round out of control. The horses also knew that it was worth stopping outside the black shed beside the Great Western Warehouse, as this was where the lump sugar was stored and some body would usually give them a lump or two. Locomotives were used for transfers between the different parts of the docks, and as some of the bends were rather sharp, the Midland Railway had a special type of tank locomotive with a very short wheelbase.” [35: p123]

The tramroad made, in its time, a dramatic contribution to the economic life of Cheltenham, Gloucester and its Docks. It was unable, however, to compete with the more modern railways and gradually became less and less significant in the life of the Docks and nearby conurbations. Eventually it closed in 1861. Much of the line has disappeared under development in Cheltenham and Gloucester. There are things to find which relate to the old tramway and details can be found in the series of articles above. Information on some of the remains can also be found at http://www.gsia.org.uk. [32]

The Railways

It was the middle of the 19th century when branches from the Midland Railway were laid to serve to docks in Gloucester. The GWR also laid tracks to serve the docks. These became a better option than the waterways for carrying imports into the Midlands and they eclipsed the tramroad for local supplies to Cheltenham. The Midland sidings cut the tramroad access to the northern part of the docks and to the quay further north along the River Severn

The Midland Railway completed their branch to Bakers Quay and the east side of the docks in 1848. That branch also served the timber yards established along the canal banks to the south. “Locomotives moved wagons to and from the main line, but most movements around the docks area, as we have already noted, were done by horses, particularly as there were a number of turntables needed to negotiate sharp corners around existing buildings.” [11]

The Great Western Railway completed their branch to Llanthony Quay and the west side of the docks just a few years later – around 1853. Broad gauge lines were laid at this time but soon these were converted to mixed-gauge. Hugh Conway-Jones says that, “it had been hoped that the GWR line would provide a ready supply of coal from the Forest of Dean for export, but most masters preferred to load coal at one of the South Wales ports.” [11]

The different railway routes at the docks will be covered in subsequent articles. It is interesting to note that because of the differing access arrangements, the sidings on each side of the docks had very different characteristics. The sidings from the Midland Railway had to find their way through relatively built up areas to reach the dockside. Those from the Great Western Railway crossed open fields and the River Severn before they formed a fan of sidings close to the docks with some extensions southwards down the west side of the docks.

Aerial Images of Gloucester Docks

These aerial images of the docks are available on the Historic England website, ‘Britain From Above’. They show the docks at work in the period between about 1920 and 1950.

Image No. EPW024154 – Gloucester prison and the docks, Gloucester, 1928. The River Severn can be seen curving away to the right of the image. The Canal to Sharpness heads away to the South at the top of the image. [27]Image No. EPW024161 – Gloucester Docks, 1928. It is interesting to note the presence of open fields on the far side of the River Severn! The Main Basin is shown in the centre of the image and the canal running from it to the bottom of the image was the access for shipping into the Victoria Dock. [28]Image No. EPW024164 – Victoria Dock, Southgate Street and environs, Gloucester, 1928. The Main Basin is just off the photograph to the right. The railway sidings in the foreground were originally Midland Railway Sidings and those  in the top right corner of the picture were GWR sidings. [29]Image No. EPW024166 – The Docks and environs, Gloucester, 1928. Both Victoria Dock and the Main Basin are centre stage in this image. The River Severn can be seen in the top right with green fields beyond. Top-centre are the GWR sidings with a bridge access across the River Severn, top right. [30]Image No. EPW037837 – GWR Railway sidings next to Llanthony Priory and surroundings, Gloucester, 1932. The River Severn and one of its locks are in the foreground. [31]

References

  1. The Docks Conservation Area (Conservation Area No. 3) Appraisal & Management Proposals. Gloucester City Council, Gloucester, 2007, accessed on 9th April 2020, quoted in reference [2] below.
  2. https://en.m.wikipedia.org/wiki/Gloucester_Docks, accessed on 9th April 2020.
  3. One of several museums and attractions operated by the Canal & River Trust, the successor to The Waterways Trust, the Gloucester Waterways Museum is housed in the old Llanthony Warehouse in the heart of what once was the bustling Gloucester Docks. [5]
  4. The Soldiers of Gloucestershire Museum is also located in Gloucester’s Historic Docks. It reopened in April 2014 after a significant Heritage Lottery funded refurbishment. It is a place to discover the lives of Gloucestershire soldiers over the last 300 years.  The story begins in 1694, travels through the Napoleonic Wars, the Age of Empire, Worlds Wars, Korea and right up to modern day conflicts. [6]
  5. https://canalrivertrust.org.uk/places-to-visit-the-national-waterways-museum-gloucester, accessed on 9th April 2020.
  6. https://www.soldiersofglos.com, accessed on 9th April 2020.
  7. The Gloucester & Sharpness Canal was once the broadest and deepest in the world. Even today, it stands out from other navigations because of its sheer scale and impressive engineering. [8]
  8. https://canalrivertrust.org.uk/enjoy-the-waterways/canal-and-river-network/gloucester-and-sharpness-canal, accessed on 9th April 2020.
  9. Neil Parkhouse; British Railway History in Colour: Volume 4A – Gloucester Midland Lines Part 2 : South, Eastgate to Stroud & Nailsworth; Lightmoor Press, Lydney, Gloucestershire, 2019; cf. http://lightmoor.co.uk/books/gloucester-midland-lines-part-2-south/L8665, accessed on 18th April 2020.
  10. https://en.wikipedia.org/wiki/Bibliography_of_the_City_of_Gloucester#Gloucester_Docks, accessed on 18th April 2020.
  11. https://www.gloucesterdocks.me.uk/gloucester/railways.htm, accessed on 18th April 2020.
  12. https://www.gloucesterdocks.me.uk/gloucester/docks.htm, accessed on 18th April 2020.
  13. https://www.gloucesterdocks.me.uk/gloucester/dockssouth.htm, accessed on 18th April 2020.
  14. https://www.gloucesterdocks.me.uk/studies/highorchard.htm, accessed on 18th April 2020.
  15. https://www.gloucesterdocks.me.uk/gloucester/details/glodetailsnorth.htm, accessed on 18th April 2020.
  16. https://en.wikipedia.org/wiki/Gloucester_and_Cheltenham_Tramroad, accessed on 18th April 2020.
  17. https://www.geograph.org.uk/photo/4166438, accessed on 18th April 2020.
  18. https://www.british-history.ac.uk/vch/glos/vol4/pp251-258, accessed on 18th April 2020.
  19. https://llanthonysecunda.org/entry/1951-map-of-gloucester-docks, accessed on 18th April 2020.
  20. https://glostransporthistory.visit-gloucestershire.co.uk/Railgloschur2.htm, accessed on 18th April 2020.
  21. https://sites.google.com/site/gloucestershirerailwaymemories/home/a-new-way-and-works/gloucester-dock-branch-sidings-and-llantony, acessed on 18th April 2020.
  22. https://www.gloucestershirelive.co.uk/whats-on/shopping/gallery/take-look-gloucester-before-gloucester-2874249, accessed on 18th April 2020.
  23. Hugh Conway-Jones; Gloucester Docks: An Historical Guide; Lightmoor Press, Lydney, Glocestershire, 2009.
  24. https://commons.wikimedia.org/wiki/File:Midland_Railway_Crane,_Gloucester_Docks._-_panoramio.jpg, accessed on 18th April 2020.
  25. https://www.gloucestershirelive.co.uk/news/gloucester-news/gallery/remnants-gloucesters-industrial-revolution-littered-3221228,, accessed on 18th April 2020.
  26. https://www.geograph.org.uk/photo/70782, accessed on 18th April 2020.
  27. https://britainfromabove.org.uk/en/image/EPW024154, accessed on 18th April 2020.
  28. https://britainfromabove.org.uk/en/image/EPW024161, accessed on 18th April 2020.
  29. https://britainfromabove.org.uk/en/image/EPW024164, accessed on 18th April 2020.
  30. https://britainfromabove.org.uk/en/image/EPW024166, accessed on 18th April 2020.
  31. https://britainfromabove.org.uk/en/image/EPW037837, accessed on 18th April 2020.
  32. https://www.gsia.org.uk/gct/gsia-tramroad-history.pdf, accessed on 18th April 2020.
  33. https://rogerfarnworth.com/2020/04/23/the-cheltenham-and-gloucester-tramroad-part-1, published on 24th April 2020.
  34. https://glostransporthistory.visit-gloucestershire.co.uk/First%20Railways%20in%20Gloucester.htm, accessed on 24th April 2020.
  35. Hugh Conway-Jones; Gloucester Docks: An Illustrated History; in the County Library Series, Allan Sutton, Gloucester and Gloucestershire County Libraries, 1984.
  36. https://rogerfarnworth.com/2020/05/02/the-gloucester-and-cheltenham-tramroad-part-2, published on 2nd May 2020.
  37. https://rogerfarnworth.com/2020/05/06/the-gloucester-and-cheltenham-tramroad-part-3, published on 6th May 2020.
  38. https://rogerfarnworth.com/2020/05/08/the-gloucester-and-cheltenham-tramroad-part-4, published on 8th May 2020.
  39. D.E. Bick; ‘The Gloucester & Cheltenham Railway and the Leckhampton Quarry Tramroads’; The Oakwood Press, 1968.
  40. https://www.gsia.org.uk/membership.php, accessed on 30th April 2020.
  41. Neil Parkhouse; British Railway History in Colour: Volume 1 – West Gloucester and Wye Valley Lines, 2nd Edition, Lightmoor Press, Lydney, Gloucestershire.

The Cornwall Minerals Railway – Part 1

The Cornwall Minerals Railway is mentioned in an article in the journal “Railway Archive.” about the first locomotives purchased for the Cornwall Minerals Railway. [1]

The Cornwall Minerals Railway developed out of a series of older Tramroads which served the Cornish Mining Industry. It owned and operated a network of 45 miles (72 km) of standard standard gauge railway lines in central Cornwall. It started by taking over an obsolescent horse-operated tramway in 1862, and it improved and extended it, connecting Newquay and Par Harbours and Fowey.

Wikipedia tells us that the Cornwall Minerals Railway had a chequered history having been hurt by a collapse in mineral extraction due to a slump in prices. But after a period in bankruptcy it recovered enough to take over a defunct route between Fowey and Lostwithiel – the Lostwithiel and Fowey line.

In 1896 it finally sold its line to the Great Western Railway which had been leasing it for some time.

Its main passenger line from Par to Newquay is still in use as the Atlantic Coast Line, and also carries some mineral traffic, but the Par to Fowey line has been converted to a private road. [2]

CMR No. 1, Treffrey was built, along with all of the CMR locomotives, by Sharp, Stewart & Co. Ltd of Manchester. It was named for Joseph Austin Treffrey but the name plates were mis-spelt. These locos were intended to work in pairs, back to back and it is likely that the lack of rear bunker and the open cab were intended to facilitate this way of working. There is no evidence to suggest that the traffic on the railway was ever large enough to justify this intention. [1][2]

The Cornwall Minerals Railway was adventurous in its intentions and purchases. It anticipated far more traffic from the mines than was to materialise and bought 18 (yes, eighteen) 0-6-0T steam engines to serve the anticipated high demand. [1] When the line was leased to the GWR in 1877, the new lease-holders quickly realised that the over provision of motive power was a financial drain on the Line. The GWR returned 9 of the engines to their makers, leaving 9 to serve the needs of the Line. [1:p30]

Of the 9 remains locos, a further one was sold by 1883 to the Sharpness New Docks Company and based on the opposite side of the River Severn from the Forest of Dean. [1:p31]

Of the 9 locos returned to Sharp, Stewart, 8 were purchased by the Lynn & Fakenham Railway and ended their days in various guises on the Midland & Great Northern Joint Railway (M&GNJR) which was the ultimate successor to the Lynn & Fakenham Railway. [1:p30] A first batch of three were sold to the Lynn & Fakenham in 1880, a further five were sent to the Lynn & Fakenham in 1881. [1: p36]

The last of the 9 locos returned to Sharp, Stewart was sold to the Colne Valley & Halstead Railway before ending up at a colliery in Northumberland. [1: p30]

This is the first article of what I hope will be a series about the Cornwall Minerals Railway.

References

1. Peter Treloar; A Scattered Family: The Cornwall Minerals Railway’s 0-6-0Ts; Railway Archive Issue 30, Black Dwarf Lightmoor Press, 2011, p27-40.

2. https://en.m.wikipedia.org/wiki/Cornwall_Minerals_Railway, accessed on 17th May 2020.

The Gloucester and Cheltenham Tramroad – Part 4

The Tramroad in Gloucester. …

In the last article in this series we had reached a point of the journey from Cheltenham where the tramroad passed along the North side of what was later to be Barnwood LMR Locomotive Depot.

The first map below is the 6″ 1882 OS Map and shows the approximate alignment of the tramroad which had already been lifted by that date. The 1886 25″ OS Map is very similar to the 1182 Map but things changed somewhat over the next decade. The second map below is the 25″ OS Map from the turn of the 20th century. Tramway cottage has been removed by this time. The MPD roundhouse was at the right hand end of that OS Map extract. The third OS Map extract below comes from the 1930s when the sidings to the Southwest of the Roundhouse had been increased in number.The old tramroad embankment can be made out running behind the two jinties stabled at Barnwoood MPD (c) Roger Smith, used with permission.

The locomotive depot is now long-gone and the land turned over to industrial use. The Google Streetview image below the OS Maps is taken at the end of Myers Road. It is difficult to fix the exact location of the tramroad here. It clearly ran through the site in the picture between the two access roads that are visible. The line probably ran near to the right-hand access road. The view East from the end of Myers Road towards what was the location of Barnwood MPD Roundhouse (Google Streetview).

As the OS Map extract above suggests, the tramroad curved round to the Southwest. To cross Horton Road and the standard-gauge lines on the level. The level-crossing on Horton Road was known as Tramway Junction, now Horton Road Crossing.The next image is a Google Streetview image which looks Northeast from the Horton Road Crossing and which as a result looks along the line of the old Tramroad as it heads to the Northeast. The second image below is again a Google Streetview image taken from a point 20 metres or so to the south of the first image and showing the route of the tramway crossing Horton Road/Derby Road.After crossing what was a small area of open ground and which now carries Metz Way (A 4302) the tramroad joined Millbrook Street. The two following images show this. The first looks to the Southwest and shows the route meeting Millbrook Street, the second looks North East and shows the alleyway which remains long after the tramroad has gone! Both are, again, Google Streetview images.Contact with Millbrook Street is only fleeting. The old tramroad headed away to the West after only a short distance. The footpath shown in the centre of the next Google Streetview image follows its ancient route!The route of the old tramroad through Gloucester can be found in D.E. Bick’s book, [2: p16] and B. Baxter’s article. [3: p118], rather than reproduce either of these images here, the route is followed in detail on OS Map extracts. The first of these shows the length from Tramway Crossing/Junction on Horton/Derby Road in the East to very close to the old Eastgate Station (LMR). One its way, as we have already noted the line touched Millbrook Street and then ran across the backs of the houses on Napier Street towards Barton Iron Foundry. To the North of the old route today is Widden Primary School, and the ASDA superstore.Causton’s 1843 Map of Gloucester shows the Tramroad at this location in open fields. The tramroad was, in 1843, in the heyday of its working life and had not been encroached upon by development. Its route is highlighted in yellow on this extract. [6]

In the extract from Causton’s map above, the tramroad is seen entering from the East and then turning sharply towards the Southwest as it approached what in 1843 was the outer limits of the built-up area of Gloucester. The street entering from the West is Cambridge Street. Marked on the extract is a passing loop. just to the West of the sharp curve in the alignment of the tramroad and perhaps of greater significance a branch heading way to the North along what was to become first Barton Lane and then Station Road.

At this time, there was no Eastgate Station. Gloucester’s only railway station was located on the site of the complex that in the 21st Century continues to serve as Gloucester’s Railway Station. The railway station, in 1843, was to the North of the Tramroad.

The tramroad predated the larger-gauge network in Gloucester and a link must have been provided to connect the Railway Station with the Tramroad when the larger scale lines were opened.

Later maps suggest that the tramroad link to the station was replaced by a larger-gauge (broad-gauge) siding. [4: 1852 Board of Health Map]

To the South, the tramroad ran down to a level-crossing at Barton Street and onto Park Road (or Park End Road). Just South of Barton Street there was another passing loop provided. This length of the tramroad had to be maintained even after the construction of the larger scale railways which used its route over this very short section.

Baxter notes that this section of the tramroad, “was used by the two railways which jointly bought the tramroad shares, but, as the tramroad continued to work independently for more than twenty years after its acquisition, the tramroad track must obviously have been maintained on a course parallel with the new railway.” [3: p119]Sadly, the large scale .jpg image of Causton’s 1843 Map, that I have access to, does not cover the full extent of the tramroad. The tramroad leaves that copy of the map just to the Southwest of the passing loop which we have already noted and which appears at the bottom of the extract above. [6] Other copies of Causton’s map available on line are not so well defined and are blurry. They do, however, show the tramroad looping through open fields as it turns Westward.

Just off the bottom of the copy of the map that I have, the tramroad turned to the right and took a Westerly course along what became Park Road. It ran on the Northside of Park Road. This is shown on the alignment included by me on the OS Map below after significant property development in the city.OS Map from before the construction of Eastgate Station. The map comes from around the 1880s which means that the tramroad was abandoned by the time it was drawn.The Tramroad turns through 90° to head West. This plan is part of a series from 1852. [13]

The tramroad re-appears on my copy of Causton’s map as it travels along the length of Park Road, just to the East of Parker’s Row (later Wellington Street). It is helpful that this length appears on Causton’s map as it allows us to identify a Gloucester and Cheltenham Tramroad depot at the junction of Parker’s Row (Brunswick Road) and Park Road.These buildings stand at the corner of Brunswick Road (one time Parker’s Row) and Park Road on the site of what was once the tramroad depot (Google Streetview).What remains of the Depot in the early 21st century (Google Streetview).

The Gloucester and Cheltenham Tram Road is clearly annotated on Causton’s Map. The route is highlighted in yellow again. [5]OS Map extract from 1880s [5]Looking ahead to the West along the line of the old Tramway (Google Streetview)A view East along Old Tram Road (Google Streetview).Looking West on Old Tram Road (Google Streetview).Looking West along Albion Street (Google Streetview).The route of the Old Tramroad down Albion Street towards Southgate (Google Streetview).Looking back to the East along Albion Street, the route of the old Tramway. The building to the right of the old Tramroad route is the Whitesmiths Arms, the lower portion of the building, on the right-hand edge of the photograph was apparently the only building south of the city walls that was not destroyed during the siege of Gloucester in 1643 during the English Civil War (Google Streetview).

The next sequence of maps are also extracts from Causton’s Map They show the full length of the tramroad alongside the docks with the route from Cheltenham appearing as two lines entering from the right in the bottom map extract of the sequence. The tramroads have again been lightly highlighted in yellow.Gloucester Docks Tramroads before the coming of the railways as shown on Causton’s Map of Gloucester from 1843. The two tramroads shown leaving the bottom right of the map extract immediately above become one tramroad within no more than a few yards and that single tramroad crossed Lower Southgate Street and headed off along Albion Street. [5] In 1824, the Barge Arm, referred to on the above maps as the Barge Dock, was opened and was served by a series of 18 sidings from the tramroad. [6]

The Barge Arm was constructed in 1824-25 permitting smaller vessels to load and unload without occupying space in the main canal basin. Hugh Comway-Jones says that ”the surrounding land was divided into eighteen yards on each side, each yard having a frontage of only  twenty feet, although some tenants rented more than one yard. Each pair of yards was served by a siding of the Gloucester & Cheltenham Tramroad. A surviving inventory of 1834 shows that one yard was surrounded by seven foot high fencing, with a pair of gates which opened on wheels. In the yard was a manually operated cast-iron crane capable of pitting seven tons, a tramroad wagon and several barrows used for transferring cargoes between the boats and the tramroad.” [8: p31]

Conway-Jones goes on to describe the various different yards around the Barge Arm and to note that the loss of the tramroad in 1861 was quickly rectified by the provision of sidings by the Midland Railway and by an adjustment of levels of the quay by the dock company. [8: p31]

Tramroad Blocks excavated near the Barge Arm in 1983. Cast Iron plates recover from another location have been placed on the blocks to show the Tramroad construction. [11]

Excavations were undertaken close to the Barge Arm in 1983 and these uncovered some examples of the Tramroad sidings. An example is shown in the adjacent image. (A better picture can be found in Conway-Jones earlier book of 1984. [10: p21])

There is also a map of 1829 which shows the tramroad sidings serving the Barge Arm and with similar sidings on the East side of the main Canal Basin. That map was drawn by Sutherland. [10: p31] The south side of the Barge Arm is also shown on the 1852 series of Health plans as being served by the tramroad. [13]

The 1852 plan showing the tramroad serving the south side of the Barge Arm despite the fact that by this time the north side was served by the Midland Railway. [13]

Looking West into the Docks complex at Gloucester with the approximate Tramroad alignments shown in red (Google Streetview).Reconstructed Trams placed on typical plateway rails on one of the lines of the old Tramroad (Google Streetview).A siding passed down to the East of the Barge Arm (Google Streetview).Approximate Tramroad alignments further into the docks (Google Streetview).At this location, two of the tramroad arms are remembered with rails let into the modern paving (Google Streetview).The old Tramroad route North through the site of the docks (Google Streetview).The old Tramway route between the River Severn and the County Gaol (Google Streetview).

I have not provided extracts from the later 1880s OS Map for the area around the docks, as by that time the docks were served primarily by larger-gauge edge-railways rather than the old plateways and those railways dominate the old maps from that period. There is an excellent reproduction of the 1902 OS Map in Hugh Conway-Jones, ”Gloucester Docks: An Historical Guide.” [8: p30] A similar map can be found on the website of British History Online. [12] And there are an increasing number of online resources available for those who are interested. [9]

Interestingly Bick records the fact that the plateway north of the dock entrance was abandoned in the late 1840s or thereabouts. [2: p27] This is supported by the 1852 series of Health Maps which show the north side of the Barge Arm being served by the Midland Railway. [13]

We have now followed the full length of the Old Tramroad. There are a few other bits and pieces that it is worth us considering before we complete this series of 4 articles about the line.

Tramroad Traffic and Operations

There is short document produced by the Gloucestershire Society for Industrial Archaeology about the Tramroad. [6]. In this document a short paragraph provides details of the operation of the tramroad: “At its peak operating period, the tramroad must have been very busy with up to 60 journeys each day carrying over 35,000 tons of general materials and 20,000 tons of stone from the Leckhampton quarries in a single year. Despite competition from the railways and the Coombe Hill Canal, coal from the Forest of Dean was the main material transported along the tramroad, being preferred to Midlands coal and cheaper to purchase. Many different commodities were carried, from stone water pipes from the Guiting Power Stone Pipe Company between 1812-1815, to iron from Horsley in the West Midlands for the new Cheltenham gas lighting project in 1819.” [6]

Other sources such as D.E. Bick note that a tram trains usually consited on 2 trams. Thjis was the usual maximum which could be managed by one horse and the limiting factor was the gradient on the Cheltenham side of Staverton Bridge. I find it really interesting that the tramroad followed a prctice which eventually became prevalent on standard gauge lines of augmenting the power of a locomotive with another on steep sections of line. Stables were provided at Staverton Bbridge for horse which provided support for the tram horses climbing the 1:100 gradient near Arle Court. Could we use a term which became familiar with railways? Could we call this an early example of the principle of ‘banking’? [cf. 2: p36]

Maintenance of the Tramroad

Plateways were  maintenance intensive. They required the short cast-iron plates to be leveled regularly, they were particularly intolerant of over-loaded trams. The GSIA document says: “The ‘L’ shaped design of rails needed to be kept clean to prevent derailing of wagons.  Replacement of broken cast iron rails was frequently necessary; this may have been aggravated by the desire to carry loads in excess of the weight capacity of the rails. It was reported that poor and unstable ground also contributed to the difficulties of keeping the permanent way open.” [6] It seems that the income derived from the carriage of materials and the tolls levied was never significantly more than the cost of maintenance of the line. [2: p38]

Theft of plates was apparently a common occurrence. Bick quotes one example of a theft of 58 of the plates by one individual. [2: p38]

The Demise of the Tramroad

There were a number of factors which influenced the timing of the final closure of the tramroad. These included:

  • The rapid decrease in profits after about 1841. Bick quotes figures which show that a profit of £2,100 in 1841 decreased to about £1,000 in 1850 and to less than £100 by the end of the 1850s. [2: p40]
  • The tramroad was, at one time, the most convenient method of transporting Forest of Dean Coal to the Gasworks at Cheltenham. With the opening of the Midland Railways lines in the area it became possible for that traffic to travel entirely by rail and the tramroad could not compete. [2: p40] Talking about this, Wikipedia says: “The South Wales Railway opened in July 1854 and the tramroad suffered a serious blow, as the Forest of Dean minerals could now come much more expeditiously by rail throughout. Its main business was now the conveyance of Leckhampton stone to Cheltenham, its advantage being that it could unload at any point along its line as compared with the Midland Railway which was obliged to do so at a goods depot.” [7]
  • One section of the line was overshadowed by the newer edge-railways. … A decision was taken to push a standard-gauge line through Gloucester, close to the alignment of the tramroad where it crossed Barton Street in Gloucester and ran down Park Road. The tramroad and the railway co-existed for a time, although the standard-gauge line cut the tramroad access to the Great Western Railway Station. This removed what had been an important link from the Railway Station to the docks using the tramroad.
  • Conway-Jones notes that traffic was, “seriously affected by the arrival of the railway [at the docks] and by the loss of the northern end of the tramroad which was cut across by the excavation for the new dock.” [10: p55] He also notes that coal traffic decreased significantly “in the face of competition from the railways, and complaints about the bad state of the rails running unguarded through the streets.” [10: p71]
  • Baxter points out that the Birmingham & Gloucester Railway Act of 22nd April 1836 “empowered that company and the Cheltenham & Great Western Union Railway to buy the tramroad shares, and each paid £17,500 for a moiety in the early days of 1837. Very little of the early route was adopted for the new railways.” [3: p117-118] The purchase of these shares gave their successor companies a major say in the future of the tramroad. When some local interests sought to keep the Tramroad in use after powers to close it had been sought and won, these major shareholders stepped in to ensure closure and the sale of the company’s assets. In particular, most of the plateway was lifted and sold, a large proportion ended up in the Forest of Dean. [14]
  • One short section of the Leckhampton Branch remained open for the carriage of stone until late in the 1890s. [14]

The Tramroad served for about 50 years and was a major contributor to the local economy. It’s value to Cheltenham was significant. It brought Forest of Dean coal to the Gas Works which supplied the town’s gas and allowed for significant exports of limestone for building and road construction. It remained popular with a number merchants right up to its demise, as it offered a greater flexibility for deliveries than the newer railways. Ultimately, it seems that it’s end arrived because other forms of transport became cheaper and were faster, even if less flexible.

References

  1. https://osmaps.ordnancesurvey.co.uk/51.86236,-2.22658,18, accessed on 6th May 2020.
  2. D.E. Bick; ‘The Gloucester & Cheltenham Railway and the Leckhampton Quarry Tramroads’; The Oakwood Press, 1968.
  3. B. Baxter; The Route of the Gloucester & Cheltenham Railway; The Railway Magazine, February 1953: p117-121 & p133.
  4. https://maps.bristol.gov.uk/kyp/?edition=glos, accessed on 6th May 2020.
  5. https://upload.wikimedia.org/wikipedia/commons/e/e6/Causton’s_1843_map_of_Gloucester.jpg, accessed on 4th May 2020.
  6. https://www.gsia.org.uk/gct/gsia-tramroad-history.pdf, accessed on 30th April 2020.
  7. https://en.wikipedia.org/wiki/Gloucester_and_Cheltenham_Tramroad, accessed on 30th April 2020.
  8. Hugh Comwy-Jones; Gloucester Docks: An Historical Guide; Black Dwarf Lightnoor Publications Ltd., Lydney,  Gloucestershire, 2009.
  9. On-line Maps, over-and-above those developed by Google and Microsoft, include those available from the National Library of Scotland, https://maps.nls.uk; the Ordnance Survey, https://osmaps.ordnancesurvey.co.uk; Know Your Place, https://maps.bristol.gov.uk/kyp/?edition=glos.
  10. Hugh Conway-Jones; Gloucester Docks: An Illustrated History; in the County Library Series, Allan Sutton, Gloucester and Gloucestershire County Libraries, 1984.
  11. https://www.gloucesterdocks.me.uk/studies/tramroad.htm, accessed on 25th April 2020.
  12. https://www.british-history.ac.uk/vch/glos/vol4/pp251-258, accessed on 8th May 2020.
  13. http://www.glosarch.org.uk/glosmapsprospectspdffiles.html, accessed on 8th May 2020.
  14. Bick provides some details of the machinations which went on around closure [2: p27-29] Once the abandonment Act was obtained in 1859, initially little was done by those empowered to take action. It wasn’t until March 1861 that significant action was taken by the GWR to enforce closure and sale. One small remnant of the line was, as we have noted in a previous article, trained almost to the arrival of the 20th century. [2: p29 & 51]

The Gloucester and Cheltenham Tramroad – Part 3

The Mainline Southwest from Knapp Toll Gate in Cheltenham to Gloucester

At Cheltenham the Tramroad terminated at Knapp Toll Gate which was the start of the Turnpike Road to Gloucester. Chris Green says: “The final section ran to the end of The Knapp (in New Street) but was revised to end at the existing turnpike gate on Tewkesbury Road, located at Cheltenham’s western “town’s end” (now Townsend Street).” [1] This suggests that the line was extended a short distance North on Gloucester Road to its junction with Tewkesbury Road. Townsend Road is the extension to Gloucester Road beyond Tewkesbury Road.

We noted in previous articles that most of the descriptions of the Gloucester and Cheltenham Tramroad start from the Docks in Gloucester and run through to Knapp Toll Gate and then talk of the branch to Leckhampton Hill. Their narrative ignores the way in which the tramroad was constructed. Work started first at Leckhampton Hill and once the branch was completed then focussed on the short length from the branch to Knapp Toll Gate before looking towards Gloucester. Bick comments to this effect in his book of 1968: “Initial efforts concentrated on the Leckhampton branch and that  part of the mainline from the junction to the terminal depot in Cheltenham. The depot covered one and three quarter acres. The site is now bounded by Market Street and Gloucester Road.” [2: p9-10]

Baxter also notes that the Toll Gate can be picked out on Merrett’s map below. [3: p120]

An extract from Merrett’s Plan of Cheltenham from 1834.

In Merrett’s early plan of Cheltenham above, the Gas Works are shown occupying a small site adjacent to Coach Road. The next plan below does not record that site as Gas Works but the outline of the buildings is similar once one ignores the frontage onto Tewkesbury Road..

This relatively indistinct copy of a 1843 engraving may well be based on an earlier survey as the Gas Works appears to occupy a smaller site than shown on the 1834 plan above. The tramroad is shown terminating in the top-middle of the extract from the map, in a similar position to that shown on Merrett’s plan from 1834. [5]

D.E. Bick [2] provides a sketch plan of the area around the Tramroad Terminus/Depot which is reproduced below. It shows the area in the early 1850s. Development since 1834 has been significant. A series of short branches from the Tramroad main-line serve a number of different sites in the immediate area. BIck comments that the development of the Gas Works was a significant factor in the Tramroad becoming profitable. He says that they were one of two developments that were “of lasting importance to trade on the tramroad. … Sidings for coal trams were laid into the works and remained in use until about 1850 when cheaper supplies were available from the Midland Railway coal sidings some half mile away.” [2: p14]The Tramroad Terminus in Cheltenham, D.E. Bick provided this sketch plan in his book of 1968 .[2: p17]The same location on a plan of 1855 with the tramroad rails annotated with red dotted lines. The crucial position of the junction of the various roots has been lost because of damage to the original map(s). The source for these specific maps is the website ‘Know Your Place’. [15]

Chris Green comments that, “the main wharves formed Cheltenham’s first industrial estate with its mixture of trades. They lay alongside the ancient tithing boundary between Alstone and Cheltenham which was delineated by a new highway – now Market Street.” [1]

By 1901, the date of the OS Map below, [4] the area has changed significantly. All signs of the tramroad are long-gone. The Depot, prominent on the sketch map is now used for housing. Alstone Terrace has been subsumed into an enlarged gas works site. Knapp Road is now Market Street and the site of Albion Brewery now appears to the the town Cattle Market. The layout of the streets is very similar in both the sketch map and the OS map extract.OS 25″ Map from 1901 sourced from the National Library of Scotland [4]

Plaque on the Hop Pole Inn on Gloucester Road. [6]

The area is much less easy to recognise in the 21st century. The Hop Pole Inn which was at the corner of Market Street and Gloucester Road is still there but apparently closed. [6] The building still bears a plaque to highlight that it was built on part of the site of the old Tramroad Depot. The Gasworks site is now the home of Cheltenham’s Tesco Superstore. And at the southern corner of the old gasworks site, there is a clever but sad memorial to one of the old gasometers.The site of what once fwas the town gas works in Cheltenham is now the location of its Tesco Superstore (Google Streetview).DW Sports have built their store on the footprint of one of the old gasometers (Google Streetview).The Depot area in the 21st century (Google Maps).

The Tramroad between Knapp Toll Gate and the Junction with the Branch line to Leckhampton Hill followed the Southeastern verge of Gloucester Road in a Southwesterly direction to the junction at what soon became Queens Road. Beyond that point the line ran across the entrance of what was to become first Lansdown Station and then Cheltenham Railway Station down to the junction between Gloucester Road and Lansdown Road.

Baxter, writing in 1953, talks of two cottages built after the closure of the Tramroad. “At the junction of Lansdown Road and Gloucester Road are two houses curiously built in a position sideways to the Gloucester Road with their front doors facing each other across to narrow elongated front gardens which are obviously the width of the original Tramroad land, and it seems almost certain that these represent two plots of tramroad land sold off for building.” [3: p121]

I have looked at a number of maps from around the time that Baxter was writing, and found it difficult to identify the two properties that he refers to. Two examples of the maps are below and they are accompanied by an aerial image from the 1930s of the same area.Publishing this article has produced a very helpful response from Richard Beamer. I have produced an enlarged extract from the second OS Map above which shows the two properties concerned. This results in a slight amendment to the alignment of the tramroad away from the kerb of Gloucester Road into what are now the front gardens of some of the properties. Richard Beamer comments that these two cottages had disappeared by the time of mapping work undertaken in the 1960s.

Beyond the junction between Gloucester Road and Lansdown Road the tramroad continued along the Southern verge of Gloucester Road. You might expect that the turnpike road was in existence before the tramroad was constructed, however, the reverse is true. The turnpike road was not constructed until the tramroad was operational. Bick tells us that in the same parliamentary session that saw the  tramroad powers granted (April 1809) a parallel Acts was granted authorising “a new turnpike road from [Cheltenham] to meet the existing Gloucester road at Staverton Bridge. …The turnpike road and tramroad … were largely supported by the same people, and the new road was planned to run alongside the tramroad, taking advantage of its easy gradients and ready conveyance of stone for construction. … Stone for the road’s upkeep was to be carried toll free on the tramroad. ” [2: p8]

As we have noted the tramroad route was chosen to minimise the use of gradients which would have limited the capacity of the trams. Bick comments that the turnpike road was as a result not a great success, as the route was longer than it needed to be for road traffic. “Financially the road never compared with its iron companion.” [2:p8]

Road and tramroad were tightly paired as they travelled Westwards. The modern roads follow, relatively faithfully the line of the old Gloucester Road.

On the Google Maps extracts above, the tramroad alignment is plotted over the current road arrangement. For a distance it runs along the South side of the A40 before turning away up the old Gloucester Raod (B4063). In order to make the modern road alignments work at the junction of the A40 and the B4063 the modern alignment of the B4063 has been moved away from its old alignment and so also from the tramroad.The old tramway and the old turnpike road followed the approximate route shown above. The roundabout from which the picture is taken is the junction of the B4063 and the A40. The B4063 heads along the right side of this image (Google Streetview).The view back to the East along the alignment of the old Tramroad towards the modern roundabout junction with the A40. The modern B4063 is on the left of the image. (Google Streetview)Looking to the West along the B4063 today. (Google Streetview)

The route of the old tramroad line runs from Arle along the B4063 towards Staverton. It is thought that the old Tramroad ran a little removed from the turnpike road at the point where the Old Goucester Road meets the B4063. The verges at this location in particular are wide and may have accommodated a stabling point for the horses which pulled the trams and the tramroad itself probably passed behing the pub at this location – the former Plough Inn (now White Lion House (AGD)).The route of the old tramway probably passed to the South of the pub at Staverton Junction. (Google Streetview)25″ OS Map from the early 20th century. [7]

The Hare and Hounds Pub in the 21st Century. (Google Streetview)

Beyond Staverton, the road and the tramroad converged again and the old tramroad followed the Southern verge of the road once again. Halfway Bridge was once two parallel structures with three brick arches which took both turnpike and tramroad across Norman Brook. “The tramroad bridge … has long since disappeared, but a perfect image of it remains supporting the B 4063 itself.  We know this because in January 1818 an advertisement appeared for contractors to build a new road bridge with three arches ‘to correspond and adjoin with those under the Rail Road’.” [10]

There has been a significant amount of modern development in the immediate vicinity of the B4063 as it passed to the Northside of the Airport and on into Churchdown before gradually drifting back towards what is now the A40 but which was just open fields!

On the way down to the location of the modern roundabout, the tramroad passed behind the Hare & Hounds Pub. The alignment close to the rounabout followed the old B4063 which was diverted to provide good access to the new A40 roundabout.

Some realignment of the B4063 has therefore taken place which takes it away from the old turnpike and tramroad alignment. The first side-by-side images below [8] demonstrate that movement. The old tramroad alignment is now lost under the A40 roundabout!

Again, just beyond Elm Bridge, the tramroad deviates away, for just a short distance) from the modern B4603 following the alignment of the old highway. The second side-by-side images illustrate this. [9]It then crossed Cheltenham Road and ran down along what is now Elmbridge Road. Baxter indicates that when the tramroad was built it crossed open fields along this length. The road was built after the tramroad was in use. [3: p120]The Tramroad runs down Elmbridge Road into Gloucester [11]Elmbridge Road became Armscroft Road to the south side of Ermin Street. Ermin Street is now the A38 Barnwood Road. [12]

At the point where Armscroft Road turned sharply to the Southeast the old Tramroad made its way across open-ground. Its route could still be followed as a footpath on an embankment until relatively recently and part of the route remains as a tree-lined route towards what was Gloucester Locomotive Depot.. The depot is just visible to the bottom left of the map extract above. The map extract below comes from the OS Maps online and the old Tramway route is marked with dotted red lines [12] It left Armscroft Rod, passed across the end of what is now Brookfields Mews and then ran on to cross Wotton Brook before crossing the Gloucester MPD site.

1855 Ordnance Survey Map. [13]1901 Ordnance Survey Map. [14]

Baxter commented in 1953, that the length of tramroad from Armcroft Road to Barnwood LMR Locomotive Shed and Depot  was one of “the few real traces of the tramroad, in the form of a length of original embankment some 350 yd. long. This provides, ” he says,”a convenient footpath for enginemen going to and from the sheds from the Barnwood district. For this reason, a culvert which formerly carried the embankment over the Wotton Brook, and which has at some time been washed out by a flood, has been replaced by a footbridge built of old railway sleepers.” [3: p120] As we have seen, a portion of that embankment remains, the original footbridge sleepers have been removed  and the bridge now has a tarmac surface and is part of a cycle track/footpath between Blinkhorns Bridge Lane and Metz Way.

The next article in this series will cover the length of the tramroad from  Barnwood MPD to the docks in Gloucester.

References

  1. Chris Green; The History Of Alstone – Volume 1; http://www.historyofhestersway.co.uk/vola1/ha1_11.php, accesssed on 4th May 2020.
  2. D.E. Bick; ‘The Gloucester & Cheltenham Railway and the Leckhampton Quarry Tramroads’; The Oakwood Press, 1968.
  3. B. Baxter; The Route of the Gloucester & Cheltenham Railway; The Railway Magazine, February 1953: p117-121 & p133.
  4. https://maps.nls.uk/geo/explore/#zoom=17&lat=51.90571&lon=-2.08672&layers=168&b=1, accessed on 4th May 2020.
  5. http://www.rareoldprints.com/z/20611, accessed on 30th April 2020.
  6. https://www.closedpubs.co.uk/gloucestershire/cheltenham_hoppole.html, accessed on 4th May 2020.
  7. https://maps.nls.uk/geo/explore/#zoom=17&lat=51.90047&lon=-2.15933&layers=168&b=1, accessed on 5th May 2020.
  8. https://maps.nls.uk/geo/explore/side-by-side/#zoom=17&lat=51.88077&lon=-2.19707&layers=168&right=BingHyb, accessed on 5th May 2020.
  9. https://maps.nls.uk/geo/explore/side-by-side/#zoom=17&lat=51.87578&lon=-2.20740&layers=168&right=BingHyb, accessed on 5th May 2020.
  10. https://glostransporthistory.visit-gloucestershire.co.uk/First%20Railways%20in%20Gloucester.htm, accessed on 5th May 2020.
  11. https://maps.nls.uk/geo/explore/#zoom=17&lat=51.87403&lon=-2.20985&layers=168&b=1, accessed on 5th May 2020.
  12. https://osmaps.ordnancesurvey.co.uk/51.86335,-2.22055,18, accessed on 5th May 2020.
  13. https://maps.bristol.gov.uk/kyp/?edition=glos, accessed on 6th May 2020.
  14. https://maps.nls.uk/view/109724691, accessed on 6th May 2020.
  15. https://maps.bristol.gov.uk/kyp/?edition=glos, accessed on 7th May 2020.

The Gloucester and Cheltenham Tramroad – Part 2

Leckhampton Road and Beyond!

This article covers the length of the Tramroad up Leckhampton Road and through the Southern ‘suburbs’ of Cheltenham to meet what was the mainline of the Gloucester and Cheltenham Tramroad.

Before covering the route in detail, it is worth noting that a presentation was given in 2010 by Wendy Ellyatt covering the History of the Tramroad. This presentation can be foolowed by following this link: http://www.authorstream.com/Presentation/wendyellyatt-478472-the-history-of-southe-cheltenham-tramroad. [30] The presentation was prepared as part of the work ont he renovation of the Norwood Triangle referred to later in the text of this article.

At the end of the last article about this Tramroad we noted that the branch from Leckhampton Hill into Cheltenham headed North away from the quarries and Leckhampton Hill. The quarry tramway lines were served by a Depot alongside Leckhampton Road. The Depot was built in about 1810. It became the location of Leckhampton Industrial Estate (although I think it has now been developed for housing). In 1923 the depot was transferred to Southfield Farm. [1: p41]

The tramroad only had a short distance to travel between the bottom of Bottom Incline and the Depot. Ownership of the length of tramway from the incline to the depot in the early years is not entirely clear. The 1809 Act gave powers to the Tramroad Company to connect with the tramroads on Leckhampton Hill but included a clause which allowed Trye to complete the connection should the Company not do so. It is therefore clear, given that Trye did make the connection and built a length of 950 yards or so which included Middle and Bottom incline, that the line as far as the bottom of Bottom Incline belonged to the quarry company but the point North of the Incline at which the lines became the responsibility of the Tramroad Company is not entirely clear. [2: p50]

Although gradients on the Tramroad were generally relatively shallow, those along Leckhampton Road and particularly the length closest to the quarries were not. Bick has the gradient on the Branch averaging about 1 in 70, steepening to 1 in 35 on the approach to the bottom of Bottom Incline. [2: p32] 

The bottom of Bottom Incline. [19] It was at this point that the public tramroad gave way to the quarry tramroads. Interestingly, Bick gives the date of this photograph as being around 1895. This is evidence that a length of the tramway alongside Leckhampton Road was retained in use after the closure of Gloucester & Cheltenham Tramroad as a whole, in 1861. Bick says: “Here the Leckhampton branch of the Gloucester and Cheltenham Tramroad met C. B. Trye’s quarry lines. c. 1895. (c) A. T. Bendall.” [2: p32a][3] Leckhampton Road/Hill can be seen on the left of the picture.The point where the tramway from Bottom Incline drew alongside Leckhampton Road, as it is in the 21st century. The cottages in the monochrome image from the turn of the 20th century are long-gone. The old depot was located just off the the right of this picture. (Google Streetview).

North of the Depot, the old tramroad ran along the west verge of Leckhampton Road towards Cheltenham.

When we see images, later in this article, of a tramway in the centre of Leckhampton Road, we need to remember that the tramway in those images is a later tramway which operated in the early 20th Century and which was primarily a passenger tramway. The image below comes from the year 1900, the trees in the verge have just been planted, there is no evidence of a tramway in the centre of the road and the old tramway rails are still evident to the west of the road, on the right of this picture. Leckhampton Road under reconstruction. The old tramroad rails appear still to be available at this time as the tramroad wagon on the right of the image testifies. Although some sources do suggest that the rails were lifted when the old tramway closed in 1861, [4: p50][5][6] Bick is clear that the length at this location survived into the 1890s.  He says that Trye who owned the quarries in 1861, “retained about 500 yds. of line down the side of Leckhampton Road to a point opposite the Malvern Inn, where he established a stone wharf. This bit of line, the last of the Gloucester and Cheltenham Tramroad, was not taken up until the late 1890s.” [2: p51 (and very briefly on p29)]Leckhampton Road in the 21st Century at approximately the same location as the image above (Google Streetview).

I have not been able to establish the location on Leckhampton Road of this picture. I understand that it was taken in 1902 and is probably of the Cotswold Hunt. It appears that by 1902 the old tramway rails had been removed. [7]

There are very few early images available of Leckhampton Road prior to the introduction of the later trams. The two above are all I have been able to find. The following images come from the early years of the passenger tram service along Leckhampton Road so must be dated 1903 or later.

It is nearly impossible to give an accurate date for this view. The old tramroad would have been on the right of the image and the area seems quite overgrown so must come from a slightly later date than other images below. [11]

Leckhampton Road facing South. The old tramroad would have been in the verge at the right side of the road, although no remains would have been visible when the tram in the postcard picture would have been in service. The first passenger trams appeared in Cheltenham in 1901 on a route from Lansdown to Cleeve Hill. It was two years later that a service began from Leckhampton terminus to the Norwood Arms. They had gone by 1931. It is difficult to be sure of the date of this picture but some of the trees in the verge have had time to grow a little, so perhaps close to 1910 would be a reasonable guess. [9][10] There is a black and white version of this image on the “Archive Images” website which says that it was taken in 1908. [3]

The image immediately below appears to come from the 1940s and is taken looking North up the west side of Leckhampton Road. A prominent feature in the picture is the very regular infill tarmac in the footpath. This is likely to be the route of the old tramroad.

Leckhampton Road looking North in the 1940s. [8]

Both the older tramroad and the newer tramway crossed the Leckhampton Road railway bridge as they travelled North. Although the Gloucester and Cheltenham Tramroad closed in 1861 a section from Leckhampton Hill to the junction at Bath Road remained open until the advent of the 20th century. The Station opened in 1881. [16]

Leckhampton Railway Station in the first half of the 20th century, (c) Brian Rudman. [17]

Leckhampton Road Bridge is at the rear of this photograph of Leckhampton Station. In the 1800s, the old tramway crossed this bridge in the 20th century it was the passenger trams that did so, (c) Malcolm Mitchell. [15]

Leckhampton Road near the North end, sometime after the arrival of the trams in around 1903. [14]

Leckhampton Road at its junction with Shurdington Road and Bath Road in around 1910. The Norwood Arms is just off the picture to the right. [12]

A similar location at the junction between Leckhampton Road and what is now the A46, Shurdington Road/Bath Road. The junction is now a roundabout.. [13]A wider angle image of the same location in the 21st century. The trough can still be seen near the centre of this image. (Google Streetview).

In a final reference here to the passenger tramway network in Cheltenham, Wikipedia has this map (below) of the tramways which were incorporated as the “Cheltenham and District Light Railway.” It shows the tramway on Leckhampton Road as one of two which served the southern suburbs of Cheltenham  in the first third of the 20th century. [21]

Returning to the Gloucester and Cheltenham Tramroad: heading North by North-West the old tramroad left  the bounds of the highway and travelled cross-country from the present A46. The area is of course now built up but when the tramroad was first built it crossed open fields through areas which  are now known as Tivoli, Westall Green  and along what is now Queens Road.

D.E. Bick notes that in the middle of the 19th century the route from Westall Green to Leckhampton Road was increasingly flanked with dwellings. He goes on to say: “H.N. Tyre’s branch to Grottens Wharf gave way to Great Norwood Street and was replaced by two long sidings on ground now (1968) occupied by Messrs. Parry’s timber yard opposite the Railway Inn, Norwood Road. These became the new Grottens Wharf. A short distance up the line, sidings diverged into a large coal yard bordering Grafton Street.” [2: p18]

The same length is described by the GSIA (Gloucestershire Society for Industrial Archaeology) as follows: “The Leckhampton quarry branch left the main line immediately to the north of the present Lansdown railway station. It then ran along Queens Road, Andover Road, Norwood Street and past the Norwood Arms public house into Leckhampton Road continuing past the Malvern Inn to the depot where it met the Leckhampton quarry system.” [20: p5]

The Northern part of the Leckhampton Branch. [23: p120]

The Railway Magazine article of February 1953 says that the Leckhampton Branch ran in a Northwest to Southeast axis “through open fields” [23: p121] Baxter, in that article, goes on to say that, “According to a map fifteen years later, this track across the fields had developed and [was] marked as ‘New Queens Road’.” [23: p121] The adjacent sketch map is a small part of the plan provided with the article in The Railway Magazine. North of Leckhampton Road the  line can be seen following Norwood Road and Andover Road, both of which owe their existence and alignment to the tramroad.

At the top of Norwood Road the line curves from travelling roughly North-South to take up a Northwest-Southeast alignment along Andover Road. This happens at a place often referred to as the Norwood Triangle.

Norwood Triangle (Google Maps)

The Norwood Triangle was at the Southern end of Great Norwood Street where it met Norwood Road. It was an open area of land formed by the junction of a number of roads close to what was at the time the Railway Inn. The pub has been redeveloped as private dwellings. In 2008, the SPJARA Residents Association was given a National Lottery grant to renovate the triangle. [28]

The excerpt (below) from an ancient map of 1843 shows the route of the tramroad in this part of Cheltenham. The roads named along the alignment are Queen’s Road and Tivoli Place. Norwood Triangle is not easily identified  on the map but it is present at the North end of Norwood Road. The engraver of this map was H.W. Darby. [22] Below the 1843 map is an extract from an earlier map – Merrett’s Plan of Cheltenham – which just picks up the location of the Triangle.

I have been unable as yet to find a full copy of the 1834 Plan of Cheltenham and have been able to find this extract on The Cheltonia Blog. [29]

Grotten’s Wharf (Wharves)

In identifying the location of Grotten’s Wharf, it is important to remember, when reading D.E. Bick’s work and the GSIA document referred to above, that both Bick’s review of the tramroad route and that provided by the GSIA set off from Gloucester and follow the line of the Tramroad to Cheltenham and Leckhampton Hill, whereas, in this article, we have started from Leckhampton Hill. This means that the area first known as Grotten’s Wharf in the quote from Bick above was accessed by a short branch line from close to the top of Leckhampton Road.

The building that was Norwood Pharmacy and before that the yard at the north end of Grotten’s Wharf branch from the Gloucester and Cheltenham Tramroad (Google Streetview).

D.E. Bick says that a branch “was laid from the Leckhampton branch to a rural stone depot and workshops known as Grotten’s Wharf, a large area now (1968) partly occupied by the Norwood Pharmacy in Suffolk Road, Cheltenham. The line and depot was very probably made by Henry Norwood Tyre after inheriting his father’s property in 1812.” [2: p15]. The adjacent monochrome picture from the 1950s shows Norwood Pharmacy which faced Suffolk Road and was in business until sometime in the late 1970s or early 1980s. Its premises ran back along Great Norwood Street and included No. 4 Great Norwood Street. [27] The colour image above shows the same location in the early 21st century.

The locations of the Wharves and of the branch-line to Grotten’s Wharf are clarified by comments on the Cheltenham South Town website. Grotten’s Wharf was, “on a short tramway spur opposite what is now (early 21st Century) the Jolly Brewmaster in Painswick Road; another line ran along the future route of Great Norwood Street to a yard in Suffolk Road.” [24] This quote talks of two different locations, one immediately alongside the mainline and the other along a short branch.

David Elder says that “In the 1820s-30s the main stone depot (known as Grotten’s Wharf) was located on the corner of Great Norwood Street and Suffolk Road (then called Commercial Road).” [25]

Elsewhere on the Cheltenham South Town Website, the authors say: “Great Norwood Street was laid out around 1825 on land belonging to Henry Norwood Tyre. … Previously there were only fields here, the one bordering the Suffolk Road being called the “”Grattons” or “Grottens”. Through here  ran the horse drawn railway bringing stone from the Leckhampton quarries to Grotten’s Wharf and this street followed the route of a spur line. Number 45, built by 1825 by a stone mason named Richard Allen, may have been the first house erected. The street is named on an 1834 map, where it is still only partially developed.” [26]

Grotten’s Wharf and its branch-line (Google Maps).

An extract from an 1855 plan of Cheltenham. [33]

Taking all of these comments into account, it seems as though we can place Grotten’s Wharf relatively accurately at the Northwest corner of the junction of Great Norwood Street and  Suffolk Road. The branch-line serving the wharf followed the line of what is now Great Norwood Street. Evidence suggests that this branch-line was lifted and the original wharf was closed when Great Norwood Street was developed. A 1855 plan, which can be found on the Know Your Place website, [33] shows new wharves close to the Norwood Triangle and the original short branch has disappeared.

“Suffolk Road was formerly known as Commercial Road and it was only partly built up by 1834. However this was already an ancient route from the Old Bath Road to Westal Green, across the open field system called Sandford Field.” [26]

The tramroad is likely to have been a catalyst in the development of  much of the South side of Cheltenham.

To conclude the notes about Grotten’s Wharf, D.E. Bick mentions that in 1821 a system of tolls was introduced to manage the traffic on the Tramroad. [2: p15] This sytem mirrored similar arrangements made for traffic on the turnpike roads of the time. Nik Thomas posted a very interesting scan on the Days Gone By in Cheltenham group on Facebook. It shows an old toll permit issued at the foot of Leckhampton Hill for three trams of gravel to Grotten’s Wharf. He comments that the overall figures for the transport of stone from Leckhampton Hill along the old tramroad were significant – 20,000 tonnes came down the line annually between 1820 and 1830. [29]

Andover Road, Tivoli Place and Queens Road (Westal Green)

The Tramroad route continued Northwest along Andover Road to the point where Andover Road now joins Tivoli Place. These roads, together with Queens Road, owe their existence and alignment to the Tramroad.

The road marked ‘Rail Road’ on the 1834 plan below in Andover Road. The road named Lippiate Street is Tivoli Place. By 1834, development of the area was still in its relatively early stages. The extract from the map can be found on the Cheltenham South Town Website. [32]

Extrarct from Merrett’s 1834 Plan of Cheltenham.

Queens Road “was initially formed in the early 1800s as a railroad for horse-drawn trams, going up to the quarries on Leckhampton Hill and bringing building stone into the town. The tram road was an important route in the Regency period and the section which linked up Westal Green with the lower end of Gloucester Road was what became Queen’s Road. The fact that Victoria had been crowned a couple of years previously may have had something to do with the name.” [31] It was later to be improved to provide the main access from the Lansdown estate to what at the time was called Lansdown Station but later became Cheltenham Railway Station. [31]

Talking elsewhere about this area of Cheltenham the Cheltenham South Town Website speaks of C.B. Trye recognising that the stone from the Leckhampton quarries would be in demand as Cheltenham developed. And a result, In 1810, “before there was any significant development to the south of Montpellier Terrace, he built a tramroad link from the quarries, which punched through the fields and hedgerows.” [24]

Queens Road formed a junction with Gloucester Road (B4633) just to the Northeast of what is now Cheltenham Railway Station. Baxter says: “The Leckhampton branch is shown on Merrett’s 1834 map as branching off in a south-easterly direction through open fields at a point three-quarters of a mile south of the mainline terminus at Knapp Toll Gate. The map is of sufficiently large scale to show that there was a double junction with the main line, so that traffic coming from Leckhampton could proceed either southwards down the main line to Gloucester or northwards into Cheltenham.” [23: p121]The junction of the Gloucester and Cheltenham Tramroad with the Leckhampton Hill Branch (Google Maps)

References

  1. https://www.gsia.org.uk/reprints/2001/gi200135.pdf, accessed on 23rd April 2020.
  2. D.E. Bick; ‘The Gloucester & Cheltenham Railway and the Leckhampton Quarry Tramroads’; The Oakwood Press, 1968.
  3. http://www.archive-images.co.uk/gallery/Archive-Images-of-Cheltenham-Gloucestershire/image/31/Cheltenham_Leckhampton_Road__Tram_No_20_c1908, accessed on 27th April 2020.
  4. https://leckhamptonlhs.weebly.com/uploads/5/8/8/7/5887234/bulletin_no_1_pdf(1).pdf, accessed on 23rd April 2020.
  5. http://www.cheltenhamsouthtown.org/tramroad.html, accessed on 23rd April 2020.
  6. https://www.facebook.com/photo.php?fbid=10153275218432453&set=gm.465134820308742&type=3&theater&ifg=1, posted on the ‘Days Gone By in Cheltenham’ website by Nik Thomas on 14th May 2015, accessed on 23rd April 2020.
  7. https://www.facebook.com/photo.php?fbid=10153224883927453&set=gm.455281957960695&type=3&theater&ifg=1, posted on the ‘Days Gone By in Cheltenham’ website by Nik Thomas on 20th April 2015, accessed on 25th April 2020.
  8. https://www.facebook.com/photo.php?fbid=10157691954217453&set=gm.1422406081248273&type=3&theater&ifg=1, posted on the ‘Days Gone By in Cheltenham’ website by Nik Thomas on 5th November 2019, accessed on 25th April 2020.
  9. https://en.wikipedia.org/wiki/Cheltenham_and_District_Light_Railway, accessed on 25th April 2020.
  10. https://www.facebook.com/photo.php?fbid=10206068835652477&set=gm.518710091617881&type=3&theater&ifg=1, posted on the ‘Days Gone By in Cheltenham’ website by Steve Lawrey on 30th September 2015, accessed on 25th April 2020.
  11. http://leckhamptonlhs.weebly.com/a-general-leckhampton-picture-book.html, accessed on 25th April 2020.
  12. https://www.facebook.com/photo.php?fbid=10157365124192453&set=gm.1320028664819349&type=3&theater&ifg=1, posted on the ‘Days Gone By in Cheltenham’ website by Nik Thomas on 4th July 2019, accessed on 25th April 2020.
  13. https://www.facebook.com/photo.php?fbid=10156052159537453&set=gm.923670774455142&type=3&theater&ifg=1, posted on the ‘Days Gone By in Cheltenham’ website by Nik Thomas on 20th January 2018, accessed on 26th April 2020.
  14. https://www.facebook.com/photo.php?fbid=10156100034984091&set=p.10156100034984091&type=3&theater, posted on the ‘Days Gone By in Cheltenham’ website by Malcolm Mitchell on 10th September 2018, accessed on 26th April 2020.
  15. https://www.facebook.com/photo.php?fbid=10155607785549091&set=p.10155607785549091&type=3&theater, posted on the ‘Days Gone By in Cheltenham’ website by Malcolm Mitchell on 27th February 2018, accessed on 26th April 2020.
  16. https://maps.nls.uk/geo/explore/#zoom=18&lat=51.88294&lon=-2.07743&layers=168&b=1, accessed on 26th April 2020.
  17. https://www.facebook.com/photo.php?fbid=10152049663040148&set=gm.247323758756517&type=3&theater&ifg=1, posted on the ‘Days Gone By in Cheltenham’ website by Brian Rudman on 18th November 2013, accessed on 26th April 2020.
  18. https://en.wikipedia.org/wiki/Gloucester_and_Cheltenham_Tramroad, accessed on 18th April 2020.
  19. https://www.tewkesburydirect.co.uk/times-gone-by, accessed on 22nd April 2020.
  20. https://www.gsia.org.uk/gct/gsia-tramroad-history.pdf, accessed on 30th April 2020.
  21. https://en.wikipedia.org/wiki/Cheltenham_and_District_Light_Railway, accessed on 30th April 2020.
  22. http://www.rareoldprints.com/z/20611, accessed on 30th April 2020.
  23. B. Baxter; The Route of the Gloucester & Cheltenham Railway; The Railway Magazine, February 1953: p117-121 & p133.
  24. http://www.cheltenhamsouthtown.org/south-town.html, accessed on 1st May 2020.
  25. David Elder; A-Z of Cheltenham: Places-People-History; Amberley Publishing, Stroud, 2019, Q: Quarries.
  26. http://www.cheltenhamsouthtown.org/an-introduction-to-the-suffolks.html, accessed on 1st May 2020.
  27. https://www.facebook.com/groups/243104989178394/search/?query=Norwood%20Pharmacy&epa=SEARCH_BOX, accessed on 2nd May 2020.
  28. http://www.cheltenhamsouthtown.org/the-norwood-triangle-project.html, accessed on 30th April 2020.
  29. https://www.facebook.com/photo.php?fbid=10152980114832453&set=gm.410997645722460&type=3&theater&ifg=1, accessed on 30th April 2020.
  30. http://www.authorstream.com/Presentation/wendyellyatt-478472-the-history-of-southe-cheltenham-tramroad, accessed on 2nd May 2020.
  31. https://cheltonia.wordpress.com/2008/11/13/queens-road, accessed on 2nd May 2020.
  32. http://www.cheltenhamsouthtown.org/an-introduction-to-tivoli.html, accesed on 2nd May 2020.
  33. https://maps.bristol.gov.uk/kyp/?edition=glos, accessed on 7th May 2020.

Railways in Iran – Part 7 – Some limited reflections on Iran’s Railways in the 21st century

For Iranians, life changed dramatically in 1979.

It is easy, from a Western perspective, to assume that Iran is a country that has chosen to avoid progress. So, I have to admit to being surprised by the current state of the railways in Iran. The network has been developing at a significant pace. Since 1979 there have been a significant number of major construction projects and there have been some significant changes in motive power.

There are holiday companies [1][2][3] advertising railway trips to Iran. Given what is reported about the instability of the country and its sponsorship of, what to Western eyes are, terrorist groups, these holidays do not feel very attractive. Yet the picture on the ground in Iran is seemingly one of relatively energetic technological development. “Since the first railway project was implemented [after] the revolution, 12 railway projects, that is 4676 km of the total 10171 km of the total network have been constructed. That is about 46% of the total rail routes in the country.” [21]

I hope that this article will provide a taster of what things are like on the railways in Iran today.

Before looking at the situation in detail, here is a video which focusses on the Trans-Iranian Railway in recent times. It was shared by D6700 a member of RailUKForums as part of a thread about Iranian Railways. [4] It is produced by a German team but the dialogue is in English. It gives a good impression of technological developments and notes a reluctance from many of the people encountered to talk with the Western film-crew.

The Trans-Iranian Railway. [4]

The notes that follow are inevitably far from comprehensive and rely heavily on sources on the internet (which are all referenced). A railway map of the network in Iran in the 21st century is provided by the national rail service, Islamic Republic of Iran Railways. The schematic plan they provide is shown immediately below. Not all routes are however shown on the map.The Iran Railway Network in the 21st century. [6] 

Wikipedia [5] notes the long-distance schemes which were undertaken by the Islamic Republic of Iran Railways in the 21st century, these include:

Bafq — Kashmar                        800km     1992—2001 (but see the comments  below)

Kerman — Bam                          225km     1999—2002

Bam — Zahedan                         546km     2000—2009

Isfahan — Shiraz                         506km     2001—2009

Khorramshahr — Shalamcheh   16km     2009—2012

Gorgan — Incheh Borun              80km     2012—2013   [22]

Tehran — Hamedan                   268km     2001—2017   [23]

Arak — Kermanshah                  267km     2001—2018   [24]

In addition to long-distance services, Iran has also developed commuter service for the major cities and a series of light rail/tramway schemes too.

For example, Tehran Metro carries more than 3 million passengers a day. [7] In 2014, 815 million trips were made on Tehran Metro. As of 2019, the total system was 229 kilometres (142 miles) long, [8] 186 kilometres (116 miles) of which is metro-grade rail. It is planned to have a length of 430 kilometres (270 miles) with 9 lines once all construction is complete by 2025. [9][10]

Commuter Services are currently available in Tehran, Tabriz, Kuzestan, Lorestan, Mashhad and Mazandaran-Golestan. [5]

Commuter and Metro Services are not covered in detail in this article and will have to await  a further post as time permits. ……..

Major Schemes

Wikipedia provides the list of schemes [5] above which shows construction, commencing in 1992, of a line from Bafq to Kashmar. Farrail, however, indicates that the line from Bafq to Kashmar and on to Mashhad was not started until 2001, this is verifiable from other sources as well. [11] [12]

1. Bafq to Kashmar and Mashhad – Despite its relatively small size, [13] Bafq has become a major junction on the Iranian rail network. Kashmar is in the Northeast of the country. It is in Razavi Khorasan Province and is located near the River Sish Taraz in the western part of the province, and 217 kilometres (135 miles) south of the province’s capital Mashhad. In  the 2006 census, its population was 81,527, in 21,947 families. [14][15] The city is the fourth most important pilgrimage city in Iran. [16] It is a major producer of raisins and has about 40 types of grapes. It is also internationally recognized for exporting saffron, and handmade Persian rugs. [14] It appears to be some distance from the railway. The town of Mehneh, approximately 50km Southeast of Kashmar, is close to the railway but has no railway station. This is also true of Shadmehr, which is 55km due East of Kashmar. Mashhad is the second-most-populous city in Iran and the capital of Khorasan-e Razavi Province. It had a population of 3,372,660 (in the 2016 census), which includes the areas of Mashhad Taman and Torqabeh.[27] It was a major oasis along the ancient Silk Road connecting with Merv to the East.

Trains to Mashhad from Bafq have about 800km to travel to their destination.

As we have already noted and as shown below, the Railway Station at Bafq is on the South side of the town.Bafq Railway Station is on the South side of the town of Bafq. It shown at the bottom of this map extract [17]

East of Bafq Station a triangular junction has the line to Kerman and Bandar Abbas heading away to the South and the line to Kashmar setting off the Northeast. A short distance beyond the town limits this line also divides. The more northerly of the lines serves the Choghart Iron Ore Mine.Choghort Iron Ore Mine in February 2019 (c) Reza 39 (Google Maps). [18]Choghort Iron Ore Mine in January 2020 (c) S.I.G Group (Google Maps). [19]

The main line then also curves round to the North by-passing the industrial complex which surrounds Cloghort MIne and continues on towards Kashmar. It curves past another open-cast mining site and climbs into the hills by means of a series of loops. Mining sites and sidings are a regular occurrence on the route through the hills.

This satellite image shows the trailing connection with the branch-line which serves Chadormalu Iron Ore Processing Plant (at the bottom of the picture) and the loop which allows trains from the branch to head towards Bafq (Google Earth).

En-route through the hills a trailing junction is made with a line that serves Chadormalu Iron Ore Processing Plant and extends on some distance to Meybod. (See Part 5 of this series. [20])

Leaving Yazd Province the line enters South Khorasan Province and continues predominantly in a Northeasterly direction across open wilderness and gradually getting closer to Route 68. A long tunnel takes the line very close to the road and the two transport modes run alongside each other to Dashteqarrān and Tabas.

Tabas is the first station on the line after leaving Bafq. In the satellite images there are a signficant number of large open wagons stored in a significant number of sidings.

Tabas Railway Station is sited to the Northwest of the city (Google Earth).

Leaving Tabas, the line heads North-northwest for a distance, passing through a small station at Dehshour before once again turning towards the Northeast and then leaving South Khorasan Province and entering Rasavi Khorasan Province.

The railway line runs into more mountainous territory once again and almost immediately passes through a long tunnel. It then crosses further open plains near Neygenan. A view typical of this area can be found below the satellite images of Tabas Station.

After some distance the line passes under Route 87/91 and through the adjacent railway station pictured in the landscape satellite image further below.

A closer view of Tabas Station (Google Earth).

Before the railway passes under Route 95, the surrounding land begins to be more cultivated. The line then passes to the Southeast of Mehneh and follows Route 95 towards Torbat Heydarieh Railway Station.

The Station at Torbat Heydarieh is also shown on a satellite image below.

After passing under Route 36, the line heads in a northerly direction, looping round to gain height as it once again enters hilly terrain and then follows Route 95 once again. After a time in the mountains the railway line  returns to relatively flat land. It passes Fathabad before once again entering the hills.Open plains near Neygenan. [25]Route 87/91 and its adjacent railway station (Google Earth).Torbat Heydarieh Railway Station (Google Earth).

Closing in on its destination of Mashhad the line encounters a triangular junction close to Dizbad Pa’in. At Dizbad Pa’in, the line heading North West through Dizbad Railway Station heads for Neyshabur and the North. That running to the Southeast heads for Mashhad. Triangular junction east of Dizbad Pa’in and south of Mashhad (Google Earth).

Between Dizbad Pa’in and Mashhad, a further triangular junction sees the line to Mashhad continuing North and a line to Turkmenistan heading East. Almost immediately, trains travelling East enter Martyr Motahhari Railway Station shown on the satellite image below. The line passes through the mountains and on to Sarakhs and over the Garagumskij Canal in Turkmenistan. [22]Martyr Motahhari Railway Station (Google Maps).Mashhad Railway Station (Google Maps).

The line terminates at Mashhad, and, rather unusually for Iran, the station is well within the city limits.

2. Kerman to Zahedan via Bam: Construction started on the line from Kerman to Bam (225km)  in 1999 and was finished in 2002. The 546km line from Bam to Zahedan was started in the year 2000 and finished in 2009. In a previous article we noted that Kerman‘s population was 821,394, in 221,389 households, making it the 10th most populous city of Iran.[15]

Wikipedia comments: “Kerman is … the most important city in the southeast of Iran. It is also one of the largest cities of Iran in terms of area. Kerman is famous for its long history and strong cultural heritage. The city is home to many historic mosques and Zoroastrian fire temples. [28]

Bam‘s popluation at the 2006 census was 73,823, in 19,572 families. [15] Before the 2003 earthquake, Bam had gradually developed as an agricultural and industrial centre, and until the 2003 earthquake was experiencing rapid growth. In particular, the city is known for its dates and citrus fruit, irrigated by a substantial network of qanats (gently sloping underground channels transporting water from an aquifer or water well to surface for irrigation and drinking). [30]

Zahedan is the capital of Sistan and Baluchestan Province. At the 2016 census, its population was 587,730. [31]

Kerman Railway Station (Google Maps)

The new line set off from Kerman Railway Station in a Southerly direction, heading for Reyan. The Railway Station at Reyan is on the Northeast side of the town.

From Reyan, the line heads South-southeast before later turning due East, then Southeast, then East again to head for Bam.

Bam Railway Station is well outside the town limits to the South. The line so far has been relatively level.

Reyan (Ryan) Railway Station (Google Earth).Bam Railway Station (Google Earth).

Beyond Bam the railway turns East. It passes under Route 84, the Bam-Narmashir Road and then follows Route 84 (now the Zahedan-Narmashir Road) on its Northside to the state boundary. The line then enters Sistan and Baluchestan Province and leave Route 84 behind. It crosses open country gradually drifting slightly to the North of East before it encounters mountainous country. The line follows river valleys, first Northeast, then in an Easterly direction, but with tight curves and steep grades, and then predominantly in a South-southeast direction  still in mountainous country towards Shuru.

The railway leaves the mountains close to Shuru and then follows the Zahedan-Shuru Road, often switching from one side to the other of the road, to meet Route 95 beofre following Route 95 until close to Zahedan, where the line turns directly East and runs across the South side of the city.

The line runs due East across the south side of the city and then connects with the old line which served Zahedan’s Central Station – the old line linking with Pakistan. The two images immediately below show the old railway station at Zahedan.Zahedan’ Central Railway Station. One of a few which relies on a turntable to turn locomotives rather than a triangle (Google Maps).Zahedan’s Central Railway Station – The view from the concourse. [32]

There is a newer station to the South of the City just to the West of the point where the line from Bam meets the line which heads off to Pakistan. This station is shown on the satellite image below.Zahedan Railway Station (Google Maps).

3. Isfahan to Shiraz – Isfahan is almost precisely due South of Tehran. We have noted before that it is the third largest city in Iran with a population of more than 2 million people. [33] Shiraz is the fifth-most-populous city of Iran . It has a population of around 1.9 million and is one of the oldest cities of ancient Persia. [34]. The size of the population of these two cities suggests that a railway line linking the two makes economic sense, particularly given that otherwise Shiraz would have remained isolated from the rail network in Iran.

As we have already seen, the station at Isfahan is a terminus trains all leave the station heading to the Northeast before turning south to a junction with the inter-regional lines. We have already followed a line West from Isfahan to Zarrin Shahr. [35] The route to Shiraz takes that line as far as Seyd Abad Railway Station. Then, immediately south of Seyd Abad Railway Station a junction allows the railway to Shiraz to head East back towards Route 65 (the Isfahan-Shahreza Expressway). The road and railway share the same corridor to Shahreza.

Shahreza Railway Station is situated on the Southwest side of the city, immediately adjacent to the Ring Road (Route 65) and the line and road continue roughly together to the Isfahan Province boundary and then enter Fars Province. The line follows along the Southwest side of Route 65 (now the Shahrez-Abadeh Expressway) to Abadeh Railway Station and then passes under Route 78 (Eqlid-Sumaq Road) and heads through open country to meet Route 65 (now the Abadeh-Safashahr Expressway) again.

South of Safashahr Railway Station the line runs on the East side of Route 65 (Sa’adatshahr- Safashahr Expressway) before heading away to the South-southeast and then South across the Qaderabad-Harat Road and then through open country in a westerly direction before running for a short distance alongside the Qaderabad Road before following Route 65 (Sa’adatshahr- Safashahr Expressway) into Sa’adat Shahr railway station. From there the railway stays alongside Route 65 (now the the Marvdasht-Sa’adatshahr Expressway). The line and road trun south for a short distance before they separate temporarily. The railway curves away to the West through an outcrop and then emerges from a short tunnel and back to align with Route 65, adjacent to a village called Khalaftahuneh. It then heads generally in a Southwesterly direction towards the city of Shiraz, crossing the Nahr-Azam River and entering Shiraz Railway Station.

Shiraz Railway Station (Google Maps).

The picture below shows the view of the station at Shiraz on the approach from the main road.Shiraz Railway Station in 2016 (c) Hussein Karim Almaliki (Google Maps [36]

4. Khorramshahr to Shalamcheh – this is a short, 16 km length of line in the South of the country. Khorramshahr  was used as an alternative port during the Second World War and a line was built from there North to join the Trans-Iranian Railway. This resulted in a significant increase in the port capacity for the supply effort to Russia during the War.

Passenger Train en-route between Khorramshahr and Shalamcheh, (Google Maps).

Khorramshahr is also known as Muhammarah. In the 2016 census its population was 133,097. It is an inland port city located approximately 10 kilometres (6.2 miles) north of Abadan. The city extends to the right bank of the Arvand Rud waterway near its confluence with the Haffar arm of the Karun river. [37]

Shalamcheh is situated on the border with Iraq, north-west of Abadan. The town was one of the main sites of invasion of Saddam Hussein’s Iraq in the Iran–Iraq War. Some 50,000 Iranians died in the fighting around the town, and there is today a war memorial in their memory. [38]

The line West from Khorramshahr appears to be truncated some distance short of the border at Shalamcheh with no evidence of more than a single line running to a terminus and no obvious station. However, Google Earth’s imagery close to the border comes from 2004 while only a short distance to the East the imagery comes from 2016. The line is visible in the 2016 imagery and, unsurprisingly (as it was built between 2009 and 2012), not visible on the 2004 imagery.

There are plans at present (2019/2020) to extend this rail link to Basra in Iraq. [39][40][41][42] This would create a rail corridor running between Iran and Syria.

5. Gorgan to Incheh Borun 

Gorgan lies approximately 400 km (250 mi) to the north east of Tehran, some 30 km (19 mi) away from the Caspian Sea. In the 2006 census; its population was 269,226, in 73,702 families. [15][43]

Incheh Borun is little more than a small town on the border between Iran and Turkmenistan. At the 2006 census its population was 1,764, in 334 families.[15][44] Its station is about 1 km Northwest of the small town.

Gorgan Railway Station (Google Maps).

The line from Gorgan to Incheh Borun forms part of the Kazakhstan – Turkmenistan – Iran transit corridor east of the Caspian Sea which is being developed under a 2007 agreement between the three countries. The section within Kazakhstan was opened on 11th May 2013, and the Turkmen section was under construction in 2013. Bogie changing facilities are to be provided at the break of gauge in Incheh Borun. [22] The Iranian section, a length of 80 km (50 miles) was completed in 2013. The full line was opened in 2014. [45]

The line from Bandar Torkaman travels East to Gorgan. Around 15 to 20 km short of Gorgan there is a junction. The line into Gorgan continues Eastward and the line to the border turns to the North and follows Route 73 to Incheh Borun.

Transfer facilities are provided at Incheh Borun to allow for the change of gauge between the two countries. Iran uses the international standard gauge of 1,435 mm (4 ft 8 12 in). Turkmenistan and Kazakhstan use the Russian standard gauge of 1,520 mm.

6. Tehran to Hamedan (Hamadan)

Hamedan (Hamadan) is believed to be among the oldest Iranian cities. It is possible that it was occupied by the Assyrians in 1100 BCE; the Ancient Greek historian, Herodotus, states that it was the capital of the Medes, around 700 BCE. At the 2016 census, its population was 676,105 in 210,775 families. [46]

Construction of the line between the two cities was started in 2001 but not finished until 2017. [5] Work stopped in 2004 before being restarted after the easing of sanctions in 2015. [23]

Hamedan Railway Station is sited some distance Northeast of the city itself. The line now continues South of Hamedan for no more than a kilometre. I guess to allow for future expansion of the railway network.

Just North of the station a junction allows for trains to travel towards Tehran (first heading North) and for a route travelling in a Northwesterly diirection which at the time the Google satellite images were taken in the  first quarter of the 21st century was under construction.

The route to Tehran first heads North for some 15 to 16 kilometres before running parallel to Route 37/48 in a Northeastlerly direction, and then parallel to the Saveh to Hamedan Freeway (No. 6) in a more easterly direction. It passes under Route 47 and continues to follow the same transport corridor as the Freeway (at times running immediately adjacent to the road. Route 48 re-appears and for a reasonable distance takes up an alignment between the Freeway and the railway. Close to Nowbaran Route 48 crosses the railway, as in a kilometre or two, does the Freeway.

The Freeway and the railway continue to follow similar paths but with the railway now on the North side of the Freeway as far as Saveh Railway Station.

Saveh Railway Station is 6 or 7 kilometres North-northwest of the city. A little to the East of Saveh, the land begins to rise and the railway and the Freeway find their own way into the hills. Beyond this point it is the Tehran to Saveh Freeway (No. 5) that the track follows.

A line from the South meets the Tehran-Hamedan line near Parandak and from this point two lines head Northeast. The more southerly of these lines passes through Roodshur Railway Station.And then through a series of sharp curves to gain height while also crossing the Shur river valley.The more Northerly of the two lines climbs more steadily and in a gracefully curved bridge crosses the Shur valley.The two lines eventually come togther as they approach Robat Karim Railway Station in Vahidieh on the Southwestern apporaches to Tehran. The line then passes through Kolmeh Station and Eslamshahr Station on the southside of Aprin and on into Tehran.

7. Arak to Kermanshah 

This is another line for which construction started in 2001 and was then held up by sanctions. Completion was finally achieved in 2018. It needed 175 kilometres of track laying across a difficult terrain which included building three kilometres of tunnels and seven large bridges. [24]

Kermanshah is located 525 kilometres (326 miles) from Tehran in the western part of Iran. According to the 2016 census, its population was 946,681 (and the 2019 estimate is 1,046,000). [47]

Arak has a population of 526,182, in 160,761 families. [15] The city is nicknamed the “Industrial Capital of Iran”. Arak produces around 50% of the needs of the country in steel, petrochemical, and locomotive industries. [48]Kermanshah Railway Station (c) Mohammad Yousefvand, (Google Maps).

Kermanshah sits adjacent to the border with Iraq in Iran’s western hills. As befits a line completed in the last few years, its station is of a highly modern design.

The line from Kermanshah heads East under the City By-pass – Route 48 – and then runs parallel to Route 48 on its Southern side, crossing under Route 35 and then over the Gamasiab River near Faraash. Route 48 stays on the Western side of the river.

The railway passes from Kemanshah Province into Lorestan Province and finds itself travelling through hilly terrain. It, once again, crosses the River Gamasiab and follows its Northern slopes into the hills. In a short distance along the valley the line leaves Lorestan Province and enters Hamadan Province. Three crossings of the River Gamasiab are quickly followed by a short curved tunnel and then another bridge close to Khalenjah. Now, once again, on the North side of the river, two tunnels precede another crossing of the River Khorram Rud, a tributary of the Gamasiab.

The railway is now on the higher plateau and turns to the North, passing under Route 52 and entering another curving tunnel in which it turns to the East. The land here appears much more fertile.  The line travels a distance alongside Route 52, through the Railway Station at Firuzan.The two, road and rail, separate soon after Firuzan Station with Route 52 heading way to the South. Later the line crosses Route 37 (the Malayer to Borujerd Highway).


Malayer Railway Station (Google Streetview).Malayer Railway Station (c) Jabbar Sattari, (Google Maps).Malayer Railway Station (Google Maps).

After the Station, the Railway passes under the Arak-Malayer Highway. The Highway and the Railway then share a transport corridor past Zangeneh and Cheshme Zoragh before the railway turns South-southwest leaving the highway heading East-southeast. The line passes to the West of Jalayer and then curves sharply to the East and rejoins the Arak-Malayer Highway which when it is joined by the Arak-Borujerd Highway becomes Route 56.

Shazand Oil Refinery (c) homayoun varzeshdost (Google Maps).

Close to Hesar and Tureh the road turns North and the Railway passes to the South of Hesar. On the North side of Akbar Abad the line turns sharply to the North, running past the Shazand Oil Refinery.

It rejoins the Arak-Borujerd Highway (Route 56) just before entering The Railway Station at Samangan.

Samangan Railway Station, (Google Maps).

The Road and Railway contiue together through Feyjan Bala and Senejan where the separate once again as the Road follows the North side of the increasingly urbanised area and the Railway, the South and then runs into Arak Railway Station.

Arak Railway Station (Google Maps).

……………………


References

  1. https://www.coxandkings.co.uk/destinations/middle-east/iran/private-travel, accessed on 3rd April 2020
  2. https://surfiran.com/iran-tour/iran-train-tour-persian-caravan, accessed on 3rd April 2020.
  3. https://www.farrail.com/pages/touren-engl/Standard-and-broad-gauge-railways-in-Iran-Zahedan-Mashhad-Bandar_Abbas-2019.php, accessed on 3rd April 2020.
  4. https://www.railforums.co.uk/threads/iran-railways.202543 (YouTube link: https://youtu.be/lqSoLVkYYu0), accessed on 25th March 2020
  5. https://en.wikipedia.org/wiki/Islamic_Republic_of_Iran_Railways, accessed on 29th March 2020.
  6. https://www.iranrail.net/network.php, accessed on 4th April 2020.
  7. http://in.reuters.com/article/2011/03/05/idINIndia-55349520110305, accessed on 4th April 2020.
  8. https://web.archive.org/web/20160318034423/http://www.tehran.ir/Default.aspx?tabid=40: http://www.tehran.ir; archived from the original on 18 March 2016, quoted in reference [10] below and noted on 4th April 2020. This article is not in English and will need translation software it it is to be read in English.
  9. “Tehran Metro, Iran”. Railway-Technology.com. Archived from the original on 1 July 2014; quoted in reference [10] below and noted on 4th April 2020.
  10. https://en.wikipedia.org/wiki/Tehran_Metro, accessed on 4th April 2020.
  11. https://www.farrail.com/pages/touren-engl/Railways-in-Iran-2016.php, accessed on 4th April 2020.
  12. M. Frybourg et B. Seiler; Globe Trotter : Des trains en Iran; Objectif Rail n°77 September/October 2016, p 68-85.
  13. https://en.wikipedia.org/wiki/Bafq, accessed on 4th April 2020.
  14. https://en.wikipedia.org/wiki/Kashmar, accessed on 4th April 2020.
  15. Census of the Islamic Republic of Iran, 1385 (2006); Islamic Republic of Iran. Archived from the original (Excel) on 11th November 2011 and quoted by Wikipedia in references [13] and [14] above and in references [28] and [29] below..
  16. “دومین شهر زیارتی خراسان رضوی”. khorasan.iqna.ir, quoted in reference 16 above and noted on 4th April 2020. This article is not written in English and will need translation software it it is to be read in English
  17. https://www.waze.com/en-GB/livemap, accessed on 4th April 2020.
  18. https://www.google.co.uk/maps/place/Choghart+Iron+Mine/@31.7003018,55.4698463,3a,75y/data=!3m8!1e2!3m6!1sAF1QipPYLmKr21Z-kKbP9-liOIvQOc7bUKvobIJgUXTI!2e10!3e12!6shttps:%2F%2Flh5.googleusercontent.com%2Fp%2FAF1QipPYLmKr21Z-kKbP9-liOIvQOc7bUKvobIJgUXTI%3Dw114-h86-k-no!7i4128!8i3096!4m13!1m7!3m6!1s0x3fa82f568572170b:0x5a1d010a9aa87c!2sBafgh,+Yazd+Province,+Iran!3b1!8m2!3d31.6216425!4d55.4139392!3m4!1s0x3fa8273801690549:0x2c64d562f8ad363!8m2!3d31.700303!4d55.4698473#, accessed on 4th April 2020.
  19. https://www.google.co.uk/maps/place/Choghart+Iron+Mine/@31.700303,55.4698473,3a,75y,90t/data=!3m8!1e2!3m6!1sAF1QipPMm5u7jHg1feIHONAM9Xhl8ashkIa1GQkO8Yly!2e10!3e12!6shttps:%2F%2Flh5.googleusercontent.com%2Fp%2FAF1QipPMm5u7jHg1feIHONAM9Xhl8ashkIa1GQkO8Yly%3Dw203-h123-k-no!7i1200!8i733!4m13!1m7!3m6!1s0x3fa82f568572170b:0x5a1d010a9aa87c!2sBafgh,+Yazd+Province,+Iran!3b1!8m2!3d31.6216425!4d55.4139392!3m4!1s0x3fa8273801690549:0x2c64d562f8ad363!8m2!3d31.700303!4d55.4698473#, accessed on 4th April 2020.
  20. https://rogerfarnworth.com/2020/04/05/railways-in-iran…rom-1980-to-1999, written in April 2020.
  21. https://www.tinn.ir/بخش-شرکت-ساخت-توسعه-زیربناها-16/44902-مقایسه-بهره-برداری-از-خطوط-ریلی-قبل-بعد-از-انقلاب-سال-تا-جدول, accessed on 6th April 2020 and translated using Google Translate.
  22. https://www.railwaygazette.com/news/infrastructure/single-view/view/iran-inaugurates-railway-to-border-with-turkmenistan.html, accessed on 6th April 2020 and quoted in reference [5] above.
  23. https://www.railwaygazette.com/news/infrastructure/single-view/view/tehran-hamadan-railway-opened-by-president-rouhani.html, accessed on 6th April 2020 and quoted in reference [5] above.
  24. https://www.presstv.com/Detail/2018/03/20/556070/Iran-railway-Rouhani-Kermanshah-Iraq, accessed on 6th April 2020 and quoted in reference [5] above.
  25. https://www.google.co.uk/maps/place/Neygenan/@34.302021,57.3525574,3a,75y/data=!3m8!1e2!3m6!1sAF1QipPgRSnb3niAHFzEvByGD8Qa2mGGOACPzLm0Wjgs!2e10!3e12!6shttps:%2F%2Flh5.googleusercontent.com%2Fp%2FAF1QipPgRSnb3niAHFzEvByGD8Qa2mGGOACPzLm0Wjgs%3Dw86-h114-k-no!7i1536!8i2048!4m5!3m4!1s0x3f0c40c3cad3fc83:0x4d2189b4cc1fa01!8m2!3d34.3020213!4d57.3524952#, accessed on 4th April 2020.
  26. https://en.wikipedia.org/wiki/Mashhad, accessed on 6th April 2020.
  27. “Razavi Khorasan (Iran): Counties & Cities – Population Statistics in Maps and Charts”. http://www.citypopulation.de/php/iran-khorasanerazavi.php, accessed on 6th April 2020, and quoted by Wikipedia in reference [26] above.
  28. https://en.wikipedia.org/wiki/Kerman, accessed on 30th March 2020.
  29. https://en.wikipedia.org/wiki/Bam,_Iran, accessed on 6th April 2020.
  30. https://en.wikipedia.org/wiki/Qanat, accessed on 6th April 2020 and quoted by Wikipedia in reference [29] above.
  31. https://en.wikipedia.org/wiki/Zahedan, accessed on 6th April 2020.
  32. https://www.google.com/maps/place/Zahedan+Railway+Station/@29.4799927,60.8749292,3a,75y,90t/data=!3m8!1e2!3m6!1sAF1QipNbAwS0nhAJvzjWZwTfWfIOo1-MRpoLjF-Ge7bY!2e10!3e12!6shttps:%2F%2Flh5.googleusercontent.com%2Fp%2FAF1QipNbAwS0nhAJvzjWZwTfWfIOo1-MRpoLjF-Ge7bY%3Dw114-h86-k-no!7i4160!8i3120!4m5!3m4!1s0x3ee7375adbd012a9:0xa702253341447988!8m2!3d29.4799927!4d60.8749293#, taken in October 2019 (c) Amin Shahraki Kia, accessed on 6th April 2020.
  33. https://en.wikipedia.org/wiki/Isfahan, accessed on 13th April 2020.
  34. https://en.wikipedia.org/wiki/Shiraz, accessed on 14th April 2020.
  35. https://rogerfarnworth.com/2020/03/30/railways-in-iran-part-4-1970s, published on 30th March 2020.
  36. https://www.google.co.uk/maps/place/Shiraz+Railway+Station/@29.7650944,52.4332488,3a,79.4y,90t/data=!3m8!1e2!3m6!1sAF1QipPJnYN2GJFLAu_822azykjx_ZAotEGghvxW83FO!2e10!3e12!6shttps:%2F%2Flh5.googleusercontent.com%2Fp%2FAF1QipPJnYN2GJFLAu_822azykjx_ZAotEGghvxW83FO%3Dw128-h86-k-no!7i929!8i622!4m5!3m4!1s0x3fb21943761b5367:0x405883f5466c3369!8m2!3d29.7641336!4d52.4314056, accessed on 14th April 2020.
  37. https://en.wikipedia.org/wiki/Khorramshahr, accessed on 28th April 2020.
  38. https://en.wikipedia.org/wiki/Shalamcheh, accessed on 28th April 2020.
  39. https://en.irna.ir/news/83239949/Shalamcheh-Basra-railroad-to-boom-trade-with-West-Asia, accessed on 29th April 2020.
  40. https://www.al-monitor.com/pulse/originals/2018/11/iran-iraq-syria-railway.html, accessed on 29th April 2020.
  41. https://theiranproject.com/blog/2019/03/12/shalamcheh-basra-railroad-to-boom-trade-with-west-asia, accessed on 29th April 2020.
  42. https://ifpnews.com/iraq-syria-working-on-joint-railway-project-with-iran, accessed on 29th April 2020.
  43. https://en.wikipedia.org/wiki/Gorgan, accessed on 29th April 2020.
  44. https://en.wikipedia.org/wiki/Incheh_Borun, accessed on 29th April 2020.
  45. http://country.eiu.com/article.aspx?articleid=1112552295&Country=Iran&topic=Politics&subtopic=For_4, accessed on 29th April 2020.
  46. https://en.wikipedia.org/wiki/Hamadan, accessed on 29th April 2020.
  47. https://en.wikipedia.org/wiki/Kermanshah, accessed on 29th April 2020.
  48. https://en.wikipedia.org/wiki/Arak,_Iran, accessed on 29th April 2020.

The Gloucester and Cheltenham Tramroad – Part 1

The featured image at the head of this article appears later in the text as well. It comes from an old article in The Railway Magazine. In the February 1953 edition of the magazine. The article in The Railway Magazine followed the route of the Gloucester and Cheltenham Tramroad from Gloucester to Cheltenham and Leckhampton Hill. [11]

The Gloucester and Cheltenham Tramroad was built, primarily, to transport of coal from Gloucester’s docks to the rapidly developing spa town of Cheltenham and to transport of building stone from quarries on nearby Leckhampton Hill. [1][2]

It was ”opened for mineral traffic on 2 July 1810. The line was a 3ft 6 in (1,067mm) gauge plateway, with cast iron plates on stone blocks. Wagons with plain wheels could run on the plates and were guided by an upstand on the plates. The route was single track, but passing places were provided at four to the mile, or more frequently. It appears that more passing places were added later, no doubt in response to higher traffic densities.” [1][2]

A steam locomotive was tried out on the line in 1831 or 1832. The engine was ‘Royal William’, built at Neath Abbey Ironworks. It was an 0-6-0 tender engine. It caused traumatic breakages of the tramplates and for a time the Company thought seriously about converting the line to an edge railway, something which would not have had the approval of traders who used the line at the time. [1]

There is an excellent schematic map of the route of the Tramroad provided in an online publication from the Gloucestershire Society for Industrial Archaeology (GSIA) https://www.gsia.org.uk/gct/gsia-tramroad-history.pdf [10]

Very little of the tramroad remains visible today. The urban areas of Cheltenham and Gloucester have grown closer together over the years and the roads linking them have been widened and realigned. What does remain in the 21st Century? …. We will discover this as we follow the route of the tramroad below and in a second article!

The Route of the Tramroad – starting from the Quarries at Leckhampton Hill

Careful inspection of the 6″ OS Maps published around the turn of the 20th Century shows the old 3ft 6in [17] tramway still in place close to Leckhampton Quarries. The extent of the network was, by this time, drastically curtailed from that which existed in the heyday of the tramroad in the early to mid-1800s. The map extract below shows the tramroad terminating at the Stables and Depot close to the Sanatorium on Leckhampton Road. [12]Two passing loops can be seen, one close to Hill Cottage and the other close to Cotteswold (to the north of Ashmead). The southern terminus of the line was high above the main Leckhampton Quarries at Brownstine Quarry just at the southern edge of the map extract above. The black line on the satellite image below shows the approximate line of the tramroad.From the location of the old Sanatorium and the Tramroad Depot the line headed North along Leckhampton Road. We will return to that length of the line once we have a better idea of the various tramways and workings around Leckhampton Hill. Key locations on the modern satellite image are marked by flags.

The focal point of the network of tramways on the hills was close to the Limekiln remains flagged above. The sketch map below illustrates this. It shows what remained in around 1925. The majority of these tramways were narrow gauge (3ft 6in [17: p38]). As was the mainline of the tramway from Cheltenham to Gloucester with its branch up to Leckhampton Hill. The sketch map also sows a newer standard-gauge line it was planned would link to exchange sidings and to the line from Cheltenham to Banbury. Only around a mile and a quarter of the work on this line was completed. That did, however, include a significant incline with a bridge under Daisybank Road. This illustration comes from ‘Old Leckhampton’ by David Bick. The locations marked with numbers are: 1. Devil’s Chimney; 2. Bottom Incline; 3. Middle Incline; 4. Top Incline; 5. No name; 6. Dead Man’s Incline; 7. No name. [13][17] 

Cheltenham Borough Council Map of Historic Features at Leckhampton Hill. This map was published in 2003. The tramway routes shown in yellow and are quite hard to make out on the map. [18]

This sketch map was carried in the February 1953 edition of The Railway Magazine and shows the tramway running from the quarries in the bottom right of the map. [11: p120]

“Leckhampton Hill was a source of Cotswold stone of varying quality. The best stone was suitable for carving for interior use and some of this can, for example, be found in the Cheltenham College Chapel. However, the bulk of it was of lower quality and used for the likes of road stone and gravel and as a source material for the production of lime.” [14]

Most quarrying took place on the North and West faces of the hill and the visible areas of rock face which remain in the 21st Century are there as a result of the quarrying work. This is even true of the well-known Devil’s Chimney on the West face of the hill. One quarry, Brownstone, was on the top of the hill remote from the escarpment.

Devil’s Chimney and the view from the top of the Leckhampton Escarpment, (c) Adrian Pingstone, 4th June 2006 – Public Domain. There was a quarry incline between the present view point and the Devil’s Chimney. [15]

Engraving of the Devil’s Chimney Incline. [16]

Devil’s chimney was formed as a result of the construction of the incline, shown above, up to the top of the Hill, to allow the stone to be removed down the hill by trucks, it left an isolated section of rock that was then weathered over time, and possibly shaped by mischievous quarrymen. [14] Research on line resulted in the discovery of the image below, posted by Gordon Braithwaite, which shows quarry excavation in 1923 in the area close to where the Limekilns were being built. [7]

The Middle Incline, which starts by Tramway Cottage, is shown in a photograph on the website of the Friends of Leckhampton Hill and Charlton Kings Commom as it was in 2016. [14] The Friends of Leckhampton Hill and Charlton KIngs Common have also provided a shot of the incline at work in 1902 – taken when Tramaway Cottage was demolished as part of riots that year.

Middle Incline is shown at the right-rear of this photograph of the demolished Tramway Cottage in 1902. [14]

In the 1920s some major work was undertaken at Leckhampton Hill and a standard-gauge incline was installed.  It was an ambitious scheme in which four large limekilns were to be built near the Focal Point of the railways. “The lime produced would be transported off the hill on a standard gauge railway. …. By September 1924 the limekilns and one and a quarter miles of railway track including the long incline had been completed. However, the project was not a success and all production stopped about two years later and the plant [was] sold in August 1927.” [17]

The Standard-gauge incline (see the adjacent picture, [14[23] connected with further standard gauge tracks (on which was run a small steam engine) which ran eastwards towards the Cheltenham to Banbury line  at Charlton Kings. Hisoric England records the line as follows: “A 20th century mineral railway is visible as earthworks on aerial photographs. The railway connected the lime kilns at Leckhampton quarries to the Banbury and Cheltenham Direct Line, near Charlton Kings station. The railway was a standard gauge railway, constructed in 1924 to connect the works on the hill with the depot at Southfield Manor Farm and then the main railway line to the northeast. The railway was subsequently disused by 1927.”[17][19]

The standard-gauge line postdated the Cheltenham to Gloucester Tramroad and its branch to the quarries. David Elder says that little is known of this “ill-fated scheme, begun in 1922, to produce lime on the hill and transport it to Charlton Kings by a specially built standard-gauge railway. Today, the concrete foundations of four large steel limekilns are the main visible reminders of this project, which only lasted five years. The scheme was funded by a government loan to ease unemployment after the First World War.” [5]

Construction of the limekilns was completed by September 1924. “Standing 23.5 metres high it was hoped that, once the kilns had been fired up using producer gas made from coal, they could make 300 tons per day. However, this level was never attained and the resulting lime was not of sufficiently good quality to make the enterprise worthwhile. The standard-gauge railway, connecting the kilns to a depot at Southfield Farm in Charlton Kings and thence to join the railway line at Charlton Kings, employed a three-rail system with a halfway passing point below an overbridge … [at] Daisybank Road. … In the end, although an impressive engineering feat, it produced little of real benefit.” [5] 

Jock Leonard published a short piece about the standard-gauge line and its locomotives in a blog in 2015. [6]  That drew my attention to a Facebook group called ‘Days Gone by in Cheltenham’. In that group, a search for ‘Leckhampton Quarries’ produced some great pictures of the old tramways and the limekilns on the site. Some of those photographs are included below along with others from different sources on the internet and in literature. All are fully referenced at the bottom of this article.

Bottom Incline:

The bottom of Bottom Incline. it was at this point that the public tramroad gave way to the quarry tramroads. Interetsingly, Bick gives the date of this photograph as being around 1895. This is evidence that a length of the tramway alongside Leckhampton Road was retained in use after the closure of Gloucester & Cheltenham Tramroad as a whole, in 1861. Bick says: “Here the Leckhampton branch of the Gloucester and Cheltenham Tramroad met C. B. Trye’s quarry lines. c. 1895. (c) A. T. Bendall.” Leckhampton Road/Hill can be seen on the left of the picture. [9: p32a][21]The point where the tramway from Bottom Incline drew alongside Leckhampton Road, as it is in the 21st century. (Google Streetview).The top of Bottom Incline showing the winding gear most clearly. [8]

The Line between Middle and Bottom Incline:

The line crossed Leckhampton Road/Hill at grade at the junction with Daisy Bank Road.

The Tramroad and road crossing location in the 21st century (Google Streetviw).

Middle Incline:

At the bottom of the Middle Incline. The tramway curved round to Daisy Bank Road which is behind the camera, (c) B. Baxter. [11: p121]Middle Incline [8]Middle Incline. [21][23]Tramway cottage in the 21st Century (Google Streetview).

Devil’s Chimney Incline:

I believe that this is an etching of the winding gear at the Devil’s Chimney Incline. If this is the case, then the chimney is just out of the picture to the right. [8]

The 1923-1924 Lime Kilns:

Before we look at the pictures of the limekilns below, there is an interesting aside which is worth noting, that is that there was a 2 ft Narrow Gauge Railway which conveyed the limestone needed by the kilns. It was “a 2ft gauge “Jubilee track” railway which ran on a ledge which can be traced in part today. At the far end the trucks were pushed across a bridge which connected the cliff face to the kilns and the stone was then tipped from the trucks into the kilns. The change in level along the route may have required a small incline to have been built but it is not clear where this was.” [25: p41]

The Limekilns built between 1923 and 1924 – I believe that his is the same location as the image of quarrying above from Gordon Braithwaite [7]. This is another image sourced by Albert Hands. [8]The view from above the Limekilns constructed in the 1920s provides and excellent view of  both the top of the Middle Incline, for which the winding drum can be seen, and the standard-gauge incline which superseded it, to its right. [21] A wider version of the same image can be found in David Bick’s booklet which shws that the work to build the standard-gauge incline destroyed the higher parts of the Middle Incline, leaving just the short stub visible in the picture here. [9: p32e]

The focal point of the tramway system with Top Incline heading away to the upper right of the picture (c) T.F. Coke. The line heading towards the camera was at this time the access to some short sidings but in the past had been the tramway route round to the incline at the Devll’s Chimney.. [9: p32c][21]

Dead Man’s Quarry:

Dead Man’s Quarry was a lter addition to the excavations at the Leckhampton site it was not until 1905, according to Bick [9] that this quarry needed a tramroad and a new incline.

Dead Man’s Quarry 1911, (c) H.G.W. Household [9: p32c][23].Horse-drawn empty tram ‘train’ returning to Dead Man’s Quarry, Leckhampton in June 1911, (c) H.G.W. Household. [9: p32b][23]

The Standard Gauge Incline and Sidings:

The Linekilns and the Standard-gauge incline are in a very real sense just a footnote to the story of the Cheltenham & Gloucester Tramroad. They appeared late and lasted nothing but a few years!

This first photo shows a Great North of Scotland Railway wagon half-way up the rope incline.  It seems unlikely that it was just visiting. Had it been bought or leased by the quarry company – we will never know!

post-189-0-54638400-1474630702_thumb.jpg

Great North of Scotland on the Standard-Gauge Incline at Leckhampton. [24]

There are very few images available which show the standard gauge railway and incline one is much earlier in this article and shows the standard gauge incline, that view looks roughly Southwest up the incline towards the limekilns. The next image, below, shows that incline during its construction. …. Again the view faces up the incline towards the kilns.

The standard gauge incline and Daisy Bank Bridge under construction. [21]

Steam power was used on the line at the bottom of the incline and this has been covered in a short article by Jock Leonard: “Standard gauge steam locomotives working at the Leckhampton Quarry, circa 1920.” [26] (https://jockleonard.wordpress.com/2015/01/17/standard-gauge-steam-locomotives-working-at-the-leckhampton-quarry-circa-1920.)

The Friends of Leckhampton Hill and Charlton Kings Common  and the GSIA (Gloucestershire Society for industrial Archaeology) arranged with Cheltenham Borough Council and LifeChart for a display to be placed at the Limekilns site (shown below) which aids visitors in interpreting what they encounter. [14][20]The GSIA & Friends of Leckhampton Hill and Charlton Kings Common display board at Leckhampton Quarries and Limekilns. [14]

The OS map extract below shows that by the time of the publication of the OS 1:25,000 series (1937-1961) very little of the old tramway remained, just a short length behind the old Tramway Depot.

Returning to the line of the old tramroad/tramway branch from Leckhampton Hill into Cheltenham. The quarry tramway lines were served by a Depot alongside Leckhampton Road. The Depot was built in about 1810. it was the location of the Leckhampton Industrial Estate (although I think it has now been developed for housing). In 1923 the depot was transferred to Southfield Farm. [25: p41]

North of the Depot, the old tramroad ran along the west verge of Leckhampton Road towards Cheltenham. When we see images, particularly in the next article in this series, of a tramway in the centre of Leckhampton Road, we need to remember that the tramway in those images is a later tramway which operated in the early 20th Century and which was primarily a passenger tramway. The image below comes from the year 1900, the trees in the verge have just been planted, there is no evidence of a tramway in the centre of the road and the old tramway rails are still evident to the west of the road, on the right of this picture.

Leckhampton Road under reconstruction. The old tramroad rails appear still to be available at this time as the tramroad wagon on the right of the image testifies. Although some sources do suggest that the rails were lifted when the old tramway closed in 1861, [27][9: p50][23] Bick is clear that the length at this location survived into the 1890s.  He says that Trye who owned the quarries in 1861, “retained about 500 yds. of line down the side of Leckhampton Road to a point opposite the Malvern Inn, where he established a stone wharf. This bit of line, the last of the Gloucester and Cheltenham Tramroad, was not taken up until the late 1890s.” [9: p51 (and very briefly on p29)]Leckhampton Road in the 21st Century at approximately the same location as the image above (Google Streetview).

References

  1. https://en.wikipedia.org/wiki/Gloucester_and_Cheltenham_Tramroad, accessed on 18th April 2020.
  2. David VereyAlan Brooks; Gloucestershire 2: The Vale and the Forest of Dean;
    Yale University Press, 2002, p99
  3. https://www.gloucestershirelive.co.uk/news/gloucester-news/gallery/remnants-gloucesters-industrial-revolution-littered-3221228,, accessed on 18th April 2020.
  4. https://www.geograph.org.uk/photo/70782, accessed on 18th April 2020.
  5. David Elder; Secret Cheltenham; Amberley Publications Ltd,  Stroud, Gloucestershire, 2009; accessed via https://books.google.co.uk/books?id=IZOSDwAAQBAJ&pg=PT25&lpg=PT25&dq=standard+gauge+railway+-+Leckhampton+hill&source=bl&ots=AlpLRjl9CA&sig=ACfU3U2VfASkKY18B8xFWUB4y7WiNsgVVQ&hl=en&sa=X&ved=2ahUKEwjm3au7rfzoAhW1Q0EAHVfRAIIQ6AEwB3oECAoQAQ#v=onepage&q=standard%20gauge%20railway%20-%20Leckhampton%20hill&f=false, accessed on 22nd April 2020.
  6. https://jockleonard.wordpress.com/2015/01/17/standard-gauge-steam-locomotives-working-at-the-leckhampton-quarry, accessed on 22nd April 2020.
  7. https://www.facebook.com/gordon.braithwaite.1?fref=gh&hc_location=group&__tn__=%2CdC-R-R&dti=243104989178394, accessed on 22nd April 2020.
  8. Albert Hands who posted these images on the facebook group “Days Gone by in Cheltenham” has sadly passed away and his permission cannot be sought for their inclusion here, neither can their provenance be checked;  https://www.facebook.com/groups/243104989178394, accessed on 22nd April 2020.
  9. D.E. Bick; ‘The Gloucester & Cheltenham Railway and the Leckhampton Quarry Tramroads’; The Oakwood Press, 1968.
  10. https://www.gsia.org.uk/gct/gsia-tramroad-history.pdf, accessed on 18th April 2020.
  11. B. Baxter; The Route of the Gloucester & Cheltenham Railway; The Railway Magazine, February 1953: p117-121 & p133. NB: Mike Farmer has noted a small error in the drafting of the map: “The road labelled ‘Liberton Road’ on the map [p120] just by Landsown Railway Station is mis-named: it should be ‘Libertus Road’.” (please see the comments on this post below). This map is the featured image for this article.
  12. https://maps.nls.uk/geo/explore/#zoom=17&lat=51.86676&lon=-2.07397&layers=6&b=1, accessed on 19th April 2020.
  13. D.E. Bick; ‘Old Leckhampton (Its Quarries, Railways, Riots and the Devil’s Chimney)’; 2nd Edition, Runpast Publishing, Cheltenham, 1994; noted in reference [14] below.
  14. https://www.leckhamptonhill.org.uk/site-description/industrial-archaeology/#/ accessed on 20th April 2020.
  15. https://en.wikipedia.org/wiki/Devil%27s_Chimney_(Gloucestershire)#/media/File:Devils.chimney.viewpoint.at.leckhampton.arp.jpg, accessed on 21st April 2020.
  16. https://www.google.co.uk/imgres?imgurl=https%3A%2F%2Fnews.bbcimg.co.uk%2Fmedia%2Fimages%2F53100000%2Fjpg%2F_53100654_gsia_4_june_docks_leck_hill.jpg&imgrefurl=https%3A%2F%2Fwww.bbc.co.uk%2Fnews%2Fuk-england-gloucestershire-13617786&tbnid=77PCeAPdUap-vM&vet=12ahUKEwjtl7yKifnoAhV8gM4BHQZqD8EQMygVegQIARAm..i&docid=0rTDiH0XyNGl-M&w=976&h=549&q=Incline%20Devil%27s%20Chimney%20Gloucestershire&client=opera&ved=2ahUKEwjtl7yKifnoAhV8gM4BHQZqD8EQMygVegQIARAm, accessed on 21st April 2020.
  17. Ray Wilson; The Industrial Archaeology of Leckhampton Hill; in the Gloucestershire Society for Industrial Archeaology Journal, 2001, p38-46, https://gsia.org.uk/leckia.pdf, accessed on 21st April 2020.
  18. Leckhampton Hill and Charlton Kings Common Management Plan – Issue No. 2 , April 2003; Cheltenham Borough Council; https://www.google.co.uk/url?sa=t&rct=j&q=&esrc=s&source=web&cd=5&ved=2ahUKEwj7_KjynPzoAhUhmVwKHV1nAIAQFjAEegQIBhAB&url=https%3A%2F%2Fwww.cheltenham.gov.uk%2Fdownload%2Fdownloads%2Fid%2F830%2Fleckhampton_hill_and_charlton_kings_common.pdf&usg=AOvVaw0VNsgqsbUK894hVhn2DDh0, accessed on 22nd April 2020.
  19. https://www.pastscape.org.uk/hob.aspx?hob_id=1509734, accessed on 22nd April 2020.
  20. https://lifechart.co.uk/services/heritage-trails/leckhampton-hill, accessed on 22nd April 2020.
  21. https://www.facebook.com/photo.php?fbid=2403959226287834&set=gm.1156616937827190&type=3&theater&ifg=1, posted on the ‘Days Gone by in Cheltenham’ website by Bridget Capon on 18th November 2018, accessed on 22nd April 2020.
  22. https://leckhamptonlhs.weebly.com/uploads/5/8/8/7/5887234/bulletin_no_1_pdf(1).pdf, accessed on 23rd April 2020.
  23. http://www.cheltenhamsouthtown.org/tramroad.html, accessed on 23rd April 2020.
  24. https://www.rmweb.co.uk/community/index.php?/topic/114180-standard-gauge-light-railways-goods-stock/page/2, accessed on 23rd April 2020.
  25. https://www.gsia.org.uk/reprints/2001/gi200135.pdf, accessed on 23rd April 2020.
  26. https://jockleonard.wordpress.com/2015/01/17/standard-gauge-steam-locomotives-working-at-the-leckhampton-quarry-circa-1920, accessed on 21st April 2020.
  27. https://www.facebook.com/photo.php?fbid=10153275218432453&set=gm.465134820308742&type=3&theater&ifg=1, posted on the ‘Days Gone By in Cheltenham’ website by Nik Thomas on 14th May 2015, accessed on 23rd April 2020.

Appendix 1 – THE INDUSTRIAL ARCHAEOLOGY OF LECKHAMPTON HILL – Ray Wilson – Extract from the Gloucestershire Society for Industrial Archaeology Journal for 2001 pp. 35-46

TRAMROAD INCLINES – Table 1 (p43)


Book Series Review – Neil Parkhouse: “British Railway History in Colour”

Over the last few years I have been collecting and reading a series of books written by Neil Parkhouse and published by the Lightmoor Press, an imprint of Black Dwarf Lightmoor Publications Ltd.

The author of the series is Neil Parkhouse. He and Ian Pope are the leading lights of the publishing house. Both are experts in railway history and infrastructure, and they publish some of the best railway history literature on the market.

I have quite an extensive library of railway books, but if you were to tell me that I could only keep say 15 to 20 books from the whole library. This series (5 books so far) would make up one third of the total and books by Ian Pope would also be included, specifically the two books on the Forest of Dean Railway and the five volumes which make up the series on the Severn & Wye Railway. (The earlier volumes in that series were jointly authored with Bob Howe and Paul Karau). I guess thatI’d probably also want to keep the books I have about the Railways in and around Hereford which I model in N Gauge.

Neil Parkhouse has, for many years, been collecting colour photos of the railways of Gloucestershire and this series of books is the result. The series is ambitious, and I can imagine that it is a labour of love for Neil Parkhouse. His enthusiasm shines out from the pages of each book. The series title is ”British Railway History in Colour” and Neil Parkhouse hopes soon to broaden the series out beyond the immediate area of Gloucestershire.

I have the full series up to and including Volume 4A and cannot recommend them highly enough. A very short introduction to each volume in the series follows here, a longer introduction can be found on the Lightmoor Press website:

Volume 1: West Gloucester & Wye Valley Lines: Second Edition – if you purchase the first edition, be sure to pick up the supplement which contains all the changes between the two editions.

This volume, and those which follow, relies on an army of photographers who from the late 1950s onwards determined to record the railway scene, and particularly on those who chose to use the medium of colour transparencies. In this volume he concentrates on the Southwest of the county, an area of striking natural beauty with a long history of industrial activity.

The Lightmoor website introduces this volume by saying that, ”The aim has been to show the infrastructure – stations, signal boxes, goods yard, engine sheds – which has been lost, as much as the trains and their motive power. Along the way, some of the other locations which were once railway served – such as docks, quarries and industrial works – are also illustrated.” [1] The book certainly achieves those objectives and, in effect, is a pictorial commentary on life in this part of Gloucestershire in the middle years of the 20th century.

This volume has colour images from the 1930s through to the mid 1970s. It is a feast for sore eyes!

Volume 2: Forest of Dean Lines and the Severn Bridge – the horse operated tramroads of the Forest of Dean were later turned into railways and for a time provided both for passengers and freight. By the time embraced by this series, these Railways were drafting toward their final years. This volume covers the full range of routes within the Forest and also looks at the Severn Bridge.

The period covered by this volume is, ”from the late 1950s to the mid 1970s, when traffic on the branch to Parkend finally ceased and the Dean Forest Railway took over.” [1]

Volume 3: Gloucester Midland Lines Part 1 : North – the Midland Railway surprised many at the time by transgressing, in the mid 1840s, into what was Great Western Railway territory.  It bought the Birmingham & Bristol Railway and as a result gained access to Gloucester. Neil Parkhouse had thought to cover the Midland line and its associated branch lines in Gloucestershire in one volume but the material has ultimately provided three really engaging volumes of colour photography. This first volume focuses on the routes on the north side of Gloucester. The subsequent volumes look at the Midland lines on the South side of the city.

Volume 4A: Gloucester Midland Lines Part 2: South – I have just finished reading this volume. It covers the Midland Mainline between Gloucester Eastgate Station and Stonehouse. Its illustrations come from the period between 1959 and 1975. It also looks at a number of other lines as well.

My brother-in-law lives in Nailsworth, and it has been good to see images of the station in the 1950s/60s. For a time he lived in a flat in the Railway Hotel which can be seen in at least one of the photographs which Neil Parkhouse has drawn together. I was, however most interested in the three ancillary lines in Gloucester itself that Neil Parkhouse explores: the Tuffley Loop; the High Orchard Branch serving the docks; and the Hempsted or New Docks Branch. [4]. I want to explore these areas more, when times and opportunity permits.

These books do that to you. They draw you in, not only in your imagination but in a way that begs you to explore not only the past but the present as well.

Volume 4B: Gloucester Midland Lines Part 3: South – This is the one book in the series that has been published so far that I have yet to purchase. I am looking forward to getting it in the near future. Lightmoor Press say of this book that, “The pictures range from circa 1959 to 1975, illustrating the end of the steam age, the dawn of the diesel age and the start of the BR blue years in colour, whilst also showing the huge amount of railway infrastructure that has now gone, much of it within this period.” [5] If it is anywhere near as good as the earlier volumes, it will be an absolute delight.

The personal reviews of this series posted on Amazon, are very positive, almost every review posted is a 5* review! ………………..

“Yet more wonderful photographs bringing the age of steam back to life. Every time I look at [this book] something new appears in a photograph – truly evocative.” [2]

“Packed throughout with excellent, unseen before (especially in colour) photographs.” [2]

“Excellent, wonderful photography, congratulations to all that contributed to this book, it evoked precious memories of the happiest childhood, I could smell the engines again and see the excited faces of lads around the stations or sheds, after school or on weekends.” [2]

“A lot of the photographs in the book put the train in the landscape, giving you a great sense of the railway within the Forest. However it’s the captions that go with the photographs that for me make the book, they are incredibly detailed and do much to enhance the book.” [3]

“Absolutely brilliant book full of high quality colour photographs I own many books on British Railways but none as good as this one. This book is a comprehensive [g]em on the Forest Of Dean Lines, cannot get over the high quality photographs from times long past 100% recommend.” [3]

“An excellent book.” [6]

If you want to sample the contents before purchase, then the Lightmoor Press website provides a few photographs from each volume in the series.

References

  1. http://lightmoor.co.uk/category.php?section=CatBRColour, accessed on 17th April 2020.
  2. Amazon: https://www.amazon.co.uk/Gloucester-Midland-Lines-Part-British/dp/1911038184/ref=sr_1_4?dchild=1&qid=1587155094&refinements=p_27%3ANeil+Parkhouse&s=books&sr=1-4#customerReviews, accessed on 17th April 2020.
  3. https://www.amazon.co.uk/Forest-Dean-Lines-Severn-Bridge/dp/1899889981/ref=sr_1_3?dchild=1&qid=1587155094&refinements=p_27%3ANeil+Parkhouse&s=books&sr=1-3#customerReviews, accessed on 17th April 2020.
  4. http://lightmoor.co.uk/books/gloucester-midland-lines-part-2-south/L8665, accessed on 18th April 2020
  5. http://lightmoor.co.uk/books/gloucester-midland-lines-part-3-south/L8672, accessed on 17th April 2020.
  6. https://www.amazon.co.uk/Gloucester-Midland-Lines-Part-Westerleigh/dp/1911038672/ref=sr_1_1?dchild=1&qid=1587155094&refinements=p_27%3ANeil+Parkhouse&s=books&sr=1-1#customerReviews, accessed on 17th April 2020.