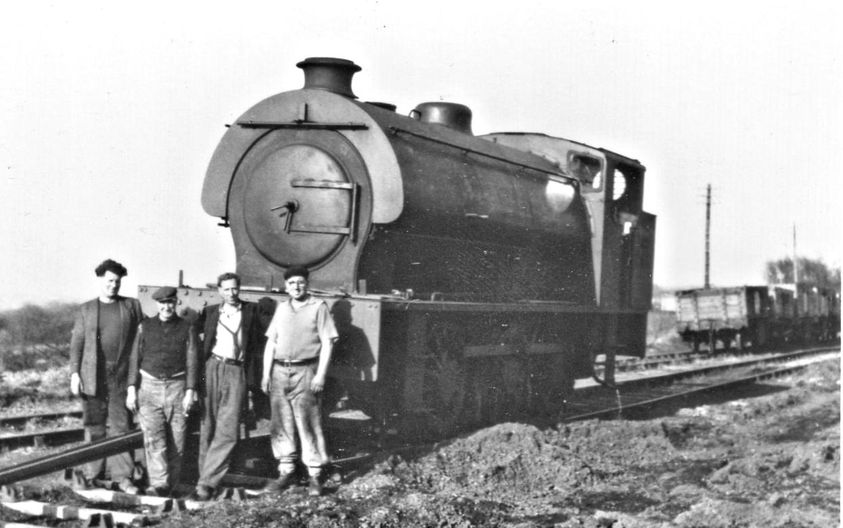
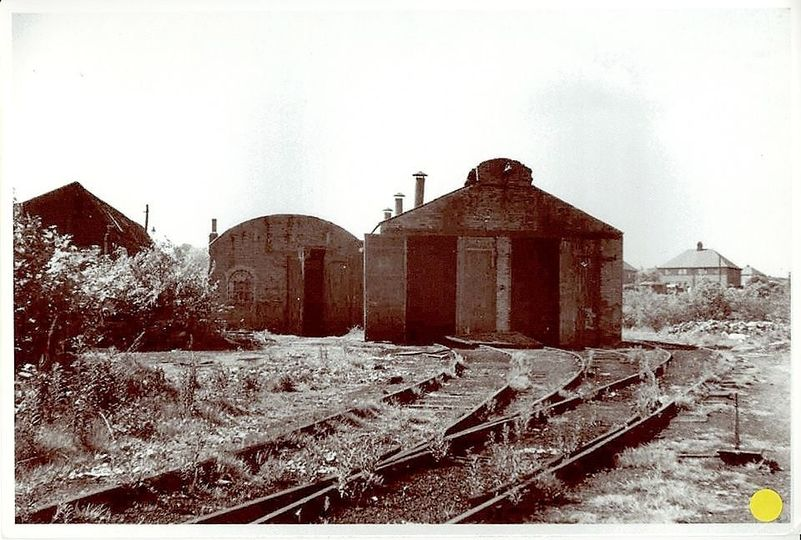
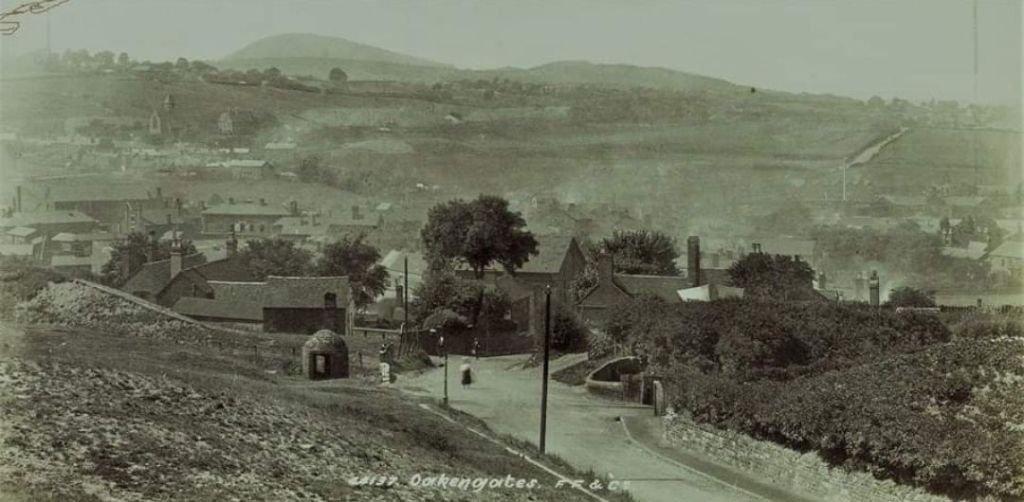
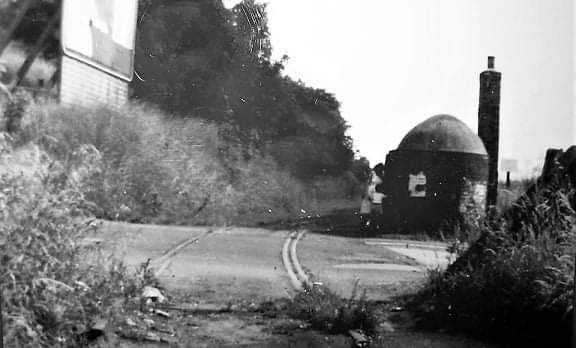
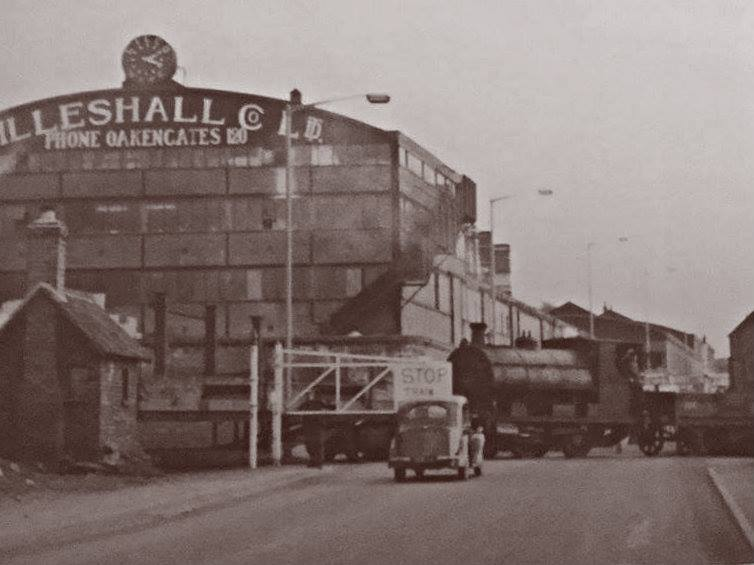
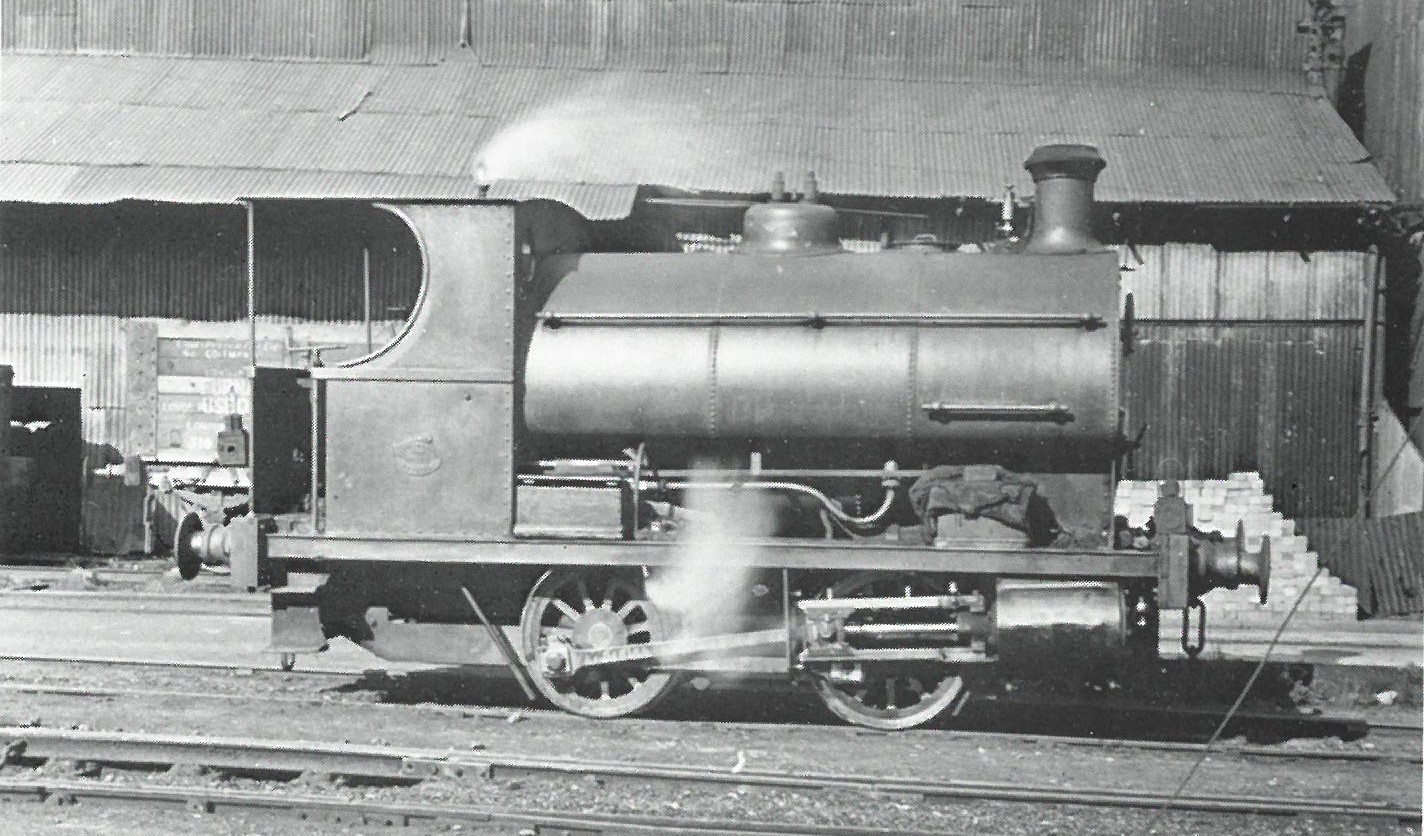
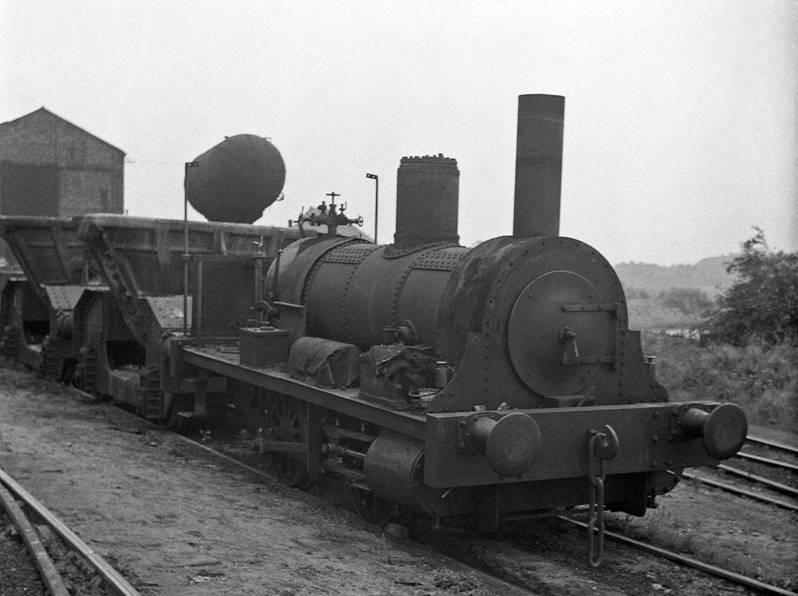
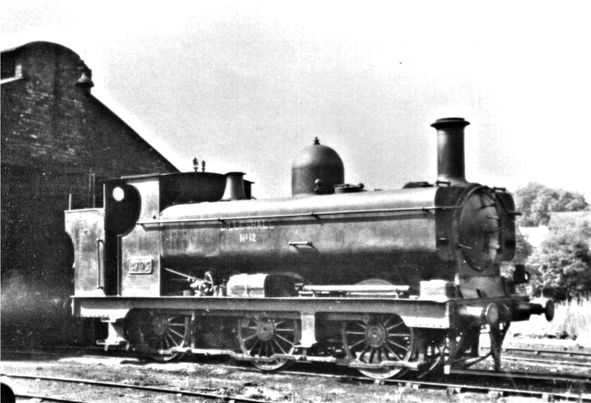
The featured image was taken in June 1954 within the Priorslee steelworks complex and shows one of the 3 blast furnaces in the background. The locomotive is Lilleshall Company No. 12 (ex-GWR 0-6-0PT No. 2794), © F.W. Shuttleworth. This image was shared on the Telford Memories Facebook Group by Marcus Keane on 15th September 2015. The blast furnace did not supply the adjacent rolling mill after 1925. At that time the Bessimer converters were scrapped. The Priorslee Furnaces only made made pig iron for the foundry trade until closure. The Lilleshall Company were forced to cease steel-making from the blast furnace pig-iron by the Iron and Steel Federation who shared out production around the country in the slump following the first world war. [61]
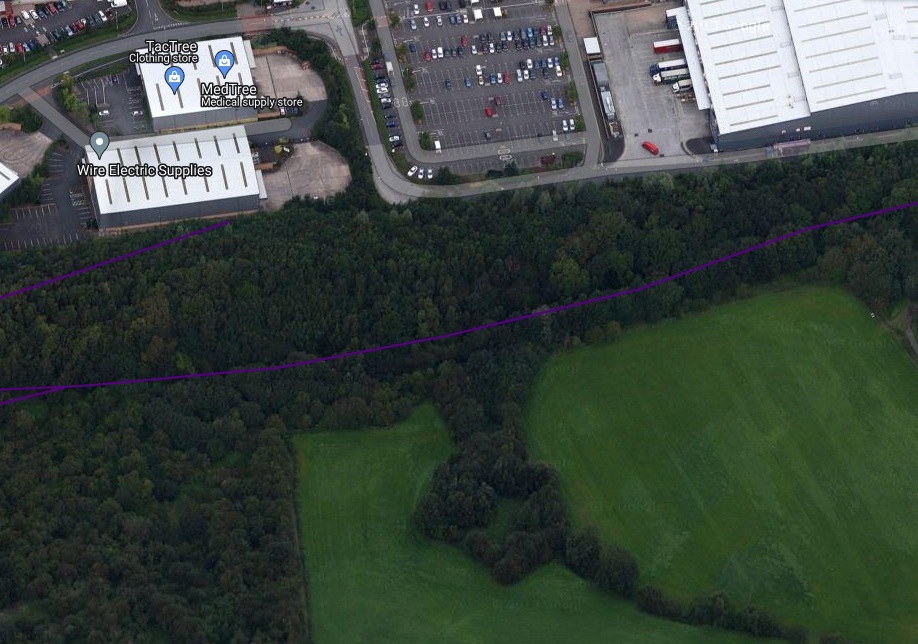
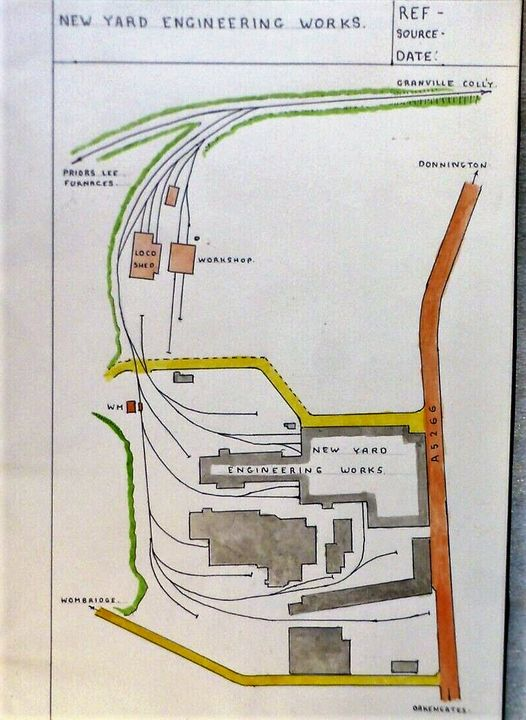
The dotted lines on this sketch map are private railways. The Lilleshall Company’s main line runs from Granville and Grange Collieries in the top-right of the sketch map via Old Lodge Ironworks and Priorslee Furnaces down to Hollinswood. This sketch map was included on the Miner’s Walk website which provides information about the local area. [4] The monochrome photographs included in this article were taken by a number of different photographers. Where possible permission has been sought to include those photographs in this article. Particularly, there are a significant number of photographs taken by A.J.B. Dodd which appear here which were first found on various Facebook Groups. A number were supplied direct by Mike Dodd, A.J.B. Dodd’s son, who curates the photographs taken by his father. Particular thanks are expressed to Mike Dodd for entering into email correspondence about all of these photographs and for his generous permission to use them in this article. [72]
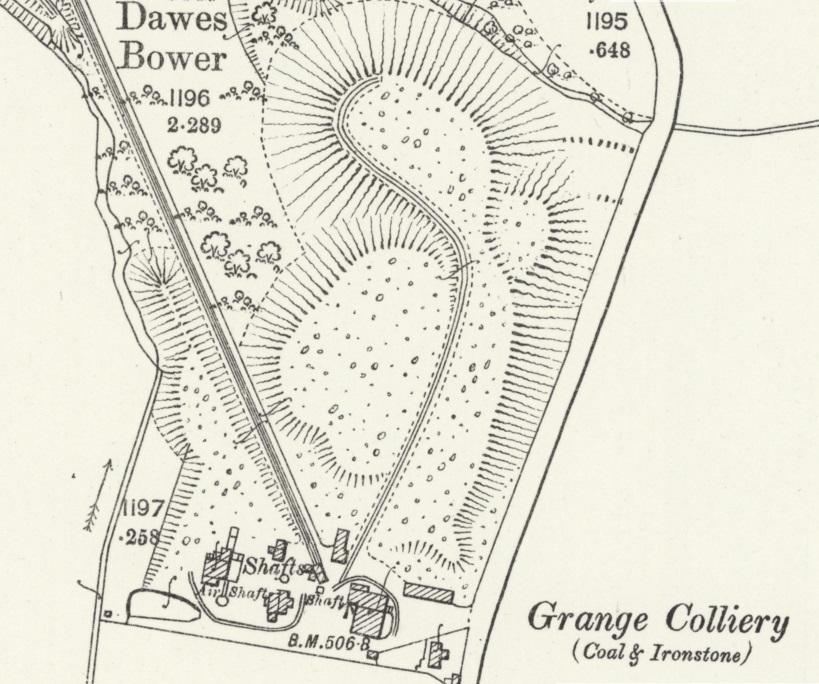
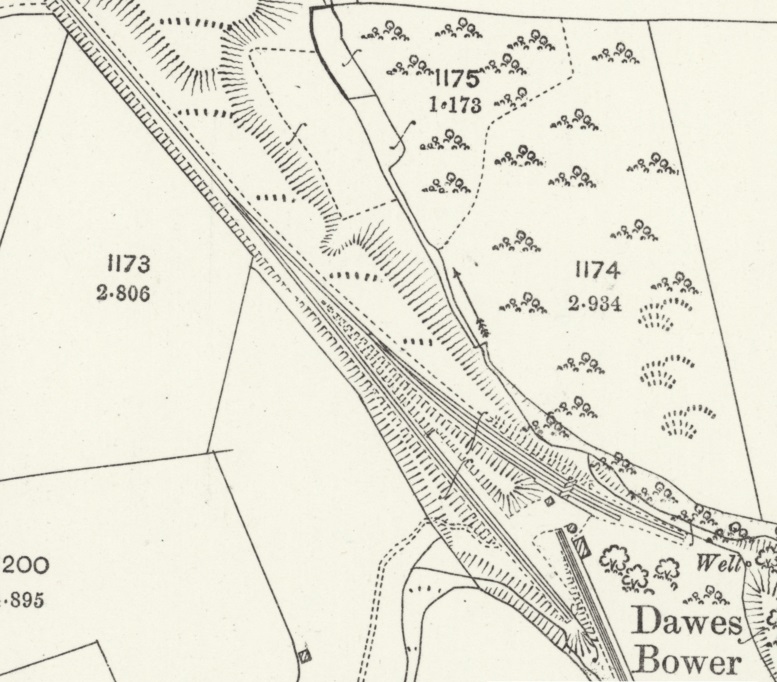
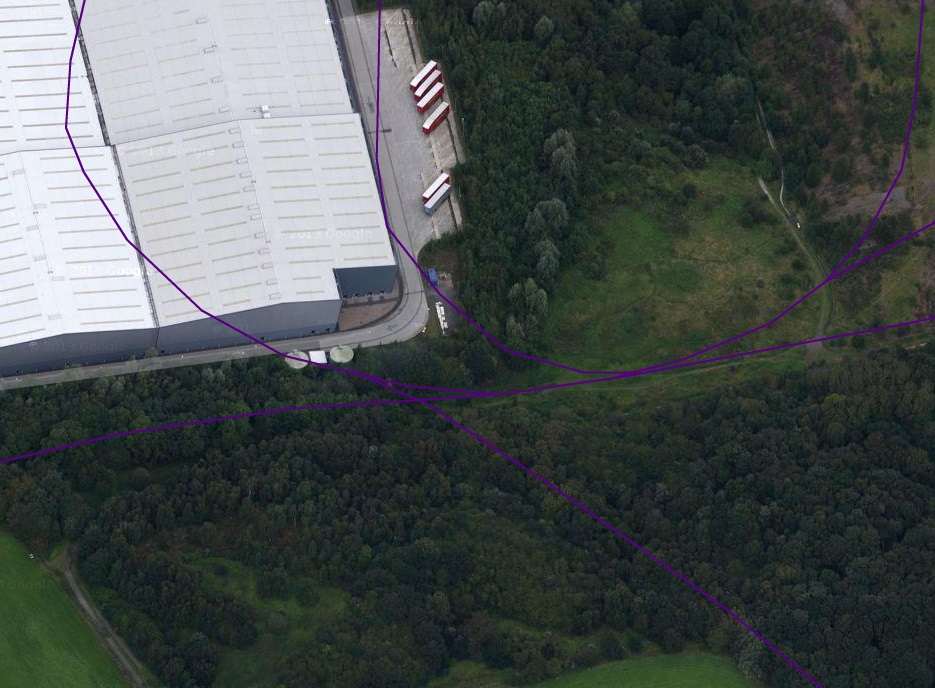
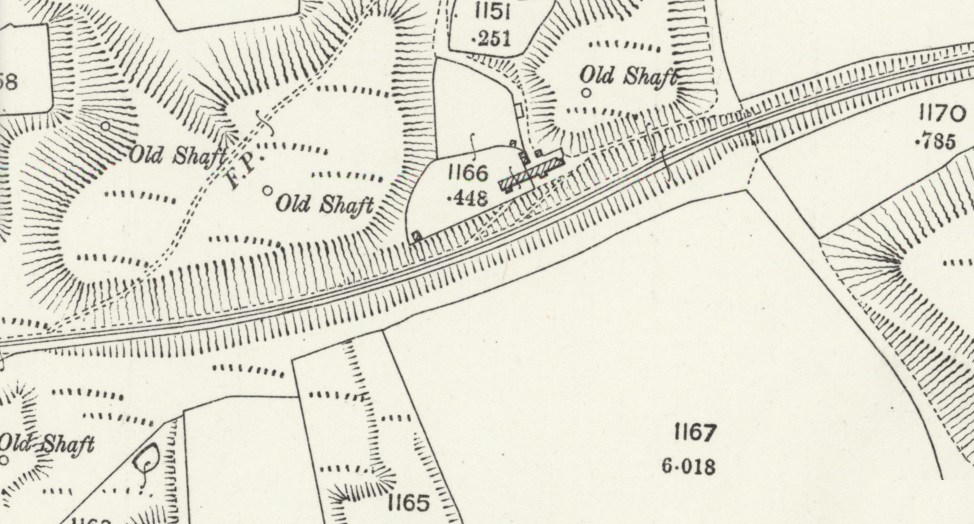
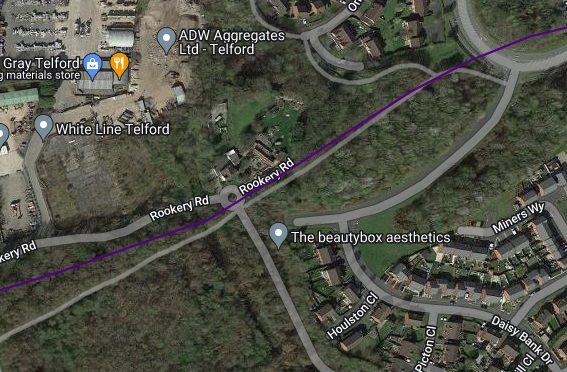
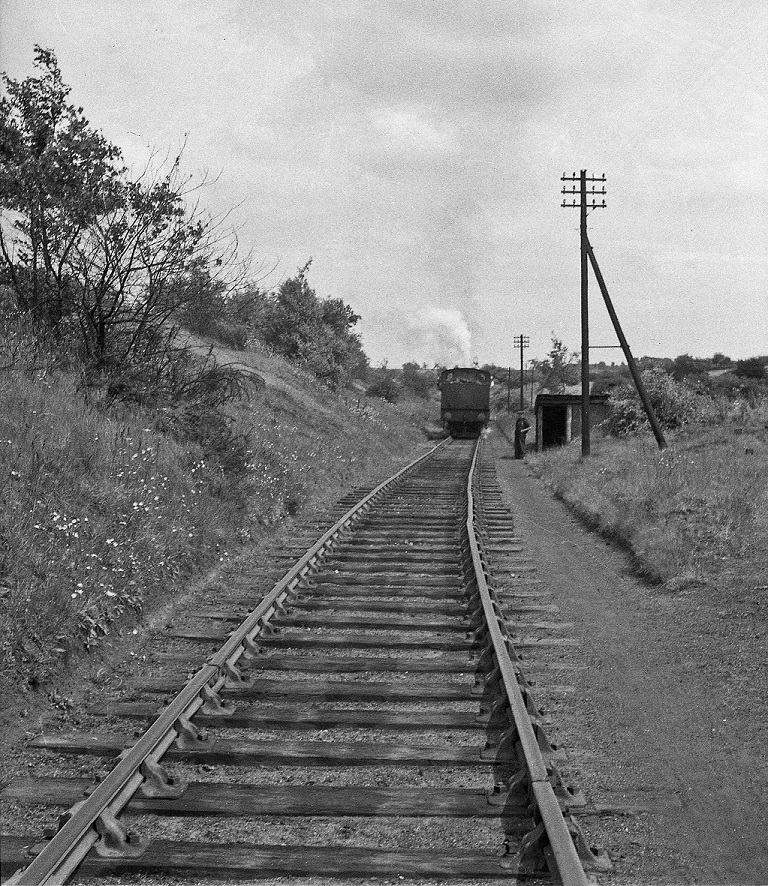
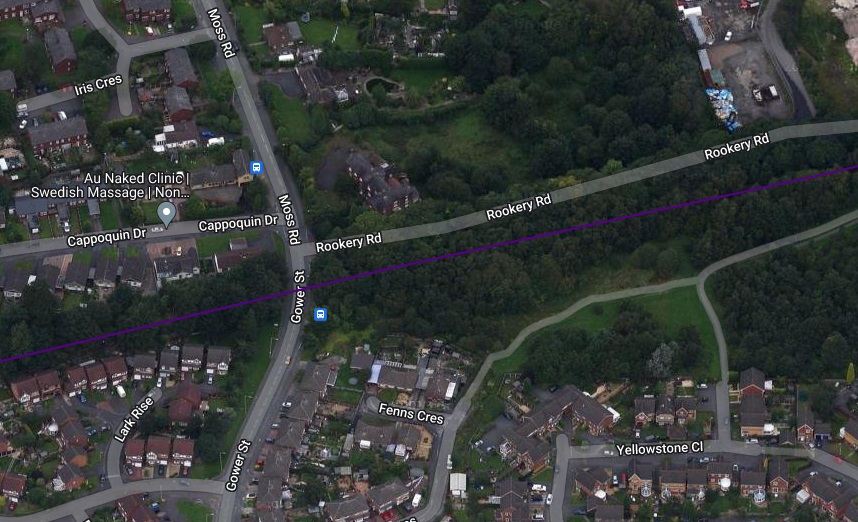
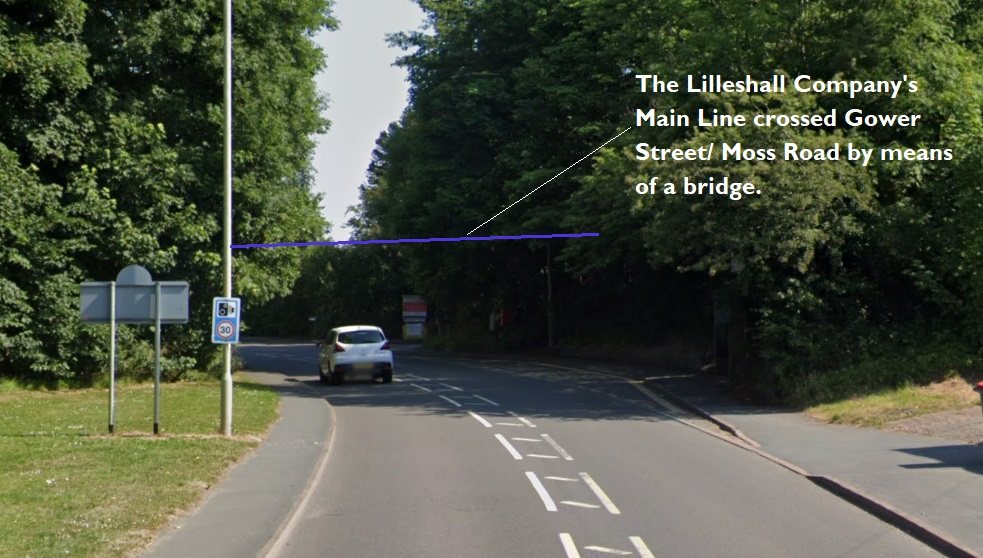
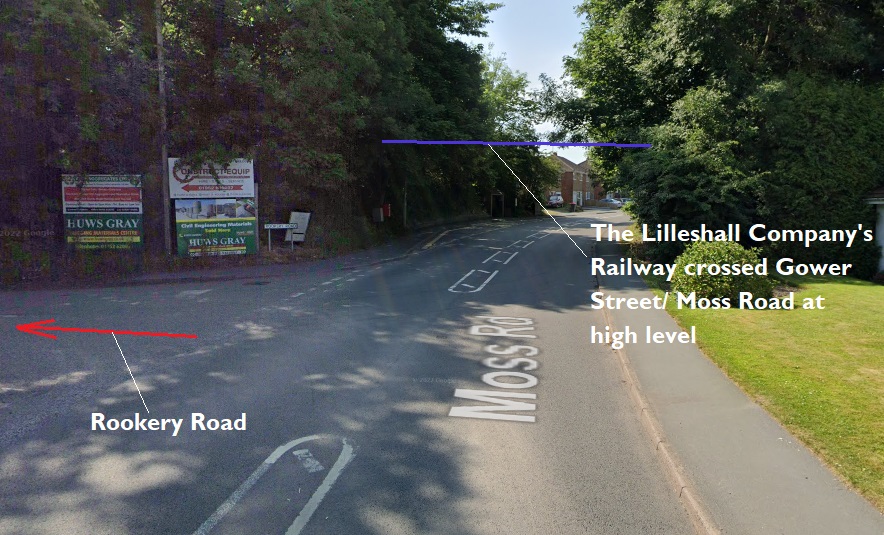
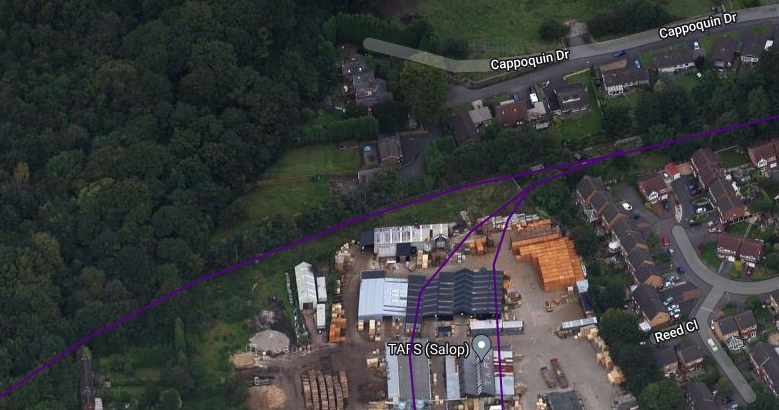
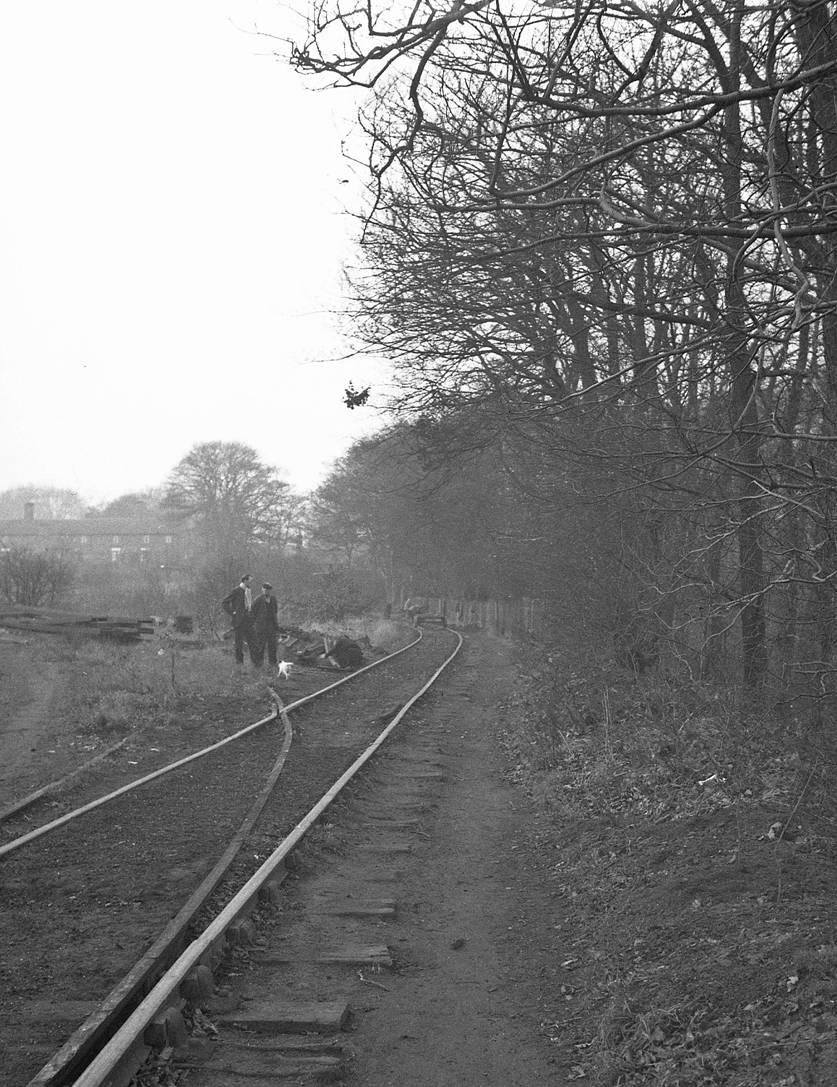
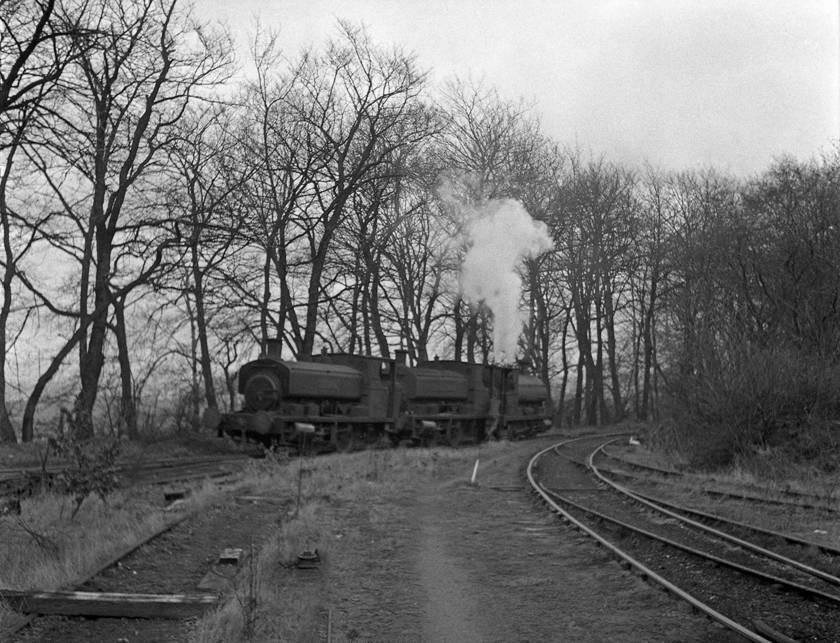
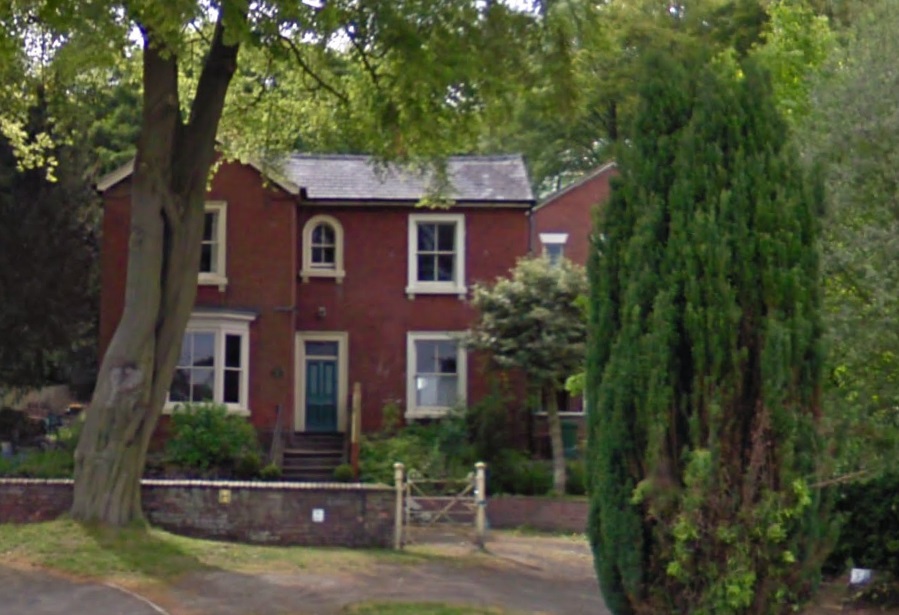
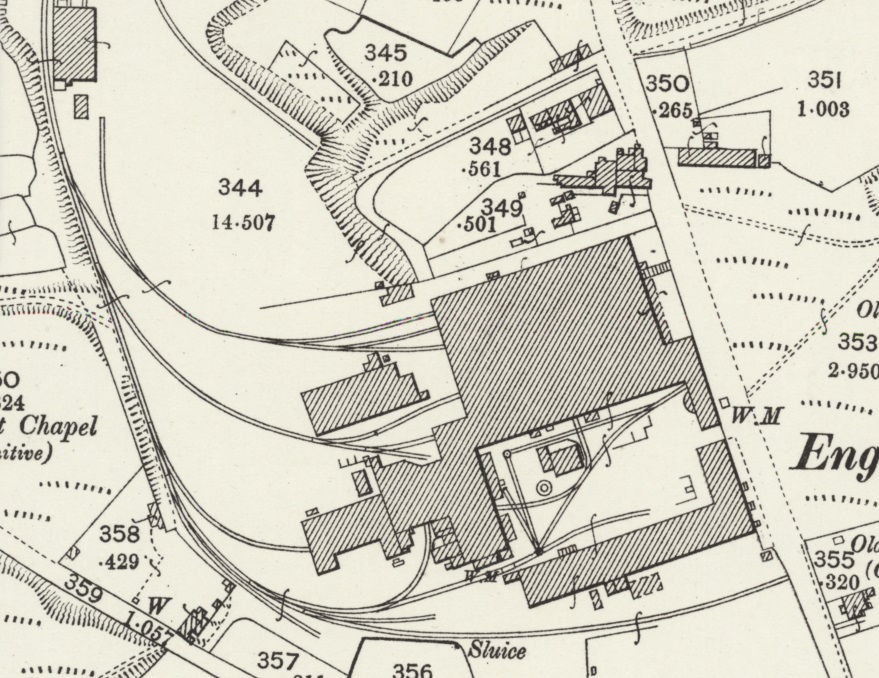
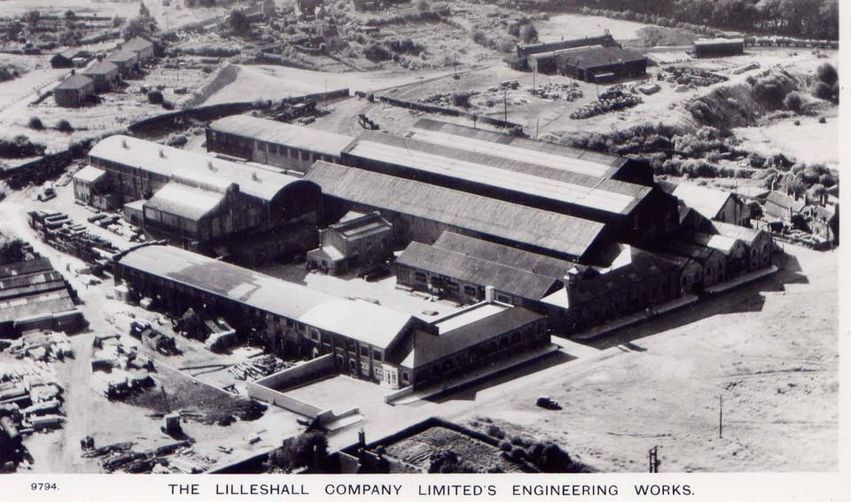
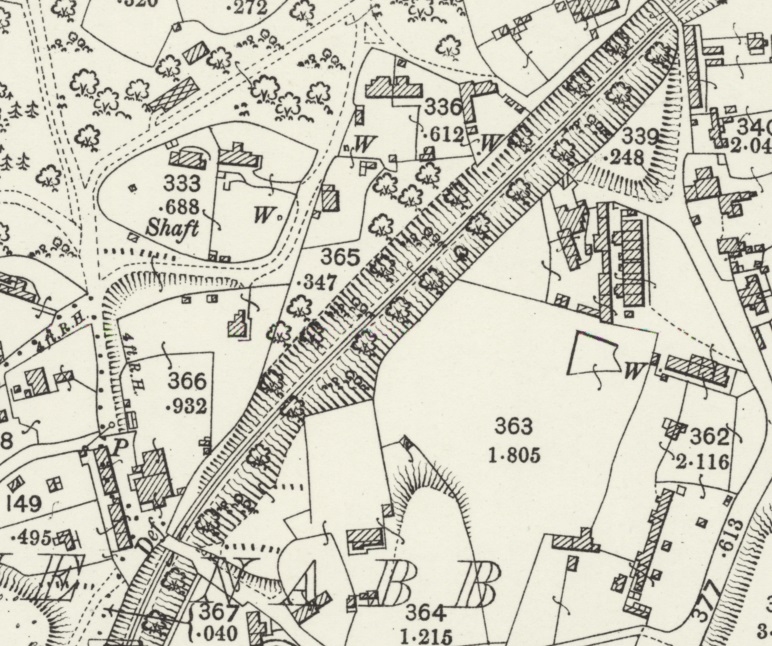
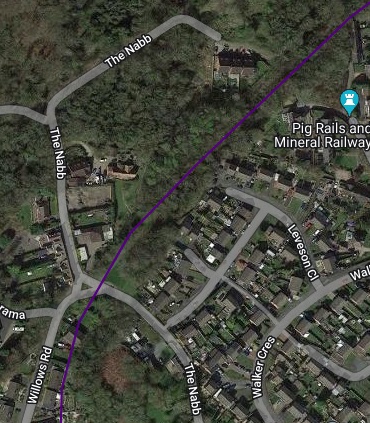
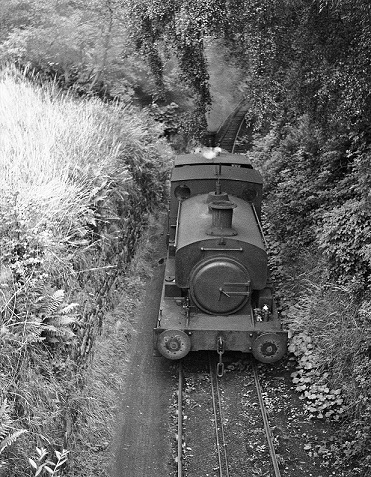
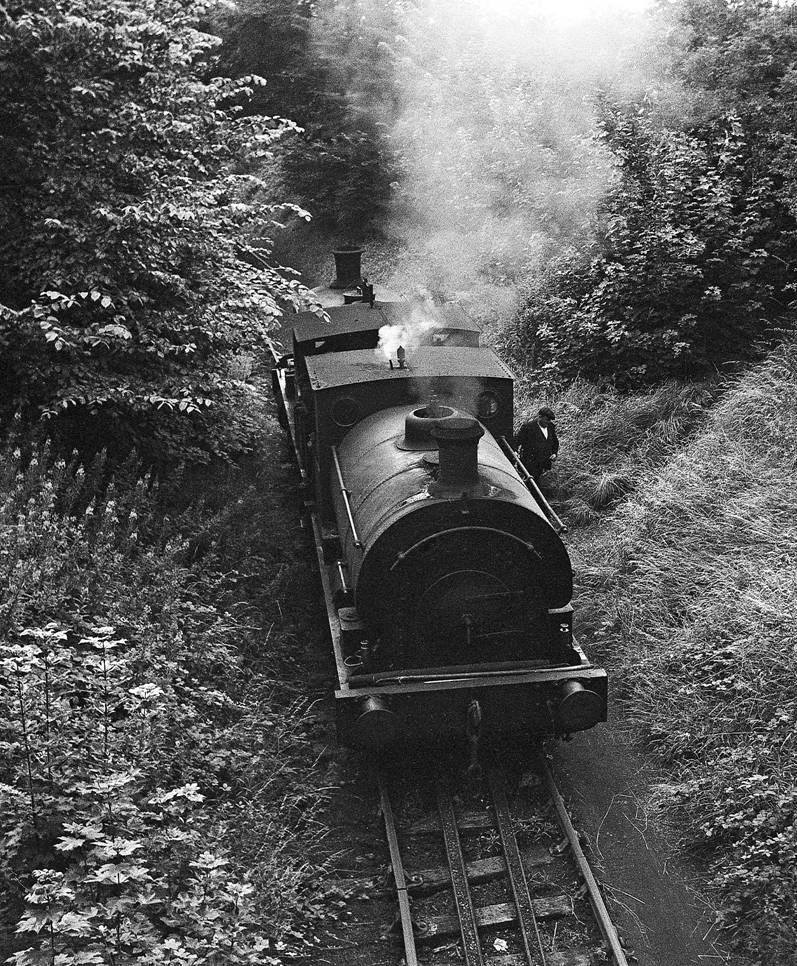
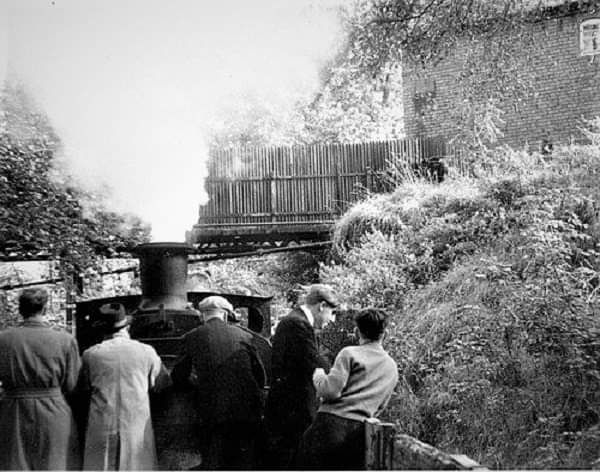
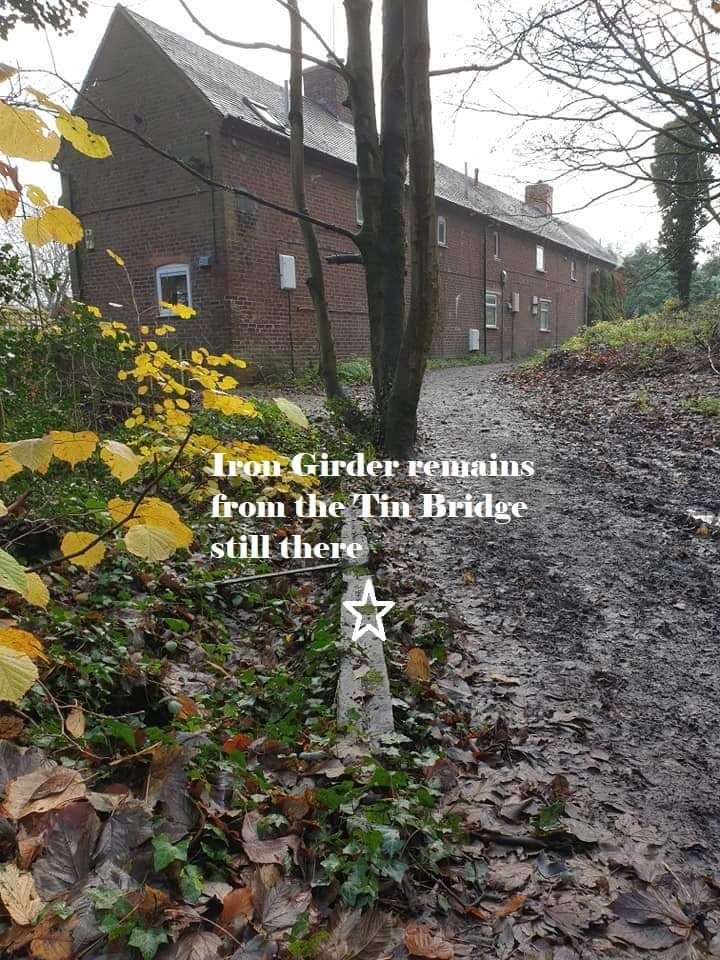
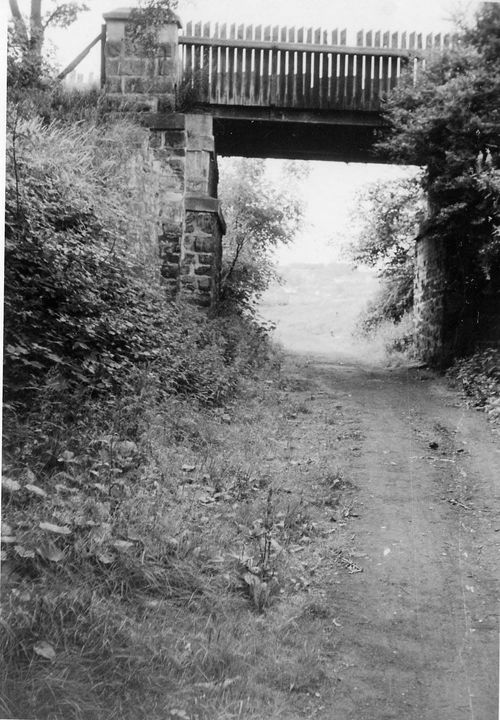
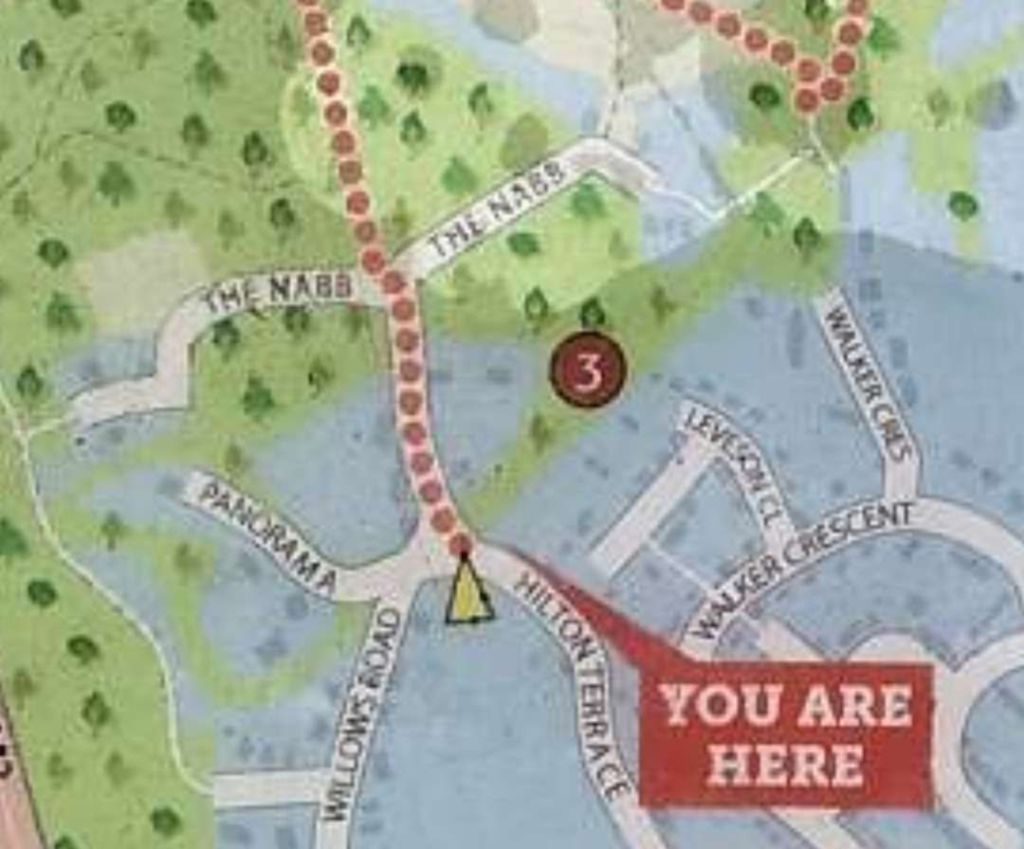
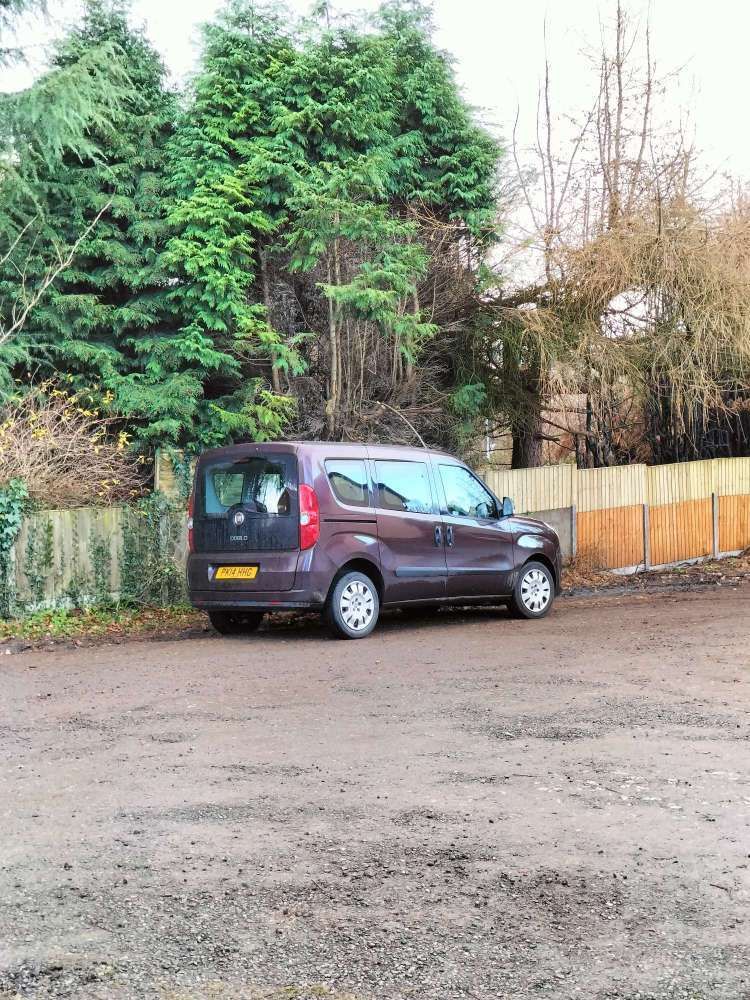
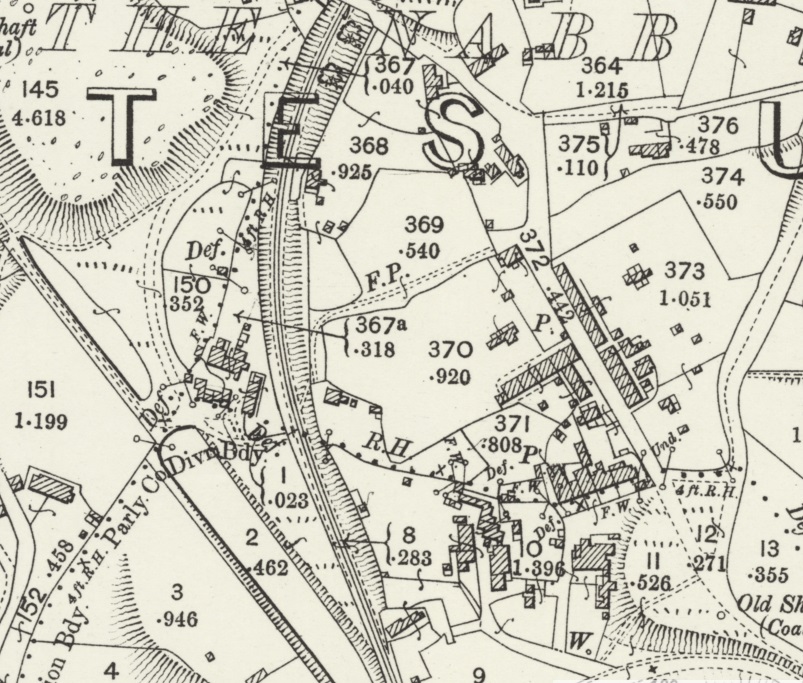
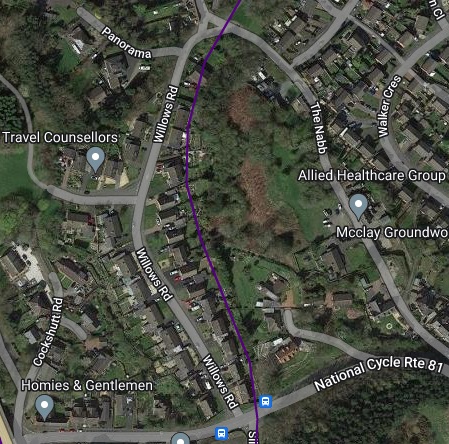
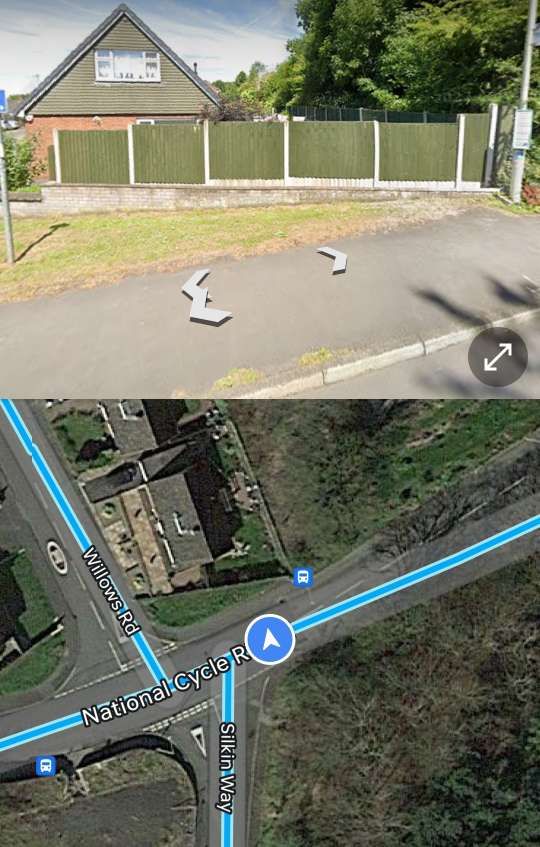
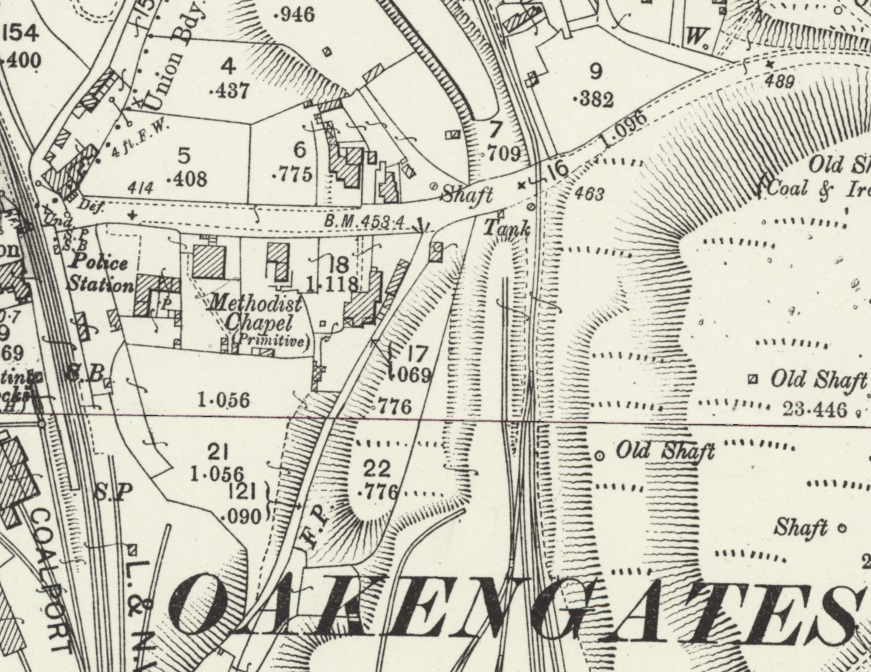
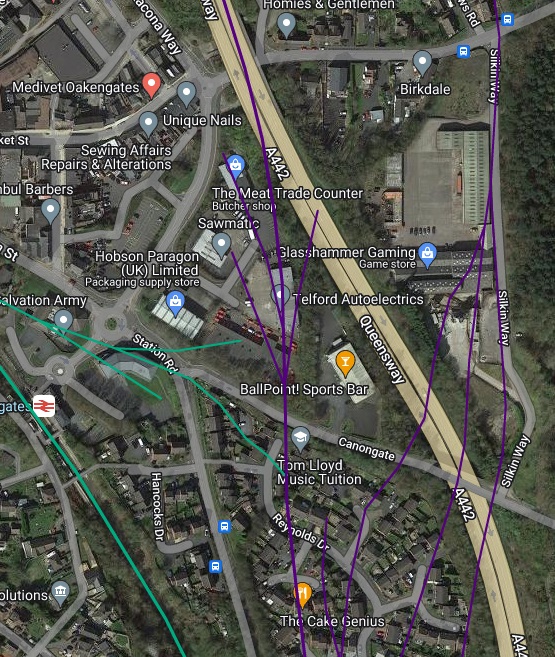
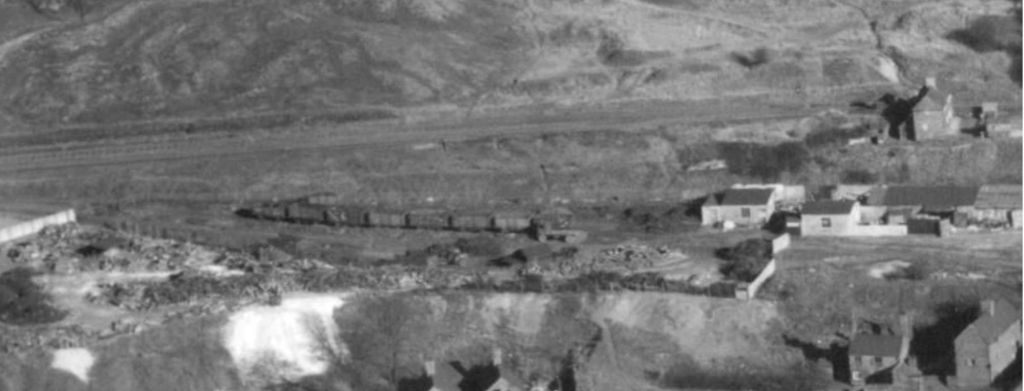
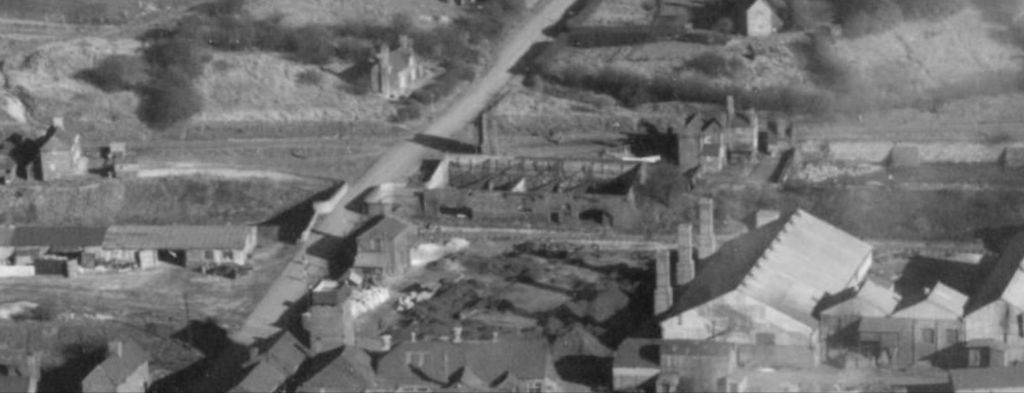
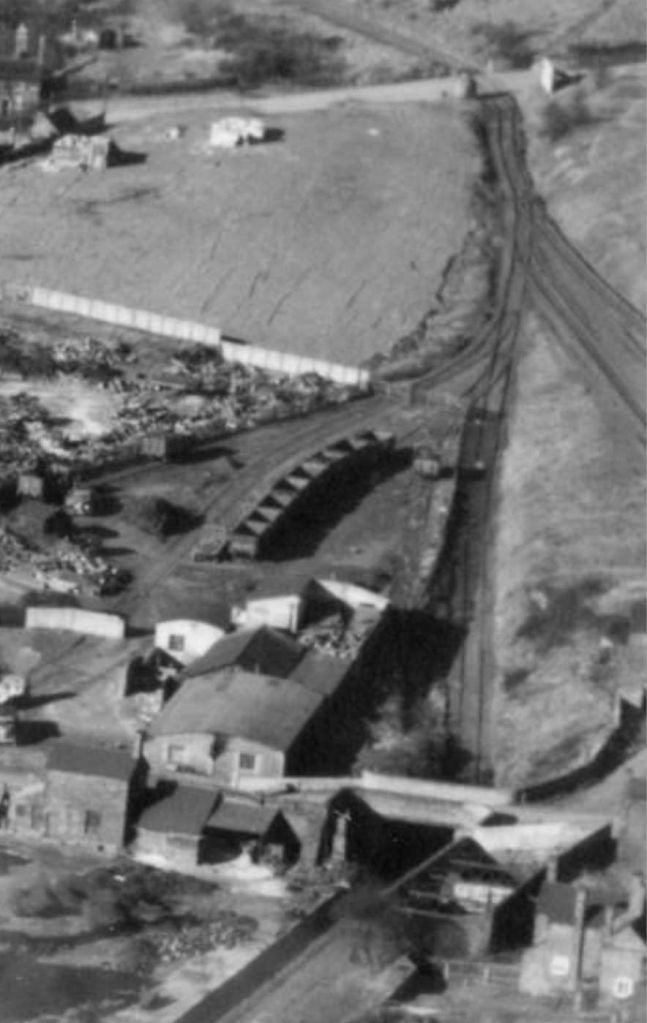
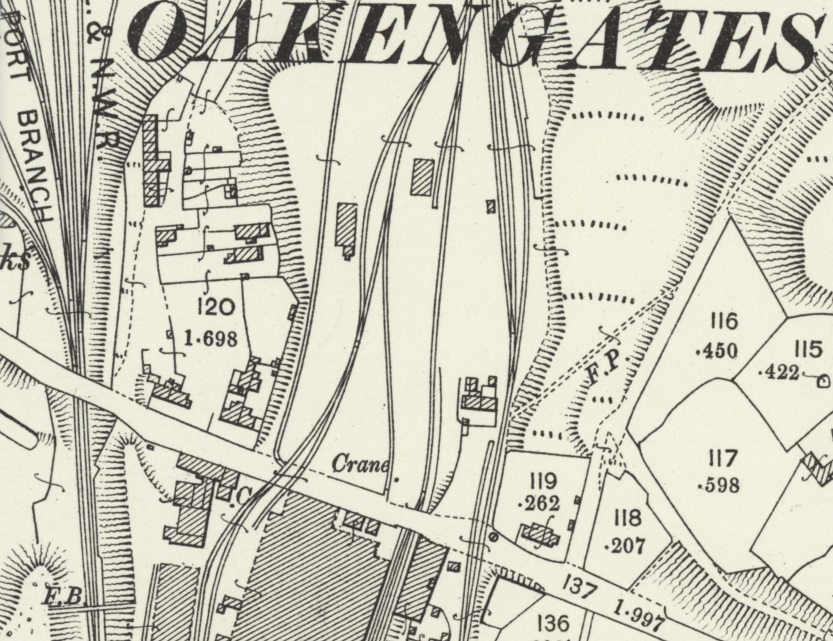
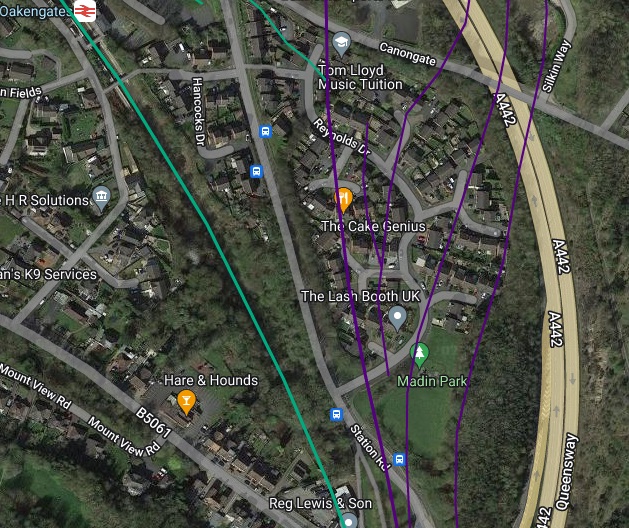
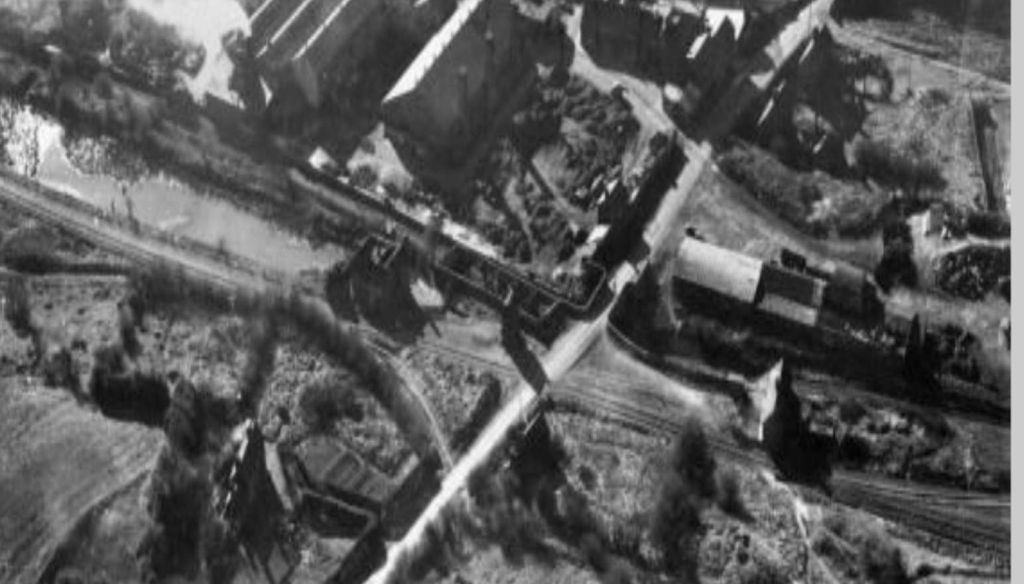
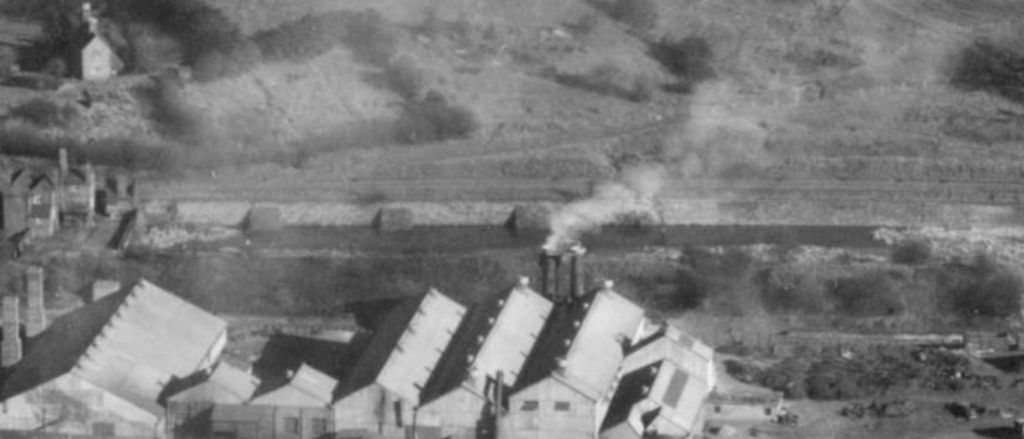
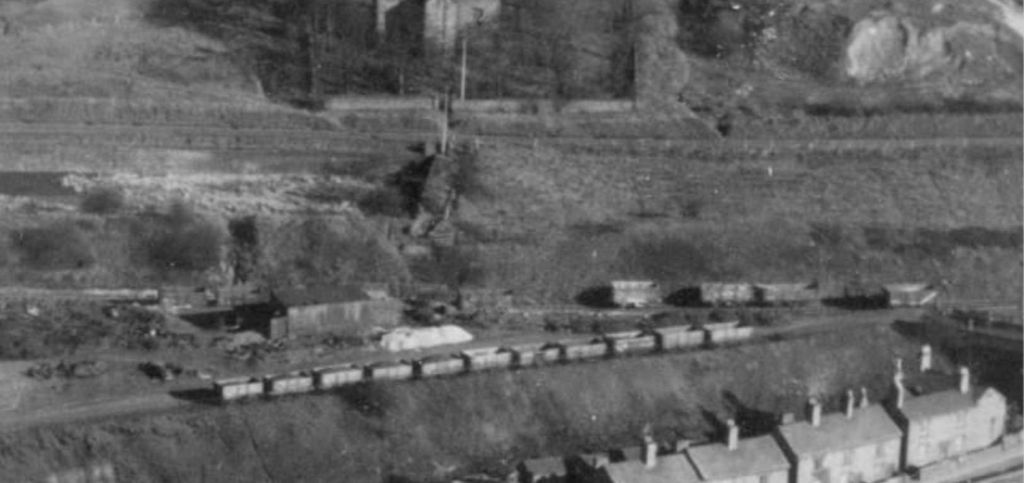
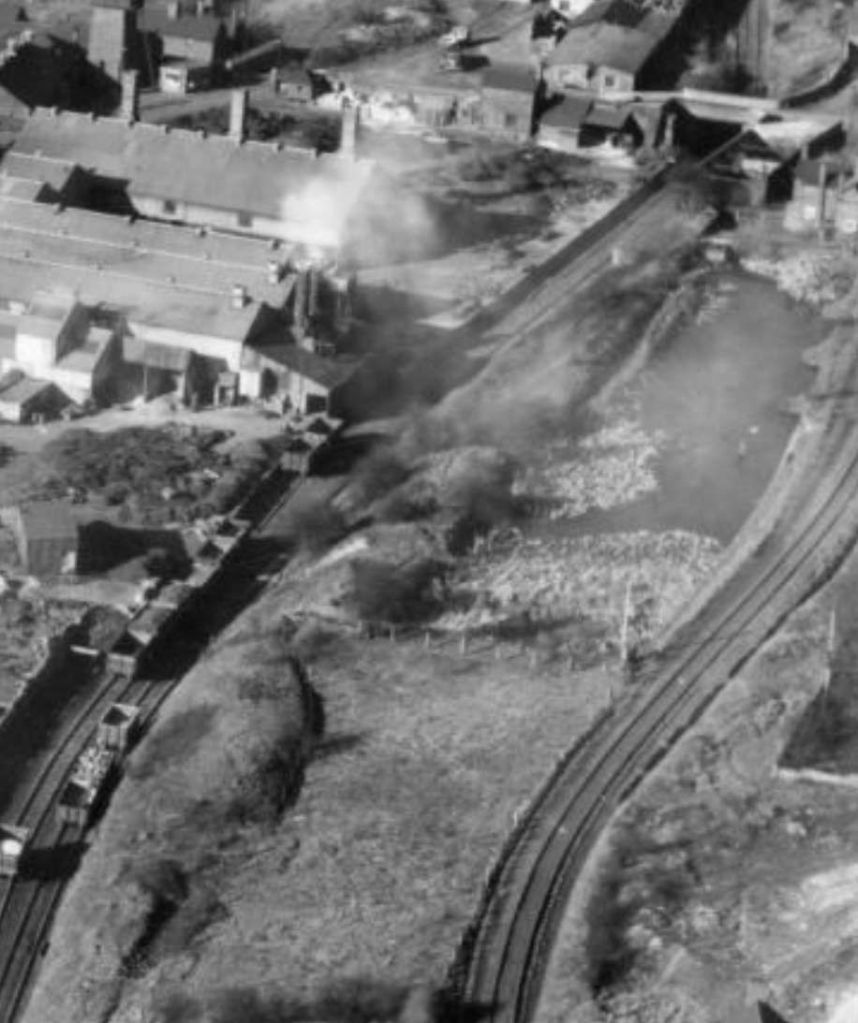
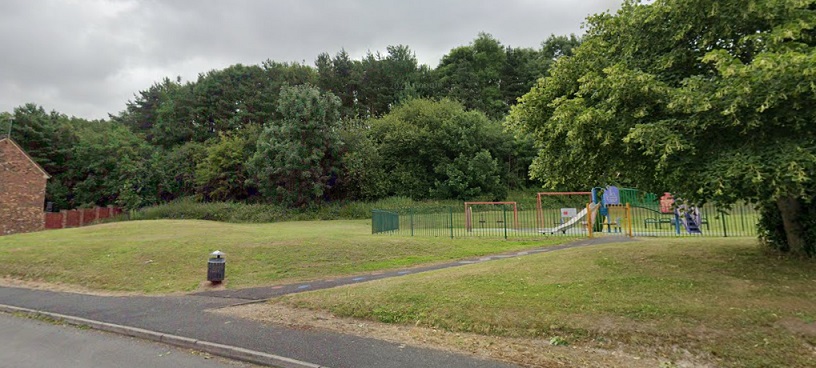
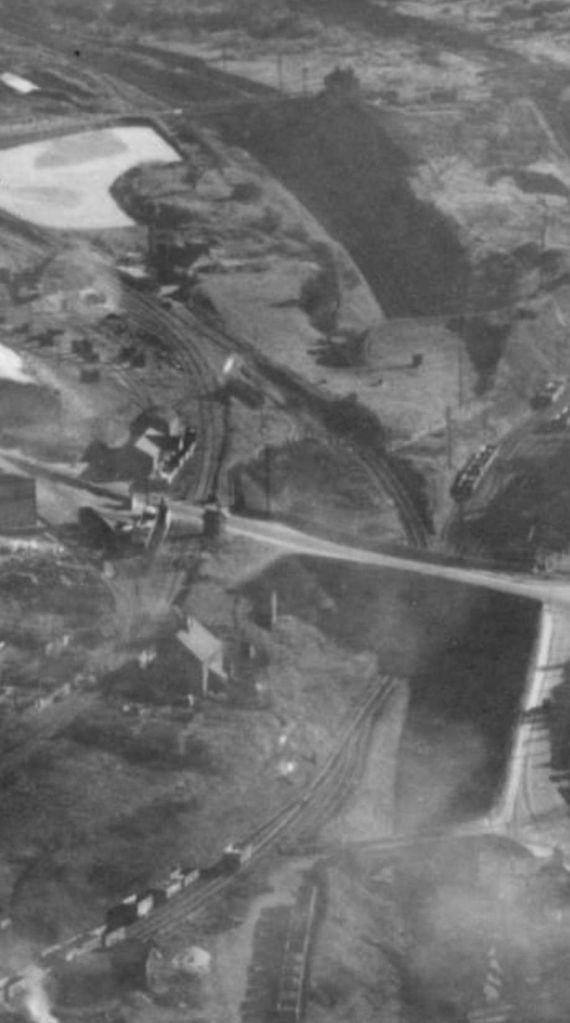
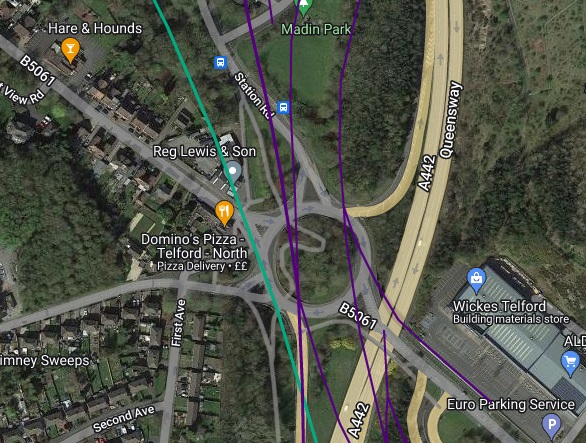
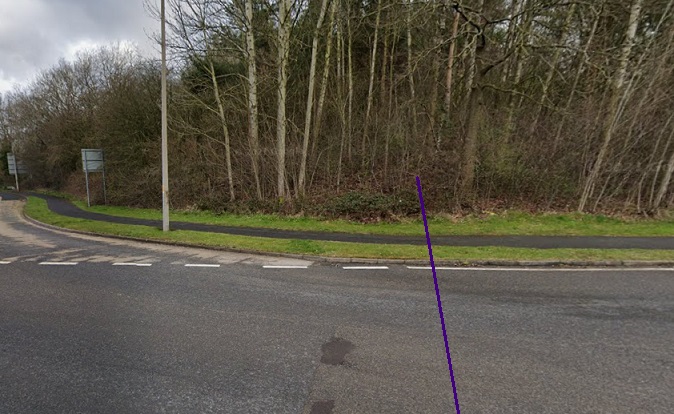
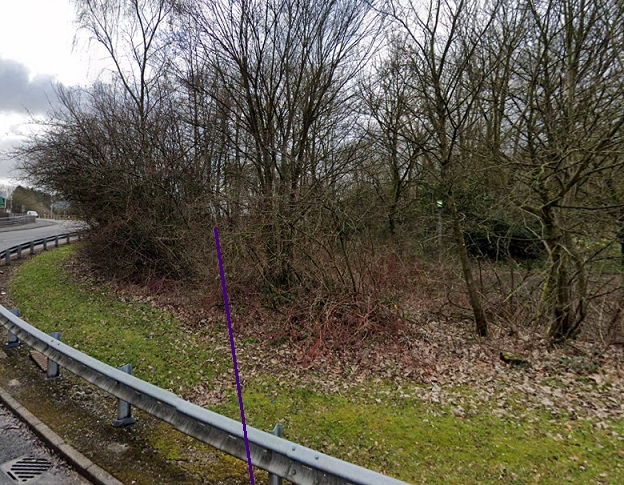
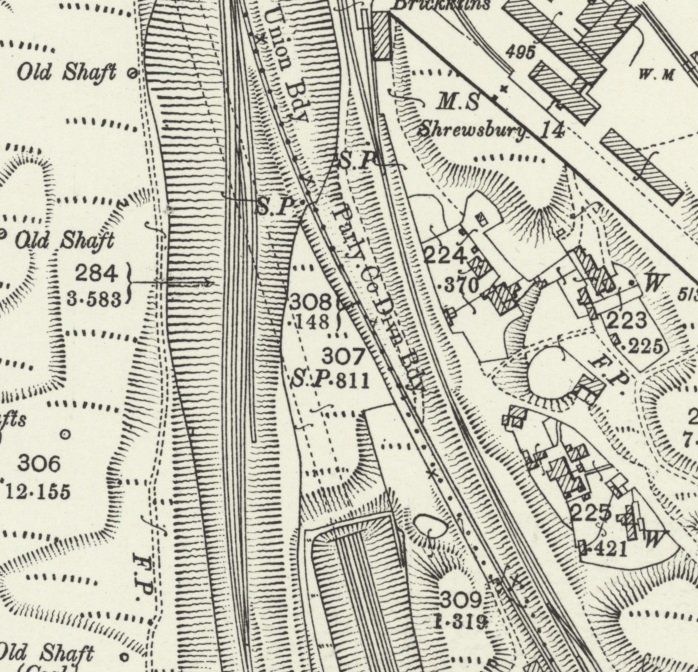
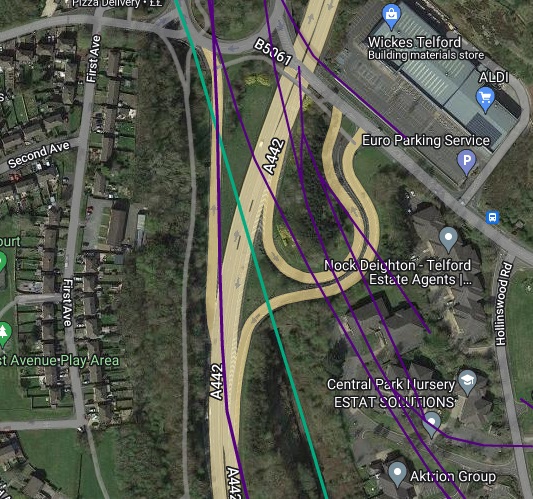
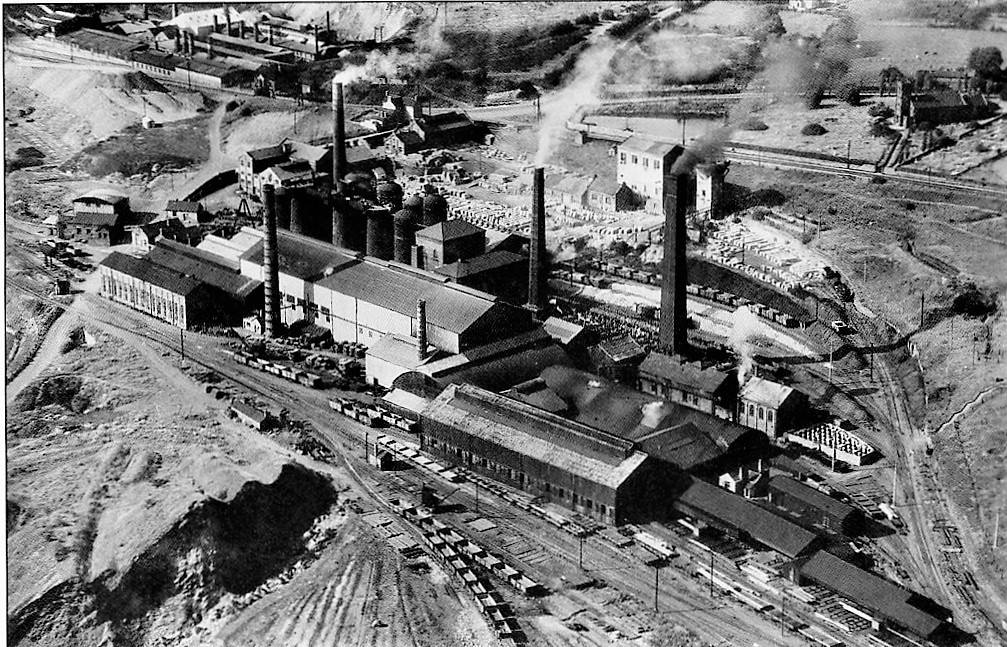
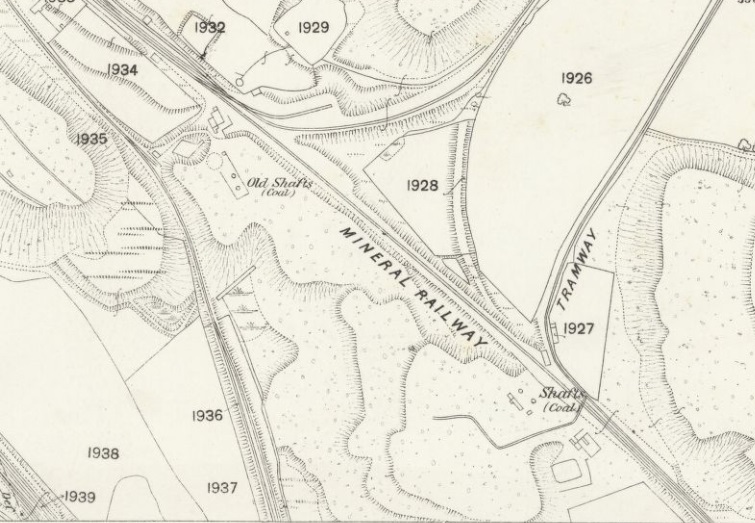
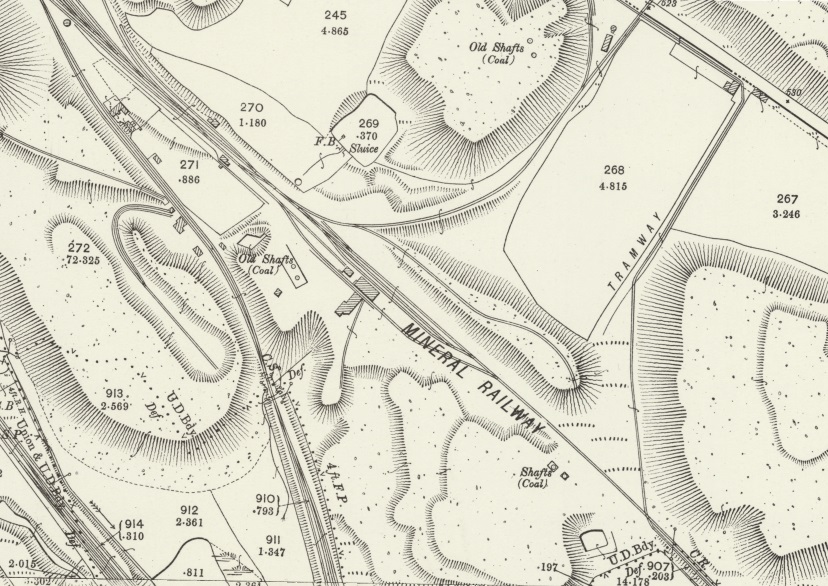
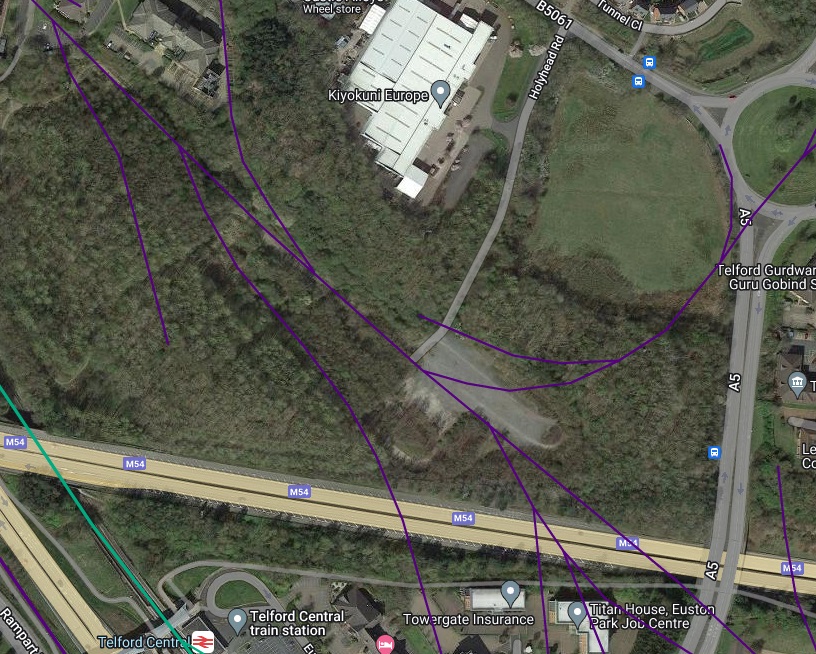
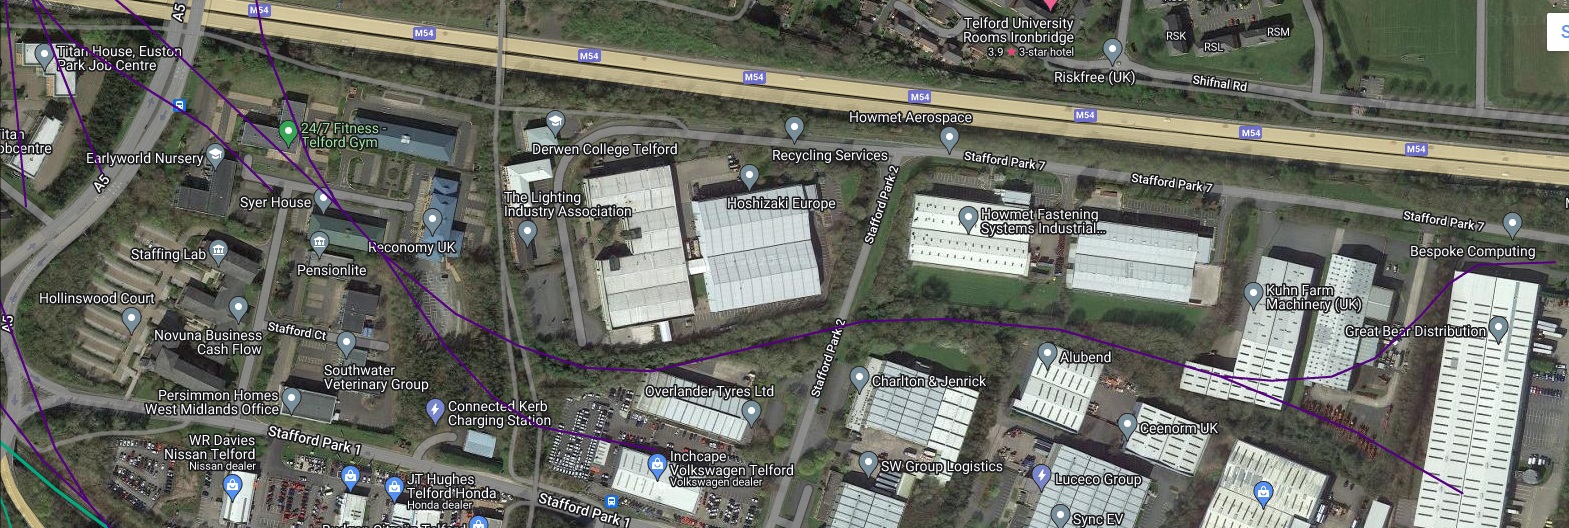
Grange Colliery as it appears on the 25″ Ordnance Survey of 1901, published in 1902. The railway lines shown in the immediate area of the shafts and slag heaps were internal lines unconnected to the wider Lilleshall Company network. [5] The same area as shown on the OS map extract above. This image comes from the RailMapOnline.com website. What appears to be a caravan park on the site of the old colliery is Telford Naturist Club. The buildings to the top-right of the image are the Cottage Boarding Kennels and Cattery. [25] This next extract from the 25″ Ordnance Survey of 1901 shows what appear to be the screens, or at least a loading point where output from Grange Colliery was loaded into Lilleshall Company wagons. The disconnect between the main network and the local lines can be seen at Dawes Bower. [6] The same area as shown on the OS map extract above, in the 21st century. This image comes from the RailMapOnline.com website. [25] This extract from the 25″ Ordnance Survey of 1901 shows the point where the branch-line to Grange Colliery met the main Lilleshall line. The line from Grange Colliery enters bottom-right. At the top-right of this extract two sets of lines are shown. The upper lines run towards Donnington sidings, the lower lines connect to Granville Colliery. The lines leaving the top of the extract are local lines serving the area immediately around what were Old Lodge Furnaces. The line leaving the west (left) edge of the extract is the Lilleshall Company mainline to Priorslee and Hollinswood. As can be seen at the centre of the extract, a loco brining wagons from Grange Colliery would need to cross the mainline before reversing its wagons onto the mainline and, depending on its destination, then head for Donnington or Hollinswood. The sidings shown on this extract were also used for storing wagons before onward transit to their ultimate destination. [7] Again, a similar area to that shown on the OS map extract above. The purple lines are those provided by RailMapOnline.com. The Lilleshall Company Mainline curves from the top-right of this image to exit below the mid-point on the left side. [25] The 25″ Ordnance Survey of 1901, published in 1902 shows the Lilleshall Main Line heading West towards Donnington Wood Brickworks junction. [8] A 21st century satellite image with the mineral railway superimposed shows the Lilleshall Company’s main line running in a West-Southwest direction towards the next junction. [25] A triangular junction provided bi-directional access to Donnington Wood Brick & Tile Works [9] Again, a very similar area to that covered by the 25″ OS Map above. One arm of the triangular junction service Donnington Wood Brickworks can be seen on this image as providing the access route for vehicles to the old brickworks site. Redhill Way is the A4640n and it warrants a grade separated junction with the local roads. [25] Looking East along the line of the old mineral railway. [Google Streetview, June 2022] Looking East from beneath the Redhill Road bridge in the 21st century. [Google Streetview, June 2022] Donnington Wood Brick & Tile Works were conveniently sited next to reserves of Clay. The Works had their own internal railway with a Self-acting Inclined Plane. [10] Donnington Wood Brick & Tile Works seen from the air, from the Northeast. This image was shared on the Telford Memories Facebook Group by Marcus Keane on 27th March 2019. [23] A much closer view of the circular Hoffman Kiln taken in 1966. This image was shared by Marcus Keane on the Telford Memories Facebook Group on 23rd September 2017. [24] The location of the Donnington Wood Brick and Tile Works plotted on modern satellite imagery from Google Maps. Properties on Cloisters Way sit directly over the site of the Hoffman Kiln. [Google Maps, December 2023] Track lifting at Rookery Road sidings, © A.J.B. Dodd. [1] This next extract from the 25″ Ordnance Survey shows the Lilleshall Mainline running South West from the junction which served the Donnington Wood Brick & Tile Works. [11] This RailMapOnline.com satellite image covers the same area as the map extract above, very little of the landscape and buildings remains. [25] The Lilleshall Company main line looking East from close to Rookery Road, © A.J.B. Dodd. [72] The view from the South in the 21st century. The old railway crossed the access road which ran South from Rookery Road. [Google Streetview, May 2009] This next extract from the 25″ Ordnance Survey shows the Lilleshall Mainline running South West towards the junction which served New Yard Engineering Works. [12] The same area as on the early 20th century map extract above. Moss Road, Gower Street and Rookery Road remain on this image, as does the group of buildings at the junction of these roads. However, the satellite images used by RailMapOnline.com are a little out-of-date. [25] A closer view of the location of the road junction mentioned above but on 2023 Google satellite imagery shows that the buildings close to the junction have been demolished. [Google Maps, 8th December 2023] Looking North along Gower Street in 2022. Rookery Road leaves Gower Street just beyond the location of the erstwhile railway bridge. The sign visible in this image sits just beyond the kerb line of Rookery Road. [Google Streetview, June 2022] Looking South along Moss Road. [Google Streetview, June 2022] Moss Road/Gower Street Railway Bridge before demolition. This is a photo of a photo which was behind glass, hence the glare. It was shared by Gwyn Thunderwing Hartley on the Oakengates History Group including surrounding areas Facebook Group on 17th July 2018. [27] I believe that this is a view looking East along the Lilleshall Company main line from a point close to the Moss Road/Gower Street Railway Bridge, © A.J.B. Dodd. [72] This is a view, probably looking West along the old railway from close to the bridge over Moss Road/Gower Street. The image was shared on the Oakengates History Group Facebook Group on 29th March 2018 by John Wood, © A.J.B. Dodd. [71] The junction for New Yard Engineering Works was adjacent to Wrockwardine Villa. The engine shed is visible bottom-centre of the extract. One of two bridges which crossed the Lilleshall Company’s Railway appears towards the bottom-left of the image. I believe that this was the ‘Tin Bridge’. [13] A very similar area to that covered on the map extract above. The image comes, again, from RailMapOnline.com’s satellite imagery. Wrockwardine Villa is centre-top in this image. [25] This is a view, probably looking West along the old railway from the junction with the short line to New Yard and its Engine Shed and Workshop. The image was shared on the Oakengates History Group Facebook Group on 29th March 2018 by John Wood, © A.J.B. Dodd. [71] This view looks Northeast from the line to New Yard at the junction with the Lilleshall Company’s main line. The Locomotives are Andrew Barclay 0-6-0T Lilleshall Company’s Locomotive No. 11 (i think) on the left, one of the Taff Vale Railway 0-6-2Ts in the middle and Lilleshall Company’s Locomotive No. 12 (ex-GWR 0-6-0PT No. 2794) on the right. The image was shared on the Oakengates History Group Facebook Group on 29th March 2018 by John Wood, © A.J.B. Dodd. [71] A similar view during the winter. The locomotives are possibly No. 4, Constance, No 5, and No. 10 a Peckett 0-4-0ST. The definition on the photograph is not really good enough to be sure of these identities. The image was shared on the Oakengates History Group Facebook Group on 29th March 2018 by John Wood, © A.J.B. Dodd. [71] The view from the North at the West end of Cappoquin Drive. The old mineral railway ran approximately where the fence line now stands. [My photograph, 4th January 2024] Wrockwardine Villa. This image was shared on the Oakengates History Group and Surrounding Areas Facebook Group on 23rd June 2019 by Gwyn Thunderwing Hartley. [29] Wrockwardine Villa as seen from the East on Cappoquin Drive in 2009. [Google Streetview, May 2009] The Lilleshall Company, New Yard, Engine Sheds, Gower Street, St Georges. … Urban Terrace can be seen in background. The line to the right of the image runs round behind the engine shed and workshop to serve the Works. This picture was taken by Frank Meeson and shared on the Oakengates History Group including surrounding areas Facebook Group on 15th June 2021 by Gwyn Thunderwing Hartley, © A.J.B. Dodd. [26] New Yard Engineering Works. Gower Street runs North-South on the right of the map extract New Works buildings faced East onto the road. The locomotive shed can be seen to the top-left of the image. The worskshops which stood alongside it were not built by the time of the Ordnance Survey (1901). [14] Sketch Railway Plan/Map of New Yard Engineering Works, Gower St., St Georges showing the layout in 1959. This image was shared on the Oakengates History Group Facebook Group on 1st April 2023 by Gwyn Thunderwing Hartley. [2] New Yard Engineering Works seen for the air to the Southwest of the site. Gower Street runs immediately beyond the main buildings. At the bottom of the photograph the sidings serving the Works appear to be well-used! This aerial image was shared on the Oakengates History Group Facebook Group on 22nd July 2022 by Gwyn Thunderwing Hartley. [30] A postcard image of New Yard Engineering Works, this time the camera is to the Southeast of the Works and as a result shows, at the top-right, the Engine Shed and Workshop. This image was shared on the Oakengates History Group Facebook Group by Gwyn Thunderwing Hartley on 17th February 2019. [70] The Lilleshall Company mainline curves to the South through the area known as ‘The Nabb’. Two bridges are shown. The one just visible top-right is the ‘Tin Bridge. Prior to the construction of the standard gauge mineral railway a horse-drawn tramway ran North-South through this location, running down the side of the terraced housing adjacent to the bridge. The second bridge appears bottom-left. It was a more substantial structure. [15] Two bridges are shown on the 25″ OS map extract above. This image covers the same area as the map extract and comes from railmaponline.com’s satellite imagery. The one just visible top-right on the map extract was adjacent to the set of terraced houses which appear at the top-tight of this image. Prior to the construction of the standard gauge mineral railway a horse-drawn tramway ran North-South through this location, it is flagged on this image and given the local name ‘pig-rails’. The location of the second bridge is centre-left on this image. [25] Former Great Western Railway 1901-built, William Dean-designed, 0-6-0PT No 2794 found a career extension after being sold-off by British Railways in October 1950. In the mid-1950s the 0-6-0PT, now Lilleshall No 12, is working hard up-grade as it passes the ‘tin bridge’ at The Nabb. The locomotive seems to be heading another engine, which is seemingly not in steam, so this is likely to be a move from Priorslee to the nearby locomotive shed at New Works, © A.J.B. Dodd. [31: p179] A view Northeast, back towards the access to New Yard Engineering Works, from the ‘Tin Bridge’ on The Nabb. This locomotive movement appears to be the same movement as appears in the photograph immediately below. This locomotive may be ‘Alberta’, © A.J.B. Dodd. [72] Looking South from the ‘Tin Bridge’ this is the same light engine movement as pictured above, probably to the engine shed just a little further along the line to the Northeast. The locomotive closest to the camera appears to be a Peckett loco. This image was shared on the Oakengates History Group Facebook Group by John Wood on 28th March 2018, © A.J.B. Dodd. [47] The Tin Bridge again with Diamond Row above and to the right. This photograph was taken during the Lilleshall Companies last run on their Mineral line, with the Engine ‘Alberta’ in 1959. The Photo was taken by the late Edgar Meeson, cousin of Frank Meeson. The image was shared in the Oakengates History Group and surrounding areas Facebook Group by Gwyn Thunderwing Hartley on 27th January 2021. [32] This image was shared by Gwyn Thunderwing Hartley on the Oakengates History Facebook Group alongside the monochrome image above. It shows a remnant of the bridge still on site in the 21st century. [32] This image was also shared by Gwyn Thunderwing Hartley on the Oakengates History Facebook Group alongside the monochrome image above. It shows the condition of the remaining bridge girder in the 21st century. [32] This photograph is taken from a point adjacent to the terraced houses (Diamond Row) in the next photograph. It looks North across the cutting made for the Lilleshall Mineral Railway at the location of the ‘Tin Bridge’ [My photograph, 4th January 2024] Looking South from the location of the ‘Tin Bridge’ along the line of what would at one time have been a horse-drawn tramway. [My photograph, 4th January 2024] Looking back Northeast along the line of the cutting from the location of the ‘Tin Bridge’. [My photograph, 4th January 2024] Looking Southwest along the old mineral railway from the location of the ‘Tin Bridge’. This is the same camera position as in the monochrome image immediately above. [My photograph, 4th January 2024] Looking back Northeast along the old mineral railway from a point midway between the two overbridges towards the location of the ‘Tin Bridge’. [My photograph, 4th January 2024] A view Southwest looking along the railway cutting towards the location of the second overbridge. [My photograph, 4th January 2024] Again looking Southwest, the cutting has been infilled and allows room for a metalled public footpath which can be glimpsed ahead. [My photograph, 4th January 2024] The aforementioned footpath, approaching the location of the second bridge. [My photograph, 4th January 2024] A view from the West across the second overbridge on the map extract above. One of the bridge girders remains in the ground at this location. The mineral railway used to pass in cutting from left to right under the bridge. [My photograph, 4th January 2024] A closer view of the bridge girder. [My photograph, 4th January 2024] The view Northeast, back towards Wrockwardine Villa along the footpath which sits over the line of the old railway. [My photograph, 11th December 2023] The information board adjacent to the location of the old overbridge. [My photograph, 11th December 2023] This is the second of the two bridges which crossed the Lilleshall Main Line in ‘The Nabb’.The picture looks to the Southwest and comes from the Howard Williams Collection and was shared on the Oakengates History Group including surrounding areas Facebook Group on 27th February 2014 by Frank Meeson. The girder visible in the pictures above would have been the parapet girder on the far face of the bridge. [28] This closer view of the information board marks the second bridge location with a yellow triangle. The green area running Northeast, and marked with the number ‘3’, is the cutting of the old mineral railway. To the South of the yellow triangle, the route of old line ran behind the houses now on the East side of Willows Road. [My photograph, 11th December 2023] The line continued to the South after passing under the second bridge. The Conifers mark its approximate alignment. The new fence panels protect the back garden of the first property on Willows Road. [My photograph, 11th December 2023] Continuing South the line curved round towards the South East and ran alongside the remains of the Shropshire Canal. [16] Another extract from the satellite imagery provided by railmaponline.com. This extract shows a similar are to the map extract directly above and shows the route of the old railway heading South through, what are in the 21st century, the back gardens of the houses on Willows Road. It crossed Station Hill (National Cycle Route 81) at a level crossing. [25] This aerial image, taken in 1948, shows the line of the mineral railway curving round from close to Wrockwardine Villa through the woodland cutting to run South towards Station Hill, Oakengates. It is an extract from Image No. EAW013745, held on the Britain From Above website, © Historic England. [36] The same area on a different aerial photograph. The Station Hill Crossing is to the bottom right of the image. The picture is an extract from Image No. EAW013748, held on the Britain From Above website, © Historic England. [40] Looking North from Station Hill – the old railway approached the road through what are, in the 21st century, the rear gardens of the houses on the East side of Willows Road. [Google Streetview, June 2022] Looking South from Station Hill – the old railway crossed the road at a level crossing and ran South alongside the canal (now infilled) along what is now the Silken Way. [Google Streetview, June 2022] Station Hill, Oakengates at the turn of the 20th century. This postcard view looks West across the line of the Lilleshall Company’s line down the hill towards the centre of Oakengates. The crossing keeper’s beehive hut is visible to the left of the road. This image was shared on the Oakengates History Group Facebook Group on 24th October 2018 by Gwyn Thunderwing Hartley. [33] Another view of Station Hill Crossing. The Locomotive is Alberta and is providing an enthusiasts tour of the Lilleshall Company’s network. This image was shared on the Oakengates History Group Facebook Group on 29th March 2018 by John Wood, © A.J.B. Dodd. [71] Looking South across Station Hill. The beehive keeper’s hut stands across the road from the camera. This image was shared by Gwyn Thunderwing Hartley on the Oakengates History Group Facebook Group on 16th May 2021. [34] Looking East across Station Hill, this aerial image, taken in 1948, shows the beehive keeper’s hut standing alongside the mineral railways it crosses Station Hill. This image is an extract from Image No. EAW013744, held on the Britain From Above website, © Historic England. [34] The line crossed Station Hill in Oakengates on the level with the old canal running beneath the road. Looking West from the crossing, train crews would have had a glimpse of Oakengates (Market) Railway Station on the LNWR/LMS/BR Coalport Branch. The station appears on the left of this map extract. [17] This extract from the railmaponline.com satellite imagery covers the area on the 25″ OS map above and that covered by the first OS Map below. The turquoise line is the GWR mainline from Shrewsbury to Wolverhampton, the heavier purple line is the LNWR Coalport Branch and the thinner lines represent the various Lilleshall Company lines. The Company’s mainline is that shown closest to the right of the image. Station Hill is close to the top of the image, with Canongate in the bottom third of the image. The housing estate built around the modern Reynolds Drive sits over the site of the Snedshill Ironworks. The Silkin Way follows the route of the Lilleshall Company’s mainline. [25] Looking South down Silkin Way in the 21st century. [Google Streetview, June 2022] These two aerial images from 1948, looking East, are extracts from Image No. EAW013746 on the Britain From Above website, © Historic England. The main line of the mineral railway runs across the top of each extract. The road in the second image is Canongate. [38] A closer view of the Canongate level crossing. This image is an extract from Image No. EAW013747 on the Britain From Above website, © Historic England. The cottage which are prominent at the top of his image can be seen on the next 25″ map extract below. [39] Looking North towards Station Hill. The mineral railway main line enters the image across Station Hill (top-right) and curves away to the right just above centre-right. The lines which run down the centre of the image pass under Canongate and include sidings serving Snedshill Ironworks. The sidings sit over the line of the old canal. The mineral railway crosses Canongate at a level crossing just off the left of the photograph. The picture is another extract from Image No. EAW013748, held on the Britain From Above website, © Historic England. [40] This view looks South from a point 50 to 100 metres South of Station Hill. The Lilleshall Company’s main line bears to the left and the line down to the sidings at Snedshill Iron Works runs down hill to the right. The image was shared on the Oakengates History Group Facebook Group on 29th March 2018 by John Wood, © A.J.B. Dodd. [71] The canal has been infilled and its land used to create an operating yard to the North of Canongate. It is interesting to note that Canongate climbs to the East. Rail tracks cross it at level on the West side of Snedshill Iron Works which feature at the bottom of the map extract. To the East of the Works, sidings pass under Canongate. Meanwhile, the Lilleshall Company’s mainline remains at high level and crosses Canongate by means of a level-crossing. [18] Snedshill Ironworks dominates this map extract. Towards the left edge of the extract, the Coalport Branch runs in cutting crossed by a number of footbridges/access bridges. The Works sidings on the West of the Works terminate on the site, whereas those to the East of the building run off the bottom of the extract. On the next extract we will see that a junction is formed with the Coalport Branch. The old canal was in use as a reservoir alongside the Works and the Lilleshall Company’s mainline runs alongside that reservoir to its East. In the bottom-left of the image, we can see the Shrewsbury to Wolverhampton mainline entering its tunnel. [19] This extract from railmaponline’s satellite imagery covers much the same area as the 25″ OS Map above. All the railway lines on the image appear t be converging on a point just to the South of the bottom of the image. [25] Looking North from Canongate, back along the centre-line of the old railway. Silkin Way is on the right and within a 100 metres or so is on the line of the old railway. [Google Streetview, June 2022] Looking South from Canongate, The route of the old railway ran South through the tress directly ahead of the camera on the far side of the A442, Queensway. The two taller trees to the left of the lighting column are approximately on the line of the railway. [Google Streetview, June 2022] Another aerial view from 1948, this time looking from the East across the old mineral railway line. Canongate features at the centre of the image. This is an extract from Image No. EAW013743 shared on the Britain From Above website, © Historic England. [35] Two further extracts from Image No. EAW013746 taken in 1948 looking East, which show the mineral railway running South passing the Snedshill Ironworks (at the bottom of the first image). The darker area above the ironworks is a remaining length of canal with a retaining wall immediately beyond which supports the mineral railway. The mineral wagons on the second of these two images are in the sidings which can be seen at the bottom of the 25″ map extract of 1901 above. [38] Two further extracts from EAW013748 of 1948. As already noted that aerial view looks Northwards across Snedshill Ironworks. In these two extracts we see the Lilleshall Company’s mainline at the right side of the images which continue the sequence of aerial images following that line. In the first of these images we see the reservoir which was once a length of the Shropshire Canal to the South of Canongate. The railway lines which pass under Canongate to the East of the Works continue onto the second image and head towards a junction with the LNWR Coalport Branch. Visible at the top-left of the second image is the end of the sidings/yard which was on the West side of the Ironworks. The white areas on the second image are where the image was marked for editing, © Historic England. [40] This extract from EAW013752 on the Britain From Above website looks over Snedshill Ironworks (bottom-left), with the short length of canal behind them, towards Priorslee. The Lilleshall Company’s mainline enters just below centre-left and runs at an angle towards the top-right of the image. The Greyhound bridge on the old A5 is alongside the level crossing which took the mineral railway across the A5. The Greyhound bridge took the A5 over the LNWR Coalport Branch (in deep cutting) and a feeder line from/to the sidings at the Snedshill Ironworks which met the Coalport Branch just beyond the bridge. [41] This is Madin Park as seen, looking East, from Newlands Road. The Park sits over the various Lilleshall Company lines in this area. The treeline at the east side of the park marks the approximate route of the Lilleshal Company’s main line. [Google Streetview, June 2022] This extract from EAW013782 on the Britain From Above website, (© Historic England), faces South-southeast. Priorslee Brick and Tile Works are immediately to the left of the picture with a corner of the building just edging onto the image. The LNWR Coalport Branch runs up the right side of the image and passes under Greyhound bridge alongside the line from Snedshill Ironworks. Just beyond the bridge, a line turns away to the left and meets the Lilleshall Company’s mainline before leaving the image towards the top-left. The Company’s mainline crosses the A5 at road level. Towards the top of the image the GWR mainline leaves the tunnel and bears away to the top-left. [42] Lines from Snedshill Iron Works join the Coalport Branch in passing under what became the A5 a little to the South of the Works themselves. The Lilleshall Company mainline crosses the road at level. A short branch runs off towards the Snedshill Brickworks. [20] In the 21st century the area covered by the 25″ OS Map extract above has changed considerably. Only the GWR mainline from Shrewsbury to Wolverhampton remains of the line on the OS Map extract. On this satellite image it is represented by the turquoise line. and is running in tunnel across the area of this image. The Greyhound Roundabout has replaced what was the A5 (B5061 in 21st century) bridge over the Coalport Branch. The level crossing shown below, is long gone. The Lilleshall Company buildings have been replaced by Wickes and Aldi! The A442 dual carriageway dominates the area. [25] A view North from the East side of the island at Greyhound Roundabout. Madin Park is just beyond the tree seen in this image. [Google Streetview, March 2021] Turning through 180 …., the route of the line crossed the central island of Greyhound Roundabout on its East side. [Google Streetview, March 2021] And then crossed the line of the modern A442 while drifting from a southerly direction to the South-southeast. The road on the left of this photograph is the B5061 (the erstwhile A5)which crosses the A442 as it leaves the Greyhound Roundabout. [Google Streetview, June 2022] A Pecket Loco used by the Lilleshall Co, at the Greyhound Crossroads junction, with the Lilleshall Co. Snedshill Buildings in view. The photograph was taken looking Southeast from the Greyhound bridge. This area is now the Greyhound Island, and Aldi & Wickes now stand on the ground where the buildings in the picture once stood. This image was shared by Gwyn Thunderwing Hartley on the Oakengates History Group Facebook Group on 15th May 2018, © A.J.B. Dodd. [3] The building in the photograph above is at the bottom of this aerial image, just to the right of centre. This is another extract from Image No. EAW013782, © Historic England. The Priorslee Furnaces are top-left of the image and shrouded in smoke. The Lilleshall Company’s mainline curves round from the bottom of the picture, to the right of the Lilleshall Brick and Tileworks buildings to run immediately to the Southwest side of the Furnaces (the side furthest from the camera). [42] This photograph looks across the roof of the Snedhill Brick and Tilw Works towards Priorslee Furnaces. This image was shared on the Oakengates History Group Facebook Group on 24th November 2015 by Gwyn Thunderwing Hartley. [44] The remaining maps in this article follow the Lilleshall Company’s mainline as far as Hollinswood Sidings. Those sidings sat alongside the GWR mainline from Shrewsbury to Wolverhampton and Birmingham.
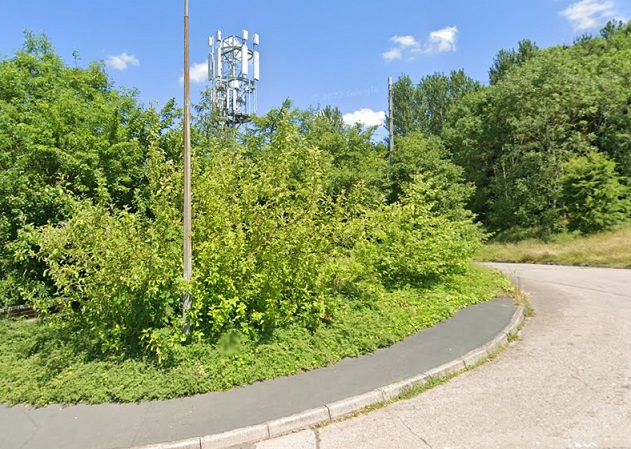
Another extract from the 1901 25″ Ordnance Survey. South of the A5 the Snedshill Ironworks sidings merge with the Coalport Branch although they do so after a line leaves heading away to the Southeast, passing to the East of the tunnel portal at the bottom of the map extract.. The Coalport Branch runs to the West of the tunnel portal of the GWR/BR mainline between Shrewsbury and Wolverhampton. The Lilleshall Company mainline curves round to run parallel to the spur closest to the tunnel portal. [21] The main line of the Lilleshall System continued in a South-southeast direction, curving gradually round towards the Southeast. [25] Photographs taken while looking at the older tramway which predated the standard gauge network can be found in the later part of my article about the old tramway from Sutton Wharf to Oakengates. Those pictures illustrate the approximate route of the standard gauge line as well as the older tramway. To access that article, please click here (https://wordpress.com/post/rogerfarnworth.com/32520 ). That article also shows modern photographs of the area Southeast of this location on the Lilleshall Company’s network, including the area of Priorslee Furnaces and Hollingswood Sidings as it appears in the 21st century.
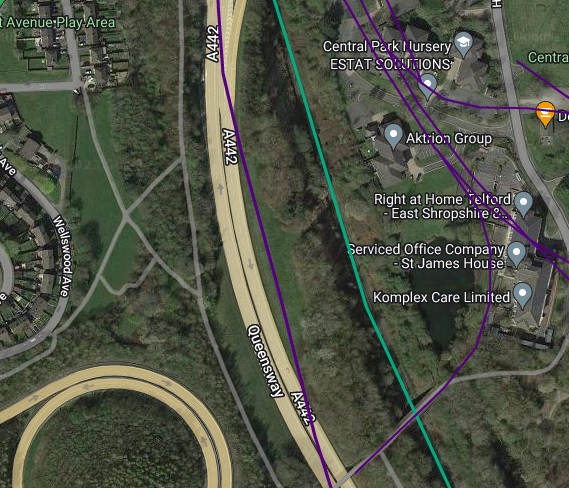
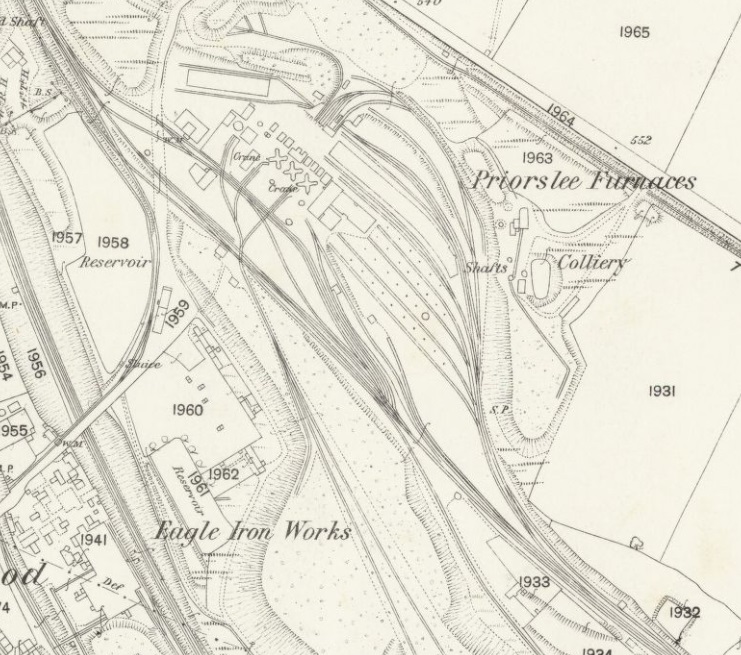
This extract is a little further to the Southeast. The Coalport Branch is on the left. The GWR mainline is in cutting running from the top-left of the image to the bottom-centre. The spur from the Snedshill Sidings meets the Lilleshall Company’s mainline just right of the centre point of the image. The line curving back towards the GWR mainline but terminating just above the bottom edge of the image, was originally a tramroad through Hollinswood to Malinslee. Links to articles about the tramroads in this area can be found below.[22] A similar area as covered by the 1901 25″ Ordnance Survey extract above. This extract from the Railmaponline.com satellite imagery shows the modern A442 following the route of the LNWR Coalport Branch with the GWR mainline to the East of it. The complex arrangement of the Lilleshall Company’s railways shows that we are close to what was Priorslee Furnaces. As noted above, the line which curves away to the South from the Company’s railways is a former tramroad which fed into a network of tramroads in the Hollinswood and Malinslee area of what is now Telford. Those tramroads are covered in the linked articles immediately below. [25] Priorslee Furnaces as shown on the 1882 25″ Ordnance Survey. [51] A very similar area to that shown in the extract above, this map extract comes from the 1901 25″ Ordnance Survey. There have been some significant changes to the buildings on the site in the period from 1882 to 1901. Alterations to the railway sidings on the site either accommodate the new structures or are relatively minor in nature. [52] This railmaponline satellite image covers much the same area as the two OS Map extracts above. The sidings shown on this image are indicative rather than definitive but do give a good idea of the area covered by Priorslee Furnaces. The road which runs down through the image is a diverted version of Hollinswood Road which then becomes a footpath. It crosses the GWR Mainline using a bridge which was built at the time the railway was constructed, and then a modern footbridge over the A442. [25] Much of the area to the Southeast of Oakengates, including Priorslee is also covered in this article:
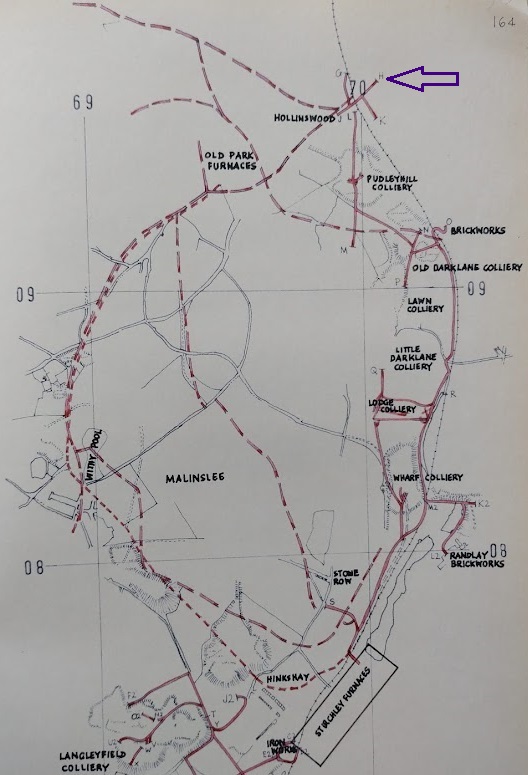
Early Tramroads near Telford – Part 8 – Malinslee Part 4 – the East side of Malinslee in the vicinity of the later Coalport (LNWR) and Stirchley (GWR) Branches The tramroads in the Hollinswood/Malinslee area are covered in earlier articles about the Malinslee area (below) and are illustrated in the hand-drawn map from Savage and Smith’s research which appears below:
Early Tramroads near Telford – Part 4 – Malinslee Part 1
Early Tramroads near Telford – Part 6 – Malinslee Part 2 – Jerry Rails …
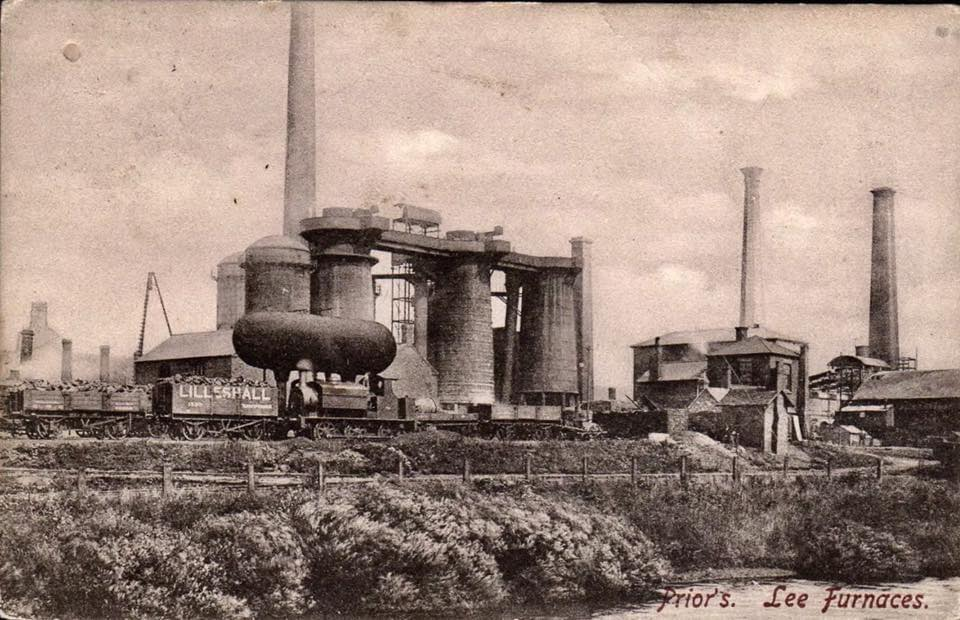
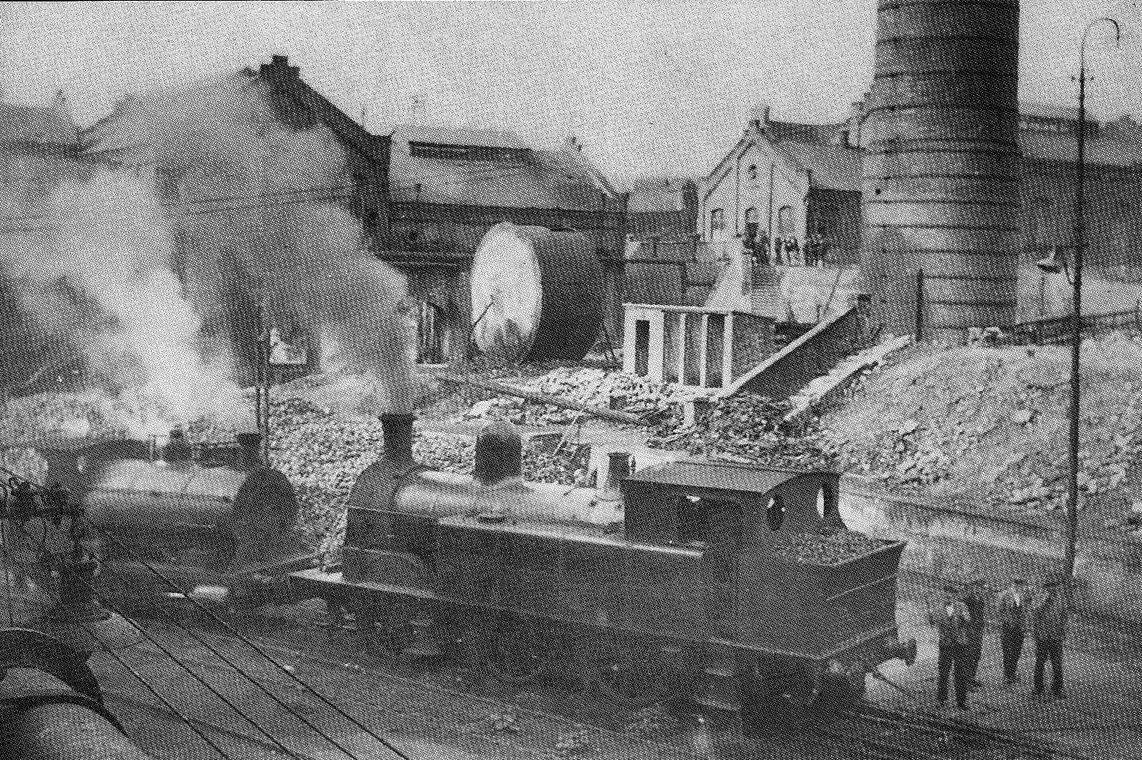
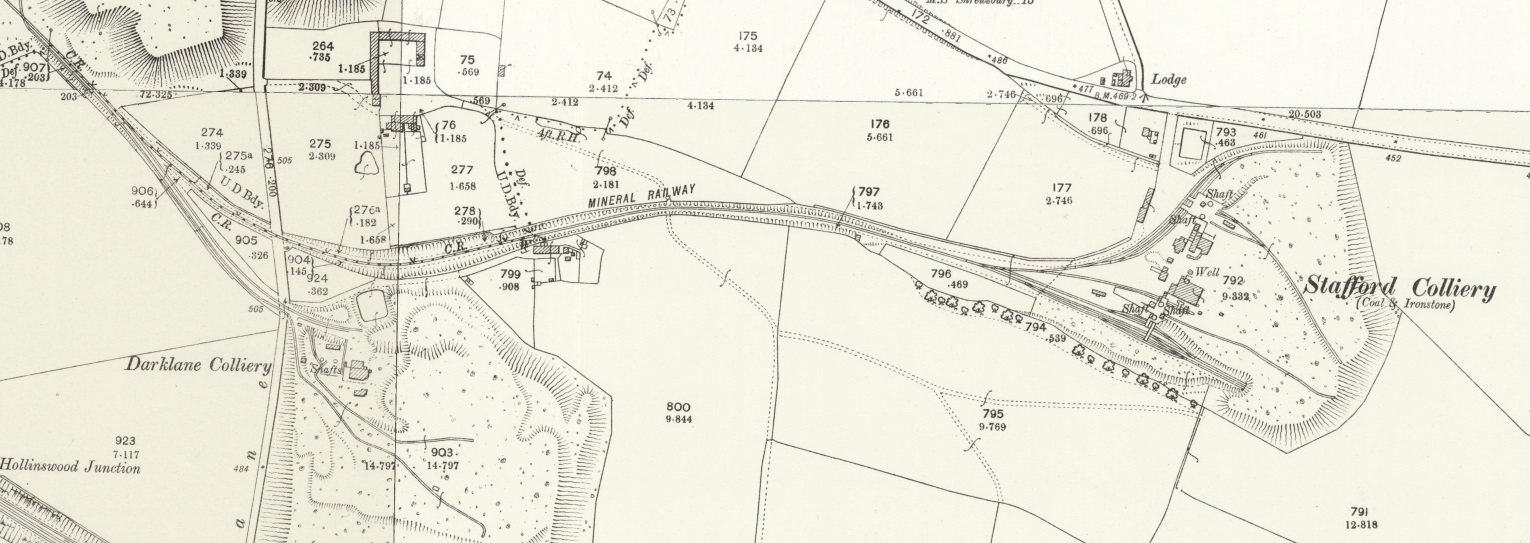
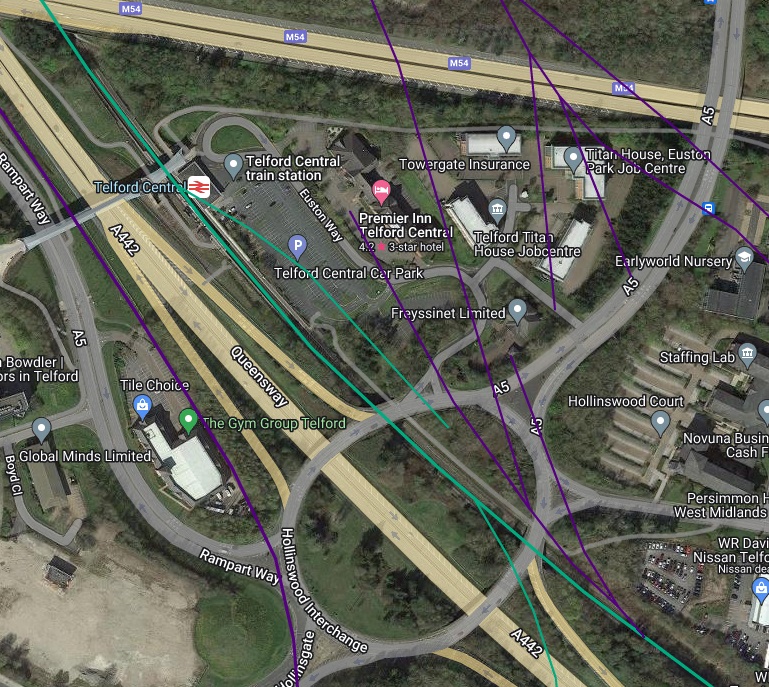
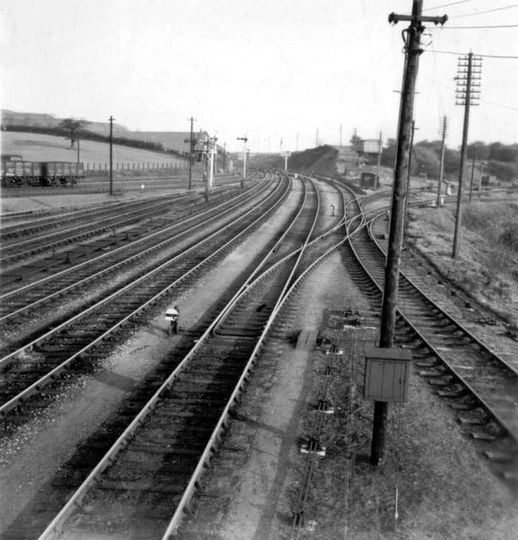
Early Tramroads near Telford – Part 7 – Malinslee Part 3 The purple arrow in the top right of this hand-drawn map (copied from Savage and Smith’s research and used with the kind permission of the archivist at Ironbridge Gorge Museum Trust) shows the point at which the tramroad at the bottom of the 25″ OS map extract above links to the network of tramroads in Hollinswood and Malinslee. [43] A view from the North across the Priorslee Furnacestowards Hollinswood and Mailinslee. This image was shared on the Telford Memories Facebook Group by Marcus Keane on 20th September 2017. [48] Priorslee Furnaces viewed from the Southeast. This image was shared by Paul Wheeler on the Oakengates History Group Facebook Group on 28th November 2017. [45] An aerial image of the extensive steelworks and slag reduction plant at Priorslee. This postcard view of Priorslee Furnaces was taken in 1899. The rail access to the plant is emphasised by the locomotive and wagons in the foreground. The image was shared on the Telford Memories Facebook Group by Lin Keska on 27th June 2020. [49] Two Lilleshall Company locomotives (Peckett 0-4-0ST No.10 and 0-6-2T No. 3 which was once GWR No. 589) in attendance of the demolition of a 98ft high concrete coal bunker at Priorslee Furnaces circa 1936. This work was taking place as part of the demolition of the former steelworks site. The image was shared on the Oakengates History Group Facebook Group by Gwyn Thunderwing Hartley (courtesy of John Wood) on 1st December 2019. I understand that the original image is held in the Archives of the Ironbridge Gorge Museum Trust. [50] This next extract from the 1882 25″ Ordnance Survey shows the area immediately Southeast of Priorslee Furnaces The Lilleshall Company’s mainline split in three directions – to the South it runs into Hollinswood Sidings and up to Hollinswood Junction, where it joins the GWR mainline, Southeast it continues towards Stafford Colliery, and Northeast towards Woodhouse and Lawn Collieries. [51] This extract from the 1901 25″ Ordnance Survey shows only minor changes from the equivalent extract from the 1882 survey above. [53] Again, this railmaponline.com satellite image covers similar ground to the two OS map extracts above. Significant feature on the satellite image are: the M54 running East/West across the bottom of the image; the A442 which intrudes only slightly on the bottom-left of the image; The diverted A5 which runs up the right of the image to meet the old A5 (the B5061 in the 21st century) and Telford Central railway station. [25] The remaining length of the Lilleshall Company’s mainline served Stafford Colliery (passing Darklane Colliery on its way East. This extract covers a greater area than the one’s above but is also taken from the 1901 25″ Ordnance Survey. Hollinswood Junction on the GWR mainline between Shrewsbury and Wolverhampton just sneaks into the bottom-left corner of this map extract. [54] A look at Stafford Colliery, Woodhouse Colliery and Lawn Colliery is for a future article. This image and the map extract above show the line which terminated at Stafford Colliery.[25] Hollinswood Sidings and Hollinswood Junction. The GWR line between Shrewsbury and Wolverhampton runs from the top-left to the bottom-right. The LNWR Coalport Branch enters top-left and leaves the map extract to the left of centre at the bottom of the image. The line turning off the GWR mainline to the South served a series industrial undertakings to the East of the old Shropshire Canal. The Lilleshall Company’s sidings enter the map extract centre-top and meet the GWR mainline at Hollinswood Junction. [55] This is another area of Telford which has seen dramatic change. The GWR line ‘turquoise’ remains, the LNWR Coalport branch (thicker purple0 has long gone. As have all the Lilleshall Company’s lines (thinner purple). The A442, Queensway and Hollinswood Interchange dominate the modern image. [25] Locomotive 48516 heading what seems to be a train of empty coal wagons and facing towards Wolverhampton. Hollinswood Sidings can be seen beyond the locomotive. The image was shared on the Telford Memories Facebook Group by Lin Keska on 4th April 2018. [57] Just a little further to the Southeast, Hollinswood Junction is seen from the Northwest, looking along the GWR mainline. The Lilleshall Company’s sdings are to the left and the short GWR branch line to Randlay and beyond is on the right. This image was shared by Marcus Keane on the Telford Memories Facebook Group on 19th April 2020, © A.J.B. Dodd. [56] Lilleshall Company Motive Power
The Lilleshall Company operated a number of steam engines which it picked up from various sources and some of which it built itself. The remainder of this article is no more than a glimpse of these locomotives on the Lilleshall Company’s network. The authoritative treatment of the motive power on the Lilleshall Company network is the book by Bob Yate, “The Railways and Locos of the Lilleshall Company .” [59]
Yate tells us that, because the Lilleshall Company’s network was extensive, it needed a considerable number of locomotives to operate it. He continues: “Much of the traffic was heavy, so it comes as no surprise to find that the company turned to acquiring former main line company locomotives for some of their more arduous duties. The total number of locomotives rose from four during the mid-1850s to eight by 1870, down to five by 1875, then six by 1886, increasing to nine in 1900 until 1920 when there were eleven. By the 1930s the number was back down to nine .” [59: p67] After WW2, numbers were reduced to five, and once closure was approaching all five were scrapped and two other locomotives were purchased.
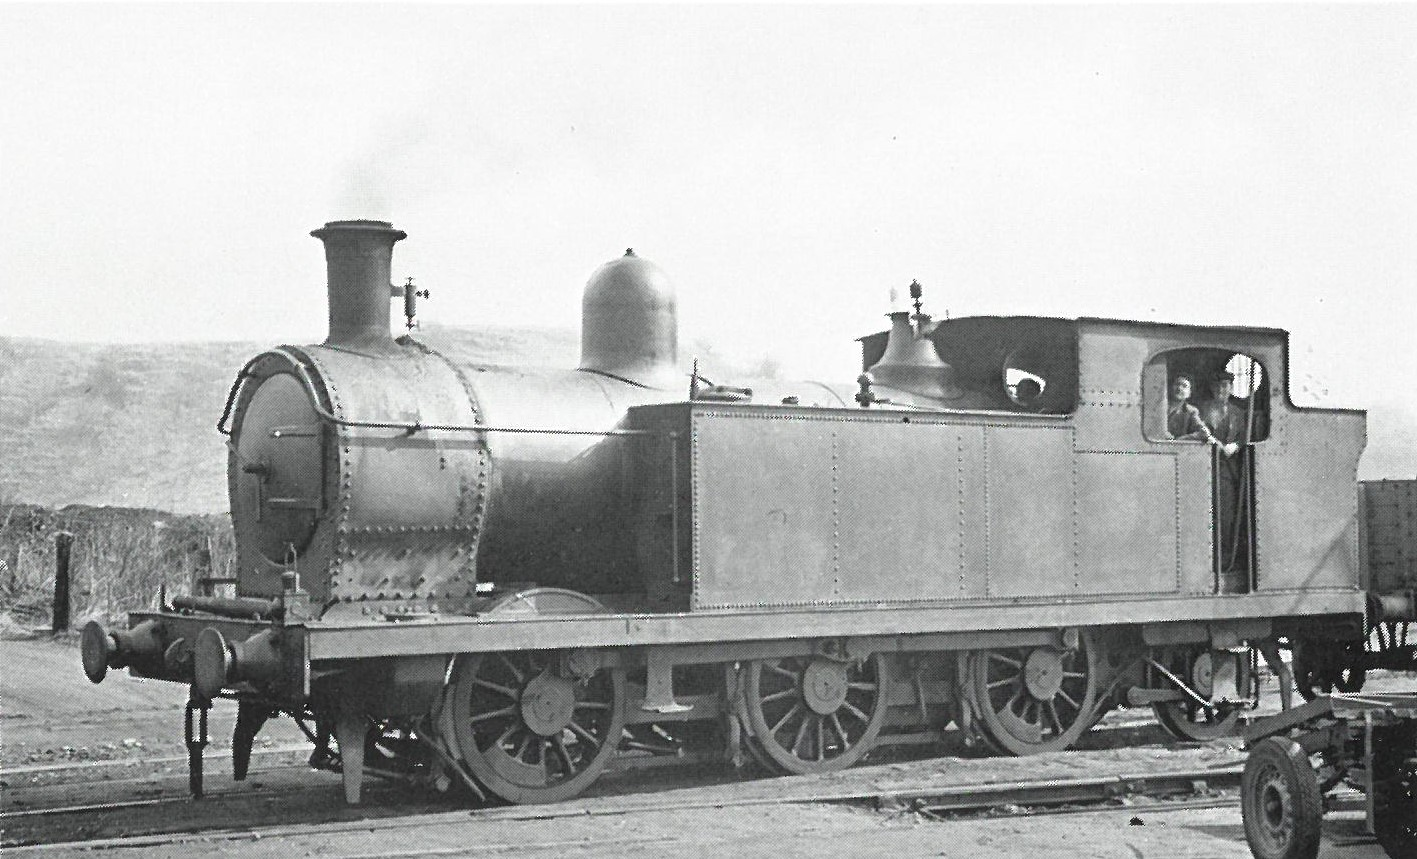
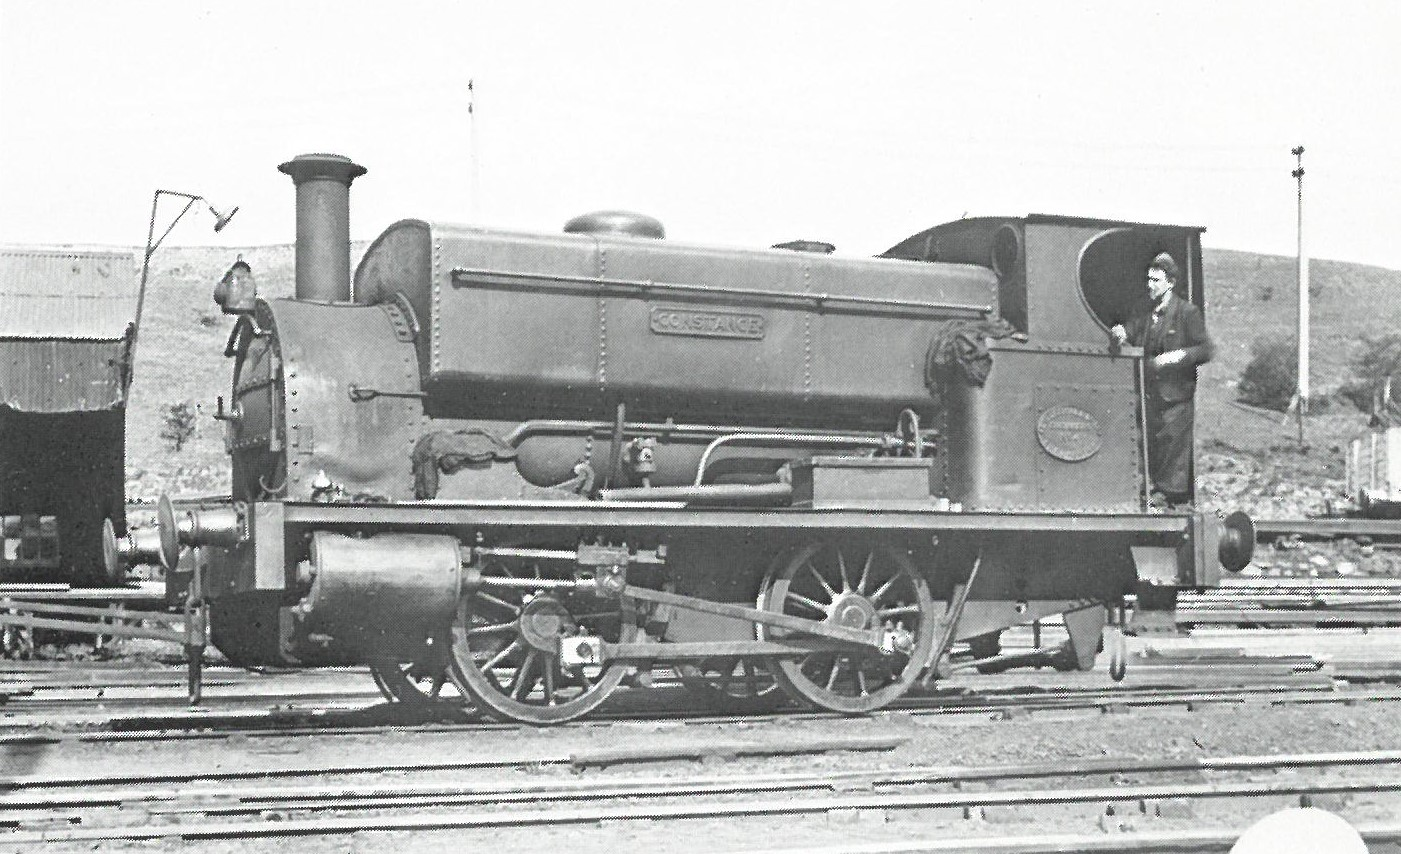
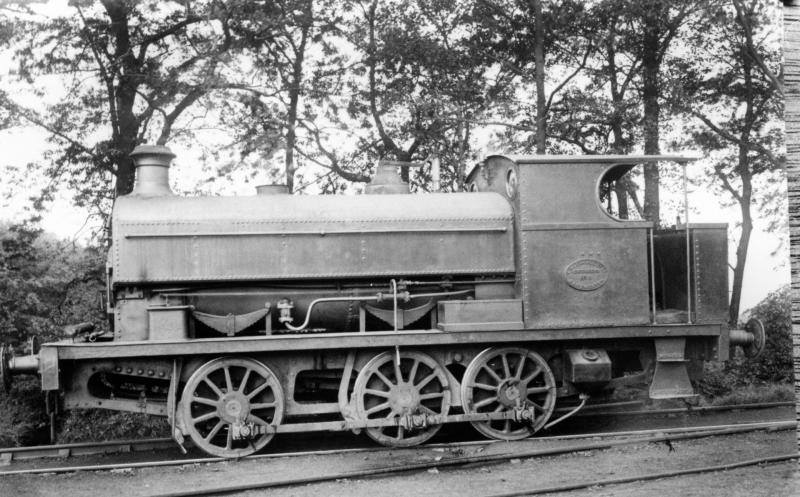
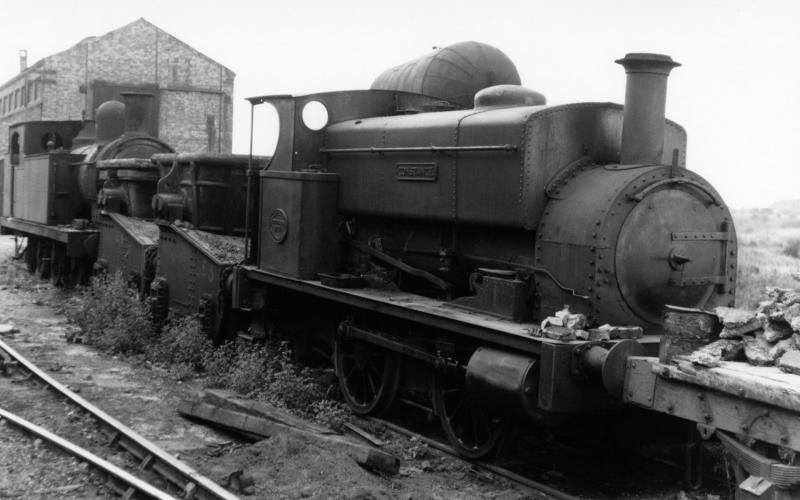
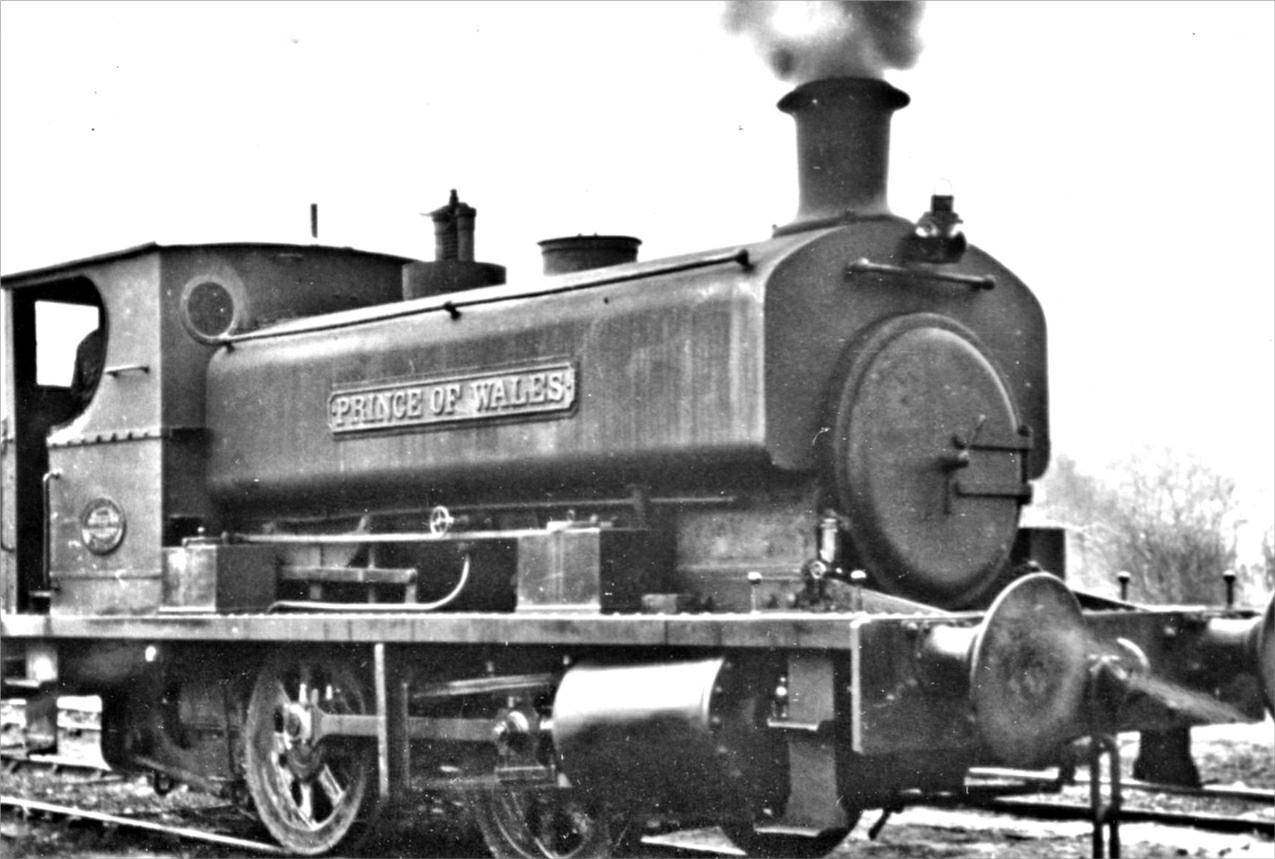
Taken in June 1954 within the Priorslee steelworks complex and shows one of the 3 blast furnaces in the background. The locomotive is Lilleshall Company No. 12 (ex-GWR 0-6-0PT No. 2794), © F.W. Shuttleworth. This image was shared on the Telford Memories Facebook Group by Marcus Keane on 15th September 2015. The blast furnace did not supply the adjacent rolling mill after 1925. At that time the Bessimer converters were scrapped. The Priorslee Furnaces only made made pig iron for the foundry trade until closure. The Lilleshall Company were forced to cease steel-making from the blast furnace pig-iron by the Iron and Steel Federation who shared out production around the country in the slump following the first world war. [61] Peckett 0-4-0T, Lilleshall Locomotive No. 10 at Priorslee, (c) Industrial Railway Society, Ken Cooper collection] This photograph was shared by Andy Rose on the Telford Memories Facebook Group on 29th September 2019. [62] I think this is Lilleshall Company No. 6, one of a number built by the Lilleshall Company, © A.J.B. Dodd. This photograph was shared by Andy Rose on the Telford Memories Facebook Group on 29th September 2019. [62] Former Barry Railway ‘B1’ Class 0-6-2T No. 60 (also ex-GWR No. 251) which when purchased by the Lilleshall Company was given No. 5, photographer not known. This photograph was shared by Andy Rose on the Telford Memories Facebook Group on 29th September 2019. [62] Lilleshall Company Locomotive No. 4, Constance, © A.J.B. Dodd. This photograph was shared by Andy Rose on the Telford Memories Facebook Group on 29th September 2019. [62] Lilleshall Company Locomotive No. 9, built by George Stevenson & Co. Ltd. It was bought by the Lilleshall Company in 1904 and lasted until 1929, (c) F. Jones Collection. This photograph was also shared by Gwyn Thunderwing Hartley on the Oakengates History Group Facebook Group on 27th November 2017. [69] Austerity 0-6-0ST Locomotives sit on shed at Granville Colliery. After the NCB took over the collieries owned by the Lilleshall Company, Granville Colliery supplied coal to Buildwas Power Station and the coal trains were worked by a range of locos down the 1.5 miles to Donnington Sidings. Granville Colliery had a decent sized shed and in later years used these Austerity 0-6-0ST locos. In Lilleshall Company days bigger engines (ex TVR and Barry) were used. This photograph was shared by Marcus Keane on the Telford Memories Facebook Group on 15th September 2015. [65] 0-4-0ST Locomotive No. 4, Constance and an 0-6-0T Locomotive sit out of use at Priorslee in 1954. Between them are what appear to be two slag ladles, © A.J.B. Dodd. This photograph was shared by Marcus Keane on the Telford Memories Facebook Group on 15th September 2015. [65] The same location but different slag ladles and a different locomotive in front of them. This seems to be a Peckett Locomotive which appears to be being scrapped, © A.J.B. Dodd. This photograph was shared by John Wood on the Oakengates History Group Facebook Group on 29th March 2018, © A.J.B. Dodd. [67] Lilleshall Company 0-6-0ST, The Colonel was based at Granville Shed which is just off this picture to the right, © A.J.B. Dodd. This photograph was shared by Mets Vaim EdOrg on the Telford Memories Facebook Group on 24th October 2020. [63][66] .No. 6 (I think) sits outside the old loco shed at the Granville pit early 1950s this loco was made at New Yard, St Georges by the Lilleshall Company for there own use and transferred when the pit was nationalised. This photograph was shared by John Wood on the Telford Memories Facebook Group on 17th November 2015. [63] Peckett 0-4-0ST, probably outside Snedshill Brick and Tile Works. This photograph was shared by Marcus Keane on the Telford Memories Facebook Group on 18th October 2015. [64] This postcard image was one of a number published in 1980 to celebrate 150 years of railway history. It shows the 2-2-2 Engine (built in 1867) that the Lilleshall Company put on display in the 1800s at the Paris Exposition. [60] Lilleshall built 0-4-0T, Constance and Andrew Barclay 0-6-0T No. 11 at New Yard Locomotive Shed. The image was shared on the Oakengates History Group Facebook Group by Gwyn Thunderwing Hartley on 4th April 2021. [58] Lilleshall Company Locomotive Alberta (a Barclay 0-4-0ST), possibly close to New Yard Engineering Works. This photograph was shared by John Wood on the Oakengates History Group Facebook Group on 29th March 2018. Alberta was only purchased in October 1956 and was active on the Lilleshall Company’s network until closure, © A.J.B. Dodd. [67] Lilleshall Company Locomotive No. 12, (ex-GWR No. 2794) 0-6-0PT sits a New Yard This photograph was shared by John Wood on the Oakengates History Group Facebook Group on 28th June 2020. [68] Lilleshall Company Locomotive, Prince of Wales (ex-Lever Brothers, Port Sunlight Railway) 0-4-0ST also sits a New Yard This photograph was also shared by John Wood on the Oakengates History Group Facebook Group on 29th March 2018. [68] References
https://www.facebook.com/photo?fbid=10158258868359890&set=gm.1573059866203702&locale=en_GB , accessed on 17th August 2023.https://www.facebook.com/groups/261490703946559/permalink/5921967501232156 , accessed on 7th November 2023.https://www.facebook.com/groups/261490703946559/permalink/1631467146948901 . accessed on 7th November 2023.https://theminerswalk.org/snedshill/lilleshall-company-mineral-railway-line , accessed on 7th November 2023.https://maps.nls.uk/geo/explore/#zoom=18.0&lat=52.70068&lon=-2.41423&layers=168&b=1 , accessed on 8th November 2023.https://maps.nls.uk/geo/explore/#zoom=18.0&lat=52.70265&lon=-2.41736&layers=168&b=1 , accessed on 8th November 2023.https://maps.nls.uk/geo/explore/#zoom=18.0&lat=52.70461&lon=-2.42072&layers=168&b=1 , accessed on 8th November 2023.https://maps.nls.uk/geo/explore/#zoom=18.0&lat=52.70390&lon=-2.42449&layers=168&b=1 , accessed on 8th November 2023.https://maps.nls.uk/geo/explore/#zoom=18.0&lat=52.70305&lon=-2.42863&layers=168&b=1 , accessed on 8th November 2023.https://maps.nls.uk/geo/explore/#zoom=18.0&lat=52.70097&lon=-2.42826&layers=168&b=1 , accessed on 8th November 2023.https://maps.nls.uk/geo/explore/#zoom=18.0&lat=52.70257&lon=-2.43263&layers=168&b=1 , accessed on 8th November 2023.https://maps.nls.uk/geo/explore/#zoom=18.0&lat=52.70171&lon=-2.43735&layers=168&b=1 , accessed on 8th November 2023.https://maps.nls.uk/geo/explore/#zoom=18.0&lat=52.70034&lon=-2.44258&layers=168&b=1 , accessed on 8th November 2023.https://maps.nls.uk/geo/explore/#zoom=18.0&lat=52.69896&lon=-2.43963&layers=168&b=1 , accessed on 8th November 2023.https://maps.nls.uk/geo/explore/#zoom=18.0&lat=52.69906&lon=-2.44501&layers=168&b=1 , accessed on 8th November 2023.https://maps.nls.uk/geo/explore/#zoom=18.0&lat=52.69726&lon=-2.44584&layers=168&b=1 , accessed on 8th November 2023.https://maps.nls.uk/geo/explore/#zoom=18.0&lat=52.69531&lon=-2.44638&layers=168&b=1 , accessed on 8th November 2023.https://maps.nls.uk/geo/explore/#zoom=18.0&lat=52.69346&lon=-2.44610&layers=168&b=1 , accessed on 8th November 2023.https://maps.nls.uk/geo/explore/#zoom=18.0&lat=52.69185&lon=-2.44694&layers=168&b=1 , accessed on 8th November 2023.https://maps.nls.uk/geo/explore/#zoom=18.0&lat=52.68980&lon=-2.44738&layers=168&b=1 , accessed on 8th November 2023.https://maps.nls.uk/geo/explore/#zoom=18.0&lat=52.68798&lon=-2.44638&layers=168&b=1 , accessed on 8th November 2023.https://maps.nls.uk/geo/explore/#zoom=18.0&lat=52.68584&lon=-2.44518&layers=168&b=1 , accessed on 8th November 2023.https://m.facebook.com/groups/674238619260811/permalink/2779688992049086 , accessed on 5th December 2023.https://scontent.fbhx4-1.fna.fbcdn.net/v/t1.18169-9/21761420_10203764899078501_3636312693064153721_n.jpg?_nc_cat=110&ccb=1-7&_nc_sid=bd3046&_nc_ohc=TLTiCmZZExAAX9QiWM3&_nc_ht=scontent.fbhx4-1.fna&oh=00_AfAbhEAgGsk80Y8ua6NY6gjhnURjRZb13stK8S9bW6AjoA&oe=6597E1D8 , accessed on 6th December 2023.https://railmaponline.com/UKIEMap.php , accessed on 6th December 2023.https://scontent.fbhx4-2.fna.fbcdn.net/v/t1.6435-9/201482784_10158311988498862_4566373800303848415_n.jpg?stp=dst-jpg_p180x540&_nc_cat=106&ccb=1-7&_nc_sid=bd3046&_nc_ohc=yHmKg6jHVdcAX_Cs0Fv&_nc_ht=scontent.fbhx4-2.fna&oh=00_AfDnT7hKAayk2GcdynEjVb0-CbVhrKLewE2PkgsvTXFPjg&oe=659A7442 , accessed on 8th December 2023.https://www.facebook.com/photo/?fbid=10155782408243862&set=gm.1710808045681477 , accessed on 8th December 2023.https://scontent.fbhx4-1.fna.fbcdn.net/v/t31.18172-8/1655808_1425186684388540_656137306_o.jpg?_nc_cat=110&ccb=1-7&_nc_sid=bd3046&_nc_ohc=VZiU88xJa_sAX8eqOIg&_nc_ht=scontent.fbhx4-1.fna&oh=00_AfByQtLEzkvqCA7hZqxr4gvZUadwmfRB0hCPQQVgrGsLzQ&oe=659AAC33 , accessed on 8th December 2023.https://www.facebook.com/photo/?fbid=10156504900068862&set=pcb.2207355879360022&__cft__[0]=AZWM_sG-8rb1Z8zR3v0d2wTYVidq8AJCRoQ0385g01iahveRLzlQhOSrRP0w781Nw8ODRaK9QfZI1S_wHWRsf_70OLeymBaH6R1VpqUAxa5o5MMT9_NvuG0ROdUYj5m6zfC0GVS8PVkvs-dlORb4TvBrX-3Qy6OBqLLzCrEaG0EpuD1fXlueiyUTiHaofJtwyGo&__tn__=*bH-R , accessed on 8th December 2023.https://scontent.fbhx4-2.fna.fbcdn.net/v/t39.30808-6/295253453_10158960381253862_1596451847515642843_n.jpg?_nc_cat=103&ccb=1-7&_nc_sid=c42490&_nc_ohc=oZFumj6_D1sAX__fJJ0&_nc_ht=scontent.fbhx4-2.fna&oh=00_AfDJT-IQGT2HuEOFqyROrOk1wo0_PGznDul4706piA9m3w&oe=6577CD2C , accessed on 8th December 2023.D. Bradshaw and S.C. Jenkins; Rails around Oakengates ; in Steam Days No. 283 , March 2013, p165-179.
https://m.facebook.com/groups/261490703946559/permalink/3559120847516845 , accessed on 4th January 2024.https://m.facebook.com/groups/261490703946559/permalink/1846594735436140/ accessed on 6th January 2024.https://m.facebook.com/groups/261490703946559/permalink/3868350286593898 , accessed on 6th January 2024.https://www.britainfromabove.org.uk/image/EAW013743 , accessed on 6th January 2024.https://www.britainfromabove.org.uk/image/EAW013745 , accessed on 6th January 2024.https://www.britainfromabove.org.uk/image/EAW013744 , accessed on 6th January 2024.https://www.britainfromabove.org.uk/image/EAW013746 , accessed on 6th January 2024.https://www.britainfromabove.org.uk/image/EAW013747 , accessed on 6th January 2024.https://www.britainfromabove.org.uk/image/EAW013748 , accessed on 7th January 2024.https://www.britainfromabove.org.uk/image/EAW013752 , accessed on 7th January 2024.https://www.britainfromabove.org.uk/image/EAW013782 , accessed on 7th January 2024.R.F. Savage & L.D.W. Smith; The Waggon-ways and Plateways of East Shropshire; Birmingham School of Architecture, 1965. Original document is held by the Archive Office of the Ironbridge Gorge Museum Trust.
https://scontent.fbhx4-2.fna.fbcdn.net/v/t1.18169-9/12249708_10153234847943862_2405376747380940551_n.jpg?_nc_cat=101&ccb=1-7&_nc_sid=bd3046&_nc_ohc=PTpPZUncF0oAX_zR0kT&_nc_ht=scontent.fbhx4-2.fna&oh=00_AfDmxW2EgzwA0skHXQQQicuFeBEC0U9pehtSXasn-aUj7w&oe=65C345CA , accessed on 8th January 2024.https://scontent.fbhx4-1.fna.fbcdn.net/v/t31.18172-8/23926176_1960058820984785_764665039428004773_o.jpg?_nc_cat=111&ccb=1-7&_nc_sid=bd3046&_nc_ohc=ZkPn9C3jrwsAX_zb32j&_nc_ht=scontent.fbhx4-1.fna&oh=00_AfAjCyq1hFT5gGcqA3z3JR4rQhMnvTqdrOd-860xljNpxQ&oe=65C3663D , accessed on 8th January 2024.https://www.facebook.com/photo/?fbid=1404096642968102&set=gm.1211545145607772 , accessed on 8th January 2024.https://scontent.fbhx4-1.fna.fbcdn.net/v/t31.18172-8/29352389_10156155183739890_3408729237109418941_o.jpg?_nc_cat=110&ccb=1-7&_nc_sid=3ba11c&_nc_ohc=NI9fQJlGVl8AX8MQqOk&_nc_ht=scontent.fbhx4-1.fna&oh=00_AfDMKjsidvIGKui1zGj0rpgAYGJpE596uwZCBljaVGyhTA&oe=65C343AA , accessed on 8th January 2024.https://scontent.fbhx4-1.fna.fbcdn.net/v/t1.18169-9/21616545_10203756370465291_4769410919911128767_n.jpg?_nc_cat=104&ccb=1-7&_nc_sid=bd3046&_nc_ohc=HZqT9xwWcf0AX9LMd5M&_nc_ht=scontent.fbhx4-1.fna&oh=00_AfCPy7JRbSDyHWfoxdzAKtp5jQ5Bbyl9aeH0KpiZdngT0g&oe=65C33FEA , accessed on 8th January 2024.https://www.facebook.com/photo/?fbid=2886679371376481&set=pcb.3555775264440451 , accessed on 8th January 2024.https://www.facebook.com/photo/?fbid=10156905402433862&set=pcb.2505678986194375 , accessed on 8th January 2024.https://maps.nls.uk/view/121150313 , accessed on 8th January 2024.https://maps.nls.uk/geo/explore/#zoom=17.0&lat=52.68525&lon=-2.44187&layers=168&b=1 , accessed on 8th January 2024.https://maps.nls.uk/geo/explore/#zoom=17.0&lat=52.68253&lon=-2.43685&layers=168&b=1 , accessed on 8th January 2024.https://maps.nls.uk/geo/explore/#zoom=17.0&lat=52.67930&lon=-2.42607&layers=168&b=1 , accessed on 8th January 2024.https://maps.nls.uk/geo/explore/#zoom=17.0&lat=52.67956&lon=-2.43844&layers=168&b=1 , accessed on 8th January 2024.https://www.facebook.com/groups/674238619260811/permalink/3967944629890177 , accessed on 7th November 2023.https://www.facebook.com/photo/?fbid=1853495224694906&set=pcb.2089170144434311 , accessed on 9th January 2024.https://www.facebook.com/photo/?fbid=10158161361783862&set=gm.3745067428922185 , accessed on 9th January 2024.Bob Yate; The Railways and Locos of the Lilleshall Company Hardcover; Irwell Press, Bedfordshire, 2008.
https://www.postcardfinder.co.uk/2-2-2-engine-lilleshall-company-paris-exposition-train-postcard-101243-p.asp , accessed on 10th January 2024.https://m.facebook.com/groups/674238619260811/permalink/1059102267441109 , accessed on 11th January 2024.https://www.facebook.com/photo/?fbid=2438789446357223&set=pcb.3267701209914526 , accessed on 11th January 2024.https://www.facebook.com/photo/?fbid=10153713019669890&set=gm.1091634104187925 , accessed on 11th January 2024.https://www.facebook.com/photo/?fbid=10201109752821504&set=gm.1076444759040193 https://www.facebook.com/photo?fbid=10156229799958862&set=gm.2010423612386584 , accessed on 11th January 2024.https://www.facebook.com/photo/?fbid=10201024425808382&set=gm.1059100807441255 https://www.facebook.com/photo?fbid=10156229799958862&set=gm.2010423612386584 , accessed on 11th January 2024.https://www.facebook.com/photo/?fbid=415854582741549&set=pcb.4828097803874851 https://www.facebook.com/photo?fbid=10156229799958862&set=gm.2010423612386584 , accessed on 11th January 2024.https://www.facebook.com/photo/?fbid=10156155205514890&set=pcb.1585964188165864 https://www.facebook.com/photo?fbid=10156229799958862&set=gm.2010423612386584 , accessed on 11th January 2024.https://www.facebook.com/photo/?fbid=10158258749094890&set=pcb.2971873616241574 https://www.facebook.com/photo?fbid=10156229799958862&set=gm.2010423612386584 , accessed on 11th January 2024.https://www.facebook.com/photo/?fbid=10155141661473862&set=oa.1468997059862578 https://www.facebook.com/photo?fbid=10156229799958862&set=gm.2010423612386584 , accessed on 11th January 2024.https://www.facebook.com/photo?fbid=10156229799958862&set=gm.2010423612386584 , accessed on 11th January 2024.https://www.facebook.com/photo/?fbid=10156158070314890&set=pcb.1586941058068177 , accessed on 11th January 2024.Many of the photographs taken by A.J.B. Dodd which appear in this article were first found on various Facebook Groups. A number were supplied direct by Mike Dodd, A.J.B. Dodd’s son who curates the photographs taken by his father. Particular thanks are expressed to Mike Dodd for entering into email correspondence about all of these photographs and for his generous permission to use them in this article.


