I was asked to do a talk for the Association of Shrewsbury Railway Modellers in November 2025. These are the notes and images pulled together for that talk. In many cases, the images included have been used in other articles and rather than creating new image files a link to the original image has been provided in these notes. ………
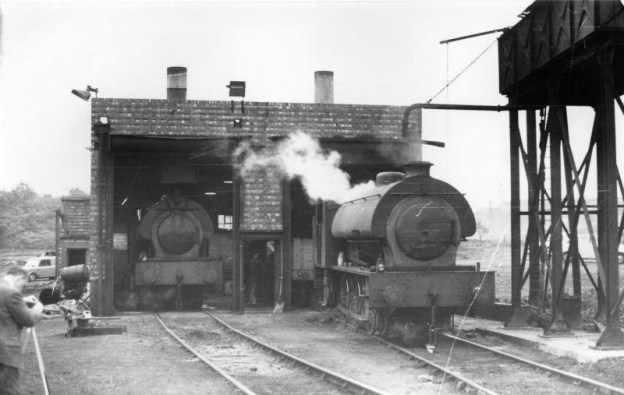
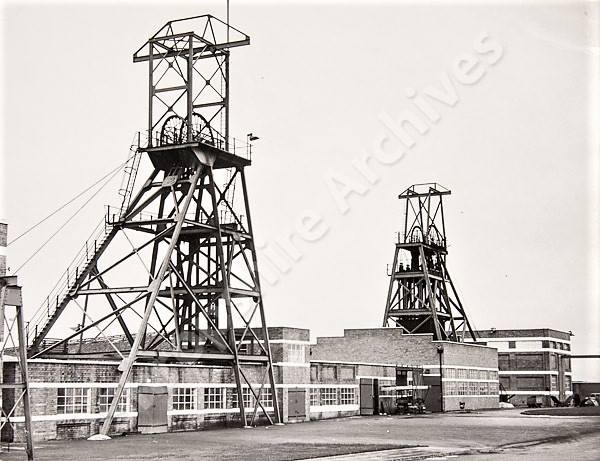
The featured image above is a view of the NCB-built engine shed near Granville Colliery. After the NCB took over the collieries owned by the Lilleshall Company, Granville Colliery supplied coal to Buildwas Power Station and the coal trains were worked by a range of locos down the 1.5 miles to Donnington. Granville Colliery had a decent sized shed and in later years used Austerity 0-6-0ST tanks but in Lilleshall Company days the bigger engines were the ex-TVR and Barry railway engines. This image and the accompanying text were shared by Marcus Keane on the Telford Memories Facebook Group on 15th September 2015. [38]
The Lilleshall Company
Sir John Leveson became Earl Gower in 1746. His son Granville Leveson Gower became the second Earl in 1754. They owned limestone quarries and coal mines in Shropshire and had significant land holdings across the country.
Granville Leveson Gower was elected to Parliament in 1744. With the death of his elder brother in 1746, he became known by the courtesy title of Viscount Trentham until he succeeded his father as Earl Gower in 1754. He built the earlier Lilleshall Hall, converting a 17th-century house located in the village of Lilleshall into a country residence around the late 1750s. [1]
He remained active in politics until his retirement later in 1794. In 1786, he was created Marquess of Stafford as a reward for his services. He dies in 1803. [1] He took an active interest in the efficient running of his local estates, including those at Sherrifhales, Lilleshall, Donnington Wood, St Georges, Priorslee, Wombridge and Snedshill. [2]
The second Earl’s brother-in-law was Francis, 3rd Duke of Bridgewater, who was the originator of the Bridgewater Canal which carried coal out of his mines in the Manchester area. Earl Gower was introduced to the brothers Thomas and John Gilbert John Gilbert was instrumental in the construction of the Bridgewater Canal. Along with the Gilbert brothers, the second Earl formed the Lilleshall Partnership in 1764. Initially, it focused on improving the extraction and supply of lime for use in agriculture and as a flux in iron-making. [2]
The Earl had a vested interest in producing and delivering limestone as cheaply as possible. The Lilleshall Partnership recognised that a better communication system was required between its widely dispersed sites and in 1765 began the construction of a 5.5 mile long canal. It ran from the Earl’s holdings in Donnington Wood to wharves at Pave Lane and was known as the Donnington Wood Tug Boat Canal.
Large scale iron making began in the parish of Lilleshall in 1785 when a blast furnace was operating at Donnington Wood. The works was started by William Reynolds and Joseph Rathbone. By 1802 there were two furnaces and a third was added in that year.
By 1802, the partnership and its associated companies were dissolved and replaced by The Lilleshall Company which over time developed interests in mechanical engineering, coal mining, iron and steel making and brickworks. The company was noted for its winding, pumping and blast engines and operated a private railway network. It also constructed railway locomotives from 1862 to 1888. [2]
In 1880, the Lilleshall Company became a Public company. After the Second World War its mines were nationalised as was the Lilleshall Iron and Steel Co under the Iron and Steel Act but then denationalised in 1954 and sold back to Lilleshall Company. The company’s railways were closed in 1969. [2]
The Mines
The Friends of Granville Country Park tell us that the Lilleshall Company “sank its first deep mine at Waxhill Barracks in 1818 and another the Freehold pit, at about the same time. The Muxton Bridge pit was opened by 1840. There were over 400 acres of coalpits and waste tips in the area in the 1840s. Their production was running at some 100,000 tons of coal a year with 50,000 tons of iron ore. ” [2]
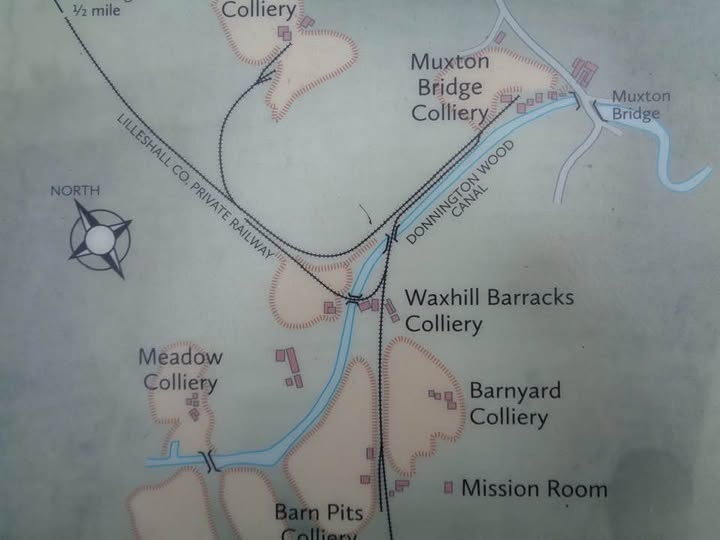
Map of Muxton Bridge, Waxhill Barracks and Barnyard Collieries. This image was shared by Brian Edwards on the Granville Colliery Facebook Group on 29th September 2022. It shows the rail network prior to the installation of the cutoff line, Granville Colliery sits off the bottom of this image, (c) Unknown. [14]
Granville Colliery
“By 1860, the Granville pit had been sunk and sinking of the Grange (originally the Albert and Alexander) pit began in 1864. Grange Colliery, Granville Colliery, The Muxton Bridge, Woodhouse and Stafford Collieries were known as the Deepside Mines.” [2]
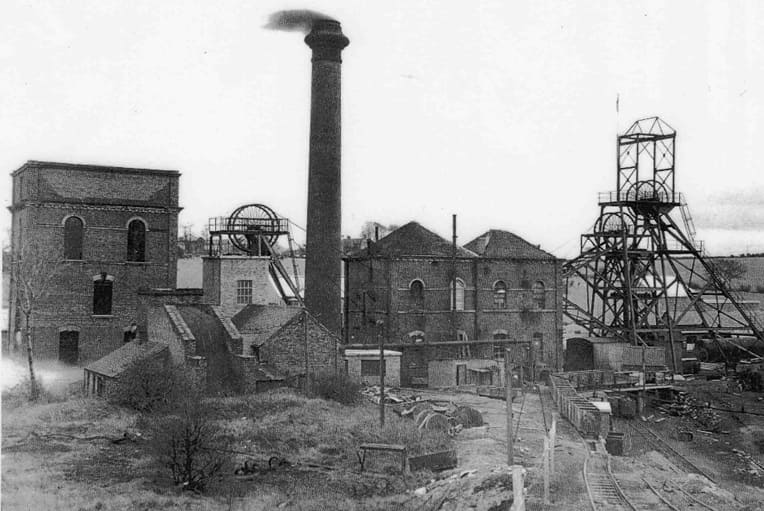
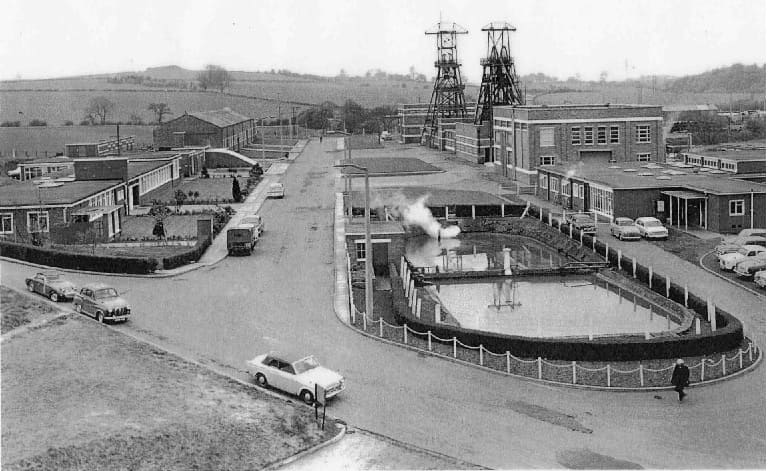
Granville Colliery was nationalised after the Second World War. It remained under National Coal Board control until closure in 1979. At the time of closure it was employing 560 people. This image was shared on the Granville Colliery Facebook Group by Sharon Bradburn on 10th July 2018, (c) Unknown. [4]
“From the late 19th century, coal mining gradually declined. The Waxhill barracks colliery ceased production in 1900 and Muxton Bridge soon after. The Freehold colliery closed in 1928 and only the Grange and Granville collieries survived until nationalisation in 1947. In 1951 the two were connected underground and from 1952 the Grange served mainly to ventilate the Granville. In 1979 the Granville colliery, which employed 560 men, was closed. It was the last coal mine in Shropshire.” [2]
Bob Yate tells us that, “The most prolific of the collieries, [Granville Colliery] supplied the LNWR, GWR and Cambrian Railways with locomotive coal, and latterly also to Ironbridge ‘B’ Power Station. In 1896, there were 177 underground and 67 surface workers. Later the pit had a fairly consistent workforce of around 300 men, but after the closure of the nearby Kemberton colliery in 1967, this grew to 900 men, but shrank again to around 600 in the early 1970s. Meanwhile, the annual output had grown from around 300-350,000 tons to 600,000 tons in the late 1960s.” [25: p16]
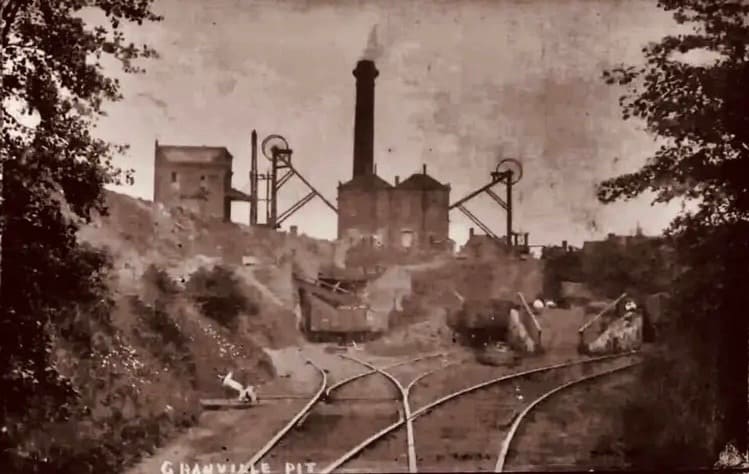
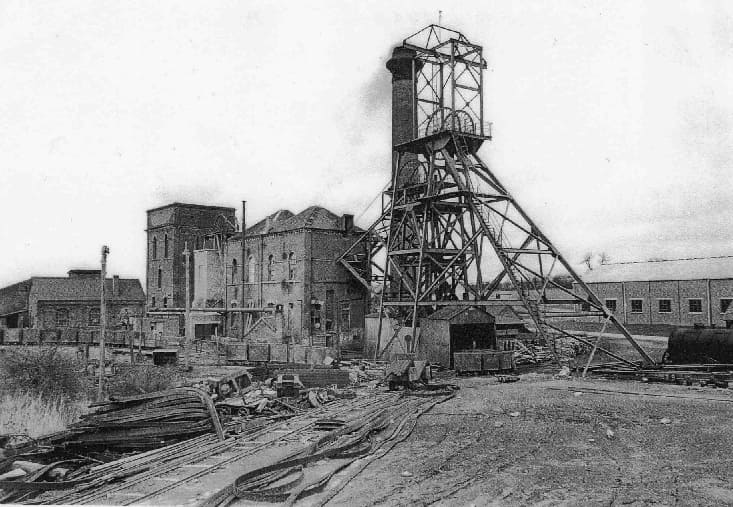
An early photograph of Granville Pit, taken from the West in around 1900. This image was shared on the Granville Colliery Facebook Group by Ray Robinson on 20th May 2024, (c) Unknown. [6]
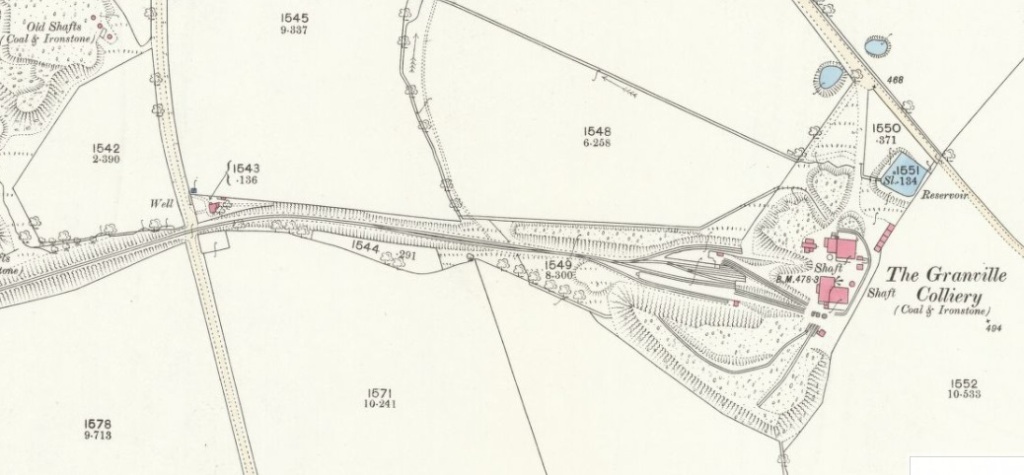
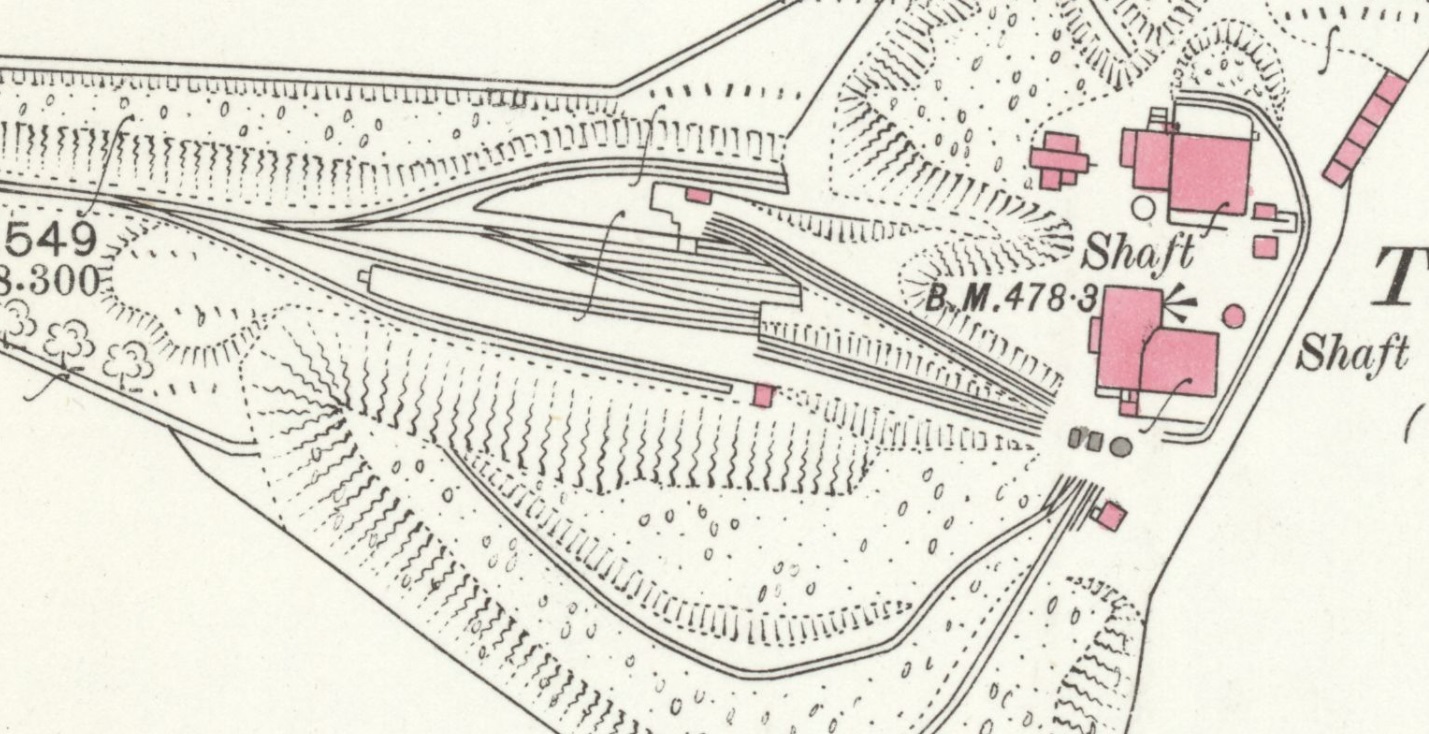
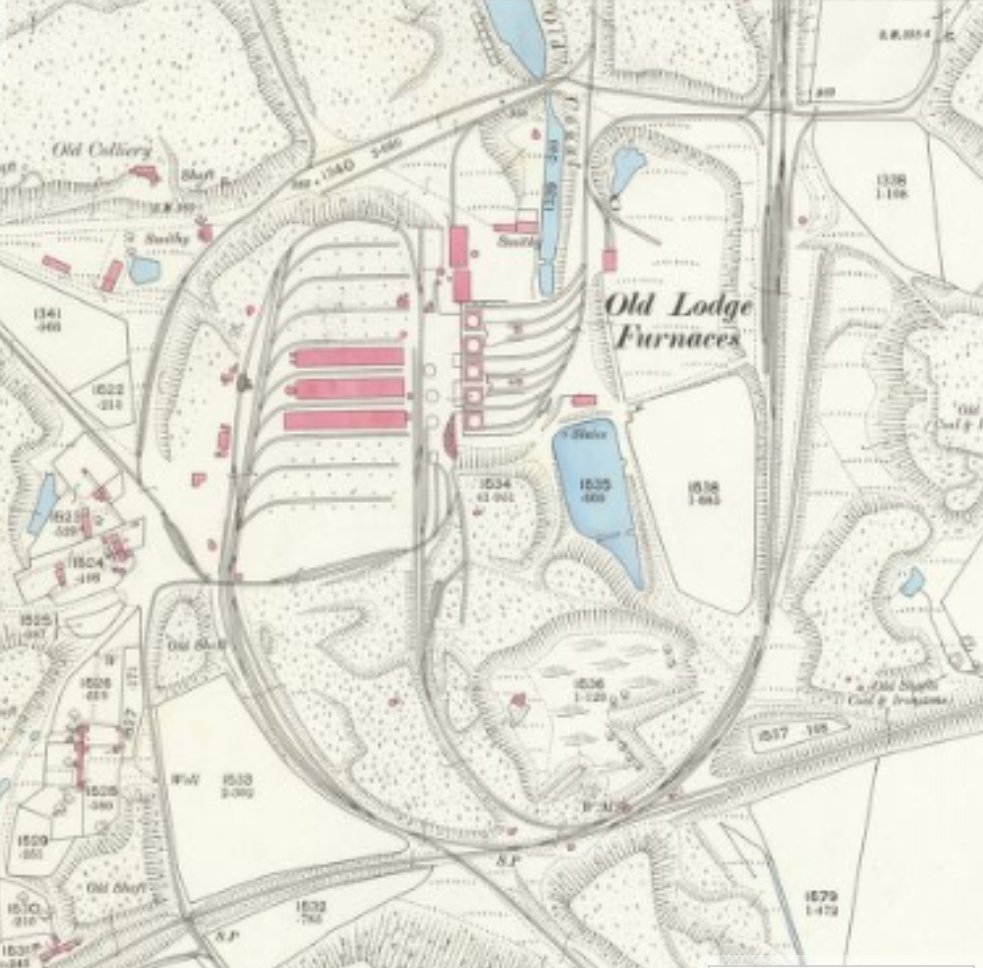
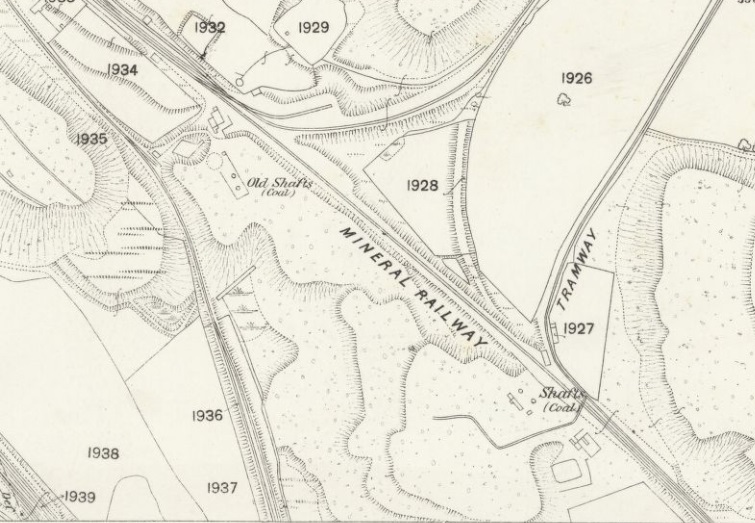
This extract from the 25″ Ordnance Survey of 1881/1882 shows the full length of the Mineral Railway branch from the East side of the map extracts above which show Old Lodge Furnaces. It is worth noting the loop which allowed locomotives to run round their trains just to the West of the Colliery site. [26]
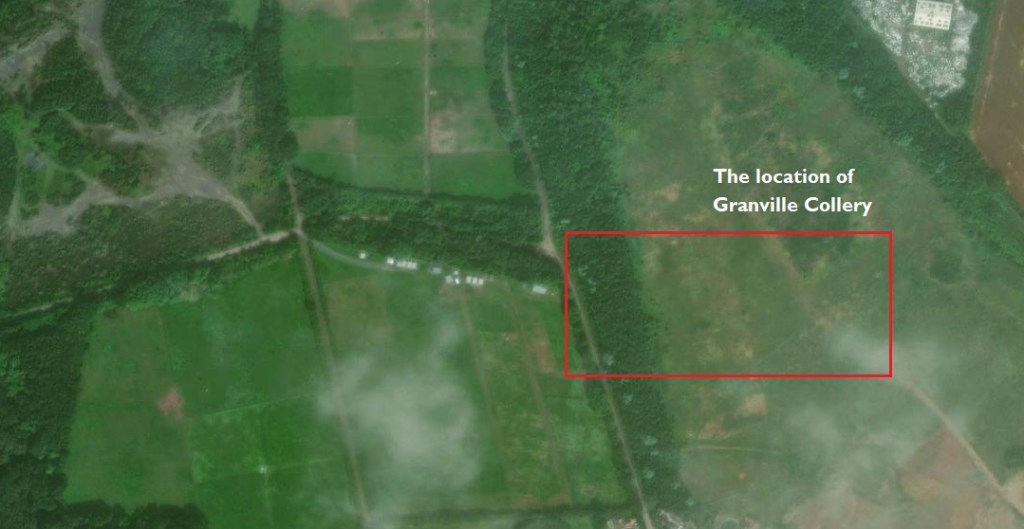
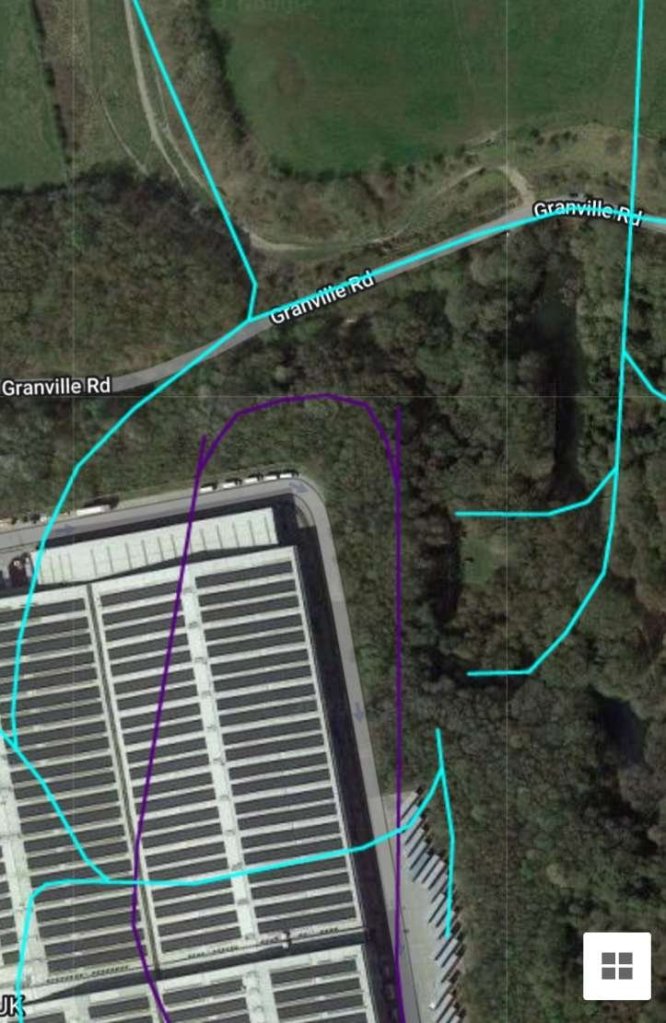
An extract from the ERSI satellite imagery provided by the National Library of Scotland. The two lanes which appear on the map extract above can easily be seen on this satellite image. The line of the old Mineral Railway is also easy to make out. Nothing remains of the old colliery buildings. [27]
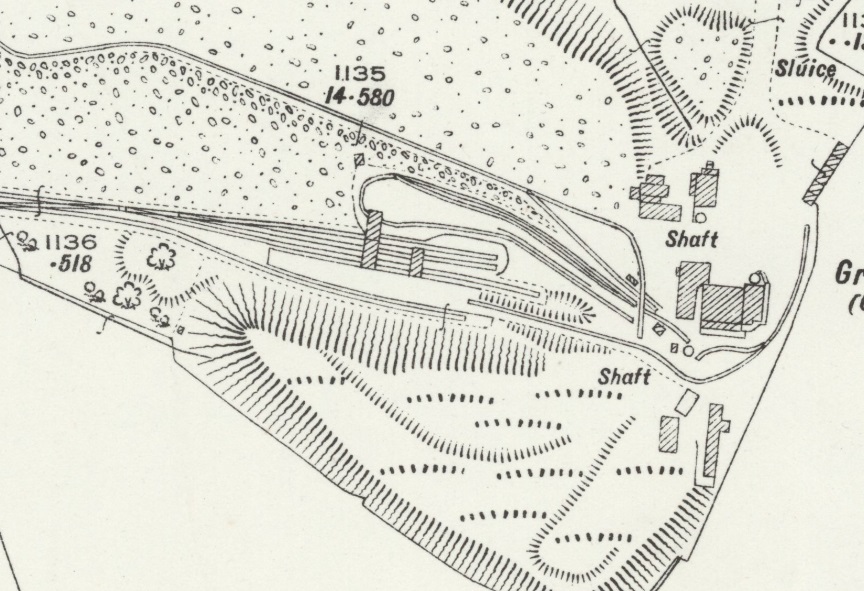
A similar extract from the 25″ Ordnance Survey of 1901/1902. In 20 years some changes have occurred. The more southerly of the two colliery buildings has been enlarged and the new tramway/tramroad has been provided onto the spoil heap North of the standard-gauge mineral railway terminus, [28]
This map extract comes from the 1925/1927 edition of the 25″ Ordnance Survey. The screens have been built and some modifications to the internal tramway layout have occurred. [19]
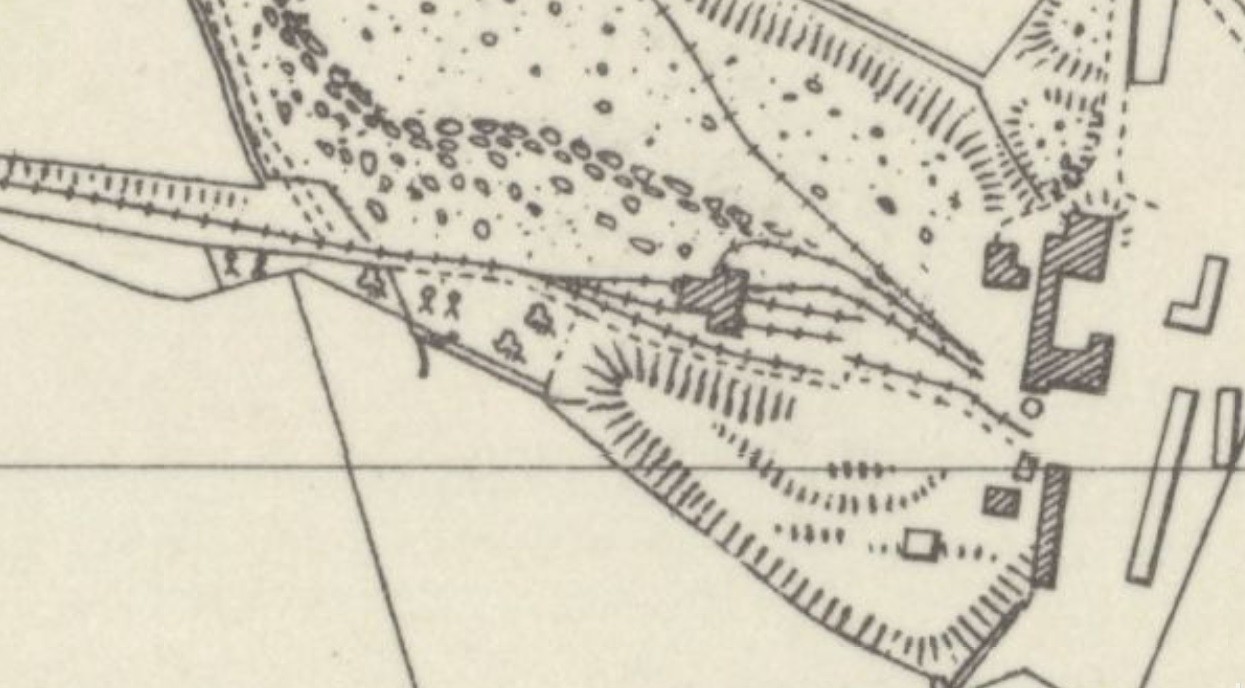
The Colliery site on the 1:10,000 Ordnance Survey published in 1954. The tramway to the spoil heap has been relocated and the buildings on site have been altered. [30]
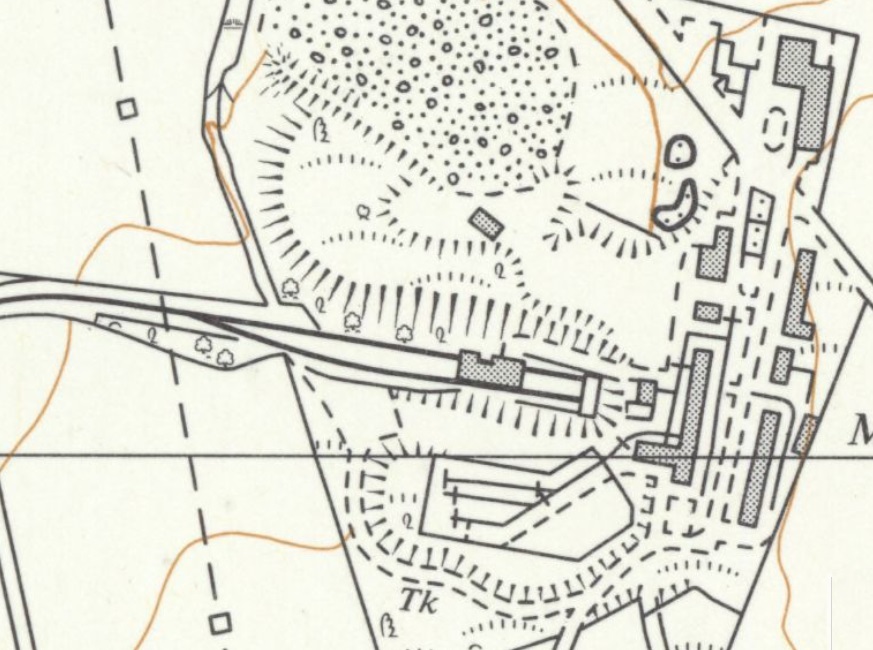
The colliery site on the 1:10,000 Ordnance Survey published in 1967. A complete refurbishment of the buildings above ground has taken place. The screens building is different and the area to the East of the railway has seen significant reconstruction. An internal tramway can now be seen to the South and East of the standard gauge line. [31]
This extract from the same Ordnance Survey sheet of 1967 shows the wider area close to Granville Colliery and the rationalisation which had by then taken place. The line North off this extract heads for the site of Muxtonbridge Colliery where trains to the Donnington Sidings would once have reversed. The line leaving the extract to the West runs on to the rest of the Lilleshall Company’s network. [31]
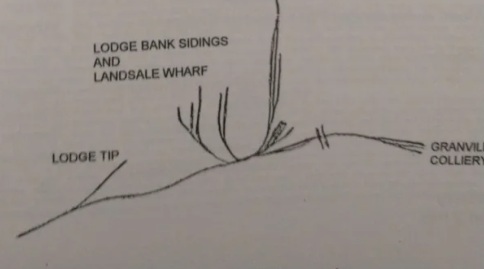
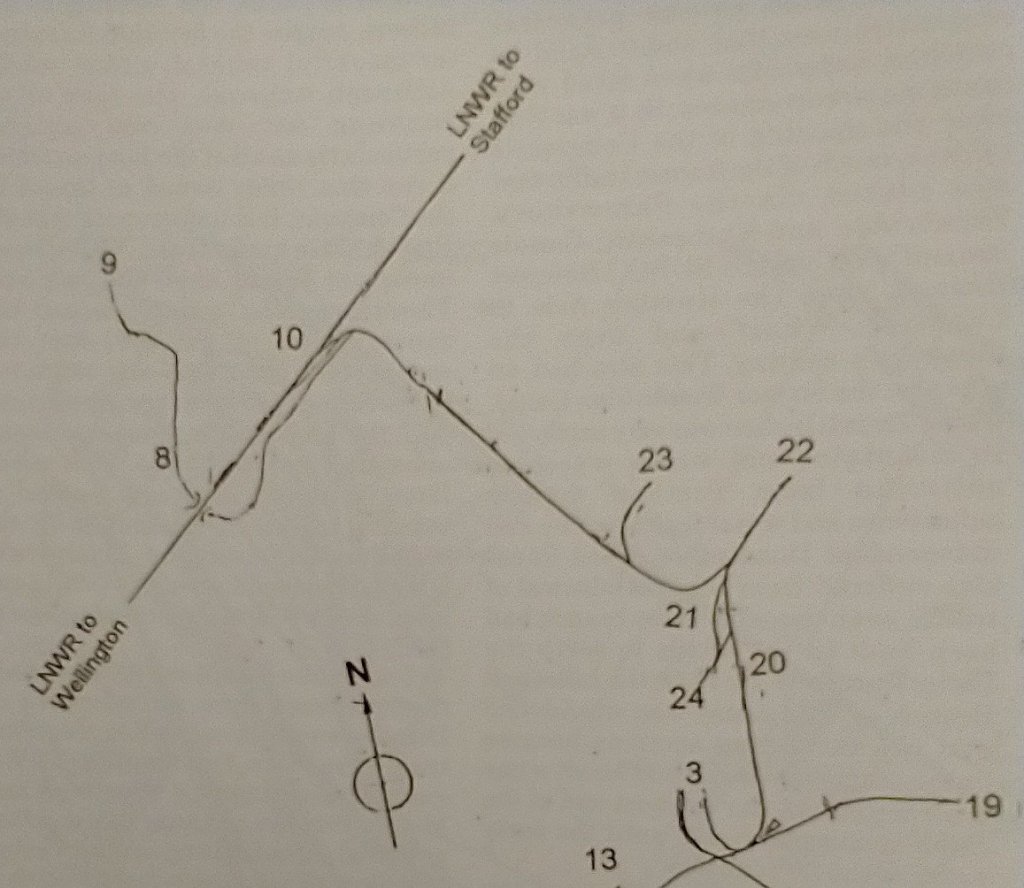
By 1970, this was the layout of the lines between the mainline at Donnington and the Colliery. This hand-drawn image appears in Bob Yate’s book. [25: p119]
Having looked at maps showing the Granville Colliery site at different points in its history, some photographs will help us better to envisage the site.
The picture referred to by Cliff Hewitt in his notes above. The image was shared by Cliff Hewitt on the Telford Memories Facebook Group on 1st October 2017. [44]
What appears to be a train of empties at the screens at Granville Colliery. [11]
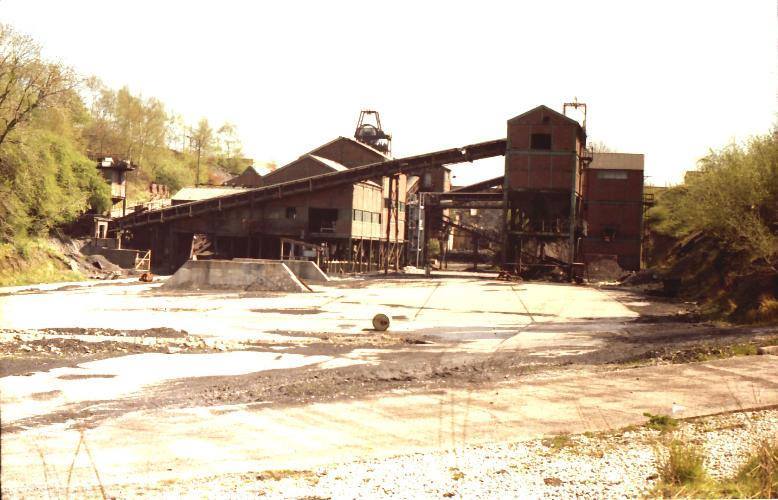
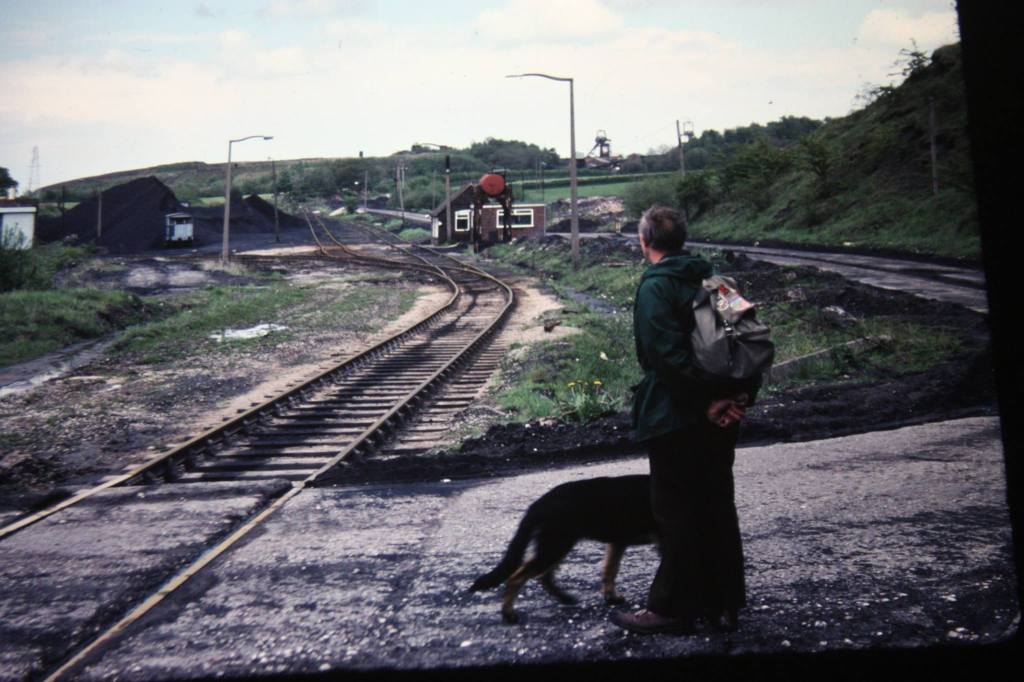
The same location but after the rail link was severed. This image was shared on the Granville Colliery Facebook Group by Linda Howard on 9th March 2014. [18]
A view of the screens from behind. This image was shared on the Granville Colliery Facebook Group by John Wood on 30th January 2015. [43]
Granville Colliery had its own 2ft 3in narrow gauge railway/tramway underground and close to the main shafts, battery powered locomotives were used below ground. …
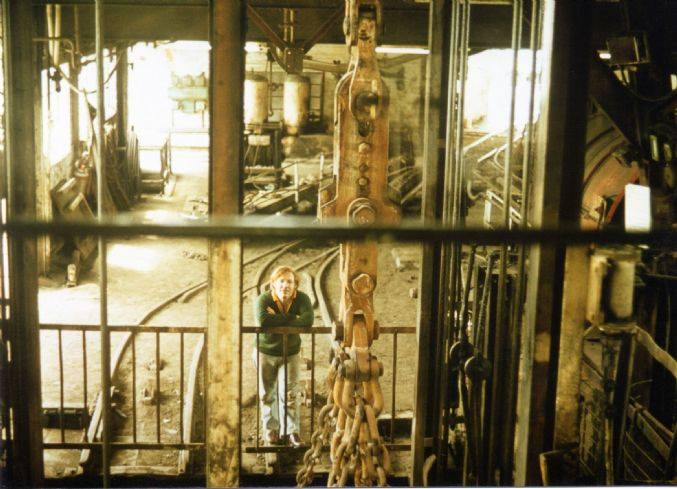
Under the head gear at Granville Colliery. Coal was lifted up the shaft and run off to left to what appears to be a tippler. From there the coal went down to the screens. This image was shared on the Granville Colliery Facebook Group on 1st March 2014 by Marcus Keane. [20]
The same lines seen from the opposite direction and from above. This image was shared on the Granville Colliery Facebook Group on 1st March 2014 by Marcus Keane. [21]
Two of the tubs/wagons used underground are seen in this image which was shared by John Wood on the Granville Colliery Facebook Group on 30th January 2015. [23]
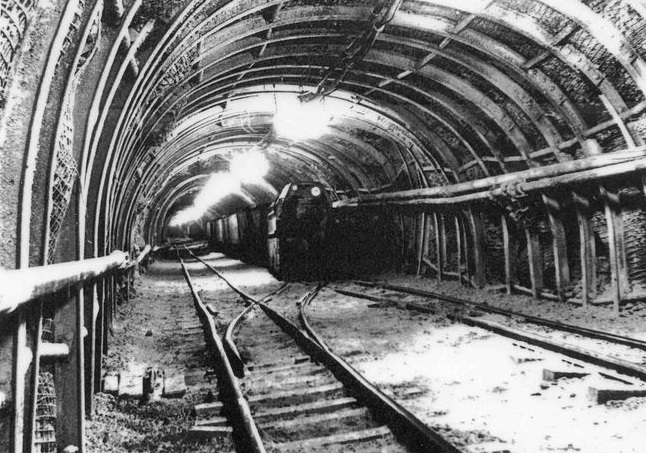
Underground, there was an extensive network of 2ft 3in gauge lines which were initially served by horse power but which were later to see a number of dedicated battery-powered locomotives in use.
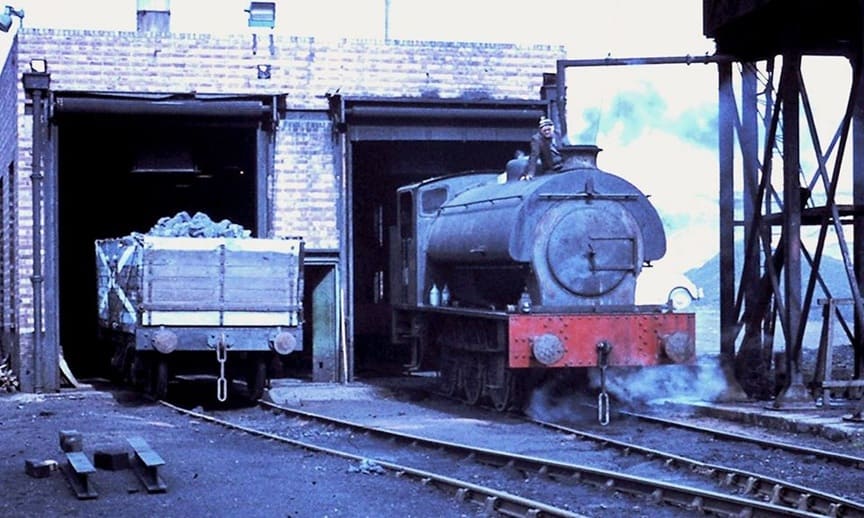
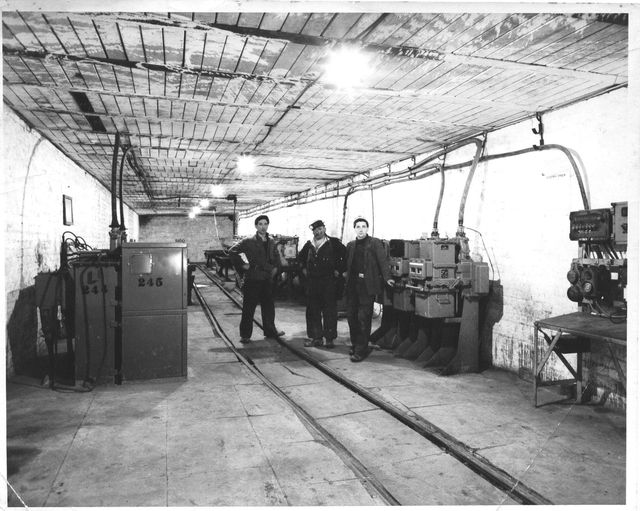
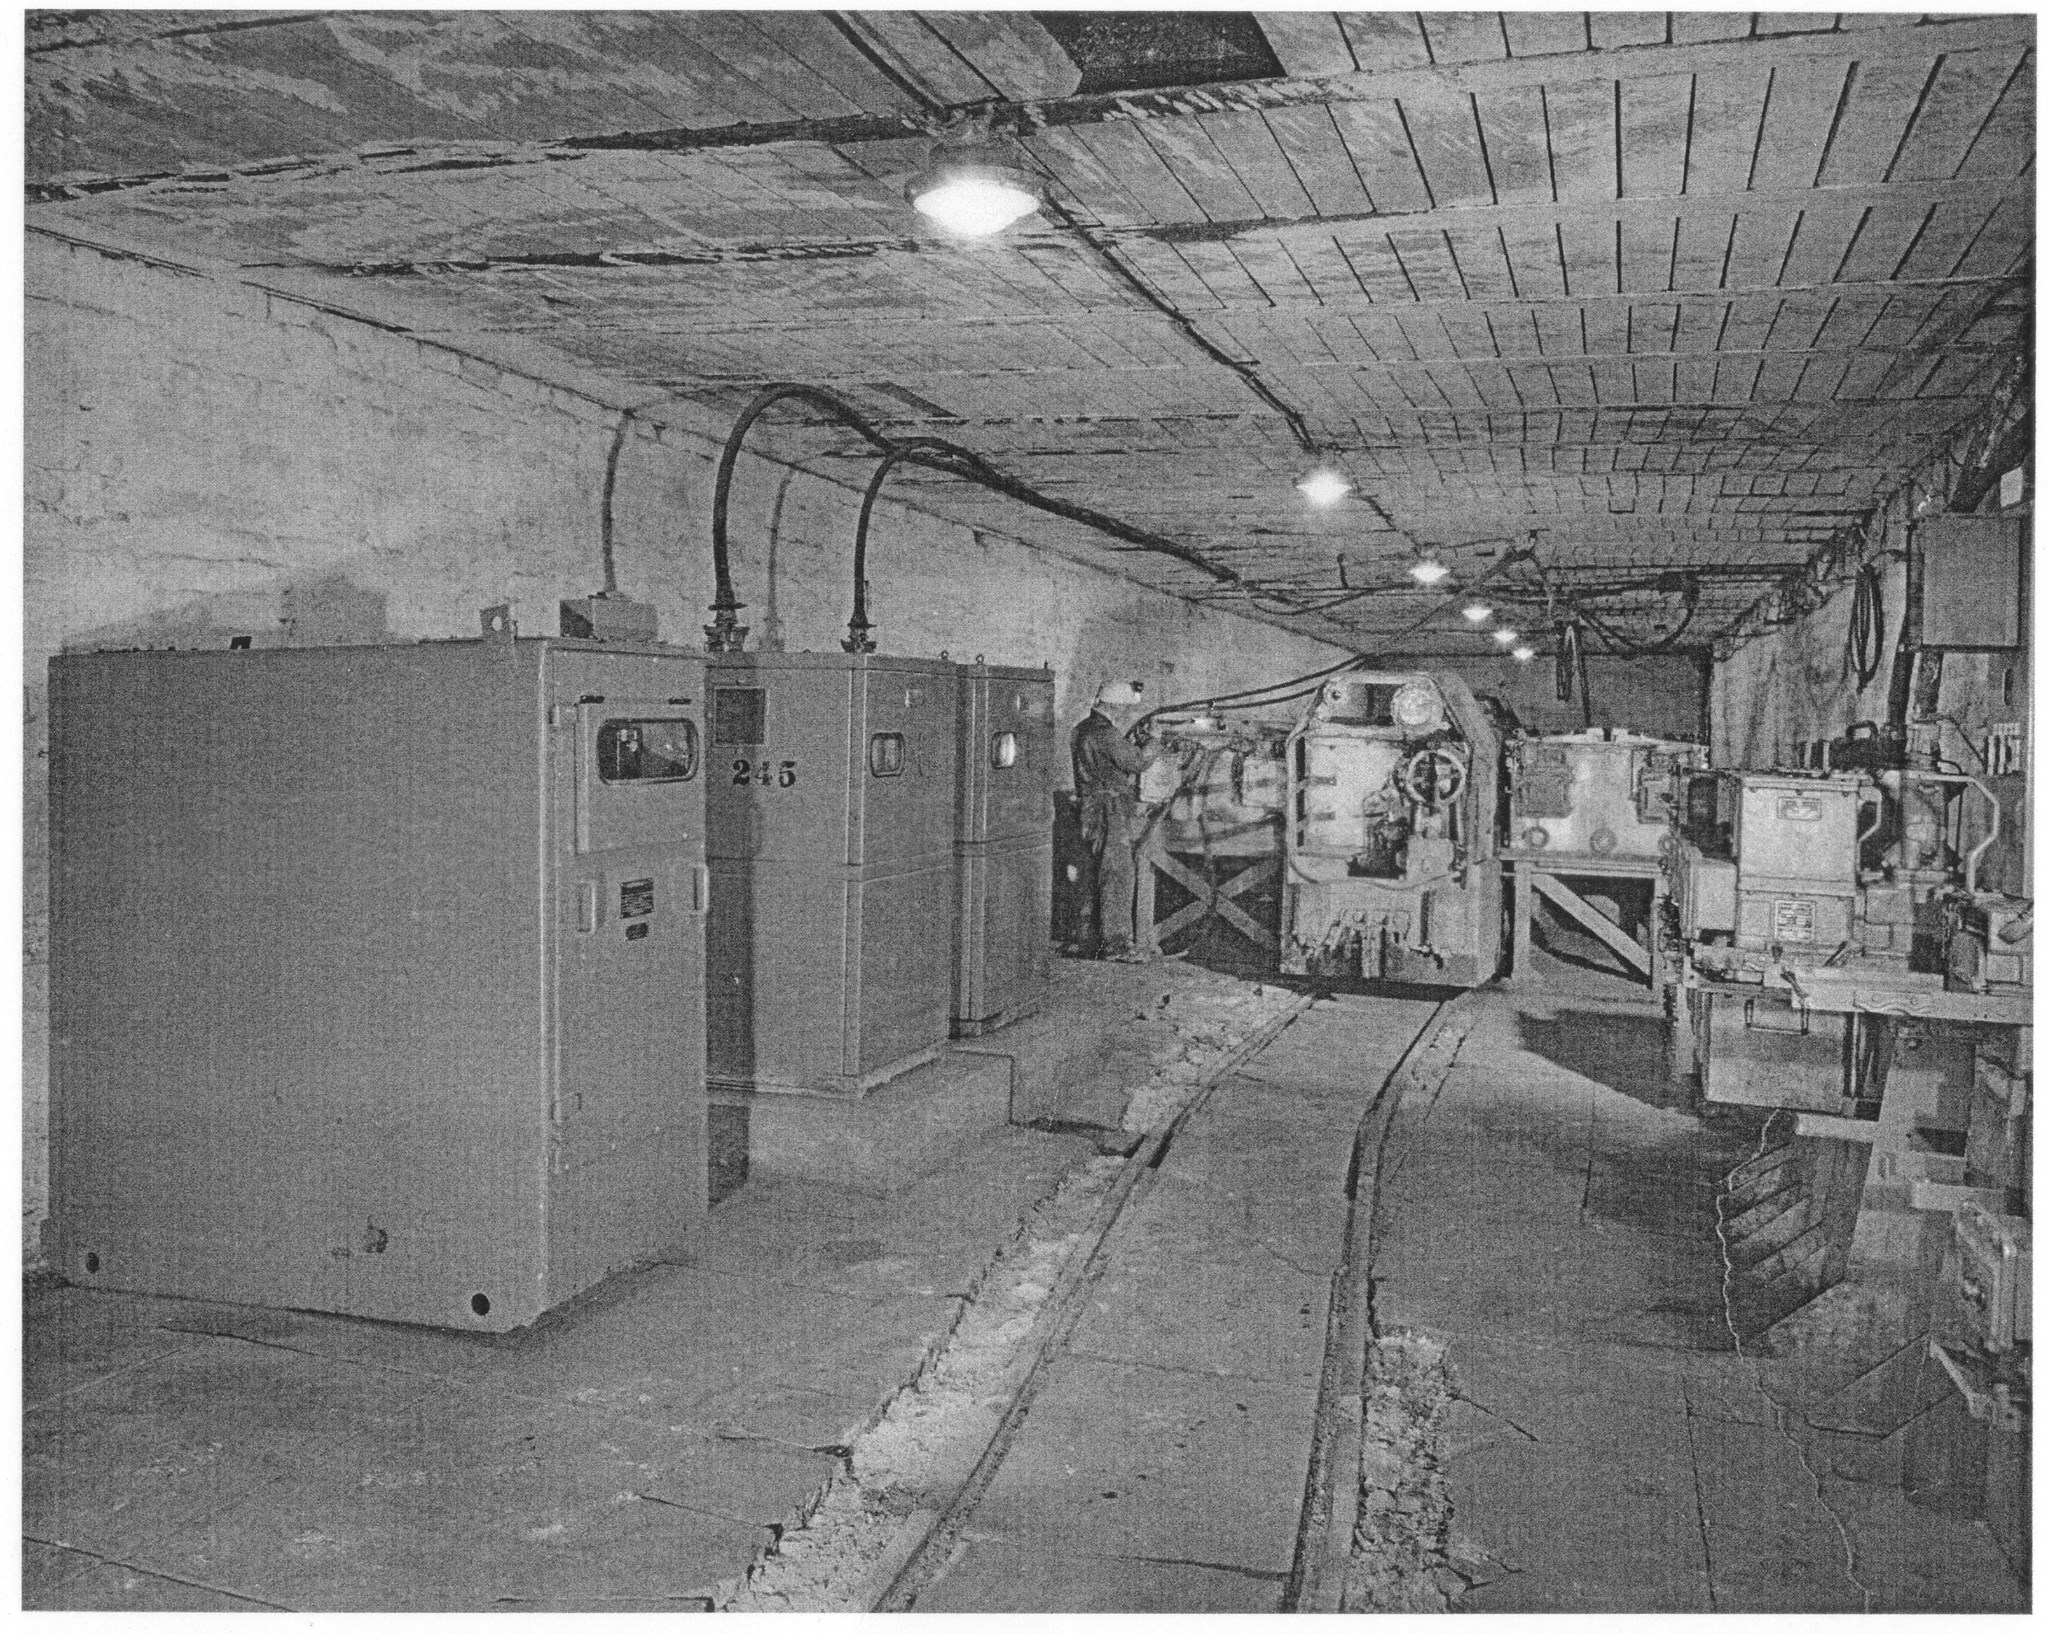
The underground workshop/garage at Granville Colliery in 1958. Granville had three English Electric battery locos and the garage had battery charging benches on either side of the rails. This image was shared by Cliff Hewitt on 22nd November 2015 on the Granville Colliery Facebook Group. [24]
Granville Colliery had English Electric battery locos, picture is of the loco garage with the 3.3kv battery chargers to the left of frame switchgear to the right & a loco in the background ready for a battery change. This image was shared by Cliff Hewitt as a comment under a post by Ray Pascal, dated 18th November 2015, on the Granville Colliery Facebook Group. [24]
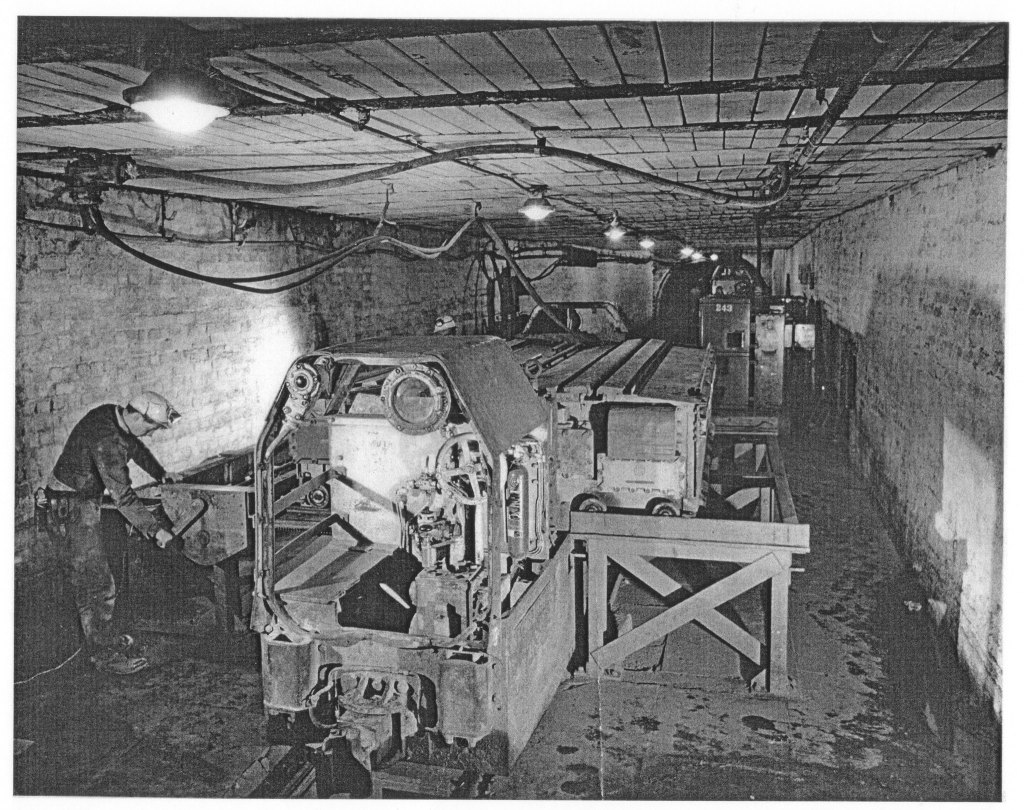
A loco battery changeout. This image was shared on the Granville Colliery Facebook Group on 18th November 2015 by Cliff Hewitt. [24]
Old Lodge Furnaces
In 1824 the company commissioned two new blast furnaces. They were named the Old Lodge furnaces because of their proximity to the site of an old hunting lodge which was demolished in 1820. In March 1825 the Lilleshall Company paid the Coalbrookdale Company £2,392 for the works. George Roden, a stonemason from the Nabb, was paid £425 in 1825 and just over £777 in 1826 for erecting loading ramps and the retaining walls. In 1830 the Donnington Wood and the Old Lodge ironworks together produced 15,110 tons. A third furnace was added in 1846 and two more in 1859. New blast beam engines, manufactured by the Lilleshall Company, were installed in 1862 and the height of the furnaces was increased from 50 to 71 feet at about the same time.
Limestone came, via the canal, from the Lilleshall quarries and the coal (coke) and iron stone from the local pits via an extensive system of tramways, some of which, were later converted to standard gauge railways.
The Old Lodge Furnaces produced cold-blast pig iron of the finest quality, but eventually it could not compete with cheaper iron made elsewhere and in 1888 the last of the Old Lodge furnaces was blown out. The furnaces were demolished in 1905 by Thomas Molineaux Jnr, including a tall chimney 140 feet high by 13 feet diameter, known locally as “The Lodge Stack”. In 1956 the stone was reused for St Mathew’s Church. Thereafter the company concentrated all its iron and steel making at Priorslee.
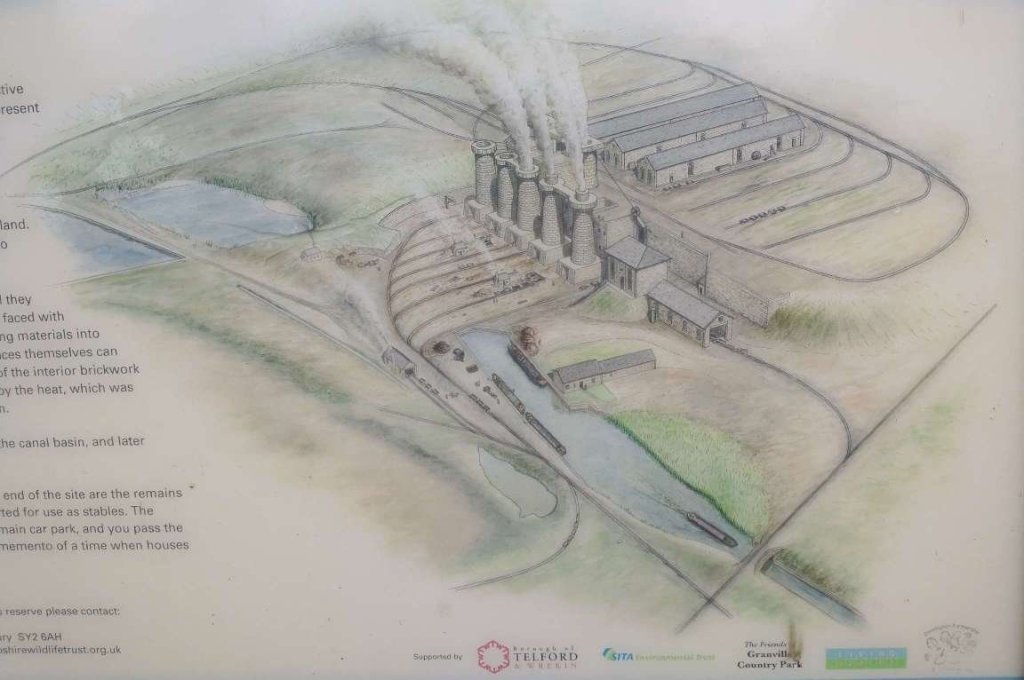
An artist’s impression of what the Old Lodge Furnaces site would have looked like in its heyday. The view is from the Northeast. The canal arm which served the furnaces can be seen entering the sketch from the bottom-right (the North). The image is a little misleading as it shows narrow-boats on the canal when in fact tub-boats would have been used. The tub-boats would have been drawn by horses. The rails shown as a schematic representation of the rails on the site throughout its history and show an engine shed on the North end of the fun of furnaces. [My photograph, 27th July 2023]
This map extract is taken from the 25″ Ordnance Survey of 1881/1882. The canal arm enters from the top of the extract and railways/tramways are shown in preponderance, with the furnaces themselves in a row running North-South just above the centre of the extract. The line running off the extract to the East heads towards Granville Colliery. The line running off the extract to the South runs to Dawes Bower and Grange Colliery. Of the lines exiting the extract to the West, one, running Northwest (at the top corner of the lower image) is the old tramway link to Lubstree Wharf. There are also two lines leaving the bottom-left corner of the lower image, the lower line runs towards collieries/shafts local to the furnaces and is probably a tramway at a higher level than the upper of the two lines which is in cutting and is the connection from Old Lodge Furnaces into the wider Mineral Railway network belonging to the Lilleshall Company. [46]
This extract from RailMapOnline.com’s satellite imagery shows the area of the furnaces in the 21st century, a little more of the area immediately to the North than appears on the OS map extract above and less on the East-West axis. The turquoise lines are symbolic representations of the tramway network which preceded the mineral railway which is represented by the purple lines. The two tramway routes leading North out of this and the map extract served, from the left: Meadow Colliery (which appears in the first map extract below); Barn Colliery; Waxhill Barracks and Barracks Colliery; and Muxton Bridge Colliery. (That line, from Muxton Bridge Colliery to the site of Old Lodge Furnaces is illustrated on the map extracts which follow the one covering Meadow Colliery). [47]
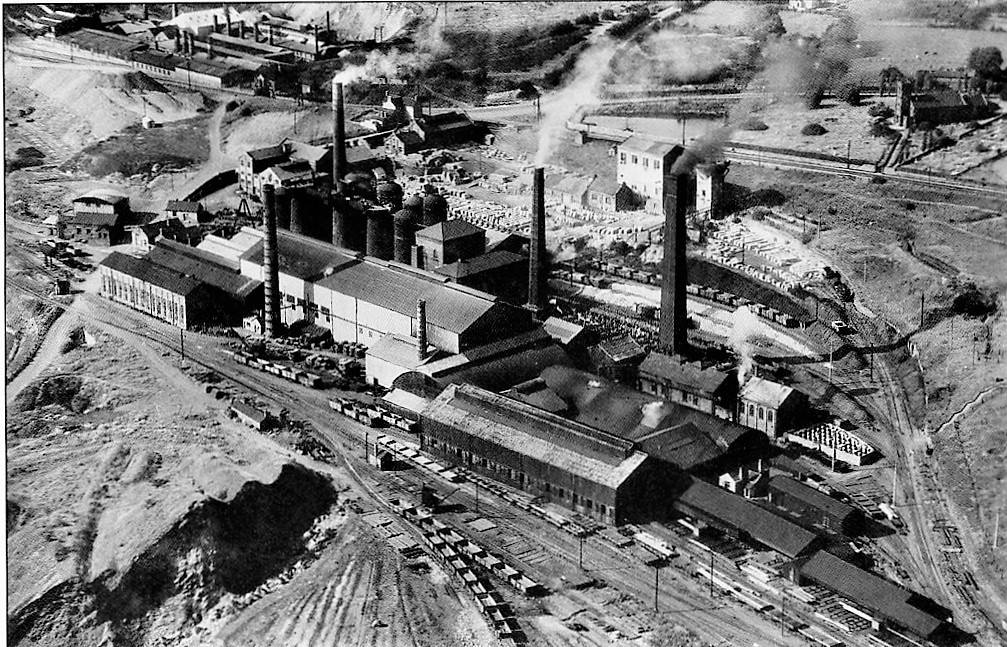
A view of Old Lodge Furnaces from the East. [4] (This image was first produced in the ‘London Trade Exchange’ of 2nd January 1875. Some of the tramways are visible, as are the coke ovens in the distance, and the engine house on the right, although the engraver has omitted the chimney beside the engine house.) [25: p11]
The site of the furnaces became the main marshalling are for coal wagons from a number of the collieries, but particularly Granville Colliery
The Lilleshall Company Tramway and Railway Networks
A significant network of tramways and later railways served the Lilleshall Company’s interests in East Shropshire.
Bob Yate provides a sketch of the whole of the Lilleshall Company’s network of railways. This extract from the sketch map shows the length of their railways between the Humber Arm and Granville Colliery. The locations shown on this extract are: 3. Old Lodge Furnaces; 8. The Humber Arm Railway; 9. Lubstree Wharf; 10. The Donnington (LNWR) exchange sidings and the Midland Ironworks; 13. Lodge Trip; 19. Granville Colliery; 20. Barn Pits Colliery; 21. Waxhill Barracks Colliery; 22. Muxton Bridge Colliery; 23. Freehold Colliery; and 24. Shepherd Slag Crushing Plant. Yaye does not record Meadow Colliery which was close to the Donnington Wood Canal to the Southwest of Muxton Bridge Colliery and apparently tramway served until its closure. [2: p38]
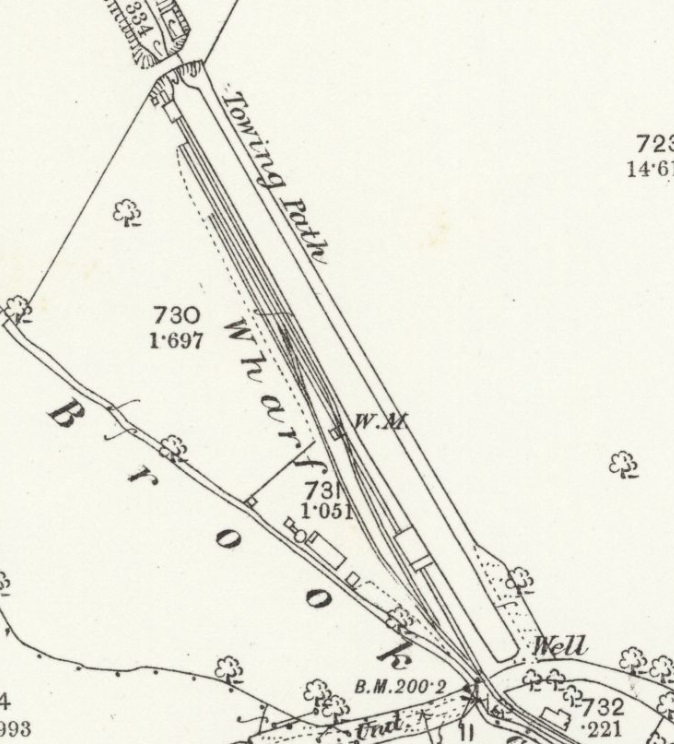
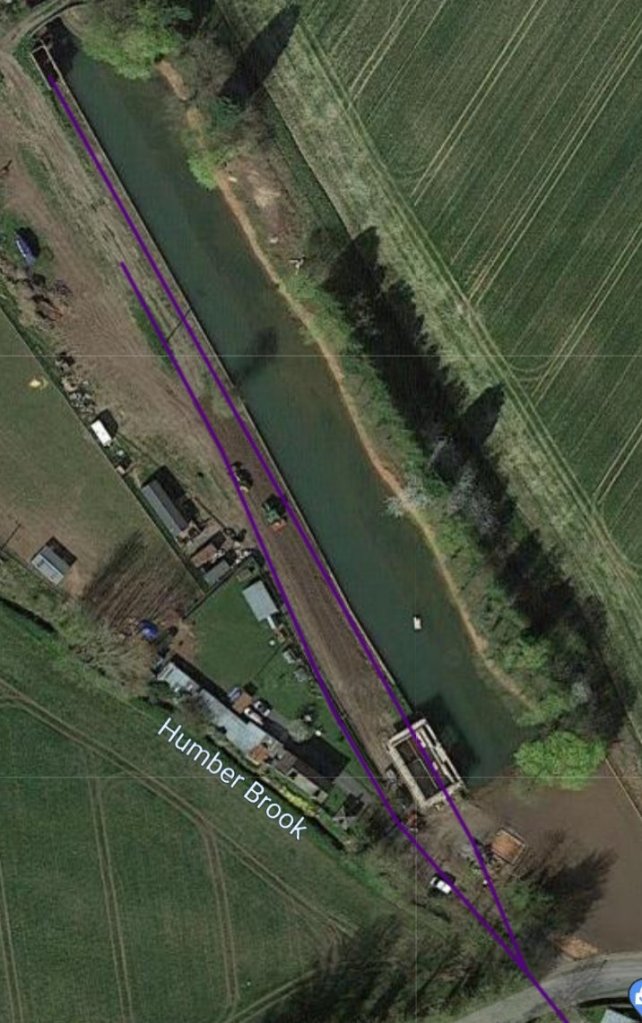
The northernmost point on the network of tramways/tramroads was a wharf on the Humber Arm of the Newport Branch of the Shropshire Union Canal. That short branch canal ran from Kynnersley to Lubstree close to The Humbers, a hamlet located to the North of the old LNWR mainline through Donnington and on the North side of Venning Barracks, the present base of the 11th Signal Brigade and Headquarters West Midlands, part of the British Army’s 3rd UK Division. The early tramroad North of the old LNWR line was later replaced by a standard-gauge line. The length of tramroad to the South of the LNWR line was eventually abandoned in favour of a standard gauge line to the East.
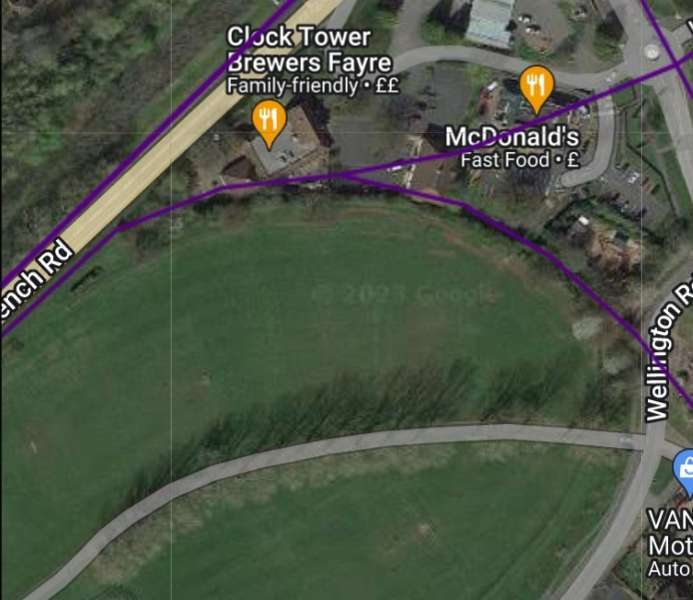
Approximately the same area as shown on the map extract above, as it appears on the RailMapOnline.com satellite imagery. The purple lines are the approximate line of the Mineral Railway that replaced the tramway we will following first. Satellite imagery shows nothing of the Canal Arm to the North of this image. Heading to the North from here, the line of the canal traverses open fields and then Aqueduct plantation. The trees in the plantation obscure any direct evidence of the old canal arm from above and, similarly, the location of its junction with the Shropshire Union Canal Newport Branch. Significant work has taken place at this location to convert derelict buildings to housing. [47]
The modern home created from the goods shed at Lubstree. [48]
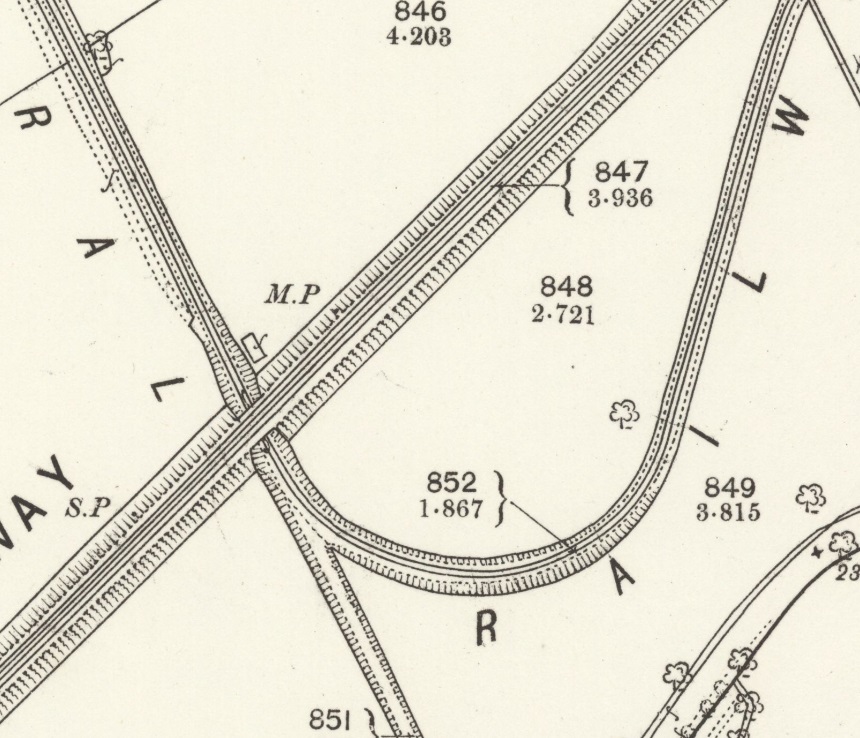
As shown on Yate’s sketch plan above, the line ran South towards the LNWR main line, passing under it by means of the bridge. The LNWR line has been replaced by the A518.
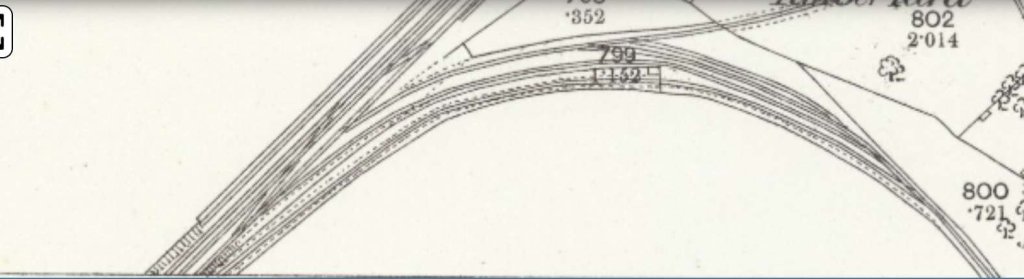
This extract from the 1882 25″ Ordnance Survey shows the point at which the LNWR bridged the Lilleshall Company’s tramway/railway. It also shows the old tramway route continuing to the South-southeast and the later standard-gauge mineral railway curving round to the Northeast to run parallel to the LNWR main line. [49]
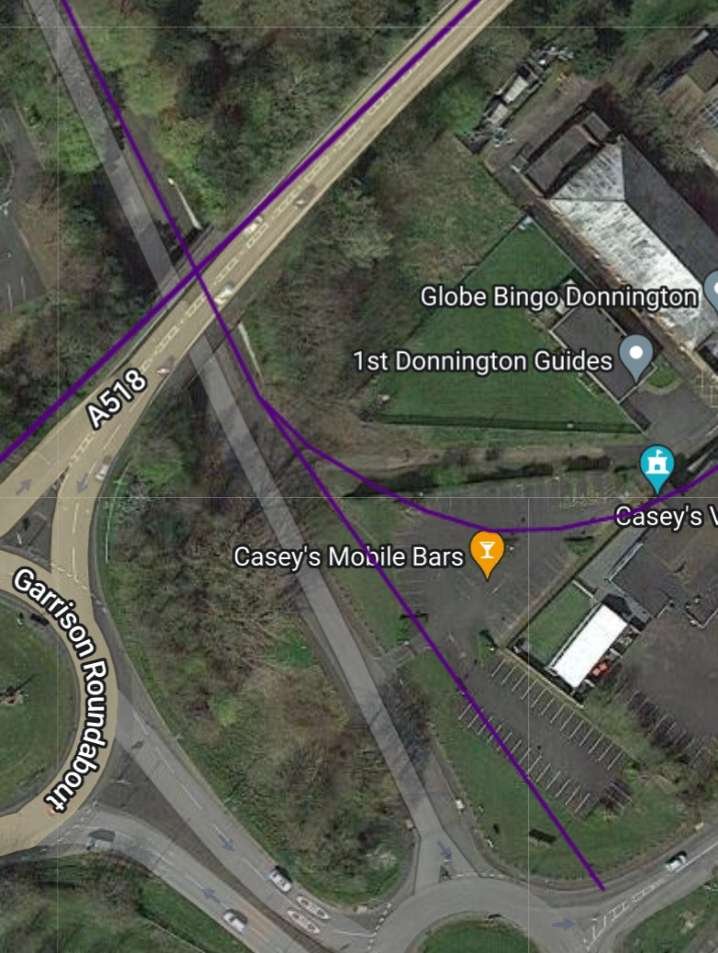
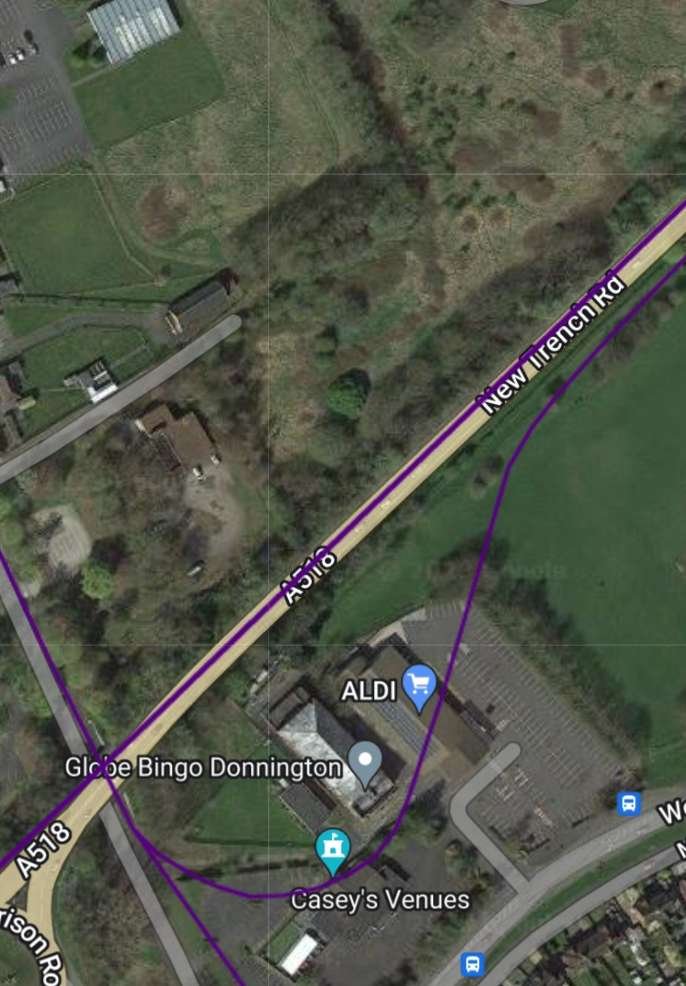
This RailMapOnline satellite image shows the features noted on map extract above and shows the dramatic changes which have occurred in the immediate vicinity of the old tramway. The tramway route is not followed by RailMapOnline South-southeast of Wellington Road. It runs Southeast towards Old Lodge Furnaces. [47]
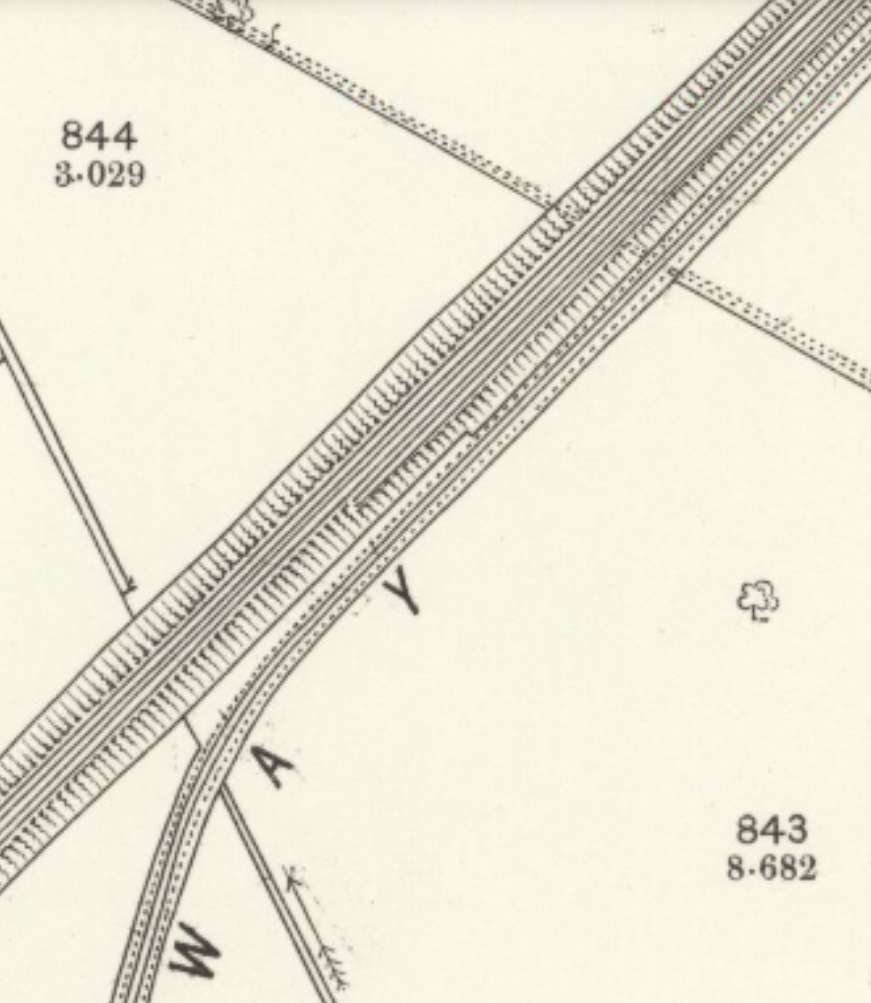
After passing under the LNWR main line, the Lilleshall Company’s Mineral Railway turned Northeast to run alongside the LNWR for a short distance.
This map extract shows the mineral railway curving away from the LNWR mainline. There were exchange sidings at this location and lines which accessed a Timber Yard and the Midland Ironworks, both on the East side of the LNWR mainline. [50]
On the curve on Donnington Sidings looking East. This is the same train as shown on the next picture. This image was shared by Carole Anne Huselbee on the Telford Memories Facebook Group on 14th September 2014. [51]
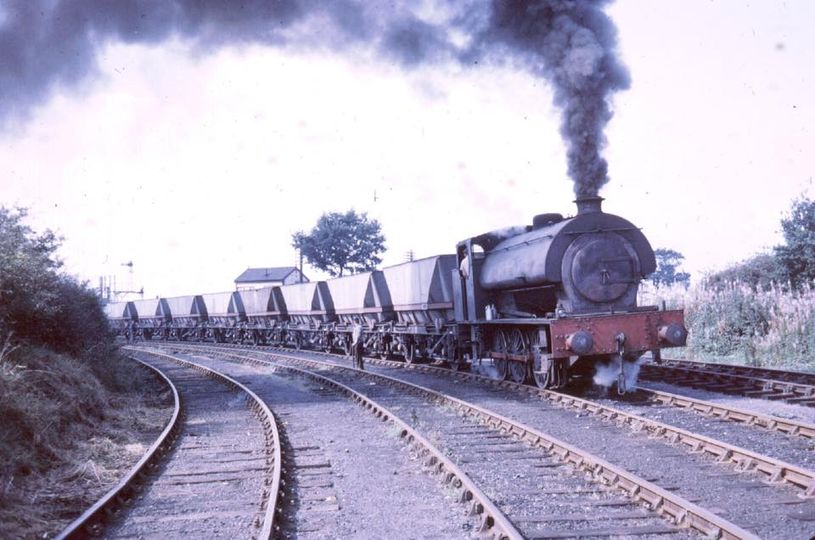
Donnington Sidings looking Northwest. A rake of empties setting off for Granville Colliery behind an 0-6-0ST locomotive. Wellington Road Crossing is a short distance ahead of the locomotive. This photograph was shared by Carole Anne Huselbee on the Telford Memories Facebook Group on 5th October 2014. [52]
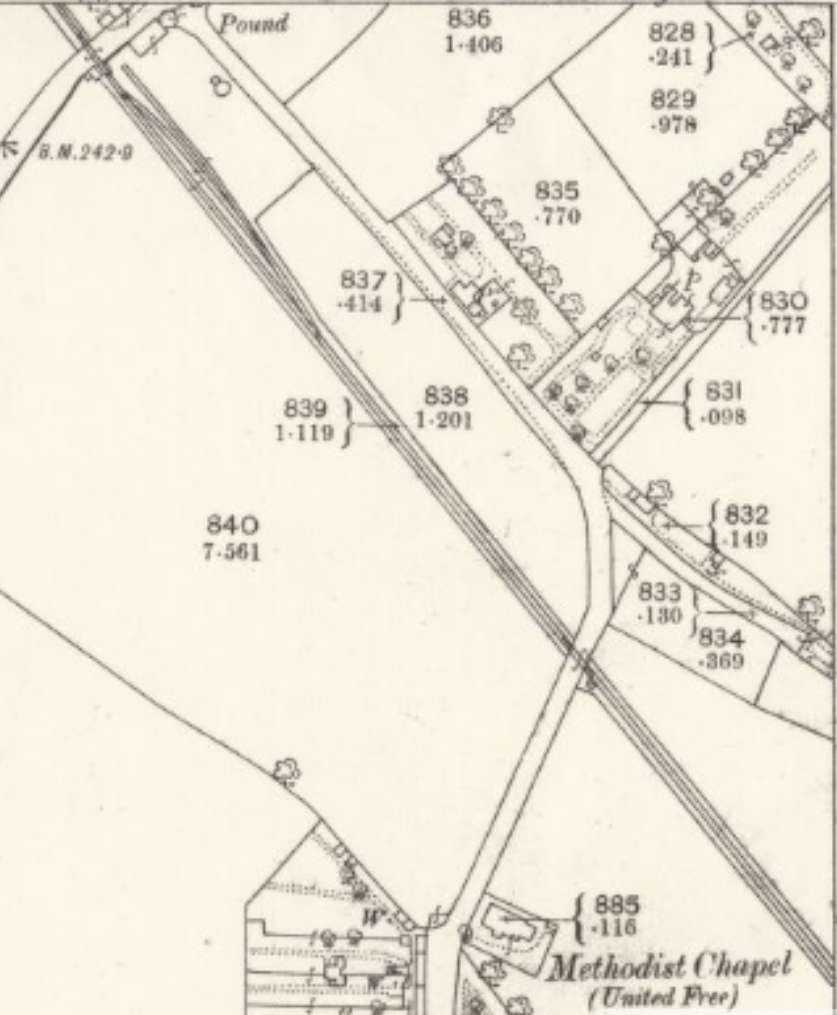
This next extract from the 25″Ordnance Survey of 1882 shows the mineral railway heading Southeast and crossing, first, what is now Wellington Road, and then running parallel to the modern Donnington Wood Way and crossing School Road. [49]
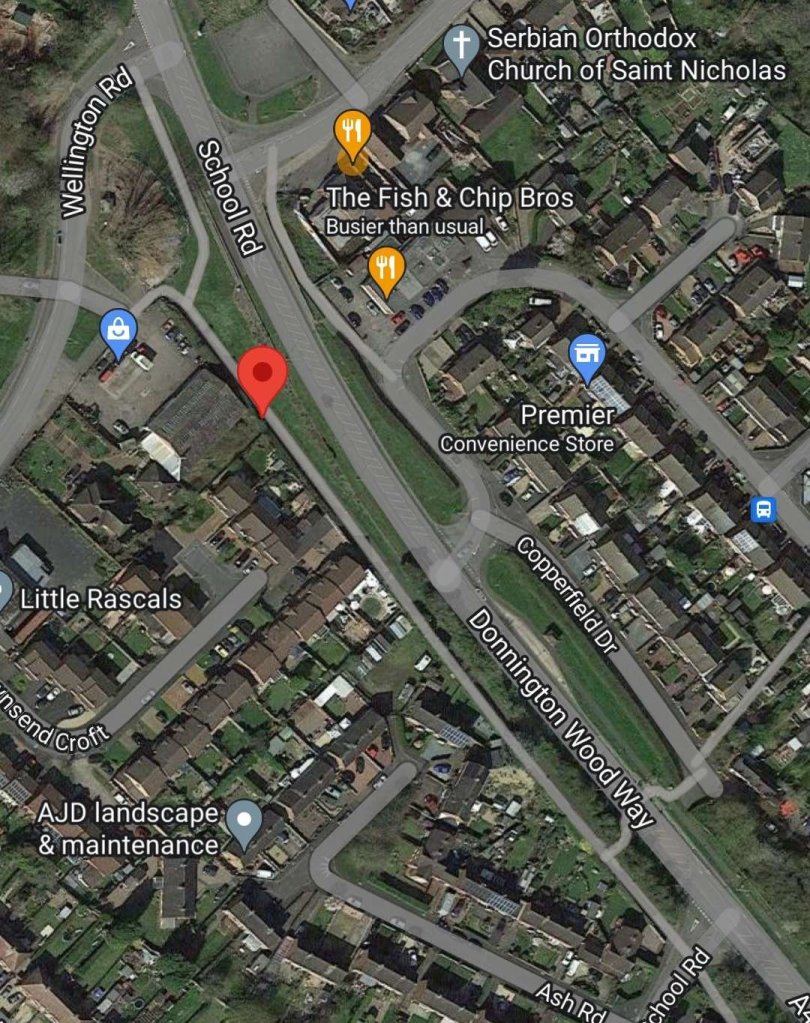
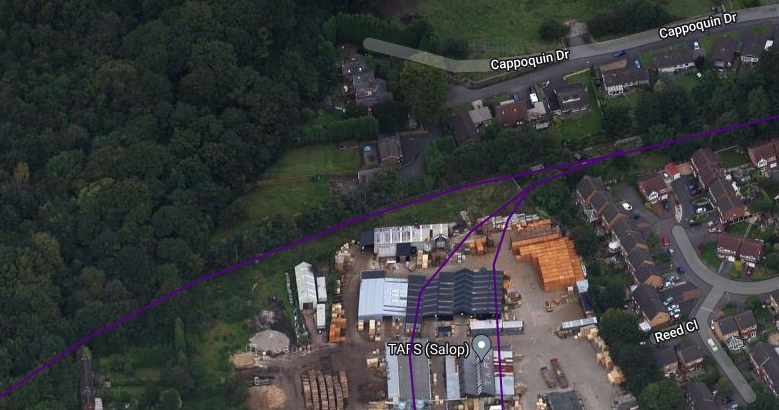
The route of the old mineral railway runs parallel to Donnington Wood Way, approximately on the line of the footpath shown on this Google Maps extract. The red flag marker highlights its route. [Google Maps, July 2023]
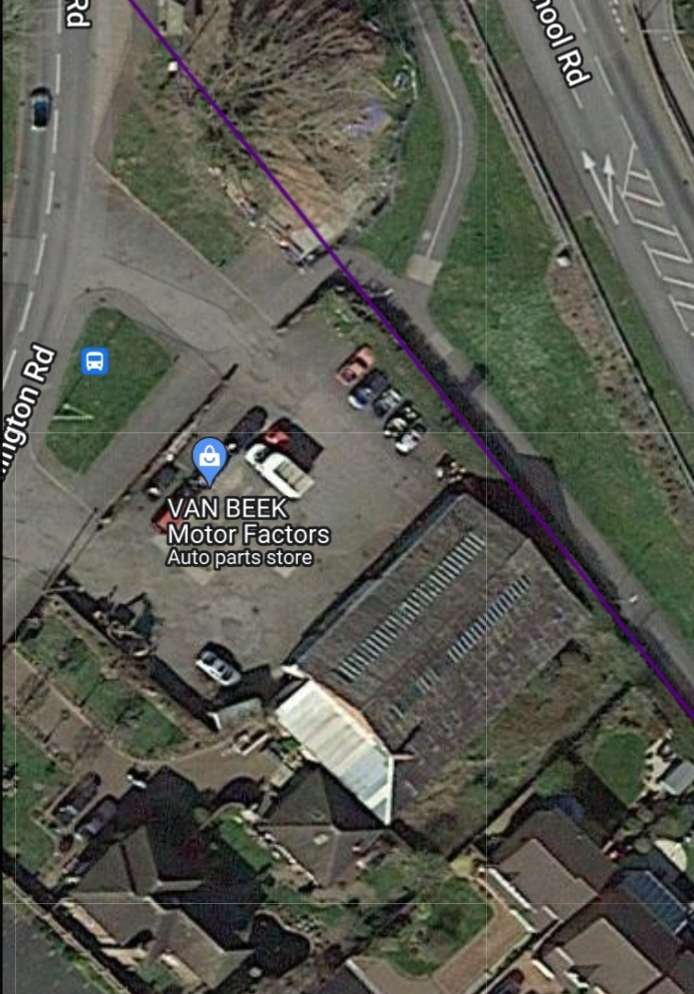
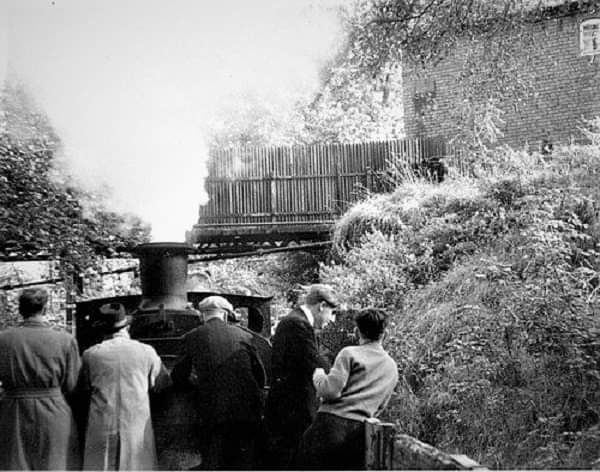
A closer view of the point where the mineral railway crossed the old Wellington Road. The photograph below shows a locomotive approaching the level-crossing from the Southeast. [47]
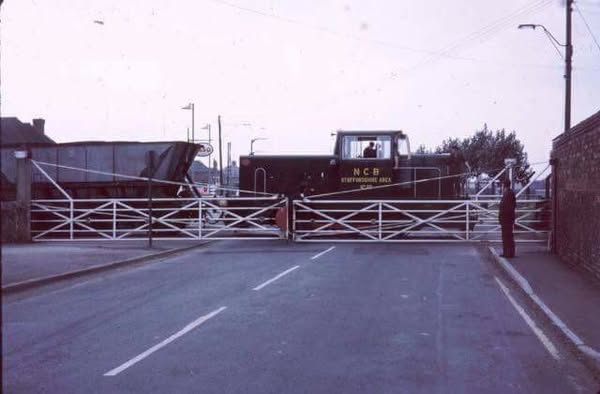
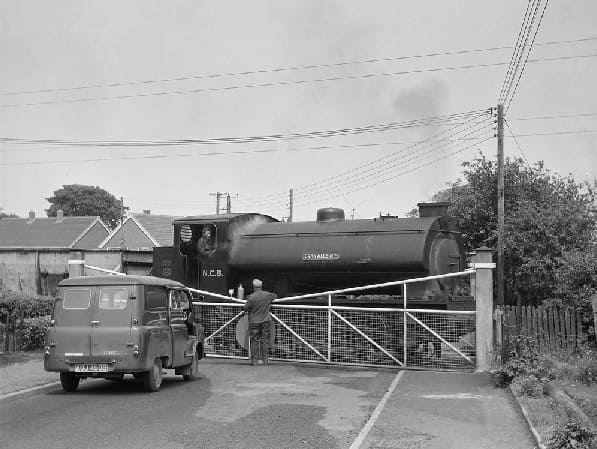
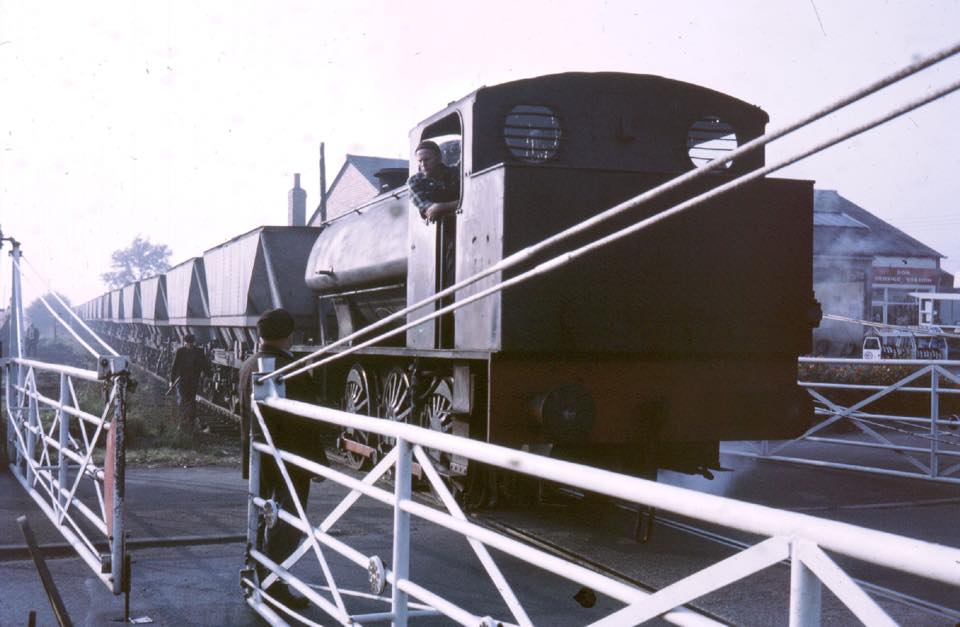
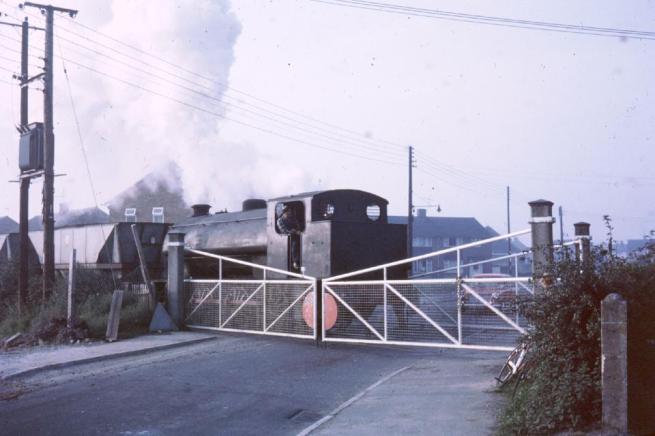
Wellington Road Crossing. The photograph below shows a locomotive entering the level-crossing from the Southeast. This picture was shared by Carole Anne Huselbee on the Telford Memories Facebook Group on 5th October 2014. [53]This crossing was located at what was called the Coal Wharf on the old Wellington Road just over & up from the now Ladbrokes Bookies. The line ran from the pit and approached it via what is now a footpath between “The Fields” (a lane to the houses at the bottom of bell rec.) and Donnington Wood Way then across the first gated crossing at the bottom of School Road and on past the end of what is now Van Beeks Motor Spares to the second crossing. The road was wide so gates with supporting heavy caster type wheels allowed them to open seperately. The photograph shows NCB loco No 10 crossing the main Telford to Newport road (A518) at Donnington in 1975 with a trip working from Granville Colliery to the exchange sidings which were just the other side of the road. The MGR hopper wagons would then be moved by a Class 47 to Ironbridge, with run rounds at both Wellington and Madeley Junction. This image was shared on the Granville Colliery Facebook Group by Peter Bushell on 21st August 2023, The gates in this image are now in use by Telford Steam Railway. (c) Unknown. [7]
Possibly the same locomotive, definitely at the same location as the image above. This image was shared by Phil Neal on the Granville Colliery Facebook Group on 8th August 2017, (c) Unknown. [12]
Locomotive No. 10 (a Hunslet 0-6-0 ) waiting with its train to cross Wellington Road. This photo was shared by Lin Keska on the Telford Memories Facebook Group on 2nd May 2017. [54]
Another view of the School Road Crossing. This photo was shared on the Telford Memories Facebook Group by Carole Anne Huselbee on 8th September 2014. [57]
An 0-6-0ST pulls a train of empties back from Donnington to Lodge and Granville Colliery. It is seen here crossing School Road. This image was shared on the Granville Colliery Facebook Group by Jim Walton on 16th August 2023, (c) Unknown. [13]
From the School Road Crossing the line ran Southeast. Its route is now a public footpath separated from the modern Donnington Wood Way by a hedgeline.
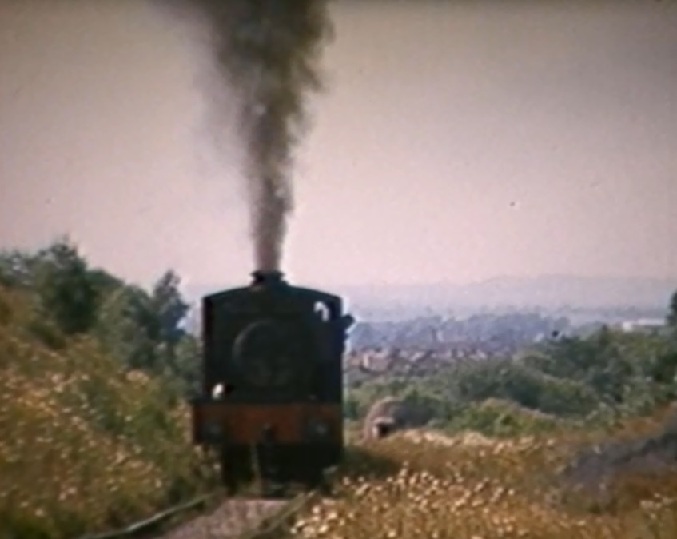
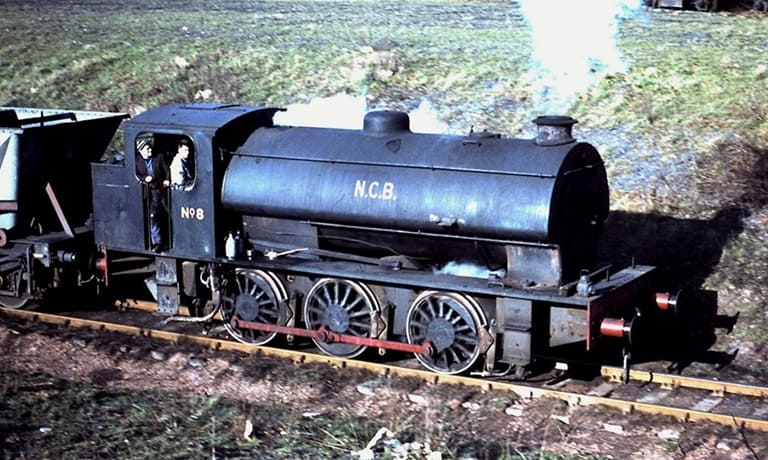
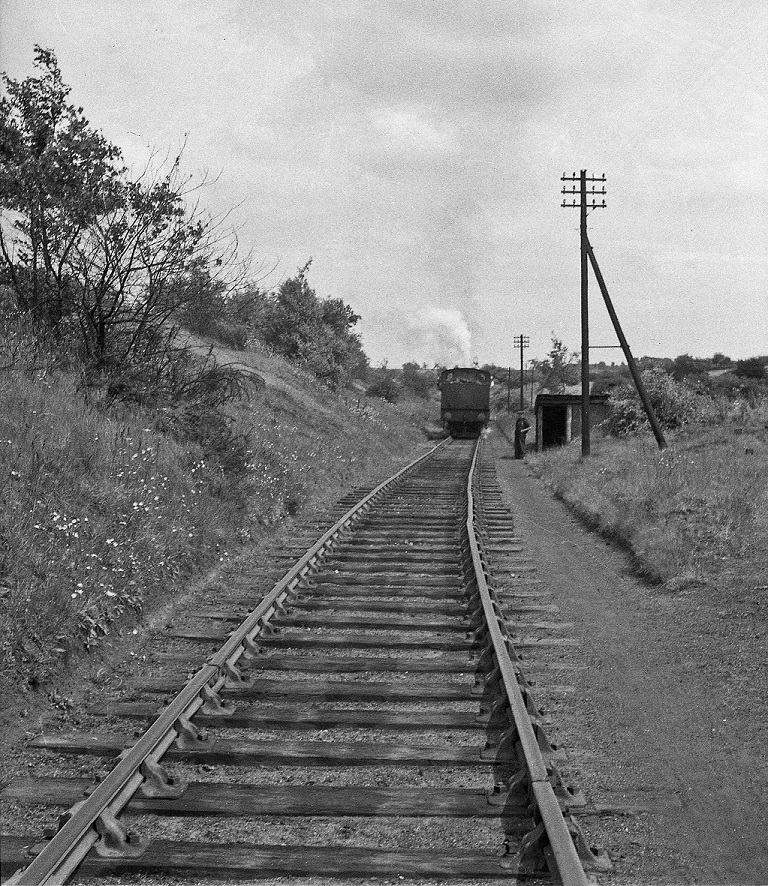
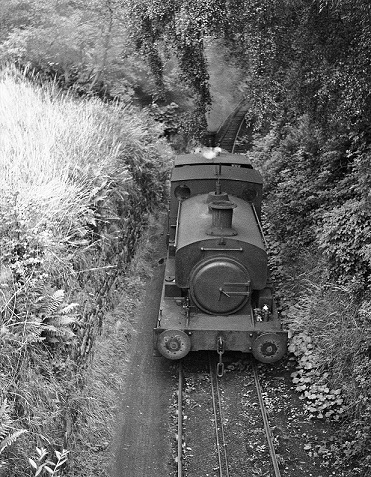
Somewhere Southeast of School Road on 8th September 1969, this view looks Northwest and shows NCB Loco No. 8 hauling empty hopper wagons towards Granville Colliery. This image was shared on Telford Memories Facebook Group by Carole Anne Huselbee on 14th September 2014. [58]
Heading up hill from Donnington towards the Lodge and Granville Colliery. [11]
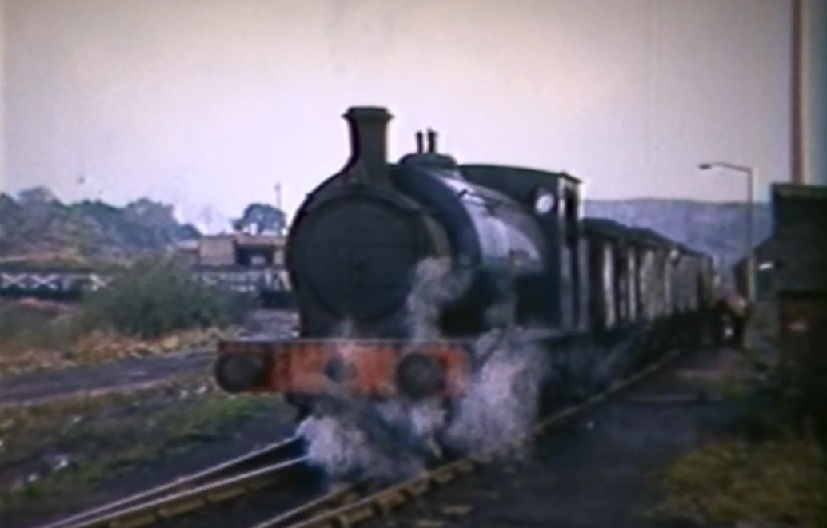
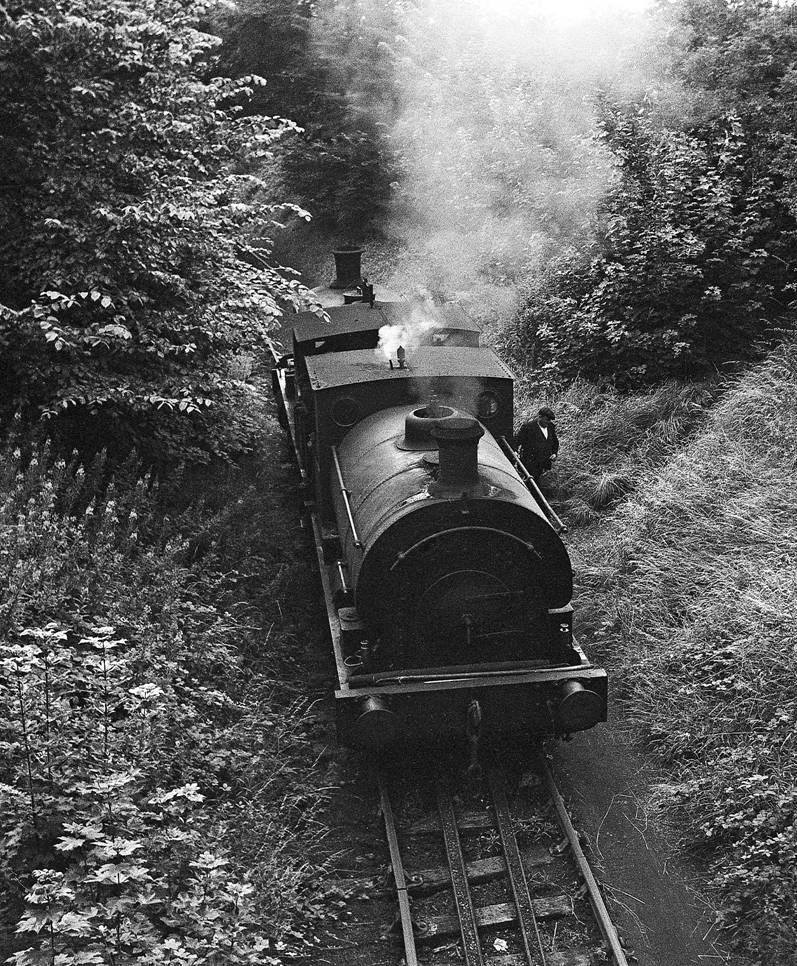
An 0-6-0ST (possibly No.8) pulls is train of hopper wagons up the direct route from Coal Wharf (Donnington) to Granville Pit (not going via the location of Muxton Bridge Pit) .This image was shared on the Granville Colliery Facebook Group on 10th March 2020 by John Wood. [36]NCB 0-6-0ST No. 8 taking a train of empty hoppers up the line from Donnington. This appears to have been taken on the cutoff link avoiding the need for reversing at Muxonbridge Colliery. This image was shared on the Granville Colliery Facebook Group by John Wood on 20th March 2020. [8]This photograph shows ‘The Colonel’, an 0-6-0ST, running down to the Sidings at Donnington. The image was shared on the Telford Memories Facebook Group by Clive Sanbrook on 27th March 2020. [32]
A later locomotive crossing the same road. This image was shared on the Telford Memories Facebook Group by Carole Anne Huselbee on 15th September 2014. [35]
Having climbed up from the exchange sidings trains of empties entered the area of what was once Old Lodge Furnaces.
By 1970, this was the layout of the lines between the mainline at Donnington and the Colliery. This hand-drawn image appears in Bob Yate’s book. [25: p119]
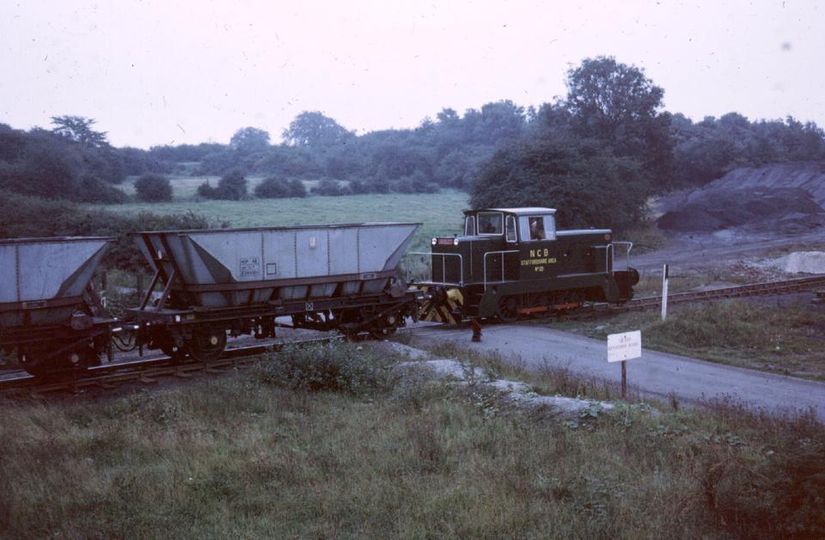
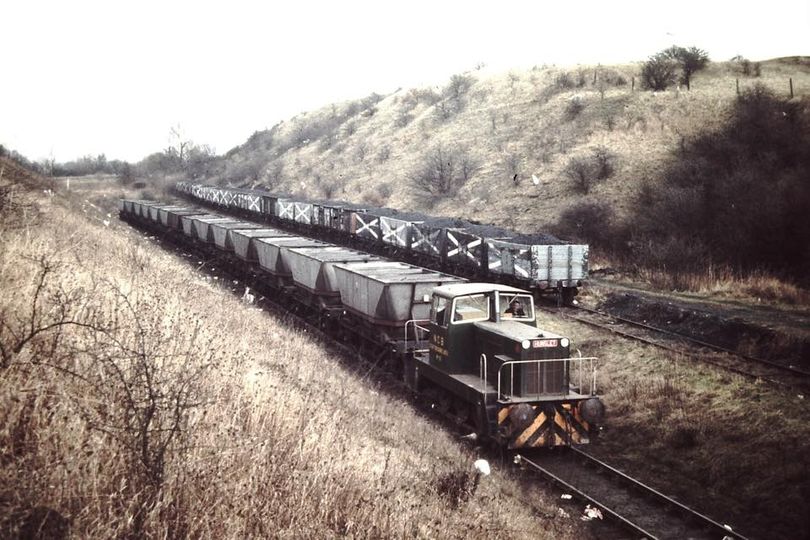
Granville Colliery’s Diesel Loco (NCB No. 2D?) hauling a rake of empty coal hopper wagons on the lines to the West of Granville Colliery. This photo was shared on the Telford Memories Facebook Group by Carole Anne Huselbee on 5th October 2014. [33]
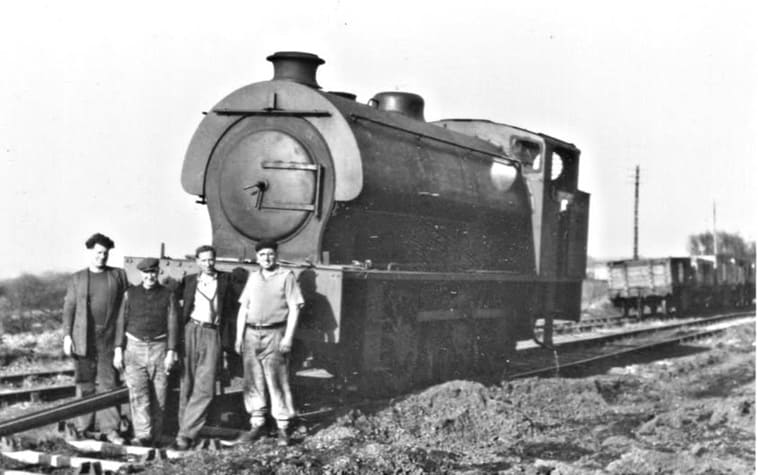
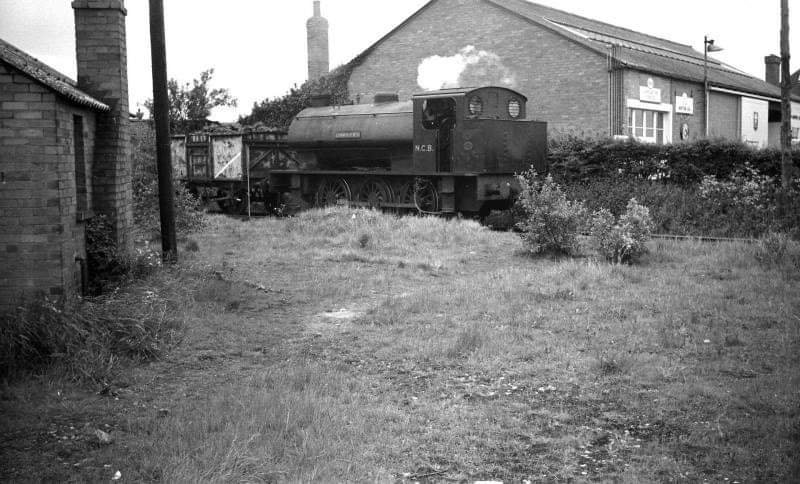
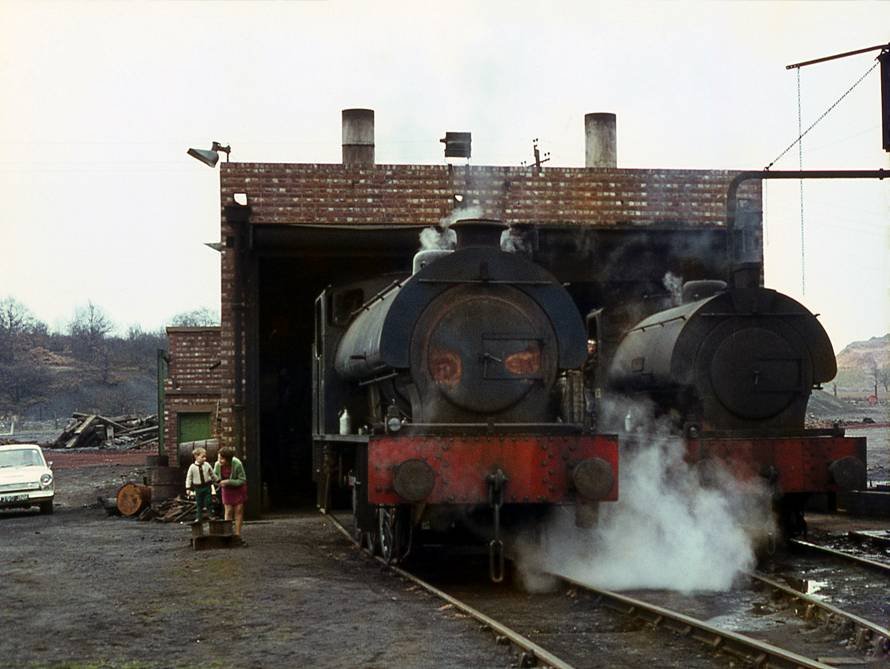
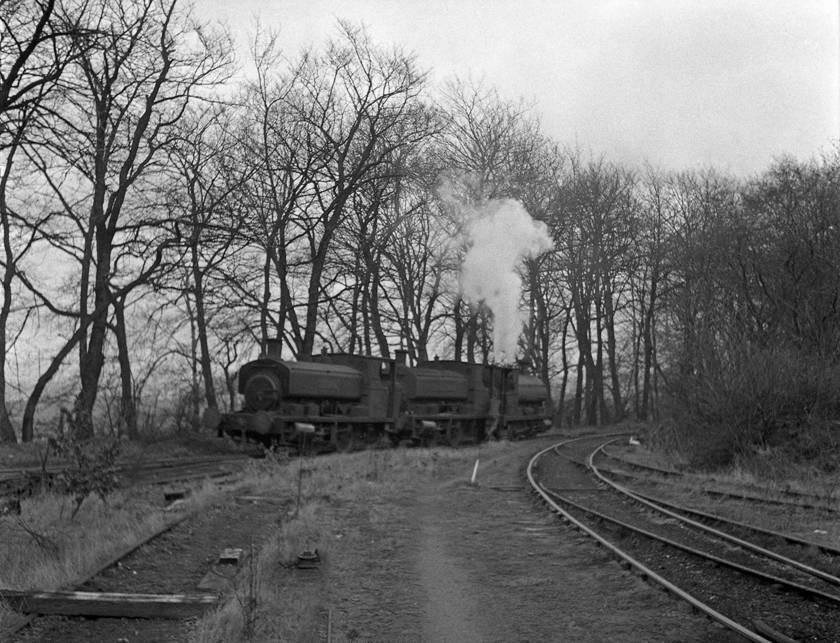
The original engine shed. This building was demolished and the NCB built a replacement some distance away. It looks in a poor condition. The loco on the left looks like the 0-6-0 Barclay tank No 11 or one of the large ex Taff Vale locos. The one on the right is an unidentified Saddle Tank. This image was sent to me by David Clarke the author of a book about Telford’s railways, (c) Unknown. [37]
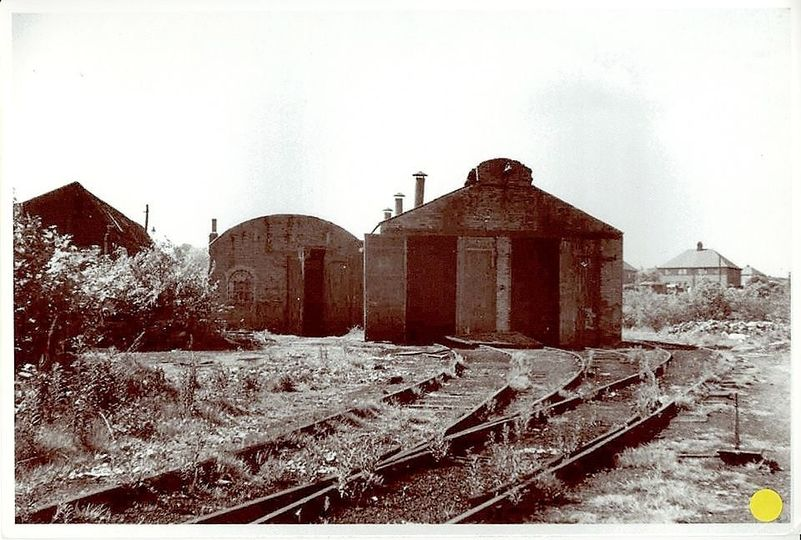
A view of the NCB-built engine shed noted in the image above. After the NCB took over the collieries owned by the Company, Granville Colliery supplied coal to Buildwas Power Station and the coal trains were worked by a range of locos down the 1.5 miles to Donnington. Granville Colliery had a decent sized shed and in later years used Austerity 0-6-0ST tanks but in Lilleshall Company days the bigger engines were the ex-TVR and Barry railway engines. This image and the accompanying text were shared by Marcus Keane on the Telford Memories Facebook Group on 15th September 2015. [38]Possibly locomotive No. 8 on shed. This image was shared on the Granville Colliery Facebook Group by John Wood on 20th March 2020. [8]
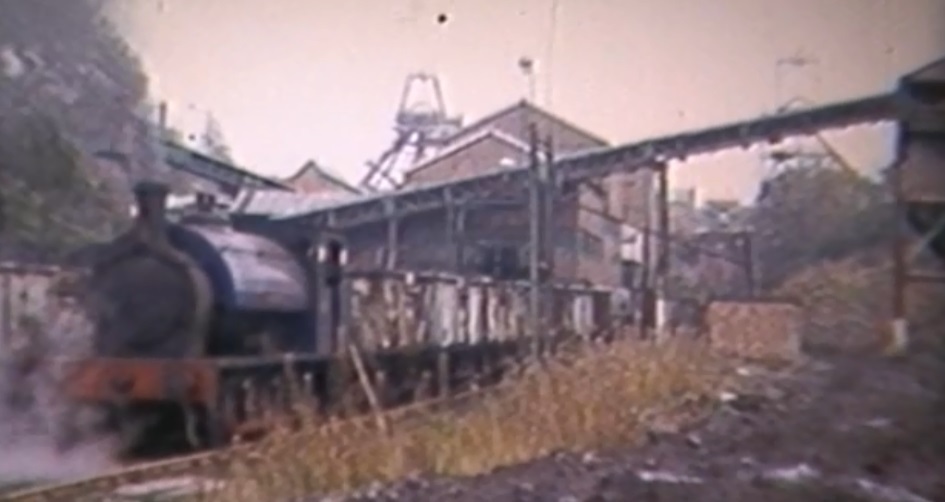
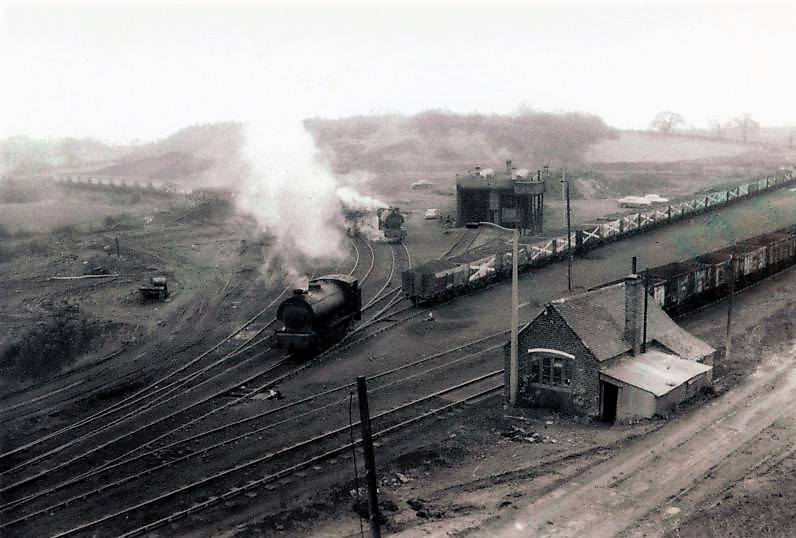
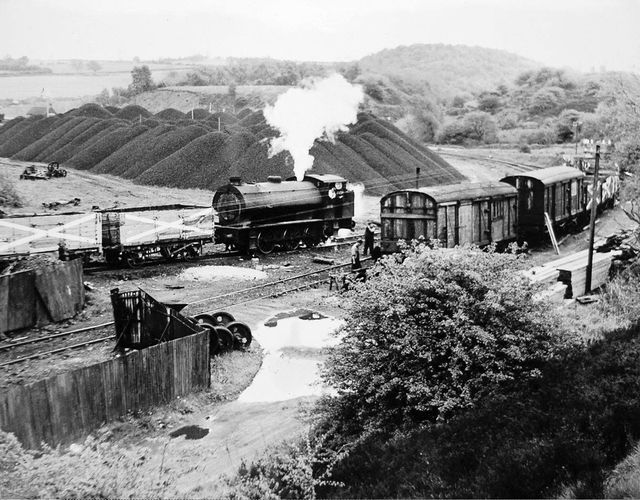
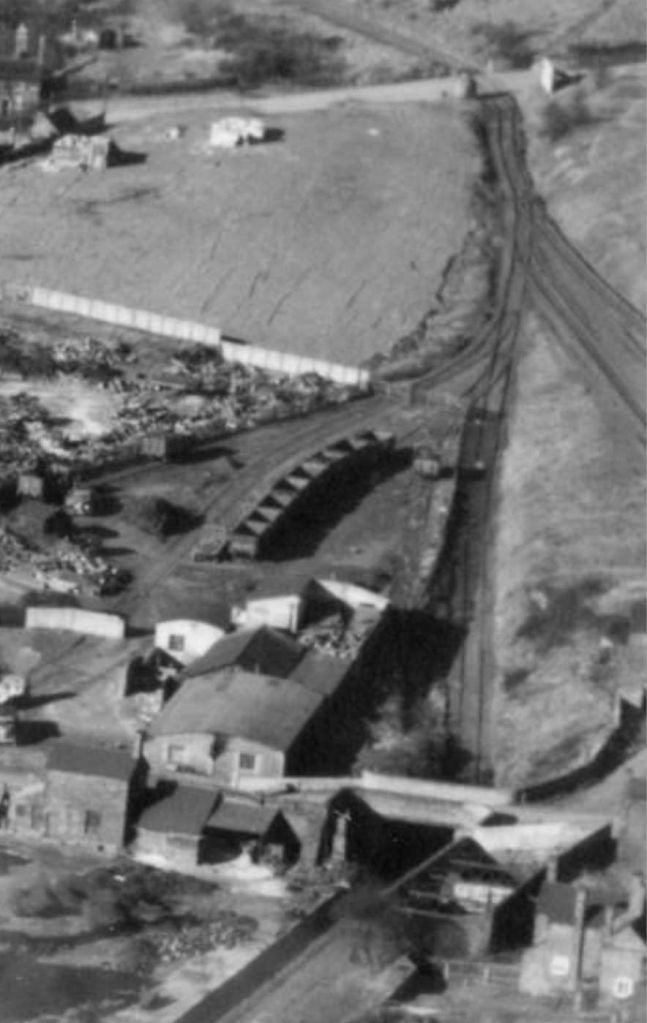
This view from a location on the spoil heap to the South of the last image shows the later engine shed, built by the NCB, and two locomotives in steam marshalling wagons. The wagons closest to the camera appear to be empties which will probably be pushed towards the colliery screens which are a distance off to the right of this image. The photograph was shared on the Telford Memories Facebook Group by Paul Wheeler on 25th May 2018. [34]
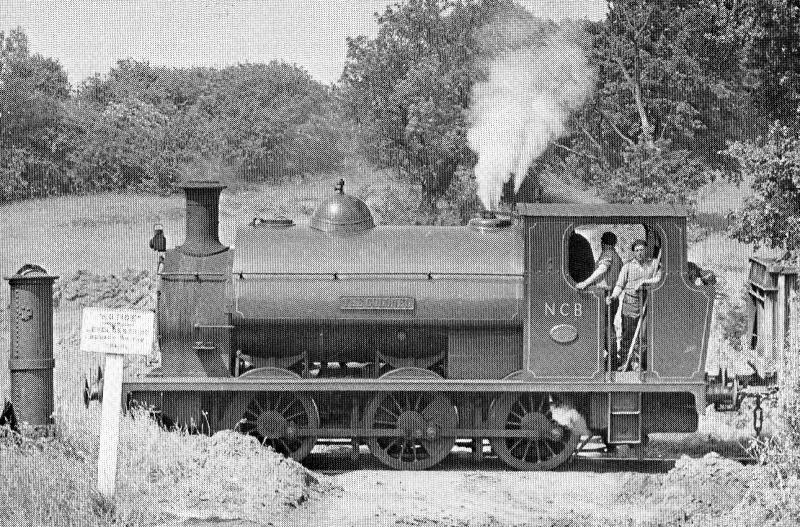
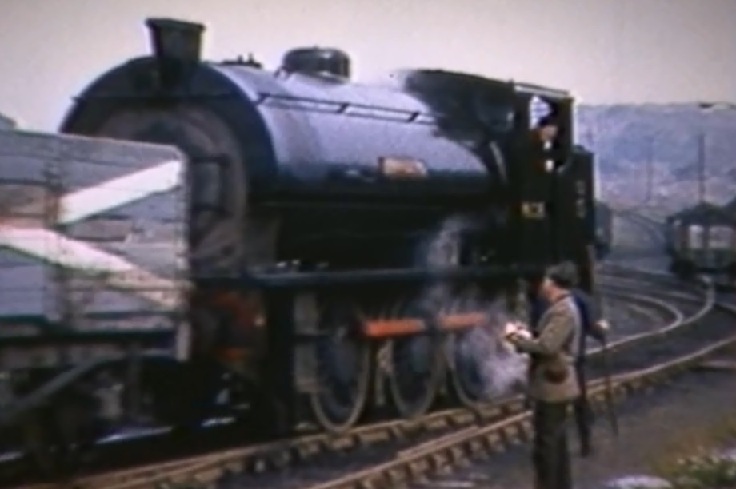
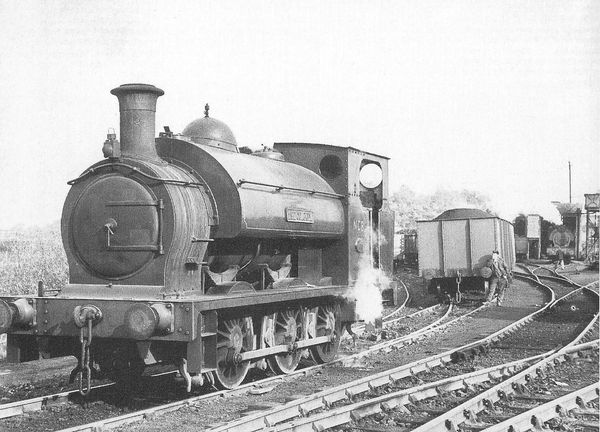
The ‘Colonel’, with a train of full wagons having left Granville Colliery and about to marshall its train for onward movement to Donnington Sidings. [11]
‘The Colonel‘ again! ‘The Colonel‘ was named after Colonel Harrison, Chairman of Harrison’s Grove Colliery. He was also Chairman of Cannock & Rugeley Colliery. After a spell at Area Central Workshops – May 1960 to June 1961, ‘The Colonel‘ went back to Grove Colliery then to Coppice Colliery at Heath Hayes for a few months in 1963 before transfer to Granville Colliery in November 1963. This image was shared on the Telford memories Facebook Group by Metsa Vaim EdOrg on 24th October 2020. [41]
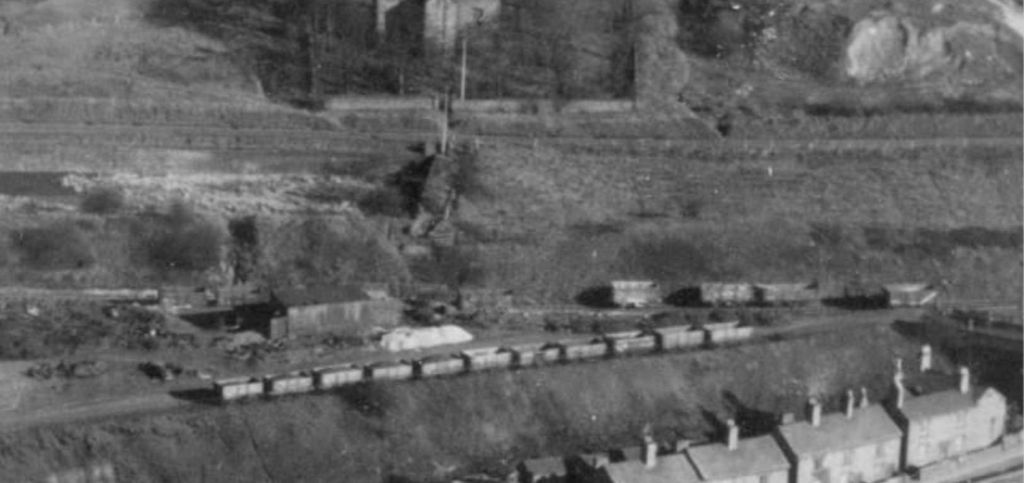
Towards the end of steam, this loco is bringing its train South from the Depot towards the location of the engine shed which is off the picture to the left beyond the stored coal. The locomotive is ‘Granville No. 5‘. This image was shared on the Telford Memories Facebook Group on 15th February 2017 by Lin Keska. [40]
This photograph was taken at a similar location to those above. At the centre of the image is the weighbridge. Granville Colliery itself can be made out on the horizon. The image was shared by John Wood on the Granville Colliery Facebook Group on 30th January 2015. [42]
The Lilleshall network continued to the West and Southwest of Granville Colliery and Lodge Sidings. These next photographs cover the length of the line through Oakengates to Hollingworth Sidings and Stafford and Dark Lane Collieries.
The dotted lines on this sketch map are private railways. The Lilleshall Company’s main line runs from Granville and Grange Collieries in the top-right of the sketch map via Old Lodge Ironworks and Priorslee Furnaces down to Hollinswood. This sketch map was included on the Miner’s Walk website which provides information about the local area. [10]
Grange Colliery, close to Granville Colliery operated independently at first and along with Granville Colliery survived to be nationalised in 1947. In 1951, the two were connected underground and from 1952 Grange Colliery served mainly to ventilate Granville Colliery. [2]
The monochrome photographs included here were taken by a number of different photographers. Where possible permission has been sought to include those photographs in this article. Particularly, there are a significant number of photographs taken by A.J.B. Dodd which appear here which were first found on various Facebook Groups. A number were supplied direct by Mike Dodd, A.J.B. Dodd’s son, who curates the photographs taken by his father. Particular thanks are expressed to Mike Dodd for entering into email correspondence about all of these photographs and for his generous permission to use them in this article. [59]
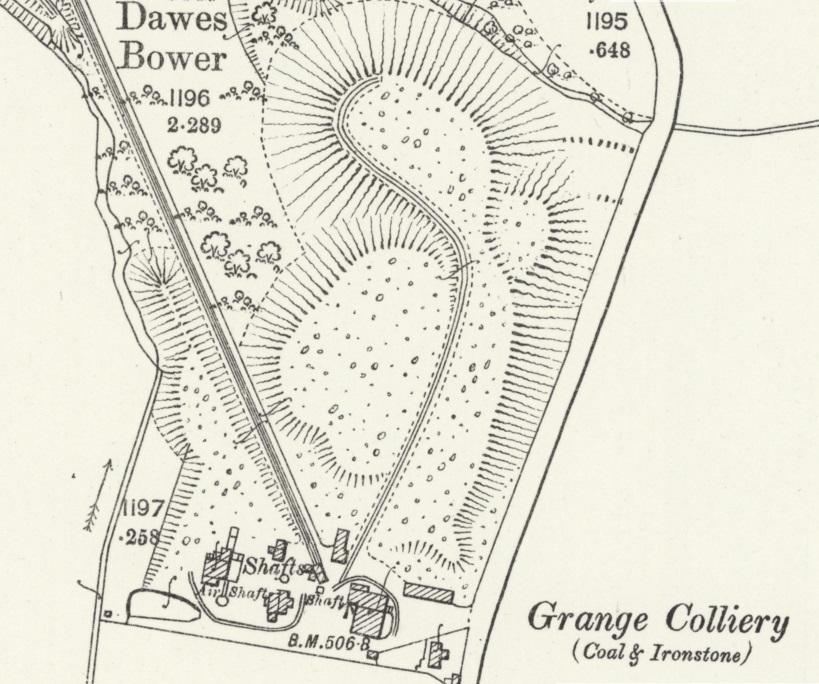
Grange Colliery as it appears on the 25″ Ordnance Survey of 1901, published in 1902. The railway lines shown in the immediate area of the shafts and slag heaps were internal lines unconnected to the wider Lilleshall Company network. A single line ran to Dawes Bower where transshipment to the standard gauge Lilleshall Company network took place. [60]
The same area as shown on the OS map extract above. This image comes from Google Maps. What appears to be a caravan park on the site of the old colliery is Telford Naturist Club. The buildings to the top-right of the image are the Cottage Boarding Kennels and Cattery. [Google Maps, September 2025]
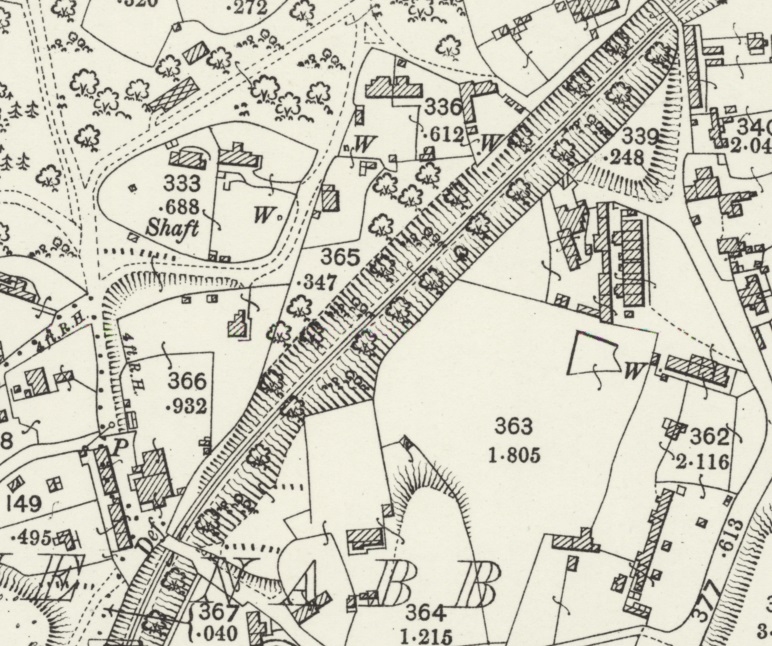
This extract from the 25″ Ordnance Survey of 1901 shows the point where the branch-line to Grange Colliery met the main Lilleshall line. The line from Grange Colliery enters bottom-right. At the top-right of this extract two sets of lines are shown. The upper lines run towards Donnington sidings, the lower lines connect to Granville Colliery. The lines leaving the top of the extract are local lines serving the area immediately around what were Old Lodge Furnaces. The line leaving the west (left) edge of the extract is the Lilleshall Company mainline to Priorslee and Hollinswood. As can be seen at the centre of the extract, a loco bringing wagons from Grange Colliery would need to cross the mainline before reversing its wagons onto the mainline and, depending on its destination, then head for Donnington or Hollinswood. The sidings shown on this extract were also used for storing wagons before onward transit to their ultimate destination. [61]
A short distance to the West of the sidings at Lodge, a line running North from Donnington Wood Brick and Tile Works met the Lilleshall Company’s main line at a triangular junction. [62]
Donnington Wood Brick & Tile Works were conveniently sited next to reserves of Clay. The Works had their own internal railway with a Self-acting Inclined Plane. [63]
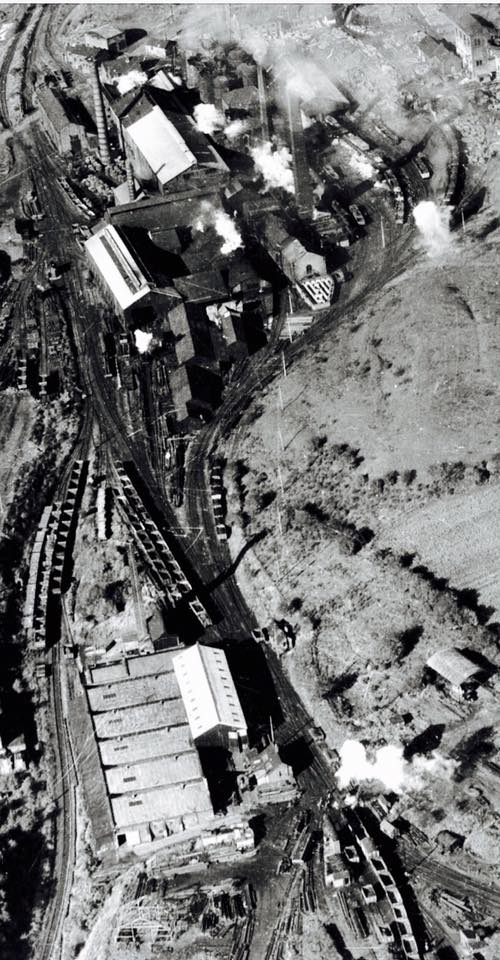
Donnington Wood Brick & Tile Works seen from the air, from the Northeast. This image was shared on the Telford Memories Facebook Group by Marcus Keane on 27th March 2019. [64]
A much closer view of the circular Hoffman Kiln taken in 1966. This image was shared by Marcus Keane on the Telford Memories Facebook Group on 23rd September 2017. [65]
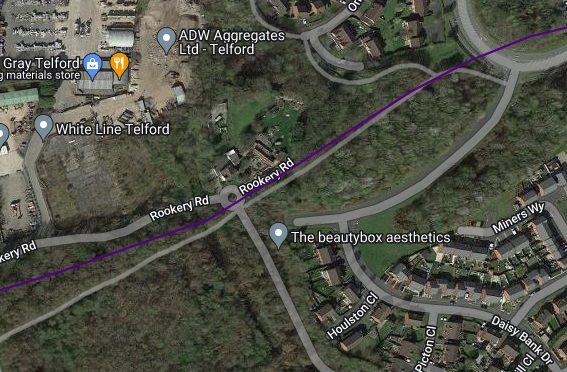
The location of the Donnington Wood Brick and Tile Works plotted on modern satellite imagery from Google Maps. Properties on Cloisters Way sit directly over the site of the Hoffman Kiln. [Google Maps, December 2023]
West along the main line from the short branch to Donnington Wood Brickworks there were sidings adjacent to Rookery Road. I have not been able to find them on any maps.
This extract from the 25″ Ordnance Survey shows the Lilleshall Mainline running South West from the junction which served the Donnington Wood Brick & Tile Works and covers the approximate location of the Rookery Road Sidings. [66]
This view looks East towards the triangular junction serving Donnington Wood Brick Works, (c) A. J. B. Dodd. [59]An 0-6-0ST Saddle Tank participating in track removal at Rookery Road Sidings. This image was shared on the Granville Colliery Facebook Group by John Wood on 28th June 2020, (c) A. J. B. Dodd. [9]
I believe this photograph was taken from a point close to the bridge over Gower Street. It looks East and shows Rookery Road Sidings in the distance, (c) A. J. B. Dodd. [59]
Moss Road/Gower Street Railway Bridge before demolition. This is a photo of a photo which was behind glass, hence the glare. It was shared by Gwyn Thunderwing Hartley on the Oakengates History Group including surrounding areas Facebook Group on 17th July 2018. [68]
The junction for New Yard Engineering Works was adjacent to Wrockwardine Villa. The engine shed is visible bottom-centre of the extract. One of two bridges which crossed the Lilleshall Company’s Railway appears towards the bottom-left of the image. I believe that this was known as the ‘Tin Bridge’. [69]
A very similar area to that covered on the map extract above. The image comes, again, from RailMapOnline.com’s satellite imagery. Wrockwardine Villa is centre-top in this image. [47]
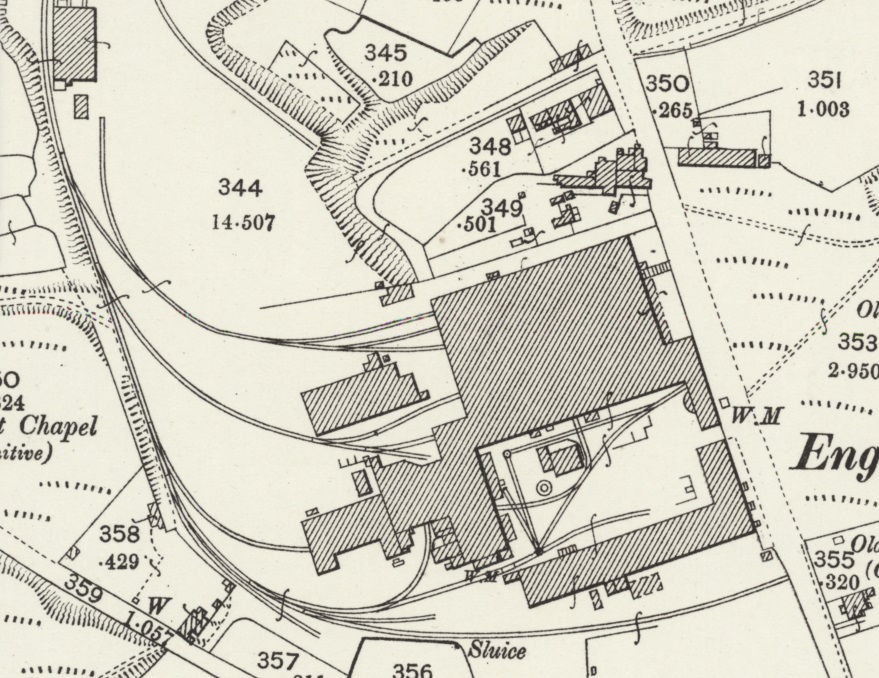
New Yard Engineering Works. … Gower Street runs North-South on the right of the map extract New Works buildings faced East onto the road. The locomotive shed can be seen to the top-left of the image. The workshops which stood alongside it were not built by the time of the Ordnance Survey (1901). [72]
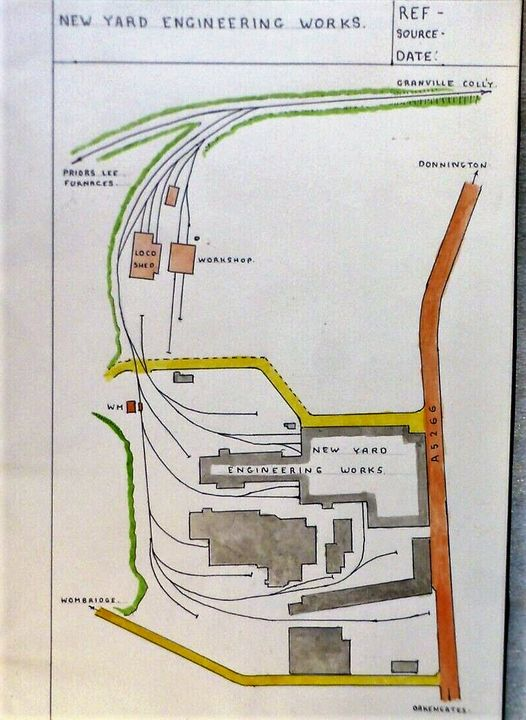
Sketch Railway Plan/Map of New Yard Engineering Works, Gower Street, St Georges showing the layout in 1959. The workshops adjacent to the Engine Shed are shown, top-left. This image was shared on the Oakengates History Group Facebook Group on 1st April 2023 by Gwyn Thunderwing Hartley. [73]
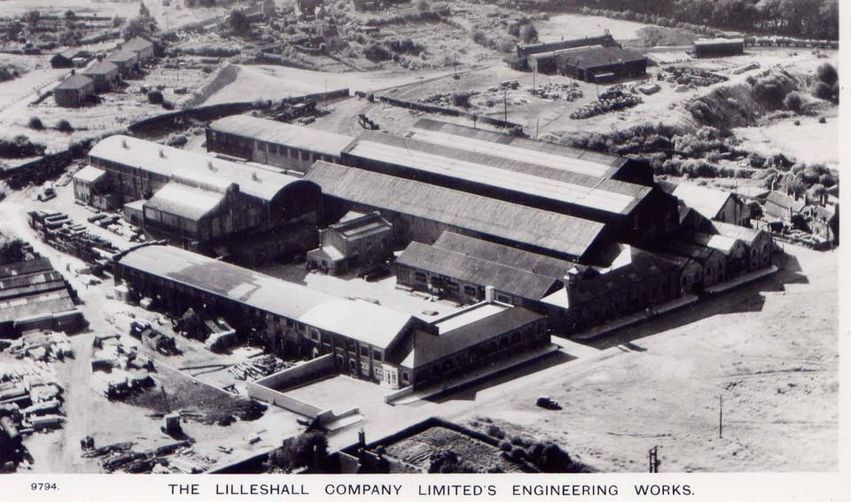
A aerial postcard image of New Yard Engineering Works, the camera is to the Southeast of the Works and as a result shows, at the top-right, the Engine Shed and Workshop. This image was shared on the Oakengates History Group Facebook Group by Gwyn Thunderwing Hartley on 17th February 2019. [74]
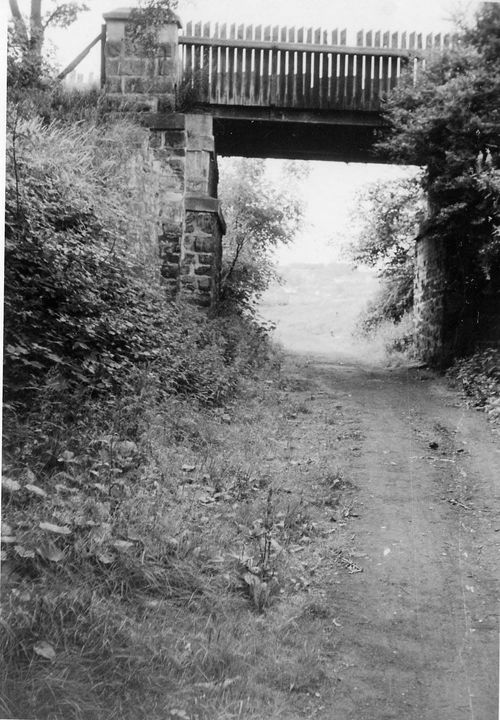
The Lilleshall Company mainline curves to the South through the area known as ‘The Nabb’. Two bridges are shown. The one just visible top-right is the ‘Tin Bridge. Prior to the construction of the standard gauge mineral railway a horse-drawn tramway ran North-South through this location, running down the side of the terraced housing adjacent to the bridge. The second bridge appears bottom-left. It was a more substantial structure. [75]
The Tin Bridge again with Diamond Row above and to the right. This photograph was taken during the Lilleshall Company’s last run on their Mineral line, with the Engine ‘Alberta’ in 1959. The Photo was taken by the late Edgar Meeson, cousin of Frank Meeson. The image was shared in the Oakengates History Group and surrounding areas Facebook Group by Gwyn Thunderwing Hartley on 27th January 2021. [78]
This is the second of the two bridges which crossed the Lilleshall Main Line in ‘The Nabb’.The picture looks to the Southwest and comes from the Howard Williams Collection and was shared on the Oakengates History Group including surrounding areas Facebook Group on 27th February 2014 by Frank Meeson. [79]
From this location the Lilleshall Company’s line curved round to the South and crossed Station Hill, Oakengates.
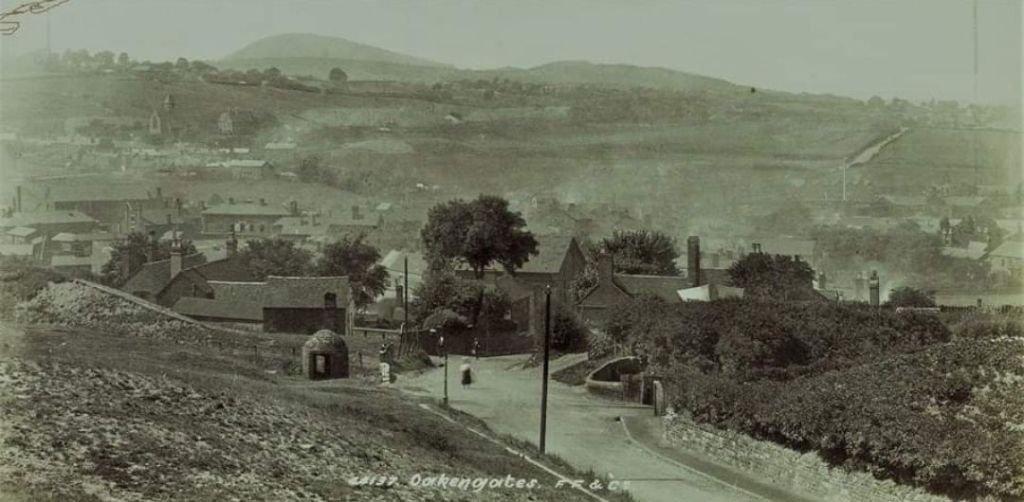
Station Hill, Oakengates at the turn of the 20th century. This postcard view looks West across the Lilleshall Company’s line down the hill towards the centre of Oakengates. The crossing keeper’s beehive hut is visible to the left of the road. This image was shared on the Oakengates History Group Facebook Group on 24th October 2018 by Gwyn Thunderwing Hartley. [81]
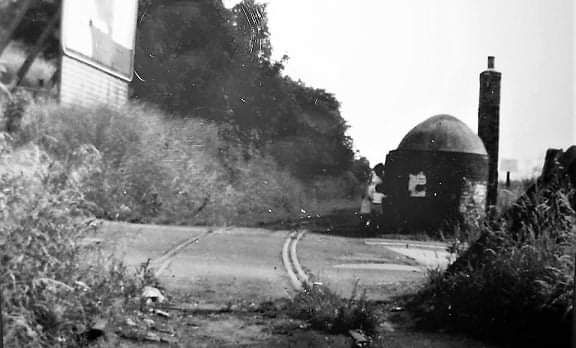
Two further images of the Station Hill Crossing. …
Looking South across Station Hill. The beehive keeper’s hut stands across the road from the camera. This image was shared by Gwyn Thunderwing Hartley on the Oakengates History Group Facebook Group on 16th May 2021. [82]
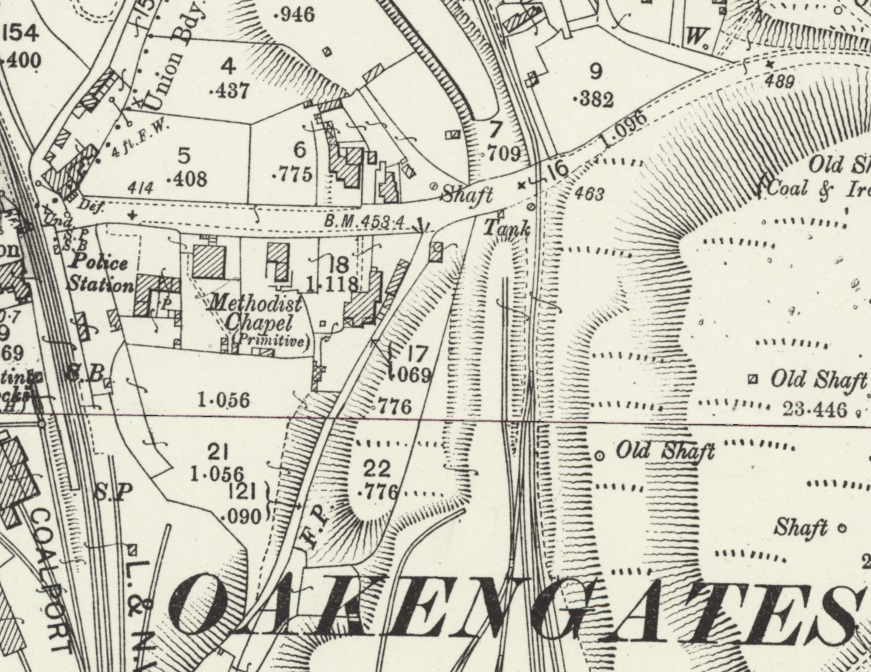
The line crossed Station Hill in Oakengates on the level with the old canal running beneath the road. Looking West from the crossing, train crews would have had a glimpse of Oakengates (Market) Railway Station on the LNWR/LMS/BR Coalport Branch. The station appears on the left of this map extract. [83]
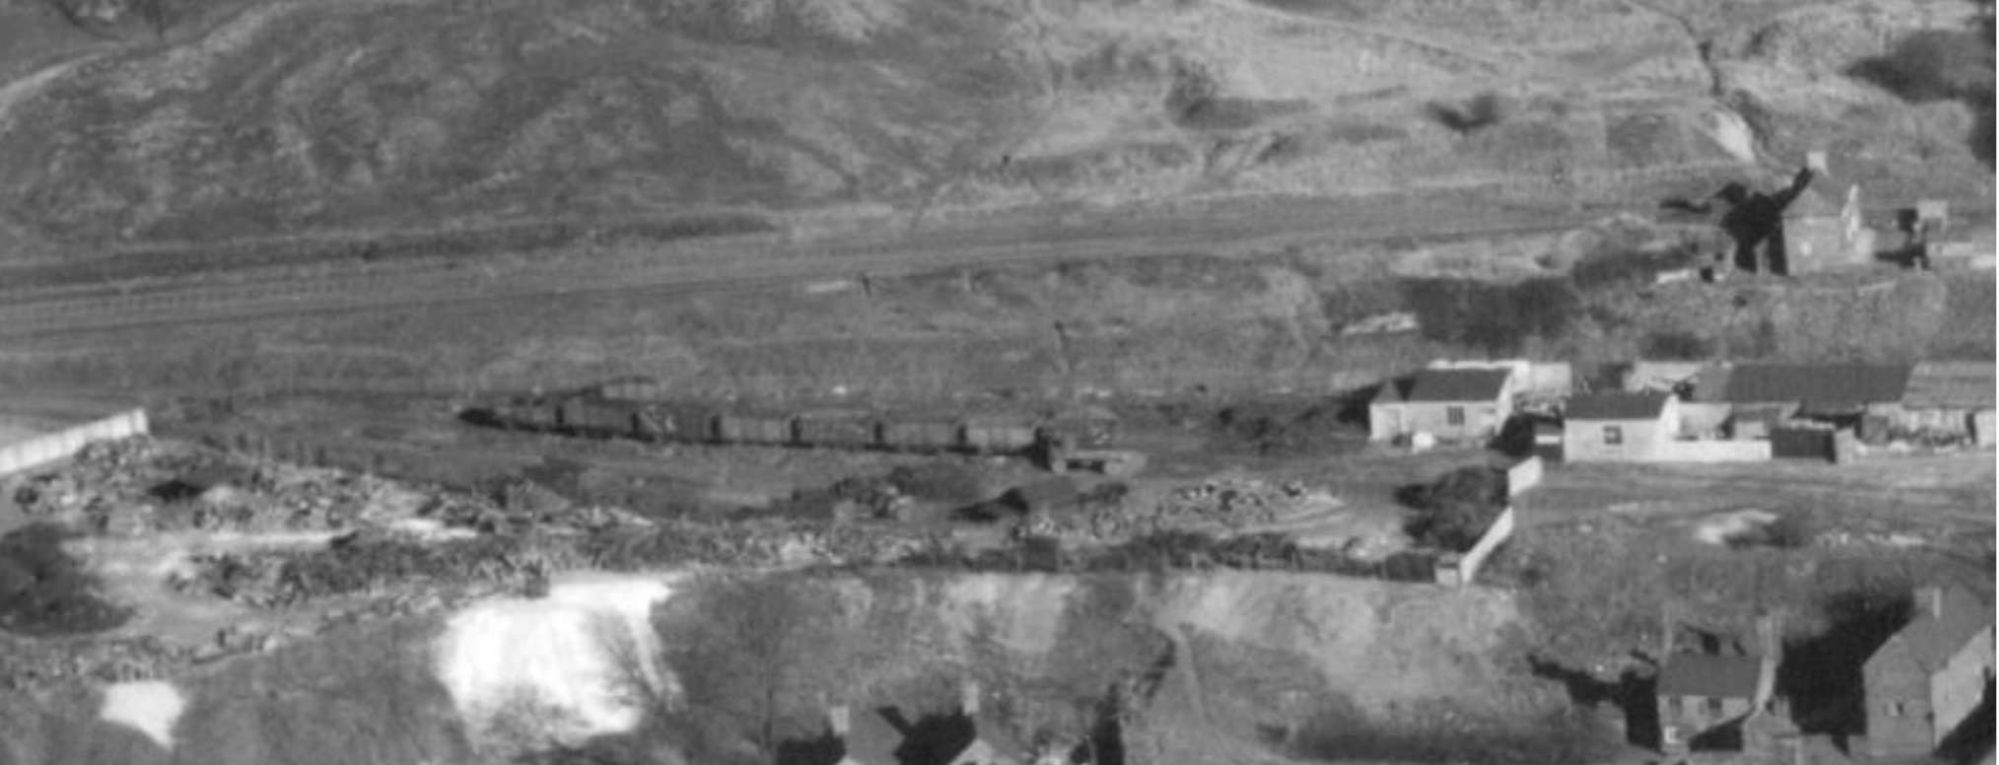
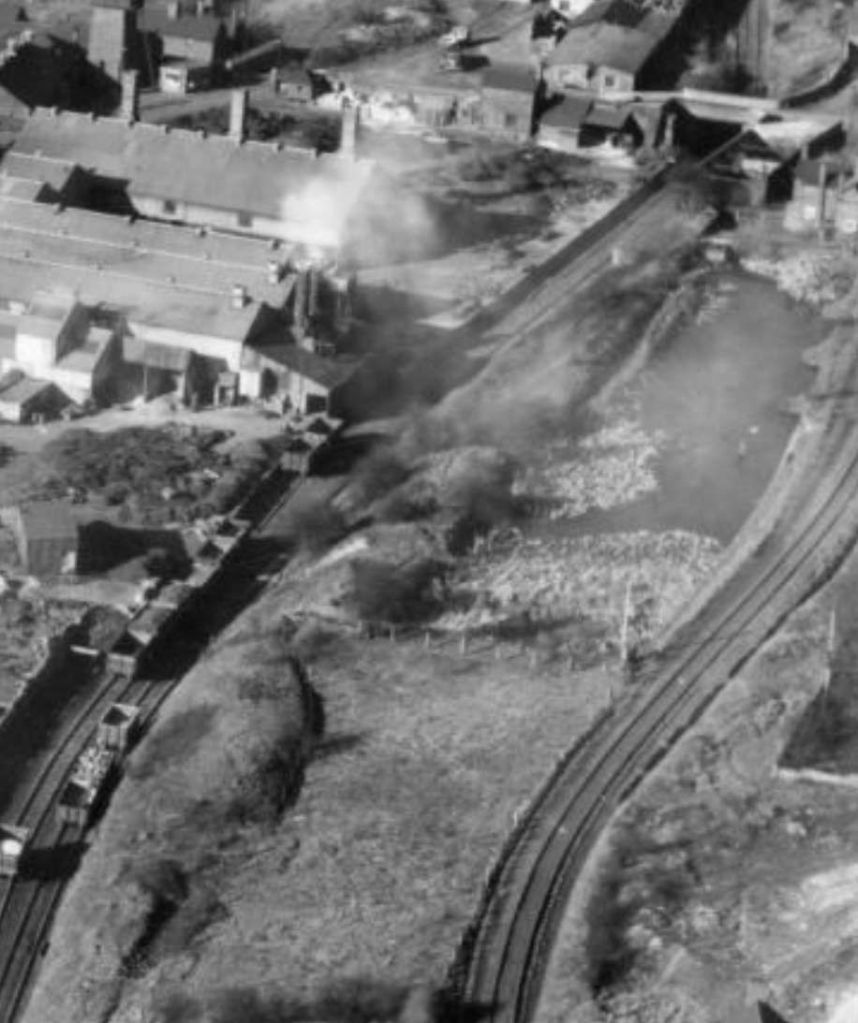
South of Station Hill the line ran at a high level above sidings which served Snedshill Ironworks. The next few images are relatively grainy as they are enlargements from aerial images from 1948. …
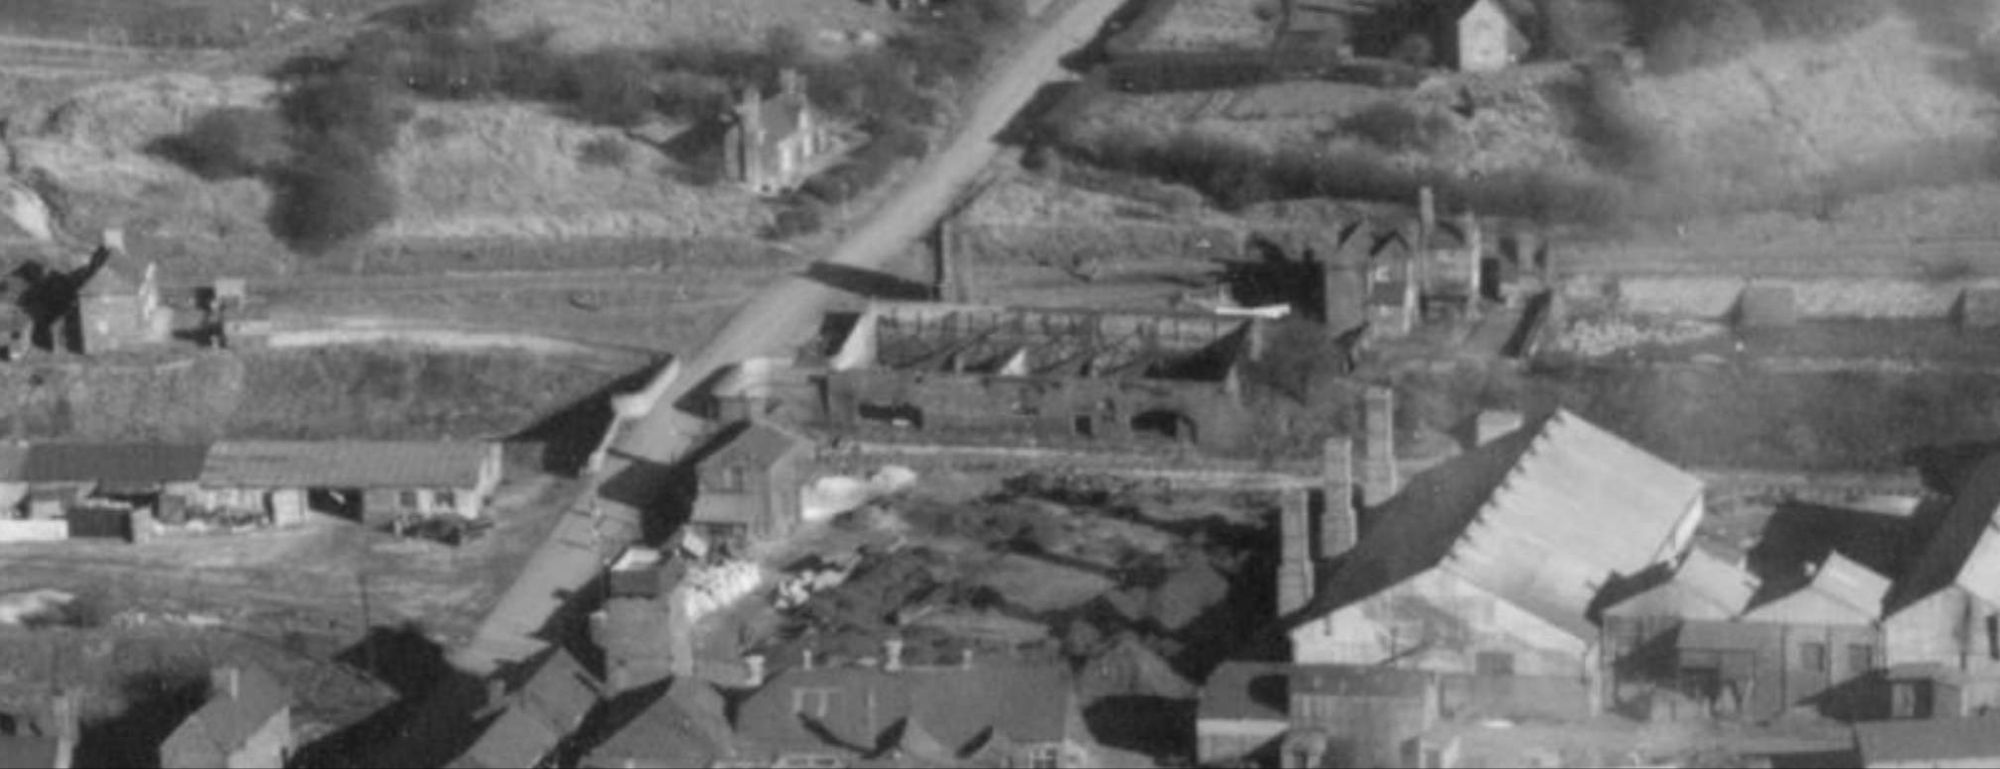
The Lilleshall main line runs across the top of the first of these images and behind the house at the top-right of the image. Wagons sit in the sidings associated with Snedshill Ironworks. [84]
On the South side of Canongate, Snedshill Ironworks dominates this map extract. The Shrewsbury to Birmingham main line can be seen entering a tunnel at the bottom-left of this image. Towards the left edge of the extract, the LNWR Coalport Branch runs in cutting crossed by a number of footbridges/access bridges. The Works sidings on the West of the Works terminate on the site, whereas those to the East of the building run off the bottom of the extract to make a junction with the Coalport Branch. The old canal was in use as a reservoir alongside the Works and the Lilleshall Company’s mainline runs alongside that reservoir to its East. [87]
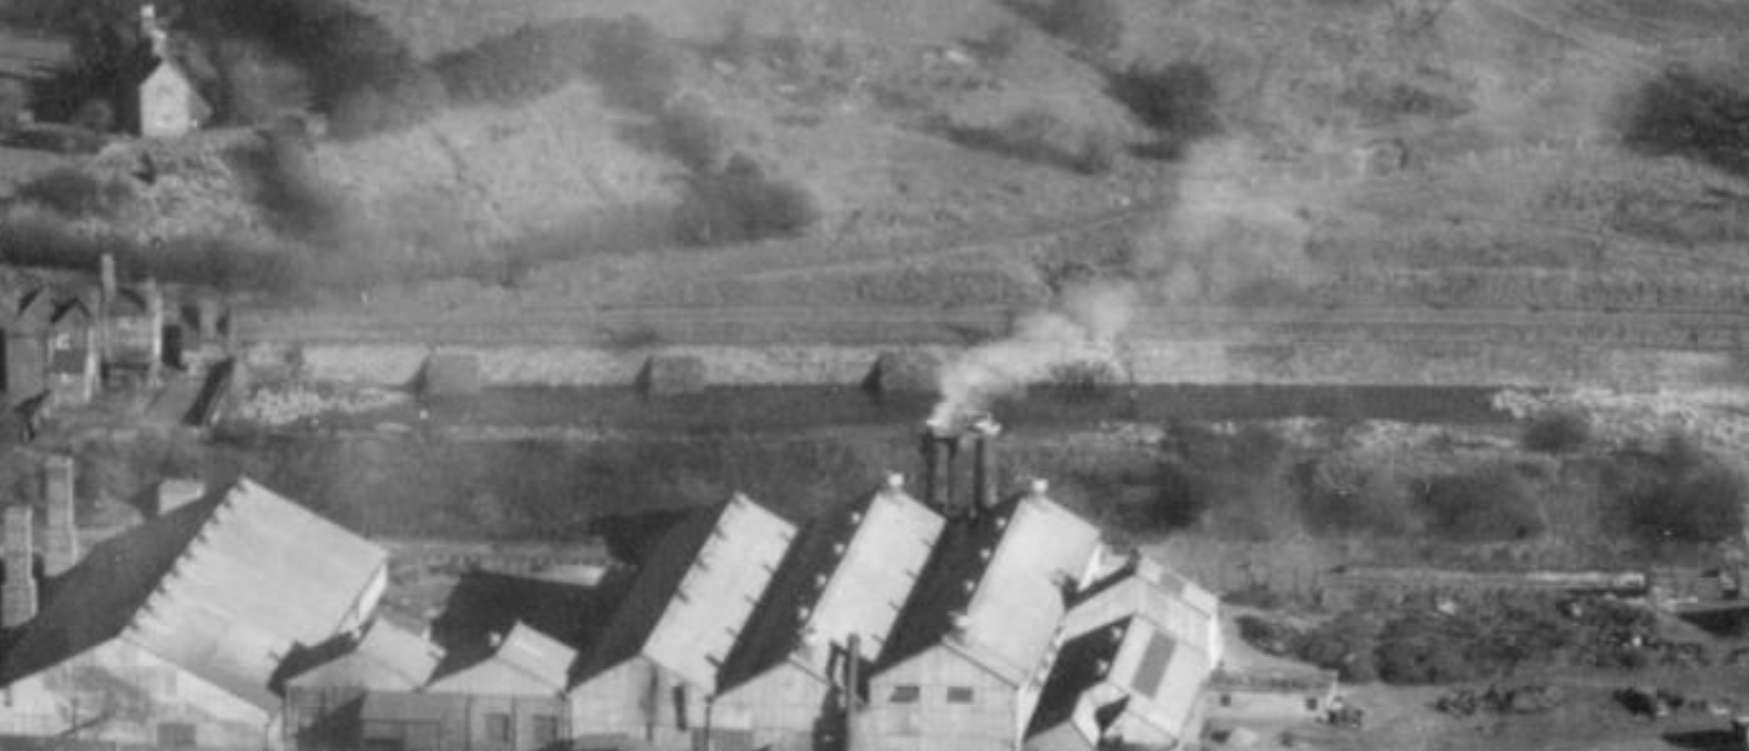
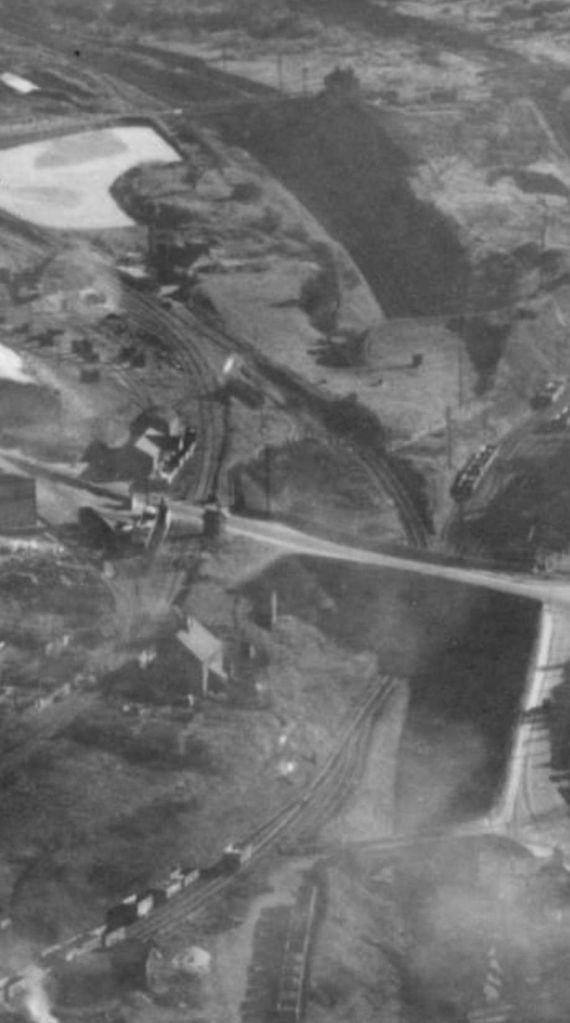
Two further extracts from Image No. EAW013746 taken in 1948 looking East, which show the mineral railway running South passing the Snedshill Ironworks (at the bottom of the first image).
The darker area above the Ironworks is a remaining length of canal with a retaining wall immediately beyond which supports the Lilleshall Company’s main line. [85]
The Lilleshall Company’s main line is on the right side of this image. Canongate can be seen at the top of the image with the reservoir which was once a length of the Shropshire Canal to the South of Canongate alongside the Lilleshall main line. Snedshill Ironworks sidings pass under Canongate and run towards the bottom-left of the image. [86]
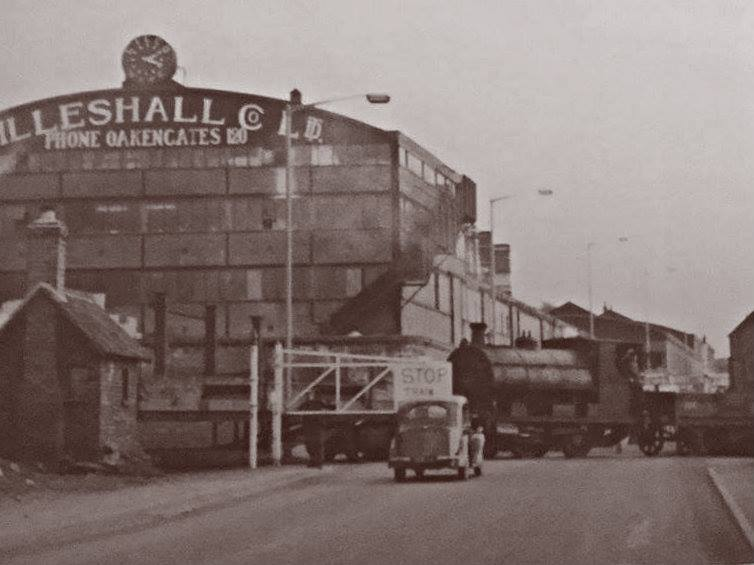
Another extract from an aerial image which was taken shortly after those above. The wagons on this image are in the same location as those on the image above. This extract from EAW013752 on the Britain From Above website looks over Snedshill Ironworks (bottom-left), with the short length of canal behind them, towards Priorslee. The Lilleshall Company’s mainline enters just below centre-left and runs at an angle towards the top-right of the image. The Greyhound bridge on the old A5 is alongside the level crossing which took the mineral railway across the A5. The Greyhound bridge took the A5 over the LNWR Coalport Branch (in deep cutting) and a feeder line from/to the sidings at the Snedshill Ironworks which met the Coalport Branch just beyond the bridge. [88]
Lines from Snedshill Ironworks join the Coalport Branch in passing under what became the A5 a little to the South of the Works themselves. The Lilleshall Company mainline crosses the road at level. A short branch runs off towards the Snedshill Brickworks. The GWR line from Shrewsbury to Wolverhampton runs in tunnel from top to bottom of the map extract. [90]
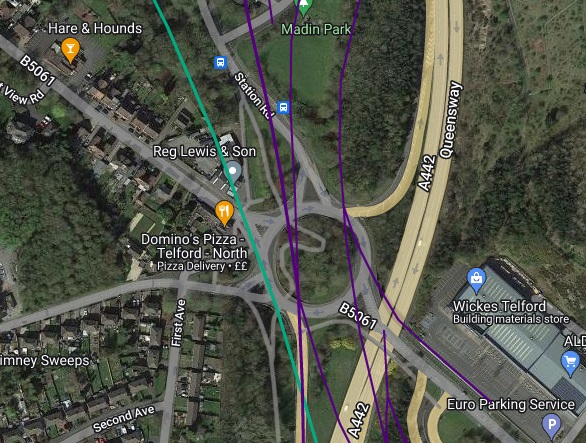
In the 21st century the area covered by the 25″ OS Map extract above has changed considerably. Only the GWR mainline from Shrewsbury to Wolverhampton remains of the lines on the OS Map extract. On this satellite image it is represented by the turquoise line and is running in tunnel. The Greyhound Roundabout has replaced what was the A5 (B5061 in 21st century) bridge over the Coalport Branch. The level crossing shown below, is long gone. The Lilleshall Company buildings have been replaced by Wickes and Aldi! The A442 dual carriageway dominates the area. [47]
This photograph looks across the roof of the Snedshill Brick and Tile Works towards Priorslee Furnaces. This image was shared on the Oakengates History Group Facebook Group on 24th November 2015 by Gwyn Thunderwing Hartley. [92]
Priorslee Furnaces and Steel Works in 1901. The Lilleshall Company’s main line runs diagonally across this map extract from the top-left corner to the bottom-right corner. [93]
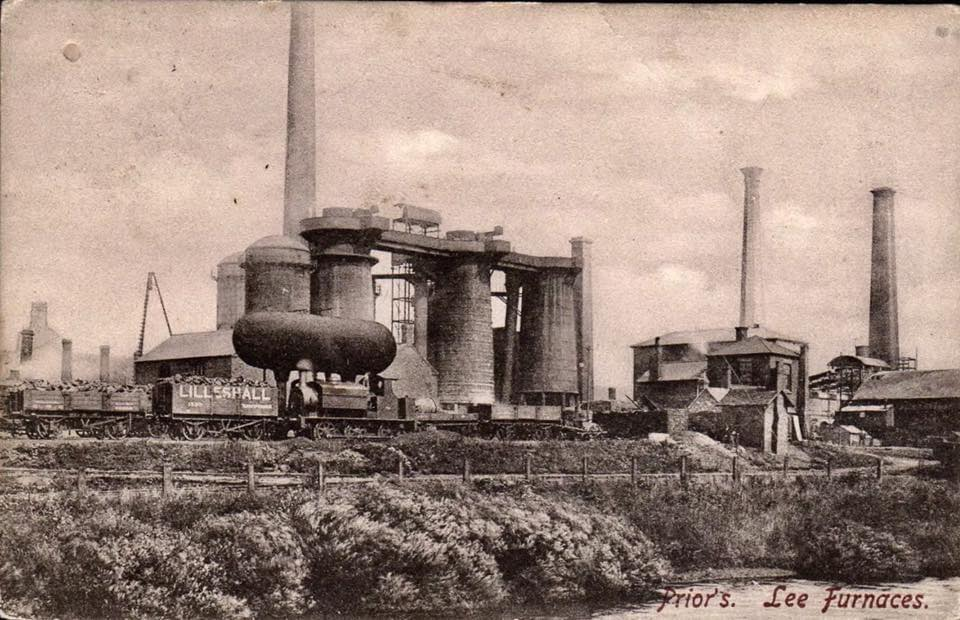
Priorslee Furnaces viewed from the Southeast. This image was shared by Paul Wheeler on the Oakengates History Group Facebook Group on 28th November 2017. [94]
An aerial image of the extensive steelworks and slag reduction plant at Priorslee. The blast furnaces were decommissioned in 1958 and the internal system closed. This image was shared on the Oakengates History Group Facebook Group by Lin Keska on 22nd February 2017. [95]
This postcard view of Priorslee Furnaces was taken in 1899. The rail access to the plant is emphasised by the locomotive and wagons in the foreground. The image was shared on the Telford Memories Facebook Group by Lin Keska on 27th June 2020. [96]
Two Lilleshall Company locomotives (Peckett 0-4-0ST No.10 and 0-6-2T No. 3 which was once GWR No. 589) in attendance at the demolition of a 98ft high concrete coal bunker at Priorslee Furnaces circa 1936. This work was taking place as part of the demolition of the former steelworks site. The image was shared on the Oakengates History Group Facebook Group by Gwyn Thunderwing Hartley (courtesy of John Wood) on 1st December 2019. I understand that the original image is held in the Archives of the Ironbridge Gorge Museum Trust. [97]
This extract from the 1882 25″ Ordnance Survey shows the area immediately Southeast of Priorslee Furnaces The Lilleshall Company’s main line split in three directions – to the South it runs into Hollinswood Sidings and up to Hollinswood Junction, where it joins the GWR mainline, Southeast it continues towards Stafford Colliery, and Northeast towards Woodhouse and Lawn Collieries. [98]
The remaining length of the Lilleshall Company’s mainline served Stafford Colliery (passing Darklane Colliery on its way East. This extract is taken from the 1901 25″ Ordnance Survey. Hollinswood Junction on the GWR mainline between Shrewsbury and Wolverhampton just sneaks into the bottom-left corner of this map extract. [99]
Hollinswood Sidings and Hollinswood Junction, to the South of Priorslee Furnaces and Steelworks. The GWR line between Shrewsbury and Wolverhampton runs from the top-left to the bottom-right. The LNWR Coalport Branch enters top-left and leaves the map extract to the left of centre at the bottom of the image. The line turning off the GWR mainline to the South served a series industrial undertakings to the East of the old Shropshire Canal. The Lilleshall Company’s sidings enter the map extract centre-top and meet the GWR mainline at Hollinswood Junction. [100]
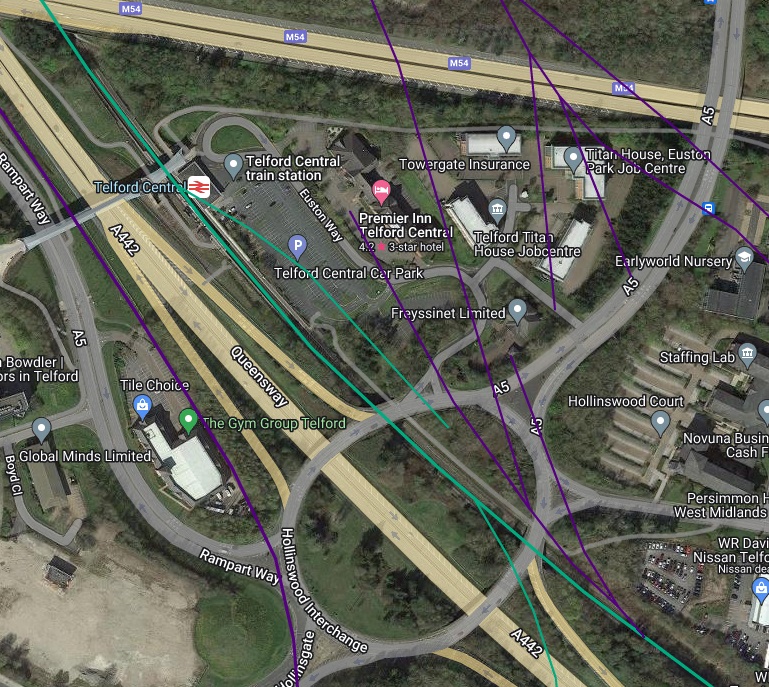
This is another area of Telford which has seen dramatic change. The GWR line ‘turquoise’ remains, the LNWR Coalport branch (thicker purple) has long gone. As have all the Lilleshall Company’s lines (thinner purple). The M54, the A442, Queensway and Hollinswood Interchange dominate the modern image. [47]
Locomotive 48516 heading what seems to be a train of empty coal wagons and facing towards Wolverhampton. Hollinswood Sidings can be seen beyond the locomotive. The image was shared on the Telford Memories Facebook Group by Lin Keska on 4th April 2018. [101]
Lilleshall Company Locomotives
The Lilleshall Company operated a number of steam engines which it picked up from various sources and some of which it built itself. The remainder of this article is no more than a glimpse of these locomotives on the Lilleshall Company’s network. The authoritative treatment of the motive power on the Lilleshall Company network is the book by Bob Yate, “The Railways and Locos of the Lilleshall Company.” [25]
Yate tells us that, because the Lilleshall Company’s network was extensive, it needed a considerable number of locomotives to operate it. He continues: “Much of the traffic was heavy, so it comes as no surprise to find that the company turned to acquiring former main line company locomotives for some of their more arduous duties. The total number of locomotives rose from four during the mid-1850s to eight by 1870, down to five by 1875, then six by 1886, increasing to nine in 1900 until 1920 when there were eleven. By the 1930s the number was back down to nine.” [25: p67] After WW2, numbers were reduced to five, and once closure was approaching all five were scrapped and two other locomotives were purchased.
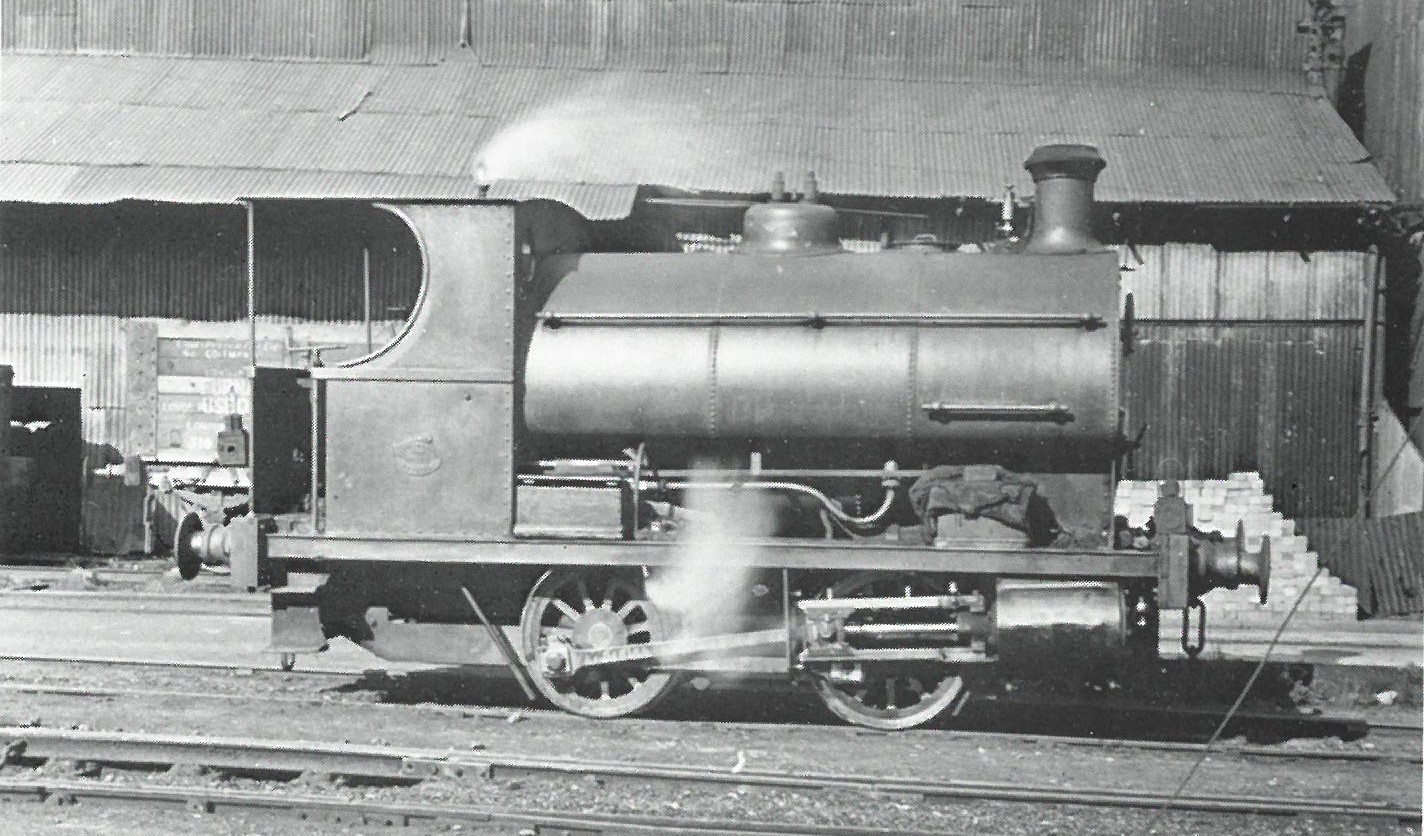
Peckett 0-4-0ST, Lilleshall Locomotive No. 10 at Priorslee, (c) Industrial Railway Society, Ken Cooper collection. This photograph was shared by Andy Rose on the Telford Memories Facebook Group on 29th September 2019. [103]
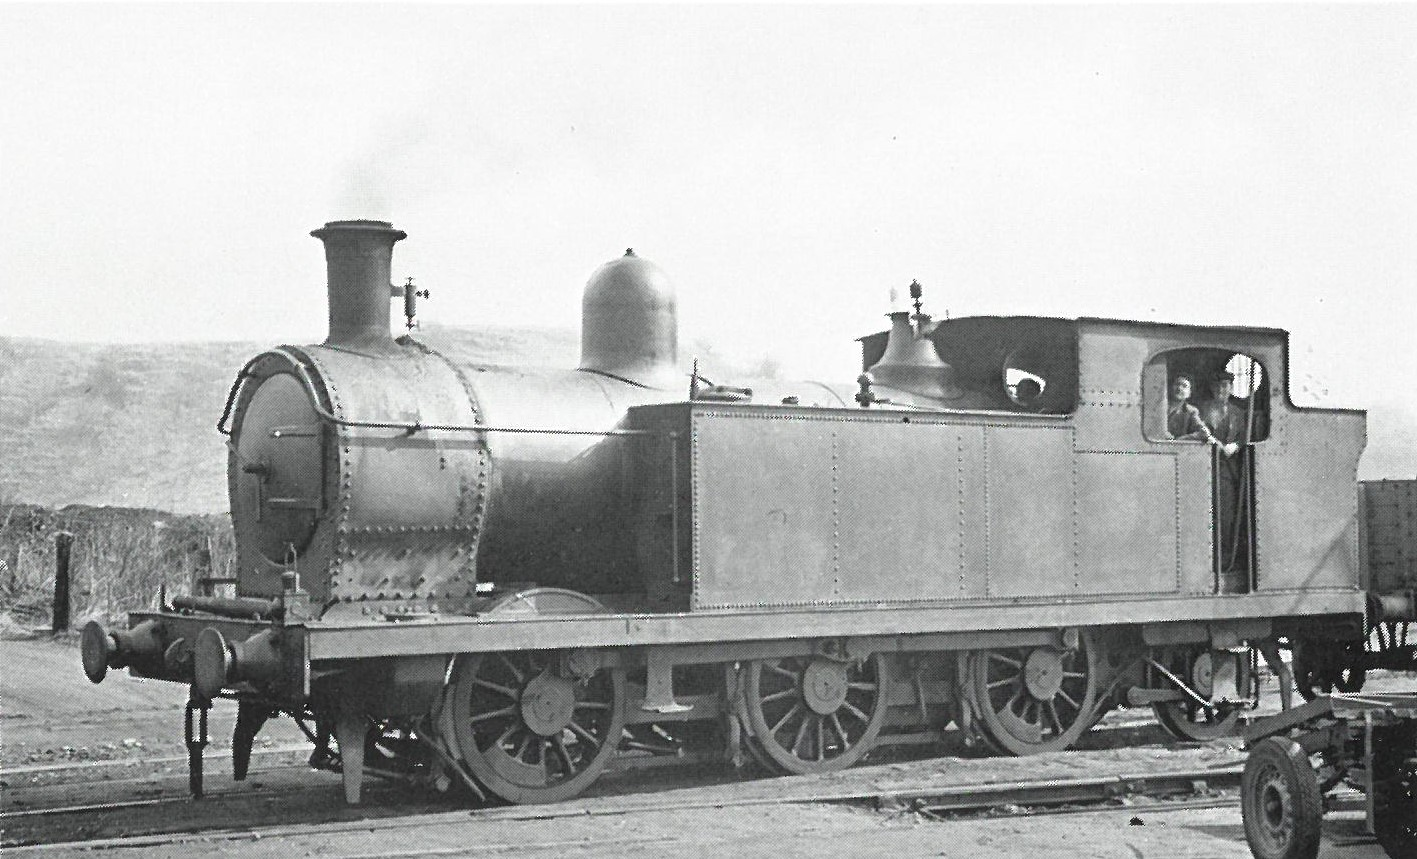
Former Barry Railway ‘B1’ Class 0-6-2T No. 60 (also ex-GWR No. 251) which when purchased by the Lilleshall Company was given No. 5, photographer not known. This photograph was shared by Andy Rose on the Telford Memories Facebook Group on 29th September 2019. [103]
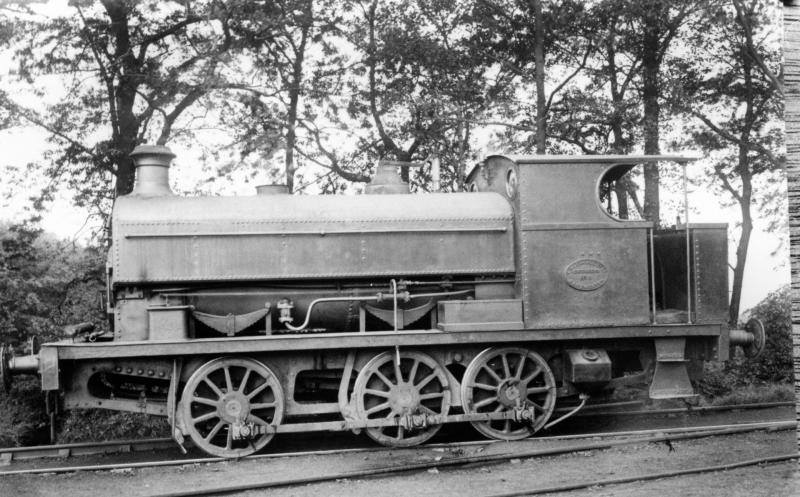
Lilleshall Company No. 9, an 0-6-0ST locomotive built by Robert Stephenson & Co. Ltd. It was bought by the Lilleshall Company in 1904 and lasted until 1929, (c) F. Jones Collection. This photograph was shared by Gwyn Thunderwing Hartley on the Oakengates History Group Facebook Group on 27th November 2017. [104]
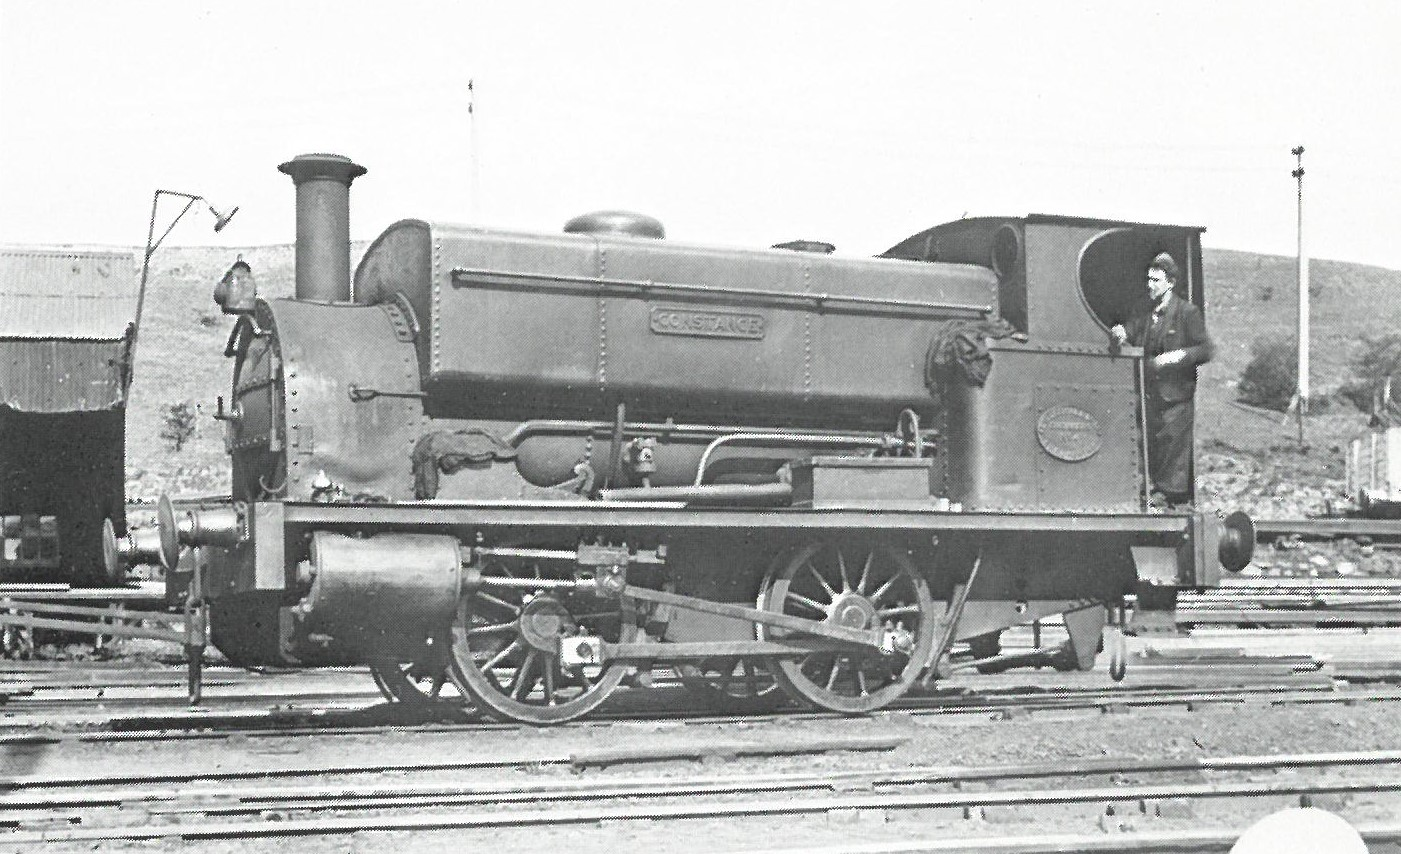
Lilleshall built 0-4-0ST, Constance and Andrew Barclay 0-6-0T No. 11 at New Yard Locomotive Shed. The image was shared on the Oakengates History Group Facebook Group by Gwyn Thunderwing Hartley on 4th April 2021. [105]
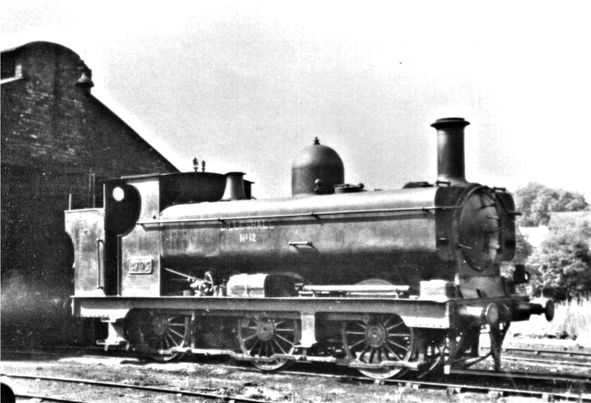
Lilleshall Company Locomotive No. 12, (ex-GWR No. 2794) 0-6-0PT sits a New Yard. This photograph was shared by John Wood on the Oakengates History Group Facebook Group on 28th June 2020. [107]
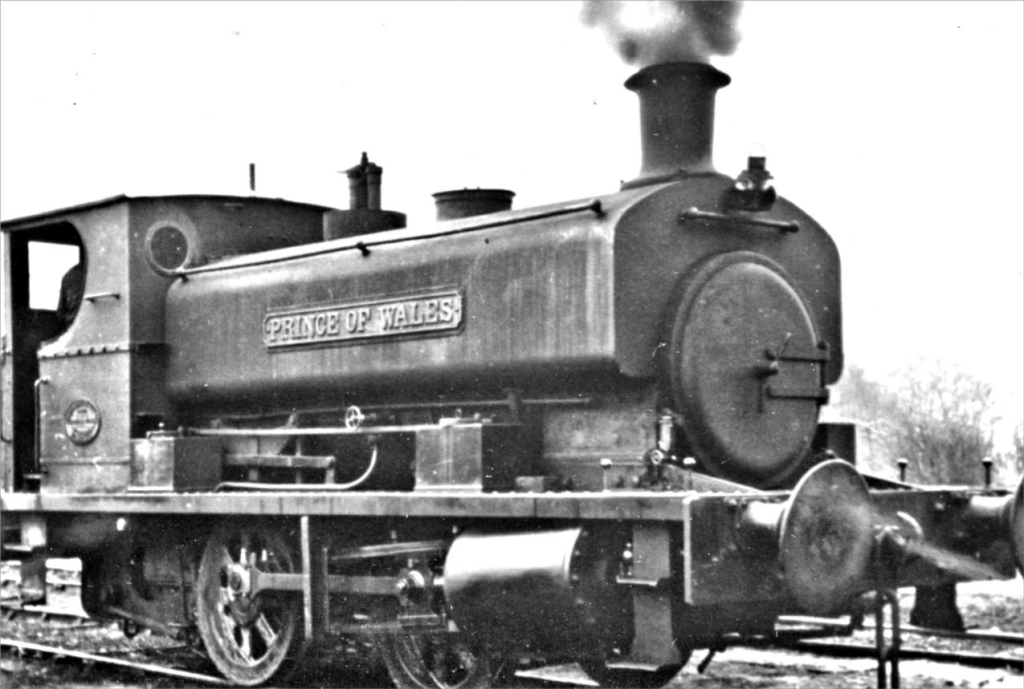
Lilleshall Company Locomotive, Prince of Wales (ex-Lever Brothers, Port Sunlight Railway) 0-4-0ST also sits a New Yard This photograph was also shared by John Wood on the Oakengates History Group Facebook Group on 29th March 2018. [107]
National Coal Board Locomotives
With nationalisation, the NCB took over Granville and Grange pits and continued to use the northern length of the Lilleshall Network until closure of Granville Colliery in 1979. Granville Colliery supplied coal to Buildwas Power Station and the coal trains were worked by a range of locos down the 1.5 miles to Donnington. Austerity 0-6-0ST steam locomotives were the most common form of motive power until steam was replaced by diesel locomotives.
Between 1948 and 1964, 77 new “Austerity” 0-6-0ST locomotives were built for the NCB.
NCB Hunslet Austerity 0-6-0ST Granville No. 5 at School Road Crossing. [108]
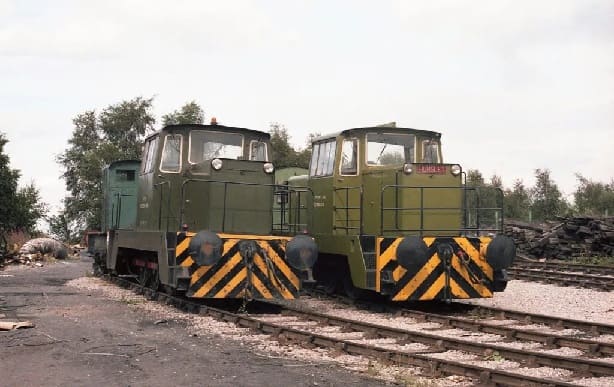
When steam was replaced by diesel, the NCB deployed Hunslet 0-6-0DH locos at Granville Colliery. Between 1965 and 1989 well over 50 0-6-0DH shunters were built by Hunslet (Leeds) for the British market. More were also built to a variety of gauges for users abroad in South America, Africa, Europe and the Indian subcontinent. The Hunslet 0-6-0DHs were surprisingly powerful for their size, and their short wheelbase enabled them to operate in locations where other locomotives may struggle. [109]
Typical NCB Hunslet 0-6-0DH locomotives. [110]
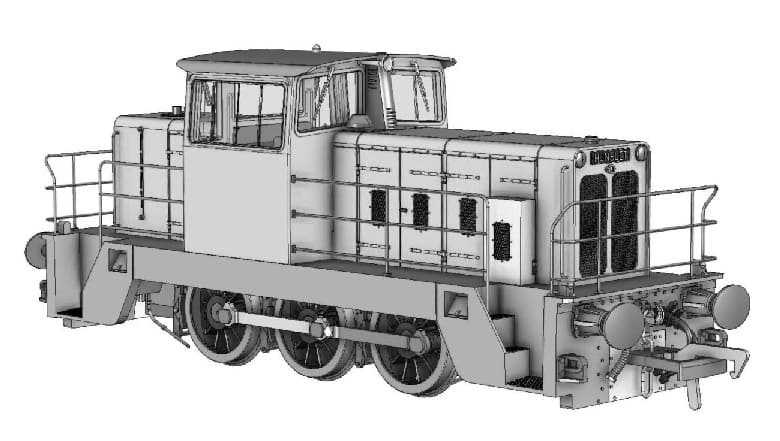
Models of the Hunslet 0-6-0DH are produced in OO gauge by Revolution Trains and in N gauge by the N Gauge Society.
CAD 3/4 image of Hunslet 0-6-0DH in 00 Gauge. [110]
What can be seen today?
All of the Granville Colliery buildings have been removed.
All that remains of the Old Lodge furnaces after extensive dismantling and site restoration involving raising of the ground levels are parts of the brickwork of the first three furnaces.
The high walls behind the furnaces are the remains of the furnace loading ramps. On the right of the ramp walls hidden in the trees is a retaining wall in front which was the blowing house. Behind the loading ramps were calcining kilns which were added in 1870 to improve the quality of the iron ore. Remains of the Lodge Furnaces, Tug Boat Canal and other buildings can be seen around Granville Country Park.
The Lilleshall Company Railways have disappeared completely.
G. F. R. Barker; Leveson-Gower, Granville (1721-1803); in Sydney Lee, (ed.); Dictionary of National Biography. Vol. 33; Smith Elder & Co., London, 1893.
The Jim Clemens Collection No. 2 – Steaming Through Shropshire Part 1; B&R Videos; and can be seen on Facebook at https://www.facebook.com/groups/265906436919058/search/?q=locomotive&locale=en_GB. B & R Video Productions produce a series of DVDs which have primarily been created by converting cine-film. One part of their library is the Jim Clemens Collection. These stills from the video are shared here with permission from Michael Clemens who holds the copyright on his father’s work. Michael is an author in his own right and maintains a website: https://www.michaelclemensrailways.co.uk. On that website there are details of all of the books he as published together with quite a bit of downloadable material including working timetables. His most relevant publication to this current article is: Michael Clemens; The Last Years of Steam in Shropshire and the Severn Valley; Fonthill Media Ltd, Stroud, Gloucestershire, 2017. That book contains two photographs which are similar to two of the images shown above (p67).
Many of the photographs taken by A.J.B. Dodd which appear in this article were first found on various Facebook Groups. A number were supplied direct by Mike Dodd, A.J.B. Dodd’s son who curates the photographs taken by his father. Particular thanks are expressed to Mike Dodd for entering into email correspondence about all of these photographs and for his generous permission to use them in this article.


