Monthly Archives: Oct 2023

La Ligne du Littoral et ses Antennes, First Generation Electric Tramways – Nice-Monte Carlo (Chemins de Fer de Provence/Alpes-Maritimes No. 91) …

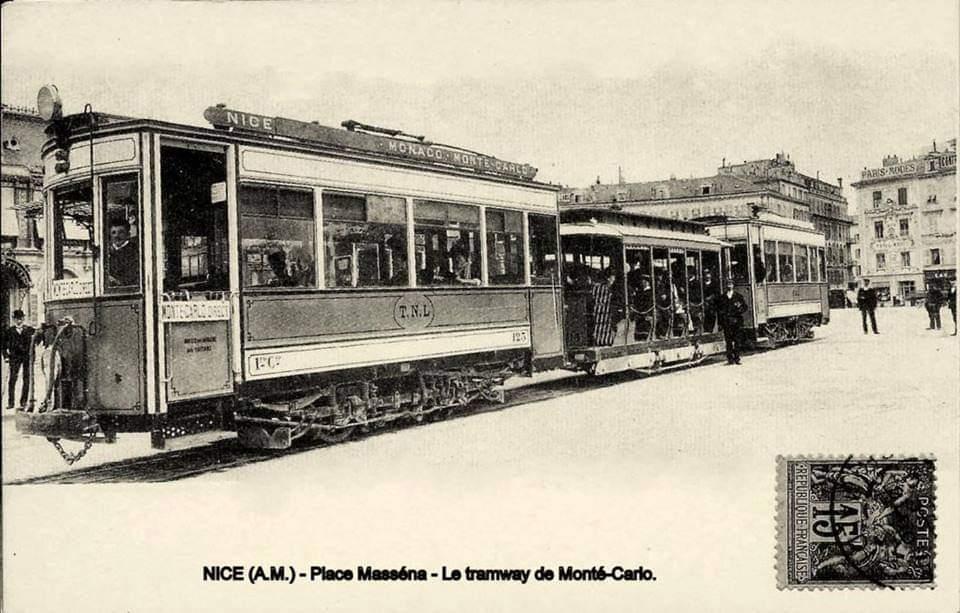
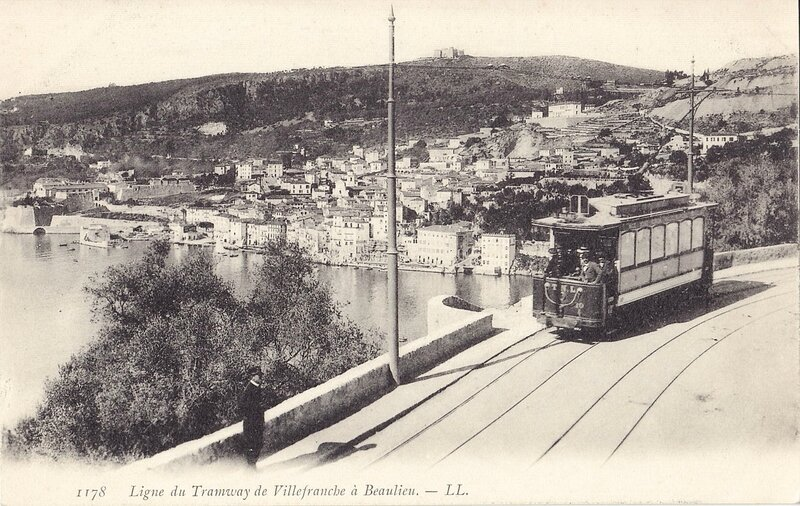
The line between Nice and Monte Carlo opened in a series of stages. First from Monaco to Place d’Armes in Monte Carlo on 14th May 1898; then from Place Massena in Nice to Villefranche, on 1st February 1900; Villefranche to Beaulieu on 3rd November 1900; TNL trams were permitted to run on Monaco’s tramways from 28th May 1903; and the remaining length, Beaulieu to Monaco Place d’Armes opened on 7th November 1903. Over the next few years some single track lengths were doubled.

Trams for Monte Carlo began their journey in Nice a Place Massena. This postcard image was shared on the Comte de Nice et son Histoire Facebook Group by Roland Ciccoli on 10th March 2016. [34]

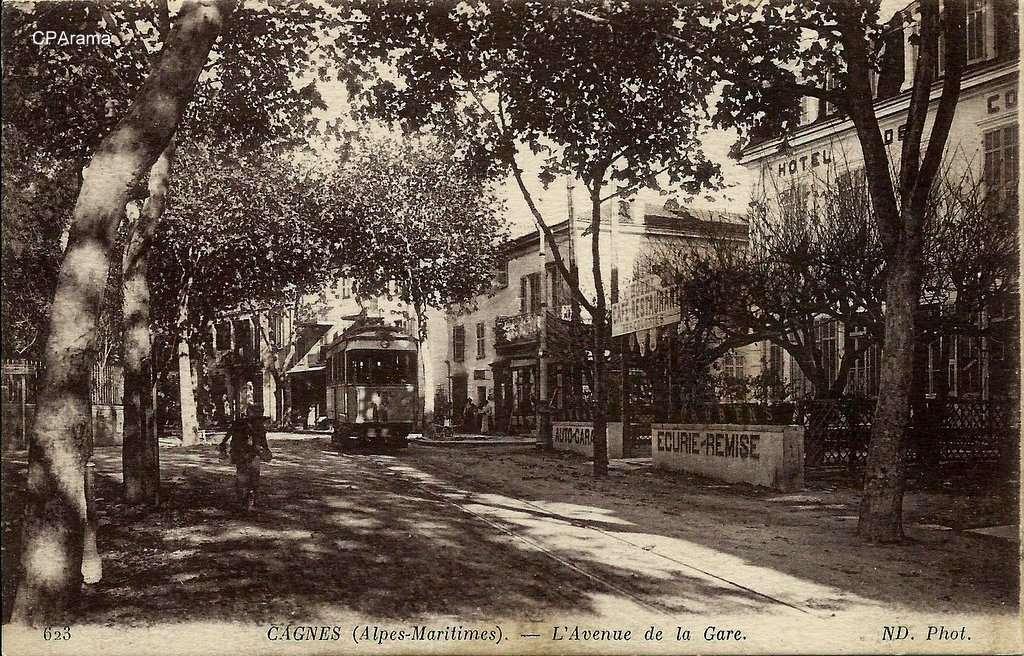
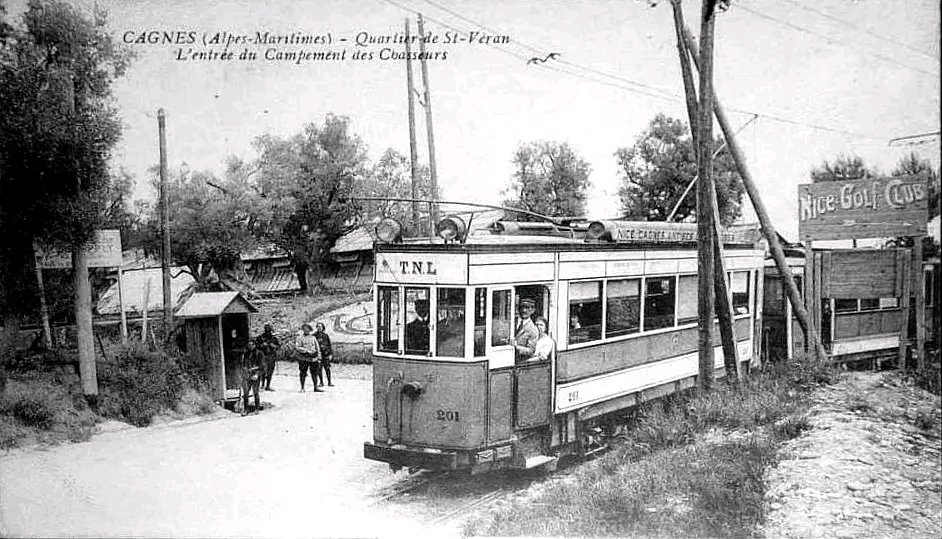
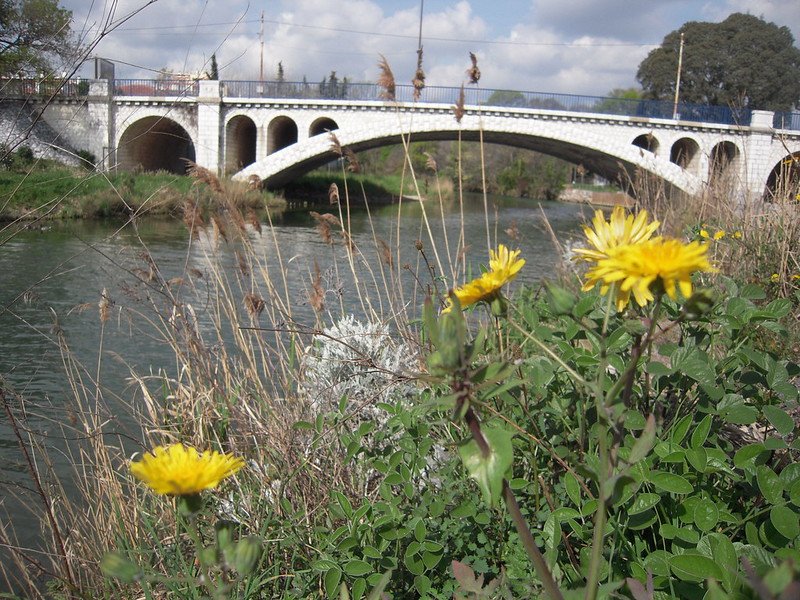
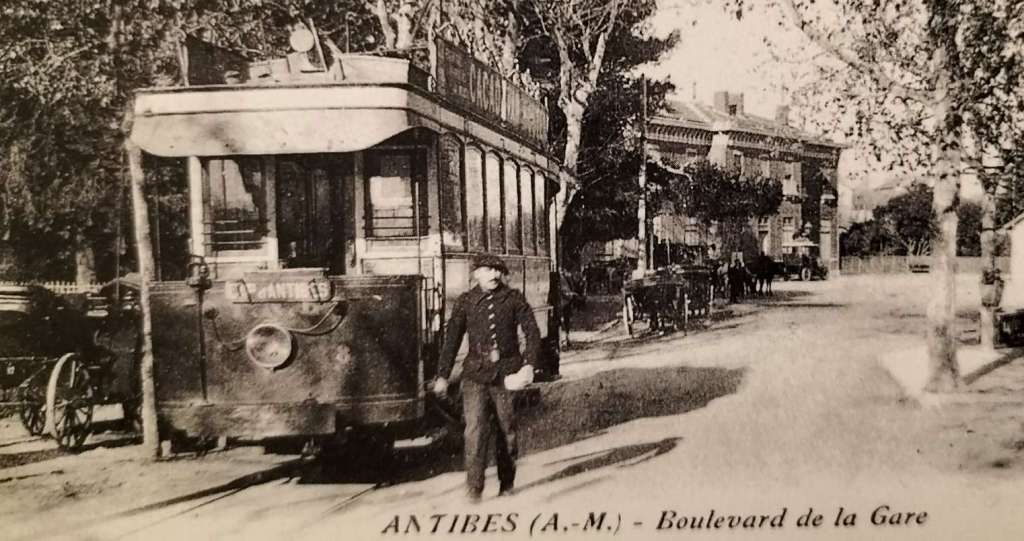
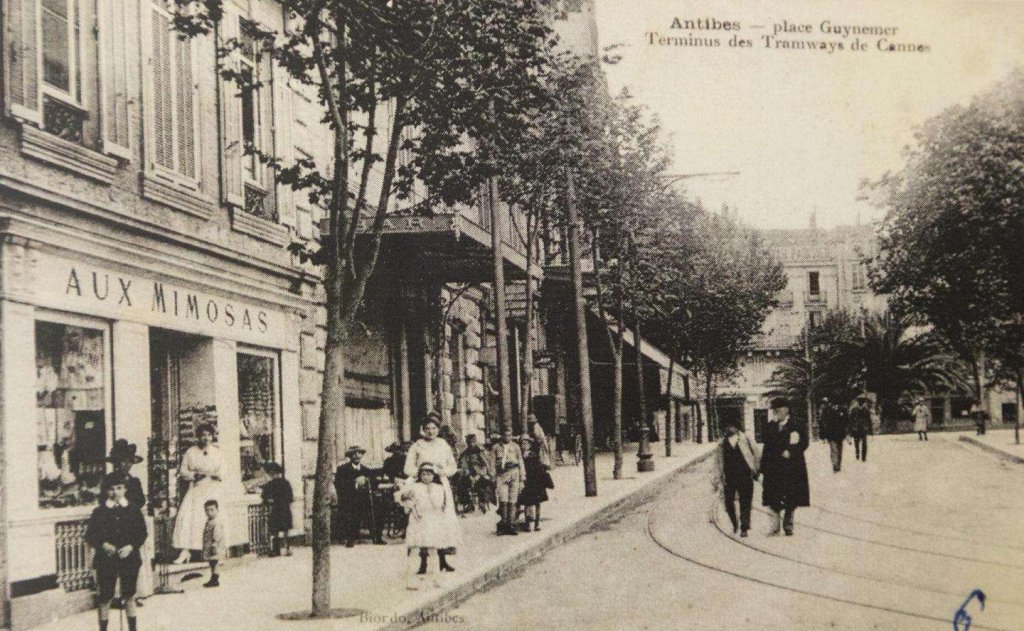
Trams to Villefranche, Beaulieu and Monte-Carlo left the TNL station at Place Masséna and entered Rue Gioffredo sharing the double track with the urban lines to Gendarmerie and St. Pons.  At Rue Defly, the route branched off to the right to cross the River Paillon to Place Garibaldi. The right bank lines to the Boulevard du Pont-Vieux and Abattoirs were crossed there. The line then ran along Rue Cassini to Place Cassini (today Ile-de-Beauté) where several urban lines serving the port terminated.

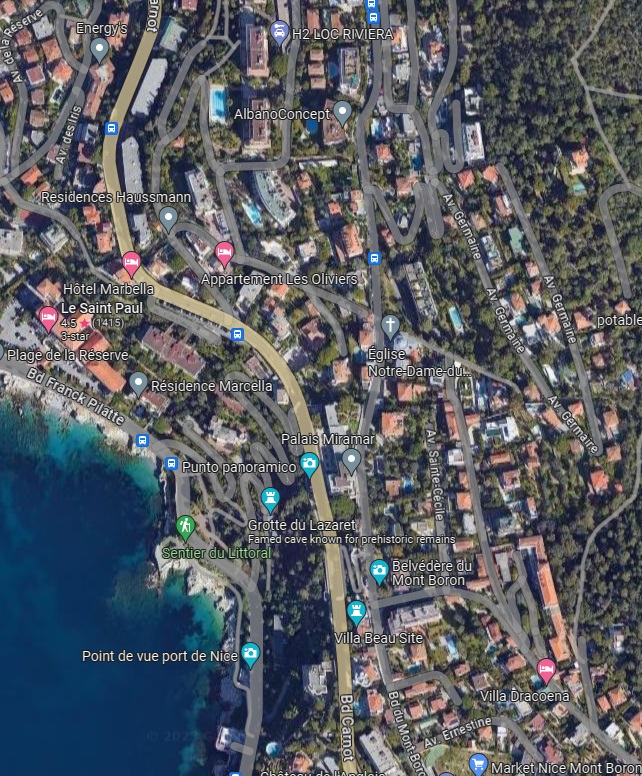
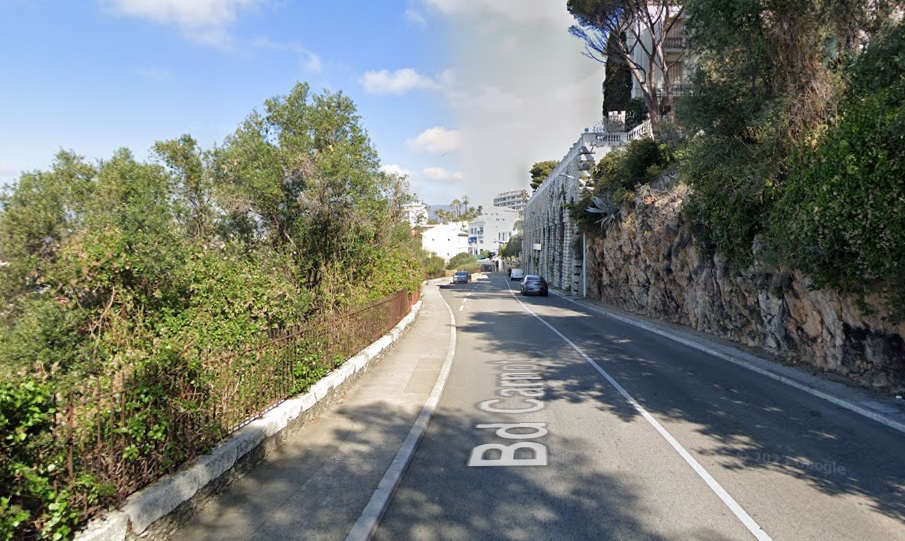
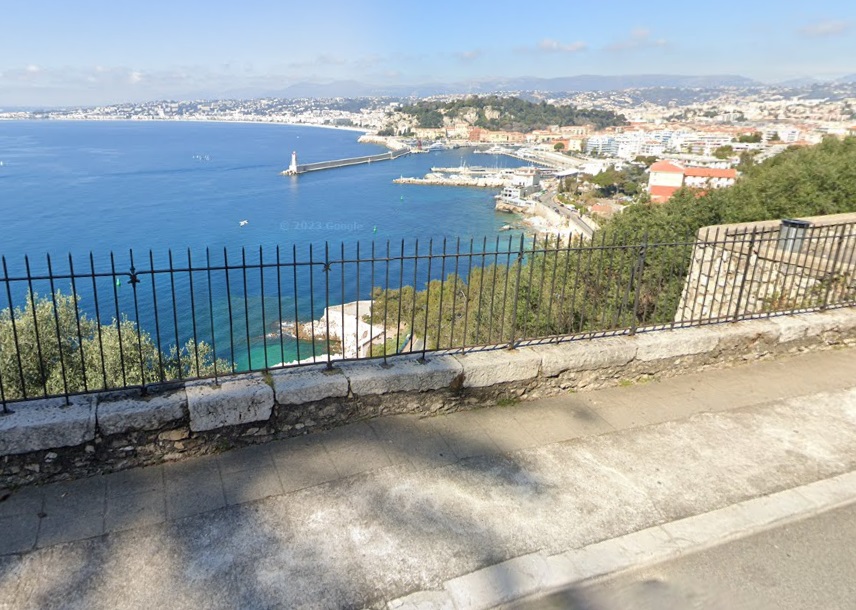
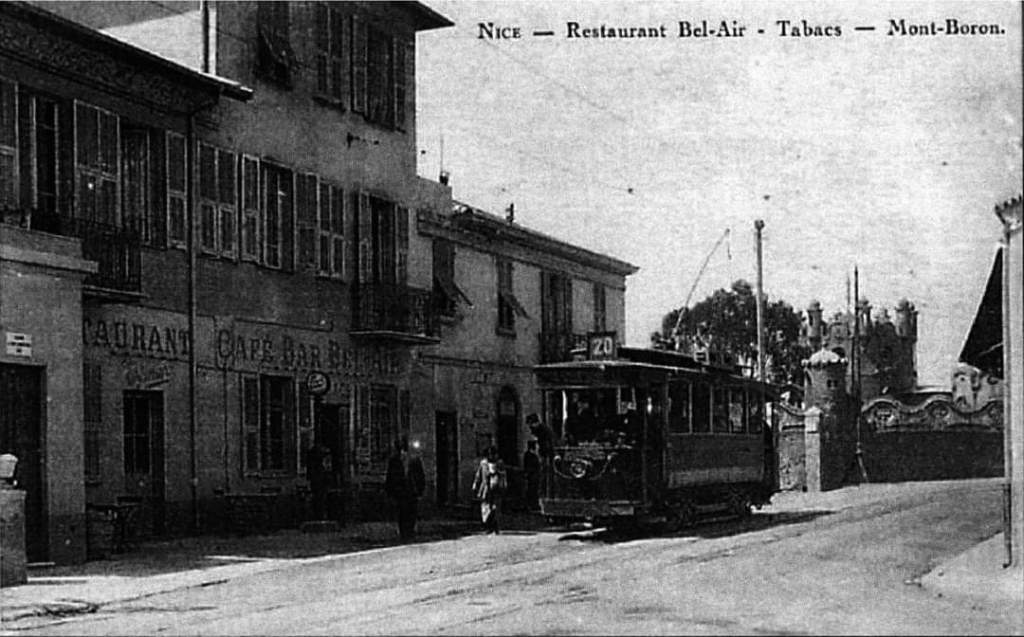
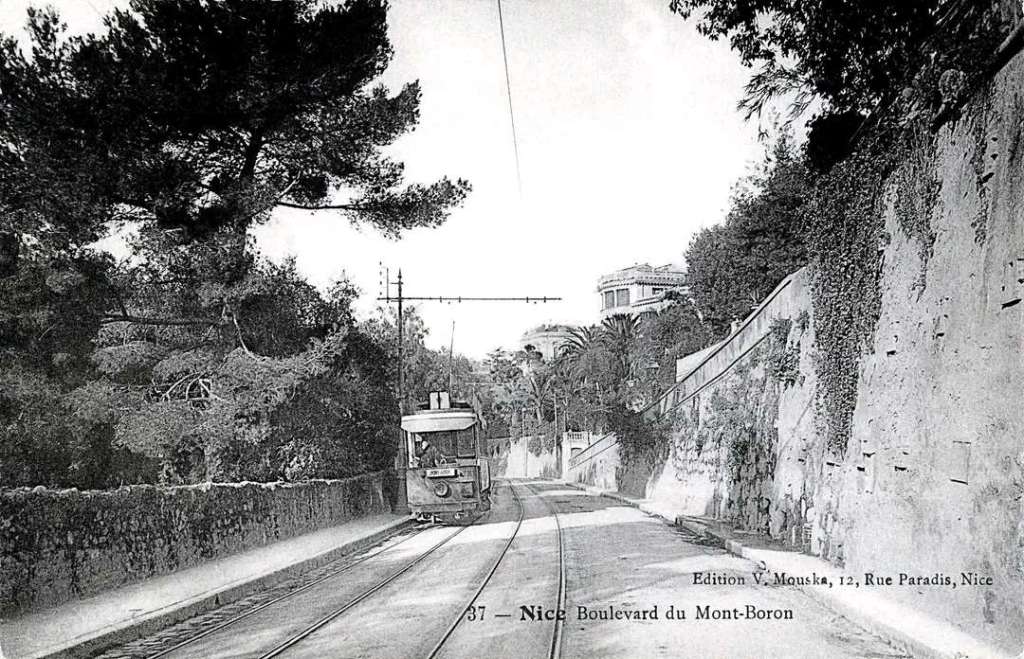
After leaving the port, trams headed towards Papacino and Deux-Emmanuel quays. With the Riquier line heading up Rue Arson, the Monte-Carlo trams began a steep climb along Boulevard Carnot on the western slope of Mont Boron.  

Boulevard Carnot leaves the Port area of Nice and winds its way up the western side of Mont Boron. Trams followed this road towards Monte Carlo. [Google Maps, October 2023]
Much the same location in 2022 as shown in the postcard above. [Google Streetview, October 2022]
Boulevard Carnot continues South along the western side of Mont Boron. [Google Maps, October 2023]
A similar view North along Boulevard Carnot in 2023. The retaining wall on the right of the road fixes the location. [Google Streetview, March 2023]
A view across Nice in March 2023 from the approximate location of the tram in the monochrome image above. [Google Streetview, March 2023]
Boulevard Carnot and Boulvard Maurice Maeterlinck. [Google Maps, October 2023]
The tram in front of the restaurant Bel-Air – Tabacs (today’s Bar-Tabacs San Luca). The restaurant was at the beginning of Boulevard Maurice Maeterlinck, © Yves Nissart Premier. This image was shared on the Comte de Nice et son Histoire Facebook Group by Pierre Richert and Roland Coccoli in June 2023. [3]
The same location in 2022. [Google Streetview, October 2022]
Boulevard Maeterlinck close to Boulevard Carnot. Note the tram tracks in the road surface. © Yves Nissart Premier. This image was shared on the Comte de Nice et son Histoire Facebook Group by Pierre Richert and Roland Coccoli in June 2023. [3]
The tramway followed what was the RN7 (today’s M6098) towards Villefranche-sur-Mer. [Google Maps, October 2023]
A tram on Boulevard du Mont Boron (today’s Boulvard Princess Grace de Monaco) This image was shared on the Comte de Nice et son Histoire Facebook Group on 19th June 2016 by Jean-Paul Bascoul. The tram is a T2 powered car providing an extended urban service as far as l’Octroi du Mont-Boron on the Monte-Carlo line, [5]
The same location in 2023. [Google Streetview, March 2023]
The route of the tramway down into Villefranche. [Google Maps, October 2023]
A tram approaching Villefranche on a service from Nice. The harbour is visible to the right of the picture. The town can be seen in the centre of the image. [6]
The same view, colourised, [7]
Approximately the same location in the 21st century. [Google Streetview, March 2023]
An early map of Villefranche-sur-Mer with Mont Boron on the left of the image and St. John Cap Ferrat on the right. (1699 by De Fer). [4]
Mont Boron and the route to Villefranche-sur-Mer as seen on an IGN aerial photograph of 1943. [4]
An IGN aerial view of 1924 with the Moyenne Corniche under construction. Both this and the image above were shared by Pierre Richert on the Comte de Nice et son Histoire Facebook Group on 1st October 2022. [4]

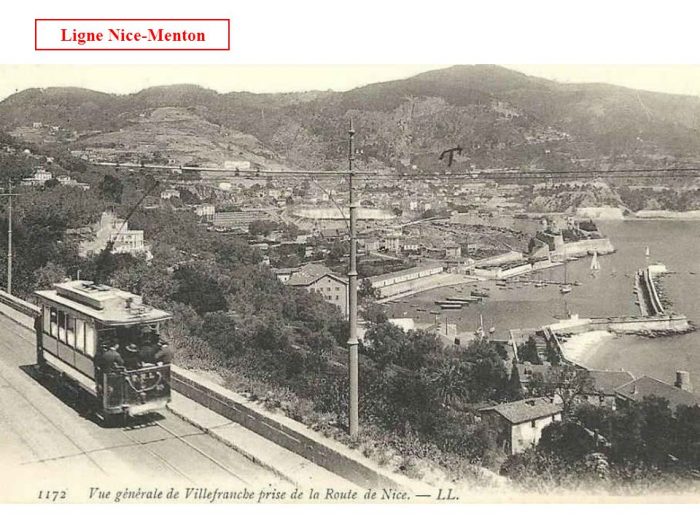
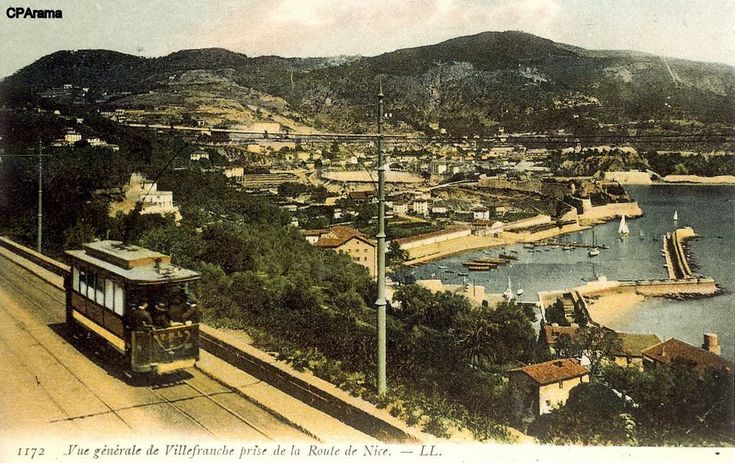
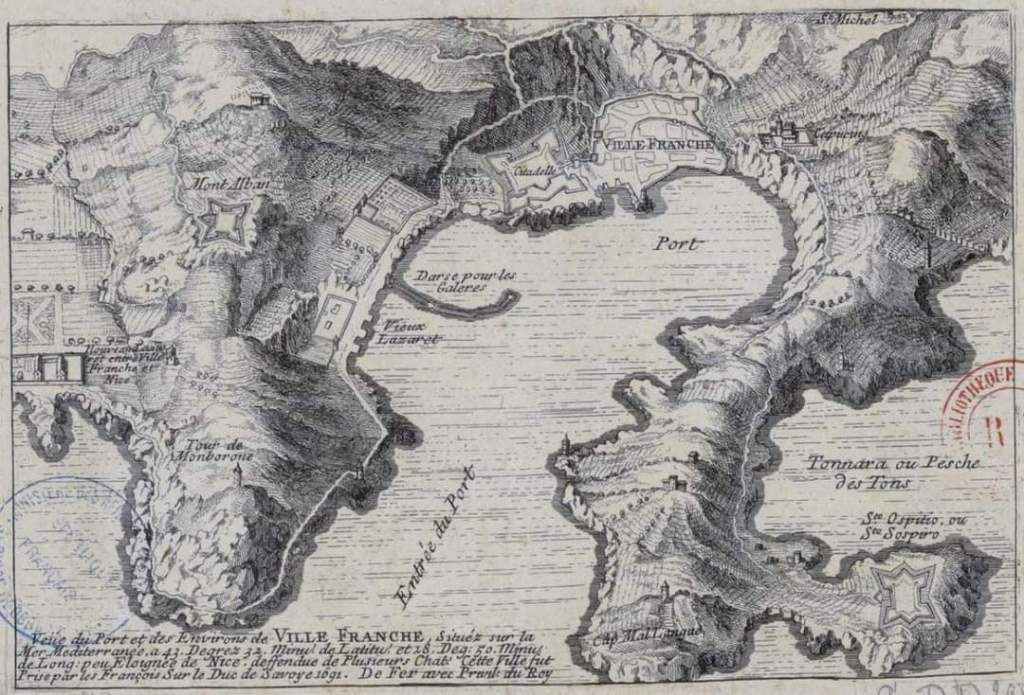
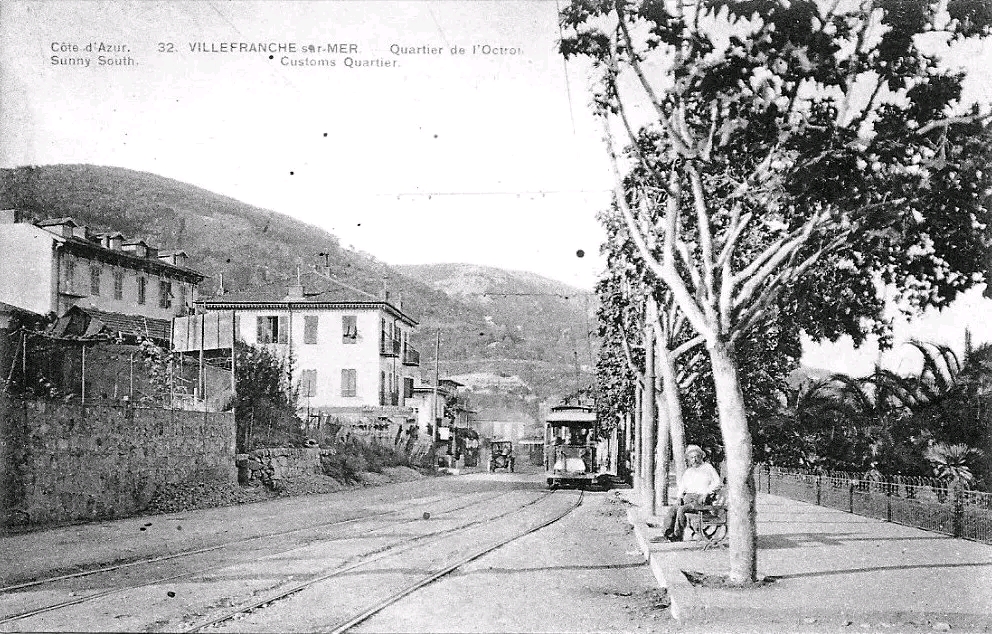
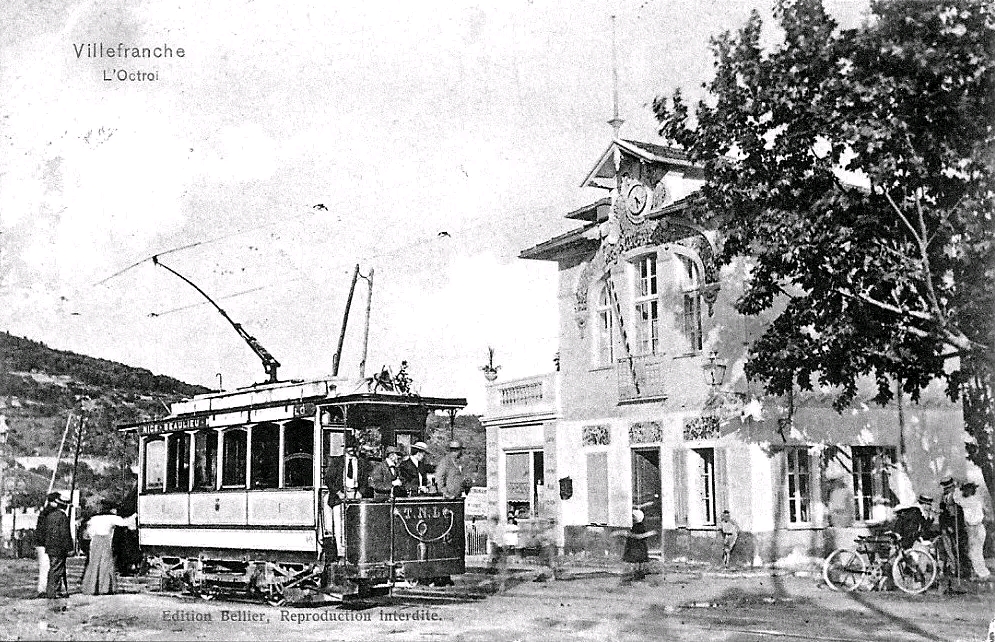
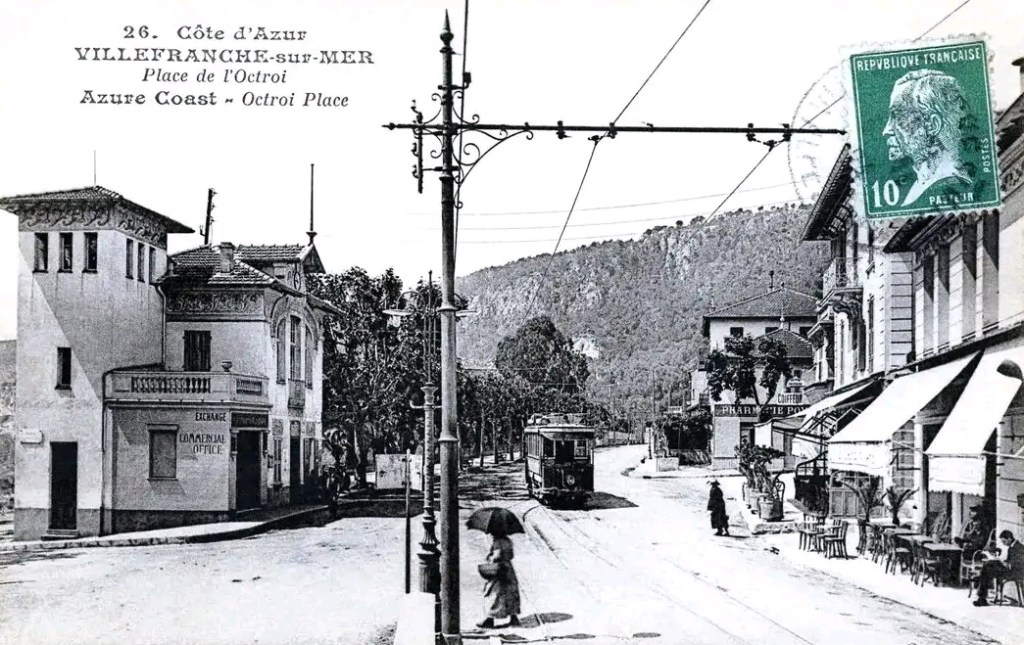
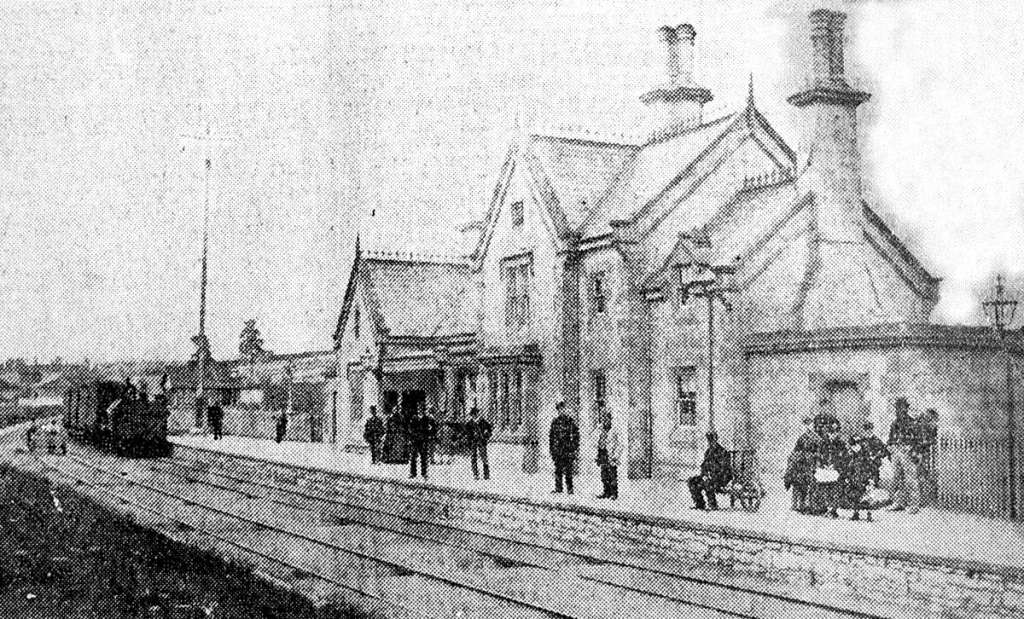
Trams then headed down into Villefranche, which Banaudo reminds us, was the “military port of the House of Savoy and always a popular stopover for cruise and warships.  The tramway passed above the dock and the citadel, … crossed ‘l’octroi’ and reached the Villefranche station located in the upper part of the town.” [1: p41]  ‘L’octroi’ was the point where visas were granted and taxes were collected. According to the “Petit Robert de la Langue Française,” an ‘octroi’ was, historically, an “indirect contribution collected by a municipality on goods for local consumption (entrance fees).” [2]

This is the first of a sequence of 5 postcard views shared on the Comte de Nice et son Histoire Facebook Group by Alain Nissim on 10th July 2023, which show the approach to Villefranche and it’s customs house (l’Octroi), the entrance to the old town and the first 100 metres or so, of the RN7 heading East. [13]
A little closer to Villefranche. [20]
The approach to l’Octroi from Nice with a tram standing in front of the building. [13]
Looking towards Nice, this view shows the Place de l’Octroi. The building on the left is l’Octroi, the road to the old town leaves past the photographer on the left of the picture. The RN7 and the tram route leave bottom-right. [13]
Looking towards Beaulieu and Monte Carlo, the RN7 curves away from the tram stop in Villefranche. The road to the old town drops away to the right. [13]
A closer view of the junction. [13]
Turning a little to the left from the last image. [13]
This picture shows approximately the same location as the last three monochrome images above. [Google Streetview, March 2023]

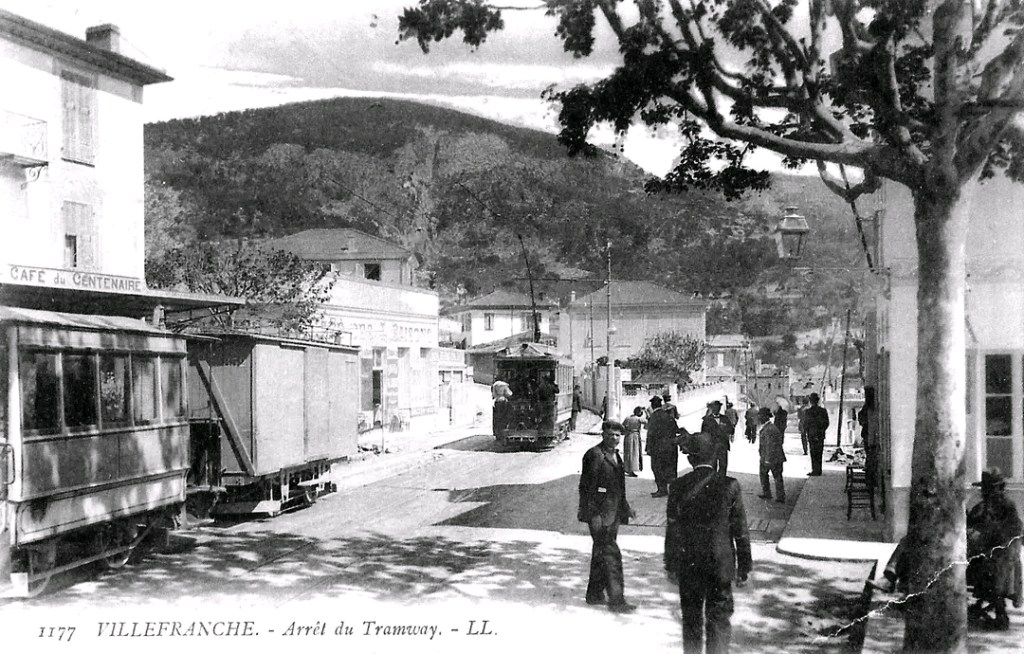
At Villefranche station, according to Banaudo, “certain partial services had their terminus and a particular branch served a building materials warehouse, (un entrepot de materiaux de construction).” [1: p40]

Villefranche-sur-mer again. The road shown pale yellow on this image is the route of the old tramway. [Google Maps, October 2023]
St. Jean-Cap-Ferrat runs south from the bottom of this image, which shows Beaulieu-sur-mer. The road shown pale yellow on this image is the route of the old tramway. Beaulieu’s port is top-right. [Google Maps, October 2023]
Thomson TNL tram Nº 10 heads East from Villefranche towards Beaulieu, with the Mont Alban fort in the background. [8]
Approximately the same location in the 21st century. [Google Streetview, May 2023]

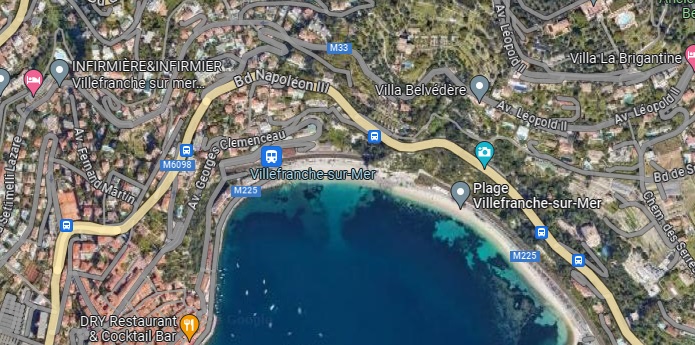
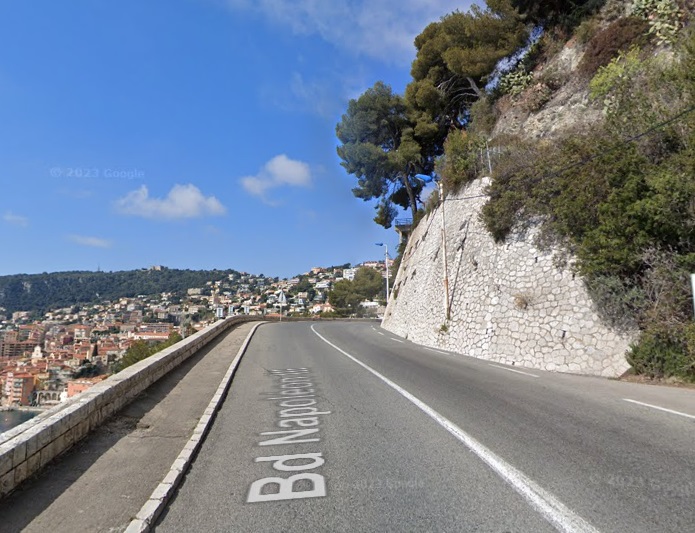
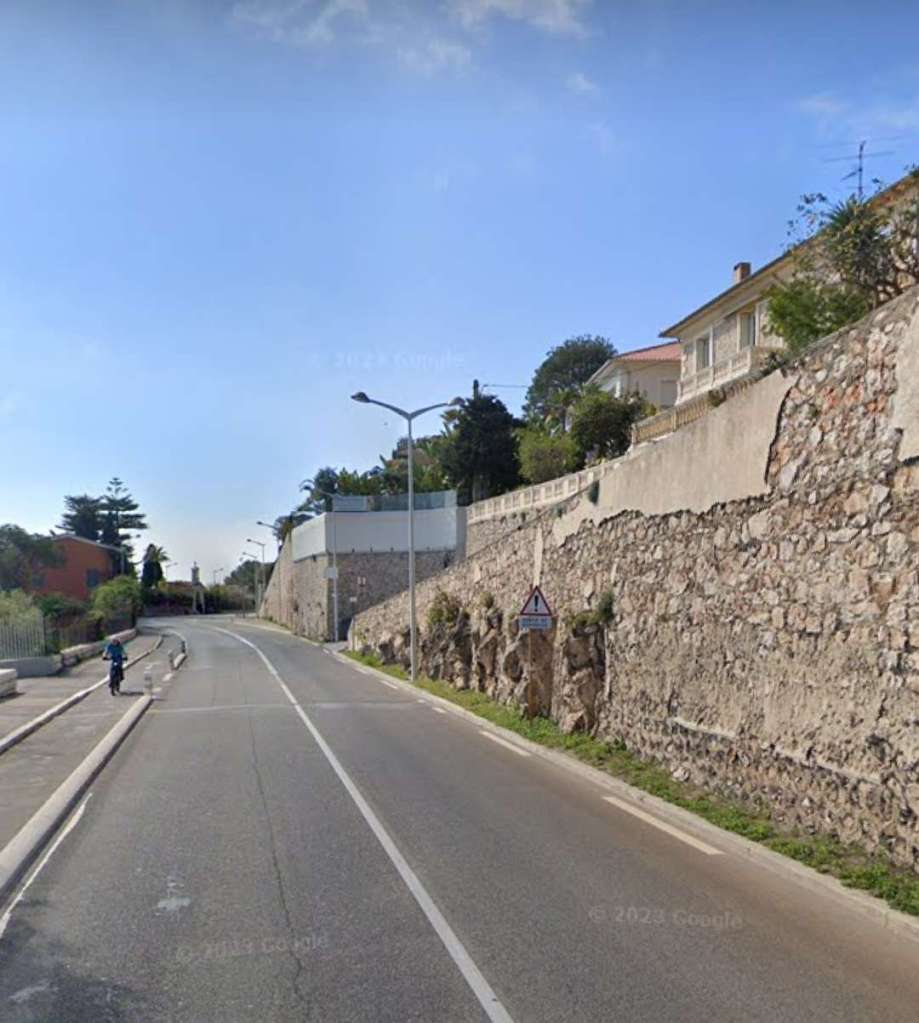
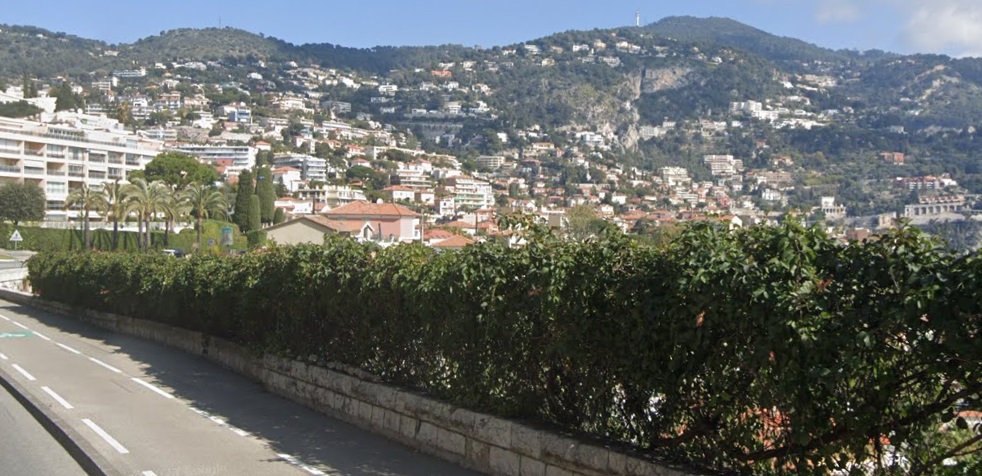
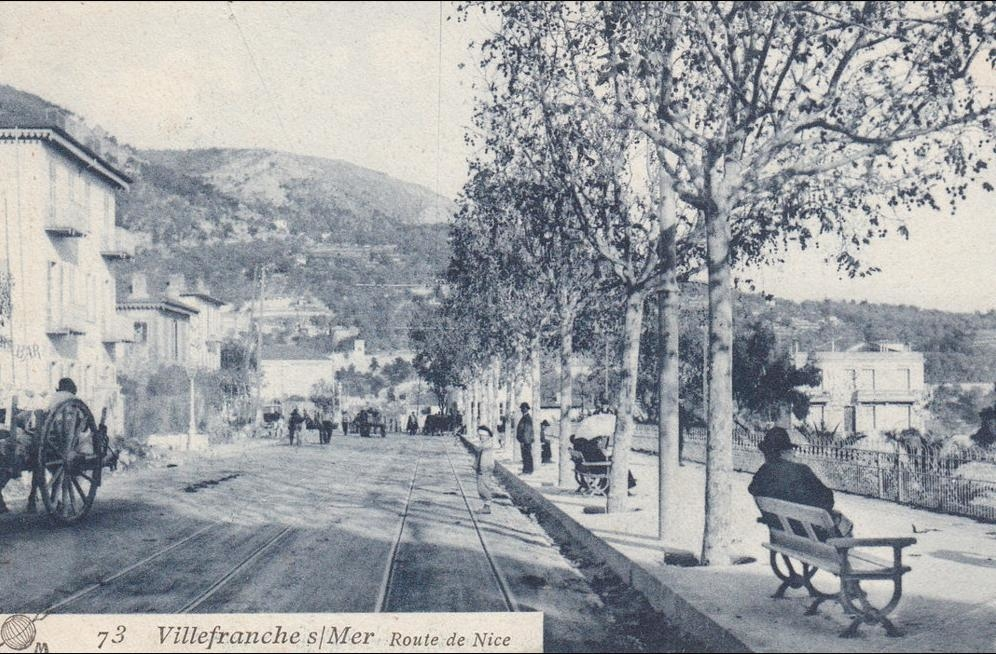
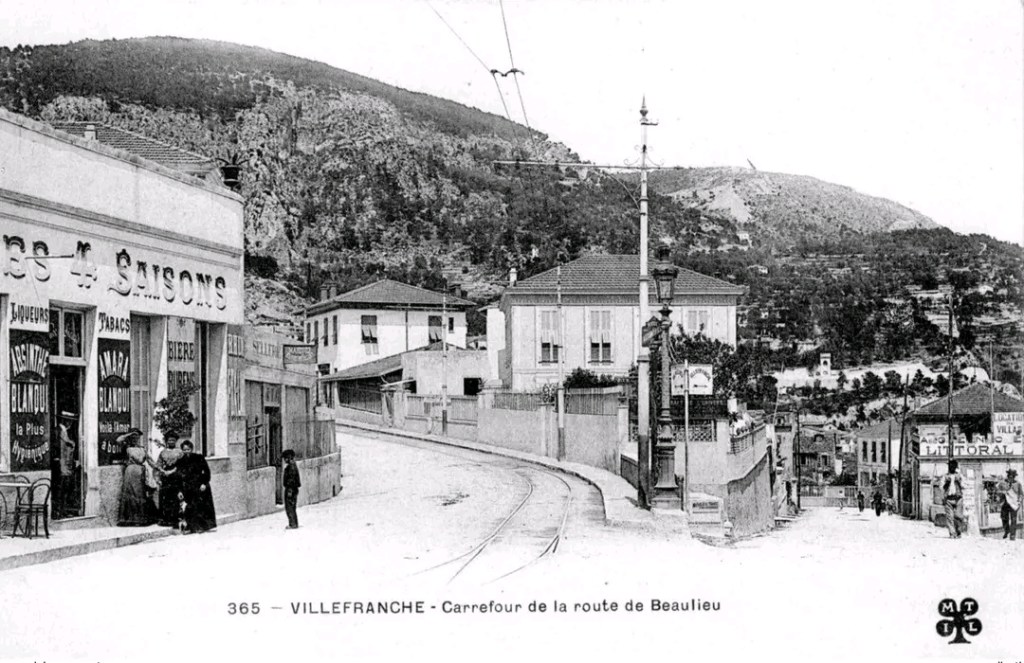
To accommodate the trams, the RN7, the Basse Corniche, was widened using large retaining walls. The tramway, “skirted the bottom of Villefranche harbour and approached the base of Cap Ferrat. ” [1: p41]
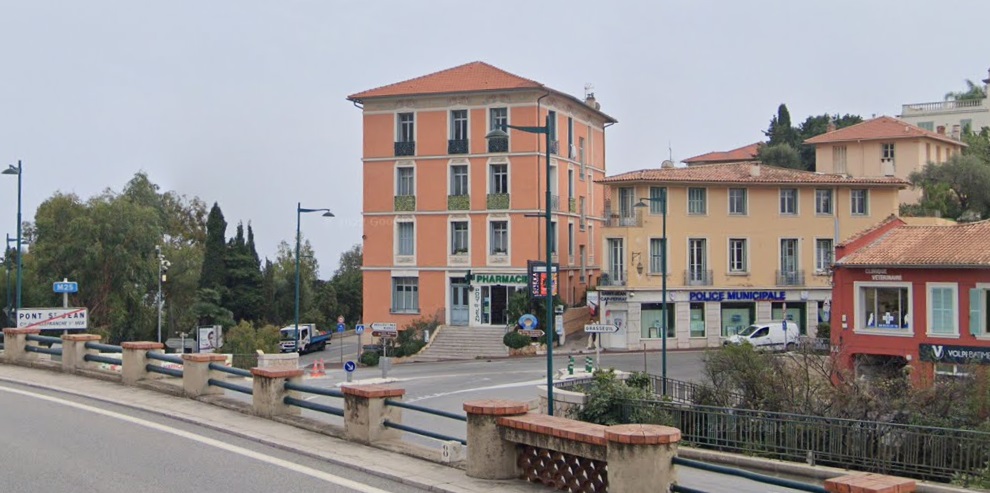
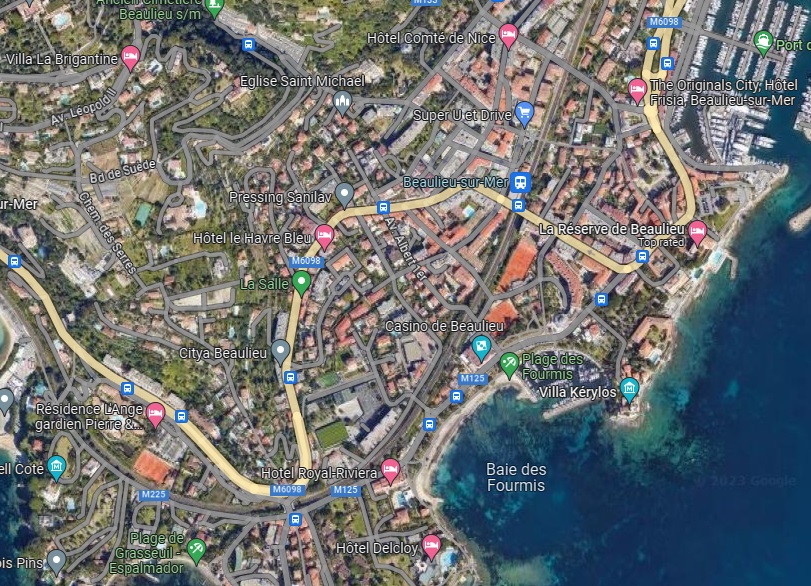
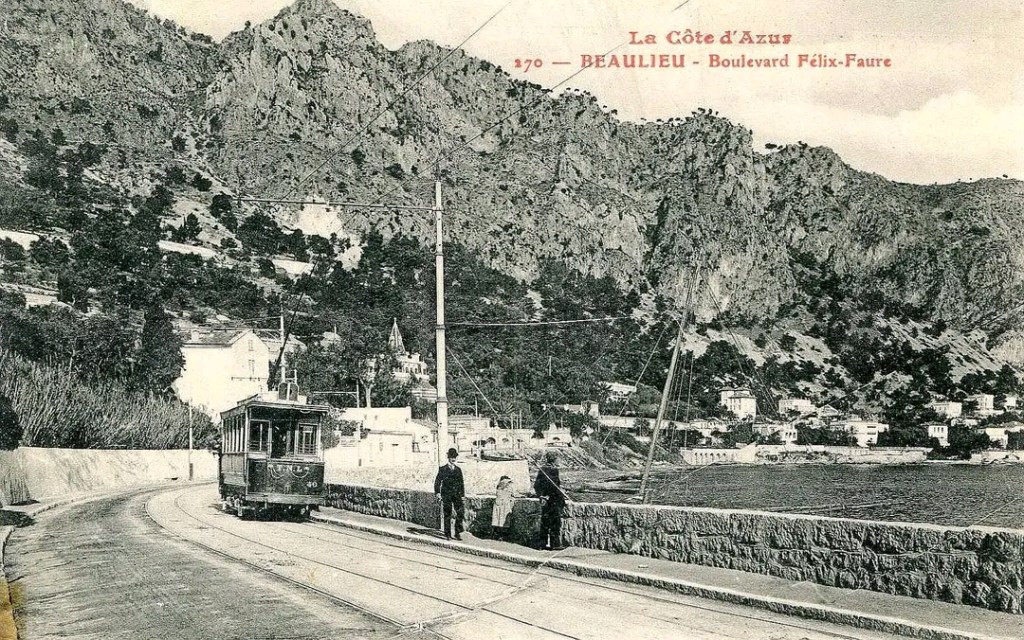
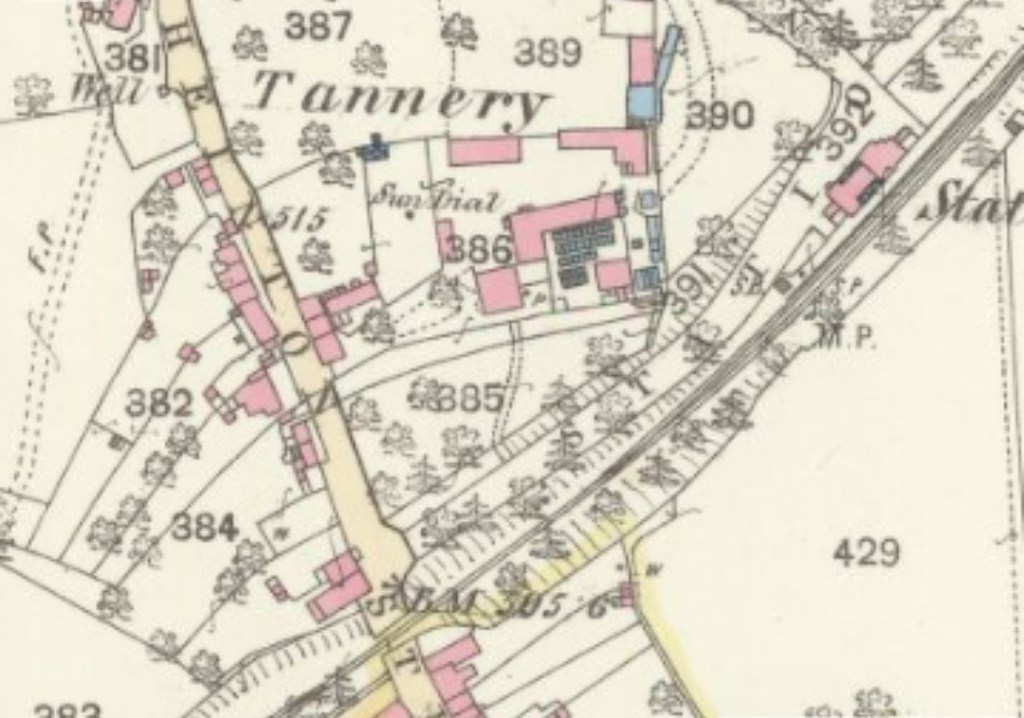
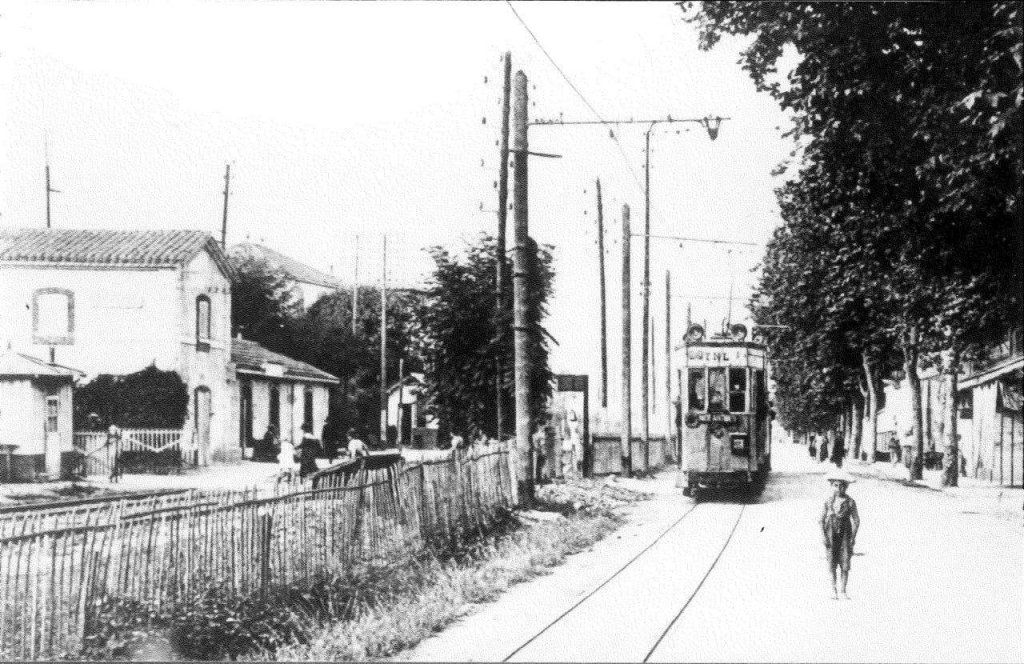
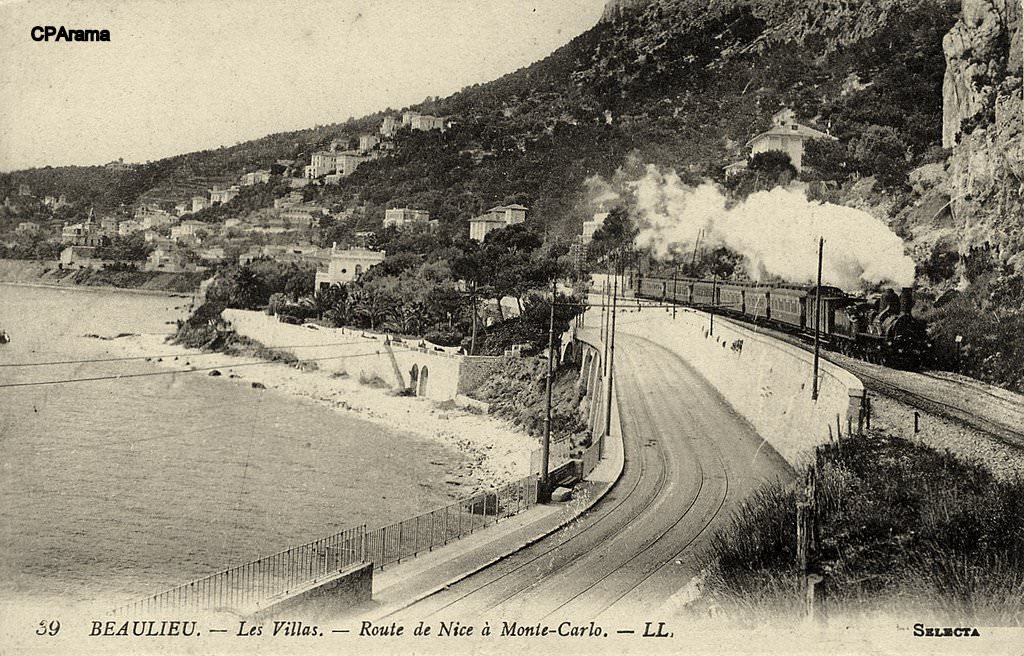
The tramway junction where trams for St. Jean Cap Ferrat left the line to Monte Carlo. [12]
The same locatiuon in the 21st century. [Google Streetview, October 2022]

At the Pont-St. Jean, where the St. Jean-Cap-Ferrat branch turned away, [trams] arrived in the town of Beaulieu, where a centuries-old olive tree marked the entrance adjacent to l’octroi pavilion.  Following modifications made during the First World War, the double track ended … shortly after [l’Octroi] stop.  Crossing Beaulieu, the line followed Boulevard Félix-Faure (today Maréchal-Joffre), passed under the PLM Nice – Ventimiglia artery near the station then went down towards the seaside where it ran alongside the town hall,  the church and the port.” [1: p41]

The old tramway continued to follow the Basse Corniche through Petite Afrique and on twards Cap Roux. [Google Maps, October 2023]
Beaulieu-sur-mer, Boulevard Felix-Faure. This photo was shared on the Comte de Nice et son Histoire Facebook Group on 4th October 2019 by Laurant Mannu. [11]
Beaulieu-sur-mer, la Petite Afrique in 1903. This image was shared on the Comte de Nice et son Histoire Facebook Group by Roland Coccoli on 31st March 2017. [10]
Looking East along the promenade in Beaulieu-sur-mer. East of Beaulieu the line heading to Monte Carlo faced significant obstacles. Cliffs falling directly down to the water’s edge required significant civil engineering works to widen the Basse Corniche to make room for vehicles and the tramway. [9]
A similar location to the view shown in the monochrome image immediately above. [Google Streetview, April 2023]
The Basse Corniche ran below the PLM railway through Petite Afrique. [26]
A similar view in the 21st century to the sepia postcard image above. [Google Streetview, April 2023]
Looking back West towards Beaulieu. [22]
This colourised postcard view was taken at almost the same location as the image above. [25]

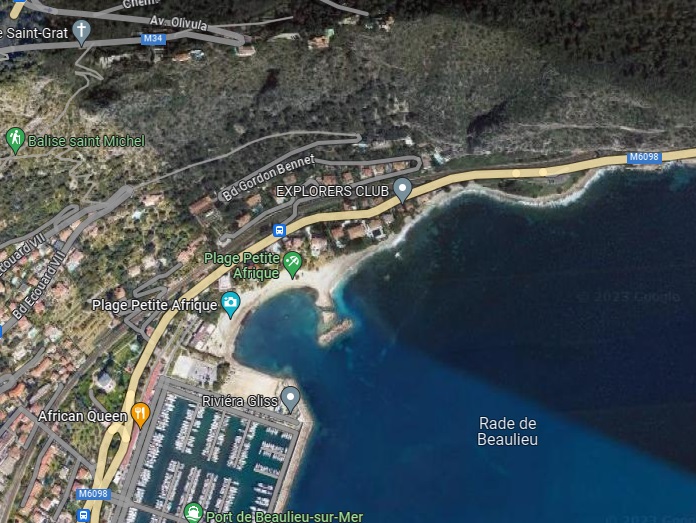
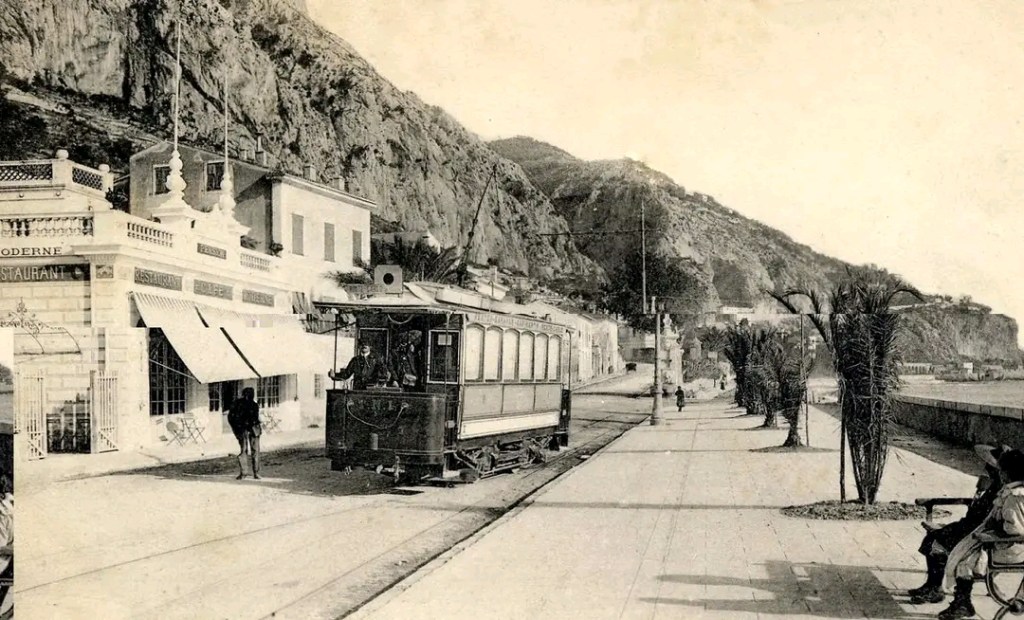
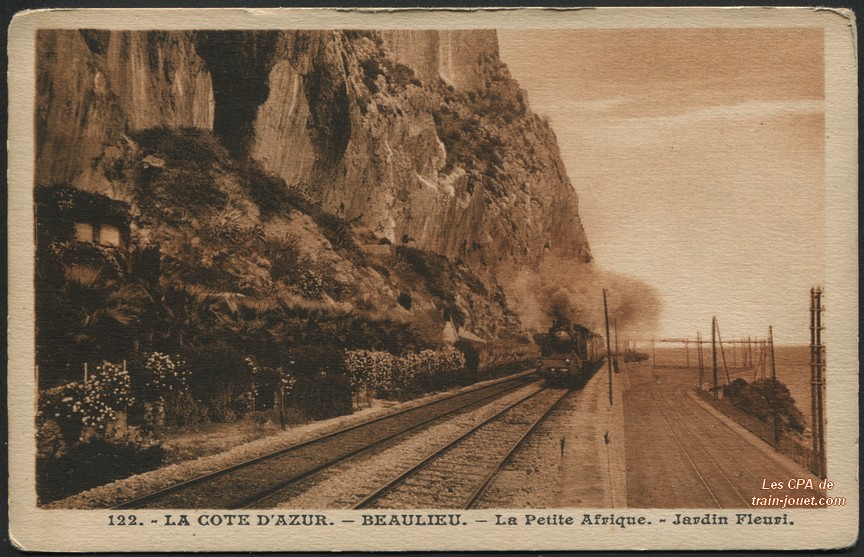
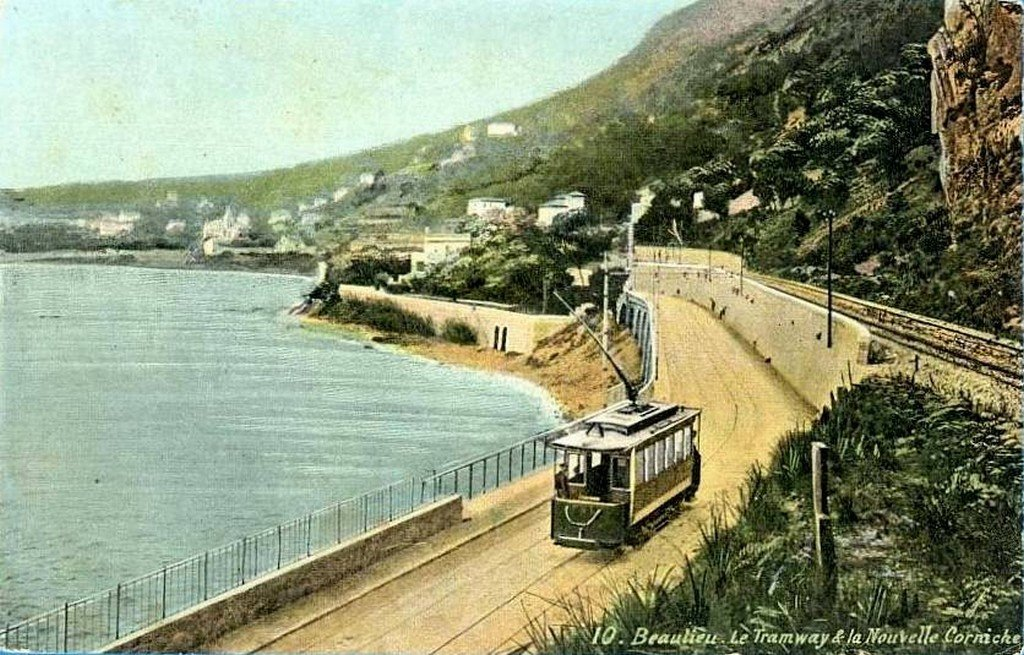
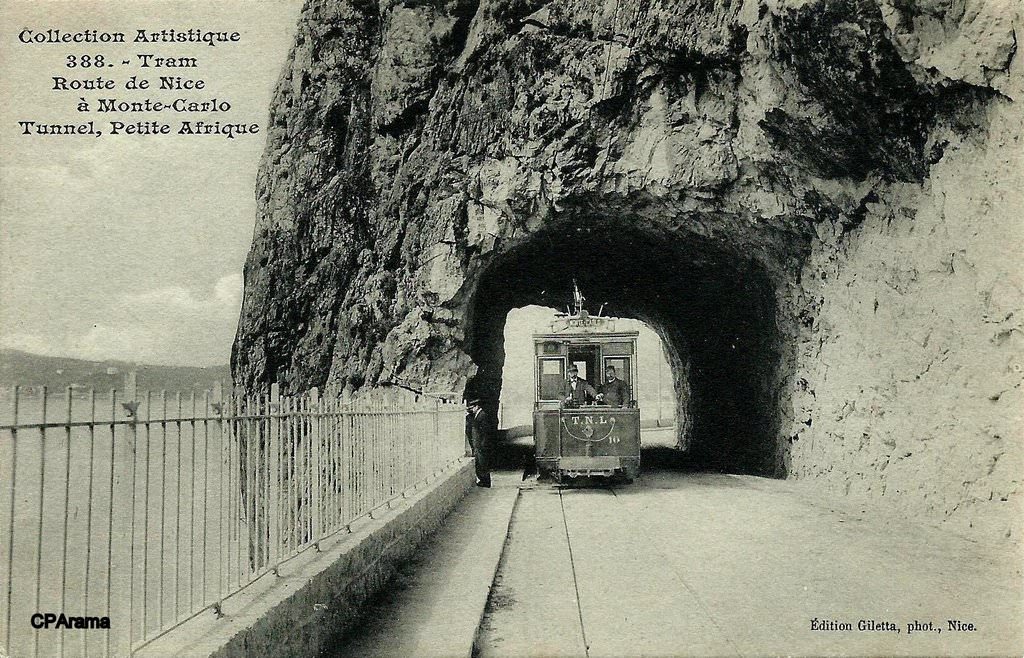
Leaving the town, a siding at the foot of the railway embankment constituted an intermediate terminus in the residential district of ‘Petit Afrique’, “where,” Banaudo tells us, “a micro-climate favours the blossoming of luxuriant vegetation among Moorish and exotic villas.” [1: p41]

The railway tunnel at Cap Roux with the road and tramway at the base of the cliffs. [14]
A closer view of the tunnel mouth. [15]
The tunnel mouth at Cap Roux in 21st century. [Google Streetview, April 2023]

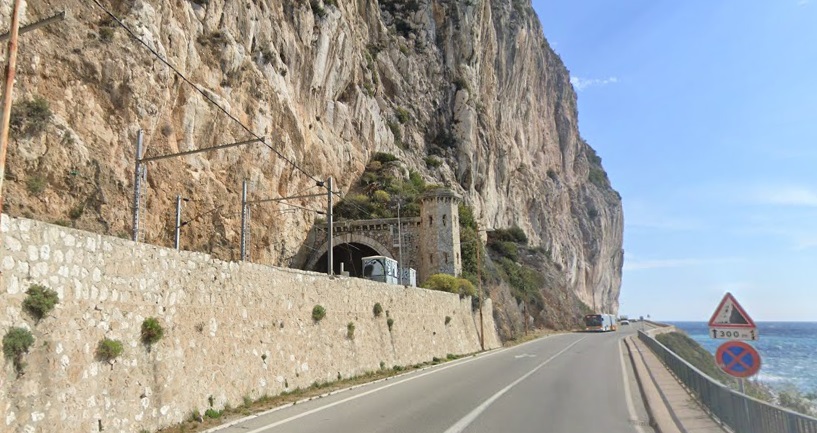
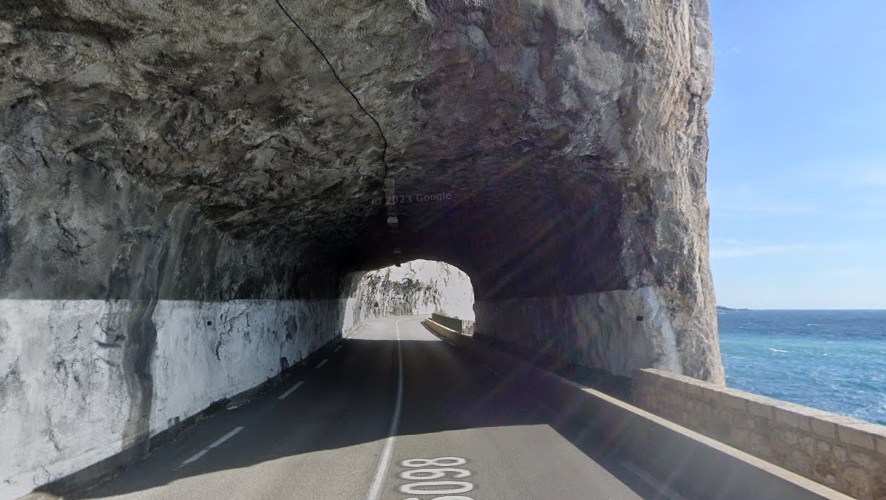
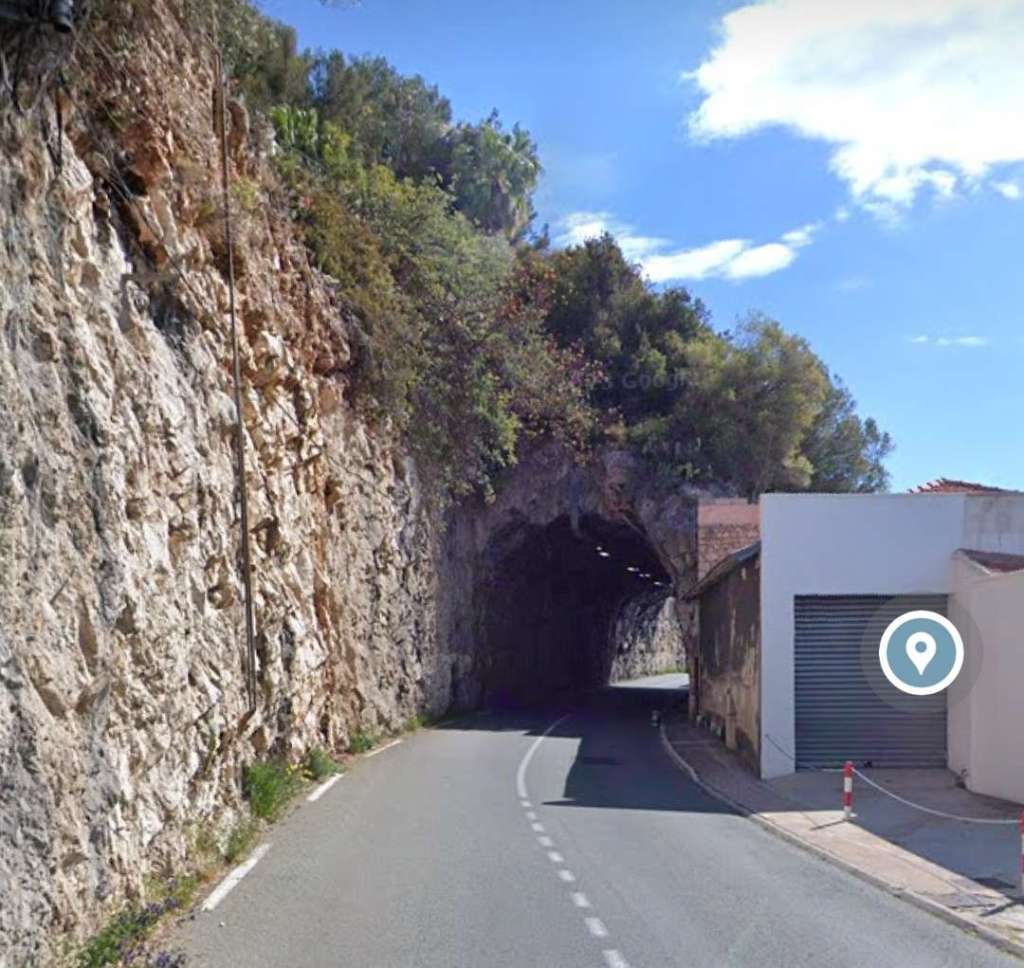
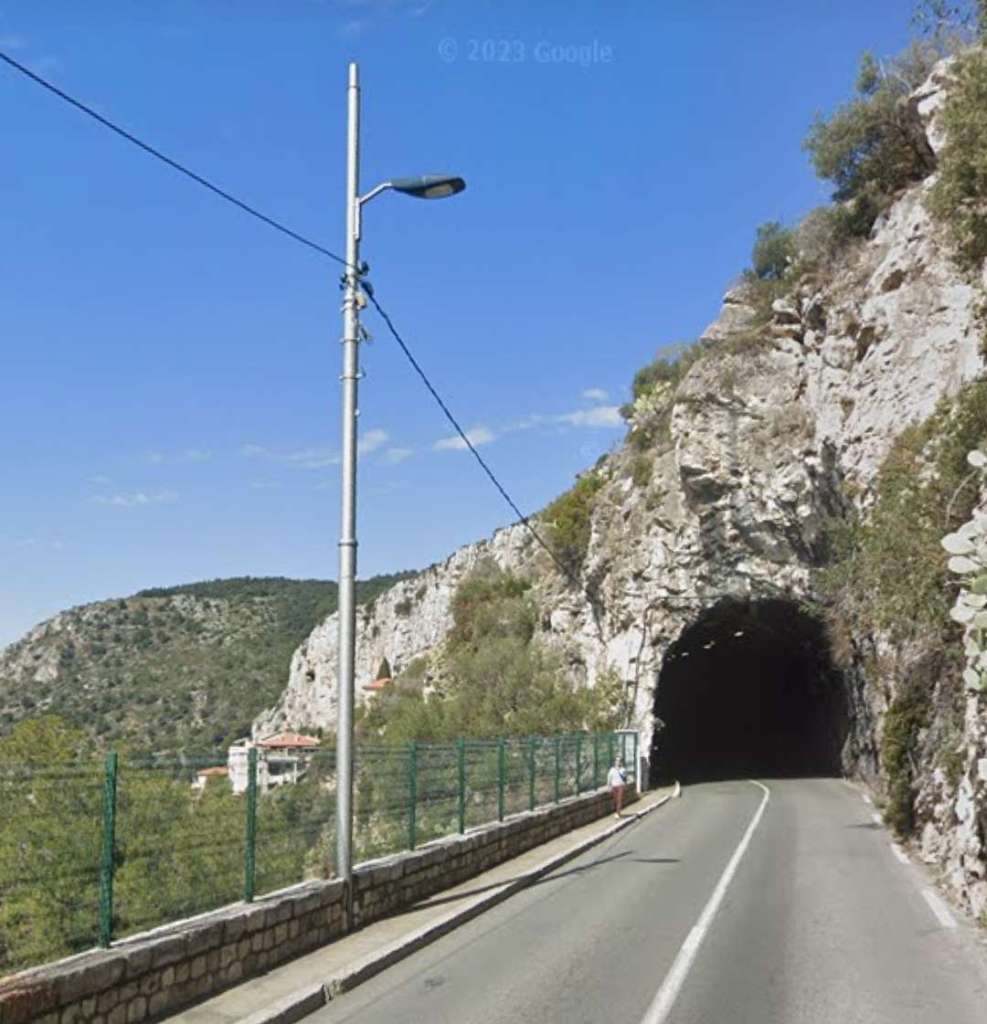
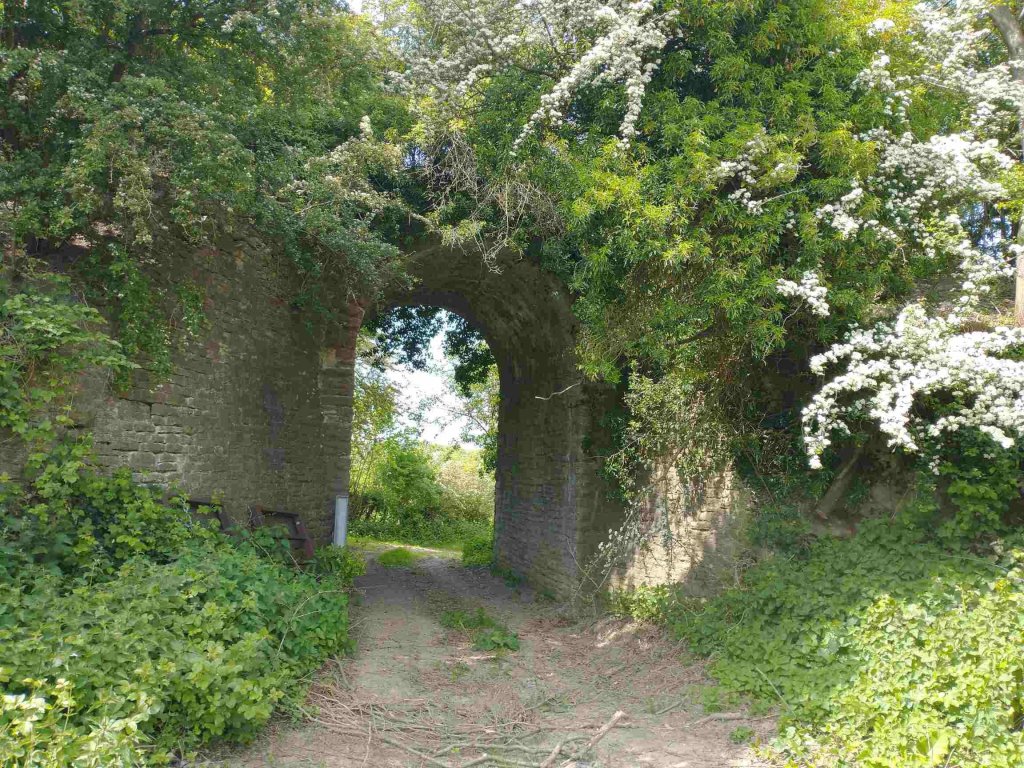
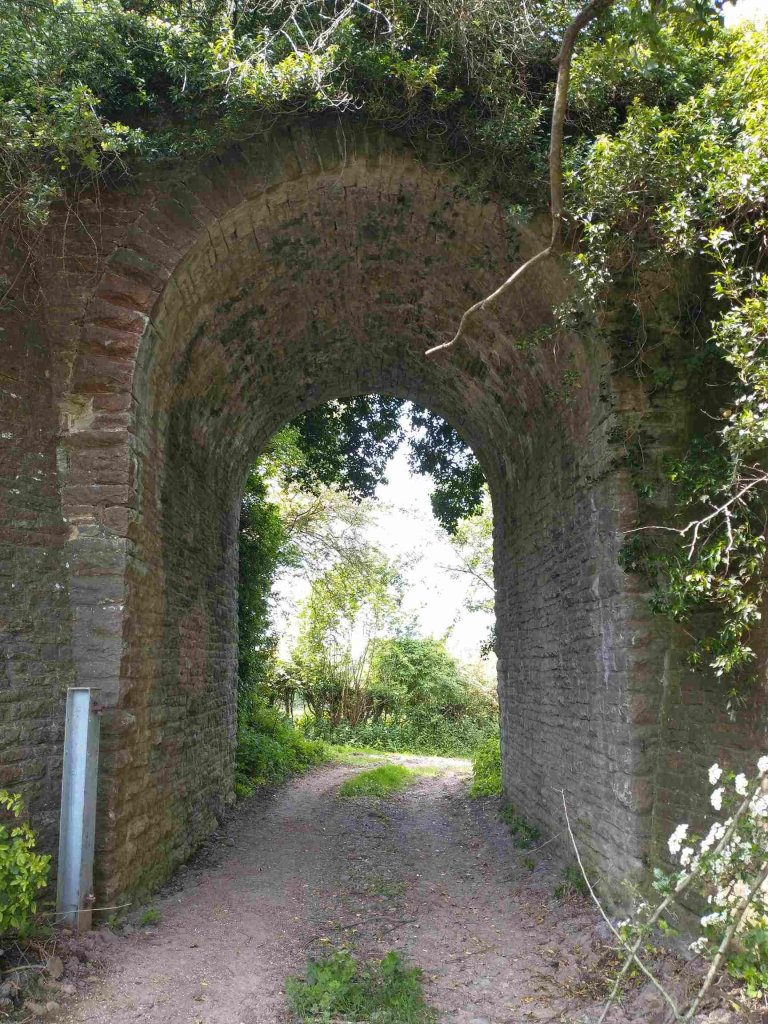
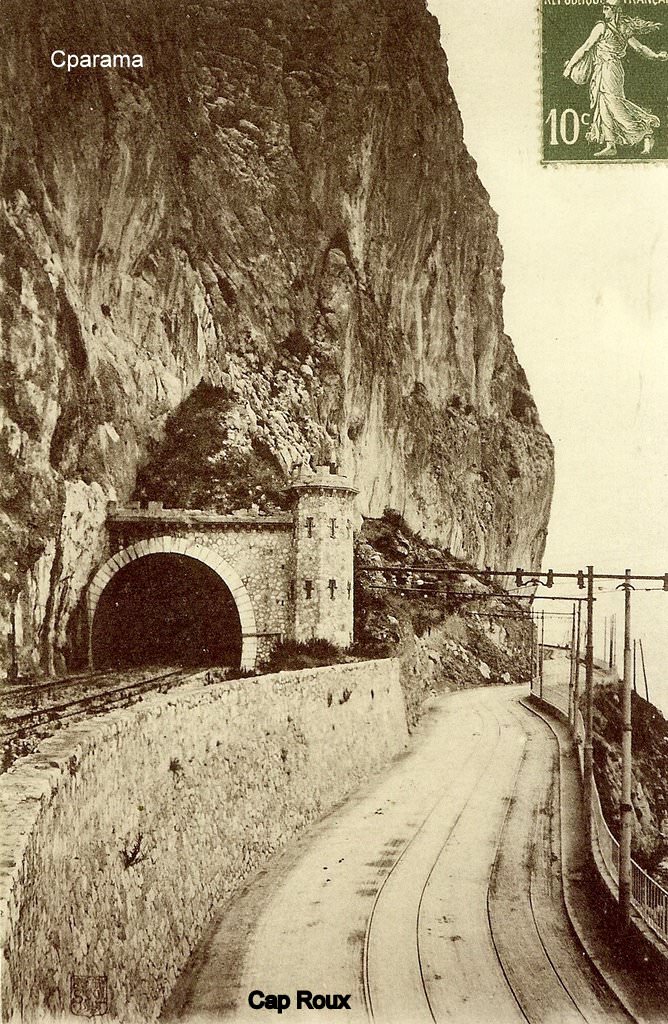
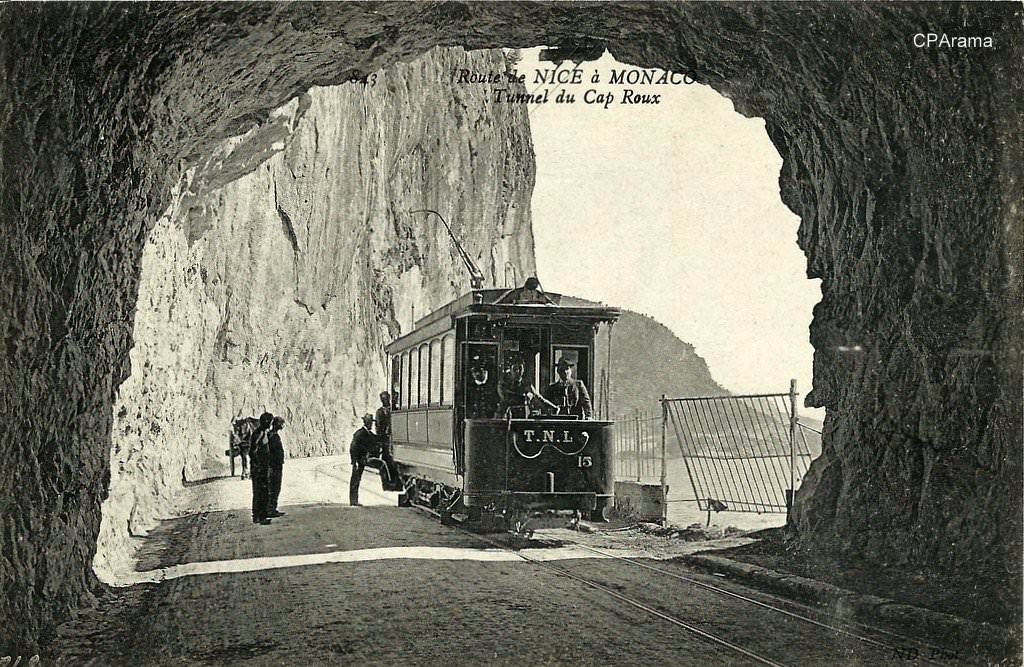
As Banaudo comments: “Shortly after, the high limestone cliffs of Cap Roux fall directly into the sea and form an apparently impassable obstacle to communications on the coast.  The PLM line crossed this location via a 419 m tunnel decorated with a superb fortified portal, while a short tunnel cut directly into rock provided for the road and the tramway.  It had to be widened when the latter was made double track.” [1: p41] 

The road/tramway continue to be shown by the pale yellow line on this next extract from Google Maps. The tunnel at Cap Roux appears at the bottom-left of this extract which shows the Baie d’Eze. [Google Maps, October 2023]
A View East from inside the tunnel at Cap Roux. [16]
The tunnel at Cap Roux has been widened to accommodate the modern carriageway. [Google Streetview, April 2023]
A view West towards the tunnel at Cap Roux. [23]
Another postcard image showing the tunnel at Cap Roux, again looking West. [17]
A 100 metres or so East from the tunnel, this view looks West and includes part of St. Jean-Cap Ferrat and Beaulieu. [18]

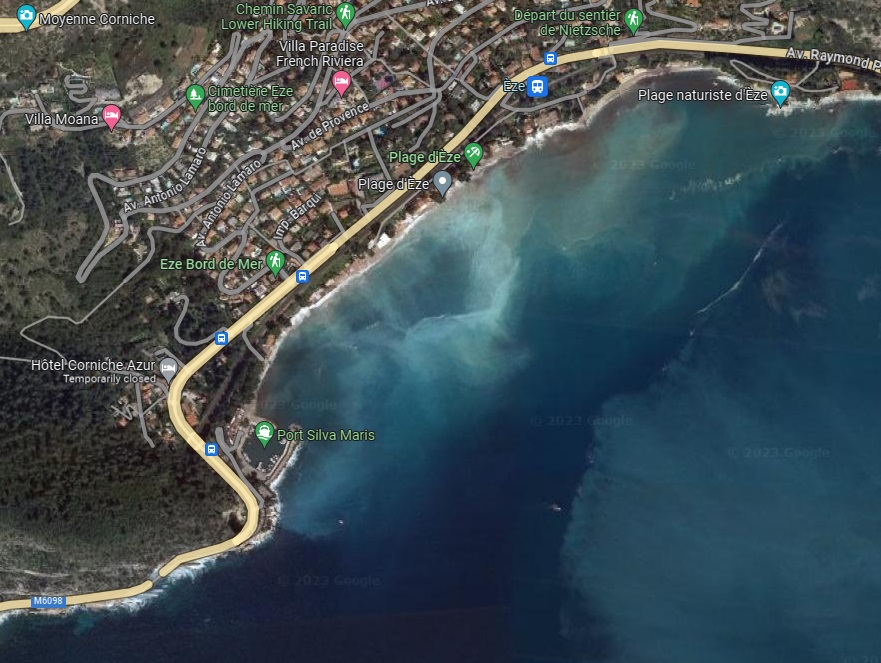
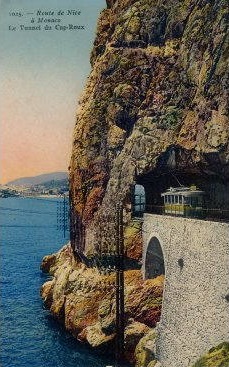
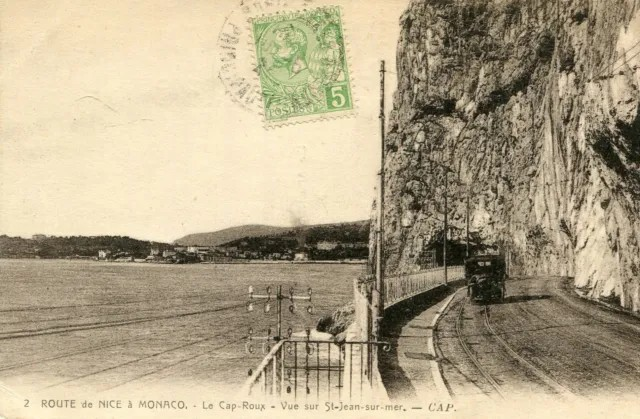
At the point where the PLM line emerged from the Cap Roux, the tramway passed above it on the road bridge and ran along the verge through the location of Eze station.  Banaudo tells us that, “In this residential area, the villas are spread out between a well-sheltered beach at the bottom of a bay and the foot of the mountain where the medieval village of Eze perches, at an altitude of 427 m.” 1: p41]

TNL Tram Car No. 3 at Baie d’Eze in around 1906. This image was shared on the Comte de Nice et son Histoire Facebook Group by Alan Rozier on 19th September 2019. Cap Roux is prominent to the left of the tram. [8]

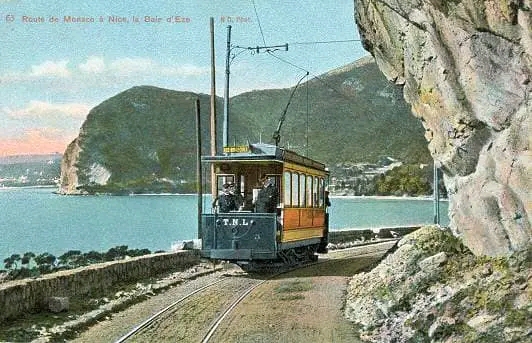
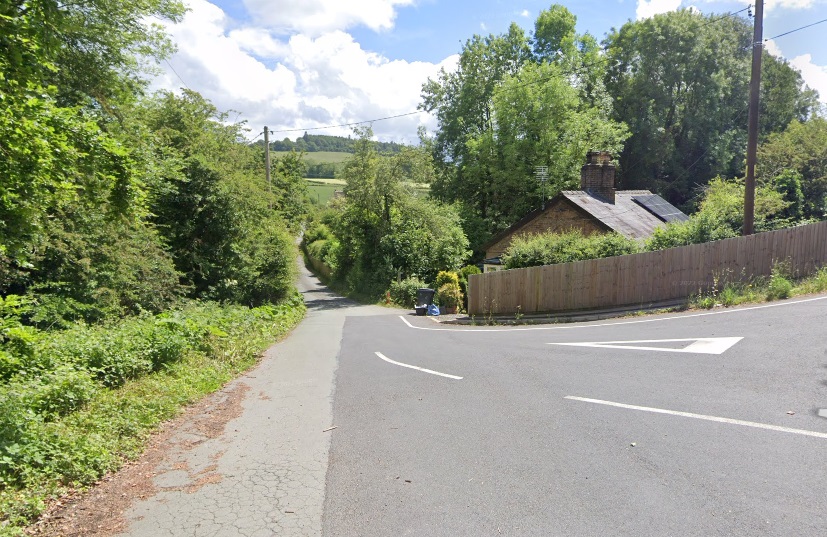
From this point, the terrain along the coast became increasingly steep and the Basse Corniche and the tramway track had to gain height again, passing above Point de L’Isoletta and through Pointe de Cabéel and Cape Estelle, (today, Estel).

This next extract from Google Maps shows Point de L’Isoletta towards the bottom-left. Through traffic on the modern M6098 now passes in tunnel behind Cap-Estel. [Google Maps, October 2023]
Looking East along the Basse Corniche in 2023. [Google Streetview, April 2023]
Looking West along the old tram route on the old Basse Corniche from Cap-Estel. [Google Streetview, April 2023]

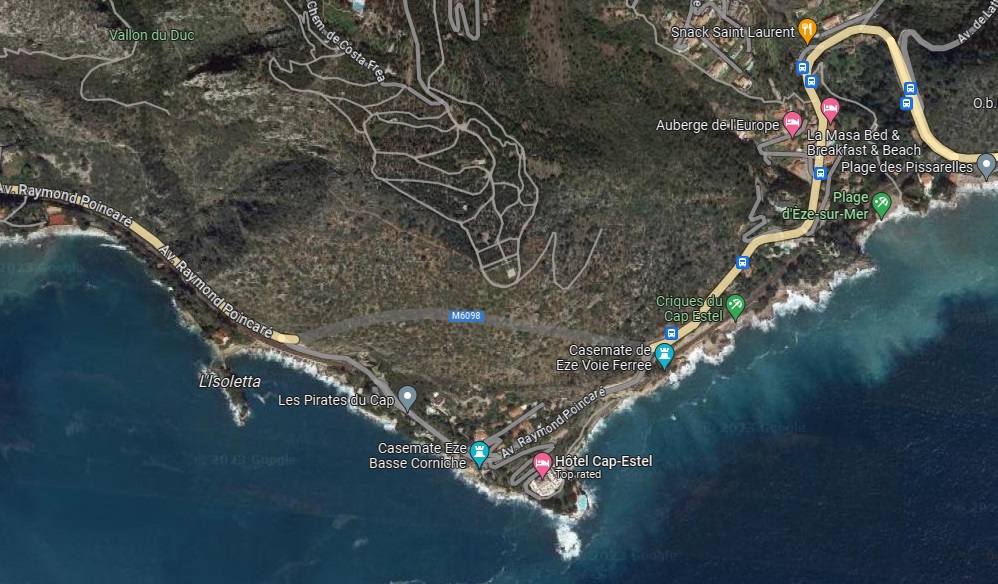
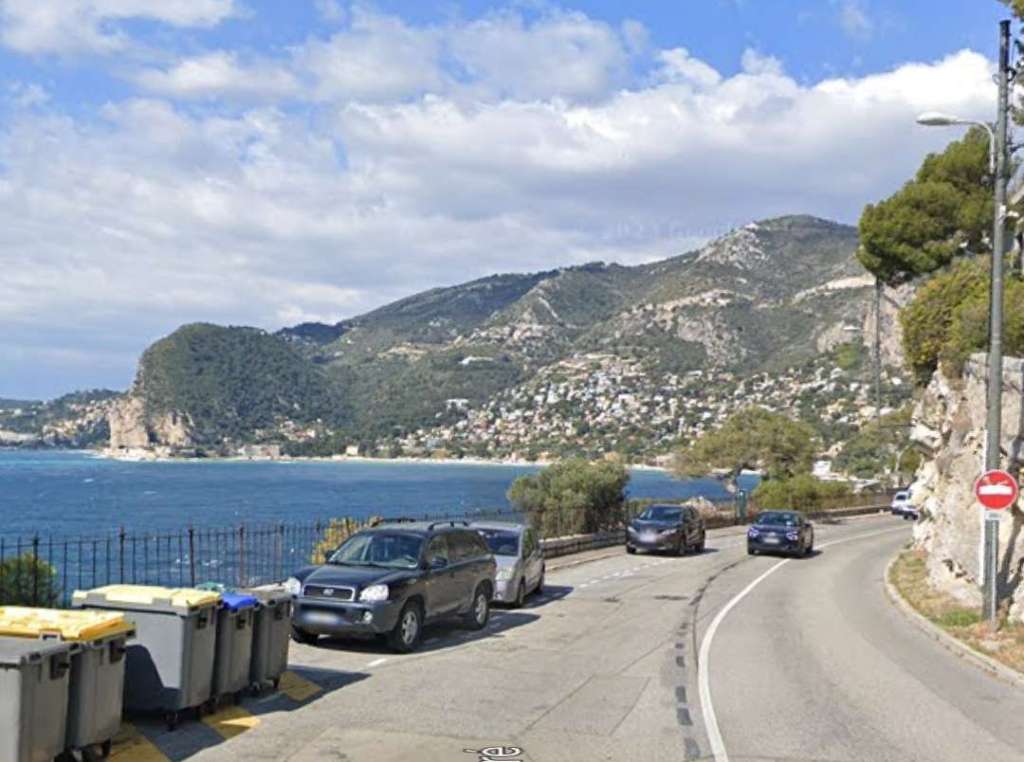
The route rose up from the coast and looped inland below the hamlet of St. Laurent d’Eze. The line soon reached 85m above sea level (its highest point) near the passing loop in the Pissarelles district.

Trams passed through two very short tunnels close the Plage Mala. These appear on the right side of this extract from Google Maps. [Google Maps, October 2023]

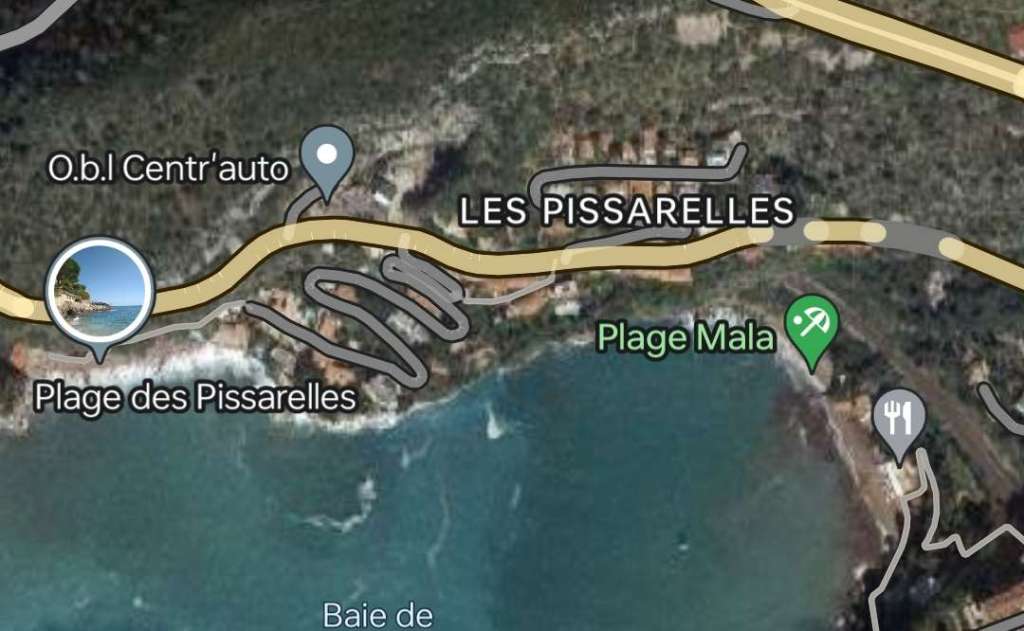
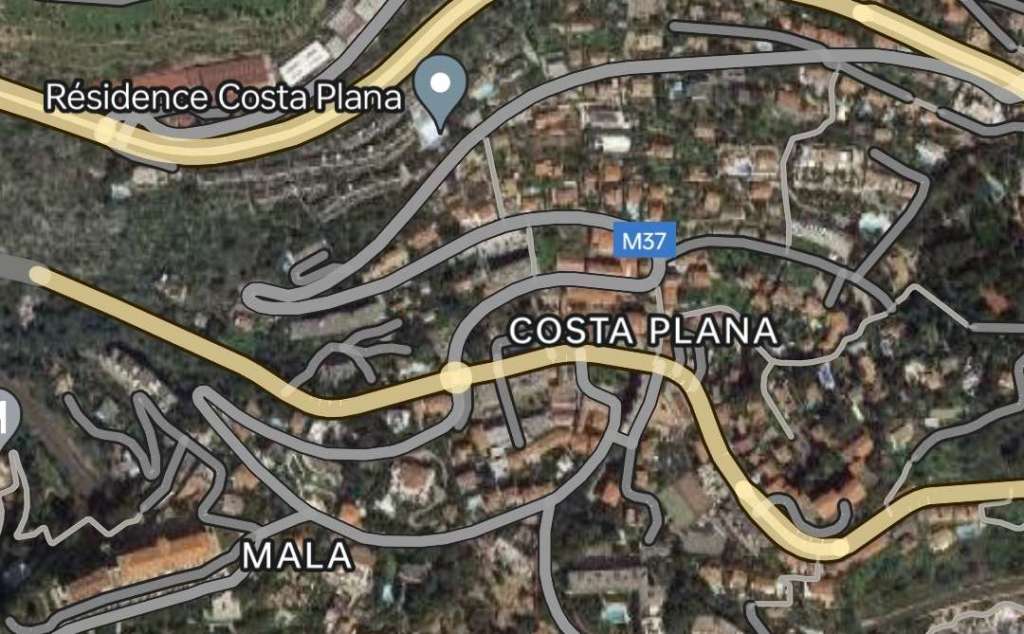
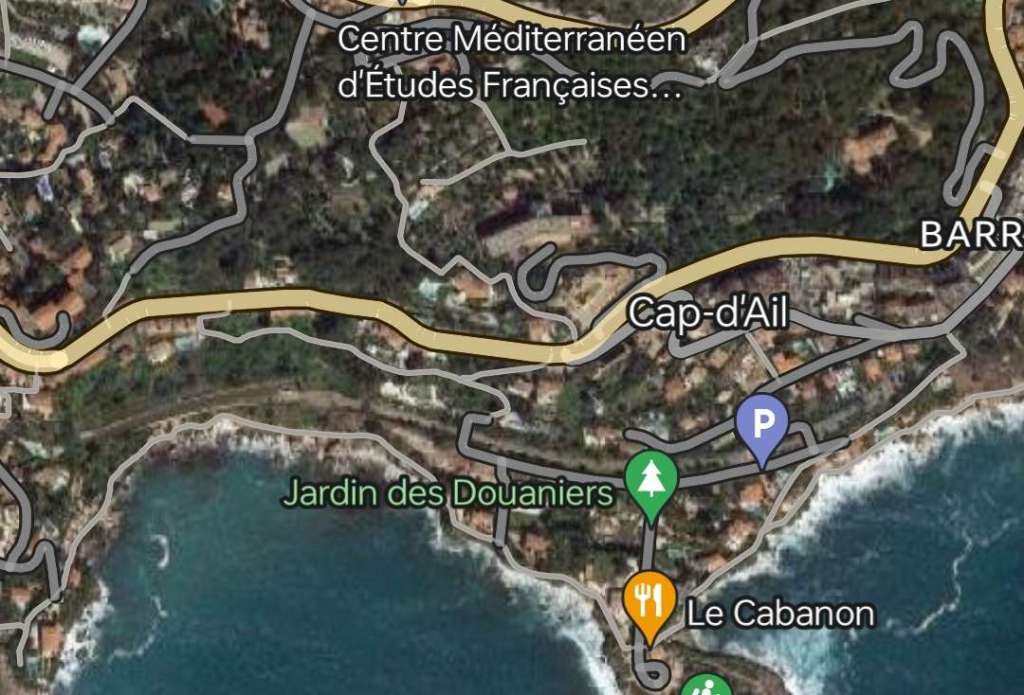
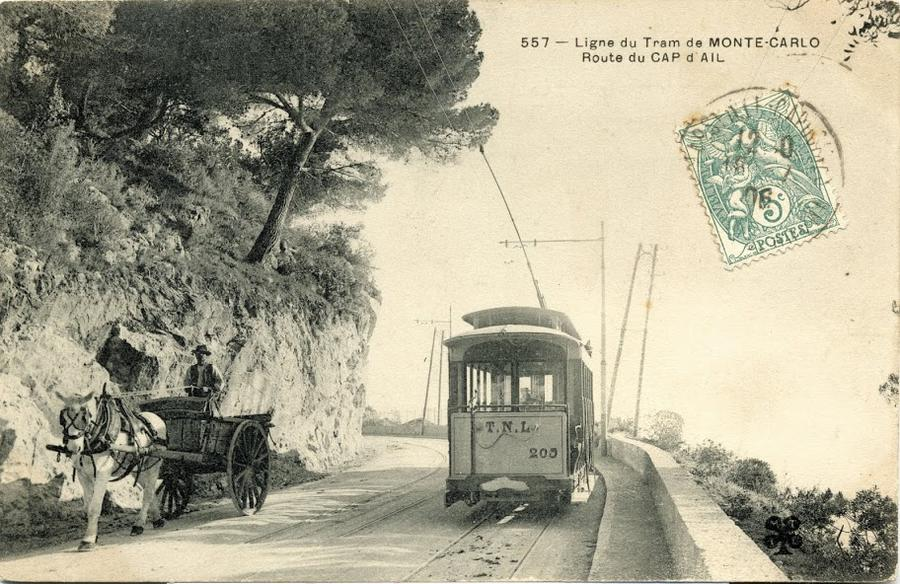
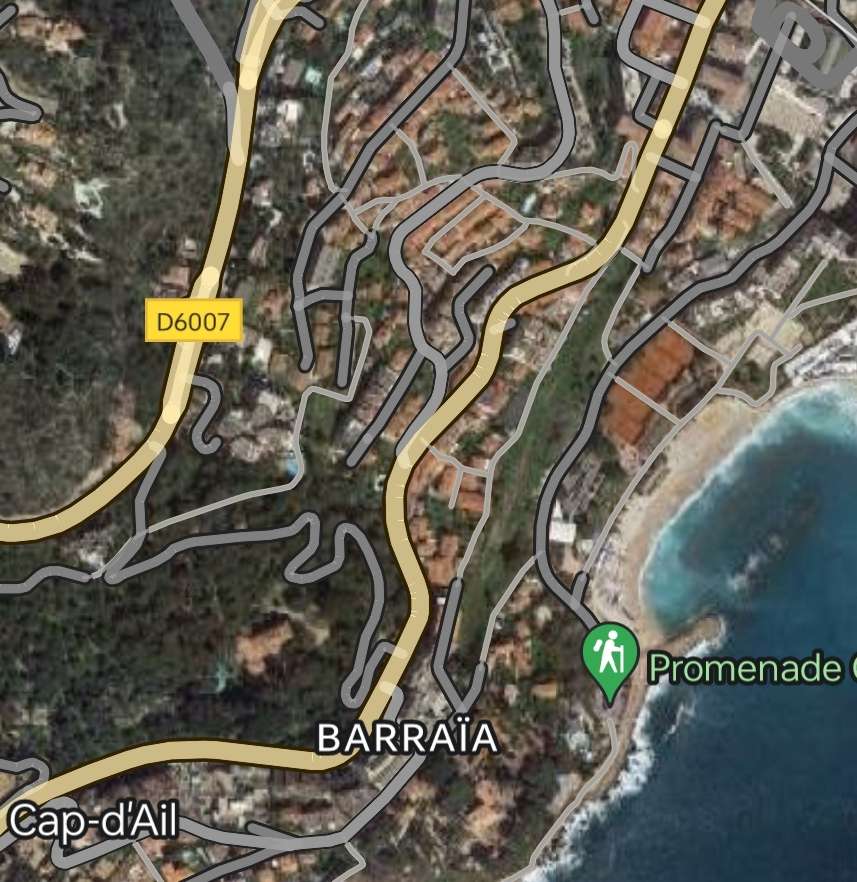
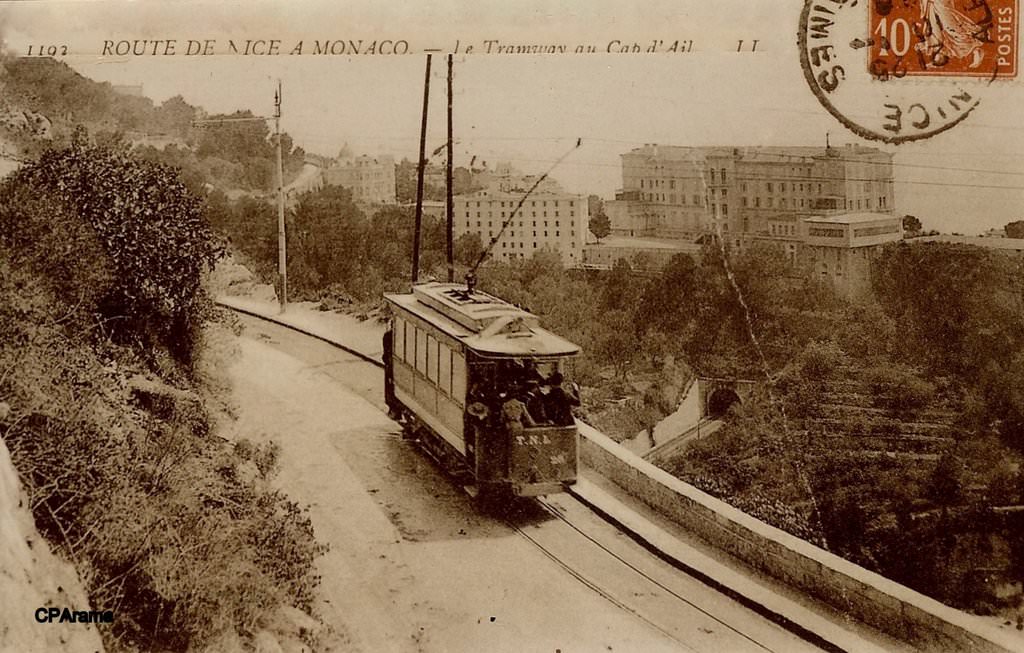
Two tunnels cut into the cliff above Plage Mala preceded the start of the descent to Cap-d’Ail. Both of these tunnels remain and continue to carry the Basse Corniche. Banaudo tells us that this was in “the former coastal district of La Turbie which obtained its municipal autonomy in 1908.” [1: p42]

East of St. Laurent d’Eze the Basse Corniche and the trams ran round the Cap-d’Eze, passing through two short tunnels. This is the first viewed from the East. [24]
The first of two short tunnels above Plage Mala. This view looks East into the tunnel. [Google Streetview, April 2023]
The second tunnel viewed from the West. [Google Streetview, April 2023]
The second tunnel viewed from the East. [Google Streetview April 2023]
The second Mala tunnel sits at the extreme left of this next extract from Google Maps. [Google Maps, October 2023]
The Basse Corniche and the tramway continued down through Cap-d’Ail. [Google Maps, October 2023]
The descent toward Cap-d’Ai. The tram car is a trailer, part of a two car train heading for Monte Carlo. The double-track tramway takes up much of the highway on the Basse Corniche! [30]

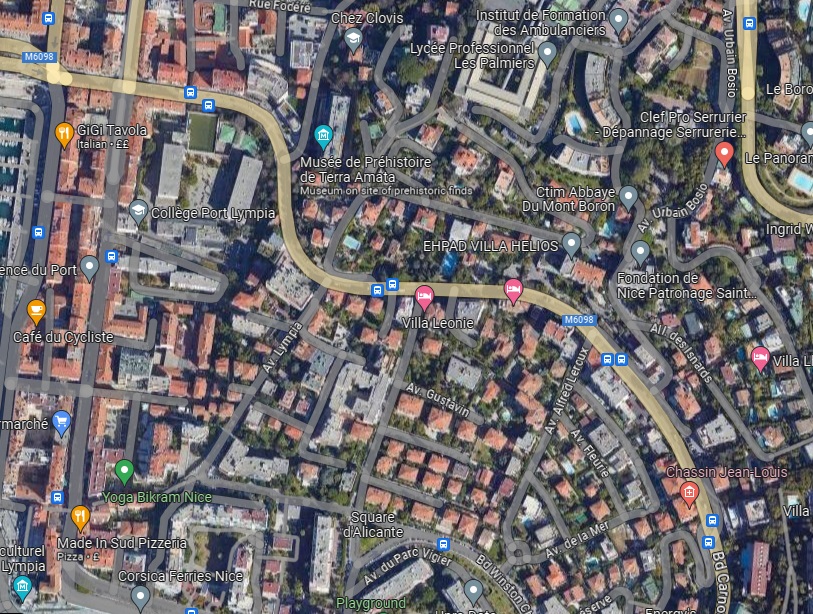
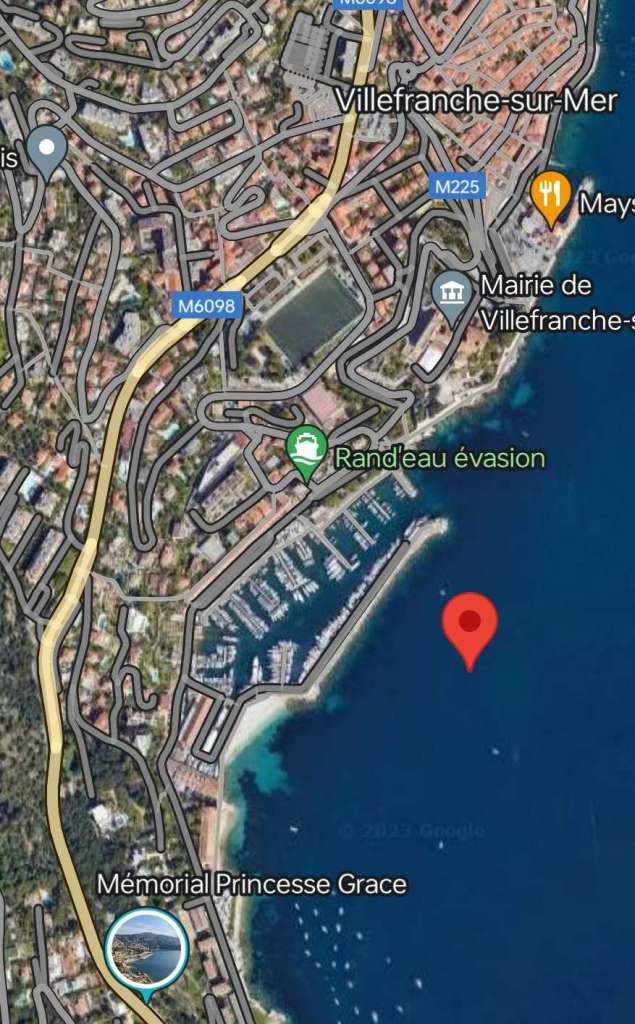
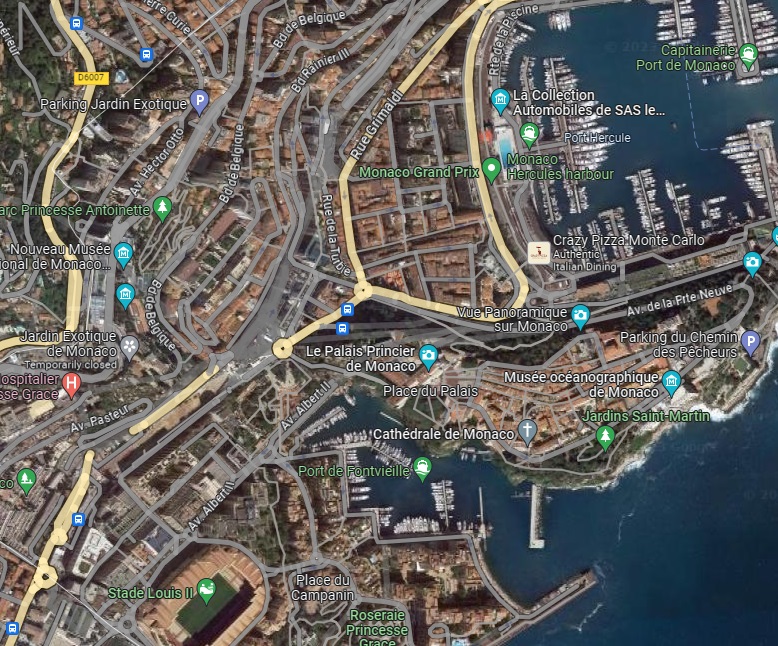
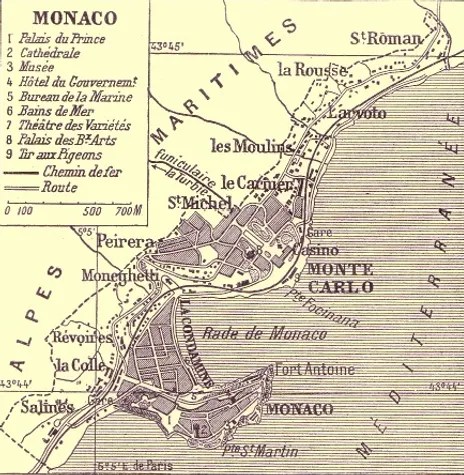
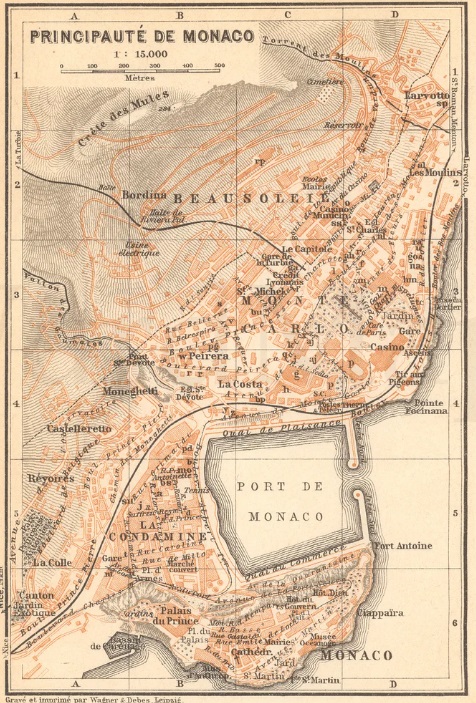
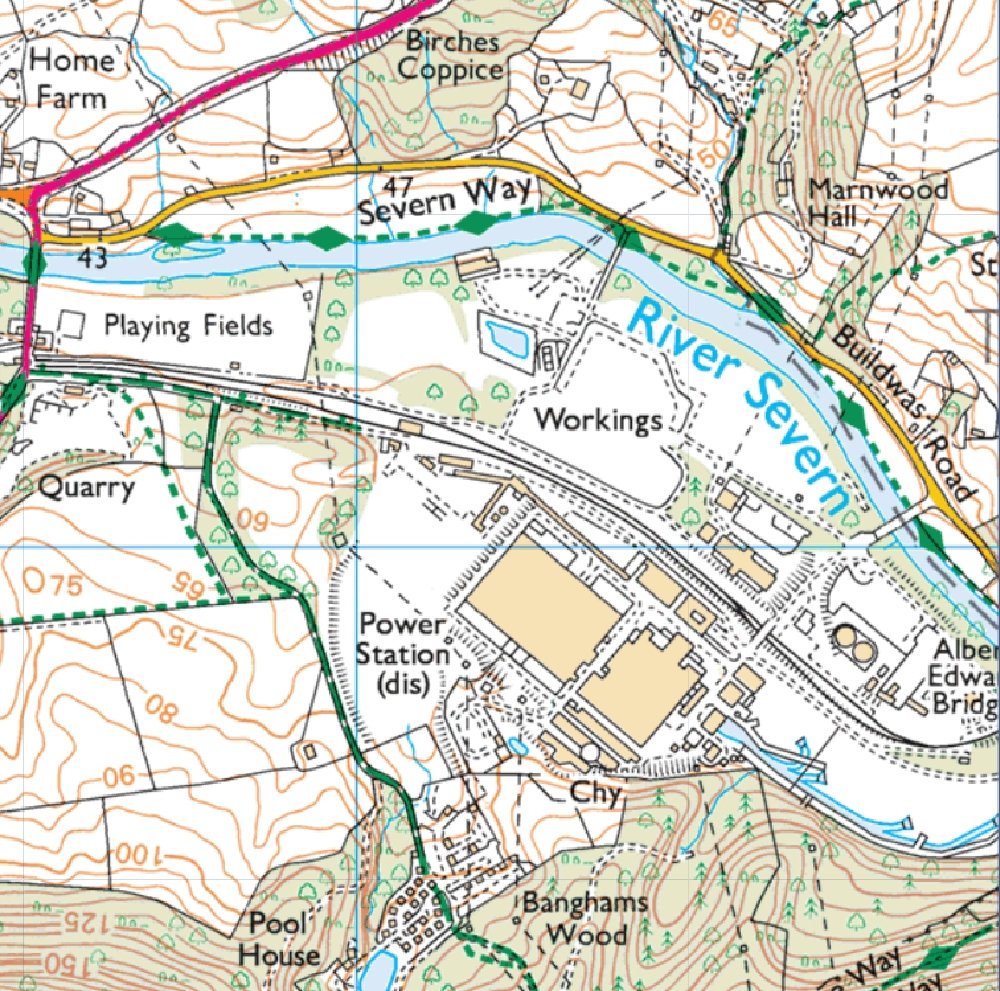
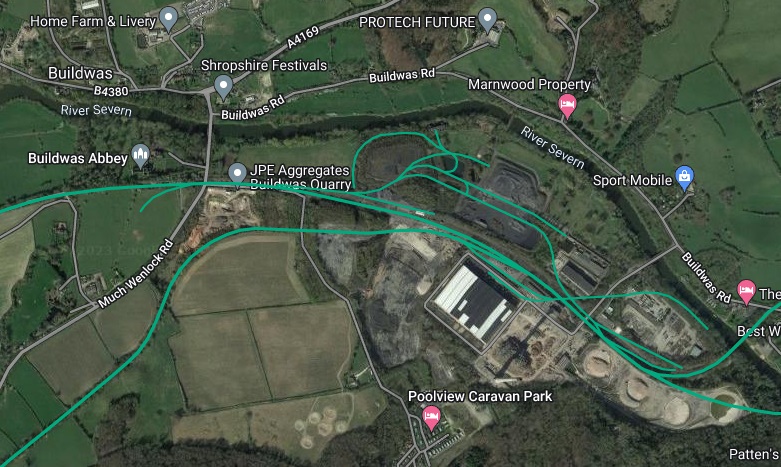
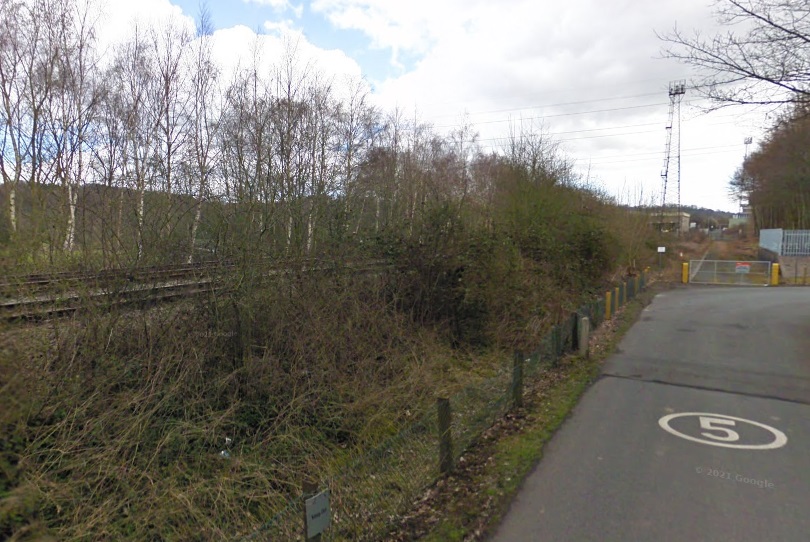
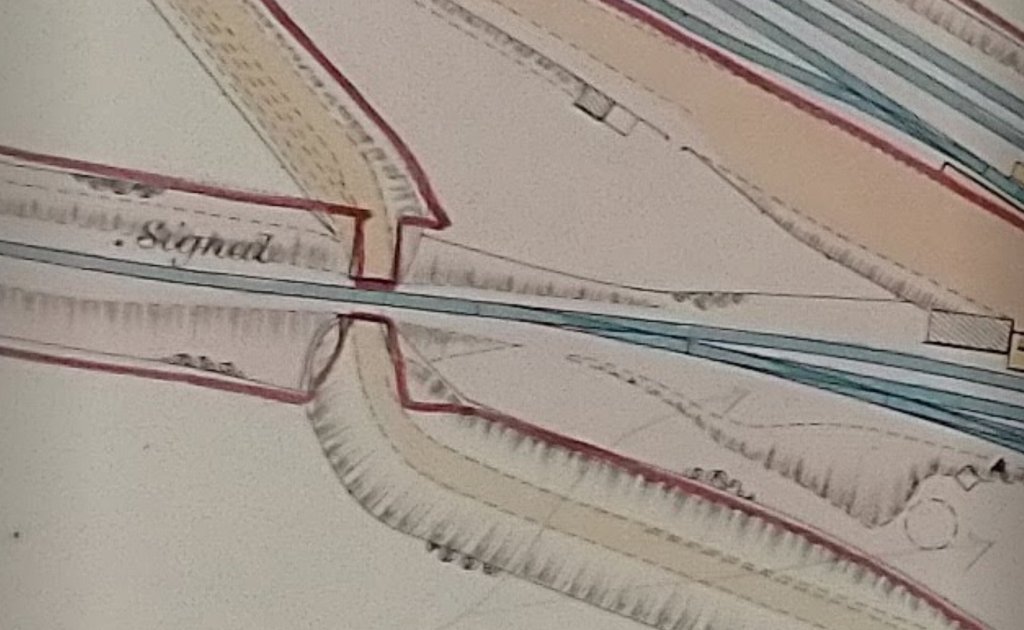
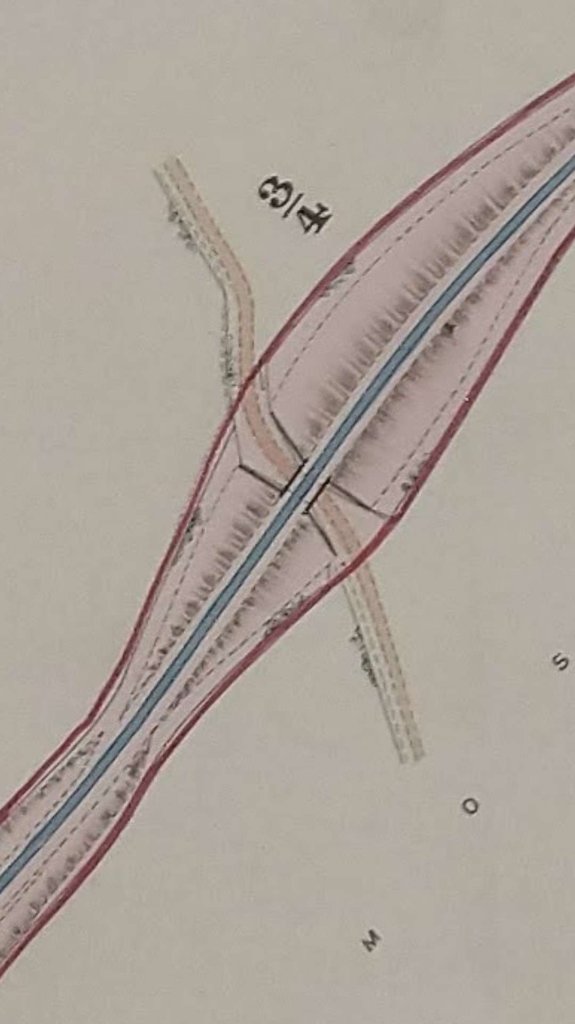
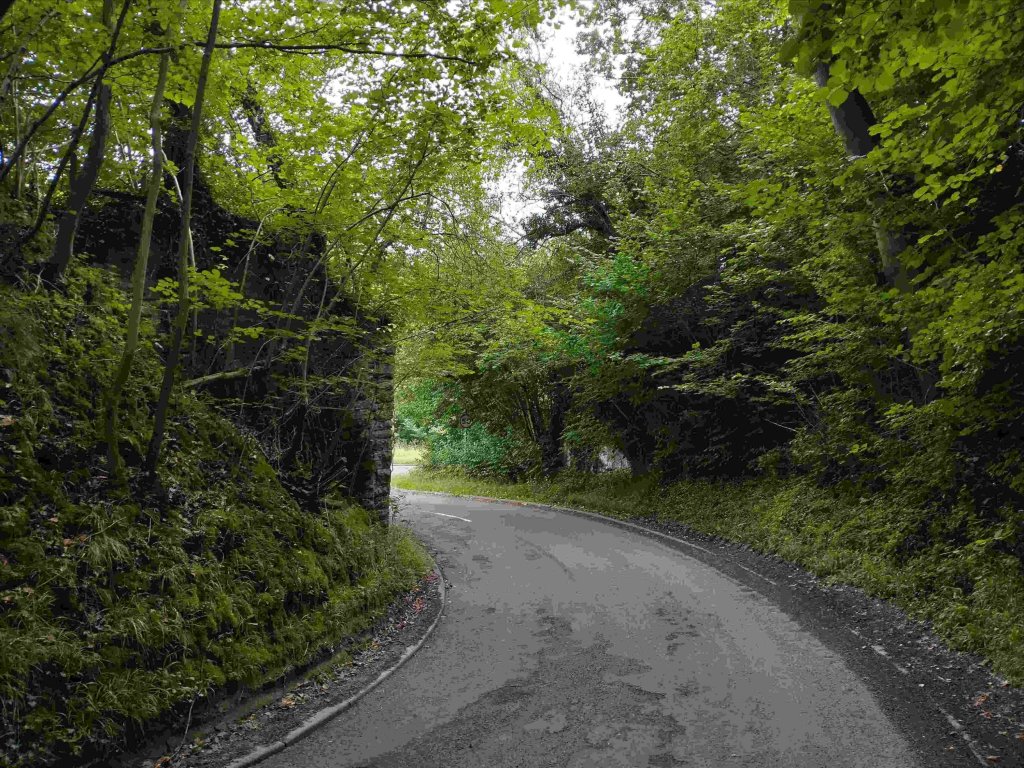
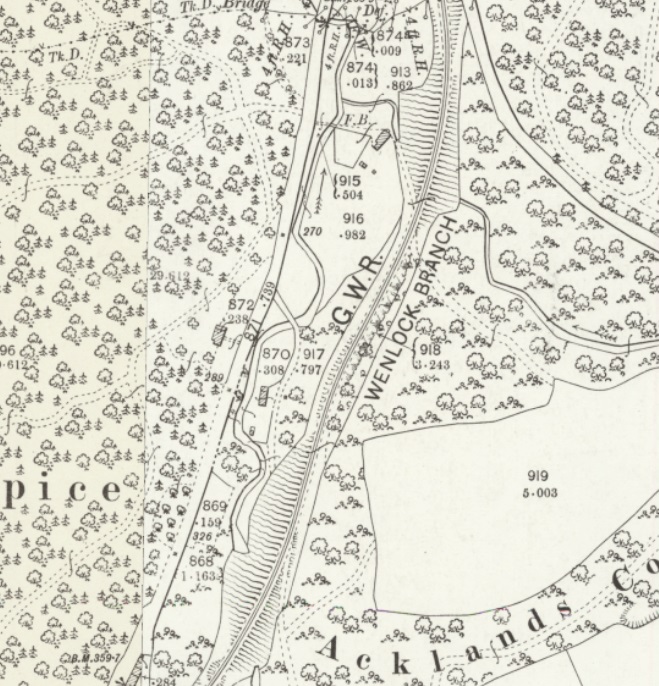
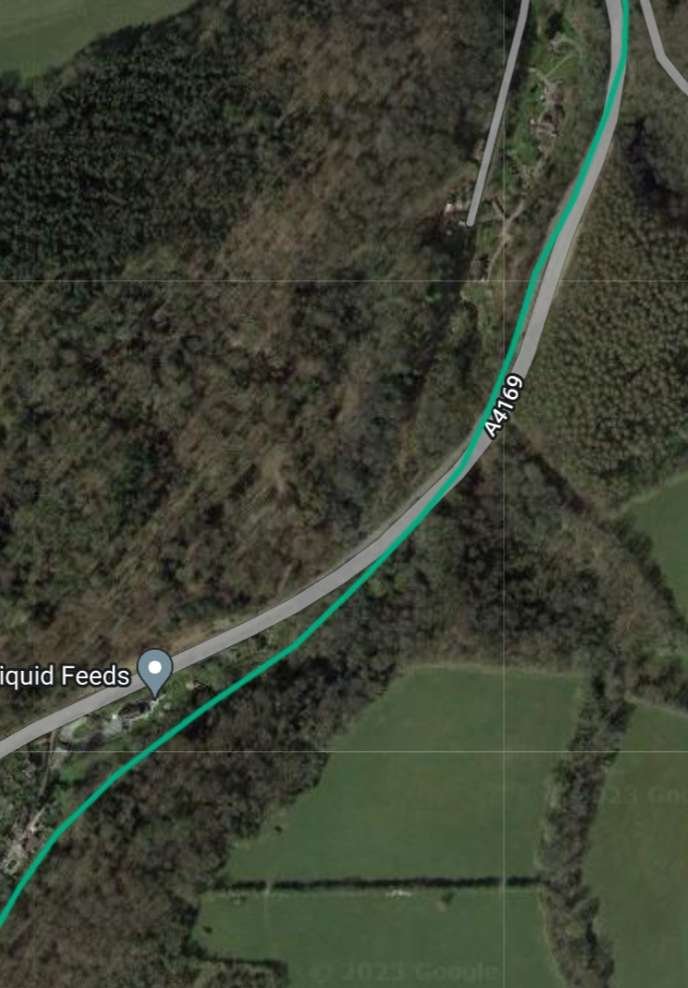
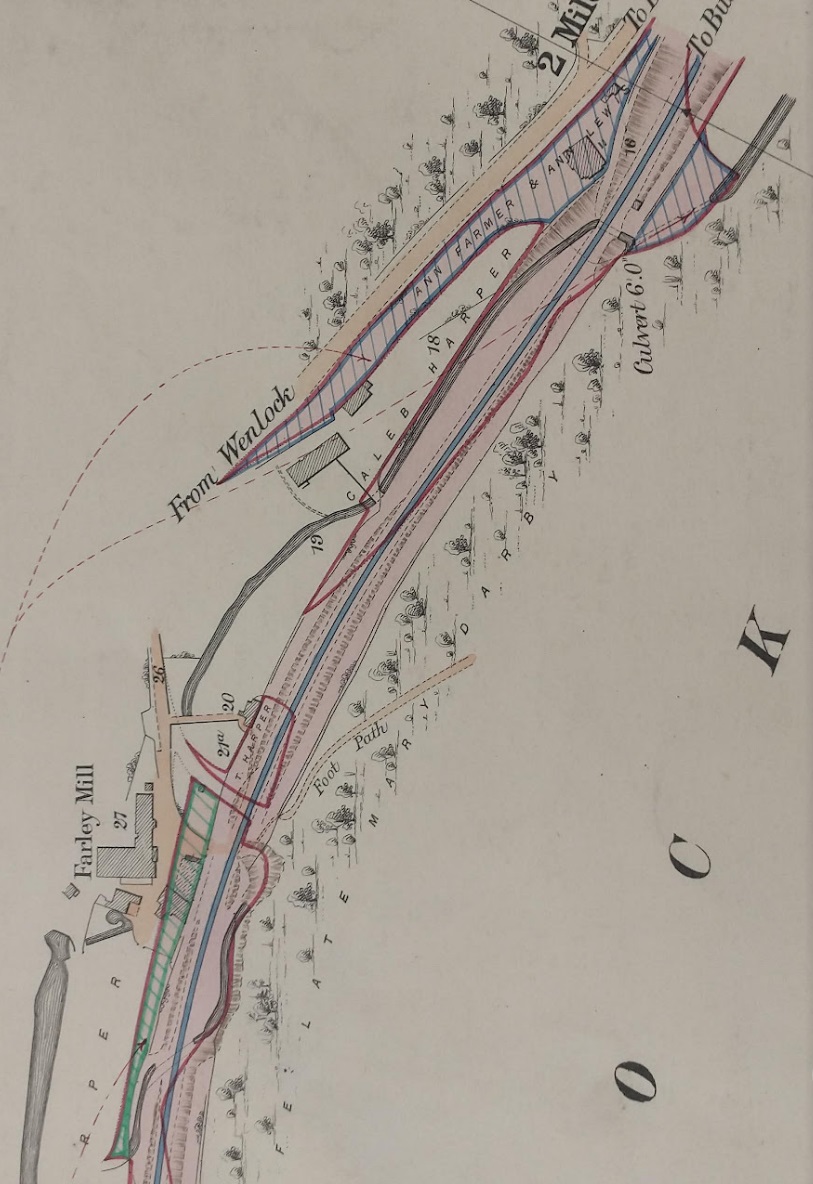
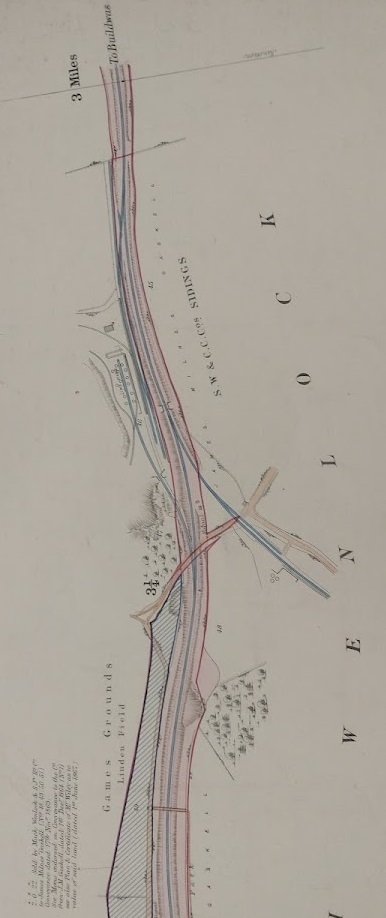
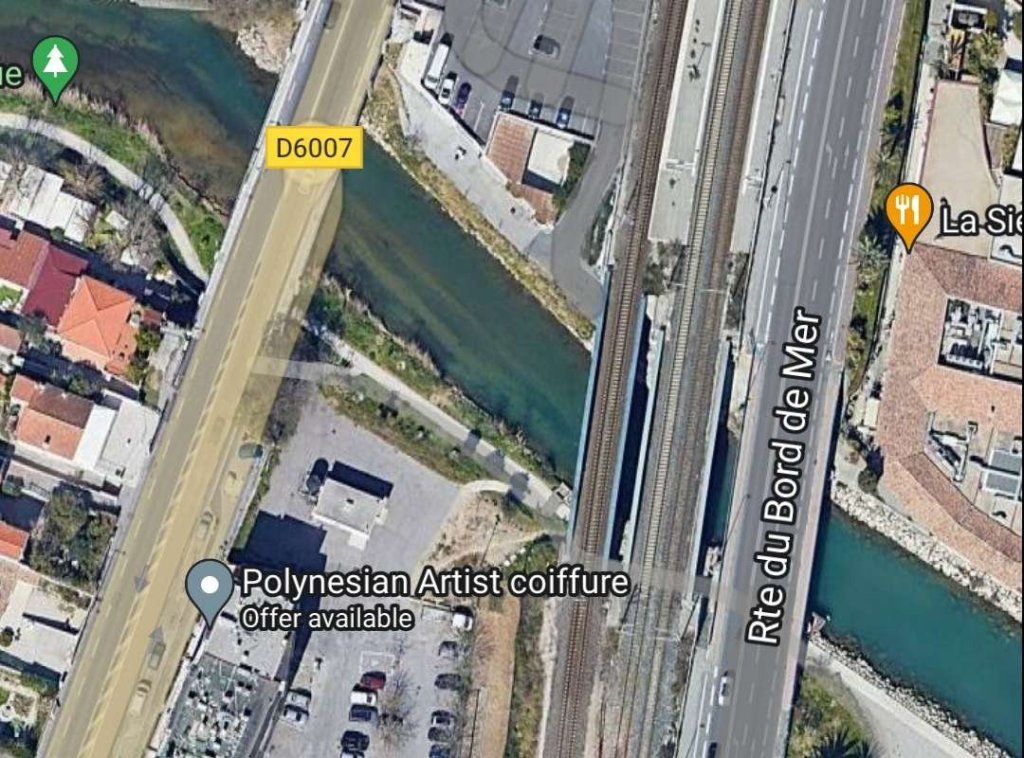
The tramway then ran down past customs barracks and crossed the border into the principality of Monaco. The extract below shows the route of the tramway as it approached the border, which is just off the top of the map extract.
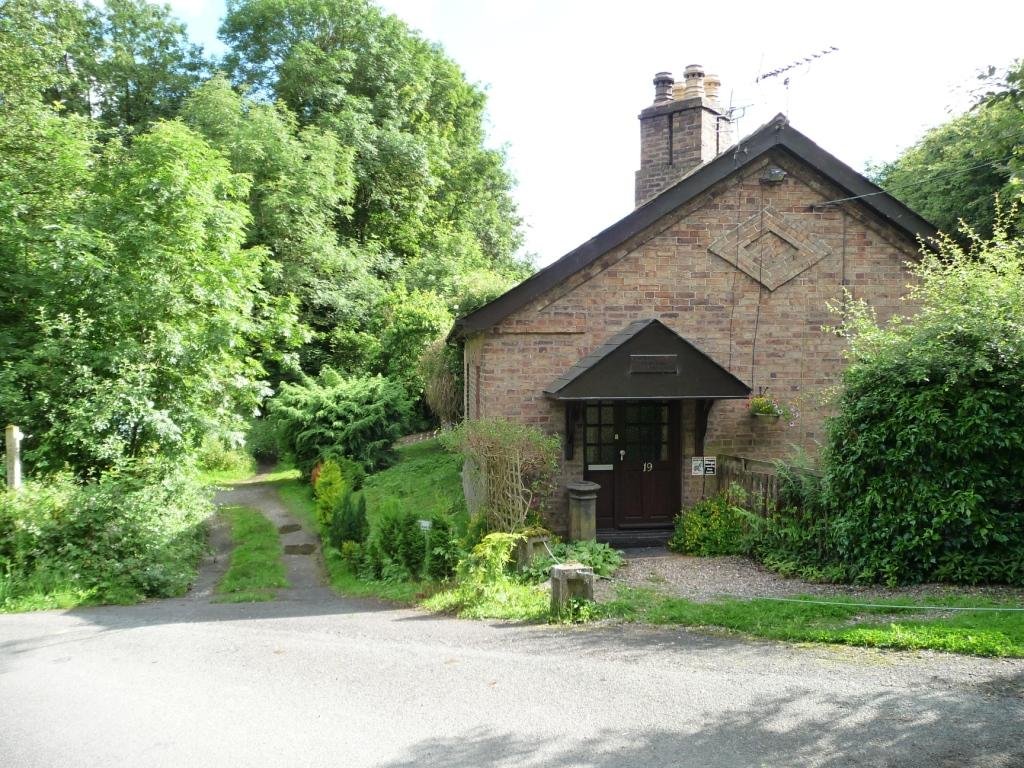
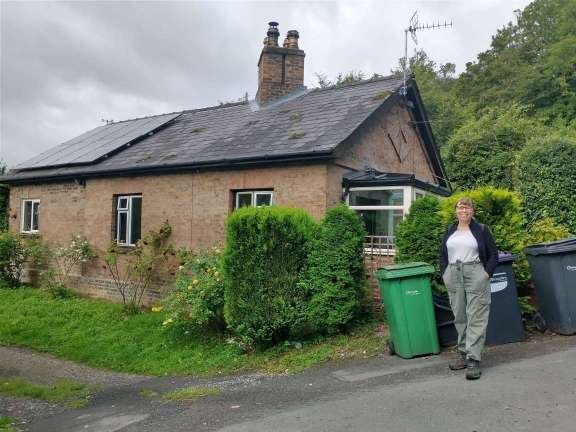
The village of Cap-d’Ail is at the bottom-left of this next extract from Google Maps. The tramway continued to follow the Basse Corniche from Cap d’ Ail in a Northeasterly direction. [Google Maps, October 2023]
The descent along the Basse Corniche continued. [21]
This next extract from Google Maps shows the centre of Monaco. The border between France and Monaco crossed the old tram route at the location of the roundabout in the bottom-left of this extract, West of the Stade Louis II. [Google Maps, October 2023]
The descent into Monaco. This colourised postcard view looks across the TNL tram route towards the Palace. [27]
Monaco in 1900. The promontary in the colourised image above is shown towards the bottom of this map with the PLM railway station at its landward (West) end. [31]
Monaco 1930. The route of the tramway is shown on this image, crossing the PLM railway line in the bottom left of the map on the Wurttemberg Bridge and then running along Boulevard Charles III towards the port, turning right onto Avenue du Port and then running North alongside the port on Boulevard Albert 1er. [32]

A warehouse of materials and fuels was located on the border itself in the St. Antoine district.” [1: p42] The tramway then passed under the PLM tracks at the Württemberg bridge, where a passing loop was created in 1913. 

Le Boulevard Charles III, very early in the 20th century [40]
A simialr view in the 21st century. [Google Streetview, July 2021]

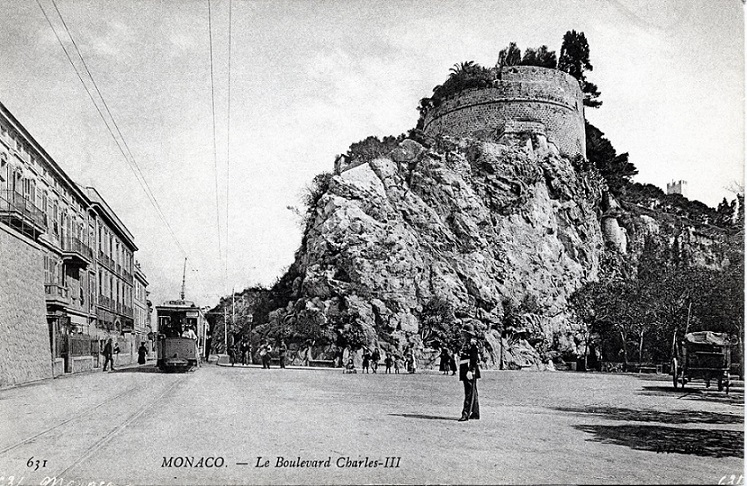
The tramway then followed Boulevard Charles III to Place du Canton where a siding was established at the foot of the bastion at the western end of the rock which supported the palace.  Banaudo continues: “Industrialists in the Fontvieille district (brewery, chocolate factory and pasta factory) used this siding for unloading and shipping their goods.” [1: p42]

These two postcard views show Place d’Armes. On the second the tramway to Place de la Visitation can clearly be seen on the right. [43]
Approximately the same view in the 21st century. [Google Streetview, December 2010]

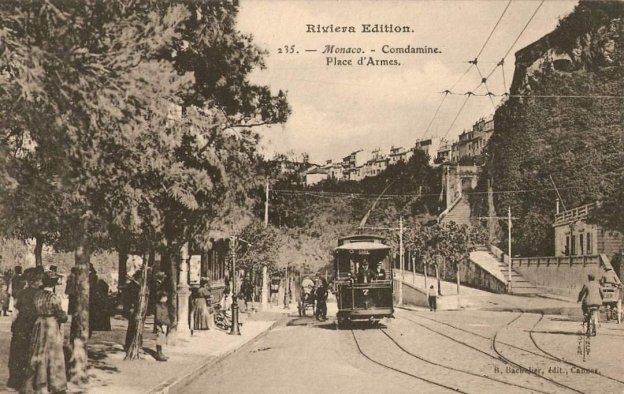
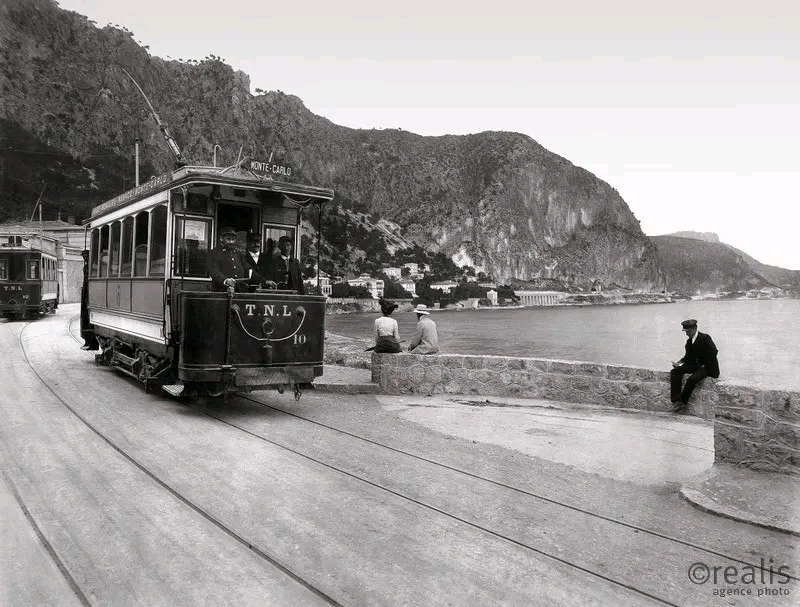
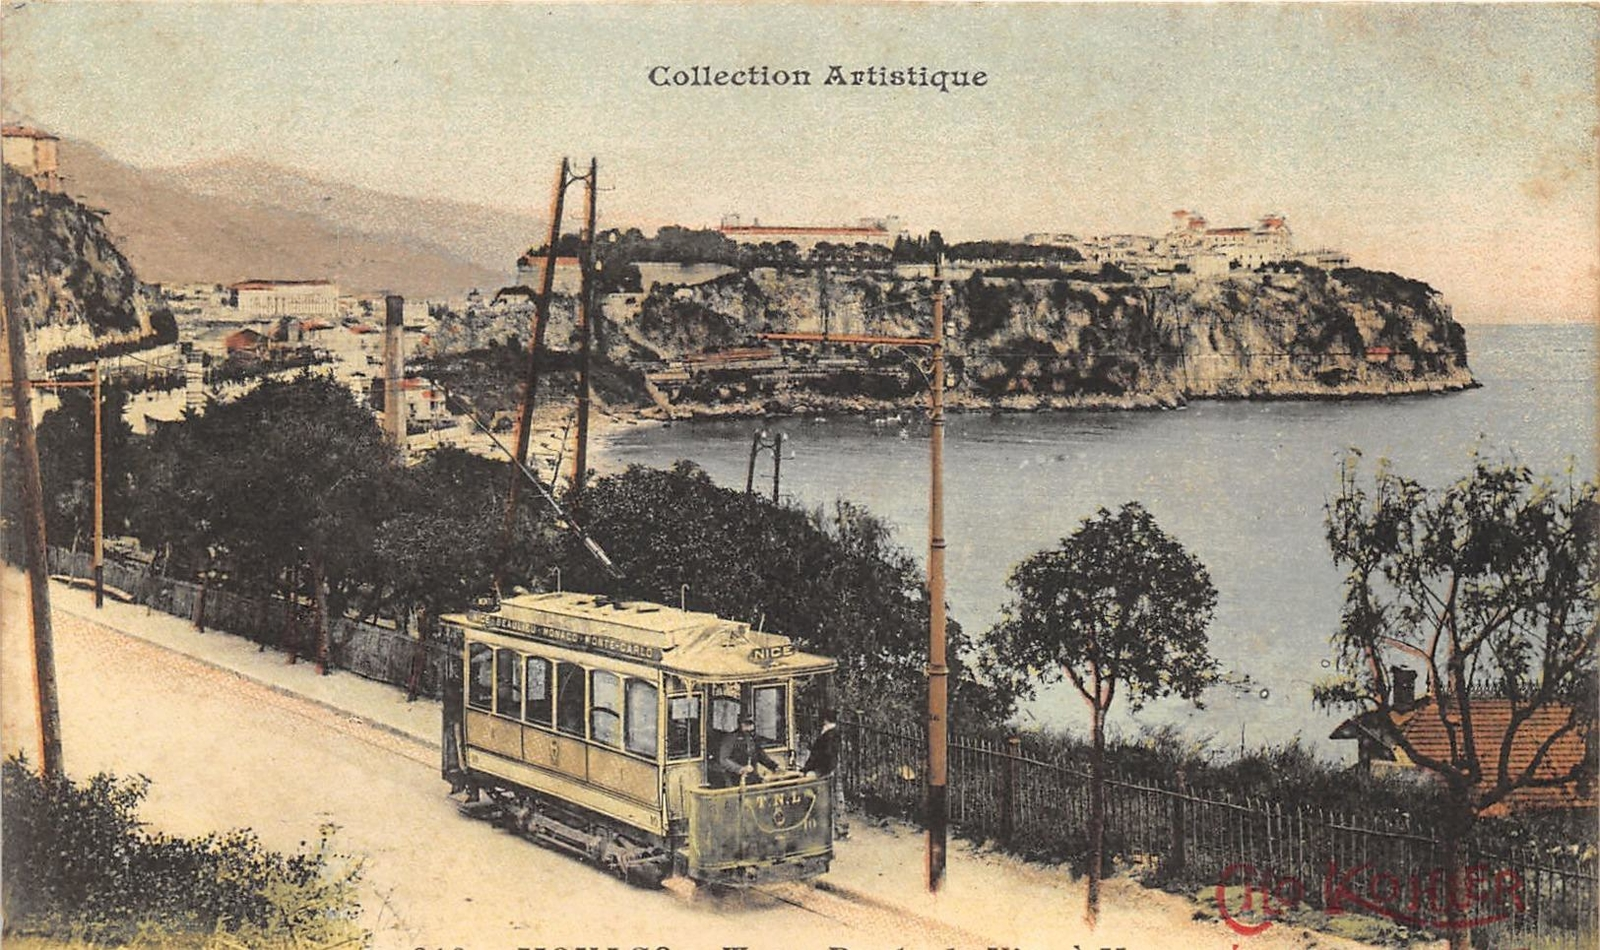
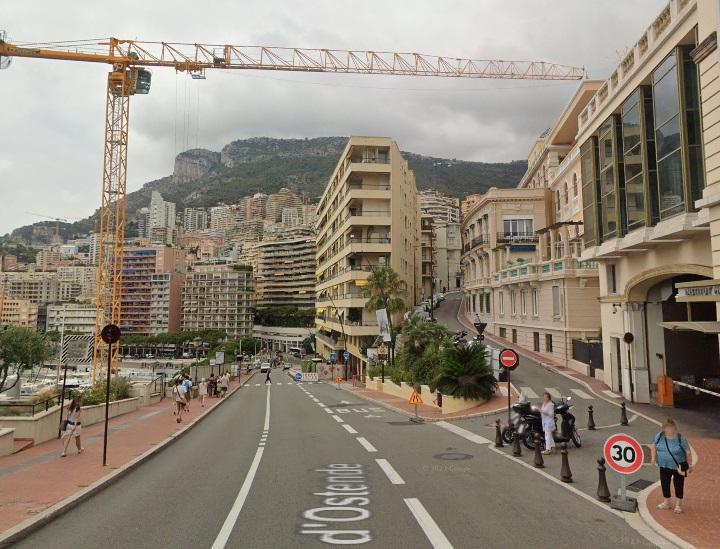
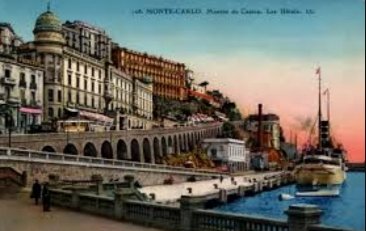
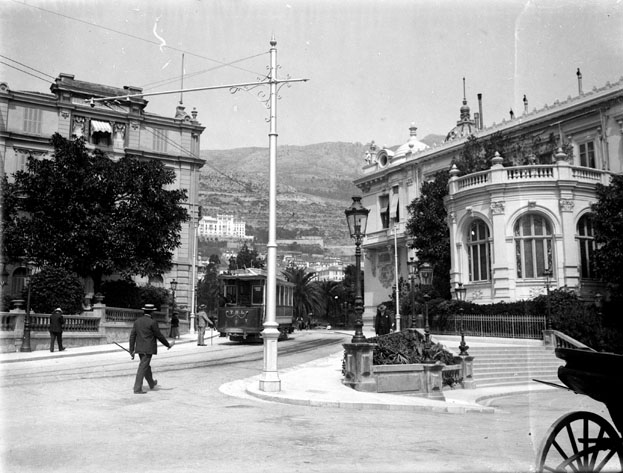
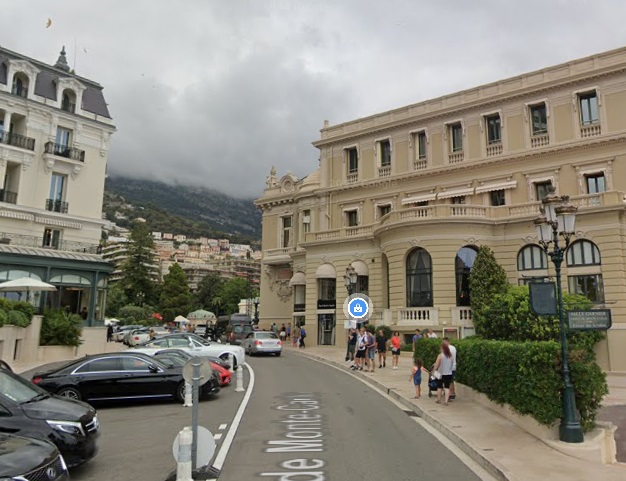
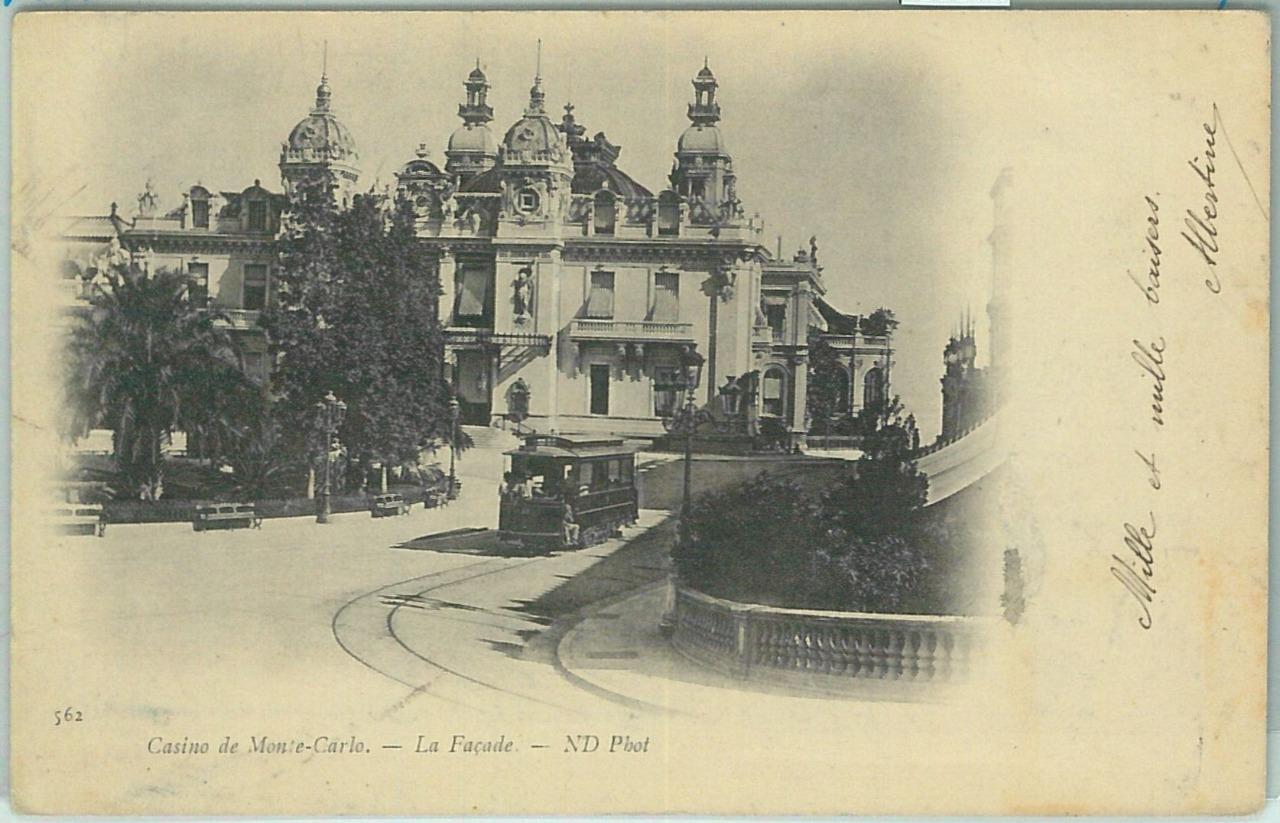
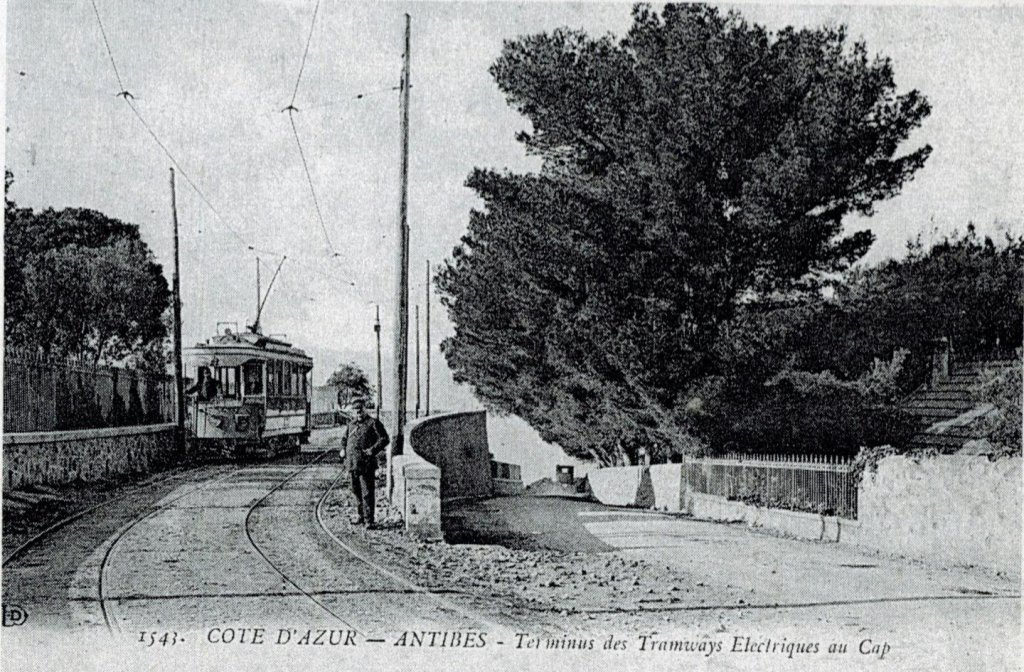
The TNL line joined the urban network of Monaco on the Place d’Armes, where two branch lines left the route: on the left towards the PLM station; and on the right towards Place de la Visitation, on the Rock.  The tramway ran along Avenue du Port on a “brief double-track section, then arrived at the gasometer bend, it ran alongside the port by going down Boulevard de la Condamine (today Albert 1er).  On Place Ste. Devote, the double track resumed to climb Avenue de Monte-Carlo, whose inclination constituted an absolute record for the entire TNL network: 80 mm/m average over 415 m, including a “peak” at  93 mm/m over 41 m! A bridge spanned the PLM line below ‘l’Hotel Ermitage’, then the tramway left the urban line at la Poste to reach le Plateau de Spélugues, where the terminus was located between ‘l’Hotel de Paris’ and l’e Casino de Monte-Carlo‘.” [1: p42]

Banaudo also highlights a number of structures along the route from Nice to Monaco: “In Nice: Garibaldi bridge over the Paillon (3 cast iron arches).  Between Beaulieu and Eze: Cap-Roux tunnel (26 m) and bridge on the PLM Nice – Ventimiglia line.  Between Eze and Cap-d’Ail: La Mala 1 (30 m) and La Mala 2 (50 m) tunnels.  In Monte-Carlo: L’Ermitage bridge on the PLM Nice – Ventimiglia line.” [1: p43]

La Condamine, now Albert Premier. [29]
A view along Boulevard Albert Premier in the 21st century. [Google Streetview, March 2011]
A tram runs down La Rampe on La Condamine, now Avenue d’Ostende. [42]
A similar view in the 21st century. [Google Streetview, July 2021]
A 21st century view along Avenue d’Ostende at approximately the same location as the two postcard views above. [Google Streetview, July 2021]
This low resolution colourised postcard view shows a tram climbing La Rampe (now Avenue de i’Ostende) towards the Casino, passing a series of Hotels. [41]
A tram alongside the Casino. [28]
A similar location to the monochrome image above. [Google Streetview, July 2021]
This 1903 postcard shows a tram close to the Casino. [35]
A similar view in the 21st century. [Google Streetview, October 2010]

Two branch lines left the main tramway between Nice and Monte Carlo. These were:

  • Pont-St. Jean to St. Jean-Cap-Ferrat
  • Monaco-Gare to Monaco-Ville (Place d’Armes to Place de la Visitation on the Rock).

These will be the subject of future article(s), as will be the length of the line from Monte Carlo to Menton.

References

  1. José Banaudo; Nice au fil du Tram, Volume No. 2: Les Hommes, Les Techniques; Les Editions de Cabri, Breil-sur-Roya, France, 2005.
  2. https://dictionnaire.lerobert.com/definition/octroi, accessed on 14th October 2023.pwe
  3. https://www.facebook.com/groups/ciccoli/permalink/3705752563003919, accessed on 20th October 2023.
  4. https://m.facebook.com/groups/ciccoli/permalink/3693480434231132, accessed on 20th October 2023.
  5. https://m.facebook.com/groups/ciccoli/permalink/3726228004289708, accessed on 20th October 2023.
  6. https://slideplayer.fr/slide/3703631, accessed on 11th April 2019.
  7. https://i.pinimg.com/736x/59/3a/b4/593ab4398089380e93e36f57e3986208.jpg, accessed on 20th October 2023.
  8. http://transporturbain.canalblog.com/pages/les-tramways-de-nice—de-l-apogee-au-declin/31975780.html, accessed on 20th October 2023.
  9. https://m.facebook.com/groups/ciccoli/permalink/3478397479072763, accessed on 21st October 2023.
  10. https://www.facebook.com/groups/ciccoli/permalink/1917168321862361, accessed on 21st October 2023.
  11. https://m.facebook.com/groups/ciccoli/permalink/2545681792344341, accessed on 21st October 2023.
  12. https://m.facebook.com/groups/ciccoli/permalink/3372278223018023, accessed on 21st October 2023.
  13. https://www.facebook.com/groups/ciccoli/permalink/3720422128203629, accessed on 21st October 2023.
  14. https://www.cparama.com/forum/cartes2013a/1367699129-721.jpg, accessed on 21st October 2023.
  15. https://www.cparama.com/forum/cartes2013a/1367700498-06-Eze-t.du-Cap-Roux.jpg, accessed on 21st October 2023.
  16. https://www.cparama.com/forum/cartes2013a/1367699408-843.jpg, accessed on 21st October 2023.
  17. https://octo-puces.com/20713-large_default/vichy.jpg, accessed on 21st October 2023.
  18. https://picclick.fr/Carte-Route-de-Nice-%C3%A0-Monaco-Le-Cap-266462066907.html, accessed on 21st October 2023.
  19. https://www.geneanet.org/cartes-postales/view/7748918#0, accessed on 21st October 2023.
  20. https://www.geneanet.org/cartes-postales/view/5253150#0, accessed on 21st October 2023.
  21. https://www.cparama.com/forum/cartes2013a/1367698172-06-Cap-d-Ail-tram.jpg, accessed on 21st October 2023.
  22. https://www.cparama.com/forum/cartes2013a/1367694969-06-Beaulieu-39-001.jpg, accessed on 21st October 2023.
  23. https://www.cparama.com/forum/cartes2013a/1367695565-06-Beaulieu-388-.jpg, accessed on 21st October 2023.
  24. https://www.cparama.com/forum/cartes2013a/1367695792-06-Beaulieu-1183-.jpg, accessed on 21st October 2023.
  25. https://www.cparama.com/forum/download/file.php?id=71728, accessed on 21st October 2023.
  26. https://www.train-jouet.com/PA/Vente-CPA-Ferroviaire/Train-06/TR3719-2.jpg, accessed on 21st October 2023.
  27. https://www.geneanet.org/cartes-postales/view/7700125#0, accessed on 21st October 2023.
  28. https://upload.wikimedia.org/wikipedia/commons/b/b7/Station_des_tramways_au_casino%2C_Monte-Carlo%2C_avril_1905_%285686522389%29.jpg, accessed on 21st October 2023.
  29. https://upload.wikimedia.org/wikipedia/commons/2/2a/Exposition_des_canots_autos%2C_Monaco%2C_avril_1905_%285619067954%29.jpg, accessed on 21st October 2023.
  30. https://www.google.com/search?q=monaco+trams+cartes+postales+ancienne&tbm=isch&ved=2ahUKEwi22qipp4SCAxXvWaQEHUO_CVsQ2-cCegQIABAD&oq=monaco+trams+cartes+postales+ancienne&gs_lcp=ChJtb2JpbGUtZ3dzLXdpei1pbWcQAzIFCAAQogQ6BAgjECc6BAgeEApQ7w5YziNgtTJoAHAAeACAAaQBiAHcCZIBAzIuOJgBAKABAcABAQ&sclient=mobile-gws-wiz-img&ei=m0cyZfagNe-zkdUPw_6m2AU&bih=664&biw=360&client=ms-android-oppo-rvo3&hl=en#imgrc=2d6uTfkjSefGVM, accessed on 21st October 2023.
  31. https://www.detaille.mc/en/hier, accessed on 23rd October 2023.
  32. https://wardmapsgifts.com/products/monaco-1930, accessed on 23rd October 2023.
  33. https://www.facebook.com/groups/ciccoli/permalink/3790242024554972, accessed on 25th October 2023.
  34. https://m.facebook.com/groups/ciccoli/permalink/1729856960593499, accessed on 26th October 2023.
  35. https://www.ebay.co.uk/itm/304773417554?mkcid=16&mkevt=1&mkrid=711-127632-2357-0&ssspo=ngW_GOApSZS&sssrc=4429486&ssuid=afQhrar7TGK&var=&widget_ver=artemis&media=MORE, accessed on 26th October 2023.
  36. https://www.monaco-tribune.com/2023/03/lancien-tramway-de-monaco, accessed on 26th October 2023.
  37. https://www.delcampe.net/en_GB/collectables/postcards/monaco/harbor/monte-carlo-le-boulevard-de-la-condamine-935509054.html, accessed on 26th October 2023.
  38. https://www.fortunapost.com/monaco/56820-monaco-la-condamine-et-l-avenue-de-la-costa-a-monte-carlo-vers-1905.html, accessed on 26th October 2023.
  39. https://www.etsy.com/hk-en/listing/962449177/monte-carlo-vintage-postcard-set-four, accessed on 26th October 2023
  40. https://cronobook.com/pic/317b6f78-4763-4f52-b8a6-bc625f310c79, accessed on 26th October 2023.
  41. https://picclick.fr/Monaco-Monte-Carlo-Mont%C3%A9e-Du-Casino-Les-H%C3%B4tels-266021428207.html, accessed on 28th October 2023.
  42. https://m.facebook.com/story.php?story_fbid=pfbid037Agoz1RnVkMM6FYgqS999TT5pM1brTsYaKoX8V6TXtMfRovpbYUMepmzxSpTZLqfl&id=100066989205256, accessed on 28th October 2023.
  43. https://m.facebook.com/story.php?story_fbid=pfbid034LetSqTPvanReBnsQi4NbvfNRU5vXtfnjSnCRP1hXApywdEB5Ko9KKhTraEYDqR5l&id=100066989205256, accessed on 28th October 2023.

The Railways of East Shropshire (and Telford) – the Much Wenlock and Severn Junction Railway, Buildwas to Much Wenlock.

This article follows on from three other articles which covered the Wellington to Severn Junction Railway and which reached as far along the line as Buildwas. Those articles can be found on these links:

https://rogerfarnworth.com/2022/07/07/the-railways-of-telford-the-wellington-to-severn-junction-railway-wsjr-part-1-wellington-to-horsehay

https://rogerfarnworth.com/2022/07/12/the-railways-of-telford-the-wellington-to-severn-junction-railway-wsjr-part-2-horsehay-to-lightmoor-junction

https://rogerfarnworth.com/2022/07/18/the-railways-of-telford-the-wellington-to-severn-junction-railway-wsjr-part-3-lightmoor-junction-to-buildwas

In this article we follow the line from Buildwas to Much Wenlock which was initially the Much Wenlock and Severn Junction Railway, “established by the Much Wenlock and Severn Railway Company. The company itself was formed on 21 July 1859. The railway was later constructed between 1860 and 1862 forming part of the Wellington to Craven Arms Railway.” [1]

The Wellington to Craven Arms Railway was formed by a group of railway companies that eventually joined the Great Western Railway family, and connected Wellington and Shifnal with Coalbrookdale, Buildwas, Much Wenlock and a junction near Craven Arms on the route between Shrewsbury and Hereford. It’s purpose was particularly focussed on the iron, colliery and limestone industries around Coalbrookdale.

The line was built over a number of years by what started out as a number of different independent ventures:

The Wenlock branch, with its four original constituent companies passed through areas as complex and diverse as its original organisation: from the slag tips and pennystone pit mounds of the East Shropshire coalfield to the wooded crest of Wenlock Edge and Ape Dale. The one central strand however on which the companies focused their attention was the ironworks nestling in the tree-lined Coalbrookdale valley, the success of their venture depending solely on the support which they would receive from the Coalbrookdale Company.” [61: p5]

The railways were opened to traffic between 1854 and 1867. The railways local to Coalbrookdale were heavily used by mineral traffic; the hoped-for trunk hauls to and from South Wales via Craven Arms were not realised. Passenger traffic was never heavy, and was sparse between Much Wenlock and Craven Arms. Passenger traffic closures took place from 1951 and ordinary goods traffic closed down in the 1960s. Ironbridge B Power Station generated significant volumes of merry-go-round coal traffic between 1967 and 2015. The line is now entirely closed to ordinary traffic, but the heritage Telford Steam Railway operates on a section between Lawley and Doseley. [2]

The immediate location of the railway station at Buildwas disappeared under the redevelopment of the power station.

These first few maps are taken from StreetMap.co.uk [17] and show the route of the railway South from Buildwas through Much Wenlock as it appears on 21st century Ordnance Survey mapping. …..

Buildwas to Much Wenlock – The Route

Buildwas Junction Station was on the South side of the River Severn close to what was Abbeygrange Farm. The Village of Buildwas was on the North side of the river. The Station was a relatively busy junction The Severn Valley line was met by the line from Wellington and the line via Much Wenlock to Craven Arms. A short goods line left the station to serve a pumping station on the South bank of the Severn. This extract is from the 1901/2 6″ OS Map. [3]
This 25″ Map provides greater clarity and is taken from the 1901 25″ Ordnance Survey. [4]
This aerial image was taken in 1968 a short while before Ironbridge B Power Station was commissioned and linked to the national grid. Ironbridge A Power Station is on the left of the image and is still operational. The railway as it remained in 1968 can be seen snaking across the centre of the image (c) E-ON. [18]
The site is unrecognisable in 21st century. The power stations on the site have both been consigned to history (2023) at different times. This ESRI satellite image as supplied by the National Library of Scotland (NLS) does show remnants of the railway still in place. [5]
An aerial view of the site taken from the East after the demolition of the cooling towers. The railway enters on the bottom right and runs up the centre of the image to the South of the River Severn. In this image, the site has yet to see any major redevelopment. [19]
Buildwas Junction Railway Station in 1962. This view looks West towards Bridgenorth on the Severn Valley line. The junction for services to Wellington via Coalbrookdale was a few hundred meters beyond the station in this view. The line to Much Wenlock is indicated by the platform name board which can be seen just to the left of the water tower on the right of the image. This picture was shared on the Telford Memories Facebook Group on 11th May 2017 by Paul Wheeler. He comments: “The station was closed on 9/9/63 on closure of the Severn Valley line. Passenger services from Craven Arms had ceased on 31/12/51, from Much Wenlock and from Wellington on 23/7/62, but the line to Buildwas remained open from Longville for freight until 4/12/63 and from Ketley on the Wellington line until 6/7/64. However, coal traffic for Ironbridge Power Station (B Station built on site of Buildwas railway station) … continued from Madeley Junction, on the main line between Shifnal and Telford Central” until 2016. The Power Station in this photograph was Ironbridge A. This image is reproduced under a Creative Commons Licence [Some Rights Reserved] © Copyright Ben Brooksbank and licensed for reuse (CC BY-SA 2.0). [6]
A service for Much Wenlock sits at the station platform in 1957 in the capable hands of 0-6-0PT No 7744 . The line to Much Welock went through the combined station at a higher level than the Severn Valley line. Buildwas Junction Station was overshadowed by the Ironbridge ‘A’ power station. Note the ‘fire-devil’ next to the water column to the left of the picture, in front of the water tower. The Fire Devil is the container with a long chimney which is beneath the water tower. It is used in freezing conditions to prevent the water column from freezing. This picture was shared on the Telford Memories Facebook Group by Metsa Vaim EdOrg on 17th October 2020, © G.F. Bannister. [7]
A similar view from 1954, this time with a service for Wellington at the branch platform. This was shared by Metsa Vaim EdOrg on the Telford Memories Facebook Group on 2nd March 2020, (c) G.F. Bannister. [8]
This image of Buidwas Railway Station comes from 1961. This time the image shows the Severn Valley lines. The photographer has chosen to focus tightly on the railway station which avoids including the power station in the image. This picture was shared on the Telford Memories Facebook Group by Marcus Keane on 20th May 2019. [9]
This image from 1959 was shared by Metsa Vaim EdOrg on the Telford Memories Facebook Group on 24th February 2020. It shows an ex-GWR railcar in the East-bound platform on the Severn Valley line and a service for Wellington arriving from Much Wenlock on the branch. The relative levels of the platforms can easily be seen in this image. [10]
This image from 1932 was shared by Metsa Vaim EdOrg on the Telford Memories Facebook Group on 24th February 2020. [11]
A Westbound SVR passenger service at Buildwas, with service that has arrived from Much Wenlock in the higher branch line platforms in the background. Taken 9 June 1961. From the Sellick collection, hosted online by the National Railway Museum, © National Railway Museum and included here under a Creative Commons Licence, Attribution 4.0 International (CC BY 4.0). [12]
A particularly busy moment at Buildwas Junction Station on 9 June 1961. On the right, two Severn Valley passenger services cross, whilst on the left, a passenger service stands at the single platform for the Much Wenlock branch, with a goods train for Much Wenlock standing in the branch loop waiting to depart. From the Sellick collection, hosted online by the National Railway Museum, © National Railway Museum and included here under a Creative Commons Licence, Attribution 4.0 International (CC BY 4.0). [13] .
This aerial image is embedded from Historic England’s Britain from Above site. It shows the construction of Ironbridge Power Station. It was taken in 1930. Buildwas Station can be seen on the left of the image which has been taken facing West and the line to Much Wenlock curves away to the left from what was the old Severn Valley Line.  [14]
Ironbridge Power Station, Buildwas Junction Station and associated sidings in 1948 (EAW012667) © Historic England (Britain from Above). Both the Severn Valley line and the line to Craven Arms via Much Wenlock leave the image on the left (West) with the Much Wenlock line just to the South of the Severn Valley line. [15]
Looking West along the River Severn in a time of flood. Buildwas Abbey is close to the centre of the screen. The sidings associated with the power station can be seen running from bottom centre to the mid-point of the image, The Much Wenlock Branch curved away to the left of the image and its route is marked by the modern field boundary. (c) xerdnA. [Google Streetview, February 2020]
Looking East through the power station site from the same elevated location, (c) xerdnA. [Google Streetview, February 2020]
A view of the Power Station sidings in 2020. [20]
Google Maps satellite imagery is used by RailMapOnline.com as a background to its mapping of old railway lines. This image shows the area around the two power station sites with the railways of the past shown by the turquoise lines. The route of the Severn Valley Line enters from the left near Buildwas Abbey and runs off the image to the bottom-right. The line to Wellington and Madeley Junction leaves the image mid-right. The Much Wenlock branch leaves the image in the bottom-left corner. [16]
Looking Northwest from the access road to Poolview Caravan Park. For a short distance, that access road runs immediately beside the Power Station sidings. [Google Streetview, March 2009]
Looking Northeast from the access road to Poolview Caravan Park  just before the point where it turns away to the South from the power station sidings. [Google Streetview, March 2009]
The area to the West of Buildwas Junction Station as shown on the 1901 25″ Ordnance Survey. Note the station approach road which widens out into an open area between the the two railway lines and the access road to Abbeygrange Farm which passes under the line to Much Wenlock towards the West of the image. [4]
This very grainy image is a significant enlargement of a small section of the aerial image held by Heritage England on their Britain from Above website which is shown above, (EPW034013). It shows the point where the access road to Abbeygrange Farm passed under the line to Much Wenlock. The view is from the East. [14]
The similarly grainy image is also an extract from a Britain from Above aerial image, (EAW012578), which is taken looking South in 1948. Ironbridge Power Station is off the left of this extract. The Severn Valley line is in the foreground with the River Severn to the North (off the bottom of the extract). The Much Wenlock line runs across the centre of the image. The access road to Abbeygrange Farm enters the image from the right and passes under the line at the centre of the image. [21]
This is a first extract from the plans of the Much Wenlock line which are held in the Shropshire Archives in Shrewsbury. It shows the accommodation underbridge which permits access to Abbeygrange Farm which effectively defines the rail approach to Buildwas Junction Station, © Shropshire Archives Ref. No. 6008/26 copyright reserved, used by kind permission. [22][My photograph of the plan, 5th August 2022]
Looking South along the access road to Poolview Caravan Park at the point where the old railway line crossed the line of that road. [Google Streetview, March 2009]
Another extract from the 25″ Ordnance Survey of 1901. The red line superimposed on the image is the route of the modern access road to the Poolview Caravan Park. [4]
Approximately the same area as that covered by the map extract above but shown on the modern satellite imagery provided by the NLS. The modern access road is visible under the tree canopy. The superimposed red lines indicate the approximate position of the station approach road and the alignment of the farm access road. The superimposed turquoise line is the approximate route of the Much Wenlock line. [23]
This next extract from the archived plans shows the length from the accommodation underbridge to a first crossing of the railway on the line of a public footpath just beyond the half-mile point. This is approximately the same length as shown on the map extract and satellite images above, © Shropshire Archives Ref. No. 6008/26 copyright reserved, used by kind permission. [22][My photograph of the plan, 5th August 2022]

The footpath shown on the map extract above was accessible from the old station access road as far as the field boundary on the North side of railway land but not beyond that point. A public footpath runs East-West across the field shown to the West of the access road and to the South side of the old railway. In 2023, the field was in use to grow potatoes. Walking West along that path brings one to the first remaining significant structure on the line to Much Wenlock. The map extract below shows the line curving round to the South before crossing a farm access road.

A further extract from the 25″ Ordnance Survey of 1901 shows the line to Much Wenlock turning away to the South-southwest. An underbridge is shown in the bottom-left of the extract. [4]
The same area in the 21st century with the line of the railway and the location of the underbridge superimposed on the satellite image. [24]
The construction plan shows the curve towards the South, please note that the construction plans are drawn with the North point oriented so as to get significant lengths of the line shown on each plan. The occupation crossing referred to above is at the right side of this image, © Shropshire Archives Ref. No. 6008/26 copyright reserved, used by kind permission. [22][My photograph of the plan, 5th August 2022]
An enlarged extract of the construction plans for the line shows the location of the accommodation bridge which was just beyond the three-quarters of a mile point on the line, © Shropshire Archives Ref. No. 6008/26 copyright reserved, used by kind permission. [22][My photograph of the plan, 5th August 2022]
The first accommodation underbridge on the branch is a significant stone-arched structure. This photograph shows it from the East. [My photograph, 24th May 2023]
A closer image, also from the East. [My photograph, 24th May 2023]
The same structure seen from the West. [My photograph, 24th May 2023]

A steep track alongside the underpass leads South-southwest alongside the old railway route to allow field access and it is possible, at the top of that access road, to step onto the old railway formation and follow it for a short distance to the Southwest through increasingly dense vegetation. Walking Northeast along the formation over the accommodation bridge was not feasible because vegetation obstructed the route over the bridge.

After following a track South-southwest alongside the accommodation bridge which led up to the level of the old railway, this is the view back to the North along the route of the railway. [My photograph, 24th May 2023]
The line to Much Wenlock continues in a Southwesterly direction. [25″ 1901 Ordnance Survey as supplied by the NLS. The underbridge appears in the top-right of the extract. [4]
Approximately the same area as shown on the map above as supplied by RailMapOnline.com. [16]
This image and the one below taken together also show a similar length of the old railway to that on the 1901 25″ Ordnance Survey above. These two extracts from the archived construction plans get us to the one mile post on our journey along the line to Much Wenlock, © Shropshire Archives Ref. No. 6008/26 copyright reserved, used by kind permission. [22][My photograph of the plan, 5th August 2022]
For a short distance it was possible to walk along the old railway route Southwest of the accommodation bridge, however undergrowth encroached to such an extent that it was nigh impossible to continue to follow the railway formation. This picture shows the route a hundred metres, or so, Southwest of the underbridge. [My photograph, 24th May 2023]

As the picture above shows, the trackbed from a point just to the West of the accommodation bridge is inaccessible. The next location where access is possible is at the next minor road on the East side of the A4169.

This next map extract takes the railway line to the bottom edge of the the 25″ OS Map Sheet. The road and the railway are running in parallel over the bottom half of this extract. [4]
A narrow lane can be seen entering this map extract in the bottom-right. It passes under the old railway and meets the old road. The bridge deck is long-gone but the abutments remain in an overgrown condition. [25]
This extract from RailMapOnline shows that the tight bends in the old road have been removed by realignment and widening. The A4169 turns away from the line of the old Much Wenlock Road and starts to run on the formation of the old railway. As the new road drifts East towards the route of the old railway it meets the side road which approaches from the East. As we have just noted, the bridge abutments are still present. [16]
This image is a length of the construction plan which shows the length of the line from the 1mile post to the under bridge noted above, © Shropshire Archives Ref. No. 6008/26 copyright reserved, used by kind permission. [22][My photograph of the plan, 5th August 2022]
Looking Southeast from the A4169. The South abutment of the old bridge is hidden in the shadows close to the road junction. The old railway ran on alongside the new road alignment to the left. Comparison of this photograph with the preconstruction plan above shows that the new road alignment is taking much closer order to the route of the old railway by this point. [Google Streetview, June 2022]
Looking Northwest from the minor road, the South abutment of the old railway bridge can be made out easily on the left. The North abutment is more camouflaged by vegetation. [My photograph, 8th August 2023]
The face of the North abutment peeks out from the undergrowth on the left of this image. The East abutment wall-return can be made out on the right of the image. [My photograph, 8th August 2023]
The South abutment face is considerably less covered by vegetation. [My photograph, 8th August 2023]

After clearing the bridge the old line was on embankment for a short distance with the minor road rising to the same height and continuing then on an upward grade. The next two pictures show the old railway formation at the point where the minor road and the old railway formation were at a similar height.

Looking North towards the old bridge abutment. [My photograph, 8th August 2023]
Looking South along the line of the old railway. In a matter of around 100 metres, the climbing modern A4169 occupies the same space as the old railway. [My photograph, 8th August 2023]
Looking North along the A4169. In the distance the old railway route was on the right of the area now occupied by the modern road. Closer to the camera the newer road encroaches into the space occupied by the old railway. [Google Streetview, June 2022]
This extract from the precontract drawings for the Much Wenlock line takes us as far as the bottom edge to the last RailMapOnline.com image above, © Shropshire Archives Ref. No. 6008/26 copyright reserved, used by kind permission. [22][My photograph of the plan, 5th August 2022]

The next two extracts from the 1901/1902 OS mapping take us as far as Farley Halt.

These two map extracts from the 1901/1902 Ordnance Survey show the old railway curving to the Southwest and for a short distance running immediately adjacent to the Much Wenlock Road. [26][27]
This extract from RailMapOnline covers the same length of the old railway as the two map extracts above. For a distance, the modern Much Wenlock Road (A4169) follows the same line as the old railway formation, pulling away from it at the point where the old road and railway were closest. The lane to Farley Mill can be seen leaving the modern road in the bottom-left of this image. [16]
Looking Southwest along the A4169. Along this length the road occupies the formation of the old railway. [Google Streetview, June 2022]
Also looking Southwest along the A4169. The road curves away from the line of the railway which ran straight ahead. [Google Streetview, June 2022]
This next extract from the precontract drawings takes us to the 2 mile point on the old railway, just short of Farley Halt, © Shropshire Archives Ref. No. 6008/26 copyright reserved, used by kind permission. [22][My photograph of the plan, 5th August 2022]
This enlarged extract from the precontract plans shows the area around Farley Mill. Farley Halt was provided at a much later date and was sited about 400 metres South of the Mill close to what was Bradley Rock Quarry, © Shropshire Archives Ref. No. 6008/26 copyright reserved, used by kind permission. [22][My photograph of the plan, 5th August 2022]

Farley Halt was opened in 1934 and closed in 1962. It had a short timber edged platform with a wooden shelter on the west side of the line behind the former Rock House Inn. The halt could be accessed by steps down from a road over bridge to the south. On the other side of the overbridge was an access siding to Bradley Rock Quarry. The halt has been demolished, but its nameboard can be found displayed 400 metres to the north of the site on a stone barn adjacent to the A4169 Much Wenlock Road. [28]

This next extract from the 1901/1902 Ordnance Survey takes the line as far as Farley Halt which was just on the North side of the road overbridge shown close to Rock House Inn. On the South side of the bridge were the sidings which served Bradley Rock Quarry. It is worth noting the tramways/tramroads associated with the Quarry and the incline and lime kilns to the East. Landowner Liquid Fertilisers now occupy the site of the sidings. [29]
This map extract shows the full length of the sidings and most of the tramway/tramroad network on the East side of the old railway as surveyed in 1901. [30]
This RailMapOnline extract covers the same length of line as the two map extracts above. [16]
Farley Halt before the closure of the line to Much Wenlock. The access road bridge is visible beyond the locomotive. The shelter was made of timber, as can be seen, was the platform edge. [39]

Adrian Knowles

The building shown in this photograph used to Rock House Inn. The railway ran to the East of the Inn and Farley Halt was to the East of the Inn and to the North of the access road to Bradley Rock Quarry. Steps led down from that access road to the wooden-platformed halt. [Google Streetview, June 2022]
The Northern Parapet of the bridge over the old railway at the entrance to what was Bradley Rock Quarry. Farley Halt was on the North side of the bridge. [Google Streetview, June 2022]
Looking North over the Northern parapet of the bridge. Farley Halt’s platform was on the right-hand (West) side of the line. [My photograph, 19th August 2023]
Looking South over the Southern parapet of the bridge towards Much Wenlock. The railway formation between here and the next minor road is overgrown. Bradley Rock Sidings were alongside the railway on this side of the bridge. [My photograph, 19th August 2023]

On the South side of the accommodation bridge were Bradley Rock Sidings. They can be seen clearly on the precontract plan below.

This next extract from the precontract drawings takes us to just South of the 2.5 mile point and brings us to the same location as the bottom edge of the RailMapOnline image above.. It covers the full length of the Bradley Rock Quarry sidings and indicates the presence of the quarry’s internal system of tramways. The transhipment wharf is shown with tramways parallel to the Standard-gauge siding. This indicates that at the time of the construction of the line in the early 1860s, the tramways were already present or were at least being constructed, © Shropshire Archives Ref. No. 6008/26 copyright reserved, used by kind permission. [22][My photograph of the plan, 5th August 2022]

Bradley Rock Quarry appears to have been a relatively significant operation at the turn of 20th century. The Quarry is also known as Farley Quarry and it is under this name that more details can be found online. Much Wenlock is situated in the area of a Limestone outcrop. Kent Geologists Group comment on the Quarry: “The strata exposed in Farley Quarry consist mainly of Wenlock Reef Facies interbedded with nodular and tabular limestones of Silurian age and display clearly the particular feature known as “ball stones”. In the deeper parts of the quarry the strata gradually pass downwards into the Farley member. … The Wenlock Series was subdivided by Bassett et al (1974) into bio-zones based on graptolite fauna and the Farley Member is placed at the top of the Coalbrookdale Formation. Within the Coalbrookdale formation, the uppermost mudstones of the underlying Apedale strata grade upwards over some ten metres into an alternating sequence of grey, shaley mudstones and thin, nodular, buff to blue-grey limestones – the Farley Member.” [31]

The two images above were taken in Farley Quarry/Bradley Rock Quarry and illustrate the kind of rock encountered, © Richard Law and licensed for reuse under a Creative Commons Licence (CC BY-SA 2.0). [32][33]

It is worth pausing our journey along the Much Wenlock & Severn Junction Railway to wonder what might have been the way in which stone and lime from Bradley Rock Quarry was exported to the probable primary users along the River Severn and to its immediate North. There appears to be no evidence of a tramway along the line of the Much Wenlock & Severn Junction Railway. This suggests that transport from the quarry followed one of two possible routes. The first option was to use the old road from Much Wenlock to Buildwas, and that would have been the original route used. An alternative option was to gain access in some way to the Gleedon Hill Tramroad. John Wooldridge tells us about the tramways/tramroads which served this area. [34]

“In the early 18th century Abraham Darby brought Wenlock stone for iron smelting in Coalbrookdale. As the local iron industry expanded, quarries between Much Wenlock and the River Severn were acquired by ironmasters operating in the southern part of the East Shropshire coalfield. The Wenlock-Buildwas road (now A4169) led to a wharf on the River Severn downstream (East) of Buildwas bridge from where stone was carried downriver to the ironworks. In 1780 William Ferriday of Lightmoor leased stone quarries near Gleedon hill and the Coalbrookdale Company leased quarries nearby. In 1800 William Reynolds leased quarries at Tickwood and Wyke. In the early 19th century the Madeley Wood Company succeeded to the Wenlock quarries of Richard and William Reynolds (probably the quarries at Tickwood and Wyke) and also to the Coalbrookdale Company quarries (probably near Gleedon Hill). The late 19th-century decline of Shropshire’s iron industry curtailed demand for Wenlock stone and Gleedon Hill quarries closed between 1882 and 1901.

The first stone carrying railway may have been built some time after 1800 – the date when William Reynolds took a lease on quarries at Tickwood and Wyke – to transport stone north eastwards, probably to a Severnside wharf on the Buildwas-Benthall boundary (perhaps the area now occupied by Buildwas power station). This railway had gone by 1833 and I have found no other reference to it, nor indeed any trace of it on the ground. Between 1824 and 1833 the Madeley Wood Company built a railway north from Gleedon Hill to a Severnside wharf [a short distance] upstream (west) of Buildwas bridge. In 1862, mainly to improve the transport of limestone to the Severn, and of coal from there to the kilns at Much Wenlock, a steam railway was opened from Buildwas to Much Wenlock [35].” [34]

The railway built by the Madeley Wood Company between 1824 and 1833 was probably the route which was known as the Gleedon Hill Tramroad. This did not follow the valley in the way that the later railway did but ran South from wharves on the River Severn to the West of Buildwas. Bertram Baxter noted that this was about 1.75 miles in length. [34]

The route of the tramway can be followed on the 25″ Ordnance Survey of 1881/1882. Doing so, is beyond the scope of this article but one extract from the 1881/1882 Ordnance Survey will illustrate its relative proximity to the Bradley Rock Quarry.

It should be noted that, while there is clear evidence for the existence of the Gleedon Hill Tramroad and of the red line drawn onto this extract from the 25″ 1881/182 Ordnance Survey being correct, the suggested possible tramway routes are speculative. They do illustrate, however, that they were possibly used to access the Much Wenlock Road by the owners of Gleedon Hill Quarry before the construction of their tramroad. It is possible that they were also able, later, to take materiel from Bradley Rock Quarry to the Gleedon Hill Tramroad. To be able to firm up this possibility, further research would be required. [36]

Adrian Knowles, in his excellent book about the line, “The Wellington, Much Wenlock and Craven Arms Railway, that quarrying ceased at the Bradley Rock Quarry in 1927, “and this ended a quaint tradition. Each morning, just before 10.00am, the quarry timekeeper had stood at the connection to Bradley Sidings from where the crossing keeper’s cottage at Farley could just be seen down the line. The crossing keeper would stand at the door with his arm raised and at the instant he dropped his arm the quarry man would know that the Greenwich time signal had been relayed by telephone. Thus, for many years, railway time was quarry time.” [40: p105]

Apparently, “The redundant quarry buildings were later purchased by the Midland Counties Dairy for conversion to a creamery, mainly engaged in cheese production, which opened in April 1934 under the name ‘Dingle Dairy’. Bradley Sidings were left intact but were seldom used as the Midland Counties Dairy operated its own lorries to collect milk from surrounding farms and despatch the finished cheeses. Even the small tramway, which ran into the old quarry from Bradley Sidings, was left in place but was not used.” [40: p105]

The dairy was active until the mid-to late 1930s, but after its closure the newly formed Railway Executive Committee brought about an agreement for the Sidings to be taken over by the Air Ministry “which cleared most of the old buildings in 1938 and installed 16 large underground oil storage tanks. The original quarry tramway, which had been left in place while the dairy had occupied the site, was removed at this time, but the standard gauge siding and connection to the branch were retained. The establishment of the Air Ministry fuel depot was to have dramatic and exciting implications for the Much Wenlock branch and a hint of what was to come was given when strengthening work was undertaken on an occupation bridge near Farley.” [40: p115-116]

When, on 1st September 1939, the Railway Executive Committee took control of the railways, weight restriction on the Much Wenlock line were substantially lifted. “All ‘red’ engines (except ’47xx 2-8-0s and the ’60xx King’ Class) were now permitted to run from Madeley Junction and Ketley Junction to Builders and as far South as Much Wenlock, subject to a 20mph overall maximum speed limit.” [40: p116]

Local airfields were supplied by the oil stored at Bradley and regularly ’63xx’ Moguls and ’28xx’ heavy freight 2-8-0s were seen on the branch. There may even have been the occasional ‘USA’ 2-8-0 as well.

The next length of the railway shows a road crossing and a small disused quarry. The Much Wenlock Road is now moving away from the railway. [37]
The road is further away still on this extract from the 1901/1902 25″ Ordnance Survey. This shows the area that inn the 21st century has a lagoon  [38]
This extract from the RailMapOnline.com satellite imagery shows the same length of line as the two map extracts above. The most notable feature other than the location of the minor road crossing is the presence of a lagoon in the bottom-left of this image. [16]
The crossing in use. This image was shared by Linda West on the Much Wenlock History Facebook Group on 13th March 2018. [54]
Looking Southeast from the A4169 along the minor road which crossed the old railway on the level. [Google Streetview, June 2022]
Looking Northwest along the same minor road. The crossing-keepers cottage features in this and the last image above. Southwards from this point the line of the old railway is now a public footpath. [Google Streetview, June 2022]
The view North along the route of the old railway towards Farley Halt. The area between this point and the bridge over the line noted earlier is overgrown. [My photograph, 19th August 2023]
This photograph was taken from the line of the old railway, looking towards Much Wenlock. The crossing cottage is much as it was when the line was active. There is a small canopy over the doorway which was not present in the past and the land levels were adjusted with a slight realignment of the road carriageway so that wooden steps were no longer need to access the cottage door. This photograph was taken pon 11th July 2012, © Christine Johnstone and included here under a Creative Commons Licence (CC BY-SA 2.0). [41]
An oblique view of the crossing-keeper’s cottage in 2023. The porch at the North end of the cottage is an addition (as are the solar panels). [My photograph, 19th August 2023]

Since completing this article, I have been contacted by Eddie Challoner. His grandfather had time as the crossing-keeper at this location in the mid-1950s. This article brought back a series of memories for him and he very kindly provided two photographs from that time ….

This first picture shows a pannier tank approaching the crossing from the South and gives an excellent view of the front face of the signal cabin, © Eddie Challoner.
This picture shows a small family group which Eddie says “includes my father, a railwayman for 51 years, myself and later an engineering student on the railways, sister and grandfather the crossing keeper at Farley Crossing in the mid 50s, © Eddie Challoner.
This extract from the precontract plans shows the location of the crossing-keeper’s cottage and the road crossing. © Shropshire Archives Ref. No. 6008/26 copyright reserved, used by kind permission. [22][My photograph of the plan, 5th August 2022]

The next few images were taken along the length of the line to the South of the cottage which is now a public footpath and part of the Jack Mytton Way.

The line runs South passed a lagoon to its right which was not present when the line was built.

This extract from the pre-contract drawings take us to the 3 mile point, © Shropshire Archives Ref. No. 6008/26 copyright reserved, used by kind permission. [22][My photograph of the plan, 5th August 2022]
Shadwell Rock Quarry appears on this next extract from the 1882 25″ Ordnance Survey. [42]
Shadwell Rock Quarry appears again on this extract from the 25″ Ordnance Survey of 1901. The layout of the tramways associated with this area seems to have been relatively fluid. [43]

Shadwell Rock Quarry  was located at the South side of the modern lagoon. It grew significantly in size during the 20th century and its workings have now formed the lagoon which remains into the 21st century.

This aerial image of the quarry is taken looking South towards Much Wenlock in 2002. the line of the old railway is very clear on the East (left-hand) side of the quarry with the Much Wenlock Road (A4169) on the West (right-hand) side of the quarry. The original quarry area was to the South (the far side) of the modern quarry. [44]
This extract from the RailMapOnline satellite imagery shows the route of the line to Much Wenlock as well as the various sidings which were in use when the line was active. [16]
This extract from the precontract drawings shows approximately the same length as the RailMapOnline image above. The elbow in the minor road to the East of the line is evident in both. These precontract plans were orientated in respect to the North point so as the get the greatest possible length of the proposed railway onto each sheet, © Shropshire Archives Ref. No. 6008/26 copyright reserved, used by kind permission. [22][My photograph of the plan, 5th August 2022]

The various maps above and below show ‘Games Grounds’ or ‘Recreation Ground’. This were called Linden Field. This was the site of the very earliest revival of the World Olympic Movement. the field was immediately to the North of Much Wenlock Railway Station. The first Olympic games were held in 1850 on this field and continue to be held in the 21st century. The 130th games were held in July 2016.

The Olympic Memorial celebrates the use of these fields for the first modern revival of the Olympic Games. [45] More information can be found here: https://wp.me/p2zM3f-67v [46]
This extract from RailMapOnline.com includes the full length of the site of Much Wenlock railway station. [16]
An extract from the 25″ Ordnance Survey of 1882. The Station building and forecourt are at the top-right of this extract, the road bridge is at the bottom, just left of centre. [47]
Another extract from the same 25″ Ordnance Survey sheet of 1882. The goods shed is central to the extract. The yard is framed at the bottom-left by a road bridge. The running line climbs away from the passenger station towards Wenlock Edge on the North side of the yard and passes under that bridge. [47]
An aerial view of Much Wenlock Railway Station and the A4169 from 1955. This image was shared on the Much Wenlock Memories Facebook Group by Janet Jones on 8th September 2022. [52]
This next extract from the precontract drawings shows approximately the same length as the RailMapOnline image above. The Station building was on the West side of the line and North of the bridge which carried the line over what became the A4169. The goods yard was South of the bridge on the East side of the line. … As we have already noted, these precontract plans were orientated in respect to the North point so as to get the greatest possible length of the proposed railway onto each sheet, © Shropshire Archives Ref. No. 6008/26 copyright reserved, used by kind permission. [22][My photograph of the plan, 5th August 2022]
Much Wenlock Station in 1868. [51]
Much Wenlock railway station around the turn of the 20th century. This view looks Northeast along the single platform towards Buildwas. [50]
Another view of the station, this time looking to the Southeast. This image was shared on the Much Wenlock Memories Facebook Group by Shane Leavesley on 8th September 2014. [53]
The platform side of Much Wenlock Station Building. This image was shared on the Much Wenlock History Facebook Group by Linda West on 27th May 2020. [55]
The street side of Much Wenlock Station Building. This image was shared on the Much Wenlock History Facebook Group by Linda West on 27th May 2020. [55]
A DMU at Much Wenlock Station. This image was shared on the Much Wenlock Memories Facebook Group by Shane Leavesley on 8th September 2014. [53]
Much Wenlock Station Building seen from the Northwest on Station Road,© John Winder and licensed for reuse under a Creative Commons Licence (CC BY-SA 2.0 DEED). [58]
Much Wenlock Railway Station seen in 2012 from the Southwest on Station Road © Nigel Thompson and licensed for reuse under a Creative Commons Licence (CC BY-SA 2.0 DEED). [59]

Travelling Southwest from the passenger station, trains crossed Sheinton Street at high level and the either entered the goods yard or continued on towards Craven Arms rising up above the town and along the flanks of Wenlock Edge.

The railway bridge in Much Wenlock in 1901 as shown on the 25″ Ordnance Survey of that year, published in 1902. [60]
The view looking Southwest from Much Wenlock Railway Station towards the goods yard. The parapets of the bridge crossed Sheinton Street are visible in the foreground. The signals control access to the different lines in the yard. The line on towards Craven Arms can be picked out to the right in front of the housing. It climbs away from the facilities in Much Wenlock, © D Chandler Collection. [57]
A view Northwest along Sheinton Street taken outside number 19 Sheinton St. It is included here for the view of the railway bridge over the road and was taken in the first half of the 1960s. This image was shared on the Much Wenlock Memories Facebook Group by Lynne Steele on 10th April 2021. [48]
A view Southeast along Sheinton Street showing one of the carnival walks in Much Wenlock probably in the mid-60s. It is included here for the view of the railway bridge over the road. This image was shared on the Much Wenlock Memories Facebook Group by Colin Onions on 2nd February 2015. [49]
Looking South along Sheinton Street in 2023. One bridge abutment remains (immediately behind the pedestrians in the picture. The a4169 was realigned and in this image runs away to the right. The main road used to run down Sheinton Street and into Much Wenlock with what is now New Road meeting it at a T-junction just beyond the old bridge and in front of the black and white timbered building in the photograph. [Google Streetview, May 2021)
Looking North along Sheinton Street with the remaining bridge abutment on the right of the image. [Googl;e Streetview, September 2021]
Looking Northeast along New Road (A4169) towards the remaining bridge abutment. The realigned road runs through the location of the more southerly of the abutments to the old bridge. [Google Streetview, May 2021]

The station goods yard and engine shed were immediately to the Southwest of the railway bridge. We finish this part of our journey along the Wellington to Craven Arms railway in the goods yard at Much Wenlock.

Much Wenlock Engine Shed. This image was shared by Linda West on the Much Wenlock History Facebook Group on 13th March 2018. [54]
The goods yard and engine shed at Much Wenlock. This image was shared on the Much Wenlock Memories Facebook Group by Shane Leavesley on 8th September 2014. The line towards Craven Arms runs behind the Engine Shed. [53]

References

  1. https://en.m.wikipedia.org/wiki/Much_Wenlock_and_Severn_Junction_Railway, accessed on 2nd March 2023.
  2. https://en.m.wikipedia.org/wiki/Wellington_to_Craven_Arms_Railway, accessed on 2nd March 2023.
  3. https://maps.nls.uk/view/101594479, accessed on 4th March 2023.
  4. https://maps.nls.uk/view/121150853, accessed on 18th July 2022.
  5. https://maps.nls.uk/geo/explore/#zoom=17&lat=52.63304&lon=-2.51557&layers=168&b=1, accessed on 18th July 2022.
  6. https://www.facebook.com/photo/?fbid=1844651349192200&set=gm.1655719937779336, accessed on 18th JUly 2022.
  7. https://www.facebook.com/photo/?fbid=409683050025369&set=gm.4793839370634028, accessed on 18th July 2022.
  8. https://www.facebook.com/photo/?fbid=255663442093998&set=gm.3788208897863752, accessed on 18th July 2022.
  9. https://www.facebook.com/photo?fbid=10205802893027076&set=gm.2905708482780469, accessed on 18th July 2022.
  10. https://www.facebook.com/photo/?fbid=251261995867476&set=gm.3765229570161685, accessed on 18th July 2022.
  11. https://www.facebook.com/photo/?fbid=251261115867564&set=gm.3765224093495566, accessed on 18th July 2022.
  12. http://www.nrm.org.uk/ourcollection/photo?group=Sellick%20collection&objid=1997-7219_RJS_SV_46, sourced from https://www.svrwiki.com/File:Buildwas-SVR-Wenlock-1961-06-09.jpg, accessed on 4th March 2023.
  13. http://www.nrm.org.uk/ourcollection/photo?group=Sellick%20collection&objid=1997-7219_RJS_SV_43, sourced from https://www.svrwiki.com/File:Buildwas-4-trains-1961-06-09.jpg, accessed on 4th March 2023.
  14. https://www.britainfromabove.org.uk/en/image/EPW034013, accessed on 18th July 2022.
  15. https://www.britainfromabove.org.uk/image/EAW012667, accessed on 4th March 2023.
  16. https://www.railmaponline.com/UKIEMap.php, accessed on 23rd May 2023.
  17. https://www.streetmap.co.uk, accessed on 25th May 2023.
  18. https://www.bbc.co.uk/news/uk-england-shropshire-34876922, accessed on 25th May 2023.
  19. https://www.investinshropshire.co.uk/locations/former-ironbridge-power-station, accessed on 25th May 2023.
  20. https://www.shropshirestar.com/news/local-hubs/telford/ironbridge/2020/11/04/hi-tech-railcars-idea-for-new-ironbridge-park-and-ride-service, accessed on 25th May 2023.
  21. https://www.britainfromabove.org.uk/en/image/EAW012578, accessed on 26th May 2023.
  22. These photographs were taken by myself and show extracts from the construction plans held in the Shropshire Archive. There is a standard charge of £10 per visit for taking photographs of their records.
  23. https://maps.nls.uk/geo/explore/#zoom=17.0&lat=52.63386&lon=-2.52054&layers=168&b=1, accessed on 26th May 2023.
  24. https://maps.nls.uk/geo/explore/#zoom=17.0&lat=52.63327&lon=-2.52504&layers=168&b=1, accessed on 26th May 2023.
  25. https://m.facebook.com/groups/352799184389/permalink/10158618389784390, accessed on 8th April 2023.
  26. https://maps.nls.uk/geo/explore/#zoom=17.3&lat=52.61992&lon=-2.53764&layers=168&b=1, accessed on 14th August 2023.
  27. https://maps.nls.uk/geo/explore/#zoom=17.3&lat=52.61696&lon=-2.53998&layers=168&b=1, accessed on 14th August 2023.
  28. https://en.wikipedia.org/wiki/Farley_Halt_railway_station, accessed on 14th August 2023.
  29. https://maps.nls.uk/geo/explore/#zoom=17.3&lat=52.61423&lon=-2.54290&layers=168&b=1, accessed on 14th August 2023.
  30. https://maps.nls.uk/geo/explore/#zoom=17.3&lat=52.61163&lon=-2.54320&layers=168&b=1, accessed on 14th August 2023.
  31. https://www.kgg.org.uk/farleyh.html, accessed on 14th August 2023.
  32. https://www.geograph.org.uk/photo/1841547, accessed on 14th August 2023.
  33. https://www.geograph.org.uk/photo/1841545, accessed on 14th August 2023.
  34. http://www.telford.org.uk/tramways/gleedon_hill.html, accessed on 14th August 2023.
  35. A History of the County of Shropshire, Volume 10: Munslow Hundred (part), The Liberty and Borough of Wenlock, 1998, p339-477: http://www.british-history.ac.uk., accessed on 14th August 2023.
  36. https://maps.nls.uk/view/121151300, accessed on 14th August 2023.
  37. https://maps.nls.uk/geo/explore/#zoom=17.0&lat=52.60946&lon=-2.54796&layers=168&b=1, accessed on 15th August 2023.
  38. https:/https://www.geograph.org.uk/photo/3042155/maps.nls.uk/geo/explore/#zoom=17.0&lat=52.60637&lon=-2.54931&layers=168&b=1, accessed on 15th August 2023.
  39. https://www.shropshirestar.com/news/nostalgia/shrewsbury-nostalgia/2021/07/16/memories-of-a-1960s-train-journey-never-to-be-repeated, accessed on 15th August 2023.
  40. Adrian Knowles; The Wellington, Much Wenlock and Craven Arms Railway; Lightmoor Press, Lydney, Gloucestershire, 2022.
  41. https://www.geograph.org.uk/photo/3042155, accessed on 17th August 2023.
  42. https://maps.nls.uk/view/121151333, accessed on 30th August 2023.
  43. https://maps.nls.uk/geo/explore/#zoom=17.0&lat=52.60319&lon=-2.55248&layers=168&b=1, accessed on 30th August 2023.
  44. https://historicengland.org.uk/services-skills/education/educational-images/shadwell-quarry-near-much-wenlock-4267, accessed on 30th August 2023.
  45. https://www.muchwenlock-tc.gov.uk/property-and-assets/the-gaskell-recreation-ground, accessed on 30th August 2023.
  46. https://wp.me/p2zM3f-67v, accessed on 13th October 2023.
  47. https://maps.nls.uk/view/121151333, accessed on 13th October 2023.
  48. https://scontent.fbhx4-1.fna.fbcdn.net/v/t1.6435-9/171398056_5264731283601330_7585531238603702981_n.jpg?_nc_cat=104&ccb=1-7&_nc_sid=bd3046&_nc_ohc=tjiydGZcDfcAX-DYKVT&_nc_ht=scontent.fbhx4-1.fna&oh=00_AfBZDkK_GfCn6WMHmKJ0ASZWiMiwyiHjEE0dM8Vxgk47nA&oe=65511915, accessed on 13th October 2023.
  49. https://www.facebook.com/photo?fbid=871714362892537&set=pcb.1583276891885898, accessed on 13th October 2023.
  50. https://en.m.wikipedia.org/wiki/File:Much_Wenlock_railway_station.jpg, accessed on 14th October 2023.
  51. https://www.shropshirestar.com/news/features/2019/12/02/final-days-of-wenlock-station, accessed on 14th October 2023.
  52. https://m.facebook.com/groups/1470137459866509/permalink/3753567794856786, accessed on 15th October 2023.
  53. https://m.facebook.com/groups/1470137459866509/permalink/1482470245299897, accessed on 15th October 2023.
  54. https://www.facebook.com/groups/1532191000361509/permalink/2075425426038061/?app=fbl, accessed on 16th October 2023.
  55. https://m.facebook.com/groups/1532191000361509/permalink/2670607383186526, accessed on 17th October 2023.
  56. https://m.facebook.com/groups/1532191000361509/permalink/2624088597838405, accessed on 17th October 2023.
  57. https://www.facebook.com/groups/1532191000361509/permalink/3363056680608256, accessed on 17th October 2023.
  58. https://www.geograph.org.uk/photo/4879308, accessed on 19th October 2023.
  59. https://www.geograph.org.uk/photo/4354465, accessed on 19th October 2023.
  60. https://maps.nls.uk/geo/explore/#zoom=19.0&lat=52.59812&lon=-2.55899&layers=168&b=1, accessed on 19th October 2023.
  61. Ken Jones; The Wenlock Branch; The Oakwood Press, Usk, Monmouthshire; 1998.

La Ligne du Littoral et ses Antennes, First Generation Electric Tramways – Nice-Cap d’Antibes (Chemins de Fer de Provence/Alpes-Maritimes No. 90) …

Jose Banaudo writes,”As an extension of the Cannes Tramway route which linked Mandelieu, Cannes and Antibes, the TNL coastal line extended from Cap-d’Antibes to the Menton district of Garavan via Cagnes, Nice, Villefranche, Beaulieu , Monaco, Cap-Martin and Menton. These juxtaposed sections formed a continuous axis of 76 km of interurban tramway which served almost the entire coastline of the Alpes-Maritimes, from the Emite of the Var department to the Italian border.” [1: p35]

Jose Banaudo published a two volume set of books about the historic trams of Nice, “Nice au fil du Tram.” Articles based around the first of these two volumes can be found on this blog.

This is the third in a series looking at the second volume. The first two can be found on these links:

https://rogerfarnworth.com/2023/08/26/the-first -generation-electric-tramways-of-nice-again-four -of-the-urban-lines-chemins-de-fer-de-provence -alpes-maritimes-no-88/

The First Generation Electric Tramways of Nice again. Five more lines. (Chemins de Fer de Provence/Alpes-Maritimes No. 89) …

Nice – Cap d’Antibes

Of a total length of nearly 26.5 kilometres, the first 7.8 kilometres of this route (as far as St. Laurent-du-Var) were over the rails of Nice’s urban tram network. Cagnes was a further 4.8 kilometres along the coast and the length of the tracks between Cagnes and Cap-d’Antibes was 13.75 kilometres. The maximum gradient on the line was 49mm/metre with 2.22 kilometres on the level and 24.75 kilometres on a gradient, however shallow. The highest point on the route was on the length approaching Cap-d’Antibes.

Nice to Cagnes and Antibes services departed from Place Masséna, following Rue Masséna and Rue de France towards St. Augustin on the main East-West urban line. The double-track  lines ended “beyond the stop serving the station called Le Var by the PLM then Nice-St.Augustin by SNCE Shortly after, a branch operated on race days served the Hippodrome … located on the left bank of the Var at the location occupied today by the postal sorting centre and the airport parking lot.  The River Var  was crossed on the bridge which carried both national road 7 and the PLM bridge, Marseille – Nice line.” [1: p35]

The TNL tracks were in the shoulder of the RN7 over the bridge across the River Var. This image was shared on the Comte de Nice et son Histoire Facebook Group by Jean-Paul Bascoul on 18th December 2020. [4]
St. Laurent-du-Var Railway Station. The tracks of the TNL can be seen in the foreground. This image was shared on the Comte de Nice et son Histoire Facebook Group by Alain Nissim on 10th July 2021. [5]
The same location in the 1960s. The railway station building has been replaced and the level crossing now serves a more significant road. This image was shared on the Comte de Nice et son Histoire Facebook Group by Mike LeFotographe on 17th October 2022. [6]
St. Laurent-du-Var Railway Station in 2023. A footbridge has replaces the level-crossing but the station building is much the same as it was in the mid-20th century. [Google Streetview, April 2023]
Another view of St. Laurent-du-Var, this time from the West. The PLM lines through the station are on the left. The tracks of the TNL lines can be seen within the road surface on the right. This image was shared by Alain Nissim on the Comte de Nice et son Histoire Facebook Group on 10th July 2021. [5]
The picture above had a PLM train at St. Laurent-du-Var station, this shows a TNL tram on the RN7. [7]
A similar view to that shown in the two monochrome images above. [Google Streetview, August 2022]

Trams stopped at the level crossing of the St. Laurent-du-Var station, at the point where the road leading to the centre of the town diverged from the RN7. “Beyond that, the track remained on the RN7 through the hamlet of Cros and then passed over the PLM line in the La Bégude district.  The old town of Cagnes and its castle, built on a hill overlooking the modern districts, was seen while the River Cagne was crossed on an ancient donkey bridge.  Beyond this structure, a station served the centre of the locality where a two-track shed served as a depot.” [1: p36] 

Further west, the bridge over the River Malvan was followed by the PLM Cagnes Gare. This was the point at which lines of the TAM network to Venice and Grasse met with the TNL lines. Those two lines were opened in December 1911 but not connected to the TNL line until October 1917.

A TNL tram leaves Cagnes-sur-Mer heading for Nice. Haut de Cagnes is in the background. [8]
Avenue des Freres-Roustan early in the 20th century, looking North. [8]
The same view/location I think, in 2023. [Google Streetview, March 2023]
Avenue-de-la-Gare in the early 20th century. So little of this scene remains. [8]
Place-de-la-Gare in the early 20th century, again little of this scene remains. [8]
A typical view looking South on Avenue-de-la-Gare in 2023. The motorway runs between the road and the railway station, much of the west side of the street has been redeveloped as well. [Google Streetview, April 2023]
The South end of l’Avenue de la Gare. The TNL tram rails can be seen in the road surface. It is difficult to confirm this location in the 21st century. [8]

These different tram lines working in close proximity on the same site required special precautions, so as to avoid any accidental contact between the incompatible overhead lines of the two companies (550 V DC for the TNL and 6600 V single-phase AC for the TAM).

After leaving Cagnes, TNL trams ran past the location of an Alpine hunters camp. This image was shared on the Comte de Nice et son Histoire Facebook Group by Alain Nissim on 6th February 2023. [9]

Leaving Cagnes through the St. Véran district, the TNL line ran on the shoulder of the NR7. It ran past the location of an Alpine hunters camp and then crossed the River Loup on a metal bridge. Sadly, I have not been able to find old views of the bridge over the Loup.

Le pont routier de la Loup looking Northeast towards Nice. Trams ran along the shoulder of the highway over the bridge. The Pont du Loup had 3 metal spans (of 14m, 17m and 14m). [Google Streetview, April 2023]

The line ran between the Vaugrenier pine forest and the PLM line, close to the sea and adjacent to the RN7. Jose Banaudo says that there were two stops with sidings (presumably passing loops) before the tramway crossed the River Brague on a shared bridge with the RN7. The Pont de la Brague, constructed close to the start of the 20th century, had three substantial arches. The spandrels of the centre-span had arched voids which relieved weight on the arch and allowed additional capacity for times when the river was in flood.

Le pont routier de la Brague in the 19th century which was rebuilt for road and tram at the turn of 20th century. [10]
The bridge built in the early 29th century as it appeared in 2014 © Patrick Janicek and made available for use under a Creative Commons Licence (CC BY 2.0 DEED
Attribution 2.0 Generic). [11]
A new walkway was made in 2012 along the banks of the River Brague looking East under the road bridge towards the railway and the sea © Nice-Matin 2012. [12]
La Brague, showing the river with the Pont Routier on the left. Trams ran in the shoulder of the highway over the bridge. [Google Maps, October 2023]
Le pont routier de la Brague looking North towards Nice along the RN7, now numbered the D6007. It carried the tramway in the shoulder of the highway. [Google Streetview, April 2023]

The city of Antibes then came into view. First, trams passed Fort Carré, and then entered Antibes across a narrow road bridge over the PLM railway. The Pont d’Antibes had one metal span of 11m. Just beyond the bridge there was a short (118m) connection to ‘la gare PLM d’Antibes’ where there was a passing loop and shed.

There was a shuttle service between the Cap d’Antibes and the PLM station.

A tram sits at the terminus of the short branch on Avenue de la Gare (today Robert-Soleau) in Antibes, ready to provide a shuttle to Cap-d’Antibes. The station building is visible beyond the tram. [1: p37]

The tram in the picture above sits at the terminus of the short (0.3km) line from the railway station in Antibes which connected to the line from Nice.

After just over 0.2 km the line reached the southern end of Place Jean-Macé (then Place de la Victoire and today Général De Gaulle) where the TNL rails intersected with the tramway from Cannes (CTC) which had its terminus in Place Guynemer.  Banaudo comments: “Originally, the tracks of the two companies only crossed, but a connection was established between them during the First World War to allow the circulation of direct freight trains between Nice and Cannes.  Depending on the direction of traffic, the tram stopped on one side or the other of this intersection, near which a waiting room was set up on the ground floor of a building.” [1: p36]

The Antibes terminus of the tram route to/from Cannes in Place Guynemer.. [14]

From what is now Place General de Gaulle, trams ran along the Boulevard du Cap (today Albert Premier).

The Cap-d’Antibes shuttle service on Boulevard du Cap (today Albert 1st) in Antibes © Nice-Matin. [16]
The Place General de Gaulle looking Southeast towards the Boulevard Albert 1er. It is difficult to locate the monochrome image above. [Google Streetview July 2022]
Place General de Gaul le and Boulevard Albert 1er in Antibes in 2023. The monochrome photograph above is likely to have been taken from a location on the bottom-right of this image. [Google Earth, October 2023]
A view looking Northwest along Boulevard Albert 1er towards Place General de Gaulle from approximately the same location as the monochrome image above. [Google Streetview, July 2023]

Trams ran in the road close to the beach at La Salis and then followed the Boulevard du Cap as it began to rise between villas and gardens which it served by a series of fixed and optional stops. Two passing loops were provided, one of which was at Chemin des Contrebandiers. 

Looking Southwest along Boulevard de la Garoupe, the route of the TNL towards the terminus. Chemins des Contrabandieres is on the left. [Google Streetview, April 2023]

The Cap-d’Antibes terminus was established towards the south-west end of the peninsula, between the Grand Hôtel du Cap and the Graillon Tower.

The tram terminus on Cap d’Antibes © Nice-Matin. [16]
A view from almost the same location as the monochrome image above. The modern bus stop sits close to the location of the old tram terminus. [Google Streetview, April 2023]

This brings us to the westerly limit of the TNL. The CTC tramway to Cannes is a matter for another time.

To bring the trams to the Cap d’Antibes was a costly exercise. It was a steep, wooded promontory. It was also necessary to undertake costly work to widen existing roads. A generous loan on good repayment terms was agreed by the local authority.

The work included in the contract was the widening of local roads from 6.15m to 8m and the laying of the tram tracks.

Originally trams from Nice covered the full length of the line through Antibes and out onto the Cap d’Antibes. In the post-war years, the Nice and Cap-d’Antibes services were separated, the former running to Place Jean-Macé and the latter leaving from the PLM Station. [1: p38]

References

  1. Jose Banaudo; Nice au fil du Tram, Volume No. 2: Les Hommes, Les Techniques; Les Editions de Cabri, Breil-sur-Roya, France, 2005. This is a French language text.
  2. Not used.
  3. Not used.
  4. https://www.facebook.com/groups/ciccoli/permalink/2974470189465497/?app=fbl, accessed on 30th September 2023.
  5. https://www.facebook.com/groups/ciccoli/permalink/3136429316602916/?app=fbl, accessed on 30th September 2023.
  6. https://www.facebook.com/groups/ciccoli/permalink/3517639871815190/?app=fbl, accessed on 30th September 2023.
  7. https://saintlaurentduvar.fr/blog/la-gare-travers-l-histoire-un-quartier-en-mutations, accessed on 30th September 2023.
  8. https://www.cparama.com/forum/viewtopic.php?f=11&t=165, accessed on 30th September 2023.
  9. https://www.facebook.com/groups/ciccoli/permalink/3612075812371595/?app=fbl, accessed on 30th September 2023.
  10. https://www.nicematin.com/vie-locale/le-pont-de-la-brague-une-douloureuse-histoire-468926, accessed on 6th October 2023.
  11. https://www.flickr.com/photos/marsupilami92/13741672855, accessed on 6th October 2023.
  12. https://www.nicematin.com/faits-divers/les-berges-de-la-brague-s-offrent-une-nouvelle-jeunesse-364539, accessed on 6th October 2023.
  13. Not used.
  14. Not used.
  15. https://www.google.com/imgres?imgurl=https%3A%2F%2Fstatic01.nicematin.com%2Fmedia%2Fnpo%2F1440w%2F2016%2F11%2F34718603.jpg&tbnid=vZ5-SLb0NRZBNM&vet=1&imgrefurl=https%3A%2F%2Fwww.nicematin.com%2Fvie-locale%2Fewan-sur-la-piste-d-un-tramway-nomme-desir-96168&docid=E3doVhjrbZkPUM&w=1440&h=888&source=sh%2Fx%2Fim%2Fm4%2F2#imgrc=vZ5-SLb0NRZBNM, accessed on 30th September 2023.
  16. https://www.nicematin.com/vie-locale/ewan-sur-la-piste-d-un-tramway-nomme-desir-96168, accessed on 6th October 2023.

A Rail Strategy for Greater Manchester (1983). …

Reading the ‘Modern Tramway’ Journal of May 1983 in Autumn 2023, took me back to the time when I was working for Greater Manchester Council. The County Engineer was A.E. Naylor. I was working in the Engineer’s office in County Hall.

The ‘Modern Tramway’ carried an article by W.J. Wyse about the then recently released rail strategy for the conurbation. [1]

The report was released on 18th February 1983 and summarised the results of six months’ work by BR, the Greater Manchester Council (GMC) and the Greater Manchester PTE, assisted by consultants, ‘to develop an achievable long-term strategy for the maintenance and development of the local rail network, having regard to the likely development of the Intercity network’. It was a report which first made clear intentions for the building of a new ‘tram’-network for Greater Manchester.

Wyse writes:

“From the BR side, there was the important objective of improving Intercity services, so that these need no longer terminate at Manchester. An obvious example of such improvements would be to permit Anglo- Scottish expresses to run from London to Manchester on their way to Preston. The “Picc-Vic” scheme of the early 1970s had had to be abandoned because resources were not available. A later proposal for a low-cost Castlefield curve would have given only limited benefits in terms of improved central area access. Then, in 1980, BR published its proposals for the Windsor Link in Salford which, also using the link via Deansgate and Oxford Road, would enable through running between several interurban and local services. Coupled with the proposed Blackpool-Preston-Manchester electrification, this would also improve access to many Intercity services. Further improvements would follow from the Hazel Grove Chord, linking Hazel Grove with New Mills Central, to give better Intercity services to Sheffield.

The desire to improve the BR facilities in Manchester obviously brought up the possibility of electrifying the existing local rail system at 25 kV, coupling this with converting the 1500-volt lines to Hadfield and Glossop and the 1200-volt third-rail line to Bury all to 25 kV overhead supply. The problem here is that this would be a very expensive solution, so other strategies were considered and compared.

The current rail situation has five distinct areas which create problems that have to be solved in order to improve services. Some of these have already been mentioned, but setting them out in this way shows them in perspective.

1) Rolling stock obsolescence, especially of diesel railcar units.

2) Re-equipment of non-standard electric services now using de supply.

3) Renewal of obsolete signalling systems.

4) Separate north and south suburban railway networks, with lack of links and lack of penetration into and across central Manchester, making rail travel less attractive.

5) Two main Intercity stations, Piccadilly and Victoria, too far apart for easy interchange, and causing duplication of to be abandoned because resources were not facilities.

The GMC has committed itself to maintain the present basic pattern of rail services, and to improve the network to increase the use made of it. This includes better access to existing stations as well as possible new stations, and putting pressure on the government to authorise construction of new class-141 diesel railcar rolling stock.” [1: p146]

The Report proposed a number of alternative strategies.

BR’s intention to focus its Intercity services at Manchester Piccadilly retaining Victoria for provincial interurban and local services was made clear. This would mean a basic framework of Intercity services to Crewe, Macclesfield, Leeds, Preston and Liverpool, and beyond. Other interurban lines would serve Warrington, Chester and Bradford. These main programmes would then govern the re-equipment policies for the local services on these lines.

The rail strategy study concentrated on the lines which carry only local services, and indirect access into and across central Manchester.

The two main options were:

1) a comprehensive system of cross-city rail tunnels with electrification of the whole regional system to 25-kV mainline standards with ‘conventional’ rolling stock; or

2) non-conventional solutions using existing rail routes and a former rail route (to Charlton and Didsbury) with vehicles that could run on existing streets or in tunnels across the city centre to provide a comprehensive network that also would also allow for interchange with the Intercity network.

That second option was then further subdivided into two:

2a) a Light Rail Rapid Transit system using vehicle which were defined as “a cross between a rail vehicle and a tram”; and

2b) replacement of rail tracks by carriageways on which some form of express bus would run.

It was noted that (2b) might create problems for existing and proposed goods facilities.

Greater Manchester Rail Network with the Windsor Link and the Light Rail Transit System. It is interesting to see how much of this proposal has been implemented by 2023 and what additions have been made to the proposals as well. [1: p147]

The conventional rail solution would have meant a rail tunnel between Piccadilly and Victoria Stations with an intermediate stop at Piccadilly Gardens. Another tunnel would have run East-West, connecting the Altrincham line with the Piccadilly line with an intermediate station at Albert Square No reinstatement of the Chrolton-Didsbury line was included.

The non-conventional solutions would have to meet certain criteria:

“i) segregation from the conventional rail network except for grade crossings with limited movement of goods;

ii) routes compatible with development of the conventional rail network;

iii) existing or potential traffic must be sufficient; and

iv) the routes must make a logical network and, for the corridors they serve, give adequate interchange with the main BR network.

These criteria would be satisfied by the following lines; Bury, Rochdale via Oldham, Glossop/Hadfield, Marple/Rose Hill (assuming building of the Hazel Grove chord), Altrincham (with Chester services diverted via Stockport), and the former Midland line to Didsbury.

Interchange with conventional Intercity and local rail services would be given at Victoria, Piccadilly and Deansgate/Central stations. The cross-city routes would meet at Piccadilly Gardens with the equivalent of a triangular junction to provide good access to what they call “the core of the Regional Centre” by all permutations of through-running across the junction.

The routes for the surface link in the city centre [had] been worked out to minimise conflicts with general traffic; apart from the section between Piccadilly Gardens and High Street, the lines would not run through high pedestrian-activity areas. These routes, as shown in the map, have been worked out for a Light Rail solution, but the report indicates that they could be modified for a busway solution.

Alternatives to LRT that were considered include road-based systems (buses and trolleybuses) and dual-mode systems including busways on existing rail formations. The only systems they felt worth considering [were]: LRT, busways and guided buses. [1: p148]

The possible LRT system would require lower standards (in terms of alignment, stations, signalling and vehicle weight) than conventional rail systems. They would be able to run on streets and use existing rail routes at relatively minimal cost. This made them very attractive. Their capacity was stated as between 1,000 and 5,000 passengers per hour, with up to 10,000 in central areas. It was noted that phased development would be possible and that boarding and alighting might well be at close to normal pavement level.

Wyse continues:

“Changes would be needed to the proposed new layout of Piccadilly Gardens, and a number of changes to the road layout to accommodate LRT would have to balance the needs of LRT against other vehicles and pedestrians. An important change of attitude from the more usual approach is the opinion that installation of LRT need not lead to any significant decline in environmental standards, especially if overhead wires can be supported from wires attached to buildings rather than poles.

An LRT system could be extended on to other existing or former rail routes, or considered for other corridors where the roads are wide enough to allow construction. Indeed the wheel [had] now turned full circle, for the LRT could be extended “on-highway, right into the middle of major district centres”, in other words, as a conventional tramway. …

Both busway solutions [were] not … studied in the same detail as LRT solutions. They would require significantly higher capital expenditure for carriageways to replace existing rail tracks on some 90% of the proposed system, but only indicative costs [were] worked out for a carriageway width of 8 m with hard shoulders of 2.5 m. Whilst a guided busway would avoid the need for hard shoulders, there [were] issues of operational reliability and ‘on street’ use. A busway that [could] run on street without extra works or hardware could have advantages over LRT, and feeder services at the outer ends could also use existing roads. Further work would [have been] needed to establish whether capital costs could be reduced without sacrificing the operational and safety aspects. [1: p148-149]

A Comparison of Costs

This table gives an idea, at November 1982 prices, of the relative costs of the different options. The report’s authors noted that these figures do not include thing which were common to all the options, such as the Northwest electrification and the Windsor Link. [1: p149]

As can be seen in Table 1, LRT at surface level is the cheapest estimate by some margin. The report also considered what might be the costs of a first phase of work:

  • Re-electrifying the Bury line and constructing the Victoria-Piccadilly tunnel – £95 million;
  • LRT above ground – converting the Bury and Altrincham lines and building the complete city centre network – £38.5 million
  • LRT city centre network in tunnel, otherwise as the above ground scheme – £56.5 million.

Apparently, no work had yet been done “on assessing the operating costs of the alternative strategies, or on considering the effects of bus operating strategies. … While no assessment [had] been made of the benefits to passengers and the effects on other road users, all options [were] considered likely to give significant benefits compared with the ‘Do Nothing’ alternative.” [1: p149]

Cost comparisons were made with the Tyne & Wear and the London Docklands schemes with figures adjusted to November 1982 levels. Table 2 shows these prices.

This table shows just how significantly lower the estimated costs/mile of the Manchester LRT schemes were when compared with the Tyne & Wear Metro and the London Docklands schemes. The critical figures are in the right-hand column in the table. [1: p149]

Wyse commented that work so far undertaken indicated “that if the present rail network [was] to be retained, an LRT system using existing rail lines which do not carry BR interurban services would appear to offer a significantly cheaper solution than conventional heavy rail and ‘busway’ solutions.” [1: p150]

He also noted that, “Further work [was] needed to consider both the operating costs of the alternatives, with due allowance for revisions to bus services, and the likely order of benefits. … Aspects which need[ed] early consideration include[d]: confirmation of the feasibility of city centre LRT tunnels, the safeguarding of potential LRT and busway routes and facilities, the organisation and management of an LRT or busway system (a joint BR/PTE set up [was] suggested), and finally the opportunities to provide improved cross-conurbation services and connexions to Intercity services for major district centres such as Ashton-under-Lyne.” [1: p150]

Manchester’s Network in 2023

40 years on from thi9s report it is interesting to note how much of what was planned came to fruition. As we know the high cost solution of tunnelling under the city centre was not developed. A Light Rapid Transit solution was given the go-ahead and has met much of what was intended.

The network map can be found here [2].

The first line constructed was the Altrincham to Bury line through Victoria Station and the centre of the city. A link to Piccadilly Station was also installed in the early years. The following history is gleaned from Wikipedia [3].

Phase I opened in 1992. The original Market Street tram stop handled trams to Bury, with High Street tram stop handling trams from Bury. When Market Street was pedestrianised, High Street stop was closed, and Market Street stop was rebuilt to handle trams in both directions, opening in its new form in 1998.

Shudehill Interchange opened between Victoria station and Market Street in April 2003. The bus station complementing it opened on 29 January 2006.

Phase 2 provided a link with Salford Quays with a line running to Eccles. Cornbrook tram stop was opened in 1995 on the Altrincham line to provide an interchange with the new line to Eccles. There was initially no public access from the street, but this changed on 3 September 2005 when the original fire exit was opened as a public access route.

Two of the original stops; Mosley Street, and Woodlands Road were closed in 2013. The latter being replaced by two new stops (Abraham Moss and Queens Road) opened nearby.

By the mid-2000s, most of the track on the Bury and Altrincham routes was 40+ years old and in need of replacement. In 2006 it was decided that a £107 million programme to replace this worn track would take place in 2007.

Phase 3 entailed a significant expansion of the network. It turned into a series of different phases as different funding arrangements had to be made:

Phase 3a – created four new lines along key transport corridors in Greater Manchester: the Oldham and Rochdale Line (routed northeast to Oldham and Rochdale), the East Manchester Line (routed east to East Manchester and eventually to Ashton-under-Lyne), the South Manchester Line (routed southeast to Chorlton-cum-Hardy and eventually to East Didsbury), and eventually the Airport Line (routed south to Wythenshawe and Manchester Airport). A spur was also added to the network to link from the Eccles line to Media City. The link to Media City was opened in 2010. The Line to Chorlton opened in 2011. The other lines opened gradually between 2011 and 2013.

Phase 3b – Three lines mentioned in the paragraph above were extended from initially shorter lines. The construction of the East Manchester line extension from Droylsden to Ashton-under-Lyne, the East Didsbury extension from Chorlton and the Airport line via Wythenshawe, commenced in 2011 and all was complete by the end of 2014.

The link to Manchester Airport. [5]

Phase 2CC – Second City Centre Crossing – was completed in 2017.

Trafford Park [4] – The Trafford Park line linked the Trafford Centre to the network and opened in 2020.

References

  1. W.J. Wyse; A Rail Strategy for Greater Manchester; in Modern Tramway and Light Rail Transit, Volume 48 No. 545; Light Rail Transit Association and Ian Allan, Shepperton, London; May 1983, p146-150.
  2. https://images.ctfassets.net/nv7y93idf4jq/4RsbFDfzF2zVYfE67Njh8H/0018c0020be875e86e41b04e940433ab/23-0483_Metrolink_Map_-_Sept_2023.svg, accessed on 11th October 2023.
  3. https://en.wikipedia.org/wiki/History_of_Manchester_Metrolink, accessed on 11th October 2023. The featured image comes from this Wikipedia article.
  4. https://en.wikipedia.org/wiki/Trafford_Park_Line, accessed on 11th October 2023.
  5. https://www.theguardian.com/uk-news/2014/nov/02/manchester-metrolink-line-opens-ahead-schedule, accessed on 11th October 2023.