
Just a few days after I completed addendum 1B about the first length of The Micklehurst Loop and particularly about Staley and Millbrook Station and Goods Yard, I came across some photographs of the locomotives used at the Staley & Millbrook sidings on behalf of Hartshead power station. I found them on a Facebook post but can also be found free to share on the site set up by the Friends of Davenport Station on behalf of J.W. Sutherland’s widow (http://sutherland.davenportstation.org.uk). [3]
I was also sent two pictures by Keith Norgrove which came from a cycle ride along the Huddersfield Narrow Canal Towpath in 1963, one of which is relevant to this length of the Loop. [2]
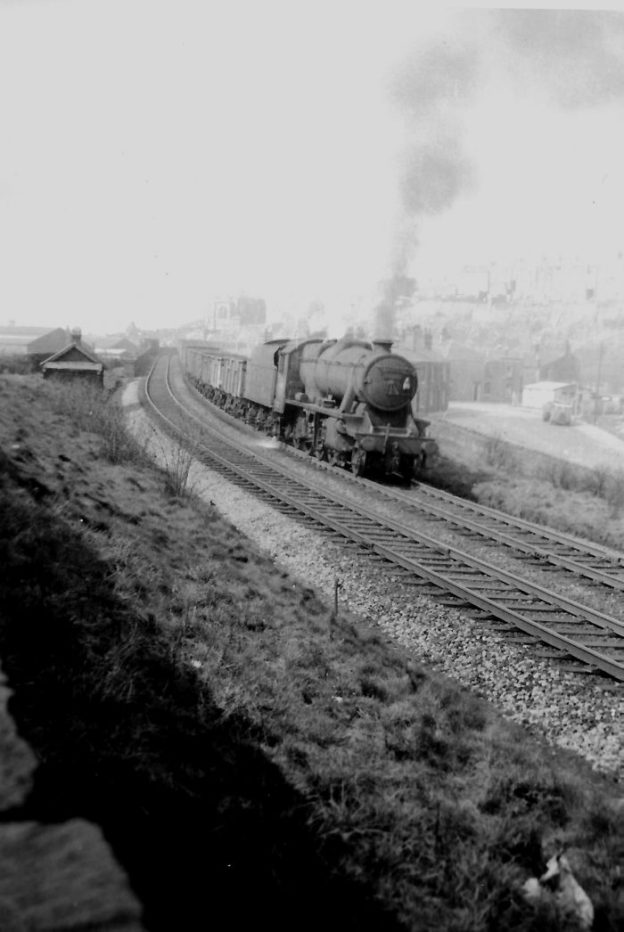
And finally, James Ward has sent me three monochrome pictures which can be found at the end of this addendum. I have included one of these pictures as the featured image for this article.
My first article on the Micklehurst Loop can be found using this link:
the first addendum, on this link:
the second addendum, on this link:
Huddersfield Narrow Canal Photograph of Hartshead Power Station
Keith Norgrove cycled the towpath of the Huddersfield Narrow Canal in 1963 and took this photograph:
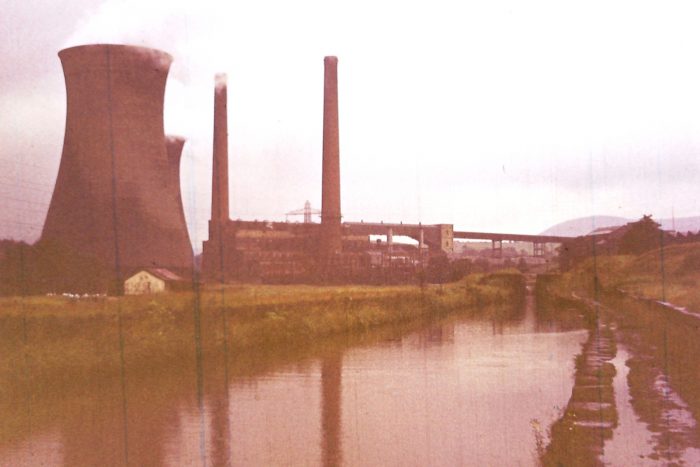
This photograph is taken from the Canal towpath at a point some distance closer to Stalybridge. The coal conveyor can be seen crossing the valley from the location of the Staley & Millbrook Goods Yard. The roof of the GoodsShed is visible close to the coal conveyor. The north-light roof of Spring Grove Mill can also be picked out on the right side of the image, (c) Keith Norgrove 1963 [2]
Hartshead Power Station Locomotives
The series of three pictures below appeared on the Facebook Group ‘The History of Stalybridge’ in May 2020. I only found them on 16th February 2021. [3]
The post on the Facebook Group included the following words credited to Geoff Ward:
“Preparations for a power station at Heyrod began in 1916 when 26 acres (110,000 m2) of land were purchased. The station was opened in 1926 by the Stalybridge, Hyde, Mossley and Dukinfield Transport and Electricity Board. The station began operation with three Metropolitan-Vickers 12,500 kW turbo-alternators generating at the local SHMD supply frequency of 40 Hz. Later that year the station’s output was changed to the nationally agreed standard of 50 Hz. In 1935, a major expansion of Hartshead began with the first of three new Metropolitan-Vickers 30,000 kW generating sets being commissioned, followed by the second set in 1943 and the third set in 1950. The station’s concrete cooling towers were constructed in the 1940s.
Coal was delivered to the plant at Millbrook railway sidings on the Micklehurst Line, situated on the opposite side of the Huddersfield Narrow Canal. The sidings were built in 1932 and had space to hold up to 130 12-ton wagons. Coal was fed into a hopper underneath the sidings before being transported on an enclosed conveyor belt which emerged high above the valley to cross the River Tame and canal before entering the station at a high level. The station was closed on 29 October 1979 with a generating capacity of 64 megawatts. It was demolished during the late 1980s, although part of the site is still used as an electrical substation.” [3]
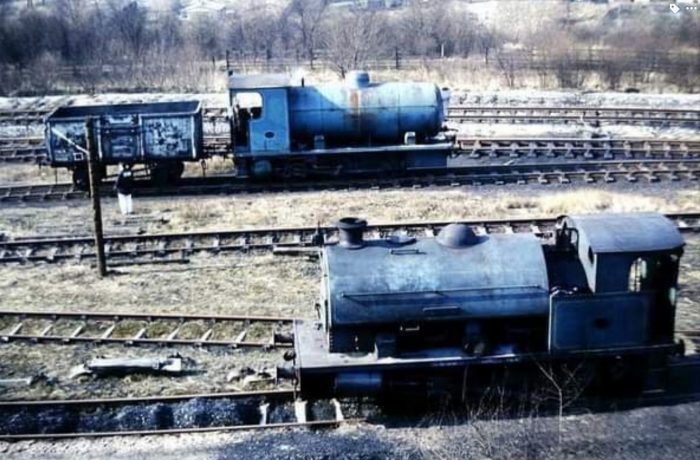
Hartshead appears to have owned two locomotives for shunting the yard accessed via the Micklehurst Loop, both are visible in this photograph of the Staley and Millbrook Goods Yard, (c) J.W. Sutherland. [3]
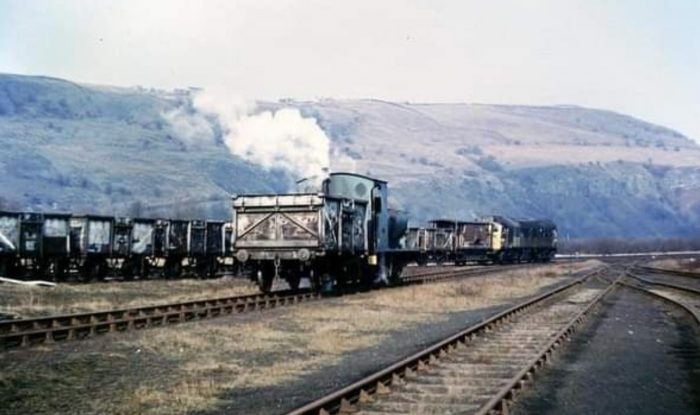
Lookin North from the Staley and Millbrook Yard. Coal trains entered the Yard full from the South along what was once the Micklehurst Loop and empties were returned to the South. (c) J.W. Sutherland. [3]

The Hawthorn Leslie fireless 0-6-0 (HL3805/1932) was fed with steam from the power station and was much cheaper to run that the saddle tank, (c) J.W. Sutherland. [3]
0-4-0ST Locomotive: BEA 2
The Saddle Tank shown in two of the photographs above was built by Robert Stephenson & Hawthorn. Its Works No. was 7661 and was numbered BEA (British Electricity Authority) No 2 in service in the yard opposite Hartshead Power Station. It was an 0-4-0ST Locomotive. It shared its duties with a large fireless locomotive which can also be seen in the photographs above.
“Because the fireless was cheap to run (there was a good supply of steam from the power station boiler), it was preferred as the working engine, and so No. 2 was used as the standby, and also whenever the power station boiler was shut down, as there would be no supply of steam for the fireless.” [4]
“The sidings were built in 1932 and had space to hold up to 130 12-ton wagons. Coal was fed into a hopper underneath the sidings before being transported on an enclosed conveyor belt which emerged high above the valley to cross the River Tame and canal before entering the station at a high level.” [4]
When the Micklehurst line was closed to traffic in October 1966 the short section of line between the Millbrook sidings and Stalybridge remained in use until the power station closed in 1979. At this time the locomotive was transported to the Embsay & Bolton Abbey Steam Railway where it sits awaiting restoration.
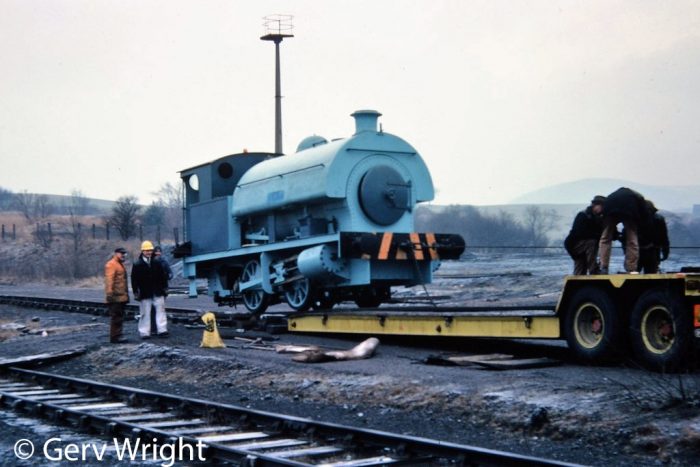
The 0-4-0ST being loaded onto a low-loader transport for the trip to the Embsay & Bolton Abbey Steam Railway in the late 1970s, included by kind permission of the photographer, © Gerv Wright. [4]
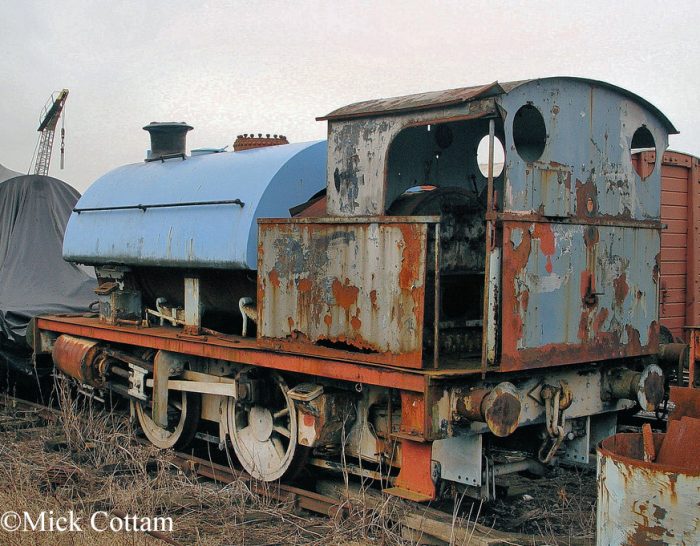
The same locomotive awaiting restoration in 2010, included by kind permission of the photographer, (c) Mick Cottam. [4]
This locomotive can be seen in the photographs of J.W. Sutherland above. It was a Hawthorn Leslie fireless 0-6-0 (HL3805/1932). The photo of this loco for sale on the Transport Library site was taken in 1967. [5] A picture is also included in ‘Industrial Locomotives & Railways of the North West of England’ by Gordon Edgar. [6]
“A fireless locomotive ……. uses a reciprocating engine powered from a reservoir of compressed air or steam, which is filled at intervals from an external source. They offer advantages over conventional steam locomotives of lower cost per unit, cleanliness, and decreased risk from fire or boiler explosion; these are counterbalanced by the need for a source to refill the locomotive, and by the limited range afforded by the reservoir.” [6]
They were most often used, for industrial rail yards where either:
- a conventional locomotive was too noxious or risky, such as in a mine or a food or chemical factory; or
- where the source of air or steam was readily available, as here at Hartshead Power Station,
“A fireless steam locomotive is similar to a conventional steam locomotive, but has a reservoir, known as a steam accumulator, instead of a boiler. This reservoir is charged with superheated water under pressure from a stationary boiler. The engine works like a conventional steam engine using the high pressure steam above the water in the accumulator. As the steam is used and pressure drops, the superheated water boils, replacing the used steam. The locomotive can work like this until the pressure has dropped to a minimum useful level or the water runs out, after which it must be recharged.” [6]
A Further 3 Photographs from James Ward
James Ward has shared three photographs with me of which he says: ” I don’t know how you would feel about including them on your website uncredited, as unfortunately, obtaining proper permission could prove impossible. My Dad thought they came from the colleague of a family friend, but when I contacted our family friend, he was struggling to recall this. If there are any further developments, I’ll let you know.” [7]
James Ward also comments that here is still a very small remnant of the unusual solid sleeper fence (shown in MLL2 and MLL3) in situ.
These photographs are shared here on the basis that James mentions. Neither he nor I can credit the photographer. Should anyone know better, please contact me and they will be properly credited or removed if the copyright holder wishes.
They appear to show a sequence of pictures of the same train leaving Stalybridge along the Micklehurst Loop most probably heading for the Staley and Millbrook Sidings for Hartshead Power Station, and then returning with the engine operating tender first, This probably means that the correct chronological sequence of the pictures would be MLL1, MLL3, MLL2
In one of the pictures the octagonal form of Old St. George’s can be made out on the horizon. I do not have a date for these images. But the smog appears thick over Stalybridge!

Photograph MLL1: provided courtesy of James Ward. James comments: This picture is taken “looking WSW towards the centre of Stalybridge. The Loco is an 8F according to my Dad. The platelayers hut to the south of the line is marked on the 25″ OS Maps. Just beyond this, the parapet of the Knowl St viaduct is visible. St George’s Church is just about discernible above what I assume are full coal wagons, on their way to the power station.”
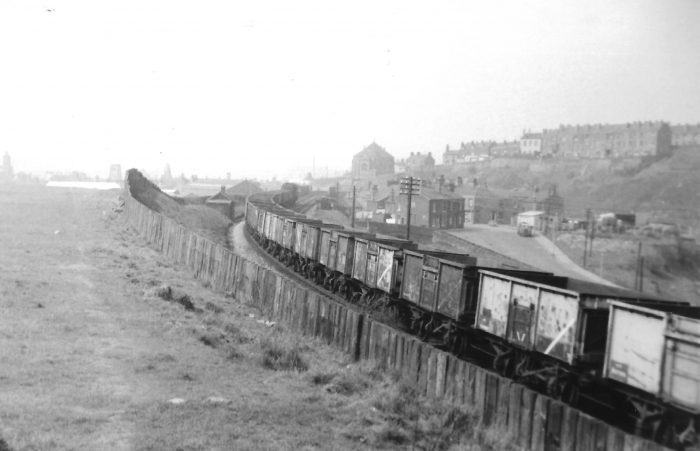
Photograph MLL2 provided courtesy of James Ward. James comments: “Looking SW towards the centre of Stalybridge. Coal wagons having been emptied at the power station(?). There is a clearer view of the Stalybridge skyline, including St George’s Church. The railway boundary is marked by an unusual solid fence made from railway sleepers, a few sleepers-worth of which is still in situ.”
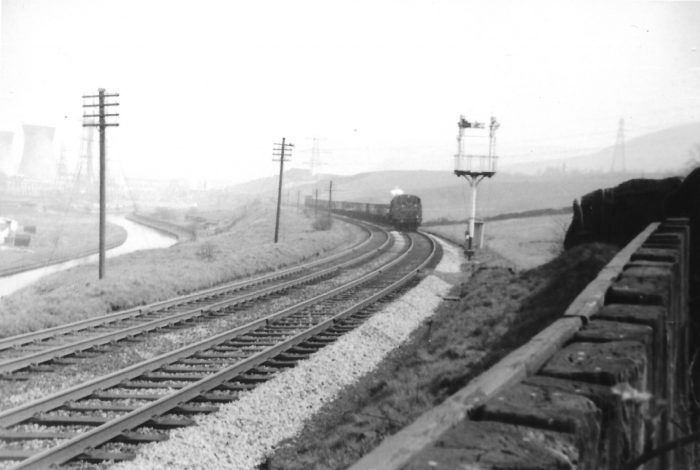
Photograph MLL3 provided courtesy of James Ward. James comments: this picture is taken “looking NE towards Millbrook. This might well be the same train as in MLL2, and taken just before. The signal post to the SE of the line is marked on the 25″ OS Maps as ‘S.Ps’. The picture gives a close up view of the top of the sleeper fence. The Huddersfield Narrow Canal to the left of the railway with Hartshead Power Station cooling towers just visible as shadows on the far left of the picture.”
References
- https://maps.nls.uk, accessed on 2nd February 2021.
- Keith Norgrove is a contributor to the RMWeb Forum under the pseudonym ‘Grovenor’. Keith’s two pictures (one of which is included here) were a response to my articles about the Micklehurst Loop on that Forum: https://www.rmweb.co.uk/community/index.php?/topic/161854-the-micklehurst-loop, accessed on 15th February 2021.
- https://m.facebook.com/groups/405881989841095/permalink/917279782034644, accessed on 16th February 2021. (A check on the copyright of these images on the J.W. Sutherland Collection Site (http://sutherland.davenportstation.org.uk) has been undertaken – they are free to use provided the photographer is credited).
- https://preservedbritishsteamlocomotives.com/robert-stephenson-hawthorn-works-no-7661-bea-no-2-0-4-0st, accessed on 16th February 2021.
- https://thetransportlibrary.co.uk/?route=product/search&search=Hartshead+Power+Station%2C+Stalybridge&category_id=64&page=1, accessed on 16th February 2021.
- https://en.wikipedia.org/wiki/Fireless_locomotive, accessed on 16th February 2021.
- Email from James Ward on 16th February 2021

Pingback: The Micklehurst Loop – Part 2 | Roger Farnworth
Pingback: The Micklehurst Loop – Part 3 | Roger Farnworth
Pingback: The Micklehurst Loop – Part 1D – Some Miscellaneous Items relating to the area around the Staley and Millbrook Goods Yard. | Roger Farnworth
Pingback: The Micklehurst Loop – Part 4 | Roger Farnworth
I visited Hartshead Power Station on 22nd May 1971. There were three steam locomotives present. The fireless which was in the shed but obviously had been in use recently and two RSHN 0-4-0STs. These were RSHN 7646/50 and RSHN 7661/50. One of these was hidden inside a shed and the other near the exchange sidings as in the photos above. Unfortunately I am unsure which was which. If 7661 (aka no 2) was still parked on the exchange sidings it had changed colour as my colour slide of it clearly shows that it is yellow. Weathering perhaps?
Thank you, Keith.
I think that the yellow loco was RSHN 7646. I have compared it with photos of 7661 and there are slight detail differences. Different smokebox handrail for example.
Was there an inclined plane for coal wagons from the sidings up to the conveyor? There is something in my photo which looks like it.
Hi Keith,
I will bow to your greater knowledge.
Best wishes
Roger
One of the pictures seems to show a conveyor. I don’t know for sure but it seems likely that coal was taken on a conveyor to the higher level. I’d be interested to hear what you discover.
I have looked at the photo 632-23 in part 1A. This shows the conveyor. I am fairly sure that my photo of the saddle tank is taken from the left of this view and shows the coal conveyor in the background. It clearly has rails on it. There doesn’t appear to be a belt as such. I wonder whether wagons were hauled up this slope to a tippler above the conveyor belt that crossed to the power station. I would be happy to send you a copy of the photo if you let me know the best way of doing that.
Hi Keith, thank you, my email address is rogerfarnworth@aol.com.
Pingback: The Micklehurst Loop again … | Roger Farnworth