Tag Archives: port

The Railways of Barrow-in-Furness

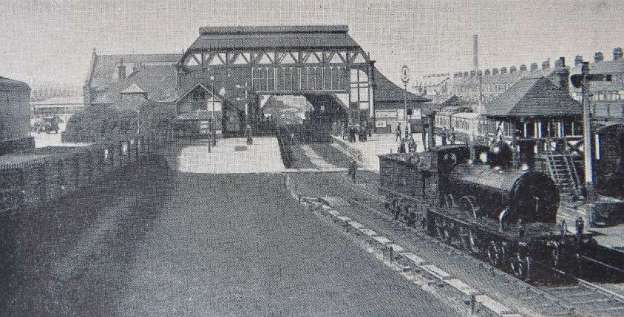
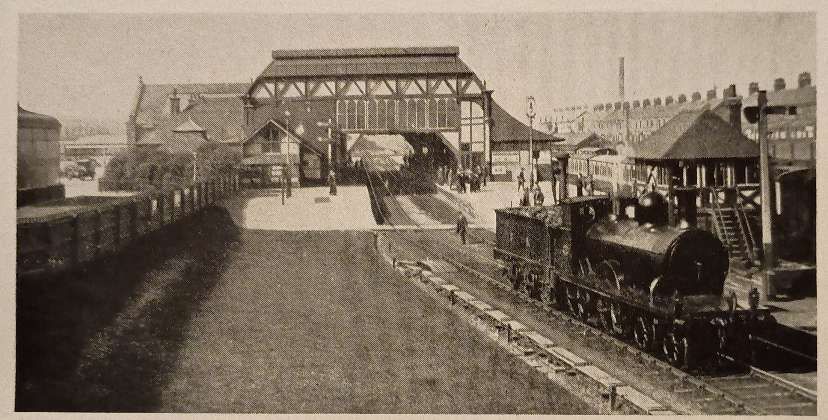
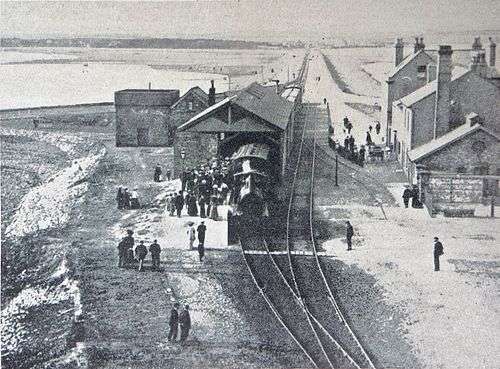
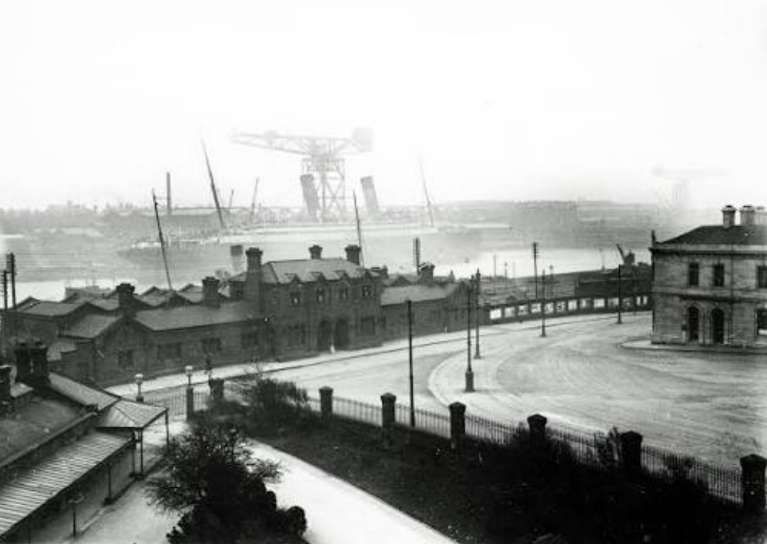
Barrow-in-Furness Railway Station is shown in the featured image above and repeated in the first image below. It featured a large, distinct covered roof over the platforms, as seen in this vintage postcard view from the south. The prominent locomotive is one of the Furness Railway K2 Class locomotive, often referred to as “Larger Seagulls”. [4]

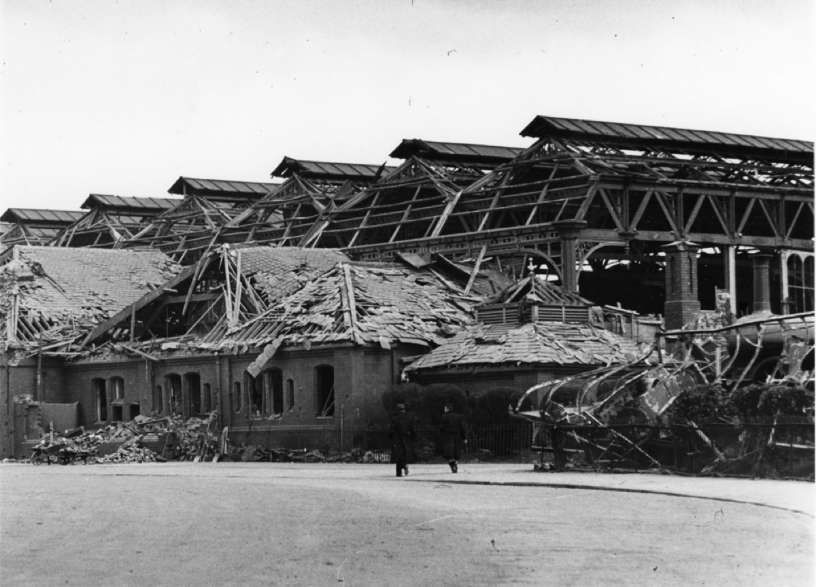
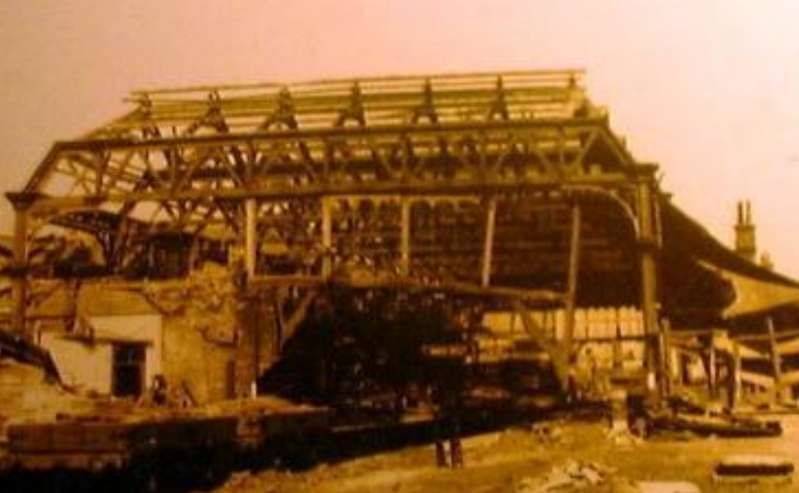
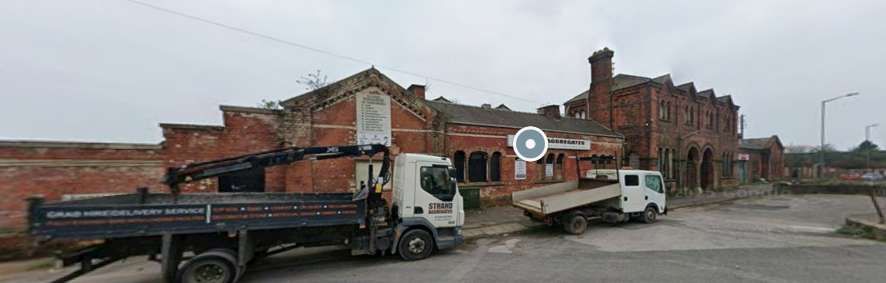
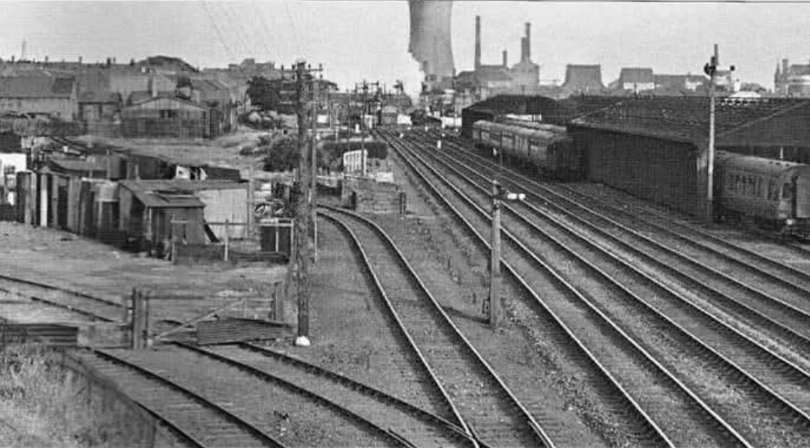
Barrow was featured in The Railway Magazine in March 1959. [1] The rebuilding of the old Central Station at Barrow-in-Furness which was virtually destroyed (please see the images below) in the air-raids of 1941 was completed in the late 1950s. The replacement buildings marked another link broken with Barrow’s past. Originally known as Barrow Central Station and the headquarters of the Furness Railway, it was, by the end of the rebuilding renamed Barrow-in-Furness. Early in the 20th century, the borough boasted ten stations. It had grown from a hamlet of a few farms with a population of around 100 to “a seething steel-town of 60,000 in under forty years.” [1: p149]

Barrow Central Station with its distinctive overall roof, circa 1910, seen from the South end of the station site, © Public Domain. [1: p 149][4]
Barrow Central Station Forecourt and the original station building, as it appeared between 1882 and 1941, © Public Domain. [5]
A similar view after the bombing in May 1941, © Public Domain. [6]
Another view of the station buildings in the aftermath of the May 1941 bombing, © Public Domain. [5]
The rebuilt station as seen in 1966, © Ben Brooksbank and made available for reuse under a Creative Commons licence (CC BY-SA 2.0). [5]

The most significant factor in the dramatic increase in population was apparently “the progress in railway development in the 1830s. The two dukes had toyed with the possibility of a mineral line for some years, but it was not until George Stephenson’s plan for the Caledonian, West Cumberland & Furness Railway was made known in 1837 that serious attention was given to the idea. Though this scheme for crossing the Duddon Estuary and Morecambe Bay came to nothing, a survey for embanking and reclaiming land and for a mineral line in Furness was carried out in 1841 by James Walker at the request of the Earl of Burlington (later seventh Duke of Devonshire).” [1: p149]

The coming of the railway made the exploitation of vast iron ore deposits feasible. Large ironworks, steelmaking, and shipbuilding industries developed, attracting thousands of workers and causing rapid population growth, urbanization, and infrastructural development. Barrow village had been shipping iron ore for many years and was chosen as a suitable port for iron ore from Lindal-in-Furness and slate quarries at Kirkby-in-Furness.

Google Maps satellite imagery shows the relative location of Kirkby-, Lindal-, and Barrow-in-Furness. [Google Maps, 21st December 2025]

The person directly responsible for the organisation of the Bill and for the affairs of the new Furness Railway Company was Benjamin Currey, Clerk of the House of Lords and Agent of the Devonshire Estates. He visited Furness frequently at this period and was able to influence the local population in favour of the railway. [1: p149-151]

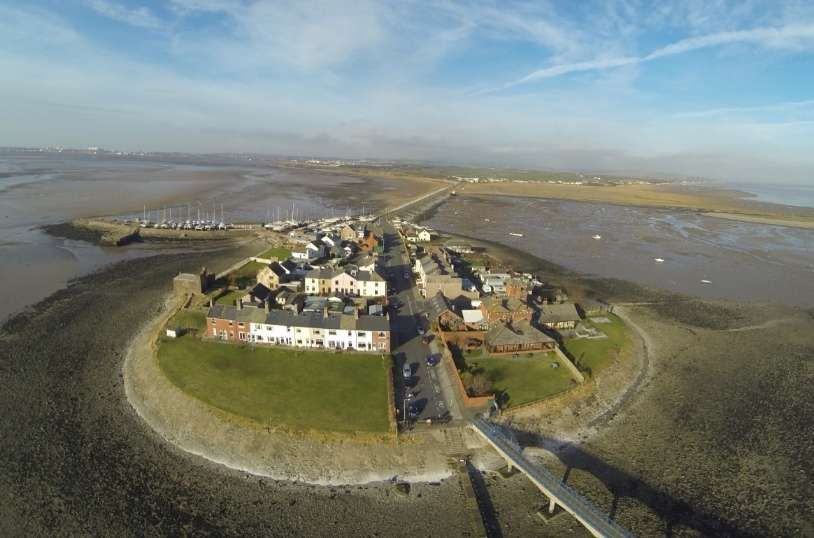
It appears that a strong influence on the development of railways in the area was the purchase of Roa Island by J. A. Smith, who, in conjunction with the Preston & Wyre Railway at Fleetwood, planned to build a pier to accommodate a ferry service between Furness and Fleetwood.

Roa Island lies just over half a mile (1 km) south of the village of Rampside at the southernmost point of the Furness Peninsula in Cumbria. [2]

Roa Island in the 21st Century. This view looks North towards the village of Rampside. [3]
Roa Island sits to the South of the Furness Peninsula and North of Piel Island and Piel Castle. [Google Maps, December 2025]

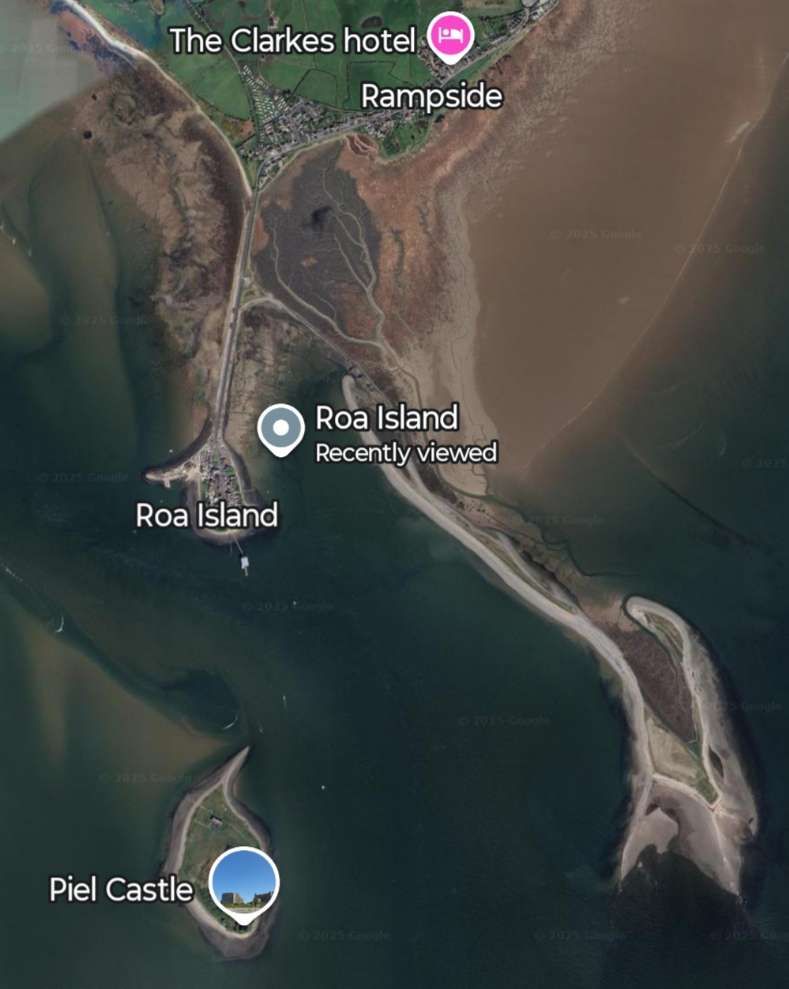
Smith’s plans meant that the Furness Railway Company needed to provide a connecting line to the pier. Two trips between Fleetwood and Roa Island were made daily from 24th August 1846.

A superb diagrammatic map of the railway system around Barrow-in-Furness giving details of the network in 1959 with dates on railways previously proposed but not built and others which had already been removed. The present main line from Ulverston enters the sketch map in the top right. The line to Whitehaven leaves the map centre-top. [1: p150]
The wider Furness Railway network and its connections to other companies’ railways in the pre-grouping era. [1: p151]

Initially the Furness Railway Company built a single line North from the pier on Roa Island. The competing needs of mineral and passenger traffic could not be accommodated. The solution was the doubling of the track running North-South between Millwood Junction and Roose Junction. Timetables were published in Bradshaw but Smith’s ferry was not ready in time for the new season. Unsurprisingly, relationships between Smith and the Furness Railway Company were strained!

Indeed, the relationship continued to be difficult, seemingly with Smith seeking to persuade the Furness Railway to purchase his interest in the pier. Eventually, after significant damage occurred to the pier in a storm on 27th December 1852. The Furness Railway saw an opportunity to deal with the problem and bought out Smith’s interests in the pier and in any of Smith’s schemes to access mineral reserves in Furness. Apparently the buy out cost £15,000. However Smith’s pier continued in use until the opening of Ramsden Dock Station in 1881. The pier “was rebuilt in 1867-8 to accommodate the Midland Railway boat trains (which began in 1867) and survived until 1891, when it was finally demolished.” [1: p152]

A train at Piel Station on Roa Island, circa 1900. This building replaced the original Piel Pier Station which closed in 1882. It survived until 1936, © Public Domain. [1: p153][7] As we have noted, steamer services transferred to Ramsden Dock from 1881, but local trains continued from Platform 3 at Barrow Central, running via the 1873 curve at Salthouse Junction until closure of Piel Station in July 1936. [1: p156][7]

Andrews continues: “During the early years Barrow grew slowly, as railway workshops were built and its pier gradually enlarged, and it was not until 1859 that the stage was set for the boom that hit this village in the 1860s. In 1846 a young man named James Ramsden, from Wolverton Works, had been appointed Locomotive Superintendent of the Furness, and from the outset had shown considerable promise as an administrator. He was appointed Secretary and Superintendent of the Line in 1850.” [1: p152]

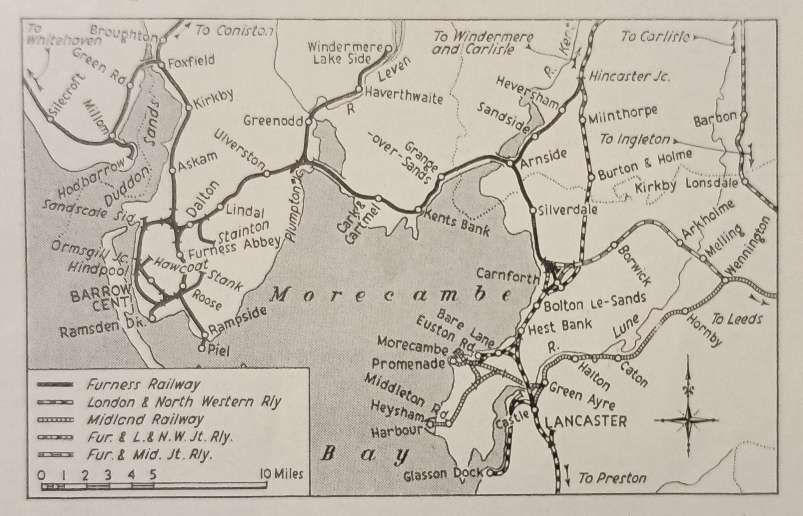
Continuing developments saw the line to Kirkby-in-Furness extended in 1848 to Broughton and the Whitehaven & Furness Junction Railway opened to Whitehaven in 1850. The line to Dalton was continued to Ulverston by 1854 and the Ulverston & Lancaster Railway opened through to Carnforth by 1857. In Barrow, the first blast furnaces opened in 1859.

“With the local production of iron and the establishment of through rail communication, Ramsden was able to put into operation his plan for a new Barrow – a model industrial town and port. The first stage was the construction of a dock between Barrow Island and the mainland, when it would be possible to build up passenger and freight steamer services with Belfast and the Isle of Man. Stage two was the development of an industrial estate on Barrow Island and on the mainland shore, with a residential area inland.” [1: p152]

1863 saw an Act obtained for the construction of the Devonshire and Buccleuch Docks. The Devonshire Dock was opened in September 1867. During that year: Barrow became a County Borough; a ferry service from Piel Pier to the Isle of Man commenced; the Belfast ferry service opened (in the Autumn); and the population of Barrow exceeded 11,000; and the Barrow Haematite Iron & Steel Company paid a 30% divided to shareholders.

Negotiations with the Midland Railway led to the Furness & Midland Joint line scheme of 1863 which included the moving of the Midland steamer services from Morecambe to Piel Pier.” [1: p153]

It seems that the “Midland Railway was anxious that a communication should be provided for affording better access to the Lakes in connection with the Yorkshire districts.” [8]

Andrews tells us that,  “During the 1860s, the Furness Railway … absorbed its neighbours one by one. The Ulverston & Lancaster, which had been heavily subsidised by the Furness during its construction, was bought in 1862 and … the Whitehaven & Furness Junction Railway was taken over in 1866.” [1: p154]

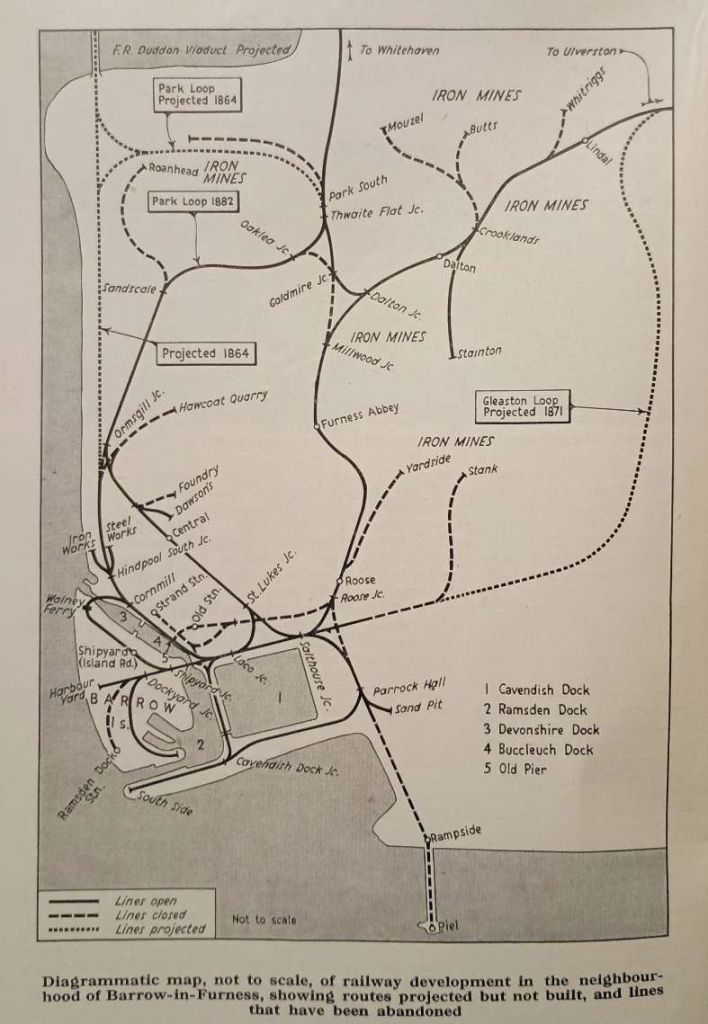
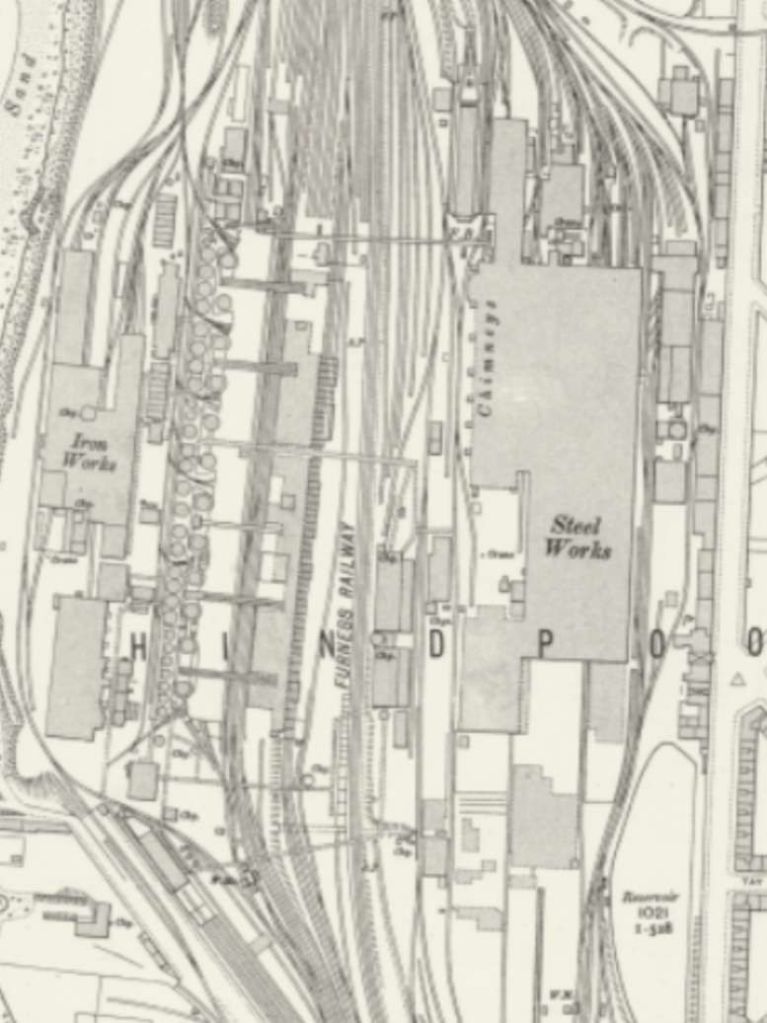
There were plans for the construction of a viaduct to span the Duddon Estuary which would have been part of a new line running North along the coast from a point near to the Iron Works and Steel Works at Hindpool. The scheme failed to gain parliamentary approval because it constricted access to the small port at Borwick Rails.

After a depression in the late 1860s, a return to prosperity in 1870 brought with it a fresh wave of development plans. These included:

  • Moving the ferry/steamer service from Piel Pier to a new Dock Station.
  • Two loop lines intended to relieve congestion on the mainline, one the Gleaston loop between Lindal and Salt-house, and the other the Barrow loop from Salthouse to Ormsgill. Later the Gleaston scheme was abbreviated to a single line branch to Stank Mines (opened in 1873. The Barrow loop was slowed by the depression of the late 1870s and was not opened until 1882;
  • Completion of the docks, which ultimately proved to be somewhat over scale. However the deep water berth at Ramsden Dock was a great improvement over Piel Pier.

High capital expenditure in the 1870s meant that resources for railway development were limited in the 1880s. In the 1890s, exhaustion of local iron ore stocks and the lower cost of imported iron ore saw local freight traffic decline rapidly. In 1893, the Midland Railway gave three years’ notice to the Furness Railway as it had developed its own harbour at Heysham. Some services remained at Barrow until the first world war. Services declined further after the railway grouping, iron ore traffic dwindled away, leaving only that between Hodbarrow and the iron works/docks.

A century of gradual decline brought changes to the rail network. The original line entered Barrow “at Millwood Junction, where the Kirkby and Dalton branches joined, and then ran down the narrow valley to the ruins of Furness Abbey, where a station and hotel were completed in 1847. This became an important interchange station when the lines through to Carnforth and Whitehaven were open, and although a curve was opened between the two branches on 1st August 1858, most trains continued to reverse at Furness Abbey until 1873 when Dalton took over the exchange traffic; the now-unused bays at Dalton were for the Barrow branch trains. Furness Abbey was still used for dividing boat trains into portions for the dock and Barrow until 1904, and the down loop used for this existed until the 1930s. An up bay at Furness Abbey was used in the 1880s for a service from and to Coniston, but this was discontinued in 1891. The first part of the original Kirkby branch from Millwood to Park Junction (renamed Goldmire in 1882) fell rapidly into disuse after this as Whitehaven-Barrow traffic used the Park loop after 1882. Millwood Junction was finally removed in 1898.” [1: p155]

A postcard image of Furness Abbey Railway Station which was shared on the Disused Stations Facebook Group by Brian Prevett on 31st December 2024. © Public Domain. [9]

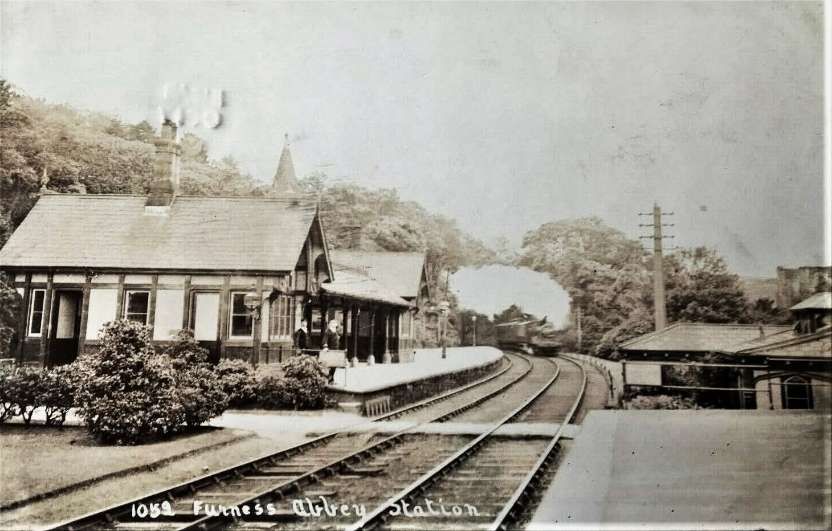
The next station down the line from Furness Abbey was Roose.

Roose Railway Station as it appeared on 25″ OS mapping of 1889, published in 1890. Note the road bridge spamming the railway to the South of the Station and the tramway crossing that bridge. [11]
Roose Railway Station in the 21st century, as shown on satellite imagery provided by Railmaponline.com. [10]
Looking North through Roose Station in 2022 © NTL PWM Survey. [Google Streetview, March 2022]

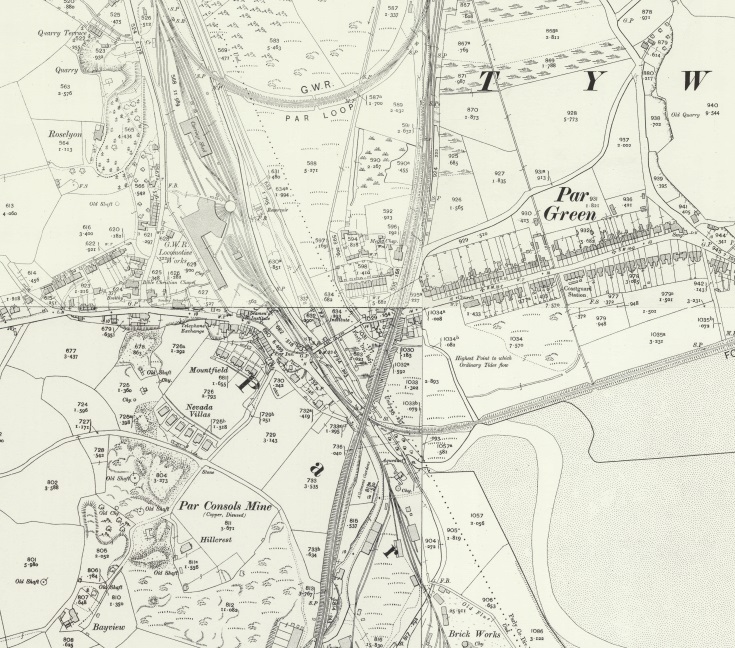
In 1959, Roose had “a reasonable passenger traffic from the surrounding housing estates. The main road originally crossed the line on the level and it was at these gates that trains first stopped by signal in the 1850s. The old junction with the Piel line was where the bridge carrying the main road now stands (which was completed with the [station present in 1959] in 1875).” [1: p156]
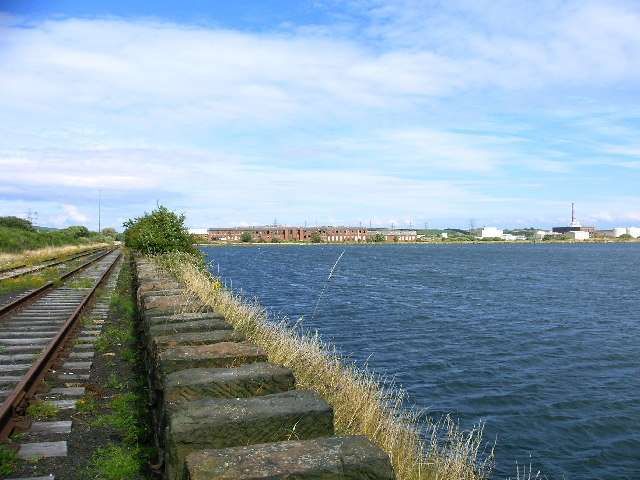
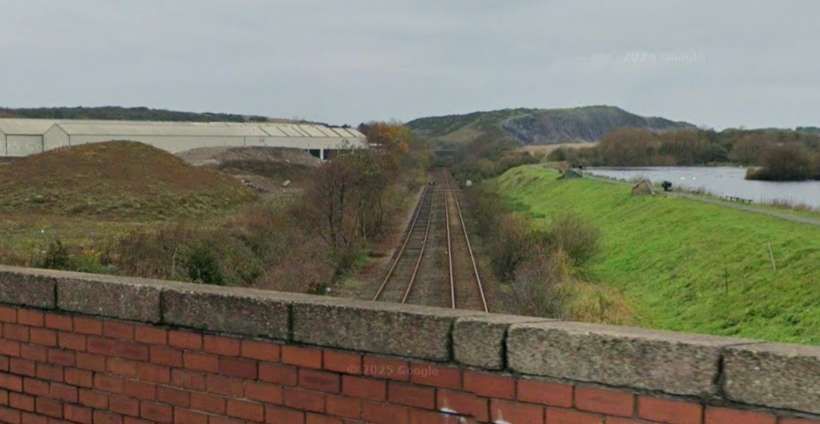
Looking South from Roose Station in 2022, this photograph  shows the bridge referred to above, © NTL PWM Survey. [Google Streetview, March 2022]

The Piel line curved away to the left, following the shore for about a mile before entering a cutting to reach Rampside Station.” [1: p156]

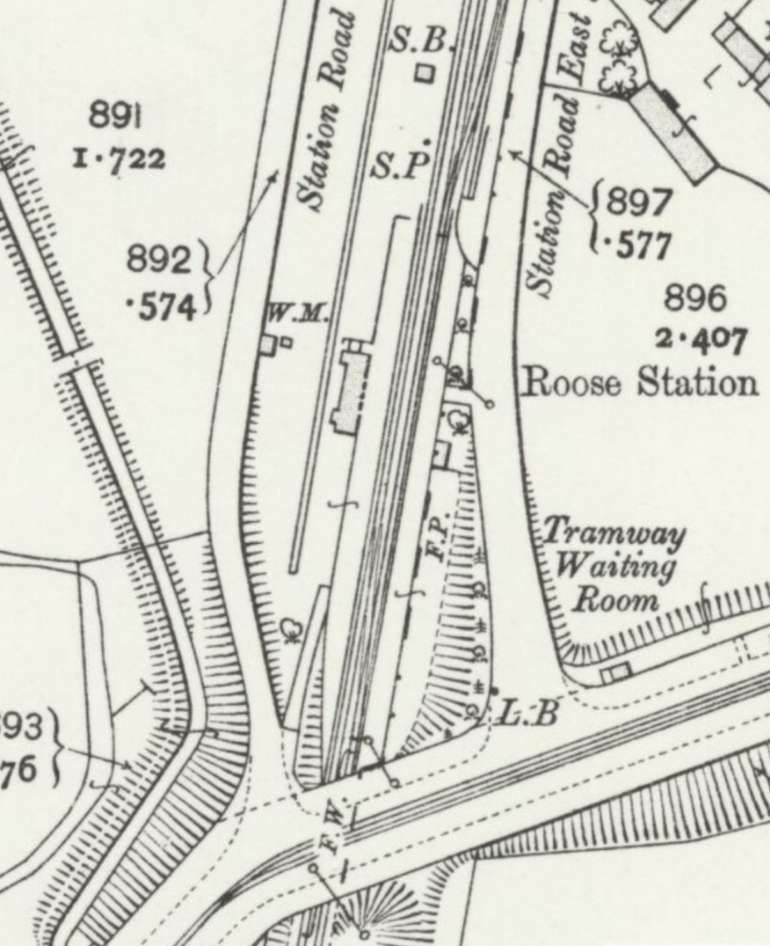
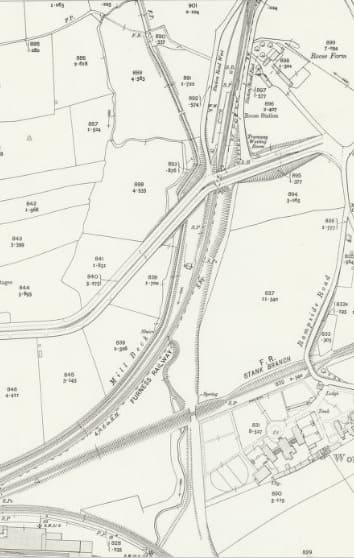
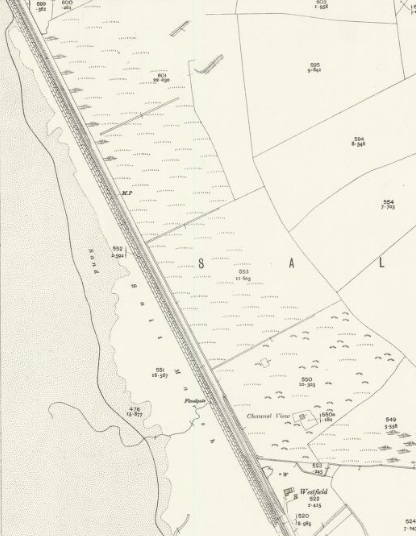
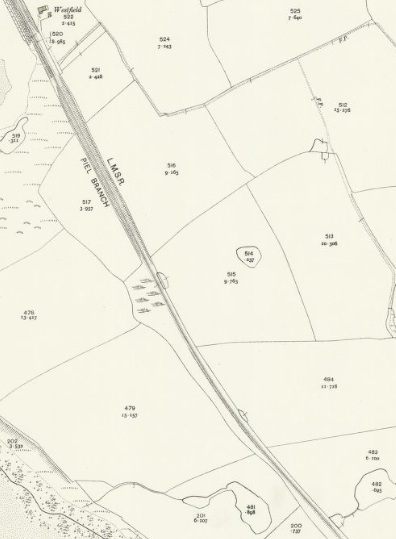
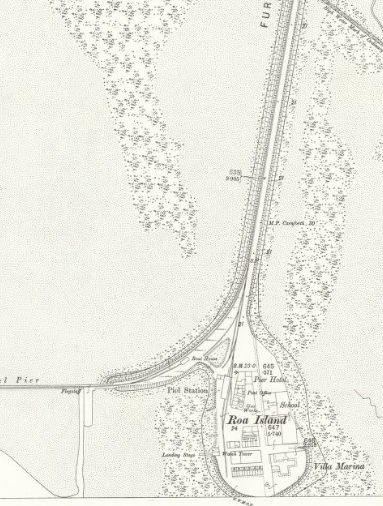
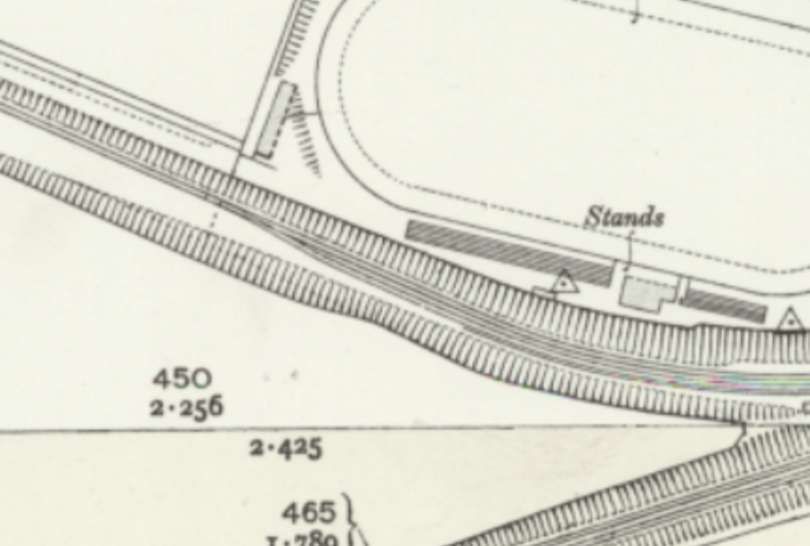
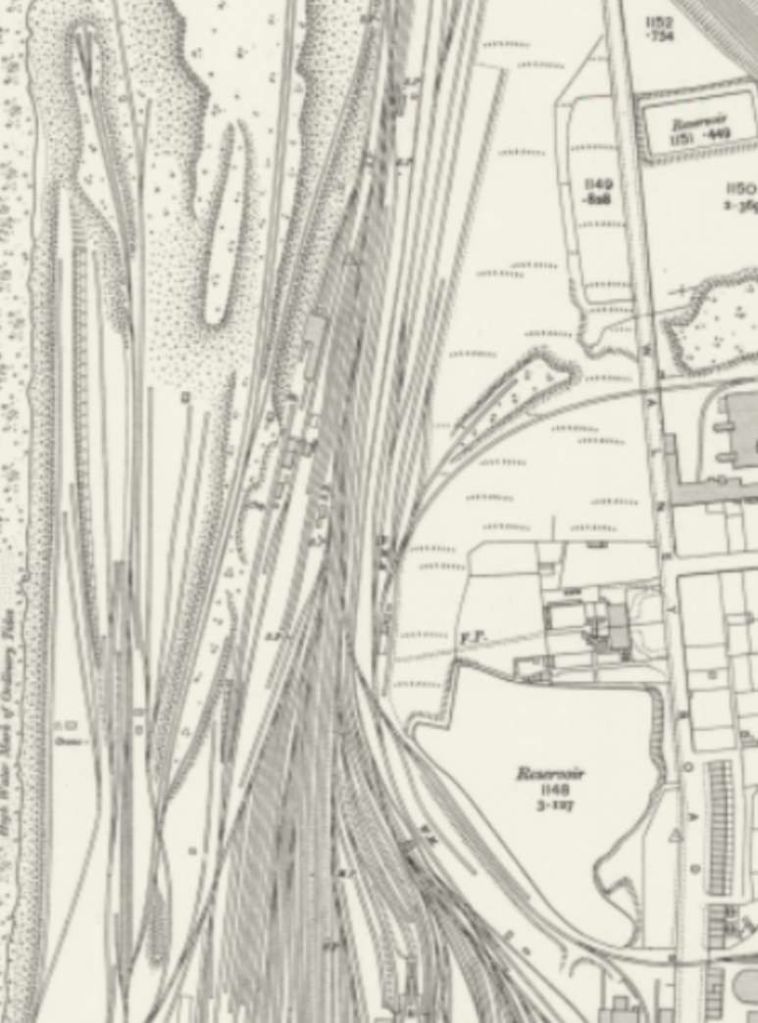
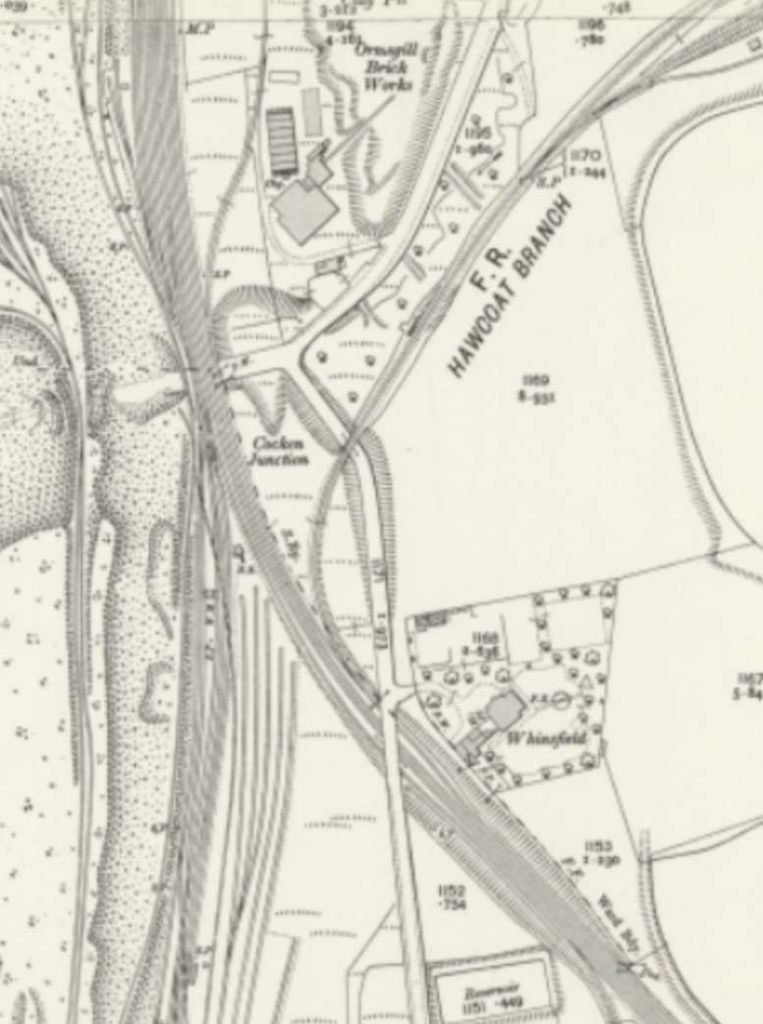
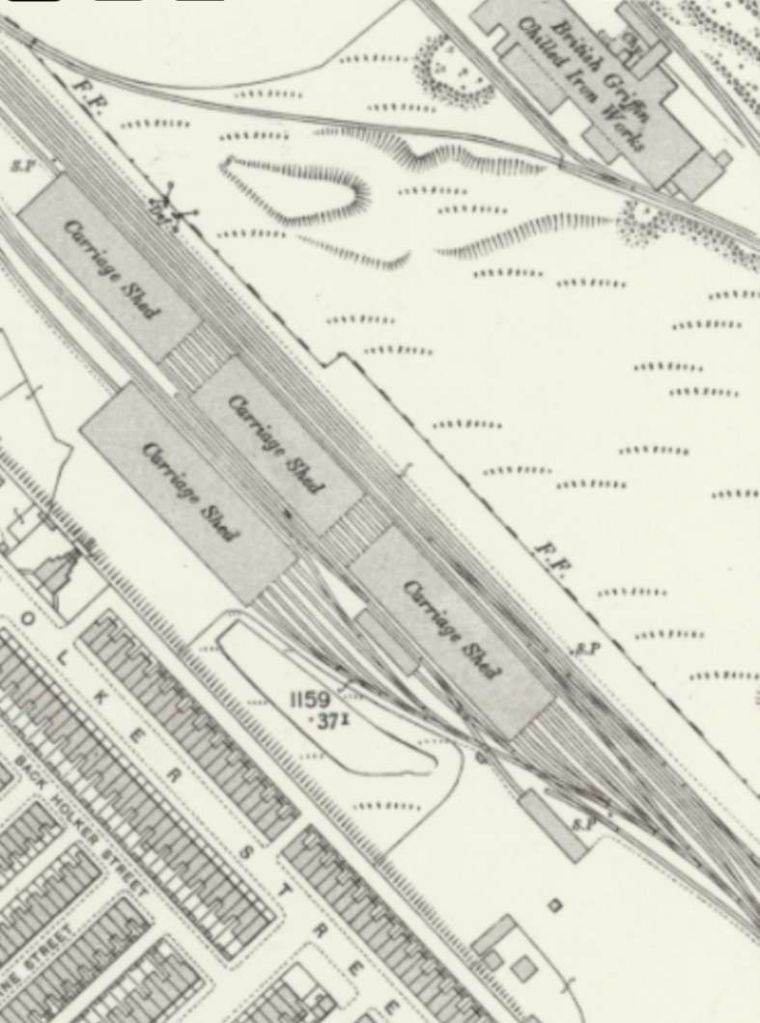
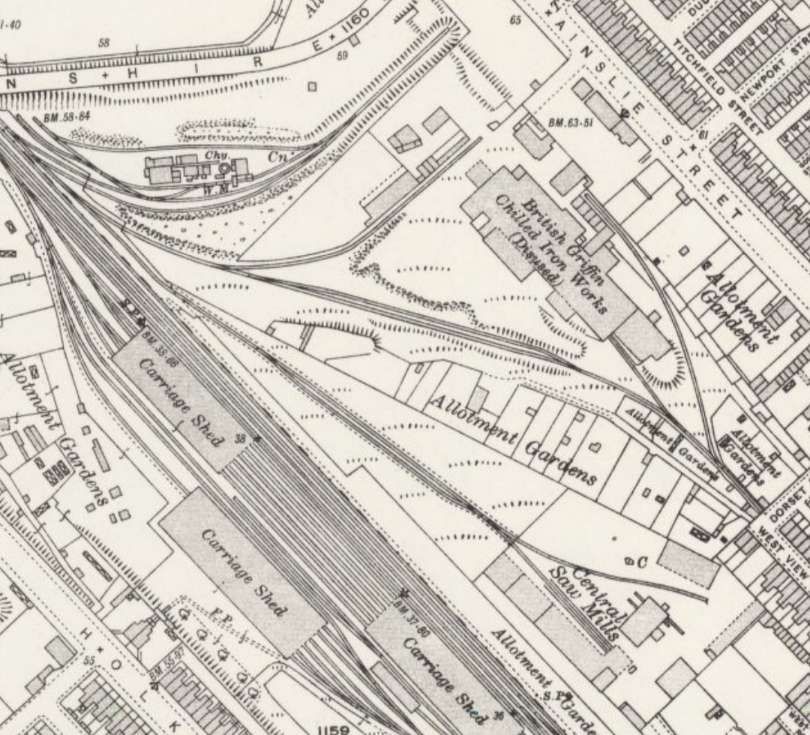
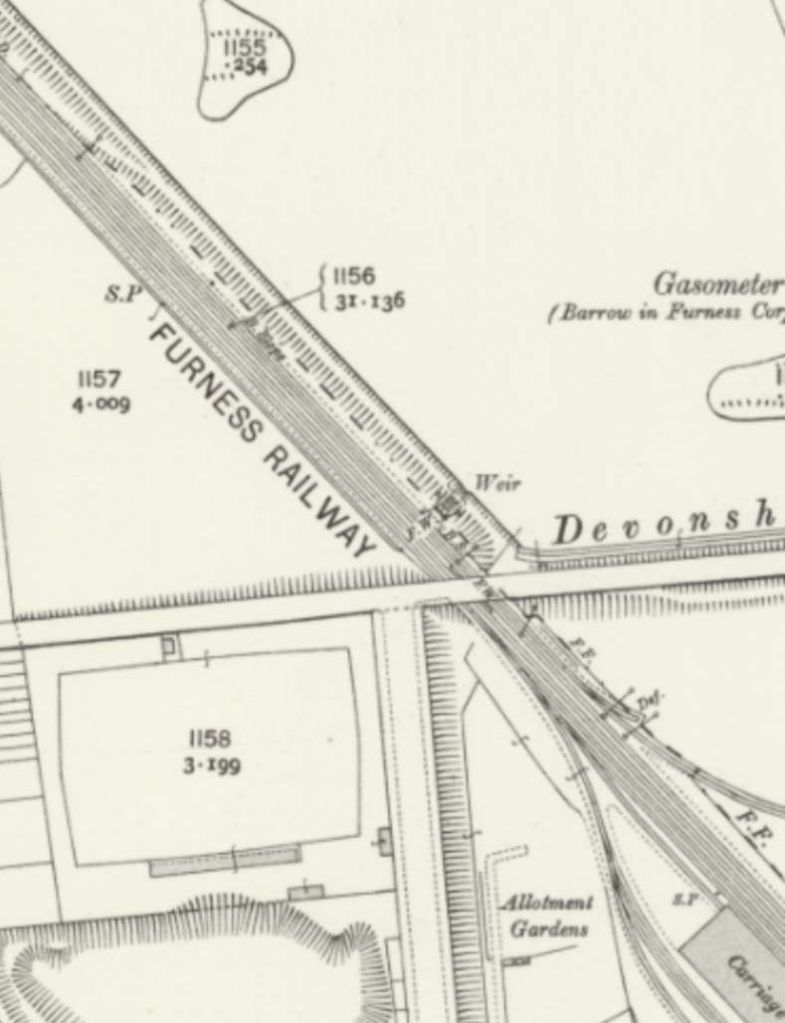
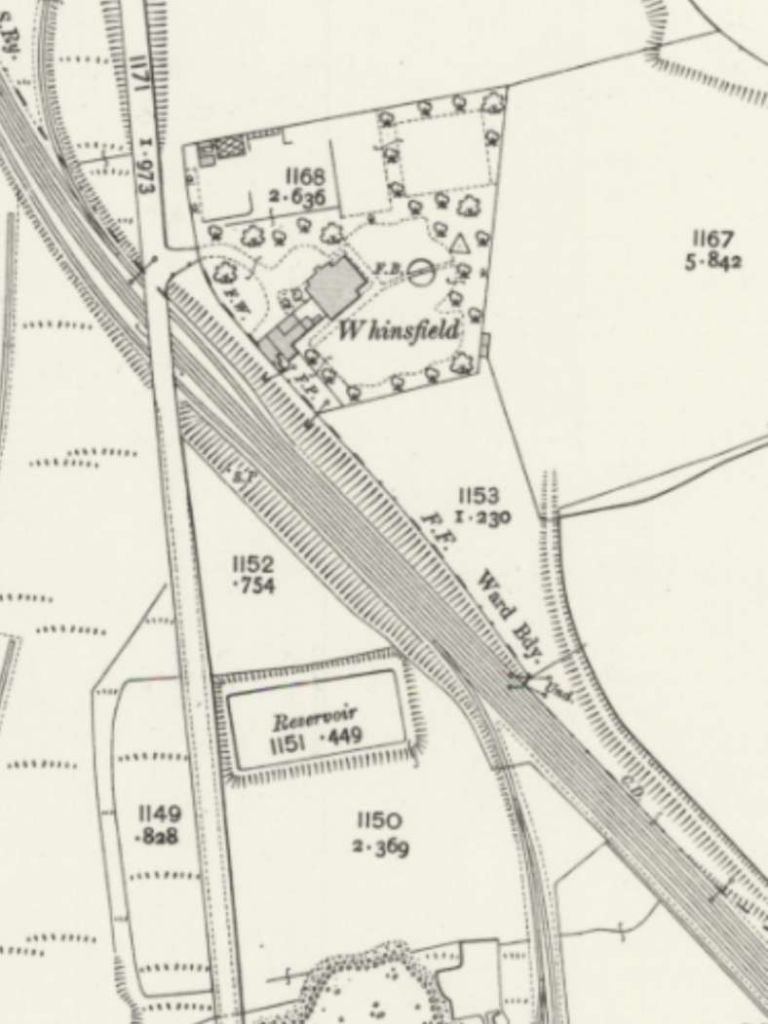
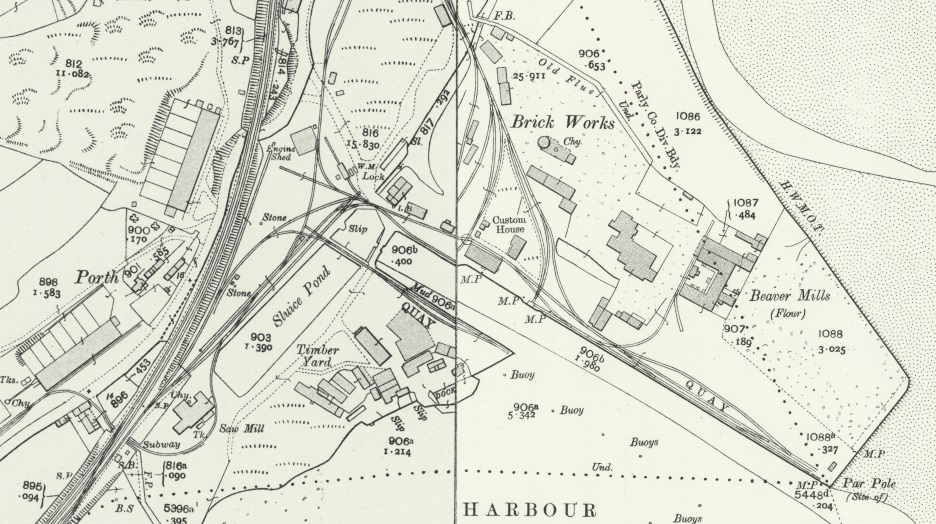
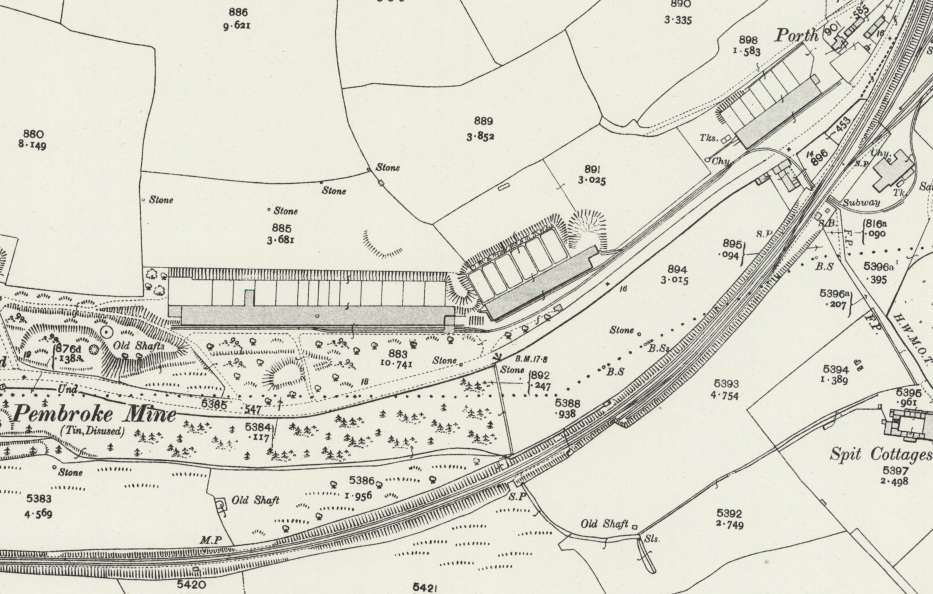
The three map extracts below show the line as it appeared  on 25″ OS mapping of 1889, published in 1890. The chord running South towards Rampside Station had, by this time, already been removed. …

The line to Rampside Station curved away to the South from the line between Roose Station and Barrow Central Station, © Ordnance Survey and provided by the NLS. These first two, somewhat fuzzy, extracts come form the 1911 Ordnance Survey, published in 1913.  [11]
These two map extracts from the same OS Sheet show the line to Rampside Station running along the shore, © Ordnance Survey and provided by the NLS. [12]
These two map extracts show that line then curved to the South running through Rampside Station before continuing on across a causeway to Roa Island and Piel Pier, © Ordnance Survey and provided by the NLS. [13]

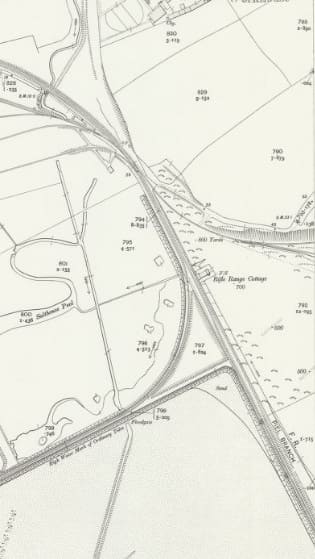
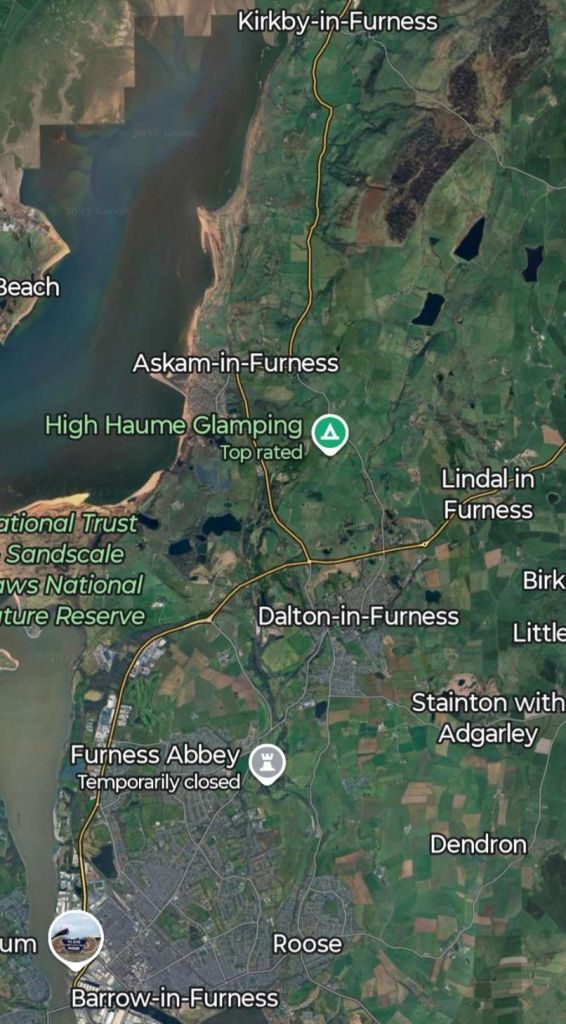
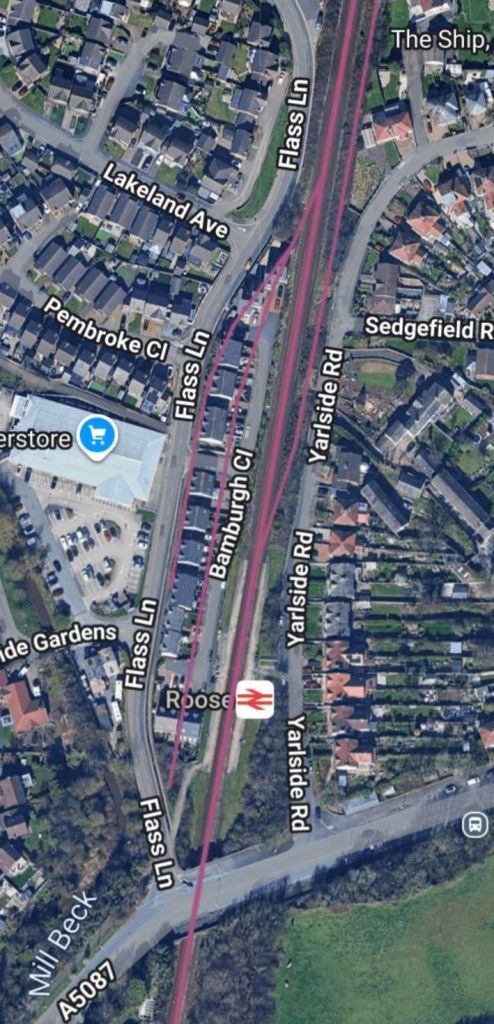
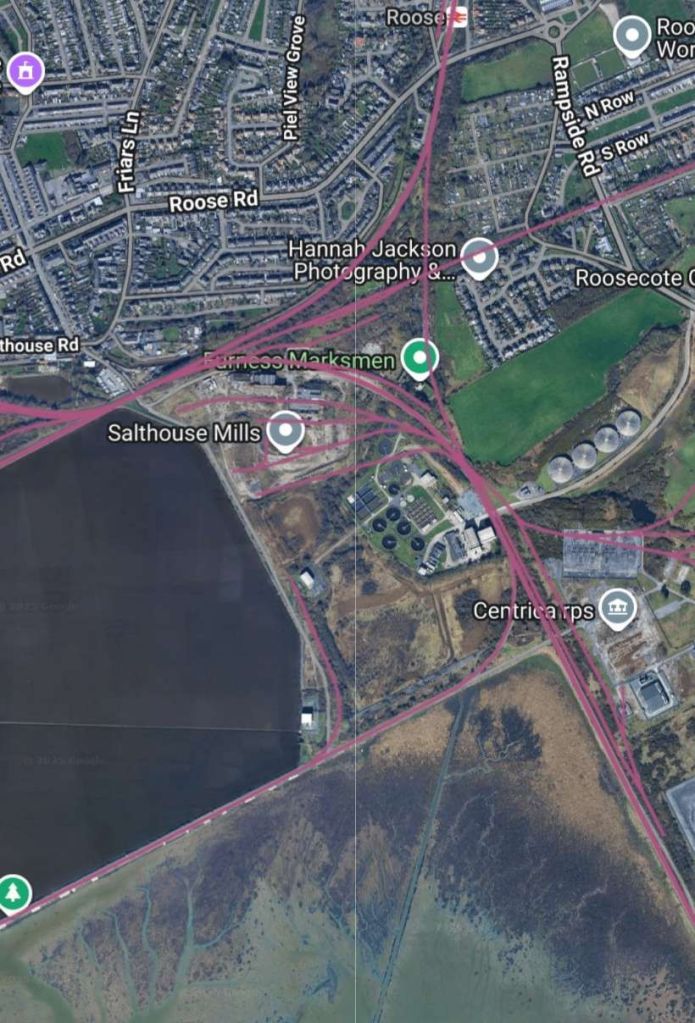
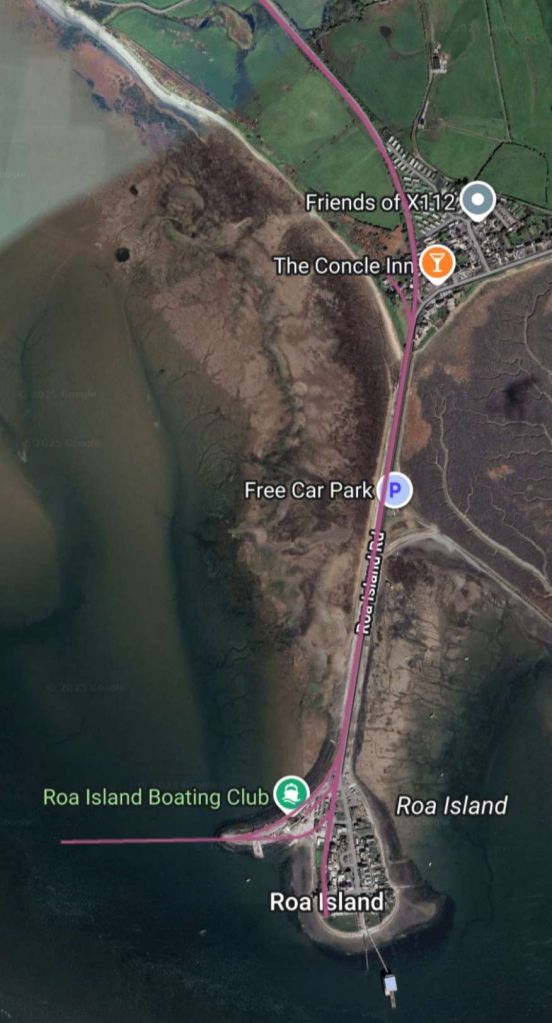
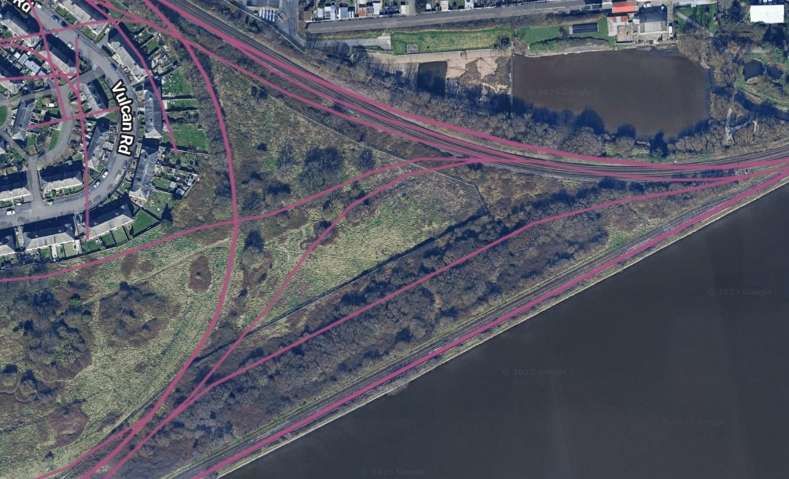
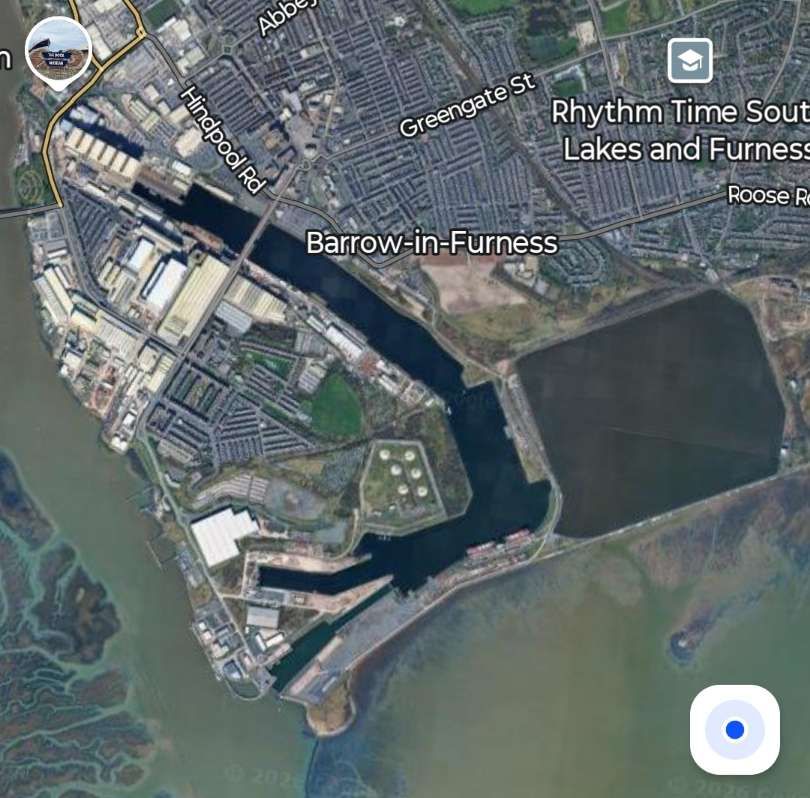
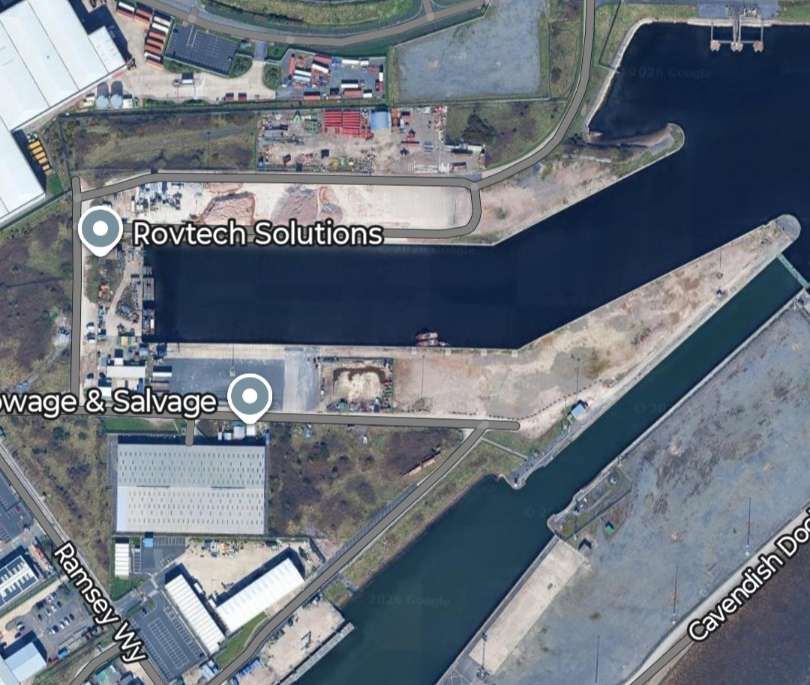
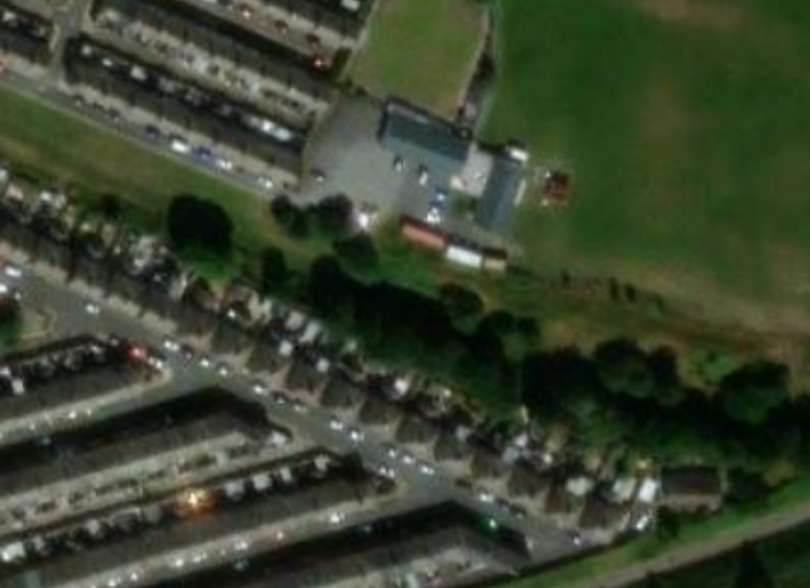
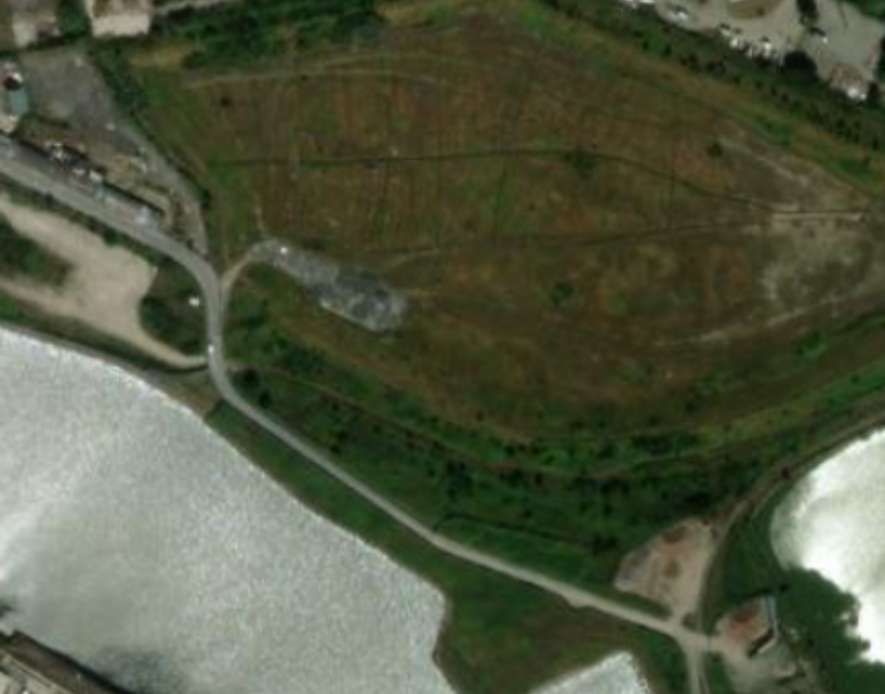
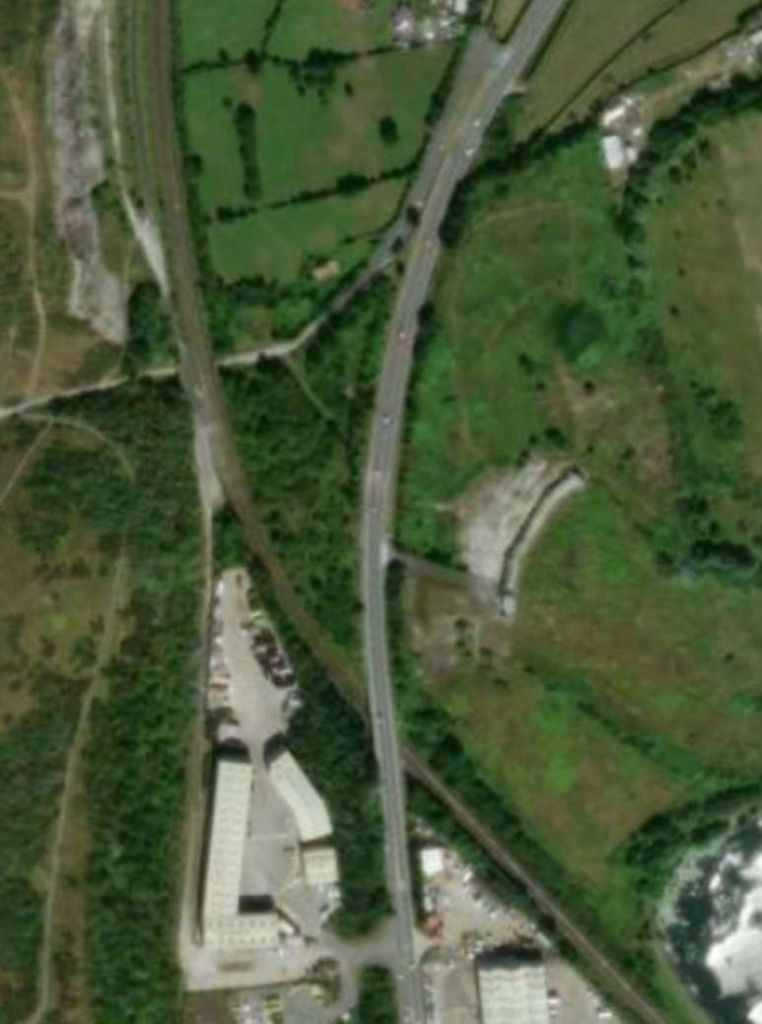
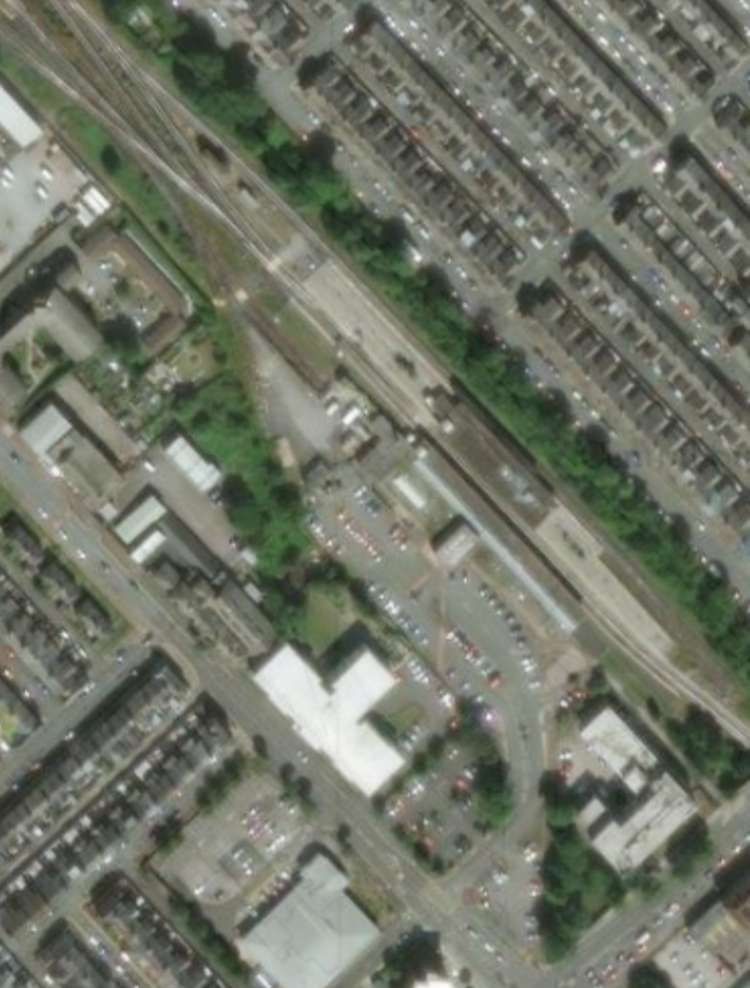
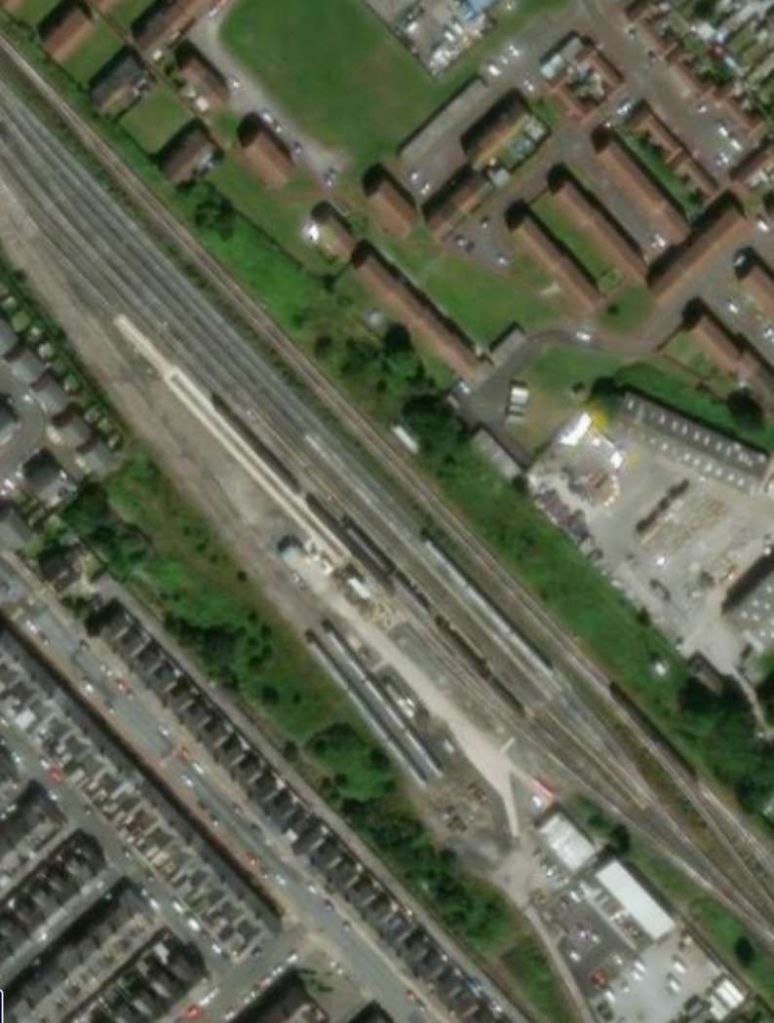
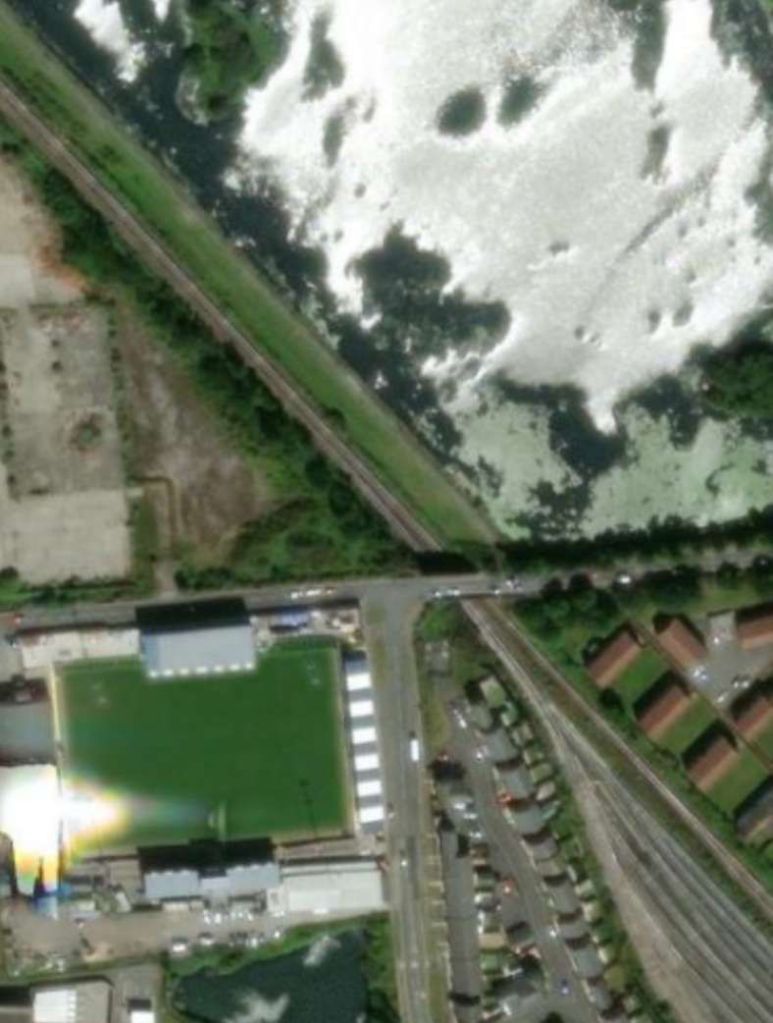
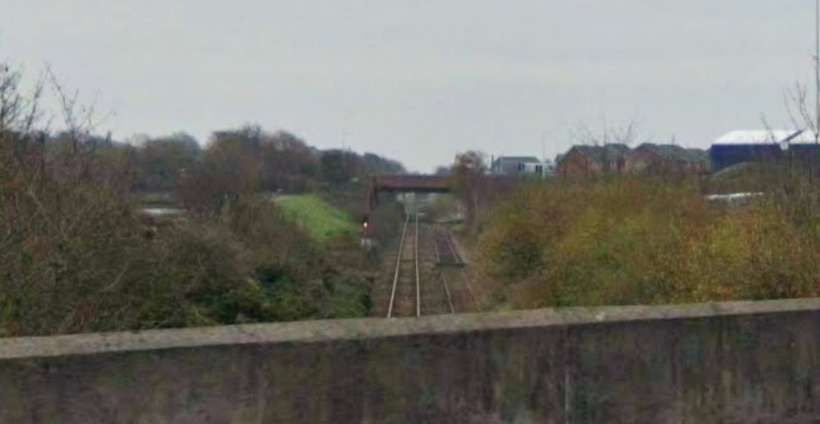
The next sequence of satellite images shows the line to Rampside Station and Roa Island superimposed on modern satellite imagery. The main line can be seen curving away to the West after passing South through Roose Railway Station. …

This sequence of three satellite image extracts from Railmaponline.com show the line serving Piel Pier. Rampside Station was closed to the Concle Inn at the top of the third of the images. [10]

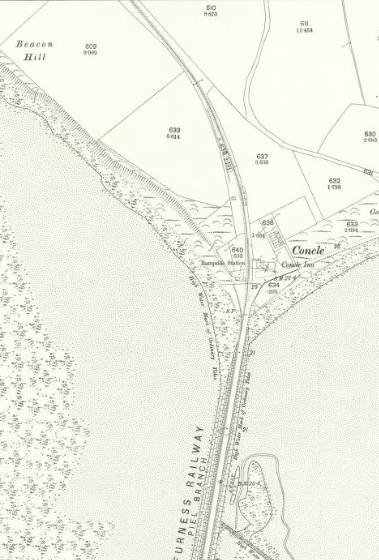
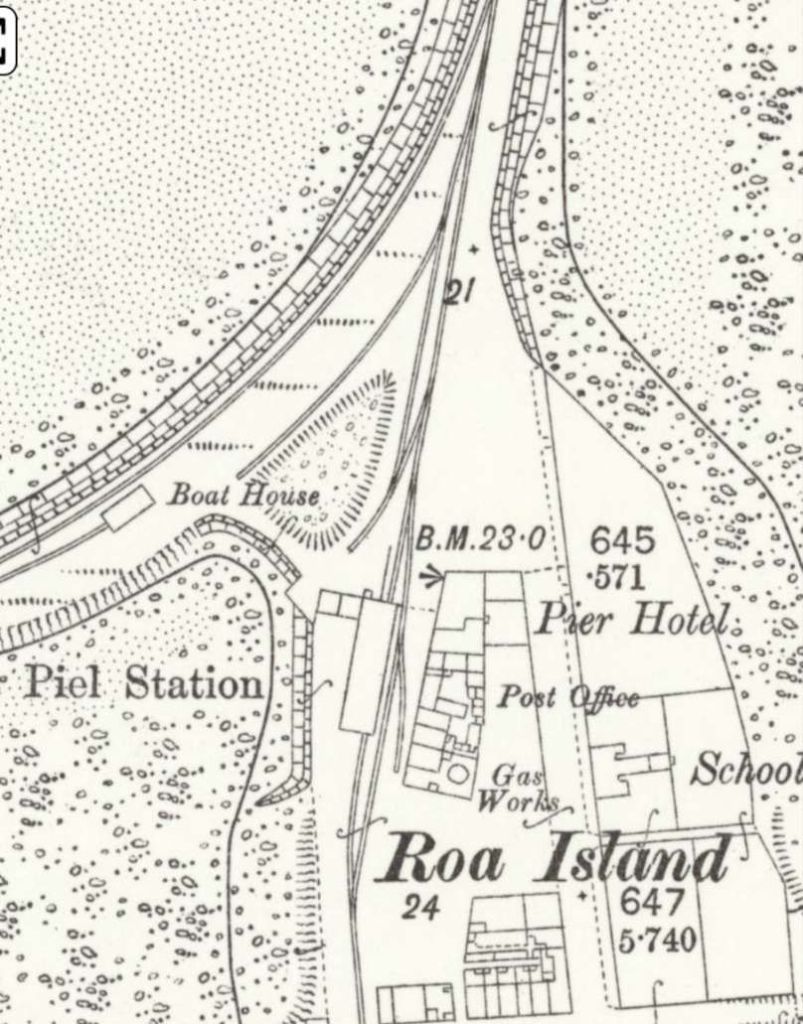
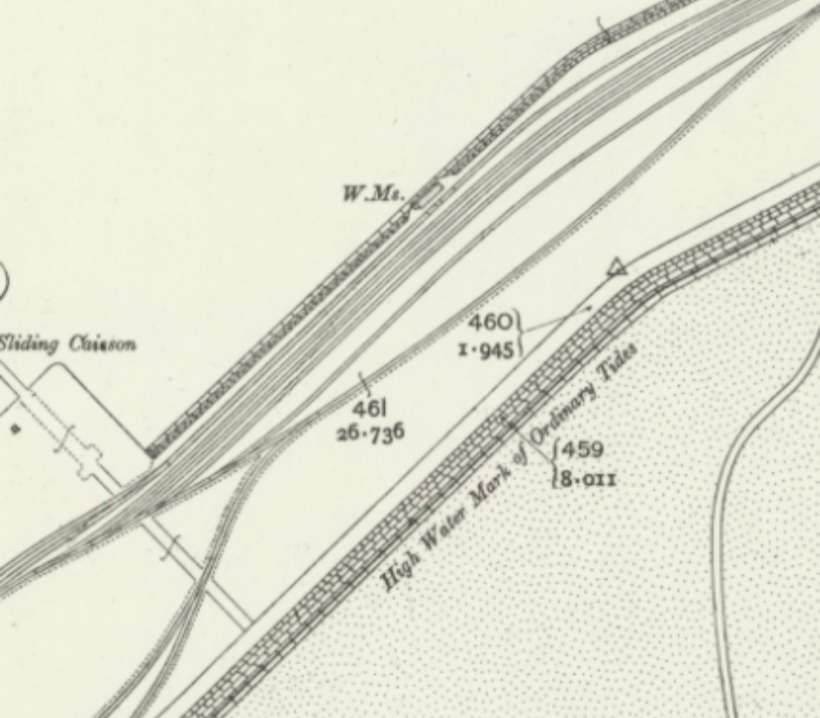
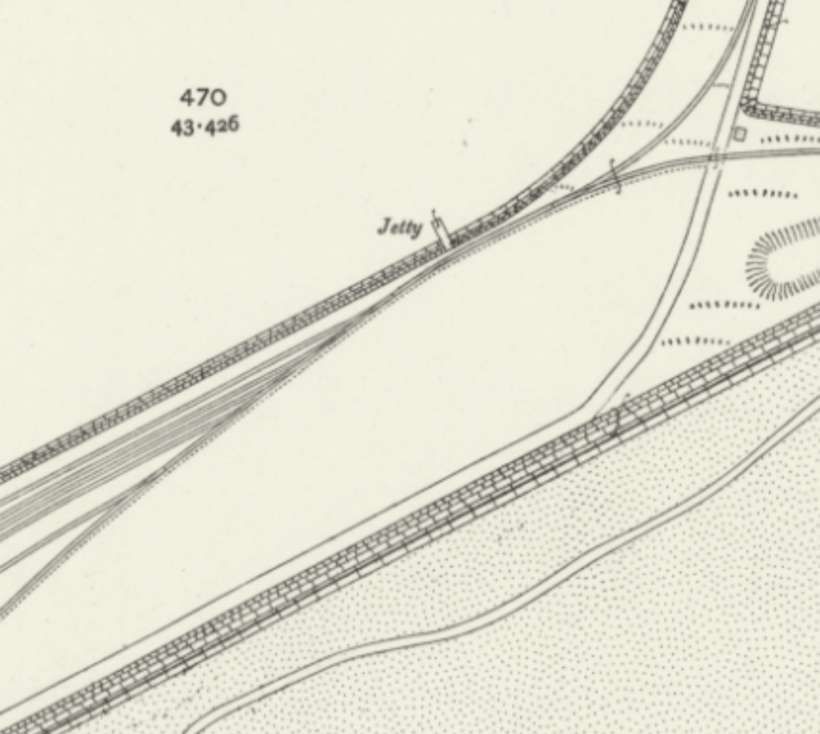
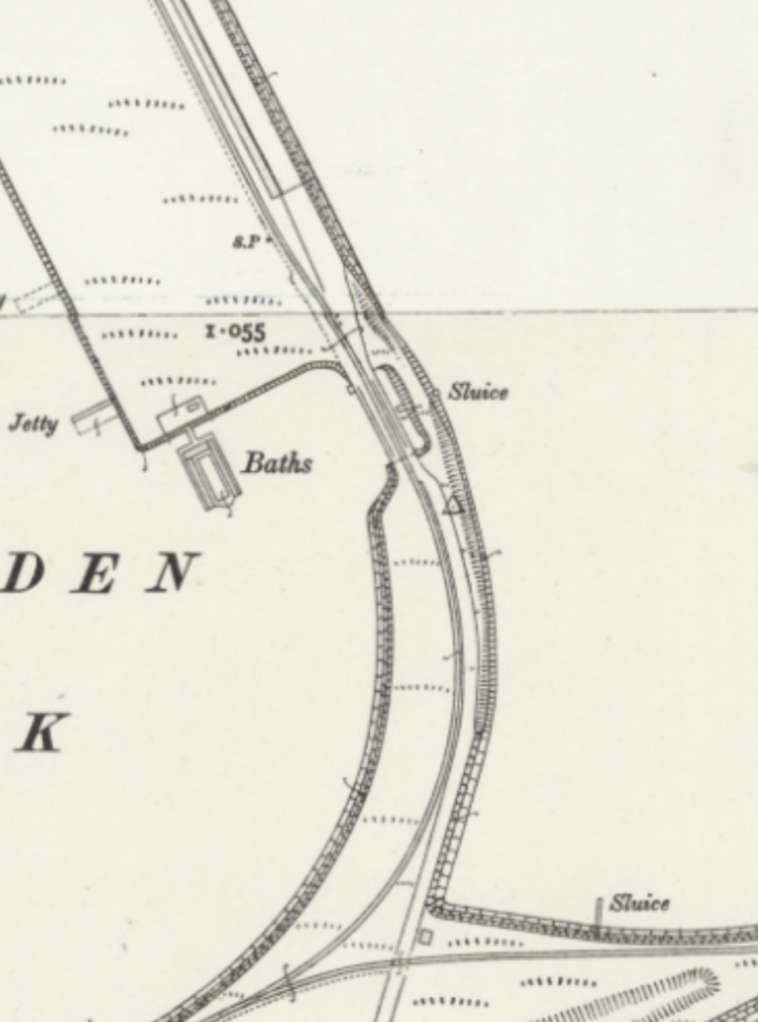
The two map extracts below show Rampside Station and Roa Island as they appear on the 25″ OS mapping of 1889, published in 1890.

Rampside Railway Station in 1889. [13]
Rampside Railway Station closed in 1936. There was a period in the early 1800s when Rampside was a larger community than Barrow! In 1800, the population of Barrow was 65, that of Rampside was 94, © Public Domain. [16]

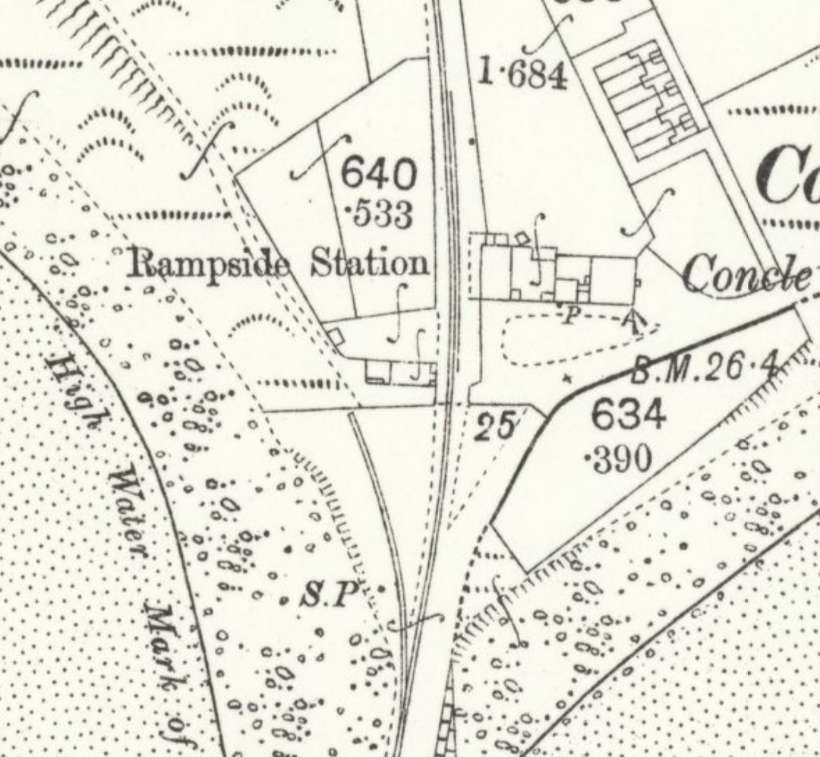
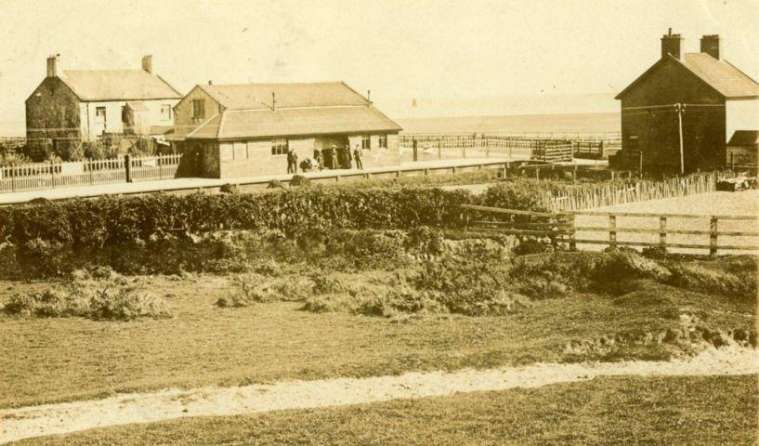
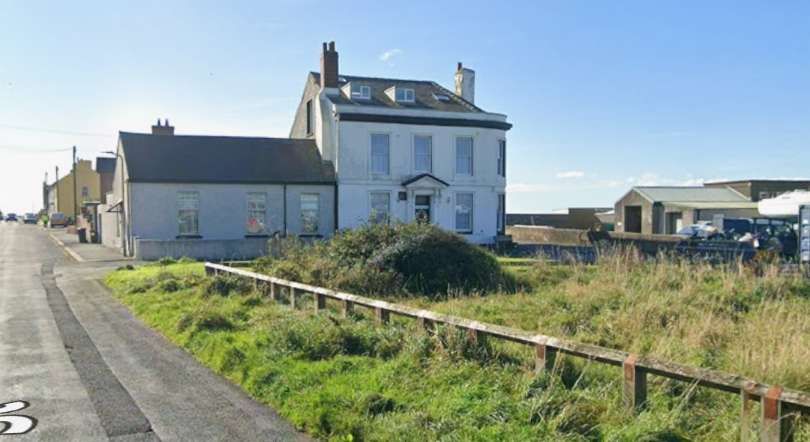
Rampside Railway Station was a single platform station opened on 24th August 1846 as Concle Station, [14: p37] it was renamed Rampside in 1869. The station remained operational until 1936 when it closed along with the line and the following station at Piel, which had been reachable via the Roa Island Causeway. The station building and entire branch line had been demolished by the 1980s. [15]

Roa Island in 1889. The Pier Hotel has the benchmark on its West side.  [13]
This view faces South on Roa Island, the Pier Hotel is now a private dwelling, Piel Station was to its West side (on the right of the Hotel in this image). [Google Streetview, October 2024]

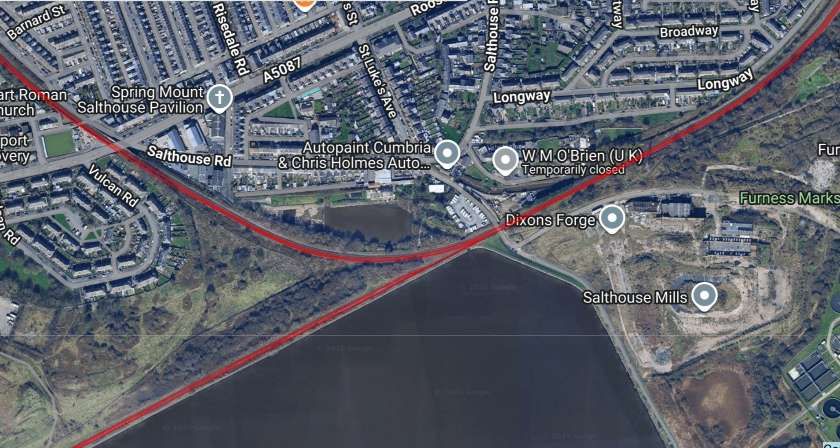
Returning to the main line: South and West of Roose Railway Station the main line curves round towards what was Salthouse Junction.

Salthouse Junction: the line from Roose Station curved into the map extract in the top-right corner on the North side of the Paper Works which just intruded into the right of the image, the line to Barrow Central Station curves away from the Junction and leaves this map extract on the left. The lines running from the top-right to the bottom left are local lines serving the docks and industry in the area, © Ordnance Survey and provided by the NLS. [11]
A slightly wider area centred on the OS map extract immediately above. This is from Railmaponline.com’s satellite imagery which superimposed historic lines over the modern image. The large area of water at the bottom of this image is known as Cavendish Dock. [10]

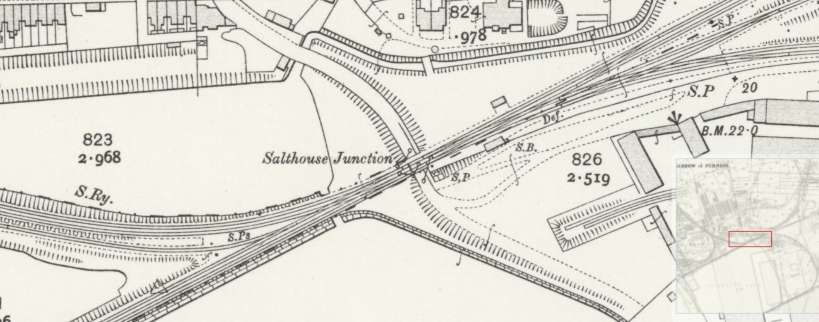
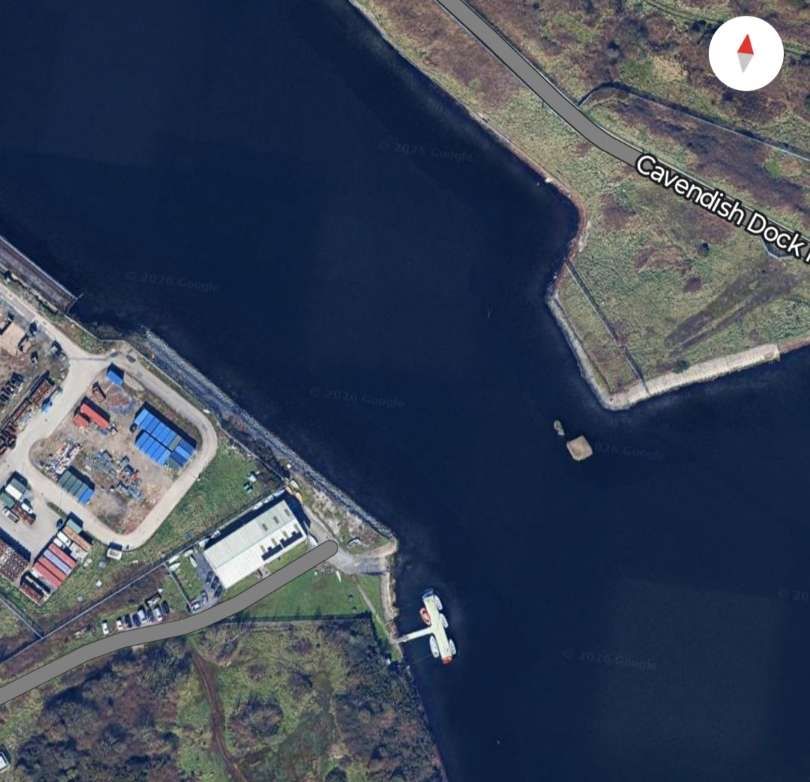
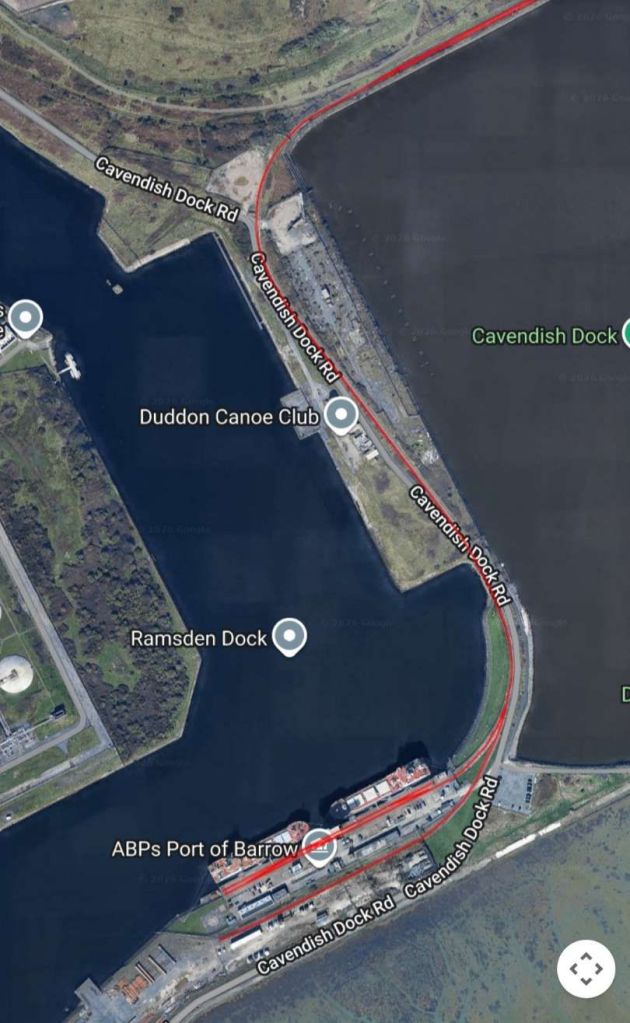
Only the main line remains to the East of Salthouse Junction. To the West, a single line leaves the main line at Salthouse Junction on the South side of the main line, heading West alongside Cavendish Dock.

Andrews tells us that a significant embankment was built from Salthouse Junction to Barrow Island. A line was laid along this which separated the Ramsden and Buccleuch Docks, running to the South of what was the old line to Strand Station. After the building of the embankment, land to its North was reclaimed and the old Strand Station was closed together with the line which approached it on a rather tortuous/sinuous route. Parts of the embankment for this old line were still visible in the late 1950s.

A triangular junction sat to the West, of which Salthouse Junction formed one apex. St. Luke’s junction formed the northern apex, close to which the original railway embankment appears on this map extract. A chord, the Loop Line curved down the West side of the triangle providing access from the North to the line to Barrow Island – named the Ramsden Dock branch.  [11]
The same area on the satellite imagery provided by Railmaponline.com. [10]
The original Strand Station, seen in the 1950s, from the South end – its entrance arches bricked up. This photograph was taken by M.J. Andrews, © Public Domain. [1: p154]

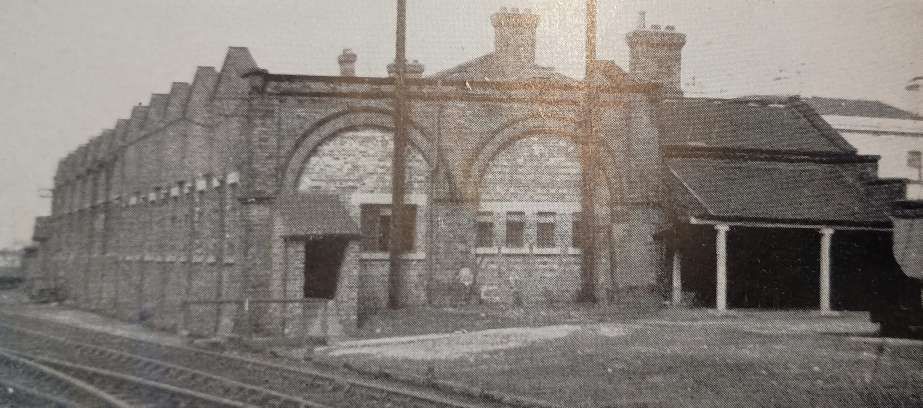
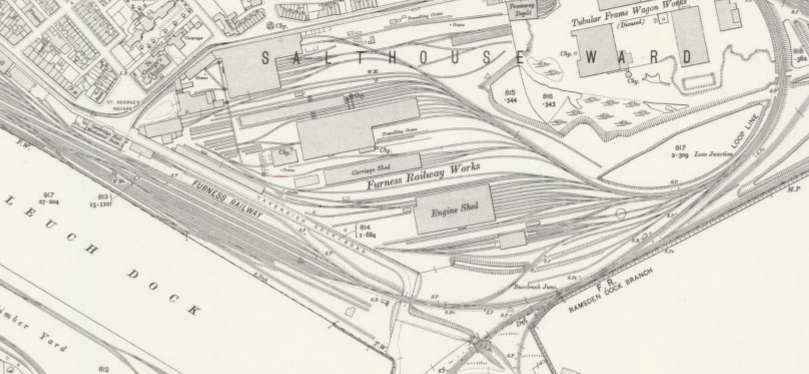
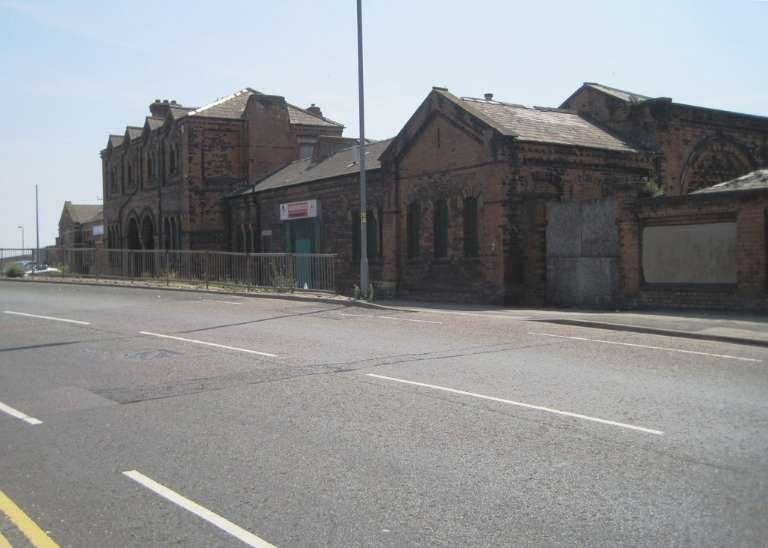
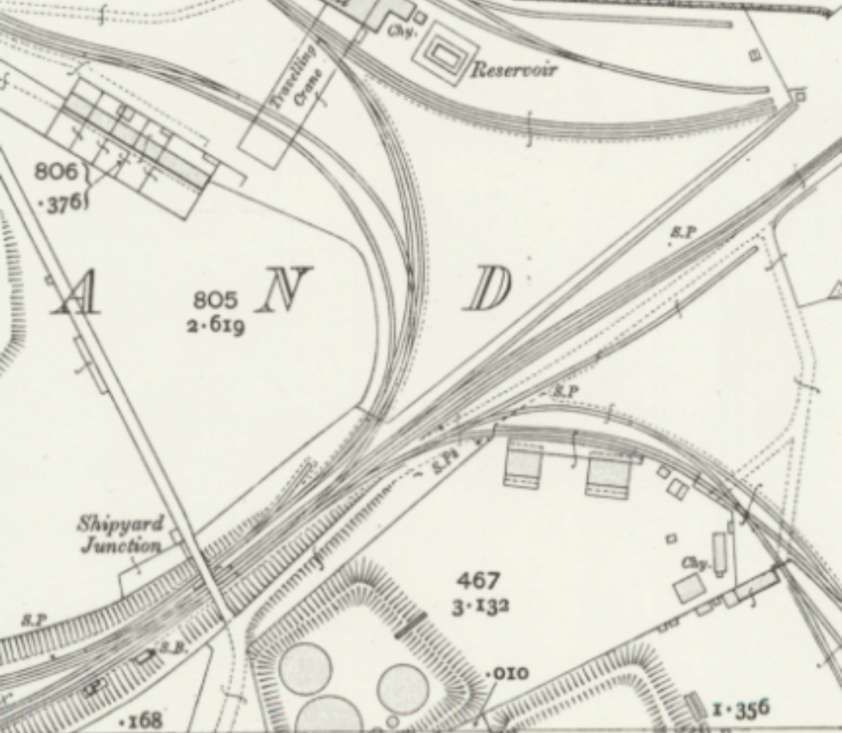
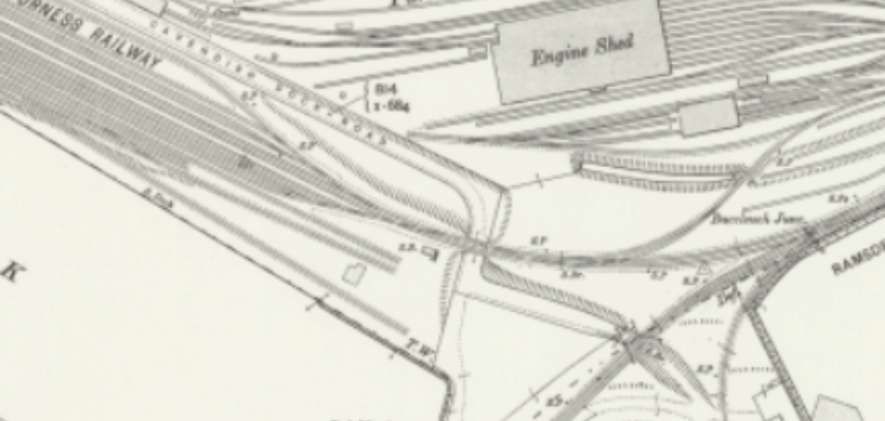
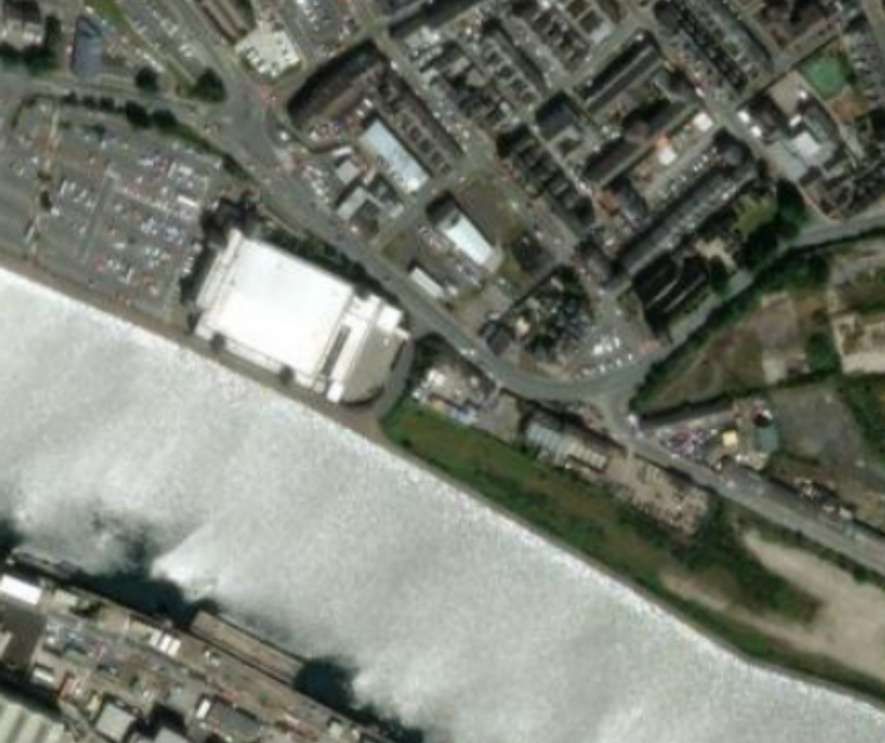
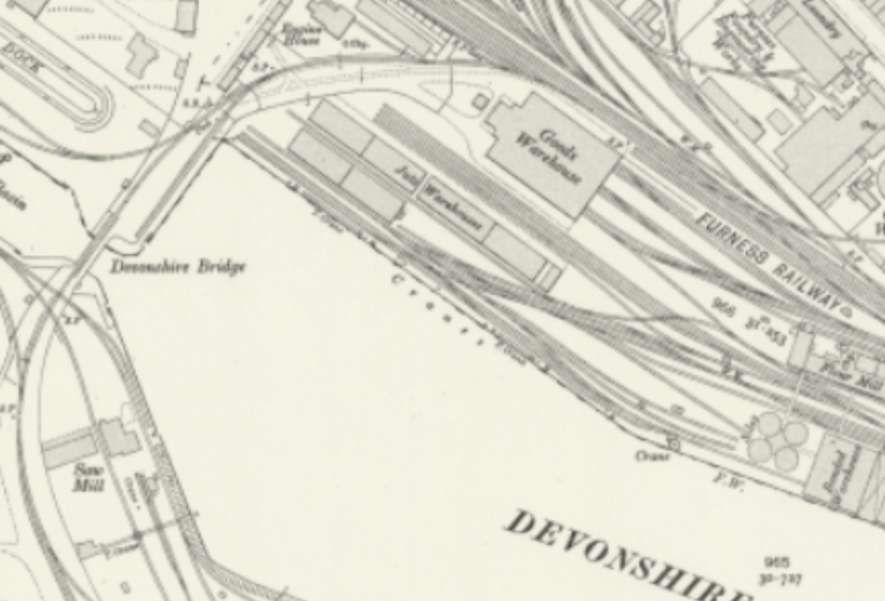
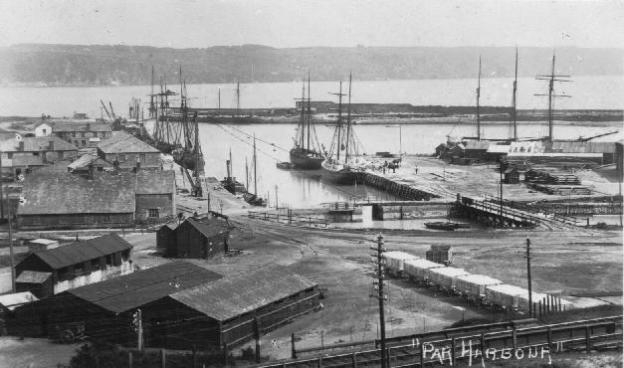
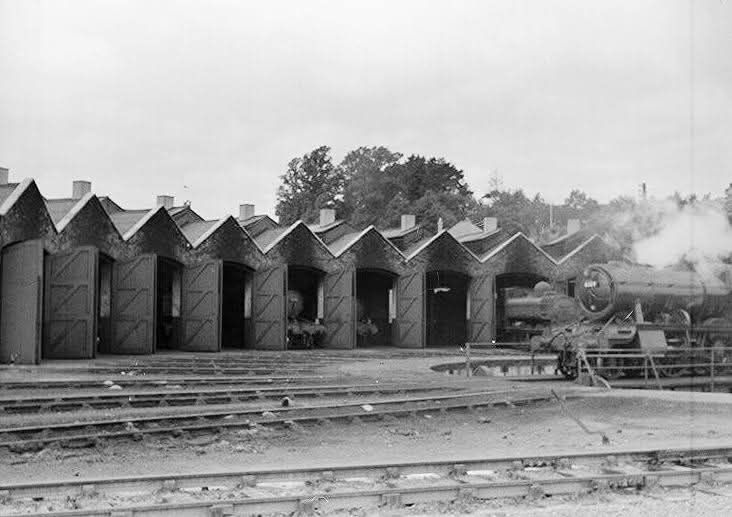
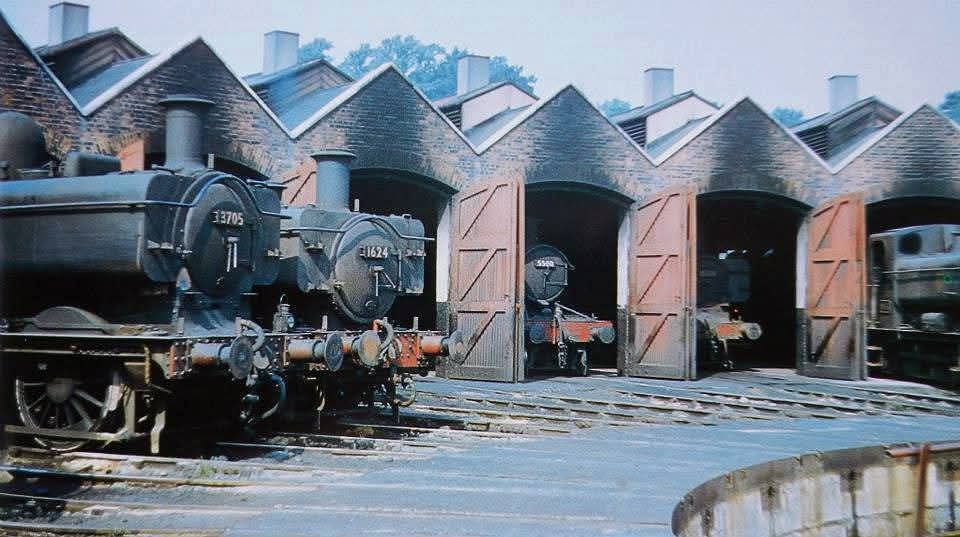
Andrews tells us that “The original Barrow Station, a wooden structure with one platform, rapidly became inadequate to deal with the expanding traffic of the town and was converted into an engine shed in 1862.” [1: p156] Apparently, in the late 1950s, it was still in use “as a carpenters’ shed and offices, although the lines leading to it were closed in January 1871. … The main line was taken round the outside of the works [shown below] to reach the newer Strand Station in 1862. This, [in the late 1950s,] the Railway Institute, had to be enlarged again in 1873 and the old carriage shed … converted into an arrival station. However, hardly had these alterations been completed in the Strand, than the intention to build a large new station in the centre of the new town.” [1: p156]

This extract from the 1911 Ordnance Survey shows the railway works and sidings. [11]
This image is an extract from Railmaponline.com’s satellite imagery showing the same area as the map extract above. So much railway infrastructure has been lost. [10]

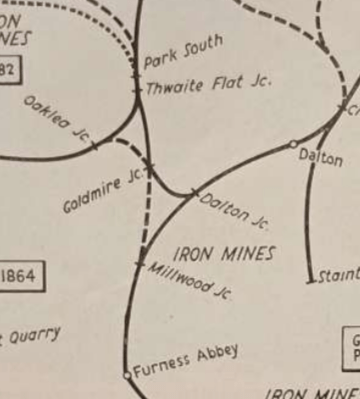
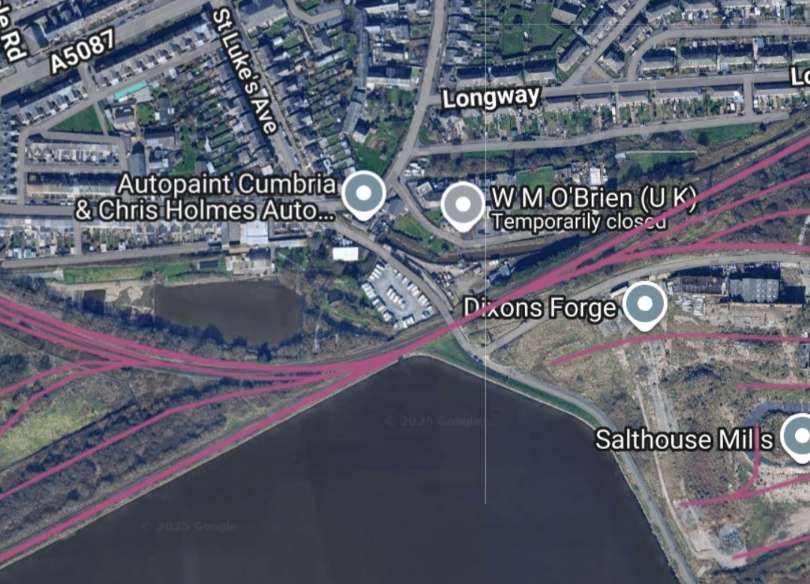
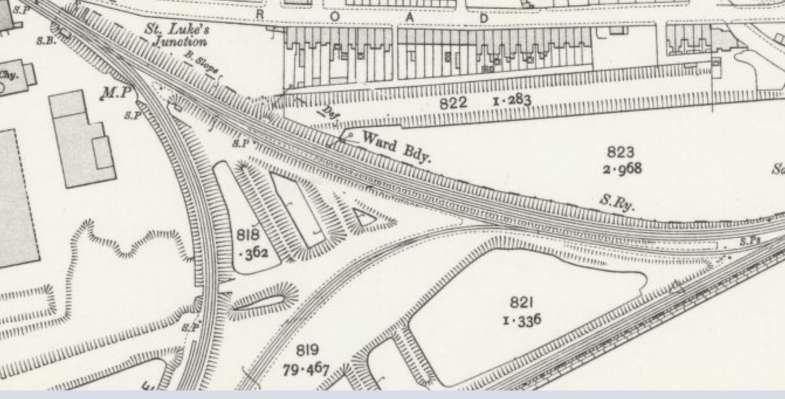
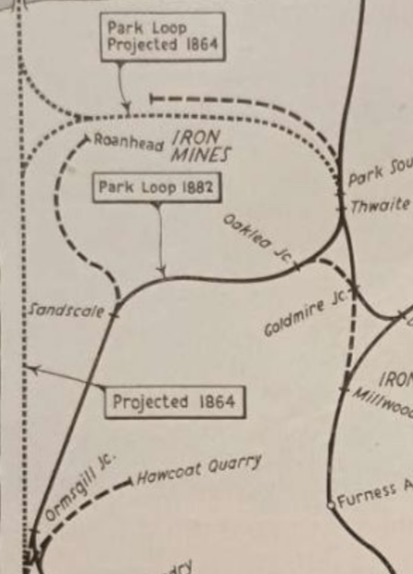
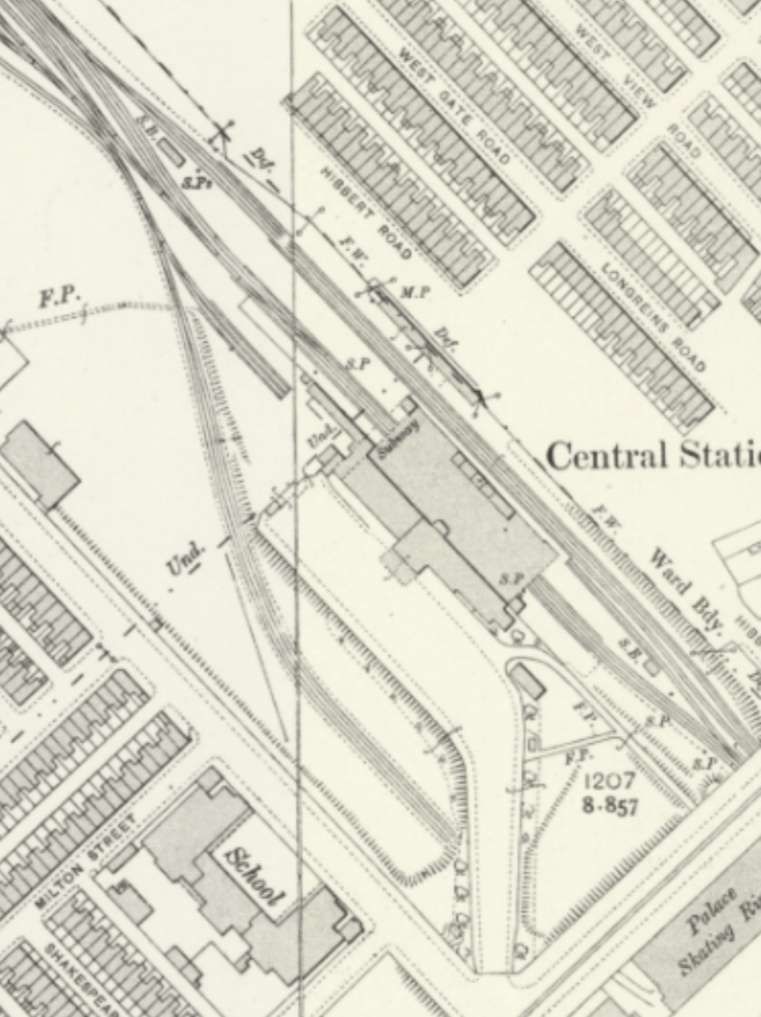
The line from St. Luke’s Junction through Barrow Central Station was not opened until 1882. Andrews continues: “by which time it had been put on a through route to the North by the completion of the Park loop line. A curve between Oaklea and Goldmire Junctions allowed the station to be approached from Carnforth in both directions. This curve [shown dashed in the adjacent image] was closed in 1904.” [1: p156]

An early view of Strand Station which emphasises its location adjacent to the docks, © Public Domain. [18]
Strand Station building seen from the East, now in private hands as the premises of a scaffolding company. [Google Streetview, November 2024]
Strand Station building, seen from the North in 2013. The station opened in 1846 and closed in 1882 when it was replaced by the current through station. While in use, this was the headquarters of the Furness Railway, © Nigel Thompson and licensed for reuse under a Creative Commons Licence (CC BY-SA 2.0). [17]

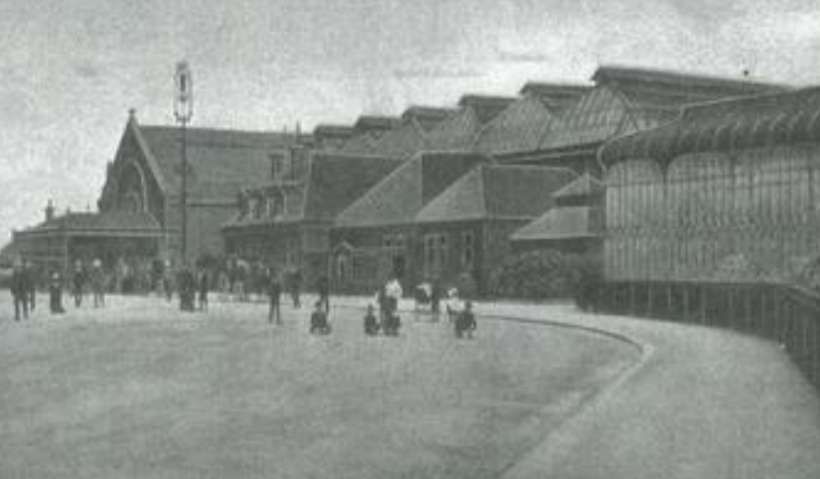
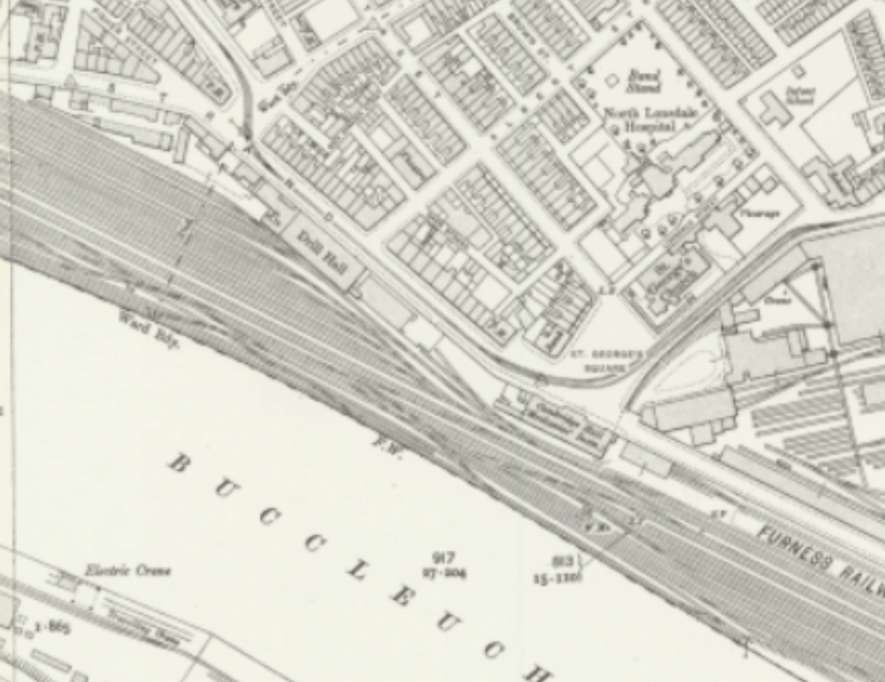
Andrew’s describes Central Station as having “a large, all-over roof covering Platforms 1 and 2. No. 3, the other side of the island platform, was uncovered and was used by the local service to Piel which ran from 1881 to 1936. These trains approached the Piel line by a curve from Salthouse Junction built in 1873; the line from Roose Junction to Parrock Hall was closed in 1881, after the boat trains were diverted to Ramsden Dock.” [1: p156]

Central Station appears top-centre on the extract from the sketch map of Barrow’s railways below. We will return to look at this later in this article

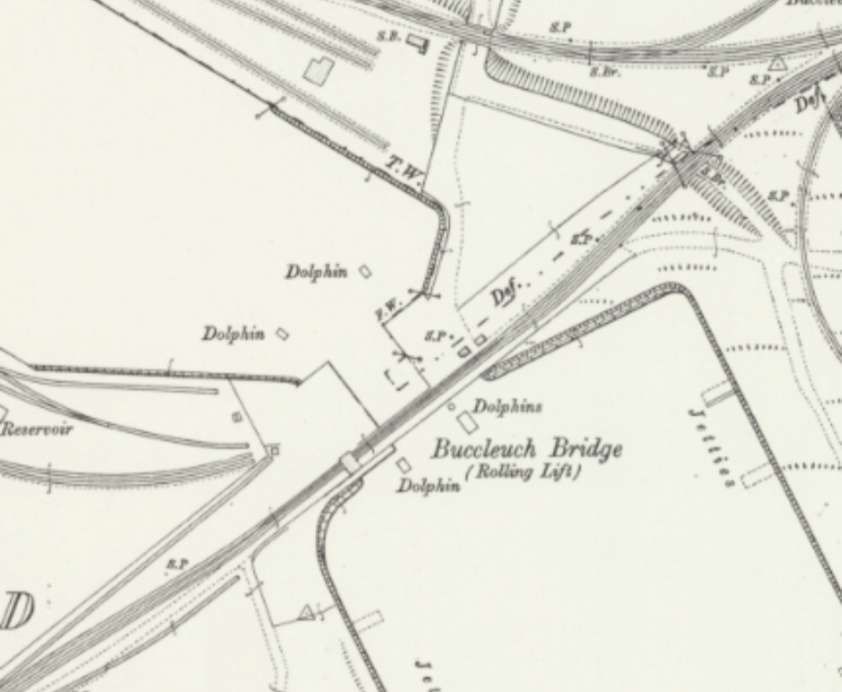
Andrews continued: “From 1881, the boat trains left the main line at Salthouse Junction and proceeded down the embankment to Loco Junction, where the curve from St. Lukes Junction, on the Central line, came in on the up side, and where the line to the Barrow goods yard and old Strand Station curved away. The passageway between the Ramsden and Buccleuch Docks was crossed by a swing bridge, replaced by the present lift bridge in 1907.” [1: p156-157]

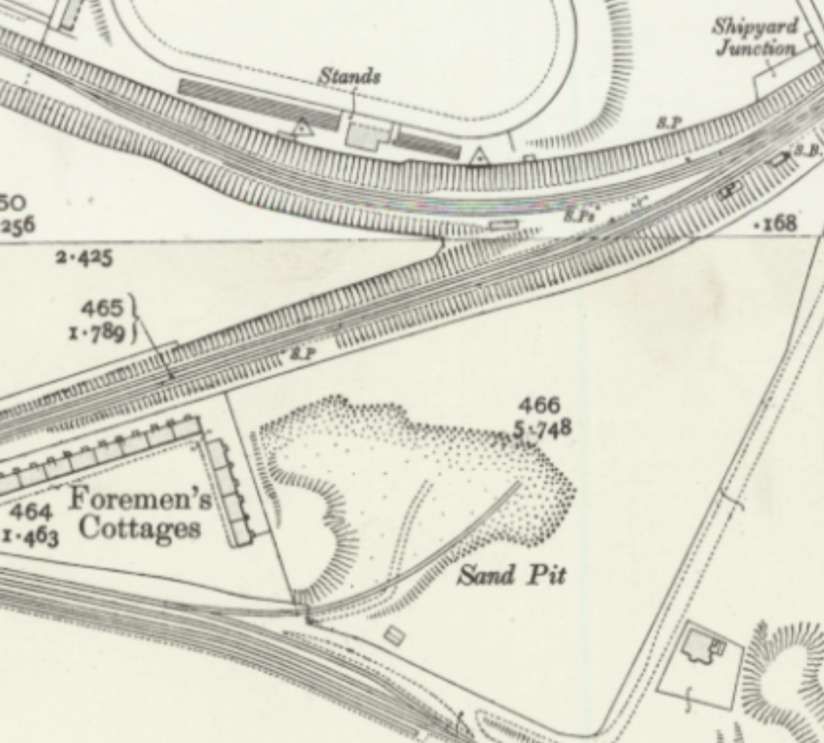
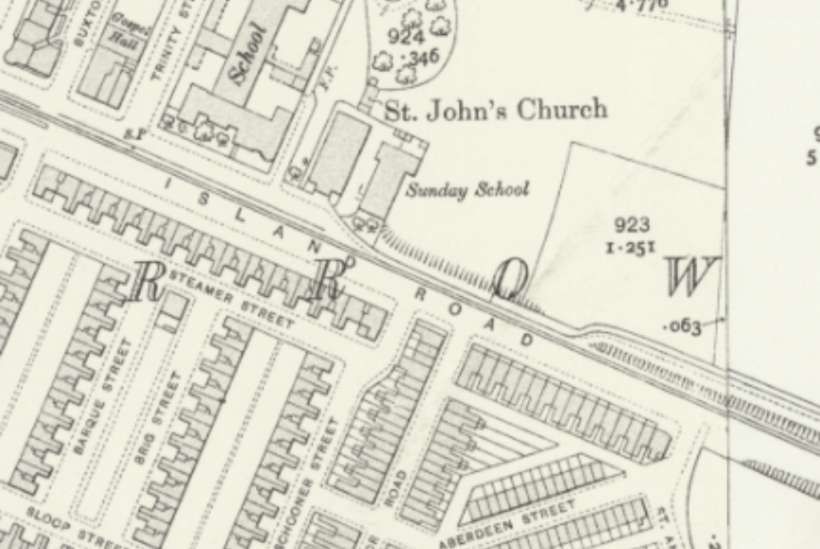
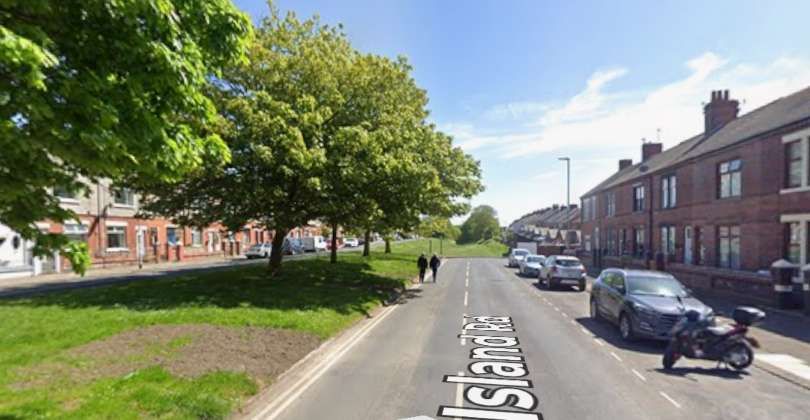
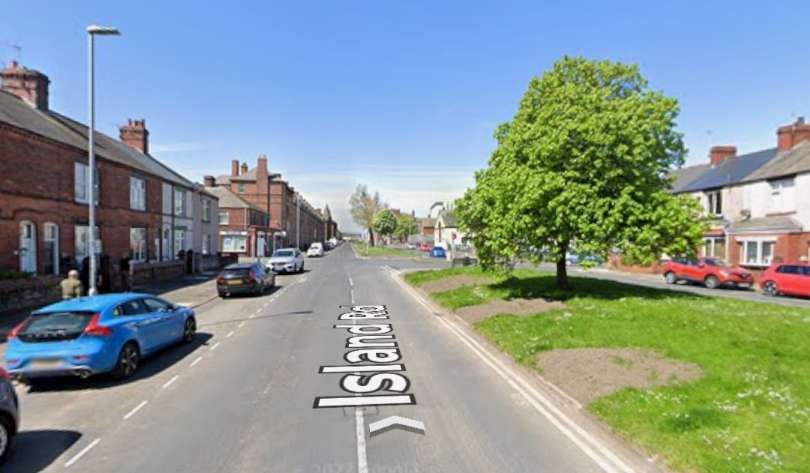
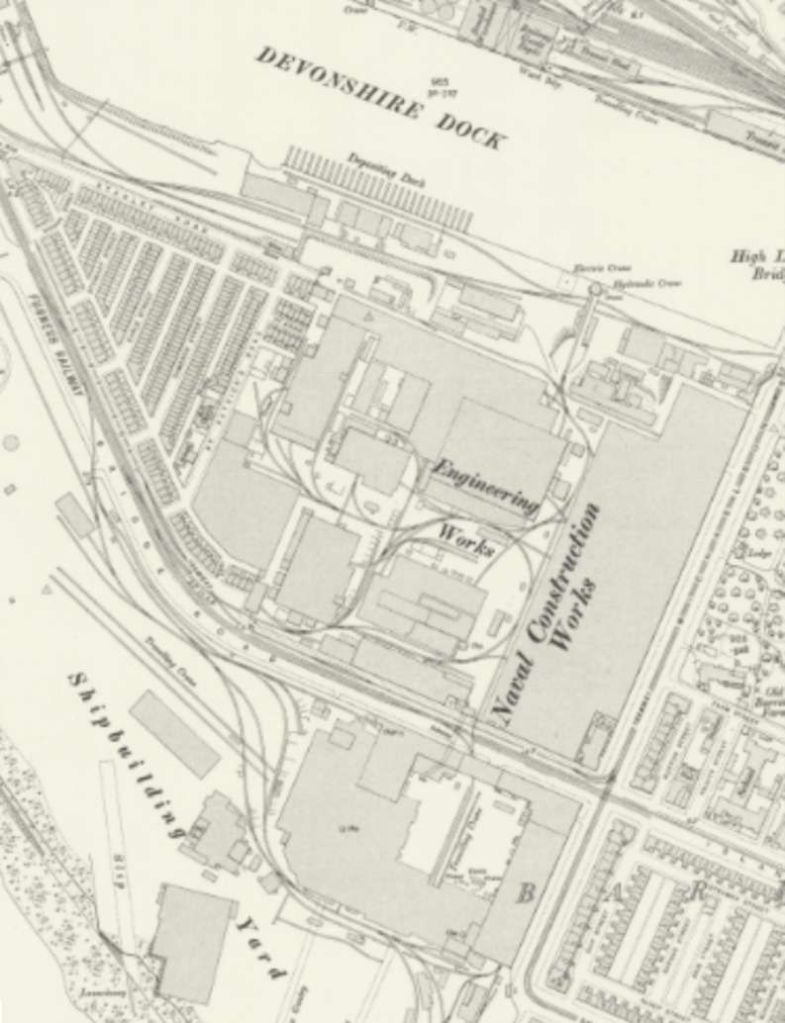
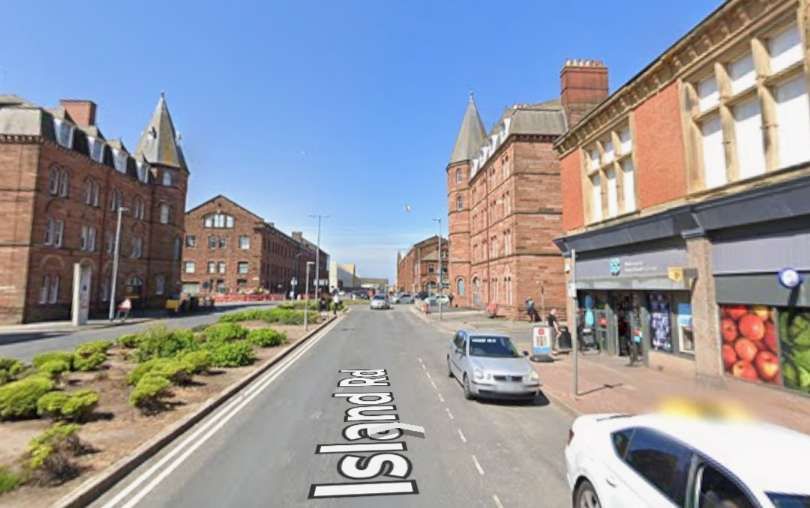
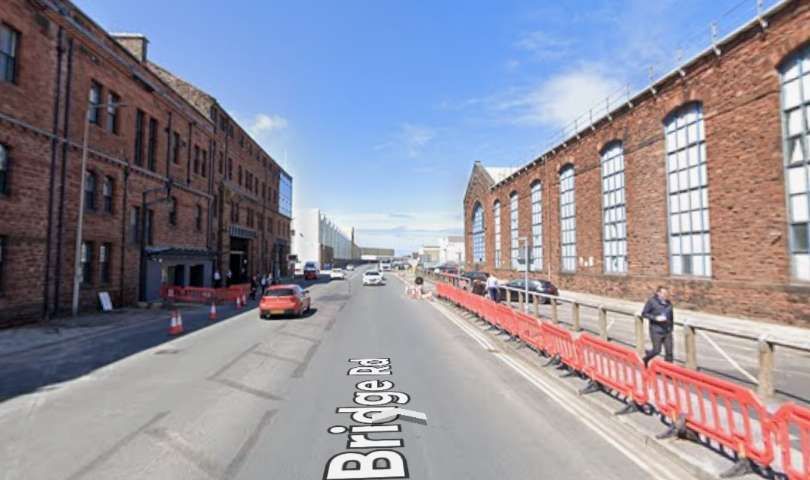
And again: “Shipyard Junction was reached in a cutting and the line to the Naval construction works curved off to the right. A station, Island Road, was built in 1899 for workmen’s trains and these have used the platforms ever since. The line is now used for out-of-gauge loads to Vickers Works, near Island Road Station, and normal freight traffic is worked over Devonshire Bridge from the goods yard.” [1: p157]

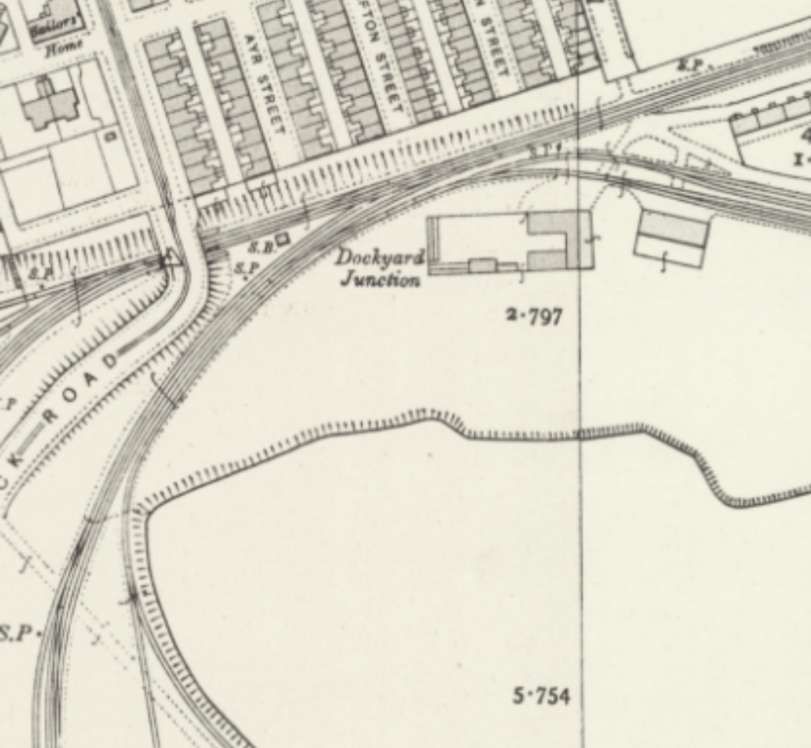
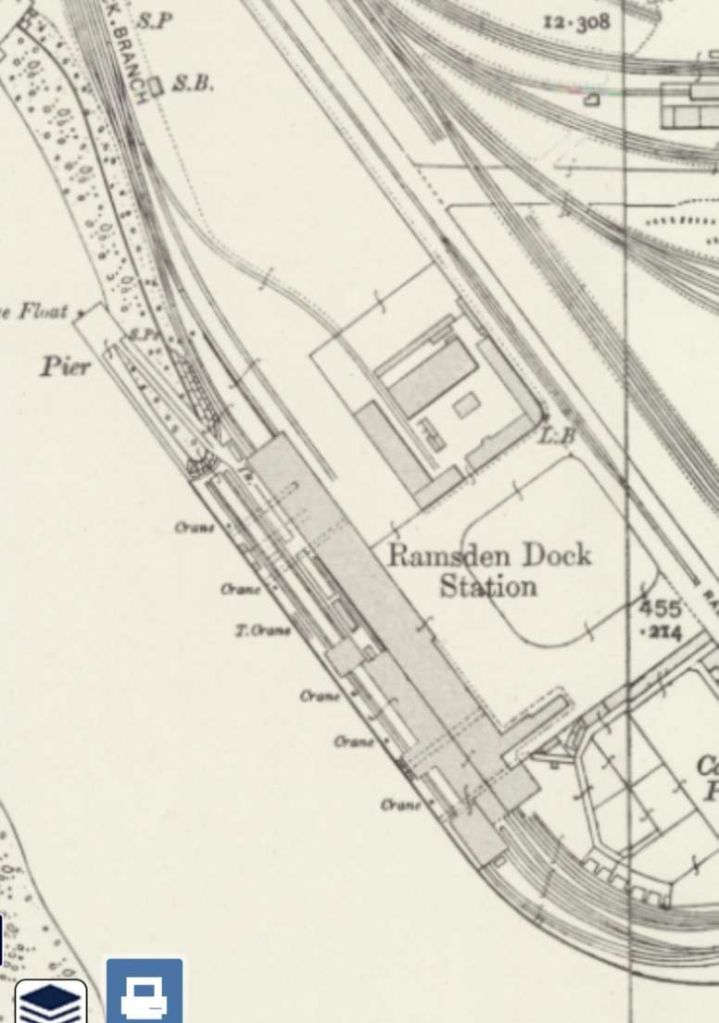
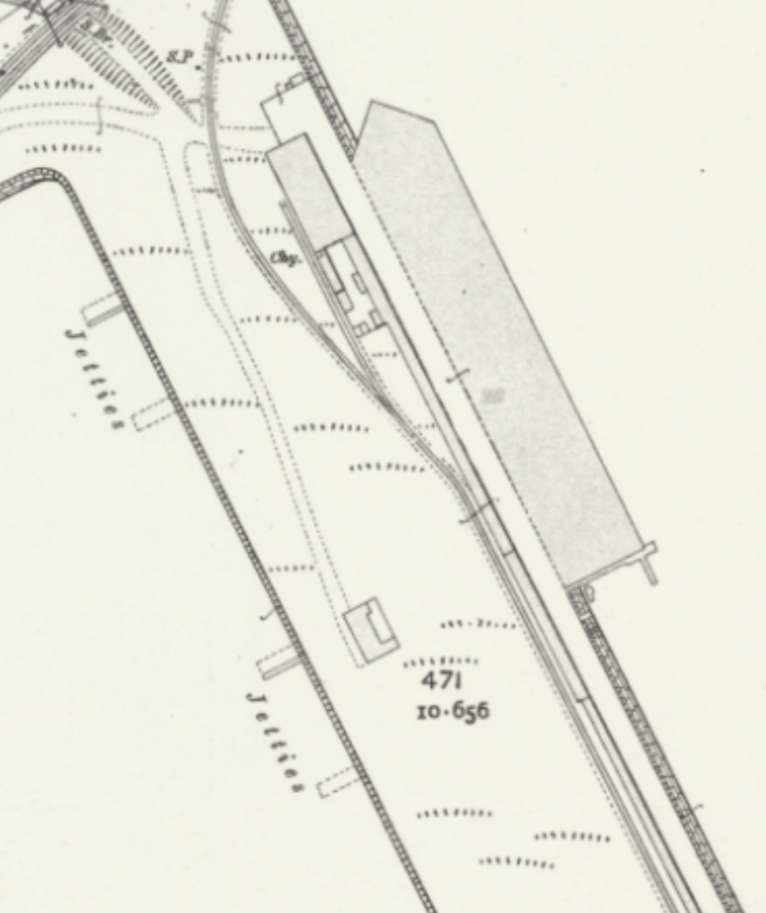
Andrews continued: “Reaching the shore, the line to the docks branched off at Dockyard Junction and the passenger line curved away to the left to reach Ramsden Dock Station, which consisted of a long covered platform and a short bay. A goods shed separated the platform from the quayside and at low tide passengers embarked through a tunnel under the lines. The station was completed in 1885. Regular steamboat traffic to the Isle of Man, Belfast and Fleetwood ceased at the outbreak of the first world war, but excursion boats were run from the station, mainly to Blackpool, until 1936. The station was pulled down in 1938.” [1: p157]

Although the docks, seen on satellite imagery, seem substantially as shown on the drawing in Andrews’ article, closer inspection will reveal substantial changes. [Google Maps, February 2026]

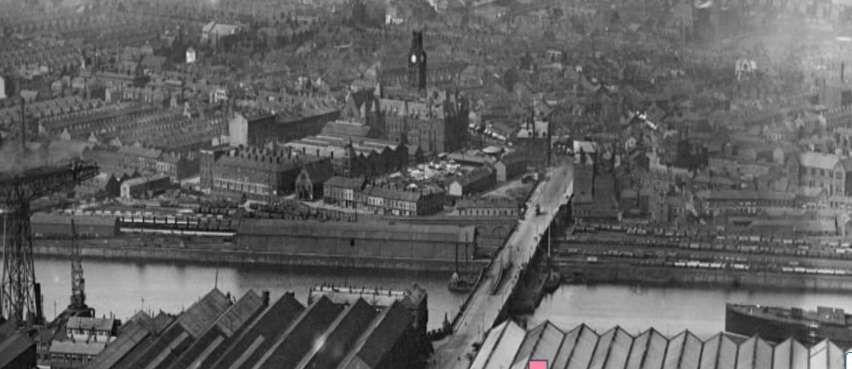
Before looking at the rail infrastructure of the 21st century it is right to at least try to show what existed in around 1910 and which has since been substantially lost.

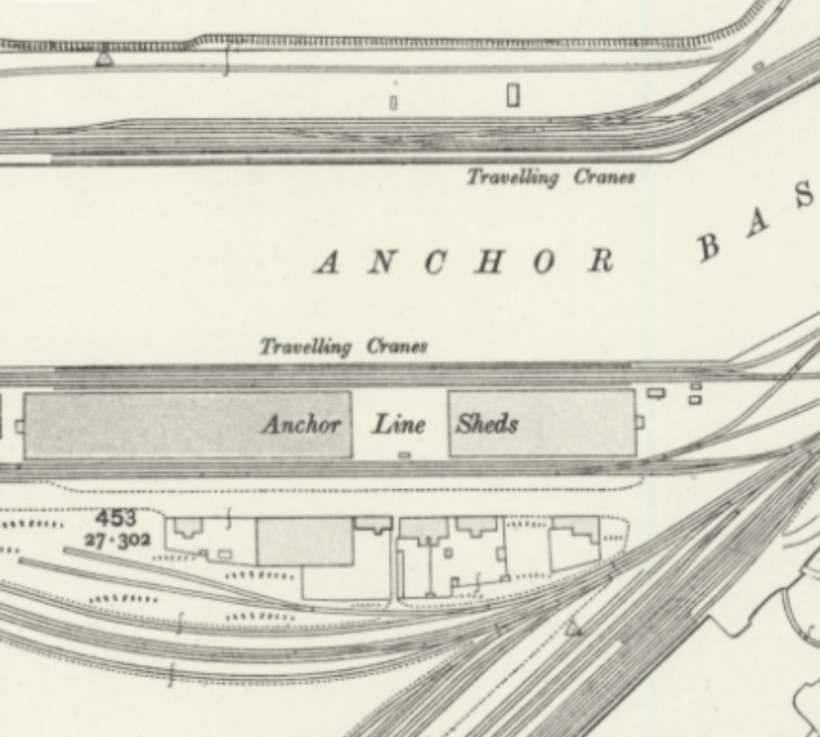
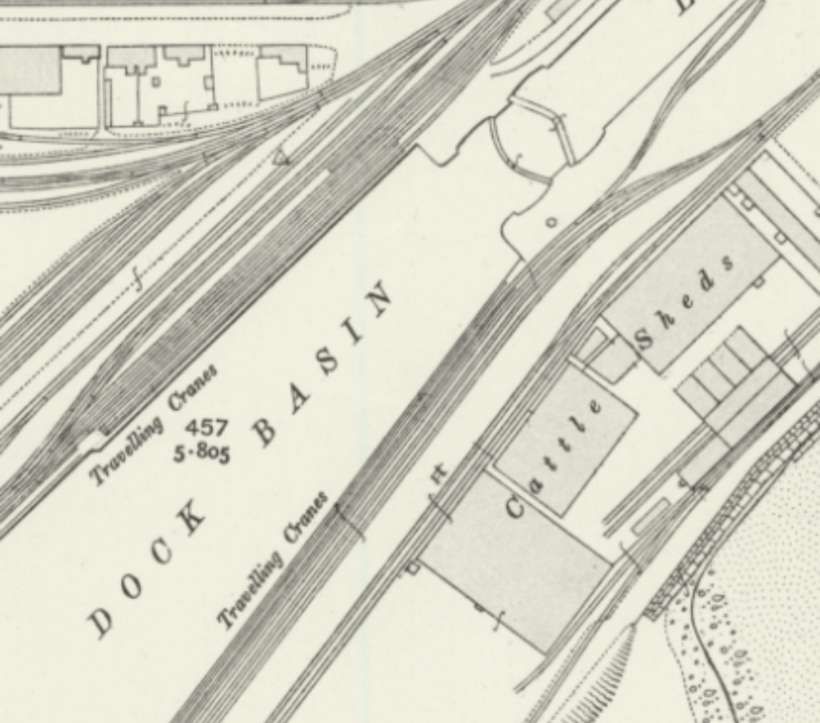
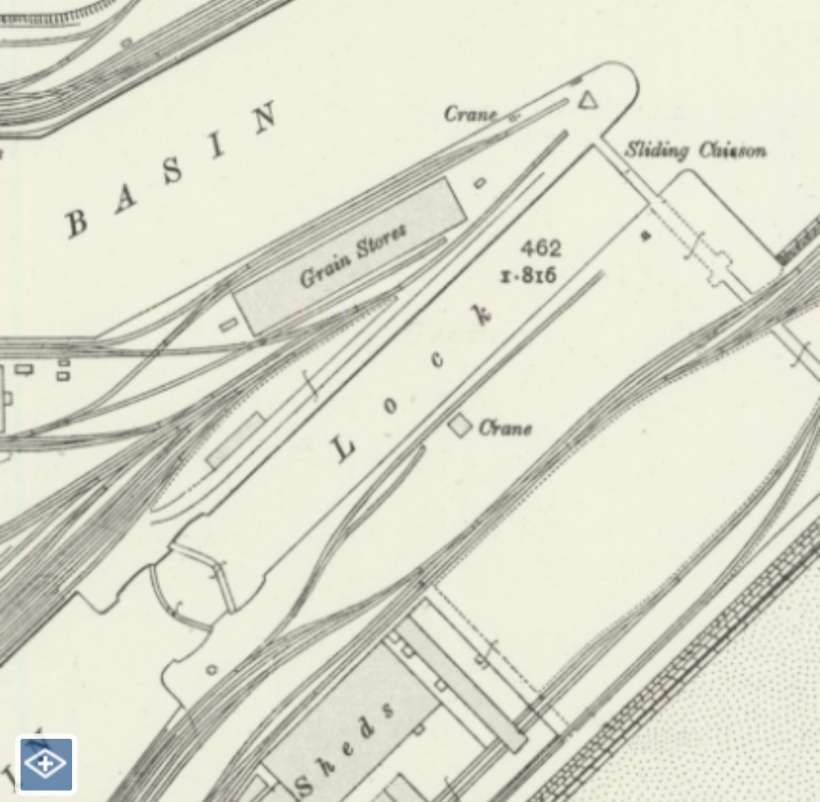
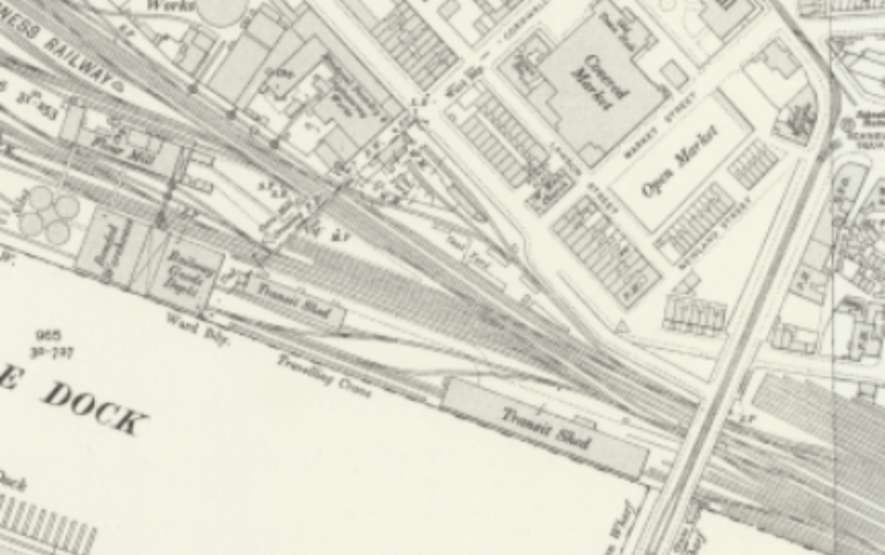
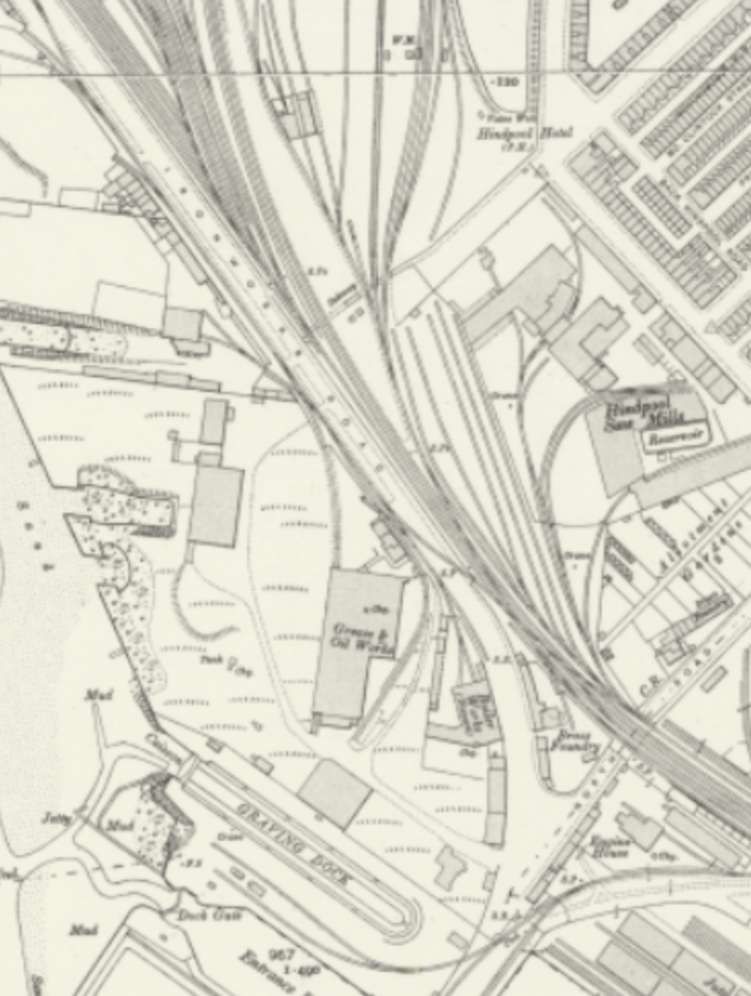
It is difficult to give an effective account of the complexity of the railway infrastructure around the docks at the turn of the 20th century, although the sketch map from 1959 is particularly helpful for understanding the mid-20th century situation. The following extracts from the 25″ Ordnance Survey from around 1910 may do more to obfuscate than to illustrate!

The Buccleuch Bridge of 1907 is shown in this extract. [20]

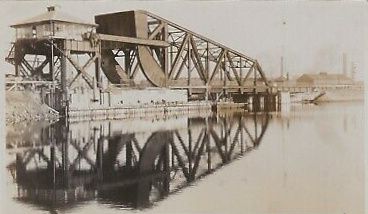
The New Buccleuch Bridge across the Buccleuch Dock in Barrow in around 1910, © Public Domain. [24] More photographs of the bridge can be found here. [25]

The location of the 1907 lift bridge as it appears in the 21st century. [Google Maps, February 2026]

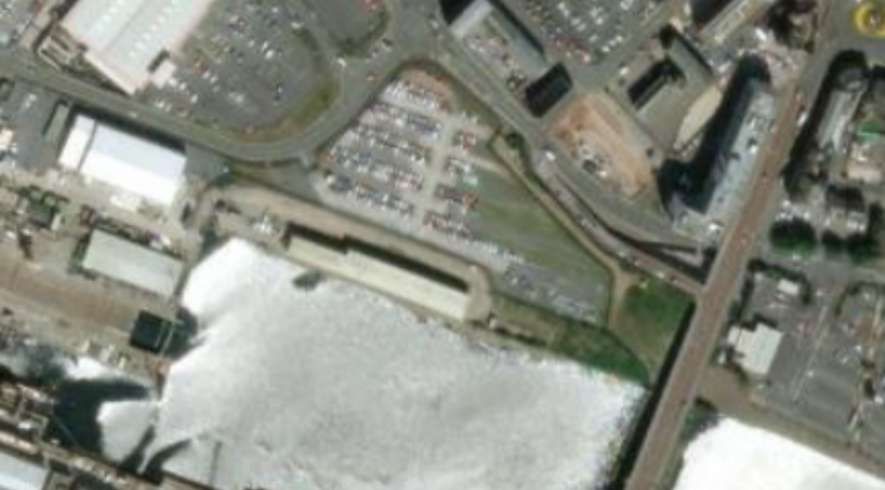
As we have noted, the lift bridge mentioned by Andrews in 1959, is long gone, as is all of the network to the West of the bridge. That network was substantial. … A line ran from the bridge Southwest before curving round to the Southeast to head into Ramsden Dock Station.

That line can be seen here running from top-right to bottom-left through Shipyard Junction. [20]
Approximately the same area in the 21st century! [Google Maps, February 2026]
Shipyard Junction is top-right in this extract. The line ran Southwest passing a series of workers cottages. [20]
Approximately the same area in the 21st century! [Google Maps, February 2026]
Looking East along the line of the old railway from the South end of Andrew Street. [Google Streetview, May 2022]
Looking West along the line of the old railway from the South end of Andrew Street. [Google Streetview, May 2022]
Dockyard Junction is at the centre-top of this extract close to terraced housing. The line then passed under Ramsden Dock Road before curving round to the South as shown below. [20]
Approximately the same area in the 21st century! [Google Maps, February 2026]
Looking East along the line of the old railway from the bridge carrying Ramsden Dock Road. [Google Streetview, April 2009]
Looking West along the line of the old railway from the bridge carrying Ramsden Dock Road. [Google Streetview, April 2009]
This aerial image from the Britain From Above website (Image No. EPW014339), was taken facing Northeast. It shows the railway running under and alongside Ramsden Dock Road. The most westerly of the lines, served Ramsden Dock Station which was off the bottom right of the image, © Historic England. [27]
The road and the railway curved together to the South. It is worth noting the tramway which ran down the centre line of Ramsden Dock Road. [20]
Approximately the same area in the 21st century! Note that Ramsden Dock Road has been severed to accommodate a road scheme. [Google Maps, February 2026]
Further South the line ran closer to the sea shore. [20]
Approximately the same area in the 21st century! [Google Maps, February 2026]
Looking South from the roundabout shown in the satellite image above, approximately along the line of the railway which served Ramsden Dock Station. [Google Streetview, May 2022]
Ramsden Dock Station and Pier. Note that the lines continued beyond the Station curving round to the Northeast. [20]
Approximately the same area in the 21st century! There is nothing to indicate that a railway station was ever on the site. [Google Maps, February 2026]

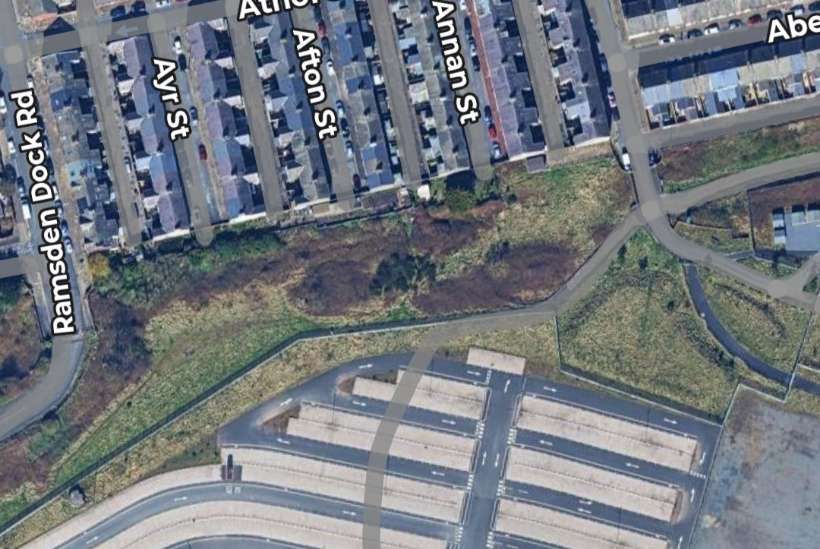
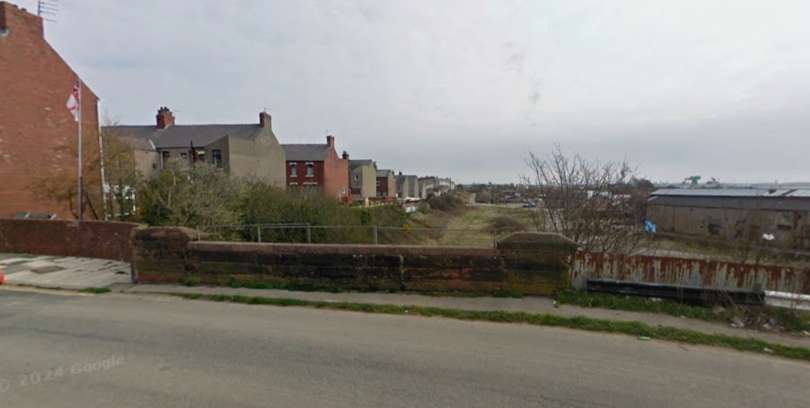
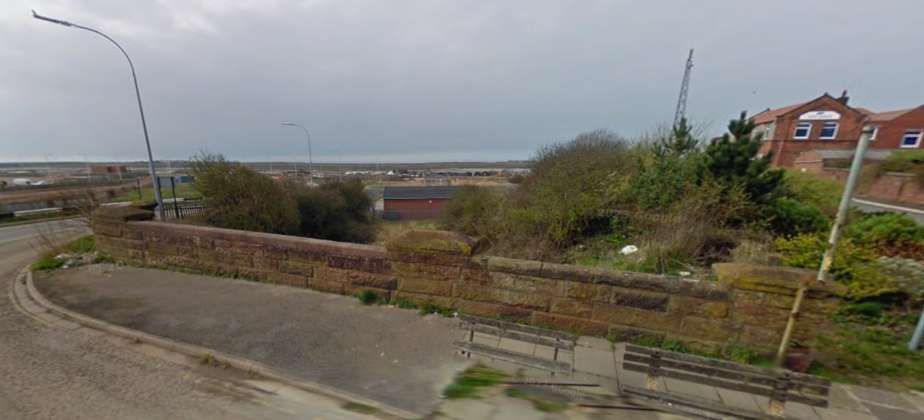
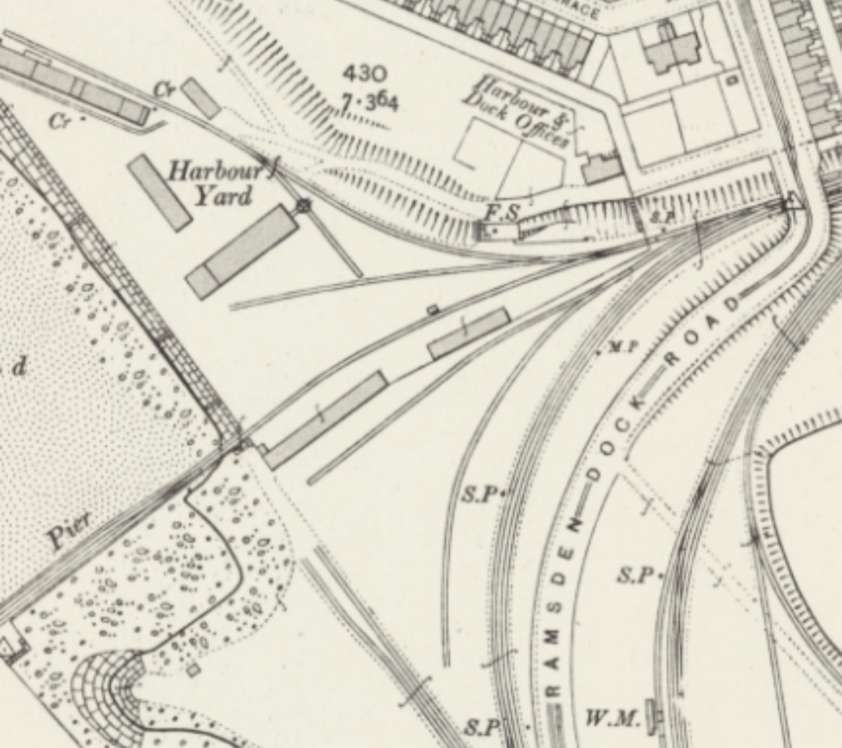
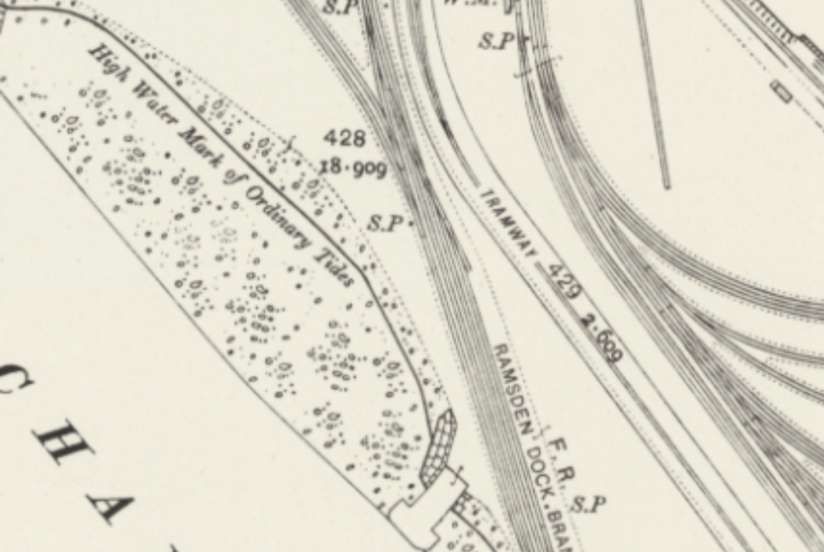
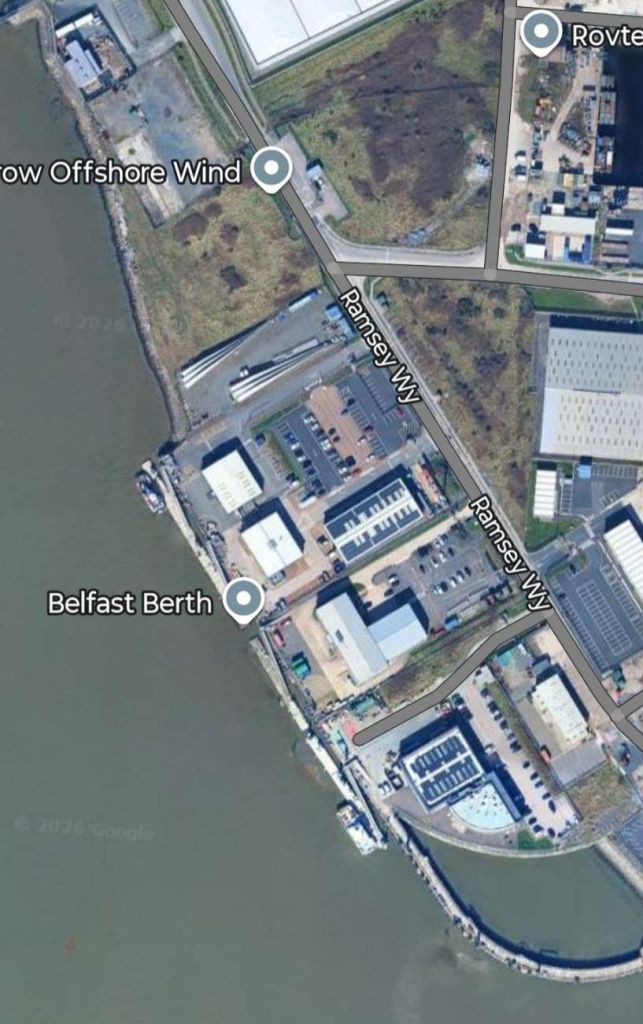
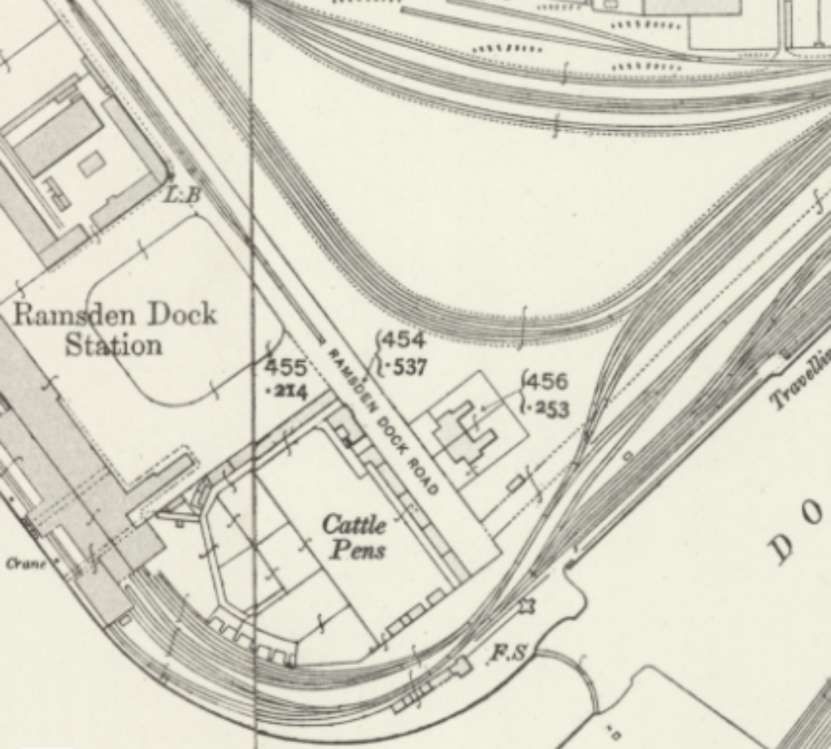
Ramsden Dock railway station (also known as Barrow Island and officially as Barrow Ramsden Dock) was the terminus of the Furness Railway’s Ramsden Dock Branch. [26]

The station operated between 1881 and 1915. Located at the southern tip of Barrow Island alongside Ramsden Dock it primarily served the adjacent Walney Channel passenger ferry terminal. It was accessible by Ramsden Dock Road and the Barrow-in-Furness Tramway. [26]

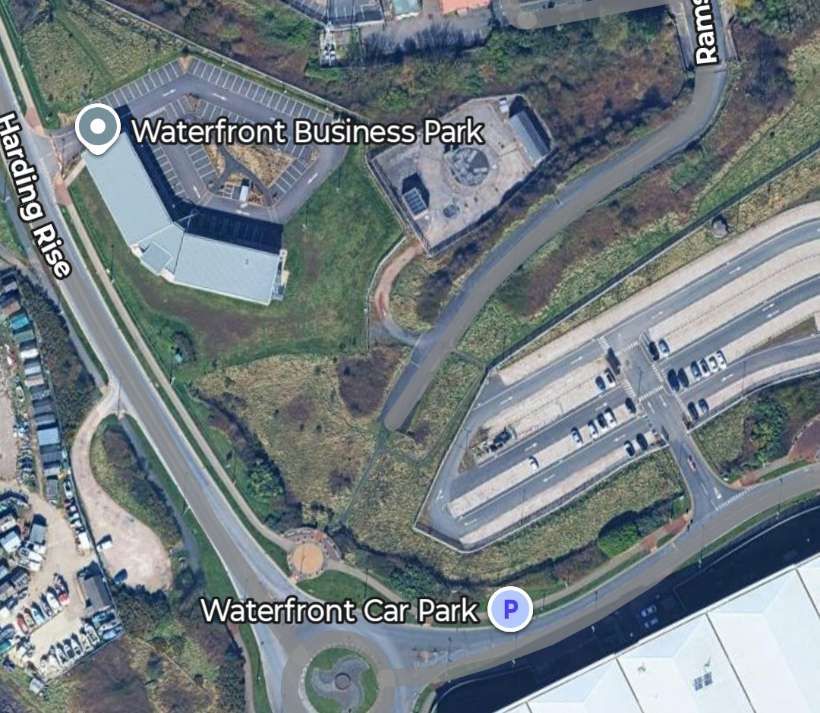
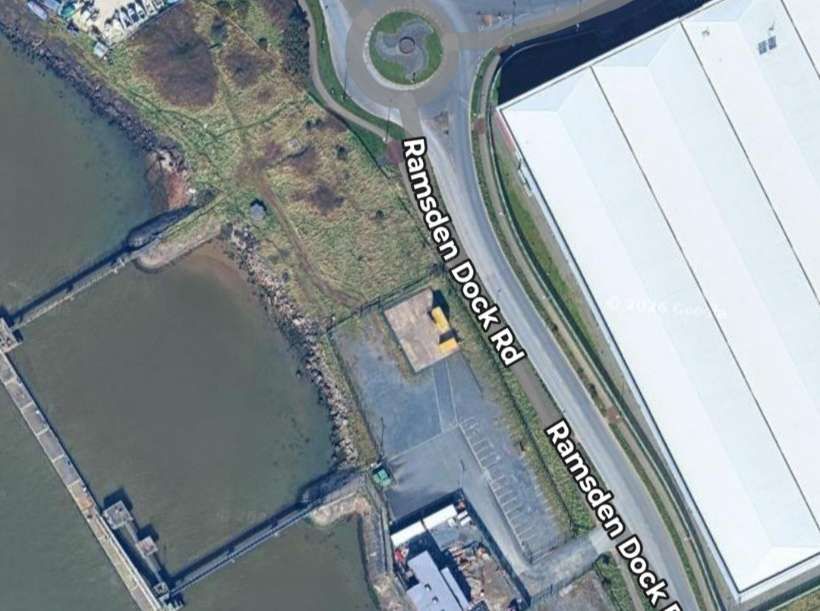
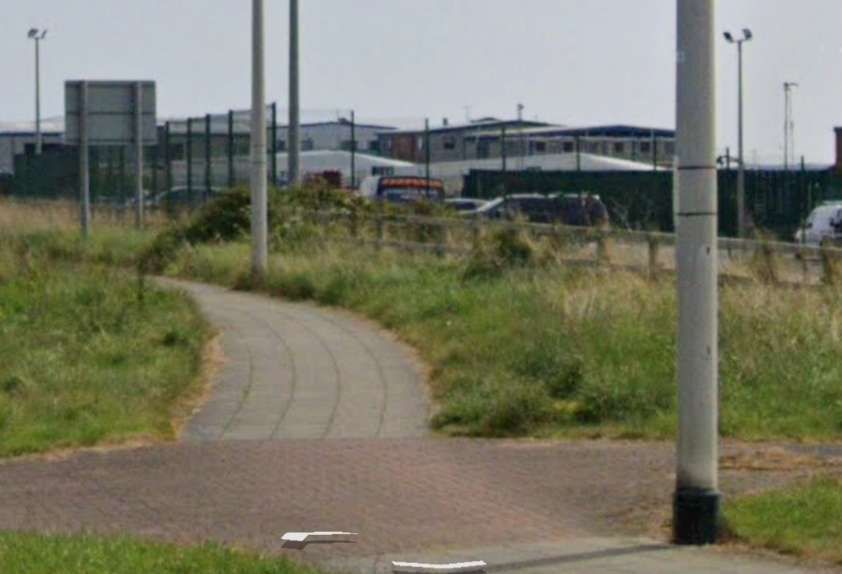
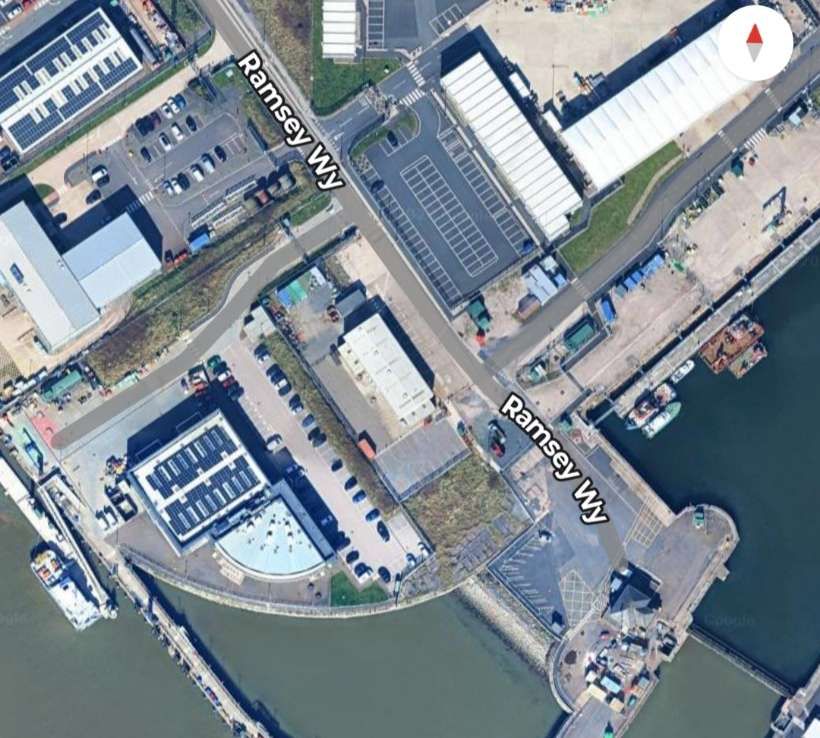
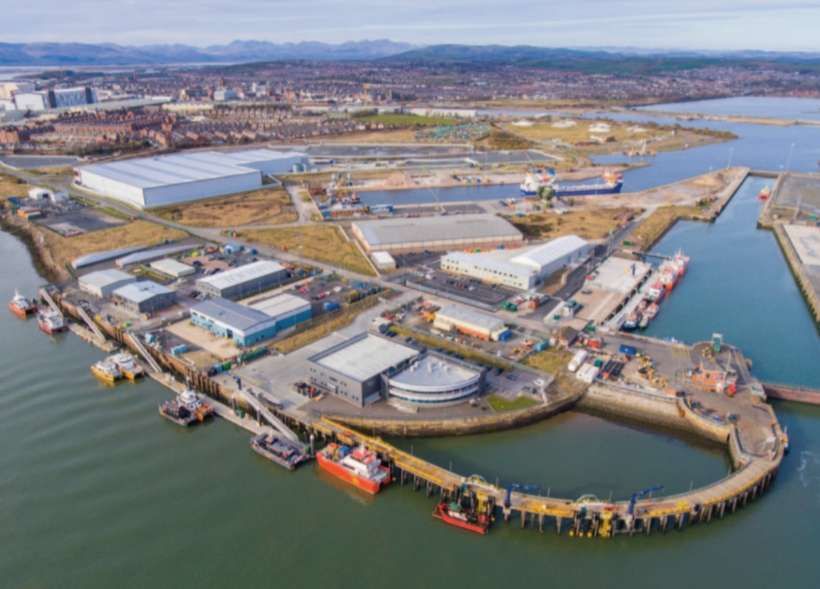
The station building was demolished in the 1940s, while the rail line leading to it was completely removed in the 1990s. No evidence of either remain and a windfarm operations centre has been built on the site. [26]

The lines from Ramsden Dock Station curved round into the dock railway network. [20]
Approximately the same area in the 21st century! [Google Maps, February 2026]
Barrow Port, looking towards the Cumbrian Hills. [30]
A Britain From Above aerial image looking Northeast across the Dock Basin EPW004066 in 1920 © Historic England. [31]

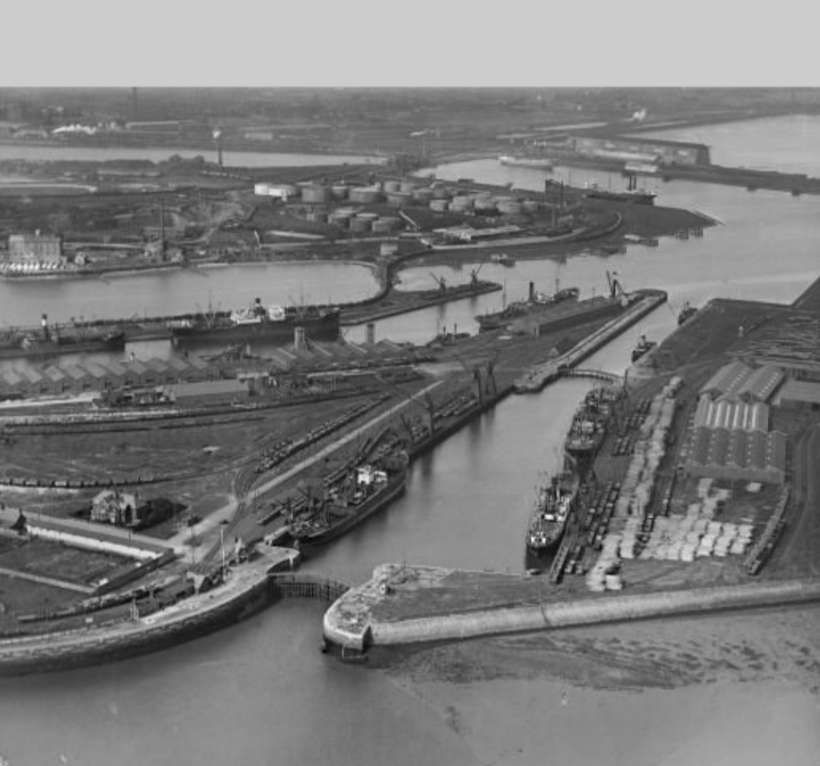
Running parallel to the line through Ramsden Dock Station were lines which served the various sidings in the docks. These lines can be seen in the extract above entering at the third-point along the top from the left of the image, and appear on the extract below, running diagonally across the image from the top-left corner.

A tree of sidings curved off the feeder line and ran East-West. The lines leaving the bottom of the extract at the third-point from the right enter the last extract from the quarter-point from the left. [20]
Anchor Basin and the Anchor Line Sheds circa 1910. [20]
South of the extract above, the extract shows the Dock Basin which had a lock gate to open water at its Southwest end with Cattle Sheds to its Southeast. [20]
A grain store sat to the Southeast of Anchor Basin and a lock linked it with the Dock Basin in the last extract. The Northeast end of the Cattle Sheds can be seen at the bottom of this extract. [20]
Approximately the same area as covered by the four map extracts above, as it appears in the 21st century! [Google Maps, February 2026]
Lines ran between the Southeast dock wall of Ramsden Dock and the shore. [20]
At the Southeast corner of Ramsden Dock, one line remained close to the shore with another turning North to run between Ramsden Dock and Cavendish Dock. The line along the Southeast side of Cavendish Dock and close to the shore led across to the Piel Branch curving round to the North to make a junction with the Branch. [20]
The line heading North linked back to the line that ran along the Northwest edge of Cavendish  Dock and crossed the Buccleuch Bridge. [20]
This length of line is part of the remnants of what was on an extensive rail system. [20]
Approximately the same area as covered by the four map extracts above in the 21st century! [Google Maps, February 2026]

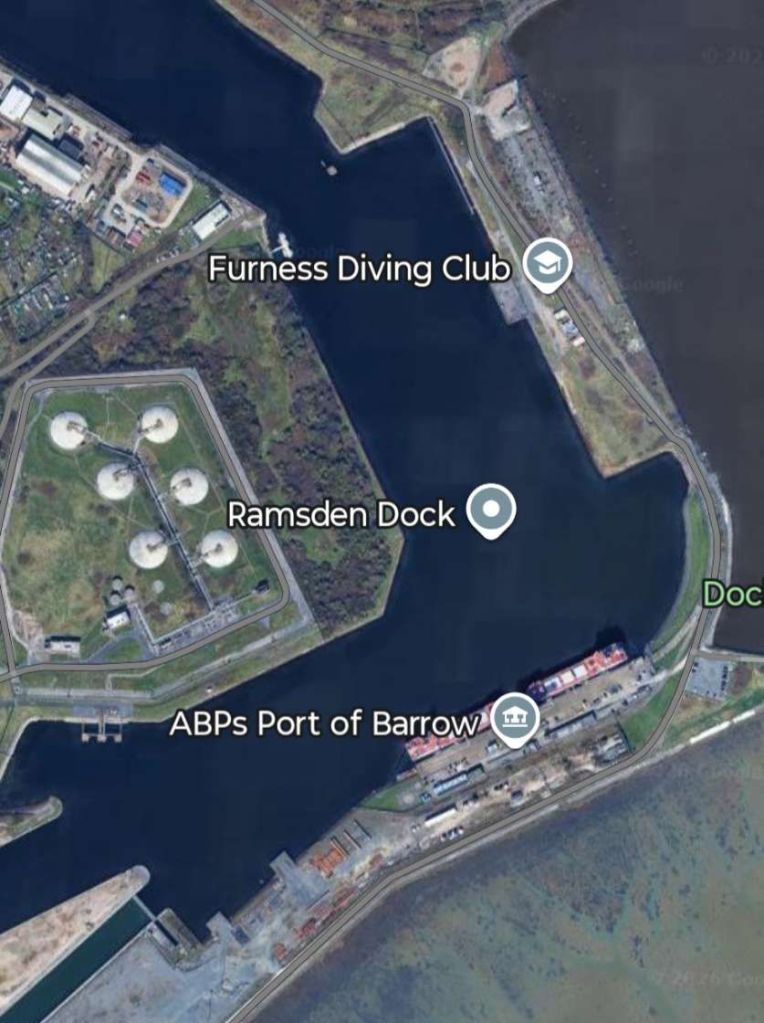
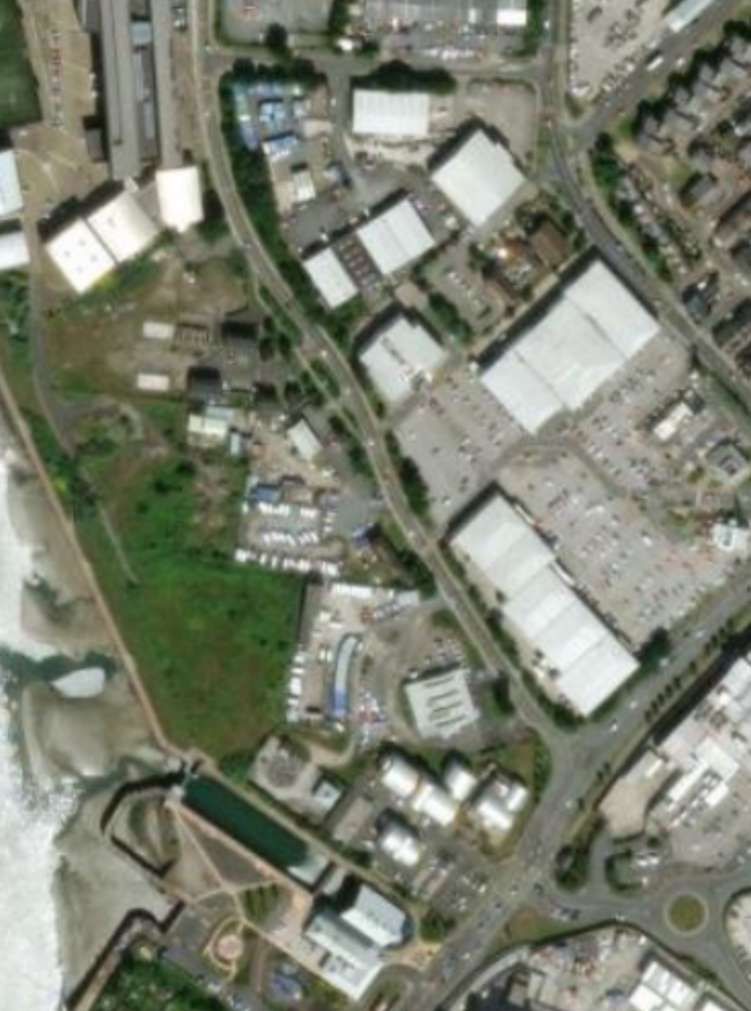
Much more has changed since 1959. The significant network of dock railways has been replaced by a single line running down the East side of Ramsden Dock.

Railmaponline.com shows a single line entering Barrow along the original main line from the Northeast on this satellite image. The triangular junction is gone, although the ghost of the original curve from St. Luke’s Junction to Loco Junction can still be made out. A line curves to the Northwest towards Barrow Railway Station.The line to the docks heads Southwest from Salthouse Junction [10]
This satellite image provided by railmaponline.com shows the single line on the East side of Ramsden Dock curving round to the Southwest to serve ABP’s Port. [10]
This photograph was taken in August 2005. Cavendish Dock is on the right of this North-facing image. The disused Barrow Paper Mills are in the background. The building with the tall chimney at the right of the photo is the gas fired Electricity Power Station, © David Jackson and licenced for reuse under a Creative Commons licence (CC BY-SA 2.0). [28]
The line curving round to the North side of Cavendish Dock from Cavendish Dock Road © habiloid and licensed for reuse under a Creative Commons Licence (CC BY-SA 2.0). [29]

Associated British Ports’ “Port of Barrow plays a key role in serving the offshore energy industry in the region described as Britain’s “energy coast”. The port has 15ha of secure open storage and is the site of BAE Systems’ submarine design and manufacturing facility. … The Port of Barrow … handles over 100,000 tonnes of cargo each year, comprising an array of different products including limestone, sand, aggregates, granite and woodpulp. Heavy lift projects are also routinely and efficiently carried out to support the offshore energy sector.” [19]

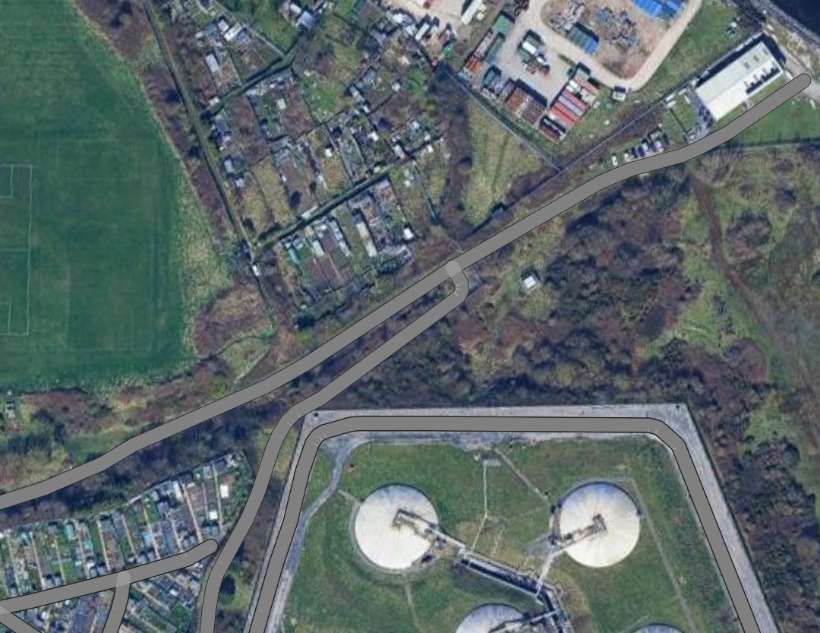
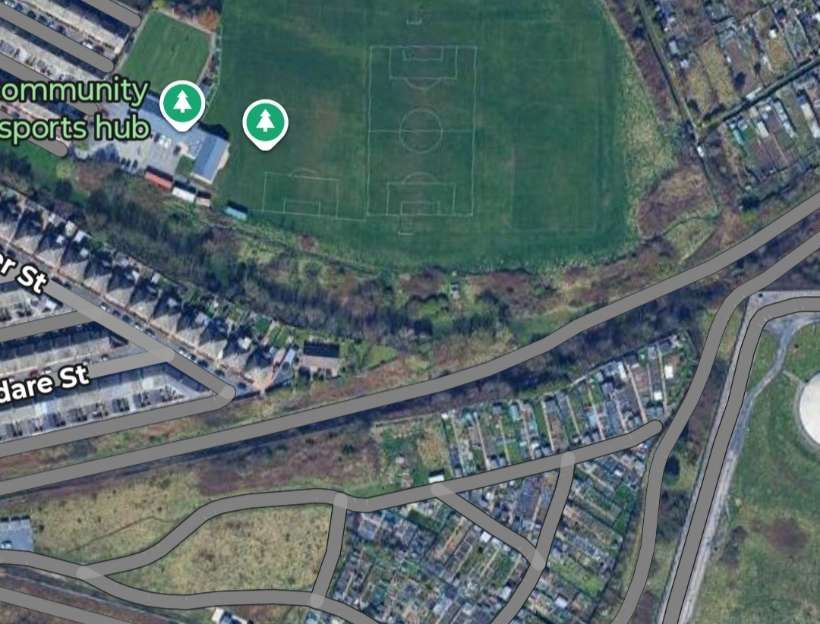
To the Northwest of the dock lines we have been looking at, were the Naval Engineering Works and Shipbuilding Yard. These were served from the Southeast by a line heading West-northwest from Shipyard Junction which ran round the Southern side of the stadium and then in the surface of Island Road.

To the West of Shipyard Junction the lines thinned down to a single line which took its place in the road surface. [22]
The same area in the 21st century. [22]
The railway in Island Road. [22]
The same area in the 21st century. [22]
Looking East-Southeast along Island Road and the line of the railway. [Google Streetview, May 2022]
Looking West-Northwest along Island Road and the line of the railway. [Google Streetview, May 2022]
The Naval Construction and Engineering Works and the Shipbuilding Yard. Devonshire Dock sits to the North of the Works and railway lines curved round the Northwest end of the Dock to meet those running along its Northeast side. [22]
The structures on the site seem very similar in the 21st century. [22]
In this aerial image looking North-northeast from 1920 the high-level bridge can be seen top-right, Michaelson Road runs bottom-left to top-right, Island Road/Bridge Road runs a Ross the bottom half of the image. The Naval Works dominate the centre and centre-left of the image, © Historic England. [
Further West along Island Road looking West-northwest into the Naval Works. [Google Streetview, May 2022]
Looking West-northwest through the naval Works. [Google Streetview, May 2022]
Further West, looking Northwest along Bridge Road. [Google Streetview, May 2022]
This photograph is taken approximately at the location of the old Devonshire Bridge. It looks North along North Road. [Google Streetview, May 2022]
Buccleuch Junction at the left of this map extract was the point at which the line South between Ramsden and Cavendish Docks, the line across Buccleuch Bridge and the line along the Northeast side of Buccleuch Dock separated. There were a series of sidings which ran along the Northeast side of Buccleuch and Devonshire Docks. [22]
Only the line curving to the South remains in the 21st century. [22]
Note not only the significant rail infrastructure but also the tramways which served Barrow. [22]
Both the railway and the trams no longer feature on this 21st century satellite image. [22]
A high level bridge took Michaelson Road and its tramway over both the railway lines and the Docks. [22]
The same area in the 21st century. [22]
The high-level bridge features at the centre of this extract from an aerial image provided by Britain From Above. It is included here for the railway sidings on the far dock wall, © Historic England. [32]
A rail line from the South of the Devonshire Dock curved around its Northwest end, crossing Devonshire Bridge and linking up with the lines on the Northeast of the Dock. [22]
The same area in the 21st century. The Dock’s length has been curtailed and North Road now curves round on the approximate line of the old railway and bridge. [22]
We have already seen this photograph which is taken approximately at the location of the old Devonshire Bridge. It looks North along North Road. [Google Streetview, May 2022]
A series of tracks curved away to the North to serve the Iron & Steelworks site. [23]
The same area in the 21st century! [23]

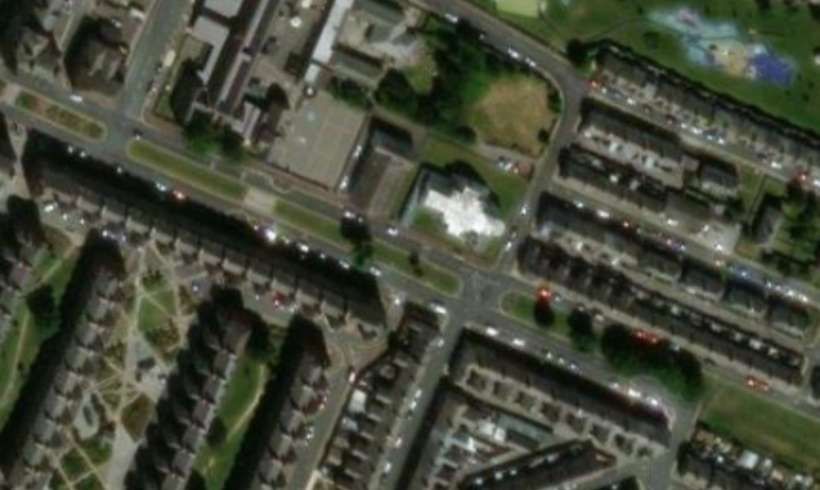
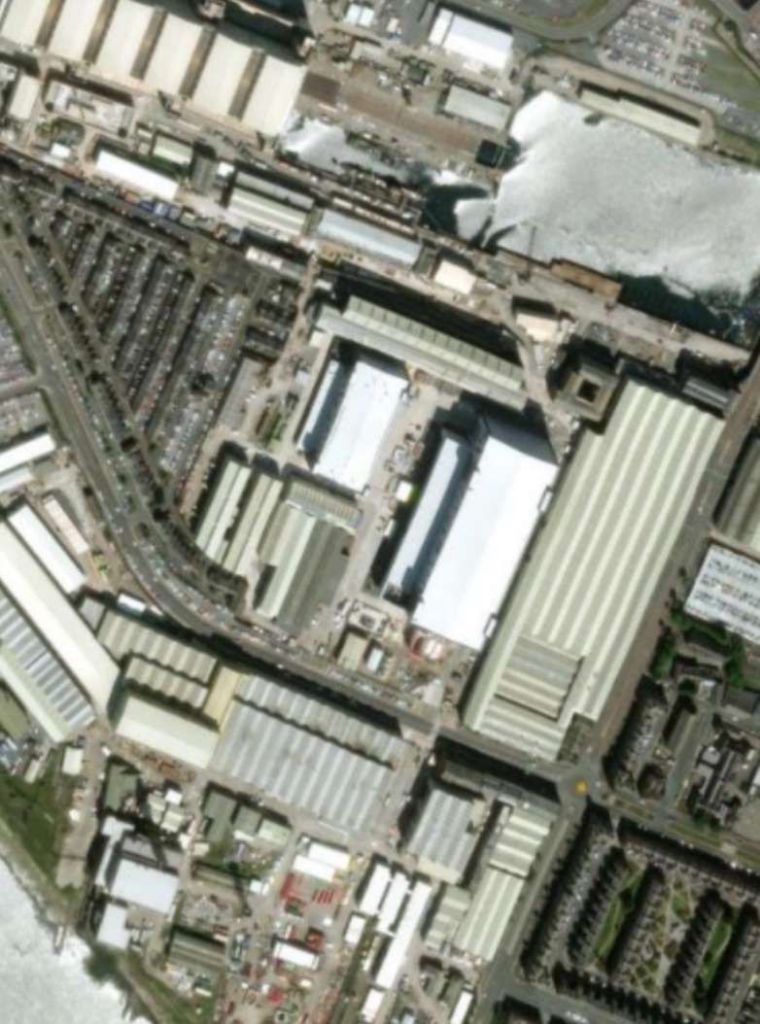
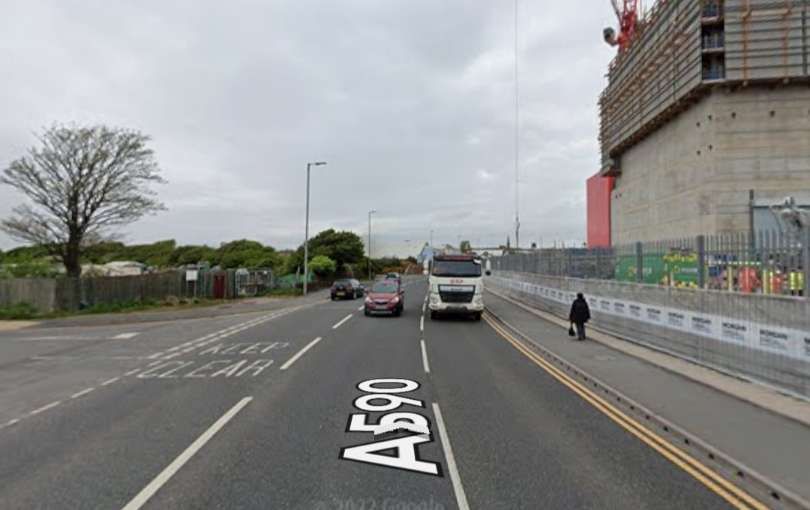
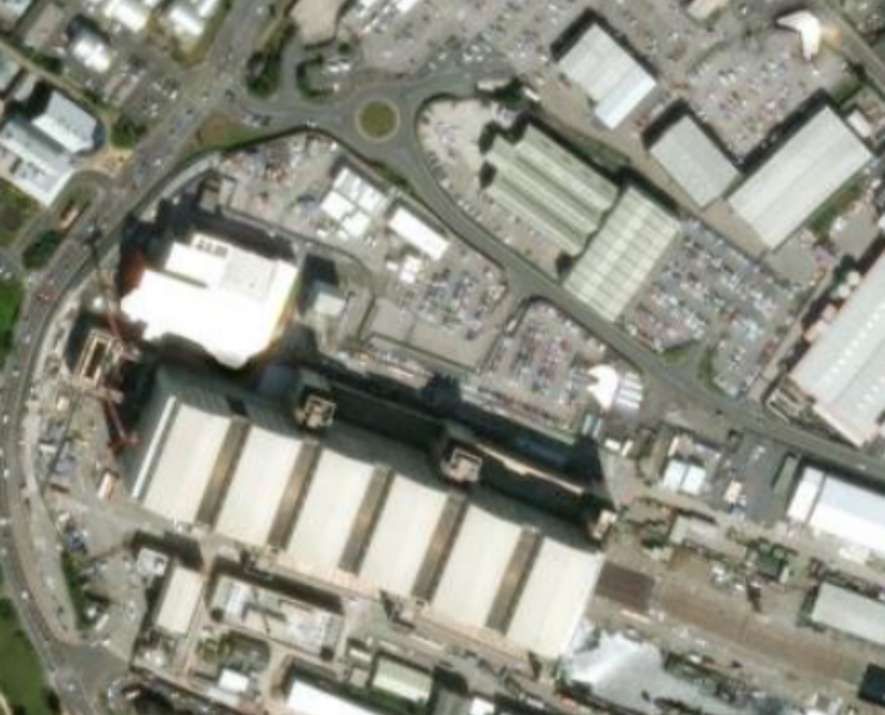
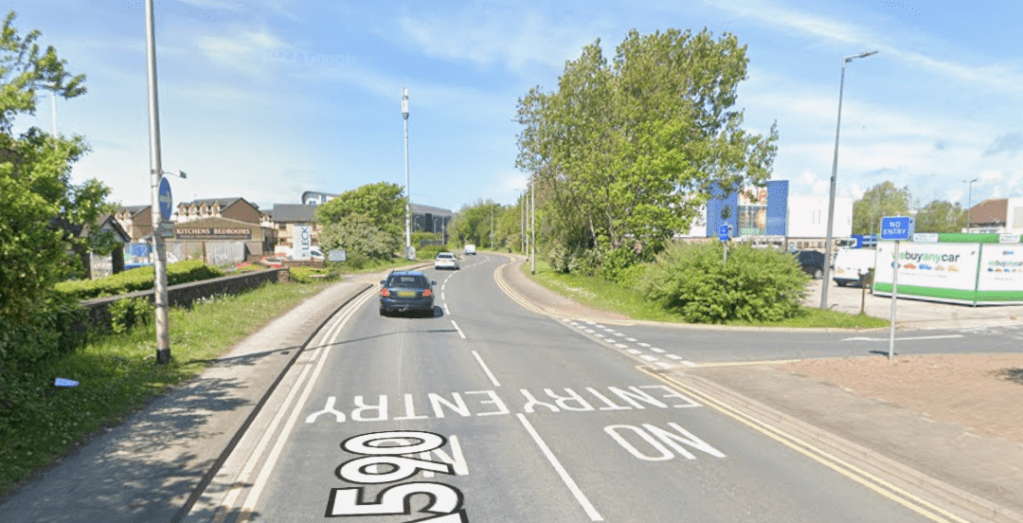
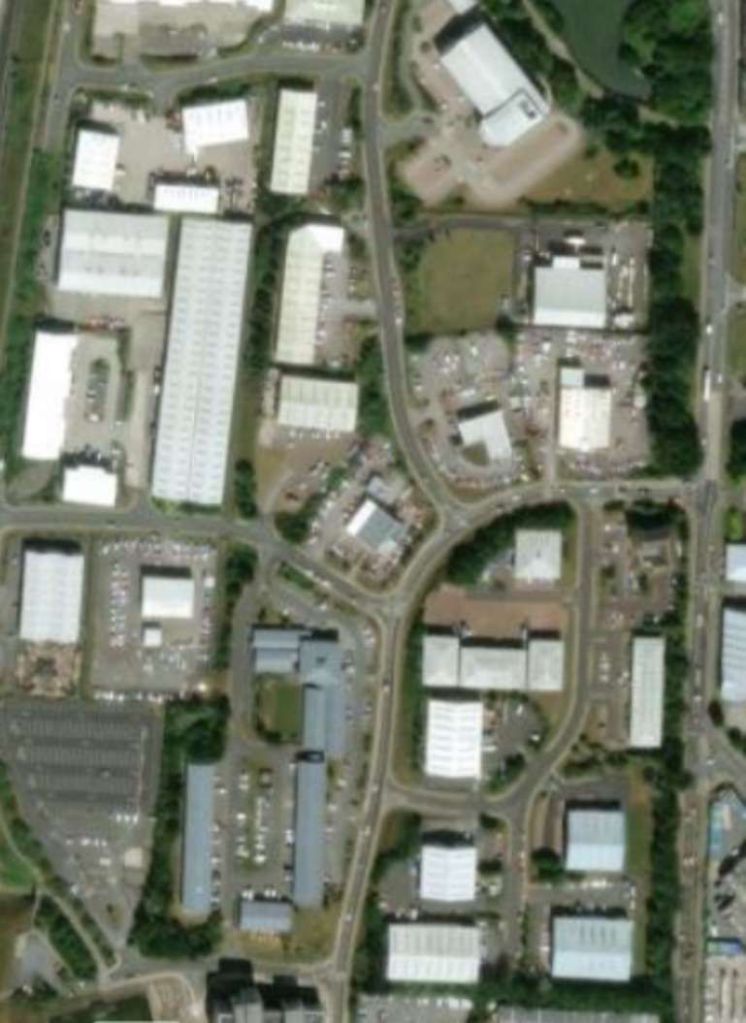
The road layout in the area of the Steelworks and to their immediate South has changed significantly. The image immediately below looks North-northwest along the line of the old and new Ironworks Road which now accommodates Northbound traffic on the A590.

Looking North-northwest along the modern Ironworks Road which accommodates the Northbound A590 traffic. This location is on the approximate line of the old Ironworks Road. [Google Streetview, May 2022]
The tightly packed Ironworks and Steelworks site with its myriad of rail lines. [23]
In the 21st century, the site remains an industrial site but with much lighter industrial processes! [23]
The Steelworks seen from the Southeast in an extract from Britain from Above aerial image, Image No. EPW004060. Ironworks Road can be seen on the left of the image, © Historic England. [33]
This next extract from the early 20th century Ordnance Survey shows the multiple rail lines of the Steelworks site gradually condensing down to a few lines going North. [23]
No sign of rails infrastructure in the 21st century! So much has changed! [23]
Further North again, the lines travelling North from the Steelworks meet those which have passed through Barrow Central Station which can be seen below. The Hawcoat Beach served Hawcoat Quarry. [23]
In the 21st century, a double-track line runs out from Barrow to the North. The A590 curves bottom to top across this extract from the ESRI satellite imagery provided by the National Library of Scotland. The alignment of the old road can just be picked out to the East of the railway line, running Northwest away from the A590, then dog-legging back towards the modern road alignment. [23]

Looking at the lines further to the North, Andrews said in 1959 that, “The economy drive which closed the Piel branch in 1936 also abolished the junction into the goods lines at Ormsgill north of the Central Station, and now trains from the north of the iron works have to work round through Loco Junction and Barrow yard.” [1: p157]

Ormsgill Junction is at the bottom-left of this sketch map. Lines to Hawcoat Quarry and Roanhead Iron Mines were similarly closed by the late-1950s. [1: p150]

But to complete our look at the central area of Barrow, we follow the line up through Barrow Central Station to the North.

Barrow Central Station after the turn of the 29th century. [21]
The site of the station as it appears on the ESRI satellite imagery supplied by the National Library of Scotland. [21]
Barrow Central Station seen from the South on the Station Approach in the 21st century. [Google Streetview, August 2018]
Barrow Central Station seen from Abbey Road Bridge looking Northwest. [Google Streetview, May 2022]

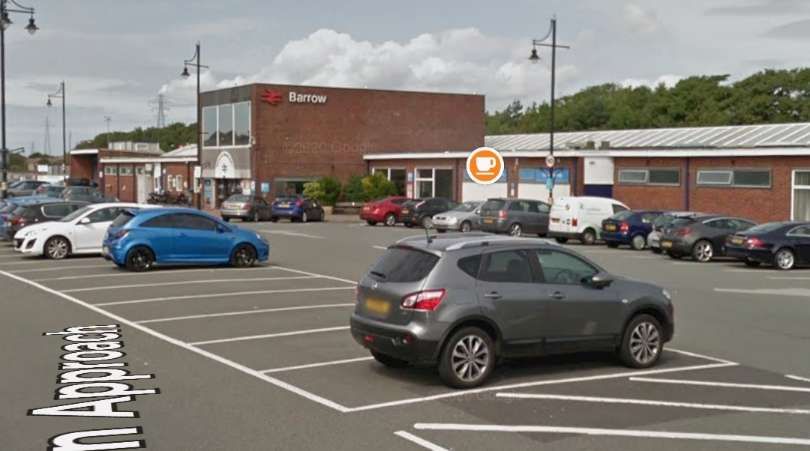
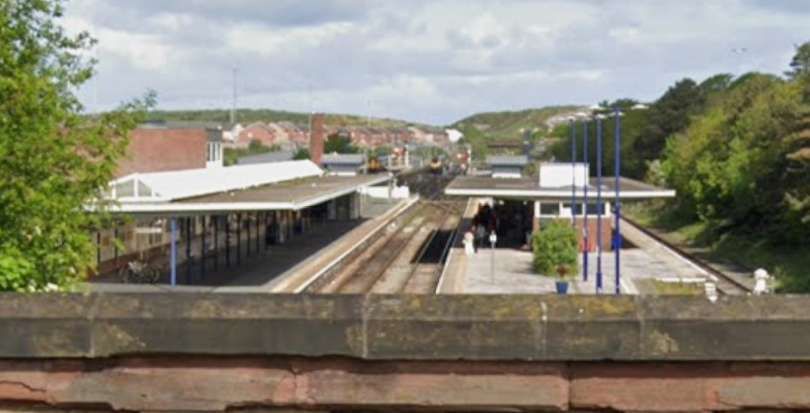
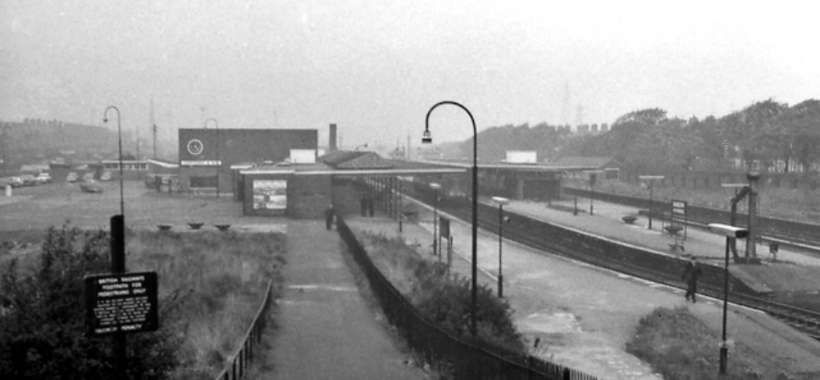
Andrews said in 1959: “The buildings at the new Barrow in Furness Station have been constructed on the site of the old, and are mainly steel framed. A considerable amount of glass has been introduced in the infilling panels forming windows to both the road and platform elevations. Multi-coloured rustic bricks have been used, with slate window sills and fascia over the high-level windows of the front entrance. The platform awnings are of light steel decking, with continuous roof glazing in line with the face of the external wall adjacent to No. 1 platform. The flooring of the booking hall and cafeteria-waiting rooms is laid in precast tiles, and polished hardwood has been used extensively as a decorative wall lining in the cafeterias, and for the framing to the ticket windows and internal window frames. The walls of the booking hall are finished in glazed tiles to the top of door height, with a glossy finish above, and re-erected on the south wall is the Furness Railway 1914-18 war memorial, Loudspeakers have been installed through out the station, and the open platform lighting is fluorescent, incorporating the station name within the light fitting.” [1: p200]

Looking North from the end of the station platform towards what was the location of the carriage sheds. [Google Streetview & Vextrix Surveys, November 2021]
Carriage Sheds to the Northwest of Barrow Central Station in the early 20th century. Note the single industrial siding serving British Griffin Chilled Iron Works. [21]

A similar area in the 21st century! [21]
By the early 1930s, the provision for local industry close to the carriage sidings had increased significantly! This extract comes from the 25″ Ordnance Survey of 1931, published in 1933. [35]
The lines passed under Devonshire Road. [23]
The same location in the 21st century. [23]
This photograph was taken in the late 1950s from a point somewhere Southeast of Devonshire Road. The carriage sheds are on the right of the photograph. There are two tracks on the left of the main line which served industrial premises. The Ordnance Survey shows the first of these sidings serving British Griffin Chilled Ironworks. This image was shared by Ralph Sheppard on the Barrow-in-Furness in Old Photos Facebook Group on 29th December 2019. [34]
Looking Southeast from Devonshire Road towards the maintenance facilities and the station beyond. [Google Streetview,  November 2024]
Looking Northwest from Devonshire Road. [Google Streetview, November 2024]
Continuing Northwest, the lines passed under Walney Road. [23]
The same location in the 21st century. [23]
Looking Southeast from the A590, Walney Road, along the line of the railway towards Barrow Railway Station. [Google Streetview, November 2024]

We finish our survey of Barrow’s Railways at this northern point. Towards the end of his 1959 article, Andrews commented about the first half of the 20th century: “The last fifty years have shown a steady decline in Barrow’s railway system, the inevitable result of the failure of James Ramsden’s vision to become reality. Although the iron ore brought a temporary and easy prosperity, the geographical situation was a permanent setback to the port. The industrial centres of Lancashire and Yorkshire were just too far away and the Furness main line was not built for real speed. Moreover, the Furness Railway Company just failed to establish sufficient variety of local industry to keep the port busy with local trade and the town came in the end to rely almost entirely on the shipbuilding industry. Since the last war, however, there have been signs of a reversal in this downward trend; sidings are being laid in to serve new factories at Salthouse and Sandscale, and Barrow is to become a divisional centre in the L.M.R. de-centralisation scheme. It is hoped that some of the prosperity of the old days is on the way back.” [1: p157]

From 1959 to 2026, Barrow-in-Furness transitioned from a traditional heavy industrial town into a specialized hub for nuclear submarine construction and offshore energy. While iron and steel industries closed by 1988, the BAE Systems shipyard became the town’s primary economic driver, cementing its role in national defense. 

British Cellophane (1959) and Kimberly Clark (1967) established manufacturing plants in Barrow and the 1980s saw the development of gas terminals for the Morecambe Bay gas field.

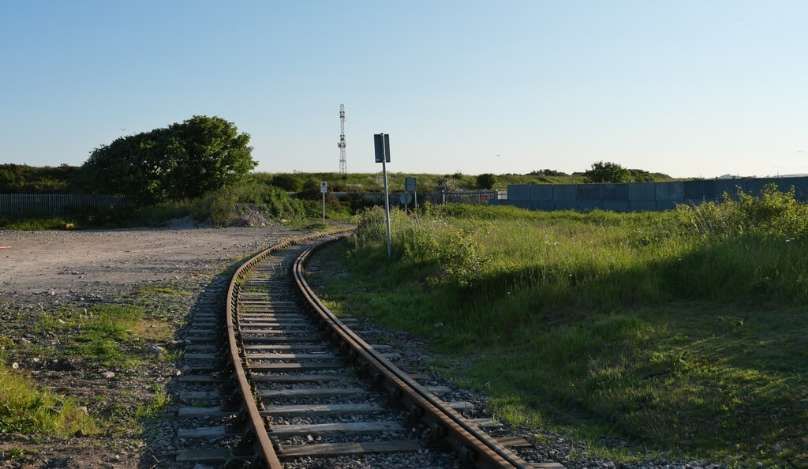
The vast majority of the industrial railway heritage has disappeared. The town is left with its mainline service which serves the Cumbrian Coast and connects the town to the wider UK, and a branch line which runs down to the ABP port facilities.

References

  1. M. J. Andrews; The Railways of Barrow; in The Railway Magazine, Tothill Press, London, March 1959, p149-157 & 200.
  2. https://en.wikipedia.org/wiki/Roa_Island, accessed on 22nd December 2025.
  3. https://visitbarrow.org.uk/roa-island, accessed on 22nd December 2025.
  4. https://en.wikipedia.org/wiki/File:Barrow_Central_railway_station.jpg, accessed on 22nd December 2025.
  5. https://en.wikipedia.org/wiki/Barrow-in-Furness_railway_station, accessed on 22nd December 2025.
  6. https://signalfilmandmedia.com/blitz-stories-images/barrow-central-station, accessed on 22nd December 2025.
  7. https://en.wikipedia.org/wiki/Piel_railway_station, accessed on 23rd December 2025.
  8. Andrews quotes from a newspaper report of a Furness shareholders’ meeting in 1869. [1: p153]
  9. https://www.facebook.com/share/p/1AxvAoRHBg, accessed on 23rd December 2025.
  10. https://www.railmaponline.com/UKIEMap.php, accessed on 24th December 2025.
  11. https://maps.nls.uk/view/126514796, accessed on 24th December 2025.
  12. https://maps.nls.uk/view/126514871, accessed on 24th December 2025.
  13. https://maps.nls.uk/view/126515072, accessed on 24th December 2025.
  14. Peter W. Robinson; Cumbria’s Lost Railways; Stenlake Publishing, Catrine, 2002.
  15. https://en.wikipedia.org/wiki/Rampside_railway_station, accessed on 24th December 2025.
  16. https://www.nwemail.co.uk/features/nostalgia/16445714.rampside-was-a-haven-for-19th-century-sea-bathers, accessed on 24th December 2025.
  17. https://www.geograph.org.uk/photo/3562688, accessed on 27th December 2025.
  18. https://encrypted-tbn0.gstatic.com/images?q=tbn:ANd9GcRGdfLogUZSAQZgRDfqBb-aHVR2IlOZsU-5chvmZR0aNy_pS1j6lQIS_1c&s=10, accessed on 28th December 2025.
  19. https://www.abports.co.uk/locations/barrow, accessed on 12th February 2026.
  20. Individual extracts can be found by enlarging the mapping provided by the National Library of Scotland on this link: https://maps.nls.uk/geo/explore/#zoom=13.6&lat=54.10820&lon=-3.21096&layers=168&b=ESRIWorld&o=100, accessed on 12th February 2026.
  21. https://maps.nls.uk/geo/explore/#zoom=16.9&lat=54.11966&lon=-3.22651&layers=168&b=ESRIWorld&o=100, accessed on 13th February 2026.
  22. Individual extracts can be found by enlarging the mapping provided by the National Library of Scotland on this link: https://maps.nls.uk/geo/explore/#zoom=15.0&lat=54.10776&lon=-3.23089&layers=168&b=ESRIWorld&o=100, accessed on 13th February 2026.
  23. Individual extracts can be found by enlarging the mapping provided by the National Library of Scotland on this link: https://maps.nls.uk/geo/explore/#zoom=14.3&lat=54.12347&lon=-3.24052&layers=168&b=ESRIWorld&o=100, accessed o. 13th February 2026.
  24. https://commons.wikimedia.org/wiki/File:The_New_Bridge_at_Buccleuch_Dock,_Barrow_in_Furness,_circa_1910.jpg, accessed on 14th February 2026.
  25. https://www.sankeyphotoarchive.uk/collection/view/?id=2152, accessed on 14th February 2026.
  26. https://en.wikipedia.org/wiki/Ramsden_Dock_railway_station, accessed on 14th February 2026.
  27. https://britainfromabove.org.uk/image/EPW014339, accessed on 14th February 2026.
  28. https://www.geograph.org.uk/photo/34423, accessed on 14th February 2026.
  29. https://www.geograph.org.uk/photo/7514496, accessed on 14th February 2026.
  30. https://www.abports.co.uk/media/ohpjrxsw/port-charges-barrow-2025-v2.pdf, accessed on 14th February 2026.
  31. https://www.britainfromabove.org.uk/en/image/EPW004066, accessed on 14th February 2026.
  32. https://www.britainfromabove.org.uk/en/image/EPW004065, accessed on 15th February 2026.
  33. https://www.britainfromabove.org.uk/en/image/EPW004060, accessed on 15th February 2026.
  34. https://m.facebook.com/groups/Barrowinoldphotos/permalink/3301006416594574, accessed on 15th February 2026.
  35. https://maps.nls.uk/view/126514772, accessed on 15th February 2026.

The Cornwall Minerals Railway – Part 2 – Par, its Harbour and St. Blazey Engine Shed

A first article about the Cornwall Minerals Railway can be found here:

https://rogerfarnworth.com/2020/05/17/the-cornwall-minerals-railway-part-1. [32]

In this second article we look at Par and its harbour, include some information about Treffry’s Tramway which transported goods to and from the Port and take note of St. Blazey Loco Shed. …

Par Harbour was built in 1829 by a local entrepreneur Joseph Thomas Treffry who was known as the “King of Mid Cornwall”. [1: p13]

The first ships used the port at Par in 1833 and it was finished in 1840. The breakwater enclosed 36 acres (15 hectares) of harbour and was capable of taking up to about 50 vessels of 200 tons each. The port is tidal so the vessels would sit on the bottom at low tide. Cornish granite was exported from Par in the early days for such famous landmarks as Waterloo Bridge in London, Chatham Docks, Gibraltar Docks & Glasgow Docks.” [33] As the china clay industry grew during the 19th century this became the main export through the port.

The first map below comes from the Ordnance Survey 1st series of the very early 19th century.

Par Harbour, OS First series, early 19th century. [5]
Old map of Par Harbour shared on the St. Blazey and Par Old Photos and Postcards Facebook Page on 18th June 2019. [6]

Coal needed to be imported from Wales to power Treffry’s mines, and copper, lead, and granite needed to be exported all over the country. Treffry, as a leading industrialist of the time, “had an urgent need for a harbour to serve his mines and quarries and the narrow streets of Fowey hampered the process when cargos could only be transported from the mines by mules and wagons. After he had completed his safe haven, up to fifty small sailing vessels of the time could be accommodated in the harbour, while larger ships lay at anchor in St Austell bay where their cargoes were loaded from barges. Other industries and businesses developed inside the port area such as ship repair, rope works, sail making, timber and coal merchants and brickworks.” [1: p13]

Hugh Howes notes that the new harbour “was a vital outlet for minerals particularly the expanding china clay industry and a rival to Fowey, Pentwan and Charlestown. [Teffry’s] Fowey Consols Mine was reaching its peak production in the late 1830s at 15,000 tons. The output at Par Consols Mine peaked a little later at nearly 8,500 tons. They were producing profitable amounts of copper at that time. … He had brought industrial success firstly with the copper mines in Tywardreath and St. Blazey, then with the granite workings at Luxulyan, and finally with china clay extraction to serve the fast developing ceramics industry in the Potteries.” [27: p48-49]

Canal and tramways in the Luxulyan Valley in 1835, © Copyright Afterbrunel and included here under a Creative Commons Attribution-ShareAlike 3.0 Unported (CC BY-SA 3.0) Licence. [7]

The Par Canal was built by Treffry to transport his minerals from Pontsmill to Par Harbour and was operational from 1833 [8][33], 1842 [1: p21] or 1844 [10], depending on which source you rely on. A number of tramway inclines were associated with it. One from Fowey Consols Mine to a location to the South of Pontsmill was in use by 1835. A second, was built a little to the South of the first, both seem to have served Fowey Consols Mine. A third tramway inclined plane was built between Par Consols Mine and Par Harbour. That inclined plane was working by 1841. [8] The Canal was closed in 1873. [10]

The Treffry Tramway was built in stages. The first length headed North from Pontsmill to Colcerrow Quarry and included an incline to lift the line out of Pontsmill. This line was extended to Molinnis near Bugle. To get there a large viaduct was needed, to cross the valley of the River Par (the Luxulyan Valley). The Teffry Viaduct, was 648 feet in length with ten arches, and was 98 feet high. It was the first large granite viaduct in Cornwall. This section of Treffry’s tramway opened in early 1844. [8]

Tramways in the Luxulyan Valley in 1855, © Copyright Afterbrunel and included here under a Creative Commons Attribution-ShareAlike 3.0 Unported (CC BY-SA 3.0) Licence. [7]

Construction of the Tramway continued from it’s planned Northern terminus at Newquay. There were delays as a result of Treffry’s death in 1850 but his work was eventually continued by his cousin who had the Hedra Incline operational by 1857 at the latest, possibly as much as five years earlier. [7]

Treffry’s Tramways by 1857, © Copyright Afterbrunel and included here under a Creative Commons Attribution-ShareAlike 3.0 Unported (CC BY-SA 3.0) Licence. [7]

The Fowey Consols Mine was geologically exhausted by 1865. It closed, as did the connecting tramway inclines. Copper extraction in the area was in steep decline, tin ore extraction proved commercially unsuccessful, but granite quarrying “enjoyed an upsurge, and new quarries opened on a small scale at Rock Mill Quarry and Orchard Quarry, above Pontsmill on the south-west side of the river. In 1870 a branch of the tramway was extended from near Pontsmill to serve the two quarries. The line was on the north-east side of the river, and it had two branches for the quarries; each of them crossed the river, and the Orchard Quarry line had an incline to reach the site. The tramway on the incline may have been narrow gauge and was probably gravity operated.” [7][12][14]

Joseph Treffry’s decision in 1844 to use horse-power meant that by the 1870s his tramways were becoming inefficient. Modernisation was essential but the Teffry Estate’s finances precluded that work being undertaken solely by the estate. [7]

In 1872 William Richardson Roebuck leased the tramways. He formed a limited company, the Cornwall Minerals Railway Limited and obtained “parliamentary authority on 21st July 1873 to acquire the lines, form a new railway to connect them, and to make an extension to Fowey, and to improve the original tramway sections so as to make them suitable for operation by steam locomotive.” [7][11][6][15]

The Cornwall Minerals Railway (CMR) took over Treffry’s lines and improved them. They quickly built the link between Hendra and Molinnis, and their new line to Fowey, and Treffry’s vision of a through line from Newquay to Fowey was realised when on 1 June 1874 the CMR opened the line throughout.” [7] The line required a “new route up the Luxulyan Valley so as to avoid the rope-worked Carmears Incline.” [7]

The new line in the Luxulyan Valley by-passed the Treffry Viaduct, but Colcerrow Quarry continued to be rail served. Traffic from the quarry reversed at the junction with the old main line at the Par end of the viaduct, and then crossed it, joining the new line at Luxulyan. This operation was horse worked, and the track was still the original Treffry stone-block type in 1933.” [7][17] By 1959 the Colcerrow route at Luxulyan had been shortened to a stub siding. [7][16: p21]

Passenger operation commenced in 1876. The GWR leased the lines from the CMR in 1877, and purchased them in 1896. “The East Wheal Rose branch remained a mineral section until the Great Western Railway (GWR) … built its line from Newquay to Perranporth and Chacewater, partly taking over the line of route.” [7]

The Treffry Tramways and the Par Canal warrant separate articles in this series which will be written in due course. …..

These next set of extracts from the Ordnance Survey belong together but cross the boundary between two OS Map sheets and come from the 1881 survey which was published in 1888. Treffry’s harbour is shown, as is the canal he built. The rail track shown running alongside the canal follows the route of the Treffry Tramway.

As well as the Treffry Tramway and the, already closed, Par Canal, there is a railway shown running roughly North to South on the first two map extracts. This was the Cornwall Railway, the railway company which built the majestic Royal Albert Bridge over the River Tamar. Because of the difficult terrain it traversed, it had a large number of viaducts, built as timber trestles because of the shortage of money. It was a 7 ft 1⁄4 in (2,140 mm) broad gauge railway from Plymouth in Devon to Falmouth in Cornwall, built in the second half of the nineteenth century. It was constantly beset with shortage of capital for the construction, and was eventually forced to sell its line to the Great Western Railway (GWR) in 1889, a little after the date of the 1881 Survey. [9]

On this map extract from the 1881 survey, the line of the Treffry Tramway is to the East of the Par Inn. It is followed closely, to its East, by the Par Canal and then by the River Par. Also visible is the Par Engine Shed which later became known as the St. Blazey Engine Shed. The engine shed is prominent on this map extract, it was built for the eighteen 0-6-0T locomotives that were built by Sharp Stewart in 1873 and 1874. These locos were intended to operate in pairs, back to back and each road in the engine shed was designed to accommodate one pair of locomotives. Traffic never warranted the paired use of these locomotives and only nine were put to use. What happened to the other nine locomotives is covered in the first article in this short series, (cf. [32]) [2][18][31]
St. Blazey Station and Engine Shed seen from the North in 1930. This image is an extract from EPW033131, the roundhouse is in the middle distance close to the centre of the image, © Historic England. [40]

Stephen Austin, in a May 2003 article in Steam Days, describes the workshops and depot this:

“At Par, the Cornwall Minerals Railway set up a new headquarters and engineering depot on a piece of flat ground between the river and the original valley side where once ships moored in front of the Sloop Inn.

It was fortunate that the Cornwall Railway line, at the south end of this site, was elevated on a viaduct, for its five arches now spanned the canal, the Cornwall Mineral Railways main line to Fowey, a branch into Par Harbour, the river, and a public road. At the north end the new line swung across the river on a sharp reverse curve to join the 1855 causeway. On this length from Par Bridge to Middleway Bridge the original railway between the river and canal was abandoned, and is today a public footpath where some of the sleeper blocks may still be seen.

The railway depot, finished by the end of 1873, had two main buildings. One was a wagon repair shed and the other contained a Signal & Telegraph repair shop, smithy, boiler room, water tank, a two-storey office suite, machine shop, and locomotive repair shop. Adjoining the latter was a locomotive running shed constructed in what was then a frequently-used layout – a segment of a circle-covering tracks which radiated from a turntable in the centre of the circle. This shed, which became known locally as ‘the roundhouse’, contained nine tracks, each with its own gable-ended roof, of which the middle three extended through the back wall into the repair shop.

The buildings at the depot were handsome, elegantly-proportioned brick structures. The whole workshop group cost £16,000 and was a huge development for the time and place of its construction, exceeding the Cornwall Railway Works at nearby Lostwithiel. … The reason for the nine roads in the running shed was that it was to accommodate the whole of the company’s locomotive fleet. They ordered eighteen 0-6-0Ts from Sharp Stewart & Company of Manchester. The design was attributed to Francis Trevithick, formerly of the L&NWR and a descendant of the great Richard Trevithick, and was conventional except that the cab had no back. The intention was to run the locomotives in pairs, coupled back to back, with one crew. This was because Robert Fairlie had recently created a sensation with his double-ended locomotive mounted on two power bogies, able to do the work of two smaller engines without the expense of two engine crews; the Cornwall Mineral Railways’ idea was to obtain this last benefit without having to pay royalties to Robert Fairlie.

The prospect of a driver having to leap from one footplate to another whenever a control needed adjusting is an alarming one, but in practice it was seldom, if ever, put to the test. Far from needing two locomotives to a train, one was ample, and half of the new fleet of locomotives was never used at all. The staple traffic on which the hopes of the firm were raised iron-ore from the Perran Iron Lode never appeared. All that was offered was stone, and the then-modest output of china-clay, and within a year it was clear that the railway was a financial failure.” [31: p279-280]

St. Blazey Shed in early BR days. This image was shared by Colin Bangs on the St. Blazey Roundhouse Facebook Group on 30th April 2024 © Unknown. [35]
All nine roads appear in this image which was shared on 24th August 2015 on the Old Cornwall in Pictures Facebook Page, © Unknown. [38]
This image of the roundhouse in use in the early 1969s was shared on the Didcot Railway Centre Facebook Page on 28th April 2016, © possibly HMRS or Colour Rail as the image is reproduced in Stephen Austin’s article with that attributation. [39] [31: p285]
On this extract from the 1881 Survey, the Cornwall Railway at Porth is shown to have connecting lines to Par’s dockyard area. [2]
This extract from the 1881 Survey is included for the sake of completeness. It shows the Par Canal, being crossed by two footbridges, the most southerly of which also appears on the next map extract. [3]
This extract from the 1881 6″ Ordnance Survey shows the tramway serving the quayside. Much of the harbour area was mud flats at low tide with just a narrow channel of water remaining. [3]

The next images show the area as recorded for the 25″ Ordnance Survey in 1905/1906 and published in 1907.

This extract from the 25″ Survey of 1905/1906 published in 1907, shows the Northern half of the area immediately around Par Harbour. St. Blazey Engine Shed is in the top-left quadrant. [19]
The view looking South in 1922 from St. Blazey Railway Station. The curve running away to the left is the link to what was the Cornwall Railway at Par Station. The wagon works are just to the right of centre. At the top of the image with the locomotive shed beyond and to the right. The down to Par Harbour runs ahead of the camera to the left of the wagon works; that to Fowey leaves the image bottom-left. The image is greatly enhanced by the two movements taking place. Immediately to the left of the wagon works what appears to be a saddle tank heads a train of, mixed empty and loaded general fright wagons and loaded and sheeted china clay wagons. To the right of the works, a pannier tank heads a train of china clay wagons within the sidings. Presumably the various wagons and brake vans in front of the wagon works are awaiting servicing or return to use on the railway, © Public Domain. [31: p281]
This next extract from the 25″ Survey of 1905/1906 published in 1907, shows the Southern half of the area immediately around Par Harbour. [20]

The next few images show a number of the areas in greater detail. All these extracts come from the 25″ OS mapping published in 1907.

The GWR Loop between St. Blazey Railway Station and Par Railway Station. [25]
St. Blazey Engine Shed and Par Green with the GWR Par Loop visible at the top of the map extract. [24]
The area North of the Quay including the Fowey branch on its causeway. [23]
The immediate area around the Quay. [22]
The area between Pembroke Mine and Porth on the North side of the mainline. [21]
Par Harbour, as it appears on the 1943 Admiralty Chart. [4]

Par Docks saw significant developments in the late 1940s. The image below is an aerial image of Par taken in 1950 for English China Clay.

An aerial image of Par Docks taken on 20th April 1950, shared under a Creative Commons Licence (Attribution-Share Alike 2.5 Generic (CC BY-SA 2.5)). [26]

Railway Bylines has at least two articles about Par Harbour. The first, a 10 page article about the history of the Harbour, appeared in Railway Bylines Volume 2 No. 5 of August/September 1997. The second, an article entitled ‘Cornish Cream’ with text and photography by Tom Heavyside, was included in Railway Bylines Volume 9 No. 12 of November 2004. [28] It focussed on the diminutive locomotives which served the port’s railways. … Alfred and Judy were still at Par in 1977 when Tom Heavyside visited. Judy was no longer in working order. Alfred was ‘in steam’ on Wednesday 15th June. Alfred was stood-down in August 1977 with its duties being undertaken by a tractor with the occasional use of a BR ’08’ shunter from St. Blazey depot as and when required. Both Alfred and Judy were subsequently removed from the site and saved for posterity.

Tom Heavyside comments: “Fortunately, Alfred and Judy we both saved for posterity. Initially, Alfred went to the Cornish Steam Locomotive Society depot at Bugle and Judy to the Wheal Martyn China Clay Museum near St.Austell. However, in 1987 Alfred moved to the Bodmin & Wenford Railway and in the autumn of 2002 Judy also moved to the Bodmin & Wenford. Fittingly, Alfred became something of a celebrity, not only at Bodmin but elsewhere; I well remember e it making a guest appearance at the Exeter Rail Fair in April/May 1994 when it mingled with a number of much larger steam locomotives including a couple of Bulleid Pacifics and a GWR King.” [28: p590]

Wikipedia tells us that: “Alfred and Judy are two 0-4-0 saddle tank steam locomotives. They were built by W. G. Bagnall for use at Par Docks in Cornwall, United Kingdom. The unusually low design was required to cope with extremely tight curves and a very low bridge under the Cornish Main Line. The locomotives are both preserved in operational condition on the nearby Bodmin and Wenford Railway and inspired the Reverend Wilbert Awdry to include them in The Railway Series of children’s books as Bill and Ben.” [29]

The bridge under the Cornish Mainline served the china clay works. It had a maximum headroom of 8ft. Operating curves in the Port were as tight as 70ft radius. The locomotives used in the Port needed to meet these stringent restrictions. A series of different locomotives were used over the years.  One of those locomotives was ‘Toby’, a low-profile Sentinel, which served the Port throughout much of the first half of the 20th century. By September 1937, demands on the older locomotives were such that a new locomotive was required to work alongside Toby.

W. G. Bagnall & Co. built a suitable locomotive which was delivered to Par in 1937. That locomotive was to be given the name ‘Judy’ in 1955. The locomotive was delivered at a cost of £1200 carrying the works number 2572. “By 1952, ‘Toby’ required replacement and an upturn in traffic meant an order was placed for another locomotive. In 1954, Alfred was delivered (named after the manager of the harbour Alfred Truscott). Whilst nominally the same, Alfred had some differences to Judy with different bunker style, tank and handrail alterations (such as a tank filler that opened in the opposite direction) and a different purchase price – this time £7500.” [30]

Par Docks in the 2020s. [Google Earth, January 2025]
Par Docks, Clay Dries in use in April 2003, © Tony Atkin and licenced for reuse under a Creative Commons Licence (CC BY-SA 2.0). [36]
Par Docks, Clay Dries in 2013, © Chris Gunn and licenced for reuse under a Creative Commons Licence (CC BY-SA 2.0). [37]

The Imerys Blueprint for Cornwall, published in 2003, provided information about the history of china clay production in Cornwall. It included information about the amount of china clay that was shipped out of Par Docks between 1858 and 2002:

1858 – 15,154 tons of china clay

1885 – 86,325 tons of china clay

1987 – 700,000 tons of china clay

2002 – 313,425 tons of china clay, 134,810 tons of aggregates.

Incidentally, the blueprint also noted: the sale of the harbour by the Teffry Estates to English China Clay (ECC) in 1964; the construction of dryers at the site in the 1950s and 1960s; and the closure of the port in 2007.

After closure the port was used as a Milling Centre and a Grade Dryer with all bins clay shipment being handled by Fowey Docks.

Stephen Austin notes the use of the locomotive shed over the years from the 1980s to the new millennium as follows:

“St Blazey depot, much diminished as it was, was still very much alive. It maintained a dedicated fleet of china-clay wagons introduced in 1954, and from 1970 a fixed cover for these wagons was designed and fitted in the Wagon Works, producing the distinctive ‘Clay Hood’. The staff was proud of their self-sufficiency, and when the Clay Hoods were replaced by the Type CDA hopper wagons in 1987 the fitters, on their own initiative, rebuilt the example which now stands as gate-guardian at the Wagon Works. Other freight business disappeared, and the Newquay line was reduced to a long siding on which a railcar shuttled desultorily, but following the break-up of British Rail in 1993 there was renewed optimism.

The depot was taken over by a company named English, Welsh & Scottish Railway Company … and St Blazey was that company’s only depot in Cornwall. It stabled and serviced the TPO coaches of the mail services which were tripped empty from and to Plymouth and Penzance every day, and wagons carrying cement to Blue Circle at Moorswater and products from Fitzgerald Lighting Ltd at Bodmin were staged through the yard. In 1995 some of the locomotives allocated in Cornwall were given names of local association. Among them was No. 37674 St Blaise Church 1445-1995, named after the nearby parish church and unveiled in the yard. In 1998 St Blazey began operating the new locomotives imported by EWSR (Class 66) on the china-clay trains.

On 11th August 1999, in its 125th anniversary year, St Blazey hosted perhaps the biggest assembly of preserved coaches ever gathered on the national network, and excursions brought people down to view the total eclipse of the sun. On 26th February 2000 diesel locomotive No 67008 arrived to begin the depot’s association with the Class 67 diesel then the fastest true self-contained locomotives running anywhere in the world, and worthy successors to those little Sharp Stewart tank engines. …

… The new millennium brought more uncertainty to St Blazey’s future. The last train conveying Fitzgerald Lighting’s wagons, the last consignment of any West Country manufacturer’s goods to be sent out by railway, left the yard on 25th July 2001. The remaining customers, the cement, china-clay, and the mails, made it clear that if the railway did not satisfy them on price and speed they would take to the roads. The only hope [lay] in the fact that … after 128 years of service, St Blazey is still very much a going concern.

Notwithstanding the unique nature of St Blazey Works, it received no attention at all from the enthusiasts in the fields of railways, architecture, or history, nor from the ‘official’ bodies paid to safeguard these things. The roundhouse building was divided up and rented by local traders, and the yard was a dump for rubbish and wrecked cars. However, even the tracks into the building remained intact, and apart from the demolition of the coaling stage nothing else was done until the summer of 2001 when the ownership changed hands, and plans were announced for new building on the site. Thus the original character of the Works, and the practicality of returning it to railway use, will finally be extinguished.” [31: p284, 286]

The news in 2024/2025 is that the anticipated removal of the St. Blazey roundhouse did not occur. St. Blazey Engine Shed has recently been restored as the base for MPower Kernow CIC (MPower), a new Cornish social enterprise company. [34]

The restored depot at St. Blazey. [34]

In April 2023, World of Railways reported that “the ongoing restoration of the turntable and the creation of a servicing facility for steam locomotives is expected to provide many and varied training opportunities for a broad cross section of the community and MPower is already working with local education and training organisations to provide hands-on experience in a range of skills, from woodwork to plumbing, electrics, construction and engineering.” [34]

Future articles?

It is, finally, worth noting that the Cornwall Minerals Railway had a total of 46 miles of track with “a main line from Fowey to Newquay … and branches from Bugle to Carbis, St Dennis Junction to Melangoose Mill and Newquay to East Wheal Rose. These connected clay works, quarries, mines and harbours (Newquay, Par and Fowey) in the area with the headquarters and works being sited at St Blazey (part of which is still in use).” [1: p21]

Other clay lines were built in later years, Bugle to Carbean Siding in 1893 and Trenance Junction (just West of St Austell on the main line), to Bojes Sidings in 1520 Two narrow gauge lines were also in use at various times. The Gothers Tramway of … from Pochin’s siding near St Dennis Junction to a clay works a Gothers opened in 1884 and closed in 1931.” [1: p22]

These lines will hopefully be covered in future articles.

References

  1. Pit to Port; The Cornish Steam Locomotive Preservation Society, 2009.
  2. https://maps.nls.uk/view/101438942, accessed on 20th January 2023.
  3. https://maps.nls.uk/view/101438954, accessed on 20th January 2023.
  4. Admiralty Chart Misc. 645, corrected 15th April 1943; https://www.ebay.co.uk/itm/274499586563?mkcid=16&mkevt=1&mkrid=711-127632-2357-0&ssspo=F5J0o5CiRha&sssrc=2349624&ssuid=afQhrar7TGK&var=&widget_ver=artemis&media=COPY; accessed on 20th January 2023.
  5. http://www.visionofbritain.org.uk/maps/series, accessed on 20th January 2023.
  6. https://m.facebook.com/story.php?story_fbid=pfbid0Py845Q675ooziPmV7A5PJqJVKMkFTs9xPnmrFARWQPpX7arVtvHGEMqosiKtEtXWl&id=171605006288707, accessed on 20th January 2023.
  7. https://commons.m.wikimedia.org/wiki/File:Lux_valley_1835.gif#mw-jump-to-license, accessed on 20th January 2023.
  8. https://en.wikipedia.org/wiki/Treffry_Tramways, accessed on 20th January 2023.
  9. https://en.wikipedia.org/wiki/Cornwall_Railway, accessed on 21st January 2023.
  10. https://www.cornwall-calling.co.uk/mines/tramways/par-canal.htm, accessed on 21st January 2023.
  11. John Vaughan; The Newquay Branch and its Branches; Haynes/Oxford Publishing Company, Sparkford, 1991.
  12. Martin Bodman; Inclined Planes in the South West; Twelveheads Press, Chacewater, 2012.
  13. E T MacDermot; History of the Great Western Railway, Vol II; the Great Western Railway, London, 1931.
  14. Cornwall Archaeological Unit; The Luxulyan Valley Project: an Archaeological and Historical Survey; Cornwall County Council, Truro, 1988.
  15. E F Carter; An Historical Geography of the Railways of the British Isles; Cassell, London, 1959.
  16. Maurice Dart; Images of Cornish Railways; Halsgrove House, Wellington, Somerset, 2007.
  17. D S Barrie and “Precursor”; Railway Relics in West Cornwall; Railway Magazine, December 1933.
  18. https://en.wikipedia.org/wiki/St_Blazey_engine_shed, accessed on 21st January 2023.
  19. https://maps.nls.uk/geo/explore/#zoom=16.0&lat=50.35131&lon=-4.70645&layers=168&b=1, accessed on 1st March 2023.
  20. https://maps.nls.uk/geo/explore/#zoom=16.0&lat=50.34419&lon=-4.70495&layers=168&b=1, accessed on 1st March 2023.
  21. https://maps.nls.uk/geo/explore/#zoom=17.0&lat=50.34387&lon=-4.71396&layers=168&b=1, accessed on 1st March 2023.
  22. https://maps.nls.uk/geo/explore/#zoom=17.0&lat=50.34528&lon=-4.70401&layers=168&b=1, accessed on 1st March 2023.
  23. https://maps.nls.uk/geo/explore/#zoom=17.0&lat=50.34883&lon=-4.70290&layers=168&b=1, accessed on 1st March 2023.
  24. https://maps.nls.uk/geo/explore/#zoom=17.0&lat=50.35257&lon=-4.70492&layers=168&b=1, accessed on 1st March.
  25. https://maps.nls.uk/geo/explore/#zoom=17.0&lat=50.35595&lon=-4.70647&layers=168&b=1, accessed on 1st March 2023.
  26. https://en.wikipedia.org/wiki/Par_Docks#/media/File:Par_Docks_ECC_Aerial_Photograph.jpg, accessed on 1st March 2023.
  27. Hugh Howes; The Struggle for the Cornwall Railway – Fated Decisions; Twelveheads Press, Truro, 2012.
  28. Tom Heavyside; Cornish Cream; in Railway Bylines Volume 9 No. 12, November 2004, p586-590.
  29. https://en.m.wikipedia.org/wiki/Bagnall_0-4-0ST_%22Alfred%22_and_%22Judy%22, accessed on 8th March 2024.
  30. https://rapidotrains.co.uk/port-of-par-bagnall-tanks, accessed on 8th March 2024.
  31. Stephen Austin; St. Blazey: At the Heart of West Country History; in Steam Days, May 2003, p278-286.
  32. https://rogerfarnworth.com/202y0/05/17/the-cornwall-minerals-railway-part-1.
  33. https://en.m.wikipedia.org/wiki/Par_Docks, accessed on 24th January 2025.
  34. https://www.world-of-railways.co.uk/news/st-blazeys-restored-turntable-set-for-scotsman-visit, accessed on 24th January 2025.
  35. https://www.facebook.com/share/p/15WHnYinBM, accessed on 24th January 2025.
  36. https://www.geograph.org.uk/photo/104676, accessed on 24th January 2025.
  37. https://www.geograph.org.uk/photo/3824704, accessed on 24th January 2025.
  38. https://www.facebook.com/share/14r1jXREEN, accessed on 25th January 2025.
  39. https://www.facebook.com/share/p/18VjPfoZGu, accessed on 25th January 2025.
  40. https://www.britainfromabove.org.uk/image/EPW033131, accessed on 25th January 2025.