Early Iranian Locomotives
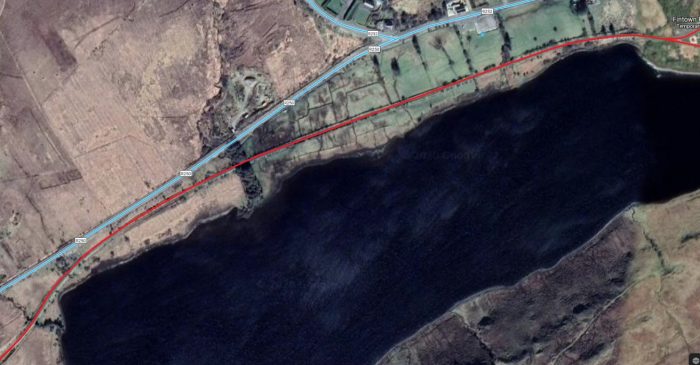
We have already noted in this series that Iran had a very limited railway network at the turn of the 20th century. Essentially just one railway line which was of a narrow gauge and was no more than 6 miles long. Glyn Williams says that the line, as built, … was approximately 5.5 miles in length and had two branch lines of 2.5 miles in length. [22]
Its roster of locomotives was limited to five in total. And details of these can be found on the manufacturer’s listings, as tabulated below. [21] The full article is in french. The locomotives were built in Belgium by La Tubize.
Tableau des locomotives Tubize livrées pour la Perse (Iran)
n° Année Voie Essieux Destinataire
662 1887 1000 Cn2t / 0-6-0T CF et Tramways en Perse, Téhéran-Rey No. 1
663 1887 1000 Cn2t / 0-6-0T CF et Tramways en Perse, Téhéran-Rey No. 2
664 1887 1000 Cn2t / 0-6-0T CF et Tramways en Perse, Téhéran-Rey No. 3
665 1887 1000 Cn2t / 0-6-0T CF et Tramways en Perse, Téhéran-Rey No. 4
1436 1905 1000 Cn2t / 0-6-0T CF et Tramways en Perse, Téhéran-Rey No. 5
Source : liste établie par Sébastien Jarne
Cn2t = 3 essieux moteurs, vapeur saturée, 2 cylindres, tender (tank in UK terminology)

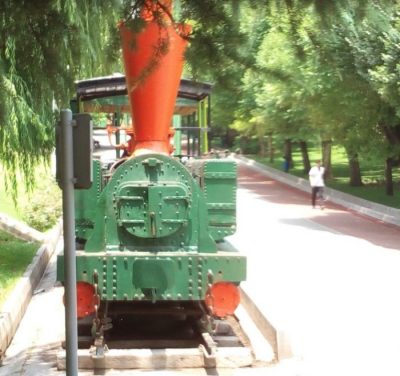
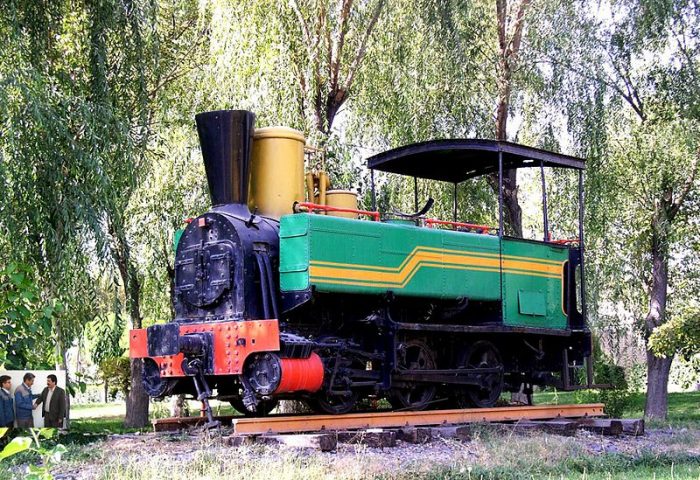
No. 3 in display in Mellat Park, Tehran. [24]

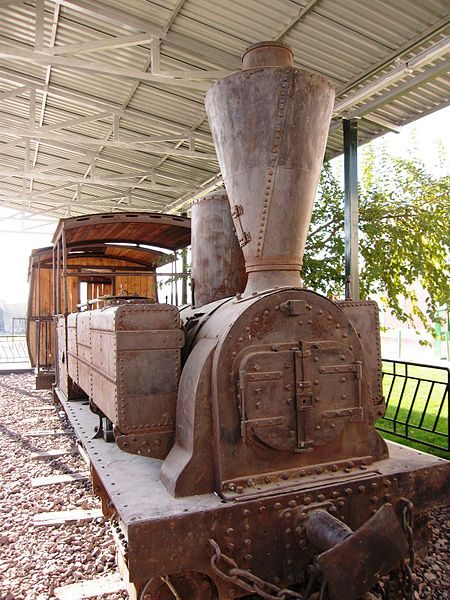
La Tubize Locomotive No. 665 – No. 4 on display in Rey, (c) Alireza Javaheri, used under a Creative Commons Licence. [25]
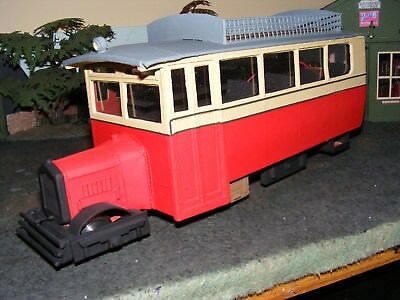
What is perhaps surprising, is that the oldest preserved La Tubize locomotives in the world are in Iran. These locomotives were ordered by Shah Abdul Azim for the Railways and Tramways in Persia. They were to serve on the Tehran-Rey line and carried the company’s numbers 1 to 5. All of them, it seems, were preserved. In Iran, they were called the “Mashin Doodi”, or smoking machines.
Luc Delporte, writing in French in 2017 comments that, “It is not easy to find recent and verifiable information on these locomotives. However, it is possible to glean some information on the web to locate and, in some cases, verify the location of the locomotives.” [17] He goes on to undertake an internet search for the locomotives which are preserved in a non-operational condition. ……..

Un-numbered La Tubize Locomotive in Mellat Park in Tehran, (c) João Amado (Google Maps).

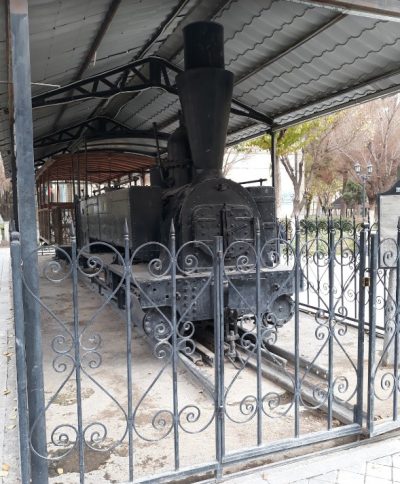
Un-numbered La Tubize Locomotive in Kosar Park, Tehran, (c) Mahdi Sarkhani (Google Maps).

The fifth of the five locomotive, again unnumbered outside the PARS Wagon Works in Arak (c) Hamid Hajihusseini (CC BY 3.0). [72]
No. 664 – No. 3 – has been kept in Mellat Park in Northern Tehran.
No. 665 – No. 4 – Is on display at the entrance to Shahr-e-Rey Metro.
There are three further static displays of locomotives which means that the full set of 5 were retained for display. The remaining three are not numbered. They are as follows:
An additional locomotive in Mellat Park In Tehran. Another has been in Kosar Park in Tehran, probably since 1963. The third, and final, locomotive is on display in Arak at the PARS wagon factory.
Locomotives prior to World War Two
The Railway Gazette of 1945 informs us [18: p159] that, in the period before the British took control of the Iranian (Persian) network, the State Railways owned the following locomotives:
49 German 2-8-0s with double bogie tenders.
16 German 2-10-0s with double bogie tenders.
12 Swedish 2-8-2s with double bogie tenders.
4 Beyer-Garratt 4-8-2+2-8-4 articulated engines.
5 Beyer-Peacock 2-8-0s with double bogie tenders, and
20 (or so) shunting locomotives.
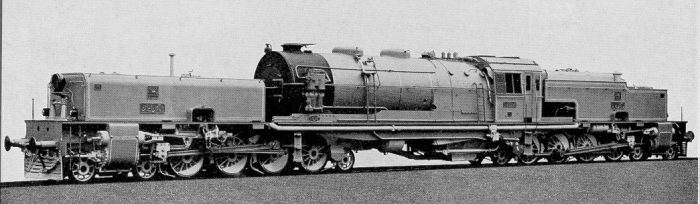
This list may not be comprehensive – the Beyer Peacock Locomotive Order List, Garratt Locomotives, Customer List V1 (PDF); suggests that the company supplied 10 No. Beyer Garratt Locomotives of the same class (Class 86) to Iran. [8] A Beyer-Garratt in Iran. [5]
 Iranian State Railway. 418 – 421 (BP 6787-6790/1936) later renumbered 86.01 – 86.04. [7]
Wikipedia tells us that German manufacturers supplied 65 steam locomotives for the opening of the line in 1938. [10][26: p112] As we have noted above, these were of two classes. “49 were 2-8-0 ‘Consolidations’: 24 from Krupp forming class 41.11; 16 from Henschel und Sohn forming class 41.35; and nine from Maschinenfabrik Esslingen forming class 41.51. The other 16 were Henschel 2-10-0 ‘Decapods’ forming class 51.01.” [10][26: p107]
Wikipedia continues: “The Trans-Iranian acquired 10 of the locomotives that Kampsax had used to build the line. [26: p107].” These are not in the list provided by the Railway Gazette above. They were: “Gölsdorf two-cylinder compound 0-10-0 freight locomotives built between 1909 and 1915 as Austrian State Railways class 80 by Wiener Neustädter Lokomotivfabrik, Lokomotivfabrik Floridsdorf and Lokomotivfabrik der StEG in Vienna and by Breitfeld–Daněk in Bohemia.” [10][26: p107] Apparently, the Gölsdorf 0-10-0s kept their original Austrian numbers. [26: p107]
The revised roster with these alterations looks more like this:
24 German Krupp 2-8-0s with double bogie tenders.
16 German Henschel und Sohn 2-8-0s with double bogie tenders.
9 German Maschinenfabrik Esslingen 2-8-0s with double bogie tenders. (Ex-works images of these locos can be found on Flickr.) [27][30]
16 German Henschel und Sohn 2-10-0s with double bogie tenders. (An image of one of these locos can be found on Flickr.) [31]
12 Swedish 2-8-2s with double bogie tenders.
10 Austrian State Railways 0-10-0s with double bogie tenders.
10 Beyer-Garratt 4-8-2+2-8-4 articulated engines.
5 Beyer-Peacock 2-8-0s with double bogie tenders, and
20 (or so) shunting locomotives.
“All the 65 German engines needed immediate repairs, as their fireboxes, tubes, stays, motion, and rods were all in poor condition because of lack of maintenance. The 12 Swedish locomotives were all out of service, awaiting modifications necessitated by excessive slipping. The four Beyer-Garratts were also out of commission as they required new fireboxes, longitudinal cracks having developed across their tube-plates. The 2-8-0 Beyer-Peacock locomotives had been excellent engines, but needed overhaul.” [18: p111]
The ’20 or so’ shunting locomotives referred to in the Railway Gazette article of 1945 probably include some locomotives used in the oilfields. There were a number of tank locos and at least these tender locomotives, although I don’t know details. These tender locomotives were in use:
- some 2-6-0 steam locomotives which left Baldwin Locomotive Works in 1932 and were probably in use in the Oilfields in the South of Iran – an example can be seen on Flickr. [28]
- some 2-8-0 Beyer Peacock locomotives delivered in 1934 – an example can be seen on Flickr. [29]
The Second World War
Two distinct phases of operation occurred during the War. The first was British led, the second, in the south of Iran, was led by the USA.
1. Iran’s Railways under British Control
After the arrival of the British Railway Engineers (Royal Engineers) a series of additional locomotives were ordered and received from abroad:
39 coal-burning “W.D.” (British) 2-8-0s. (A photographic example of these locos can be found on Flickr.) [32]
104 oil-burning “W.D.” 2-8-0s.
96 oil-burning U.S.A. 2-8-2s.
6 German 2-10-2s diverted from China.
3 Kitson-built 2-6-4 and 4-6-4 tank engines from the Kowloon-Canton Railway, and
22 0-4-0 diesel shunting engines from the U.S.A.
Coal for the first batch of 39 “W.D.” 2-8-0s also had to be shipped from the United Kingdom.
The Railway Gazette articles of February 1945 catalogue a whole series of difficulties which needed to be overcome by the British Engineers:
- Only senior railway men in Iran (Persia) were experienced in railway operation, and “their training in various European countries had been academic rather than practical. Though they were, individually, competent and clever, they were not capable, collectively, of producing a really good and simple organisation to insure the satisfactory working of a railway beset with such topographical and climatic difficulties, especially in view of the ignorance of their subordinates.” [18: p112]
- Initially, “subordinate staff understood no English and the British … knew no Persian.” [18: p112]
- As we have noted already, “there were in the country ample engines and stock for light traffic working, an incredible percentage of them [however, were] out of order and laid up awaiting repairs, or [were, unsuitable] for working on long continuous mountain grades. Repair facilities and spare parts were also inadequate. ” [18: p112]
- The British majority of the British troops were inexperienced and young and numbers were inadequate.
- The arid nature of the country traversed meant that water supplies could only possible support “eight double-headed trains daily between Ahwaz and Teheran.” [18: p112] Indeed, later in the War, it was this fact that most influenced the American Eningeers who took over the running of the line to import 65 No. 1,000-h.p. diesel-electric locomotives.
- “The intense heat, as well as causing constant trouble with injectors and. being responsible for excessive slipping due to oil leakage on to the track, became almost unbearable for the European staff on the lower sections of line.” [18: p112]
- All the locomotives and wagons supplied from the U.K. and U.S.A. “were, in many respects, completely unsuited to the abnormal requirements of Persia, especially in regard to brake equipment, super-heaters, sanding and draw gear, and chilled cast-steel wheels.” [18: p112]
So significant were these issues that the article in the Railway Gazette repeated them alongside other difficulties. The wider list included: inadequate repairs and stores; hot weather troubles; failure of water supplies; carriage and wagon chaos; faults in locomotive depots; and a low standard of general organisation. [18: p159-160]
2. American Control
In the last two years of the War, the roster of locomotives was dramatically changed on the Southern section of the Trans-Iranian Railway (from the coast to Tehran) which was controlled by the Americans. Diesel power meant that the levels of traffic required could be achieved and the Americans brought with them 13 ALCO diesel locomotives. [15] The locomotives, made in Schenectady, New York, by the American Locomotive Company, required prepping in Iran prior to use. [16]
These ALCO (RSD-1) locomotives were intended originally as what the Americans call a road switcher, designed to both haul freight in mainline service and shunt them in railroad yards. They were rated at 1,000 horsepower (750kW) and rode on two three-axle bogies. [17]
At this time a number of American Mikados (WD/USA series 1000-1199) had been leased to the British forces and “had just started working in Iran, although it was realised that the extreme temperatures in the southern plains and above all the scarcity of good water along the whole line made the operation of heavy trains by steam locomotives extremely difficult. Moreover, the 1000 ton “Aid-to-Russia” trains required double-heading over the mountain sections, where gradients of 1 in 67 were frequent and the fact that there were 144 tunnels in 165 miles meant that locomotive crews suffered considerable hardship from smoke and oil fumes.” [33]
Some of the 1000hp diesel-electric locomotives worked the more difficult sections of the Trans-Iranian Railway. The first batch of USA/TC RSD-1 locomotives, numbered 8000 to 8012 arrived in Iran in about March 1943. On relatively level lines with little gradient, they were used singly. This was primarily between Ahwaz and Bandar Shalpur, Khorramshahr, Tanuma and Andhimishk.
A second and larger tranche of these RSD-1 locomotives was delivered to Iran within a few months. These were number 8013 to 8056 and “were fitted for multiple-unit working so that two locomotives could be worked with only one engine crew. … They were stationed at Andhimishk and Arak, and normally worked in pairs hauling all the heavy northbound freight trains over the mountainous sections between these two places. On the return journey, as many as five were coupled together to work back to Andhimishk.” [33]

No. 8014 at the head of a train in the mountains, (c) R. Tourret Collection. [33]
In May 1943, numbers 8007, 8009, 8010, 8011, 8012, 8028, 8029, 8031 and 8034 to 8056 were still awaiting finishing. Numbers 8000, 8001, 8002, 8003, 8004, 8005, 8013, 8015, 8018 and 8030 were allocated to the Southern Division and 8006, 8008, 8014, 8016, 8017, 8019, 8020, 8021, 8022, 8023, 8024, 8025, 8026, 8027, 8028, 8029, 8032, and 8033 were allocated to Andhimishk/Arak.

No. 8048 at Durud in Iran in June 1945. In Iran, the heat was so intense that the Alco diesels operated with the engine access doors removed, despite the increased risk of damage due to the ingress of sand (c) H.C. Hughes. [33]
“From September 1943, some of them worked as far north as Qum and by May 1944 some were working regularly through to Teheran. Between Arak and Teheran it became a common sight to see a diesel and a USA/TC steam 2-8-2 coupled together at the head of a train, and on at least one occasion two diesels and a 2-8-2 were used on a passenger train.” [33]
Following the war, these diesel locomotives were shipped back to the US where they continued to work either hauling freight on military installations, used for training, or were sold to railroad companies. [19] Steam power once again held sway in Iran and continued to do so until the late 1950s. [20]
Steam After the Second World War
As noted above, there were steam locomotives at work throughout Iran during the War. A good number of “American S200s operated in the Middle East, including Egypt, Palestine and Lebanon. One was destroyed by fire at El Arish in Egypt in 1942. 29 of this batch was later supplied to Turkey where they became the TCDD 46201 Class. In 1946 another 24 were transferred to TCDD which added them to the same number series 46201–46253. 51 S200s built in 1942 served on the Trans-Iranian Railway, where they became Iranian class 42.“[34][26: p125]

Turkish Railways USATC S200 Class Locomotive No. 46224 at TCDD Open Air Steam Locomotive Museum, Ankara, Turkey (c) Ex13(CC BY-SA 3.0). [34]
By the end of the Second World War, motive power on Iranian State Railways reverted to steam and a number of new purchases were made.
Iranian State Railways Steam Locomotives
Jonathan D.H. Smith provides the catalogue of Iranian Railways Steam Locomotives below. He maintains a database of a similar nature for most countries in the world. All dimensions metric: lengths in mm, areas in m2, weights in metric tons, pressures in atmospheres. There is no indication in the table of the dates that the locomotives were active. [2]
| Class |
Axle arr-
angement |
Dr.
Dia. |
Cylinders
Diameter x Stroke |
B.P. |
Ad.
Wt. |
EW
WO |
Grate
Area |
Evap
Surf. |
Sup.
Surf. |
Remarks |
| 30.1 |
C |
1270 |
435×610 |
10 |
33 |
33 |
1.4 |
82 |
none |
|
| 30.2 |
Ct |
1100 |
380×550 |
13 |
34 |
34 |
1.3 |
65 |
none |
|
| 31.0 |
1’C |
1350 |
490×600 |
14 |
44 |
57 |
2.6 |
168 total |
|
| 31.2 |
1’C |
1170 |
405×560 |
12.3 |
34 |
41 |
1.6 |
94 |
none |
|
| 33.30 |
1’C2’t |
1560 |
485×660 |
12.7 |
51 |
91 |
3.0 |
168 |
none |
KCR 3 |
| 34.60 |
2’C2’t |
1560 |
560×710 |
12.7 |
60 |
106 |
3.2 |
229 |
none |
KCR 9 |
| 41.0 |
1’D |
1220 |
510×660 |
12.3 |
57 |
67 |
3.2 |
167 |
30 |
|
| 41.1 |
1’D |
1450 |
560×720 |
15 |
68 |
75 |
3.9 |
185 |
65 |
|
| 41.10 |
1’D |
1435 |
470×710 |
15.8 |
64 |
73 |
2.7 |
153 |
23 |
LMS 8F coal |
| 41.15 |
1’D |
1435 |
470×710 |
15.8 |
64 |
73 |
2.7 |
153 |
23 |
LMS 8F oil |
| 42.0 |
1’D1′ |
1350 |
500×660(3) |
12.5 |
64 |
86 |
4.2 |
165 |
51 |
|
| 42.40 |
1’D1′ |
1520 |
535×710 |
14 |
65 |
89 |
4.3 |
201 |
58 |
USATC S200 |
| 51.0 |
1’E |
1450 |
630×720 |
15 |
89 |
99 |
4.5 |
213 |
78 |
|
| 52.0 |
1’E1′ |
1370 |
560×710 |
14.8 |
75 |
102 |
5.0 |
217 |
70 |
Ex 52.50 |
| 52.1 |
1’E1′ |
1295 |
605×660 |
14 |
82 |
109 |
6.1 |
254 |
81 |
|
| 80.1 |
E |
1260 |
590(1)/850(1)x630 |
14 |
69 |
69 |
3.4 |
135 |
34 |
KköStB 80 |
| 86.0 |
2’D1′-1’D2’t |
1350 |
490×660(4) |
14 |
118 |
201 |
6.3 |
336 |
81 |
Garratt |
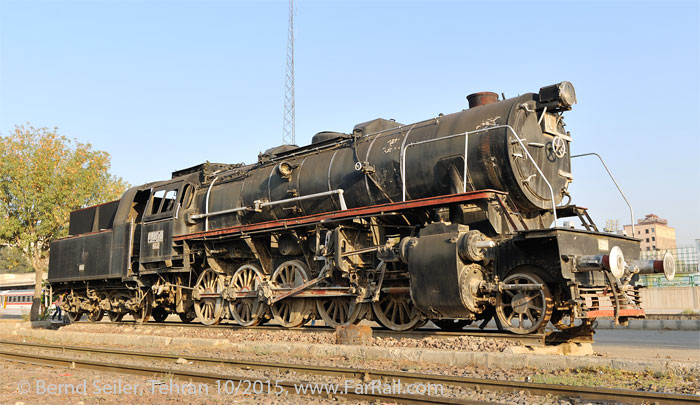
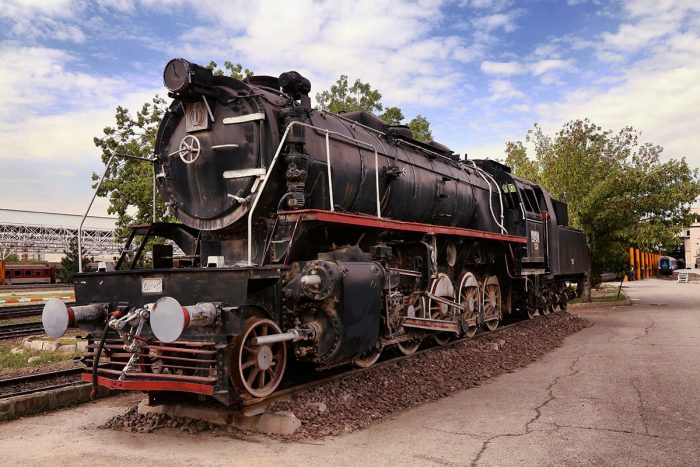
The most dramatic of the locomotives purchased by Iranian State Railways after the War were 2-10-2 Locomotives. They supplemented what was left of the locomotives from Hencshel, Krupp, and Maschinenfabrik Esslingen.
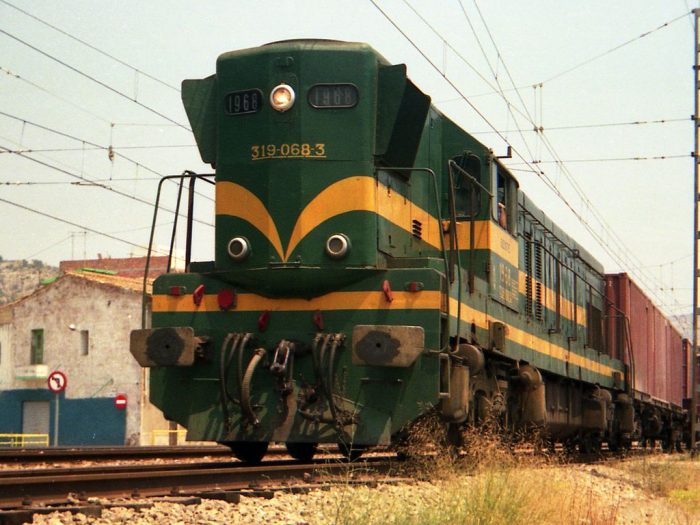
 A Vulcan supplied Iranian Railways 2-10-2! [6]
 A pre-war 2-10-0 locomotive (Henschel 24054/1938) was photographed in 2015 by Bernd Seiler on a Farrail trip. [12]
 The same plinthed locomotive (Henschel 24054/1938). This time the picture shows a full three-quarter view [13]
The Vulcan Foundry Co. was a British locomotive builder sited at Newton-le-Willows, Lancashire. The Company produced a series of large locomotives in the 1950s for locations around the world. [35] The Company’s own records show that 40 No. 2-10-2 locomotives were made for Iranian State Railways and delivered in 1952 and a further 24 No. were delivered in 1954. These were monsters! The Vulcan Magazine article about them (from Winter 1952/53 (Volume 2 Number 8) [3][4] can be found on the http://enuii.com website, [35] along with the Vulcan/Iranian State Railways Brochure. [6][35]
Just a few limited facts about the Vulcan 2-10-2 locomotives:-
They were built entirely to metric dimensions and set up for oil-firing rather than coal. They had a tractive effort of 49,000 lb at 85% pressure and were provided with boilers with a total evaporative heating surface of over 2,730 sq. ft. [6]
The contract for these locomotives was negotiated in 1950, they were expected to cope with trains of 592 tons (600 tonnes) on a 1.5% grade and 296 tons (300 tonnes) on a ruling 2.8% grade where curves of 22 metre radius were the norm. [3][4]
Full details can be found by following the links [3][4] and [6] in the references section below.

Ex-Russian group E from the Djulfa broad gauge line, Tabriz, Iran 1973. [1]
There were still, in the 1970s, some 5ft 3 in gauge tracks rusting away in Iran which had been built by the Russians. The adjacent picture shows an ex-Russian Steam Locomotive on broad-gauge tracks near Tabriz. The main line was converted to standard-gauge in the late 1950s to coincide with the line being built between Tabriz and Tehran in standard-gauge.

Istanbul – Tehran, Iranian 90-510, Razi border station August 1973. [1]
The broad-gauge was also evident at the border as can be seen in the next image. Broad-gauge is most clearly in evidence on the right of the picture
“In 1945, before the Cold War started, the Soviet Union got the first modern diesel engines, Db series from Baldwin, employed Tuapse – Samtrediya and Gudermes – Ordzonikidse, decorated with the Soviet star.” [1]
Diesels After the Second World War
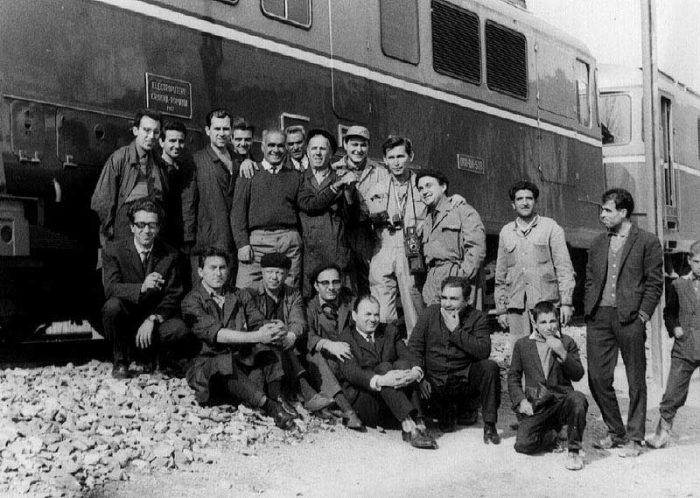
Electroputere Sulzer Diesel Locomotives
A pair of these locomotives were sent for testing in Iran in the late 1950s. It seems as though around 10 of these locomotives were purchased. [36][37]
| Name |
Type |
Specifications and Notes |
Maximum speed |
Years built |
| Class 60 (DA) |
Diesel electric |
2,100 hp (1,566 kW) Co-Co axle formula |
100 km/h (62 mph) |
1959–1981 |
 One of three views of a pair of Co-Co Class 60 DAs led by 0518 that were sent for testing in Iran. All three pictures can be seen on the Derby Sulzer Website All three views were taken at the town of Arak. (c) F Burdubus. The other two follow below. [23]

These were among the earliest in a long line of purchases of Diesel Locomotives by the Iranian State Railways. Details can be found on the link at reference [37] below. They included:
General Motors – EMD Locos (1950s)
Many of the early diesel purchases made in the late 1950s by Iranian State Railways were from General Motors (GM-EMD(USA)). A series of purchases began with a significant number of G12 Bo-Bo locomotives in 1957. A total of 137 of these locomotives were delivered. These were number 40.001- 40.137. A GM-EMD G12 Bo-Bo Locomotive. These locomotives had a long life having first seen service in 1957. This picture was taken in 2016, (c) blackthorn57 on Flickr (CC BY 2.0). [38]
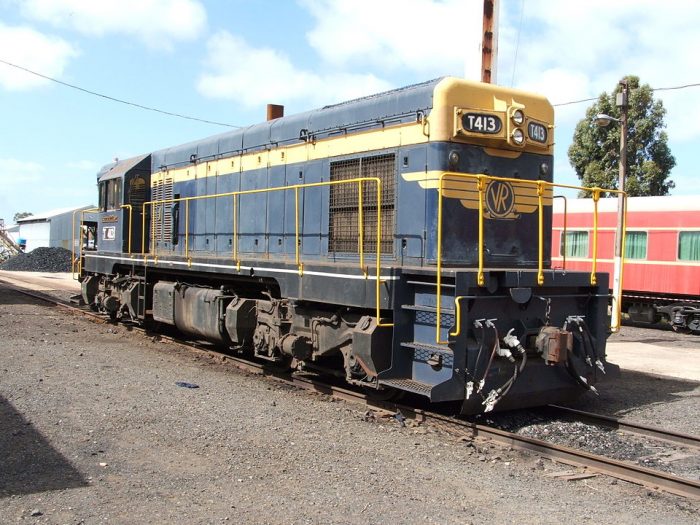
By 1959, Iranian State Railways had also purchased 13 No. GM-EMD G8 Bo-Bo locos; and 20 No. GM-EMD G16 Co-Co locos from General Motors. A preserved G8 Locomotive in Australia, (c) Zzrbiker, English Wikipedia, (CC BY-SA 3.0). [39]
  A RENFE GM-EMD G16 Co-Co Locomotive in service in Spain. [40]
The G8s were of a lower power rating than the G12s, 643kW as opposed to 963kW. They were numbered 40.401- 40.413.
The G16s had two three axle bogies and a power rating of 1323kW, they were numbered 60.301-60.320.
General Motors – EMD Locos (1960s onwards)
Further purchases were made from General Motors (USA) over the years:
- 2 No. GM-EMD G18W Bo-Bo Locomotives were purchased in 1968. Their power rating was 735kW. They were numbered 40.451-40.452. [37][45]
- 193 No. GM-EMD GT26-CW Co-Co locomotives were bought in 1971. They had a power rating of 2205kW and were numbered 60.501-60.569, 60.801-60.914 and 60.975-984. [37][44]
- 41 No. GM-EMD G22W Bo-Bo Locomotives were purchased and delivered in 1975 & 1982. Their power-rating was 1103kW. They were numbered 40.138-40.178. [37] Nos. 40.158-40.178 were constructed under licence by Đuro Đaković [42][43]
- 70 No. GM-EMD GT26-CW2 Co-Co Locomotives were purchased in 1984. Their power rating was 2205kW and they were numbered 60.915-60.974 and 60.985-60.994. All of these locomotives have three 48 inch fans instead of the standard two which is a necessary provision for hot climate of Iran. [37][41]
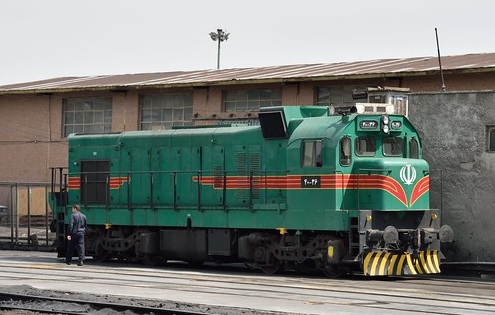
Locomotives from Japan (1970s)
A single contract was arranged with Hitachi for the delivery of HD10C Locomotives. It seems that these were delivered in 1971 and 1975. They had a lower power-rating (707kW)and were used for shunting. They were numbered 60.601-60.138. A Hitachi HD10C Bo-Bo at Tehran Loco depot.This picture was taken in 2016, (c) blackthorn57 on Flickr (CC BY 2.0). [38]
General Electric (Canada) (1990s)
In the 1990s Iran contracted with General Electric in Canada for the supply of further locomotives:
- 21 No. U30C Co-Co Locomotives were purchased in 1992. They had a 2240kW power rating and carried the fleet numbers 60.2001-60.2021 [37][46][47]
- 41 No. C30-7i Co-Co Locomotives bought in 1993 and delivered in 1993 and 1994 had a power rating of 2240kW and were numbered 60.2022-60.2062 [37][47][48]
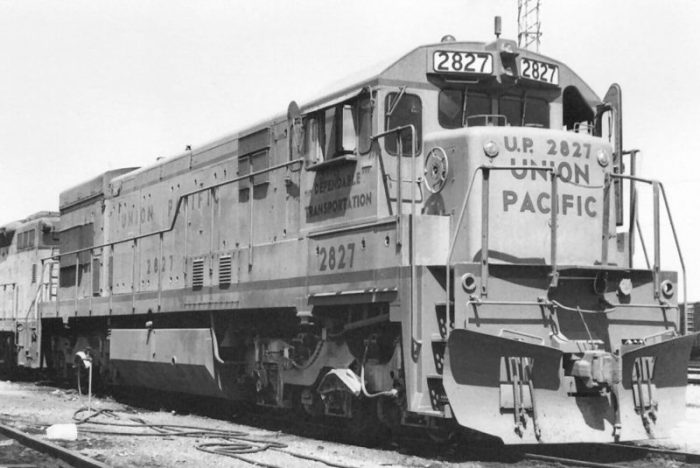
 A Union Pacific GE U30C Locomotive similar to those used in Iran. [46]
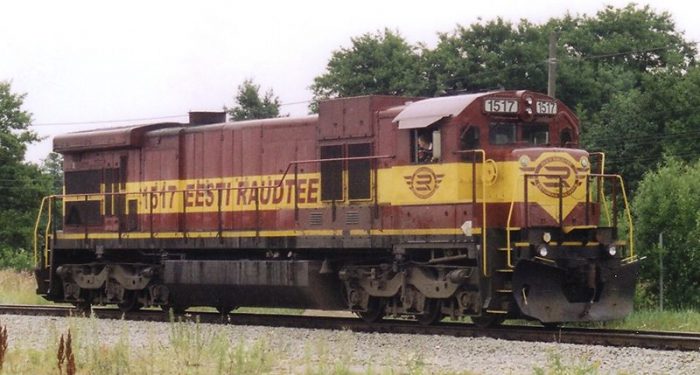
 A GE C30-7i in use in Estonia, (c) LHOON (CC BY-SA 2.0). [48]
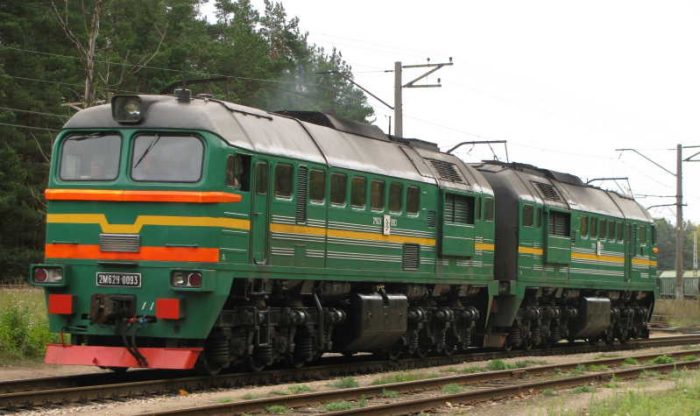
Lugansk Locomotives from Ukraine (1997)
Iran bought 5 No. 2M62U Co-Co (x2) Locomotives from Lugansk in the Ukraine in 1997. They were rated at 2942kW and were used for heavy freight duties. Their wheel arrangement was unusual – Co-Co + Co-Co. They were effectively two large locomotives paired together which operated as one unit. LDz 2M62U Locomotive at Ziemeļblāzma Station, (c) Jindřich Běťák (GNU Free Documentation License). [49]
Newer Diesels (2000 onwards)
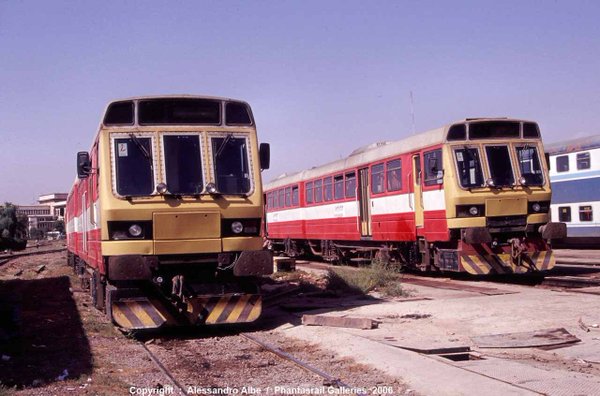
 Recognise these? Pacers. Iran imported them from the UK but scrapped them long before the UK! They were exported to Iran in 2001/2 (Numbers 141001, 141004, 141006, 141008, 141010
and 141013-141019) [14][50]
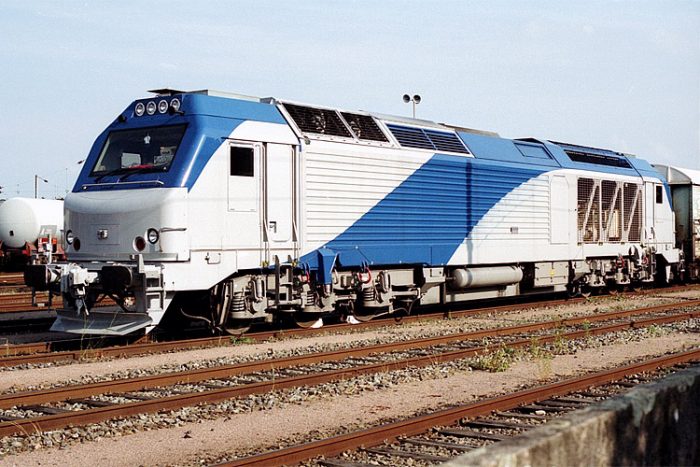
Alstom Locomotives
In 2002, Alstom Locomotives were ordered by the Islamic Republic of Iran Railways (RAI). “Of the 100 units ordered by RAI, Alstom built the first 20 machines in its plant in Belfort, France, including 5 kits. The remainder was produced by Wagon Pars in Iran. For the 20 units built in France, Ruston supplied the engines (16 RK 215). The engines for the remaining 80 locomotives were built in Iran by DESA as agreed in a technology transfer agreement.” [51] The 100 locomotives were designated as follows:
- 30 No. Alstom DE43CAC Co-Co Passenger Locomotives with a power rating of 2880kV and numbered 201-230. [37]
- 70 No. Alstom DE43CAC Co-Co Freight Locomotives with a power rating of 2600kV and which were numbered 231-300. [37]
 An Alstom Prima DE43 C AC. [51]
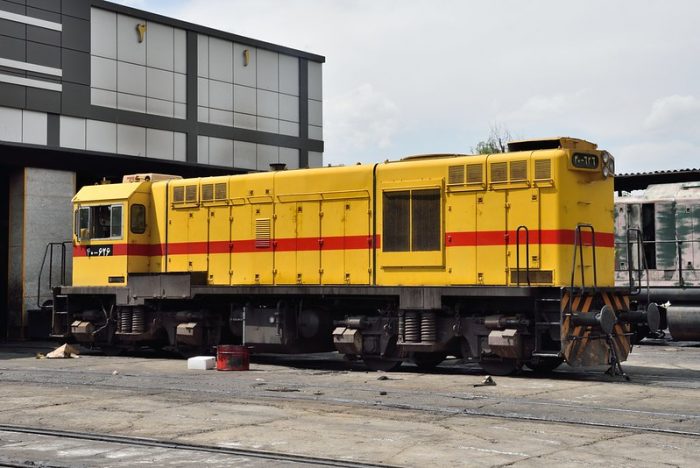
Ziyang Locomotive Co. Ltd GK1C Locomotive. [53]
Five modern diesel shunting Locomotive were purchased in 2008 from CRRC Ziyang in China. These are GK1C B-B Locomotives with a power rating of 990kW [37] although figures quoted elsewhere are higher than this [cf. 52]
Siemens “Safir” Locomotives
In In 2006 Siemens, MAPNA and the Islamic Republic of Iran Railways (RAI) agreed a contact for the supply of 150 four axle Bo-Bo Locomotives. The first locomotive was manufactured by Siemens in early 2010, a further 199 were eventually supplied – the first 30 were built in Germany. [37][54] The remainder were built/assembled in manufactured in Iran under a technology transfer agreement. The value of the contract for the first 150 was $450 million (€294 million). [55]
These are single-ended passenger ER24PC locos with a power rating of 1960kW. They are sometimes referred to as “IranRunners” or “Iran Safirs”. They are numbered 1501-1700. [54] A pair of Siemens ER24PC “IranRunners” of the Islamic Republic of Iran Railways at Tehran, (c) Kabelleger/David Gubler (CC BY-SA 4.0). [54]
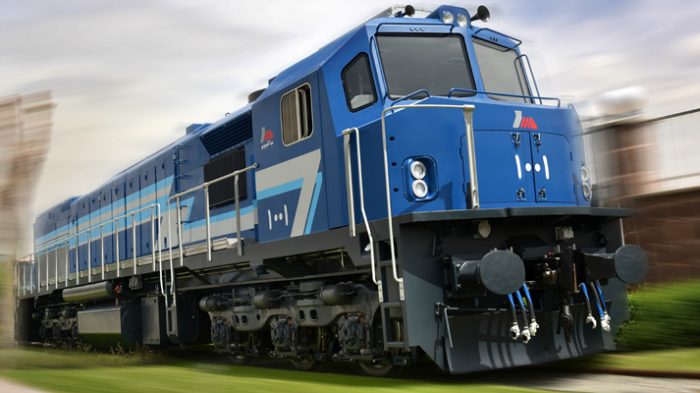
MAPNA MLC Locomotives
MAPNA is an Iranian Industrial concern. “In 2016, a contract for production and sale of 25 MAP24 locomotives was signed between MAPNA Railway Operation Development & Maintenance Company as the clientو and MAPNA Locomotive Engineering & Manufacturing Company. The first unit of the 25-strong batch was delivered to MAPNA Railway Operation Development & Maintenance Company and started trial operation in March 2018 at Tehran depot.” [56]
The MAP24-S90 Co-Co Locomotives have a power-rating of 2238kW. [37] A MAPNA MAP24-S90 Co’Co’ Locomotive in Tehran. [56]
DMUs (Diesel Motive Power Units)
We have already noted the presence of Pacers in Iran. Other DMUs include:-
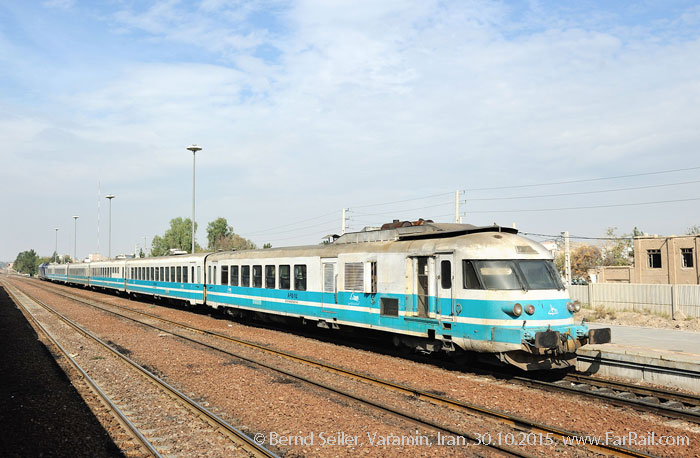
The French RTG DMU-5 Turbo Trainsets (Class T2000) which were delivered in the mid-1970s and power rated at 2020kW. four units were delivered in the mid 1970s [58] and a further 5 were bought from SNCF in 2005. [37] French Turbotrain RTG DMU-5 (c) Bernd Seiler used with the kind permission of the photographer. [57]
20 No. DMUs from Seimens, Austria were delivered in 2004. These DH4 DMU-4 units had a 2352kW power rating. [37] They were intended, initially, for the 1000km route between Tehran and Mashhad. 5 units were built by Siemens, and Wagon Pars Co. in Iran built 15 of these units as a sub-contractor to Siemens. They were designed for a maximum operating speed on 160km/hour. DH4 DMU-4 Unit in Tehran. [59]
50 No. DMU-3 sets from Hyundai Rotem (Korea) were ordered in the early 2000s and delivered two batches in 2007 and 2016/2017, these were primarily built for suburban traffic. The delay in the delivery schedule can be accounted for by the imposition of international sanctions. [37]
A further 150 No. DMU-3 sets were the subject of negotiations between the Islamic Republic of Iran Railways (RAI) and Hyundai Rotem (Korea). A deal was struck in 2016 for the supply of 150 DMU cars for Raja Passenger Train Company. 50 No. of the trainsets were to be made by Hyundai Rotem and 100 no. by Iranian Rail Industries Development (IRICO). [37][60][61] Hyundai Rotem employs around 3,800 people and exports to 50 countries worldwide. [62] In 2020, the order was still being fulfilled. [37] the contract continues as a result of Hyundai-Rotem being able to recover frozen payments of US$74.7 million from Iran in 2016 which were stopped because of sanctions. [71] Hyundai-Rotem DMU-3 in Iran. [71]
Electric Locomotives
Iran has been pursuing a programme of electrification. As yet there is much to achieve in this respect. The line between Tabriz and Jolfa was electified in time to order eight Rc4, Bo-Bo 3440kW power rated locomotive from SJ (Sweden) in 1979. These locos were used for freight between Tabriz and Jolfa and, much later, for commuter trains between Tabriz-and Azarshahr. They were numbered 40-651 – 40-658.m [37][62][64]
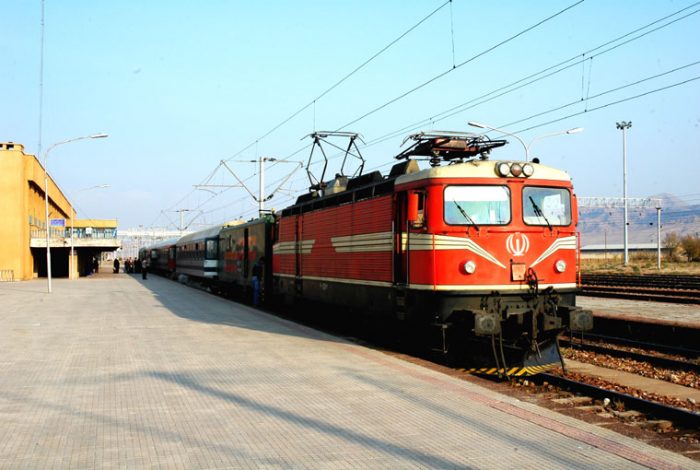
These locomotives were known as the RAI 40-700 class. They were based on the Swedish Rc4 but with Rm-type bogies, sand-proof air filters and no round windows on the side. [63] This photo was taken in 2009 and shows a RAI 40-700 Class Electric Locomotive (c) Ghorbanalibeik [63]
New electrification projects were started with the completion in 2012 of a 46km length of line between Tabriz and Azarshahr to the south. The primary aim of electrifying the five-station single-track route at 25 kV 50 Hz wass to improve services for students travelling to the university at Azarshahr. No additional locomotives needed to be purchased to support this service. [65]
Plans are afoot to electrify 2 lengths of railway. Negotiations started in 2016 to make this happen. The two lengths involved are the line between Tehran and Tabriz and the line between Tehran and Mashhad. [66] Italy offered to undertake the work on the Tehran to Tabriz line. [67]
“Iran has been in talks with Germany’s Siemens as well as Chinese companies to electrify the Tehran-Mashhad Railroad. In October, Germany’s Siemens signed a contract to supply components for 50 diesel-electric locomotives, which will be used in the 926-km railroad, to Iran’s MAPNA Group. Another agreement was signed between the two companies to jointly manufacture 70 electric locomotives for the route.” [66][cf. 68]
Detailed studies for the line were completed in 2018 and construction was due to start later in that year. [69] At present, I cannot find details of the construction programme for the electrification nor of detailed plans for the manufacture of the planned 50 or 70 locomotives. Siemens withdrew from the project in 2018 after pressure from the USA. [70]
References
- https://www.trains-worldexpresses.com/300/305.htm, accessed on 25th March 2020.
- https://orion.math.iastate.edu/jdhsmith/term/slpeisr.htm, accessed on 25th March 2020.
- http://enuii.com/vulcan_foundry/magazine/Vol2_no8_1952/page11-16.htm and http://enuii.com/vulcan_foundry/magazine/Vol2_no8_1952/page17-22.htm, both accessed on 25th March 2020.
- https://blog.mechanicallandscapes.com/2014/11/05/371-library-of-congress-images-allied-railways-and-british-engines-in-iran, accessed on 25th March 2020.
- https://blog.mechanicallandscapes.com/2015/08/06/417-library-of-congress-images-a-beyer-garrett-in-iran, accessed on 25th March 2020
- http://enuii.com/vulcan_foundry/photographs/locomotives/Publicity/Iranian%202-10-2.pdf
- http://www.beyergarrattlocos.co.uk/pics5.html, accessed on 25th March 2020.
- Beyer Peacock Locomotive Order List, Garratt Locomotives, Customer List V1 (PDF); BeyerPeacock.co.uk, accessed on 25th March 2020.
- http://enuii.com/vulcan_foundry/photographs/index.htm, accessed on 25th March 2020.
- https://en.wikipedia.org/wiki/Trans-Iranian_Railway, accessed on 22nd March 2020.
- https://www.railway-technology.com/projects/northsouthtransnatio, accessed on 25th March 2020.
- https://www.farrail.com/pages/touren-engl/Standard-and-broad-gauge-railways-in-Iran-Zahedan-Mashhad-Bandar_Abbas-2019.php, accessed on 26 March 2020.
- https://www.pinterest.co.uk/pin/644718502883386467, accessed on 26th March 2020.
- https://twitter.com/mrtimdunn/status/894664887741407232, accessed on 26th March 2020.
- https://en.wikipedia.org/wiki/Persian_Corridor, accessed on 26th March 2020.
- https://www.historynet.com/the-battle-before-the-battle.htm, accessed on 26th March 2020.
- https://en.wikipedia.org/wiki/ALCO_RSD-1, accessed on 26th March 2020.
- British Work on Persian Railways, 1942 – Parts 1 and 2; The Railway Gazette, 2nd and 16th February 1945, p111-114 and p159-162.
- https://transportation.army.mil/museum/AOTM/aotm-august-2018.html, accessed on 26th March 2020.
- https://iranrails.com/description/17/Iran-railway-locomotives, accessed on 27th March 2020.
- http://www.museedelaporte.be/patrimoine/?p=1655&pdf=1655, accessed on 25th March 2020.
- https://www.sinfin.net/railways/world/iran.html, accessed on 19th March 2020.
- https://multimedia.scmp.com/news/china/article/One-Belt-One-Road/iran.html, accessed on 25th March 2020.
- Ḥamida Amāni, “Farār az čarḵ-a-ye nābudi: Eḥyā-ye baqāyā-ye māšin dudi-e ḵ-aṭṭ-e āhan-e Tehrān Šāh ʿAbd-al-ʿAẓim,” Hamšahri, 25 Bahman 1383 Š./13 February 2005, available online, accessed on 22nd March 2020.
- https://commons.wikimedia.org/wiki/File:Old_steam_locomotive_in_Rey.jpg; https://web.archive.org/web/20161104221645/http://www.panoramio.com/user/1317158, accessed on 26th March 2020.
- Hugh Hughes; Middle East Railways. Harrow: Continental Railway Circle. 1981, p. 98–125.
- https://www.flickr.com/photos/124446949@N06/29564178523, accessed on 25th June 2020.
- https://www.flickr.com/photos/124446949@N06/33632130960/in/photolist-TeXsNU-UwKQvA-Pz9D84-BLJk23-EkpgJo-EnBZbV-2g92Tpc-2dfMckU-22VHX1k-TQppLj-Vcxs9m-DXmR4z-NPFjaa-EvRgRP-BLXvYC-QJyGoM-29o9Awo-B87sTA-B3NvQc-QG6XWY-QV1sT2-E4JbpG-EnBQXv-DysLPc-CxgG6E-TTjhtV-Ekp5zE-USrWGw-EnBK84-Xi2Zc4-A6Mjgb-pv9P8p-21jtfjF-qqQDsW-q8FtL9-p9HMZp-NJT8o8-pdWEwJ-QJzhtk-PFqrCt-ABHTNQ-pv9FE8-pdWdJo-pvqY6g-pdVywv-pvoTWq-ptovfu-pdWNNx-pdWKaR-ptorV3, accessed on 25th June 2020.
- https://www.flickr.com/photos/124446949@N06/46780636985/in/photolist-2egQZyD-Q2jWNJ-22rG8E7-QJzU3B-J8EZ16-2cKSndU-FDuYDQ-Ekpn2Y-TeXsNU-UwKQvA-Pz9D84-BLJk23-EkpgJo-EnBZbV-2g92Tpc-2dfMckU-22VHX1k-TQppLj-Vcxs9m-DXmR4z-NPFjaa-EvRgRP-BLXvYC-QJyGoM-29o9Awo-B87sTA-B3NvQc-QG6XWY-QV1sT2-E4JbpG-EnBQXv-DysLPc-CxgG6E-TTjhtV-Ekp5zE-USrWGw-EnBK84-Xi2Zc4-A6Mjgb-pv9P8p-21jtfjF-qqQDsW-q8FtL9-p9HMZp-NJT8o8-pdWEwJ-QJzhtk-PFqrCt-ABHTNQ-pv9FE8, accessed on 25th June 2020.
- https://www.flickr.com/photos/124446949@N06/25161128942/in/photolist-Ekpn2Y-TeXsNU-UwKQvA-Pz9D84-BLJk23-EkpgJo-EnBZbV-2g92Tpc-2dfMckU-22VHX1k-TQppLj-Vcxs9m-DXmR4z-NPFjaa-EvRgRP-BLXvYC-QJyGoM-29o9Awo-B87sTA-B3NvQc-QG6XWY-QV1sT2-E4JbpG-EnBQXv-DysLPc-CxgG6E-TTjhtV-Ekp5zE-USrWGw-EnBK84-Xi2Zc4-A6Mjgb-pv9P8p-21jtfjF-qqQDsW-q8FtL9-p9HMZp-NJT8o8-pdWEwJ-QJzhtk-PFqrCt-ABHTNQ-pv9FE8-pdWdJo-pvqY6g-pdVywv-pvoTWq-ptovfu-pdWNNx-pdWKaR, accessed on 25th June 2020.
- https://www.flickr.com/photos/124446949@N06/30731957091/in/photolist-22VHX1k-TQppLj-Vcxs9m-DXmR4z-NPFjaa-EvRgRP-BLXvYC-QJyGoM-29o9Awo-B87sTA-B3NvQc-QG6XWY-QV1sT2-E4JbpG-EnBQXv-DysLPc-CxgG6E-TTjhtV-Ekp5zE-USrWGw-EnBK84-Xi2Zc4-A6Mjgb-pv9P8p-21jtfjF-qqQDsW-q8FtL9-p9HMZp-NJT8o8-pdWEwJ-QJzhtk-PFqrCt-ABHTNQ-pv9FE8-pdWdJo-pvqY6g-pdVywv-pvoTWq-ptovfu-pdWNNx-pdWKaR-ptorV3-pv9BUn-pdWB2X-pdVAKt-q9kxvL-p9HRa2-QFWnrU-q9mrjh-qqdjti, accessed on 25th June 2020.
- https://www.flickr.com/photos/124446949@N06/38277705675/in/photolist-22VHX1k-TQppLj-Vcxs9m-DXmR4z-NPFjaa-EvRgRP-BLXvYC-QJyGoM-29o9Awo-B87sTA-B3NvQc-QG6XWY-QV1sT2-E4JbpG-EnBQXv-DysLPc-CxgG6E-TTjhtV-Ekp5zE-USrWGw-EnBK84-Xi2Zc4-A6Mjgb-pv9P8p-21jtfjF-qqQDsW-q8FtL9-p9HMZp-NJT8o8-pdWEwJ-QJzhtk-PFqrCt-ABHTNQ-pv9FE8-pdWdJo-pvqY6g-pdVywv-pvoTWq-ptovfu-pdWNNx-pdWKaR-ptorV3-pv9BUn-pdWB2X-pdVAKt-q9kxvL-p9HRa2-QFWnrU-q9mrjh-qqdjti, accessed on 25th June 2020.
- https://www.berail.be/usa/rs1/index.html, accessed on 25th June 2020.
- https://en.wikipedia.org/wiki/USATC_S200_Class, accessed on 25th June 2020.
- http://enuii.com/vulcan_foundry/photographs/pictorial_loco_list.htm, accessed on 25th June 2020.
- https://en.wikipedia.org/wiki/List_of_stock_used_by_railways_in_Iran, accessed on 27th June 2020.
- http://www.railfaneurope.net/list/iran/iran_rai.html, accessed on 27th June 2020.
- https://flic.kr/p/PPZE2K, accessed on 28th June 2020.
- https://commons.wikimedia.org/w/index.php?curid=9804030, accessed on 28th June 2020.
- https://www.wikiwand.com/en/EMD_G16, accessed on 28th June 2020.
- https://en.wikipedia.org/wiki/EMD_GT26CW-2, accessed on 28th June 2020.
- https://en.wikipedia.org/wiki/EMD_G22_Series, accessed on 28th June 2020.
- https://en.wikipedia.org/wiki/Đuro_Đaković_(company), accessed on 28th June 2020.
- https://en.wikipedia.org/wiki/EMD_GT26_Series#GT26CW/CWP, accessed on 28th June 2020.
- https://en.wikipedia.org/wiki/EMD_G18, accessed on 28th June 2020.
- https://en.wikipedia.org/wiki/GE_U30C, accessed on 28th June 2020.
- https://en.wikipedia.org/wiki/List_of_stock_used_by_railways_in_Iran, accessed on 28th June 2020.
- https://en.wikipedia.org/wiki/GE_C30-7, accessed on 28th June 2020.
- https://commons.wikimedia.org/wiki/File:2M62U-0093.JPG, accessed on 28th June 2020.
- https://www.railforums.co.uk/threads/class-141s-in-iran.76653, accessed on 28th June 2020.
- https://www.mainlinediesels.net/index.php?nav=1000909&lang=en, accessed on 28th June 2020.
- http://www.trainfanz.com/en/series_info.aspx?Series=24&msg=378, accessed on 28th June 2020.
- http://www.zyloco.com/cpsj/gk1c-b, accessed on 28th June 2020.
- https://en.wikipedia.org/wiki/IranRunner, accessed on 28th June 2020.
- https://archive.vn/20121217213645/https://www.zawya.com/story/ZAWYA20061115042009/Iran:%20Siemens%20Signs%20450m-Euro%20Locomotive%20Project, accessed on 28th June 2020.
- https://www.mapnagroup.com/en/projects/railway/map24, accessed on 29th June 2020.
- https://www.farrail.com/pages/touren-engl/Railways-in-Iran-2016.php, accessed on 29th June 2020.
- https://en.wikipedia.org/wiki/Turbotrain#Class_T_2000_RTG_(Rame_à_Turbine_à_Gaz)_Trains, accessed on 29th June 2020.
- http://wagonpars.com/media/pdfs/DMU%20Paradise.pdf, accessed on 30th June 2020.
- https://www.railwaypro.com/wp/iranian-railways-and-hyundai-rotem-sign-rail-cooperation-mou, accessed on 1st July 2020.
- https://www.railjournal.com/regions/asia/hyundai-rotem-signs-iranian-rolling-stock-mou, accessed on 1st July 2020.
- https://en.wikipedia.org/wiki/Hyundai_Rotem, accessed on 1st July 2020.
- https://en.wikipedia.org/wiki/SJ_Rc, accessed on 1st July 2020.
- https://en.wikipedia.org/wiki/Railway_electrification_in_Iran, accessed on 1st July 2020.
- https://www.railwaygazette.com/news/projects-infrastructure/single-view/view/azarshahr-electrification-inaugurated.html, accessed on 1st July 2020.
- https://financialtribune.com/articles/economy-business-and-markets/55172/plan-to-electrify-tehran-tabriz-railroad, accessed on 1st July 2020.
- https://en.irna.ir/news/81957105/Italy-offered-to-electrify-Tehran-Tabriz-railway, accessed on 1st July 2020.
- https://www.mapnagroup.com/en/news/railway/tehran-mashhad-railway-electrification-project, accessed on 1st July 2020.
- https://www.railwaypro.com/wp/tehran-mashhad-electrification-study-completed, accessed on 1st July 2020.
- https://www.dw.com/en/siemens-turns-its-back-on-iran/a-45216112, accessed on 1st July 2020.
- http://www.businesskorea.co.kr/news/articleView.html?idxno=15605, accessed on 2nd July 2020.
- https://commons.wikimedia.org/wiki/File:Endlich_im_Ruhestand_-_panoramio.jpg, accessed on 2nd July 2020.


 Some people are just doomed to be failures. That’s something we sometimes say. It is just the judgement being made in the story in our gospel reading. As out talk for this morning, I want to tell you a story about a teenager called T. J. Ware:


 Try to make room today for a child-like faith: seek to find God in every encounter you have with others; seek to receive God’s promises for yourself once again. Let’s allow children to teach us about wonder, about life and joy and hope, and ultimately about faith as well. For, in doing so, I believe that we will discover that the last verses of the reading from Matthew are true. Let’s hear and hold onto Jesus own words:


.jpg)