Wikipedia provides this schematic map of the Coalport Branch which highlights the key stations and sidings. [3]
History
The history of the Coalport Branch begins with competition between rival rail companies in the area during the mid 1850’s. The GWR had control of the industrial areas of East Shropshire, whereas the LNWR only had access to the area via the Shropshire Canal which ran from Trench down to Coalport.
The Canal was going into disrepair and suffering from water shortages and subsidence. Canals in the area were difficult to maintain as the various mines in the area were causing significant subsidence.
The LNWR decided that it was best to discontinue costly maintenance and instead to build a railway line along the length of the Canal from Hadley to Coalport. Parts of the Canal were converted into railway track bed.
The use of a canal to provide a route for the railway was something that a number of railway companies pursued. In this case, the Canal provided a route for the railway down the East side of Dawley through what is now Telford Town Park, taking it past Aqueduct, Madeley and onto Coalport by the River Severn.
It is important not to confuse the LNWR station at Coalport with that on the opposite bank of the River Severn. The Severn Valley Railway chose to name its station ‘Coalport’ when it was subsequently built. Two stations with the same name on opposite sides of the river.
Eight months later, the LNWR decided to call their station on the north bank of the river Coalport East. It appears that at one time there were ambitious plans to join the two stations together by a bridge. These never came to fruition.
The LNWR branch opened as a single track on 17th June 1861. Unfortunately passenger numbers were low, but passengers were not the main reason for constructing the line. Freight traffic was expected to make the line profitable. The slow speed of the trains was not commensurate to passenger use, neither was the steep incline down to Coalport. Apparently, “some passengers were frightened to go on in case the train didn’t stop at the bottom!” [2]
The passenger service on the line closed on 2nd June 1952. Freight traffic continued until 1964.
The southern section of the line, from the northern end of Telford Town Park is now on the Silkin Way, a walkway named after Lord Silkin who was a pioneer of the Telford New Town development in the 1960’s. The northern length of the line has been lost under the development of the New Town. Part of the northern length of the line, North of Oakengates, is now a section of the A442 dual carriageway.
The Coalport Branch of the Shropshire Canal.
The history of the LNWR railway branch line is built on the story of the Canal and it is with that story that any investigation should begin. A Separate article cover the route of the Canal and the first of these can be found on this link:
Wellington Railway Station to Hadley Railway Station
Wellington Railway Station was the junction station for the Coalport Branch passenger services. The bay platform on the South side of the Wellington Station site was shared with the GWR Coalbrookdale line (Wellington & Severn Junction Railway). The station and the line to its East are covered in the link below:
Coalport East trains left the Shrewsbury to Birmingham line and for a short distance, to Hadley Junction, travelled along the line from Wellington to Stafford. After passing through Hadley Railway Station trains took to the Branch which curved away to the South of the main line.
Hadley Railway Station to Wombridge (Goods)
Experience shows that it is very difficult to plot a line on the ground when significant development has taken place. For the first section of this line the redevelopment from the 1960s into the 21st century has been very significant. In this article I have relied on modern satellite images provided by railmaponline.com. [4] As usual, historic mapping comes from the NLS (National Library of Scotland).
Hadley Railway Station appears on the left of this extract from the 25″ Ordnance Survey of 1901, published in 1902. The trackwork associated with the junction and with Castle Car Works can be seen at the top right of the extract. [60]The same area in the 21st century as shown on the ESRI satellite imagery provided by the NLS. [60]An enlarged extract from the 25″ Ordnance Survey which shows the area immediately around Hadley Station. [61]The same area on the modern satellite imagery of Google Maps. [62]Caren Craft shared the photograph of modern Hadley taking shape on the Hadley History Facebook Group on 26th June 2022. The photo was carried by the Shropshire Star on 15th August 2011. Both of the two railway bridges can be seen on the left of the image carrying the new single track railway line. [80]
Hadley Railway Station served the former Stafford to Shrewsbury Line and was the start of the branch to Coalport. The station was opened in 1849 and closed in 1964. The line through Hadley was closed from 1964, with the last remaining stretches of track being taken up in 1991. In the late 2000s a stretch of track was re-laid to the Telford International Railfreight Park for freight purposes only. [63]
Telford International Railfreight Park (known as TIRFP) is rail freight depot and construction development site located in Donnington to the north of Telford, on the former route of the Stafford to Shrewsbury Line. The terminal was opened in 2009. [64]
The old bridge at Hadley Station viewed from the North. [Google Streetview, June 2022]The old bridge at Hadley Station viewed from the South. [Google Streetview, June 2022]An early view looking North up Station Road under the railway bridge. This image was shared on the Hadley History Facebook Group by Caren Craft on 3rd July 2022. [71]
A later view (1963) of the bridge which was shared on the Hadley History Group by Tony Handley on 22nd March 2021. [73]
An even later image (1986) of the same bridge with the new pedestrian/cycleway bridges in place. This view was shared on the Hadley History Facebook Group by Lynne Purcell on 5th February 2021. [74]
Wombridge Priory was a small Augustinian monastery established in the early 12th century, it was supported by a network of minor nobility and was never a large community. Despite generally good financial management, it fell within the scope of the Suppression of Religious Houses Act 1535 and was dissolved in the following year. [82]
The priory was dedicated to St Leonard. St Leonard was particularly popular in the 12th century following the release of Bohemond I of Antioch, a captured crusader – a circumstance which he seems to have attributed to the saint’s intercession. White Ladies Priory, another Shropshire Augustinian house, was also dedicated to St Leonard, as was the parish church at Bridgnorth, [82] and at a later date, Malinslee Parish Church. Remains of the priory buildings remained visible until the 19th century but are now hidden beneath the churchyard and other development. They were excavated in the 1930s and again in 2011 and 2012. [82]
The church was designated to St. Mary and St. Leonard and was built in 1869 by George Bidlake. It is the fourth church on the site of the Priory.
An aerial view of Wombridge Church with some of the remains of the Priory evident. This photograph was shared on the Telford – The Ultimate Guide Facebook Group by Steve Bowers on 27th February 2023. [83]
The bridge which carried the Coalport Branch over what was once Wombridge Road was demolished to make way for the A442 Queensway.
This photograph was taken during the demolition of the bridge. It is the only photo I have been able to find of the old railway bridge. It appears to have been taken from the South. Headroom would have been quite limited. The photograph was shared by Paul Wheeler on the Telford Memories Facebook Group on 23rd November 2017. [84]
We continue on our journey along the old Coalport Branch with a ground-level shot along the A442 showing the line of the old railway.
Looking Southeast along the A442, Queensway from the Northwest-bound off slip road. The A442 was built over the line of the Coalport branch which was curving along the length ahead towards the Southeast. [Google Streeetview, June 2022]The 25″ Ordnance Survey from the turn of the 20th century again. The important feature on this length of the Coalport Branch was the bridge which carried Stafford Road over the line. [12]Once again, this satellite image covers approximately the same area as that covered by the OS map extract above. The purple line is the route of the Coalport Branch as recorded on railmaponline.com. [4]An image from the Southbound carriageway of the A442 from a position at the top-left of the satellite image above. [Google Streetview, June 2022]From the same Southbound carriageway, the bridge which carries Stafford road over the A442 is visible in the distance. The Coalport Branch followed a tighter curve than the modern road, passing under Stafford Road to the South of the modern bridge over the A442. [Google Streetview, June 2022]Stafford Road, Oakengates looking North across the bridge over the A442. The bridge over the Coalport Branch would have sat just to the South side of the modern A442 in roughly the location indicated by the purple line on the photograph. [Google Streetview, June 2022]
A Brown’s Sentinel bus crosses the Stafford Road bridge in Oakengates in March 1963. For much of his married life, Ron Dean was in the driving seat. And his wife Greta was his conductor. The camera is pointing towards the South. [15]
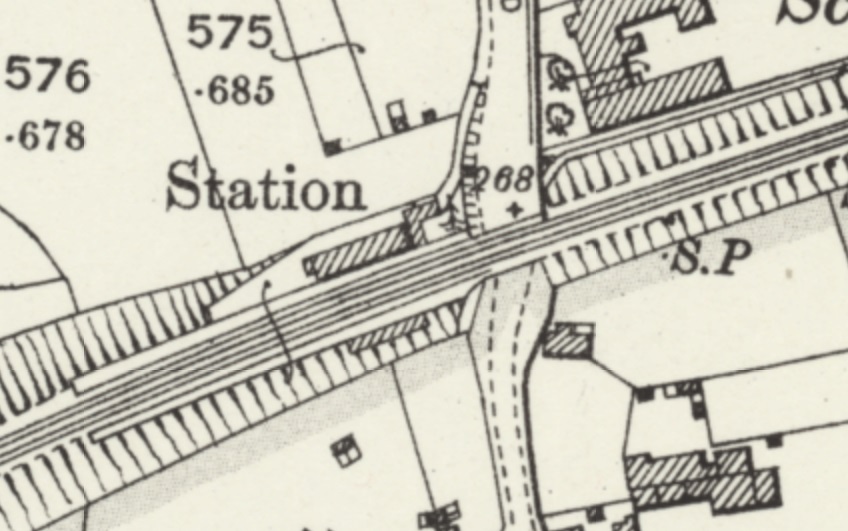
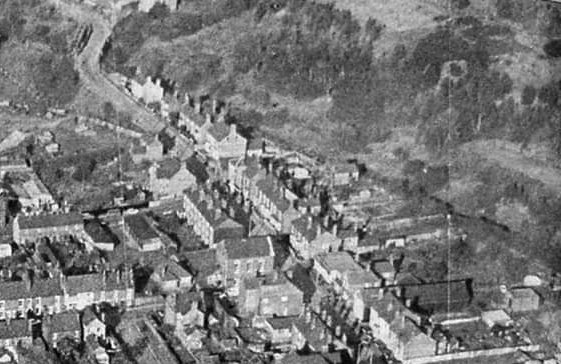
Stafford Road Bridge again, sometime in the 1960s before the A442, Queensway dual carriageway was built. This was probably taken at the time that a footbridge was being installed alongside the road bridge. The photo is taken facing South along the Brach line. It was shared on the Telford memories Facebook Group by Bear Yeomans on 7th February 2016. [16]Looking North from Stafford Road Bridge along the Coalport Branch towards Hadley Junction. This image was shared on the Oakengates History Facebook Group by Gwyn Thunderwing Hartley on 23rd May 2020. [50]Looking North under Stafford Road Bridge along the Coalport Branch. This image was shared on the Oakengates History Facebook Group by Gwyn Thunderwing Hartley on 30th July 2018. [51]This aerial photo of Oakengates was taken in November 1970. Just to the right of the top-centre of the image, Stafford Road bridge can be seen with the footbridge alongside it. The A442 is not evident, but the Coalport Branch cutting can be followed from the road bridge to the right. This image was shared on the Telford Memories Facebook Group by Marcus Keane on 22nd March 2022. [19]An enlarged extract from the picture immediately above showing Stafford Road bridge in the top-left. [19]This next length of the line takes us through Oakengates Market Street Railway Station and Goods yard. The 25″ Ordnance Survey of 1901, published in 1902 shows the station and goods yard to full advantage. [20]The railmaponline.com satellite image of the same area as in the map extract above. This begins to show how congested the area around Oakengates was with a variety of railway lines and sidings. [4]The level crossing to the immediate North of Oakengates Market Street Station with the gates closed to road traffic to allow the passage of a goods train in the capable hands of a Pannier tank! We are looking East up Station Hill. This view was shared by Gwyn Thunderwing Hartley on the Oakengates History Facebook Group on 10th March 2017. [55]Looking East up Station Hill from Oakengates Market Street Station forecourt. This image was shared by Metsa Vaim EdOrg on the Telford Memories Facebook Group on 2nd November 2019. [26]
This photograph is taken from a point just off the left of the above image and also looks East up Station Hill across the railway line, which was by the time the picture was taken, closed. The image was shared on the Telford memories Facebook Group by Marcus Keane on 13th November 2016. [27]
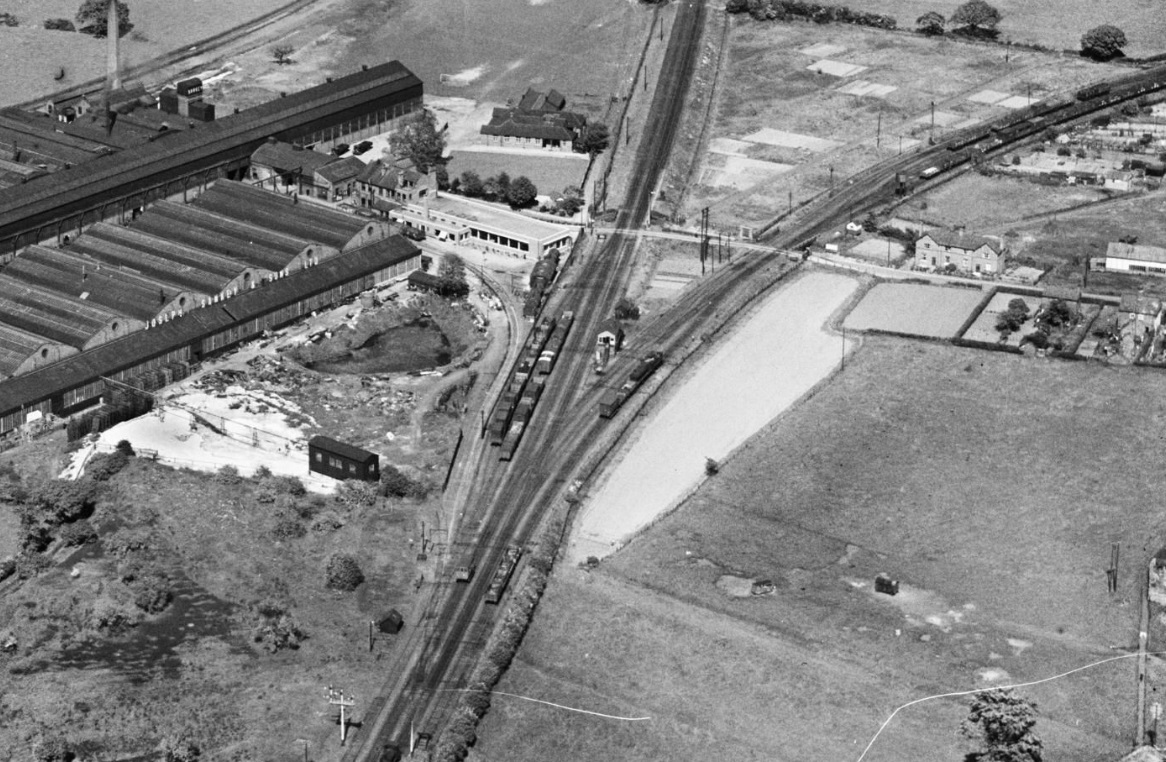
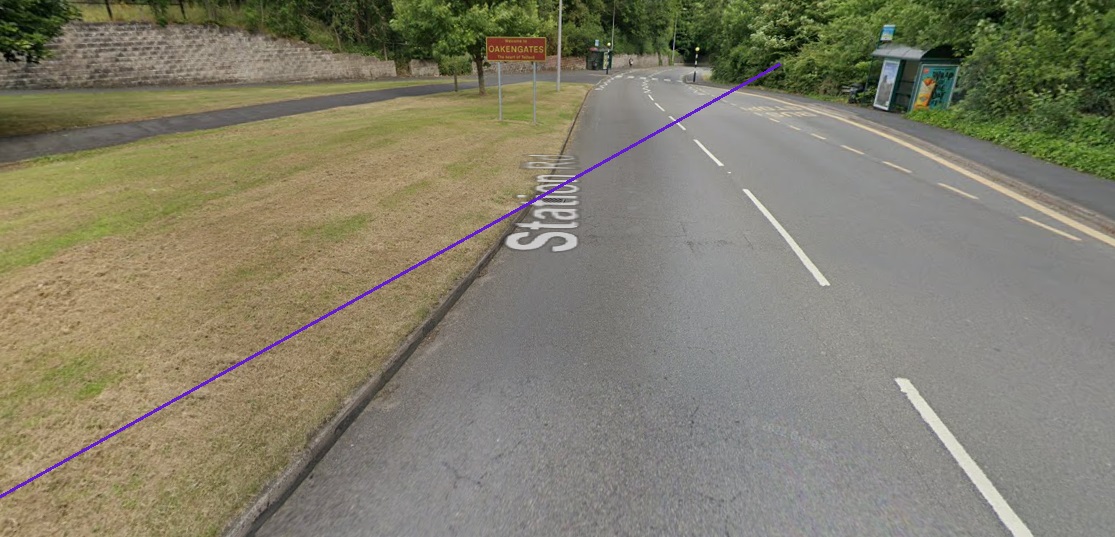
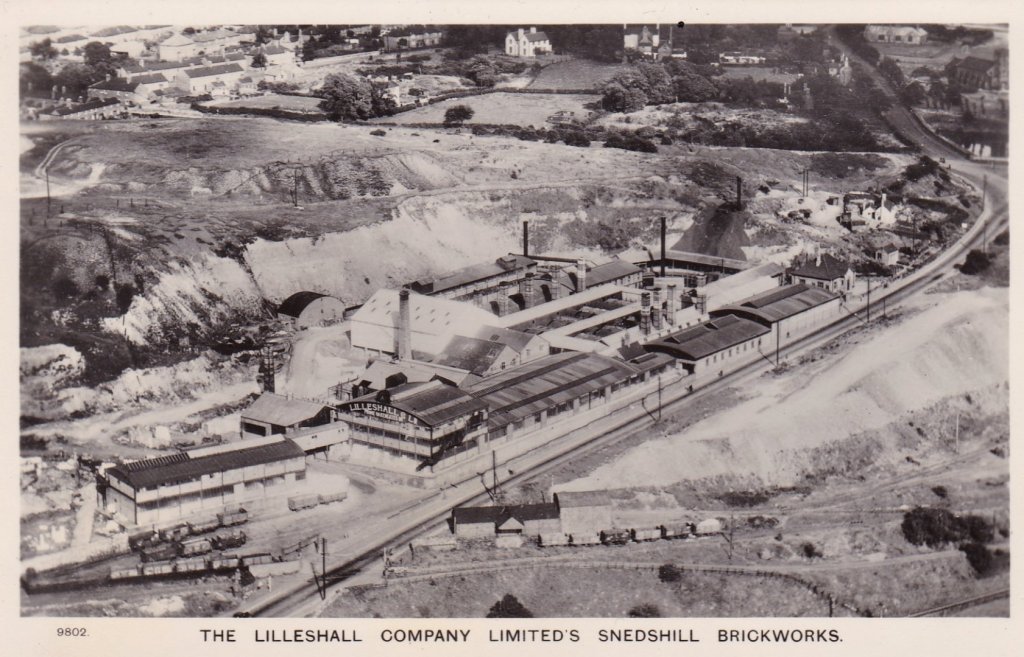
Oakengates Market Street Station from the East. This image was shared on the Oakengates History Facebook Group by Gwyn Thunderwing Hartley on 29th March 2021. [49]Oakengates Market Street Station as seen from the East on Station Hill, adjacent to the Police Station. This image was shared by Paul Wheeler on the Telford memories Facebook Group on 16th August 2017. [21]A view from almost exactly the same location in 2022. The police station site is on the left of the image, the modern railings in the same location as on the image above. The A442, Queensway, overbridge now dominates the scene. [Google Streetview, June 2022]Looking West into Oakengates after the removal of the passenger facilities at Oakengates Market Street Station. Rails remain in the road. It is possible that this photograph was taken in the late 1950s or the very early 1960s. It was shared on the Oakengates History Facebook Group by Gwyn Thunderwing Hartley on 10th March 2017. [56]This little tableau of three images (one above and two below) were shared on the Oakengates History Facebook Group on 16th July 2019 by Gwyn Thunderwing Hartley. Two of the pictures show the work going on to deal with a derailment of a Pannier Tank. The photographs of the derailment were sent to the Group by John Wood and were taken by Mike Dodd. Gwyn Thunderwing Hartley writes: A “derailment at Oakengates Crossing sometime before 1958. This is the LNWR LMS Rail line Market Street/Station Hill. Pic 3 shows where the then disused Line cuts across the Station Hill Road (the line ran between the Building and the Bus Stop traveling in the direction of Wellington), the building is the old Whitefoots Showroom, this was formerly a Pub, the building you can see the back of in the derailment pic is this same as in Pic 3. Much of this info is from John Wood.” The first picture shows the level crossing gates in the background and was taken looking Southeast with the Goods Yard and erstwhile Station Buildings beyond the Crossing gates to the South. The first of the two pictures below is taken looking North from the crossing gates. [57]HistoryLooking South from the level-crossing at the bottom of Station Hill and the top of Market Street. Market Street Railway Station buildings were off the image on the right. The station platform edge can be seen through the crossing gates. The line curves round passed the Goods Yard, under Canongate Bridge and on towards the A5 at Greyhound Bridge. The photo was shared by Gwyn Thunderwing Hartley on the Oakengates History Facebook Group on 9th November 2019. [58]Oakengates Market Street Station in the 1930s looking North towards Hadley, (c) C.L. Mowat used here with permission from dawleyhistory.com. [81]The view North through Oakengates Goods Yard and Market Street Station. The crossing gates at Station Hill/Market Street appear to be closed to rail traffic. The station building sits to their left in the centre of this image. This image was shared by Paul Wheeler on the Telford memories Facebook Group on 16th August 2017. An equivalent modern view from Canongate is not feasible because the industrial site is now screened by trees. [22]Looking North towards Oakengates Market Street Station through the Goods Yard in 1932. This picture was shared on the Oakengates History Facebook Group by David Bradshaw on 27th November 2016. The goods train is hauled by an unidentified 0‒6‒0 and is passing a Super D 0‒8‒0 waiting in the goods yard. The very sharp curve just apparent on the extreme left is Millington’s timber yard siding. The shed on the left was latterly used by the CWS as a store, (c) C.L. Mowat. [54] [81]Looking North through the area that was Oakengates Market Street Station Goods yard from the Eastern end of Commercial Way. The purple line shows the approximate route of the Coalport Branch. The white building at the centre of this image is the old goods shed now put to a different use! [Google Streetview, June 2022]Looking Southeast from the same location. The mainline of the Coalport Branch would have run along the treeline behind the industrial units. [Google Streetview, June 2022]The view from the Southeast on Canongate. The purple line shows the approximate location of the Coalport Branch which passed under the road by means of a bridge. [Google Streetview, June 2022]Canongate Railway Bridge was a brick-arched structure. It is seen here infilled to support the road above. This image was posted by BruceS on Waymarking.com on 2nd June 2015. [23]Looking North under Canongate Bridge towards Oakengates Market Street Station. This picture was shared on the Oakengates History Facebook Group by Gwyn Thunderwing Hartley on 12th October 2017. [52]An aerial image looking North along the line of the Coalport Branch in 1948. Canongate bridge is in the centre of the image, the Station is towards the top of the image beyond the goods yard, (c) Historic England, Britain from Above (EAW013748). [24]An extract from the above image which shows Canongate, the Goods Yard and the Station in greater detail, (c) Historic England, Britain from Above (EAW013748). [24]The next length of the Coalport Branch took it passed Snedshill Iron Works and into a tight corridor which included the GWR Shrewsbury to Birmingham railway Line, the Coalport Branch and a Mineral Railway. This area is again shown on the 25″ Ordnance Survey of 1901, published in 1902. [26]Railmaponline.com’s satellite imagery shows the same area as in the OS map above as it appears in the 21st century. All the lines mentioned above are included in the overlay to the satellite imagery. [4]Another extract from the aerial image of 1948 which showed Canongate Bridge, this shows the area to the South of Canongate. Snedshill Iron Works are on the right of the image. In the centre of the image are John Maddock and Co.’s works for whom the aerial photographs were taken. Those works do not feature on either the 1901 Ordnance Survey or the modern satellite imagery. [24]Looking North from the A5 bridge over the Coalport branch. Snedshill Ironworks are on the right of the image. The bridge at the centre of the image is the same one that appears at the bottom of the aerial image immediately above. This photograph was shared on the Telford Memories Facebook Group by Paul Wheeler on 18th March 2018. [37]Looking Northwest along Reynolds Drive, Oakengates. The Coalport Branch was in cutting at this location. The purple line gives an idea of its Route. Its route crosses Hawkshaw Close a 100 yards or so to the left, as shown below. [Google Streetview, June 2022]Looking South along Hawkshaw Close, Oakengates with the line of the Coalport Branch shown. As noted above the line was in relatively deep cutting at this location. Google Streetview, June 2022]Looking North from Newlands Road, Oakengates, towards Oakengates Market Street Station. At this point on the line we are a little to the North of the accommodation bridge shown on the 1948 aerial image above. The approximate route of the line is again shown by the purple line. The line was, however, in deep cutting at this location. [Google Streetview, June 2022]Looking South from Newlands Road, Oakengates, along the line of the Coalport Branch which was in deep cutting at this location. The road to the right of this image is Station Road which once ran immediately alongside the old railway line a little further to the South.[Google Streetview, June 2022]Looking North along Station Road across the line of the old railway. Station Road was diverted when the new roundabout (immediately behind the camers) was constructed. The next two monochrome images focus on this location as it was in 1948. [Google Streetview, June 2022]The same length of line, but this time as shown in an aerial image from the Northwest, also taken in 1948. The image features John Maddock’s works with Snedshill Iron Works beyond, (c) Historic England, Britain from Above (EAW013752). [25]A closer view of the top-right of the above image with the Coalport branch heading away to the South. This area saw significant alterations in the later years of the 20th century. The significant bridge carries what is designated the B5061 in the 21st century, but was the A5 Trunk Road. The works immediately beyond the bridge and alongside the A5 are the Lilleshall Company’s Snedshill Brickworks, (c) Historic England, Britain from Above (EAW013752). [25]The 1″ OS Map of 1898, published 1899, shows the location of the bridge. The immediate area is now under the Greyhound Roundabout which sits alongside the A442. [28]Looking Southeast along the A5 towards the Lilleshall works at Priorslee. The dominant building with the curved roof on the left of this image is the Lilleshall Company’s Snedshill Brickworks. The Coalport Branch passed under the bridge at the centre of the image. This phot was shared on the Telford Memories Facebook Group on 23rd February 2014 by Vince Allen. [29]Looking down into the cutting of the Coalport Branch from the East in 1973. The road running across the image is the A5. The arch bridge is the Greyhound Bridge which is eventually replaced by the Greyhound Roundabout. The picture was shared on the Oakengates History Facebook Group by Gwyn Thunderwing Hartley on 14th May 2019. [58]A local collapse of parapet walling alongside the bridge occurred in 1966. The bridge is off to the left of the photograph, the running line of the Coalport Branch just below the image. This press cutting was shared on the Telford Memories Facebook Group by Paul Johnson on 1st March 2014. [30]In this postcard aerial view of Snedshill Brickworks from the West, the Mineral Railway adjacent to the Coalport Branch is visible, crossing the A5 at the bottom edge of the image. The Coalport Branch is just off the bottom of the picture. [32]Snedshill Brickworks again, this time in the 1950s and viewed from the East. The A5 runs away to the right of the image. The cutting of the Coalport Branch runs across from middle-right to middle-left. The A5 bridge over the line is hidden by the Works buildings. This picture was shared on the Telford Memories Facebook Group by Marcus Keane on 26th March 2014. [36]From a similar angle to the last picture but taken from the Lilleshall Brickworks buildings in 1974, this image was carried by the Shropshire Star at the time. The A5 runs diagonally across the shot with the dwarf wall above the arched Greyhound Bridge visible to its right. The cutting of the Coalport Branch runs left to right across the centre of the image. The picture was shared on the Oakengates History Facebook Group on 22nd October 2020 by Gwyn Thunderwing Hartley. [59]
This photo does not have the best of definition, but it is worth including as it shows the view South across the Brickworks before redevelopment work in the area. The Shrewsbury to Birmingham line curves away to the East. The A5 bridge over the Coalport Branch is visible at the bottom of the image. [33]
This aerial image looks to the South at a time of great change in the local landscape. In the bottom-eft of the image, the A5 still runs on its route passed the Snedshill Brickworks and across what was once the Coalport Branch. Greyhound roundabout is under construction. South of the roundabout the mainline from Shrewsbury to Birmingham appears out of its tunnel and the A442 construction alongside it is well advanced. Toward the top of the image is the M54 construction work and in the top-right corner, part of Telford’s new town centre. [33]This aerial image is taken facing North. The Coalport Branch no longer features. Snedshill Brickworks remain and the A442 is not yet completed and there is little or no evidence of it North of Greyhound Roundabout. What will be the Northbound off-slip road from the A442 runs South away from the newly completed Greyhound Roundabout. [33]Looking North under the A5 towards Oakengates, apparently the bridge was known as Greyhound Bridge and gave its name to the roundabout that replaced it. This photo was shared on the Oakengates History Facebook Group by David Bradshaw on 27th November 2016. [54]
From this point South the A442 now occupies the space which once was used by the Coalport Branch. The Northbound slip road from the A442 can be seen following the line of the old railway on the Railmaponlin.com satellite image below.
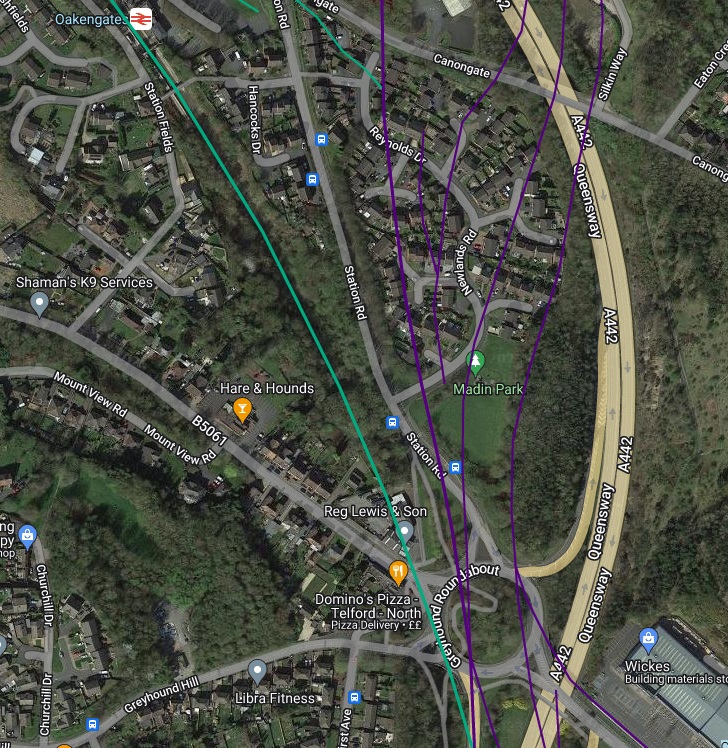
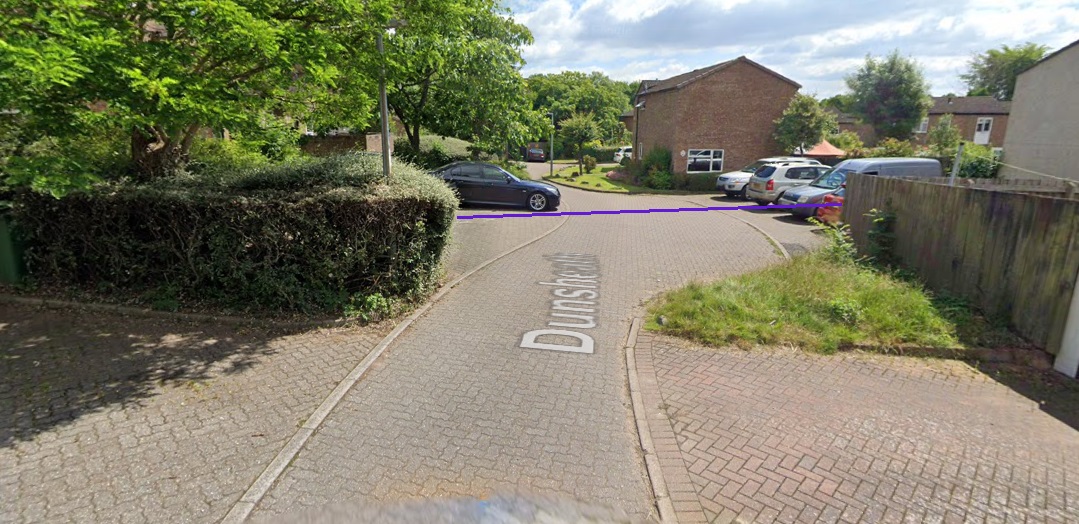
The 25″ Ordance Survey of 1901, published 1902, shows the Coalport Branch passing over the GWR Shrewsbury to Birmingham main line. The GWR line passed under the area in a deep tunnel with the Coalport Branch above it also in a relative deep cutting. The two lines ran approximately parallel for a short distance. [31]Railmaponline.com shows the same area with the local lines overlaid on the satellite imagery from Google Maps. [4]The view North, back towards Oakengates from the northbound slip road of the A442. [Google Streetview, June 2022]The view South from the same location showing the approximate route of the Coalport Branch. [Google Streetview, June 2022]A little further South along the A442 with the approximate line of the Coalport Branch marked once again. [Google Streetview, June 2022]Further South again, this time the camera is on the southbound carriageway. The Coalport Branch ran approximately along the modern treeline. Beyond the horizon the A442 curves back over the formation of the old line. [Google Streetview, June 2022]Further South again the A442 crosses the line of the Coalport Branch. The next Railmaponline.com satellite image shows that the footbridge in this view is very close to the point where the A442 leaves the formation of the Coalport branch. [Google Streetview, June 2022]This next extract from the 25″ Ordnance Survey of 1902 shows the Shrewsbury to Birmingham line to the East of the Coalport branch and running parallel to it. Both pass under the road leading Northeast out of Hollinswood. The Coalport branch remains in cutting along much of its length on this map extract. [34]The same area on the satellite imagery provided by Railmaponline.com. The purple line shows the route of the Coalport Branch which, from close to the top-left of the image ran along a route immediately adjacent to the modern A442. Hollinswood Road has been replaced by a footbridge over the A442 and the Shrewsbury to Birmingham main line. It is further cut to the Southwest by the M54 and its junction arrangement, just off this image to the bottom-left. [4]Looking North towards Oakengates from the cycle track on the West side of the A442. The approximate route of the Coalport Brnach is indicated by the purple line. [My photograph, 13th March 2023]Looking Southeast from the cycleway alongside the A442. [My photograph, 13th March 2023]Another view looking North, but this time taken from the Footbridge/Cycleway bridge over the A442. [My photograph, 13th March 2023]Looking South from the same bridge with the route of the old railway indicated by the purple line. The bridge ahead carries the M54 over the A442. [My photograph, 13th March 2023]Looking South again, this time from the cycleway/footpath which runs under the M54 bridge over the A442. [My photograph, 13th March 2023]This is now the view South towards the Telford Station footbridge. My photograph, 13th March 2023]A few steps ahead and turning a half-circle, this is the view looking North under the M54 Bridge with the old railway route marked by the same purple line. [My photograph, 13th March 2023]The view South once more showing the line of the old railway. [My photograph, 13th March 2023]Looking North-northwest on Rampart Way under the footbridge leading to Telford Railway Station. The approximate line of the Coalport Branch is shown by the purple line. The M54 runs parallel to and beyond the purple line [Google Streetview, June 2022]Looking to the Southwest under the Station Footbridge with the line of the Old Coalport Branch shown in purple. [Google Streetview, June 2022]Old Dark Lane Colliery and Brickworks appear at the top of the next extract from the 25″ Ordnance Survey of 1901, published in 1902. Dark Lane Village is at the bottom of the image. Dark Lane village was lost as part of the development of Telford. The Branch has turned away from the Shrewsbury to Birmingham line towards the South. [35]The same area on the satellite imagery provided by Railmaponline.com. The route of the old line cuts across the West side of the A442 interchange and then South through housing and across Dale Acre Way. [4]Looking South across Hollinswood Interchange along the line of the Coalport Branch. [Google Streetview, June 2022]Looking East along the northern arm of Dunsheath. The line of the old railway crosses the housing development immediately this side of the black car and the van (approximately)! [Google Streetview, June 2022]Looking East along the southern arm of Dunsheath. The line of the old railway crosses the housing development as shown by the purple line. [Google Streetview, June 2022]
Old Darklane Colliery and Brickworks
The Colliery was opened in 1855 and closed finally in 1885. The owners were: Beriah Botfield (1855-1860]; Leighton and Grenfell (1869-1870); and Haybridge Iron Co. Ltd (1875-1885). [38]
Dark Lane Village
Dark Lane Village was lost in its entirety to the redevelopment which produced Telford. Dark Lane Row and the Methodist Chapel appear at the bottom of the OS map extract above. The remainder of the village features at the top of the OS Map extract below. Malins Lee Station was on the South side of the village. Little Dark Lane Colliery to the West. There were three long rows of cottages which were known locally as: Long Row (about 550ft long and containing 20 houses); Bottom Row (a little over 500ft long and containing 25 houses); and Short Row (nine houses built by the Botfield family in around 1825). A full description of the village and pictures of the buildings can be found on the Dawleyhistory.com website. [39]
The last extract from the 1901 25″ Ordnance Survey in this article covers Dark Lane village and Malins Lee Railway Station. [47]The same area on the satellite imagery provided by Railmaponline.com. After crossing Dale Acre Way, the route of the old line heads South-southwest across open ground and then over land used for housing development. [4]Looking West on Dale Acre Way. the approximate location of the old railway is shown by the purple line. [Google Streetview, June 2022]The view West in the 1960s along Dark Lane the GWR mineral railway was hidden in the dip. The road then rose relatively steeply to cross over the Coalport Branch. The bridge can be seen middle-left of this image. [40]This Streetview image is taken from approximately the same location as the picture immediately above. [Google Streetview, June 2022]This bucolic colour image shows the road featured in the image above but this time from a location adjacent to Bottoms Row, Dark Lane. The bridge over the Coalport Branch can be seen again on the horizon. This photo was shared on the Telford memories Facebook Group by Marcus Keane on 28th February 2023. It was colourised by Simon Alun Hark. [42]This image is taken from the same geographical location as the one immediately above, facing in the same direction. The light blue line indicates the alignment of the old Dark Lane. [Google Streetview, June 2022]This postcard view shows Bottom Row with the Methodist Chapel beyond. The bridge on the right of the image carried Dark Lane over the Coalport Branch. Malins Lee Station was beyond the bridge to the right of the image. A matching modern image is not practical as the camera location is now in the midst of a copse of trees close to the boundary of the exhibition centre car park. [39]
‘The Miner’s Walk‘ website provides more information about the area around Dark Lane village. [41] It includes a hand-drawn overlay of modern roads over the Ordnance Survey of the 1880s.
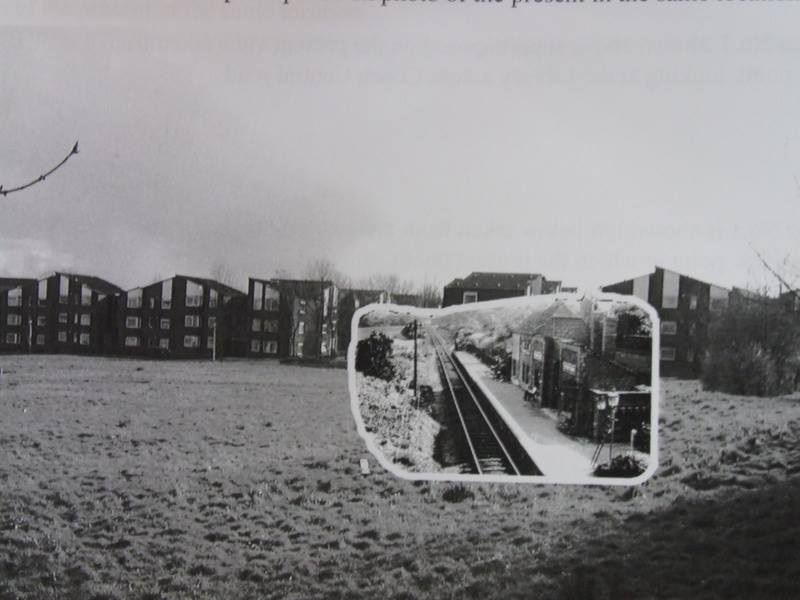
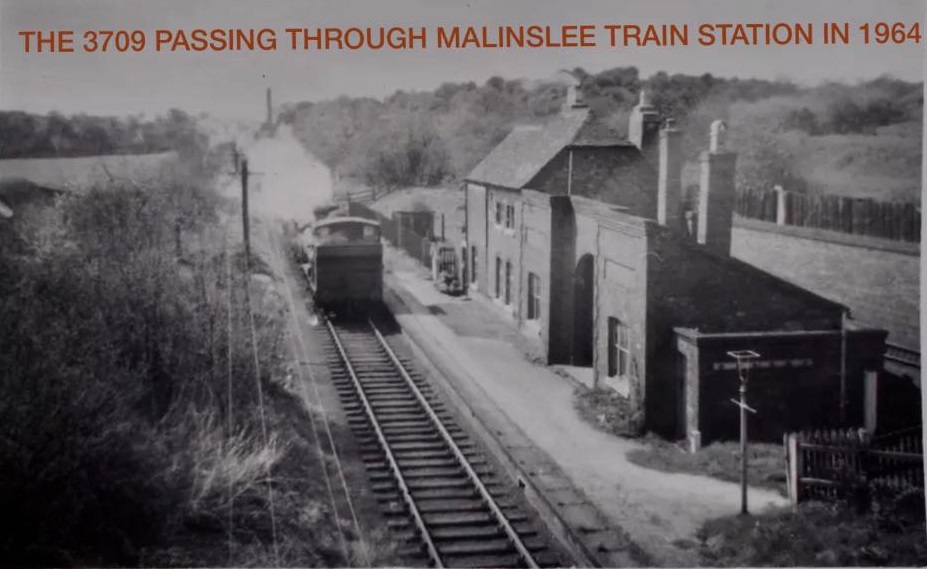
Malins Lee Station as in appeared in 1932.The photograph seems to have been taken facing South from the bridge which carried Dark Lane over the line. The passenger facilities at the station seem to be a little different to others on the Coalport Branch. The station was closed for two years during WW1 as an economy measure and finally closed in 1952 with the line remaining open for goods traffic for more than a decade. Just to the South of the station was a single siding which served immediately local industries. This picture was shared by Lin Keska on the Telford Memories Facebook Group on 15th August 2018. [45]Marcus Keane shared this composite image on the Telford Memories Facebook Group on 20th July 2014 which shows the location of Malins Lee Station in relation to the modern blocks of flats in Hollinswood. [48]Malins Lee Station once again. This photo seems to have been taken from the filed opposite the station. The tall chimney behind the station was probably that of Dark Lane Foundry. This photograph was shared by Marcus Keane on the Telford memories Facebook Group on 24th January 2018, (c) Ray Farlow, circa 1907. [43]Malins Lee Station passenger facilities. The photograph was shared on Telford Memories Facebook Group by Marcus Keane on 20th September 2017. [44]Malins Lee Station had been closed to passengers for 12 years when this photograph was taken of a goods service on the Coalport Branch. The picture was shared on the Telford memories Facebook Group by Lin Keska on 15th August 2018. [46]
We have reached the end of this article. Two further articles will cover the remaining length of the LNWR Branch to Coalport East. The next article can be found on this link:
This blog post provides a great overview of the history of the Coalport Branch which I found particularly interesting. I’m curious to know more about the competition between the GWR and LNWR in the area and the reasons behind their decision to build the railway along the Canal. Is there any additional information you could provide about this topic? Thank you for your post!
Hi, there have been a number of articles in the railway press ‘Rails around Oakengates’ (Steam Days, March 2013) might be a place to start. There is an online article at the dawleyhistory.com website which has an article written by William H. Smith on the Coalport Branch.


Pingback: The Railways of Telford – the Coalport Branch of the LNWR – Part 2 – Malins Lee Station to Madeley Market Station | Roger Farnworth
This blog post provides a great overview of the history of the Coalport Branch which I found particularly interesting. I’m curious to know more about the competition between the GWR and LNWR in the area and the reasons behind their decision to build the railway along the Canal. Is there any additional information you could provide about this topic? Thank you for your post!
Hi, there have been a number of articles in the railway press ‘Rails around Oakengates’ (Steam Days, March 2013) might be a place to start. There is an online article at the dawleyhistory.com website which has an article written by William H. Smith on the Coalport Branch.
Pingback: The Railways of Telford – the Coalport Branch – Part 1A | Roger Farnworth
Pingback: The Railways of Telford – the Coalport Branch of the LNWR – Part 3 – Madeley Market Station to Coalport East Station | Roger Farnworth