

On the outbreak of war in 1939 the S&MLR received a letter dated 1st September “informing it that under the Defence of the Realm, Defence Regulations 1939, the railway was now under government control. It was the last of 11 in a list of railways affected. The only other light railways were the Kent Light Railway and the Kent & East Sussex Light Railway, two other lines once run by Stephens, and probably selected because of their strategic significance.” [1: p79]
Criggion provided a significant source of income. The building of the East Lancs road provided a major outlet for roadstone. However, with the Depression and consequent crash in mineral traffic after the East Lancs road contract had been completed, income for the S&MLR dried up. “Passenger traffic had long become uneconomic and even the bank holiday specials had been abandoned in 1936. Agricultural traffic was thin and the line survived on residual quarry traffic and substantial local traffic in Shrewsbury to the Anglo-American Oil Company’s depot established at Abbey station in June 1934.” [2]
A reconnaissance of the railway was undertaken by the military which found the S&MLR to be in a poor state,” with sleepers rotting and bridges devoid of decking. The track consisted in part of 82.5lb per yard bullhead rail, but there were some lengths of 60lb rail laid in 1922. Approximately 25% of the sleepers needed renewing. The axle loading on the line was as low as 11 tons.” [15: p27]
“Nothing could cover up the terminal nature of the enterprise, which could only be rescued by a massive upturn in the Criggion roadstone traffic. The latter months of 1939, like everywhere in these early months of the war, were fairly normal and the only intrusion of the war was the use of the waiting room at Abbey Station for ARP meetings for 1 hour every evening.” [2]
“By the end of 1939 the S&MLR owed £16,439 offset by less than £2,000 of realisable current assets. The remainder on the so-called credit side of the balance sheet £9,756 of capital expenditure paid from revenue and £4,929 of accumulated losses. Of the five locomotives owned by the railway, only one, No. 2, the former No. 8108, was in use; the S&MLR was really in a poor state.” [1: p79][cf.15: p33] Shropshire and Montgomeryshire Light Railway No. 2 was the only operating steam locomotive on the Railway at the time it was commandeered by the military. [1: p88]
 LNWR Collier No 2 at Kinnerley. No. 2 was the last loco repainted by the S&MLR before the military takeover. It is resplendent in sage green, (c) David Giddins. [14]
“Government control allowed the line to continue at a guaranteed return of £1 profit but there were continuing concerns about paying for the maintenance backlog which this arrangement did nothing to alter. This factor raised doubts in the Ministry of War Transport about the continuance off government control and decontrol was actively discussed in February 1940.” [2]
This discussion eventually resulted in the terms of the arrangement being confirmed on the basis of the actual performance of the line in 1935-1937, which was poor, and the £1/annum payment being confirmed. Maintenance, including renewals was capped at £900. No provision was made for debenture interest. “Clearly being under government control was not going to be of much benefit to the railway.” [1: p94]
The Colonel Stephens Society website says: “With the outbreak of war the S&MLR was seen … as a railway that was important to the nation and was accordingly taken into government control, although formal terms were not agreed till April/May 1940. Delays arose not only through bureaucracy but concerns about the Railways finances and the Directors misgivings about the indirect control relationship arising from a decision to deal with smaller companies through the majors; in the S&MLR case the old enemy, the GWR. This was causing continuing tension on major issues, but in the short term, … it continued to be managed and run as before.” [2]
“During the 1930s, there was a recognition of a need to provide secure storage for munitions within the United Kingdom. The proposal was to create three Central Ammunition Depots (CADs) in easily-hewn and relatively horizontal rocks: one in the south (Monkton Farleigh); one in the north of England (Longtown, Cumbria); and one in the Midlands. While Monkton Farleigh came into operations in 1939, CAD Nesscliffe was only opened by the War Office in 1941. In order to service the extensive property, the War Office took over the virtually defunct Shropshire and Montgomeryshire Railway and built extensive additional service tracks along the 8¾ miles of railway line from Maesbrook to the former Ford and Crossgate railway station.” [3]
Peter Johnson says: “The war gave the S&MLR a new lease of life, but not straight away. Until January 1941, things carried on much as they had done before. The winter of 1939/40 was, however, extremely severe and played a cruel trick on the railway.” [1: p94]
January 1940 brought disaster to the S&MLR: Ice flows in the river Severn attacked the Achilles heel of the line, Melverley Bridge, which was so damaged on the 27th January that all Criggion branch traffic ceased. [2]
The quarry was severely hit and only managed to divert a part of its potential output by road to Four Crosses station. The S&MR could not afford the required repairs to Melverley Bridge. Although of little consequence to the nation, the Quarry had a Director with influence, “Sir Henry Maybury former Director-General of Roads, Ministry of Transport 1919-1928, and a pioneer of the arterial road network. He used his contacts to press the Ministry of Transport to safeguard the bridge and get it repaired and also to get the GWR to operate the Llanymynech-Criggion section.” [2]
“Matters dragged on and the financial situation of the S&MLR was so severe that they decided that their resources had to be concentrated on those parts of the line which might be made to pay. The Kinnerley to Moele Brace section was to be closed and arrangements made for the remaining lines to be worked by the GWR. In the light of this decision and Ministry pressure, the REC (Railway Executive Committee) approved financial arrangements to repair Melverley Bridge and these were confirmed in discussions over the June to September 1940 period.” [4]
The Colonel Stephens Society says that had this been a time of peace the decision would have been implemented immediately, “but others held the ultimate destiny of the line in their hands, for the War Department announced in October that they wanted the mainline of the S&MLR for storing munitions.” [4]
The depot(s) to be constructed would replace other planned facilities “at Wem and Nantwich and be capable of accommodating 50,000 tons of ammunition; 50 ammunition sheds would be required, not less than 200 yards apart.” [1: p94]
The War Department “began to take over the main line, but not the branch, in late 1940 and in a meeting on Christmas Eve 1940 between the Ministry and the War Office it was revealed that the military were about to remove some girders [from Melverley Bridge]. Indeed they had already removed some but the work was stopped. However these changes and lack of materials and other resources delayed the bridge work further. It was not until 8 May 1941 that reconstruction commenced under the supervision of the GWR. These repairs involved more work than originally envisaged and ultimately cost £5,700, with a further £2,350 of repairs to the track of the branch itself. The bridge was not reopened until 27 October 1941, and crucially, the GWR’s contractors had, through accident or design, only rebuilt it for an axle load of 9 tons. Moreover, it appeared later that they had done a poor job that would not endure. So now the S&MLR did not, following the loss of the last Ilfracombe goods Hesperus in 1941, have a light enough locomotive to work the reconnected line. Although they tried to obtain a small locomotive for the work ,they did not succeed.” [4] This drawing shows “Hesperus” as bought in 1910 which was light enough to serve on the branch-line and to cross Melverley Bridge. It was lost to the line in 1941. [5]
Initially, as we have noted, the War Department’s plan was to take over the S&MLR but not the Criggion Branch. It identified an area between Shrawardine and Nesscliffe for an amuntion depot. [1: p95] However, the War Department (WD) eventually agreed to work the branch line. The decision was confirmed in May 1942, and small locomotives that came to be used by the WD, such as a Manning Wardle 0-6-0ST, could have been used on the whole branch. The records show that the WD worked the Branch as far as the Bridge until 7th May 1947, including both quarry and other goods traffic, which had increased, particularly with the construction of a BBC transmitting station near the branch. Workings were not however on a daily basis but appear to be about every other day, unless quarry traffic was heavy. The quarry’s Sentinel worked the branch beyond Melverley Bridge. [4] The GWR had placed a 9 ton axle limit on the Melverley Bridge. [1: p99]
The WD, in the form of No. 1 Railway Group, Royal Engineers, formally accepted control of the S&MLR mainline and a number of S&MLR employees on 1st June 1941. [1: p99][cf., 15: p37] Prior to that, McAlpines had been engaged to undertake both the repair of the S&MLR and the construction of the depots. The work of the civilian contractors continued after the formal handover. “Sir A. McAlpine personally attended a progress meeting on 30th January 1942. He made it clear that for a project of this nature he would have wanted roads to give him ready access to the many shed (and other) construction sites for materials and men. Denied the use of roads (new roads are highly visible from the air and draw attention to the location of newly constructed targets), he considered that the contract required at least eight locomotives, six of them working at any one time. There were 525 PoWs working on construction, but some of the bricklayers had been idle for lack of a rail service.” [15: p45] An excerpt from an aerial photograph which was taken in 1948 and shows Ford Sub-depot and the nearby marshalling sidings. The picture makes it clear that the concern raised about roadways being highly visible from the air carries weight. By the time of the photograph these roads had been built for about 6 years and they are still highly visible, (c) MoD Ref. No. CPE/UK/1492 frame 4320. [15: p84]
The WD built extensive additional service tracks along the 8¾ miles of railway line from Maesbrook to the former Ford and Crossgate railway station. Like a typical ammunition depot, the site was laid out over an extensive area to avoid total destruction should an accidental explosion occur, or the site be attacked by enemy. The depot was made up of five separate sites at : Kinnerley (SJ354192); Pentre (SJ374170); Ford (SJ408139); Argoed (SJ327217); Loton Park (SJ357137). [3] This meant that during construction access without roads was very difficult and McAlpine’s concerns are easily understood.  CAD Nescliff Depot Map. [6]
 A GE trace showing the 80+ miles of rail-track laid and operated by the Royal Engineers to serve the multiple storage areas in and around Kinnerley and Nesscliffe. [7]
To ameliorate McAlpine’s concerns it was agreed to make every effort to ensure that ammunition traffic ran each day before the contractors work started. This would at least eliminate on specific conflict. [15: p45]
The first four sites were capable of storing around 55,000 tons of shells. Loton Park was used for storage of both incendiary ammunition and chemical weapons shells from 1943. This was one of only two Chemical Warfare depots operated in co-operation with and guarded by the United States Army Air Force, specifically 7th US Chemical Depot Company. Locomotives and train drivers were provided by the Royal Engineers, who also maintained the extensive network. Their main servicing depot for rolling stock was on the stub-junction of the former branch-line to Criggion. [3]
“The informal nature of the agreement under which the military took over the assets of the S&M was to cause endless problems, notably on the upkeep of land and buildings” [15: p38] and produced a series of disagreements with local businesses and land owners. [15: p38]
Ammunition traffic began to arrive from 12th January 1942. [15: p49] “At Pentre, sheds 31-44 and 65-76 were complete by 1st April 1942 and were receiving ammunition traffic. Shrawardine was under construction. Work was just starting at Ford and would not be completed before August. Nesscliff would not be ready before the end of the year and Kimberley would not be available until 1943.” [15: p50]
During the first three weeks of February 1942, 342 wagons of ammunition were received and 73 dispatched. The WD was also required to work the civilian traffic on the S&MLR. Stone traffic was the most significant civilian cargo, averaging over 20,000 tons/annum from November 1942 to October 1948. [15: p63]
Ammunition storage on site officially stopped in 1959 and the ammunition depot closed in 1961.
Ford Sub-depot.
The first site encountered on the journey West from Shrewsbury was next to the village of Ford. Ford Munitions Depot is visible in this OS extract to the West of the village of Ford. [8]
 The majority of the buildings used by the military are still in place in a relatively poor condition. [8]
 The site is now a poultry farm. [8]
Access to the site was from the West, with the tracks fanning out to serve the storage facilities. Ford Sub-depot had 10 sheds adjacent to the sorting/marshalling sidings, and one Road/Rail Transit (RRT) siding. “Unlike the other sheds in the Depot, those at Ford were not used for long term storage, but only for transfer storage. All were accessible by road and formed part of the facility that allowed for the transfer of ‘sensitive’ munitions to the open air storage in Loton Deer Park. … Loton Deer Park was used by American forces as a depot for chemical weapons.” [15: p88][16] Loton Park was at Alberbury to the West of Ford along what is now the B4393. The Chemical Weapons storage area at Loton Deer Park at Alberbury. Small sheds were laid out among the trees in the park (c) The Office of the Welsh Assembly Government (MoD Ref. No. CPE/UK/2492, frame 4315). [15: p90]
 A part of the Deer Park in the early 21st century showing the locations of storage facilities after their removal. (Google Earth).
 RailMap Online shows a simplified diagram of the sidings at the depot. Each store building was actually provided with its own access track [10][15: p84] and the marshalling yard which ran alongside the S&MLR is completely ignored. A diagrammatic representation of the depot and the marshalling yard, which was quite substantial, is shown here. [11]
Hansard in May 1960 contains a record of the planned sale of Ford Depot as the War Office had no further need for it. [9] The tracks serving the depot are long-gone. Loton Deer Park was returned to its owners once the need for it had gone.
Pentre/Shrawardine Sub-depot
A short distance to the Northwest of Ford the S&MLR crossed the River Severn at Shrawardine and almost immediately entered land sequestered by the War Office. Pentre/Shrawardine Sub-depot was much larger that the site at Ford. It consisted of two Districts. “The North Balloon Area included Camp Station, sheds 11 to 30 inclusive, and the civilain yard at Shrawardine. This District could be accessed in three places, at Nescliff East Block Post via the we leg of the triangle or via the East leg, and also at Shrawardine Station yard. It was permissible for more than one train to operate in the District, except in darkness when ‘One Engine in Steam’ only was allowed. … All points within the District were operated locally by handnlevers. … In addition to the normal traffic to sheds the North Balloon handled the daily Works Passenger trains to and from Camp Station.” [15: p93] On the satellite image below, Camp Station was located close to ‘Cakequirks’. Wilcot Camp was to the North of the Station and to the East of the location of the modern ‘Cakequirks’.
 The Pentre/Shrawardine Sub-depot was served by a significant network of sidings which were decided into Two Districts. Railmap Online has slightly simplified the track diagram as each storage building had its own rail access and there was a triangle at the West end of the site close to Nesscliff East Block Post. [10]
Wilcot Camp was the principal army camp at Nescliff CAD. Across the road from the Camp was the station which served it. To the South of the station was a single-line siding which was used to transfer from road to rail and vice-versa. An aerial image of Wilcot Camp which shows ‘Lonsdale’ Station to its South. Lonsdale Station was usually just know as ‘Camp’, © National Monuments Record of English Heritage (now Historic England, MoD No. 541/214 frame 3036. [15: p100]
Hansard in May 1960 records this Sub-depot as being named Shrawardine. It notes, at that date, that it was a former ammunition depot; mostly to be sold, but a small area to be kept for training. [9] Pentre was to the Northwest of the Sub-depot, Shrawardine to the South-East. This modern OS Map extract shows that most of the buildings of the original depot are still in place. [8]
 A closeup, above, of the Southeast of the site close to the River Severn. [8]
Adjacent is a sketch plan of the site showing all of the railsidings. Note that the North point is different on this sketch. The River Severn is shown on the right of the sketch. [11] The two buildings immediately adjacent to the 62m height-point on the OSMap above. The picture is taken from the road to the Southeast, © Peter Craine. [12]
 Every sketch map that I have found of the Pentre Sub-depot has its north point in a different pace! This is probably the best quality image on the internet bug also chooses an unusual North point. [13]
Google Earth is of little help in providing up-to-date images of the site as the vast majority of the depot was remote from the surrounding highways.
Kinnerley Sub-depot
The third complex of sidings was known as Kinnerley Sub-depot. It was formed of two almost separate loops of sidings – two Districts. These Districts cwere Kinnerley and Nescliff. Sheds 77 to 114 were in Nescliff District and sheds 115 to 140 were. In Kinnerley District. “The whole was worked as a single yard, with entrance cand exit at Kimberley (in an emergency also at Edgerley). Only one train was allowed to operate during darkness.” [15: p106] Kinnerley Sub-depot. [13]
 Again Railmap Online slightly simplifies the arrangement of railway tracks. [10]
Google Earth cannot help with modern images of the Nescliff District. There is more of the Kinnerley District that can easily be seen from the public roads. On the satellite image above, I have marked a number of locations and pictures at these locations are provided below:
A. There was a gated road-crossing at this location. The two pictures below show the view in each direction along the old MOD line from the road.  Looking back along the line to the South, (Google Streetview).
 Looking North along the siding., (Google Streetview). A number of MOD buildigns can be picked out in this view, specifically buildings 135 and 136, which were rail-served despite that not being shown on the Railmap Online image above.
B. Another gated road-crossing was to be found at this location. Looking Southeast, the line of the MOD railway is marked in red together with the two sidings which served store buildings 117 and 118. The S&MLR mainline ran just behind these two buildings.
 Turning towards the West, we see buildings 119 and 120 and the location of the road-crossing at B.
C. The road-crossing at location C was only a very short distance from location B.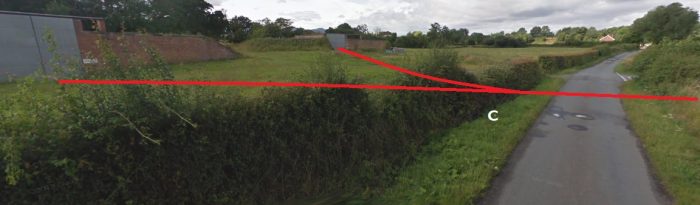 Buildings 119 and 120 were rail served and their sidings crossed the public road before their junction with the main MOD line. There are no obvious signs of the main MOD line on the North side of the public road. It did, however, run north from ‘B’ and ‘C’ in close proximity to the narrow lane shown in the picture below, at approximately the location, just beyond the modern boundary hedge, indicated by the red line.
 D. At this location two siding separated from the MOD mainline, both trailing to locos travelling north. The first accessed buildings 121 and 122 on the East side of the line, the second linked to stores numbered 123 and 124.
 Building 121 with 122 hidden behind a tree, (Google Streetview).
 Buildings 121 and 122 seen from close the road crossing and ‘B’, (Google Streetview).
 Buildings 123 and 124, (Google Streetview).
E. There was another road crossing at ‘E’ which provided rail access to two further stores – Nos. 125 and 126. Location ‘E’ and Buildings 125 and 126.
To the East of ‘E’ the narrow road and the railway ran in parallel for a few hundred yards before the road turned gradually away to the Northeast. Looking East with the minor road turning away to the Northeast and the MOD line continuing to the East and then turning south to cross the road at point ‘A’ above.
The Maesbrook and Argoed Sub-depot
The fourth sub-depot was located to the Northwest, beyond Kinnerley Station and Junction. The whole Sub-depot was worked as one yard with avrestriction nallowing only one loco at night. Sketch Plan of Argoed Sub-depot. [13]
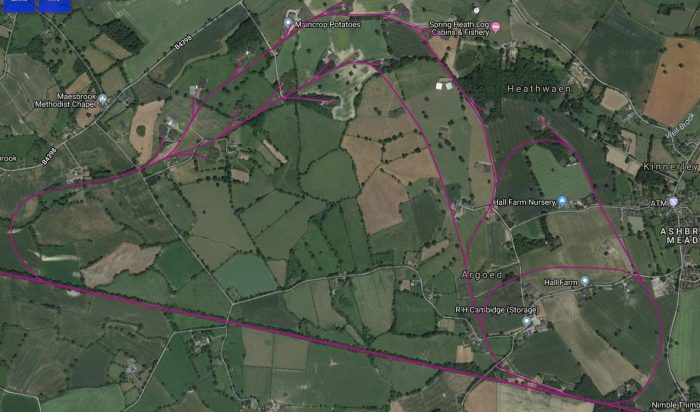 Again Railmap Online simplifies the arrangement of railway tracks. [10]
 This modern OS Map extract shows the location of the Argoed Sub-depot to the West of Kinnerley village. [8]
 The Southeastern part of Argoed Sub-depot. [10]
 The approximate track layout at the South of the Sub-depot. [8]
F. The MOD line diverged slowly from a junction with the S&MLR mainline (‘J’) to a gated road-crossing just to the North of the road bridge over the mainline. The MOD line at ‘F’ looking back eastwards to its junction with the S&MLR, (Google Streetview).
 Looking forward from location ‘F’ to location ‘G’.
G. The MOD line crossed another minor road at a gated crossing close to Laburnham House on the OS Map extract above. There is no sign of the route on the ground in the 21st Century. Looking back eastward along the minor road from Laburnham House. The red line shows the approximate line of the old railway, (GoogleStreetview). Immediately to the North of the road, off the left side of this picture the MOD line split into two as illustrated in the image below.
 H. The MOD line at location ‘H’ was crossed by a minor road which travelled North to South. Just to the south of the crossing were two storage buildings – No. 148 and No. 149. which were linked to the line by sidings on their East side.
 Buildings 148 and 149 seen from the highway south of the old MOD line and North of The Lawns, (Google Streetview).
 Building 149 seen from the road to the South, on the East side of The Lawns, (Google Streetview).
 Looking North at location ‘H’. Between the camera and the slight bend in the road there were two railway-crossings. All evidence has now disappeared. The second of those lines fed two storage buildings to the West of the road which can be seen below – Buildings 146 and 147, (Google Streetview).
 I. The line travelled back East from location ‘H’ passing the two buildings 148 and 149 and buildings 150, 151, 152 and 154 before once again encountering the public highway at location ‘I’ close to storage buildings 166 and 153 which are shown on the adjacent Google Earth satellite image.
At location ‘I’ there were again two rail-crossings of which there is no longer any evidence. At this point the railway turned southwards joining a line form further north and then turned gradually back to form an opposing junction at location ‘J’ above.
K. Another loop of the MOD Line encompasses the two locations ‘K’ and ‘L’. ‘K’ is shown on the Google Streetview image below. This is the nearest that Google Streetview can get us on the South side to the location of the two road crossings at ‘K’. There were two road crossings on the bend visible ahead. The closest led to Building number 156 which appears in the picture the second loop line ran across the fields just beyond the storage building.
 The same building (No. 156) viewed from the North along the route of the railway, (Google Streetview). The image below is taken from the same location but this time looking North along the formation of the old line.
  Lwashere is no obvious sign in the 21st Century of the rail-crossing further to the East on Vicarage Lane, although it is quite likely that the access road running North from the lane follows the formation of the railway.
 Vicarage Lane looking West at the possible location of the rail-crossing, (Google Streetview).
 The remaining area of the Argoed Sub-depot is relatively remote from public roads, but some access is possible.
M. Along the line between location ‘K’ and location ‘M’ there is a semi-metalled road on the formation of the old line.
 The route of the old line is on the right of the image above, an observation tower is on the left with a storage building in between.
The adjacent satellite image shows the same observation tower and storage buildings 158, closest to the line, and 159.
The first two pictures below show the two storage buildings, 189 and 190 which connected to the line at point ‘M’; and secondly, the next set of storage buildings a little to the North along the line and on its West side and numbered 191 and 192.
The third picture below shows both of the two main MOD line near the North of the Argoed site and more of the storage buildings served by those lines. The most northerly line allowed Google Streetview access.


 N. The formation of the old line remains, access is over a lightly maintained gravel road.
  Looking East from location ‘N’.
O. The track formation continues through location ‘O’ as a gravelled road. Looking East from location ‘O’.
P. A road connection exists in the 21st Century from the B4398 to the track formation at location ‘P’. Location ‘P’.
 The observation tower at location ‘P’ with store buildings 199 and 200 in the distance.
Q. Both arms of the railway met to the East of point ‘Q’ on the above plan and then continued westward before looping through to the East and forming a junction with the S&MLR.
 Looking East from location ‘Q’ (Google Streetview).
 Looking Northwest at point ‘Q’ on the above map showing the onward route of the MOD line to the West (Google Streetview).
Llanymynech
The military adapted the layout at Lanymynech so that it could act as the “emergency exchange point with the national railway system. The initial WD layout constructed in 1941 provided four loop sidings, but this was later reduced to just two yard roads.” [15: p127]
The Post-War Years
It was anticipated that the ammunition depot would remain open for at least 10 years Carter the end of the War, but the military wanted to allow men to return to civilian life at the earliest possible date. “The manpower shortage created by constant turnover and demobilisation was expected to be so serious that the Army was forced to consider asking the S&MLR Company to take over the operation of the line again and act as agents for working WD traffic.” [15: p133] However, difficulties were encountered in the negotiations and thecdealy proved fortuitous for the WD. The predicted reductions in manpower were not realised. A much larger compliment of military and civilian staff remained available to the Army than had been predicted. The cArmy withdrew from negotiations with the S&MLR Company.
It did not take long after nationalisation for BR, who took on ownership of the line, to realise that receipts did not compare well with staff costs. BR decided to close many of the stations on the line and the Criggion branch, the War Office raised no objection, so closure took place on 1st May 1949.
With a view to a further ten years of occupation, the WD had to face the cost of continuing the upkeep of the railway. As early as May 1945, underused track was lifted to provide rails for necessary replacements on the main line, some parts of which still had the S&M bull head rail.” [15: p141] The Llanymynech to Kimberley blanc by of the railway had only never been intended by the WD to be a necessary emergency provision, so this length was cannibalised. By 1954, this length of line was in a very poor condition and required £25,000 of expenditure to render it adequate for use. [15: p141]
On 4th April 1957, the government published a Defence White Paper reviewing the armed forces in the light of the Suez campaign of the previous year. The result was that “on 18th Oçtober 1957, the WD wrote to the General Manager of British Railways (Western Region) to say that CAD Nescliff would be closed progressively, and completely by March 1960. The WD would then give up its lease on the line, and the working of the civilian traffic would become the responsibility of BR.” [15: p154]
The closure of the S&MLR was inevitable and by 1961, the WD and the BTC were left with the need to reach a financial settlement which recognise that the WD was not going to restore the line and its rolling stock to pre-1941 condition. [15: p166]
References
- Peter Johnson; An Illustrated History of the Shropshire and Montgomeryshire Light Railway; OPC, Ian Allan, Hersham, Surrey, 2008.
- http://colonelstephenssociety.co.uk/shropshire%20ww1/shropshire%20and%20montgomeryshire%20topics.html, accessed on 4th August 2019.
- http://shropshirehistory.com/military/camps.htm, accessed on 5th August 2019.
- http://colonelstephenssociety.co.uk/shropshire%20ww1/melverley%20bridge.html, accessed on 5th August 2019.
- http://colonelstephenssociety.co.uk/light%20railway%20modelling/light%20railway%20modelling%20-%20ilfracombe%20goods.html, accessed on 5th August 2019.
- https://web.archive.org/web/20131012030418/http://www.28dayslater.co.uk/forums/military-sites/33114-leyland-ammunition-store-23-09-08-a.html, Post #5, accessed on 5th August 2019.
- https://web.archive.org/web/20131005010516/http://www.airfieldinformationexchange.org/community/showthread.php?4825-Kinnerley-Ammunition-Depots, accessed on 5th August 2019.
- http://www.shropshiresgreatoutdoors.co.uk/site/nesscliffe-hills-and-the-cliffe-countryside-heritage-site, accessed on 6th August 2019.
- Hansard: HC Deb 04 May 1960 vol 622 cc1066-7; https://api.parliament.uk/historic-hansard/commons/1960/may/04/land-shrewsbury, accessed on 6th August 2019.
- http://www.railmaponline.com/UKIEMap.php, accessed on 6th August 2019.
- http://www.oswestry-borderland-heritage.co.uk/?page=115, accessed on 6th August 2019.
- https://www.geograph.org.uk/photo/464750, accessed on 6th August 2019.
- http://shropshirehistory.com/railways/mineral.htm, accessed on 6th August 2019.
- https://www.facebook.com/groups/512212695656054, accessed on 6th August 2019.
- Mike Christensen OBE; The Shropshire & Montgomeryshire Light Railway Under Military Control 1940-1960; Lightmoor Press, Lydney, 2011.
- https://www.lotonpark.co.uk/visiting-loton/deer-park, accessed on 10th August 2019.

Although I did have some knowledge of “The Potts” line from my travels back in the 1970’s and 80’s, I had no idea of the vastness of the MoD Storage sites. They were massive! Wasn’t there an accidental explosion at one of these depots?
Hi Bob
I have not come across details of an explosion but would be interested to hear of it if you can point me in the right direction.
Roger
It may be the RAF bomb store at Fauld that Bob is thinking about. One of the largest explosions ever in Britain, if not the largest.
Very informative piece about CAD Nesscliffe. A surprising number of the Explosive Store Houses (ESH) are still in existence and in some cases in use but in different roles. The space taken by these depots was huge and significant economies were made in later designs. The rebuilt Longtown and Kineton depots hold significantly more in a much smaller area. In these depots there was much greater use of heavy walls and rooves and earth covering.
I have spent more than a few nights out at Wilcot Camp and many of the accommodation buildings are the original wartime Nissen and prefab types, though better heating than a central coke stove is now in use!
Interesting comment about being obvious to aerial photography. I can usually pick out an ammo depot or ROF very quickly on Google Earth but some are better suited than others. Nesscliffe is a very open area with few trees and a number of key navigation markers nearby. Other depots used the land much more advantageously, e.g. Caerwent. Kineton was partly chosen as a site because it has the most consistent cloud cover annually!
A significant number of depots and ROF etc were build near railways for obvious reasons, but many of them were built on the stubs of lightly used or foreclosed routes e.g. Kineton on the Stratford Joint, Nesscliffe as above and Longtown off the Waverley route.
Great response, Dave. Thank you.
I am in the process of 3D modelling some farm buildings, part of this is a Nissen hut, i understand how it looks i think, when i have put it together i would appreciate some thoughts on how it looks, if you would be so kind. Thanks Alan
Hi Alan
Peedie Models of Orkney make these as 3D prints and /or resin mouldings. ….
https://www.peediemodels.com/proddetail.php?prod=PMA15007
Best wishes
Roger
thanks for that, i have only just come back to it today. it will be useful info for the slow moving project…
Pingback: Holiday Reading! | Roger Farnworth
Just picking up on the earlier reference to the Fauld explosion in Nov ‘44, yes this was the largest ever explosion in Britain and claimed 70 lives, including a whole farm, as it created a crater of c. a quarter of a mile wide and 300 feet deep. It remains cordoned off by the MoD due to the possibility of unexploded munitions but it’s not a beautiful wildlife haven, filled with trees and indigenous vegetation, with beautiful local walks. There’s a memorial stone at the site, given by the Italian RAF.
Thank you.