
Peter Clowes, in his article in the September 1963 edition of the Railway Magazine wrote: “Rolling down from the Derbyshire hills came the “gang” a train of perhaps 20 wagons, their rough iron bodies piled high with skilfully stacked lumps of grey limestone. They lurched and swayed on the flanged steel track and forced the brakeman in charge of the train to cling firmly to the leading wagon on which he perched. This is how the villagers of the High Peak remember the clattering, dusty Peak Forest Tramway, built by Benjamin Outram, that was part of the life of the district for 125 years.” [1]
He goes on to explain that the tramway was only ever used for goods, no passengers were carried except when company officials undertook tours of inspection. The line carried lime and limestone from Buxton’s quarries and kilns down to the Peak Forest Canal at Bugsworth for ongoing transport on barges to Lancashire and beyond.
Wikipedia provides a sketch map of the route of the tramway which is reproduced below.

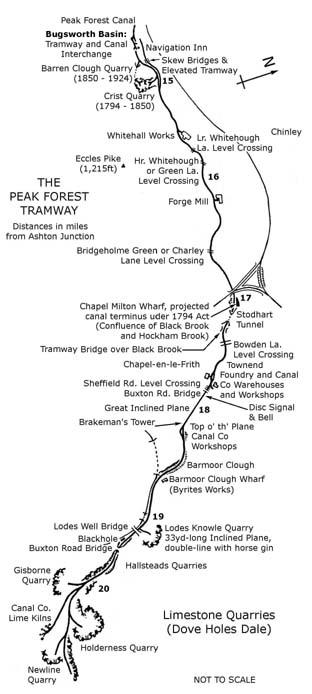
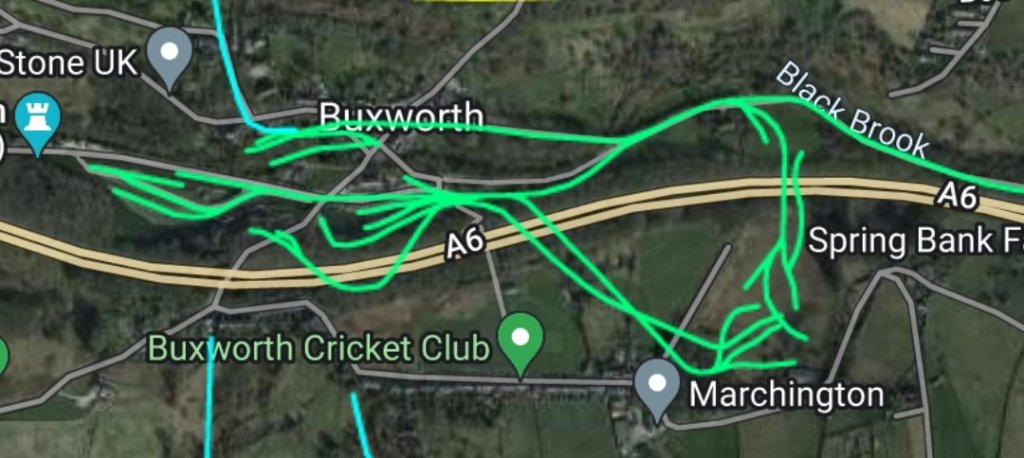
The next (adjacent) sketch map is more informative. It was included in a post about the line on the Peak and Northern Footpaths Society website. It shows the locations of a number of key features on the route of the tramway. [18]
Benjamin Outram’s original intentions were to build a canal from Ashton-under-Lyne through to Chapel Milton, now a ‘suburb’ of Chapel-en-le-Frith. [4] He sought and received and Act of Parliament to this effect, dated 28th March 1794. That Act authorised the construction of the canal, which would have been 22 miles long, and the construction of a feeder tramway/plateway from the canal to Load’s Knowle (Dove Holes), near Buxton. Gradients between Chapel Milton and Buxton were severe and unsuited to canal construction.
However, Outram decided to reduce construction costs by terminating the Peak Forest Canal at Bugsworth and building his tramway for the whole of the remaining six miles to Dove Holes. Clowes tells us that, “The line was opened on August 31, 1796, and was an immediate success. Hundreds of tons of stone were brought down to Bugsworth every day. Sometimes there were as many as 20 barges – each with a capacity of 20 tons leaving the village for Lancashire.” [1]
Wikipedia tells us that “the tramway was initially single-track, on a 4 ft 2 in (1,270 mm) gauge, constructed of stone sleeper blocks and L-section cast-iron rails that were fastened directly onto the blocks, in the same manner as [Outram’s] Little Eaton Gangway built for the Derby Canal. The rails, known as gang rails or plates, were provided by Benjamin Outram and Company who also supplied the mineral wagons.” However, in 1803, the significant traffic volumes on the line required the single line to be “made double-track, with the exception of Stodart Tunnel and below Buxton Road Bridge, using the same method of fixing the rails.” [2]
When Outram’s Peak Forest Canal Company was building the Peak Forest Tramway, between 1794 and 1796, it cut into a bed of gritstone by the hamlet of Lower Crist, about 380 yards to the east of the terminus of the Peak Forest Canal at Bugsworth. The stone apparently “had good non-slip properties and was easy to cut because it had no grain. … This bed extended south of the main line of the tramway at Lower Crist and a branch line was made into it. The Company also discovered another deposit of the same stone adjoining the nearby hamlet of Barren Clough, which is situated between Lower Crist and the canal terminus. Consequently, they purchased land there as well but it was another 56 years before Barren Clough Quarry was opened.” [3]
Clowes comments that a considerable trade in this gritstone developed as it was located so close to the Tramway and Canal. “Thousands of 6 in. square setts for the cobbled streets of the country’s growing cities were carried … to the wharfs.” [1]
“Bugsworth a sleepy little village, renamed Buxworth, … became a hive of industry.” [1] [5]
It was originally intended to extend the tramway to Buxton as and when demand for minerals grew. A further extension to Ashopton in the Hope Valley over the Rushup Moors by way of Sparrowpit , Mam Tor and Lose Hill was also planned. “These extensions never materialised and the plans were finally abandoned when the Cromford & High Peak Railway was built in 1830.” [1]
Clowes provided a vivid description of what travelling with the “gang” must have been like. A quite exhilarating experince! “Teams of horses pulled the loaded wagons from the Dove Holes quarries to the highest point of the line about a quarter of a mile away. Here the horses were unhitched. The brakeman gave the “gang” a push and then leaped onto the leading axle pin as the train of anything from 16 to 40 wagons gathered speed. At first the track curved gently through a long limestone cutting, then under the main Buxton to Chapel-en-le-Frith road by means of a stone arch bridge and down into the woods of Barmoor Clough between dry stone walls about 20ft. apart. This section of the line was closely followed by the London & North Western Railway when its spur was constructed from Stockport to Buxton, more than 50 years after the tramway was built. Until the tramway ceased operations in 1920, trains and “gangs” ran alongside each other separated only by a moss-covered wall.” [1]
As we will see in a future article about the line, “where the railway swings left into a tunnel, the tramway continued around the shoulder of a hill that shadows the birch and sycamore clad gorge which plunges down to Blackbrook. … The “gang” ran on down a steady 1-in-60 gradient to marshalling yards at the end of a 900-ft. ridge overlooking Chapel-en-le Frith. Here were workshops, stables, a permanent way store, and other buildings of the tramway company.” [1]
“An inclined plane, 500 yd. long and worked by a wire rope that ran around an 18 ft.-wide wooden drum, controlled the descent of loaded wagons to the foot of the slope. The rope was 2 in. in diameter and weighed six tons. No more than eight wagons were allowed in a run on the incline. The loaded vehicles would be balanced with an appropriate number of empties whenever possible. The weight of the descending wagons pulled the empties up the slope. Sometimes horses were harnessed to the driving drum to provide additional power. If the weight of the wagons became too great and the train started to run away, a lever-operated brake would be applied in the wooden control cabin that stood on stilts just beyond the top of the 1-in-7 incline. Sometimes, however, this proved ineffective. With an ever-increasing roar the wagons would race downhill, then jump the rails and scatter their loads far and wide.” [1]
Clowes narrative continues from the small town of Chapel-en-le-Frith: “After negotiating the plane the “gangs” were reassembled in the Townend sidings and were started again on the journey to Bugsworth under their own momentum. Soon they were clattering across Bowden Lane and through a copse of oak and elm.” [1]
“A mile west of Chapel was Stodhart Tunnel which the wagons entered through a steep sided cutting, the slopes of which were covered with ivy and rhododendron bushes. For 100 yards the “gangs” thundered in darkness. Then they were out into daylight and speeding along the fastest part of the track through Chapel Milton. There were sidings here across the road from the old Spread Eagle Inn-and two or three wagons of lime might be shunted off the main line to await the arrival of local farmers with horse and cart. The tramway continued through the pleasant fields of Bridgeholm, across the Whitehough road and along the banks of Black Brook to Bugsworth. The whole journey might take three hours, allowing for delays on the plane.” [1]
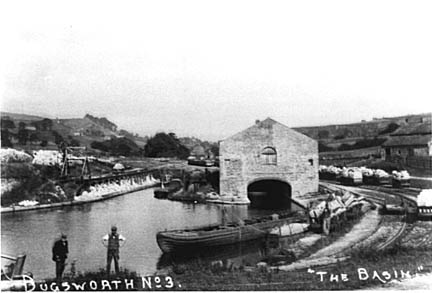
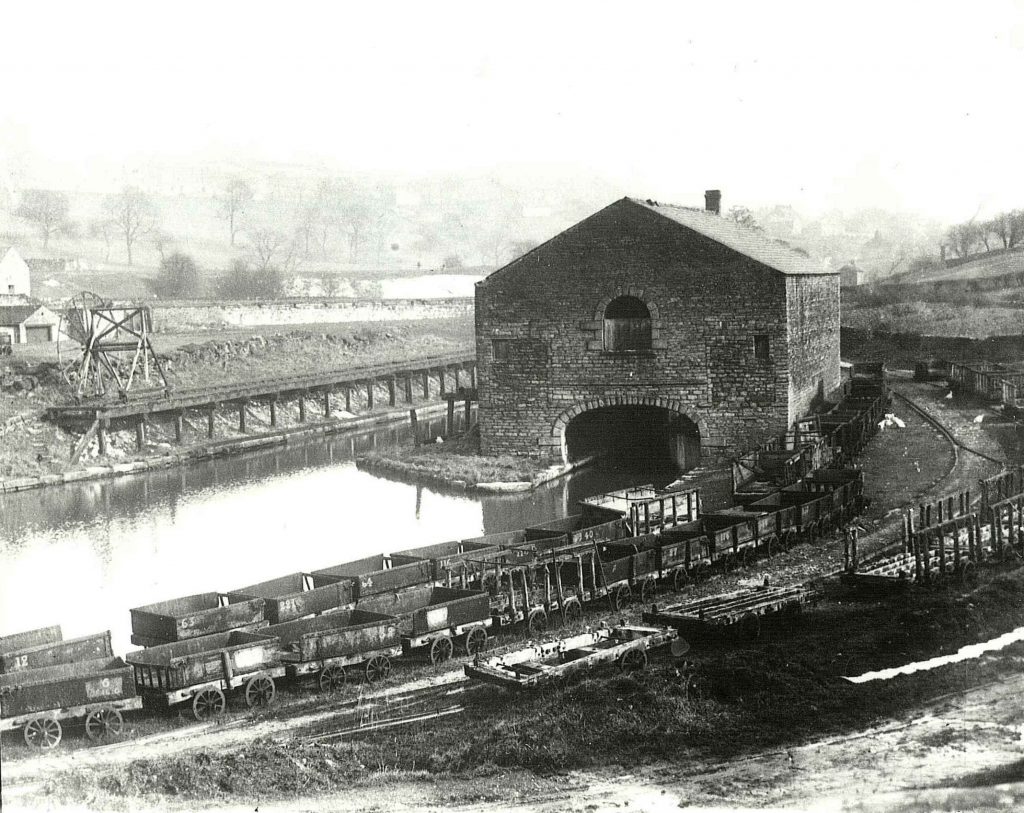
At Bugsworth, the tramway divided into extensive sidings and there were many loading berths. where limestone was tipped into large canal-side storage bays below the level of the track. Clowes tells us that “one of the most interesting features of this inland port was a simple yet ingenious tipping wheel which consisted of two vertical, spoked wheels about 16 ft. high attached to a frame which ran on a special rail track. The frame was pushed over a line of wagons which had been run on to a pier over the canal basin, and a hook was fastened to the end of each wagon in turn. A rope led from the hook over a drum which linked the two main wheels. A man would climb up the spokes of one of the vertical wheels, so making it turn like a human gin. This lifted one end of the wagon off the rails, its hinged end-plate swung open and the contents of the vehicle spilled into the hold of a barge below.” [1]
Bugsworth Basin was surrounded by merchants’ offices and warehouses. The offices housed a series of different merchants supplying limestone, lime, coal and general merchandise. Further buildings housed workshops for track and rolling-stock repair; and stables for a horses which were used to transport goods and wagons back up the line to Dove Holes.
Outram’s plateways used L-shaped flanged track on which the wagons ran. The rails were 4 ft. 2 in. apart and initially made of cast-iron. Each rail was 3 ft. long and weighed 56 lb. Clowes tells us that, “the inner flange was raised 2 in. above the 3 in. wide running surface on which the flat wheels of the wagons ground their way. The rails were secured at the joints by cast-iron chairs which sat on stone block sleepers, each one about 18 in. square. An iron spike with a tapering head was driven through the end of each rail into an oak plug seated inside the sleeper. The clatter of “gangs” passing over these primitive joints must have been fearful and, understandably enough, rail breakages were frequent.” [1]
It wasn’t until the five year period between 1865 and 1870 that the line was relaid with 9 ft. long steel rails. These were rolled at Gorton and fishplates, 1ft 6ins long were used to connect the rails. “Between the stone sleeper blocks was laid a cobbled path which enabled the horses to get a firm grip. The cobbles were raised well above the level of the sleepers, in fact about an inch higher than the rail flange. This arrangement might have helped to guide wagon wheels back on to the track following derailments.” [1]
Clowes explains that wagons used on the tramway were very crudely constructed: “Each weighed between 16 and 20 cwt. when empty, and carried about 2 tons. Three sides of the body were sheets of cast iron held together by iron bands and two large wooden chocks. The fourth side was a hinged iron gate which swung open when the vehicle was tipped to unload its cargo. The body was bolted in farm-cart style to wooden axle beams. The wheels – some were cast iron, others were of wood with wrought-iron tyres – ran loose on iron pins projecting from the axle beams. They were secured by large washers and cotter pins. The “gangs” were coupled together by two short iron chains fastened at each end of the wagon beds. There was no proper braking system. Until the last days of working, the running wagons could be halted only by a perilous practice on the part of the brakeman. He would leap from his perch on the leading axle pin and thrust iron sprags into the spokes of the spinning wheels. This would lock the wheels and skid the “gang” to a stop.” [1]
The Route from Bugsworth to Dove Holes
Peter Clowes has given us a description of the journey from Dove Holes to Bugsworth. [1] As we have already noted, it would have been an exciting ride for the brakesman/ brakesmen in charge of the trams. The journey back up the gradient from Bugsworth to Dove Holes would have been much more of a toil and would have relied on horsepower. The route will be covered in greater detail, illustrated, where possible by contemporary plans and maps. In addition, as many modern photographs as is practical will be included and the journey will probably need to be divided into at least two articles.
Bugsworth Basin is shown below on an extract from the 1898 25″ OS Map which was surveyed in 1896. The concentration of tramway sidings is remarkable and suggests that, in the years before the turn of the 20th century, this was a very dynamic, busy and noisy place!


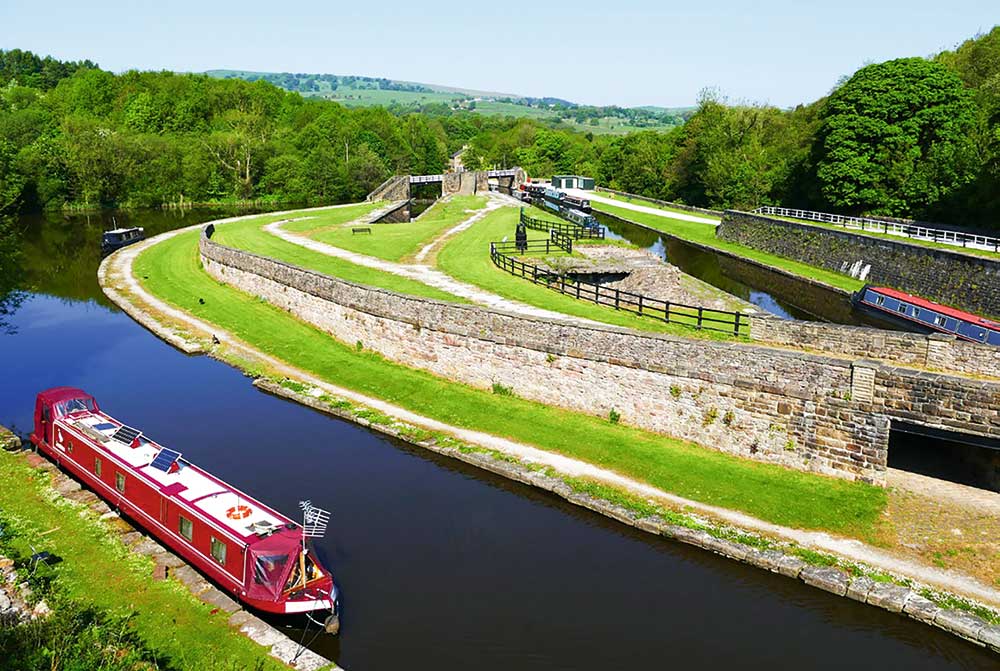
“Starting in 1968, volunteers of the Inland Waterways Protection Society restored the canal and basins culminating in the re-opening to navigation in 2005. Now that restoration of navigation has been achieved, improvements and development continues” [9] under the auspices of the Bugsworth Basin Heritage Trust (BBHT). Their plan of the site is shown below.


Before heading east from Bugsworth Basin two particular things are worthy of note:
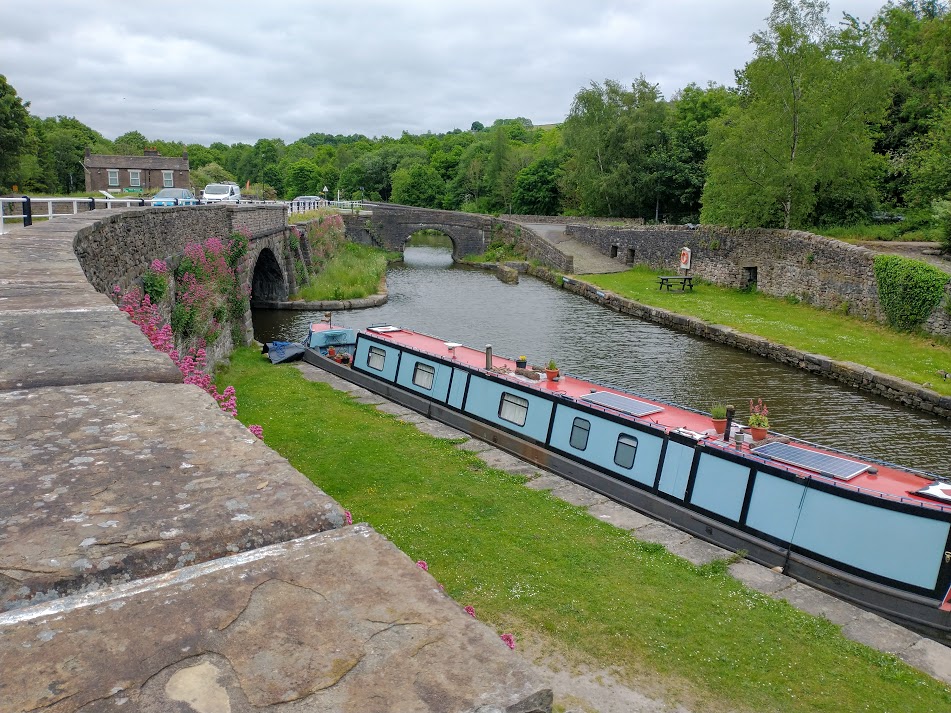
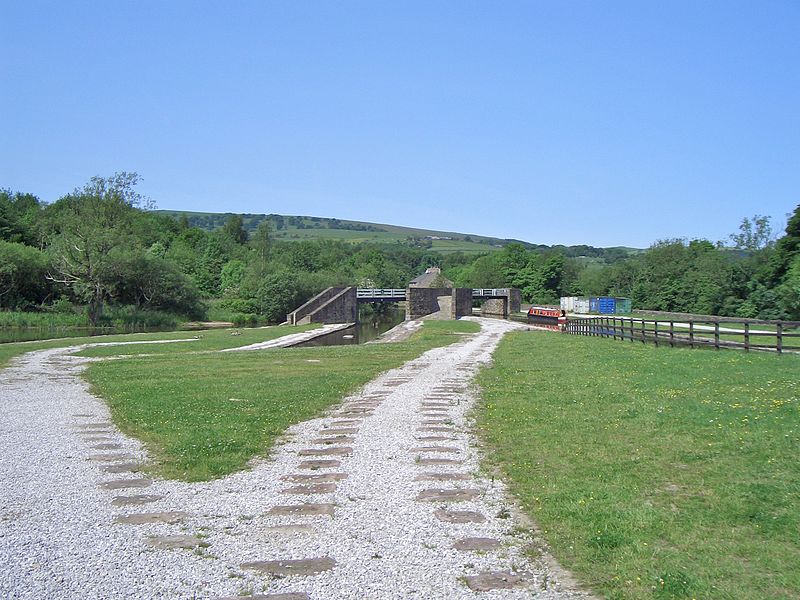
- First, just beyond the Navigation Inn on the North side of the Upper Basin, there is a well-preserved example of a tramway wharf where goods were loaded and unloaded.
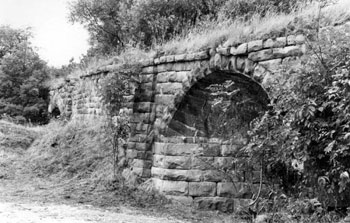
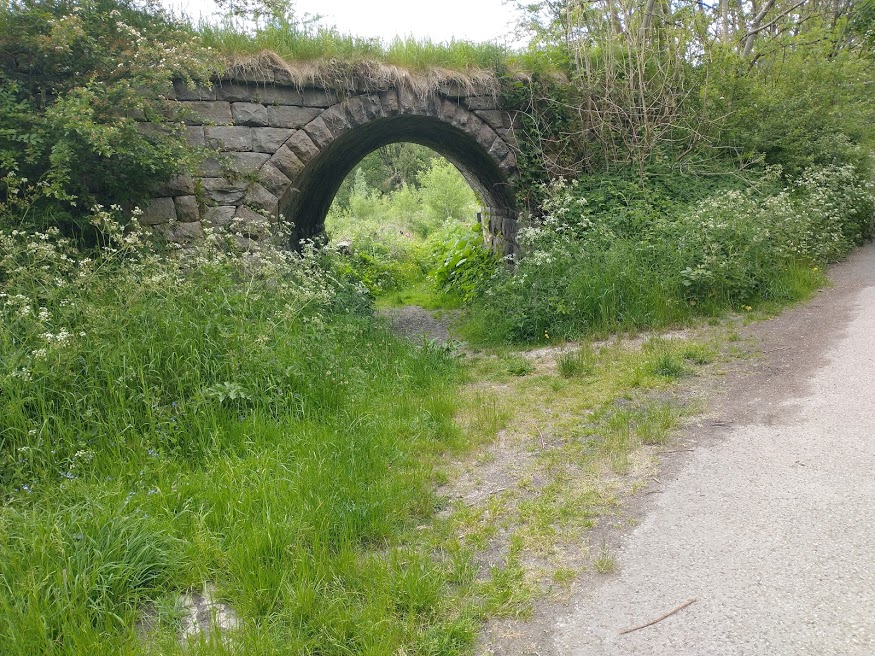
- Second, the skew arch bridges which carry a branch tramway which served lime kilns.
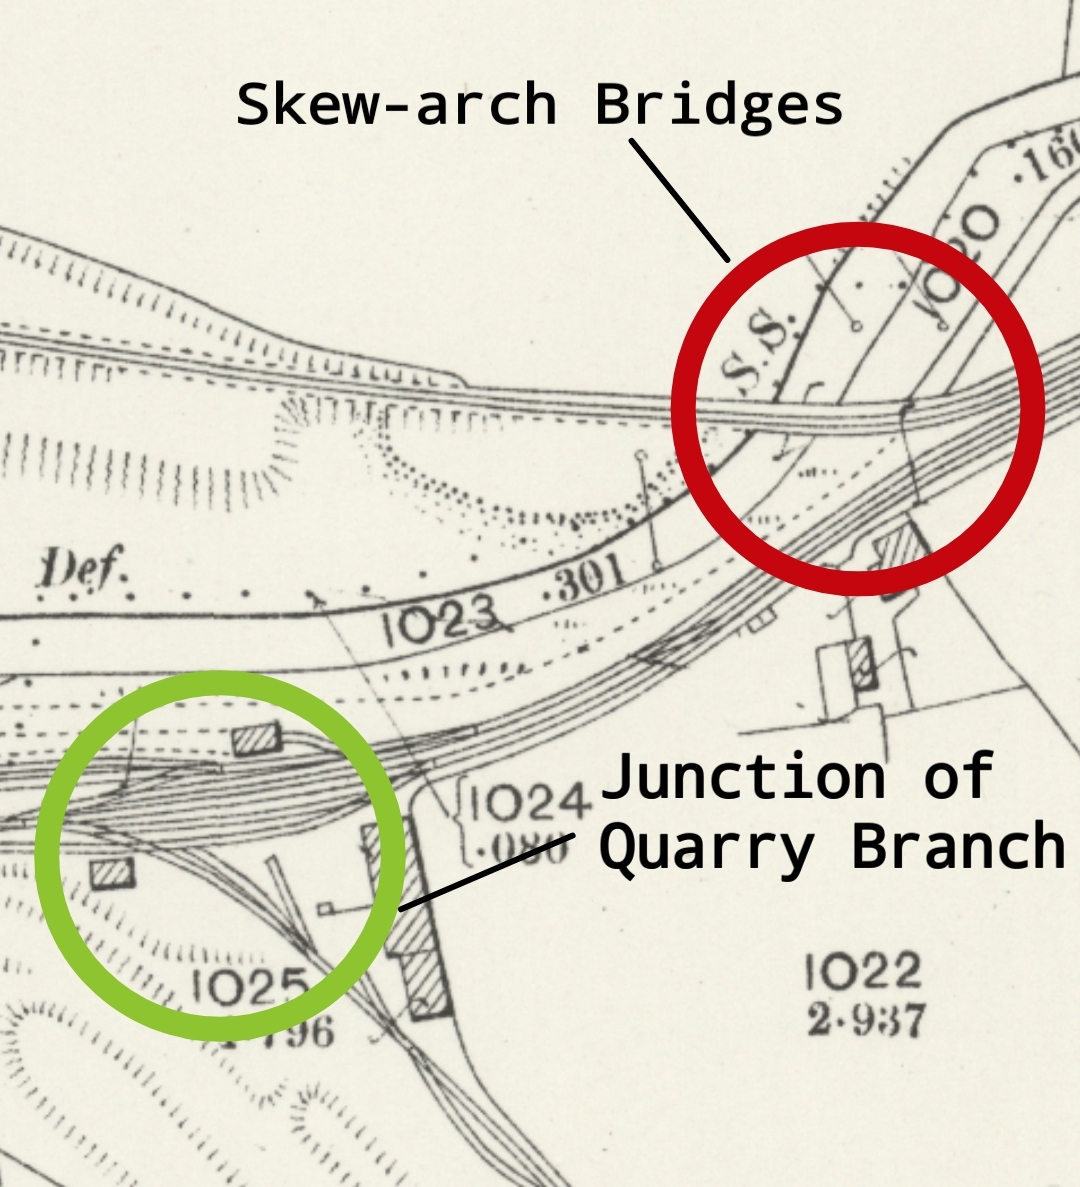
Leaving Bugworth Basin, the Tramway passed to the North of Lower Crist Quarry. Its branch tramway left the mainline to the East of the junction with the limekiln tramway branch as shown below.
Both the Barren Clough Quarry and the Crist Quarry (and the tunnel which gave access to the Barren Clough Quarry are covered in detail in an article by Peter J. Whitehead, “Crist and Barren Clough Quarries, High Peak, Derbyshire.” [19] It seems as though Barren Clough Quarry was not opened until the Company believed that Christ Quarry was close to exhaustion. Barren Clough was opened 56 years after Crust Quarry. It was served by a single-track tramway branch. The branch “commenced at a point 80 yards to the east of the terminus of the Peak Forest Canal. At a distance of 145 yards from the main line, it entered the tunnel before arriving on the quarry floor. Although the tunnel was relatively short, a vertical shaft was first sunk at a distance of 76 yards from the north portal (just under half way) to enable it to be excavated from four faces at once rather than at each end. When the tunnel was completed this shaft became an airshaft, although this feature was probably unnecessary for such a short tunnel.” [19]
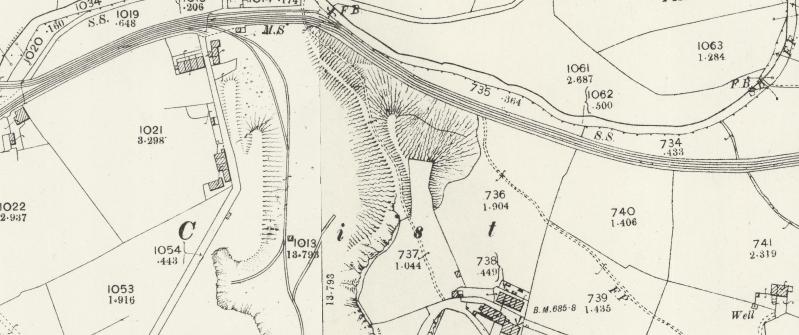
The two quarry branch tramways are shown on the map extract below.


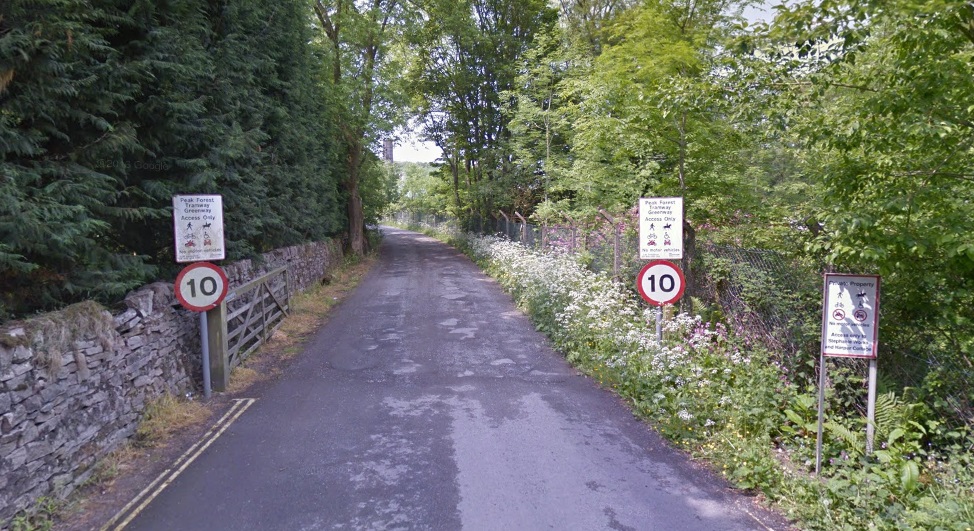
As the OS Map extract above shows, there was a group of cottages just to the West of the tramway access to Crist Quarry. Those cottages are still in use in 21st Century. The access route to them (shown on the OS Map) has been cut by the A6 Dual Carriageway. They can only now be accessed from Bugsworth Basin.
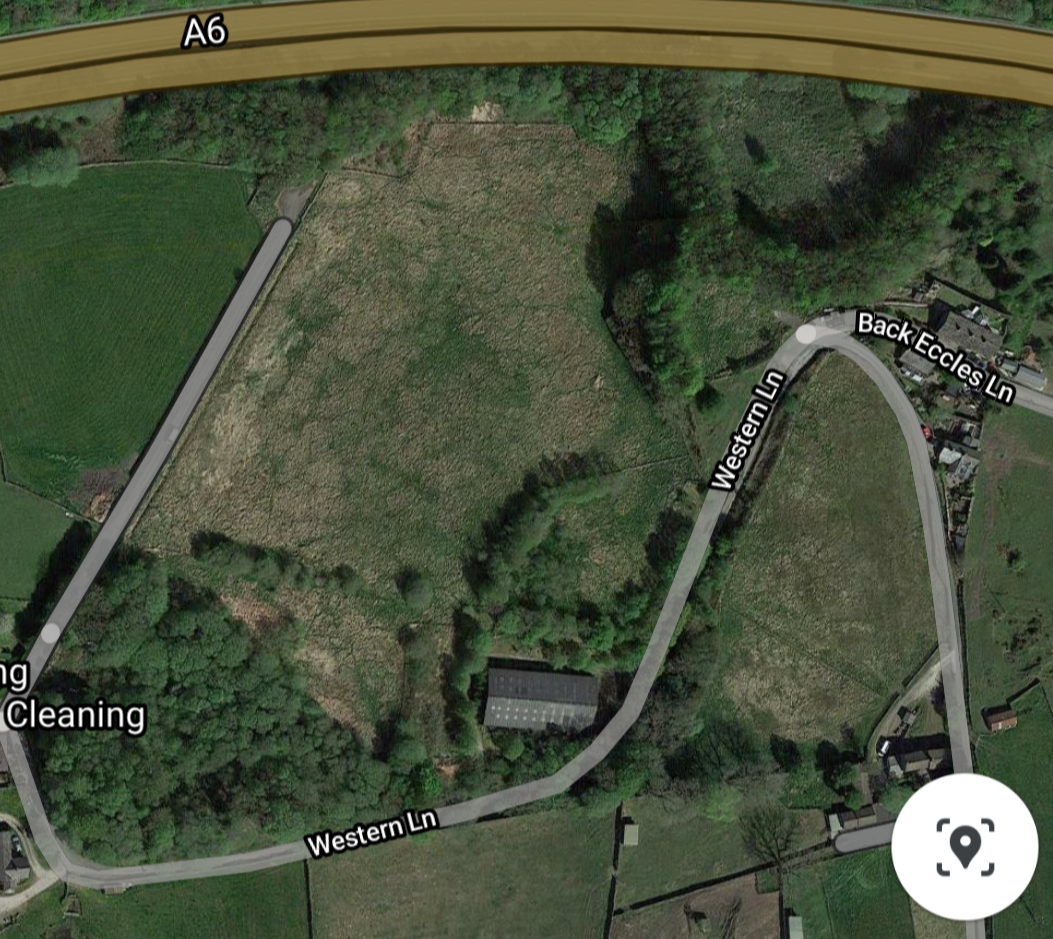
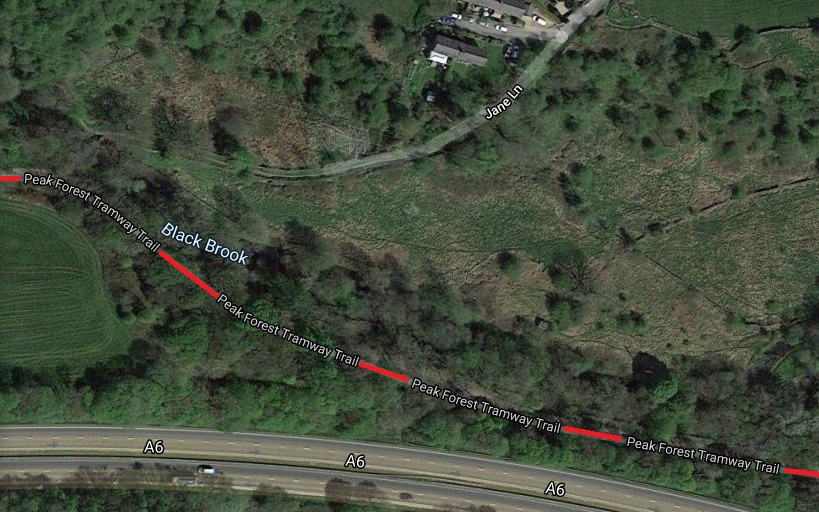
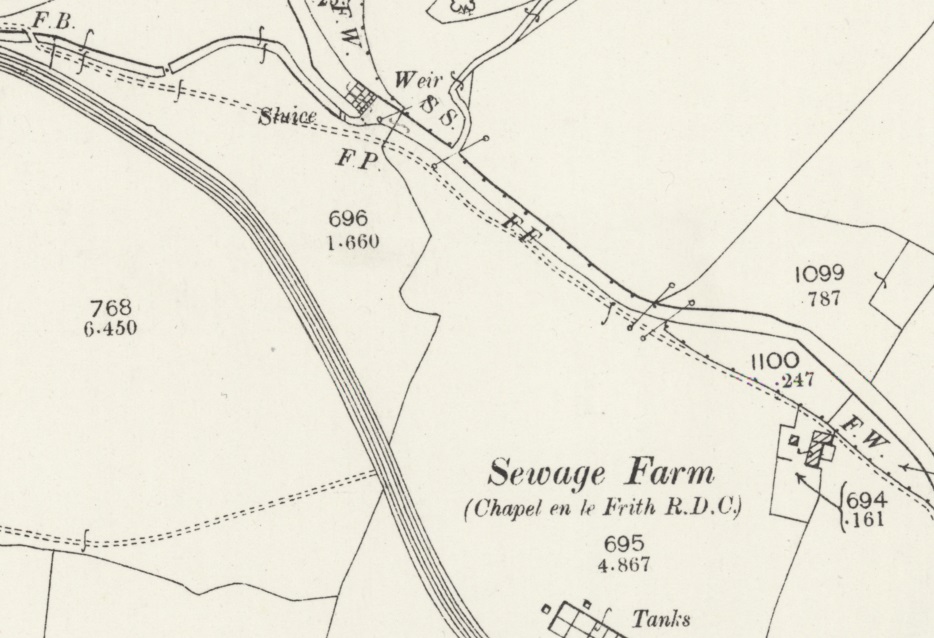
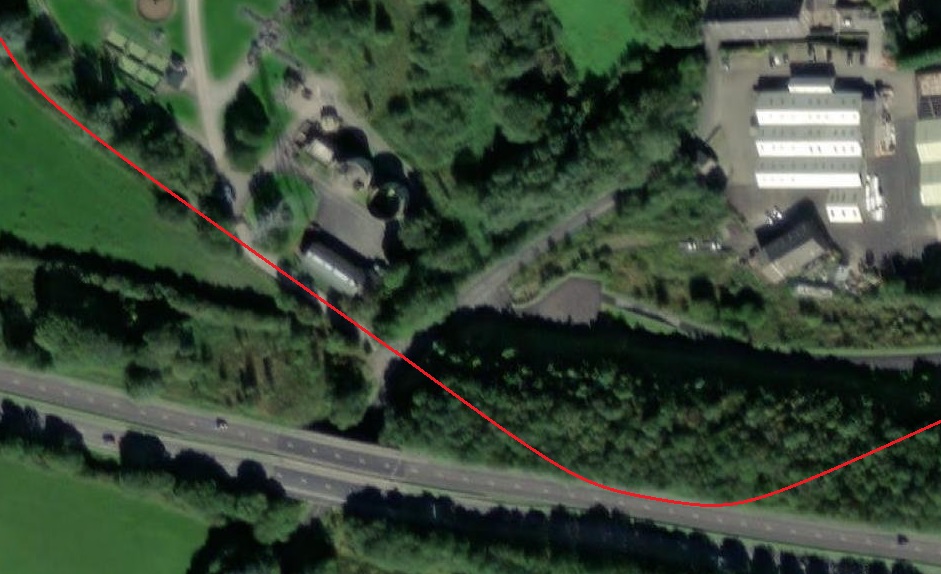
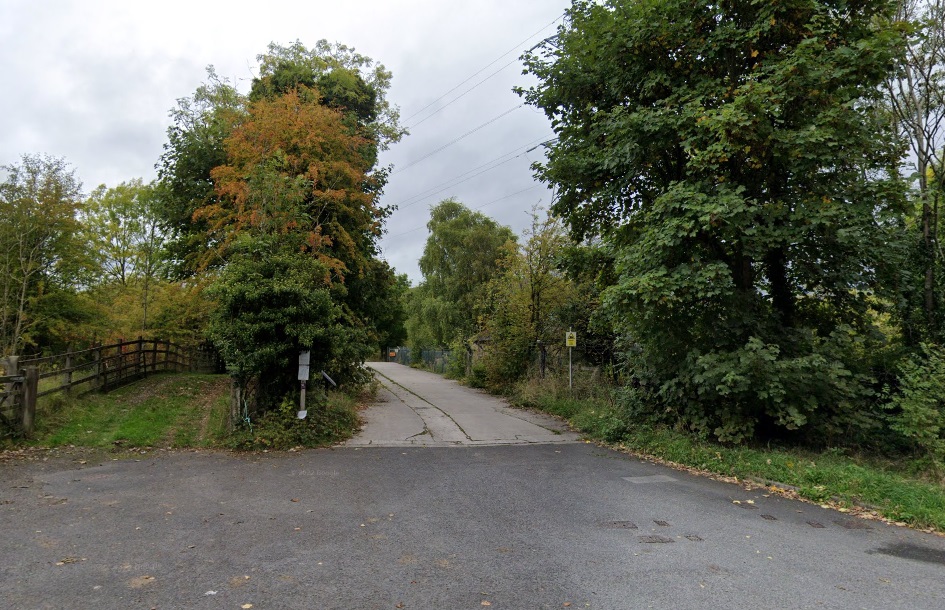
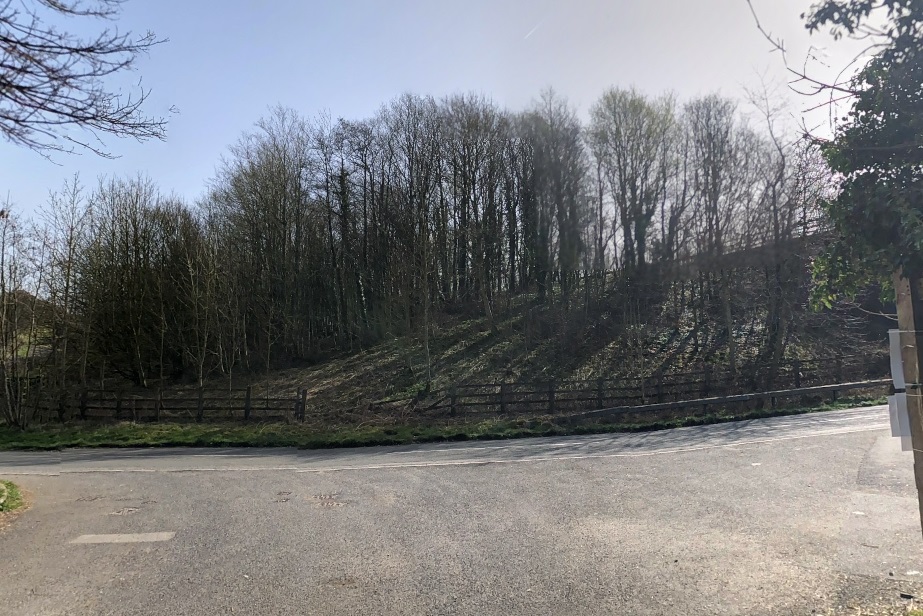
Further East, the Tramroad follows the South side of Black Brook….

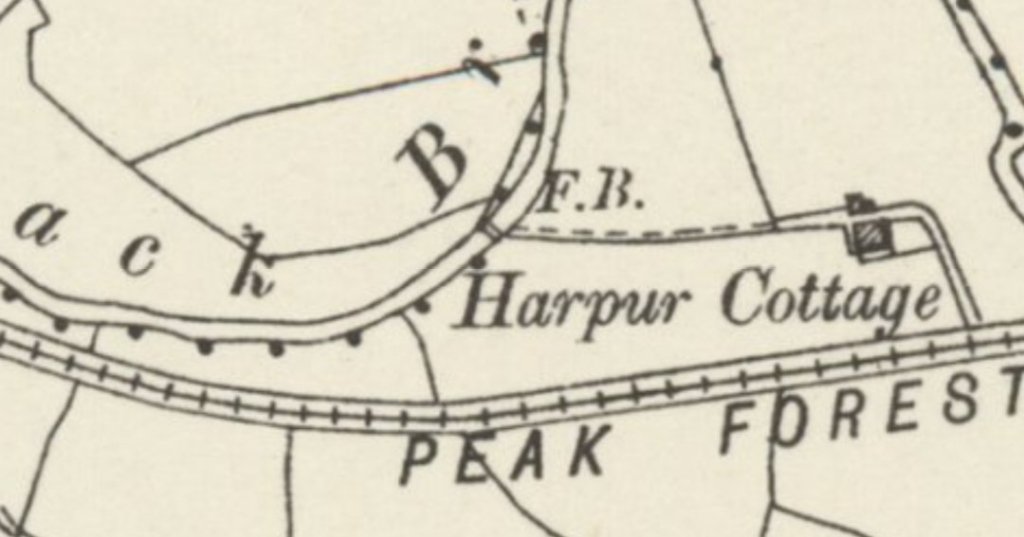
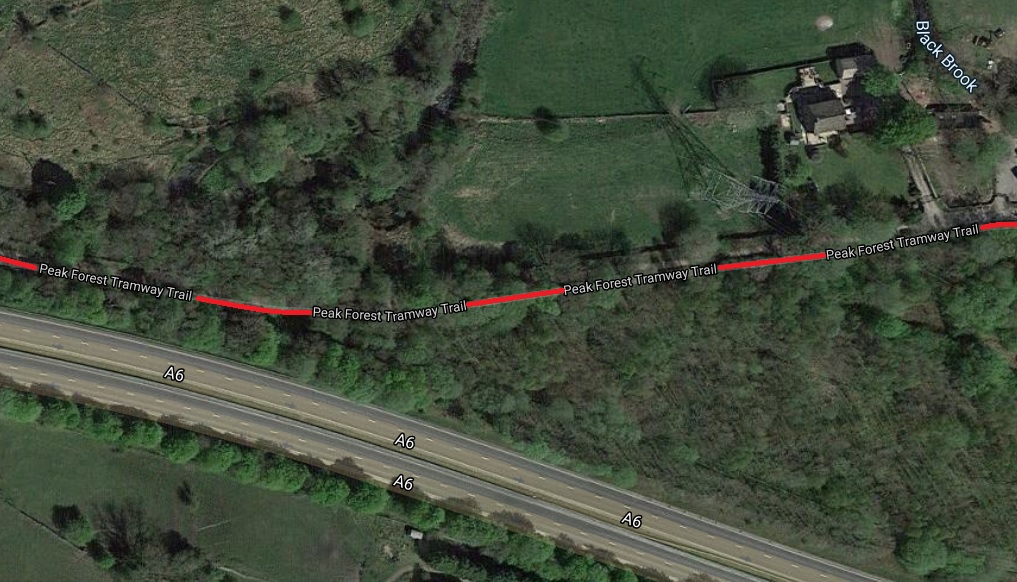
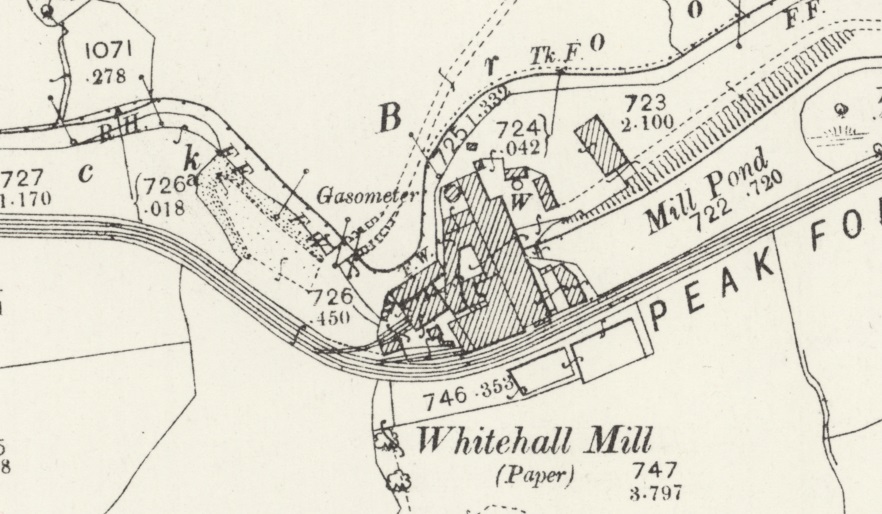
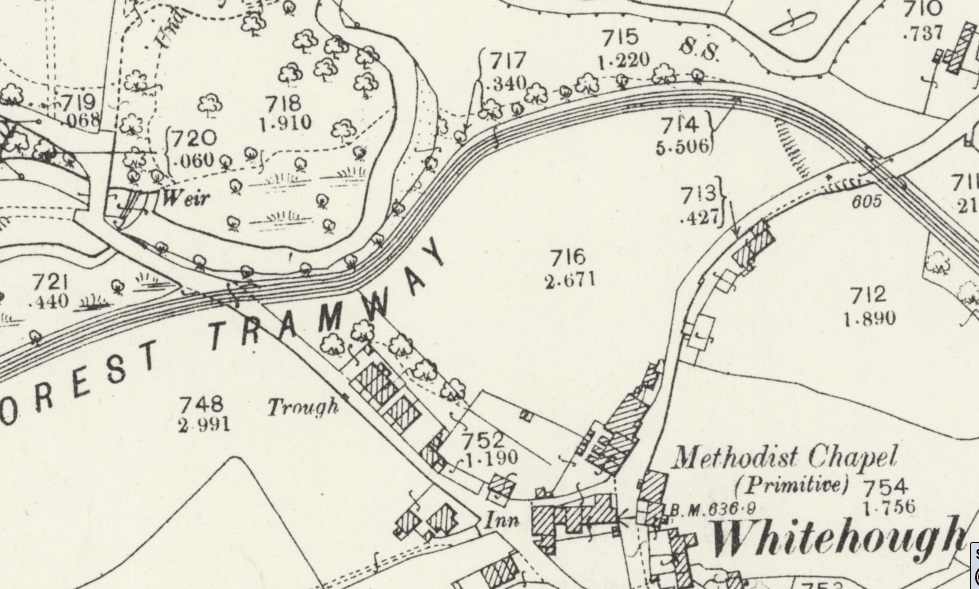
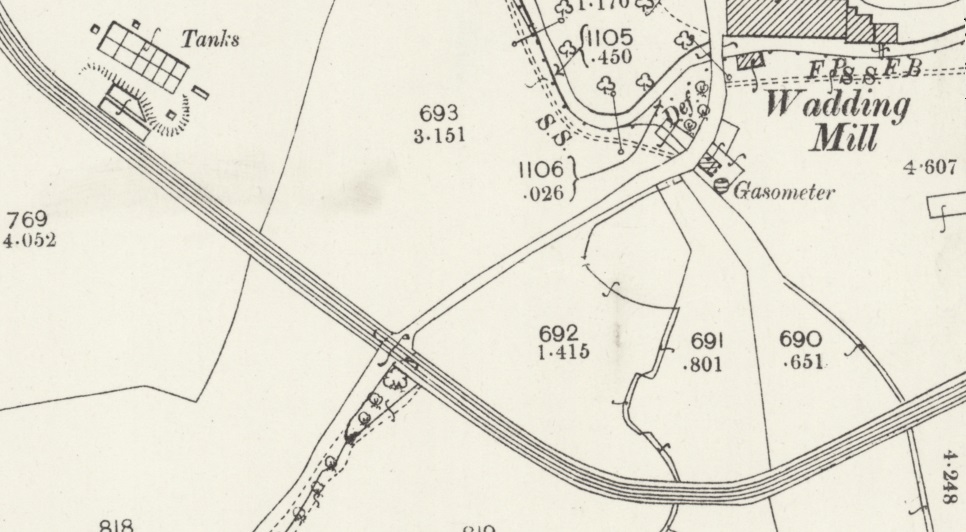
Further along the line, it deviated South away from Black Brook so as to pass to the South side of Whitehall Mill.


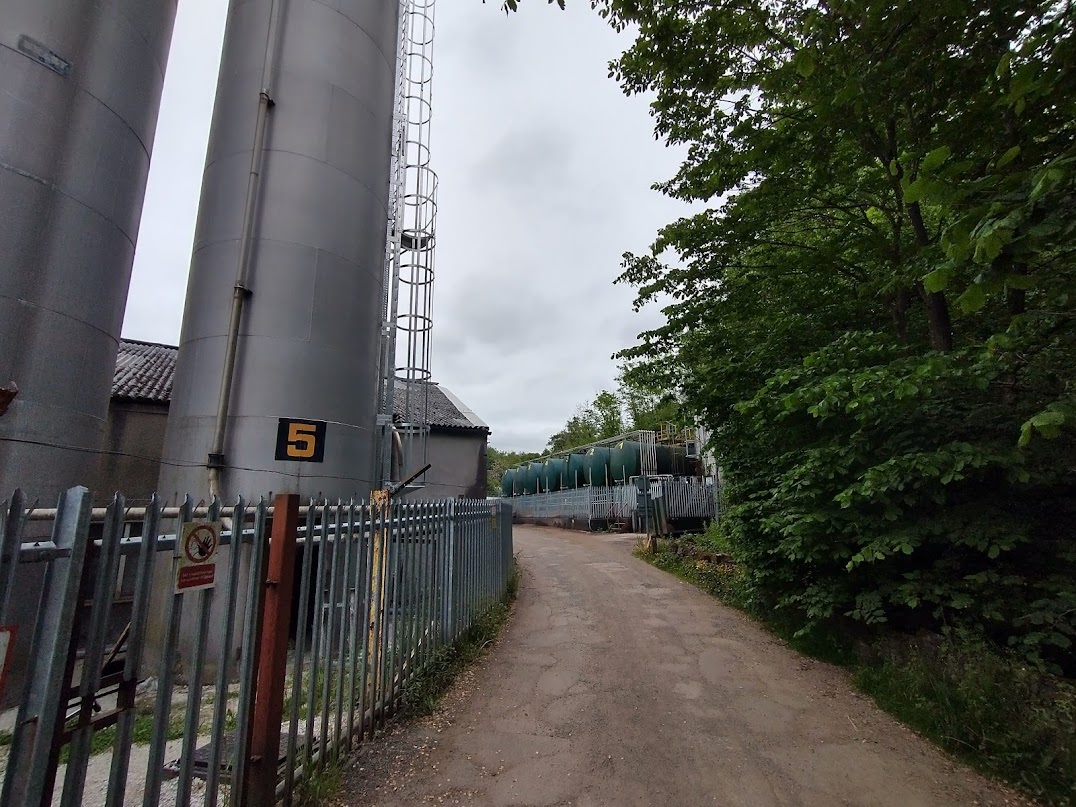

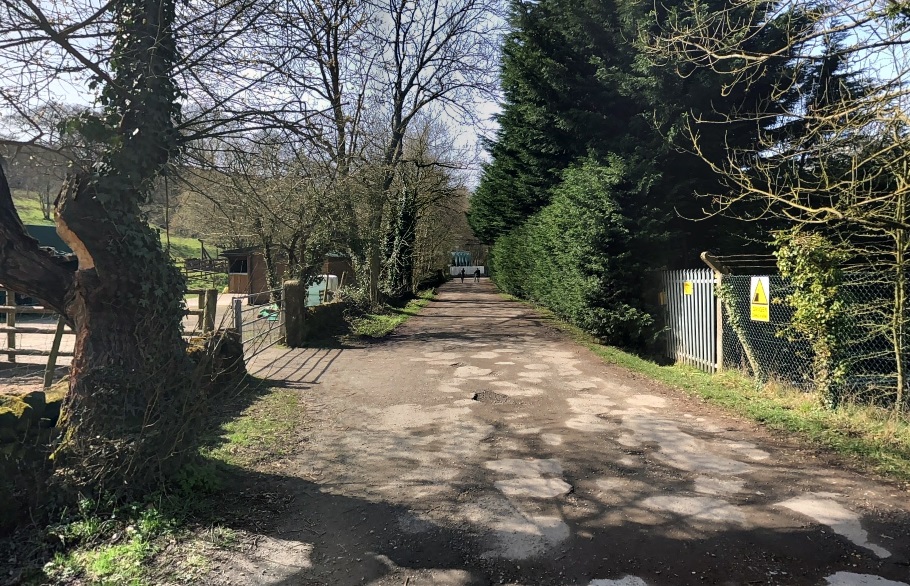
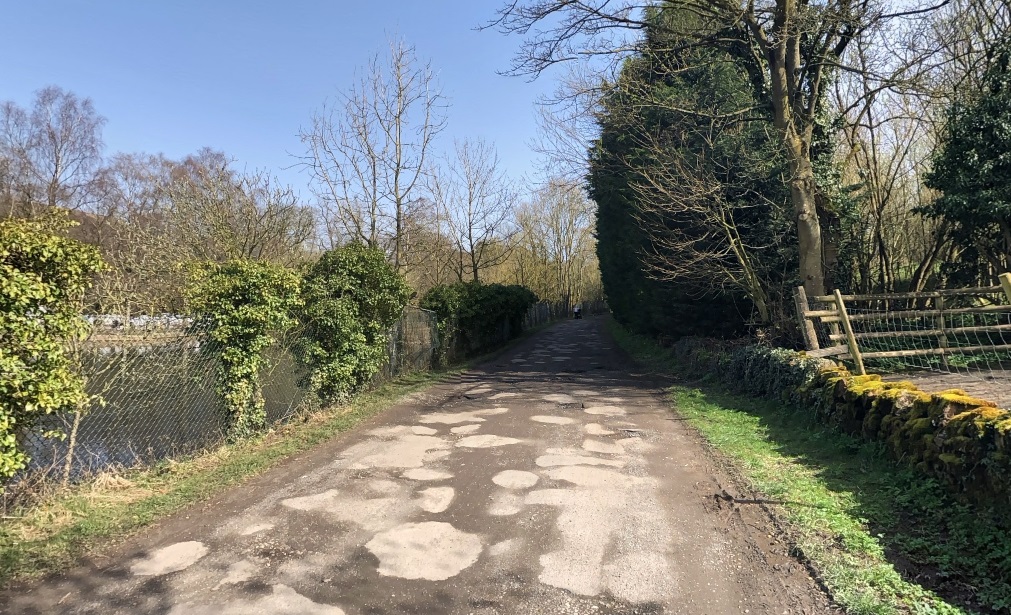


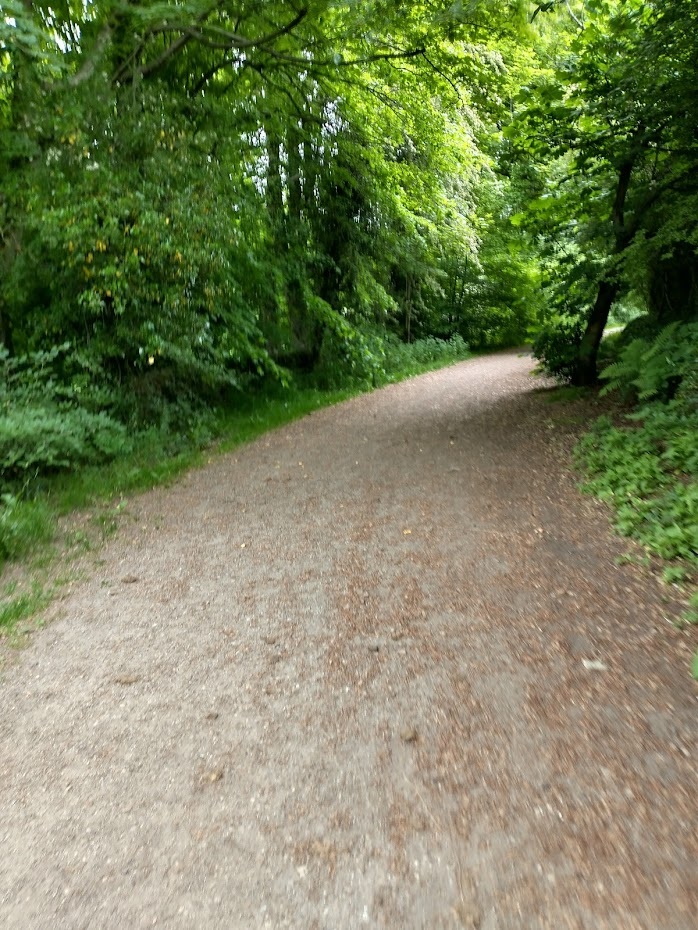


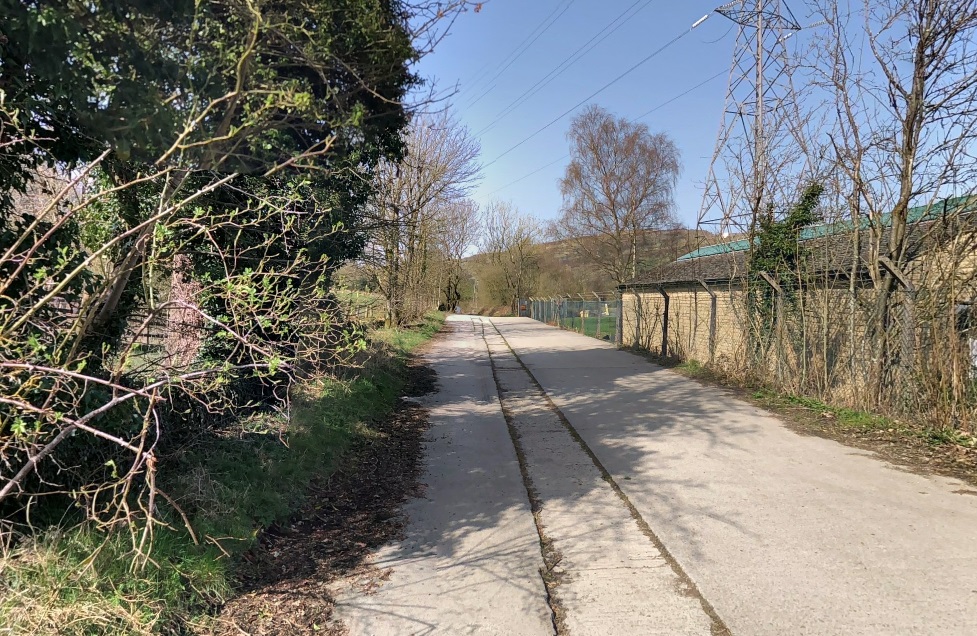
Along this length of the tramway the formation of the old tramway is exposed with some of the old stone blocks which secured the tramways rails in position visible. The next sequence of photographs show these blocks.


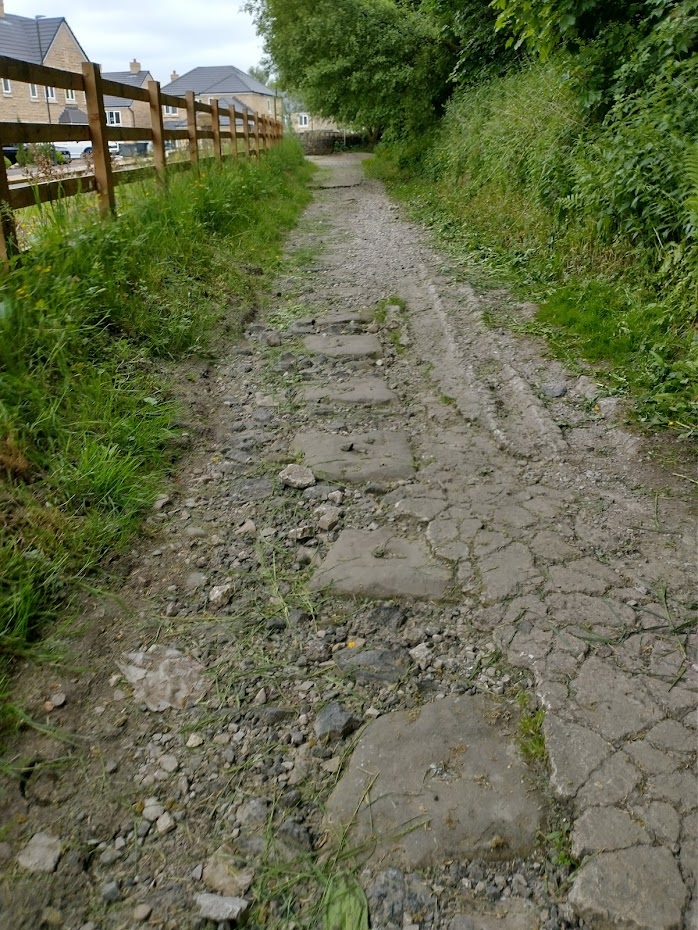


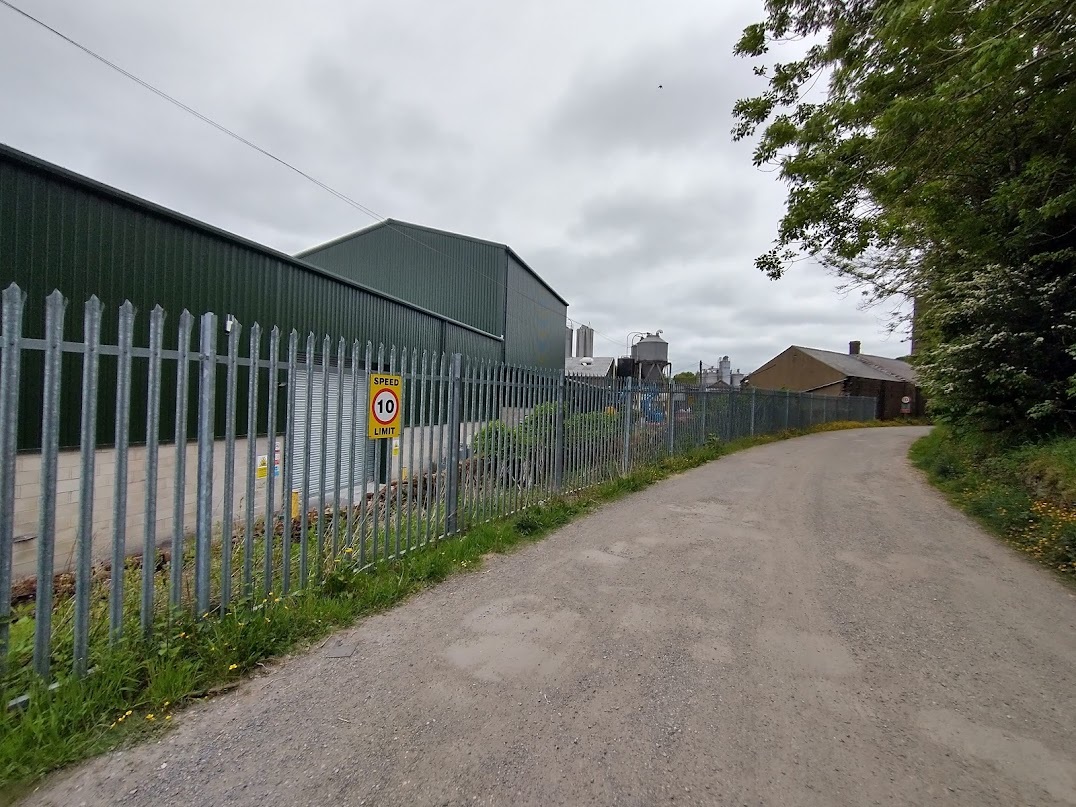
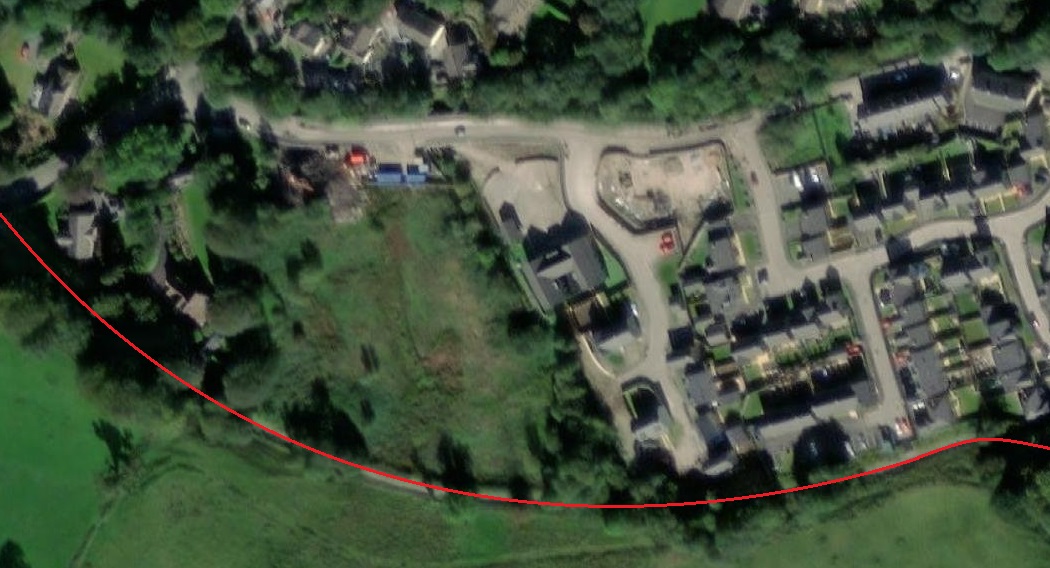
The estate of new housing visible in these pictures is built on the site of Forge Mill. An information board provides details, although the protective Perspex cover to the board has begun to fog over the years.

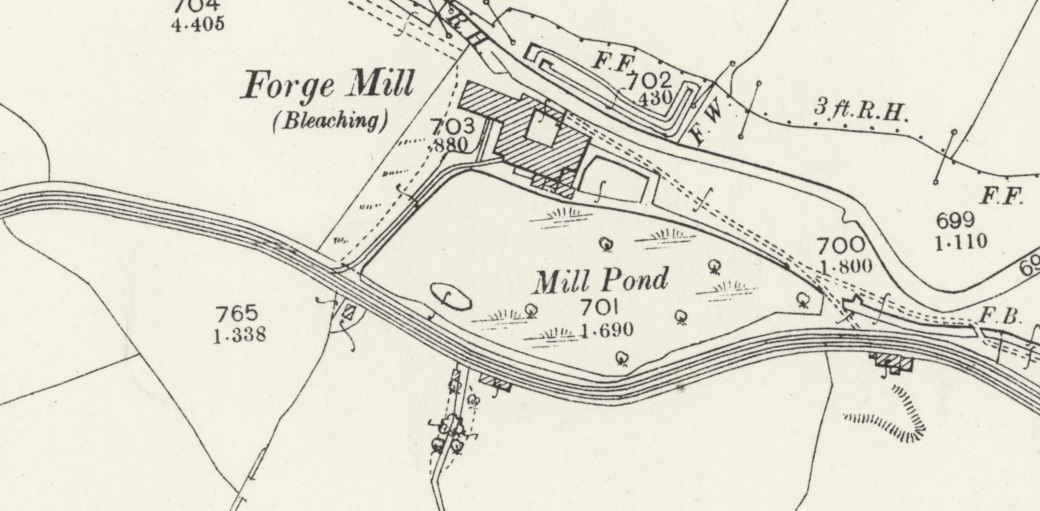

Forge Mill has seen a variety of different uses over the years. The Derbyshire Historic Environment Record list these as:
BLEACH WORKS (Post Medieval – 1540 AD to 1900 AD)
MILL POND (Post Medieval – 1540 AD to 1900 AD)
WEIR (Post Medieval – 1540 AD to 1900 AD)
PAPER MILL (Post Medieval – 1540 AD to 1900 AD)
RAILWAY SIDING (Georgian to Victorian – 1800 AD? to 1900 AD) [25]
Information about the site was provided as part of the planning application for the new housing estate on the site of the Works . The document is available on High Peak Council’s website. [26] It confirms that the Forge Mill site was, before redevelopment, known as the Dorma Works. “The site was first developed in the early 1800’s as
a paper mill. By the 1900’s the site changed to the production of textiles, a dye and bleach works. The site was sold in the early 20th century to Dorma who produced bed linen and cotton prints.” [26] After the site was purchased in 2005 it remained unoccupied and was largely demolished in 2010.
A siding was provided to link the mill to the tramway. This can be seen on the OS map above.

This is a convenient point to finish the first part of our journey along the Peak Forest Tramway. There is, of course, much more to come, but this will need to wait for a future article.
Just to round off details of the old tramway’s history, we return first to Peter Clowes’ article in the Railway Magazine and then to other sources ….
The Gradual Demise of the Tramway
“Fifty years after the line was opened, the owners leased the Peak Forest and Macclesfield Canals – and, of course, the tramway – in perpetuity to the Sheffield, Ashton-under Lyne & Manchester Railway. A Parliamentary Act of 1846 provided for an annuity of £9,325 to be paid to the Peak Forest Canal Company. The railway later became part of the Manchester, Sheffield & Lincolnshire Railway, and in 1883 the canals and tramway were transferred completely to the new owners. The old canal company was dissolved. The Manchester, Sheffield & Lincolnshire Railway became the Great Central Railway in 1897 and was absorbed into the London & North Eastern Railway in 1923.” [1]
A 1925 Act of Parliament led to the closure of both the Peak Forest Tramway and the canal basin at Bugsworth. Clause 54 of Act 15 & 16 George V cap 52, 31st July 1925 was entitled ‘Abandonment of Peak Forest Tramway’. The Act was to empower the London and North Eastern Railway to construct new railways, widening others and to acquire land. It extended the time for the completion of certain works and it permitted the compulsory purchase of certain lands. Clause 54 stated: “The Company may abandon and discontinue their Peak Forest Tramway extending from Chinley to Dove Holes and may hold, sell or dispose of, or apply to the purposes of their undertaking the site and soil of any part of the said tramway so abandoned and discontinued.” [6]
After closure in the mid-1920s, records “made at the Marple Toll Office show that between 17th April 1928 and 12th February 1931 there were 30 deliveries of scrap iron from Bugsworth Basin to Prince’s Dock on the Ashton Canal at Guide Bridge. The total quantity of scrap was 523¼ tons, which averaged 17½ tons per boatload. …. At Prince’s Dock the scrap was transhipped onto the railway and from there it was taken to Sheffield for subsequent melting down. The scrap merchant who dismantled the tramway was T W Ward Ltd of Sheffield and it was melted down by Edgar Allen & Co Ltd, steel manufacturers of Sheffield.” [6]
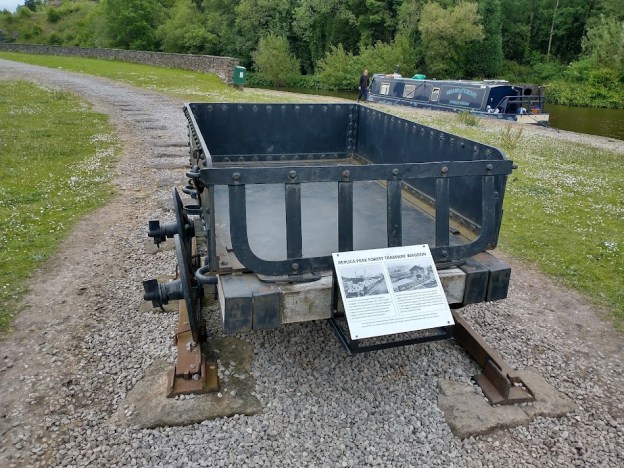
As we have seen above, it was not until 1968 that work really began on recovering the industrial archaeology of the site and bringing the basin and canal back into navigable use. [9] The BBHT are proud of the replica wagon that they have relatively recently completed. The chassis of which “has been produced by members using traditional techniques, utilising timber cut from redundant oak lock gate balance beams, courtesy of the Canal & River Trust. The body steelwork has been produced by modern laser cutting, again from drawings by one of our volunteers. We have assembled this “kit” and mounted it onto the chassis.” [9] The replica wagon is now on display on the peninsula on the South side of the lower basin arm.
Further Reading
There is some excellent coverage of the Tramway and Bugsworth Basin available both online and in print form. This material includes:
- Grahame Boyes and Brian Lamb; ‘The Peak Forest Canal and Railway; an Engineering and Business History’; The Railway & Canal Historical Society, 2012, (ISBN 948 0 901461 59 9). £30.00
- The Industrial Archaeology of the Peak Forest Tramway; http://archive.bugsworthbasin.org/pages/tram.htm
References
- Peter Clowes; The Peak Forest Limestone Tramway; in The Railway Magazine, Volume 109, September 1963, p611-617. This article can be accessed via a subscription to The Railway Magazine archives which is available as an add-on to a regular subscription to the magazine.
- https://en.wikipedia.org/wiki/Peak_Forest_Tramway, accessed on 3rd June 2021.
- http://www.pittdixon.go-plus.net/quarries-gritstone/quarries-gritstone.htm, accessed on 3rd June 2021.
- https://en.wikipedia.org/wiki/Chapel_Milton, accessed on 3rd June 2021.
- https://en.wikipedia.org/wiki/Bugsworth_Basin, accessed on 3rd June 2021.
- http://www.pittdixon.go-plus.net/pft/$pft.htm, accessed on 3rd June 2021.
- https://maps.nls.uk/geo/explore/#zoom=17&lat=53.33580&lon=-1.96833&layers=168&b=1, accessed on 3rd June 2021.
- https://maps.nls.uk/geo/explore/#zoom=17&lat=53.33580&lon=-1.96833&layers=170&b=1, accessed on 3rd June 2021. This is an extract from the ESRI satellite imagery which forms the base layer over which various NLS OS Maps are overlaid.
- https://bugsworthbasin.org, accessed on 3rd June 2021.
- https://bugsworthbasin.org/the-basin, accessed on 3rd June 2021.
- https://maps.nls.uk/geo/explore/#zoom=17&lat=53.33559&lon=-1.95887&layers=168&b=1, accessed on 3rd June 2021.
- https://youtu.be/g91uwioVV4o, accessed on 3rd June 2021.
- https://narrowboatworld.com/7254-memories-of-bugsworth-basin, accessed on 3rd June 2021.
- https://www.countryimagesmagazine.co.uk/featured/bugsworth-canal-basin, accessed on 3rd June 2021.
- https://commons.wikimedia.org/wiki/File:Bugsworth_Basin_4.jpg, 3rd June 2021.
- https://www.wondersofthepeak.org.uk/facts/wanders-through-the-industrial-peak-bugsworth-basin, accessed on 3rd June 2021.
- https://collections.canalrivertrust.org.uk/themes/the-history-of-bugsworth-basin, accessed on 3rd June 2021.
- Ian Salvage (Publicity Officer) & Ian Edgar MBE (Chair of Bugworth Basin Heritage Trust); http://www.peakandnorthern.org.uk/newsletter/1702/07-peak-forest-tramway.htm, accessed on 3rd June 2021. (NB: the same sketch map can be found in: Peter J Whitehead; The Peak Forest Tramway, High Peak, Derbyshire (including a Walking Guide to the Tramway Trail); http://archive.bugsworthbasin.org/pages/pft.htm)
- http://archive.bugsworthbasin.org/pages/quarries/quarries.htm
- https://www.railmaponline.com/UKIEMap.php, accessed on 16th January 2023.
- https://maps.nls.uk/geo/explore/#zoom=16.8&lat=53.33623&lon=-1.95773&layers=6&b=1, accessed on 16th January 2023.
- https://maps.nls.uk/geo/explore/#zoom=16.8&lat=53.33602&lon=-1.95500&layers=6&b=1, accessed on 16th January 2023.
- https://maps.nls.uk/geo/explore/#zoom=18.0&lat=53.33658&lon=-1.94378&layers=168&b=1, accessed on 28th February 2023.
- https://maps.nls.uk/geo/explore/#zoom=18.0&lat=53.33604&lon=-1.93857&layers=168&b=1, accessed on 18th February 2023.
- https://her.derbyshire.gov.uk/Monument/MDR485, accessed on 28th February 2023.
- http://planning.highpeak.gov.uk/portal/servlets/AttachmentShowServlet?ImageName=145422, accessed on 28th February 2023.
- https://maps.nls.uk/geo/explore/#zoom=18.0&lat=53.33561&lon=-1.93349&layers=168&b=1, accessed on 28th February 2023.
- https://maps.nls.uk/geo/explore/#zoom=18.0&lat=53.33449&lon=-1.92832&layers=168&b=1, accessed on 28th February 2023.
- https://maps.nls.uk/geo/explore/#zoom=18.0&lat=53.33267&lon=-1.92589&layers=168&b=1, accessed on 28th February 2023.

Fascinating! I must pay a visit, spend a few days in the area. So much to see.
Yes, Tony. A great location, and a walk the other way takes you along the Peak Forest Canal towards Ashton-under-Lyne.
Wonderful, very detailed information. Thanks
You are welcome!🙂
Dear Roger, I was glad to stumble across your Peak Forest Tramway article today, as I grew up in New Mills and Chinley. Look forward to part 2. I used to buy things at David Ripley’s model shop in Chapel! I also resonate very closely with your faith position from what I have read of your blog. My interest in googling Peak Forest just now is that I am researching a story that started in Dove Holes Tunnel and ended in New Mills, a tragic double crash and double runaway. You are very welcome to see the almost completed draft if there is an email address to send it to, anywhere.
Blessings to you
Tony
Hi Tony. You are welcome to send me something. I have moved away from the Northwest so it might be a while before I write anything further about the Peak Forest Tramway. Sadly, I cannot promise to read what you send me but if you want to do so my email address is rogerfarnworth@aol.com