[NB: As far as I am aware permission has been granted for the use of all the photographs below. This is particularly the case of the site rintetsu.net which I have relied heavily on in producing this post. I have sought, where-ever possible to attribute all sources and have no intention of contravening copyright. Should there be an issue with any of the images below, if you are the copyright holder, please contact me. Please accept my apologies in advance if this has occurred.]
 This sketch map shows the location of the JR Chuo Line station as a white rectangle. The Kiso Forest Ibarahara (Yabuhara) Forestry Office & yard extended south of the red dot labelled 木曽森林管理署. [1] The darker black line shows the short branch from the JR Station to the transshipment area. The thick green lines show the 762mm gauge lines.
 Yabuhara JR Chuo Line Station. [2]
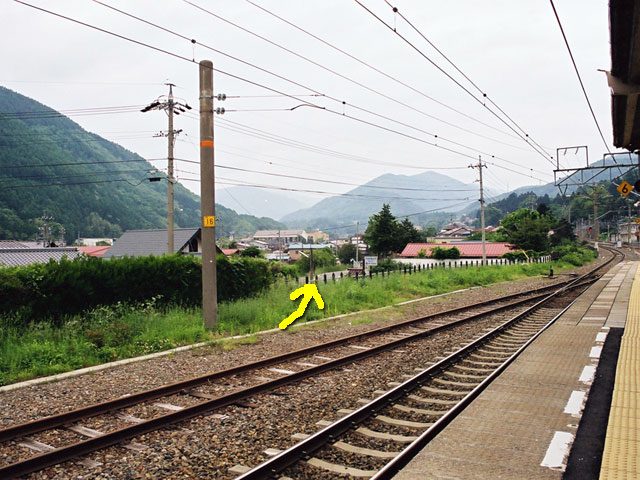 The yellow arrow shows the route of the short branch to the logging yard. The picture was taken in 1999. [2]
 Looking back at the station along the approximate line of the short branch in 2014.
 The approximate line of the branch running into what was the logging yard.
 A view across the logging yard showing the rote of the branch from the station in the top-right.
 The sketch plan above shows the arrangement of tracks in the transshipment yard. The yellow lines are those connecting with the JR Chuo Line and are at the approximate position of the red arrow on the image immediately above. The green lines are the 762mm Lines. North is to the right of the sketch. [2]
The adjacent annotated satellite image from Google Maps shows how the area of the sidings has been developed over the years.
The JR transshipment sidngs are shown in 1964 in the image below. Timber is shipped from here all over Japan. The JR transshipment sidings. [3]
  The same transshipment sidings. [4]
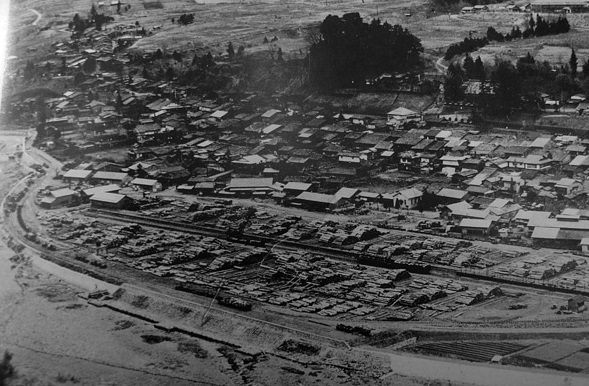 An overview of the location showing the JR sidings in the centre of the image and the 762mm lines at the bottom of the picture and above the JR lines. The village is behind. This picture also comes from 1964. [5]
 This modern image from Google Maps shows the line of the old 762mm gauge railway in 2014. Its location is about two-thirds up the monochrome image immediately above.
 Less than a kilometre further north the old railway route leave the modern prefectural highway No. 26 when it crosses the river. The old railway remains of the East bank of the river. It appears that the old line was on the West side of highway No. 26 and crossed the road to take the route shown above. The location is marked on the sketch map below by the first indicator arrow above the red dot which marks the southern terminus of the line. [6]
 A little further north the main line (Green) continues to follow the river while a branch-line (Light Green) heads off the the Northeast. The point is marked by the second indicator arrow above and is shown in 2014 below.
 The route continues North along the East side of the Kiso River before running through Ogiso (小木曽), the village in the picture below.
 In Ogiso another branch-line departed from the main logging route. It can be seen branching off the the West across the river close to the top of the sketch map above.
 The Sasagawa Line left the main line in Ogiso. Currently it is the site of a sawmill. [7]
From Ogiso the line continued on the East bank of the river eventually reaching the modern-day Miso Dam. The Miso Dam is shown at the top of this sketch map. For most of the journey to the dam the railway followed the East bank of the Miso River, only crossing the course of the river close to the location of the modern Dam. [8]
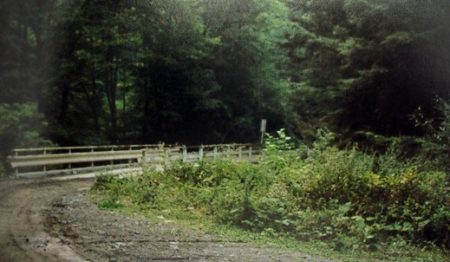
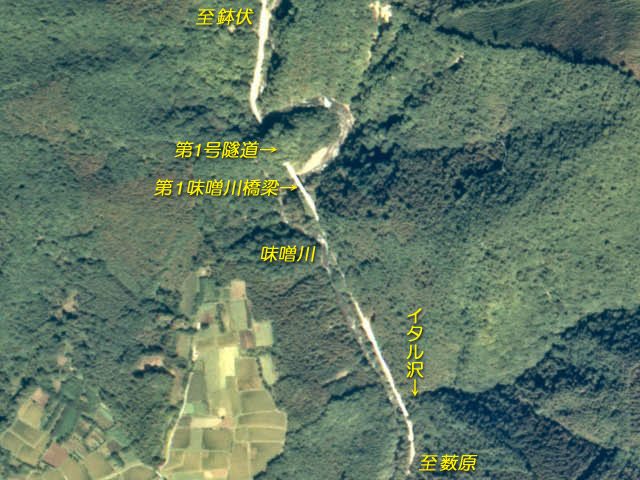 Prior to the construction of the Miso Dam the railway crossed the river as shown here and then passed through a short tunnel before continuing up the West side of the river [9]
 The forest road which replaced the railway before the construction of the Dam. The bridge was built after the railway closed, the tunnel was built for the railway. [9]
 The same location during construction of the Dam. The bridge span has been removed but the tunnel portal remains (Construction record photos). [9]
 The railway followed the valley floor as shown above. There is little to see today other than the water of the lake. [10]
The adjacent image was taken as a record photograph before construction of the Dam. The railway route at this point was a long straight section. The longest in the Kiso Forest network. [11]
This next picture is taken at the site of the Takase stop. The caption indicated that there were 4 or 5 tracks at the station. This picture was taken before the flooding of the valley when the Miso Dam was finished. [11]
The line continues northward and branches again towards the top of the modern lake as shown on the sketch plan below. [12]
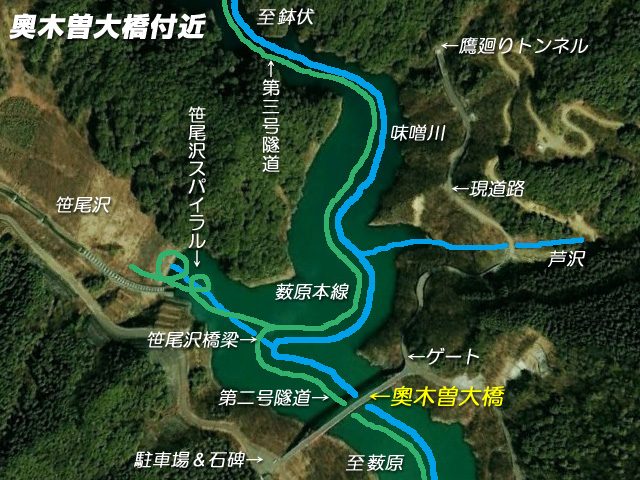 The route of the two lines at the junction is highlighted on the satellite image above. The bridge at the bottom of the satellite image is shown in the picture below. [13]
 Okinoiso Bridge. [13]
 The confluence of the two rivers before the formation of the reservoir. This image was also taken as a record photograph before construction of the Dam. The river to the left is the Sasaozawa. [13]
The railway route up the valley of the Sasaozawa was constructed to a lower standard than the main line as it was designated as a working track. The satellite image above shows a spiral track arrangement to allow the logging line to gain the necessary height to continue up the valley. That spiral is shown below.
 This ramshackle spiral was eventually removed at the end of the Second World War when the Sasaozawa working track was abandonned. [13]
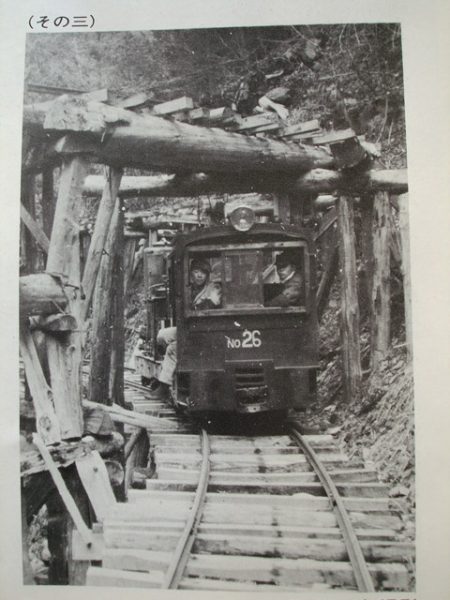
A full survey of the length of the Sasaozawa Line has not been attempted but rintetsu.net carries a few photographs of the line which were taken in 1929 and originally included in a Japanese language book entitled “Ogiso Forest Railway” which was issued by Yabohara Forestry.
The first two of these show Diesel Locomotive No 26 negotiating the spiral. The pictures were taken at different times or on different dates as the train formation is different in each of the pictures. [13]
The third of these images appears immediately below and shows the line further up the Sasaozawa River. The construction techniques are clearly shown. The railway has a temporary look to it and would almost inevitably have been at risk in the event of the river being in spate. [13]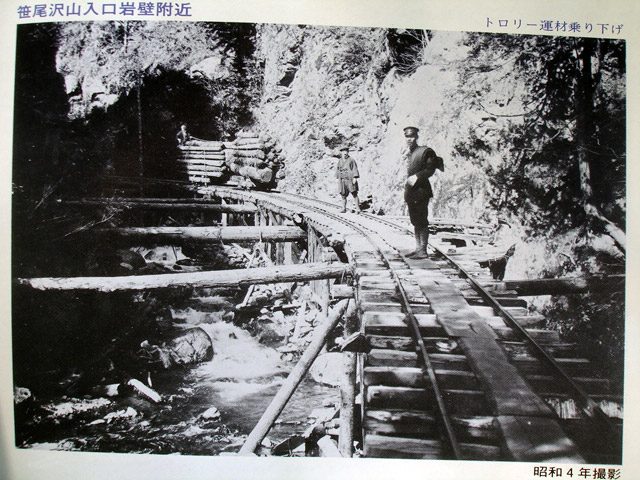
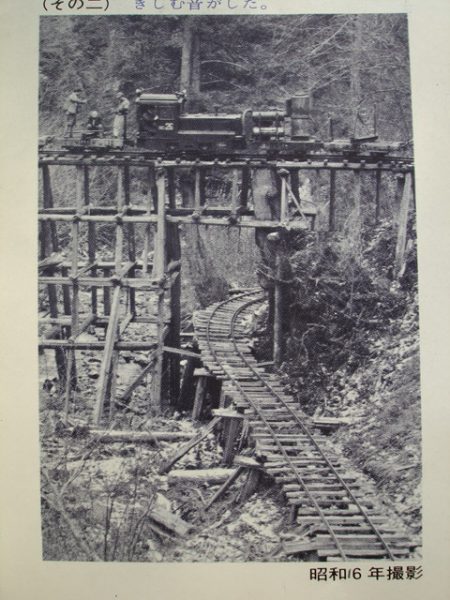
 This final photograph in the sequence from 1929 shows as the caption says: Trolley riding down gold shoe curve (say horseshoe shape). both the last two photos illustrate the fact that the line use gravity as a tractive force. Pairs of trolleys travelled down the line in the hands of a single brake-man. [13]
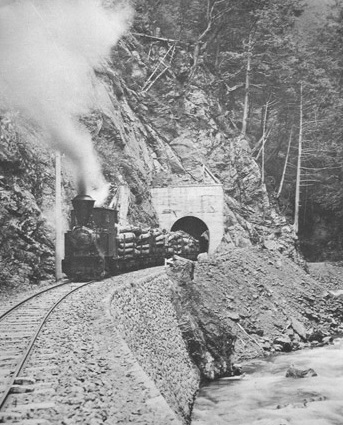

Returning to the main line, the adjacent image is one of relatively few which shoe one of the Baldwin steam locomotives at work. The location is north of the confluence between the two rivers. The tunnel is now under water, although at times of low water it is said to be possible to negotiate the tunnel in a canoe. [13]
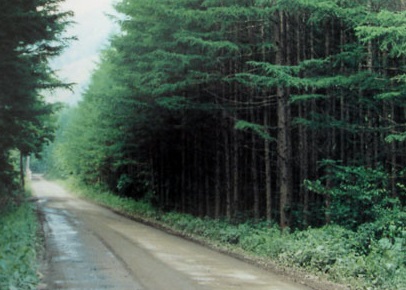
The next picture shows the forest track that replaced the railway. It is another picture taken for record purposes before the valley was flooded. [13]
Beyond the end of the modern reservoir the landscape has been altered as regrading has been undertaken. The old railway formation is occasionally visible as below. [13] The old railway track-bed is on the right in this image. [13]
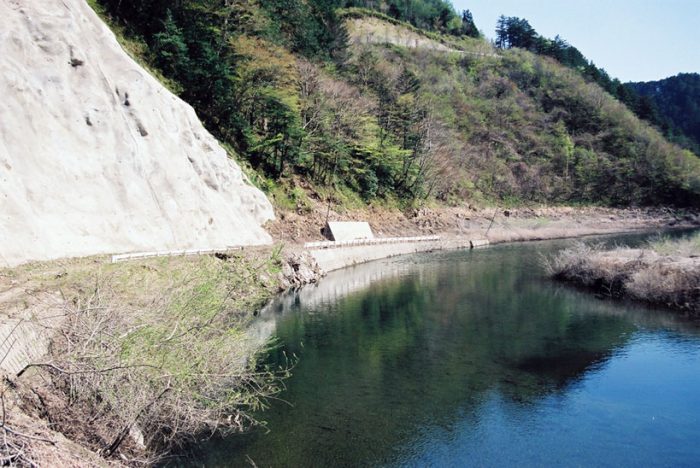 This image is taken looking back down the old railway line. [13]
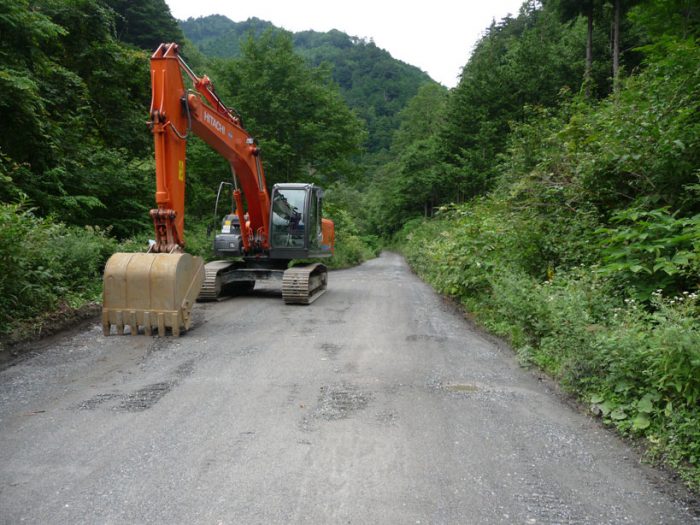 This is the location of what was once a two track station and passing loop – Senmizawa Station. [13]
 The old railway continues running northeast along the Miso River Valley following the path of what is now a gravel forest road. There is little evidence left of the old railway as forest road bridges have replaced the old railway structures. [14]
The line travelled on through Funagawa (a station on a curve with a passing loop). The location is shown below in May 2014. [15]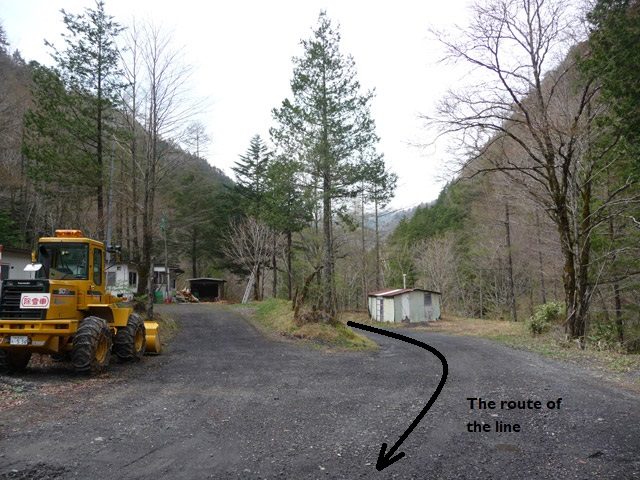 Funagawa Station (舟ヶ沢). [15]
 Funagawa Station (舟ヶ沢) is the lower red dot on the plan the next significant point is where a branch-line heads off to the East at Sawa Bridge of the Pond (池の沢橋梁). [16]
 The branch-line (the pond line, 池の沢) was built to the same standard as the main line because it was heavily used. [17]
Some distance further along the line comes another branch-line. It appears at the top of the sketch map above at the location of Ogasawa bridge (尾頭沢橋梁). The line from the south enters this plan from the right. The branch-line follows the Ogasawa River. The station is named after the river. [18]
 The Ogasawa junction with a train coming off the branch line. The branch is clearly a ‘work line’ as the construction standard is lower and it runs on timber piers. The photograph comes from “Ogiso Forest Railway” issued by Yubarahara Forestry Bureau. Note that this train is also pulled by one of the Baldwin Steam Locomotives. [18]
 Ogasawa Station in 2008. [18]
 Ogasawa Station in use. It included a logging plant of which the offices are behind the locomotive. The photograph comes from “Ogiso Forest Railway” issued by Yubarahara Forestry Bureau. [18]
 The line continues up the valley. The Ogasawa Station is the lower red dot above. Hakubaki Station is the red dot at the top of the map. [19]
At times the old line does not follow the forestry track. The 7th Misogawa Bridge (第7味噌川橋梁) is one such location. As the adjacent photograph shows, one of the abutments of the old railway is still visible. [20]
This applies for the 8th Misogawa bridge (第8味噌川橋梁), below. The track-bed between these bridges is indistinct and follows the opposite bank of the river to the forest road. [20] The 7th Misogawa Bridge (第7味噌川橋梁) and the 8th Misogawa bridge (第8味噌川橋梁) are shown above. There are copious photos available on the Japanese language website (rintetsu.net) which can be found by following the link in the references below. [20]
 Hakubaki station (鉢伏停車場) [20]
 The rail route continues to completion on the sketch map above. [21]
 Upper Zokotsuzawa Bridge No. 1. The forest road sits alongside the abutment and piers of the old railway bridge. for many of the structures up the remainder of the valley the picture is the same, a newer forest road bridge alongside old abutments. (上ゾコツ沢橋梁第1号) [22]
 The sketch map above shows two hairpin bends on the line. This if the first, the photo was taken in 2014 looking north. [22]
 The hairpin bends. [23]
 The second hairpin bend. [23] Beyond this point the route of the old line become increasing indistinct but it can be followed on the Japanese language website rintetsu.net. [24]
Just occasionally highlights stand out along the route.
 These two pictures show a typical bridge on the working line. The construction is entirely from locally sourced timber. [25]
References
- http://rintetsu.net/nagano_05/yabuhara01/yabumap_1.html, accessed on 2nd March 2019.
- http://rintetsu.net/nagano_05/yabuhara01/yabuhara_001.html to http://rintetsu.net/nagano_05/yabuhara01/yabuhara_004.html, accessed on 2nd March 2019.
- Kisei Village History; cf. http://rintetsu.net/nagano_05/yabuhara01/yabuhara_003.html, accessed on 2nd March 2019.
- Kisei Village History; cf. http://rintetsu.net/nagano_05/yabuhara01/yabuhara_004.html, accessed on 2nd March 2019.
- History of Kisan Village 100 Years; cf. http://rintetsu.net/nagano_05/yabuhara01/yabuhara_004.html, accessed on 2nd March 2019.
- http://rintetsu.net/nagano_05/yabuhara02/yabumap_2.html, accessed on 3rd March 2019.
- http://rintetsu.net/nagano_05/yabuhara02/yabuhara_008.html, accessed on 3rd March 2019.
- http://rintetsu.net/nagano_05/yabuhara03/yabumap_3.html, accessed on 3rd March 2019.
- http://rintetsu.net/nagano_05/yabuhara03/yabuhara_009.html to http://rintetsu.net/nagano_05/yabuhara03/yabuhara_013.html, accessed on 3rd March 2019.
- http://rintetsu.net/nagano_05/yabuhara04/yabumap_4.html, accessed on 3rd March 2019.
- http://rintetsu.net/nagano_05/yabuhara04/yabuhara_014.html to http://rintetsu.net/nagano_05/yabuhara04/yabuhara_019.html, accessed on 3rd March 2019
- http://rintetsu.net/nagano_05/yabuhara05/yabumap_5.html, accessed on 3rd March 2019.
- http://rintetsu.net/nagano_05/yabuhara05/yabuhara_022.html to http://rintetsu.net/nagano_05/yabuhara05/yabuhara_032.html, accessed on 3rd March 2019.
- http://rintetsu.net/nagano_05/yabuhara06/yabumap_6.html, accessed on 3rd March 2019.
- http://rintetsu.net/nagano_05/yabuhara06/yabuhara_033.html to http://rintetsu.net/nagano_05/yabuhara06/yabuhara_038.html, accessed on 3rd March 2019.
- http://rintetsu.net/nagano_05/yabuhara07/yabumap_7.html, accessed on 3rd March 2019.
- http://rintetsu.net/nagano_05/yabuhara07/yabuhara_039.html to http://rintetsu.net/nagano_05/yabuhara07/yabuhara_041.html, accessed on 3rd March 2019.
- http://rintetsu.net/nagano_05/yabuhara07/yabuhara_046.html to http://rintetsu.net/nagano_05/yabuhara07/yabuhara_051.html, accessed on 4th March 2019.
- http://rintetsu.net/nagano_05/yabuhara08/yabumap_8.html, accessed on 4th March 2019.
- http://rintetsu.net/nagano_05/yabuhara08/yabuhara_052.html to http://rintetsu.net/nagano_05/yabuhara08/yabuhara_063.html, accessed on 4th March 2019.
- http://rintetsu.net/nagano_05/yabuhara09/yabumap_9.html, accessed on 4th March 2019.
- http://rintetsu.net/nagano_05/yabuhara09/yabuhara2_hz01.html to http://rintetsu.net/nagano_05/yabuhara09/yabuhara2_hz08.html, accessed on 4th March2019.
- http://rintetsu.net/nagano_05/yabuhara11/yabuhara2_hz17.html to http://rintetsu.net/nagano_05/yabuhara11/yabuhara2_hz18.html, accessed on 4th March 2019.
- http://rintetsu.net/nagano_05/yabuhara11/yabuhara2_hz19.html to http://rintetsu.net/nagano_05/yabuhara11/yabuhara2_hz20.html and http://rintetsu.net/nagano_05/yabuhara13/yabuhara2_25.html to http://rintetsu.net/nagano_05/yabuhara13/yabuhara2_39.html , accessed on 4th March 2019.
- http://uguigawa.blog42.fc2.com/blog-entry-448.html, accessed on 4th March 2019.

Great stuff! We’re visiting Kiso this year as in 2019, we spent week exploring the 2’6″ railways on Yakushima Island. To date, I have published three short videos on Yakshima’s forest railways, one of which is still operational: https://www.youtube.com/user/ozsteam
Thank you for the comment and for the link. I very much enjoyed watching the video. Thank you.